Undersökning av spill och läckage vid hantering av antibiotika ...
Upload
khangminh22Category
view
7download
0
75” (189cm) DIGITAL SIGNAGE DISPLAY
ENGLISH
USER MANUAL
CTL-75DS4KV

English - 1 -
ContentsImportant Safety Information ..................................2General View ..........................................................6Control Buttons on the Display ...............................7Connecting the IR Receiver....................................8Turning the Display On/Off .....................................8Remote Control ......................................................9First Time Installation............................................10Android Launcher .................................................10Using Main Display Menu .....................................14Vsign Lite ..............................................................15Media Playback via USB Input .............................16CEC and CEC RC Passthrough ...........................18Usage of the Start URL ........................................18Settings Menu Content .........................................19Connectivity ..........................................................26Apps .....................................................................28Internet Browser ...................................................29OSD Rotation Support ..........................................30HDMI Out ..............................................................30Real Time Clock (RTC) .........................................30Controlling With An External PC ...........................30RS232/LAN Command Tables ..............................32RS232 HEX Commands .......................................55Maximum Pixel Rates ...........................................59Input Matrix ...........................................................59Supported Media Formats from USB ...................60System Features ..................................................62Federal Communication Commission Interference Statement ............................................................62Accessories Included............................................63Information for Users on Disposal of Old Equipment and Batteries ........................................................63License Notification ..............................................63Vesa Wall Mount Measurements ..........................64Installation On An Indented Wall ..........................64

English - 2 -
• Please place the product in a position that electric cables cannot be affected by the operations on the product.
• Follow all warnings and instructions marked on the product.
• Follow the on screen instructions for operating the related features.
• To prevent the risk of fire or electric shock, please do not overuse the plugs and extension cords. Please do not open the lid of the monitor to service yourself. If the required service needs are not met by an authorized service, dangerous voltage and other risks may occur.
• If you will not use the product for a long period of time, unplug the power cord from the mains.
• Put the product on a well-ventilated place and prevent from bright light, overheat and damp.
• The product should be kept in 0 C° - 40 C°. Otherwise, the appliance may be damaged permanently.
• Plug the appliance to a grounded outlet. Always use the grounded power cord supplied with your product. Manufacturer is not responsible for any damage caused unearthed usage.
• The socket-outlet shall be installed near the equipment and shall be easily accessible.
• Do not stay in contact with the parts of the product that become hot for long periods of time. Doing so may result in low-temperature burns.
• The LCD panel used in this product is made of glass. Therefore, it can break when the product is dropped or applied with impact. Be careful not to be injured by broken glass pieces in case the LCD panel breaks.
• Usage of the monitor must not be accompanied by fatal risks or dangers that, could lead directly to death, personal injury, severe physical damage or other loss, including nuclear reaction control in nuclear facility, medical life support system, and missile launch control in a weapon system.
• Do not expose the product to direct sunlight or do not place open flames such as lit candles on the top of or near the product.
• Do not place any heat sources such as electric heaters, radiators, etc. near the product.
• In order to prevent a potential electrical shock, in extreme weather (storms, lightning) disconnect the product from the mains.
• Do not touch the controls other than those described in the operating instructions. Improper adjustment of controls not described in the instructions can cause damage, which often requires extensive adjustment work by a qualified technician.
Important Safety Information
CAUTION
RISK OF ELECTRIC SHOCKDO NOT OPEN
CAUTION: TO REDUCE THE RISK OF ELECTRIC SHOCK DO NOT REMOVE COVER (OR BACK). NO USER-SERVICEABLE PARTS INSIDE. REFER SERVICING TO QUALIFIED SERVICE PERSONNEL.
OPS USAGE WARNING: Do not plug the OPS unit while the Display is turned on. Turn on the OPS unit using the remote control or the buttons on the Display, do not turn it on using the buttons on the device itself.
Please read these instructions fully and carefully before use and keep for future reference
WARNING: This device is not intended for use by persons (including children) without physical, sensory or mental capabilities, or lack of experience and/or knowledge unless they have been given supervision or instruction concerning use of the device by a person responsible for their safety.• This product is for indoor use only.• Use this product at an altitude of less than 2000
meters above the sea level and in dry locations and in regions with moderate or tropical climates.
• Please keep this manual for further use.• Unplug your product before starting to clean. Do
not clean the product when it is on. Do not use liquid or aerosol cleaners. Use a damp cloth for cleaning. If that does not help, please use LCD display cleansers. Do not apply the cleaner directly on the product.
• To prevent breakdown, do not use non-advised accessories.
• Please do not place your product near wash basins, sinks, water pans, pools etc.
• Do not expose the product to dripping or splashing of liquids and do not place objects filled with liquids, such as vases, cups, etc. on or over the product (e.g., on shelves above the unit).
• Please leave at least 5 cm of free space between the product and walls or other furnitures for ventilation purposes.
• That product can only be started by the defined power source on its rating plate. For further information, please contact with your dealer.
• As a safety precaution, a three-wired grounding plug is given with the product. As a safety precaution, please do not make any change on the grounding plug. Always use earthed socket outlet for product.
• Please provide the plug and socket to supply the needed power for appliance.

English - 3 -
• Do not shake the product. Ensure that it stays in a balanced stance on its position.
• Do not throw or drop any object on your product. • Do not interfere on your products screen or any other
surface with a sharp object. • Do not keep your product in a humid environment.• Do not keep your product in an extremely cold
environment. • Do not keep your product in an extremely hot
environment.• Do not place the product on the floor and inclined
surfaces.• To avoid danger of suffocation, keep plastic bags
out of the reach of the babies, children and domestic animals.
Vent holes of the productThe vent holes are designed to provide the product to work constantly and prevent it from overheat. Do not block these openings in anyway. For the same reason, please do not place your product on beds, sofas, carpets and similar surfaces. Never insert an object into the product through vents or openings. High voltage flows in the product, and inserting any objects in the vents or openings of the product may cause electric shock, short circuit of the internal parts and/or fire. For the same reason, do not spill water or liquid on the product.RepairUnless a basic implementation on the product is specified by the producers’ technical department on a document, do not repair your product by yourself. Otherwise, your guarantee may get suspended and you may risk your health or your product. In case of need, consult your authorized service.• When the cable is worn off or harmed.• If the product has been dropped or the cabinet has
been damaged.• If the performance of the product is changed or the
appliance needs to be repaired.• When a liquid was spilled on the product or when
objects have fallen into the product.• When the product has been exposed to rain or water.• When the product does not operate properly as
described in the operating instructions.Replacement partsIn case the product needs replacement parts, make sure that the service person uses replacement parts specified by the manufacturer, or those with the same characteristics and performance as the original parts. Use of unauthorized parts can result in fire, electric shock and/or other danger.
Safety checksUpon completion of service or repair work, request the service technician to perform safety checks to ensure that the product is in proper operating condition.Wall mountingWhen mounting the product on a wall, be sure to install the product according to the method recommended by the manufacturer.• Read the instructions before mounting the product
on the wall.• The wall mount kit is optional. You can obtain from
your local dealer, if not supplied with the product.• Do not install the product on a ceiling or on an
inclined wall.• Use the specified wall mounting screws and other
accessories.• Tighten the wall mounting screws firmly to prevent
the product from fall. Do not over-tighten the screws.Power Cord• The power cord is used to disconnect the product
from the mains and therefore it must remain readily operable. If the product is not disconnected electrically from the mains, the device will still draw power for all situations even if the product is in standby mode or switched off.
• Use only the power cord supplied with the monitor.• Do not damage the power cord nor place heavy
objects on it, stretch it, over bend it or step on it. Also, do not add extension cords. Damage to the cord may result in fire or electric shock.
• When unplugging the appliance, always pull directly on the plug. Do not pull from the cable when unplugging the appliance.
• Do not use the power cord with a power tap. Adding an extension cord may lead to fire as a result of overheating.
• Do not remove or insert the power plug with wet hands. Doing so could result in electric shock.
• Unplug the power cord if it is not used for a long time.• Do not attempt to repair the power cord if it is
broken or malfunctioning. When damaged it must be replaced, this should only be done by qualified personnel.
Especially for child safety• Don’t allow children to climb on or play with the
monitor.• Don’t place the monitor above furniture that can
easily be used as steps.• Remember that children can become excited while
watching a program, especially on a “larger than life” monitor. Care should be taken to place or install the

English - 4 -
Foreseeable misuse and incorrect use• For apparatus intended to be used in vehicles, ships
or aircraft or at altitudes exceeding 2000m above sea level, for outdoor use or in general for the application other than mentioned in user manual additional requirements may be necessary.
CAUTION
Do not leave a static image displayed for pro-longed period of time. If a static image is displayed continuously for a long period of time, that image may cause image sticking on the display. This con-dition is not permanent, but may require a consid-erable amount of operational display time to dissi-pate, depending upon the degree of image stick. 120 minutes of continuous motion display will elim-inate most image sticking effects at normal room temperature (not lower than 10 C).As the nature of the TFT technology, you may see some amount of bright, dark, red, green and blue dots and sparklings on the screen, those do not af-fect the performance of the computer and are not accepted as a defect.
WarningThis is a class A. In a domestic environment this may cause radio interference in which case the user may be required to take adequate measures.
BATTERY SAFETY GUIDELINESUsed correctly, domestic batteries are a safe and dependable source of portable power. Problems can occur if they are misused or abused resulting in leakage or, in extreme cases, fire or explosion.Here are some simple guidelines to safe battery use designed to eliminate any such problems.• Take care to fit your batteries correctly, observing the
plus and minus marks on the battery and appliance. Incorrect fitting can cause leakage or, in extreme cases, fire or even an explosion.
• Replace the whole set of batteries at one time, taking care not to mix old and new batteries or batteries of different types, since this can result in leakage or, in extreme cases, fire or even an explosion.
• Store unused batteries in their packaging and away from metal objects which may cause a short-circuit resulting in leakage or, in extreme cases, fire or even an explosion.
monitor where it cannot be pushed, pulled over, or knocked down.
• Care should be taken to route all cords and cables connected to the monitor so that they cannot be pulled or grabbed by curious children.
ConnectionsBe sure to turn off the main power switch and disconnect the plug from the power outlet before
connecting/disconnecting cables. Also, read the manual of the equipment to be connected.Be careful not to confuse the input terminal with the output terminal when connecting cables. Accidentally reversing cables connected to the input and output terminals may cause malfunctions and other problems.PositioningIf a monitor is positioned in an unstable or inclined location, it can be potentially hazardous due to falling. Many injuries, particularly to children, can be avoided by taking simple pre-cautions such as:• Using fixing devices like wall mount brackets
recommended or supplied by the manufacturer.• Educating children about the dangers of climbing on
furniture to reach the monitor or its controls. If your existing product is being retained and relocated, the same considerations as above should be applied
Transport and Shipping• Your device must be kept in its original package
to protect from damage to its accessories during transport and shipping.
• Keep the product in normal position during transport.• Do not drop the device during transport and protect
it against impacts.• Damages and faults that occur during transport after
the delivery of the appliance to the customer are not included in the warranty cover.
• Product transportation, installation, repair and servicing must be done by qualified technical service personnel.
Intended Use• This product is intended to be used in public places
such as schools, offices, theatres, places of worship.• Product is only suitable for connecting commercial
mains socket outlets. Do not connect product industrial socket outlets.

English - 5 -
• Remove dead batteries from equipment and all batteries from equipment you know you are not going to use for a long time. Otherwise the batteries may leak and cause damage.
• Batteries must not be exposed to excessive heat such as sunshine, fire or the like.
• Never dispose of batteries in fire or with hazardous or flammable materials as this can cause them to explode. Please recycle dead batteries; do not put with the normal household waste.
• Never attempt to recharge ordinary batteries, either in a charger or by applying heat to them. They may leak, cause fire or even explode. There are special rechargeable batteries which are clearly marked as such.
• Supervise children if they are replacing batteries themselves in order to ensure these guidelines are followed.
• Do not ingest the battery, Chemical Burn Hazard.• This product or the accessories supplied with the
product may contain a coin/button cell battery. If the coin/button cell battery is swallowed, it can cause severe internal burns in just 2 hours and can lead to death.
• Remember that small button cell batteries such as used in some hearing aids, toys, games and other appliances, are easily swallowed by young children and this can be dangerous.
• Keep new and used batteries away from children.• Make sure battery compartments are secure. If the
battery compartment does not close securely, stop using the product and keep it away from children.
• Seek immediate medical attention if you believe batteries might have been swallowed or placed inside any part of the body.
• If leaked battery fluid gets on your skin or clothing, rinse immediately and thoroughly. If it gets into your eye, bathe your eye well rather than rubbing and seek medical treatment immediately. Leaked battery fluid that gets into your eye or your clothing may cause a skin irritation or damage your eye.
CAUTIONRISK OF EXPLOSION IF BATTERY IS
REPLACED BY AN INCORRECT TYPE. DISPOSE OF USED BATTERIES ACCORDING
TO THE INSTRUCTIONS.
Markings on the ProductThe following symbols are used on the product as a marker for restrictions and precautions and safety instructions. Each explanation shall be considered where the product bears related marking only. Note such information for security reasons.
Class II Equipment: This appliance is designed in such a way that it does not require a safety connection to electrical earth.Class II Equipment With Functional Earthing: This appliance is designed in such a way that it does not require a safety
connection to electrical earth, the earth connection is used for functional purposes.
Protective Earth Connection: The marked terminal is intended for connection of the protective earthing conductor associated with
the supply wiring.Hazardous Live Terminal: The marked terminal(s) is/are hazardous live under normal operating conditions.
Caution, See Operating Instructions: The marked area(s) contain(s) user replaceable coin or button cell batteries.
Any issues which are caused by customer mis-adjustment of any software including the operating system are not covered by the warranty.
Depending on the model you buy, the actual appearance of the product may differ from the images used in this manual.
i

English - 6 -
General ViewFront Side
1. LCD Panel
Rear Side (1)
13
1 2 3
8
4 5
9
11
12
6
7
10
14 15
1. RS2322. VGA3. Ethernet4. USB (2.0)6. HDMI2 In7. HDMI3 In9. IR Input10. Headphone/Line Out11. HDMI1 In12. HDMI Out13. Micro USB14. Internal USB Compartment15. Connector for PC (OPS) Module
Android Sockets5. USB (2.0)8. Micro SD

English - 7 -
Rear Side (2)
1
3
4
2
1. SPDIF Optical Out2. Audio In3. RJ12 (for sensor)4. RJ12 (service use only)
Control Buttons on the DisplayTo turn on the Display: Press the centre of the joystick in and hold it down for a few seconds, the Display will turn on.To turn the Display off: Press the centre of the joystick in and hold it down for a few seconds, the Display will turn into standby mode.To change source: Press the centre of the joystick in, the sources list will appear on the screen. Scroll through the available sources by pushing the joystick up or down.To change volume: Increase the volume by pushing the joystick right. Decrease the volume by pushing the joystick left.Note: Main menu OSD cannot be displayed via joystick.

English - 8 -
Connecting the IR ReceiverBefore plugging the Display into the mains supply, connect the supplied IR receiver to the IR input on the Display. Place the IR receiver in sight of your own remote control. Simply operate your remote control whilst pointed at the IR receiver and it will relay the control signal to your Display.In case your Display has touch screen feature and if the IR receiver is going to be placed on the Display it shouldn’t be placed facing the inside of the screen, otherwise the signals of the touch screen and the remote may interfere with each other. To improve the performance of your remote control place the IR receiver as shown in the drawing below.
1 Front side of the Display
Turning the Display On/OffAfter connecting the Display to the mains set the main On/Off switch to the “1” position. The Display will switch into standby mode. Press the Standby button on the remote or press the centre of the joystick in located on the rear left side of the Display and hold it down for a few seconds to switch it on from standby. Press the centre of the joystick in and hold it down for a few seconds or press the Standby button on the remote to switch the Display into standby mode. To switch the Display off, set the On/Off switch to the “2” position.
2
3
1 Standby button2 Joystick3 On/Off Switch (*)
(*) The location of the On/Off switch may differ depending on the model.
LED Status Status of the monitorPower LED not lit Power on
Power LED lit Power off (Standby mode)
Power LED flashing (slow) Scheduler active (optional)
Power LED flashing (fast) Software update

English - 9 -
Remote Control
19
20
22
24
26
27
29
7
6
5
4
3
2
1
10
11
12
13
15
16
17
8
9
28
23
14
21
18
25
30
31
1. Standby: Switches On / Off the Display2. Numeric buttons: Enters a number or a letter in the text
box on the screen.3. Signage: Displays Settings>Signage menu4. Volume +/-: Increases or decreases the volume5. CMS: Opens the predefined Start url (in Settings>Sig-
nage>Link Options menu). Press and hold 3 seconds to open the predefined Settings url (in Settings>Sig-nage>Link Options menu)
6. Menu: Displays the main menu7. Directional buttons: Helps navigate menus, content etc.8. Exit: Closes and exits from displayed menus or returns
to previous screen9. Network: Displays Network/Internet Settings menu10. Sound: Displays Sound menu11. Coloured Buttons: Follow the on-screen instructions
for coloured button functions12. Picture Mode: Cycles between picture modes13. Rapid reverse: Moves frames backwards in media
such as movies14. Pause: Pauses the media being played15. Media browser: Opens the media browsing screen16. Play: Starts to play selected media17. Stop: Stops the media being played
18. Rapid advance: Moves frames forward in media such as movies
19. No function 20. Info: Displays information about on-screen content21. No function22. Picture: Displays Picture menu23. Internet: Opens the predefined Start url (in Set-
tings>Signage>Link Options menu).24. Wireless Display: Opens the wireless display connection
screen25. Back/Return: Returns to previous screen26. OK: Confirms user selections27. Quick Menu: Displays picture and sound setting menus28. No function29. Mute: Completely turns off the volume of the Display30. Screen: Changes the aspect ratio of the screen31. Source: Shows all available content sources
Inserting the Batteries into the RemoteRemove the screw that secure the battery compartment cover on the back side of the remote control first. Lift the cover gently. Insert two AAA batteries. Make sure the (+) and (-) signs match (observe correct polarity). Place the cover back on. Then screw the cover back on again.

English - 10 -
First Time InstallationWhen turned on for the first time, the Country selection screen will be displayed. Select the desired country and press OK.
You will be asked to set and confirm a PIN at this point. For some country options, the PIN cannot be set to 0000, in this case you need to enter another 4-digit number combination. You have to enter this PIN if you are asked to enter a PIN for certain menu operations such as resetting the display.
The Signage Settings menu will be displayed next. If you set Digital Signage option to Enable and select Next and press OK, the Display will switch to CMS software.
If you set Digital Signage option to disable, then the Display will continue with the standard setup process.
Set ID, OSD Orientation, Auto Software Update options can be configured using this menu. Model name, Serial number and Software version options are for information only. They will be greyed out and not selectable. You can save the model information data of the Display to a connected USB device using the Save model information option. You can also copy database files from a connected USB device to the Display using the Clone from USB option. Refer to the Signage Settings Menu Content section for more information on the options of this menu. After the settings are completed, highlight Next and press OK to continue. On the next screen, the Network/Internet Settings menu will be displayed. Please refer to Connectivity section to configure a wired or a wireless connection. If you want your Display to consume less power in standby mode, you can disable the Wake On option by setting it as Off. After the settings are completed highlight Next and press OK button to continue. The First Time Installation is completed. To repeat this process and reset the Display's settings to the factory defaults enter the Settings>Signage menu, highlight First time installation and press OK. You will be asked to enter the PIN that you have defined in the First Time Installation. If the correct PIN is entered a confirmation message will be displayed asking whether you want to delete all settings and reset the Display. Select Yes and press OK to confirm. Note: Do not turn off the Display while initializing first time installation. Note that, some options may not be available depending on the country selection.
Android LauncherIf the Digital Signage option is set to disable, you can Access the Android input as follows.Press the Source button on the remote, move the focus to ANDROID and press the OK button to switch to Android source if another source is set as the currently active input source.

English - 11 -
Setting up the internet connectionThere is a secondary ethernet socket on the rear side of the Display for Android source only. Plug an ethernet cable into this socket in order to establish a wired LAN connection for Android source. The connection status will be displayed in the All apps>- Settings>Device-Network menu under the Ethernet caption on the home screen of Android as Connected or Not connected. You can also connect to a Wireless LAN for Androi̇ d source by turning on the Wi-Fi option under the same menu. Refer to following Network and Connecting to Internet sections for more information on internet based settings for Android source.
Home ScreenTo interact with the user interface on the home screen, touch, touch and hold or touch and drag your finger on the screen instead of using the remote control. The remote control buttons may not function properly. On the home screen a logo, wallpaper, time and date widget, a navigation tool bar and a launch bar will be available. For information on how to configure the home screen see the Settings (Home Screen) sectionLogoThe logo used on the home screen of the launcher is configurable. You can change the logo and its position from the configuration menu of the home screenWallpaperThe wallpaper used on the home screen of the launcher is also configurable. You can change it from the configuration menu of the home screen. Time & Date WidgetIn the middle of the home screen time and date information will be displayed. You can enable or disable this widget from the configuration menu of the home screen. Home Screen AppsOnly All apps application will be pre-loaded on the home screen which is located on the left hand side of the screen. You can manage the home screen applications from the hidden Settings menu. See the Settings (Home Screen) section for more information on this settings menu. All apps: Touch All apps in order to access many pre-loaded applications such as App Store, Chromium, Downloads, File Manager, Gallery and Settings. See Settings section for detailed information on Settings menu contents. If you experience problems with an unsupported file format, you can download an auxiliary application such as a media player from the App Store.
Navigation ToolbarOver the bottom edge of the screen navigation toolbar will be available. Touch the Collapse/Expand button of the tool bar to expand it. You can touch this button again to hide. Back, Home and Recent Apps buttons will be available when you expand the bar. You can use these buttons to navigate through the menus without having to use the remote control. Toolbar in collapsed state
Toolbar in expanded state1 2 3 4
Collapse / Expand Back: Touch to return to the previous screen, or
to close a dialogue box, menu, or keyboard Home: Touch to return to the home screen Recent Apps: Touch to display recent apps
The toolbar is pinned to the bottom edge of the screen However you can change the position of it. Touch and hold the bar and then drag your finger in left or right direction to move the bar over the bottom edge of the screen. The toolbar can not be dragged when it is in expanded state.Settings (Home Screen)To configure the home screen you need to enter the hidden Settings menu. In order to do that touch and hold the logo on the home screen for at least 5 seconds and then raise your finger. You will be requested to enter a password in order to access the settings. Enter the default password(*) using the virtual keyboard, unless you have defined another password, and then touch OK. (*) Default password is set to android.
You can configure the wallpaper, logo, home screen applications, language, enable or disable the displaying of the time and date widget and change the password using the options in the Settings screen.
Wallpaper: The preview of the current wallpaper will be displayed. Touch BROWSE to select a new wallpaper. The supported file formats are BMP, JPEG, PNG, GIF and WebP. Touch RESET to reset the default wallpaper.Logo: The preview of the current logo will be displayed. Touch BROWSE to select a new logo. The supported file formats are BMP, JPEG, PNG, GIF and WebP. Touch RESET to reset the default logo. The logo can be positioned in any of the 4

English - 12 -
corners of the screen. Touch the desired position option to set. Top left, Top right, Bottom left and Bottom right options will be available.Home screen applications: The applications of the home screen will be shown. Touch Add (plus sign), then touch the app you want to add from the listed applications. You can add up to 8 apps to home screen. To remove an application from the home screen touch the application and then touch Remove on the next screen.Time and Date Widget: This widget shows the current system time and date information in system language. Touch the on/off switch indicator located under the Clock title to enable or disable the displaying of the time and date widget on the home screen.Language: Touch the current language under the Language title if you want the change it. Available languages will be listed. Touch the desired language to set as current language. You will be asked to enter the password. Enter the password and touch OK to return to Settings menu. Touch Cancel to return to home screen.Password: Touch SET NEW PASSWORD to change the default password.
Android System Settings MenuIn order to access the Settings menu touch All apps on the home screen and then touch the Settings app. The available options will be listed. Touch one to see the details and available options.1. Device1.1. NetworkWi-Fi: To turn on the WLAN touch Wi-Fi option. Available wireless networks will be searched and listed. Touch one to connect. You may be asked to enter a password to connect to the selected network, in case the network is password protected. You cannot use the wireless connection if you are connected via Ethernet.Other options: Under the Other options caption Scanning always available option will be available. Connect via WPS and Add new network options will also be available under this caption when the WLAN is turned on. You can use the Add new network option in order to connect to the networks with hidden SSID’s (wireless network name) by entering the SSID manually.When the WPS option is selected the Display will start a search for the WPS router. Press the WPS button on your wireless router/modem to establish the connection. This way you wont need to enter or select a network name and the related password.By turning the Scanning always available option on you can allow google location service and other apps
to scan for networks and get location information, even when WLAN is turned off.Ethernet: Under the Ethernet caption you can see the LAN status (Connected - Not connected) and also MAC/IP addresses if connected. You can also set a proxy server and change the IP settings using the related options.1.2. SoundYou can set your sound preferences. You can enable/disable System sounds and set the Surround sound option as Auto, Always or Never.1.3. AppsUnder this menu option applications installed on your Display will be listed. App Permissions, Downloaded Apps and System apps options will be available. You can display the information of the apps and manage them using the available options. You can also manage the permissions required by the applications. You can turn on and off the permissions for each application.1.4. DisplayResolution and Orientation options will be available. You can set the resolution and the orientation of the Display manually by selecting one of the listed options or set as Auto.1.5. Storage & resetUsing the options of this menu you can display the storage status informations, manage the connected storage devices and reset the Display to factory default.Device storage: Storage informations for Internal shared storage and other connected storage devices will be displayed if available. Under the Device storage option the connected storage devices which are used as an internal storage will be listed. For these devices Eject and Erase & format as removable storage options will be available. To safely remove a storage device use the Eject option. In this case the device will not be removed from the device list but its state will be shown as Not connected. Use the Erase & format as removable storage option to format a storage device and use it as a removable storage device again.Removable storage: Under this option the removable storage devices connected to the Display will be listed if any available. To safely remove a storage device use the Eject option. Use the Erase & format as device storage option to format a storage device and use it as an internal storage device. In this case the device will be listed under the Device storage option.reset: Factory data reset option wil be available. Use this option to clear user data (i.e system app updates, user apps, audio, video, photos) and reset the Display to factory default.

English - 13 -
1.6. AboutUsing the options of this menu you can display detailed informations about the Android system, manage the system updates or restart the Android launcher. You can manually check if a system update is available on the network or on the connected storage device using the System Update option and restart the Android launcher using the Restart option.2. Preferences2.1. Date & timeSet the date and time options of your Display.Automatic date & time: You can enable or disable network-provided date&time data by setting this option accordingly. This option is enabled by default.Set date: You can set the date using this option. This option will be inactive if the Automatic date & time option is enabled.Set time: You can set the time using this option. This option will be inactive if the Automatic date & time option is enabled.Set time zone: You can set the time zone using this option. Use 24-hour format: You can use this option to toggle between the 24-hour and 12-hour time formats.2.2. LanguageSelect your language preference.2.3. KeyboardThere are different types of keyboards, mainly used to provide input methods for non Latin languages. You can select your keyboard language and keyboard type. 2.4. Lock ScreenThis option can be used to lock the entire screen and Settings menu if desired. For detailed information refer to Vestel Lock Screen section.2.5. AccessibilityThis option is for hard of hearing and visually impaired people. Configure the accessibility settings for Android source. Some of the settings may not be applied.Captions: This option is for Closed Caption(CC) settings.
Display - Enable/Disable CCDisplay options - Set the text Language and sizeCaption style - Set caption style
High-contrast text: You can increase the contrast of all texts system-wide. Services: Available services will be displayed.
Vestel System Bar Service - You can enable, disable or configure this service using the options of this menu. When this service is enabled all the
text that is typed by the user will be collected, expect passwords.Text to speech - Choose the TTS engine. TTS is a feature used by the apps. Only the Pico TTS is supported currently. You can also configure the TTS engine, set the speech rate, listen to an example of the speech and see the current language status using the other options of this menu.
3. Remote & accessories3.1. Add accessoryYou can use wireless accessories, such as remote controllers, keyboards or game controllers with Android source. Add devices to use them with your Display. Touch this option to start searching available devices in order to pair them with your Display. Set your device to pairing mode. Available devices will be recognized and listed. Touch your device to start pairing.Connected devices will also be listed under this section. To unpair a device, touch the name of it. Then touch the Unpair option. After that touch OK to unpair the device from the Display.4. Personal4.1. LocationYou can allow or restrict apps to use your location information, display recent location requests or allow the use of the wireless connection to estimate the location.4.2. Security & restrictionsUsing the options of this menu;• You can allow or restrict installation of apps from
sources other than the Play Store.• Set the Display to disallow or warn before installation
of apps that may cause harm.• Restrict access to apps and other content in your
account. You can restrict the use of certain apps by switching the Display to a restricted profile. The Home menu will only show the apps you allowed. You need a PIN code to switch out of the restricted profile. Restricted Profile option will appear at the bottom row of the home screen. Move the focus to this option and press OK to enter. Exit restricted profile option will be highlighted. Press OK and enter the PIN you defined to switch out of the restricted profile mode.
Installing Third Party ApplicationsCheck if the installation of apps from sources other than the Play Store is allowed from the System Set-tings>Personal>Security & restrictions menu. If the checkbox next to the Unknown sources option is not checked, highlight this option and press OK. Then

English - 14 -
follow the below mentioned steps in order to install a third party application.• Copy the file with the extension “.apk” onto a FAT
formatted USB storage device• Connect the USB storage device to one of the
Android USB inputs on the Display. Refer to General View section to see the USB inputs dedicated to the Android system.
• Select the USB storage device from the Android launchers Removable Storage menu and press OK to browse the content. Highlight the file with the extension “.apk” and press OK. Your permission will be asked. Select Install and press OK again to proceed.
Connecting To InternetTo configure wired and wireless settings you should access the System Settings>Device>Network menu on the home screen. Two options will be available, Wi-Fi and Ethernet. To Connect to a Wired NetworkThere is a secondary LAN port on the rear side of your Display dedicated to Android source. Connect your Display to your modem/router via this LAN port using an ethernet cable. Refer to the General View section in the first pages of this manual to find out the right socket. The status of the Ethernet option in the Network Settings menu will be changed to Connected. The MAC and IP addresses will also be displayed under this caption.
1
2
3
Broadband ISP connection LAN (Ethernet) cable LAN input on the rear side of the Display
To Connect to a Wireless NetworkA wireless LAN modem/router is required to connect the Display to a wireless network. Highlight Wi-Fi option in the Network menu and press OK to turn on the WLAN. Available networks will be listed. Select one and press OK to connect. You may be asked to enter a password to connect to the selected network, in case the network is password
protected. Additionally you can connect to your router/modem via WPS or add new networks by using the related options.
Broadband ISP connectionA network with hidden SSID (wireless network name) can not be detected by other devices. If you want to connect to a network with hidden SSID, select Add new network option under the Other options caption. Add the network by entering its name manually using the related option. To make your modem’s SSID visible, you should change your SSID settings via the modem’s software.If your router has WPS, you can directly connect to the modem/router without entering a password or adding the network first. Select Connect via WPS option under the Network Settings>Wi-Fi menu on the home screen. Go to your modem/router device and press the WPS button on it to make the connection. You will see a connection confirmation on your Display once the devices have paired. Select OK to proceed. No further configuration is required.• A Wireless-N router (IEEE 802.11a/b/g/n/ac) with
simultaneous 2.4 and 5 GHz bands is designed to increase bandwidth. These are optimized for smoother and faster HD video streaming, file transfers and wireless gaming.
• The frequency and channel differ depending on the area.
• The transmission speed differs depending on the distance and number of obstructions between the transmission products, the configuration of these products, the radio wave conditions, the line traffic and the products that you use. The transmission may also be cut off or may get disconnected depending on the radio wave conditions, DECT phones or any other WLAN 11b appliances. The standard values of the transmission speed are the theoretical maximum values for the wireless standards. They are not the actual speeds of data transmission.
• The location where the transmission is most effective differs depending on the usage environment.

English - 15 -
• The Wireless feature of the Display supports 802.11 a,b,g & n type modems. It is highly recommended that you should use the IEEE 802.11n communication protocol in order to avoid any possible problems while watching videos.
• You must change your modem’s SSID when there are any other modems around with the same SSID. You can encounter connection problems otherwise. Use a wired connection if you experience problems with a wireless connection.
Note: Android system allows only one network connection at a time. If the Display is connected to the network both wirelessly and via ethernet (wired) while it is on android source, the ethernet connection will take priority. Since if this is the case, WLAN connection can not be established. Unplug the ethernet cable to allow wireless connection.
Lock ScreenWe have a lock screen application that is used to lock the entire screen and Settings application if desired. Its configuration menu can be opened from Settings>Lock Screen.
Menu Options• Enable [ Enables the lock screen application and
creates a draggable lock icon to lock the screen. ]• Auto Start [ Configuration option for locking the
screen automatically on boot. ]• Lock Android Settings [ Configuration option for
protecting the Settings app with password. ]• Auto Lock Timeout [ Display automatically locks after
a set amount of inactivity. ]• Change Password [ User can set an initial password
or change the existing one. ]Secret ResetThere may be a situation where user forgets about the password and needs a reset. We provide a secret reset option for this.Follow these steps to reset lock screen configurations and password:1. Insert a USB drive with a file named ".WB.locksc.
reen!ReseT.7318" in it.2. First enter "0000" as password and then re-enter
password as "5967".This will unlock the screen/settings and clear the existing password. A new password can be set from configuration menu.
Using Main Display MenuWhen the Menu button is pressed, the main Display menu will appear at the bottom of the screen. You can navigate through the menu items using the directional buttons on the remote. To select an item or see the
sub-menu options of the highlighted menu press OK button. When you highlight a menu option some of the sub-menu items of this menu may appear on the upper side of the menu bar for quick access. To use a quick access item highlight it, press OK and set as desired using the Left/Right directional buttons. When finished press OK or Back/Return button to exit.Press Exit button to close the main menu.1. HomeWhen main menu is opened Home menu bar will be highlighted. The content of the Home menu can be customised by adding options from other menus. Just highlight an option and press the Down direction button on the remote. If you see Add to Home option you can add it to the Home menu. Same way you can delete or change the position of any item in the Home menu. Press the Down direction button and select Delete or Move option and press OK. In order to move a menu item use the Right and Left direction buttons to select the position that you want the item to move to and press OK.2. SettingsYou can manage the settings of your Display using the options of this menu. Refer to Settings Menu Contents section for more information.3. AppsWhen your Display is connected to the Internet related contents will also be available, including Apps related contents. Using the Apps menu you can access your applications. Refer to Apps section for more information.4. SourcesYou can manage your input source references using the options of this menu. To change the current source highlight one of the options and press OK. 4.3. Source SettingsEdit the names, enable or disable selected source options. There are also Regular, Enhanced and Disabled options available for HDMI source. Regular and Enhanced options are affecting the colour settings of the HDMI source. To be able to watch 4K or HDR/HLG images from the HDMI source its source setting should be set as Enhanced if the connected device is compatible with HDMI 2.0 and subsequent versions. Set as Regular if the connected device is HDMI 1.4 compatible. Set accordingly or disable the HDMI source by setting as Disabled.You can reset your customizations on the Home and Apps menus to defaults using the Reset Menu option in the Settings menu. Highlight this option and press OK. A confirmation message will be displayed. Highlight Yes and press OK to proceed.

English - 16 -
Vsign LiteVsign Lite is a signage application runs without CMS and managed through Display. Display software is integrated with it.1. Setup1.1. Application Specification
RequirementsDisplay Platform MB135VSFirmware Version 7.33 & Higher versionLanguage Options English, TurkishHardware Requirements USB
1.2. How is it opened? During the Display’s setup, Auto Launch option should be selected as Vsign Lite. Later, every time the Display restarts, the application will open. Additionally this can be changed on Menu > Settings > Signage > Power Up Settings > Auto Launch.2. Vsign Application DisplayThe Vsign Lite application consists of three main parts. These are Player, Schedule and Template sections. Moreover, there are the Import/Export settings section for backup/export of application settings and to switch to VSign there is a Switch to VSign part.2.1. PLAYER Using this screen, the inserted USB memory can be viewed, erased, played, and transferred to another USB memory. Various filtering and sorting operations can be done from the menu section above. In addi-tion, the channels created in the section over time are played here.
2.1.1. File Management Pressing the OK button on any file opens the menu for file-related operations. The options described below can be selected and processed.Select: Selecting the file activates the multi-selection mode described in the next section.Play: If the selected file is playable, it plays, otherwise the text is dimmed.Send: It sends the chosen file to another memory.Delete: It deletes the chosen file.2.1.2. Multi-Selection Mode Multiple selection mode is activated by pressing OK button on Select option on file management menu. Then select the files you want to select with the OK button and cancel them. During this process, you can go to different folders and select the files there.Options appear up when multi-selection mode is on. These operations can be done to the selected files
as explained below.Select All: Selects all files. Delete All: Clears all selected options. Play All: Plays selected files in order of selection.Send All: Sends selected files to USB.Cancel: Closes multi-selection mode.2.2. SCHEDULE By using Schedule screen, a channel can be created, programs can be created within the channel, they can be viewed and edited. The channels number are limited to four. In the menu, the channels are displayed on the screen in accordance with the time information on the top left and down. With navigation, it can be switched through programs. Detailed information about the focused program can be found on the right-hand panel.2.2.1. Channel/Program Addition Navigate to an empty or occupied area and press the OK button. In the empty area, channel and program addition screen, in the occupied area editing screen are opened. Images, videos and templates can be added to the channel as content.-If the rightmost space (Add Channel) is selected, a new channel will be created and the screen will pop up to create our first program.-If an empty space is selected in a previously created channel, the new program is added to the channel.-If the occupied area is selected in a previously cre-ated channel, the selected program will be edited.2.2.1.1. Channel/Program Editing Screen Input FieldsAdd Content: If the OK button is pressed on this field; the appropriate contents are listed. The users can do multi-selection. You can then delete the contents by pressing the OK button.Start Time: Start time of the program.Finish Time: Finish time of the program.Channel: Name of the channel in which the program is included. Memory: Memory in which the channel is saved.2.2.2. Supported Files The application supports the formats listed below:video: mp4, mpeg, avi, mov, webm, ts, mpg, m4a, mkvimage: jpg, jpeg, png, bmp2.3. TEMPLATE This screen displays the predefined templates and the user fills them and prepares them for use. User-cre-ated templates are kept in the My Templates folder. They can be played, edited and deleted from here.

English - 17 -
2.3.1. Creation of the Templates Scroll to one of the previously defined templates and press OK. When the OK button is pressed on the zones, the compatible contents in the memory are listed. Single or multiple selections can be made here. The template can be previewed with the Pre-view button on the right and the Save button can be selected and saved.2.3.1.1. Add Content to Templates Input Fields Template Time: The length of time that the template will be displayed in a program cycle. Content Time: Specifies the amount of time a content will be displayed in the selected area via the template. Aspect Ratio: If the area on the template accepts the image, it determines whether the inserted image performs one of the behaviors that maintain the aspect ratio or fill the area. Audio: If there is a field that accepts video in the temp-late, it determines whether the video will sound or not. 2.4. Export/Import Using this menu, the Display settings can be trans-ferred to another Display. 2.5. Switch to Vsign With this menu, the users can be transferred to VSign Application. In addition, the VSign application will start to open when the Display is turned on. 2.6. Switch to Vsign Lite Portrait Orientation The user can rotate the screen 90 degrees clockwise or counterclockwise by selecting Portrait 1 or Portrait 2 from Menu > Settings > Signage > Controls > OSD Orientaton. The application will be rotated vertically.
Media Playback via USB InputYou can connect 2.5” and 3.5” inch (HDD with external power supply) external hard disk drives or USB memory stick to your Display by using the USB input/s of the Display.IMPORTANT! Back up the files on your storage devices before connecting them to the Display. Manufacturer will not be responsible for any file damage or data loss. Certain types of USB devices (e.g. MP3 Players) or USB hard disk drives/memory sticks may not be compatible with this Display. The Display supports FAT32 and NTFS disk formatting.Wait a little while before each plugging and unplugging as the player may still be reading files. Failure to do so may cause physical damage to the USB player and the USB device itself. Do not pull out your drive while playing a file.You can use USB hubs with your Display’s USB input/s. External power supplied USB hubs are recommended in such a case.
It is recommended to use the Display’s USB input/s directly, if you are going to connect a USB hard disk.Note: When viewing image files the Media Browser menu can only display 1000 image files stored on the connected USB device.
Media Browser MenuYou can play back music and movie files and display photo files stored on a USB storage device by connecting it to your Display. Connect a USB storage device to one of the USB inputs located on the rear side of the Display. After connecting a USB storage device to your Display Media Browser menu will be displayed on the screen. You can access the content of the connected USB device any time later from the Sources menu. Select the related USB input option from this menu and press OK. Then select the file of your choice and press OK to display or play it back.You can set your Media Browser preferences by using the Settings menu. Settings menu can be accessed via the information bar which is displayed on the bottom of the screen when pressed the Info button while playing back a video file or displaying a picture file. Press the Info button, highlight the gear wheel symbol positioned on the right side of the information bar and press OK. Picture Settings, Sound Settings, Media Browser Settings and Options menus will be available. The contents of these menus may change according to the type of the currently open media file. Only Sound Settings menu will be available while playing back audio files.
Loop/Shuffle Mode Operation
Start playback and activate All files in the list will be contin-uously played in original order
Start playback and activate The same file will be played continuously (repeat)
Start playback and activate All files in the list will be played once in random order
Start playback and activate ,
All files in the list will be con-tinuously played in the same random order.
To use the functions on the information bar highlight the symbol of the function and press OK. To change the status of a function highlight the symbol of the function and press OK as much as needed. If the symbol is marked with a red cross, that means it is deactivated.USB Auto Play FeatureUSB AutoPlay feature is to start playing the media content installed on a removable device, automatically. It uses the Media Browser. The media content types have different priorities in order to be played. The reducing priority order is as Photo, Video and Audio. That means, if there is Photo content in the root

English - 18 -
directory of the removable device, Media Browser will play the Photos in a sequence (in file name order) instead of Video or Audio files. If not, it will be checked for Video content and as last Audio.This feature will only work if all of the following cir-cumstances occur:• The USB device is plugged in.• USB Auto Play option is enabled. It is placed in the
Settings>System>More menu.USB Auto Play Feature with Playlist ScenarioIf there is a file named as “playlist.txt” installed on the connected USB storage device, the new scenario is started. The media content in this file will be played or displayed according to the entered sequence.To activate this function, a file named “playlist.txt” should be installed on the USB storage device. Also, the first line of the file must start with “//**do usb auto play**//”.Files which to be displayed/played must be written line by line in playlist.txt. The “/* */” expression provides to comment out the line. During playing content, only the volume and standby buttons are used. Other buttons perform the exit operation.Sample file content://**do usb auto play**//picture.jpgvideo.mp4picture2.jpg/*picture3.jpg*/video2.mp4Scheduler playlist scenarioIn this scenario, if the Source option is set as USB while creating a scheduler, playlist options will be displayed. The user can create 3 different playlists.When the scheduler is activated, the playlist scenario is started. During the autoplay, the selected playlist will be checked first. If the selected playlist is not available in connected the USB storage device, the default playlist file will be checked. If the default playlist file is not found, it works just like the USB Auto play scenario.
Failover FeatureIf No Signal option in the Settings>Signage>Controls menu is set as Failover the Display checks the connected USB device for available files to play. If no playable files are available or there is no USB device connected to the Display, the No Signal image will be displayed and the Display will turn itself off after a period of 5 minutes. If there isn’t any No Signal Image available, No Signal OSD will be displayed on
the screen and the Display will turn itself off after a period of 5 minutes.Note: The setting of the USB Auto Play option in the Settings>System>More menu is not important, in Failover mode it will function anyway.
CEC and CEC RC PassthroughThis function allows to control the CEC-enabled devices, that are connected through HDMI ports by using the remote control of the Display.The CEC option in the Settings>System>More menu should be set as Enabled at first. Press the Source button and select the HDMI input of the connected CEC device from the Sources List menu. When new CEC source device is connected, it will be listed in source menu with its own name instead of the connected HDMI ports name(such as DVD Player, Recorder 1 etc.).The Display remote is automatically able to perform the main functions after the connected HDMI source has been selected. To terminate this operation and control the Display via the remote again, press and hold the “0-Zero” button on the remote control for 3 seconds. You can disable the CEC functionality by setting the related option under the Settings>System>More menu accordingly.The Display supports ARC (Audio Return Channel). This feature is an audio link meant to replace other cables between the Display and an audio system (A/V receiver or speaker system).When ARC is active, the Display does not mute its other audio outputs automatically. You will need to decrease Display volume to zero manually if you wish to hear the ARC audio only (same as optical or co-axial digital audio outputs). If you want to change connected device’s volume level, you should select that device from the source list. In that case volume control keys are directed to connected audio device.System Audio ControlAllows an Audio Amplifier/Receiver to be used with the Display. The volume can be controlled using the remote control of the Display. To activate this feature set the Speakers option in the Settings>System>More menu as Amplifier. The Display speakers will be muted and the sound of the watched source will be provided from the connected sound system.Note: The audio device should support System Audio Control feature and CEC option should be set as Enabled.
Usage of the Start URL• Create a file named “starturl.txt” in the root directory
of any USB storage device. Make sure that the extension is “txt”.

English - 19 -
• Open this file with a text editor software such as Notepad.• Write the desired URL (for example, www.starturl.com) in the file and save changes.• Connect the USB strorage device to the Display. Highlight USB Operations option in the
Settings>Signage>USB menu and press OK.• Switch the Display off and then switch it on again.Note: You can check if the Start URL have the desired link from the Settings>Signage>Link Options menu.

English - 20 -
Settings Menu Content
Picture Menu Content
Mode You can change the picture mode to suit your preference or requirements. Picture mode can be set to one of these options: Text, Game, Sports, Signage and Natural.
Contrast Adjusts the light and dark values on the screen.
Brightness Adjusts the brightness values on the screen.
Sharpness Sets the sharpness value for the objects displayed on the screen.
Colour Sets the colour value, adjusting the colours.
Energy Saving
This Display is designed to be environmentally friendly. If you set this option to Minimum, Medium, Maximum or Auto the Display will reduce energy consumption by regulating the backlight level accordingly. If you like to set the backlight level to a fixed value set as Custom and adjust the Backlight (located under this setting) manually using Left or Right buttons on the remote. Set as Off to turn this setting off. If pressed Right button while Auto option is selected or Left button while Custom option is selected, “Screen will be off in 15 seconds.” message will be displayed on the screen. Select Proceed and press OK to turn the screen off immediately. If you don’t press any button, the screen will be off in 15 seconds. Press any button on the remote or on the Display to turn the screen on again. When the Display is not in use, please switch off or disconnect the Display from the mains plug. This will also reduce energy consumption.Note: Available options may differ depending on the selected Mode.
Backlight This setting controls the backlight level. The backlight function will be inactive if the Energy Saving is set to an option other than Custom.
Advanced SettingsDynamic Contrast You can change the dynamic contrast ratio to desired value.
Noise Reduction If the signal is weak and the picture is noisy, use the Noise Reduction setting to reduce the amount of noise.
Colour Temp Sets the desired colour temperature value. Cool (1300K), Normal (9300K) and Warm (8500K) options are available.
Picture Zoom Sets the desired image size format.
Picture Shift This option may be available depending on the Picture Zoom setting. Highlight and press OK, then use directional buttons to shift the picture upwards or downwards.
Film Mode Films are recorded at a different number of frames per second. Turn this feature on when you are watching films to see the fast motion scenes clearly.
Skin Tone Skin tone can be changed between -5 and 5.
RGB Gain Adjust the strength of the red, green and blue colours. You can use this feature for fine adjustment of white balance in the picture.
HDMI Full Range While watching from a HDMI source, this feature will be visible. You can use this feature to enhance blackness in the picture.
Reset Resets the picture settings to factory default settings (except Game mode).
Sound Menu ContentVolume Adjusts the volume level.
Equalizer Selects the equalizer mode. Custom settings can be made only when in User mode.
Balance Adjusts whether the sound comes from the left or right speaker.
Headphone
Sets headphone volume.Please ensure before using headphones that the headphone volume is set to a low level, to prevent damage to your hearing. Only available if Headphone/Lineout option is set to Headphone.

English - 21 -
Audio Link (Optional) Press OK to open the Audio Link menu screen. Using this screen you can discover and connect the sound devices to your Display wirelessly.
AVL (Automatic Volume Limiting)
Sets the sound to obtain fixed output level between sources.If the Dolby Audio menu item is set to an option other than Off the AVL setting options will change. Auto, Night, Normal and Off options will be available. In Auto mode the TV will switch to Normal or Night mode automatically according to the current time information. If no time information is available this option will always function as Normal. When the TV switches to Night mode for the first time after setting this option as Auto, an information bar will pop up on the screen.Please note that compared to Normal mode Night mode provides more aggressive dynamic compression control which is suitable for silent environments.
Headphone/Lineout
When you connect an external amplifier to your Display using the headphone jack, you can select this option as Lineout. If you have connected headphones to the Display, set this option as Headphone.Please ensure before using headphones that this menu item is set to Headphone. If it is set to Lineout, the output from the headphone socket will be set to maximum which could damage your hearing. A warning message will be displayed on the screen when switched to Lineout option. Remove your headphone and press OK to continue.
Dynamic Bass Enables or disables the Dynamic Bass.
Dolby Audio Smart, Movie, Music, News and Off options will be available. Set as Off to disable. Note: Some items in Sound menu will be grayed out and unavailable if set to an option other than Off.
Surround Sound Surround sound mode can be changed as On or Off.
Digital Out Sets digital out audio type. PCM and Compressed options are available.
Network Menu ContentNetwork Type Disable the network connection or change the connection type.
Scan Wireless Networks
Start a search for wireless networks. This option will be available if the Network Type is set as Wireless Device.
Press WPS on your wifi router
If your modem/router device has WPS, you can directly connect to it using this option. Highlight this option and press OK. Go to your modem/router device and press the WPS button on it to make the connection. This option will be available if the Network Type is set as Wireless Device.
Internet Speed Test Start a speed test to check your connection bandwidth. The result will be displayed on the screen when finished.
Advanced Settings Change the IP and DNS configurations of your Display.
Wake On Enable or disable this feature by setting it as On or Off.Note: For detailed information on the options of this menu refer to the Connectivity section.
Signage Menu ContentDevice Info
Set ID Sets the device ID. You can select a value between 0-99 using the numeric buttons on the remote in order to identify your Display.
Software upgrade
Displays current software version. Press OK to see the upgrade options. You can use these options to start a manual search for software updates and set your automatic scan preference.
Serial number Displays serial number of the unit. (Cannot changed by user)
Model name Displays model name of the unit. (Cannot changed by user)
Save model information Copies the model information data of the unit to a connected USB device.
Display Life Time Displays the duration of life of the unit.

English - 22 -
Controls
OSD Orientation Sets the OSD (On Screen Display) rotation of your Display. Landscape, Portrait 1 and Portrait 2 options are available.
Browser Orientation
Sets the rotation of the browser. Landscape, Portrait1 and Portrait2 options are available. One of the portrait options will be set by default depending on the model. This option will rotate the browser only and the changes will be applied after the Display is switched off and back on again.Note: Portrait mode does not support html pages which include videos.
Pixel shiftEnables or disables pixel shifting. This option can be used to avoid image retention (after image effects) that can occur when displaying fixed patterns or still images for long periods of time. If enabled, the picture and OSD (On-Screen Display) will be shifted at specified time intervals.
No Signal
Sets the behavior preference of the Display, when no signal is detected from the currently set input source. Failover and Input Search options are available. If Failover is selected the Display checks the connected USB device for available files to play. If no playable files are available or there is no USB device connected to the Display, the No Signal image will be displayed. If there isn’t any No Signal Image available, No Signal OSD will be displayed on the screen. The setting of the USB Auto Play option in the Settings>System>More menu is not important, in Failover mode it will function anyway.If Input Search is selected the Display will search all available input sources consecutively to find signal. If no signal is detected from other available sources, No Signal OSD will be displayed and the signal search will continue according to the order in the Sources list until the ANDROID source is reached as it will always be available.How to install No Signal ImageInstall the file you want to use onto the root directory of any USB storage device and name it as “NoSignalImage.png”. Connect the USB storage device to the Display. Highlight USB Operations option in the Settings>Signage>USB menu and press OK.
No Signal DelaySets a delay value to the ‘No Signal’ preferences when the Display is in No Signal state. After the set delay time is expired ‘No Signal’ preferences will be applied. If the No Signal option is set as Input Search, this option will not be available.
No Signal Power Off
When enabled the Display will turn itself off after a period of 5 minutes, if no signal is received from the selected source. This feature will only work if all of the following circumstances occur:
- No Signal option is set as Failover. - USB device is not connected to the Display / USB device is connected but there are
no playable files installed on the USB device.If the No Signal option is set as Input Search, this option will not be available.
Panel Lock Set as Off to prohibit the use of the buttons on the Display.
RCU Inhibit
Set as On to inhibit the use of the remote. Remote control will function in Stand-By mode independently from the setting of this option. To turn this option off and be able to use the remote again, press MENU/M-1-9-7-3 buttons on the remote consecutively. Signage menu will appear. Enter the Controls menu and set this option as Off.
UART 0
Select ASCII/HEX protocol for UART 0. Default value is ASCII. There is no need to restart the Display after selection in order to work with the protocols correctly. If the selection is changed, the latest selected protocol will be preserved and started when the Display is booted up.Note that ASCII/HEX selection is not working while debug logs are enabled. If it is wrongly changed to HEX while debug logs are enabled, revert the selection to ASCII and reboot the Display in order to correct the debug logs and the ASCII protocol behaviour.Also note that HEX protocol will work with the baud rate value 19200 for UART 0.

English - 23 -
UART 1
Select ASCII/HEX protocol for UART 1. Default value is HEX. There is no need to restart the Display after selection in order to work with the protocols correctly. If the selection is changed, the latest selected protocol will be preserved and started when the Display is booted up.Note that ASCII/HEX selection is always working as expected. It does not matter if the debug logs are enabled or not.Also note that HEX protocol will work with the baud rate value 9600 for UART1
Wifi & BT (Optional)
Sets the source option for these funtions. Auto, Display and Android options will be available.
Menu lockYou can block the usage of the menu button on the remote by setting this item as All menus. When you press the menu button, you will be asked to enter the PIN that you have defined in the First Time Installation. Set as Off to disable this function.
Auto Source Switch
If this option is enabled the Display will switch to the currently active HDMI source automatically when a device is connected to the Display through the HDMI1 or HDMI2 input socket. Set as Enabled to enable this feature. When the HDMI source is removed the Display will switch to other active HDMI source. If there isn't any other device connected to the Display and the HDMI Wake UP option for the related HDMI source is enabled the Display will switch into the standby mode.There is also a 3-second restriction for the successive connected HDMI sources. This means, second HDMI device must be plugged in 3 seconds after the first HDMI device is plugged in.Note: This feature applies for HDMI1 and HDMI2 input sockets only. Refer to the General View section to see the HDMI inputs.
Power Up Settings
Power Up Mode Configures the power up mode preference. Last State, Always On and Standby options are available.
Quick StandyIf this feature is enabled the Display can be turned on again with the RS232 and LAN commands if it is turned off through it. Press Left or Right button to enable or disable the feature.
Power on Delay Sets a delay value at power on. This value can be set from 0 to 2000 ms in steps of 100 ms. The Display will turn on after the set delay time is expired.
Auto Launch Configures the auto launch preference. CMS(Start url), Open Browser(Open Browser initial page) and Disabled options are available.
Boot Up Picture Mode
Configures the picture mode preference at power on. If set as Off the last set picture mode will be used at power on.
HDMI1 Wake Up
If this option is set as Enabled, the Display will turn on with the HDMI1 input source, when it is switched on. This feature works based on HDMI 5V signal. When this signal is active the Display wakes up and when the signal is inactive the Display shuts down. You can disable this option by setting as Disabled. In order to use this feature in conjunction with the Auto Source Switch feature it is recommended to enable the Auto Source Switch option in the Signage>Controls menu.If any Scheduler is set this option will be inactive and can not be set as Enabled. Note: This feature may not be available depending on the model of your unit.
HDMI2, HDMI3, HDMI4 Wake Up (optional)
If this option is set as Enabled, the Display will turn on with the active input source (HDMI2, HDM3 or HDMI4 depending on which input source is active), when it is switched on. This feature works based on HDMI 5V signal. When this signal is active the Display wakes up and when the signal is inactive the Display shuts down. You can disable this option by setting as Disabled. In order to use this feature in conjunction with the Auto Source Switch feature it is recommended to enable the Auto Source Switch option in the Signage>Controls menu.If any Scheduler is set this option will be inactive and can not be set as Enabled. Note: This feature or HDMI3 and HDMI4 options may not be available depending on the model of your unit. If multiple devices are connected to the Display through HDMI input sockets, this feature will not work.

English - 24 -
USBClone to USB Copies the database files from the unit to a connected USB device.
Clone from USB Copies the database files from a connected USB device to the unit.
Copy app cache from USB
Copies app cache data from a connected USB device to the unit.Note: This feature may not be available depending on the model of your unit.
USB InformationPress OK to open the USB information menu screen. Current Total space and Free space information of the connected USB device will be displayed. You can also format the connected USB device using the Format Disk option in this menu (FAT32 format only).
USB Operations Highlight and press OK to perform USB operations.
USB OptionSet as Off to disable the USB ports on the Display. You can also set this option as 5V to provide 5 volts power over USB. In this case it will still not be available to browse the USB content via Media Browser feature of the Display.
Safely Remove
You can use this option to remove the devices connected to the USB inputs of the Display safely. Highlight this option and press OK. Wait for the message to be displayed on the screen indicating that you can remove your device and then remove your device. Failure to do so, may cause problems when you connect your USB device to other devices and you might have to format your USB device.
Video Wall Settings
Press OK to open the Video Wall Settings menu screen. Video Wall Settings, Row Count, Column Count, Cell and Offset options are available.
Video Wall Settings: Enable or disable the Video Wall function by pressing Left/Right directional buttons.Row count: Adjust the number of Video Wall “rows” by pressing Left/Right directional buttons. The maximum number that can be set is 10. Column count: Adjust the number of VideoWall “columns” by pressing Left/Right directional buttons. The maximum number that can be set is 10. Cell: Each Video Wall unit is called “Cell”. Adjust the number of a cell by pressing Left/Right directional buttons. The maximum number that can be set is 100. In order to disable video wall function of the unit and display the image in full-screen mode, the Cell option should be set as 0.Offset: Offset setting is used to adjust the refractions at the sides of the picture depending on the bezel thickness between Video Wall units (Cells). The maximum number that can be set is 50.
For example; For a 2x3 video wall matrix, Row count option should be set as 2 and Column count option should be set as 3. Numbers of the cells in a video wall matrix will be determined as shown in the template below. If you are setting the Display, which is positioned same as the Display with the number 1 in this template, then the Cell option should be set as 1 for this Display.

English - 25 -
OPS Settings
Press OK to open the OPS Settings menu screen. Three sub-menu options are available.
OPS Information: Displays read-only information about the OPS unit, if supported.OPS Status: Displays whether the OPS module is on or off. Allows the change of status via soft PSON signal (0.5s)Boot Signal: Enables or disables sending of a PSON signal. The Display checks the status signal of the OPS at bootup in order to turn it on by sending a PSON signal if it is off. Some OPS’s send incorrect information on their status during the bootup of the Display, so they seem to be on even though they are off. For such non-standard OPS’s, this option must be enabled. In this case, a PSON signal will be send for the OPS regardless of the received status information at bootup. Powerdown: Turns the OPS off via hard PSON signal (5s)OPS Always on (optional): When this option is enabled, Quick Standby will be forced to enabled and greyed out in the menu and OPS will not be set to standby.Recovery Mode: When this option is enabled and OPS is on, if there is no video for 10 seconds it resets hotplug. If there is no video available after 30 seconds it reboots OPS.
Note: This menu will not be available if OPS is not supported or not connected to the unit.
Scheduler Settings
Using the scheduler options you can set the unit to turn on automatically at defined time intervals with the defined input source setting on the desired days of the week. Press OK to open the Scheduler Settings menu screen. You can set up to 4 different schedulers. Highlight the first checkbox of the desired scheduler option and check it by pressing the OK button. Now you will be able to define a time for the Display to be turned on automatically. Highlight the time box next to the first checkbox and press the OK button, then use the directional and numeric buttons on the remote to set a time. Press the OK button again when you are done.Perform the same steps to set a time for the Display to turn off.You can also define a source for your scheduler. Highlight the box located under the Source tab for your scheduler option and press the OK button, then set as desired using the Left/Right directional buttons. If the Source option is set as Last Source, the input source will not be changed at the power-up. If the Source option is set as USB, the media files in the connected USB device will be played back automatically as explained in the section entitled ‘USB Auto Play Feature’.Lastly, you can select the week day/s for your scheduler setting to be activated. Highlight the checkbox under the desired day tab and press OK to check. Highlight and press OK a second time to uncheck a box. The scheduler will be active on the checked days of the week.You can also set a backlight scheduler. After setting the On, Off, Source and day options highlight the checkbox under the Backlight column and press OK. The checkbox will be checked and backlight level setting screen will be displayed. Set On value and Off value using the sliders and then press OK to save. Mind that, in case you set a backlight scheduler, the display will not be turned on or off, only the backlight values will be changed at defined time interval. If Source option is set as Last Source the backlight settings will be applied to all sources, otherwise the settings will be applied to the selected source only.Press the Green button on the main scheduler screen to save settings when complete.
Link optionsPress OK to open the link options menu screen. Current Start url and Settings url links will be displayed. These items are for information only and not selectable. Refer to Usage of the Start URL section for information on setting the Start url. Open browser initial page and NTP server link preferences can be configured using the related options.
Volume Settings Press OK to see available menu options.
Reset to Default Values
Highlight this option and press the OK button on the remote to return the Display to default settings.
First time installationHighlight and press OK to perform First Time Installation and reset all settings to factory settings. You will need to enter the correct PIN to carry out this operation.Note: Enter the PIN you have defined during the First Time Installation process.

English - 26 -
System Menu ContentLanguage Sets the OSD menu language preference.
Date/Time Sets date and time.
Sources
Enables or disables selected source options. There will be Regular, Enhanced and Disabled options available for HDMI sources, if your Display supports Ultra HD. Regular and Enhanced options are affecting the colour settings of the selected HDMI source. To be able to watch 4K images from an HDMI source related source setting should be set as Enhanced if the connected device is HDMI 2.0 compatible. Set as Regular if the connected device is HDMI 1.4 compatible. Set accordingly or disable the related HDMI source by setting as Disabled.Note: HDMI cables which are longer than 5 metres and which are not HDMI certified can cause display problems. We recommend using a certified Premium High-Speed HDMI Cable. Source device, connection cable quality and other HDMI equipments used may affect performance.Please refer to → https://www.hdmi.org/consumer/finding_right_cable.aspx (for finding the right cable)
https://www.hdmi.org/installers/longcablelengths.aspx (for cable lengths)
More Displays other setting options of the Display.
Menu Timeout Changes timeout duration for menu screens.
Standby Led Enables or disables the functionality of the standby led. If disabled the led will not function.
Software upgrade
Displays current software version. Press OK to see the upgrade options. You can use these options to start a manual search for software updates and set your automatic scan preference.
Auto Display OFF
Sets the desired time for the Display to automatically go into standby mode when not being operated.
Audio Video Sharing (Optional)
Audio Video Sharing feature allows you to share files stored on your smartphone or tablet pc. If you have a compatible smartphone or tablet pc and the appropriate software is installed, you can share/play photos on your Display. See instructions of your sharing software for more information.
Video Wall Settings
Press OK to open the Video Wall Settings menu screen. Video Wall Settings, Row Count, Column Count, Cell and Offset options are available.
CEC With this setting you can enable and disable CEC functionality completely. Press Left or Right button to enable or disable the feature.
CEC Auto Power On
This function allows the connected HDMI-CEC compatible device to turn on the Display and switch to its input source automatically. Press Left or Right button to enable or disable the feature.
Quick StandbyIf this feature is enabled the Display can be turned on again with the RS232 and Lan commands if it is turned off through it. Press Left or Right button to enable or disable the feature.
DP Stream Setting (*)
Sets the DisplayPort stream type. MST and SST options are available.(*) This menu item appears only when the input source is set to DP.
USB Auto PlayUsing this option you can set your Display to start playing the media content installed on a removable device automatically. Refer to USB Auto Play Feature section for detailed information.

English - 27 -
ConnectivityTo configure wired or wireless settings you should access the Network menu in the Settings menu.
Wired ConnectivityTo Connect to a Wired Network• You must have a modem/router connected to an
active broadband connection.• There is a LAN port at the bottom of the rear side of
your Display. Connect your Display to your modem/router via this LAN port using an Ethernet cable.
1
2
3
1 Broadband ISP connection2 LAN (Ethernet) cable3 LAN input on the bottom of the rear side of the
DisplayConfiguring Wired Device SettingsNetwork TypeSet the Network Type as Wired Device if you are connecting via an Ethernet cable.Internet Speed TestHighlight Internet Speed Test and press the OK button. Display will check the internet connection bandwidth and display the result when complete. Advanced SettingsHighlight Advanced Settings and press the OK but-ton. On the next screen you can change the IP and DNS settings of the Display. Highlight the desired one and press Left or Right button to change the setting from Automatic to Manual. Now you can enter the Manual IP and / or Manual DNS values. Select the related item in the drop down menu and enter the new values using the numeric buttons on the remo-te. Highlight Save and press the OK button to save settings when complete. Other InformationYou can also enable or disable Wake On feature using the related option. The status of the connection will be displayed as Connected or Not Connected and
the current IP and MAC addresses, if a connection is established.Wireless Access Point (Optional)If the network type is set as Wired Device access point feature will be available. Highlight Access Point option and press OK. Access Point, SSID, Security Type and Password options will be available. Access Point: Start or stop access point functionality. The function of this option will change according to the current status.SSID: Set the name of the accesspoint.Security Type: Secure your network using WPA2 PSK. You can also set this option as None. In that case no password will be required to connect to the access point. This option can be set only if the access point feature is not activated.Password: Define a password for the access point. This option will be available if the Security Type option is set as WPA2 PSK and can be set only if the access point feature is not activated.
Wireless Connectivity To Connect to a Wireless Network• You must have a wireless modem/router connected
to an active broadband connection.
1
1 Broadband ISP connection• A Wireless-N router (IEEE 802.11a/b/g/n) with
simultaneous 2.4 and 5 GHz bands is designed to increase bandwidth. These are optimized for smoother and faster HD video streaming, file transfers and wireless gaming.
• The frequency and channel differ depending on the area.
• The transmission speed differs depending on the distance and number of obstructions between the transmission products, the configuration of these products, the radio wave conditions, the line traffic and the products that you use. The transmission may also be cut off or may get disconnected depending on the radio wave conditions, DECT phones or any

English - 28 -
other WLAN 11b appliances. The standard values of the transmission speed are the theoretical maximum values for the wireless standards. They are not the actual speeds of data transmission.
• The location where the transmission is most effective differs depending on the usage environment.
• The Wireless feature of the Display supports 802.11 a,b,g & n type modems. It is highly recommended that you should use the IEEE 802.11n communication protocol in order to avoid any possible problems while watching videos.
• You must change your modem’s SSID when there are any other modems around with the same SSID. You can encounter connection problems otherwise. Use a wired connection if you experience problems with a wireless connection.
Configuring Wireless Device SettingsOpen the Network menu and select Network Type as Wireless Device to start connection process.Highlight Scan Wireless Networks option and press OK to start a search for available wireless networks. All found networks will be listed. Highlight your desired network from the list and press OK to connect. Note: If the modem supports N mode, you should set N mode settings.
If the selected network is password-protected, enter the correct key by using the virtual keyboard. You can use this keyboard via the directional buttons and the OK button on the remote control. Wait until the IP address is shown on the screen.This means that the connection is now established. To disconnect from a wireless network, highlight Network Type and press Left or Right buttons to set as Disabled.If your router has WPS, you can directly connect to the modem/router without entering a password or adding the network first. Highlight Press WPS on your wifi router option and press OK. Go to your modem/router device and press the WPS button on it to make the connection. You will see a connection confirmation on your Display once the devices have paired. Select OK to proceed. No further configuration is required.Highlight Internet Speed Test and press the OK button to check your internet connection speed. Highlight Advanced Settings and press the OK button to open the advanced setting menu. Use directional and numeric buttons to set. Highlight Save and press the OK button to save settings when complete. Other InformationYou can also enable or disable Wake On feature using the related option. The status of the connection will be displayed as Connected or Not Connected and the current IP and MAC addresses, if a connection is established.
Connecting to your mobile device via WLAN• If available, you can download a virtual remote
controller application from the server of your mobile device application provider.
Note: This feature may not be supported on all mobile devices.
Wake ONWake-on-LAN (WoL) and Wake-on-Wireless LAN (WoWLAN) are technologies that allow a device to be turned on or woken up by a network message(magic packet). This message is sent to the device by a program executed on a remote device connected to the same local area network, such as a smartphone.Your Display is WoL and WoWLAN compatible. To enable this feature set the Wake On option in the Settings/Network menu as On and set the Quick Standby option in the Signage>Power Up Settings menu as Disabled. It is necessary that both the device, from which the network message will be sent to the Display, and the Display are connected to the same network. All devices must support magic packet on the system from Access Points to the device which sends the magic packet and the device which receives the magic packet to wake-up. You can use any Wake-on-LAN software available for the operating system of your device in order to send magic packets.In order to use this feature the Display and the remote device should be connected at least once while the Display is on. If the Display is powered off, the connection should be re-established, the next time it is switched on. Otherwise this feature will be unavailable. This does not apply, when the Display is switched into the standby mode.How to control functionality• Enable Wake On option from Settings>Network
menu by settings as On• Connect your Display and the remote device, which
will send the magic packets to the Display, to the same network
• Get the MAC address of your Display which will be needed in order to send magic packets
• Switch the Display into standby mode• Send magic packets to the MAC address of your
Display by using mobile phones, Linux or Windows computers
Your Display should wake up after receiving magic packets.
Connecting Other Wireless DevicesYour Display supports another short range wireless connection technology too. A pairing is required before using these kind of wireless devices with the Display set. You should do the followings to pair your device with the Display:

English - 29 -
• Set the device to pairing mode• Start device discovery on the DisplayNote: Refer to the user manual of the wireless device to learn how to set the device to pairing mode.
You can connect audio devices wirelessly to your Display. Unplug or switch off any other connected audio device in order for wireless connection feature to work correctly. Select the Audio Link option in the Settings>Sound menu and press the OK button to open the related menu. Using this menu you can discover and connect the devices that use the same wireless technology and start to use them. Follow the on-screen instructions. Start the device discovery. A list of available wireless devices will be displayed. Select the device you want to connect from the list and press the OK button to connect. If “Device connected” message is displayed, the connection is successfully established. If the connection fails try it again.Note: Wireless devices may operate within the same radio frequency range and may interfere with one another. To improve the performance of your wireless device place it at least 1 meter away from any other wireless devices.
Wireless DisplayWireless Display is a standard for streaming video and sound content. This feature provides the ability to use your Display as wireless display device.Using with mobile devicesThere are different standards which enable sharing of screens including graphical, video and audio content between your mobile device and Display.Plug in the WLAN USB dongle to Display first, then press the Source button on the remote and switch to Wireless Display source. A screen appears stating that the Display is ready for connection.Open the sharing application on your mobile device. These applications are named differently for each brand, refer to the instruction manual of your mobile device for detailed information.Scan for devices. After you select your Display and connect, the screen of your device will be displayed on your Display.Note: This feature can be used only if the mobile device supports this feature. If you experience problems with the connection check if the operating system version you use supports this feature. There may be incompatibility problems with the operating system versions which are released after the production of this Display. Scanning and connecting processes differ according to the programme you use. The maximum supported resolution is 1920x1080. Image quality may be affected by neighbouring wireless networks and your internet connection speed.
Connectivity TroubleshootingWireless Network Not Available• Ensure that any firewalls of your network allow the
Display wireless connection. • Try searching for wireless networks again, using the
Network menu screen.If the wireless network does not function properly, try using the wired network. Refer to the Wired Connectivity section for more information on the process.If the Display does not function using the wired connection, check the modem (router). If the router does not have a problem, check the internet connection of your modem.Connection is SlowSee the instruction book of your wireless modem to get information on the internal service area, connection speed, signal quality and other settings. You need to have a high speed connection for your modem.Distruption during playback or slow reactionsYou could try the following in such a case:Keep at least three meters distance from microwave ovens, mobile telephones, bluetooth devices or any other WLAN compatible devices. Try changing the active channel on the WLAN router.Internet Connection Not AvailableIf the MAC address (a unique identifier number) of your PC or modem has been permanently registered, it is possible that your Display might not connect to the internet. In such a case, the MAC address is authenticated each time when you connect to the internet. This is a precaution against unauthorized access. Since your Display has its own MAC address, your internet service provider cannot validate the MAC address of your Display. For this reason, your Display cannot connect to the internet. Contact your internet service provider and request information on how to connect a different device, such as your Display, to the internet.It is also possible that the connection may not be available due to a firewall problem. If you think this causes your problem, contact your internet service provider. A firewall might be the reason of a connectivity problem.
AppsYou can access the applications installed on your Display from Apps menu. Highlight an app and press OK to launch.

English - 30 -
In order to open the Start url that is defined the in Settings>Signage>Link Options menu highlight the Custom App option and press OK. Notes: Possible application dependent problems may be caused by the content service provider.Third party internet services may change, be discontinued or restricted at any time.
Using Audio Video Sharing Network Service
Audio Video Sharing feature uses a standard that eases the viewing process of digital electronics and makes them more convenient to use on a home network. This standard allows you to view and play photos, music and videos stored on your media server connected to your home network.1. Server Software InstallationThe Audio Video Sharing feature cannot be used if the server programme is not installed onto your PC or if the required media server software is not installed onto the companion device. Please prepare your PC with a proper server programme.2. Connect to a Wired or Wireless NetworkSee the Wired/Wireless Connectivity chapters for detailed configuration information. 3. Enable Audio Video SharingEnter the Settings>System>More menu and enable the Audio Video Sharing option.4. Play Shared Files via Media BrowserHighlight the Audio Video Sharing option in the Sources menu by using the directional buttons and press OK. Available media server devices in the network will be listed. Select one and press OK to continue. The media browser will then be displayed. Refer to the Media Browser Menu section for further information on file playback.If a problem occurs with the network, please switch your display off at the wall socket and back on again. Trick mode and jump are not supported with the Audio Video Sharing feature.PC/HDD/Media Player or any other devices that are compatible should be used for higher playback quality.Note: There may be some PC’s which may not be able to utilise the Audio Video Sharing feature due to administrator and security settings (such as business PC’s).
Internet BrowserTo use the internet browser enter the Apps menu first. Then launch the internet browser application which has an orange coloured logo with earth symbol on it. (*) The appearance of the internet browser logo may change
In the initial screen of the browser, the thumbnails of the predefined (if any) links to web sites available will be displayed as Speed Dial options along with the Edit Speed Dial and the Add to Speed Dial options.You can press the Internet button on the remote to open the initial internet browser page. If the Open browser initial page URL in the Settings>Signage>Link Options menu is defined, the browser will open on this page. Otherwise this button will not be functional.To navigate the web browser, use the directional buttons on the remote or a connected mouse. To see the browser options bar, move the cursor to the top of the page. History, Tabs and Bookmarks options and the browser bar which contains previous/next buttons, the refresh button, the adress/search bar, the Speed Dial and the Vewd buttons are available.To add a desired website to the Speed Dial list for quick access, move the cursor to the top of the page. The browser bar will appear. Highlight the Speed Dial - button and press the OK button. Then select Add to Speed Dial option and press the OK button. Fill in the blanks for Name and Address, highlight OK and press the OK button to add. Whilst you are on the site you wish to add to the Speed Dial list, highlight the Vewd button and press the OK button. Then highlight Add to Speed Dial option in the submenu and press the OK button again. Name and Address will be filled automatically according to the site you are visiting. Highlight OK and press the OK button to add.You can also use the Vewd menu options to manage the browser. Highlight the Vewd button and press the OK button to see available page specific and general options.There are various ways to search or visit websites using the web browser. Enter the address of a website(URL) into the search/
address bar and highlight the Submit button on the virtual keyboard and press the OK button to visit the site.
Enter keyword/s into the search/address bar and highlight the Submit button on the virtual keyboard and press the OK button to start a search for the related websites.
Highlight a Speed Dial thumbnail and press the OK button to visit the related website.
Your Display is compatible with USB keyboard/mice. Plug your device into the USB input of your Display for easier and quicker navigation.Some web pages include flash content. These are not supported by the browser.Your Display does not support any download processes from the internet via the browser.All sites on the internet might not be supportted. According to the site; content problems may occur.

English - 31 -
In some circumstances video contents might not be able to be played.
OSD Rotation SupportYou can change the OSD (On Screen Display) rotation of your Display if desired. While performing First time installation set the OSD Orientation option as desired when the Signage menu is displayed. You can also change this setting later from the Signage>-Controls menu. Available options are: Landscape, Portrait 1 and Portrait 2.
HDMI OutThe HDMI port located on the rear left side of the Display functions as an output port (upper HDMI port, HDMI Out). This port will not function as an input, thus no source devices should be connected to this port. Only the content received from the HDMI input port located also on the rear left side of the Display (lower HDMI port, HDMI1 In) can be outputted from this port. The contents received from other inputs, such as VGA or Display Port, can not be outputted. This is a default function and you can not disable/enable through any menu option. HDMI output port will always function if a source device is connected to the specified HDMI input.
Real Time Clock (RTC)Your Display has an RTC. It is used to maintain the real date and time information for a period of time if the energy supply is interrupted by separating the Display from the mains or by a power blackout. In this case the Display will use the date and time information stored in RTC.• All time sources are able to override RTC date/time.• Display tries to connect to the NTP server period-
ically (6 hours after last update) to get the current date and time information. If the Display successfully gets these informations from the NTP server, it updates itself and RTC with the received date and time information. If the NTP server update fails, the Display uses RTC time and date to update itself.
• The RTC battery provides power to the integrated real-time clock and the calendar. Without any external power source, RTC is able to function for a minimum of 14 days.
• If RTC is used as time source, manual date-time set is enabled from Date/Time option in the Settings> System menu.
Controlling With An External PC
1
2 34
5
1 RS-232 Input Socket2 RS-232 straight cable (commercially available)3 To COM port4 RS-232 to USB Adaptor5 PC
You can control the product from an external PC via RS-232 (COM port) or LAN (Ethernet port) on the PC. For instance, system source can be changed by RS-232 from remote computer. When a command is sent from the PC to the product, the product operates according to the received command and sends a response message to the PC.
Equipment/Tools:• RS-232 (female) to RS-232(male) cable or LAN
cable (connected via router)• USB to RS-232(male) cable• Notebook or PC which has USB or LAN port• Installed program on remote PC to send commands:

English - 32 -
In general, the RS-232 commands are sent for operating the implemented functions via serial port and utility. A suitable utility can be used such as described below. Secure CommandsThis feature is controlled by the Secure Command profile option. If option is enabled, all commands will be registered as secure.If this profile option is disabled, commands can be run without having admin level, otherwise user must have ADMIN level privilege.Currently there are 2 modes for user: NORMAL and ADMINFor switching user to admin mode, use the following command:SETUSERSECLEVEL ADMIN <password>This setting is not permanent, and will be set to default (NORMAL) again in case of restart.Connecting to the Display (LAN port)Download and install the PuTTY software from the following link first: http://www.putty.org/.Run the software and enter the Display’s IP address in the field Host Name. Enter “1986” as a default value in the field Port. Then select “Telnet” as Connection type and click the Open button.Note: Refer to the Connectivity section of this manual for information on connecting the Display to a network and displaying the IP address of the Display.
Use the commands in the RS232 Command Table.For example, if “GETVOLUME” command is entered, current volume level should be displayed on the putty window as shown in the pictures below.
Another example; Volume level can be changed by using “VOLUME” command. After sending this command, you can verify the changes from the Display.
The last example ;When “GETSOURCE” command is entered, current source should be displayed on the putty window as shown in the picture below.
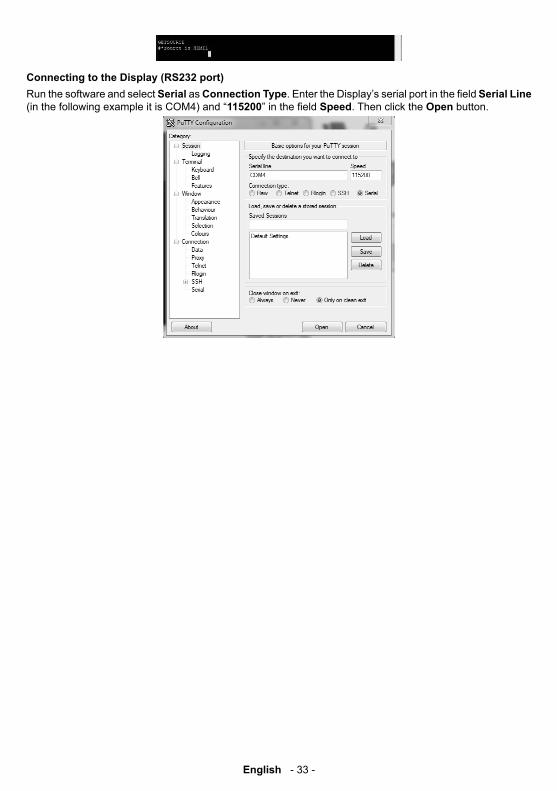
English - 33 -
Connecting to the Display (RS232 port)Run the software and select Serial as Connection Type. Enter the Display’s serial port in the field Serial Line (in the following example it is COM4) and “115200” in the field Speed. Then click the Open button.

English - 34 -
RS232/LAN Command TablesAUDIO COMMANDS
Command Description Parameter Return
VOLUME Set volume level. integer n (0 ≤ n ≤ 100) #*set volume to nGETVOLUME Volume level information. no parameter #*volume level is ...
HEADPHONEVOLUME Set headphone volume level. integer n (0 ≤ n ≤ 100)
#*set headphone volume to n or #*invalid headphone volume level entered
GETHEADPHONEVOLUME Headphone volume level information. no parameter #*headphone volume is ...
SETHEADPHONEOUTPUT Set headphone output string n (headphone,lineout)#*set headphone output to n or #*Invalid Parameter
GETHEADPHONEOUTPUT Get headphone output no parameter#*LINEOUT or #*HEADPHONE
GETMUTE Get mute status. no parameter#*MUTE OFF or #*MUTE ON
SETMUTE Toggle mute status. no parameter#*MUTE OFF or #*MUTE ON
SETSOUNDMODE
Set sound mode.SETEQUSERFREQ 100Hz 10 It's available if TV source is active.
integer n (0 = mono, 1 = stereo, 2 = dual I, 3 = dual II, 4 = mono left, 5 = mono right)
#*setSoundMode() set to n or #*Invalid sound mode entered or #*TV Source is inactive.
SETBALANCE Set balance value. integer n (-50 <= n <= 50)#*set balance level to n or #*invalid balance level entered
GETBALANCE Get balance value. no parameter #*balance level is ...
SETAVL Set AVL state. integer n (0 = off, 1 = on)
#*AVL is not changed due to DAP (Dolby Audio Processing Availability) is active or #*set avl state to n or Invalid parameter (0-1)
GETAVL Get AVL state. no parameter
#*DAP (Dolby Audio Processing Availability) is active or #*avl state is ...
SETDAPAVL Set DAP (Dolby Audio Processing) AVL state.
integer n (0 = off, 1 = normal, 2 = night, 3 = auto)
#*DAP AVL is not changed due to DAP (Dolby Audio Processing Availability) is inactive or #*DAP AVL is not changed due to DAP (Dolby Audio Processing Availability) Mode is off or #*Set DAP (Dolby Audio Processing) state to n or Invalid parameter (0-1-2-3)

English - 35 -
GETDAPAVL Get DAP (Dolby Audio Processing) AVL state. no parameter
#*DAP (Dolby Audio Processing Availability) is inactive or #*DAP (Dolby Audio Processing Availability) Mode is off or #*DAP (Dolby Audio Processing) state is ...
SETDYNAMICBASS Set dynamic bass state. integer n (0 = off, 1 = on) #*set dynamic bass state to n
GETDYNAMICBASS Get dynamic bass state. no parameter #*the dynamic bass state is ... (0 = off, 1= on)
SETBASSGAIN Set bass gain integer n (-6 <= n <= 6)
#*set bass gain to n or #*Incorrect sound system parameter entered
GETBASSGAIN Get bass gain no parameter #*the bass gain level is n Note: Above n is -6 <= n <= 6
SETSURROUNDSOUND Set surround sound state. integer n (0 = off, 1 = on) #*set surround sound state to n
SETEQUSERFREQ Set equalizer user freq. value for any band.
string n (120Hz, 500Hz, 1.5KHz, 5KHz, 10KHz) integer n -13 < n < 13 Example: SETEQUSERFREQ 120Hz 10
#*setEQUserFreq() set to n or #*Invalid parameter entered or #*Incorrect equalizer mode. It should be USER mode
GETEQUSERFREQ Get equalizer user freq. value of specified band
string n (120Hz, 500Hz, 1.5KHz, 5KHz, 10Khz)
#*the equalizer value for the band is n or #*Invalid parameter entered Note: Above n is -13 < n < 13
GETDIGITALOUT Get digital out. no parameter#*digital out is pcm or #*digital out is compressed
SETSOUNDSYSTEM Set sound system. string n (M, BG, I, DK, L, LP)
#*setSoundSystem() to n or #*Incorrect sound system parameter entered
SETEQMODE Set equalizer mode. string n (Music, Movie, Speech, Flat, Classic, User)
#*setEQMode() set to n or #*Incorrect equalizer parameter entered
GETEQMODE Get equalizer mode no parameter
#*the equalizer mode is n Note: Above n is one of Music, Movie, Speech, Flat, Classic, User
SETDIGITALOUT Set digital out. string n (compressed, pcm)
#*setDigitalOut() set to n or #*Incorrect digital out mode parameter entered
HARDOFHEARING Set hard of hearing state. integer n (0 = off, 1 = on) #*set hardofhearing state to n
AUDIODESC Set audio description state. integer n (0 = off, 1 = on) #*set audio description state to n
VOLUMEUPInrease Volume Level by 1 step (Until max volume)
no parameter
#*volume LEVEL is increased to ... or #*Volume level is at max value. You can not increase volume level further. Confirmed max volume level is ...
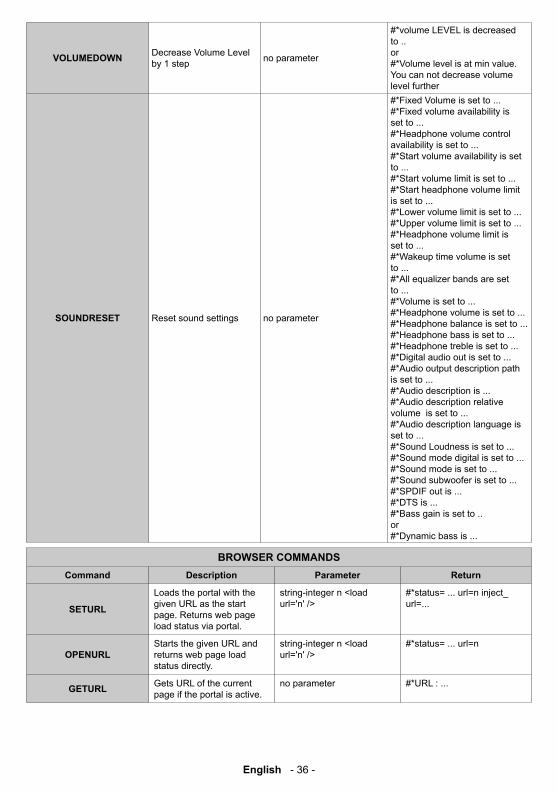
English - 36 -
VOLUMEDOWN Decrease Volume Level by 1 step no parameter
#*volume LEVEL is decreased to .. or #*Volume level is at min value. You can not decrease volume level further
SOUNDRESET Reset sound settings no parameter
#*Fixed Volume is set to ... #*Fixed volume availability is set to ... #*Headphone volume control availability is set to ... #*Start volume availability is set to ... #*Start volume limit is set to ... #*Start headphone volume limit is set to ... #*Lower volume limit is set to ... #*Upper volume limit is set to ... #*Headphone volume limit is set to ... #*Wakeup time volume is set to ... #*All equalizer bands are set to ... #*Volume is set to ... #*Headphone volume is set to ... #*Headphone balance is set to ... #*Headphone bass is set to ... #*Headphone treble is set to ... #*Digital audio out is set to ... #*Audio output description path is set to ... #*Audio description is ... #*Audio description relative volume is set to ... #*Audio description language is set to ... #*Sound Loudness is set to ... #*Sound mode digital is set to ... #*Sound mode is set to ... #*Sound subwoofer is set to ... #*SPDIF out is ... #*DTS is ... #*Bass gain is set to .. or #*Dynamic bass is ...
BROWSER COMMANDSCommand Description Parameter Return
SETURL
Loads the portal with the given URL as the start page. Returns web page load status via portal.
string-integer n <load url='n' />
#*status= ... url=n inject_url=...
OPENURLStarts the given URL and returns web page load status directly.
string-integer n <load url='n' />
#*status= ... url=n
GETURL Gets URL of the current page if the portal is active.
no parameter #*URL : ...

English - 37 -
SETSETTINGSURL
Sets the browser settings URL (URL set by the command is openned with long press on CMS key)
string #*Setting URL is set
GETSETTINGSURL Gets the browser settings URL
no parameter #*Setting URL is ...
SETSTARTURL Sets the start URL string #*Start URL is set
GETSTARTURL Gets the start URL no parameter #*Start URL is ...
GETUSERAGENT Gets portal user agent. no parameter #*Current UA : ...
GETCURSORPOSITION Gets cursor position in the browser.
no parameter #*X: ... Y: ...
SETCURSORPOSITION Sets cursor position in the browser.
string-integer a,b #*X: a Y: b
GETTOUCHCONTROL Touch control is n, where n is one of (off, on)
no parameter #*Touch control is n
SETTOUCHCONTROL
SETTOUCHCONTROL n, where n is one of (off, on)
string parameter "on" or "off"
#*Set Touch Control on or #*Set Touch Control off or #*Touch Control is already on or #*Touch Control is already off or #*Touch Device is not available or #*invalid value entered
CLEARCACHE Clear browser cache/cookies
no parameter #*Browser cookies are cleared
CLEARBROWSERDATAClear browser data files like History, Bookmarks, Speed Dial and Configuration
no parameter #*Browser data files are cleared
GETCMSSTATUS Gets the CMS status no parameter Returns the value of cms status
SETCMSSTATUSSets the CMS status string parameter max.
length of 255 characters#*CMS status set to ... or #*NACK
GETCMSPARAMS Gets the CMS parameters no parameter Returns the value of cms params
SETCMSPARAMSSets the CMS parameters string parameter max.
length of 255 characters#*CMS params set to ... or #*NACK

English - 38 -
GENERAL DISPLAY COMMANDSCommand Description Parameter Return
LedTurns the led on/off. (Used for setting the led statu of current state)
integer n (0 = off, 1 = on)Led is ON or Led is OFF
GETLEDGet led on/off state. (Used for getting the led statu of current state)
no parameter#*LED is on or #*LED is off
SETSTANDBYLED Set Standby led status string n (n = ON, n = OFF)
#*Standby Led is set to ON or #*Standby Led is set to OFF or #*Standby Led is not set (invalid input)
SETRC Enables/disables remote control commands.
string-integer n (n = ON, n = OFF)
set remote state to ON or set remote state to OFF or Missing remote state selection or wrong string parameter for remote state
GETRCGet remote control commands enabled status
no parameter#*remote state is on or #*remote state is off
irkey irkey KeyValue(HEX). string-integer n (ex: irkey 0x38) GenericIRKeySet key: n
SETSOURCE Set source as enable/disable.
string n, integer b (n = SCART1, n = SCART2, n = FAV, n = SVHS, n = HDMI1, n = HDMI2, n = HDMI3, n = HDMI4, n = YPBPR, n = VGA, n = SCART1S, n = SCART2S, n = DP, n = OPS, n = DVI, n = BACKAV, n = WIDI ) (b = 1(enable), b = 0(disable))
#*Selected source n #*Enable/Disable state : b
GETSOURCE Gets source. no parameter #*source is ...
CHILDLOCK Set child lock mode. integer n (0 = off, 1 = on) #*set child lock state to n
OSDMENU Set osd menu mode integer n (0 = off, 1 = on) #*set osd menu state to n
AUTOTVOFF Set auto panel off level. integer n (0 = off, 1 = on)#*set auto tv off mode to ON or #*set auto tv off mode to OFF
GETAUTOTVOFF Get auto panel off mode. no parameter#*auto TV off is on or #*auto TV off is off
GETCOUNTRY Get country in channels state. no parameter #*COUNTRY IS : ...
GETCURRENTANALOG- TVSYSTEM
Get current analog tv system value. no parameter #*CURRENT TV SYSTEM : ...
GETSWVERSION Returns the software version of panel. no parameter #*V...
BUILDINFO Reports the build info. no parameter #*Build info = ... Revision = ...

English - 39 -
FACTORY
Load factory settings to NVRAM. Settings are updated with defaults. Clears flash.
no parameter #*Factory Settings were loaded to NVRAM.
KEY Send key.string-integer n (n = 0, n = 1, ......, n = up, ......, n = menu, .....ext.)
n key sent
RESET Reset the device. no parameterReset process was successfully accomplished. You need to establish the connection again.
KEY standbySwitch box to Standby mode. ( For quick standby)
no parameter standby key sent
SETQUICKSTANDBY(only hotel tv project)
SETQUICKSTANDBY n, where n is one of (off, on).
string-integer n (n = ON, n = OFF)
#*Set Quick Standby on or #*Set Quick Standby off or #*Quick Standby is not enabled
GETQUICKSTANDBY(only hotel tv project)
Returns Quick Standby state n (on or off) no parameter #*Quick Stanby is n
SETQUICKSTANDBY- OPTION
SETQUICKSTANDBY- OPTION n, where n is one of (OFF, ON).
string-integer n (n = ON, n = OFF)
#*Set Quick Standby option ON or #*Set Quick Standby option OFF or#*Quick Standby option is ON or OFF or #*Quick Standby Control is not enabled
GETQUICKSTANDBY- OPTION
Returns Quick Standby option state (enabled or disabled)
no parameter #*quick standby option is ...
STANDBY(only hotel tv project)
Switch box to Standby mode. ( Attention: Television cannot be opened with standby command. You should open it with remote control. If you use STANDBY command, you will need to establish the connection again. Tv state :HARD-STANDBY )
no parameter
#*enterLowPowerMode() returns successfully. or #*enterLowPowerMode() returns unsuccessfully! or #*enterStandbyMode() returns successfully. or #*enterStandbyMode() returns unsuccessfully!
USBSWUPDATE Updates software from usb and re-boots. no parameter
upgradeSoftwareFromUSB (frost_bool force:1) Successfully written or no ... found
USBOPERATIONS Perform USB Operations no parameter
You may observe prints Bank 0, Bank 1 etc. Be sure or observe debug print outs: "MFC ISP: done" will be writen... This may take over 10 minutes.

English - 40 -
VIDOFF Select video off. no parameter Video off.
VIDON Select video on. no parameter Video on.
GETVIDSTATE Get video state. no parameter#*video is on or #*video is off
TIME Display the current date and time. no parameter Time = ...
SETTIMEMODE Set time mode string n ("auto", "manual")
#*set time mode to n or #*invalid input type or #*can not set time mode
GETTIMEMODE Get time mode no parameter
#*time mode is n or #*can not get time mode Note: Above n is "auto" or "manual".
RTCSET Set/Query RTC clock optional integer parameter
First outputs the current RTC elapsed seconds in decimal and hex format: #*RTC time is 200 0xc8 If a non-zero parameter is passed, sets it as RTC elapsed seconds(assumes parameter is a UTC time) and outputs the following:#*RTC set time to 255 #*RTC new time is 255 0xff
SETRTCDATE Set/Query RTC date
str-int (DD:MM:YYYY, 0 < DD <= # of days in the month, 0 < MM < 13) Example: SETRTCDATE 20:12:2016
#*RTC Date is set to ... or #*Wrong argument format use SETRTCDATE DD:MM:YYYY or #*Invalid month or #*Invalid day
GETRTCDATE Get RTC date no parameter #*The RTC date is ...
MENUTIMEOUT Set menu time out mode. integer n (n = 0 , n = 15, n = 30, n = 60)
#*set menu timeout mode to OFF or #*set menu timeout mode to 60 or #*Invalid menu timeout mode
GETMENUTIMEOUT Get menu time out mode no parameter
#*menu timeout mode is OFF or #*menu timeout mode is n or #*can not get menu timeout mode Note: Above n is one of (15, 30, 60)
GETSTANDBY Get standby on/off. no parameter#*standby off or #*standby on
STARTFTI
Start First Time Installation by presenting FTI dialog just as it does when FTI is triggered from menu by the user.
no parameter #*FTI was initialising.

English - 41 -
BROADCAST Set broadcast type.
integer n (0 = digital_network_type_terrestrial, 1 = digital_network_type_cable, 2 = digital_network_type_satellite)
#*no services of selected type available or #*Set broadcast ...
MAINMENUITEM Select main menu item.string-integer n (picture, sound, settings, installation, channellist, mediabrowser)
#*selectMainMenuItem() set to n
SHOWBUILDOPTIONS Show build options. no parameter #*...
CHANGELNG Change active language.
integer-integer x y x = language type (0 = System Language, 1 = Event Language, 2 = Primary Audio Language, 3 Secondary Audio Language, 4 = Primary Subtitle Language, 5 = Secondary Subtitle Language, 6 = Primary Teletext Language, 7 = Secondary Teletext Language) y = language (0 = Danish, 1 = German, 2 = Estonian, 3 = English, 4 = Spanish, 5 = Greek, 6 = French, 7 = Gaelic, 8 = Croatian, 9 = Italian, 10 = Latvian, 11 = Lithuanian, 12 = Hungarian, 13 = Dutch, 14 = Norwegian, 15 = Polish, 16 = Portuguese, 17 = Russian, 18 = Romanian, 19 = Albanian, 20 = Slovenian, 21 = Slovak, 22 = Serbian, 23 = Finnish, 24 = Swedish, 25 = Turkish, 26 = Czech, 27 = Ukranian, 28 = Bulgarian, 29 = Arabic, 30 = Persian, 31 = Hebrew , 32 = Belarussian, 33 = Macedonian, 34 = Montenegrin, 35 = Kazakh, 36 = Thai) Example: CHANGELNG 0 25 (To set system language to Turkish)
#*Active language was changed or #*Incorrect item parameter entered
GETLANGUAGE Shows the language. no parameter #*Language: X(string)
OSD_PRINT
Prints an osd in x-y position with the string entered and font size in it (OSD_PRINT font_size-X-Y-string).
integer (0 < font_size ≤ 3) integer x integer y string message The range of X and Y position should be in panel size range. The ' * ' character in message is used to go new line and the ' - ' character is used for space.
Font size:..... (1, 2, 3) X POS: x Y POS: y MESSAGE: ... or Osd_print command doesn't work at the teletext_mode or EPG_mode

English - 42 -
SELECTSOURCE
Select source. (0=TV, other source indexes(some of them are not enabled))
integer n (0,14 = TV, 1,15 = SCART1 (CVBS), 3 = SCART2 (CVBS), 5 = FAV, 6 = S-Video, 7 = HDMI1, 8 = HDMI2, 9 = HDMI3, 10 = HDMI4, 11 = YPbPr, 12 = Pc, 13 = SCART2 (S-VIDEO), 16 = SCART1 (S-VIDEO), 17 = DVD, 18 = DVI, 19 = DP, 20 = OPS, 21 = WIDI 22 = ANDROID, 23 = HDMI5 (for Signage Products mb135vs), 24 = HDMI6 (for Signage Products mb135vs), 25 = HDMI7 (for Signage Products mb135vs), 26 = TYPE C (for Signage Products mb135vs))
#*select TV source or #*select External source ...
SETCOUNTRY Set country in no channels state.
string-integer n( TURKEY, GERMANY, ...) Valid country strings are below: ALBANIA, AUSTRALIA, AUSTRIA, BAHRAIN, BELARUS, BELGIUM, BULGARIA, CHINA, COLOMBIA, CROATIA, CYPRUS, CZECH_REBUPLIC, DENMARK, ESTONIA, FINLAND, FRANCE, GERMANY, GREECE, HUNGARY, ICELAND, INDIA, IRAQ, IRELAND, ISLE_OF_MAN, ISRAEL, ITALY, JORDAN, KUWAIT, LATVIA, LEBANON, LITHUANIA, LUXEMBOURG, MACEDONIA, MONTENEGRO, NETHERLANDS, NEW_ZEALAND, NORWAY, OMAN, OTHER, PERSIA, POLAND, PORTUGAL, QATAR, ROMANIA, RUSSIA, SAN_MARINO, SAUDI_ARABIA, SERBIA, SLOVAKIA, SLOVENIA, SOUTH_AFRICA, SPAIN, SWEDEN, SWITZERLAND, THAILAND, TURKEY, UKRAINE, UNITED_ARAB_EMIRATES, UK, GHANA, EGYPT, LIBERIA, TOGO, SIERRA_LEONE, COTE_D_IVOIRE, KENYA, TANZANIA, MOZAMBIQUE, CONGO, SENEGAL, NIGERIA, ETHIOPIA, ZAMBIA, UGANDA, ARGENTINA, ANGOLA, CANADA, US. , JAPAN, MEXICO, BRAZIL, SOUTH_KOREA, TAIWAN, PALESTINE, HONG_KONG
#* setCountry() set to n or #*Country should be set only in the FTI mode (no channels state)

English - 43 -
GETPORTALMODE Gets tv is portal mode or not. no parameter
#*tv_portal_status:0 #*Portal status 0 is sent to listening socket(if open) or #*tv_portal_status:1#*Portal status 1 is sent to listening socket(if open)
SETFRONTPANEL- CLOCK
Sets front panel clock time( values : 10:00 , 12:30 ,... ).
string-integer n( 10:00, 14:00, ...)
#*Time is set succesfully. or #*Given time parameter is wrong! Time is not set.!(Param : 10:00 , 12:30 , ...)
GETMODELNO Get model no. no parameter #*Model no: ...
SETMODELNO Set model no. string-integer n#*ACK or #*NACK
GETSERIALNOGet serial no. (returns #*NACK if no serial number has been set)
no parameter#*<Serial no> or #*NACK
SETSERIALNO Set serial no. string-integer n#*ACK or #*NACK
DEACTIVATENETFLIX Remove account informations of Netflix. no parameter
#*Account informations were deleted for Netflix or #*Remove failed for Netflix account.
GETTVLIFETIME Prints panel life time in minutes. no parameter #*TV Life Time: n
SETPOWERONDELAY Set poweron delay level integer n (0<=n<=20, delay is calculated as 100ms*n)
#*Poweron delay set to ... ms or #*NACK
GETPOWERONDELAY Get poweron delay level no parameter #*The power on delay is … ms
SIGNAGERESETSet all items in the signage settings menu to their default values.
no parameter #*All signage settings set to default values
SETFTIPIN Set FTI PIN number integer n (n is a four digit number)
#*FTI PIN was set to n or #*PIN can not be set to n
GETFTIPIN Get FTI PIN number no parameter #*The FTI PIN is n
SETUSERSECLEVEL Set user security level
string - string (new security level(NORMAL / ADMIN) - password)Please request the password from your supplier.
#*User security level was set to ...
GETPROFILEINFO Get Profile Info no parameter #*Profile name: mbXXX_draft_profile
SILENTRESETResets the device without coming up backlight.
no parameter
#*This command is available only Active Standby state! or #*Reset operation was not successful
GETCPUTEMPERATURE Gets cpu temperature no parameter #*cpu temperature is ...
GETRAMUSAGEPER- CENTAGE
Gets ram usage percentage no parameter
#*memory usage percentage is ... or #*can not get memory usage percentage

English - 44 -
ENTERACTIVESTANDBY Enter active standby state no parameter
#*TV will be sent to Active Standby state! or #*TV is in Active Standby state already!
EXITACTIVESTANDBY Exit active standby state no parameter #* TV is not in Active Standby state!
SWOL Set Wake on Lan option integer n ( n = 1 (enable), n = 0 (disable))
#*Wake on Lan is set to enable. or #*Wake on Lan is set to disable.
GWOL Get Wake on Lan option no parameter#*Wake on Lan is enable. or #*Wake on Lan is disable.
SETCUSTOMERNAME Change or set the Customer name string - (customername) #*Customer name is set as
TOSHIBA (ie. TOSHIBA)
GETCUSTOMER Get the Customer name no parameter *Customer:TOSHIBA#* (ie. TOSHIBA)
screen_capture_usb Capture specified surface as bmp to USB stick.
integer n (0 for UI, 8 for video and OSD)
#*Screen capture is successfull. or #*Screen capture failed!
NETWORK COMMANDSCommand Description Parameter Return
set_IP_address Set static IP address of eth0 network interface.
str-int n Example: set_IP_address 192.168.0.15
#*IP address setting Succesfull or #*IP address setting NOK
get_IP_addressGet IP address of eth0 network interface. Usage: get_IP_address
no parameter #*IPaddr: ...
SAVEWIFIPROFILE Save access point to wifi_profile. str-int ssid, bssid key
Profile saved. or Number of profiles exceeds the maximum number to be stored.
Wifi
checks if given SSID wifi is found or not and returns Pass or Fail. Works only in portal mode
str-int ssid#*Pass or #*FAIL
GETWIFIAPSSID returns the SSID of access point no parameter #*Current stored Wifi AP SSID is
(<SSID>)
SETWIFIAPSSIDsets the SSID of access point. SSID must be maximum 32 characters
string n (example ‘AP-ac:6d:bb:82:a8:ac’ or ‘486dbb82a89ac’ )
#*Error! SSID can not be changed when Access Point is active or #*Error! SSID parameter is too long. Should be less than 32 characters or #*Wifi AP SSID is already (<SSID>) or #*Setting Wifi AP SSID (<SSID>) succeeded
GETWIFIAPSECURITY- TYPE
returns the security type of access point no parameter #*Current stored Wifi AP Security
type is (<TYPE>)

English - 45 -
SETWIFIAPSECURITY- TYPE
sets the security type of access point. The value should be "none" or "WPA2-PSK"
string n (‘none’ or ‘WPA2-PSK’ note: string is case insensitive)
#*Error! Security Type can not be changed when Access Point is active or #*Error! Security type parameter should be given or #*Error! Security type parameter is invalidor #*Security Type is set to (<TYPE>) succeeded
GETWIFIAPSECURITY- PASSWORD
returns the password of access point no parameter #*Current stored Wifi AP Password
is (<PASSWORD>)
SETWIFIAPSECURITY- PASSWORD
sets the password of access point. Password must be maximum 64 characters
string n (example: ‘Password1234’ )
#*Error! Security Password can not be changed when Access Point is active or #*Error! Password length should be between 8 and 63 characters or #*Setting Wifi AP Password (<PASSWORD>) succeeded
GETWIFIAPSTATEreturns the access point state ‘active’ or ‘not active’
no parameter #*Wifi Access Point is (<STATE>)
SETWIFIAPSTATEsets the access point state. State should be ‘off’ or ‘on’
string n ( ‘on’ or ‘off’ note: string is case insensitive)
#*Error! Access Point state parameter is invalid or #*Access Point state is already (<STATE>) or #*Setting Wifi AP state (<STATE>) succeeded
GETWIFIAPCHANNELreturns the stored channel of the wifi access point
no parameter #*Current stored Wifi AP Channel is (<channel>)
SETWIFIAPCHANNEL sets the channel of the wifi access point
n (integer channel) - (Channel number should be valid for current country. If invalid channel number is given all valid channel numbers will be listed.)
#*Setting Wifi AP Channel (<channel>) succeeded or #*Wifi AP Channel is already (<channel>) or #*Error! Invalid channel. Available channels for your country (<country name>) are: <all available channels separated with space>
GETWIFIAPTXPOWER returns TX Power for wifi access point no parameter #*Current Wifi AP TX Power is
<tx-power>
SETWIFIAPTXPOWER sets TX Power for wifi access point.
n (integer tx power in dBm) - should be in the range of 0 - 20 dbm (0 for default value)
#*Setting Wifi AP TX Power (<tx-power>) is successful. or #*Wifi AP TX Power is already set to (<tx-power>)! or #*Error setting Wifi Access Point TX Power (<tx-power>)! TX Power should be in the range of 0 - 20 dbm (0 for default value) or #*Error setting Wifi Access Point TX Power (<tx-power>)!

English - 46 -
NETCLONE
Clone from FTP server Before this process, please check network configuration (If a static ip address is set, it will also be cloned)
string "<ip-of-ftp-server/path>" Ex: ftp://user_name:password@ip_addr/source_path
#* Invalid parameter or #* "file_name" is cloned successfully or #* "file_name" clone is failed
SETNETWORKTYPE
set network type (eg. SETNETWORKTYPE value) (value should be 'wired', 'wireless' or 'disabled' as string)
string n ('wired', 'wireless' or 'disabled')
#*Network type is set to: <network-type> or #*wireless connnection is not supported! or #*Network is not supported!or #*invalid parameter <network-type>
GETNETWORKTYPE get network type (eg. GETNETWORKTYPE) no parameter #*the network type is <network-
type>
SETSUBNETMASK
set subnet mask (subnet mask value should be of format nnn.nnn.nnn.nnn) (eg. SETSUBNETMASK nnn.nnn.nnn.nnn)
string "nnn.nnn.nnn.nnn"
#*set subnet mask: nnn.nnn.nnn.nnn or #*setting subnet mask is failed
GETSUBNETMASK get subnet mask (eg. GETSUBNETMASK) no parameter #*the subnet mask is nnn.nnn.
nnn.nnn
SETDEFAULTGATEWAY
set default gateway (default gateway value should be of format nnn.nnn.nnn.nnn) (eg. SETDEFAULTGATEWAY nnn.nnn.nnn.nnn)
string "nnn.nnn.nnn.nnn"
#*set default gateway: nnn.nnn.nnn.nnn or #*setting default gateway is failed
GETDEFAULTGATEWAY get default gateway (eg. GETDEFAULTGATEWAY) no parameter #*the default gateway is nnn.nnn.
nnn.nnn
SETDNS- CONFIGURATION
set DNS configuration mode (auto,manual) (eg. SETDNS CONFIGURATION mode (auto,manual))
string n ('auto' or 'manual')
#*set DNS configuration to: <dns-conf-mode> or #*setting DNS configuration is failed
GETDNS CONFIGURATION
get DNS configuration mode (auto,manual) (eg. GETDNS CONFIGURATION)
no parameter
#*the DNS configuration is manual or #*the DNS configuration is auto or on error: #*the DNS configuration is unknown
SETDNS1
set DNS server 1 (DNS server value should be of format nnn.nnn.nnn.nnn) (eg. SETDNS1 nnn.nnn.nnn.nnn)
string "nnn.nnn.nnn.nnn"
#*set DNS server 1 to: nnn.nnn.nnn.nnn or #*setting DNS server 1 failed
GETDNS1 get DNS server 1 (eg. GETDNS1) no parameter #*DNS server 1 is nnn.nnn.nnn.
nnn
SETDNS2
set DNS server 2 (DNS server value should be of format nnn.nnn.nnn.nnn) (eg. SETDNS2 nnn.nnn.nnn.nnn)
string "nnn.nnn.nnn.nnn"
#*set DNS server 2 to: nnn.nnn.nnn.nnn or #*setting DNS server 2 failed
GETDNS2 get DNS server 2 (eg. GETDNS2) no parameter #*DNS server 2 is nnn.nnn.nnn.
nnn

English - 47 -
INTERNETSPEED start internet speed test no parameterSpeed test is started. Prints "No internet connection found" message if fails.
GETINTERNETSPEED get internet speed no parameter #*The internet speed is ... Mbps
SETHOSTNAME
Creates the file (if does not exist) "/conf/ip_tuner/hostname.txt" and pastes the string into that file
string ABC(hostname)
#*SUCCESS Hostname ABC is written into the fileor #*FAILURE Hostname can not be set
GETHOSTNAME Returns the customisable Hostname no parameter
#*SUCCESS Hostname is ABCor #*FAILURE Hostname can not be read
DELETEHOSTNAME Deletes the Hostname file from file system no parameter
#*SUCCESS Hostname file is deleted or #*FAILURE Hostname file can not be deleted
SETPROXY Sets proxy configuration string (nnn.nnn.nnn.nnn:nnnn)
#*addr = nnn.nnn.nnn.nnn, port = nnnn
GETPROXY Gets proxy configuration no parameter
#*Current proxy is nnn.nnn.nnn.nnn:nnnn or #*No proxy address
CLEARPROXY Clears proxy configuration no parameter #*Proxy was cleaned
VGA/PC COMMANDSCommand Description Parameter Return
SETOSDORIENTATION Set OSD orientation
string-integer n ( n = landscape, n = portrait, n = portrait2) ( landscape : 0 degree rotation, portrait : 90 degree rotation,portrati2: 270 degree rotation)
#*ACK or #*NACK
GETOSDORIENTATION Get OSD orientation no parameter #*The OSD orientation ...
SETBROWSER- ORIENTATION Set Browser orientation
string-integer n ( n = landscape, n = portrait, n = portrait2) ( landscape : 0 degree rotation, portrait : 90 degree rotation,portrati2: 270 degree rotation)
#*ACK or #*NACK
GETBROWSER- ORIENTATION Get Browser orientation no parameter #*The Browser orientation ...
HPOS Set horizontal position. int n (-25 ≤ n ≤ 25)
set horizontal position to ... or #*invalid value entered or #*HPOS is available only for VGA Source.

English - 48 -
GETHPOS Get horizontal position. no parameter
#*The horizontal position is ... or #*GETHPOS is available only for VGA Source.
VPOS Set vertical position. int n (-25 ≤ n ≤ 25)
#*set vertical position to ... or #*invalid value entered or #*VPOS is available only for VGA Source.
GETVPOS Get vertical position. no parameter
#*The vertical position is ... or #*GETVPOS is available only for VGA Source.
DOTCLOCK Set dot clock. int n (-50 ≤ n ≤ 50)
#*set dot clock to ... (percentange in the range) or #*invalid value entered or #*DOTCLOCK is available only for VGA Source.
GETDOTCLOCK Get dot clock. no parameter
#*The dot clock is ... or #*GETDOTCLOCK is available only for VGA Source.
PHASE Set phase. int n (-30 ≤ n ≤ 30)
#*set dot clock to ... (percentange in the range) or #*invalid value entered or #*PHASE is available only for VGA Source.
GETPHASE Get phase. no parameter
#*The phase is ... or #*GETPHASE is available only for VGA Source.
AUTOPOS Set auto position no parameter
#*set auto position or #*Auto position is available only for VGA Source.
SETOPSPOWER Set OPS power status string parameter "on" or "off"
#*Turning OPS on #*Turning OPS off #*The OPS is already on #*The OPS is already off #*The OPS is not enabled #*The OPS is not plugged in #*invalid value entered
GETOPSPOWER Get OPS power status no parameter
#*The OPS is on #*The OPS is off #*The OPS is not enabled #*The OPS is not plugged in
SETOPSALWAYSON Set OPS Always on value string parameter "true" or "false"
#*invalid value entered #*OPS Always on set as true #*OPS Always on set as false

English - 49 -
VIDEO WALL COMMANDSCommand Description Parameter Return
SETROWCOUNT Set row count. integer n (0 ≤ n ≤ 100) #*set row count to n
GETROWCOUNT Get row count. no parameter #*row count is ...
SETCOLUMNCOUNT Set column count. integer n (0 ≤ n ≤ 100) #*set column count to n
GETCOLUMNCOUNT Get column count. no parameter #*column count is ...SETCELL Set cell. integer n (0 ≤ n ≤ 100) #*set cell to n
GETCELL Get cell. no parameter #*cell is ...
SETOFFSET Set offset.
integer n (0 ≤ n ≤ 100). n is the number of pixels which will be cropped from all four sides.
#*set offset to n
GETOFFSET Get offset. no parameter #*offset is ...
SETVIDEOWALL Set videowall parameters
parameters for items in following format: RowCount-ColumnCount-Cell-Offset
#*set row count to ..., set column count to ..., set cell to ..., set offset to ...
GETVIDEOWALL Get videowall parameters no parameter #*row count is ..., column count is ..., cell is ..., offset is ...
SETALLVIDEOWALL Set all videowall parameters
parameters for items in following format: picture_mode-contrast-brightness-sharpness-color-powesave_mode-backlight_mode-colortemp-zoom_mode-hdmi_trueblack-picture_hue-volume-headphone_volume
#*... ("set to" for each parameter in order)
GETALLVIDEOWALL Get all videowall parameters no parameter
#*picture_mode-contrast-brightness-sharpness-color-powesave_mode-backlight_mode-colortemp-zoom_mode-hdmi_trueblack-picture_hue-volume-headphone_volume
SETPIXELSHIFT Set pixel shift is enabled or not
string-integer n ( n = on, n = off)
#*ACK or #*NACK
GETPIXELSHIFT Get pixel shift no parameter #*Pixel Shift is ...
SETSIGNAGEID Set Signage ID integer n (1 ≤ n ≤ 100). n is the Signage ID
#*ACK or #*NACK
GETSIGNAGEID Get Signage ID no parameter
#*The signage ID is ... (If return value is 0, then it means no signage id is assigned. 0 is the default value.)
SETVIDEOWALL- ENABLED
Set video wall is enabled or not string n (n = ON, n = OFF)
#*Video wall is set to ON or #*Video wall is set to OFF or #*Video wall is disabled in profile or #*Video wall is not set (invalid input)
GETVIDEOWALL- ENABLED
Get video wall enable value no parameter
#*Video Wall is ON or OFF or #*Video wall is disabled in profile
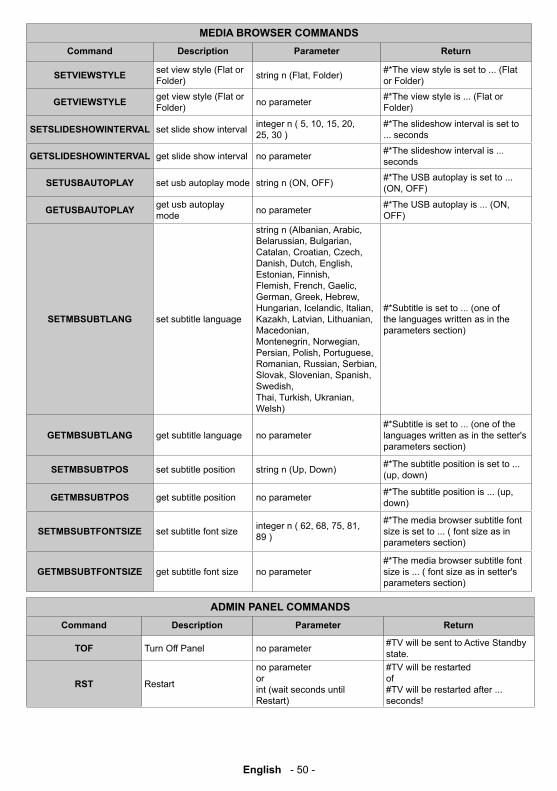
English - 50 -
MEDIA BROWSER COMMANDSCommand Description Parameter Return
SETVIEWSTYLE set view style (Flat or Folder) string n (Flat, Folder) #*The view style is set to ... (Flat
or Folder)
GETVIEWSTYLE get view style (Flat or Folder) no parameter #*The view style is ... (Flat or
Folder)
SETSLIDESHOWINTERVAL set slide show interval integer n ( 5, 10, 15, 20, 25, 30 )
#*The slideshow interval is set to ... seconds
GETSLIDESHOWINTERVAL get slide show interval no parameter #*The slideshow interval is ... seconds
SETUSBAUTOPLAY set usb autoplay mode string n (ON, OFF) #*The USB autoplay is set to ... (ON, OFF)
GETUSBAUTOPLAY get usb autoplay mode no parameter #*The USB autoplay is ... (ON,
OFF)
SETMBSUBTLANG set subtitle language
string n (Albanian, Arabic, Belarussian, Bulgarian, Catalan, Croatian, Czech, Danish, Dutch, English, Estonian, Finnish, Flemish, French, Gaelic, German, Greek, Hebrew, Hungarian, Icelandic, Italian, Kazakh, Latvian, Lithuanian, Macedonian, Montenegrin, Norwegian, Persian, Polish, Portuguese, Romanian, Russian, Serbian, Slovak, Slovenian, Spanish, Swedish, Thai, Turkish, Ukranian, Welsh)
#*Subtitle is set to ... (one of the languages written as in the parameters section)
GETMBSUBTLANG get subtitle language no parameter#*Subtitle is set to ... (one of the languages written as in the setter's parameters section)
SETMBSUBTPOS set subtitle position string n (Up, Down) #*The subtitle position is set to ... (up, down)
GETMBSUBTPOS get subtitle position no parameter #*The subtitle position is ... (up, down)
SETMBSUBTFONTSIZE set subtitle font size integer n ( 62, 68, 75, 81, 89 )
#*The media browser subtitle font size is set to ... ( font size as in parameters section)
GETMBSUBTFONTSIZE get subtitle font size no parameter#*The media browser subtitle font size is ... ( font size as in setter's parameters section)
ADMIN PANEL COMMANDSCommand Description Parameter Return
TOF Turn Off Panel no parameter #TV will be sent to Active Standby state.
RST Restart
no parameter or int (wait seconds until Restart)
#TV will be restarted of #TV will be restarted after ... seconds!

English - 51 -
TON
This command will turn on the panel, if panel is in active standby state and the parameter value will set volume value, if the Startup Volume Enable item (in Volume Settings menu) value is enable. TON must be called with a parameter for volume level. Otherwise, it gives "Missing parameter" error.
integer (volume value) #TV will be turned on
STVSets panel Volume, parameter value will ve set for volume level
integer (volume level) #Volume set level= ...
CTZ Change Time Zone. integer (gmt value ) #Timezone setup SUCCEEDED
GTZ Get Time Zone no parameter #Timezone is ...
STL Set panel Language string-int (please look at abbreviations of languages) #Language changed to ...
UPF Update Profile Files
string string ( <profile_files_path> <optional parameter> ) First parameter: ("auto" : default path will be used for update or string for path of profile files(string can be a url or a directory)) Second parameter: Optional parameter. If the parameter is "skip_restart", system reset will be skipped
#Profile Files Updated from default path success = .. #Profile Files Updated from defined path success =...
UWSI Update Welcome Screen Image
string (URL string for path of image file or path which starts with /tmp/... and contains image file, image file must be png and 960*540)
#Welcome Screen File Updated from defined path success =...
GTCURL Get Channel List URL no parameter #channelListUrl =...
SCURL Set Channel List URL string -int (new url of channel list)
#Channel List Url setup SUCCESSED
GTFTP Get FTP Properties no parameter#FTP server address=... FTP server user =... FTP server password =...
SFTP Set FTP Properties
string string (ip_addr user-password) (ex: 10.0.0.251 vestel-vest123)
#Set FTP Props operation SUCCESSED
FSU
Update software (SW Auto Upgrade should be enabled - see WAU command)
no parameter #Web Software Update search STARTED !!!
UCL Update channel list no parameter #"Channel List updated !!!
SWA Send wake up alarm string (alarm url (with .ts file extension) ) #WakeupAlarm is set
STWA Stop wake up alarm no parameter #WakeupAlarm stopped !!!

English - 52 -
SEA Send emergency alarm
string-string (alarm url - emergency message) [message content should be "word1+ word2+word3 ..."]
#Emergency Alarm is set !!!
STEA Stop emergency alarm none #Emergency Alarm is stopped !!!
UNP Send Messagestring-int (message text - 0) [message content should be "word1+ word2+word3 ..."]
#Message Sent in SUCCESS !!!
TN Send Message/Trigger notification int (key id (900<= id<=904)) #Message Sent in SUCCESS !!!
DBOOTC Disable Bootcaster none #BOOTCASTER_DISABLED in SUCCESS !!!
EBOOTC Enable Bootcaster none #BOOTCASTER_ENABLED in SUCCESS !!!
DDHCPC Disable Dhcp client none #DHCPC_DISABLED in SUCCESS !!!
EDHCPC Enable Dhcp client none #DHCPC_ENABLED in SUCCESS !!!
RTVP Return TV Main Page none #Refresh Done in SUCCESS !!!
GTSURL Get TV Portal URL none #StartUp url is ....
SFTI
Set First Time Installation by taking and saving system language and txt language text parameters; then reboots the system.
string-string[system language (look at abbreviations) - txt language text (look at txt languages)]
#System reinitialised !!!
SDFTI
Set Default First Time Installation by reseting the parameters set by SFTI and returning to default FTI settings; then reboots the system.
none #System will be reinitialised !!!
SHM Set Hotel Mode int ( 1-enabled/ 2- disabled) #Hotel Mode is enabled/disabled
UNTP Update Date and Time none
#Internet connection successful file_size=2048 #Date and Time is being updated from NTP Client or #No Internet Connection! Date and Time cannot be updated
SNTP Set NTP Server IP string-int ("auto" / ntp server path - 0 )
#Auto : forced_ntpserver file deleted - SUCCESS !! or#Forced_ntpserver written - SUCCESS !!
WAU SW Auto Upgrade int ( 1-enabled/ 2- disabled) #Auto Software Update Availability - ENABLED !!
SRC Set Remote Control Code int (2/3/4) #Remote Control system Code
set to ...
GTNTP Get NTP Server IP none #"NTP server url is ...

English - 53 -
SMA Set mac address string-int ( ex: eth0-00:09:df:86:34:25)
#SetMacAdress Succesfull#*FAILURE - Wrong parameter value!#*FAILURE - Invalid parameter!#*FAILURE - Invalid mac address!#*FAILURE - Could not write MAC address!
get_mac_address Get mac address none #*Hwaddr: mac_address - Succesfull
SSIP
Set static IP, Default Gateway and SubnetMask addresses (seperate addresses with "-" character)
string ( ex: 192.168.0.15-10.0.90.5-255.255.255.0) #IP address setting Succesfull
ATOF Auto panel Off Mode int ( 0 <= mode <=8) #set auto tv off mode to ...
STVCH Set TV Channel int ( index of channel) #CURRENT PROGRAME IS SETTED ...
SIGNAGE SETTINGS COMMANDSCommand Description Parameter Return
GETNUMBEROFUSB- STORAGES
gets number of attached usb storages no parameter #*number of attached usb storages
is ... (numbers 0,1,2,...)
GETTOTALSPACE get total usb space (in MB)
no parameter or usb index (numbers 1,2,....)
#*The total space is ... MB or #*Invalid index (only for parametrized version)
GETFREESPACE get free usb space (in MB)
no parameter or usb index (numbers 1,2,....)
#*The free space is ... MB or #*Invalid index (only for parametrized version)
SAVEMODELINFOsaves model name and sw version to a removable device
no parameter
#*Model info is saved OR #*No Removable drive is connected (If there is no device connected)
SETSCHEDULER enables/disables scheduler
string n (ON, OFF)new command is available with Ronesans_B2B r232185 - Raphael V7.36.0.0: "SETSCHEDULER N_X" (N is scheduler number, X is "ON" or "OFF")
#*The scheduler is set to .... (ON, OFF)
GETSCHEDULER get scheduler enabled/disabled
no parameter------------------------------------new command is available with Ronesans_B2B r232185 - Raphael V7.36.0.0:"GETSCHEDULER N" (N is scheduler number)
#*The scheduler is .... (ON, OFF)

English - 54 -
SETSCHEDULEOP set scheduler parameters
string n ( on time_off time_source in format: hh:mm_hh:mm_source ) ------------------------------------ new command is available with Ronesans_B2B r232185 - Raphael V7.36.0.0: "SETSCHEDULEOP number_enabled_ontime_offenabled_offtime_days_source" (SETSCHEDULEOP 4_1_08:00_1_22:00_ 0111110_HDMI) Available source names: LastSource USB DP OPS DVI HDMI YPbPr VGA/PC
#*Schedule parameters are ... (set/not set).
GETSCHEDULEOP get scheduler parameters
no parameter ------------------------------------ new command is available with Ronesans_B2B r232185 - Raphael V7.36.0.0: "GETSCHEDULEOP N" (N is scheduler number)
#*Scheduler on/off time and source is: ...... (hh:mm_hh:mm_source)
SETRCU set RCU Inhibit to on,off string n ( ON, OFF )
#*set RCU inhibit ... (ON, OFF) OR #*Missing RCU Inhibit selection OR #*wrong string parameter for RCU Inhibit
GETRCU get RCU Inhibit value no parameter#*RCU Inhibit is .... (ON, OFF) OR #*NACK
TSU trigger sw update no parameter #*Web Software Update search triggered !!!
SHOWSIGNAGEID display signage ID on screen no parameter #* Signage ID is 0 (1...99)
SETBROWSERMEM force browser memory limit value in MBs
string n (any number between 100-700 for MB120DS, 0 for default limit)
#*Browser memory limit is set
GETBROWSERMEM gets browser memory limit value in MBs no parameter #*browser memory limit is: .....
(numbers)
SETGPURASTER force browser gpu raster state
string n ( ON, OFF , any other string for default state) #*GPU Raster state is set
GETGPURASTER gets browser gpu raster state no parameter #*browser gpu raster is .... (ON,
OFF)
SET4KBROWSER force browser resolution as 4K
string n (ON, OFF (or any other string) for default state)
#*Forced 4K browser is enabled OR #*Forced 4K browser is disabled
GET4KBROWSER gets browser resolution state as 4K no parameter #*browser 4K is .... (ON, OFF)

English - 55 -
AUTOSETSIGNAGEID
Sets signage id automatically. For usage the feature the AdvancedVideoWall profile item should be enable.
no parameter
#* OR #*AdvancedVideoWall profile item is disabled.
C2CONNECTION
Returns the handshake result between G6F and C2 devices
no parameter
#*FAILURE, wait to check C2 availability (process still not finished) OR #*FAILURE, C2 is not READY (handshake failed, C2 is not available) OR #*SUCCESS, C2 is READY (handshake is succeded)
UART_CHECKStarts the handshake process between G6F and C2 devices
no parameter #*C2 handshake process is started
GETTEMPERATUREMeasure ambient temperature using temperature sensor
no parameter
#*TEM=... OR #*Temperature sensor is not available
GETHUMIDITYMeasure relative humidity using humidity sensor
no parameter#*HUM=... OR #*Humidity sensor is not available
SETVIDEOCROP
Crop input video with given parameters and show full screen.Wideowall must be disabled or cell number must be zero to activate this feature.Set width or height as 0 to disable crop.
string (X-Y-W-H) #*set x position to X, set y position to Y, set width to W, set height to H
GETVIDEOCROP Get crop parameters no parameter #*x position is X, y position is Y, width is W, height is H
LENLED Bar PWM Enable/Disable of the given color
str-int n (W, R, G, B) (0 - 1) #*SUCCESS #*FAILURE
LPELED Bar PWM Period value of the given color
str-int n (W, R, G, B) (0 - 65535)
#*SUCCESS #*FAILURE
LDCLED Bar PWM Duty Cycle value of the given color
str-int n (W, R, G, B) (0 - 65535)
#*SUCCESS #*FAILURE
LDILED Bar PWM Division value of the given color
str-int n (W, R, G, B) (0 - 65535)
#*SUCCESS #*FAILURE
LBE LED Bar Enable/Disable via GPIO int n (0, 1) #*SUCCESS

English - 56 -
LCO LED Bar Color drivestring (red_green_blue_white) (color level value as string)
#*FAILURE, lacking parameter! #*FAILURE, parameter exceeds the limit! #*FAILURE, no parameter after '_' character! #*FAILURE, all colors are not processed#*SUCCESS
C2MSGSends message to UART2 (C2 connection)
string #*SUCCESS, Message Send: %s
SETC2PROFILEThe profile file name of C2 is saved in Aurora side.
string (length_of_the_profile_name/profile_name/END)
#*FAILURE, lacking parameter! #*FAILURE, parameter exceeds the limit! #*FAILURE, profile string is too long! #*FAILURE, profile string length is not matching! #*FAILURE, 'END' string could not be captured correctly! #*FAILURE, no parameter after '/' character! #*FAILURE, all parameters are not processed#*SUCCESS
GETBOARDNAME Sends the board name to C2 side
string (length_of_the_board_name/board_name/END)
#*SUCCESS, Board Name: XXXXXXXXX
GETGYRO
Sends the orientation mode to C2 side(The orientation information comes from gyro sensor to rotate android display automatically)
no parameter#*SUCCESS, GyroSensorStatus: GYUG or GYRG or GYDG or GYLG

English - 57 -
RS232 HEX CommandsProtocol Test Steps• Before testing, please know the board type you have. There are two types of board. The UART 0 and UART
1 connections of the these boards are explained below:1. RJ12 is connected to UART 0, DSUB9 is connected to UART 1. Therefore, UART 0 and UART 1 could
be tested separately in this type of the board2. RJ12 and DSUB9 both are connected to UART 0. UART 1 is supported for OPS module but not
reachable. Therefore, only UART 0 could be tested in this type of the board.• Activate HEX protocol on Display.
a. Enter Signage menu.b. Change ASCII option to HEX in UART 0 or UART 1 sub-menu item
• Open any serial port communications program (e.g Realterm). Configure serial communication settings as below:
Baud Rate : 19200 for UART0, 9600 for UART1 Parity : NoneData Bits : 8Stop Bits : 1Handshake : None
• Note that UART0 default value: ASCII, UART1 default value: HEX In the tables given below, XY represents are variable byte. All byte values are hexadecimal.
Error Responses• NAK reply: 15 When the display cannot understand the received command, it returns this value. In
such a case, check the sending code and send the same command again.
• Error reply: 1C 00 00 When the display cannot execute the received command for any reasons, it returns this value. In such a case, check the sending code and the setting status of the display.

English - 58 -
Command received by displayReply sent by display for successful operation
Byte Number 0 1 2 3 4 5 6 7 8 9 10 11 12
0 1 2 Notes
Header Data
Header code Pa
cket Data
SizeCRC flag Action Type Setting
code
Name Operation L H L H L H L H L H L H
Mon
itor ON BE EF 03 06 00 19 D3 02 00 00 60 02 00 06
Quick standby should be enabled to be able to turn on tv with this command.
OFF BE EF 03 06 00 19 D3 02 00 00 60 01 00 06
GET BE EF 03 06 00 19 D8 03 00 00 60 07 00 1D 00 XY XY can be either 00 or 01. 00 means OFF, 01 means ON.
Mut
e
ON BE EF 03 06 00 D6 D2 01 00 02 20 01 00 06
OFF BE EF 03 06 00 46 D3 01 00 02 20 00 00 06
GET BE EF 03 06 00 75 D3 02 00 02 20 00 00 1D 00 XY XY can be either 00 or 01. 00 means OFF, 01 means ON.
Scre
en
ON BE EF 03 06 00 6B D9 01 00 20 30 01 00 06
OFF BE EF 03 06 00 FB D8 01 00 20 30 00 00 06
GET BE EF 03 06 00 C8 D8 02 00 20 30 00 00 1D 00 XY XY can be either 00 or 01. 00 means OFF, 01 means ON.
Sour
ce
OPS BE EF 03 06 00 FE D2 01 00 00 20 00 00 06
HDMI BE EF 03 06 00 0E D2 01 00 00 20 03 00 06
VGA BE EF 03 06 00 6E D2 01 00 00 20 01 00 06
SCART2(CVBS) BE EF 03 06 00 00 00 01 00 00 20 04 00 06
FAV BE EF 03 06 00 00 00 01 00 00 20 05 00 06
S-Video BE EF 03 06 00 00 00 01 00 00 20 06 00 06
Sour
ce
HDMI2 BE EF 03 06 00 00 00 01 00 00 20 08 00 06
HDMI3 BE EF 03 06 00 00 00 01 00 00 20 09 00 06
HDMI4 BE EF 03 06 00 00 00 01 00 00 20 0A 00 06
YPbPr BE EF 03 06 00 00 00 01 00 00 20 0B 00 06
SCART2 (S-Video) BE EF 03 06 00 00 00 01 00 00 20 0D 00 06
TV BE EF 03 06 00 00 00 01 00 00 20 0E 00 06
SCART1(CVBS) BE EF 03 06 00 00 00 01 00 00 20 0F 00 06
SCART1 (S-Video) BE EF 03 06 00 00 00 01 00 00 20 10 00 06
DVD BE EF 03 06 00 00 00 01 00 00 20 11 00 06
DVI BE EF 03 06 00 00 00 01 00 00 20 12 00 06
DP BE EF 03 06 00 00 00 01 00 00 20 13 00 06
WIDI BE EF 03 06 00 00 00 01 00 00 20 15 00 06
GET BE EF 03 06 00 CD D2 02 00 00 20 00 00 1D 00 XY
XY can be one of the following: 01: OPS, 02: HDMI, 03: VGA, 04: SCART2(CVBS), 05: FAV, 06: S-Video, 08: HDMI2, 09: HDMI3, 0A: HDMI4, 0B: YPbPr, 0D: SCART2(S-Video), 0E: TV, 0F: SCART1(CVBS), 10: SCART1(S-Video), 11: DVD, 12: DVI, 13: DP, 15: WIDINote that all of the sources are not enabled.
Volu
me
GET BE EF 03 06 00 31 D3 02 00 01 20 00 00 1D 00 XY
INCREMENT BE EF 03 06 00 57 D3 04 00 01 20 00 00 06
DECREMENT BE EF 03 06 00 86 D2 05 00 01 20 00 00 06
SET BE EF 03 06 00 31 D3 03 00 01 20 01 XY 06 XY can take 00 as a minimum and 1D as a maximum.

English - 59 -
Command received by displayReply sent by display for successful operation
Byte Number 0 1 2 3 4 5 6 7 8 9 10 11 12
0 1 2 Notes
Header Data
Header code Pa
cket Data
SizeCRC flag Action Type Setting
code
Name Operation L H L H L H L H L H L H
OPS
Pow
er ON BE EF 03 06 00 BA D2 01 00 05 20 01 00 06
OFF BE EF 03 06 00 2A D3 01 00 05 20 00 00 06
GET BE EF 03 06 00 19 D3 02 00 05 20 00 00 1D 00 XY XY can be either 00 or 01. 00 means OFF, 01 means ON.
Bac
klig
ht
GET BE EF 03 06 00 89 D2 02 00 03 20 00 00 1D 00 XY
INCREMENT BE EF 03 06 00 EF D2 04 00 03 20 00 00 06
DECREMENT BE EF 03 06 00 3E D3 05 00 03 20 00 00 06
SET BE EF 03 06 00 89 D2 03 00 03 20 01 XY 06 range: 0x64-0x1E
RESET BE EF 03 06 00 58 D3 06 00 03 20 00 00 06
Aut
o A
djus
t ON BE EF 03 06 00 32 D4 01 00 19 20 01 00 06 Auto Adjust command is for only VGA.
OFF BE EF 03 06 00 A2 D5 01 00 19 20 00 00 06
Key
pad
Lock
ON BE EF 03 06 00 93 97 01 00 11 24 01 00 06
OFF BE EF 03 06 00 03 96 01 00 11 24 00 00 06
GET BE EF 03 06 00 30 96 02 00 11 24 00 00 1D 00 XY XY can be either 00 or 01. 00 means OFF, 01 means ON.
Rem
ote
Con
trol
ler
Lock
ON BE EF 03 06 00 77 97 01 00 16 24 00 00 06
OFF BE EF 03 06 00 E7 96 01 00 16 24 01 00 06
GET BE EF 03 06 00 44 97 02 00 16 24 00 00 1D 00 XY XY can be either 00 or 01. 00 means OFF, 01 means ON.
OSD
M
enu ON BE EF 03 06 00 6A 63 01 00 00 37 01 00 06
OFF BE EF 03 06 00 FA 62 01 00 00 37 00 00 06
Con
tras
t GET BE EF 03 06 00 FD D3 02 00 04 20 00 00 1D 00 XY
SET BE EF 03 06 00 FD D3 03 00 04 20 01 XY 06 range: 0x4E - 0xB2
INCREMENT BE EF 03 06 00 9B D3 04 00 04 20 00 00 06
DECREMENT BE EF 03 06 00 4A D2 05 00 04 20 00 00 06
Aut
o Po
sitio
n
EXECUTE BE EF 03 06 00 91 D0 06 00 0A 20 00 00 06
Col
or
Tem
pera
ture INCREMENT BE EF 03 06 00 0B F5 10 00 B0 30 03 00 06 9300K, 6500K, 13000K
DECREMENT BE EF 03 06 00 CB F8 01 00 B0 30 13 00 06 9300K, 6500K, 13000K
GET BE EF 03 06 00 C8 F5 02 00 B0 30 00 00 1D 00 XYXY takes one of the followings:
00=9300K, 01=6500K, 02=13000K
Clo
ck
INCREMENT BE EF 03 06 00 19 D4 03 00 02 21 03 00 06 Clock commands are for VGA Clock. They would work independently of the selected source.DECREMENT BE EF 03 06 00 19 D5 03 00 02 21 04 00 06
GET BE EF 03 06 00 19 D7 03 00 02 21 06 00 1D 00 XY XY would be in the range of 00 and 64
Phas
e INCREMENT BE EF 03 06 00 2F 83 04 00 03 21 00 00 06 Phase commands are for VGA Phase shift. They would work independently of the selected source.DECREMENT BE EF 03 06 00 FE 82 05 00 03 21 00 00 06
GET BE EF 03 06 00 49 83 02 00 03 21 00 00 1D 00 XY XY would be in the range of 00 and 64
H-P
ositi
on INCREMENT BE EF 03 06 00 97 82 04 00 01 21 00 00 06
DECREMENT BE EF 03 06 00 46 83 05 00 01 21 00 00 06
GET BE EF 03 06 00 F1 82 02 00 01 21 00 00 1D 00 XY XY would be in the range of 00 and 64. Central position is 32.
V-Po
sitio
n INCREMENT BE EF 03 06 00 6B 83 04 00 00 21 00 00 06
DECREMENT BE EF 03 06 00 BA 82 05 00 00 21 00 00 06
GET BE EF 03 06 00 0D 83 02 00 00 21 00 00 1D 00 XY XY would be in the range of 00 and 64. Central position is 32.

English - 60 -
Col
or T
emp
Gai
n R
INCREMENT BE EF 03 06 00 52 F4 04 00 B1 30 00 00 06
DECREMENT BE EF 03 06 00 83 F5 05 00 B1 30 00 00 06
GET BE EF 03 06 00 34 F4 02 00 B1 30 00 00 1D 00 XY
Col
or T
emp
Gai
n G
INCREMENT BE EF 03 06 00 16 F4 04 00 B2 30 00 00 06
DECREMENT BE EF 03 06 00 C7 F5 05 00 B2 30 00 00 06
GET BE EF 03 06 00 70 F4 02 00 B2 30 00 00 1D 00 XY
Col
or T
emp
Gai
n B
INCREMENT BE EF 03 06 00 EA F5 04 00 B3 30 00 00 06
DECREMENT BE EF 03 06 00 3B F4 05 00 B3 30 00 00 06
GET BE EF 03 06 00 8C F5 02 00 B3 30 00 00 1D 00 XY
Free
ze
EXECUTE BE EF 03 06 00 00 00 06 00 C0 30 00 00 06 Toggles video freeze status.

English - 61 -
Maximum Pixel RatesFor UHD panels,
Source Max. Resolution Colour Space Bits/Component Pixel/Rate
HDMI 4K@60Hz YCbCr4:4:4/RGB 8 bit 594MHz
OPS (Optional) 4K@30Hz / 4K@60Hz YCbCr4:4:4/RGB 8 bit 594MHz
Input Matrix
Timing fH (kHz) fV (Hz) Dot clock (MHz)
Input
HDMI DP
VESA
720 x 400 31.5 70.156 26.25 O O
640 x 480 31.469 59.95 25.175 O O
800 x 600 37.879 60.317 40 O O
1024 x 768 48.363 60.004 65 O O
1360 x 768 47.712 60.015 85.5 O O
1920 x 1080 67.5 60 148.5 O O
HD
1280x720p
37.5 50 74.25 O O
44.995 59.94 74.176 O O
45 60 74.25 O O
1920x1080i
28.13 50 74.25 O O
33.716 59.94 74.175 O O
33.75 60 74.25 O O
1920x1080p
56.25 50 148.5 O O
67.432 59.95 148.35 O O
67.5 60 148.5 O O
UHD (Only for 4K models)
3840x2160p 67.5 30 297 O O
3840x2160p 135 60 594 O

English - 62 -
Supported Media Formats from USBVideo File Formats
Video Codec Resolution Bit Rate Container
MPEG1/2
1080Px2@30fps, 1080P@60fps 40Mbps
MPEG program stream (.DAT, .VOB, .MPG, .MPEG), MPEG transport stream (.ts, .trp, .tp), MP4 (.mp4, .mov), 3GPP (.3gpp, .3gp), AVI (.avi), MKV (.mkv), ASF (.asf)
MPEG4 MPEG program stream (.MPG, .MPEG), MP4 (.mp4, .mov), 3GPP (.3gpp, .3gp), AVI (.avi), MKV (.mkv), ASF (.asf)
XviD MP4 (.mp4, .mov), AVI (.avi), MKV (.mkv), ASF (.asf)Sorenson H.263 FLV (.flv), AVI (.avi)H.263 MP4 (.mp4, .mov), 3GPP (.3gpp, .3gp), AVI (.avi), MKV (.mkv)
H.264 3840x2160@30fps, 1080P@60fps 135Mbps FLV (.flv), MP4 (.mp4, .mov), 3GPP (.3gpp, .3gp), MPEG
transport stream (.ts, .trp, .tp), ASF (.asf), AVI (.avi), MKV (.mkv)
Motion JPEG 720P@30fps 10Mbps AVI (.avi), 3GPP (.3gpp, .3gp), MP4 (.mp4, .mov), MKV (.mkv), ASF (.asf)
VP8 1080P@30fps 20Mbps MKV (.mkv), WebM (.webm)
HEVC/H.2654K2K@60fps 100Mbps MP4 (.mp4, .mov), MKV (.mkv), MPEG transport stream (.ts, .trp,
.tp)
1080P@60fps 50Mbps MP4 (.mp4, .mov), MKV (.mkv), MPEG transport stream (.ts, .trp, .tp), 3GPP (.3gpp, .3gp)
VP9 4K2K@30fps 100Mbps MKV (.mkv), WebM (.webm)
Picture File FormatsImage Photo Resolution (width x height) Remark
JPEGBase-line 15360x8640
The limit for max resolution depends on DRAM size
Progressive 1024x768
PNGnon-interlace 9600x6400interlace 1200x800
BMP 9600x6400
Audio File FormatsAudio Codec Sample rate Bit Rate Container
MPEG1/2 Layer1 16KHz ~ 48KHz 32Kbps ~ 448Kbps
MP3 (.mp3), AVI (.avi), ASF (.asf), Matroska (.mkv, .mka), MPEG transport stream (.ts, .trp, .tp), MPEG program stream (.DAT, .VOB, .MPG, .MPEG), WAV (.wav)
MPEG1/2 Layer2 16KHz ~ 48KHz 8Kbps ~ 384Kbps
MP3 (.mp3), AVI (.avi), ASF (.asf), Matroska (.mkv, .mka), MPEG transport stream (.ts, .trp, .tp), MPEG program stream (.DAT, .VOB, .MPG, .MPEG), WAV (.wav)
MPEG1/2 Layer3 16KHz ~ 48KHz 8Kbps ~ 320Kbps
MP3 (.mp3), AVI (.avi), ASF (.asf), Matroska (.mkv, .mka), 3GPP (.3gpp, .3gp), MP4 (.mp4, .mov, m4a), MPEG transport stream (.ts, .trp, .tp), MPEG program stream (.DAT, .VOB, .MPG, .MPEG), FLV (.flv), WAV (.wav)
AC3 32KHz, 44.1KHz, 48KHz
32Kbps ~ 640Kbps
AC3 (.ac3), AVI (.avi), Matroska (.mkv, .mka), 3GPP (.3gpp, .3gp), MP4 (.mp4, .mov, m4a), MPEG transport stream (.ts, .trp, .tp), MPEG program stream (.DAT, .VOB, .MPG, .MPEG)

English - 63 -
EAC3 32KHz, 44.1KHz, 48KHz
32Kbps ~ 6 Mbps
EAC3 (.ec3), 3GPP (.3gpp, .3gp), MP4 (.mp4, .mov, m4a), MPEG transport stream (.ts, .trp, .tp), MPEG program stream (.DAT, .VOB, .MPG, .MPEG)
AAC, HEAAC 8KHz ~ 48KHz
AAC (.aac), AVI (.avi), Matroska (.mkv, .mka), 3GPP (.3gpp, .3gp), MP4 (.mp4, .mov, m4a), MPEG transport stream (.ts, .trp, .tp), MPEG program stream (.DAT, .VOB, .MPG, .MPEG), FLV (.flv), RM (.ra)
WMA 8KHz ~ 48KHz 128bps ~ 320Kbps
ASF (.wma, .asf), AVI (.avi), Matroska (.mkv, .mka)WMA 10 Pro M0 48KHz < 192kbpsWMA 10 Pro M1 48KHz < 384kbpsWMA 10 Pro M2 96KHz < 768kbps
G711 A/mu-law 8KHz 64Kbps ~ 128Kbps
WAV (.wav), AVI (.avi), Matroska (.mkv, .mka), 3GPP (.3gpp, .3gp), MP4 (.mp4, .mov, m4a)
LBR (cook)8KHz, 11.025KHz, 22.05KHz, 44.1KHz
6Kbps ~ 128Kbps RM (.ra)
FLAC 8KHz~96KHz < 1.6Mbps Matroska (.mkv, .mka)
Subtitle File FormatsInternal Subtitles
Extension Container Subtitle Codedat, mpg, mpeg, vob MPG, MPEG DVD Subtitlets, trp, tp TS DVB Subtitle
mp4 MP4 DVD Subtitle UTF-8 Plain Text
mkv MKV
ASS SSA UTF-8 Plain Text VobSub DVD Subtitle
aviAVI (1.0, 2.0),DMF0,1, 2
XSUBXSUB+
External Subtitles
Extension Subtitle Parser Remark.srt Subrip.ssa/ .ass SubStation Alpha.smi SAMI
.sub
SubViewer MicroDVD DVDSusbtitleSystem SubIdx (VobSub)
SubViewer 1.0 & 2.0 Only
.txt TMPlayer

English - 64 -
System FeaturesPanelPanel type 75” (189cm) 16/7 DLED
Resolution 3840x2160 UHD
Visual angle
Horizontal 89°
Perpendicular 89°
Max. brightness Typ: 400 cd/m2
H-Frequency 60 Khz
V-Frequency 67,5 Khz
Audio2 x 12 W Audio Output PowerNetwork Connection Ethernet (LAN) for Internet connectivity802.11 a/b/g/n built in WLAN support (optional)Input/Output Ports 1 x RS232 port1 x VGA port1 x Ethernet port1 x Internal USB 3.0 port2 x USB 2.0 port1 x Micro USB1 x Micro SD3 x HDMI 2.0 In port (1.4 for FHD panels)1 x IR port1 x Headphone/Line Out port1 x HDMI Out port1 x SPDIF Optical Out port1 x Audio In port1 x RJ12 (for sensor) port1 x RJ12 (service use only) port
Power110-240V AC 50-60Hz xxAWeight (kg)37,25Display Dimensions DxLxH (mm)1684mm x 100mm x 967mm
Wireless LAN Transmitter Specifications
Frequency Ranges Max Output Power
2400 - 2483,5 MHz (CH1-CH13) < 100 mW
5150 - 5250 MHz (CH36 - CH48) < 200 mW
5250 - 5350 MHz (CH52 - CH64) < 200 mW
5470 - 5725 MHz (CH100 - CH140) < 200 mW
Country RestrictionsThis device is intended for home and office use in all EU countries (and other countries following the relevant EU directive) without any limitation except for the countries mentioned below.
Country Restriction
Bulgaria General authorization required for outdoor use and public service
Italy If used outside of own premises, general authorization is required
Greece In-door use only for 5470 MHz to 5725 MHz band
Luxembourg General authorization required for network and service supply(not for spectrum)
NorwayRadio transmission is prohibited for the geographical area within a radius of 20 km from the centre of Ny-Ålesund
Russian Fed-eration In-door use only
Israel 5 GHz band only for 5180 MHz-5320 MHz range
The requirements for any country may change at any time. It’s recommended that user checks with local authorities for the current status of their national regulations for 5 GHz wireless LAN’s.
WarningSurges could cause data loss except monitoring modes.
Federal Communication Commission Interference Statement
This equipment has been tested and found to comply with the limits for a Class B digital device, pursuant to Part 15 of the FCC Rules. These limits are designed to provide reasonable protection against harmful in-terference in a residential installation. This equipment generates, uses and can radiate radio frequency ener-gy and, if not installed and used in accordance with the instructions, may cause harmful interference to radio communications. However, there is no guarantee that interference will not occur in a particular installation. If this equipment does cause harmful interference to radio or television reception, which can be determined by turning the equipment off and on, the user is en-

English - 65 -
couraged to try to correct the interference by one of the following measures:• Reorient or relocate the receiving antenna.• Increase the separation between the equipment
and receiver.• Connect the equipment into an outlet on a circuit
different from that to which the receiver is connected.• Consult the dealer or an experienced radio/TV
technician for help.
FCC Caution: Any changes or modifications not expressly approved by the party responsible for compliance could void the user’s authority to operate this equipment.
This device complies with Part 15 of the FCC Rules. Operation is subject to the following two conditions: (1) This device may not cause harmful interference, and (2) this device must accept any interference received, including interference that may cause undesired operation.For product available in the USA/Canada market, only channel 1~11 can be operated. Selection of other channels is not possible.IMPORTANT NOTEFCC Radiation Exposure StatementThis equipment complies with FCC radiation exposure limits set forth for an uncontrolled environment. This equipment should be installed and operated with minimum distance 20cm between the radiator & your body.
Accessories Included• Remote Control• Batteries: 2 x AAA• Instruction Book• Quick Start Guide• IR Extender• Wall Mount Kit
Information for Users on Disposal of Old Equipment and Batteries
[European Union only]Equipment bearing these symbols should not be disposed as general household waste. You should look for appropriate recycling facilities and systems for the disposal of these products.Notice: The sign Pb below the symbol for batteries indicates that this battery contains lead.
1 2
1 Products2 Battery
License NotificationThe terms HDMI and HDMI High-Definition Multimedia Interface, and the HDMI Logo are trademarks or reg-istered trademarks of HDMI Licensing Administrator, Inc. in the United States and other countries.
Manufactured under license from Dolby Laboratories. Dolby, Dolby Audio and the double-D symbol are trademarks of Dolby Laboratories. Confidential unpublished works. Copyright ©1992-2019 Dolby Laboratories. All rights reserved.
This product is protected by certain intellectual property rights of Microsoft Corporation. Use or distribution of such technology outside of this product is prohibited without a license from Microsoft or an authorized Microsoft subsidiary.

English - 66 -
Vesa Wall Mount Measurements
W
H
Hole Pattern Sizes (mm)
W H
600 200
Screw Sizes
Length (X)min. (mm) 15max. (mm) 15
Thread (Y) M8
Installation On An Indented Wall
Side view
E
A
B
C
Plane view
D D
A Minimum 50 mmB Minimum 70 mmC Minimum 50 mmD Minimum 50 mmE Ambient temperature range: 0-35ºC
When installing the product on an indented wall, allow at least the space specified above between the product and wall for ventilation and ensure that the ambient temperature is kept between 0ºC-35ºC.Do not expose the product to direct sunlight.
We will take no responsibility for any damages or failures in case our products are not being used subject to these recommendations and/or instructions for use.

Safety Warnings
Laite on liitettävä suojakoskettimilla varustettuun pistorasiaan.
Apparatet må tilkoples jordet stikkontakt.
Apparaten skall anslutas till jordat uttag.
Equipment connected to the protective earthing of the building installation through the mains connection or through other equipment with a connection to protective earthing – and to a cable distribution system using coaxial cable, may in some circumstances create a fire hazard. Connection to a cable distribution system has therefore to be provided through a device providing electrical isolation below a certain frequency range (galvanic isolator, see EN 60728-11).
Utstyr som er koplet til beskyttelsesjord via nettplugg og/eller via annet jordtilkoplet utstyr – og er tilkoplet et kabel-TV nett, kan forårsake brannfare. For å unngå dette skal det ved tilkopling av utstyret til kabel-TV nettet installeres en galvanisk isolator mellom utstyret og kabel- TV nette.
Utrustning som är kopplad till skyddsjord via jordat vägguttag och/eller via annan utrustning och samtidigt är kopplad till kabel-TV nät kan i vissa fall medfőra risk főr brand. Főr att undvika detta skall vid anslutning av utrustningen till kabel-TV nät galvanisk isolator finnas mellan utrustningen och kabel-TV nätet.
Apparatets stikprop skal tilsluttes en stikkontakt med jord, som giver forbindelse til stikproppens jord.

TR: İşbu belgede; Sahara Presentation Systems PLC, telsiz ekipmanı tipi Monitor’nin 2014/53/AB sayılı direktife uygun olduğunu beyan eder. AB uygunluk beyanının tam metni internet adresinde mevcuttur: www.saharaplc.com
EN: Hereby, Sahara Presentation Systems PLC, declares that the radio equipment type Monitor is in compliance with Directive 2014/53/EU. The full text of the EU declaration of conformity is available at the following internet address: www.saharaplc.com
BG: С настоящото Sahara Presentation Systems PLC, декларира, че този тип радиосъоръжение Monitor е в съответствие с Директива 2014/53/ЕС. Цялостният текст на ЕС декларацията за съответствие може да се намери на следния интернет адрес: www.saharaplc.com
CS: Tímto Sahara Presentation Systems PLC, prohlašuje, že typ rádiového zařízení Monitor je v souladu se směrnicí 2014/53/EU. Úplné znění EU prohlášení o shodě je k dispozici na této internetové adrese: www.saharaplc.com
DA: Hermed erklærer Sahara Presentation Systems PLC, at radioudstyrstypen Monitor er i overensstemmelse med direktiv 2014/53/EU. EU-overensstemmelseserklæringens fulde tekst kan findes på følgende internetadresse: www.saharaplc.com
DE: Hiermit erklärt Sahara Presentation Systems PLC, dass der Funkanlagentyp Monitor der Richtlinie 2014/53/EU entspricht. Der vollständige Text der EU-Konformitätserklärung ist unter der folgenden Internetadresse verfügbar: www.saharaplc.com
EL: Με την παρούσα ο/η Sahara Presentation Systems PLC, δηλώνει ότι ο ραδιοεξοπλισμός Monitor πληροί την οδηγία 2014/53/ΕΕ. Το πλήρες κείμενο της δήλωσης συμμόρφωσης ΕΕ διατίθεται στην ακόλουθη ιστοσελίδα στο διαδίκτυο: www.saharaplc.com
ES: Por la presente, Sahara Presentation Systems PLC, declara que el tipo de equipo radioeléctrico Monitor es conforme con la Directiva 2014/53/UE. El texto completo de la declaración UE de conformidad está disponible en la dirección Internet siguiente: www.saharaplc.com
ET: Käesolevaga deklareerib Sahara Presentation Systems PLC, et käesolev raadioseadme tüüp Monitor vastab direktiivi 2014/53/EL nõuetele. ELi vastavusdeklaratsiooni täielik tekst on kättesaadav järgmisel internetiaadressil: www.saharaplc.com
FI: Sahara Presentation Systems PLC, vakuuttaa, että radiolai-tetyyppi Monitor on direktiivin 2014/53/EU mukainen. EU-vaatimustenmukaisuusvakuutuksen täysimittainen teksti on saatavilla seuraavassa internetosoitteessa: www.saharaplc.com
FR: Le soussigné, Sahara Presentation Systems PLC, déclare que l’équipement radioélectrique du type Monitor est conforme à la directive 2014/53/UE. Le texte complet de la déclaration UE de conformité est disponible à l’adresse internet suivante: www.saharaplc.com
HR: Sahara Presentation Systems PLC, ovime izjavljuje da je radijska oprema tipa Monitor u skladu s Direktivom 2014/53/EU. Cjeloviti tekst EU izjave o sukladnosti dostupan je na sljedećoj internetskoj adresi: www.saharaplc.com
HU: Sahara Presentation Systems PLC, igazolja, hogy a Monitor típusú rádióberendezés megfelel a 2014/53/EU irányelvnek. Az EU-megfelelőségi nyilatkozat teljes szövege elérhető a következő internetes címen: www.saharaplc.com
IT: Il fabbricante, Sahara Presentation Systems PLC, dichiara che il tipo di apparecchiatura radio Monitor è conforme alla direttiva 2014/53/UE. Il testo completo della dichiarazione di conformità UE è disponibile al seguente indirizzo Internet: www.saharaplc.com
LT: Aš, Sahara Presentation Systems PLC, paMonitorirtinu, kad radijo įrenginių tipas Monitor atitinka Direktyvą 2014/53/ES. Visas ES atitikties deklaracijos tekstas prieinamas šiuo interneto adresu: www.saharaplc.com
LV: Ar šo Sahara Presentation Systems PLC, deklarē, ka radioiekārta Monitor atbilst Direktīvai 2014/53/ES. Pilns ES atbilstības deklarācijas teksts ir pieejams šādā interneta vietnē: www.saharaplc.com
MT: B’dan, Sahara Presentation Systems PLC, niddikjara li dan it-tip ta’ tagħmir tar-radju Monitor huwa konformi mad-Direttiva 2014/53/UE. It-test kollu tad-dikjarazzjoni ta’ konformità tal-UE huwa disponibbli f’dan l-indirizz tal-Internet li ġej: www.saharaplc.com
NL: Hierbij verklaar ik, Sahara Presentation Systems PLC, dat het type radioapparatuur Monitor conform is met Richtlijn 2014/53/EU. De volledige tekst van de EU-conformiteitsverklaring kan worden geraadpleegd op het volgende internetadres: www.saharaplc.com
PL: Sahara Presentation Systems PLC, niniejszym oświadcza, że typ urządzenia radiowego Monitor jest zgodny z dyrektywą 2014/53/UE. Pełny tekst deklaracji zgodności UE jest dostępny pod następującym adresem internetowym: www.saharaplc.com
PT: O(a) abaixo assinado(a) Sahara Presentation Systems PLC, declara que o presente tipo de equipamento de rádio Monitor está em conformidade com a Diretiva 2014/53/UE. O texto integral da declaração de conformidade está disponível no seguinte endereço de Internet: www.saharaplc.com
RO: Prin prezenta, Sahara Presentation Systems PLC, declară că tipul de echipamente radio Monitor este în conformitate cu Directiva 2014/53/UE. Textul integral al declarației UE de conformitate este disponibil la următoarea adresă internet: www.saharaplc.com
SK: Sahara Presentation Systems PLC, týmto vyhlasuje, že rádiové zariadenie typu Monitor je v súlade so smernicou 2014/53/EÚ. Úplné EÚ vyhlásenie o zhode je k dispozícii na tejto internetovej adrese: www.saharaplc.com
SL: Sahara Presentation Systems PLC, potrjuje, da je tip radijske opreme Monitor skladen z Direktivo 2014/53/EU. Celotno besedilo izjave EU o skladnosti je na voljo na naslednjem spletnem naslovu: www.saharaplc.com
SV: Härmed försäkrar Sahara Presentation Systems PLC, att denna typ av radioutrustning Monitor överensstämmer med direktiv 2014/53/EU. Den fullständiga texten till EU-försäkran om överensstämmelse finns på följande webbadress: www.saharaplc.com

Vestel Trade Co.Organize Sanayi Bölgesi, 45030 Manisa/TürkiyePhone: 90 - 236 233 25 82Fax: 90 - 236 233 25 [email protected]
Vestel France S.A.17 Rue de la Couture-Silic BP 10190-94563 RUNGIS Cedex/FrancePhone: 33 - 1 46 75 00 29Fax: 33 - 1 41 80 99 [email protected]
Vestel Germany GmbHParkring 6, D-85748 Garching b. München/GermanyPhone: 49 - 89 55295 - 0Fax : 49 - 89 55295 - [email protected]
Vestel Iberia
SpainPhone: 34-91 320 63 98Fax: 34-91 320 52 [email protected] www.vestel.es
Gruppo Industriale Vesit S.P.ASocietà Unipersonale Via Polidoro da Caravaggio,6 20156 Milano (MI)Phone: +39 02 842 48577Fax: +39 02 842 [email protected] www.givesit.it
Vestel UK LtdVestel House, Waterside DriveLangley, Berkshire SL3 6EZPhone: 44 3330 146 [email protected]
Vestel Benelux B.V.P.O. Box 29179 3001 GD - Rotterdam / NetherlandsPhone: 31 - 10 235 1000Fax: 31 - 10 235 [email protected] www.vestelbenelux.nl
Vestel ScandinaviaPostikatu 4, FI-04400 Jârvenpââ / Finland Phone: +358 46 712 2262Fax: +358 (0) 9 251 7 8222
Vestel CIS Ltd.1-st Graivoronovsky Proezd, No.20 Building 16, 109518, Moscow /Russia Phone: 7 - 095 956 8230Fax: 7 - 095 956 8233
Vestel ElectronicaStr Zidarului nr 9-11, Sector 5 Bucuresti, ZIP 051765 Bucharest/RomaniaPhone: 40- 31 425 42 93Fax: 40-31 425 42 95
Copyright © 2022 FDOKUMEN