User guide Xperia 5 - Belsimpel
91
User guide Xperia 5 J8210/J8270/J9210
-
Upload
khangminh22 -
Category
Documents
-
view
4 -
download
0
Transcript of User guide Xperia 5 - Belsimpel

User guide
Xperia 5J8210/J8270/J9210
Contents
Xperia 5 features.......................................................................... 5Cinema Pro....................................................................................... 5Game enhancer............................................................................... 6Enhancing the sound output........................................................... 7Side sense........................................................................................ 7Dynamic Vibration.......................................................................... 10Ambient display settings............................................................... 10Smart call handling......................................................................... 11
Getting started............................................................................ 13About this User guide.................................................................... 13Overview........................................................................................ 14Assembly - Single SIM.................................................................... 15Assembly - Dual SIM...................................................................... 16Using a Dual SIM device................................................................. 17Screen protection........................................................................... 17Starting your device for the first time............................................ 18Why do I need a Google account?................................................. 18Transferring content from your old device.................................... 18
Device security........................................................................... 20Making sure your device is protected........................................... 20Screen lock..................................................................................... 20Fingerprint Manager ..................................................................... 21SIM card protection........................................................................ 21Finding the IMEI number(s) of your device................................... 22Finding, locking or erasing a lost device ...................................... 22
Learning the basics.................................................................... 24Using the touchscreen................................................................... 24Turning the screen on or off.......................................................... 25Smart backlight control................................................................. 26Home screen.................................................................................. 26Application screen......................................................................... 26Navigating applications................................................................. 27Widgets.......................................................................................... 30Shortcuts and folders.................................................................... 30Background.................................................................................... 31Taking a screenshot....................................................................... 32Notifications................................................................................... 32Icons in the status bar................................................................... 34
2
Battery and maintenance.......................................................... 36Charging your device..................................................................... 36Battery and power management.................................................. 38Updating your device.................................................................... 39Restarting, resetting and repairing............................................... 40Improving memory performance.................................................. 42
Backing up and synchronizing data.......................................... 44Backing up and synchronizing with a Google account ............... 44Backing up and transferring data using a computer.................... 45Backing up and transferring data using a memory card.............. 45
Downloading applications......................................................... 46Downloading applications on Google Play.................................. 46
Internet and networks................................................................ 47Mobile data connection................................................................. 47Wi-Fi............................................................................................... 47Sharing your mobile data connection.......................................... 48Controlling data usage.................................................................. 48
Basic settings............................................................................. 50Accessing settings......................................................................... 50Volume, vibration and sound........................................................ 50Silence your device with Do not disturb........................................ 51Screen settings.............................................................................. 52Application settings....................................................................... 53Using location services.................................................................. 54Language settings......................................................................... 54On-screen keyboards.................................................................... 54Date and time................................................................................ 55
Calling and Contacts.................................................................. 56Calling............................................................................................ 56Contacts......................................................................................... 56
Messaging and chat................................................................... 57Reading and sending messages................................................... 57Messaging settings....................................................................... 58
Music.......................................................................................... 59Transferring music from a computer to your device.................... 59Listening to music......................................................................... 59
Camera....................................................................................... 62Getting to know your camera........................................................ 62Exposure, color and light conditions............................................. 67Setting the right focus................................................................... 70People, selfies and smiling faces................................................... 71
3

Moving objects............................................................................... 72Bokeh effect................................................................................... 73Using various capturing modes..................................................... 73Resolution and memory................................................................ 75Diagnosing your camera............................................................... 76Additional camera settings........................................................... 76
Photos and videos in Album...................................................... 78Viewing photos and videos........................................................... 78Album home screen menu............................................................ 78
Connectivity............................................................................... 80Mirroring the screen of your device wirelessly on a TV............... 80Connecting your device to USB accessories................................. 80NFC (Near Field Communication).................................................. 82Using your device as a wallet........................................................ 82Bluetooth wireless technology...................................................... 83
Clock and Calendar.................................................................... 85Calendar......................................................................................... 85Clock............................................................................................... 85
Accessibility................................................................................ 88Magnification................................................................................. 88Font size......................................................................................... 88Color correction............................................................................. 88TalkBack......................................................................................... 88Other settings for accessibility...................................................... 89
Support application................................................................... 90About the Support app................................................................. 90
Legal information....................................................................... 91General........................................................................................... 91Warranty, SAR, and usage guidelines........................................... 91
4
Xperia 5 features
Cinema Pro
Cinema Pro is an application powered by Sony's digital motion picture cameratechnology. You can create your ideal videos by configuring professionalparameters and color settings.
To launch Cinema Pro
• Find and tap (Cinema Pro icon).
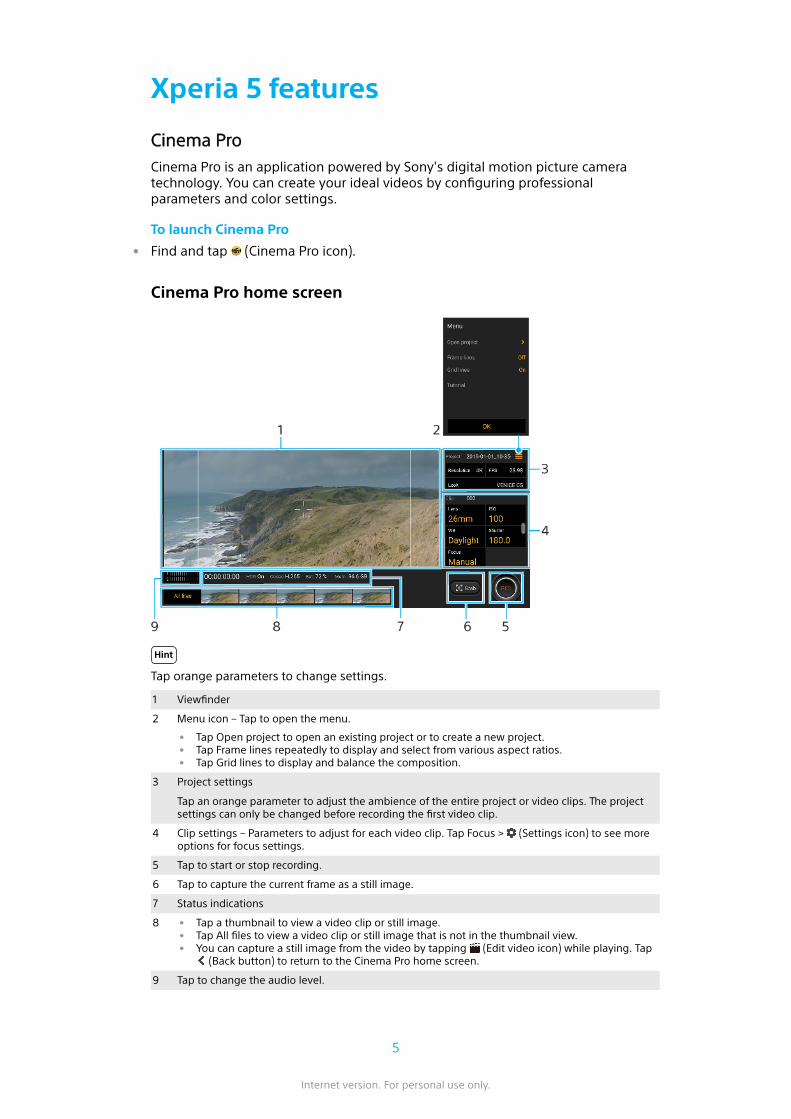
Cinema Pro home screen
Hint
Tap orange parameters to change settings.
1 Viewfinder
2 Menu icon – Tap to open the menu.
• Tap Open project to open an existing project or to create a new project.• Tap Frame lines repeatedly to display and select from various aspect ratios.• Tap Grid lines to display and balance the composition.
3 Project settings
Tap an orange parameter to adjust the ambience of the entire project or video clips. The projectsettings can only be changed before recording the first video clip.
4 Clip settings – Parameters to adjust for each video clip. Tap Focus > (Settings icon) to see moreoptions for focus settings.
5 Tap to start or stop recording.
6 Tap to capture the current frame as a still image.
7 Status indications
8 • Tap a thumbnail to view a video clip or still image.• Tap All files to view a video clip or still image that is not in the thumbnail view.• You can capture a still image from the video by tapping (Edit video icon) while playing. Tap
(Back button) to return to the Cinema Pro home screen.
9 Tap to change the audio level.
5
Internet version. For personal use only.
To combine clips and watch a film
1 While using the Cinema Pro application, tap All files to display a list of clips in aproject.
2 Tap (More icon) > Create final film.3 Tap the clips in the order in which you want to combine them. Then, tap Create.4 To watch the created film, tap (Navigate up button) twice, tap Final films, and
then tap the film that you created.
Game enhancer
The Game enhancer application makes gameplay much more convenient withvarious functions. While playing a game, you can prevent notifications fromshowing up, change the performance settings, and more.
Downloaded games are automatically listed in the Game enhancer application,and you can quickly launch the games from the Game enhancer menu. You cancustomize various settings while gaming by tapping (Open Game enhancermenu icon).
To launch the Game enhancer app
• Find and tap (Game enhancer icon).
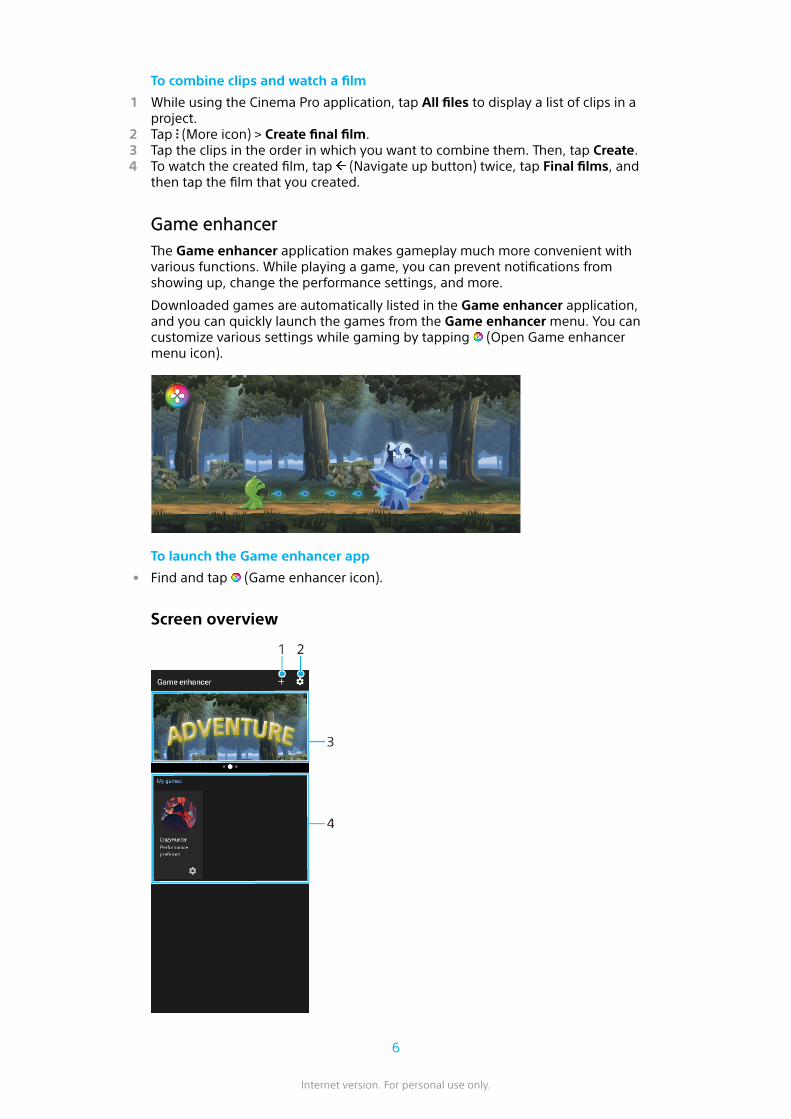
Screen overview
6
Internet version. For personal use only.

1 Add new games manually.
2 Game enhancer settings
3 Recommended – Tap to launch, download or see more information about recommended games.
4 Game launcher
To use Game enhancer while playing
1 While playing a game, tap (Game enhancer floating icon).2 In the menu that opens, tap and configure the desired settings.
Hint
You can drag and move (Game enhancer floating icon) to the desired position, such asthe edge of the screen. You can also switch (Game enhancer floating icon) to (Pull-down bar). Tap (Game enhancer floating icon) > (Settings icon), and then selectPull-down bar to switch.
Enhancing the sound output
You can enhance the sound of your device by manually configuring the soundsettings.
To upgrade the quality of compressed music files
1 Find and tap Settings > Sound > Audio settings.2 Enable the DSEE HX function by tapping the switch.
Note
• With the DSEE HX function, wired headphones that support High-Resolution Audio areneeded to play back sound in near-high-resolution sound quality.
• DSEE HX only works for headphones with a 3.5 mm Audio jack connected to your devicewith the USB host adapter. The DSEE HX function is not available for wireless or USBheadphones.
To enhance the sound output using Dolby Atmos®
1 Find and tap Settings > Sound > Audio settings.2 Enable the Dolby Atmos function by tapping the switch.3 Tap Dolby Atmos for more options.
Side sense
Your device has sensors on the sides that you can tap or slide with one hand inorder to use your device more easily. You can display the Side sense menu as ashortcut to applications and settings, or the Multi-window menu to select twoapplications in the split-screen mode. You can also return to the previous screen bysliding down along the sensor. Make sure to tap or slide your finger within thesensor area. To learn more about Side sense, find and tap Settings > Display >Advanced > Side sense > TRY SIDE SENSE TUTORIAL.
7
Internet version. For personal use only.
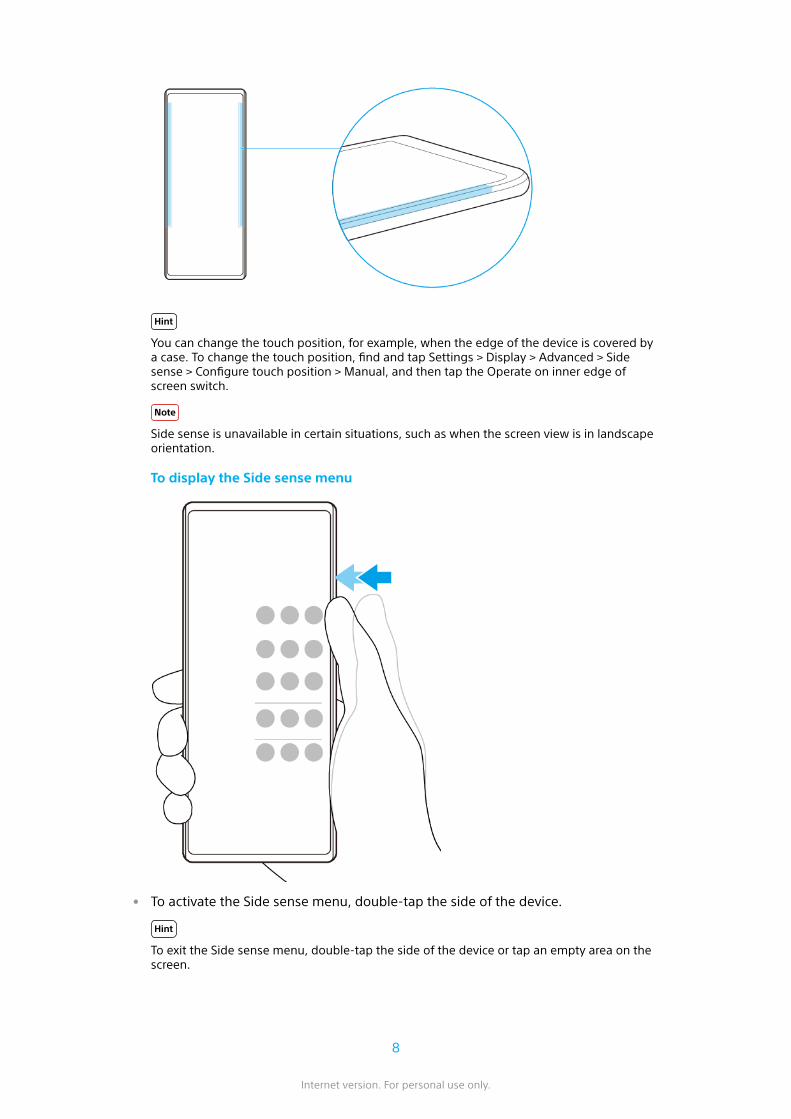
Hint
You can change the touch position, for example, when the edge of the device is covered bya case. To change the touch position, find and tap Settings > Display > Advanced > Sidesense > Configure touch position > Manual, and then tap the Operate on inner edge ofscreen switch.
Note
Side sense is unavailable in certain situations, such as when the screen view is in landscapeorientation.
To display the Side sense menu
• To activate the Side sense menu, double-tap the side of the device.
Hint
To exit the Side sense menu, double-tap the side of the device or tap an empty area on thescreen.
8
Internet version. For personal use only.
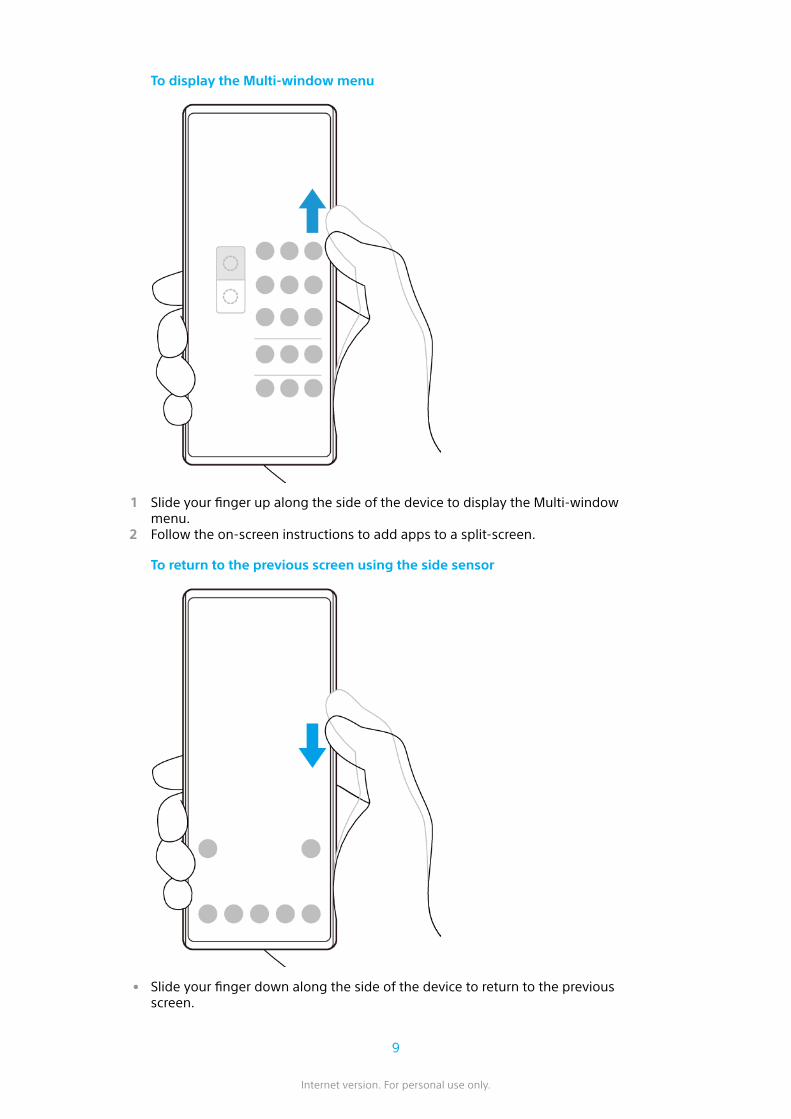
To display the Multi-window menu
1 Slide your finger up along the side of the device to display the Multi-windowmenu.
2 Follow the on-screen instructions to add apps to a split-screen.
To return to the previous screen using the side sensor
• Slide your finger down along the side of the device to return to the previousscreen.
9
Internet version. For personal use only.

To turn Side sense on or off, or set other Side sense options
1 Find and tap Settings > Display > Advanced.2 Tap Side sense.3 Tap the switch to enable or disable the function. To edit other Side sense options,
follow the on-screen instructions in the lower part of the screen.
Hint
For example, the following options are available for Side sense.
• Whether to use Side sense on one or both sides of your device• The screen actions for gesture• Whether to use Side sense on the inner edge of the screen or the side of the device
Dynamic Vibration
The Dynamic Vibration feature enhances your media experience by addingsynchronized vibration when you watch videos or listen to music on your device. Tolearn more about this feature, go to Settings > Sound > Dynamic Vibration.
There is no vibration in the following cases:
• The media volume is set to silent.• The screen is off.• STAMINA mode is activated.
Note
Dynamic Vibration does not work with all media apps.
Dynamic vibration levels
Off No vibration
Mild Less vibration
Normal Well-balanced vibration
Powerful More vibration
To adjust Dynamic Vibration settings within a media app
1 Open the desired media app, for example, YouTube or the Album app.2 Start playback of the media contents.3 Press the volume key to open the volume panel.4 Drag the slider for Dynamic Vibration to set the preferred level for this app.5 The Dynamic Vibration setting is saved for the next time you use this app.
Note
There is no vibration if the media volume is set to silent.
To enable or disable Dynamic Vibration
• Find and tap Settings > Sound > Dynamic Vibration.
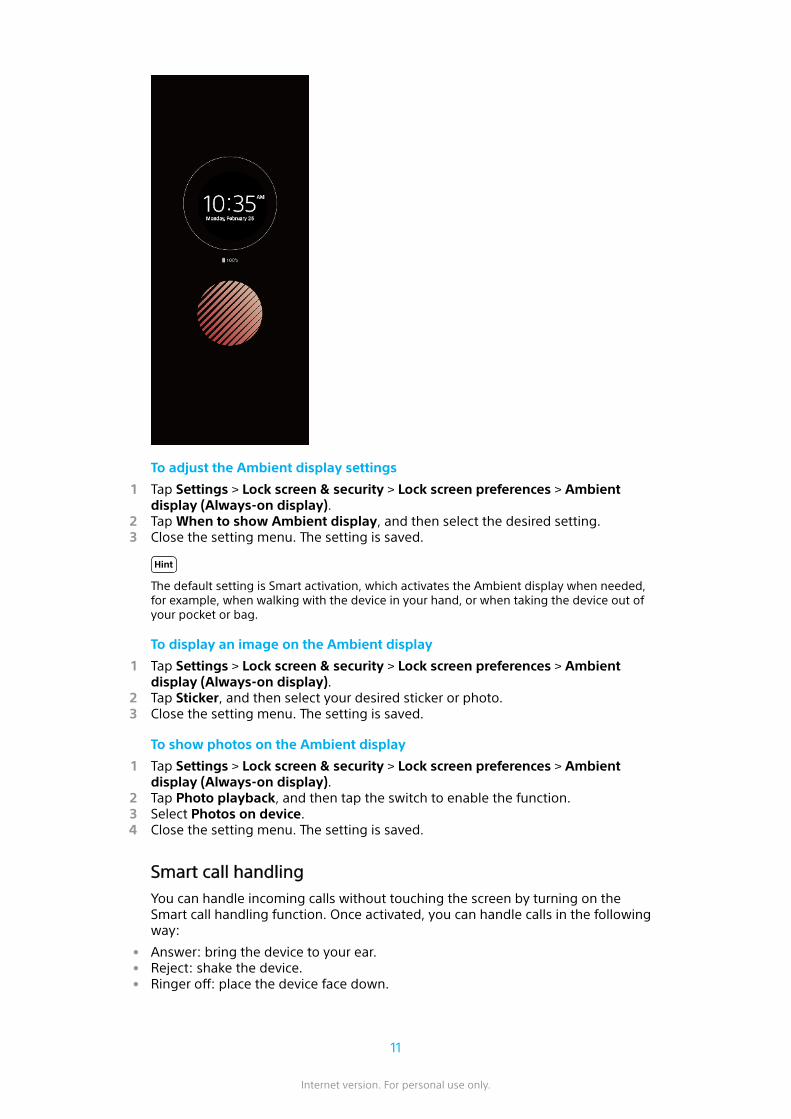
Ambient display settings
The ambient display lets you view information such as time, notifications, music, orphotos on the screen when the screen is turned off. The ambient display can alsoshow album art when playing music, recently taken photos, or photos in Albumtaken at your current location. When you are at home, photos to be shown areselected automatically by your Xperia device.
10
Internet version. For personal use only.
To adjust the Ambient display settings
1 Tap Settings > Lock screen & security > Lock screen preferences > Ambientdisplay (Always-on display).
2 Tap When to show Ambient display, and then select the desired setting.3 Close the setting menu. The setting is saved.
Hint
The default setting is Smart activation, which activates the Ambient display when needed,for example, when walking with the device in your hand, or when taking the device out ofyour pocket or bag.
To display an image on the Ambient display
1 Tap Settings > Lock screen & security > Lock screen preferences > Ambientdisplay (Always-on display).
2 Tap Sticker, and then select your desired sticker or photo.3 Close the setting menu. The setting is saved.
To show photos on the Ambient display
1 Tap Settings > Lock screen & security > Lock screen preferences > Ambientdisplay (Always-on display).
2 Tap Photo playback, and then tap the switch to enable the function.3 Select Photos on device.4 Close the setting menu. The setting is saved.
Smart call handling
You can handle incoming calls without touching the screen by turning on theSmart call handling function. Once activated, you can handle calls in the followingway:
• Answer: bring the device to your ear.• Reject: shake the device.• Ringer off: place the device face down.
11
Internet version. For personal use only.
To enable or disable Smart call handling
1 Find and tap Settings > System > Gestures > Smart call handling.2 Tap the switch to enable or disable the function.
12
Internet version. For personal use only.

Getting started
About this User guide
This is the Xperia 5 User guide for the Android 9 software version. If you’re not surewhich software version your device is running, you can check it in the Settingsmenu.
Note
System and application updates can present the features in your device in another way thandescribed in this User guide. The Android version might not be affected in an update. Formore information about software updates, see Updating your device on page 39.
To check the current software version and model number of your device
• Find and tap Settings > System > About phone. The current software version isdisplayed under Build number. The current model number is displayed underModel.
Limitations to services and features
Some of the services and features described in this User guide may not besupported in all countries or regions, or by all networks or service providers. TheGSM International Emergency Number can always be used in all countries, regions,networks and by all service providers, provided that the device is connected to themobile network. Please contact your network operator or service provider todetermine the availability of any specific service or feature and whether additionalaccess or usage fees apply.
The use of certain features and applications described in this guide may requireaccess to the internet. You may incur data connection charges when you connectto the internet with your device. Contact your wireless service provider for moreinformation.
13
Internet version. For personal use only.

Overview
1 Charging/Notification light
2 Second microphone
3 Front camera
4 Ear speaker/Second loudspeaker
5 Proximity/Light sensor
6 Volume/Zoom key
7 Fingerprint sensor
8 Power key
9 Camera key
10 Main loudspeaker
11 USB port/Charger/Audio adapter
You can view the screen of your device on a TV or other large display device using a USB Type-Ccable.
Note
When you connect your device to a TV or other large display using a USB Type-Ccable, the cable must be compatible with the display port standard. Note thatsome functions or content on your Xperia device may not be displayable on the TVor display device.
12 Main microphone
14
Internet version. For personal use only.
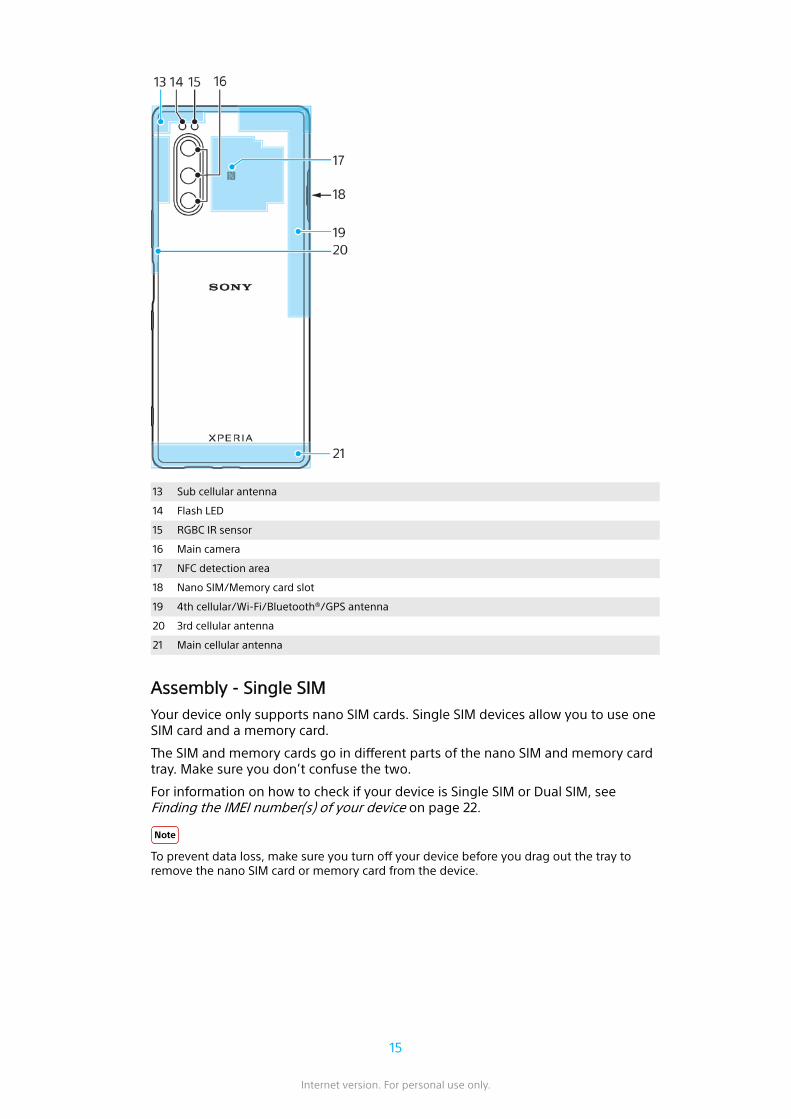
13 Sub cellular antenna
14 Flash LED
15 RGBC IR sensor
16 Main camera
17 NFC detection area
18 Nano SIM/Memory card slot
19 4th cellular/Wi-Fi/Bluetooth®/GPS antenna
20 3rd cellular antenna
21 Main cellular antenna
Assembly - Single SIM
Your device only supports nano SIM cards. Single SIM devices allow you to use oneSIM card and a memory card.
The SIM and memory cards go in different parts of the nano SIM and memory cardtray. Make sure you don’t confuse the two.
For information on how to check if your device is Single SIM or Dual SIM, seeFinding the IMEI number(s) of your device on page 22.
Note
To prevent data loss, make sure you turn off your device before you drag out the tray toremove the nano SIM card or memory card from the device.
15
Internet version. For personal use only.
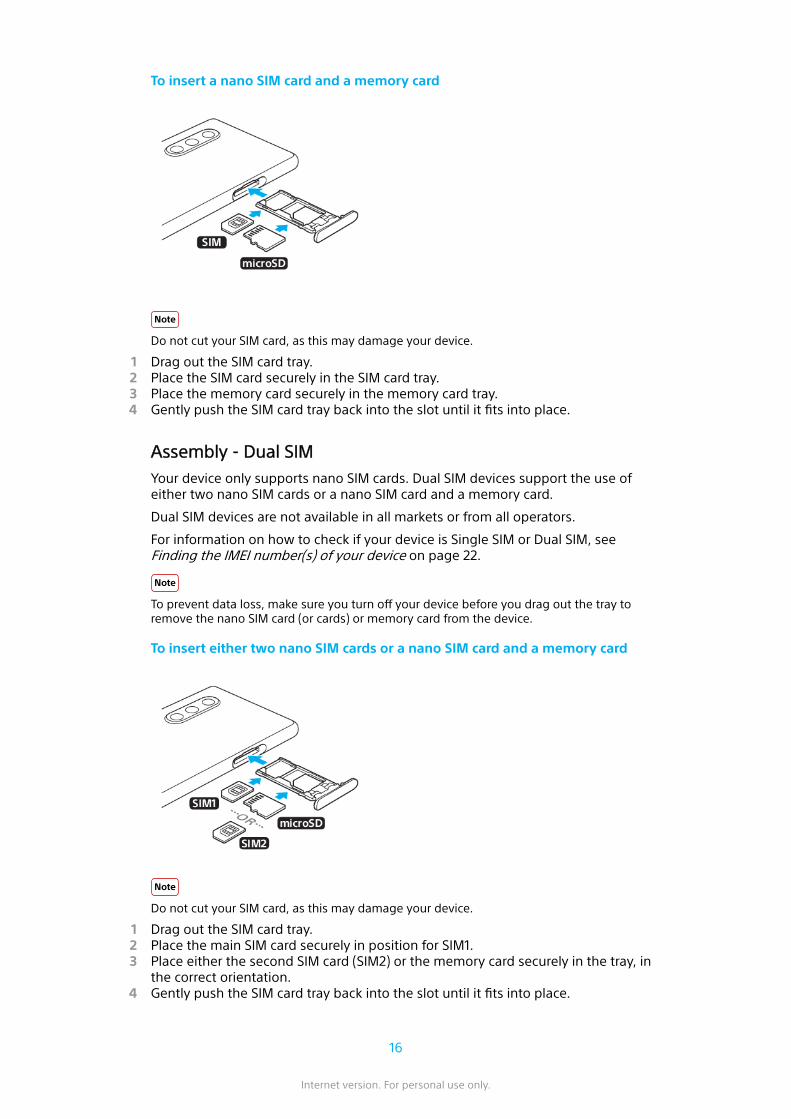
To insert a nano SIM card and a memory card
Note
Do not cut your SIM card, as this may damage your device.
1 Drag out the SIM card tray.2 Place the SIM card securely in the SIM card tray.3 Place the memory card securely in the memory card tray.4 Gently push the SIM card tray back into the slot until it fits into place.
Assembly - Dual SIM
Your device only supports nano SIM cards. Dual SIM devices support the use ofeither two nano SIM cards or a nano SIM card and a memory card.
Dual SIM devices are not available in all markets or from all operators.
For information on how to check if your device is Single SIM or Dual SIM, seeFinding the IMEI number(s) of your device on page 22.
Note
To prevent data loss, make sure you turn off your device before you drag out the tray toremove the nano SIM card (or cards) or memory card from the device.
To insert either two nano SIM cards or a nano SIM card and a memory card
Note
Do not cut your SIM card, as this may damage your device.
1 Drag out the SIM card tray.2 Place the main SIM card securely in position for SIM1.3 Place either the second SIM card (SIM2) or the memory card securely in the tray, in
the correct orientation.4 Gently push the SIM card tray back into the slot until it fits into place.
16
Internet version. For personal use only.
Using a Dual SIM device
A Dual SIM device enables you to do the following:
• Receive incoming communications via both SIM cards.• Select the number from which to send outgoing communications, or have the
option to select a SIM card each time you place a call.• Forward calls received via SIM 1 to SIM 2 when SIM 1 is unreachable, and vice versa.
This function is called Dual SIM reachability. You must enable it manually.
Before using multiple SIM cards, you need to enable them and select a SIM cardwhich will handle data traffic.
Hint
A Dual SIM device works with either one or two SIM cards inserted.
To enable or disable the use of two SIM cards
1 Find and tap Settings > Network & internet > Advanced > Dual SIM.2 Tap the SIM 1 and SIM 2 switches to enable or disable the SIM cards.
To rename a SIM card
1 Find and tap Settings > Network & internet > Advanced > Dual SIM.2 Select a SIM card and enter a new name for it.3 Tap OK.
To select which SIM card handles data traffic
1 Find and tap Settings > Network & internet > Advanced > Dual SIM > Cellulardata.
2 Select the SIM card you want to use for data traffic.
To set the default SIM card for placing a call
1 Find and tap Settings > Network & internet > Advanced > Dual SIM > Calls.2 Select an option.
To enable the Dual SIM reachability function
1 Find and tap Settings > Network & internet > Advanced > Dual SIM > Dual SIMreachability.
2 Under Dual SIM reachability, tap the switch to enable the function.3 Follow the on-screen instructions to complete the procedure.
Hint
If the Dual SIM reachability function does not work after you enable it, check that you haveentered the phone numbers correctly for each SIM card. In some cases, the numbers aredetected automatically during setup. Otherwise, you are prompted to enter them manually.
Screen protection
Note
Before using your device, remove all protection films to enable full functionality.
Screen covers and protectors may help you protect your device against damage.We recommend you use only those screen covers intended for your Xperia device.The use of third-party screen protection accessories may prevent your device fromworking correctly by covering sensors, lenses, speakers, or microphones and caninvalidate the warranty.
17
Internet version. For personal use only.
Starting your device for the first time
It is recommended that you charge the battery for at least 30 minutes beforestarting up your device for the first time. You can still use your device while it ischarging. For more information on charging, see Charging your device on page 36.
The first time you start your device, a setup guide helps you to configure basicsettings, personalize your device, and sign in to your accounts, for example aGoogle account.
To turn on your device
• Long press the power key until your device vibrates.
To turn off the device
1 Long press the power key until the options menu opens.2 Tap Power off.
Note
It may take a while for the device to shut down.
Why do I need a Google account?
Your device from Sony runs on the Android platform developed by Google. A rangeof Google applications and services is available on your device when you purchaseit, for example, Gmail, Google Maps, YouTube, and the Google Play application. Toget the most out of these services, you need a Google account. For example, aGoogle account enables you to do the following:
• Download and install applications on Google Play.• Synchronize your email, contacts, and calendar using Gmail.• You can back up, restore and transfer your data from an old device to your new
device.• Chat with friends using the Google Duo application.• Synchronize your browsing history and bookmarks using the Chrome web browser.• Identify yourself as the authorized user after a software repair using Xperia
Companion.• Remotely find, lock, or clear a lost or stolen device using the Find my device
services.
For more information, go to http://support.google.com/.
To set up a Google account on your device
1 Find and tap Settings > Accounts > Add account > Google.2 Follow the on-screen instructions to create a Google account, or sign in if you
already have an account.
Transferring content from your old device
There are several ways to transfer your data from an old device to your new device.
• Synchronize data using Google account• Copy and transfer data using a computer• Copy and transfer data using an SD card
Synchronizing data using a Google account
You can transfer data by synchronizing with a Google account. First, back up yourdata to the Google server from your old phone using your Google account. Then,set the same Google account on your new device. Depending on which contents tobackup and synchronize, there are several ways.
18
Internet version. For personal use only.
• Gmail, Calendar, Contacts: Log in with the same Google account that you wereusing on your old device. Then, your Gmail, Calendar, and Contacts will beautomatically synchronized with your Google account.
• Image (photo), video: Back up your data from the old device to the Google serverusing Google Photos. Then, synchronize with your Google account on the newdevice.
• Applications, setting, call history: Back up automatically using Google Drive onyour old device. Then, synchronize with your Google account on your new device.
• Music and other document files: Manually back up your media files from the olddevice using Google Drive. Then, synchronize with your Google account on thenew device.
For more information, see Backing up and synchronizing with a Google account onpage 44.
Transferring data using a computer
If you are storing large volumes of data on your device, you can transfer your datausing a computer. For more information, see Backing up and transferring datausing a computer on page 45.
Transferring data using an SD card
You can transfer media files and contacts using an SD card. For more information,see Backing up and transferring data using a memory card on page 45.
19
Internet version. For personal use only.
Device security
Making sure your device is protected
Your device includes security options, strongly recommended in case of loss ortheft.
Note
When using a security option to protect your device, it is crucial to remember the detailsprovided at set up.
Screen lock
Set a secure screen lock on your device using a PIN, password, pattern, orfingerprint to prevent others from using your device without permission. Once thescreen lock is set, it is not possible to unlock the screen or erase the content via aErase all data (factory reset) without providing the screen lock information.
Find my device
Use the Find my device service to remotely locate, lock, unlock, or erase thecontent on a lost device.
SIM card lock
Lock your SIM cards with a PIN to protect your subscription against misuse. The PINis required every time you restart your device.
IMEI number
Keep a copy of the IMEI number. If your device is stolen, some network providerscan use this number to stop the device from accessing the network in your countryor region.
Backup
Back up the content on your device in case your device is damaged, lost or stolen.
• To back up with a Google account, see Backing up and synchronizing with aGoogle account on page 44.
• To back up using a computer, see Backing up and transferring data using acomputer on page 45.
• To back up using a memory card, see Backing up and transferring data using amemory card on page 45.
Screen lock
When the screen is locked you have to unlock it with a swipe gesture or with yourpersonal pattern, PIN, password or fingerprint. Initially, the unprotected screenswipe is set, but it is recommended to use a more secure screen lock to protectyour device.
The security level of each lock type is listed below in order of weakest to strongest:
• Swipe: no protection, but you have quick access to the Home screen.• Pattern: draw a simple pattern with your finger to unlock your device.• PIN: enter a numeric PIN of at least four digits to unlock your device.• Password: enter an alpha-numeric password to unlock your device.
20
Internet version. For personal use only.
• Fingerprint: place your registered finger on the sensor to unlock your device.
Hint
The Smart Lock feature lets you set your device to unlock automatically in certain situations,such as when connected to a Bluetooth device or carrying your device with you. For moreinformation, go to http://www.support.google.com/.
To create or change a screen lock
Note
It is very important that you remember your screen lock when using a pattern, PIN orpassword. If you forget this information, it may not be possible to restore important datasuch as contacts and messages.
1 Find and tap Settings > Lock screen & security > Screen lock.2 If requested, confirm your current screen lock.3 Choose an option and follow the on-screen instructions.4 When you are finished, press the power key to lock the screen.
Fingerprint Manager
Register your fingerprint to use it as an additional security method for unlockingyour device or authenticating purchases. You can register up to 5 fingerprints onyour device.
The pattern, PIN, or password screen lock serves as a backup unlock method whena fingerprint is used as a screen lock. Before registering your fingerprint, make surethe sensor is clean and without any visible moisture.
To register a fingerprint
1 Find and tap Settings > Lock screen & security > Fingerprint Manager.2 Tap Next and follow the on-screen instructions to complete fingerprint registration.3 You can add, delete, or rename a fingerprint. Edit the options as desired.
SIM card protection
You can lock and unlock each SIM card that you use in your device with a PIN.When a SIM card is locked, the subscription linked to the card is protected againstmisuse, meaning that you have to enter a PIN every time you start your device.
If you enter the PIN incorrectly too many times, your SIM card will get blocked. Youthen need to enter your PUK (Personal Unblocking Key) and a new PIN. Your PINand PUK are supplied by your network operator.
To set up a SIM card lock
1 Find and tap Settings > Lock screen & security > Advanced > SIM card lock.2 Dual SIM users, select a SIM card.3 Tap the Lock SIM card switch to enable.4 Enter the SIM card PIN and tap OK. The SIM card lock is now active and you will be
prompted to enter your PIN every time you restart your device.
To change the SIM card PIN
1 Find and tap Settings > Lock screen & security > Advanced > SIM card lock.2 Dual SIM users, select a SIM card.3 Tap Change SIM PIN and follow the on-screen instructions.
21
Internet version. For personal use only.
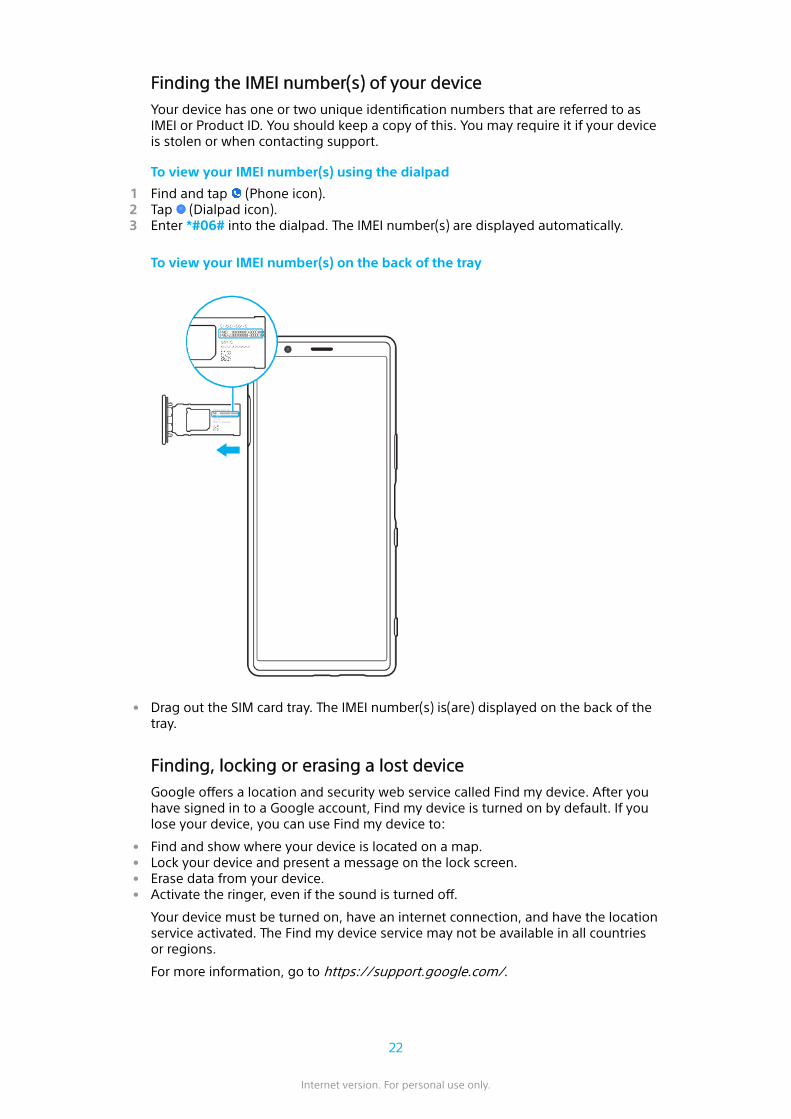
Finding the IMEI number(s) of your device
Your device has one or two unique identification numbers that are referred to asIMEI or Product ID. You should keep a copy of this. You may require it if your deviceis stolen or when contacting support.
To view your IMEI number(s) using the dialpad
1 Find and tap (Phone icon).2 Tap (Dialpad icon).3 Enter *#06# into the dialpad. The IMEI number(s) are displayed automatically.
To view your IMEI number(s) on the back of the tray
• Drag out the SIM card tray. The IMEI number(s) is(are) displayed on the back of thetray.
Finding, locking or erasing a lost device
Google offers a location and security web service called Find my device. After youhave signed in to a Google account, Find my device is turned on by default. If youlose your device, you can use Find my device to:
• Find and show where your device is located on a map.• Lock your device and present a message on the lock screen.• Erase data from your device.• Activate the ringer, even if the sound is turned off.
Your device must be turned on, have an internet connection, and have the locationservice activated. The Find my device service may not be available in all countriesor regions.
For more information, go to https://support.google.com/.
22
Internet version. For personal use only.

To verify that your device can be found
• Go to https://www.google.com/android/find and sign in using your Googleaccount.
23
Internet version. For personal use only.

Learning the basics
Using the touchscreen
Tapping
• Open or select an item.• Mark or unmark a checkbox or option.• Enter text using the on-screen keyboard.
Touching and holding
• Move an item.• Activate selection mode, for example, to select several items from a list.
24
Internet version. For personal use only.
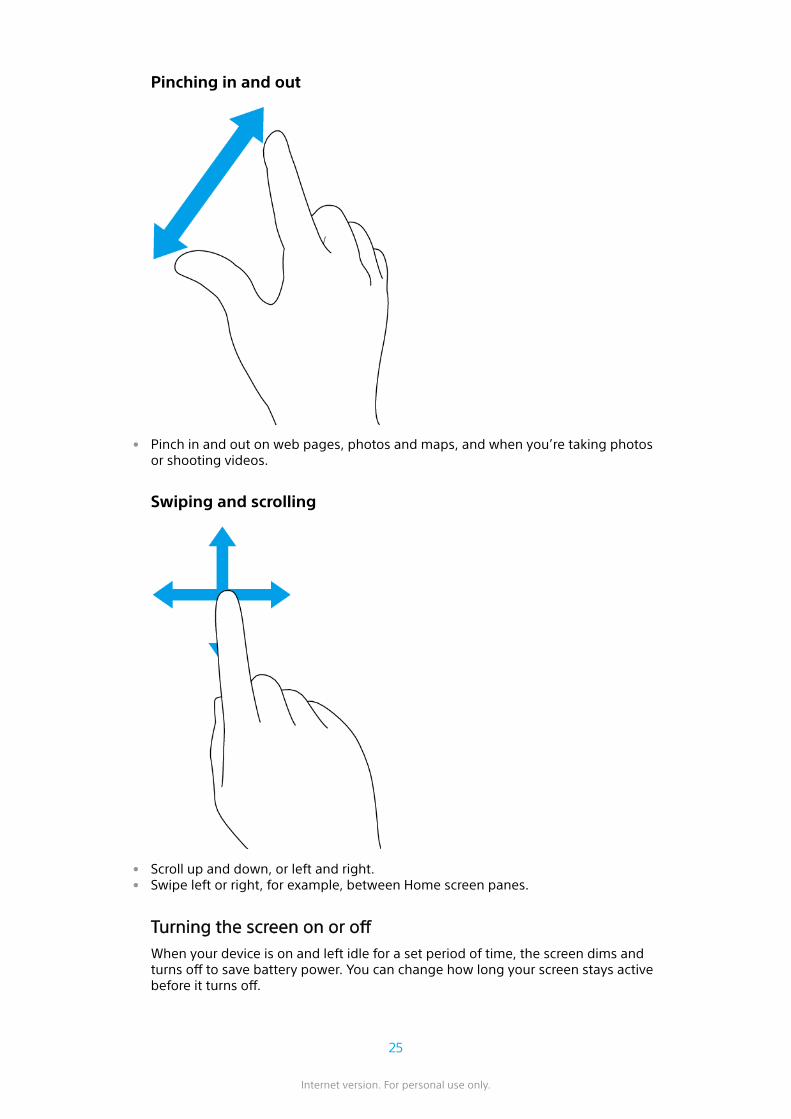
Pinching in and out
• Pinch in and out on web pages, photos and maps, and when you’re taking photosor shooting videos.
Swiping and scrolling
• Scroll up and down, or left and right.• Swipe left or right, for example, between Home screen panes.
Turning the screen on or off
When your device is on and left idle for a set period of time, the screen dims andturns off to save battery power. You can change how long your screen stays activebefore it turns off.
25
Internet version. For personal use only.
When your screen is turned off, your device can be locked or unlocked, dependingon your screen lock setting. See Screen lock on page 20.
The Ambient display feature enables you to view information such as the time andnotifications without pressing the power key.
To turn the screen on or off
• Briefly press the power key.
Hint
If the ambient display is set to Smart activation or Show when device is lifted, the screen isturned on automatically when you pick up your device. See Ambient display settings onpage 10.
To adjust the idle time before the screen turns off
1 Find and tap Settings > Display > Sleep.2 Select an option.
Smart backlight control
The smart backlight control keeps the screen on as long as the device is held inyour hand. Once you put down the device, the screen turns off according to yoursleep setting.
To enable or disable the Smart backlight control function
1 Find and tap Settings > Display > Advanced > Smart backlight control.2 Tap the switch to enable or disable the function.
Home screen
The Home screen is the starting point for using your device. You can adjust theHome screen settings, such as changing the wallpapers.
Note
Avoid displaying very bright or static images for a long period of time. This may cause anafterimage or coloring to remain on the screen.
To go to the Home screen
• Tap (Home button).
To adjust the Home screen settings
1 Touch and hold an empty area on your Home screen until the device vibrates. Iconsfor the Home screen settings appear.
2 Tap to edit the settings as desired.
Application screen
You can open or search for applications from the Application screen.
26
Internet version. For personal use only.
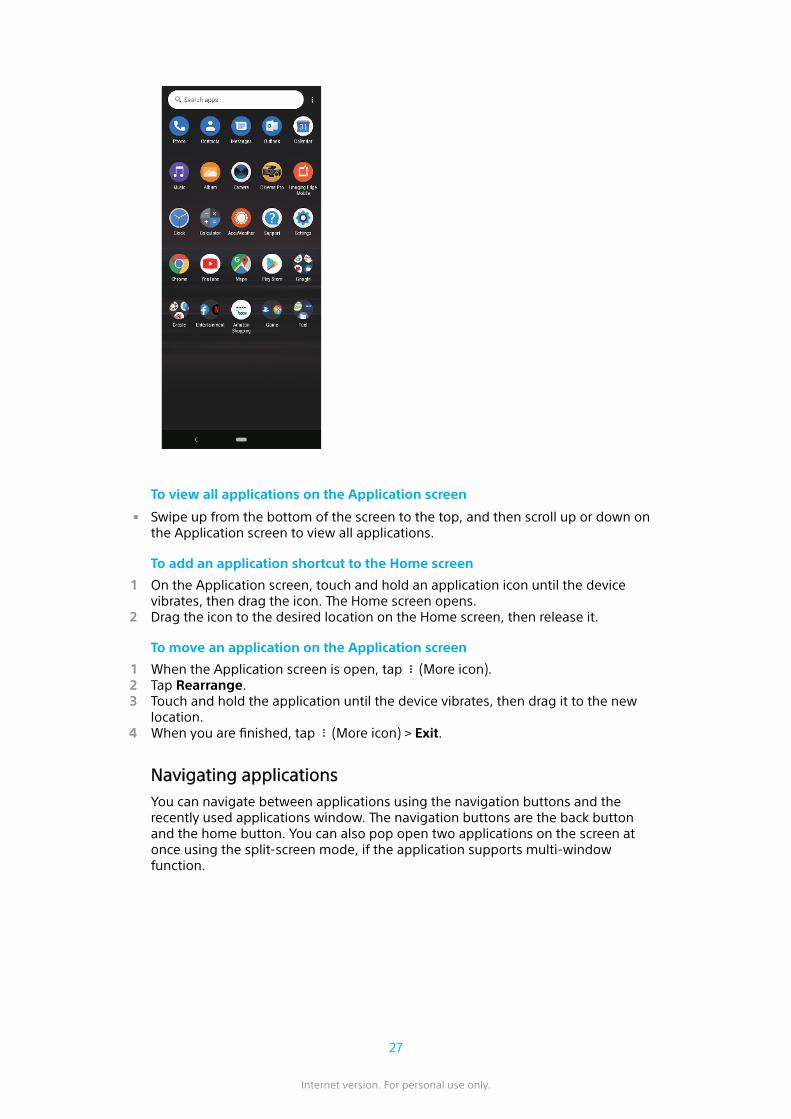
To view all applications on the Application screen
• Swipe up from the bottom of the screen to the top, and then scroll up or down onthe Application screen to view all applications.
To add an application shortcut to the Home screen
1 On the Application screen, touch and hold an application icon until the devicevibrates, then drag the icon. The Home screen opens.
2 Drag the icon to the desired location on the Home screen, then release it.
To move an application on the Application screen
1 When the Application screen is open, tap (More icon).2 Tap Rearrange.3 Touch and hold the application until the device vibrates, then drag it to the new
location.4 When you are finished, tap (More icon) > Exit.
Navigating applications
You can navigate between applications using the navigation buttons and therecently used applications window. The navigation buttons are the back buttonand the home button. You can also pop open two applications on the screen atonce using the split-screen mode, if the application supports multi-windowfunction.
27
Internet version. For personal use only.
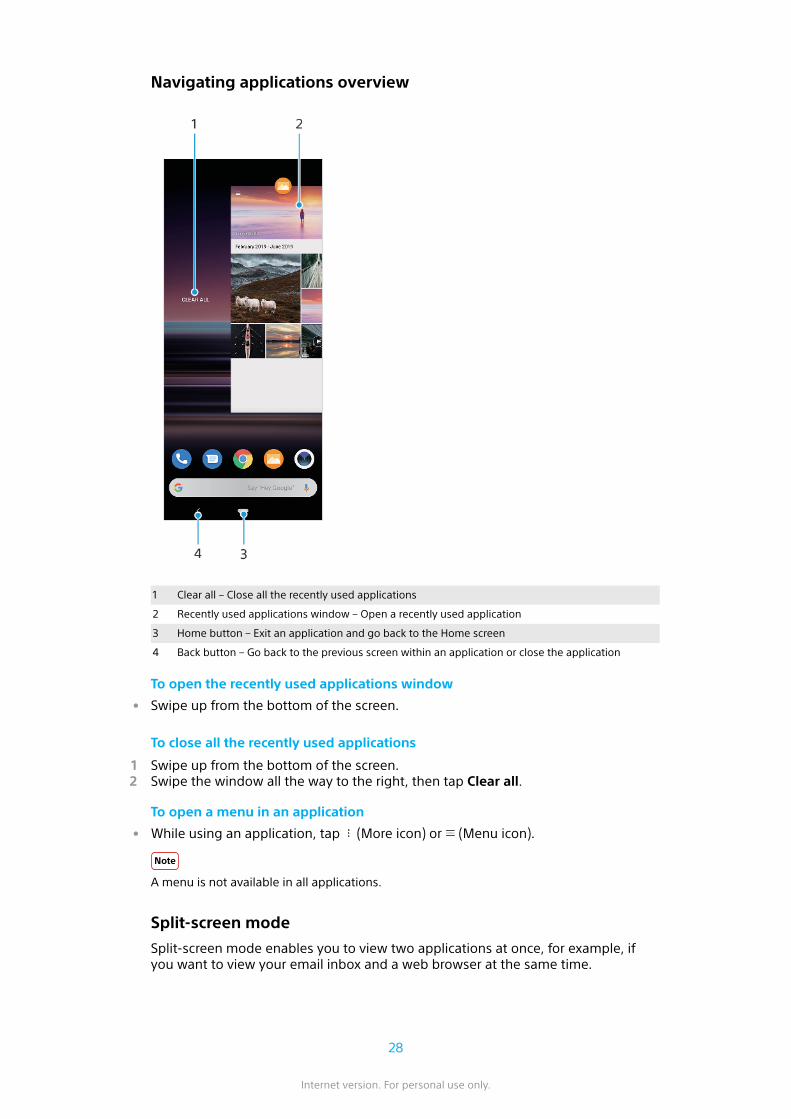
Navigating applications overview
1 Clear all – Close all the recently used applications
2 Recently used applications window – Open a recently used application
3 Home button – Exit an application and go back to the Home screen
4 Back button – Go back to the previous screen within an application or close the application
To open the recently used applications window
• Swipe up from the bottom of the screen.
To close all the recently used applications
1 Swipe up from the bottom of the screen.2 Swipe the window all the way to the right, then tap Clear all.
To open a menu in an application
• While using an application, tap (More icon) or (Menu icon).
Note
A menu is not available in all applications.
Split-screen mode
Split-screen mode enables you to view two applications at once, for example, ifyou want to view your email inbox and a web browser at the same time.
28
Internet version. For personal use only.

Split-screen overview
1 Application 1
2 Split-screen border – Drag to resize windows
3 Application 2
4 Home button – Go back to the Home screen
5 Back button – Go back to the previous screen
Note
Not all applications support split-screen mode.
To open applications in the split-screen mode
1 Touch and hold the first application icon, and then tap (Split-screen button).2 Tap the second desired application.
To open applications in the split-screen mode using the Multi-window menu
1 Slide your finger up along the side of the device to open the Multi-window menu.2 Follow the on-screen instructions to use applications in the split-screen mode.
Hint
You can also open the Multi-window menu by tapping (Multi-window menu icon) on yourHome screen.
To open running applications in the split-screen mode
1 Make sure that the two applications that you want to use in the split-screen modeare open and running in the background.
2 Swipe up from the bottom of the screen to open the recently used applicationswindow.
3 Swipe left or right to find the application that you would like to use in the split-screen mode.
4 Tap the application icon at the top of the applications window, and then tap Splitscreen.
29
Internet version. For personal use only.
5 Select the second desired application.
To resize the split-screen windows
• Drag the split-screen border in the center.
To exit the split-screen mode
• Drag the split-screen border to the top or bottom of the screen.
One-handed mode
Enable One-handed mode to adjust the display size so you can type with one handmore easily.
To enable or disable One-handed mode
1 Find and tap Settings > Display > Advanced > One-handed mode.2 Tap the One-handed mode switch to enable or disable the function.3 To shrink the screen, double-tap (Home button).4 To exit One-handed mode, double-tap (Home button) again or tap an empty
area on the screen.
To adjust the position of the screen
1 To move the screen to the left side or to the right side, tap (Left arrow icon) or (Right arrow icon) accordingly.
2 To move the screen upwards or downwards, drag the horizontal stripes at the edgeof the resized screen.
3 To resize the screen, drag (Resize screen icon) at the edge of the resized screen.
Hint
To return to full screen mode, double-tap (Home button) again or tap an empty area onthe screen.
Widgets
Widgets are small applications that you can use directly on your Home screen.They also function as shortcuts.
To add a widget to the Home screen
1 Touch and hold an empty area on your Home screen until the device vibrates, thentap Widgets.
2 Touch and hold the widget that you want to add, and then drag it to the desiredlocation.
To resize a widget
1 Touch and hold a widget until the device vibrates, then release it.2 Drag the dots to shrink or expand the widget.3 To confirm the new size, tap anywhere on the Home screen.
To move or remove a widget
• Touch and hold the widget until the device vibrates, and then drag it to a newlocation or to Remove.
Shortcuts and folders
Use shortcuts and folders to manage your applications and keep your Homescreen tidy.
30
Internet version. For personal use only.
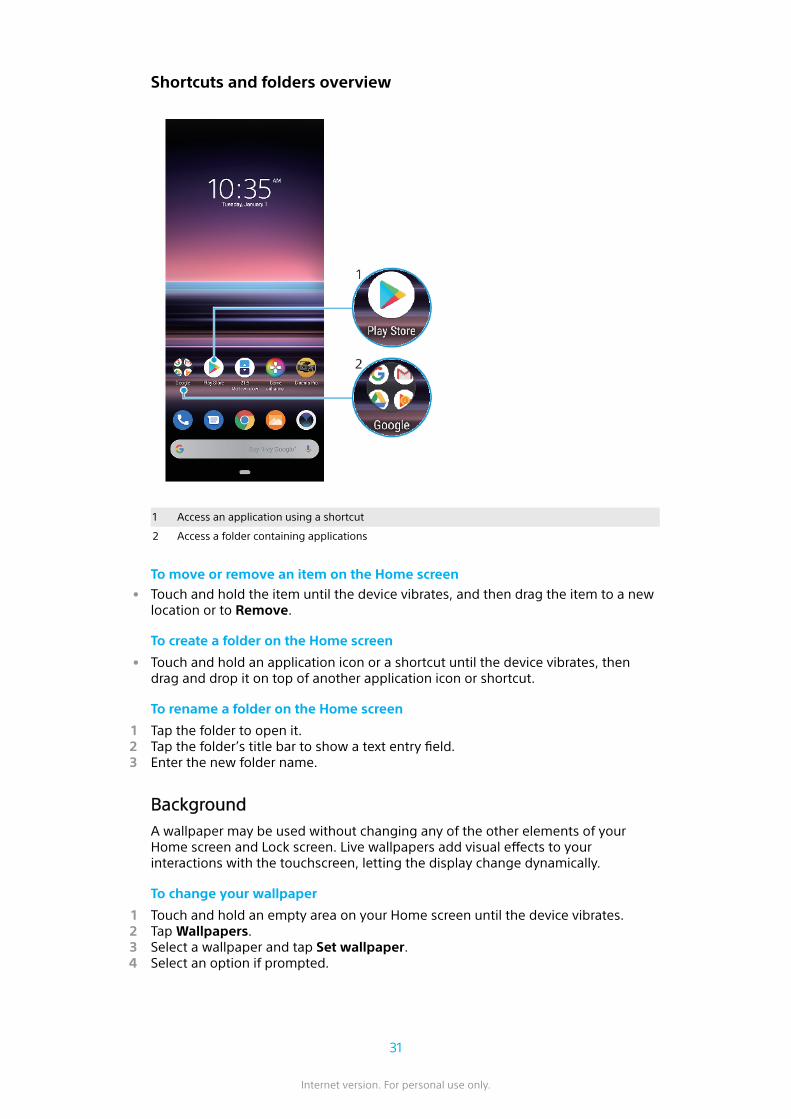
Shortcuts and folders overview
1 Access an application using a shortcut
2 Access a folder containing applications
To move or remove an item on the Home screen
• Touch and hold the item until the device vibrates, and then drag the item to a newlocation or to Remove.
To create a folder on the Home screen
• Touch and hold an application icon or a shortcut until the device vibrates, thendrag and drop it on top of another application icon or shortcut.
To rename a folder on the Home screen
1 Tap the folder to open it.2 Tap the folder’s title bar to show a text entry field.3 Enter the new folder name.
Background
A wallpaper may be used without changing any of the other elements of yourHome screen and Lock screen. Live wallpapers add visual effects to yourinteractions with the touchscreen, letting the display change dynamically.
To change your wallpaper
1 Touch and hold an empty area on your Home screen until the device vibrates.2 Tap Wallpapers.3 Select a wallpaper and tap Set wallpaper.4 Select an option if prompted.
31
Internet version. For personal use only.
Hint
You can also use a photo as your wallpaper. Instead of selecting a wallpaper from theoptions shown, tap My photos and select a photo.
Taking a screenshot
You can capture still images of any screen on your device as a screenshot.Screenshots you take are automatically saved in the Album application.
To take a screenshot
1 Long press the power key until the options menu opens.2 Tap Screenshot.
Hint
You can also take a screenshot by pressing and holding the power key and volume downkey at the same time.
To view your screenshot
1 Drag the status bar downwards, or simply double-tap it to open the Notificationpanel.
2 Tap the screenshot.
Notifications
Notifications inform you of events such as new messages and calendarnotifications as well as activities in progress such as file downloads. Notificationsappear in the following places:
• The status bar• The notification panel• The lock screen• The app icon
32
Internet version. For personal use only.
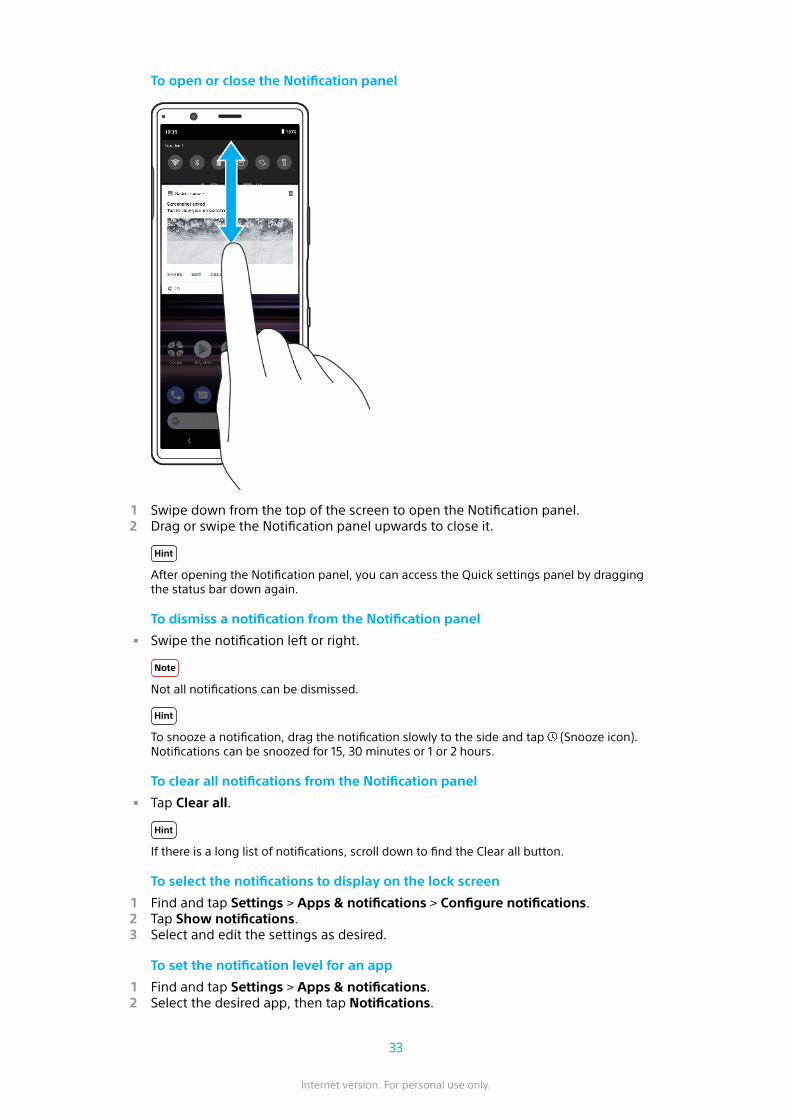
To open or close the Notification panel
1 Swipe down from the top of the screen to open the Notification panel.2 Drag or swipe the Notification panel upwards to close it.
Hint
After opening the Notification panel, you can access the Quick settings panel by draggingthe status bar down again.
To dismiss a notification from the Notification panel
• Swipe the notification left or right.
Note
Not all notifications can be dismissed.
Hint
To snooze a notification, drag the notification slowly to the side and tap (Snooze icon).Notifications can be snoozed for 15, 30 minutes or 1 or 2 hours.
To clear all notifications from the Notification panel
• Tap Clear all.
Hint
If there is a long list of notifications, scroll down to find the Clear all button.
To select the notifications to display on the lock screen
1 Find and tap Settings > Apps & notifications > Configure notifications.2 Tap Show notifications.3 Select and edit the settings as desired.
To set the notification level for an app
1 Find and tap Settings > Apps & notifications.2 Select the desired app, then tap Notifications.
33
Internet version. For personal use only.

3 Tap the switches to adjust notification settings as desired.
To block an application from sending notifications
1 Find and tap Settings > Apps & notifications.2 Select the desired application, then tap Notifications.3 Tap the Show notifications switch to block application notifications.
Notification light
The notification light informs you about battery status and some other events. Thenotification light is enabled by default but can be disabled manually.
Note
When the notification light is disabled, it only lights up when there is a battery statuswarning, for example, when the battery level goes below 15 percent.
To enable or disable the notification light
1 Find and tap Settings > Apps & notifications > Configure notifications.2 Tap Use LED light to show incoming notifications switch to enable or disable the
function.
Icons in the status bar
Status icons
(Signal strength icon)
The mobile network mode is also displayed when sending and downloading mobile data.
(No signal icon)
(Data roaming icon)
(Wi-Fi signal icon) A Wi-Fi connection is enabled and data is being transmitted
(Wi-Fi connection error icon) A Wi-Fi connection is enabled but there is no internet connection.
This icon also appears when you are trying to connect to a secured Wi-Fi or captive portal network.After a successful login, the cross mark disappears.If Google is blocked in your area, the cross mark may appear even when the device is connected toa network and there is a Wi-Fi working internet connection.
(Battery status icon)
(Charging battery icon)
(Airplane mode icon)
(Microphone muting icon)
(Speakerphone icon)
(Do not disturb icon)
(Muting icon)
(Vibrate icon)
(Alarm icon)
(GPS icon)
34
Internet version. For personal use only.
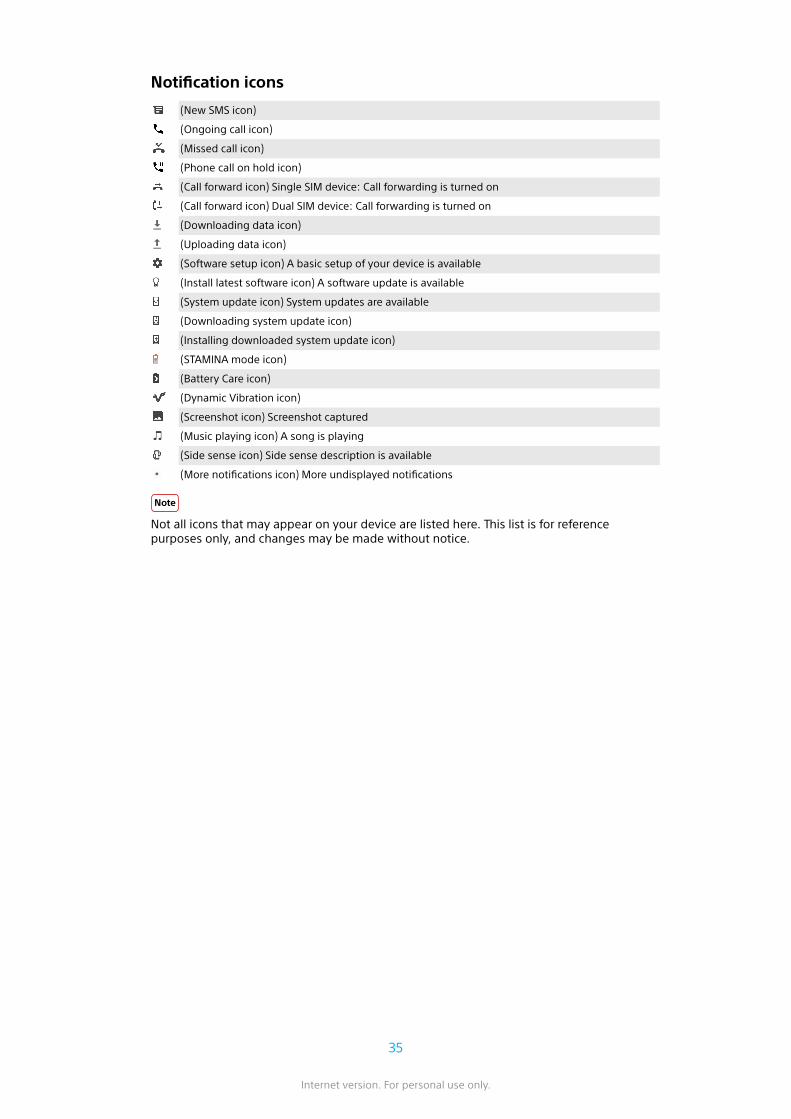
Notification icons
(New SMS icon)
(Ongoing call icon)
(Missed call icon)
(Phone call on hold icon)
(Call forward icon) Single SIM device: Call forwarding is turned on
(Call forward icon) Dual SIM device: Call forwarding is turned on
(Downloading data icon)
(Uploading data icon)
(Software setup icon) A basic setup of your device is available
(Install latest software icon) A software update is available
(System update icon) System updates are available
(Downloading system update icon)
(Installing downloaded system update icon)
(STAMINA mode icon)
(Battery Care icon)
(Dynamic Vibration icon)
(Screenshot icon) Screenshot captured
(Music playing icon) A song is playing
(Side sense icon) Side sense description is available
(More notifications icon) More undisplayed notifications
Note
Not all icons that may appear on your device are listed here. This list is for referencepurposes only, and changes may be made without notice.
35
Internet version. For personal use only.

Battery and maintenance
Charging your device
You can charge your device from a wall socket or computer. You can still use yourdevice while charging.
If the battery is depleted, it may take up to 10 minutes for your device to respondto the charging. During this time, the screen may remain completely dark, notshowing the charging icon. It can take couple of hours for a completely drainedbattery to be fully charged. Charging speed may be affected by ambienttemperature.
Note
Your device has an embedded, rechargeable battery that can only be replaced by anauthorized Sony repair center. Never try to open or take apart the device yourself. Doing socan cause damage and void your warranty.
Always use the original Sony charger and a USB cable intended for your specificXperia model, since other types of chargers can increase charging time, not chargeat all, or may even damage your device.
Hint
A wall socket charger will charge your device faster than charging via computer. You can stilluse your device while charging.
36
Internet version. For personal use only.
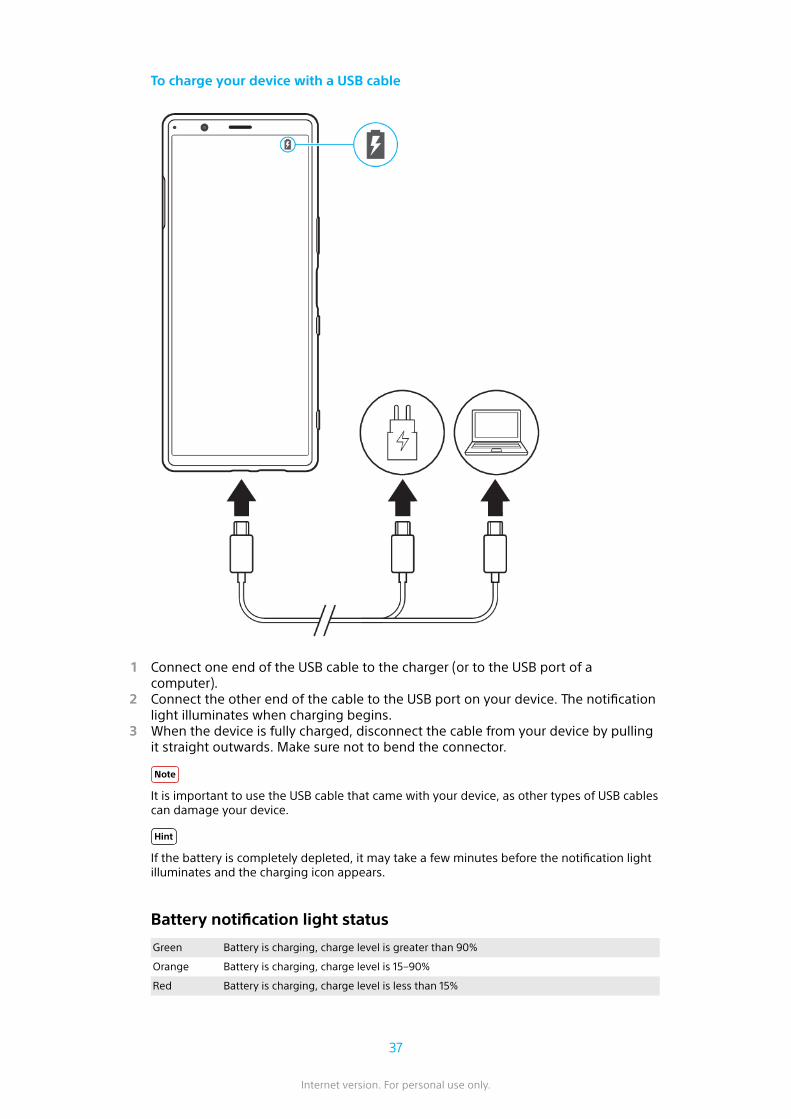
To charge your device with a USB cable
1 Connect one end of the USB cable to the charger (or to the USB port of acomputer).
2 Connect the other end of the cable to the USB port on your device. The notificationlight illuminates when charging begins.
3 When the device is fully charged, disconnect the cable from your device by pullingit straight outwards. Make sure not to bend the connector.
Note
It is important to use the USB cable that came with your device, as other types of USB cablescan damage your device.
Hint
If the battery is completely depleted, it may take a few minutes before the notification lightilluminates and the charging icon appears.
Battery notification light status
Green Battery is charging, charge level is greater than 90%
Orange Battery is charging, charge level is 15–90%
Red Battery is charging, charge level is less than 15%
37
Internet version. For personal use only.
Battery and power management
Your device has an embedded battery. To get the most use from it, keep track ofthe power consumed by different applications and features. You can also useBattery Care to increase the battery’s lifetime. Background power-saving featuresare activated by default to help you further reduce battery consumption, andadditional power-saving modes are available to help you reduce batteryconsumption when necessary.
Power-saving features lower the priority of certain non-essential device functions.If you do not want an application to be affected, you can make it exempt in thePower-saving exceptions menu. Phone calls and SMS are not affected.
Note
System updates may change the power-saving features available on your device.
To review your battery consumption
1 Find and tap Settings > Battery to view the estimated remaining batterypercentage and battery time.
2 Tap Advanced for more details about battery usage.
To view battery consumption for applications
1 Find and tap Settings > Apps & notifications.2 Select an application and review its battery consumption under Advanced >
Battery.
General usage tips to improve battery performance
The following tips can help you improve battery performance:
• Lower the screen brightness level, see Screen settings on page 52.• Turn off Bluetooth, Wi-Fi and location services when you don’t need these
features.• Turn off your device or use Airplane mode if you are in an area with no or low
network coverage. Otherwise, your device repeatedly scans for available networks,and this consumes power.
• Use a Wi-Fi network instead of roaming when abroad. Roaming is scanning foryour home network and puts additional demands on your battery as your devicemust transmit with a higher output power, see Wi-Fi on page 47.
• Change the synchronization settings for your email, calendar and contacts.• Check the applications that have a high battery consumption and consider the
battery saving tips provided on your device for these applications.• Change the notification level for an application, see Notifications on page 32.• Turn off the location-sharing permission for an application, see Application
settings on page 53.• Uninstall applications that you are not using.• Use a Sony original handsfree device to listen to music. Handsfree devices
consume less battery than your device’s loudspeakers.• Restart your device every now and then.
To make specific applications exempt from optimization
1 Find and tap Settings > Apps & notifications > Advanced > Special app access >Power-saving feature.
2 Follow the on-screen instructions, and select the applications to which the power-saving feature is applied.
38
Internet version. For personal use only.

STAMINA mode
The STAMINA mode prolongs the time until the battery needs charging bydisabling some functions of the device.
Depending on the STAMINA level, different features will be restricted or disabled inorder to reduce battery consumption. These include rendering performance,screen brightness, image enhancement, and GPS while the screen is off.Synchronizing of background app data or streaming may be disabled for someapplications.
To activate STAMINA mode
1 Find and tap Settings > Battery > STAMINA mode.2 Tap Activate now or the Activate automatically switch.3 When you tap the Activate automatically switch, adjust the auto-start percentage
according to your preferences.4 Tap STAMINA level to select the desired level.
Hint
You can exempt applications from being optimized by STAMINA mode in the Power-savingfeature menu.
Battery Care
Battery Care increases the lifespan of your battery. This feature detects yourcharging patterns and estimates the start and end time of your regular chargingperiod. The charging rate is controlled so that your battery reaches 100% justbefore you disconnect the charger. You can also set a start and end time for thecharging period manually.
Note
Battery Care will not control the charging rate until it detects a regular charging cycle of atleast 4 hours over a period of several days.
To enable or disable Battery Care
1 Find and tap Settings > Battery > Battery Care.2 Tap the switch to enable or disable Battery Care. Auto is selected by default.3 To manually set a start and end time for the charging period, tap Custom, and
then set the start and end times.
Hint
Learned patterns of the regular charging cycle are saved by Battery Care. Even if thefunction has been disabled, it adopts to the learned patterns after enabling the functionagain.
Updating your device
You should update the software on your device to get the latest functionality,enhancements, and bug fixes in order to ensure optimal performance. When asoftware update is available, (System update icon) appears in the status bar. Youcan also check for new updates manually.
The easiest way to install a software update is to do it wirelessly from your device.However, some updates are not available for wireless download. You then need touse the Xperia Companion software on a PC or on an Apple Mac computer toupdate your device.
Before updating your device, consider the following:
• Ensure you have sufficient storage capacity.
39
Internet version. For personal use only.
• System and application updates can present the features on your device in anotherway than described in this User guide. The Android version might not be affectedafter an update.
To check for new software
• Find and tap Settings > System > Advanced > Software update.
Updating your device wirelessly
Use the Software update application to update your device software wirelessly. Theupdates you can download over a mobile network depend on your operator. It isrecommended to use a Wi-Fi network instead of a mobile network to downloadnew software so that you can avoid data traffic costs.
To install a system update
1 Find and tap Settings > System > Advanced > Software update.2 Follow the on-screen instructions.
To set up automatic download of system updates
1 Find and tap Settings > System > Advanced > Software update.2 Tap (More icon), then tap Settings > Auto update system.3 Select the preferred option.
To enable or disable automatic updates for applications
1 Find and tap Settings > System > Advanced > Software update.2 Tap (More icon), then tap Settings > Auto update apps.3 Select the preferred option.
To update your device using a computer
1 Connect your device to the computer using a USB cable.2 Make sure that the screen of your device is unlocked, and drag down the status
bar, and then tap Android System next to (USB icon).3 Tap Tap for more options, and then tap File Transfer.4 Open Xperia Companion, if it is not automatically launched.5 Make sure that the computer can access the internet.6 Computer: If a new software update is detected, a pop-up window appears.
Follow the on-screen instructions to run the relevant software updates.
Note
If you don’t have the Xperia Companion software installed on the relevant computer,connect your device to the computer and follow the on-screen installation instructions.Make sure that you are using the USB cable that came with your device and that it isproperly connected to the device and computer.
Restarting, resetting and repairing
You can force your device to restart or shut down if it stops responding or won'trestart normally. No settings or personal data get deleted.
You can also reset your device to its original factory settings. This procedure issometimes necessary if your device stops functioning properly, but note that youshould first back up your data, as resetting your device will erase all your data fromyour device. For more information, see Backing up and synchronizing with aGoogle account on page 44.
If your device fails to turn on or you want to reset your device’s software, you canuse Xperia Companion to repair your device. For more information on using Xperia
40
Internet version. For personal use only.
Companion, see Xperia Companion web site https://support.sonymobile.com/xperia-companion/.
To restart your device
Note
Your device may fail to restart if the battery level is low. Connect your device to a chargerand try restarting again.
1 Long press the power key.2 In the menu that opens, tap Restart. The device restarts automatically.
To force the device to restart or shut down
1 Long press the power key and the volume up key at the same time until yourdevice vibrates.
2 Depending on whether you wish to force the device to restart or shut down,proceed as follows.
• If you wish to force restart the device: Release the keys at this point. The devicerestarts.
• If you wish to force shut down the device: Continue pressing the keys. After a fewmore seconds, the device vibrates three times and turns off.
To perform a factory data reset
Note
To avoid permanent damage to your device, do not interrupt a factory data reset procedure.
1 Back up any data saved to the internal memory of your device. Resetting will eraseall your data from your device.
2 Find and tap Settings > System > Advanced > Reset options.3 Tap Erase all data (factory reset) > Reset phone.4 If required, draw your screen unlock pattern or enter your screen unlock password
or PIN to continue.5 To confirm, tap Erase everything.
Hint
Your device does not revert to an earlier software version of Android when you perform afactory data reset.
Repairing the device software
You can use Xperia Companion to repair your device’s software. If you forget yourscreen unlock password, PIN or pattern, you can use the device repair feature inXperia Companion to erase the security layer. You need to provide your Googleaccount login details to perform this operation. By running the repair feature, youreinstall software for your device and you may lose some personal data in theprocess.
If your device seems to have frozen, restarts repeatedly or doesn’t start at all afteryou’ve updated the Xperia software or after you’ve performed a software repair ora factory data reset, try forcing the device to shut down then try turning it back on.If the problem still exists, force the device to shut down then perform a softwarerepair.
Hint
When you receive a new Google account username or password, you might not be able touse them to log in.
41
Internet version. For personal use only.
To repair the device software using Xperia Companion
Note
Before performing a software repair, make sure you know your Google account usernameand password. Depending on your security settings, you may need to enter them in order torestart the device after a software repair.
1 Make sure that Xperia Companion is installed on the computer.2 Open the Xperia Companion software on the computer and click Software repair
on the main screen.3 Follow the instructions that appear on the screen to reinstall the software and
complete the repair.
Resetting your applications
You can reset an application or clear application data if your application stopsresponding or causes issues with your device.
To reset application preferences
1 Find and tap Settings > Apps & notifications.2 Tap (See all apps icon) to see all applications.3 Tap (More icon) > Reset app preferences > Reset apps.
Hint
Resetting application preferences does not delete any application data from your device.
To clear application data
1 Find and tap Settings > Apps & notifications.2 Select an application or service, then tap Storage > CLEAR DATA > OK.
Note
When you clear application data, data for the selected application is deleted from yourdevice permanently. The option to clear application data is not available for everyapplication or service.
To clear application cache
1 Find and tap Settings > Apps & notifications.2 Select an application or service, then tap Storage > CLEAR CACHE.
Note
The option to clear the application cache is not available for every application or service.
To clear the application default setting
1 Find and tap Settings > Apps & notifications.2 Select an application or service, then tap Advanced > Open by default > CLEAR
DEFAULTS.
Note
The option to clear the application default setting is not available for every application orservice.
Improving memory performance
The internal storage stores downloaded or transferred content along with personalsettings and data, and it tends to fill up as a result of normal usage. If the devicestarts to slow down, or applications suddenly shut down, you should consider thefollowing:
• Close running applications that you are not using.
42
Internet version. For personal use only.
• Uninstall downloaded applications that you don’t use.• Transfer photos, videos, and music from the internal memory to the removable
memory card or Google service.
Note
• You can purchase a memory card separately.• If your device can’t read content on the memory card, you may need to format the card.
Note that when you format the card, all content is erased.
To view the memory status
• Find and tap Settings > Storage.
To free up space on the internal storage
1 Find and tap Settings > Storage.2 Tap FREE UP SPACE. If you have a memory card inserted, select Internal shared
storage > FREE UP SPACE.3 Select infrequently used apps or old files to delete, and then follow the on-screen
instructions.
To stop applications and services from running
1 Find and tap Settings > Apps & notifications.2 Select an application or service, then tap FORCE STOP > OK.
To format the memory card
1 Find and tap Settings > Storage.2 Tap SD card > (More icon), then tap Storage settings > Format, then perform
formatting on the next confirmation dialog.
Note
All content on the memory card gets erased when you format it. Make sure you first makebackups of all data that you want to save. To back up your content, you can copy it to acomputer. For more information, see Backing up and transferring data using a computer onpage 45.
Smart cleaner
Smart cleaner improves the device's performance by automatically optimizingstorage and memory based on app usage.
To enable or disable Smart cleaner
1 Find and tap Settings > Xperia Assist.2 Tap Smart cleaner, then tap the switch to enable or disable the function.
Note
You can also modify, copy or delete files manually if you find and tap the Files application.
43
Internet version. For personal use only.
Backing up and synchronizing data
Backing up and synchronizing with a Google account
You can back up your data to the Google server and synchronize with a Googleaccount. Depending on the types of content, there are several ways to back up andsynchronize. If you want to transfer data from your old device to a new device, setthe backup on your old device, and synchronize with your Google account on thenew device. Backing up is especially recommended if you are updating your devicesoftware to a newer Android version.
To set up a Google account
1 Tap Settings > Accounts > Add account, then select Google.2 Follow the on-screen instructions to create or sign in to an account.
To back up and synchronize Gmail, Calendar, and Contacts
1 Tap Settings > Accounts.2 If there is no Google account yet, tap Add account.3 Tap the Automatically sync data switch to enable the function. Your Gmail,
Calendar, and Contacts will be backed up automatically.
Note
You can transfer and synchronize Gmail, Calendar, and Contacts data automatically bylogging in to the Google account used to synchronize data on your old device.
To back up and synchronize photos and videos
1 Find and tap (Google Photos icon).2 Tap (Menu icon), and then tap the settings menu.3 Tap the backup and sync menu.4 Tap the switch to enable the function. Your photos and videos will be backed up
automatically.
Note
You can synchronize photos and videos automatically by logging in to the Google accountused to synchronize data on your old device. For more information, go to http://support.google.com/.
To back up and synchronize apps, phone settings, and call history
1 Find and tap Settings > System > Advanced > Backup.2 Tap the switch to enable the function. Your app data, device settings, and call
history will be backed up automatically.
Note
You can also enable backup from the settings menu in Google Drive. You can synchronizeyour app data, device settings, and call history automatically by logging in to the Googleaccount used to synchronize data on your old device. When you power on your new devicefor the first time, log in to the Google account and follow the on-screen instructions.
To back up and synchronize files manually
1 Find and tap (Music icon) or (Files icon).2 Touch and hold the files you want to back up and select Share from the options
that appear.3 Save to Google Drive.
Note
You can synchronize data on your new device by logging in to the Google account used tosynchronize data on your old device.
44
Internet version. For personal use only.

Backing up and transferring data using a computer
It is recommended to back up your data to a computer when you have largevolumes of media files, such as photos, videos, music files. You can also transferyour data from an old device to your new device, by connecting both devices tothe computer at the same time. Use a USB cable connection between a Windowscomputer and your device to transfer and manage your files.
To connect to a computer using a USB cable
1 Connect your device to the computer using a USB cable.2 Drag down the status bar, and then tap Android System next to (USB icon).3 Tap Tap for more options. Your computer will detect your device once you tap File
Transfer.
Note
Always use a USB cable intended for your specific Xperia model and make sure it iscompletely dry.
To back up your data using a computer
1 Unlock the screen of your device and connect your device to the computer using aUSB cable.
2 On the computer, select which files to back up, then copy and paste or drag anddrop the files to a location on your computer.
To transfer files from your old device to new device
1 Unlock the screen of your device and connect both your old device and new deviceto a computer using a USB cable.
2 On the computer, select which files to transfer from your old device, then copy andpaste or drag and drop the files to a location on your new device.
Note
When you copy files from your old device to the new device, make sure that the foldernames are the same on both devices.
Backing up and transferring data using a memory card
To back up and transfer files using a memory card
1 Make sure you have a memory card inserted into your device.2 Find and tap (Files icon).3 Tap and hold and mark the files that you want to transfer to the memory card.4 Tap (More icon) and select Copy to… or Move to… to back up or transfer.
45
Internet version. For personal use only.
Downloading applications
Downloading applications on Google Play
Google Play is the official online Google store for downloading applications,games, music, movies, and books. It includes both free and paid applications.Before you start downloading on Google Play, make sure that you have a workinginternet connection, preferably over Wi-Fi to limit data traffic charges. For moreinformation, see Updating your device on page 39.
To download an application on Google Play
1 Find and tap (Play Store icon).2 Find an item you wish to download by browsing categories, or by using the search
function.3 Tap the item to view its details. Follow the on-screen instructions to complete the
installation.
46
Internet version. For personal use only.
Internet and networks
Mobile data connection
You need the correct internet settings to access the internet with a mobile dataconnection.
• For most mobile networks and operators, these settings come pre-installed onyour device so that you can start using the internet right away.
• You can manually check for updates to your internet settings. If you change ordelete an internet setting by mistake, reset the internet settings.
• Find and tap Settings > Network & internet > Mobile network for more mobilenetwork options.
Wi-Fi
Available Wi-Fi networks may be open or secured. Secured networks are indicatedby (Wi-Fi lock icon) next to the Wi-Fi network name.
To connect to a Wi-Fi network
1 Find and tap Settings > Network & internet > Wi-Fi.2 Tap the switch to turn on Wi-Fi. All available Wi-Fi networks are displayed.3 Tap a Wi-Fi network to connect to it. For secured networks, enter the relevant
password. (Wi-Fi icon) is displayed in the status bar once you are connected.
To add a Wi-Fi network manually
1 Find and tap Settings > Network & internet > Wi-Fi.2 Scroll down and tap Add network.3 Enter the Network name information.4 To select a security type, tap the Security field.5 If required, enter a password.6 To edit advanced options such as proxy settings, IP settings, and other network
settings, tap Advanced options and then edit the options as desired.7 Tap SAVE.
Increasing Wi-Fi signal strength
There are a number of things you can do to improve Wi-Fi reception:
• Move your device closer to the Wi-Fi access point.• Move the Wi-Fi access point away from any potential obstructions or interference.• Don’t cover the Wi-Fi antenna area of your device.
Note
The Wi-Fi antenna is usually located in the upper part of the device. See Overview on page14.
Wi-Fi settings
When you are connected to a Wi-Fi network or when there are Wi-Fi networksavailable in your vicinity, you can view the status of these networks. You can alsoenable your device to notify you whenever an open Wi-Fi network is detected.
To view detailed information about a connected Wi-Fi network
1 Find and tap Settings > Network & internet > Wi-Fi.2 Tap the Wi-Fi network that you are currently connected to. Detailed network
information is displayed.
47
Internet version. For personal use only.
To change the Wi-Fi settings
1 Find and tap Settings > Network & internet > Wi-Fi.2 Tap Wi‑Fi preferences.
Sharing your mobile data connection
You can share your mobile data connection with other devices in several ways.
• Portable hotspot: share your mobile data connection via Wi-Fi with up to 10 otherdevices simultaneously.
• One-touch portable hotspot: touch devices to start sharing your mobileconnection over Wi-Fi.
• USB tethering: share your mobile data connection with a single computer using aUSB cable.
To use your device as a portable hotspot
1 Find and tap Settings > Network & internet > Hotspot & tethering > Portablehotspot.
2 Tap the switch at the top of the list to enable the function.
To share your data connection using a USB cable
1 Connect your device to a computer using the USB cable.2 Find and tap Settings > Network & internet > Hotspot & tethering.3 Tap the USB tethering switch, then tap OK if prompted. (USB sharing icon) is
displayed in the status bar once you are connected.4 To stop sharing your data connection, tap the USB tethering switch or disconnect
the USB cable.
Note
You cannot share your device's data connection and SD card over a USB cable at the sametime.
To share your mobile connection by One-touch portable hotspot
1 Make sure that both devices have the NFC function turned on, and that bothscreens are active.
2 Find and tap Settings > Network & internet > Hotspot & tethering.3 Tap One-touch portable hotspot.4 Hold the devices together so that the N-Marks of each device touch, then tap
CONNECT.
Note
This function only works with devices that also support NFC Wi-Fi tethering.
Controlling data usage
You can keep track of the amount of data transferred to and from your device overyour mobile data or Wi-Fi connection during a given period. For example, you canview the amount of data used by individual applications. For data transferred overyour mobile data connection, you can also set data usage warnings and limits toavoid additional charges.
To set and control data usage
1 Find and tap Settings > Network & internet > Data usage.2 Select and edit settings as desired.
48
Internet version. For personal use only.
To control the data usage of individual applications
1 Find and tap Settings > Apps & notifications.2 Tap the application that you want to control, then tap Data usage.3 Edit the options as desired.
Note
The performance of individual applications may be affected if you change the related datausage settings.
49
Internet version. For personal use only.
Basic settings
Accessing settings
View and change settings for your device from the Settings menu. The Settingsmenu is accessible from both the Application screen and the Quick settings panel.
To open the device settings menu from the Application screen
• Find and tap Settings.
To view information about your device
• Find and tap Settings > System > About phone.
To access the Quick settings panel
• Drag the status bar downwards using two fingers.
To select which settings to display on the Quick settings panel
1 Drag the status bar downwards using two fingers, then tap (Edit icon).2 To add a setting to the Quick settings panel, drag and drop the icon into the upper
part of the screen. To remove a setting, drag and drop the icon into the lower partof the screen.
To rearrange the Quick settings panel
1 Drag the status bar downwards using two fingers, then tap (Edit icon).2 Touch and hold an icon, then move it to the desired position.
To turn on the flashlight
1 Drag the status bar downwards using two fingers.2 Tap (Flashlight icon).
Volume, vibration and sound
The volume and vibration can be changed either by using the volume keys or bychanging a setting. Sounds and tones can only be changed from a setting.
Note
App settings can override the selected volume, vibration and sound settings.
Volume and vibration
You can change the ring, media, alarm, and in-call volumes. Additionally, you canset your device to vibrate (Vibrate icon).
The ring and notification volume (Ringer volume icon) affects notifications, thein-call volume (In-call volume icon) affects calls and the media volume (Mediavolume icon) affects music, videos, games and other media. For example, if youchange the volume while watching a video, the media volume is changed. Thealarm volume is indicated with (Alarm icon).
To change the volume
1 Press the volume key up or down to change the media volume. To quickly turn themedia volume on or off, tap (Media volume icon).
2 To change the in-call, ring and notification, or alarm volumes, tap (Settings icon).Use each slider to adjust the volume.
50
Internet version. For personal use only.
To activate the vibrating mode
1 Press the volume key up or down.2 Tap the icon displayed above the slider one or more times until (Vibrate icon)
appears.
To activate sound with vibration for incoming calls
1 Find and tap Settings > Sound.2 Tap the Also vibrate for calls switch to enable the function.
Sounds and tones
To set the ringtone
1 Find and tap Settings > Sound.2 Dual SIM users, select Phone ringtone - SIM 1 or Phone ringtone - SIM 2. Single
SIM users, tap Phone ringtone.3 Select an option from the list or tap Add ringtone and select a music file that is
saved on your device.4 To confirm, tap OK.
To set the notification sound
1 Find and tap Settings > Sound > Notification sound.2 Select a sound from the list or select None to turn off all notification sounds and
set your notifications to vibrate only.3 To select a music file that is saved on your device, tap Add ringtone.4 To confirm, tap OK.
To enable or disable other sounds and tones
1 Find and tap Settings > Sound > Advanced.2 Tap the switches to enable or disable the different sounds and tones.
Silence your device with Do not disturb
Activate Do not disturb to mute sounds and limit vibrations and visual indicationsfor situations in which you do not want to be disturbed, for example at night.
Setting options
• Notifications• Exceptions• Duration• Turn on automatically
To activate or deactivate Do not disturb
1 Drag the status bar downwards using two fingers to access the Quick settingspanel.
2 Tap (Do not disturb icon).
Automatic rules
You can set automatic rules to activate Do not disturb mode for specific times orevents.
To set an automatic rule
1 Find and tap Settings > Sound > Do not disturb > Turn on automatically.
51
Internet version. For personal use only.
2 Tap an automatic rule, for example Sleeping.3 Set the time and behaviors as desired. To change the rule name, tap (Edit icon).4 Tap the switch to activate the rule.
Hint
To create a new rule, tap Add rule and follow the on-screen instructions.
To set the notification sound when Do not disturb mode is activated
1 Find and tap Settings > Sound > Do not disturb.2 Tap Notifications.3 Select an option.
To set the exceptions for Do not disturb mode
1 Find and tap Settings > Sound > Do not disturb.2 Tap the options under Exceptions.3 Tap the switches to activate one or more options.
To set when to deactivate Do not disturb mode
1 Find and tap Settings > Sound > Do not disturb.2 Tap Duration.3 Select a setting, and tap OK. You can adjust hours by tapping + or -.
Screen settings
You can change the screen’s behavior, brightness, viewing size and quality. Forexample, select a bigger font or display size for easier reading or change the iconsyou see in the status bar.
If you want to change your background, see Background on page 31. To changehow long you want to have the screen on before it is turned off, see Turning thescreen on or off on page 25.
To change a screen setting
1 Find and tap Settings > Display.2 Tap the setting you want to change.3 Use the sliders, checkboxes or additional menus to adjust.
Image quality settings
Color gamut and contrast enhance the quality of photos and videos when viewingthem on your device.
Video image enhancement improves the visual quality of videos when you viewthem on your device using X1 for mobile. With this feature, videos recorded in theSDR mode are played with HDR-like quality.
Note
When the Creator mode is selected in Color gamut and contrast, Video image enhancementcannot be used.
Hint
Video image enhancement is available only for certain applications.
White balance
Select one of the preset settings. If you select Custom, you can use the sliders toadjust the white balance. To revert to the default setting, select Medium.
52
Internet version. For personal use only.
Brightness level
Adjust the brightness level with the slider. You can also enable Adaptive brightnessto automatically optimize brightness based on surrounding light.
Note
Avoid displaying very bright or static images for a long period of time. This may cause anafterimage or coloring to remain on the screen.
Auto-rotate screen
Set the screen to rotate automatically when the device is turned, or set it to stay inportrait view.
Hint
Even if the Auto-rotate screen function is disabled, you can rotate the screen manually bytapping (Rotate icon) in the navigation bar.
Night Light
Night Light switches the color of the screen to amber. This makes it easier to viewthe screen in a darker setting, and also makes it easier to fall asleep.
Prevent accidental operations with screen off
You can prevent your device from being activated by mistake while placed in apocket or a bag. Tap the Prevent accidental operations with screen off switch toenable or disable the feature.
To change a lock screen setting
1 Find and tap Settings > Lock screen & security > Lock screen preferences.2 Tap the setting you want to change.3 Use the switches, checkboxes or additional menus to adjust.
Application settings
Some applications will ask for permissions once you start using them. You canallow or deny permissions individually for each app, either from the Settings menuor from the Permission confirm dialog. Permission requirements depend on theapp’s design.
Allowing or denying permissions
You can choose whether to allow or deny permissions when the dialog is shown. Ifyou have used another Android version previously, most applications will havealready been granted the necessary permissions.
To set permissions
1 Find and tap Settings > Apps & notifications > Advanced > App permissions.2 Select an option, then tap the relevant switch to adjust permissions.
Allowing or denying automatic application updates
If the automatic update feature is enabled, your applications get updated withoutyou being asked, so you may not realize that large volumes of data are beingdownloaded. In order to avoid potentially high data transfer costs, you can disableautomatic updates or enable automatic updates only over Wi-Fi connection. You
53
Internet version. For personal use only.
have to disable the automatic update feature in the Play Store app to avoid theautomatic updating of applications.
To enable or disable automatic updates for all applications in the Play Store
1 Find and tap (Play Store icon).2 Tap (Menu icon), then tap the settings menu.3 Tap the auto update apps menu.4 Select the preferred option.
Using location services
Location services allow applications such as Maps and the camera to useinformation from your mobile or Wi-Fi network as well as GPS (Global PositioningSystem) information to determine your approximate location.
In order to use your device to find out where you are, you need to enable locationservices.
For more information, go to http://support.google.com/.
To enable or disable location services
1 Find and tap Settings > Lock screen & security > Location.2 Tap the switch to enable or disable location services.
Improving GPS accuracy
The first time you use the GPS function in your device, it can take a few minutes foryour location to be found. To help the search, make sure you have a clear view ofthe sky. Stand still and don’t cover the GPS antenna. GPS signals can pass throughclouds and plastic, but not through most solid objects such as buildings andmountains. If your location isn’t found after a few minutes, move to anotherlocation.
Note
The GPS antenna is usually located in the upper part of the device. See Overview on page14.
Language settings
You can select a default language for your device and change it again at a latertime. You can also change the writing language for text input.
To change the language
1 Find and tap Settings > System > Languages & input > Languages.2 To change the language, drag and drop the desired language to the top of the list.
If the desired language is not currently listed, tap (Add icon) to add it.
Note
If you select the wrong language and cannot read the menu texts, find and tap (Settingsicon) > (System menu icon). Then select the text beside (Keyboard icon) and select thefirst entry in the menu that opens. You can then select the language you want.
On-screen keyboards
There are a number of pre-installed text entry providers on your device.
Note
The default text entry provider may depend on the regional or language settings you use.One or more text entry providers might not be available in your region.
54
Internet version. For personal use only.
To switch between different on-screen keyboard options
1 Find and tap Settings > System > Languages & input > On-screen keyboard.2 Tap Manage keyboards, then tap the switch to enable or disable the keyboard.
Date and time
You can change the date and time on your device.
To set the date, time, or time zone manually
1 Find and tap Settings > System > Date & time. You may find the item underAdvanced.
2 To set the date or time manually, disable the Automatic date & time function bytapping the switch. To set the time zone manually, disable the Automatic timezone function by tapping the switch.
3 Tap the desired item to edit and change the values.
55
Internet version. For personal use only.

Calling and Contacts
Calling
Use the Phone application to manage calls.
The Phone application enables you to do the following:
• Making calls• Receiving calls• Forwarding calls• Blocking a number
For more information, go to http://support.google.com/.
Hint
Dual SIM users can set a default SIM card for placing calls, or have the option to select a SIMcard each time you place a call. Find and tap Settings > Network & internet > Advanced >Dual SIM > Calls to select an option.
Contacts
Use the Contacts application to manage your contacts.
Contacts enables you to do the following:
• Adding and editing contacts• Transferring contacts• Backing up contacts
For more information, go to http://support.google.com/.
56
Internet version. For personal use only.
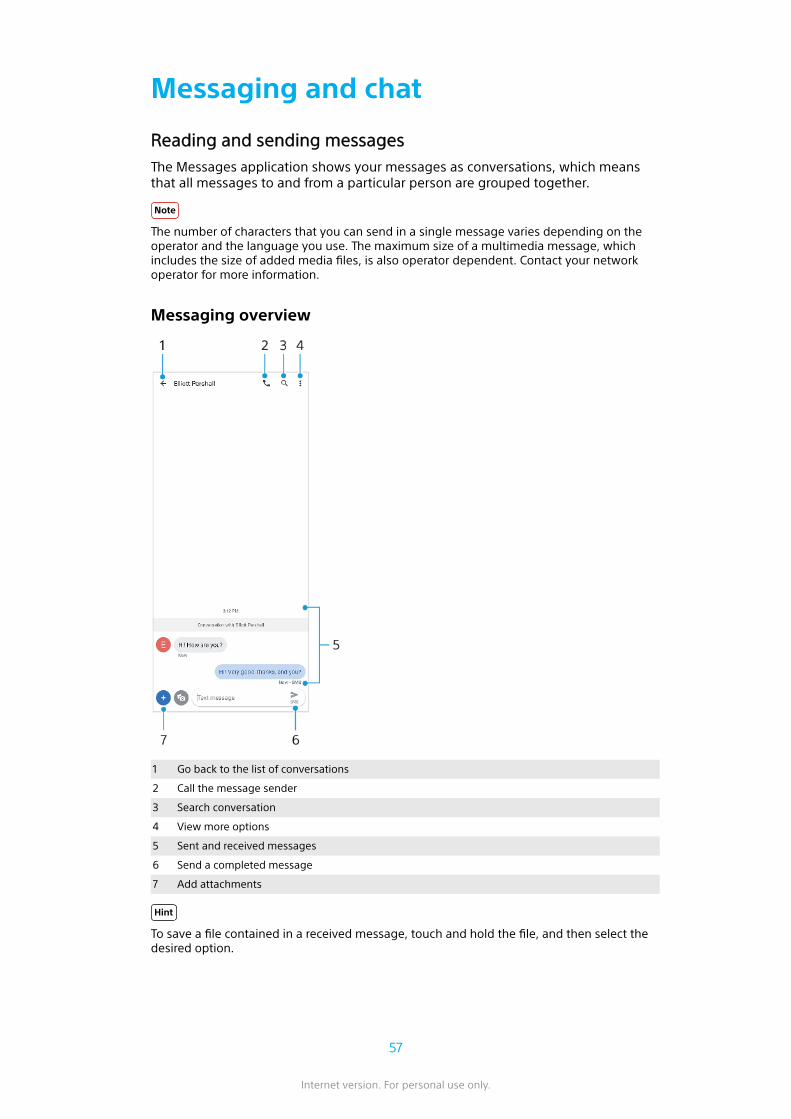
Messaging and chat
Reading and sending messages
The Messages application shows your messages as conversations, which meansthat all messages to and from a particular person are grouped together.
Note
The number of characters that you can send in a single message varies depending on theoperator and the language you use. The maximum size of a multimedia message, whichincludes the size of added media files, is also operator dependent. Contact your networkoperator for more information.
Messaging overview
1 Go back to the list of conversations
2 Call the message sender
3 Search conversation
4 View more options
5 Sent and received messages
6 Send a completed message
7 Add attachments
Hint
To save a file contained in a received message, touch and hold the file, and then select thedesired option.
57
Internet version. For personal use only.
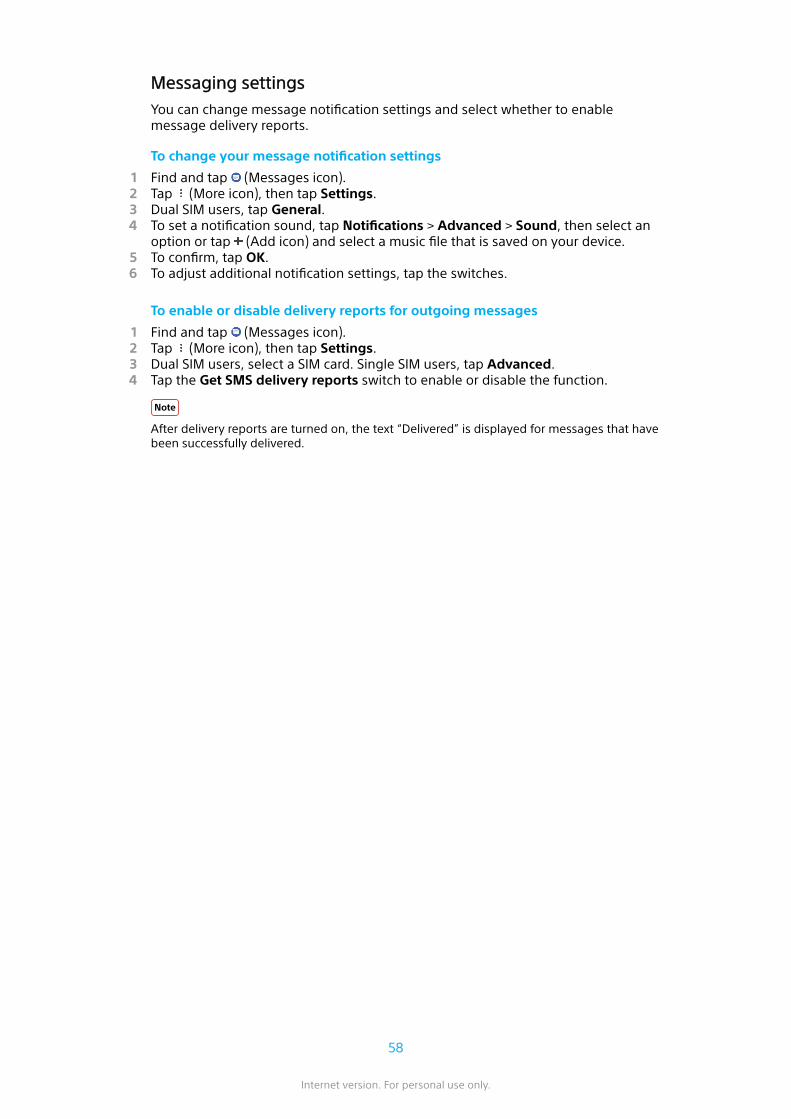
Messaging settings
You can change message notification settings and select whether to enablemessage delivery reports.
To change your message notification settings
1 Find and tap (Messages icon).2 Tap (More icon), then tap Settings.3 Dual SIM users, tap General.4 To set a notification sound, tap Notifications > Advanced > Sound, then select an
option or tap (Add icon) and select a music file that is saved on your device.5 To confirm, tap OK.6 To adjust additional notification settings, tap the switches.
To enable or disable delivery reports for outgoing messages
1 Find and tap (Messages icon).2 Tap (More icon), then tap Settings.3 Dual SIM users, select a SIM card. Single SIM users, tap Advanced.4 Tap the Get SMS delivery reports switch to enable or disable the function.
Note
After delivery reports are turned on, the text “Delivered” is displayed for messages that havebeen successfully delivered.
58
Internet version. For personal use only.
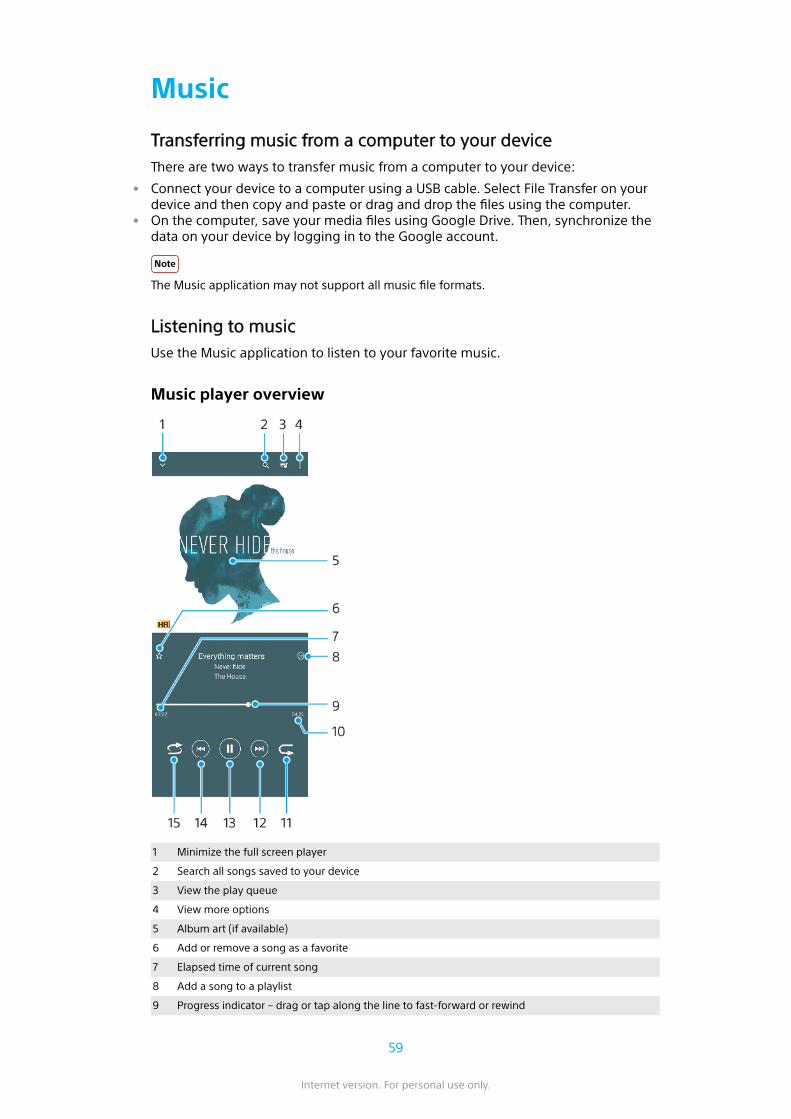
Music
Transferring music from a computer to your device
There are two ways to transfer music from a computer to your device:
• Connect your device to a computer using a USB cable. Select File Transfer on yourdevice and then copy and paste or drag and drop the files using the computer.
• On the computer, save your media files using Google Drive. Then, synchronize thedata on your device by logging in to the Google account.
Note
The Music application may not support all music file formats.
Listening to music
Use the Music application to listen to your favorite music.
Music player overview
1 Minimize the full screen player
2 Search all songs saved to your device
3 View the play queue
4 View more options
5 Album art (if available)
6 Add or remove a song as a favorite
7 Elapsed time of current song
8 Add a song to a playlist
9 Progress indicator – drag or tap along the line to fast-forward or rewind
59
Internet version. For personal use only.
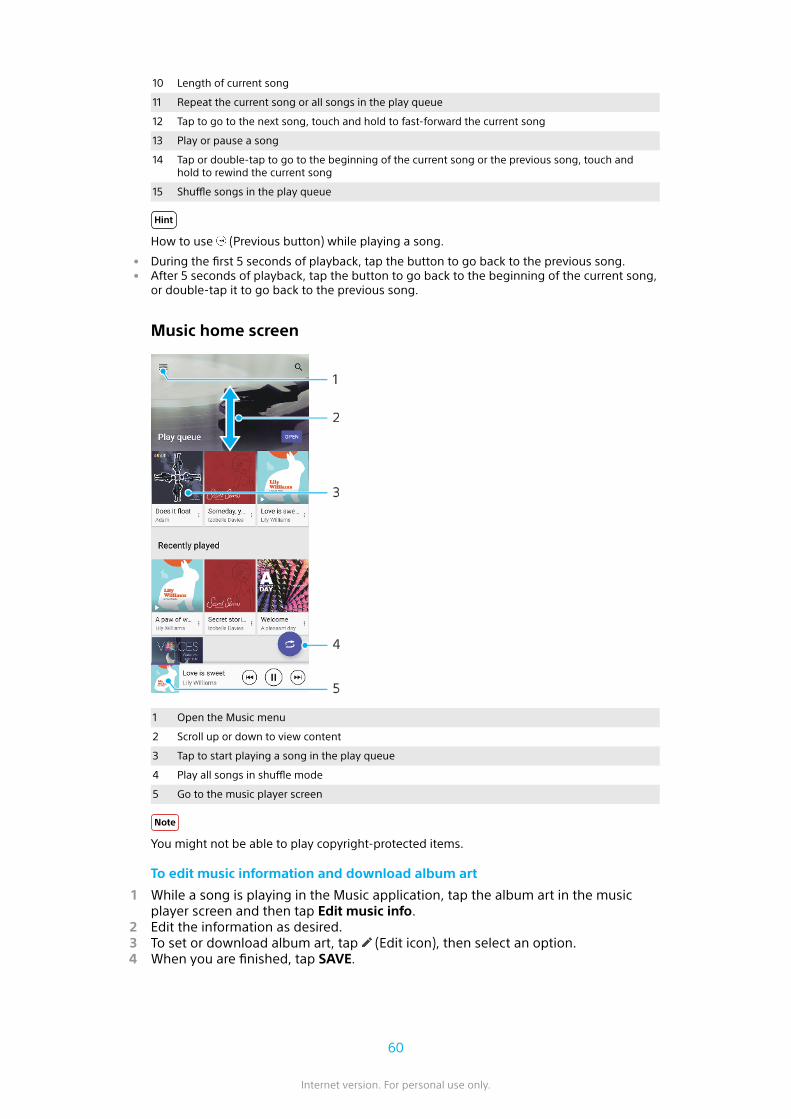
10 Length of current song
11 Repeat the current song or all songs in the play queue
12 Tap to go to the next song, touch and hold to fast-forward the current song
13 Play or pause a song
14 Tap or double-tap to go to the beginning of the current song or the previous song, touch andhold to rewind the current song
15 Shuffle songs in the play queue
Hint
How to use (Previous button) while playing a song.
• During the first 5 seconds of playback, tap the button to go back to the previous song.• After 5 seconds of playback, tap the button to go back to the beginning of the current song,
or double-tap it to go back to the previous song.
Music home screen
1 Open the Music menu
2 Scroll up or down to view content
3 Tap to start playing a song in the play queue
4 Play all songs in shuffle mode
5 Go to the music player screen
Note
You might not be able to play copyright-protected items.
To edit music information and download album art
1 While a song is playing in the Music application, tap the album art in the musicplayer screen and then tap Edit music info.
2 Edit the information as desired.3 To set or download album art, tap (Edit icon), then select an option.4 When you are finished, tap SAVE.
60
Internet version. For personal use only.

To minimize the Music application
• When a song is playing, tap (Home button) to go to the Home screen. TheMusic application keeps running in the background.
To open the Music application when it is playing in the background
• While a song is playing in the background, drag the status bar downwards and tapthe Music notification.
• Alternatively, find and tap (Music icon).
61
Internet version. For personal use only.
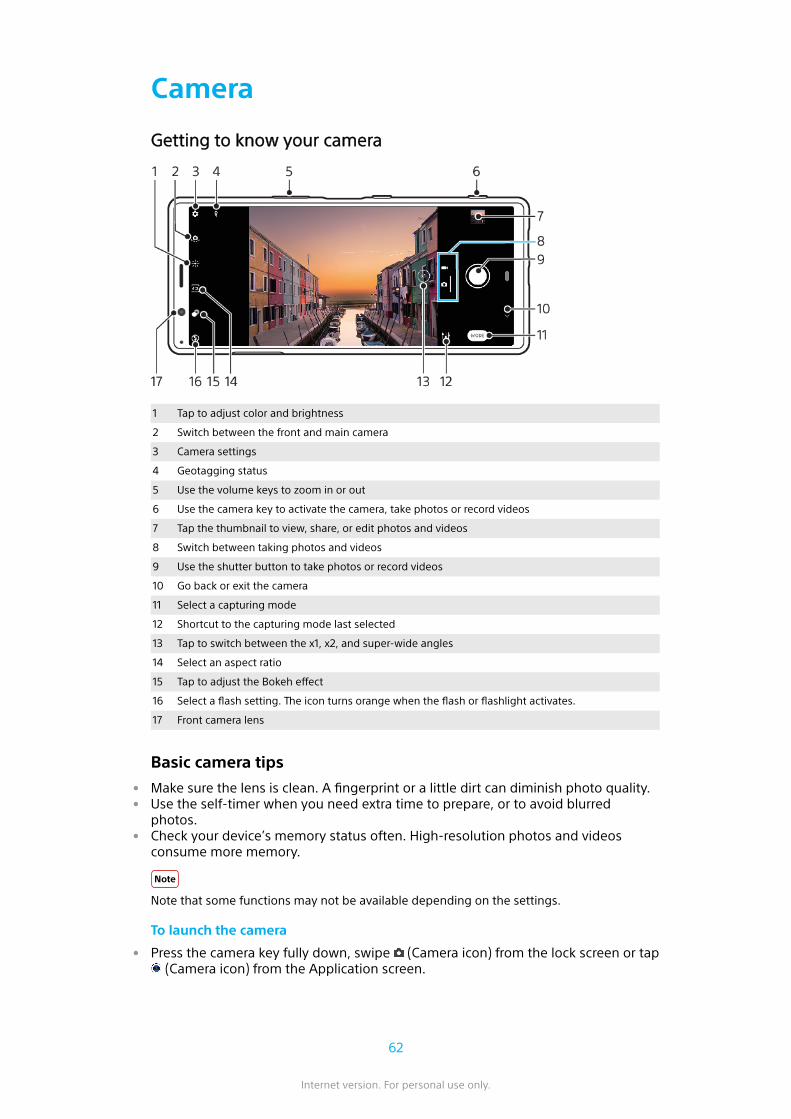
Camera
Getting to know your camera
1 Tap to adjust color and brightness
2 Switch between the front and main camera
3 Camera settings
4 Geotagging status
5 Use the volume keys to zoom in or out
6 Use the camera key to activate the camera, take photos or record videos
7 Tap the thumbnail to view, share, or edit photos and videos
8 Switch between taking photos and videos
9 Use the shutter button to take photos or record videos
10 Go back or exit the camera
11 Select a capturing mode
12 Shortcut to the capturing mode last selected
13 Tap to switch between the x1, x2, and super-wide angles
14 Select an aspect ratio
15 Tap to adjust the Bokeh effect
16 Select a flash setting. The icon turns orange when the flash or flashlight activates.
17 Front camera lens
Basic camera tips
• Make sure the lens is clean. A fingerprint or a little dirt can diminish photo quality.• Use the self-timer when you need extra time to prepare, or to avoid blurred
photos.• Check your device’s memory status often. High-resolution photos and videos
consume more memory.
Note
Note that some functions may not be available depending on the settings.
To launch the camera
• Press the camera key fully down, swipe (Camera icon) from the lock screen or tap (Camera icon) from the Application screen.
62
Internet version. For personal use only.
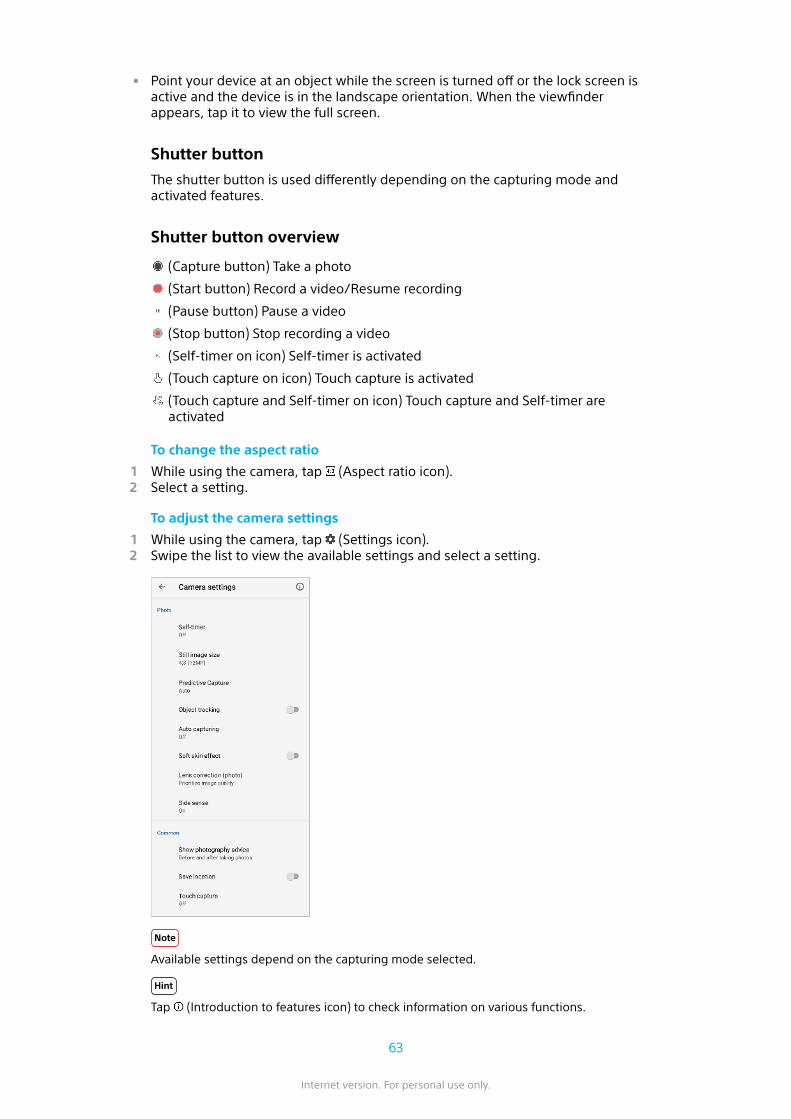
• Point your device at an object while the screen is turned off or the lock screen isactive and the device is in the landscape orientation. When the viewfinderappears, tap it to view the full screen.
Shutter button
The shutter button is used differently depending on the capturing mode andactivated features.
Shutter button overview
(Capture button) Take a photo
(Start button) Record a video/Resume recording
(Pause button) Pause a video
(Stop button) Stop recording a video
(Self-timer on icon) Self-timer is activated
(Touch capture on icon) Touch capture is activated
(Touch capture and Self-timer on icon) Touch capture and Self-timer areactivated
To change the aspect ratio
1 While using the camera, tap (Aspect ratio icon).2 Select a setting.
To adjust the camera settings
1 While using the camera, tap (Settings icon).2 Swipe the list to view the available settings and select a setting.
Note
Available settings depend on the capturing mode selected.
Hint
Tap (Introduction to features icon) to check information on various functions.
63
Internet version. For personal use only.
To view, share or edit photos and videos
1 When using the camera, tap the thumbnail to open a photo or video.2 Swipe left or right to view your photos and videos.3 Tap the screen to edit a photo or video.4 Tap (Share icon) to share a photo or a video.
Hint
Your photos and videos are stored in the Album application. See Viewing photos and videoson page 78 for more options.
Smart launch
You can launch the camera automatically when you point your device at an object.
To use Smart launch
1 While using the camera, tap (Settings icon).2 Tap the Smart launch and select an option.3 Point your device at an object while the screen is turned off or the lock screen is
active and the device is in the landscape orientation. A viewfinder will appear.4 Tap the viewfinder to view the full screen, and then take the photo.
Capturing modes
You can select capturing modes by tapping Mode.
Note
Available settings depend on the capturing mode selected.
Capturing modes overview
The following are some of the main capturing modes.
(AR effect icon)
Take photos with virtual scenes and characters
(Creative effect icon)
Take photos with effects and color filters
(Panorama icon)
Take wide-angle and panoramic photos
(Manual mode icon)
Take photos with manually adjusted camera settings
(Slow motion icon)
Add a slow-motion effect after recording a video
(Portrait selfie icon)
Take better-looking selfies
To switch between taking photos and videos
• While using the camera, swipe the screen to select a photo or video mode.
To select a capturing mode
• When using the camera, tap Mode and select a capturing mode.
64
Internet version. For personal use only.

To switch between the main and front camera
• When using the camera, tap (Switch camera icon) to switch between the mainand front camera.
Hint
You can also switch between cameras by swiping down the camera screen.
To use the zoom
• Pinch in or out on the camera screen.• Use the volume key.• Tap (Switch angle button) repeatedly to select x1 (normal) or x2 (2x optical
zoom).• Drag (Switch angle button) to the left and right.
Note
• Zooming is only available for the main camera.• Switching angles using (Switch angle button) is not available when the manual mode is
selected.
Hint
If you zoom in three or more times, this can affect image quality.
To use the super-wide lens
• Tap (Switch angle button) repeatedly to select W (super wide).
Note
• You cannot pinch the screen or use the volume keys to zoom while the super-wide lens isselected.
• Resolution and some other settings for the super-wide angle are different from those whenthe x1 or x2 angle is selected.
To take a photo
• Press the camera key.• Tap the shutter button.• Double-tap the side sensor.
65
Internet version. For personal use only.
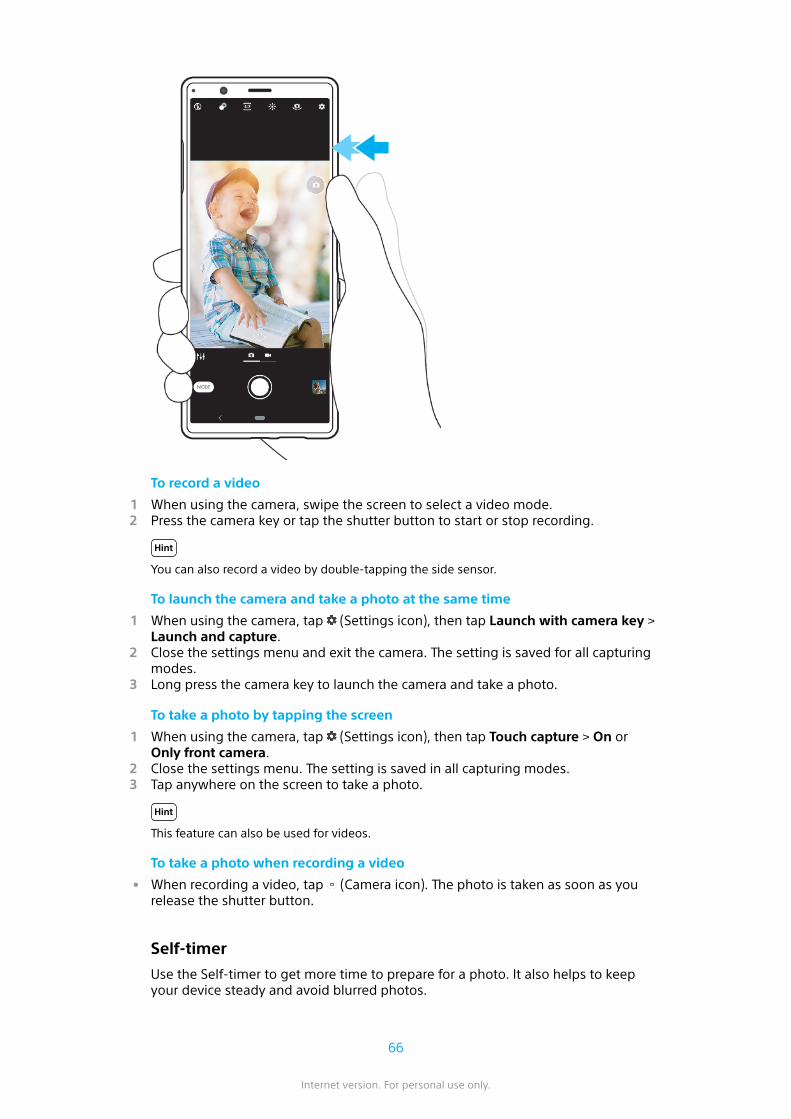
To record a video
1 When using the camera, swipe the screen to select a video mode.2 Press the camera key or tap the shutter button to start or stop recording.
Hint
You can also record a video by double-tapping the side sensor.
To launch the camera and take a photo at the same time
1 When using the camera, tap (Settings icon), then tap Launch with camera key >Launch and capture.
2 Close the settings menu and exit the camera. The setting is saved for all capturingmodes.
3 Long press the camera key to launch the camera and take a photo.
To take a photo by tapping the screen
1 When using the camera, tap (Settings icon), then tap Touch capture > On orOnly front camera.
2 Close the settings menu. The setting is saved in all capturing modes.3 Tap anywhere on the screen to take a photo.
Hint
This feature can also be used for videos.
To take a photo when recording a video
• When recording a video, tap (Camera icon). The photo is taken as soon as yourelease the shutter button.
Self-timer
Use the Self-timer to get more time to prepare for a photo. It also helps to keepyour device steady and avoid blurred photos.
66
Internet version. For personal use only.
To use the self-timer with the main camera
1 When using the main camera, tap (Settings icon).2 Tap Self-timer and select the delay time.3 Close the settings menu. The Self-timer setting is saved.4 Press the camera key or tap the shutter button to take a photo. A series of beeps
marks the countdown until the photo is taken.
Exposure, color and light conditions
Good exposure for your photos requires the right amount of light. The cameraautomatically detects and adjusts to ambient light conditions.
Different exposures are required, for example, when taking photos of faces,moving objects or in low light.
You can also record videos in HDR to add brightness and contrast for a morerealistic effect. See To record a video in HDR on page 69.
Optimizing light conditions
• Look for light with direction and color that gives a scene shape and depth. Thistype of light occurs just before sunrise and at sunset. Natural light from a windowis also good.
• For higher quality photos in low light, you need to keep the camera steady. Youcan place the camera on a solid surface and use the self-timer.
• Even if light conditions are poor, try to take photos with and without the flash.Sometimes the quality is better without the flash.
To use the flash
1 When using the camera, tap the flash icon displayed on the screen, for example (Auto flash icon).
2 If required, change the flash setting.3 Press the camera key or tap the shutter button to take a photo or record a video.
Note
Available settings depend on the capturing mode selected.
Hint
When the background is brighter than the object, use Fill flash to remove unwanted darkshadows.
Color, brightness and exposure value
Your camera automatically adjusts the color, brightness and exposure value bydetecting the light conditions and estimating the color temperature of ambientlight. Digital cameras can only estimate the color temperature, so you may need toadjust the settings to get it correct.
If you experience yellow-colored photos in indoor environments or bluish photoswhen using the flash, try adjusting the color.
To achieve better exposures in low-light environments, change the brightness forphotos and videos. If you are using Manual mode for photos, change the exposurevalue.
To adjust the color and brightness
1 When using the camera, tap (Color and brightness icon).2 Drag the sliders to adjust the color and brightness.3 Press the camera key or tap the shutter button to take a photo or record a video.
67
Internet version. For personal use only.
4 Tap (Cancel icon) to reset and close the color setting.
To adjust the exposure value
1 When using the camera, tap Mode > (Manual mode icon).2 Tap EV and drag the slider to adjust the exposure value. To hide or show the
settings menu, tap (Manual mode icon).3 Press the camera key or tap the shutter button to take a photo.
Shutter speed
Shutter speed refers to how long the shutter is open and the camera sensor isexposed to light.
A fast shutter speed helps to freeze motion, while a slow shutter speed can createan effect called "motion blur", where moving objects appear blurred along theirline of motion.
The shutter speed is automatically adjusted, but it can also be set manually. Youcan set an exposure of up to 30 seconds to enjoy more creative control over yourphotos.
To adjust the shutter speed
1 When using the camera, tap Mode > (Manual mode icon).2 Tap SS and drag the slider to adjust the shutter speed. To hide or show the settings
menu, tap (Manual mode icon).3 Press the camera key or tap the shutter button to take the photo.
Note
This setting is only available for the main camera.
ISO
ISO determines how sensitive your camera is to light. A low ISO number meanslower sensitivity, and a high ISO number means higher sensitivity. Highersensitivity can add blur to your photos.
A higher ISO value is used when taking photos of moving objects or when takingphotos in low-light conditions without the flash.
If there is too much light, the lowest ISO setting is used to achieve a higher imagequality.
ISO is automatically adjusted when taking photos and videos.
To adjust the ISO value
1 When using the camera, tap Mode > (Manual mode icon).2 Tap ISO and drag the slider to adjust the ISO value. To hide or show the settings
menu, tap (Manual mode icon).3 Press the camera key or tap the shutter button to take a photo.
Note
This setting is only available for the main camera.
Strong backlight (HDR)
Strong backlight (HDR) is automatically adjusted when taking photos. You can alsoadjust for strong backlight manually in Manual mode.
To adjust towards a strong backlight
1 When using the camera, tap Mode > (Manual mode icon).
68
Internet version. For personal use only.
2 Tap (HDR icon) and select On.3 Press the camera key or tap the shutter button to take a photo.
HDR video recording
Enable HDR (High Dynamic Range) to make your videos appear more dramatic andcloser to what you see in real life.
To record a video in HDR
1 When using the camera, swipe the screen to select a video mode.2 Tap (HDR icon) and select On.
Note
This setting is not available when (Settings icon) > Video size is set to HD.
White balance
White balance adjusts the color balance of the ambient light conditions.
White balance is automatically adjusted when taking photos and videos. In Manualmode, you can adjust the white balance manually.
To adjust the white balance
1 When using the camera, tap Mode > (Manual mode icon).2 Tap WB and select one of the pre-defined light conditions, for example (Cloudy
white balance icon). To hide or show the settings menu, tap (Manual mode icon).3 Press the camera key or tap the shutter button to take a photo.
White balance settings
(Auto white balance icon)
Adjust the color balance automatically
(Cloudy white balance icon)
Adjust the color balance for a cloudy sky
(Daylight white balance icon)
Adjust the color balance for sunny outdoor conditions
(Fluorescent white balance icon)
Adjust the color balance for fluorescent lighting
(Incandescent white balance icon)
Adjust the color balance for warm lighting conditions, such as under lightbulbs
Optimizing exposure
Exposure metering measures the amount of light that strikes an object, to optimizeexposure.
Exposure metering is automatically adjusted when taking photos and videos.You can adjust the exposure manually in Manual mode, for example for a specificpart of a photo.
To adjust the exposure with metering
1 When using the camera, tap Mode > (Manual mode icon).2 Tap (Settings icon) > Metering.
69
Internet version. For personal use only.
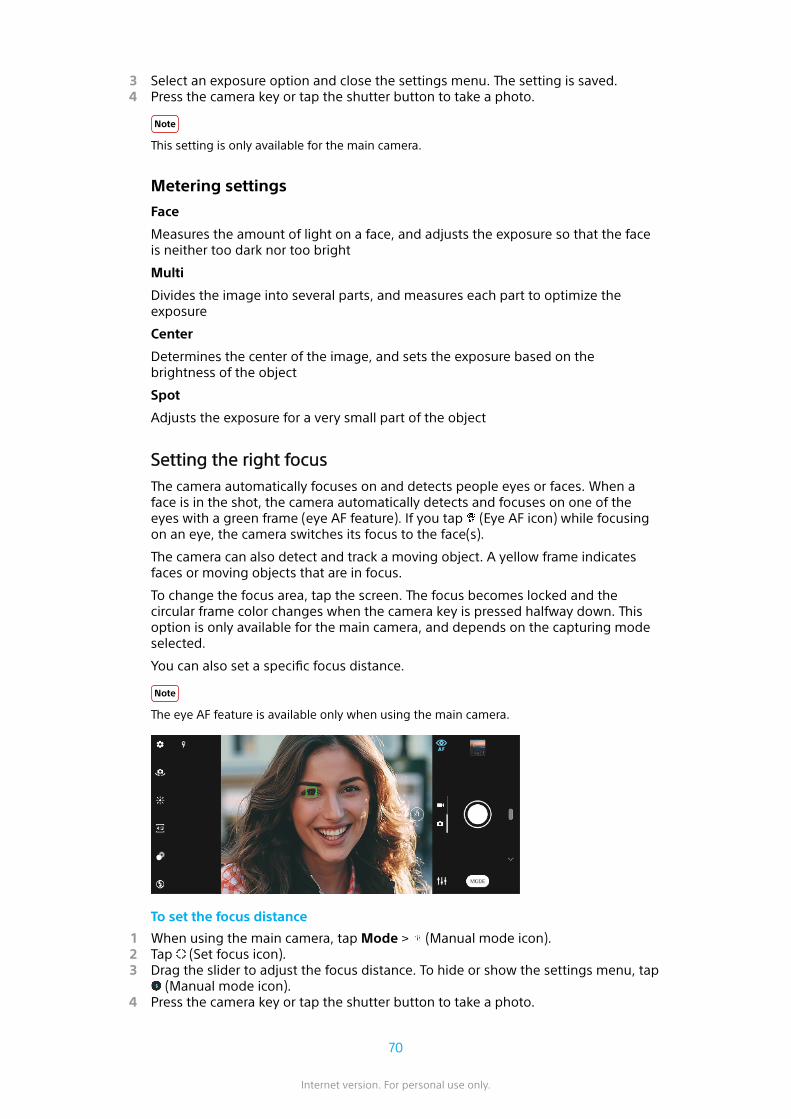
3 Select an exposure option and close the settings menu. The setting is saved.4 Press the camera key or tap the shutter button to take a photo.
Note
This setting is only available for the main camera.
Metering settings
Face
Measures the amount of light on a face, and adjusts the exposure so that the faceis neither too dark nor too bright
Multi
Divides the image into several parts, and measures each part to optimize theexposure
Center
Determines the center of the image, and sets the exposure based on thebrightness of the object
Spot
Adjusts the exposure for a very small part of the object
Setting the right focus
The camera automatically focuses on and detects people eyes or faces. When aface is in the shot, the camera automatically detects and focuses on one of theeyes with a green frame (eye AF feature). If you tap (Eye AF icon) while focusingon an eye, the camera switches its focus to the face(s).
The camera can also detect and track a moving object. A yellow frame indicatesfaces or moving objects that are in focus.
To change the focus area, tap the screen. The focus becomes locked and thecircular frame color changes when the camera key is pressed halfway down. Thisoption is only available for the main camera, and depends on the capturing modeselected.
You can also set a specific focus distance.
Note
The eye AF feature is available only when using the main camera.
To set the focus distance
1 When using the main camera, tap Mode > (Manual mode icon).2 Tap (Set focus icon).3 Drag the slider to adjust the focus distance. To hide or show the settings menu, tap
(Manual mode icon).4 Press the camera key or tap the shutter button to take a photo.
70
Internet version. For personal use only.

Note
This setting is only available for the main camera.
People, selfies and smiling faces
This camera can detect people faces and eyes. When a face or eye is detected, thedetection frame appears. Tap (Eye AF icon) to switch the focus between facesand an eye. When multiple faces are detected, tap any frame to select the face onwhich you want to focus. When the camera is set to focus on eyes, tap any face toselect the eye on which you want to focus.
Use Smile Shutter to automatically take a photo when a person smiles. If you arerecording a video, a photo is taken each time a smile is detected.
Note
The eye AF feature is not available when taking selfies or recording videos.
Taking photos and videos of people
• Consider the camera orientation. Use portrait for close-up photos, to fill the frame.Use landscape for close-up group photos, or to capture an object in thebackground.
• Place the camera on a solid surface and use the self-timer to prevent blurredphotos.
To soften the skin tone
1 When using the camera, tap (Settings icon).2 Tap the Soft skin effect switch to enable the effect.3 Close the settings menu. The setting is saved.
To take a photo when someone smiles
1 When using the camera, tap (Settings icon).2 Tap Auto capturing or Auto capturing (video) > Smile Shutter.3 Close the settings menu. The setting is saved for the capturing mode selected.4 When a smile is detected, the camera automatically takes a photo.
Note
This setting is not available when the Video size is set to 4K.
To take a selfie
1 When using the camera, select a photo or video capturing mode for your selfie.2 Tap (Switch camera icon) to activate the front camera.3 Tap (Self-timer icon) if you want to use the self-timer.4 Press the camera key or tap the shutter button to take a selfie.
To activate the selfie timer with the palm of your hand
1 When using the camera, tap (Switch camera icon) to activate the front camera.
71
Internet version. For personal use only.
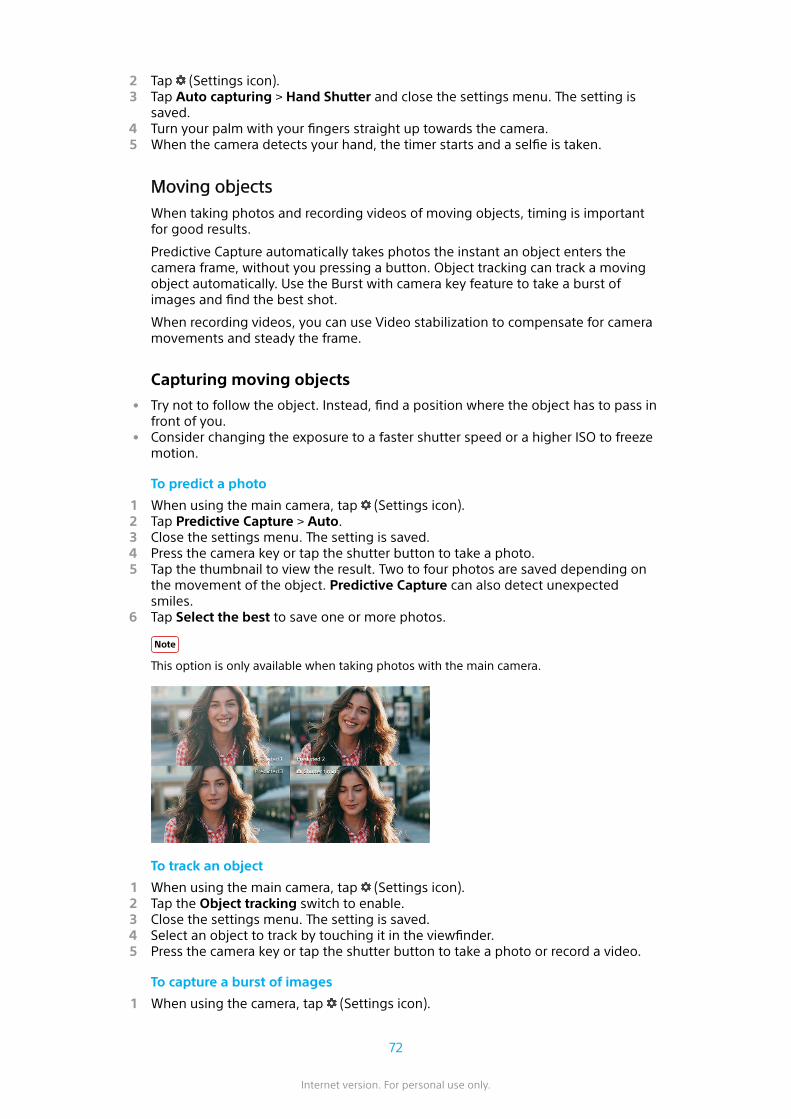
2 Tap (Settings icon).3 Tap Auto capturing > Hand Shutter and close the settings menu. The setting is
saved.4 Turn your palm with your fingers straight up towards the camera.5 When the camera detects your hand, the timer starts and a selfie is taken.
Moving objects
When taking photos and recording videos of moving objects, timing is importantfor good results.
Predictive Capture automatically takes photos the instant an object enters thecamera frame, without you pressing a button. Object tracking can track a movingobject automatically. Use the Burst with camera key feature to take a burst ofimages and find the best shot.
When recording videos, you can use Video stabilization to compensate for cameramovements and steady the frame.
Capturing moving objects
• Try not to follow the object. Instead, find a position where the object has to pass infront of you.
• Consider changing the exposure to a faster shutter speed or a higher ISO to freezemotion.
To predict a photo
1 When using the main camera, tap (Settings icon).2 Tap Predictive Capture > Auto.3 Close the settings menu. The setting is saved.4 Press the camera key or tap the shutter button to take a photo.5 Tap the thumbnail to view the result. Two to four photos are saved depending on
the movement of the object. Predictive Capture can also detect unexpectedsmiles.
6 Tap Select the best to save one or more photos.
Note
This option is only available when taking photos with the main camera.
To track an object
1 When using the main camera, tap (Settings icon).2 Tap the Object tracking switch to enable.3 Close the settings menu. The setting is saved.4 Select an object to track by touching it in the viewfinder.5 Press the camera key or tap the shutter button to take a photo or record a video.
To capture a burst of images
1 When using the camera, tap (Settings icon).
72
Internet version. For personal use only.
2 Tap the Burst with camera key switch to enable.3 Close the settings menu. The setting is saved.4 Long-press the camera key or shutter button to take a burst of images. The
number of pictures taken is indicated in the middle of the viewfinder.5 Release the camera key or shutter button to finish the burst. All photos are saved.6 Tap the thumbnail to view the result, then tap (Burst viewer icon).7 Scroll through the pictures taken and select the photo or photos that you want to
save, then tap Save.
Hint
This setting is enabled by default when using the shutter button. Touch and hold the shutterbutton to take a burst of images.
To record a steady video
1 When using the camera, swipe the screen to select a video mode.2 Tap (Settings icon).3 Tap the Video stabilization switch to compensate camera movement.4 Close the settings menu. The setting is saved.5 Press the camera key or tap the shutter button to record a video.
Bokeh effect
You can take pictures with the Bokeh effect when using the dual camera on yourdevice. The Bokeh effect decreases focus in the background of a photo toemphasize objects at the foreground, for an artistic effect.
To take a photo with Bokeh effect
1 When using the camera, tap (Bokeh icon).2 Drag the slider to adjust.3 Tap the shutter button to take a photo.
Note
Zooming is not available while using the Bokeh effect.
Hint
If you get too close to or too far to an object while using the Bokeh effect, a warningmessage appears. If this happens, adjust the distance between your camera and the objectto take the photo with Bokeh effect.
Using various capturing modes
Use the capturing modes to take more creative photos and videos, and share themwith your friends. You can create virtual scenes, panoramic photos, and more. Youcan also use capturing modes provided by Google.
AR effect
AR effect is the augmented reality app that lets you apply fantastical worlds toyour photos or videos, and to create avatars and stickers.
73
Internet version. For personal use only.
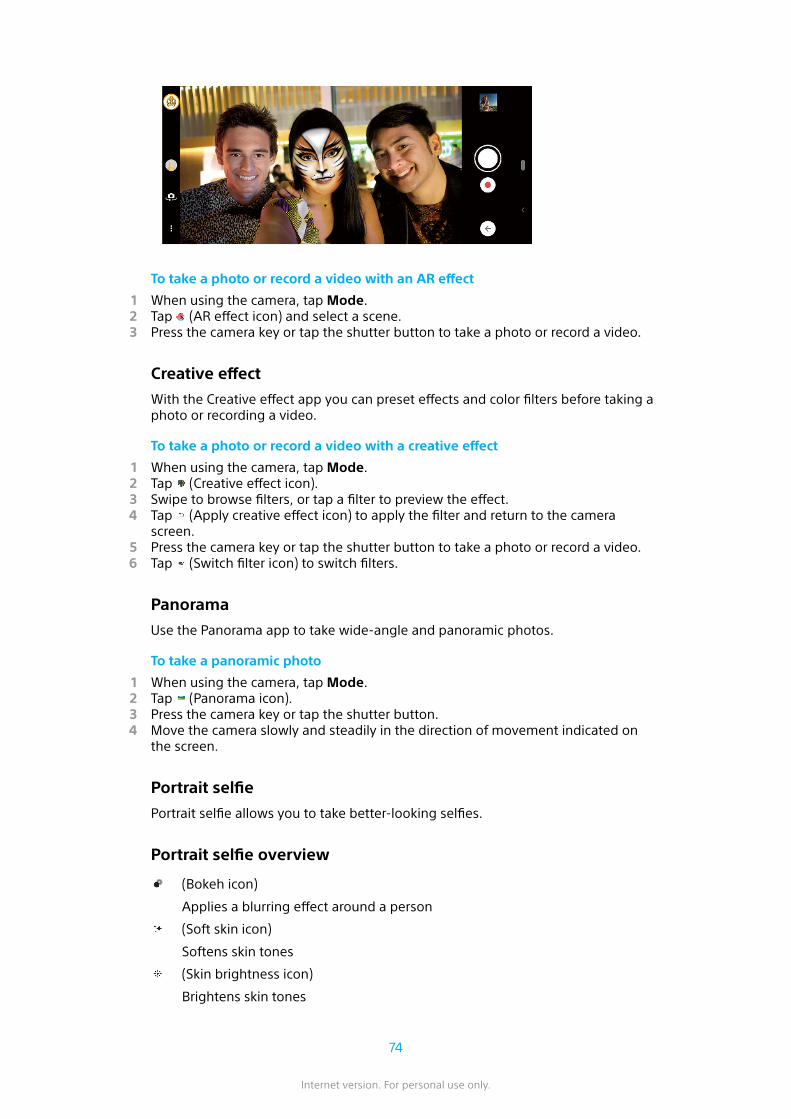
To take a photo or record a video with an AR effect
1 When using the camera, tap Mode.2 Tap (AR effect icon) and select a scene.3 Press the camera key or tap the shutter button to take a photo or record a video.
Creative effect
With the Creative effect app you can preset effects and color filters before taking aphoto or recording a video.
To take a photo or record a video with a creative effect
1 When using the camera, tap Mode.2 Tap (Creative effect icon).3 Swipe to browse filters, or tap a filter to preview the effect.4 Tap (Apply creative effect icon) to apply the filter and return to the camera
screen.5 Press the camera key or tap the shutter button to take a photo or record a video.6 Tap (Switch filter icon) to switch filters.
Panorama
Use the Panorama app to take wide-angle and panoramic photos.
To take a panoramic photo
1 When using the camera, tap Mode.2 Tap (Panorama icon).3 Press the camera key or tap the shutter button.4 Move the camera slowly and steadily in the direction of movement indicated on
the screen.
Portrait selfie
Portrait selfie allows you to take better-looking selfies.
Portrait selfie overview
(Bokeh icon)
Applies a blurring effect around a person
(Soft skin icon)
Softens skin tones
(Skin brightness icon)
Brightens skin tones
74
Internet version. For personal use only.
(Eye enlargement icon)
Enlarges eyes
(Slender face icon)
Makes your face look slimmer
To take a selfie with Portrait selfie
1 When using the camera, tap Mode > (Portrait selfie icon).2 Tap the icon for the effect you want to apply, and drag the slider to adjust the
effect. If desired, adjust the other effects in the same way.3 Press the camera key or tap the shutter button to take a photo.
Hint
You can save your portrait in the same direction as the preview by tapping (Mirror icon) >On.
Slow motion videos
The Slow motion video mode adds powerful effects to your videos. The Slowmotion effect is added after a video is recorded at normal speed.
Note
Good lighting conditions are essential when you record slow motion videos.
To add slow motion effect after recording a video
1 When using the camera, tap Mode.2 Tap (Slow motion icon).3 Press the camera key or tap the shutter button to record a video.4 Tap (Stop button) to stop recording.5 Drag the blue circles to where you want the slow motion effect to appear.6 Tap (Save slow motion video icon) to save the video(s).
Resolution and memory
The number of photos and videos you can store depends on the resolution or MP(megapixel) value used and video length.
High-resolution photos and videos take up more memory, so keep in mind that alower resolution can be suitable for everyday use.
Check the memory status from time to time. When the memory is full, you cantransfer photos and videos to another storage device to free up memory. SeeBacking up and synchronizing with a Google account on page 44.
Choose whether to store photos and videos on your device’s internal storage or onan SD card using the Data storage option in the camera settings menu.
To change the resolution
1 When using the camera, tap (Settings icon).2 Tap Still image size or Video size.3 Select the resolution and close the settings menu. The setting is saved for the
selected capturing mode.
Hint
You can set the resolution separately for each capturing mode.
75
Internet version. For personal use only.
Diagnosing your camera
If your camera isn’t working properly, you can run a diagnostics test to identify ifthere is a problem with the main camera, front camera, flash, or camera key.
To run a diagnostics test of your camera
1 Make sure you are connected to the internet. When using the camera, tap (Settings icon).
2 Tap (Introduction to features icon) > Help.3 Select a category, then follow the on-screen instructions.
Additional camera settings
Geotagging
You can save your photos and videos with the location where they were taken, thisis called geotagging. The option to geotag your photos and videos requires awireless network and that the GPS function is enabled.
To turn on geotagging
1 When using the camera, tap (Settings icon).2 Tap the Save location switch to enable. The setting is saved.
Geotagging status icons
(Acquired GPS icon)
The geographical position is saved.
(GPS not found icon)
The geographical position is not found.
Grid lines
With Grid lines, you can apply the “Rule of Thirds” and place important objectsalong the grid lines or their intersections. By not always having the object in themiddle of the frame, you can make your photos and videos more interesting.
To activate or deactivate the grid lines
1 When using the camera, tap (Settings icon).2 Tap the Grid lines switch to enable or disable. The setting is saved.
Photography advice
The camera can display photography advice and help you to take a photo. Beforetaking photos, the camera will notify you if your finger is covering the lens or theimage is out of focus. After taking photos, the camera checks whether subjects areblinking their eyes or there is blurring, and you may get advice for retaking photos.
Note
This feature is only available when taking photos.
To activate or deactivate the photography advice
1 When using the camera, tap (Settings icon).2 Tap Show photography advice and select an option. The setting is saved.
76
Internet version. For personal use only.

Photography advice settings
Before and after takingphotos
Photography advice is displayed both before and aftertaking photos.
After taking photos only Photography advice is displayed only after takingphotos.
Off No photography advice is displayed.
Photo preview settings
You can choose to preview photos as soon as you take them.
To activate or deactivate previewing
1 When using the camera, tap (Settings icon).2 Tap Auto photo preview and select an option. The setting is saved.
Previewing settings
On After you take a photo, a preview appears in the lower right cornerof the screen for three seconds before it is saved.
Only frontcamera
After you take a photo with the front camera, a preview appears inthe lower right corner of the screen for three seconds before it issaved.
Off No preview appears. The photo is saved directly.
Different ways to use the volume key
You can change the way you use the volume key.
To change how the volume key is used
1 When using the camera, tap (Settings icon).2 Tap Use Volume key as and select an option. The setting is saved.
Volume key settings
Zoom Use the volume key to zoom in or out.
Volume The volume key is deactivated for the camera.
Shutter Use the volume key as a shutter button for photos and videos.
Sound
When Sound is activated, the camera makes a sound when you take a photo orwhen you start or stop a video recording. Additionally, when you use the self-timerthe countdown is indicated by a series of beeps.
To activate or deactivate sound
1 When using the camera, tap (Settings icon).2 Tap the Sound switch to enable or disable. The setting is saved.
77
Internet version. For personal use only.

Photos and videos in Album
Viewing photos and videos
Use the Album application to view photos and play videos that you’ve taken withyour camera, or to view similar content that you've saved to your device. All photosand videos are displayed in a chronologically ordered grid.
Album overview
1 Open the Album home screen menu
2 View more options
3 View a slideshow of your photos and videos
4 View date of items in the group
5 Tap a photo or video to view it
Album home screen menu
From the Album home screen menu you can browse your photo albums, includingphotos and videos taken using special effects. From the Album application, youcan also perform basic editing tasks and use methods such as Bluetooth and emailto share content.
78
Internet version. For personal use only.
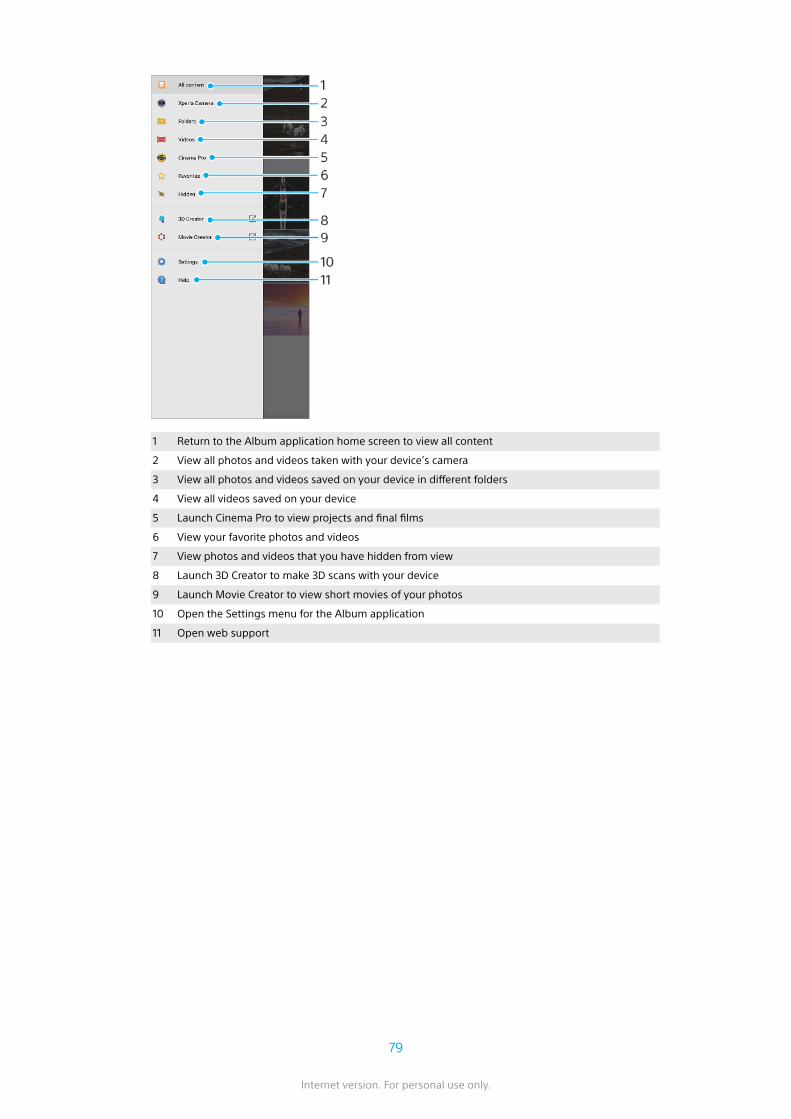
1 Return to the Album application home screen to view all content
2 View all photos and videos taken with your device’s camera
3 View all photos and videos saved on your device in different folders
4 View all videos saved on your device
5 Launch Cinema Pro to view projects and final films
6 View your favorite photos and videos
7 View photos and videos that you have hidden from view
8 Launch 3D Creator to make 3D scans with your device
9 Launch Movie Creator to view short movies of your photos
10 Open the Settings menu for the Album application
11 Open web support
79
Internet version. For personal use only.
Connectivity
Mirroring the screen of your device wirelessly on a TV
You can use the Screen mirroring feature to show the screen of your device on a TVor other large display without using a cable connection. Wi-Fi Direct technologycreates a wireless connection between the two devices, so you can sit back andenjoy your favorite photos from the comfort of your couch. You can also use thisfeature to listen to music from your device using the TV’s speakers.
Note
• This function can be used with TVs that support the Screen mirroring feature.• When using Screen mirroring, the image quality may sometimes be negatively impacted if
there is interference from other Wi-Fi networks.
To mirror the screen of your device on a TV screen
1 TV: Follow the instructions in the User guide of your TV to turn on the Screenmirroring function.
2 Your device: Find and tap Settings > Device connection > Connectionpreferences > Screen mirroring.
3 Tap START.4 Tap OK and select a device.
Note
When using Screen mirroring, do not cover the Wi-Fi antenna area of your device.
Hint
Tap (More icon) for more options.
To stop screen mirroring between devices
1 Find and tap Settings > Device connection > Connection preferences > Screenmirroring.
2 Tap Disconnect, then tap OK.
Hint
You can also stop screen mirroring by tapping the notification in the status bar of yourdevice. Drag the status bar downwards, tap the Screen mirroring notification, and then tapOK.
Connecting your device to USB accessories
You can use a USB host adapter to connect your device to USB accessories, such asUSB mass storage devices, headphones, game controllers, USB keyboards, andUSB mice.
Sony does not guarantee that all USB accessories are supported by your device.
Note
This device has a capless USB port. If your device gets exposed to water, ensure that theport is completely dry before connecting a USB cable. If water is detected on the USBconnector, a warning notification appears in the Notification panel.
80
Internet version. For personal use only.
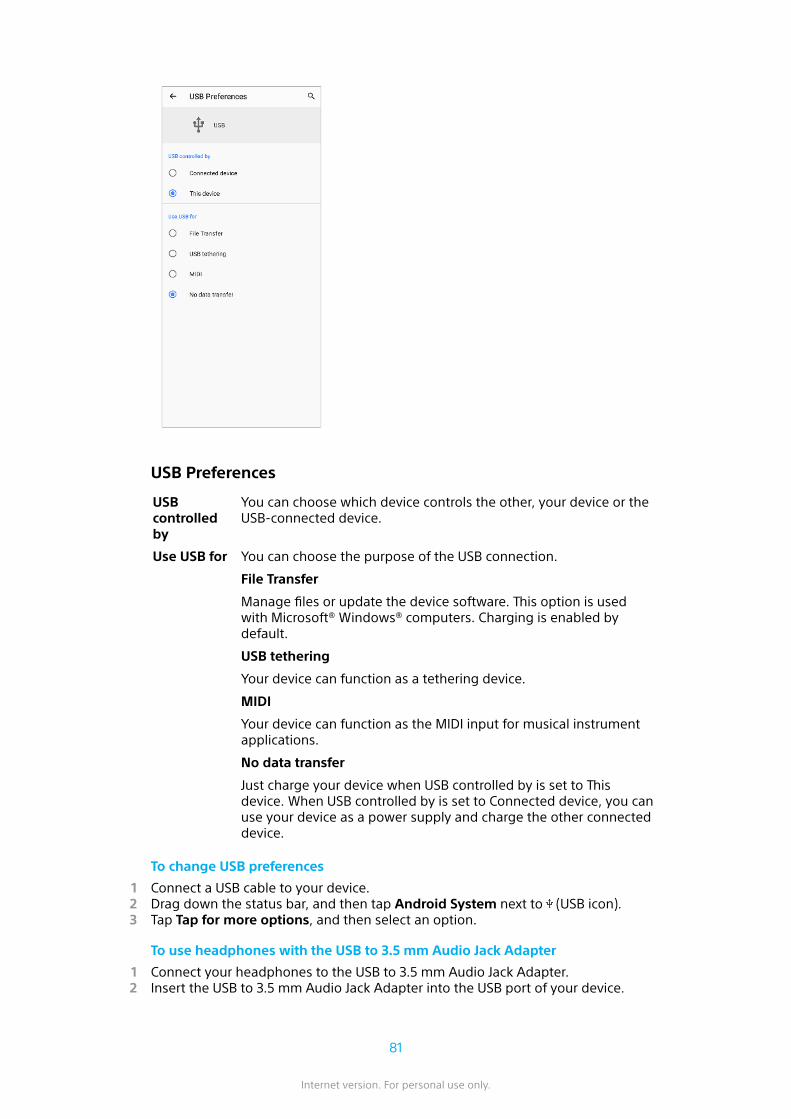
USB Preferences
USBcontrolledby
You can choose which device controls the other, your device or theUSB-connected device.
Use USB for You can choose the purpose of the USB connection.
File Transfer
Manage files or update the device software. This option is usedwith Microsoft® Windows® computers. Charging is enabled bydefault.
USB tethering
Your device can function as a tethering device.
MIDI
Your device can function as the MIDI input for musical instrumentapplications.
No data transfer
Just charge your device when USB controlled by is set to Thisdevice. When USB controlled by is set to Connected device, you canuse your device as a power supply and charge the other connecteddevice.
To change USB preferences
1 Connect a USB cable to your device.2 Drag down the status bar, and then tap Android System next to (USB icon).3 Tap Tap for more options, and then select an option.
To use headphones with the USB to 3.5 mm Audio Jack Adapter
1 Connect your headphones to the USB to 3.5 mm Audio Jack Adapter.2 Insert the USB to 3.5 mm Audio Jack Adapter into the USB port of your device.
81
Internet version. For personal use only.

NFC (Near Field Communication)
NFC is a wireless technology with a maximum range of one centimeter, so thedevices sharing data must be held close to each other. Make sure that both deviceshave the NFC function turned on, and the both screens are active and unlocked.
The NFC detection area is located on the back of the device. Hold your device closeto another device or an NFC reader so that the N-Marks touch.
Note
Using certain applications, some NFC functions can be enabled even when the device isswitched off. Note that not all devices support this feature.
To share content with another device using NFC
1 Display the content that you want to share on your screen. For example, you canshare contacts, photos, videos, or web addresses.
2 Hold your device and the receiving device close to each other so that the N-Marksof both devices touch. When the devices connect, a thumbnail of the contentappears.
3 Tap the thumbnail to start the transfer.4 When the transfer is done, the content is saved on the receiving device.5 To display the music file, photo, or video, drag down the status bar to open the
Notification panel, and then tap Beam complete.
Scanning NFC tags
Your device can scan various kinds of NFC tags to receive additional information,such as a web address. For example, it can scan embedded tags on a poster, on abillboard advertisement, or beside a product in a retail store.
To scan an NFC tag
• Place your device over the tag so that the N-Mark touches it. Your device scans thetag and displays the content collected. Tap the content of the tag to open it.
Connecting to an NFC compatible device
You can connect your device to other NFC compatible devices produced by Sony,such as a speaker or a headphone. When establishing this kind of connection, referto the User guide of the compatible device for more information.
Note
You may need to have Wi-Fi or Bluetooth activated on both devices for the connection towork.
Using your device as a wallet
You can use your device to pay for goods without reaching for your real wallet andmanage all payment services in one place. When making a payment, remember toturn on the NFC function before you touch your device to a card reader. For moreinformation about NFC, see NFC (Near Field Communication) on page 82.
Note
Mobile payment services may not be available in your region. For Dual SIM devices, NFC-initiated payments are only supported for an NFC-enabled SIM card inserted in SIM card slot1.
To manage payment services
1 Make sure NFC is enabled on your device.
82
Internet version. For personal use only.
2 Find and tap Settings > Apps & notifications > Default apps > Tap & pay. You mayfind the item under Advanced. A list of payment services appears.
3 Manage the payment services as desired. For example, you can change yourdefault payment service.
Bluetooth wireless technology
Use the Bluetooth function to send files to other Bluetooth compatible devices, orto connect to handsfree accessories. Bluetooth connections work better within 10meters (33 feet), with no solid objects in between. Pairing is necessary to connectto other Bluetooth devices.
Note
Interoperability and compatibility among Bluetooth devices can vary.
To turn the Bluetooth function on or off
1 Find and tap Settings > Device connection > Connection preferences.2 Tap Bluetooth.3 Tap the switch to enable or disable the function.
Hint
You can also turn Bluetooth on or off from the Quick settings panel.
Naming your device
You can give your device a name. This name is shown to other devices after youhave turned on the Bluetooth function and your device is set to visible.
To give your device a name
1 Find and tap Settings > Device connection > Pair new device.2 Tap Device name.3 Enter a name for your device.4 Tap RENAME.
Pairing with another Bluetooth device
When you pair your device with another device, you can, for example, connectyour device to a Bluetooth headset or a Bluetooth car kit, and use these otherdevices to share music.
Once you pair your device with another Bluetooth device, your device remembersthis pairing.
Note
Some Bluetooth devices, for example, most Bluetooth headsets, require you to both pairand connect with the other device.
Hint
You can pair your device with several Bluetooth devices, but you can only connect to oneBluetooth profile at the same time.
To pair your device with another Bluetooth device
1 Make sure that the device you want to pair with has the Bluetooth functionactivated and is visible to other Bluetooth devices.
2 Find and tap Settings > Device connection > Pair new device. A list of theavailable Bluetooth devices appears.
3 Tap the Bluetooth device that you want to pair with.
83
Internet version. For personal use only.
To connect your device to another Bluetooth device
1 Find and tap Settings > Device connection > Previously connected devices.2 Tap the Bluetooth device that you want to connect to.
To unpair a Bluetooth device
1 Find and tap Settings > Device connection > Previously connected devices.2 Tap (Settings icon) beside the name of the device that you want to unpair.3 Tap Forget > Forget device.
Sending and receiving items using Bluetooth technology
Use Bluetooth technology to share items with other Bluetooth compatible devicessuch as phones or computers. You can send and receive the following kinds ofitems:
• Photos and videos• Music and other audio files• Web pages
To send items using the Bluetooth connection
1 Make sure the Bluetooth function is turned on for the receiving device, and thatthe device is visible to other Bluetooth devices.
2 Open the application on the sending device which contains the item that you wantto send. Scroll to the item.
3 Depending on the app and the item you want to send, you may need to touch andhold or open the item, then tap (Share icon).
4 Select Bluetooth.5 Turn on the Bluetooth function if prompted.6 Tap the name of the receiving device.7 On the receiving device, accept the connection if prompted.8 On the sending device, confirm the transfer to the receiving device, if prompted.9 Accept the incoming item on the receiving device.
To receive items using the Bluetooth connection
1 Make sure that the Bluetooth function is on and is visible to other Bluetoothdevices.
2 The sending device now starts sending data to your device.3 When you are notified of an incoming file to your device, drag the status bar
downwards and tap the notification to accept the file transfer.4 Tap Accept to start the file transfer.5 To view the progress of the transfer, drag the status bar downwards.6 To open a received item, drag the status bar downwards and tap the relevant
notification.
To view files you have received using the Bluetooth connection
1 Find and tap Settings > Device connection > Connection preferences.2 Tap Received files.
84
Internet version. For personal use only.

Clock and Calendar
Calendar
Use the Calendar application to manage your time schedule.
If you have signed in to and synchronized your device with one or several onlineaccounts that include calendars, for example, your Google account, then calendarevents from these accounts will also appear in the Calendar application. You canselect which calendars you want to integrate into the combined Calendar view.
When an appointment time approaches, your device plays a notification sound toremind you. Also, (Calendar notification icon) appears in the status bar.
Calendar overview
1 Access settings, select a view type and the calendars that you want to view
2 Access an overview of the current month
3 Return to the current date
4 View more options
5 Scroll up or down to browse the calendar
6 Add a calendar entry
Clock
You can set one or several alarms. The alarm does not sound if your device isturned off.
85
Internet version. For personal use only.

Clock overview
1 Access the Alarm tab
2 Access the Clock tab
3 Access the Timer tab
4 Access the Stopwatch tab
5 View more options for the current tab
6 Add a world clock
To set a new alarm
1 Find and tap Clock > Alarm.2 Tap (Add item icon).3 Select the desired value.4 Tap OK.
Hint
Tap (More options icon) to edit the alarm.
To snooze an alarm when it sounds
• When the alarm sounds, tap Snooze.
To turn off an alarm when it sounds
• When the alarm sounds, tap Dismiss.
Hint
To turn off a snoozed alarm, you can drag down the status bar to open the Notificationpanel and then tap Dismiss.
To edit an alarm
1 Find and tap Clock > Alarm.2 To turn an alarm on or off, tap the switch.3 To edit each alarm, tap (More options icon).
86
Internet version. For personal use only.
4 To edit more detailed properties of all alarms, tap (More icon) > Settings.
To set a world clock
1 Find and tap Clock, and then tap (World clock icon).2 Search for the city you want to add, and then tap the city name. You can add
multiple cities as desired.
Note
You cannot show the time in multiple cities on the Home screen with this feature.
Hint
To edit your world clock list, touch and hold a world clock until the device vibrates.
87
Internet version. For personal use only.

Accessibility
Magnification
Magnification allows you to zoom in to parts of the screen by tapping an area ofthe touchscreen three times in succession.
To enable or disable Magnification
1 Find and tap Settings > Accessibility > Magnification.2 Select an option and tap the switch to enable the function.
To magnify an area and pan across the screen
1 Make sure that Magnification is enabled.2 Depending on the selected magnification option, to temporary magnify the area
tap the screen three times or tap (Magnification icon) first and then tap thescreen.
3 Move the area by dragging it with two or more fingers.4 To exit zoom mode, tap the area three times or tap (Magnification icon) again.
Hint
With certain applications, you can also zoom in or out by pinching an area.
Font size
You can enable the Font size option to increase the default size of text displayedon your device.
To set Font size
1 Find and tap Settings > Accessibility.2 Tap Font size, and then set the desired font size by tapping the scale.
Color correction
The Color correction setting adjusts how colors are displayed on the screen forusers who are color blind or have difficulty distinguishing between colors.
To enable or disable Color correction
1 Find and tap Settings > Accessibility > Color correction.2 Tap Use color correction switch to enable or disable the function.3 Tap Correction mode, then select the appropriate color sensitivity.
TalkBack
TalkBack is a screen reader service for visually impaired users. TalkBack usesspoken feedback to describe any events or actions performed on your Androiddevice. TalkBack describes the user interface and reads out software errors,notifications and messages.
To enable TalkBack
1 Find and tap Settings > Accessibility > TalkBack.2 Tap the switch and then tap OK.
Note
To change speech, feedback and touch preferences for TalkBack, tap Settings, then tap thescreen twice.
88
Internet version. For personal use only.
Hint
TalkBack launches a tutorial immediately after you enable the feature. To exit the tutorial,tap (Back button), then tap the screen twice.
To disable TalkBack
1 Find and tap Settings, then tap anywhere on the screen twice.2 Find and tap Accessibility by scrolling through the list, then tap anywhere on the
screen twice.3 Find and tap TalkBack by scrolling through the list, then tap anywhere on the
screen twice.4 Tap the on-off switch, and then tap anywhere on the screen twice.5 Tap OK, and then tap anywhere on the screen twice.
Other settings for accessibility
To set Display size, Mono audio, or Switch Access
1 Find and tap Settings > Accessibility.2 Tap the option that you want to edit, and set the desired value or setting.
89
Internet version. For personal use only.
Support application
About the Support app
Use the Support app to find device and software information. You can readsupport topics, troubleshoot, or use helpful applications such as the device test.Visit our Web support directly from the app to read User guides, knowledgearticles, or the Support forum.
Note
Support contact information is available from the Contact us menu even without a networkconnection.
To access the Support app
• Find and tap (Support icon).
Hint
Connect to the internet when using the Support application for the best available support.
90
Internet version. For personal use only.
Legal information
GeneralThis User guide is published by Sony Mobile Communications Inc. or its local affiliated company, without any warranty. Improvements andchanges to this User guide necessitated by typographical errors, inaccuracies of current information, or improvements to programs and/orequipment, may be made by Sony Mobile Communications Inc. at any time and without notice. Such changes will, however, beincorporated into new editions of this User guide. All illustrations are for illustration purposes only and may not accurately depict theactual device.
All product and company names mentioned herein are the trademarks or registered trademarks of their respective owners. All othertrademarks are property of their respective owners. Any rights not expressly granted herein are reserved. Visit www.sonymobile.com/legal/ for more information.
This User guide may reference services or applications provided by third parties. Use of such programming or services may requireseparate registration with the third-party provider, payment of fees or provision of credit card information, as well as be subject toadditional terms of use, change, interruption or discontinuance at any time. For applications accessed on or through a third-party website,please review such websites’ terms of use and applicable privacy policy in advance. Sony Mobile does not warrant or guarantee theavailability or performance of any third-party application, websites, or offered services. In the event software accompanying or provided inconjunction with your device is provided with additional terms and conditions, such provisions shall also govern your possession andusage of the software.
Your device has the capability to download, store, and forward additional content, for example, music or videos. The use of such contentmay be restricted or prohibited by rights of third parties, including but not limited to restriction under applicable copyright laws. You, andnot Sony Mobile, are entirely responsible for additional content that you download to or forward from your device. Prior to your use of anyadditional content, please verify that your intended use is properly licensed or is otherwise authorized. Sony Mobile does not guaranteethe accuracy, integrity or quality of any additional content or any other third-party content. Under no circumstances will Sony Mobile beliable in any way for your improper use of additional content or other third-party content.
This product is licensed under the MPEG-4 visual and AVC patent portfolio licenses for the personal and non-commercial use of aconsumer for (i) encoding video in compliance with the MPEG-4 visual standard ("MPEG-4 video") or the AVC standard ("AVC video")and/or (ii) decoding MPEG- 4 or AVC video that was encoded by a consumer engaged in a personal and non-commercial activity and/orwas obtained from a video provider licensed by MPEG LA to provide MPEG-4 and/or AVC video. No license is granted or shall be impliedfor any other use. Additional information including that relating to promotional, internal and commercial uses and licensing may beobtained from MPEG LA, L.L.C. See www.mpegla.com. MPEG Layer-3 audio decoding technology licensed from Fraunhofer IIS andThomson.
Note: Sony Mobile advises users to backup their personal data and information.
SONY MOBILE WILL NOT BE LIABLE FOR ANY LOSS, DELETION AND/OR DATA-OVERWRITING OF PERSONAL DATA OR FILES STORED ONYOUR DEVICE (INCLUDING BUT NOT LIMITED TO CONTACTS, MUSIC TRACKS AND PICTURES) ARISING OUT OF ANY UPDATE OF YOUR DEVICEBY ANY OF THE METHODS DESCRIBED IN THIS USER GUIDE OR DOCUMENTATION. IN NO EVENT SHALL SONY MOBILE’S OR ITS SUPPLIERS’TOTAL LIABILITY TO YOU FOR ANY AND ALL DAMAGES, LOSSES AND CAUSES OF ACTION (WHETHER IN CONTRACT OR TORT, INCLUDING,BUT NOT LIMITED TO NEGLIGENCE OR OTHERWISE) EXCEED THE AMOUNT ACTUALLY PAID BY YOU FOR YOUR DEVICE.
©2019 Sony Mobile Communications Inc.
All rights reserved.
Warranty, SAR, and usage guidelinesFor information about warranty, SAR (Specific Absorption Rate), and safety guidelines, please read the Important information providedunder Settings > System > About phone > Legal information on your device.
91
Internet version. For personal use only.