USER GUIDE PRODUCTION SUITE v4.5 - CODEX
61
USER GUIDE PRODUCTION SUITE v4.5 RELEASE: vlt-4.5.0beta2-04543 DOCUMENT VERSION 29.03.17
-
Upload
khangminh22 -
Category
Documents
-
view
1 -
download
0
Transcript of USER GUIDE PRODUCTION SUITE v4.5 - CODEX

PAGE 1CODEX USER GUIDE - CODEX PRODUCTION SUITE v.4.5 29.03.2017
USER GUIDE
PRODUCTION SUITE v4.5RELEASE: vlt-4.5.0beta2-04543
DOCUMENT VERSION 29.03.17
PAGE 2CODEX USER GUIDE - CODEX PRODUCTION SUITE v.4.5 29.03.2017
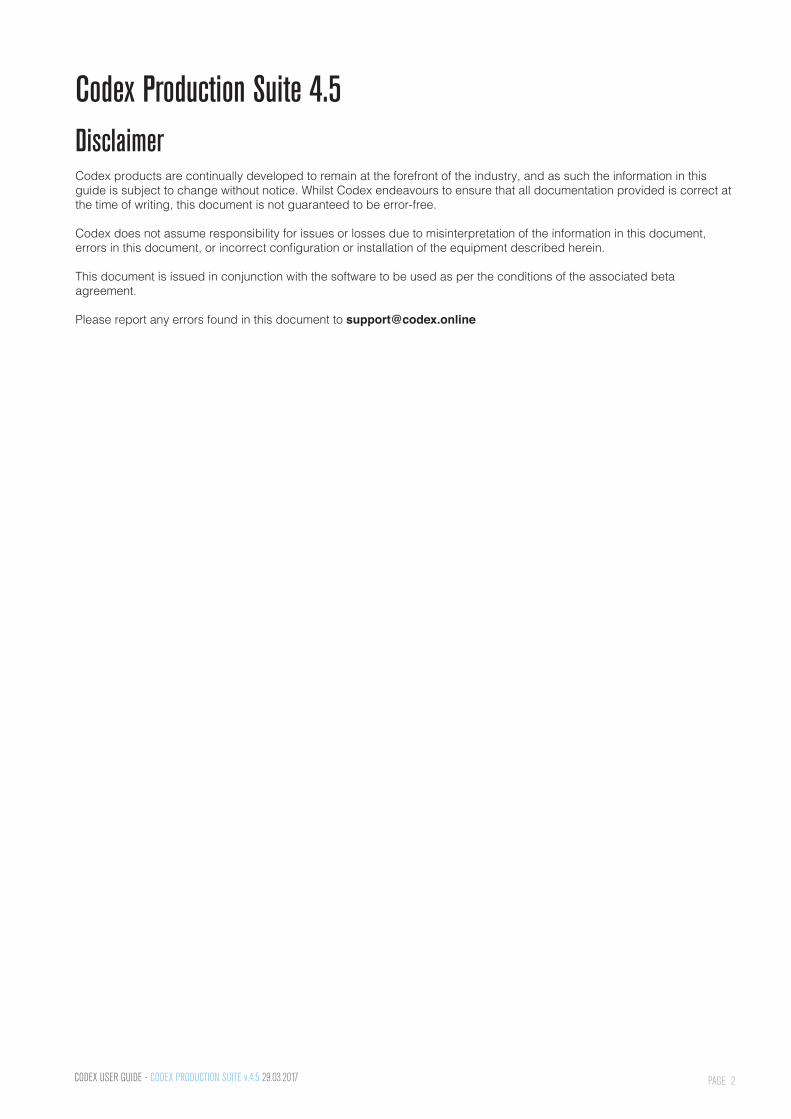
Codex Production Suite 4.5DisclaimerCodex products are continually developed to remain at the forefront of the industry, and as such the information in this guide is subject to change without notice. Whilst Codex endeavours to ensure that all documentation provided is correct at the time of writing, this document is not guaranteed to be error-free.
Codex does not assume responsibility for issues or losses due to misinterpretation of the information in this document, errors in this document, or incorrect configuration or installation of the equipment described herein.
This document is issued in conjunction with the software to be used as per the conditions of the associated beta agreement.
Please report any errors found in this document to [email protected]
PAGE 3CODEX USER GUIDE - CODEX PRODUCTION SUITE v.4.5 29.03.2017
Disclaimer ..............................................................................................................................2
1.0 Codex Production Suite 4.51.1 Introduction ....................................................................................................................41.2 Supported Hardware.....................................................................................................41.3 Installation ......................................................................................................................51.4 Login ................................................................................................................................51.5. Licensing ........................................................................................................................5
2.0 Vault Platform2.1. Overview of Vault Platform ........................................................................................53. Library ................................................................................................................................73.1 Clip Views .......................................................................................................................73.2 Clip Selection .................................................................................................................83.3 Filter Panel ......................................................................................................................93.4 Clip Panel ......................................................................................................................103.5 Metadata Panel ............................................................................................................113.6 Edit Metadata ...............................................................................................................123.7. Tools Panel ...................................................................................................................133.7.1 General Tools .............................................................................................................133.7.2 Clip Tools ....................................................................................................................133.7.3 Jobs .............................................................................................................................143.8 Group View ..................................................................................................................143.9. Locked Clips ................................................................................................................154. Preset Jobs .....................................................................................................................155. File Browser ....................................................................................................................166. Storage .............................................................................................................................187. Project ..............................................................................................................................187.2 Cameras .......................................................................................................................207.3 Framing ..........................................................................................................................217.3.1 Configuring a Framing Template ...........................................................................227.4 Deliverables ...................................................................................................................237.4.1 Preset Deliverables ...................................................................................................237.4.2 Configuring a Deliverable Template ......................................................................247.5 Jobs ...............................................................................................................................277.5.1 Archive task settings .............................................................................................. 307.5.2 Audio sync task settings ........................................................................................317.5.3 Clone task settings ..................................................................................................317.5.4 Generate task settings ............................................................................................327.5.5 Import task settings.................................................................................................337.5.6 Link task settings .....................................................................................................337.5.7 Media Verify task settings ......................................................................................347.5.8 Media Clear task settings .......................................................................................347.5.9 Reports task settings...............................................................................................347.6 VFS .............................................................................................................................. 35
8. Job Queue .......................................................................................................................379. Preferences .................................................................................................................... 389.1 System .......................................................................................................................... 389.2 Users ............................................................................................................................. 399.3 About............................................................................................................................. 3910. Keyboard Shortcuts ................................................................................................... 3911. Supported file formats and codecs ....................................................................... 4012. Custom file naming in the Generate task and VFS ........................................... 4012.1 Rules for Token-Names .......................................................................................... 4012.2 Metadata Property Names and Labels ................................................................41
13.0 Vault Review13.1 Introduction ................................................................................................................4213.2 Supported Hardware ................................................................................................4214. Launching Vault Review.............................................................................................4314.1 Vault Review - Overview .........................................................................................4314.1.1 Menu Bar Options and Shortcut Editor ............................................................4314.2 Configuration Options ..............................................................................................4414.3 Transport Controls.................................................................................................... 4514.4 Zoom, Viewport and Fit Options ........................................................................... 4614.5 Overlays ......................................................................................................................4714.6 Timeline .......................................................................................................................4714.6.1 Poster Frames, Notes, and In/Out Point ..........................................................4714.7 Clips ............................................................................................................................ 4814.8 Exporting Still Images ............................................................................................ 4814.9 A/B Playheads ......................................................................................................... 4914.9.1 A/B Timeline ........................................................................................................ 4914.9.2 Playhead Options ................................................................................................ 4914.9.3 Comparing images, Zooming and Repositioning the A/B Viewports .... 5014.10 Colour ..................................................................................................................... 5014.10.1 Meters ................................................................................................................... 5014.10.2 LUTs ......................................................................................................................5114.10.3 Printer Lights ......................................................................................................5114.10.4 Colour Wheels ..................................................................................................5214.10.5 Looks Panel.........................................................................................................5214.10.6 CDL Panel ...........................................................................................................5314.10.7 Tangent Element Series ...................................................................................5414.11 Audio Sync .............................................................................................................5414.12 Metadata View ...................................................................................................... 5514.13 Save Changes ....................................................................................................... 5614.14 QC Tool ....................................................................................................................5714.15 Keyboard Shortcuts ............................................................................................. 58
Notes .............................................................................................................................. 61
Contents

PAGE 4CODEX USER GUIDE - CODEX PRODUCTION SUITE v.4.5 29.03.2017
1. Codex Production Suite 4.51.1 IntroductionWelcome to this guide for Codex Production Suite 4.5 - a fully-featured dailies and archiving system featuring sophisticated tools for colour grading and LUT management, QC, metadata editing and audio sync so you can manage and create all your deliverables within one unified system. Transcode to all the formats you need to deliver, faster than real-time, even with an input LUT, CDL and a 3D LUT.
Codex Production Suite 4.5 consists of Vault Platform and Vault Review, and provides a comprehensive feature set including:
• Support for many popular cameras - ARRI ALEXA/MINI/AMIRA, Codex Action Cam, Canon C700/C500/C300 Mark II, Panasonic VariCam 35 and Pure, Sony F65/F55/F5, RED EPIC/WEAPON, Phantom Flex 4K and GoPro.• View, edit and add metadata in the Library.• Clone camera original data to local storage.• Primary colour correction - play back, adjust and apply LUTs and CDL looks in Vault Review.• Synchronise audio, either with timecode or manually.• Add Quality Control (QC) notes and create PDF QC reports.• Transcode to common deliverable formats such as ProRes, DNxHR/DNxHD, DCP and H264 with LUTs, CDL, burn-ins and masks.• VFS (Virtual File System) for fast, flexible and powerful deliverables creation.• Framings to allow customisable extraction of ‘region of interest’ from source image into deliverables.• Archive to disk or LTFS tape with md5 verification.
1.2 Supported HardwareCodex Production Suite 4.5 can be used on several hardware platforms:
• Codex S-Series (only if running latest CodexOS operating system).• Codex XL-Series (only if running latest CodexOS operating system).• Mac Pro running OS X 10.10, 10.11.6+, or 10.12 (recommended specification: Processor - 3.7GHz Quad Core Intel Xeon E5, Memory - 32GB 1866MHz DDR3 ECC, Graphics - AMD FirePro D700 6144MB).• MacBook Pro running OS X 10.10, 10.11.6+, or 10.12 (recommended specification: Processor - 2.8GHz Intel Core i7, Memory - 16GB 1600MHz DDR3, Graphics - NVIDIA GeForce GT 750M 2048MB).
Codex Production Suite 4.5 running on Mac OS X supports the following media readers:
• Codex Capture Drive Dock (Thunderbolt).• Codex Capture Drive 2.0 Dock (Thunderbolt).• Codex Capture Drive Dock (USB-3).• Codex Capture Drive Dock (SAS).• Codex CFast 2.0 Card Reader.• Sony AXS-CR1.• Sony SBAC-US30.• Sony SBAC-UT100.• REDSTATION REDMINI 1.8”.
Any other card reader supported on Mac OS X can also be used with Codex Production Suite - the list above details those integrated for use directly with media expressions, which are covered in more detail later in this guide. For playback to an SDI monitor from Mac, the AJA Io4K and AJA T-Tap are supported.
PAGE 5CODEX USER GUIDE - CODEX PRODUCTION SUITE v.4.5 29.03.2017
1.3 InstallationPlease follow the install guide available with software from https://www.codex.online/software
1.4 LoginOn Mac go to /Applications/Codex and open the Vault Platform software. On Vault S/XL-Series the login screen is presented when the system starts. From the login screen there is no password by default so simply click Login.
A password can be set later to restrict access.
1.5. LicensingA licence is required to use the Codex Production Suite software.
On Mac, first connect your Dock hardware (and for USB3 Docks, insert a Capture Drive).
From the ‘Preferences’->’System’ screen click ‘Request Licence’. On Mac this will open a web browser on a page where you can request a licence. On Vault S/XL-Series this will present a URL for the webpage where you can request a licence (https://codex.online/licence-request).
Codex Support will then provide the licence key and activation instructions.
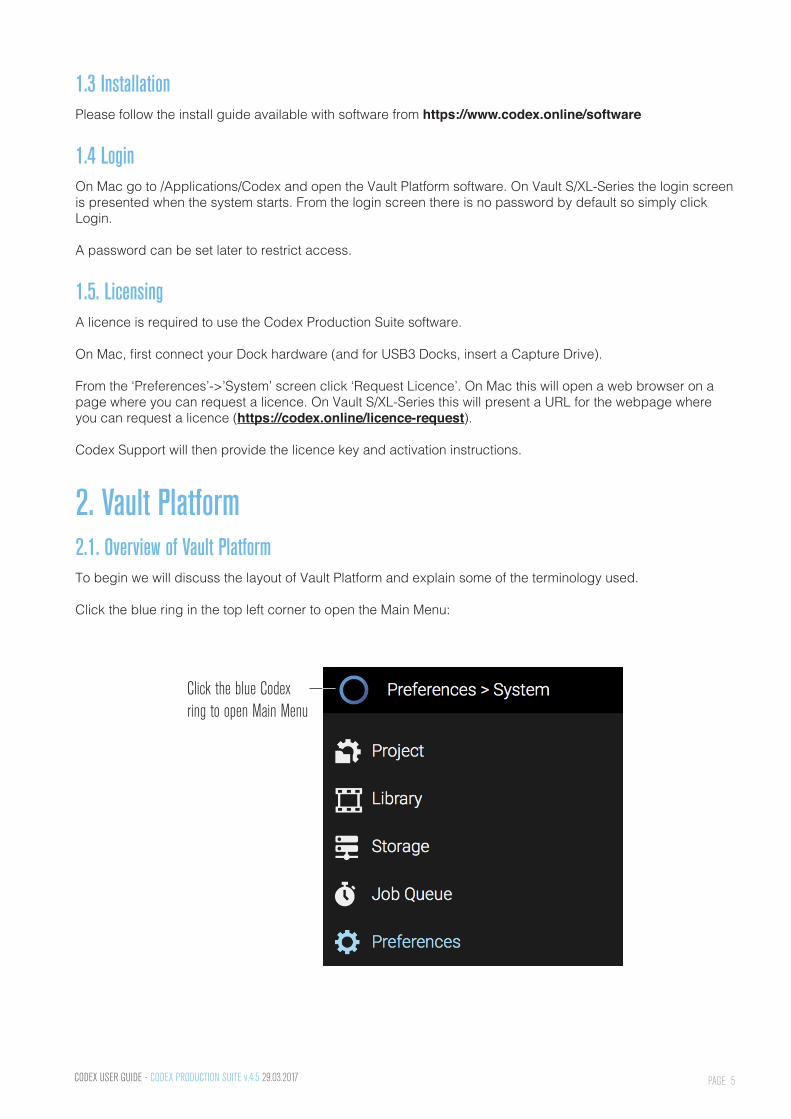
2. Vault Platform2.1. Overview of Vault PlatformTo begin we will discuss the layout of Vault Platform and explain some of the terminology used.
Click the blue ring in the top left corner to open the Main Menu:
Click the blue Codex ring to open Main Menu
PAGE 6CODEX USER GUIDE - CODEX PRODUCTION SUITE v.4.5 29.03.2017
The following options are available:
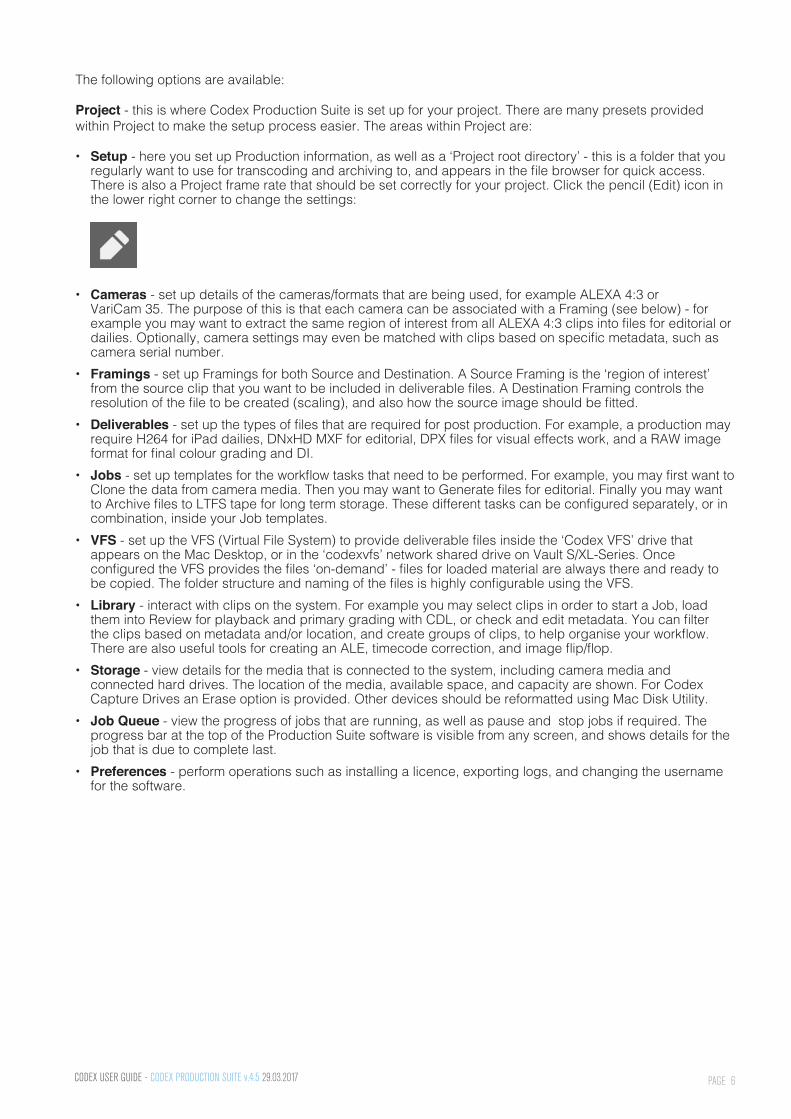
Project - this is where Codex Production Suite is set up for your project. There are many presets provided within Project to make the setup process easier. The areas within Project are:
• Setup - here you set up Production information, as well as a ‘Project root directory’ - this is a folder that you regularly want to use for transcoding and archiving to, and appears in the file browser for quick access. There is also a Project frame rate that should be set correctly for your project. Click the pencil (Edit) icon in the lower right corner to change the settings:
• Cameras - set up details of the cameras/formats that are being used, for example ALEXA 4:3 or VariCam 35. The purpose of this is that each camera can be associated with a Framing (see below) - for example you may want to extract the same region of interest from all ALEXA 4:3 clips into files for editorial or dailies. Optionally, camera settings may even be matched with clips based on specific metadata, such as camera serial number. • Framings - set up Framings for both Source and Destination. A Source Framing is the ‘region of interest’ from the source clip that you want to be included in deliverable files. A Destination Framing controls the resolution of the file to be created (scaling), and also how the source image should be fitted.• Deliverables - set up the types of files that are required for post production. For example, a production may require H264 for iPad dailies, DNxHD MXF for editorial, DPX files for visual effects work, and a RAW image format for final colour grading and DI.• Jobs - set up templates for the workflow tasks that need to be performed. For example, you may first want to Clone the data from camera media. Then you may want to Generate files for editorial. Finally you may want to Archive files to LTFS tape for long term storage. These different tasks can be configured separately, or in combination, inside your Job templates.• VFS - set up the VFS (Virtual File System) to provide deliverable files inside the ‘Codex VFS’ drive that appears on the Mac Desktop, or in the ‘codexvfs’ network shared drive on Vault S/XL-Series. Once configured the VFS provides the files ‘on-demand’ - files for loaded material are always there and ready to be copied. The folder structure and naming of the files is highly configurable using the VFS.• Library - interact with clips on the system. For example you may select clips in order to start a Job, load them into Review for playback and primary grading with CDL, or check and edit metadata. You can filter the clips based on metadata and/or location, and create groups of clips, to help organise your workflow. There are also useful tools for creating an ALE, timecode correction, and image flip/flop.• Storage - view details for the media that is connected to the system, including camera media and connected hard drives. The location of the media, available space, and capacity are shown. For Codex Capture Drives an Erase option is provided. Other devices should be reformatted using Mac Disk Utility.• Job Queue - view the progress of jobs that are running, as well as pause and stop jobs if required. The progress bar at the top of the Production Suite software is visible from any screen, and shows details for the job that is due to complete last.• Preferences - perform operations such as installing a licence, exporting logs, and changing the username for the software.
PAGE 7CODEX USER GUIDE - CODEX PRODUCTION SUITE v.4.5 29.03.2017
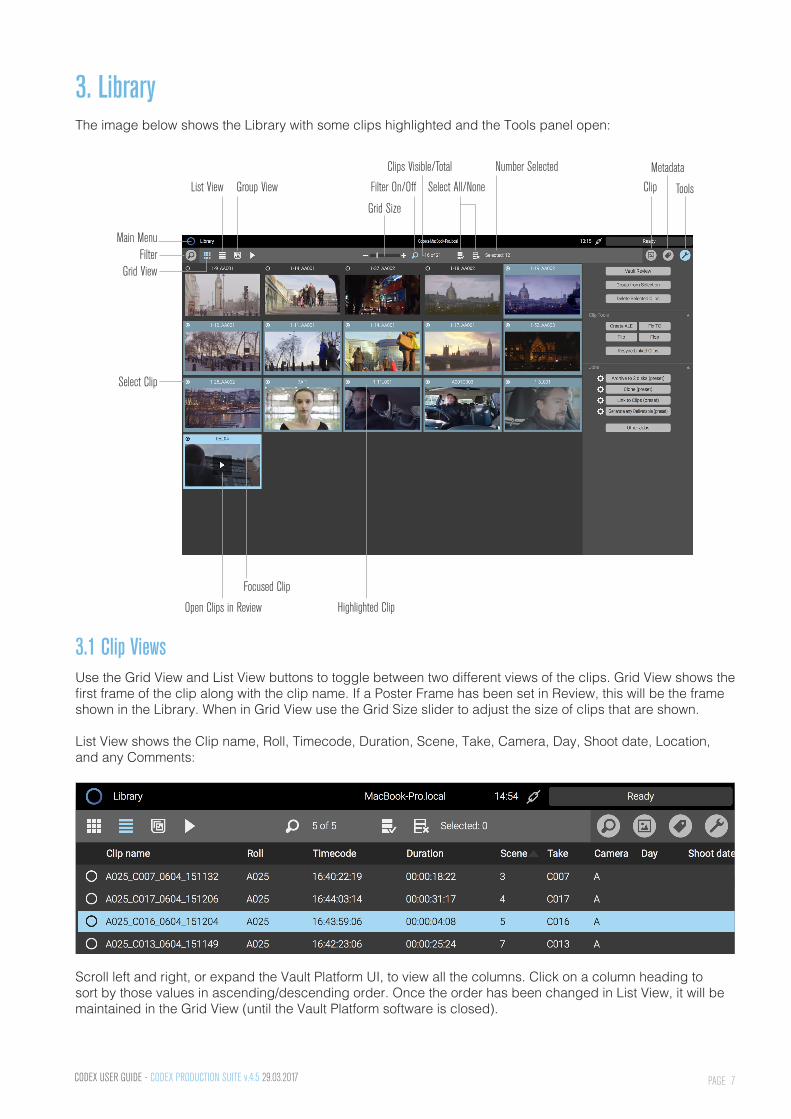
3. LibraryThe image below shows the Library with some clips highlighted and the Tools panel open:
Main Menu
List View Group View
Grid Size
Filter On/Off Clip ToolsSelect All/None
Clips Visible/Total Number Selected Metadata
Grid View
Select Clip
Highlighted Clip
Focused Clip
Open Clips in Review
3.1 Clip ViewsUse the Grid View and List View buttons to toggle between two different views of the clips. Grid View shows the first frame of the clip along with the clip name. If a Poster Frame has been set in Review, this will be the frame shown in the Library. When in Grid View use the Grid Size slider to adjust the size of clips that are shown.
List View shows the Clip name, Roll, Timecode, Duration, Scene, Take, Camera, Day, Shoot date, Location, and any Comments:
Scroll left and right, or expand the Vault Platform UI, to view all the columns. Click on a column heading to sort by those values in ascending/descending order. Once the order has been changed in List View, it will be maintained in the Grid View (until the Vault Platform software is closed).
Filter
PAGE 8CODEX USER GUIDE - CODEX PRODUCTION SUITE v.4.5 29.03.2017
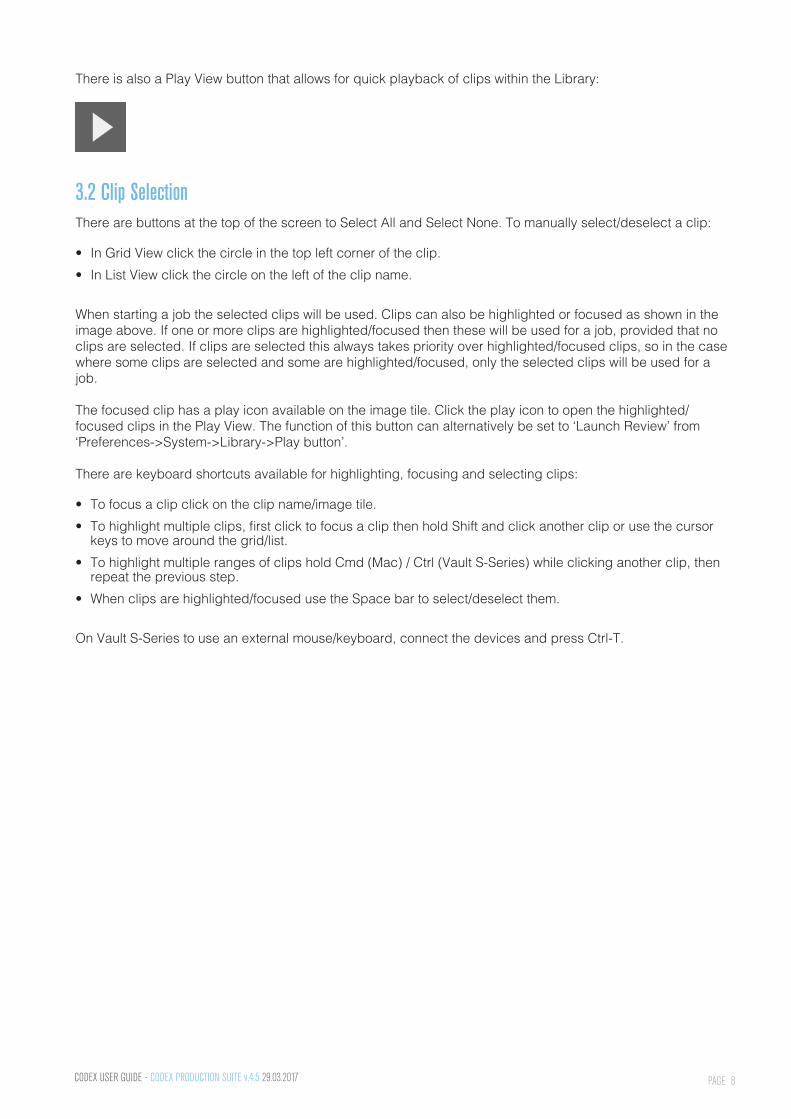
There is also a Play View button that allows for quick playback of clips within the Library:
3.2 Clip SelectionThere are buttons at the top of the screen to Select All and Select None. To manually select/deselect a clip:
• In Grid View click the circle in the top left corner of the clip.• In List View click the circle on the left of the clip name.
When starting a job the selected clips will be used. Clips can also be highlighted or focused as shown in the image above. If one or more clips are highlighted/focused then these will be used for a job, provided that no clips are selected. If clips are selected this always takes priority over highlighted/focused clips, so in the case where some clips are selected and some are highlighted/focused, only the selected clips will be used for a job.
The focused clip has a play icon available on the image tile. Click the play icon to open the highlighted/focused clips in the Play View. The function of this button can alternatively be set to ‘Launch Review’ from ‘Preferences->System->Library->Play button’.
There are keyboard shortcuts available for highlighting, focusing and selecting clips:
• To focus a clip click on the clip name/image tile.• To highlight multiple clips, first click to focus a clip then hold Shift and click another clip or use the cursor keys to move around the grid/list.• To highlight multiple ranges of clips hold Cmd (Mac) / Ctrl (Vault S-Series) while clicking another clip, then repeat the previous step.• When clips are highlighted/focused use the Space bar to select/deselect them.
On Vault S-Series to use an external mouse/keyboard, connect the devices and press Ctrl-T.
PAGE 9CODEX USER GUIDE - CODEX PRODUCTION SUITE v.4.5 29.03.2017
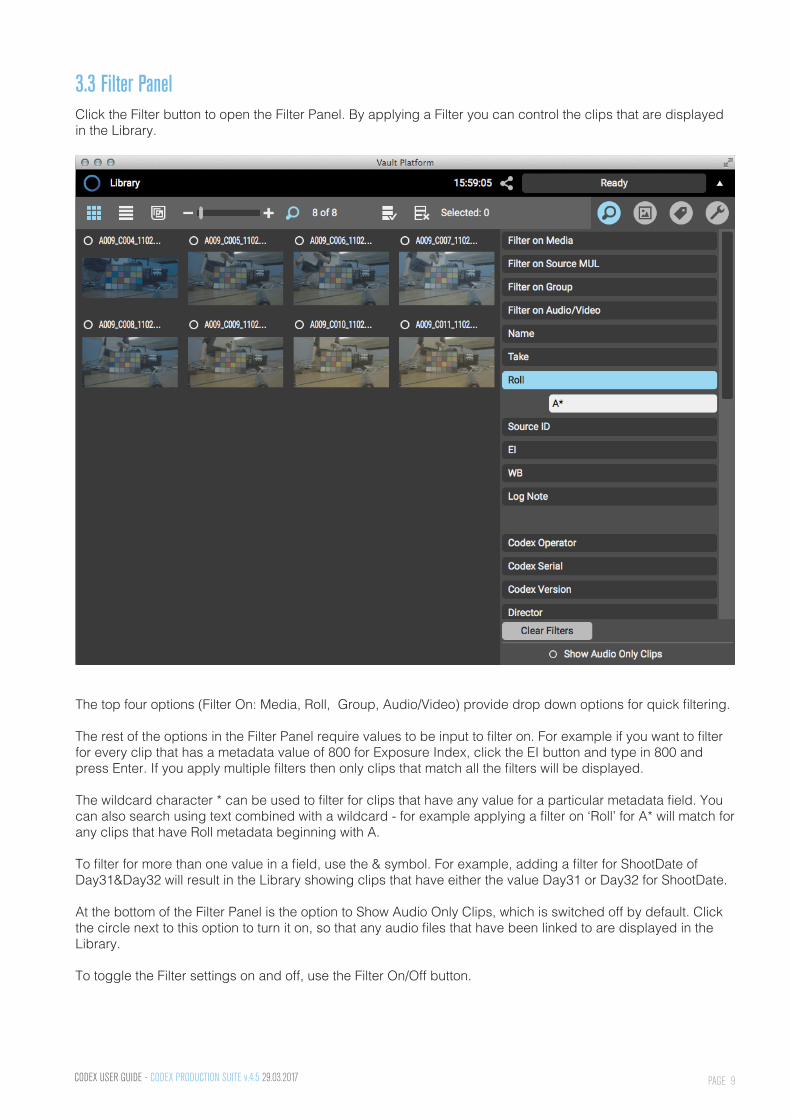
3.3 Filter PanelClick the Filter button to open the Filter Panel. By applying a Filter you can control the clips that are displayed in the Library.
The top four options (Filter On: Media, Roll, Group, Audio/Video) provide drop down options for quick filtering.
The rest of the options in the Filter Panel require values to be input to filter on. For example if you want to filter for every clip that has a metadata value of 800 for Exposure Index, click the EI button and type in 800 and press Enter. If you apply multiple filters then only clips that match all the filters will be displayed. The wildcard character * can be used to filter for clips that have any value for a particular metadata field. You can also search using text combined with a wildcard - for example applying a filter on ‘Roll’ for A* will match for any clips that have Roll metadata beginning with A.
To filter for more than one value in a field, use the & symbol. For example, adding a filter for ShootDate of Day31&Day32 will result in the Library showing clips that have either the value Day31 or Day32 for ShootDate.
At the bottom of the Filter Panel is the option to Show Audio Only Clips, which is switched off by default. Click the circle next to this option to turn it on, so that any audio files that have been linked to are displayed in the Library.
To toggle the Filter settings on and off, use the Filter On/Off button.
PAGE 10CODEX USER GUIDE - CODEX PRODUCTION SUITE v.4.5 29.03.2017
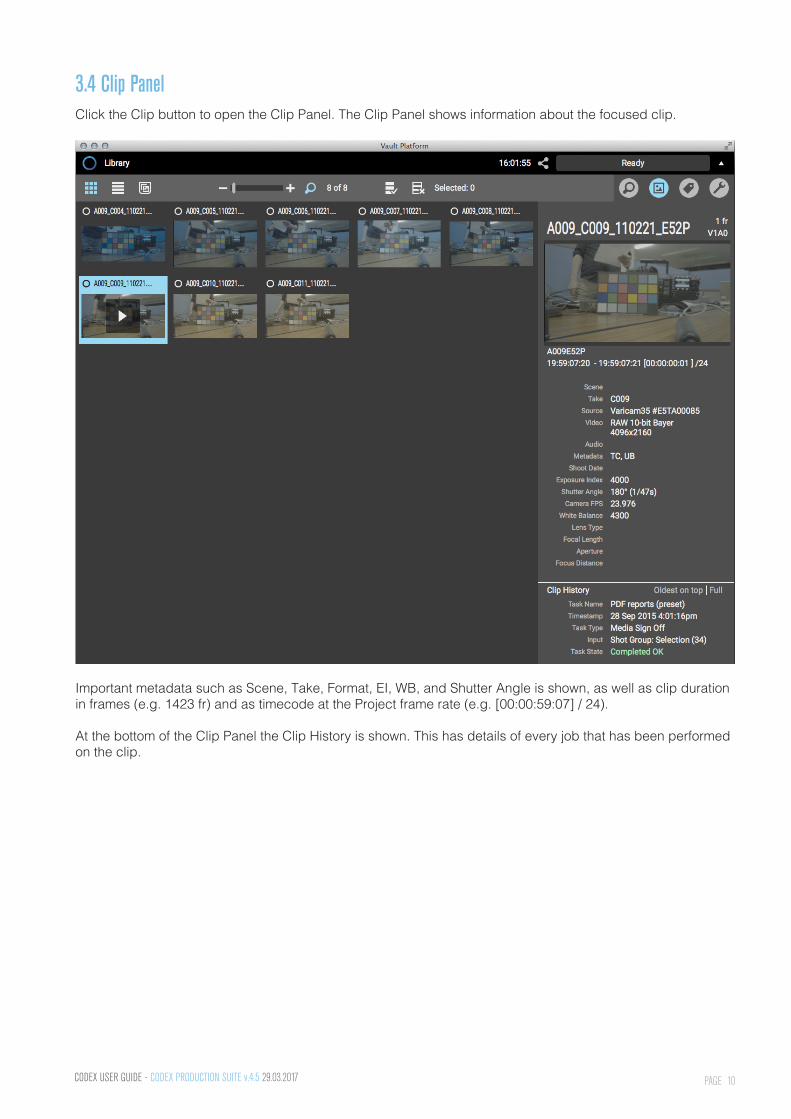
3.4 Clip PanelClick the Clip button to open the Clip Panel. The Clip Panel shows information about the focused clip.
Important metadata such as Scene, Take, Format, EI, WB, and Shutter Angle is shown, as well as clip duration in frames (e.g. 1423 fr) and as timecode at the Project frame rate (e.g. [00:00:59:07] / 24).
At the bottom of the Clip Panel the Clip History is shown. This has details of every job that has been performed on the clip.
PAGE 11CODEX USER GUIDE - CODEX PRODUCTION SUITE v.4.5 29.03.2017
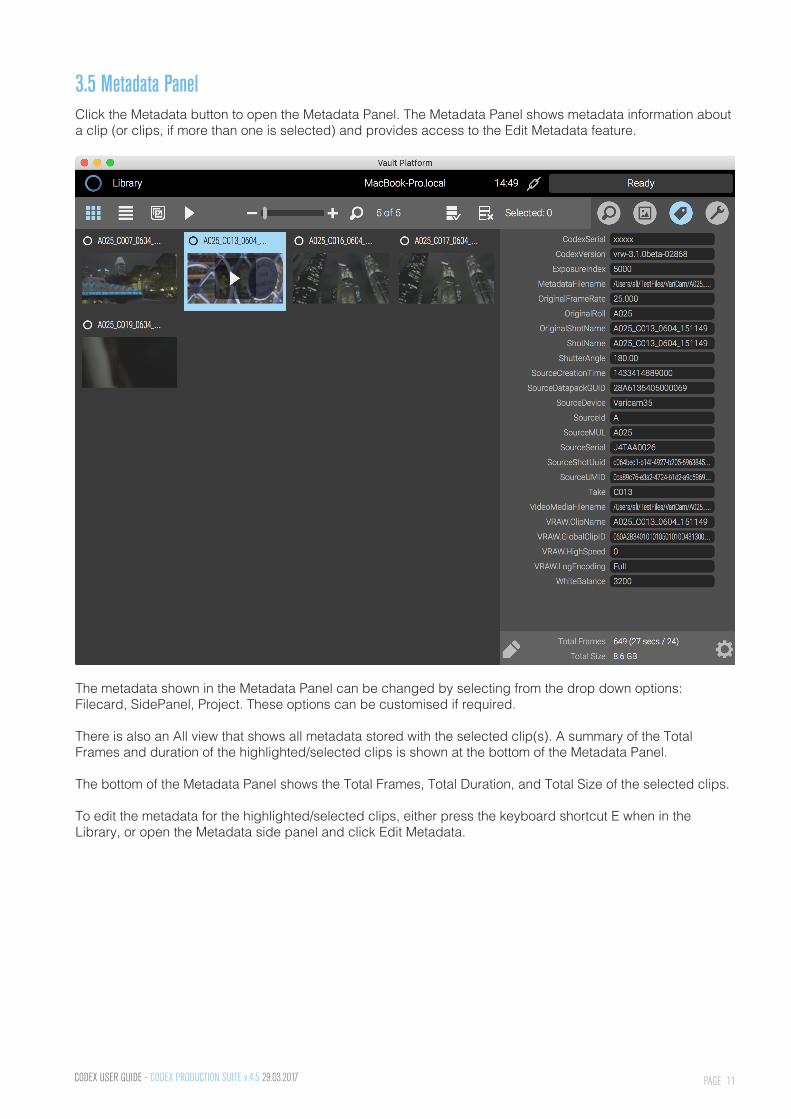
3.5 Metadata PanelClick the Metadata button to open the Metadata Panel. The Metadata Panel shows metadata information about a clip (or clips, if more than one is selected) and provides access to the Edit Metadata feature.
The metadata shown in the Metadata Panel can be changed by selecting from the drop down options: Filecard, SidePanel, Project. These options can be customised if required.
There is also an All view that shows all metadata stored with the selected clip(s). A summary of the Total Frames and duration of the highlighted/selected clips is shown at the bottom of the Metadata Panel.
The bottom of the Metadata Panel shows the Total Frames, Total Duration, and Total Size of the selected clips.
To edit the metadata for the highlighted/selected clips, either press the keyboard shortcut E when in the Library, or open the Metadata side panel and click Edit Metadata.
PAGE 12CODEX USER GUIDE - CODEX PRODUCTION SUITE v.4.5 29.03.2017
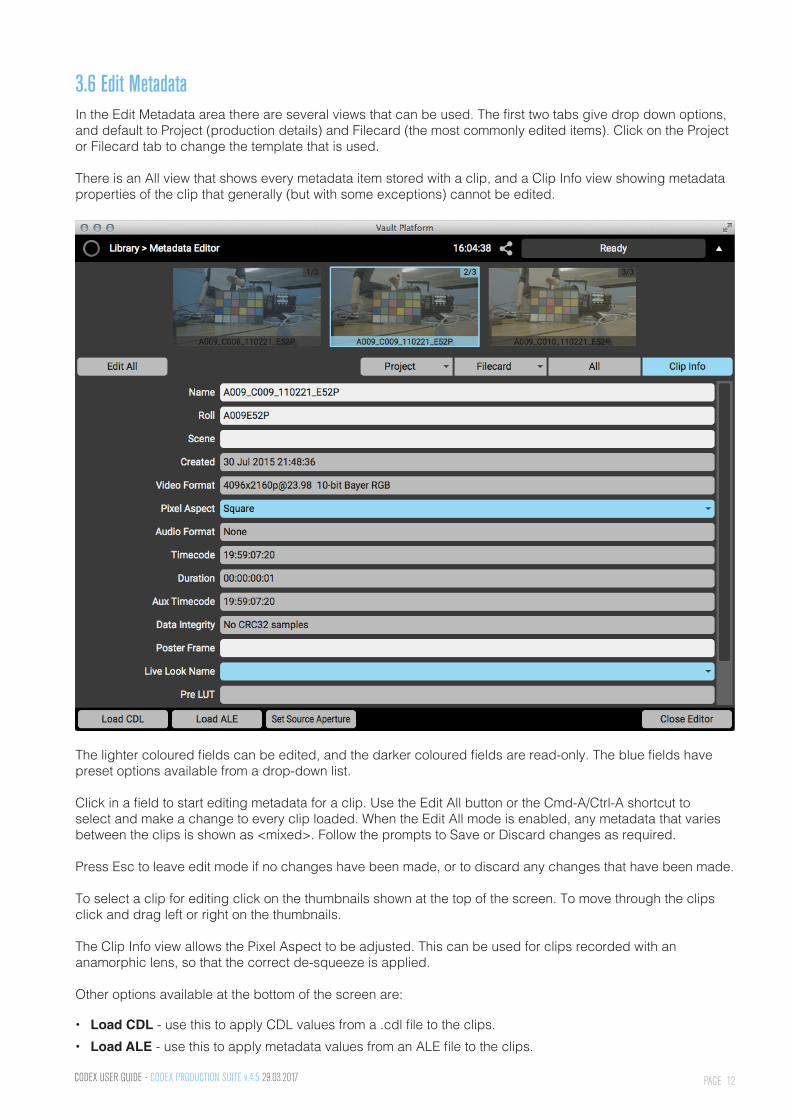
3.6 Edit MetadataIn the Edit Metadata area there are several views that can be used. The first two tabs give drop down options, and default to Project (production details) and Filecard (the most commonly edited items). Click on the Project or Filecard tab to change the template that is used.
There is an All view that shows every metadata item stored with a clip, and a Clip Info view showing metadata properties of the clip that generally (but with some exceptions) cannot be edited.
The lighter coloured fields can be edited, and the darker coloured fields are read-only. The blue fields have preset options available from a drop-down list.
Click in a field to start editing metadata for a clip. Use the Edit All button or the Cmd-A/Ctrl-A shortcut to select and make a change to every clip loaded. When the Edit All mode is enabled, any metadata that varies between the clips is shown as <mixed>. Follow the prompts to Save or Discard changes as required.
Press Esc to leave edit mode if no changes have been made, or to discard any changes that have been made.
To select a clip for editing click on the thumbnails shown at the top of the screen. To move through the clips click and drag left or right on the thumbnails.
The Clip Info view allows the Pixel Aspect to be adjusted. This can be used for clips recorded with an anamorphic lens, so that the correct de-squeeze is applied.
Other options available at the bottom of the screen are:
• Load CDL - use this to apply CDL values from a .cdl file to the clips.• Load ALE - use this to apply metadata values from an ALE file to the clips.
PAGE 13CODEX USER GUIDE - CODEX PRODUCTION SUITE v.4.5 29.03.2017
• Set Source Aperture - use this to apply a Source Aperture to the clips (for defining a ‘region of interest’ inside the source image). Once the Source Aperture is set for a clip, this can be used to determine what part of the image is shown for playback and what part of the image is used when transcoding to other file formats for post production. To remove a Source Aperture, select the clip(s), click Set Source Aperture, and select None.
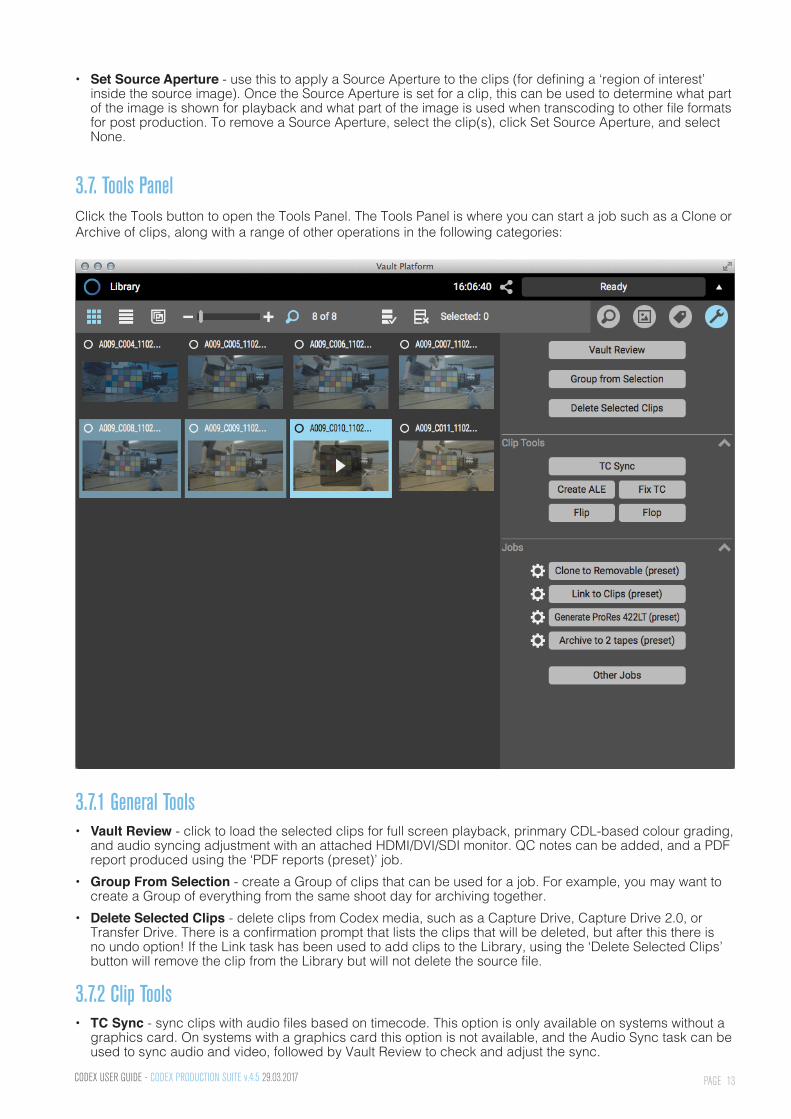
3.7. Tools PanelClick the Tools button to open the Tools Panel. The Tools Panel is where you can start a job such as a Clone or Archive of clips, along with a range of other operations in the following categories:
3.7.1 General Tools• Vault Review - click to load the selected clips for full screen playback, prinmary CDL-based colour grading, and audio syncing adjustment with an attached HDMI/DVI/SDI monitor. QC notes can be added, and a PDF report produced using the ‘PDF reports (preset)’ job.• Group From Selection - create a Group of clips that can be used for a job. For example, you may want to create a Group of everything from the same shoot day for archiving together.• Delete Selected Clips - delete clips from Codex media, such as a Capture Drive, Capture Drive 2.0, or Transfer Drive. There is a confirmation prompt that lists the clips that will be deleted, but after this there is no undo option! If the Link task has been used to add clips to the Library, using the ‘Delete Selected Clips’ button will remove the clip from the Library but will not delete the source file.
3.7.2 Clip Tools• TC Sync - sync clips with audio files based on timecode. This option is only available on systems without a graphics card. On systems with a graphics card this option is not available, and the Audio Sync task can be used to sync audio and video, followed by Vault Review to check and adjust the sync.
PAGE 14CODEX USER GUIDE - CODEX PRODUCTION SUITE v.4.5 29.03.2017
• Create ALE - create an ALE (Avid Log Exchange) file for the selected clips.• Fix TC - adjust the start timecode for a clip.• Flip - reverse the vertical orientation of the clip.• Flop - reverse the horizontal orientation of the clip.
3.7.3 Jobs• There are 4 slots here that can be used to start any Job on the system. These default to the first four preset Jobs on the system. Click the cog icon to set which Job is assigned to which slot.• The Other Jobs button provides access to all the Jobs on the system. For users familiar with Vault 3.0, this button has replaced Task Scheduler->Manual Jobs.
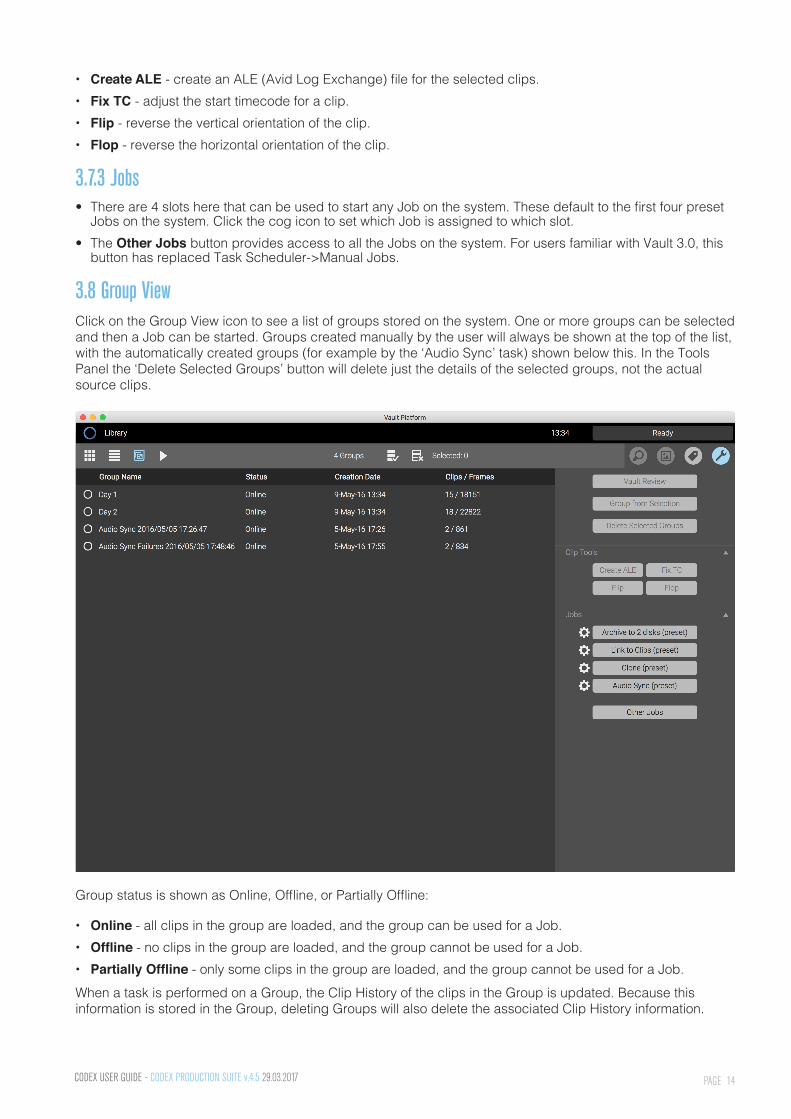
3.8 Group View Click on the Group View icon to see a list of groups stored on the system. One or more groups can be selected and then a Job can be started. Groups created manually by the user will always be shown at the top of the list, with the automatically created groups (for example by the ‘Audio Sync’ task) shown below this. In the Tools Panel the ‘Delete Selected Groups’ button will delete just the details of the selected groups, not the actual source clips.
Group status is shown as Online, Offline, or Partially Offline:
• Online - all clips in the group are loaded, and the group can be used for a Job.• Offline - no clips in the group are loaded, and the group cannot be used for a Job.• Partially Offline - only some clips in the group are loaded, and the group cannot be used for a Job.When a task is performed on a Group, the Clip History of the clips in the Group is updated. Because this information is stored in the Group, deleting Groups will also delete the associated Clip History information.
PAGE 15CODEX USER GUIDE - CODEX PRODUCTION SUITE v.4.5 29.03.2017
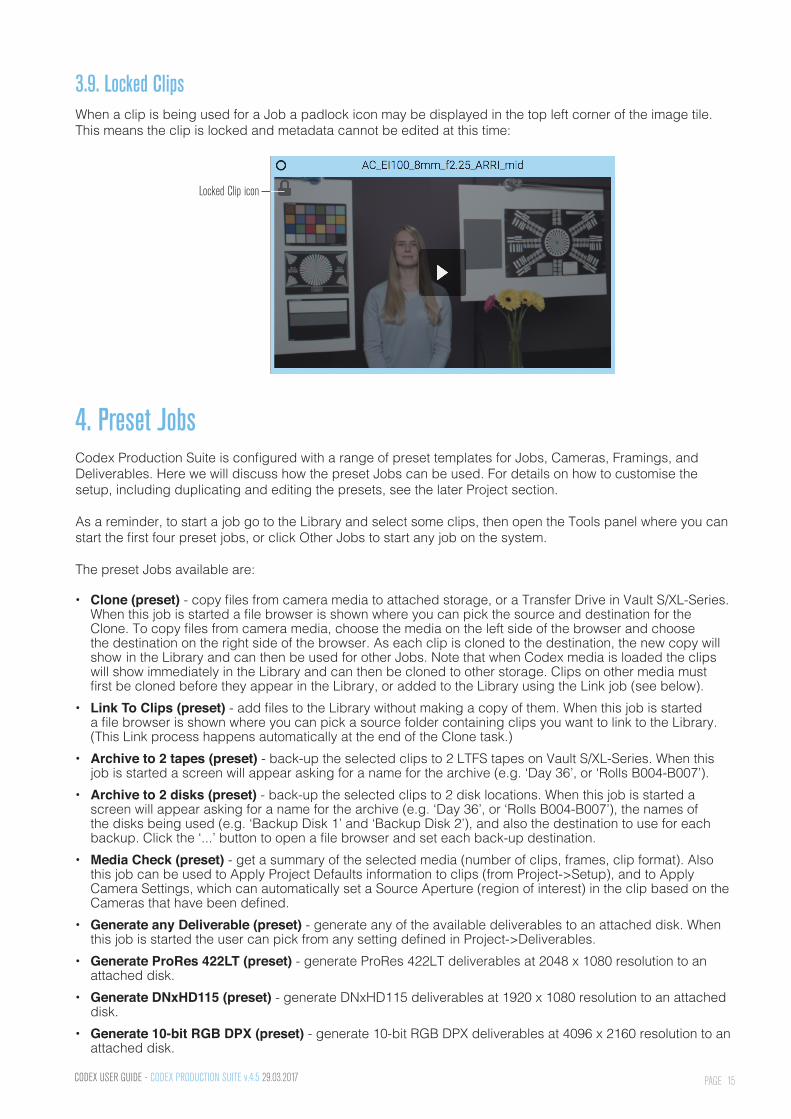
3.9. Locked ClipsWhen a clip is being used for a Job a padlock icon may be displayed in the top left corner of the image tile. This means the clip is locked and metadata cannot be edited at this time:
Locked Clip icon
4. Preset JobsCodex Production Suite is configured with a range of preset templates for Jobs, Cameras, Framings, and Deliverables. Here we will discuss how the preset Jobs can be used. For details on how to customise the setup, including duplicating and editing the presets, see the later Project section.
As a reminder, to start a job go to the Library and select some clips, then open the Tools panel where you can start the first four preset jobs, or click Other Jobs to start any job on the system.
The preset Jobs available are:
• Clone (preset) - copy files from camera media to attached storage, or a Transfer Drive in Vault S/XL-Series. When this job is started a file browser is shown where you can pick the source and destination for the Clone. To copy files from camera media, choose the media on the left side of the browser and choose the destination on the right side of the browser. As each clip is cloned to the destination, the new copy will show in the Library and can then be used for other Jobs. Note that when Codex media is loaded the clips will show immediately in the Library and can then be cloned to other storage. Clips on other media must first be cloned before they appear in the Library, or added to the Library using the Link job (see below).• Link To Clips (preset) - add files to the Library without making a copy of them. When this job is started a file browser is shown where you can pick a source folder containing clips you want to link to the Library. (This Link process happens automatically at the end of the Clone task.)• Archive to 2 tapes (preset) - back-up the selected clips to 2 LTFS tapes on Vault S/XL-Series. When this job is started a screen will appear asking for a name for the archive (e.g. ‘Day 36’, or ‘Rolls B004-B007’).• Archive to 2 disks (preset) - back-up the selected clips to 2 disk locations. When this job is started a screen will appear asking for a name for the archive (e.g. ‘Day 36’, or ‘Rolls B004-B007’), the names of the disks being used (e.g. ‘Backup Disk 1’ and ‘Backup Disk 2’), and also the destination to use for each backup. Click the ‘...’ button to open a file browser and set each back-up destination.• Media Check (preset) - get a summary of the selected media (number of clips, frames, clip format). Also this job can be used to Apply Project Defaults information to clips (from Project->Setup), and to Apply Camera Settings, which can automatically set a Source Aperture (region of interest) in the clip based on the Cameras that have been defined.• Generate any Deliverable (preset) - generate any of the available deliverables to an attached disk. When this job is started the user can pick from any setting defined in Project->Deliverables.• Generate ProRes 422LT (preset) - generate ProRes 422LT deliverables at 2048 x 1080 resolution to an attached disk. • Generate DNxHD115 (preset) - generate DNxHD115 deliverables at 1920 x 1080 resolution to an attached disk.• Generate 10-bit RGB DPX (preset) - generate 10-bit RGB DPX deliverables at 4096 x 2160 resolution to an attached disk.

PAGE 16CODEX USER GUIDE - CODEX PRODUCTION SUITE v.4.5 29.03.2017
• PDF reports (preset) - save PDF reports for the selected clips. There are 2 types of PDF report that can be saved. The Clip Report contains a summary of details for every selected clip. The QC Report contains details of any QC notes made in Review.• Audio Sync (preset) - sync the selected video clips with audio files based on timecode. If both video and audio are selected in the Library, these files will be compared for sync. If only video clips are selected a browser will be shown where the location of audio files can be chosen. If there is an ‘audio’ folder containing BWF files in the same location as the video clip folders, these files will be used by default. After using this task, the sync can be checked and adjusted in Vault Review.
5. File BrowserThe File Browser is used to select sources and destinations for different tasks. In the case where only a source is needed (e.g. Link), it appears as below:

PAGE 17CODEX USER GUIDE - CODEX PRODUCTION SUITE v.4.5 29.03.2017
In the case where both a source and destination is needed (e.g. Clone), it appears as below:
The left hand panel contains a tree view that can be used to navigate through the filesystem. The central panel is where the source is selected, and right hand panel is where the destination is selected.
The users Home directory is shown at the top level of the File Browser, along with any attached volumes.As you navigate down through folders, a ‘breadcrumb’ trail is shown at the top, which can be used to navigate back up to higher level folder.
You can mark any folder as a Favourite, by navigating to it and selecting the star symbol. Any folders marked as a Favourite will always appear at the top level of the file browser, and in the left and right hand panels. To remove the Favourite tag from a folder, navigate to it and deselect the star symbol.
PAGE 18CODEX USER GUIDE - CODEX PRODUCTION SUITE v.4.5 29.03.2017
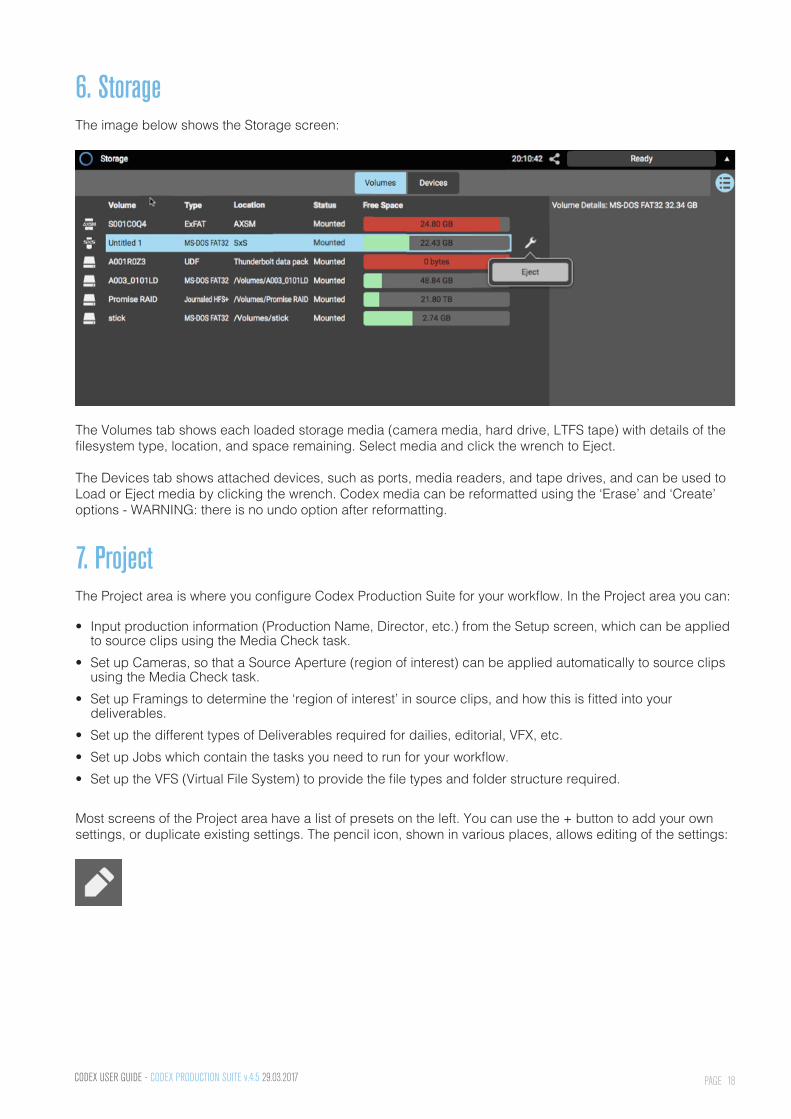
6. StorageThe image below shows the Storage screen:
The Volumes tab shows each loaded storage media (camera media, hard drive, LTFS tape) with details of the filesystem type, location, and space remaining. Select media and click the wrench to Eject.
The Devices tab shows attached devices, such as ports, media readers, and tape drives, and can be used to Load or Eject media by clicking the wrench. Codex media can be reformatted using the ‘Erase’ and ‘Create’ options - WARNING: there is no undo option after reformatting.
7. ProjectThe Project area is where you configure Codex Production Suite for your workflow. In the Project area you can:
• Input production information (Production Name, Director, etc.) from the Setup screen, which can be applied to source clips using the Media Check task.• Set up Cameras, so that a Source Aperture (region of interest) can be applied automatically to source clips using the Media Check task.• Set up Framings to determine the ‘region of interest’ in source clips, and how this is fitted into your deliverables.• Set up the different types of Deliverables required for dailies, editorial, VFX, etc.• Set up Jobs which contain the tasks you need to run for your workflow.• Set up the VFS (Virtual File System) to provide the file types and folder structure required.
Most screens of the Project area have a list of presets on the left. You can use the + button to add your own settings, or duplicate existing settings. The pencil icon, shown in various places, allows editing of the settings:
PAGE 19CODEX USER GUIDE - CODEX PRODUCTION SUITE v.4.5 29.03.2017
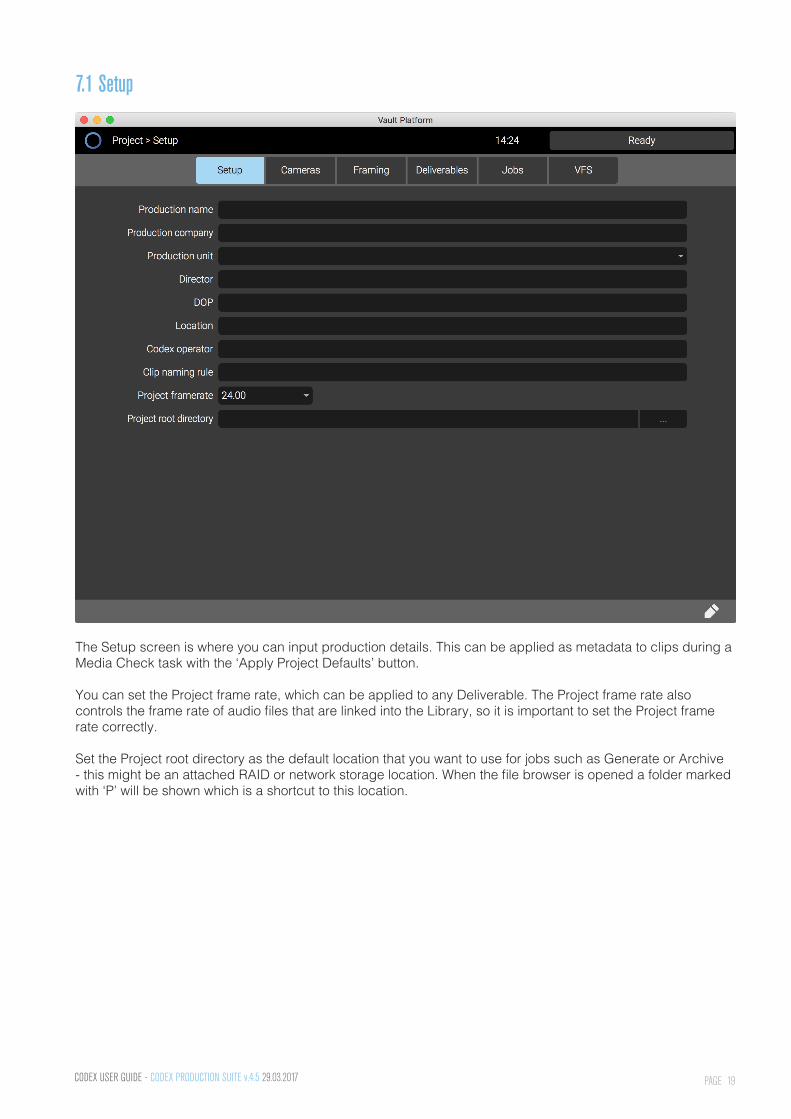
7.1 Setup
The Setup screen is where you can input production details. This can be applied as metadata to clips during a Media Check task with the ‘Apply Project Defaults’ button.
You can set the Project frame rate, which can be applied to any Deliverable. The Project frame rate also controls the frame rate of audio files that are linked into the Library, so it is important to set the Project frame rate correctly.
Set the Project root directory as the default location that you want to use for jobs such as Generate or Archive - this might be an attached RAID or network storage location. When the file browser is opened a folder marked with ‘P’ will be shown which is a shortcut to this location.
PAGE 20CODEX USER GUIDE - CODEX PRODUCTION SUITE v.4.5 29.03.2017
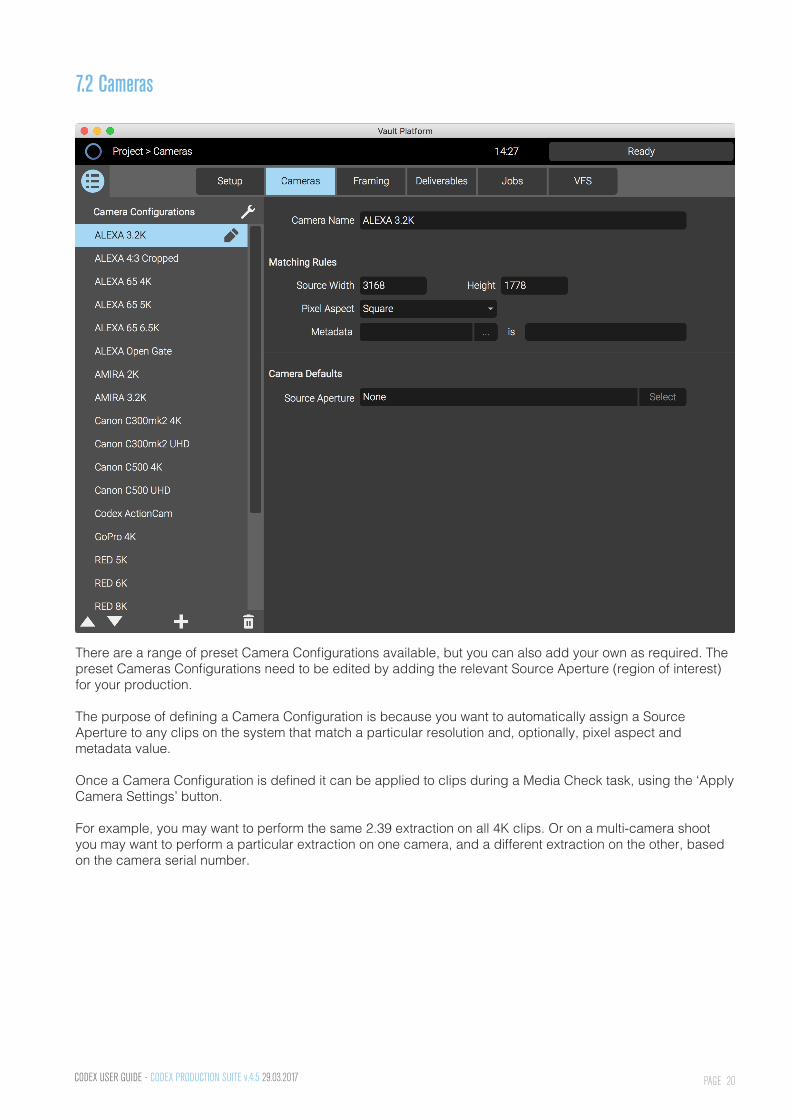
7.2 Cameras
There are a range of preset Camera Configurations available, but you can also add your own as required. The preset Cameras Configurations need to be edited by adding the relevant Source Aperture (region of interest) for your production.
The purpose of defining a Camera Configuration is because you want to automatically assign a Source Aperture to any clips on the system that match a particular resolution and, optionally, pixel aspect and metadata value.
Once a Camera Configuration is defined it can be applied to clips during a Media Check task, using the ‘Apply Camera Settings’ button.
For example, you may want to perform the same 2.39 extraction on all 4K clips. Or on a multi-camera shoot you may want to perform a particular extraction on one camera, and a different extraction on the other, based on the camera serial number.
PAGE 21CODEX USER GUIDE - CODEX PRODUCTION SUITE v.4.5 29.03.2017
7.3 Framing
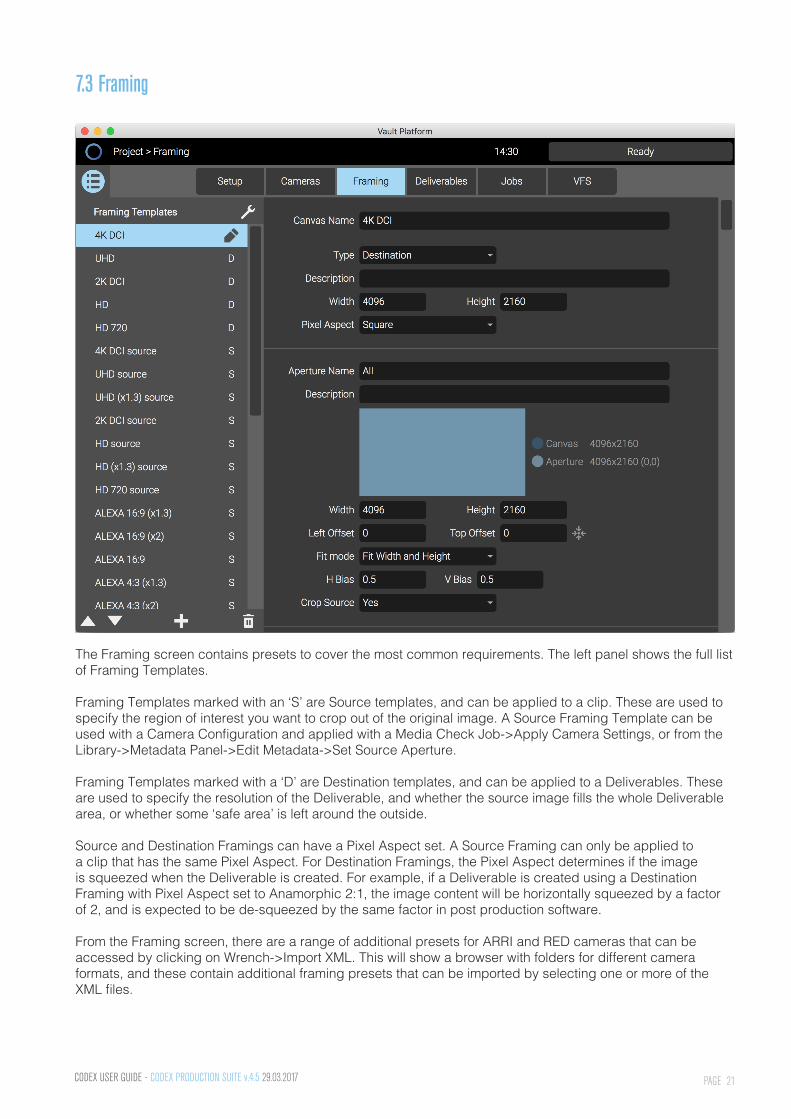
The Framing screen contains presets to cover the most common requirements. The left panel shows the full list of Framing Templates.
Framing Templates marked with an ‘S’ are Source templates, and can be applied to a clip. These are used to specify the region of interest you want to crop out of the original image. A Source Framing Template can be used with a Camera Configuration and applied with a Media Check Job->Apply Camera Settings, or from the Library->Metadata Panel->Edit Metadata->Set Source Aperture.
Framing Templates marked with a ‘D’ are Destination templates, and can be applied to a Deliverables. These are used to specify the resolution of the Deliverable, and whether the source image fills the whole Deliverable area, or whether some ‘safe area’ is left around the outside.
Source and Destination Framings can have a Pixel Aspect set. A Source Framing can only be applied to a clip that has the same Pixel Aspect. For Destination Framings, the Pixel Aspect determines if the image is squeezed when the Deliverable is created. For example, if a Deliverable is created using a Destination Framing with Pixel Aspect set to Anamorphic 2:1, the image content will be horizontally squeezed by a factor of 2, and is expected to be de-squeezed by the same factor in post production software.
From the Framing screen, there are a range of additional presets for ARRI and RED cameras that can be accessed by clicking on Wrench->Import XML. This will show a browser with folders for different camera formats, and these contain additional framing presets that can be imported by selecting one or more of the XML files.
PAGE 22CODEX USER GUIDE - CODEX PRODUCTION SUITE v.4.5 29.03.2017
7.3.1 Configuring a Framing TemplateClick the + icon to Add a Framing. Enter a descriptive Canvas Name and then set the Type as either Source or Destination. The settings then available depend on the Type selected.
When setting up a Framing template, the contents of the Description fields do not appear anywhere else in the software, but can be used to record information about the Framing preset you are creating for reference later.
Settings for Source Framings
Width and Height (of Canvas) - these must be set correctly to match the resolution of the clips that you want to apply the framing to.
Pixel Aspect - this must be set correctly to match the Pixel Aspect of the clips that you want to apply the framing to.
Aperture Name - enter a name for the region of interest that you want to extract from the source clip.
Width and Height (of Aperture) - enter the resolution of the region of interest that you want to extract from the source clip.
Left Offset and Top Offset - the region of interest will default to the top-left of the source image. To centre this region, click the symbol of four arrows next to the Top Offset box. Alternately, enter values for the Left Offset and Top Offset manually.
Settings for Destination Framings
Width and Height (of Canvas) - set these values to determine the resolution of the Deliverable file that will be created.
Pixel Aspect - set this to determine the squeeze factor applied to the source image when the Deliverable file is created. Deliverables such as .mov and .exr will contain this as metadata, allowing other applications to automatically apply the correct de-squeeze.
Aperture Name - enter a name for the area within the Deliverable that the source image will be fitted into.
Width and Height (of Aperture) - enter the resolution for the area within the Deliverable that the source image will be fitted into.
Left Offset and Top Offset - the source image will default to the top-left of the Deliverable area. To center the source image in the Deliverable, click the symbol of four arrows next to the Top Offset box. Alternately, enter values for the Left Offset and Top Offset manually.
Fit Mode - there are several options to determine how the source image is fitted into the Deliverable:
• Fit Width and Height - the whole source image will be scaled to fit into the width/height of the defined Aperture size. None of the source image will be cropped (apart from the area outside any Source Aperture that has been applied to the source clip).• Fit Width - the source image will be scaled until the width matches the defined Aperture width. Any of the source image above/below the Aperture area will be cropped if Crop Source is set to Yes.• Fit Height - the source image will be scaled until the height matches the defined Aperture height. Any of the source image left/right of the Aperture area will be cropped if Crop Source is set to Yes.• Fill - the source image will be scaled until the whole Aperture area is filled. This will result in the cropping of either the top/bottom or left/right of the source image if Crop Source is set to Yes, depending on the relative aspect ratios of the source image and Aperture it is being fitted to.
PAGE 23CODEX USER GUIDE - CODEX PRODUCTION SUITE v.4.5 29.03.2017
Crop Source:
• Yes - this setting will crop the source image to fit the Aperture area, based on the Fit Mode that is selected. • No - this setting will result in the source image being scaled and fitted into the Aperture area based on the Fit Mode, but a crop will not be applied, so the source image may extend outside of the Aperture area.
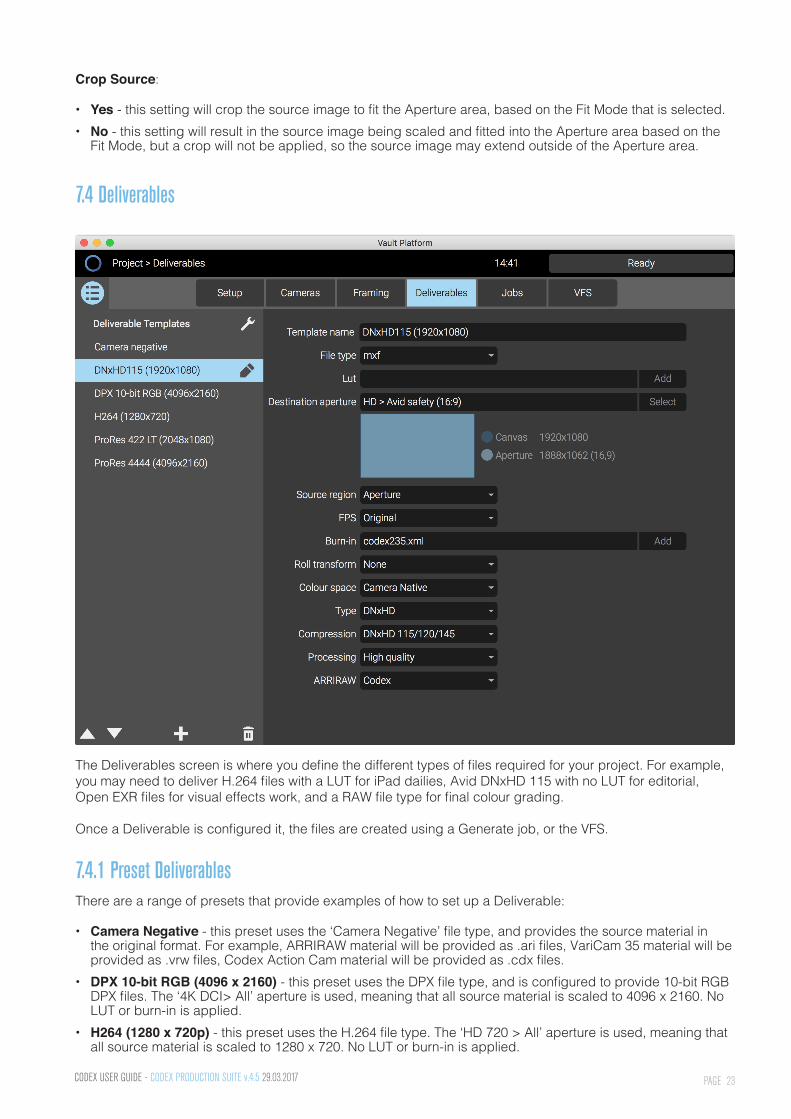
7.4 Deliverables
The Deliverables screen is where you define the different types of files required for your project. For example, you may need to deliver H.264 files with a LUT for iPad dailies, Avid DNxHD 115 with no LUT for editorial, Open EXR files for visual effects work, and a RAW file type for final colour grading.
Once a Deliverable is configured it, the files are created using a Generate job, or the VFS.
7.4.1 Preset DeliverablesThere are a range of presets that provide examples of how to set up a Deliverable:
• Camera Negative - this preset uses the ‘Camera Negative’ file type, and provides the source material in the original format. For example, ARRIRAW material will be provided as .ari files, VariCam 35 material will be provided as .vrw files, Codex Action Cam material will be provided as .cdx files.• DPX 10-bit RGB (4096 x 2160) - this preset uses the DPX file type, and is configured to provide 10-bit RGB DPX files. The ‘4K DCI> All’ aperture is used, meaning that all source material is scaled to 4096 x 2160. No LUT or burn-in is applied.• H264 (1280 x 720p) - this preset uses the H.264 file type. The ‘HD 720 > All’ aperture is used, meaning that all source material is scaled to 1280 x 720. No LUT or burn-in is applied.
PAGE 24CODEX USER GUIDE - CODEX PRODUCTION SUITE v.4.5 29.03.2017
• DNxHD115 (1920 x 1080) - this preset uses the mxf file type, and is configured to provide DNxHD 115 files. The ‘HD > Avid safety 16:9’ aperture is used, meaning that the files will be 1920 x 1080 resolution, and the source image will be scaled to 1888 x 1062 inside this (the remainder of the image area is black). An example burn-in is applied that includes roll and clip name, masking, timecode, and a logo.• DNxHD175X (1920 x 1080) - this preset uses the mxf file type, and is configured to provide DNxHD 175 files. The ‘HD > All’ aperture is used, meaning that the files will be 1920 x 1080 resolution. No LUT or burn-in is applied.• DNxHD444 (1920 x 1080) - this preset uses the mxf file type, and is configured to provide DNxHD 444 files. The ‘HD > All’ aperture is used, meaning that the files will be 1920 x 1080 resolution. No LUT or burn-in is applied.• ProRes 4444 (4096 x 2160) - this preset uses the mov file type, and is configured to provide ProRes 4444 files. The ‘4K DCI > All’ aperture is used, meaning that all source material is scaled to 4096 x 2160. No LUT or burn-in is applied.• ProRes 422 LT (2048 x 1080) - this preset uses the mov file type, and is configured to provide ProRes 422 LT files. The ‘2K DCI > All’ aperture is used, meaning that all source material is scaled to 2048 x 1080. The LUT is set as {CDLData}, meaning that if a clip has a CDL look stored in metadata then this will be applied.• ProRes 422 HQ (2048 x 1080) - this preset uses the mov file type, and is configured to provide ProRes 422 HQ files. The ‘2K DCI > All’ aperture is used, meaning that all source material is scaled to 2048 x 1080. No LUT or burn-in is applied.• ProRes 422 HQ (4096 x 2160) - this preset uses the mov file type, and is configured to provide ProRes 422 HQ files. The ‘4K DCI > All’ aperture is used, meaning that all source material is scaled to 4096 x 2160. No LUT or burn-in is applied.• ProRes 4444 (2048 x 1080) - this preset uses the mov file type, and is configured to provide ProRes 4444 files. The ‘2K DCI > All’ aperture is used, meaning that all source material is scaled to 2048 x 1080. No LUT or burn-in is applied.• ProRes 4444 (4096 x 2160) - this preset uses the mov file type, and is configured to provide ProRes 4444 files. The ‘4K DCI > All’ aperture is used, meaning that all source material is scaled to 4096 x 2160. No LUT or burn-in is applied.• ProRes 4444 XQ (2048 x 1080) - this preset uses the mov file type, and is configured to provide ProRes 4444 XQ files. The ‘2K DCI > All’ aperture is used, meaning that all source material is scaled to 2048 x 1080. No LUT or burn-in is applied.• ProRes 4444 XQ (4096 x 2160) - this preset uses the mov file type, and is configured to provide ProRes 4444 XQ files. The ‘4K DCI > All’ aperture is used, meaning that all source material is scaled to 4096 x 2160. No LUT or burn-in is applied.
Some of these Deliverables are used in the preset Jobs, and some are in the preset VFS templates. Click the + icon to Duplicate one of these Deliverables and customise it for your own use, or use the details in the next section to Add and configure a Deliverable.
7.4.2 Configuring a Deliverable TemplateClick the + icon to Add a Deliverable. Enter a descriptive Template name and then select a File type from the drop down list. The available file types are:
• Camera negative - provides the source material in the original format. For example, ARRIRAW material will be provided as .ari files, VariCam 35 material will be provided as .vrw files, Codex Action Cam material will be provided as .cdx files.• dpx - transcodes source material to DPX format, where there is a file per frame. Files can be output as 10- bit, 12-bit, or 16-bit RGB.• jpg - transcodes source material to JPG format, where there is a file per frame.• ari - provides ARRIRAW material as ARI files, where there is a file per frame. This file type can only be output from ARRIRAW source material.• rmf - provides Canon Cinema RAW material as RMF files, where there is a file per frame. This file type can only be output from Canon Cinema RAW source material. • vrw - provides Panasonic VariCam RAW material as VRW files, where there is a file per frame. This file type can only be output from Panasonic VariCam RAW source material.
PAGE 25CODEX USER GUIDE - CODEX PRODUCTION SUITE v.4.5 29.03.2017
• cdx - provides Codex Action Cam RAW material as CDX files, where there is a file per frame. This file type can only be output from Codex Action Cam RAW source material• exr - transcodes source material to OpenEXR format, where there is a file per frame. This file type is output in ACES Linear colourspace, and is compatible with source material in the following formats: ARRIRAW, ARRI ProRes, RED, GoPro, Phantom. The ‘Type’ setting determines whether any compression is applied - the None option applies no compression, and the ZIP (per scanline), ZIP (16 scanline blocks), and PIZ (wavelet compression) apply different types of compression.• H264 - transcodes source material to H264 format, where there is a file per clip. The files can be created at 720p or 1080p with 1 or 2 channels of audio, and are compatible with the PIX online dailies system.• mov - transcodes source material to Quicktime MOV format, where there is a file per clip. The files can be compressed with a range of ProRes, DNxHD, Motion JPEG, or Photo JPEG codec options.• mxf - transcodes source material to Avid MXF format, where there is a file per clip. The files can be compressed with a range of DNxHD and DNxHR codec options.• 3D DNxHD mxf - transcodes stereo source material to Avid 3D MXF format (side-by-side), where there is a file per clip. The files can be compressed with a range of DNxHD and DNxHR codec options.• DCP - transcodes source material to DCP format, where there is a file per clip. The files can be compressed with DCI or IMF settings. When using DCI, then additional options are available for Conformity (InterOp/ SMPTE), Encryption, and Audio Layout (5.1, 5.1 HI/VIN, 7.1 SDDS, 7.1 DS, and Wild Track Format).• wav - outputs audio from the source material in WAV format (no timecode or other metadata). Audio is output as stereo files, so for example if the source clip has 4 audio channels, then 2 wav files will be output.• BWF - outputs audio from the source material in Broadcast WAV format (including timecode and reel metadata). Audio is output as stereo files, so for example if the source clip has 4 audio channels, then 2 wav files will be output.• CodexShot xml - outputs a Codex format metadata xml per clip.• VRAW Metadata xml - outputs a Panasonic format metadata xml per clip from VRAW material.• VLT 3DLUT - outputs a Panasonic format 3D LUT per clip from VRAW material.• Canon xml - outputs a Canon format metadata xml per clip from Canon Cinema RAW material.• FinalCut xml - outputs a FinalCut 7 compatible metadata xml per clip.• Metadata txt - outputs a text file with a timecode entry for each frame in the clip, along with metadata from Canon cameras.• ASC CCC xml - outputs an ASC CCC xml containing CDL data for multiple clips.• ASC CDL xml - outputs an ASC CDL xml containing CDL data, with one xml file per clip.• cine - provides Phantom RAW material as a CINE file, where there is one file per clip. This file type can only be output from Phantom RAW source material• ALE - outputs an ALE (Avid Log Exchange) containing metadata for all selected clips.
The settings available depend on the file type selected.
When setting a LUT, the following options are available from the Add button:
• LUT - this option allows the selection of a LUT file from the computer. See details below about how to automate selection of ALEXA LUTs based on the Exposure Index of the clip being processed.• CDL - this option will apply a look based on CDL metadata that is stored with the clip.• Pre/CDL/Post - this option will apply the Pre LUT, CDL, and Post LUT that can be set on the clip using Review.• Live Look - this option will apply the Live Look that is stored with the clip. A Live Look can be set on a clip using either Review from the Live Looks panel, or from Library->Edit Metadata->Clip Info->Live Look.• Camera Look - this option will apply any embedded look data that was set in the camera from ALEXA ARRIRAW or VariCam 35 VRAW.
PAGE 26CODEX USER GUIDE - CODEX PRODUCTION SUITE v.4.5 29.03.2017
More than one LUT or colour transform can be applied. For example, if you require CDL, plus a 3D LUT, plus a range adjustment LUT, these can be added sequentially so that the contents of the Lut field looks something like:
{CDLData}; arri/arri.logC.rec709.EI1000.ee.3d.lut; range_EL.lut
When using the Add Lut button there are a range of preset LUTs for different camera systems. The presets are mostly 3D LUTs that perform a camera log to Rec. 709 conversion. An example LUT file name is ‘arri.logc.rec709.EI1000.ee.3d.lut’, and the file name describes: <SourceCamera>.<SourceColourspace>.<TargetColourspace>.<SourceExposureIndex>.<OutputRange>.<LutType>.extension. The OutputRange of ‘ee’ indicates extended range (black=0, white=1024 in output file) while ‘el’ indicates legal range (black=64, white=940 in output file).Where a set of LUTs are provided for a range of exposures you can configure the system to select the correct LUT based on the exposure of the clip. First select a LUT from the set provided. Then, in the LUT field edit the name so that the exposure value is replaced with the metadata tag {ExposureIndex}, e.g. arri/arri.logC.rec709.EI{ExposureIndex}.ee.3d.lut. This means that for every clip, the correct LUT will be applied based on the ExposureIndex value in the clip metadata.
To use custom LUTs click the Add->LUT button and navigate to the LUT file using the browser. Custom LUTs can be installed in /Library/Application Support/Codex/luts on OS X, or /etc/codex/luts on Vault S/XL-Series, which is the default location for the browser when using the Add->LUT button.
The Destination aperture setting determines the size of the file that will be created, and whether the source image is fitted fully into this, or whether the source image only fills a portion of the total image area. See the additional guide ‘Using Framings In Vault Platform’ for more information and examples.
The Source region setting controls whether the whole source image (Full canvas) or only the area set by the Source aperture (Aperture) is included in the created files.
The FPS setting can be used to force all created files to a particular frame rate. The Original setting will create files at the same frame rate as the source clips. The Project setting will create files at the frame rate set in Project->Setup->Project framerate.
The Burn-in setting can be used to apply metadata overlays on the created files. Choose Burn-in->Add and select from the preset templates of metadata to add. The template names indicate the metadata that will be added and the position on the image. You can repeat the process to add multiple metadata overlays to different parts of the image.
The Roll transform setting can be used to add a channel ID to the beginning (Prepend chan ID) or end (Append chan ID) of the Roll number in the metadata of the files that are created. This is mainly used for dual-camera/stereo recordings on Codex recorders, but can be used on any clip that has metadata for ‘ChannelID_V1’ or ‘ChannelID_V2’.
The Colour space of many available file types can be either Camera Native, ACEScc, or ACEScct. Open EXR files can be created in ACES linear space, or ALEXA Wide Gamut space (for ARRIRAW clips only). When ACEScc/ACEScct/ACES is selected the software will apply an IDT to take the image into this colour space. IDTs are built into the software for many of the supported camera formats. If the files cannot be generated in ACES colourspace this means there is not a built in IDT for the selected camera format.
The Processing setting determines the quality of scaling, colour conversion, and Codex debayering operations. It is recommended to set this to ‘High quality’ to get the best result. Different scaling filters are used depending on the setting:
• High quality - Lanczos, optimal Codex debayer.• Medium quality - Mitchell, optimal Codex debayer unless the file created is less than half the resolution of the source clip, in which case a lower quality Codex debayer is used.• Low quality - Cubic, optimal Codex debayer unless the file created is less than half the resolution of the source clip, in which case a half-scale Codex debayer is used.
The ARRIRAW and Sony Debayer settings can be used to select the manufacturers debayer algorithm instead of the Codex debayer algorithm for ‘exr’, ‘dpx’, ‘mov’ and ‘mxf’ file types.
PAGE 27CODEX USER GUIDE - CODEX PRODUCTION SUITE v.4.5 29.03.2017
The Sharpening setting can be used to apply sharpening (via an unsharp mask) to image file types, with values from 0-100.
The Audio Channel Map setting can be used to remap audio channels from the source material into the output file. For example, if the source file contains 4 audio channels (Mixdown, Boom L, Boom R, Room), and you want channel 1 only (Mixdown) to be used in channels 1 and 2 of the output file for dailies, you would specify the Audio Channel Map as:
1:1,2
Or to remap channel 1 to output 1 and 2, and channel 2 to output 3 and 4, you would specify 1:1,2;2:3,4
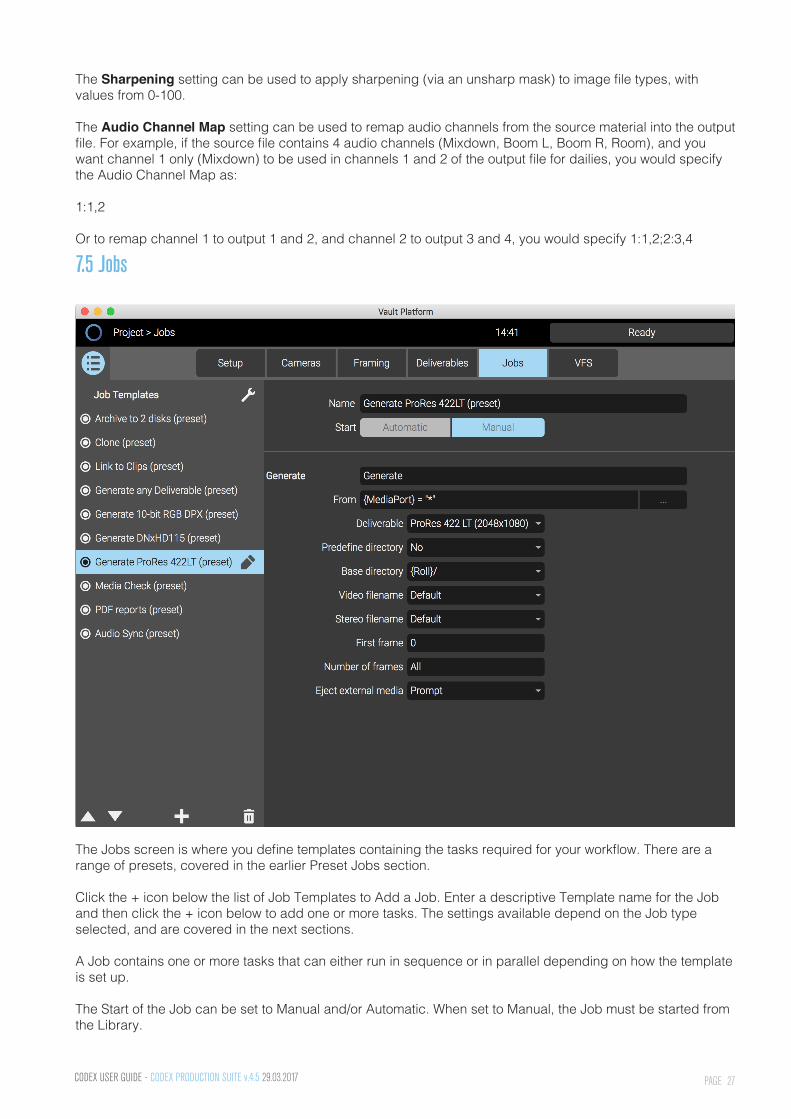
7.5 Jobs
The Jobs screen is where you define templates containing the tasks required for your workflow. There are a range of presets, covered in the earlier Preset Jobs section.
Click the + icon below the list of Job Templates to Add a Job. Enter a descriptive Template name for the Job and then click the + icon below to add one or more tasks. The settings available depend on the Job type selected, and are covered in the next sections.
A Job contains one or more tasks that can either run in sequence or in parallel depending on how the template is set up.
The Start of the Job can be set to Manual and/or Automatic. When set to Manual, the Job must be started from the Library.
PAGE 28CODEX USER GUIDE - CODEX PRODUCTION SUITE v.4.5 29.03.2017
When set to Automatic, the Job will start when media is loaded into the port specified in the ‘From’ field.
The different types of Jobs available are:
• Archive - backup the camera negative files to either disk or LTFS tape. The Operation can be set to ‘Backup’, ‘Backup and verify’, or ‘Verify’. ‘Backup and verify’ is recommended as this copies the files to the destination and then reads them back, performing an md5 verification against the source files. The ‘Add other files’ option allows you to choose another folder of files to be included with the archive - for example if you have master sound files that also need to be archived. The Archive tasks writes image, audio, and metadata files to the destination in the manufacturers preferred structure.• Audio Sync - sync the selected video clips with audio files based on timecode. If both video and audio are selected in the Library, these files will be compared for sync. If only video clips are selected a browser will be shown where the location of audio files can be chosen. If there is an ‘audio’ folder containing BWF files in the same location as the video clip folders, these files will be used by default. After using this task, the sync can be checked and adjusted in Vault Review. • Clone - make a copy of the original clips from camera media to attached storage or a Transfer Drive in Vault S/XL-Series. An internal CRC32 verification is performed as files are copied. The Clone task writes image, audio, and metadata, and the copied clips are immediately linked back to the Library. • Generate - output files using one of the defined Deliverables. Typically this task is used to create files for dailies, editorial, and VFX.• Import - import clips to Codex media.• Media Check - get a summary of the selected media (number of clips, frames, clip format). Also this task can be used to apply Project metadata information such as ‘Production name’ and ‘Director’ to clips (from Project->Setup), and to automatically set a Source Aperture (region of interest) to be applied to the clip based on the Cameras that have been defined.• Media Verify - verify that no corruption has occurred to clips, and that they still match with the original checksums. This is not needed as part of a normal workflow, but can be used if the software reports a CRC error during another task.• Media Clear - format Codex media.• Media Sign Off - mark Codex media as ‘signed-off’, which means you have finished working with it and it is safe to delete the contents using the Media Clear task.• Match Look - part of the workflow with Codex Live software. Looks saved when using Codex Live can be matched to clips using this task. Timecode is used to match a look to a clip.• Link - add files to the Library without making a copy of them. When this job is started a file browser is shown where you can pick a source folder containing clips you want to link to the Library. (This happens automatically as part of the Clone task.)• Reports - save PDF reports for the selected clips. There are 2 types of PDF report that can be saved. The Clip Report contains a summary of details for every selected clip. The QC Report contains details of any QC points applied to clips using Review. Each report has a record of Production Name and Shoot Date.
This metadata must be added to the clips in order to appear in the report.
Each Job can be configured with a ‘From’ setting (the source where the clips are coming from) and/or a ‘To’ setting (the destination where the clips/files are going to). The ‘From’ setting is optional - if the template does not have a pre-configured ‘From’ setting (that is, it contains the default ‘<enter input expression>’) then the selection in the Library will be used, or if there is no Library selection you will be asked to select the source when the Job is started. Next to the ‘From’ and ‘To’ settings click the ‘...’ button to open a chooser where you can pick the source/destination for the Job. The options that specify ‘any’ (e.g. ‘Any SxS’) mean that the system will use any connected media reader/port of that type. In the ‘Common Expressions’ options, choose ‘Any directory’ to be able to pick from any source/destination folder on the system when the job starts.
PAGE 29CODEX USER GUIDE - CODEX PRODUCTION SUITE v.4.5 29.03.2017
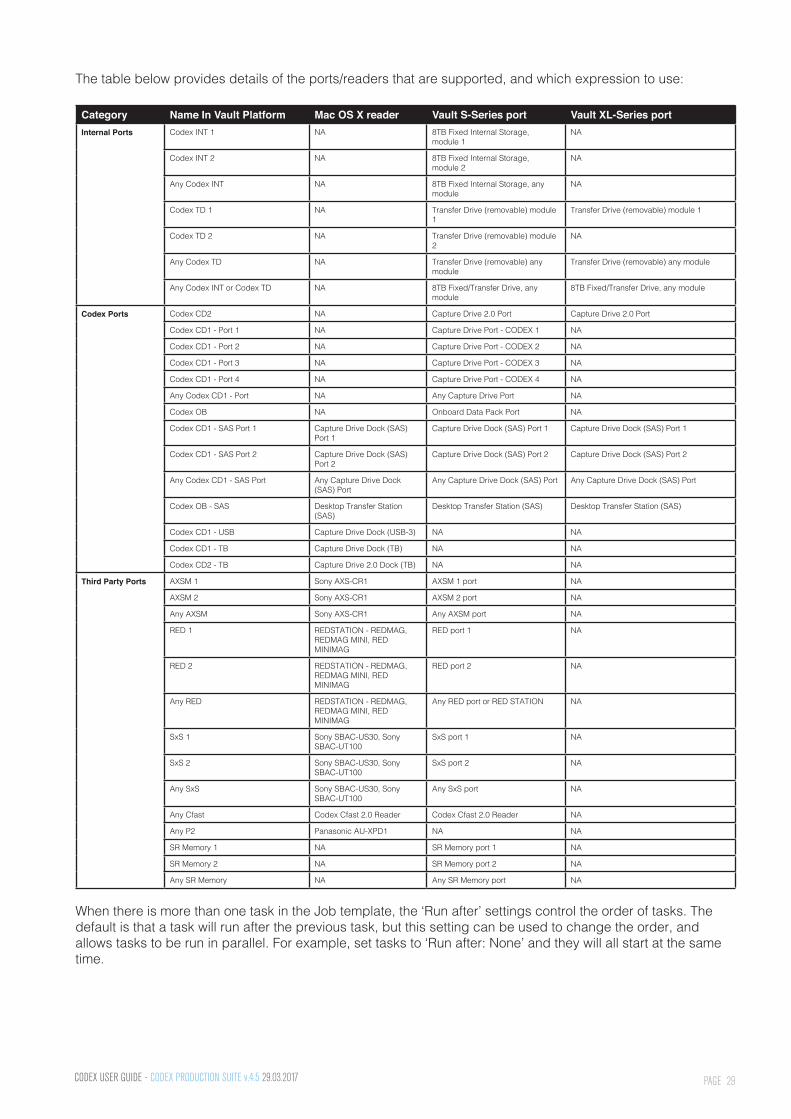
The table below provides details of the ports/readers that are supported, and which expression to use:
Category Name In Vault Platform Mac OS X reader Vault S-Series port Vault XL-Series portInternal Ports Codex INT 1 NA 8TB Fixed Internal Storage,
module 1NA
Codex INT 2 NA 8TB Fixed Internal Storage, module 2
NA
Any Codex INT NA 8TB Fixed Internal Storage, any module
NA
Codex TD 1 NA Transfer Drive (removable) module 1
Transfer Drive (removable) module 1
Codex TD 2 NA Transfer Drive (removable) module 2
NA
Any Codex TD NA Transfer Drive (removable) any module
Transfer Drive (removable) any module
Any Codex INT or Codex TD NA 8TB Fixed/Transfer Drive, any module
8TB Fixed/Transfer Drive, any module
Codex Ports Codex CD2 NA Capture Drive 2.0 Port Capture Drive 2.0 Port
Codex CD1 - Port 1 NA Capture Drive Port - CODEX 1 NA
Codex CD1 - Port 2 NA Capture Drive Port - CODEX 2 NA
Codex CD1 - Port 3 NA Capture Drive Port - CODEX 3 NA
Codex CD1 - Port 4 NA Capture Drive Port - CODEX 4 NA
Any Codex CD1 - Port NA Any Capture Drive Port NA
Codex OB NA Onboard Data Pack Port NA
Codex CD1 - SAS Port 1 Capture Drive Dock (SAS) Port 1
Capture Drive Dock (SAS) Port 1 Capture Drive Dock (SAS) Port 1
Codex CD1 - SAS Port 2 Capture Drive Dock (SAS) Port 2
Capture Drive Dock (SAS) Port 2 Capture Drive Dock (SAS) Port 2
Any Codex CD1 - SAS Port Any Capture Drive Dock (SAS) Port
Any Capture Drive Dock (SAS) Port Any Capture Drive Dock (SAS) Port
Codex OB - SAS Desktop Transfer Station (SAS)
Desktop Transfer Station (SAS) Desktop Transfer Station (SAS)
Codex CD1 - USB Capture Drive Dock (USB-3) NA NA
Codex CD1 - TB Capture Drive Dock (TB) NA NA
Codex CD2 - TB Capture Drive 2.0 Dock (TB) NA NA
Third Party Ports AXSM 1 Sony AXS-CR1 AXSM 1 port NA
AXSM 2 Sony AXS-CR1 AXSM 2 port NA
Any AXSM Sony AXS-CR1 Any AXSM port NA
RED 1 REDSTATION - REDMAG, REDMAG MINI, RED MINIMAG
RED port 1 NA
RED 2 REDSTATION - REDMAG, REDMAG MINI, RED MINIMAG
RED port 2 NA
Any RED REDSTATION - REDMAG, REDMAG MINI, RED MINIMAG
Any RED port or RED STATION NA
SxS 1 Sony SBAC-US30, Sony SBAC-UT100
SxS port 1 NA
SxS 2 Sony SBAC-US30, Sony SBAC-UT100
SxS port 2 NA
Any SxS Sony SBAC-US30, Sony SBAC-UT100
Any SxS port NA
Any Cfast Codex Cfast 2.0 Reader Codex Cfast 2.0 Reader NA
Any P2 Panasonic AU-XPD1 NA NA
SR Memory 1 NA SR Memory port 1 NA
SR Memory 2 NA SR Memory port 2 NA
Any SR Memory NA Any SR Memory port NA
When there is more than one task in the Job template, the ‘Run after’ settings control the order of tasks. The default is that a task will run after the previous task, but this setting can be used to change the order, and allows tasks to be run in parallel. For example, set tasks to ‘Run after: None’ and they will all start at the same time.
PAGE 30CODEX USER GUIDE - CODEX PRODUCTION SUITE v.4.5 29.03.2017
7.5.1 Archive task settingsOperation:
• Backup - files will be written to disk or tape (depending on other settings), and md5 checksums will be created. After files are written they will not be read back and verified.• Backup and verify - files will be written to disk or tape (depending on other settings), and md5 checksums will be created. After files are written they will be read back and verified against the source files.• Verify - files will be read back and verified against the md5 checksums created when the archive was first written.
Archive name prefix:
• Default - when the archive is created, the Default name for the top level folder includes a unique time and date stamp in the format ‘archive_YYYYMMDD_HHMMSS_<archive_name>’, where the <archive_name> can either be auto or manual, as described below.• None - the ‘archive_YYYYMMDD_HHMMSS_’ details are not included, so the name of the top level folder is based only on the name entered by the user.
Auto naming:
• No - when the archive is started the user will be prompted to enter a name. This would typically summarise the contents of the archive, e.g. ‘Day-56’, or ‘Rolls-A001-A002-B001’. When the archive is written the files are contained in a top level folder that is named in the format: archive_YYYYMMDD_ HHMMSS_<archive_name>. For example, if the archive name was entered as ‘Day-56’, the archive name could be: ‘archive_20160505_160142_Day-56’.• Yes - when this setting is selected an additional option is shown for ‘Auto name prefix’. In this field enter a name that will be applied to each archive. This can be used to reduce the amount of information the user is prompted to enter at the beginning of the archive. Each time an archive is run, a number will be appended to the end. For example, if ‘Auto name prefix’ is entered as ‘my-project’ then archive names could be: ‘archive_20160505_160142_my-project’, ‘archive_20160505_192133_my-project(2)’, ‘archive_20160506_094712_my-project(3)’.
Number of LTFS archives - this sets the number of tapes that will be written to during the archive. Options are 0, 1, or 2. If the tapes are not already formatted, they will be formatted with an LTFS (Linear Tape File System) at the beginning of the archive.
Number of disk archives - this sets the number of disks that will be written to during the archive. Options are 0, 1, or 2.
Predefine file path:
• No - when this setting is selected the user will be prompted to enter the file path (disk location) at the beginning of the archive. • Yes - when this setting is selected an additional option is shown for ‘Destination file path’. Click the ‘...’ symbol to choose the file path (location) of the disk to be used for the archive. This can be useful if you always want to archive files to the same location.
Auto destination name:
• No - when this setting is selected the user will be prompted to enter a name for the disk location at the beginning of the archive. This name is logged by the system for tracking purposes.• Yes - when this setting is selected an additional option is shown for ‘Destination media name’. In this field enter a name for the disk that will be used for the archive. This can be used to reduce the amount of information the user is prompted to enter at the beginning of the archive.
Frame rate - by default files will be archived at the Original frame rate, and this is the recommended setting. If required the files can be forced to a different frame rate in the archive. This option will affect only files stored on media formatted with a Codex File System.
PAGE 31CODEX USER GUIDE - CODEX PRODUCTION SUITE v.4.5 29.03.2017
Add other files:
• No - when this setting is selected no other files will be included in the archive other than those clips selected in the Library.• Yes - when this setting is selected an additional option is shown for ‘Other files location’. Click the ‘...’ symbol to choose the file path (location) of the other files to be included in the archive. This can be useful if you always want to include some files that cannot be loaded into the Library - for example PDF reports, or camera sheet scans.
7.5.2 Audio sync task settingsMatching rule:
• Timecode only - video and audio clips will be matched if there is a minimum 30% timecode overlap.• Timecode and roll - video and audio clips will be matched if there is a minimum 30% timecode overlap and the roll metadata also matches.
Auto name matching group:
• Automatic - when the Audio Sync task is run, a group will automatically be created for video clips that were successfully sync’d. When this setting is used the group will be named automatically in the format: ‘Audio Sync YYYY/MM/DD HH:MM:SS’.• Manual - when this setting is selected an additional option is shown for ‘Matching name prefix’. In this field enter an alternate prefix for the name of the group created of clips that have been sync’d successfully.
Create group for failures:
• No - for any video clips that could not be sync’d to audio clips, no group will be created by default.• Yes - when this setting is selected a group will be created for video clips that could not be sync’d to audio clips. The group of clips will be named automatically in the format: ‘Audio Sync Failures YYYY/MM/DD HH:MM:SS’.
Auto name fail group:
• Automatic - when ‘Create group for failures’ is set to Yes, the group created will default to the name format detailed above. • Manual - when this setting is selected an additional option is shown for ‘Fail name prefix’. In this field enter an alternate prefix for the name of the group created of clips that could not be sync’d.
Video clip metadata:
• Keep original - when this setting is selected, no metadata will be extracted from the audio clips and applied to the video clips.• Copy from audio file - when this setting is selected the following metadata items can be highlighted to be extracted from the audio clips and applied to the video clips during the sync process: Scene, Take, Shoot Date, Audio Track Names, Creation Time.
7.5.3 Clone task settingsThe Clone task does not have any settings, and requires only a From and To expression to determine the source and destination. Clips are copied from camera media to attached storage or an 8TB Transfer Drive in Vault S/XL-Series. An internal CRC32 verification is performed as files are copied. The Clone task writes image, audio, and metadata, and the copied clips are immediately linked back to the Library.
PAGE 32CODEX USER GUIDE - CODEX PRODUCTION SUITE v.4.5 29.03.2017
7.5.4 Generate task settingsDeliverable - this can be set to ‘Specify at launch’, or to a specific Deliverable that is configured. When set to ‘Specify at launch’, upon starting the Generate task the user can choose the Deliverable. When set to a specific Deliverable the Generate task will always transcode to that format.
Predefine directory:
• No - when this setting is selected, the user will be prompted to choose the destination for the Generate task when it is started.
• Yes - when this setting is selected an additional ‘Directory’ option is shown. Click the ‘...’ button to choose a destination for the Generate task. This can be useful if you always want to write files to the same destination.
Base directory - this setting determines the folders that will be created above the files that are generated. There are four options, depending on which file type is being created:
• {Roll} - this setting is suitable for stream file types, such as ProRes mov or DNxHD mxf.• {Roll}/{Shot} - this setting is suitable for sequence file types, such as dpx or exr.• {ProductionName}/{ShootDate}/{Day}/{Roll} - this setting is suitable for stream file types, such as ProRes mov or DNxHD mxf.• {ProductionName}/{ShootDate}/{Day}/{Roll}/{Shot} - this setting is suitable for sequence file types, such as dpx or exr.• None - this setting will result in no additional folders being created inside the primary folder for the Deliverables.
Video filename:
• Default - when this setting is selected, files created will use the clip name as shown in the LIbrary. For files that require a sequence number (e.g. dpx or exr), the numbering will be based on the timecode of each frame, expressed as ‘frames-since-midnight’. One exception is rmf (Canon RAW) files, that use ‘frame-in- clip’ numbering.• Custom - when this setting is selected an additional option is shown for ‘Custom video filename’. In this field enter tokens or the name of a metadata property in braces to determine how the files will be named. There are full details on the standard tokens and metadata property names later in this guide.
Stereo filename - this setting works in the same way as ‘Video filename’ detailed above, but applies only to clips that contain 2 video channels, captured on either a Codex Onboard Recorder or Codex Action Cam.
Audio filename - this setting works in the same way as ‘Video filename’ detailed above, but applies only to audio files that are created.
First frame - by default files generated will contain all frames from a clip. This setting can be used to specify if you want the files generated to begin a specific number of frames from the start of the clip.
Number of frames - this setting can be used to specify if you only want to generate a limited number of frames, rather than all the frames in a clip. This can be useful during testing/prep to create smaller files, or shorter file sequences.
Eject external media:
• Prompt - when this setting is selected the user will be prompted as to whether they would like to eject the target disk at the end of the Generate task.• Yes - when this setting is selected the target disk will be ejected automatically at the end of the Generate task.• No - when this setting is selected the target disk will not be ejected at the end of the Generate task.
PAGE 33CODEX USER GUIDE - CODEX PRODUCTION SUITE v.4.5 29.03.2017
Create ALE:
• Yes - when this setting is selected an ALE will be created for the selected clips along with the primary Deliverable.• No - when this setting is selected an ALE will not be created alongside the primary Deliverable.
7.5.5 Import task settingsSource:
• File - when this setting is selected files will be imported from a disk storage location. The import process will search recursively through directory trees to identify any files that can be imported. Files will be imported to Codex media based on the input expression in the ‘To’ field.• Tape - when this setting is selected files will be imported from LTFS tape. The tape must contain files written using the Archive task. Tapes written with other methods cannot be imported. Files will be imported to Codex media based on the input expression in the ‘To’ field.
Number of frames - by default all frames of a clip will be imported. This setting can be used to limit the number of frames that will be imported for each clip.
Predefine file path:
• No - when this setting is selected the user will be prompted to enter the source file path (disk location) at the beginning of the import. • Yes - when this setting is selected an additional option is shown for ‘File path’. Click the ‘...’ symbol to choose the source file path (location). This can be useful if you always want to import files from the same location.
7.5.6 Link task settingsPredefine file path:
• No - when this setting is selected the user will be prompted to enter the path (disk location) for files to link to at the beginning of the Link task. • Yes - when this setting is selected an additional option is shown for ‘File path’. Click the ‘...’ symbol to choose the source file path (location). This can be useful if you always want to link to files from the same location.
Recursive:
• Yes - when this setting is selected the Link task will search down from the specified location into all sub- directories to identify files that can be linked to.• No - when this setting is selected the Link task will only check the specified directory to identify files that can be linked to.
Apply ALE after link:
• Yes - when this setting is selected the Link task will search for an ALE associated to the clips being linked, and apply metadata from this. The location of the ALE is expected to be inside the folder selected for the Link - this is the location where the ALE is created if the files were produced by the Generate task.• No - when this setting is selected the Link task will not search for an ALE associated to the clips being linked.
PAGE 34CODEX USER GUIDE - CODEX PRODUCTION SUITE v.4.5 29.03.2017
7.5.7 Media Verify task settingsCreate CRC32 samples:
• Disable - when this setting is selected, the Media Verify will not add checksums to files on media formatted with a Codex file system.• Enable - when this setting is selected, the Media Verify will add checksums to files on media formatted with a Codex file system.
Repair CRC32 samples:
• Disable - when this setting is selected, the Media Verify will not repair any checksums that are detected as incorrect for the source data.• Enable - when this setting is selected, the Media Verify will repair any checksums that are detected as incorrect for the source data.
7.5.8 Media Clear task settingsCreate new volume:
• No - when this setting is selected, a new Roll will not be created on Codex media as part of the Media Clear task.• Yes - when this setting is selected, a new Roll will be created on Codex media as part of the Media Clear task.
User sets new label:
• No - when this setting is selected, a new Roll number will be automatically assigned to the media, incremented from the previous Roll number.• Yes - when this setting is selected, the user will be prompted to enter a new Roll number during the task.
7.5.9 Reports task settingsDefault report directory - click the ‘...’ button to choose a destination for saving reports. This can be useful if you always want to save reports to the same destination. If this field is left blank the user will be prompted to choose a destination when the Reports task is run.
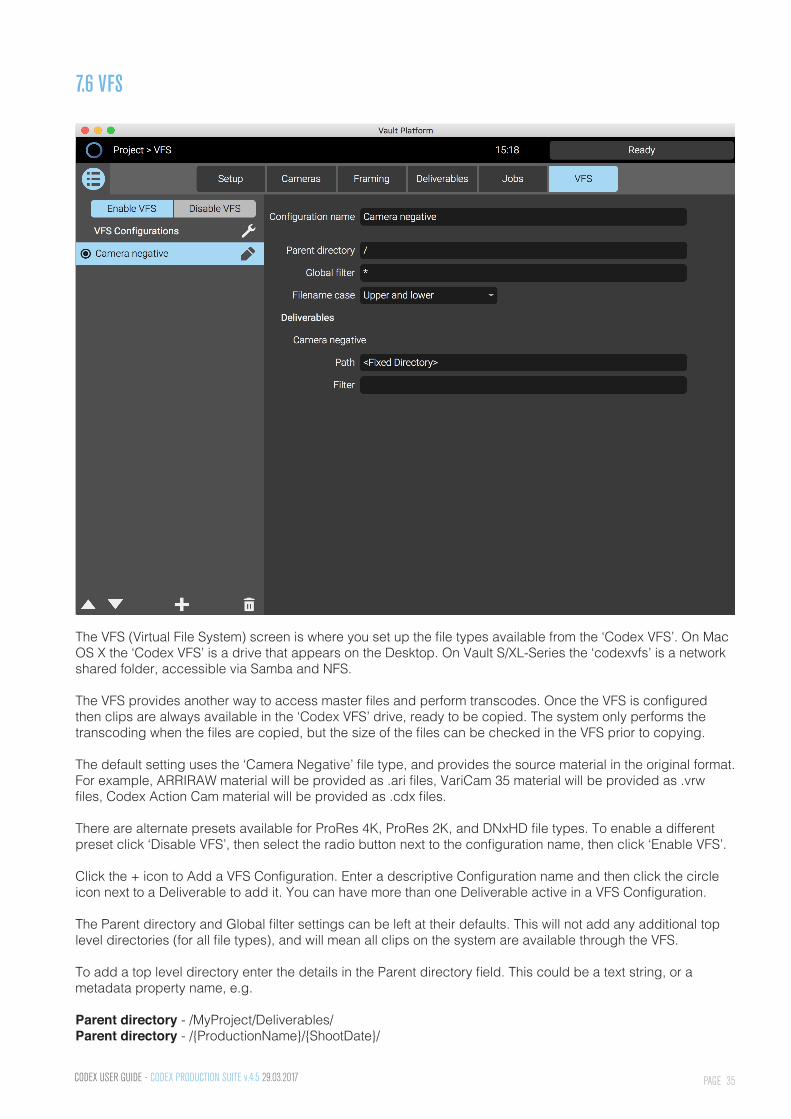
PAGE 35CODEX USER GUIDE - CODEX PRODUCTION SUITE v.4.5 29.03.2017
7.6 VFS
The VFS (Virtual File System) screen is where you set up the file types available from the ‘Codex VFS’. On Mac OS X the ‘Codex VFS’ is a drive that appears on the Desktop. On Vault S/XL-Series the ‘codexvfs’ is a network shared folder, accessible via Samba and NFS.
The VFS provides another way to access master files and perform transcodes. Once the VFS is configured then clips are always available in the ‘Codex VFS’ drive, ready to be copied. The system only performs the transcoding when the files are copied, but the size of the files can be checked in the VFS prior to copying.
The default setting uses the ‘Camera Negative’ file type, and provides the source material in the original format. For example, ARRIRAW material will be provided as .ari files, VariCam 35 material will be provided as .vrw files, Codex Action Cam material will be provided as .cdx files.
There are alternate presets available for ProRes 4K, ProRes 2K, and DNxHD file types. To enable a different preset click ‘Disable VFS’, then select the radio button next to the configuration name, then click ‘Enable VFS’.
Click the + icon to Add a VFS Configuration. Enter a descriptive Configuration name and then click the circle icon next to a Deliverable to add it. You can have more than one Deliverable active in a VFS Configuration.
The Parent directory and Global filter settings can be left at their defaults. This will not add any additional top level directories (for all file types), and will mean all clips on the system are available through the VFS.
To add a top level directory enter the details in the Parent directory field. This could be a text string, or a metadata property name, e.g.
Parent directory - /MyProject/Deliverables/Parent directory - /{ProductionName}/{ShootDate}/
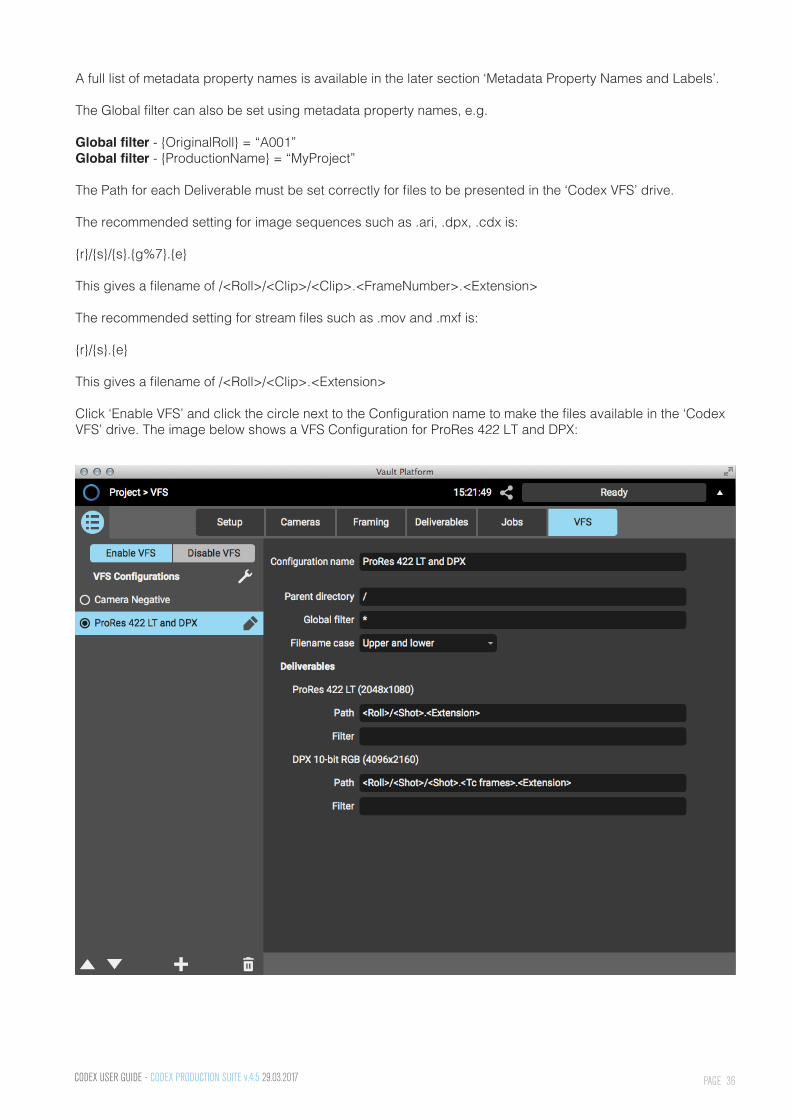
PAGE 36CODEX USER GUIDE - CODEX PRODUCTION SUITE v.4.5 29.03.2017
A full list of metadata property names is available in the later section ‘Metadata Property Names and Labels’.
The Global filter can also be set using metadata property names, e.g.
Global filter - {OriginalRoll} = “A001”Global filter - {ProductionName} = “MyProject”
The Path for each Deliverable must be set correctly for files to be presented in the ‘Codex VFS’ drive.
The recommended setting for image sequences such as .ari, .dpx, .cdx is:
{r}/{s}/{s}.{g%7}.{e}
This gives a filename of /<Roll>/<Clip>/<Clip>.<FrameNumber>.<Extension>
The recommended setting for stream files such as .mov and .mxf is:
{r}/{s}.{e}
This gives a filename of /<Roll>/<Clip>.<Extension>
Click ‘Enable VFS’ and click the circle next to the Configuration name to make the files available in the ‘Codex VFS’ drive. The image below shows a VFS Configuration for ProRes 422 LT and DPX:
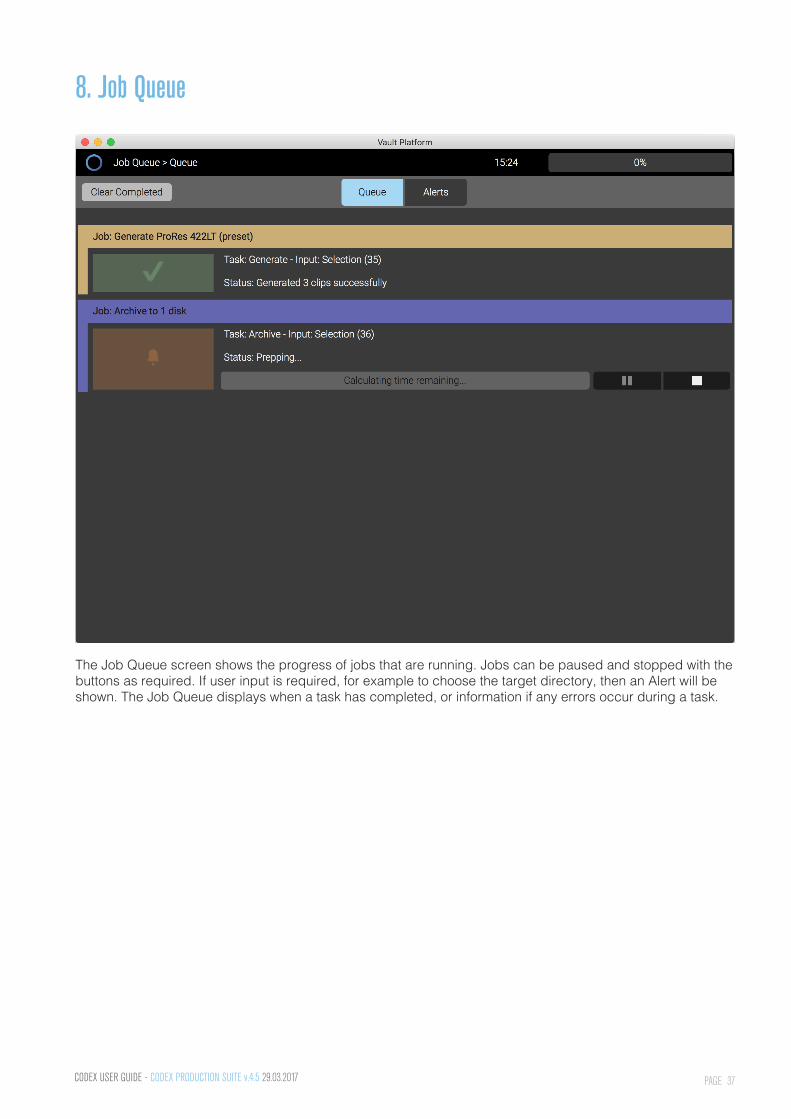
PAGE 37CODEX USER GUIDE - CODEX PRODUCTION SUITE v.4.5 29.03.2017
8. Job Queue
The Job Queue screen shows the progress of jobs that are running. Jobs can be paused and stopped with the buttons as required. If user input is required, for example to choose the target directory, then an Alert will be shown. The Job Queue displays when a task has completed, or information if any errors occur during a task.
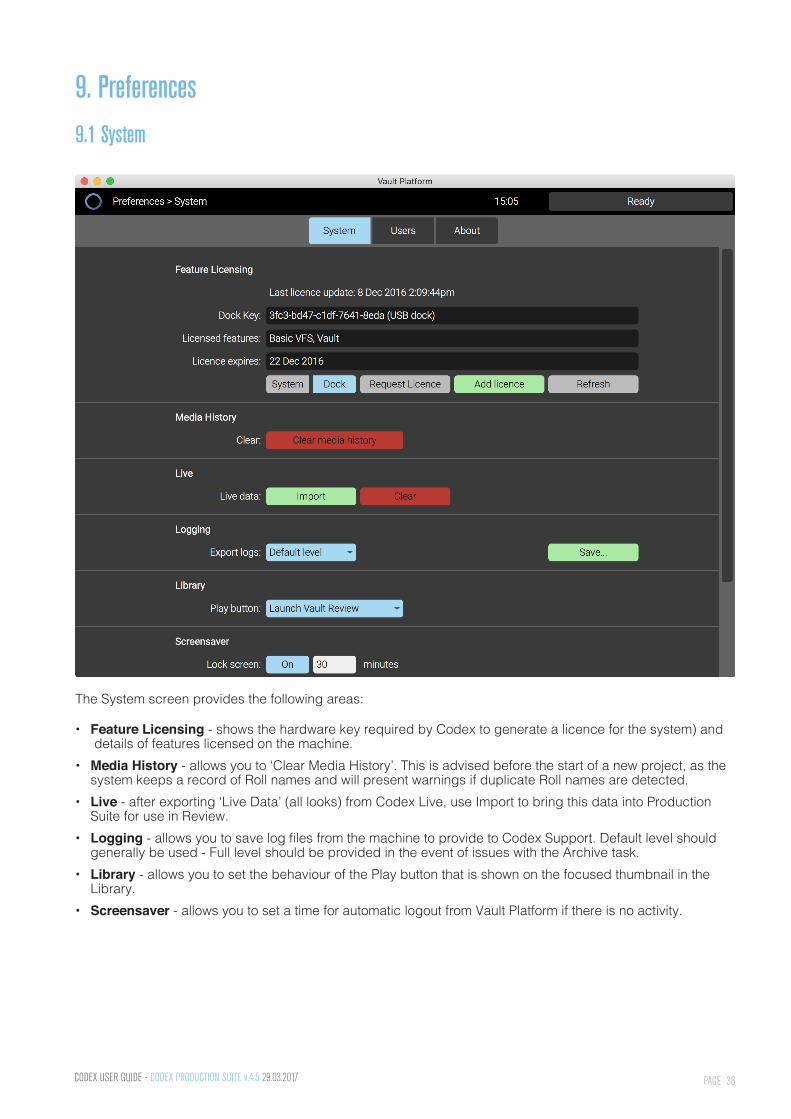
PAGE 38CODEX USER GUIDE - CODEX PRODUCTION SUITE v.4.5 29.03.2017
9. Preferences9.1 System
The System screen provides the following areas:
• Feature Licensing - shows the hardware key required by Codex to generate a licence for the system) and details of features licensed on the machine.• Media History - allows you to ‘Clear Media History’. This is advised before the start of a new project, as the system keeps a record of Roll names and will present warnings if duplicate Roll names are detected.• Live - after exporting ‘Live Data’ (all looks) from Codex Live, use Import to bring this data into Production Suite for use in Review.• Logging - allows you to save log files from the machine to provide to Codex Support. Default level should generally be used - Full level should be provided in the event of issues with the Archive task.• Library - allows you to set the behaviour of the Play button that is shown on the focused thumbnail in the Library.• Screensaver - allows you to set a time for automatic logout from Vault Platform if there is no activity.
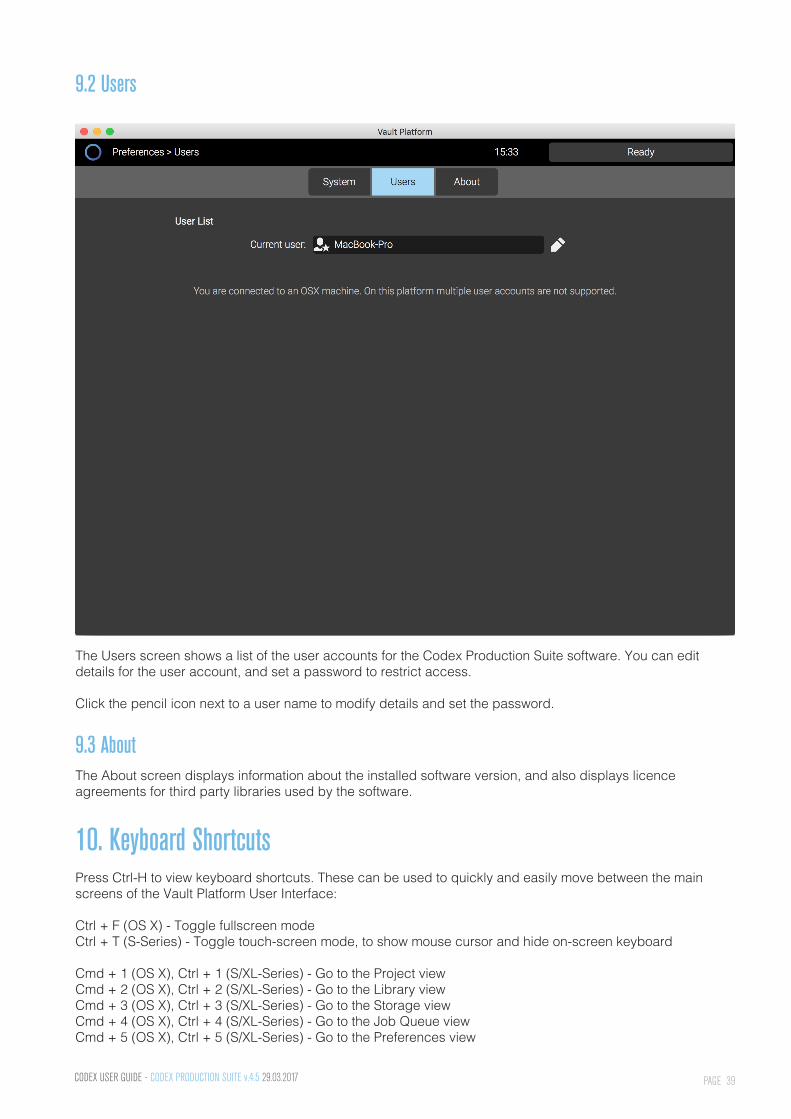
PAGE 39CODEX USER GUIDE - CODEX PRODUCTION SUITE v.4.5 29.03.2017
9.2 Users
The Users screen shows a list of the user accounts for the Codex Production Suite software. You can edit details for the user account, and set a password to restrict access.
Click the pencil icon next to a user name to modify details and set the password.
9.3 AboutThe About screen displays information about the installed software version, and also displays licence agreements for third party libraries used by the software.
10. Keyboard ShortcutsPress Ctrl-H to view keyboard shortcuts. These can be used to quickly and easily move between the main screens of the Vault Platform User Interface:
Ctrl + F (OS X) - Toggle fullscreen modeCtrl + T (S-Series) - Toggle touch-screen mode, to show mouse cursor and hide on-screen keyboard
Cmd + 1 (OS X), Ctrl + 1 (S/XL-Series) - Go to the Project viewCmd + 2 (OS X), Ctrl + 2 (S/XL-Series) - Go to the Library viewCmd + 3 (OS X), Ctrl + 3 (S/XL-Series) - Go to the Storage viewCmd + 4 (OS X), Ctrl + 4 (S/XL-Series) - Go to the Job Queue viewCmd + 5 (OS X), Ctrl + 5 (S/XL-Series) - Go to the Preferences view
PAGE 40CODEX USER GUIDE - CODEX PRODUCTION SUITE v.4.5 29.03.2017
11. Supported file formats and codecsThe following source camera formats and codecs can be used with Production Suite:
• ARRI ALEXA Classic/XT/SXT/Mini - ARRIRAW (16:9, 4:3, Open Gate), all ProRes variants.• ARRI AMIRA - all ProRes variants.• Panasonic VariCam 35 - VRAW (UHD and 4K, 10-bit and 12-bit).• Canon C500 - Canon Cinema RAW (UHD and 4K).• Canon C300 Mark II - XF-AVC MXF.• Sony EX3 - MPEG-2 MXF.• Sony F5, F55, and F65 - Sony RAW MXF, XAVC MXF.• GoPro Hero - H.264.• RED - REDCODE RAW R3D.• Phantom Flex 4K - Cine files.
The following audio file formats can be used with Production Suite:
• WAV and Broadcast WAV• 1 to 18 channels• 48kHz and 96kHz
12. Custom file naming in the Generate task and VFSFor custom file naming in deliverables, any metadata field (such as Roll, Scene, Take) can be referred to by using the property name of the field enclosed in {braces} – for example {Scene}. Metadata fields used in this way are called tokens.
When the deliverable file is created, these tokens are then replaced by the value of that field from the source clip. For example, a custom file name could be:
{Scene}-{Take}
Then for each clip the tokens will be replaced by the Scene and Take values. If the clip metadata has a Scene value of 14 and a Take value of 5, the deliverable file name would be:
14-5
Deliverable files also need a file type extension, for which the {e} token should be used. With a custom file name of {Scene}-{Take}.{e}, the deliverable files would be named with the correct extension, for example:
DPX: 14-5.dpxMOV: 14-5.mov
12.1 Rules for Token-NamesAll metadata is described by internal property names, which are ultimately what the token-replacement system uses: the built-in ones are listed in the section ‘Metadata Property Names and Labels’ and have to be case-sensitive and without spaces. Examples are ProductionName and CircleTake.
However, the user interface presents metadata fields with ‘friendly’ names for improved readability. These names are not case-sensitive and may contain spaces.
It is possible to modify the metadata views, such as Filecard or Project, if you need to add your own custom fields. Users wanting to perform such customisation should contact [email protected] for further details.
PAGE 41CODEX USER GUIDE - CODEX PRODUCTION SUITE v.4.5 29.03.2017
There are also a number of single-letter tokens. Some of these are for convenience - for example {r} is the same as {OriginalRoll} – but they are mainly for special purposes when setting up custom file naming. For example, if you are generating dpx files - which are one-per-frame - {f} can be used to put the frame-number in each filename. There is a full list of all legal token-names in ‘Metadata Property Names and Labels’.
12.2 Metadata Property Names and Labels
User Friendly Label Metadata Property Name SynonymProduction ProductionNameProduction Company ProductionCompanyUnit ProductionUnitDirector DirectorDoP DirectorOfPhotographyCamera Assistant CameraAssistantCodex Operator CodexOperatorSound Recordist SoundRecordistName ShotName {s}Roll OriginalRoll {r}Scene SceneTake TakeShot ShotSlate SlateCircle Take CircleTakeShot Type ShotTypeInterior / Exterior IntExtDay / Night DayNightComments CommentsT-Stop TstopFocus FocusLens LensTypeFilter FilterSource Type SourceTypeSource ID SourceIdSource Name SourceDeviceSerial No SourceSerialShutter Angle ShutterAngleSnapshot SnapshotDate DateCDLData CDLData
PAGE 42CODEX USER GUIDE - CODEX PRODUCTION SUITE v.4.5 29.03.2017
13. Vault Review13.1 IntroductionVault Review allows you to playback any clips from your Production Suite Library, as well as perform primary colour correction for dailies, audio synchronisation, QC of images, and export of colour corrected stills. Looks are applied non-destructively and can be saved to the Look Library to be applied to other clips. Review supports CDL and a range of 3D LUT formats created in other applications.
13.2 Supported HardwareVault Review can run on Mac OS X, Vault S-Series (with Review module) and Vault XL-Series.
The software can be controlled with a keyboard and mouse, with a range of keyboard shortcuts available.
It integrates with the Tangent Element series, Tangent Ripple, or Tangent Wave panels.
For video output from Mac Pro or MacBook Pro, Vault Review can be used with:
• AJA Io4K can be used to output to an SDI video monitor, from HD up to 4K resolutions.• AJA T-Tap can be used to output to an SDI video monitor, from HD up to 2K resolutions.
In order to use an AJA Io4K or AJA T-Tap for SDI output, you will need to install the device drivers available on the AJA website.
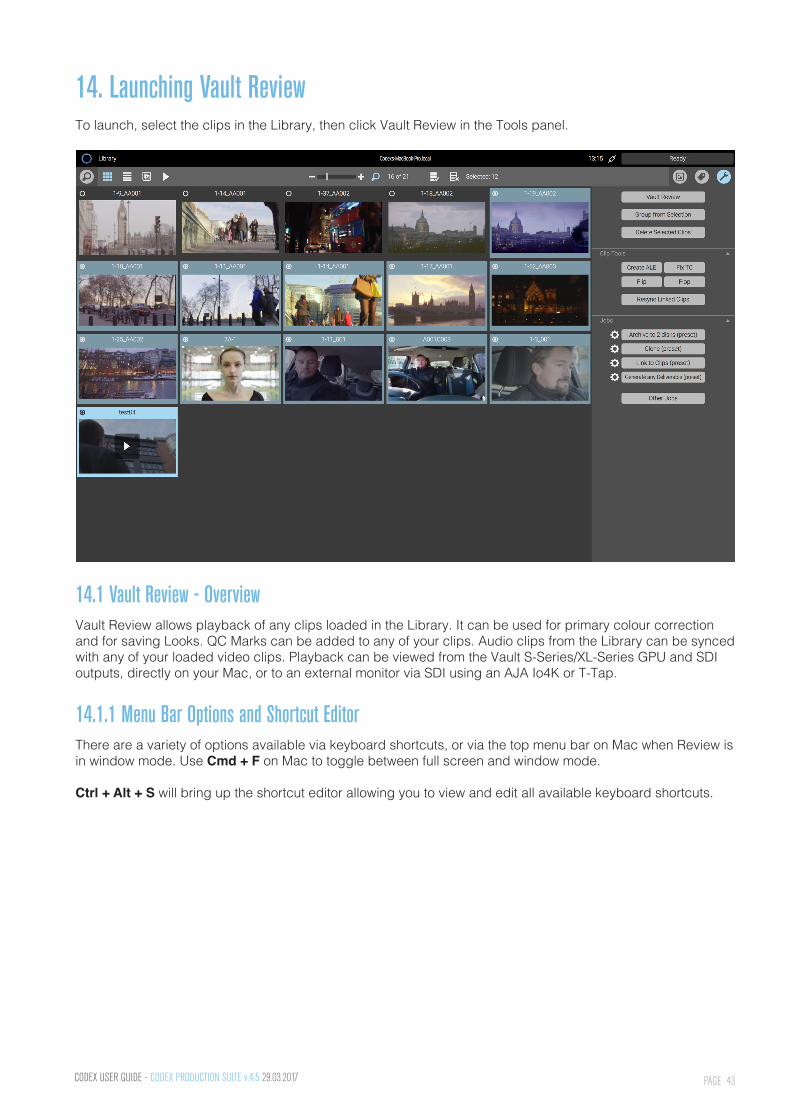
PAGE 43CODEX USER GUIDE - CODEX PRODUCTION SUITE v.4.5 29.03.2017
14. Launching Vault Review To launch, select the clips in the Library, then click Vault Review in the Tools panel.
14.1 Vault Review - OverviewVault Review allows playback of any clips loaded in the Library. It can be used for primary colour correction and for saving Looks. QC Marks can be added to any of your clips. Audio clips from the Library can be synced with any of your loaded video clips. Playback can be viewed from the Vault S-Series/XL-Series GPU and SDI outputs, directly on your Mac, or to an external monitor via SDI using an AJA Io4K or T-Tap.
14.1.1 Menu Bar Options and Shortcut EditorThere are a variety of options available via keyboard shortcuts, or via the top menu bar on Mac when Review is in window mode. Use Cmd + F on Mac to toggle between full screen and window mode.
Ctrl + Alt + S will bring up the shortcut editor allowing you to view and edit all available keyboard shortcuts.
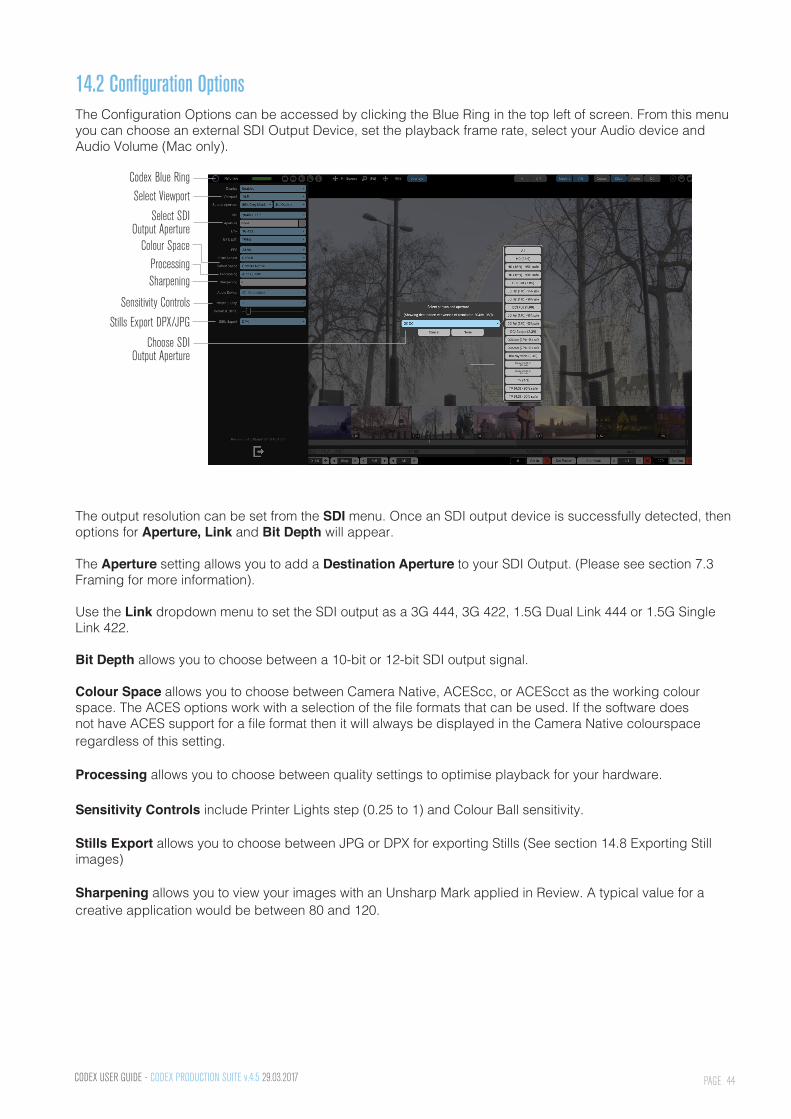
PAGE 44CODEX USER GUIDE - CODEX PRODUCTION SUITE v.4.5 29.03.2017
14.2 Configuration OptionsThe Configuration Options can be accessed by clicking the Blue Ring in the top left of screen. From this menu you can choose an external SDI Output Device, set the playback frame rate, select your Audio device and Audio Volume (Mac only).
Select Viewport
Select SDIOutput Aperture
Processing
Sensitivity Controls
Choose SDIOutput Aperture
Codex Blue Ring
The output resolution can be set from the SDI menu. Once an SDI output device is successfully detected, then options for Aperture, Link and Bit Depth will appear.
The Aperture setting allows you to add a Destination Aperture to your SDI Output. (Please see section 7.3 Framing for more information).
Use the Link dropdown menu to set the SDI output as a 3G 444, 3G 422, 1.5G Dual Link 444 or 1.5G Single Link 422.
Bit Depth allows you to choose between a 10-bit or 12-bit SDI output signal.
Colour Space allows you to choose between Camera Native, ACEScc, or ACEScct as the working colour space. The ACES options work with a selection of the file formats that can be used. If the software does not have ACES support for a file format then it will always be displayed in the Camera Native colourspace regardless of this setting.
Processing allows you to choose between quality settings to optimise playback for your hardware.
Sensitivity Controls include Printer Lights step (0.25 to 1) and Colour Ball sensitivity.
Stills Export allows you to choose between JPG or DPX for exporting Stills (See section 14.8 Exporting Still images)
Sharpening allows you to view your images with an Unsharp Mark applied in Review. A typical value for a creative application would be between 80 and 120.
Sharpening
Stills Export DPX/JPG
Colour Space
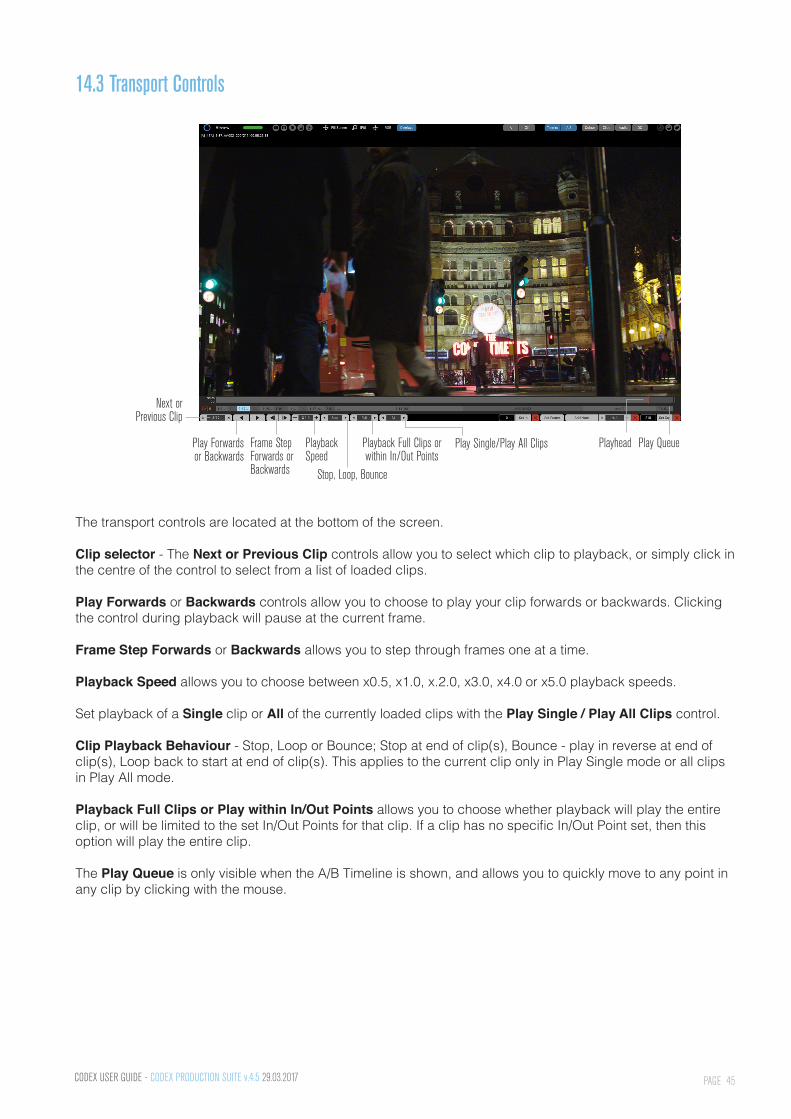
PAGE 45CODEX USER GUIDE - CODEX PRODUCTION SUITE v.4.5 29.03.2017
14.3 Transport Controls
Next orPrevious Clip
Play Forwardsor Backwards
Frame StepForwards or Backwards
PlaybackSpeed
Stop, Loop, Bounce
Playback Full Clips or within In/Out Points
Play Single/Play All Clips Playhead Play Queue
The transport controls are located at the bottom of the screen.
Clip selector - The Next or Previous Clip controls allow you to select which clip to playback, or simply click in the centre of the control to select from a list of loaded clips.
Play Forwards or Backwards controls allow you to choose to play your clip forwards or backwards. Clicking the control during playback will pause at the current frame.
Frame Step Forwards or Backwards allows you to step through frames one at a time.
Playback Speed allows you to choose between x0.5, x1.0, x.2.0, x3.0, x4.0 or x5.0 playback speeds.
Set playback of a Single clip or All of the currently loaded clips with the Play Single / Play All Clips control.
Clip Playback Behaviour - Stop, Loop or Bounce; Stop at end of clip(s), Bounce - play in reverse at end of clip(s), Loop back to start at end of clip(s). This applies to the current clip only in Play Single mode or all clips in Play All mode.
Playback Full Clips or Play within In/Out Points allows you to choose whether playback will play the entire clip, or will be limited to the set In/Out Points for that clip. If a clip has no specific In/Out Point set, then this option will play the entire clip.
The Play Queue is only visible when the A/B Timeline is shown, and allows you to quickly move to any point in any clip by clicking with the mouse.
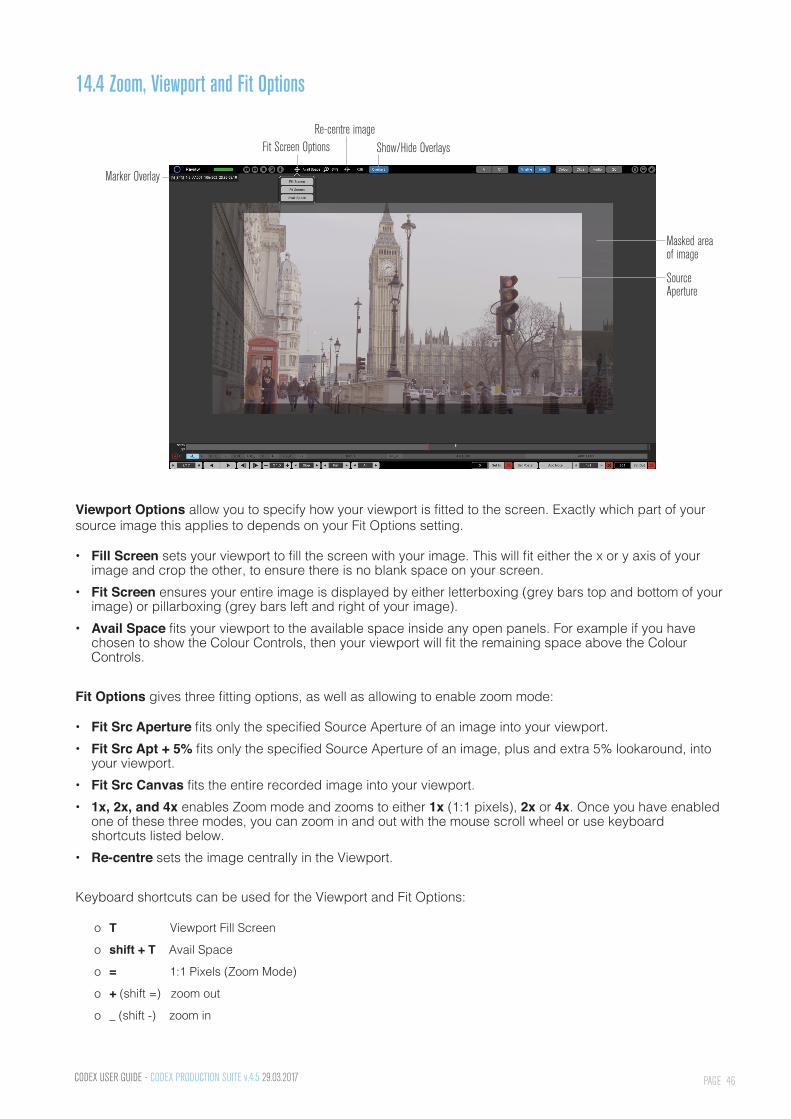
PAGE 46CODEX USER GUIDE - CODEX PRODUCTION SUITE v.4.5 29.03.2017
14.4 Zoom, Viewport and Fit Options
Marker Overlay
Masked areaof image
Source Aperture
Fit Screen Options Show/Hide OverlaysRe-centre image
Viewport Options allow you to specify how your viewport is fitted to the screen. Exactly which part of your source image this applies to depends on your Fit Options setting.
• Fill Screen sets your viewport to fill the screen with your image. This will fit either the x or y axis of your image and crop the other, to ensure there is no blank space on your screen.• Fit Screen ensures your entire image is displayed by either letterboxing (grey bars top and bottom of your image) or pillarboxing (grey bars left and right of your image).• Avail Space fits your viewport to the available space inside any open panels. For example if you have chosen to show the Colour Controls, then your viewport will fit the remaining space above the Colour Controls.
Fit Options gives three fitting options, as well as allowing to enable zoom mode:
• Fit Src Aperture fits only the specified Source Aperture of an image into your viewport. • Fit Src Apt + 5% fits only the specified Source Aperture of an image, plus and extra 5% lookaround, into your viewport.• Fit Src Canvas fits the entire recorded image into your viewport.• 1x, 2x, and 4x enables Zoom mode and zooms to either 1x (1:1 pixels), 2x or 4x. Once you have enabled one of these three modes, you can zoom in and out with the mouse scroll wheel or use keyboard shortcuts listed below. • Re-centre sets the image centrally in the Viewport.
Keyboard shortcuts can be used for the Viewport and Fit Options:
о T Viewport Fill Screen
о shift + T Avail Space
о = 1:1 Pixels (Zoom Mode)
о + (shift =) zoom out
о _ (shift -) zoom in
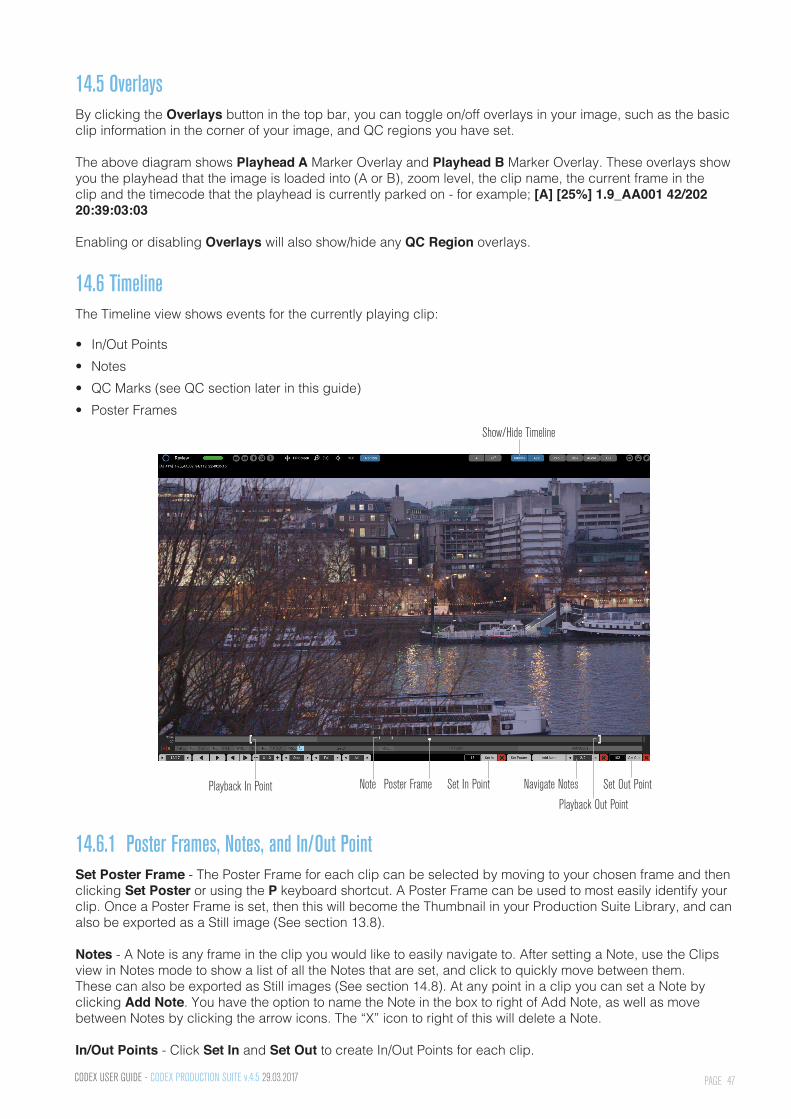
PAGE 47CODEX USER GUIDE - CODEX PRODUCTION SUITE v.4.5 29.03.2017
14.5 OverlaysBy clicking the Overlays button in the top bar, you can toggle on/off overlays in your image, such as the basic clip information in the corner of your image, and QC regions you have set.
The above diagram shows Playhead A Marker Overlay and Playhead B Marker Overlay. These overlays show you the playhead that the image is loaded into (A or B), zoom level, the clip name, the current frame in the clip and the timecode that the playhead is currently parked on - for example; [A] [25%] 1.9_AA001 42/202 20:39:03:03
Enabling or disabling Overlays will also show/hide any QC Region overlays.
14.6 TimelineThe Timeline view shows events for the currently playing clip:
• In/Out Points• Notes• QC Marks (see QC section later in this guide)• Poster Frames
Playback Out Point
Show/Hide Timeline
Set Out PointPlayback In Point Set In PointPoster FrameNote Navigate Notes
14.6.1 Poster Frames, Notes, and In/Out PointSet Poster Frame - The Poster Frame for each clip can be selected by moving to your chosen frame and then clicking Set Poster or using the P keyboard shortcut. A Poster Frame can be used to most easily identify your clip. Once a Poster Frame is set, then this will become the Thumbnail in your Production Suite Library, and can also be exported as a Still image (See section 13.8).
Notes - A Note is any frame in the clip you would like to easily navigate to. After setting a Note, use the Clips view in Notes mode to show a list of all the Notes that are set, and click to quickly move between them. These can also be exported as Still images (See section 14.8). At any point in a clip you can set a Note by clicking Add Note. You have the option to name the Note in the box to right of Add Note, as well as move between Notes by clicking the arrow icons. The “X” icon to right of this will delete a Note.
In/Out Points - Click Set In and Set Out to create In/Out Points for each clip.
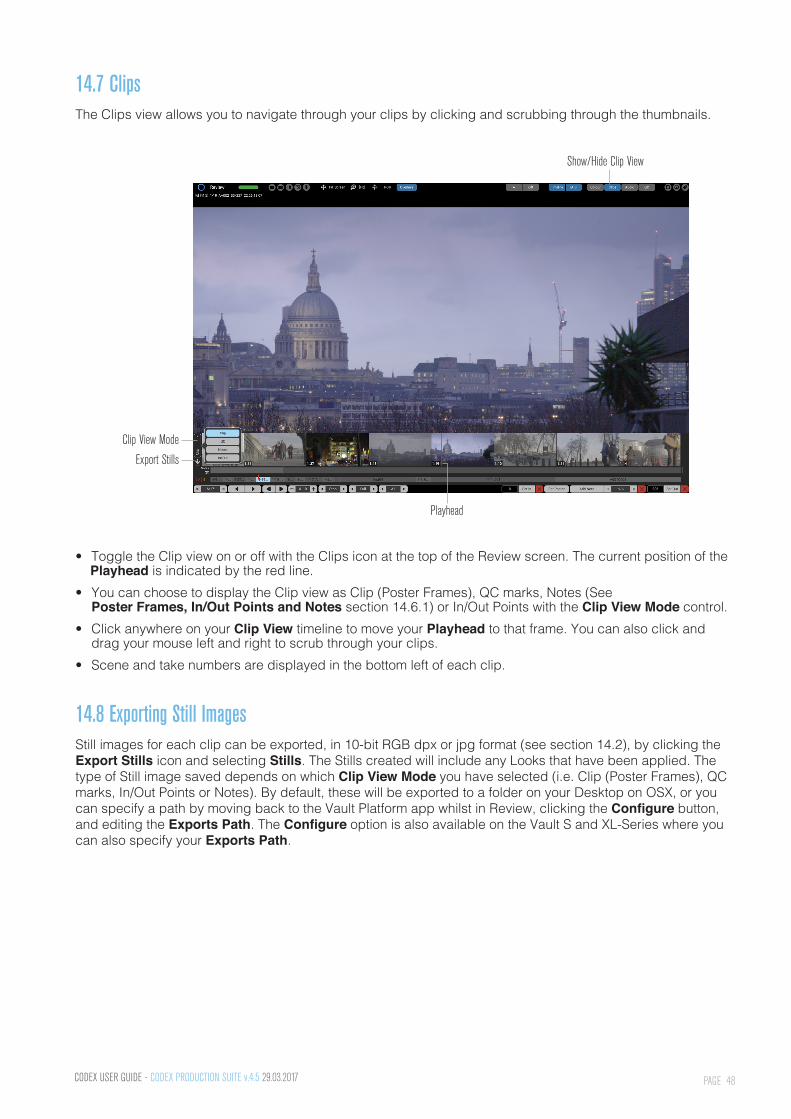
PAGE 48CODEX USER GUIDE - CODEX PRODUCTION SUITE v.4.5 29.03.2017
14.7 ClipsThe Clips view allows you to navigate through your clips by clicking and scrubbing through the thumbnails.
Clip View Mode
Export Stills
Show/Hide Clip View
Playhead
• Toggle the Clip view on or off with the Clips icon at the top of the Review screen. The current position of the Playhead is indicated by the red line.• You can choose to display the Clip view as Clip (Poster Frames), QC marks, Notes (See Poster Frames, In/Out Points and Notes section 14.6.1) or In/Out Points with the Clip View Mode control.• Click anywhere on your Clip View timeline to move your Playhead to that frame. You can also click and drag your mouse left and right to scrub through your clips.• Scene and take numbers are displayed in the bottom left of each clip.
14.8 Exporting Still ImagesStill images for each clip can be exported, in 10-bit RGB dpx or jpg format (see section 14.2), by clicking the Export Stills icon and selecting Stills. The Stills created will include any Looks that have been applied. The type of Still image saved depends on which Clip View Mode you have selected (i.e. Clip (Poster Frames), QC marks, In/Out Points or Notes). By default, these will be exported to a folder on your Desktop on OSX, or you can specify a path by moving back to the Vault Platform app whilst in Review, clicking the Configure button, and editing the Exports Path. The Configure option is also available on the Vault S and XL-Series where you can also specify your Exports Path.

PAGE 49CODEX USER GUIDE - CODEX PRODUCTION SUITE v.4.5 29.03.2017
14.9 A/B PlayheadsThe default behaviour of Vault Review is to show a single clip in a single Viewport (Playhead Options set to A and Off). Vault Review also supports a dual Viewport functionality which can display upto two simultaneous images from the A, B, C and D playheads.
Left Viewport Right Viewport
Select A/B Playhead
Playhead Options Show/Hide A/B Playhead Timeline
A/B Timeline Playhead A Playhead B
14.9.1 A/B TimelineYou can add the A/B Playhead Timeline with the Show/Hide Playhead Timeline button. This allows you to independently move each of the four playheads (A, B, C and D) to any point in the timeline for your selected clips. To do this, click on the Select A/B Playhead options (A or B) and then select a point in the Timeline to move your Playhead to.
To access playhead C and D in the A/B Timeline, you will need to select the option from View menu bar dropdown, or set keyboard shortcuts for View Playhead C and View Playhead D.
Note: the position of Playhead A is indicated by a red line to the top of the A/B Timeline and that Playhead B is indicated by an orange line to the bottom. Playhead C is indicated by a green line on top of the A/B Timeline, and Playhead D by an orange line on the bottom.
14.9.2 Playhead OptionsYou can choose how you would like to display your Playheads with the Playhead Options dropdown menus in the top bar.
• To only view one Playhead across the whole screen, set one of them to A, B, C or D and the other to Off.• To view A, B, C or D side-by-side in left and right viewports, set the playhead options to display any of the playheads.• You can also choose to display one of your Look Stills in either the left or right pane by selecting Still, and then opening the Looks side panel and choosing the Look you would like to display. See section 14.10.5 for more information on the Look Stills side panel.
Playhead C Playhead D
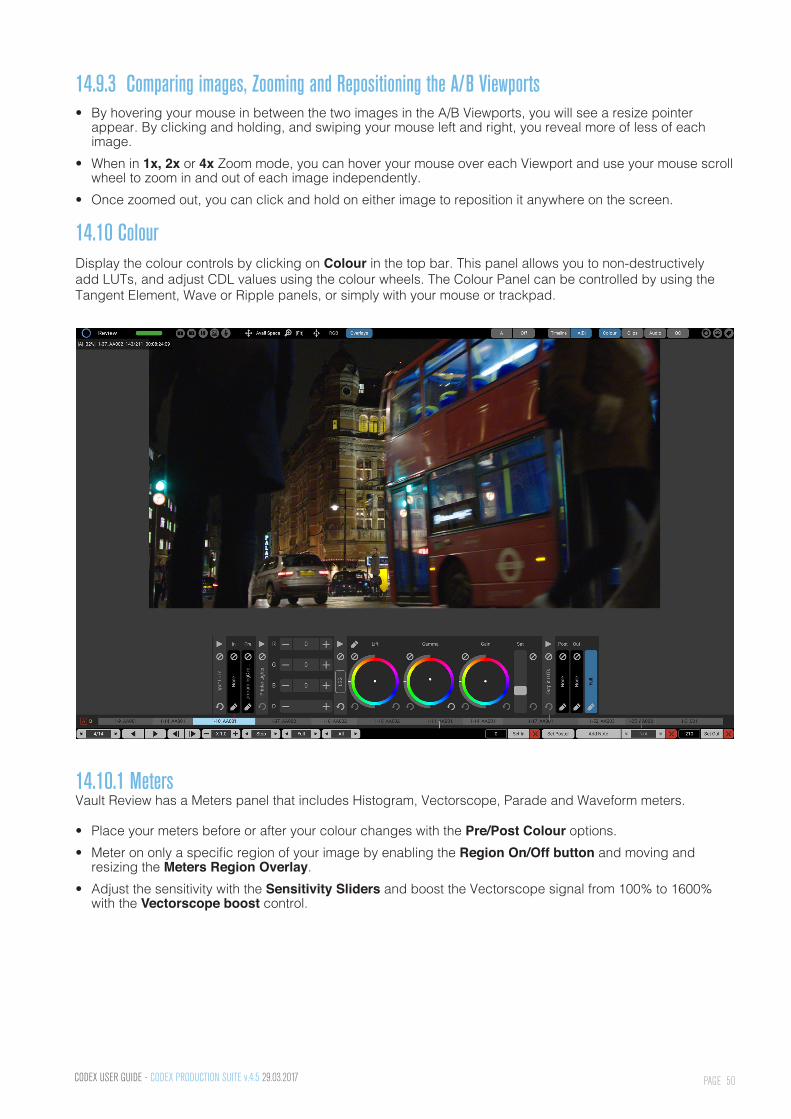
PAGE 50CODEX USER GUIDE - CODEX PRODUCTION SUITE v.4.5 29.03.2017
14.9.3 Comparing images, Zooming and Repositioning the A/B Viewports • By hovering your mouse in between the two images in the A/B Viewports, you will see a resize pointer appear. By clicking and holding, and swiping your mouse left and right, you reveal more of less of each image.• When in 1x, 2x or 4x Zoom mode, you can hover your mouse over each Viewport and use your mouse scroll wheel to zoom in and out of each image independently.• Once zoomed out, you can click and hold on either image to reposition it anywhere on the screen.
14.10 Colour Display the colour controls by clicking on Colour in the top bar. This panel allows you to non-destructively add LUTs, and adjust CDL values using the colour wheels. The Colour Panel can be controlled by using the Tangent Element, Wave or Ripple panels, or simply with your mouse or trackpad.
14.10.1 MetersVault Review has a Meters panel that includes Histogram, Vectorscope, Parade and Waveform meters.
• Place your meters before or after your colour changes with the Pre/Post Colour options.• Meter on only a specific region of your image by enabling the Region On/Off button and moving and resizing the Meters Region Overlay.• Adjust the sensitivity with the Sensitivity Sliders and boost the Vectorscope signal from 100% to 1600% with the Vectorscope boost control.
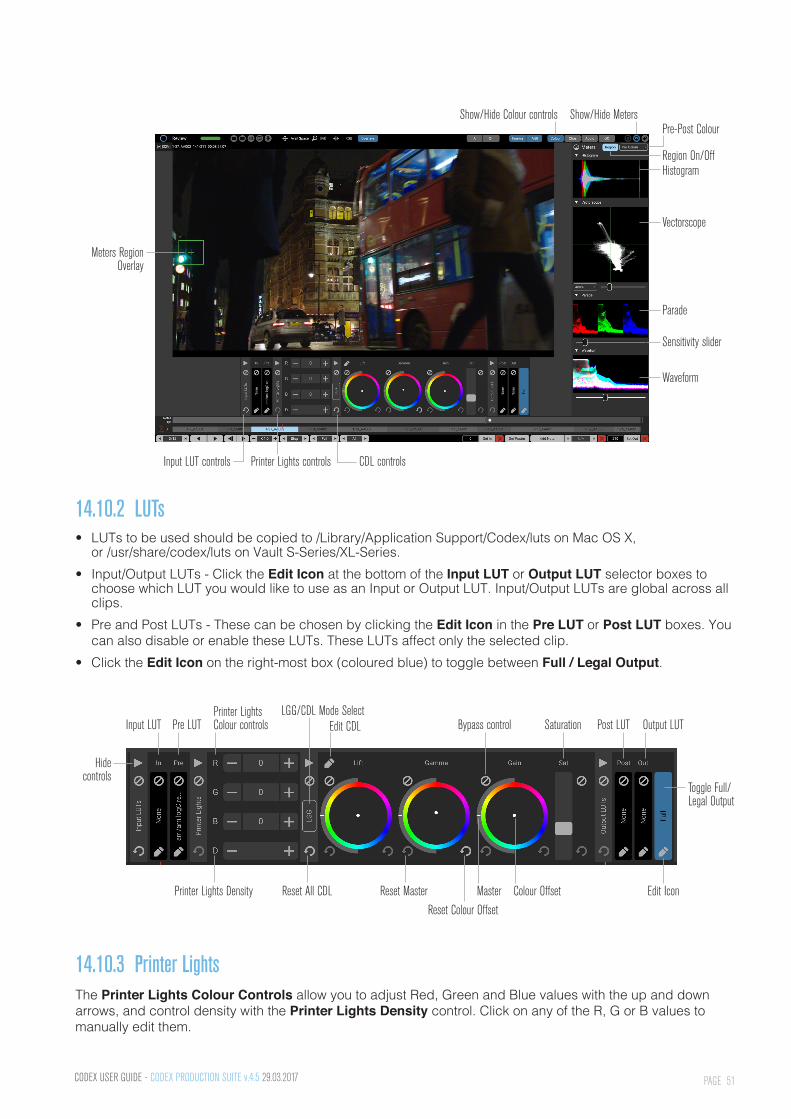
PAGE 51CODEX USER GUIDE - CODEX PRODUCTION SUITE v.4.5 29.03.2017
Meters Region Overlay
Waveform
Parade
Vectorscope
Histogram
Pre-Post ColourShow/Hide MetersShow/Hide Colour controls
Region On/Off
Sensitivity slider
Input LUT controls Printer Lights controls CDL controls
14.10.2 LUTs• LUTs to be used should be copied to /Library/Application Support/Codex/luts on Mac OS X, or /usr/share/codex/luts on Vault S-Series/XL-Series.• Input/Output LUTs - Click the Edit Icon at the bottom of the Input LUT or Output LUT selector boxes to choose which LUT you would like to use as an Input or Output LUT. Input/Output LUTs are global across all clips.• Pre and Post LUTs - These can be chosen by clicking the Edit Icon in the Pre LUT or Post LUT boxes. You can also disable or enable these LUTs. These LUTs affect only the selected clip.• Click the Edit Icon on the right-most box (coloured blue) to toggle between Full / Legal Output.
Toggle Full/Legal Output
Input LUT Pre LUT
Hide controls
Printer LightsColour controls
LGG/CDL Mode SelectEdit CDL Bypass control Saturation Post LUT Output LUT
Edit IconColour OffsetMasterReset Colour Offset
Reset MasterReset All CDLPrinter Lights Density
14.10.3 Printer LightsThe Printer Lights Colour Controls allow you to adjust Red, Green and Blue values with the up and down arrows, and control density with the Printer Lights Density control. Click on any of the R, G or B values to manually edit them.
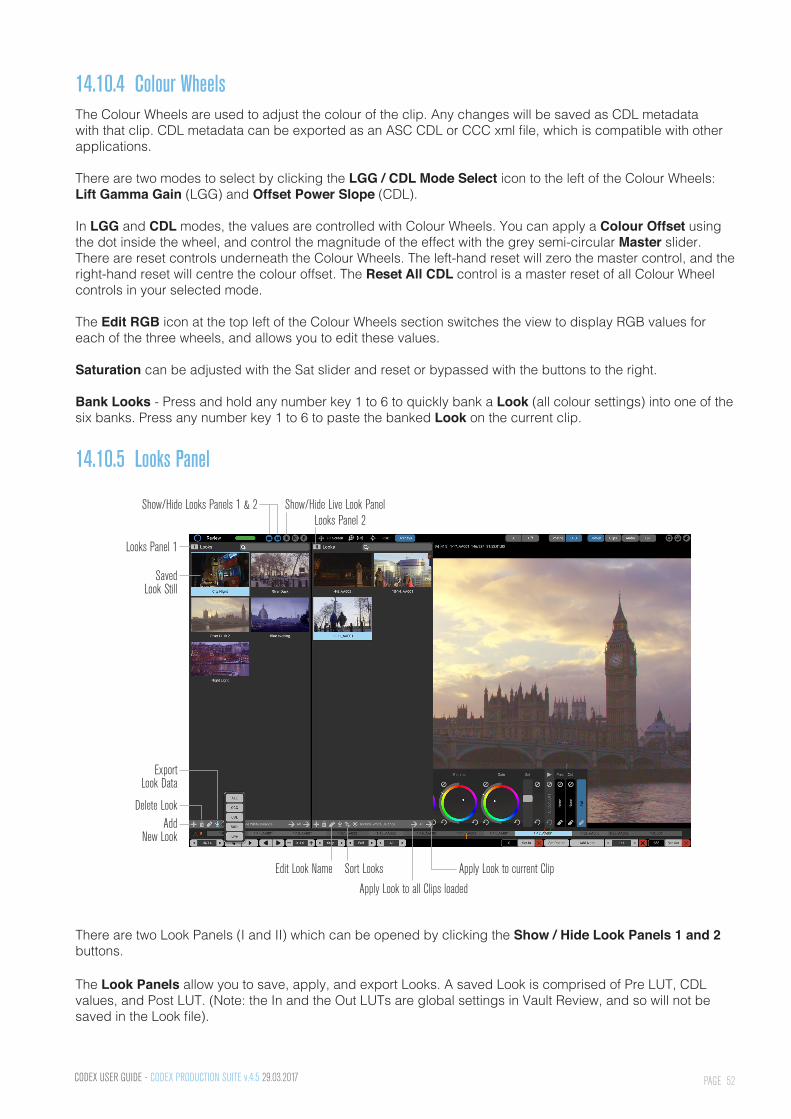
PAGE 52CODEX USER GUIDE - CODEX PRODUCTION SUITE v.4.5 29.03.2017
14.10.4 Colour Wheels The Colour Wheels are used to adjust the colour of the clip. Any changes will be saved as CDL metadata with that clip. CDL metadata can be exported as an ASC CDL or CCC xml file, which is compatible with other applications. There are two modes to select by clicking the LGG / CDL Mode Select icon to the left of the Colour Wheels: Lift Gamma Gain (LGG) and Offset Power Slope (CDL).
In LGG and CDL modes, the values are controlled with Colour Wheels. You can apply a Colour Offset using the dot inside the wheel, and control the magnitude of the effect with the grey semi-circular Master slider. There are reset controls underneath the Colour Wheels. The left-hand reset will zero the master control, and the right-hand reset will centre the colour offset. The Reset All CDL control is a master reset of all Colour Wheel controls in your selected mode.
The Edit RGB icon at the top left of the Colour Wheels section switches the view to display RGB values for each of the three wheels, and allows you to edit these values.
Saturation can be adjusted with the Sat slider and reset or bypassed with the buttons to the right.
Bank Looks - Press and hold any number key 1 to 6 to quickly bank a Look (all colour settings) into one of the six banks. Press any number key 1 to 6 to paste the banked Look on the current clip.
14.10.5 Looks Panel
Saved Look Still
Looks Panel 1
Add New Look
Export Look Data
Show/Hide Looks Panels 1 & 2 Show/Hide Live Look PanelLooks Panel 2
Delete Look
Edit Look Name Sort Looks
Apply Look to all Clips loaded
Apply Look to current Clip
There are two Look Panels (I and II) which can be opened by clicking the Show / Hide Look Panels 1 and 2 buttons.
The Look Panels allow you to save, apply, and export Looks. A saved Look is comprised of Pre LUT, CDL values, and Post LUT. (Note: the In and the Out LUTs are global settings in Vault Review, and so will not be saved in the Look file).
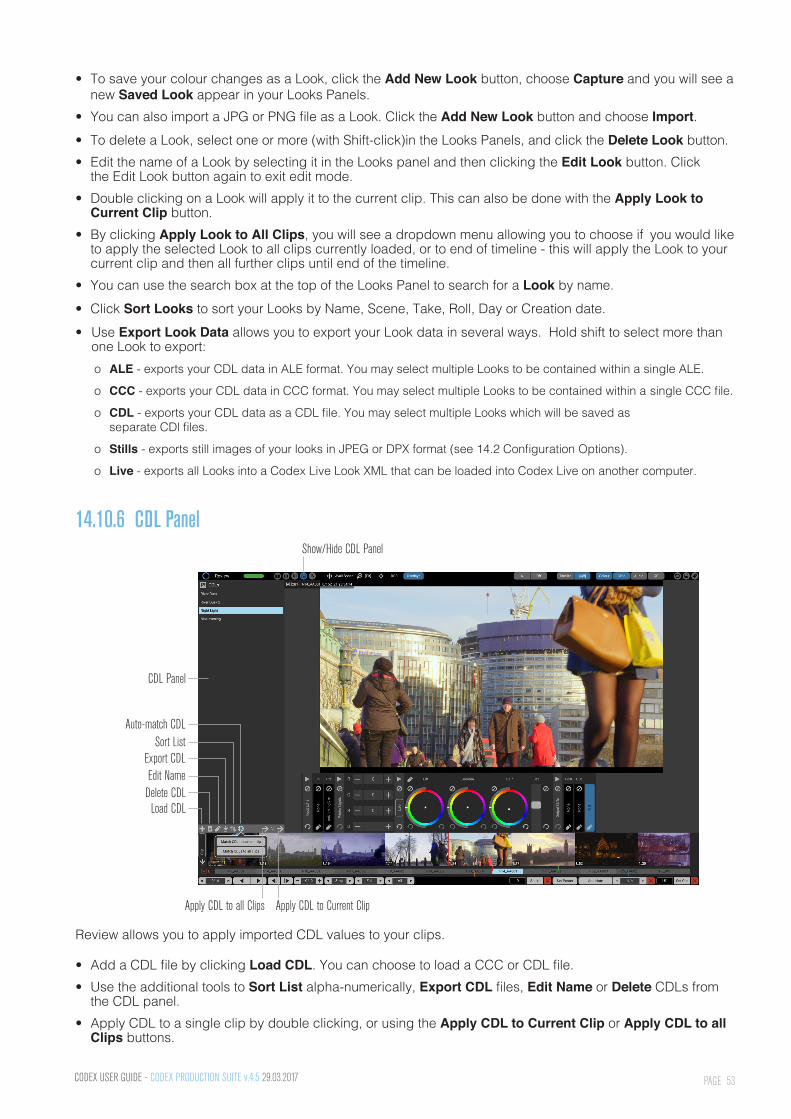
PAGE 53CODEX USER GUIDE - CODEX PRODUCTION SUITE v.4.5 29.03.2017
• To save your colour changes as a Look, click the Add New Look button, choose Capture and you will see a new Saved Look appear in your Looks Panels.• You can also import a JPG or PNG file as a Look. Click the Add New Look button and choose Import.• To delete a Look, select one or more (with Shift-click)in the Looks Panels, and click the Delete Look button. • Edit the name of a Look by selecting it in the Looks panel and then clicking the Edit Look button. Click the Edit Look button again to exit edit mode.• Double clicking on a Look will apply it to the current clip. This can also be done with the Apply Look to Current Clip button. • By clicking Apply Look to All Clips, you will see a dropdown menu allowing you to choose if you would like to apply the selected Look to all clips currently loaded, or to end of timeline - this will apply the Look to your current clip and then all further clips until end of the timeline. • You can use the search box at the top of the Looks Panel to search for a Look by name.• Click Sort Looks to sort your Looks by Name, Scene, Take, Roll, Day or Creation date.• Use Export Look Data allows you to export your Look data in several ways. Hold shift to select more than one Look to export:
о ALE - exports your CDL data in ALE format. You may select multiple Looks to be contained within a single ALE.
о CCC - exports your CDL data in CCC format. You may select multiple Looks to be contained within a single CCC file.
о CDL - exports your CDL data as a CDL file. You may select multiple Looks which will be saved as separate CDl files.
о Stills - exports still images of your looks in JPEG or DPX format (see 14.2 Configuration Options).
о Live - exports all Looks into a Codex Live Look XML that can be loaded into Codex Live on another computer.
14.10.6 CDL Panel
CDL Panel
Load CDL
Auto-match CDLSort List
Export CDLEdit Name
Show/Hide CDL Panel
Delete CDL
Apply CDL to all Clips Apply CDL to Current Clip
Review allows you to apply imported CDL values to your clips.
• Add a CDL file by clicking Load CDL. You can choose to load a CCC or CDL file.• Use the additional tools to Sort List alpha-numerically, Export CDL files, Edit Name or Delete CDLs from the CDL panel. • Apply CDL to a single clip by double clicking, or using the Apply CDL to Current Clip or Apply CDL to all Clips buttons.

PAGE 54CODEX USER GUIDE - CODEX PRODUCTION SUITE v.4.5 29.03.2017
• The Auto-match CDL feature enables you to auto apply any CDL files loaded into the CDL panel based on Scene and Take metadata. To use this feature, you will need to edit the CDL file description to include the Scene and Take. For example if Scene is 1 and Take is C012, edit your CDL file in a text editor and adjust the description field like this: <Description>1C012</Description> Once you have edited your CDL file, load it into the CDL panel ready to Auto-match.
14.10.7 Tangent Element SeriesColour can be adjusted in Vault Review with the Tangent Element series of controllers (Tk, Mf, Kb and Bt). Once connected the LCDs will indicate the parameters which can be adjusted with each of the controls. You can switch between LGG, CDL and PL modes, adjust Master and Offset, bypass LUTs, and use Transport controls.
Here are some additional controls not listed on the LCD’s:
• Tangent Tk: Hold down A to toggle controls for Jog (to scrub through playback) and Saturation.• Tangent Tk: Press B to cycle through LGG, CDL and PL modes.• Tangent Mf: Hold down A to use the wheel as a Jog control, and set In / Out points, as well as switch view to Red, Blue or Green colour channels.• Tangent Mf: Press B to cycle through control of each of the three colour wheels in LGG and CDL modes, or Red, Green, Blue in PL mode.
14.11 Audio SyncClick the Audio Side Panel icon to open the Audio side panel. Here you can select from any Audio clips that are currently in the Library to sync with your Video clips.
Selected audio clip
Show only matching
audio clips
Audio channels
for selected audio clip
Fit whole audio clip into audio timeline
Waveform Boost
Unused section of audio clip (Grey)
Synced section ofaudio clip (black)
Audio Sync options Audio Timecode Position Audio Sync Offset Audio clip zoomApply control
Audio Side Panel Show/Hide Show/Hide Audio Timeline
• Click the Audio icon to Show / Hide the Audio Timeline at the bottom of the screen. This will show the waveform of any audio that is synced to your video clip. The red line will indicate the current position of the audio clip playhead on the waveform.
PAGE 55CODEX USER GUIDE - CODEX PRODUCTION SUITE v.4.5 29.03.2017
• The Audio Side Panel shows all audio clips currently linked to your Library. Any that match the timecode of your currently selected video clip will have a percentage value next to the audio clip name, for example CODEX_011 [91%]. The percentage value is the amount of the audio clip that matches with the video clip timecode. In the above example, the audio recording started before the video clip, and ended after it. If your audio clip started and stopped at exactly the same time as your video clip (i.e. start and stop timecodes values match), you will see the audio clip name appended as [100%].• The [R] and [S] icons next to some audio clips indicate a match of Roll or Scene with the current video clip. • In the Audio Side Panel, select the audio clip that you wish to sync with your video clip. If there is a timecode match (i.e. 91%), then the audio clip will be chosen and automatically synced with the video.• The section of the audio clip that does not match the timecode of the video clip is shown with a grey colour (Unused Section of Audio Clip), and the matched part of the audio clip is shown in black (Synced Section of Audio Clip).• At the bottom of the Audio Clip Library Side Panel, you will see the waveforms for the different channels for your selected audio clip. In the example above, the audio clip has three channels. Click on each channel to display that waveform in the Audio Timeline.• Use the Fit icon to Fit the Whole Audio Clip Into Audio Timeline, or use the Audio Clip Zoom contols to zoom in and out of the waveform in the Audio Timeline.• Use the Waveform Boost function to boost the visual waveform by up to 6x.• For manual Audio Sync, or if you wish to adjust the Audio Sync for any clips that have automatically synced with timecode, Cmd-click (on Mac) or Ctrl-click (On Vault S/XL-Series) anywhere in the Audio Timeline to move the red audio clip playhead to the desired position. • Use the Audio Sync Offset controls for finer control of the sync. The + and - symbols will advance or move back in quarter frame increments.• The Audio Side Panel has further options for syncing your audio clips, available by clicking the Audio Sync Options cog icon:
о Auto Match - Selects best audio clip from the displayed list, considering timecode and roll / scene / take metatdata.
о Auto Sync - Resets to audio offset of your current clip, so that audio and video timecode are in-sync.
о Reset - Discards the audio changes made since last save.
14.12 Metadata ViewClick Show/Hide Metadata to open up the Metadata View side-panel. (see below) You can select different views with the Choose Metadata View dropdown menu at the bottom of the side-panel.
Edit Scene and Take, and add comments, for each clip by clicking the Edit Mode button or using the E keyboard shortcut. Use tab to move between Scene, Take and Comments and Enter to save changes for your clip.
Click the Circle Take icon to set circle take metadata to Yes or No.
The Auto-increment Take button will apply a Take number for any clips with a matching Scene number, which appear before your selected clip in the Timeline. For example if you have three clips in Review all marked as Scene 1, pressing the Auto-increment Take button on the last clip will set your three clips as Take 1, Take 2 and Take 3.
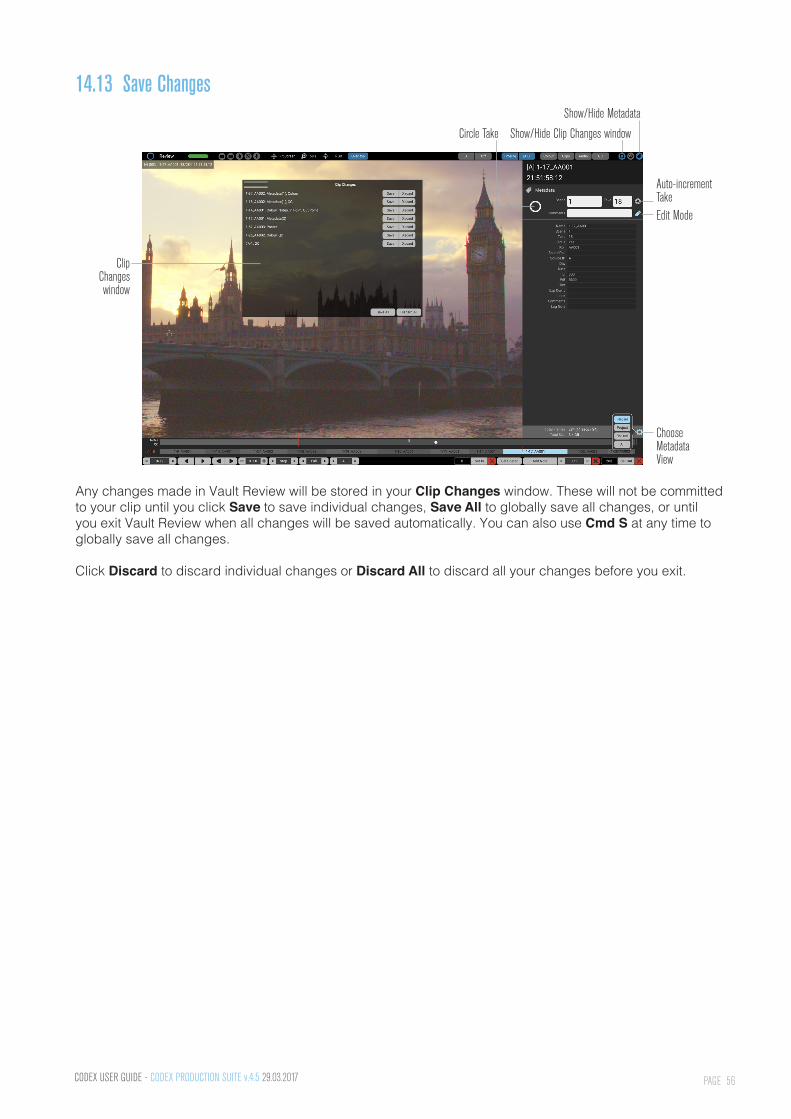
PAGE 56CODEX USER GUIDE - CODEX PRODUCTION SUITE v.4.5 29.03.2017
14.13 Save Changes
Show/Hide Clip Changes window
Auto-incrementTakeEdit Mode
Choose MetadataView
ClipChangeswindow
Circle Take
Show/Hide Metadata
Any changes made in Vault Review will be stored in your Clip Changes window. These will not be committed to your clip until you click Save to save individual changes, Save All to globally save all changes, or until you exit Vault Review when all changes will be saved automatically. You can also use Cmd S at any time to globally save all changes.
Click Discard to discard individual changes or Discard All to discard all your changes before you exit.

PAGE 57CODEX USER GUIDE - CODEX PRODUCTION SUITE v.4.5 29.03.2017
14.14 QC ToolThe QC Tools allow you to mark events in your timeline per clip, frame or range of frames, and then save them as a QC Report.
• Click the QC button at the top of the screen to open the QC Toolbar:• A QC mark can be for a single Frame, a Range of frames, or Global (all frames in the clip).
о Single Frame - Click Add In/Out to create a QC Mark on your current frame.
о Range - Click Add In/Out to create a QC Mark. Move your playhead to the end frame of your range and click Set QC Out.
о Global - Click Add Global to create a QC Mark across your current clip.
• A QC mark will default to being for a Region. A red box is shown, and you can click and drag to re-position and resize the Region. Unclick the circle next to Region if the QC mark applies to the whole image.• Click Predefined QC Mark Names dropdown to open a list of common issues, or click in the box to the left to enter your own comment.• After setting QC points on your clips, use the Reports task in Production Suite to create a QC report. To do this, select all clips in the Vault Platform Library, start a PDF Reports job, choose where you would like to save the pdf, and then select the QC Report button at the bottom of the screen.
QC Toolbar On/Off
QC RegionOverlay
Clips View Mode set
to QC
Add QC MarkQC Mark Selector QC Mark Range
QC Region On/OffQC Mark Name
Pre-defined QC Mark NamesDelete QC MarkQC Timeline

PAGE 58CODEX USER GUIDE - CODEX PRODUCTION SUITE v.4.5 29.03.2017
14.15 Keyboard Shortcuts
PAGE 59CODEX USER GUIDE - CODEX PRODUCTION SUITE v.4.5 29.03.2017
PAGE 60CODEX USER GUIDE - CODEX PRODUCTION SUITE v.4.5 29.03.2017
PAGE 61CODEX USER GUIDE - CODEX PRODUCTION SUITE v.4.5 29.03.2017
Notes
24 hour support line +44 7985 467 665
CODEX 60 POLAND STREET LONDON ENGLAND W1F 7NT UK TEL +44 203 7000 999 CODEX.ONLINE [email protected]
Codex reserve the right to alter the specification at any time and without prior notice. © Copyright Codex Digitial Limited March 2017.