User Guide for AsyncOS 14.1 for Cisco Secure Email and Web ...
642
User Guide for AsyncOS 14.1 for Cisco Secure Email and Web Manager- GD (General Deployment) First Published: 2021-08-16 Last Modified: 2021-10-08 Americas Headquarters Cisco Systems, Inc. 170 West Tasman Drive San Jose, CA 95134-1706 USA http://www.cisco.com Tel: 408 526-4000 800 553-NETS (6387) Fax: 408 527-0883
-
Upload
khangminh22 -
Category
Documents
-
view
1 -
download
0
Transcript of User Guide for AsyncOS 14.1 for Cisco Secure Email and Web ...

User Guide for AsyncOS 14.1 for Cisco Secure Email and Web Manager-GD (General Deployment)First Published: 2021-08-16
Last Modified: 2021-10-08
Americas HeadquartersCisco Systems, Inc.170 West Tasman DriveSan Jose, CA 95134-1706USAhttp://www.cisco.comTel: 408 526-4000
800 553-NETS (6387)Fax: 408 527-0883

THE SPECIFICATIONS AND INFORMATION REGARDING THE PRODUCTS IN THIS MANUAL ARE SUBJECT TO CHANGE WITHOUT NOTICE. ALL STATEMENTS,INFORMATION, AND RECOMMENDATIONS IN THIS MANUAL ARE BELIEVED TO BE ACCURATE BUT ARE PRESENTED WITHOUT WARRANTY OF ANY KIND,EXPRESS OR IMPLIED. USERS MUST TAKE FULL RESPONSIBILITY FOR THEIR APPLICATION OF ANY PRODUCTS.
THE SOFTWARE LICENSE AND LIMITED WARRANTY FOR THE ACCOMPANYING PRODUCT ARE SET FORTH IN THE INFORMATION PACKET THAT SHIPPED WITHTHE PRODUCT AND ARE INCORPORATED HEREIN BY THIS REFERENCE. IF YOU ARE UNABLE TO LOCATE THE SOFTWARE LICENSE OR LIMITED WARRANTY,CONTACT YOUR CISCO REPRESENTATIVE FOR A COPY.
The Cisco implementation of TCP header compression is an adaptation of a program developed by the University of California, Berkeley (UCB) as part of UCB's public domain version ofthe UNIX operating system. All rights reserved. Copyright © 1981, Regents of the University of California.
NOTWITHSTANDING ANY OTHERWARRANTY HEREIN, ALL DOCUMENT FILES AND SOFTWARE OF THESE SUPPLIERS ARE PROVIDED “AS IS" WITH ALL FAULTS.CISCO AND THE ABOVE-NAMED SUPPLIERS DISCLAIM ALL WARRANTIES, EXPRESSED OR IMPLIED, INCLUDING, WITHOUT LIMITATION, THOSE OFMERCHANTABILITY, FITNESS FOR A PARTICULAR PURPOSE AND NONINFRINGEMENT OR ARISING FROM A COURSE OF DEALING, USAGE, OR TRADE PRACTICE.
IN NO EVENT SHALL CISCO OR ITS SUPPLIERS BE LIABLE FOR ANY INDIRECT, SPECIAL, CONSEQUENTIAL, OR INCIDENTAL DAMAGES, INCLUDING, WITHOUTLIMITATION, LOST PROFITS OR LOSS OR DAMAGE TO DATA ARISING OUT OF THE USE OR INABILITY TO USE THIS MANUAL, EVEN IF CISCO OR ITS SUPPLIERSHAVE BEEN ADVISED OF THE POSSIBILITY OF SUCH DAMAGES.
Any Internet Protocol (IP) addresses and phone numbers used in this document are not intended to be actual addresses and phone numbers. Any examples, command display output, networktopology diagrams, and other figures included in the document are shown for illustrative purposes only. Any use of actual IP addresses or phone numbers in illustrative content is unintentionaland coincidental.
All printed copies and duplicate soft copies of this document are considered uncontrolled. See the current online version for the latest version.
Cisco has more than 200 offices worldwide. Addresses and phone numbers are listed on the Cisco website at www.cisco.com/go/offices.
Cisco and the Cisco logo are trademarks or registered trademarks of Cisco and/or its affiliates in the U.S. and other countries. To view a list of Cisco trademarks, go to this URL:https://www.cisco.com/c/en/us/about/legal/trademarks.html. Third-party trademarks mentioned are the property of their respective owners. The use of the word partner does not imply apartnership relationship between Cisco and any other company. (1721R)
© 2021 Cisco Systems, Inc. All rights reserved.

C O N T E N T S
Introduction 1C H A P T E R 1
What's New in this Release 1
Cisco Content Security Management Overview 5
Setup, Installation, and Basic Configuration 9C H A P T E R 2
Solution Deployment Overview 9
SMA Compatibility Matrix 10
Installation Planning 10
Network Planning 10
About Integrating a Security Management Appliance with Email Security Appliances 11
Deployments with Clustered Email Security Appliances 11
Preparing for Setup 11
Physically Setting Up and Connecting the Appliance 11
Determining Network and IP Address Assignments 12
Gathering the Setup Information 12
Accessing the Security Management Appliance 13
Browser Requirements 13
About Accessing the Web Interfaces 14
Accessing the Web Interface 15
Accessing the Legacy Web Interface 16
Accessing the Command Line Interface 16
Supported Languages 16
Accessing the New Web Interface on Dark Mode 17
Accessing the Security Management Appliance API Interface Using Swagger UI 17
Running the System Setup Wizard 17
Before You Begin 18
User Guide for AsyncOS 14.1 for Cisco Secure Email and Web Manager- GD (General Deployment)iii

Overview of the System Setup Wizard 18
Launch the System Setup Wizard 19
Review the End User License Agreement 19
Configure the System Settings 19
Configure the Network Settings 20
Review Your Configuration 20
Proceeding to the Next Steps 21
About Adding Managed Appliances 21
Editing Managed Appliance Configurations 21
Removing an Appliance from the List of Managed Appliances 22
Configuring Services on the Security Management Appliance 22
Committing and Abandoning Configuration Changes 23
Working With Reports 25C H A P T E R 3
Ways to View Reporting Data 25
How the Security Management Appliance Gathers Data for Reports 26
How Reporting Data is Stored 26
About Reporting and Upgrades 27
Customizing Your View of Report Data 27
Viewing Reporting Data for an Appliance or Reporting Group 27
Choosing a Time Range for Reports 28
(Web Reports Only) Choosing Which Data to Chart 28
Customizing Tables on Report Pages 29
Custom Reports 29
Modules That Cannot Be Added to Custom Reports 30
Creating Your Custom Report Page 30
Viewing Details of Messages or Transactions Included in Reports 31
Improving Performance of Email Reports 31
Exporting Reporting and Tracking Data 33
Exporting Report Data as a Comma Separated Values (CSV) File 34
Subdomains vs. Second Level Domains in Reporting and Tracking 35
Troubleshooting All Reports 35
Unable to View Report Data on Backup Security Management Appliance 36
Reporting Is Disabled 36
User Guide for AsyncOS 14.1 for Cisco Secure Email and Web Manager- GD (General Deployment)iv
Contents

Email and Web Reports 36
Working With Reports on the New Web Interface 37C H A P T E R 4
Ways to View Reporting Data 37
How the Security Management Appliance Gathers Data for Reports 38
How Reporting Data is Stored 38
About Reporting and Upgrades 39
Using the Interactive Report Pages 39
Customizing Your View of Report Data 40
Viewing Reporting Data for an Appliance or Reporting Group 40
Choosing a Time Range for Reports 41
(Web Reports Only) Choosing Which Data to Chart 41
(Email Reports Only) Customizing Views on Report Pages 42
Customizing Tables on Report Pages 42
Using Counters to Filter Data on the Trend Graphs 43
My Favorite Reports Page 43
Modules That Cannot Be Added to the My Favorite Reports Page 44
Adding Reports on the My Favorite Reports Page 44
Viewing Details of Messages or Transactions Included in Reports 45
Improving Performance of Email Reports 45
Exporting Reporting and Tracking Data 47
Exporting Report Data as a Comma Separated Values (CSV) File 48
Troubleshooting All Reports 49
Unable to View Report Data on Backup Security Management Appliance 49
Reporting Is Disabled 49
Using Centralized Email Security Reporting 51C H A P T E R 5
Centralized Email Reporting Overview 51
Setting Up Centralized Email Reporting 52
Enabling Centralized Email Reporting 52
Enabling Centralized Email Reporting on the Legacy Web Interface 52
Enabling Centralized Email Reporting on the New Web Interface 53
Creating Email Reporting Groups 54
Adding the Centralized Email Reporting Service to Each Managed Email Security Appliance 54
User Guide for AsyncOS 14.1 for Cisco Secure Email and Web Manager- GD (General Deployment)v
Contents

Enabling Centralized Email Reporting on Email Security Appliances 55
Working with Email Report Data 55
Working with Email Report Data on the New Web Interface 56
Searching and the Interactive Email Report Pages 57
Understanding the Email Reporting Pages 57
Table Column Descriptions for Email Reporting Pages 62
Email Reporting Overview Page 64
How Incoming Mail Messages are Counted 65
How Email Messages Are Categorized by the Appliances 65
Categorizing Email Messages on the Overview Page 65
Incoming Mail Page 68
Views Within the Incoming Mail Page 68
Incoming Mail Details Table 70
Sender Profile Pages 70
Sender Groups Report Page 71
Sender Domain Reputation Page 72
Outgoing Destinations Page 72
Outgoing Senders Page 73
Internal Users Page 74
Internal User Details Page 75
Searching for a Specific Internal User 75
DLP Incidents 75
DLP Incidents Details Table 76
DLP Policy Detail Page 77
Message Filters 77
Geo Distribution 77
High Volume Mail 77
Content Filters Page 78
Content Filter Details Page 78
DMARC Verification 78
Macro Detection 79
External Threat Feeds Page 79
Virus Types Page 79
URL Filtering Page 80
User Guide for AsyncOS 14.1 for Cisco Secure Email and Web Manager- GD (General Deployment)vi
Contents

Web Interaction Tracking Page 81
Forged Email Detection Page 82
Safe Print Page 82
Mail Policy Details Report Page 82
Advanced Phishing Protection Page 82
Advanced Phishing Protection Page on Legacy Web Interface 83
Advanced Phishing Protection Page on New Web Interface 83
Advanced Malware Protection (File Reputation and File Analysis) Reporting Pages 84
Requirements for File Analysis Report Details 84
Identifying Files by SHA-256 Hash 85
File Reputation and File Analysis Report Pages 86
Viewing File Reputation Filtering Data in Other Reports 88
For Which Files Are Detailed File Analysis Results Visible in the Cloud? 88
Mailbox Auto Remediation 88
TLS Connections Page 89
Inbound SMTP Authentication Page 90
Rate Limits Page 90
Outbreak Filters Page 91
Reporting of Graymail 93
Reporting of Marketing Messages after Upgrade to AsyncOS 9.5 93
System Capacity Page 93
How to Interpret the Data You See on System Capacity Page 94
System Capacity – Workqueue 94
System Capacity – Incoming Mail 95
System Capacity – Outgoing Mail 95
System Capacity – System Load 95
System Capacity – All 96
Threshold Indicator in System Capacity Graphs 97
Reporting Data Availability Page 97
Understanding the Email Reporting Pages on the New Web Interface 97
Mail Flow Summary Page 101
How Incoming Mail Messages are Counted 104
How Email Messages Are Categorized by the Appliances 104
Categorizing Email Messages on the Mail Flow Summary Page 104
User Guide for AsyncOS 14.1 for Cisco Secure Email and Web Manager- GD (General Deployment)vii
Contents

System Capacity Page 106
How to Interpret the Data You See on System Capacity Page 107
System Capacity – Workqueue 108
System Capacity – Incoming Mail 108
System Capacity – Outgoing Mail 108
System Capacity – System Load 109
System Capacity – All 110
Threshold Indicator in System Capacity Graphs 110
Advanced Malware Protection Page 110
Advanced Malware Protection – Summary 111
Advanced Malware Protection – AMP Reputation 111
Advanced Malware Protection – File Analysis 112
Advanced Malware Protection – File Retrospection 113
Advanced Malware Protection – Mailbox Auto Remediation 113
Requirements for File Analysis Report Details 113
Identifying Files by SHA-256 Hash 115
Viewing File Reputation Filtering Data in Other Reports 115
For Which Files Are Detailed File Analysis Results Visible in the Cloud? 115
Virus Filtering Page 116
Virus Types Detail Table 117
Macro Detection Page 117
DMARC Verification Page 118
Domains by DMARC Verification Details Table 118
Outbreak Filtering Page 119
URL Filtering Page 120
Forged Email Detection Page 122
Sender Domain Reputation Page 122
External Threat Feeds Page 122
Safe Print Page 123
Advanced Phishing Protection Reports Page 123
Mail Flow Details Page 124
Views Within the Mail Flow Details Page 125
Incoming Mails Table 126
Sender Profile Pages 129
User Guide for AsyncOS 14.1 for Cisco Secure Email and Web Manager- GD (General Deployment)viii
Contents

Sender Details Table 130
Sender Groups Page 131
Outgoing Destinations Page 131
Outgoing Destinations Detail Table 132
TLS Encryption Page 133
TLS Connections Details Table 135
Inbound SMTP Authentication Page 136
Rate Limits Page 137
Connections by Country Page 138
Domain Protection Page 138
User Mail Summary 139
User Mail Flow Details Table 140
Searching for a Specific Internal User 141
DLP Incident Summary Page 142
Web Interaction Page 143
Web Interaction Tracking Details 144
Remediation Reports Page 144
Message Filters Page 146
High Volume Mail Page 147
Content Filters Page 147
Content Filter Details Page 148
Reporting Data Availability Page 148
Reporting of Graymail 148
Reporting of Marketing Messages after Upgrade to AsyncOS 9.5 149
About Scheduled and On-Demand Email Reports 149
Additional Report Types 150
Domain-Based Executive Summary Report 150
Executive Summary Report 153
Scheduled Reports Page 153
Scheduling Email Reports 153
Adding Scheduled Reports 154
Editing Scheduled Reports 154
Discontinuing Scheduled Reports 155
Generating Email Reports On Demand 155
User Guide for AsyncOS 14.1 for Cisco Secure Email and Web Manager- GD (General Deployment)ix
Contents

Archived Email Reports Page 156
Viewing and Managing Archived Email Reports 156
Accessing Archived Reports 157
Deleting Archived Reports 157
Scheduling and Archiving Email Reports on the New Web Interface 157
Scheduling Email Reports on the New Web Interface 157
Adding Scheduled Reports on the New Web Interface 158
Editing Scheduled Reports on the New Web Interface 159
Discontinuing Scheduled Reports on the New Web Interface 159
Archived Email Reports Page on the New Web Interface 159
Accessing Archived Reports on the New Web Interface 159
Generating Email Reports On Demand 160
Deleting Archived Reports on the New Web Interface 161
Troubleshooting Email Reports 161
Outbreak Filters Reports Do Not Show Information Correctly 161
Message Tracking Results Do Not Match Report Results After Clicking a Link in a Report 162
Advanced Malware Protection Verdict Updates Report Results Differ 162
Issues Viewing File Analysis Report Details 162
File Analysis Report Details Are Not Available 162
Error When Viewing File Analysis Report Details 162
Error When Viewing File Analysis Report Details with Private Cloud Cisco AMP Threat GridAppliance 163
Logging of File Analysis-Related Errors 163
Total Graymail or Marketing Messages Appears To Be Incorrect 163
Using Centralized Web Reporting and Tracking 165C H A P T E R 6
Centralized Web Reporting and Tracking Overview 165
Setting Up Centralized Web Reporting and Tracking 167
Enabling Centralized Web Reporting on the Security Management Appliance 167
Enabling Centralized Web Reporting on Web Security Appliances 167
Adding the Centralized Web Reporting Service to Each Managed Web Security Appliance 167
Anonymizing User Names in Web Reports 168
Working with Web Security Reports 169
Working with Web Security Reports on the New Web Interface 169
User Guide for AsyncOS 14.1 for Cisco Secure Email and Web Manager- GD (General Deployment)x
Contents

Web Reporting Page Descriptions 170
About Time Spent 172
Web Reporting Overview 173
Users Report (Web) 174
User Details (Web Reporting) 175
User Count Report (Web) 177
Web Sites Report 177
URL Categories Report 178
Reducing Uncategorized URLs 179
URL Category Set Updates and Reports 179
Using The URL Categories Page in Conjunction with Other Reporting Pages 179
Reporting Misclassified and Uncategorized URLs 180
Application Visibility Report 180
Understanding the Difference between Application versus Application Types 180
Anti-Malware Report 182
Malware Category Report 183
Malware Threat Report 183
Malware Category Descriptions 183
Advanced Malware Protection (File Reputation and File Analysis) Reports 184
Requirements for File Analysis Report Details 185
Identifying Files by SHA-256 Hash 186
Advanced Malware Protection (File Reputation and File Analysis) Report Pages 187
Viewing File Reputation Filtering Data in Other Reports 188
For Which Files Are Detailed File Analysis Results Visible in the Cloud? 188
Client Malware Risk Report 189
Web Reputation Filters Report 190
What are Web Reputation Filters? 190
Adjusting Web Reputation Settings 191
L4 Traffic Monitor Report 191
SOCKS Proxy Report 193
Reports by User Location 193
System Capacity Page 194
Viewing the System Capacity Report 195
How to Interpret the Data You See on the System Capacity Page 195
User Guide for AsyncOS 14.1 for Cisco Secure Email and Web Manager- GD (General Deployment)xi
Contents

System Capacity - System Load 195
System Capacity - Network Load 196
Note About Proxy Buffer Memory Swapping 196
Data Availability Page 196
Understanding the Web Reporting Pages on the New Web Interface 197
About Time Spent 199
Overview Page 199
Application Visibility Page 201
Layer 4 Traffic Monitor Page 203
SOCKS Proxy Page 205
URL Categories Page 206
Reducing Uncategorized URLs 207
URL Category Set Updates and Reports 208
Using The URL Categories Page in Conjunction with Other Reporting Pages 208
Reporting Misclassified and Uncategorized URLs 208
Users Page 209
User Details Page (Web Reporting) 210
Web Sites Page 212
HTTPS Reports Page 213
Anti-Malware Page 214
Malware Category Report 216
Malware Threat Report 216
Malware Category Descriptions 216
Advanced Malware Protection Page 217
Advanced Malware Protection - AMP Summary 218
Advanced Malware Protection - File Analysis 219
Client Malware Risk Report 219
Web Reputation Filters Page 220
About Scheduled and On-Demand Web Reports 222
Scheduling Web Reports 223
Storage of Scheduled Web Reports 224
Adding Scheduled Web Reports 224
Editing Scheduled Web Reports 225
Deleting Scheduled Web Reports 225
User Guide for AsyncOS 14.1 for Cisco Secure Email and Web Manager- GD (General Deployment)xii
Contents

Additional Extended Web Reports 225
Top URL Categories—Extended 225
Top Application Types—Extended 226
Generating Web Reports on Demand 226
Archived Web Reports Page 227
Viewing and Managing Archived Web Reports 228
Schedule and Archive Web Reports on the New Web Interface 228
Scheduling Web Reports on the New Web Interface 228
Adding Scheduled Web Reports on the New Web Interface 229
Editing Scheduled Web Reports on the New Web Interface 229
Deleting Scheduled Web Reports on the New Web Interface 229
Archiving Web Reports on the New Web Interface 230
[New Web Interface] Generating Web Reports on Demand 230
Viewing and Managing Archived Web Reports on the New Web Interface 231
Web Tracking 231
Searching for Transactions Processed by Web Proxy Services 231
Malware Category Descriptions 234
Searching for Transactions Processed by the L4 Traffic Monitor 235
Searching for Transactions Processed by the SOCKS Proxy 235
Web Tracking on the New Web Interface 236
Searching for Transactions Processed by Web Proxy Services 236
Malware Category Descriptions 238
Searching for Transactions Processed by the Layer 4 Traffic Monitor 240
Searching for Transactions Processed by the SOCKS Proxy 240
Working with Web Tracking Search Results 241
Displaying More Web Tracking Search Results 241
Understanding Web Tracking Search Results 241
Viewing Transaction Details for Web Tracking Search Results 241
About Web Tracking and Advanced Malware Protection Features 242
About Web Tracking and Upgrades 243
Troubleshooting Web Reporting and Tracking 243
Centralized Reporting Is Enabled Properly But Not Working 243
Advanced Malware Protection Verdict Updates Report Results Differ 243
Issues Viewing File Analysis Report Details 243
User Guide for AsyncOS 14.1 for Cisco Secure Email and Web Manager- GD (General Deployment)xiii
Contents

File Analysis Report Details Are Not Available 243
Error When Viewing File Analysis Report Details 244
Error When Viewing File Analysis Report Details with Private Cloud Cisco AMP Threat GridAppliance 244
Expected Data Is Missing from Reporting or Tracking Results 244
PDF Shows Only a Subset of Web Tracking Data 245
Troubleshooting L4 Traffic Monitor Reports 245
Exported .CSV file is Different From Web Interface Data 245
Issues Exporting Web Tracking Search Results 245
Tracking Messages 247C H A P T E R 7
Tracking Service Overview 247
Setting Up Centralized Message Tracking 248
Enabling Centralized Email Tracking 248
Enabling Centralized Email Tracking on the Legacy Web Interface 249
Enabling Centralized Email Tracking on the New Web Interface 249
Configuring Centralized Message Tracking on Email Security Appliances 249
Adding the Centralized Message Tracking Service to Each Managed Email Security Appliance250
Managing Access to Sensitive Information 251
Checking Message Tracking Data Availability 251
Searching for Email Messages 251
Searching for Email Messages on the New Web Interface 251
Searching for Email Messages on the Legacy Web Interface 253
Remediating Messages in Mailboxes 255
Search and Remediate Actions on Messages in the Mailboxes 256
Narrowing the Result Set 257
About Message Tracking and Advanced Malware Protection Features 258
Understanding Tracking Query Results 259
Message Details 259
Verdict Chart and Last State Verdicts 260
Envelope and Header Summary 261
Sending Host Summary 261
Processing Details 261
User Guide for AsyncOS 14.1 for Cisco Secure Email and Web Manager- GD (General Deployment)xiv
Contents

Troubleshooting Message Tracking 262
Expected Messages Are Missing from Search Results 262
Attachments Do Not Appear in Search Results 263
Exporting Message Service 263
Spam Quarantine 265C H A P T E R 8
Overview of the Spam Quarantine 265
Local Versus External Spam Quarantine 265
Setting Up the Centralized Spam Quarantine 266
Enabling and Configuring Spam Quarantine 266
Enabling and Configuring the Spam Quarantine on the Legacy Web Interface 266
Enabling and Configuring Spam Quarantine on the New Web Interface 268
Adding the Centralized Spam Quarantine Service to Each Managed Email Security Appliance 270
Configuring an Outbound IP Interface on the Security Management Appliance 270
Configuring the IP Interface for Browser Access to the Spam Quarantine 271
Configuring Administrative User Access to the Spam Quarantine 272
Spam Quarantine Threshold Alert 273
Configuring Spam Quarantine Threshold Alert Settings Using CLI 273
Configuring Spam Quarantine Threshold Alert Settings Using GUI 273
Limiting Which Recipients Have Mail Quarantined 274
Spam Quarantine Language 274
Edit Spam Quarantine Page 274
Using Safelists and Blocklists to Control Email Delivery Based on Sender 274
Message Processing of Safelists and Blocklists 275
Enabling Safelists and Blocklists 275
Enabling Safelists and Blocklists on the Legacy Web Interface 276
Enabling Safelists and Blocklists on the New Web Interface 276
External Spam Quarantine and Safelist/Blocklists 277
Adding Senders and Domains to Safelists and Blocklists (Administrators) 277
Syntax for Safelists and Blocklist Entries 281
Clearing All Safelists and Blocklists 282
About End-User Access to Safelists and Blocklists 282
Adding Entries to Safelists (End Users) 282
Adding Senders to Blocklists (End Users) 283
User Guide for AsyncOS 14.1 for Cisco Secure Email and Web Manager- GD (General Deployment)xv
Contents

Backing Up and Restoring the Safelist/Blocklist 283
Troubleshooting Safelists and Blocklists 284
Message from Safelisted Sender Was Not Delivered 284
Configuring Spam Management Features for End Users 285
Authentication Options for End Users Accessing Spam Management Features 285
LDAP Authentication Process 286
IMAP/POP Authentication Process 287
SAML 2.0 Authentication Process 287
Setting Up End-User Access to the Spam Quarantine via Web Browser 287
Configuring End-User Access to the Spam Quarantine 288
Determining the URL for End-User Access to the Spam Quarantine 289
Which Messages an End User Sees 289
Notifying End Users About Quarantined Messages 290
Recipient Email Mailing List Aliases and Spam Notifications 292
Testing Notifications 293
Troubleshooting Spam Notifications 293
Managing Messages in the Spam Quarantine 294
Accessing the Spam Quarantine (Administrative Users) 294
Accessing the Spam Quarantine (Administrative Users) 294
Searching for Messages in the Spam Quarantine 294
Searching Very Large Message Collections 295
Viewing Messages in the Spam Quarantine 295
Delivering Messages in the Spam Quarantine 295
Deleting Messages from the Spam Quarantine 296
Disk Space for the Spam Quarantine 296
About Disabling the External Spam Quarantine 296
Troubleshooting Spam Quarantine Features 296
Centralized Policy, Virus, and Outbreak Quarantines 297C H A P T E R 9
Overview of Centralized Quarantines 297
Quarantine Types 298
Centralizing Policy, Virus, and Outbreak Quarantines 299
Enabling Centralized Policy, Virus, and Outbreak Quarantines on the SecurityManagement Appliance301
User Guide for AsyncOS 14.1 for Cisco Secure Email and Web Manager- GD (General Deployment)xvi
Contents
Enabling Centralized Policy, Virus, and Outbreak Quarantines on the New Web Interface of theAppliance 302
Adding the Centralized Policy, Virus, and Outbreak Quarantine Service to Each Managed EmailSecurity Appliance 302
Configuring Migration of Policy, Virus, and Outbreak Quarantines 303
Designating an Alternate Appliance to Process Released Messages 305
Configuring Centralized Quarantine Access for Custom User Roles 305
Disabling Centralized Policy, Virus, and Outbreak Quarantines 305
Releasing Messages When an Email Security Appliance Is Unavailable 306
Managing Policy, Virus, and Outbreak Quarantines 306
Disk Space Allocation for Policy, Virus, and Outbreak Quarantines 306
Retention Time for Messages in Quarantines 307
Default Actions for Automatically Processed Quarantined Messages 308
Checking the Settings of System-Created Quarantines 308
Configuring Policy, Virus, and Outbreak Quarantines 308
About Editing Policy, Virus, and Outbreak Quarantine Settings 310
Determining the Filters and Message Actions to Which a Policy Quarantine Is Assigned 311
About Deleting Policy Quarantines 311
Monitoring Quarantine Status, Capacity, and Activity 311
Alerts About Quarantine Disk-Space Usage 313
Policy Quarantines and Logging 313
About Distributing Message Processing Tasks to Other Users 314
Which User Groups Can Access Policy, Virus, and Outbreak Quarantines 314
Working with Messages in Policy, Virus, or Outbreak Quarantines 314
Viewing Messages in Quarantines 315
Quarantined Messages and International Character Sets 316
Searching for Messages in Policy, Virus, and Outbreak Quarantines 316
Modifying Search Criteria 316
Manually Processing Messages in a Quarantine 317
Sending a Copy of the Message 317
About Moving Messages Between Policy Quarantines 318
Messages in Multiple Quarantines 318
Message Details and Viewing Message Content 318
Viewing Matched Content 319
User Guide for AsyncOS 14.1 for Cisco Secure Email and Web Manager- GD (General Deployment)xvii
Contents

Downloading Attachments 320
About Rescanning of Quarantined Messages 320
The Outbreak Quarantine 321
Rescanning Messages in an Outbreak Quarantine 321
Rule Summary View 321
Manage by Rule Summary Link 322
Reporting False Positives or Suspicious Messages to Cisco Systems 322
Troubleshooting Centralized Policy Quarantines 322
Administrative User Cannot Choose Quarantines in Filters and DLP Message Actions 322
Messages Released from a Centralized Outbreak Quarantine Are Not Rescanned 322
Managing Web Security Appliances 323C H A P T E R 1 0
About Centralized Configuration Management 323
Determining the Correct Configuration Publishing Method 323
Using Configuration Masters to Centrally Manage Web Security Appliances 324
Important Notes About Using Configuration Masters 327
Determine the Configuration Master Versions to Use 327
Enabling Centralized Configuration Management on the Security Management Appliance 327
Initializing and Configuring Configuration Masters 328
Initializing Configuration Masters 328
About Associating Web Security Appliances to Configuration Masters 328
Adding Web Security Appliances and Associating Them with Configuration Master Versions329
Associating Configuration Masters to Web Security Appliances 330
Configuring Sub Configuration Masters 330
Viewing Associated Configuration Masters in the Appliance List 331
Deleting Sub Configuration Masters 331
Selecting the Sub Configuration Master as the Active Configuration 331
Configuring Settings to Publish 332
Importing from an Existing Configuration Master 332
Importing Settings from a Web Security Appliance 333
Configuring Web Security Features Directly in Configuration Masters 333
Ensuring that Features are Enabled Consistently 335
Comparing Enabled Features 336
User Guide for AsyncOS 14.1 for Cisco Secure Email and Web Manager- GD (General Deployment)xviii
Contents

Enabling Features to Publish 336
Disabling Unused Configuration Masters 337
Setting Up to Use Advanced File Publishing 338
Publishing Configurations to Web Security Appliances 338
Publishing a Configuration Master 338
Before You Publish a Configuration Master 338
Publishing a Configuration Master Now 340
Publishing a Configuration Master Later 341
Publishing a Configuration Master Using the Command Line Interface 342
Publishing Configurations Using Advanced File Publishing 342
Advanced File Publish: Publish Configuration Now 342
Advanced File Publish: Publish Later 343
Viewing Status and History of Publishing Jobs 343
Viewing Publish History 344
Centralized Upgrade Management 344
Setting Up Centralized Upgrade Management for Web Security Appliances 344
Enable the Centralized Upgrade Manager 345
Adding the Centralized Upgrade Service to Each Managed Web Security Appliance 345
Selecting and Downloading WSA Upgrades 346
Using the Install Wizard 347
Viewing Web Security Appliance Status 348
Viewing a Summary of Status of Web Appliances 348
Viewing Status of Individual Web Security Appliances 348
Web Appliance Status Details 349
System Health Dashboard on the New Web Interface 349
Preparing For and Managing URL Category Set Updates 351
Understand the Impacts of URL Category Set Updates 351
Ensure That You Will Receive Notifications and Alerts about URL Category Set Updates 351
Specify Default Settings for New and Changed Categories 351
When the URL Category Set is Updated, Check Your Policy and Identity/Identification ProfileSettings 352
Application Visibility and Control (AVC) Updates 352
Troubleshooting Configuration Management Issues 352
In Configuration Master Identities/Identification Profiles, Groups Are Not Available 352
User Guide for AsyncOS 14.1 for Cisco Secure Email and Web Manager- GD (General Deployment)xix
Contents

Configuration Master Access Policies Web Reputation and Anti-Malware Settings Page Settings areNot as Expected 353
Troubleshooting Issues when Importing Existing Configuration for Configuration Masters 353
Troubleshooting Configuration Publishing Failures 353
Monitoring System Status 355C H A P T E R 1 1
About Security Management Appliance Status 355
Monitoring Service Status on the New Web Interface of the Appliance 356
Monitoring Security Management Appliance Capacity 357
Monitoring the Processing Queue 357
Monitoring CPU Utilization 357
Monitoring Status of Data Transfer From Managed Appliances 358
Viewing the Configuration Status of Your Managed Appliances 359
Additional Status Information for Web Security Appliances 359
Monitoring Reporting Data Availability Status 360
Monitoring Email Security Reporting Data Availability 360
Monitoring Web Security Reporting Data Availability 360
Monitoring Email Tracking Data Status 361
Monitoring Capacity of Managed Appliances 361
Identifying Active TCP/IP Services 361
Replacing a Managed Appliance During Hardware Failure 361
Integrating With LDAP 363C H A P T E R 1 2
Overview 363
Configuring LDAP to Work with the Spam Quarantine 363
Creating the LDAP Server Profile 364
Testing LDAP Servers 366
Configuring LDAP Queries 366
LDAP Query Syntax 366
Tokens 367
Spam Quarantine End-User Authentication Queries 367
Sample Active Directory End-User Authentication Settings 368
Sample OpenLDAP End-User Authentication Settings 368
Spam Quarantine Alias Consolidation Queries 368
User Guide for AsyncOS 14.1 for Cisco Secure Email and Web Manager- GD (General Deployment)xx
Contents

Sample Active Directory Alias Consolidation Settings 369
Sample OpenLDAP Alias Consolidation Settings 369
Testing LDAP Queries 370
Domain-Based Queries 370
Creating a Domain-Based Query 371
Chain Queries 372
Creating a Chain Query 372
Configuring AsyncOS to Work With Multiple LDAP Servers 373
Testing Servers and Queries 373
Failover 374
Configuring the Cisco Content Security Appliance for LDAP Failover 374
Load Balancing 375
Configuring the Cisco Content Security Appliance for Load Balancing 375
Configuring External Authentication of Administrative Users Using LDAP 376
User Accounts Query for Authenticating Administrative Users 376
Group Membership Queries for Authenticating Administrative Users 377
Enabling External Authentication of Administrative Users 378
Configuring SMTP Routing 379C H A P T E R 1 3
SMTP Routes Overview 379
SMTP Routes, Mail Delivery, and Message Splintering 380
SMTP Routes and Outbound SMTP Authentication 380
Routing Email for Local Domains 380
Default SMTP Route 380
Managing SMTP Routes 381
Defining an SMTP Route 381
SMTP Routes Limits 381
Adding SMTP Routes 381
Exporting SMTP Routes 382
Importing SMTP Routes 382
SMTP Routes and DNS 383
Integrating with Cisco SecureX or Cisco Threat Response 385C H A P T E R 1 4
Integrating Your Appliance with Cisco SecureX or Cisco Threat Response 385
User Guide for AsyncOS 14.1 for Cisco Secure Email and Web Manager- GD (General Deployment)xxi
Contents
How to Integrate Your Appliance with Cisco SecureX or Cisco Threat Response 386
Prerequisites 387
Enable the Cisco SecureX Integration on your Security Management Appliance 387
Register Cisco SecureX or Cisco Threat Response on Your Security Management Appliance 388
Reregistering with Cisco Cloud Service Portal 388
Confirm Whether the Registration was Successful 389
Enabling Cisco SecureX or Threat Response on content Security Gateway 389
Enabling Cisco Cloud Services Portal on Content Security Gateway 389
Performing Threat Analysis using Cisco SecureX Ribbon 390
Accessing the Cisco SecureX Ribbon 391
Adding Observable to Casebook for Threat Analysis using Cisco SecureX Ribbon and PivotMenu 392
Performing Remedial Actions on Messages in Cisco SecureX Threat Response 393
Distributing Administrative Tasks 395C H A P T E R 1 5
About Distributing Administrative Tasks 395
Assigning User Roles 395
Predefined User Roles 396
Custom User Roles 398
About Custom Email User Roles 398
About Custom Web User Roles 402
Deleting Custom User Roles 404
User Roles with Access to the CLI 404
Using LDAP 404
Access to Quarantines 404
Users Page 404
About Authenticating Administrative Users 404
Changing the Admin User’s Passphrase 405
Changing the User’s Passphrase After Expiry 405
Managing Locally-Defined Administrative Users 405
Adding Locally-Defined Users 406
Editing Locally-Defined Users 406
Deleting Locally-Defined Users 407
Viewing the List of Locally-Defined Users 407
User Guide for AsyncOS 14.1 for Cisco Secure Email and Web Manager- GD (General Deployment)xxii
Contents

Setting and Changing Passphrases 407
Setting Passphrase and Login Requirements 407
Requiring Users to Change Passphrase on Demand 412
Locking and Unlocking Local User Accounts 412
External User Authentication 413
Configuring LDAP Authentication 413
Enabling RADIUS Authentication 413
Two-Factor Authentication 416
Enabling Two-Factor Authentication 416
Disabling Two-Factor Authentication 417
Adding an Email or Web Security appliance over SSH with Pre-Shared Keys 417
Additional Controls on Access to the Security Management Appliance 418
Configuring IP-Based Network Access 418
Direct Connections 418
Connecting Through a Proxy 419
Creating the Access List 419
Configuring the Web UI Session Timeout 421
Configuring the CLI Session Timeout 422
Controlling Access to Sensitive Information in Message Tracking 422
Displaying a Message for Administrative Users 423
Enabling and Disabling Message Banners for Administrative Users 423
Viewing Administrative User Activity 423
Viewing Active Sessions Using the Web 423
Viewing Your Recent Login Attempts 424
Viewing Administrative User Activity via the Command Line Interface 424
Troubleshooting Administrative User Access 425
Error: User Has No Access Privileges Assigned 425
User Has No Active Menus 425
Externally-Authenticated Users See Preferences Option 425
Common Administrative Tasks 427C H A P T E R 1 6
Performing Administrative Tasks 428
Cisco Content Security Management Appliances Licensing 428
Working with Feature Keys 428
User Guide for AsyncOS 14.1 for Cisco Secure Email and Web Manager- GD (General Deployment)xxiii
Contents

Virtual Appliance Licensing and Feature Keys 429
Smart Software Licensing 429
Overview 429
Enabling Smart Software Licensing 430
Registering the Appliance with Cisco Smart Software Manager 431
Requesting for Licenses 432
Deregistering the Appliance from Smart Cisco Software Manager 433
Reregistering the Appliance with Smart Cisco Software Manager 433
Changing Transport Settings 433
Renewing Authorization and Certificate 433
Updating Smart Agent 434
Alerts 434
Command Line Interface 435
Smart Software Licensing Key Points for AsyncOS 14.0 445
Performing Maintenance Tasks Using CLI Commands 445
Shutting Down the Security Management Appliance 445
Rebooting the Security Management Appliance 446
Taking the Security Management Appliance Out of Service 446
CLI Examples: suspend and suspendtransfers Commands 447
Resuming from a Suspended State 447
CLI Examples: resume and resumetransfers Commands 447
Resetting the Configuration to Factory Defaults 447
The resetconfig Command 448
Displaying the Version Information for AsyncOS 448
Enabling Remote Power Cycling 449
Monitoring System Health Using SNMP 450
Example: snmpconfig Command 450
Backing Up Security Management Appliance Data 452
What Data Is Backed Up 452
Restrictions and Requirements for Backups 452
Backup Duration 454
Availability of Services During Backups 454
Interruption of a Backup Process 454
Prevent the Target Appliance From Pulling Data Directly from Managed Appliances 455
User Guide for AsyncOS 14.1 for Cisco Secure Email and Web Manager- GD (General Deployment)xxiv
Contents

Receiving Alerts About Backup Status 455
Scheduling Single or Recurring Backups 455
Starting an Immediate Backup 456
Checking Backup Status 456
Backup Information in Log Files 457
Other Important Backup Tasks 457
Making a Backup Appliance the Primary Appliance 457
Disaster Recovery on the Security Management Appliance 458
Upgrading Appliance Hardware 460
Upgrading AsyncOS 460
Batch Commands for Upgrades 461
Determining Network Requirements for Upgrades and Updates 461
Choosing an Upgrade Method: Remote vs. Streaming 461
Streaming Upgrade Overview 461
Remote Upgrade Overview 462
Hardware and Software Requirements for Remote Upgrades 462
Hosting a Remote Upgrade Image 463
Important Differences in Remote Upgrading Method 463
Configuring Upgrade and Service Update Settings 463
Upgrade and Update Settings 464
Static Upgrade and Update Server Settings for Environments with Strict Firewall Policies 465
Configuring the Update and Upgrade Settings from the GUI 467
Upgrade Notifications 468
Before You Upgrade: Important Steps 468
Upgrading AsyncOS 468
Viewing Status of, Canceling, or Deleting a Background Download 470
After Upgrading 471
About Reverting to an Earlier Version of AsyncOS 471
Important Note About Reversion Impact 471
Reverting AsyncOS 471
About Updates 473
About URL Category Set Updates for Web Usage Controls 473
Configuring the Return Address for Generated Messages 473
Managing Alerts 473
User Guide for AsyncOS 14.1 for Cisco Secure Email and Web Manager- GD (General Deployment)xxv
Contents

Alert Types and Severities 474
Alert Delivery 474
Viewing Recent Alerts 475
About Duplicate Alerts 475
Cisco AutoSupport 476
Hardware Alert Descriptions 476
System Alert Descriptions 476
Changing Network Settings 480
Changing the System Hostname 480
The sethostname Command 480
Configuring Domain Name System Settings 480
Specifying DNS Servers 481
Multiple Entries and Priority 481
Using the Internet Root Servers 481
Reverse DNS Lookup Timeout 482
DNS Alert 482
Clearing the DNS Cache 482
Configuring DNS Settings via the Graphical User Interface 482
Configuring TCP/IP Traffic Routes 483
Managing Static Routes in the GUI 483
Modifying the Default Gateway (GUI) 483
Configuring the Default Gateway 483
Specifying a Secure Communication Protocol 483
Configuring the System Time 484
Using a Network Time Protocol (NTP) Server 485
(Recommended) Setting Appliance System Time Using the Network Time Protocol (NTP) 485
Selecting a GMT Offset 485
Updating Time Zone Files 486
Automatically Updating Time Zone Files 486
Manually Updating Time Zone Files 486
Configuration File Page 486
Saving and Importing Configuration Settings 487
Managing Configuration Files 487
Saving and Exporting the Current Configuration File 487
User Guide for AsyncOS 14.1 for Cisco Secure Email and Web Manager- GD (General Deployment)xxvi
Contents

Loading a Configuration File 488
Resetting the Current Configuration 490
Rolling Back to a Previously Committed Configuration 490
CLI Commands for Configuration Files 490
The showconfig, mailconfig, and saveconfig Commands 491
The loadconfig Command 491
The rollbackconfig Command 492
The publishconfig Command 492
The trailblazerconfig Command 492
The updatepvocert Command 493
Uploading Configuration Changes Using the CLI 493
Managing Disk Space 494
(Virtual Appliances Only) Increasing Available Disk Space 495
Viewing Disk Space, Quotas and Usage 495
About Disk Space Maximums and Allocations 496
Ensuring That You Receive Alerts About Disk Space 496
Managing Disk Space for the Miscellaneous Quota 496
Reallocating Disk Space Quotas 497
Adjusting the Reference Threshold in System Health Graphs for Email Security Appliances 497
SSO Using SAML 2.0 498
About SSO and SAML 2.0 498
SAML 2.0 SSO Workflow 498
Guidelines and Limitations for SAML 2.0 499
Logout 500
General 500
Spam Quarantine Access for Administrators 500
How to Configure SSO on your Cisco Security Management Appliance 500
Prerequisites 500
Configure Cisco Content Security Management Appliance as a Service Provider 501
Configuring the Identity Provider to Communicate with Cisco SecurityManagement Appliance503
Configure Identity Provider Settings on Cisco Content Security Management Appliance 505
Enable SAML Authentication 506
How to Configure SSO for Spam Quarantine 507
User Guide for AsyncOS 14.1 for Cisco Secure Email and Web Manager- GD (General Deployment)xxvii
Contents

Prerequisites 507
Configure Cisco Content Security Management Appliance as a Service Provider 508
Configure the Identity Provider to Communicate with Cisco Content Security ManagementAppliance 509
Configure Identity Provider Settings on Cisco Content Security Management Appliance 511
Enable SSO for Spam Quarantine 512
Configuring OpenID Connect 1.0 on Cisco Content Security Management for AsyncOS APIs 512
Overview 512
Workflow 513
Sample Access Token 513
Prerequisites 514
Configuring OpenID Connect on Appliance 514
Configuring OpenID Connect on Appliance using CLI 515
Customizing Your View 515
Using Favorite Pages 515
Setting Preferences 516
General Settings 517
Monitoring Web Usage Analytics 517
Improving Web Interface Rendering 517
Restarting and Viewing Status of Services Enabled on Appliance 517
Managing Lists of Certificate Authorities 519
Disabling the System Certificate Authority List 519
Importing a Custom Certificate Authority List 520
Exporting a Certificate Authority List 520
Displaying Trust Root Certificate 521
Deleting Custom Certificate 521
Receiving and Delivering Messages with Internationalised Domain Names (IDNs) 521
Prerequisites IDN 522
Features Configurable using IDN Domains in Cisco Secure Email and Web Manager 522
FQDN 523
Validation on Peer Certificate 523
Validation on Peer Certificate Using the GUI 523
Validation on Peer Certificate Using the CLI 524
Custom CA Validation 524
User Guide for AsyncOS 14.1 for Cisco Secure Email and Web Manager- GD (General Deployment)xxviii
Contents

Appliance Certificate Validation 524
Single Pane of Glass 525
SPoG Add a Cisco Secure Email and Web Manager 525
SPoG Edit a Cisco Secure Email and Web Manager 526
SPoG Delete a Cisco Secure Email and Web Manager 528
SPoG Enable Services on a Cisco Secure Email and Web Manager 529
SPoG Viewing details on primary Cisco Secure Email and Web Manager 529
Logging 531C H A P T E R 1 7
Logging Overview 531
Logging Versus Reporting 531
Log Retrieval 531
Filename and Directory Structure 533
Log Rollover and Transfer Schedule 533
Timestamps in Log Files 534
Logs Enabled by Default 534
Log Types 535
Summary of Log Types 536
Log Type Comparison 538
Using Configuration History Logs 540
Using CLI Audit Logs 540
Using FTP Server Logs 541
Using HTTP Logs 542
Using Spam Quarantine Logs 542
Using Spam Quarantine GUI Logs 543
Using Text Mail Logs 543
Sample Text Mail Log 544
Examples of Text Mail Log Entries 545
Generated or Rewritten Messages 548
Sending a Message to the Spam Quarantine 548
Using NTP Logs 548
Using Reporting Logs 549
Using Reporting Query Logs 549
Using Safelist/Blocklist Logs 550
User Guide for AsyncOS 14.1 for Cisco Secure Email and Web Manager- GD (General Deployment)xxix
Contents

Using SMA Logs 551
Using Status Logs 552
Using System Logs 554
Understanding Tracking Logs 555
Using Audit Logs 555
Log Subscriptions 557
Configuring Log Subscriptions 557
Setting the Log Level 558
Creating a Log Subscription in the GUI 559
Editing Log Subscriptions 559
Configuring Global Settings for Logging 560
Logging Message Headers 560
Configuring Global Settings for Logging by Using the GUI 561
Rolling Over Log Subscriptions 561
Rolling Over Logs in Log Subscriptions 562
Rolling Over Logs Immediately Using the GUI 562
Rolling Over Logs Immediately via the CLI 562
Viewing the Most Recent Log Entries in the GUI 562
Viewing the Most Recent Entries in Logs (tail Command) 562
Configuring Host Keys 563
Troubleshooting 567C H A P T E R 1 8
Collecting System Information 567
Troubleshooting Hardware Issues 567
Troubleshooting Feature Setup Issues 567
General Troubleshooting Resources 568
Troubleshooting Issues with Specific Functionality 568
Responding to Alerts 569
Alert: Battery Relearn Timed Out (RAID Event) on 380 or 680 Hardware 569
Additional Alert Descriptions 569
Working with Technical Support 569
Opening or Updating a Support Case from the Appliance 569
Getting Support for Virtual Appliances 570
Enabling Remote Access for Cisco Technical Support Personnel 570
User Guide for AsyncOS 14.1 for Cisco Secure Email and Web Manager- GD (General Deployment)xxx
Contents
Enabling Remote Access to Appliances With an Internet Connection 571
Enabling Remote Access to Appliances Without a Direct Internet Connection 571
Disabling a Tech Support Tunnel 572
Disabling Remote Access 572
Checking the Status of the Support Connection 572
Running a Packet Capture 572
Remotely Resetting Appliance Power 573
IP Interfaces and Accessing the Appliance 575A P P E N D I X A
IP Interfaces and Accessing the Appliance 575
IP Interfaces 575
Configuring IP Interfaces 576
Creating IP Interfaces Using the GUI 576
Accessing the Appliance via FTP 577
Secure Copy (scp) Access 579
Accessing via a Serial Connection 579
Pinout Details for the Serial Port in 80- and 90- Series Hardware 580
Pinout Details for the Serial Port in 70-Series Hardware 580
Assigning Network and IP Addresses 583A P P E N D I X B
Ethernet Interfaces 583
Selecting IP Addresses and Netmasks 583
Sample Interface Configurations 584
IP Addresses, Interfaces, and Routing 584
Summary 585
Strategies for Connecting Your Content Security Appliance 585
Firewall Information 587A P P E N D I X C
Firewall Information 587
Web Security Management Examples 591A P P E N D I X D
Web Security Management Examples 591
Web Security Appliance Examples 591
Example 1: Investigating a User 591
User Guide for AsyncOS 14.1 for Cisco Secure Email and Web Manager- GD (General Deployment)xxxi
Contents

Example 2: Tracking a URL 593
Example 3: Investigating Top URL Categories Visited 593
Additional Resources 595A P P E N D I X E
Cisco Notification Service 595
Documentation 595
Third Party Contributors 596
Training 596
Knowledge Base Articles (TechNotes) 597
Cisco Support Community 597
Customer Support 597
Registering for a Cisco Account 597
Cisco Welcomes Your Comments 598
End User License Agreement 599A P P E N D I X F
Cisco Systems End User License Agreement 599
Supplemental End User License Agreement for Cisco Systems Content Security Software 605
User Guide for AsyncOS 14.1 for Cisco Secure Email and Web Manager- GD (General Deployment)xxxii
Contents

C H A P T E R 1Introduction
This chapter contains the following sections:
• What's New in this Release, on page 1• Cisco Content Security Management Overview, on page 5
What's New in this ReleaseThis section describes the new features and enhancements in this release of AsyncOS for Cisco ContentSecurity Management.
Table 1: What's New in AsyncOS 14.1
DescriptionFeature
In AsyncOS 14.0, you can now view the current status andconfiguration of theWeb Security appliance in a page. You mustchooseMonitoring > SystemHealth to monitor the system statusof the Web security appliances.
For more information, see SystemHealth Dashboard on the NewWeb Interface, on page 349.
New System Health Status Dashboard
In AsyncOS 14.1.0, export tracking has been enhanced as:
• View additional fields to perform analysis and investigationon related mails using the Export file option along withmessage details.
• When you perform an export, themaximum number of rowsyou can view is now set to 50000.
For more information, see Exporting Message Service, on page263 .
Export Tracking Data
Administrators can create custom roles with read-only optionfor Quarantine messages. The read-only option prevents usersfrom deleting or releasing messages and only have read-onlyaccess to quarantine.
Quarantine Custom Access Role
User Guide for AsyncOS 14.1 for Cisco Secure Email and Web Manager- GD (General Deployment)1

DescriptionFeature
AsyncOS 14.1.0 sends alerts when a certain number of spammessages are quarantined in a specified duration. The alerts arealso entered in the syslogs on generation. In addition to this,Cisco Secure Email and Web Manager triggers an alert once thequarantine threshold is reached.
Spam Quarantine Threshold Alert
AsyncOS 14.1.0 enables you to save more time without havingto perform multiple logins in multiple Cisco Secure Email andWeb Managers. You can view the reporting, tracking, andquarantine pages of individual Cisco Secure Email and WebManager on a primary appliance. To perform this, you can selectthe required Cisco Secure Email and Web Manager from thedrop-down listed on the Tracking, Reporting, and Quarantinepage.
For more information, see Single Pane of Glass , on page 525.
Single Pane of Glass
You can reregister your Cisco Secure Email and Web Managerwith the Cisco Cloud Services portal based on any one of thefollowing scenarios:
• If you are unable to view or manage the devices added tothe Cisco Cloud Services portal when you automaticallyregister your email gateway with the Cisco Cloud Servicesportal.
• If your Smart Account and Cisco Cloud Services Accountare not linked when you automatically register yourappliance with the Cisco Cloud Services portal.
Formore information, see Reregisteringwith Cisco Cloud ServicePortal, on page 388.
Smart Licensing re-registration
Following are the new parameters that you need to use toconfigure the Syslog Push log retrieval method in your CiscoSecure Email and Web Manager:
• Port number of the remote Syslog server.
• Maximum size of the log message that is sent to the remoteSyslog server.
• [For TCP protocol only]: TLS connection between CiscoSecure Email and Web Manager and the remote Syslogserver.
New Parameters for Syslog Push- LogRetrieval Method
User Guide for AsyncOS 14.1 for Cisco Secure Email and Web Manager- GD (General Deployment)2
IntroductionWhat's New in this Release

Table 2: What's New in AsyncOS 14.0
DecsriptionFeature
The following are the enhancements made to theIncoming Mail reporting pages in the legacy webinterface of your appliance:
Incoming Mail report page:
Added new column – Stopped by Domain ReputationFiltering in the Incoming Mail Details section.
Changed Stopped by Reputation Filtering columnname to Stopped by IP Reputation Filtering in theIncoming Mail Details section.
For more information, see Using Centralized EmailSecurity Reporting, on page 51
Enhanced Overview and Incoming Mail reportingpages
You can now view the current status and configurationof the Web Security appliance in a page. You mustchooseMonitoring > System Health to monitor thesystem status of the Web security appliances.
For more information, see System Health Dashboardon the New Web Interface, on page 349.
New System Health Status Dashboard
The appliance uses stored trusted certificate authoritiesto verify a certificate from a remote domain toestablish the credentials of the domain. You canconfigure the security management appliance to usethe following trusted certificate authorities:
• System List
• Custom List
For more information, see Common AdministrativeTasks, on page 427
Working with Certificates
User Guide for AsyncOS 14.1 for Cisco Secure Email and Web Manager- GD (General Deployment)3
IntroductionWhat's New in this Release

DecsriptionFeature
Cloud Service will be enabled and Appliance will beregistered automatically when smart licensing isenabled and registered.
• To enable or disable Cisco SecureX and CiscoThreat response, the option is introduced underthe generalconfig command.
• The command threstresponseconfig will displaythe warning message “Enter general configcommand to Enable/Disable of Cisco SecureX/Threat Response feature”.
• The command smartaccountinfo is introducedfor getting the Smart account information.
• When you enable CloudServices, Cisco SecureXwill be enabled automatically and Cisco Securexwill be disabled when CloudServices is disabled.
For more information, see Integrating with CiscoSecureX or Cisco Threat Response.
Smart Licensing
You must use the general configuration settings toenable Cisco SecureX or Threat Response on ContentSecurity Gateway.
For more information, see Integrating with CiscoSecureX or Cisco Threat Response.
Enabling Cisco SecureX or Threat Response onContent Security Gateway
A new report – Mail Policy Details is added in thenew web interface of your appliance. Use this reportto view the number of messages that match aconfigured mail policy.
For more information, see Using Centralized EmailSecurity Reporting, on page 51
New report for mail policy details
In Cisco Threat Response, you can now investigateand apply the following remedial actions on messagesprocessed by your appliance:
• Delete
• Forward
• Forward and Delete
For more information, see Integrating with CiscoSecureX or Cisco Threat Response.
Performing Remedial Actions on Messages in CiscoThreat Response
User Guide for AsyncOS 14.1 for Cisco Secure Email and Web Manager- GD (General Deployment)4
IntroductionWhat's New in this Release

DecsriptionFeature
AsyncOS 14.0 can now receive and deliver messageswith email addresses that contain IDN domains.Currently, your email gateway provides support ofIDN domains for the following languages only:
• Indian Regional Languages: Hindi, Tamil,Telugu, Kannada, Marati, Punjabi, Malayalam,Bengali, Gujarati, Urdu, Assamese, Nepali,Bangla, Bodo, Dogri, Kashmiri, Konkani,Maithili, Manipuri, Oriya, Sanskrit, Santali,Sindhi, and Tulu.
• European andAsian Languages: French, Russian,Japanese, German, Ukrainian, Korean, Spanish,Italian, Chinese, Dutch, Thai, Arabic, andKazakh.
For more information, see Introduction, on page 1
Support for Internationalized Domain Name (IDN)
A new field Custom Logo Position is included thatenables you to add the same logo to the SPAMnotification email at the given position.
SPAM Notification
We have rebranded the product, and relateddocumentation from “Cisco Content SecurityManagement” to “Cisco Secure Email and WebManager.”
Rebranded Product and Related Documentation
A new passphrase rule is added in your Email andWeb Manager to define your login passphrase:
For more information, see Common AdministrativeTasks, on page 427
Passphrases
For a X.509 certificate, the FQDN validation validatesthe common name field (CN) of that certificate'ssubject distinguished name and the subjectAltNameextension of type dNSName (SAN:dNSName)
For more information, see Common AdministrativeTasks, on page 427
FQDN
Cisco Content Security Management OverviewAsyncOS for Cisco Content Security Management incorporates the following features:
• External Spam Quarantine:Hold spam and suspected spam messages for end users, and allow endusers and administrators to reviewmessages that are flagged as spam before making a final determination.
User Guide for AsyncOS 14.1 for Cisco Secure Email and Web Manager- GD (General Deployment)5
IntroductionCisco Content Security Management Overview

• Centralized Policy, Virus, and Outbreak Quarantines: Provide a single interface for managing thesequarantines and the messages quarantined in them from multiple Email Security appliances. Allows youto store quarantined messages behind the firewall.
• Centralized reporting:Run reports on aggregated data frommultiple Email andWeb Security appliances.The same reporting features available on individual appliances are available on Security Managementappliances.
• Centralized tracking: Use a single interface to track email messages and web transactions that wereprocessed by multiple Email and Web Security appliances.
• Centralized Configuration Management for Web Security appliances: For simplicity and consistency,manage policy definition and policy deployment for multiple Web Security appliances.
The Security Management appliance is not involved in centralized emailmanagement, or ‘clustering’ of Email Security appliances.
Note
• Centralized Upgrade Management:You can simultaneously upgrade multipleWeb Security appliances(WSAs) using a single Security Management Appliance (SMA).
• Backup of data: Back up the data on your Security Management appliance, including reporting andtracking data, quarantined messages, and lists of safe and blocked senders.
• Support for Internationalized Domain Name (IDN): AsyncOS 14.0 can now receive and delivermessages with email addresses that contain IDN domains. Currently, your content security gatewayprovides support of IDN domains for the following languages only:
• Indian Regional Languages: Hindi, Tamil, Telugu, Kannada, Marati, Punjabi, Malayalam, Bengali,Gujarati, Urdu, Assamese, Nepali, Bangla, Bodo, Dogri, Kashmiri, Konkani, Maithili, Manipuri,Oriya, Sanskrit, Santali, Sindhi, and Tulu.
• European and Asian Languages: French, Russian, Japanese, German, Ukrainian, Korean, Spanish,Italian, Chinese, Dutch, Thai, Arabic, and Kazakh.
For this release, you can only configure few features using IDN domains in your content security gateway.
• SMTP Routes Configuration Settings- Add or edit IDN domains, Export or import SMTP routes usingIDN domains.
• Reporting Configuration Settings: View IDN data - usernames, email addresses, and domains) in thereports.
• Message Tracking Configuration Settings: View IDN data- usernames, email addresses, and domains)in message tracking.
• Policy, Virus, and Outbreak Quarantine Configuration Settings: View messages with IDN domains thatmay be transmitting malware, as determined by the anti-virus engine, View messages with IDN domainscaught by Outbreak Filters as potentially being spam or malware, View messages with IDN domainscaught by message filters, content filters, and DLP message actions.
• SpamQuarantine Configuration Settings- Viewmessages with IDN domains detected as spam or suspectedspam, Add email addresses with IDN domains to the safelist and blocklist categories.
User Guide for AsyncOS 14.1 for Cisco Secure Email and Web Manager- GD (General Deployment)6
IntroductionCisco Content Security Management Overview

You can coordinate your security operations from a single Security Management appliance or spread the loadacross multiple appliances.
User Guide for AsyncOS 14.1 for Cisco Secure Email and Web Manager- GD (General Deployment)7
IntroductionCisco Content Security Management Overview

User Guide for AsyncOS 14.1 for Cisco Secure Email and Web Manager- GD (General Deployment)8
IntroductionCisco Content Security Management Overview

C H A P T E R 2Setup, Installation, and Basic Configuration
This chapter contains the following sections:
• Solution Deployment Overview, on page 9• SMA Compatibility Matrix, on page 10• Installation Planning , on page 10• Preparing for Setup , on page 11• Accessing the Security Management Appliance , on page 13• Accessing the Security Management Appliance API Interface Using Swagger UI, on page 17• Running the System Setup Wizard, on page 17• About Adding Managed Appliances, on page 21• Configuring Services on the Security Management Appliance, on page 22• Committing and Abandoning Configuration Changes , on page 23
Solution Deployment OverviewTo configure your Cisco Secure Email and Web Managerto provide service to your Cisco Secure Email andWeb Manager solution:
More InformationDo ThisOn These Appliances
See the SMA Compatibility Matrix,on page 10.
Ensure that your appliances meet the systemrequirements for the features you will use. Ifnecessary, upgrade your appliances.
All appliancesStep 1
See the documentation for yourCisco Email Security release.
Before you introduce centralized services toyour environment, configure all Email Securityappliances to provide the security features youwant, and verify that all features are workingas expected on each appliance.
Email Security appliancesStep 2
See the AsyncOS for Cisco WebSecurity Appliances User Guide.
Before you introduce centralized services toyour environment, configure at least one WebSecurity appliance to provide the securityfeatures you want, and verify that all featuresare working as expected.
Web Security appliancesStep 3
User Guide for AsyncOS 14.1 for Cisco Secure Email and Web Manager- GD (General Deployment)9

More InformationDo ThisOn These Appliances
See the Installation Planning , onpage 10, Preparing for Setup , onpage 11 and the Running the SystemSetup Wizard, on page 17.
Set up the appliance and run the System SetupWizard.
Security Managementappliance
Step 4
Start with the Configuring Serviceson the Security ManagementAppliance, on page 22.
Configure each centralized service that youwant to deploy.
All appliancesStep 5
SMA Compatibility MatrixFor compatibility of your Security Management appliance with Email Security appliances and Web Securityappliances, and for compatibility of configuration files when importing and publishingWeb Security applianceconfigurations, see the Compatibility Matrix athttp://www.cisco.com/c/en/us/support/security/content-security-management-appliance/products-release-notes-list.html.
Installation Planning• Network Planning , on page 10• About Integrating a Security Management Appliance with Email Security Appliances , on page 11• Deployments with Clustered Email Security Appliances , on page 11
Network PlanningThe Security Management appliance lets you separate end user applications from the more secure gatewaysystems residing in your demilitarized zones (DMZs). Using a two-layer firewall can provide flexibility innetwork planning so that end users do not connect directly to the outer DMZ .Figure 1: Typical Network Configuration Incorporating the Security Management appliance
The following figure shows a typical network configuration incorporating the SecurityManagement applianceand multiple DMZs. You deploy the Security Management appliance outside your DMZ, in your internal
User Guide for AsyncOS 14.1 for Cisco Secure Email and Web Manager- GD (General Deployment)10
Setup, Installation, and Basic ConfigurationSMA Compatibility Matrix

networks. All connections are initiated by the Security Management appliances (M-Series) to the managedEmail Security appliances (C-Series) and managed Web Security appliances (S-Series).
Corporate data centers can share a Security Management appliance to perform centralized reporting andmessage tracking for multiple Web and Email Security appliances, and centralized policy configuration formultiple Web Security appliances. The Security Management appliance can also be used as an external spamquarantine.
After you connect the Email Security appliance and the Web Security appliances to a Security Managementappliance and properly configure all appliances, AsyncOS gathers and aggregates data from the managedappliances. From the aggregated data, reports can be generated and an overall view of email and web usagecan be determined.
About Integrating a Security Management Appliance with Email SecurityAppliances
Additional information about integrating the Security Management appliance with your Email Securityappliances, see the “Centralizing Services on a Cisco Content Security Management Appliance” chapter inthe user documentation or online help for your Email Security appliance.
Deployments with Clustered Email Security AppliancesThe Security Management appliance cannot be placed in a cluster of Email Security appliances that are usingthe email appliances’ centralized management feature. However, clustered Email Security appliances candeliver messages to the SecurityManagement appliance for centralized reporting and tracking and to quarantinemessages.
Preparing for SetupBefore you run the System Setup Wizard:
Step 1 Review the latest release notes for your product. See Network Planning , on page 10.Step 2 Verify that the components of your security solution are compatible. See the SMA Compatibility Matrix, on page 10.Step 3 Ensure that your network and physical space are ready to support this deployment. See Installation Planning , on page
10.Step 4 Physically set up and connect the SecurityManagement appliance. See Physically Setting Up and Connecting the Appliance
, on page 11.Step 5 Determine network and IP address assignments. See Determining Network and IP Address Assignments, on page 12.Step 6 Gather information about your system setup. See Gathering the Setup Information, on page 12.
Physically Setting Up and Connecting the ApplianceBefore you follow the procedures in this chapter, complete the steps described in the quick start guide thatcame with your appliance. In this guide, it is assumed that you have unpacked the appliance, physicallyinstalled it in a rack, and turned it on.
User Guide for AsyncOS 14.1 for Cisco Secure Email and Web Manager- GD (General Deployment)11
Setup, Installation, and Basic ConfigurationAbout Integrating a Security Management Appliance with Email Security Appliances

Before you can log in to the GUI, you need to set up a private connection between a PC and the SecurityManagement appliance. For example, you can use the included crossover cable to connect directly from theManagement port on the appliance to a laptop. Optionally, you can connect through an Ethernet connectionbetween a PC and the network (for example, an Ethernet hub) and between the network and the Managementport on the Security Management appliance.
Determining Network and IP Address Assignments
If you have already cabled your appliance to your network, ensure that the default IP address for the contentsecurity appliance does not conflict with other IP addresses on your network. The IP address that ispre-configured on the Management port of each appliance is 192.168.42.42.
Note
After setup, go to the Management Appliance > Network > IP Interfaces page on the main SecurityManagement appliance to change the interface that the Security Management appliance uses.
You need the following network information about each Ethernet port that you choose to use:
• IP address• Netmask
In addition, you need the following information about your overall network:
• IP address of the default router (gateway) on your network• IP address and hostname of your DNS servers (not required if you want to use Internet root servers)• Hostname or IP address of your NTP servers (not required if you want to manually set system time)
For more information, see Assigning Network and IP Addresses, on page 583.
If you are running a firewall on your network between the Internet and the content security appliance, it maybe necessary to open specific ports for the appliance to work properly. For more information on firewalls, seeFirewall Information, on page 587
Always use the same IP address on the Security Management appliance for receiving and sending emailmessages to the Email Security appliances. For an explanation, see information about Mail Flow in thedocumentation for your Email Security appliance.
Note
Note that IPv6 is not supported for communication between the Cisco Secure Email and Web Managerappliance and the appliances it manages.
Gathering the Setup InformationUse the following table to gather information about system setup. You will need this information at handwhile running the System Setup Wizard.
See the Assigning Network and IP Addresses, on page 583 for detailed information about network and IPaddresses.
Note
User Guide for AsyncOS 14.1 for Cisco Secure Email and Web Manager- GD (General Deployment)12
Setup, Installation, and Basic ConfigurationDetermining Network and IP Address Assignments

The following table shows the system setup worksheet
Email address where system alerts are sent:Notifications1
NTP Server (IP address or hostname):System Time2
Choose a new passphrase for the “admin” account:Admin Passphrase3
Enable AutoSupport? ___ Yes ___ NoAutoSupport4
Fully qualified hostname of the Security Management appliance:Hostname5
IP address:Interface / IP Address6
Netmask:
Default Gateway (router) IP address:GatewayNetwork7
___ Use the Internet’s root DNS serversDNS
___ Use these DNS servers:
Accessing the Security Management ApplianceThe Security Management appliance has a standard web-based graphical user interface, a separate web-basedinterface for managing the spam quarantine, a command-line interface, and special or limited web interfacesfor administrative users granted access to specific features and functionality.
• Browser Requirements, on page 13
• About Accessing the Web Interfaces , on page 14
• Accessing the Legacy Web Interface, on page 16
• Accessing the Web Interface , on page 15
• Accessing the Command Line Interface, on page 16
• Supported Languages, on page 16
• Accessing the New Web Interface on Dark Mode, on page 17
Browser RequirementsTo access the GUI, your browser must support and be enabled to accept JavaScript and cookies, and it mustbe able to render HTML pages containing Cascading Style Sheets (CSS).
Table 3: Supported Browsers and Releases
MacOS 10.6Windows 7Browser
7.0 and later—Safari
User Guide for AsyncOS 14.1 for Cisco Secure Email and Web Manager- GD (General Deployment)13
Setup, Installation, and Basic ConfigurationAccessing the Security Management Appliance

MacOS 10.6Windows 7Browser
Latest StableVersion
Latest StableVersion
Google Chrome
—11.0Microsoft Internet Explorer
Latest StableVersion
Latest StableVersion
Mozilla Firefox
• Internet Explorer 11.0 (Windows 7 only)
• Safari (7 and later)
• Firefox (Latest Stable Version)
• Google Chrome (Latest Stable Version)
Browsers are supported only for operating systems officially supported by the browser.
You may need to configure your browser’s pop-up blocking settings in order to use the GUI, because somebuttons or links in the interface will cause additional windows to open.
For a seamless navigation and rendering of HTML pages, Cisco recommends using the following browsersto access the new web interface of the appliance (AsyncOS 12.0 and later):
• Google Chrome (Latest Stable Version)
• Mozilla Firefox (Latest Stable Version)
You can access the legacy web interface of the appliance on any of the supported browsers.
The supported resolution for the new web interface of the appliance (AsyncOS 12.0 and later) is between1280x800 and 1680x1050. The best viewed resolution is 1440x900, for all the browsers.
Cisco does not recommend viewing the new web interface of the appliance on higher resolutions.Note
About Accessing the Web InterfacesThe Security Management appliance has two web interfaces: the standard administrator interface, availableby default on port 80, and the spam quarantine end user interface, available by default on port 82. The spamquarantine HTTPS interface defaults to port 83 when enabled.
Because you can specify HTTP or HTTPS when configuring each of the web interfaces (go to ManagementAppliance > Network > IP Interfaces on the Security Management appliance), you may be asked toreauthenticate if you switch between the two during your session. For example, if you access the admin webinterface through HTTP on port 80 and then, in the same browser, access the spam quarantine end user webinterface through HTTPS on port 83, you are asked to reauthenticate if you return to the admin web interface.
User Guide for AsyncOS 14.1 for Cisco Secure Email and Web Manager- GD (General Deployment)14
Setup, Installation, and Basic ConfigurationAbout Accessing the Web Interfaces

Do not perform any configuration changes simultaneously using:
• Multiple tabs on the same browser.
• Multiple browsers on the same system or two different systems.
Also, do not use concurrent web interface and CLI sessions as it may lead to unexpected behavior.
Note
Accessing the Web Interface
Step 1 Open your web browser and enter the IP address or host name of your appliance.Step 2 [New Web Interface Only] You can access the new web interface in any one of the following ways:
The new web interface of your appliance uses AsyncOS API HTTP/HTTPS ports (6080/6443) and trailblazerHTTPS port (4431). You can use the trailblazerconfig command in the CLI to configure the trailblazerHTTPS ports. Make sure that the trailblazer HTTPS port is opened on the firewall.
Note
• When trailblazerconfig CLI command is enabled, use the following URL -https://example.com:<trailblazer-https-port>/ng-login
where example.com is the appliance host name and <trailblazer-https-port> is the trailblazer HTTPS portconfigured on the appliance.
For more information on the trailblazerconfig CLI command, seeThe trailblazerconfig Command, on page 492.
• When trailblazerconfig CLI command is disabled, use the following URL -https://example.com:<https-port>/ng-login
where example.com is the appliance host name and <https-port> is the HTTPS port configured on the appliance.
• Log in to the legacy web interface and click Security Management appliance is getting a new look. Try it!! linkto access the new web interface.
• Make sure that AsyncOS API is enabled on the appliance.
• You must login to the legacy web interface of the appliance.
• If trailblazerconfig is enabled, the configured HTTPS port must be opened on the firewall. The defaultHTTPS port is 4431.
Also ensure that your DNS server can resolve the hostname that you specified for accessing the appliance.
• If trailblazerconfig is disabled, the AsycnOS API ports configured in Management Appliance >Network > IP Interfaces, are opened on the firewall. The default AsyncOS API HTTP/HTTPS port is6080/6443.
Important
Step 3 Enter the following default values:
• User name: admin
• Passphrase: ironport
User Guide for AsyncOS 14.1 for Cisco Secure Email and Web Manager- GD (General Deployment)15
Setup, Installation, and Basic ConfigurationAccessing the Web Interface

This passphrase is NOT valid after you complete the System Setup Wizard, either using the web interface orthe command-line interface.
Note
Accessing the Legacy Web Interface
Youmust login to the SecurityManagement Appliance to access the legacyweb interface. Formore information,see Accessing the Web Interface , on page 15
Note
To enable and configure reporting, message tracking, quarantines, network access, and monitor system status,you must access the legacy web interface.
To access the legacy web interface from the new web interface, click on the gear icon as shown in thefollowing figure:Figure 2: Accessing the Legacy Web Interface from the
The legacy web interface opens in a new browser window. You must log in again to access it.
If you want to log out of the appliance completely, you need to log out of both the new and legacy webinterfaces of your appliance.
Accessing the Command Line InterfaceThe command line interface, or CLI, is accessed on the Email and Web Managerappliance in the same waythat the CLI is accessed on all Cisco Content Security appliances. There are, however, some differences:
• System setup must be performed through the GUI.• Some CLI commands are not available on the appliance. For a list of which commands are not supported,see the IronPort AsyncOS CLI Reference Guide for Cisco Content Security Appliances.
For production deployments, you should use SSH to access the CLI. Use a standard SSH client to access theappliance on port 22. For lab deployments, you can also use telnet; however, this protocol is not encrypted.
Supported LanguagesWith the appropriate license key, AsyncOS can display the GUI and CLI in any of the following languages:
• English• French• Spanish• German• Italian• Korean• Japanese
User Guide for AsyncOS 14.1 for Cisco Secure Email and Web Manager- GD (General Deployment)16
Setup, Installation, and Basic ConfigurationAccessing the Legacy Web Interface

• Portuguese (Brazil)• Chinese (traditional and simplified)• Russian
To choose the GUI and default reporting language, do one of the following:
• Set the language preference. See Setting Preferences , on page 516.• Use the Options menu at the top right side of the GUI window to select the language for the session.
(The method that works depends on the method used to authenticate your login credentials.)
Accessing the New Web Interface on Dark ModeDark Mode is a reversed color scheme that utilizes light-colored typography, UI elements, and iconographyon dark backgrounds. You can now use dark mode on the new web interface of your appliance.
To switch to the dark mode web interface on your appliance, click on the user information section on the topright corner of the new web interface and select Dark Mode.
Accessing the Security Management Appliance API InterfaceUsing Swagger UI
Swagger UI allows you to visualize and interact with the API resources of your appliance. This is automaticallygenerated from your API specifications. For more information, see https://swagger.io/tools/swagger-ui/.
You can log in to the Swagger UI on the new web interface of your Security Management appliance in anyone of the following ways:
• Use the following URL - https://example.com:<trailblazer-https-port>/swagger
where example.com is the appliance host name and <trailblazer-https-port> is the trailblazer HTTPSport configured on the appliance.
You must enable the trailblazer HTTPS port on the appliance to access theSwagger UI. For more information on the trailblazerconfig CLI command,see The trailblazerconfig Command, on page 492.
Note
• Log in to the new web interface of your appliance. Click the ? button on the upper-right corner and selectAPI Help: Swagger from the drop-down. The Swagger UI opens in a new browser window.
Running the System Setup WizardAsyncOS provides a browser-based System Setup Wizard to guide you through the process of systemconfiguration. Later, you may want to take advantage of custom configuration options not available in thewizard. However, you must use the wizard for the initial setup to ensure a complete configuration.
The Security Management appliance supports this wizard via the GUI only. It does not support system setupthrough the command line interface (CLI).
User Guide for AsyncOS 14.1 for Cisco Secure Email and Web Manager- GD (General Deployment)17
Setup, Installation, and Basic ConfigurationAccessing the New Web Interface on Dark Mode

• Before You Begin , on page 18• Overview of the System Setup Wizard , on page 18
Before You BeginComplete all tasks in the Preparing for Setup , on page 11.
The System Setup Wizard completely reconfigures the appliance. Only use the wizard when you initiallyinstall the appliance, or if you want to completely overwrite the existing configuration.
Caution
Be sure to connect the Security Management appliance to your network through the Management port.
The Security Management appliance ships with a default IP address of 192.168.42.42 on the Managementport. Before connecting the Security Management appliance to your network, ensure that no other device’sIP address conflicts with the factory default setting.
Caution
By default, your session times out if you are idle for more than 30 minutes or if you close the browser withoutlogging out. If this happens, you must reenter your user name and passphrase. If the session times out whileyou are running the System Setup Wizard, you need to start over from the beginning. To change the timeoutlimit, see Configuring the Web UI Session Timeout, on page 421.
Note
Overview of the System Setup Wizard
Step 1 Launch the System Setup Wizard , on page 19Step 2 Review the End User License Agreement, on page 19Step 3 Configure the System Settings, on page 19
• Notification settings and AutoSupport
• System time settings
• Admin passphrase
Step 4 Configure the Network Settings, on page 20
• Hostname of the appliance
• IP address, network mask, and gateway of the appliance
• Default router and DNS settings
Step 5 Review Your Configuration, on page 20
User Guide for AsyncOS 14.1 for Cisco Secure Email and Web Manager- GD (General Deployment)18
Setup, Installation, and Basic ConfigurationBefore You Begin

Proceed through the wizard pages, and carefully review your configuration at Step 4. You can return to a step by clickingPrevious. At the end of the process, the wizard prompts you to commit the changes that you have made. Most changesdo not take effect until you commit them.
Step 6 Proceeding to the Next Steps, on page 21
Launch the System Setup WizardTo launch the wizard, log in to the GUI as described in the Accessing the Web Interface , on page 15. Thefirst time you log in to the GUI, the initial page of the System Setup Wizard appears by default. You can alsoaccess the System Setup Wizard from the System Administration menu (Management Appliance > SystemAdministration > System Setup Wizard).
Review the End User License AgreementBegin by reading the license agreement. After you have read and agreed to the license agreement, select thecheck box indicating that you agree, and then click Begin Setup to proceed.
Configure the System Settings
Entering an Email Address for System alertsAlerts
AsyncOS sends alert messages through email if there is a system error that requires your intervention. Enterthe email address (or addresses) where the alerts are sent.
You need to add at least one email address for the system alerts. Separate multiple addresses with commas.The email addresses that you enter initially receive all types of alerts at all levels. You can customize the alertconfiguration later. For more information, see the Managing Alerts, on page 473.
Setting the Time
Set the time zone on the Security Management appliance so that timestamps in reports, message headers andlog files are correct. Use the drop-down menus to locate your time zone or to define the time zone by GMToffset.
You can set the system clock time manually, but Cisco recommends using an Network Time Protocol (NTP)server to synchronize time with other servers on your network or the Internet. By default, the Cisco NTPserver (time.sco.cisco.com) is added as an entry to synchronize the time on your content security appliance.Enter the hostname of the NTP server, and click Add Entry to configure an additional NTP server. For moreinformation, see the Configuring the System Time, on page 484.
Setting the Passphrase
You must change the passphrase: adminpassphrase for the AsyncOS admin account. Keep the passphrase ina secure location. Changes to the passphrase take effect immediately.
If you cancel the system setup after resetting the passphrase, your passphrase changes are not undone.Note
User Guide for AsyncOS 14.1 for Cisco Secure Email and Web Manager- GD (General Deployment)19
Setup, Installation, and Basic ConfigurationLaunch the System Setup Wizard

Enabling AutoSupport
The AutoSupport feature (enabled by default) notifies Customer Support about issues with the SecurityManagement appliance so that they can provide optimal support. For more information, see the CiscoAutoSupport, on page 476.
Configure the Network SettingsDefine the hostname of the machine and then configure the gateway and DNS settings.
Verify that you have connected the SecurityManagement appliance to your network through theManagementport.
Note
Network Settings
Enter the fully qualified hostname for the Security Management appliance. This name should be assigned bythe network administrator.
Enter the IP address of the Security Management appliance.
Enter the network mask and IP address of the default deerrouter (gateway) on your network.
Next, configure the Domain Name Service (DNS) settings. AsyncOS contains a high-performance internalDNS resolver/cache that can query the Internet’s root servers directly, or the system can use DNS servers thatyou specify. If you use your own servers, you need to supply the IP address of each DNS server. You canenter up to four DNS servers when you are using the System Setup Wizard.
The DNS servers you specify have an initial priority of 0. For more information, see the Configuring DomainName System Settings, on page 480.
Note
The appliance requires access to a working DNS server to perform DNS lookups for incoming connections.If you cannot specify a working DNS server that is reachable by the appliance while you are setting up theappliance, you can select Use Internet Root DNS Servers, or else temporarily specify the IP address of theManagement interface so that you can complete the System Setup Wizard.
Note
Review Your ConfigurationNow, the System Setup Wizard displays a summary of the setup information that you have entered. If youneed to make any changes, click Previous at the bottom of the page and edit the information.
After you have reviewed the information, click Install This Configuration. Then click Install in theconfirmation dialog box that appears.
If the page appears not to respond when you click Install This Configuration, this is because the applianceis now using the the new IP address that you specified in the wizard. To continue using the appliance, use thenew IP address. If you followed the instructions in the Quick Start Guide to temporarily change the IP addressof the computer you used to access your new hardware appliance, revert your computer’s IP address to itsoriginal settings first.
User Guide for AsyncOS 14.1 for Cisco Secure Email and Web Manager- GD (General Deployment)20
Setup, Installation, and Basic ConfigurationEnabling AutoSupport

Proceeding to the Next StepsAfter you install the Security Management appliance and run the System SetupWizard, you can modify othersettings on the appliance and configure the monitoring services.
Depending on the process you used to access the appliance in order to run the system setup wizard, the SystemSetup Next Steps page appears. If this page dos not appear automatically, you can access it by choosingManagement Appliance > System Administration > Next Steps.
Click on any of the links on the System Setup Next Steps page to proceed with the configuration of your CiscoContent Security appliances.
About Adding Managed AppliancesYou will add managed Email and Web Security appliances to the Security Management appliance when youconfigure the first centralized service for each appliance.
Supported Email and Web Security appliances are shown in the SMA Compatibility Matrix, on page 10.
When you add a remote appliance, the Security Management appliance compares the product name of theremote appliance with the type of appliance you are adding. For example, you add an appliance using the AddWeb Security appliance page, the Security Management appliance checks the product name of the remoteappliance to make sure that it is a Web Security appliance and not an Email Security appliance. The SecurityManagement appliance will also check the monitoring services on the remote appliances to make sure thatthey are correctly configured and compatible.
The Security Appliances page shows themanaged appliances that you have added. The Connection Established?column shows whether or not the connection for monitoring services is properly configured.
Instructions for adding managed appliances are included in the following procedures:
• Adding the Centralized Email Reporting Service to Each Managed Email Security Appliance , on page54
• Adding the CentralizedMessage Tracking Service to EachManaged Email Security Appliance , on page250
• Adding the Centralized Spam Quarantine Service to Each Managed Email Security Appliance , on page270
• Adding the Centralized Policy, Virus, and Outbreak Quarantine Service to EachManaged Email SecurityAppliance, on page 302
• Adding the CentralizedWeb Reporting Service to Each ManagedWeb Security Appliance , on page 167
• Adding Web Security Appliances and Associating Them with Configuration Master Versions , on page329
Editing Managed Appliance Configurations
Step 1 [New Web Interface Only] On the Security Management appliance, click to load the legacy web interface.Step 2 Choose Management Appliance > Centralized Services > Security Appliances.
User Guide for AsyncOS 14.1 for Cisco Secure Email and Web Manager- GD (General Deployment)21
Setup, Installation, and Basic ConfigurationProceeding to the Next Steps

Step 3 In the Security Appliance section, click on the name of the appliance you want to edit.Step 4 Make the necessary changes to the appliance configuration.
For example, select or clear check boxes for monitoring services, reconfigure file transfer access, or change the IP address.
Changing the IP address of a managed appliance can cause several issues to occur. If you change the IP addressof a Web Security appliance, the publish history for the appliance will be lost, and publishing errors will occurif the Web Security appliance is currently selected for a scheduled publish job. (This does not affect scheduledpublish jobs that are set to use all assigned appliances.) If you change the IP address of an Email Securityappliance, the tracking availability data for the appliance will be lost.
Note
Step 5 Click Submit to submit your changes on the page, then click Commit Changes to commit your changes.
Removing an Appliance from the List of Managed Appliances
Before you begin
You may need to disable any enabled centralized services on the remote appliance before you can removethat appliance from the Security Management appliance. For example, if the Centralized Policy, Virus, andOutbreak Quarantine service is enabled, you must disable that service first on the Email Security appliance.See the documentation for your email or web security appliance.
Step 1 [New Web Interface Only] On the Security Management appliance, click to load the legacy web interface.Step 2 Choose Management Appliance > Centralized Services > Security Appliances.Step 3 In the Security Appliances section, and click the trash can icon in the row for the managed appliance that you want to
delete.Step 4 In the confirmation dialog box, click Delete.
Step 5 Submit and commit your changes.
Configuring Services on the Security Management ApplianceEmail security services:
• Using Centralized Email Security Reporting, on page 51
• Tracking Messages, on page 247
• Spam Quarantine, on page 265
• Centralized Policy, Virus, and Outbreak Quarantines, on page 297
Web security services:
• Centralized Policy, Virus, and Outbreak Quarantines, on page 297
• Managing Web Security Appliances, on page 323
User Guide for AsyncOS 14.1 for Cisco Secure Email and Web Manager- GD (General Deployment)22
Setup, Installation, and Basic ConfigurationRemoving an Appliance from the List of Managed Appliances

Committing and Abandoning Configuration ChangesAfter you make most configuration changes in the Cisco Content Security appliance GUI, you must explicitlycommit the changes.Figure 3: The Commit Changes Button
Do ThisTo
Click the orange Commit Changes button at the top right side of the window.Add a description of the changes and then click commit. If you have not madeany changes that require a commit, then a gray No Changes Pending buttonappears instead of Commit Changes.
Commit all pending changes
Click the orange Commit Changes button at the top right side of the window,then click Abandon Changes.
Abandon all pending changes
The configuration changes made on the old web interface is updated on the newweb interface, after you logoutand login to the new Cisco Content Security Management web interface.
Note
Related Topic
• Rolling Back to a Previously Committed Configuration , on page 490
User Guide for AsyncOS 14.1 for Cisco Secure Email and Web Manager- GD (General Deployment)23
Setup, Installation, and Basic ConfigurationCommitting and Abandoning Configuration Changes

User Guide for AsyncOS 14.1 for Cisco Secure Email and Web Manager- GD (General Deployment)24
Setup, Installation, and Basic ConfigurationCommitting and Abandoning Configuration Changes

C H A P T E R 3Working With Reports
This chapter contains the following sections:
• Ways to View Reporting Data , on page 25• How the Security Management Appliance Gathers Data for Reports, on page 26• Customizing Your View of Report Data , on page 27• Viewing Details of Messages or Transactions Included in Reports , on page 31• Improving Performance of Email Reports , on page 31• Exporting Reporting and Tracking Data , on page 33• Subdomains vs. Second Level Domains in Reporting and Tracking, on page 35• Troubleshooting All Reports , on page 35• Email and Web Reports , on page 36
Ways to View Reporting DataTable 4: Ways To View Reporting Data
SeeTo
• Customizing Your View of Report Data , on page 27
• Using Centralized Email Security Reporting, on page 51
• Centralized Policy, Virus, and Outbreak Quarantines, onpage 297
View and customizeweb-based interactivereport pages
• Scheduling Email Reports, on page 153
• Scheduling Web Reports , on page 223
Automatically generate recurring PDF orCSV reports
• Generating Email Reports On Demand , on page 155
• Generating Web Reports on Demand , on page 226
Generate a PDF or CSV report on demand
• Exporting Reporting and Tracking Data , on page 33
• Exporting Report Data as a Comma Separated Values (CSV)File , on page 34
Export raw data as a CSV(Comma-separated values) file
User Guide for AsyncOS 14.1 for Cisco Secure Email and Web Manager- GD (General Deployment)25

SeeTo
Exporting Reporting and Tracking Data , on page 33Generate a PDF of report data
• Generating Email Reports On Demand , on page 155
• Scheduling Email Reports, on page 153
• Generating Web Reports on Demand , on page 226
• Scheduling Web Reports , on page 223
Email report information to yourself andother people
Viewing Details of Messages or Transactions Included in Reports, on page 31
Find information about specifictransactions
For differences between logging and reporting, see Logging Versus Reporting, on page 531.Note
How the Security Management Appliance Gathers Data forReports
The Security Management appliance pulls data for all reports from all managed appliances approximatelyevery 15 minutes and aggregates the data from these appliances. Depending on your appliance, it may takeawhile for a particular message to be included in the reporting data on the Security Management appliance.Check the System Status page for information on your data.
Reporting Data includes transactions involving both IPv4 and IPv6.
When gathering data for reports, the SecurityManagement appliance applies the timestamp from the informationthat was set when you configured the time settings on the Security Management appliance. For informationon setting the time on your Security Management appliance, see the Configuring the System Time, on page484.
Note
How Reporting Data is StoredAll of the appliances store reporting data. The following table shows what time periods that each appliancestores data.
Table 5: Reporting Data Storage on the Email and Web Security Appliances
YearlyMonthlyWeeklyDailyHourlyMinute
•••••Local Reporting onEmail Security appliance or Web Security appliance
••••Centralized Reporting on Email Security appliance or Web Security appliance
•••••Security Management appliance
User Guide for AsyncOS 14.1 for Cisco Secure Email and Web Manager- GD (General Deployment)26
Working With ReportsHow the Security Management Appliance Gathers Data for Reports

About Reporting and UpgradesNew reporting features may not apply to transactions that occurred before upgrade, because the required datamay not have been retained for those transactions. For possible limitations related to reporting data andupgrades, see the Release Notes for your release.
Customizing Your View of Report DataWhen viewing report data in the web interface, you can customize your view.
Do ThisTo
Viewing Reporting Data for an Appliance or Reporting Group,on page 27
View data per appliance or reporting group
Choosing a Time Range for Reports , on page 28Specify a time range
(Web Reports Only) Choosing Which Data to Chart , on page28
(ForWeb reports) Choose which data to chart
See Customizing Tables on Report Pages , on page 29Customize tables
• For Email reports, Searching and the Interactive EmailReport Pages , on page 57.
• For Web reports, look for a Find or Filter option at thebottom of most tables.
• Some tables include links (in blue text) to details foraggregated data.
Search for specific information or a subsetof data to view
See Setting Preferences , on page 516Specify report-related preferences
See Custom Reports , on page 29.Create a custom report with only the chartsand tables you want
Not all customization features are available for every report.Note
Viewing Reporting Data for an Appliance or Reporting GroupFor Mail Flow Summary and System Capacity reports for Email, you can view data from all appliances, orfrom any one centrally-managed appliance.
For Email reports, if you have created groups of Email Security appliances as described in Creating EmailReporting Groups, on page 54, you can view the data for each reporting group.
To specify the view, select an appliance or group from the View Data For list on supported pages.
User Guide for AsyncOS 14.1 for Cisco Secure Email and Web Manager- GD (General Deployment)27
Working With ReportsAbout Reporting and Upgrades

If you are viewing report data on the SecurityManagement appliance to which you have recently taken backupfrom another Security Management appliance, you must first add (but do not establish a connection to) each
appliance in > Management Appliance > Centralized Services > Security Appliances.
Choosing a Time Range for ReportsMost predefined report pages allow you to choose a Time Range for the data to include. The time range thatyou select is used for all of the report pages until you select a different value in the Time Range menu.
Available Time Range options differ by appliance and differ for Email and Web reporting on the SecurityManagement appliance:
Time ranges on report pages are displayed as a Greenwich Mean Time (GMT) offset. For example, Pacifictime is GMT + 7 hours (GMT + 07:00).
Note
All reports display date and time information based on the systems configured time zone, shown as a GreenwichMean Time (GMT) offset. However, data exports display the time in GMT to accommodate multiple systemsin multiple time zones around the world.
Note
You can specify a default time range that will always display each time you log in. For information, see SettingPreferences , on page 516.
Tip
(Web Reports Only) Choosing Which Data to ChartThe default charts on each Web Reporting page display commonly-referenced data, but you can choose tochart different data instead. If a page has multiple charts, you can change each chart.
Generally, the chart options are the same as the columns of the table in the report. However, some columnscannot be charted.
Charts reflect all available data in a table column, regardless of the number of items (rows) you choose todisplay in the associated table.
Step 1 Click the Chart Options link below a chart.Step 2 Choose the data to display.Step 3 Click Done.
User Guide for AsyncOS 14.1 for Cisco Secure Email and Web Manager- GD (General Deployment)28
Working With ReportsChoosing a Time Range for Reports

Customizing Tables on Report PagesTable 6: Customizing Tables on Web Report Pages
More InformationDo ThisTo
For most tables, some columns are hiddenby default.
Each each report page offers differentcolumns.
See also Table Column Descriptions forEmail Reporting Pages, on page 62.
Click theColumns link below thetable, select the columns todisplay, then click Done.
• Show additional columns
• Hide visible columns
• Determine availablecolumns for a table
—Drag a column heading to thedesired new position
Reorder table columns
—Click a column heading.Sort the table by the headingof your choice.
For Web reports, you can also set apreference for a default number of rowsto display; see Setting Preferences , onpage 516.
From the Items Displayeddrop-down list at the top right ofa table, choose a number of rowsto display.
Display more or fewer rowsof data
See also Viewing Details of Messages orTransactions Included in Reports , onpage 31.
Click a blue entry in the tableView details about a tableentry, where available
For Web reports, available filters arediscussed on each individual report pagedescription. See Web Reporting PageDescriptions, on page 170.
Choose or enter a value in thefilter setting below the table,where available
Narrow the pool of data to aspecific subset
Custom ReportsYou can create a custom email security report page by assembling charts (graphs) and tables from existingreport pages.
On Email Security appliances, starting in release 9.6, “My Reports” is called “My Dashboard”.Note
Do ThisTo
See:
• Modules That Cannot Be Added to Custom Reports
• Creating Your Custom Report Page , on page 30
Add modules to your custom report page
User Guide for AsyncOS 14.1 for Cisco Secure Email and Web Manager- GD (General Deployment)29
Working With ReportsCustomizing Tables on Report Pages

Do ThisTo
1. Choose Email > Reporting > My Reports.
2. Select the time range to view. The time range selected appliesto all reports, including all modules on the My Reports page.
Newly-added modules appear at the top of the custom report.
View your custom report page
Drag and drop modules into the desired location.Rearrange modules on your custom reportpage
Click the [X] in the top right corner of the module.Delete modules from your custom reportpage
See:
• Generating Email Reports On Demand , on page 155
• Generating Web Reports on Demand , on page 226
Generate a CSV version of your customreport
See:
• Scheduling Email Reports, on page 153
• Scheduling Web Reports , on page 223
Periodically generate a CSV version ofyour custom report
Modules That Cannot Be Added to Custom Reports• All modules on the Management Appliance > Centralized Services > System Status page
• All modules on the Email > Reporting > Reporting Data Availability page
• All modules on the Email > Message Tracking > Message Tracking Data Availability page
• The following per-domain modules from the Sender Profile detail report page: Current Information fromSenderBase, Sender Group Information, and Network Information
• The Past Year Virus Outbreak Summary chart and Past Year Virus Outbreaks table on the OutbreakFilters report page
Creating Your Custom Report Page
Before you begin
• Ensure that the modules that you want to add can be added. See Modules That Cannot Be Added toCustom Reports .
• Delete any default modules that you do not need by clicking the [X] in the top right corner of the module.
Step 1 Use one of the following methods to add a module to your custom report page:
User Guide for AsyncOS 14.1 for Cisco Secure Email and Web Manager- GD (General Deployment)30
Working With ReportsModules That Cannot Be Added to Custom Reports

Some modules are available only using one of these methods. If you cannot add a module using one method,try another method.
Note
• Navigate to the report page under the Email tab that has the module that you want to add, then click the [+] buttonat the top of the module.
• Go to Email > Reporting > My Reports and click on the [+] Report Module button at the top of one of the sections,then select the report module that you want to add You may need to click the + button in each section on the MyReports page in order to find the module that you are looking for.
You can add each module only once; if you have already added a particular module to your report, the option to add itwill not be available.
Step 2 If you add a module that you have customized (for example, by adding, deleting, or reordering columns , or by displayingnon-default data in the chart), customize the modules on the My Reports page.
Modules are added with default settings. Time range of the original module is not maintained.
Step 3 If you add a chart that includes a separate legend (for example, a graph from the Overview page), add the legend separately.If necessary, drag and drop it into position beside the data it describes.
Viewing Details of Messages or Transactions Included inReports
Step 1 Click any blue number in a table on a report page.
(Not all tables have these links.)
The messages or transactions included in that number are displayed in Message Tracking or Web Tracking, respectively.
Step 2 Scroll down to see the list of messages or transactions.
What to do next
• Tracking Messages, on page 247
Improving Performance of Email ReportsIf the performance of aggregated reporting decreases due to a large number of unique entries over the courseof a month, use reporting filters to restrict the aggregation of data in reports that cover the previous year (LastYear reports). These filters can restrict detailed, individual IP, domain, or user data in reports. Overviewreports and summary information remain available for all reports.
You can enable one or more of the reporting filters using the reportingconfig > filters menu in the CLI. Thechanges must be committed to take effect.
User Guide for AsyncOS 14.1 for Cisco Secure Email and Web Manager- GD (General Deployment)31
Working With ReportsViewing Details of Messages or Transactions Included in Reports

• IP Connection Level Detail. Enabling this filter prevents the Security Management appliance fromrecording information about individual IP addresses. This filter is appropriate for systems that processa large number of incoming IP addresses due to attacks.
This filter affects the following Last Year reports:
• Sender Profile for Incoming Mail• IP Addresses for Incoming Mail• IP Addresses for Outgoing Senders
• User Detail. Enabling this filter prevents the SecurityManagement appliance from recording informationabout individual users sending and receiving mail and the content filters that are applied to the users’mail. This filter is appropriate for appliances that process mail for millions of internal users or if thesystem does not validate recipient addresses.
This filter affects the following Last Year reports:
• Internal Users• Internal User Details• IP Addresses for Outgoing Senders• Content Filters
• Mail Traffic Detail. Enabling this filter prevents the Security Management appliance from recordinginformation about individual domains and networks that the appliances monitor. This filter is appropriatewhen the number of valid incoming or outgoing domains is measured in the tens of millions.
This filter affects the following Last Year reports:
• Domains for Incoming Mail• Sender Profile for Incoming Mail• Internal User Details• Domains for Outgoing Senders
To view up-to-the-minute reporting data for the preceding hour, you must log in to an individual applianceand view the data there.
Note
User Guide for AsyncOS 14.1 for Cisco Secure Email and Web Manager- GD (General Deployment)32
Working With ReportsImproving Performance of Email Reports

Exporting Reporting and Tracking DataTable 7: Exporting Reporting and Tracking Data on the New Web Interface
NotesDo ThisCSVTo Get This
The CSV file contains allapplicable data, includingthe data visible in thechart or table.
1. Click Export link onthe top of a reportpage.
2. Select CSV as therequired format.
3. Select the requiredreport module thatyou want to exportand click Download.
•Raw data
See also Exporting ReportData as a CommaSeparated Values (CSV)File , on page 34
Each CSV file maycontain up to 100 rows.
If a report contains morethan one table, a separateCSV file is created foreach table.
Some extended reports arenot available in CSVformat.
Create a scheduled oron-demand report. See:
• Generating EmailReports On Demand, on page 155
• Scheduling EmailReports, on page 153
•
The PDF reflects thecustomizations that youare currently viewing.
PDFs are formatted to beprinter-friendly.
1. Click Export link onthe top of a reportpage.
2. Select PDF as therequired format.
3. Select the requiredreport module thatyou want to exportand click Download.
•A PDF of an interactivereport page
-Create a scheduled oron-demand report. See:
• Generating EmailReports On Demand, on page 155
• Scheduling EmailReports, on page 153
•A PDF of report data
User Guide for AsyncOS 14.1 for Cisco Secure Email and Web Manager- GD (General Deployment)33
Working With ReportsExporting Reporting and Tracking Data

NotesDo ThisCSVTo Get This
CSV files include all rawdata matching the searchcriteria.
1. Select Web from theProduct drop-downand choose Tracking> Web Tracking.
2. Perform a search andclick the Export linkor Export All linkabove the searchresults
•(Web Security) A customsubset of report data, forexample data for aparticular user.
The Export linkdownloads a CSV filewith the displayed searchresults, up to the limit youspecified in your searchcriteria.
The Export All linkdownloads a CSV filewith up to 50,000messages that match yoursearch criteria.
Tip: If you need to exportmore than 50,000messages, perform a seriesof exports for a set ofshorter time ranges.
1. SelectEmail from theProduct drop-downand choose Tracking> Message Tracking.
2. Perform a search andclick the Export linkor Export All linkabove the searchresults
•(Email Security) Acustom subset of data, forexample data for aparticular user.
Exporting Report Data as a Comma Separated Values (CSV) FileYou can export raw data to a comma-separated values (CSV) file, which you can access and manipulate usingdatabase applications such as Microsoft Excel. For different ways to export data, see Exporting Reportingand Tracking Data , on page 33.
Because CSV exports include only raw data, exported data from a web-based report page may not includecalculated data such as percentages, even if that data appears in the web-based report.
For email message tracking and reporting data, the exported CSV data will display all data in GMT regardlessof what is set on the Security Management appliance. This simplifies using data independently from theappliance, particularly when referencing data from appliances in multiple time zones.
The following example is an entry from a raw data export of the Anti-Malware category report, where PacificDaylight Time (PDT) is displayed as GMT - 7 hours:
Begin Timestamp, End Timestamp, Begin Date, End Date, Name, Transactions Monitored, TransactionsBlocked, Transactions Detected
1159772400.0, 1159858799.0, 2006-10-02 07:00 GMT, 2006-10-03 06:59 GMT, Adware, 525, 2100, 2625
User Guide for AsyncOS 14.1 for Cisco Secure Email and Web Manager- GD (General Deployment)34
Working With ReportsExporting Report Data as a Comma Separated Values (CSV) File

Table 8: Viewing Raw Data Entries
DescriptionValueCategory Header
Query start time in number of seconds from epoch.1159772400.0Begin Timestamp
Query end time in number of seconds from epoch.1159858799.0End Timestamp
Date the query began.2006-10-02 07:00 GMTBegin Date
Date the query ended.2006-10-03 06:59 GMTEnd Date
Name of the malware category.AdwareName
Number of transactions monitored.525TransactionsMonitored
Number of transactions blocked.2100Transactions Blocked
Total number of transactions:
Number of transactions detected +Number of transactionsblocked.
2625Transactions Detected
Category headers are different for each type of report.If you export localized CSV data, the headings may notbe rendered properly in some browsers. This occurs because some browsers may not use the proper characterset for the localized text. To work around this problem, you can save the file to your local machine, and openthe file on any web browser using File > Open. When you open the file, select the character set to displaythe localized text.
Note
Subdomains vs. Second Level Domains in Reporting andTracking
In reporting and tracking searches, second-level domains (regional domains listed athttp://george.surbl.org/two-level-tlds) are treated differently from subdomains, even though the two domaintypes may appear to be the same. For example:
• Reports will not include results for a two-level domain such as co.uk , but will include results for foo.co.uk. Reports include subdomains under the main corporate domain, such as cisco.com .
• Tracking search results for the regional domain co.uk will not include domains such as foo.co.uk , whilesearch results for cisco.com will include subdomains such as subdomain.cisco.com .
Troubleshooting All Reports• Unable to View Report Data on Backup Security Management Appliance , on page 36• Reporting Is Disabled, on page 36
User Guide for AsyncOS 14.1 for Cisco Secure Email and Web Manager- GD (General Deployment)35
Working With ReportsSubdomains vs. Second Level Domains in Reporting and Tracking

Unable to View Report Data on Backup Security Management ApplianceProblem
You are unable to select a single Email Security appliance for which to view report data. The View Data Foroption does not appear on the reporting page.
Solution
See also Availability of Services During Backups , on page 454.
Reporting Is DisabledProblem
Canceling a backup in progress can disable reporting.
Solution
Reporting functionality will be restored after a backup is completed.
Email and Web ReportsFor information specific to Email reports, see Using Centralized Email Security Reporting, on page 51.
For information specific to Web reports, see Using Centralized Web Reporting and Tracking, on page 165.
User Guide for AsyncOS 14.1 for Cisco Secure Email and Web Manager- GD (General Deployment)36
Working With ReportsUnable to View Report Data on Backup Security Management Appliance

C H A P T E R 4Working With Reports on the New Web Interface
This chapter contains the following sections:
• Ways to View Reporting Data , on page 37• How the Security Management Appliance Gathers Data for Reports, on page 38• Using the Interactive Report Pages, on page 39• Customizing Your View of Report Data , on page 40• My Favorite Reports Page, on page 43• Viewing Details of Messages or Transactions Included in Reports , on page 45• Improving Performance of Email Reports , on page 45• Exporting Reporting and Tracking Data , on page 47• Troubleshooting All Reports , on page 49
Ways to View Reporting DataThe following table shows the different ways to view reporting data:
Table 9: Ways To View Reporting Data
SeeTo
• Using the Interactive Report Pages, on page 39
• Customizing Your View of Report Data , on page 40
• Using Centralized Email Security Reporting, on page51
View and customize web-based interactivereport pages
Scheduling Email Reports, on page 153Automatically generate recurring CSV reports
Generating Email Reports On Demand , on page 155Generate a CSV report on demand
Exporting Reporting and Tracking Data , on page 33
Exporting Report Data as a Comma Separated Values (CSV)File , on page 34
Export raw data as a CSV (Comma-separatedvalues) file
User Guide for AsyncOS 14.1 for Cisco Secure Email and Web Manager- GD (General Deployment)37

SeeTo
Scheduling Email Reports, on page 153
Generating Email Reports On Demand , on page 155
Email report information to yourself and otherpeople
Viewing Details of Messages or Transactions Included inReports , on page 31
Find information about specific transactions
For differences between logging and reporting, see Logging Versus Reporting, on page 531.Note
How the Security Management Appliance Gathers Data forReports
The Security Management appliance pulls data for all reports from all managed appliances approximatelyevery 15 minutes and aggregates the data from these appliances. Depending on your appliance, it may takeawhile for a particular message to be included in the reporting data on the Security Management appliance.Check the System Status page for information on your data.
Reporting Data includes transactions involving both IPv4 and IPv6.
When gathering data for reports, the SecurityManagement appliance applies the timestamp from the informationthat was set when you configured the time settings on the Security Management appliance. For informationon setting the time on your Security Management appliance, see the Configuring the System Time, on page484.
Note
How Reporting Data is StoredAll of the appliances store reporting data. The following table shows what time periods that each appliancestores data.
Table 10: Reporting Data Storage on the Email Security Appliances
YearlyMonthlyWeeklyDailyHourlyMinute
•••••Local Reporting onEmail Security appliance
••••Centralized Reporting onEmail Security appliance
•••••Security Management appliance
User Guide for AsyncOS 14.1 for Cisco Secure Email and Web Manager- GD (General Deployment)38
Working With Reports on the New Web InterfaceHow the Security Management Appliance Gathers Data for Reports

About Reporting and UpgradesNew reporting features may not apply to transactions that occurred before upgrade, because the required datamay not have been retained for those transactions. For possible limitations related to reporting data andupgrades, see the Release Notes for your release.
Using the Interactive Report PagesYou can use the Product drop-down on the top of the web interface to switch between the Email Securityappliance and Web Security appliance.
You can view the reports for the Email and Web Security appliances using the Reports drop-down as shownin the following figure:Figure 4: Reports Drop-down
The Mail Flow Summary report page is the landing page (the page displayed after login).Note
You can use the Reporting drop-down to view your email and web reports as categorized in the followingtable:
Web Security ApplianceEmail Security Appliance
• General Reports
• Threat Reports
• Email Threat Reports
• File and Malware Reports
• Connection and Flow Reports
• User Reports
• Filter Reports
Related Topics
• Customizing Your View of Report Data , on page 40
• Customizing Tables on Report Pages , on page 42
• (Web Reports Only) Choosing Which Data to Chart, on page 41
User Guide for AsyncOS 14.1 for Cisco Secure Email and Web Manager- GD (General Deployment)39
Working With Reports on the New Web InterfaceAbout Reporting and Upgrades

Customizing Your View of Report DataYou can customize your view while viewing the report data in the web interface.
Do ThisTo
See Choosing a Time Range for Reports , on page 28.Specify a time range
See Viewing Reporting Data for an Appliance or Reporting Group, onpage 27
View data per appliance or reportinggroup
See (Web Reports Only) Choosing Which Data to Chart, on page 41(For Web reports) Choose whichdata to chart
See Customizing Tables on Report Pages , on page 42Customize tables
See (Email Reports Only) Customizing Views on Report Pages, onpage 42
(Email Reports Only) Customizeviews
See Using Counters to Filter Data on the Trend Graphs, on page 43Using Counters to Filter Data onTrend Graph
See Setting Preferences , on page 516Specify report-related preferences
• For Email reports, see Searching and the Interactive Email ReportPages , on page 57.
• For Web reports, look for a Find or Filter option at the bottom ofmost tables.
• Some tables include links (in blue text) to details for aggregateddata. For more information, see Viewing Details of Messages orTransactions Included in Reports , on page 31.
Search for specific information or asubset of data to view
See My Favorite Reports Page, on page 43.Create a custom report with only thecharts and tables you want
All customization features are not available for every report.Note
Viewing Reporting Data for an Appliance or Reporting GroupFor Mail Flow Summary and System Capacity reports for Email, you can view data from all appliances, orfrom any one centrally-managed appliance.
For Email reports, if you have created groups of Email Security appliances as described in Creating EmailReporting Groups, on page 54, you can view the data for each reporting group.
To specify the view, select an appliance or group from the View Data For list on supported pages.
User Guide for AsyncOS 14.1 for Cisco Secure Email and Web Manager- GD (General Deployment)40
Working With Reports on the New Web InterfaceCustomizing Your View of Report Data

If you are viewing report data on the SecurityManagement appliance to which you have recently taken backupfrom another Security Management appliance, you must first add (but do not establish a connection to) each
appliance in > Management Appliance > Centralized Services > Security Appliances.
Choosing a Time Range for ReportsMost predefined report pages allow you to choose a Time Range for the data to include. The time range thatyou select is used for all of the report pages until you select a different value in the Time Range menu.
Available Time Range options differ by appliance and differ for Email and Web reporting on the SecurityManagement appliance:
Time ranges on report pages are displayed as a Greenwich Mean Time (GMT) offset. For example, Pacifictime is GMT + 7 hours (GMT + 07:00).
Note
All reports display date and time information based on the systems configured time zone, shown as a GreenwichMean Time (GMT) offset. However, data exports display the time in GMT to accommodate multiple systemsin multiple time zones around the world.
Note
You can specify a default time range that will always display each time you log in. For information, see SettingPreferences , on page 516.
Tip
(Web Reports Only) Choosing Which Data to ChartThe default charts on each Web Reporting page display commonly-referenced data, but you can choose tochart different data instead. If a page has multiple charts, you can change each chart.
Generally, the chart options are the same as the columns of the table in the report. However, some columnscannot be charted.
Charts reflect all available data in a table column, regardless of the number of items (rows) you choose todisplay in the associated table.
Step 1 Click on a specific chart.Step 2 Choose the required data to be displayed. The preview of the chart is displayed as per the selected options.Step 3 Click Apply.
User Guide for AsyncOS 14.1 for Cisco Secure Email and Web Manager- GD (General Deployment)41
Working With Reports on the New Web InterfaceChoosing a Time Range for Reports

(Email Reports Only) Customizing Views on Report PagesMost report pages allow you to choose between graphical view, tabular view or combined view. The viewthat you select is used to show the data on the report pages.
Table 11: Customizing Views on Email Reporting Pages
Do ThisTo
Click to view data in graphical format.Show data in graph view.
Click to view data in tabular format.Show data in table view.
Click a blue entry in the table.View details about a table entry,where available
Click to view data in graphical and tabular format.Show data in combined view.
Customizing Tables on Report PagesYou can view, customize and sort information on the interactive tables within the report pages. The view thatyou select is used to show the data on the report pages.
Table 12: Customizing Tables on Report Pages
More InformationDo ThisTo
For most tables, some columns arehidden by default.
Each report page offers differentcolumns.
See the table column descriptionsfor the respective tables.
1. Click .
2. Select the columns to display,and click Close.
• Show additional columns
• Hide visible columns
• Determine available columnsfor a table
-Click a column heading.Sort the table by the heading ofyour choice.
-Drag a column heading to thedesired new position
Reorder table columns
See also Viewing Details ofMessages or Transactions Includedin Reports , on page 31.
Click a blue entry in the tableView details about a table entry,where available
-You can scroll down on a table todisplay details of additional rows.
View details of additional rows.
User Guide for AsyncOS 14.1 for Cisco Secure Email and Web Manager- GD (General Deployment)42
Working With Reports on the New Web Interface(Email Reports Only) Customizing Views on Report Pages

More InformationDo ThisTo
For Web reports, available filtersare discussed on each individualreport page description. SeeUnderstanding the Web ReportingPages on the New Web Interface,on page 197.
Enter a value in the filter settingbelow a specific table, whereavailable
Filtering data to a specific subset
Using Counters to Filter Data on the Trend GraphsYou can filter data based on the required time range and available counters on a trend graph.
The time range that you select in the Time Range drop-down, is used for a trend graph until you select adifferent value.
A counters on a trend graph of the Mail Flow Summary report page is used to view data specific to differentfilters. Click on an available counter to filter the data.
My Favorite Reports PageOn the My Favorite Reports page, you can create a custom report page by assembling charts (graphs) andtables from all your existing email security reports.
Do ThisTo
See:
• Modules That Cannot Be Added to the My FavoriteReports Page, on page 44
• Adding Reports on theMy Favorite Reports Page, on page44
Add modules to My Favorite Reports page
1. Select Email from the Product drop-down and chooseMonitoring > My Favorite Reports from the Reportsdrop-down. For more information, see Using the InteractiveReport Pages, on page 39.
2. Select the time range to view. The time range selectedapplies to all reports, including all modules on the MyFavorite Reports page.
Newly-added modules appear at the top of the custom report.
The report modules that you add on the My FavoriteReports page of the new web interface differs fromthe report modules added on the legacyweb interface.It can also differ based on the User roles that youassign.
Note
View My Favorite Reports page
User Guide for AsyncOS 14.1 for Cisco Secure Email and Web Manager- GD (General Deployment)43
Working With Reports on the New Web InterfaceUsing Counters to Filter Data on the Trend Graphs

Do ThisTo
On the My Favorite Reports page, drag and drop the modulesinto the desired location.
Rearrange modules on the My FavoriteReports page
You can delete the report modules from theMy Favorite Reportspage in any one of the following ways:
• Click the in the top right corner of the required reportmodule.
• Go to the Monitoring > My Favorite Reports page andselect Manage Favorites to remove the required reportmodule.
Delete modules from the My FavoriteReports page
Modules That Cannot Be Added to the My Favorite Reports Page• All modules on the System Status page.
• All modules on the Reporting Data Availability page.
• All modules on the Message Tracking Data Availability page.
• The following per-domain modules from the Sender Profile detail report page: Current Information fromSenderBase, Sender Group Information, and Network Information.
• The Past Year Virus Outbreak Summary chart and Past Year Virus Outbreaks table on the OutbreakFilters report page.
Adding Reports on the My Favorite Reports Page
Before you begin
• Ensure that the modules that you want to add can be added. See Modules That Cannot Be Added to theMy Favorite Reports Page, on page 44.
• Click on the top right corner of a module to delete any default modules that you do not need.
Step 1 You can add a report module on the My Favorite Reports page in any one of the following ways:
Some modules are available only using one of these methods. If you cannot add a module using one method,try another method.
Note
• Go to any report page under the Reports drop-down and click on the top of the report module.
• From the Reports drop-down, choose My Favorite Reports, and then click Manage Favorites.
User Guide for AsyncOS 14.1 for Cisco Secure Email and Web Manager- GD (General Deployment)44
Working With Reports on the New Web InterfaceModules That Cannot Be Added to the My Favorite Reports Page

The report modules are listed as per the tables and charts on email report pages. Select the required report modulesand click Add to add to the My Favorite Reports page. If you do not want any reports to be displayed on the MyFavorite Report page, select the report module and click Remove.
You can add each module only once; if you have already added a particular module to your report, the option to addit will not be available.
You can add a maximum of 10 report modules on the My Favorite Reports page.Note
Step 2 If you add a report module that you have customized (for example, by adding, deleting, or reordering columns, or bydisplaying non-default data in the chart), customize the modules on the My Favorite Reports page.
Modules are added with default settings. Time range of the original module is not maintained.
Step 3 If you add a chart that includes a separate legend (for example, a graph from the Mail Flow Summary page), add thelegend separately. If necessary, drag and drop it into position beside the data it describes.
You can export or download the My Favorite Reports page as a PDF. For more information, see ExportingReporting and Tracking Data .
Note
Viewing Details of Messages or Transactions Included inReports
Step 1 Click any blue number in a table on a report page.
(Not all tables have these links.)
The messages or transactions included in that number are displayed in Message Tracking or Web Tracking, respectively.
Step 2 Scroll down to see the list of messages or transactions.
What to do next
• Tracking Messages, on page 247
Improving Performance of Email ReportsIf the performance of aggregated reporting decreases due to a large number of unique entries over the courseof a month, use reporting filters to restrict the aggregation of data in reports that cover the previous year (LastYear reports). These filters can restrict detailed, individual IP, domain, or user data in reports. Overviewreports and summary information remain available for all reports.
You can enable one or more of the reporting filters using the reportingconfig > filters menu in the CLI. Thechanges must be committed to take effect.
User Guide for AsyncOS 14.1 for Cisco Secure Email and Web Manager- GD (General Deployment)45
Working With Reports on the New Web InterfaceViewing Details of Messages or Transactions Included in Reports

• IP Connection Level Detail. Enabling this filter prevents the Security Management appliance fromrecording information about individual IP addresses. This filter is appropriate for systems that processa large number of incoming IP addresses due to attacks.
This filter affects the following Last Year reports:
• Sender Profile for Incoming Mail• IP Addresses for Incoming Mail• IP Addresses for Outgoing Senders
• User Detail. Enabling this filter prevents the SecurityManagement appliance from recording informationabout individual users sending and receiving mail and the content filters that are applied to the users’mail. This filter is appropriate for appliances that process mail for millions of internal users or if thesystem does not validate recipient addresses.
This filter affects the following Last Year reports:
• Internal Users• Internal User Details• IP Addresses for Outgoing Senders• Content Filters
• Mail Traffic Detail. Enabling this filter prevents the Security Management appliance from recordinginformation about individual domains and networks that the appliances monitor. This filter is appropriatewhen the number of valid incoming or outgoing domains is measured in the tens of millions.
This filter affects the following Last Year reports:
• Domains for Incoming Mail• Sender Profile for Incoming Mail• Internal User Details• Domains for Outgoing Senders
To view up-to-the-minute reporting data for the preceding hour, you must log in to an individual applianceand view the data there.
Note
User Guide for AsyncOS 14.1 for Cisco Secure Email and Web Manager- GD (General Deployment)46
Working With Reports on the New Web InterfaceImproving Performance of Email Reports

Exporting Reporting and Tracking DataTable 13: Exporting Reporting and Tracking Data on the New Web Interface
NotesDo ThisCSVTo Get This
The CSV file contains allapplicable data, includingthe data visible in thechart or table.
1. Click Export link onthe top of a reportpage.
2. Select CSV as therequired format.
3. Select the requiredreport module thatyou want to exportand click Download.
•Raw data
See also Exporting ReportData as a CommaSeparated Values (CSV)File , on page 34
Each CSV file maycontain up to 100 rows.
If a report contains morethan one table, a separateCSV file is created foreach table.
Some extended reports arenot available in CSVformat.
Create a scheduled oron-demand report. See:
• Generating EmailReports On Demand, on page 155
• Scheduling EmailReports, on page 153
•
The PDF reflects thecustomizations that youare currently viewing.
PDFs are formatted to beprinter-friendly.
1. Click Export link onthe top of a reportpage.
2. Select PDF as therequired format.
3. Select the requiredreport module thatyou want to exportand click Download.
•A PDF of an interactivereport page
-Create a scheduled oron-demand report. See:
• Generating EmailReports On Demand, on page 155
• Scheduling EmailReports, on page 153
•A PDF of report data
User Guide for AsyncOS 14.1 for Cisco Secure Email and Web Manager- GD (General Deployment)47
Working With Reports on the New Web InterfaceExporting Reporting and Tracking Data

NotesDo ThisCSVTo Get This
CSV files include all rawdata matching the searchcriteria.
1. Select Web from theProduct drop-downand choose Tracking> Web Tracking.
2. Perform a search andclick the Export linkor Export All linkabove the searchresults
•(Web Security) A customsubset of report data, forexample data for aparticular user.
The Export linkdownloads a CSV filewith the displayed searchresults, up to the limit youspecified in your searchcriteria.
The Export All linkdownloads a CSV filewith up to 50,000messages that match yoursearch criteria.
Tip: If you need to exportmore than 50,000messages, perform a seriesof exports for a set ofshorter time ranges.
1. SelectEmail from theProduct drop-downand choose Tracking> Message Tracking.
2. Perform a search andclick the Export linkor Export All linkabove the searchresults
•(Email Security) Acustom subset of data, forexample data for aparticular user.
Exporting Report Data as a Comma Separated Values (CSV) FileYou can export raw data to a comma-separated values (CSV) file, which you can access and manipulate usingdatabase applications such as Microsoft Excel. For different ways to export data, see Exporting Reportingand Tracking Data , on page 33.
Because CSV exports include only raw data, exported data from a web-based report page may not includecalculated data such as percentages, even if that data appears in the web-based report.
For email message tracking and reporting data, the exported CSV data will display all data in GMT regardlessof what is set on the Security Management appliance. This simplifies using data independently from theappliance, particularly when referencing data from appliances in multiple time zones.
The following example is an entry from a raw data export of the Anti-Malware category report, where PacificDaylight Time (PDT) is displayed as GMT - 7 hours:
Begin Timestamp, End Timestamp, Begin Date, End Date, Name, Transactions Monitored, TransactionsBlocked, Transactions Detected
1159772400.0, 1159858799.0, 2006-10-02 07:00 GMT, 2006-10-03 06:59 GMT, Adware, 525, 2100, 2625
User Guide for AsyncOS 14.1 for Cisco Secure Email and Web Manager- GD (General Deployment)48
Working With Reports on the New Web InterfaceExporting Report Data as a Comma Separated Values (CSV) File

Table 14: Viewing Raw Data Entries
DescriptionValueCategory Header
Query start time in number of seconds from epoch.1159772400.0Begin Timestamp
Query end time in number of seconds from epoch.1159858799.0End Timestamp
Date the query began.2006-10-02 07:00 GMTBegin Date
Date the query ended.2006-10-03 06:59 GMTEnd Date
Name of the malware category.AdwareName
Number of transactions monitored.525TransactionsMonitored
Number of transactions blocked.2100Transactions Blocked
Total number of transactions:
Number of transactions detected +Number of transactionsblocked.
2625Transactions Detected
Category headers are different for each type of report.If you export localized CSV data, the headings may notbe rendered properly in some browsers. This occurs because some browsers may not use the proper characterset for the localized text. To work around this problem, you can save the file to your local machine, and openthe file on any web browser using File > Open. When you open the file, select the character set to displaythe localized text.
Note
Troubleshooting All Reports• Unable to View Report Data on Backup Security Management Appliance , on page 36• Reporting Is Disabled, on page 36
Unable to View Report Data on Backup Security Management ApplianceProblem
You are unable to select a single Email Security appliance for which to view report data. The View Data Foroption does not appear on the reporting page.
Solution
See also Availability of Services During Backups , on page 454.
Reporting Is DisabledProblem
Canceling a backup in progress can disable reporting.
User Guide for AsyncOS 14.1 for Cisco Secure Email and Web Manager- GD (General Deployment)49
Working With Reports on the New Web InterfaceTroubleshooting All Reports

Solution
Reporting functionality will be restored after a backup is completed.
User Guide for AsyncOS 14.1 for Cisco Secure Email and Web Manager- GD (General Deployment)50
Working With Reports on the New Web InterfaceReporting Is Disabled

C H A P T E R 5Using Centralized Email Security Reporting
This chapter contains the following sections:
• Centralized Email Reporting Overview, on page 51• Setting Up Centralized Email Reporting, on page 52• Working with Email Report Data , on page 55• Working with Email Report Data on the New Web Interface, on page 56• Searching and the Interactive Email Report Pages , on page 57• Understanding the Email Reporting Pages, on page 57• Understanding the Email Reporting Pages on the New Web Interface, on page 97• About Scheduled and On-Demand Email Reports , on page 149• Scheduled Reports Page , on page 153• Scheduling Email Reports, on page 153• Generating Email Reports On Demand , on page 155• Archived Email Reports Page , on page 156• Viewing and Managing Archived Email Reports , on page 156• Scheduling and Archiving Email Reports on the New Web Interface, on page 157• Troubleshooting Email Reports , on page 161
Centralized Email Reporting OverviewYour Cisco Content SecurityManagement appliance shows aggregated information from individual or multipleEmail Security appliances so that you can monitor your email traffic patterns and security risks. You can runreports in real-time to view an interactive display of system activity over a specific period of time, or you canschedule reports and run them at regular intervals. Reporting functionality also allows you to export raw datato a file.
This feature centralizes the reports listed under the Monitor menu of the Email Security appliance.
The Centralized Email Reporting feature not only generates high-level reports, allowing you to understandwhat is happening on their network, but it also allows you to drill down and see traffic details for a particulardomain, user, or category.
The Centralized Tracking feature allows you to track email messages that traverse multiple Email Securityappliances.
User Guide for AsyncOS 14.1 for Cisco Secure Email and Web Manager- GD (General Deployment)51

The Email Security appliance only stores data if local reporting is used. If centralized reporting is enabled forthe Email Security appliance then the Email Security appliance does NOT retain any reporting data exceptfor System Capacity and System Status. If Centralized Email Reporting is not enabled, the only reports thatare generated are System Status and System Capacity.
Note
For more information about availability of report data during and after the transition to centralized reporting,see the “Centralized Reporting Mode” section of the documentation or online help for your Email Securityappliance.
Setting Up Centralized Email ReportingTo set up centralized email reporting, complete the following procedures in order:
1. Enabling Centralized Email Reporting, on page 52
2. [Only for Legacy Web Interface] Creating Email Reporting Groups, on page 54.
3. Adding the Centralized Email Reporting Service to Each Managed Email Security Appliance , on page54
4. Enabling Centralized Email Reporting on Email Security Appliances , on page 55
If reporting and tracking are not consistently and simultaneously enabled and functioning properly, or are notconsistently and simultaneously either centralized or stored locally on each Email Security appliance, thenthe message tracking results when drilling down from reports will not match expected results. This is becausethe data for each feature (reporting, tracking) is captured only while that feature is enabled.
Note
Enabling Centralized Email Reporting• Enabling Centralized Email Reporting on the Legacy Web Interface, on page 52
• Enabling Centralized Email Reporting on the New Web Interface
Enabling Centralized Email Reporting on the Legacy Web Interface
Before you begin
• All Email Security appliances should be configured andworking as expected before you enable centralizedreporting.
• Before enabling centralized email reporting, ensure that sufficient disk space is allocated to that service.See the Managing Disk Space , on page 494.
Step 1 Choose Management Appliance > Centralized Services > Email > Centralized Reporting.Step 2 Click Enable.
User Guide for AsyncOS 14.1 for Cisco Secure Email and Web Manager- GD (General Deployment)52
Using Centralized Email Security ReportingSetting Up Centralized Email Reporting

Step 3 If you are enabling centralized email reporting for the first time after running the System Setup Wizard, review the enduser license agreement, and click Accept.
Step 4 Submit and commit your changes.
If you have enabled email reporting on the appliance, and there is no disk space allocated for this action,centralized email reporting will not work until disk space is allocated. As long as the quota you are setting theEmail Reporting and Tracking to is larger than the currently used disk space, you will not lose any reportingand tracking data. See the Managing Disk Space , on page 494 section, for more information.
Note
What to do next
Creating Email Reporting Groups, on page 54
Enabling Centralized Email Reporting on the New Web Interface
Before you begin
• All Email Security appliances should be configured andworking as expected before you enable centralizedreporting.
• Before enabling centralized email reporting, ensure that sufficient disk space is allocated to that service.See the Managing Disk Space , on page 494.
Step 1 On the Security Management appliance, click Service Status and hover over the icon corresponding to Reportingcard.
Step 2 Click Edit Settings.Step 3 If you are enabling centralized email reporting for the first time after running the System SetupWizard, review and accept
the license agreement, and click Proceed.Step 4 Click the toggle switch to enable Centralized Email Reporting.Step 5 Create Email Reporting Groups:
a) Click + icon to add a group.b) Enter an unique name for the group.
The Email Security appliance list displays the Email Security appliances that you added to the Security Managementappliance. Select the appliances that you want to add to the group.
Themaximum number of groups that can be added is smaller than or equal to themaximum number of email appliancesthat can be connected.
If you added an Email Security appliance to the Security Management appliance, but you do not see it inthe list, edit the configuration of the Email Security appliance so that the Security Management applianceis collecting reporting data from it.
Note
c) Click Add to add the appliances to the Group Members list.
Step 6 Click Submit.
User Guide for AsyncOS 14.1 for Cisco Secure Email and Web Manager- GD (General Deployment)53
Using Centralized Email Security ReportingEnabling Centralized Email Reporting on the New Web Interface

What to do next
For more information on managing reporting groups, see Adding the Centralized Email Reporting Service toEach Managed Email Security Appliance , on page 54.
Creating Email Reporting GroupsYou can create groups of Email Security appliances for which to view reporting data from the SecurityManagement appliance.
A group can include one or more appliances, and an appliance may belong to more than one group.
Before you begin
This section is applicable only for Legacy Web Interface.Note
Make sure centralized reporting is enabled for each appliance. See Adding the Centralized Email ReportingService to Each Managed Email Security Appliance , on page 54.
Step 1 Choose Management Appliance > Centralized Services > Centralized Reporting.Step 2 Click Add Group .Step 3 Enter a unique name for the group.
The Email Security appliance list displays the Email Security appliances that you added to the Security Managementappliance. Select the appliances that you want to add to the group.
The maximum number of groups that can be added is smaller than or equal to the maximum number of email appliancesthat can be connected.
If you added an Email Security appliance to the Security Management appliance, but you do not see it in thelist, edit the configuration of the Email Security appliance so that the Security Management appliance iscollecting reporting data from it.
Note
Step 4 Click Add to add the appliances to the Group Members list.Step 5 Submit and commit your changes.
What to do next
Adding the Centralized Email Reporting Service to Each Managed Email Security Appliance , on page 54
Adding the Centralized Email Reporting Service to Each Managed EmailSecurity Appliance
The steps you follow depend on whether or not you have already added the appliance while configuringanother centralized management feature.
User Guide for AsyncOS 14.1 for Cisco Secure Email and Web Manager- GD (General Deployment)54
Using Centralized Email Security ReportingCreating Email Reporting Groups
Step 1 [New Web Interface Only] On the Security Management appliance, click to load the legacy web interface.Step 2 Choose Management Appliance > Centralized Services > Security Appliances.Step 3 If you have already added the Email Security appliance to the list on this page:
a) Click the name of an Email Security appliance.b) Select the Centralized Reporting service.
Step 4 If you have not yet added Email Security appliances:a) Click Add Email Appliance.b) In the Appliance Name and IP Address text fields, type the appliance name and the IP address for the Management
interface of the Security Management appliance.
If you enter A DNS name in the IP Address text field, it will be immediately resolved to an IP address whenyou click Submit.
Note
c) The Centralized Reporting service is pre-selected.d) Click Establish Connection.e) Enter the user name and passphrase for an administrator account on the appliance to be managed, then clickEstablish
Connection..
You enter the login credentials to pass a public SSH key for file transfers from the Security Managementappliance to the remote appliance. The login credentials are not stored on the SecurityManagement appliance.
Note
f) Wait for the Success message to appear above the table on the page.g) Click Test Connection..h) Read test results above the table.
Step 5 Click Submit.Step 6 Repeat this procedure for each Email Security appliance for which you want to enable Centralized Reporting.Step 7 Commit your changes.
What to do next
Enabling Centralized Email Reporting on Email Security Appliances , on page 55
Enabling Centralized Email Reporting on Email Security AppliancesYou must enable centralized email reporting on each managed Email Security appliance appliance.
For instructions, see the “Configuring an Email Security Appliance to Use Centralized Reporting” section ofthe documentation or online help for your Email Security appliance.
Working with Email Report Data• For options for accessing and viewing report data, see Ways to View Reporting Data , on page 25.
• To customize your view of report data, see Customizing Your View of Report Data , on page 27
User Guide for AsyncOS 14.1 for Cisco Secure Email and Web Manager- GD (General Deployment)55
Using Centralized Email Security ReportingEnabling Centralized Email Reporting on Email Security Appliances
• To search for specific information within your data, see Searching and the Interactive Email Report Pages, on page 57.
• To print or export report information, see Exporting Reporting and Tracking Data , on page 33
• To understand the various interactive report pages, see Understanding the Email Reporting Pages, onpage 57.
• To generate a report on demand, see Generating Email Reports On Demand , on page 155.
• To schedule reports to run automatically at intervals and times that you specify, see Scheduling EmailReports, on page 153.
• To view archived on-demand and scheduled reports, see Viewing andManaging Archived Email Reports, on page 156.
• For background information, How the Security Management Appliance Gathers Data for Reports, onpage 26.
• To improve performance when working with large amounts of data, see Improving Performance of EmailReports , on page 31.
• To get details about an entity or number that appears as a blue link in a chart or table, click the entity ornumber.
For example, if your permissions allow you to do so, you can use this feature to view details aboutmessages that violate Content Filtering or Data Loss Prevention policies. This performs the relevantsearch in Message Tracking. Scroll down to view results.
Working with Email Report Data on the New Web Interface• For options for accessing and viewing report data, see Ways to View Reporting Data , on page 37.
• To customize your view of report data, see Customizing Your View of Report Data , on page 40.
• To print or export report information, see Exporting Reporting and Tracking Data , on page 33.
• To understand the various interactive report pages, see Using the Interactive Report Pages, on page 39.
• To generate a report on demand, see Generating Email Reports On Demand , on page 155.
• To schedule reports to run automatically at intervals and times that you specify, see Scheduling EmailReports, on page 153.
• To view archived on-demand and scheduled reports, see Viewing andManaging Archived Email Reports, on page 156.
• For background information, How the Security Management Appliance Gathers Data for Reports, onpage 26.
• To improve performance when working with large amounts of data, see Improving Performance of EmailReports , on page 31.
• To get details about an entity or number that appears as a blue link in a chart or table, click the entity ornumber.
User Guide for AsyncOS 14.1 for Cisco Secure Email and Web Manager- GD (General Deployment)56
Using Centralized Email Security ReportingWorking with Email Report Data on the New Web Interface

For example, if your permissions allow you to do so, you can use this feature to view details aboutmessages that violate Content Filtering or Data Loss Prevention policies. This performs the relevantsearch in Message Tracking. Scroll down to view results.
Searching and the Interactive Email Report PagesMany of the interactive email reporting pages include a ‘Search For:’ drop-down menu at the bottom of thepage.
From the drop-down menu, you can search for several types of criteria, including the following:
• IP address• Domain• Network owner• Internal user• Destination domain• Internal sender domain• Internal sender IP address• Incoming TLS domain• Outgoing TLS domain• SHA-256
For most searches, choose whether to exactly match the search text or look for items starting with the enteredtext (for example, starts with “ex” will match “example.com”).
For IPv4 searches, the entered text is always interpreted as the beginning of up to four IP octets in dotteddecimal format. For example, ‘17.*’ will search in the range 17.0.0.0 through 17.255.255.255, so it will match17.0.0.1 but not 172.0.0.1. For an exact match search, enter all four octets. IP address searches also supportClassless Inter-Domain Routing (CIDR) format (17.16.0.0/12).
For IPv6 searches, you can enter addresses using the formats in the following examples:
• 2001:db8:2004:4202::0-2001:db8:2004:4202::ff• 2001:db8:2004:4202::• 2001:db8:2004:4202::23• 2001:db8:2004:4202::/64
Understanding the Email Reporting Pages
This list represents the reports available in the latest supported release of AsyncOS for Email Securityappliances. If your Email Security appliances are running earlier releases of AsyncOS, not all of these reportsare available.
Note
User Guide for AsyncOS 14.1 for Cisco Secure Email and Web Manager- GD (General Deployment)57
Using Centralized Email Security ReportingSearching and the Interactive Email Report Pages
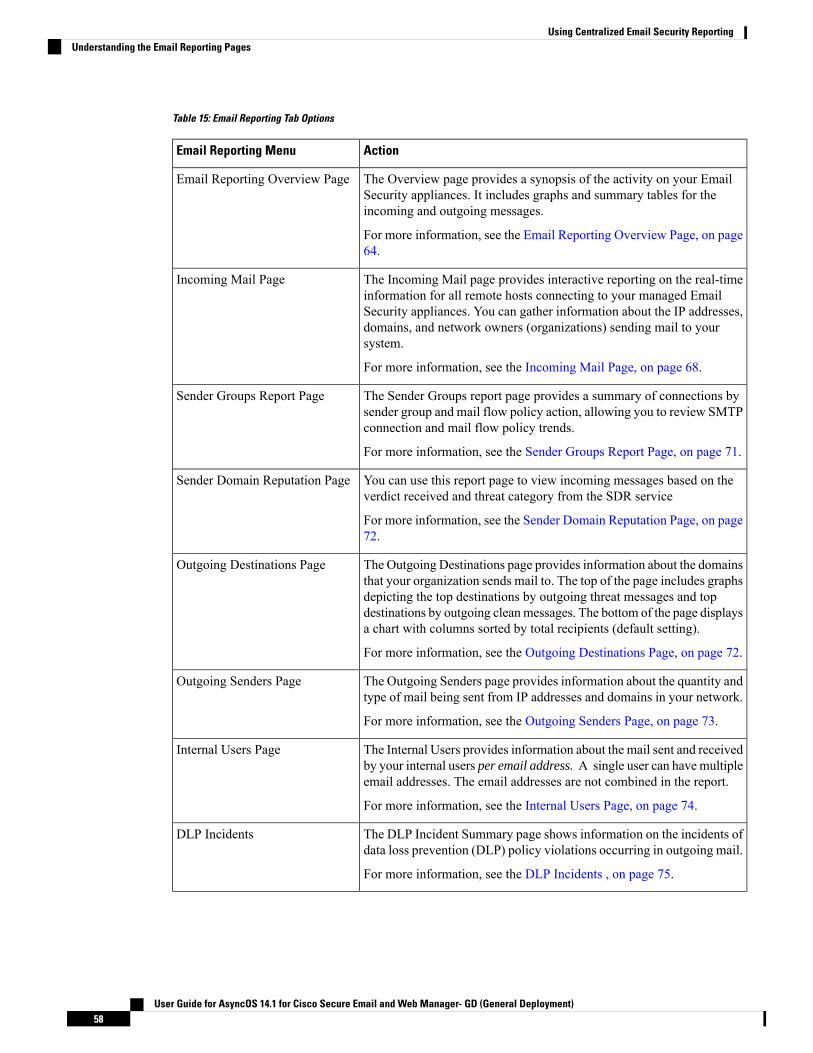
Table 15: Email Reporting Tab Options
ActionEmail Reporting Menu
The Overview page provides a synopsis of the activity on your EmailSecurity appliances. It includes graphs and summary tables for theincoming and outgoing messages.
For more information, see the Email Reporting Overview Page, on page64.
Email Reporting Overview Page
The Incoming Mail page provides interactive reporting on the real-timeinformation for all remote hosts connecting to your managed EmailSecurity appliances. You can gather information about the IP addresses,domains, and network owners (organizations) sending mail to yoursystem.
For more information, see the Incoming Mail Page, on page 68.
Incoming Mail Page
The Sender Groups report page provides a summary of connections bysender group and mail flow policy action, allowing you to review SMTPconnection and mail flow policy trends.
For more information, see the Sender Groups Report Page, on page 71.
Sender Groups Report Page
You can use this report page to view incoming messages based on theverdict received and threat category from the SDR service
For more information, see the Sender Domain Reputation Page, on page72.
Sender Domain Reputation Page
The Outgoing Destinations page provides information about the domainsthat your organization sends mail to. The top of the page includes graphsdepicting the top destinations by outgoing threat messages and topdestinations by outgoing cleanmessages. The bottom of the page displaysa chart with columns sorted by total recipients (default setting).
For more information, see the Outgoing Destinations Page, on page 72.
Outgoing Destinations Page
The Outgoing Senders page provides information about the quantity andtype of mail being sent from IP addresses and domains in your network.
For more information, see the Outgoing Senders Page, on page 73.
Outgoing Senders Page
The Internal Users provides information about the mail sent and receivedby your internal users per email address. A single user can have multipleemail addresses. The email addresses are not combined in the report.
For more information, see the Internal Users Page, on page 74.
Internal Users Page
The DLP Incident Summary page shows information on the incidents ofdata loss prevention (DLP) policy violations occurring in outgoing mail.
For more information, see the DLP Incidents , on page 75.
DLP Incidents
User Guide for AsyncOS 14.1 for Cisco Secure Email and Web Manager- GD (General Deployment)58
Using Centralized Email Security ReportingUnderstanding the Email Reporting Pages

ActionEmail Reporting Menu
TheMessage Filters page shows information about the top message filtermatches (which message filters had the largest number of matchingmessages) for incoming and outgoing messages.
For more information, see the Message Filters , on page 77
Message Filters
The Geo Distribution page shows the:
• Top incoming mail connections based on country of origin ingraphical format.
• Total incoming mail connections based on country of origin intabular format.
For more information, see the Geo Distribution, on page 77.
Geo Distribution
The High Volume Mail page identifies attacks involving a large numberof messages from a single sender, or with identical subjects, within amoving one-hour period.
For more information, see the High Volume Mail , on page 77.
High Volume Mail
The Content Filters page shows information about the top incoming andoutgoing content filter matches (which content filter had the mostmatching messages). This page also displays the data as both bar chartsand listings. Using the Content Filters page, you can review yourcorporate policies on a per-content-filter or per-user basis.
For more information, see the Content Filters Page, on page 78.
Content Filters Page
The DMARCVerification page shows the top sender domains that failedDomain-based Message Authentication, Reporting and Conformance(DMARC) verification, and a summary of the actions taken for incomingmessages from each domain.
For more information, see the DMARC Verification , on page 78.
DMARC Verification
The Macro Detection Report page shows the top incoming and outgoingmacro-enabled attachments by file type detected by the content ormessage filters.
For more information, see the Macro Detection, on page 79
Macro Detection
The External Threat Feeds page shows the following reports:
• Top ETF sources that is used to detect threats in messages.
• Top IOCs that matched threats detected in messages.
• Top ETF sources that is used to filter malicious incoming mailconnections
For more information, see the External Threat Feeds Page, on page 79.
External Threat Feeds Page
User Guide for AsyncOS 14.1 for Cisco Secure Email and Web Manager- GD (General Deployment)59
Using Centralized Email Security ReportingUnderstanding the Email Reporting Pages

ActionEmail Reporting Menu
The Virus Types page provides an overview of the viruses that are sentto and from your network. The Virus Types page displays the virusesthat have been detected by the virus scanning engines running on theEmail Security appliances and are displayed on the SecurityManagementappliance. Use this report to take action against a particular virus.
For more information, see the Virus Types Page, on page 79.
Virus Types Page
Use this page to view the URL categories most frequently occurring inmessages, the most common URLs in spam messages, and the numberof malicious and neutral URLs seen in messages.
For more information, see the URL Filtering Page , on page 80.
URL Filtering Page
Identifies the end users who clickedURLs rewritten by policy or OutbreakFilter, and the action associated with each user click.
For more information, see the Web Interaction Tracking Page, on page81.
Web Interaction Tracking Page
The Forged Email Detection page includes the following reports:
• Top Forged Email Detection. Displays the top ten users in thecontent dictionary that matched the forged From: header in theincoming messages.
• Forged Email Detection: Details. Displays a list of all the usersin the content dictionary that matched the forged From: header inthe incomingmessages and for a given user, the number of messagesmatched.
See Forged Email Detection Page, on page 82.
Forged Email Detection Page
You can use the Safe Print report page to view:
• Number of safe-printed attachments based on the file type ingraphical format.
• Summary of safe-printed attachments based on the file type in tabularformat.
For more information, see the Safe Print Page , on page 82.
Safe Print
You can use the Advanced Phishing Protection report page to view:
• Total number of messages successfully forwarded to the CiscoAdvanced Phishing Protection cloud service.
• Total number of messages that are not forwarded to the CiscoAdvanced Phishing Protection cloud service.
For more information, see the Advanced Phishing Protection Page onLegacy Web Interface, on page 83.
Advanced Phishing ProtectionPage
User Guide for AsyncOS 14.1 for Cisco Secure Email and Web Manager- GD (General Deployment)60
Using Centralized Email Security ReportingUnderstanding the Email Reporting Pages

ActionEmail Reporting Menu
There are three reporting pages showing file reputation and analysis data.
For more information, see the Advanced Malware Protection (FileReputation and File Analysis) Reporting Pages , on page 84.
Advanced Malware Protection(File Reputation and File Analysis)Reporting Pages
Use this page to view the details of the mailbox remediation results.
See Mailbox Auto Remediation, on page 88
Mailbox Auto Remediation
The TLS Connections page shows the overall usage of TLS connectionsfor sent and receivedmail. The report also shows details for each domainsending mail using TLS connections.
For more information, see the TLS Connections Page, on page 89.
TLS Connections Page
The Inbound SMTP authentication page shows the use of clientcertificates and the SMTP AUTH command to authenticate SMTPsessions between the Email Security appliance and users’ mail clients.
For more information, see Inbound SMTP Authentication Page, on page90.
Inbound SMTP AuthenticationPage
The Outbreak Filters page shows information about recent outbreaks andthe messages quarantined by Outbreak Filters. Use this page to monitoryour defense against virus attacks.
For more information, see the Outbreak Filters Page, on page 91.
Outbreak Filters Page
The Rate Limits page shows the mail senders (based on MAIL-FROMaddress) who exceed the threshold you set for the number of messagerecipients per sender.
For more information, see the Rate Limits Page , on page 90.
Rate Limits Page
Allows you to view the overall workload that is sending reporting datato the Security Management appliance.
For more information, see the System Capacity Page, on page 93.
System Capacity Page
Allows you to get a glimpse of the impact of the reporting data on theSecurityManagement appliance for each appliance. Formore information,see the Reporting Data Availability Page, on page 97.
Reporting Data Availability Page
Allows you to schedule reports for a specified time range. For moreinformation, see the Scheduling Email Reports, on page 153.
Scheduling Email Reports
Allows you to view and manage archived reports. For more information,see the Viewing and Managing Archived Email Reports , on page 156.
Also allows you to generate on-demand reports. See Generating EmailReports On Demand , on page 155.
Viewing and Managing ArchivedEmail Reports
User Guide for AsyncOS 14.1 for Cisco Secure Email and Web Manager- GD (General Deployment)61
Using Centralized Email Security ReportingUnderstanding the Email Reporting Pages

Table Column Descriptions for Email Reporting PagesTable 16: Table Column Descriptions for Email Reporting Pages
Column Name
Incoming Mail Details
All connections blocked by HAT policies. When theappliance is under heavy load, an exact count ofrejected connections is not maintained on a per-senderbasis. Instead, rejected connections counts aremaintained only for the most significant senders ineach time interval.
Connections Rejected
All connections accepted,Connections Accepted
All accepted and blocked connections attempted.Total Attempted
This is a component of Stopped by IP ReputationFiltering. It represents the number of recipientmessages stopped because any of the following HATlimits have been exceeded: maximum recipients perhour, maximum recipients per message, or maximummessages per connection. This is summed with anestimate of the recipient messages associated withrejected or TCP refused connections to yield Stoppedby IP Reputation Filtering.
Stopped by Recipient Throttling
The value for Stopped by IP Reputation Filtering iscalculated based on several factors:
• Number of “throttled”messages from this sender• Number of rejected or TCP refused connections(may be a partial count)
• A conservative multiplier for the number ofmessages per connection
When the appliance is under heavy load, an exactcount of rejected connections is not maintained on aper-sender basis. Instead, rejected connections countsare maintained only for the most significant sendersin each time interval. In this situation, the value showncan be interpreted as a “floor”; that is, at least thismany messages were stopped.
The Stopped by IP Reputation Filteringtotal on the Overview page is always basedon a complete count of all rejectedconnections. Only the per-senderconnection counts are limited due to load.
Note
Stopped by IP Reputation Filtering
All mail recipients rejected by conversational LDAPrejection plus all RAT rejections.
Stopped as Invalid Recipients
User Guide for AsyncOS 14.1 for Cisco Secure Email and Web Manager- GD (General Deployment)62
Using Centralized Email Security ReportingTable Column Descriptions for Email Reporting Pages

Column Name
The total count of messages blocked based on thereputation verdict of the sender domain.
Stopped by Domain Reputation Filtering
Any spam that has been detected.Spam Detected
Any viruses that have been detectedVirus Detected
The total count of messages that were stopped by acontent filter.
Stopped by Content Filter
Total number of threat messages (stopped byreputation, stopped as invalid recipient, spam, plusvirus)
Total Threat
Number of messages detected as unwanted marketingmessages.
Marketing
All clean messages.
Messages processed on appliances on which thegraymail feature is not enabled are counted as clean.
Clean
User Mail Flow Details (Internal Users Page)
All incoming spam that is detectedIncoming Spam Detected
The incoming virus that has been detected.Incoming Virus Detected
The incoming content filter matches that have beendetected.
Incoming Content Filter Matches
The Incoming messages that were stopped due tocontent filters that have been set.
Incoming Stopped by Content Filter
All incoming clean messages.Incoming Clean
The outgoing spam that was detected.Outgoing Spam Detected
The outgoing viruses that have been detected.Outgoing Virus Detected
The outgoing content filter matches that have beendetected.
Outgoing Content Filter Matches
The outgoing messages that were stopped due tocontent filters that have been set.
Outgoing Stopped by Content Filter
All outgoing clean messages.Outgoing Clean
Incoming and Outgoing TLS Connections: TLS Connections Page
All required TLS connections that failed.Required TLS: Failed
All required TLS connections that are successful.Required TLS: Successful
User Guide for AsyncOS 14.1 for Cisco Secure Email and Web Manager- GD (General Deployment)63
Using Centralized Email Security ReportingTable Column Descriptions for Email Reporting Pages

Column Name
All preferred TLS connections that failed.Preferred TLS: Failed
All preferred TLS connections that are successful.Preferred TLS: Successful
Total number of TLS connections.Total Connections
The total number of TLS messages.Total Messages
Outbreak Filters
The name of the outbreak.Outbreak Name
The outbreak ID.Outbreak ID
The first time the virus has been seen globally.First Seen Globally
The time the virus has been protected.Protection Time
Messages related to the quarantine.Quarantined Messages
Email Reporting Overview PageThe Email > Reporting > Overview page on the Security Management appliance provides a synopsis of theemail message activity from your Email Security appliances. The Overview page includes graphs and summarytables for the incoming and outgoing messages.
At a high level the Overview page shows you the incoming and outgoing mail graphs, and well as incomingand outgoing mail summaries.
The mail trend graphs provide a visual representation of the mail flow. You can use the mail trend graphs onthis page to monitor the flow of all mail into and out of your appliances.
The Domain-Based Executive Summary Report and the Executive Summary report are based on the EmailReporting Overview Page, on page 64. For more information, see the Domain-Based Executive SummaryReport, on page 150 and Executive Summary Report , on page 153
Note
Table 17: Details on the Email Reporting Overview Page
DescriptionSection
A drop-down list with options for choosing a time range to view. For more information, see the Choosing a TimeRange for Reports , on page 28.
Time Range
Choose an Email Security appliance for which you want to view Overview data, or choose All Email Appliances.
See also Viewing Reporting Data for an Appliance or Reporting Group, on page 27.
View Data for
User Guide for AsyncOS 14.1 for Cisco Secure Email and Web Manager- GD (General Deployment)64
Using Centralized Email Security ReportingEmail Reporting Overview Page

How Incoming Mail Messages are CountedCounts of incoming messages are dependent on the number of recipients per message. For example, anincoming message from example.com sent to three recipients is counted as three messages coming from thatsender.
Because the messages blocked by sender reputation filtering do not actually enter the work queue, the appliancedoes not have access to the list of recipients for an incoming message. In this case, a multiplier is used toestimate the number of recipients. This multiplier is based on research of a large sampling of existing customerdata.
How Email Messages Are Categorized by the AppliancesAsmessages proceed through the email pipeline, they can apply to multiple categories. For example, a messagecan be marked as spam or virus positive; it can also match a content filter. The precedence of the variousfilters and scanning activities greatly impacts the results of message processing.
In the example above, the various verdicts follow these rules of precedence:
• Spam positive• Virus positive• Matching a content filter
Following these rules, if a message is marked as spam positive, and your anti-spam settings are set to dropspam positive messages, the message is dropped and the spam counter is incremented.
Further, if your anti-spam settings are set to let the spam positive message continue on in the email pipeline,and a subsequent content filter drops, bounces, or quarantines the message, the spam count is still incremented.The content filter count is only incremented if the message is not spam or virus positive.
Alternately, if the message were quarantined by Outbreak Filters, it would not be counted until it was releasedfrom the quarantine and again processed through the work queue.
For complete information about message processing precedence, see chapter about the email pipeline in theonline help or user guide for your Email Security appliance.
Categorizing Email Messages on the Overview PageMessages reported in the Incoming Mail Summary on the Overview report page are categorized as follows:
User Guide for AsyncOS 14.1 for Cisco Secure Email and Web Manager- GD (General Deployment)65
Using Centralized Email Security ReportingHow Incoming Mail Messages are Counted
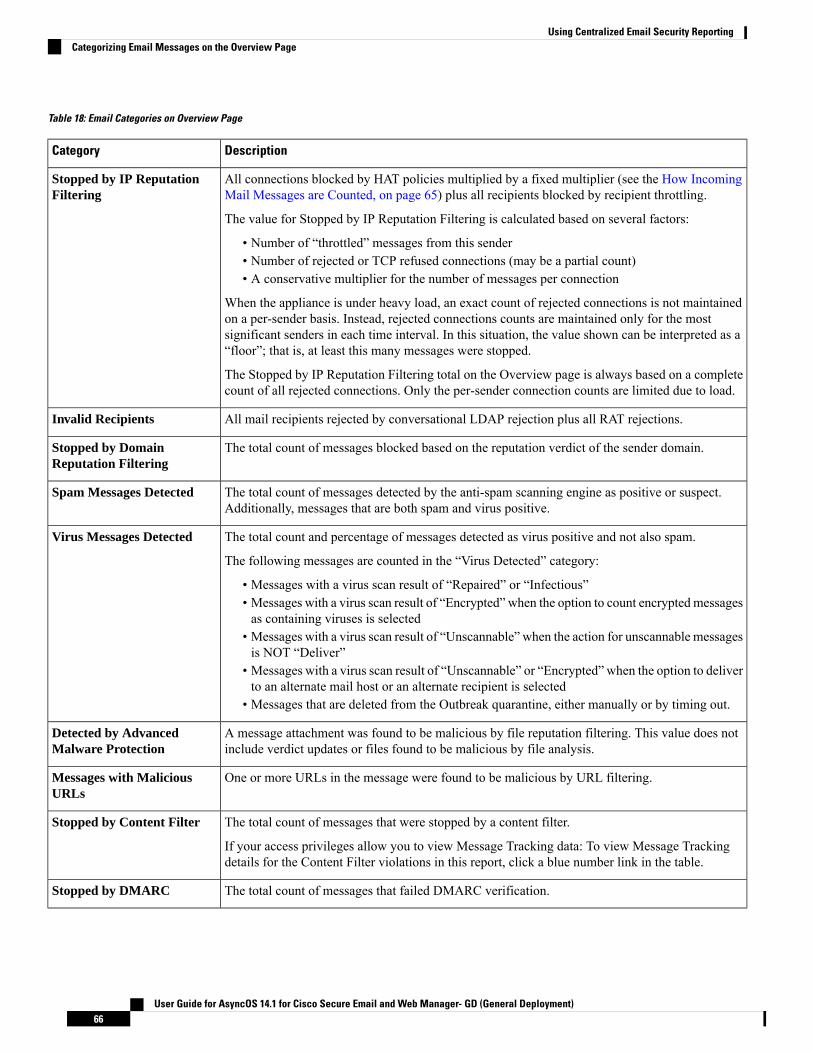
Table 18: Email Categories on Overview Page
DescriptionCategory
All connections blocked by HAT policies multiplied by a fixed multiplier (see the How IncomingMail Messages are Counted, on page 65) plus all recipients blocked by recipient throttling.
The value for Stopped by IP Reputation Filtering is calculated based on several factors:
• Number of “throttled” messages from this sender• Number of rejected or TCP refused connections (may be a partial count)• A conservative multiplier for the number of messages per connection
When the appliance is under heavy load, an exact count of rejected connections is not maintainedon a per-sender basis. Instead, rejected connections counts are maintained only for the mostsignificant senders in each time interval. In this situation, the value shown can be interpreted as a“floor”; that is, at least this many messages were stopped.
The Stopped by IP Reputation Filtering total on the Overview page is always based on a completecount of all rejected connections. Only the per-sender connection counts are limited due to load.
Stopped by IP ReputationFiltering
All mail recipients rejected by conversational LDAP rejection plus all RAT rejections.Invalid Recipients
The total count of messages blocked based on the reputation verdict of the sender domain.Stopped by DomainReputation Filtering
The total count of messages detected by the anti-spam scanning engine as positive or suspect.Additionally, messages that are both spam and virus positive.
Spam Messages Detected
The total count and percentage of messages detected as virus positive and not also spam.
The following messages are counted in the “Virus Detected” category:
• Messages with a virus scan result of “Repaired” or “Infectious”• Messages with a virus scan result of “Encrypted” when the option to count encrypted messagesas containing viruses is selected
• Messages with a virus scan result of “Unscannable” when the action for unscannable messagesis NOT “Deliver”
• Messages with a virus scan result of “Unscannable” or “Encrypted” when the option to deliverto an alternate mail host or an alternate recipient is selected
• Messages that are deleted from the Outbreak quarantine, either manually or by timing out.
Virus Messages Detected
A message attachment was found to be malicious by file reputation filtering. This value does notinclude verdict updates or files found to be malicious by file analysis.
Detected by AdvancedMalware Protection
One or more URLs in the message were found to be malicious by URL filtering.Messages with MaliciousURLs
The total count of messages that were stopped by a content filter.
If your access privileges allow you to view Message Tracking data: To view Message Trackingdetails for the Content Filter violations in this report, click a blue number link in the table.
Stopped by Content Filter
The total count of messages that failed DMARC verification.Stopped by DMARC
User Guide for AsyncOS 14.1 for Cisco Secure Email and Web Manager- GD (General Deployment)66
Using Centralized Email Security ReportingCategorizing Email Messages on the Overview Page

DescriptionCategory
The total count of messages that failed S/MIME verification, decryption, or both.S/MIMEVerification/Decryption Failed
The total count of advertising messages sent by recognized professional marketing groups, forexample Amazon.com.
This list item appears on the page only if marketing data are present in the system.
This number includes marketing messages identified both by Email Security appliances on whichthe graymail feature is enabled and by appliances on which Marketing Email Scanning underanti-spam settings is enabled.
Marketing Messages
The total count of notification messages from social networks, dating websites, forums, and so on.Examples include LinkedIn and CNET forums. This information is determined by the graymailfeature.
Social Networking Messages
The total count of advertising messages sent by unrecognized marketing groups, for example,TechTarget, a technology media company.
This information is determined by the graymail feature.
Bulk Messages
This number includes marketing messages detected by the graymail feature, plus social networkingmessages and bulk mail. It does not include marketing messages identified on appliances on whichthe graymail feature is not enabled, even if those totals are included in the Marketing Messagesvalue.
Click on the number corresponding to any of the graymail categories to view a list of messagesbelonging to that category using Message Tracking.
See also Reporting of Graymail , on page 93.
Graymail Messages
The total count of messages that were successfully verified, decrypted, or decrypted and verifiedusing S/MIME.
S/MIMEVerification/DecryptionSuccessful
This category is mail that is accepted and deemed to be virus and spam free.
The most accurate representation of clean messages accepted when taking per-recipient scanningactions (such as splintered messages being processed by separate mail policies) into account.
However, because messages that are marked as spam or virus positive and still delivered are notcounted, the actual number of messages delivered may differ from the clean message count.
If messages match a message filter and are not dropped or bounced by the filter, they are treatedas clean. Messages dropped or bounced by a message filter are not counted in the totals.
Messages processed on appliances on which the graymail feature is not enabled are counted asclean.
Clean Messages Accepted
This number includes spam, marketing messages (whether found by the graymail feature or byMarketing Email Scanning functionality in the anti-spam feature), social networking messages,bulk mail, and clean messages.
Total Attempted Messages
User Guide for AsyncOS 14.1 for Cisco Secure Email and Web Manager- GD (General Deployment)67
Using Centralized Email Security ReportingCategorizing Email Messages on the Overview Page

If you have configured your anti-virus settings to deliver unscannable or encrypted messages, these messageswill be counted as clean messages and not virus positive. Otherwise, the messages are counted as viruspositive.Additionally, if messages match a message filter and are not dropped or bounced by the filter, theyare treated as clean. Messages dropped or bounced by a message filter are not counted in the totals.
Note
Incoming Mail PageThe Email > Reporting > Incoming Mailpage on the Security Management appliance provides interactivereporting on the real-time information for all remote hosts connecting to your managed Security Managementappliances. You can gather information about the IP addresses, domains, and network owners (organizations)sending mail to your system. You can also perform a Sender Profile search on IP addresses, domains, ororganizations that have sent mail to you.
The Incoming Mail Details interactive table displays detailed information about the particular IP address,domain, or network owner (organization). You can access a Sender Profile page for any IP address, domain,or network owner by clicking the corresponding link at the top of the Incoming Mail page, or on other SenderProfile pages.
From the Incoming Mail pages you can:
• Perform a search on IP addresses, domains, or network owners (organizations) that have sent mail toyour Security Management appliances. See Searching and the Interactive Email Report Pages , on page57.
• View the Sender Groups report to monitor connections according to the specific sender group and mailflow policy actions. See the Sender Groups Report Page, on page 71 for more information.
• See detailed statistics on senders that have sent mail to your appliances. The statistics include the numberof attempted messages broken down by security service (sender reputation filtering, anti-spam, anti-virus,and so forth).
• Sort by senders who have sent you a high volume of spam or virus email, as determined by anti-spamor anti-virus security services.
• Use the SenderBase Reputation Service to examine the relationship between specific IP addresses,domains, and organizations to obtain information about a sender.
• Obtain more information about a sender from the SenderBase Reputation Service, including a sender’sSenderBase Reputation Score (SBRS) and which sender group the domain matched most recently. Addsenders to sender groups.
• Obtain more information about a specific sender who has sent a high volume of spam or virus email, asdetermined by the anti-spam or anti-virus security services.
Views Within the Incoming Mail PageThe Incoming Mail page has three different views:
• IP Addresses• Domains• Network Owners
These views provide a snapshot of the remote hosts connecting to the system in the context of the selectedview.
User Guide for AsyncOS 14.1 for Cisco Secure Email and Web Manager- GD (General Deployment)68
Using Centralized Email Security ReportingIncoming Mail Page

Additionally, in the Incoming Mail Details section of the Incoming Mail Page, you can click on a Sender’sIP Address, Domain name, or Network Owner Information to retrieve specific Sender Profile Information.For more information on Sender Profile information, see the Sender Profile Pages, on page 70.
Network owners are entities that contain domains. Domains are entities that contain IP addresses.Note
Depending on the view you select, the Incoming Mail Details interactive table displays the top IP addresses,domains, or network owners that have sent mail to all public listeners configured on the Email Securityappliances. You can monitor the flow of all mail into your appliances.
Click an IP address, domain, or network owner to access details about the sender on the Sender Profile page.The Sender Profile page is an IncomingMail page that is specific to a particular IP address, domain, or networkowner.
To access the mail flow information by sender group, click the Sender Groups Report link at the bottom ofthe Incoming Mail page. See Sender Profile Pages, on page 70.
In some cases, some of the report pages contain several unique sub-reports that can be accessed from thetop-level page. For example, the Incoming Mail report page on the Security Management appliance allowsyou to see information for individual IP Addresses, Domains and Network Owners. Each of these are sub-pagesare accessed from the Incoming Mail report page.
Results for each of these sub-report pages are generated on one consolidated report when you click on thePrintable PDF link at the top-right of the top-level page; in this case the Incoming Mail report page. Seeimportant information in Understanding the Email Reporting Pages, on page 57.
The Email > Reporting > Incoming Mail page offers the following views: IP Addresses, Domains, orNetwork Owners
See the Incoming Mail Details Table, on page 70 for an explanation of the data included in the IncomingMail Details interactive table.
From the Incoming Mail page you can also generate a PDF or export raw data to a CSV file. For informationon printing or exporting a file, see the Understanding the Email Reporting Pages, on page 57.
You can generate a scheduled report for the Incoming Mail report page. See the Scheduling Email Reports,on page 153.
Note
“No Domain Information” Link
Domains that have connected to the Security Management appliances and could not be verified with adouble-DNS lookup are automatically grouped into the special domain called “No Domain Information.” Youcan control how these types of unverified hosts are managed via Sender Verification. For more informationabout Sender Verification, see the documentation or online help for your Email Security appliance.
You can use the Items Displayed menu to select the number of senders to display in the list.
Time Ranges in the Mail Trend Graphs
You can select varying degrees of granularity to see your data in a mail graph. You can select a day, week,month, and year views of the same data. Because the data is monitored in real time, information is periodicallyupdated and summarized in the database.
User Guide for AsyncOS 14.1 for Cisco Secure Email and Web Manager- GD (General Deployment)69
Using Centralized Email Security Reporting“No Domain Information” Link

For more information on time ranges, see Choosing a Time Range for Reports , on page 28.
Incoming Mail Details TableThe interactive Incoming Mail Details table at the bottom of the Incoming Mail page lists the top sendersthat have connected to public listeners on the Email Security appliances. The table shows domains, IP addresses,or network owners, based on the view selected. Click the column headings to sort the data.
The system acquires and verifies the validity of the remote host’s IP address by performing a double DNSlookup . For more information about double DNS lookups and sender verification, see the documentation oronline help for your Email Security appliance.
For senders, that is Network Owner, IP Address or Domain, listed in the first column of the Incoming MailDetails table, or on the Top Senders by Total Threat Messages, click the Sender or No Domain Informationlink to view more information about the sender. The results appear on a Sender Profile page, which includesreal-time information from the SenderBase Reputation Service. From the Sender Profile page, you can viewfor more information about specific IP addresses or network owners. For more information, see the SenderProfile Pages, on page 70.
You can also view the Sender Groups report, by clicking Sender Groups report at the bottom of the IncomingMail page. For more information about the Sender Groups report page, see the Sender Groups Report Page,on page 71.
If your access privileges allow you to view Message Tracking data: To view Message Tracking details forthe Content Filter violations in this report, click a blue number link in the table.
Sender Profile PagesWhen you click a sender in the IncomingMail interactive table, on theMail Flow Details [NewWeb Interface]or Incoming Mail page, the Sender Profile page appears. It shows detailed information about the particularIP address, domain, or network owner (organization). You can access a Sender Profile page for any IP address,domain, or network owner by clicking the corresponding link on the Mail Flow Details page or on otherSender Profile pages.
Network owners are entities that contain domains. Domains are entities that contain IP addresses.
The Sender Profile pages displayed for IP addresses, domains, and network owners vary slightly. For each,the page contains a graph and summary table for incoming mail from the particular sender. Below the graph,a table lists the domains or IP addresses associated with the sender. (The Sender Profile page for an individualIP address does not contain a more granular listing.) The Sender Profile page also includes an informationsection with the current SenderBase, sender group, and network information for the sender.
• Network Owner profile pages contain information for the network owner, as well as the domains and IPaddresses associated with that network owner.
• Domain profile pages contain information for the domains and IP addresses associated with that domain.
• IP address profile pages contain information about the IP address only.
Each Sender Profile page contains the following data in the Current Information table at the bottom of thepage:
• The global information from the SenderBase Reputation Service, including:
• IP address, domain name, and/or network owner
• Network owner category (network owner only)
User Guide for AsyncOS 14.1 for Cisco Secure Email and Web Manager- GD (General Deployment)70
Using Centralized Email Security ReportingIncoming Mail Details Table
• CIDR range (IP addresses only)
• Daily magnitude and monthly magnitude for the IP address, domain, and/or network owner
• Days since the first message was received from this sender
• Last sender group and whether DNS verified (IP address sender profile page only)
Daily magnitude is a measure of how many messages a domain has sent over the last 24 hours. Similarto the Richter scale used to measure earthquakes, SenderBasemagnitude is a measure of message volumecalculated using a log scale with a base of 10. The maximum theoretical value of the scale is set to 10,which equates to 100% of the world's email message volume. Using the log scale, a one-point increasein magnitude equates to a 10x increase in actual volume.
Monthly magnitude is calculated using the same approach as daily magnitude, except the percentagesare calculated based on the volume of email sent over the last 30 days.
• Average magnitude (IP addresses only)
• Lifetime volume / 30 day volume (IP address profile pages only)
• Bonded sender status (IP address profile pages only)
• SenderBase Reputation Score (IP address profile pages only)
• Days since first message (network owner and domain profile pages only)
• Number of domains associated with this network owner (network owner and domain profile pagesonly)
• Number of IP addresses in this network owner (network owner and domain profile pages only)
• Number of IP addresses used to send email (network owner pages only)
ClickMore from SenderBase to see a page with all information supplied by the SenderBase ReputationService.
• Details about the domains and IP addresses controlled by this network owner appear on network ownerprofile pages. Details about the IP addresses in the domain appear on domain pages.
From a domain profile page, you can click on a specific IP address to view specific information, or view anorganization profile page.
Sender Groups Report PageThe Sender Groups report page provides a summary of connections by sender group and mail flow policyaction, allowing you to review SMTP connection and mail flow policy trends. The Mail Flow by SenderGroup listing shows the percentage and number of connections for each sender group. The Connections byMail Flow Policy Action chart shows the percentage of connections for each mail flow policy action. Thispage provides an overview of the effectiveness of your Host Access Table (HAT) policies. For more informationabout the HAT, see the documentation or online help for your Email Security appliance.
To view the Sender Groups report page, select Email > Reporting > Sender Groups.
From the Sender Group Report page you can also generate a PDF or export raw data to a CSV file. Forinformation on printing or exporting a file, see the Understanding the Email Reporting Pages, on page 57.
User Guide for AsyncOS 14.1 for Cisco Secure Email and Web Manager- GD (General Deployment)71
Using Centralized Email Security ReportingSender Groups Report Page

You can generate a scheduled report for the Sender Group report page. See the Scheduling Email Reports,on page 153.
Note
Sender Domain Reputation PageYou can use the Sender Domain Reputation report page to view:
• Incoming messages based on the verdict received from the SDR service in graphical format.
• Summary of incoming messages based on the threat category and verdict received from the SDR servicein tabular format.
• Incoming messages based on the threat category received from the SDR service in graphical format.
Only the messages whose SDR verdict is 'awful' or 'poor' are classified under theSDR threat category, such as, 'spam,' 'malicious,' etc.
Note
• Summary of incoming messages based on the threat category received from the SDR service in tabularformat.
In the Summary of Incoming Messages handled by SDR section, you can click on the number of messagescorresponding to a particular verdict to view the related messages in Message Tracking.
Outgoing Destinations PageThe Email > Reporting > Outgoing Destinations page provides information about the domains that yourorganization sends mail to.
Use the Outgoing Destinations page to answer the following types of questions:
• Which domains are the Email Security appliances sending mail to?• How much mail is sent to each domain?• How much of that mail is clean, spam-positive, virus-positive, malware or stopped by a content filter?• Howmanymessages are delivered and howmanymessages are hard-bounced by the destination servers?
The following list explains the various sections on the Outgoing Destinations page:
Table 19: Details on the Email Reporting Outgoing Destinations Page
DescriptionSection
A drop-down list that can range from a day to 90 days or a custom range. For more informationon time ranges and customizing this for your needs, see the Choosing a Time Range for Reports, on page 28.
Time Range (drop-down list)
The top destination domains of outgoing threat messages (spam, antivirus, etc.) sent by yourorganization. Total threat include threats that are spam or virus positive or that triggered acontent filter.
Top Destination by Total Threat
User Guide for AsyncOS 14.1 for Cisco Secure Email and Web Manager- GD (General Deployment)72
Using Centralized Email Security ReportingSender Domain Reputation Page
DescriptionSection
The top destination domains of clean outgoing messages sent by your organization.Top Destination by Clean Messages
All details related to the destination domains of all outgoingmessages sent by your organization,sorted by total recipients. Details include detected spam, viruses, clean messages etc.
If your access privileges allow you to viewMessage Tracking data: To viewMessage Trackingdetails for the Content Filter violations in this report, click a blue number link in the table.
Outgoing Destination Details
From the Outgoing Destinations page you can also generate a PDF or export raw data to a CSV file. Forinformation on printing or exporting a file, see the Understanding the Email Reporting Pages, on page 57.
You can generate a scheduled report for the Outgoing Destinations page. See the Scheduling Email Reports,on page 153.
Note
Outgoing Senders PageThe Email > Reporting > Outgoing Senders page provides information about the quantity and type of mailbeing sent from IP addresses and domains in your network.
Use the Outgoing Senders page to answer the following types of questions:
• Which IP addresses are sending the most virus-positive, or spam-positive or malware email?• Which IP addresses trigger content filters the most frequently?• Which domains are sending the most mail?• What are the total number of recipients that are being processed where a delivery was attempted.
To view the Outgoing Senders page, perform the following:
You can see the results of the Outgoing senders with two types of views:
• Domain: This view allows you to see the volume of mail that is being sent by each domain• IP address: This view allows you to see which IP addresses are sending the most virus messages ortriggering content filters.
The following list explains the various sections on the Outgoing Senders page for both views:
Table 20: Details on the Email Reporting Outgoing Sender Page
DescriptionSection
A drop-down list that can range from a day to 90 days or a custom range. For more informationon time ranges and customizing this for your needs, see the Choosing a Time Range forReports , on page 28.
Time Range (drop-down list)
The top senders (by IP address or domain) of outgoing threat messages (spam, antivirus, etc.)in your organization.
Top Senders by Total ThreatMessages
The top senders (by IP address or domain) of clean outgoing messages sent in yourorganization.
Top Sender by Clean Messages
User Guide for AsyncOS 14.1 for Cisco Secure Email and Web Manager- GD (General Deployment)73
Using Centralized Email Security ReportingOutgoing Senders Page

DescriptionSection
All details on the senders (by IP address or domain) of all outgoing messages sent by yourorganization. Details include detected spam, viruses, clean messages, etc.
If your access privileges allow you to viewMessage Tracking data: To viewMessage Trackingdetails for the DLP and Content Filter violations in this report, click a blue number link inthe table.
Sender Details
This page does not display information about message delivery. To track delivery information, such as thenumber of messages from a particular domain that were bounced, log in to the appropriate Email Securityappliance and choose Monitor > Delivery Status.
Note
From theOutgoing Senders page you can also generate a PDF or export raw data to a CSV file. For informationon printing or exporting a file, see the Understanding the Email Reporting Pages, on page 57.
You can generate a scheduled report for the Outgoing Senders page. See the Scheduling Email Reports, onpage 153.
Note
Internal Users PageThe Email > Reporting > Internal Users page provides information about the mail sent and received byyour internal users per email address. A single user can have multiple email addresses. The email addressesare not combined in the report.
Use the Internal Users interactive report page to answer these types of questions:
• Who is sending the most external email?• Who receives the most clean email?• Who receives the largest number of graymail messages?• Who receives the most spam?• Who is triggering which content filters?• Whose email is getting caught by content filters?
Table 21: Details on the Email Reporting Internal Users Page
DescriptionSection
A drop-down list that can range from a day to 90 days or a custom range. For more informationon time ranges and customizing this for your needs, see the Choosing a Time Range forReports , on page 28.
Time Range (drop-down list)
The top users by (by IP address or domain) of clean incoming messages sent in yourorganization.
Top Users by Clean IncomingMessages
The top users (by IP address or domain) of clean outgoingmessages sent in your organization.Top Users by Clean OutgoingMessages
User Guide for AsyncOS 14.1 for Cisco Secure Email and Web Manager- GD (General Deployment)74
Using Centralized Email Security ReportingInternal Users Page

DescriptionSection
The User Mail Flow Details interactive section breaks down the mail received and sent byeach email address. You can sort the listing by clicking the column headers.
To view details for a user, click the user name in the Internal User column. For moreinformation, see the Internal User Details Page, on page 75.
If your access privileges allow you to viewMessage Tracking data: To viewMessage Trackingdetails for the Content Filter violations in this report, click a blue number link in the table.
User Mail Flow Details
From the Internal Users page you can also generate a PDF or export raw data to a CSV file. For informationon printing or exporting a file, see the Understanding the Email Reporting Pages, on page 57.
You can generate a scheduled report for the Internal Users page. See the Scheduling Email Reports, on page153.
Note
Internal User Details PageThe Internal User detail page shows detailed information about a user, including a breakdown of incomingand outgoing messages showing the number of messages in each category (such as spam detected, virusdetected, detected by Advanced Malware Protection, stopped by content filter, etc.). Incoming and outgoingcontent filter matches are also shown.
Inbound Internal Users are the users for which you received email, based on the Rcpt To: address. OutboundInternal Users are based on theMail From: address and are useful when tracking the types of email that senderson your internal network are sending.
Click a content filter name to view detailed information for that filter on the corresponding content filterinformation page (see Content Filters Page, on page 78). You can use this method to view a list of all userswho sent or received mail that matched the particular content filter.
Some outbound mail (such as bounces) has a null sender. They are counted as outbound “unknown.”Note
Searching for a Specific Internal UserWith the search form at the bottom of the User Mail Summary page and the User Mail Flow Details page,you can search for a specific internal user (email address). Select whether to exactly match the search text orlook for items startingwith the entered text (for example, starts with “ex”will match “[email protected]”).
DLP IncidentsTheEmail > Reporting > DLP Incidents (DLP Incident Summary) page shows information on the incidentsof data loss prevention (DLP) policy violations occurring in outgoing mail. The Email Security applianceuses the DLP email policies enabled in the Outgoing Mail Policies table to detect sensitive data sent by yourusers. Every occurrence of an outgoing message violating a DLP policy is reported as an incident.
Using the DLP Incident Summary report, you can answer these kinds of questions:
User Guide for AsyncOS 14.1 for Cisco Secure Email and Web Manager- GD (General Deployment)75
Using Centralized Email Security ReportingInternal User Details Page

• What type of sensitive data is being sent by your users?• How severe are these DLP incidents?• How many of these messages are being delivered?• How many of these messages are being dropped?• Who is sending these messages?
The DLP Incident Summary page contains two main sections:
• the DLP incident trend graphs summarizing the top DLP incidents by severity (Low, Medium, High,Critical) and policy matches,
• the DLP Incident Details listing
Table 22: Details on the Email Reporting DLP Incident Summary Page
DescriptionSection
A drop-down list that can range from a day to 90 days or a custom range. For more information ontime ranges and customizing this for your needs, see the Choosing a Time Range for Reports , onpage 28.
Time Range (drop-down list)
The top DLP incidents listed by severity.Top Incidents by Severity
The DLP policies currently enabled for each email appliance’s outgoing mail policies are listed inthe DLP Incident Details interactive table at the bottom of the DLP Incident Summary page. Clickthe name of a DLP policy to view more detailed information.
Incident Summary
The top DLP Policies that have been matched.Top DLP Policy Matches
The DLP Incident Details table shows the total number of DLP incidents per policy, with a breakdownby severity level, and whether any of the messages were delivered in the clear, delivered encrypted,or dropped.
For more information on the DLP Incidents Details table, see the DLP Incidents Details Table, onpage 76.
DLP Incident Details
Click the name of a DLP policy to view detailed information on the DLP incidents detected by the policy.You can use this method to get a list of users who sent mail that contained sensitive data detected by thepolicy.
DLP Incidents Details TableThe DLP Incident Details table is an interactive table that shows the total number of DLP incidents per policy,with a breakdown by severity level, and whether any of the messages were delivered in the clear, deliveredencrypted, or dropped. Click the column headings to sort the data.
To find out more information about any of the DLP Policies listed in this table, click the name of the DLPPolicy and the DLP Policy Page appears.For more information, see DLP Policy Detail Page, on page 77.
If your access privileges allow you to view Message Tracking data: To view Message Tracking details forthe messages that populate this report, click a blue number link in the table.
User Guide for AsyncOS 14.1 for Cisco Secure Email and Web Manager- GD (General Deployment)76
Using Centralized Email Security ReportingDLP Incidents Details Table

DLP Policy Detail PageIf you click on a name of a DLP policy in the DLP Incident Details table, the resulting DLP Policy Detailpage displays the DLP incidents data for the policy. The page displays graphs on the DLP Incidents based bySeverity.
The page also includes an Incidents by Sender table at the bottom of the page that lists each internal user whohas sent a message that violated the DLP policy. The table also shows the total number of DLP incidents forthis policy per user, with a breakdown by severity level, and whether any of the messages were delivered inthe clear, delivered encrypted, or dropped. You can use the Incidents by Sender table to find out which usersmay be sending your organization’s sensitive data to people outside your network.
Clicking the sender name on the incident detail page opens up the Internal Users page. See the Internal UsersPage, on page 74 for more information.
Message FiltersThe Message Filters page shows information about the top message filter matches (which message filters hadthe largest number of matching messages) for incoming and outgoing messages.
Geo DistributionYou can use the Geo Distribution report page to view:
• Top incoming mail connections based on country of origin in graphical format.
• Total incoming mail connections based on country of origin in tabular format.
The following are the scenarios when no country information is displayed for the top and total incoming mailconnections:
• The sender IP address belongs to a private IP address
• The sender IP address does not get a valid SBRS.
High Volume MailUse reports on this page to:
• Identify attacks involving a large number of messages from a single sender, or with identical subjects,within a moving one-hour period.
• Monitor top domains to ensure that such attacks do not originate in your own domain. If this situationoccurs, one or more accounts in your organization may be compromised.
• Help identify false positives so you can adjust your filters accordingly.
Reports on this page show data only from message filters that use the Header Repeats rule and that pass thenumber-of-messages threshold that you set in that rule. When combined with other rules, the Header Repeatsrule is evaluated last, and is not evaluated at all if the message disposition is determined by a precedingcondition. Similarly, messages caught by Rate Limiting never reach Header Repeats message filters. Therefore,some messages that might otherwise be considered high-volume mail may not be included in these reports.If you have configured your filters to include certain messages in the allowed list, those messages are alsoexcluded from these reports.
User Guide for AsyncOS 14.1 for Cisco Secure Email and Web Manager- GD (General Deployment)77
Using Centralized Email Security ReportingDLP Policy Detail Page

For more information about message filters and the Header Repeats rule, see the online help or user guide foryour Email Security appliance.
Related Topics
• Rate Limits Page , on page 90
Content Filters PageThe Email > Reporting > Content Filters page shows information about the top incoming and outgoingcontent filter matches (which content filter had the most matching messages). The page displays the data asboth bar charts and listings. Using the Content Filters page, you can review your corporate policies on aper-content-filter or per-user basis and answer the following types of questions:
• Which content filter is triggered the most by incoming or outgoing mail?• Who are the top users sending or receiving mail that triggers a particular content filter?
To view more information about a specific filter, click the name of the filter. The Content Filter Details pageappears. For more information on Content Filter details page, see the Content Filter Details Page, on page78.
If your access privileges allow you to view Message Tracking data: To view Message Tracking details forthe messages that populate this report, click a blue number link in the table.
From theContent Filters page you can also generate a PDF or export raw data to a CSV file. For informationon printing or exporting a file, see the Understanding the Email Reporting Pages, on page 57.
You can generate a scheduled report for the Content Filter page. See the Scheduling Email Reports, on page153.
Note
Content Filter Details PageThe Content Filter Detail page displays matches for the filter over time, as well as matches by internal user.
In the Matches by Internal User section, click the name of a user to view the detail page for the internal user(email address). For more information, see Internal User Details Page, on page 75.
If your access privileges allow you to view Message Tracking data: To view Message Tracking details forthe messages that populate this report, click a blue number link in the table.
DMARC VerificationThe DMARC Verification page shows the top sender domains that failed Domain-based MessageAuthentication, Reporting and Conformance (DMARC) verification, and a summary of the actions taken forincoming messages from each domain. You can use this report to fine-tune your DMARC settings and answerthese kinds of questions:
• Which domains sent the most messages that failed DMARC verification?• For each domain, what actions were taken on messages that failed DMARC verification?
For more information about DMARC verification, see the Email Authentication chapter in the online help oruser guide for your Email Security appliance.
User Guide for AsyncOS 14.1 for Cisco Secure Email and Web Manager- GD (General Deployment)78
Using Centralized Email Security ReportingContent Filters Page

Macro DetectionYou can use the Macro Detection report page to view:
• Top Incoming Macro-Enabled Attachments by File Type in graphical and tabular format.
• Top Outgoing Macro-Enabled Attachments by File Type in graphical and tabular format.
You can click on the number of macro-enabled attachments to view the relatedmessages inMessage Tracking.
During report generation:
• If one or more macros are detected within an archive file, the Archive Files file type is incremented byone. The number of macro-enabled attachments within an archive file are not counted.
• If one or more macros are detected within an embedded file, the parent file type is incremented by one.The number of macro-enabled attachments within an embedded file are not counted.
Note
External Threat Feeds PageYou can use the External Threat Feeds report page to view:
• Top ETF sources used to detect threats in messages in graphical format
• Summary of ETF sources used to detect threats in messages in tabular format.
• Top IOCs that matched threats detected in messages in graphical format.
• Top ETF sources used to filter malicious incoming mail connections in graphical format.
• Summary of ETF sources used to filter malicious incoming mail connections in tabular format.
In the ‘Summary of External Threat Feed Sources’ section:
• You can click on the number of messages for a particular ETF source to view the related messages inMessage Tracking.
• You can click on a particular threat feed source to view the distribution of the ETF source based on theIOCs.
In the ‘Summary of Indicator of Compromise (IOC) Matches’ section:
• You can click on the number of IOCs for a particular ETF source to view the relatedmessages inMessageTracking.
• You can click on a particular IOC to view the distribution of the IOC based on the ETF sources.
Virus Types PageThe Email > Reporting > Virus Types page provides an overview of the viruses that are sent to and fromyour network. The Virus Types page displays the viruses that have been detected by the virus scanning enginesrunning on the Email Security appliances and are displayed on the Security Management appliance. Use this
User Guide for AsyncOS 14.1 for Cisco Secure Email and Web Manager- GD (General Deployment)79
Using Centralized Email Security ReportingMacro Detection

report to take action against a particular virus. For example, if you see that you are receiving a high volumeof viruses known to be embedded in PDF files, you can create a filter action to quarantine messages with PDFattachments.
Outbreak Filters can quarantine these types of virus-infected messages with no user intervention.Note
If you run multiple virus scanning engines, the Virus Types page includes results from all enabled virusscanning engines. The name of the virus that appears on the page is determined by the virus scanning engines.If more than one scanning engine detects a virus, it is possible to have more than one entry for the same virus.
Table 23: Details on the Email Reporting Virus Types Page
DescriptionSection
A drop-down list that can range from a day to 90 days or a custom range. For more informationon time ranges and customizing this for your needs, see the Choosing a Time Range forReports , on page 28.
Time Range (drop-down list)
This section displays a chart view of the viruses that have been sent to your network.Top Incoming Virus Types Detected
This section displays a chart view of the viruses that have been sent from your network.Top Outgoing Virus Types Detected
An interactive table that shows the details of each virus type.Virus Types Detail
To see which hosts sent virus-infected messages to your network, go to the Incoming Mail page, specify thesame reporting period, and sort by virus positive. Similarly, to see which IP addresses have sent virus positiveemail within your network, view the Outgoing Senders page and sort by virus positive messages.
Note
From the Virus Types page you can also generate a PDF or export raw data to a CSV file. For informationon printing or exporting a file, see the Understanding the Email Reporting Pages, on page 57.
You can generate a scheduled report for the Virus Types page. See the Scheduling Email Reports, on page153.
Note
URL Filtering Page• URL Filtering report modules are populated only if URL filtering is enabled.• URL Filtering reports are available for incoming and outgoing messages.• Only messages that are scanned by the URL filtering engine (either as part of anti-spam/outbreak filterscanning or through message/content filters) are included in these modules. However, not all of the resultsare necessarily specifically attributable to the URL Filtering feature.
• The Top URL Categories module includes all categories found in messages that have been scanned,whether or not they match a content or message filter.
User Guide for AsyncOS 14.1 for Cisco Secure Email and Web Manager- GD (General Deployment)80
Using Centralized Email Security ReportingURL Filtering Page

• Each message can be associated with only one reputation level. For messages with multiple URLs, thestatistics reflect the lowest reputation of any URL in the message.
• URLs in the global allowed list configured at Security Services > URL Filtering are not included inreports.
URLs in allowed lists used in individual filters are included in reports.
• Malicious URLs are URLs that Outbreak Filters have determined to have poor reputation. Neutral URLsare those that Outbreak Filters have determined to require click-time protection. Neutral URLs havetherefore been rewritten to redirect them to the Cisco Web Security proxy.
• Results of URL category-based filters are reflected in content and message filter reports.• Results of click-time URL evaluations by the Cisco Web Security proxy are not reflected in reports.
Web Interaction Tracking Page• Web Interaction Tracking report modules are populated only if the Web Interaction Tracking feature isenabled on managed Email Security appliances.
• Web Interaction Tracking reports are available for incoming and outgoing messages.• Only rewritten URLs (either by policy or Outbreak Filter) clicked by the end users are included in thesemodules.
• Web Interaction Tracking page includes the following reports:
Top Rewritten Malicious URLs clicked by End Users. Click on a URL to view a detailed report thatcontains the following information:
• A list of end users who clicked on the rewritten malicious URL.• Date and time at which the URL was clicked.• Whether the URL was rewritten by a policy or an outbreak filter.• Action taken (allow, block, or unknown) when the rewritten URL was clicked. Note that, if a URLwas rewritten by outbreak filter and the final verdict is unavailable, the status is shown as unknown.
Due to a limitation, status of all outbreak rewritten URLs are shown as unknown.Note
Top End Users who clicked on Rewritten Malicious URLs
Tracking Web Interaction Details. Includes the following information:
• A list of all the rewritten URLs (malicious and unmalicious). Click on a URL to view a detailedreport.
• Action taken (allow, block, or unknown) when a rewritten URL was clicked.
If the verdict of a URL (clean or malicious) was unknown at the time when the end user clicked it,the status is shown as unknown. This could be because the URL was under further scrutiny or theweb server was down or not reachable at the time of the user click.
• The number of times end users clicked on a rewritten URL. Click a number to view a list of allmessages that contain the clicked URL.
• Note the following:
User Guide for AsyncOS 14.1 for Cisco Secure Email and Web Manager- GD (General Deployment)81
Using Centralized Email Security ReportingWeb Interaction Tracking Page

If you have configured a content or message filter to deliver messages after rewriting maliciousURLs and notify another user (for example, an administrator), the web interaction tracking data forthe original recipient is incremented if the notified user clicks on the rewritten URLs.
•
• If you are sending a copy of quarantined messages containing rewritten URLs to a user other thanthe original recipient (for example, to an administrator) using the web interface, the web interactiontracking data for the original recipient is incremented if the other user clicks on the rewritten URLs.
Forged Email Detection Page• The Forged Email Detection page includes the following reports:
• Top Forged Email Detection. Displays the top ten users in the content dictionary that matched theforged From: header in the incoming messages.
• Forged Email Detection Details. Displays a list of all the users in the content dictionary thatmatched the forged From: header in the incoming messages and for a given user, the number ofmessages matched.
• The Forged Email Detection reports are populated only if you are using the Forged Email Detectioncontent filter or the forged-email-detection message filter.
Safe Print PageYou can use the Safe Print Action report page to view:
• Number of safe-printed attachments based on the file type in graphical format.
• Summary of safe-printed attachments based on the file type in tabular format.
In the ‘Summary of Safe Print File Types’ section, click the total number of safe-printed attachments to viewthe message details in Message Tracking.
Mail Policy Details Report PageYou can use the Mail Policy Details report page to view:
• Top incoming messages that matched a configured mail policy in graphical and tabular format.
• Top outgoing messages that matched a configured mail policy in graphical and tabular format.
In the ‘Incoming Policies’ section, click the total number of incoming messages that matched a specific mailpolicy to view the message details in Message Tracking.
In the ‘Outgoing Policies’ section, click the total number of incoming messages that matched a specific mailpolicy to view the message details in Message Tracking.
Advanced Phishing Protection Page• Advanced Phishing Protection Page on Legacy Web Interface, on page 83
• Advanced Phishing Protection Page on New Web Interface, on page 83
User Guide for AsyncOS 14.1 for Cisco Secure Email and Web Manager- GD (General Deployment)82
Using Centralized Email Security ReportingForged Email Detection Page

Advanced Phishing Protection Page on Legacy Web InterfaceThe Email > Reporting > Advanced Phishing Protection report page displays the following:
• Total number of messages successfully forwarded to the Cisco Advanced Phishing Protection cloudservice.
• Total number of messages that are not forwarded to the Cisco Advanced Phishing Protection cloudservice.
If the forwarding of message metadata has failed, you must validate the configurations of the AdvancedPhishing Protection feature. For more information, see the "Integrating Cisco Email Security Gateway withthe Cisco Advanced Phishing Protection" chapter of the User Guide for AsyncOS for Cisco Email SecurityAppliances.
Note
You can use the Advanced Phishing Protection report page to view:
• Total number of messages attempted to be forwarded to the Cisco Advanced Phishing Protection cloudservice, in a graphical format.
• Summary of messages forwarded to the Cisco Advanced Phishing Protection cloud service in a graphical
format.
Advanced Phishing Protection Page on New Web InterfaceThe Monitoring > Advanced Phishing Protection report page displays the following:
• Total number of messages successfully forwarded to the Cisco Advanced Phishing Protection cloudservice.
• Total number of messages that are not forwarded to the Cisco Advanced Phishing Protection cloudservice.
If the forwarding of message metadata has failed, you must validate the configurations of the AdvancedPhishing Protection feature. For more information, see the "Integrating Cisco Email Security Gateway withthe Cisco Advanced Phishing Protection" chapter of the User Guide for AsyncOS for Cisco Email SecurityAppliances.
Note
You can use the Advanced Phishing Protection report page to view:
• Total number of messages attempted to be forwarded to the Cisco Advanced Phishing Protection cloudservice, in a graphical format.
User Guide for AsyncOS 14.1 for Cisco Secure Email and Web Manager- GD (General Deployment)83
Using Centralized Email Security ReportingAdvanced Phishing Protection Page on Legacy Web Interface

Advanced Malware Protection (File Reputation and File Analysis) ReportingPages
• Requirements for File Analysis Report Details , on page 84
• Identifying Files by SHA-256 Hash , on page 85
• File Reputation and File Analysis Report Pages, on page 86
• Viewing File Reputation Filtering Data in Other Reports , on page 88
Requirements for File Analysis Report Details• (Cloud File Analysis) Ensure That the Management Appliance Can Reach the File Analysis Server , onpage 84
• (Cloud File Analysis) Configure the Management Appliance to Display Detailed File Analysis Results, on page 84
• (On-Premises File Analysis) Activate the File Analysis Account , on page 85• Additional Requirements , on page 85
(Cloud File Analysis) Ensure That the Management Appliance Can Reach the File Analysis Server
In order to obtain File Analysis report details, the appliance must be able to connect to the File Analysis serverover port 443. See details in Firewall Information, on page 587
(Cloud File Analysis) Configure the Management Appliance to Display Detailed File Analysis Results
In order to allow all content security appliances in your organization to display detailed results in the cloudabout files sent for analysis from any Cisco Email Security appliance or Cisco Web Security appliance inyour organization, you need to join all appliances to the same appliance group.
Step 1 Access the File Analysis section on the web interface:
• In the Legacy Web Interface, click Management Appliance > Centralized Services > Security Appliances andscroll down to the File Analysis section.
• In the New Web Interface, click Service Status and scroll down to the File Analysis section.
Step 2 If your managed appliances are pointed at different File Analysis cloud servers, select the server from which to displayresult details.
Result details will not be available for files processed by any other cloud server.
Step 3 Enter the Analysis Group ID.
• If you enter the Group ID incorrectly or need to change it for any other reason, you must open a case with CiscoTAC.
• This change takes effect immediately; it does not require a Commit.
• It is suggested to use your CCOID for this value.
• This value is case-sensitive.
User Guide for AsyncOS 14.1 for Cisco Secure Email and Web Manager- GD (General Deployment)84
Using Centralized Email Security ReportingAdvanced Malware Protection (File Reputation and File Analysis) Reporting Pages

• This value must be identical on all appliances that will share data about files that are uploaded for analysis.
• An appliance can belong to only one group.
• You can add a machine to a group at any time, but you can add it only once.
Step 4 Click Group Now.Step 5 Configure the same group on each Email Security appliance that will share data with this appliance.
What to do next
Related Topics
For Which Files Are Detailed File Analysis Results Visible in the Cloud? , on page 88
(On-Premises File Analysis) Activate the File Analysis Account
If you have deployed an on-premises (private cloud) Cisco AMP Threat Grid Appliance, you must activatethe File Analysis account for your Cisco Content Security Management appliance in order to view reportdetails available on the Threat Grid appliance. You generally only need to do this once.
Before you begin
Ensure that you are receiving System alerts at Critical level.
Step 1 The first time you attempt to access File Analysis report details from the Threat Grid appliance, wait a few minutes andyou will receive an alert that includes a link.
If you do not receive this alert, go to Management Appliance > System Administration > Alerts and click View TopAlerts.
Step 2 Click the link in the alert message.Step 3 Activate your management appliance account.
Additional Requirements
For any additional requirements, see the Release Notes for your Security Management appliance release,available from http://www.cisco.com/c/en/us/support/security/content-security-management-appliance/products-release-notes-list.html
Identifying Files by SHA-256 HashBecause filenames can easily be changed, the appliance generates an identifier for each file using a SecureHash Algorithm (SHA-256). If an appliance processes the same file with different names, all instances arerecognized as the same SHA-256. If multiple appliances process the same file, all instances of the file havethe same SHA-256 identifier.
In most reports, files are listed by their SHA-256 value (in an abbreviated format).
User Guide for AsyncOS 14.1 for Cisco Secure Email and Web Manager- GD (General Deployment)85
Using Centralized Email Security Reporting(On-Premises File Analysis) Activate the File Analysis Account

File Reputation and File Analysis Report Pages
DescriptionReport
Shows file-based threats that were identified by the file reputationservice.
For files with changed verdicts, see the AMP Verdict updates report.Those verdicts are not reflected in the AdvancedMalware Protectionreport.
If a file extracted from a compressed or archived file is malicious,only the SHA value of the compressed or archived file is included inthe Advanced Malware Protection report.
From AsyncOS 9.6.5 onwards, Advanced MalwareProtection report has been enhanced to display additionalfields, graphs, and so on. The report displayed after theupgrade does not include the reporting data prior to theupgrade. To view the AdvancedMalware Protection reportprior to AsyncOS 9.6.5 upgrade, click on the hyperlink atthe bottom of the page.
Note
The Incoming Malware Files by Category section shows thefollowing:
• The percentage of blocked listed file SHAs received from theAMP reputation server that are categorized as Malware.
• The percentage of blocked listed file SHAs received from theAMP for Endpoints console that are categorised as CustomDetection.
The threat name of a blocked listed file SHA obtained fromAMP for Endpoints console is displayed as Simple CustomDetection in the Incoming Malware Threat Files section of thereport.
• The percentage of blocked listed file SHAs received from theAMP for Endpoints console that are categorised as CustomThreshold.
You can click on the link in the More Details section of the report toview the file trajectory details of a blocked listed file SHA in theAMP for Endpoints console
You can view the Low Risk verdict details in the Incoming FilesHanded by AMP section of the report.
Advanced Malware Protection
User Guide for AsyncOS 14.1 for Cisco Secure Email and Web Manager- GD (General Deployment)86
Using Centralized Email Security ReportingFile Reputation and File Analysis Report Pages

DescriptionReport
Displays the time and verdict (or interim verdict) for each file sentfor analysis. The appliance checks for analysis results every 30minutes.
To view more than 1000 File Analysis results, export the data as a.csv file.
For deployments with an on-premises Cisco AMP Threat GridAppliance: Files that are included in the allowed lists on the AMPThreat Grid appliance show as "clean." For information about allowedlist, see the AMP Threat Grid documentation or online help.
Drill down to view detailed analysis results, including the threatcharacteristics for each file.
You can also search for additional information about an SHA, orclick the link at the bottom of the file analysis details page to viewadditional details on the server that analyzed the file.
To view details on the server that analyzed a file, see Requirementsfor File Analysis Report Details , on page 84.
If a file extracted from a compressed or archived file is sent foranalysis, only the SHA value of the extracted file is included in theFile Analysis report.
From AsyncOS 9.6.5 onwards, File Analysis report hasbeen enhanced to display additional fields, graphs, and soon. The report displayed after the upgrade does not includethe reporting data prior to the upgrade. To view the FileAnalysis report prior to AsyncOS 9.6.5 upgrade, click onthe hyperlink at the bottom of the page.
Note
Advanced Malware Protection FileAnalysis
Because Advanced Malware Protection is focused on targeted andzero-day threats, threat verdicts can change as aggregated dataprovides more information.
The AMP Verdict Updates report lists the files processed by thisappliance for which the verdict has changed since the message wasreceived. For more information about this situation, see thedocumentation for your Email Security appliance.
To view more than 1000 verdict updates, export the data as a .csvfile.
In the case of multiple verdict changes for a single SHA-256, thisreport shows only the latest verdict, not the verdict history.
To view all affected messages for a particular SHA-256 within themaximum available time range (regardless of the time range selectedfor the report) click a SHA-256 link.
AdvancedMalware ProtectionVerdictUpdates
User Guide for AsyncOS 14.1 for Cisco Secure Email and Web Manager- GD (General Deployment)87
Using Centralized Email Security ReportingFile Reputation and File Analysis Report Pages

Viewing File Reputation Filtering Data in Other ReportsData for file reputation and analysis is available in other reports where relevant. A Detected by AdvancedMalware Protection column may be hidden by default in applicable reports. To display additional columns,click the Columns link at the bottom of the table.
For Which Files Are Detailed File Analysis Results Visible in the Cloud?If you have deployed public-cloud File Analysis, you can view detailed results for all files uploaded from anymanaged appliance that has been added to the appliance group for File Analysis.
If you have added your management appliance to the group, you can view the list of managed appliances inthe group by clicking the button on the Management Appliance > Centralized Services > SecurityAppliances page.
Appliances in the analysis group are identified by the File Analysis Client ID. To determine this identifier fora particular appliance, look in the following location:
Location of File Analysis Client IDAppliance
Advanced Settings for File Analysis section on the Security Services> File Reputation and Analysis page.
Email Security appliance
Advanced Settings for File Analysis section on the Security Services> Anti-Malware and Reputation page.
Web Security appliance
At the bottom of the Management Appliance > CentralizedServices > Security Appliances page.
Cisco Content Security Managementappliance
Related Topics
• (Cloud File Analysis) Configure the Management Appliance to Display Detailed File Analysis Results, on page 84
Mailbox Auto RemediationYou can view the details of the mailbox remediation results using the Mailbox Auto Remediation report page.Use this report to view details such as:
• A list of recipients for whom the mailbox remediation was successful or unsuccessful• Remedial actions taken on messages• The filenames associated with a SHA-256 hash
The Recipients for whom remediation was unsuccessful field is updated in the following scenarios:
• The recipient is not a valid Office 365 user or the recipient does not belong to the Office 365 domainaccount configured on your appliance.
• The message containing the attachment is no longer available in the mailbox, for example, the end userdeleted the message.
• There was a connectivity issue between your appliance and Office 365 services when the appliance wastrying to perform the configured remedial action.
Click on a SHA-256 hash to view the related messages in Message Tracking.
User Guide for AsyncOS 14.1 for Cisco Secure Email and Web Manager- GD (General Deployment)88
Using Centralized Email Security ReportingViewing File Reputation Filtering Data in Other Reports

After upgrading to AsyncOS 13.6.1, the message tracking status of the messages received before the upgraderemains as "Delivered" than "Remediated."
Note
TLS Connections PageThe Email > Reporting > TLS Connections page shows the overall usage of TLS connections for sent andreceived mail. The report also shows details for each domain sending mail using TLS connections.
The TLS Connections page can be used to determine the following information:
• Overall, what portion of incoming and outgoing connections uses TLS?• Which partners do I have successful TLS connections with?• Which partners do I have unsuccessful TLS connections with?• Which partners have issue with their TLS certificates?• What percentage of overall mail with a partner uses TLS?
Table 24: Details on the Email Reporting TLS Connections Page
DescriptionSection
A drop-down list that can range from a day to 90 days or a custom range. For moreinformation on time ranges and customizing this for your needs, see the Choosing a TimeRange for Reports , on page 28.
Time Range (drop-down list)
The graph displays a view of incoming TLS encrypted and unencrypted connections overthe last hour, day, or week depending on the time frame that you have selected.
Incoming TLS Connections Graph
This table displays the total volume of incoming messages, the volume of encrypted andunencrypted messages, and the volume of successful and failed incoming TLS encryptedmessages.
Incoming TLS Connections Summary
This table displays a summary of the total volume of incoming messages.Incoming TLS Message Summary
The table displays details for domains sending or receiving encrypted messages. For eachdomain, you can view the total number of connections, messages sent, and the number ofTLS connections that were successful or failed. You can also view the percentage ofsuccessful and failed connections for each domain.
Incoming TLS Connections Details
The graph displays a view of outgoing TLS encrypted and unencrypted connections overthe last hour, day, or week depending on the time frame that you have selected.
Outgoing TLS Connections Graph
This table displays the total volume of outgoing messages, the volume of encrypted andunencrypted messages, and the volume of successful and failed outgoing TLS encryptedmessages.
Outgoing TLS Connections Summary
This table shows the total volume of outgoing messagesOutgoing TLS Message Summary
User Guide for AsyncOS 14.1 for Cisco Secure Email and Web Manager- GD (General Deployment)89
Using Centralized Email Security ReportingTLS Connections Page
DescriptionSection
The table displays details for domains sending or receiving encrypted messages. For eachdomain, you can view the total number of connections, messages sent, and the number ofTLS connections that were successful or failed, and the last TLS status. You can also viewthe percentage of successful and failed connections for each domain.
Outgoing TLS Connections Details
Inbound SMTP Authentication PageThe Inbound SMTP Authentication page shows the use of client certificates and the SMTP AUTH commandto authenticate SMTP sessions between the Email Security appliance and users’ mail clients. If the applianceaccepts the certificate or SMTP AUTH command, it will establish a TLS connection to the mail client, whichthe client will use to send a message. Since it is not possible for the appliance to track these attempts on aper-user basis, the report shows details on SMTP authentication based on the domain name and domain IPaddress.
Use this report to determine the following information:
• Overall, how many incoming connection use SMTP authentication?• How many connections use a client certificated?• How many connections use SMTP AUTH?• What domains are failing to connect when attempting to use SMTP authentication?• How many connections are successfully using the fall-back when SMTP authentication fails?
The Inbound SMTPAuthentication page includes a graph for received connections, a graph for mail recipientswho attempted an SMTP authentication connection, and a table with details on the attempts to authenticateconnections.
The Received Connections graph shows the incoming connections from mail clients that attempt toauthentication their connections using SMTP authentication over the time range you specify. The graphdisplays the total number of connections the appliance received, the number that did not attempt to authenticateusing SMTP authentication, the number that failed and succeeded to authenticate the connection using a clientcertificate, and the number that failed and succeeded to authenticate using the SMTP AUTH command.
The Received Recipients graph displays the number of recipients whose mail clients attempted to authenticatetheir connections to the Email Security appliances to send messages using SMTP authentication. The graphalso show the number of recipients whose connections were authenticated and the number of recipients whoseconnections were not authenticated.
The SMTP Authentication details table displays details for the domains whose users attempt to authenticatetheir connections to the Email Security appliance to sendmessages. For each domain, you can view the numberof connection attempts using a client certificate that were successful or failed, the number of connectionattempts using the SMTP AUTH command that were successful or failed, and the number that fell back tothe SMTP AUTH after their client certificate connection attempt failed. You can use the links at the top ofthe page to display this information by domain name or domain IP address.
Rate Limits PageRate Limiting by envelope sender allows you to limit the number of email message recipients per time intervalfrom an individual sender, based on the mail-from address. The Rate Limits report shows you the senderswho most egregiously exceed this limit.
User Guide for AsyncOS 14.1 for Cisco Secure Email and Web Manager- GD (General Deployment)90
Using Centralized Email Security ReportingInbound SMTP Authentication Page

Use this report to help you identify the following:
• Compromised user accounts that might be used to send spam in bulk.• Out-of-control applications in your organization that use email for notifications, alerts, automatedstatements, etc.
• Sources of heavy email activity in your organization, for internal billing or resource-management purposes.• Sources of large-volume inbound email traffic that might not otherwise be considered spam.
Note that other reports that include statistics for internal senders (such as Internal Users or Outgoing Senders)measure only the number of messages sent; they do not identify senders of a few messages to a large numberof recipients.
The Top Offenders by Incident chart shows the envelope senders who most frequently attempted to sendmessages to more recipients than the configured limit. Each attempt is one incident. This chart aggregatesincident counts from all listeners.
The Top Offenders by Rejected Recipients chart shows the envelope senders who sent messages to the largestnumber of recipients above the configured limit. This chart aggregates recipient counts from all listeners.
Rate Limiting settings, including “Rate Limit for Envelope Senders” settings, are configured on the EmailSecurity appliance in Mail Policies > Mail Flow Policies. For more information on rate limiting, see thedocumentation or online help for your Email Security appliance.
Related Topics
• High Volume Mail , on page 77
Outbreak Filters PageThe Email > Reporting > Outbreak Filters page shows information about recent outbreaks and messagesquarantined due to Outbreak Filters. You can use this page to monitor your defense against targeted virus,scam, and phishing attacks.
Use the Outbreak Filters page to answer the following types of questions:
• How many messages are quarantined and by which Outbreak Filters rule?• How much lead time has the Outbreak Filters feature been providing for virus outbreaks?• How do the local outbreaks compare to the global outbreaks?• How long do messages stay in the Outbreak Quarantine?• Which potentially malicious URLs are most frequently seen?
The Threats By Type section shows the different types of threat messages received by the appliance. TheThreat Summary section shows a breakdown of the messages by Virus, Phish, and Scam.
The Past Year Outbreak Summary lists global as well as local outbreaks over the past year, allowing you tocompare local network trends to global trends. The listing of global outbreaks is a superset of all outbreaks,both viral and non-viral, whereas local outbreaks are limited to virus outbreaks that have affected yourappliance. Local outbreak data does not include non-viral threats. Global outbreak data represents all outbreaksdetected by the Threat Operations Center which exceeded the currently configured threshold for the outbreakquarantine. Local outbreak data represents all virus outbreaks detected on this appliance which exceeded thecurrently configured threshold for the outbreak quarantine. The Total Local Protection Time is always basedon the difference between when each virus outbreak was detected by the Threat Operations Center and therelease of an anti-virus signature by a major vendor. Note that not every global outbreak affects your appliance.A value of “--” indicates either a protection time does not exist, or the signature times were not available from
User Guide for AsyncOS 14.1 for Cisco Secure Email and Web Manager- GD (General Deployment)91
Using Centralized Email Security ReportingOutbreak Filters Page

the anti-virus vendors (some vendors may not report signature times). This does not indicate a protection timeof zero, rather it means that the information required to calculate the protection time is not available.
The Quarantined Messages section summarizes Outbreak Filters quarantining, and is a useful gauge of howmany potential threat messages Outbreak Filters are catching. Quarantined messages are counted at time ofrelease. Typically, messages will be quarantined before anti-virus and anti-spam rules are available. Whenreleased, they will be scanned by the anti-virus and anti-spam software and determined to be positive or clean.Because of the dynamic nature of Outbreak tracking, the rule under which a message is quarantined (and eventhe associated outbreak) may change while the message is in the quarantine. Counting the messages at thetime of release (rather than the time of entry into the quarantine) avoids the confusion of having counts thatincrease and decrease.
The Threat Details listing displays information about specific outbreaks, including the threat category (virus,scam, or phishing), threat name, a description of the threat, and the number of messages identified. For virusoutbreaks, the Past Year Virus Outbreaks include the Outbreak name and ID, time and date a virus outbreakwas first seen globally, the protection time provided by Outbreak filters, and the number of quarantinedmessages. You can choose whether to view global or local outbreaks.
The First SeenGlobally time is determined by the Threat Operations Center, based on data from the SenderBase,the world’s largest email and web traffic monitoring network. The Protection Time is based on the differencebetween when each threat was detected by the Threat Operations Center and the release of an anti-virussignature by a major vendor.
A value of “--” indicates either a protection time does not exist, or the signature times were not available fromthe anti-virus vendors (some vendors may not report signature times). This does not indicate a protection timeof zero. Rather, it means that the information required to calculate the protection time is not available.
Other modules on this page provide:
• The number of incoming messages processed by Outbreak Filters in the selected time period.
Non-viral threats include phishing emails, scams, and malware distribution using links to an external website.
• Severity of threats caught by Outbreak Filters.
Level 5 threats are severe in scope or impact, while Level 1 represents low threat risk. For descriptions ofthreat levels, see the online help or user guide for your Email Security appliance.
• Length of time messages spent in the Outbreak Quarantine.
This duration is determined by the time it takes the system to compile enough data about the potential threatto make a verdict on its safety. Messages with viral threats typically spend more time in the quarantine thanthose with non-viral threats, because they must wait for anti-virus program updates. The maximum retentiontime that you specify for each mail policy is also reflected.
• The URLs most frequently rewritten to redirect message recipients to the Cisco Web Security Proxy forclick-time evaluation of the site if and when the recipient clicks a potentially malicious link in a message.
This list may include URLs that are not malicious, because if any URL in a message is deemed malicious,then all URLs in the message are rewritten.
In order to correctly populate the tables on the Outbreak Filters reporting page, the appliance must be able tocommunicate with the Cisco update servers specified in Management Appliance > System Administration >Update Settings.
Note
For more information, see the Outbreak Filters chapter.
User Guide for AsyncOS 14.1 for Cisco Secure Email and Web Manager- GD (General Deployment)92
Using Centralized Email Security ReportingOutbreak Filters Page

Reporting of GraymailGraymail statistics are reflected in the following reports:
Contains the Following Graymail DataReport
The number of incoming graymail messages under each graymailcategory (Marketing, Social, and Bulk) and the total number ofgraymail messages.
Mail Flow Summary page > Incomingtab
The top graymail senders.Mail Flow Details page > OutgoingSenders tab
The number of incoming graymail messages under each graymailcategory (Marketing, Social, and Bulk) and the total number ofgraymail messages for all the IP addresses, domain names, ornetwork owners.
Mail Flow Details page > IncomingMails tab
The top end users who receive graymail.User Mail Summary page > Top Usersby Graymail
The number of incoming graymail messages under each graymailcategory (Marketing, Social, and Bulk) and the total number ofgraymail messages for all the users.
User Mail Summary page > User MailDetails
Related Topics
• Reporting of Marketing Messages after Upgrade to AsyncOS 9.5 , on page 93
Reporting of Marketing Messages after Upgrade to AsyncOS 9.5After upgrade to AsyncOS 9.5:
• The number of marketing messages is the sum of marketing messages detected before and after theupgrade.
• The total number of graymail messages does not include the number of marketing messages detectedbefore the upgrade.
• The total number of attemptedmessages also includes the number of marketingmessages detected beforethe upgrade.
• If the graymail feature is not enabled on managed Email Security appliances, marketing messages arecounted as clean messages.
System Capacity PageThe Email > Reporting > System Capacity page provides a detailed representation of the system load,including messages in the work queue, incoming and outgoing messages (volume, size, and number), overallCPU usage, CPU usage by function, and memory page swapping information.
The System Capacity page can be used to determine the following information:
• Identify when Email Security appliances are exceeding recommended capacity; this enables you todetermine when configuration optimization or additional appliances are needed.
User Guide for AsyncOS 14.1 for Cisco Secure Email and Web Manager- GD (General Deployment)93
Using Centralized Email Security ReportingReporting of Graymail

• Identify historical trends in system behavior that point to upcoming capacity issues.• For troubleshooting, identify which parts of the system are using the most resources.
Monitor your Email Security appliances to ensure that the capacity is appropriate to your message volumes.Over time, volume inevitably rises and appropriate monitoring ensures that additional capacity or configurationchanges can be applied proactively. The most effective way to monitor system capacity is to track the overallvolume, the messages in the work queue, and the incidents of Resource Conservation Mode.
• Volume:It is important to understand the “normal” message volume and the “usual” spikes in yourenvironment. Track this data over time to measure volume growth. You can use the Incoming Mail andOutgoing Mail pages to track volume over time. For more information, see System Capacity – IncomingMail, on page 95 and System Capacity – Outgoing Mail, on page 95.
• Work Queue: The work queue is designed to work as a “shock absorber”— absorbing and filteringspam attacks and processing unusual increases in non-spam messages. However, the work queue canalso indicate a system under stress. Prolonged and frequent work queue backups may indicate a capacityproblem. You can use the System Capacity – Workqueue page to track the activity in your work queue.For more information, see System Capacity – Workqueue, on page 94.
• Resource Conservation Mode:When an appliance becomes overloaded, it enters Resource ConservationMode (RCM) and sends a CRITICAL system alert. This is designed to protect the device and allow it toprocess any backlog of messages. Your appliance should enter RCM infrequently and only during a verylarge or unusual increase in mail volume. Frequent RCM alerts may be an indication that the system isbecoming overloaded. See Resource Conservation Activity , on page 96.
How to Interpret the Data You See on System Capacity PageWhen choosing time ranges for viewing data on the System Capacity page, the following is important toremember:
• Day Report— The Day report queries the hour table and displays the exact number of queries that havebeen received by the appliance on an hourly basis over a 24 hour period. This information is gatheredfrom the hour table. This is an exact number.
• Month Report— TheMonth report queries the day tables for the 30 or 31 days (dependent on the numberof days in the month), giving you an exact report on the number of queries over 30 or 31 days. Again,this is an exact number.
The ‘Maximum’ value indicator on the System Capacity page is the highest value seen for the specified period.The ‘Average’ value is the average of all values for the specified period. The period of aggregation dependson the interval selected for that report. For example, you can choose to see the Average and Maximum valuesfor each day if the chart is for a month period.
You can click the View Details link for a specific graph to view data for individual Email Security appliancesand overall data for the appliances connected to the Security Management appliance.
System Capacity – WorkqueueThe Workqueue page shows the average time a message spends in the work queue, excluding any time spentin the Spam quarantine or in a policy, virus, or outbreak quarantine. You can view time periods from an hourup to one month. This average can help in identifying both short term events delaying mail delivery andidentify long term trends in the workload on the system.
User Guide for AsyncOS 14.1 for Cisco Secure Email and Web Manager- GD (General Deployment)94
Using Centralized Email Security ReportingHow to Interpret the Data You See on System Capacity Page
If a message is released from the quarantine into the work queue, the “average time in work queue” metricignores this time. This prevents double-counting and distorted statistics due to extended time spent in aquarantine.
Note
The report also shows the volume of messages in the work queue over a specified time period, and it showsthe maximum messages in the work queue over the same time period. The graphical representation of themaximum messages in the work queue also shows the work queue threshold level.
Occasional spikes in the Workqueue graphs are normal and expected. If the messages in the work queueremain higher than the configured threshold for a long duration, this may indicate a capacity issue. In thisscenario, consider tuning the threshold level or review the system configuration.
To change the work queue threshold level, see Adjusting the Reference Threshold in System Health Graphsfor Email Security Appliances, on page 497.
When reviewing the work queue page, you may want to measure the frequency of work queue backups, andtake note of work queue backups that exceed 10,000 messages.
Tip
System Capacity – Incoming MailThe System Capacity – Incoming Mail page shows incoming connections, the total number of incomingmessages, the average message size, and the total incoming message size. You can view the results for a day,week, month, or year. It is important to understand the trends of normal message volume and spikes in yourenvironment. You can use the System Capacity – Incoming Mail page to track volume growth over time andplan for system capacity. You might also want to compare the incoming mail data with the sender profile datato view the trends in volumes of email messages that are sent from specific domains to your network.
An increased number of incoming connections may not necessarily affect system load.Note
System Capacity – Outgoing MailThe System Capacity – Outgoing Mail page shows outgoing connections, the total number of outgoingmessages, the average message size, and the total outgoing message size. You can view the results for a day,week, month, or year. It is important to understand the trends of normal message volume and spikes in yourenvironment. You can use the System Capacity – Outgoing Mail page to track volume growth over time andplan for system capacity. Youmight also want to compare the outgoing mail data with the outgoing destinationsdata to view the trends in volumes of email messages that are sent from specific domains or IP addresses.
System Capacity – System LoadThe system load report shows the following:
• Overall CPU Usage, on page 96• Memory Page Swapping, on page 96• Resource Conservation Activity , on page 96
User Guide for AsyncOS 14.1 for Cisco Secure Email and Web Manager- GD (General Deployment)95
Using Centralized Email Security ReportingSystem Capacity – Incoming Mail

Overall CPU Usage
Email Security appliances are optimized to use idle CPU resources to improve message throughput. HighCPU usage may not indicate a system capacity problem. If the high CPU usage is coupled with consistent,high-volume memory page swapping, you may have a capacity problem.
This graph also indicates a threshold for CPU usage that is a visual reference only. To adjust the position ofthis line, see Adjusting the Reference Threshold in System Health Graphs for Email Security Appliances, onpage 497. You can configure your Email Security appliances to send you alerts that will suggest actions thatyou can take to address capacity issues.
Note
This page also shows a graph that displays the amount of CPU used by different functions, including mailprocessing, spam and virus engines, reporting, and quarantines. The CPU-by-function graph is a good indicatorof which areas of the product use the most resources on your system. If you need to optimize your appliance,this graph can help you determine which functions may need to be tuned or disabled.
Memory Page Swapping
Thememory page swapping graph shows how frequently the systemmust page to disk, in kilobytes per second.
The system is designed to swap memory regularly, so some memory swapping is expected and is not anindication of problems with your appliance. Unless the system consistently swaps memory in high volumes,memory swapping is normal and expected behavior (especially on C170appliances). To improve performance,youmay need to add Email Security appliances to your network or tune your configuration to ensure maximumthroughput.
This graph also indicates a threshold for memory page swapping that is a visual reference only. To adjust theposition of this line, see Adjusting the Reference Threshold in System Health Graphs for Email SecurityAppliances, on page 497. You can configure your Email Security appliances to send you alerts that will suggestactions that you can take to address capacity issues.
Note
Resource Conservation Activity
The resource conservation activity graph shows the number of times the Email Security appliance enteredResource Conservation Mode (RCM). For example, if the graph shows n times, it means that the appliancehas entered RCM n times and exited at least n-1 times.
Your appliances should enter RCM infrequently and only during a very large or unusual increase in mailvolume. If the Resource Conservation Activity graph shows that your appliance is entering RCS frequently,it may be an indication that the system is becoming overloaded.
System Capacity – AllThe All page consolidates all the previous system capacity reports onto a single page so you can view therelationship between the different reports. For example, you might see that the message queue is high at thesame time that excessive memory swapping takes place. This might be an indication that you have a capacityproblem. You may want to save this page as a PDF file to preserve a snapshot of system performance for laterreference (or to share with support staff).
User Guide for AsyncOS 14.1 for Cisco Secure Email and Web Manager- GD (General Deployment)96
Using Centralized Email Security ReportingOverall CPU Usage

Threshold Indicator in System Capacity GraphsIn some graphs, a line indicates the default value that may indicate a possible problem if it is frequently orconsistently crossed. To adjust this visual indicator, see Adjusting the Reference Threshold in System HealthGraphs for Email Security Appliances, on page 497.
Reporting Data Availability PageThe Email > Reporting > Reporting Data Availability page allows you to view, update and sort data toprovide real-time visibility into resource utilization and email traffic trouble spots.
All data resource utilization and email traffic trouble spots are shown from this page, including the dataavailability for the overall appliances that are managed by the Security Management appliance.
From this report page you can also view the data availability for a specific appliance and time range.
Understanding the Email Reporting Pages on the New WebInterface
This list represents the reports available in the latest supported release of AsyncOS for Email Security appliancesunder the Reports drop-down of the web interface. For more information, see Using the Interactive ReportPages, on page 39. If your Email Security appliances are running earlier releases of AsyncOS, not all of thesereports are available.
Note
Table 25: Email Reports Drop-down Options
ActionReports Drop-down Option
The Mail Flow Summary report page provides a synopsis of the activityon your Email Security appliances. It includes graphs and summary tablesfor the incoming and outgoing messages.
For more information, see the Mail Flow Summary Page, on page 101.
Mail Flow Summary Page
The System Capacity report page shows detailed information about theoverall workload of the reporting data, sent to the Security Managementappliance.
For more information, see the System Capacity Page, on page 106.
System Capacity Page
File and Malware Reports
The Advanced Malware Protection report page shows reporting viewsthat displays details of Summary, File Reputation, File Analysis, FileRetrospection andMailbox Auto Remediation, for incoming and outgoingfile-based threats.
For more information, see the Advanced Malware Protection Page , onpage 110.
Advanced Malware ProtectionPage (File Reputation and FileAnalysis)
User Guide for AsyncOS 14.1 for Cisco Secure Email and Web Manager- GD (General Deployment)97
Using Centralized Email Security ReportingThreshold Indicator in System Capacity Graphs

ActionReports Drop-down Option
The Virus Filtering report page provides an overview of the viruses thatare sent to and from your network. This page displays the viruses thathave been detected by the virus scanning engines running on the EmailSecurity appliances and are displayed on the Security Managementappliance. Use this report to take action against a particular virus.
For more information, see the Virus Filtering Page, on page 116.
Virus Filtering Page
The Macro Detection report page shows the top incoming and outgoingmacro-enabled attachments by file type detected by the content filter andmessage filters.
For more information, see the Macro Detection Page, on page 117.
Macro Detection Page
Email Threat Reports
The DMARC Verification report page shows the top sender domains thatfailedDomain-basedMessageAuthentication, Reporting andConformance(DMARC) verification, and a summary of the actions taken for incomingmessages from each domain.
For more information, see the DMARC Verification Page, on page 118.
DMARC Verification Page
The Outbreak Filters page shows information about recent outbreaks andthe messages quarantined by Outbreak Filters. Use this page to monitoryour defense against phishing, scam, virus and malware attacks.
For more information, see the Outbreak Filtering Page, on page 119.
Outbreak Filtering Page
Use this page to view the URL categories most frequently occurring inmessages, the most common URLs in spam messages, and the number ofmalicious and neutral URLs seen in messages.
For more information, see the URL Filtering Page, on page 120.
URL Filtering Page
The Forged Email Detection report page includes the following reports:
• Top Forged Email Detection. Displays the top ten users in thecontent dictionary that matched the forged From: header in theincoming messages.
• Forged Email Detection: Details. Displays a list of all the users inthe content dictionary that matched the forged From: header in theincoming messages and for a given user, the number of messagesmatched.
For more information, see the Forged Email Detection Page, on page 122.
Forged Email Detection Page
You can use this report page to view incoming messages based on theverdict received and threat category from the SDR service
For more information, see the Sender Domain Reputation Page, on page122.
Sender Domain Reputation Page
User Guide for AsyncOS 14.1 for Cisco Secure Email and Web Manager- GD (General Deployment)98
Using Centralized Email Security ReportingUnderstanding the Email Reporting Pages on the New Web Interface

ActionReports Drop-down Option
The External Threat Feeds page shows the following reports:
• Top ETF sources that is used to detect threats in messages.
• Top IOCs that matched threats detected in messages.
• Top ETF sources that is used to filter malicious incoming mailconnections
For more information, see the External Threat Feeds Page, on page 122.
External Threat Feeds Page
You can use the Safe Print report page to view:
• Number of safe-printed attachments based on the file type in graphicalformat.
• Summary of safe-printed attachments based on the file type in tabularformat.
For more information, see the Safe Print Page , on page 82.
Safe Print
You can use the Advanced Phishing Protection report page to view:
• Total number of messages successfully forwarded to the CiscoAdvanced Phishing Protection cloud service.
• Total number of messages that are not forwarded to the CiscoAdvanced Phishing Protection cloud service.
For more information, see the Advanced Phishing Protection ReportsPage, on page 123.
Advanced Phishing ProtectionPage
Connection and Flow Reports
The Mail Flow Details report page provides interactive reporting on thereal-time information for all remote hosts connecting to your managedEmail Security appliances. You can gather information about the IPaddresses, domains, and network owners (organizations) sending mail toyour system.
For more information, see the Mail Flow Details Page, on page 124.
Mail Flow Details Page
The Sender Groups report page provides a summary of connections bysender group and mail flow policy action, allowing you to review SMTPconnection and mail flow policy trends.
For more information, see the Sender Groups Page, on page 131.
Sender Groups Page
The Outgoing Destinations report page provides information about thedomains that your organization sends mail to. The top of the page includesgraphs depicting the top destinations by outgoing threat messages and topdestinations by outgoing clean messages. The bottom of the page displaysa chart with columns sorted by total recipients (default setting).
For more information, see the Outgoing Destinations Page, on page 131.
Outgoing Destinations Page
User Guide for AsyncOS 14.1 for Cisco Secure Email and Web Manager- GD (General Deployment)99
Using Centralized Email Security ReportingUnderstanding the Email Reporting Pages on the New Web Interface

ActionReports Drop-down Option
The TLS Encryption report page shows the overall usage of TLSconnections for sent and received mail. The report also shows details foreach domain sending mail using TLS connections.
For more information, see the TLS Encryption Page, on page 133.
TLS Encryption Page
The Inbound SMTP authentication report page shows the use of clientcertificates and the SMTPAUTH command to authenticate SMTP sessionsbetween the Email Security appliance and users’ mail clients.
For more information, see the Inbound SMTP Authentication Page, onpage 136.
Inbound SMTP AuthenticationPage
The Rate Limits report page shows the mail senders (based onMAIL-FROM address) who exceed the threshold you set for the numberof message recipients per sender.
For more information, see the Rate Limits Page, on page 137.
Rate Limits Page
The Connections by Country report page shows the:
• Top incoming mail connections based on country of origin ingraphical format.
• Total incoming mail connections and messages based on country oforigin in tabular format.
For more information, see the Connections by Country Page, on page 138.
Connections by Country Page
You can use the Domain Protection report page of the new web interfaceof your appliance to view:
• Summary of messages that are classified as legitimate or threat, in agraphical format.
• Summary of the destination domains details based on the senders, ina tabular format.
For more information, see the Domain Protection Page, on page 138.
Domain Protection Page
User Reports
The User Mail Summary report provides information about the mail sentand received by your internal users per email address. A single user canhave multiple email addresses. The email addresses are not combined inthe report.
For more information, see the User Mail Summary, on page 139.
User Mail Summary Page
TheDLP Incident Summary report page shows information on the incidentsof data loss prevention (DLP) policy violations occurring in outgoingmail.
For more information, see the DLP Incident Summary Page, on page 142.
DLP Incident Summary Page
User Guide for AsyncOS 14.1 for Cisco Secure Email and Web Manager- GD (General Deployment)100
Using Centralized Email Security ReportingUnderstanding the Email Reporting Pages on the New Web Interface
ActionReports Drop-down Option
The Web Interaction report page identifies the end users who clickedURLs rewritten by policy or Outbreak Filter, and the action associatedwith each user click.
For more information, see the Web Interaction Page, on page 143.
Web Interaction Page
You can now monitor the remediation results for Mailbox AutoRemediation and Mailbox Search and Remediate using the RemediationReport.
This report provides a summary of:
• Total number of messages attempted for remediation using MailboxAuto Remediation and Mailbox Search and Remediate.
• Number of messages successfully remediated for a configuredremedial action.
• Number of messages for which the remediation failed.
Click the Mailbox Auto Remediation andMailbox Search and Remediatetabs in the report to view details about the messages for which theremediation was attempted.
For more information, see the Remediation Reports Page, on page 144
Remediation Reports Page
Filter Reports
TheMessage Filters report page shows information about the top messagefilter matches (which message filters had the largest number of matchingmessages) for incoming and outgoing messages.
For more information, see the Message Filters Page, on page 146.
Message Filters Page
The High Volume Mail report page identifies attacks involving a largenumber of messages from a single sender, or with identical subjects, withina moving one-hour period.
For more information, see the High Volume Mail Page, on page 147.
High Volume Mail Page
The Content Filters report page shows information about the top incomingand outgoing content filter matches (which content filter had the mostmatching messages). This page also displays the data as both bar chartsand listings.
For more information, see the Content Filters Page, on page 147.
Content Filters Page
Mail Flow Summary PageTheMail Flow Summary report page on the Security Management appliance provides a synopsis of the emailmessage activity from your Email Security appliances. The Mail Flow Summary report page includes graphsand summary tables for the incoming and outgoing messages.
User Guide for AsyncOS 14.1 for Cisco Secure Email and Web Manager- GD (General Deployment)101
Using Centralized Email Security ReportingMail Flow Summary Page

The Mail Flow Summary: Incoming report page shows the incoming mail graphs for the total number ofmessages that are processed and blocked by the appliance, as well as the summary of the incoming mails.
You can use the mail trend graphs on this page to monitor the flow of all the incoming mails that are processedand blocked by your appliances, based on the selected time range. For more information, see Choosing a TimeRange for Reports , on page 28.
To search for specific information within your data, see Searching and the Interactive Email Report Pages ,on page 57
The following mail trend graphs provide a visual representation of the incoming mail flow:
• Threat Detection Summary
• Content Summary
You can view the mail trend of the incoming messages based on the required counters for the respectivecategories. For more information, see Using Counters to Filter Data on the Trend Graphs, on page 43.
The Mail Flow Summary: Outgoing report page shows the outgoing mail graphs for the total number ofmessages that are processed and delivered by the appliance, as well as the summary of the outgoing mail.
You can use the mail trend graphs on this page to monitor the flow of all the outgoing mails that are processedand delivered by your appliances, based on the selected time range. For more information, see Choosing aTime Range for Reports , on page 28.
The following mail trend graphs provide a visual representation of the mail flow of the Outgoing Mails.
You can view themail trend of the outgoingmessages based on the required counters of the processedmessages.For more information, see Using Counters to Filter Data on the Trend Graphs, on page 43.
The following list explains the various sections on the Mail Flow Summary report page:
Table 26: Details on the Mail Flow Summary Page
DescriptionSection
Mail Flow Summary: Incoming
The Number ofMessages graph provides a visual representation of thetotal number of messages processed, including the messages that areprocessed as threat messages.
Number of Messages
The ThreatMessages graph provides a visual representation of the totalnumber of messages that are blocked by the Email Security appliance.
Threat Messages
User Guide for AsyncOS 14.1 for Cisco Secure Email and Web Manager- GD (General Deployment)102
Using Centralized Email Security ReportingMail Flow Summary Page

DescriptionSection
The Threat Detection Summary mail trend graph provides a visualrepresentation based on the following categories:
• Connection and Reputation Filtering: Messages that arecategorized as threat by the Reputation Filtering and InvalidRecipients.
• Spam Detection: Messages that are categorized as threat by theAnti-spam scanning engine.
• Email Spoofing: Messages which are categorized as threat dueto DMARC Verification failure.
• Outbreak Threat Summary: Messages which are categorizedas phishing, scam, virus or malware, by the Outbreak Filteringengine.
• Attachment and Malware Detection: Messages that arecategorized as threat by the Anti-virus and AMP engines.
• All Categories: All the messages that are categorized as threat.
Threat Detection Summary
The Content Summarymail trend graph provides a visual representationbased on the following categories:
• Graymail: Messages that are categorized as marketing, bulk orsocial networking.
• Content Filters: Messages that are categorized by the contentfilters.
• All Categories: All the messages that are categorized by graymailengines and content filters.
Content Summary
Mail Flow Summary: Outgoing
The Number ofMessages graph provides a visual representation of thetotal number of messages processed, including the messages that areprocessed as clean.
Number of Messages
The Message Delivery graph provides a visual representation of thetotal number of messages that are delivered, including hard bounces.
Message Delivery
The OutgoingMails trend graph provides a visual representation basedon the following categories:
• Spam Detected
• Virus Detected
• Detected by AMP
• Stopped by Content Filters
• Stopped by DLP
Outgoing Mails
User Guide for AsyncOS 14.1 for Cisco Secure Email and Web Manager- GD (General Deployment)103
Using Centralized Email Security ReportingMail Flow Summary Page

Related Topics
• How Email Messages Are Categorized by the Appliances, on page 65
• How Incoming Mail Messages are Counted, on page 65
• Categorizing Email Messages on the Mail Flow Summary Page, on page 104
How Incoming Mail Messages are CountedCounts of incoming messages are dependent on the number of recipients per message. For example, anincoming message from example.com sent to three recipients is counted as three messages coming from thatsender.
Because the messages blocked by sender reputation filtering do not actually enter the work queue, the appliancedoes not have access to the list of recipients for an incoming message. In this case, a multiplier is used toestimate the number of recipients. This multiplier is based on research of a large sampling of existing customerdata.
How Email Messages Are Categorized by the AppliancesAsmessages proceed through the email pipeline, they can apply to multiple categories. For example, a messagecan be marked as spam or virus positive; it can also match a content filter. The precedence of the variousfilters and scanning activities greatly impacts the results of message processing.
In the example above, the various verdicts follow these rules of precedence:
• Spam positive• Virus positive• Matching a content filter
Following these rules, if a message is marked as spam positive, and your anti-spam settings are set to dropspam positive messages, the message is dropped and the spam counter is incremented.
Further, if your anti-spam settings are set to let the spam positive message continue on in the email pipeline,and a subsequent content filter drops, bounces, or quarantines the message, the spam count is still incremented.The content filter count is only incremented if the message is not spam or virus positive.
Alternately, if the message were quarantined by Outbreak Filters, it would not be counted until it was releasedfrom the quarantine and again processed through the work queue.
For complete information about message processing precedence, see chapter about the email pipeline in theonline help or user guide for your Email Security appliance.
Categorizing Email Messages on the Mail Flow Summary PageIncoming messages that are considered as threat, and outgoing messages that are delivered in the Mail FlowSummary report page are categorized as follows:
Table 27: Email Categories on Mail Flow Summary Page
DescriptionCategory
Mail Flow Summary: Incoming
User Guide for AsyncOS 14.1 for Cisco Secure Email and Web Manager- GD (General Deployment)104
Using Centralized Email Security ReportingHow Incoming Mail Messages are Counted
DescriptionCategory
All connections blocked by HAT policies, multiplied by a fixed multiplier,(see the How Incoming Mail Messages are Counted, on page 65) and addedwith all recipients blocked by recipient throttling.
The value for Stopped by IP Reputation Filtering is calculated based on thefollowing factors:
• Number of “throttled” messages from this sender.
• Number of rejected or TCP refused connections (may be a partial count).
• A conservative multiplier for the number of messages per connection.
When the appliance is under heavy load, an exact count of rejectedconnections is not maintained on a per-sender basis. Instead, rejectedconnections counts are maintained only for the most significant senders ineach time interval. In this situation, the value shown can be interpreted asan indicative value of the least number of messages are stopped.
The Reputation Filtering total count and percentage on the Mail FlowSummary report page is always based on a complete count of all rejectedconnections. Only the per-sender connection counts are limited due to load.
Reputation Filtering
The total count and percentage of all mail recipients rejected byconversational LDAP rejection in addition to all RAT rejections.
Invalid Recipients
The total count and percentage of incoming messages detected by theanti-spam scanning engine as positive or suspect. Additionally, messagesthat are both spam and virus positive.
Anti-Spam
The total count and percentage of incoming messages detected as viruspositive and not also spam.
The following messages are counted in the “Virus Detected” category:
• Messages with a virus scan result of “Repaired” or “Infectious”
• Messages with a virus scan result of “Encrypted” when the option tocount encrypted messages as containing viruses is selected
• Messages with a virus scan result of “Unscannable” when the actionfor unscannable messages is NOT “Deliver”
• Messages with a virus scan result of “Unscannable” or “Encrypted”when the option to deliver to an alternate mail host or an alternaterecipient is selected
• Messages that are deleted from the Outbreak quarantine, either manuallyor by timing out.
Anti-Virus
User Guide for AsyncOS 14.1 for Cisco Secure Email and Web Manager- GD (General Deployment)105
Using Centralized Email Security ReportingCategorizing Email Messages on the Mail Flow Summary Page

DescriptionCategory
The total count and percentage of incoming messages blocked by the fileanalysis service.
Amessage attachment was found to bemalicious by file reputation filtering.This value does not include verdict updates or files found to be maliciousby file analysis.
AdvancedMalware Protection
The total count and percentage of incoming messages that are stopped bymessage and content filters.
Content Filter
The total count and percentage of incoming messages that failed DMARCverification policy.
DMARC Policy
The total count and percentage of incoming messages that failed S/MIMEverification, decryption, or both.
S/MIMEVerification/Decryption Failed
Mail Flow Summary: Outgoing
The total count and percentage of outgoing messages that are permanentlyundeliverable.
Hard Bounces
The total count and percentage of outgoing messages that are delivered.Delivered
If you have configured your anti-virus settings to deliver unscannable or encrypted messages, these messageswill be counted as cleanmessages and not virus positive. Otherwise, the messages are counted as virus positive.
Additionally, if messages match a message filter and are not dropped or bounced by the filter, they are treatedas clean. Messages dropped or bounced by a message filter are not counted in the totals.
Note
Related Topics
Mail Flow Details Page, on page 124
System Capacity PageThe System Capacity report page provides a detailed representation of the system load, including messagesin the work queue, incoming and outgoing messages (volume, size, and number), overall CPU usage, CPUusage by function, and memory page swapping information.
The System Capacity report page can be used to determine the following information:
• Identify when Email Security appliances are exceeding recommended capacity; this enables you todetermine when configuration optimization or additional appliances are needed.
• Identify historical trends in system behavior that point to upcoming capacity issues.
• For troubleshooting, identify which parts of the system are using the most resources.
To view the System Capacity report page on the Security Management appliance, select Email from theProduct drop-down and choose Monitoring > System Capacity from the Reports drop-down. For moreinformation, see Using the Interactive Report Pages, on page 39.
User Guide for AsyncOS 14.1 for Cisco Secure Email and Web Manager- GD (General Deployment)106
Using Centralized Email Security ReportingSystem Capacity Page

You can monitor your Email Security appliances to ensure that the capacity is appropriate to your messagevolumes. Over time, volume inevitably rises and appropriate monitoring ensures that additional capacity orconfiguration changes can be applied proactively. The most effective way to monitor system capacity is totrack the overall volume, the messages in the work queue, and the incidents of Resource Conservation Mode.
• Volume: It is important to understand the “normal” message volume and the “usual” spikes in yourenvironment. Track this data over time to measure volume growth. You can use the Incoming Mail andOutgoing Mail pages to track volume over time. For more information, see System Capacity – IncomingMail, on page 95 and System Capacity – Outgoing Mail, on page 95.
• Work Queue: The work queue is designed to work as a “shock absorber”— absorbing and filtering spamattacks and processing unusual increases in non-spam messages. However, the work queue can alsoindicate a system under stress. Prolonged and frequent work queue backups may indicate a capacityproblem. You can use the System Capacity – Workqueue page to track the activity in your work queue.For more information, see System Capacity – Workqueue, on page 94.
• Resource Conservation Mode:When an appliance becomes overloaded, it enters Resource ConservationMode (RCM) and sends a CRITICAL system alert. This is designed to protect the device and allow it toprocess any backlog of messages. Your appliance should enter RCM infrequently and only during a verylarge or unusual increase in mail volume. Frequent RCM alerts may be an indication that the system isbecoming overloaded. See Resource Conservation Activity , on page 96.
Related Topics
• How to Interpret the Data You See on System Capacity Page, on page 94
• System Capacity – Workqueue, on page 94
• System Capacity – Incoming Mail, on page 95
• System Capacity – Outgoing Mail, on page 95
• System Capacity – All, on page 96
• Threshold Indicator in System Capacity Graphs , on page 97
How to Interpret the Data You See on System Capacity PageWhen choosing time ranges for viewing data on the System Capacity page, the following is important toremember:
• Day Report— The Day report queries the hour table and displays the exact number of queries that havebeen received by the appliance on an hourly basis over a 24 hour period. This information is gatheredfrom the hour table. This is an exact number.
• Month Report— TheMonth report queries the day tables for the 30 or 31 days (dependent on the numberof days in the month), giving you an exact report on the number of queries over 30 or 31 days. Again,this is an exact number.
The ‘Maximum’ value indicator on the System Capacity page is the highest value seen for the specified period.The ‘Average’ value is the average of all values for the specified period. The period of aggregation dependson the interval selected for that report. For example, you can choose to see the Average and Maximum valuesfor each day if the chart is for a month period.
You can click the View Details link for a specific graph to view data for individual Email Security appliancesand overall data for the appliances connected to the Security Management appliance.
User Guide for AsyncOS 14.1 for Cisco Secure Email and Web Manager- GD (General Deployment)107
Using Centralized Email Security ReportingHow to Interpret the Data You See on System Capacity Page

System Capacity – WorkqueueThe Workqueue page shows the average time a message spends in the work queue, excluding any time spentin the Spam quarantine or in a policy, virus, or outbreak quarantine. You can view time periods from an hourup to one month. This average can help in identifying both short term events delaying mail delivery andidentify long term trends in the workload on the system.
If a message is released from the quarantine into the work queue, the “average time in work queue” metricignores this time. This prevents double-counting and distorted statistics due to extended time spent in aquarantine.
Note
The report also shows the volume of messages in the work queue over a specified time period, and it showsthe maximum messages in the work queue over the same time period. The graphical representation of themaximum messages in the work queue also shows the work queue threshold level.
Occasional spikes in the Workqueue graphs are normal and expected. If the messages in the work queueremain higher than the configured threshold for a long duration, this may indicate a capacity issue. In thisscenario, consider tuning the threshold level or review the system configuration.
To change the work queue threshold level, see Adjusting the Reference Threshold in System Health Graphsfor Email Security Appliances, on page 497.
When reviewing the work queue page, you may want to measure the frequency of work queue backups, andtake note of work queue backups that exceed 10,000 messages.
Tip
System Capacity – Incoming MailThe System Capacity – Incoming Mail page shows incoming connections, the total number of incomingmessages, the average message size, and the total incoming message size. You can view the results for a day,week, month, or year. It is important to understand the trends of normal message volume and spikes in yourenvironment. You can use the System Capacity – Incoming Mail page to track volume growth over time andplan for system capacity. You might also want to compare the incoming mail data with the sender profile datato view the trends in volumes of email messages that are sent from specific domains to your network.
An increased number of incoming connections may not necessarily affect system load.Note
System Capacity – Outgoing MailThe System Capacity – Outgoing Mail page shows outgoing connections, the total number of outgoingmessages, the average message size, and the total outgoing message size. You can view the results for a day,week, month, or year. It is important to understand the trends of normal message volume and spikes in yourenvironment. You can use the System Capacity – Outgoing Mail page to track volume growth over time andplan for system capacity. Youmight also want to compare the outgoing mail data with the outgoing destinationsdata to view the trends in volumes of email messages that are sent from specific domains or IP addresses.
User Guide for AsyncOS 14.1 for Cisco Secure Email and Web Manager- GD (General Deployment)108
Using Centralized Email Security ReportingSystem Capacity – Workqueue

System Capacity – System LoadThe system load report shows the following:
• Overall CPU Usage, on page 96• Memory Page Swapping, on page 96• Resource Conservation Activity , on page 96
Overall CPU Usage
Email Security appliances are optimized to use idle CPU resources to improve message throughput. HighCPU usage may not indicate a system capacity problem. If the high CPU usage is coupled with consistent,high-volume memory page swapping, you may have a capacity problem.
This graph also indicates a threshold for CPU usage that is a visual reference only. To adjust the position ofthis line, see Adjusting the Reference Threshold in System Health Graphs for Email Security Appliances, onpage 497. You can configure your Email Security appliances to send you alerts that will suggest actions thatyou can take to address capacity issues.
Note
This page also shows a graph that displays the amount of CPU used by different functions, including mailprocessing, spam and virus engines, reporting, and quarantines. The CPU-by-function graph is a good indicatorof which areas of the product use the most resources on your system. If you need to optimize your appliance,this graph can help you determine which functions may need to be tuned or disabled.
Memory Page Swapping
Thememory page swapping graph shows how frequently the systemmust page to disk, in kilobytes per second.
The system is designed to swap memory regularly, so some memory swapping is expected and is not anindication of problems with your appliance. Unless the system consistently swaps memory in high volumes,memory swapping is normal and expected behavior (especially on C170appliances). To improve performance,youmay need to add Email Security appliances to your network or tune your configuration to ensure maximumthroughput.
This graph also indicates a threshold for memory page swapping that is a visual reference only. To adjust theposition of this line, see Adjusting the Reference Threshold in System Health Graphs for Email SecurityAppliances, on page 497. You can configure your Email Security appliances to send you alerts that will suggestactions that you can take to address capacity issues.
Note
Resource Conservation Activity
The resource conservation activity graph shows the number of times the Email Security appliance enteredResource Conservation Mode (RCM). For example, if the graph shows n times, it means that the appliancehas entered RCM n times and exited at least n-1 times.
Your appliances should enter RCM infrequently and only during a very large or unusual increase in mailvolume. If the Resource Conservation Activity graph shows that your appliance is entering RCS frequently,it may be an indication that the system is becoming overloaded.
User Guide for AsyncOS 14.1 for Cisco Secure Email and Web Manager- GD (General Deployment)109
Using Centralized Email Security ReportingSystem Capacity – System Load

System Capacity – AllThe All page consolidates all the previous system capacity reports onto a single page so you can view therelationship between the different reports. For example, you might see that the message queue is high at thesame time that excessive memory swapping takes place. This might be an indication that you have a capacityproblem. You may want to save this page as a PDF file to preserve a snapshot of system performance for laterreference (or to share with support staff).
Threshold Indicator in System Capacity GraphsIn some graphs, a line indicates the default value that may indicate a possible problem if it is frequently orconsistently crossed. To adjust this visual indicator, see Adjusting the Reference Threshold in System HealthGraphs for Email Security Appliances, on page 497.
Advanced Malware Protection PageAdvanced Malware Protection protects against zero-day and targeted file-based threats in email attachmentsby:
• Obtaining the reputation of known files.
• Analyzing behavior of certain files that are not yet known to the reputation service.
• Evaluating emerging threats as new information becomes available, and notifying you about files thatare determined to be threats after they have entered your network.
This feature is available for incoming and outgoing messages.
For more information on the file reputation filtering and file analysis, see the User Guide or Online Help forAsyncOS for Email Security Appliances.
To view the report page, select Advanced Malware Protection from the Filter and Malware Reports sectionof the Reports drop-down.
The Advanced Malware Protection report page shows the following reporting views:
• Advanced Malware Protection – Summary, on page 111
• Advanced Malware Protection – AMP Reputation, on page 111
• Advanced Malware Protection – File Analysis, on page 112
• Advanced Malware Protection – File Retrospection, on page 113
• Advanced Malware Protection – Mailbox Auto Remediation, on page 113
To view the Advanced Malware Protection report page on the Security Management appliance, select Emailfrom the Product drop-down and choose Monitoring > Advanced Malware Protection from the Reportsdrop-down. For more information, see Using the Interactive Report Pages, on page 39.
The Advanced Malware Protection report page displays a metrics bar that provides real time data of all themanaged appliances connected to the Cisco Threat Grid appliance.
User Guide for AsyncOS 14.1 for Cisco Secure Email and Web Manager- GD (General Deployment)110
Using Centralized Email Security ReportingSystem Capacity – All

• You must use the trailblazerconfig > enable command on the CLI to populate data on the metricsbar. For more information, see The trailblazerconfig Command, on page 492.
• You can only view the data from the Cisco Threat Grid appliance for the day, week and month.
Note
Related Topics
• Identifying Files by SHA-256 Hash , on page 85
• Requirements for File Analysis Report Details , on page 84
• Viewing File Reputation Filtering Data in Other Reports , on page 88
Advanced Malware Protection – SummaryThe Advanced Malware Protection - Summary page shows the complete summary of the incoming andoutgoing file-based threats that are identified by the file reputation and file analysis service.
For more information, see Advanced Malware Protection – AMP Reputation, on page 111 and AdvancedMalware Protection – File Analysis, on page 112.
Advanced Malware Protection – AMP ReputationThe Advanced Malware Protection - AMP Reputation page shows incoming and outgoing file-based threatsthat were identified by the file reputation service.
For files with changed verdicts, see the AMP Verdict updates report. Those verdicts are not reflected in theAdvanced Malware Protection report.
If a file extracted from a compressed or archived file is malicious, only the SHA value of the compressed orarchived file is included in the Advanced Malware Protection report.
The Incoming files handled by AMPsection shows the incoming malware files by different categories suchas malicious, clean, unknown, unscanable, and low risk.
Incoming malicious files are categorized as the following:
• The percentage of blocked listed file SHAs received from the AMP reputation server that are categorizedas Malware.
• The percentage of blocked listed file SHAs received from the AMP for Endpoints console that arecategorised as Custom Detection. The threat name of a blocked listed file SHA obtained from AMP forEndpoints console is displayed as Simple Custom Detection in the Incoming Malware Threat Filessection of the report.
• The percentage of blocked listed file SHAs based on the threshold settings that are categorised asCustomThreshold.
You can click on the link in theMore Details section of the report to view the file trajectory details of a blockedlisted file SHA in the AMP for Endpoints console.
You can view the Low Risk verdict details in the Incoming Files Handed by AMP section of the report.
You can use the AMP Reputation view of the Advanced Malware Protection: Incoming report page to view:
User Guide for AsyncOS 14.1 for Cisco Secure Email and Web Manager- GD (General Deployment)111
Using Centralized Email Security ReportingAdvanced Malware Protection – Summary

• The summary of incoming files that are identified by file reputation service of the Advanced MalwareProtection engine, in a graphical format.
• A trend graph for all the incoming malware threat files based on the selected time range.
• The top incoming malware threat files.
• The top incoming threat files based on the file types.
• The Incoming Malware Threat Files interactive table that lists the top incoming malware threat files.
Drill down to view detailed analysis results, including the threat characteristics for each file.
If your access privileges allow you to view Message Tracking data for the messages that populate thisreport, click a blue number link in the table.
You can use the AMP Reputation view of the Advanced Malware Protection: Outgoing report page to view:
• The summary of outgoing files that are identified by file reputation service of the Advanced MalwareProtection engine, in a graphical format.
• A trend graph for all the outgoing malware threat files based on the selected time range.
• The top outgoing malware threat files.
• The top outgoing threat files based on the file types.
• The Outgoing Malware Threat Files interactive table that lists the top outgoing malware threat files thatare identified by the file reputation service.
Drill down to view detailed analysis results, including the threat characteristics for each file.
If your access privileges allow you to view Message Tracking data for the messages that populate thisreport, click a blue number link in the table.
Advanced Malware Protection – File AnalysisThe Advanced Malware Protection - File Analysis page shows the time and verdict (or interim verdict) foreach file sent for analysis. The appliance checks for analysis results every 30 minutes.
To view more than 1000 File Analysis results, export the data as a .csv file.
For deployments with an on-premises Cisco AMPThreat Grid Appliance: Files that are inluded in the allowedlist on the AMP Threat Grid appliance show as "clean". For information about allowed list, see the AMPThreat Grid documentation or online help.
Drill down to view detailed analysis results, including the threat characteristics for each file.
You can also search for additional information about an SHA, or click the link at the bottom of the file analysisdetails page to view additional details on the server that analyzed the file. For more information, see IdentifyingFiles by SHA-256 Hash , on page 85.
If your access privileges allow you to view Message Tracking data for the messages that populate this report,click the Details link in the table.
To view details on the server that analyzed a file, see Requirements for File Analysis Report Details , on page84.
If a file extracted from a compressed or archived file is sent for analysis, only the SHA value of the extractedfile is included in the File Analysis report.
User Guide for AsyncOS 14.1 for Cisco Secure Email and Web Manager- GD (General Deployment)112
Using Centralized Email Security ReportingAdvanced Malware Protection – File Analysis

You can use the File Analysis view of the Advanced Malware Protection report page to view:
• The number of incoming and outgoing files that are uploaded for file analysis by file analysis service ofthe Advanced Malware Protection engine.
• A list of incoming and outgoing files that have completed file analysis requests.
• A list of incoming and outgoing files that have pending file analysis requests.
Advanced Malware Protection – File RetrospectionThe Advanced Malware Protection - File Retrospection page lists the files processed by this appliance forwhich the verdict has changed since the message was received. For more information about on this scenario,see the documentation for your Email Security appliance.
As Advanced Malware Protection is focused on targeted and zero-day threats, threat verdicts can change asaggregated data might unviel more information.
To view more than 1000 verdict updates, export the data as a .csv file.
In the case of multiple verdict changes for a single SHA-256, this report shows only the latest verdict, not theverdict history.
To view all affected messages for a particular SHA-256 within the maximum available time range (regardlessof the time range selected for the report) click a SHA-256 link.
You can use the File Retrospection view of the Advanced Malware Protection report page to view:
• A list of incoming and outgoing files with retrospective verdict changes.
Advanced Malware Protection – Mailbox Auto RemediationThe Advanced Malware Protection - Mailbox Auto Remediation report page shows the details of the mailboxremediation results for the incoming files.
You can use the Advanced Malware Protection - Mailbox Auto Remediation page to view retrospectivesecurity details such as:
• The filenames associated with a SHA-256 hash.
• Remedial actions taken on messages.
• A list of recipients for whom the mailbox remediation was successful or unsuccessful.
The Recipients for whom remediation was unsuccessful field is updated in the following scenario:
• There was a connectivity issue between your appliance and Office 365 services when the appliance wastrying to perform the configured remedial action.
Click on a SHA-256 hash to view the related messages in Message Tracking.
Requirements for File Analysis Report Details• (Cloud File Analysis) Ensure That the Management Appliance Can Reach the File Analysis Server , onpage 84
• (Cloud File Analysis) Configure the Management Appliance to Display Detailed File Analysis Results, on page 84
User Guide for AsyncOS 14.1 for Cisco Secure Email and Web Manager- GD (General Deployment)113
Using Centralized Email Security ReportingAdvanced Malware Protection – File Retrospection

• (On-Premises File Analysis) Activate the File Analysis Account , on page 85• Additional Requirements , on page 85
(Cloud File Analysis) Ensure That the Management Appliance Can Reach the File Analysis Server
In order to obtain File Analysis report details, the appliance must be able to connect to the File Analysis serverover port 443. See details in Firewall Information, on page 587
(Cloud File Analysis) Configure the Management Appliance to Display Detailed File Analysis Results
In order to allow all content security appliances in your organization to display detailed results in the cloudabout files sent for analysis from any Cisco Email Security appliance or Cisco Web Security appliance inyour organization, you need to join all appliances to the same appliance group.
Step 1 Access the File Analysis section on the web interface:
• In the Legacy Web Interface, click Management Appliance > Centralized Services > Security Appliances andscroll down to the File Analysis section.
• In the New Web Interface, click Service Status and scroll down to the File Analysis section.
Step 2 If your managed appliances are pointed at different File Analysis cloud servers, select the server from which to displayresult details.
Result details will not be available for files processed by any other cloud server.
Step 3 Enter the Analysis Group ID.
• If you enter the Group ID incorrectly or need to change it for any other reason, you must open a case with CiscoTAC.
• This change takes effect immediately; it does not require a Commit.
• It is suggested to use your CCOID for this value.
• This value is case-sensitive.
• This value must be identical on all appliances that will share data about files that are uploaded for analysis.
• An appliance can belong to only one group.
• You can add a machine to a group at any time, but you can add it only once.
Step 4 Click Group Now.Step 5 Configure the same group on each Email Security appliance that will share data with this appliance.
What to do next
Related Topics
For Which Files Are Detailed File Analysis Results Visible in the Cloud? , on page 88
User Guide for AsyncOS 14.1 for Cisco Secure Email and Web Manager- GD (General Deployment)114
Using Centralized Email Security Reporting(Cloud File Analysis) Ensure That the Management Appliance Can Reach the File Analysis Server

(On-Premises File Analysis) Activate the File Analysis Account
If you have deployed an on-premises (private cloud) Cisco AMP Threat Grid Appliance, you must activatethe File Analysis account for your Cisco Content Security Management appliance in order to view reportdetails available on the Threat Grid appliance. You generally only need to do this once.
Before you begin
Ensure that you are receiving System alerts at Critical level.
Step 1 The first time you attempt to access File Analysis report details from the Threat Grid appliance, wait a few minutes andyou will receive an alert that includes a link.
If you do not receive this alert, go to Management Appliance > System Administration > Alerts and click View TopAlerts.
Step 2 Click the link in the alert message.Step 3 Activate your management appliance account.
Additional Requirements
For any additional requirements, see the Release Notes for your Security Management appliance release,available from http://www.cisco.com/c/en/us/support/security/content-security-management-appliance/products-release-notes-list.html
Identifying Files by SHA-256 HashBecause filenames can easily be changed, the appliance generates an identifier for each file using a SecureHash Algorithm (SHA-256). If an appliance processes the same file with different names, all instances arerecognized as the same SHA-256. If multiple appliances process the same file, all instances of the file havethe same SHA-256 identifier.
In most reports, files are listed by their SHA-256 value (in an abbreviated format).
Viewing File Reputation Filtering Data in Other ReportsData for file reputation and analysis is available in other reports where relevant. A Detected by AdvancedMalware Protection column may be hidden by default in applicable reports. To display additional columns,click the Columns link at the bottom of the table.
For Which Files Are Detailed File Analysis Results Visible in the Cloud?If you have deployed public-cloud File Analysis, you can view detailed results for all files uploaded from anymanaged appliance that has been added to the appliance group for File Analysis.
If you have added your management appliance to the group, you can view the list of managed appliances inthe group by clicking the button on the Management Appliance > Centralized Services > SecurityAppliances page.
Appliances in the analysis group are identified by the File Analysis Client ID. To determine this identifier fora particular appliance, look in the following location:
User Guide for AsyncOS 14.1 for Cisco Secure Email and Web Manager- GD (General Deployment)115
Using Centralized Email Security Reporting(On-Premises File Analysis) Activate the File Analysis Account

Location of File Analysis Client IDAppliance
Advanced Settings for File Analysis section on the Security Services> File Reputation and Analysis page.
Email Security appliance
Advanced Settings for File Analysis section on the Security Services> Anti-Malware and Reputation page.
Web Security appliance
At the bottom of the Management Appliance > CentralizedServices > Security Appliances page.
Cisco Content Security Managementappliance
Related Topics
• (Cloud File Analysis) Configure the Management Appliance to Display Detailed File Analysis Results, on page 84
Virus Filtering PageThe Virus Filtering report page provides an overview of the viruses that are sent to and from your network.The Virus Types page displays the viruses that have been detected by the virus scanning engines running onthe Email Security appliances and are displayed on the Security Management appliance. Use this report totake action against a particular virus. For example, if you see that you are receiving a high volume of virusesknown to be embedded in PDF files, you can create a filter action to quarantinemessages with PDF attachments.
To view the Virus Filtering report page on the Security Management appliance, selectEmail from the Productdrop-down and choose Monitoring > Virus Filtering from the Reports drop-down. For more information,see Using the Interactive Report Pages, on page 39.
If you run multiple virus scanning engines, the Virus Filtering report page includes results from all enabledvirus scanning engines. The name of the virus that appears on the page is determined by the virus scanningengines. If more than one scanning engine detects a virus, it is possible to have more than one entry for thesame virus.
The following list explains the various sections on the Virus Filtering report page:
Table 28: Details on the Virus Filtering Page
DescriptionSection
A drop-down list with options for choosing a time range to view. Formore information, see Choosing a Time Range for Reports , on page 28.
Time Range (drop-down list)
Choose an Email Security appliance for which you want to view the data,or choose All Email Appliances.
See also Viewing Reporting Data for an Appliance or Reporting Group,on page 27.
View Data For (drop-down list)
This section displays a chart view of the detected viruses in messagessent to your network.
Top Incoming Virus TypesDetected
This section displays a chart view of the detected viruses in messagessent from your network.
Top Outgoing Virus TypesDetected
User Guide for AsyncOS 14.1 for Cisco Secure Email and Web Manager- GD (General Deployment)116
Using Centralized Email Security ReportingVirus Filtering Page

DescriptionSection
An interactive table that shows the details of each virus type.
For more information, see Virus Types Detail Table, on page 117
Virus Types Detail
To see which hosts sent virus-infected messages to your network, go to the Incoming Mail page, specify thesame reporting period, and sort by virus positive messages. Similarly, to see which IP addresses have sentvirus positive emails within your network, go to the Outgoing Senders page and sort by virus positive messages.
From the Virus Filtering report page, you can export raw data to a CSV file. For information on printing orexporting a file, see the Exporting Reporting and Tracking Data , on page 33.
You can generate a scheduled report for the Virus Filtering report page. See the Scheduling Email Reports,on page 153.
Note
Virus Types Detail TableThe Virus Types Detail table is an interactive table that shows the total number of virus-infected messages,with a breakdown by incoming and outgoing messages. Click the column headings to sort the data.
The following table shows the table column descriptions for the Virus Types Detail table:
Table 29: Table Column Descriptions for Virus Types Detail Table
DescriptionColumn Name
The name of the virus type.Virus Type
Number of incoming messages detected as virus.Incoming Messages
Number of outgoing messages detected as virus.Outgoing Messages
Total number of infected messages (incoming and outgoing).Total Infected Messages
Macro Detection PageYou can use the Macro Detection report page to view:
• Top Incoming Macro-Enabled Attachments by File Type in graphical and tabular format.
• Total Incoming Macro-Enabled Attachments by File Type in tabular format.
• Top Outgoing Macro-Enabled Attachments by File Type in graphical and tabular format.
• Total Outgoing Macro-Enabled Attachments by File Type in tabular format.
To view the Macro Detection report page on the Security Management appliance, select Email from theProduct drop-down and choose Monitoring > Macro Detection from the Reports drop-down. For moreinformation, see Using the Interactive Report Pages, on page 39.
From the Macro Detection report page you can export raw data to a CSV file. For information on printing orexporting a file, see the Exporting Reporting and Tracking Data , on page 33.
User Guide for AsyncOS 14.1 for Cisco Secure Email and Web Manager- GD (General Deployment)117
Using Centralized Email Security ReportingVirus Types Detail Table

You can click on the number of macro-enabled attachments to view the relatedmessages inMessage Tracking.
During report generation:
• If one or more macros are detected within an archive file, the Archive Files file type is incremented byone. The number of macro-enabled attachments within an archive file are not counted.
• If one or more macros are detected within an embedded file, the parent file type is incremented by one.The number of macro-enabled attachments within an embedded file are not counted.
Note
DMARC Verification PageThe DMARC Verification report page shows the top sender domains that failed Domain-based MessageAuthentication, Reporting and Conformance (DMARC) verification, and a summary of the actions taken forincoming messages from each domain. You can use this report to fine-tune your DMARC settings and answerthese kinds of questions:
• Which domains sent the most messages that failed DMARC verification?
• For each domain, what actions are taken on messages that failed DMARC verification?
You can use the DMARC Verification report page to view:
• Top Domains by DMARC verification failures in graphical format.
• Total domains by DMARC verification details in tabular format. For more information, see Domains byDMARC Verification Details Table, on page 118.
To view the DMARC Verification report page on the Security Management appliance, select Email from theProduct drop-down and choose Monitoring > DMARC Verification from the Reports drop-down. For moreinformation, see Using the Interactive Report Pages, on page 39.
If your access privileges allow you to view Message Tracking data for the messages that populate this report,click a blue number link in the table.
From the DMARCVerification report page you can export raw data to a CSV file. For information on printingor exporting a file, see the Exporting Reporting and Tracking Data , on page 33.
For more information about DMARC verification, see the Email Authentication chapter in the online help oruser guide for your Email Security appliance.
Domains by DMARC Verification Details TableThe Domains by DMARC Verification Details table is an interactive table that shows the details of the senderdomains that have failed (by either being rejected, quarantined, or no action), attempted, and passed theDomain-based Message Authentication, Reporting and Conformance (DMARC) verification.
To customize and sort information on the table, see Customizing Tables on Report Pages , on page 42.
To view Message Tracking details for the messages that populate this report, click a blue number link in thetable.
User Guide for AsyncOS 14.1 for Cisco Secure Email and Web Manager- GD (General Deployment)118
Using Centralized Email Security ReportingDMARC Verification Page

Outbreak Filtering PageThe Outbreak Filtering report page shows information about recent outbreaks and messages quarantined dueto Outbreak Filters. You can use this page to monitor your defense against targeted virus, scam, and phishingattacks.
Use the Outbreak Filtering report page to answer the following types of questions:
• How many messages are quarantined and by which Outbreak Filters rule?
• How long do messages stay in the Outbreak Quarantine?
• Which potentially malicious URLs are most frequently seen?
To view the Outbreak Filtering report page on the Security Management appliance, select Email from theProduct drop-down and choose Monitoring > Outbreak Filtering from the Reports drop-down. For moreinformation, see Using the Interactive Report Pages, on page 39.
The following table explains the various sections on the Outbreak Filtering report page:
Table 30: Details on the Outbreak Filtering Page
DescriptionSection
A drop-down list with options for choosing a time range to view. Formore information, see Choosing a Time Range for Reports , on page28.
Time Range (drop-down list)
Choose an Email Security appliance for which you want to view thedata, or choose All Email Appliances.
See also Viewing Reporting Data for an Appliance or ReportingGroup, on page 27.
View Data For (drop-down list)
The Threats by Type section shows the different types of threatmessages received by the appliance.
Threats By Type
The Threat Summary section shows a breakdown of the messages byMalware, Phish, Scam and Virus.
To viewMessage Tracking details for the messages that populate thisreport, click a blue number link in the table.
Threat Summary
The Threat Details interactive table shows details about specificoutbreaks, including the threat category (virus, scam, or phishing),threat name, a description of the threat, and the number of messagesidentified.
To viewMessage Tracking details for the messages that populate thisreport, click a blue number link in the table.
Threat Details
The Hit Messages from Incoming Messages section shows the chartand summary of the number of incoming messages processed byOutbreak Filters in the selected time period.
Non-viral threats include phishing emails, scams, and malwaredistribution using links to an external website.
Hit Messages from IncomingMessages
User Guide for AsyncOS 14.1 for Cisco Secure Email and Web Manager- GD (General Deployment)119
Using Centralized Email Security ReportingOutbreak Filtering Page

DescriptionSection
The Hit Messages by Threat Level section shows the chart andsummary of the severity of threats caught by Outbreak Filters.
Level 5 threats are severe in scope or impact, while Level 1 representslow threat risk. For descriptions of threat levels, see the online helpor user guide for your Email Security appliance.
Hit Messages by Threat Level
The Messages resided in Outbreak Quarantine shows the length oftime messages spent in the Outbreak Quarantine.
This duration is determined by the time it takes the system to compileenough data about the potential threat to make a verdict on its safety.Messages with viral threats typically spendmore time in the quarantinethan those with non-viral threats, because they must wait for anti-virusprogram updates. The maximum retention time that you specify foreach mail policy is also reflected.
Messages resided in OutbreakQuarantine
The Top URL’s Rewritten section shows the URLs that are mostfrequently rewritten to redirect message recipients to the Cisco WebSecurity Proxy for click-time evaluation of the site if and when therecipient clicks a potentially malicious link in a message.
This list may include URLs that are not malicious, because if anyURL in a message is deemedmalicious, then all URLs in the messageare rewritten.
To viewMessage Tracking details for the messages that populate thisreport, click a blue number link in the table.
Top URL’s Rewritten
In order to correctly populate the tables on the Outbreak Filtering report page, the appliance must be able tocommunicate with the Cisco update servers.
Note
For more information, see the Outbreak Filters chapter in the online help or user guide for your Email Securityappliance.
URL Filtering PageURL Filtering reports are available for incoming and outgoing messages.
Only messages that are scanned by the URL filtering engine (either as part of anti-spam/outbreak filter scanningor throughmessage/content filters) are included in these modules. However, not all of the results are necessarilyspecifically attributable to the URL Filtering feature.
URL Filtering report modules are populated only if URL filtering is enabled.Note
From the URL Filtering report page, you can view:
User Guide for AsyncOS 14.1 for Cisco Secure Email and Web Manager- GD (General Deployment)120
Using Centralized Email Security ReportingURL Filtering Page

• The Top URL Categories module includes all categories found in messages that have been scanned,whether or not they match a content or message filter.
Each message can be associated with only one reputation level. For messages with multiple URLs, thestatistics reflect the lowest reputation of any URL in the message.
• The Top URL spam messages
URLs in the global allowed list configured at Security Services > URL Filtering page of the emailsecurity appliance, are not included in reports.
URLs in allowed lists used in individual filters are included in reports.
• Malicious URLs are URLs that Outbreak Filters have determined to have poor reputation. Neutral URLsare those that Outbreak Filters have determined to require click-time protection. Neutral URLs havetherefore been rewritten to redirect them to the Cisco Web Security proxy.
Results of URL category-based filters are reflected in content and message filter reports.
Results of click-time URL evaluations by the Cisco Web Security proxy are not reflected in reports.
To view the URL Filtering report page on the Security Management appliance, select Email from the Productdrop-down and choose Monitoring > URL Filtering from the Reports drop-down. For more information,see Using the Interactive Report Pages, on page 39.
The following table explains the various sections on the URL Filtering report page:
Table 31: Details on the URL Filtering Page
DescriptionSection
A drop-down list with options for choosing a time range to view. Formore information, see Choosing a Time Range for Reports , on page 28.
Time Range (drop-down list)
Choose an Email Security appliance for which you want to view the data,or choose All Email Appliances.
See also Viewing Reporting Data for an Appliance or Reporting Group,on page 27.
View Data For (drop-down list)
This section displays the graphical view and summary of the top URLcategories of the incoming and outgoing messages.
To view Message Tracking details for the messages that populate thisreport, click a blue number link in the table.
Top URL Categories
This section displays the graphical view and summary of the top incomingand outgoing URL spam messages.
Top URL Spam Messages
This section displays the chart view and the summary of malicious andneutral URLs of the incoming and outgoing messages.
To view Message Tracking details for the messages that populate thisreport, click a blue number link in the table.
Malicious and Neutral URLs
From the URL Filtering report page you can export raw data to a CSV file. For information on printing orexporting a file, see the Exporting Reporting and Tracking Data , on page 33.
User Guide for AsyncOS 14.1 for Cisco Secure Email and Web Manager- GD (General Deployment)121
Using Centralized Email Security ReportingURL Filtering Page

Forged Email Detection PageThe Forged Email Detection page includes the following reports:
• Top Forged Email Detection. Displays the top ten users in the content dictionary that matched theforged From: header in the incoming messages.
• Forged Email Detection: Details. Displays a list of all the users in the content dictionary that matchedthe forged From: header in the incomingmessages and for a given user, the number of messagesmatched.
To view the Forged Email Detection report page on the Security Management appliance, select Email fromthe Product drop-down and chooseMonitoring > Forged Email Detection from the Reports drop-down. Formore information, see Using the Interactive Report Pages, on page 39.
The Forged Email Detection reports are populated only if you are using the Forged Email Detection contentfilter or the forged-email-detection message filter.
From the Forged Email Detection report page you can export raw data to a CSV file. For information onprinting or exporting a file, see the Exporting Reporting and Tracking Data , on page 33.
Sender Domain Reputation PageYou can use the Sender Domain Reputation report page to view:
• Incoming messages based on the verdict received from the SDR service in graphical format.
• Summary of incoming messages based on the threat category and verdict received from the SDR servicein tabular format.
• Incoming messages based on the threat category received from the SDR service in graphical format.
Only the messages whose SDR verdict is 'awful' or 'poor' are classified under theSDR threat category, such as, 'spam,' 'malicious,' etc.
Note
• Summary of incoming messages based on the threat category received from the SDR service in tabularformat.
To view the Sender Domain Reputation report page on the Security Management appliance, select Emailfrom the Product drop-down and choose Monitoring > Sender Domain Reputation from the Reportsdrop-down. For more information, see Using the Interactive Report Pages, on page 39.
External Threat Feeds PageYou can use the External Threat Feeds report page to view:
• Top ETF sources used to detect threats in messages in graphical format
• Summary of ETF sources used to detect threats in messages in tabular format.
• Top IOCs that matched threats detected in messages in graphical format.
• Top ETF sources used to filter malicious incoming mail connections in graphical format.
User Guide for AsyncOS 14.1 for Cisco Secure Email and Web Manager- GD (General Deployment)122
Using Centralized Email Security ReportingForged Email Detection Page

• Summary of ETF sources used to filter malicious incoming mail connections in tabular format.
In the ‘Summary of External Threat Feed Sources’ section:
• You can click on the number of messages for a particular ETF source to view the related messages inMessage Tracking.
• You can click on a particular threat feed source to view the distribution of the ETF source based on theIOCs.
In the ‘Summary of Indicator of Compromise (IOC) Matches’ section:
• You can click on the number of IOCs for a particular ETF source to view the relatedmessages inMessageTracking.
• You can click on a particular IOC to view the distribution of the IOC based on the ETF sources.
To view the External Threat Feeds report page on the Security Management appliance, select Email from theProduct drop-down and chooseMonitoring > External Threat Feeds from the Reports drop-down. For moreinformation, see Using the Interactive Report Pages, on page 39.
Safe Print PageYou can use the Safe Print Action report page to view:
• Number of safe-printed attachments based on the file type in graphical format.
• Summary of safe-printed attachments based on the file type in tabular format.
In the ‘Summary of Safe Print File Types’ section, click the total number of safe-printed attachments to viewthe message details in Message Tracking.
Advanced Phishing Protection Reports PageYou can view the following on the Advanced Phishing Protection report page:
• Total number of messages successfully forwarded to the Cisco Advanced Phishing Protection cloudservice.
• Total number of messages that are not forwarded to the Cisco Advanced Phishing Protection cloudservice.
If the forwarding of message metadata has failed, you must validate the configurations of the AdvancedPhishing Protection feature. For more information, see the "Integrating Cisco Email Security Gateway withthe Cisco Advanced Phishing Protection" chapter of the User Guide for AsyncOS for Cisco Email SecurityAppliances.
Note
To view the Advanced Phishing Protection report page on the Security Management appliance, select Emailfrom the Product drop-down and choose Monitoring > Advanced Phishing Protection from the Reportsdrop-down. For more information, see Using the Interactive Report Pages, on page 39.
You can use the Advanced Phishing Protection report page to view:
User Guide for AsyncOS 14.1 for Cisco Secure Email and Web Manager- GD (General Deployment)123
Using Centralized Email Security ReportingSafe Print Page

• Total number of messages attempted to be forwarded to the Cisco Advanced Phishing Protection cloudservice.
• Summary of messages forwarded to the Cisco Advanced Phishing Protection cloud service in a graphicalformat.
Mail Flow Details PageThe Mail Flow Details report page on the Security Management appliance provides interactive reporting onthe real-time information for all remote hosts connecting to your managed Security Management appliances.You can gather information about the IP addresses, domains, and network owners (organizations) sendingmail to your system. You can also gather information about the IP addresses and domains of the outgoingsenders.
To view the Mail Flow Details report page on the Security Management appliance, select Email from theProduct drop-down and choose Monitoring > Mail Flow Details from the Reports drop-down. For moreinformation, see Using the Interactive Report Pages, on page 39.
The Mail Flow Details report page has the following tabs:
• Incoming Mails
• Outgoing Senders
To search for specific information within your data, see Searching and the Interactive Email Report Pages ,on page 57.
From the Incoming Mails tab, you can:
• View the top senders by total threat messages in graphical format.
• View the top senders by clean messages in graphical format.
• View the top senders by graymail messages in graphical format.
• See the IP addresses, domains, or network owners (organizations) that have sent mail to your SecurityManagement appliances.
• See detailed statistics on senders that have sent mail to your appliances. The statistics include the numberof connections (accepted or rejected), attempted messages broken down by security service (senderreputation filtering, anti-spam, anti-virus, and so forth), total threat messages, total graymails and cleanmessages.
• See the Incoming Mails interactive table for the detailed information about the particular IP address,domain, or network owner (organization). For more information, see IncomingMails Table, on page 126.
If your access privileges allow you to view Message Tracking data for the messages that populate thisreport, click a number hyperlink in the table.
From the Outgoing Senders tab, you can:
• View the top senders by total threat messages in graphical format.
• View the top senders by clean messages in graphical format.
• View the top senders (by IP address or domain) of outgoing threat messages (spam, antivirus, etc.) inyour organization.
User Guide for AsyncOS 14.1 for Cisco Secure Email and Web Manager- GD (General Deployment)124
Using Centralized Email Security ReportingMail Flow Details Page

• See detailed statistics on senders that have sent mail from your appliances. The statistics include the totalthreat messages broken down by security service (sender reputation filtering, anti-spam, anti-virus, andso forth) and clean messages.
• See the Sender Details interactive table for detailed information about the particular IP address or domain.For more information, see Sender Details Table, on page 130.
If your access privileges allow you to view Message Tracking data for the messages that populate thisreport, click a number hyperlink in the table.
Related Topics
• “No Domain Information” Link, on page 69
• Time Ranges in the Mail Trend Graphs, on page 69
• Views Within the Mail Flow Details Page, on page 125
• Incoming Mails Table, on page 126
• Sender Details Table, on page 130
Views Within the Mail Flow Details PageThe Mail Flow Details: Incoming report page has three different views:
• IP Addresses
• Domains
• Network Owners
These views provide a snapshot of the remote hosts connecting to the system in the context of the selectedview.
Additionally, in the IncomingMail table of theMail FlowDetails page, you can click on a Sender’s IP Address,Domain name, or Network Owner Information to retrieve specific Sender Profile Information. For moreinformation on Sender Profile information, see the Sender Profile Pages, on page 70.
Network owners are entities that contain domains. Domains are entities that contain IP addresses.Note
Depending on the view you select, the Incoming Mail Details interactive table displays the top IP addresses,domains, or network owners that have sent mail to all public listeners configured on the Email Securityappliances. You can monitor the flow of all mail into your appliances.
Click an IP address, domain, or network owner to access details about the sender on the Sender Profile page.The Sender Profile page is an Mail Flow Details page that is specific to a particular IP address, domain, ornetwork owner.
See the Incoming Mails Table, on page 126 for an explanation of the data included in the Incoming Mailsinteractive table.
From the Mail Flow Details page you can export raw data to a CSV file.
The Mail Flow Details: Outgoing report page has two different views:
User Guide for AsyncOS 14.1 for Cisco Secure Email and Web Manager- GD (General Deployment)125
Using Centralized Email Security ReportingViews Within the Mail Flow Details Page

• IP Addresses
• Domains
These views provide a snapshot of the remote hosts connecting to the system in the context of the selectedview.
Depending on the view you select, the Sender Details interactive table displays the top IP addresses or domainsof the senders that have sent mail from the public listeners configured from the Email Security appliances.You can monitor the flow of all mail from your appliances.
See the Sender Details Table, on page 130 for an explanation of the data included in the Sender Detailsinteractive table.
“No Domain Information” Link
Domains that have connected to the Security Management appliances and could not be verified with adouble-DNS lookup are automatically grouped into the special domain called “No Domain Information.” Youcan control how these types of unverified hosts are managed via Sender Verification. For more informationabout Sender Verification, see the documentation or online help for your Email Security appliance.
You can use the Items Displayed menu to select the number of senders to display in the list.
Time Ranges in the Mail Trend Graphs
You can select varying degrees of granularity to see your data in a mail graph. You can select a day, week,month, and year views of the same data. Because the data is monitored in real time, information is periodicallyupdated and summarized in the database.
For more information on time ranges, see Choosing a Time Range for Reports , on page 28.
Incoming Mails TableThe interactive Incoming Mails table at the bottom of the Mail Flow Details: Incoming Mails page lists thetop senders that have connected to public listeners on the Email Security appliances. The table shows domains,IP addresses, or network owners, based on the view selected.
The system acquires and verifies the validity of the remote host’s IP address by performing a double DNSlookup. For more information about double DNS lookups and sender verification, see the user guide or onlinehelp for AsyncOS Email Security appliance.
For senders, that is Network Owner, IP Address or Domain, listed in the first column of the Incoming Mailstable, or on the Top Senders by Total Threat Messages, click the Sender or No Domain Information link toviewmore information about the sender. The results appear on a Sender Profile page, which includes real-timeinformation from the SenderBase Reputation Service. From the Sender Profile page, you can view for moreinformation about specific IP addresses or network owners. For more information, see the Sender ProfilePages, on page 70.
You can also view the Sender Groups report, by clicking Sender Groups report at the bottom of the Mail FlowDetails page. For more information about the Sender Groups report page, see the Sender Groups Page, onpage 131.
To view Message Tracking details for the messages that populate this report, click a number hyperlink in thetable.
The following table shows the table column descriptions for the Incoming Mails table:
User Guide for AsyncOS 14.1 for Cisco Secure Email and Web Manager- GD (General Deployment)126
Using Centralized Email Security Reporting“No Domain Information” Link

Table 32: Table Column Descriptions for Incoming Mail Table
DescriptionColumn Name
The domain name of the sender.Sender Domain (Domains)
The IP address of the sender.Sender IP Address (IPAddresses)
The hostname of the sender.Hostname (IP Addresses)
The IP addresses that are verified by the DNS.DNS Verified (IP Addresses)
The SenderBase Reputation Score of the sender.SBRS (IP Addresses)
The details of the last sender group.Last Sender Group (IPAddresses)
The details of the last sender group.Last Sender Group (IPAddresses)
The network owner of the sender.Network Owner (NetworkOwners)
All connections blocked by HAT policies.When the appliance is under heavyload, an exact count of rejected connections is not maintained on a per-senderbasis. Instead, rejected connections counts are maintained only for the mostsignificant senders in each time interval.
Connections Rejected(Domains and NetworkOwners)
All connections accepted,Connections Accepted(Domains and NetworkOwners)
All accepted and blocked connections attempted.Total Attempted
This is a component of Stopped by Reputation Filtering. It represents thenumber of recipient messages stopped because any of the following HATlimits have been exceeded: maximum recipients per hour, maximum recipientsper message, or maximum messages per connection. This is summed withan estimate of the recipient messages associated with rejected or TCP refusedconnections to yield Stopped by Reputation Filtering.
Stopped by RecipientThrottling (Domains andNetwork Owners)
User Guide for AsyncOS 14.1 for Cisco Secure Email and Web Manager- GD (General Deployment)127
Using Centralized Email Security ReportingIncoming Mails Table

DescriptionColumn Name
The value for Stopped by IP Reputation Filtering is calculated based on severalfactors:
• Number of “throttled” messages from this sender
• Number of rejected or TCP refused connections (may be a partial count)
• A conservative multiplier for the number of messages per connection.
When the appliance is under heavy load, an exact count of rejected connectionsis not maintained on a per-sender basis. Instead, rejected connections countsare maintained only for the most significant senders in each time interval. Inthis situation, the value shown can be interpreted as a “floor”; that is, at leastthis many messages are stopped.
The Reputation Filtering total on the Mail Flow Summary page isalways based on a complete count of all rejected connections. Onlythe per-sender connection counts are limited due to load.
Note
Stopped by IP ReputationFiltering
The total count of messages blocked based on the reputation verdict of thesender domain.
Stopped by DomainReputation Filtering
All mail recipients rejected by conversational LDAP rejection plus all RATrejections.
Stopped as Invalid Recipients
Any spam that has been detected.Spam Detected
Any viruses that have been detectedVirus Detected
The total count of messages detected by Advanced Malware Protectionengines.
Detected by AdvancedMalware Protection
The total count of messages that are stopped by a content filter.Stopped by Content Filter
The total count of messages that failedDomain-basedMessageAuthentication,Reporting and Conformance (DMARC) verification.
Stopped by DMARC
Total number of threat messages (stopped by reputation, stopped as invalidrecipient, spam, plus virus)
Total Threat
Number of messages detected as unwanted marketing messages.Marketing
Number of messages detected as social messages.Social
Number of messages detected as bulk.Bulk
Number of messages detected as graymails.Total Graymails
All clean messages.
Messages processed on appliances on which the graymail feature is notenabled are counted as clean.
Clean
User Guide for AsyncOS 14.1 for Cisco Secure Email and Web Manager- GD (General Deployment)128
Using Centralized Email Security ReportingIncoming Mails Table

Sender Profile PagesWhen you click a sender in the IncomingMail interactive table, on theMail Flow Details [NewWeb Interface]or Incoming Mail page, the Sender Profile page appears. It shows detailed information about the particularIP address, domain, or network owner (organization). You can access a Sender Profile page for any IP address,domain, or network owner by clicking the corresponding link on the Mail Flow Details page or on otherSender Profile pages.
Network owners are entities that contain domains. Domains are entities that contain IP addresses.
The Sender Profile pages displayed for IP addresses, domains, and network owners vary slightly. For each,the page contains a graph and summary table for incoming mail from the particular sender. Below the graph,a table lists the domains or IP addresses associated with the sender. (The Sender Profile page for an individualIP address does not contain a more granular listing.) The Sender Profile page also includes an informationsection with the current SenderBase, sender group, and network information for the sender.
• Network Owner profile pages contain information for the network owner, as well as the domains and IPaddresses associated with that network owner.
• Domain profile pages contain information for the domains and IP addresses associated with that domain.
• IP address profile pages contain information about the IP address only.
Each Sender Profile page contains the following data in the Current Information table at the bottom of thepage:
• The global information from the SenderBase Reputation Service, including:
• IP address, domain name, and/or network owner
• Network owner category (network owner only)
• CIDR range (IP addresses only)
• Daily magnitude and monthly magnitude for the IP address, domain, and/or network owner
• Days since the first message was received from this sender
• Last sender group and whether DNS verified (IP address sender profile page only)
Daily magnitude is a measure of how many messages a domain has sent over the last 24 hours. Similarto the Richter scale used to measure earthquakes, SenderBasemagnitude is a measure of message volumecalculated using a log scale with a base of 10. The maximum theoretical value of the scale is set to 10,which equates to 100% of the world's email message volume. Using the log scale, a one-point increasein magnitude equates to a 10x increase in actual volume.
Monthly magnitude is calculated using the same approach as daily magnitude, except the percentagesare calculated based on the volume of email sent over the last 30 days.
• Average magnitude (IP addresses only)
• Lifetime volume / 30 day volume (IP address profile pages only)
• Bonded sender status (IP address profile pages only)
• SenderBase Reputation Score (IP address profile pages only)
• Days since first message (network owner and domain profile pages only)
User Guide for AsyncOS 14.1 for Cisco Secure Email and Web Manager- GD (General Deployment)129
Using Centralized Email Security ReportingSender Profile Pages

• Number of domains associated with this network owner (network owner and domain profile pagesonly)
• Number of IP addresses in this network owner (network owner and domain profile pages only)
• Number of IP addresses used to send email (network owner pages only)
ClickMore from SenderBase to see a page with all information supplied by the SenderBase ReputationService.
• Details about the domains and IP addresses controlled by this network owner appear on network ownerprofile pages. Details about the IP addresses in the domain appear on domain pages.
From a domain profile page, you can click on a specific IP address to view specific information, or view anorganization profile page.
Sender Details TableThe interactive Sender Details table at the bottom of theMail FlowDetails: Outgoing page lists the top sendersthat have connected to public listeners on the Email Security appliances. The table shows domains or IPaddresses, based on the view selected.
To view Message Tracking details for the messages that populate this report, click a number hyperlink in thetable.
The following table shows the table column descriptions for the Sender Details table:
Table 33: Table Column Descriptions for Sender Details Table
DescriptionColumn Name
The domain name of the sender.Sender Domain (Domains)
The IP address of the sender.Sender IP Address (IP Addresses)
The hostname of the sender.Hostname (IP Addresses)
Any spam that has been detected.Spam Detected
Any viruses that have been detected.Virus Detected
The total count of messages detected by Advanced Malware Protectionengines.
Detected by Advanced MalwareProtection
The total count of messages that are stopped by a content filter.Stopped by Content Filter
The total count of messages that are stopped by DLP engine.Stopped by DLP
Total number of threat messages (spam, virus)Total Threat
All clean messages.
Messages processed on appliances on which the graymail feature is notenabled are counted as clean.
Clean
The total count of all the messages.Total Messages
User Guide for AsyncOS 14.1 for Cisco Secure Email and Web Manager- GD (General Deployment)130
Using Centralized Email Security ReportingSender Details Table

Sender Groups PageThe Sender Groups report page provides a summary of connections by sender group and mail flow policyaction, allowing you to review SMTP connection and mail flow policy trends. The Mail Flow by SenderGroup listing shows the percentage and number of connections for each sender group. The Connections byMail Flow Policy Action chart shows the percentage of connections for each mail flow policy action. Thispage provides an overview of the effectiveness of your Host Access Table (HAT) policies. For more informationabout the HAT, see the documentation or online help for your Email Security appliance.
To view the Sender Groups report page on the SecurityManagement appliance, selectEmail from the Productdrop-down and choose Monitoring > Sender Groups from the Reports drop-down. For more information,see Using the Interactive Report Pages, on page 39.
From the Sender Group report page you can export raw data to a CSV file. For information on printing orexporting a file, see the Exporting Reporting and Tracking Data , on page 33.
You can generate a scheduled report for the Sender Group report page. See the Scheduling Email Reports,on page 153.
Note
Outgoing Destinations PageThe Outgoing Destinations report page provides information about the domains that your organization sendsmail to.
You can use the Outgoing Destinations page to view:
• Which domains are the Email Security appliances sending messages to?
• How much message is sent to each domain?
• Howmuch of that message is clean, spam-positive, virus-positive, malware or stopped by a content filter?
• Howmanymessages are delivered and howmanymessages are hard-bounced by the destination servers?
To view the Outgoing Destinations report page on the Security Management appliance, select Email fromthe Product drop-down and choose Monitoring > Outgoing Destinations from the Reports drop-down. Formore information, see Using the Interactive Report Pages, on page 39.
To search for specific information within your data, see Searching and the Interactive Email Report Pages ,on page 57.
The following list explains the various sections on the Outgoing Destinations report page:
Table 34: Details on the Outgoing Destinations Page
DescriptionSection
A drop-down list with options for choosing a time range to view. Formore information, see Choosing a Time Range for Reports , on page 28.
Time Range (drop-down list)
User Guide for AsyncOS 14.1 for Cisco Secure Email and Web Manager- GD (General Deployment)131
Using Centralized Email Security ReportingSender Groups Page

DescriptionSection
Choose an Email Security appliance for which you want to view the data,or choose All Email Appliances.
See also Viewing Reporting Data for an Appliance or Reporting Group,on page 27.
View Data For (drop-down list)
The top destination domains of outgoing threat messages (spam, antivirus,etc.) sent by your organization. Total threat messages include spam orvirus positive, or the messages that are triggered by a content filter.
Top Destinations by Total ThreatMessages
The top destination domains of clean outgoing messages sent by yourorganization.
Top Destinations by CleanMessages
All details related to the destination domains of all outgoing messagessent by your organization, sorted by total recipients. Details includedetected spam, viruses, clean messages etc.
For more information, see Outgoing Destinations Detail Table, on page132.
To view Message Tracking details for the messages that populate thisreport, click a blue number link in the table.
Outgoing Destinations Details
From the Outgoing Destinations report page you can export raw data to a CSV file. For information on printingor exporting a file, see the Exporting Reporting and Tracking Data , on page 33.
You can generate a scheduled report for the Outgoing Destinations page. See the Scheduling Email Reports,on page 153.
Related Topics
Outgoing Destinations Detail Table, on page 132
Outgoing Destinations Detail TableThe Outgoing Destinations Detail table is an interactive table that shows the total number of messages thatare processed and delivered, with a breakdown of the messages that are processed as threat (Spam, Virus,etc.) or clean, and the messages that are either hard bounced or delivered. Click the column headings to sortthe data.
To view Message Tracking details for the messages that populate this report, click a blue number link in thetable.
The following table shows the table column descriptions for the Outgoing Destination Detail table:
Table 35: Table Column Descriptions for Outgoing Destination Detail Table
DescriptionColumn Name
The name of the destination domain.Destination Domain
Number of messages detected as spam.Spam Detected
Number of messages detected as spam.Virus Detected
User Guide for AsyncOS 14.1 for Cisco Secure Email and Web Manager- GD (General Deployment)132
Using Centralized Email Security ReportingOutgoing Destinations Detail Table
DescriptionColumn Name
Number of messages stopped by content filters.Stopped by Content Filter
Total number of messages detected as threat (Spam, Virus, etc.)Total Threat
Number of messages detected as clean,Clean
Total number of messages processed as threat or clean.Total Processed
Number of messages that are marked as permanently undeliverable.Hard Bounces
Number of messages that are delivered.Delivered
Total number of messages that are delivered (including Hard Bounces).Total Messages Delivered
TLS Encryption PageThe TLS Encryptions page shows the overall usage of TLS connections for sent and received mail. The reportalso shows details for each domain sending mail using TLS connections.
The TLS Connections page can be used to determine the following information:
• Overall, what portion of incoming and outgoing connections uses TLS?
• Which partners do I have successful TLS connections with?
• Which partners do I have unsuccessful TLS connections with?
• What partners do I have successful outgoing TLS connections with DANE support?
• What partners do I have unsuccessful outgoing TLS connections with DANE support?
• Which partners have issue with their TLS certificates?
• What percentage of overall mail with a partner uses TLS?
To view the TLS Encryption report page on the SecurityManagement appliance, selectEmail from the Productdrop-down and choose Monitoring > TLS Encryption from the Reports drop-down. For more information,see Using the Interactive Report Pages, on page 39.
The TLS Encryption report page has the following tabs:
• Incoming
• Outgoing
To search for specific information within your data, see Searching and the Interactive Email Report Pages ,on page 57.
The following list explains the various sections on the TLS Encryption report page:
User Guide for AsyncOS 14.1 for Cisco Secure Email and Web Manager- GD (General Deployment)133
Using Centralized Email Security ReportingTLS Encryption Page

Table 36: Details on the TLS Encryption Page
A drop-down list with options for choosing a timerange to view. For more information, see Choosing aTime Range for Reports , on page 28.
Time Range (drop-down list)
Choose an Email Security appliance for which youwant to view the data, or choose All EmailAppliances.
See also Viewing Reporting Data for an Applianceor Reporting Group, on page 27.
View Data For (drop-down list)
The TLS Encryption: Incoming page displays a graphview of incoming encrypted and unencrypted TLSconnections over the last hour, day, week, month oryear depending on the time frame that you haveselected.
The TLS Encryption: Outgoing page displays a graphview of outgoing encrypted and unencrypted TLSconnections over the last hour, day, week, month, oryear, depending on the time frame that you haveselected.
TLS Connections Graph
The TLS Encryption: Incoming page displays a tableview of the total volume of incoming messages, thevolume of encrypted and unencrypted messages, andthe volume of successful and failed incoming TLSencrypted messages.
The TLS Encryption: Outgoing page displays a tableview of the total volume of outgoing messages, thevolume of encrypted and unencrypted messages, thevolume of successful and failed outgoing TLSencrypted messages, and the volume of successfuland failed outgoing TLS connection with DANEsupport.
TLS Connections Summary
The TLS Encryption: Incoming page displays a chartview of the total count and percentage of incomingTLS encrypted and unencrypted messages.
The TLS Encryption: Outgoing page displays a chartview of the total count and percentage of outgoingTLS encrypted and unencrypted messages.
TLS Messages
This table displays a summary of the total count andpercentage of incoming and outgoing TLS encryptedand unencrypted messages.
TLS Messages Summary
User Guide for AsyncOS 14.1 for Cisco Secure Email and Web Manager- GD (General Deployment)134
Using Centralized Email Security ReportingTLS Encryption Page

This table displays details for domains sending orreceiving encrypted messages. For each domain, youcan view the total number of connections, messagessent, and the number of TLS connections that aresuccessful or failed. You can also view the percentageof successful and failed connections for each domain.
For more information, see TLS Connections DetailsTable, on page 135.
TLS Connections Details
Related Topics
TLS Connections Details Table, on page 135
TLS Connections Details TableThe TLS Connections Details table is an interactive table that shows the total number of connections, messagessent, and the number of TLS connections that are successful or failed, and the last TLS status for the incomingand outgoing messages. You can also view the percentage of successful and failed connections for eachdomain.
The following table shows the table column descriptions for the TLS Connection Details table:
Table 37: Table Column Descriptions for TLS Connections Details Table
DescriptionColumn Name
The domain name of the sender.Domain
All required TLS connections that failed.TLS Req. Failed
All required TLS connections that are successful.TLS Req. Success
All preferred TLS connections that failed.TLS Pref. Failed
All preferred TLS connections that are successful.TLS Pref. Success
The status of the TLS connections mapped based on the following:
• 0: N/A
• 1: Required - Fail
• 2: Preferred - Fail
• 3: Required - Success
• 4: Preferred - Success
Last TLS Status
Total number of unsuccessful outgoing TLS connections with DANEsupport.
DANE Failure
Total number of successful outgoing TLS connections with DANEsupport.
DANE Success
User Guide for AsyncOS 14.1 for Cisco Secure Email and Web Manager- GD (General Deployment)135
Using Centralized Email Security ReportingTLS Connections Details Table

DescriptionColumn Name
Total number of TLS connections.Total TLS Connections
Total number of unencrypted TLS connections.Unencrypted Connections
The percentage of TLS encryptions for all TLS connections.% TLS of all Connections
The total number of TLS messages.Messages by TLS
Inbound SMTP Authentication PageThe Inbound SMTP Authentication report page shows the use of client certificates and the SMTP AUTHcommand to authenticate SMTP sessions between the Email Security appliance and users’ mail clients. If theappliance accepts the certificate or SMTP AUTH command, it will establish a TLS connection to the mailclient, which the client will use to send a message. Since it is not possible for the appliance to track theseattempts on a per-user basis, the report shows details on SMTP authentication based on the domain name anddomain IP address.
Use this report to determine the following information:
• Overall, how many incoming connection use SMTP authentication?
• How many connections use a client certificated?
• How many connections use SMTP AUTH?
• What domains are failing to connect when attempting to use SMTP authentication?
• How many connections are successfully using the fall-back when SMTP authentication fails?
To view the Inbound SMTP Authentication report page on the Security Management appliance, select Emailfrom the Product drop-down and choose Monitoring > Inbound SMTP Authentication from the Reportsdrop-down. For more information, see Using the Interactive Report Pages, on page 39.
The Inbound SMTP Authentication has two different views:
• Domains
• IP Addresses
These views provide a snapshot of the SMTP authentications in the context of the selected view.
The Inbound SMTPAuthentication report page includes a graph for received connections, a graph for receivedrecipients who attempted an SMTP authentication connection, and a table with details on the attempts toauthenticate connections.
The following list explains the various sections on the Inbound SMTP Authentication report page:
Table 38: Details on the Inbound SMTP Authentication Page
DescriptionSection
A drop-down list with options for choosing a time range to view. Formore information, see Choosing a Time Range for Reports , on page28.
Time Range (drop-down list)
User Guide for AsyncOS 14.1 for Cisco Secure Email and Web Manager- GD (General Deployment)136
Using Centralized Email Security ReportingInbound SMTP Authentication Page

DescriptionSection
Choose an Email Security appliance for which you want to view thedata, or choose All Email Appliances.
See also Viewing Reporting Data for an Appliance or ReportingGroup, on page 27.
View Data For (drop-down list)
The Received Connections graph shows the incoming connectionsfrom mail clients that attempt to authentication their connectionsusing SMTP authentication over the time range you specify. Thegraph displays the total number of connections the appliance received,the number that did not attempt to authenticate using SMTPauthentication, the number that failed and succeeded to authenticatethe connection using a client certificate, and the number that failedand succeeded to authenticate using the SMTP AUTH command.
Received Connection Graph
The Received Recipients graph displays the number of recipientswhose mail clients attempted to authenticate their connections to theEmail Security appliances to send messages using SMTPauthentication. The graph also show the number of recipients whoseconnections were authenticated and the number of recipients whoseconnections were not authenticated.
Received Recipient Graph
The SMTP Authentication Details (by domain name and IP address)table displays details about the users who attempt to authenticate theirconnections to the Email Security appliance to send messages. Foreach domain, you can view the number of connection attempts usinga client certificate that were successful or failed, the number ofconnection attempts using the SMTP AUTH command that weresuccessful or failed, and the number that fell back to the SMTPAUTHafter their client certificate connection attempt failed.
SMTP Authentication Details (ByDomain Name or IP Address).
Rate Limits PageRate Limiting by envelope sender allows you to limit the number of email message recipients per time intervalfrom an individual sender, based on the mail-from address. The Rate Limits report shows you the senderswho most egregiously exceed this limit.
Use this report to help you identify the following:
• Compromised user accounts that might be used to send spam in bulk.
• Out-of-control applications in your organization that use email for notifications, alerts, automatedstatements, etc.
• Sources of heavy email activity in your organization, for internal billing or resource-management purposes.
• Sources of large-volume inbound email traffic that might not otherwise be considered spam.
To view the Rate Limits report page on the Security Management appliance, select Email from the Productdrop-down and choose Monitoring > Rate Limits from the Reports drop-down. For more information, seeUsing the Interactive Report Pages, on page 39.
User Guide for AsyncOS 14.1 for Cisco Secure Email and Web Manager- GD (General Deployment)137
Using Centralized Email Security ReportingRate Limits Page

Note that other reports that include statistics for internal senders (such as Internal Users or Outgoing Senders)measure only the number of messages sent; they do not identify senders of a few messages to a large numberof recipients.
The Top Offenders by Incident chart shows the envelope senders who most frequently attempted to sendmessages to more recipients than the configured limit. Each attempt is one incident. This chart aggregatesincident counts from all listeners.
The Top Offenders by Rejected Recipients chart shows the envelope senders who sent messages to the largestnumber of recipients above the configured limit. This chart aggregates recipient counts from all listeners.
Rate Limiting settings, including “Rate Limit for Envelope Senders” settings, are configured on the EmailSecurity appliance in Mail Policies > Mail Flow Policies. For more information on rate limiting, see thedocumentation or online help for your Email Security appliance.
Related Topics
High Volume Mail Page, on page 147
Connections by Country PageYou can use the Connections by Country report page to view:
• Top incoming mail connections based on country of origin in graphical format.
• Total incoming mail connections and messages based on country of origin in tabular format.
To view the Connections by Country report page on the Security Management appliance, select Email fromthe Product drop-down and choose Monitoring > Connections by Country from the Reports drop-down.For more information, see Using the Interactive Report Pages, on page 39.
The following are the scenarios when no country information is displayed for the top and total incoming mailconnections:
• The sender IP address belongs to a private IP address.
• The sender IP address does not get a valid SBRS.
If your access privileges allow you to view Message Tracking data for the messages that populate this report,click a blue number link in the table.
From the Connections by Country report page you can export raw data to a CSV file. For information onprinting or exporting a file, see the Exporting Reporting and Tracking Data , on page 33.
Domain Protection PageThe Cisco Domain Protection cloud service interface automatically identifies, monitors andmanages messagessent on your behalf. This provides an easy way to identify and eliminate illegitimate email messages and blockmalicious ones to prevent phishing attacks impersonating your company’s domain. Domain Protection evendetects the use of look-alike domains so the malicious URLs can be quickly taken down.
You can use the Monitoring > Domain Protection report page of the new web interface of your applianceto view:
• Summary of messages that are classified as legitimate or threat, in a graphical format.
• Summary of the destination domains details based on the senders, in a tabular format.
User Guide for AsyncOS 14.1 for Cisco Secure Email and Web Manager- GD (General Deployment)138
Using Centralized Email Security ReportingConnections by Country Page

Make sure that you have a valid license to access Cisco Domain Protection cloud service interface withAdministrator access privileges. To obtain a license, go to the Cisco Domain Protection registration pageusing the following URL: https://www.cisco.com/c/en/us/buy.html.
If you are already registered to Cisco Domain Protection, enter the following details to authenticate and viewthe Domain Protection reports on your appliance:
• Client ID: This is the API access UID used to import the reports from the Cisco Domain Protectioncloud service.
• Client Secret: This is the API access key used to import the reports from the Cisco Domain Protectioncloud service.
To generate API access UID and key, you must log in to the Cisco Domain Protection cloud service and goto Settings > API Client Secret > Generate API Credentials. For more information, see User Guide forCisco Domain Protection.
To view the Domain Protection report page on the new web interface of your appliance, make sure thattrailblazerconfig is enabled on your appliance.
Note
User Mail SummaryThe User Mail Summary report page provides information about the mail sent and received by your internalusers per email address. A single user can havemultiple email addresses. The email addresses are not combinedin the report.
You can use the User Mail Summary report page to view:
• Who is sending the most external email?
• Who receives the most clean email?
• Who receives the largest number of graymail messages?
• Who receives the most spam?
• Who is triggering which content filters?
• Whose email is getting caught by content filters?
To view the User Mail Summary report page on the Security Management appliance, select Email from theProduct drop-down and choose Monitoring > User Mail Summary from the Reports drop-down. For moreinformation, see Using the Interactive Report Pages, on page 39.
To search for specific information within your data, see Searching and the Interactive Email Report Pages ,on page 57.
The following list explains the various sections on the User Mail Summary report page:
User Guide for AsyncOS 14.1 for Cisco Secure Email and Web Manager- GD (General Deployment)139
Using Centralized Email Security ReportingUser Mail Summary
Table 39: Details on the User Mail Summary Page
DescriptionSection
A drop-down list with options for choosing a time range to view. Formore information, see Choosing a Time Range for Reports , on page 28.
Time Range (drop-down list)
Choose an Email Security appliance for which you want to view the data,or choose All Email Appliances.
See also Viewing Reporting Data for an Appliance or Reporting Group,on page 27.
View Data For (drop-down list)
The top users (by domain), of clean incomingmessages received by yourorganization.
Top Users by Clean IncomingMessages
The top users (by domain), of clean outgoing messages sent by yourorganization.
Top Users by Clean OutgoingMessages
The top users (by domain), of graymail messages.Top Users by Graymail
The User Mail Flow Details interactive table breaks down the mailsreceived and sent by each email address. You can sort the listing byclicking the column headers.
For more information, see the User Mail Flow Details Table, on page140.
To view Message Tracking details for the messages that populate thisreport, click a blue number link in the table.
User Mail Flow Details
From the User Mail Summary report page you can export raw data to a CSV file. For information on printingor exporting a file, see the Exporting Reporting and Tracking Data , on page 33.
You can generate a scheduled report for the User Mail Summary page. See the Scheduling Email Reports, onpage 153.
Note
Related Topics
• User Mail Flow Details Table, on page 140
• Searching for a Specific Internal User, on page 75
User Mail Flow Details TableThe User Mail Flow Detail table shows detailed information about a user, including a breakdown of incomingand outgoing messages, and the number of messages in each category (such as spam detected, virus detected,stopped by content filter, etc.). Incoming and outgoing content filter matches are also shown.
Inbound Internal Users are the users for which you received email, based on the Rcpt To: address. OutboundInternal Users are based on the Mail From: address, and are useful when tracking the types of email thatsenders on your internal network are sending.
User Guide for AsyncOS 14.1 for Cisco Secure Email and Web Manager- GD (General Deployment)140
Using Centralized Email Security ReportingUser Mail Flow Details Table

Some outbound mail (such as bounces) has a null sender. They are counted as outbound “unknown.”
To view Message Tracking details for the messages that populate this report, click a number hyperlink in thetable.
The following table shows the table column descriptions for the User Mail Flow Details table:
Table 40: Table Column Descriptions for User Mail Flow Details Table
DescriptionColumn Name
The domain name of the internal user.Internal User
All incoming spam that was detected.Incoming Spam Detected
The incoming virus that were detected.Incoming Virus Detected
The incomingmessages that are detected byAdvancedMalware Protection(File Analysis and File Reputation).
Incoming Detected by AdvancedMalware Protection
The incoming content filter matches that were detected.Incoming Content Filter Matches
The incoming messages that were stopped due to content filters that havebeen set.
Incoming Stopped by ContentFilter
The incoming messages that were detected as marketing.Incoming Marketing
The incoming messages that were detected as social networking.Incoming Social Networking
The incoming messages that were detected as bulk.Incoming Bulk
The incoming messages that were detected as graymail.Incoming Graymails
All incoming clean messages.Incoming Clean
The outgoing spam that was detected.Outgoing Spam Detected
The outgoing viruses that were detected.Outgoing Virus Detected
The outgoing content filter matches that were detected.Outgoing Content Filter Matches
The outgoing messages that were stopped due to content filters that havebeen set.
Outgoing Stopped by ContentFilter
All outgoing clean messages.Outgoing Clean
Searching for a Specific Internal UserWith the search form at the bottom of the User Mail Summary page and the User Mail Flow Details page,you can search for a specific internal user (email address). Select whether to exactly match the search text orlook for items startingwith the entered text (for example, starts with “ex”will match “[email protected]”).
User Guide for AsyncOS 14.1 for Cisco Secure Email and Web Manager- GD (General Deployment)141
Using Centralized Email Security ReportingSearching for a Specific Internal User

DLP Incident Summary PageThe DLP Incidents (DLP Incident Summary) report page shows information on the incidents of data lossprevention (DLP) policy violations occurring in outgoing mail. The Email Security appliance uses the DLPemail policies enabled in the Outgoing Mail Policies table to detect sensitive data sent by your users. Everyoccurrence of an outgoing message violating a DLP policy is reported as an incident.
Using the DLP Incident Summary report, you can answer these kinds of questions:
• What type of sensitive data is being sent by your users?
• How severe are these DLP incidents?
• How many of these messages are being delivered?
• How many of these messages are being dropped?
• Who is sending these messages?
The DLP Incident Summary page contains two main sections:
• The DLP incident trend graphs summarizing the top DLP incidents by severity (Low, Medium, High,Critical) and policy matches.
• The DLP Incident Details listing.
To view the DLP Incident Summary report page on the Security Management appliance, select Email fromthe Product drop-down and choose Monitoring > DLP Incident Summary from the Reports drop-down.For more information, see Using the Interactive Report Pages, on page 39.
From the DLP Incidents report page you can export raw data to a CSV file. For information on printing orexporting a file, see the Exporting Reporting and Tracking Data , on page 33.
To search for specific information within your data, see Searching and the Interactive Email Report Pages ,on page 57.
The following list explains the various sections on the DLP Incident Summary report page:
Table 41: Details on the DLP Incident Summary Page
DescriptionSection
A drop-down list with options for choosing a time range to view. Formore information, see Choosing a Time Range for Reports , on page28.
Time Range (drop-down list)
Choose an Email Security appliance for which you want to view thedata, or choose All Email Appliances.
See also Viewing Reporting Data for an Appliance or Reporting Group,on page 27.
View Data For (drop-down list)
The top DLP incidents listed by severity.Top Incidents by Severity
The DLP policies currently enabled for each email appliance’s outgoingmail policies are listed in the DLP Incident Details interactive table atthe bottom of the DLP Incident Summary page. Click the name of aDLP policy to view more detailed information.
Incident Summary
User Guide for AsyncOS 14.1 for Cisco Secure Email and Web Manager- GD (General Deployment)142
Using Centralized Email Security ReportingDLP Incident Summary Page

DescriptionSection
The top DLP Policies that have been matched.Top DLP Policy Matches
The DLP Incidents Details table shows the total number of DLPincidents per policy, with a breakdown by severity level, and whetherany of the messages are delivered in the clear, delivered encrypted, ordropped.
To view Message Tracking details for the messages that populate thisreport, click a blue number link in the table.
DLP Incident Details
Web Interaction PageYou can use the Web Interaction report page to view:
• Top Malicious URLs clicked by End Users.
• Top Users who clicked on Rewritten Malicious URLs.
• Web Interaction Tracking Details.
Web Interaction report modules are populated only if the Web Interaction Tracking feature is enabled onmanaged Email Security appliances.
Note
Web Interaction reports are available for incoming and outgoing messages. Only rewritten URLs (either bypolicy or Outbreak Filter) clicked by the end users are included in these modules.
To view theWeb Interaction report page on the SecurityManagement appliance, selectEmail from the Productdrop-down and choose Monitoring > Web Interaction from the Reports drop-down. For more information,see Using the Interactive Report Pages, on page 39.
From the Web Interaction report page you can export raw data to a CSV file. For information on printing orexporting a file, see the Exporting Reporting and Tracking Data , on page 33.
The following list explains the various sections on the Web Interaction report page:
Table 42: Details on the Web Interaction Page
DescriptionSection
A drop-down list with options for choosing a time range to view. Formore information, see Choosing a Time Range for Reports , on page28.
Time Range (drop-down list)
Choose an Email Security appliance for which you want to view thedata, or choose All Email Appliances.
See also Viewing Reporting Data for an Appliance or Reporting Group,on page 27.
View Data For (drop-down list)
This section displays the summary of the top malicious URLs clickedby end users, for incoming and outgoing messages.
Top Malicious URLs clicked byEnd Users
User Guide for AsyncOS 14.1 for Cisco Secure Email and Web Manager- GD (General Deployment)143
Using Centralized Email Security ReportingWeb Interaction Page

DescriptionSection
This section displays the summary of the top end users who clicked onthe Rewritten Malicious URLs, for incoming and outgoing messages.
Top Users who clicked onMalicious URLs
This section displays the chart view and the summary of malicious andneutral URLs of the incoming and outgoing messages.
To view Message Tracking details for the messages that populate thisreport, click a blue number link in the table.
Web Interaction Tracking Details
Web Interaction Tracking DetailsThe Web Interaction Tracking Details table is an interactive table which includes the following information:
• A list of all the rewritten URLs (malicious and unmalicious).
• Action taken (allow, block, or unknown) when a rewritten URL was clicked.
• If the verdict of a URL (clean or malicious) was unknown at the time when the end user clicked it, thestatus is shown as unknown. This could be because the URLwas under further scrutiny or the web serverwas down or not reachable at the time of the user click.
• The number of times end users clicked on a rewritten URL.
• Note the following:
• If you have configured a content or message filter to deliver messages after rewriting maliciousURLs and notify another user (for example, an administrator), the web interaction tracking data forthe original recipient is incremented if the notified user clicks on the rewritten URLs.
• If you are sending a copy of quarantined messages containing rewritten URLs to a user other thanthe original recipient (for example, to an administrator) using the web interface, the web interactiontracking data for the original recipient is incremented if the other user clicks on the rewritten URLs.
To view Message Tracking details for the messages that populate this report, click a blue number link in thetable.
Remediation Reports PageThe Remediation Report page displays the remediation results of messages attempted for remediation usingMailbox Auto Remediation and Mailbox Search and Remediate.
On the Security Mangament appliance, click the Monitoring tab and select Mail Flow Summary > UserReports > Remediation Report.
You can use this report to:
• View the messages attempted for remediation usingMailbox Auto Remediation andMailbox Search andRemediate.
• Know the reason for remediation failure. For example, connections errors, authentication errors, and soon.
The following list explains the various sections on the Remediation Report page:
User Guide for AsyncOS 14.1 for Cisco Secure Email and Web Manager- GD (General Deployment)144
Using Centralized Email Security ReportingWeb Interaction Tracking Details

Table 43: Details on the Remediation Reports Page
DescriptionSection
The Summary section displays the following:
• Total number of messages attempted for remediation usingMailboxAuto Remediation and Mailbox Search and Remediate.
• Number of messages successfully remediated for a configuredremedial action.
• Number of messages for which the remediation failed.
Summary
The Mailbox Auto Remediation report section displays the following:
• A list of recipients for whom the mailbox remediation wassuccessful or unsuccessful.
• Remedial actions taken on messages.
• The filenames associated with a SHA-256 hash. Click the SHA-256hash to view the related messages in the Message Tracking page.
• A list of profile names defined for the recipients for whom themailbox remediation was successful or unsuccessful.
• Reason for the remediation failure.
After upgrading to AsyncOS 13.6.1, the message trackingstatus of the messages received before the upgrade remainsas "Delivered" than "Remediated."
Note
Mailbox Auto Remediation Report
User Guide for AsyncOS 14.1 for Cisco Secure Email and Web Manager- GD (General Deployment)145
Using Centralized Email Security ReportingRemediation Reports Page

DescriptionSection
The Mailbox Search and Remediate section displays the followingdetails:
• The list of remediation batches that are in progress or completed.
• The remediation status of the messages in the batches.
• The batch name and batch ID. Click the batch name to view thebatch details:
• The date and time when the remediation was initiated.
• The source from which the remediation was initiated.
• The host who initiated the remediation of the messages.
• The remedial action taken on the messages.
• The Cisco Ironport Message ID of the message.
• A read receipt icon to show if the message was read by therecipient before the message was remediated successfully.
• The remediation status of the message in the particular batchas Success, Failed, or In Progress.
• The email address of the sender who sent the message.
• The email addresses of the recipients for whom the messagewas delivered and later attempted for remediation.
• The date and time when the message was sent to the recipient.
Mailbox Search and Remediate
Message Filters PageThe Message Filters report page shows information about the top message filter matches (which messagefilters had the largest number of matching messages) for incoming and outgoing messages.
You can use the Message Filters report page to view:
• Top message filter by number of matches in graphical format.
• Total message filter by number of matches in tabular format.
To view theMessage Filters report page on the SecurityManagement appliance, selectEmail from the Productdrop-down and choose Monitoring > Message Filters from the Reports drop-down. For more information,see Using the Interactive Report Pages, on page 39.
From the Message Filters report page you can export raw data to a CSV file. For information on printing orexporting a file, see the Exporting Reporting and Tracking Data , on page 33.
User Guide for AsyncOS 14.1 for Cisco Secure Email and Web Manager- GD (General Deployment)146
Using Centralized Email Security ReportingMessage Filters Page

High Volume Mail PageYou can use the High Volume Mail report page to:
• Identify attacks involving a large number of messages from a single sender, or with identical subjects,within a moving one-hour period.
• Monitor top domains to ensure that such attacks do not originate in your own domain. If this situationoccurs, one or more accounts in your organization may be compromised.
• Help identify false positives so you can adjust your filters accordingly.
You can use the High Volume Mail report page to view:
• Messages with the top subjects in graphical format.
• Messages with the top envelope senders in graphical format.
• Top message filters by number of matches in graphical format.
• Total message filters by number of matches in tabular format.
To view the High Volume Mail report page on the Security Management appliance, select Email from theProduct drop-down and choose Monitoring > High Volume Mail from the Reports drop-down. For moreinformation, see Using the Interactive Report Pages, on page 39.
From the High Volume Mail report page you can export raw data to a CSV file. For information on printingor exporting a file, see the Exporting Reporting and Tracking Data , on page 33.
Reports on this page show data only from message filters that use the Header Repeats rule and that pass thenumber-of-messages threshold that you set in that rule. When combined with other rules, the Header Repeatsrule is evaluated last, and is not evaluated at all if the message disposition is determined by a precedingcondition. Similarly, messages caught by Rate Limiting never reach Header Repeats message filters. Therefore,some messages that might otherwise be considered high-volume mail may not be included in these reports.If you have configured your filters to include certain messages in allowed list, those messages are also excludedfrom these reports.
For more information about message filters and the Header Repeats rule, see the online help or user guide foryour Email Security appliance.
Content Filters PageThe Content Filters report page shows information about the top incoming and outgoing content filter matches(which content filter had the most matching messages). The page displays the data as both bar charts andlistings. Using the Content Filters report page, you can answer the following types of questions:
• Which content filter is triggered the most by incoming or outgoing mail?
• Who are the top users sending or receiving mail that triggers a particular content filter?
You can use the Content Filter report page to view:
• Top incoming and outgoing content filter matches in graphical format.
• Top incoming and outgoing content filter matches in tabular format.
User Guide for AsyncOS 14.1 for Cisco Secure Email and Web Manager- GD (General Deployment)147
Using Centralized Email Security ReportingHigh Volume Mail Page
To view the Content Filters report page on the SecurityManagement appliance, selectEmail from the Productdrop-down and choose Monitoring > Content Filters from the Reports drop-down. For more information,see Using the Interactive Report Pages, on page 39.
From the Content Filters report page you can export raw data to a CSV file. For information on printing orexporting a file, see the Exporting Reporting and Tracking Data , on page 33.
Note You can generate a scheduled report for the Content Filter page. See the Scheduling Email Reports, onpage 153.
Note
Content Filter Details PageThe Content Filter Detail page displays matches for the filter over time, as well as matches by internal user.
In the Matches by Internal User section, click the name of a user to view the detail page for the internal user(email address). For more information, see User Mail Summary, on page 139.
If your access privileges allow you to view Message Tracking data: To view Message Tracking details forthe messages that populate this report, click a blue number link in the table.
Reporting Data Availability PageFrom the Reports drop-down, select Monitoring > Reporting Data Availability on the new web interfaceof your appliance to view, update and sort data to provide real-time visibility into resource utilization andemail traffic trouble spots.
All data resource utilization and email traffic trouble spots are shown from this page, including the dataavailability for the overall appliances that are managed by the Security Management appliance.
From this report page you can also view the data availability for a specific appliance and time range.
Reporting of GraymailGraymail statistics are reflected in the following reports:
Contains the Following Graymail DataReport
The number of incoming graymail messages under each graymailcategory (Marketing, Social, and Bulk) and the total number ofgraymail messages.
Mail Flow Summary page > Incomingtab
The top graymail senders.Mail Flow Details page > OutgoingSenders tab
The number of incoming graymail messages under each graymailcategory (Marketing, Social, and Bulk) and the total number ofgraymail messages for all the IP addresses, domain names, ornetwork owners.
Mail Flow Details page > IncomingMails tab
The top end users who receive graymail.User Mail Summary page > Top Usersby Graymail
User Guide for AsyncOS 14.1 for Cisco Secure Email and Web Manager- GD (General Deployment)148
Using Centralized Email Security ReportingContent Filter Details Page

Contains the Following Graymail DataReport
The number of incoming graymail messages under each graymailcategory (Marketing, Social, and Bulk) and the total number ofgraymail messages for all the users.
User Mail Summary page > User MailDetails
Related Topics
• Reporting of Marketing Messages after Upgrade to AsyncOS 9.5 , on page 93
Reporting of Marketing Messages after Upgrade to AsyncOS 9.5After upgrade to AsyncOS 9.5:
• The number of marketing messages is the sum of marketing messages detected before and after theupgrade.
• The total number of graymail messages does not include the number of marketing messages detectedbefore the upgrade.
• The total number of attemptedmessages also includes the number of marketingmessages detected beforethe upgrade.
• If the graymail feature is not enabled on managed Email Security appliances, marketing messages arecounted as clean messages.
About Scheduled and On-Demand Email ReportsTypes of Reports Available
Except as noted, the following types of Email Security reports are available as both scheduled and on-demandreports:
• Content Filters—This report includes up to 40 content filters. For additional information on what isincluded on this page, see the Content Filters Page, on page 147.
• DLP Incident Summary—For information onwhat is included on this page, see the DLP Incident SummaryPage, on page 142.
• Delivery Status—The report page displays information about delivery problems to a specific recipientdomain or Virtual Gateway address, page displays a list of the top 20, 50, or 100 recipient domains formessages delivered by the system within the last three hours. You can sort by latest host status, activerecipients (the default), connections out, delivered recipients, soft bounced events, and hard bouncedrecipients by clicking the links in the column heading for each statistic. For more information on whatthe Delivery Status page does on the Email Security appliance, see the documentation or online help foryour Email Security appliance.
• Domain-Based Executive Summary—This report is based on the Mail Flow Summary Page, on page101, and is limited to a group of specified domains. For information on what is included, see theDomain-Based Executive Summary Report, on page 150.
• Executive Summary—This report is based on the information from the Mail Flow Summary Page, onpage 101. For information on what is included, see the Domain-Based Executive Summary Report, onpage 150.
• Mail Flow Details — For information on what in included on this page, see the Mail Flow Details Page,on page 124.
User Guide for AsyncOS 14.1 for Cisco Secure Email and Web Manager- GD (General Deployment)149
Using Centralized Email Security ReportingReporting of Marketing Messages after Upgrade to AsyncOS 9.5

• User Mail Summary—For information on what is included on this page, see the User Mail Summary,on page 139.
• Outgoing Destinations—For information on what is included on this page, see the Outgoing DestinationsPage, on page 131.
• Sender Groups—For information on what is included on this page, see the Sender Groups Page, on page131.
• TLS Encrptions—For information on what is included on this page, see the TLS Encryption Page, onpage 133.
• Virus Types—For information on what is included on this page, see the Virus Filtering Page, on page116.
Time ranges
Depending on the report, these reports can be configured to include data for the previous day, previous sevendays, previous month, previous calendar day (up to 250), or previous calendar month (up to 12). Alternatively,you can include data for a custom number of days (from 2 days to 100 days) or a custom number of months(from 2 months to 12 months).
Regardless of when you run a report, the data is returned from the previous time interval (hour, day, week,or month). For example, if you schedule a daily report to run at 1AM, the report will contain data from theprevious day, midnight to midnight (00:00 to 23:59).
Languages and Locales
You can schedule a PDF report or export raw data as a CSV file with a specific locale for that individualreport. The language drop-down menu on the Scheduled Reports page allows you to view or schedule a PDFreport in the users current selected locale and language. See important information at Exporting Reportingand Tracking Data , on page 33.
Note
Storage of Archived Reports
For information on how long reports are stored for, and when archived reports are deleted from the system,see Viewing and Managing Archived Email Reports , on page 156.
Additional Report TypesTwo special reports that can be generated in the Email > Reporting section on the Security Managementappliance are:
• Domain-Based Executive Summary Report, on page 150• Executive Summary Report , on page 153
Domain-Based Executive Summary ReportThe Domain-Based Executive Summary report provides a synopsis of the incoming and outgoing messageactivity for one or more domains in your network. It is similar to the Executive Summary report, but it limitsthe report data to the messages sent to and from the domains that you specify. The outgoing mail summaryshows data only when the domain in the PTR (pointer record) of the sending server matches a domain you
User Guide for AsyncOS 14.1 for Cisco Secure Email and Web Manager- GD (General Deployment)150
Using Centralized Email Security ReportingAdditional Report Types

specify. If multiple domains are specified, the appliance aggregates the data for all those domains into a singlereport.
To generate reports for a subdomain, you must add its parent domain as a second-level domain in the reportingsystem of the Email Security appliance and the Security Management appliance. For example, if you addexample.com as a second-level domain, its subdomains, such as subdomain.example.com, are available forreporting. To add second-level domains, use reportingconfig -> mailsetup -> tld in the Email Securityappliance CLI, and reportingconfig -> domain -> tld in the Security Management appliance CLI.
Unlike other scheduled reports, Domain-Based Executive Summary reports are not archived.
Domain-Based Executive Summary Reports and Messages Blocked by Sender Reputation Filtering
Because messages blocked by sender reputation filtering do not enter the work queue, AsyncOS does notprocess these messages to determine the domain destination. An algorithm estimates the number of rejectedmessages per domain. To determine the exact number of blocked messages per domain, you can delay HATrejections on the Security Management appliance until the messages reach the recipient level (RCPT TO).This allows AsyncOS to collect recipient data from the incoming messages. You can delay rejections usinglistenerconfig -> setup command on the Email Security appliance. However, this option can impact systemperformance. For more information about delayed HAT rejections, see the documentation for your EmailSecurity appliance.
To see Stopped by Reputation Filtering results in your Domain-Based Executive Summary report on theSecurityManagement appliance, you must have hat_reject_info enabled on both the Email Security applianceand the SecurityManagement appliance.To enable the hat_reject_info on the SecurityManagement appliance,run the reportingconfig > domain > hat_reject_info command.
Note
Managing Lists of Domains and Recipients for Domain-Based Executive Summary Reports
You can use a configuration file to manage the domains and recipients for a Domain-Based Executive Summaryreport. The configuration file is a text file that is stored in the configuration directory of the appliance. Eachline in the file produces a separate report. This allows you to include a large number of domains and recipientsin a single report, as well as define multiple domain reports in a single configuration file.
Each line of the configuration file includes a space-separated list of domain names and a space-separated listof email addresses for the report recipients. A comma separates the list of domain names from the list of emailaddresses. You can include subdomains by appending the subdomain name and a period at the beginning ofthe parent domain name, such as subdomain.example.com.
The following is a Single Report configuration file that generates three reports.
yourdomain.com sampledomain.com, [email protected], [email protected] [email protected] mail.example.com, [email protected]
User Guide for AsyncOS 14.1 for Cisco Secure Email and Web Manager- GD (General Deployment)151
Using Centralized Email Security ReportingDomain-Based Executive Summary Reports and Messages Blocked by Sender Reputation Filtering

You can use a configuration file and the settings defined for a single named report to generate multiple reportsat the same time. For example, a company named Bigfish purchases two other companies, Redfish and Bluefish,and continues to maintain their domains. Bigfish creates a single Domain-Based Executive Summary reportusing a configuration file containing three lines corresponding to separate domain reports. When the appliancegenerates a Domain-Based Executive Summary report, an administrator for Bigfish receives a report on theBigfish.com, Redfish.com, and Bluefish.com domains, while a Redfish administrator receives a report on theRedfish.com domain and a Bluefish administrator receives a report on the Bluefish.com domain.
Note
You can upload a different configuration file to the appliance for each named report. You can also use thesame configuration file for multiple reports. For example, you might create separate named reports that providedata about the same domains over different time periods. If you update a configuration file on your appliance,you do not have to update the report settings in the GUI unless you change the filename.
Creating Domain-Based Executive Summary Reports
Step 1 On the Security Management appliance, you can schedule the report or generate the report immediately.
To schedule the report:
a) [New Web Interface Only] On the Security Management appliance, click to load the legacy web interface.b) Choose Email > Reporting > Scheduled Reports.c) Click Add Scheduled Report.
To create an on-demand report:
• Choose Email > Reporting > Archived Reports.• Click Generate Report Now.
Step 2 From the Report Type drop-down list, choose Domain-Based Executive Summary report type.Step 3 Specify the domains to include in the report and the email addresses for the report recipients. You can select one of the
following options for generating the report:
• Generate report by specifying individual domains. Enter the domains for the report and the email addresses forthe report recipients. Use commas to separate multiple entries. You can also use subdomains, such assubdomain.yourdomain.com. Specifying individual domains is recommended if you create reports for a smallnumber of domains that are not expected to change frequently.
• Generate reports by uploading file. Import a configuration file that contains a list of the domains and recipientemail addresses for the report. You can select a configuration file from the configuration directory on the applianceor upload one from your local computer. Using a configuration file is recommended if you create reports for alarge number of domains that change frequently. For more information on configuration files for domain-basedreports, see Managing Lists of Domains and Recipients for Domain-Based Executive Summary Reports , on page151.
If you send reports to an external account (such as Yahoo! Mail or Gmail), you may need to add the reportingreturn address to the external account’s allowed list to prevent report messages from being incorrectly classifiedas spam.
Note
Step 4 In the Title text field, type the name of the title for the report.
User Guide for AsyncOS 14.1 for Cisco Secure Email and Web Manager- GD (General Deployment)152
Using Centralized Email Security ReportingCreating Domain-Based Executive Summary Reports

AsyncOS does not verify the uniqueness of report names. To avoid confusion, do not create multiple reports with thesame name.
Step 5 In the Outgoing Domain section, choose the domain type for the outgoing mail summary. Choices are: By Server orBy Email Address.
Step 6 From the Time Range to Include drop-down list, select a time range for the report data.Step 7 In the Format section, choose the format of the report.
Choices include:
• PDF. Create a formatted PDF document for delivery, archival, or both. You can view the report as a PDF fileimmediately by clicking Preview PDF Report.
• CSV. Create an ASCII text file that contains raw data as comma-separated values. Each CSV file may contain upto 100 rows. If a report contains more than one type of table, a separate CSV file is created for each table.
Step 8 From the Schedule section, choose a schedule for generating the report.
Choices include: Daily, Weekly (drop-down list for day of week included), or monthly.
Step 9 (Optional) Upload a custom logo for the report. The logo appears at the top of the report.
• The logo should be a .jpg, .gif, or .png file that is at most 550 x 50 pixels.
• If a logo file is not supplied, the default Cisco logo is used.
Step 10 Select a language for this report. For generating PDFs in Asian languages, see important information at ExportingReporting and Tracking Data , on page 33.
Step 11 Click Submit to submit your changes on the page, then click Commit Changes to commit your changes.
Executive Summary ReportThe Executive Summary Report is a high-level overview of the incoming and outgoing email message activityfrom your Email Security appliances. that can be viewed on the Security Management appliance.
This report page summarizes what you can view on the Mail Flow Summary Page, on page 101. For moreinformation on the Email Reporting Overview page, see Mail Flow Summary Page, on page 101.
Scheduled Reports Page• Scheduling Email Reports, on page 153
• Scheduling Web Reports , on page 223
Scheduling Email ReportsYou can schedule any of the reports listed in About Scheduled and On-Demand Email Reports , on page 149.
To manage report scheduling, see the following:
• Adding Scheduled Reports, on page 154
User Guide for AsyncOS 14.1 for Cisco Secure Email and Web Manager- GD (General Deployment)153
Using Centralized Email Security ReportingExecutive Summary Report

• Editing Scheduled Reports, on page 154• Discontinuing Scheduled Reports , on page 155
Adding Scheduled ReportsTo add a scheduled email report, use the following steps:
Step 1 Choose Email > Reporting > Scheduled Reports.Step 2 Click Add Scheduled Report.Step 3 Choose your report type.
For descriptions of the report types, see About Scheduled and On-Demand Email Reports , on page 149.
- For information about the settings for a Domain-Based Executive Summary report, see Domain-BasedExecutive Summary Report, on page 150.
- Available options for scheduled reports differ by report type. Options described in the remainder of thisprocedure do not necessarily apply to all reports.
Note
Step 4 In the Title field, type the title of your report.
To avoid creating multiple reports with the same name, we recommend using a descriptive title.
Step 5 Choose the time range for the report from the Time Range to Include drop-down menu.Step 6 Choose the format for the generated report.
The default format is PDF. Most reports also allow you to save raw data as a CSV file.
Step 7 Depending on the report, for Number of Rows, choose the amount of data to include.Step 8 Depending on the report, choose the column by which to sort the report.Step 9 From the Schedule area, select the radio button next to the day, week, or month for your scheduled report. Additionally,
include the time that you want the report scheduled for. Time increments are based on midnight to midnight (00:00 to23:59).
Step 10 In the Email text field, type in the email address where the generated report will be sent.
If you do not specify an email recipient, the system will still archive the reports.
You can add as many recipients for reports as you want, including zero recipients. If you need to send the reports to alarge number of addresses, however, you may want to create a mailing list instead of listing the recipients individually.
Step 11 Choose a language for the report.
For Asian languages, see important information at Exporting Reporting and Tracking Data , on page 33.
Step 12 Click Submit.
Editing Scheduled Reports
Step 1 [New Web Interface Only] On the Security Management appliance, click to load the legacy web interface.
User Guide for AsyncOS 14.1 for Cisco Secure Email and Web Manager- GD (General Deployment)154
Using Centralized Email Security ReportingAdding Scheduled Reports

Step 2 Choose Email > Reporting > Scheduled Reports.Step 3 Click the report name link in the Report Title column that you want to modify.Step 4 Modify the report settings.Step 5 Submit and commit your changes.
Discontinuing Scheduled ReportsTo prevent future instances of scheduled reports from being generated, perform the following steps:
Step 1 [New Web Interface Only] On the Security Management appliance, click to load the legacy web interface.Step 2 Choose Email > Reporting > Scheduled Reports.Step 3 Select the check boxes corresponding to the reports that you want to discontinue generating. To remove all scheduled
reports, select the All check box.Step 4 Click Delete.
Any archived versions of deleted reports are not automatically deleted. To delete previously-generated reports,see Deleting Archived Reports, on page 157.
Note
Generating Email Reports On DemandIn addition to the reports that you can view (and generate PDFs for) using the interactive report pages describedin Understanding the Email Reporting Pages on the New Web Interface, on page 97, you can save PDFs orraw-data CSV files for the reports listed in About Scheduled and On-Demand Email Reports , on page 149 atany time, for the time frame that you specify.
To generate an on-demand report perform the following:
Step 1 [New Web Interface Only] On the Security Management appliance, click to load the legacy web interface.Step 2 Choose Email > Reporting > Archived Reports.Step 3 Click Generate Report Now.Step 4 Choose a report type.
For descriptions of the report types, see About Scheduled and On-Demand Email Reports , on page 149.
Step 5 In the Title text field, type the name of the title for the report.
AsyncOS does not verify the uniqueness of report names. To avoid confusion, do not create multiple reports with thesame name.
For information about the settings for a Domain-Based Executive Summary report, see Domain-BasedExecutive Summary Report, on page 150.
Available options for scheduled reports differ by report type. Options described in the remainder of thisprocedure do not necessarily apply to all reports.
Note
User Guide for AsyncOS 14.1 for Cisco Secure Email and Web Manager- GD (General Deployment)155
Using Centralized Email Security ReportingDiscontinuing Scheduled Reports
Step 6 From the Time Range to Include drop-down list, select a time range for the report data.
Note the custom time range option.
Step 7 In the Format section, choose the format of the report.
Choices include:
• PDF. Create a formatted PDF document for delivery, archival, or both. You can view the report as a PDF fileimmediately by clicking Preview PDF Report.
• CSV. Create an ASCII text file that contains raw data as comma-separated values. Each CSV file may contain upto 100 rows. If a report contains more than one type of table, a separate CSV file is created for each table.
Step 8 Select the appliances or appliance groups for which you want to run the report. If you have not created any appliancegroups, this option does not appear.
Step 9 From the Delivery Option section, choose the following:
• Archive the report by checking the Archive Report checkbox.
By choosing this, the report will be listed on the Archived Reports page.
Domain-Based Executive Summary reports cannot be archived.Note
• Email the report, by checking the Email now to recipients checkbox.
In the text field, type in the recipient email addresses for the report.
Step 10 Select a language for this report. For generating PDFs in Asian languages, see important information at ExportingReporting and Tracking Data , on page 33.
Step 11 Click Deliver This Report to generate the report.
Archived Email Reports Page• About Scheduled and On-Demand Email Reports , on page 149
• Generating Email Reports On Demand , on page 155
• Viewing and Managing Archived Email Reports , on page 156
Viewing and Managing Archived Email ReportsScheduled and on-demand reports are archived for a period of time.
The Security Management appliance retains the most recent reports that it generates, up to 30 instances ofeach scheduled report, up to 1000 total versions for all reports. The limit of 30 instances applies to eachscheduled report with the same name and time range.
Archived reports are deleted automatically. As new reports are added, older reports are removed to keep thenumber at 1000.
Archived reports are stored in the /periodic_reports directory on the appliance. (See IP Interfaces and Accessingthe Appliance, on page 575 for more information.)
User Guide for AsyncOS 14.1 for Cisco Secure Email and Web Manager- GD (General Deployment)156
Using Centralized Email Security ReportingArchived Email Reports Page

Accessing Archived ReportsThe Email > Reporting > Archived Reports page lists scheduled and on-demand reports that you havechosen to archive which have been generated and not yet purged.
Step 1 [New Web Interface Only] On the Security Management appliance, click to load the legacy web interface.Step 2 Choose Email > Reporting > Archived Reports.Step 3 To locate a particular report if the list is long, filter the list by choosing a report type from the Show menu, or click a
column heading to sort by that column.Step 4 Click the Report Title to view that report.
Deleting Archived ReportsReports are automatically deleted from the system according to the rules outlined in Viewing and ManagingArchived Email Reports , on page 156. However, you can manually delete unneeded reports.
To manually delete Archived reports, perform the following:
Step 1 [New Web Interface Only] On the Security Management appliance, click to load the legacy web interface.Step 2 Choose Email > Reporting > Archived Reports.
The Archived reports that are available are displayed.
Step 3 Select the checkbox for one or more reports to delete.Step 4 Click Delete.Step 5 To prevent future instances of scheduled reports from being generated, see Discontinuing Scheduled Reports , on page
155.
Scheduling and Archiving Email Reports on the New WebInterface
• Scheduling Email Reports on the New Web Interface, on page 157
• Archived Email Reports Page on the New Web Interface, on page 159
Scheduling Email Reports on the New Web Interface• Adding Scheduled Reports on the New Web Interface, on page 158
• Editing Scheduled Reports on the New Web Interface, on page 159
• Discontinuing Scheduled Reports on the New Web Interface, on page 159
User Guide for AsyncOS 14.1 for Cisco Secure Email and Web Manager- GD (General Deployment)157
Using Centralized Email Security ReportingAccessing Archived Reports

Adding Scheduled Reports on the New Web Interface
You can schedule your favorite reports (My Email Reports) page. For information on how to add schedulereports, see Scheduling Email Reports on the New Web Interface.
Note
To add a scheduled email report, use the following steps:
Step 1 Log in to the new web interface of the appliance.Step 2 Choose Monitoring > Schedule & Archive.Step 3 In the Schedule Reports tab, click the + button.Step 4 Choose your report type.
For descriptions of the report types, see About Scheduled and On-Demand Email Reports , on page 149.
- For information about the settings for a Domain-Based Executive Summary report, see Domain-BasedExecutive Summary Report, on page 150.
- Available options for scheduled reports differ by report type. Options described in the remainder of thisprocedure do not necessarily apply to all reports.
Note
Step 5 In the Title field, type the title of your report.
To avoid creating multiple reports with the same name, we recommend using a descriptive title.
Step 6 Choose the time range for the report from the Time Range to Include drop-down menu.Step 7 Choose the format for the generated report.
The default format is PDF.
You can export My Favorite Reports page or download My Favorite Reports page as a PDF. For moreinformation, see Exporting Reporting and Tracking Data .
Note
Step 8 From the Email Appliance(s) section, select the Email Security appliance from the drop-down list.Step 9 From the Delivery Options section, choose any one of the following:
By choosing this, the report will be listed on the Archived Reports page.
Domain-Based Executive Summary reports cannot be archived.Note
• To archive the report, select Only Archive.
• To archive and email the report, click Archive and Email to Recipients.
• To email the report, click Only Email to Recipients.
In the Email IDs field, enter the recipient email addresses.
Step 10 From the Scheduling section, select the radio button next to the day, week, or month for your scheduled report.Additionally, include the time that you want the report scheduled for. Time increments are based onmidnight to midnight(00:00 to 23:59).
Step 11 Choose a language for the report.
User Guide for AsyncOS 14.1 for Cisco Secure Email and Web Manager- GD (General Deployment)158
Using Centralized Email Security ReportingAdding Scheduled Reports on the New Web Interface

Step 12 Click Submit.
Editing Scheduled Reports on the New Web Interface
Step 1 Log in to the new web interface of the appliance.Step 2 Choose Monitoring > Schedule & Archive.
Step 3 In the Schdule Reports tab, select the check box next to the required Report Title column and click the button.Step 4 Modify the report settings.Step 5 Submit and commit your changes.
Discontinuing Scheduled Reports on the New Web InterfaceTo prevent future instances of scheduled reports from being generated, perform the following steps:
Step 1 Log in to the new web interface of the appliance.Step 2 Choose Monitoring > Schedule & Archive.Step 3 In the Schedule Reports tab, select the check boxes corresponding to the reports that you want to discontinue generating.
To remove all scheduled reports, select the All check box.Step 4 Click Delete.
Any archived versions of deleted reports are not automatically deleted. To delete previously-generated reports,see Accessing Archived Reports on the New Web Interface, on page 159.
Note
Archived Email Reports Page on the New Web Interface• Accessing Archived Reports on the New Web Interface, on page 159
• Generating Email Reports On Demand, on page 160
• Deleting Archived Reports on the New Web Interface, on page 161
Accessing Archived Reports on the New Web InterfaceThe View Archived Reports tab of the Schedule & Archive page lists scheduled and on-demand reportsthat you have chosen to archive which have been generated and not yet purged.
You can archive your favorite reports (My Email Reports) page. For information on how to add archive reports,see Archived Email Reports Page on the New Web Interface.
Note
User Guide for AsyncOS 14.1 for Cisco Secure Email and Web Manager- GD (General Deployment)159
Using Centralized Email Security ReportingEditing Scheduled Reports on the New Web Interface

Step 1 Log in to the new web interface of the appliance.Step 2 Choose Monitoring > Schedule & Archive.Step 3 Click on the View Archived Reports tab.Step 4 To locate a particular report if the list is long, you can search for the report name and type or click a column heading to
sort by that column.
Generating Email Reports On DemandIn addition to the reports that you can view (and generate PDFs for) using the interactive report pages describedin Understanding the Email Reporting Pages on the New Web Interface, on page 97, you can save PDFs orraw-data CSV files for the reports listed in About Scheduled and On-Demand Email Reports , on page 149 atany time, for the time frame that you specify.
To generate an on-demand report perform the following:
Step 1 Log in to the new web interface of the appliance.Step 2 Choose Monitoring > Schedule & Archive.Step 3 In the View Archived Reports tab, click on the + button.Step 4 Choose a report type.
For descriptions of the report types, see About Scheduled and On-Demand Email Reports , on page 149.
Step 5 In the Title field, enter the name of the title for the report.
AsyncOS does not verify the uniqueness of report names. To avoid confusion, do not create multiple reports with thesame name.
For information about the settings for a Domain-Based Executive Summary report, see Domain-BasedExecutive Summary Report, on page 150.
Available options for scheduled reports differ by report type. Options described in the remainder of thisprocedure do not necessarily apply to all reports.
Note
Step 6 From the Time Range to Include drop-down list, select a time range for the report data.
Note the custom time range option.
Step 7 In the Format section, choose the format of the report.
Choices include:
• PDF. Create a formatted PDF document for delivery, archival, or both. You can view the report as a PDF fileimmediately by clicking Preview PDF Report.
• CSV. Create an ASCII text file that contains raw data as comma-separated values. Each CSV file may contain upto 100 rows. If a report contains more than one type of table, a separate CSV file is created for each table.
Step 8 Select the appliances or appliance groups for which you want to run the report. If you have not created any appliancegroups, this option does not appear.
Step 9 From the Email Appliance(s) section, select the Email Security appliance from the drop-down list.
User Guide for AsyncOS 14.1 for Cisco Secure Email and Web Manager- GD (General Deployment)160
Using Centralized Email Security ReportingGenerating Email Reports On Demand

Step 10 From the Delivery Options section, choose any one of the following:
By choosing this, the report will be listed on the Archived Reports page.
Domain-Based Executive Summary reports cannot be archived.Note
• To archive the report, select Only Archive.
• To archive and email the report, click Archive and Email to Recipients.
• To email the report, click Only Email to Recipients.
In the Email IDs field, enter the recipient email addresses.
Step 11 Select a language for this report. For generating PDFs in Asian languages, see important information at ExportingReporting and Tracking Data , on page 33.
Step 12 Click Submit to generate the report.
Deleting Archived Reports on the New Web InterfaceReports are automatically deleted from the system according to the rules outlined in Viewing and ManagingArchived Email Reports , on page 156. However, you can manually delete unneeded reports.
To manually delete Archived reports, perform the following:
Step 1 Log in to the new web interface of the appliance.Step 2 Choose Monitoring > Schedule & Archive.Step 3 In the View Archived Reports tab, select the checkbox for one or more reports to delete.Step 4 Click on the trash can button.Step 5 To prevent future instances of scheduled reports from being generated, see Discontinuing Scheduled Reports on the New
Web Interface, on page 159.
Troubleshooting Email Reports• Outbreak Filters Reports Do Not Show Information Correctly , on page 161• Message Tracking Results Do Not Match Report Results After Clicking a Link in a Report , on page 162• Advanced Malware Protection Verdict Updates Report Results Differ , on page 162• Issues Viewing File Analysis Report Details , on page 162
See also Troubleshooting All Reports , on page 35.
Outbreak Filters Reports Do Not Show Information CorrectlyProblem
Outbreak Filters reports do not show threat information correctly.
Solution
User Guide for AsyncOS 14.1 for Cisco Secure Email and Web Manager- GD (General Deployment)161
Using Centralized Email Security ReportingDeleting Archived Reports on the New Web Interface

Verify that the appliance can communicate with the Cisco update servers specified in Management Appliance> System Administration > Update Settings.
Message Tracking Results Do Not Match Report Results After Clicking a Linkin a Report
Problem
Message tracking results when drilling down from reports do not match expected results.
Solution
This can occur if reporting and tracking are not consistently and simultaneously enabled and functioningproperly, or are not consistently and simultaneously either centralized or stored locally on each Email Securityappliance. Data for each feature (reporting, tracking) is captured only while that feature is enabled.
Related Topics
• Checking Message Tracking Data Availability , on page 251
Advanced Malware Protection Verdict Updates Report Results DifferProblem
AWeb Security appliance and an Email Security appliance sent the same file for analysis, and the AMPVerdict Updates reports for Web and Email show different verdicts for that file.
Solution
This situation is temporary. Results will match once all verdict updates have been downloaded. Allow up to30 minutes for this to occur.
Issues Viewing File Analysis Report Details• File Analysis Report Details Are Not Available , on page 162• Error When Viewing File Analysis Report Details, on page 162• ErrorWhen Viewing File Analysis Report Details with Private Cloud Cisco AMP Threat Grid Appliance, on page 163
• Logging of File Analysis-Related Errors , on page 163
File Analysis Report Details Are Not AvailableProblem
File Analysis report details are not available.
Solution
See Requirements for File Analysis Report Details , on page 84.
Error When Viewing File Analysis Report DetailsProblem
User Guide for AsyncOS 14.1 for Cisco Secure Email and Web Manager- GD (General Deployment)162
Using Centralized Email Security ReportingMessage Tracking Results Do Not Match Report Results After Clicking a Link in a Report
No cloud server configuration is available error appears when you attempt to view File Analysis report details.
Solution
Go to Management Appliance > Centralized Services > Security Appliances and add at least one EmailSecurity appliance that has the File Analysis feature enabled.
Error When Viewing File Analysis Report Details with Private Cloud Cisco AMP Threat GridAppliance
Problem
You see an API key, registration, or activation error when attempting to view File Analysis report details.
Solution
If you are using a private cloud (on-premises) Cisco AMP Threat Grid appliance for file analysis, see(On-Premises File Analysis) Activate the File Analysis Account , on page 85.
If your Threat Grid appliance hostname changes, you must repeat the process in the referenced procedure.
Logging of File Analysis-Related ErrorsRegistration and other File Analysis-related errors are logged in the GUI logs.
Total Graymail or Marketing Messages Appears To Be IncorrectProblem
The count of Marketing, Social and Bulk mail exceeds the total number of graymail messages.
Solution
The total number ofMarketingMessages includes marketingmessages received both before and after upgradeto AsyncOS 9.5, but the total number of graymail messages includes only messages received after upgrade.See Reporting of Marketing Messages after Upgrade to AsyncOS 9.5 , on page 93.
User Guide for AsyncOS 14.1 for Cisco Secure Email and Web Manager- GD (General Deployment)163
Using Centralized Email Security ReportingError When Viewing File Analysis Report Details with Private Cloud Cisco AMP Threat Grid Appliance

User Guide for AsyncOS 14.1 for Cisco Secure Email and Web Manager- GD (General Deployment)164
Using Centralized Email Security ReportingTotal Graymail or Marketing Messages Appears To Be Incorrect

C H A P T E R 6Using Centralized Web Reporting and Tracking
This chapter contains the following sections:
• Centralized Web Reporting and Tracking Overview, on page 165• Setting Up Centralized Web Reporting and Tracking , on page 167• Working with Web Security Reports, on page 169• Working with Web Security Reports on the New Web Interface, on page 169• Web Reporting Page Descriptions, on page 170• Understanding the Web Reporting Pages on the New Web Interface, on page 197• About Scheduled and On-Demand Web Reports, on page 222• Scheduling Web Reports , on page 223• Generating Web Reports on Demand , on page 226• Archived Web Reports Page, on page 227• Viewing and Managing Archived Web Reports, on page 228• Schedule and Archive Web Reports on the New Web Interface, on page 228• Web Tracking , on page 231• Web Tracking on the New Web Interface, on page 236• Working with Web Tracking Search Results , on page 241• Troubleshooting Web Reporting and Tracking , on page 243
Centralized Web Reporting and Tracking OverviewThe Cisco Content SecurityManagement appliance aggregates information from security features on multipleWeb Security appliances and records data that can be used to monitor your web traffic patterns and securityrisks. You can run reports in real-time to view an interactive display of system activity over a specific periodof time, or you can schedule reports and run them at regular intervals. Reporting functionality also allows youto export raw data to a file.
The Centralized Web Reporting feature not only generates high-level reports, allowing administrators tounderstand what is happening on their network, but it also allows an administrator to drill down and see trafficdetails for a particular domain, user, or URL category.
Domain
For a domain, the web reporting feature can generate the following data elements to be on a domain report.For example, if you are generating a report on the Facebook.com domain, the report may contain:
User Guide for AsyncOS 14.1 for Cisco Secure Email and Web Manager- GD (General Deployment)165

• A list of the top users who accessed Facebook.com
• A list of the top URLs that were accessed within Facebook.com
User
For a user, the web reporting feature can generate data elements to be on a user report. For example, for theuser report titled ‘Jamie’, the report may contain:
• A list of the top domains that the user ‘Jamie’ accessed• A list of the top URLs that were malware or virus positive• A list of the top categories that the user ‘Jamie’ accessed
URL Category
For a URL category, the web reporting feature can generate data to be included in a category report. Forexample, for the category ‘Sports’, the report may contain:
• A list of the top domains that were in the ‘Sports’ category• A list of the top users who accessed the ‘Sports’ category
In all of these examples, these reports are intended to give a comprehensive view about a particular item onthe network so that the administrator can take action.
General
For a detailed description on logging pages versus reporting pages, see the Logging Versus Reporting, onpage 531.
You can retrieve all the domain information that a user goes to, not necessarily the specific URL that isaccessed. For information on a specific URL that the user is accessing, what time they went to that URL,whether that URL is allowed, etc., use the Searching for Transactions Processed by Web Proxy Services , onpage 231 on the Web Tracking page.
Note
The Web Security appliance only stores data if local reporting is used. If centralized reporting is enabled forthe Web Security appliance then the Web Security appliance retains ONLY System Capacity and SystemStatus data. If CentralizedWeb Reporting is not enabled, the only reports that are generated are System Statusand System Capacity.
Note
There are multiple ways to view web reporting data on the Security Management appliance.
• To view interactive report pages, see Web Reporting Page Descriptions, on page 170.• To generate a report on demand, see Generating Web Reports on Demand , on page 226.• To schedule generation of reports on a regular, recurring basis, see About Scheduled and On-DemandWeb Reports, on page 222.
• To view archived versions of previously run reports (both scheduled and generated on demand), seeViewing and Managing Archived Web Reports, on page 228.
• To view information about individual transactions, see Web Tracking , on page 231.
User Guide for AsyncOS 14.1 for Cisco Secure Email and Web Manager- GD (General Deployment)166
Using Centralized Web Reporting and TrackingCentralized Web Reporting and Tracking Overview

Setting Up Centralized Web Reporting and TrackingTo set up centralized web reporting and tracking, complete the following steps in order:
• Enabling Centralized Web Reporting on the Security Management Appliance , on page 167
• Anonymizing User Names in Web Reports , on page 168
• Enabling Centralized Web Reporting on Web Security Appliances , on page 167
• Adding the CentralizedWeb Reporting Service to Each ManagedWeb Security Appliance , on page 167
• Anonymizing User Names in Web Reports , on page 168
Enabling Centralized Web Reporting on the Security Management Appliance
Step 1 Before enabling centralized web reporting, ensure that sufficient disk space is allocated to that service. See ManagingDisk Space , on page 494.
Step 2 [New Web Interface Only] On the Security Management appliance, click to load the legacy web interface.Step 3 Choose Management Appliance > Centralized Services > Web > Centralized Reporting.Step 4 If you are enabling centralized reporting for the first time after running the System Setup Wizard:
a) Click Enable.b) Review the end user license agreement, then click Accept.
Step 5 If you are enabling centralized reporting after it has previously been disabled:a) Click Edit Settings.b) Select the Enable Centralized Web Report Services checkbox.c) You can address Anonymizing User Names in Web Reports , on page 168 now or later.
Step 6 Submit and commit your changes.
Enabling Centralized Web Reporting on Web Security AppliancesAll Web Security appliances should be configured and working as expected before you enable centralizedreporting.
You must enable centralized reporting on each Web Security appliance that will use centralized reporting.
See the “Enabling Centralized Reporting” section in AsyncOS for CiscoWeb Security Appliances User Guide.
Adding the Centralized Web Reporting Service to Each Managed Web SecurityAppliance
The steps you follow depend on whether or not you have already added the appliance while configuringanother centralized management feature.
User Guide for AsyncOS 14.1 for Cisco Secure Email and Web Manager- GD (General Deployment)167
Using Centralized Web Reporting and TrackingSetting Up Centralized Web Reporting and Tracking

Step 1 [New Web Interface Only] On the Security Management appliance, click to load the legacy web interface.Step 2 Choose Management Appliance > Centralized Services > Security Appliances.Step 3 If you have already added the Web Security appliance to the list:
a) Click the name of a Web Security Appliance.b) Select the Centralized Reporting service.
Step 4 If you have not yet added Web Security appliances:a) Click Add Web Appliance.b) In the Appliance Name and IP Address text fields, type the appliance name and the IP address for the Management
interface of the Web Security appliance.
A DNS name may be entered in the IP Address text field, however, it will be immediately resolved to anIP address when you click Submit.
Note
c) The Centralized Reporting service is pre-selected.d) Click Establish Connection.e) Enter the user name and passphrase for an administrator account on the appliance to be managed, then clickEstablish
Connection.
You enter the login credentials to pass a public SSH key for file transfers from the Security Managementappliance to the remote appliance. The login credentials are not stored on the SecurityManagement appliance.
Note
f) Wait for the Success message to appear above the table on the page.g) Click Test Connection.h) Read test results above the table.
Step 5 Click Submit.Step 6 Repeat this procedure for each Web Security Appliance for which you want to enable Centralized Reporting.Step 7 Commit your changes.
Anonymizing User Names in Web ReportsBy default, user names appear on reporting pages and PDFs. However, to protect user privacy, you may wantto make user names unrecognizable in web reports.
Users with Administrator privileges on this appliance can always see user names when viewing interactivereports.
Note
Step 1 [New Web Interface Only] On the Security Management appliance, click to load the legacy web interface.Step 2 Choose Management Appliance > Centralized Services > Web > Centralized Reporting.Step 3 Click Edit Settings.Step 4 Select the Anonymize usernames in reports checkbox.
User Guide for AsyncOS 14.1 for Cisco Secure Email and Web Manager- GD (General Deployment)168
Using Centralized Web Reporting and TrackingAnonymizing User Names in Web Reports

Step 5 Submit and commit your change.
Working with Web Security ReportsWeb reporting pages allow you to monitor information on one or all of the managed Web Security appliancesin your system.
SeeTo
Ways to View Reporting Data , on page 25View options for accessing and viewing report data
Customizing Your View of Report Data , on page 27Customize your view of the interactive report pages
Web Tracking , on page 231Find information about specific transactions withinyour data
Exporting Reporting and Tracking Data , on page 33Print or export report information
Web Reporting Page Descriptions, on page 170Understand the various interactive report pages
Understanding the Web Reporting Pages on the NewWeb Interface, on page 197
Generate a report on demand
About Scheduled and On-Demand Web Reports, onpage 222
Schedule reports to run automatically at intervalsand times that you specify
Viewing andManaging ArchivedWeb Reports, on page228
View archived on-demand and scheduled reports
How the SecurityManagement Appliance Gathers Datafor Reports, on page 26
Understand how data is gathered
Working with Web Security Reports on the New Web InterfaceWeb reporting pages allow you to monitor information on one or all of the managed Web Security appliancesin your system.
SeeTo
Ways to View Reporting Data , on page 37View options for accessing and viewingreport data
Customizing Your View of Report Data , on page 40Customize your view of the interactivereport pages
Web Tracking on the New Web Interface, on page 236Find information about specifictransactions within your data
Exporting Reporting and Tracking Data , on page 33Print or export report information
User Guide for AsyncOS 14.1 for Cisco Secure Email and Web Manager- GD (General Deployment)169
Using Centralized Web Reporting and TrackingWorking with Web Security Reports

SeeTo
Understanding the Web Reporting Pages on the New WebInterface, on page 197
Understand the various interactive reportpages
Web Reporting Page Descriptions
For information on which of the options on the Web Reporting tab are available as on-demand or scheduledreports, see the About Scheduled and On-Demand Web Reports, on page 222.
Note
Table 44: Web Reporting Tab Details
ActionWeb Reporting Menu
The Overview page provides a synopsis of the activity on your Web Securityappliances. It includes graphs and summary tables for the incoming and outgoingtransactions. For more information, see the Web Reporting Overview , on page173.
Web Reporting Overview, on page 173
The Users page provides several web tracking links that allow you to view webtracking information for individual users.
From the Users page you can view how long a user, or users, on your systemhave spent on the internet, on a particular site or URL, and howmuch bandwidththat user is using.
From theUsers page you can click on an individual user in the interactive Userstable to view more details for that specific user on the User Details page.
The User Details page allows you to see specific information about a user thatyou have identified in the Users table on the Web > Reporting > Users page.From this page you can investigate individual user’s activity on your system.This page is particularly useful if you are running user-level investigations andneed to find out, for example, what sites your users are visiting, what Malwarethreats they are encountering, what URL categories they are accessing, and howmuch time a specific user is spending at these sites.
For more information, see the Users Report (Web) , on page 174. For informationon a specific user in your system, see the User Details (Web Reporting) , onpage 175
Users Report (Web) , onpage 174
The User Count page provides the aggregated information about the total numberof authenticated and unauthenticated users of the Web Security appliances withCentralized Reporting enabled. The page lists the unique user count for the last30 days, 90 days, and 180 days.
System hourly computes the total user count of authenticted andunauthenticated users.
Note
User Count Report (Web)
User Guide for AsyncOS 14.1 for Cisco Secure Email and Web Manager- GD (General Deployment)170
Using Centralized Web Reporting and TrackingWeb Reporting Page Descriptions

ActionWeb Reporting Menu
The Web Sites page allows you to view an overall aggregation of the activitythat is happening on your managed appliances. From this page you can monitorhigh-risk web sites accessed during a specific time range. For more information,see the Web Sites Report , on page 177.
Web Sites Report , on page177
The URL Categories page allows you to view the top URL Categories that arebeing visited, including:
• the top URLs that have triggered a block or warning action to occur pertransaction.
• all the URL categories during a specified time range for both completed,warned and blocked transactions. This is an interactive table with interactivecolumn headings that you can use to sort data as you need.
For more information, see the URL Categories Report , on page 178.
URL Categories Report ,on page 178
The Application Visibility page allows you to apply and view the controls thathave been applied to a particular application types within the SecurityManagement appliance and Web Security appliance. For more information, seethe Application Visibility Report , on page 180.
Application VisibilityReport , on page 180
The Anti-Malware page allows you to view information about malware portsand malware sites that the anti-malware scanning engine(s) detected during thespecified time range. The upper part of the report displays the number ofconnections for each of the top malware ports and web sites. The lower part ofthe report displays malware ports and sites detected. For more information, seethe Anti-Malware Report , on page 182.
Anti-Malware Report , onpage 182
There are three reporting pages showing file reputation and analysis data.
For more information, see the Advanced Malware Protection (File Reputationand File Analysis) Reports , on page 184.
Advanced MalwareProtection (File Reputationand File Analysis) Reports, on page 184
The Client Malware Risk page is a security-related reporting page that can beused to identify individual client computers that may be connecting unusuallyfrequently to malware sites.
For more information, see the Client Malware Risk Report , on page 189.
Client Malware RiskReport , on page 189
Allows you to view reporting onWeb Reputation filtering for transactions duringa specified time range. For more information, see the Web Reputation FiltersReport , on page 190.
Web Reputation FiltersReport , on page 190
Allows you to view information about malware ports and malware sites that theL4 Traffic Monitor detected during the specified time range. For moreinformation, see the L4 Traffic Monitor Report , on page 191.
L4 Traffic Monitor Report, on page 191
Allows you to view data for SOCKS proxy transactions, including destinationsand users.
For more information, see the SOCKS Proxy Report , on page 193.
SOCKS Proxy Report , onpage 193
User Guide for AsyncOS 14.1 for Cisco Secure Email and Web Manager- GD (General Deployment)171
Using Centralized Web Reporting and TrackingWeb Reporting Page Descriptions

ActionWeb Reporting Menu
The Reports by User Location page allows you to find out what activities thatyour mobile users are conducting from their local or remote systems.
For more information, see the Reports by User Location , on page 193.
Reports by User Location, on page 193
The Web Tracking page allows you to search for the following types ofinformation:
• Searching for Transactions Processed by Web Proxy Services , on page231 allows you to track and see basic web-related information such as thetype of web traffic that is being handled by the appliances.
This includes information such as time ranges, and UserID and Client IPaddresses, but also includes information like certain types of URLs, how muchbandwidth that each connection is taking up, or tracking a specific user’s webusage.
• Searching for Transactions Processed by the L4 Traffic Monitor , on page235 allows you to search your L4TM data for sites, ports, and client IPaddresses involved in malware transfer activity.
• Searching for Transactions Processed by the SOCKS Proxy , on page 235allows you to search for transactions processed by the SOCKS proxy.
For more information, see the Web Tracking , on page 231.
Web Tracking , on page231
Allows you to view the overall workload that is sending reporting data to theSecurity Management appliance.
For more information, see the System Capacity Page, on page 194.
System Capacity Page, onpage 194
Allows you to get a glimpse of the impact of the reporting data on the SecurityManagement appliance for each appliance. For more information, see the DataAvailability Page, on page 196.
Data Availability Page, onpage 196
Allows you to schedule reports for a specified time range. For more information,see the About Scheduled and On-Demand Web Reports, on page 222.
Scheduled Reports
Allows you to archive reports for a specified time range. For more information,see the Viewing and Managing Archived Web Reports, on page 228.
Archived Reports
You can schedule reports for most of the web reporting categories, including additional reports for ExtendedTop URL Categories and Top Application Types. For more information on scheduling reports, see the AboutScheduled and On-Demand Web Reports, on page 222.
Note
About Time SpentThe Time Spent column in various tables represents the amount of time a user spent on a web page. Forpurposes of investigating a user, the time spent by the user on each URL category. When tracking a URL, thetime spent by each user on that specific URL.
User Guide for AsyncOS 14.1 for Cisco Secure Email and Web Manager- GD (General Deployment)172
Using Centralized Web Reporting and TrackingAbout Time Spent

Once a transaction event is tagged as ‘viewed’, that is, a user goes to a particular URL, a ‘Time Spent’ valuewill start to be calculated and added as a field in the web reporting table.
To calculate the time spent, AsyncOS assigns each active user with 60 seconds of time for activity during aminute. At the end of the minute, the time spent by each user is evenly distributed among the different domainsthe user visited. For example, if a user goes to four different domains in an active minute, the user is consideredto have spent 15 seconds at each domain.
For the purposes of the time spent value, considering the following notes:
• An active user is defined as a user name or IP address that sends HTTP traffic through the appliance andhas gone to a website that AsyncOS considers to be a “page view.”
• AsyncOS defines a page view as an HTTP request initiated by the user, as opposed to a request initiatedby the client application. AsyncOS uses a heuristic algorithm to make a best effort guess to identify userpage views.
Units are displayed in Hours:Minutes format.
Web Reporting OverviewTheWeb > Reporting > Overview page provides a synopsis of the activity on yourWeb Security appliances.It includes graphs and summary tables for the incoming and outgoing transactions.
At a high level the Overview page shows you statistics about the URL and User usage, Web Proxy activity,and various transaction summaries. The transaction summaries gives you further trending details on, forexample suspect transactions, and right across from this graph, how many of those suspect transactions areblocked and in what manner they are being blocked.
The lower half of the Overview page is about usage. That is, the top URL categories being viewed, the topapplication types and categories that are being blocked, and the top users that are generating these blocks orwarnings.
Table 45: Details on the Web Reporting Overview Page
DescriptionSection
A drop-down list that can range from a day to 90 days or a custom range. For more informationon time ranges and customizing this for your needs, see the Choosing a Time Range forReports , on page 28.
Time Range (drop-down list)
Choose a Web Security appliance for which you want to view Overview data, or choose AllWeb Appliances.
See also Viewing Reporting Data for an Appliance or Reporting Group, on page 27.
View Data for
This section allows you to view the web proxy activity that is being reported by the WebSecurity appliances that are currently managed by the Security Management appliance.
This section displays the actual number of transactions (vertical scale) as well as theapproximate date that the activity occurred (horizontal timeline).
Total Web Proxy Activity
This section allows you to view the percentage of web proxy activity that are suspect, or cleanproxy activity, including the total number of transactions.
Web Proxy Summary
This section reports any L4 traffic that is being reported by the Web Security appliances thatare currently managed by the Security Management appliance.
L4 Traffic Monitor Summary
User Guide for AsyncOS 14.1 for Cisco Secure Email and Web Manager- GD (General Deployment)173
Using Centralized Web Reporting and TrackingWeb Reporting Overview

DescriptionSection
This section allows you to view the web transactions that have been labeled as suspect by theadministrator.
This section displays the actual number of transactions (vertical scale) as well as theapproximate date that the activity occurred (horizontal timeline).
Suspect Transactions
This section allows you to view the percentage of blocked or warned transactions that aresuspect. Additionally you can see the type of transactions that have been detected and blocked,and the actual number of times that this transaction was blocked.
Suspect Transactions Summary
This section displays the top 10 URL categories that are being blocked, including the type ofURL category (vertical scale) and the actual number of times the specific type of categoryhas been blocked (horizontal scale).
The set of predefined URL categories is occasionally updated. For more information aboutthe impact of these updates on report results, see URL Category Set Updates and Reports ,on page 179.
Top URL Categories by TotalTransactions
This section displays the top application types that are being blocked, including the name ofthe actual application type (vertical scale) and the number of times the specific applicationhas been blocked (horizontal scale).
Top Application Types by TotalTransactions
This section displays all Malware categories that have been detected.Top Malware Categories Detected
This section displays the actual users that are generating the blocked or warned transactions.Users can be displayed by IP address or by user name. To make user names unrecognizable,see Anonymizing User Names in Web Reports , on page 168.
Top Users Blocked or WarnedTransactions
Displays the untapped and tapped traffic transactions in a graph format.Web Traffic Tap Status
Displays the summary of the tapped and untapped traffic transactions along with the totaltraffic transactions.
Web Traffic Tap Summary
Displays the tapped HTTP and HTTPS traffic transactions in a graph format.Tapped HTTP/HTTPS Traffic
Displays the summary of HTTP and HTTPS traffic transactions along with the totalHTTP/HTTPS traffic transactions.
Tapped Traffic Summary
Users Report (Web)The Web > Reporting > Users page provides several links that allow you to view web reporting informationfor individual users.
From the Users page you can view how long a user, or users, on your system have spent on the internet, ona particular site or URL, and how much bandwidth that user is using.
From the Users page, you can view the following information pertaining to the users on your system:
User Guide for AsyncOS 14.1 for Cisco Secure Email and Web Manager- GD (General Deployment)174
Using Centralized Web Reporting and TrackingUsers Report (Web)

Table 46: Details on the Web Reporting Users Page
DescriptionSection
A drop-down list that can range from a day to 90 days or a custom range. For more information ontime ranges and customizing this for your needs, see the Choosing a Time Range for Reports , on page28.
TimeRange (drop-down list)
This section lists the top users, by either IP address or user name (vertical scale), and the number oftransactions that have been blocked specific to that user (horizontal scale). The user name or IP addresscan be made unrecognizable for reporting purposes. For more information on how to make user namesunrecognizable in for this page or in scheduled reports, see the section Enabling Centralized WebReporting on the Security Management Appliance , on page 167. The default setting is that all usernames appear. To hide user names, see Anonymizing User Names in Web Reports , on page 168.
Top Users by TransactionsBlocked
This sections displays the top users, by either IP address or user name (vertical scale), that are usingthe most bandwidth on the system (horizontal scale represented in gigabyte usage).
Top Users by BandwidthUsed
You can find a specific User ID or Client IP address. In the text field at the bottom of the User section,enter the specific User ID or Client IP address and click on Find User ID or Client IP Address. TheIP address does not need to be an exact match to return results.
From the Users table you can click on a specific user to findmore specific information. This informationappears on the User Details page. For more information on the User Details page, see the User Details(Web Reporting) , on page 175
Users Table
To view user IDs instead of client IP addresses, you must set up your Security Management appliance toobtain user information from an LDAP server. For information, see Creating the LDAP Server Profile, onpage 364 in chapter Integrating With LDAP, on page 363.
Note
To customize your view of this report, see Working with Web Security Reports, on page 169.Tip
To view an example of how the Users page may be used, see Example 1: Investigating a User , on page 591.
You can generate or schedule a report for the Users page. For information, see the About Scheduled andOn-Demand Web Reports, on page 222.
Note
User Details (Web Reporting)The User Details page allows you to see specific information about a user that you have identified in theinteractive Users table on the Web > Reporting > Users page.
The User Details page allows you to investigate individual user’s activity on your system. This page isparticularly useful if you are running user-level investigations and need to find out, for example, what sitesyour users are visiting, what Malware threats they are encountering, what URL categories they are accessing,and how much time a specific user is spending at these sites.
User Guide for AsyncOS 14.1 for Cisco Secure Email and Web Manager- GD (General Deployment)175
Using Centralized Web Reporting and TrackingUser Details (Web Reporting)

To display the User Details page for a specific user, click on a specific user from the User table on the Web> Users page.
From the User Details page, you can view the following information pertaining to an individual user on yoursystem:
Table 47: Details on the Web Reporting User Details Page
DescriptionSection
A menu that allows you to choose the time range of the data contained in the report. For moreinformation on time ranges and customizing this for your needs, see the Choosing a Time Range forReports , on page 28.
Time Range (drop-down list)
This section lists the specific URL Categories that a specific user is using.
The set of predefined URL categories is occasionally updated. For more information about the impactof these updates on report results, see URL Category Set Updates and Reports , on page 179.
URL Categories by TotalTransactions
This graph displays at what times the user accessed the web.
For example, this graph will indicate if there is a large spike in web traffic during certain hours of theday, and when those spikes occur. Using the Time Range drop-down list, you can expand this graphto see a more or less granular span of time that this user was on the web.
Trend by Total Transactions
The URL Categories Matched section shows matched categories for both completed and blockedtransactions.
From this section you can also find a specific URL Category. In the text field at the bottom of thesection enter the URL Category and click Find URL Category. The category does not need to be anexact match.
The set of predefined URL categories is occasionally updated. For more information about the impactof these updates on report results, see URL Category Set Updates and Reports , on page 179.
URL Categories Matched
From this section you can find out about a specific Domain or IP address that this user has accessed.You can also see the time spent on those categories, and various other information that you have setfrom the column view. In the text field at the bottom of the section enter the Domain or IP addressand click Find Domain or IP. The domain or IP address does not need to be an exact match.
Domains Matched
From this section you can find a specific application that a specific user is using. For example, if auser is accessing a site that requires use of a lot of Flash video, you will see the application type inthe Application column.
In the text field at the bottom of the section enter the application name and click Find Application.The name of the application does not need to be an exact match.
Applications Matched
From this table you can see the top Malware threats that a specific user is triggering.
You can search for data on a specific malware threat name in the Find Malware Threat field. Enterthe Malware Threat name and click Find Malware Threat. The name of the Malware Threat does notneed to be an exact match.
Malware Threats Detected
From this section you can find the policy groups that applied to this user when accessing the web.
In the text field at the bottom of the section enter the policy name and click Find Policy. The nameof the policy does not need to be an exact match.
Policies Matched
User Guide for AsyncOS 14.1 for Cisco Secure Email and Web Manager- GD (General Deployment)176
Using Centralized Web Reporting and TrackingUser Details (Web Reporting)

From Client Malware Risk Details table: The client reports sometimes show a user with an asterisk (*) at theend of the user name. For example, the Client report might show an entry for both “jsmith” and “jsmith*”.User names listed with an asterisk (*) indicate the user name provided by the user, but not confirmed by theauthentication server. This happens when the authentication server was not available at the time and theappliance is configured to permit traffic when authentication service is unavailable.
Note
To view an example of how the User Details page may be used, see Example 1: Investigating a User , on page591.
User Count Report (Web)The Web >Reporting > User Count page displays the aggregated information about the total number ofauthenticated and unauthenticated users of the Web Security appliances with Centralized Reporting enabled.The page lists the unique user count for the last 30 days, 90 days, and 180 days.
System hourly computes the total user count of authenticted and unauthenticated users.Note
Web Sites ReportThe Web > Reporting > Web Sites page is an overall aggregation of the activity that is happening on themanaged appliances. From this page you can monitor high-risk web sites accessed during a specific timerange.
From the Web Sitespage, you can view the following information:
Table 48: Details on the Web Reporting Web Sites Page
DescriptionSection
A drop-down list that can range from a day to 90 days or a custom range. For more information ontime ranges and customizing this for your needs, see the Choosing a Time Range for Reports , onpage 28.
Time Range (drop-down list)
This section lists the top domains that are being visited on the site in a graph format.Top Domains by TotalTransactions
This section lists the top domains that triggered a block action to occur per transaction in a graphformat. For example, a user went to a certain domain and because of a specific policy that I havein place, this triggered a block action. This domain is listed in this graph as a transaction blocked,and the domain site that triggered the block action is listed.
Top Domains by TransactionsBlocked
User Guide for AsyncOS 14.1 for Cisco Secure Email and Web Manager- GD (General Deployment)177
Using Centralized Web Reporting and TrackingUser Count Report (Web)

DescriptionSection
This section lists the domains that are that are being visited on the site in an interactive table. Fromthis table you can access more granular information about a specific domain by clicking on thespecific domain. The Proxy Services tab on theWeb Tracking page appears and you can see trackinginformation and why certain domains were blocked.
When you click on a specific domain you can see the top users of that domain, the top transactionson that domain, the URL Categories matched and the Malware threats that have been detected.
To view an example of how Web Tracking may be used, see Example 2: Tracking a URL, on page593.
If you export this data to a .csv file, only the first 300,000 entries are exported.Note
Domains Matched
To customize your view of this report, see Working with Web Security Reports, on page 169.Tip
You can generate or schedule a report for information on the Web Sites page. For information, see the AboutScheduled and On-Demand Web Reports, on page 222.
Note
URL Categories ReportThe Web > Reporting > URL Categories page can be used to view the URL categories of sites that userson your system are visiting.
From the URL Categories page, you can view the following information:
Table 49: Details on the Web Reporting URL Categories Page
DescriptionSection
Choose the time range for your report. For more information, see the Choosing a TimeRange for Reports , on page 28.
Time Range (drop-down list)
This section lists the top URL Categories that are being visited on the site in a graphformat.
Top URL Categories by TotalTransactions
This section lists the top URL that triggered a block or warning action to occur pertransaction in a graph format. For example, a user went to a certain URL and because ofa specific policy that is in place, this triggered a block action or a warning. This URLthen gets listed in this graph as a transaction blocked or warning.
Top URL Categories by Blocked andWarned Transactions
The URL Categories Matched section shows the disposition of transactions by URLcategory during the specified time range, plus bandwidth used and time spent in eachcategory.
If there are a large number of unclassified URLs, see Reducing Uncategorized URLs ,on page 179.
URL Categories Matched
User Guide for AsyncOS 14.1 for Cisco Secure Email and Web Manager- GD (General Deployment)178
Using Centralized Web Reporting and TrackingURL Categories Report

DescriptionSection
Represents policy, port, and admin user agent blocking that occurs before URL filtering.URL Filtering Bypassed
To customize your view of this report, see Working with Web Security Reports, on page 169.Tip
To generate a more detailed report than this page can provide, see Top URL Categories—Extended, on page225.
Note
• If Data Availability is used within a scheduled report for URL Categories, and there are gaps in data forany of the appliances, the following message is displayed at the bottom of the page: “ Some data in thistime range was unavailable.” If there are no gaps present, nothing appears.
Reducing Uncategorized URLsIf the percentage of uncategorized URLs is higher than 15-20%, consider the following options:
• For specific localized URLs, you can create custom URL categories and apply them to specific users orgroup policies. These transactions will then be included in “URL Filtering Bypassed” statistics instead.To do this, see information about custom URL categories AsyncOS for Cisco Web Security Appliances User Guide.
• For sites that you feel should be included in existing or other categories, see Reporting Misclassified andUncategorized URLs , on page 180.
URL Category Set Updates and ReportsThe set of predefined URL categories may periodically be updated on your Security Management appliance,as described in Preparing For and Managing URL Category Set Updates , on page 351.
When these updates occur, data for old categories will continue to appear in reports and web tracking resultsuntil the data is too old to be included. Report data generated after a category set update will use the newcategories, so you may see both old and new categories in the same report.
If there is overlap between the contents of old and new categories, you may need to examine report resultsmore carefully to obtain valid statistics. For example, if the “Instant Messaging” and “Web-based Chat”categories have been merged into a single “Chat and Instant Messaging” category during the time frame thatyou are looking at, visits before the merge to sites covered by the “Instant Messaging” and “Web-based Chat”categories are not counted in the total for “Chat and Instant Messaging”. Likewise, visits to instant messagingor Web-based chat sites after the merge would not be included in the totals for the “Instant Messaging” or“Web-based Chat” categories.
Using The URL Categories Page in Conjunction with Other Reporting PagesThe URL Categories page can be used in conjunction with the Application Visibility Page, on page 201 andthe Users Page, on page 209 to investigate a particular user and the types of applications or websites that aparticular user is trying to access.
User Guide for AsyncOS 14.1 for Cisco Secure Email and Web Manager- GD (General Deployment)179
Using Centralized Web Reporting and TrackingReducing Uncategorized URLs

For example, from the URL Categories Page, on page 206 you can generate a high level report for HumanResources which details all the URL categories that are visited by the site. From the same page, you can gatherfurther details in the URLCategories interactive table about the URL category ‘StreamingMedia’. By clickingon the Streaming Media category link, you can view the specific URL Categories report page. This page notonly displays the top users that are visiting streaming media sites (in the Top Users by Category for TotalTransactions section), but also displays the domains that are visited (in the DomainsMatched interactive table)such as YouTube.com or QuickPlay.com.
At this point, you are getting more and more granular information for a particular user. Now, let’s say thisparticular user stands out because of their usage, and you want to find out exactly what they are accessing.From here you can click on the user in the Users interactive table. This action takes you to the Users Page,on page 209, where you can view the user trends for that user, and find out exactly what they have been doingon the web.
If you wanted to go further, you can now get down to web tracking details by clicking on TransactionsCompleted link in the interactive table. This displays the Searching for Transactions Processed byWeb ProxyServices , on page 231 on the Web Tracking page where you can see the actual details about what dates theuser accessed the sites, the full URL, the time spent on that URL, etc.
To view another example of how the URL Categories page may be used, see Example 3: Investigating TopURL Categories Visited, on page 593.
Reporting Misclassified and Uncategorized URLsYou can report misclassified and uncategorized URLs at the following URL:
https://talosintelligence.com/tickets.
Submissions are evaluated for inclusion in subsequent rule updates.
To check the status of submitted URLs, click the Status on Submitted URLs tab on this page.
Application Visibility Report
For detailed information on Application Visibility, see the ‘Understanding Application Visibility and Control’chapter in AsyncOS for Cisco Web Security Appliances User Guide.
Note
The Web > Reporting > Application Visibility page allows you to apply controls to particular applicationtypes within the Security Management appliance and Web Security appliance.
Not only does application control gives you more granular control over web traffic than just URL filtering,for example, it gives you more control over the following types of applications, and application types:
• Evasive applications, such as anonymizers and encrypted tunnels.• Collaboration applications, such as Cisco WebEx, Facebook, and instant messaging.• Resource intensive applications, such as streaming media.
Understanding the Difference between Application versus Application TypesIt is crucial to understand the difference between an application and an application types so that you cancontrol the applications involved for your reports.
User Guide for AsyncOS 14.1 for Cisco Secure Email and Web Manager- GD (General Deployment)180
Using Centralized Web Reporting and TrackingReporting Misclassified and Uncategorized URLs

• Application Types. A category that contains one or more applications. For example, search engines isan application type that may contain search engines such as Google Search and Craigslist. Instantmessaging is another application type category which may contain Yahoo Instant Messenger, or CiscoWebEx. Facebook is also an application type.
• Applications. Particular applications that belong in an application type. For example, YouTube is anapplication in the Media application type.
• Application behaviors. Particular actions or behaviors that users can accomplish within an application.For example, users can transfer files while using an application, such as Yahoo Messenger. Not allapplications include application behaviors you can configure.
For detailed information on understanding how you can use Application Visibility and Control (AVC) engineto control Facebook activity, see the ‘Understanding Application Visibility and Control’ chapter in AsyncOSfor Cisco Web Security Appliances User Guide.
Note
From the Application Visibility page, you can view the following information:
Table 50: Details on the Web Reporting Application Visibility Page
DescriptionSection
A drop-down list that can range from a day to 90 days or a custom range. For more information ontime ranges and customizing this for your needs, see the Choosing a Time Range for Reports , onpage 28.
Time Range (drop-down list)
This section lists the top application types that are being visited on the site in a graph format. Forexample, instant messaging tools such as Yahoo Instant Messenger, Facebook, and Presentationapplication types.
Top Application Types byTotal Transactions
This section lists the top application types that triggered a block action to occur per transaction ina graph format. For example, a user has tried to start a certain application type, for example GoogleTalk or Yahoo Instant Messenger, and because of a specific policy that is in place, this triggered ablock action. This application then gets listed in this graph as a transaction blocked or warning.
Top Applications by BlockedTransactions
The Application Types Matched interactive table allows you to view granular details about theapplication types listed in the Top Applications Type by Total Transactions table. From theApplications column you can click on an application to view details
Application Types Matched
The Applications Matched section shows all the application during a specified time range. This isan interactive table with interactive column headings that you can use to sort data as you need.
You can configure the columns that you want to appear in the Applications Matched section. Forinformation on configuring columns for this section, see the Working with Web Security Reports,on page 169.
After you have selected the specific items to appear in the Applications table, you can select howmany items you want to be displayed from the Items Displayed drop-down menu. Choices are: 10,20, 50, or 100.
Additionally, you can find a specific Application within the Application Matched section. In thetext field at the bottom of this section, enter the specific Application name and clickFind Application.
Applications Matched
User Guide for AsyncOS 14.1 for Cisco Secure Email and Web Manager- GD (General Deployment)181
Using Centralized Web Reporting and TrackingUnderstanding the Difference between Application versus Application Types

To customize your view of this report, see Working with Web Security Reports, on page 169.Tip
You can generate a scheduled report for information on the Application Visibility page. For information onscheduling a report, see the About Scheduled and On-Demand Web Reports, on page 222.
Note
Anti-Malware ReportThe Web > Reporting > Anti-Malware page is a security-related reporting page that reflects the results ofscanning by your enabled scanning engines (Webroot, Sophos, McAfee, and/or Adaptive Scanning).
Use this page to help identify and monitor web-based malware threats.
To view data for malware found by L4 Traffic Monitoring, see L4 Traffic Monitor Report , on page 191.Note
From the Anti-Malware page, you can view the following information:
Table 51: Details on the Web Reporting Anti-Malware Page
DescriptionSection
A drop-down list that can range from a day to 90 days or a custom range. For more informationon time ranges and customizing this for your needs, see the Choosing a Time Range for Reports, on page 28.
Time Range (drop-down list)
This section displays the top malware categories that are detected by a given category type. Thisinformation is displayed in graph format. See Malware Category Descriptions, on page 183 formore information on valid Malware categories.
Top Malware Categories:Monitored or Blocked
This section displays the top malware threats. This information is displayed in graph format.TopMalware Threats: Monitoredor Blocked
The Malware Categories interactive table shows detailed information about particular malwarecategories that are displayed in the Top Malware Categories chart.
Clicking on any of the links in the Malware Categories interactive table allows you to view moregranular details about individual malware categories and where they are on the network.
Exception: an Outbreak Heuristics link in the table lets you view a chart showingwhen transactionsin this category occurred.
See Malware Category Descriptions, on page 183 for more information on valid Malwarecategories.
Malware Categories
The Malware Threats interactive table shows detailed information about particular malwarethreats that are displayed in the Top Malware Threats section.
Threats labeled “Outbreak” with a number are threats identified by the Adaptive Scanning featureindependently of other scanning engines.
Malware Threats
User Guide for AsyncOS 14.1 for Cisco Secure Email and Web Manager- GD (General Deployment)182
Using Centralized Web Reporting and TrackingAnti-Malware Report

To customize your view of this report, see Working with Web Security Reports, on page 169.Tip
Malware Category ReportTheMalware Category Report page allows you to view detailed information on an individualMalware Categoryand what it is doing on your network.
To access the Malware Category report page, perform the following:
Step 1 On the Security Management appliance, choose Web from the dropdown list.Step 2 Choose Monitoring > Anti-Malware page.Step 3 In the Malware Categories interactive table, click on a category in the Malware Category column.Step 4 To customize your view of this report, see Working with Web Security Reports, on page 169.
Malware Threat ReportThe Malware Threat Report page shows clients at risk for a particular threat, displays a list of potentiallyinfected clients, and links to the Client Detail page. The trend graph at the top of the report shows monitoredand blocked transactions for a threat during the specified time range. The table at the bottom shows the actualnumber of monitored and blocked transactions for a threat during the specified time range.
To view this report, click a category in the Malware Category column of the Anti-Malware report page.
For additional information, click the Support Portal Malware Details link below the table.
Malware Category DescriptionsThe Web Security Appliance can block the following types of malware:
DescriptionMalware Type
Adware encompasses all software executables and plug-ins that direct users towardsproducts for sale. Some adware applications have separate processes that runconcurrently and monitor each other, ensuring that the modifications are permanent.Some variants enable themselves to run each time the machine is started. Theseprograms may also change security settings making it impossible for users to makechanges to their browser search options, desktop, and other system settings.
Adware
A browser helper object is browser plug-in that may perform a variety of functionsrelated to serving advertisements or hijacking user settings.
Browser Helper Object
A commercial system monitor is a piece of software with system monitorcharacteristics that can be obtained with a legitimate license through legal means.
Commercial SystemMonitor
A dialer is a program that utilizes your modem or another type of Internet accessto connect you to a phone line or a site that causes you to accrue long distancecharges to which you did not provide your full, meaningful, and informed consent.
Dialer
User Guide for AsyncOS 14.1 for Cisco Secure Email and Web Manager- GD (General Deployment)183
Using Centralized Web Reporting and TrackingMalware Category Report

DescriptionMalware Type
Spyware is a type of malware installed on computers that collects small pieces ofinformation about users without their knowledge.
Generic Spyware
A hijacker modifies system settings or any unwanted changes to a user’s systemthat may direct them to a website or run a programwithout a user’s full, meaningful,and informed consent.
Hijacker
This category is used to catch all other malware and suspicious behavior that doesnot exactly fit in one of the other defined categories.
Other Malware
This category represents malware found by Adaptive Scanning independently ofthe other anti-malware engines.
Outbreak Heuristics
A phishing URL is displayed in the browser address bar. In some cases, it involvesthe use of domain names and resembles those of legitimate domains. Phishing is aform of online identity theft that employs both social engineering and technicalsubterfuge to steal personal identity data and financial account credentials.
Phishing URL
Potentially Unwanted Application. A PUA is an application that is not malicious,but which may be considered to be undesirable.
PUA
A system monitor encompasses any software that performs one of the followingactions:
Overtly or covertly records system processes and/or user action.
Makes those records available for retrieval and review at a later time.
System Monitor
A trojan downloader is a Trojan that, after installation, contacts a remote host/siteand installs packages or affiliates from the remote host. These installations usuallyoccur without the user’s knowledge. Additionally, a Trojan Downloader’s payloadmay differ from installation to installation since it obtains downloading instructionsfrom the remote host/site.
Trojan Downloader
A trojan horse is a destructive program that masquerades as a benign application.Unlike viruses, Trojan horses do not replicate themselves.
Trojan Horse
A trojan phisher may sit on an infected computer waiting for a specific web pageto be visited or may scan the infected machine looking for user names andpassphrases for bank sites, auction sites, or online payment sites.
Trojan Phisher
A virus is a program or piece of code that is loaded onto your computer withoutyour knowledge and runs against your wishes.
Virus
A worm is program or algorithm that replicates itself over a computer network andusually performs malicious actions.
Worm
Advanced Malware Protection (File Reputation and File Analysis) Reports• Requirements for File Analysis Report Details , on page 185• Identifying Files by SHA-256 Hash , on page 186
User Guide for AsyncOS 14.1 for Cisco Secure Email and Web Manager- GD (General Deployment)184
Using Centralized Web Reporting and TrackingAdvanced Malware Protection (File Reputation and File Analysis) Reports

• Advanced Malware Protection (File Reputation and File Analysis) Report Pages , on page 187• Viewing File Reputation Filtering Data in Other Reports , on page 188• About Web Tracking and Advanced Malware Protection Features , on page 242
Requirements for File Analysis Report Details• (Cloud File Analysis) Ensure That the Management Appliance Can Reach the File Analysis Server , onpage 185
• (Cloud File Analysis) Configure the Management Appliance to Display Detailed File Analysis Results, on page 185
• (On-Premises File Analysis) Activate the File Analysis Account , on page 186
• Additional Requirements , on page 186
(Cloud File Analysis) Ensure That the Management Appliance Can Reach the File Analysis Server
In order to obtain File Analysis report details, the appliance must be able to connect to the File Analysis serverover port 443. See details in Firewall Information, on page 587.
If your Cisco Content Security Management appliance does not have a direct connection to the internet,configure a proxy server for this traffic (See Upgrade and Update Settings, on page 464.) If you have alreadyconfigured the appliance to use a proxy to obtain upgrades and service updates, the existing settings are used.
If you use an HTTPS proxy, the proxy must not decrypt the traffic; use a pass-through mechanism forcommunications with the File Analysis server. The proxy server must trust the certificate from the Fire Analysisserver, but need not provide its own certificate to the File Analysis server.
(Cloud File Analysis) Configure the Management Appliance to Display Detailed File Analysis Results
In order to allow all content security appliances in your organization to display detailed results in the cloudabout files sent for analysis from any Cisco Email Security appliance or Cisco Web Security appliance inyour organization, you need to join all appliances to the same appliance group.
Step 1 [New Web Interface Only] On the Security Management appliance, click to load the legacy web interface.Step 2 Select Management Appliance > Centralized Services > Security Appliances.Step 3 Scroll to the File Analysis section.Step 4 If your managed appliances are pointed at different File Analysis cloud servers, select the server from which to display
result details.
Result details will not be available for files processed by any other cloud server.
Step 5 Enter the Analysis Group ID.
• If you enter the Group ID incorrectly or need to change it for any other reason, you must open a case with CiscoTAC.
• This change takes effect immediately; it does not require a Commit.
• It is suggested to use your CCOID for this value.
• This value is case-sensitive.
User Guide for AsyncOS 14.1 for Cisco Secure Email and Web Manager- GD (General Deployment)185
Using Centralized Web Reporting and TrackingRequirements for File Analysis Report Details

• This value must be identical on all appliances that will share data about files that are uploaded for analysis.
• An appliance can belong to only one group.
• You can add a machine to a group at any time, but you can do it only once.
Step 6 Click Group Now.Step 7 Configure the same group on each Web Security appliance that will share data with this appliance.
What to do next
Related Topics
For Which Files Are Detailed File Analysis Results Visible in the Cloud? , on page 188
(On-Premises File Analysis) Activate the File Analysis Account
If you have deployed an on-premises (private cloud) Cisco AMP Threat Grid Appliance, you must activatethe File Analysis account for your Cisco Content Security Management appliance in order to view reportdetails available on the Threat Grid appliance. You generally only need to do this once.
Before you begin
Ensure that you are receiving System alerts at Critical level.
Step 1 The first time you attempt to access File Analysis report details from the Threat Grid appliance, wait a few minutes andyou will receive an alert that includes a link.
If you do not receive this alert, click on the icon to load the legacy web interface and chooseManagement Appliance> System Administration > Alerts and click View Top Alerts.
Step 2 Click the link in the alert message.Step 3 If necessary, sign in to your Cisco AMP Threat Grid Appliance.Step 4 Activate your management appliance account.
Additional Requirements
For any additional requirements, see the Release Notes for your Security Management appliance release,available from http://www.cisco.com/c/en/us/support/security/content-security-management-appliance/products-release-notes-list.html
Identifying Files by SHA-256 HashBecause filenames can easily be changed, the appliance generates an identifier for each file using a SecureHash Algorithm (SHA-256). If an appliance processes the same file with different names, all instances arerecognized as the same SHA-256. If multiple appliances process the same file, all instances of the file havethe same SHA-256 identifier.
User Guide for AsyncOS 14.1 for Cisco Secure Email and Web Manager- GD (General Deployment)186
Using Centralized Web Reporting and Tracking(On-Premises File Analysis) Activate the File Analysis Account

In most reports, files are listed by their SHA-256 value (in an abbreviated format). To identify the filenamesassociated with a malware instance in your organization, select Advanced Malware Protection report pageand click an SHA-256 link in the table. The details page shows associated filenames.
Advanced Malware Protection (File Reputation and File Analysis) Report Pages
DescriptionReport
Shows file-based threats that were identified by the file reputation service.
To see the users who tried to access each SHA, and the filenames associated with that SHA-256,click a SHA-256 in the table.
Clicking the link at the bottom ofMalware Threat File Details report page displays all instancesof the file in Web Tracking that were encountered within the maximum available time range,regardless of the time range selected for the report.
For files with changed verdicts, see the AMP Verdict updates report. Those verdicts are notreflected in the Advanced Malware Protection report.
If a file extracted from a compressed or archived file is malicious, only the SHA value of thecompressed or archived file is included in the Advanced Malware Protection report.
The Malware Files by Category section shows the percentage of blocked listed file SHAsreceived from the AMP for Endpoints console that are categorised as Custom Detection
The threat name of a blocked listed file SHA obtained from AMP for Endpoints console isdisplayed as Simple Custom Detection in the Malware Threat Files section of the report.
To view the file trajectory details of a blocked listed file SHA in the AMP for Endpointsconsole, perform the following steps:
1. Choose Reporting > Advanced Malware Protection.
2. Click on the file SHA link for which you want to view the trajectory details.
3. Click on the AMP Console link in the More Details section.
AdvancedMalwareProtection
Displays the time and verdict (or interim verdict) for each file sent for analysis. The appliancechecks for analysis results every 30 minutes.
To view more than 1000 File Analysis results, export the data as a .csv file.
For deployments with an on-premises Cisco AMP Threat Grid Appliance: Files that areincluded in the allowed list on the Cisco AMP Threat Grid appliance show as "clean." Forinformation about allowed list, see the AMP Threat Grid online help.
Drill down to view detailed analysis results, including the threat characteristics and score foreach file.
You can also view additional details about an SHA directly on the server that performed theanalysis by searching for the SHA or by clicking the Cisco AMP Threat Grid link at the bottomof the file analysis details page.
To view details on the server that analyzed a file, see Requirements for File Analysis ReportDetails , on page 185.
If a file extracted from a compressed or archived file is sent for analysis, only the SHA valueof the extracted file is included in the File Analysis report.
File Analysis
User Guide for AsyncOS 14.1 for Cisco Secure Email and Web Manager- GD (General Deployment)187
Using Centralized Web Reporting and TrackingAdvanced Malware Protection (File Reputation and File Analysis) Report Pages

DescriptionReport
Lists the files processed by this appliance for which the verdict has changed since thetransaction was processed. For more information about this situation, see the documentationfor your Web Security appliance.
To view more than 1000 verdict updates, export the data as a .csv file.
In the case of multiple verdict changes for a single SHA-256, this report shows only the latestverdict, not the verdict history.
If multiple Web Security appliances have different verdict updates for the same file, the resultwith the latest time stamp is displayed.
Clicking an SHA-256 link displays web tracking results for all transactions that included thisSHA-256 within the maximum available time range, regardless of the time range selected forthe report.
To view all affected transactions for a particular SHA-256 within the maximum availabletime range (regardless of the time range selected for the report), click the link at the bottomof the Malware Threat Files page.
AMPVerdictUpdates
Viewing File Reputation Filtering Data in Other ReportsData for file reputation and analysis is available in other reports where relevant. A "Blocked by AdvancedMalware Protection" column may be hidden by default in applicable reports. To display additional columns,click the Columns link below the table.
For Which Files Are Detailed File Analysis Results Visible in the Cloud?If you have deployed public-cloud File Analysis, you can view detailed results for all files uploaded from anymanaged appliance that has been added to the appliance group for File Analysis.
If you have added your management appliance to the group, you can view the list of managed appliances inthe group by clicking the button on the Management Appliance > Centralized Services > SecurityAppliancespage.
Appliances in the analysis group are identified by the File Analysis Client ID. To determine this identifier fora particular appliance, look in the following location:
Location of File Analysis Client IDAppliance
Advanced Settings for File Analysis section on the Security Services> File Reputation and Analysis page.
Email Security appliance
Advanced Settings for File Analysis section on the Security Services> Anti-Malware and Reputationpage.
Web Security appliance
At the bottom of the Management Appliance > CentralizedServices > Security Appliances page.
Cisco Content Security Managementappliance
Related Topics
(Cloud File Analysis) Configure the Management Appliance to Display Detailed File Analysis Results , onpage 185
User Guide for AsyncOS 14.1 for Cisco Secure Email and Web Manager- GD (General Deployment)188
Using Centralized Web Reporting and TrackingViewing File Reputation Filtering Data in Other Reports

Client Malware Risk ReportThe Web > Reporting > Client Malware Risk page is a security-related reporting page that can be used tomonitor client malware risk activity.
From the Client Malware Risk page, a system administrator can see which of their users are encountering themost blocks or warnings. Given the information gathered from this page, the administrator can click on theuser link to view what this user doing on the web that makes them run into so many blocks or warnings andsetting off more detections than the rest of the users on the network.
Additionally, the Client Malware Risk page lists client IP addresses involved in frequent malware connections,as identified by the L4 Traffic Monitor (L4TM). A computer that connects frequently to malware sites maybe infected with malware that is trying to connect to a central command and control server and should bedisinfected.
The following table describes the information on the Client Malware Risk page.
Table 52: Client Malware Risk Report Page Components
DescriptionSection
A menu that allows you to choose the time range of the data contained in thereport. For more information, see Choosing a Time Range for Reports , onpage 28.
Time Range (drop-down list)
This chart displays the top ten users that have encountered a malware risk.Web Proxy: Top ClientsMonitored or Blocked
This chart displays the IP addresses of the ten computers in your organizationthat most frequently connect to malware sites.
This chart is the same as the “Top Client IPs” chart on the L4 Traffic MonitorReport , on page 191. See that section for more information and chart options.
L4 Traffic Monitor: MalwareConnections Detected
TheWeb Proxy: Client Malware Risk table shows detailed information aboutparticular clients that are displayed in theWeb Proxy: Top Clients byMalwareRisk section.
You can click each user in this table to view the User Details page associatedwith that client. For information about that page, see the User Details (WebReporting) , on page 175.
Clicking on any of the links in the table allows you to view more granulardetails about individual users and what activity they are performing that istriggering the malware risk. For example, clicking on the link in the “UserID / Client IP Address” column takes you to a User page for that user.
Web Proxy: Client MalwareRisk
This table displays IP addresses of computers in your organization thatfrequently connect to malware sites.
This table is the same as the “Client Source IPs” table on the L4 TrafficMonitor Report , on page 191. For information about working with this table,see that section.
L4 Traffic Monitor: Clientsby Malware Risk
User Guide for AsyncOS 14.1 for Cisco Secure Email and Web Manager- GD (General Deployment)189
Using Centralized Web Reporting and TrackingClient Malware Risk Report

To customize your view of this report, see Working with Web Security Reports, on page 169.Tip
Web Reputation Filters ReportThe Web > Reporting > Web Reputation Filters allows you to view the results of your set Web Reputationfilters for transactions during a specified time range.
What are Web Reputation Filters?Web Reputation Filters analyze web server behavior and assign a reputation score to a URL to determine thelikelihood that it contains URL-based malware. It helps protect against URL-based malware that threatensend-user privacy and sensitive corporate information. TheWeb Security appliance uses URL reputation scoresto identify suspicious activity and stop malware attacks before they occur. You can useWeb Reputation Filterswith both Access and Decryption Policies.
Web Reputation Filters use statistical data to assess the reliability of Internet domains and score the reputationof URLs. Data such as how long a specific domain has been registered, or where a web site is hosted, orwhether a web server is using a dynamic IP address is used to judge the trustworthiness of a given URL.
The web reputation calculation associates a URL with network parameters to determine the probability thatmalware exists. The aggregate probability that malware exists is then mapped to a Web Reputation Scorebetween -10 and +10, with +10 being the least likely to contain malware.
Example parameters include the following:
• URL categorization data• Presence of downloadable code• Presence of long, obfuscated End-User License Agreements (EULAs)• Global volume and changes in volume• Network owner information• History of a URL• Age of a URL• Presence on any block lists• Presence on any allow lists• URL typos of popular domains• Domain registrar information• IP address information
For more information on Web Reputation Filtering, see ‘Web Reputation Filters’ in the IronPort AsyncOSfor Web User Guide.
From the Web Reputation Filterspage, you can view the following information:
Table 53: Details on the Web Reporting Web Reputation Filters Page
DescriptionSection
A drop-down list that can range from a day to 90 days or a custom range. For moreinformation on time ranges and customizing this for your needs, see the Choosing a TimeRange for Reports , on page 28.
Time Range (drop-down list)
User Guide for AsyncOS 14.1 for Cisco Secure Email and Web Manager- GD (General Deployment)190
Using Centralized Web Reporting and TrackingWeb Reputation Filters Report

DescriptionSection
This section, in graph format, displays the total number of web reputation actions (vertical)against the time specified (horizontal timeline). From this you can see potential trendsover time for web reputation actions.
Web Reputation Actions (Trend)
This section displays the web reputation action volume in percentages by transactions.Web Reputation Actions (Volume)
This section displays the types of threats found in transactions that were blocked by WebReputation filtering.
Note: WBRS cannot always identify the threat type.
Web Reputation Threat Types Blockedby WBRS
This section displays the type of threats found in transactions that were not blocked byWeb Reputation filtering.
Reasons these threats might not have been blocked include:
• Not all threats have a score that meets the threshold for blocking. However, otherfeatures of the appliance may catch these threats.
• Policies might be configured to allow threats to pass through.
Note: WBRS cannot always identify the threat type.
Threat Types Detected in OtherTransactions
If Adaptive Scanning is not enabled, this interactive table displays the Web Reputationscores broken down for each action.
Web ReputationActions (Breakdown byScore)
To customize your view of this report, see Working with Web Security Reports, on page 169.Tip
Adjusting Web Reputation SettingsBased on your report results, you may want to adjust the configured web reputation settings, for exampleadjust the threshold scores or enable or disable Adaptive Scanning. For specific information about configuringweb reputation settings, see AsyncOS for Cisco Web Security Appliances User Guide.
L4 Traffic Monitor ReportThe Web > Reporting > L4 Traffic Monitor page displays information about malware ports and malwaresites that the L4 Traffic Monitors on your Web Security appliances have detected during the specified timerange. It also displays IP addresses of clients that frequently encounter malware sites.
The L4 Traffic Monitor listens to network traffic that comes in over all ports on each Web Security applianceand matches domain names and IP addresses against entries in its own database tables to determine whetherto allow incoming and outgoing traffic.
You can use data in this report to determine whether to block a port or a site, or to investigate why a particularclient IP address is connecting unusually frequently to a malware site (for example, this could be because thecomputer associated with that IP address is infected with malware that is trying to connect to a central commandand control server.)
User Guide for AsyncOS 14.1 for Cisco Secure Email and Web Manager- GD (General Deployment)191
Using Centralized Web Reporting and TrackingAdjusting Web Reputation Settings

To customize your view of this report, see Working with Web Security Reports, on page 169.Tip
Table 54: L4 Traffic Monitor Report Page Components
DescriptionSection
Amenu that allows you to choose a time range on which to report. For more information,see Choosing a Time Range for Reports , on page 28.
Time Range(drop-down list)
This section displays, in graph format, the IP addresses of computers in your organizationthat most frequently connect to malware sites.
Click the Chart Options link below the chart to change the display from total MalwareConnections Detected to Malware Connections Monitored or Malware ConnectionsBlocked.
This chart is the same as the “L4 Traffic Monitor: Malware Connections Detected” charton the Client Malware Risk Report , on page 189.
Top Client IPs
This section displays, in graph format, the top malware domains detected by the L4Traffic Monitor.
Click the Chart Options link below the chart to change the display from total MalwareConnections Detected to Malware Connections Monitored or Malware ConnectionsBlocked.
Top MalwareSites
This table displays the IP addresses of computers in your organization that frequentlyconnect to malware sites.
To include only data for a particular port, enter a port number into the box at the bottomof the table and click Filter by Port. You can use this feature to help determine whichports are used by malware that “calls home” to malware sites.
To view details such as the port and destination domain of each connection, click an entryin the table. For example, if one particular client IP address has a high number ofMalwareConnections Blocked, click the number in that column to view a list of each blockedconnection. The list is displayed as search results in the L4 Traffic Monitor tab on theWeb >Reporting >Web Tracking page. For more information about this list, see Searchingfor Transactions Processed by the L4 Traffic Monitor , on page 235.
This table is the same as the “L4 Traffic Monitor - Clients by Malware Risk” table onthe Client Malware Risk Report , on page 189.
Client Source IPs
This table displays the ports on which the L4 TrafficMonitor has most frequently detectedmalware.
To view details, click an entry in the table. For example, click the number of TotalMalware Connections Detected to view details of each connection on that port. The listis displayed as search results in the L4 Traffic Monitor tab on the Web > Reporting >Web Tracking page. For more information about this list, see Searching for TransactionsProcessed by the L4 Traffic Monitor , on page 235.
Malware Ports
User Guide for AsyncOS 14.1 for Cisco Secure Email and Web Manager- GD (General Deployment)192
Using Centralized Web Reporting and TrackingL4 Traffic Monitor Report

DescriptionSection
This table displays the domains on which the L4 Traffic Monitor most frequently detectsmalware.
To include only data for a particular port, enter a port number into the box at the bottomof the table and click Filter by Port. You can use this feature to help determine whetherto block a site or a port.
To view details, click an entry in the table. For example, click the number of MalwareConnections Blocked to view the list of each blocked connection for a particular site.The list is displayed as search results in the L4 TrafficMonitor tab on theWeb > Reporting>Web Tracking page. For more information about this list, see Searching for TransactionsProcessed by the L4 Traffic Monitor , on page 235.
Malware SitesDetected
To customize your view of this report, see Working with Web Security Reports, on page 169.Tip
Related Topics
• Troubleshooting L4 Traffic Monitor Reports , on page 245
SOCKS Proxy ReportThe Web > Reporting > SOCKS ProxyPage allows you to view data and trends for transactions processedthrough the SOCKS proxy, including information about destinations and users.
The destination shown in the report is the address that the SOCKS client (typically a browser) sends to theSOCKS proxy.
Note
To change SOCKS policy settings, see AsyncOS for Cisco Web Security Appliances User Guide.
Related Topics
• Searching for Transactions Processed by the SOCKS Proxy , on page 235
Reports by User LocationThe Web > Reporting > Reports by User Location Page allows you to find out what activities your mobileusers are conducting from their local or remote systems.
Activities include:
• URL Categories that are being accessed by the local and remote users.• Anti-Malware activity that is being triggered by sites the local and remote users are accessing.• Web Reputation of the sites being accessed by the local and remote users.• Applications that are being accessed by the local and remote users.• Users (local and remote).
User Guide for AsyncOS 14.1 for Cisco Secure Email and Web Manager- GD (General Deployment)193
Using Centralized Web Reporting and TrackingSOCKS Proxy Report
• Domains accessed by local and remote users.
From the Reports by User Location page, you can view the following information:
Table 55: Details on the Web Reporting Reports by User Location Page
DescriptionSection
A drop-down list that can range from a day to 90 days or a custom range. For moreinformation on time ranges and customizing this for your needs, see the Choosing aTime Range for Reports , on page 28.
Time Range (drop-down list)
This section displays, in graph format, the activity of your remote users (vertical) overthe specified time (horizontal).
Total Web Proxy Activity: Remote Users
This section displays a summary of the activities of the local and remote users on yoursystem.
Web Proxy Summary
This section displays, in graph format, the activity of your remote users (vertical) overthe specified time (horizontal).
Total Web Proxy Activity: Local Users
This section displays, in graph format, the suspect transactions that have been detecteddue to access policies that you have defined for your remote users (vertical) over thespecified time (horizontal).
Suspect Transactions Detected: RemoteUsers
This section displays a summary of suspected transactions of the remote users on yoursystem.
Suspect Transactions Summary
This section displays, in graph format, the suspect transactions that have been detecteddue to access policies that you have defined for your remote users (vertical) over thespecified time (horizontal).
Suspect Transactions Detected: Local Users
This section displays a summary of suspected transactions of the local users on yoursystem.
Suspect Transactions Summary
From the Reports by User Location page you can generate reports showing the activity of local and remoteusers. This allows you to easily compare local and remote activities of your users.
To customize your view of this report, see Working with Web Security Reports, on page 169.Tip
You can generate a scheduled report for information on the Reports by User Location page. For informationon scheduling a report, see the About Scheduled and On-Demand Web Reports, on page 222.
Note
System Capacity PageThe Web > Reporting > System Capacity page allows you to view the overall workload that is put on theSecurity Management appliance by the Web Security appliances. Most importantly, you can use the SystemCapacity page to track growth over time and plan for system capacity.Monitoring yourWeb Security appliances
User Guide for AsyncOS 14.1 for Cisco Secure Email and Web Manager- GD (General Deployment)194
Using Centralized Web Reporting and TrackingSystem Capacity Page
ensures that the capacity is appropriate to your volumes. Over time, volume inevitably rises and appropriatemonitoring ensures that additional capacity or configuration changes can be applied proactively.
The System Capacity page can be used to determine the following information:
• Identify when Web Security appliances are exceeding recommended CPU capacity; this enables you todetermine when configuration optimization or additional appliances are needed.
• For troubleshooting, identify which parts of the system are using the most resources.• Identify response time and Proxy buffer memory.• Identify the transactions per second, and any connections that are outstanding.
Viewing the System Capacity Report
Step 1 On the Security Management appliance, choose Web > Reporting > System Capacity.Step 2 To view different types of data, click Columns and choose the data to view.Step 3 To see the system capacity for a single appliance, click the appliance in the Web Security appliance column in the
Overview of Averaged Usage and Performance table.
The System Capacity graphs appear for that appliance. The graphs on the page are divided into two sets:
• System Capacity - System Load , on page 195
• System Capacity - Network Load , on page 196
How to Interpret the Data You See on the System Capacity PageWhen choosing time ranges for viewing data on the System Capacity page, the following is important toremember:
• Day Report— The Day report queries the hour table and displays the exact number of queries that havebeen received by the appliance on an hourly basis over a 24 hour period. This information is gatheredfrom the hour table.
• Month Report— TheMonth report queries the day tables for the 30 or 31 days (dependent on the numberof days in the month), giving you an exact report on the number of queries over 30 or 31 days. Again,this is an exact number.
The ‘Maximum’ value indicator on the System Capacity page is the highest value seen for the specified period.The ‘Average’ value is the average of all values for the specified period. The period of aggregation dependson the interval selected for that report. For example, you can choose to see the Average and Maximum valuesfor each day if the chart is for a month period.
If you select Year for the time range for other reports, we recommend that you select the largest time range,90 days.
Note
System Capacity - System LoadThe first four graphs on the System Capacity window show the system load reports. These reports show theoverall CPU usage on the appliances. AsyncOS is optimized to use idle CPU resources to improve transaction
User Guide for AsyncOS 14.1 for Cisco Secure Email and Web Manager- GD (General Deployment)195
Using Centralized Web Reporting and TrackingViewing the System Capacity Report

throughput. High CPU usage may not indicate a system capacity problem. If the high CPU usage is coupledwith consistent, high-volumememory page swapping, you may have a capacity problem. This page also showsa graph that displays the amount of CPU used by different functions, including processing for theWeb Securityappliance reporting. The CPU-by-function graph is an indicator of which areas of the product use the mostresources on your system. If you need to optimize your appliance, this graph can help you determine whichfunctions may need to be tuned or disabled.
Additionally, the Response Time/Latency and Transactions Per Second graphs shows the overall responsetime (in milliseconds), and transactions per second for the date range specified in the Time Range drop-downmenu.
System Capacity - Network LoadThe next graphs on the System Capacity window show the outgoing connections, the bandwidth out, and theproxy buffer memory statistics. You can view the results for a day, week, month, or year. It is important tounderstand the trends of normal volume and spikes in your environment.
The Proxy Buffer Memory may indicate spikes in network traffic during normal operation, but if the graphclimbs steadily to the maximum, the appliance may be reaching its maximum capacity and you should consideradding capacity.
These charts are on the same page as the charts described in System Capacity - System Load , on page 195,below those charts.
Note About Proxy Buffer Memory SwappingThe system is designed to swap proxy buffer memory regularly, so some proxy buffer memory swapping isexpected and is not an indication of problems with your appliance. Unless the system consistently swaps proxybuffer memory in high volumes, proxy buffer memory swapping is normal and expected behavior. If yoursystem runs with extremely high volumes, and consistently swaps proxy buffer memory due to the highvolumes, you may need to add Web Security appliances to your network or tune your configuration to ensuremaximum throughput to improve performance.
Data Availability PageThe Web > Reporting > Data Availability page provides an overview of the date ranges for which reportingand web tracking data are available on the Security Management appliance for each managed Web Securityappliance.
If Web Reporting is disabled, the Security Management appliance will not pull any new data from the WebSecurity appliance, but previously retrieved data is still present on the Security Management appliance.
Note
If the status is different between The Web Reporting ‘From’ and ‘To’ columns, and the Web Reporting andTracking ‘From’ and ‘To’ columns, the most severe consequence appears in the Status column.
For information about purging of data, see the Managing Disk Space , on page 494.
User Guide for AsyncOS 14.1 for Cisco Secure Email and Web Manager- GD (General Deployment)196
Using Centralized Web Reporting and TrackingSystem Capacity - Network Load

If Data Availability is used within a scheduled report for URL Categories, and there are gaps in data for anyof the appliances, the following message is displayed at the bottom of the page: “Some data in this time rangewas unavailable.” If there are no gaps present, nothing appears.
Note
Understanding the Web Reporting Pages on the New WebInterface
The following table lists the reports under the Reports drop-down. available in the latest supported release ofAsyncOS forWeb Security appliances under theReports drop-down of theweb interface. Formore information,see Using the Interactive Report Pages, on page 39. If your Web Security appliances are running earlierreleases of AsyncOS, not all of these reports are available.
Table 56: Web Reports Drop-down Options
ActionReports Drop-down Option
General Reports
The Overview page provides a synopsis of the activity on yourWebSecurity appliances. It includes graphs and summary tables for theincoming and outgoing transactions. For more information, see theOverview Page, on page 199.
Overview Page
The Application Visibility page allows you to apply and view thecontrols that have been applied to a particular application typeswithin the Security Management appliance and Web Securityappliance. For more information, see the Application Visibility Page,on page 201.
Application Visibility Page
Allows you to view information about malware ports and malwaresites that the L4 Traffic Monitor detected during the specified timerange. For more information, see the Layer 4 Traffic Monitor Page,on page 203.
Layer 4 Traffic Monitor Page
Allows you to view data for SOCKS proxy transactions, includingdestinations and users. For more information, see the SOCKS ProxyPage, on page 205.
SOCKS Proxy Page
User Guide for AsyncOS 14.1 for Cisco Secure Email and Web Manager- GD (General Deployment)197
Using Centralized Web Reporting and TrackingUnderstanding the Web Reporting Pages on the New Web Interface

ActionReports Drop-down Option
The URL Categories page allows you to view the top URLCategories that are being visited, including:
• The top URLs that have triggered a block or warning action tooccur per transaction.
• All the URL categories during a specified time range for bothcompleted, warned and blocked transactions. This is aninteractive table with interactive column headings that you canuse to sort data as you need.
For more information, see the URL Categories Page, on page 206.
URL Categories Page
The Users page provides several web tracking links that allow youto view web tracking information for individual users.
From the Users page you can view how long a user, or users, onyour system have spent on the internet, on a particular site or URL,and how much bandwidth that user is using.
From the Users page you can click on an individual user in theinteractive Users table to view more details for that specific user onthe User Details page.
The User Details page allows you to see specific information abouta user that you have identified in the Users table on the Users page.From this page you can investigate individual user’s activity on yoursystem. This page is particularly useful if you are running user-levelinvestigations and need to find out, for example, what sites yourusers are visiting, what Malware threats they are encountering, whatURL categories they are accessing, and how much time a specificuser is spending at these sites.
For more information, see the Users Page, on page 209.
For information on a specific user in your system, see the UserDetails Page (Web Reporting) , on page 210.
Users Page
The Web Sites page allows you to view an overall aggregation ofthe activity that is happening on your managed appliances. Fromthis page you can monitor high-risk web sites accessed during aspecific time range. For more information, see the Web Sites Page,on page 212.
Web Sites Page
The HTTPS Reports report page is an overall aggregation of theHTTP/HTTPS traffic summary (transactions or bandwidth usage)on the managed appliances. For more information, see the HTTPSReports Page, on page 213.
HTTPS Reports
Threat Reports
User Guide for AsyncOS 14.1 for Cisco Secure Email and Web Manager- GD (General Deployment)198
Using Centralized Web Reporting and TrackingUnderstanding the Web Reporting Pages on the New Web Interface

ActionReports Drop-down Option
The Anti-Malware page allows you to view information aboutmalware ports and malware sites that the anti-malware scanningengine(s) detected during the specified time range. The upper partof the report displays the number of connections for each of the topmalware ports and web sites. The lower part of the report displaysmalware ports and sites detected. For more information, see theAnti-Malware Page , on page 214.
Anti-Malware Page
The Client Malware Risk page is a security-related reporting pagethat can be used to identify individual client computers that may beconnecting unusually frequently to malware sites.
For more information, see the ClientMalware Risk Report , on page219.
Client Malware Risk Page
Allows you to view reporting on Web Reputation filtering fortransactions during a specified time range. For more information,see the Web Reputation Filters Page , on page 220.
Web Reputation Filters Page
About Time SpentThe Time Spent column in various tables represents the amount of time a user spent on a web page. Forpurposes of investigating a user, the time spent by the user on each URL category. When tracking a URL, thetime spent by each user on that specific URL.
Once a transaction event is tagged as ‘viewed’, that is, a user goes to a particular URL, a ‘Time Spent’ valuewill start to be calculated and added as a field in the web reporting table.
To calculate the time spent, AsyncOS assigns each active user with 60 seconds of time for activity during aminute. At the end of the minute, the time spent by each user is evenly distributed among the different domainsthe user visited. For example, if a user goes to four different domains in an active minute, the user is consideredto have spent 15 seconds at each domain.
For the purposes of the time spent value, considering the following notes:
• An active user is defined as a user name or IP address that sends HTTP traffic through the appliance andhas gone to a website that AsyncOS considers to be a “page view.”
• AsyncOS defines a page view as an HTTP request initiated by the user, as opposed to a request initiatedby the client application. AsyncOS uses a heuristic algorithm to make a best effort guess to identify userpage views.
Units are displayed in Hours:Minutes format.
Overview PageThe Overview report page provides a synopsis of the activity on your Web Security appliances. It includesgraphs and summary tables for the incoming and outgoing transactions.
To view the Overview report page, select Web from the Product drop-down and choose Monitoring >Overview from the Reports drop-down. For more information, see Using the Interactive Report Pages, onpage 39.
User Guide for AsyncOS 14.1 for Cisco Secure Email and Web Manager- GD (General Deployment)199
Using Centralized Web Reporting and TrackingAbout Time Spent

At a high level the Overview report page shows you statistics about the URL and User usage, Web Proxyactivity, and various transaction summaries. The transaction summaries gives you further trending details on,for example suspect transactions, and right across from this graph, how many of those suspect transactionsare blocked and in what manner they are being blocked.
The lower half of the Overview report page is about usage. That is, the top URL categories being viewed, thetop application types and categories that are being blocked, and the top users that are generating these blocksor warnings.
Table 57: Details on the Overview Page
DescriptionSection
Choose the time range for your report. For more information, see theChoosing a Time Range for Reports , on page 28.
Time Range (drop-down list)
Choose a Web Security appliance for which you want to viewOverview data, or choose All Web Appliances.
See also Viewing Reporting Data for an Appliance or ReportingGroup, on page 27
View Data for (drop-down list)
You can view the web proxy activity that is being reported by theWeb Security appliances that are currently managed by the SecurityManagement appliance.
This section displays the actual number of transactions and theapproximate date that the activity occurred in graphical format.
You can also view the percentage of web proxy activity that aresuspect, or clean proxy activity, including the total number oftransactions.
Total Web Proxy Activity
You can view the web transactions that have been labeled as suspectby the administrator in a graphical format.
This section displays the actual number of transactions and theapproximate date that the activity occurred, in graphical format.
You can also view the percentage of blocked or warned transactionsthat are suspect. Additionally you can see the type of transactionsthat have been detected and blocked, and the actual number of timesthat this transaction was blocked.
Suspect Transactions
You can view any L4 traffic that is being reported by the WebSecurity appliances that are currently managed by the SecurityManagement appliance, in graphical format.
L4 Traffic Monitor Summary
You can view the top URL categories that are being blocked,including the type of URL category and the actual number of timesthe specific type of category has been blocked in graphical format.
The set of predefined URL categories is occasionally updated. Formore information about the impact of these updates on report results,see URL Category Set Updates and Reports , on page 179.
Top URL Categories: TotalTransactions
User Guide for AsyncOS 14.1 for Cisco Secure Email and Web Manager- GD (General Deployment)200
Using Centralized Web Reporting and TrackingOverview Page

DescriptionSection
You can view the top application types that are being blocked,including the name of the actual application type and the number oftimes the specific application has been blocked, in graphical format.
Top Application Types: TotalTransactions
You can view all the Malware categories that have been detected, ingraphical format.
Top Malware Categories: Monitoredor Blocked
You can view the actual users that are generating the blocked orwarned transactions, in graphical format. Users can be displayed byIP address or by user name. To make user names unrecognizable, seeAnonymizing User Names in Web Reports , on page 168.
Top Users: Blocked or WarnedTransactions
Application Visibility Page
For detailed information on Application Visibility, see the ‘Understanding Application Visibility and Control’chapter in User Guide for AsyncOS for Cisco Web Security Appliances.
Note
The Application Visibility report page allows you to apply controls to particular application types within theSecurity Management appliance and Web Security appliance.
To view the Application Visibility report page, selectWeb from the product drop-down and chooseMonitoring> Application Visibility from the Reports drop-down. For more information, see Using the Interactive ReportPages, on page 39.
The application control gives you more granular control over web traffic than just URL filtering, for example,as well as more control over the following types of applications, and application types:
• Evasive applications, such as anonymizers and encrypted tunnels.
• Collaboration applications, such as Cisco WebEx, Facebook, and instant messaging.
• Resource intensive applications, such as streaming media.
Understanding the Difference between Application versus Application Types
It is crucial to understand the difference between an application and an application types so that you cancontrol the applications involved for your reports.
• Application Types. A category that contains one or more applications. For example, search engines isan application type that may contain search engines such as Google Search and Craigslist. Instantmessaging is another application type category which may contain Yahoo Instant Messenger, or CiscoWebEx. Facebook is also an application type.
• Applications. Particular applications that belong in an application type. For example, YouTube is anapplication in the Media application type.
• Application behaviors. Particular actions or behaviors that users can accomplish within an application.For example, users can transfer files while using an application, such as Yahoo Messenger. Not allapplications include application behaviors you can configure.
User Guide for AsyncOS 14.1 for Cisco Secure Email and Web Manager- GD (General Deployment)201
Using Centralized Web Reporting and TrackingApplication Visibility Page

For detailed information on understanding how you can use Application Visibility and Control (AVC) engineto control Facebook activity, see the ‘Understanding Application Visibility and Control’ chapter in User Guidefor AsyncOS for Cisco Web Security Appliances.
Note
From the Application Visibility page, you can view the following information:
Table 58: Details on the Application Visibility Page
DescriptionSection
Choose the time range for your report. For more information, see theChoosing a Time Range for Reports , on page 28.
Time Range (drop-down list)
You can view the top application types that are being visited on thesite in graphical format.
To customize the view of the chart, click on the chart. For moreinformation, see (Web Reports Only) ChoosingWhich Data to Chart,on page 41.
For example, instant messaging tools such as Yahoo InstantMessenger, Facebook, and Presentation application types.
Top Application Types by TotalTransactions
You can view the top application types that triggered a block actionto occur per transaction in graphical format.
To customize the view of the chart, click on the chart. For moreinformation, see (Web Reports Only) ChoosingWhich Data to Chart,on page 41.
For example, a user has tried to start a certain application type, forexample Google Talk or Yahoo Instant Messenger, and because ofa specific policy that is in place, this triggered a block action. Thisapplication then gets listed in this graph as a transaction blocked orwarning.
Top Applications by BlockedTransactions
The Application Types Matched interactive table allows you to viewgranular details about the application types listed in the TopApplications Type by Total Transactions table.
From the Applications column you can click on an application toview details.
Application Types Matched
The ApplicationsMatched interactive table shows all the applicationduring a specified time range.
Additionally, you can find a specific Application within theApplication Matched section. In the text field at the bottom of thissection, enter the specific Application name and click FindApplication.
Applications Matched
User Guide for AsyncOS 14.1 for Cisco Secure Email and Web Manager- GD (General Deployment)202
Using Centralized Web Reporting and TrackingApplication Visibility Page
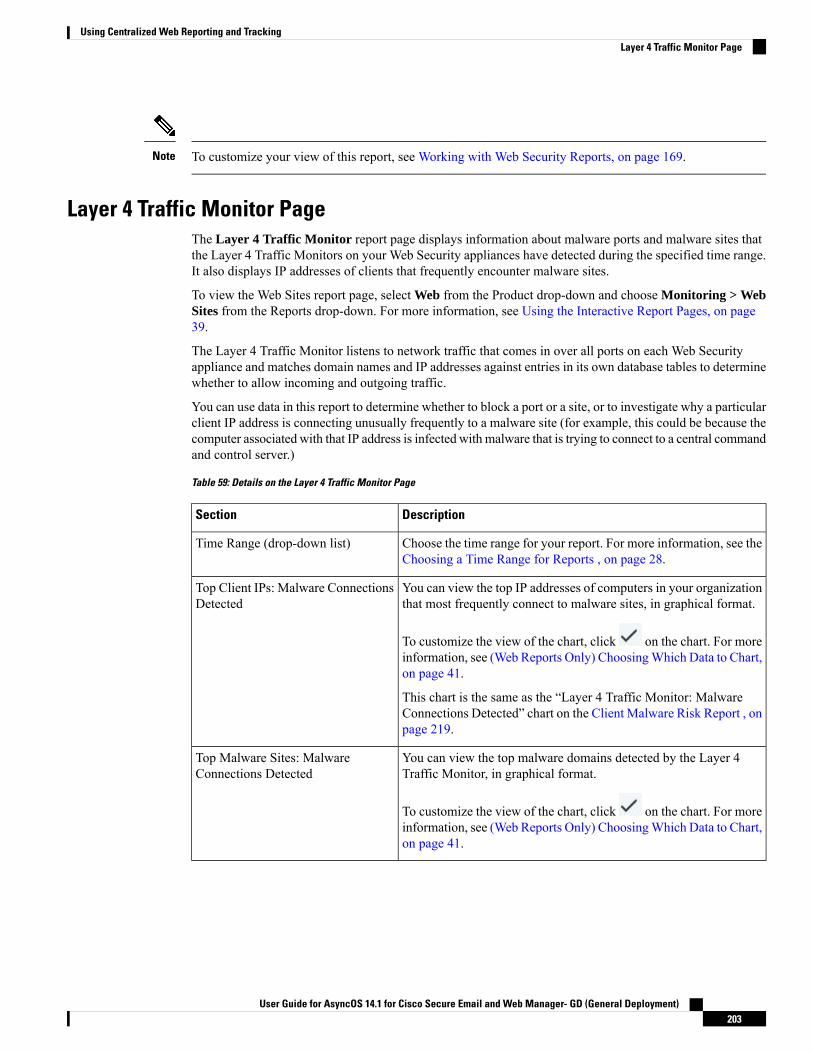
To customize your view of this report, see Working with Web Security Reports, on page 169.Note
Layer 4 Traffic Monitor PageThe Layer 4 Traffic Monitor report page displays information about malware ports and malware sites thatthe Layer 4 Traffic Monitors on your Web Security appliances have detected during the specified time range.It also displays IP addresses of clients that frequently encounter malware sites.
To view the Web Sites report page, select Web from the Product drop-down and choose Monitoring > WebSites from the Reports drop-down. For more information, see Using the Interactive Report Pages, on page39.
The Layer 4 Traffic Monitor listens to network traffic that comes in over all ports on each Web Securityappliance and matches domain names and IP addresses against entries in its own database tables to determinewhether to allow incoming and outgoing traffic.
You can use data in this report to determine whether to block a port or a site, or to investigate why a particularclient IP address is connecting unusually frequently to a malware site (for example, this could be because thecomputer associated with that IP address is infected with malware that is trying to connect to a central commandand control server.)
Table 59: Details on the Layer 4 Traffic Monitor Page
DescriptionSection
Choose the time range for your report. For more information, see theChoosing a Time Range for Reports , on page 28.
Time Range (drop-down list)
You can view the top IP addresses of computers in your organizationthat most frequently connect to malware sites, in graphical format.
To customize the view of the chart, click on the chart. For moreinformation, see (Web Reports Only) ChoosingWhich Data to Chart,on page 41.
This chart is the same as the “Layer 4 Traffic Monitor: MalwareConnections Detected” chart on the Client Malware Risk Report , onpage 219.
Top Client IPs: Malware ConnectionsDetected
You can view the top malware domains detected by the Layer 4Traffic Monitor, in graphical format.
To customize the view of the chart, click on the chart. For moreinformation, see (Web Reports Only) ChoosingWhich Data to Chart,on page 41.
Top Malware Sites: MalwareConnections Detected
User Guide for AsyncOS 14.1 for Cisco Secure Email and Web Manager- GD (General Deployment)203
Using Centralized Web Reporting and TrackingLayer 4 Traffic Monitor Page

DescriptionSection
You can use the this interactive table to view the IP addresses ofcomputers in your organization that frequently connect to malwaresites.
To include only data for a particular port, enter a port number intothe box at the bottom of the table and click Filter by Client IP. Youcan use this feature to help determinewhich ports are used bymalwarethat “calls home” to malware sites.
To view details such as the port and destination domain of eachconnection, click an entry in the table. For example, if one particularclient IP address has a high number ofMalware Connections Blocked,click the number in that column to view a list of each blockedconnection. The list is displayed as search results in the Layer 4Traffic Monitor tab of the Web Tracking Search page. For moreinformation about this list, see Searching for Transactions Processedby the L4 Traffic Monitor , on page 235.
This chart is the same as the “Layer 4 Traffic Monitor: MalwareConnections Detected” chart on the Client Malware Risk Report , onpage 219.
Client Source IPs
You can use the this interactive table to view the ports on which theLayer 4 Traffic Monitor has most frequently detected malware.
To view details, click an entry in the table. For example, click thenumber of Total Malware Connections Detected to view details ofeach connection on that port. The list is displayed as search resultsin the Layer 4 Traffic Monitor tab on the Web Tracking Search page.For more information about this list, see Searching for TransactionsProcessed by the L4 Traffic Monitor , on page 235.
Malware Ports
You can use the this interactive table to view the domains on whichthe Layer 4 Traffic Monitor most frequently detects malware.
To include only data for a particular port, enter a port number intothe box at the bottom of the table and click Filter by Port. You canuse this feature to help determine whether to block a site or a port.
To view details, click an entry in the table. For example, click thenumber of Malware Connections Blocked to view the list of eachblocked connection for a particular site. The list is displayed as searchresults in the Layer 4 TrafficMonitor tab on theWeb Tracking Searchpage. For more information about this list, see Searching forTransactions Processed by the L4 Traffic Monitor , on page 235.
Malware Sites Detected
To customize your view of this report, see Working with Web Security Reports, on page 169.Tip
User Guide for AsyncOS 14.1 for Cisco Secure Email and Web Manager- GD (General Deployment)204
Using Centralized Web Reporting and TrackingLayer 4 Traffic Monitor Page

Related Topics
Troubleshooting L4 Traffic Monitor Reports , on page 245
SOCKS Proxy PageThe SOCKS Proxy report page allows you to view transactions processed through the SOCKS proxy, includinginformation about destinations and users, in a graphical and tabular format.
To view the SOCKS Proxy report page, select Web from the product drop-down and choose Monitoring >SOCKS Proxy from the Reports drop-down. For more information, see Using the Interactive Report Pages,on page 39.
The destination shown in the report is the address that the SOCKS client (typically a browser) sends to theSOCKS proxy.
Note
To change SOCKS policy settings, see User Guide for AsyncOS for Cisco Web Security Appliances.
Table 60: Details on the SOCKS Proxy Page
DescriptionSection
Choose the time range for your report. For more information, seethe Choosing a Time Range for Reports , on page 28.
Time Range (drop-down list)
You can view the top destinations detected by the SOCKS proxy, ingraphical format.
To customize the view of the chart, click on the chart. For moreinformation, see (Web Reports Only) ChoosingWhich Data to Chart,on page 41.
Top Destinations for SOCKS: TotalTransactions
You can view the top users detected by the SOCKS proxy, ingraphical format.
To customize the view of the chart, click on the chart. For moreinformation, see (Web Reports Only) ChoosingWhich Data to Chart,on page 41.
Top Users for SOCKS: MalwareTransactions
You can use the this interactive table to view the list of destinationdomains or IP addresses processed through SOCKS proxy.
To include only data for a particular destination, enter a domain nameor IP address into the box at the bottom of the table and click FindDomain or IP.
Destinations
User Guide for AsyncOS 14.1 for Cisco Secure Email and Web Manager- GD (General Deployment)205
Using Centralized Web Reporting and TrackingSOCKS Proxy Page

DescriptionSection
You can use the this interactive table to view the list of users or IPaddresses processed through SOCKS proxy.
To include only data for a particular user, enter a user name or IPaddress into the box at the bottom of the table and click Find UserID / Client IP Address.
Users
To customize your view of this report, see Working with Web Security Reports, on page 169.Tip
Related Topics
Searching for Transactions Processed by the SOCKS Proxy , on page 235
URL Categories PageThe URL Categories report page can be used to view the URL categories of sites that users on your systemare visiting.
To view the URL Categories report page, select Web from the Product drop-down and choose Monitoring> URL Categories from the Reports drop-down. For more information, see Using the Interactive ReportPages, on page 39.
From the URL Categories page, you can view the following information:
Table 61: Details on the URL Categories Page
DescriptionSection
Choose the time range for your report. For more information, seethe Choosing a Time Range for Reports , on page 28.
Time Range (drop-down list)
You can view the top URL Categories that are being visited on thesite in a graphical format.
To customize the view of the chart, click on the chart. Formore information, see (Web Reports Only) Choosing Which Datato Chart, on page 41.
Top URLCategories: Total Transactions
You can view the top URL that triggered a block or warning actionto occur per transaction in a graphical format. For example, a userwent to a certain URL and because of a specific policy that is inplace, this triggered a block action or a warning. This URL thengets listed in this graph as a transaction blocked or warning.
To customize the view of the chart, click on the chart. Formore information, see (Web Reports Only) Choosing Which Datato Chart, on page 41.
Top URL Categories: Blocked andWarned Transactions
User Guide for AsyncOS 14.1 for Cisco Secure Email and Web Manager- GD (General Deployment)206
Using Centralized Web Reporting and TrackingURL Categories Page

DescriptionSection
You can view the top Youtube Categories that are being visited onthe site in a graphical format.
To customize the view of the chart, click on the chart. Formore information, see (Web Reports Only) Choosing Which Datato Chart , on page 28.
Top Youtube Categories: TotalTransactions
You can view the top Youtube URL that triggered a block orwarning action to occur per transaction in a graphical format. Forexample, a user went to a certain Youtube URL and because of aspecific policy that is in place, this triggered a block action or awarning. This Youtube URL then gets listed in this graph as atransaction blocked or warning.
To customize the view of the chart, click on the chart. Formore information, see (Web Reports Only) Choosing Which Datato Chart , on page 28 .
Top Youtube Categories: Blocked andWarned Transactions
The URL Categories Matched interactive table shows thedisposition of transactions by URL category during the specifiedtime range, plus bandwidth used and time spent in each category.
If there are a large number of unclassified URLs, see ReducingUncategorized URLs , on page 179.
URL Categories Matched
The Youtube Categories Matched interactive table shows thedisposition of transactions by Youtube category during the specifiedtime range, plus bandwidth used and time spent in each category.
To view the Youtube Categories Matched interactive table, chooseWeb > Reporting > URL Categories .
Youtube Categories Matched
To customize your view of this report, see Working with Web Security Reports, on page 169.Tip
Reducing Uncategorized URLsIf the percentage of uncategorized URLs is higher than 15-20%, consider the following options:
• For specific localized URLs, you can create custom URL categories and apply them to specific users orgroup policies. These transactions will then be included in “URL Filtering Bypassed” statistics instead.To do this, see information about custom URL categories AsyncOS for Cisco Web Security Appliances User Guide.
• For sites that you feel should be included in existing or other categories, see Reporting Misclassified andUncategorized URLs , on page 180.
User Guide for AsyncOS 14.1 for Cisco Secure Email and Web Manager- GD (General Deployment)207
Using Centralized Web Reporting and TrackingReducing Uncategorized URLs

URL Category Set Updates and ReportsThe set of predefined URL categories may periodically be updated on your Security Management appliance,as described in Preparing For and Managing URL Category Set Updates , on page 351.
When these updates occur, data for old categories will continue to appear in reports and web tracking resultsuntil the data is too old to be included. Report data generated after a category set update will use the newcategories, so you may see both old and new categories in the same report.
If there is overlap between the contents of old and new categories, you may need to examine report resultsmore carefully to obtain valid statistics. For example, if the “Instant Messaging” and “Web-based Chat”categories have been merged into a single “Chat and Instant Messaging” category during the time frame thatyou are looking at, visits before the merge to sites covered by the “Instant Messaging” and “Web-based Chat”categories are not counted in the total for “Chat and Instant Messaging”. Likewise, visits to instant messagingor Web-based chat sites after the merge would not be included in the totals for the “Instant Messaging” or“Web-based Chat” categories.
Using The URL Categories Page in Conjunction with Other Reporting PagesThe URL Categories page can be used in conjunction with the Application Visibility Page, on page 201 andthe Users Page, on page 209 to investigate a particular user and the types of applications or websites that aparticular user is trying to access.
For example, from the URL Categories Page, on page 206 you can generate a high level report for HumanResources which details all the URL categories that are visited by the site. From the same page, you can gatherfurther details in the URLCategories interactive table about the URL category ‘StreamingMedia’. By clickingon the Streaming Media category link, you can view the specific URL Categories report page. This page notonly displays the top users that are visiting streaming media sites (in the Top Users by Category for TotalTransactions section), but also displays the domains that are visited (in the DomainsMatched interactive table)such as YouTube.com or QuickPlay.com.
At this point, you are getting more and more granular information for a particular user. Now, let’s say thisparticular user stands out because of their usage, and you want to find out exactly what they are accessing.From here you can click on the user in the Users interactive table. This action takes you to the Users Page,on page 209, where you can view the user trends for that user, and find out exactly what they have been doingon the web.
If you wanted to go further, you can now get down to web tracking details by clicking on TransactionsCompleted link in the interactive table. This displays the Searching for Transactions Processed byWeb ProxyServices , on page 231 on the Web Tracking page where you can see the actual details about what dates theuser accessed the sites, the full URL, the time spent on that URL, etc.
To view another example of how the URL Categories page may be used, see Example 3: Investigating TopURL Categories Visited, on page 593.
Reporting Misclassified and Uncategorized URLsYou can report misclassified and uncategorized URLs at the following URL:
https://talosintelligence.com/tickets.
Submissions are evaluated for inclusion in subsequent rule updates.
To check the status of submitted URLs, click the Status on Submitted URLs tab on this page.
User Guide for AsyncOS 14.1 for Cisco Secure Email and Web Manager- GD (General Deployment)208
Using Centralized Web Reporting and TrackingURL Category Set Updates and Reports

Users PageThe Users report page provides several links that allow you to view web reporting information for individualusers.
To view the Users report page, select Web from the Product drop-down and choose Monitoring > Usersfrom the Reports drop-down. For more information, see Using the Interactive Report Pages, on page 39.
From the Users page you can view how long a user, or users, on your system have spent on the internet, ona particular site or URL, and how much bandwidth that user is using.
The maximum number of users on the Web Security appliance that the Security Management appliance cansupport is 500.
Note
From the Users page, you can view the following information pertaining to the users on your system:
Table 62: Details on the Users Page
DescriptionSection
Choose the time range for your report. For more information, seethe Choosing a Time Range for Reports , on page 28.
Time Range (drop-down list)
You can view the top users, by either IP address or user name, andthe number of transactions that have been blocked specific to thatuser, in graphical format. The user name or IP address can be madeunrecognizable for reporting purposes. For more information onhow to make user names unrecognizable in for this page or inscheduled reports, see the Enabling Centralized Web Reporting onthe Security Management Appliance , on page 167. The defaultsetting is that all user names appear. To hide user names, seeAnonymizing User Names in Web Reports , on page 168.
To customize the view of the chart, click on the chart. For moreinformation, see (WebReports Only) ChoosingWhichData to Chart,on page 41.
Top Users: Transactions Blocked
You can view the top users, by either IP address or user name, thatare using the most bandwidth on the system, in graphical format.
To customize the view of the chart, click on the chart. For moreinformation, see (WebReports Only) ChoosingWhichData to Chart,on page 41.
Top Users: Bandwidth Used
User Guide for AsyncOS 14.1 for Cisco Secure Email and Web Manager- GD (General Deployment)209
Using Centralized Web Reporting and TrackingUsers Page

DescriptionSection
You can use this interactive table to search for a specific User IDor Client IP address. In the text field at the bottom of the User table,enter the specific User ID or Client IP address and click on FindUser ID / Client IP Address. The IP address does not need to be anexact match to return results.
You can click on a specific user to find more specific information.For more information, see the User Details Page (Web Reporting), on page 210
Users
To view user IDs instead of client IP addresses, you must set up your Security Management appliance toobtain user information from an LDAP server.
Note
To customize your view of this report, see Working with Web Security Reports, on page 169.Tip
User Details Page (Web Reporting)The User Details page allows you to see specific information about a user that you have identified in theinteractive table on the Users report page.
The User Details page allows you to investigate individual user’s activity on your system. This page isparticularly useful if you are running user-level investigations and need to find out, for example, what sitesyour users are visiting, what Malware threats they are encountering, what URL categories they are accessing,and how much time a specific user is spending at these sites.
To display the User Details page for a specific user, click on a specific user from the Users interactive tableon the Users report page.
From the User Details page, you can view the following information pertaining to an individual user on yoursystem:
Table 63: Details on the User Details Page
DescriptionSection
Choose the time range for your report. For more information, seethe Choosing a Time Range for Reports , on page 28.
Time Range (drop-down list)
You can view the specific URL Categories that a specific user isusing, in graphical format.
To customize the view of the chart, click on the chart.
The set of predefined URL categories is occasionally updated. Formore information about the impact of these updates on report results,see URL Category Set Updates and Reports , on page 179.
URL Categories: Total Transactions
User Guide for AsyncOS 14.1 for Cisco Secure Email and Web Manager- GD (General Deployment)210
Using Centralized Web Reporting and TrackingUser Details Page (Web Reporting)
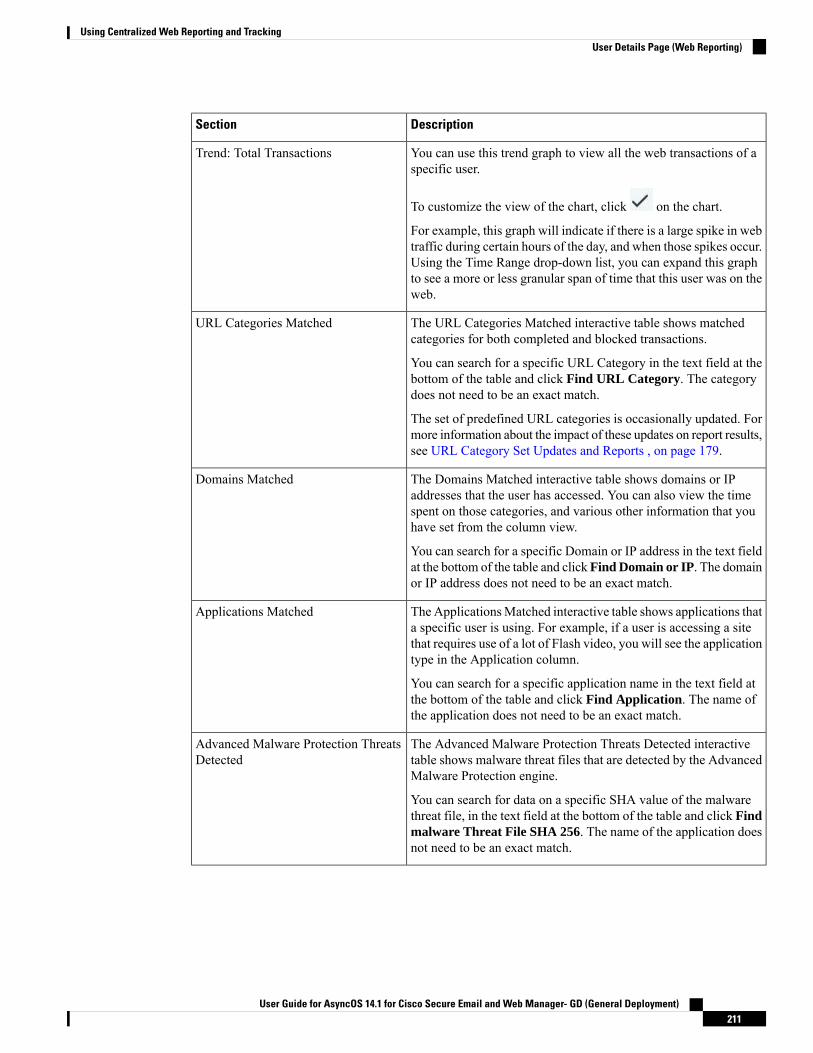
DescriptionSection
You can use this trend graph to view all the web transactions of aspecific user.
To customize the view of the chart, click on the chart.
For example, this graph will indicate if there is a large spike in webtraffic during certain hours of the day, and when those spikes occur.Using the Time Range drop-down list, you can expand this graphto see a more or less granular span of time that this user was on theweb.
Trend: Total Transactions
The URL Categories Matched interactive table shows matchedcategories for both completed and blocked transactions.
You can search for a specific URL Category in the text field at thebottom of the table and click Find URL Category. The categorydoes not need to be an exact match.
The set of predefined URL categories is occasionally updated. Formore information about the impact of these updates on report results,see URL Category Set Updates and Reports , on page 179.
URL Categories Matched
The Domains Matched interactive table shows domains or IPaddresses that the user has accessed. You can also view the timespent on those categories, and various other information that youhave set from the column view.
You can search for a specific Domain or IP address in the text fieldat the bottom of the table and clickFind Domain or IP. The domainor IP address does not need to be an exact match.
Domains Matched
The ApplicationsMatched interactive table shows applications thata specific user is using. For example, if a user is accessing a sitethat requires use of a lot of Flash video, you will see the applicationtype in the Application column.
You can search for a specific application name in the text field atthe bottom of the table and click Find Application. The name ofthe application does not need to be an exact match.
Applications Matched
The Advanced Malware Protection Threats Detected interactivetable shows malware threat files that are detected by the AdvancedMalware Protection engine.
You can search for data on a specific SHA value of the malwarethreat file, in the text field at the bottom of the table and click Findmalware Threat File SHA 256. The name of the application doesnot need to be an exact match.
Advanced Malware Protection ThreatsDetected
User Guide for AsyncOS 14.1 for Cisco Secure Email and Web Manager- GD (General Deployment)211
Using Centralized Web Reporting and TrackingUser Details Page (Web Reporting)

DescriptionSection
The Malware Threats Detected interactive table shows the topMalware threats that a specific user is triggering.
You can search for data on a specific malware threat name in thetext field at the bottom of the table and click Find Malware Threat.The name of theMalware Threat does not need to be an exact match.
Malware Threats Detected
The PoliciesMatched interactive table shows the policy groups thatapplied to this user when accessing the web.
You can search for a specific policy name in the text field at thebottom of the table and click Find Policy. The name of the policydoes not need to be an exact match.
Policies Matched
From Client Malware Risk Details table: The client reports sometimes show a user with an asterisk (*) at theend of the user name. For example, the Client report might show an entry for both “jsmith” and “jsmith*”.User names listed with an asterisk (*) indicate the user name provided by the user, but not confirmed by theauthentication server. This happens when the authentication server was not available at the time and theappliance is configured to permit traffic when authentication service is unavailable.
Note
Web Sites PageTheWeb Sites report page is an overall aggregation of the activity that is happening on themanaged appliances.You can use this report page to monitor high-risk web sites accessed during a specific time range.
To view the Web Sites report page, select Web from the Product drop-down and choose Monitoring > WebSites from the Reports drop-down. For more information, see Using the Interactive Report Pages, on page39.
From the Web Sites page, you can view the following information:
Table 64: Details on the Web Sites Page
DescriptionSection
Choose the time range for your report. For more information, see theChoosing a Time Range for Reports , on page 28.
Time Range (drop-down list)
You can view the top domains that are being visited on the website ingraphical format.
To customize the view of the chart, click on the chart. For moreinformation, see (Web Reports Only) Choosing Which Data to Chart,on page 41.
Top Domains: Total Transactions
User Guide for AsyncOS 14.1 for Cisco Secure Email and Web Manager- GD (General Deployment)212
Using Centralized Web Reporting and TrackingWeb Sites Page

DescriptionSection
You can view the top domains that triggered a block action to occurper transaction in graphical format.
To customize the view of the chart, click on the chart. For moreinformation, see (Web Reports Only) Choosing Which Data to Chart,on page 41.
For example, a user went to a certain domain and because of a specificpolicy that I have in place, this triggered a block action. This domainis listed in this graph as a transaction blocked, and the domain site thattriggered the block action is listed.
Top Domains: Transactions Blocked
You can use this interactive table to search for the domains that arethat are being visited on the website. You can click on a specific domainto access more granular information. The Proxy Services tab on theWeb Tracking page appears and you can see tracking information andwhy certain domains were blocked.
When you click on a specific domain you can see the top users of thatdomain, the top transactions on that domain, the URL Categoriesmatched and the Malware threats that have been detected.
To view an example of how Web Tracking may be used, see Example2: Tracking a URL, on page 593.
Domains Matched
To customize your view of this report, see Working with Web Security Reports, on page 169.Tip
HTTPS Reports PageThe HTTPS Reports report page is an overall aggregation of the HTTP/HTTPS traffic summary (transactionsor bandwidth usage) on the managed appliances.
You can also view the summary of supported ciphers based on either client side connections or server sideconnections, for individual HTTP/HTTPS web traffic that passes through the managed appliance.
To view the HTTPS Reports report page, select Web from the Product drop-down and choose Monitoring> HTTPS Reports from the Reports drop-down. For more information, see Using the Interactive ReportPages, on page 39.
Table 65: Details on the HTTPS Reports Page
DescriptionSection
Choose the time range for your report. For more information, see theChoosing a Time Range for Reports , on page 28.
Time Range (drop-down list)
User Guide for AsyncOS 14.1 for Cisco Secure Email and Web Manager- GD (General Deployment)213
Using Centralized Web Reporting and TrackingHTTPS Reports Page

DescriptionSection
You can view the web traffic summary on the appliance in one of thefollowing ways:
• Transactions: Select this option from the drop-down list to displaythe web traffic summary based on the number of HTTP or HTTPSweb transactions, in a graphical format and percentage of HTTPor HTTPS web transaction in tabular format.
• Bandwidth Usage: Select this option from the drop-down list todisplay the web traffic summary based on the amount of bandwidthconsumed by the HTTP or HTTPS web traffic, in a graphicalformat and the percentage of HTTP or HTTPS bandwidth usagein tabular format.
Web Traffic Summary
You can view the trend graph for the web traffic on the appliance basedon the required time range in one of the following ways:
• Web Traffic Trend: Select this option from the dropdown list todisplay the cumulative trend for HTTP and HTTPS web trafficbased on the transactions or bandwidth usage.
• HTTPS Trend: Select this option from the dropdown list todisplay the trend for HTTPS web traffic based on the transactionsor bandwidth usage.
• HTTP Trend: Select this option from the dropdown list to displaythe trend for HTTP web traffic based on the transactions orbandwidth usage.
Trend: Web Traffic
You can view the summary of the ciphers in one of the following ways:
• By Client Side Connections: Select this option from the dropdownlist to display the summary of the ciphers used on the client sideof the HTTP or HTTPS web traffic in a graphical format.
• By Server Side Connections: Select this option from thedropdown list to display the summary of the ciphers used on theserver side of the HTTP or HTTPS web traffic in a graphicalformat.
Ciphers
Anti-Malware PageThe Anti-Malware report page is a security-related reporting page that reflects the results of scanning byyour enabled scanning engines (Webroot, Sophos, McAfee, and/or Adaptive Scanning).
To view the Anti-Malware report page, select Web from the Product drop-down and choose Monitoring >Anti-Malware from the Reports drop-down. For more information, see Using the Interactive Report Pages,on page 39.
You can use this page to help identify and monitor web-based malware threats.
User Guide for AsyncOS 14.1 for Cisco Secure Email and Web Manager- GD (General Deployment)214
Using Centralized Web Reporting and TrackingAnti-Malware Page

To view data for malware found by L4 Traffic Monitoring, see Layer 4 Traffic Monitor Page, on page 203Note
From the Anti-Malware page, you can view the following information:
Table 66: Details on the Anti-Malware Page
DescriptionSection
Choose the time range for your report. For more information, see theChoosing a Time Range for Reports , on page 28.
Time Range (drop-down list)
You can view the top malware categories that are detected by a givencategory type, in graphical format. SeeMalware Category Descriptions,on page 183 for more information on valid Malware categories.
To customize the view of the chart, click on the chart. For moreinformation, see (Web Reports Only) Choosing Which Data to Chart,on page 41.
Top Malware Categories
You can view the the top malware threats in graphical format.
To customize the view of the chart, click on the chart. For moreinformation, see (Web Reports Only) Choosing Which Data to Chart,on page 41.
Top Malware Threats
The Malware Categories interactive table shows detailed informationabout particular malware categories that are displayed in the TopMalware Categories chart.
Clicking on any of the links in theMalware Categories interactive tableallows you to view more granular details about individual malwarecategories and where they are on the network.
Exception: an Outbreak Heuristics link in the table lets you view achart showing when transactions in this category occurred.
SeeMalware Category Descriptions, on page 183 for more informationon valid Malware categories.
Malware Categories
The Malware Threats interactive table shows detailed informationabout particular malware threats that are displayed in the TopMalwareThreats section.
Threats labeled “Outbreak” with a number are threats identified by theAdaptive Scanning feature independently of other scanning engines.
Malware Threats
To customize your view of this report, see Working with Web Security Reports, on page 169.Tip
User Guide for AsyncOS 14.1 for Cisco Secure Email and Web Manager- GD (General Deployment)215
Using Centralized Web Reporting and TrackingAnti-Malware Page

Malware Category ReportTheMalware Category Report page allows you to view detailed information on an individualMalware Categoryand what it is doing on your network.
To access the Malware Category report page, perform the following:
Step 1 On the Security Management appliance, choose Web from the dropdown list.Step 2 Choose Monitoring > Anti-Malware page.Step 3 In the Malware Categories interactive table, click on a category in the Malware Category column.Step 4 To customize your view of this report, see Working with Web Security Reports, on page 169.
Malware Threat ReportThe Malware Threat Report page shows clients at risk for a particular threat, displays a list of potentiallyinfected clients, and links to the Client Detail page. The trend graph at the top of the report shows monitoredand blocked transactions for a threat during the specified time range. The table at the bottom shows the actualnumber of monitored and blocked transactions for a threat during the specified time range.
To view this report, click a category in the Malware Category column of the Anti-Malware report page.
For additional information, click the Support Portal Malware Details link below the table.
Malware Category DescriptionsThe Web Security Appliance can block the following types of malware:
DescriptionMalware Type
Adware encompasses all software executables and plug-ins that direct users towardsproducts for sale. Some adware applications have separate processes that runconcurrently and monitor each other, ensuring that the modifications are permanent.Some variants enable themselves to run each time the machine is started. Theseprograms may also change security settings making it impossible for users to makechanges to their browser search options, desktop, and other system settings.
Adware
A browser helper object is browser plug-in that may perform a variety of functionsrelated to serving advertisements or hijacking user settings.
Browser Helper Object
A commercial system monitor is a piece of software with system monitorcharacteristics that can be obtained with a legitimate license through legal means.
Commercial SystemMonitor
A dialer is a program that utilizes your modem or another type of Internet accessto connect you to a phone line or a site that causes you to accrue long distancecharges to which you did not provide your full, meaningful, and informed consent.
Dialer
Spyware is a type of malware installed on computers that collects small pieces ofinformation about users without their knowledge.
Generic Spyware
User Guide for AsyncOS 14.1 for Cisco Secure Email and Web Manager- GD (General Deployment)216
Using Centralized Web Reporting and TrackingMalware Category Report

DescriptionMalware Type
A hijacker modifies system settings or any unwanted changes to a user’s systemthat may direct them to a website or run a programwithout a user’s full, meaningful,and informed consent.
Hijacker
This category is used to catch all other malware and suspicious behavior that doesnot exactly fit in one of the other defined categories.
Other Malware
This category represents malware found by Adaptive Scanning independently ofthe other anti-malware engines.
Outbreak Heuristics
A phishing URL is displayed in the browser address bar. In some cases, it involvesthe use of domain names and resembles those of legitimate domains. Phishing is aform of online identity theft that employs both social engineering and technicalsubterfuge to steal personal identity data and financial account credentials.
Phishing URL
Potentially Unwanted Application. A PUA is an application that is not malicious,but which may be considered to be undesirable.
PUA
A system monitor encompasses any software that performs one of the followingactions:
Overtly or covertly records system processes and/or user action.
Makes those records available for retrieval and review at a later time.
System Monitor
A trojan downloader is a Trojan that, after installation, contacts a remote host/siteand installs packages or affiliates from the remote host. These installations usuallyoccur without the user’s knowledge. Additionally, a Trojan Downloader’s payloadmay differ from installation to installation since it obtains downloading instructionsfrom the remote host/site.
Trojan Downloader
A trojan horse is a destructive program that masquerades as a benign application.Unlike viruses, Trojan horses do not replicate themselves.
Trojan Horse
A trojan phisher may sit on an infected computer waiting for a specific web pageto be visited or may scan the infected machine looking for user names andpassphrases for bank sites, auction sites, or online payment sites.
Trojan Phisher
A virus is a program or piece of code that is loaded onto your computer withoutyour knowledge and runs against your wishes.
Virus
A worm is program or algorithm that replicates itself over a computer network andusually performs malicious actions.
Worm
Advanced Malware Protection PageAdvanced Malware Protection protects against zero-day and targeted file-based threats by:
• Obtaining the reputation of known files.
• Analyzing behavior of certain files that are not yet known to the reputation service.
User Guide for AsyncOS 14.1 for Cisco Secure Email and Web Manager- GD (General Deployment)217
Using Centralized Web Reporting and TrackingAdvanced Malware Protection Page
• Evaluating emerging threats as new information becomes available, and notifying you about files thatare determined to be threats after they have entered your network.
For more information on the file reputation filtering and file analysis, see the user guide or online help forAsyncOS for Web Security Appliances.
To view the Advanced Malware Protection report page, select Web from the Product drop-down and chooseMonitoring > Advanced Malware Protection from the Reports drop-down. For more information, see Usingthe Interactive Report Pages, on page 39.
The Advanced Malware Protection report page shows the following reporting views:
• Advanced Malware Protection - AMP Summary, on page 218
• Advanced Malware Protection - File Analysis, on page 219
Related Topics
• Requirements for File Analysis Report Details , on page 185
• Identifying Files by SHA-256 Hash , on page 186
• Viewing File Reputation Filtering Data in Other Reports , on page 188
• About Web Tracking and Advanced Malware Protection Features , on page 242
Advanced Malware Protection - AMP SummaryThe AMP Summary section of the Advanced Malware Protection report page shows file-based threats thatwere identified by the file reputation service.
To see the users who tried to access each SHA, and the filenames associated with that SHA-256, click aSHA-256 in the table.
You can click on the link in the Malware Threat Files interactive table to view all the instances of the file inWeb Tracking that were encountered within the maximum available time range, regardless of the time rangeselected for the report.
If a file extracted from a compressed or archived file is malicious, only the SHA value of the compressed orarchived file is included in the Advanced Malware Protection report.
You can use the AMP Summary section of the Advanced Malware Protection page to view:
• The summary of files that are identified by file reputation service of the Advanced Malware Protectionengine, in a graphical format.
• The top malware threat files in a graphical format.
• The top threat files based on the file types in a graphical format.
• A trend graph for all the malware threat files based on the selected time range.
• The Malware Threat Files interactive table that lists the top malware threat files.
• The Files With Retrospective Verdict Change interactive table that lists the files processed by thisappliance for which the verdict has changed since the transaction was processed. For more informationabout this situation, see the documentation for your Web Security appliance.
User Guide for AsyncOS 14.1 for Cisco Secure Email and Web Manager- GD (General Deployment)218
Using Centralized Web Reporting and TrackingAdvanced Malware Protection - AMP Summary

In the case of multiple verdict changes for a single SHA-256, this report shows only the latest verdict,not the verdict history.
If multiple Web Security appliances have different verdict updates for the same file, the result with thelatest time stamp is displayed.
You can click on a SHA-256 link to view web tracking results for all transactions that included thisSHA-256 within the maximum available time range, regardless of the time range selected for the report.
Advanced Malware Protection - File AnalysisThe File Analysis section of the Advanced Malware Protection report page shows the time and verdict (orinterim verdict) for each file sent for analysis. The appliance checks for analysis results every 30 minutes.
For deployments with an on-premises Cisco AMPThreat Grid Appliance: Files that are included in the allowedlist on the Cisco AMP Threat Grid appliance show as "clean." For information about allowed list, see theAMP Threat Grid online help.
Drill down to view detailed analysis results, including the threat characteristics and score for each file.
You can also view additional details about an SHA directly on the server that performed the analysis bysearching for the SHA or by clicking the Cisco AMP Threat Grid link at the bottom of the file analysis detailspage.
To view details on the server that analyzed a file, see Requirements for File Analysis Report Details , on page185.
If a file extracted from a compressed or archived file is sent for analysis, only the SHA value of the extractedfile is included in the File Analysis report.
You can use the File Analysis section of the Advanced Malware Protection report page to view:
• The number of files that are uploaded for file analysis by file analysis service of the Advanced MalwareProtection engine.
• A list of files that have completed file analysis requests.
• A list of files that have pending file analysis requests.
Client Malware Risk ReportThe Client Malware Risk report page is a security-related reporting page that can be used to monitor clientmalware risk activity.
To view the ClientMalware Risk report page, selectWeb from the Product drop-down and chooseMonitoring> Client Malware Risk from the Reports drop-down. For more information, see Using the Interactive ReportPages, on page 39.
From the ClientMalware Risk report page, a system administrator can see which of their users are encounteringthe most blocks or warnings. Given the information gathered from this page, the administrator can click onthe user link to view what this user doing on the web that makes them run into so many blocks or warningsand setting off more detections than the rest of the users on the network.
Additionally, the Client Malware Risk page lists client IP addresses involved in frequent malware connections,as identified by the L4 Traffic Monitor (L4TM). A computer that connects frequently to malware sites maybe infected with malware that is trying to connect to a central command and control server and should bedisinfected.
User Guide for AsyncOS 14.1 for Cisco Secure Email and Web Manager- GD (General Deployment)219
Using Centralized Web Reporting and TrackingAdvanced Malware Protection - File Analysis

The following table describes the information on the Client Malware Risk page.
Table 67: Details on Client Malware Risk Page
DescriptionSection
Choose the time range for your report. For more information, see theChoosing a Time Range for Reports , on page 28.
Time Range (drop-down list)
You can view the top ten users that have encountered a malware risk,in graphical format.
To customize the view of the chart, click on the chart. For moreinformation, see (Web Reports Only) Choosing Which Data to Chart,on page 41.
Web Proxy: Top Clients Monitoredor Blocked
You can view the IP addresses of the ten computers in your organizationthat most frequently connect to malware sites, in graphical format.
To customize the view of the chart, click on the chart. For moreinformation, see (Web Reports Only) Choosing Which Data to Chart,on page 41.
This chart is the same as the “Top Client IPs” chart on the Layer 4Traffic Monitor Page, on page 203.
L4 Traffic Monitor: MalwareConnections Detected
The Web Proxy: Client Malware Risk interactive table shows detailedinformation about particular clients that are displayed in theWeb Proxy:Top Clients by Malware Risk section.
You can click each user in this table to view the User Details pageassociated with that client. For information about that page, see theUser Details Page (Web Reporting) , on page 210.
You can click on any of the links in the table to view more granulardetails about individual users and what activity they are performingthat is triggering the malware risk.
Web Proxy: Client Malware Risk
The L4 Traffic Monitor: Clients by Malware Risk interactive tabledisplays IP addresses of computers in your organization that frequentlyconnect to malware sites.
This table is the same as the “Client Source IPs” table on the Layer 4Traffic Monitor Page, on page 203.
L4 Traffic Monitor: Clients byMalware Risk
To customize your view of this report, see Working with Web Security Reports, on page 169.Tip
Web Reputation Filters PageYou can use the Web Reputation Filters report page to view the results of your set Web Reputation filtersfor transactions during a specified time range.
User Guide for AsyncOS 14.1 for Cisco Secure Email and Web Manager- GD (General Deployment)220
Using Centralized Web Reporting and TrackingWeb Reputation Filters Page
To view the Web Reputation Filters report page, select Web from the Product drop-down and chooseMonitoring > Web Reputation Filters from the Reports drop-down. For more information, see Using theInteractive Report Pages, on page 39.
What are Web Reputation Filters?
Web Reputation Filters analyze web server behavior and assign a reputation score to a URL to determine thelikelihood that it contains URL-based malware. It helps protect against URL-based malware that threatensend-user privacy and sensitive corporate information. TheWeb Security appliance uses URL reputation scoresto identify suspicious activity and stop malware attacks before they occur. You can useWeb Reputation Filterswith both Access and Decryption Policies.
Web Reputation Filters use statistical data to assess the reliability of Internet domains and score the reputationof URLs. Data such as how long a specific domain has been registered, or where a web site is hosted, orwhether a web server is using a dynamic IP address is used to judge the trustworthiness of a given URL.
The web reputation calculation associates a URL with network parameters to determine the probability thatmalware exists. The aggregate probability that malware exists is then mapped to a Web Reputation Scorebetween -10 and +10, with +10 being the least likely to contain malware.
Example parameters include the following:
• URL categorization data
• Presence of downloadable code
• Presence of long, obfuscated End-User License Agreements (EULAs)
• Global volume and changes in volume
• Network owner information
• History of a URL
• Age of a URL
• Presence on any block lists
• Presence on any allow lists
• URL typos of popular domains
• Domain registrar information
• IP address information
For more information on Web Reputation Filtering, see ‘Web Reputation Filters’ in the User Guide forAsyncOS for Web Security Appliances.
From the Web Reputation Filters page, you can view the following information:
Table 68: Details on Web Reputation Filters Page
DescriptionSection
Choose the time range for your report. For more information, see theChoosing a Time Range for Reports , on page 28.
Time Range (drop-down list)
User Guide for AsyncOS 14.1 for Cisco Secure Email and Web Manager- GD (General Deployment)221
Using Centralized Web Reporting and TrackingWeb Reputation Filters Page

DescriptionSection
You can view the total number of web reputation actions against thetime specified, in graphical format. From this you can see potentialtrends over time for web reputation actions.
Web Reputation Actions (Trend)
You can view the web reputation action volume in percentages bytransactions.
Web Reputation Actions (Volume)
You can view the types of threats found in transactions that wereblocked by Web Reputation filtering, in graphical format.
WBRS cannot always identify the threat type.Note
Web Reputation Threat TypesBlocked by WBRS
You can view the type of threats found in transactions that were notblocked by Web Reputation filtering, in graphical format.
To customize the view of the chart, click on the chart. For moreinformation, see (Web Reports Only) Choosing Which Data to Chart,on page 41.
Reasons these threats might not have been blocked include:
• Not all threats have a score that meets the threshold for blocking.However, other features of the appliance may catch these threats.
• Policies might be configured to allow threats to pass through.
WBRS cannot always identify the threat type.Note
Threat Types Detected in OtherTransactions
If Adaptive Scanning is not enabled, this interactive table displays theWeb Reputation scores broken down for each action.
Web Reputation Actions(Breakdown by Score)
To customize your view of this report, see Working with Web Security Reports, on page 169.Tip
Adjusting Web Reputation Settings
Based on your report results, you may want to adjust the configured web reputation settings, for exampleadjust the threshold scores or enable or disable Adaptive Scanning. For specific information about configuringweb reputation settings, see User Guide for AsyncOS for Cisco Web Security Appliances.
About Scheduled and On-Demand Web ReportsExcept as noted, you can generate the following types ofWeb Security reports either as scheduled or on-demandreports:
• Web Reporting Overview—For information on what is included on this page, see the Web ReportingOverview , on page 173.
• Users—For information on what is included on this page, see the Users Report (Web) , on page 174.
User Guide for AsyncOS 14.1 for Cisco Secure Email and Web Manager- GD (General Deployment)222
Using Centralized Web Reporting and TrackingAbout Scheduled and On-Demand Web Reports

• Web Sites—For information on what is included on this page, see the Web Sites Report , on page 177.• URL Categories—For information on what is included on this page, see the URL Categories Report ,on page 178.
• Top URL Categories — Extended: For information on how to generate a report for Top URL Categories— Extended, see the Top URL Categories—Extended, on page 225.
This report is not available as an On-Demand report.
• Application Visibility—For information on what is included on this page, see the Application VisibilityReport , on page 180.
• Top Application Types—Extended: For information on how to generate a report for Top URLCategories— Extended, see the Top Application Types—Extended, on page 226.
This report is not available as an On-Demand report.
• Anti-Malware—For information on what is included on this page, see the Anti-Malware Report , on page182.
• Client Malware Risk—For information on what is included on this page, see the Client Malware RiskReport , on page 189.
• Web Reputation Filters—For information on what is included on this page, see the Web ReputationFilters Report , on page 190.
• L4 TrafficMonitor—For information on what is included on this page, see the L4 TrafficMonitor Report, on page 191.
• Mobile Secure Solution—For information on what is included on this page, see the Reports by UserLocation , on page 193.
• System Capacity—For information on what is included on this page, see the System Capacity Page, onpage 194.
Scheduling Web ReportsThis section includes the following:
• Adding Scheduled Web Reports, on page 224• Editing Scheduled Web Reports, on page 225• Deleting Scheduled Web Reports, on page 225• Additional Extended Web Reports, on page 225
You can choose to make user names unrecognizable in all reports. For information, see Anonymizing UserNames in Web Reports , on page 168.
Note
You can schedule reports to run on a daily, weekly, or monthly basis. Scheduled reports can be configuredto include data for the previous day, previous seven days, previous month, previous calendar day (up to 250),previous calendar month (up to 12). Alternatively, you can include data for a custom number of days (from2 days to 100 days) or a custom number of months (from 2 months to 12 months).
Regardless of when you run a report, the data is returned from the previous time interval (hour, day, week,or month). For example, if you schedule a daily report to run at 1AM, the report will contain data from theprevious day, midnight to midnight (00:00 to 23:59).
User Guide for AsyncOS 14.1 for Cisco Secure Email and Web Manager- GD (General Deployment)223
Using Centralized Web Reporting and TrackingScheduling Web Reports

You can define as many recipients for reports as you want, including zero recipients. If you do not specify anemail recipient, the system will still archive the reports. If you need to send the reports to a large number ofaddresses, however, you may want to create a mailing list instead of listing the recipients individually.
Storage of Scheduled Web ReportsThe Security Management appliance retains the most recent reports that it generates — up to 30 of the mostrecent instances of each scheduled report, and up to 1000 total versions for all reports.
Archived reports are deleted automatically. As new reports are added, older reports are removed to keep thenumber at 1000. The limit of 30 instances applies to each scheduled report with the same name and time range.
Archived reports are stored in the /periodic_reports directory on the appliance. (See IP Interfaces and Accessingthe Appliance, on page 575 for more information.)
Related Topics
• Viewing and Managing Archived Web Reports, on page 228
Adding Scheduled Web Reports
Step 1 On the Security Management appliance, choose Web > Reporting > Scheduled Reports.Step 2 Click Add Scheduled Report.Step 3 From drop-down menu next to Type, choose your report type.Step 4 In the Title field, type the title of your report.
To avoid creating multiple reports with the same name, we recommend using a descriptive title.
Step 5 Choose the time range for the report from the Time Range drop-down menu.Step 6 Choose the format for the generated report.
The default format is PDF. Most reports also allow you to save raw data as a CSV file.
Step 7 From the drop-down list next to Number of Items, choose the number of items that you want to be included in thegenerated report.
Valid values are from 2 through 20. The default value is 5.
Step 8 For Charts, click the default chart under Data to display and choose the data to display in each chart in the report.Step 9 From the drop-down list next to Sort Column, select the column to sort the data by for this report. This allows you to
create a scheduled report of Top ‘N’ items by any column available in the scheduled report.Step 10 From the Schedule area, select the radio button next to the day, week, or month for your scheduled report.Step 11 In the Email text field, type in the email address where the generated report will be sent.
If you do not specify an email address, the report is archived only.
Step 12 Click Submit.
User Guide for AsyncOS 14.1 for Cisco Secure Email and Web Manager- GD (General Deployment)224
Using Centralized Web Reporting and TrackingStorage of Scheduled Web Reports

Editing Scheduled Web ReportsTo edit reports, go to the Web > Reporting > Scheduled Reports page and select the check boxescorresponding to the reports that you want to edit. Modify settings then click Submit to submit your changeson the page, then click the Commit Changes button to commit your changes on the appliance.
Deleting Scheduled Web ReportsTo delete reports, go to the Web > Reporting > Scheduled Reports page and select the check boxescorresponding to the reports that you want to delete. To remove all scheduled reports, select the All checkbox, Delete and Commit your changes. Note that archived versions of deleted reports are not deleted.
Additional Extended Web ReportsTwo additional reports are available only as Scheduled Reports on the Security Management appliance:
• Top URL Categories—Extended, on page 225• Top Application Types—Extended, on page 226
Top URL Categories—ExtendedThe Top URL Categories —Extended report is useful for administrators who want to receive more detailedinformation than the URL Categories report can provide.
For example, in a typical URL Categories report, you can gather information measuring bandwidth usage bya particular employee at a larger URL Category level. To generate a more detailed report that monitorsbandwidth usage for the top ten URLs for each URL Category, or top five users for each URL Category, usethe Top URL Categories —Extended report.
The maximum number of reports that can be generated using this type of report is 20.Note
• Predefined URL category lists are occasionally updated. For more information about the impact of theseupdates on report results, see URL Category Set Updates and Reports , on page 179.
To generate a Top URL Categories—Extended report, perform the following:
Step 1 On the Security Management appliance, choose Web> Reporting > Scheduled Reports.Step 2 Click Add Scheduled Report.Step 3 From the drop-down menu next to Type, choose Top URL categories — Extended.Step 4 In the Title text field, type the title of your URL extended report.Step 5 Choose the time range for the report from the Time Range drop-down menu.Step 6 Choose the format for the generated report.
The default format is PDF.
Step 7 From the drop-down list next to Number of Items, select the number of URL Categories that you want to be includedin the generated report.
User Guide for AsyncOS 14.1 for Cisco Secure Email and Web Manager- GD (General Deployment)225
Using Centralized Web Reporting and TrackingEditing Scheduled Web Reports

Valid values are from 2 through 20. The default value is 5.
Step 8 From the drop-down list next to Sort Column, select the column to sort the data by for this report. This allows you tocreate a scheduled report of Top ‘N’ items by any column available in the scheduled report.
Step 9 For Charts, click the default chart under Data to display and choose the data to display in each chart in the report.Step 10 From the Schedule area, select the radio button next to the day, week, or month for your scheduled report.Step 11 In the Email text field, type in the email address where the generated report will be sent.Step 12 Click Submit.
Top Application Types—ExtendedTo generate a Top Application Type—Extended report, perform the following:
Step 1 On the Security Management appliance, choose Web> Reporting > Scheduled Reports.Step 2 Click Add Scheduled Report.Step 3 From the drop-down menu next to Type, choose Top Application Types — Extended.
The options on the page will change.
Step 4 In the Title text field, type the title of your report.Step 5 Choose the time range for the report from the Time Range drop-down menu.Step 6 Choose the format for the generated report.
The default format is PDF.
Step 7 From the drop-down list next toNumber of Items, select the number of Application Types that you want to be includedin the generated report.
Valid values are from 2 through 20. The default value is 5.
Step 8 From the drop-down list next to Sort Column, select the type of column that you want to appear in the table. Choicesinclude: Transactions Completed, Transactions Blocked, Transaction Totals.
Step 9 For Charts, click a default chart under Data to display and choose the data to display in each chart in the report.Step 10 From the Schedule area, select the radio button next to the day, week, or month for your scheduled report.Step 11 In the Email text field, type in the email address where the generated report will be sent.Step 12 Click Submit.
Generating Web Reports on DemandMost reports that you can schedule, you can also generate on demand.
Some reports are available only as Scheduled Reports, not on demand. See Additional ExtendedWeb Reports,on page 225.
Note
User Guide for AsyncOS 14.1 for Cisco Secure Email and Web Manager- GD (General Deployment)226
Using Centralized Web Reporting and TrackingTop Application Types—Extended

To generate a report on demand, perform the following:
Step 1 On the Security Management appliance, choose, Web > Reporting > Archived Reports.Step 2 Click on Generate Report Now.Step 3 From the Report type section, choose a report type from the drop-down list.
The options on the page may change.
Step 4 In the Title text field, type the name of the title for the report.
AsyncOS does not verify the uniqueness of report names. To avoid confusion, do not create multiple reports with thesame name.
Step 5 From the Time Range to Include drop-down list, select a time range for the report data.Step 6 In the Format section, choose the format of the report.
Choices include:
• PDF. Create a formatted PDF document for delivery, archival, or both. You can view the report as a PDF fileimmediately by clicking Preview PDF Report.
• CSV. Create an ASCII text file that contains raw data as comma-separated values. Each CSV file may contain upto 100 rows. If a report contains more than one type of table, a separate CSV file is created for each table.
Step 7 Depending on the options available for the report, choose:
• Number of rows: The number of rows of data to display in the table.
• Charts: Which data to display in the chart(s) in the report:
• Click the default option under Data to display.
• Sort Column: The column to sort by for each table.
Step 8 From the Delivery Option section, choose the following:
• If you want this report to appear on the Archived Reports page, select the Archive Report checkbox.
Domain-Based Executive Summary reports cannot be archived.Note
• Check the Email now to recipients checkbox to email the report.
• In the text field, type in the recipient email addresses for the report.
Step 9 Click Deliver This Report to generate the report.
Archived Web Reports Page• About Scheduled and On-Demand Web Reports, on page 222
• Generating Web Reports on Demand , on page 226• Viewing and Managing Archived Web Reports, on page 228
User Guide for AsyncOS 14.1 for Cisco Secure Email and Web Manager- GD (General Deployment)227
Using Centralized Web Reporting and TrackingArchived Web Reports Page

Viewing and Managing Archived Web ReportsUse the information in this section to work with reports that are generated as scheduled reports.
Step 1 Go to Web > Reporting > Archived Reports.Step 2 To view a report, click the report names in the Report Title column. The Show drop-downmenu filters the types of reports
that are listed on the Archived Reports page.Step 3 To locate a particular report if the list is long, filter the list by choosing a report type from the Show menu, or click a
column heading to sort by that column.
What to do next
Related Topics
• Storage of Scheduled Web Reports , on page 224• Adding Scheduled Web Reports, on page 224• Generating Web Reports on Demand , on page 226
Schedule and Archive Web Reports on the New Web Interface• Scheduling Web Reports on the New Web Interface, on page 228
• Archiving Web Reports on the New Web Interface, on page 230
Scheduling Web Reports on the New Web InterfaceThis section includes the following:
• Adding Scheduled Web Reports on the New Web Interface, on page 229
• Editing Scheduled Web Reports on the New Web Interface, on page 229
• Deleting Scheduled Web Reports on the New Web Interface, on page 229
You can choose to make user names unrecognizable in all reports. For information, see Anonymizing UserNames in Web Reports , on page 168.
Note
You can schedule reports to run on a daily, weekly, or monthly basis. Scheduled reports can be configuredto include data for the previous day, previous seven days, previous month, previous calendar day (up to 250),previous calendar month (up to 12). Alternatively, you can include data for a custom number of days (from2 days to 100 days) or a custom number of months (from 2 months to 12 months).
Regardless of when you run a report, the data is returned from the previous time interval (hour, day, week,or month). For example, if you schedule a daily report to run at 1AM, the report will contain data from theprevious day, midnight to midnight (00:00 to 23:59).
User Guide for AsyncOS 14.1 for Cisco Secure Email and Web Manager- GD (General Deployment)228
Using Centralized Web Reporting and TrackingViewing and Managing Archived Web Reports

You can define as many recipients for reports as you want, including zero recipients. If you do not specify anemail recipient, the system will still archive the reports. If you need to send the reports to a large number ofaddresses, however, you may want to create a mailing list instead of listing the recipients individually.
Adding Scheduled Web Reports on the New Web Interface
Step 1 On the Security Management appliance, choose Web from the Product drop-down. For more information, see Usingthe Interactive Report Pages, on page 39.
Step 2 Choose Monitoring > Schedule & Archive.Step 3 In the Schduled / Archived tab, click the + button.Step 4 Select your report type from the Report Type drop-down menu.Step 5 In the Report Title field, enter the title of your report.
To avoid creating multiple reports with the same name, we recommend using a descriptive title.
Step 6 Choose the time range for the report from the Time Range to Include drop-down menu.Step 7 Choose the format for the generated report.
The default format is PDF.
Step 8 From the Delivery Options section, choose any one of the following:
By choosing this, the report will be listed on the Archived Reports page.
Domain-Based Executive Summary reports cannot be archived.Note
• To archive the report, select Only Archive.
• To archive and email the report, click Archive and Email to Recipients.
• To email the report, click Only Email to Recipients.
In the Email IDs field, enter the recipient email addresses.
Step 9 From the Schedule area, select the radio button next to the day, week, or month for your scheduled report.Step 10 Select the language in which the report must be generated from the Report Language drop-down list.Step 11 Click Submit.
Editing Scheduled Web Reports on the New Web InterfaceTo edit reports on the new web interface of your appliance, select Web from the Product drop-down andchoose Monitoring > Scheduled & Archive page. Click on the link corresponding to the Report Title ofreports that you want to edit. Modify settings then click Edit to submit your changes on the page.
Deleting Scheduled Web Reports on the New Web InterfaceTo delete reports on the new web interface of your appliance, select Web from the Product drop-down andchoose Monitoring > Scheduled / Archived page. Select the checkboxes corresponding to the reports thatyou want to delete and click on the trash can icon.
User Guide for AsyncOS 14.1 for Cisco Secure Email and Web Manager- GD (General Deployment)229
Using Centralized Web Reporting and TrackingAdding Scheduled Web Reports on the New Web Interface

To remove all scheduled reports, select the check box next to the report title. Note that archived versions ofdeleted reports are not deleted.
Archiving Web Reports on the New Web Interface• [New Web Interface] Generating Web Reports on Demand, on page 230
• Viewing and Managing Archived Web Reports on the New Web Interface, on page 231
[New Web Interface] Generating Web Reports on DemandMost reports that you can schedule, you can also generate on demand.
Some reports are available only as Scheduled Reports, not on demand. See Additional ExtendedWeb Reports,on page 225.
Note
To generate a report on demand, perform the following:
Step 1 On the Security Management appliance, select Web from the Product drop-down and choose Monitoring > Schedule& Archive.
Step 2 In the View Archived tab, click on the + button.Step 3 From the Report Type section, choose a report type from the drop-down list.
The options on the page may change.
Step 4 In the Report Title section, enter the name of the title for the report.
AsyncOS does not verify the uniqueness of report names. To avoid confusion, do not create multiple reports with thesame name.
Step 5 From the Time Range to Include drop-down list, select a time range for the report data.Step 6 In the Attachment Details section, choose the format of the report.
PDF. Create a formatted PDF document for delivery, archival, or both. You can view the report as a PDF file immediatelyby clicking Preview PDF Report.
Step 7 From the Delivery Options section, choose any one of the following:
By choosing this, the report will be listed on the Archived Reports page.
Domain-Based Executive Summary reports cannot be archived.Note
• To archive the report, select Only to Archive.
• To archive and email the report, click Archive and Email to Recipients.
• To email the report, click Only Email to Recipients.
In the Email IDs field, enter the recipient email addresses.
Step 8 Select the language in which the report must be generated from the Report Language drop-down list.
User Guide for AsyncOS 14.1 for Cisco Secure Email and Web Manager- GD (General Deployment)230
Using Centralized Web Reporting and TrackingArchiving Web Reports on the New Web Interface

Step 9 Click Deliver This Report to generate the report.
Viewing and Managing Archived Web Reports on the New Web InterfaceUse the information in this section to work with reports that are generated as scheduled reports.
Step 1 Login to the new web interface of your appliance.Step 2 Choose Web from the Product drop-down and select Monitoring > Schedule& Archive.Step 3 Select the View Archived tab.Step 4 To view a report, click the report names in the Report Title column. The Report Type drop-down list filters the types of
reports that are listed on the Archived Reports tab.Step 5 You can search for a particular report in the search box.
Web TrackingUse the Web Tracking page to search for and view details about individual transactions or patterns oftransactions that may be of concern. Depending on the services that your deployment uses, search in relevanttabs:
• Searching for Transactions Processed by Web Proxy Services , on page 231• Searching for Transactions Processed by the L4 Traffic Monitor , on page 235• Searching for Transactions Processed by the SOCKS Proxy , on page 235• Working with Web Tracking Search Results , on page 241• Viewing Transaction Details for Web Tracking Search Results , on page 241
For more information about the distinction between the Web Proxy and the L4 Traffic Monitor, see the“Understanding How the Web Security Appliance Works” section in AsyncOS for Cisco Web SecurityAppliances User Guide.
Related Topics
• About Web Tracking and Upgrades , on page 243
Searching for Transactions Processed by Web Proxy ServicesUse the Proxy Services tab on the Web > Reporting > Web Tracking page to search web tracking dataaggregated from individual security components and acceptable use enforcement components. This data doesnot include L4 Traffic Monitoring data or transactions processed by the SOCKS Proxy.
You might want to use it to assist the following roles:
• HR or Legal manager. Run an investigative report for an employee during a specific time period.
For example, you can use the Proxy Services tab to retrieve information about a specific URL that a user isaccessing, what time the user visited that URL, whether that URL is allowed, etc.
• Network security administrator. Examine whether the company network is being exposed to malwarethreats through employees’ smartphones.
User Guide for AsyncOS 14.1 for Cisco Secure Email and Web Manager- GD (General Deployment)231
Using Centralized Web Reporting and TrackingViewing and Managing Archived Web Reports on the New Web Interface

You can view search results for the transactions recorded (including blocked, monitored, warned, andcompleted) during a particular time period. You can also filter the data results using several criteria, such asURL category, malware threat, and application.
The Web Proxy only reports on transactions that include an ACL decision tag other than “OTHER-NONE.Note
For an example of Web Tracking usage, see the Example 1: Investigating a User , on page 591.
For an example of how the Proxy Services tab can be used with other web reporting pages, see the Using TheURL Categories Page in Conjunction with Other Reporting Pages, on page 179.
Step 1 On the Security Management appliance, choose Web > Reporting > Web Tracking.Step 2 Click the Proxy Services tab.Step 3 To see all search and filtering options, click Advanced.Step 4 Enter search criteria:
Table 69: Web Tracking Search Criteria on the Proxy Services Tab
DescriptionOption
Default Search Criteria
Choose the time range on which to report. For information on time ranges available on theSecurity Management appliance, see the Choosing a Time Range for Reports , on page 28.
Time Range
Optionally, enter an authentication username as it appears in reports or a client IP addressthat you want to track. You can also enter an IP range in CIDR format, such as 172.16.0.0/16.
When you leave this field empty, the search returns results for all users.
User/Client IPv4 or IPv6
Optionally, enter a website that you want to track.When you leave this field empty, the searchreturns results for all websites.
Website
Choose the type of transactions that you want to track, either All Transactions, Completed,Blocked, Monitored, or Warned.
Transaction Type
Advanced Search Criteria
To filter by a URL category, select Filter by URL Category and type the first letter of acustom or predefined URL category by which to filter. Choose the category from the list thatappears . .
If the set of URL categories has been updated, some categories may be labeled “Deprecated.”Deprecated categories are no longer being used for new transactions. However, you can stillsearch for recent transactions that occurredwhile the categorywas active. Formore informationabout URL category set updates, see URL Category Set Updates and Reports , on page 179.
All recent transactions that match the category name are included, regardless of the enginename noted in the drop-down list.
URL Category
User Guide for AsyncOS 14.1 for Cisco Secure Email and Web Manager- GD (General Deployment)232
Using Centralized Web Reporting and TrackingSearching for Transactions Processed by Web Proxy Services

DescriptionOption
To filter by an application, select Filter by Application and choose an application by whichto filter.
To filter by an application type, select Filter by Application Type and choose an applicationtype by which to filter.
Application
To filter by a policy group, select Filter by Policy and enter a policy group name by whichto filter.
Make sure that you have declared the policy on the Web Security appliance.
Policy
To filter by a particular malware threat, select Filter by Malware Threat and enter a malwarethreat name by which to filter.
To filter by a malware category, select Filter by Malware Category and choose a malwarecategory by which to filter. For descriptions, see Malware Category Descriptions, on page183.
Malware Threat
In the WBRS section, you can filter by Web-Based Reputation Score and by a particular webreputation threat.
• To filter by web reputation score, select Score Rangeand select the upper and lowervalues by which to filter. Or, you can filter for websites that have no score by selectingNo Score.
• To filter by web reputation threat, select Filter by Reputation Threat and enter a webreputation threat by which to filter.
For more information on WBRS scores, see the IronPort AsyncOS for Web User Guide.
WBRS
To filter by remote or local access, select Filter by User Location and choose an access type.To include all access types, select Disable Filter.
(In previous releases, this option was labeled Mobile User Security.)
AnyConnect SecureMobility
To filter by a specific Web appliance, click on the radio button next to Filter by WebApplianceand enter the Web appliance name in the text field.
If you select Disable Filter, the search includes all Web Security appliances associated withthe Security Management appliance.
Web Appliance
To filter by transactions that were actually initiated by the user, select Filter by WebUser-Requested Transactions.
Note: When you enable this filter, the search results include “best guess” transactions.
User Request
Step 5 Click Search.
What to do next
Related Topics
• Displaying More Web Tracking Search Results , on page 241• Understanding Web Tracking Search Results , on page 241
User Guide for AsyncOS 14.1 for Cisco Secure Email and Web Manager- GD (General Deployment)233
Using Centralized Web Reporting and TrackingSearching for Transactions Processed by Web Proxy Services

• Viewing Transaction Details for Web Tracking Search Results , on page 241• About Web Tracking and Advanced Malware Protection Features , on page 242
Malware Category DescriptionsThe Web Security Appliance can block the following types of malware:
DescriptionMalware Type
Adware encompasses all software executables and plug-ins that direct users towardsproducts for sale. Some adware applications have separate processes that runconcurrently and monitor each other, ensuring that the modifications are permanent.Some variants enable themselves to run each time the machine is started. Theseprograms may also change security settings making it impossible for users to makechanges to their browser search options, desktop, and other system settings.
Adware
A browser helper object is browser plug-in that may perform a variety of functionsrelated to serving advertisements or hijacking user settings.
Browser Helper Object
A commercial system monitor is a piece of software with system monitorcharacteristics that can be obtained with a legitimate license through legal means.
Commercial SystemMonitor
A dialer is a program that utilizes your modem or another type of Internet accessto connect you to a phone line or a site that causes you to accrue long distancecharges to which you did not provide your full, meaningful, and informed consent.
Dialer
Spyware is a type of malware installed on computers that collects small pieces ofinformation about users without their knowledge.
Generic Spyware
A hijacker modifies system settings or any unwanted changes to a user’s systemthat may direct them to a website or run a programwithout a user’s full, meaningful,and informed consent.
Hijacker
This category is used to catch all other malware and suspicious behavior that doesnot exactly fit in one of the other defined categories.
Other Malware
This category represents malware found by Adaptive Scanning independently ofthe other anti-malware engines.
Outbreak Heuristics
A phishing URL is displayed in the browser address bar. In some cases, it involvesthe use of domain names and resembles those of legitimate domains. Phishing is aform of online identity theft that employs both social engineering and technicalsubterfuge to steal personal identity data and financial account credentials.
Phishing URL
Potentially Unwanted Application. A PUA is an application that is not malicious,but which may be considered to be undesirable.
PUA
A system monitor encompasses any software that performs one of the followingactions:
Overtly or covertly records system processes and/or user action.
Makes those records available for retrieval and review at a later time.
System Monitor
User Guide for AsyncOS 14.1 for Cisco Secure Email and Web Manager- GD (General Deployment)234
Using Centralized Web Reporting and TrackingMalware Category Descriptions

DescriptionMalware Type
A trojan downloader is a Trojan that, after installation, contacts a remote host/siteand installs packages or affiliates from the remote host. These installations usuallyoccur without the user’s knowledge. Additionally, a Trojan Downloader’s payloadmay differ from installation to installation since it obtains downloading instructionsfrom the remote host/site.
Trojan Downloader
A trojan horse is a destructive program that masquerades as a benign application.Unlike viruses, Trojan horses do not replicate themselves.
Trojan Horse
A trojan phisher may sit on an infected computer waiting for a specific web pageto be visited or may scan the infected machine looking for user names andpassphrases for bank sites, auction sites, or online payment sites.
Trojan Phisher
A virus is a program or piece of code that is loaded onto your computer withoutyour knowledge and runs against your wishes.
Virus
A worm is program or algorithm that replicates itself over a computer network andusually performs malicious actions.
Worm
Searching for Transactions Processed by the L4 Traffic MonitorThe L4 TrafficMonitor tab on theWeb > Reporting > Web Tracking page provides details about connectionsto malware sites and ports. You can search for connections to malware sites by the following types ofinformation:
• Time range• IP address of the machine that initiated the transaction (IPv4 or IPv6)• Domain or IP address of the destination website (IPv4 or IPv6)• Port• IP address associated with a computer in your organization• Connection type• The Web Security appliance that processed the connection
The first 1000 matching search results are displayed.
To view the hostname at the questionable site or the Web Security appliance that processed the transaction,click the Display Details link in the Destination IP Address column heading.
For more information about how you can use this information, see L4 Traffic Monitor Report , on page 191.
Searching for Transactions Processed by the SOCKS ProxyYou can search for transactions that meet a variety of criteria, including blocked or completed transactions;IP address of the client machine that initiated the transaction; and destination domain, IP address, or port. Youcan also filter results by custom URL category, policy matched, and user location (local or remote). IPv4 andIPv6 addresses are supported.
Step 1 Choose Web > Reporting > Web Tracking.
User Guide for AsyncOS 14.1 for Cisco Secure Email and Web Manager- GD (General Deployment)235
Using Centralized Web Reporting and TrackingSearching for Transactions Processed by the L4 Traffic Monitor
Step 2 Click the SOCKS Proxy tab.Step 3 To filter results, click Advanced.Step 4 Enter search criteria.Step 5 Click Search.
What to do next
Related Topics
SOCKS Proxy Report , on page 193
Web Tracking on the New Web InterfaceYou can use the Web Tracking Search page to search and view details about individual transactions orpatterns of transactions that may be of concern. Depending on the services that your deployment uses, searchin relevant tabs:
• Searching for Transactions Processed by Web Proxy Services , on page 236
• Searching for Transactions Processed by the L4 Traffic Monitor , on page 235
• Searching for Transactions Processed by the SOCKS Proxy , on page 240
• Working with Web Tracking Search Results , on page 241
• Viewing Transaction Details for Web Tracking Search Results , on page 241
For more information about the distinction between the Web Proxy and the Layer4 Traffic Monitor, see the“Understanding How the Web Security Appliance Works” section in User Guide for AsyncOS for Cisco WebSecurity Appliances.
Searching for Transactions Processed by Web Proxy ServicesYou can use the Proxy Services tab on theWeb Tracking Search page to search web tracking data aggregatedfrom individual security components and acceptable use enforcement components. This data does not includeLayer 4 Traffic Monitoring data or transactions processed by the SOCKS Proxy.
You might want to use it to assist the following roles:
• HR or Legal manager. Run an investigative report for an employee during a specific time period.
For example, you can use the Proxy Services tab to retrieve information about a specific URL that a useris accessing, what time the user visited that URL, whether that URL is allowed, etc.
• Network security administrator. Examine whether the company network is being exposed to malwarethreats through employees’ smartphones.
You can view search results for the transactions recorded (including blocked, monitored, warned, andcompleted) during a particular time period. You can also filter the data results using several criteria, such asURL category, malware threat, and application.
User Guide for AsyncOS 14.1 for Cisco Secure Email and Web Manager- GD (General Deployment)236
Using Centralized Web Reporting and TrackingWeb Tracking on the New Web Interface
The Web Proxy only reports on transactions that include an ACL decision tag other than “OTHER-NONE.Note
For an example of Web Tracking usage, see the Example 1: Investigating a User , on page 591.
For an example of how the Proxy Services tab can be used with other web reporting pages, see the Using TheURL Categories Page in Conjunction with Other Reporting Pages, on page 179.
Step 1 On the Security Management appliance, choose Web from the dropdown list..Step 2 Choose Tracking > Proxy Services.Step 3 To see all search and filtering options, click Advanced.Step 4 Enter search criteria:
Table 70: Web Tracking Search Criteria on the Proxy Services Tab
DescriptionOption
Default Search Criteria
Choose the time range on which to report. For information on time ranges available on theSecurity Management appliance, see the Choosing a Time Range for Reports , on page 28.
Time Range
Optionally, enter an authentication username as it appears in reports or a client IP addressthat you want to track. You can also enter an IP range in CIDR format, such as 172.16.0.0/16.
When you leave this field empty, the search returns results for all users.
User/Client IPv4 or IPv6
Optionally, enter a website that you want to track. When you leave this field empty, thesearch returns results for all websites.
Website
Choose the type of transactions that you want to track, either All Transactions, Completed,Blocked, Monitored, or Warned.
Transaction Type
Advanced Search Criteria
To filter by a URL category, select Filter by URL Category and type the first letter of acustom or predefined URL category by which to filter. Choose the category from the list thatappears . .
If the set of URL categories has been updated, some categories may be labeled “Deprecated.”Deprecated categories are no longer being used for new transactions. However, you can stillsearch for recent transactions that occurred while the category was active. For moreinformation about URL category set updates, see URL Category Set Updates and Reports ,on page 179.
All recent transactions that match the category name are included, regardless of the enginename noted in the drop-down list.
URL Category
To filter by an application, select Filter by Application and choose an application by whichto filter.
To filter by an application type, select Filter by Application Type and choose an applicationtype by which to filter.
Application
User Guide for AsyncOS 14.1 for Cisco Secure Email and Web Manager- GD (General Deployment)237
Using Centralized Web Reporting and TrackingSearching for Transactions Processed by Web Proxy Services
DescriptionOption
To filter by a specific Youtube category, expand the Youtube Category section and selectthe Youtube categories that you want to view.
Youtube (YT) Category
To filter by a policy group, select Filter by Policy and enter a policy group name by whichto filter.
Make sure that you have declared the policy on the Web Security appliance.
Policy
To filter by a particular malware threat, selectFilter by Malware Threat and enter a malwarethreat name by which to filter.
To filter by a malware category, select Filter by Malware Category and choose a malwarecategory by which to filter. For descriptions, see Malware Category Descriptions, on page183.
Malware Threat
In the WBRS section, you can filter by Web-Based Reputation Score and by a particularweb reputation threat.
• To filter by web reputation score, select Score Rangeand select the upper and lowervalues by which to filter. Or, you can filter for websites that have no score by selectingNo Score.
• To filter by web reputation threat, select Filter by Reputation Threat and enter a webreputation threat by which to filter.
For more information on WBRS scores, see the IronPort AsyncOS for Web User Guide.
WBRS
To filter by remote or local access, select Filter by User Location and choose an accesstype. To include all access types, select Disable Filter.
(In previous releases, this option was labeled Mobile User Security.)
AnyConnect SecureMobility
To filter by a specific Web appliance, click on the radio button next to Filter by WebApplianceand enter the Web appliance name in the text field.
If you select Disable Filter, the search includes all Web Security appliances associated withthe Security Management appliance.
Web Appliance
To filter by transactions that were actually initiated by the user, select Filter by WebUser-Requested Transactions.
Note: When you enable this filter, the search results include “best guess” transactions.
User Request
Malware Category DescriptionsThe Web Security Appliance can block the following types of malware:
User Guide for AsyncOS 14.1 for Cisco Secure Email and Web Manager- GD (General Deployment)238
Using Centralized Web Reporting and TrackingMalware Category Descriptions

DescriptionMalware Type
Adware encompasses all software executables and plug-ins that direct users towardsproducts for sale. Some adware applications have separate processes that runconcurrently and monitor each other, ensuring that the modifications are permanent.Some variants enable themselves to run each time the machine is started. Theseprograms may also change security settings making it impossible for users to makechanges to their browser search options, desktop, and other system settings.
Adware
A browser helper object is browser plug-in that may perform a variety of functionsrelated to serving advertisements or hijacking user settings.
Browser Helper Object
A commercial system monitor is a piece of software with system monitorcharacteristics that can be obtained with a legitimate license through legal means.
Commercial SystemMonitor
A dialer is a program that utilizes your modem or another type of Internet accessto connect you to a phone line or a site that causes you to accrue long distancecharges to which you did not provide your full, meaningful, and informed consent.
Dialer
Spyware is a type of malware installed on computers that collects small pieces ofinformation about users without their knowledge.
Generic Spyware
A hijacker modifies system settings or any unwanted changes to a user’s systemthat may direct them to a website or run a programwithout a user’s full, meaningful,and informed consent.
Hijacker
This category is used to catch all other malware and suspicious behavior that doesnot exactly fit in one of the other defined categories.
Other Malware
This category represents malware found by Adaptive Scanning independently ofthe other anti-malware engines.
Outbreak Heuristics
A phishing URL is displayed in the browser address bar. In some cases, it involvesthe use of domain names and resembles those of legitimate domains. Phishing is aform of online identity theft that employs both social engineering and technicalsubterfuge to steal personal identity data and financial account credentials.
Phishing URL
Potentially Unwanted Application. A PUA is an application that is not malicious,but which may be considered to be undesirable.
PUA
A system monitor encompasses any software that performs one of the followingactions:
Overtly or covertly records system processes and/or user action.
Makes those records available for retrieval and review at a later time.
System Monitor
A trojan downloader is a Trojan that, after installation, contacts a remote host/siteand installs packages or affiliates from the remote host. These installations usuallyoccur without the user’s knowledge. Additionally, a Trojan Downloader’s payloadmay differ from installation to installation since it obtains downloading instructionsfrom the remote host/site.
Trojan Downloader
A trojan horse is a destructive program that masquerades as a benign application.Unlike viruses, Trojan horses do not replicate themselves.
Trojan Horse
User Guide for AsyncOS 14.1 for Cisco Secure Email and Web Manager- GD (General Deployment)239
Using Centralized Web Reporting and TrackingMalware Category Descriptions
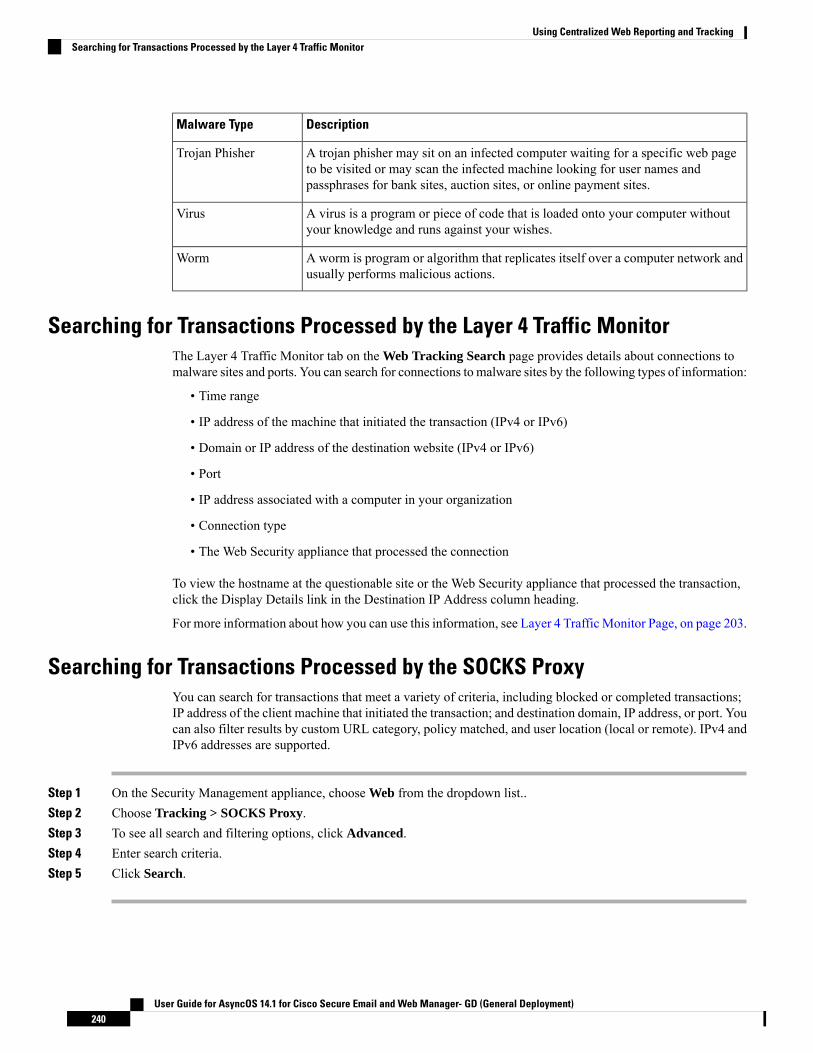
DescriptionMalware Type
A trojan phisher may sit on an infected computer waiting for a specific web pageto be visited or may scan the infected machine looking for user names andpassphrases for bank sites, auction sites, or online payment sites.
Trojan Phisher
A virus is a program or piece of code that is loaded onto your computer withoutyour knowledge and runs against your wishes.
Virus
A worm is program or algorithm that replicates itself over a computer network andusually performs malicious actions.
Worm
Searching for Transactions Processed by the Layer 4 Traffic MonitorThe Layer 4 Traffic Monitor tab on the Web Tracking Search page provides details about connections tomalware sites and ports. You can search for connections to malware sites by the following types of information:
• Time range
• IP address of the machine that initiated the transaction (IPv4 or IPv6)
• Domain or IP address of the destination website (IPv4 or IPv6)
• Port
• IP address associated with a computer in your organization
• Connection type
• The Web Security appliance that processed the connection
To view the hostname at the questionable site or the Web Security appliance that processed the transaction,click the Display Details link in the Destination IP Address column heading.
For more information about how you can use this information, see Layer 4 Traffic Monitor Page, on page 203.
Searching for Transactions Processed by the SOCKS ProxyYou can search for transactions that meet a variety of criteria, including blocked or completed transactions;IP address of the client machine that initiated the transaction; and destination domain, IP address, or port. Youcan also filter results by custom URL category, policy matched, and user location (local or remote). IPv4 andIPv6 addresses are supported.
Step 1 On the Security Management appliance, choose Web from the dropdown list..Step 2 Choose Tracking > SOCKS Proxy.Step 3 To see all search and filtering options, click Advanced.Step 4 Enter search criteria.Step 5 Click Search.
User Guide for AsyncOS 14.1 for Cisco Secure Email and Web Manager- GD (General Deployment)240
Using Centralized Web Reporting and TrackingSearching for Transactions Processed by the Layer 4 Traffic Monitor

What to do next
Related Topics
SOCKS Proxy Report , on page 193
Working with Web Tracking Search Results• Displaying More Web Tracking Search Results , on page 241• Understanding Web Tracking Search Results , on page 241• Viewing Transaction Details for Web Tracking Search Results , on page 241• About Web Tracking and Upgrades , on page 243
Displaying More Web Tracking Search Results
Step 1 Be sure to review all pages of returned results.Step 2 To display more results per page than the current number displayed, select an option from the Items Displayed menu.Step 3 If more transactions match your criteria than the maximum number of transactions offered in the Items Displayed menu,
you can view the complete set of results by clicking the Printable Download link to obtain a CSV file that includes allmatching transactions.
This CSV file includes the complete set of raw data, excluding details of related transactions.
Understanding Web Tracking Search ResultsBy default, results are sorted by time stamp, with the most recent result at the top.
Search results include:
• The time that the URL was accessed.
• The number of related transactions spawned by the user-initiated transaction, such as images loaded,javascripts run, and secondary sites accessed. The number of related transactions appears in each rowbelow the Display All Details link in the column heading.
• The disposition (The result of the transaction. If applicable, shows the reason the transaction was blocked,monitored, or warned.)
Viewing Transaction Details for Web Tracking Search ResultsDo ThisTo View
Note which hostWeb Security Appliance processed the transaction,then check the Accesslog on that appliance.
The full URL for a truncated URL inthe list
Click a URL in the Website column.Details for an individual transaction
User Guide for AsyncOS 14.1 for Cisco Secure Email and Web Manager- GD (General Deployment)241
Using Centralized Web Reporting and TrackingWorking with Web Tracking Search Results

Do ThisTo View
Click theDisplay All Details... link in theWebsite column heading.Details for all transactions
The number of related transactions appears in parentheses belowthe “Display Details” link in the column heading in the list of searchresults.
Click the Related Transactions link in the Details view for atransaction.
A list of up to 500 related transactions
About Web Tracking and Advanced Malware Protection FeaturesWhen searching for file threat information in Web Tracking, keep the following points in mind:
• To search for malicious files found by the file reputation service, selectKnown Malicious and High-RiskFiles for the Filter by Malware Category option in the Malware Threat area in the Advanced sectionin Web Tracking.
• Web Tracking includes only information about file reputation processing and the original file reputationverdicts returned at the time a transaction was processed. For example, if a file was initially found to beclean, then a verdict update found the file to be malicious, only the clean verdict appears in Trackingresults.
"Block - AMP" in search results means the transaction was blocked because of the file's reputation verdict.
In Tracking details, the "AMP Threat Score" is the best-effort score that the cloud reputation serviceprovides when it cannot determine a clear verdict for the file. In this situation, the score is between 1 and100. (Ignore the AMP Threat Score if an AMP Verdict is returned or if the score is zero.) The appliancecompares this score to the threshold score (configured on the Security Services > Anti-Malware andReputation page) to determine what action to take. By default, files with scores between 60 and 100 areconsideredmalicious. Cisco does not recommend changing the default threshold score. TheWBRS scoreis the reputation of the site from which the file was downloaded; this score is not related to the filereputation.
• Verdict updates are available only in the AMP Verdict Updates report. The original transaction detailsin Web Tracking are not updated with verdict changes. To see transactions involving a particular file,click a SHA-256 in the verdict updates report.
• Information about File Analysis, including analysis results and whether or not a file was sent for analysis,are available only in the File Analysis report.
Additional information about an analyzed file may be available from the cloud. To view any availableFile Analysis information for a file, select Reporting > File Analysis and enter the SHA-256 to searchfor the file, or click the SHA-256 link in Web Tracking details. If the File Analysis service has analyzedthe file from any source, you can see the details. Results are displayed only for files that have beenanalyzed.
If the appliance processed a subsequent instance of a file that was sent for analysis, those instances willappear in Web Tracking search results.
Related Topics
• Identifying Files by SHA-256 Hash , on page 186
User Guide for AsyncOS 14.1 for Cisco Secure Email and Web Manager- GD (General Deployment)242
Using Centralized Web Reporting and TrackingAbout Web Tracking and Advanced Malware Protection Features

About Web Tracking and UpgradesNew web tracking features may not apply to transactions that occurred before upgrade, because the requireddata may not have been retained for those transactions. For possible limitations related to web tracking dataand upgrades, see the Release Notes for your release.
Troubleshooting Web Reporting and Tracking• Centralized Reporting Is Enabled Properly But Not Working , on page 243• Advanced Malware Protection Verdict Updates Report Results Differ , on page 243• Issues Viewing File Analysis Report Details , on page 243• Expected Data Is Missing from Reporting or Tracking Results, on page 244• PDF Shows Only a Subset of Web Tracking Data , on page 245• Troubleshooting L4 Traffic Monitor Reports , on page 245• Exported .CSV file is Different From Web Interface Data , on page 245
See also Troubleshooting All Reports , on page 35.
Centralized Reporting Is Enabled Properly But Not WorkingProblem
You have enabled centralized web reporting as directed, but it is not working.
Solution
If there is no disk space allocated for reporting, centralized web reporting will not work until disk space isallocated. As long as the quota you are setting the Web Reporting and Tracking to is larger than the currentlyused disk space, you will not lose any Web Reporting and Tracking data. See the Managing Disk Space , onpage 494, for more information.
Advanced Malware Protection Verdict Updates Report Results DifferProblem
AWeb Security appliance and an Email Security appliance sent the same file for analysis, and the AMPVerdict Updates reports for Web and Email show different verdicts for that file.
Solution
This situation is temporary. Results will match once all verdict updates have been downloaded. Allow up to30 minutes for this to occur.
Issues Viewing File Analysis Report Details• File Analysis Report Details Are Not Available , on page 243• Error When Viewing File Analysis Report Details, on page 244
File Analysis Report Details Are Not AvailableProblem
User Guide for AsyncOS 14.1 for Cisco Secure Email and Web Manager- GD (General Deployment)243
Using Centralized Web Reporting and TrackingAbout Web Tracking and Upgrades

File Analysis report details are not available.
Solution
See Requirements for File Analysis Report Details , on page 185.
Error When Viewing File Analysis Report DetailsProblem
No cloud server configuration is available, error appears when you attempt to view File Analysis report details.
Solution
Go to Management Appliance > Centralized Services > Security Appliances and add at least one WebSecurity appliance that has the File Analysis feature enabled.
Error When Viewing File Analysis Report Details with Private Cloud Cisco AMP Threat GridAppliance
Problem
You see an API key, registration, or activation error when attempting to view File Analysis report details.
Solution
If you are using a private cloud (on-premises) Cisco AMP Threat Grid appliance for file analysis, see(On-Premises File Analysis) Activate the File Analysis Account , on page 186.
If your Threat Grid appliance hostname changes, you must repeat the process in the referenced procedure.
Expected Data Is Missing from Reporting or Tracking ResultsProblem
Expected data is missing from reporting or tracking results.
Solution
Possible causes:
• Make sure you have selected the desired time range.• For tracking results, be sure you are viewing all matching results. See Displaying More Web TrackingSearch Results , on page 241.
• Data transfer between Web Security appliances and the Cisco Content Security Management appliancemay have been interrupted, or data may have been purged. See Data Availability Page, on page 196.
• If an upgrade changes the way information is reported or tracked, transactions that occurred beforeupgrade may not be represented as expected. To see if your release has this type of change, see the ReleaseNotes for your release at the location specified in Documentation , on page 595.
• For missing results in Web Proxy Services tracking search results, see Searching for TransactionsProcessed by Web Proxy Services , on page 231.
• For unexpected results when filtering by user requested transactions, see the User Request row of thetable in Searching for Transactions Processed by Web Proxy Services , on page 231.
User Guide for AsyncOS 14.1 for Cisco Secure Email and Web Manager- GD (General Deployment)244
Using Centralized Web Reporting and TrackingError When Viewing File Analysis Report Details

PDF Shows Only a Subset of Web Tracking DataProblem
PDF shows only some of the data that is visible on the Web Tracking page.
Solution
For information about what data is included in and omitted from PDFs and CSV files, see the web trackinginformation in the table in Exporting Reporting and Tracking Data , on page 33.
Troubleshooting L4 Traffic Monitor ReportsIf the Web Proxy is configured as a forward proxy and L4 Traffic Monitor is set to monitor all ports, the IPaddress of the proxy’s data port is recorded and displayed as the client IP address in reports. If the Web Proxyis configured as a transparent proxy, enable IP spoofing to correctly record and display the client IP addresses.To do this, see the IronPort AsyncOS for Web User Guide.
Related Topics
• Client Malware Risk Report , on page 189• Searching for Transactions Processed by the L4 Traffic Monitor , on page 235
Exported .CSV file is Different From Web Interface DataProblem
Domains Matched data exported to .csv file differs from the data shown in the Web interface.
Solution
For performance reasons, only the first 300,000 entries are exported as .csv.
Issues Exporting Web Tracking Search ResultsProblem
Web tracking search results display an “Out of Memory” errors when you simultaneously run multiple largesearch queries.
Solution
You can increase the heap size of the memory to 1024 MB or more or reduce the time range of your searchcriteria as a workaround. Keep in mind that increasing the heap size of the memory can cause memory-relatedissues.
User Guide for AsyncOS 14.1 for Cisco Secure Email and Web Manager- GD (General Deployment)245
Using Centralized Web Reporting and TrackingPDF Shows Only a Subset of Web Tracking Data

User Guide for AsyncOS 14.1 for Cisco Secure Email and Web Manager- GD (General Deployment)246
Using Centralized Web Reporting and TrackingIssues Exporting Web Tracking Search Results

C H A P T E R 7Tracking Messages
This chapter contains the following sections:
• Tracking Service Overview, on page 247• Setting Up Centralized Message Tracking , on page 248• Checking Message Tracking Data Availability , on page 251• Searching for Email Messages, on page 251• Understanding Tracking Query Results, on page 259• Troubleshooting Message Tracking, on page 262• Exporting Message Service, on page 263
Tracking Service OverviewThe tracking service of the Cisco Secure Email and Web Managerappliance complements Email Securityappliances. With the Security Management appliance, email administrators have a single place to track thestatus of messages that traverse any of their Email Security appliances.
The SecurityManagement appliancemakes it easy to find the status of messages that Email Security appliancesprocess. Email administrators can quickly resolve help desk calls by determining the exact location of amessage. With the Security Management appliance, an administrator can determine if a particular messagewas delivered, found to contain a virus, or placed in a spam quarantine — or if it is located somewhere elsein the mail stream.
Instead of having to search through log files using grep or similar tools, you can use the flexible trackinginterface of the SecurityManagement appliance to locate messages. You can use a variety of search parametersin combination
Tracking queries can include:
• Time Frame: Find a message that was sent between specified dates and times.
• Envelope Information: Find messages from particular envelope senders or recipients by entering thetext strings to match.
• Subject: Match a text string in the subject line. Warning: Do not use this type of search in environmentswhere regulations prohibit such tracking.
• Attachment Name: You can search for messages based on an attachment name. Messages that containat least one attachment with the queried name will appear in the search results.
User Guide for AsyncOS 14.1 for Cisco Secure Email and Web Manager- GD (General Deployment)247

For performance reasons, the names of files within attachments such as OLE objects or archives such as.ZIP files are not tracked.
Some attachments may not be tracked. For performance reasons, scanning of attachment names occursonly as part of other scanning operations, for example message or content filtering, DLP, or disclaimerstamping. Attachment names are available only for messages that pass through body scanning while theattachment is still attached. Some examples when an attachment name will not appear include (but arenot limited to):
• if the system only uses content filters, and a message is dropped or its attachment is stripped byanti-spam or anti-virus filters
• if message splintering policies strip the attachment from some messages before body scanningoccurs.
• File SHA256: Find messages with the SHA-256 value of the message file
• Cisco Host: Narrow search criteria to particular Email Security appliances, or search across all managedappliances.
• Message ID Header and Cisco MID: Find messages by identifying the SMTP “Message-ID:” headeror the Cisco message ID (MID).
• Sender IP Address/ Domain/ Network Owner: Search for messages from a particular IP address,domain name or network owner.
• Message Event: Find messages that match specified events, such as messages flagged as virus positive,spam positive, or suspected spam, and messages that were delivered, hard bounced, soft bounced, or sentto the Virus Outbreak Quarantine
• Rejected Connections: Search for messages from a particular IP address, domain name or networkowner of the rejected connections in the search results
Setting Up Centralized Message TrackingTo set up centralized message tracking, complete the following procedures in order:
1. Enabling Centralized Email Tracking, on page 248
2. Configuring Centralized Message Tracking on Email Security Appliances , on page 249
3. Adding the Centralized Message Tracking Service to Each Managed Email Security Appliance , on page250
Enabling Centralized Email Tracking• Enabling Centralized Email Tracking on the Legacy Web Interface, on page 249
• Enabling Centralized Email Tracking on the New Web Interface, on page 249
User Guide for AsyncOS 14.1 for Cisco Secure Email and Web Manager- GD (General Deployment)248
Tracking MessagesSetting Up Centralized Message Tracking

Enabling Centralized Email Tracking on the Legacy Web Interface
Step 1 Choose Management Appliance > Centralized Services > Email> Centralized Message Tracking.Step 2 In the Message Tracking Service section, click Enable.Step 3 If you are enabling centralized email tracking for the first time after running the System Setup Wizard, review the end
user license agreement, and click Accept.Step 4 Submit and commit your changes.
What to do next
Configuring Centralized Message Tracking on Email Security Appliances , on page 249
Enabling Centralized Email Tracking on the New Web Interface
Step 1 On the SecurityManagement appliance, click Service Status and hover over the corresponding toMessage Trackingcard.
Step 2 Click Edit Settings.Step 3 If you are enabling centralized email tracking for the first time after running the System SetupWizard, review and accept
the license agreement, and click Proceed.Step 4 Click the toggle switch to enable Centralized Email Tracking.Step 5 Select the appropriate fields and click Submit.
What to do next
Configuring Centralized Message Tracking on Email Security Appliances , on page 249
Configuring Centralized Message Tracking on Email Security Appliances
Step 1 [New Web Interface Only] On the Security Management appliance, click to load the legacy web interface.Step 2 Verify that Message Tracking is configured and working properly on the Email Security appliance.Step 3 Go to Security Services > Message Tracking.Step 4 Click Edit Settings.Step 5 Select Centralized Tracking.Step 6 Click Submit.Step 7 If you want to be able to search for and log the names of email attachments:
Make sure you have at least one incoming content filter or other body scanning feature configured and enabled on theEmail Security appliance. For information about content filters and body scanning, see the documentation or online helpfor your Email Security appliance.
User Guide for AsyncOS 14.1 for Cisco Secure Email and Web Manager- GD (General Deployment)249
Tracking MessagesEnabling Centralized Email Tracking on the Legacy Web Interface
Step 8 Submit and commit your changes.Step 9 Repeat for each Email Security appliance to manage.
What to do next
Adding the Centralized Message Tracking Service to Each Managed Email Security Appliance , on page 250
Adding the Centralized Message Tracking Service to Each Managed EmailSecurity Appliance
The steps you follow depend on whether or not you have already added the appliance while configuringanother centralized management feature.
Step 1 [New Web Interface Only] On the Security Management appliance, click to load the legacy web interface.Step 2 Choose Management Appliance > Centralized Services > Security Appliances.Step 3 If you have already added the Email Security appliance to the list on this page:
a) Click the name of an Email Security appliance.b) Select the Centralized Message Tracking service.
Step 4 If you have not yet added the Email Security appliance:a) Click Add Email Appliance.b) In the Appliance Name and IP Address text fields, type the appliance name and the IP address for the Management
interface of the Email Security appliance.
If you enter a DNS name in the IP Address text field, it will be immediately resolved to an IP address whenyou click Submit.
Note
c) The Centralized Message Tracking service is pre-selected.d) Click Establish Connection.e) Enter the user name and passphrase for an administrator account on the appliance to be managed, then clickEstablish
Connection.
You enter the login credentials to pass a public SSH key for file transfers from the Security Managementappliance to the remote appliance. The login credentials are not stored on the SecurityManagement appliance.
Note
f) Wait for the Success message to appear above the table on the page.g) Click Test Connection.h) Read test results above the table.
Step 5 Submit and commit your changes.Step 6 Repeat this procedure for each Email Security appliance for which you want to enable Centralized Message Tracking.
User Guide for AsyncOS 14.1 for Cisco Secure Email and Web Manager- GD (General Deployment)250
Tracking MessagesAdding the Centralized Message Tracking Service to Each Managed Email Security Appliance
Managing Access to Sensitive InformationIf you will distribute administrative tasks to other people and you want to restrict their access to sensitiveinformation that may appear in email messages that violate Data Loss Prevention (DLP) policies, see ControllingAccess to Sensitive Information in Message Tracking , on page 422.
Checking Message Tracking Data AvailabilityYou can determine the date range that your message tracking data includes, as well as identify any missingintervals in that data.
Step 1 [New Web Interface Only] On the Security Management appliance, click to load the legacy web interface.Step 2 Choose Email > Message Tracking > Message Tracking Data Availability.
Searching for Email Messages
After upgrading to AsyncOS 13.6.1, the state of the messages that were in quarantine prior to the upgradedoes not change.
Note
• Searching for Email Messages on the New Web Interface, on page 251
• Searching for Email Messages on the Legacy Web Interface, on page 253
• Remediating Messages in Mailboxes, on page 255
Searching for Email Messages on the New Web InterfaceThe tracking service of the appliance lets you search for a particular email message or group of messages thatmatch specified criteria, such as the message subject line, date and time range, envelope sender or recipient,or processing event (for example, whether the message was virus positive, spam positive, hard bounced,delivered, and so forth). Message tracking gives you a detailed view of message flow. You can also drill downon particular email messages to see message details, such as the processing events, attachment names, or theenvelope and header information.
Although the tracking component provides detailed information about individual email messages, you cannotuse it to read the content of messages.
Note
Step 1 On the Security Management appliance, choose Tracking > Search.Step 2 Select Messages tab or Rejected Connections tab to narrow your search results.
User Guide for AsyncOS 14.1 for Cisco Secure Email and Web Manager- GD (General Deployment)251
Tracking MessagesManaging Access to Sensitive Information

You can search for rejected connections based on the sender IP address, domain or network owner.Note
Step 3 (Optional) Click the Advanced Search to display additional search options.Step 4 Enter the following search criteria:
Tracking searches do not support wildcard characters or regular expressions. Tracking searches are not casesensitive.
Note
• [For Messages and Rejected Connections] Message Received: Specify a date and time range for the query using“Last Day,” “Last 7 Days,” or “Custom Range.” Use the “Last Day” option to search for messages within the past24 hours, and use the “Last 7 Days” option to search for messages within the past full seven days, plus the time thathas passed on the current day.
If you do not specify a date, the query returns data for all dates. If you specify a time range only, the query returnsdata for that time range across all available dates. If you specify the current date and 23:59 as the end date and time,the query returns all data for the current date.
Dates and times are converted to GMT format when they are stored in the database. When you view dates and timeson an appliance, they are displayed in the local time of the appliance.
Messages appear in the results only after they have been logged on the Email Security appliance and retrieved bythe Security Management appliance. Depending on the size of logs and the frequency of polling, there could be asmall gap between the time when an email message was sent and when it actually appears in tracking and reportingresults.
• Envelope Sender: Select Begins With, Is, or Contains, and enter a text string to search for in the envelope sender.You can enter email addresses, user names, or domains. Use the following formats:
• For email domains: example.com, [203.0.113.15], [ipv6:2001:db8:80:1::5]
• For full email addresses: [email protected], user@[203.0.113.15] or user@[ipv6:2001:db8:80:1::5].
• You can enter any character(s). No validation of your entry is performed.
• Subject: Select Begins With, Is, Contains, or Is Empty, and enter a text string to search for in the message subjectline.
• Envelope Recipient: Select Begins With, Is, or Contains, and enter text to search for in the envelope recipient. Youcan enter email addresses, user names, or domains.
If you use the alias table for alias expansion on your Email Security appliances, the search finds the expandedrecipient addresses rather than the original envelope addresses. In all other cases, message tracking queries find theoriginal envelope recipient addresses.
Otherwise, valid search criteria for Envelope Recipient are the same as those for Envelope Sender.
You can enter any character(s). No validation of your entry is performed.
• Attachment Name: Select BeginsWith, Is, or Contains, and enter an ASCII or Unicode text string for one AttachmentName to find. Leading and trailing spaces are not stripped from the text you enter.
• Reply-To: Select Begins With, Is, or Contains, and enter a text string to search for messages based on the Reply-Toheader of the message.
• File SHA256: Enter a File SHA-256 value of the message.
For more information about identifying files based on SHA-256 hash, see Identifying Files by SHA-256 Hash , onpage 85.
User Guide for AsyncOS 14.1 for Cisco Secure Email and Web Manager- GD (General Deployment)252
Tracking MessagesSearching for Email Messages on the New Web Interface

• Cisco Host: Select All Host to search across all email security appliances or select the required email securityappliance from the drop-down menu.
• Message ID Header and Cisco MID: Enter a text string for the message ID header, the Cisco IronPort message ID(MID), or both.
• [ForMessages and Rejected Connections] Sender IP Address/ Domain/ Network Owner: Enter a sender IP address,domain or nework owner details.
• An IPv4 address must be 4 numbers separated by a period. Each number must be a value from 0 to 255.(Example: 203.0.113.15).
• An IPv6 address consists of 8 sets of 16-bit hexadecimal values separated by colons.
You can use zero compression in one location, such as 2001:db8:80:1::5.
• Message Event: Select the events to track. Options are Virus Positive, Spam Positive, Suspect Spam, containedmalicious URLs, contained URL in specified category, DLPViolations (you can enter the name of a DLP policyand select violation severities or action taken), DMARC violations, Delivered, Advanced Malware ProtectionPositive (for malware found in an attachment), Hard Bounced, Soft Bounced, currently in a policy, virus, oroutbreak quarantine, caught by message filters or content filters, and Quarantined as Spam. Unlike mostconditions that you add to a tracking query, events are added with an “OR” operator. Selecting multiple eventsexpands the search.
You do not need to complete every field. Except for the Message Event options, the query is an “AND” search. The queryreturns messages that match the “AND” conditions specified in the search fields. For example, if you specify text stringsfor the envelope recipient and the subject line parameters, the query returns only messages that match both the specifiedenvelope recipient and the subject line.
In the new web interface, to perform a partial URL search, you need to add "*" before and after the searchstring to retrieve the results.
Note
Step 5 Click Search.
Each row corresponds to an email message. Scroll down to load more messages in the view.
If necessary, you can refine your search by entering new search criteria, and run the query again. Alternatively, you canrefine the search by narrowing the result set, as described in the following section.
Click Export to export the search results.
What to do next
• Narrowing the Result Set, on page 257
• About Message Tracking and Advanced Malware Protection Features , on page 258
• Understanding Tracking Query Results, on page 259
Searching for Email Messages on the Legacy Web InterfaceThe SecurityManagement appliance’s tracking service lets you search for a particular email message or groupof messages that match specified criteria, such as the message subject line, date and time range, envelope
User Guide for AsyncOS 14.1 for Cisco Secure Email and Web Manager- GD (General Deployment)253
Tracking MessagesSearching for Email Messages on the Legacy Web Interface

sender or recipient, or processing event (for example, whether the message was virus positive, spam positive,hard bounced, delivered, and so forth). Message tracking gives you a detailed view of message flow. You canalso drill down on particular email messages to see message details, such as the processing events, attachmentnames, or the envelope and header information.
Although the tracking component provides detailed information about individual email messages, you cannotuse it to read the content of messages.
Note
Step 1 Choose Email > Message Tracking > Message Tracking.Step 2 (Optional) Click the Advanced link to display more search options.Step 3 Enter search criteria:
Tracking searches do not support wildcard characters or regular expressions. Tracking searches are not casesensitive.
Note
• Envelope Sender: Select Begins With, Is, or Contains, and enter a text string to search for in the envelope sender.You can enter email addresses, user names, or domains. Use the following formats:
• For email domains: example.com, [203.0.113.15], [ipv6:2001:db8:80:1::5]• For full email addresses: [email protected], user@[203.0.113.15] or user@[ipv6:2001:db8:80:1::5].• You can enter any character(s). No validation of your entry is performed.
• Envelope Recipient: Select Begins With, Is, or Contains, and enter text to search for in the envelope recipient. Youcan enter email addresses, user names, or domains.
If you use the alias table for alias expansion on your Email Security appliances, the search finds the expanded recipientaddresses rather than the original envelope addresses. In all other cases, message tracking queries find the original enveloperecipient addresses.
Otherwise, valid search criteria for Envelope Recipient are the same as those for Envelope Sender.
You can enter any character(s). No validation of your entry is performed.
• Subject: Select Begins With, Is, Contains, or Is Empty, and enter a text string to search for in the message subjectline.
• Message Received: Specify a date and time range for the query using “Last Day,” “Last 7 Days,” or “CustomRange.”Use the “Last Day” option to search for messages within the past 24 hours, and use the “Last 7 Days” option tosearch for messages within the past full seven days, plus the time that has passed on the current day.
If you do not specify a date, the query returns data for all dates. If you specify a time range only, the query returns datafor that time range across all available dates. If you specify the current date and 23:59 as the end date and time, the queryreturns all data for the current date.
Dates and times are converted to GMT format when they are stored in the database. When you view dates and times onan appliance, they are displayed in the local time of the appliance.
Messages appear in the results only after they have been logged on the Email Security appliance and retrieved by theSecurity Management appliance. Depending on the size of logs and the frequency of polling, there could be a small gapbetween the time when an email message was sent and when it actually appears in tracking and reporting results.
• Sender IP Address: Enter a sender IP address and select whether to searchmessages or to search rejected connectionsonly.
User Guide for AsyncOS 14.1 for Cisco Secure Email and Web Manager- GD (General Deployment)254
Tracking MessagesSearching for Email Messages on the Legacy Web Interface

An IPv4 address must be 4 numbers separated by a period. Each number must be a value from 0 to 255.(Example: 203.0.113.15).
•
• An IPv6 address consists of 8 sets of 16-bit hexadecimal values separated by colons. You can use zerocompression in one location, such as 2001:db8:80:1::5.
• Message Event: Select the events to track. Options are Virus Positive, Spam Positive, Suspect Spam, containedmalicious URLs, contained URL in specified category, DLP Violations (you can enter the name of a DLP policyand select violation severities or action taken), DMARC violations, Delivered, AdvancedMalware Protection Positive(for malware found in an attachment), Hard Bounced, Soft Bounced, currently in a policy, virus, or outbreakquarantine, caught by message filters or content filters, Macro File Types Detected, Geolocation, Low Risk andQuarantined as Spam. Unlike most conditions that you add to a tracking query, events are added with an “OR”operator. Selecting multiple events expands the search.
• Message ID Header and Cisco IronPort MID: Enter a text string for the message ID header, the Cisco IronPortmessage ID (MID), or both.
• Query Settings: From the drop-down menu, select how long you want the query to run before it times out. Optionsare “1 minute,” “2 minutes,” “5 minutes,” “10 minutes,” and “No time limit.” Also, select the maximum number ofresults you want the query to return (up to 1000).
• Attachment name: Select BeginsWith, Is, or Contains, and enter an ASCII or Unicode text string for one AttachmentName to find. Leading and trailing spaces are not stripped from the text you enter.
You do not need to complete every field. Except for the Message Event options, the query is an “AND” search. The queryreturns messages that match the “AND” conditions specified in the search fields. For example, if you specify text stringsfor the envelope recipient and the subject line parameters, the query returns only messages that match both the specifiedenvelope recipient and the subject line.
Step 4 Click Search.
The query results appear at the bottom of the page. Each row corresponds to an email message.
Your search criteria are highlighted in each row.
If the number of returned rows is greater than the value specified in the “Items per page” field, the results appear onmultiple pages. To navigate through the pages, click the page numbers at the top or bottom of the list.
If necessary, refine the search by entering new search criteria, and run the query again. Alternatively, you can refine thesearch by narrowing the result set, as described in the following section.
What to do next
• Narrowing the Result Set, on page 257
• About Message Tracking and Advanced Malware Protection Features , on page 258
• Understanding Tracking Query Results, on page 259
Remediating Messages in MailboxesCisco Content Security Management appliance provides the capability to remediate the malicious messagesthat are already delivered to the user mailbox. You can configure your appliance to remediate the messagesby using the Message Tracking filter.
User Guide for AsyncOS 14.1 for Cisco Secure Email and Web Manager- GD (General Deployment)255
Tracking MessagesRemediating Messages in Mailboxes

You can perform remedial actions manually on messages that are already delivered to the user mailbox. Forexample, an administrator monitoring the incoming messages can perform remedial actions on messages inthe user mailbox using the Message Tracking filter.
You can also use the Message Tracking page to search and remediate the messages that are delivered to theuser mailbox. The Message Tracking page is a unified place to search for all messages delivered to themailboxes. From the search result, you can choose the messages you want to remediate and apply the actionyou want to perform on the messages.
Search and Remediate Messages Workflow
1. Message reaches the appliance and is delivered to the recipient.
2. The user searches for the message delivered to the recipient using the Message Tracking filter.
3. The user selects the message to be remediated from the recipient's mailbox and applies the remedial actionon the message.
Search and Remediate Actions on Messages in the Mailboxes
Before you begin
• Make sure that you have enabled mailbox remediation and configured the account settings on CiscoEmail Security Gateway.
• Enable Message Tracking on your appliance. See Setting Up Centralized Message Tracking , on page248.
• If you are using the CentralizedMessage Tracking service, make sure that you have enabled the trailblazerport and AsyncOS API HTTP port on the managed Cisco Email Security Gateway and the Cisco ContentSecurity Management appliance can access the trailblazer port. If the trailblazer port is disabled, ensurethat the Cisco Content Security Management appliance can access the AsyncOS API HTTP(S) port onthe managed Cisco Email Security Gateway.
• If the managed Cisco Email Security appliance is using a certificate whose Certificate Authority doesnot exist in the Cisco Content SecurityManagement appliance trust store, the server certificate validationon the Content Security Management appliance fails. To allow communication, add the CertificateAuthority of the signed certificate used by the Cisco Email Security appliance to the Cisco ContentSecurity Management appliance. To add the Certificate Authority, use certconfig > CERTAUTHORITY
sub command in the CLI.
CAUTION: If you want to disable the server certificate validation on the Content Security Managementappliance, use the esaapiconfig command in the CLI. Cisco does not recommend you to disable thecertificate validation for security reasons.
Step 1 On the Security Management appliance, click on the Tracking tab on the new web interface of the appliance.Step 2 Click the Messages tab to narrow your search results. For more information, see Searching for Email Messages on the
New Web Interface, on page 251.Step 3 Select the messages you want to remediate. You can select a maximum of 1000 messages at a time. You can remediate
the messages that are only in the delivered state.Step 4 Click Remediate.Step 5 Enter the following details:
User Guide for AsyncOS 14.1 for Cisco Secure Email and Web Manager- GD (General Deployment)256
Tracking MessagesSearch and Remediate Actions on Messages in the Mailboxes

• Enter a batch name for the remediation.
• Select anyone of the following remediation action:
• Delete the messages. Select this option to permanently delete the messages from the end user’s mailbox.
• Forward to an email address. Select this option to forward the messages to a specified user, for example, anemail administrator.
• Forward to an email address and delete the messages. Select this option to forward the messages to a specifieduser, for example, an email administrator and permanently delete that messages from the end user’s mailbox.
Step 6 Click Apply.
After you click Apply, you can view the Remediation Report Status widget at the bottom-right corner of the MessageTracking page. Use this widget to check the status of the Remediation Report generation. After the Remediation Reportgeneration is complete, click View Details on the widget to go to the Remediation Report to view the remediation results.
You can also view Remediation Report directly by navigating to Reports > User Reports > > RemediationReport and click the Mailbox Search And Remediate tab.
Note
Narrowing the Result SetAfter you run a query, you might find that the result set includes more information than you need. Instead ofcreating a new query, narrow the result set by clicking a value within a row in the list of results. Clicking avalue adds the parameter value as a condition in the search. For example, if the query results include messagesfrom multiple dates, click a particular date within a row to show only messages that were received on thatdate.
Step 1 Float the cursor over the value that you want to add as a condition. The value is highlighted in yellow.
Use the following parameter values to refine the search:
• Date and time• Message ID (MID)• Host (the Email Security appliance)• Sender• Recipient• The subject line of the message, or starting words of the subject
Step 2 [New Web Interface Only] In the Message Tracking search criteria, click Modify.
Use the following parameter values to refine the search:
• Date and time
• Message ID (MID)
• Cisco Host (the Email Security appliance)
• Sender
User Guide for AsyncOS 14.1 for Cisco Secure Email and Web Manager- GD (General Deployment)257
Tracking MessagesNarrowing the Result Set

• Recipient
• The subject line of the message, or starting words of the subject
• Message Event
• Additional Details (Message Last State, SBRS, Sender IP, and Group)
Step 3 Click the value to refine the search.
The Results section displays the messages that match the original query parameters and the new condition that you added.
Step 4 If necessary, click additional values in the results to further refine the search.
To remove query conditions, click Clear and run a new tracking query.Note
About Message Tracking and Advanced Malware Protection FeaturesWhen searching for file threat information in Message Tracking, keep the following points in mind:
• To search for malicious files found by the file reputation service, select Advanced Malware ProtectionPositive for the Message Event option in the Advanced section in Message Tracking.
• Message Tracking includes only information about file reputation processing and the original file reputationverdicts returned at the time a message was processed. For example, if a file was initially found to beclean, then a verdict update found the file to be malicious, only the clean verdict appears in Trackingresults.
In Message Tracking details, the Processing Details section shows:
• The SHA-256 of each attachment in the message, and
• The final Advanced Malware Protection verdict for the message as a whole, and
• Any attachments which were found to contain malware.
No information is provided for clean or unscannable attachments.
• Verdict updates are available only in the AMP Verdict Updates report. The original message details inMessage Tracking are not updated with verdict changes. To seemessages that have a particular attachment,click a SHA-256 in the verdict updates report.
• Information about File Analysis, including analysis results and whether or not a file was sent for analysis,are available only in the File Analysis report.
Additional information about an analyzed file may be available from the cloud. To view any availableFile Analysis information for a file, select Monitor > File Analysis and enter the SHA-256 to searchfor the file. If the File Analysis service has analyzed the file from any source, you can see the details.Results are displayed only for files that have been analyzed.
If the appliance processed a subsequent instance of a file that was sent for analysis, those instances willappear in Message Tracking search results.
User Guide for AsyncOS 14.1 for Cisco Secure Email and Web Manager- GD (General Deployment)258
Tracking MessagesAbout Message Tracking and Advanced Malware Protection Features

Understanding Tracking Query ResultsIf results are not what you expected, see Troubleshooting Message Tracking, on page 262.
Tracking query results list all of the messages that match the criteria specified in the tracking query. Exceptfor the Message Event options, the query conditions are added with an “AND” operator. The messages in theresult set must satisfy all of the “AND” conditions. For example, if you specify that the envelope sender beginswith J and you specify that the subject begins with T , the query returns a message only if both conditions aretrue for that message.
To view detailed information about a message, click the More Details link in the new web interface or ShowDetails link in the legacy web interface, for that message. For more information, see the Message Details, onpage 259.
• Messages with 50 or more recipients will not appear in tracking query results. This issue will be resolvedin a future release.
• [New Web Interface Only] You can scroll down to display the search results when you specify yourquery. More results are displayed in the view as you scroll down.
• You can export the search results to a .csv file using the Export link above the search results section.
You can choose to display up to 1000 search results when you specify your query. To view up to 50,000messages that match your criteria, click the Export All link above the search results section and openthe resulting .csv file in another application.
• If you clicked a link in a report page to view message details in Message Tracking, and the results areunexpected, this can occur if reporting and tracking were not both simultaneously and continuouslyenabled during the time period you are reviewing.
• For information about printing or exporting message tracking search results, see Exporting Reportingand Tracking Data , on page 33.
Note
Related Topics
Message Details, on page 259
Message DetailsTo view detailed information about a particular email message, including the message header informationand processing details, click More Details linkfor any item in the search results list. A new window openswith the message details.
The message details include the following sections:
• Verdict Chart and Last State Verdicts, on page 260
• Envelope and Header Summary, on page 261
• Sending Host Summary, on page 261
• Processing Details, on page 261
User Guide for AsyncOS 14.1 for Cisco Secure Email and Web Manager- GD (General Deployment)259
Tracking MessagesUnderstanding Tracking Query Results

Verdict Chart and Last State VerdictsA Verdict Chart displays information of the various possible verdicts triggered by each engine of the emailsecurity appliance.
Verdict charts for AsyncOS prior to 12.0 will not be displayed and last state verdicts is displayed as "LastState Not Available".
Note
The following table shows the various verdicts of each engine:
Table 71: Verdict Charts
DLPOutbreakFilter
ContentFilter
GraymailAMPAnti-VirusAnti-SpamMessageFilter
ConnectionBehavior
NotEvaluated
NoTrigger
Violation
NoViolation
NotEvaluated
Match
No Match
NotEvaluated
Match
No Match
NotEvaluated
Negative
Positive
NotEvaluated
Clean
FAPending
Unknown
Skipped
Malicious
Unscannable
Low Risk
NotEvaluated
Negative
Repaired
Encrypted
Unscanable
Positive
NotEvaluated
Negative
Suspect
Bulk Mail
SocialMail
MarketingMail
Positive
NotEvaluated
Match
No Match
NotApplicable
Accepted
Relayed
The Last State verdict of the message determines the final verdict that is triggered after all the possible verdictsof each of the engine in your appliance.
Following are some of the last state verdicts:
• Delivered: When a message is delivered.
• Dropped: When a message is dropped.
• Aborted: When a message is aborted. (Example: Due to Mail Policy restrictions)
• Bounced: When a message is bounced back.
• Splintered: When the MID of a message is split into multiple MIDs having multiple final states.
• Quarantined: When a message is quarantined by engines.
• Queued: When a message is queued for delivery either to end recipient or to an off-box Spam quarantineor Centralized Policy, Virus or Outbreak quarantine.
• Processing: When a message is not completely processed by all the engines; or when a message is waitingin a queue of a particular engine.
• Last State Not Available: When last state of message cannot be retrieved. (Example: When message isstill being processed by the engine and has not reached any final state.
User Guide for AsyncOS 14.1 for Cisco Secure Email and Web Manager- GD (General Deployment)260
Tracking MessagesVerdict Chart and Last State Verdicts

Envelope and Header SummaryThis section displays information from the message envelope and header, such as the envelope sender andrecipients. It includes the following information:
Received Time: Time that the Email Security appliance received the message.
MID: Message ID.
Subject: Subject line of the message.
The subject line in the tracking results may have the value “(No Subject)” if the message does not have asubject or if the Email Security appliances are not configured to record the subject lines in log files.
Envelope Sender: Address of the sender in the SMTP envelope.
Envelope Recipients: Addresses of the recipients in the SMTP envelope.
Message ID Header: “Message-ID:” header that uniquely identifies each email message. It is inserted in themessage when the message is first created. The “Message-ID:” header can be useful when you are searchingfor a particular message.
Cisco Host: Email Security appliance that processed the message.
SMTP Auth User ID: SMTP authenticated user name of the sender, if the sender used SMTP authenticationto send the email. Otherwise, the value is “N/A.”
Attachments: The names of files attached to the message.
Sender Group: The sender group that received the message.
Message Size: The size of the message.
Policy Match (Incoming or Outgoing): The policy that received the message.
If the engine is not able to fetch the details, the value is displayed as “N/A”.Note
Sending Host SummaryReverse DNS Hostname: Hostname of the sending host, as verified by reverse DNS (PTR) lookup.
IP Address: IP address of the sending host.
SBRS Score: (SenderBase Reputation Score). The range is from 10 (likely a trustworthy sender) to -10(apparent spammer). A score of “None” indicates that there was no information about this host at the time themessage was processed.
Processing DetailsThis section displays various logged status events during the processing of the message.
Entries include information about mail policy processing, such as anti-spam and anti-virus scanning, and otherevents such as message splitting.
If the message was delivered, the details of the delivery appear here. For example, a message may have beendelivered and a copy kept in quarantine.
The last recorded event is highlighted in the processing details.
User Guide for AsyncOS 14.1 for Cisco Secure Email and Web Manager- GD (General Deployment)261
Tracking MessagesEnvelope and Header Summary

Summary Tab
This tab displays the summary logs of all the events during the processing of message.
DLP Matched Content Tab
This tab displays content that violates Data Loss Prevention (DLP) policies.
Because this content typically includes sensitive information, such as corporate confidential information orpersonal information including credit card numbers and health records, you may want to disable access tothis content for users who have access, but not Administrator-level access, to the Security Managementappliance. See Controlling Access to Sensitive Information in Message Tracking , on page 422.
URL Details Tab
This tab displays only for messages caught by URL Reputation and URL Category content filters and byoutbreak filters not message filters.
This tab displays the following information:
• The reputation score or category associated with the URL• The action performed on the URL (rewrite, defang, or redirect)
• If a message contains multiple URLs, which URL has triggered the filter action.
You can see this tab only if you have configured your Email Security appliance to display this information.See User Guide for AsyncOS for Cisco Email Security Appliances .
To control access to this tab, see Controlling Access to Sensitive Information in Message Tracking , on page422
SMTP Log Tab
This section displays a log of messages when the sender of the email fails SMTP authentication.
AMP Log Tab
This section displays a log of messages caught by the Advanced Malware Protection file reputation and fileanalysis service.
Troubleshooting Message Tracking• Expected Messages Are Missing from Search Results , on page 262• Attachments Do Not Appear in Search Results , on page 263
Expected Messages Are Missing from Search ResultsProblem
Search results did not include messages that should have met the criteria.
Solution
• Results for many searches, especially Message Event searches, depend on your appliance configuration.For example, if you search for a URL Category for which you have not filtered, no results will be found,even if a message contains a URL in that category. Verify that you have configured the Email Security
User Guide for AsyncOS 14.1 for Cisco Secure Email and Web Manager- GD (General Deployment)262
Tracking MessagesSummary Tab

appliance properly to achieve the behavior that you expected. For example, check your mail policies,content and message filters, and quarantine settings.
• See Checking Message Tracking Data Availability , on page 251.
Attachments Do Not Appear in Search ResultsProblem
Attachment names are not found and displayed in search results.
Solution
At least one incoming content filter or other body scanning feature configured and enabled on the ESA. Seeconfiguration requirements at Enabling Centralized Email Tracking on the Legacy Web Interface, on page249 and limitations for attachment name searches in Tracking Service Overview.
Exporting Message ServiceYou can view additional fields to perform analysis and investigation on related mails using the Export fileoption along with messages.
Step 1 Choose Tracking > Messages.
Step 2 Select your criteria.Step 3 Click Export.
You can view additional fields to perform analysis and investigation on related mails using the Export file option alongwith the message. The additional fields you can view include:
• Message Size- The size of the message.
• Attachment Details- The name of the files attached to the message.
• Delivery Details- Delivery information, such as the number of messages from a particular domain that were bounced.
• Source IP/FQDN- The IP address of the sender.
• Sender Group- The sender group that received the message.
• DKIM, SPF, or DMARC Status- Authentication method to verify if the email was actually sent by the owner.
• URL List- Cisco Secure Email and Web Manager displays only 1024 characters of the URL.
User Guide for AsyncOS 14.1 for Cisco Secure Email and Web Manager- GD (General Deployment)263
Tracking MessagesAttachments Do Not Appear in Search Results

User Guide for AsyncOS 14.1 for Cisco Secure Email and Web Manager- GD (General Deployment)264
Tracking MessagesExporting Message Service

C H A P T E R 8Spam Quarantine
This chapter contains the following sections:
• Overview of the Spam Quarantine , on page 265• Local Versus External Spam Quarantine , on page 265• Setting Up the Centralized Spam Quarantine , on page 266• Edit Spam Quarantine Page, on page 274• Using Safelists and Blocklists to Control Email Delivery Based on Sender , on page 274• Configuring Spam Management Features for End Users , on page 285• Managing Messages in the Spam Quarantine , on page 294• Disk Space for the Spam Quarantine , on page 296• About Disabling the External Spam Quarantine , on page 296• Troubleshooting Spam Quarantine Features , on page 296
Overview of the Spam QuarantineThe SpamQuarantine (also known as ISQ) and End-User Quarantine (also known as EUQ) provides a safeguardmechanism for organizations that are concerned about “false positives” — that is, legitimate email messagesthat the appliance has deemed to be spam.When the appliance determines that a message is spam or suspectedspam, you may want to let the recipient or an administrator review the message before delivering or deletingit. The spam quarantine stores messages for this purpose.
Administrative users of the appliance can view all messages in a spam quarantine. End users, usually themessage recipients, can view their own quarantined messages in a slightly different web interface.
The spam quarantine is separate from policy, virus, and outbreak quarantines.
Related Topics
• Centralized Policy, Virus, and Outbreak Quarantines, on page 297
Local Versus External Spam QuarantineA local spam quarantine stores spam and suspect spam on the appliance . An external spam quarantine canstore these messages on a separate Cisco Content Security Management appliance .
Consider using an external spam quarantine if:
User Guide for AsyncOS 14.1 for Cisco Secure Email and Web Manager- GD (General Deployment)265

• You want a centralized location to store and manage spam from multiple appliances .• You want to store more spam than the appliance can hold.• You want to regularly back up the spam quarantine and its messages.
Setting Up the Centralized Spam QuarantineProcedure
PurposeCommand or Action
Enabling and Configuring Spam Quarantine, on page 266On the Security Management appliance, enable thecentralized spam quarantine service.
Step 1
Adding the Centralized Spam Quarantine Service to EachManaged Email Security Appliance , on page 270
On the Security Management appliance, specify the EmailSecurity appliances to include in the centralized spamquarantine.
Step 2
Configuring an Outbound IP Interface on the SecurityManagement Appliance , on page 270
Set up the Security Management appliance for sendingnotifications and released spam.
Step 3
Configuring the IP Interface for Browser Access to theSpam Quarantine , on page 271
On the SecurityManagement appliance, configure the spamquarantine browser interface.
Step 4
For more information about configuring anti-spam andmailpolicies, see the “Anti-Spam” section of theUser Guide forAysncOS for Email Security Appliances.
Ensure that the Email Security appliance is configured tosend mail to the spam quarantine.
Step 5
For more information, see User Guide for AysncOS forEmail Security Appliances.
On the Email Security appliances, enable and configure theexternal spam quarantine.
Step 6
For information about disabling the local spam quarantineto activate the external spam quarantine, see User Guidefor AysncOS for Email Security Appliances.
On the Email Security appliances, disable the localquarantine.
Step 7
Enabling and Configuring Spam Quarantine• Enabling and Configuring the Spam Quarantine on the Legacy Web Interface , on page 266
• Enabling and Configuring Spam Quarantine on the New Web Interface
Enabling and Configuring the Spam Quarantine on the Legacy Web Interface
Step 1 Select Management Appliance > Centralized Services > Spam Quarantine.Step 2 If you are enabling the spam quarantine for the first time after running the System Setup Wizard:
a) Click Enable.b) Review the end user license agreement, then click Accept.
Step 3 If you are editing spam quarantine settings, click Edit Settings.
User Guide for AsyncOS 14.1 for Cisco Secure Email and Web Manager- GD (General Deployment)266
Spam QuarantineSetting Up the Centralized Spam Quarantine

Step 4 Specify options:
DescriptionOption
By default, the spam quarantine uses the Management interface and port6025. The IP interface is the interface on the Security Managementappliance that is configured to listen for incoming mail. The quarantineport is the port number that the sending appliances use in their externalquarantine settings.
If your Email Security appliances are not on the same network as yourSecurity Management appliance, then you must use the Managementinterface.
Quarantine IP Interface
Quarantine Port
All outgoing quarantine-related email (such as spam notifications andmessages released from the spam quarantine) must be delivered via anotherappliance or server that is configured to send messages.
You can route these messages through an SMTP or groupware server, oryou can specify the outbound listener interface of an appliance (typicallythe Data 2 interface).
The alternate address is used for load balancing and failover.
If you havemultiple appliances , you can use the outbound listener interfaceof any managed appliances for the primary and alternate addresses. Bothmust use the same interface (either Data 1 or Data 2) as the outboundlistener.
Read instructions on the screen for additional caveats about these addresses.
Deliver Messages Via
Specify the number of days to hold messages before deleting them.
Cisco recommends that you configure the quarantine to delete oldermessages to prevent the quarantine from filling to capacity, but you canelect not to schedule automatic deletion.
Schedule Delete After
Check the Send a copy of released messages to Cisco foranalysis(recommended) checkbox if you wish to notify Cisco uponmessage release.
Notify Cisco Upon Message Release
User Guide for AsyncOS 14.1 for Cisco Secure Email and Web Manager- GD (General Deployment)267
Spam QuarantineEnabling and Configuring the Spam Quarantine on the Legacy Web Interface

DescriptionOption
Logo
By default, the Cisco logo is displayed at the top of the spam quarantinepage when the user logs in to view quarantined messages.
You can view the logo on both new and legacy web interface.
To use a custom logo instead, upload the logo. The logo should be a .jpg,.gif, or .png file that is at most 50 pixels high by 500 pixels wide.
Spam Quarantine Appearance
Login page message
(Optional) Specify a login page message. This message is shown to endusers and administrators when they log in to view the quarantine.
If you do not specify a message, the following message appears:
Enter your login information below. If you are unsure what to enter, pleasecontact your administrator.
See Configuring Administrative User Access to the Spam Quarantine , onpage 272.
Administrative Users
Step 5 Submit and commit your changes.
What to do next
• Return to Adding the Centralized Spam Quarantine Service to Each Managed Email Security Appliance, on page 270
Enabling and Configuring Spam Quarantine on the New Web Interface
Step 1 On the SecurityManagement Appliance, click Service Status and hover over the corresponding to Spam Quarantine,click Edit Spam Quarantine Settings.
Step 2 If you are using configuring spam quarantine for the first time after running the System Setup Wizard, review and acceptthe license agreement and click Proceed.
Step 3 Click the toggle switch to enable Spam Quarantine.Step 4 Specify options:
DescriptionOption
By default, the spam quarantine uses the Management interface and port6025. The IP interface is the interface on the Security Managementappliance that is configured to listen for incoming mail. The quarantineport is the port number that the sending appliances use in their externalquarantine settings.
If your Email Security appliances are not on the same network as yourSecurity Management appliance, then you must use the Managementinterface.
Quarantine IP Interface
Quarantine Port
User Guide for AsyncOS 14.1 for Cisco Secure Email and Web Manager- GD (General Deployment)268
Spam QuarantineEnabling and Configuring Spam Quarantine on the New Web Interface

DescriptionOption
All outgoing quarantine-related email (such as spam notifications andmessages released from the spam quarantine) must be delivered via anotherappliance or server that is configured to send messages.
You can route these messages through an SMTP or groupware server, oryou can specify the outbound listener interface of an Email Securityappliance (typically the Data 2 interface).
The alternate address is used for load balancing and failover.
If you have multiple Email Security appliances, you can use the outboundlistener interface of anymanaged Email Security appliances for the primaryand alternate addresses. Both must use the same interface (either Data 1or Data 2) as the outbound listener.
Read instructions on the screen for additional caveats about these addresses.
Deliver Messages Via
Specify the number of days to hold messages before deleting them.
Cisco recommends that you configure the quarantine to delete oldermessages to prevent the quarantine from filling to capacity, but you canelect not to schedule automatic deletion.
Schedule Delete After
You can choose to send a copy of released messages to Cisco for analysisby checking the respective box.
Notify Cisco Upon Message Release
Logo
By default, the Cisco logo is displayed at the top of the spam quarantinepage when the user logs in to view quarantined messages.
You can view the logo on both new and legacy web interface.
To use a custom logo instead, upload the logo. The logo should be a .jpg,.gif, or .png file that is at most 50 pixels high by 500 pixels wide.
Spam Quarantine Appearance
Login page message
(Optional) Specify a login page message. This message is shown to endusers and administrators when they log in to view the quarantine.
If you do not specify a message, the following message appears:
Enter your login information below. If you are unsure what to enter, pleasecontact your administrator.
See Configuring Administrative User Access to the Spam Quarantine , onpage 272.
Administrative Users
Step 5 Click Save.
User Guide for AsyncOS 14.1 for Cisco Secure Email and Web Manager- GD (General Deployment)269
Spam QuarantineEnabling and Configuring Spam Quarantine on the New Web Interface

What to do next
• Return to Adding the Centralized Spam Quarantine Service to Each Managed Email Security Appliance, on page 270
Adding the Centralized Spam Quarantine Service to Each Managed EmailSecurity Appliance
The steps that you follow depend on whether or not you have already added the appliance while configuringanother centralized management feature.
Step 1 [New Web Interface Only] On the Security Management appliance, click to load the legacy web interface.Step 2 Choose Management Appliance > Centralized Services > Security Appliances.Step 3 If you have already added the Email Security appliance to the list on this page:
a) Click the name of the Email Security appliance.b) Select the Spam Quarantine service.
Step 4 If you have not yet added Email Security appliances:a) Click Add Email Appliance.b) In the Appliance Name and IP Address text fields, type the appliance name and the IP address for the Management
interface of the appliance.
A DNS name may be entered in the IP Address text field; however, it will be immediately resolved to anIP address when you click Submit.
Note
c) The Spam Quarantine service is pre-selected.d) Click Establish Connection.e) Enter the username and passphrase for an administrator account on the appliance to be managed, then clickEstablish
Connection.
You enter the login credentials to pass a public SSH key for file transfers from the Security Managementappliance to the remote appliance. The login credentials are not stored on the SecurityManagement appliance.
Note
f) Wait for the success message to appear above the table on the page.g) Click Test Connection.h) Read the test results above the table.
Step 5 Submit and commit your changes.Step 6 Repeat this procedure for each Email Security appliance for which you want to enable the spam quarantine.
Configuring an Outbound IP Interface on the Security Management ApplianceConfigure an interface on the SecurityManagement appliance to send quarantine-related messages (includingnotifications and released email) to the Email Security appliance for delivery.
User Guide for AsyncOS 14.1 for Cisco Secure Email and Web Manager- GD (General Deployment)270
Spam QuarantineAdding the Centralized Spam Quarantine Service to Each Managed Email Security Appliance

Before you begin
Obtain or identify an IP address to use for the outbound interface. This will typically be the Data 2 interfaceon the Security Management appliance. For more information about network requirements, see AssigningNetwork and IP Addresses, on page 583
Use this procedure in conjunction with the information in Configuring IP Interfaces, on page 576.Note
Step 1 [New Web Interface Only] On the Security Management appliance, click to load the legacy web interface.Step 2 Choose Management Appliance > Network IP Interfaces.Step 3 Click Add IP Interface.Step 4 Enter the following settings:
• Name
• Ethernet Port
Typically, this will be Data 2. Specifically, this must match the data interface on the Email Security appliance thatyou specified for the Primary Server in the Deliver Messages Via section of the Spam Quarantine Settings pageunder Management Appliance > Centralized Services > Spam Quarantine.
• IP Address
IP address of the interface that you just specified.
• Netmask
• Hostname
For example, if this is the Data 2 interface, use data2.sma.example.com .
Do not enter information in the Spam Quarantine section for this interface.
Step 5 Submit and commit your changes.
Configuring the IP Interface for Browser Access to the Spam QuarantineWhen administrators and end users access the spam quarantine, a separate browser window opens.
Step 1 [New Web Interface Only] On the Security Management appliance, click to load the legacy web interface.Step 2 Choose Management Appliance > Network > IP Interfaces.Step 3 Click the name of the Management interface.Step 4 In the Spam Quarantine section, configure settings for access to the spam quarantine:
• By default, HTTP uses port 82 and HTTPS uses port 83.
• Specify the URL that appears in notifications and in the spam quarantine browser window.
User Guide for AsyncOS 14.1 for Cisco Secure Email and Web Manager- GD (General Deployment)271
Spam QuarantineConfiguring the IP Interface for Browser Access to the Spam Quarantine

If you do not want to expose the hostname of your Security Management appliance to end users, you can specifyan alternate hostname.
Step 5 Submit and commit your changes.
What to do next
Ensure that your DNS server can resolve the hostname that you specified for spam quarantine access.
Configuring Administrative User Access to the Spam QuarantineAll users with administrator privileges can change spam quarantine settings and view and manage messagesin the spam quarantine. You do not need to configure spam quarantine access for administrator users.
If you configure access to the spam quarantine for users with the following roles, they can view, release, anddelete messages in the spam quarantine:
• Email administrator• Operator• Read-only operator• Help desk user• Guest• Custom user roles that have spam quarantine privileges
These users cannot access spam quarantine settings.
Before you begin
Create users or custom user roles that have access to the spam quarantine. For more information, see informationabout Access to Quarantines for Custom User Role , on page 400 in Distributing Administrative Tasks, onpage 395
Step 1 On the SecurityManagement appliance , click Service Status and hover over the corresponding to Spam Quarantineand click Edit Spam Quarantine Settings.
Step 2 Click the toggle switch to enable Spam Quarantine.Step 3 Click the link for the type of user to add: local, externally authenticated, or custom role.
If you have already added users or roles, click a username or role to view all eligible users or roles.
Step 4 Select the users or roles that you want to add.
Users with Administrator privileges , including Email Administrators, are not listed because they automatically have fullaccess to the spam quarantine.
Step 5 Click OK.Step 6 Click Submit.
User Guide for AsyncOS 14.1 for Cisco Secure Email and Web Manager- GD (General Deployment)272
Spam QuarantineConfiguring Administrative User Access to the Spam Quarantine

What to do next
Related Topics
Configuring End-User Access to the Spam Quarantine , on page 288
Spam Quarantine Threshold AlertYou can configure to receive alert notification(s) after you set the maximum number of spam messages thatcan be triggered in a duration. In addition to configuring your own alerts, you can configure Cisco SecureEmail and Web Manager to generate alerts either on an hourly or on a daily basis. However, you may alsoset the maximum number of alerts that can be received within the time duration once the threshold is crossed.
When administrators are mapped to this custom role, they can view the quarantine mails but cannot performa release, delete, or any other operation.
Cisco Secure Email andWebManager ensures that you receive the alerts you set as both an email and a syslogaddition.
Configuring Spam Quarantine Threshold Alert Settings Using CLITo configure spam quarantine threshold alerts, use the spamquarantinethresholdalert command.
Once you execute the command, you must enable the services you avail.
You must provide values for the:
• Threshold- Numeric Only. Configures threshold of new quarantined spam mails for which alerts will besent in selected time. Values range between 1-1,00,000.
• Time Duration- Configures the duration in hours in which the spam messages are monitored. Valuesrange between 1800 to 86400 seconds.
• Alert Limit-Numeric Only.Configures the alert limit. Value ranges from 1-20.
Procedure
PurposeCommand or Action
Configures the spam quarantine threshold alert.spamquarantinethresholdalert
Example:
Step 1
spamquarantinethresholdalert
Example
Configuring Spam Quarantine Threshold Alert Settings Using GUI
Step 1 Click Centralized Services > SPAM Quarantine
The SPAM Quarantine page is displayed.
Step 2 Enable Threshold Alert checkbox.
User Guide for AsyncOS 14.1 for Cisco Secure Email and Web Manager- GD (General Deployment)273
Spam QuarantineSpam Quarantine Threshold Alert

Spam Quarantine Threshold Alerts are also governed by the System Alerts settings. To configure recipients, you mustnavigate to System Administration > Alerts.
To receive these alerts, you must subscribe to system critical alerts.
Step 3 Enter the threshold value.Step 4 Choose the Time Duration from the drop-down.
Value ranges between half-an-hour to 24 hours.
Step 5 Enter the Alert Limit.
Value ranges between 1 to 20.
Step 6 Click Submit.
Limiting Which Recipients Have Mail QuarantinedYou can use multiple mail policies (Mail Policies > Incoming Mail Policy) to specify a list of recipientaddresses for which mail will not be quarantined. Select ‘Deliver’ or ‘Drop’ instead of quarantine whenconfiguring the anti-spam settings for the mail policy.
Spam Quarantine LanguageEach user selects a language in the spam quarantine from the Options menu at the top right of the window.
Edit Spam Quarantine Page• Enabling and Configuring the Spam Quarantine on the Legacy Web Interface , on page 266• Local Versus External Spam Quarantine , on page 265• Configuring End-User Access to the Spam Quarantine , on page 288• Notifying End Users About Quarantined Messages , on page 290
Using Safelists and Blocklists to Control Email Delivery Basedon Sender
Administrators and end users can use safelists and blocklists to help determine which messages are spam.Safelists specify senders and domains that are never treated as spam. Blocklists specify senders and domainsthat are always treated as spam.
You can allow end users (email users) to manage the safelist and blocklist for their own email accounts. Forexample, an end user may receive email from a mailing list that no longer interests him. He may decide toadd this sender to his blocklist to prevent emails from the mailing list from being sent to his inbox. On theother hand, end users may find that emails from specific senders are sent to their spam quarantine when theydo not want them to be treated as spam. To ensure that messages from these senders are not quarantined, theymay want to add the senders to their safelists.
Changes that end users and administrators make are visible to and can be changed by either.
User Guide for AsyncOS 14.1 for Cisco Secure Email and Web Manager- GD (General Deployment)274
Spam QuarantineLimiting Which Recipients Have Mail Quarantined

Related Topics
• Message Processing of Safelists and Blocklists , on page 275• Enabling Safelists and Blocklists on the Legacy Web Interface, on page 276• External Spam Quarantine and Safelist/Blocklists , on page 277• Adding Senders and Domains to Safelists and Blocklists (Administrators) , on page 277• About End-User Access to Safelists and Blocklists , on page 282• Backing Up and Restoring the Safelist/Blocklist , on page 283• Troubleshooting Safelists and Blocklists, on page 284
Message Processing of Safelists and BlocklistsA sender’s being on a safelist or blocklist does not prevent the appliance from scanning a message for virusesor determining if the message meets the criteria for a content-related mail policy. Even if the sender of amessage is on the recipient’s safelist, the message may not be delivered to the end user depending on otherscanning settings and results.
When you enable safelists and blocklists, the appliance scans the messages against the safelist/blocklistdatabase immediately before anti-spam scanning. If the appliance detects a sender or domain that matches asafelist or blocklist entry, the message will be splintered if there are multiple recipients (and the recipientshave different safelist/blocklist settings). For example, a message is sent to both recipient A and recipient B.Recipient A has safelisted the sender, whereas recipient B does not have an entry for the sender in the safelistor the blocklist. In this case, the message may be split into two messages with two message IDs. The messagesent to recipient A is marked as safelisted with an X-SLBL-Result-Safelist header and skips anti-spam scanning,whereas the message bound for recipient B is scanned by the anti-spam scanning engine. Both messages thencontinue along the pipeline (through anti-virus scanning, content policies, and so on) and are subject to anyconfigured settings.
If a message sender or domain is blocklisted, the delivery behavior depends on the blocklist action that youspecify when you enable the safelist/blocklist feature. Similar to safelist delivery, the message is splinteredif there are different recipients with different safelist/blocklist settings. The blocklisted message splinter isthen quarantined or dropped, depending on the blocklist action settings. If the blocklist action is configuredto quarantine, the message is scanned and eventually quarantined. If the blocklist action is configured to delete,the message is dropped immediately after safelist/blocklist scanning.
Because safelists and blocklists are maintained in the spam quarantine, delivery behavior is also contingenton other anti-spam settings. For example, if you configure the “Accept” mail flow policy in the Host AccessTable (HAT) to skip anti-spam scanning, then users who receive mail on that listener will not have theirsafelist and blocklist settings applied to mail received on that listener. Similarly, if you create a mail flowpolicy that skips anti-spam scanning for certain message recipients, these recipients will not have their safelistand blocklist settings applied.
Related Topics
• Enabling Safelists and Blocklists on the Legacy Web Interface, on page 276• External Spam Quarantine and Safelist/Blocklists , on page 277
Enabling Safelists and Blocklists• Enabling Safelists and Blocklists on the Legacy Web Interface, on page 276
• Enabling Safelists and Blocklists on the New Web Interface
User Guide for AsyncOS 14.1 for Cisco Secure Email and Web Manager- GD (General Deployment)275
Spam QuarantineMessage Processing of Safelists and Blocklists
Enabling Safelists and Blocklists on the Legacy Web Interface
Before you begin
• The spam quarantine must be enabled. See Setting Up the Centralized Spam Quarantine , on page 266.
Step 1 Navigate to Management Appliance > Centralized Services > Spam Quarantine.Step 2 Under End-User Safelist/Blocklist, click Edit Settings.Step 3 Select Enable End User Safelist/Blocklist Feature.Step 4 Specify Maximum List Items Per User.
This is the maximum number of addresses or domains for each list, for each recipient. If you allow a large number of listentries per user, system performance might be adversely affected.
Step 5 Select Update Frequency.
This value determines how often AsyncOS updates the safelists/blocklists on the appliances that use the external spamquarantine. The significance of this setting is described in External Spam Quarantine and Safelist/Blocklists , on page277.
Step 6 Submit and commit your changes.
Enabling Safelists and Blocklists on the New Web Interface
Before you begin
• The spam quarantine must be enabled. See Setting Up the Centralized Spam Quarantine , on page 266.
Step 1 On the Security Management appliance, click Service Status and hover over the icon corresponding to SpamQuarantine.
Step 2 Click Edit Safelist/Blocklist Settings.Step 3 Click the toggle switch to enable Safelist/Blocklist Settings.Step 4 Specify the Maximum List Items Per User.
This is the maximum number of addresses or domains for each list, for each recipient. If you allow a large number of listentries per user, system performance might be adversely affected.
Step 5 Select Update Frequency.
This value determines how often AsyncOS updates the safelists/blocklists on the Email Security appliances that use theexternal spam quarantine. The significance of this setting is described in External SpamQuarantine and Safelist/Blocklists, on page 277.
Step 6 Click Submit.
User Guide for AsyncOS 14.1 for Cisco Secure Email and Web Manager- GD (General Deployment)276
Spam QuarantineEnabling Safelists and Blocklists on the Legacy Web Interface
External Spam Quarantine and Safelist/BlocklistsBecause the appliance evaluates senders in safelists and blocklists when processing incoming mail, safelistsand blocklists that are stored on a Security Management appliance must be sent to the appliance in order tobe applied to incoming mail. When you configure the safelist/blocklist feature on a Security Managementappliance , you configure the frequency of these updates.
Adding Senders and Domains to Safelists and Blocklists (Administrators)Manage safelists and blocklists via the spam quarantine interface.
You can also see whether many recipients (end users in your organization) have included a particular senderor domain in allowed list or blocked list.
Administrators see and work with the superset of the same entries that each end user sees and works with.
Before you begin
• Ensure that you can access the spam quarantine. See Accessing the Spam Quarantine (AdministrativeUsers), on page 294.
• Enable access to the safelist/blocklist. See Enabling Safelists and Blocklists on the LegacyWeb Interface,on page 276.
• (Optional) To import safelist/blocklists instead of building these lists using the procedure in this section,use the process described in Backing Up and Restoring the Safelist/Blocklist , on page 283.
• Understand the required format of safelist and blocklist entries. See Syntax for Safelists and BlocklistEntries , on page 281.
Step 1 [New Web Interface Only] On the Security Management appliance, click Quarantine > Spam Quarantine > Search.
Or
Choose Email > Message Quarantine > Spam Quarantine and select the Options drop-down menu in the upper rightcorner of the page.
Step 2 Choose Safelist or Blocklist.Step 3 (Optional) Search for a sender or recipient.Step 4 Do one or more of the following:
User Guide for AsyncOS 14.1 for Cisco Secure Email and Web Manager- GD (General Deployment)277
Spam QuarantineExternal Spam Quarantine and Safelist/Blocklists
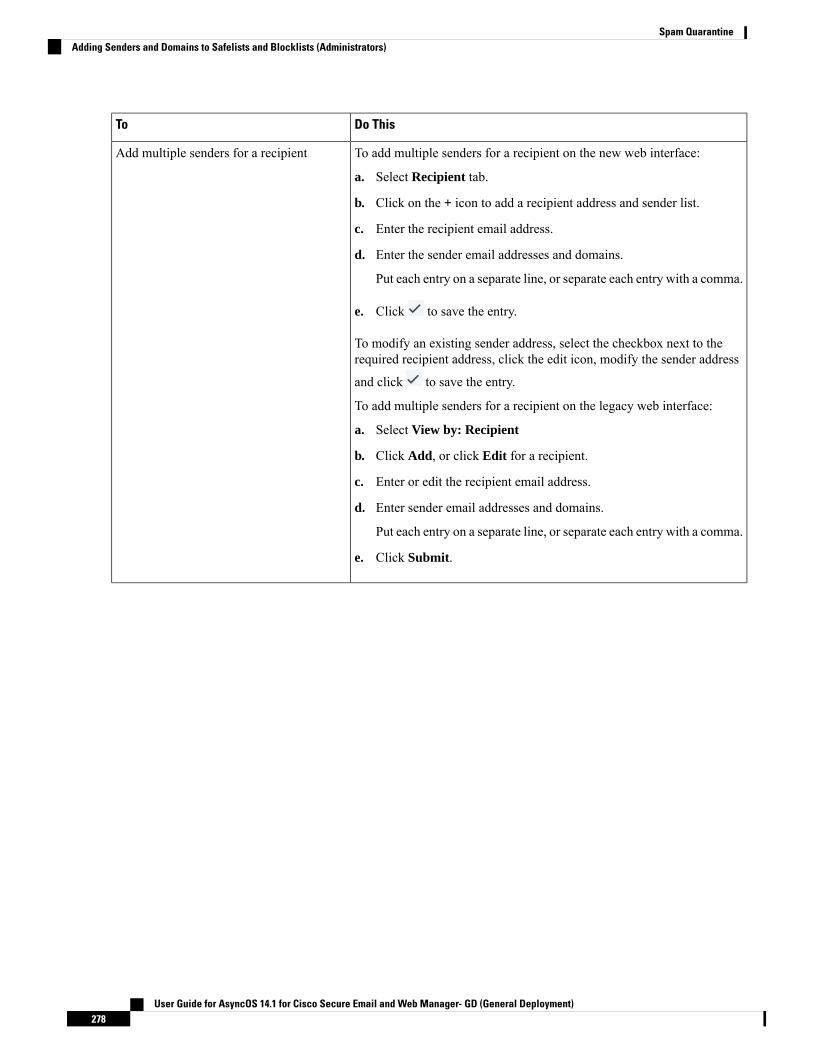
Do ThisTo
To add multiple senders for a recipient on the new web interface:
a. Select Recipient tab.
b. Click on the + icon to add a recipient address and sender list.
c. Enter the recipient email address.
d. Enter the sender email addresses and domains.
Put each entry on a separate line, or separate each entry with a comma.
e. Click to save the entry.
To modify an existing sender address, select the checkbox next to therequired recipient address, click the edit icon, modify the sender address
and click to save the entry.
To add multiple senders for a recipient on the legacy web interface:
a. Select View by: Recipient
b. Click Add, or click Edit for a recipient.
c. Enter or edit the recipient email address.
d. Enter sender email addresses and domains.
Put each entry on a separate line, or separate each entry with a comma.
e. Click Submit.
Add multiple senders for a recipient
User Guide for AsyncOS 14.1 for Cisco Secure Email and Web Manager- GD (General Deployment)278
Spam QuarantineAdding Senders and Domains to Safelists and Blocklists (Administrators)

Do ThisTo
To add multiple recipient for a sender on the new web interface:
a. Select Sender tab.
b. Click + to add a sender address and recipient list.
c. Enter the sender address or domain.
d. Enter the recipient email addresses.
Put each entry on a separate line, or separate each entry with a comma.
e. Click to save the entry.
To modify an existing recipient address, select the checkbox next to therequired sender address, click the edit icon, modify the sender address and
click to save the entry.
To add multiple recipient for a sender on the legacy web interface:
a. Select View by: Sender
b. Click Add, or click Edit for a sender.
c. Enter or edit the sender address or domain.
d. Enter recipient email addresses.
Put each entry on a separate line, or separate each entry with a comma.
e. Click Submit.
Add multiple recipients for a sender
To delete all senders associated with a recipient on the new web interface:
a. Select the checkbox next to the recipient or sender address to selectthe entry.
You can select and delete all entries.
b. Click on the trash can icon to delete an entire table row.
To delete all senders associated with a recipient on the legacy web interface:
a. Select a View by option.
b. Click a trash can icon to delete an entire table row.
Delete all senders associated with a recipient
User Guide for AsyncOS 14.1 for Cisco Secure Email and Web Manager- GD (General Deployment)279
Spam QuarantineAdding Senders and Domains to Safelists and Blocklists (Administrators)

Do ThisTo
To delete all recipients associated with a sender on the new web interface:
a. Select the checkbox next to the recepient or sender address to selectthe entry.
You can select and delete all entries.
b. Click on the trash can icon to delete an entire table row.
To delete all recipients associated with a sender on the legacy web interface:
a. Select a View by option.
b. Click a trash can icon to delete an entire table row.
Delete all recipients associated with a sender
To delete individual senders for a recipient on the new web interface:
a. Select the checkbox next to the recepient or sender address to selectthe entry.
You can select and delete multiple entries.
b. Click on the edit icon to modify an individual recipient or sender.
c. Add or remove entries from the text box. You must leave at least oneentry.
d. Click to save the entry.
To delete individual senders for a recipient on the legacy web interface:
a. Select a View by option.
b. Click Edit for an individual recipient or sender.
c. Add or remove entries from the text box. You must leave at least oneentry.
d. Click Submit.
Delete individual senders for a recipient
User Guide for AsyncOS 14.1 for Cisco Secure Email and Web Manager- GD (General Deployment)280
Spam QuarantineAdding Senders and Domains to Safelists and Blocklists (Administrators)
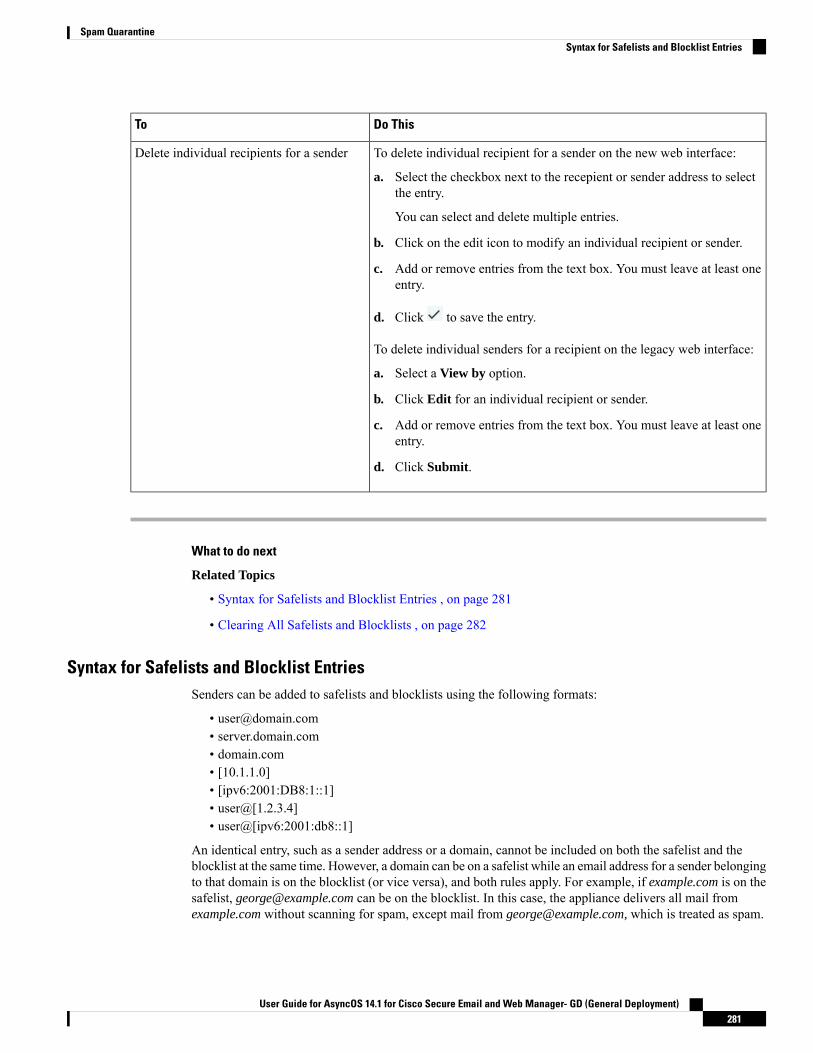
Do ThisTo
To delete individual recipient for a sender on the new web interface:
a. Select the checkbox next to the recepient or sender address to selectthe entry.
You can select and delete multiple entries.
b. Click on the edit icon to modify an individual recipient or sender.
c. Add or remove entries from the text box. You must leave at least oneentry.
d. Click to save the entry.
To delete individual senders for a recipient on the legacy web interface:
a. Select a View by option.
b. Click Edit for an individual recipient or sender.
c. Add or remove entries from the text box. You must leave at least oneentry.
d. Click Submit.
Delete individual recipients for a sender
What to do next
Related Topics
• Syntax for Safelists and Blocklist Entries , on page 281
• Clearing All Safelists and Blocklists , on page 282
Syntax for Safelists and Blocklist EntriesSenders can be added to safelists and blocklists using the following formats:
• [email protected]• server.domain.com• domain.com• [10.1.1.0]• [ipv6:2001:DB8:1::1]• user@[1.2.3.4]• user@[ipv6:2001:db8::1]
An identical entry, such as a sender address or a domain, cannot be included on both the safelist and theblocklist at the same time. However, a domain can be on a safelist while an email address for a sender belongingto that domain is on the blocklist (or vice versa), and both rules apply. For example, if example.com is on thesafelist, [email protected] can be on the blocklist. In this case, the appliance delivers all mail fromexample.com without scanning for spam, except mail from [email protected], which is treated as spam.
User Guide for AsyncOS 14.1 for Cisco Secure Email and Web Manager- GD (General Deployment)281
Spam QuarantineSyntax for Safelists and Blocklist Entries

It is not possible allow or block a range of subdomains using the following syntax: .domain.com . However,it is possible to block a specific domain using the following syntax: server.domain.com .
Clearing All Safelists and BlocklistsIf you need to delete all safelist and blocklist entries, including all senders and all recipients, import a filewith no entries using the procedure in Backing Up and Restoring the Safelist/Blocklist , on page 283.
About End-User Access to Safelists and BlocklistsEnd users access their safelist and blocklist via the spam quarantine. To configure end-user access to the spamquarantine, see Setting Up End-User Access to the Spam Quarantine via Web Browser .
Youmay want to give your end users the URL of the spam quarantine and the instructions below, as applicable.
Related Topics
• Adding Entries to Safelists (End Users)
• Adding Senders to Blocklists (End Users)
Adding Entries to Safelists (End Users)
Delivery of messages from safelisted senders depends on other settings that are configured in the system. SeeMessage Processing of Safelists and Blocklists , on page 275.
Note
End users can add senders to safelists in two ways:
• Adding the Sender of a Quarantined Message to the Safelist , on page 282
• Adding Senders to the Safelist Without a Quarantined Message , on page 282
Adding the Sender of a Quarantined Message to the Safelist
End users can add senders to the safelist if the message has been sent to the spam quarantine.
[New Web Interface Only] Click Release and Add to Safelist icon to release the message and add it to the safelist.
Or
Select Release and Add to Safelist from the drop-down menu.
The envelope sender and the from header for the specified mail are both added to the safelist, and the released messagesproceed directly to the destination queue, skipping any further work queue processing in the email pipeline.
Adding Senders to the Safelist Without a Quarantined Message
Step 1 [New Web Interface Only] Choose Safelist.
User Guide for AsyncOS 14.1 for Cisco Secure Email and Web Manager- GD (General Deployment)282
Spam QuarantineClearing All Safelists and Blocklists

Step 2 [New Web Interface Only] Enter the email address or domain. You can enter multiple domains and email addresses,separated by commas.
Step 3 [New Web Interface Only] Click to save the entry.Step 4 Access Spam Quarantine page.
a) Choose Monitor > Spam Quarantine.b) Select the Options drop-down menu in the upper right corner of the pagec) Choose Safelist.d) From the Safelist dialog box, enter the email address or domain. You can enter multiple domains and email addresses,
separated by commas.e) Click Add to List.
Adding Senders to Blocklists (End Users)Messages from blocklisted senders may be rejected or quarantined, depending on the safelist/blockist actionsettings defined by your administrator.
You can add blocklist entries only using this procedure.Note
Step 1 [New Web Interface Only] Choose Blocklist, click the + icon and enter the domain or email address that you want toblocklist. You can enter multiple domains and email addresses, separated by commas.
Step 2 [New Web Interface Only] Click to save the entry.Step 3 Access Spam Quarantine page.
a) Choose Monitor > Spam Quarantine.b) Choose Blocklist from the Options drop-down menu in the upper right corner of the page.c) Enter the domain or email address that you want to blocklist. You can enter multiple domains and email addresses,
separated by commas.d) Click Add to List.
Backing Up and Restoring the Safelist/BlocklistBefore you upgrade your appliance or run the installation wizard, you should back up the safelist/blocklistdatabase. Safelist/blocklist information is not included in the main XML configuration file that contains yourappliance configuration settings.
Safelist/blocklist entries can also be backed up along with other data on the Security Management appliance.See Backing Up Security Management Appliance Data , on page 452.
Step 1 [New Web Interface Only] On the Security Management appliance, click to load the legacy web interface.Step 2 Select Management Appliance > System Administration > Configuration File.
User Guide for AsyncOS 14.1 for Cisco Secure Email and Web Manager- GD (General Deployment)283
Spam QuarantineAdding Senders to Blocklists (End Users)

Step 3 Scroll to the End-User Safelist/Blocklist Database (Spam Quarantine) section.
Do ThisTo
Note the path and filename of the .csv file, and modify as needed.
Click Backup Now.
The appliance saves a .csv file to the /configuration directory of the appliance using thefollowing naming convention:
slbl<serial number><timestamp>.csv
Export the safelist/blocklist
This process will overwrite all existing entries in safelists and blocklists forall users.
Caution
Click Select File to Restore.
Select the desired file from the list of files in your configuration directory.
Select the safelist/blocklist backup file that you want to restore.
Click Restore.
Import the safelist/blocklist
Troubleshooting Safelists and BlocklistsTo troubleshoot issues with safelists and blocklists, you can view the log files or system alerts.
When an email is blocked due to safelist/blocklist settings, the action is logged in the ISQ_log files or theantispam log files. Emails that are safelisted are marked as safelisted with an X-SLBL-Result-Safelist header.Emails that are blocklisted are marked as blocklisted with an X-SLBL-Result-Blocklist header.
Alerts are sent out when the database is created or updated, or if there are errors in modifying the database orrunning the safelist/blocklist processes.
For more information about alerts, see Managing Alerts, on page 473 .
For more information about log files, see Logging, on page 531 .
Related Topics
• Message from Safelisted Sender Was Not Delivered , on page 284
Message from Safelisted Sender Was Not DeliveredProblem
Message from a safelisted sender was not delivered.
Solution
Possible causes:
• The message was dropped for malware or content violations. See Message Processing of Safelists andBlocklists , on page 275.
User Guide for AsyncOS 14.1 for Cisco Secure Email and Web Manager- GD (General Deployment)284
Spam QuarantineTroubleshooting Safelists and Blocklists

• If you have multiple appliances and the sender was recently added to the safelist, then safelist/blocklistsmight not have been synchronized at the time the message was processed. See External SpamQuarantineand Safelist/Blocklists , on page 277 .
Configuring Spam Management Features for End UsersSeeTo
Configuring End-User Access to the SpamQuarantine , on page 288 and subsections
Understand the benefits and limitations of the differentauthentication methods for end-user access to spammanagement features.
Authentication Options for End UsersAccessing Spam Management Features , onpage 285
Allow end users to access the spam quarantine directly viabrowser.
Notifying End Users About QuarantinedMessages , on page 290
Send users a notification when messages addressed to themare routed to the spam quarantine.
Notifications can include links for access to the spamquarantine.
Using Safelists and Blocklists to Control EmailDelivery Based on Sender , on page 274
Allow users to specify email addresses and domains ofsenders whom they know to be safe, and of senders whomthey know to be sending spam or other unwanted mail.
Related Topics
• Authentication Options for End Users Accessing Spam Management Features , on page 285• Setting Up End-User Access to the Spam Quarantine via Web Browser , on page 287• Notifying End Users About Quarantined Messages , on page 290
Authentication Options for End Users Accessing Spam Management Features
Mailbox authentication does not allow users to view messages addressed to an email alias.Note
Do ThisFor End-User Spam Quarantine Access
1. In the End User Quarantine Access settings, chooseLDAP, SAML 2.0, or Mailbox (IMAP/POP).
2. In the SpamNotifications settings, deselectEnable loginwithout credentials for quarantine access.
Directly via web browser, authenticationrequired
and
Via a link in a notification, authenticationrequired
User Guide for AsyncOS 14.1 for Cisco Secure Email and Web Manager- GD (General Deployment)285
Spam QuarantineConfiguring Spam Management Features for End Users

Do ThisFor End-User Spam Quarantine Access
1. In the End User Quarantine Access settings, chooseLDAP, SAML 2.0, or Mailbox (IMAP/POP).
2. In the Spam Notifications settings, select Enable loginwithout credentials for quarantine access.
Directly via web browser, authenticationrequired
and
Via a link in a notification, authentication notrequired
In the End User Quarantine Access settings, choose None asthe authentication method.
Only via a link in a notification, authenticationnot required
In the End User Quarantine Access settings, deselect EnableEnd-User Quarantine Access.
No access
Related Topics
• LDAP Authentication Process , on page 286• IMAP/POP Authentication Process , on page 287• SAML 2.0 Authentication Process, on page 287• Configuring End-User Access to the Spam Quarantine , on page 288• Notifying End Users About Quarantined Messages , on page 290• Configuring LDAP to Work with the Spam Quarantine, on page 363• About End-User Access to Safelists and Blocklists , on page 282
LDAP Authentication Process1. A user enters his or her username and passphrase into the web UI login page.2. The spam quarantine connects to the specified LDAP server either to perform an anonymous search or
as an authenticated user with the specified “Server Login” DN and passphrase. For Active Directory, youwill usually need to have the server connect on the “Global Catalog port” (it is in the 6000s) and you needto create a low privilege LDAP user that the spam quarantine can bind as in order to execute the search.
3. The spam quarantine then searches for the user using the specified BaseDN and Query String. When auser’s LDAP record is found, the spam quarantine then extracts the DN for that record and attempts bindto the directory using the user records’ DN and the passphrase they entered originally. If this passphrasecheck succeeds then the user is properly authenticated, but the spam quarantine still needs to determinewhich mailboxes’ contents to show for that user.
4. Messages are stored in the spam quarantine using the recipient's envelope address. After a user's passphraseis validated against LDAP, the spam quarantine then retrieves the “Primary Email Attribute” from theLDAP record to determine which envelope address they should show quarantined messages for. The“Primary Email Attribute” can contain multiple email addresses which are then used to determine whatenvelope addresses should be displayed from the quarantine for the authenticated user.
Related Topics
• Authentication Options for End Users Accessing Spam Management Features , on page 285• Integrating With LDAP, on page 363
User Guide for AsyncOS 14.1 for Cisco Secure Email and Web Manager- GD (General Deployment)286
Spam QuarantineLDAP Authentication Process
IMAP/POP Authentication Process1. Depending on your mail server configuration, a user enters their username ( joe ) or email address (
[email protected] ) and passphrase into the web UI login page. You can modify the Login Page Messageto tell your users whether they should enter a full email address or just their username (see ConfiguringEnd-User Access to the Spam Quarantine , on page 288).
2. The spam quarantine connects to the IMAP or POP server and uses the entered login (either username oremail address) and passphrase to try to log into the IMAP/POP server. If the passphrase is accepted thenthe user is considered authenticated and the spam quarantine immediately logs out of the IMAP/POPserver.
3. Once the user is authenticated, the spam quarantine lists email for the user, based on the email address:
• If you have configured the spam quarantine to specify a domain to append to bare usernames (likejoe ), then this domain is appended and that fully qualified email address is used to search for matchingenvelopes in the quarantine.
• Otherwise, the spam quarantine uses the entered email address to search for matching envelopes.
For more information about IMAP, see the University of Washington web site:
http://www.washington.edu/imap/
SAML 2.0 Authentication ProcessSee section SSO Using SAML 2.0 in the Cisco Content Security Management Appliance Guide
Setting Up End-User Access to the Spam Quarantine via Web Browser
Step 1 Understand the benefits and limitations of the different authentication methods for end-user access to spam managementfeatures.
Step 2 If you will authenticate end users using LDAP, configure an LDAP server profile, including the Spam QuarantineEnd-User Authentication Query settings on the System Administration > LDAP > LDAP Server Profile page.
Example:If you will authenticate end users using SAML 2.0 (SSO), configure the settings on theSystem Administration > SAML page.
Integrating With LDAP, on page 363 and subsections
SSO Using SAML 2.0, on page 498
Step 3 Configure end-user access to the spam quarantine.
Configuring End-User Access to the Spam Quarantine , on page 288
Step 4 Determine the URL for end-user access to the spam quarantine.
Determining the URL for End-User Access to the Spam Quarantine, on page 289
What to do next
Related Topics
User Guide for AsyncOS 14.1 for Cisco Secure Email and Web Manager- GD (General Deployment)287
Spam QuarantineIMAP/POP Authentication Process

• Configuring End-User Access to the Spam Quarantine , on page 288
• Determining the URL for End-User Access to the Spam Quarantine, on page 289
• Which Messages an End User Sees , on page 289
Configuring End-User Access to the Spam QuarantineAdministrative users can access the spam quarantine whether or not end-user access is enabled.
Before you begin
See requirements in Authentication Options for End Users Accessing Spam Management Features , on page285.
Step 1 If you are on the legacy interface, navigate to Management Appliance > Centralized Services > Monitor > SpamQuarantine >Edit Settings, and then scroll down toEnd-User Quarantine Access.If you are on the new web interface,
then navigate to Security Management appliance , click Service Status and hover on icon and click Edit End-UserQuarantine Settings. You will be redirected to the legacy interface.
Step 2 Select Enable End-User Quarantine Access.Step 3 Specify the method to use to authenticate end users when they attempt to view their quarantined messages.
More InformationSelect This Option
Choose this option to make the quarantined messages accessible to the end-usersvia links in the spam notification without additional authentication.
None
For sites without an LDAP directory to use for authentication, the quarantine canvalidate user email addresses and passphrases against a standards-based IMAPor POP server that holds their mailbox.
When logging in to the spam quarantine, end users enter their full email addressand mailbox passphrase.
If the POP server advertises APOP support in the banner, then for security reasons(i.e., to avoid sending the passphrase in the clear) the Cisco appliance will onlyuse APOP. If APOP is not supported for some or all users then the POP servershould be reconfigured to not advertise APOP.
Select SSL if you have configured your server to use it. If users enter usernameonly, you can specify a domain to add to automatically complete the email address.Enter the domain of the envelope for users logging in to “Append Domain toUnqualified Usernames.”
Mailbox (IMAP/POP)
Configure LDAP settings as described in the sections referenced in the BeforeYou Begin section of this topic.
LDAP
Enable single sign-on for Spam Quarantine.
Before using this option, make sure that you have configured all the settings onManagement Appliance > System Administration > SAML page. See sectionSSO Using SAML 2.0 in theCisco Content Security Management Appliance Guide.
SAML 2.0
User Guide for AsyncOS 14.1 for Cisco Secure Email and Web Manager- GD (General Deployment)288
Spam QuarantineConfiguring End-User Access to the Spam Quarantine

Step 4 Specify whether or not to display message bodies before messages are released.
If this box is selected, users may not view the message body via the spam quarantine page. Instead, to view the body ofa quarantined message, users must release the message and view it in their mail application (such as Microsoft Outlook).You can use this feature for policy and regulation compliance — for example, if a regulation requires that all viewedemail be archived.
Step 5 Submit and commit your changes.
What to do next
(Optional) Customize the page that users see when they access the spam quarantine, if you have not yet doneso. See setting descriptions in Enabling and Configuring the Spam Quarantine on the Legacy Web Interface, on page 266.
Determining the URL for End-User Access to the Spam QuarantineThe URL that end users can use to directly access the spam quarantine is formed from the hostname of themachine and the settings (HTTP/S and port numbers) configured on the IP interface on which the quarantinehas been enabled. For example, HTTP://mail3.example.com:82.
The end-users can now access the Spam Quarantine on the new web interface in any one of the followingways:
• When trailblazerconfig CLI command is enabled, use the following URL -https://example.com:<trailblazer-https-port>/euq-login.
where example.com is the appliance host name and <trailblazer-https-port> is the trailblazer HTTPSport configured on the appliance.
• When trailblazerconfig CLI command is disabled, use the following URL -https://example.com:<https-port>/euq-login.
where example.com is the appliance host name and <https-port> is the HTTPS port configured on theappliance.
Local and externally-authenticated users cannot log into the end-user Spam Qurantine portal.Note
Which Messages an End User SeesGenerally, end users see only their own messages in the spam quarantine.
Depending on the method of access (via notification or directly via web browser) and authentication method(LDAP or IMAP/POP), users may see mail for multiple email addresses in the spam quarantine.
When LDAP authentication is used, if the Primary Email attribute has multiple values in the LDAP directory,all of those values (addresses) will be associated with the user. Therefore, quarantined messages addressedto all email addresses associated with the end user in the LDAP directory are present in the quarantine.
If the authentication method is IMAP/POP, or the user accesses the quarantine directly via a notification, thenthe quarantine will display only messages for that user’s email address (or the address to which the notificationwas sent).
User Guide for AsyncOS 14.1 for Cisco Secure Email and Web Manager- GD (General Deployment)289
Spam QuarantineDetermining the URL for End-User Access to the Spam Quarantine

For information about messages that are sent to aliases of which the user is a member, see Recipient EmailMailing List Aliases and Spam Notifications , on page 292.
Related Topics
• Configuring End-User Access to the Spam Quarantine , on page 288• Recipient Email Mailing List Aliases and Spam Notifications , on page 292
Notifying End Users About Quarantined MessagesYou can configure the system to send a notification email to some or all users when they have spam andsuspected spam messages in the spam quarantine.
By default, spam notifications lists the end user’s quarantined messages. Notifications include a link that youcan use to view the quarantined messages in the spam quarantine. You can then decide whether to have thequarantined messages delivered to the inbox or to delete them.
In cluster configurations, you can choose which users receive notifications only at the machine level.Note
Before you begin
• For end users to manage messages listed in notifications, they must be able to access the spam quarantine.See Configuring End-User Access to the Spam Quarantine , on page 288.
• Understand and implement the authentication options for managing spam using notifications. SeeAuthentication Options for End Users Accessing Spam Management Features , on page 285.
• If end users receive email at multiple aliases, see Recipient Email Mailing List Aliases and SpamNotifications , on page 292.
Step 1 If you are on the legacy interface, navigate toManagement Appliance >Centralized Services > Spam Quarantine >Edit Settings, and then scroll down to Spam Notifications. However if you are on the new web interface, navigate to
Security Management appliance , click Service Status, hover over the icon, and click Edit Spam NotificationSettings. You will be redirected to the legacy interface.
Step 2 Select Enable Spam Notification.Step 3 Enter a From: address for the notifications.Step 4 Specify the end-users whom you want to notify.Step 5 (Optional) Customize the subject for the notification.Step 6 (Optional) Customize the title for the notification.Step 7 Select the default language for notifications.Step 8 Configure the quarantine access for the end-users.
a) Check the Login without credentials check box to automatically log users into the spam quarantine when theyaccess it by clicking a link in a notification. The end-users can release messages by clicking the Release links inthe notification. If you uncheck this option, the end-users cannot release messages by clicking the Release links inthe notification.
User Guide for AsyncOS 14.1 for Cisco Secure Email and Web Manager- GD (General Deployment)290
Spam QuarantineNotifying End Users About Quarantined Messages

This option is visible only if you choose one of the following end-user authenticationmethods:Mailbox (IMAP/POP),LDAP, or SAML 2.0. If you have chosen None as the authentication method, when the end-users click on the linksin the spam notification, they are automatically logged into the spam quarantine.
b) Set an expiration period (in days) for the links in the notification. Enter a number between 0 and 365. These linkswill expire automatically after the specified period. Enter 0 if you do not want the links to expire.
(ForMailbox (IMAP/POP), LDAP, and SAML 2.0) This option is configurable only if you check theLogin withoutcredentials check box.
You can also set the expiration period using the spamdigestconfig command in the CLI.
Step 9 Customize the message body:a) (Optional) Customize the default text and variables.
To insert a variable, place the cursor where you would like the variable inserted and then click the name of thevariable in the Message Variables listing on the right. Or type in the variable.
The following message variables are expanded to the actual value for the specific end user:
• New Message Count ( %new_message_count% )— The number of new messages since the user last loggedin.
• Total Message Count ( %total_message_count% )— The number of messages for the user in the spamquarantine.
• Days Until Message Expires ( %days_until_expire% )
• Quarantine URL ( %quarantine_url% )— URL to log in to the quarantine and view messages.
• Username ( %username% )
• New Message Table ( %new_quarantine_messages% )— A list of the user’s new quarantined messages,showing sender, message subject, date, and a link to release the message. The user clicks a message subjectto view the message in the spam quarantine.
• New Message Tablewithout Subject (%new_quarantine_messages_no_subject% )—Similar to NewMessageTable, but only a “View Message” link is shown in place of the subject for each message.
b) Choose whether to show or hide the links to view all the quarantined messages in a spam notification. Under Showlink to see all quarantined messages in Notification Mails, choose Yes or No depending on your requirement.
(For Mailbox (IMAP/POP), LDAP, and SAML 2.0). This option is visible only if you check the Login withoutcredentials check box (under Quarantine Access).
If you chooseYes, you can force the end-user to authenticate before accessing the spam quarantine. CheckChallengeAccess. This option is not available if you have chosen None as the end-user authentication method.
You can also show or hide the links using the spamdigestconfig command in the CLI.
c) Click Preview Message to verify that the message is as you want it to be.
Step 10 Select a message format (HTML, Text, or HTML/Text).Step 11 Specify the address to which bounced notifications will be sent.Step 12 (Optional) Select Consolidate messages sent to the same LDAP user at different addresses.Step 13 Set the notification schedule.
User Guide for AsyncOS 14.1 for Cisco Secure Email and Web Manager- GD (General Deployment)291
Spam QuarantineNotifying End Users About Quarantined Messages

Step 14 Submit and commit your changes.
What to do next
To ensure that end users receive these notifications, consider recommending that they add the From: addressfor the spam quarantine notification emails to the “allowed list” in the junkmail settings of their mail application(such as Microsoft Outlook or Mozilla Thunderbird.)
Related Topics
• Recipient Email Mailing List Aliases and Spam Notifications , on page 292
• Testing Notifications, on page 293
• Troubleshooting Spam Notifications , on page 293
Recipient Email Mailing List Aliases and Spam NotificationsNotifications can be sent to each Envelope Recipient that has quarantined email, including mailing lists andother aliases. Each mailing list receives a single digest. If you send notifications to a mailing list, all subscribersto the list will receive the notification. Users who belong to multiple email aliases, or who belong to LDAPgroups that receive notifications, or who use several email addresses, may receive multiple spam notifications.The following table shows example situations in which users may receive multiple notifications.
Table 72: Notifications per Address/Alias
NotificationsAliasesEmail AddressesUser
[email protected]@example.com, [email protected]
If you use LDAP authentication, you can choose not to send notifications to mailing list aliases. Or, if youchoose to send spam notifications to mailing list aliases, you can prevent some occurrences of multiplenotifications. .
Users who access the spam quarantine by clicking a link in a notification will not see quarantined messagesfor any other aliases that the end-user may have, unless the appliance is using a spam quarantine aliasconsolidation query for email notifications. If the notification was sent to a distribution list that is expandedafter processing by the appliance, then multiple recipients may have access to the same quarantine for thatlist.
This means that all subscribers to a mailing list will receive the notification and can log in to the quarantineto release or delete messages. In this case, end users visiting the quarantine to view messages mentioned in anotification may find that those messages have already been deleted by other users.
User Guide for AsyncOS 14.1 for Cisco Secure Email and Web Manager- GD (General Deployment)292
Spam QuarantineRecipient Email Mailing List Aliases and Spam Notifications
If you do not use LDAP and you do not want your end users to receive multiple email notifications, considerdisabling notifications and instead allow end users to access the quarantine directly and authenticate via LDAPor POP/IMAP.
Note
Testing NotificationsYou can test notifications by configuring a testing mail policy, and having spam quarantined for just a singleuser. Then, configure the spam quarantine notification settings: Select theEnable Spam Notification checkboxand do not selectEnable End-User Quarantine Access. Then only the administrator configured in theDeliverBounced Messages To field is notified of new spam in the quarantine.
Troubleshooting Spam Notifications
Related Topics
• User Receives Multiple Notifications , on page 293• Recipient Does Not Receive Notifications , on page 293• User Receives Multiple Notifications , on page 293• Recipient Does Not Receive Notifications , on page 293
User Receives Multiple Notifications
Problem
A user receives multiple spam notifications for a single message.
Solution
Possible causes:
• The user has multiple email addresses and the spammessage was sent to more than one of those addresses.• The user is a member of one or more email aliases that received the spam message. To minimizeduplications, and for more information, see Recipient Email Mailing List Aliases and SpamNotifications, on page 292.
Recipient Does Not Receive Notifications
Problem
Recipient is not receiving spam notifications.
Solution
• If notifications are being sent to the “Deliver BounceMessages To:” address instead of to spam recipients,this means that spam notifications are enabled, but spam quarantine access is not enabled. SeeAuthentication Options for End Users Accessing Spam Management Features , on page 285.
• Have the user check the junk mail settings of their email client.• Check for issues with the appliance or server that you specified for Deliver Messages Via in Enablingand Configuring the Spam Quarantine on the Legacy Web Interface , on page 266.
User Guide for AsyncOS 14.1 for Cisco Secure Email and Web Manager- GD (General Deployment)293
Spam QuarantineTesting Notifications

Managing Messages in the Spam QuarantineThis section explains how to work with messages in local or external spam quarantines.
Administrative users can see and manage all messages in the spam quarantine.
Related Topics
• Accessing the Spam Quarantine (Administrative Users), on page 294
• Searching for Messages in the Spam Quarantine, on page 294
• Viewing Messages in the Spam Quarantine, on page 295
• Delivering Messages in the Spam Quarantine, on page 295
• Deleting Messages from the Spam Quarantine, on page 296
Accessing the Spam Quarantine (Administrative Users)Administrative users can see and manage all messages in the spam quarantine.
Accessing the Spam Quarantine (Administrative Users)Administrative users can see and manage all messages in the spam quarantine.
Step 1 [NewWeb Interface Only] On the Security Management appliance, choose Quarantine > Spam Quarantine > Search.Step 2 Select Email > Message Quarantine > Spam Quarantine, then click the Spam Quarantine link.
The spam quarantine opens in a separate browser window.
Searching for Messages in the Spam Quarantine
Step 1 Specify an envelope recipient.
You can enter a partial address.Note
Step 2 Select whether the search results should match the exact recipient you entered, or whether the results should contain, startwith, or end with your entry.
Step 3 Enter a date range to search through. Click the calendar icons to select a date.Step 4 Specify a From: address, and select whether the search results should contain, match exactly, start with, or end with the
value you entered.Step 5 Click Search. Messages matching your search criteria are displayed below the Search section of the page.
User Guide for AsyncOS 14.1 for Cisco Secure Email and Web Manager- GD (General Deployment)294
Spam QuarantineManaging Messages in the Spam Quarantine

What to do next
Related Topics
Searching Very Large Message Collections, on page 295
Searching Very Large Message CollectionsIf you have a very large collection of messages in the spam quarantine, and if your search terms are notnarrowly defined, your query may take a very long time to return information, or it may time out.
You will be prompted to confirm whether you want to resubmit your search. Please note that having multiplelarge searches running simultaneously can impact performance.
Viewing Messages in the Spam QuarantineThe message listing shows messages in the spam quarantine. You can select how many messages are shownat one time. You can sort the display by clicking on the column headings. Click the same column again toreverse the sorting.
Click the subject of a message to view the message, including the body and headers. The message is displayedin the Message Details page. The first 20K of the message is displayed. If the message is longer, it is truncatedat 20K and you can download the message via the link at the bottom of the message.
From the Message Details page you can delete a message (select Delete) or select Release to release themessage. Releasing a message causes it to be delivered.
To view additional details about the message, click the Message Tracking link.
Note the following:
• Viewing Messages with Attachments
When viewing a message that includes an attachment, the body of the message is displayed, followedby a list of attachments.
In the new web interface, if a message includes an attachment, you can view the details of the attachmentin the Attachments section of the message.
• Viewing HTML Messages
The spam quarantine attempts to render an approximation of HTML-based messages. Images are notdisplayed.
• Viewing Encoded Messages
Base64-encoded messages are decoded and then displayed.
Delivering Messages in the Spam QuarantineTo release a message for delivery, click the checkbox next to the message or messages that you want to releaseand select Release from the drop-down menu. Then click Submit.
Click the checkbox in the heading row to automatically select all messages currently displayed on the page.
Released messages proceed directly to the destination queue, skipping any further work queue processing inthe email pipeline.
User Guide for AsyncOS 14.1 for Cisco Secure Email and Web Manager- GD (General Deployment)295
Spam QuarantineSearching Very Large Message Collections

Deleting Messages from the Spam QuarantineThe spam quarantine can be configured to automatically delete messages after a certain amount of time. Also,the spam quarantine can be configured to automatically delete the oldest messages once the quarantine hasreached its maximum size. You may also delete messages from the spam quarantine manually.
To delete specific messages, click the checkbox next to the messages that you want to delete and then selectDelete from the drop-downmenu. Then click Submit. Click the checkbox in the heading row to automaticallyselect all of the messages currently displayed on the page.
To delete all messages in the spam quarantine, disable the quarantine (see About Disabling the External SpamQuarantine , on page 296) and then click the Delete All Messages link. The number in parenthesis at the endof the link is the number of messages in the spam quarantine.
Disk Space for the Spam QuarantineAvailable disk space for the quarantine varies by appliance model. See Viewing Disk Space, Quotas andUsage , on page 495.
By default, messages in the spam quarantine are automatically deleted after a set amount of time. If thequarantine gets full, older spam is deleted. To change this setting, see Enabling and Configuring the SpamQuarantine on the Legacy Web Interface , on page 266.
Related Topics
About Disabling the External Spam QuarantineIf you disable the spam quarantine:
• If messages are present in the spam quarantine when it is disabled, you can opt to delete all of the messages.• Any mail polices set to quarantine spam or suspected spam will instead be set to deliver the message.You may need to adjust mail policies on the Email Security appliance.
• To completely disable an external spam quarantine, disable it on both the appliance and the SecurityManagement appliance .
Disabling an external spam quarantine on the appliance only does not delete the external quarantine or itsmessages and data.
Troubleshooting Spam Quarantine Features• Troubleshooting Safelists and Blocklists, on page 284• Troubleshooting Spam Notifications , on page 293
User Guide for AsyncOS 14.1 for Cisco Secure Email and Web Manager- GD (General Deployment)296
Spam QuarantineDeleting Messages from the Spam Quarantine

C H A P T E R 9Centralized Policy, Virus, and OutbreakQuarantines
This chapter contains the following sections:
• Overview of Centralized Quarantines , on page 297• Centralizing Policy, Virus, and Outbreak Quarantines , on page 299• Managing Policy, Virus, and Outbreak Quarantines, on page 306• Working with Messages in Policy, Virus, or Outbreak Quarantines, on page 314• Troubleshooting Centralized Policy Quarantines , on page 322
Overview of Centralized QuarantinesMessages processed by certain filters, policies, and scanning operations on an Email Security appliance canbe placed into quarantines to temporarily hold them for further action. You can centralize quarantines frommultiple Email Security appliances on a Cisco Content Security Management appliance.
Benefits of centralizing quarantines include the following:
• You can manage quarantined messages from multiple Email Security appliances in one location.
• Quarantined messages are stored behind the firewall instead of in the DMZ, reducing security risk.
• Centralized quarantines can be backed up as part of the standard backup functionality on the SecurityManagement appliance.
Anti-virus scanning, Outbreak Filters, and Advanced Malware Protection (File Analysis) each have a singlededicated quarantine. You create policy quarantines to hold messages that are caught by message filtering,content filtering, and Data Loss Prevention policies.
The Policy, Virus and Outbreak Quarantines section in the legacy web interface is labeled as Other Quarantinesin the new web interface. For more information, see Viewing Messages in Quarantines , on page 315.
For additional information about quarantines, see the documentation for your Email Security appliance.
User Guide for AsyncOS 14.1 for Cisco Secure Email and Web Manager- GD (General Deployment)297

Quarantine TypesMore InformationDescriptionCreated by the
System by Default?Quarantine NameQuarantine Type
• ManagingPolicy, Virus,and OutbreakQuarantines
• Working withMessages inPolicy, Virus,or OutbreakQuarantines
Holdsmessages thatare sent for fileanalysis, until averdict is returned.
YesFile AnalysisAdvanced MalwareProtection
Holdsmessages thatmay be transmittingmalware, asdetermined by theanti-virus engine.
YesVirusVirus
Holds messagescaught by OutbreakFilters as potentiallybeing spam ormalware.
YesOutbreakOutbreak
Holds messagescaught by messagefilters, contentfilters, and DLPmessage actions.
A default Policyquarantine has beencreated for you.
YesPolicyPolicy
Holds messagesonly if a quarantinethat is specified in amessage filter,content filter, orDLPmessage actionhas been deleted.
You cannot assignthis quarantine toany filter or messageaction.
YesUnclassified
Policy quarantinesthat you create foruse in messagefilters, contentfilters, and DLPmessage actions.
No(Policy quarantinesthat you create)
User Guide for AsyncOS 14.1 for Cisco Secure Email and Web Manager- GD (General Deployment)298
Centralized Policy, Virus, and Outbreak QuarantinesQuarantine Types

More InformationDescriptionCreated by theSystem by Default?
Quarantine NameQuarantine Type
Spam Quarantine,on page 265
Holds spam orsuspected spammessages for themessage’s recipientor an administratorto review.
The spamquarantineis not included in thegroup of policy,virus, and outbreakquarantines and ismanaged separatelyfrom all otherquarantines.
YesSpamSpam
Centralizing Policy, Virus, and Outbreak QuarantinesProcedure
PurposeCommand or Action
Firewall Information, on page 587If your Email Security appliance is in your DMZ and yourSecurity Management appliance is behind your firewall,
Step 1
open a port in the firewall to allow the appliances toexchange centralized policy, virus, and outbreak quarantinedata.
Enabling Centralized Policy, Virus, and OutbreakQuarantines on the Security Management Appliance , onpage 301
On the SecurityManagement appliance, enable the feature.Step 2
Managing Disk Space , on page 494On the SecurityManagement appliance, allocate disk spacefor non-spam quarantines.
Step 3
(Optional)Step 4 • Configuring Policy, Virus, and Outbreak Quarantines, on page 308• Create centralized policy quarantines on the Security
Management appliance with desired settings. • Checking the Settings of System-CreatedQuarantines, on page 308.• Configure settings for the centralized virus and
outbreak quarantines, and for the default policyquarantines.
If you configure these settings before migration, youcan refer to the existing settings on your EmailSecurity appliances.
You can also create required quarantines whileconfiguring custommigration, or quarantines will be
User Guide for AsyncOS 14.1 for Cisco Secure Email and Web Manager- GD (General Deployment)299
Centralized Policy, Virus, and Outbreak QuarantinesCentralizing Policy, Virus, and Outbreak Quarantines

PurposeCommand or Action
created for you during automatic migration. Allquarantines created during migration have defaultsettings.
Local quarantine settings are not retained in thecentralized quarantine, even if the quarantine nameis the same.
Adding the Centralized Policy, Virus, and OutbreakQuarantine Service to Each Managed Email SecurityAppliance, on page 302
On the SecurityManagement appliance, add Email Securityappliances to manage, or select the Policy, Virus andOutbreak Quarantines option from the centralized servicesof an already-added appliance.
Step 5
• If your Email Security appliances are clustered, allappliances that belong to a particular level (machine,group, or cluster) must be added to the SecurityManagement appliance before you enable centralizedPolicy, Virus and Outbreak Quarantines on any EmailSecurity appliance in the cluster.
Commit your changes.Step 6
Configuring Migration of Policy, Virus, and OutbreakQuarantines , on page 303
On the Security Management appliance, configuremigration of existing policy quarantines from EmailSecurity appliances.
Step 7
See the “Centralizing Services on a Cisco Content SecurityManagement appliance” chapter in the documentation for
On an Email Security appliance, enable the centralizedpolicy, virus, and outbreak quarantines feature.
Step 8
your Email Security appliance, specifically the followingsections:• If you have policy, virus, and outbreak
quarantines configured on an EmailSecurity appliance, migration ofquarantines and all their messages beginsas soon as you commit this change.
Important
• “About Migration of Policy, Virus, and OutbreakQuarantines”
• “Centralizing Policy, Virus, and OutbreakQuarantines”
Migrate additional Email Security appliances.Step 9
• Only one migration process can be in progress at anytime. Do not enable centralized policy, virus, andoutbreak quarantines on another Email Securityappliance until the previous migration is complete.
Configuring Policy, Virus, and Outbreak Quarantines , onpage 308
Edit centralized quarantine settings as needed.Step 10
• Quarantines created duringmigration are created withdefault settings, not the settings in the originatinglocal quarantines, even if the centralized and localquarantine names are the same.
User Guide for AsyncOS 14.1 for Cisco Secure Email and Web Manager- GD (General Deployment)300
Centralized Policy, Virus, and Outbreak QuarantinesCentralizing Policy, Virus, and Outbreak Quarantines

PurposeCommand or Action
See the documentation for message filters, content filters,and DLPMessage Actions in the online help or user guidefor your Email Security appliance.
If message filters, content filters, and DLPmessage actionscould not be automatically updated with the names ofcentralized quarantines, manually update thoseconfigurations on your Email Security appliances.
Step 11
• In cluster configurations, filters and message actionscan be automatically updated on a particular levelonly if filters and message actions are defined at thatlevel.
Designating an Alternate Appliance to Process ReleasedMessages, on page 305
(Recommended) Specify an Email Security appliance toprocess released messages if the originating appliance isnot available.
Step 12
Configuring Centralized Quarantine Access for CustomUser Roles
If you delegate administration to custom user roles, youmay need to configure access in a certain way.
Step 13
Enabling Centralized Policy, Virus, and Outbreak Quarantines on the SecurityManagement Appliance
Before you begin
Complete any steps preceding this procedure in the table in Centralizing Policy, Virus, and OutbreakQuarantines , on page 299.
Step 1 Choose Management Appliance > Centralized Services > Policy, Virus, and Outbreak Quarantines.Step 2 Click Enable.Step 3 Specify the interface and port for communication with Email Security appliances:
• Accept the default selections unless you have reason to change them.
• If your Email Security appliances are not on the same network as your Security Management appliance, then youmust use the Management interface.
• Use the same port that you opened in the firewall.
Step 4 Click Submit.
What to do next
Return to the next step in the table in Centralizing Policy, Virus, and Outbreak Quarantines , on page 299.
User Guide for AsyncOS 14.1 for Cisco Secure Email and Web Manager- GD (General Deployment)301
Centralized Policy, Virus, and Outbreak QuarantinesEnabling Centralized Policy, Virus, and Outbreak Quarantines on the Security Management Appliance

Enabling Centralized Policy, Virus, and Outbreak Quarantines on the New WebInterface of the Appliance
Before you begin
Complete any steps preceding this procedure in the table in Centralizing Policy, Virus, and OutbreakQuarantines , on page 299.
Step 1 On the SecurityManagement appliance, click Service Status, hover on the icon corresponding toOther Quarantine,and click Edit Settings.
Step 2 Click Enable once you are redirected to the legacy interface.
Adding the Centralized Policy, Virus, and Outbreak Quarantine Service to EachManaged Email Security Appliance
To see an consolidated view of all quarantines on all Email Security appliances, consider adding all EmailSecurity appliances before centralizing any quarantines.
Before you begin
Make sure you have completed all procedures to this point in the table in Centralizing Policy, Virus, andOutbreak Quarantines , on page 299.
Step 1 [New Web Interface Only] On the Security Management appliance, click to load the legacy web interface.Step 2 Choose Management Appliance > Centralized Services > Security Appliances.Step 3 If you have already added the Email Security appliance to the list on this page:
a) Click the name of an Email Security appliance.b) Select the Policy, Virus, and Outbreak Quarantines service.
Step 4 If you have not yet added the Email Security appliance:a) Click Add Email Appliance.b) In the Appliance Name and IP Address text fields, enter the appliance name and the IP address for the Management
interface of the appliance you are adding.
If you enter a DNS name in the IP Address text field, it will be immediately resolved to an IP address whenyou click Submit.
Note
c) The Policy, Virus and Outbreak Quarantines service is pre-selected.d) Click Establish Connection.e) Enter the user name and passphrase for an administrator account on the appliance to be managed, and then click
Establish Connection.
You enter the login credentials to pass a public SSH key for file transfers from the Security Managementappliance to the remote appliance. The login credentials are not stored on the SecurityManagement appliance.
Note
User Guide for AsyncOS 14.1 for Cisco Secure Email and Web Manager- GD (General Deployment)302
Centralized Policy, Virus, and Outbreak QuarantinesEnabling Centralized Policy, Virus, and Outbreak Quarantines on the New Web Interface of the Appliance
f) Wait for the Success message to appear above the table on the page.
Step 5 Click Submit.Step 6 Repeat this procedure for each Email Security appliance for which you want to enable Centralized Policy, Virus, and
Outbreak Quarantines.
For example, add the other appliances in the cluster.
Step 7 Commit your changes.
What to do next
Return to the next step in the table in Centralizing Policy, Virus, and Outbreak Quarantines , on page 299.
Configuring Migration of Policy, Virus, and Outbreak Quarantines
Before you begin
• Make sure that you have completed all procedures to this point in the table in Centralizing Policy, Virus,and Outbreak Quarantines , on page 299
• For caveats and information about the migration process, see the “About Migration of Policy, Virus, andOutbreak Quarantines” section in the “Centralizing Services on a Cisco Content Security Managementappliance” chapter in the documentation for your Email Security appliance.
Step 1 [New Web Interface Only] On the Security Management appliance, click to load the legacy web interface.Step 2 Choose Management Appliance > Centralized Services > Policy, Virus, and Outbreak Quarantines.Step 3 Click Launch Migration Wizard.Step 4 Choose a migration method:
Additional InformationChooseIf
All centralized policy quarantines that arecreated using this process are automaticallyconfigured with default settings, regardlessof the settings in the quarantines with thesame names on the Email Security appliance.
You must update those settings aftermigration.
Automatic• You want to migrate all existing policyquarantines from all associated EmailSecurity appliances,
and
• Policy quarantines with the same nameshave identical settings on all EmailSecurity appliances,
and
• You want to merge all policy quarantineswith the same name on all Email Securityappliances into a single centralized policyquarantine having that name.
User Guide for AsyncOS 14.1 for Cisco Secure Email and Web Manager- GD (General Deployment)303
Centralized Policy, Virus, and Outbreak QuarantinesConfiguring Migration of Policy, Virus, and Outbreak Quarantines

Additional InformationChooseIf
Any centralized policy quarantines that youcreate during migration, instead of beforemigration, will be configured with the defaultsettings for new quarantines.
You should update those settings aftermigration.
Custom• Policy quarantines with the same nameshave different settings on different EmailSecurity appliances and you want tomaintain the differences,
or
• You want to migrate some localquarantines and delete all others,
or
• You want to migrate local quarantines tocentralized quarantines with differentnames
or
• You want to merge local quarantines withdifferent names into a single centralizedquarantine.
Step 5 Click Next.Step 6 If you selected Automatic:
Verify that the policy quarantines to be migrated and other information on this page match your expectations.
Virus, Outbreak, and File Analysis quarantines will also be migrated.
Step 7 If you selected Custom:
• To select whether to show quarantines from all Email Security appliances or just one., choose an option from theShow Quarantines from: list.
• Select which local policy quarantines move to each centralized policy quarantine.
• Create additional centralized policy quarantines as needed. These will have default settings.
• Quarantine names are case-sensitive.
• Any quarantines remaining in the table on the left will not be migrated and will be deleted from the Email Securityappliance upon migration.
• You can change the quarantine mapping by selecting a quarantine from the table on the right and clicking Removefrom Centralized Quarantine.
Step 8 Click Next as needed.Step 9 Submit and commit your changes.
What to do next
Return to the next step in the table in Centralizing Policy, Virus, and Outbreak Quarantines , on page 299.
User Guide for AsyncOS 14.1 for Cisco Secure Email and Web Manager- GD (General Deployment)304
Centralized Policy, Virus, and Outbreak QuarantinesConfiguring Migration of Policy, Virus, and Outbreak Quarantines

Designating an Alternate Appliance to Process Released MessagesNormally, when a message is released from a centralized quarantine, the Security Management appliancereturns it for processing to the Email Security appliance that originally sent it to the centralized quarantine.
If the Email Security appliance that originated a message is not available, a different Email Security appliancecan process and deliver released messages. You designate the appliance for this purpose.
Before you begin
• Verify that the alternate appliance can process and deliver released messages as expected. For example,configurations for encryption and antivirus rescanning should match the same configurations on yourprimary appliances.
• The alternate appliance must be fully configured for centralized policy, virus, and outbreak quarantines.Complete the steps in the table in Centralizing Policy, Virus, and Outbreak Quarantines , on page 299 forthat appliance.
Step 1 [New Web Interface Only] On the Security Management appliance, click to load the legacy web interface.Step 2 Choose Management Appliance > Centralized Services > Security Appliances.Step 3 Click the Specify Alternate Release Appliance button.Step 4 Choose an Email Security appliance.Step 5 Submit and commit your changes.
What to do next
Related Topics
Releasing Messages When an Email Security Appliance Is Unavailable , on page 306
Configuring Centralized Quarantine Access for Custom User RolesIn order to allow administrators with custom user roles to specify centralized policy quarantines in messageand content filters and in DLP message actions on the Email Security appliance, you must grant those usersaccess to the relevant policy quarantines on the Security Management appliance, and the custom user rolenames that you create on the SecurityManagement appliancemust match those on the Email Security appliance.
Related Topics
• Creating Custom Email User Roles , on page 400
Disabling Centralized Policy, Virus, and Outbreak QuarantinesGenerally, if you need to disable these centralized quarantines, you should do so on the Email Securityappliance.
For information about disabling centralized policy, virus, and outbreak quarantines, including a list of impactsof doing so, see the online help or documentation for your Email Security appliance.
User Guide for AsyncOS 14.1 for Cisco Secure Email and Web Manager- GD (General Deployment)305
Centralized Policy, Virus, and Outbreak QuarantinesDesignating an Alternate Appliance to Process Released Messages

Releasing Messages When an Email Security Appliance Is UnavailableNormally, when a message is released from a centralized quarantine, the Security Management appliancereturns it for processing to the Email Security appliance that originally sent it to the centralized quarantine.
If the Email Security appliance that originated a message is not available, a different Email Security appliancecan process and deliver releasedmessages. You should designate an alternate release appliance for this purpose.
If the alternate appliance is unavailable, you can specify a different Email Security appliance as the alternaterelease appliance and that appliance will process and deliver queued messages.
After repeated unsuccessful attempts to reach an Email Security appliance. you will receive an alert.
Related Topics
• Designating an Alternate Appliance to Process Released Messages, on page 305
Managing Policy, Virus, and Outbreak Quarantines• Disk Space Allocation for Policy, Virus, and Outbreak Quarantines , on page 306• Retention Time for Messages in Quarantines , on page 307• Default Actions for Automatically Processed Quarantined Messages , on page 308• Checking the Settings of System-Created Quarantines , on page 308• Configuring Policy, Virus, and Outbreak Quarantines , on page 308• About Editing Policy, Virus, and Outbreak Quarantine Settings , on page 310• Determining the Filters and Message Actions to Which a Policy Quarantine Is Assigned , on page 311• About Deleting Policy Quarantines , on page 311• Monitoring Quarantine Status, Capacity, and Activity , on page 311• Alerts About Quarantine Disk-Space Usage , on page 313• Policy Quarantines and Logging, on page 313• About Distributing Message Processing Tasks to Other Users , on page 314
Disk Space Allocation for Policy, Virus, and Outbreak QuarantinesFor information about allocating disk space, see Managing Disk Space , on page 494.
Messages in multiple quarantines consume the same amount of disk space as a message in a single quarantine.
If Outbreak Filters and Centralized Quarantines are both enabled:
• All disk space on the appliance that would have been allocated to local policy, virus, and outbreakquarantines is used instead to hold copies of messages in the Outbreak quarantine, in order to scan thosemessages each time outbreak rules are updated.
• The disk space on the Security Management appliance for messages in the Outbreak quarantine from aparticular managed Email Security appliance may be limited by the amount of available disk space forquarantined messages on that Email Security appliance.
• For more information about this situation, see Retention Time for Messages in Quarantines , on page307
User Guide for AsyncOS 14.1 for Cisco Secure Email and Web Manager- GD (General Deployment)306
Centralized Policy, Virus, and Outbreak QuarantinesReleasing Messages When an Email Security Appliance Is Unavailable

Related Topics
• Monitoring Quarantine Status, Capacity, and Activity , on page 311• Alerts About Quarantine Disk-Space Usage , on page 313• Retention Time for Messages in Quarantines , on page 307
Retention Time for Messages in QuarantinesMessages are automatically removed from the quarantine under the following circumstances:
• Normal Expiration—the configured retention time is met for a message in the quarantine. You specifya retention time for messages in each quarantine. Each message has its own specific expiration time,displayed in the quarantine listing. Messages are stored for the amount of time specified unless anothercircumstance described in this topic occurs.
The normal retention time for messages in the Outbreak Filters quarantine isconfigured in the Outbreak Filters section of each mail policy, not in the outbreakquarantine.
Note
• Early Expiration—messages are forced from quarantines before the configured retention time is reached.This can happen when:
• The size limit for all quarantines, as defined in Disk Space Allocation for Policy, Virus, and OutbreakQuarantines , on page 306, is reached.
If the size limit is reached, the oldest messages, regardless of quarantine, are processed and thedefault action is performed for each message, until the size of all quarantines is again less than thesize limit. The policy is First In First Out (FIFO). Messages in multiple quarantines will be expiredbased on their latest expiration time.
(Optional) You can configure individual quarantines to be exempt from release or deletion becauseof insufficient disk space. If you configure all quarantines to be exempt and the disk space reachescapacity messages will be held on the Email Security appliance until space is available on theSecurity Management appliance.
Because the Security Management appliance does not scan messages, a copy of each message inthe centralized outbreak quarantine is stored on the Email Security appliance that originally processedthe message. This allows the Email Security appliance to rescan quarantined messages each timeoutbreak filter rules are updated, and tell the Security Management appliance to release messagesthat are no longer deemed a threat. Both copies of the outbreak quarantine should hold the same setof messages at all times. Therefore, in the rare situation when disk space on the Email Securityappliance becomes full, then the copies of messages in the Outbreak quarantine on both applianceswill expire early, even if the centralized quarantine still has space.
You will receive alerts at disk-space milestones. See Alerts About Quarantine Disk-Space Usage ,on page 313.
• You delete a quarantine that still holds messages.
When a message is automatically removed from a quarantine, the default action is performed on that message.See Default Actions for Automatically Processed Quarantined Messages , on page 308.
User Guide for AsyncOS 14.1 for Cisco Secure Email and Web Manager- GD (General Deployment)307
Centralized Policy, Virus, and Outbreak QuarantinesRetention Time for Messages in Quarantines

In addition to the above scenarios, messages can be automatically removed from quarantine based on theresult of scanning operations (outbreak filters or file analysis.)
Note
Effects of Time Adjustments on Retention Time
• Daylight savings time and appliance time zone changes do not affect the retention period.• If you change the retention time of a quarantine, only new messages will have the new expiration time.• If the system clock is changed, messages that should have expired in the past will expire at the next mostappropriate time.
• System clock changes do not apply to messages that are in the process of being expired.
Default Actions for Automatically Processed Quarantined MessagesThe default action is performed on messages in a policy, virus, or outbreak quarantine when any situationdescribed in Retention Time for Messages in Quarantines , on page 307, occurs.
There are two primary default actions:
• Delete—The message is deleted.• Release—The message is released for delivery.
Upon release, messages may be rescanned for threats. For more information, see About Rescanning ofQuarantined Messages , on page 320.
In addition, messages released before their expected retention time has passed can have additional operationsperformed on them, such as adding an X-Header. For more information, see Configuring Policy, Virus, andOutbreak Quarantines , on page 308.
Messages released from a centralized quarantine are returned to the originating Email Security appliance forprocessing.
Checking the Settings of System-Created QuarantinesBefore you use quarantines, customize the settings of the default quarantines, including the Unclassifiedquarantine.
Related Topics
• Configuring Policy, Virus, and Outbreak Quarantines , on page 308
Configuring Policy, Virus, and Outbreak Quarantines
Before you begin
• If you are editing an existing quarantine, see About Editing Policy, Virus, and Outbreak QuarantineSettings , on page 310.
• Understand how messages in quarantines are automatically managed, including retention times anddefault actions. See Retention Time for Messages in Quarantines , on page 307, and Default Actions forAutomatically Processed Quarantined Messages , on page 308.
User Guide for AsyncOS 14.1 for Cisco Secure Email and Web Manager- GD (General Deployment)308
Centralized Policy, Virus, and Outbreak QuarantinesDefault Actions for Automatically Processed Quarantined Messages

• Determine which users you want to have access to each quarantine, and create users and custom userroles accordingly. For details, seeWhichUser Groups CanAccess Policy, Virus, and Outbreak Quarantines, on page 314.
Step 1 You can configure Policy, Virus, and Outbreak Quarantines in any one of the following ways:
• [ New Web Interface Only] Choose Quarantine > Other Quarantine > View > +.
• Choose Email > Message Quarantine > Policy, Virus, and Outbreak Quarantines and do one of the following:
• Click Add Policy Quarantine.
• Click a quarantine to edit.
Step 2 Enter the following information:
Keep the following in mind:
• Changing the retention time of the File Analysis quarantine from the default of one hour is not recommended.
• If you do not want messages in this quarantine to be processed before the end of the Retention Period you specify,even when quarantine disk space is full, deselect Free up space by applying default action on messages uponspace overflow.
Do not select this option for all quarantines. The system must be able to make space by deleting messages from atleast one quarantine.
• If you select Release as the default action, you can specify additional actions to apply to messages that are releasedbefore their retention period has passed:
InformationOption
Type the text to add and specify whether to add it to the beginning or the end of theoriginal message subject.
For example, you might want to warn the recipient that the message may containinappropriate content.
In order for a subject with non-ASCII characters to display correctly it mustbe represented according to RFC 2047.
Note
Modify Subject
An X-Header can provide a record of actions taken on a message. This can be helpfulfor example when handling inquiries about why a particular message was delivered.
Enter a name and value.
Example:
Name = Inappropriate-release-early
Value = True
Add X-Header
Stripping attachments protects against viruses that may be in such files.Strip Attachments
Step 3 Specify the users who can access this quarantine:
User Guide for AsyncOS 14.1 for Cisco Secure Email and Web Manager- GD (General Deployment)309
Centralized Policy, Virus, and Outbreak QuarantinesConfiguring Policy, Virus, and Outbreak Quarantines

InformationUser
The list of local users includes only users with roles that can access quarantines.
The list excludes users with Administrator privileges, because all Administrators havefull access to quarantines.
Local Users
You must have configured external authentication.Externally Authenticated Users
You see this option only if you have created at least one custom user role with quarantineaccess.
Custom User Roles
Step 4 Submit and commit your changes.
What to do next
See Message Filters Page, on page 146 and Content Filters Page, on page 147
• If you have not yet migrated quarantines from the Email Security appliance:
You will assign these quarantines to message and content filters and DLP message actions as part of themigration process.
• If you have already migrated to centralized quarantines:
Make sure your Email Security appliance has message and content filters and DLP message actions thatwill move messages to the quarantine. See the user guide or online help for the Email Security appliance.
About Editing Policy, Virus, and Outbreak Quarantine Settings
• You cannot rename a quarantine.
• See also Retention Time for Messages in Quarantines , on page 307.
Note
To change quarantine settings, choose Email > Message Quarantine > Policy, Virus, and OutbreakQuarantines, and then click the name of a quarantine.
To change quarantine settings on the new web interface, navigate to Quarantine > Other Quarantine >
View and click on the required quarantine or
To change quarantine settings on the legacy web interface, choose Email > Message Quarantine > Policy,Virus, and Outbreak Quarantines, and then click the name of a quarantine.
User Guide for AsyncOS 14.1 for Cisco Secure Email and Web Manager- GD (General Deployment)310
Centralized Policy, Virus, and Outbreak QuarantinesAbout Editing Policy, Virus, and Outbreak Quarantine Settings

Determining the Filters and Message Actions to Which a Policy QuarantineIs Assigned
You can view the message filters, content filters, Data Loss Prevention (DLP) message actions, and DMARCverification profiles that are associated with a policy quarantine, and the Email Security appliance on whicheach is configured.
Step 1 [New Web Interface Only] On the Security Management appliance, click on Quarantine > Other Quarantine > View.
Step 2 [New Web Interface Only] Select the required quarantine and click on the button.Step 3 Choose Email > Message Quarantine > Policy, Virus, and Outbreak Quarantines.Step 4 Click the name of the policy quarantine to check.Step 5 Scroll to the bottom of the page and view the Associated Message Filters/Content Filters/DLP Message Actions.
About Deleting Policy Quarantines• Before you delete a policy quarantine, see if it is associated with any active filters or message actions.See Determining the Filters and Message Actions to Which a Policy Quarantine Is Assigned , on page311.
• You can delete a policy quarantine even if it is assigned to a filter or message action.• If you delete a quarantine that is not empty, the default action defined in the quarantine will be appliedto all messages, even if you have selected the option not to delete messages if the disk is full. See DefaultActions for Automatically Processed Quarantined Messages , on page 308.
• After you delete the quarantine associated with a filter or message action, any messages subsequentlyquarantined by that filter or message action will be sent to the Unclassified quarantine. You shouldcustomize the default settings of the Unclassified quarantine before you delete quarantines.
• You cannot delete the Unclassified quarantine.
Monitoring Quarantine Status, Capacity, and ActivityDo ThisTo View
[New Web Interface Only] On the Security Management
appliance, click to load the legacy web interface.
Choose Management Appliance > Centralized Services >Policy, Virus, and Outbreak Quarantines and look in the firstsection on the page.
To change allocations, see Managing Disk Space , on page 494.
Total space allocated for all non-spamquarantines
User Guide for AsyncOS 14.1 for Cisco Secure Email and Web Manager- GD (General Deployment)311
Centralized Policy, Virus, and Outbreak QuarantinesDetermining the Filters and Message Actions to Which a Policy Quarantine Is Assigned

Do ThisTo View
[New Web Interface Only] Choose Quarnatine > OtherQuarantine.
or
Choose Email > Message Quarantine > Policy, Virus, andOutbreak Quarantines and look just below the table.
The available space for policy, virus and outbreak quarantine isdisplayed above the table in the Quarantines section
Currently available space for all non-spamquarantines
[New Web Interface Only] On the Security Management
appliance, click to load the legacy web interface.
Choose Management Appliance > Centralized Services >System Status.
Total amount of space currently used by allquarantines
[New Web Interface Only] Choose Quarantines Quarantine> Other Quarantine > View.
The table displays the amount of space currently used by eachquarantine.
or
Choose Email > Message Quarantine > Policy, Virus, andOutbreak Quarantines, click the quarantine name, and lookfor this information in the table row directly below the quarantinename.
Amount of space currently used by eachquarantine
[New Web Interface Only] On the Security Management
appliance, click to load the legacy web interface.
Choose Management Appliance > Centralized Services >System Status.
Total number of messages currently in allquarantines
[New Web Interface Only] Choose Quarantines Quarantine> Other Quarantine > View.
The table displays the total number of messages currentlyavailable for each quarantine.
or
Choose Email > Message Quarantine > Policy, Virus, andOutbreak Quarantines and look at the table row for thequarantine.
Number of messages currently in eachquarantine
[New Web Interface Only] On the Security Management
appliance, click to load the legacy web interface.
Choose Management Appliance > Centralized Services >System Status and look in the System Information section.
Total CPU usage by all quarantines
User Guide for AsyncOS 14.1 for Cisco Secure Email and Web Manager- GD (General Deployment)312
Centralized Policy, Virus, and Outbreak QuarantinesMonitoring Quarantine Status, Capacity, and Activity

Do ThisTo View
[New Web Interface Only] Choose Quarantines > OtherQuarantine > View.
The table displays the date and time when the last message wasquarantined.
or
Choose Email > Message Quarantine > Policy, Virus, andOutbreak Quarantines and look at the table row for thequarantine.
Date and time when the last messageentered each quarantine (excluding movesbetween policy quarantines)
[New Web Interface Only] On the Security Management
appliance, click to load the legacy web interface.
Choose Email > Message Quarantine > Policy, Virus, andOutbreak Quarantines, click the quarantine name, and lookfor this information in the table row directly below the quarantinename.
Creation date and creator name are not available forsystem-created quarantines.
Date a policy quarantine was created
Name of policy quarantine creator
See Determining the Filters and Message Actions to Which aPolicy Quarantine Is Assigned , on page 311.
Filters and message actions associated witha policy quarantine
Alerts About Quarantine Disk-Space UsageAn alert is sent whenever the total size of the policy, virus, and outbreak quarantine reaches or passes 75percent, 85 percent, and 95 percent of its capacity. The check is performed when a message is placed in thequarantine. For example, if adding a message to a quarantine increases the size to or past 75 percent of thetotal capacity, an alert is sent.
Policy Quarantines and LoggingAsyncOS individually logs all messages that are quarantined:
Info: MID 482 quarantined to "Policy" (message filter:policy_violation)
The message filter or Outbreak Filters feature rule that caused the message to be quarantined is placed inparentheses. A separate log entry is generated for each quarantine in which the message is placed.
AsyncOS also individually logs messages that are removed from quarantine:
Info: MID 483 released from quarantine "Policy" (queue full)
Info: MID 484 deleted from quarantine "Anti-Virus" (expired)
The system individually logs messages after they are removed from all quarantines and either permanentlydeleted or scheduled for delivery, for example
Info: MID 483 released from all quarantines
Info: MID 484 deleted from all quarantines
User Guide for AsyncOS 14.1 for Cisco Secure Email and Web Manager- GD (General Deployment)313
Centralized Policy, Virus, and Outbreak QuarantinesAlerts About Quarantine Disk-Space Usage

When a message is re-injected, the system creates a newMessage object with a newMessage ID (MID). Thisis logged using an existing log message with a new MID “byline”, for example:
Info: MID 483 rewritten to 513 by Policy Quarantine
About Distributing Message Processing Tasks to Other UsersYou can distribute message review and processing tasks to other administrative users. For example:
• The Human Resources team can review and manage the Policy Quarantine.• The Legal team can manage the Confidential Material Quarantine.
You assign access privileges to these users when you specify settings for a quarantine. In order to add usersto quarantines, the users must already exist.
Each user may have access to all, some, or none of the quarantines. A user who is not authorized to view aquarantine will not see any indication of its existence anywhere in the GUI or CLI listings of quarantines.
Related Topics
• Which User Groups Can Access Policy, Virus, and Outbreak Quarantines , on page 314• Distributing Administrative Tasks, on page 395
Which User Groups Can Access Policy, Virus, and Outbreak QuarantinesWhen you allow administrative users to access a quarantine, the actions that they can perform depend on theiruser group:
• Users in the Administrators or Email Administrators groups can create, configure, delete, and centralizequarantines and can manage quarantined messages.
• Users in the Operators, Guests, Read-Only Operators, and Help Desk Users groups, as well as customuser roles with quarantine management privileges, can search for, view, and process messages in aquarantine, but cannot change the quarantine’s settings, create, delete, or centralize quarantines. Youspecify in each quarantine which of these users have access to that quarantine.
• Users in the Technicians group cannot access quarantines.
Access privileges for related features, such as Message Tracking and Data Loss Prevention, also affect theoptions and information that an administrative user sees on Quarantine pages. For example, if a user does nothave access toMessage Tracking, that user will not see message trackinginformation for quarantinedmessages.
Note: To allow custom user roles configured on the Security Management appliance to specify policyquarantines in filters and DLP message actions, see Configuring Centralized Quarantine Access for CustomUser Roles , on page 305.
End users do not have see or have access to policy, virus, and outbreak quarantines.
Working with Messages in Policy, Virus, or OutbreakQuarantines
Related Topics
• Viewing Messages in Quarantines , on page 315
User Guide for AsyncOS 14.1 for Cisco Secure Email and Web Manager- GD (General Deployment)314
Centralized Policy, Virus, and Outbreak QuarantinesAbout Distributing Message Processing Tasks to Other Users

• Searching for Messages in Policy, Virus, and Outbreak Quarantines , on page 316• Manually Processing Messages in a Quarantine, on page 317• Messages in Multiple Quarantines , on page 318• Message Details and Viewing Message Content, on page 318• About Rescanning of Quarantined Messages , on page 320• The Outbreak Quarantine, on page 321
Viewing Messages in QuarantinesDo ThisTo
[New Web Interface Only] Choose Quarantine > Other Quarantine> View.
or
ChooseEmail > Message Quarantine > Policy, Virus, and OutbreakQuarantines.
In the row for the relevant quarantine, click the blue number in theMessages column of the table.
View all messages in a quarantine
[NewWeb Interface] ChooseQuarantine >Other Quarantine >View.
or
ChooseEmail > Message Quarantine > Policy, Virus, and OutbreakQuarantines.
In the row for the relevant quarantine, click the blue number in theMessages column of the table.
See Manage by Rule Summary Link, on page 322 or Rule SummaryView, on page 321 [New Web Interface Only].
View messages in the Outbreakquarantine
Click Previous, Next, a page number, or double-arrow link. The doublearrows take you to the first (<<) or last (>>) page in the listing.
[New Web Interface Only] Scroll down on the table to display detailsof all the new messages.
Navigate through the list ofmessages in a quarantine
Click a column heading (except columns that could include multipleitems or the “In quarantines” column).
Sort the list of messages in aquarantine
Drag the divider between column headings.Resize table columns
Click and select the columns to display, and click CloseCustomize table columns
See Viewing Matched Content , on page 319.View the content that caused themessage to be quarantined
Related Topics
• Quarantined Messages and International Character Sets, on page 316
User Guide for AsyncOS 14.1 for Cisco Secure Email and Web Manager- GD (General Deployment)315
Centralized Policy, Virus, and Outbreak QuarantinesViewing Messages in Quarantines

Quarantined Messages and International Character SetsFor messages with subjects that contain characters from international character sets (double-byte, variablelength, and non-ASCII encoded), the Policy Quarantine pages display subject lines in non-ASCII charactersin their decoded form.
Searching for Messages in Policy, Virus, and Outbreak Quarantines
• Users can find and see only the messages in quarantines to which they have access.
• Searches in Policy, Virus, and Outbreak quarantines do not find messages in the spam quarantine.
Note
Step 1 [New Web Interface Only] Choose Quarantine > Other Quarantine > Search.Step 2 [New Web Interface Only] Click the blue number link of the corresponding quarantine.
[New Web Interface Only] For the Outbreak Quarantine, you can also find all messages quarantined by eachoutbreak rule: Click the Rule Summary tab in the Outbreak quarantine, and then click the relevant rule.
Tip
Step 3 Choose Email > Message Quarantine > Policy, Virus, and Outbreak Quarantines.Step 4 Click the Search Across Quarantines button.
For the Outbreak Quarantine, you can also find all messages quarantined by each outbreak rule: Click theManage by Rule Summary link in the Outbreak table row, and then click the relevant rule.
Tip
Step 5 (Optional) Enter other search criteria.
• For Envelope Sender and Envelope Recipient: You can enter any character(s). No validation of your entry isperformed.
• Search results include only messages that match all of the criteria you specify. For example, if you specify anEnvelope Recipient and a Subject, only messages that match the terms specified in both the Envelope Recipient andthe Subject are returned.
What to do next
You can use the search results in the same way that you use the quarantine listings. For more information,see Manually Processing Messages in a Quarantine, on page 317.
For information on modifying your search criteria, see Modifying Search Criteria, on page 316.
Modifying Search CriteriaYou can modify the search criteria to a custom time range or a different quarantine.
To modify the search criteria, click Modify.
User Guide for AsyncOS 14.1 for Cisco Secure Email and Web Manager- GD (General Deployment)316
Centralized Policy, Virus, and Outbreak QuarantinesQuarantined Messages and International Character Sets

Manually Processing Messages in a QuarantineManually processing messages means to manually select a Message Action for the message from theMessageActions page.
You can perform the following actions on messages:
• Delete
• Release
• Delay Scheduled Exit from quarantine
• Send a Copy of messages to email addresses that you specify
• Move a message from one quarantine to another
Generally, you can perform actions on messages in the lists that are displayed when you do the following.However, not all actions are available in all situations.
• From the list of quarantines on the Email > Message Quarantine > Policy, Virus, and OutbreakQuarantines page or [New Web Interface Only] Quarantine > Other Quarantine > View page, clickthe number of messages in a quarantine.
• Click on the check box of the quarantine message and select the required actions.
You can perform these actions on multiple messages at one time by:
• Choosing an option from the pick list at the top of the list of messages.
• Selecting the check box beside each message listed on a page.
• Selecting the check box in the table heading at the top of a list of messages. This applies the action toall messages visible on the screen. Messages on other pages are not affected.
Additional options are available for messages in the outbreak quarantine. See information about the RuleSummary view in the chapter on Outbreak Filters in the online help or user guide for the AsyncOS for EmailSecurity Appliances.
Related Topics
• Sending a Copy of the Message, on page 317
• About Moving Messages Between Policy Quarantines , on page 318
• Messages in Multiple Quarantines , on page 318
• Default Actions for Automatically Processed Quarantined Messages , on page 308
Sending a Copy of the MessageOnly users who belong to the Administrators group may send copies of a message.
To send a copy of the message, enter an email address in the Send Copy To: field and click Submit. Sendinga copy of a message does not cause any other action to be performed on the message.
User Guide for AsyncOS 14.1 for Cisco Secure Email and Web Manager- GD (General Deployment)317
Centralized Policy, Virus, and Outbreak QuarantinesManually Processing Messages in a Quarantine

About Moving Messages Between Policy QuarantinesYou can manually move messages from one policy quarantine to another on a single appliance .
When you move a message to a different quarantine:
• The expiration time is unchanged. The message keeps the retention time of the original quarantine.• The reason the message was quarantined, including the matched content and other relevant details, doesnot change.
• If a message is in multiple quarantines and you move the message to a destination that already holds acopy of that message, the expiration time and reason for quarantine of the moved copy of the messageoverwrite those of the copy of the message that was originally in the destination quarantine.
Messages in Multiple QuarantinesIf a message is present in one or more other quarantines, the “In other quarantines” column in the quarantinemessage list will show “Yes,” regardless of whether you have permissions to access those other quarantines.
A message in multiple quarantines:
• Is not delivered unless it has been released from all of the quarantines in which it resides. If it is deletedfrom any quarantine, it will never be delivered.
• Is not deleted from any quarantine until it has been deleted or released from all quarantines in which itresides.
Because a user wanting to release a message may not have access to all of the quarantines in which it resides,the following rules apply:
• A message is not released from any quarantine until it has been released from all of the quarantines inwhich it resides.
• If a message is marked as Deleted in any quarantine, it cannot be delivered from any other quarantine inwhich it resides. (It can still be released.)
If a message is queued in multiple quarantines and a user does not have access to one or more of the otherquarantines:
• The user will be informed whether the message is present in each of the quarantines to which the userhas access.
• The GUI shows only the scheduled exit time from the quarantines to which the user has access. (For agiven message, there is a separate exit time for each quarantine.)
• The user will not be told the names of the other quarantine(s) holding the message.• The user will not see matched content that caused the message to be placed into quarantines that the userdoes not have access to.
• Releasing a message affects only the queues to which the user has access.• If the message is also queued in other quarantines not accessible to the user, the message will remain inquarantine, unchanged, until acted upon by users who have the required access to the remaining quarantines(or until the message is released “normally” via early or normal expiration).
Message Details and Viewing Message ContentClick on the subject line of a message to view that message’s content and to access the Quarantined Messagepage.
The Quarantined Message page has two sections: Quarantine Details and Message Details.
User Guide for AsyncOS 14.1 for Cisco Secure Email and Web Manager- GD (General Deployment)318
Centralized Policy, Virus, and Outbreak QuarantinesAbout Moving Messages Between Policy Quarantines

From the Quarantined Message page, you can read the message, select a Message Action, or send a copy ofthe message. You can also see if a message will be encrypted upon release from the quarantine due to theEncrypt on Delivery filter action.
The Message Details section displays the message body, message headers, and attachments. Only the first100 K of the message body is displayed. If the message is longer, the first 100 K is shown, followed by anellipsis (...). The actual message is not truncated. This is for display purposes only. You can download themessage body by clicking [message body] in the Message Parts section at the bottom of Message Details.You can also download any of the message’s attachments by clicking the attachment’s filename.
The maximum limit for the attachment downloads on the Message Details page is restricted to 25 MB.Note
If you view amessage that contains a virus and you have desktop anti-virus software installed on your computer,your anti-virus software may complain that it has found a virus. This is not a threat to your computer and canbe safely ignored.
To view additional details about the message, click the Message Tracking link.
For the special Outbreak quarantine, additional functionality is available. See The Outbreak Quarantine, onpage 321.
Note
Related Topics
• Viewing Matched Content , on page 319• Downloading Attachments , on page 320
Viewing Matched ContentWhen you configure a quarantine action for messages that match Attachment Content conditions, MessageBody or Attachment conditions, Message body conditions, or the Attachment content conditions, you canview the matched content in the quarantined message. When you display the message body, the matchedcontent is highlighted in yellow, except for DLP policy violation matches. You can also use the$MatchedContent action variable to include the matched content from message or content filter matches inthe message subject.
If the attachment contains the matched content, the attachment’s contents are displayed, as well as the reasonit was quarantined, whether it was due to a DLP policy violation, content filter condition, message filtercondition, or Image Analysis verdict.
When you view messages in the local quarantine that have triggered message or content filter rules, the GUImay display content that did not actually trigger the filter action (along with content that triggered the filteraction). The GUI display should be used as a guideline for locating content matches, but does not necessarilyreflect an exact list of content matches. This occurs because the GUI uses less strict content matching logicthan is used in the filters. This issue applies only to the highlighting in the message body. The table that liststhe matched strings in each part of the message, along with the associated filter rule, is correct.
User Guide for AsyncOS 14.1 for Cisco Secure Email and Web Manager- GD (General Deployment)319
Centralized Policy, Virus, and Outbreak QuarantinesViewing Matched Content

Figure 5: Matched Content Viewed in the Policy Quarantine
Downloading AttachmentsYou can download a message attachment by clicking the attachment’s file name in the Message Parts orMatched Content section. AsyncOS displays a warning that attachments from unknown sources may containviruses and asks you if you want to continue. Download attachments that may contain viruses at your ownrisk. You can also download the message body by clicking [message body] in the Message Parts section.
About Rescanning of Quarantined MessagesWhen a message is released from all queues in which is has been quarantined, the following rescanning occurs,depending on the features enabled for the appliance and for the mail policy that originally quarantined themessage:
• Messages released from Policy and Virus quarantines are rescanned by the anti-virus, advanced malwareprotection, and graymail engines.
• Messages released from the Outbreak quarantine are rescanned by the anti-spam, AMP, and anti-virusengines.
• Messages released from the File Analysis quarantine are rescanned for threats.• Messages with attachments are rescanned by the file reputation service upon release from Policy, Virus,and Outbreak quarantines.
Upon rescanning, if the verdict produced matches the verdict produced the previous time the message wasprocessed, the message is not re-quarantined. Conversely, if the verdict is different, the message could be sentto another quarantine.
User Guide for AsyncOS 14.1 for Cisco Secure Email and Web Manager- GD (General Deployment)320
Centralized Policy, Virus, and Outbreak QuarantinesDownloading Attachments

The rationale is to prevent messages from looping back to the quarantine indefinitely. For example, supposea message is encrypted and therefore sent to the Virus quarantine. If an administrator releases the message,the anti-virus engine will still not be able to decrypt it; however, the message should not be re-quarantined ora loop will be created and the message will never be released from the quarantine. Since the two verdicts arethe same, the system bypasses the Virus quarantine the second time.
The Outbreak QuarantineThe Outbreak quarantine is present when a valid Outbreak Filters feature license key has been entered. TheOutbreak Filters feature sends messages to the Outbreak quarantine, depending on the threshold set. For moreinformation, see the Outbreak Filters chapter in the online help or user guide for the Email Security appliance.
The Outbreak quarantine functions just like other quarantines—you can search for messages, release or deletemessages, and so on.
The Outbreak quarantines has the following views:
The Outbreak quarantine has some additional features not available in other quarantines: the Rule Summaryview, the Send to Cisco feature when viewing message details, and the option to sort messages in searchresults by the Scheduled Exit time.
If the license for the Outbreak Filters feature expires, you will be unable to addmore messages to the Outbreakquarantine. Once the messages currently in the quarantine have expired and the Outbreak quarantine becomesempty, it is no longer shown in the Quarantines listing in the GUI.
Related Topics
• Rescanning Messages in an Outbreak Quarantine , on page 321
• Rule Summary View, on page 321
• Reporting False Positives or Suspicious Messages to Cisco Systems, on page 322
Rescanning Messages in an Outbreak QuarantineMessages placed in the Outbreak quarantine are automatically released if newly published rules deem thequarantined message no longer a threat.
If anti-spam and anti-virus are enabled on the appliance , the scanning engines scan every message releasedfrom the Outbreak quarantine based on the mail flow policy that applies to the message.
Rule Summary ViewThe Rule Summary view is available only in the new web interface.
In the Outbreak quarantine, click the Rule Summary tab to see the listing of the contents of Outbreakquarantine, grouped by Rule ID.
You can perform message actions (Release and Delete) on all of the messages in the quarantine based onwhich outbreak rule caused the message to be quarantined. This is ideal for clearing out large numbers ofmessages from the Outbreak quarantine. For more information, see Outbreak Quarantine and the Manage byRule Summary View section of chapter “Outbreak Filters” in the online help or user guide of the AsyncOSfor the Email Security Appliance.
User Guide for AsyncOS 14.1 for Cisco Secure Email and Web Manager- GD (General Deployment)321
Centralized Policy, Virus, and Outbreak QuarantinesThe Outbreak Quarantine

Manage by Rule Summary LinkClick the Manage by Rule Summary link next to the Outbreak quarantine in the quarantine listing to view theManage by Rule Summary page. You can perform message actions (Release, Delete, Delay Exit) on all ofthe messages in the quarantine based on which outbreak rule caused the message to be quarantined. This isideal for clearing out large numbers of messages from the Outbreak quarantine. For more information, seeinformation about the Manage by Rule Summary view in the Outbreak Filters chapter in the online help oruser guide for the Email Security appliance
Reporting False Positives or Suspicious Messages to Cisco SystemsWhen viewing message details for a message in the Outbreak quarantine, you can send the message to Ciscoto report false positives or suspicious messages.
Step 1 Navigate to a message in the Outbreak quarantine.Step 2 Enter the recipient address and click Send.
Troubleshooting Centralized Policy Quarantines• Administrative User Cannot Choose Quarantines in Filters and DLP Message Actions, on page 322
• Messages Released from a Centralized Outbreak Quarantine Are Not Rescanned , on page 322
Administrative User Cannot Choose Quarantines in Filters and DLP MessageActions
Problem
Administrative users cannot see or choose quarantines in content and message filters or DLP actions on theEmail Security appliance.
Solution
See Configuring Centralized Quarantine Access for Custom User Roles , on page 305
Messages Released from a Centralized Outbreak Quarantine Are NotRescanned
Problem
Messages released from the Outbreak Quarantine should be scanned again before delivery. However, somecontaminated messages have been delivered from the quarantine.
Solution
This can occur under the situation described in About Rescanning of Quarantined Messages , on page 320
User Guide for AsyncOS 14.1 for Cisco Secure Email and Web Manager- GD (General Deployment)322
Centralized Policy, Virus, and Outbreak QuarantinesManage by Rule Summary Link

C H A P T E R 10Managing Web Security Appliances
This chapter contains the following sections:
• About Centralized Configuration Management , on page 323• Determining the Correct Configuration Publishing Method , on page 323• Using Configuration Masters to Centrally Manage Web Security Appliances , on page 324• Initializing and Configuring Configuration Masters, on page 328• Setting Up to Use Advanced File Publishing , on page 338• Publishing Configurations to Web Security Appliances, on page 338• Viewing Status and History of Publishing Jobs , on page 343• Centralized Upgrade Management, on page 344• Viewing Web Security Appliance Status, on page 348• Preparing For and Managing URL Category Set Updates , on page 351• Application Visibility and Control (AVC) Updates , on page 352• Troubleshooting Configuration Management Issues , on page 352
About Centralized Configuration ManagementCentralized configuration management allows you to publish configurations from a Cisco Content SecurityManagement appliance to the associated Web Security appliances, in order to:
• Simplify and speed management of web security policies by configuring or updating settings once onthe Security Management appliance, instead of on each Web Security appliance.
• Ensure uniform policy enforcement across distributed networks.
There are two ways to publish settings to Web Security appliances:
• Using Configuration Masters
• Using configuration files from Web Security appliances (using Advanced File Publishing)
Determining the Correct Configuration Publishing MethodThere are two different processes for publishing configurations from the Security Management appliance,and each publishes different settings. Some settings cannot be centrally managed.
User Guide for AsyncOS 14.1 for Cisco Secure Email and Web Manager- GD (General Deployment)323

Do ThisTo Configure
Publish a Configuration Master.
Many features that are configurable in aConfiguration Master also requireconfigurations directly on the Web Securityappliance in order to work. For example,SOCKS Policies are configurable viaConfiguration Master, but a SOCKS Proxymust first be configured directly on the WebSecurity appliance.
Features that appear under the Web Security Manager menuon the Web Security appliance, such as policies and customURL categories.
Exception: L4 Traffic Monitor (L4TM) settings are notincluded in Configuration Masters.
The exact features supported depend on the configurationmaster version, which corresponds to an AsyncOS for WebSecurity version.
Use Advanced File Publishing.Note: Integration with a Cisco Identity Services Engine (ISE)must be configured independently on each Web Securityappliance. Cisco Identity Services Engine settings cannot bepublished from a Cisco Content Security Managementappliance.
Configure settings directly on your managedWeb Security appliances.
See the AsyncOS for Cisco Web SecurityAppliances User Guide
FIPS mode for Federal Information Processing Standard,Network/interface settings, DNS,WebCache CommunicationProtocol (WCCP), upstream proxy groups, certificates, theproxy mode, time settings such as NTP, L4 Traffic Monitor(L4TM) settings, and authentication redirect hostname.
Using Configuration Masters to Centrally Manage Web SecurityAppliances
Your Security Management appliance provides different versions of Configuration Masters, so that you cancentrallymanage yourWeb Security appliances. Each ConfigurationMaster supports multiple sub ConfigurationMasters under it. The sub configuration masters allows you to define different policy configurations withinthe same configuration master.
Assume that your engineering and sales teams are using AsyncOS 11.7 for Web Security appliances. Yourorganizational policy requires you define different policies for these teams. In this scenario, you can createtwo sub configuration masters under the ConfigurationMaster 11.7 and define different policy configurationsfor each sub configuration master, as shown in the following figure:
User Guide for AsyncOS 14.1 for Cisco Secure Email and Web Manager- GD (General Deployment)324
Managing Web Security AppliancesUsing Configuration Masters to Centrally Manage Web Security Appliances

Setting Up Configuration Masters to Centrally Manage Web Security Appliances
The following table provides instructions to initialize and configure ConfigurationMasters and sub configurationmasters.
More InformationOn This ApplianceDo ThisSteps
See Important Notes About UsingConfiguration Masters, on page327.
—Check for general configurationrequirements and caveats.
Step 1
See Determine the ConfigurationMaster Versions to Use, on page327.
—Determine the Configuration Masterversion to use for each Web Securityappliance.
Step 2
—Web Securityappliances
On all target Web Security appliances,enable and configure the features andfunctionality that are required to supportthe policy and other settings that you willconfigure in ConfigurationMasters on theSecurity Management appliance.
Step 3
User Guide for AsyncOS 14.1 for Cisco Secure Email and Web Manager- GD (General Deployment)325
Managing Web Security AppliancesUsing Configuration Masters to Centrally Manage Web Security Appliances

More InformationOn This ApplianceDo ThisSteps
For instructions on downloading aconfiguration file from a WebSecurity appliance, see “Savingand Loading the ApplianceConfiguration” in the AsyncOS forCisco Web Security AppliancesUser Guide.
Web Securityappliance
(Optional) If you have a working WebSecurity appliance that can serve as aconfiguration model for all of your WebSecurity appliances, you can use aconfiguration file from that Web Securityappliance to speed configuration of aConfiguration Master in the SecurityManagement appliance.
Step 4
See Enabling CentralizedConfigurationManagement on theSecurity Management Appliance,on page 327.
SecurityManagementappliance
Enable and configure CentralizedConfiguration Management.
Step 5
See Initializing and ConfiguringConfiguration Masters, on page328.
SecurityManagementappliance
Initialize the Configuration Masters.Step 6
SeeConfiguring SubConfigurationMasters, on page 330
SecurityManagementappliance
(Optional) Configure Sub ConfigurationMasters
Step 7
See Selecting the SubConfigurationMaster as the ActiveConfiguration, on page 331
SecurityManagementappliance
(Optional) Select the Sub ConfigurationMaster as the Active Configuration
Step 8
See About Associating WebSecurity Appliances toConfiguration Masters, on page328.
SecurityManagementappliance
Associate Web Security appliances to theConfiguration Masters.
Step 9
See Configuring Settings toPublish , on page 332
SecurityManagementappliance
Import and/or manually configure policies,custom URL categories, and/or a webproxy bypass list in the ConfigurationMasters.
Step10
See Ensuring that Features areEnabledConsistently , on page 335.
SecurityManagementappliance
Ensure that the features enabled on eachWeb Security appliance match the featuresenabled for the Configuration Masterassigned to that appliance.
Step11
See Publishing a ConfigurationMaster , on page 338.
SecurityManagementappliance
After you have set up requiredConfiguration Masters and enabledappropriate features, publish configurationsto your Web Security appliances.
Step12
Preparing For andManaging URLCategory Set Updates , on page351
SecurityManagementappliance
Prepare in advance for possible URLCategory set updates that can modify yourexisting Configuration Master settings.
Step13
User Guide for AsyncOS 14.1 for Cisco Secure Email and Web Manager- GD (General Deployment)326
Managing Web Security AppliancesUsing Configuration Masters to Centrally Manage Web Security Appliances

Important Notes About Using Configuration Masters
Before you upgrade to AysncOS 12.0 and later, you may need to backup your Configuration Master setting.The Configuration Master versions 10.0 and earlier will be replaced with Configuration Master version 11.7and later.
After you upgrade to this release, you must initialize new Configuration Masters or import the configurationsfrom an existing Configuration Master. If you have an existing Configuration Master for a previous release(for example, 9.1), you can copy the settings to a new Configuration Master (for example, 11.5).
Due to the change in the ConfigurationMaster version, the appliance list is lost from the Identities and Policies.You must re-associate the Web Security appliance in the Configuration Masters.
Important
On each Web Security appliance that you will manage centrally, check to be sure that all Realm Names inNetwork > Authentication are unique across appliances, unless the settings for same-name realms are identical.
Note
Determine the Configuration Master Versions to UseYour Security Management appliance provides multiple Configuration Masters, so that you can centrallymanageWeb Security appliances that run different versions of AsyncOS forWeb Security that support differentfeatures.
Each ConfigurationMaster contains configurations to be used for a particular version or versions of AsyncOSfor Web Security.
To determine which configuration master version to use for your versions of AsyncOS for Web Security, seethe Compatibility Matrix athttp://www.cisco.com/c/en/us/support/security/content-security-management-appliance/products-release-notes-list.html.
The Configuration Master version should match the AsyncOS version on the Web Security appliance, asspecified in the Compatibility Matrix. Publishing an older Configuration Master version to a newer WebSecurity appliance may fail if settings on the Web Security appliance do not match the settings in theConfiguration Master. This can occur even if the Web Appliance Status detail page does not indicate anydiscrepancies. In this case, you must manually compare the configurations on each appliance.
Note
Enabling Centralized Configuration Management on the Security ManagementAppliance
Step 1 On the Security Management appliance, chooseManagement Appliance > Centralized Services > Web > CentralizedConfiguration Manager.
Step 2 Click Enable.
User Guide for AsyncOS 14.1 for Cisco Secure Email and Web Manager- GD (General Deployment)327
Managing Web Security AppliancesImportant Notes About Using Configuration Masters

Step 3 If you are enabling Centralized Configuration Management for the first time after running the System Setup Wizard,review the end user license agreement, and click Accept.
Step 4 Submit and commit your changes.
Initializing and Configuring Configuration Masters• Initializing Configuration Masters , on page 328• Importing Settings from a Web Security Appliance , on page 333• Configuring Settings to Publish , on page 332
Initializing Configuration MastersNote: After you initialize a configuration master, the Initialize option is not available. Instead, populate theConfiguration Master using one of the methods described in Configuring Settings to Publish , on page 332 .
Step 1 On the Security Management appliance, choose Web > Utilities > Configuration Masters.Step 2 Click Initialize in the Options column.Step 3 On the Initialize Configuration Master page:
• If you have an existing ConfigurationMaster for a previous release and you want to use or start with the same settingsfor the new Configuration Master, choose Copy Configuration Master. You can also import settings from anexisting Configuration Master later.
• Otherwise, choose Use default settings.
Step 4 Click Initialize.
The Configuration Master is now available.
Step 5 Repeat for each Configuration Master version to initialize.
About Associating Web Security Appliances to Configuration MastersFor information about compatibility of configuration masters with Web Security versions, see Determine theConfiguration Master Versions to Use, on page 327.
The simplest process for adding appliances to configuration masters depends on the situation:
Use This ProcedureIf
Adding Web Security Appliances and Associating Themwith Configuration Master Versions , on page 329
You have not yet added Web Security appliancesto the Security Management appliance
Associating Configuration Masters to Web SecurityAppliances , on page 330
You have already added Web Security appliances
Viewing Associated Configuration Masters in theAppliance List, on page 331
You want to view associated ConfigurationMasters in the appliance list
User Guide for AsyncOS 14.1 for Cisco Secure Email and Web Manager- GD (General Deployment)328
Managing Web Security AppliancesInitializing and Configuring Configuration Masters

Adding Web Security Appliances and Associating Them with Configuration Master VersionsUse this procedure if you have not yet added your Web Security appliances to be centrally managed.
Before you begin
• Choose the correct Configuration Master version for each Web Security appliance. See Determine theConfiguration Master Versions to Use, on page 327
• Enable the following key exchange and cipher algorithms on the Web Security Appliance that you planto add to the Security Management Appliance:
• Key Exchange Algorithms:diffie-hellman-group1-sha1,diffie-hellman-group14-sha1
• Cipher Algorithms:3des-cbc,blowfish-cbc
To enable the algorithms, use the sshconfig > sshd command in CLI on the Web Security Appliance.
Step 1 On the SecurityManagement appliance, chooseManagement Appliance > Centralized Services > Security Appliances.Step 2 Click Add Web Appliance.Step 3 In the Appliance Name and IP Address text fields, type the appliance name and the IP address or resolvable hostname
for the Management interface of the Web Security appliance.
If you enter a DNS name in the IP Address text field, it will be immediately resolved to an IP address whenyou click Submit.
Note
Step 4 The Centralized Configuration Manager service is pre-selected.Step 5 Click Establish Connection.
Step 6 Enter the user name and passphrase for an administrator account on the appliance to be managed, then click EstablishConnection.
You enter the login credentials to pass a public SSH key for file transfers from the Security Managementappliance to the remote appliance. The login credentials are not stored on the SecurityManagement appliance.
Note
Step 7 Wait for the Success message to appear above the table on the page.Step 8 Choose the Configuration Master version to which you want to assign the appliance.
If you configure a subset of a particular version of configuration master and assign aWeb Security appliance,then the sub configuration master version that is associated to the Web Seurity appliance is displayed in thedrop-down list.
Note
Step 9 Submit and commit your changes.Step 10 Repeat this procedure for each Web Security Appliance for which you want to enable Centralized Configuration
Management.
User Guide for AsyncOS 14.1 for Cisco Secure Email and Web Manager- GD (General Deployment)329
Managing Web Security AppliancesAdding Web Security Appliances and Associating Them with Configuration Master Versions

Associating Configuration Masters to Web Security AppliancesIf you have already added Web Security appliances to the Security Management appliance, you can use thefollowing procedure to quickly associate Web Security appliances with Configuration Master versions.
Before you begin
If you have not yet done so, choose the correct ConfigurationMaster version for eachWeb Security appliance.See Determine the Configuration Master Versions to Use, on page 327.
Step 1 On the Security Management appliance, choose Web > Utilities > Configuration Masters.
If a ConfigurationMaster shows as Disabled, you can enable it by clickingWeb > Utilities > Security ServicesDisplay, then Edit Display Settings. Select the check box for that Configuration Master to enable it. For moreinformation, see Enabling Features to Publish , on page 336.
Note
Step 2 Click Security Appliances.Step 3 Click on the required Web Security appliance.Step 4 Select the required configuration of the Configuration Master.
You can see the different configurations of the Configuration Master in Web > Utilities > Configuration Masters page.
Step 5 Submit and commit your changes.
Configuring Sub Configuration Masters
Step 1 On the Security Management appliance, choose Web > Utilities > Configuration Masters.
If a Configuration Master Setting shows as Disabled, you can enable it by clicking Web > Utilities > SecurityServices Display, then Edit Display Settings. Select the check box for that Configuration Master to enable it.For more information, see Enabling Features to Publish , on page 336.
Note
Step 2 From the New Configuration Master page, click New.Step 3 Enter a unique name for the Configuration Master (for example, 11_5_new).
The name must contain only alphabets, numbers, and underscores. It cannot start with an underscore.Note
Step 4 Select the Configuration Master version from the drop-down list.Step 5 For Select Configuration Source, select a Configuration Master from the dropdown-list.Step 6 Click Submit and commit your changes.
User Guide for AsyncOS 14.1 for Cisco Secure Email and Web Manager- GD (General Deployment)330
Managing Web Security AppliancesAssociating Configuration Masters to Web Security Appliances

Viewing Associated Configuration Masters in the Appliance List
Before you begin
If you have not yet done so, choose the correct ConfigurationMaster version for eachWeb Security appliance.See Determine the Configuration Master Versions to Use, on page 327.
If you have already added Web Security appliances to the Security Management appliance, you can use thefollowing procedure to view the associated Configuration Master versions in the Web Security appliance list.
Step 1 On the Security Management appliance, choose Web > Utilities > Configuration Masters.
If a ConfigurationMaster shows as Disabled, you can enable it by clickingWeb > Utilities > Security ServicesDisplay, then Edit Display Settings. Select the check box for that Configuration Master to enable it. For moreinformation, see Enabling Features to Publish , on page 336.
Note
Step 2 Click Security Appliances.
The Security Appliances page is same as the Management Appliances > Centralized Services > Security Appliancespage. If you have added aWeb Security appliance and associated configurationmaster to it, you can view the ConfigurationMaster and AsyncOS version associated to the Web Security appliance.
Deleting Sub Configuration MastersIf you have configured sub configurationmasters in Configuring Sub ConfigurationMasters, on page 330, usethe following procedure to delete the configurations.
Step 1 On the Security Management appliance, choose Web > Utilities > Configuration Masters.
If a ConfigurationMaster shows as Disabled, you can enable it by clickingWeb > Utilities > Security ServicesDisplay, then Edit Display Settings. Select the check box for that Configuration Master to enable it. For moreinformation, see Enabling Features to Publish , on page 336.
Note
Step 2 Click on the trash can icon on the required sub configuration master.
You cannot delete the configuration masters that are associated with a Web Security appliance.Note
Step 3 Submit and commit your changes.
Selecting the Sub Configuration Master as the Active ConfigurationWhen you configure sub Configuration Masters, you must assign the required configuration as the activeconfiguration.
Step 1 On the Security Management appliance, choose Web > Utilities > Configuration Masters.
User Guide for AsyncOS 14.1 for Cisco Secure Email and Web Manager- GD (General Deployment)331
Managing Web Security AppliancesViewing Associated Configuration Masters in the Appliance List

Step 2 Click Edit on the required configuration version of the Configuration Master. Selecting the configuration master versionreplaces the existing configuration of the Configuration Master.
Step 3 Commit your changes.
After you commit the changes, you can see the label of the Configuration Master drop down changed to the selectedConfiguration Master version.
Configuring Settings to PublishSet up your configuration masters with the settings you want to publish.
There are several ways to set up Configuration Masters:
Do ThisIf
Import the old version. See Importing from an ExistingConfiguration Master , on page 332.
You are upgrading from a previous release ofAsyncOS for Security Management
and
You did not initialize a new ConfigurationMaster version by copying an earlier, existingConfiguration Master into the new version
Import a configuration file that you saved from that WebSecurity appliance into the Configuration Master.
You may have saved this configuration file when youreviewedUsingConfigurationMasters to CentrallyManageWeb Security Appliances , on page 324.
To import, see Importing Settings from a Web SecurityAppliance , on page 333.
You have already configured a Web Securityappliance and want to use those sameconfigurations for multiple Web Securityappliances
See Configuring Web Security Features Directly inConfiguration Masters, on page 333.
You need to modify imported settings
Configure these settings directly in an appropriateConfiguration Master on the Security Managementappliance.
See Configuring Web Security Features Directly inConfiguration Masters, on page 333.
You have not yet configured policy settings,URL categories, or bypass settings on a WebSecurity appliance.
Importing from an Existing Configuration MasterYou can upgrade an existing configuration master to a new, higher configuration master version.
Step 1 On the Security Management appliance, choose Web > Utilities > Configuration Masters.Step 2 In the Options column, click Import Configuration.Step 3 For Select Configuration Source, select a Configuration Master from the list.
User Guide for AsyncOS 14.1 for Cisco Secure Email and Web Manager- GD (General Deployment)332
Managing Web Security AppliancesConfiguring Settings to Publish

Step 4 Choose whether or not to include existing custom user roles in this configuration.Step 5 Click Import.
What to do next
About Custom Web User Roles , on page 402
Importing Settings from a Web Security ApplianceIf you want to use an existing, working configuration from one of your Web Security appliances, you canimport the configuration file to the SecurityManagement appliance to create policy settings in a ConfigurationMaster.
Before you begin
Verify compatibility of configuration files and ConfigurationMaster versions. See Determine the ConfigurationMaster Versions to Use, on page 327.
You can import compatible web configuration files as often as you want, even if you have already publishedconfigurations to your managed Web Security appliances. Importing a configuration file to a ConfigurationMaster completely overwrites the settings associated with the selected Configuration Master. In addition, thesecurity services settings on the Security Services Display page are set to match the imported configuration.
Caution
If you attempt to import a configuration file that uses an older set of the URL Categories than the SecurityManagement appliance has, the load will fail.
Note
Step 1 Save a configuration file from the Web Security appliance.Step 2 On the Security Management appliance, choose Web > Utilities > Configuration Masters.Step 3 In the Options column, click Import Configuration.Step 4 From the Select Configuration drop-down list, select Web Configuration File.Step 5 In the New Master Defaults section, click Browse and select a valid configuration file from a Web Security appliance.Step 6 Click Import File.
Step 7 Click Import.
Configuring Web Security Features Directly in Configuration MastersYou can configure the following functionality in a Configuration Master, depending on the version:
User Guide for AsyncOS 14.1 for Cisco Secure Email and Web Manager- GD (General Deployment)333
Managing Web Security AppliancesImporting Settings from a Web Security Appliance
• SOCKS Policies
• Custom URL Categories
• Defined TimeRanges/ andQuotas
• Bypass Settings
• L4 Traffic Monitor
• Cisco Data Security
• Outbound MalwareScanning
• External Data LossPrevention
• Identities / Identification Profiles
• SaaS Policies
• Decryption Policies
• Routing Policies
• Access Policies
• Web Traffic Tap Policies
To define Web Traffic TapPolicies, you must enable theWeb Traffic Tap feature in theWeb Securiy appliacne.
Note
• Overall Bandwidth Limits
To configure settings for each feature directly in a configuration master, chooseWeb > Configuration Master<version> > <feature> .
Except for the few items described in SMA-Specific Differences when Configuring Features in ConfigurationMasters , on page 334, instructions for configuring features in a ConfigurationMaster are the same as instructionsfor configuring the same features on the Web Security appliance. For instructions, see the online help in yourWeb Security appliance or the AsyncOS for Cisco Web Security Appliances User Guide for the AsyncOSversion corresponding to the Configuration Master version. If necessary, consult the following topic todetermine the correct Configuration Master for your Web Security appliance: Determine the ConfigurationMaster Versions to Use, on page 327.
All versions of Web Security user guides are available from https://www.cisco.com/c/en/us/support/security/web-security-appliance/products-user-guide-list.html.
SMA-Specific Differences when Configuring Features in Configuration Masters
When you configure a feature in a Configuration Master, note the following differences from configuring thesame feature directly on the Web Security appliance.
Table 73: Feature Configuration: Differences between Configuration Master and Web Security Appliance
DetailsFeature or Page
For each feature that you configure in a Configuration Master, you must enable the feature inthe Security Management appliance under Web > Utilities > Security Services Display. Formore information, see Ensuring that Features are Enabled Consistently , on page 335.
All features, especially new featuresin each release
• See Tip for Working with Identities/Identification Profiles in Configuration Masters , onpage 335.
• The Identify Users Transparently option when adding or editing an Identity/IdentificationProfile is available when a Web Security appliance with an authentication realm thatsupports transparent user identification has been added as a managed appliance.
Identities/Identification Profiles
User Guide for AsyncOS 14.1 for Cisco Secure Email and Web Manager- GD (General Deployment)334
Managing Web Security AppliancesSMA-Specific Differences when Configuring Features in Configuration Masters

DetailsFeature or Page
Secure Group Tag (SGT) information is updated from the Web Security appliancesapproximately every five minutes. The management appliance does not communicate directlywith the ISE server.
To update the list of SGTs on demand, select Web > Utilities > Web Appliance Status, clicka Web Security appliance that is connected to the ISE server, then click Refresh Data. Repeatas needed for other appliances.
The common deployment scenario is that a company has only one ISE server (this is the wholepoint of ISE) that all WSAs connect to. Multiple ISE servers with different data are notsupported.
Policies that use a Cisco IdentityServices Engine (ISE) to identifyusers
When you configure the Identities /Identification Profiles and Users option in the PolicyMemberDefinition section, the following applies if you use external directory servers:
When you search for groups on the Edit Group page, only the first 500 matching results aredisplayed. If you do not see the desired group, you can add it to the “Authorized Groups” listby entering it in the Directory search field and clicking the Add button.
Access Policies > Edit Group
Access Policies > Web Reputationand Anti-Malware Settings
The authentication option “Prompt SaaS users who have been discovered by transparent useridentification” is available only when a Web Security appliance with an authentication realmthat supports transparent user identification has been added as a managed appliance.
SaaS Policies
Tip for Working with Identities/Identification Profiles in Configuration Masters
When creating an Identity/Identification Profile on the Security Management appliance, you have the optionof making it apply only to specific appliances. So for example, if you purchase a Security Managementappliance and want to preserve the existing Web Security appliance configurations and the policies that werecreated for each Web Security appliance, you must load one file into the machine, and then add policies fromother machines by hand.
One way to accomplish this is to make a set of Identities/Identification Profiles for each appliance, then havepolicies which refer to those Identities/Identification Profiles. When the Security Management appliancepublishes the configuration, those Identities/Identification Profiles and the policies which refer to them willautomatically be removed and disabled. Using this method, you do not have to configure anything manually.This is essentially a ‘per-appliance’ Identity/Identification Profile.
The only challenge with this method is if you have a default policy or Identity/Identification Profile that differsbetween sites. For example, if you have a policy set for “default allow with auth” at one site and a “defaultdeny” at another. At this point you will need to create per-appliance Identities/Identification Profiles andpolicies just above the default; essentially creating your own “default” policy.
Ensuring that Features are Enabled ConsistentlyBefore you publish a ConfigurationMaster, you should ensure that it will publish and that the intended featureswill be enabled and configured as you expect them to be after publishing.
To do this, do both of the following:
User Guide for AsyncOS 14.1 for Cisco Secure Email and Web Manager- GD (General Deployment)335
Managing Web Security AppliancesTip for Working with Identities/Identification Profiles in Configuration Masters

• Comparing Enabled Features , on page 336• Enabling Features to Publish , on page 336
If multiple Web Security appliances with different features enabled are assigned to the same ConfigurationMaster, you should publish to each appliance separately, and perform these procedures before each publish.
Note
Comparing Enabled FeaturesVerify that the features enabled on each Web Security appliance match the features enabled for theConfiguration Master associated with that appliance.
If multiple Web Security appliances with different features enabled are assigned to the same ConfigurationMaster, you should publish to each appliance separately, and perform this check before each publish.
Note
Step 1 On the Security Management appliance, choose Web > Utilities > Web Appliance Status.Step 2 Click the name of a Web Security appliance to which you will publish a Configuration Master.Step 3 Scroll to the Security Services table.Step 4 Verify that the Feature Keys for all enabled features are active and not expired.Step 5 Compare the settings in the Services columns:
The Web Appliance Service column and the Is Service Displayed on Management Appliance? column should beconsistent.
• Enabled = Yes• Disabled and Not Configured = No or Disabled.• N/A = Not Applicable. For example, the option may not be configurable using a Configuration Master, but is listedso that you can see the Feature Key status.
Configuration mismatches will appear in red text.
What to do next
If the enabled/disabled settings for a feature do not match, do one of the following:
• Change the relevant setting for the Configuration Master. See Enabling Features to Publish , on page336.
• Enable or disable the feature on theWeb Security Appliance. Some changes may impact multiple features.See the information about the relevant feature in the AsyncOS for Cisco Web Security Appliances UserGuide.
Enabling Features to PublishEnable the features for which you want to publish settings using a Configuration Master.
User Guide for AsyncOS 14.1 for Cisco Secure Email and Web Manager- GD (General Deployment)336
Managing Web Security AppliancesComparing Enabled Features

Before you begin
Determine which features must be enabled and disabled. See Comparing Enabled Features , on page 336.
Step 1 On the Security Management appliance, choose Web > Utilities > Security Services Display.Step 2 Click Edit Settings.
The Edit Security Services Display page lists the features that appear in each Configuration Master.
“N/A” alongside a feature indicates that the feature is not available in that Configuration Master version.
Web Proxy is not listed as a feature, because it is assumed that the Web Proxy is enabled in order to executeany of the managed policy types on the Web Security appliances. If the Web Proxy is disabled, any policiespublished to the Web Security appliances will be ignored.
Note
Step 3 (Optional) Hide Configuration Masters that you will not use. For instructions and cautions, see Disabling UnusedConfiguration Masters , on page 337 .
Step 4 For each Configuration Master that you will use, select or uncheck the Yes check box for each feature to enable.
Special notes for certain features (available options vary by Configuration Master version):
• Transparent Mode. If you use Forward mode, the proxy bypass feature will not be available.• HTTPS Proxy. HTTPS proxy must be enabled in order to configure decryption policies.• Upstream Proxy Groups. Upstream proxy groups must be available on your Web Security appliances if you wantto use routing policies.
Step 5 Click Submit. The GUI displays specific warning messages if the changes you made to the security services settings willaffect policies configured on your Web Security appliances. If you are sure that you want to submit your changes, clickContinue.
Step 6 On the Security Services Display page, confirm that Yes appears alongside each option that you selected.Step 7 Commit your changes.
What to do next
• Verify that all features are now correctly enabled or disabled for the appliance to which you will publish.See Comparing Enabled Features , on page 336.
• On eachWeb Security appliance to which you will publish, make sure the features are enabled consistentlywith the features you have enabled for the Configuration Master.
Disabling Unused Configuration MastersYou can choose not to display unused Configuration Masters.
However, at least one Configuration Master must be enabled.
When a Configuration Master is disabled, all references to it are removed from the GUI including thecorresponding Configuration Master tab. Pending publish jobs that use the Configuration Master are deleted,and allWeb Security appliances assigned to the hidden ConfigurationMaster are re-categorized as not assigned.
Note
User Guide for AsyncOS 14.1 for Cisco Secure Email and Web Manager- GD (General Deployment)337
Managing Web Security AppliancesDisabling Unused Configuration Masters

Step 1 On the Security Management appliance, choose Web > Utilities > Security Services Display.Step 2 Click Edit Settings.Step 3 Uncheck the checkbox(es) for unused Configuration MastersStep 4 Submit and commit your changes.
Setting Up to Use Advanced File PublishingIf your system is set up to use Configuration Masters, it is already set up for Advanced File Publishing.
Otherwise, complete procedures in the following topics, which apply to Advanced File Publishing as well asto publishing Configuration Masters.
• Enabling Centralized Configuration Management on the Security Management Appliance, on page 327• Initializing Configuration Masters , on page 328• About Associating Web Security Appliances to Configuration Masters, on page 328
Publishing Configurations to Web Security Appliances• Publishing a Configuration Master , on page 338• Publishing Configurations Using Advanced File Publishing, on page 342
Publishing a Configuration MasterAfter editing or importing settings in a Configuration Master, you can publish them to the Web Securityappliances associated with the Configuration Master.
• Before You Publish a Configuration Master , on page 338• Publishing a Configuration Master Now , on page 340• Publishing a Configuration Master Later , on page 341• Publishing a Configuration Master Using the Command Line Interface, on page 342
Before You Publish a Configuration MasterPublishing a Configuration Master overwrites existing policy information on the Web Security appliancesassociated to that Configuration Master.
For information about which settings you can configure using a Configuration Master, see Determining theCorrect Configuration Publishing Method , on page 323.
All Publishing Jobs
• The AsyncOS version on the target Web Security appliance should be the same as the ConfigurationMaster version, or be a version identified as compatible in the SMA Compatibility Matrix.
• (First time only) You must follow the procedures in Using Configuration Masters to Centrally ManageWeb Security Appliances , on page 324.
User Guide for AsyncOS 14.1 for Cisco Secure Email and Web Manager- GD (General Deployment)338
Managing Web Security AppliancesSetting Up to Use Advanced File Publishing

• To ensure that the Configuration Master will publish and that the intended set of features will be enabledafter publishing, verify the feature sets of each Web Security appliance and the associated ConfigurationMaster and make any needed changes. See Comparing Enabled Features , on page 336 and if necessary,Enabling Features to Publish , on page 336. If you publish configurations for features that are not enabledon the target appliance, those configurations are not applied.
If different features are enabled on different Web Security appliances assigned to the same ConfigurationMaster, you must publish to each appliance separately, and verify and enable features before each publish.
To identify configuration mismatches encountered during publishing, see Viewing Publish History, on page344 .
• Save a configuration file from each target Web Security appliance before publishing, so that you canrestore the existing configuration in case of problems with the published configuration. See the AsyncOSfor Cisco Web Security Appliances User Guide for details.
• Any change that would cause a Web proxy restart when committed on the Web Security appliance willalso cause a proxy restart when you publish it from the SecurityManagement appliance. You will receivea warning in these situations.
Web Proxy restarts temporarily interrupt web security services.
• When you publish any change to an Identity/Identification Profile, all end-users must re-authenticate.
Special Situations
• If you have reverted AsyncOS on the targetWeb Security appliance, you may need to associate a differentConfiguration Master with that appliance.
• If you publish a Configuration Master to a Web Security appliance that does not have a realm configuredwith Transparent User Identification enabled, but you have selected Transparent User Identification inan Identity /Identification Profile or SaaS Policy:
• For Identities/Identification Profiles, Transparent User Identification is disabled and the RequireAuthentication option is selected instead.
• For SaaS Policies, the Transparent User Identification option is disabled and the default option(Always prompt SaaS users for proxy authentication) is selected instead.
• When you publish External DLP policies from a SecurityManagement appliance to multipleWeb Securityappliances that are not configured for RSA servers, the Security Management appliance will send thefollowing publish status warning:
“The Security Services display settings configured for Configuration Master <version> do not currentlyreflect the state of one or more Security Services on Web Appliances associated with this publish request.The affected appliances are: “<WSA Appliance Names>”. This may indicate a misconfiguration of theSecurity Services display settings for this particular Configuration Master. Go to the Web ApplianceStatus page for each appliance provides a detailed view to troubleshooting this issue. Do you want tocontinue publishing the configuration now?”
If you decide to continue to publish, the Web Security appliance that is not configured for the RSA serverswill receive the External DLP policies, but these policies will be disabled.TheWeb Security appliance ExternalDLP page will not show the published policies if External DLP Server is not configured.
User Guide for AsyncOS 14.1 for Cisco Secure Email and Web Manager- GD (General Deployment)339
Managing Web Security AppliancesBefore You Publish a Configuration Master

Then the Scheme in the Identity /Identification Profileon the Web Security Appliance Becomes
If the Scheme in the Identity /Identification Profile inthe Configuration Master Was:
Use NTLMSSP or BasicUse Kerberos
Use NTLMSSPUse Kerberos or NTLMSSP
Use NTLMSSP or BasicUse Kerberos or NTLMSSP or Basic
If you are an externally authenticated user, you can only view the list of all the Configuration Master that areassigned to the Web Security appliance and publish the configuration that is currently initialized. If you wantto publish a different subset of the Configuration Master, contact your administrator.
Do not edit, load, or publish Configuration Masters simultaneously using:
• Multiple tabs on the same browser.
• Multiple browsers on the same system or two different systems.
Note
Publishing a Configuration Master Now
Before you begin
See important requirements and information in Before You Publish a Configuration Master , on page 338.
Step 1 On the Security Management appliance, choose Web > Utilities > Publish to Web Appliances.
Step 2 Click Publish Configuration Now.
Step 3 “System-generated job name” is selected by default, or enter a user-defined job name (80 characters or fewer).Step 4 Select the Configuration Master to publish.
If you configure a subset of a particular version of configuration master and assign a Web Security appliance,then the sub configuration master version that is associated to the Web Seurity appliance is displayed in thedrop-down list.
Note
Step 5 Select the Web Security appliances to which you want to publish the Configuration Master. Choose “All assignedappliances” to publish the configuration to all appliances assigned to the Configuration Master.
or
Choose “Select appliances in list” to display the list of appliances assigned to the Configuration Master. Select theappliances to which you want to publish the configuration.
Step 6 Click Publish.
Red progress bars and text on the Publish in Progress page indicate that an error occurred during publishing. If anotherjob is currently publishing, then your request will be executed when the previous job is complete.
User Guide for AsyncOS 14.1 for Cisco Secure Email and Web Manager- GD (General Deployment)340
Managing Web Security AppliancesPublishing a Configuration Master Now

Details of the job in progress also appear on the Web > Utilities > Publish to Web Appliances page. ClickCheck Progress to access the Publish in Progress page.
Note
What to do next
Check to be sure your publish was completely successful. See Viewing Publish History, on page 344. Itemsthat were not published completely will be noted.
Publishing a Configuration Master Later
Before you begin
See important requirements and information in Before You Publish a Configuration Master , on page 338.
Step 1 On the Security Management appliance, choose Web > Utilities > Publish to Web Appliances.Step 2 Click Schedule a Job.
Step 3 “System-generated job name” is selected by default, or enter a user-defined job name (80 characters or fewer).Step 4 Enter the date and time when you want to publish the Configuration Master.Step 5 Select the Configuration Master to publish.Step 6 Select the Web Security appliances to which you want to publish the Configuration Master. Choose “All assigned
appliances” to publish the configuration to all appliances assigned to the Configuration Master.
or
Choose “Select appliances in list” to display the list of appliances assigned to the Configuration Master. Select theappliances to which you want to publish the configuration.
Step 7 Click Submit.
Step 8 View a list of scheduled jobs on the Web > Utilities > Publish to Web Appliances page. To edit a scheduled job, clickthe name of the job. To cancel a pending job, click the corresponding trash can icon and confirm that you want to deletethe job.
Step 9 You may want to create a reminder for yourself (for example, in your calendar) to check after the scheduled publish timeto be sure that your publish was completely successful.
If you reboot or upgrade the appliance before the scheduled publishing job occurs, you must reschedule thejob.
Note
What to do next
Check to be sure your publish was completely successful. See Viewing Publish History, on page 344. Itemsthat were not published completely will be noted.
User Guide for AsyncOS 14.1 for Cisco Secure Email and Web Manager- GD (General Deployment)341
Managing Web Security AppliancesPublishing a Configuration Master Later

Publishing a Configuration Master Using the Command Line Interface
See important requirements and information in Before You Publish a Configuration Master , on page 338.Note
The SecurityManagement appliance provides you with the ability to publish changes through a ConfigurationMaster using the following CLI command:
publishconfig config_master [--job_name ] [--host_list | host_ip ]
where config_master is a supported configuration master version. This keyword is required. The optionjob_name is optional and will be generated if it is not specified.
The option host_list is a list of host names or IP addresses for Web Security appliances to be published, andwill be published to all hosts assigned to the Configuration Master if not specified. The option host_ip can bemultiple host IP addresses, each separated by a comma.
To verify that the publishconfig command was successful, check the smad_logs file. You can also verifythat the publish history was successful from the Security Management appliance GUI by choosing Web >Utilities > Web Appliance Status. From this page choose the web appliance that you want the publish historydetails. Additionally, you can go the Publish History page: Web > Utilities > Publish > Publish History.
Publishing Configurations Using Advanced File PublishingUse advanced file publish to push a compatible XML configuration file from your local file system to managedWeb Security appliances.
For information about which settings you can configure using Advanced File Publishing, see Determiningthe Correct Configuration Publishing Method , on page 323.
To perform an advanced file publish:
• Advanced File Publish: Publish Configuration Now, on page 342• Advanced File Publish: Publish Later, on page 343
Advanced File Publish: Publish Configuration Now
Before you begin
• Verify that the version of the configuration that you will publish is compatible with the AsyncOS versionof the appliance to which you publish. See the Compatibility Matrix athttp://www.cisco.com/c/en/us/support/security/content-security-management-appliance/products-release-notes-list.html.
• On each destination Web Security appliance, back up the existing configuration on your Web Securityappliance to a configuration file. See the AsyncOS for Cisco Web Security Appliances User Guide fordetails.
Step 1 From the source Web Security appliance, save a Configuration File.
For instructions on saving a configuration file from a Web Security appliance, see the AsyncOS for Cisco Web SecurityAppliances User Guide.
Step 2 On the Security Management appliance window, choose Web > Utilities > Publish to Web Appliances.
User Guide for AsyncOS 14.1 for Cisco Secure Email and Web Manager- GD (General Deployment)342
Managing Web Security AppliancesPublishing a Configuration Master Using the Command Line Interface

Step 3 Click Publish Configuration Now.
Step 4 “System-generated job name” is selected by default, or enter a job name (up to 80 characters).Step 5 For Configuration Master to Publish, select Advanced file options.Step 6 Click Browse to select the file that you saved in Step 1.Step 7 From the Web Appliances drop-down list, choose Select appliances in list or All assigned to Master and then select
the appliances to which you want to publish the configuration file.Step 8 Click Publish.
Advanced File Publish: Publish Later
Before you begin
• Verify that the version of the configuration that you will publish is compatible with the AsyncOS versionof the appliance to which you publish. See the Compatibility Matrix athttp://www.cisco.com/c/en/us/support/security/content-security-management-appliance/products-release-notes-list.html.
• On each destination Web Security appliance, back up the existing configuration on your Web Securityappliance to a configuration file. See the AsyncOS for Cisco Web Security Appliances User Guide fordetails.
Step 1 From the source Web Security appliance, save a Configuration File.
For instructions on saving a configuration file from a Web Security appliance, see the AsyncOS for Cisco Web SecurityAppliances User Guide.
Step 2 On the Security Management appliance, choose Web > Utilities > Publish to Web Appliances.Step 3 Click Schedule a Job.
Step 4 System-generated job name is selected by default, or enter a job name (up to 80 characters).Step 5 Enter the date and time when you want to publish the configuration.Step 6 For Configuration Master to Publish, select Advanced file options, then click Browse to select the configuration file
that you saved in Step 1.Step 7 From the Web Appliances drop-down list, choose Select appliances in list or All assigned to Master and then select
the appliances to which you want to publish the configuration file.Step 8 Click Publish.
Viewing Status and History of Publishing JobsDo ThisTo View
Choose Web > Utilities > Publish to Web Appliancesand look in the Pending Jobs section.
A list of publishing jobs that are scheduled buthave not yet occurred
Choose Web > Utilities > Web Appliance Status andlook at the Last Published Configuration information.
A list of the last published configuration perappliance
User Guide for AsyncOS 14.1 for Cisco Secure Email and Web Manager- GD (General Deployment)343
Managing Web Security AppliancesAdvanced File Publish: Publish Later

Do ThisTo View
Choose Web > Utilities > Publish to Web Appliancesand look in the Publishing Progress section.
The status of a publishing job that is currently inprogress
See Viewing Publish HistoryHistory of all or any publishing jobs to all or anyappliances
Viewing Publish HistoryViewing the publish history is useful for checking for errors that may have occurred during publishing, or toidentify mismatches between configured functionality and features enabled on target appliances.
Step 1 On the Security Management appliance, choose Web > Utilities > Publish History.Step 2 To view additional details about a particular job, click the specific job name in the Job Name column.Step 3 View more information:
• To view status details about a particular appliance in the job, click a Details link.
The Web Appliance Publish Details page appears.
• To view additional details about a particular appliance in the job, click the appliance name.
The Web > Utilities > Web Appliance Status page appears.
Centralized Upgrade ManagementYou can simultaneously upgrademultipleWeb Security appliances (WSAs) using a single SecurityManagementAppliance (SMA). You also can apply a different software upgrade to each WSA.
• Setting Up Centralized Upgrade Management for Web Security Appliances, on page 344
• Selecting and Downloading WSA Upgrades, on page 346
• Using the Install Wizard, on page 347
Setting Up Centralized Upgrade Management for Web Security AppliancesFollow these steps to configure the Centralized Upgrade service on this Security Management Appliance:
• Enable the Centralized Upgrade Manager, on page 345
• Adding the Centralized Upgrade Service to Each Managed Web Security Appliance, on page 345
User Guide for AsyncOS 14.1 for Cisco Secure Email and Web Manager- GD (General Deployment)344
Managing Web Security AppliancesViewing Publish History
Enable the Centralized Upgrade Manager
Before you begin
• AllWeb Security appliances should be configured and working as expected before you enable centralizedupgrade management.
• You must enable centralized upgrades individually on each managed Web Security appliance that willreceive centralized upgrades.
To enable Centralized Upgrades in the CLI, use
applianceconfig > services > [...] > Enable Centralized Upgrade >
Y
Note
• Be sure the appropriate feature key is installed on the Security Management Appliance.
Step 1 On the SecurityManagement appliance, select theManagement Appliance page, and then chooseCentralized Services> Centralized Upgrade Manager.
Step 2 Click Edit Settings.Step 3 Check Enable.Step 4 Submit and commit your changes.
Adding the Centralized Upgrade Service to Each Managed Web Security ApplianceAfter enabling the Centralized Upgrade Manager on the Security Management appliance, you must add thedesired Web Security appliance(s) to the Upgrade Manager roster by enabling Centralized Upgrades on theindividual managed WSA(s).
Step 1 On the SecurityManagement appliance, select theManagement Appliance page, and then chooseCentralized Services> Security Appliances.
Step 2 If you have not yet added Web Security appliances, or you need to add additional appliances for centralized upgrademanagement:a) Click Add Web Appliance.b) In the Appliance Name and IP Address text fields, type the appliance name and the IP address for the Management
interface of the Web Security appliance.
A DNS name may be entered in the IP Address text field, however, it will be resolved to an IP addresswhen you click Submit.
Note
c) Be sure to check Centralized Upgrades.d) Click Establish Connection.e) Enter the user name and passphrase for an administrator account on the appliance to be managed, then clickEstablish
Connection.
User Guide for AsyncOS 14.1 for Cisco Secure Email and Web Manager- GD (General Deployment)345
Managing Web Security AppliancesEnable the Centralized Upgrade Manager

You enter the login credentials to pass a public SSH key for file transfers from the Security Managementappliance to the remote appliance. The login credentials are not stored on the SecurityManagement appliance.
Note
Wait for the Success message to appear above the table on the page.
f) Click Test Connection.
Read test results above the table.
g) Click Submit.
Repeat this procedure for each WSA you want to add to the managed Web Security appliance list while simultaneouslyenabling Centralized Upgrade management.
Step 3 To enable Centralized Upgrade management on a WSA already on this list of managed appliances:a) Click the name of the Web Security appliance to open its Edit Web Security Appliance Settings page.b) Select Centralized Upgrades in the WSA Centralized Services section.c) Click Submit.
Repeat this procedure for each WSA on which you want to enable Centralized Upgrade management.
Step 4 Commit your changes.
What to do next
See About Adding Managed Appliances, on page 21 for more information about adding to and editing thelist of managed appliances.
Selecting and Downloading WSA Upgrades
Step 1 On the Security Management appliance, select the Web page, and then choose Utilities > Centralized Upgrade.
Any appliances recently selected for upgrade, and the upgrade status, are listed.
Step 2 Click the Upgrade Appliances button on the Centralized Upgrade page.
All managed WSAs which can be upgraded are listed.
Step 3 Select each Web Security appliance to be upgraded by checking the box preceding its name in the list.Step 4 Click either Download Wizard or Download and Install Wizard.
The Download Wizard lets you select upgrade packages for download to the selected WSA(s); this operation isdownload-only—you can install a downloaded package and restart each system later.
The Download and Install Wizard lets you select upgrade packages for download and immediate installation on theselected WSA(s). After installation, each system is restarted automatically.
Step 5 The Fetch Upgrades page of the launched wizard appears; when all available upgrades have been fetched for the selectedWSAs (Completed Fetching Available Upgrades appears in the Status column of theWSAmatrix), clickNext to continue.
Step 6 The Available Upgrades page lists all available upgrade builds for each selected WSA; select up to five for comparison,and then click Next.
User Guide for AsyncOS 14.1 for Cisco Secure Email and Web Manager- GD (General Deployment)346
Managing Web Security AppliancesSelecting and Downloading WSA Upgrades

Step 7 The wizard’s Upgrade Selection page presents a compatibility matrix of selected upgrades for each WSA; check thedesired upgrade build for each WSA and then click Next.
Step 8 The Summary page lists summary information for each selected WSA and upgrade build; click Next to continue thewizard.
Step 9 Following a series of download checks such as WSA connection status, the Review page provides listings of downloadstatus for each WSA. Click Begin Download to being downloading an upgrade package to each selected WSA.
The Centralized Upgrade page displays download status information throughout the process.
What to do next
• Download Wizard – If you clicked this button at the beginning of this procedure, when download iscomplete, refresh the Centralized Upgrade page by choosing Web > Utilities > Centralized Upgrade,or by clicking the refresh-page button in your browser window.
In addition to the listing of all managedWSAs which can be upgraded, another section of the CentralizedUpgrade page now lists all WSAs to which upgrade packages have been downloaded.(You can click thetrash can button displayed with each entry to delete the downloaded upgrade package from that WSA.)
At any time you can select one or moreWSAs in this list and then click Install Wizard to begin installationof the downloaded upgrade package on each selected WSA; when installation is complete on a WSA, itis restarted. See Using the Install Wizard, on page 347 for information about using this wizard.
• Download and Install Wizard – If you clicked this button at the beginning of this procedure, whendownload is complete, upgrade installation begins automatically; see Using the Install Wizard, on page347, beginning with Step 2, for information about this process. When installation is complete, the WSAis restarted.
Using the Install WizardWhen the Install Wizard begins, whether automatically as part of the Download and Install process, or whenyou click the Install Wizard button on the Centralized Upgrade page after selecting one or more WSAs withdownloaded but not-yet-installed upgrade packages, follow these step to configure installation.
Step 1 If installing previously downloaded upgrade packages:a) Select the desired WSAs in the Web Appliances with Downloaded AsyncOS Versions section of the Centralized
Upgrade page (Web > Utilities > Centralized Upgrade).b) Click Install Wizard.
Step 2 On the Upgrade Preparation page of the wizard, for each selected WSA:
• Check Save the current configuration to the configuration directory before upgrading if you want a back-upcopy of the WSA’s current configuration saved to that system’s configuration directory.
• If the Save current configuration option is checked, you can check Mask passphrases in the configuration fileto have all current-configuration passphrases masked in the back-up copy. Note that the Load Configurationcommand cannot be used to reload back-up files with masked passphrases.
• If the Save current configuration option is checked, you can enter one or more email addresses into the Email fileto field; a copy of the back-up configuration file is mailed to each address. Separate multiple addresses with commas.
User Guide for AsyncOS 14.1 for Cisco Secure Email and Web Manager- GD (General Deployment)347
Managing Web Security AppliancesUsing the Install Wizard

Step 3 Click Next.Step 4 The Upgrade Summary page lists upgrade-preparation information for each selected WSA; click Next to continue the
wizard.Step 5 Following a series of device checks such as connection status, the Review page provides a listing of installation status
for each WSA. You can deselect devices that are showing an error. Click Begin Install to begin installing an upgradepackage to each selected WSA.
You are returned to the Centralized Upgrade page where installation status information is displayed.
Each WSA will be restarted upon completion of the installation.Note
What to do next
Alternatively, you also can run the installer for any previously downloaded package from the WSA itself.That is, the downloaded upgrade package is listed on theWSA’s System Administration > System Upgradepage, along with an Install button. See “Upgrading and Updating AsyncOS and Security Service Components”in the Cisco Web Security Appliances User Guide for more information.
Note
Viewing Web Security Appliance Status• Comparing Enabled Features , on page 336
• Viewing a Summary of Status of Web Appliances , on page 348
• Viewing Status of Individual Web Security Appliances, on page 348
• Web Appliance Status Details , on page 349
Viewing a Summary of Status of Web AppliancesThe Web > Utilities > Web Appliance Status page provides a high-level summary of the Web Securityappliances connected to your Security Management appliance.
TheWeb Appliance Status page displays a list of your connectedWeb Security appliances, including appliancename, IP address, AsyncOS version, last published configuration information (user, job name, and configurationversion), number of security services enabled or disabled, and total number of connected appliances. Thewarning icon indicates when attention is required for one of your connected appliances.
Viewing Status of Individual Web Security AppliancesThe Appliance Status page provides a detailed view into the status of each connected appliance.
To view details for a managed Web Security appliance on the Web Appliance Status page, click the name ofthe appliance.
User Guide for AsyncOS 14.1 for Cisco Secure Email and Web Manager- GD (General Deployment)348
Managing Web Security AppliancesViewing Web Security Appliance Status

Status information includes general information about the connectedWeb Security appliances, their publishedconfiguration, publish history, feature key status, and so forth.
Only machines with support for centralized management will have data available for display.Note
Warning messages will appear if different versions of the Acceptable Use Control Engine on theWeb Securityappliance do not match with those on the SecurityManagement appliance. An ‘N/A’ is displayed if the serviceis disabled or not present on the Web Security appliance.
Note
Web Appliance Status DetailsMost of the information on this page is pulled from the Web Security appliance:
• System status information (uptime, appliance model and serial number, AsyncOS version, build date,AsyncOS installation date and time, and host name)
• Configuration publish history (publish date/time, job name, configuration version, result of the publish,and user)
• Centralized reporting status, including time of last attempted data transfer• Status of features on Web Security appliances (whether each feature is enabled, status of feature keys)• Acceptable Use Controls Engine versions on the managed and managing appliances• AnyConnect Secure Mobility settings on the Web Security appliance• Cisco Identity Services Engine (ISE) servers to which this Web Security appliance is connected.• Proxy settings (upstream proxies and HTTP ports to proxy) for the Web Security appliance• Authentication service information (servers, schemes, realms, and sequences; whether Transparent UserIdentification is supported; and whether to block or permit traffic if authentication fails)
It can take several minutes for the Web Appliance Status page to reflect recent configuration changes thatoccurred on the Web Security appliances. To refresh the data immediately, click the Refresh Data link. Thetime stamp on the page tells you when the data was last refreshed.
Tip
System Health Dashboard on the New Web InterfaceOn the appliance, choose Monitoring > System Health to monitor the system status. This page displays thecurrent status and configuration of the Web Security appliance.
The System Health Dashboard with all critical and warning alerts is available in AsyncOS 14.0 releases andlater only.
Note
You can sort the page contents based on the time range -Date, Yesterday, Custom Range. While using CustomRange, the appliance enables you to select dates for a week.
User Guide for AsyncOS 14.1 for Cisco Secure Email and Web Manager- GD (General Deployment)349
Managing Web Security AppliancesWeb Appliance Status Details

The page displays the total number of web security appliance connected to the AsyncOS, the count of criticaland warning alerts on appliances.
To search for a selected appliance, you must use the search feature.
To sort the appliances based in ascending and descending order, click the Proxy Name. However, you canonly sort the rows only based on ascending and descending order of the Proxy Name field.
When your appliance has not established connected to Cisco Secure Manager, the row is highlighted and astop icon appears when your hover your mouse over the row.
Note
Details displayed include:
• Proxy Name- Displays the Web Security appliance proxy name.
• Hardware- Displays all hardware critical and warning alerts for the appliance. You must click on thealert to view a pop-up with information on the selected alert. To get detailed information about the alert,you must click on the Hardware link available on the pop-up. To navigate to the system status page ofthe selected appliance, select Go To Appliance link displayed in the pop-up. However, you must loginto view the status page.
• Services- Displays all service critical and warning alerts for the appliance. You must click on the alertto view additional information on the selected alert. You must click on the alert to view a pop-up withinformation on the selected alert. To get detailed information about the alert, you must click on theSystem link available on the pop-up. To navigate to the system status page of the selected appliance,select Go To Appliance link displayed in the pop-up. However, you must login to view the status page.
• Peak RPS- Displays the number of requests per second for the selected appliance.
• Peak Decrypted RPS-Displays the peak RPS of decrypted requests on the appliance for the time periodselected.
• Peak Client Connections- Displays the number of peak client-side connections on the appliance.
• Peak Server Connections- Displays the number of peak server-side connections on the appliance.
In AsyncOS 14.0, you can now view the current status and configuration of the Web Security appliance in apage. You must choose Monitoring > System Health to monitor the system status of the Web securityappliances.
• In AsyncOS 14.1.0, the Web Security Appliance tracking data available on the interface is displayedbased on the date the selectedWSAwas active. All status messages of the selected appliance is displayedbased on the dates the appliance was available.
• AsyncOS 14.1.0 displays the Web Security Appliance status using color codes. The color codes usedare:
• Green status—API server and trailblazer are up and running
• Grey status— Either API server status or and trailblazer status is either up and running or not.However, appliance connection is not established with Cisco Secure Email and Web Manager.
• Red Status—Either API server status and trailblazer status is down or both are down.
User Guide for AsyncOS 14.1 for Cisco Secure Email and Web Manager- GD (General Deployment)350
Managing Web Security AppliancesSystem Health Dashboard on the New Web Interface

Preparing For and Managing URL Category Set UpdatesIn order to ensure that your system has the latest set of predefined URL categories available for managingweb usage, the URL category set for Web Usage Controls (WUC) may be updated occasionally: By default,Web Security appliances download URL category set updates automatically from Cisco, and the SecurityManagement appliance receives these updates automatically within a fewminutes frommanagedWeb Securityappliances.
Because these updates can impact existing configurations and appliance behavior, you should prepare inadvance for these updates and take action after they occur.
Actions that you should take include the following:
• Understand the Impacts of URL Category Set Updates , on page 351• Ensure That You Will Receive Notifications and Alerts about URL Category Set Updates , on page 351• Specify Default Settings for New and Changed Categories , on page 351• When the URL Category Set is Updated, Check Your Policy and Identity/Identification Profile Settings, on page 352
Understand the Impacts of URL Category Set UpdatesWhen URL category set updates occur, they may change the behavior of existing policies in ConfigurationMasters.
For essential information about actions you should take before and after URL category set updates, see the“Managing Updates to the Set of URL Categories” section of the “URL Filters” chapter in the AsyncOS forCisco Web Security Appliances User Guide at the link provided in Documentation , on page 595. Categorydescriptions are in the “URL Category Descriptions” section of the same chapter.
Ensure That You Will Receive Notifications and Alerts about URL CategorySet Updates
Do ThisTo Receive
Sign up now to receive notifications about your Cisco ContentSecurity appliances, which will include notifications about URLcategory set updates. See Cisco Notification Service , on page 595.
Advance notification of URL categoryset updates
Go toManagement Appliance > System Administration > Alertsand make sure that you are configured to receive Warning-levelalerts in the System category. More information about alerts is inManaging Alerts, on page 473.
Alerts when URL category set updateshave affected existing policy settings
Specify Default Settings for New and Changed CategoriesBefore URL category set updates occur, you should specify default actions for new and merged categories ineach policy that offers URL filtering, or import a configuration from a Web Security appliance that has thesesettings already configured.
User Guide for AsyncOS 14.1 for Cisco Secure Email and Web Manager- GD (General Deployment)351
Managing Web Security AppliancesPreparing For and Managing URL Category Set Updates

For more information, see the “Choosing Default Settings for New and Changed Categories” section in the“URL Filters” chapter of the AsyncOS for Cisco Web Security Appliances User Guide or the online help onthe Web Security appliance.
When the URL Category Set is Updated, Check Your Policy andIdentity/Identification Profile Settings
URL category set updates trigger two types of alerts:
• Alerts about category changes• Alerts about policies that have changed or been disabled as a result of category changes
When you receive alerts about URL category set changes, you should check your existing URL category-basedpolicies and Identities/Identification Profiles to be sure they still meet your policy goals.
For more information about the kinds of changes that might require your attention, see the “Responding toAlerts about URL Category Set Updates” section in the AsyncOS for Cisco Web Security Appliances UserGuide.
Application Visibility and Control (AVC) UpdatesThe SMA automatically uses the version of the AVC engine that exists on the majority of the Web Securityappliances that it manages.
Troubleshooting Configuration Management Issues• In Configuration Master Identities/Identification Profiles, Groups Are Not Available , on page 352• ConfigurationMaster Access Policies Web Reputation and Anti-Malware Settings Page Settings are Notas Expected, on page 353
• Troubleshooting Configuration Publishing Failures , on page 353
In Configuration Master Identities/Identification Profiles, Groups Are NotAvailable
Problem
In Web > Configuration Master > Identities/Identification Profiles, the Policy membership definitionpage doesn't show the Groups option under Selected groups and Users.
Solution
If you have multipleWeb Security appliances: On eachWSA, in Network > Authentication, make sure RealmNames are unique across all WSAs, unless all settings are identical for same-name realms.
To see realm names for each WSA, go to Web > Utilities > Web Appliance Status, click each appliancename, and scroll to the bottom of the details page.
Tip
User Guide for AsyncOS 14.1 for Cisco Secure Email and Web Manager- GD (General Deployment)352
Managing Web Security AppliancesWhen the URL Category Set is Updated, Check Your Policy and Identity/Identification Profile Settings

Configuration Master Access Policies Web Reputation and Anti-MalwareSettings Page Settings are Not as Expected
Problem
The Access Policies > Web Reputation and Anti-Malware Settings page in the configuration master ismissing expected settings, including the Web Reputation Score threshold settings and the ability to chooseanti-malware scanning engines. Or it includes these settings when you are using Adaptive Security on theWeb Security appliance.
Solution
Available options depend on whether Adaptive Security is selected for that configuration master in Web >Utilities > Security Services Display settings.
TroubleshootingIssueswhenImportingExistingConfigurationforConfigurationMasters
Problem
After you upgrade to Configuration Master 11.8, if you import an existing configuration to the newConfiguration Master, the appliance redirects to the Web Security appliance (WSA_Sandbox) login page.
Solution
After you upgrade your appliance to a version supporting the Configuration Master 11.8, you must associatethe Web Security appliances to the Security Management appliance to import configurations from an existingConfiguration Master.
If you encounter any policy related issues when loading a configuration file, check for GUI logs on yourappliance.
Note
Troubleshooting Configuration Publishing FailuresProblem
Publishing a configuration fails.
Solution
Look at the Web > Utilities > Web Appliance Status page. Publishing fails if:
• There is a discrepancy between the status in the “Web Appliance Service” column and the status in the“Is Service Displayed on Management Appliance?” column.
• Both columns show that the feature is enabled but the corresponding Feature Key is not active (forexample, is expired).
• The Configuration Master version should match the AsyncOS version on the Web Security appliance.Publishing an older Configuration Master version to a newer Web Security appliance may fail if settingson the Web Security appliance do not match the settings in the Configuration Master. This can occureven if the Web Appliance Status page does not indicate any discrepancies.
User Guide for AsyncOS 14.1 for Cisco Secure Email and Web Manager- GD (General Deployment)353
Managing Web Security AppliancesConfiguration Master Access Policies Web Reputation and Anti-Malware Settings Page Settings are Not as Expected

What to do Next:
• Viewing Publish History, on page 344
• Comparing Enabled Features , on page 336
• Enabling Features to Publish , on page 336
User Guide for AsyncOS 14.1 for Cisco Secure Email and Web Manager- GD (General Deployment)354
Managing Web Security AppliancesTroubleshooting Configuration Publishing Failures
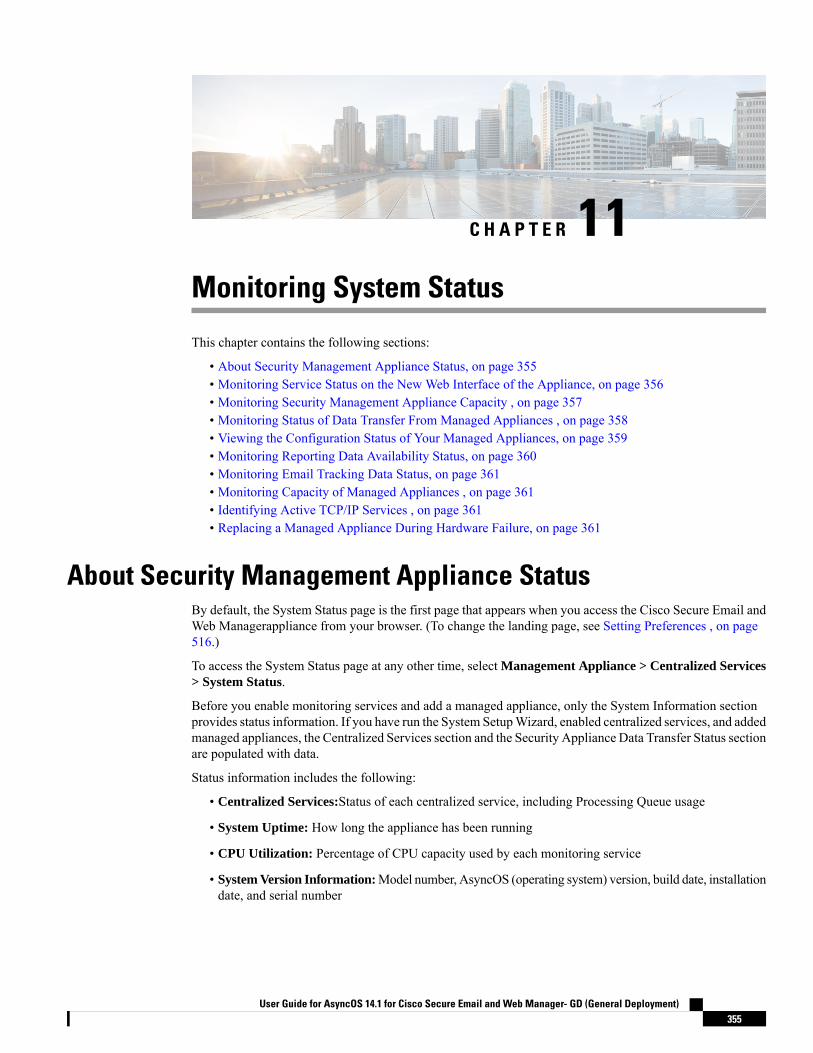
C H A P T E R 11Monitoring System Status
This chapter contains the following sections:
• About Security Management Appliance Status, on page 355• Monitoring Service Status on the New Web Interface of the Appliance, on page 356• Monitoring Security Management Appliance Capacity , on page 357• Monitoring Status of Data Transfer From Managed Appliances , on page 358• Viewing the Configuration Status of Your Managed Appliances, on page 359• Monitoring Reporting Data Availability Status, on page 360• Monitoring Email Tracking Data Status, on page 361• Monitoring Capacity of Managed Appliances , on page 361• Identifying Active TCP/IP Services , on page 361• Replacing a Managed Appliance During Hardware Failure, on page 361
About Security Management Appliance StatusBy default, the System Status page is the first page that appears when you access the Cisco Secure Email andWeb Managerappliance from your browser. (To change the landing page, see Setting Preferences , on page516.)
To access the System Status page at any other time, select Management Appliance > Centralized Services> System Status.
Before you enable monitoring services and add a managed appliance, only the System Information sectionprovides status information. If you have run the System SetupWizard, enabled centralized services, and addedmanaged appliances, the Centralized Services section and the Security Appliance Data Transfer Status sectionare populated with data.
Status information includes the following:
• Centralized Services:Status of each centralized service, including Processing Queue usage
• System Uptime: How long the appliance has been running
• CPU Utilization: Percentage of CPU capacity used by each monitoring service
• System Version Information:Model number, AsyncOS (operating system) version, build date, installationdate, and serial number
User Guide for AsyncOS 14.1 for Cisco Secure Email and Web Manager- GD (General Deployment)355

Related Topics
• Monitoring the Processing Queue , on page 357
• Monitoring CPU Utilization , on page 357
• Monitoring Status of Data Transfer From Managed Appliances , on page 358
Monitoring Service Status on the New Web Interface of theAppliance
You can now monitor the status of your managed appliances and manage centralized services on the new webinterface of your Security Management appliance.
You can use the Service Status tab on the newweb interface of your appliance to enable and disable centralizedservices such as email reporting, message tracking and quarantines.
The Email Feature Status section shows the services that are enabled and the number of licenses you haveused for each service. Click View Appliances to view the number of added appliances. This redirects you tothe legacy web interface of the appliance. For more information, see About Adding Managed Appliances, onpage 21
You can view the File Analysis details on the Service Status page of the new web interface of your appliance.You must join all managed appliances to the same appliance group in order to allow all content securityappliances in your organization to display detailed results in the cloud about files sent for analysis from anyCisco Email Security appliance or Cisco Web Security appliance in your organization.
You can enable and disable the following centralized services on the Service Status page:
• Centralized Reporting
For more information, see Enabling Centralized Email Reporting on the New Web Interface, on page53.
• Centralized Message Tracking
For more information, see Enabling Centralized Email Tracking on the NewWeb Interface, on page 249.
• Centralized Spam Quarantines
For more information, see the following:
• Enabling and Configuring Spam Quarantine on the New Web Interface, on page 268.
• Notifying End Users About Quarantined Messages , on page 290.
• Configuring End-User Access to the Spam Quarantine , on page 288.• Enabling Safelists and Blocklists on the New Web Interface, on page 276.
• Centralized Policy, Virus and Outbreak Quarantines
For more information, see Enabling Centralized Policy, Virus, and Outbreak Quarantines on the NewWeb Interface of the Appliance , on page 302.
• Safelists and Blocklists
For more information, see Enabling Safelists and Blocklists on the New Web Interface, on page 276.
User Guide for AsyncOS 14.1 for Cisco Secure Email and Web Manager- GD (General Deployment)356
Monitoring System StatusMonitoring Service Status on the New Web Interface of the Appliance

Monitoring Security Management Appliance Capacity• Monitoring the Processing Queue , on page 357• Monitoring CPU Utilization , on page 357
Monitoring the Processing QueueYou can periodically check the processing queue percentages used for email and web reporting and trackingto determine whether your appliance is running at optimal capacity.
The processing queue stores centralized reporting and tracking files as they await processing by the SecurityManagement appliance. Normally, the Security Management appliance receives batches of reporting andtracking files for processing. The percentage of reporting or tracking files in the processing queue typicallyfluctuates as the files are transmitted from managed appliances and processed by the Security Managementappliance.
Processing queue percentages gauge the number of files in the queue. They do not take file size into account.The percentages provide only a rough estimate of the Security Management appliance’s processing load.
Note
Step 1 [NewWeb Interface Only] On the SecurityManagement appliance, selectEmail from the Product drop-down and chooseService Status.
Step 2 On the Security Management appliance, choose Management Appliance > Centralized Services > System Status.Step 3 In the Centralized Services section at the top of the page, look at the Processing Queue percentages for:
a) Centralized Reporting (Email Security subsection)b) Centralized Message Trackingc) Centralized Reporting (Web Security subsection)
Step 4 If the processing queue usage percentages remain consistently high over several hours or days, then the system is runningat or beyond capacity.
In that case, consider removing some of the managed appliances from the Security Management appliance, installingadditional Security Management appliances, or both.
Monitoring CPU UtilizationTo view the percentage of its CPU capacity that the SecurityManagement appliance is using for each centralizedservice:
Step 1 [NewWeb Interface Only] On the SecurityManagement appliance, selectEmail from the Product drop-down and chooseService Status.
Step 2 Select Management Appliance > Centralized Services > System Status.Step 3 Scroll to the System Information section and view the CPU Utilization subsection.
User Guide for AsyncOS 14.1 for Cisco Secure Email and Web Manager- GD (General Deployment)357
Monitoring System StatusMonitoring Security Management Appliance Capacity
The CPU Utilization percentages indicate the portion of the Security Management appliance’s CPU processing that isdevoted to each of the main centralized services. Utilization percentages for some services may be combined. For example,email reporting are combined under “Reporting Service” while spam, policy, virus, and outbreak quarantines are combinedunder “Quarantine Services.” Other operations of the Security Management appliance are grouped under the generalheading “Security Management appliance.”
Step 4 Refresh the browser display to view the most recent data.
The CPU utilization percentages change constantly.
Monitoring Status of Data Transfer From Managed AppliancesTo perform centralized management functions, the Security Management appliance relies on the successfultransfer of data from the managed appliances to the Security Management appliance. The Security ApplianceData Transfer Status section provides status information about each appliance that is managed by the SecurityManagement appliance.
By default, the Security Appliance Data Transfer Status section displays up to ten appliances. If the SecurityManagement appliance manages more than ten appliances, you can use the Items Displayed menu to selectthe number of appliances to display.
Summary information about data transfer status appears in the Services section at the top of the System Statuspage. The Security Appliance Data Transfer Status section provides appliance-specific data transfer status.
Note
In the Security Appliance Data Transfer Status section of the System Status page, you can view connectionstatus issues for specific appliances. For detailed information about the status of each service on an appliance,click the appliance name to view the Data Transfer Status page for the appliance.
The Data Transfer Status:Appliance_Name page showswhen the last data transfer occurred for eachmonitoringservice.
The data transfer status for Email Security appliances can be one of the following values:
• Not enabled:The monitoring service is not enabled on the Email Security appliance.
• Never connected: The monitoring service is enabled on the Email Security appliance, but no connectionhas been established between the Email Security appliance and the Security Management appliance.
• Waiting for data: The Email Security appliance has connected to the Security Management appliance,which is waiting to receive data.
• Connected and transferred data:A connection was established between the Email Security applianceand the Security Management appliance, and data were successfully transferred.
• File transfer failure: A connection was established between the Email Security appliance and theSecurity Management appliance, but the data transfer failed.
The data transfer status for Web Security appliances can be one of the following values:
• Not enabled: The centralized configuration manager is not enabled for the Web Security appliance.
User Guide for AsyncOS 14.1 for Cisco Secure Email and Web Manager- GD (General Deployment)358
Monitoring System StatusMonitoring Status of Data Transfer From Managed Appliances

• Never connected: The centralized configuration manager is enabled for the Web Security appliance,but no connection has been established between theWeb Security appliance and the SecurityManagementappliance.
• Waiting for data: The Web Security appliance has connected to the Security Management appliance,which is waiting to receive data.
• Connected and transferred data: A connection was established between the Web Security applianceand the Security Management appliance, and data were successfully transferred.
• Configuration push failure: The Security Management appliance attempted to push a configurationfile to the Web Security appliance, but the transfer failed.
• Configuration push pending: The Security Management appliance is in the process of pushing aconfiguration file to the Web Security appliance.
• Configuration push success: The Security Management appliance successfully pushed a configurationfile to the Web Security appliance.
Data transfer issues can reflect temporary network problems or appliance configuration issues. The statusesof “Never connected” and “Waiting for data” are normal, transient statuses when you first add a managedappliance to the Security Management appliance. If the status does not eventually change to “Connected andtransferred data,” then the data transfer status might indicate a configuration issue.
If the “File transfer failure” status appears for an appliance, monitor the appliance to determine if the failurewas caused by a network issue or by a problem with the appliance configuration. If no network issues preventdata transfer and the status does not change to “Connected and transferred data,” then you might need tochange the appliance configuration to enable data transfer.
Viewing the Configuration Status of Your Managed AppliancesYou can view the configuration status of your managed appliances in one of the following ways:
• [New Web Interface Only] On the Security Management appliance, select Email from the Productdrop-down and choose Service Status.
• On the Security Management appliance, choose Management Appliance > Centralized Services >System Status.
The Centralized Service Status section shows which services are enabled and how many licenses you haveused for each service. The Security Appliances section lists the appliances you have added. Check marksindicate the enabled services, and the Connection Established? column shows whether or not file transferaccess is properly configured.
Related Topics
• Designating an Alternate Appliance to Process Released Messages, on page 305• About Adding Managed Appliances, on page 21
Additional Status Information for Web Security AppliancesFor additional status information about Web Security appliances, see Viewing Status of Individual WebSecurity Appliances, on page 348.
User Guide for AsyncOS 14.1 for Cisco Secure Email and Web Manager- GD (General Deployment)359
Monitoring System StatusViewing the Configuration Status of Your Managed Appliances

Monitoring Reporting Data Availability StatusThe Security Management appliance enables you to monitor the availability of reporting data for a specifiedtime period. See the appropriate section for your appliance:
• Monitoring Email Security Reporting Data Availability, on page 360
Monitoring Email Security Reporting Data AvailabilityTo monitor reporting data from your Email Security appliances on the Security Management appliance, viewthe Email > Reporting > Reporting Data Availability page.
From the Reporting Data Availability page, you can view the percentage of reporting data that the SecurityManagement appliance received from your Email Security appliances over a specified period of time. A barchart indicates the completeness of the data received during the time range.
You can monitor reporting data availability for the preceding day, week, month, or year. If the SecurityManagement appliance received less than 100% of the reporting data from the Email Security appliances, youcan tell immediately that your data may be incomplete. Use the data availability information to validatereporting data and to troubleshoot system problems.
Monitoring Web Security Reporting Data AvailabilityTo monitor reporting data from your Web Security appliances on the Security Management appliance, viewthe Web > Reporting > Data Availability page.
From the Data Availability page you can update and sort data to provide real-time visibility into resourceutilization and web traffic trouble spots.
In theWeb Reporting Data Availability window,Web Reporting will show disabled only if bothWebReportingand Email Reporting are disabled.
Note
All data resource utilization and web traffic trouble spots are shown from this page. By clicking on one of thelisted Web Security appliance links, you can view reporting data availability for that appliance.
You can monitor reporting data availability for the preceding day, week, month, or year. If the SecurityManagement appliance received less than 100% of the reporting data from the Web Security appliances, youcan tell immediately that your data may be incomplete. Use the data availability information to validatereporting data and to troubleshoot system problems.
If data availability is used within a scheduled report for URL Categories, and there are gaps in data for anyof the appliances, the following message is displayed at the bottom of the page: “Some data in this time rangewas unavailable.” If there are no gaps present, nothing appears.
See the Data Availability Page, on page 196 for more information on the Data Availability page on the WebSecurity appliance.
User Guide for AsyncOS 14.1 for Cisco Secure Email and Web Manager- GD (General Deployment)360
Monitoring System StatusMonitoring Reporting Data Availability Status
Monitoring Email Tracking Data StatusTo monitor the status of email tracking data, view the Email > Message Tracking > Message TrackingData Availability page.
Monitoring Capacity of Managed AppliancesYou can monitor capacity of your managed appliances from the Security Management appliance. You cancheck the collective capacity of all Email or Web Security appliances and the capacity of each individualappliance.
SeeTo View Capacity of
SystemCapacity Page, on page 194Managed Web Security appliances
System Capacity Page, on page 93Managed Email Security appliances
Identifying Active TCP/IP ServicesTo identify active TCP/IP services used by your SecurityManagement appliance, use the tcpservices commandin the command line interface.
Replacing a Managed Appliance During Hardware FailureIf you have to replace a managed appliance due to a hardware failure or other reasons, the data from thereplaced appliance will not be lost, but the data will not be displayed correctly on the Security Managementappliance.
Upon replacing a managed appliance, add the new appliance to the list of hosts on the SMA, and connect itto the new appliance. If the IP address remains the same, change the IP on the old host entry to a non existingvalue.
User Guide for AsyncOS 14.1 for Cisco Secure Email and Web Manager- GD (General Deployment)361
Monitoring System StatusMonitoring Email Tracking Data Status

User Guide for AsyncOS 14.1 for Cisco Secure Email and Web Manager- GD (General Deployment)362
Monitoring System StatusReplacing a Managed Appliance During Hardware Failure

C H A P T E R 12Integrating With LDAP
This chapter contains the following sections:
• Overview, on page 363• Configuring LDAP to Work with the Spam Quarantine, on page 363• Creating the LDAP Server Profile, on page 364• Configuring LDAP Queries, on page 366• Domain-Based Queries, on page 370• Chain Queries, on page 372• Configuring AsyncOS to Work With Multiple LDAP Servers, on page 373• Configuring External Authentication of Administrative Users Using LDAP , on page 376
OverviewIf you maintain end-user passphrases and email aliases in a corporate LDAP directory — for example, inMicrosoft Active Directory, SunONE Directory Server, or OpenLDAP directories — you can use the LDAPdirectory to authenticate the following users:
• End users and administrative users who access the spam quarantine.
When a user logs in to the web UI for the spam quarantine, the LDAP server validates the login nameand passphrase, and AsyncOS retrieves a list of the corresponding email aliases. Quarantined messagessent to any of the user's email aliases can appear in the spam quarantine, as long as the appliance doesnot rewrite them.
See Configuring LDAP to Work with the Spam Quarantine, on page 363.
• Administrative users who sign in to the Cisco Content Security Management appliance when ExternalAuthentication is enabled and configured.
See Configuring External Authentication of Administrative Users Using LDAP , on page 376.
Configuring LDAP to Work with the Spam QuarantineWhen you configure your Cisco Content Security appliance to work with an LDAP directory, you mustcomplete the following steps to set up for acceptance, routing, aliasing, and masquerading:
User Guide for AsyncOS 14.1 for Cisco Secure Email and Web Manager- GD (General Deployment)363

Step 1 Configure an LDAP server profile.
The server profile contains information to enable AsyncOS to connect to the LDAP server, such as:
• Server name and port
• Base DN
• Authentication requirements for binding to the server
For more information about configuring a server profile, see Creating the LDAP Server Profile, on page 364.
When you create the LDAP server profile, you can configure AsyncOS to connect to multiple LDAP servers. For moreinformation, see Configuring AsyncOS to Work With Multiple LDAP Servers, on page 373.
Step 2 Configure the LDAP queries.
You can either use the default spam quarantine queries generated for the LDAP server profile or create your own queriesthat are tailored to your particular LDAP implementation and schema. You then designate the active queries for spamnotifications and end-user access to the quarantine.
For information about queries, see Configuring LDAP Queries, on page 366.
Step 3 Enable LDAP end-user access and spam notifications for the spam quarantine.
Enable LDAP end-user access to the spam quarantine to allow end-users to view andmanage messages in their quarantine.You can also enable alias consolidation for spam notifications to prevent the user from receiving multiple notifications.
For more information, see Setting Up the Centralized Spam Quarantine .
Creating the LDAP Server ProfileWhen you configure AsyncOS to use LDAP directories, you create an LDAP server profile to store theinformation about the LDAP server.
Step 1 [New Web Interface Only] On the Security Management appliance, click to load the legacy web interface.Step 2 Choose Management Appliance > System Administration > LDAP.Step 3 Click Add LDAP Server Profile.
Step 4 Enter a name for the server profile in the LDAP Server Profile Name text field.Step 5 Enter the host name for the LDAP server in the Host Name(s) text field.
You can enter multiple host names to configure the LDAP servers for failover or load-balancing. Separate multipleentries with commas. For more information, see Configuring AsyncOS to Work With Multiple LDAP Servers, on page373.
Step 6 Select an authentication method. You can use anonymous authentication or specify a user name and passphrase.
You need to configure LDAP authentication to view client user IDs instead of client IP addresses on reports.Without LDAP authentication the system can only refer to users by their IP address. Choose the UsePassphrase radio button, and enter the User name and passphrase. The user name will now be seen on theUser Mail Summary page.
Note
User Guide for AsyncOS 14.1 for Cisco Secure Email and Web Manager- GD (General Deployment)364
Integrating With LDAPCreating the LDAP Server Profile

Step 7 Select the LDAP server type: Active Directory, OpenLDAP, or Unknown or Other.Step 8 Enter a port number.
The default port is 3268. This is the default port for Active Directory that enables it to access the global catalog in amulti-server environment.
Step 9 Enter a base DN (distinguishing name) for the LDAP server.
If you authenticate with a user name and a passphrase, the user name must include the full DN to the entry that containsthe passphrase. For example, a user with an email address of [email protected] is a user of the marketing group. Theentry for this user would look like the following entry:
uid=joe, ou=marketing, dc=example dc=com
• [Optional - Only if "Validate LDAP Server Certificate" is enabled in LDAP Global Settings]: Check whether theCustom Certificate Authority is uploaded to validate the server certificate.
• To add the Certificate Authority, use certconfig > CERTAUTHORITY sub command in the CLI. [Optional - Onlyif "Validate LDAP Server Certificate" is enabled in LDAP Global Settings and FQDN validation enabled in SSLConfiguration settings]: Check whether the 'Common Name,' 'SAN: DNS Name' fields, or both present in theserver certificate, are in the FQDN format.
• [Optional - Only if "Validate LDAP Server Certificate" is enabled in LDAP Global Settings]: Check whether the'Common Name,' or 'SAN: DNS Name' fields, of the server certificate contain Hostname of the server. ReverseDNS name is used if IP is configured in Hostname field.
Step 10 Under Advanced, select whether to use SSL when communicating with the LDAP server.Step 11 Enter the cache time-to-live. This value represents the amount of time to retain caches.Step 12 Enter the maximum number of retained cache entries.Step 13 Enter a maximum number of simultaneous connections.
If you configure the LDAP server profile for load balancing, these connections are distributed among the listed LDAPservers. For example, if you configure 10 simultaneous connections and load balance the connections over three servers,AsyncOS creates 10 connections to each server, for a total of 30 connections. For more information, see Load Balancing,on page 375.
The maximum number of simultaneous connections includes LDAP connections used for LDAP queries.However, if you enable LDAP authentication for the spam quarantine, the appliance allows 20 additionalconnections for the end user quarantine for a total of 30 connections.
Note
Step 14 Test the connection to the server by clicking the Test Server(s) button. If you specified multiple LDAP servers, theyare all tested. The results of the test appear in the Connection Status field. For more information, see Testing LDAPServers, on page 366.
Step 15 Create spam quarantine queries by selecting the check box and completing the fields.
You can configure the quarantine end-user authentication query to validate users when they log in to the end-userquarantine. You can configure the alias consolidation query so that end-users do not receive quarantine notices for eachemail alias. To use these queries, select the “Designate as the active query” check box. For more information, seeConfiguring LDAP Queries, on page 366.
Step 16 Test the spam quarantine queries by clicking the Test Query button.
Enter the test parameters and click Run Test. The results of the test appear in the Connection Status field. If you makeany changes to the query definition or attributes, click Update.
User Guide for AsyncOS 14.1 for Cisco Secure Email and Web Manager- GD (General Deployment)365
Integrating With LDAPCreating the LDAP Server Profile

If you have configured the LDAP server to allow binds with empty passphrases, the query can pass the testwith an empty passphrase field.
Note
Step 17 Submit and commit your changes.
Active Directory server configurations do not allow authentication through TLS with Windows 2000. This is a knownissue with Active Directory. TLS authentication for Active Directory and Windows 2003 does work.
Although the number of server configurations is unlimited, you can configure only one end-user authenticationquery and one alias consolidation query per server.
Note
Testing LDAP ServersUse the Test Server(s) button on the Add/Edit LDAP Server Profile page (or the test subcommand of theldapconfig command in the CLI) to test the connection to the LDAP server. AsyncOS displays a messagestating whether the connection to the server port succeeded or failed. If you configured multiple LDAP servers,AsyncOS tests each server and displays individual results.
Configuring LDAP QueriesThe following sections provide the default query strings and configuration details for each type of spamquarantine query:
• Spam quarantine end-user authentication query. For more information, see the Spam QuarantineEnd-User Authentication Queries, on page 367.
• Spam quarantine alias consolidation query. For more information, see Spam Quarantine AliasConsolidation Queries, on page 368.
To have the quarantine use an LDAP query for end-user access or spam notifications, select the “Designateas the active query” check box. You can designate one end-user authentication query to control quarantineaccess and one alias consolidation query for spam notifications. Any existing active queries are disabled. Onthe Security Management appliance, choose Management Appliance > System Administration > LDAPpage, an asterisk (*) is displayed next to the active queries.
You can also specify a domain-based query or chain query as an active end-user access or spam notificationquery. For more information, see Domain-Based Queries, on page 370 and Chain Queries, on page 372.
Use the Test Query button on the LDAP page (or the ldaptest command) to verify that your queries returnthe expected results.
Note
• LDAP Query Syntax, on page 366
• Tokens, on page 367
LDAP Query SyntaxSpaces are allowed in LDAP paths, and they do not need to be quoted. The CN and DC syntax is notcase-sensitive.
User Guide for AsyncOS 14.1 for Cisco Secure Email and Web Manager- GD (General Deployment)366
Integrating With LDAPTesting LDAP Servers

Cn=First Last,oU=user,dc=domain,DC=COM
The variable names you enter for queries are case-sensitive and must match your LDAP implementation inorder to work correctly. For example, entering mailLocalAddress at a prompt performs a different querythan entering maillocaladdress.
TokensYou can use the following tokens in your LDAP queries:
• {a} username@domainname• {d} domain• {dn} distinguished name• {g} group name• {u} user name• {f} MAILFROM: address
The {f} token is valid in acceptance queries only.Note
For example, you might use the following query to accept mail for an Active Directory LDAP server:(|(mail={a})(proxyAddresses=smtp:{a}))
We strongly recommend using the Test feature of the LDAP page (or the test subcommand of the ldapconfigcommand) to test all queries you construct and ensure that expected results are returned before you enableLDAP functionality on a listener. See the Testing LDAP Queries, on page 370 for more information.
Note
Spam Quarantine End-User Authentication QueriesEnd-user authentication queries validate users when they log in to the spam quarantine. The token {u} specifiesthe user (it represents the user’s login name). The token {a} specifies the user’s email address. The LDAPquery does not strip "SMTP:" from the email address; AsyncOS strips that portion of the address.
Based on the server type, AsyncOS uses one of the following default query strings for the end-userauthentication query:
• Active Directory: (sAMAccountName={u})• OpenLDAP: (uid={u})• Unknown or Other: [Blank]
By default, the primary email attribute is mail. You can enter your own query and email attributes. To createthe query in the CLI, use the isqauth subcommand of the ldapconfig command.
If you want users to log in with their full email addresses, use (mail=smtp:{a}) for the query string.Note
User Guide for AsyncOS 14.1 for Cisco Secure Email and Web Manager- GD (General Deployment)367
Integrating With LDAPTokens

Sample Active Directory End-User Authentication SettingsThis section shows sample settings for an Active Directory server and the end-user authentication query. Thisexample uses passphrase authentication for the Active Directory server, the default query string for end-userauthentication for Active Directory servers, and the mail and proxyAddresses email attributes.
Table 74: Example LDAP Server and Spam Quarantine End-User Authentication Settings: Active Directory
Use Passphrase (Need to create a low-privilege user to bind for searching, or configure anonymoussearching.)
Authentication Method
Active DirectoryServer Type
3268Port
[Blank]Base DN
[Blank]Connection Protocol
(sAMAccountName={u})Query String
mail,proxyAddressesEmail Attribute(s)
Sample OpenLDAP End-User Authentication SettingsThis section shows sample settings for an OpenLDAP server and the end-user authentication query. Thisexample uses anonymous authentication for the OpenLDAP server, the default query string for end-userauthentication for OpenLDAP servers, and the mail and mailLocalAddress email attributes.
Table 75: Example LDAP Server and Spam Quarantine End-User Authentication Settings: OpenLDAP
AnonymousAuthentication Method
OpenLDAPServer Type
389Port
[Blank] (Some older schemas will want to use a specific Base DN.)Base DN
[Blank]Connection Protocol
(uid={u})Query String
mail,mailLocalAddressEmail Attribute(s)
Spam Quarantine Alias Consolidation QueriesIf you use spam notifications, the spam quarantine alias consolidation query consolidates the email aliases sothat recipients do not receive quarantine notices for each alias. For example, a recipient might receive mailfor the following email addresses: [email protected], [email protected], and [email protected] you use alias consolidation, the recipient receives a single spam notification at a chosen primary emailaddress for messages sent to all of the user’s aliases.
User Guide for AsyncOS 14.1 for Cisco Secure Email and Web Manager- GD (General Deployment)368
Integrating With LDAPSample Active Directory End-User Authentication Settings

To consolidate messages to a primary email address, create a query to search for a recipient’s alternate emailaliases, and then enter the attribute for the recipient’s primary email address in the Email Attribute field.
For Active Directory servers, the default query string (which may or may not be different for your deployment)is (|(proxyAddresses={a})(proxyAddresses=smtp:{a})) and the default email attribute is mail . For OpenLDAPservers, the default query string is (mail={a}) and the default email attribute is mail . You can define yourown query and email attributes, including multiple attributes separated by commas. If you enter more thanone email attribute, Cisco recommends entering a unique attribute that uses a single value, such as mail , asthe first email attribute instead of an attribute with multiple values that can change, such as proxyAddresses.
To create the query in the CLI, use the isqalias subcommand of the ldapconfig command.
• Sample Active Directory Alias Consolidation Settings, on page 369
• Sample OpenLDAP Alias Consolidation Settings, on page 369
Sample Active Directory Alias Consolidation SettingsThis section shows sample settings for an Active Directory server and the alias consolidation query. Thisexample uses anonymous authentication for the Active Directory server, a query string for alias consolidationfor Active Directory servers, and the mail email attribute.
Table 76: Example LDAP Server and Spam Quarantine Alias Consolidation Settings: Active Directory
AnonymousAuthentication Method
Active DirectoryServer Type
3268Port
[Blank]Base DN
Use SSLConnection Protocol
( |(mail={a})(mail=smtp:{a}) )Query String
mailEmail Attribute
Sample OpenLDAP Alias Consolidation SettingsThis section shows sample settings for an OpenLDAP server and the alias consolidation query. This exampleuses anonymous authentication for the OpenLDAP server, a query string for alias consolidation for OpenLDAPservers, and the mail email attribute.
Table 77: Example LDAP Server and Spam Quarantine Alias Consolidation Settings: OpenLDAP
AnonymousAuthentication Method
OpenLDAPServer Type
389Port
[Blank] (Some older schemas will want to use a specific Base DN.)Base DN
User Guide for AsyncOS 14.1 for Cisco Secure Email and Web Manager- GD (General Deployment)369
Integrating With LDAPSample Active Directory Alias Consolidation Settings

AnonymousAuthentication Method
Use SSLConnection Protocol
(mail={a}))Query String
mailEmail Attribute
Testing LDAP QueriesUse the Test Query button on the Add/Edit LDAP Server Profile page (or the ldaptest command in the CLI)to test your queries. AsyncOS displays details about each stage of the query connection test. For example,whether the first stage SMTP authorization succeeded or failed, and whether the BIND match returned a trueor false result.
The ldaptest command is available as a batch command, for example:
ldaptest LDAP.isqalias [email protected]
The variable names you enter for queries are case-sensitive and must match your LDAP implementation towork correctly. For example, entering mailLocalAddress for the email attribute performs a different querythan entering maillocaladdress .
To test a query, you must enter the test parameters and click Run Test. The results appear in the Test Connectionfield. If an end-user authentication query succeeds, a result of “Success: Action: match positive” is displayed.For alias consolidation queries, a result of “Success: Action: alias consolidation” is displayed, along with theemail address for the consolidated spam notifications. If a query fails, AsyncOS displays a reason for thefailure, such as no matching LDAP records were found, or the matching record did not contain the emailattribute. If you use multiple LDAP servers, the Cisco Content Security appliance tests the query on eachLDAP server.
Domain-Based QueriesDomain-based queries are LDAP queries that are grouped by type and associated with a domain. You mightwant to use domain-based queries if different LDAP servers are associated with different domains, but youneed to run queries for all your LDAP servers for end-user quarantine access. For example, a company calledBigfish owns the domains Bigfish.com, Redfish.com, and Bluefish.com, and it maintains a different LDAPserver for employees associated with each domain. Bigfish can use a domain-based query to authenticateend-users against the LDAP directories of all three domains.
To use a domain-based query to control end-user access or notifications for the spam quarantine, completethe following steps:
Step 1 Create an LDAP server profile for each domain you want to use in the domain-based query. In each server profile,configure the queries you want to use in the domain-based query. For more information, see Creating the LDAP ServerProfile, on page 364.
Step 2 Create the domain-based query. When you create the domain-based query, you select queries from each server profile,and designate the domain-based query as an active query for the spam quarantine. For more information about creatingthe query, see Creating a Domain-Based Query, on page 371.
User Guide for AsyncOS 14.1 for Cisco Secure Email and Web Manager- GD (General Deployment)370
Integrating With LDAPTesting LDAP Queries

Step 3 Enable end-user access or spam notifications for the spam quarantine. For more information, see Setting Up End-UserAccess to the Spam Quarantine via Web Browser , on page 287.
Creating a Domain-Based Query
Step 1 [New Web Interface Only] On the Security Management appliance, click to load the legacy web interface.Step 2 Choose Management Appliance > System Administration > LDAP.Step 3 On the LDAP page, click Advanced.Step 4 Enter a name for the domain-based query.Step 5 Select the query type.
When you create a domain-based query, you specify a single query type. After you select a query type, thequery field drop-down lists contain the appropriate queries from the LDAP server profiles.
Note
Step 6 In the Domain Assignments field, enter a domain.Step 7 Select a query to associate with the domain.Step 8 Add a row and select a query for each domain in the domain-based query.Step 9 Enter a default query to run if all other queries fail. If you do not want to enter a default query, select None.
Figure 6: Example Domain-based Query
Step 10 Test the query by clicking the Test Query button and entering a user login and passphrase or an email address to testin the Test Parameters fields. The results appear in the Connection Status field.
Step 11 Check the Designate as the active query checkbox if you want the spam quarantine to use the domain-based query.
The domain-based query becomes the active LDAP query for the specified query type. For example, if thedomain-based query is used for end-user authentication, it becomes the active end-user authentication queryfor the spam quarantine.
Note
Step 12 Click Submit and then click Commit to commit your changes.
To do the same configuration on the command line interface, type the advanced subcommand of theldapconfig command at the command line prompt.
Note
User Guide for AsyncOS 14.1 for Cisco Secure Email and Web Manager- GD (General Deployment)371
Integrating With LDAPCreating a Domain-Based Query

Chain QueriesA chain query is a series of LDAP queries that AsyncOS runs in succession. AsyncOS runs each query in theseries each query in the “chain” until the LDAP server returns a positive response or the final query returnsa negative response or fails. Chain queries can be useful if entries in LDAP directories use different attributesto store similar (or the same) values. For example, departments in an organization might use different typesof LDAP directories. The IT department might use OpenLDAP while the Sales department uses ActiveDirectory. To ensure that queries run against both types of LDAP directories, you can use chain queries.
To use a chain query to control end-user access or notifications for the spam quarantine, complete the followingsteps:
Step 1 Create an LDAP server profile for each query you want to use in the chain queries. For each of the server profiles,configure the queries you want to use for a chain query. For more information, see Creating the LDAP Server Profile,on page 364.
Step 2 Create the chain query and designate it as an active query for the spam quarantine. For more information, see Creatinga Chain Query, on page 372.
Step 3 Enable LDAP end-user access or spam notifications for the spam quarantine. For more information about the spamquarantine, see Setting Up the Centralized Spam Quarantine .
Creating a Chain Query
You can also use the advanced subcommand of the ldapconfig command in the CLI.Tip
Step 1 [New Web Interface Only] On the Security Management appliance, click to load the legacy web interface.Step 2 Choose Management Appliance > System Administration > LDAP > LDAP Server.Step 3 From the LDAP Server Profiles page, click Advanced.Step 4 Click Add Chained Query.Step 5 Enter a name for the chain query.Step 6 Select the query type.
When you create a chain query, all of its component queries have the same query type. After you select a query type,the query field drop-down lists display the appropriate queries from the LDAP.
Step 7 Select the first query in the chain.
The Cisco Content Security appliance runs the queries in the order you configure them. If you add multiple queries tothe chain query, you might want to order them so that general queries follow granular queries.
User Guide for AsyncOS 14.1 for Cisco Secure Email and Web Manager- GD (General Deployment)372
Integrating With LDAPChain Queries

Figure 7: Example Chain Query
Step 8 Test the query by clicking the Test Query button and entering a user login and passphrase or an email address in theTest Parameters fields. The results appear in the Connection Status field.
Step 9 Check the Designate as the active query check box if you want the spam quarantine to use the domain query.
The chain query becomes the active LDAP query for the specified query type. For example, if the chain queryis used for end-user authentication, it becomes the active end-user authentication query for the spam quarantine.
Note
Step 10 Submit and commit your changes.
To do the same configuration on the command line interface, type the advanced subcommand of theldapconfig command at the command line prompt.
Note
Configuring AsyncOS to Work With Multiple LDAP ServersWhen you configure an LDAP server profile, you can configure the Cisco Content Security appliance toconnect to a list of multiple LDAP servers. If you use multiple LDAP servers, they need to contain the sameinformation, have the same structure, and use the same authentication information. Third-party products existthat can consolidate the records.
You configure the Cisco Content Security appliance to connect to redundant LDAP servers to use the followingfeatures:
• Failover. If the Cisco Content Security appliance cannot connect to an LDAP server, it connects to thenext server in the list.
• Load Balancing. The Cisco Content Security appliance distributes connections across the list of LDAPservers when it performs LDAP queries.
You can configure redundant LDAP servers on theManagement Appliance > SystemAdministration > LDAPpage or by using the CLI ldapconfig command.
Testing Servers and QueriesUse the Test Server(s) button on the Add (or Edit) LDAP Server Profile page (or the test subcommand in theCLI) to test the connection to an LDAP server. If you use multiple LDAP servers, AsyncOS tests each serverand displays individual results for each server. AsyncOS will also test the query on each LDAP server anddisplay the individual results.
User Guide for AsyncOS 14.1 for Cisco Secure Email and Web Manager- GD (General Deployment)373
Integrating With LDAPConfiguring AsyncOS to Work With Multiple LDAP Servers

FailoverTo ensure an LDAP server is available to that resolve queries, you can configure the LDAP profile for failover.If the connection to the LDAP server fails, or the query returns an error for which it is appropriate to do so,the appliance attempts to query the next LDAP server specified in the list.
The Cisco Content Security appliance attempts to connect to the first server in the list of LDAP servers for aspecified period of time. If the appliance cannot connect to the first LDAP server in the list, or the queryreturns an error, the appliance attempts to connect to the next LDAP server in the list. By default, the appliancealways attempts to connect to the first server in the list, and it attempts to connect to each subsequent serverin the order they are listed. To ensure that the Cisco Content Security appliance connects to the primary LDAPserver by default, enter it as the first server in the list of LDAP servers.
Only attempts to query a specified LDAP server fail over. Attempts to query referral or continuation serversassociated with the specified LDAP server do not fail over.
Note
If the Cisco Content Security appliance connects to a second or subsequent LDAP server, it remains connectedto that server for a specified period of time. At the end of this period, the appliance attempts to reconnect tothe first server in the list.
Configuring the Cisco Content Security Appliance for LDAP Failover
Step 1 [New Web Interface Only] On the Security Management appliance, click to load the legacy web interface.Step 2 Choose Management Appliance > System Administration > LDAP.Step 3 Select the LDAP server profile you want to edit.
In the following example, the LDAP server name is example.com.Figure 8: Example LDAP Failover Configuration
Step 4 In the Hostname text field, type the LDAP Servers; for example ldapserver.example.com.Step 5 In the Maximum number of simultaneous connections for each host text field, type the maximum number of connections.
In this example the maximum number of connections is 10.
Step 6 Click on the radio button next to Failover connections in the order list.Step 7 Configure other LDAP options as necessary.
User Guide for AsyncOS 14.1 for Cisco Secure Email and Web Manager- GD (General Deployment)374
Integrating With LDAPFailover

Step 8 Submit and commit the changes.
Load BalancingTo distribute LDAP connections among a group of LDAP servers, you can configure your LDAP profile forload balancing.
When you use load balancing, the Cisco Content Security appliance distributes connections among the LDAPservers listed. If a connection fails or times out, the appliance determines which LDAP servers are availableand reconnects to available servers. The appliance determines the number of simultaneous connections toestablish based on the maximum number of connections you configure.
If one of the listed LDAP servers does not respond, the appliance distributes the connection load among theremaining LDAP servers.
Configuring the Cisco Content Security Appliance for Load Balancing
Step 1 [New Web Interface Only] On the Security Management appliance, click to load the legacy web interface.Step 2 Choose Management Appliance > System Administration > LDAP.Step 3 Select the LDAP server profile you want to edit
In the following example, the LDAP server name is example.com.Figure 9: Example Loadbalancing Configuration
Step 4 In the Hostname text field, type the LDAP Servers; for example ldapserver.example.com.Step 5 In the Maximum number of simultaneous connections for each host text field, type the maximum number of connections.
In this example the maximum number of connections is 10.
Step 6 Click on the radio button next to Load balance connections among all hosts.Step 7 Configure other LDAP options as necessary.Step 8 Submit and commit the changes.
User Guide for AsyncOS 14.1 for Cisco Secure Email and Web Manager- GD (General Deployment)375
Integrating With LDAPLoad Balancing

Configuring External Authentication of Administrative UsersUsing LDAP
You can configure the Cisco Content Security appliance to use an LDAP directory on your network toauthenticate administrative users by allowing them to log in to the appliance with their LDAP user names andpassphrases.
Step 1 Configure the LDAP Server Profile. See Creating the LDAP Server Profile, on page 364.Step 2 Create a query to find user accounts. In an LDAP server profile, in the External Authentication Queries section, create
a query to search for user accounts in the LDAP directory. See User Accounts Query for Authenticating AdministrativeUsers , on page 376.
Step 3 Create group membership queries. Create a query to determine if a user is a member of a directory group, and createa separate query to find all members of a group. For more information, see GroupMembership Queries for AuthenticatingAdministrative Users , on page 377 and the documentation or online help for your Email Security appliance.
Use theTest Queries button in the External AuthenticationQueries section of the page (or the ldaptest command)to verify that your queries return the expected results. For related information, see Testing LDAP Queries, onpage 370.
Note
Step 4 Set up external authentication to use the LDAP server. Enable the appliance to use the LDAP server for userauthentication and assign user roles to the groups in the LDAP directory. For more information, see Enabling ExternalAuthentication of Administrative Users , on page 378 and the “Adding Users” in the documentation or online help foryour Email Security appliance.
User Accounts Query for Authenticating Administrative UsersTo authenticate external users, AsyncOS uses a query to search for the user record in the LDAP directory andthe attribute that contains the user’s full name. Depending on the server type you select, AsyncOS enters adefault query and a default attribute. You can choose to have your appliance deny users with expired accountsif you have attributes defined in RFC 2307 in your LDAP user records (shadowLastChange, shadowMax,and shadowExpire). The base DN is required for the domain level where user records reside.
The following table shows the default query string and full user name attribute that AsyncOS uses when itsearches for a user account on an Active Directory server.
Table 78: Default Query String for Active Directory Server
Active DirectoryServer Type
[blank] (You need to use a specific base DN to find the user records.)Base DN
(&(objectClass=user)(sAMAccountName={u}))Query String
displayNameAttribute containing the user’s full name
The following table shows the default query string and full user name attribute that AsyncOS uses when itsearches for a user account on an OpenLDAP server.
User Guide for AsyncOS 14.1 for Cisco Secure Email and Web Manager- GD (General Deployment)376
Integrating With LDAPConfiguring External Authentication of Administrative Users Using LDAP

Table 79: Default Query String for Open LDAP Server
OpenLDAPServer Type
[blank] (You need to use a specific base DN to find the user records.)Base DN
(&(objectClass=posixAccount)(uid={u}))Query String
gecosAttribute containing the user’s full name
Group Membership Queries for Authenticating Administrative UsersYou can associate LDAP groups with user roles for accessing the appliance.
AsyncOS also uses a query to determine if a user is a member of a directory group and a separate query tofind all members of a group. Membership in a directory group membership determines the user’s permissionswithin the system. When you enable external authentication on the Management Appliance > SystemAdministration > Users page in the GUI (or userconfig in the CLI), you assign user roles to the groups in yourLDAP directory. User roles determine the permissions that users have in the system, and for externallyauthenticated users, the roles are assigned to directory groups instead of individual users. For example, youcan assign users in the IT directory group the Administrator role and users in the Support directory group tothe Help Desk User role.
If a user belongs to multiple LDAP groups with different user roles, AsyncOS grants the user the permissionsfor the most restrictive role. For example, if a user belongs to a group with Operator permissions and a groupwith Help Desk User permissions, AsyncOS grants the user the permissions for the Help Desk User role.
When you configure the LDAP profile to query for group membership, enter the base DN for the directorylevel where group records can be found, the attribute that holds the group member’s user name, and theattribute that contains the group name. Based on the server type that you select for your LDAP server profile,AsyncOS enters default values for the user name and group name attributes, as well default query strings.
For Active Directory servers, the default query string to determine if a user is a member of a group is(&(objectClass=group)(member={u})). However, if your LDAP schema uses distinguished names in the“memberof” list instead of user names, you can use {dn} instead of {u}.
Note
The following table shows the default query strings and attributes that AsyncOS uses when it searches forgroup membership information on an Active Directory server.
Table 80: Default Query String and Attributes for Active Directory Server
Active DirectoryQuery String
[blank] (You need to use a specific base DN to find the grouprecords.)
Base DN
(&(objectClass=group)(member={u}))
If your LDAP schema uses distinguished names in themember of list instead of user names, you can replace {u}with {dn}
Note
Query string to determine if a user is a member of a group
User Guide for AsyncOS 14.1 for Cisco Secure Email and Web Manager- GD (General Deployment)377
Integrating With LDAPGroup Membership Queries for Authenticating Administrative Users

Active DirectoryQuery String
(&(objectClass=group)(cn={g}))Query string to determine all members of a group
memberAttribute that holds each member's user name (or a DN for theuser's record)
cnAttribute that contains the group name
The following table shows the default query strings and attributes that AsyncOS uses when it searches forgroup membership information on an OpenLDAP server.
Table 81: Default Query String and Attributes for Open LDAP Server
OpenLDAPQuery String
[blank] (You need to use a specific base DN to find the grouprecords.)
Base DN
(&(objectClass=posixGroup)(memberUid={u}))Query string to determine if a user is a member of a group
(&(objectClass=posixGroup)(cn={g}))Query string to determine all members of a group
memberUidAttribute that holds each member's user name (or a DN for the user'srecord)
cnAttribute that contains the group name
Enabling External Authentication of Administrative UsersAfter you configure the LDAP server profile and queries, you can enable external authentication using LDAP:
Step 1 [New Web Interface Only] On the Security Management appliance, click to load the legacy web interface.Step 2 Choose Management Appliance > System Administration > Users page.Step 3 Click Enable.Step 4 Select the Enable External Authentication check box.Step 5 Select LDAP for the authentication type.Step 6 Select the LDAP external authentication query that authenticates users.Step 7 Enter the number of seconds that the appliance waits for a response from the server before timing out.Step 8 Enter the name of a group from the LDAP directory that you want the appliance to authenticate, and select the role for
the users in the group.Step 9 Optionally, click Add Row to add another directory group. Repeat steps 7 and 8 for each directory group that the
appliance authenticates.Step 10 Submit and commit your changes.
User Guide for AsyncOS 14.1 for Cisco Secure Email and Web Manager- GD (General Deployment)378
Integrating With LDAPEnabling External Authentication of Administrative Users

C H A P T E R 13Configuring SMTP Routing
This chapter contains the following sections:
• SMTP Routes Overview, on page 379• Routing Email for Local Domains, on page 380• Managing SMTP Routes , on page 381
SMTP Routes OverviewThis chapter explains the features that affect routing and delivery of email traveling through the Cisco ContentSecurity Management appliance, and use of the SMTP Routes page and smtproutes command.
SMTP Routes allow you to redirect all email for a particular domain to a different mail exchange (MX) host.For example, you could make a mapping from example.com to groupware.example.com . This mapping causesany email with @example.com in the Envelope Recipient address to go instead to groupware.example.com .The system performs an “MX” lookup on groupware.example.com , and then performs an “A” lookup on thehost, just like a normal email delivery. This alternate MX host does not need to be listed in DNS MX recordsand it does not even need to be a member of the domain whose email is being redirected. The operating systemallows up to ten thousand (10,000) SMTP Route mappings to be configured for your Cisco Content Securityappliance. (See SMTP Routes Limits, on page 381.)
This feature also allows host “globbing.” If you specify a partial domain, such as example.com , then anydomain ending in example.com matches the entry. For instance, [email protected] [email protected] both match the mapping.
If a host is not found in the SMTP Routes table, an MX lookup is performed using DNS. The result is notre-checked against the SMTP Routes table. If the DNS MX entry for foo.domain is bar.domain , any emailsent to foo.domain is delivered to the host bar.domain . If you create a mapping for bar.domain to some otherhost, email addressed to foo.domain is not affected.
In other words, recursive entries are not followed. If there is an entry for a.domain to redirect to b.domain ,and a subsequent entry to redirect email for b.domain to a.domain , a mail loop will not be created. In thiscase, email addressed to a.domain will be delivered to the MX host specified by b.domain , and converselyemail addressed to b.domain will be delivered to the MX host specified by a.domain .
The SMTP Routes table is read from the top down for every email delivery. The most specific entry thatmatches a mapping wins. For example, if there are mappings for both host1.example.com and example.comin the SMTP Routes table, the entry for host1.example.com will be used because it is the more specific entry— even if it appears after the less specific example.com entry. Otherwise, the system performs a regular MXlookup on the domain of the Envelope Recipient.
User Guide for AsyncOS 14.1 for Cisco Secure Email and Web Manager- GD (General Deployment)379

SMTP Routes, Mail Delivery, and Message SplinteringIncoming: if one message has 10 recipients and they are all on the same Exchange server, AsyncOS will openone TCP connection and present exactly one message to the mail store, not 10 separate messages.
Outgoing: works similarly, but if one message is going to 10 recipients in 10 different domains, AsyncOSwill open 10 connections to 10 MTAs and deliver them one email each.
Splintering: if one incoming message has 10 recipients and they are each in separate Incoming Policy groups(10 groups), the message will splinter even if all 10 recipients are on the same Exchange server. Thus, 10separate emails will be delivered over a single TCP connection.
SMTP Routes and Outbound SMTP AuthenticationIf an Outbound SMTP Authentication profile has been created, you can apply it to an SMTP Route. Thisallows authentication for outgoing mail in cases where the Cisco Content Security appliance sits behind amail relay server that is at the edge of the network.
Routing Email for Local DomainsThe Security Management appliance routes the following mail:
• ISQ released messages which ignore SMTP routing• Alerts• Configuration files that can be mailed to the specified destination• Support request message that can be sent to the defined recipient as well
The last two types of messages use SMTP routes to be delivered to the destination.
The Email Security appliance routes mail to local domains to hosts specified using theManagement Appliance> Network > SMTP Routes page (or the smtproutes command). This feature is similar to the sendmailmailertable feature. (The SMTP Routes page and smtproutes command are an expansion of the AsyncOS2.0 Domain Redirect feature.)
If you have completed the System Setup Wizard in the GUI and committed the changes, you defined the firstSMTP route entries on the appliance for each RAT entry you entered at that time.
Note
Default SMTP RouteYou can also define a default SMTP route with the special keyword ALL . If a domain does not match aprevious mapping in the SMTP Routes list, it defaults to being redirected to the MX host specified by theALL entry.
When you print the SMTP Routes entries, the default SMTP route is listed as ALL: . You cannot delete thedefault SMTP route; you may only clear any values entered for it.
Configure the default SMTP route using the Management Appliance > Network > SMTP Routes page orthe smtproutes command.
User Guide for AsyncOS 14.1 for Cisco Secure Email and Web Manager- GD (General Deployment)380
Configuring SMTP RoutingSMTP Routes, Mail Delivery, and Message Splintering

Managing SMTP Routes• Defining an SMTP Route, on page 381• SMTP Routes Limits, on page 381• Adding SMTP Routes, on page 381• Exporting SMTP Routes, on page 382• Importing SMTP Routes, on page 382• SMTP Routes and DNS, on page 383
Defining an SMTP RouteThe Email Security appliance routes mail to local domains to hosts specified using theManagement Appliance> Network > SMTP Routes page (or the smtproutes command). This feature is similar to the sendmailmailer table feature. (The SMTP Routes page and smtproutes command are an expansion of the AsyncOS2.0 Domain Redirect feature.):
Use the Management Appliance > Network > SMTP Routes page (or the smtproutes command) to constructroutes. When you create a new route, you first specify the domain or partial domain for which you want tocreate a permanent route. You then specify destination hosts. Destination hosts can be entered as fully-qualifiedhostnames or as IP addresses. You can also specify a a special destination host of /dev/null to drop the messagesthat match the entry. (So, in effect, specifying /dev/null for the default route is will ensure that no mail receivedby the appliance is ever delivered.)
Multiple destination host entries can contain both fully-qualified hostnames and IP addresses. Separate multipleentries with commas.
If one or more of the hosts are not responding, messages will be delivered to one of the reachable hosts. If allthe configured hosts are not responding, mail will be queued for that host (does not fail over to using MXrecords).
SMTP Routes LimitsYou can define up to 10,000 routes. The final default route of ALL is counted as a route against this limit.Therefore, you can define up to 9,999 custom routes and one route that uses the special keyword ALL .
Adding SMTP Routes
Step 1 [New Web Interface Only] On the Security Management appliance, click to load the legacy web interface.Step 2 Choose Management Appliance > Network > SMTP Routes.Step 3 Click Add Route.Step 4 Enter a receiving domain and destination host. You can add multiple destination hosts by clickingAdd Row and entering
the next destination host in the new row.Step 5 You can specify a port number by adding “:<port number> ” to the destination host: example.com:25Step 6 Submit and commit your changes.
User Guide for AsyncOS 14.1 for Cisco Secure Email and Web Manager- GD (General Deployment)381
Configuring SMTP RoutingManaging SMTP Routes

Exporting SMTP RoutesSimilar to the Host Access Table (HAT) and the Recipient Access Table (RAT), you can also modify SMTProutes mappings by exporting and importing a file.
Step 1 Click Export SMTP Routes on the SMTP Routes page.Step 2 Enter a name for the file and click Submit.
Importing SMTP RoutesSimilar to the Host Access Table (HAT) and the Recipient Access Table (RAT), you can also modify SMTProutes mappings by exporting and importing a file.
Step 1 Click Import SMTP Routes on the SMTP Routes page.Step 2 Select the file that contains the exported SMTP Routes.Step 3 Click Submit. You are warned that importing will replace all existing SMTP Routes. All of the SMTP Routes in the text
file are imported.Step 4 Click Import.
You can place “comments” in the file. Lines that begin with a ‘#’ character are considered comments and are ignored byAsyncOS. For example:
# this is a comment, but the next line is not
ALL:
At this point, our Email Gateway configuration looks like this:
User Guide for AsyncOS 14.1 for Cisco Secure Email and Web Manager- GD (General Deployment)382
Configuring SMTP RoutingExporting SMTP Routes

Figure 10: Email Gateway Configuration
SMTP Routes and DNSUse the special keyword USEDNS to tell the appliance to do MX lookups to determine next hops for specificdomains. This is useful when you need to route mail for subdomains to a specific host. For example, if mailto example.com is to be sent to the company’s Exchange server, you might have something similar to thefollowing SMTP route:
example.com exchange.example.com
However, for mail to various subdomains (foo.example.com), add an SMTP route that looks like this:
.example.com USEDNS
User Guide for AsyncOS 14.1 for Cisco Secure Email and Web Manager- GD (General Deployment)383
Configuring SMTP RoutingSMTP Routes and DNS

User Guide for AsyncOS 14.1 for Cisco Secure Email and Web Manager- GD (General Deployment)384
Configuring SMTP RoutingSMTP Routes and DNS

C H A P T E R 14Integrating with Cisco SecureX or Cisco ThreatResponse
This chapter contains the following topic:
Integrating Your Appliance with Cisco SecureX or Cisco Threat Response
• Integrating Your Appliance with Cisco SecureX or Cisco Threat Response , on page 385
Integrating Your Appliance with Cisco SecureX or Cisco ThreatResponse
Cisco SecureX is a security platform embedded with every Cisco security product. It is cloud-native with nonew technology to deploy. Cisco SecureX simplifies the demands of threat protection by providing a platformthat unifies visibility, enables automation, and strengthens your security across network, endpoints, cloud,and applications. By connecting technology in an integrated platform, Cisco SecureX delivers measurableinsights, desirable outcomes, and unparalleled cross-team collaboration. Cisco SecureX enables you to expandyour capabilities by connecting your security infrastructure.
Cisco Threat Response is a threat incident response orchestration hub that supports and automates integrationsacross multiple Cisco Security products. As a key pillar of the Cisco integrated security architecture, ThreatResponse accelerates key security operations functions: detection, investigation, and remediation.
Integrating the Appliance with Cisco SecureX or Cisco Threat Response contains the following sections:
• How to Integrate Your Appliance with Cisco SecureX or Cisco Threat Response
• Performing Threat Analysis using Cisco SecureX Ribbon
You can integrate your appliance with Cisco SecureX or Cisco Threat Response, and perform the followingactions in Cisco SecureX or Cisco Threat Response:
• View and send the email data from multiple appliances in your organization.
• Identify, investigate and remediate threats observed in the email reports, sender and target relationships,search for multiple email addresses and subject lines and message tracking.
• Block compromised users or users violating outgoing email policies.
User Guide for AsyncOS 14.1 for Cisco Secure Email and Web Manager- GD (General Deployment)385

• Resolve the identified threats rapidly and provide recommended actions to take against the identifiedthreats.
• Document the threats to save the investigation and enable collaboration of information among otherdevices.
• Block malicious domains, track suspicious observances, initiate an approval workflow or to create an ITticket to update email policy.
You can access Cisco SecureX using the following URL:
https://securex.us.security.cisco.com/login
Cisco SecurityManagement Appliance (SMA) centralizesmanagement and reporting functions across multipleCisco email security appliances. For more information on observables that can be enriched by the SMAEmailmodule, go to https://securex.us.security.cisco.com/settings/modules/available, navigate to the module tointegrate with Cisco SecureX, and click Learn More.
How to Integrate Your Appliance with Cisco SecureX or Cisco Threat ResponseTable 82: How to Integrate Your Appliance with Cisco SecureX or Cisco Threat Response
More InfoDo This
PrerequisitesReview the prerequisites.Step 1
Enable the Cisco SecureX Integration on your SecurityManagement Appliance
On your Security Managementappliance, enable the CiscoSecureX or Cisco Threat Responseintegration.
Step 2
For more information, go tohttps://securex.us.security.cisco.com/help/settings-devices
On Cisco SecureX, add yourappliance as a device, register it,and generate a registration token.
Step 3
Register Cisco SecureX or Cisco Threat Response onYour Security Management Appliance
On your Security Managementappliance, complete the CiscoSecureX or Cisco Threat Responseregistration.
Step 4
Confirm Whether the Registration was SuccessfulConfirm whether the registrationwas successful.
Step 5
For more information, go tohttps://securex.us.security.cisco.com/settings/modules/available,navigate to the module to integrate with CiscoSecureX, click Add New Module, and see theinstructions on the page.
OnCisco SecureX, add SMAEmailModule.
Step 6
User Guide for AsyncOS 14.1 for Cisco Secure Email and Web Manager- GD (General Deployment)386
Integrating with Cisco SecureX or Cisco Threat ResponseHow to Integrate Your Appliance with Cisco SecureX or Cisco Threat Response

Prerequisites
If you already have a Cisco Threat Response user account, you do not need to create a Cisco SecureX useraccount. You can log in to Cisco SecureX using your Cisco Threat Response user account credentials.
Note
• Make sure that you create a user account in Cisco SecureX with admin access rights. To create a newuser account, go toCisco SecureX login page using the URL https://securex.us.security.cisco.com/loginand click Create a SecureX Sign-on Account in the login page. If you are unable to create a new useraccount, contact Cisco TAC for assistance.
• [Only if you are not using a proxy server] Make sure that you open HTTPS (In and Out) 443 port on thefirewall for the following FQDNs to register your appliance with Cisco SecureX or Cisco Threat Response:
• api-sse.cisco.com (applicable for NAM users only)
• api.eu.sse.itd.cisco.com (applicable for European Union (EU) users only)
• api.apj.sse.itd.cisco.com (applicable for APJC users only)
• est.sco.cisco.com (applicable for APJC, EU, and NAM users)
For more information, see Firewall Information.
Enable the Cisco SecureX Integration on your Security Management Appliance
Step 1 Log in to your appliance.Step 2 Select Networks > Cloud Service Settings.Step 3 Click Edit Settings.Step 4 Check the Enable check box.Step 5 Submit and commit your changes.Step 6 Wait for few minutes, and check whether the Register button appears on your appliance.
In a clustered configuration, you can only register your logged-in appliance with Cisco SecureX or CiscoThreat Response in the machine mode. If you have already registered your appliance with Cisco SecureX orCisco Threat Response in the standalone mode, make sure to deregister the appliance manually before youjoin it to a cluster.
Note
To enable this integration using the CLI, use the threatresponseconfig command.Note
User Guide for AsyncOS 14.1 for Cisco Secure Email and Web Manager- GD (General Deployment)387
Integrating with Cisco SecureX or Cisco Threat ResponsePrerequisites

What to do next
Register your appliance on Cisco SecureX or Cisco Threat Response. For more information, go tohttps://securex.us.security.cisco.com/settings/modules/available, navigate to the module to integrate withCisco SecureX, click Add New Module, and see the instructions on the page.
Register Cisco SecureX or Cisco Threat Response on Your Security Management Appliance
Step 1 Go to Networks > Cloud Service Settings.Step 2 In Cloud Services Settings, enter the registration token, and click Register.
To register Cisco SecureX or Cisco Threat Response using the CLI, use the cloudserviceconfig command.Note
What to do next
Confirm Whether the Registration was Successful
Reregistering with Cisco Cloud Service PortalYou can reregister your Cisco Secure Email and Web Manager with the Cisco Cloud Services portal basedon any one of the following scenarios:
• If you are unable to view or manage the devices (Cisco Secure Email and Web Managers) added to theCisco Cloud Services portal when you automatically register your email gateway with the Cisco CloudServices portal.
• If your Smart Account and Cisco Cloud Services Account are not linked when you automatically registeryour Cisco Secure Email and Web Manager with the Cisco Cloud Services portal.
You can also use the cloudserviceconfig > reregister sub command in the CLI to reregister your Cisco SecureEmail and Web Manager with the Cisco Cloud Services portal.
Before you begin
Make sure you have met the following prerequisites:
• Enabled Smart Software Licensing on your Cisco Secure Email and Web Manager.
• Registered your Cisco Secure Email and Web Manager with Cisco Smart Software Manager
Step 1 Go to Networks > Cloud Service Settings page on your Cisco Secure Email and Web Manager.Step 2 Click Reregister.
After you click Reregister, you can choose whether you want to perform the task in either steps 3 or 4 or bothdepending on your requirement.
Note
Step 3 [Optional] Choose the appropriate Cisco Secure Server to connect your Cisco Secure Email and Web Manager to theCisco Cloud Services portal if your device was automatically registered with an incorrect Cisco Secure server.
User Guide for AsyncOS 14.1 for Cisco Secure Email and Web Manager- GD (General Deployment)388
Integrating with Cisco SecureX or Cisco Threat ResponseRegister Cisco SecureX or Cisco Threat Response on Your Security Management Appliance

Step 4 [Optional] Enter the registration token obtained from the Cisco Cloud Services portal, if your Cisco Secure Email andWeb Manager was automatically registered with an incorrect Smart Account.
Step 5 Click Submit, the ‘Confirm reregistration’ dialog box appears only if you do not enter a registration token in step 4.Step 6 Click Submit, in the ‘Confirm reregistration’ dialog box to allow Cisco Cloud Services to use the token auto-generated
from the Cisco Cloud Services portal with the Smart Account information to reregister your Cisco Secure Email andWebManager with the Cisco Cloud Services portal.
Confirm Whether the Registration was Successful• On Security Services Exchange, confirm successful registration by reviewing the status in SecurityServices Exchange.
• On Cisco SecureX, navigate to theDevices page and view the SMA that has been registered with SecurityServices Exchange.
If you want to switch to another Cisco SecureX or Cisco Threat Response server (for example, 'Europe -api.eu.sse.itd.cisco.com'), you must first deregister your appliance from Cisco SecureX or Cisco ThreatResponse and follow steps mentioned in How to Integrate Your Appliance with Cisco SecureX or CiscoThreat Response.
After you have integrated your appliance with Cisco SecureX or Cisco Threat Response, you do not need tointegrate your Email Security appliance with Cisco SecureX or Cisco Threat Response because the email andweb reporting features are centralized.
After successful registration of your appliance on Security Services Exchange, add the SMA Email moduleon Cisco SecureX. Formore information, go to https://securex.us.security.cisco.com/settings/modules/available,navigate to the module to integrate with Cisco SecureX, and clickAdd New Module, and see the instructionson the page.
Note
Enabling Cisco SecureX or Threat Response on content Security Gateway
Step 1 Log into your appliance.Step 2 Select Networks > Cloud Service Settings.Step 3 Click Enable.Step 4 Check the Enable Cloud Service check box.Step 5 Choose the Cisco SecureX server.Step 6 Submit and commit your changes.
Enabling Cisco Cloud Services Portal on Content Security Gateway
Step 1 Log in to your email gateway.
User Guide for AsyncOS 14.1 for Cisco Secure Email and Web Manager- GD (General Deployment)389
Integrating with Cisco SecureX or Cisco Threat ResponseConfirm Whether the Registration was Successful

Step 2 Select Networks > Cloud Service Settings.Step 3 Click Enable.Step 4 Check the Enable Cisco Cloud Services check box.Step 5 Choose the required Cisco Secure server to connect your email gateway to the Cisco Cloud Services portal.Step 6 Submit and commit your changes. Wait for few minutes, and check whether the Register button appears on your content
security gateway.
What to do next
Performing Threat Analysis using Cisco SecureX Ribbon
When you upgrade from Security Management Appliance 13.6.1 or earlier versions, Casebook will be partof the Cisco SecureX Ribbon.
Note
Cisco SecureX supports a distributed set of capabilities that unify visibility, enable automation, accelerateincident response workflows, and improve threat hunting. These distributed capabilities are presented in theform of applications (apps) and tools in the Cisco SecureX Ribbon.
This topic contains the following sections:
• Accessing the Cisco SecureX Ribbon
• Adding Observable to Casebook for Threat Analysis using Cisco SecureX Ribbon and Pivot Menu
You will find the Cisco SecureX Ribbon at the bottom pane of the page, and it persists as you move betweenthe dashboard and other security products in your environment. Cisco SecureXRibbon consists of the followingicons and elements:
• Expand/Collapse Ribbon
• Home
• Casebook App
• Incidents App
• Orbital App
• Enrichment Search Box
• Find Observables
• Settings
For more information on Cisco SecureX Ribbon, see https://securex.us.security.cisco.com/help/ribbon.
User Guide for AsyncOS 14.1 for Cisco Secure Email and Web Manager- GD (General Deployment)390
Integrating with Cisco SecureX or Cisco Threat ResponsePerforming Threat Analysis using Cisco SecureX Ribbon

Accessing the Cisco SecureX Ribbon
Before you begin
Make sure that you meet all the prerequisites that are mentioned in Prerequisites.
Suppose you have already configuredCasebook for SecurityManagement Appliance 13.6.1 or earlier versions,you need to create a Client ID and Client Secret in Cisco SecureX API client with additional scopes, asmentioned in the following procedure.
Note
You can drag the Cisco SecureX Ribbon, positioned at the bottom pane of the page, from right usingbutton.
Step 1 Log in to the new web interface of your appliance. For more information, see Accessing the Web Interface.Step 2 Click the Cisco SecureX Ribbon.Step 3 Create a Client ID and Client Secret in SecureX API Clients. For more information to generate API Client credentials,
see Creating an API Client.
While creating a client ID and client password, make sure that you choose the following scopes:
• casebook
• enrich:read
• global-intel:read
• inspect:read
• integration:read
• profile
• private-intel
• response
• registry/user/ribbon
• telemetry:write
• users:read
• orbital (if you have access)
Step 4 Enter the client ID and client password obtained in Step 3 in the Login to use SecureX Ribbon dialog box in yourappliance.
Step 5 Select the required Cisco SecureX server in the Login to use SecureX Ribbon dialog box.Step 6 Click Authenticate.
User Guide for AsyncOS 14.1 for Cisco Secure Email and Web Manager- GD (General Deployment)391
Integrating with Cisco SecureX or Cisco Threat ResponseAccessing the Cisco SecureX Ribbon

If you want to edit the client ID, client password, and Cisco SecureX server, right-click on the Cisco SecureXRibbon, and add the details.
Note
What to do next
Adding Observable to Casebook for Threat Analysis using Cisco SecureX Ribbon and Pivot Menu
Adding Observable to Casebook for Threat Analysis using Cisco SecureX Ribbon and Pivot Menu
Before you begin
Make sure that you obtain the client ID and client password to access the Cisco SecureX Ribbon and pivotmenu widgets on your appliance. For more information, see Accessing the Cisco SecureX Ribbon.
Step 1 Log in to the new web interface of your appliance. For more information, see Accessing the Web Interface.
Step 2 Navigate to theEmail Reporting orWeb Reporting page, click the pivot menu button next to the required observable(for example, bit.ly).
Perform the following:
• Click button to add an observable to active case.
• Click button to add the observable to new case.
Use the pivot menu button to pivot an observable to other devices registered on the portal (for example,AMP for Endpoints) to investigate for threat analysis.
Note
Step 3 Hover over icon and click button to open the Casebook. Check whether the observable is added to a new or anexisting case.
User Guide for AsyncOS 14.1 for Cisco Secure Email and Web Manager- GD (General Deployment)392
Integrating with Cisco SecureX or Cisco Threat ResponseAdding Observable to Casebook for Threat Analysis using Cisco SecureX Ribbon and Pivot Menu

Step 4 (Optional) Click button to add a title, description, or notes to the Casebook.
You can search for observables for threat analysis in two different ways:Note
• Click the Enrichment search box from the Cisco SecureX Ribbon andsearch for the observables.
• Click the Casebook icon inside the Cisco SecureX Ribbon and search for the observables in the search
field.
For more information on Cisco SecureX Ribbon, see https://securex.us.security.cisco.com/help/ribbon.
Performing Remedial Actions on Messages in Cisco SecureX Threat Response
Before you begin
In Cisco Threat Response, you can now investigate and apply the following remedial actions on messagesprocessed by your email gateway:
• Delete
• Forward
• Forward and Delete
Make sure you have met the following prerequisites before you perform remedial actions on messages inCisco Threat Response:
• Enabled and registered your email gateway with the Cisco SecureX server. For more information, seeEnable the Cisco SecureX or Cisco Threat Response Integration on your Cisco Content Security Applianceand Registering Cisco SecureX or Cisco Threat Response on Cisco Content Security Appliance.
• Added your email gatewaymodule to Cisco SecureX and specified the Remediation Forwarding Addressin Cisco SecureX. For more information, go to https://securex.us.security.cisco.com/settings/modules/available navigate to the required Email Security Appliance module to integrate with Cisco SecureX,click Add New Module, and see the instructions on the page.
• Enabled and configured the remediation profiles in the System Administration > Account Settingspage in your email gateway. For more information, see the Remediating Messages in Mailboxes chapter.
Step 1 Log in to Cisco SecureX with your user credentials.Step 2 Perform an investigation for threat analysis by entering required IOCs (for example, URLs, Email Message ID and so
on) in the Investigate panel and click Investigate. For more information, see the Investigate topic in the Help section athttps://visibility.amp.cisco.com/help/investigate.
User Guide for AsyncOS 14.1 for Cisco Secure Email and Web Manager- GD (General Deployment)393
Integrating with Cisco SecureX or Cisco Threat ResponsePerforming Remedial Actions on Messages in Cisco SecureX Threat Response

Step 3 Click the pivot menu button next to the Cisco Message ID or Email Message ID and select the required remedial action(for example, ‘Forward’). For more information, see the Investigate topic in the Help section athttps://visibility.amp.cisco.com/help/investigate.
User Guide for AsyncOS 14.1 for Cisco Secure Email and Web Manager- GD (General Deployment)394
Integrating with Cisco SecureX or Cisco Threat ResponsePerforming Remedial Actions on Messages in Cisco SecureX Threat Response

C H A P T E R 15Distributing Administrative Tasks
This chapter contains the following sections:
• About Distributing Administrative Tasks , on page 395• Assigning User Roles , on page 395• Users Page , on page 404• About Authenticating Administrative Users, on page 404• Additional Controls on Access to the Security Management Appliance, on page 418• Controlling Access to Sensitive Information in Message Tracking , on page 422• Displaying a Message for Administrative Users, on page 423• Enabling and Disabling Message Banners for Administrative Users, on page 423• Viewing Administrative User Activity , on page 423• Troubleshooting Administrative User Access , on page 425
About Distributing Administrative TasksYou can distribute administrative tasks on the Cisco Content Security Management appliance to other peoplebased on the user roles that you assign to their user accounts.
To set up to distribute administrative tasks, you will determine whether the predefined user roles meet yourneeds, create any needed custom user roles, and set up the appliance to authenticate administrative userslocally on the security appliance, and/or externally using your own centralized LDAP or RADIUS system.
Additionally, you can specify additional controls on access to the appliance and to certain information on theappliance.
Assigning User Roles• Predefined User Roles , on page 396• Custom User Roles , on page 398
Additional configuration is required for quarantine access. See Access to Quarantines , on page 404.
User Guide for AsyncOS 14.1 for Cisco Secure Email and Web Manager- GD (General Deployment)395
Predefined User RolesExcept as noted, you can assign each user a predefined user role with the privileges described in the followingtable, or a custom user role.
Table 83: Descriptions of User Roles
Web Reporting/ScheduledReports Capability
DescriptionUser Role Name
Yes/YesThe admin user is the default user account for thesystem and has all administrative privileges. Theadmin user account is listed here for convenience,but it cannot be assigned via a user role, and it cannotbe edited or deleted, aside from changing thepassphrase.
Only the admin user can issue the resetconfig andrevertcommands.
admin
Yes/YesUser accounts with the Administrator role have fullaccess to all configuration settings of the system.
Administrator
Yes/YesUser accounts with the Operator role are restrictedfrom:
• Creating or editing user accounts
• Upgrading the appliance
• Issuing the resetconfig command
• Running the System Setup Wizard
• Modifying LDAP server profile settings otherthan username and passphrase, if LDAP isenabled for external authentication.
• Configuring, editing, deleting, or centralizingquarantines.
Otherwise, they have the same privileges as theAdministrator role.
Operator
Access to System Capacityreports under the Web andEmail tabs
User accounts with the Technician role can initiatesystem administration activities such as upgradesand reboots, save a configuration file from theappliance, manage feature keys, and so forth.
Technician
User Guide for AsyncOS 14.1 for Cisco Secure Email and Web Manager- GD (General Deployment)396
Distributing Administrative TasksPredefined User Roles

Web Reporting/ScheduledReports Capability
DescriptionUser Role Name
Yes/NoUser accounts with the Read-OnlyOperator role haveaccess to view configuration information. Users withthe Read-Only Operator role can make and submitmost changes to see how to configure a feature, butthey cannot commit them or make any change thatdoes not require a commit. Users with this role canmanagemessages in quarantines, if access is enabled.
Users with this role cannot access the following:
• File system, FTP, or SCP.
• Settings for creating, editing, deleting orcentralizing quarantines.
Read-Only Operator
Yes/NoUsers accounts with the Guest role can view statusinformation including reports and Web Tracking,and manage messages in quarantines, if access isenabled. Users with the Guest role cannot accessMessage Tracking.
Guest
Yes/YesUser accounts with theWeb Administrator role haveaccess to all configuration settings under the Webtab.
Web Administrator
No/NoUser accounts with the Web Policy Administratorrole can access the Web Appliance Status page andall pages in the ConfigurationMaster. Theweb policyadministrator can configure identities, access policies,decryption policies, routing policies, proxy bypass,custom URL categories, and time ranges. The webpolicy administrator cannot publish configurations.
Web PolicyAdministrator
No/NoUser accounts with the Email Administrator rolehave access to all configuration settings within theEmail menu only, including quarantines.
Email Administrator
No/NoUser accounts with the Help Desk User role arerestricted to:
• Message Tracking
• Managing messages in quarantines
Users with this role cannot access the rest of thesystem, including the CLI. After you assign a userthis role, you must also configure quarantines toallow access by this user.
Help Desk User
User Guide for AsyncOS 14.1 for Cisco Secure Email and Web Manager- GD (General Deployment)397
Distributing Administrative TasksPredefined User Roles

Web Reporting/ScheduledReports Capability
DescriptionUser Role Name
No/NoUser accounts that are assigned a custom user rolecan view and configure only policies, features, orspecific policy or feature instances that have beenspecifically delegated to the role.
These features can be access log subscriptions,Logging APIs, and log files.
You can create a new Custom Email User Role or anew Custom Web User Role from the Add LocalUser page. However, you must assign privileges tothis Custom User Role before the role can be used.To assign privileges, go toManagement Appliance> System Administration > User Roles and clickthe user name.
Users assigned to a Custom Email UserRole cannot access the CLI.
Note
For more information, see Custom User Roles , onpage 398.
Custom Roles
Custom User RolesThe Security Management appliance allows users with Administration privileges to delegate administrationcapabilities to custom roles. Custom roles provide more flexible control over your users’ access than thepredefined user roles do.
Users to whom you assign custom user roles can manage policies or access reports for a subset of appliances,features, or end users. For example, you might allow a delegated administrator for web services to managepolicies for an organization’s branch office in a different country, where the acceptable use policies might bedifferent from those at the organization’s headquarters. You delegate administration by creating custom userroles and assigning access permissions to those roles. You determine which policies, features, reports, customURL categories, etc. that the delegated administrators can view and edit.
Administrators can create custom roles with read-only option for Quarantine messages. The read-only optionprevents users from deleting or releasing messages and only have read-only access to quarantine.
For more information, see:
• About Custom Email User Roles , on page 398• Deleting Custom User Roles , on page 404
About Custom Email User RolesYou can assign custom roles to allow delegated administrators to access the following on the SecurityManagement appliance:
• All reports (optionally restricted by Reporting Group)
• Mail Policy reports (optionally restricted by Reporting Group)
User Guide for AsyncOS 14.1 for Cisco Secure Email and Web Manager- GD (General Deployment)398
Distributing Administrative TasksCustom User Roles

• DLP reports (optionally restricted by Reporting Group)
• Message Tracking
• Quarantines
• Log Subscription
Detailed information about each of these items follows this section. In addition, all users granted any of theseprivileges can see the System Status, available under the Management Appliance tab > Centralized Servicesmenu. Users assigned to custom email user roles cannot access the CLI.
Custom user roles on the Email Security appliance offer more granular access than do user roles on the SecurityManagement appliance. For example, you can delegate access to mail and DLP policies and content filters.For details, see the “Managing Custom User Roles for Delegated Administration” section in the “CommonAdministration” chapter of the documentation or online help for your Email Security appliance.
Note
Access to Email Reporting
You can grant custom user roles access to Email reports as described in the following sections.
For complete information about the Email Security Monitor pages on the Security Management appliance,see the chapter on Using Centralized Email Security Reporting, on page 51.
All Reports
If you grant a custom role access to All Reports, users assigned to this role can see the following Email SecurityMonitor pages either for all Email Security appliances, or for the Reporting Group that you select:
• Mail Flow Summary
• Mail FLow Details
• Outgoing Destinations
• User Mail Summary
• DLP Incidents
• Content Filters
• Virus Filtering
• TLS Encryption
• Scheduled Reports
• Archived Reports
Mail Policy Reports
If you grant a custom role access to Mail Policy Reports, users assigned to this role can see the followingEmail Security Monitor pages either for all Email Security appliances, or for the Reporting Group that youselect:
User Guide for AsyncOS 14.1 for Cisco Secure Email and Web Manager- GD (General Deployment)399
Distributing Administrative TasksAccess to Email Reporting

• Mail Flow Summary
• Mail FLow Details
• Outgoing Destinations
• User Mail Summary
• Content Filters
• Virus Filtering
• Archived Reports
DLP Reports
If you grant a custom role access to DLP Reports, users assigned to this role can see the following EmailSecurity Monitor pages either for all Email Security appliances, or for the Reporting Group that you select:
• DLP Incidents
• Archived Reports
Access to Message Tracking Data
If you grant a custom role access to Message Tracking, users to whom you assign this role can find the statusof all messages tracked by the Security Management appliance.
To control access to sensitive information in messages that violate DLP policies, see Controlling Access toSensitive Information in Message Tracking , on page 422.
For more information about message tracking, including instructions for setting up your appliances to enableaccess to message tracking on the Security Management appliance, see Tracking Messages, on page 247.
Access to Quarantines for Custom User Role
If you grant a custom role access to quarantines, users to whom you assign this role can search for, view,release, or delete messages in all quarantines on this Security Management appliance.
Before users can access quarantines, you must enable that access. See Access to Quarantines , on page 404.
Log Subscription
The Log Subscription access privileges define whether delegated administrators assigned to the custom userrole can access log subscriptions or Logging APIs to view or download log files.
Creating Custom Email User Roles
You can create custom email user roles for access to Email Reporting, Message Tracking, and quarantines.
For descriptions of the access that each of these options permits, see About Custom Email User Roles , onpage 398 and its subsections.
To grant more granular access or access to other features, reports, or policies, create custom user roles directlyon each Email Security appliance.
Note
User Guide for AsyncOS 14.1 for Cisco Secure Email and Web Manager- GD (General Deployment)400
Distributing Administrative TasksAccess to Message Tracking Data

Step 1 [New Web Interface Only] On the Security Management appliance, click to load the legacy web interface.Step 2 Choose Management Appliance > System Administration > User Roles.Step 3 Click Add Email User Role.
Alternatively, you can create a new role by duplicating an existing Email User Role: Click the Duplicate iconin the applicable table row, then modify the resulting copy.
Tip
Step 4 Enter a unique name for the user role (for example, “dlp-auditor”) and a description.
• Email and Web custom user role names must not be duplicated.
• The name must contain only lowercase letters, numbers, and dashes. It cannot start with a dash or a number.
• If you grant users with this role access to centralized policy quarantines, and you also want users with this role tobe able to specify those centralized quarantines in message and content filters and DLP Message Actions on anEmail Security appliance, the name of the custom role must be the same on both appliances.
Step 5 Choose the access privileges to enable for this role.
Administrators can create custom roles with read-only option for Quarantine messages. The read-only option preventsusers from deleting or releasing messages and only have read-only access to quarantine.
Step 6 Click Submit to return to the User Roles page, which lists the new user role.Step 7 If you limited access by Reporting Group, click the no groups selected link in the Email Reporting column for the user
role, then choose at least one Reporting Group.Step 8 Commit your changes.Step 9 If you granted this role access to quarantines, enable access for this role:
See:
• Configuring Administrative User Access to the Spam Quarantine , on page 272
• Configuring Policy, Virus, and Outbreak Quarantines , on page 308
Using Custom Email User Roles
When a user who is assigned a custom email user role logs into the appliance, that user sees only the links tothe security features to which that user has access. The user can return to this main page at any time by selectingAccount Privileges in the Options menu. These users can also access the features to which they have accessby using the menus at the top of the web page. In the following example, the user has access to all featuresthat are available on the Security Management appliance via custom email user roles.
User Guide for AsyncOS 14.1 for Cisco Secure Email and Web Manager- GD (General Deployment)401
Distributing Administrative TasksUsing Custom Email User Roles

Figure 11: Account Privileges Page for a Delegated Administrator assigned Custom Email User Roles
About Custom Web User RolesCustom web user roles allow users to publish policies to different Web Security appliances, and gives themthe permission to edit or publish the custom configuration to different appliances.
From the Web > Configuration Master > Custom URL Categories page on the Security Managementappliance, you can view the URL categories and policies that you are allowed to administer and publish.Additionally, you can go to the Web > Utilities > Publish Configuration Now page and view the possibleconfigurations.
Remember that when you create a custom role with Publish Privilege capabilities, when user logs in, theywill not have any usable menus. They do not have the publish menu and they will land on an non-editablelanding screen since the URL and policy tabs do not have any capabilities. In effect, you have a user thatcannot publish or administer any categories or policies.The workaround to this issue is that if you want a userto be able to publish, but not to be able to manage any categories or policies, youmust create a custom categorywhich is not used in any policy, and give that user the ability to manage that custom category along withpublishing. In this way, if they add or delete URLs from that category, it does not affect anything.
Note
You can delegate web administration by creating and editing custom user roles.
• Creating Custom Web User Roles, on page 402
• Editing Custom Web User Roles, on page 403
• Deleting Custom User Roles , on page 404
Creating Custom Web User Roles
Step 1 [New Web Interface Only] On the Security Management appliance, click to load the legacy web interface.Step 2 Choose Management Appliance > System Administration > User Roles.Step 3 Click Add Web User Role.
User Guide for AsyncOS 14.1 for Cisco Secure Email and Web Manager- GD (General Deployment)402
Distributing Administrative TasksAbout Custom Web User Roles

Alternatively, you can create a new role by duplicating an existing Web User Role: Click the Duplicate iconin the applicable table row, then modify the resulting copy.
Tip
Step 4 Enter a unique name for the user role (for example, “canadian-admins”) and a description.
The name must contain only lowercase letters, numbers, and dashes. It cannot start with a dash.Note
Step 5 Choose whether you want the policies and custom URL categories to be visible or hidden by default.Step 6 Choose whether you want Publish privileges turned on or off.
This privilege allows the user to publish any Configuration Master for which the user can edit Access Policies or URLCategories.
Step 7 Choose whether to start with new (empty) settings or to copy an existing custom user role. If you choose to copy anexisting user role, choose from the list the role that you want to copy.
Step 8 Click Submit to return to the User Roles page, which lists the new user role.
If you have enabled the anonymized feature within web reporting, all user roles with access to web reportingwill have unrecognizable user names and roles in the interactive reports page. See the Scheduling Web Reports, on page 223 section in chapter Using CentralizedWeb Reporting and Tracking, on page 165. The exception isthe Administrator role, which is able to see actual user names in the scheduled reports. If the anonymize featureis enabled, scheduled reports that are generated by the Operator and Web Administrator are anonymized.
If you use the Web > Utilities > Security > Services Display > Edit Security Services Display page to hideone of the Configuration Masters, the User Roles page also hides the corresponding Configuration Mastercolumn; however, privilege settings for the hidden Configuration Master are retained.
Note
Editing Custom Web User Roles
Step 1 On the User Roles page, click the role name to display the Edit User Role page.Step 2 Edit any of the settings: name, description, and visibility of policies and custom URL categories.Step 3 Click Submit.
To edit privileges for a custom user role:
Navigate to the User Roles page.
• To edit access policy privileges, click “Access policies” to display a list of access policies configured in theConfiguration Master. In the Include column, select the check boxes of the policies to which you want to give theuser edit access. Click Submit to return to the User Roles page.
-or-
• To edit customURL category privileges, click CustomURLCategories to display a list of the customURL categoriesdefined on the Configuration Master. In the Include column, select the check boxes of the custom URL categoriesto which you want to give the user edit access. Click Submit to return to the User Roles page.
User Guide for AsyncOS 14.1 for Cisco Secure Email and Web Manager- GD (General Deployment)403
Distributing Administrative TasksEditing Custom Web User Roles

Deleting Custom User RolesIf you delete a custom user role that is assigned to one or more users, you do not receive an error.
User Roles with Access to the CLISome roles can access both the GUI and the CLI: Administrator, Operator, Guest, Technician, and Read-OnlyOperator. Other roles can access the GUI only: Help Desk User, Email Administrator, Web Administrator,Web Policy Administrator, URL Filtering Administrator (for web security), and custom user.
Using LDAPIf you use an LDAP directory to authenticate users, you assign directory groups to user roles instead of toindividual users. When you assign a directory group to a user role, each user in that group receives thepermissions defined for the user role. For more information, see External User Authentication , on page 413.
Access to QuarantinesBefore users can access quarantines, you must enable that access. See the following information:
• Configuring Administrative User Access to the Spam Quarantine , on page 272
• About Distributing Message Processing Tasks to Other Users , on page 314 (for policy quarantines), andConfiguring Policy, Virus, and Outbreak Quarantines , on page 308
• Configuring Centralized Quarantine Access for Custom User Roles
Users PageSeeFor Information About This Section
About Distributing Administrative Tasks , on page 395
Managing Locally-Defined Administrative Users , on page 405
Requiring Users to Change Passphrase on Demand , on page 412
Users
Reset Passphrases button
Setting Passphrase and Login Requirements , on page 407Local User Account& Passphrase Settings
External User Authentication , on page 413External Authentication
Controlling Access to Sensitive Information inMessage Tracking, on page 422
DLP Tracking Privileges
About Authenticating Administrative UsersYou can control access to the appliance by defining authorized users locally on the appliance, and/or by usingexternal authentication or two-factor authentication.
• Changing the Admin User’s Passphrase, on page 405
User Guide for AsyncOS 14.1 for Cisco Secure Email and Web Manager- GD (General Deployment)404
Distributing Administrative TasksDeleting Custom User Roles

• Changing the User’s Passphrase After Expiry, on page 405
• Managing Locally-Defined Administrative Users , on page 405
• External User Authentication , on page 413
• Two-Factor Authentication, on page 416
Changing the Admin User’s PassphraseAny administrator-level user can change the passphrase for the “admin” user, via the GUI or the CLI.
Cisco recommends you to change the passphrase when you log in to the appliance for the first time or if youreset the configurations to factory defaults.
Note
To change the passphrase via the GUI, do the following:
• [New Web Interface Only] On the Security Management appliance, click to load the legacy webinterface.
• Choose Management Appliance > System Administration > Users page and select the admin user.
To change the passphrase for the admin user in the CLI, use the passphrase command. The passphrasecommand requires you to enter the old passphrase for security.
If you forget the passphrase for the “admin” user account, contact your customer support provider to reset thepassphrase.
Changes to the passphrase take effect immediately and do not require you to commit the change.Note
Changing the User’s Passphrase After ExpiryIf your account has expired, you will be prompted with the following message “Your passphrase expired.Please change your passphrase by clicking here.”
Click on the link and enter the login details with your expired passphrase, to proceed to the Change Passphrasepage. For more information on setting passphrases, Setting Passphrase and Login Requirements , on page 407.
Changes to the passphrase take effect immediately and do not require you to commit the change.Note
Managing Locally-Defined Administrative Users• Adding Locally-Defined Users, on page 406• Editing Locally-Defined Users, on page 406• Deleting Locally-Defined Users, on page 407
User Guide for AsyncOS 14.1 for Cisco Secure Email and Web Manager- GD (General Deployment)405
Distributing Administrative TasksChanging the Admin User’s Passphrase

• Viewing the List of Locally-Defined Users , on page 407• Setting and Changing Passphrases , on page 407• Setting Passphrase and Login Requirements , on page 407• Requiring Users to Change Passphrase on Demand , on page 412• Locking and Unlocking Local User Accounts , on page 412
Adding Locally-Defined UsersFollow this procedure to add users directly to the SecurityManagement appliance if you are not using externalauthentication. Alternatively, use the userconfig command in the CLI.
If external authentication is also enabled, be sure that local user names do not duplicate externally-authenticateduser names.
Note
There is no limit to the number of user accounts that you can create on the appliance.
Step 1 If you will assign custom user roles, we recommend that you define those roles first. See Custom User Roles , on page398.
Step 2 [New Web Interface Only] On the Security Management appliance, click to load the legacy web interface.Step 3 Choose Management Appliance > System Administration > Users.Step 4 Click Add User.Step 5 Enter a unique name for the user. You cannot enter words that are reserved by the system (such as “operator” and
“root”).
If you also use external authentication, user names should not duplicate externally-authenticated user names.
Step 6 Enter a full name for the user.Step 7 Select a predefined role or a custom role. See the table Descriptions of User Roles in section Predefined User Roles ,
on page 396 for more information about user roles.
If you add a new Email role or Web role here, enter a name for the role. For naming restrictions, see Creating CustomEmail User Roles , on page 400 or Creating Custom Web User Roles, on page 402.
Step 8 Confirm your current passphrase for security validation.Step 9 You can generate or enter a passphrase and re-enter the passphrase to confirm the same.Step 10 Submit and commit your changes.Step 11 If you added a custom user role on this page, assign privileges to that role now. See Custom User Roles , on page 398.
Editing Locally-Defined UsersUse this procedure to change a passphrase, for example.
Step 1 Click the user’s name in the Users listing.Step 2 Make changes to the user.
User Guide for AsyncOS 14.1 for Cisco Secure Email and Web Manager- GD (General Deployment)406
Distributing Administrative TasksAdding Locally-Defined Users

Step 3 Confirm your current passphrase for security validation.Step 4 Submit and commit your changes.
Deleting Locally-Defined Users
Step 1 Click the trash can icon corresponding to the user’s name in the Users listing.Step 2 Confirm the deletion by clicking Delete in the warning dialog that appears.Step 3 Click Commit to commit your changes.
Viewing the List of Locally-Defined UsersTo view a list of locally-defined users, do the following:
• Choose Management Appliance > System Administration > Users.
Asterisks indicate users assigned custom user roles for delegated administration. “Unassigned” appears in redif the user’s custom role has been deleted. For more information on custom user roles, see Custom User Roles, on page 398.
Note
Setting and Changing Passphrases• When you add a user, you specify an initial passphrase for that user.
• To change passphrases for users configured on the system, use the Edit User page in the GUI (see EditingLocally-Defined Users, on page 406 for more information).
Cisco recommends you to change the passphrase when you log in to the appliancefor the first time or after you complete the System Setup Wizard.
Note
• To change the passphrase for the default admin user account for the system, see Changing the AdminUser’s Passphrase, on page 405.
• To force users to change their passphrases, see Requiring Users to Change Passphrase on Demand , onpage 412.
• Users can change their own passphrases by clicking the Options menu at the top right side of the GUIand selecting the Change Passphrase option.
Setting Passphrase and Login RequirementsYou can define user account and passphrase restrictions to enforce organizational passphrase policies. Theuser account and passphrase restrictions apply to local users defined on the Security Management appliance.You can configure the following settings:
User Guide for AsyncOS 14.1 for Cisco Secure Email and Web Manager- GD (General Deployment)407
Distributing Administrative TasksDeleting Locally-Defined Users

• User account locking. You can define how many failed login attempts cause the user to be locked outof the account.
• Passphrase lifetime rules. You can define how long a passphrase can exist before the user is requiredto change the passphrase after logging in.
• Passphrase rules. You can define what kinds of passphrases users can choose, such as which charactersare optional or mandatory.
Step 1 [New Web Interface Only] On the Security Management appliance, click to load the legacy web interface.Step 2 Choose Management Appliance > System Administration > Users.Step 3 Scroll down to the Local User Account and Passphrase Settings section.Step 4 Click Edit Settings.
Step 5 Configure settings:
DescriptionSetting
Choose whether or not to lock the user account after the user fails to login successfully.Specify the number of failed login attempts that cause the account locking. You canenter any number from one (1) to 60. Default is five (5).
When you configure account locking, enter the message to be displayed to the userattempting to login. Enter text using 7-bit ASCII characters. This message is onlydisplayed when users enter the correct passphrase to a locked account.
When a user account gets locked, an administrator can unlock it on the Edit Userpage in the GUI or using the userconfig CLI command.
Failed login attempts are tracked by user, regardless of the machine the user connectsfrom or the type of connection, such as SSH or HTTP. Once the user successfullylogs in, the number of failed login attempts is reset to zero (0).
When a user account is locked out due to reaching the maximum number of failedlogin attempts, an alert is sent to the administrator. The alert is set at the “Info” severitylevel.
You can also manually lock individual user accounts. See Locking UserAccounts Manually, on page 412.
Note
User Account Lock
User Guide for AsyncOS 14.1 for Cisco Secure Email and Web Manager- GD (General Deployment)408
Distributing Administrative TasksSetting Passphrase and Login Requirements

DescriptionSetting
Choose whether or not users should be forced to change their passphrases after anadministrator changes their passphrases.
You can also choose whether or not users should be forced to change their passphrasesafter they expire. Enter the number of days a passphrase can last before users mustchange it. You can enter any number from one (1) to 366. Default is 90. To forceusers to change their passphrases at non-scheduled times, see Requiring Users toChange Passphrase on Demand , on page 412.
When you force users to change their passphrases after they expire, you can displaya notification about the upcoming passphrase expiration. Choose the number of daysbefore expiration to notify users.
When a user account uses SSH keys instead of a passphrase challenge, thePassphrase Reset rules still apply. When a user account with SSH keysexpires, the user must enter their old passphrase or ask an administratorto manually change the passphrase to change the keys associated with theaccount.
Note
Passphrase Reset
Enter the minimum number of characters that passphrases may contain.
Enter any number between one (1) and 128.
The default is 8.
Passphrases can have more characters than the number you specify here.
Passphrase Rules:
Require at least <number>characters.
Choose whether or not the passphrases must contain at least one number.Passphrase Rules:
Require at least one number(0-9).
Choose whether or not the passphrases must contain at least one special character.Passphrases may contain the following special characters:
~ ? ! @ # $ % ^ & * - _ + =
\ | / [ ] ( ) < > { } ` ' " ; : , .
Passphrase Rules:
Require at least one specialcharacter.
User Guide for AsyncOS 14.1 for Cisco Secure Email and Web Manager- GD (General Deployment)409
Distributing Administrative TasksSetting Passphrase and Login Requirements

DescriptionSetting
Choose whether or not the passphrase are allowed to be the same as the associateduser name or variations on the user name. When user name variations are banned,the following rules apply to passphrases:
• The passphrase may not be the same as the user name, regardless of case.
• The passphrase may not be the same as the user name in reverse, regardless ofcase.
• The passphrase may not be the same as the user name or reversed user namewith the following character substitutions:
• "@" or "4" for "a"
• "3" for "e"
• "|", "!", or "1" for "i"
• "0" for "o"
• "$" or "5" for "s"
• "+" or "7" for "t"
Passphrase Rules:
Ban usernames and theirvariations as passphrases.
Choose whether or not users are allowed to choose a recently used passphrase whenthey are forced to change the passphrase. If they are not allowed to reuse recentpassphrases, enter the number of recent passphrase that are banned from reuse.
You can enter any number from one (1) to 15. Default is three (3).
Passphrase Rules:
Ban reuse of the last <number>passphrases.
You can create a list of words to disallow in passphrases.
Make this file a text file with each forbidden word on a separate line. Save the filewith the name forbidden_passphrase_words.txt and use SCP or FTP to upload thefile to the appliance.
If this restriction is selected but no word list is uploaded, this restriction is ignored.
Passphrases Rules:
List of words to disallow inpassphrases
User Guide for AsyncOS 14.1 for Cisco Secure Email and Web Manager- GD (General Deployment)410
Distributing Administrative TasksSetting Passphrase and Login Requirements

DescriptionSetting
You can display a passphrase-strength indicator when an admin or user enters a newpassphrase.
This setting does not enforce creation of strong passphrases, it merely shows howeasy it is to guess the entered passphrase.
Select the roles for which you wish to display the indicator. Then, for each selectedrole, enter a number greater than zero. A larger number means that a passphrase thatregisters as strong is more difficult to achieve. This setting has no maximum value.
Examples:
• If you enter 30 , then an 8 character passphrase with at least one upper- andlower-case letter, number, and special character will register as a strongpassphrase.
• If you enter 18 , then an 8 character passphrase with all lower case letters andno numbers or special characters will register as strong.
Passphrase strength is measured on a logarithmic scale. Evaluation is based on theU.S. National Institute of Standards and Technology rules of entropy as defined inNIST SP 800-63, Appendix A.
Generally, stronger passphrases:
• Are longer
• Include upper case, lower case, numeric, and special characters
• Do not include words in any dictionary in any language.
To enforce passphrases with these characteristics, use the other settings on this page.
Passphrase Strength
A new passphrase rule is added in your Email and Web Manager to define your loginpassphrase:
Avoid usage of passphrases that contain three or more repetitive or sequentialcharacters, (for example, ‘AAA@124,’ ‘Abc@123,’ and so on.)
Passphrase Rule
A new passphrase rule is added to your Email and Web Manager to define your loginpassphrase:
Avoid usage of username substrings in your passphrase. Three or more charactersfrom username along with numeric and special characters are not allowed.
Passphrase Rule
Step 6 Submit and commit your changes.
What to do next
Require users to change their passphrases to new passphrases that meet the new requirements. See RequiringUsers to Change Passphrase on Demand , on page 412
User Guide for AsyncOS 14.1 for Cisco Secure Email and Web Manager- GD (General Deployment)411
Distributing Administrative TasksSetting Passphrase and Login Requirements

Requiring Users to Change Passphrase on DemandTo require all or selected users to change their passphrases at any time on an ad-hoc basis, perform the stepsin this procedure. This is a one-time action.
To automate a periodic requirement for changing passphrases, use the Passphrase Reset option described inSetting Passphrase and Login Requirements , on page 407.
Step 1 [New Web Interface Only] On the Security Management appliance, click to load the legacy web interface.Step 2 Choose Management Appliance > System Administration > Users.Step 3 In the Users section, select the check boxes beside the users who will be required to change passphrases .Step 4 Select Enforce Passphrase Changes.Step 5 Select options.
The global setting for the grace period is configured in Local User Account & Passphrase Settings.
Step 6 Click OK.
Locking and Unlocking Local User AccountsLocking a user account prevents a local user from logging into the appliance. A user account can be lockedin one of the following ways:
• You can configure all local user accounts to lock after users fail to log in successfully after a configurednumber of attempts. See Setting Passphrase and Login Requirements , on page 407.
• Administrators can manually lock user accounts. See Locking User Accounts Manually, on page 412.
AsyncOS displays the reason why the user account was locked when you view the user account on the EditUser page.
Locking User Accounts Manually
Step 1 First time only: Set up the appliance to enable user account locking:Step 2 Perform the following:
a) [New Web Interface Only] On the Security Management appliance, click to load the legacy web interface.b) Go to Management Appliance > System Administration > Users.c) In the Local User Account & Passphrase Settings section, click Edit Settings.d) Select the checkbox to Display Locked Account Message if Administrator has manually locked a user account
and enter your message.e) Submit the change.
Step 3 Go to Management Appliance > System Administration > Users and click the user name.
Before you lock the Admin account, be sure that you can unlock it. See the Note in Unlocking User Accounts, on page 413.
Note
Step 4 Click Lock Account.
User Guide for AsyncOS 14.1 for Cisco Secure Email and Web Manager- GD (General Deployment)412
Distributing Administrative TasksRequiring Users to Change Passphrase on Demand

AsyncOS displays a message saying that the user will be unable to log into the appliance and asks if you want to continue.
Unlocking User Accounts
To unlock a user account, open the user account by clicking on the user name in the Users listing and clickUnlock Account.
If you lock the admin account, you can only unlock it by logging in as the admin through a serialcommunications connection to the serial console port. The admin user can always access the appliance usingthe serial console port, even when the admin account is locked. See the “Setup and Installation” chapter inthe documentation or online help for your Email Security appliance for more information on accessing theappliance using the serial console port.
Note
External User AuthenticationIf you store user information in an LDAP or RADIUS directory on your network, you can configure yourSecurity Management appliance to use the external directory to authenticate users who log in to the appliance.
Some features described in Customizing Your View , on page 515 are not available to externally-authenticatedusers.
Note
• If your deployment uses both local and external authentication, local user names must not duplicateexternally-authenticated user names.
• If the appliance cannot communicate with the external directory, a user who has both an external and alocal account can log in with a local user account on the appliance.
See:
• Configuring External Authentication of Administrative Users Using LDAP , on page 376
• Enabling RADIUS Authentication, on page 413
Configuring LDAP AuthenticationTo configure LDAP authentication, see Configuring External Authentication of Administrative Users UsingLDAP , on page 376.
Enabling RADIUS AuthenticationYou can use a RADIUS directory to authenticate users and assign groups of users to user roles for administeringyour appliance. The RADIUS server should support the CLASS attribute, which AsyncOS uses to assignusers in the RADIUS directory to user roles.
User Guide for AsyncOS 14.1 for Cisco Secure Email and Web Manager- GD (General Deployment)413
Distributing Administrative TasksUnlocking User Accounts

If an external user changes the user role for their RADIUS group, the user should log out of the appliance andthen log back in. The user will have the permissions of their new role.
Note
Before you begin
The Shared Secret key for access to the RADIUS server must be no more than 48 characters long.
Step 1 [New Web Interface Only] On the Security Management appliance, click to load the legacy web interface.Step 2 Choose Management Appliance > System Administration > Users page and click Enable.Step 3 Select the Enable External Authentication check box.Step 4 Select RADIUS for the authentication type.Step 5 Enter the host name for the RADIUS server.Step 6 Enter the port number for the RADIUS server. The default port number is 1812.Step 7 Enter the Shared Secret key for the RADIUS server.
When enabling external authentication for a cluster of Email Security appliances, enter the same SharedSecret key on all appliances in the cluster.
Note
Step 8 Enter the number of seconds that the appliance waits for a response from the server before timing out.Step 9 Select whether to use Passphrase Authentication Protocol (PAP) or Challenge Handshake Authentication Protocol
(CHAP) for the authentication protocol.Step 10 (Optional) Click Add Row to add another RADIUS server. Repeat Steps 6 and 7 for each RADIUS server that your
appliance uses for authentication.
When you define multiple external servers, the appliance connects to the servers in the order defined on the appliance.You might want to define multiple external servers to allow for failover in case one server is temporarily unavailable.
Step 11 Enter the amount of time to store external authentication credentials in the web user interface.
If the RADIUS server uses one-time passphrases, for example passphrases created from a token, enter zero(0). When the value is set to zero, AsyncOS does not contact the RADIUS server again to authenticate duringthe current session.
Note
Step 12 Configure Group Mapping:
User Guide for AsyncOS 14.1 for Cisco Secure Email and Web Manager- GD (General Deployment)414
Distributing Administrative TasksEnabling RADIUS Authentication

DescriptionSetting
AsyncOS assigns RADIUS users to appliance roles based on the RADIUSCLASSattribute. CLASS attribute requirements:
• 3 character minimum
• 253 character maximum
• no colons, commas, or newline characters
• one or more mapped CLASS attributes for each RADIUS user (With thissetting, AsyncOS denies access to RADIUS users without a mapped CLASSattribute.)
For RADIUS users with multiple CLASS attributes, AsyncOS assigns the mostrestrictive role. For example, if a RADIUS user has two CLASS attributes, whichare mapped to the Operator and Read-Only Operator roles, AsyncOS assigns theRADIUS user to the Read-Only Operator role, which is more restrictive than theOperator role.
These are the appliance roles ordered from least restrictive to most restrictive:
• Administrator
• Email Administrator
• Web Administrator
• Web Policy Administrator
• URL Filtering Administrator (for web security)
• Custom user role (email or web)
If a user is assigned multiple Class attributes that are mapped to custom userroles, the last class attribute on the list on the RADIUS server will be used.
• Technician
• Operator
• Read-Only Operator
• Help Desk User
• Guest
Map externally authenticated usersto multiple local roles(Recommended)
AsyncOS assigns RADIUS users to the Administrator role.Map all externally authenticatedusers to the Administrator role
Step 13 (Optional) ClickAdd Row to add another group. Repeat step 11 for each group of users that the appliance authenticates.Step 14 Submit and commit your changes.
User Guide for AsyncOS 14.1 for Cisco Secure Email and Web Manager- GD (General Deployment)415
Distributing Administrative TasksEnabling RADIUS Authentication

Two-Factor AuthenticationYou can use a RADIUS directory to configure two-factor authentication for specific user roles. The appliancesupports the following authentication protocols for communicating with the RADIUS server:
• Passphrase Authentication Protocol (PAP)
• Challenge Handshake Authentication Protocol (CHAP)
You can enable two-factor authentication for the following user roles:
• predefined
• custom
The feature has been tested with:
• RSA Authentication Manager v8.2
• FreeRADIUS v1.1.7 and above
• ISE v1.4 and above
Related Topics:
• Enabling Two-Factor Authentication, on page 416
• Disabling Two-Factor Authentication, on page 417
• Adding an Email or Web Security appliance over SSH with Pre-Shared Keys, on page 417
Enabling Two-Factor AuthenticationMake sure that you get the required RADIUS server details for two-factor authentication from your ITadministrator.
Step 1 [New Web Interface Only] On the Security Management appliance, click to load the legacy web interface.Step 2 Choose System Administration > Users page and click Enable under Two-Factor Authentication.Step 3 Enter the hostname or IP address of the RADIUS server.Step 4 Enter the port number of the RADIUS server.Step 5 Enter the Shared Secret passphrase of the RADIUS server.Step 6 Enter the number of seconds to wait for a response from the server before timing out.Step 7 Select the appropriate authentication protocol.Step 8 (Optional) Click Add Row to add another RADIUS server. Repeat steps 2 to 6 for each RADIUS server.
You can add up to ten RADIUS servers.Note
Step 9 Select the required user roles for which you want to enable two-factor authentication.Step 10 Submit and commit your changes.
User Guide for AsyncOS 14.1 for Cisco Secure Email and Web Manager- GD (General Deployment)416
Distributing Administrative TasksTwo-Factor Authentication

When two-factor authentication is enabled, the user is prompted to enter a passcode after entering the username andpassphrase, to login to the appliance.
Disabling Two-Factor Authentication
Before you begin
Make sure you have enabled two-factor authentication on your appliance.
Step 1 [New Web Interface Only] On the Security Management appliance, click to load the legacy web interface.Step 2 Choose System Administration > Users page and click Edit Global Settings under Two-Factor AuthenticationStep 3 Deselect Enable Two-Factor Authentication.Step 4 Submit and commit your changes.
Adding an Email or Web Security appliance over SSH with Pre-Shared KeysThe following example demonstrates how to add an Email Security applaince (testesa.example.com) to theSecurity Management appliance (testsma.example.com) over SSH using pre-shared keys.
To add a Web Security appliance, choose WSA when prompted to enter the type of Cisco appliance.testsma.example.com> applianceconfig
Choose the operation you want to perform.
ADD - Add SMA Connection Parameters and Keys.EDIT - Edit an appliance.DELETE - Remove an appliance.TEST - Test that an appliance is properly configured.SERVICES - Configure the centralized services for an appliance.STATUS - Display the status of centralized services.PORT - Configure which port is used to communicate with remote appliances.
[]> add
Please enter the type of Cisco appliance that this device is1. ESA2. WSA
[1]> 1
Enter the IP address or hostname of an appliance to transfer data with.(A hostname may be entered in this field, however it will be immediatelyresolved to an IP address when the form is submitted.)[]> IP address entered
Enter a name to identify this appliance
[]> name of appliance
File transfer access via SSH is required to transfer reporting data, message logs,and quarantine safelist/blocklist data from appliances
User Guide for AsyncOS 14.1 for Cisco Secure Email and Web Manager- GD (General Deployment)417
Distributing Administrative TasksDisabling Two-Factor Authentication

Would you like to configure file transfer access for this appliance? [Y]>
Would you like to use a custom ssh port to connect to this appliance? [N]>
Would you like to connect an Email Security appliance using pre-shared keys?Use this option if you have enabled two-factor authentication on the EmailSecurity appliance. [N]> yes
To add an Email Security appliance to the Content Security Management applianceusing pre-shared keys, log in to the Email Security appliance,run the smaconfig > add command, enter the following details.
Host: vm10sma0006.qa
User Key:AAAAB3NzaC1yc2EAAAADAQABAAABAQDgm3kG9RHc4gVZxRe0orh5DW5Yje5UB9BpJqcTRQJoxUIAv2Xig8q5geyaWHZcFoUxH61YQbPX3R8CVMYgJ8/QB/iunjkr3jowV/SCuBBikEFgj1zuxlsFhL0L487epEgby1gH0rfJgwSa2/6dhfyUayst6pT87CZGOQltgx7s51wc+ve770X3SqlQD5bdYC4x9+gCX0wdwfhTH1+4/82jwYjK1lAEXcO4k4TuZJEJnyBQ3YyCyVwXuDkXpI6xJDemxcc36e7Wwtpn3mn2VLaTG2/I38XwSvlYB6TcqmWnO10gL+aDwkKAKcuhYpz4NFr9myej1mhMk7ZAFXmRNxvT
Before you proceed to the next step, ensure that you have added the Host and User Key details to the Emailor Web Security appliance. Commit the changes in your Email or Web Security appliance before continuingthe process of adding connection parameters in the Security Management appliance.
Note
Do you want to continue connecting using pre-shared keys? [Y]> yes
Additional Controls on Access to the Security ManagementAppliance
• Configuring IP-Based Network Access, on page 418• Configuring the Web UI Session Timeout, on page 421
Configuring IP-Based Network AccessYou can control from which IP addresses users access the Security Management appliance by creating accesslists for users who connect directly to the appliance and users who connect through a reverse proxy, if yourorganization uses reverse proxies for remote users.
• Direct Connections, on page 418• Connecting Through a Proxy, on page 419• Creating the Access List , on page 419
Direct ConnectionsYou can specify the IP addresses, subnets, or CIDR addresses for machines that can connect to the SecurityManagement appliance. Users can access the appliance from any machine with IP address from the accesslist. Users attempting to connect to the appliance from an address not included in the list are denied access.
User Guide for AsyncOS 14.1 for Cisco Secure Email and Web Manager- GD (General Deployment)418
Distributing Administrative TasksAdditional Controls on Access to the Security Management Appliance

Connecting Through a ProxyIf your organization’s network uses reverse proxy servers between remote users’ machines and the SecurityManagement appliance, AsyncOS allows you create an access list with the IP addresses of the proxies thatcan connect to the appliance.
Even when using a reverse proxy, AsyncOS still validates the IP address of the remote user’s machine againsta list of IP addresses allowed for user connections. To send the remote user’s IP address to the Email Securityappliance, the proxy needs to include the x-forwarded-for HTTP header in its connection request to theappliance.
The x-forwarded-for header is a non-RFC standard HTTP header with the following format:
x-forwarded-for: client-ip, proxy1, proxy2,... CRLF .
The value for this header is a comma-separated list of IP addresses with the left-most address being the addressof the remote user’s machine, followed by the addresses of each successive proxy that forwarded the connectionrequest. (The header name is configurable.) The Security Management appliance matches the remote user’sIP address from the header and the connecting proxy’s IP address against the allowed user and proxy IPaddresses in the access list.
AsyncOS supports only IPv4 addresses in the x-forwarded-for header.Note
Creating the Access ListYou can create the network access list either via the Network Access page in the GUI or the adminaccessconfig> ipaccess CLI command. The following figure shows the Network Access page with a list of user IPaddresses that are allowed to connect directly to the Security Management appliance.
The following settings are applicable for the legacy web interface and the new web interface of the appliance.
User Guide for AsyncOS 14.1 for Cisco Secure Email and Web Manager- GD (General Deployment)419
Distributing Administrative TasksConnecting Through a Proxy

Figure 12: Example Network Access Settings
AsyncOS offers four different modes of control for the access list:
• Allow All. This mode allows all connections to the appliance. This is the default mode of operation.
• Only Allow Specific Connections. This mode allows a user to connection to the appliance if the user’sIP address matches the IP addresses, IP ranges, or CIDR ranges included in the access list.
• Only Allow Specific Connections Through Proxy. This mode allows a user to connect to the appliancethrough a reverse proxy if the following conditions are met:
• The connecting proxy’s IP address is included in the access list’s IP Address of Proxy Server field.• The proxy includes the x-forwarded-header HTTP header in its connection request.• The value of x-forwarded-header is not empty.• The remote user’s IP address is included in x-forwarded-header and it matches the IP addresses, IPranges, or CIDR ranges defined for users in the access list.
• Only Allow Specific Connections Directly or Through Proxy. This mode allows users to connectthrough a reverse proxy or directly to the appliance if their IP address matches the IP addresses, IP ranges,or CIDR ranges included in the access list. The conditions for connecting through a proxy are the sameas in the Only Allow Specific Connections Through Proxy mode.
Please be aware that you may lose access to the appliance after submitting and committing your changes ifone of the following conditions is true:
• If you selectOnly Allow Specific Connections and do not include the IP address of your current machinein the list.
• If you selectOnly Allow Specific Connections Through Proxy and the IP address of the proxy currentlyconnected to the appliance is not in the proxy list and the value of the Origin IP header is not in the listof allowed IP addresses.
• If you select Only Allow Specific Connections Directly or Through Proxy and
User Guide for AsyncOS 14.1 for Cisco Secure Email and Web Manager- GD (General Deployment)420
Distributing Administrative TasksCreating the Access List

the value of the Origin IP header is not in the list of allowed IP addresses•
OR
• the value of the Origin IP header is not in the list of allowed IP Addresses and the IP address of theproxy connected to the appliance is not in the list of allowed proxies.
If you choose to continue without correcting the access list, AsyncOS will disconnect your machine or proxyfrom the appliance when you commit your changes.
Step 1 [New Web Interface Only] On the Security Management appliance, click to load the legacy web interface.Step 2 Choose System Administration > Network Access.Step 3 Click Edit Settings.Step 4 Select the mode of control for the access list.Step 5 Enter the IP addresses from which users will be allowed to connect to the appliance.
You can enter an IP address, IP address range or CIDR range. Use commas to separate multiple entries.
Step 6 If connecting through a proxy is allowed, enter the following information:
• The IP addresses of the proxies allowed to connect to the appliance. Use commas to separate multiple entries.
• The name of the origin IP header that the proxy sends to the appliance, which contains the IP addresses of the remoteuser’s machine and the proxy servers that forwarded the request. By default, the name of the header is x-forwarded-for.
Step 7 Submit and commit your changes.
Configuring the Web UI Session TimeoutYou can specify how long a user can be logged into the Security Management appliance’s Web UI beforeAsyncOS logs the user out due to inactivity. ThisWebUI session timeout applies to all users, including admin,and it is used for both HTTP and HTTPS sessions.
Once AsyncOS logs a user out, the appliance redirects the user’s web browser to login page.
The Web UI Session Timeout does not apply to spam quarantine sessions, which have a 30 minute timeoutthat cannot be configured.
Note
Step 1 [New Web Interface Only] On the Security Management appliance, click to load the legacy web interface.Step 2 Use the System Administration > Network Access page.Step 3 Click Edit Settings.Step 4 In the Web UI Inactivity Timeout field, enter the number of minutes users can be inactive before being logged out. You
can define a timeout period between 5 and 1440 minutes.
User Guide for AsyncOS 14.1 for Cisco Secure Email and Web Manager- GD (General Deployment)421
Distributing Administrative TasksConfiguring the Web UI Session Timeout

Step 5 Submit and commit your changes.
Configuring the CLI Session TimeoutYou can specify how long a user can be logged into the SecurityManagement appliance’s CLI before AsyncOSlogs the user out due to inactivity. The CLI session timeout applies:
• To all users, including administrator
• Only to the connections using Secure Shell (SSH), SCP, and direct serial connection
Any uncommitted configuration changes at the time of CLI session timeout will be lost. Make sure that youcommit the configuration changes as soon as they are made.
Note
Step 1 [New Web Interface Only] On the Security Management appliance, click to load the legacy web interface.Step 2 Use the System Administration > Network Access page.Step 3 Click Edit Settings.Step 4 In the CLI Inactivity Timeout field, enter the number of minutes users can be inactive before being logged out. You
can define a timeout period between 5 and 1440 minutes.Step 5 Submit and commit your changes.
What to do next
You can also use the adminaccessconfig command in CLI to configure CLI session timeout. SeeCLI ReferenceGuide for AsyncOS for Cisco Email Security Appliances.
Controlling Access to Sensitive Information in MessageTracking
Step 1 [New Web Interface Only] On the Security Management appliance, click to load the legacy web interface.Step 2 Go to the Management Appliance > System Administration > Users page.Step 3 In the Tracking Privileges section, click Edit Settings.Step 4 Select the roles for which you want to grant access to sensitive information in Message Tracking.
Only custom roles with access to Message Tracking are listed.
Step 5 Submit and commit your changes.
User Guide for AsyncOS 14.1 for Cisco Secure Email and Web Manager- GD (General Deployment)422
Distributing Administrative TasksConfiguring the CLI Session Timeout

The Centralized Email Message Tracking feature must be enabled under Management Appliance > Centralized Servicesfor this setting to take effect.
Displaying a Message for Administrative UsersYou can display a message that administrative users will see when they sign in to the appliance.
To set or clear a message:
Step 1 If you are planning to use a text file, upload it to the /data/pub/configuration directory on the appliance.Step 2 Access the command-line interface (CLI).Step 3 Run the adminaccessconfig > BANNER command.Step 4 Load the banner message.Step 5 Commit the change.
Enabling and Disabling Message Banners for AdministrativeUsers
You can enable and disable a banner with a link to navigate to the new web interface of the appliance fromthe legacy web interface of the appliance.
Step 1 Access the command-line interface (CLI).Step 2 Run the adminaccessconfig > NGUIBANNER command.Step 3 Enable or disable the banner message.Step 4 Commit the change.
Viewing Administrative User Activity• Viewing Active Sessions Using the Web , on page 423• Viewing Your Recent Login Attempts , on page 424• Viewing Administrative User Activity via the Command Line Interface , on page 424
Viewing Active Sessions Using the WebFrom the SecurityManagement appliance, you can view all active sessions and users logged in to the appliance.
From the upper right corner of the window, choose Options > Active Sessions.
User Guide for AsyncOS 14.1 for Cisco Secure Email and Web Manager- GD (General Deployment)423
Distributing Administrative TasksDisplaying a Message for Administrative Users

Figure 13: Active Sessions Menu
From the Active Sessions page you can view the User name, what role the user has, the time the user logged in, idle time,and whether the user is logging in from the command line or the GUI.
Viewing Your Recent Login AttemptsTo view your last few recent login attempts (failed or successful) via the web interface, SSH, and/or FTP:
Step 1 Log in.Step 2 Click the Figure-icon icon beside "Logged in as" near the top right side of the screen.
Viewing Administrative User Activity via the Command Line InterfaceThe following commands support multiuser access to the appliance.
• The who command lists all users who are logged in to the system via the CLI or the web user interface,the role of the user, the time of login, the idle time, and the remote host from which the user is loggedin.
• The whoami command displays the user name and full name of the user currently logged in, and whichgroups the user belongs to:
mail3.example.com>whoamiUsername: adminFull Name: AdministratorGroups: admin, operators, config, log, guest
• The last command displays which users have recently logged into the appliance. The IP address of theremote host, and the login, logout, and total time also appear.
mail3.example.com> lastUsername Remote Host Login Time Logout Time Total Time======== =========== ================ ================ ==========admin 10.1.3.67 Sat May 15 23:42 still logged in 15madmin 10.1.3.67 Sat May 15 22:52 Sat May 15 23:42 50madmin 10.1.3.67 Sat May 15 11:02 Sat May 15 14:14 3h 12madmin 10.1.3.67 Fri May 14 16:29 Fri May 14 17:43 1h 13mshutdown Fri May 14 16:22
User Guide for AsyncOS 14.1 for Cisco Secure Email and Web Manager- GD (General Deployment)424
Distributing Administrative TasksViewing Your Recent Login Attempts

shutdown Fri May 14 16:15admin 10.1.3.67 Fri May 14 16:05 Fri May 14 16:15 9madmin 10.1.3.103 Fri May 14 16:12 Fri May 14 16:15 2madmin 10.1.3.103 Thu May 13 09:31 Fri May 14 14:11 1d 4h 39madmin 10.1.3.135 Fri May 14 10:57 Fri May 14 10:58 0madmin 10.1.3.67 Thu May 13 17:00 Thu May 13 19:24 2h 24m
Troubleshooting Administrative User Access• Error: User Has No Access Privileges Assigned, on page 425• User Has No Active Menus , on page 425• Externally-Authenticated Users See Preferences Option , on page 425
Error: User Has No Access Privileges AssignedProblem
A user to whom you have delegated administration can log in to the Security Management appliance but seesa message that no access privileges are assigned.
Solution
Make sure that you have assigned privileges to the custom user role to which this user is assigned. Look atManagement Appliance > System Administration > Users to determine the User Role assigned, then go toManagement Appliance > System Administration > User Roles, click the name of the User Role, and assignprivileges to the role.
If you have assigned access based on Reporting Group, make sure you have selected a Reporting Group forthat user on the Management Appliance > System Administration > User Roles page. To assign a group, clickthe No groups selected link in the Email Reporting column of the User Roles for Delegated Administrationtable.
User Has No Active MenusProblem
A user to whom you have granted Publish privileges has no active menus upon login.
Solution
Make sure you have granted access to at least one Access Policy or Custom URL Category. If you do notwant to grant this user privileges to edit either of these, create a custom URL category which is not used inany policy and grant this user role privileges to this category on the Custom User Role page.
Externally-Authenticated Users See Preferences OptionProblem
Externally-authenticated users see the Preferences option.
Solution
Ensure that users that you add directly in the Security Management appliance have unique usernames that arenot also used in your external authentication database.
User Guide for AsyncOS 14.1 for Cisco Secure Email and Web Manager- GD (General Deployment)425
Distributing Administrative TasksTroubleshooting Administrative User Access

User Guide for AsyncOS 14.1 for Cisco Secure Email and Web Manager- GD (General Deployment)426
Distributing Administrative TasksExternally-Authenticated Users See Preferences Option

C H A P T E R 16Common Administrative Tasks
This chapter contains the following sections:
• Performing Administrative Tasks, on page 428• Cisco Content Security Management Appliances Licensing, on page 428• Performing Maintenance Tasks Using CLI Commands, on page 445• Enabling Remote Power Cycling , on page 449• Monitoring System Health Using SNMP , on page 450• Backing Up Security Management Appliance Data , on page 452• Disaster Recovery on the Security Management Appliance , on page 458• Upgrading Appliance Hardware , on page 460• Upgrading AsyncOS, on page 460• About Reverting to an Earlier Version of AsyncOS, on page 471• About Updates , on page 473• Configuring the Return Address for Generated Messages, on page 473• Managing Alerts, on page 473• Changing Network Settings, on page 480• Specifying a Secure Communication Protocol , on page 483• Configuring the System Time, on page 484• Configuration File Page , on page 486• Saving and Importing Configuration Settings , on page 487• Managing Disk Space , on page 494• Adjusting the Reference Threshold in SystemHealth Graphs for Email Security Appliances, on page 497• SSO Using SAML 2.0, on page 498• Configuring OpenID Connect 1.0 on Cisco Content Security Management for AsyncOS APIs, on page512
• Customizing Your View , on page 515• Restarting and Viewing Status of Services Enabled on Appliance, on page 517• Managing Lists of Certificate Authorities, on page 519• Receiving and Delivering Messages with Internationalised Domain Names (IDNs), on page 521• FQDN, on page 523• Single Pane of Glass , on page 525
User Guide for AsyncOS 14.1 for Cisco Secure Email and Web Manager- GD (General Deployment)427

Performing Administrative TasksYou can perform most system administration tasks by using the System Administration menu in the graphicaluser interface (GUI). Some system administration features, however, are available only in the command-lineinterface (CLI).
In addition, you access the status-monitoring features of the appliance on theMonitor menu, which is describedin chapter Monitoring System Status, on page 355
Several of the features or commands described in this chapter can affect routing precedence. For moreinformation, see IP Addresses, Interfaces, and Routing, on page 584.
Note
Cisco Content Security Management Appliances Licensing• Working with Feature Keys, on page 428
• Smart Software Licensing, on page 429
Working with Feature KeysKeys are specific to the serial number of your appliance and specific to the feature that you enable. You cannotreuse a key from one system on another system.
To perform the tasks described in this section from the command-line prompt, use the featurekey command.
Do ThisTo
Select Management Appliance > System Administration >Feature Keys.
To add a new feature key manually, paste or enter the key intothe Feature Key field and click Submit Key. An error messageappears if the feature is not added (for example, if the key isincorrect); otherwise, the feature key is added to the list.
If the appliance is configured to automatically download andinstall new keys as they are issued. the Pending Activation listis always empty.
• View all active feature keys for theappliance
• View any feature keys that arepending activation
• Search for new keys that have beenissued
• Install feature keys manually• Activate feature keys
Select Management Appliance > System Administration >Feature Keys Settings
By default, the appliance periodically checks for new keys.
Enable or disable automatic download andactivation of feature keys
Contact your Cisco representativeRenew expired feature keys
User Guide for AsyncOS 14.1 for Cisco Secure Email and Web Manager- GD (General Deployment)428
Common Administrative TasksPerforming Administrative Tasks

Virtual Appliance Licensing and Feature KeysFor information about appliance behavior upon license and feature key expiration, see the Cisco ContentSecurity Virtual Appliance Installation Guide available from http://www.cisco.com/c/en/us/support/security/content-security-management-appliance/products-installation-guides-list.html
To view license information, use the show license command in the command-line interface (CLI.)
Smart Software Licensing• Overview, on page 429
• Enabling Smart Software Licensing, on page 430
• Registering the Appliance with Cisco Smart Software Manager, on page 431
• Requesting for Licenses, on page 432
• Releasing Licenses, on page 432
• Deregistering the Appliance from Smart Cisco Software Manager , on page 433
• Reregistering the Appliance with Smart Cisco Software Manager , on page 433
• Changing Transport Settings, on page 433
• Renewing Authorization and Certificate, on page 433
• Updating Smart Agent, on page 434
• Alerts, on page 434
• Command Line Interface, on page 435
OverviewSmart Software Licensing enables you to manage andmonitor Cisco Content SecurityManagement appliancelicenses seamlessly. To activate Smart Software licensing, you must register your appliance with Cisco SmartSoftware Manager (CSSM) which is the centralized database that maintains the licensing details about all theCisco products that you purchase and use. With Smart Licensing, you can register with a single token ratherthan registering them individually on the website using Product Authorization Keys (PAKs).
Once you register the appliance, you can track your appliance licenses and monitor license usage through theCSSM portal. The Smart Agent installed on the appliance connects the appliance with CSSM and passes thelicense usage information to the CSSM to track the consumption.
See https://www.cisco.com/c/en/us/td/docs/wireless/technology/mesh/8-2/b_Smart_Licensing_Deployment_Guide.html to know about Cisco Smart Software Manager.
• Make sure that your appliance has internet connectivity.
• Contact Cisco sales team to create a smart account in Cisco Smart Software Manager portal(https://software.cisco.com/#module/SmartLicensing) or install a Cisco Smart SoftwareManager Satelliteon your network.
See https://www.cisco.com/c/en/us/td/docs/wireless/technology/mesh/8-2/b_Smart_Licensing_Deployment_Guide.html to know more about Cisco Smart Software Manager user account creation orinstalling a Cisco Smart Software Manager Satellite.
User Guide for AsyncOS 14.1 for Cisco Secure Email and Web Manager- GD (General Deployment)429
Common Administrative TasksVirtual Appliance Licensing and Feature Keys

For users who do not want to directly send the license usage information to the internet, the SmartSoftware Manager Satellite can be installed on the premises, and it provides a subset of CSSMfunctionality. Once you download and deploy the satellite application, you can manage licenses locallyand securely without sending data to CSSMusing the internet. The CSSMSatellite periodically transmitsthe information to the cloud.
If you want to use Smart SoftwareManager Satellite, use Smart SoftwareManagerSatellite Enhanced Edition 6.1.0.
Note
• The existing users of classical licenses (traditional) should migrate their classical licenses to smart licenses.
See https://video.cisco.com/detail/video/5841741892001/convert-classic-licenses-to-smart-licenses?autoStart=true&q=classic.
• The system clock of the appliance must be in sync with that of the CSSM. Any deviation in the systemclock of the appliance with that of the CSSM, will result in failure of smart licensing operations.
If you have internet connectivity and want to connect to the CSSM through a proxy, you must use the sameproxy that is configured for the appliance using System Administration-> Update Settings
Note
For virtual users, every time you receive a new PAK file (new or renewal), generate the license file and loadthe file on the appliance. After loading the file, you must convert the PAK to Smart Licensing. In SmartLicensing mode, the feature keys section in the license file will be ignored while loading the file and only thecertificate information will be used.
Note
You must perform the following procedures to activate Smart Software Licensing for your appliance:
More InformatonDo This
Enabling Smart SoftwareLicensing, on page 430
Enable Smart Software LicensingStep 1
Registering the Appliance withCisco Smart SoftwareManager, onpage 431
Register the appliance with CiscoSmart Software Manager
Step 2
Requesting for Licenses, on page432
Request for licenses (feature keys)Step 3
Enabling Smart Software Licensing
Step 1 Choose Managed Appliance > System Administration > Smart Software Licensing.Step 2 Click Enable Smart Software Licensing.
To know about Smart Software Licensing, click on the Learn More about Smart Software Licensing link.
User Guide for AsyncOS 14.1 for Cisco Secure Email and Web Manager- GD (General Deployment)430
Common Administrative TasksEnabling Smart Software Licensing

Step 3 Click OK after reading the information about Smart Software Licensing.Step 4 Commit your changes.
What to do next
After you enable Smart Software Licensing, all the features in the Classic Licensingmode will be automaticallyavailable in the Smart Licensingmode. If you are an existing user in Classic Licensingmode, you have 90-daysevaluation period to use the Smart Software Licensing feature without registering your appliance with theCSSM.
You will get notifications on regular intervals (90th, 60th, 30th, 15th, 5th, and last day) prior to the expiryand also upon expiry of the evaluation period. You can register your appliance with the CSSM during or afterthe evaluation period.
New Virtual Appliance users with no active licenses in Classic Licensing mode will not have the evaluationperiod even if they enable the Smart Software Licensing feature. Only the existing Virtual Appliance userswith active licenses in Classic Licensing mode will have evaluation period. If new Virtual Appliance userswant to evaluate the smart licensing feature, contact Cisco Sales team to add the evaluation license to thesmart account. The evaluation licenses are used for evaluation purpose after registration.
Note
After you enable the Smart Licensing feature on your appliance, you will not be able to roll back from SmartLicensing to Classic Licensing mode.
Note
Registering the Appliance with Cisco Smart Software ManagerYoumust enable the Smart Software Licensing feature under SystemAdministration menu in order to registeryour appliance with the Cisco Smart Software Manager.
Step 1 Choose Managed Appliance > System Administration > Smart Software Licensing.Step 2 Click Edit, if you want to change the Transport Settings. The available options are:
• Direct: Connects the appliance directly to the Cisco Smart SoftwareManager through HTTPs. This option is selectedby default.
• Transport Gateway: Connects the appliance to the Cisco Smart Software Manager through a Transport Gateway orSmart Software Manager Satellite. When you choose this option, you must enter the URL of the Transport Gatewayor the Smart Software Manager Satellite and click OK. This option supports HTTP and HTTPS. In FIPS mode,Transport Gateway supports only HTTPS. Seehttps://www.cisco.com/c/en/us/td/docs/wireless/technology/mesh/8-2/b_Smart_Licensing_Deployment_Guide.htmlto know about Transport Gateway.
Access the Cisco Smart Software Manager portal
(https://software.cisco.com/#module/SmartLicensing using your login credentials. Navigate to the Virtual Accountpage of the portal and access the General tab to generate a new token. Copy the Product Instance Registration Tokenfor your appliance.
User Guide for AsyncOS 14.1 for Cisco Secure Email and Web Manager- GD (General Deployment)431
Common Administrative TasksRegistering the Appliance with Cisco Smart Software Manager

See https://www.cisco.com/c/en/us/td/docs/wireless/technology/mesh/8-2/b_Smart_Licensing_Deployment_Guide.html to know about Product Instance Registration Token creation.
Step 3 Switch back to your appliance and paste the Product Instance Registration Token.Step 4 Click Register.Step 5 On the Smart Software Licensing page, you can check the Reregister this product instance if it is already registered check
box to reregister your appliance. See Reregistering the Appliance with Smart Cisco Software Manager , on page 433.
What to do next
The product registration process takes a few minutes and you can view the registration status on the SmartSoftware Licensing page.
After you enabled smart software licensing and registered your content security gateway with the Cisco SmartSoftware Manager, the Cisco Cloud Services portal is automatically enabled and registered on your contentsecurity gateway.
Note
Requesting for LicensesOnce you complete the registration process successfully, you must request for licenses for the appliance'sfeatures as required.
Step 1 Choose Management Appliance > System Administration > Licenses.Step 2 Click Edit Settings.Step 3 Check the checkboxes under the License Request/Release column corresponding to the licenses you want to request for.Step 4 Click Submit.
By default the license for Mail Handling is available. You cannot activate, deactivate, or release this license.There is no evaluation period or out of compliance for Mail Handling license.
Note
What to do next
When the licenses are overused or expired, they will go to out of compliance (OOC) mode and 30-days graceperiod is provided to each license. You will get notifications on regular intervals (30th, 15th, 5th, and lastday) prior to the expiry and also upon the expiry of the OOC grace period.
After the expiry of the OOC grace period, you cannot use the licenses and the features will be unavailable.To access the features again, you must update the licenses on the CSSM portal and renew the authorization.
Releasing Licenses
Step 1 Choose Management Appliance > System Administration > Licenses.Step 2 Click Edit Settings.
User Guide for AsyncOS 14.1 for Cisco Secure Email and Web Manager- GD (General Deployment)432
Common Administrative TasksRequesting for Licenses

Step 3 Uncheck the checkboxes under the License Request column corresponding to the licenses you want to release.Step 4 Click Submit.
You cannot release the license for Mail Handling.Note
Deregistering the Appliance from Smart Cisco Software Manager
Step 1 Choose Management Appliance > System Administration > Smart Software Licensing.Step 2 From the Action drop-down list, choose Deregister and click Go.Step 3 Click Submit.
Reregistering the Appliance with Smart Cisco Software Manager
Step 1 Choose Management Appliance > System Administration > Smart Software Licensing.Step 2 From the Action drop-down list, choose Reregister and click Go.
What to do next
See Registering the Appliance with Cisco Smart Software Manager, on page 431 to know about registrationprocess.
You can reregister the appliance after you reset the appliance configurations during unavoidable scenarios.
Changing Transport SettingsYou can change the transport settings only before registering the appliance with CSSM.
You can change the transport settings only when the smart licensing feature is enabled. If you have alreadyregistered your appliance, you must deregister the appliance to change the transport settings. After changingthe transport settings, you must register the appliance again.
Note
See Registering the Appliance with Cisco Smart Software Manager, on page 431 to know how to change thetransport settings.
Renewing Authorization and CertificateAfter you register your appliance with the Smart Cisco Software Manager, you can renew the certificate.
You can renew authorization only after the successful registration of the appliance.Note
User Guide for AsyncOS 14.1 for Cisco Secure Email and Web Manager- GD (General Deployment)433
Common Administrative TasksDeregistering the Appliance from Smart Cisco Software Manager

Step 1 Choose Management Appliance > System Administration > Smart Software Licensing.Step 2 From the Action drop-down list, choose the appropriate option:
• Renew Authorization Now
• Renew Certificates Now
Step 3 Click Go.
Updating Smart AgentTo update the Smart Agent version installed on your appliance, perform the following steps:
Step 1 Choose Management Appliance > System Administration > Smart Software Licensing.Step 2 In the Smart Agent Update Status section, click Update Now and follow the process.
If you try to save any configuration changes using the CLI command saveconfig or through the web interfaceusing System Administration > Configuration Summary, then Smart Licensing related configuration willnot be saved.
Note
AlertsYou will receive notifications on the following scenarios:
• Smart Software Licensing successfully enabled
• Smart Software Licensing enabling failed
• Beginning of the evaluation period
• Expiry of evaluation period (on regular intervals during evaluation period and upon expiry)
• Successfully registered
• Registration failed
• Successfully authorized
• Authorization failed
• Successfully deregistered
• Deregistration failed
• Successfully renewed Id certificate
• Renewal of Id certificate failed
• Expiry of authorization
• Expiry of Id certificate
User Guide for AsyncOS 14.1 for Cisco Secure Email and Web Manager- GD (General Deployment)434
Common Administrative TasksUpdating Smart Agent

• Expiry of out of compliance grace period (on regular intervals during out of compliance grace periodand upon expiry).
• First instance of the expiry of a feature
Command Line Interface• license_smart, on page 435
• show_license, on page 438
license_smart
• Description, on page 435
• Usage, on page 435
• Example: Configuring Port for Smart Agent Service, on page 435
• Example: Enabling Smart Licensing, on page 435
• Example: Registering the Appliance with the Smart Software Manager , on page 436
• Example: Status of Smart Licensing , on page 436
• Example: Status Summary of Smart Licensing , on page 437
• Example: Setting the Smart Transport URL, on page 437
• Example: Requesting Licenses, on page 437
• Example: Releasing Licenses, on page 438
Description
Configure smart software licensing feature.
Usage
Commit: This command requires a 'commit'.
Batch Command: This command supports a batch format. For details, see the inline help by typing thecommand: help license_smart.
Example: Configuring Port for Smart Agent Service
example.com> license_smartChoose the operation you want to perform:- ENABLE - Enables Smart Licensing on the product.- SETAGENTPORT - Set port to run Smart Agent service.[]> setagentport
Enter the port to run smart agent service.[65501]>
Example: Enabling Smart Licensing
mail.example.com > license_smartChoose the operation you want to perform:
User Guide for AsyncOS 14.1 for Cisco Secure Email and Web Manager- GD (General Deployment)435
Common Administrative TasksCommand Line Interface

- ENABLE - Enables Smart Licensing on the product.[]> enableAfter enabling Smart Licensing on your appliance, follow below steps to activatethe feature keys (licenses):
a) Register the product with Smart Software Manager using license_smart > register commandin the CLI.b) Activate the feature keys using license_smart > requestsmart_license command in the CLI.
Note: If you are using a virtual appliance, and have not enabled any of thefeatures in the classic licensing mode; you will not be able to activate thelicenses, after you switch to the smart licensing mode. You need to first registeryour appliance, and then you can activate the licenses (features) in the smart licensingmode.Commit your changes to enable the Smart Licensing mode on your appliance.All the features enabled in the Classic Licensing mode will be available in the Evaluationperiod.Type "Y" if you want to continue, or type "N" if you want to use the classic licensing mode[Y/N] []> y
> commit
Please enter some comments describing your changes:[]>Do you want to save the current configuration for rollback? [Y]>
Example: Registering the Appliance with the Smart Software Manager
mail.example.com > license_smartTo start using the licenses, please register the product.Choose the operation you want to perform:
- REGISTER - Register the product for Smart Licensing.- URL - Set the Smart Transport URL.- STATUS - Show overall Smart Licensing status.- SUMMARY - Show Smart Licensing status summary.
[]> registerReregister this product instance if it is already registered [N]> n
Enter token to register the product:[]>ODRlOTM5MjItOTQzOS00YjY0LWExZTUtZTdmMmY3OGNlNDZmLTE1MzM3Mzgw%0AMDEzNTR8WlpCQ1lMbGVMQWRxOXhuenN4OWZDdktFckJLQzF5V3VIbzkyTFgx%0AQWcvaz0%3D%0AProduct Registration is in progress. Use license_smart > status command to check status ofregistration.
Example: Status of Smart Licensing
mail.example.com > license_smartTo start using the licenses, please register the product.Choose the operation you want to perform:
- REQUESTSMART_LICENSE - Request licenses for the product.- RELEASESMART_LICENSE - Release licenses of the product.- REGISTER - Register the product for Smart Licensing.- URL - Set the Smart Transport URL.- STATUS - Show overall Smart Licensing status.- SUMMARY - Show Smart Licensing status summary.
[]> statusSmart Licensing is: Enabled
Evaluation Period: In Use
User Guide for AsyncOS 14.1 for Cisco Secure Email and Web Manager- GD (General Deployment)436
Common Administrative TasksExample: Registering the Appliance with the Smart Software Manager

Evaluation Period Remaining: 89 days 23 hours 53 minutesRegistration Status: Unregistered
License Authorization Status: Evaluation Mode
Last Authorization Renewal Attempt Status: No Communication Attempted
Product Instance Name: mail.example.com
Transport Settings: Direct (https://smartreceiver.cisco.com/licservice/license)
Example: Status Summary of Smart Licensing
mail.example.com > license_smartTo start using the licenses, please register the product.Choose the operation you want to perform:- REGISTER - Register the product for Smart Licensing.- URL - Set the Smart Transport URL.- STATUS - Show overall Smart Licensing status.- SUMMARY - Show Smart Licensing status summary.
[]> summary
FeatureName LicenseAuthorizationStatusMail Handling In ComplianceContent Security Management Master ISQ In Compliance
Example: Setting the Smart Transport URL
mail.example.com > license_smart
Choose the operation you want to perform:- REQUESTSMART_LICENSE - Request licenses for the product.- RELEASESMART_LICENSE - Release licenses of the product.- REGISTER - Register the product for Smart Licensing.- URL - Set the Smart Transport URL.- STATUS - Show overall Smart Licensing status.- SUMMARY - Show Smart Licensing status summary.
[]> url
1. DIRECT - Product communicates directly with the cisco license servers2. TRANSPORT_GATEWAY - Product communicates via transport gateway or smart software managersatellite.
Choose from the following menu options:[1]> 1Note: The appliance uses the Direct URL(https://smartreceiver.cisco.com/licservice/license) to communicate with CiscoSmart Software Manager (CSSM) via the proxy server configured using the updateconfig command.Transport settings will be updated after commit.
Example: Requesting Licenses
Users of virtual appliance must register their appliance to request for or release the licenses.Note
mail.example.com > license_smartChoose the operation you want to perform:
User Guide for AsyncOS 14.1 for Cisco Secure Email and Web Manager- GD (General Deployment)437
Common Administrative TasksExample: Status Summary of Smart Licensing

- REQUESTSMART_LICENSE - Request licenses for the product.- RELEASESMART_LICENSE - Release licenses of the product.- REGISTER - Register the product for Smart Licensing.- URL - Set the Smart Transport URL.- STATUS - Show overall Smart Licensing status.- SUMMARY - Show Smart Licensing status summary.
[]> requestsmart_license
Feature Name License Authorization Status1. Content Security Management Centralized Tracking Not Requested2. Content Security Management Master ISQ Not requested
Enter the appropriate license number(s) for activation.Separate multiple license with comma or enter range:[]> 1Activation is in progress for following features:Security Management Centralized TrackingUse license_smart > summary command to check status of licenses.
Example: Releasing Licenses
mail.example.com > license_smartChoose the operation you want to perform:
- REQUESTSMART_LICENSE - Request licenses for the product.- RELEASESMART_LICENSE - Release licenses of the product.- REGISTER - Register the product for Smart Licensing.- URL - Set the Smart Transport URL.- STATUS - Show overall Smart Licensing status.- SUMMARY - Show Smart Licensing status summary.
[]> releasesmart_license
Feature Name License Authorization Status1. Content Security Management Centralized In Compliance
Tracking2. Content Security Management Master ISQ In Compliance
show_license
• Description, on page 438
• Example: Status of Smart Licensing, on page 438
• Example: Status Summary of Smart Licensing, on page 439
Description
Show Smart Licensing status and summary of status.
Example: Status of Smart Licensing
example.com> showlicense_smartChoose the operation you want to perform:- STATUS- Show overall Smart Licensing status.- SUMMARY - Show Smart Licensing summary.[]> statusSmart Licensing is: Enabled
Evaluation Period: In Use
User Guide for AsyncOS 14.1 for Cisco Secure Email and Web Manager- GD (General Deployment)438
Common Administrative TasksExample: Releasing Licenses

Evaluation Period Remaining: 89 days 23 hours 53 minutesRegistration Status: Unregistered
License Authorization Status: Evaluation Mode
Last Authorization Renewal Attempt Status: No Communication Attempted
Product Instance Name: mail.example.com
Transport Settings: Direct (https://smartreceiver.cisco.com/licservice/license)
Example: Status Summary of Smart Licensing
example.com> showlicense_smartChoose the operation you want to perform:- STATUS- Show overall Smart Licensing status.- SUMMARY - Show Smart Licensing summary.
[]> summary
FeatureName LicenseAuthorizationStatusMail Handling In ComplianceContent Security Management Master ISQ In Compliance
cloudserviceconfig
• Description, on page 439
• Usage, on page 440
• Example: Enabling Cisco Cloud Services on Appliance, on page 440
• Example: Disabling Cisco Cloud Services on Appliance, on page 440
• Example: Registering Content Security Gateway with Cisco Cloud Services Portal, on page 441
• Example: Deregistering Content Security Gateway from Cisco Cloud Services Portal, on page 441
• Example: Choosing Cisco Secure Cloud Server to connect Content Security Gateway to Cisco CloudServices Portal, on page 441
• Example: Enabling Cisco SecureX or Cisco Threat Response on Content Security Gateway, on page 444
• Example: Disabling Cisco SecureX or Cisco Threat Response from Content Security Gateway, on page444
Description
The cloudserviceconfig command is used to:
• This command is applicable only in Smart Licensing mode.
• Enable the Cisco Cloud Services portal on your appliance.
• Disable the Cisco Cloud Services portal on your appliance.
• Register your Cisco Secure Email and Web Manager with the Cisco Cloud Services portal.
• Automatically register your Cisco Secure Email andWebManager with the Cisco Cloud Services portal.
• Deregister your Cisco Secure Email and Web Manager from the Cisco Cloud Services portal.
User Guide for AsyncOS 14.1 for Cisco Secure Email and Web Manager- GD (General Deployment)439
Common Administrative TasksExample: Status Summary of Smart Licensing

• Choose the Cisco Secure Cloud server to connect your appliance to the Cisco Cloud Services portal.
• Fetch the certificate and key from talos server used by the updater.
• Enable Cisco SecureX (or Cisco Threat Response) on your Cisco Secure Email and Web Manager. Youmust perform this using the General configuration settings.
• Disable Cisco SecureX or Cisco Threat Response on your Cisco Secure Email and Web Manager. Youmust perform this using the General configuration settings.
Usage
• Commit: This command does not require a 'commit.
• Batch Command: This command supports a batch format.
Example: Enabling Cisco Cloud Services on Appliance
In the following example, you can use the cloudserviceconfig > enable sub command to enable Cisco CloudServices on your email gateway.
You can only use this sub command if Smart Software licensing is not enabled, and your appliance is notregistered with Cisco Smart Software Manager
Note
mail1.example.com > cloudserviceconfigChoose the operation you want to perform:- ENABLE - The Cisco Cloud Service is currently disabled on your appliance.[]> enableThe Cisco Cloud Service is currently enabled on your appliance.Currently configured Cisco Secure Cloud Server is: api.apj.sse.itd.cisco.comAvailable list of Cisco Secure Cloud Servers:1. AMERICAS (api-sse.cisco.com)2. APJC (api.apj.sse.itd.cisco.com)3. EUROPE (api.eu.sse.itd.cisco.com)Enter Cisco Secure Cloud Server to connect to the Cisco Cloud Service portal.:[]> 1Selected Cisco Secure Cloud Server is api-sse.cisco.com.Make sure you run "commit" to make these changes active.mail1.example.com > commitPlease enter some comments describing your changes:[]> commit changesDo you want to save the current configuration for rollback? [Y]>Changes committed: Tue Dec 29 13:23:19 2020 GMTmail1.example.com >
Example: Disabling Cisco Cloud Services on Appliance
In the following example, you can use the cloudserviceconfig > disable sub command to disable Cisco CloudServices on your appliance.mail1.example.com> cloudserviceconfigThe appliance is not registered with the Cisco Cloud Service portal.Currently configured Cisco Cloud Server is api-sse.cisco.comChoose the operation you want to perform:- DISABLE - The Cisco Cloud Service is currently enabled on your appliance.- REGISTER - To register the appliance with the Cisco Cloud Service portal.- SETTRS - Set the Cisco Secure Cloud Server to connect to the Cisco CloudService portal.
User Guide for AsyncOS 14.1 for Cisco Secure Email and Web Manager- GD (General Deployment)440
Common Administrative TasksUsage

[]> disableThe Cisco Cloud Service is currently disabled on your appliance.mail1.example.com > commitPlease enter some comments describing your changes:[]> commit changesDo you want to save the current configuration for rollback? [Y]>Changes committed: Tue Dec 29 13:01:07 2020 GMTmail1.example.com >
Example: Registering Content Security Gateway with Cisco Cloud Services Portal
sma> cloudserviceconfig
Cisco Cloud Service portal list update was successful.The appliance is not registered with the Cisco Cloud Service portal.Currently used Cisco Cloud Server is stage-api-sse.cisco.com
Choose the operation you want to perform:- DISABLE - The Cisco Cloud Service is currently enabled on your appliance.- REGISTER - To register the appliance with the Cisco Cloud Service portal.- SETTRS - Set the Cisco Cloud Service portal to connect to the Cisco Cloud Service portal.- UPDATEFQDNLIST - Update the Cisco Cloud Service portal list.- ENABLE_PROXY - Enable connection to Cisco Cloud Server through proxy.[]> REGISTER
Enter a registration token key to register your appliance with the Cisco Cloud Serviceportal.[]> 90a92909fc3b1be666f180621146fea3
The appliance registration is in progress.
Example: Deregistering Content Security Gateway from Cisco Cloud Services Portal
In the following example, you can use the cloudserviceconfig > deregister sub command to deregister yourappliance from the Cisco Cloud Services portal.sma> cloudserviceconfig
Cisco Cloud Service portal list update was successful.The Content Security Management appliance is successfully registered with the Cisco CloudService portal.Currently used Cisco Cloud Server is stage-api-sse.cisco.com
Choose the operation you want to perform:- DISABLE - The Cisco Cloud Service is currently enabled on your appliance.- DEREGISTER - To deregister the appliance from the Cisco Cloud Service portal.- SETTRS - Set the Cisco Cloud Service portal to connect to the Cisco Cloud Service portal.- UPDATEFQDNLIST - Update the Cisco Cloud Service portal list.- ENABLE_PROXY - Enable connection to Cisco Cloud Server through proxy.[]> DEREGISTER
Do you want to deregister your appliance from the Cisco Cloud Service portal.If you deregister, you will not be able to access the Cloud Service features. [N]> Y
The Content Security Management appliance deregistration is in progress.
Example: Choosing Cisco Secure Cloud Server to connect Content Security Gateway to Cisco Cloud Services Portal
In the following example, you can use the cloudserviceconfig > settrs sub command to choose the requiredCisco Secure Cloud Server to connect your email gateway to the Cisco Cloud Services portal.mail1.example.com > cloudserviceconfigThe appliance is not registered with the Cisco Cloud Service portal.Currently configured Cisco Cloud Server is api-sse.cisco.com
User Guide for AsyncOS 14.1 for Cisco Secure Email and Web Manager- GD (General Deployment)441
Common Administrative TasksExample: Registering Content Security Gateway with Cisco Cloud Services Portal

Choose the operation you want to perform:- DISABLE - The Cisco Cloud Service is currently enabled on your appliance.- REGISTER - To register the appliance with the Cisco Cloud Service portal.- SETTRS - Set the Cisco Secure Cloud Server to connect to the Cisco CloudService portal.[]> settrsCurrently configured Cisco Secure Cloud Server is: api-sse.cisco.comAvailable list of Cisco Secure Cloud Servers:1. AMERICAS (api-sse.cisco.com)2. APJC (api.apj.sse.itd.cisco.com)3. EUROPE (api.eu.sse.itd.cisco.com)Enter Cisco Secure Cloud Server to connect to the Cisco Cloud Service portal.:[]> 3Selected Cisco Secure Cloud Server is api.eu.sse.itd.cisco.com.Make sure you run "commit" to make these changes active.mail1.example.com > commitPlease enter some comments describing your changes:[]> commit changesDo you want to save the current configuration for rollback? [Y]>Changes committed: Tue Dec 29 13:37:40 2020 GMT
Example Performing AutoRegistration using CLI for Smart Licensing
In the following example, you can use the command to display after you register once in smart licensing, theappliance performs auto registration in backend. If auto registration fails, you can see command forautoregistration in the CLI.Autoregister Success/ and failuresma> cloudserviceconfig
Cisco Cloud Service portal list update was successful.The appliance is not registered with the Cisco Cloud Service portal.Currently used Cisco Cloud Server is api-sse.cisco.com
Choose the operation you want to perform:- REGISTER - To register the appliance with the Cisco Cloud Service portal.- SETTRS - Set the Cisco Cloud Service portal to connect to the Cisco Cloud Service portal.- UPDATEFQDNLIST - Update the Cisco Cloud Service portal list.- AUTOREGISTER - register the appliance with the Cisco Cloud Service portal automatically.- ENABLE_PROXY - Enable connection to Cisco Cloud Server through proxy.[]> AUTOREGISTER
The appliance failed to auto-register with the Cisco Cloud Service portal.Reason: A request to generate a Smart Licensing payload from Cisco Smart Software Managerfailed.The appliance is not registered with the Cisco Cloud Service portal.Currently used Cisco Cloud Server is api-sse.cisco.com
Choose the operation you want to perform:- REGISTER - To register the appliance with the Cisco Cloud Service portal.- SETTRS - Set the Cisco Cloud Service portal to connect to the Cisco Cloud Service portal.- UPDATEFQDNLIST - Update the Cisco Cloud Service portal list.- AUTOREGISTER - register the appliance with the Cisco Cloud Service portal automatically.- ENABLE_PROXY - Enable connection to Cisco Cloud Server through proxy.[]> AUTOREGISTER
The appliance successfully auto-registered with the Cisco Cloud Service portal.
Example Download a Certificate and Key
In the following example, you can use the command to Fetch the certificate and key used by the updater fromthe TALOS server.
User Guide for AsyncOS 14.1 for Cisco Secure Email and Web Manager- GD (General Deployment)442
Common Administrative TasksExample Performing AutoRegistration using CLI for Smart Licensing

sma> cloudserviceconfig
Cisco Cloud Service portal list update was successful.The Content Security Management appliance is successfully registered with the Cisco CloudService portal.Currently used Cisco Cloud Server is api-sse.cisco.com
Choose the operation you want to perform:- UPDATEFQDNLIST - Update the Cisco Cloud Service portal list.- FETCHCERTIFICATE - Download the Cisco Talos certificate and key- ENABLE_PROXY - Enable connection to Cisco Cloud Server through proxy.[]> FETCHCERTIFICATE
Current Cisco Talos certificate is valid for 172 days
Do you like to overwrite the existing certificate and key [Y|N] ? []> N
The Content Security Management appliance is successfully registered with the Cisco CloudService portal.Currently used Cisco Cloud Server is api-sse.cisco.com
Example Client Certificate cloudserviceconfig
In the following example, you can use the command to upload the certificate and the key.[]> clientcertificate
Do you like to overwrite the existing certificate and key [Y|N] ? []> Y
Paste the certificate.Press CTRL-D on a blank line when done.-----BEGIN CERTIFICATE-----AQEFAAOCAQ8AMIIBCgKCAQEAyf9pD6jCYmA2YUmzjs711J80V2Ehil8FnvDo8ElJcVPlrZFwzTmI5wHTrQi0YkjaYsbe9Nbh9q5vdmrL58Pmiky7HOhOYFXcHi95U1SarY6DhYNw8isKxFuG0Xnm1mNzSSIQdIcTvqIV/iPUjQl8Omwl/p1ErDl5J7MY5kNLMpES7AmQitef0BRmcDmpammCCVmUx2b1A7PmepclCVs2PfaoqIGy26CcAonFOlrJMIIDYzCCAkugAwIBAgIDCMvdMA0GCSqGSIb3DQEBCwUAMIGCMQswCQYDVQQGEwJVGlyOpFkbHg8ALkdKiD4RHXkUSKdadFDKIAIgc/9g9adrUwIDAQABoxowGDAJBgNVUzETMBEGA1UECBMKQ2FsaWZvcm5pYTERMA8GA1UEBxMIU2FuIEpvc2UxGzAZBgNVBAoTEkNpc2NvIFN5c3RlbXMgSW5jLjERMA8GA1UECxMIU2VjdXJpdHkxGzAZBgNVBAMTElN0YWdlIEtleW1hc3RlciBDQTAeFw0xOTAyMTkwMzU3MzhaFw0yMjA0MDIw2jgYEzrhGtZmx+hpAmHi1i8cnIarD5oePtcggOafxpa/32rqXPGfjiaJU6cdA6SuQguqh7/bn6u8R9EMjzu4V+Rn54JZMTcJ9v/u5OC1kKohsMFMwBQ0EpPL5CpM8NDxSjGPIMP2SrqktLORlTqtvcx8SnMurrxe61PnrUs93z1nRSXhcHGlyrQs6HIqIvMTMzU3MzhaMEkxHTAbBgkqhkiG9w0BCQEWDnRlc3RAY2lzY28uY29tMRgwFgYDVQQDDA9WTE5TTUExMjM0NTY3ODkxDjAMBgNVBAoMBWNpc2NvMIIBIjANBgkqhkiG9w0BAQEFAAOCAQ8AMIIBCgKCAQEAyf9pD6jCYmA2YUmzjs711J80V2Ehil8FnvDo8ElJcVPlrZFwzTmI5wHTrQi0YkjaYsbe9Nbh9q5vdmrL58Pmiky7HOhOYFXcHi95U1SarY6DhYNw8isKxFuG0Xnm1mNzSSIQdIcTvqIV/iPUjQl8Omwl/p1ErDl5J7MY5kNLMpES7AmQitef0BRmcDmpammCCVmUx2b1A7PmepclCVs2PfaoqIGy26CcAonFOlrJuT6K+qrTusUEP41oDC7IrpnbBE697xzbtF8l7xgxUosxP+OuXcgtTX1TXcY516jSGlyOpFkbHg8ALkdKiD4RHXkUSKdadFDKIAIgc/9g9adrUwIDAQABoxowGDAJBgNVHRMEAjAAMAsGA1UdDwQEAwIHgDANBgkqhkiG9w0BAQsFAAOCAQEAOKYfiZfJg4rMIWM73wz8u7Wtj97E6rGVgsj0D54fOKF6DmqHfyqPCuXns0Fl8nL1Da3ogslLwIrSd5a1lfj/2r6NfbN0hjKN7/5PGBtcRyMDi86aUBoqahNmgCwDKTTJgoVTO0//a+Ca2jgYEzrhGtZmx+hpAmHi1i8cnIarD5oePtcggOafxpa/32rqXPGfjiaJU6cdA6SuQguqh7/bn6u8R9EMjzu4V+Rn54JZMTcJ9v/u5OC1kKohsMFMwBQ0EpPL5CpM8NDxSjGPIMP2SrqktLORlTqtvcx8SnMurrxe61PnrUs93z1nRSXhcHGlyrQs6HIqIvMTJ1SwgurFWg==-----END CERTIFICATE-----^D
Paste Private Key.
User Guide for AsyncOS 14.1 for Cisco Secure Email and Web Manager- GD (General Deployment)443
Common Administrative TasksExample Client Certificate cloudserviceconfig

Press CTRL-D on a blank line when done.-----BEGIN RSA PRIVATE KEY-----ZzSWnNAdMjtobo6dx1iMfbaWDd1Um+PIEiBXEy5z74btukQUGTI0DXsCgYEA36q3gH/+2ybheB8iCYQfZnZkeUM4qqN3HkRmrhTB9OlPLkZ0B0fstPfpEcw/v/lz3BRQDyk5VlgEtnOpWbyYKqlZbFPHbddQGTIbCV4T1hyEcjNbyD2SSCIv5gxF70TBR5qD14HT3PPt4HXpgcFw70NofNSnpNm63OhkW4SBNgkCgYEAs8Y4VMWA2WWEAFZhIZKS4Jw8/yWYe4V746aWRVN7wL99aRK6eVTk7kCEZLG7+vqzboSORPi98QXY1o/aBNhgMIIEowIBAAKCAQEAyf9pD6jCYmA2YUmzjs711J80V2Ehil8FnvDo8ElJcVPlrZFwNEnrtal7WnKNZz96nC1kaqh8DBaGuoMPTbEGrEjnavfm7JDY/vlLxTUE2SMRd2ZXzTmI5wHTrQi0YkjaYsbe9Nbh9q5vdmrL58Pmiky7HOhOYFXcHi95U1SarY6DhYNwBHXHikhkl+8ibEB2K+XlQUPSCy7aGmbekc8y0vJBVObdKx+/uIwuk1buy4rUybMyf3DsaHI6Yj7jYi4aI1ec7HT0X60vxc4eahBv8DvaIF3Ak0LyIvdLomycVkG58siVLt+psQKBgFjRVfNddwgcX5QaQXopYJWa/HFnWgH7jXgVFeR1Q9smq7L0Yk39GrxT8isKxFuG0Xnm1mNzSSIQdIcTvqIV/iPUjQl8Omwl/p1ErDl5J7MY5kNLMpES7AmQitef0BRmcDmpammCCVmUx2b1A7PmepclCVs2PfaoqIGy26CcAonFOlrJuT6K+qrTusUEP41oDC7IrpnbBE697xzbtF8l7xgxUosxP+OuXcgtTX1TXcY516jSGlyOpFkbHg8ALkdKiD4RHXkUSKdadFDKIAIgc/9g9adrUwIDAQABAoIBAE+jQNqJoEmEwSvOENqmwcjYE5y3kK+rEt49ALlrS2dAunaZtq1Sl6Tr1XaMzgFJ07/JxDEnXuMQlqVLKaTwWT4BTmvxMqVMdIH6GY0+99ShMT08OxVe3tnXc+m2c8nmX5dftLkcYC5yXNVbbvtD2BR4eupNOrvj1N5P/+sYcNc4I7ZAAheGfhLc4oDTMiHIE5g6Dyvh7j+WIi9ybpoU99fFV7jcGtql5AOUQtLUtuO6d1tk2WL1+m2qsX7uMkQ5ddM9vGbTRg0IkjRbPVpshAK5j/RsQCUN6LlRq+SY7y18CllZ4MYWXu754KqMloK8UDarI+dKISyVskfe69lNQ2ECgYEA5zLHTykFOA349MyliSQxIE6YsVL8tc1Ryf/PB69OoTY+vKUcmCZpTzLPuEEbyzndAIW7FagVG5aYYFXD0kcUE9LUCCTl5bTOiYJM0YCGgsHnBpqUI7yIZzSWnNAdMjtobo6dx1iMfbaWDd1Um+PIEiBXEy5z74btukQUGTI0DXsCgYEA36q3gH/+2ybheB8iCYQfZnZkeUM4qqN3HkRmrhTB9OlPLkZ0B0fstPfpEcw/v/lz3BRQDyk5VlgEtnOpWbyYKqlZbFPHbddQGTIbCV4T1hyEcjNbyD2SSCIv5gxF70TBR5qD14HT3PPt4HXpgcFw70NofNSnpNm63OhkW4SBNgkCgYEAs8Y4VMWA2WWEAFZhIZKS4Jw8/yWYe4V746aWRVN7wL99aRK6eVTk7kCEZLG7+vqzboSORPi98QXY1o/aBNhgNEnrtal7WnKNZz96nC1kaqh8DBaGuoMPTbEGrEjnavfm7JDY/vlLxTUE2SMRd2ZXXEDpdHDalZZFpGDrf+wZraECgYB3cT1pe/Dnq43Aji+pEUuLdjIVp9Y9Gepk2XZUBHXHikhkl+8ibEB2K+XlQUPSCy7aGmbekc8y0vJBVObdKx+/uIwuk1buy4rUybMyf3DsaHI6Yj7jYi4aI1ec7HT0X60vxc4eahBv8DvaIF3Ak0LyIvdLomycVkG58siVLt+psQKBgFjRVfNddwgcX5QaQXopYJWa/HFnWgH7jXgVFeR1Q9smq7L0Yk39GrxTGu2acBalPQR474nW9394XqmPTJ5tYhf80nmT7JRwYEgE2C/flnDDea9YFoiX/yP3fD4kLyDPgQ8utQwK7X7aK1PxdEIsXKZLcR6FoeT0wQj31gCG2igH-----END RSA PRIVATE KEY-----^DCertificate and key are stored successfully
Example: Enabling Cisco SecureX or Cisco Threat Response on Content Security Gateway
In the following example, you can use the clouderviceconfig > enablesecurecx sub command to enable CiscoSecureX or Cisco Threat Response on your appliance.Choose the operation you want to perform:- IEOVERRIDE - Configure Internet Explorer Compatibility Mode Override- SECUREX - Configure Cisco SecureX/ Threat Response feature on your appliance[]> SECUREX
The Cisco SecureX / Threat Response feature is currently disabled on your appliance.Would you like to enable Cisco SecureX/ Threat Response feature [Y]>
Cloud Service is not enabled.Enter "cloudserviceconfig" for enabling Cisco Cloud service.
Example: Disabling Cisco SecureX or Cisco Threat Response from Content Security Gateway
In the following example, you can use the cloudserviceconfig >disablesecurex sub command to disable CiscoSecureX or Cisco Threat Response on your appliance.sma> generalconfig
Choose the operation you want to perform:
User Guide for AsyncOS 14.1 for Cisco Secure Email and Web Manager- GD (General Deployment)444
Common Administrative TasksExample: Enabling Cisco SecureX or Cisco Threat Response on Content Security Gateway

- IEOVERRIDE - Configure Internet Explorer Compatibility Mode Override- SECUREX - Configure Cisco SecureX/ Threat Response feature on your appliance[]> SECUREX
The Cisco SecureX / Threat Response feature is currently enabled on your appliance.Would you like to disable Cisco SecureX/ Threat Response feature [N]> Y
The Cisco SecureX / Threat Response feature is currently disabled on your appliance.The Cisco Cloud Service is currently disabled on your appliance.
Smart Software Licensing Key Points for AsyncOS 14.0• Cisco SecureX will be automatically enabled when you enable Cloud Services and Cisco Securex willbe disabled when Cloud Services is disabled.
• Cisco SecureX and Cisco Threat Response option is now changed in the Web UI and you can enable ordisable Cisco SecureX and Cisco Threat Response from System Administration > General Settings.You can also perform the same from CLI by using the generalconfig command.
• Cloud Service will be enabled and Appliance(SSE) will be registered automatically when smart softwarelicensing is enabled and registered.
• In Classic Mode, Cloud Service will be in disabled state by default. You need to enable it manually andCisco SecureX and Cisco Threat Response will be enabled. You must enable smart licensing mode forauto-registration to occur.
• After Enabling Smart Software Licensing, the Smart Agent is started and once the registration is completed,Cloud services will be enabled.
• You cannot perform an SSE auto registration when smart license is with evaluation mode.
Performing Maintenance Tasks Using CLI CommandsThe operations and commands described in this section enable you to perform maintenance-related tasks onthe Security Management appliance. This section describes the following operations and commands:
• shutdown• reboot• suspend• suspendtransfers• resume• resumetransfers• resetconfig• version
Shutting Down the Security Management ApplianceTo shut down your Security Management appliance, do the folliwng:
• Use the Management Appliance > System Administration > Shutdown/Reboot page.
or
• Use the shutdown command at the command-line prompt.
User Guide for AsyncOS 14.1 for Cisco Secure Email and Web Manager- GD (General Deployment)445
Common Administrative TasksSmart Software Licensing Key Points for AsyncOS 14.0

Shutting down an appliance exits AsyncOS, which allows you to safely power down the appliance. You mayrestart the appliance at a later time without losing any messages in the delivery queue. You must enter a delayfor the appliance to shut down. The default delay is 30 seconds. AsyncOS allows open connections to completeduring the delay, after which it forcefully closes open connections.
Rebooting the Security Management ApplianceTo reboot your Security Management appliance, use the Shutdown/Reboot page available on the SystemAdministration menu in the GUI, or use the r eboot command in the CLI.
Rebooting your appliance restarts AsyncOS, which allows you to safely power down and reboot the appliance.You must enter a delay for the appliance to shut down. The default delay is 30 seconds. AsyncOS allows openconnections to complete during the delay, after which it forcefully closes open connections. You may restartthe appliance without losing any messages in the delivery queue.
Taking the Security Management Appliance Out of ServiceIf you want to take the appliance offline, for example to perform systemmaintenance, use one of the followingcommands:
PersistenceDescriptionCommand
Persists afterreboot.
• Suspends transfer of quarantined messages from the EmailSecurity appliance to the Security Management appliance.
• Suspends delivery of messages released from quarantines.
• Inbound email connections are not accepted.
• Outbound email delivery is halted.
• Log transfers are halted.
• The CLI remains accessible.
suspend
Persists afterreboot.
Suspends transfer of reporting and tracking data frommanaged emailand web security appliances to the content security managementappliance.
This command also suspends receiving of quarantined messagesfrom Email Security appliances.
Use this command when preparing to bring a backup appliance intoservice as the primary appliance.
suspendtransfers
You must enter a delay for the appliance when using these commands. The default delay is 30 seconds.AsyncOS allows open connections to complete during the delay, after which it forcefully closes openconnections. If there are no open connections, service is suspended immediately.
To re-activate services that were halted by the suspend or suspendtransfers commands, use the resume orresumetransfers commands, respectively.
To determine the current online/suspended status of themanagement appliance, selectManagement Appliance> System Administration > Shutdown/Reboot in the web interface.
User Guide for AsyncOS 14.1 for Cisco Secure Email and Web Manager- GD (General Deployment)446
Common Administrative TasksRebooting the Security Management Appliance

See also:
• “Suspending Email Delivery,” “Resuming Email Delivery,” “Suspending Receiving,” and “ResumingReceiving” in the documentation or online help for your Email Security appliance.
CLI Examples: suspend and suspendtransfers Commands
sma.example.com> suspendEnter the number of seconds to wait before abruptly closing connections.[30]> 45Waiting for listeners to exit...Receiving suspended.Waiting for outgoing deliveries to finish...Mail delivery suspended.sma.example.com>sma.example.com> suspendtransfers
Transfers suspended.sma.example.com>
Resuming from a Suspended StateThe resume command returns the appliance to normal operating state after using the suspend or suspenddelcommand.
The resumetransfers command returns the appliance to normal operating state after using the suspendtransferscommand.
CLI Examples: resume and resumetransfers Commands
sma.example.com> resumeReceiving resumed.Mail delivery resumed.sma.example.com>sma.example.com> resumetransfers
Receiving resumed.Transfers resumed.sma.example.com>
Resetting the Configuration to Factory DefaultsWhen physically transferring the appliance, or as a last resort for solving configuration issues, you may wantto reset the appliance to factory defaults.
Resetting the configuration will disconnect you from the CLI, disable services that you used to connect to theappliance (FTP, Telnet, SSH, HTTP, HTTPS), and remove user accounts.
Caution
User Guide for AsyncOS 14.1 for Cisco Secure Email and Web Manager- GD (General Deployment)447
Common Administrative TasksCLI Examples: suspend and suspendtransfers Commands

Do ThisTo
1. Ensure that you can connect to the appliance after reset using thedefault admin user account and passphrase, either to the CLI usingthe serial interface or to the Management port using the defaultsettings. See chapter Setup, Installation, and Basic Configuration,on page 9 for information about accessing an appliance havingdefault settings.
2. Suspend service on the appliance.
3. Select Management Appliance > System Administration >Configuration File and click Reset.
After resetting, the appliance automatically returns to theonline state. If mail delivery was suspended before reset,delivery will be attempted again after the reset.
Note
• Reset all configurations tofactory defaults
• Clear all reporting counters
But
• Retain log files
• Retain quarantined messages
Use the diagnostic > reload CLI command.
This command is NOT the same as the similar command usedon a Cisco router or switch.
Caution
• Reset all configurations tofactory defaults
• Remove all data
The resetconfig Command
mail3.example.com> suspendDelay (seconds, minimum 30):[30]> 45Waiting for listeners to exit...Receiving suspended.Waiting for outgoing deliveries to finish...Mail delivery suspended.mail3.example.com> resetconfigAre you sure you want to reset all configuration values? [N]> YAll settings have been restored to the factory default.
Displaying the Version Information for AsyncOS
Step 1 [New Web Interface Only] On the Security Management appliance, click to load the legacy web interface.Step 2 Choose Management Appliances > Centralized Services > System Status.Step 3 Scroll to the bottom of the page and look under Version Information to see the version of AsyncOS that is currently
installed.
Additionally, you can use the version command at the command-line prompt.
User Guide for AsyncOS 14.1 for Cisco Secure Email and Web Manager- GD (General Deployment)448
Common Administrative TasksThe resetconfig Command

Enabling Remote Power CyclingThe ability to remotely reset the power for the appliance chassis is available only on 80- and 90- serieshardware.
If you want to be able to remotely reset appliance power, you must enable and configure this functionality inadvance, using the procedure described in this section.
Before you begin
• Cable the dedicated Remote Power Cycle (RPC) port directly to a secure network. For information, seehardware documentation for your model, available from the location listed in Documentation , on page595.
• Ensure that the appliance is accessible remotely; for example, open any necessary ports through thefirewall.
• This feature requires a unique IPv4 address for the dedicated Remote Power Cycle interface. This interfaceis configurable only via the procedure described in this section; it cannot be configured using the ipconfigcommand.
• In order to cycle appliance power, you will need a third-party tool that can manage devices that supportthe Intelligent Platform Management Interface (IPMI) version 2.0. Ensure that you are prepared to usesuch a tool.
• For more information about accessing the command-line interface, see the CLI reference guide.
Step 1 Use SSH, telnet, or the serial console port to access the command-line interface.Step 2 Sign in using an account with Administrator access.Step 3 Enter the following commands:
remotepower
setup
Step 4 Follow the prompts to specify the following:
• The dedicated IP address for this feature, plus netmask and gateway.
• The username and passphrase required to execute the power-cycle command.
These credentials are independent of other credentials used to access your appliance.
Step 5 Enter commit to save your changes.Step 6 Test your configuration to be sure that you can remotely manage appliance power.Step 7 Ensure that the credentials that you entered will be available to you in the indefinite future. For example, store this
information in a safe place and ensure that administrators who may need to perform this task have access to the requiredcredentials.
User Guide for AsyncOS 14.1 for Cisco Secure Email and Web Manager- GD (General Deployment)449
Common Administrative TasksEnabling Remote Power Cycling

What to do next
Remotely Resetting Appliance Power , on page 573
Monitoring System Health Using SNMPAsyncOS supports system status monitoring via Simple Network Management Protocol (SNMP) versionsv1, v2, and v3.
• To enable and configure SNMP, use the snmpconfig command in the command-line interface.
• MIBs are available from http://www.cisco.com/c/en/us/support/security/content-security-management-appliance/tsd-products-support-series-home.html use the latest availablefiles.
• The use of SNMPv3 with passphrase authentication and DES Encryption is mandatory to enable thisservice. (For more information on SNMPv3, see RFCs 2571-2575.) You are required to set a SNMPv3passphrase of at least 8 characters to enable SNMP system status monitoring. The first time you enter aSNMPv3 passphrase, youmust re-enter it to confirm. The snmpconfig command “remembers” this phrasethe next time you run the command.
• When setting up SNMP to monitor connectivity:
When entering the url-attribute while configuring a connectivityFailure SNMP trap, determine whetherthe URL is pointing at a directory or a file.
• If it is a directory, add a trailing slash (/)
• If it is a file, do not add a trailing slash
• Additional information about using SNMP with AsyncOS is available in the online help for your webor email security appliance.
Example: snmpconfig Command
sma.example.com> snmpconfigCurrent SNMP settings:SNMP Disabled.Choose the operation you want to perform:- SETUP - Configure SNMP.[]> SETUPDo you want to enable SNMP?[Y]>Please choose an IP interface for SNMP requests.1. Management (198.51.100.1: sma.example.com)[1]>Which port shall the SNMP daemon listen on interface "Management"?[161]>Please select SNMPv3 authentication type:1. MD52. SHA[1]> 2Please select SNMPv3 privacy protocol:1. DES2. AES[1]> 2
User Guide for AsyncOS 14.1 for Cisco Secure Email and Web Manager- GD (General Deployment)450
Common Administrative TasksMonitoring System Health Using SNMP

Enter the SNMPv3 authentication passphrase.[]>Please enter the SNMPv3 authentication passphrase again to confirm.[]>Enter the SNMPv3 privacy passphrase.[]>Please enter the SNMPv3 privacy passphrase again to confirm.[]>Service SNMP V1/V2c requests?[N]> YEnter the SNMP V1/V2c community string.[ironport]> publicShall SNMP V2c requests be serviced from IPv4 addresses?[Y]>From which IPv4 networks shall SNMP V1/V2c requests be allowed? Separatemultiple networks with commas.[127.0.0.1/32]>Enter the Trap target as a host name, IP address or list of IPaddresses separated by commas (IP address preferred). Enter "None" to disable traps.[127.0.0.1]> 203.0.113.1Enter the Trap Community string.[ironport]> tcommEnterprise Trap Status1. CPUUtilizationExceeded Disabled2. FIPSModeDisableFailure Enabled3. FIPSModeEnableFailure Enabled4. FailoverHealthy Enabled5. FailoverUnhealthy Enabled6. RAIDStatusChange Enabled7. connectivityFailure Disabled8. fanFailure Enabled9. highTemperature Enabled10. keyExpiration Enabled11. linkUpDown Enabled12. memoryUtilizationExceeded Disabled13. powerSupplyStatusChange Enabled14. resourceConservationMode Enabled15. updateFailure EnabledDo you want to change any of these settings?[N]> YDo you want to disable any of these traps?[Y]> nDo you want to enable any of these traps?[Y]> yEnter number or numbers of traps to enable. Separate multiple numbers withcommas.[]> 1,7,12What threshold would you like to set for CPU utilization?[95]>What URL would you like to check for connectivity failure?[http://downloads.ironport.com]>What threshold would you like to set for memory utilization?[95]>Enter the System Location string.[Unknown: Not Yet Configured]> Network Operations Center - west; rack #30, position 3Enter the System Contact string.[snmp@localhost]> [email protected] SNMP settings:Listening on interface "Management" 198.51.100.1 port 161.SNMP v3: Enabled.SNMP v1/v2: Enabled, accepting requests from subnet 127.0.0.1/32 .SNMP v1/v2 Community String: publicTrap target: 203.0.113.1Location: Network Operations Center - west; rack #30, position 3
User Guide for AsyncOS 14.1 for Cisco Secure Email and Web Manager- GD (General Deployment)451
Common Administrative TasksExample: snmpconfig Command
System Contact: [email protected] the operation you want to perform:- SETUP - Configure SNMP.[]>sma.example.com> commitPlease enter some comments describing your changes:[]> Enable and configure SNMPChanges committed: Fri Nov 06 18:13:16 2015 GMTsma.example.com>
Backing Up Security Management Appliance Data• What Data Is Backed Up , on page 452• Restrictions and Requirements for Backups , on page 452• Backup Duration , on page 454• Availability of Services During Backups , on page 454• Interruption of a Backup Process , on page 454• Prevent the Target Appliance From Pulling Data Directly from Managed Appliances , on page 455• Receiving Alerts About Backup Status , on page 455• Scheduling Single or Recurring Backups, on page 455• Starting an Immediate Backup, on page 456• Checking Backup Status , on page 456• Other Important Backup Tasks , on page 457• Making a Backup Appliance the Primary Appliance , on page 457
What Data Is Backed UpYou can choose to back up all data, or any combination of the following data:
• Spam quarantine, including messages and meta data
• Centralized policy, virus, and outbreak quarantines, including messages and meta data
• Email tracking (message tracking), including messages and meta data
• Web tracking
• Reporting (Email and Web)
• Safelist/blocklist
After the data transfer is finished, the data on the two appliances will be identical.
Configurations and logs are not backed up using this process. To back up those items, see Other ImportantBackup Tasks , on page 457.
Each backup after the first backup copies only the information generated since the last backup.
Restrictions and Requirements for BackupsBe sure to address the following restrictions and requirements before you schedule a backup:
User Guide for AsyncOS 14.1 for Cisco Secure Email and Web Manager- GD (General Deployment)452
Common Administrative TasksBacking Up Security Management Appliance Data

RequirementRestriction
The AsyncOS version of the source and target Security Management appliancesmust be the same. If there is a version incompatibility, upgrade appliances to thesame release before scheduling a backup.
AsyncOS version
The target appliance must be set up on the network.
If the target appliance is new, run the System Setup Wizard to enter the necessaryinformation. For instructions, see Setup, Installation, and Basic Configuration, onpage 9
Target appliance on thenetwork
The source and target Security Management appliances must be able tocommunicate using SSH. Therefore:
• Port 22 must be open on both appliances. By default, this port is opened whenyou run the System Setup Wizard.
• The Domain Name Server (DNS) must be able to resolve the host names ofboth appliances using both A records and PTR records.
Communication betweensource and targetappliances
Only the primary appliance should pull data frommanaged email and web securityappliances. To ensure this, see Prevent the Target Appliance From Pulling DataDirectly from Managed Appliances , on page 455.
Also, cancel any scheduled configuration publishing jobs on the backup appliance.
Target appliance mustnot be in service
The disk space capacity of the target appliance must be the same as or greater thanthe capacity of the source appliance. Disk space allocated to each type of data(reporting, tracking, quarantine, etc.) on the target appliance cannot be less thanthe corresponding allocation on the source appliance.
You can schedule a backup from a larger source to a smaller target SecurityManagement appliance as long as there is enough space on the target appliancefor all of the data being backed up, for each type of data. If the source applianceis larger than the target appliance, you must reduce the space allocated on thesource appliance to match the space available on the smaller target appliance.
To view and manage disk space allocations and capacity, see Managing DiskSpace , on page 494.
For disk capacity of virtual appliances, see the Cisco Content Security VirtualAppliance Installation Guide .
Appliance capacity
Only one backup process can run at a time; a backup that is scheduled to run beforea previous backup has been completed will be skipped and a warning sent.
Data from a SecurityManagement appliance can be backed up to a single SecurityManagement appliance.
Chained backup (a backup to a backup) is not supported.
Multiple, concurrent, andchained backups
User Guide for AsyncOS 14.1 for Cisco Secure Email and Web Manager- GD (General Deployment)453
Common Administrative TasksRestrictions and Requirements for Backups

Backup DurationDuring a full initial backup, a backup of 800GB may take up to 10 hours. Daily backups, may take up to 3hours each. Weekly and monthly backups may take longer. These numbers may vary.
After the initial backup, the backup process transfers only files that have changed since the last backup. Thus,subsequent backups should take less time than the initial backup. The time required for subsequent backupsdepends on the amount of data accumulated, how many files have changed, and to what extent the files havechanged since the last backup.
Availability of Services During BackupsBacking up a SecurityManagement appliance copies the active data set from the ‘source’ SecurityManagementappliance to a ‘target’ Security Management appliance with minimum disruption on the originating ‘source’appliance.
The phases of the backup process and their effect on the availability of services are as follows:
• Phase 1—Phase 1 of the backup process starts with the data transfer between the source and targetappliances. During data transfer, services on the source appliance remain running, therefore data collectioncan still continue. However, services are shut down on the target appliance. Once the data transfer iscomplete from the source to target appliance, Phase 2 begins.
• Phase 2—When Phase 2 begins, services on the source appliance are shut down. Any differences thathave collected during the data transfer between the source and target appliance since the initial shutdownare copied to the target appliance and services on both the source and the target appliances are returnedto the state they were in when backup was initiated. This allows maintain maximum uptime on the sourceappliance and no data loss for either appliance.
During the backup, data availability reports may not work, and when viewing the message tracking results,the hostname for each message may be labeled as ‘unresolved’.
If you try to schedule a report and forget that a backup is in progress, you can check the system status bychoosing Management Appliance > Centralized Services. From this window you can see the warning atthe top of the page that a system backup is in progress.
Interruption of a Backup Process
If there is an unexpected reboot of the source appliance while a backup is being performed, the target applianceis unaware of this stoppage. You must cancel the backup on the target appliance.
Note
If there is an interruption of the backup process and the backup process is not completed, the next time abackup is attempted, the Security Management appliance can start the backup process up from where it wasstopped.
Canceling a backup in progress is not recommended, as the existing data will be incomplete and may not beusable until a subsequent backup is completed, especially if you receive an error. If you must cancel a backupin progress, be sure to run a complete backup as soon as possible to ensure that you always have a usablecurrent backup.
User Guide for AsyncOS 14.1 for Cisco Secure Email and Web Manager- GD (General Deployment)454
Common Administrative TasksBackup Duration

Prevent the Target Appliance From Pulling Data Directly from ManagedAppliances
Step 1 Access the command-line interface of the target appliance. For instructions, see Accessing the Command Line Interface,on page 16.
Step 2 Run the suspendtransfers command.Step 3 Wait for the prompt to reappear.Step 4 Run the suspend command.Step 5 Wait for the prompt to reappear.Step 6 Exit the command-line interface of the target appliance.
Receiving Alerts About Backup StatusTo receive alerts when backups are complete and be informed of any issues, configure the appliance to sendyou alerts of type System, severity Info. See Managing Alerts, on page 473.
Scheduling Single or Recurring BackupsYou can schedule a single or recurring backup to occur at a predetermined time.
A backup process will not start if there are any ongoing backups on the remote machine.Note
Before you begin
• Address the items in Restrictions and Requirements for Backups , on page 452.
• Make sure you disable two-factor authentication temporarily on the target appliance before you beginthe backup process. Once the backup process is complete, you can enable two-factor authentication onthe target appliance.
Step 1 Login, as administrator, to the command-line interface of the source appliance.Step 2 At the command prompt, type backupconfigand press Enter.Step 3 If the connection between source and target appliances is slow, turn on data compression:
Type setup and enter Y.
Step 4 Type Schedule and press Enter.Step 5 Type the IP address of the target Security Management appliance.Step 6 Enter a meaningful name to identify the target appliance (up to 20 characters).Step 7 Enter the admin user name and passphrase for the target appliance.Step 8 Respond to prompts about which data you want to back up.
User Guide for AsyncOS 14.1 for Cisco Secure Email and Web Manager- GD (General Deployment)455
Common Administrative TasksPrevent the Target Appliance From Pulling Data Directly from Managed Appliances

Step 9 To schedule a single backup, type 2 to Schedule a single backup and press Enter.Step 10 To schedule a recurring backup:
a) Type 1 to Setup Repeating Backup Schedule and press Enter.b) Choose the frequency for your periodic backup and press Enter.
Step 11 Type the specific date or day and time that you want the backup to start and press Enter.Step 12 Type the name of the backup process.Step 13 Verify that the backup was successfully scheduled: Type View and press Enter at the command prompt.Step 14 See also Other Important Backup Tasks , on page 457.
Starting an Immediate Backup
A backup process will not start if there are any ongoing backups on the target machine.Note
Before you begin
Meet all requirements in Restrictions and Requirements for Backups , on page 452.
Step 1 Login, as administrator, to the command-line interface of the source appliance.Step 2 At the command prompt, type backupconfig and press Enter.Step 3 If the connection between source and target appliances is slow, turn on data compression:
Type setup and enter Y.
Step 4 Type Schedule and press Enter.Step 5 Type the IP address of the target Security Management appliance.Step 6 Enter a meaningful name to identify the target appliance (up to 20 characters).Step 7 Enter the admin user name and passphrase for the target appliance.Step 8 Respond to prompts about which data you want to back up.Step 9 Type 3to Start a Single Backup Now and press Enter.Step 10 Enter a meaningful name for the backup job.
The backup process begins in a few minutes.
Step 11 (Optional) To see the progress of the backup, type Status at the command-line prompt.Step 12 See also Other Important Backup Tasks , on page 457.
Checking Backup Status
Step 1 Log in, as administrator, to the command-line interface of the primary appliance.
User Guide for AsyncOS 14.1 for Cisco Secure Email and Web Manager- GD (General Deployment)456
Common Administrative TasksStarting an Immediate Backup

Step 2 At the command prompt, type backupconfig and press Enter.
Do ThisTo Check Status Of
Choose the View operation.A scheduled backup
Choose the Status operation.
If you have configured alerts, check your email or see Viewing Recent Alerts , on page 475.
A backup in progress
What to do next
Related Topics
Backup Information in Log Files , on page 457
Backup Information in Log FilesBackup logs record the backup process from start to finish.
Information about backup scheduling is in the SMA logs.
Related Topics
• Checking Backup Status , on page 456
Other Important Backup TasksConsider doing the following in order to prevent loss of items that are not backed up by the backup processesdescribed in this section, and to speed setup of your replacement Security Management appliance in case ofappliance failure:
• To save the settings from your primary Security Management appliance, see Saving and ImportingConfiguration Settings , on page 487. Save the configuration file to a safe location separate from yourprimary Security Management appliance.
• Save any Web Security appliance configuration files that you used to populate your ConfigurationMasters.
• To save log files from your SecurityManagement appliance to an alternate location, see Log Subscriptions,on page 557.
Additionally, you can set up a log subscription for Backup Logs. See Creating a Log Subscription in the GUI,on page 559.
Making a Backup Appliance the Primary ApplianceIf you are upgrading appliance hardware, or if you need to switch appliances for any other reason, use thisprocedure.
Before you begin
Review the information in Backing Up Security Management Appliance Data , on page 452.
User Guide for AsyncOS 14.1 for Cisco Secure Email and Web Manager- GD (General Deployment)457
Common Administrative TasksBackup Information in Log Files

Step 1 Save a copy of the configuration file from your old/primary/source appliance to a location that you can reach from thenew appliance. See Saving and Importing Configuration Settings , on page 487.
Step 2 Run the System Setup Wizard on the new/backup/target appliance.Step 3 Meet the requirements in Restrictions and Requirements for Backups , on page 452.Step 4 Run a backup from the old/primary/source appliance. See instructions at Starting an Immediate Backup, on page 456.Step 5 Wait for the backup to complete.Step 6 Run the suspendtransfers and suspend commands on the old/primary/source appliance.Step 7 Run a second backup to transfer last-minute data from the old/primary/source to the new/backup/target appliance.Step 8 Import the configuration file into the new/backup/target appliance.Step 9 Run the resumetransfers and resume commands on the new/backup/target appliance.
Do NOT run this command on the old/original primary/source appliance.
Step 10 Establish the connection between the new/backup/target appliance and the managed email and web security appliances:
Step 11 [New Web Interface Only] On the Security Management appliance, click to load the legacy web interface.a)b) Select Management Appliance > Centralized Services > Security Appliances.c) Click an appliance name.d) Click the Establish Connection button.e) Click Test Connection.f) Return to the list of appliances.g) Repeat for each managed appliance.
Step 12 Verify that the new/target appliance is now functioning as the primary appliance:
Select Management Appliance > Centralized Services > System Status and check the status of data transfers.
Disaster Recovery on the Security Management ApplianceIf your Security Management appliance unexpectedly fails, use the following procedure to restore securitymanagement services and your backed-up data, which you regularly save using the information in BackingUp Security Management Appliance Data , on page 452.
A typical appliance configuration might look as shown in the following figure:
User Guide for AsyncOS 14.1 for Cisco Secure Email and Web Manager- GD (General Deployment)458
Common Administrative TasksDisaster Recovery on the Security Management Appliance

Figure 14: Disaster Recovery: A Typical Environment
In this environment, SMA 1 is the primary Security Management appliance that is receiving data from ESAs1-3 and WSA 1. SMA 2 is the backup Security Management appliance receiving backup data from SMA1.
In case of failure, you must configure SMA 2 to be your primary Security Management appliance.
To configure SMA 2 as your new primary Security Management appliance and restore service:
Procedure
PurposeCommand or Action
See instructions for disabling Centralized Policy, Virus,and Outbreak Quarantines in the Email Security appliancedocumentation.
If you are using Centralized Policy, Virus, and OutbreakQuarantines:
Step 1
• On each Email Security appliance, disable thecentralized quarantines. This will create local quarantines on each Email Security
appliance, which you will migrate later to the new SecurityManagement appliance.
See Loading a Configuration File, on page 488.Load onto your backup Security Management appliance(SMA2) the configuration file that you saved from yourprimary Security Management appliance (SMA1).
Step 2
Recreate the IP address from the failed SMA 1 to be the IPaddress on SMA 2
Step 3 a. On SMA 2 chooseNetwork > IP Interfaces > Add IPInterfaces.
b. On theAdd IP Interfaces page, enter all of the relevantIP Interface information from the failed SMA1 into thetext fields to recreate the interface on SMA 2.
For more information about Adding IP Interfaces, seeConfiguring IP Interfaces, on page 576.
Submit and commit your changes.Step 4
See Configuring Services on the Security ManagementAppliance, on page 22.
Enable all applicable centralized services on the newSecurity Management appliance (SMA 2).
Step 5
See About Adding Managed Appliances, on page 21.Add all appliances on to the new Security Managementappliance (SMA 2).
Step 6
User Guide for AsyncOS 14.1 for Cisco Secure Email and Web Manager- GD (General Deployment)459
Common Administrative TasksDisaster Recovery on the Security Management Appliance

PurposeCommand or Action
• Test to see that each appliance is enabled and workingby establishing a connection to the appliances andtesting the connections.
See Centralizing Policy, Virus, and Outbreak Quarantines, on page 299.
If you are using Centralized Policy, Virus, and OutbreakQuarantines, configure quarantine migration on the newSecurityManagement appliance, then enable and configurethe migration on each applicable Email Security appliance.
Step 7
See Other Important Backup Tasks , on page 457.If necessary, restore additional data.Step 8
What to do next
After this process is complete, SMA 2 becomes the primary Security Management appliance. All data fromESAs 1-3 and WSA 1 now goes to SMA 2, as shown in the following figure:Figure 15: Disaster Recovery: Final Result
Upgrading Appliance HardwareSee Making a Backup Appliance the Primary Appliance , on page 457.
Upgrading AsyncOS• Batch Commands for Upgrades , on page 461• Determining Network Requirements for Upgrades and Updates , on page 461• Choosing an Upgrade Method: Remote vs. Streaming , on page 461• Configuring Upgrade and Service Update Settings, on page 463• Before You Upgrade: Important Steps , on page 468• Upgrading AsyncOS, on page 460• Viewing Status of, Canceling, or Deleting a Background Download , on page 470
User Guide for AsyncOS 14.1 for Cisco Secure Email and Web Manager- GD (General Deployment)460
Common Administrative TasksUpgrading Appliance Hardware

• After Upgrading , on page 471
Batch Commands for UpgradesBatch commands for upgrade procedures are documented in the CLI Reference Guide for AsyncOS for Emailat http://www.cisco.com/c/en/us/support/security/email-security-appliance/products-command-reference-list.html
Determining Network Requirements for Upgrades and UpdatesThe update servers for Cisco content security appliances use dynamic IP addresses. If you have strict firewallpolicies, you may need to configure a static location for AsyncOS upgrades. If you determine that your firewallsettings require a static IP for upgrades, contact Cisco Customer support to obtain the required URL addresses.
If you have any existing firewall rules allowing download of legacy upgrades from upgrades.cisco.com portssuch as 22, 25, 80, 4766, they will need to be removed and/or replaced with revised firewall rules.
Note
Choosing an Upgrade Method: Remote vs. StreamingCisco provides two methods (or ‘sources’) for upgrading AsyncOS on your appliances:
• Streaming upgrades — Each appliance downloads the AsyncOS upgrades via HTTP directly from theCisco content security update servers.
• Remote upgrades — You only download the upgrade image from Cisco one time, and then serve it toyour appliances. Your appliances then download the AsyncOS upgrades from a server within yournetwork.
You will configure the upgrade method in Configuring Upgrade and Service Update Settings, on page 463.Optionally, use the updateconfig command in the CLI.
Streaming Upgrade OverviewIn Streaming upgrades, each Cisco Content Security appliance connects directly to the Cisco content securityupdate servers to find and download upgrades:Figure 16: Streaming Update Method
This method requires that your appliance contacts the Cisco content security update servers directly from thenetwork.
User Guide for AsyncOS 14.1 for Cisco Secure Email and Web Manager- GD (General Deployment)461
Common Administrative TasksBatch Commands for Upgrades
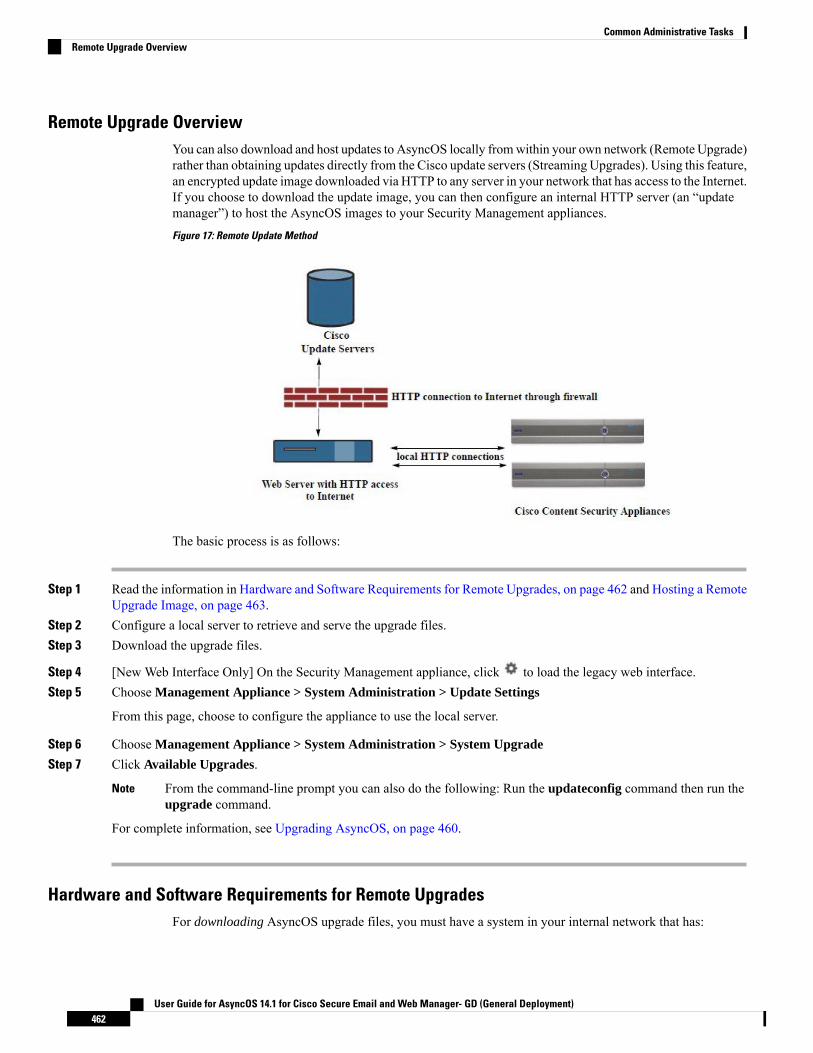
Remote Upgrade OverviewYou can also download and host updates to AsyncOS locally fromwithin your own network (Remote Upgrade)rather than obtaining updates directly from the Cisco update servers (Streaming Upgrades). Using this feature,an encrypted update image downloaded via HTTP to any server in your network that has access to the Internet.If you choose to download the update image, you can then configure an internal HTTP server (an “updatemanager”) to host the AsyncOS images to your Security Management appliances.Figure 17: Remote Update Method
The basic process is as follows:
Step 1 Read the information in Hardware and Software Requirements for Remote Upgrades, on page 462 and Hosting a RemoteUpgrade Image, on page 463.
Step 2 Configure a local server to retrieve and serve the upgrade files.Step 3 Download the upgrade files.
Step 4 [New Web Interface Only] On the Security Management appliance, click to load the legacy web interface.Step 5 Choose Management Appliance > System Administration > Update Settings
From this page, choose to configure the appliance to use the local server.
Step 6 Choose Management Appliance > System Administration > System Upgrade
Step 7 Click Available Upgrades.
From the command-line prompt you can also do the following: Run the updateconfig command then run theupgrade command.
Note
For complete information, see Upgrading AsyncOS, on page 460.
Hardware and Software Requirements for Remote UpgradesFor downloading AsyncOS upgrade files, you must have a system in your internal network that has:
User Guide for AsyncOS 14.1 for Cisco Secure Email and Web Manager- GD (General Deployment)462
Common Administrative TasksRemote Upgrade Overview

• Internet access to the update servers for Cisco content security appliances.• A web browser.
For this release, if you need to configure a firewall setting to allow HTTP access to this address, you mustconfigure it using the DNS name and not a specific IP address.
Note
For hosting AsyncOS update files, you must have a server in your internal network that has:
• A web server — for example, Microsoft IIS (Internet Information Services) or the Apache open sourceserver — that:
• supports the display of directory or filenames in excess of 24 characters• has directory browsing enabled• is configured for anonymous (no authentication) or basic (“simple”) authentication• contains at least 350MB of free disk space for each AsyncOS update image
Hosting a Remote Upgrade ImageAfter setting up a local server, go to http://updates.ironport.com/fetch_manifest.html to download a zipfile of an upgrade image. To download the image, enter your serial number and the version number of theCisco Content Security appliance. You will then be presented with a list of available upgrades. Click theupgrade version that you want to download a zip file of the upgrade image. To use the upgrade image forAsyncOS upgrades, enter the base URL for your local server on the Edit Update Settings page (or useupdateconfig in the CLI).
You can also host an XML file on a local server that limits the available upgrades for the Cisco ContentSecurity appliances on your network to the version selected at http://updates.ironport.com/fetch_manifest.html. Your Cisco Content Security appliances still download the upgrade from the Cisco servers. If you want tohost the upgrade list on a local server, download the zip file and extract the asyncos/phoebe-my-upgrade.xmlfile to the root directory of the local server. To use the upgrade list for AsyncOS upgrades, enter the full URLfor the XML file on the Edit Update Settings page (or use updateconfig in the CLI).
For more information about remote upgrades, check the Knowledge Base (see Knowledge Base Articles(TechNotes) , on page 597) or contact your support provider.
Important Differences in Remote Upgrading MethodNote these differences when upgrading AsyncOS from a local server (Remote upgrade) as opposed to theStreaming upgrade method:
• The upgrade installs immediately while downloading .• A banner appears for 10 seconds at the beginning of the upgrade process. While this banner appears, youhave the option to press Control-C to exit the upgrade process before downloading starts.
Configuring Upgrade and Service Update SettingsYou can configure how the Cisco Content Security appliance downloads security services updates (such astime zone rules) and AsyncOS upgrades. For example, you can choose whether to download upgrades andupdates dynamically fromCisco servers or from a local server onto which you have made the images available;configure the update interval; or disable automatic updates.
User Guide for AsyncOS 14.1 for Cisco Secure Email and Web Manager- GD (General Deployment)463
Common Administrative TasksHosting a Remote Upgrade Image

AsyncOS periodically queries the update servers for new updates to all security service components exceptfor newAsyncOS upgrades. To upgrade AsyncOS, youmust manually prompt AsyncOS to query for availableupgrades.
You can configure upgrade and updates settings in the GUI (see the following two sections) or using theupdateconfig command in the CLI.
You can also configure upgrade notification settings.
Upgrade and Update SettingsThe following table describes the update and upgrade settings you can configure.
Table 84: Update Settings for Security Services
DescriptionSetting
Choose whether to download AsyncOS upgrade and service update software images, such as time zone rulesand Feature Key updates, from the Cisco servers or a from a local web server. The default is the Cisco serversfor both upgrades and updates.
You might want to use a local web server if :
• You need to download images to your appliance from a static address. See Static Upgrade and UpdateServer Settings for Environments with Strict Firewall Policies , on page 465.
• You want to download AsyncOS upgrade images to your appliance at your convenience. (You can stilldownload service update images dynamically from the Cisco update servers.)
When you choose a local update server, enter the base URL and port number for the servers used to downloadthe upgrades and updates. If the server requires authentication, you can also enter a valid user name andpassphrase.
For more information, see Choosing an Upgrade Method: Remote vs. Streaming , on page 461 and RemoteUpgrade Overview, on page 462.
Update Servers(images)
Choose whether to download the lists of available upgrades and service updates (the manifest XML files)from the Cisco servers or from a local web server.
The default for both upgrades and updates is the Cisco servers. You can choose different settings for upgradesand for updates.
If applicable, see Static Upgrade and Update Server Settings for Environments with Strict Firewall Policies, on page 465.
If you choose local update servers, enter the full path to the manifest XML file for each list including thefile name and port number for the server. If you leave the port field blank, AsyncOS uses port 80. If theserver requires authentication, you can also enter a valid user name and passphrase.
For more information, see Choosing an Upgrade Method: Remote vs. Streaming , on page 461 and RemoteUpgrade Overview, on page 462.
Update Servers(lists)
Choose whether or not to enable automatic updates for time zone rules. When enabled, enter the time to waitbetween checks for updates. Add a trailing m for minutes, h for hours, and d for days.
Automatic Updates
User Guide for AsyncOS 14.1 for Cisco Secure Email and Web Manager- GD (General Deployment)464
Common Administrative TasksUpgrade and Update Settings

DescriptionSetting
Choose which network interface to use when contacting the update servers for time zone rules and AsyncOSupgrades. The available proxy data interfaces are shown. By default, the appliance selects an interface touse.
Interface
If an upstream HTTP proxy server exists and requires authentication, enter the server information and username and passphrase here.
Note that if you specify a proxy server, it will be used to access and update the services listed in the GUI.
This proxy server is also used to obtain File Analysis report details from the cloud. See also Requirementsfor File Analysis Report Details , on page 84 (Web reports) or Requirements for File Analysis Report Details, on page 185 (Email reports).
HTTP Proxy Server
If an upstream HTTPS proxy server exists and requires authentication, enter the server information and username and passphrase here.
Note that if you specify a proxy server, it will be used to access and update the services listed in the GUI.
This proxy server is also used to obtain File Analysis report details from the cloud.. See also Requirementsfor File Analysis Report Details , on page 84 (Web reports) or Requirements for File Analysis Report Details, on page 185 (Email reports).
HTTPS ProxyServer
Static Upgrade and Update Server Settings for Environments with Strict Firewall PoliciesThe AsyncOS update servers use dynamic IP addresses. If your environment has strict firewall policies whichrequire static IP addresses, use the following settings on the Update Settings page:Figure 18: Static URLs for Update Servers (images) Settings
User Guide for AsyncOS 14.1 for Cisco Secure Email and Web Manager- GD (General Deployment)465
Common Administrative TasksStatic Upgrade and Update Server Settings for Environments with Strict Firewall Policies

Figure 19: Static URLs for Update Servers (list) Settings
Table 85: Static Addresses for Environments with Strict Firewall Policies
Static URL/IP Address and PortSettingSection
http://downloads-static.ironport.com
204.15.82.8
Port 80
Base URL (all services except Time zone rules andAsyncOS upgrades)
Update Servers(images):
downloads-static.ironport.com
204.15.82.8
Port 80
Base URL (Time zone rules)
updates-static.ironport.com
208.90.58.25
Port 80
Host (AsyncOS upgrades)
User Guide for AsyncOS 14.1 for Cisco Secure Email and Web Manager- GD (General Deployment)466
Common Administrative TasksStatic Upgrade and Update Server Settings for Environments with Strict Firewall Policies

Static URL/IP Address and PortSettingSection
update-manifests.ironport.com
208.90.58.5
Port 443
For updates on physical hardware appliances:
Full URL
Update Servers(list):
update-manifests.sco.cisco.com
Port 443
For updates on virtual appliances: Full URL
update-manifests.ironport.com
208.90.58.5
Port 443
For upgrades: Full URL
You must configure the update-manifests URLs and port numbers using the dynamichost sub command ofthe updateconfig command in the CLI. This validates the service updates.
Important
Configuring the Update and Upgrade Settings from the GUI
Step 1 [New Web Interface Only] On the Security Management appliance, click to load the legacy web interface.Step 2 Choose Management Appliance > System Administration > Update Settings.
Step 3 Click Edit Update Settings.
Use the descriptions in Upgrade and Update Settings, on page 464 to configure the settings in this procedure.
Step 4 In the Update Servers (images) section, specify the servers from which to download images for updates.Step 5 Specify the server from which to download images for AsyncOS upgrades:
a) At the bottom of the same section, click the Click to use different settings for AsyncOS upgradeslink.b) Specify server settings for downloading images for AsyncOS upgrades.
Step 6 In theUpdate Servers (list) section, specify the servers for obtaining the list of available updates and AsyncOS upgrades.
The top subsection applies to updates. The bottom subsection applies to upgrades.
Step 7 Specify settings for Time Zone rules and interface.Step 8 (Optional) Specify settings for Proxy Servers.Step 9 Submit and commit your changes.Step 10 Verify that your results are what you expect:
If you are not already looking at the Update Settings page, chooseManagement Appliance > System Administration> Update Settings.
Some URLs may append an “asyncos” directory to the server URL. You can ignore this discrepancy.
User Guide for AsyncOS 14.1 for Cisco Secure Email and Web Manager- GD (General Deployment)467
Common Administrative TasksConfiguring the Update and Upgrade Settings from the GUI
Upgrade NotificationsBy default, users with administrator and technician privileges will see a notification at the top of the webinterface when an AsyncOS upgrade is available for the appliance.
Do ThisTo
Hover over the upgrade notification.View more information about the latest upgrade
Click the down arrow in the notification.View a list of all available upgrades
Click the down arrow, then select Clear thenotification, then click Close.
Dismiss a current notification.
The appliance will not display another notification untila new upgrade becomes available.
Go to Management Appliance > SystemAdministration > System Upgrade.
Prevent future notifications (Users with Administratorprivileges only.)
Before You Upgrade: Important Steps
Before you begin
See network requirements at Determining Network Requirements for Upgrades and Updates , on page 461.
Step 1 Take steps to prevent or minimize data loss:
• Make sure the new appliance has sufficient disk capacity and the same or greater size allocations for each data typethat will be transferred. See About Disk Space Maximums and Allocations, on page 496.
• If you have received any disk space warnings, resolve any disk space issues before upgrading.
Step 2 Save the XML configuration file off the appliance. See caveats at Saving and Exporting the Current Configuration File,on page 487.
If you need to revert to the pre-upgrade release for any reason, you will need this file.
Step 3 If you are using the Safelist/Blocklist feature, export the list off the appliance.
Click Management Appliance > System Administration > Configuration File and scroll down.
Step 4 Suspend the listeners using the suspendlistener command when running the upgrade from the CLI. If you perform theupgrade from the GUI, listener suspension occurs automatically.
Step 5 Drain the mail queue and the delivery queue.Step 6 Verify that the upgrade settings are configured as you want them. See Configuring Upgrade and Service Update Settings,
on page 463.
Upgrading AsyncOSYou can download and install in a single operation, or download in the background and install later.
User Guide for AsyncOS 14.1 for Cisco Secure Email and Web Manager- GD (General Deployment)468
Common Administrative TasksUpgrade Notifications

When downloading and upgrading AsyncOS in a single operation from a local server instead of from a Ciscoserver, the upgrade installs immediatelywhile downloading . A banner displays for 10 seconds at the beginningof the upgrade process. While this banner is displayed, you have the option to type Control-C to exit theupgrade process before downloading starts.
Note
Before you begin
• Choose whether you will download upgrades directly from Cisco or will host upgrade images from aserver on your network. Then set up your network to support the method you choose. Then configurethe appliance to obtain upgrades from your chosen source. See Choosing an Upgrade Method: Remotevs. Streaming , on page 461 and Configuring Upgrade and Service Update Settings, on page 463.
• Before installing the upgrade, follow the instructions in Before You Upgrade: Important Steps , on page468.
Step 1 [New Web Interface Only] On the Security Management appliance, click to load the legacy web interface.Step 2 Choose Management Appliance > System Administration > System Upgrade.Step 3 Click Upgrade Options.Step 4 Choose an option:
Do ThisTo
Click Download and Install.
If you have already downloaded an installer, you will be prompted to overwritethe existing download.
Download and install the upgrade in asingle operation
Click Download only.
If you have already downloaded an installer, you will be prompted to overwritethe existing download.
The installer downloads in the background without interrupting service.
Download an upgrade installer
Click Install.
This option appears only if an installer has been downloaded.
The AsyncOS version to be installed is noted below the Install option.
Install a downloaded upgrade installer
Step 5 Unless you are installing a previously-downloaded installer, select an AsyncOS version from the list of available upgrades.Step 6 If you are installing:
a) Choose whether or not to save the current configuration to the configuration directory on the appliance.b) Choose whether or not to mask the passphrases in the configuration file.
You cannot load a configuration file with masked passphrases using the Configuration File page in the GUIor the loadconfig command in the CLI.
Note
c) If you want to email copies of the configuration file, enter the email addresses to which you want to email the file.Use commas to separate multiple email addresses.
User Guide for AsyncOS 14.1 for Cisco Secure Email and Web Manager- GD (General Deployment)469
Common Administrative TasksUpgrading AsyncOS

Step 7 Click Proceed.Step 8 If you are installing:
a) Be prepared to respond to prompts during the process.
The process pauses until you respond.
A progress bar appears near the top of the page.
b) At the prompt, click Reboot Now.
Do not interrupt power to the appliance for any reason (even to troubleshoot an upgrade issue) until at least20 minutes have passed since you rebooted.
Note
c) After about 10 minutes, access the appliance again and log in.
What to do next
• If the process was interrupted, you must start the process again.
• If you downloaded but did not install the upgrade:
When you are ready to install the upgrade, follow these instructions from the beginning, including theprerequisites in the Before You Begin section, but choose the Install option.
• If you installed the upgrade, see After Upgrading , on page 471.
Viewing Status of, Canceling, or Deleting a Background Download
Step 1 [New Web Interface Only] On the Security Management appliance, click to load the legacy web interface.Step 2 Choose Management Appliance > System Administration > System Upgrade.Step 3 Click Upgrade Options.Step 4 Choose an option:
Do ThisTo
Look in the middle of the page.
If there is no download in progress and no completed download waiting to be installed,you will not see download status information.
Upgrade status also appears in upgrade_logs.
View download status
Click the Cancel Download button in the middle of the page.
This option appears only while a download is in progress.
Cancel a download
Click the Delete File button in the middle of the page.
This option appears only if an installer has been downloaded.
Delete a downloaded installer
User Guide for AsyncOS 14.1 for Cisco Secure Email and Web Manager- GD (General Deployment)470
Common Administrative TasksViewing Status of, Canceling, or Deleting a Background Download

After UpgradingAfter the upgrade is complete, complete the following:
• (For deployments with associated Email Security appliances) Re-enable the listeners.
• (For deployments with associated Web Security appliances) Configure your system to support the latestConfiguration Master. See Using Configuration Masters to Centrally Manage Web Security Appliances, on page 324.
• Consider saving your configuration. For more information, see Saving and Importing ConfigurationSettings , on page 487.
• Before viewing the online help after upgrade, clear your browser cache, exit the browser, then open itagain. This clears the browser cache of any outdated content.
About Reverting to an Earlier Version of AsyncOSYou can revert to an to a previous qualified version of AsyncOS for emergency uses.
You can also revert to the currently running build if you want to clear all data on the appliance and start witha new, clean configuration.
Related Topics
• Important Note About Reversion Impact, on page 471• Reverting AsyncOS , on page 471
Important Note About Reversion ImpactUsing the revert command on a Cisco Content Security appliance is a very destructive action. This commandpermanently destroys all existing configurations and data. In addition, it disrupts mail handling until theappliance is reconfigured.
Reverting does not affect feature key or virtual appliance license expiration dates.
Reverting AsyncOS
Before you begin
• Back up or save any data that you want to preserve to a location off the appliance.
• You must have a configuration file for the version you want to revert to. Configuration files are notbackwards-compatible.
• Because this command destroys all configuration, it is highly recommended that you have physical localaccess to the appliance when reverting.
• If quarantines are enabled on your Email Security appliances, disable centralization so that messages arequarantined locally on those appliances.
User Guide for AsyncOS 14.1 for Cisco Secure Email and Web Manager- GD (General Deployment)471
Common Administrative TasksAfter Upgrading

Step 1 Ensure that you have the configuration file for the version you want to revert to. Configuration files are notbackwards-compatible.
Step 2 Save a backup copy of the current configuration of your appliance (with passphrases unmasked) on another machine.To do this, you can email the file to yourself or FTP the file. A simple way to do this is to run the mailconfig CLIcommand, which emails the current configuration file on your appliance to the specified email address.
This is not the configuration file you will load after reverting.Note
Step 3 If you use the Safelist/Blocklist feature, export the Safelist/Blocklist database to another machine.Step 4 Suspend any listeners on your Email Security appliances.Step 5 Wait for the mail queue to empty.Step 6 Log in to the CLI of the appliance you want to revert.
When you run the revert command, several warning prompts are issued. Once these warning prompts are accepted,the revert action takes place immediately. Therefore, do not begin the reversion process until after you have completedthe prereversion steps.
Step 7 From the command-line prompt, type the revert command and respond to the prompts.
The following example shows the revert command:
Example:
m650p03.prep> revertThis command will revert the appliance to a previous version of AsyncOS.WARNING: Reverting the appliance is extremely destructive.The following data will be destroyed in the process:- all configuration settings (including listeners)- all log files- all databases (including messages in Virus Outbreak and Policyquarantines)- all reporting data (including saved scheduled reports)- all message tracking data- all Cisco Spam Quarantine message and end-user safelist/blocklist dataOnly the network settings will be preseved.Before running this command, be sure you have:- saved the configuration file of this appliance (with passphrasesunmasked)- exported the Cisco Spam Quarantine safelist/blocklist database
to another machine (if applicable)- waited for the mail queue to emptyReverting the device causes an immediate reboot to take place.After rebooting, the appliance reinitializes itself and reboots again to the desired version.Do you want to continue? yesAre you sure you want to continue? yesAvailable versions=================1. 7.2.0-3902. 6.7.6-020Please select an AsyncOS version: 1You have selected "7.2.0-390".Reverting to "testing" preconfigure install mode.The system will now reboot to perform the revert operation.
Step 8 Wait for the appliance to reboot twice.Step 9 Log in to the appliance using the CLI.
User Guide for AsyncOS 14.1 for Cisco Secure Email and Web Manager- GD (General Deployment)472
Common Administrative TasksReverting AsyncOS

Step 10 Add at least one Web Security appliance and wait a few minutes to allow any URL Category updates to be downloadedfrom that appliance.
Step 11 After URL Category updates are completed, load the XML configuration file of the version you are reverting to.Step 12 If you use the Safelist/Blocklist feature, import and restore the Safelist/Blocklist database.Step 13 Reenable any listeners on your Email Security appliances.Step 14 Commit your changes.
The reverted Cisco Content Security appliance should now run using the selected AsyncOS version.
It may take 15 to 20 minutes before reversion is complete and console access to the Cisco Content Securityappliance is available again.
Note
About UpdatesService updates are periodically made available for download. To specify settings for these downloads, seeConfiguring Upgrade and Service Update Settings, on page 463
Related Topics
• Configuring Upgrade and Service Update Settings, on page 463
About URL Category Set Updates for Web Usage Controls• Preparing For and Managing URL Category Set Updates , on page 351• URL Category Set Updates and Reports , on page 179
Configuring the Return Address for Generated MessagesYou can configure the envelope sender for mail generated by AsyncOS for the following types of cases:
• Bounce messages• Reports
You can specify the display, user, and domain names of the return address. You can also choose to use theVirtual Gateway domain for the domain name.
Use the Return Addresses page available on the System Administration menu in the GUI, or use theaddressconfig command in the CLI.
To modify the return address for system-generated email messages in the GUI, click Edit Settings on theReturn Addresses page. Make changes to the address or addresses you want to modify, click Submit, andcommit your changes.
Managing AlertsThe appliance sends you email alerts about events occurring on the appliance.
User Guide for AsyncOS 14.1 for Cisco Secure Email and Web Manager- GD (General Deployment)473
Common Administrative TasksAbout Updates

Do ThisTo
Select Management Appliance > System Administration> Alerts
If you enabled AutoSupport during system setup, the emailaddress that you specified will receive alerts for all severitiesand classes by default. You can change the configuration atany time.
Separate multiple addresses with commas.
Have different types of alerts sent to differentadministrative users
Select Management Appliance > System Administration> Alerts
See About Duplicate Alerts , on page 475
See Cisco AutoSupport, on page 476
Configure global settings for alerts, including:
• Alert sender (FROM:) address• Controls for duplicate alerts• AutoSupport settings.
See Viewing Recent Alerts , on page 475View a list of recent alerts
Manage settings for this list
See:
Hardware Alert Descriptions , on page 476.
System Alert Descriptions , on page 476
See a list of alerts and their descriptions
See Alert Delivery, on page 474Understand alert delivery mechanisms
Alert Types and SeveritiesAlert types include:
• Hardware alerts. See Hardware Alert Descriptions , on page 476.• System alerts. See System Alert Descriptions , on page 476.• Updater alerts.
Alerts can have the following severities:
• Critical: issue that requires immediate attention• Warning: problem or error requiring further monitoring and potentially immediate attention• Info: information generated in the routine functioning of this device
Alert DeliveryBecause alert messages can be used to inform you of problems within your Cisco Content Security appliance,they are not sent using AsyncOS’s normal mail delivery system. Instead, alert messages pass through a separateand parallel email system designed to operate even in the face of significant system failure in AsyncOS.
The alert mail system does not share the same configuration as AsyncOS, which means that alert messagesmay behave slightly differently from other mail delivery:
• Alert messages are delivered using standard DNS MX and A record lookups.
User Guide for AsyncOS 14.1 for Cisco Secure Email and Web Manager- GD (General Deployment)474
Common Administrative TasksAlert Types and Severities

• They do cache the DNS entries for 30 minutes and the cache is refreshed every 30 minutes, so incase of DNS failure the alerts still go out.
• If your deployment includes Email Security appliances:
• Alert messages do not pass through the work queue, so they are not scanned for viruses or spam.They are also not subjected to message filters or content filters.
• Alert messages do not pass through the delivery queue, so they will not be affected by bounceprofiles or destination control limits.
• [Optional - Only if TLS support is enabled in "alertconfig" and FQDN validation enabled in SSLConfiguration settings]: Check whether the 'Common Name,' 'SAN: DNS Name' fields, or both presentin the server certificate, are in the FQDN format.
• [Optional - Only if TLS support is enabled in "alertconfig"]: Check whether the 'Common Name,' or'SAN: DNS Name' fields, of the server certificate contain Hostname of the server. Reverse DNS nameis used if IP is configured in Hostname field.
Viewing Recent AlertsDo ThisTo
Users with administrator and operator access can chooseManagementAppliance > System Administration > Alerts and click the ViewTop Alerts button.
Alerts appear even if there was a problem emailing them.
View a list of recent alerts
Click a column heading.Sort the list
Use the alertconfig command in the command-line interfaceSpecify the maximum number ofalerts to save in this list
Use the alertconfig command in the command-line interface to set themaximum number of alerts to zero (0).
Disable this feature
About Duplicate AlertsYou can specify the initial number of seconds to wait before AsyncOS will send a duplicate alert. If you setthis value to 0, duplicate alert summaries are not sent; instead, all duplicate alerts are sent without any delay(this can lead to a large amount of email over a short amount of time). The number of seconds to wait betweensending duplicate alerts (alert interval) is increased after each alert is sent. The increase is the number ofseconds to wait plus twice the last interval. So a 5-second wait would have alerts sent at 5 seconds, 15 seconds,35 seconds, 75 seconds, 155 seconds, 315 seconds, and so on.
Eventually, the interval could become large. You can set a cap on the number of seconds to wait betweenintervals via the maximum number of seconds to wait before sending a duplicate alert field. For example, ifyou set the initial value to 5 seconds, and the maximum value to 60 seconds, alerts would be sent at 5 seconds,15 seconds, 35 seconds, 60 seconds, 120 seconds, and so on.
User Guide for AsyncOS 14.1 for Cisco Secure Email and Web Manager- GD (General Deployment)475
Common Administrative TasksViewing Recent Alerts

Cisco AutoSupportTo allow Cisco to better support and design future system changes, the Cisco Content Security appliance canbe configured to send Cisco a copy of all alert messages generated by the system. This feature, called‘AutoSupport’, is a useful way to allowCustomer Support to be proactive in supporting your needs. AutoSupportalso sends weekly reports noting the uptime of the system, the output of the status command, and the AsyncOSversion used.
By default, alert recipients set to receive Information severity level alerts for System alert types receive a copyof every message sent to Cisco. This can be disabled if you do not want to send the weekly alert messagesinternally. To enable or disable this feature, selectManagement Appliance > System Administration Alertsand click edit settings.
By default, if AutoSupport is enabled, the weekly AutoSupport report is sent to alert recipients set to receivesystem alerts at the Information level.
Hardware Alert DescriptionsTable 86: Hardware Alert Descriptions
SeverityDescriptionAlert Name
WarningSent when interface errors aredetected.
INTERFACE.ERRORS
WarningSent when a disk partition is nearingcapacity (75%).
MAIL.MEASUREMENTS_FILESYSTEM
CriticalSent when a disk partition reaches90% capacity (and at 95%, 96%, 97%,and so on).
MAIL.MEASUREMENTS_FILESYSTEM.CRITICAL
WarningSent when a critical RAID-eventoccurs.
SYSTEM.RAID_EVENT_ALERT
InformationSent when a RAID-event occurs.SYSTEM.RAID_EVENT_ALERT_INFO
System Alert DescriptionsTable 87: System Alert Descriptions
SeverityDescriptionAlert Name
CriticalSent when there is an unknownapplication failure.
COMMON.APP_FAILURE
WarningSent when a feature key hasexpired.
COMMON.KEY_EXPIRED_ALERT
WarningSent when a feature key is aboutto expire.
COMMON.KEY_EXPIRING_ALERT
User Guide for AsyncOS 14.1 for Cisco Secure Email and Web Manager- GD (General Deployment)476
Common Administrative TasksCisco AutoSupport
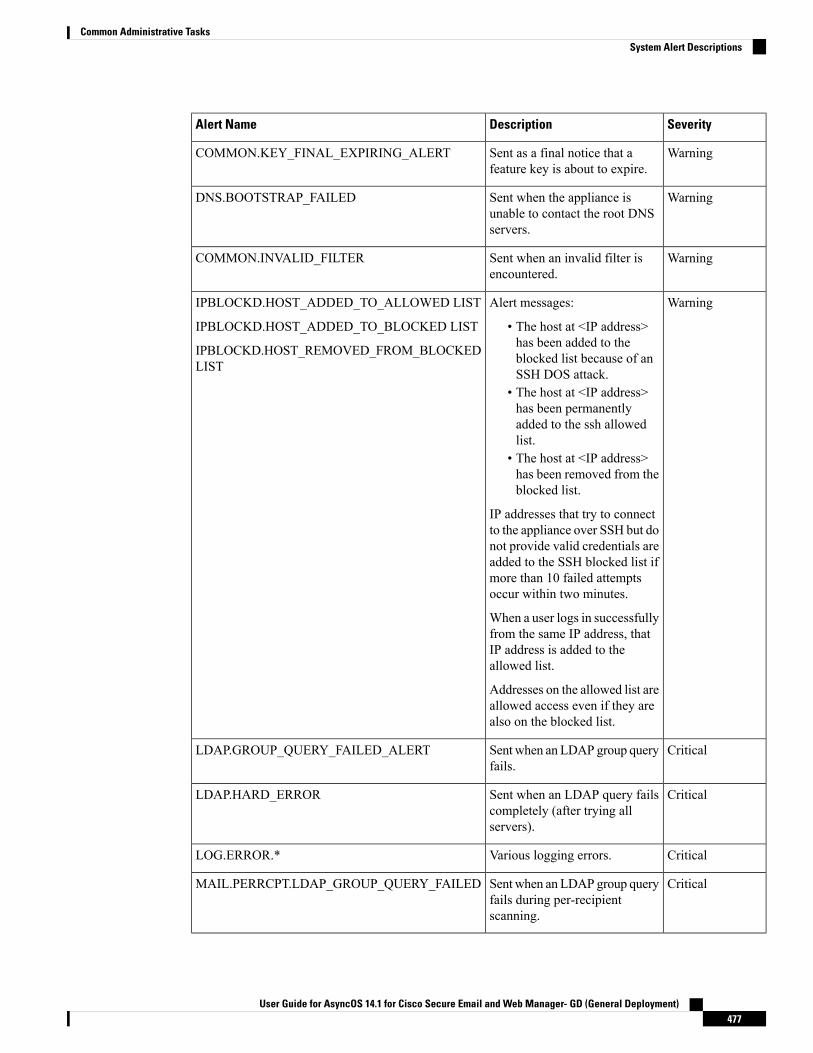
SeverityDescriptionAlert Name
WarningSent as a final notice that afeature key is about to expire.
COMMON.KEY_FINAL_EXPIRING_ALERT
WarningSent when the appliance isunable to contact the root DNSservers.
DNS.BOOTSTRAP_FAILED
WarningSent when an invalid filter isencountered.
COMMON.INVALID_FILTER
WarningAlert messages:
• The host at <IP address>has been added to theblocked list because of anSSH DOS attack.
• The host at <IP address>has been permanentlyadded to the ssh allowedlist.
• The host at <IP address>has been removed from theblocked list.
IP addresses that try to connectto the appliance over SSH but donot provide valid credentials areadded to the SSH blocked list ifmore than 10 failed attemptsoccur within two minutes.
When a user logs in successfullyfrom the same IP address, thatIP address is added to theallowed list.
Addresses on the allowed list areallowed access even if they arealso on the blocked list.
IPBLOCKD.HOST_ADDED_TO_ALLOWED LIST
IPBLOCKD.HOST_ADDED_TO_BLOCKED LIST
IPBLOCKD.HOST_REMOVED_FROM_BLOCKEDLIST
CriticalSent when an LDAP group queryfails.
LDAP.GROUP_QUERY_FAILED_ALERT
CriticalSent when an LDAP query failscompletely (after trying allservers).
LDAP.HARD_ERROR
CriticalVarious logging errors.LOG.ERROR.*
CriticalSent when an LDAP group queryfails during per-recipientscanning.
MAIL.PERRCPT.LDAP_GROUP_QUERY_FAILED
User Guide for AsyncOS 14.1 for Cisco Secure Email and Web Manager- GD (General Deployment)477
Common Administrative TasksSystem Alert Descriptions

SeverityDescriptionAlert Name
CriticalVarious mail queue hard errors.MAIL.QUEUE.ERROR.*
CriticalSent when RAM utilization hasexceeded the system resourceconservation threshold.
MAIL.RES_CON_START_ALERT.MEMORY
CriticalSent when the mail queue isoverloaded and system resourceconservation is enabled.
MAIL.RES_CON_START_ALERT.QUEUE_SLOW
CriticalSent when queue utilization hasexceeded the system resourceconservation threshold.
MAIL.RES_CON_START_ALERT.QUEUE
CriticalSent when listeners aresuspended because the workqueue size is too big.
MAIL.RES_CON_START_ALERT.WORKQ
CriticalSent when the appliance enters“resource conservation” mode.
MAIL.RES_CON_START_ALERT
CriticalSent when the appliance leaves“resource conservation” mode.
MAIL.RES_CON_STOP_ALERT
CriticalSent when the work queue ispaused.
MAIL.WORK_QUEUE_PAUSED_NATURAL
CriticalSent when the work queue isresumed.
MAIL.WORK_QUEUE_UNPAUSED_NATURAL
WarningSent when the appliance isunable to adjust time becauseNTP is not running as root.
NTP.NOT_ROOT
CriticalSent when errors are found in thedomain specification file.
PERIODIC_REPORTS.DOMAIN_REPORT.DOMAIN_FILE_ERRORS
CriticalSent when the domainspecification file is empty.
PERIODIC_REPORTS.DOMAIN_REPORT.FILE_EMPTY
CriticalSent when the domainspecification file is not found.
PERIODIC_REPORTS.DOMAIN_REPORT.FILE_MISSING
CriticalSent if the reporting engine isunable to open the database.
REPORTD.DATABASE_OPEN_FAILED_ALERT
WarningSent if the system runs out ofdisk space. When the disk usagefor a log entry exceeds the logusage threshold, reportd disablesaggregation and sends the alert.
REPORTD.AGGREGATION_DISABLED_ALERT
User Guide for AsyncOS 14.1 for Cisco Secure Email and Web Manager- GD (General Deployment)478
Common Administrative TasksSystem Alert Descriptions

SeverityDescriptionAlert Name
WarningSent if the reporting engine wasunable to save reporting data.
REPORTING.CLIENT.UPDATE_FAILED_ALERT
CriticalSent if the reporting engine isunable to store new data.
REPORTING.CLIENT.JOURNAL.FULL
InformationSent when the reporting engineis again able to store new data.
REPORTING.CLIENT.JOURNAL.FREE
CriticalSent when the reporting engineis unable to build a report.
PERIODIC_REPORTS.REPORT_TASK.BUILD_FAILURE_ALERT
CriticalSent when a report could not beemailed.
PERIODIC_REPORTS.REPORT_TASK.EMAIL_FAILURE_ALERT
CriticalSent when a report could not bearchived.
PERIODIC_REPORTS.REPORT_TASK.ARCHIVE_FAILURE_ALERT
InformationSent when an error occurredwhile processing a response fromSenderBase.
SENDERBASE.ERROR
WarningSent if a configuration pushfailed for one or more hosts.
SMAD.ICCM.ALERT_PUSH_FAILED
WarningSent if SMA logs are unable tofetch tracking data for two hoursor reporting data for six hours.
SMAD.TRANSFER.TRANSFERS_STALLED
WarningSent when the SMTPAuthentication forwarding serveris unreachable.
SMTPAUTH.FWD_SERVER_FAILED_ALERT
WarningSent when an LDAP query fails.SMTPAUTH.LDAP_QUERY_FAILED
WarningSent when there was a problemshutting down the system onreboot.
SYSTEM.HERMES_SHUTDOWN_FAILURE.
REBOOT
WarningSent when there was a problemshutting down the system.
SYSTEM.HERMES_SHUTDOWN_FAILURE.
SHUTDOWN
CriticalSent when a recipient validationupdate failed.
SYSTEM.RCPTVALIDATION.UPDATE_FAILED
InformationSent when a tunnel created forCisco Support Services isdisabled.
SYSTEM.SERVICE_TUNNEL.DISABLED
InformationSent when a tunnel created forCisco Support Services isenabled.
SYSTEM.SERVICE_TUNNEL.ENABLED
User Guide for AsyncOS 14.1 for Cisco Secure Email and Web Manager- GD (General Deployment)479
Common Administrative TasksSystem Alert Descriptions

Changing Network SettingsThis section describes the features used to configure the network operation of the appliance. These featuresgive you direct access to the hostname, DNS, and routing settings that you configured using the System SetupWizard in Running the System Setup Wizard, on page 17.
The following features are described:
• sethostname
• DNS configuration (in the GUI and by using the dnsconfig command in the CLI)
• Routing configuration (in the GUI and by using the routeconfig and setgateway commands in the CLI)
• dnsflush
• Passphrase
Changing the System HostnameThe hostname is used to identify the system at the CLI prompt. You must enter a fully qualified hostname.The s ethostname command sets the name of the content security appliance. The new hostname does not takeeffect until you issue the commit command.
The sethostname Command
oldname.example.com> sethostname[oldname.example.com]> mail3.example.comoldname.example.com>
For the hostname change to take effect, you must enter the commit command. After you have successfullycommitted the hostname change, the new name appears in the CLI prompt:
oldname.example.com> commitPlease enter some comments describing your changes:[]> Changed System HostnameChanges committed: Mon Jan 04 12:00:01 2010
The new hostname appears in the prompt as follows: mail3.example.com>
Configuring Domain Name System SettingsYou can configure the Domain Name System (DNS) settings for your content security appliance through theManagement Appliance > Network > DNS page in the GUI, or via the dnsconfig command.
You can configure the following settings:
• Whether to use the Internet’s DNS servers or your own, and which server(s) to use• Which interface to use for DNS traffic• The number of seconds to wait before timing out a reverse DNS lookup• Clearing the DNS cache
User Guide for AsyncOS 14.1 for Cisco Secure Email and Web Manager- GD (General Deployment)480
Common Administrative TasksChanging Network Settings

Specifying DNS ServersAsyncOS can use the Internet root DNS servers, your own DNS servers, or the Internet root DNS servers andauthoritative DNS servers that you specify. When using the Internet root servers, you may specify alternateservers to use for specific domains. Because an alternate DNS server applies to a single domain, it must beauthoritative (provide definitive DNS records) for that domain.
AsyncOS supports “splitting” DNS servers when not using the Internet’s DNS servers. If you are using yourown internal server, you can also specify exception domains and associated DNS servers.
When setting up “split DNS,” you should set up the in-addr.arpa (PTR) entries as well. For example, if youwant to redirect “.eng” queries to the nameserver 1.2.3.4 and all the .eng entries are in the 172.16 network,then you should specify “eng,16.172.in-addr.arpa” as the domains in the split DNS configuration.
Multiple Entries and PriorityFor each DNS server that you enter, you can specify a numeric priority. AsyncOS attempts to use the DNSserver with the priority closest to 0. If that DNS server is not responding, AsyncOS attempts to use the serverat the next priority. If you specifymultiple entries for DNS servers with the same priority, the system randomizesthe list of DNS servers at that priority every time it performs a query. The system then waits a short amountof time for the first query to expire or “time out” and then a slightly longer amount of time for the second,and so on. The amount of time depends on the exact total number of DNS servers and priorities that havebeen configured. The timeout length is the same for all IP addresses at any particular priority. The first prioritygets the shortest timeout; each subsequent priority gets a longer timeout. Further, the timeout period is roughly60 seconds. If you have one priority, the timeout for each server at that priority is 60 seconds. If you havetwo priorities, the timeout for each server at the first priority is 15 seconds, and each server at the secondpriority is 45 seconds. For three priorities, the timeouts are 5, 10, 45.
For example, suppose you configure four DNS servers, with two of them at priority 0, one at priority 1, andone at priority 2:
Table 88: Example of DNS Servers, Priorities, and Timeout Intervals
Timeout (Seconds)Server(s)Priority
5, 51.2.3.4, 1.2.3.50
101.2.3.61
451.2.3.72
AsyncOS randomly chooses between the two servers at priority 0. If one of the priority 0 servers is down, theother is used. If both of the priority 0 servers are down, the priority 1 server (1.2.3.6) is used, and then, finally,the priority 2 (1.2.3.7) server.
The timeout period is the same for both priority 0 servers, longer for the priority 1 server, and longer still forthe priority 2 server.
Using the Internet Root ServersThe AsyncOS DNS resolver is designed to accommodate the large number of simultaneous DNS connectionsrequired for high-performance email delivery.
User Guide for AsyncOS 14.1 for Cisco Secure Email and Web Manager- GD (General Deployment)481
Common Administrative TasksSpecifying DNS Servers

If you choose to set the default DNS server to something other than the Internet root servers, that server mustbe able to recursively resolve queries for domains for which it is not an authoritative server.
Note
Reverse DNS Lookup TimeoutThe Cisco Content Security appliance attempts to perform a “double DNS lookup” on all remote hostsconnecting to a listener for the purposes of sending or receiving email. That is, the system acquires and verifiesthe validity of the remote host's IP address by performing a double DNS lookup. This consists of a reverseDNS (PTR) lookup on the IP address of the connecting host, followed by a forward DNS (A) lookup on theresults of the PTR lookup. The system then checks that the results of the A lookup match the results of thePTR lookup. If the results do not match, or if an A record does not exist, the system uses only the IP addressto match entries in the Host Access Table (HAT). This particular timeout period applies only to this lookupand is not related to the general DNS timeout discussed in Multiple Entries and Priority, on page 481.
The default value is 20 seconds. You can disable the reverse DNS lookup timeout globally across all listenersby entering ‘0’ as the number of seconds. If the value is set to 0 seconds, the reverse DNS lookup is notattempted, and instead the standard timeout response is returned immediately.
DNS AlertOccasionally, an alert may be generated with the message “Failed to bootstrap the DNS cache” when anappliance is rebooted. The message means that the system was unable to contact its primary DNS servers,which can happen at boot time if the DNS subsystem comes online before network connectivity is established.If this message appears at other times, it could indicate network issues or that the DNS configuration is notpointing to a valid server.
Clearing the DNS CacheThe Clear Cache button from the GUI, or the d nsflush command (for more information about the dnsflushcommand, see the IronPort AsyncOS CLI Reference Guide, available from the location specified inDocumentation , on page 595), clears all information in the DNS cache. You may choose to use this featurewhen changes have been made to your local DNS system. The command takes place immediately and maycause a temporary performance degradation while the cache is repopulated.
Configuring DNS Settings via the Graphical User Interface
Step 1 [New Web Interface Only] On the Security Management appliance, click to load the legacy web interface.Step 2 Choose Management Appliance > Network > DNS page and click the Edit Settings button.Step 3 Select whether to use the Internet’s root DNS servers or your own internal DNS server(s), and specify authoritative DNS
servers.Step 4 If you want to use your own DNS server(s) or specify authoritative DNS servers, enter the server ID and click Add Row.
Repeat this for each server. When entering your own DNS servers, specify a priority as well. For more information, seeSpecifying DNS Servers, on page 481.
Step 5 Choose an interface for DNS traffic.Step 6 Enter the number of seconds to wait before canceling a reverse DNS lookup.Step 7 Optionally, clear the DNS cache by clicking Clear Cache.
User Guide for AsyncOS 14.1 for Cisco Secure Email and Web Manager- GD (General Deployment)482
Common Administrative TasksReverse DNS Lookup Timeout

Step 8 Submit and commit your changes.
Configuring TCP/IP Traffic RoutesSome network environments require the use of traffic routes other than the standard default gateway. Youcan manage static routes in the GUI through the Management Appliance > Network > Routing page, or inthe CLI by using the routeconfig command.
• Managing Static Routes in the GUI, on page 483• Modifying the Default Gateway (GUI), on page 483
Managing Static Routes in the GUIYou can create, edit, or delete static routes by using the Management Appliance > Network > Routing page.You can also modify the default gateway from this page.
Step 1 [New Web Interface Only] On the Security Management appliance, click to load the legacy web interface.Step 2 On the Management Appliance > Network > Routing page, click Add Route in the route listing. The Enter a name
for the route.Step 3 Enter the destination IP address.Step 4 Enter the gateway IP address.Step 5 Submit and commit your changes.
Modifying the Default Gateway (GUI)
Step 1 Click Default Route in the route listing on the Routing page.Step 2 Change the gateway IP address.Step 3 Submit and commit your changes.
Configuring the Default GatewayYou can configure the default gateway via the GUI through the Management Appliance > Network > Routingpage (see Modifying the Default Gateway (GUI), on page 483) or via the setgateway command in the CLI.
Specifying a Secure Communication Protocol• If you plan to upgrade from a lower AsyncOS version (for example, 13.6.x) with TLSv1.0 enabled, toAsyncOS 13.8.x and later, then TLSv1.0 is disabled and TLSv1.1 and TLSv1.2 are enabled by default.You need to enable TLSv1.0 method on your appliance after upgrade.
• From AsyncOS 13.8.x and later, there is no support for SSLv2 and SSLv3 methods.
User Guide for AsyncOS 14.1 for Cisco Secure Email and Web Manager- GD (General Deployment)483
Common Administrative TasksConfiguring TCP/IP Traffic Routes

• It is recommended to use TLSv1.1 and TLSv1.2 methods instead of SSLv3 and TLSv1.0. SSLv3 is notsecure and you should not use it.
• You can choose the communication protocol to be used for each of the following:
• Updater server
• Web-based administrative interface to the appliance
• LDAPS
By default, Update Servers, Web Interface, and LDAP servers use TLSv1.1 andTLSv1.2 methods on a newly installed appliance. SSLv3 is disabled for theend-user access to the spam quarantine.
Note
• To view the currently selected protocols and available options, or to change protocols, use the sslconfigcommand in the command-line interface.
• Cisco update servers do not support SSLv3.
• If you are using a local (remote) update server, and for all other services and web browsers, the protocolyou choose must be supported by and enabled on the server and tools you are using.
• One of the available options must be enabled for each service you use.
• Changes made using the sslconfig command require a Commit.
• Affected services will be briefly interrupted after you commit changes made using the sslconfigcommand.
Configuring the System Time
When gathering data for reports, the Security Management appliance applies the time stamp from theinformation that was set when you configured the time settings on the Security Management appliance. Forinformation, see How the Security Management Appliance Gathers Data for Reports, on page 26.
Note
To set time-related settings using the command-line interface, use the ntpconfig , settime , and settz commands.
Do ThisTo
Select Management Appliance > System Administration > Time Settings
See also Using a Network Time Protocol (NTP) Server, on page 485
Set the system time
Select Management Appliance > System Administration > Time Zone
See also:
• Selecting a GMT Offset, on page 485• Updating Time Zone Files, on page 486
Set the time zone
User Guide for AsyncOS 14.1 for Cisco Secure Email and Web Manager- GD (General Deployment)484
Common Administrative TasksConfiguring the System Time
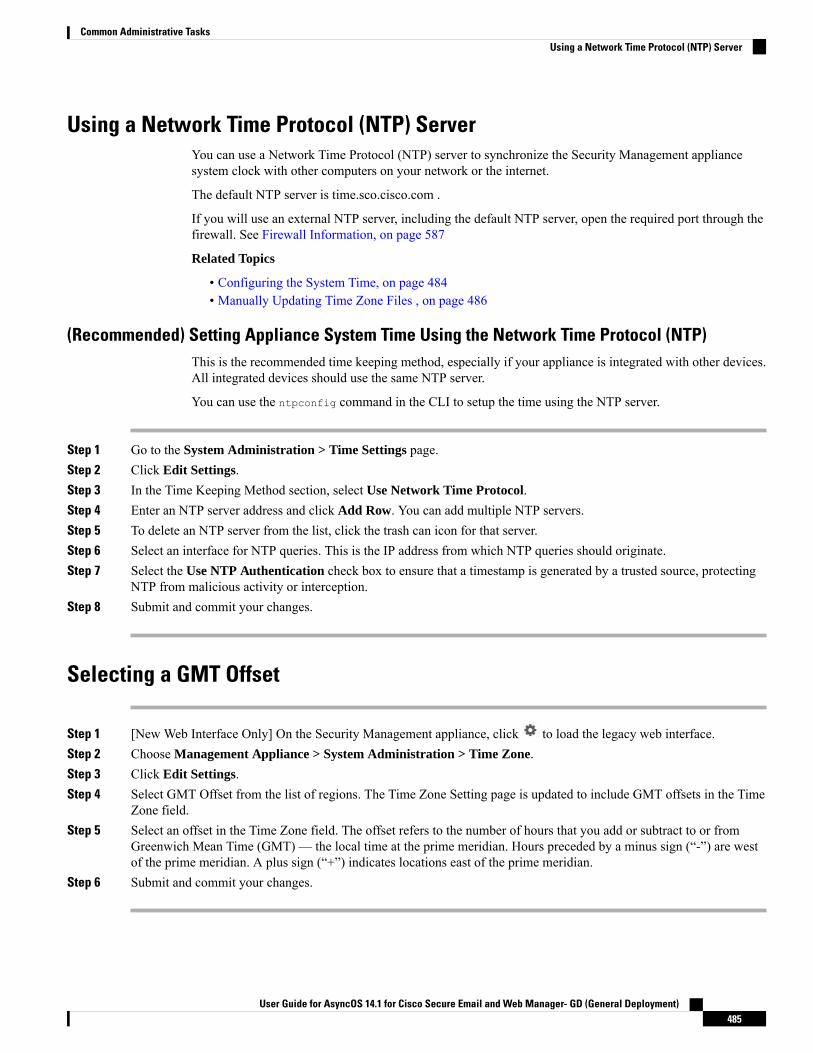
Using a Network Time Protocol (NTP) ServerYou can use a Network Time Protocol (NTP) server to synchronize the Security Management appliancesystem clock with other computers on your network or the internet.
The default NTP server is time.sco.cisco.com .
If you will use an external NTP server, including the default NTP server, open the required port through thefirewall. See Firewall Information, on page 587
Related Topics
• Configuring the System Time, on page 484• Manually Updating Time Zone Files , on page 486
(Recommended) Setting Appliance System Time Using the Network Time Protocol (NTP)This is the recommended time keeping method, especially if your appliance is integrated with other devices.All integrated devices should use the same NTP server.
You can use the ntpconfig command in the CLI to setup the time using the NTP server.
Step 1 Go to the System Administration > Time Settings page.Step 2 Click Edit Settings.Step 3 In the Time Keeping Method section, select Use Network Time Protocol.Step 4 Enter an NTP server address and click Add Row. You can add multiple NTP servers.Step 5 To delete an NTP server from the list, click the trash can icon for that server.Step 6 Select an interface for NTP queries. This is the IP address from which NTP queries should originate.Step 7 Select the Use NTP Authentication check box to ensure that a timestamp is generated by a trusted source, protecting
NTP from malicious activity or interception.Step 8 Submit and commit your changes.
Selecting a GMT Offset
Step 1 [New Web Interface Only] On the Security Management appliance, click to load the legacy web interface.Step 2 Choose Management Appliance > System Administration > Time Zone.Step 3 Click Edit Settings.Step 4 Select GMT Offset from the list of regions. The Time Zone Setting page is updated to include GMT offsets in the Time
Zone field.Step 5 Select an offset in the Time Zone field. The offset refers to the number of hours that you add or subtract to or from
Greenwich Mean Time (GMT) — the local time at the prime meridian. Hours preceded by a minus sign (“-”) are westof the prime meridian. A plus sign (“+”) indicates locations east of the prime meridian.
Step 6 Submit and commit your changes.
User Guide for AsyncOS 14.1 for Cisco Secure Email and Web Manager- GD (General Deployment)485
Common Administrative TasksUsing a Network Time Protocol (NTP) Server

Updating Time Zone FilesWhenever there is a change in the time zone rules for any country, Time Zone files on the appliance must beupdated.
• Automatically Updating Time Zone Files , on page 486• Manually Updating Time Zone Files , on page 486
Automatically Updating Time Zone Files
Step 1 [New Web Interface Only] On the Security Management appliance, click to load the legacy web interface.Step 2 Choose Management Appliance > System Administration > Update Settings.Step 3 Select the Enable automatic updates for Time zone rules check box.Step 4 Enter an interval. Click the ? help on the page for important information.Step 5 Submit and commit your changes.
Manually Updating Time Zone Files
Step 1 [New Web Interface Only] On the Security Management appliance, click to load the legacy web interface.Step 2 Choose Management Appliance > System Administration > Time Settings.Step 3 Look at the Time Zone File Updates section.Step 4 If there is an available time zone file update, click Update Now.
Configuration File PageSeeFor Information About This Section
Saving and Importing Configuration Settings , on page487
Saving the current configuration
Saving and Importing Configuration Settings , on page487
Loading a saved configuration
Backing Up and Restoring the Safelist/Blocklist , on page283
End-User Safelist/Blocklist Database (SpamQuarantine)
Resetting the Configuration to Factory Defaults, on page447
Reset Configuration
User Guide for AsyncOS 14.1 for Cisco Secure Email and Web Manager- GD (General Deployment)486
Common Administrative TasksUpdating Time Zone Files

Saving and Importing Configuration Settings
The configuration file described in this section is used to configure Security Management appliances.Note
Most configuration settings for the Security Management appliance can be managed in a single configurationfile. The file is maintained in Extensible Markup Language (XML) format.
You can use this file in several ways:
• In case of unexpected disaster to your primary SecurityManagement appliance, you can quickly configurea second Security Management appliance to restore service.
• You can save the configuration file to a different system to back up and preserve crucial configurationdata. If you make a mistake while configuring your appliance, you can “roll back” to the most recentlysaved configuration file.
• You can download the existing configuration file to view the entire configuration for an appliance quickly.(Many newer browsers include the ability to render XML files directly.) This may help you troubleshootminor errors (like typographic errors) that may exist in the current configuration.
• You can download an existing configuration file, make changes to it, and upload it to the same appliance.This, in effect, “bypasses” both the CLI and the GUI for making configuration changes.
• You can upload an entire configuration file through FTP, or you can paste portions of a configurationfile directly into the CLI.
• Because the file is in XML format, an associated document type definition (DTD) that describes all ofthe XML entities in the configuration file is also provided. You can download the DTD to validate anXML configuration file before uploading it. (XML validation tools are readily available on the Internet.)
• You can use the configuration file to speed configuration of another appliance, for example a clonedvirtual appliance.
Managing Configuration Files• Backing Up and Restoring the Safelist/Blocklist , on page 283• Resetting the Configuration to Factory Defaults, on page 447• Rolling Back to a Previously Committed Configuration , on page 490
Saving and Exporting the Current Configuration FileUsing the Current Configuration section of the Management Appliance > System Administration >Configuration File page, you can save the current configuration file to your local machine, save it on theappliance (placed in the configuration directory in the FTP/SCP root), or email it to the address specified.
Masking the passphrase
Optionally, mask the user’s passphrases by selecting the check box. Masking a passphrase causes the original,encrypted passphrase to be replaced with “*****” in the exported or saved file.
Configuration files with masked passphrases cannot be loaded back into AsyncOS.Note
User Guide for AsyncOS 14.1 for Cisco Secure Email and Web Manager- GD (General Deployment)487
Common Administrative TasksSaving and Importing Configuration Settings

Encrypting the passphrase
You can encrypt the user’s passphrases by clicking the Encrypt passphrases in the Configuration Files checkbox.The following are the critical security parameters in the configuration file that will be encrypted.
• Certificate private keys
• RADIUS passwords
• LDAP bind passwords
• Local users' password hashes
• SNMP password
• Outgoing SMTP authentication passwords
• PostX encryption keys
• PostX encryption proxy password
• FTP Push log subscriptions' passwords
• IPMI LAN password
• Updater server URLs
You can also configure this in the command-line interface using the saveconfig command.
Loading a Configuration FileThe configuration file must have been saved from an appliance running the same AsyncOS version as theappliance on which you will load the configuration.
Configuration files with masked passphrases cannot be loaded.
Regardless of the method, you must include the following tags at the top of your configuration:
<?xml version="1.0" encoding="ISO-8859-1"?><!DOCTYPE config SYSTEM "config.dtd"><config>... your configuration information in valid XML</config>
The closing </config> tag should follow your configuration information. The values in XML syntax are parsedand validated against the DTD located in the configuration directory on your Cisco Content Security appliance.The DTD file is named config.dtd . If validation errors are reported at the command line when you use theloadconfig command, the changes are not loaded. You can download the DTD to validate configuration filesoutside of the appliance before uploading them.
In any import method, you can import an entire configuration file (the information defined between the highestlevel tags: <config></config> ), or a complete and unique subsection of the configuration file, as long as itcontains the declaration tags (above) and is contained within the <config></config> tags.
“Complete” means that the entire start and end tags for a given subsection as defined by the DTD are included.For example, uploading or pasting the following code causes validation errors:
<?xml version="1.0" encoding="ISO-8859-1"?><!DOCTYPE config SYSTEM "config.dtd"><config>
User Guide for AsyncOS 14.1 for Cisco Secure Email and Web Manager- GD (General Deployment)488
Common Administrative TasksLoading a Configuration File

<autosupport_enabled>0</autosu</config>
However, uploading or pasting the following code does not cause validation errors:
<?xml version="1.0" encoding="ISO-8859-1"?><!DOCTYPE config SYSTEM "config.dtd"><config><autosupport_enabled>0</autosupport_enabled>
</config>
“Unique” means that the subsection of the configuration file being uploaded or pasted is not ambiguous forthe configuration. For example, a system can have only one hostname, so uploading the following code(including the declarations and <config></config> tags) is allowed:
<hostname>mail4.example.com</hostname>
However, a system can have multiple listeners defined, each with different Recipient Access Tables defined,so uploading only the following code is considered ambiguous:
<rat><rat_entry><rat_address>ALL</rat_address><access>RELAY</access>
</rat_entry></rat>
Because it is ambiguous, it is not allowed, even though it is “complete” syntax.
When uploading or pasting a configuration file or subsections of a configuration file, you have the potentialto erase uncommitted changes that may be pending.
Caution
Empty Versus Omitted Tags
Use caution when uploading or pasting sections of configuration files. If you do not include a tag, then itsvalue in the configuration is not modified when you load a configuration file. However, if you include anempty tag, then its configuration setting is cleared.
For example, uploading the following code removes all listeners from the system:
<listeners></listeners>
When uploading or pasting subsections of a configuration file, you can disconnect yourself from the GUI orCLI and destroy large amounts of configuration data. Do not disable services with this command if you arenot able to reconnect to the appliance using another protocol, the Serial interface, or the default settings onthe Management port. Also, do not use this command if you are unsure of the exact configuration syntax asdefined by the DTD. Always back up the configuration data before loading a new configuration file.
Caution
Note About Loading Passphrases for Log Subscriptions
If you attempt to load a configuration file that contains a log subscription that requires a passphrase (forexample, one that will use FTP push), the loadconfig command does not warn you about the missing
User Guide for AsyncOS 14.1 for Cisco Secure Email and Web Manager- GD (General Deployment)489
Common Administrative TasksEmpty Versus Omitted Tags

passphrase. The FTP push fails and alerts are generated until you configure the correct passphrase using thelogconfig command.
Note About Character Set Encoding
The “encoding” attribute of the XML configuration file must be “ ISO-8859-1 ” regardless of the characterset you may be using to manipulate the file offline. The encoding attribute is specified in the file wheneveryou issue the showconfig , saveconfig , or mailconfig command:
<?xml version="1.0" encoding="ISO-8859-1"?>
Resetting the Current ConfigurationResetting the current configuration causes your Cisco Content Security appliance to revert settings back tothe original factory defaults. Save your configuration prior to resetting it.
See Resetting the Configuration to Factory Defaults, on page 447.
Rolling Back to a Previously Committed ConfigurationYou can roll back the configuration to a previously-committed configuration.
Use the rollbackconfig command in the command-line interface to choose one of the ten most recent commits.
If you enter Nowhen prompted to commit a rollback, the rollback will be committed the next time you commitchanges.
Only users with Administrator access can use the rollbackconfig command.
No log messages or alerts will be generated when a previous configuration is restored.Note
Certain commits, such as re-allocating disk space to a size insufficient to hold existing data, could result indata loss.
Note
CLI Commands for Configuration FilesThe following commands enable you to manipulate the configuration files:
• showconfig• mailconfig• saveconfig• loadconfig• rollbackconfig• resetconfig (see Resetting the Configuration to Factory Defaults, on page 447 )• publishconfig• backupconfig (see Backing Up Security Management Appliance Data , on page 452 )• trailblazerconfig
User Guide for AsyncOS 14.1 for Cisco Secure Email and Web Manager- GD (General Deployment)490
Common Administrative TasksNote About Character Set Encoding

The showconfig, mailconfig, and saveconfig CommandsFor the configuration commands showconfig , mailconfig , and saveconfig , you are prompted to choosewhether to include passphrases in the file that will be mailed or displayed. Choosing not to include passphrasesleaves any passphrase field blank. You can choose not to include passphrases if you are concerned aboutsecurity breaches. However, configuration files without passphrases fail when loaded using the loadconfigcommand. See Note About Loading Passphrases for Log Subscriptions, on page 489.
When saving, showing, or mailing your configuration file if you choose to include passphrases (answer yesto “Do you want to include passphrases?”), the passphrases are encrypted. However, the private keys andcertificates are included in unencrypted PEM format.
Note
The showconfig command prints the current configuration to the screen.
mail3.example.com> showconfigDo you want to include passphrases? Please be aware that a configuration withoutpassphrases will fail when reloaded with loadconfig.<?xml version="1.0" encoding="ISO-8859-1"?><!DOCTYPE config SYSTEM "config.dtd"><!--Product: model number
Messaging Gateway Appliance(tm)Model Number: model numberVersion: version of AsyncOS installedSerial Number: serial numberCurrent Time: current time and date
[The remainder of the configuration file is printed to the screen.]
Use the mailconfig command to email the current configuration to a user. A configuration file in XML formatnamed config.xml will be attached to the message.
mail3.example.com> mailconfigPlease enter the email address to which you want to sendthe configuration file.[]> [email protected] you want to include passphrases? Please be aware that a configurationwithout passphrases will fail when reloaded with loadconfig. [N]> yThe configuration file has been sent to [email protected].
The saveconfig command on the Security Management appliance stores and saves all of the configurationmaster files (ESA) with a unique filename to the configuration directory.
mail3.example.com> saveconfigDo you want to include passphrases? Please be aware that a configuration without passphrases
will fail when reloaded with loadconfig. [N]> yThe file C650-00065B8FCEAB-31PM121-20030630T130433.xml has been saved in the configurationdirectory.mail3.example.com>
The loadconfig CommandUse the loadconfig command to load new configuration information into the appliance. You can loadinformation using one of two methods:
• Placing information in the configuration directory and uploading it
User Guide for AsyncOS 14.1 for Cisco Secure Email and Web Manager- GD (General Deployment)491
Common Administrative TasksThe showconfig, mailconfig, and saveconfig Commands

• Pasting configuration information directly into the CLI
See Loading a Configuration File, on page 488 for more information.
The rollbackconfig CommandSee Rolling Back to a Previously Committed Configuration , on page 490.
The publishconfig CommandUse the publishconfig command to publish changes a configuration master. The syntax is as follows:
publishconfig config_master [job_name ] [host_list | host_ip
where config_master is a supported ConfigurationMaster, as listed in the Compatibility Matrix in the ReleaseNotes for this release at http://www.cisco.com/en/US/products/ps10155/prod_release_notes_list.html . Thiskeyword is required. The keyword job_name is optional and will be generated if it is not specified.
The keyword host_list is a list of host names or IP addresses for WSA appliances to be published, and willbe published to all hosts assigned to the configuration master if not specified. The optional host_ip can bemultiple host IP addresses, each separated by a comma.
To verify that the publishconfig command was successful, check the smad_logs file. You can also verifythat the publish history was successful from the Security Management appliance GUI by choosing Web >Utilities > Web Appliance Status. From this page choose the web appliance that you want the publish historydetails. Additionally, you can go the Publish History page: Web > Utilities > Publish > Publish History.
The trailblazerconfig CommandYou can use the trailblazerconfig command to route your incoming and outgoing connections throughHTTP and HTTPS ports on the new web interface.
You can see the inline help by using the following command on the CLI: help trailblazerconfig.
The syntax is as follows:
trailblazerconfig enable <https_port> <http_port>
trailblazerconfig disable
trailblazerconfig status
Where:
'enable' runs the trailblazer configuration on the default ports (HTTPS: 4431).
'disable' disables the trailblazer configuration
'status' checks the status of the trailblazer configuration.
User Guide for AsyncOS 14.1 for Cisco Secure Email and Web Manager- GD (General Deployment)492
Common Administrative TasksThe rollbackconfig Command

By default, trailblazerconfigCLI command is enabled on your appliance. Make sure that the HTTPS portsare opened on the firewall. Also ensure that your DNS server can resolve the hostname that you specified foraccessing the appliance.
The trailblazerconfig command helps you to avoid the following issues:
• Requiring to add multiple certificates for API ports in certain browsers.
• Redirecting to the legacy web interface when you refresh the Spam quarantine, Safelist or Blocklist page.
• Metrics bar on the Advanced Malware Protection report page does not contain any data.
Important
When you enable trailblazerconfig command on the appliance, the request URL will contain thetrailblazerconfig HTTPS port number appended to the hostname.
Note
The updatepvocert CommandYou must use the updatepvocert command in the CLI to update the CA certificate of 2048 bits to enableCentralized Policy, Virus and Quarantines on the managed Cisco Email Security appliance that is in FIPSmode.
The Centralized Policy, Virus, and Outbreak Quarantines on the managed Email Security appliance is disabledwhen FIPS is enabled. From AsyncOS 13.0 onwards, appliances in FIPS mode uses a certificate of 2048 bitsto enable Centralized Policy, Virus, and Outbreak Quarantines. The earlier AsyncOS versions have certificatesof size 1024 bits.example.mail.com> updatepvocertThis command will recreate the PVO certificate and key of strength 2048 bits.Also, the new certificate will be signed by a CA of strength 2048 bits.Hermes process will restart post certificate update. No commit will be required.Do you want to proceed with the certificate update? [Y]>
Certificate updated successfully. Hermes restart needed for the changes to be effective.Do you want to restart hermes? []> Y
Enter the number of seconds to wait before abruptly closing connections. [30]>
Waiting for listeners to exit... Receiving suspended for euq_listener, cpq_listener. Waitingfor outgoing deliveries to finish... Mail delivery suspended. Receiving resumed foreuq_listener, cpq_listener. Mail delivery resumed.Hermes will be up in a moment. Run the status command for hermes.
example.mail.com >
Uploading Configuration Changes Using the CLI
Step 1 Outside of the CLI, ensure that you are able to access the configuration directory of the appliance. See IP Interfaces andAccessing the Appliance, on page 575 for more information.
Step 2 Place an entire configuration file or subsection of a configuration file in the configuration directory of the appliance, oredit an existing configuration that was created from the saveconfig command.
User Guide for AsyncOS 14.1 for Cisco Secure Email and Web Manager- GD (General Deployment)493
Common Administrative TasksThe updatepvocert Command

Step 3 Within the CLI, use the loadconfig command to load the configuration file you placed in the directory from Step 2, orpaste the text (XML syntax) directly into the CLI.
In this example, a file named changed.config.xml is uploaded and the changes are committed:
Example:
mail3.example.com>loadconfig1. Paste via CLI2. Load from file[1]> 2Enter the name of the file to import:[]> changed.config.xmlValues have been loaded.Be sure to run "commit" to make these settings active.mail3.example.com> commit
In this example, a new configuration file is pasted directly at the command line. (Remember to press Ctrl-D on a blankline to end the paste command.) Then the System Setup Wizard is used to change the default hostname, IP address, andgateway information. (For more information, see Running the System Setup Wizard, on page 17.) Finally, the changesare committed.
Example:
mail3.example.com> loadconfig1. Paste via CLI2. Load from file[1]> 1Paste the configuration file now. Press CTRL-D on a blank line when done.[The configuration file is pasted until the end tag</config>. Control-D is entered on a separate line.]Values have been loaded.Be sure to run "commit" to make these settings active.mail3.example.com> commitPlease enter some comments describing your changes:[]> pasted new configuration file and changed default settings
Managing Disk SpaceYou can allocate available disk space among the features that your organization uses, up to the maximumavailable.
• (Virtual Appliances Only) Increasing Available Disk Space , on page 495• Viewing Disk Space, Quotas and Usage , on page 495• About Disk Space Maximums and Allocations, on page 496• Ensuring That You Receive Alerts About Disk Space , on page 496• Managing Disk Space for the Miscellaneous Quota , on page 496• Reallocating Disk Space Quotas , on page 497
User Guide for AsyncOS 14.1 for Cisco Secure Email and Web Manager- GD (General Deployment)494
Common Administrative TasksManaging Disk Space

(Virtual Appliances Only) Increasing Available Disk SpaceFor virtual appliances running ESXi 5.5 and VMFS 5, you can allocate more than 2TB of disk space. Forappliances running ESXi 5.1, the limit is 2 TB.
Disk space reduction in ESXi is not supported. See the VMWare documentation for information.Note
To add disk space to the virtual appliance instance:
Before you begin
Carefully determine the disk space increase needed.
Step 1 Bring down the Cisco Content Security Management appliance instance.Step 2 Increase disk space using utilities or administrative tools provided by VMWare.
See information about changing the virtual disk configuration in the VMWare documentation.
Information for ESXi 5.5 is available here: http://pubs.vmware.com/vsphere-55/index.jsp?topic=%2Fcom.vmware.vsphere.hostclient.doc%2FGUID-81629CAB-72FA-42F0-9F86-F8FD0DE39E57.html
Step 3 [New Web Interface Only] On the Security Management appliance, click to load the legacy web interface.Step 4 Go to Management Appliance > System Administration > Disk Managementand verify that your change has taken
effect.
Viewing Disk Space, Quotas and UsageDo ThisTo
SelectManagement Appliance > System Administration> Disk Management.
Look at the values shown for "Total Space Allocated" -for example, 184G of 204G.
View the total disk space available on theappliance
SelectManagement Appliance > System Administration> Disk Management.
View the amount of disk space allocated to andcurrently used by each of the SecurityManagement appliance’s monitoring services
Select Management Appliance > Centralized Services> System Status and look at the Centralized Servicessection.
View the percentage of the quotas for quarantinesthat are currently used
User Guide for AsyncOS 14.1 for Cisco Secure Email and Web Manager- GD (General Deployment)495
Common Administrative Tasks(Virtual Appliances Only) Increasing Available Disk Space

About Disk Space Maximums and Allocations
Centralized Reporting Disk Space on Security Management appliances is used for both Email and Web data.If you enable either Centralized Email Reporting or Centralized Web Reporting, all of the space is dedicatedto the enabled feature. If you enable both, Email andWeb reporting data share the space and space is allocatedon a first-come basis.
Note
• If you enable centralized web reporting but there is no disk space allocated for reporting, then centralizedweb reporting will not work until disk space is allocated.
• Before reducing the Miscellaneous quota below current usage levels, you should delete unneeded data.See Managing Disk Space for the Miscellaneous Quota , on page 496.
• For more information about how disk space is managed for policy, virus, and outbreak quarantines, seeDisk Space Allocation for Policy, Virus, and Outbreak Quarantines , on page 306 and Retention Timefor Messages in Quarantines , on page 307.
• For all other data types, if you reduce the existing allocation below current usage, then the oldest data isdeleted until all data fits within the new allocation amount.
• If the new quota is larger than the currently used disk space, you will not lose data.
• If you set the allocation to zero, no data is retained.
Ensuring That You Receive Alerts About Disk SpaceYou will begin to receive system alerts at warning level when Miscellaneous disk usage reaches 75% of thequota. You should take action when you receive these alerts.
To ensure that you receive these alerts, see Managing Alerts, on page 473.
Managing Disk Space for the Miscellaneous QuotaThe Miscellaneous quota includes System data and User data. You cannot delete System data. User data thatyou can manage includes the following types of files:
Do thisTo Manage
Go to Management Appliance > System Administration > LogSubscriptions and:
• Click the Size column heading to see which logs consume the mostdisk space.
• Verify that you need all of the log subscriptions that are beinggenerated.
• Verify that the log level is no more verbose than necessary.• If feasible, reduce the rollover file size.
Log files
Go toHelp and Support(near the upper right side of your screen) > PacketCapture. Delete any unneeded captures.
Packet captures
User Guide for AsyncOS 14.1 for Cisco Secure Email and Web Manager- GD (General Deployment)496
Common Administrative TasksAbout Disk Space Maximums and Allocations

Do thisTo Manage
FTP to the /data/pub directory on the appliance.
To configure FTP access to the appliance, see Accessing the Appliancevia FTP, on page 577
Configuration files
(These files are unlikely toconsume much disk space.)
Go to System Administration > Disk Management.Quota size
Reallocating Disk Space QuotasIf disk space is allocated to features you do not use, or if the appliance frequently runs out of disk space fora particular feature and has excess space for other features, you can reallocate disk space.
If you require more space for all features, consider upgrading your hardware or allocating more disk space toyour virtual appliance. See (Virtual Appliances Only) Increasing Available Disk Space , on page 495.
Before you begin
• Changing disk allocations may impact existing data or feature availability. See information at AboutDisk Space Maximums and Allocations, on page 496.
• You can temporarily create space in a quarantine by manually releasing or deleting messages from thequarantine.
Step 1 [New Web Interface Only] On the Security Management appliance, click to load the legacy web interface.Step 2 Choose Management Appliance > System Administration > Disk Management
Step 3 Click Edit Disk Quotas.
Step 4 On the Edit Disk Quotas page, enter the amount of disk space (in gigabytes) allocated to each service.Step 5 Click Submit.
Step 6 In the confirmation dialog box, click Set New Quotas.
Step 7 Click Commit to commit your changes.
Adjusting the Reference Threshold in System Health Graphs forEmail Security Appliances
To receive alerts related to these thresholds, configure the thresholds on eachmanaged Email Security appliance.For information, see information about configuring thresholds for system health in the user guide or onlinehelp for your Email Security appliance release. You can also run on-demand system health checks fromindividual appliances. See information about checking the health of your appliance in the user guide or onlinehelp for your Email Security appliance release.
Note
User Guide for AsyncOS 14.1 for Cisco Secure Email and Web Manager- GD (General Deployment)497
Common Administrative TasksReallocating Disk Space Quotas

Step 1 [New Web Interface Only] On the Security Management appliance, click to load the legacy web interface.Step 2 Click Management Appliance > System Administration > System Health.Step 3 Click Edit Settings.Step 4 Configure options.
DescriptionOption
Default: 85%Overall CPU Usage
Default: 5000 pagesMemory Page Swapping
Default: 500 messagesMaximum Messages in Work Queue
Step 5 Submit and commit your changes.
SSO Using SAML 2.0• About SSO and SAML 2.0, on page 498
• SAML 2.0 SSO Workflow, on page 498
• Guidelines and Limitations for SAML 2.0, on page 499
• How to Configure SSO for Spam Quarantine, on page 507
• How to Configure SSO on your Cisco Security Management Appliance, on page 500
About SSO and SAML 2.0Cisco Content Security Management appliance now supports SAML 2.0 SSO so that the end users can accessthe SpamQuarantine using the same credentials that are used to access other SAML 2.0 SSO enabled serviceswithin their organization. For instance, you have enabled Ping Identity as your SAML identity provider (IdP)and has accounts on Rally, Salesforce, and Dropbox which have been SAML 2.0 SSO enabled. When youconfigure Cisco Content Security Management appliance to support SAML 2.0 SSO as a Service Provider(SP), end users will be able to sign in once and have access to all these services including Spam Quarantine.
SAML 2.0 SSO WorkflowThe SAML 2.0 SSO workflow is displayed in the following figure:
User Guide for AsyncOS 14.1 for Cisco Secure Email and Web Manager- GD (General Deployment)498
Common Administrative TasksSSO Using SAML 2.0

Figure 20: SAML 2.0 SSO Workflow
Workflow
1. The end user uses a web browser to request a resource from the service provider (your appliance). Forexample, the end user clicks on the spam quarantine link in a spam notification.
2. The service provider redirects the request to the web browser with SAML authentication request.
3. The web browser relays the SAML authentication request to the identity provider.
4. The identity provider authenticates the end user. The identity provider displays a login page to the enduser and the end user logs in.
5. The identity provider generates the SAML assertion and sends it back to the web browser.
6. The web browser relays the SAML assertion to the service provider.
7. The service provider grants access to the requested resource.
Guidelines and Limitations for SAML 2.0• Logout, on page 500• General, on page 500
User Guide for AsyncOS 14.1 for Cisco Secure Email and Web Manager- GD (General Deployment)499
Common Administrative TasksGuidelines and Limitations for SAML 2.0

• Spam Quarantine Access for Administrators, on page 500
LogoutWhen end users log out of Spam Quarantine, they are not logged out of other SAML 2.0 SSO enabledapplications.
GeneralYou can configure only one instance of service provider and identity provider on Cisco Content SecurityManagement appliance.
Spam Quarantine Access for AdministratorsIf you are enabling SSO for Spam Quarantine, keep in mind that the administrators will no longer be able toaccess the Spam Quarantine using the Spam Quarantine URL ( http://<appliance_hostname>:<port> ).Administrators can access the Spam Quarantine using the web interface (Email > Message Quarantine >Spam Quarantine).
How to Configure SSO on your Cisco Security Management Appliance
Procedure
PurposeCommand or Action
Prerequisites, on page 500Review the prerequisites.Step 1
Configure Cisco Content Security Management Applianceas a Service Provider, on page 501
Configure your appliance as a service provider.Step 2
Configuring the Identity Provider to Communicate withCisco Security Management Appliance, on page 503
[On IDP] Configure the identity provider to work with yourappliance.
Step 3
Configure Identity Provider Settings on Cisco ContentSecurity Management Appliance, on page 505
Configure identity provider settings on your appliance.Step 4
Enable SAML Authentication, on page 506Enable external authentication using SAML on yourappliance.
Step 5
Prerequisites• Supported Identity Providers, on page 500
• Certificates for Secure Communication, on page 501
Supported Identity Providers
Verify whether the identity provider used by your organization is supported by Cisco Email Security Appliance.The following are the supported identity providers:
• Microsoft Active Directory Federation Services (AD FS) 2.0 and later
• Duo Access Gateway
User Guide for AsyncOS 14.1 for Cisco Secure Email and Web Manager- GD (General Deployment)500
Common Administrative TasksLogout

• Azure AD
Certificates for Secure Communication
Obtain the following certificates that are required to secure the communication between your appliance andthe identity provider:
• If you want your appliance to sign SAML authentication requests or if want your identity provider toencrypt SAML assertions, obtain a self-signed certificate or a certificate from a trusted CA and theassociated private key.
• If you want the identity provider to sign SAML assertions, obtain the identity provider’s certificate andimport the same to your appliance. Your appliance will use this certificate to verify the signed SAMLassertions.
Converting Certificates
Normally, the certificates obtained from the appliance are in .pfx format and must be converted to .pem formatwhen you configure your appliance as a service provider.
To convert the certificates from .pfx format to .pem format, do the following:
• Download and install OpenSSL tool and import the certificate file (.pfx) obtained from your appliance.
• Run the following command to export the certificate in .pem format: openssl pkcs12 -in
<certname>.pfx -nokeys -out cert.pem
• Run the following command to export the private key in .pem format: openssl pkcs12 -in certname.pfx
-nocerts -out key.pem -nodes
• Run the following command to remove the passphrase from the private key: openssl rsa -in key.pem
-out server.key
Configure Cisco Content Security Management Appliance as a Service Provider
Before you begin
Review the Prerequisites, on page 500.
Step 1 [New Web Interface Only] On the Security Management appliance, click to load the legacy web interface.Step 2 Choose Management Appliance > System Administration > SAML.Step 3 Under the Service Provider section, click Add Service Provider.Step 4 Enter the following details:
DescriptionField
Enter a name for the service provider profile.Profile Name
Configuration Settings
Enter a globally unique name for the service provider (in this case, your appliance).The format of the service provider Entity ID is typically a URI.
Entity ID
User Guide for AsyncOS 14.1 for Cisco Secure Email and Web Manager- GD (General Deployment)501
Common Administrative TasksCertificates for Secure Communication

DescriptionField
The format that the identity provider should use to specify the user in the SAMLassertion.
This field is not configurable. You will need this value while configuring the identityprovider.
Name ID Format
The URL to which the identity provider should send the SAML assertion afterauthentication has successfully completed. In this case, this is the URL to your spamquarantine.
This field is not configurable. You will need this value while configuring the identityprovider.
Assertion Consumer URL
The private key must be in .pem format.Note
Signing Authentication Requests
If you want the appliance to sign the SAML authentication requests:
a. Upload the certificate and the associated private key.
b. Enter the passphrase for the private key.
c. Select Sign Request.
Decrypt Encrypted Assertions
If you plan to configure your identity provider to encrypt SAML assertions:
a. Upload the certificate and the associated private key.
b. Enter the passphrase for the private key.
SP Certificate
If you want the identity provider to sign the SAML assertions, select Sign Assertions.
If you select this option, you must add the identity provider’s certificate to theappliance. See Configuring the Identity Provider to Communicate with Cisco SecurityManagement Appliance, on page 503.
Sign Assertions
Enter the details of your organization.
Identity provider uses this information in the error logs.
Organization Details
Enter the email address of the technical contact.
Identity provider uses this information in the error logs.
Technical Contact
Step 5 Click Submit.Step 6 Note down the service provider metadata (Entity ID and Assertion Customer URL) displayed on the SSO Settings page
and the Name ID Format displayed on the Service Provider Settings page. You will need these details while configuringthe service provider settings on the identity provider.
User Guide for AsyncOS 14.1 for Cisco Secure Email and Web Manager- GD (General Deployment)502
Common Administrative TasksConfigure Cisco Content Security Management Appliance as a Service Provider

Optionally, you can export the metadata as a file. Click Export Metadata and save the metadata file. Some identityproviders allow you to load service provider details from a metadata file.
What to do next
Configure the identity provider to communicate with your appliance. See Configuring the Identity Providerto Communicate with Cisco Security Management Appliance, on page 503.
Configuring the Identity Provider to Communicate with Cisco Security Management Appliance
Before you begin
Make sure that you have:
• Configured your appliance as a service provider. See Configure Cisco Content Security ManagementAppliance as a Service Provider, on page 501.
• Copied the service provider metadata details or exported the metadata file. See Configure Cisco ContentSecurity Management Appliance as a Service Provider, on page 501.
Step 1 On the identity provider, do one of the following:
• Manually configure the details of the service provider (your appliance).
• If your identity provider allows you to load the service provider details from a metadata file, import the metadatafile.
If you have configured your appliance to sign the SAML authentication requests or you plan to encrypt SAML assertions,make sure that you add the relevant certificate to the identity provider.
For identity provider-specific instructions, see:
• Configure AD FS to Communicate with Cisco Security Management Appliance, on page 503.
• Configure Azure AD to Communicate with Cisco Security Management Appliance, on page 504.
• Configure Duo Access Gateway to Communicate with Cisco Security Management Appliance, on page 504.
Step 2 Note down the identity provider metadata or export the metadata as a file.
What to do next
Configure the identity provider settings on your appliance. See Configuring the Identity Provider toCommunicate with Cisco Security Management Appliance, on page 503.
Configure AD FS to Communicate with Cisco Security Management Appliance
The following are the high level tasks you need to perform to configure AD FS (2.0 and later) to communicatewith your appliance. For complete and detailed instructions, see Microsoft documentation.
• Add the service provider’s (appliance’s) Assertion Consumer URL as a relaying party.
User Guide for AsyncOS 14.1 for Cisco Secure Email and Web Manager- GD (General Deployment)503
Common Administrative TasksConfiguring the Identity Provider to Communicate with Cisco Security Management Appliance

• Enter the service provider’s (appliance’s) Entity ID under Relaying Party Trusts > Properties > Identifiers> Relaying Party Identifier. Make sure that this value is same as the Entity ID value in the Service Providersettings on your appliance.
• If you have configured your service provider (appliance) to send signed SAML authentication requests,upload the service provider’s certificate (used to sign authentication requests) in .cer format underRelaying Party Trusts > Properties > Signature.
• If you plan to configure AD FS to send encrypted SAML assertions, upload the service provider’s(appliance’s) certificate in .cer format under Relaying Party Trusts > Properties > Encryption.
• Set the Secure-hash Algorithm to SHA-1 under Relaying Party Trusts > Properties > Advanced.
• Add a custom rule to include SPNameQualifier in the response. The following is a sample custom rule:c:[Type == "http://schemas.xmlsoap.org/ws/2005/05/identity/claims/emailaddress"] =>issue(Type = "http://schemas.xmlsoap.org/ws/2005/05/identity/claims/nameidentifier",Issuer=c.Issuer, OriginalIssuer = c.OriginalIssuer, Value = c.Value, ValueType = c.ValueType,
Properties["http://schemas.xmlsoap.org/ws/2005/05/identity/claimproperties/format"] ="urn:oasis:names:tc:SAML:1.1:nameid-format:emailAddress",Properties ["http://schemas.xmlsoap.org/ws/2005/05/identity/claimproperties/format"] =
"urn:oasis:names:tc:SAML:1.1:nameid-format:unspecified");
• Edit the Claim Rule and add an Issuance Transform Rule to send the LDAP attribute for email addressas an outgoing claim type (email address). Also ensure that you add an Issuance Transform Rule to sendthe LDAP attribute for group attribute as an outgoing claim type (unspecified groups).
Configure Azure AD to Communicate with Cisco Security Management Appliance
The following are the high level tasks you need to perform to Azure AD to communicate with your appliance.For complete and detailed instructions, see Microsoft Azure AD Documentation.
• Add the service provider’s (appliance’s) Assertion Consumer URL as the service provider identifier thatreceives and processes SAML assertions.
• Enter the service provider’s (appliance’s) Entity ID in the Azure Portal under Enterprise Application >New Application > Non-gallery application > Single Sign-On > Basic SAML Configuration. Make surethat this value is same as the Entity ID value in the Service Provider settings on your appliance.
• If you have configured your service provider (appliance) to send signed SAML authentication requests,upload the service provider’s certificate (used to sign authentication requests) under SAML SigningCertificate section (Enterprise Application >NewApplication >Non-gallery application > Single Sign-On> SAML Signing Certificate).
• Configure a Group Claim under User Attributes and Claims section (Enterprise Application > NewApplication > Non-gallery application > Single Sign-On > User Attributes and Claims) and add the groupattribute.
• Add users and groups under Enterprise Application > New Application > Non-gallery application >Users & Groups) to allow users to log in to the application based on the SAML assertion or response.
Configure Duo Access Gateway to Communicate with Cisco Security Management Appliance
The following are the high level tasks you need to perform to Duo Access Gateway to communicate withyour appliance. For complete and detailed instructions, see Duo Security Documentation.
User Guide for AsyncOS 14.1 for Cisco Secure Email and Web Manager- GD (General Deployment)504
Common Administrative TasksConfigure Azure AD to Communicate with Cisco Security Management Appliance

• Add the service provider’s (appliance’s) Assertion Consumer URL as the service provider endpoint thatreceives and processes SAML assertions.
• Enter the service provider’s (appliance’s) Entity ID under Duo Admin Panel > Applications > Protectan Application > SAML Service Provider. Make sure that this value is same as the Entity ID value inthe Service Provider settings on your appliance.
• If you have configured your service provider (appliance) to send signed SAML authentication requests,upload the service provider’s certificate (used to sign authentication requests) in .cer format when youconfigure the authentication source on the Duo Access Gateway.
• If you plan to configure Duo to send encrypted SAML assertions, upload the service provider’s(appliance’s) certificate in .cer format when you configure the authentication source on the Duo AccessGateway.
• Select the NameID format as “unspecified” under Duo Admin Panel > Applications > Protect anApplication > SAML Service Provider > SAML Response.
• Set the Secure-hash Algorithm to SHA-256 under Duo Admin Panel > Applications > Protect anApplication > SAML Service Provider > SAML Response.
• Save the SAML - Service Provider Setting as a configuration file on the Duo Admin Panel and importthe configuration file as a SAML application on the Duo Access Gateway.
Configure Identity Provider Settings on Cisco Content Security Management Appliance
Before you begin
Make sure that you have:
• Configured the identity provider to communicate with your appliance. See Configuring the IdentityProvider to Communicate with Cisco Security Management Appliance, on page 503.
• Copied the identity provider metadata details or the exported metadata file.
Step 1 [New Web Interface Only] On the Security Management appliance, click to load the legacy web interface.Step 2 Choose Management Appliance > System Administration > SAML.Step 3 Under the Identity Provider section, click Add Identity Provider.Step 4 Enter the following details:
DescriptionField
Enter a name for the identity provider profile.Profile Name
Configuration Settings (Manually Configure Identity Provider Settings)
Enter a globally unique name for the identity provider. The format of theidentity provider Entity ID is typically a URI.
Entity ID
Specify the URL to which the service provider must send the SAMLauthentication requests.
SSO URL
User Guide for AsyncOS 14.1 for Cisco Secure Email and Web Manager- GD (General Deployment)505
Common Administrative TasksConfigure Identity Provider Settings on Cisco Content Security Management Appliance

DescriptionField
If the identity provider signs the SAML assertion, youmust upload the identityprovider’s signing certificate.
Certificate
Configuration Settings (Importing Identity Provider Metadata)
Click Import Metadata and select the metadata file.Import IDP Metadata
Step 5 Submit and commit your changes.
What to do next
Enable SAML Authentication, on page 506
Enable SAML AuthenticationYou can enable Single Sign On using SAML to authenticate users and assign groups of users to Cisco rules.
Before you begin
Make sure that you have configured the SAML profiles with Service Provider and Identity Provider settings.See How to Configure SSO on your Cisco Security Management Appliance, on page 500.
Step 1 Navigate to Management Appliances > System Administration > Users.Step 2 Scroll down to the External Authentication section.Step 3 Click Enable.Step 4 Select the Enable External Authentication check box.Step 5 Select SAML as the authentication type from the drop-down list.Step 6 (Optional) In the External Authentication Attribute Name Map field, enter the attribute name to search from the
Group Mapping.
The Attribute Name depends on the attributes that you configure for the Identity Provider. The appliance will search formatching entries of the Attribute Name in the Group Mapping field. This is optional and if you do not configure, theappliance will search for matching entries of all attributes present in the Group Mapping field.
Step 7 In the Group Mapping field, enter the group name attribute as defined in the SAML directory based on the predefinedor custom user role. You can click Add Row to add multiple role mappings.
The Group Mapping must contain a group attribute. You can add 'Unspecified Groups' attribute to authenticate SAMLassertions or response.
For more information on types of user roles, see Users Page , on page 404.
Step 8 Submit and commit your changes.
User Guide for AsyncOS 14.1 for Cisco Secure Email and Web Manager- GD (General Deployment)506
Common Administrative TasksEnable SAML Authentication

What to do next
After you enable SAML external authentication, you can use the Use Single Sign On link on the login pageof the appliance and enter the username to log in to the appliance.
How to Configure SSO for Spam QuarantineMore InfoDo This
Prerequisites, on page 507Review the prerequisites.Step1
Configure Cisco Content Security ManagementAppliance as a Service Provider, on page 508
Configure your appliance as a service provider.Step2
Configure the Identity Provider to Communicatewith Cisco Content SecurityManagementAppliance
[On IDP] Configure the identity provider towork with your appliance.
Step3
Configure Identity Provider Settings on CiscoContent Security Management Appliance, on page511
Configure identity provider settings on yourappliance.
Step4
Enable SSO for Spam Quarantine, on page 512Enable SSO for Spam Quarantine on yourappliance.
Step5
Notify the end users about the newauthentication mechanism.
Step6
Prerequisites• Verify whether the identity provider used by your organization is supported by Cisco Content SecurityManagement Appliance. The following are the supported identity providers:
• Microsoft Active Directory Federation Services (AD FS) 2.0
• Ping Identity PingFederate 7.2
• Cisco Web Security Appliance 9.1
• Obtain the following certificates that are required to secure the communication between your applianceand the identity provider:
• If you want your appliance to sign SAML authentication requests or if want your identity providerto encrypt SAML assertions, obtain a self signed certificate or a certificate from a trusted CA andthe associated private key.
• If you want the identity provider to sign SAML assertions, obtain the identity provider’s certificate.Your appliance will use this certificate to verify the signed SAML assertions.
User Guide for AsyncOS 14.1 for Cisco Secure Email and Web Manager- GD (General Deployment)507
Common Administrative TasksHow to Configure SSO for Spam Quarantine
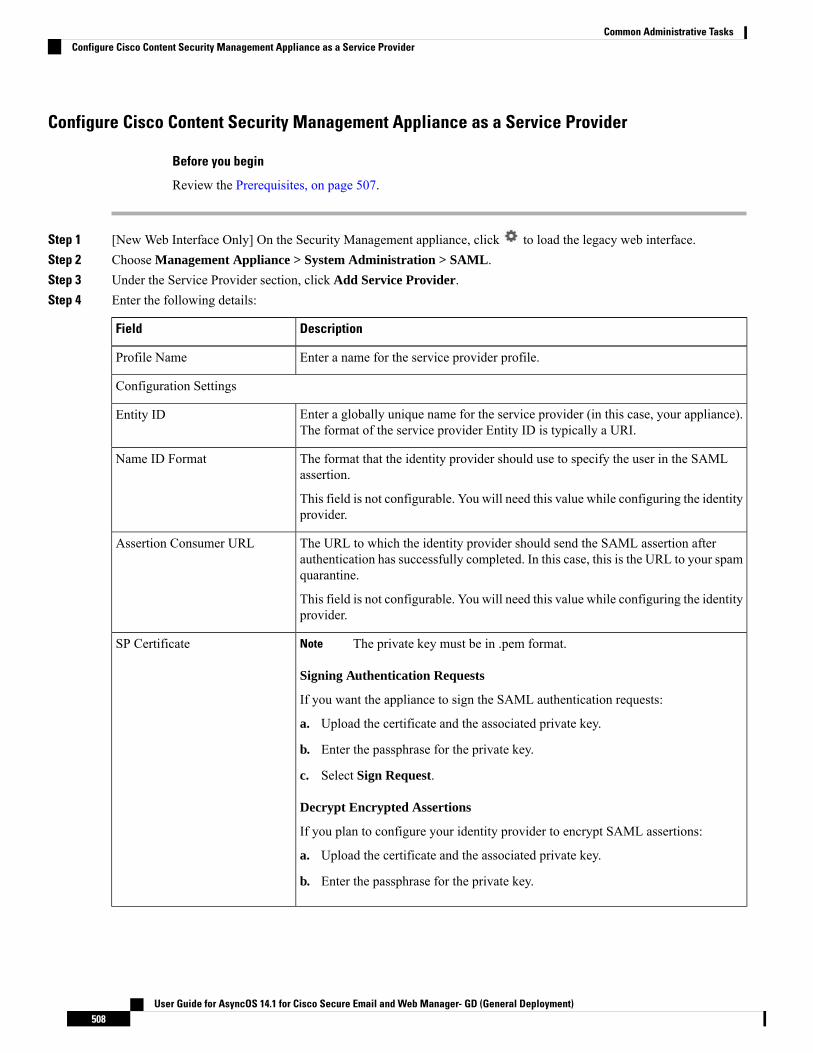
Configure Cisco Content Security Management Appliance as a Service Provider
Before you begin
Review the Prerequisites, on page 507.
Step 1 [New Web Interface Only] On the Security Management appliance, click to load the legacy web interface.Step 2 Choose Management Appliance > System Administration > SAML.Step 3 Under the Service Provider section, click Add Service Provider.Step 4 Enter the following details:
DescriptionField
Enter a name for the service provider profile.Profile Name
Configuration Settings
Enter a globally unique name for the service provider (in this case, your appliance).The format of the service provider Entity ID is typically a URI.
Entity ID
The format that the identity provider should use to specify the user in the SAMLassertion.
This field is not configurable. You will need this value while configuring the identityprovider.
Name ID Format
The URL to which the identity provider should send the SAML assertion afterauthentication has successfully completed. In this case, this is the URL to your spamquarantine.
This field is not configurable. You will need this value while configuring the identityprovider.
Assertion Consumer URL
The private key must be in .pem format.Note
Signing Authentication Requests
If you want the appliance to sign the SAML authentication requests:
a. Upload the certificate and the associated private key.
b. Enter the passphrase for the private key.
c. Select Sign Request.
Decrypt Encrypted Assertions
If you plan to configure your identity provider to encrypt SAML assertions:
a. Upload the certificate and the associated private key.
b. Enter the passphrase for the private key.
SP Certificate
User Guide for AsyncOS 14.1 for Cisco Secure Email and Web Manager- GD (General Deployment)508
Common Administrative TasksConfigure Cisco Content Security Management Appliance as a Service Provider

DescriptionField
If you want the identity provider to sign the SAML assertions, select Sign Assertions.
If you select this option, you must add the identity provider’s certificate to theappliance. See Configure the Identity Provider to Communicate with Cisco ContentSecurity Management Appliance, on page 509.
Sign Assertions
Enter the details of your organization.
Identity provider uses this information in the error logs.
Organization Details
Enter the email address of the technical contact.
Identity provider uses this information in the error logs.
Technical Contact
Step 5 Click Submit.Step 6 Note down the service provider metadata (Entity ID and Assertion Customer URL) displayed on the SSO Settings page
and the Name ID Format displayed on the Service Provider Settings page. You will need these details while configuringthe service provider settings on the identity provider.
Optionally, you can export the metadata as a file. Click Export Metadata and save the metadata file. Some identityproviders allow you to load service provider details from a metadata file.
What to do next
Configure the identity provider to communicate with your appliance. See Configure the Identity Provider toCommunicate with Cisco Content Security Management Appliance, on page 509.
ConfiguretheIdentityProvidertoCommunicatewithCiscoContentSecurityManagementAppliance
Before you begin
Make sure that you have:
• Configured your appliance as a service provider. See Configure Cisco Content Security ManagementAppliance as a Service Provider, on page 508.
• Copied the service provider metadata details or exported the metadata file. See Configure Cisco ContentSecurity Management Appliance as a Service Provider, on page 508.
Step 1 On the identity provider, do one of the following:
• Manually configure the details of the service provider (your appliance).
• If your identity provider allows you to load the service provider details from a metadata file, import the metadatafile.
If you have configured your appliance to sign the SAML authentication requests or you plan to encrypt SAML assertions,make sure that you add the relevant certificate to the identity provider.
For identity provider-specific instructions, see:
User Guide for AsyncOS 14.1 for Cisco Secure Email and Web Manager- GD (General Deployment)509
Common Administrative TasksConfigure the Identity Provider to Communicate with Cisco Content Security Management Appliance

• Configure AD FS 2.0 to Communicate with Cisco Content Security Management Appliance, on page 510
• Configure PingFederate 7.2 to Communicate with Cisco Content Security Management Appliance, on page 510
• Configuring the Appliance as an Identity Provider section in theUser Guide for AsyncOS for Cisco Web SecurityAppliances http://www.cisco.com/c/en/us/support/security/web-security-appliance/products-user-guide-list.html
Step 2 Note down the identity provider metadata or export the metadata as a file.
What to do next
Configure the identity provider settings on your appliance. See Configure Identity Provider Settings on CiscoContent Security Management Appliance, on page 511.
Configure AD FS 2.0 to Communicate with Cisco Content Security Management Appliance
The following are the high level tasks you need to perform to configure AD FS 2.0 to communicate with yourappliance. For complete and detailed instructions, see Microsoft documentation.
• Add the service provider’s (appliance’s) Assertion Consumer URL as a relaying party.• Enter the service provider’s (appliance’s) Entity ID under Relaying Party Trusts > Properties > Identifiers> Relaying Party Identifier. Make sure that this value is same as the Entity ID value in the Service Providersettings on your appliance.
• If you have configured your service provider (appliance) to send signed SAML authentication requests,upload the service provider’s certificate (used to sign authentication requests) in .cer format underRelaying Party Trusts > Properties > Signature.
• If you plan to configure AD FS to send encrypted SAML assertions, upload the service provider’s(appliance’s) certificate in .cer format under Relaying Party Trusts > Properties > Encryption.
• Set the Secure-hash Algorithm to SHA-1 under Relaying Party Trusts > Properties > Advanced.
• Edit the Claim Rule and add an Issuance Transform Rule to send the LDAP attribute for email addressas an outgoing claim type (email address).
• Add a custom rule to include SPNameQualifier in the response. The following is a sample custom rule:
c:[Type == "http://schemas.xmlsoap.org/ws/2005/05/identity/claims/emailaddress"] =>issue(Type = "http://schemas.xmlsoap.org/ws/2005/05/identity/claims/nameidentifier", Issuer=c.Issuer, OriginalIssuer = c.OriginalIssuer, Value = c.Value, ValueType = c.ValueType,Properties["http://schemas.xmlsoap.org/ws/2005/05/identity/claimproperties/format"] ="urn:oasis:names:tc:SAML:1.1:nameid-format:emailAddress", Properties["http://schemas.xmlsoap.org/ws/2005/05/identity/claimproperties/spnamequalifier"] ="https://<appliance-hostname>:83");
Configure PingFederate 7.2 to Communicate with Cisco Content Security Management Appliance
The following are the high level tasks you need to perform to configure PingFederate 7.2 to communicatewith your appliance. For complete and detailed instructions, see Ping Identity documentation.
• Add your service provider’s (appliance’s) Assertion Consumer URL as an endpoint under protocolsettings.
• Enter the service provider’s (appliance’s) Entity ID under SP Connection > General Info > Partner'sEntity ID (Connection ID). Make sure that this value is same as the Entity ID value in the Service Providersettings on your appliance.
User Guide for AsyncOS 14.1 for Cisco Secure Email and Web Manager- GD (General Deployment)510
Common Administrative TasksConfigure AD FS 2.0 to Communicate with Cisco Content Security Management Appliance
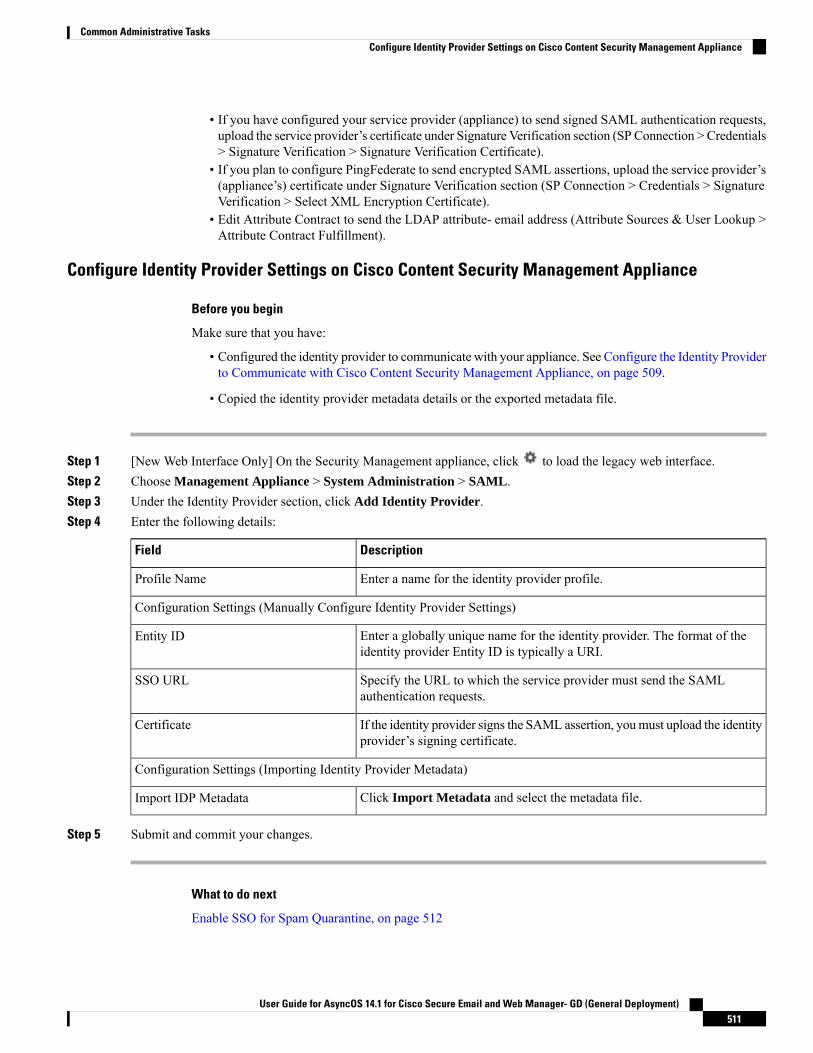
• If you have configured your service provider (appliance) to send signed SAML authentication requests,upload the service provider’s certificate under Signature Verification section (SP Connection > Credentials> Signature Verification > Signature Verification Certificate).
• If you plan to configure PingFederate to send encrypted SAML assertions, upload the service provider’s(appliance’s) certificate under Signature Verification section (SP Connection > Credentials > SignatureVerification > Select XML Encryption Certificate).
• Edit Attribute Contract to send the LDAP attribute- email address (Attribute Sources & User Lookup >Attribute Contract Fulfillment).
Configure Identity Provider Settings on Cisco Content Security Management Appliance
Before you begin
Make sure that you have:
• Configured the identity provider to communicate with your appliance. See Configure the Identity Providerto Communicate with Cisco Content Security Management Appliance, on page 509.
• Copied the identity provider metadata details or the exported metadata file.
Step 1 [New Web Interface Only] On the Security Management appliance, click to load the legacy web interface.Step 2 Choose Management Appliance > System Administration > SAML.Step 3 Under the Identity Provider section, click Add Identity Provider.Step 4 Enter the following details:
DescriptionField
Enter a name for the identity provider profile.Profile Name
Configuration Settings (Manually Configure Identity Provider Settings)
Enter a globally unique name for the identity provider. The format of theidentity provider Entity ID is typically a URI.
Entity ID
Specify the URL to which the service provider must send the SAMLauthentication requests.
SSO URL
If the identity provider signs the SAML assertion, youmust upload the identityprovider’s signing certificate.
Certificate
Configuration Settings (Importing Identity Provider Metadata)
Click Import Metadata and select the metadata file.Import IDP Metadata
Step 5 Submit and commit your changes.
What to do next
Enable SSO for Spam Quarantine, on page 512
User Guide for AsyncOS 14.1 for Cisco Secure Email and Web Manager- GD (General Deployment)511
Common Administrative TasksConfigure Identity Provider Settings on Cisco Content Security Management Appliance

Enable SSO for Spam Quarantine
Before you begin
Make sure that you have:
• Configured all the settings on Management Appliance > System Administration > SAML page.
• Enabled Spam Quarantine. See Spam Quarantine, on page 265.
Step 1 [New Web Interface Only] On the Security Management appliance, click to load the legacy web interface.Step 2 Choose Management Appliance > Centralized Services > Spam Quarantine.Step 3 Click Edit Settings and scroll down to the End-User Quarantine Access section.Step 4 Make sure that you have enabled End-User Quarantine Access.Step 5 Set the End-User Authentication method to SAML2.0.Step 6 (Optional) Specify whether to display message bodies before messages are released.Step 7 Submit and commit your changes.
What to do next
Notify the end users about the new authentication mechanism.
Configuring OpenID Connect 1.0 on Cisco Content SecurityManagement for AsyncOS APIs
• Overview , on page 512
• Workflow , on page 513
• Sample Access Token, on page 513
• Prerequisites , on page 514
• Configuring OpenID Connect on Appliance, on page 514
• Configuring OpenID Connect on Appliance using CLI, on page 515
OverviewThe Cisco Content Security Management Appliance supports integration with applications or clients that useIdentity Providers (IDPs) with OpenID Connect 1.0 authentication to connect seamlessly with AsyncOSAPIsavailable in your appliance. Currently, your appliance has been certified with OpenID Connect usingMicrosoftAD FS only.
User Guide for AsyncOS 14.1 for Cisco Secure Email and Web Manager- GD (General Deployment)512
Common Administrative TasksEnable SSO for Spam Quarantine

WorkflowIn the following workflow, AD FS is used as an identity provider, external application as a client, and yourappliance as a resource provider.
Steps:
1. In the following workflow, AD FS is used as an identity provider, external application as a client, andyour appliance as a resource provider, see Configuring OpenID Connect on Appliance, on page 514.
2. [One-time activity] The appliance fetches the OpenID Connect configuration metadata and the requiredkeys to validate the access token based on the configuration done in step1.
3. Obtain the access token after you authenticate the external application with AD FS. For more informationon how to authenticate and receive the access token, see your Authentication Provider or Identity Providerdocumentation.
4. Send the API request along with the access token to the appliance.
5. The appliance validates the access token in the API request using the key set retrieved from step2.
6. The appliance validates the required claim (issuer, audience) in the access token.
7. The appliance uses the role claim value to authorize and allocate the user role privileges to access theAsyncOS APIs.
8. The appliance provides an appropriate response for the AsyncOS API request.
Sample Access TokenThe following is the format of a sample access token:
Header
alg:RSA256
typ:JWT
[….]
Payload
claim:aud: CiscoEmailAPICaller
claim:iss:http://adfsserver/adfs/services/trust
claim:iat: 1594712147
claim:exp: 1594712807
claim:CustomOrgIdentifier: MyCustomOrgId
claim:LastName: Fernandes
claim:FirstName: Erik
claim:Email: http://[email protected]
claim:Role: LogCollector
claim:Role: ReadOnly
User Guide for AsyncOS 14.1 for Cisco Secure Email and Web Manager- GD (General Deployment)513
Common Administrative TasksWorkflow

[…..]
The appliance supports the validation of access tokens signed by the following algorithms only:
• RSA256
• RSA384
• RSA512
PrerequisitesMake sure that you have met the following prerequisites before you configure your appliance with OpenIDConnect:
• The authentication provider used by your organization is supported by the appliance.
• The application can authenticate with the authentication provider and retrieve the access token.
• The appliance can connect to the authentication provider over HTTPs to fetch the OpenID Connectmetadata configuration.
Configuring OpenID Connect on Appliance
Before you begin
Make sure that you have the following:
• A valid access token issued by the authentication provider (based on your authentication provider setup).
• The access token must include the role information to allow the appliance to perform the requiredauthorization checks.
Step 1 Click System Administration > OpenID Connect .Step 2 Click Edit Settings
Step 3 Enter the required parameters described in the following table to configure OpenID Connect:
DescriptionOpenID Connect Parameters
Enter the identity provider URL used to fetch the OpenIDConnect configurationmetadata.The metadata is used to validate the access token.
The following is an example of an identity provider URL -https://example.com/adfs/.well-known/openid-configuration
Identity Provider MetadataURL
Enter the value of the issuer of the access token.
The value must match the issuer claim value of the access token whenvalidating the access token.
Note
The following is an example of an issuer -http://example.com/adfs/services/trust
Issuer
User Guide for AsyncOS 14.1 for Cisco Secure Email and Web Manager- GD (General Deployment)514
Common Administrative TasksPrerequisites

DescriptionOpenID Connect Parameters
Enter the value of the audience that must match the audience claim value of the accesstoken.
Click Add Row if you want to add more than one audience value.Note
Audience
Enter the name of the claim in the access token, which contains the user role information.The claim name is used to retrieve the role information from the access token.
Claim Name
Enter a user group role defined in the Identity Provider server and choose a correspondinglocal user role configured in the appliance to map both roles.
Click Add Row if you want to add more than one role mapping record.Note
Identity Provider toAppliance Role Mapping
Step 4 Submit and commit your changes.
What to do next
Include the access token in the Authorization Bearer header of the AsyncOSAPI call and send the API request.
The following is an example of invoking an AsynOS API with the access token in the Authorization Bearerheader of the API.curl --location --requestGET 'https://sma.com/sma/api/v2.0/config/logs/subscriptions?retrievalMethod=manual'--header 'Authorization: Bearer <add access_token here>’
Configuring OpenID Connect on Appliance using CLIUse the oidcconfig command to perform the following tasks:
• Configure OpenID Connect on your email gateway for AsyncOS APIs.
• Delete OpenID Connect configuration settings on your email gateway.
Customizing Your View• Using Favorite Pages , on page 515• Setting Preferences , on page 516• General Settings, on page 517
Using Favorite Pages(Locally-authenticated administrative users only.) You can create a quick-access list of the pages you usemost.
User Guide for AsyncOS 14.1 for Cisco Secure Email and Web Manager- GD (General Deployment)515
Common Administrative TasksConfiguring OpenID Connect on Appliance using CLI

Do ThisTo
Navigate to the page to add, then choose Add This Page To MyFavoritesfrom the My Favorites menu near the top right corner of thewindow.
No commit is necessary for changes to My Favorites.
Add pages to your favorites list
Choose My Favorites > View All My Favorites and drag favoritesinto the desired order.
Reorder favorites
Choose My Favorites > View All My Favorites and click the nameof the favorite to edit.
Edit favorite page, name, ordescription
Choose My Favorites > View All My Favorites and delete favorites.Delete favorites
Choose a page from the My Favorites menu near the top right cornerof the window.
Go to a favorite page
Choose any favorite, or click theReturn to previous page at the bottomof the page.
Return to the main interface
Setting Preferences
Administrative users configured on the Security Management appliance
Locally-authenticated users can choose the following preferences, which apply each time the user logs in tothe Security Management appliance:
• Language (applies to the GUI)
• Landing page (the page displayed after login)
• Default time range for report pages (available options are a subset of the time ranges available for Emailand Web reporting pages)
• Number of rows visible in tables on report pages
Exact options depend on the user role.
To set these preferences, choose Options > Preferences. (The Options menu is at the top right side of theGUI window.) Submit your changes when done. Commit is not required.
To return to the page you were viewing before you accessed the Preferences page, click theReturn to previouspage link at the bottom of the page.
Tip
Externally authenticated users
Externally authenticated users can choose the display language directly in the Options menu.
User Guide for AsyncOS 14.1 for Cisco Secure Email and Web Manager- GD (General Deployment)516
Common Administrative TasksSetting Preferences

General Settings• Improving Web Interface Rendering , on page 517
• Monitoring Web Usage Analytics, on page 517
Monitoring Web Usage AnalyticsUsage Analytics is used to provide insight into your site activity data for analytical statistics. If Usage Analyticsis enabled, the appliance collects the feature usage data of the appliance on the new web interface. The usagestatistics are used to analyze and provide insight to improve the user experience of the appliance.
Step 1 [New Web Interface Only] On the Security Management appliance, click to load the legacy web interface.Step 2 Choose Management Appliance > System Administration > General Settings.Step 3 Click on Edit Settings.Step 4 Select the Enable check box in the Usage Analytics field.Step 5 Submit and commit your changes.
Improving Web Interface RenderingFor better web interface rendering, Cisco recommends that you enable Internet Explorer Compatibility ModeOverride.
If enabling this feature is against your organizational policy, you may disable this feature.Note
Step 1 [New Web Interface Only] On the Security Management appliance, click to load the legacy web interface.Step 2 Choose Management Appliance > System Administration > General Settings.Step 3 Click on Edit Settings.Step 4 Select the Enable check box in the Override IE Compatibility Mode field.Step 5 Submit and commit your changes.
RestartingandViewingStatusofServicesEnabledonApplianceYou can use the diagnostic > services sub command in the CLI to:
• Restart the services enabled on your appliance without having to reboot your appliance.
• View the status of the services enabled on your appliance.
Example: Viewing Status of Reporting Service
User Guide for AsyncOS 14.1 for Cisco Secure Email and Web Manager- GD (General Deployment)517
Common Administrative TasksGeneral Settings

In the following example, the services command is used to view the status of the reporting service enabledon your appliance.
mail.example.com> diagnostic
Choose the operation you want to perform:- RAID - Disk Verify Utility.- DISK_USAGE - Check Disk Usage.- NETWORK - Network Utilities.- REPORTING - Reporting Utilities.- TRACKING - Tracking Utilities.- RELOAD - Reset configuration to the initial manufacturer values.- SERVICES - Service Utilities.[]> services
Choose one of the following services:- REPORTING - Reporting associated services- TRACKING - Tracking associated services- EUQWEB - End User Quarantine GUI- WEBUI - Web GUI[]> reporting
Choose the operation you want to perform:- RESTART - Restart the service- STATUS - View status of the service[]> status
Reporting has been up for 28d 20h 45m 35s.
Example: Restarting the Message Tracking Service
In the following example, the services command is used to restart the message tracking service enabled onyour appliance.
mail.example.com> diagnostic
Choose the operation you want to perform:- RAID - Disk Verify Utility.- DISK_USAGE - Check Disk Usage.- NETWORK - Network Utilities.- REPORTING - Reporting Utilities.- TRACKING - Tracking Utilities.- RELOAD - Reset configuration to the initial manufacturer values.- SERVICES - Service Utilities.[]> services
Choose one of the following services:- REPORTING - Reporting associated services- TRACKING - Tracking associated services- EUQWEB - End User Quarantine GUI- WEBUI - Web GUI[]> tracking
Choose the operation you want to perform:- RESTART - Restart the service- STATUS - View status of the service[]> restart
User Guide for AsyncOS 14.1 for Cisco Secure Email and Web Manager- GD (General Deployment)518
Common Administrative TasksRestarting and Viewing Status of Services Enabled on Appliance
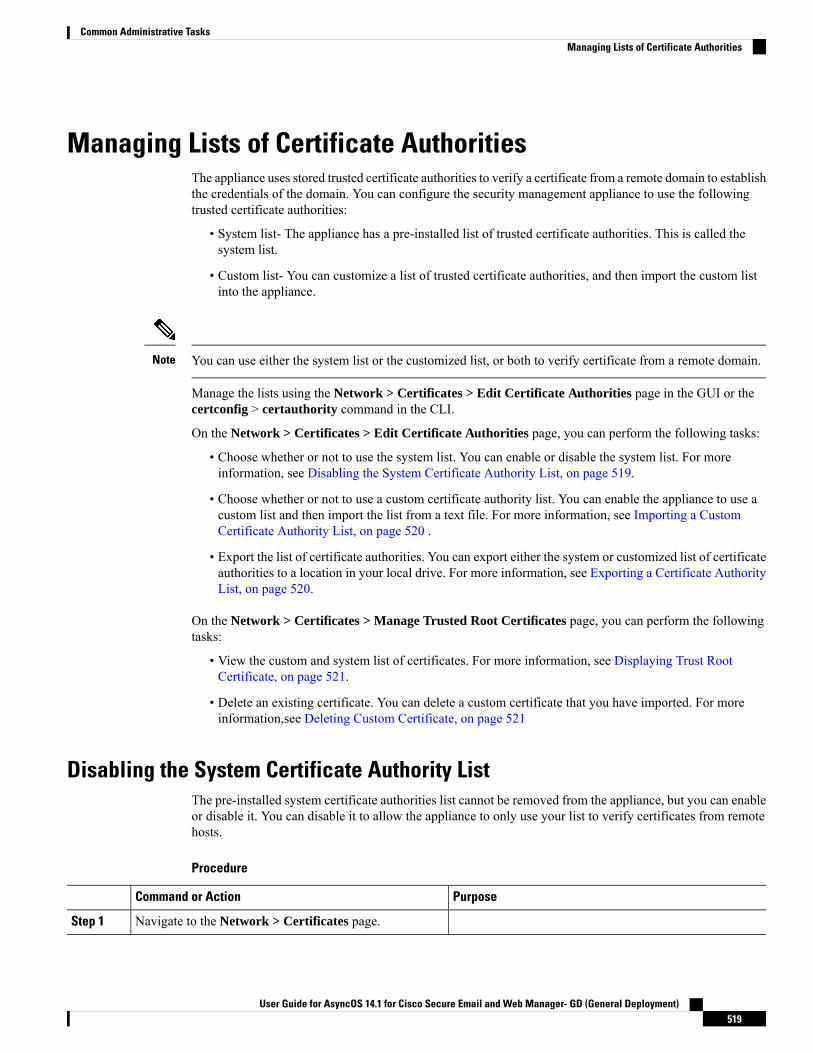
Managing Lists of Certificate AuthoritiesThe appliance uses stored trusted certificate authorities to verify a certificate from a remote domain to establishthe credentials of the domain. You can configure the security management appliance to use the followingtrusted certificate authorities:
• System list- The appliance has a pre-installed list of trusted certificate authorities. This is called thesystem list.
• Custom list- You can customize a list of trusted certificate authorities, and then import the custom listinto the appliance.
You can use either the system list or the customized list, or both to verify certificate from a remote domain.Note
Manage the lists using the Network > Certificates > Edit Certificate Authorities page in the GUI or thecertconfig > certauthority command in the CLI.
On the Network > Certificates > Edit Certificate Authorities page, you can perform the following tasks:
• Choose whether or not to use the system list. You can enable or disable the system list. For moreinformation, see Disabling the System Certificate Authority List, on page 519.
• Choose whether or not to use a custom certificate authority list. You can enable the appliance to use acustom list and then import the list from a text file. For more information, see Importing a CustomCertificate Authority List, on page 520 .
• Export the list of certificate authorities. You can export either the system or customized list of certificateauthorities to a location in your local drive. For more information, see Exporting a Certificate AuthorityList, on page 520.
On the Network > Certificates > Manage Trusted Root Certificates page, you can perform the followingtasks:
• View the custom and system list of certificates. For more information, see Displaying Trust RootCertificate, on page 521.
• Delete an existing certificate. You can delete a custom certificate that you have imported. For moreinformation,see Deleting Custom Certificate, on page 521
Disabling the System Certificate Authority ListThe pre-installed system certificate authorities list cannot be removed from the appliance, but you can enableor disable it. You can disable it to allow the appliance to only use your list to verify certificates from remotehosts.
Procedure
PurposeCommand or Action
Navigate to the Network > Certificates page.Step 1
User Guide for AsyncOS 14.1 for Cisco Secure Email and Web Manager- GD (General Deployment)519
Common Administrative TasksManaging Lists of Certificate Authorities

PurposeCommand or Action
Click Edit Settings in the Certificate Authorities section.Step 2
Click Disable for the System List.Step 3
Submit and commit your changes.Step 4
Importing a Custom Certificate Authority ListYou can create a custom list of trusted certificate authorities and import it onto the appliance. The file mustbe in the PEM format and include certificates for the certificate authorities that you want the appliance totrust.
Step 1 Click Network > Certificate.Step 2 Click Edit Settings.Step 3 Choose the Enable radio button.Step 4 Click Choose File in Custom List.Step 5 Browse to the location where the certificate resides, and click Ok.Step 6 [Optional] Select the FQDN Validation check box to allow the email gateway to check whether the 'Common Name',
'SAN: DNS Name' fields, or both present in the certificate, are in the FQDN format.Step 7 Click Submit.
Below checks will done on CA import,
• Expiry
• Duplication
• CA flag is present and Set to "True"
• Root Certificate Authority is present if importing Intermediate Certificate Authority is imported.
Note
Exporting a Certificate Authority ListIf you want to use only a subset of the trusted certificate authorities in the system or edit an existing customlist.
You can export the custom list to a .txt file, edit to add or remove certificate authorities, and then import thefile back onto the appliance as a custom list.
Note
Step 1 Click Network > Certificate.Step 2 Click Edit Settings.
User Guide for AsyncOS 14.1 for Cisco Secure Email and Web Manager- GD (General Deployment)520
Common Administrative TasksImporting a Custom Certificate Authority List

The Edit Settings list the custom and Cisco trusted root certificates.
Step 3 Click the Certificate name.Step 4 Click Export to export the certificate.
Displaying Trust Root Certificate
Step 1 Click Network > Certificate.Step 2 Click Manage Trusted Root Certificates.
The Manage Trusted Root Certificates lists the custom and Cisco trusted root certificates.
Step 3 Check the Override Trust check box to override the trust.Step 4 Click Submit.
In theManage Trusted Root Certificates page, you can click on Download Certificate to download and store the certificateto your local machine.
Deleting Custom Certificate
Step 1 Click Network > Certificate.Step 2 Click Manage Trusted Root Certificates.
The Manage Trusted Root Certificates lists the custom certificates.
Step 3 Click Delete to delete a custom trusted root certificate.Step 4 Click Submit.
Receiving and Delivering Messages with InternationalisedDomain Names (IDNs)
The Cisco Secure Email andWebManager can receive and deliver messages with email addresses that containIDN domains.
Currently, your email gateway provides support of IDN domains for the following languages only:
Indian Regional Languages: Hindi, Tamil, Telugu, Kannada, Marati, Punjabi, Malayalam, Bengali, Gujarati,Urdu, Assamese, Nepali, Bangla, Bodo, Dogri, Kashmiri, Konkani, Maithili, Manipuri, Oriya, Sanskrit, Santali,Sindhi, and Tulu.
European and Asian Languages: French, Russian, Japanese, German, Ukrainian, Korean, Spanish, Italian,Chinese, Dutch, Thai, Arabic, and Kazakh.
User Guide for AsyncOS 14.1 for Cisco Secure Email and Web Manager- GD (General Deployment)521
Common Administrative TasksDisplaying Trust Root Certificate

Related Topics
• Prerequisites IDN, on page 522
• Features Configurable using IDN Domains in Cisco Secure Email and Web Manager, on page 522
Prerequisites IDNMake sure you have met the following prerequisites before you use the Internationalised Domain Names(IDN) feature:
• All incoming messages must have IDNs encoded in UTF-8.
For Example: An MTA that sends messages to the email gateway must support IDNs and make sure thedomains in the messages are in the UTF-8 format.
• All outgoing messages must have IDNs encoded in UTF-8, and the destination server must accept andsupport IDNs accordingly.
For Example: An MTA that accepts messages from the email gateway must support IDNs and domainsencoded in the UTF-8 format.
• In all applicable DNS records, IDNs must be configured using the Punycode format
For Example: When you configure an MX record for an IDN, the domain in the DNS record must be inthe Punycode format.
Features Configurable using IDN Domains in Cisco Secure Email and WebManager
For this release, you can only configure the following features using IDN domains in your Cisco Secure Emailand Web Manager :
• SMTP Routes Configuration Settings:
• Add or edit IDN domains.
• Export or import SMTP routes using IDN domains.
• DNS Configuration Settings: Add or edit the DNS server using IDN domains.
• Reporting Configuration Settings: View IDN data - usernames, email addresses, and domains) in thereports.
• Message Tracking Configuration Settings:View IDN data- usernames, email addresses, and domains)in message tracking.
• Policy, Virus, and Outbreak Quarantine Configuration Settings:
• Viewmessages with IDN domains that may be transmittingmalware, as determined by the anti-virusengine.
• Viewmessages with IDN domains caught by Outbreak Filters as potentially being spam ormalware.
• View messages with IDN domains caught by message filters, content filters, and DLP messageactions.
User Guide for AsyncOS 14.1 for Cisco Secure Email and Web Manager- GD (General Deployment)522
Common Administrative TasksPrerequisites IDN

• Spam Quarantine Configuration Settings:
• View messages with IDN domains detected as spam or suspected spam.
• Add email addresses with IDN domains to the safelist and blocklist categories.
• End User Quarantine- IDN support with Authentication Mode as NONE. Other auth modes are notsupported in this phase.
FQDNA fully qualified domain name (FQDN) is the complete domain name for a specific computer, or host, on theinternet. For a X.509 certificate, the FQDN validation validates the common name field (CN) of that certificate'ssubject distinguished name and the subjectAltName extension of type dNSName (SAN:dNSName). AsyncOSvalidates the domain name and the certificates for the common name and SAN:dNSName in its fields. Preferablythe SAN:dNSName names are used. Examples of valid FQDN include example.com, *.example.com.
The criteria for FQDN compliance includes:
• Either the CN or the SAN:dNSName should be present in the certificate and AsyncOS mandates thateither one should be FQDN compliant.
• Both the CN and SAN:dNSName are present in the certificate and AsyncOS mandates that both shouldbe FQDN compliant.
The variants include:
• Validation on Peer Certificate, on page 523
• Custom CA Validation, on page 524
• Appliance Certificate Validation, on page 524
Validation on Peer CertificateAsyncOS provides a common configuration to control FQDN validation for all services under SSLconfiguration, for example TLS. However, you must enable the FQDN service manually.
• Validation on Peer Certificate Using the GUI, on page 523
• Validation on Peer Certificate Using the CLI, on page 524
Validation on Peer Certificate Using the GUI
Step 1 Go to System Administration > SSL Configuration page.Step 2 Click Edit Settings.
Step 3 Check the Enable checkbox listed with Peer Certificate FQDN Validation.Step 4 Click Submit.
User Guide for AsyncOS 14.1 for Cisco Secure Email and Web Manager- GD (General Deployment)523
Common Administrative TasksFQDN

Validation on Peer Certificate Using the CLIYou must enter the sslconfig command to perform a validation on peer certificate.
Before you begin
prompt> sslconfigDisabling SSLv3 is recommended for best security.Note that the SSL/TLS service on remote servers may require that the selected TLS versions besequential. So to avoid communications errors, always select a contiguous setof versions for each service. For example, do not enable TLS 1.0 and 1.2, while leaving TLS 1.1disabled.Choose the operation you want to perform:- VERSIONS - Enable or disable SSL/TLS versions- PEER_CERT_FQDN - Validate peer certificate FQDN compliance for Alert Over TLS, updater and LDAP.
Custom CA ValidationAsyncOS enables you to perform a FQDN validation when you import the custom certificate authority intothe appliance. You must enable the validation manually.
Step 1 Enter the command CERTCONFIG > CERTAUTHORITY > CUSTOM > IMPORTEnter in the command-line interface the CERTCONFIG > CERTAUTHORITY > CUSTOM > IMPORT command
Step 2 Enter the filename of the file you want to import.Enter the name of the file on machine "appliance" to import:[]> filename.pem
Step 3 Confirm if you want to check for FQDN.Do you want to check if Common Name is in Fully Qualified Domain Name(FQDN) format ? [N]> y
Appliance Certificate ValidationAsyncOS enables you to perform a FQDN validation when you import the appliance certificate into theappliance. You must enable the validation manually.
Step 1 Enter the CERTCONFIG > CERTIFICATE > SETUP command.Prompt> CERTCONFIG > CERTIFICATE > SETUP >
Step 2 Enter if you want the intermediate certificate.Do you want to add an intermediate certificate? [N]>
Step 3 Enter if you want to check for FQDN.
User Guide for AsyncOS 14.1 for Cisco Secure Email and Web Manager- GD (General Deployment)524
Common Administrative TasksValidation on Peer Certificate Using the CLI

Do you want to check if Common Name is in Fully Qualified Domain Name(FQDN) format ? [N]> y
Single Pane of GlassThe Single Pane of Glass (SPoG) feature enables you to access Cisco Secure Email and Web Manager detailson a single primary Cisco Secure Email and Web Manager. You must ensure that you have multiple CiscoSecure Email and Web Manager units connected to a primary Cisco Secure Email and Web Manager unit.You can view information for example Monitoring, Tracking, Quarantine from the secondary Cisco SecureEmail and WebManager units on a primary unit. However; to perform this you must enable the configurationusing the command line interface of the primary Cisco Secure Email and Web Manager.
To enable the drop-down and gather information in the primary Cisco Secure Email and Web Manager unit,you must use the smaapplianceconfig command
Once you enable the configuration, you can view the details of the secondary Cisco Secure Email and WebManagers in the primary unit, see SPoG Viewing details on primary Cisco Secure Email and Web Manager,on page 529
Using the smaapplianceconfig command you can:
• SPoG Add a Cisco Secure Email and Web Manager, on page 525
• SPoG Edit a Cisco Secure Email and Web Manager, on page 526
• SPoG Delete a Cisco Secure Email and Web Manager, on page 528
• SPoG Enable Services on a Cisco Secure Email and Web Manager, on page 529
• SPoG Viewing details on primary Cisco Secure Email and Web Manager, on page 529
SPoG Add a Cisco Secure Email and Web ManagerThe following example shows how you can add a Cisco Secure Email and Web Manager.vm21sma0061.cs21> smaapplianceconfigSecurity Appliances:Management# IP Name Authenticated Email Email SpamReporting Tracking Quarantines= =========== ====== ============= ========= ======== ===========1 10.10.3.165 SMA165 Yes Enabled Enabled Disabled2 10.10.3.63 SMA63 Yes Disabled Enabled EnabledChoose the operation you want to perform:- ADD - Add a new appliance.- EDIT - Edit an appliance.- DELETE - Remove an appliance.- SERVICES - Configure the centralized services for an appliance.[]> ADDEnter the IP address or hostname of an appliance to transfer data with.(A hostname may be entered in this field, however it will be immediatelyresolved to an IP address when the form is submitted.)[]> vm21sma0062.cs21Enter a name to identify this appliance[]> SMA0062File transfer access via SSH is required to transfer reporting data, message logs, andquarantine safelist/blocklist data from appliances
User Guide for AsyncOS 14.1 for Cisco Secure Email and Web Manager- GD (General Deployment)525
Common Administrative TasksSingle Pane of Glass

Would you like to configure file transfer access for this appliance? [Y]>Would you like to use a custom ssh port to connect to this appliance? [N]>Enter the login credentials for an administrator or an operator account on the appliance.This will be used to obtain an SSH key for file transfers.Username:[]> adminPassphrase:[]>Appliance 10.10.3.62 added.Security Appliances:Management# IP Name Authenticated Email Email SpamReporting Tracking Quarantines= =========== ======= ============= ========= ======== ===========1 10.10.3.165 SMA165 Yes Enabled Enabled Disabled2 10.10.3.63 SMA63 Yes Disabled Enabled Enabled3 10.10.3.62 SMA0062 Yes Disabled Disabled DisabledChoose the operation you want to perform:- ADD - Add a new appliance.- EDIT - Edit an appliance.- DELETE - Remove an appliance.- SERVICES - Configure the centralized services for an appliance.[]>vm21sma0061.cs21> commitPlease enter some comments describing your changes:[]> added vm21sma0062.cs21Changes committed: Tue Apr 27 10:28:01 2021 GMTvm21sma0061.cs21> smaapplianceconfigSecurity Appliances:Management# IP Name Authenticated Email Email SpamReporting Tracking Quarantines= =========== ======= ============= ========= ======== ===========1 10.10.3.62 SMA0062 Yes Disabled Disabled Disabled2 10.10.3.165 SMA165 Yes Enabled Enabled Disabled3 10.10.3.63 SMA63 Yes Disabled Enabled Enabled
SPoG Edit a Cisco Secure Email and Web ManagerThe following example shows how you can edit a secondary Cisco Secure Email andWebManager connectionparameters.vm21sma0061.cs21> smaapplianceconfigSecurity Appliances:Management# IP Name Authenticated Email Email SpamReporting Tracking Quarantines= =========== ======= ============= ========= ======== ===========1 10.10.3.165 SMA165 Yes Enabled Enabled Disabled2 10.10.3.63 SMA63 Yes Disabled Enabled Enabled3 10.10.3.62 SMA0062 Yes Enabled Enabled EnabledChoose the operation you want to perform:- ADD - Add a new appliance.- EDIT - Edit an appliance.- DELETE - Remove an appliance.- SERVICES - Configure the centralized services for an appliance.[]> EDITEnter the name or number of the appliance you wish to edit.[]> 3Enter the IP address or hostname of an appliance to transfer data with.(A hostname may be entered in this field, however it will be immediatelyresolved to an IP address when the form is submitted.)[10.10.3.62]>
User Guide for AsyncOS 14.1 for Cisco Secure Email and Web Manager- GD (General Deployment)526
Common Administrative TasksSPoG Edit a Cisco Secure Email and Web Manager

Enter a name to identify this appliance[SMA0062]> Tracking_SMA0062File transfer access via SSH is required to transfer reporting data, message logs, andquarantine safelist/blocklist data from appliancesWould you like to configure file transfer access for this appliance? [Y]>Would you like to use a custom ssh port to connect to this appliance? [N]>Appliance 10.10.3.62 was editedSecurity Appliances:Management# IP Name Authenticated Email Email SpamReporting Tracking Quarantines= =========== ================ ============= ========= ======== ===========1 10.10.3.63 SMA63 Yes Disabled Enabled Enabled2 10.10.3.165 SMA165 Yes Enabled Enabled Disabled3 10.10.3.62 Tracking_SMA0062 Yes Enabled Enabled EnabledChoose the operation you want to perform:- ADD - Add a new appliance.- EDIT - Edit an appliance.- DELETE - Remove an appliance.- SERVICES - Configure the centralized services for an appliance.[]> SERVICESEnter the name or number of the appliance you wish to configure.[]> 1Services for appliance "SMA63" at address 10.10.3.63:----------------------------------------------------------------------Email Reporting service: DisabledEmail Tracking service: EnabledSpam Quarantines service: EnabledWould you like Email Reporting to be enabled on this appliance? [N]>Would you like Email Tracking to be enabled on this appliance? [Y]>Would you like Spam Quarantines to be enabled on this appliance? [Y]>Services for appliance "SMA63" at address 10.10.3.63:----------------------------------------------------------------------Email Reporting service: DisabledEmail Tracking service: EnabledSpam Quarantines service: EnabledEnter the name or number of the appliance you wish to configure.[]>Security Appliances:Management# IP Name Authenticated Email Email SpamReporting Tracking Quarantines= =========== ================ ============= ========= ======== ===========1 10.10.3.165 SMA165 Yes Enabled Enabled Disabled2 10.10.3.63 SMA63 Yes Disabled Enabled Enabled3 10.10.3.62 Tracking_SMA0062 Yes Enabled Enabled EnabledChoose the operation you want to perform:- ADD - Add a new appliance.- EDIT - Edit an appliance.- DELETE - Remove an appliance.- SERVICES - Configure the centralized services for an appliance.[]> servicesEnter the name or number of the appliance you wish to configure.[]> 3Services for appliance "Tracking_SMA0062" at address 10.10.3.62:----------------------------------------------------------------------Email Reporting service: EnabledEmail Tracking service: EnabledSpam Quarantines service: EnabledWould you like Email Reporting to be enabled on this appliance? [Y]> NWould you like Email Tracking to be enabled on this appliance? [Y]>Would you like Spam Quarantines to be enabled on this appliance? [Y]> NServices for appliance "Tracking_SMA0062" at address 10.10.3.62:----------------------------------------------------------------------
User Guide for AsyncOS 14.1 for Cisco Secure Email and Web Manager- GD (General Deployment)527
Common Administrative TasksSPoG Edit a Cisco Secure Email and Web Manager

Email Reporting service: DisabledEmail Tracking service: EnabledSpam Quarantines service: DisabledEnter the name or number of the appliance you wish to configure.[]>Security Appliances:Management# IP Name Authenticated Email Email SpamReporting Tracking Quarantines= =========== ================ ============= ========= ======== ===========1 10.10.3.62 Tracking_SMA0062 Yes Disabled Enabled Disabled2 10.10.3.165 SMA165 Yes Enabled Enabled Disabled3 10.10.3.63 SMA63 Yes Disabled Enabled EnabledChoose the operation you want to perform:- ADD - Add a new appliance.- EDIT - Edit an appliance.- DELETE - Remove an appliance.- SERVICES - Configure the centralized services for an appliance.[]>vm21sma0061.cs21> commitPlease enter some comments describing your changes:[]> use vm21sma0062.cs21 for trackingChanges committed: Tue Apr 27 10:32:32 2021 GMT
SPoG Delete a Cisco Secure Email and Web ManagerThe following example shows how you can delete a Cisco Secure Email and Web Manager.vm21sma0061.cs21> smaapplianceconfigSecurity Appliances:Management# IP Name Authenticated Email Email SpamReporting Tracking Quarantines= =========== ================ ============= ========= ======== ===========1 10.10.3.63 SMA63 Yes Disabled Enabled Enabled2 10.10.3.165 SMA165 Yes Enabled Enabled Disabled3 10.10.3.62 Tracking_SMA0062 Yes Disabled Enabled DisabledChoose the operation you want to perform:- ADD - Add a new appliance.- EDIT - Edit an appliance.- DELETE - Remove an appliance.- SERVICES - Configure the centralized services for an appliance.[]> DELETEEnter the name or number of the appliance you wish to delete.[]> 3Security Appliances:Management# IP Name Authenticated Email Email SpamReporting Tracking Quarantines= =========== ====== ============= ========= ======== ===========1 10.10.3.165 SMA165 Yes Enabled Enabled Disabled2 10.10.3.63 SMA63 Yes Disabled Enabled EnabledChoose the operation you want to perform:- ADD - Add a new appliance.- EDIT - Edit an appliance.- DELETE - Remove an appliance.- SERVICES - Configure the centralized services for an appliance.[]>vm21sma0061.cs21> commitPlease enter some comments describing your changes:[]> deleting Tracking_SMA0062Changes committed: Tue Apr 27 10:37:12 2021 GMTvm21sma0061.cs21>
User Guide for AsyncOS 14.1 for Cisco Secure Email and Web Manager- GD (General Deployment)528
Common Administrative TasksSPoG Delete a Cisco Secure Email and Web Manager

SPoG Enable Services on a Cisco Secure Email and Web ManagerThe following example shows how you can enable services on a Cisco Secure Email and Web Manager.vm21sma0061.cs21> smaapplianceconfigSecurity Appliances:Management# IP Name Authenticated Email Email SpamReporting Tracking Quarantines= =========== ======= ============= ========= ======== ===========1 10.10.3.62 SMA0062 Yes Disabled Disabled Disabled2 10.10.3.165 SMA165 Yes Enabled Enabled Disabled3 10.10.3.63 SMA63 Yes Disabled Enabled EnabledChoose the operation you want to perform:- ADD - Add a new appliance.- EDIT - Edit an appliance.- DELETE - Remove an appliance.- SERVICES - Configure the centralized services for an appliance.[]> SERVICESEnter the name or number of the appliance you wish to configure.[]> 1Services for appliance "SMA0062" at address 10.10.3.62:----------------------------------------------------------------------Email Reporting service: DisabledEmail Tracking service: DisabledSpam Quarantines service: DisabledWould you like Email Reporting to be enabled on this appliance? [N]> YWould you like Email Tracking to be enabled on this appliance? [N]> YWould you like Spam Quarantines to be enabled on this appliance? [N]> YServices for appliance "SMA0062" at address 10.10.3.62:----------------------------------------------------------------------Email Reporting service: EnabledEmail Tracking service: EnabledSpam Quarantines service: EnabledEnter the name or number of the appliance you wish to configure.[]>Security Appliances:Management# IP Name Authenticated Email Email SpamReporting Tracking Quarantines= =========== ======= ============= ========= ======== ===========1 10.10.3.63 SMA63 Yes Disabled Enabled Enabled2 10.10.3.165 SMA165 Yes Enabled Enabled Disabled3 10.10.3.62 SMA0062 Yes Enabled Enabled EnabledChoose the operation you want to perform:- ADD - Add a new appliance.- EDIT - Edit an appliance.- DELETE - Remove an appliance.- SERVICES - Configure the centralized services for an appliance.[]>vm21sma0061.cs21> commitPlease enter some comments describing your changes:[]> anabled services on vm21sma0062.cs21Changes committed: Tue Apr 27 10:29:17 2021 GMTvm21sma0061.cs21>
SPoG Viewing details on primary Cisco Secure Email and Web ManagerTo view the details of the secondary units, you must:
• Navigate to the Quarantine page of the primary Cisco Secure Email and Web Manager unit.
User Guide for AsyncOS 14.1 for Cisco Secure Email and Web Manager- GD (General Deployment)529
Common Administrative TasksSPoG Enable Services on a Cisco Secure Email and Web Manager

• Select the secondary Cisco Secure Email and Web Manager from the View SMA drop down.
You can now view the data corresponding to the selected secondary Cisco Secure Email and Web Manageron your primary unit.
You can also view the same in both the Tracking and Monitoring pages after you enable using the servicessub command in the smaapplianceconfig command.
User Guide for AsyncOS 14.1 for Cisco Secure Email and Web Manager- GD (General Deployment)530
Common Administrative TasksSPoG Viewing details on primary Cisco Secure Email and Web Manager

C H A P T E R 17Logging
This chapter contains the following sections:
• Logging Overview, on page 531• Log Types , on page 535• Log Subscriptions, on page 557
Logging OverviewLog files record regular operations, as well as exceptions, for activity on the system. Use the logs for monitoringthe Cisco Content Security appliance, troubleshooting, and evaluating system performance.
Most logs are recorded in plain text (ASCII) format; however, tracking logs are recorded in binary format forresource efficiency. The ASCII text information is readable in any text editor.
Logging Versus ReportingUse logging data to debug message flow, reveal basic day-to-day operational information such as FTPconnection details, HTTP log files, and for compliance archiving.
You can access this logging data directly on the Email Security appliance or send it to any external FTP serverfor archival or reading. You can either FTP to the appliance to access the logs or push the plain text logs toan external server for backup purposes.
To view reporting data, use the Report pages on the appliance GUI. You cannot access the underlying datain any way, and this data cannot be sent to anything but a Cisco Content Security Management appliance.
The Security Management appliance pulls information for all reporting and tracking with the exception ofspam quarantine data. This data is pushed from the ESA.
Note
Log RetrievalLog files can be retrieved with the file transfer protocols described in the following table. You set the protocolwhen you create or edit a log subscription in the GUI, or by using the logconfig command in the CLI.
User Guide for AsyncOS 14.1 for Cisco Secure Email and Web Manager- GD (General Deployment)531

With this type of file transfer, a remote FTP clientaccesses the appliance to retrieve log files by usingthe user name and passphrase of an administrator-levelor operator-level user. When configuring a logsubscription to use the FTP poll method, you mustsupply the maximum number of log files to retain.When the maximum number is reached, the systemdeletes the oldest file.
FTP Poll
With this type of file transfer, the applianceperiodically pushes log files to an FTP server on aremote computer. The subscription requires a username, passphrase, and destination directory on theremote computer. Log files are transferred based onthe configured rollover schedule.
FTP Push
With this type of file transfer, the applianceperiodically pushes log files to an SCP server on aremote computer. This method requires an SSH SCPserver on a remote computer using the SSH2 protocol.The subscription requires a user name, SSH key, anddestination directory on the remote computer. Logfiles are transferred based on the configured rolloverschedule.
SCP Push
User Guide for AsyncOS 14.1 for Cisco Secure Email and Web Manager- GD (General Deployment)532
LoggingLog Retrieval

With this type of file transfer, the appliance sends logmessages to a remote syslog server. This methodconforms to RFC 3164. You must submit a hostnamefor the syslog server and use either UDP or TCP forlog transmission. The port used is 514, by default. InAsyncOS 14.1.0, the port number ranges from1-65535.A facility can be selected for the log;however, a default for the log type is preselected inthe drop-down menu. Only text-based logs can betransferred using syslog push.
Enter maximum size of the log message to send to theremote server. [For TCP protocol] The maximummessage size value must be an integer from 1024 to65535 and [For UDP protocol] The maximummessage size value must be an integer from 1024 to9216
Use the TLS option to send log messages from yourCisco Secure Email and Web Manager to the remotesyslog server over a TLS connection.
If you select the TLS option, make sureyou add a valid client certificate in youremail gateway to establish a TLSconnection between your Cisco SecureEmail and Web Manager and the remotesyslog server.
The Syslog Push method uses the sameTLS version selected in the ‘Other TLSClient Services’ option in the 'SSLConfiguration' page in your email gateway.
Note
Syslog Push
Filename and Directory StructureAsyncOS creates a directory for each log subscription based on the log name specified in the log subscription.The filenames of logs in the directory consist of the filename specified in the log subscription, the timestampwhen the log file was started, and a single-character status code. The following example shows the conventionfor the directory and filename:
/<Log_Name>/<Log_Filename>.@<timestamp>.<statuscode>
Status codes may be .c (signifying “current”) or .s (signifying “saved”). You should only transfer log fileswith the saved status.
Log Rollover and Transfer ScheduleWhen you create a log subscription, you specify the trigger(s) for when the logs roll over, the old file istransferred, and a new log file is created.
Choose between the following triggers:
• File size
User Guide for AsyncOS 14.1 for Cisco Secure Email and Web Manager- GD (General Deployment)533
LoggingFilename and Directory Structure

• Time
• At a specified interval (in seconds, minutes, hours, or days)
Follow the example on the screen when entering values.
To enter a composite interval, such as two-and-a-half hours, follow the example 2h30m .
or
• Every day, at the time(s) you specify
or
• On the days of the week that you select, at the time(s) you specify
When you specify times, use the 24-hour format, for example 23:00 for 11pm.
To schedule multiple rollover times in a day, separate times with a comma. For example, to roll over logs atmidnight and noon, enter 00:00, 12:00
Use an asterisk (*) as a wildcard. For example, to roll over logs exactly at every hour and half-hour, enter*:00, *:30
When the specified limit is reached (or the first limit is reached, if you have configured both size- and time-basedlimits), the log file is rolled over. Log subscriptions based on the FTP poll transfer mechanism create filesand store them in the FTP directory on the appliance until they are retrieved or until the system needs morespace for log files.
If a rollover is in progress when the next limit is reached, the new rollover is skipped. An error will be loggedand an alert sent.
Note
Timestamps in Log FilesThe following log files include the beginning and ending date of the log itself, the version of AsyncOS, andthe GMT offset (provided in seconds at the beginning of the log):
• Mail log• Safelist/blocklist log• System log
Logs Enabled by DefaultThe Security Management appliance is preconfigured with the following log subscriptions enabled.
Table 89: Preconfigured Log Subscriptions
Retrieval MethodLog TypeLog Name
FTP PollCLI audit logscli_logs
FTP PollSpam quarantine logseuq_logs
User Guide for AsyncOS 14.1 for Cisco Secure Email and Web Manager- GD (General Deployment)534
LoggingTimestamps in Log Files

Retrieval MethodLog TypeLog Name
FTP PollSpam quarantine GUIlogs
euqgui_logs
FTP PollHTTP logsgui_logs
FTP PollText mail logsmail_logs
FTP PollReporting logsreportd_logs
FTP PollReporting query logsreportqueryd_logs
FTP PollSafelist/blocklist logsslbld_logs
FTP PollSMA logssmad_logs
FTP PollSystem logssystem_logs
FTP PollTracking logstrackerd_logs
All preconfigured log subscriptions have the logging level set to Information. For more information aboutlog levels, see Setting the Log Level, on page 558.
You can configure additional log subscriptions depending on the license keys that you have applied. Forinformation about creating and editing log subscriptions, see Log Subscriptions, on page 557.
Log Types• Summary of Log Types, on page 536• Using Configuration History Logs, on page 540• Using CLI Audit Logs, on page 540• Using FTP Server Logs, on page 541• Using HTTP Logs, on page 542• Using Spam Quarantine Logs, on page 542• Using Spam Quarantine GUI Logs, on page 543• Using Text Mail Logs, on page 543• Using NTP Logs, on page 548• Using Reporting Logs, on page 549• Using Reporting Query Logs, on page 549• Using Safelist/Blocklist Logs, on page 550• Using SMA Logs, on page 551• Using Status Logs, on page 552• Using System Logs, on page 554• Understanding Tracking Logs, on page 555• Using Audit Logs, on page 555
User Guide for AsyncOS 14.1 for Cisco Secure Email and Web Manager- GD (General Deployment)535
LoggingLog Types

Summary of Log TypesA log subscription associates a log type with a name, a logging level, and other characteristics such as filesize and destination information. Multiple subscriptions for all log types, except configuration history logs,are permitted. The log type determines the data that are recorded in the log. You select the log type when youcreate a log subscription. See Log Subscriptions, on page 557 for more information.
AsyncOS generates the following log types:
Table 90: Log Types
DescriptionLog Type
The authentication log records successful logins and unsuccessful login attempts,for locally and externally authenticated users, for both GUI and CLI access to theSecurity Management appliance.
In Debug andmore verbose modes, if external authentication is turned on, all LDAPqueries appear in these logs.
Authentication Logs
Backup logs record the backup process from start to finish.
Information about backup scheduling is in the SMA logs.
Backup Logs
The CLI audit logs record all CLI activity on the system.CLI Audit Logs
Configuration history logs record the following information: What changes weremade on the Security Management appliance, and when were the changes made?A new configuration history log is created each time a user commits a change.
Configuration HistoryLogs
FTP logs record information about the FTP services enabled on the interface.Connection details and user activity are recorded.
FTP Server Logs
GUI logs include a history of page refreshes in the web interface, session data, andthe pages a user accesses. You can use the gui_log to track user activity orinvestigate errors that users see in the GUI. The error traceback will normally bein this log.
GUI logs also include information about SMTP transactions, for exampleinformation about scheduled reports emailed from the appliance.
GUI logs
HTTP logs record information about the HTTP and secure HTTP services enabledon the interface. Because the graphical user interface (GUI) is accessed throughHTTP, the HTTP logs are essentially the GUI equivalent of the CLI audit logs.Session data (for example, new sessions and expired sessions) are recorded, as wellas the pages accessed in the GUI.
HTTP Logs
Haystack logs record web transaction tracking data processing.Haystack logs
Text mail logs record information about the operations of the email system (forexample, message receiving, message delivery attempts, opening and closingconnections, bouncing messages, and so forth).
For important information about when attachment names are included in mail logs,see Tracking Service Overview.
Text Mail Logs
User Guide for AsyncOS 14.1 for Cisco Secure Email and Web Manager- GD (General Deployment)536
LoggingSummary of Log Types

DescriptionLog Type
Use these logs to debug problems when you are configuring LDAP in SystemAdministration > LDAP.
For example, these logs record the results of clicking the Test Server and TestQueries buttons.
For information about failed LDAP authentications, see the Authentication logs.
LDAP Debug Logs
NTP logs record the conversation between the appliance and any configuredNetwork Time Protocol (NTP) servers. For information about configuring NTPservers, see Configuring the System Time, on page 484.
NTP Logs
Reporting logs record actions associated with the processes of the centralizedreporting service.
Reporting Logs
Reporting query logs record actions associated with the reporting queries that arerun on the appliance.
Reporting Query Logs
SMA logs record actions associated with general Security Management applianceprocesses, not including the processes of the centralized reporting, centralizedtracking, and spam quarantine services.
These logs include information about backup scheduling.
SMA Logs
SNMP logs record debug messages related to the SNMP network managementengine. In Trace or Debug mode, this includes SNMP requests to the SecurityManagement appliance.
SNMP Logs
Safelist/blocklist logs record data about the safelist/blocklist settings and database.Safelist/Blocklist Logs
Spam quarantine GUI logs record actions associated with the spam quarantine GUI,such as quarantine configuration through the GUI, end user authentication, andend user actions (for example, releasing email).
Spam Quarantine GUILogs
Spam quarantine logs record actions associated with the spam quarantine processes.Spam Quarantine Logs
Status logs record system statistics found in the CLI status commands, includingstatus detail and dnsstatus . The period of recording is set using the setupsubcommand in logconfig . Each counter or rate reported in status logs is the valuesince the last time the counter was reset.
Status Logs
System logs record the following: boot information, DNS status information, andcomments users typed using the commit command. System logs are useful fortroubleshooting the state of the appliance.
System Logs
Tracking logs record actions associated with the processes of the tracking service.Tracking logs are a subset of the mail logs.
Tracking Logs
Information about service updates, such as time zone updates.Updater Logs
Status information about upgrade download and installation.Upgrade Logs
User Guide for AsyncOS 14.1 for Cisco Secure Email and Web Manager- GD (General Deployment)537
LoggingSummary of Log Types

DescriptionLog Type
The Audit logs record AAA (Authentication, Authorization, and Accounting)events.
Some of the audit log details are as follows:
• User - Logon
• User - Logon failed incorrect password
• User - Logon failed unknown username
• User - Logon failed account expired
• User – Logoff
• User - Lockout
• User - Activated
• User - Password change
• User - Password reset
• User - Security settings/profile change
• User - Created
• User - Deleted or modified
• User Configuration - Configuration changes made by the user.
• Group/Role - Deletion or modified
• Group /Role - Permissions change
• Quarantine - Actions performed on messages in the quarantine.
Audit Logs
Log Type ComparisonThe following tablesummarizes the characteristics of each log type.
Table 91: Log Type Comparison
Contains
ConfigurationInformation
IndividualSoftBounces
IndividualHardBounces
DeliveryInformation
MessageReceivingInformation
PeriodicStatusInformation
HeaderLogging
Recorded asBinary
Recorded asText
Stateless
Transactional
••AuthenticationLogs
••BackupLogs
User Guide for AsyncOS 14.1 for Cisco Secure Email and Web Manager- GD (General Deployment)538
LoggingLog Type Comparison

Contains
•••CLIAuditLogs
•••ConfigurationHistoryLogs
•••FTPServerLogs
•••HTTPLogs
••HaystackLogs
••••••••Text MailLogs
••LDAPDebugLogs
•••NTPLogs
•••ReportingLogs
•••ReportingQueryLogs
•••SMALogs
••SNMPLogs
•••Safelist/BlocklistLogs
•••SpamQuarantineGUI
•••SpamQuarantine
User Guide for AsyncOS 14.1 for Cisco Secure Email and Web Manager- GD (General Deployment)539
LoggingLog Type Comparison

Contains
•••StatusLogs
•••SystemLogs
•••••••TrackingLogs
••UpdaterLogs
•AuditLogs
Using Configuration History LogsA configuration history log consists of a configuration file with an additional section listing the name of theuser, a description of where in the configuration the user made changes, and the comment the user enteredwhen committing the change. Each time a user commits a change, a new log is created containing theconfiguration file after the change.
Example
In this example, the configuration history log shows that the user (admin) added a guest user to the table thatdefines which local users are allowed to log in to the system.
<?xml version="1.0" encoding="ISO-8859-1"?><!DOCTYPE config SYSTEM "config.dtd"><!--XML generated by configuration change.Change comment: added guest userUser: adminConfiguration are described as:This table defines which local users are allowed to log into the system.
Product: M160 Messaging Gateway(tm) ApplianceModel Number: M160Version: 6.7.0-231Serial Number: 000000000ABC-D000000Number of CPUs: 1Memory (GB): 4Current Time: Thu Mar 26 05:34:36 2009Feature "Centralized Configuration Manager": Quantity = 10, Time Remaining = "25 days"Feature "Centralized Reporting": Quantity = 10, Time Remaining = "9 days"Feature "Centralized Tracking": Quantity = 10, Time Remaining = "30 days"Feature "Centralized Spam Quarantine": Quantity = 10, Time Remaining = "30 days"Feature "Receiving": Quantity = 1, Time Remaining = "Perpetual"
--><config>
Using CLI Audit LogsThe following table describes the statistics recorded in CLI audit logs.
User Guide for AsyncOS 14.1 for Cisco Secure Email and Web Manager- GD (General Deployment)540
LoggingUsing Configuration History Logs

Table 92: CLI Audit Log Statistics
DescriptionStatistic
Time that the bytes were transmitted.Timestamp
Process ID for the particular CLI session in which the command was entered.PID
The message consists of the CLI command that was entered, the CLI output (including menus,lists, and so forth), and the prompt that appears.
Message
Example
In this example, the CLI audit log shows that, for PID 16434, the following CLI commands were entered:who , textconfig .
Thu Sep 9 14:35:55 2004 Info: PID 16434: User admin entered 'who'; prompt was'\nmail3.example.com> 'Thu Sep 9 14:37:12 2004 Info: PID 16434: User admin entered 'textconfig'; prompt was'\nUsername Login Time Idle Time Remote Host What\n======== ========== ========= =========== ====\nadmin Wed 11AM 3m 45s 10.1.3.14 tail\nadmin 02:32PM 0s 10.1.3.14
cli\nmail3.example.com> 'Thu Sep 9 14:37:18 2004 Info: PID 16434: User admin entered ''; prompt was '\nThere areno text resources currently defined.\n\n\nChoose the operation you want to perform:\n- NEW- Create a new text resource.\n- IMPORT - Import a text resource from a file.\n[]> '
Using FTP Server LogsThe following table describes the statistics recorded in FTP server logs.
Table 93: FTP Server Log Statistics
DescriptionStatistic
Time that the bytes were transmitted.Timestamp
Connection ID. A separate ID for each FTP connection.ID
The message section of the log entry can be logfile status information, or FTP connectioninformation (login, upload, download, logout, and so forth).
Message
Example
In this example, the FTP server log records a connection (ID:1). The IP address of the incoming connectionis shown, as well as the activity (uploading and downloading files) and the logout.
Wed Sep 8 18:03:06 2004 Info: Begin LogfileWed Sep 8 18:03:06 2004 Info: Version: 4.0.0-206 SN: 00065BF3BA6D-9WFWC21Wed Sep 8 18:03:06 2004 Info: Time offset from UTC: 0 secondsWed Sep 8 18:03:06 2004 Info: System is coming upFri Sep 10 08:07:32 2004 Info: Time offset from UTC: -25200 secondsFri Sep 10 08:07:32 2004 Info: ID:1 Connection from 10.1.3.14 on 172.19.0.86Fri Sep 10 08:07:38 2004 Info: ID:1 User admin login SUCCESSFri Sep 10 08:08:46 2004 Info: ID:1 Upload wording.txt 20 bytesFri Sep 10 08:08:57 2004 Info: ID:1 Download words.txt 1191 bytesFri Sep 10 08:09:06 2004 Info: ID:1 User admin logout
User Guide for AsyncOS 14.1 for Cisco Secure Email and Web Manager- GD (General Deployment)541
LoggingUsing FTP Server Logs

Using HTTP LogsThe following tabledescribes the statistics recorded in HTTP logs
Table 94: Statistics Recorded in HTTP Logs
DescriptionStatistic
Time that the bytes were transmitted.Timestamp
Session ID.ID
IP address of machine connecting.req
User name of user connecting.user
Information regarding the actions performed. May include GET or POST commands or systemstatus, and so forth.
Message
Example
In this example, the HTTP log shows the admin user’s interaction with the GUI (for example, running theSystem Setup Wizard).
Wed Sep 8 18:17:23 2004 Info: http service on 192.168.0.1:80 redirecting to https port 443Wed Sep 8 18:17:23 2004 Info: http service listening on 192.168.0.1:80Wed Sep 8 18:17:23 2004 Info: https service listening on 192.168.0.1:443Wed Sep 8 11:17:24 2004 Info: Time offset from UTC: -25200 secondsWed Sep 8 11:17:24 2004 Info: req:10.10.10.14 user:admin id:iaCkEh2h5rZknQarAecg POST/system_administration/system_setup_wizard HTTP/1.1 303Wed Sep 8 11:17:25 2004 Info: req:10.10.10.14 user:admin id:iaCkEh2h5rZknQarAecg GET/system_administration/ssw_done HTTP/1.1 200Wed Sep 8 11:18:45 2004 Info: req:10.10.10.14 user:admin id:iaCkEh2h5rZknQarAecg GET/monitor/incoming_mail_overview HTTP/1.1 200Wed Sep 8 11:18:45 2004 Info: req:10.10.10.14 user:admin id:iaCkEh2h5rZknQarAecg GET/monitor/mail_flow_graph?injector=&width=365&interval=0&type=recipientsin&height=190 HTTP/1.1200Wed Sep 8 11:18:46 2004 Info: req:10.10.10.14 user:admin id:iaCkEh2h5rZknQarAecg GET/monitor/classification_graph?injector=&width=325&interval=0&type=recipientsin&height=190HTTP/1.1 200Wed Sep 8 11:18:49 2004 Info: req:10.10.10.14 user:admin id:iaCkEh2h5rZknQarAecg GET/monitor/quarantines HTTP/1.1 200
Using Spam Quarantine LogsThe following table describes the statistics recorded in spam quarantine logs.
Table 95: Spam Quarantine Log Statistics
DescriptionStatistic
Time that the bytes were transmitted.Timestamp
The message consists of actions taken (messages quarantined, released from quarantine, and soforth).
Message
User Guide for AsyncOS 14.1 for Cisco Secure Email and Web Manager- GD (General Deployment)542
LoggingUsing HTTP Logs

Example
In this example, the log shows two messages (MID 8298624 and MID 8298625) being released from thequarantine to [email protected].
Mon Aug 14 21:41:47 2006 Info: ISQ: Releasing MID [8298624, 8298625] for allMon Aug 14 21:41:47 2006 Info: ISQ: Delivering released MID 8298624 (skipping work queue)Mon Aug 14 21:41:47 2006 Info: ISQ: Released MID 8298624 to [email protected] Aug 14 21:41:47 2006 Info: ISQ: Delivering released MID 8298625 (skipping work queue)Mon Aug 14 21:41:47 2006 Info: ISQ: Released MID8298625 to [email protected]
Using Spam Quarantine GUI LogsThe following table shows the statistics recorded in spam quarantine GUI logs.
Table 96: Spam Quarantine GUI Log Statistics
DescriptionStatistic
Time that the bytes were transmitted.Timestamp
The message consists of actions taken, including user authentication, and so forth.Message
Example
In this example, the log shows a successful authentication, login, and logout:
Table 97: Spam Quarantine GUI Log Example
Fri Aug 11 22:05:28 2006 Info: ISQ: Serving HTTP on 192.168.0.1, port 82
Fri Aug 11 22:05:29 2006 Info: ISQ: Serving HTTPS on 192.168.0.1, port 83
Fri Aug 11 22:08:35 2006 Info: Authentication OK, user admin
Fri Aug 11 22:08:35 2006 Info: logout:- user:pqufOtL6vyI5StCqhCfO session:10.251.23.228
Fri Aug 11 22:08:35 2006 Info: login:admin user:pqufOtL6vyI5StCqhCfO session:10.251.23.228
Fri Aug 11 22:08:44 2006 Info: Authentication OK, user admin
Using Text Mail LogsThese logs contain details of email receiving, email delivery, and bounces. These logs are a useful source ofinformation to understand delivery of specific messages and to analyze system performance.
These logs do not require any special configuration. However, you must configure the system properly toview attachment names, and attachment names may not always be logged. For specifics, see Tracking ServiceOverview.
User Guide for AsyncOS 14.1 for Cisco Secure Email and Web Manager- GD (General Deployment)543
LoggingUsing Spam Quarantine GUI Logs

The following table shows the information displayed in text mail logs.
Table 98: Text Mail Log Statistics
DescriptionStatistic
Injection Connection ID. This is a numerical identifier for an individual SMTP connection to thesystem. A single message or thousands of individual messages can be sent over one SMTPconnection to the system.
ICID
Delivery Connection ID. This is a numerical identifier for an individual SMTP connection toanother server, for delivery of one to thousands of messages, each with some or all of its RIDsbeing delivered in a single message transmission.
DCID
RPC Connection ID. This is a numerical identifier for an individual RPC connection to the spamquarantine. It is used to track messages as they are sent to and from the spam quarantine.
RCID
Message ID. Use this to track messages as they flow through the logs.MID
Recipient ID. Each message recipient is assigned an ID.RID
New connection initiated.New
New message started.Start
Sample Text Mail LogUse the following sample as a guide to interpret log files.
Individual lines in log files are not numbered. They are numbered here only for sample purposes.Note
Table 99: Text Mail Log Detail
Mon Apr 17 19:56:22 2003 Info: New SMTP ICID5 interface Management (10.1.1.1) address10.1.1.209 reverse dns host remotehost.comverified yes
1
Mon Apr 17 19:57:20 2003 Info: Start MID 6ICID 5
2
Mon Apr 17 19:57:20 2003 Info: MID 6 ICID 5From: <[email protected]>
3
Mon Apr 17 19:58:06 2003 Info: MID 6 ICID 5RID 0 To: <[email protected]>
4
Mon Apr 17 19:59:52 2003 Info: MID 6 ready100 bytes from <[email protected]>
5
User Guide for AsyncOS 14.1 for Cisco Secure Email and Web Manager- GD (General Deployment)544
LoggingSample Text Mail Log

Mon Apr 17 19:59:59 2003 Info: ICID 5 close6
Mon Mar 31 20:10:58 2003 Info: New SMTP DCID8 interface 192.168.42.42 address 10.5.3.25
7
Mon Mar 31 20:10:58 2003 Info: Delivery startDCID 8 MID 6 to RID [0]
8
Mon Mar 31 20:10:58 2003 Info: Message doneDCID 8 MID 6 to RID [0]
9
Mon Mar 31 20:11:03 2003 Info: DCID 8 close10
The following table can be used as a guide to reading the previous log file.
Table 100: Detail of Text Mail Log Example
DescriptionLine Number
A new connection is initiated into the system and assigned an Injection ID (ICID) of “5.” Theconnection was received on the Management IP interface and was initiated from the remotehost at 10.1.1.209.
1
The message is assigned a Message ID (MID) of “6” after the MAIL FROM command isissued from the client.
2
The sender address is identified and accepted.3
The recipient is identified and assigned a Recipient ID (RID) of “0.”4
MID 5 is accepted, written to disk, and acknowledged.5
Receiving is successful and the receiving connection closes.6
The message delivery process starts. It is assigned a Delivery Connection ID (DCID) of “8”from 192.168.42.42 and to 10.5.3.25.
7
The message delivery starts to RID “0.”8
Delivery is successful for MID 6 to RID “0.”9
The delivery connection closes.10
Examples of Text Mail Log EntriesThe following examples show log entries based on various cases.
Message Receiving
A message is injected into the appliance for a single recipient. The message is successfully delivered.
Wed Jun 16 21:42:34 2004 Info: New SMTP ICID 282204970 interface mail.example.com (1.2.3.4)
User Guide for AsyncOS 14.1 for Cisco Secure Email and Web Manager- GD (General Deployment)545
LoggingExamples of Text Mail Log Entries

address 2.3.4.5 reverse dns host unknown verified noWed Jun 16 21:42:34 2004 Info: ICID 282204970 SBRS NoneWed Jun 16 21:42:35 2004 Info: Start MID 200257070 ICID 282204970Wed Jun 16 21:42:35 2004 Info: MID 200257070 ICID 282204970 From: <[email protected]>Wed Jun 16 21:42:36 2004 Info: MID 200257070 ICID 282204970 RID 0 To: <[email protected]>Wed Jun 16 21:42:38 2004 Info: MID 200257070 Message-ID '<[email protected]>'Wed Jun 16 21:42:38 2004 Info: MID 200257070 Subject 'Hello'Wed Jun 16 21:42:38 2004 Info: MID 200257070 ready 24663 bytes from <[email protected]>Wed Jun 16 21:42:38 2004 Info: MID 200257070 antivirus negativeWed Jun 16 21:42:38 2004 Info: MID 200257070 queued for deliveryWed Jun 16 21:42:38 2004 Info: New SMTP DCID 2386069 interface 1.2.3.4 address 1.2.3.4Wed Jun 16 21:42:38 2004 Info: Delivery start DCID 2386069 MID 200257070 to RID [0]Wed Jun 16 21:42:38 2004 Info: ICID 282204970 closeWed Jun 16 21:42:38 2004 Info: Message done DCID 2386069 MID 200257070 to RID [0] [('X-SBRS','None')]Wed Jun 16 21:42:38 2004 Info: MID 200257070 RID [0] Response 2.6.0<[email protected]> Queued mail for deliveryWed Jun 16 21:42:43 2004 Info: DCID 2386069 close
Successful Message Delivery Example
Mon Mar 31 20:10:58 2003 Info: New SMTP DCID 5 interface 172.19.0.11 address 63.251.108.110Mon Mar 31 20:10:58 2003 Info: Delivery start DCID 5 MID 4 to RID [0]Mon Mar 31 20:10:58 2003 Info: Message done DCID 5 MID 4 to RID [0]Mon Mar 31 20:11:03 2003 Info: DCID 5 close
Unsuccessful Message Delivery (Hard Bounce)
A message with two recipients is injected into the appliance. Upon delivery, the destination host returns a5XX error, which indicates that the message cannot be delivered to either recipient. The appliance notifiesthe sender and removes the recipients from the queue.
Mon Mar 31 20:00:23 2003 Info: New SMTP DCID 3 interface 172.19.0.11 address 64.81.204.225Mon Mar 31 20:00:23 2003 Info: Delivery start DCID 3 MID 4 to RID [0, 1]Mon Mar 31 20:00:27 2003 Info: Bounced: DCID 3 MID 4 to RID 0 - 5.1.0 - Unknown addresserror ('550', ['<[email protected]>... Relaying denied']) []Mon Mar 31 20:00:27 2003 Info: Bounced: DCID 3 MID 4 to RID 1 - 5.1.0 - Unknown addresserror ('550', ['<[email protected]>... Relaying denied']) []Mon Mar 31 20:00:32 2003 Info: DCID 3 close
Soft Bounce with Ultimately Successful Delivery Example
Amessage is injected into the appliance. On the first delivery attempt, the message soft bounces and is queuedfor future delivery. On the second attempt, the message is successfully delivered.
Mon Mar 31 20:10:58 2003 Info: New SMTP DCID 5 interface 172.19.0.11 address 63.251.108.110Mon Mar 31 20:00:23 2003 Info: Delivery start DCID 3 MID 4 to RID [0, 1]Mon Mar 31 20:00:23 2003 Info: Delayed: DCID 5 MID 4 to RID 0 - 4.1.0 - Unknown addresserror ('466', ['Mailbox temporarily full.'])[]Mon Mar 31 20:00:23 2003 Info: Message 4 to RID [0] pending till Mon Mar 31 20:01:23 2003Mon Mar 31 20:01:28 2003 Info: DCID 5 closeMon Mar 31 20:01:28 2003 Info: New SMTP DCID 16 interface PublicNet address 172.17.0.113Mon Mar 31 20:01:28 2003 Info: Delivery start DCID 16 MID 4 to RID [0]Mon Mar 31 20:01:28 2003 Info: Message done DCID 16 MID 4 to RID [0]Mon Mar 31 20:01:33 2003 Info: DCID 16 close
Message Scanning Results (scanconfig)
When using the scanconfig command to determine behavior when a message could not be deconstructed intoits component parts (when removing attachments) as with this prompt:
User Guide for AsyncOS 14.1 for Cisco Secure Email and Web Manager- GD (General Deployment)546
LoggingSuccessful Message Delivery Example

If a message could not be deconstructed into its component parts in order to remove specifiedattachments, the system should:1. Deliver2. Bounce3. Drop[3]>
the following is the indication in the mail logs:
With scanconfig set to deliver if message could not be decomposed.
Tue Aug 3 16:36:29 2004 Info: MID 256 ICID 44784 From: <[email protected]>Tue Aug 3 16:36:29 2004 Info: MID 256 ICID 44784 RID 0 To: <[email protected]>Tue Aug 3 16:36:29 2004 Info: MID 256 Message-ID '<[email protected]>'Tue Aug 3 16:36:29 2004 Info: MID 256 Subject 'Virus Scanner Test #22'Tue Aug 3 16:36:29 2004 Info: MID 256 ready 1627 bytes from <[email protected]>Tue Aug 3 16:36:29 2004 Warning: MID 256, Message Scanning Problem: Continuation line seenbefore first headerTue Aug 3 16:36:29 2004 Info: ICID 44784 closeTue Aug 3 16:36:29 2004 Info: MID 256 antivirus positive 'EICAR-AV-Test'Tue Aug 3 16:36:29 2004 Info: Message aborted MID 256 Dropped by antivirusTue Aug 3 16:36:29 2004 Info: Message finished MID 256 done
With scanconfig set to drop if message could not be decomposed.
Tue Aug 3 16:38:53 2004 Info: Start MID 257 ICID 44785Tue Aug 3 16:38:53 2004 Info: MID 257 ICID 44785 From: [email protected] Aug 3 16:38:53 2004 Info: MID 257 ICID 44785 RID 0 To: <[email protected]>Tue Aug 3 16:38:53 2004 Info: MID 257 Message-ID '<[email protected]>'Tue Aug 3 16:38:53 2004 Info: MID 25781 Subject 'Virus Scanner Test #22'Tue Aug 3 16:38:53 2004 Info: MID 257 ready 1627 bytes from <[email protected]>Tue Aug 3 16:38:53 2004 Warning: MID 257, Message Scanning Problem: Continuation line seenbefore first headerTue Aug 3 16:38:53 2004 Info: Message aborted MID 25781 Dropped by filter 'drop_zip_c'Tue Aug 3 16:38:53 2004 Info: Message finished MID 257 doneTue Aug 3 16:38:53 2004 Info: ICID 44785 close
Message with Attachment
In this example, a content filter with condition “Message Body Contains” has been configured to enableidentification of attachment names:
Sat Apr 23 05:05:42 2011 Info: New SMTP ICID 28 interface Management (192.0.2.10)address 224.0.0.10 reverse dns host test.com verified yesSat Apr 23 05:05:42 2011 Info: ICID 28 ACCEPT SG UNKNOWNLIST match sbrs[-1.0:10.0]SBRS 0.0Sat Apr 23 05:05:42 2011 Info: Start MID 44 ICID 28Sat Apr 23 05:05:42 2011 Info: MID 44 ICID 28 From: <[email protected]>Sat Apr 23 05:05:42 2011 Info: MID 44 ICID 28 RID 0 To: <[email protected]>Sat Apr 23 05:05:42 2011 Info: MID 44 Message-ID '<000001cba32e$f24ff2e0$d6efd8a0$@com>'Sat Apr 23 05:05:42 2011 Info: MID 44 Subject 'Message 001'Sat Apr 23 05:05:42 2011 Info: MID 44 ready 240129 bytes from <[email protected]>Sat Apr 23 05:05:42 2011 Info: MID 44 matched all recipients for per-recipientpolicy DEFAULT in the inbound tableSat Apr 23 05:05:42 2011 Info: ICID 28 closeSat Apr 23 05:05:42 2011 Info: MID 44 interim verdict using engine: CASEspam negativeSat Apr 23 05:05:42 2011 Info: MID 44 using engine: CASE spam negativeSat Apr 23 05:05:43 2011 Info: MID 44 attachment 'Banner.gif'Sat Apr 23 05:05:43 2011 Info: MID 44 attachment '=D1=82=D0=B5=D1=81=D1=82.rst'
User Guide for AsyncOS 14.1 for Cisco Secure Email and Web Manager- GD (General Deployment)547
LoggingMessage with Attachment

Sat Apr 23 05:05:43 2011 Info: MID 44 attachment 'Test=20Attachment.docx'Sat Apr 23 05:05:43 2011 Info: MID 44 queued for delivery
Note that the second of the three attachments is Unicode. On terminals that cannot display Unicode, theseattachments are represented in quoted-printable format.
Generated or Rewritten MessagesSome functions, such as rewrite/redirect actions ( alt-rcpt-to filters, anti-spam rcpt rewrite, bcc() actions,anti-virus redirections, and so forth), create new messages. When looking through the logs, you might needto check the results and add in additional MIDs and possibly DCIDs. Entries such as these are possible:
Tue Jun 1 20:02:16 2004 Info: MID 14 generated based on MID 13 by bcc filter 'nonetest'
or:
Tue Jan 6 15:03:18 2004 Info: MID 2 rewritten to 3 by antispamFri May 14 20:44:43 2004 Info: MID 6 rewritten to 7 by alt-rcpt-to-filter filter 'testfilt'
“Rewritten” entries can appear after lines in the log indicating use of the new MID.Note
Sending a Message to the Spam QuarantineWhen you send a message to the quarantine, the mail logs track the movement to and from the quarantineusing the RCID (RPC connection ID) to identify the RPC connection. In the following mail log, a messageis tagged as spam and sent to the spam quarantine:
Wed Feb 14 12:11:40 2007 Info: Start MID 2317877 ICID 15726925Wed Feb 14 12:11:40 2007 Info: MID 2317877 ICID 15726925 From: <[email protected]>Wed Feb 14 12:11:40 2007 Info: MID 2317877 ICID 15726925 RID 0 To: <[email protected]>Wed Feb 14 12:11:40 2007 Info: MID 2317877 Message-ID'<W1TH05606E5811BEA0734309D4BAF0.323.14460.pimailer44.DumpShot.2@email.chase.com>'Wed Feb 14 12:11:40 2007 Info: MID 2317877 Subject 'Envision your dream home - Now make ita reality'Wed Feb 14 12:11:40 2007 Info: MID 2317877 ready 15731 bytes from <[email protected]>Wed Feb 14 12:11:40 2007 Info: MID 2317877 matched all recipients for per-recipient policyDEFAULT in the inbound tableWed Feb 14 12:11:41 2007 Info: MID 2317877 using engine: CASE spam suspectWed Feb 14 12:11:41 2007 Info: EUQ: Tagging MID 2317877 for quarantineWed Feb 14 12:11:41 2007 Info: MID 2317877 antivirus negativeWed Feb 14 12:11:41 2007 Info: MID 2317877 queued for deliveryWed Feb 14 12:11:44 2007 Info: RPC Delivery start RCID 756814 MID 2317877 to local SpamQuarantineWed Feb 14 12:11:45 2007 Info: EUQ: Quarantined MID 2317877Wed Feb 14 12:11:45 2007 Info: RPC Message done RCID 756814 MID 2317877Wed Feb 14 12:11:45 2007 Info: Message finished MID 2317877 done
Using NTP LogsThe following table shows the statistics recorded in NTP logs.
User Guide for AsyncOS 14.1 for Cisco Secure Email and Web Manager- GD (General Deployment)548
LoggingGenerated or Rewritten Messages

Table 101: Statistics Recorded in NTP Logs
DescriptionStatistic
Time that the bytes were transmitted.Timestamp
The message consists of either a Simple Network Time Protocol (SNTP) query to the server,or an adjust: message.
Message
Example
In this example, the NTP log shows the appliance polling the NTP host twice.
Thu Sep 9 07:36:39 2004 Info: sntp query host 10.1.1.23 delay 653 offset -652Thu Sep 9 07:36:39 2004 Info: adjust: time_const: 8 offset: -652us next_poll: 4096Thu Sep 9 08:44:59 2004 Info: sntp query host 10.1.1.23 delay 642 offset -1152Thu Sep 9 08:44:59 2004 Info: adjust: time_const: 8 offset: -1152us next_poll: 4096
Using Reporting LogsThe following table shows the statistics recorded in reporting logs.
Table 102: Reporting Log Statistics
DescriptionStatistic
Time that the bytes were transmitted.Timestamp
The message consists of actions taken, including user authentication, and so forth.Message
Example
In this example, the Reporting log shows the appliance set at the information log level.
Wed Oct 3 13:39:53 2007 Info: Period minute using 0 (KB)Wed Oct 3 13:39:53 2007 Info: Period month using 1328 (KB)Wed Oct 3 13:40:02 2007 Info: Update 2 registered appliance at 2007-10-03-13-40Wed Oct 3 13:40:53 2007 Info: Pages found in cache: 1304596 (99%). Not found: 1692Wed Oct 3 13:40:53 2007 Info: Period hour using 36800 (KB)Wed Oct 3 13:40:53 2007 Info: Period day using 2768 (KB)Wed Oct 3 13:40:53 2007 Info: Period minute using 0 (KB)Wed Oct 3 13:40:53 2007 Info: Period month using 1328 (KB)Wed Oct 3 13:40:53 2007 Info: HELPER checkpointed in 0.00580507753533 secondsWed Oct 3 13:41:02 2007 Info: Update 2 registered appliance at 2007-10-03-13-41Wed Oct 3 13:41:53 2007 Info: Pages found in cache: 1304704 (99%). Not found: 1692Wed Oct 3 13:41:53 2007 Info: Period hour using 36800 (KB)Wed Oct 3 13:41:53 2007 Info: Period day using 2768 (KB)Wed Oct 3 13:41:53 2007 Info: Period minute using 0 (KB)Wed Oct 3 13:41:53 2007 Info: Period month using 1328 (KB)Wed Oct 3 13:42:03 2007 Info: Update 2 registered appliance at 2007-10-03-13-42
Using Reporting Query LogsThe following table shows the statistics recorded in reporting query logs.
User Guide for AsyncOS 14.1 for Cisco Secure Email and Web Manager- GD (General Deployment)549
LoggingUsing Reporting Logs

Table 103: Reporting Query Log Statistics
DescriptionStatistic
Time that the bytes were transmitted.Timestamp
The message consists of actions taken, including user authentication, and so forth.Message
Example
In this example, the reporting query log shows the appliance running a daily outgoing email traffic query forthe period from August 29 to October 10, 2007.
Tue Oct 2 11:30:02 2007 Info: Query: Closing interval handle 811804479.Tue Oct 2 11:30:02 2007 Info: Query: Closing interval handle 811804480.Tue Oct 2 11:30:02 2007 Info: Query: Closing query handle 302610228.Tue Oct 2 11:30:02 2007 Info: Query: Merge query with handle 302610229 for['MAIL_OUTGOING_TRAFFIC_SUMMARY.DETECTED_SPAM', 'MAIL_OUTGOING_TRAFFIC_SUMMARY.DETECTED_VIRUS','MAIL_OUTGOING_TRAFFIC_SUMMARY.THREAT_CONTENT_FILTER', 'MAIL_OUTGOING_TRAFFIC_SUMMARY.TOTAL_CLEAN_RECIPIENTS','MAIL_OUTGOING_TRAFFIC_SUMMARY.TOTAL_RECIPIENTS_PROCESSED'] for rollup period "day" with interval range 2007-08-29 to 2007-10-01with key constraintsNone sorting on ['MAIL_OUTGOING_TRAFFIC_SUMMARY.DETECTED_SPAM'] returning results from 0to 2 sort_ascending=False.Tue Oct 2 11:30:02 2007 Info: Query: Closing query handle 302610229.Tue Oct 2 11:30:02 2007 Info: Query: Merge query with handle 302610230 for['MAIL_OUTGOING_TRAFFIC_SUMMARY.TOTAL_HARD_BOUNCES', 'MAIL_OUTGOING_TRAFFIC_SUMMARY.TOTAL_RECIPIENTS_DELIVERED','MAIL_OUTGOING_TRAFFIC_SUMMARY.TOTAL_RECIPIENTS'] for rollup period "day" with interval range 2007-08-29 to 2007-10-01with key constraints None sorting on ['MAIL_OUTGOING_TRAFFIC_SUMMARY.TOTAL_HARD_BOUNCES'] returning resultsfrom 0 to 2 sort_ascending=False.Tue Oct 2 11:30:02 2007 Info: Query: Closing query handle 302610230.
Using Safelist/Blocklist LogsThe following table shows the statistics recorded in safelist/blocklist logs.
Table 104: Safelist/Blocklist Log Statistics
DescriptionStatistic
Time that the bytes were transmitted.Timestamp
The message consists of actions taken, including user authentication, and so forth.Message
Example
In this example, the safelist/blocklist log shows the appliance creating database snapshots every two hours.It also shows when senders were added to the database.
Fri Sep 28 14:22:33 2007 Info: Begin Logfile Fri Sep 28 14:22:33 2007 Info: Version: 6.0.0-425SN: XXXXXXXXXXXX-XXX Fri Sep 28 14:22:33 2007 Info: Time offset from UTC: 10800 seconds
User Guide for AsyncOS 14.1 for Cisco Secure Email and Web Manager- GD (General Deployment)550
LoggingUsing Safelist/Blocklist Logs

Fri Sep 28 14:22:33 2007 Info: System is coming up.Fri Sep 28 14:22:33 2007 Info: SLBL: The database snapshot has been created.Fri Sep 28 16:22:34 2007 Info: SLBL: The database snapshot has been created.Fri Sep 28 18:22:34 2007 Info: SLBL: The database snapshot has been created.Fri Sep 28 20:22:34 2007 Info: SLBL: The database snapshot has been created.Fri Sep 28 22:22:35 2007 Info: SLBL: The database snapshot has been created..........................Mon Oct 1 14:16:09 2007 Info: SLBL: The database snapshot has been created.Mon Oct 1 14:37:39 2007 Info: SLBL: The database snapshot has been created.Mon Oct 1 15:31:37 2007 Warning: SLBL: Adding senders to the database failed.Mon Oct 1 15:32:31 2007 Warning: SLBL: Adding senders to the database failed.Mon Oct 1 16:37:40 2007 Info: SLBL: The database snapshot has been created.
Using SMA LogsThe following table shows the statistics recorded in SMA logs.
Table 105: SMA Log Statistics
DescriptionStatistic
Time that the bytes were transmitted.Timestamp
The message consists of actions taken, including user authentication, and so forth.Message
Example
In this example, the SMA log shows the centralized tracking service downloading tracking files from an EmailSecurity appliance, and it shows the centralized reporting service downloading reporting files from an EmailSecurity appliance.
Wed Oct 3 13:26:39 2007 Info: TRANSFER: Plugin TRACKINGPLUGIN downloading from 172.29.0.17- /export/tracking/tracking.@20071003T202244Z_20071003T202544Z.sWed Oct 3 13:28:11 2007 Info: TRANSFER: Plugin TRACKINGPLUGIN downloading from 172.29.0.15- /export/tracking/tracking.@20071003T202443Z_20071003T202743Z.sWed Oct 3 13:28:46 2007 Info: TRANSFER: Plugin TRACKINGPLUGIN downloading from 172.29.0.17- /export/tracking/tracking.@20071003T202544Z_20071003T202844Z.sWed Oct 3 13:31:27 2007 Info: TRANSFER: Plugin TRACKINGPLUGIN downloading from 172.29.0.15- /export/tracking/tracking.@20071003T202743Z_20071003T203043Z.sWed Oct 3 13:31:28 2007 Info: TRANSFER: Plugin REPORTINGPLUGIN downloading from 172.29.0.15- /reporting/outgoing_queue/rpx.2007-10-03-20-15Z.000F1F6ECA7C-2RWDB51.v1.tgzWed Oct 3 13:31:53 2007 Info: TRANSFER: Plugin TRACKINGPLUGIN downloading from 172.29.0.17- /export/tracking/tracking.@20071003T202844Z_20071003T203144Z.sWed Oct 3 13:32:31 2007 Info: TRANSFER: Plugin REPORTINGPLUGIN downloading from 172.29.0.17- /reporting/outgoing_queue/rpx.2007-10-03-20-15Z.0019B9B316E4-JZ41PC1.v1.tgzWed Oct 3 13:34:40 2007 Info: TRANSFER: Plugin TRACKINGPLUGIN downloading from 172.29.0.15- /export/tracking/tracking.@20071003T203043Z_20071003T203343Z.s
User Guide for AsyncOS 14.1 for Cisco Secure Email and Web Manager- GD (General Deployment)551
LoggingUsing SMA Logs

Using Status LogsStatus logs record system statistics found in the CLI status commands, including status , status detail , anddnsstatus . The period of recording is set using the setup subcommand in logconfig . Each counter or ratereported in status logs is the value since the last time the counter was reset.
Table 106: Status Log Statistics
DescriptionStatistic
CPU utilization.CPULd
Disk I/O utilization.DskIO
RAM utilization.RAMUtil
Queue kilobytes used.QKUsd
Queue kilobytes free.QKFre
Message ID (MID).CrtMID
Injection connection ID (ICID).CrtICID
Delivery connection ID (DCID).CRTDCID
Injected messages.InjMsg
Injected recipients.InjRcp
Generated bounce recipients.GenBncRcp
Rejected recipients.RejRcp
Dropped messages.DrpMsg
Soft bounced events.SftBncEvnt
Completed recipients.CmpRcp
Hard bounced recipients.HrdBncRcp
DNS hard bounces.DnsHrdBnc
5XX hard bounces.5XXHrdBnc
Filter hard bounces.FltrHrdBnc
Expired hard bounces.ExpHrdBnc
Other hard bounces.OtrHrdBnc
Delivered recipients.DlvRcp
Deleted recipients.DelRcp
User Guide for AsyncOS 14.1 for Cisco Secure Email and Web Manager- GD (General Deployment)552
LoggingUsing Status Logs

DescriptionStatistic
Global unsubscribe hits.GlbUnsbHt
Active recipients.ActvRcp
Unattempted recipients.UnatmptRcp
Attempted recipients.AtmptRcp
Current inbound connections.CrtCncIn
Current outbound connections.CrtCncOut
DNS requests.DnsReq
Network requests.NetReq
Cache hits.CchHit
Cache misses.CchMis
Cache exceptions.CchEct
Cache expired.CchExp
Total CPU time used by the application.CPUTTm
Elapsed time since the application started.CPUETm
Maximum disk I/O operations per second for the mail process.MaxIO
Allocated memory in bytes.RamUsd
Memory swapped in.SwIn
Memory swapped out.SwOut
Memory paged in.SwPgIn
Memory paged out.SwPgOut
Total number of messages in the system.MMLen
Number of destination objects in memory.DstInMem
Resource conservation tarpit value. Acceptance of incoming mail is delayed by this numberof seconds due to heavy system load.
ResCon
Number of messages currently in the work queue.WorkQ
Number of individual messages in the system quarantine (messages present in multiplequarantines are counted only once).
QuarMsgs
Kilobytes used by system quarantine messages.QuarQKUsd
Percent of log partition used.LogUsd
User Guide for AsyncOS 14.1 for Cisco Secure Email and Web Manager- GD (General Deployment)553
LoggingUsing Status Logs

DescriptionStatistic
Percent CPU used by CASE scanning.CASELd
Total CPU consumption.TotalLd
Amount of disk space available for log files.LogAvail
Number of messages in the spam quarantine.EuQ
Number of messages in the spam quarantine release queue.EuqRls
Example
Fri Feb 24 15:14:39 2006 Info: Status: CPULd 0 DskIO 0 RAMUtil 2 QKUsd 0 QKFre 8388608CrtMID 19036 CrtICID 35284 CrtDCID 4861 InjMsg 13889 InjRcp 14230 GenBncRcp 12 RejRcp 6318DrpMsg 7437 SftBncEvnt 1816 CmpRcp 6813 HrdBncRcp 18 DnsHrdBnc 2 5XXHrdBnc 15 FltrHrdBnc0 ExpHrdBnc 1 OtrHrdBnc 0 DlvRcp 6793 DelRcp 2 GlbUnsbHt 0 ActvRcp 0 UnatmptRcp 0 AtmptRcp0 CrtCncIn 0 CrtCncOut 0 DnsReq 143736 NetReq 224227 CchHit 469058 CchMis 504791 CchEct15395 CchExp 55085 CPUTTm 228 CPUETm 181380 MaxIO 350 RAMUsd 21528056 MMLen 0 DstInMem 4ResCon 0 WorkQ 0 QuarMsgs 0 QuarQKUsd 0 LogUsd 3 AVLd 0 BMLd 0 CASELd 3 TotalLd 3 LogAvail17G EuQ 0 EuqRls 0
Using System LogsThe following table shows the statistics recorded in system logs.
Table 107: System Log Statistics
DescriptionStatistic
Time that the bytes were transmitted.Timestamp
The logged event.Message
Example
In this example, the system log shows some commit entries, including the name of the user issuing the commitand the comment entered.
Wed Sep 8 18:02:45 2004 Info: Version: 6.0.0-206 SN: XXXXXXXXXXXX-XXXWed Sep 8 18:02:45 2004 Info: Time offset from UTC: 0 secondsWed Sep 8 18:02:45 2004 Info: System is coming upWed Sep 8 18:02:49 2004 Info: bootstrapping DNS cacheWed Sep 8 18:02:49 2004 Info: DNS cache bootstrappedWed Sep 8 18:13:30 2004 Info: PID 608: User admin commit changes: SSW:PassphraseWed Sep 8 18:17:23 2004 Info: PID 608: User admin commit changes: Completed Web::SSWThu Sep 9 08:49:27 2004 Info: Time offset from UTC: -25200 secondsThu Sep 9 08:49:27 2004 Info: PID 1237: User admin commit changes: Added a second CLI logfor examplesThu Sep 9 08:51:53 2004 Info: PID 1237: User admin commit changes: Removed example CLIlog.
User Guide for AsyncOS 14.1 for Cisco Secure Email and Web Manager- GD (General Deployment)554
LoggingUsing System Logs

Understanding Tracking LogsTracking logs record information about the email operations of AsyncOS. The log messages are a subset ofthe messages recorded in the mail logs.
The tracking logs are used by the message tracking component to build the message tracking database. Becausethe log files are consumed in the process of building the database, the tracking logs are transient. Theinformation in tracking logs is not designed to be read or analyzed by humans.
Tracking logs are recorded and transferred in a binary format for resource efficiency. The information is laidout in a logical manner and is human-readable after conversion using a utility provided by Cisco. The conversiontools are located at the following URL: http://tinyurl.com/3c5l8r .
Using Audit LogsThe Audit logs record AAA (Authentication, Authorization, and Accounting) events. Most information is atthe debug or trace level.
Example of Audit Log Entries:
• In this example, the log shows when a user (for example, admin):
• Logged in to the web interface of the appliance.
• Logged out of the web interface of the appliance.
Tue Aug 25 12:33:17 2020 Info: Appliance: mail1.example.com,Interaction Mode: GUI, User: admin, Source IP: 192.168.1.1, Destination IP: 192.168.2.2,Event: Successful loginTue Aug 25 12:33:17 2020 Info: Appliance: mail1.example.com,Interaction Mode: GUI, User: admin, Source IP: 192.168.1.1, Event: Session establishedsuccessfullyTue Aug 25 12:33:58 2020 Info: Appliance: mail1.example.com,Interaction Mode: GUI, User: admin, Source IP: 192.168.1.1, Event: User logged outTue Aug 25 12:33:58 2020 Info: Appliance: mail1.example.com,Interaction Mode: GUI, User: admin, Source IP: 192.168.1.1, Event: Session terminated
• In this example, the log shows that a user (for example, admin) entered the logconfig CLI command.Thu Oct 8 13:33:38 2020 Info: Appliance: mail1.example.com, Interaction Mode: CLI,User: admin,Source IP: 192.168.1.1, Event: User input was 'logconfig'Thu Oct 8 13:33:46 2020 Info: Appliance: mail1.example.com, Interaction Mode: CLI,User: admin,Source IP: 192.168.1.1, Event: User input was 'Enter'
• In this example, the log shows that a user (for example, admin) viewed the GUI pages on the legacy webinterface of the appliance.Thu Oct 8 13:35:07 2020 Info: Appliance: mail1.example.com, Interaction Mode: GUI,User: admin,Source IP: 192.168.1.1, Location: /network/dns, Event: User visited the web page.
• In this example, the log shows that a new user (for example, admin) is added to the appliance using theweb interface, but the changes are not committed.Thu Oct 8 13:36:30 2020 Info: Appliance: mail1.example.com, Interaction Mode: GUI,User: admin,Source IP: 192.168.1.1, Location: /system_administration/access/users, Event: Addeduser "admin" and changes
User Guide for AsyncOS 14.1 for Cisco Secure Email and Web Manager- GD (General Deployment)555
LoggingUnderstanding Tracking Logs

will reflect after commit.Thu Oct 8 13:37:22 2020 Info: Appliance: mail1.example.com, Interaction Mode: GUI,User: admin,Source IP: 192.168.1.1, Location: /system_administration/access/users, Event: Deleteduser "admin" and changeswill reflect after commit.
• In this example, the log shows that a user (for example, admin) discarded all the changes that were notcommitted on the web interface of the appliance.Thu Oct 8 13:39:44 2020 Info: Appliance: mail1.example.com, Interaction Mode: GUI,User: admin,Source IP: 192.168.1.1, Location: /commit, Event: User discarded all uncommitted changes.
• In this example, the log shows that a user (for example, admin) discarded all the changes that were notcommitted through the CLI.Thu Oct 8 13:41:38 2020 Info: Appliance: mail1.example.com, Interaction Mode: CLI,User: admin,Source IP: 192.168.1.1, Event: User discarded all uncommitted changes.
• In this example, the log shows that a user (for example, admin) made configuration changes to the WebUI session timeout.
You can view more details of the configuration changes made in your applianceby viewing the Configuration History Logs or by enabling the debug mode forthe audit logs.
Note
Thu Oct 8 13:45:46 2020 Info: Appliance: mail1.example.com, User: admin,Event: The following configuration changes were commited with comment - 'N/A'Thu Oct 8 13:45:46 2020 Info: * [standalone] Number of seconds before the Web UI sessiontimes out.
• In this example, the log shows that the AsyncOS APIs could not fetch the log subscriptions because theauthentication failed.Thu Oct 8 13:52:28 2020 Debug: 08/Oct/2020 13:52:28 +0000 Error - Code: 401,Details: Unauthorized (No permission -- see authorization schemes)Thu Oct 8 13:52:28 2020 Info: Appliance: mail1.example.com, Interaction Mode: API,User: admin, Role: Role Not Available, Source IP: 192.168.1.1, Destination IP:192.168.2.2,Location: GET /sma/api/v2.0/config/logs/subscriptions/ HTTP/1.0, Event: User is notvalid.
• In this example, the log shows that the AsyncOS APIs could fetch the log subscriptions because theauthentication was successful.Thu Oct 8 13:52:37 2020 Info: Appliance: mail1.example.com, Interaction Mode: API,User: admin, Role: Administrator, Source IP: 192.168.1.1, Destination IP: 192.168.2.2,Location: GET /sma/api/v2.0/config/logs/subscriptions/ HTTP/1.0, Event: API AccessSuccess.
• In this example, the log shows that:
• A new user (for example, admin) is added to the appliance using the CLI, but the changes were notcommitted.
• The existing user account details are updated in the appliance using the CLI, but the changes werenot committed.
User Guide for AsyncOS 14.1 for Cisco Secure Email and Web Manager- GD (General Deployment)556
LoggingUsing Audit Logs

Thu Oct 8 13:42:48 2020 Info: Appliance: mail1.example.com, Interaction Mode: CLI,User: admin, Source IP: 192.168.1.1, Event: Added user "hops" and changes willreflectafter commitThu Oct 8 13:43:26 2020 Info: Appliance: mail1.example.com, Interaction Mode: CLI,User: admin,Source IP: 192.168.1.1, Event: Updated user "hops" and changes will reflect aftercommit
• In this example, the log shows that a user (for example, admin) performed a message tracking search onthe new web interface of the appliance.User: admin,Role: Administrator, Source IP: 192.168.1.1, Destination IP: 192.168.2.2,Location: GET /sma/api/v2.0/message-tracking/messages?startDate=2020-10-12T00:00:00.000Z&endDate=2020-10-12T04:13:00.000Z&ciscoHost=All_Hosts&searchOption=messages&offset=0&limit=100HTTP/1.0,Event: API Access Success.
The actions that you perform on the new web interface of the appliance (forexample, tracking, reporting, or quarantine search) are recorded as logs based onthe corresponding APIs used for these actions.
Note
Log Subscriptions• Configuring Log Subscriptions, on page 557• Creating a Log Subscription in the GUI, on page 559• Configuring Global Settings for Logging, on page 560• Rolling Over Log Subscriptions , on page 561• Configuring Host Keys, on page 563
Configuring Log SubscriptionsLog subscriptions create the individual log files that are stored on a Cisco Content Security appliance orremotely. A log subscription is either pushed (delivered to another computer) or polled (retrieved from theappliance). Generally, log subscriptions have the following attributes:
Table 108: Log File Attributes
DescriptionAttribute
Defines the type of information recorded and the format of the log subscription. Formore information, see Summary of Log Types, on page 536.
Log Type
Descriptive name of log subscription that you provide for your future reference.Name
Physical name of the file when it is written to disk. If the system includes multiplecontent security appliances, use a unique log filename to identify the appliance thatgenerated the log file.
Log Filename
User Guide for AsyncOS 14.1 for Cisco Secure Email and Web Manager- GD (General Deployment)557
LoggingLog Subscriptions

DescriptionAttribute
Maximum size that the file can reach before it rolls over.Rollover by File Size
When to roll over log files, based on time. See options at Log Rollover and TransferSchedule, on page 533.
Rollover by Time
Sets the maximum number of logged events in the log file, within the specified timerange (in seconds).
The default time range value is 10 seconds.
Rate Limit
Level of detail for each log subscription.Log Level
Method used to transfer the log files from the appliance.Retrieval Method
Use the Management Appliance > System Administration > Log Subscriptions page (or the logconfigcommand in the CLI) to configure a log subscription. You are prompted for the log type, as shown in Summaryof Log Types, on page 536. For most log types, you are also asked to select a log level for the log subscription.
Configuration history logs only: If you anticipate loading configurations from the configuration history logs,be aware that you cannot load configurations containingmasked passphrases. On theManagement Appliance> System Administration > Log Subscriptions page, select Yeswhen prompted whether you want to includepassphrase in the log. If you are using the logconfig command in the CLI, type y when prompted.
Note
Setting the Log LevelLog levels determine the amount of information delivered in a log. Logs can have one of five levels of detail.A detailed log-level setting creates larger log files and has a greater impact on system performance than anabbreviated log-level setting. A detailed log-level setting includes all the messages contained in the abbreviatedlog-level settings, plus additional messages. As the level of detail increases, system performance decreases.
You can specify different logging levels for each log type.Note
Table 109: Log Levels
DescriptionLog Level
Only errors are logged. This is the most abbreviated log-level setting. At this log level, youcannot monitor performance and important appliance activities; however, the log files do notreach maximum size as quickly as they do at a detailed log level. This log level is analogous tothe syslog level Alert.
Critical
All system errors and warnings are logged. At this log level, you cannot monitor performanceand important appliance activities. The log files reach maximum size more quickly than theydo at the Critical log level. This log level is analogous to the syslog level Warning.
Warning
User Guide for AsyncOS 14.1 for Cisco Secure Email and Web Manager- GD (General Deployment)558
LoggingSetting the Log Level

DescriptionLog Level
Second-by-second operations of the system are logged. For example, connections opened anddelivery attempts are logged. The Information level is the recommended setting for logs. Thislog level is analogous to the syslog level Info.
Information
More detailed information is logged than at the Information log level. Use the Debug log levelwhen you are troubleshooting an error. Use this setting temporarily, and then return to the defaultlevel. This log level is analogous to the syslog level Debug.
Debug
All available information is logged. The Trace log level is recommended only for developers.Using this level causes a serious degradation of system performance and is not recommended.This log level is analogous to the syslog level Debug.
Trace
Creating a Log Subscription in the GUI
Step 1 [New Web Interface Only] On the Security Management appliance, click to load the legacy web interface.Step 2 On the Management Appliance > System Administration > Log Subscriptions page, click Add Log Subscription.Step 3 Select a log type and enter the log name (for the log directory), as well as the name for the log file itself.Step 4 If applicable, specify the maximum file size.Step 5 If applicable, specify days, times of day, or time intervals to roll over the logs. For more information, see Log Rollover
and Transfer Schedule, on page 533.Step 6 If applicable, specify the maximum number of logged events in the log file, within the specified time range (in seconds).Step 7 If applicable, specify the log level.Step 8 (Configuration history logs only) Select whether to include passphrases in the log.
You cannot load configurations containing masked passphrases. If you anticipate loading configurations fromthe configuration history logs, select Yes to include passphrases in the log.
Note
Step 9 Configure the log retrieval method.Step 10 Submit and commit your changes.
Editing Log Subscriptions
Step 1 Click the name of the log in the Log Name column on the Log Subscriptions page.Step 2 Update the log subscription.Step 3 Submit and commit your changes.
User Guide for AsyncOS 14.1 for Cisco Secure Email and Web Manager- GD (General Deployment)559
LoggingCreating a Log Subscription in the GUI

Configuring Global Settings for LoggingThe system periodically records system metrics within text mail logs and status logs. Use the Edit Settingsbutton in the Global Settings section of the Log Subscriptions page (or the logconfig -> setup command inthe CLI) to configure:
• The amount of time, in seconds, that the system waits between recording metrics• Whether to record the Message ID headers• Whether to record the remote response status code• Whether to record the subject header of the original message• The headers that should be logged for each message
All Cisco Content Security appliance logs optionally include the following three items:
• Message-ID: When this option is configured, every message will have its Message ID header logged, ifit is available. This Message ID may have come from the received message or may have been generatedby AsyncOS. For example:
Tue Apr 6 14:38:34 2004 Info: MID 1 Message-ID Message-ID-Content
• Remote Response: When this option is configured, every message will have its remote response statuscode logged, if it is available. For example:
Tue Apr 6 14:38:34 2004 Info: MID 1 RID [0] Response 'queued as 9C8B425DA7'
The remote response string is the human-readable text received after the response to the DATA commandduring the delivery SMTP conversation. In this example, the remote response after the connection host issuedthe data command is “queued as 9C8B425DA7.”
[...]250 ok hostname250 Ok: queued as 9C8B425DA7
White space, punctuation, and, in the case of the 250 response, the OK characters are stripped from thebeginning of the string. Only white space is stripped from the end of the string. For example, Cisco ContentSecurity appliances, by default, respond to the DATA command with this string: 250 Ok: Message MIDaccepted . So, the entry “Message MID accepted” would be logged if the remote host were another CiscoContent Security appliance.
• Original Subject Header: When this option is enabled, the original subject header of each message isincluded in the log.
Tue May 31 09:20:27 2005 Info: Start MID 2 ICID 2Tue May 31 09:20:27 2005 Info: MID 2 ICID 2 From: <[email protected]>Tue May 31 09:20:27 2005 Info: MID 2 ICID 2 RID 0 To: <[email protected]>Tue May 31 09:20:27 2005 Info: MID 2 Message-ID '<[email protected]>'Tue May 31 09:20:27 2005 Info: MID 2 Subject 'Monthly Reports Due'
Logging Message HeadersIn some cases, it is necessary to record the presence and contents of a message’s headers as they pass throughthe system. You specify the headers to record on the Log Subscriptions Global Settings page (or via thelogconfig -> logheaders subcommand in the CLI). The appliance records the specified message headers inthe text mail logs and the tracking logs. If the header is present, the system records the name of the headerand the value. If a header is not present, nothing is recorded in the logs.
User Guide for AsyncOS 14.1 for Cisco Secure Email and Web Manager- GD (General Deployment)560
LoggingConfiguring Global Settings for Logging

The system evaluates all headers that are present on a message, at any time during the processing of themessage for recording, regardless of the headers specified for logging.
Note
The RFC for the SMTP protocol is located at http://www.faqs.org/rfcs/rfc2821.html and defines user-definedheaders.
Note
If you have configured headers to log via the logheaders command, the header information appears after thedelivery information:
Note
Table 110: Log Headers
Name of the headerHeadername
Contents of the logged headerValue
For example, specifying “date, x-subject” as headers to be logged causes the following line to appear in themail log:
Tue May 31 10:14:12 2005 Info: Message done DCID 0 MID 3 to RID [0] [('date', 'Tue, 31 May2005 10:13:18 -0700'), ('x-subject', 'Logging this header')]
Configuring Global Settings for Logging by Using the GUI
Step 1 Click the Edit Settings button in the Global Settings section of the Log Subscriptions page.Step 2 Specify the systemmetrics frequency, whether to includeMessage ID headers in mail logs, whether to include the remote
response, and whether to include the original subject header of each message.
For information about these settings, see Configuring Global Settings for Logging, on page 560.
Step 3 Enter any other headers you want to include in the logs. Separate each entry with a comma.Step 4 Submit and commit your changes.
Rolling Over Log SubscriptionsWhen AsyncOS rolls over a log file, it:
• Creates a new log file with the timestamp of the rollover and designates the file as current with the letter“c” extension
• Renames the current log file to have a letter “s” extension signifying saved• Transfers the newly saved log file to a remote host (if push-based)
User Guide for AsyncOS 14.1 for Cisco Secure Email and Web Manager- GD (General Deployment)561
LoggingConfiguring Global Settings for Logging by Using the GUI

• Transfers any previously unsuccessful log files from the same subscription (if push-based)• Deletes the oldest file in the log subscription if the total number of files to keep on hand has been exceeded(if poll-based)
What To Do Next
Rolling Over Logs in Log SubscriptionsSee Log Rollover and Transfer Schedule, on page 533.
Rolling Over Logs Immediately Using the GUI
Step 1 On the Log Subscriptions page, select the check box to the right of the logs you want to roll over.Step 2 Optionally, select all logs for rollover by selecting the All check box.Step 3 Click the Rollover Now button.
What to do next
• Rolling Over Logs in Log Subscriptions , on page 562
• Rolling Over Logs Immediately via the CLI, on page 562
Rolling Over Logs Immediately via the CLIUse the rollovernow command to roll over all log files at once or select a specific log file from a list.
Viewing the Most Recent Log Entries in the GUIYou can view a log file via the GUI by clicking the log subscription in the Log Files column of the table onthe Log Subscriptions page. When you click the link to the log subscription, you are prompted to enter yourpassphrase. A listing of log files for that subscription then appears. You can click one of the log files to viewit in your browser or to save it to disk. You must have the FTP service enabled on the Management interfaceto view logs in the GUI.
Viewing the Most Recent Entries in Logs (tail Command)AsyncOS supports a tail command, which shows the latest entries of configured logs on the appliance. Issuethe tail command and select the number of a currently configured log to view it. Press Ctrl-C to exit from thetail command.
You cannot view configuration history logs by using the tail command. You must use FTP or SCP.Note
Example
In the following example, the tail command is used to view the system log. The tail command also acceptsthe name of a log to view as a parameter, for example, tail system_logs
User Guide for AsyncOS 14.1 for Cisco Secure Email and Web Manager- GD (General Deployment)562
LoggingRolling Over Logs in Log Subscriptions

Welcome to the M600 Messaging Gateway(tm) Applianceexample.srv> tailCurrently configured logs:1. "cli_logs" Type: "CLI Audit Logs" Retrieval: FTP Poll2. "euq_logs" Type: " Spam Quarantine Logs" Retrieval: FTP Poll3. "euqgui_logs" Type: "Spam Quarantine GUI Logs" Retrieval: FTP Poll4. "gui_logs" Type: "HTTP Logs" Retrieval: FTP Poll5. "mail_logs" Type: "Text Mail Logs" Retrieval: FTP Poll6. "reportd_logs" Type: "Reporting Logs" Retrieval: FTP Poll7. "reportqueryd_logs" Type: "Reporting Query Logs" Retrieval: FTP Poll8. "slbld_logs" Type: "Safe/Block Lists Logs" Retrieval: FTP Poll9. "smad_logs" Type: "SMA Logs" Retrieval: FTP Poll10. "system_logs" Type: "System Logs" Retrieval: FTP Poll11. "trackerd_logs" Type: "Tracking Logs" Retrieval: FTP PollEnter the number of the log you wish to tail.[]> 10Press Ctrl-C to stop.Thu Sep 27 00:18:56 2007 Info: Begin LogfileThu Sep 27 00:18:56 2007 Info: Version: 6.0.0-422 SN: 001143583D73-FT9GP61Thu Sep 27 00:18:56 2007 Info: Time offset from UTC: 0 secondsThu Sep 27 00:18:47 2007 Info: System is coming up.Thu Sep 27 00:23:05 2007 Warning: DNS query network error '[Errno 64] Host is down' to'172.16.0.3' looking up 'downloads.cisco.com'Fri Sep 28 22:20:08 2007 Info: PID 688: User admin commit changes:Fri Sep 28 23:06:15 2007 Info: PID 688: User admin commit changes:^Cexample.srv>
.
Configuring Host KeysUse the logconfig -> hostkeyconfig subcommand to manage host keys for use with SSH when pushing logsto other servers from the Cisco Content Security appliance. SSH servers must have a pair of host keys, oneprivate and one public. The private host key resides on the SSH server and cannot be read by remote machines.The public host key is distributed to any client machine that needs to interact with the SSH server.
To manage user keys, see “Managing Secure Shell (SSH) Keys” in the user guide or online help for yourEmail Security appliance.
Note
The hostkeyconfig subcommand performs the following functions:
Table 111: Managing Host Keys - List of Subcommands
DescriptionCommand
Add a new key.New
Modify an existing key.Edit
Delete an existing key.Delete
Automatically download a host key.Scan
Display a key.Print
User Guide for AsyncOS 14.1 for Cisco Secure Email and Web Manager- GD (General Deployment)563
LoggingConfiguring Host Keys

DescriptionCommand
Display system host keys. This is the value to place in the remote system's “known_hosts” file.Host
Display system host key fingerprints.Fingerprint
Display the public key of the system account that pushes the logs to the remote machine. This is the same key thatappears when setting up an SCP push subscription. This is the value to place in the remote system's “authorized_keys”file.
User
Example
In the following example, the commands scan for host keys and add them for the host:
mail3.example.com> logconfigCurrently configured logs:[ list of logs]Choose the operation you want to perform:- NEW - Create a new log.- EDIT - Modify a log subscription.- DELETE - Remove a log subscription.- SETUP - General settings.- LOGHEADERS - Configure headers to log.- HOSTKEYCONFIG - Configure SSH host keys.[]> hostkeyconfigCurrently installed host keys:1. mail3.example.com ssh-dss [ key displayed ]Choose the operation you want to perform:- NEW - Add a new key.- EDIT - Modify a key.- DELETE - Remove a key.- SCAN - Automatically download a host key.- PRINT - Display a key.- HOST - Display system host keys.- FINGERPRINT - Display system host key fingerprints.- USER - Display system user keys.[]> scanPlease enter the host or IP address to lookup.[]> mail3.example.comChoose the ssh protocol type:1. SSH2:rsa2. SSH2:dsa3. All[3]>SSH2:dsamail3.example.com ssh-dss[ key displayed]SSH2:rsamail3.example.com ssh-rsa[ key displayed]Add the preceding host key(s) for mail3.example.com? [Y]>Currently installed host keys:1. mail3.example.com ssh-dss [ key displayed]2. mail3.example.com ssh-rsa [ key displayed]3. mail3.example.com 1024 35 [ key displayed]
User Guide for AsyncOS 14.1 for Cisco Secure Email and Web Manager- GD (General Deployment)564
LoggingConfiguring Host Keys

Choose the operation you want to perform:- NEW - Add a new key.- EDIT - Modify a key.- DELETE - Remove a key.- SCAN - Automatically download a host key.- PRINT - Display a key.- HOST - Display system host keys.- FINGERPRINT - Display system host key fingerprints.- USER - Display system user keys.[]>Currently configured logs:[ list of configured logs]Choose the operation you want to perform:- NEW - Create a new log.- EDIT - Modify a log subscription.- DELETE - Remove a log subscription.- SETUP - General settings.- LOGHEADERS - Configure headers to log.- HOSTKEYCONFIG - Configure SSH host keys.[]>mail3.example.com> commit
User Guide for AsyncOS 14.1 for Cisco Secure Email and Web Manager- GD (General Deployment)565
LoggingConfiguring Host Keys

User Guide for AsyncOS 14.1 for Cisco Secure Email and Web Manager- GD (General Deployment)566
LoggingConfiguring Host Keys
C H A P T E R 18Troubleshooting
This chapter contains the following sections:
• Collecting System Information , on page 567• Troubleshooting Hardware Issues , on page 567• Troubleshooting Feature Setup Issues , on page 567• General Troubleshooting Resources , on page 568• Troubleshooting Issues with Specific Functionality , on page 568• Working with Technical Support, on page 569• Running a Packet Capture, on page 572• Remotely Resetting Appliance Power , on page 573
Collecting System InformationYou can get information about your appliance and its status, including your serial number. Refer MonitoringSystem Status, on page 355
Troubleshooting Hardware IssuesLights on the front and/or rear panels of your hardware appliance indicate health and status of your appliance.For descriptions of these indicators, see the hardware guides such as the Cisco x90 Series Content SecurityAppliances Installation and Maintenance Guide available from the location specified in.
Specifications for your appliance, such as temperature ranges, are also available in these documents.
If you need to cycle power to your x80 or x90 appliance, wait at least 20 minutes for the appliance to comeup (all LEDs are green) before pushing the power button.
Note
Troubleshooting Feature Setup IssuesIf you are experiencing difficulty configuring a feature successfully, see the summaries of the tasks you mustcomplete for each feature. These include links to specific information for each.
User Guide for AsyncOS 14.1 for Cisco Secure Email and Web Manager- GD (General Deployment)567

• Setting Up Centralized Web Reporting and Tracking , on page 167
• Setting Up Centralized Email Reporting, on page 52
• Setting Up Centralized Message Tracking , on page 248
• Setting Up the Centralized Spam Quarantine
• Centralized Policy, Virus, and Outbreak Quarantines, on page 297
• Using Configuration Masters to Centrally Manage Web Security Appliances , on page 324
General Troubleshooting ResourcesGeneral troubleshooting resources include:
• Recent alerts. See Viewing Recent Alerts , on page 475.• Log files. SeeLogging, on page 531• The Release Notes, including the Documentation Updates section. SeeDocumentation , on page 595.• The Cisco Bug Search Tool (instructions for access are in the Release Notes)• Knowledge Base Articles (TechNotes) , on page 597• TheCisco Support Community, on page 597
Troubleshooting Issues with Specific FunctionalitySee alsoTroubleshooting Feature Setup Issues , on page 567.
Web Security-Related Issues
• Troubleshooting All Reports , on page 35
• Troubleshooting Web Reporting and Tracking , on page 243
• Troubleshooting Configuration Management Issues , on page 352
• Feature-related issues may also result from settings on your Web Security appliances. See the releasenotes and online help or user guide for your release at the location specified inDocumentation , on page595.
Email Security-Related Issues
• Troubleshooting All Reports , on page 35
• Troubleshooting Message Tracking, on page 262
• Troubleshooting Spam Quarantine Features , on page 296
• Troubleshooting Centralized Policy Quarantines , on page 322
• Feature-related issues may also result from settings on your Email Security appliances. See the releasenotes and online help or user guide for your release at the location specified inDocumentation , on page595.
User Guide for AsyncOS 14.1 for Cisco Secure Email and Web Manager- GD (General Deployment)568
TroubleshootingGeneral Troubleshooting Resources

General Issues
• If you are unable to load a configuration file, make sure your disk space quotas are larger than the currentsize of each function in the table on the Management Appliance > System Administration > DiskManagement page.
• If you have recently upgraded and the online help appears to be outdated or you cannot find the informationabout a new feature, clear your browser cache and then reopen the browser window.
• Unexpected behavior can occur when configuring settings using the web interface if you are usingmultiplebrowser windows or tabs simultaneously.
• SeeResponding to Alerts , on page 569.
• SeeTroubleshooting Administrative User Access , on page 425.
Responding to Alerts• Alert: Battery Relearn Timed Out (RAID Event) on 380 or 680 Hardware, on page 569• Additional Alert Descriptions , on page 569
Alert: Battery Relearn Timed Out (RAID Event) on 380 or 680 HardwareProblem: You receive an alert with subject “Battery Relearn Timed Out” for 380 or 680 hardware.
Solution: This alert may or may not indicate a problem. The battery relearn timeout, in itself, does not meanthere is any problem with the RAID controller. The controller can recover in the subsequent relearn. Pleasemonitor your email for any other RAID alerts for the next 48 hours, to ensure that this is not the side-effectof any other problem. If you do not see any other RAID-related alerts from the system, then you can safelyignore this alert.
Additional Alert DescriptionsFor descriptions of additional alerts, see
• Hardware Alert Descriptions , on page 476• System Alert Descriptions , on page 476
What to do next
• Managing Alerts, on page 473
Working with Technical Support• Opening or Updating a Support Case from the Appliance , on page 569• Getting Support for Virtual Appliances , on page 570• Enabling Remote Access for Cisco Technical Support Personnel , on page 570
Opening or Updating a Support Case from the ApplianceYou can use this method to contact Cisco TAC or your own support services.
User Guide for AsyncOS 14.1 for Cisco Secure Email and Web Manager- GD (General Deployment)569
TroubleshootingResponding to Alerts
Before you begin
If you wish to contact Cisco TAC:
• If your issue is urgent, do not use this method. Instead, contact support using one of the other methodslisted in Customer Support , on page 597.
• Consider other options for getting help:• When you open a support case using this procedure, the appliance configuration file is sent to CiscoCustomer Support. If you do not want to send the appliance configuration, you can contact CustomerSupport using a different method.
• The appliance must be connected to the internet and able to send email.• If you are sending information about an existing case, make sure you have the case number.
Step 1 Log in to the appliance.Step 2 Choose Help and Support > Contact Technical Support.Step 3 Determine the recipients of the support request:
Select the Cisco Technical Support check box.To send the request to Cisco TAC
• Deselect the Cisco Technical Support checkbox.
• Enter the email address of your support desk.
To send the request only to your internal support desk
Enter email addresses.(Optional) To include other recipients
Step 4 Complete the form.Step 5 Click Send.
Getting Support for Virtual AppliancesIf you file a support case for a Cisco content security virtual appliance, you must provide your Virtual LicenseNumber (VLN), your contract number, and your Product Identifier code (PID).
You can identify your PID based on the software licenses running on your virtual appliance, by referencingyour purchase order, or from the following table:
DescriptionPIDFunctionality
—SMA-WMGT-LIC=All centralized web security functionality
SMA-EMGT-LIC=All centralized email security functionality
Enabling Remote Access for Cisco Technical Support PersonnelOnly Cisco Customer Assistance can access your appliance using these methods.
• Enabling Remote Access for Cisco Technical Support Personnel , on page 570• Enabling Remote Access to Appliances Without a Direct Internet Connection , on page 571
User Guide for AsyncOS 14.1 for Cisco Secure Email and Web Manager- GD (General Deployment)570
TroubleshootingGetting Support for Virtual Appliances
• Disabling a Tech Support Tunnel , on page 572• Disabling Remote Access , on page 572• Checking the Status of the Support Connection , on page 572
Enabling Remote Access to Appliances With an Internet ConnectionSupport accesses the appliance through an SSH tunnel that this procedure creates between the appliance andthe upgrades.ironport.com server.
Before you begin
Identify a port that can be reached from the internet. The default is port25 which will work in most environment. Connections over this port are allowed in most firewall configurations.
Step 1 Log in to the appliance.Step 2 From the top right side of the GUI window, choose Help and Support > Remote Access.Step 3 Click Enable.Step 4 Enter information.Step 5 Click Submit.
What to do next
When remote access for support personnel is no longer required, seeDisabling a Tech Support Tunnel , onpage 572.
Enabling Remote Access to Appliances Without a Direct Internet ConnectionFor appliances without a direct internet connection, access is made through a second appliance that is connectedto the internet.
Before you begin
• The appliance must be able to connect on port 22 to a second appliance that is connected to the internet.• On the appliance with the internet connection, follow the procedure inEnabling Remote Access toAppliances With an Internet Connection , on page 571 to create a support tunnel to that appliance.
Step 1 From the command-line interface of the appliance requiring support, enter the techsupport command.Step 2 Enter sshaccess .Step 3 Follow the prompts.
What to do next
When remote access for support personnel is no longer required, see the following:
• Disabling Remote Access , on page 572• Disabling a Tech Support Tunnel , on page 572
User Guide for AsyncOS 14.1 for Cisco Secure Email and Web Manager- GD (General Deployment)571
TroubleshootingEnabling Remote Access to Appliances With an Internet Connection

Disabling a Tech Support TunnelAn enabled techsupport tunnel remains connected to upgrades.ironport.com for 7 days. After that time,established connections will not be disconnected but will be unable to re-attach to the tunnel once disconnected.
Step 1 Log in to the appliance.Step 2 From the top right side of the GUI window, choose Help and Support > Remote Access.Step 3 Click Disable.
Disabling Remote AccessA remote access account that you create using the techsupport command remains active until you deactivateit.
Step 1 From the command-line interface, enter the techsupport command.Step 2 Enter sshaccess .Step 3 Enter disable .
Checking the Status of the Support Connection
Step 1 From the command-line interface, enter the techsupport command.Step 2 Enter status .
Running a Packet CapturePacket Capture allows support personnel to see the TCP/IP data and other packets going into and out of theappliance. This allows Support to debug the network setup and to discover what network traffic is reachingthe appliance or leaving the appliance.
Step 1 Choose Help and Support > Packet Capture.Step 2 Specify packet capture settings:
a) In the Packet Capture Settings section, click Edit Settings.b) (Optional) Enter duration, limits, and filters for the packet capture.
Your Support representative may give you guidance on these settings.
If you enter a capture duration without specifying a unit of time, AsyncOS uses seconds by default.
In the Filters section:
• Custom filters can use any syntax supported by the Unix tcpdump command, such as host 10.10.10.10 && port80 .
User Guide for AsyncOS 14.1 for Cisco Secure Email and Web Manager- GD (General Deployment)572
TroubleshootingDisabling a Tech Support Tunnel

• The client IP is the IP address of the machine connecting to the appliance, such as a mail client sending messagesthrough the Email Security appliance.
• The server IP is the IP address of the machine to which the appliance is connecting, such as an Exchange serverto which the appliance is delivering messages.
You can use the client and server IP addresses to track traffic between a specific client and a specific server, with theEmail Security appliance in the middle.
c) Click Submit.
Step 3 Click Start Capture.
• Only one capture may be running at a time.• When a packet capture is running, the Packet Capture page shows the status of the capture in progress by showingthe current statistics, such as file size and time elapsed.
• The GUI only displays packet captures started in the GUI, not from the CLI. Similarly, the CLI only displays thestatus of a current packet capture run started in the CLI.
• The packet capture file is split into ten parts. If the file reaches the maximum size limit before the packet captureends, the oldest part of the file is deleted (the data is discarded) and a new part starts with the current packet capturedata. Only 1/10 of the packet capture file is discarded at a time.
• A running capture started in the GUI is preserved between sessions. (A running capture started in the CLI stopswhen the session ends.)
Step 4 Allow the capture to run for the specified duration, or, if you have let the capture run indefinitely, manually stop thecapture by clicking Stop Capture.
Step 5 Access the packet capture file:
• Click the file in the Manage Packet Capture Files list and click Download File.• Use FTP or SCP to access the file in the captures subdirectory on the appliance.
What to do next
Make the file available to Support:
• If you allow remote access to your appliance, technicians can access the packet capture files using FTPor SCP. SeeEnabling Remote Access for Cisco Technical Support Personnel , on page 570.
• Email the file to Support.
Remotely Resetting Appliance PowerIf the appliance requires a hard reset, you can reboot the appliance chassis remotely using a third-partyIntelligent Platform Management Interface (IPMI) tool.
Restrictions
• Remote power cycling is available only on certain hardware.
For specifics, seeEnabling Remote Power Cycling , on page 449.
• If you want be able to use this feature, you must enable it in advance.
For details, seeEnabling Remote Power Cycling , on page 449.
User Guide for AsyncOS 14.1 for Cisco Secure Email and Web Manager- GD (General Deployment)573
TroubleshootingRemotely Resetting Appliance Power

• Only the following IPMI commands are supported:
status, on, off, cycle, reset, diag, soft
Issuing unsupported commands will produce an “insufficient privileges” error.
Before you begin
• Obtain and set up a utility that can manage devices using IPMI version 2.0.• Understand how to use the supported IPMI commands. See the documentation for your IPMI tool.
Step 1 Use IPMI to issue a supported power-cycling command to the IP address assigned to the Remote Power Cycle port, whichyou configured earlier, along with the required credentials.
For example, from a UNIX-type machine with IPMI support, you might issue the command:
ipmitool -I lan -H 192.0.2.1 -U remoteresetuser -P passphrase chassis power reset
where 192.0.2.1 is the IP address assigned to the Remote Power Cycle port and remoteresetuser and passphrase are thecredentials that you entered while enabling this feature.
Step 2 Wait at least eleven minutes for the appliance to reboot.
User Guide for AsyncOS 14.1 for Cisco Secure Email and Web Manager- GD (General Deployment)574
TroubleshootingRemotely Resetting Appliance Power

A P P E N D I X AIP Interfaces and Accessing the Appliance
This chapter contains the following sections:
• IP Interfaces and Accessing the Appliance, on page 575• IP Interfaces, on page 575
IP Interfaces and Accessing the ApplianceYou can access any IP interface you create on a Cisco Content Security appliance through a variety of services.
By default, the following services are either enabled or disabled on each interface:
Table 112: Services Enabled by Default on IP Interfaces
Enabled by default?
New IP Interfaces You CreateManagementInterface
Default PortService
NoNo21FTP
NoYes23Telnet
NoYes22SSH
NoYes80HTTP
NoYes443HTTPS
IP InterfacesAn IP interface contains the network configuration data needed for an individual connection to the network.You can configure multiple IP interfaces to a physical Ethernet interface. You can also configure access tothe spam quarantine via an IP interface. For email delivery and Virtual Gateways, each IP interface acts asone Virtual Gateway address with a specific IP address and hostname. You can also “join” interfaces intodistinct groups (via the CLI), and the system will cycle through these groups when delivering email. Joiningor grouping Virtual Gateways is useful for load-balancing large email campaigns across several interfaces.You can also create VLANs, and configure them just as you would any other interface (via the CLI). For more
User Guide for AsyncOS 14.1 for Cisco Secure Email and Web Manager- GD (General Deployment)575

information, see the “Advanced Networking” chapter in the user guide or online help for your Email Securityappliance.
Configuring IP InterfacesThe Management Appliance > Network > IP Interfaces page (and interface config command) enables you toadd, edit, or delete IP interfaces.
You cannot change the name or Ethernet port associated with the Management interface on the SecurityManagement appliance. Further, the Security Management appliance does not support all of the featuresdiscussed below (Virtual Gateways, for example).
Note
The following information is required when you configure an IP interface:
Table 113: IP Interface Components
The nickname of the interface.Name
IP addresses within the same subnet cannot be configured on separate physicalEthernet interfaces.
IP address
You can enter the netmask in standard dotted octet form (for example,255.255.255.0) or hexadecimal form (for example, 0xffffff00). The default netmaskis 255.255.255.0, a common class C value.
Netmask (orsubnetmask)
AsyncOS automatically calculates the default broadcast address from the IP addressand the netmask.
Broadcast address
The hostname that is related to the interface. This hostname is used to identify theserver during the SMTP conversation. You are responsible for entering a validhostname associated with each IP address. The software does not check that DNScorrectly resolves the hostname to the matching IP address, or that reverse DNSresolves to the given hostname.
Hostname
FTP, SSH, Telnet, spam quarantine, HTTP, and HTTPS can be enabled or disabledon the interface. You can configure the port for each service. You can also specifythe HTTP/HTTPS, port, and URL for the spam quarantine.
Allowed services
If you have completed the System Setup Wizard as described in Setup, Installation, and Basic Configuration,on page 9 and committed the changes, the Management interface should already be configured on theappliance.
Note
Creating IP Interfaces Using the GUI
Step 1 [New Web Interface Only] On the Security Management appliance, click to load the legacy web interface.
User Guide for AsyncOS 14.1 for Cisco Secure Email and Web Manager- GD (General Deployment)576
IP Interfaces and Accessing the ApplianceConfiguring IP Interfaces

Step 2 Choose Management Appliance > Network > IP Interfaces.Step 3 Click Add IP Interface.Step 4 Enter a name for the interface.Step 5 Select an Ethernet port and enter an IP address.Step 6 Enter the netmask for the IP address.Step 7 Enter a hostname for the interface.Step 8 Select the check box next to each service you want to enable on this IP interface. Change the corresponding port if
necessary.Step 9 Select whether to enable redirecting HTTP to HTTPS for appliance management on the interface.Step 10 If you are using the spam quarantine, you can select HTTP or HTTPS or both and specify the port numbers for each.
You can also select whether to redirect HTTP requests to HTTPS. Finally, you can specify whether the IP interface isthe default interface for the spam quarantine, and whether to use the hostname as the URL or provide a custom URL.
Step 11 Submit and commit your changes.
Accessing the Appliance via FTP
By disabling services via the Management Appliance > Network > IP Interfaces page or the interfaceconfigcommand, you can disconnect yourself from the GUI or CLI, depending on how you are connected to theappliance. Do not disable services with this command if you are not able to reconnect to the appliance usinganother protocol, the Serial interface, or the default settings on the Management port.
Caution
Step 1 [New Web Interface Only] On the Security Management appliance, click to load the legacy web interface.Step 2 Choose Management Appliance > Network > IP Interfaces page (or the interfaceconfig command) to enable FTP
access for the interface.
Remember to commit your changes before moving on to the next step.Note
Step 3 Access the interface via FTP. Ensure you are using the correct IP address for the interface.
Example: ftp 192.168.42.42
Many browsers also allow you to access interfaces via FTP.
Example: ftp://192.10.10.10
Step 4 Browse to the directory for the specific task you are trying to accomplish. After you have accessed an interface via FTP,you can browse the following directories to copy and add (“GET” and “PUT”) files. See the following table.
User Guide for AsyncOS 14.1 for Cisco Secure Email and Web Manager- GD (General Deployment)577
IP Interfaces and Accessing the ApplianceAccessing the Appliance via FTP

Table 114: Directories Available for Access
DescriptionDirectory Name
Created automatically for logging via the Management Appliance > System Administration >Log Subscriptions page or the logconfig and rollovernow commands. See the “Logging” chapterin the user guide or online help for your Email Security appliance for a detailed description ofeach log.
See “Log File Type Comparison” in the “Logging” chapter for the differences among each logfile type.
/avarchive
/bounces
/cli_logs
/delivery
/error_logs
/ftpd_logs
/gui_logs
/mail_logs
/rptd_logs
/sntpd.logs
/status
/system_logs
The directory where data from the following pages and commands are exported to and/or imported(saved) from:
• Virtual Gateway mappings ( altsrchost )• Configuration data in XML format ( saveconfig, loadconfig )• Host Access Table (HAT) page ( hostaccess )• Recipient Access Table (RAT) page ( rcptaccess )• SMTP Routes page ( smtproutes )• Alias tables ( aliasconfig )• Masquerading tables ( masquerade )• Message filters ( filters )• Global unsubscribe data ( unsubscribe )• Test messages for the trace command
/configuration
The Mail Flow Monitoring database directory contains data for the Mail Flow Monitorfunctionality available from the GUI. Each subdirectory contains a README file that documentsthe record format for each file.
You can copy these files to a different machine for record keeping, or load the files into a databaseand create your own analysis application. The record format is the same for all files in alldirectories; this format may change in future releases.
/MFM
The directory where all archived reports configured on the system are stored./periodic_reports
Step 5 Use your FTP program to upload and download files to and from the appropriate directory.
User Guide for AsyncOS 14.1 for Cisco Secure Email and Web Manager- GD (General Deployment)578
IP Interfaces and Accessing the ApplianceIP Interfaces and Accessing the Appliance

Secure Copy (scp) AccessIf your client operating system supports a secure copy ( scp ) command, you can copy files to and from thedirectories listed in the table Directories Available for Access. For example, in the following example, thefile /tmp/test.txt is copied from the client machine to the configuration directory of the appliance with thehostname mail3.example.com .
The command prompts for the user’s passphrase ( admin ). This example is shown for reference only; youroperating system’s implementation of secure copy may vary.
Note
% scp /tmp/test.txt [email protected]:configurationThe authenticity of host 'mail3.example.com (192.168.42.42)' can't be established.DSA key fingerprint is 69:02:01:1d:9b:eb:eb:80:0c:a1:f5:a6:61:da:c8:db.Are you sure you want to continue connecting (yes/no)? yesWarning: Permanently added 'mail3.example.com ' (DSA) to the list of known [email protected]'s passphrase: (type the passphrase)test.txt 100% |****************************| 1007 00:00%
In this example, the same file is copied from the appliance to the client machine:
% scp [email protected]:configuration/text.txt [email protected]'s passphrase: (type the passphrase)test.txt 100% |****************************| 1007 00:00
You can use secure copy ( scp ) as an alternative to FTP to transfer files to and from the content securityappliance.
Only users in the operators and administrators group can use secure copy ( scp ) to access the appliance. Formore information, see About Reverting to an Earlier Version of AsyncOS, on page 471.
Note
Accessing via a Serial ConnectionIf you are connecting to the appliance via a serial connection, use the following information for the consoleport.
Complete information about this port is in the hardware installation guide for your appliance.
Related Topics
• Documentation , on page 595
User Guide for AsyncOS 14.1 for Cisco Secure Email and Web Manager- GD (General Deployment)579
IP Interfaces and Accessing the ApplianceSecure Copy (scp) Access

Pinout Details for the Serial Port in 80- and 90- Series HardwareFigure 21: Pinout Details for the Serial Port in 80- and 90- Series Hardware
Pinout Details for the Serial Port in 70-Series HardwareThe following figure illustrates the pin numbers for the serial port connector, and the table Serial Port PinAssignments defines the pin assignments and interface signals for the serial port connector.Figure 22: Pin Numbers for the Serial Port
Table 115: Serial Port Pin Assignments
DefinitionI/OSignalPin
Data carrier detectDCD1
Serial inputSIN2
Serial outputSOUT3
Data terminal readyDTR4
Signal groundn/aGND5
Data set readyDSR6
Request to sendRTS7
Clear to sendCTS8
User Guide for AsyncOS 14.1 for Cisco Secure Email and Web Manager- GD (General Deployment)580
IP Interfaces and Accessing the AppliancePinout Details for the Serial Port in 80- and 90- Series Hardware

DefinitionI/OSignalPin
Ring indicatorRI9
Chassis groundn/an/aShell
User Guide for AsyncOS 14.1 for Cisco Secure Email and Web Manager- GD (General Deployment)581
IP Interfaces and Accessing the ApplianceIP Interfaces and Accessing the Appliance

User Guide for AsyncOS 14.1 for Cisco Secure Email and Web Manager- GD (General Deployment)582
IP Interfaces and Accessing the ApplianceIP Interfaces and Accessing the Appliance

A P P E N D I X BAssigning Network and IP Addresses
This appendix contains the following sections:
• Ethernet Interfaces, on page 583• Selecting IP Addresses and Netmasks, on page 583• Strategies for Connecting Your Content Security Appliance , on page 585
Ethernet InterfacesAppliances have up to four Ethernet interfaces located on the rear panel of the system, depending on theconfiguration (whether or not you have the optional optical network interface). They are labeled:
• Management• Data1• Data2• Data3• Data4
Selecting IP Addresses and NetmasksWhen you configure the network, the appliance must be able to select a unique interface to send an outgoingpacket. This requirement drives some of the decisions regarding IP address and netmask selection for theEthernet interfaces. The rule is that only one interface can be on a single network (as determined through theapplications of netmasks to the IP addresses of the interfaces).
An IP address identifies a physical interface on any given network. A physical Ethernet interface can havemore than one IP address for which it accepts packets. An Ethernet interface that has more than one IP addresscan send packets over that interface with any one of the IP addresses as the source address in the packet. Thisproperty is used in implementing Virtual Gateway technology.
The purpose of a netmask is to divide an IP address into a network address and a host address. The networkaddress can be thought of as the network part (the bits matching the netmask) of the IP address. The hostaddress is the remaining bits of the IP address. The number of bits in a four octet address that are significantare sometimes expressed in Classless Inter-Domain Routing (CIDR) style. This is a slash followed by thenumber of bits (1-32).
A netmask can be expressed in this way by simply counting the ones in binary, so 255.255.255.0 becomes “/24 ” and 255.255.240.0 becomes “ /20. ”
User Guide for AsyncOS 14.1 for Cisco Secure Email and Web Manager- GD (General Deployment)583

Sample Interface ConfigurationsThis section shows sample interface configurations based on some typical networks. The example uses twointerfaces called Int1 and Int2. In the case of the appliance, these interface names can represent any twointerfaces out of the three interfaces (Management, Data1, Data2).
Network 1:
Separate interfaces must appear to be on separate networks.
Net AddressNetmaskIP AddressInterface
192.168.1.0/24255.255.255.0192.168.1.10Int1
192.168.0.0/24255.255.255.0192.168.0.10Int2
Data addressed to 192.168.1.X (where X is any number from 1 through 255, except for your own address, 10in this case) go out on Int1. Anything addressed to 192.168.0.X goes out on Int2. Any packet headed for someother address not in these formats, most likely out on a WAN or the Internet, is sent to the default gateway,which must be on one of these networks. The default gateway then forwards the packet on.
Network 2:
The network addresses (network parts of the IP addresses) of two different interfaces cannot be the same.
Net AddressNetmaskIP AddressEthernet Interface
192.168.0.0/16255.255.0.0192.168.1.10Int1
192.168.0.0/16255.255.0.0192.168.0.10Int2
This situation presents a conflict in that two different Ethernet interfaces have the same network address. Ifa packet from the content security appliance is sent to 192.168.1.11 , there is no way to decide which Ethernetinterface should be used to deliver the packet. If the two Ethernet interfaces are connected to two separatephysical networks, the packet may be delivered to the incorrect network and never find its destination. Theappliance does not allow you to configure your network with conflicts.
You can connect two Ethernet interfaces to the same physical network, but you must construct IP addressesand netmasks to allow the appliance to select a unique delivery interface.
IP Addresses, Interfaces, and RoutingWhen you select an interface on which to perform a command or function in the GUI or CLI that allows youto select an interface (for example, upgrading AsyncOS or configuring DNS), routing (your default gateway)takes precedence over your selection.
For example, suppose that you have a appliance with the three network interfaces configured, each on adifferent network segment (assume all /24):
IPEthernet
192.19.0.100Management
192.19.1.100Data1
User Guide for AsyncOS 14.1 for Cisco Secure Email and Web Manager- GD (General Deployment)584
Assigning Network and IP AddressesSample Interface Configurations

IPEthernet
192.19.2.100Data2
And your default gateway is 192.19.0.1.
Now, if you perform an AsyncOS upgrade (or other command or function that allows you to select an interface)and you select the IP that is on Data1 (192.19.1.100), you would expect all the TCP traffic to occur over theData1 Ethernet interface. However, instead the traffic goes out of the interface that is set as your defaultgateway, in this case Management, but is stamped with the source address of the IP on Data1.
SummaryThe content security appliance must always be able to identify a unique interface over which a packet can bedelivered. To make this decision, the appliance uses a combination of the packet’s destination IP address, andthe network and IP address settings of its Ethernet interfaces. The following table summarizes the precedingexamples:
DifferentNetwork
SameNetwork
AllowedAllowedSame Physical Interface
AllowedNot allowedDifferent Physical Interface
Strategies for Connecting Your Content Security ApplianceKeep the following in mind when connecting your appliance :
• Administrative traffic (CLI, web interface, log delivery) is usually little compared to email traffic.• If two Ethernet interfaces are connected to the same network switch, but end up talking to a singleinterface on another host downstream, or are connected to a network hub where all data are echoed toall ports, no advantage is gained by using two interfaces.
• SMTP conversations over an interface operating at 1000Base-T are slightly faster than conversationsover the same interfaces operating at 100Base-T, but only under ideal conditions.
• There is no point in optimizing connections to your network if there is a bottleneck in some other partof your delivery network. Bottlenecks most often occur in the connection to the Internet and furtherupstream at your connectivity provider.
The number of interfaces that you choose to connect and how you address them should be dictated by thecomplexity of your underlying network. It is not necessary to connect multiple interfaces if your networktopology or data volumes do not call for it. It is also possible to keep the connection simple at first as youfamiliarize yourself with the gateway and then increase the connectivity as volume and network topologyrequire it.
User Guide for AsyncOS 14.1 for Cisco Secure Email and Web Manager- GD (General Deployment)585
Assigning Network and IP AddressesSummary

User Guide for AsyncOS 14.1 for Cisco Secure Email and Web Manager- GD (General Deployment)586
Assigning Network and IP AddressesStrategies for Connecting Your Content Security Appliance

A P P E N D I X CFirewall Information
This chapter contains the following sections:
• Firewall Information, on page 587
Firewall InformationThe following table lists the possible ports that may need to be opened for proper operation of Cisco SecureEmail Gateway (these are the default values).
Table 116: Firewall Ports
PurposeHostnameIn/OutProtocolDefaultPort
FTP for aggregation of log files.
Data ports TCP 1024 and highermust also all be open.
For more information, search forFTP port information in theKnowledge Base. SeeKnowledge Base Articles(TechNotes) , on page 597 .
AsyncOS IPs, FTP serverIn or outTCP20/21
Centralized configurationmanager configuration push.
Also used for backups.
AsyncOS IPsOutSSH22
SSH access to the CLI,aggregation of log files.
AsyncOS IPsInTCP22
SCP push to log server.SCP serverOutTCP22
Telnet access to the CLI.AsyncOS IPsInTelnet23
Telnet upgradesTelnet ServerOutTelnet23
SMTP to send email.AnyOutTCP25
User Guide for AsyncOS 14.1 for Cisco Secure Email and Web Manager- GD (General Deployment)587

SMTP to receive bounced emailor if injecting email from outsidefirewall.
AsyncOS IPsInTCP25
DNS if configured to use Internetroot servers or other DNS serversoutside the firewall. Also forSenderBase queries.
DNS serversOutUDP/TCP53
HTTP access to the GUI forsystem monitoring.
AsyncOS IPsInHTTP80
Service updates, except forAsyncOS upgrades .
downloads.ironport.comOutHTTP80
AsyncOS upgrades.upgrades.ironport.comOutHTTP80
HTTP access to the GUI usingtrailblazerconfig CLIcommand.
AsyncOS IPsIn and OutHTTP801
Used for viewing the spamquarantine.
AsyncOS IPsInHTTP82
Used for viewing the spamquarantine.
AsyncOS IPsInHTTPS83
POP authentication for end usersfor spam quarantine.
POP serverOutTCP110
NTP if time servers are outsidefirewall.
NTP serverIn & OutUDP123
IMAP authentication for endusers for spam quarantine.
IMAP serverOutTCP143
SNMP Queries.AsyncOS IPsInUDP161
SNMP Traps.Management stationOutUDP162
LDAP if LDAP directory serversare outside firewall. LDAPauthentication for Cisco SpamQuarantine.
LDAP serversOutLDAP389 or
3268
LDAPS — ActiveDirectory’sglobal catalog server (uses SSL).
LDAPSOutLDAPS636 or3269
Secure HTTP ( https ) access tothe GUI for system monitoring.
AsyncOS IPsInTCP443
Verify the latest files for theupdate server.
update-static.ironport.comOutTCP443
User Guide for AsyncOS 14.1 for Cisco Secure Email and Web Manager- GD (General Deployment)588
Firewall InformationFirewall Information

Obtain the list of the latest filesfrom the update server (forphysical hardware emailgateways.)
update-manifests.ironport.comOutTCP443
Obtain the list of the latest filesfrom the update server (forvirtual email gateways.)
update-manifests.sco.cisco.comOutTCP443
Receive/send Outbreak Filters.phonehome.senderbase.orgOutTCP443
Display detailed file analysisresults on the File Analysisserver.
• Web security reporting:(Cloud File Analysis)Ensure That theManagementApplianceCanReach the File AnalysisServer , on page 185
File Analysis server URL asconfigured on your WebSecurity appliance on theSecurity Services >Anti-Malware and Reputationpage, in the Advanced section> Advanced Settings for FileAnalysis.
File Analysis server URL asconfigured on your EmailSecurity appliance on theSecurity Services > FileReputation and Analysis page,in the Advanced Settings forFile Analysis section.
OutTCP443
Used to register your emailgateway with Cisco ThreatResponse.
api-sse.cisco.comIn and OutHTTPS443
Used to register your emailgateway with Cisco ThreatResponse.
api.eu.sse.itd.cisco.comIn and OutHTTPS443
Used to download a certificate toverify whether your emailgateway is accessing a verifiedsite when registering to CiscoThreat Response.
est.sco.cisco.comIn and OutHTTPS443
HTTPS access to the GUI usingtrailblazerconfig CLIcommand.
AsyncOS IPsIn and OutHTTPS443
Syslog logging.Syslog serverOutUDP/TCP514
See information above for Port21 (FTP.)
———1024 andhigher
User Guide for AsyncOS 14.1 for Cisco Secure Email and Web Manager- GD (General Deployment)589
Firewall InformationFirewall Information

Pass policy, virus, and outbreakquarantine data between CiscoSecure Email Gateways andCisco SecureManager Email andWeb Gateways when this featureis centralized.
AsyncOS IPsIn and outTCP7025
TCP32137
Access to API ports for HTTPServer
In or OutHTTP6080
Access to API ports for HTTPSServer
In or OutHTTPS6443
User Guide for AsyncOS 14.1 for Cisco Secure Email and Web Manager- GD (General Deployment)590
Firewall InformationFirewall Information

A P P E N D I X DWeb Security Management Examples
This chapter contains the following sections:
• Web Security Management Examples, on page 591
Web Security Management ExamplesThis appendix illustrates and describes a number of common ways to implement features of the Cisco ContentSecurity Management appliance, and includes the following sections:
• Example 1: Investigating a User , on page 591• Example 2: Tracking a URL, on page 593• Example 3: Investigating Top URL Categories Visited, on page 593
Web Security Appliance ExamplesThis section describes examples using a Security Management appliance and Web Security appliances.
All of these scenarios assume that you have enabled web reporting and web tracking on the SecurityManagement appliance and on your Web Security appliances. For information on how to enable web trackingand web reporting, see Using Centralized Web Reporting and Tracking, on page 165
Note
Example 1: Investigating a UserThis example demonstrates how a system administrator would investigate a particular user at a company.
In this scenario, a manager has gotten a complaint that an employee is visiting inappropriate web sites at work.To investigate this, the system administrator now needs to track the details of their web activity.
Once the web activity is tracked, a web report is generated with information about the employee’s browsinghistory.
Step 1 On the Security Management appliance, choose Web > Reporting > Users.Step 2 In the Users table, click on the User ID or Client IP address you want to investigate.
User Guide for AsyncOS 14.1 for Cisco Secure Email and Web Manager- GD (General Deployment)591

If you do not know the User ID or the Client IP address, type what you can remember of the User ID or Client IP addressin text field, and click on Find User ID or Client IP address. The IP address does not need to be an exact match toreturn results. The Users table is populated with the User ID and Client IP addresses that you have specified. In thisexample, we are looking for information on Client IP address 10.251.60.24.
Step 3 Click on IP address 10.251.60.24.
The User Details page appears for 10.251.60.24.
From the User Details page you can determine the URL Categories by Total Transactions, Trend by Total Transaction,URL Categories Matched, Domains Matched, Applications Matched, Malware Threats Detected, and Policies Matched.
These categories allow you to find out if, for example, user 10.251.60.24 was trying to access blocked URLs, whichcould be viewed in the Transactions Blocked column under the Domains section on the page.
Step 4 Click Export under the Domains Matched table to view the entire list of Domains and URLs that the user tried to access.
From here you can use the Web Tracking feature to track and view this specific user’s web usage.
It is important to remember that web reporting allows you to retrieve all the domain information that a usergoes to, not necessarily the specific URL that is accessed. For information on a specific URL that the user isaccessing, what time they went to that URL, whether that URL is allowed, etc., use the Proxy Services tab onthe Web Tracking page.
Note
Step 5 Choose Web > Reporting > Web Tracking.Step 6 Click the Proxy Services tab.Step 7 In the User/Client IP Address text field type in the user name or IP address.
In this example we are searching for web tracking information for user 10.251.60.24.
The search results appear.
From this page you can view a full list of transactions and URLs visited by the user of the computer that is assigned tothe IP Address 10.251.60.24.
Related Topics
The following table lists each of the topics discussed in this example. Click on the link for details on eachtopic.
Table 117: Related Topics for Investigating a User
Feature InformationFeature Name
Users Report (Web) , on page 174User Page
User Details (Web Reporting) , on page 175User Details Page
Exporting Reporting and Tracking Data , on page 33Exporting Report Data
Searching for Transactions Processed by Web Proxy Services, on page 231
Proxy Services tab on theWeb Tracking page
User Guide for AsyncOS 14.1 for Cisco Secure Email and Web Manager- GD (General Deployment)592
Web Security Management ExamplesRelated Topics
Example 2: Tracking a URLIn this scenario, a Sales manager wants to find out what the top five visited web sites are at their companyare for the last week. Additionally, the manager wants to know which users are going to those websites.
Step 1 On the Security Management appliance, choose Web > Reporting > Web Sites.Step 2 From the Time Range drop-down list, choose Week.Step 3 Scroll down to the Domains section to view the domains, or web sites that have been visited.
The top 25 web sites that have been visited will be displayed in the Domains Matched table. In the same table you canclick on the link in the Domain or IP column to view the actual web sites for a particular address or user.
Related Topics
The following table lists each of the topics discussed in this example. Click on the link for details on eachtopic.
Table 118: Related Topics for Tracking a URL
Feature InformationFeature Name
Web Sites Report , on page 177Web Sites Page
Example 3: Investigating Top URL Categories VisitedIn this scenario, the HumanResourcesmanager wants to knowwhat the top three URL categories her employeesare visiting over the 30 days. Additionally, a network manager wants to get this information to monitorbandwidth usage, to find out what URLs are taking up the most bandwidth on her network.
The example below is to show how you can gather data for several people covering several points of interest,while only having to generate one report.
Step 1 On the Security Management appliance, choose Web > Reporting > URL Categories.
From the URL Categories page in this example, you can see that of the top 10 URL Categories by Total Transactionsgraph reveals, there were 282 K of Uncategorized URLs that were accessed, as well as Instant Messaging, Hate Speechand Tattoo sites, and so forth.
At this point you can export that raw data to an Excel spreadsheet, by clicking the Export link and send this file to theHuman Resources manager. But remember, your network manager wants to know the bandwidth usage by each URL.
Step 2 NEEDS NEW ILLO - SKIP Scroll down to the URL Categories Matched table, to view the Bandwidth Used column.
From the URL Categories Matched table, you can see the Bandwidth Usage for all of the URL Categories. Again, youcan click the Export link and send this file to the Network manager. For finer granularity though, click on the InstantMessaging link to find out which users are taking up the bandwidth. The following page appears.
From this page, the network manager can see the top 10 users for Instant Messaging sites.
User Guide for AsyncOS 14.1 for Cisco Secure Email and Web Manager- GD (General Deployment)593
Web Security Management ExamplesExample 2: Tracking a URL

This pages reveals that in the last 30 days, user 10.128.4.64 has spent 19 hours and 57 minutes on an Instant Messagingsite; and the bandwidth usage for this time was 10.1 MB.
Related Topics
The following table lists each of the topics discussed in this example. Click on the link for details on eachtopic.
Table 119: Related Topics for Investigating the Top URL Categories
Feature InformationFeature Name
URL Categories Report , on page 178URL Categories Page
Exporting Reporting and Tracking Data , on page 33Exporting Report Data
User Guide for AsyncOS 14.1 for Cisco Secure Email and Web Manager- GD (General Deployment)594
Web Security Management ExamplesRelated Topics

A P P E N D I X EAdditional Resources
This chapter contains the following sections:
• Cisco Notification Service , on page 595• Documentation , on page 595• Third Party Contributors, on page 596• Training, on page 596• Knowledge Base Articles (TechNotes) , on page 597• Cisco Support Community, on page 597• Customer Support , on page 597• Registering for a Cisco Account , on page 597• Cisco Welcomes Your Comments, on page 598
Cisco Notification ServiceSign up to receive notifications relevant to your Cisco Content Security Appliances, such as Security Advisories,Field Notices, End of Sale and End of Support statements, and information about software updates and knownissues.
You can specify options such as notification frequency and types of information to receive. You should signup separately for notifications for each product that you use.
To sign up, visit http://www.cisco.com/cisco/support/notifications.html
A Cisco.com account is required. If you do not have one, see Registering for a Cisco Account , on page 597.
DocumentationDocumentation for this product and related products is available at the following locations:
User Guide for AsyncOS 14.1 for Cisco Secure Email and Web Manager- GD (General Deployment)595

Is Located At:Documentation For Cisco ContentSecurity Products:
http://www.cisco.com/c/en/us/support/security/content-security-management-appliance/tsd-products-support-series-home.html
Hardware and virtual appliance information:
http://www.cisco.com/c/en/us/support/security/content-security-management-appliance/products-installation-guides-list.html
MIBs:
See Monitoring System Health Using SNMP , on page 450.
Security Management appliances
http://www.cisco.com/c/en/us/support/security/web-security-appliance/tsd-products-support-series-home.html
Web Security appliances
http://www.cisco.com/c/en/us/support/security/email-security-appliance/tsd-products-support-series-home.html
Email Security appliances
http://www.cisco.com/c/en/us/support/security/email-security-appliance/products-command-reference-list.html
Command Line Reference guide forcontent security products
http://www.cisco.com/c/en/us/support/security/email-encryption/tsd-products-support-series-home.html
Cisco Email Encryption
You can also access the HTML online help version of the user guide directly from the appliance GUI byclicking Help and Support in the upper-right corner.
Third Party ContributorsSome software included within AsyncOS is distributed under the terms, notices, and conditions of softwarelicense agreements of FreeBSD, Inc., Stichting Mathematisch Centrum, Corporation for National ResearchInitiatives, Inc., and other third party contributors, and all such terms and conditions are incorporated in Ciscolicense agreements.
Information about third-party licenses is available in a Licensing document at: http://www.cisco.com/c/en/us/support/security/content-security-management-appliance/products-release-notes-list.html and athttps://support.ironport.com/3rdparty/AsyncOS_User_Guide-1-1.html
Portions of the software within AsyncOS is based upon the RRDtool with the express written consent of TobiOetiker.
Portions of this document are reproduced with permission of Dell Computer Corporation. Portions of thisdocument are reproduced with permission of McAfee, Inc. Portions of this document are reproduced withpermission of Sophos Plc.
TrainingFor training options, see:
• http://www.cisco.com/c/en/us/training-events/training-certifications/supplemental-training/email-and-web-security.html
User Guide for AsyncOS 14.1 for Cisco Secure Email and Web Manager- GD (General Deployment)596
Additional ResourcesThird Party Contributors
http://www.cisco.com/c/en/us/support/security/email-encryption/tsd-products-support-series-home.html

• http://www.cisco.com/c/en/us/training-events/training-certifications/overview.html
Knowledge Base Articles (TechNotes)Procedure
PurposeCommand or Action
Go to the main product page (http://www.cisco.com/c/en/us/support/security/content-security-management-appliance/tsd-products-support-series-home.html)
Step 1
Look for links with TechNotes in the name.Step 2
Cisco Support CommunityCisco Support Community is an online forum for Cisco customers, partners, and employees. It provides aplace to discuss general content security issues, as well as technical information about specific Cisco products.You can post topics to the forum to ask questions and share information with other users.
Access the Cisco Support Community at the following URLs:
• For email security and associated management:
https://supportforums.cisco.com/community/5756/email-security
• For web security and associated management:
https://supportforums.cisco.com/community/5786/web-security
Customer SupportUse the following methods to obtain support:
Cisco TAC: http://www.cisco.com/en/US/support/tsd_cisco_worldwide_contacts.html
Support site for legacy IronPort: http://www.cisco.com/web/services/acquisitions/ironport.html
If you purchased support through a reseller or another supplier, please contact that supplier directly with yourproduct support issues.
See also Opening or Updating a Support Case from the Appliance , on page 569.
For virtual appliances, see the Cisco Content Security Virtual Appliance Installation Guide.
Registering for a Cisco AccountAccess to many resources on Cisco.com requires a Cisco account.
If you do not have a Cisco.com User ID, you can register for one here: https://tools.cisco.com/RPF/register/register.do
User Guide for AsyncOS 14.1 for Cisco Secure Email and Web Manager- GD (General Deployment)597
Additional ResourcesKnowledge Base Articles (TechNotes)

Related Topics
• Cisco Notification Service , on page 595
• Knowledge Base Articles (TechNotes) , on page 597
Cisco Welcomes Your CommentsThe Technical Publications team is interested in improving the product documentation. Your comments andsuggestions are always welcome. You can send comments to the following email address:
Please include the title of this book and the publication date from the title page in the subject line of yourmessage.
User Guide for AsyncOS 14.1 for Cisco Secure Email and Web Manager- GD (General Deployment)598
Additional ResourcesCisco Welcomes Your Comments

A P P E N D I X FEnd User License Agreement
This chapter contains the following sections:
• Cisco Systems End User License Agreement , on page 599• Supplemental End User License Agreement for Cisco Systems Content Security Software , on page 605
Cisco Systems End User License AgreementIMPORTANT: PLEASE READ THIS END USER LICENSE AGREEMENT CAREFULLY. IT ISVERY IMPORTANT THAT YOU CHECK THAT YOU ARE PURCHASING CISCO SOFTWAREOR EQUIPMENT FROM AN APPROVED SOURCE AND THAT YOU, OR THE ENTITY YOUREPRESENT (COLLECTIVELY, THE "CUSTOMER") HAVE BEEN REGISTERED AS THE ENDUSER FOR THE PURPOSES OF THIS CISCO END USER LICENSE AGREEMENT. IF YOU ARENOT REGISTERED AS THE END USER YOU HAVE NO LICENSE TO USE THE SOFTWAREAND THE LIMITED WARRANTY IN THIS END USER LICENSE AGREEMENT DOES NOTAPPLY. ASSUMING YOU HAVE PURCHASED FROM AN APPROVED SOURCE, DOWNLOADING,INSTALLING OR USING CISCO OR CISCO-SUPPLIED SOFTWARE CONSTITUTESACCEPTANCE OF THIS AGREEMENT.
CISCO SYSTEMS, INC. OR ITS SUBSIDIARY LICENSING THE SOFTWARE INSTEAD OF CISCOSYSTEMS, INC. ("CISCO") IS WILLING TO LICENSE THIS SOFTWARE TO YOU ONLY UPON THECONDITION THAT YOU PURCHASED THE SOFTWARE FROM AN APPROVED SOURCE ANDTHATYOUACCEPTALLOFTHETERMSCONTAINED INTHIS ENDUSERLICENSEAGREEMENTPLUS ANY ADDITIONAL LIMITATIONS ON THE LICENSE SET FORTH IN A SUPPLEMENTALLICENSE AGREEMENT ACCOMPANYING THE PRODUCT OR AVAILABLE AT THE TIME OFYOUR ORDER (COLLECTIVELY THE "AGREEMENT"). TO THE EXTENT OF ANY CONFLICTBETWEEN THE TERMS OF THIS END USER LICENSE AGREEMENT AND ANY SUPPLEMENTALLICENSE AGREEMENT, THE SUPPLEMENTAL LICENSE AGREEMENT SHALL APPLY. BYDOWNLOADING, INSTALLING, OR USING THE SOFTWARE, YOU ARE REPRESENTING THATYOU PURCHASED THE SOFTWARE FROM AN APPROVED SOURCE AND BINDING YOURSELFTO THE AGREEMENT. IF YOU DO NOT AGREE TO ALL OF THE TERMS OF THE AGREEMENT,THEN CISCO IS UNWILLING TO LICENSE THE SOFTWARE TO YOU AND (A) YOU MAY NOTDOWNLOAD, INSTALL OR USE THE SOFTWARE, AND (B) YOU MAY RETURN THE SOFTWARE(INCLUDING ANY UNOPENED CD PACKAGE AND ANYWRITTEN MATERIALS) FOR A FULLREFUND, OR, IF THE SOFTWARE AND WRITTEN MATERIALS ARE SUPPLIED AS PART OFANOTHER PRODUCT, YOUMAY RETURN THE ENTIRE PRODUCT FOR A FULL REFUND. YOURRIGHT TO RETURN AND REFUND EXPIRES 30 DAYS AFTER PURCHASE FROM AN APPROVEDSOURCE, AND APPLIES ONLY IF YOU ARE THE ORIGINAL AND REGISTERED END USER
User Guide for AsyncOS 14.1 for Cisco Secure Email and Web Manager- GD (General Deployment)599

PURCHASER. FOR THE PURPOSES OF THIS END USER LICENSE AGREEMENT, AN "APPROVEDSOURCE"MEANS (A) CISCO; OR (B) ADISTRIBUTOROR SYSTEMS INTEGRATORAUTHORIZEDBY CISCO TO DISTRIBUTE / SELL CISCO EQUIPMENT, SOFTWARE AND SERVICES WITHINYOUR TERRITORY TO END USERS; OR (C) A RESELLER AUTHORIZED BY ANY SUCHDISTRIBUTOR OR SYSTEMS INTEGRATOR IN ACCORDANCE WITH THE TERMS OF THEDISTRIBUTOR'S AGREEMENT WITH CISCO TO DISTRIBUTE / SELL THE CISCO EQUIPMENT,SOFTWARE AND SERVICES WITHIN YOUR TERRITORY TO END USERS.
THE FOLLOWING TERMS OF THE AGREEMENT GOVERN CUSTOMER'S USE OF THE SOFTWARE(DEFINED BELOW), EXCEPT TO THE EXTENT: (A) THERE IS A SEPARATE SIGNED CONTRACTBETWEEN CUSTOMER AND CISCO GOVERNING CUSTOMER'S USE OF THE SOFTWARE, OR (B) THESOFTWARE INCLUDES A SEPARATE "CLICK-ACCEPT" LICENSE AGREEMENT OR THIRD PARTYLICENSE AGREEMENT AS PART OF THE INSTALLATION OR DOWNLOAD PROCESS GOVERNINGCUSTOMER'S USE OF THE SOFTWARE. TO THE EXTENT OF A CONFLICT BETWEEN THE PROVISIONSOF THE FOREGOING DOCUMENTS, THE ORDER OF PRECEDENCE SHALL BE (1)THE SIGNEDCONTRACT, (2) THE CLICK-ACCEPT AGREEMENT OR THIRD PARTY LICENSE AGREEMENT, AND(3) THE AGREEMENT. FOR PURPOSES OF THE AGREEMENT, "SOFTWARE" SHALL MEAN COMPUTERPROGRAMS, INCLUDING FIRMWARE AND COMPUTER PROGRAMS EMBEDDED IN CISCOEQUIPMENT, AS PROVIDED TO CUSTOMER BY AN APPROVED SOURCE, AND ANY UPGRADES,UPDATES, BUG FIXES OR MODIFIED VERSIONS THERETO (COLLECTIVELY, "UPGRADES"), ANYOF THE SAME WHICH HAS BEEN RELICENSED UNDER THE CISCO SOFTWARE TRANSFER ANDRE-LICENSING POLICY (AS MAY BE AMENDED BY CISCO FROM TIME TO TIME) OR BACKUP COPIESOF ANY OF THE FOREGOING.
License. Conditioned upon compliance with the terms and conditions of the Agreement, Cisco grants toCustomer a nonexclusive and nontransferable license to use for Customer's internal business purposes theSoftware and the Documentation for which Customer has paid the required license fees to an Approved Source."Documentation"means written information (whether contained in user or technical manuals, trainingmaterials,specifications or otherwise) pertaining to the Software and made available by an Approved Source with theSoftware in any manner (including on CD-Rom, or on-line). In order to use the Software, Customer may berequired to input a registration number or product authorization key and register Customer's copy of theSoftware online at Cisco's website to obtain the necessary license key or license file.
Customer's license to use the Software shall be limited to, and Customer shall not use the Software in excessof, a single hardware chassis or card or such other limitations as are set forth in the applicable SupplementalLicense Agreement or in the applicable purchase order which has been accepted by an Approved Source andfor which Customer has paid to an Approved Source the required license fee (the "Purchase Order").
Unless otherwise expressly provided in the Documentation or any applicable Supplemental License Agreement,Customer shall use the Software solely as embedded in, for execution on, or (where the applicableDocumentation permits installation on non-Cisco equipment) for communication with Cisco equipment ownedor leased by Customer and used for Customer's internal business purposes. No other licenses are granted byimplication, estoppel or otherwise.
For evaluation or beta copies for which Cisco does not charge a license fee, the above requirement to paylicense fees does not apply.
General Limitations. This is a license, not a transfer of title, to the Software and Documentation, and Ciscoretains ownership of all copies of the Software and Documentation. Customer acknowledges that the Softwareand Documentation contain trade secrets of Cisco or its suppliers or licensors, including but not limited to thespecific internal design and structure of individual programs and associated interface information. Except asotherwise expressly provided under the Agreement, Customer shall only use the Software in connection withthe use of Cisco equipment purchased by the Customer from an Approved Source and Customer shall haveno right, and Customer specifically agrees not to:
User Guide for AsyncOS 14.1 for Cisco Secure Email and Web Manager- GD (General Deployment)600
End User License AgreementEnd User License Agreement
(i) transfer, assign or sublicense its license rights to any other person or entity (other than in compliance withany Cisco relicensing/transfer policy then in force), or use the Software on Cisco equipment not purchasedby the Customer from an Approved Source or on secondhand Cisco equipment, and Customer acknowledgesthat any attempted transfer, assignment, sublicense or use shall be void;
(ii) make error corrections to or otherwise modify or adapt the Software or create derivative works based uponthe Software, or permit third parties to do the same;
(iii) reverse engineer or decompile, decrypt, disassemble or otherwise reduce the Software to human-readableform, except to the extent otherwise expressly permitted under applicable law notwithstanding this restrictionor except to the extent that Cisco is legally required to permit such specific activity pursuant to any applicableopen source license;
(iv) publish any results of benchmark tests run on the Software;
(v) use or permit the Software to be used to perform services for third parties, whether on a service bureau ortime sharing basis or otherwise, without the express written authorization of Cisco; or
(vi) disclose, provide, or otherwise make available trade secrets contained within the Software andDocumentation in any form to any third party without the prior written consent of Cisco. Customer shallimplement reasonable security measures to protect such trade secrets.
To the extent required by applicable law, and at Customer's written request, Cisco shall provide Customerwith the interface information needed to achieve interoperability between the Software and anotherindependently created program, on payment of Cisco's applicable fee, if any. Customer shall observe strictobligations of confidentiality with respect to such information and shall use such information in compliancewith any applicable terms and conditions upon which Cisco makes such information available.
Software, Upgrades and Additional Copies.NOTWITHSTANDINGANYOTHERPROVISIONOFTHEAGREEMENT: (1) CUSTOMERHASNOLICENSEORRIGHTTOMAKEORUSEANYADDITIONALCOPIES OR UPGRADES UNLESS CUSTOMER, AT THE TIME OF MAKING OR ACQUIRING SUCHCOPY OR UPGRADE, ALREADY HOLDS A VALID LICENSE TO THE ORIGINAL SOFTWARE ANDHAS PAID THE APPLICABLE FEE TO AN APPROVED SOURCE FOR THE UPGRADE ORADDITIONAL COPIES; (2) USE OF UPGRADES IS LIMITED TO CISCO EQUIPMENT SUPPLIED BYAN APPROVED SOURCE FOR WHICH CUSTOMER IS THE ORIGINAL END USER PURCHASEROR LESSEE OR OTHERWISE HOLDS A VALID LICENSE TO USE THE SOFTWARE WHICH ISBEING UPGRADED; AND (3) THE MAKING AND USE OF ADDITIONAL COPIES IS LIMITED TONECESSARY BACKUP PURPOSES ONLY.
Proprietary Notices. Customer agrees to maintain and reproduce all copyright, proprietary, and other noticeson all copies, in any form, of the Software in the same form and manner that such copyright and otherproprietary notices are included on the Software. Except as expressly authorized in the Agreement, Customershall not make any copies or duplicates of any Software without the prior written permission of Cisco.
Term and Termination. The Agreement and the license granted herein shall remain effective until terminated.Customer may terminate the Agreement and the license at any time by destroying all copies of Software andany Documentation. Customer's rights under the Agreement will terminate immediately without notice fromCisco if Customer fails to comply with any provision of the Agreement. Upon termination, Customer shalldestroy all copies of Software and Documentation in its possession or control. All confidentiality obligationsof Customer, all restrictions and limitations imposed on the Customer under the section titled "GeneralLimitations" and all limitations of liability and disclaimers and restrictions of warranty shall survive terminationof this Agreement. In addition, the provisions of the sections titled "U.S. Government End User Purchasers"and "General Terms Applicable to the Limited Warranty Statement and End User License Agreement" shallsurvive termination of the Agreement.
User Guide for AsyncOS 14.1 for Cisco Secure Email and Web Manager- GD (General Deployment)601
End User License AgreementEnd User License Agreement

Customer Records.Customer grants to Cisco and its independent accountants the right to examine Customer'sbooks, records and accounts during Customer's normal business hours to verify compliancewith this Agreement.In the event such audit discloses non-compliance with this Agreement, Customer shall promptly pay to Ciscothe appropriate license fees, plus the reasonable cost of conducting the audit.
Export, Re-Export, Transfer and Use Controls.The Software, Documentation and technology or direct productsthereof (hereafter referred to as Software and Technology), supplied by Cisco under the Agreement are subjectto export controls under the laws and regulations of the United States (U.S.) and any other applicable countries'laws and regulations. Customer shall comply with such laws and regulations governing export, re-export,transfer and use of Cisco Software and Technology and will obtain all required U.S. and local authorizations,permits, or licenses. Cisco and Customer each agree to provide the other information, support documents,and assistance as may reasonably be required by the other in connection with securing authorizations orlicenses. Information regarding compliance with export, re-export, transfer and use may be located at thefollowing URL:
https://www.cisco.com/c/en/us/about/legal/global-export-trade/general-export/contract-compliance.html.
U.S. Government End User Purchasers. The Software and Documentation qualify as "commercial items," asthat term is defined at Federal Acquisition Regulation ("FAR") (48 C.F.R.) 2.101, consisting of "commercialcomputer software" and "commercial computer software documentation" as such terms are used in FAR12.212. Consistent with FAR 12.212 andDoDFARSupp. 227.7202-1 through 227.7202-4, and notwithstandingany other FAR or other contractual clause to the contrary in any agreement into which the Agreement maybe incorporated, Customer may provide to Government end user or, if the Agreement is direct, Governmentend user will acquire, the Software and Documentation with only those rights set forth in the Agreement. Useof either the Software or Documentation or both constitutes agreement by the Government that the Softwareand Documentation are "commercial computer software" and "commercial computer software documentation,"and constitutes acceptance of the rights and restrictions herein.
Identified Components; Additional Terms. The Software may contain or be delivered with one or morecomponents, which may include third-party components, identified by Cisco in the Documentation, readme.txtfile, third-party click-accept or elsewhere (e.g. on https://www.cisco.com/ ) (the "Identified Component(s)")as being subject to different license agreement terms, disclaimers of warranties, limited warranties or otherterms and conditions (collectively, "Additional Terms") than those set forth herein. You agree to the applicableAdditional Terms for any such Identified Component(s)."
Limited Warranty
Subject to the limitations and conditions set forth herein, Cisco warrants that commencing from the date ofshipment to Customer (but in case of resale by an Approved Source other than Cisco, commencing not morethan ninety (90) days after original shipment by Cisco), and continuing for a period of the longer of (a) ninety(90) days or (b) the warranty period (if any) expressly set forth as applicable specifically to software in thewarranty card accompanying the product of which the Software is a part (the "Product") (if any): (a) the mediaon which the Software is furnished will be free of defects in materials and workmanship under normal use;and (b) the Software substantially conforms to the Documentation. The date of shipment of a Product by Ciscois set forth on the packaging material in which the Product is shipped. Except for the foregoing, the Softwareis provided "AS IS". This limited warranty extends only to the Software purchased from an Approved Sourceby a Customer who is the first registered end user. Customer's sole and exclusive remedy and the entire liabilityof Cisco and its suppliers under this limited warranty will be (i) replacement of defective media and/or (ii) atCisco's option, repair, replacement, or refund of the purchase price of the Software, in both cases subject tothe condition that any error or defect constituting a breach of this limited warranty is reported to the ApprovedSource supplying the Software to Customer, within the warranty period. Cisco or the Approved Sourcesupplying the Software to Customer may, at its option, require return of the Software and/or Documentationas a condition to the remedy. In no event does Cisco warrant that the Software is error free or that Customerwill be able to operate the Software without problems or interruptions. In addition, due to the continual
User Guide for AsyncOS 14.1 for Cisco Secure Email and Web Manager- GD (General Deployment)602
End User License AgreementEnd User License Agreement

development of new techniques for intruding upon and attacking networks, Cisco does not warrant that theSoftware or any equipment, system or network on which the Software is used will be free of vulnerability tointrusion or attack.
Restrictions. This warranty does not apply if the Software, Product or any other equipment upon which theSoftware is authorized to be used (a) has been altered, except by Cisco or its authorized representative, (b)has not been installed, operated, repaired, or maintained in accordance with instructions supplied by Cisco,(c) has been subjected to abnormal physical or electrical stress, abnormal environmental conditions, misuse,negligence, or accident; or (d) is licensed for beta, evaluation, testing or demonstration purposes. The Softwarewarranty also does not apply to (e) any temporary Software modules; (f) any Software not posted on Cisco'sSoftware Center; (g) any Software that Cisco expressly provides on an "AS IS" basis on Cisco's SoftwareCenter; (h) any Software for which an Approved Source does not receive a license fee; and (i) Softwaresupplied by any third party which is not an Approved Source.
DISCLAIMER OF WARRANTY
EXCEPT AS SPECIFIED IN THIS WARRANTY SECTION, ALL EXPRESS OR IMPLIEDCONDITIONS, REPRESENTATIONS, AND WARRANTIES INCLUDING, WITHOUT LIMITATION,ANY IMPLIED WARRANTY OR CONDITION OF MERCHANTABILITY, FITNESS FOR APARTICULAR PURPOSE, NON-INFRINGEMENT, SATISFACTORYQUALITY,NON-INTERFERENCE, ACCURACY OF INFORMATIONAL CONTENT, OR ARISING FROM ACOURSE OF DEALING, LAW, USAGE, OR TRADE PRACTICE, ARE HEREBY EXCLUDED TOTHE EXTENT ALLOWED BY APPLICABLE LAW AND ARE EXPRESSLY DISCLAIMED BYCISCO, ITS SUPPLIERS AND LICENSORS. TO THE EXTENT THAT ANY OF THE SAMECANNOT BE EXCLUDED, SUCH IMPLIEDCONDITION, REPRESENTATION AND/ORWARRANTY IS LIMITED IN DURATION TO THE EXPRESS WARRANTY PERIOD REFERREDTO IN THE "LIMITED WARRANTY" SECTION ABOVE. BECAUSE SOME STATES ORJURISDICTIONS DO NOT ALLOW LIMITATIONS ON HOW LONG AN IMPLIED WARRANTYLASTS, THE ABOVE LIMITATION MAY NOT APPLY IN SUCH STATES. THIS WARRANTYGIVES CUSTOMER SPECIFIC LEGAL RIGHTS, AND CUSTOMER MAY ALSO HAVE OTHERRIGHTS WHICH VARY FROM JURISDICTION TO JURISDICTION. This disclaimer and exclusionshall apply even if the express warranty set forth above fails of its essential purpose.
Disclaimer of Liabilities - Limitation of Liability. IF YOUACQUIRED THE SOFTWARE IN THE UNITEDSTATES, LATIN AMERICA, CANADA, JAPAN OR THE CARIBBEAN, NOTWITHSTANDINGANYTHING ELSE IN THE AGREEMENT TO THE CONTRARY, ALL LIABILITY OF CISCO, ITSAFFILIATES, OFFICERS, DIRECTORS, EMPLOYEES, AGENTS, SUPPLIERS AND LICENSORSCOLLECTIVELY, TO CUSTOMER, WHETHER IN CONTRACT, TORT (INCLUDING NEGLIGENCE),BREACHOFWARRANTYOROTHERWISE, SHALLNOTEXCEEDTHEPRICEPAIDBYCUSTOMERTO ANY APPROVED SOURCE FOR THE SOFTWARE THAT GAVE RISE TO THE CLAIM OR IF THESOFTWARE IS PART OF ANOTHER PRODUCT, THE PRICE PAID FOR SUCH OTHER PRODUCT.THIS LIMITATION OF LIABILITY FOR SOFTWARE IS CUMULATIVE AND NOT PER INCIDENT(I.E. THE EXISTENCE OF TWO OR MORE CLAIMS WILL NOT ENLARGE THIS LIMIT).
IFYOUACQUIREDTHESOFTWARE INEUROPE, THEMIDDLEEAST,AFRICA,ASIAOROCEANIA,NOTWITHSTANDINGANYTHINGELSE INTHEAGREEMENTTOTHECONTRARY,ALLLIABILITYOF CISCO, ITS AFFILIATES, OFFICERS, DIRECTORS, EMPLOYEES, AGENTS, SUPPLIERS ANDLICENSORS COLLECTIVELY, TO CUSTOMER, WHETHER IN CONTRACT, TORT (INCLUDINGNEGLIGENCE), BREACH OF WARRANTY OR OTHERWISE, SHALL NOT EXCEED THE PRICEPAID BY CUSTOMER TO CISCO FOR THE SOFTWARE THAT GAVE RISE TO THE CLAIM OR IFTHESOFTWARE IS PARTOFANOTHERPRODUCT, THEPRICEPAIDFORSUCHOTHERPRODUCT.THIS LIMITATION OF LIABILITY FOR SOFTWARE IS CUMULATIVE AND NOT PER INCIDENT(I.E. THE EXISTENCE OF TWO ORMORE CLAIMS WILL NOT ENLARGE THIS LIMIT). NOTHING
User Guide for AsyncOS 14.1 for Cisco Secure Email and Web Manager- GD (General Deployment)603
End User License AgreementEnd User License Agreement

IN THE AGREEMENT SHALL LIMIT (I) THE LIABILITY OF CISCO, ITS AFFILIATES, OFFICERS,DIRECTORS,EMPLOYEES,AGENTS, SUPPLIERSANDLICENSORSTOCUSTOMERFORPERSONALINJURYORDEATHCAUSEDBYTHEIRNEGLIGENCE, (II) CISCO'S LIABILITYFORFRAUDULENTMISREPRESENTATION, OR (III) ANY LIABILITY OF CISCO WHICH CANNOT BE EXCLUDEDUNDER APPLICABLE LAW.
Disclaimer of Liabilities - Waiver of Consequential Damages and Other Losses. IF YOU ACQUIRED THESOFTWARE IN THE UNITED STATES, LATIN AMERICA, THE CARIBBEAN OR CANADA,REGARDLESS OF WHETHER ANY REMEDY SET FORTH HEREIN FAILS OF ITS ESSENTIALPURPOSE OR OTHERWISE, IN NO EVENTWILL CISCO OR ITS SUPPLIERS BE LIABLE FOR ANYLOST REVENUE, PROFIT, OR LOST OR DAMAGED DATA, BUSINESS INTERRUPTION, LOSS OFCAPITAL,ORFORSPECIAL, INDIRECT,CONSEQUENTIAL, INCIDENTAL,ORPUNITIVEDAMAGESHOWEVERCAUSEDANDREGARDLESSOFTHETHEORYOFLIABILITYORWHETHERARISINGOUT OF THE USE OF OR INABILITY TO USE SOFTWARE OR OTHERWISE AND EVEN IF CISCOOR ITS SUPPLIERS OR LICENSORS HAVE BEEN ADVISED OF THE POSSIBILITY OF SUCHDAMAGES. BECAUSE SOME STATES OR JURISDICTIONS DO NOT ALLOW LIMITATION OREXCLUSION OF CONSEQUENTIAL OR INCIDENTAL DAMAGES, THE ABOVE LIMITATIONMAYNOT APPLY TO YOU.
IF YOU ACQUIRED THE SOFTWARE IN JAPAN, EXCEPT FOR LIABILITY ARISING OUT OF ORIN CONNECTION WITH DEATH OR PERSONAL INJURY, FRAUDULENT MISREPRESENTATION,AND REGARDLESS OFWHETHER ANY REMEDY SET FORTH HEREIN FAILS OF ITS ESSENTIALPURPOSEOROTHERWISE, INNOEVENTWILLCISCO, ITSAFFILIATES, OFFICERS, DIRECTORS,EMPLOYEES, AGENTS, SUPPLIERS AND LICENSORS BE LIABLE FOR ANY LOST REVENUE,PROFIT, OR LOST OR DAMAGED DATA, BUSINESS INTERRUPTION, LOSS OF CAPITAL, OR FORSPECIAL, INDIRECT, CONSEQUENTIAL, INCIDENTAL, OR PUNITIVE DAMAGES HOWEVERCAUSED AND REGARDLESS OF THE THEORY OF LIABILITY OR WHETHER ARISING OUT OFTHE USE OF OR INABILITY TO USE SOFTWARE OR OTHERWISE AND EVEN IF CISCO OR ANYAPPROVED SOURCE OR THEIR SUPPLIERS OR LICENSORS HAVE BEEN ADVISED OF THEPOSSIBILITY OF SUCH DAMAGES.
IFYOUACQUIREDTHESOFTWARE INEUROPE, THEMIDDLEEAST,AFRICA,ASIAOROCEANIA,IN NO EVENT WILL CISCO, ITS AFFILIATES, OFFICERS, DIRECTORS, EMPLOYEES, AGENTS,SUPPLIERS AND LICENSORS, BE LIABLE FOR ANY LOST REVENUE, LOST PROFIT, OR LOSTORDAMAGEDDATA,BUSINESS INTERRUPTION,LOSSOFCAPITAL,ORFORSPECIAL, INDIRECT,CONSEQUENTIAL, INCIDENTAL,ORPUNITIVEDAMAGES,HOWSOEVERARISING, INCLUDING,WITHOUTLIMITATION, INCONTRACT,TORT (INCLUDINGNEGLIGENCE)ORWHETHERARISINGOUT OF THE USE OF OR INABILITY TO USE THE SOFTWARE, EVEN IF, IN EACH CASE, CISCO,ITS AFFILIATES, OFFICERS, DIRECTORS, EMPLOYEES, AGENTS, SUPPLIERS AND LICENSORS,HAVE BEEN ADVISED OF THE POSSIBILITY OF SUCH DAMAGES. BECAUSE SOME STATES ORJURISDICTIONS DO NOT ALLOW LIMITATION OR EXCLUSION OF CONSEQUENTIAL ORINCIDENTAL DAMAGES, THE ABOVE LIMITATION MAY NOT FULLY APPLY TO YOU. THEFOREGOING EXCLUSION SHALL NOT APPLY TO ANY LIABILITY ARISING OUT OF OR INCONNECTIONWITH: (I) DEATHORPERSONAL INJURY, (II) FRAUDULENTMISREPRESENTATION,OR (III) CISCO'S LIABILITY IN CONNECTIONWITHANY TERMS THAT CANNOT BE EXCLUDEDUNDER APPLICABLE LAW.
Customer acknowledges and agrees that Cisco has set its prices and entered into the Agreement in relianceupon the disclaimers of warranty and the limitations of liability set forth herein, that the same reflect anallocation of risk between the parties (including the risk that a contract remedy may fail of its essential purposeand cause consequential loss), and that the same form an essential basis of the bargain between the parties.
Controlling Law, Jurisdiction. If you acquired, by reference to the address on the purchase order accepted bythe Approved Source, the Software in the United States, Latin America, or the Caribbean, the Agreement and
User Guide for AsyncOS 14.1 for Cisco Secure Email and Web Manager- GD (General Deployment)604
End User License AgreementEnd User License Agreement

warranties ("Warranties") are controlled by and construed under the laws of the State of California, UnitedStates of America, notwithstanding any conflicts of law provisions; and the state and federal courts of Californiashall have exclusive jurisdiction over any claim arising under the Agreement or Warranties. If you acquiredthe Software in Canada, unless expressly prohibited by local law, the Agreement andWarranties are controlledby and construed under the laws of the Province of Ontario, Canada, notwithstanding any conflicts of lawprovisions; and the courts of the Province of Ontario shall have exclusive jurisdiction over any claim arisingunder the Agreement or Warranties. If you acquired the Software in Europe, the Middle East, Africa, Asia orOceania (excluding Australia), unless expressly prohibited by local law, the Agreement and Warranties arecontrolled by and construed under the laws of England, notwithstanding any conflicts of law provisions; andthe English courts shall have exclusive jurisdiction over any claim arising under the Agreement orWarranties.In addition, if the Agreement is controlled by the laws of England, no person who is not a party to the Agreementshall be entitled to enforce or take the benefit of any of its terms under the Contracts (Rights of Third Parties)Act 1999. If you acquired the Software in Japan, unless expressly prohibited by local law, the Agreement andWarranties are controlled by and construed under the laws of Japan, notwithstanding any conflicts of lawprovisions; and the Tokyo District Court of Japan shall have exclusive jurisdiction over any claim arisingunder the Agreement or Warranties. If you acquired the Software in Australia, unless expressly prohibited bylocal law, the Agreement and Warranties are controlled by and construed under the laws of the State of NewSouth Wales, Australia, notwithstanding any conflicts of law provisions; and the State and federal courts ofNew SouthWales shall have exclusive jurisdiction over any claim arising under the Agreement orWarranties.If you acquired the Software in any other country, unless expressly prohibited by local law, the Agreementand Warranties are controlled by and construed under the laws of the State of California, United States ofAmerica, notwithstanding any conflicts of law provisions; and the state and federal courts of California shallhave exclusive jurisdiction over any claim arising under the Agreement or Warranties.
For all countries referred to above, the parties specifically disclaim the application of the UN Convention onContracts for the International Sale of Goods. Notwithstanding the foregoing, either party may seek interiminjunctive relief in any court of appropriate jurisdiction with respect to any alleged breach of such party'sintellectual property or proprietary rights. If any portion hereof is found to be void or unenforceable, theremaining provisions of the Agreement andWarranties shall remain in full force and effect. Except as expresslyprovided herein, the Agreement constitutes the entire agreement between the parties with respect to the licenseof the Software and Documentation and supersedes any conflicting or additional terms contained in anyPurchase Order or elsewhere, all of which terms are excluded. The Agreement has been written in the Englishlanguage, and the parties agree that the English version will govern.
Product warranty terms and other information applicable to Cisco products are available at the followingURL:
https://www.cisco.com/c/en/us/products/warranty-listing.html
Supplemental End User License Agreement for Cisco SystemsContent Security Software
IMPORTANT: READ CAREFULLY
This Supplemental End User License Agreement ("SEULA") contains additional terms and conditions for theSoftware product licensed under the End User License Agreement ("EULA") between You ("You" as usedherein means You and the business entity you represent or "Company") and Cisco (collectively, the"Agreement"). Capitalized terms used in this SEULA but not defined will have the meanings assigned to themin the EULA. To the extent that there is a conflict between the terms and conditions of the EULA and thisSEULA, the terms and conditions of this SEULA will take precedence.
User Guide for AsyncOS 14.1 for Cisco Secure Email and Web Manager- GD (General Deployment)605
End User License AgreementSupplemental End User License Agreement for Cisco Systems Content Security Software

In addition to the limitations set forth in the EULA on your access and use of the Software, you agree tocomply at all times with the terms and conditions provided in this SEULA.
DOWNLOADING, INSTALLING, OR USING THE SOFTWARE CONSTITUTES ACCEPTANCE OFTHE AGREEMENT, AND YOU ARE BINDING YOURSELF AND THE BUSINESS ENTITY THATYOU REPRESENT TO THE AGREEMENT. IF YOU DO NOT AGREE TO ALL OF THE TERMS OFTHE AGREEMENT, THEN CISCO IS UNWILLING TO LICENSE THE SOFTWARE TO YOU AND (A)YOU MAY NOT DOWNLOAD, INSTALL OR USE THE SOFTWARE, AND (B) YOU MAY RETURNTHESOFTWARE (INCLUDINGANYUNOPENEDCDPACKAGEANDANYWRITTENMATERIALS)FOR A FULL REFUND, OR, IF THE SOFTWARE AND WRITTEN MATERIALS ARE SUPPLIED ASPARTOFANOTHERPRODUCT,YOUMAYRETURNTHEENTIREPRODUCTFORAFULLREFUND.YOUR RIGHT TO RETURN AND REFUND EXPIRES 30 DAYS AFTER PURCHASE FROM CISCOOR AN AUTHORIZED CISCO RESELLER, AND APPLIES ONLY IF YOU ARE THE ORIGINAL ENDUSER PURCHASER.
For purposes of this SEULA, the Product name and the Product description You have ordered is any of thefollowing Cisco Systems Email Security Appliance ("ESA"), Cisco SystemsWeb Security Appliance ("WSA")and Cisco Systems Security Management Application ("SMA") (collectively, "Content Security") and theirVirtual Appliance equivalent ("Software"):
Cisco AsyncOS for Email
Cisco AsyncOS for Web
Cisco AsyncOS for Management
Cisco Email Anti-Spam, Sophos Anti-Virus
Cisco Email Outbreak Filters
Cloudmark Anti-Spam
Cisco Image Analyzer
McAfee Anti-Virus
Cisco Intelligent Multi-Scan
Cisco RSA Data Loss Prevention
Cisco Email Encryption
Cisco Email Delivery Mode
Cisco Web Usage Controls
Cisco Web Reputation
Sophos Anti-Malware
Webroot Anti-Malware
McAfee Anti-Malware
Cisco Email Reporting
Cisco Email Message Tracking
Cisco Email Centralized Quarantine
Cisco Web Reporting
Cisco Web Policy and Configuration Management
User Guide for AsyncOS 14.1 for Cisco Secure Email and Web Manager- GD (General Deployment)606
End User License AgreementEnd User License Agreement

Cisco Advanced Web Security Management with Splunk
Email Encryption for Encryption Appliances
Email Encryption for System Generated Bulk Email
Email Encryption and Public Key Encryption for Encryption Appliances
Large Attachment Handling for Encryption Appliances
Secure Mailbox License for Encryption Appliances
Definitions
For purposes of this SEULA, the following definitions apply:
"Company Service" means the Company's email, Internet, security management services provided to EndUsers for the purposes of conducting Company's internal business.
"End User" means: (1) for theWSA and SMA, the employee, contractor or other agent authorized by Companyto access the Internet and the SMA via the Company Service; and (2) for the ESA, the email boxes of theemployees, contractors, or other agent authorized by Company to access or use the email services via theCompany Service.
"Ordering Document" means the purchase agreement, evaluation agreement, beta, pre-release agreement orsimilar agreement between the Company and Cisco or the Company and a Cisco reseller, or the valid termsof any purchase order accepted by Cisco in connection therewith, containing the purchase terms for theSoftware license granted by this Agreement.
"Personally Identifiable Information" means any information that can be used to identify an individual,including, but not limited to, an individual's name, user name, email address and any other personally identifiableinformation.
"Server" means a single physical computer or devices on a network that manages or provides network resourcesfor multiple users.
"Services" means Cisco Software Subscription Services.
"Service Description" means the description of the Software Subscription Support Services athttp://www.cisco.com/c/en/us/about/legal/service-descriptions.html.
"Telemetry Data" means samples of Company's email and web traffic, including data on email message andweb request attributes and information on how different types of email messages and web requests werehandled by Company's Cisco hardware products. Email message metadata and web requests included inTelemetry Data are anonymized and obfuscated to remove any Personally Identifiable Information.
"Term"means the length of the Software subscription You purchased, as indicated in your Ordering Document.
"Virtual Appliance" means the virtual version of Cisco's email security appliances, web security appliances,and security management appliances.
"Virtual Machine" means a software container that can run its own operating system and execute applicationslike a Server.
Additional License Terms and Conditions
LICENSE GRANTS AND CONSENT TO TERMS OF DATA COLLECTION
License of Software.
User Guide for AsyncOS 14.1 for Cisco Secure Email and Web Manager- GD (General Deployment)607
End User License AgreementEnd User License Agreement

By using the Software and the Documentation, Company agrees to be bound by the terms of this Agreement,and so long as Company is in compliancewith this Agreement, Cisco hereby grants to Company a nonexclusive,non-sublicensable, non-transferable, worldwide license during the Term to use the Software only on Cisco'shardware products, or in the case of the Virtual Appliances, on a Virtual Machine, solely in connection withthe provision of the Company Service to End Users. The number of End Users licensed for the use of theSoftware is limited to the number of End Users specified in the Ordering Documents. In the event that thenumber of End Users in connection with the provision of the Company Service exceeds the number of EndUsers specified in the Ordering Documents, Company shall contact an Approved Source to purchase additionallicenses for the Software. The duration and scope of this license(s) is further defined in the Ordering Document.The Ordering Document supersedes the EULA with respect to the term of the Software license. Except forthe license rights granted herein, no right, title or interest in any Software is granted to the Company by Cisco,Cisco's resellers or their respective licensors. Your entitlement to Upgrades to the Software is subject to theService Description. This Agreement and the Services are co-terminus.
Consent and License to Use Data.
Subject to the Cisco Privacy Statement at http://www.cisco.com/web/siteassets/legal/privacy.html, Companyhereby consents and grants to Cisco a license to collect and use Telemetry Data from the Company. Ciscodoes not collect or use Personally Identifiable Information in the Telemetry Data. Cisco may share aggregatedand anonymous Telemetry Data with third parties to assist us in improving your user experience and theSoftware and other Cisco security products and services. Company may terminate Cisco's right to collectTelemetry Data at any time by disabling SenderBase Network Participation in the Software. Instructions toenable or disable SenderBase Network Participation are available in the Software configuration guide.
Description of Other Rights and Obligations
Please refer to the Cisco Systems, Inc. EndUser License Agreement, Privacy Statement and Service Descriptionof Software Subscription Support Services.
User Guide for AsyncOS 14.1 for Cisco Secure Email and Web Manager- GD (General Deployment)608
End User License AgreementEnd User License Agreement

I N D E X
A
alternate release appliance 306anti-virus quarantine. See quarantine, virus 298
B
base entropy value, for password strength 407
C
clean messageemail 65clean message 65
content filters 298
D
data loss prevention 298delete all messages in the spam quarantine 296DNS 70, 481
authoritative server 481double lookup 70servers 481splitting 481
Domain-Based Executive Summary Report 150double-DNS verified 69, 126
E
Early Expiration 307for quarantine 307
Email Security Appliance 54, 270adding as managed appliance 54, 270
End User Quarantine 287see spam quarantine, end user access 287
G
graymail 65
I
IMAP authentication 288invalid recipient 65
IronPort Spam Quarantine. See Spam quarantine 298
L
LDAP 285, 287
M
mailing lists 292notifications 292
marketing messages 65message filters 298message variables 290
spam quarantine notifications 290monitoring 51, 153
scheduling reports 153summary data 51
N
Normal Expiration 307for quarantine 307
P
passwords 407requirements 407
POP authentication 288PVO. See quarantines, policy, virus, and outbreak 298
Q
quarantine 298, 307, 308, 311, 316, 317, 318, 322applying actions to messages in 317default action 308, 311early expiration 307In other quarantines 318international character sets 316normal expiration 307outbreak 298outbreak, reporting messages to Cisco 322retention time 307spam. See Spam quarantine 298unclassified 311
User Guide for AsyncOS 14.1 for Cisco Secure Email and Web Manager- GD (General Deployment)IN-1

quarantine (continued)virus 298
quarantine. See also Quarantines 305quarantines 298, 305, 306
policy 298policy, virus, and outbreak, centralized 305
disabling 305policy, virus, and outbreak, managing 306types 298
quarantines. See also Quarantine. 305
R
reports 153scheduling 153time range 153
for scheduled reports (email) 153Retention Time 307
for quarantines 307
S
safelist/blocklist 275, 276, 277, 283, 284and external spam quarantine 277backing up and restoring 283enabling 276importing and exporting 283managing 277troubleshooting 284workqueue 275
SenderBase 70spam message 65spam quarantine 265, 266, 268, 285, 286, 287, 290, 292, 293, 295, 296
alias consolidation 292behavior when full 266, 268deleting all messages 296disabling 296end user access 287end-user access 285external 265IMAP/POP authentication 287LDAP authentication 286local 265
spam quarantine (continued)message details 295message variables 290notification 290receiving multiple notifications 292released messages and email pipeline 295testing notifications 293
stopped by content filter 62, 65stopped by reputation filtering 65System Capacity report 94, 95, 96, 108, 109, 110
Email 94, 95, 96, 108, 109, 110All page 96, 110Incoming Mail page 95, 108memory page swapping 96, 109Outgoing Mail page 95, 108System Load page 95, 109WorkQueue page 94, 108
system quarantine. See quarantines, policy, virus, and outbreak 298
T
TLS Connections page 57
U
unclassified quarantine. See quarantine, unclassified 298user accounts 405, 407, 412
locking and unlocking 407, 412user groups 396user roles 396
descriptions 396
V
virus message 65virus quarantine. See quarantine 298
virus. 298
W
Web UI session timeout 421, 422
User Guide for AsyncOS 14.1 for Cisco Secure Email and Web Manager- GD (General Deployment)IN-2
INDEX