T.I.E. RENEWAL PROCESS - Universidad de Navarra
46
T.I.E. RENEWAL PROCESS Steps to follow
-
Upload
khangminh22 -
Category
Documents
-
view
1 -
download
0
Transcript of T.I.E. RENEWAL PROCESS - Universidad de Navarra
T.I .E. RENEWALPROCESS
Steps to fol low

TABLE OF CONTENTS
03 Browser settings
06 Request the digitalcertificate
15 Download Autofirma
18 Sign the certificate
08 Verify your identity 24 Online renewal
10 Download thecertificate 30 Third renewals
12 Backup the certificate 42 Downloading theresolución

BROWSER SETTINGS
The whole process needs to be from either MozillaFirefox or Internet Explorer (keep in mind that once youstart the process from one browser, you have to do allthe process from that same browser)
You have to download Firefox´s 68th version (if you usea later version you might not be able to do the processdue to incompatibility issues)
Firefox 68 link: http://tiny.cc/lud3ez
Once you have downloaded and installed firefox, you needto make sure that ¨automatic updates¨ are turned off

SETTING UP FIREFOXNow we will set up Firefox to turn off automatic updates
On the right side of the screenwe click on Firefox´s menu (thethree bars) and subsequently weclick on ¨options¨
1.
2. Once we click in¨options¨ we canaccess the generalsettings from firefox
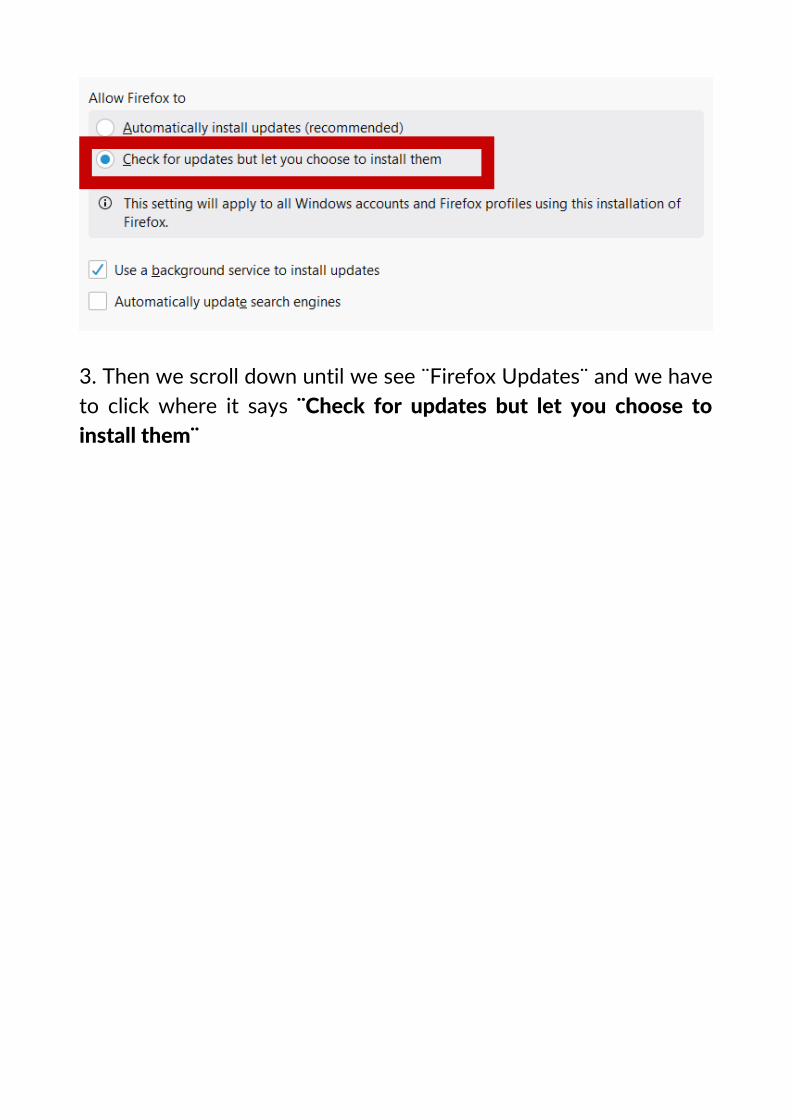
3. Then we scroll down until we see ¨Firefox Updates¨ and we haveto click where it says ¨Check for updates but let you choose toinstall them¨
STEP 1: REQUESTING YOUR DIGITALCERTIFICATE
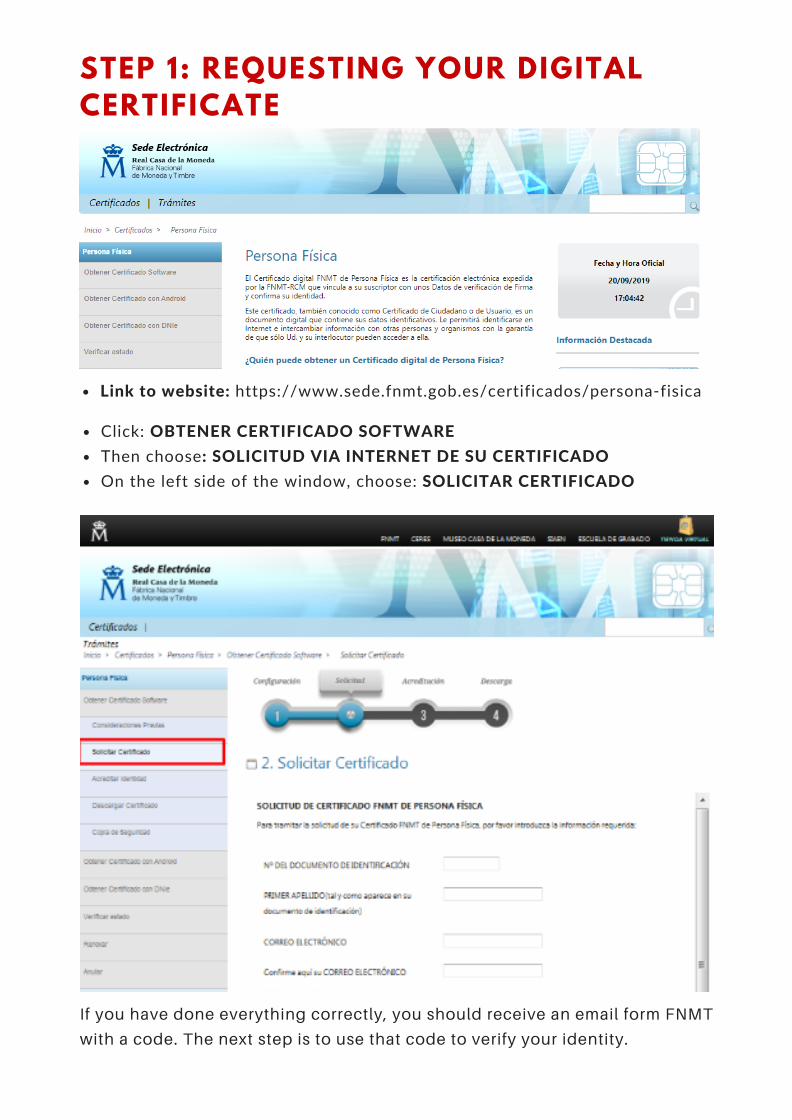
STEP 1: REQUESTING YOUR DIGITALCERTIFICATE
Link to website: https://www.sede.fnmt.gob.es/certificados/persona-fisica
Click: OBTENER CERTIFICADO SOFTWAREThen choose: SOLICITUD VIA INTERNET DE SU CERTIFICADOOn the left side of the window, choose: SOLICITAR CERTIFICADO
If you have done everything correctly, you should receive an email form FNMT
with a code. The next step is to use that code to verify your identity.

STEP 2: VERIFY YOUR IDENTITY

STEP 2: VERIFY YOUR IDENTITYOnce you have completed Step 1, you need to verify your identity to continue with the process. In order to do this, you need the code that wassent to your email from FNMT & your T.I.E card **(You need to do this beforeyour card expires)**
Where can you verify your ID?
Información al Público y Registro General del Gobierno de Navarra,Avenida Carlos III, 2, Pamplona
Delegación del Gobierno de Navarra, Calle Paulino Caballero, 19,Pamplona
AGENCIA TRIBUTARIA, C/ YANGUAS Y MIRANDA, 31, se requiere citaprevia;https://www.agenciatributaria.es/AEAT.internet/Inicio/Ayuda/_comp_Consultas_informaticas/Categorias/Otros_servicios/Cita_previa/Peticion_de_cita_previa_a_traves_de_internet/Peticion_de_cita_previa_a_traves_de_internet.shtml

STEP 3: DOWNLOAD THE CERTIFICATE
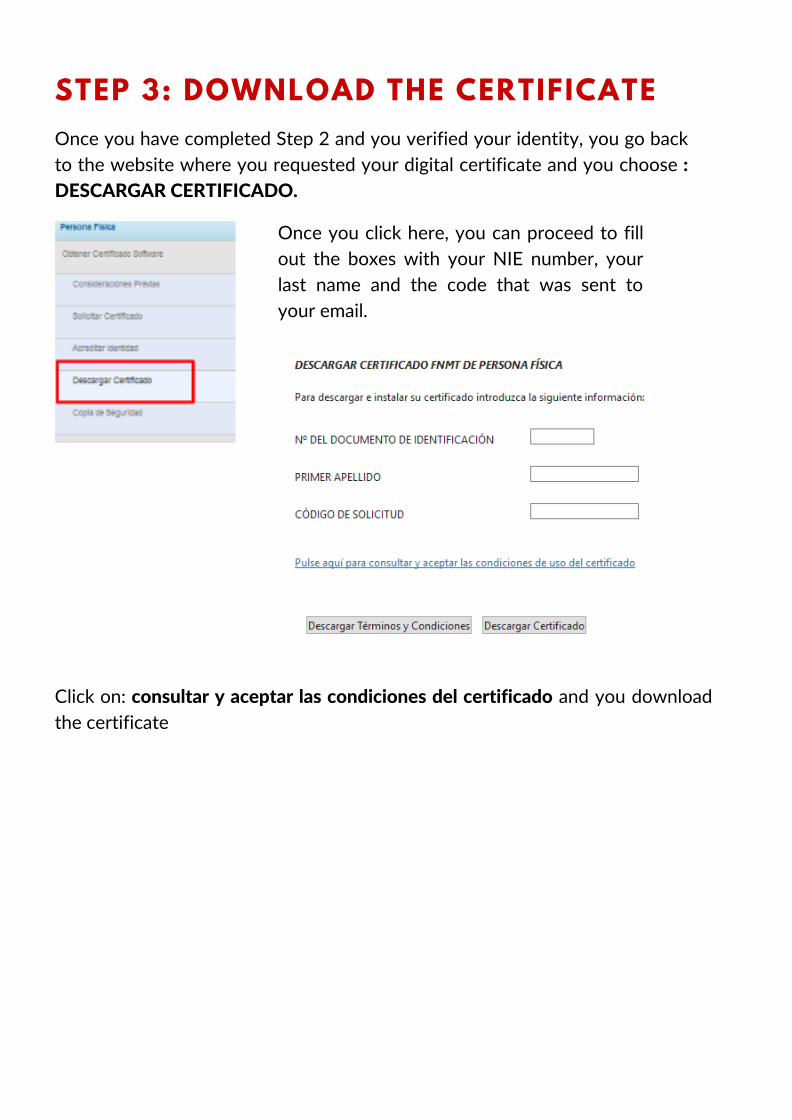
STEP 3: DOWNLOAD THE CERTIFICATEOnce you have completed Step 2 and you verified your identity, you go backto the website where you requested your digital certificate and you choose :DESCARGAR CERTIFICADO.
Once you click here, you can proceed to fillout the boxes with your NIE number, yourlast name and the code that was sent toyour email.
Click on: consultar y aceptar las condiciones del certificado and you downloadthe certificate

STEP 4: BACKUP THE DIGITAL CERTIFICATE
STEP 4: BACKUP THE DIGITAL CERTIFICATE
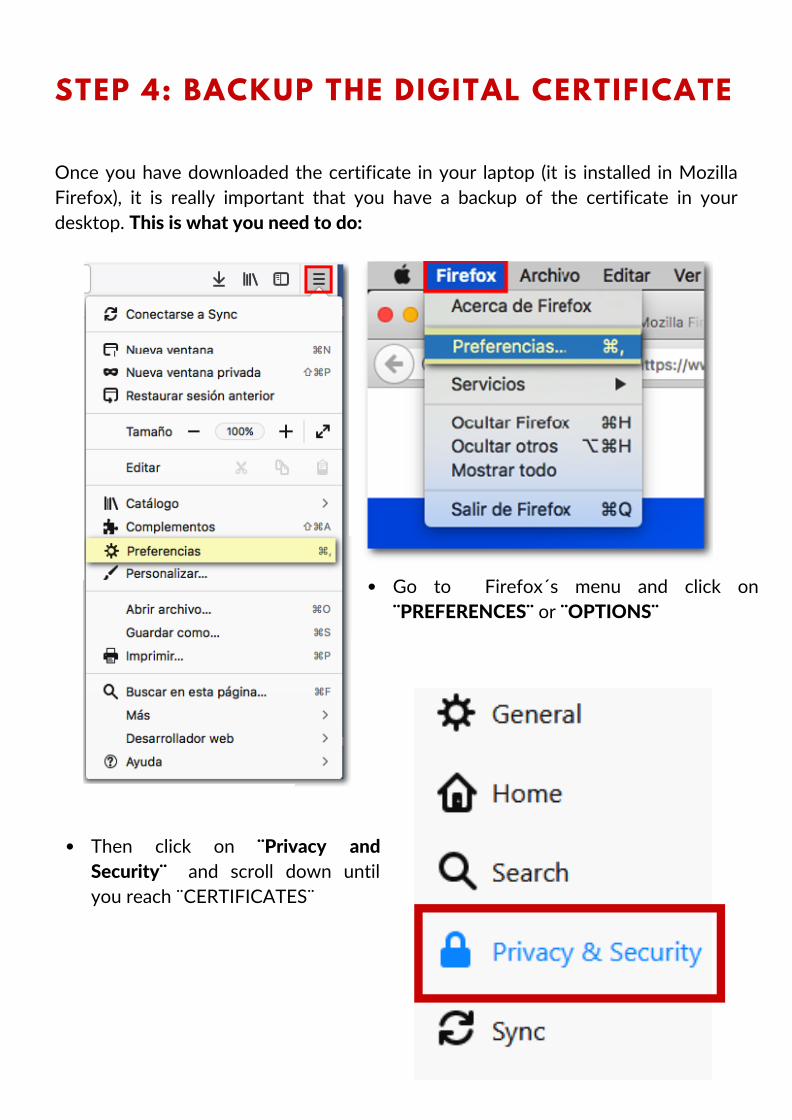
Once you have downloaded the certificate in your laptop (it is installed in MozillaFirefox), it is really important that you have a backup of the certificate in yourdesktop. This is what you need to do:
Go to Firefox´s menu and click on¨PREFERENCES¨ or ¨OPTIONS¨
Then click on ¨Privacy andSecurity¨ and scroll down untilyou reach ¨CERTIFICATES¨

Click on: VIEW CERTIFICATES
If you've done everything correctly, your certificate should appear in the tab¨YOUR CERTIFICATES¨.
Now you must select your certificate and then click on ¨backup¨
After you put a password and you save it, if you're a Mac user, you mustrename the document and add either ¨.pfx¨ or ¨.p12¨ at the end (i.e CD.pfx). Ifyou're a Windows user, you don't have to do this
STEP 5: DOWNLOAD AUTOFIRMA
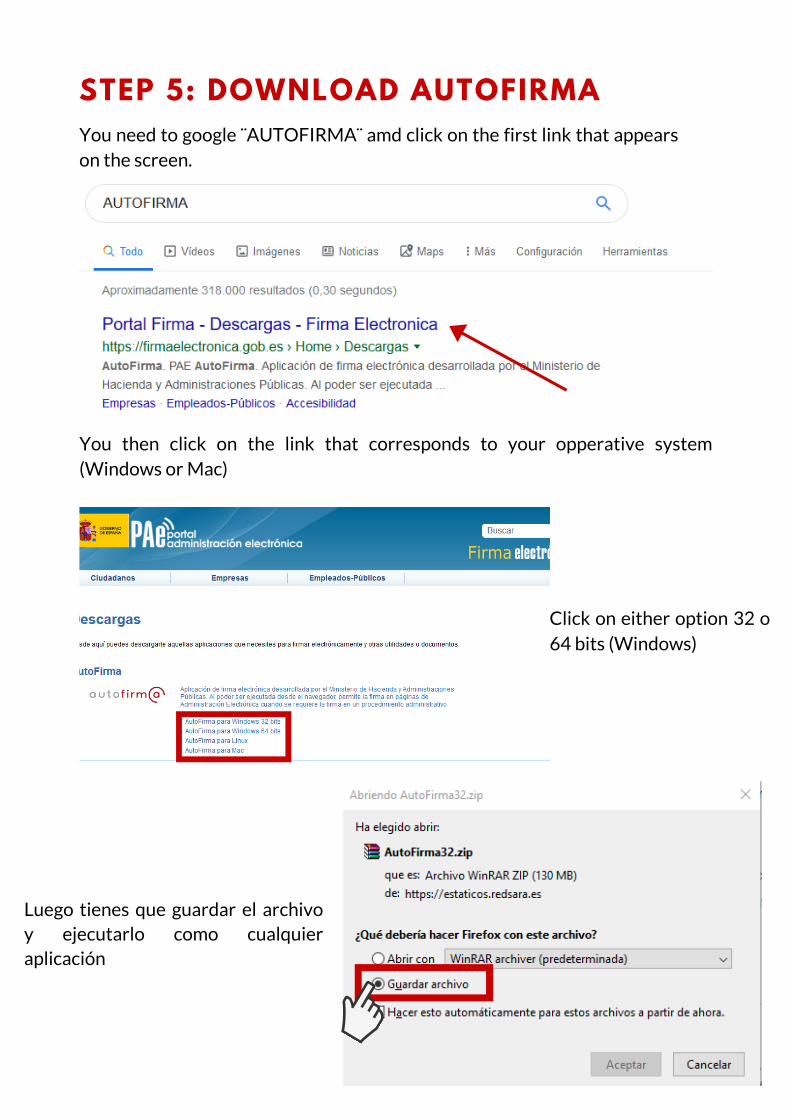
STEP 5: DOWNLOAD AUTOFIRMAYou need to google ¨AUTOFIRMA¨ amd click on the first link that appearson the screen.
You then click on the link that corresponds to your opperative system(Windows or Mac)
Click on either option 32 o64 bits (Windows)
Luego tienes que guardar el archivoy ejecutarlo como cualquieraplicación
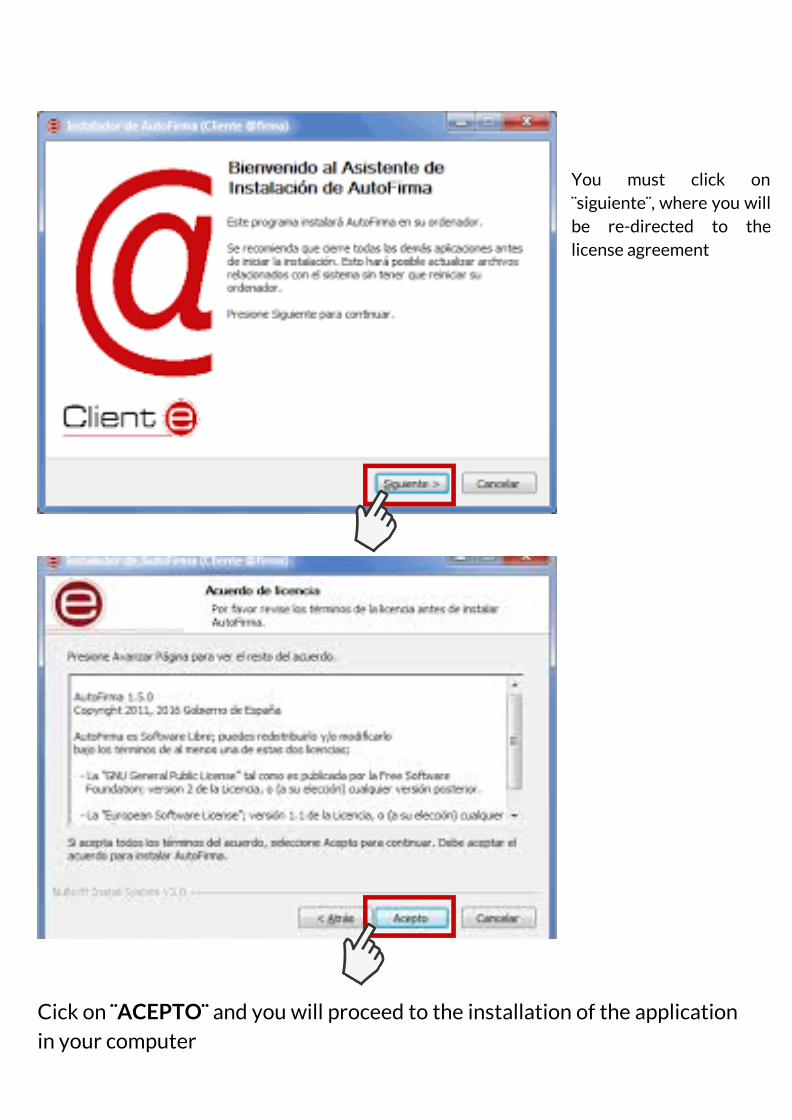
You must click on¨siguiente¨, where you willbe re-directed to thelicense agreement
Cick on ¨ACEPTO¨ and you will proceed to the installation of the applicationin your computer

PART 6: SIGN THE DIGITALCERTIFICATE

PART 6: SIGN THE DIGITAL CERTIFICATE
Click on ¨SELECCIONAR FICHEROS A FIRMAR¨ and select your previously saveddigital certificate (remember if you're a Mac user, you need to rename it and save itin either ¨.p12¨ or ¨.pfx¨ for this to work)

What to do if on the screen appears the following: ¨NO SE ENCUENTRA NINGÚNCERTIFICADO VÁLIDO¨?
Click on the icon in the middle

Then you select the file of the digital certificate and and open it
Once you complete the process on autofirma, you can now close this window andproceed with the rest of the process.
The digital certificate is valid for 4 years.
You have to repeat the renewal process EACHYEAR.
Since this is an annual process, remember to have
all your documents up to date.
THINGS TO TAKE INTO ACCOUNT:
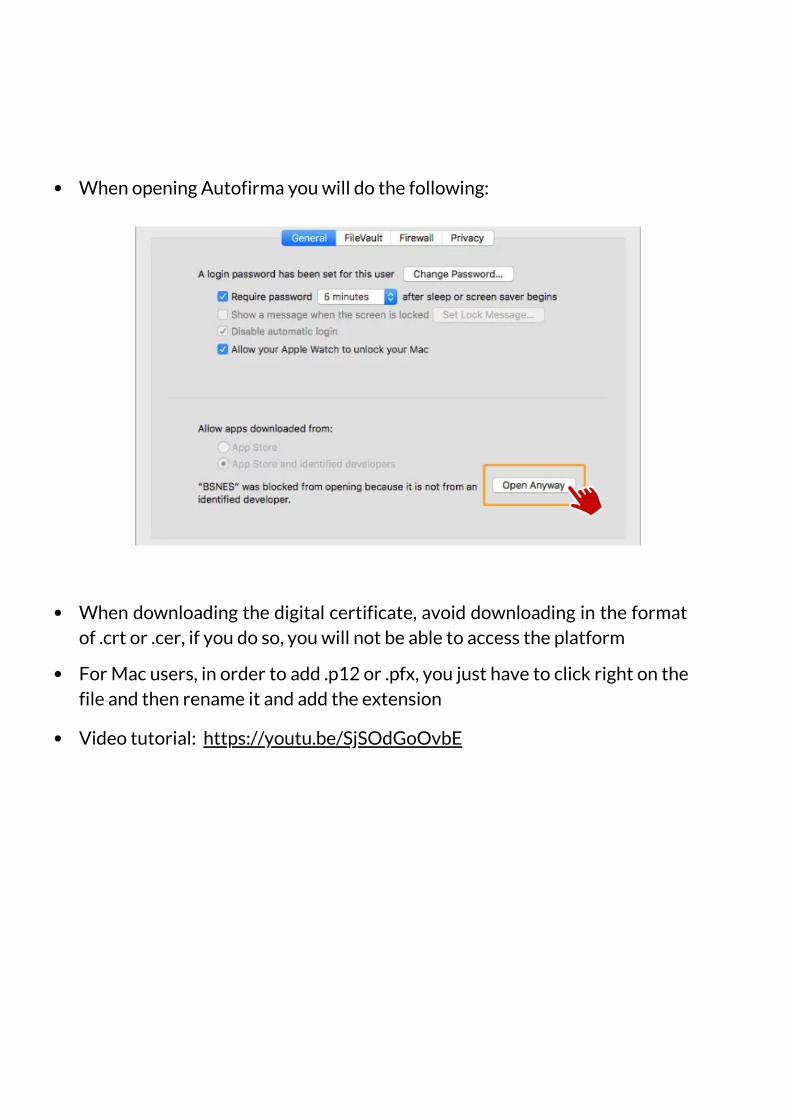
When opening Autofirma you will do the following:
When downloading the digital certificate, avoid downloading in the formatof .crt or .cer, if you do so, you will not be able to access the platform
For Mac users, in order to add .p12 or .pfx, you just have to click right on thefile and then rename it and add the extension
Video tutorial: https://youtu.be/SjSOdGoOvbE
2nd Part ofthe Process
ONLINE RENEWAL
Remember to start this process at least one monthy beforeyour T.I.E expires. Once the card is expired, you cant do thisprocess as you cannot get the digital certificate.
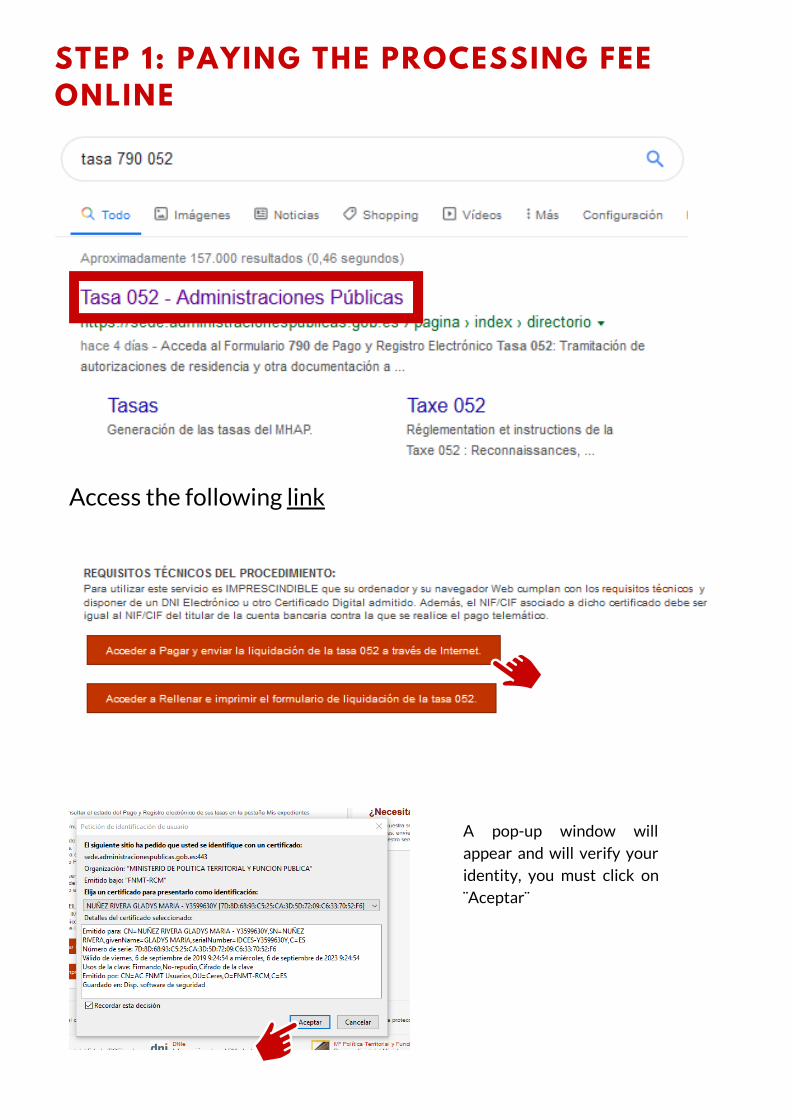
STEP 1: PAYING THE PROCESSING FEEONLINE
Access the following link
A pop-up window willappear and will verify youridentity, you must click on¨Aceptar¨
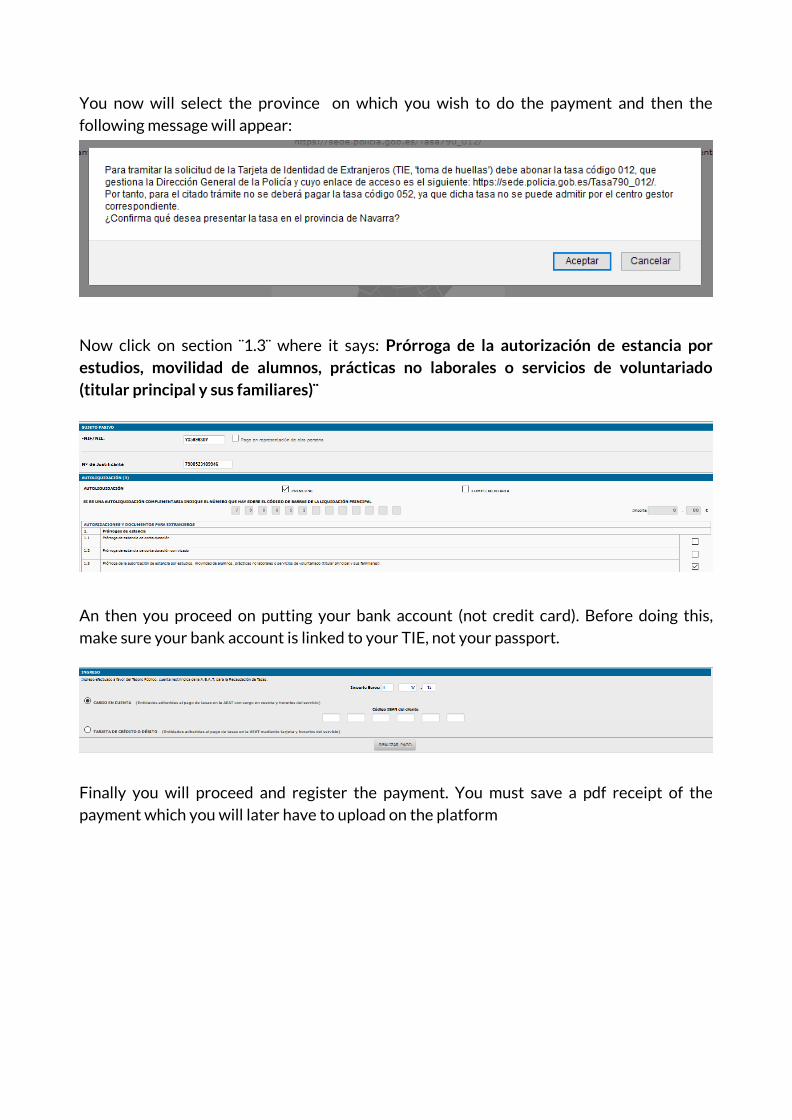
You now will select the province on which you wish to do the payment and then thefollowing message will appear:
Now click on section ¨1.3¨ where it says: Prórroga de la autorización de estancia porestudios, movilidad de alumnos, prácticas no laborales o servicios de voluntariado(titular principal y sus familiares)¨
An then you proceed on putting your bank account (not credit card). Before doing this,make sure your bank account is linked to your TIE, not your passport.
Finally you will proceed and register the payment. You must save a pdf receipt of thepayment which you will later have to upload on the platform
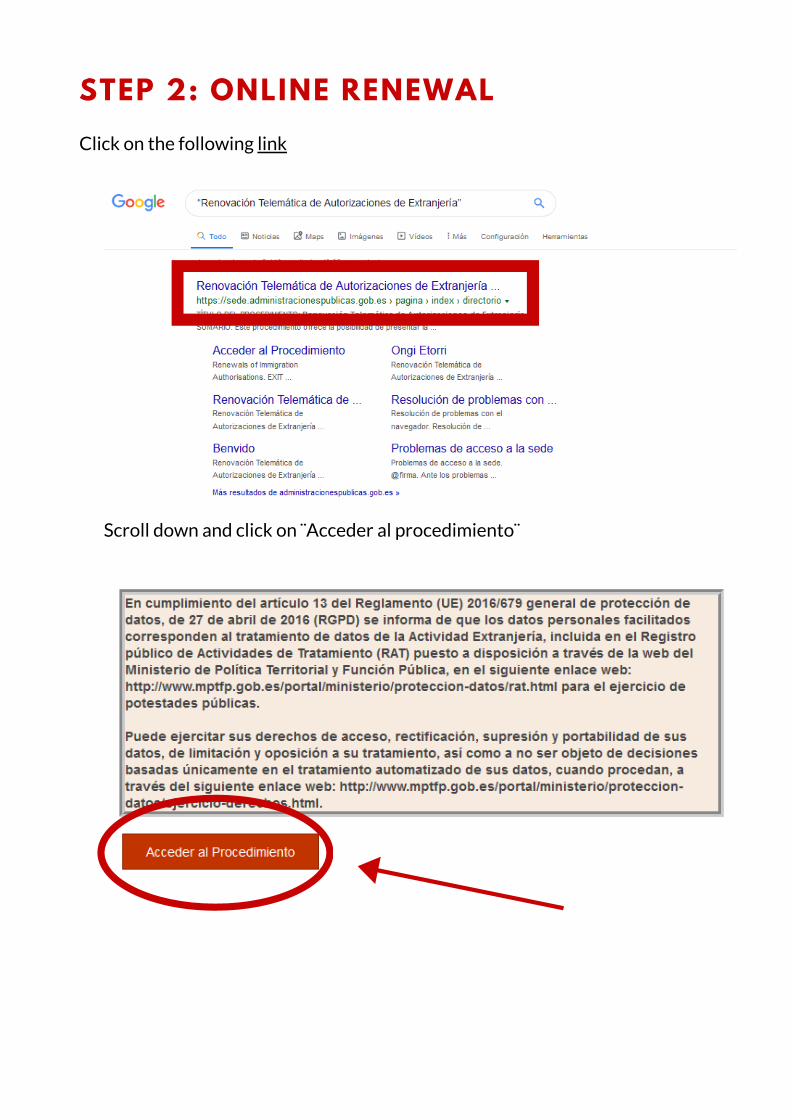
STEP 2: ONLINE RENEWALClick on the following link
Scroll down and click on ¨Acceder al procedimiento¨
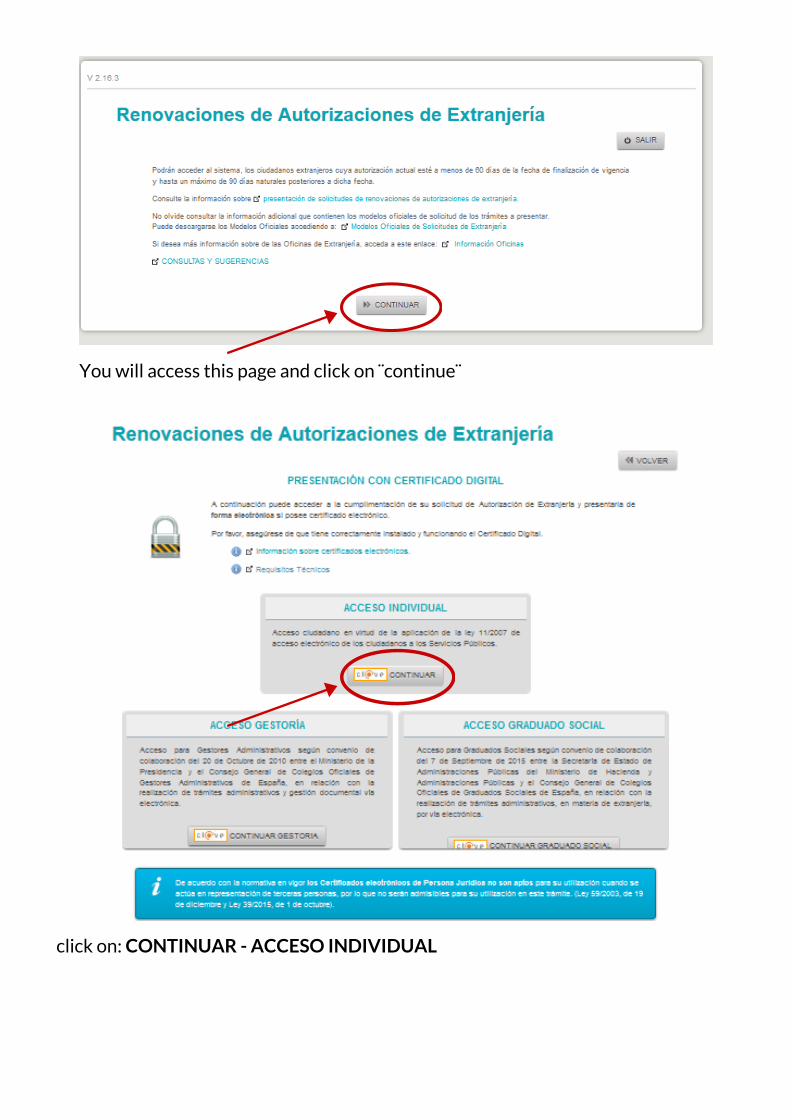
You will access this page and click on ¨continue¨
click on: CONTINUAR - ACCESO INDIVIDUAL

Processing fee 790 012 (Selecciona apartado 1.3 del formulario de la tasa)Registration certificate (you can get it through miUNAV)Student records (you can get it through miUNAV)Passport (scan even the blank pages)Medical InsuranceBank statement (with at least 600eur in your account)Empadronamiento
Fill in with your information and where it says: ¨No. de expediente¨ leave that as it is(blank) and click on ¨aceptar¨ Here you have access to the renewal platform where you will have to fill with yourpersonal information, you then will agree that all notifications are electronic andsubsequently you can upload all your documents and register your renewalrequest. Required documents:
You must scan all these documents and they have to be less than 1MB

THIRD RENEWALS

THIRD RENEWALS
Access the following link and scroll down, then click on: MERCURIO – Solicitudes deautorizaciones de Extranjería – Presentación Telemática

Once you click on MERCURIO it will take you to another page and you have toscroll down and click here:
Insertas la provincia y seleccionas donde dice ¨ACCESO INDIVIDUAL¨

Once you access the form you have to fill in with your information.
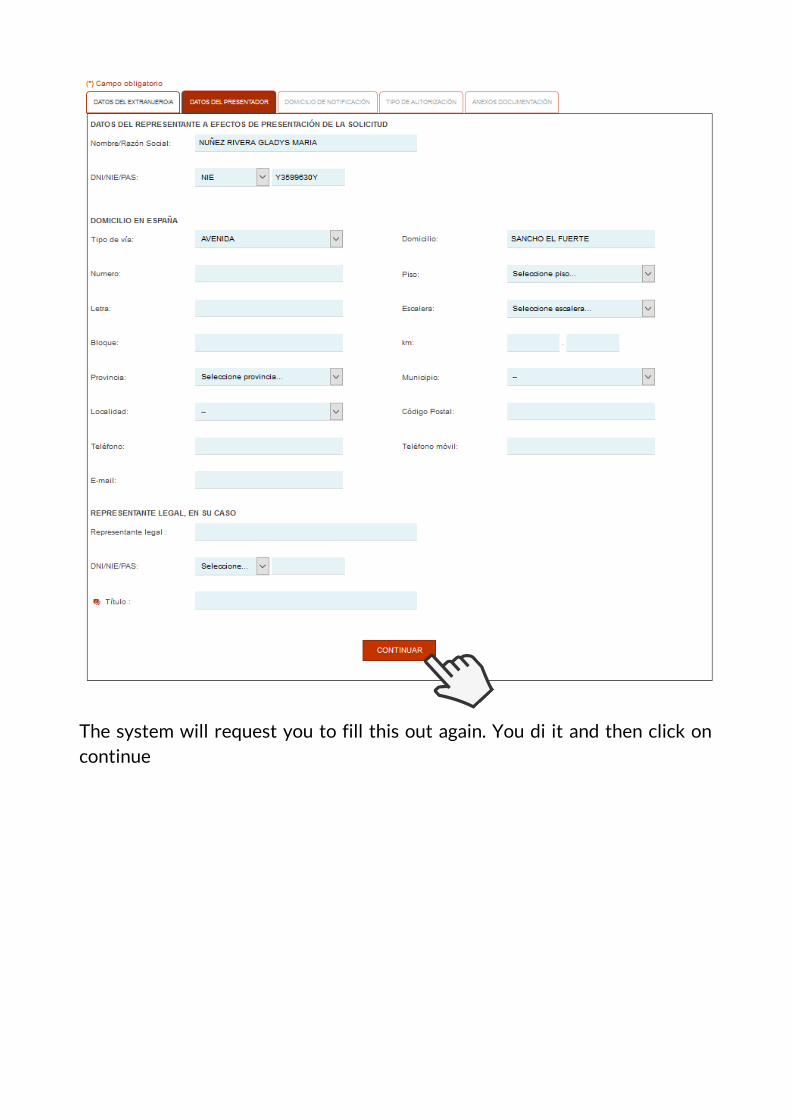
The system will request you to fill this out again. You di it and then click oncontinue

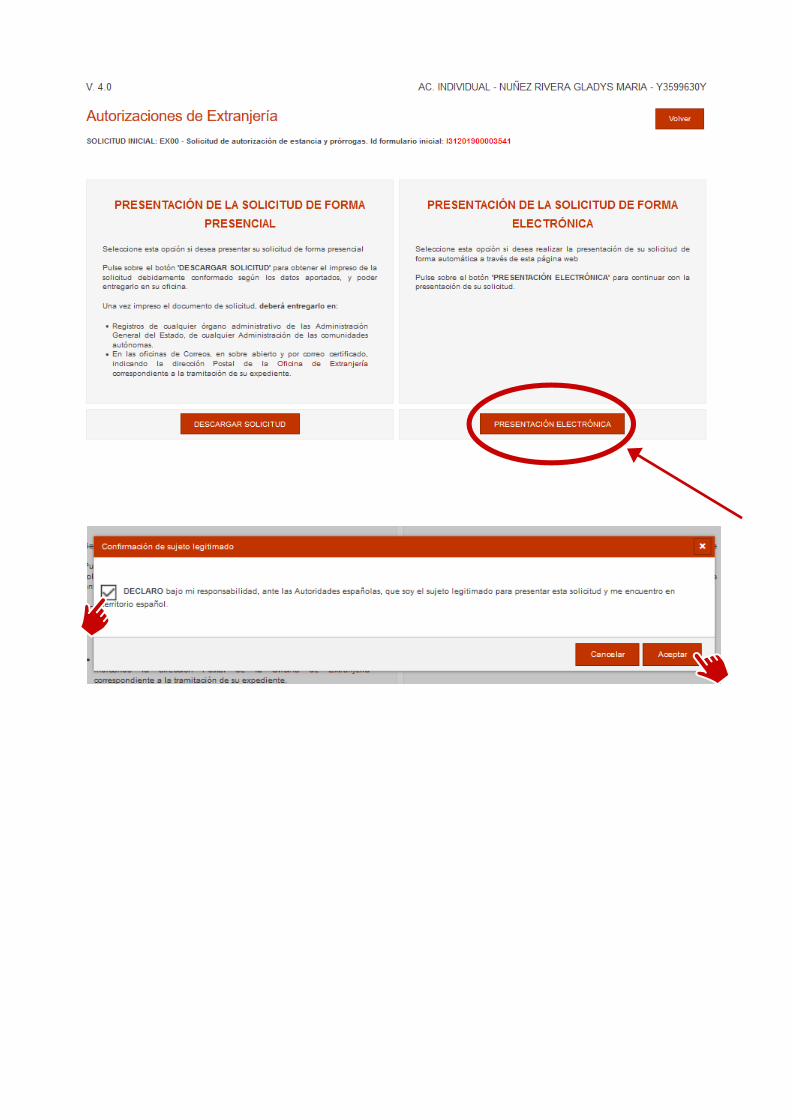
Then you click where it says: ¨Titular de autorización estancia por estudios,intercambio de alumnos, investigación/formación, prácticas no laborales ovoluntariado (art.40)¨

Select the document you will authorize Select the date you are presenting itWhere it says ¨organo¨ and ¨administración¨ you will do the following(example):
Una vez que llegas a la autorización de documentos:1.2.3.
- For both your grades & the matrícula:ÓRGANO: UNIVERSIDAD DE NAVARRAADMINISTRACIÓN: OFICINAS GENERALES - Medical Insurance:ÓRGANO: NAME OF THE INSURANCE COMPANY (i.e MAPFRE, ACUNSA)ADMINISTRACIÓN: NAME OF THE INSURANCE COMPANY (i.e MAPFRE,ACUNSA) - PASSPORT:ÓRGANO: GOVERNMENT FROM YOUR COUNTRYADMINISTRACIÓN: GOVERNMENT FROM YOUR COUNTRY Once we have authorized all the documents, we can click on ¨concluir¨

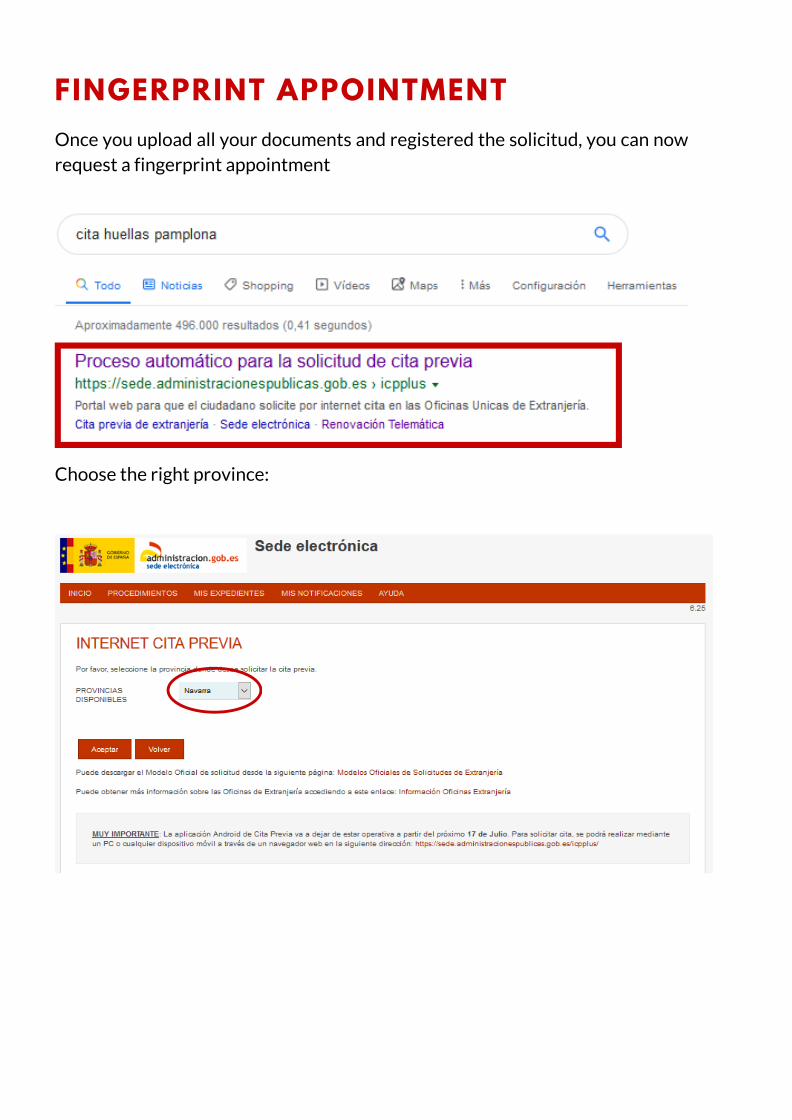
FINGERPRINT APPOINTMENTOnce you upload all your documents and registered the solicitud, you can nowrequest a fingerprint appointment
Choose the right province:

You must slect the following: ¨POLICIA - TOMA DE HUELLAS (EXPEDICIÓNDE TARJETA) Y RENOVACIÓN DE TARJETA DE LARGA DURACIÓN¨

EX 17 (link)Tasa 790 012 (link)ID size photoResoluciónPassportExpired T.I.E.
Documents to bring with you:
ESTADO DELEXPEDIENTE &RESOLUCIÓN

It is possible that you don't receive any notification fromExtranjería, thereforeyou might have to look for the resolución yourself. You will do so, by doing the following:
You will access the following link
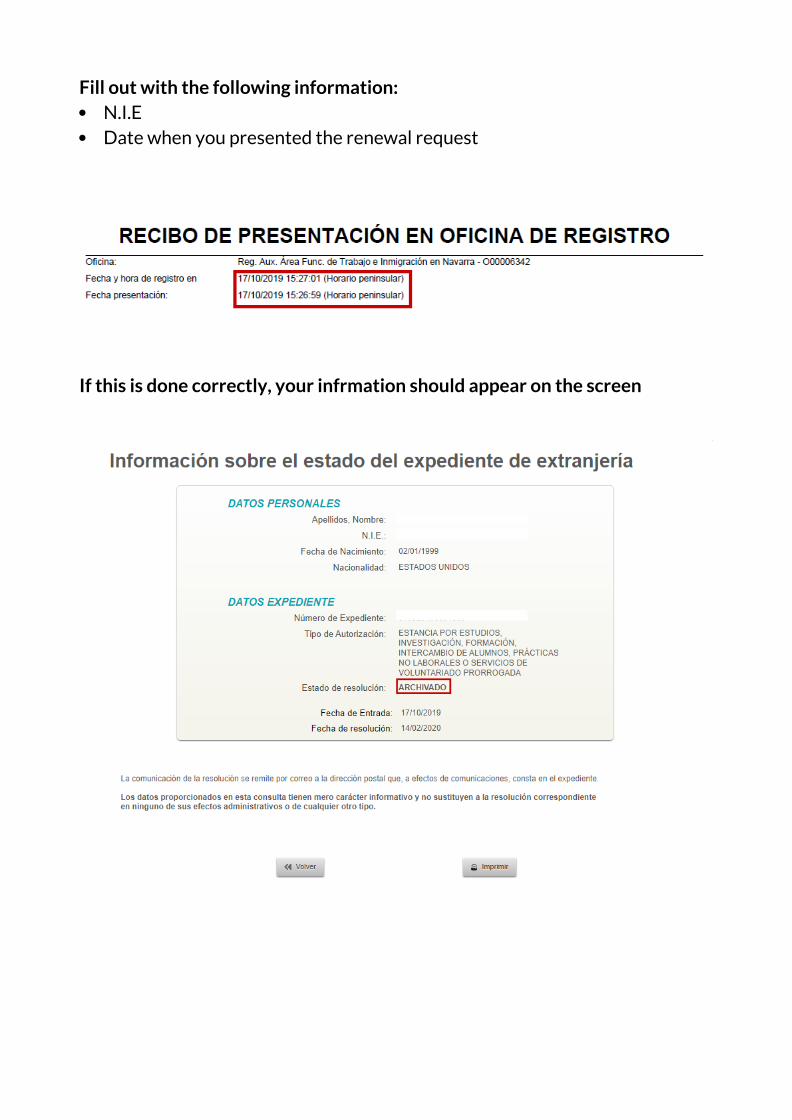
N.I.E Date when you presented the renewal request
Año de nacimiento
Fill out with the following information:
If this is done correctly, your infrmation should appear on the screen
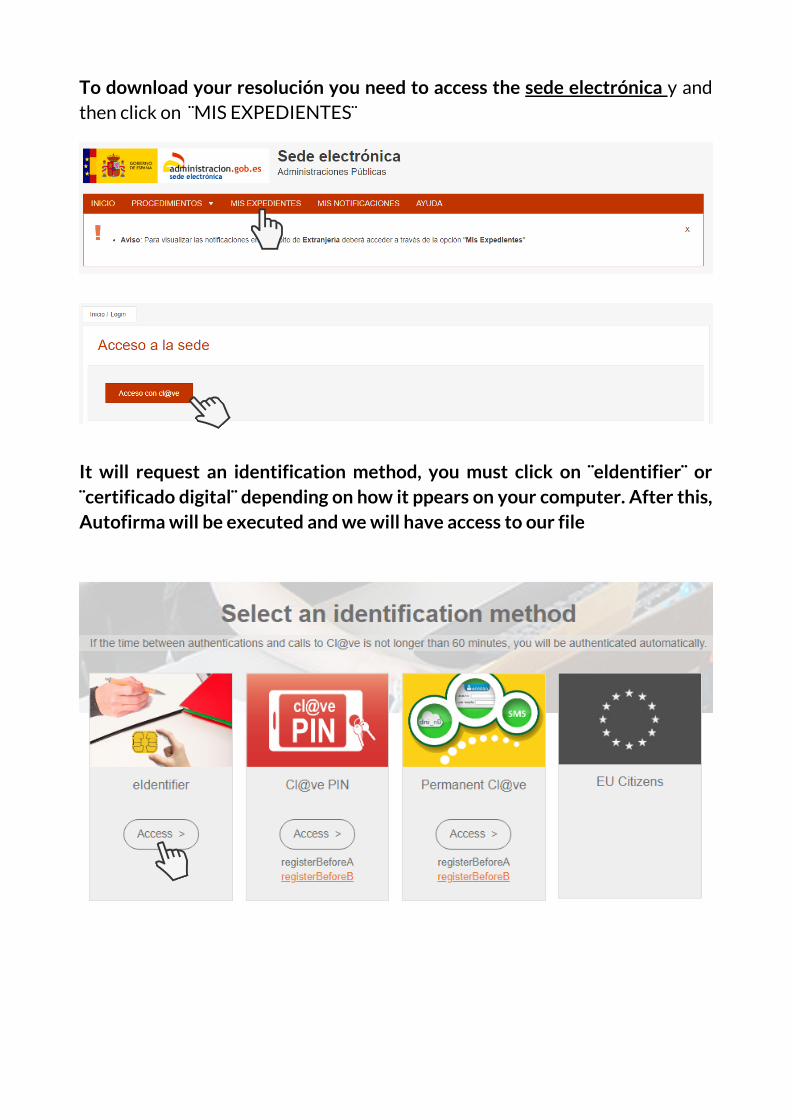
To download your resolución you need to access the sede electrónica y andthen click on ¨MIS EXPEDIENTES¨
It will request an identification method, you must click on ¨eldentifier¨ or¨certificado digital¨ depending on how it ppears on your computer. After this,Autofirma will be executed and we will have access to our file

CIt is really important to check if our file is ¨resuelto¨ or if we have any pendingnotifications (a.k.a. missing documents) Once we have verified that, we can click on our ¨resolución¨ or ¨notificación no.xxxx¨ and download the file.
Doubts?Email [email protected]
Video tutorial: https://youtu.be/SjSOdGoOvbE