Test Driven - Index Of
585
-
Upload
khangminh22 -
Category
Documents
-
view
2 -
download
0
Transcript of Test Driven - Index Of


Test Driven


Test DrivenPRACTICAL TDD AND ACCEPTANCE TDD
FOR JAVA DEVELOPERS
LASSE KOSKELA
M A N N I N GGreenwich
(74° w. long.)

For online information and ordering of this and other Manning books, please visitwww.manning.com. The publisher offers discounts on this book when ordered in quantity. For more information, please contact:
Special Sales DepartmentManning Publications Co.Sound View Court 3B fax: (609) 877-8256Greenwich, CT 06830 email: [email protected]
©2008 by Manning Publications Co. All rights reserved.
No part of this publication may be reproduced, stored in a retrieval system, or transmitted, in any form or by means electronic, mechanical, photocopying, or otherwise, without prior written permission of the publisher.
Many of the designations used by manufacturers and sellers to distinguish their products are claimed as trademarks. Where those designations appear in the book, and Manning Publications was aware of a trademark claim, the designations have been printed in initial caps or all caps.
Recognizing the importance of preserving what has been written, it is Manning’s policy to have the books we publish printed on acid-free paper, and we exert our best efforts to that end.
Manning Publications Co. Copyeditor: Laura MerrillSound View Court 3B Typesetter: Gordan SalinovicGreenwich, CT 06830 Cover designer: Leslie Haimes
ISBN 1-932394-85-0Printed in the United States of America
1 2 3 4 5 6 7 8 9 10 – MAL – 13 12 11 10 09 08 07

To my colleagues, for bugging me to finish this project. And to my love Lotta, who gave me the energy to do it.


brief contents PART 1 A TDD PRIMER .............................................. 1
1 ■ The big picture 3
2 ■ Beginning TDD 43
3 ■ Refactoring in small steps 75
4 ■ Concepts and patterns for TDD 99
PART 2 APPLYING TDD
TO SPECIFIC TECHNOLOGIES ........................ 151
5 ■ Test-driving web components 153
6 ■ Test-driving data access 195
7 ■ Test-driving the unpredictable 249
8 ■ Test-driving Swing 279
vii

viii BRIEF CONTENTS
PART 3 BUILDING PRODUCTS
WITH ACCEPTANCE TDD.............................. 321
9 ■ Acceptance TDD explained 323
10 ■ Creating acceptance tests with Fit 364
11 ■ Strategies for implementing acceptance tests 396
12 ■ Adopting TDD 435
appendix A ■ Brief JUnit 4 tutorial 467
appendix B ■ Brief JUnit 3.8 tutorial 470
appendix C ■ Brief EasyMock tutorial 473
appendix D ■ Running tests with Ant 475

contentspreface xviiacknowledgments xixabout this book xxiabout the cover illustration xxvii
PART 1 A TDD PRIMER ..............................................1
1 The big picture 31.1 The challenge: solving the right problem right 5
Creating poorly written code 5 ■ Failing to meet actual needs 6
1.2 Solution: being test-driven 7High quality with TDD 8 ■ Meeting needs with acceptance TDD 10 ■ What’s in it for me? 11
1.3 Build it right: TDD 14Test-code-refactor: the heartbeat 15 ■ Developing in small increments 19 ■ Keeping code healthy with refactoring 24 ■ Making sure the software still works 28
ix

x CONTENTS
1.4 Build the right thing: acceptance TDD 31What’s in a name? 31 ■ Close collaboration 32 ■ Tests as a shared language 33
1.5 Tools for test-driven development 36Unit-testing with xUnit 36 ■ Test frameworks for acceptance TDD 37 ■ Continuous integration and builds 37 ■ Code coverage 39
1.6 Summary 41
2 Beginning TDD 432.1 From requirements to tests 45
Decomposing requirements 45 ■ What are good tests made of? 47 ■ Working from a test list 47 ■ Programming by intention 48
2.2 Choosing the first test 48Creating a list of tests 49 ■ Writing the first failing test 50 ■ Making the first test pass 54 ■ Writing another test 56
2.3 Breadth-first, depth-first 58Faking details a little longer 59 ■ Squeezing out the fake stuff 60
2.4 Let’s not forget to refactor 63Potential refactorings in test code 64 ■ Removing a redundant test 65
2.5 Adding a bit of error handling 66Expecting an exception 66 ■ Refactoring toward smaller methods 68 ■ Keeping methods in balance 69 ■ Expecting details from an exception 70
2.6 Loose ends on the test list 71Testing for performance 72 ■ A looming design dead-end 73
2.7 Summary 73
3 Refactoring in small steps 753.1 Exploring a potential solution 76
Prototyping with spikes 77 ■ Learning by writing tests 77 ■ Example spike for learning an API 78
3.2 Changing design in a controlled manner 80Creating an alternative implementation 81 ■ Switching over safely 86

CONTENTS xi
3.3 Taking the new design further 90Keeping things compatible 90 ■ Making the switchover 95
3.4 Summary 98
4 Concepts and patterns for TDD 994.1 How to write tests and make them pass 100
Test-selection strategies 101 ■ Implementation strategies 104 ■ Prime guidelines for test-driving 106
4.2 Essential testing concepts 108Fixtures are the context for tests 108 ■ Test doubles stand in for dependencies 110 ■ State and interaction-based testing 110
4.3 Closer look into test doubles 113Example of a test double 113 ■ Stubs, fakes, and mocks 115 ■ Mock objects in action 116
4.4 Guidelines for testable designs 118Choose composition over inheritance 119 ■ Avoid static and the Singleton 120 ■ Isolate dependencies 122 ■ Inject dependencies 124
4.5 Unit-testing patterns 127Assertion patterns 128 ■ Fixture patterns 132 ■ Test patterns 137
4.6 Working with legacy code 144Test-driven legacy development 145 ■ Analyzing the change 146 ■ Preparing for the change 147 ■ Test-driving the change 148
4.7 Summary 148
PART 2 APPLYING TDD TO SPECIFIC TECHNOLOGIES 151
5 Test-driving web components 1535.1 MVC in web applications in 60 seconds 1545.2 Taming the controller 156
Test-driving Java Servlets 156 ■ Test-driving Spring controllers 168

xii CONTENTS
5.3 Creating the view test-first 173Test-driving JSPs with JspTest 174 ■ Test-driving Velocity templates 179
5.4 TDD with component-based web frameworks 184Anatomy of a typical framework 185 ■ Fleshing out Wicket pages test-first 186
5.5 Summary 193
6 Test-driving data access 1956.1 Exploring the problem domain 196
Data access crosses boundaries 197 ■ Separating layers with the DAO pattern 198
6.2 Driving data access with unit tests 199Witnessing the tyranny of the JDBC API 200 ■ Reducing pain with Spring’s JdbcTemplate 205 ■ Closer to test-driven nirvana with Hibernate 211
6.3 Writing integration tests before the code 219What is an integration test? 220 ■ Selecting the database 222
6.4 Integration tests in action 225Writing our first Hibernate integration test 226 ■ Creating the database schema 230 ■ Implementing the production code 233 ■ Staying clean with transactional fixtures 234
6.5 Populating data for integration tests 235Populating objects with Hibernate 236 ■ Populating data with DbUnit 237
6.6 Should I drive with unit or integration tests? 243TDD cycle with integration tests 243 ■ Best of both worlds 244
6.7 File-system access 245A tale from the trenches 245 ■ Practices for testable file access 246
6.8 Summary 247

CONTENTS xiii
7 Test-driving the unpredictable 2497.1 Test-driving time-based functionality 250
Example: logs and timestamps 250 ■ Abstracting system time 252 ■ Testing log output with faked system time 256
7.2 Test-driving multithreaded code 259What are we testing for? 260 ■ Thread-safety 261Blocking operations 266 ■ Starting and stopping threads 268 ■ Asynchronous execution 271 ■ Synchronization between threads 274
7.3 Standard synchronization objects 275Semaphores 275 ■ Latches 276 ■ Barriers 276Futures 277
7.4 Summary 277
8 Test-driving Swing 2798.1 What to test in a Swing UI 280
Internal plumbing and utilities 281 ■ Rendering and layout 281 ■ Interaction 282
8.2 Patterns for testable UI code 283Classic Model-View-Presenter 284 ■ Supervising Controller 284 ■ Passive View 287
8.3 Tools for testing view components 290Why do we need tools? 290 ■ TDD-friendly tools 292
8.4 Test-driving a view component 297Laying out the design 298 ■ Adding and operating standard widgets 300 ■ Drawing custom graphics 304 ■ Associating gestures with coordinates 314
8.5 Summary 319

xiv CONTENTS
PART 3 BUILDING PRODUCTS WITH ACCEPTANCE TDD............................. 321
9 Acceptance TDD explained 3239.1 Introduction to user stories 325
Format of a story 325 ■ Power of storytelling 325 ■ Examples of user stories 326
9.2 Acceptance tests 327Example tests for a story 327 ■ Properties of acceptance tests 328 ■ Implementing acceptance tests 333
9.3 Understanding the process 334The acceptance TDD cycle 334 ■ Acceptance TDD inside an iteration 343
9.4 Acceptance TDD as a team activity 348Defining the customer role 348 ■ Who writes tests with the customer? 350 ■ How many testers do we need? 350
9.5 Benefits of acceptance TDD 351Definition of “done” 351 ■ Cooperative work 353 ■ Trust and commitment 354 ■ Specification by example 354 ■ Filling the gap 354
9.6 What are we testing, exactly? 355Should we test against the UI? 355 ■ Should we stub parts of our system? 357 ■ Should we test business logic directly? 358
9.7 Brief overview of available tools 359Table-based frameworks 359 ■ Text-based frameworks 361Scripting language-based frameworks 361 ■ Homegrown tools 362
9.8 Summary 362
10 Creating acceptance tests with Fit 36410.1 What’s Fit? 365
Fit for acceptance TDD 366 ■ Test documents contain fixture tables 369 ■ Fixtures: combinations of tables and classes 371
10.2 Three built-in fixtures 372ColumnFixture 373 ■ RowFixture 376 ■ ActionFixture 379Extending the built-in fixtures 382

CONTENTS xv
10.3 Beyond the built-ins with FitLibrary 384DoFixture 384 ■ SetUpFixture 388 ■ There’s more 390
10.4 Executing Fit tests 390Using a single test document 391 ■ Placing all tests in a folder structure 391 ■ Testing as part of an automated build 392
10.5 Summary 394
11 Strategies for implementing acceptance tests 39611.1 What should acceptance tests test? 397
Focus on what’s essential 398 ■ Avoid turbulent interfaces 399 ■ Cross the fence where it is lowest 400
11.2 Implementation approaches 401Going end-to-end 401 ■ Crawling under the skin 404 ■ Exercising the internals 407 ■ Stubbing out the irrelevant 409 ■ Testing backdoors 411
11.3 Technology-specific considerations 411Programming libraries 412 ■ Faceless, distributed systems 413 ■ Console applications 415 ■ GUI applications 417 ■ Web applications 421
11.4 Tips for common problems 425Accelerating test execution 426 ■ Reducing complexity of test cases 431 ■ Managing test data 432
11.5 Summary 434
12 Adopting TDD 43512.1 What it takes to adopt TDD 436
Getting it 436 ■ Sense of urgency 437 ■ Sense of achievement 438 ■ Exhibiting integrity 438 ■ Time for change 439
12.2 Getting others aboard 440Roles and ability to lead change 441 ■ Change takes time 443
12.3 How to fight resistance 444Recognizing resistance 444 ■ Three standard responses to resistance 448 ■ Techniques for overcoming resistance 449 ■ Picking our battles 453

xvi CONTENTS
12.4 How to facilitate adoption 454Evangelize 454 ■ Lower the bar 457 ■ Train and educate 458 ■ Share and infect 459 ■ Coach and facilitate 461 ■ Involve others by giving them roles 463 ■ Destabilize 464 ■ Delayed rewards 465
12.5 Summary 465
appendix A Brief JUnit 4 tutorial 467
appendix B Brief JUnit 3.8 tutorial 470
appendix C Brief EasyMock tutorial 473
appendix D Running tests with Ant 475
resources 481
index 487

prefaceSeven years ago, in the midst of a global IT boom, programming shops of allshapes and sizes were racing like mad toward the next IPO, and the job marketwas hotter than ever. I had been pulled into the booming new media industry andwas just starting my programming career, spending long days and nights hackingaway at random pieces of code, configuring servers, uploading PHP scripts to alive production system, and generally acting like I knew my stuff.
On a rainy September evening, working late again, my heart suddenly skippeda beat: What did I just do? Did I drop all the data from the production database?That’s what it looked like, and I was going to get canned. How could I get the databack? I had thought it was the test database. This couldn’t be happening to me!But it was.
I didn’t get fired the next morning, largely because it turned out the customerdidn’t care about the data I’d squashed. And it seemed everyone else was doingthe same thing—it could have been any one of us, they said. I had learned a les-son, however, and that evening marked the beginning of my journey toward amore responsible, reliable way of developing software.
A couple of years later, I was working for a large multinational consulting com-pany, developing applications and backend systems for other large corporations.I’d learned a lot during my short career, thanks to all those late nights at the com-puter, and working on these kinds of systems was a good chance to sharpen myskills in practice. Again, I thought I knew my stuff well when I joined the ranks.
xvii

xviii PREFACE
And again, it turned out I didn’t know as much as I thought. I continued to learnsomething important almost every day.
The most important discovery I made changed the way I thought about soft-ware development: Extreme Programming (XP) gave me a new perspective on theright way to develop software. What I saw in XP was a combination of the high pro-ductivity of my past hack-a-thons and a systematic, disciplined way to work. Inaddition to the fact that XP projects bring the development team closer to the cus-tomer, the single biggest idea that struck a chord with me was test-driven develop-ment (TDD). The simple idea of writing tests before the code demolished myconcept of programming and unit-testing as separate activities.
TDD wasn’t a walk in the park. Every now and then, I’d decide to write testsfirst. For a while, it would work; but after half an hour I’d find myself editing pro-duction code without a failing test. Over time, my ability to stick with the test-firstprogramming improved, and I was able to go a whole day without falling back onmy old habits. But then I stumbled across a piece of code that didn’t bend enoughto my skills. I was coming to grips with how it should be done but didn’t yet haveall the tricks up my sleeve. I didn’t know how to do it the smart way, and fre-quently I wasn’t determined enough to do it the hard way. It took several years tomaster all the tricks, learn all the tools, and get where I am now.
I wrote this book so you don’t have to crawl over the same obstacles I did; youcan use the book to guide your way more easily through these lessons. For me,catching the test-first bug has been the single most important influence on how Iapproach my work and see programming—just as getting into agile methodschanged the way I think about software development.
I hope you’ll catch the bug, too.

acknowledgmentsTaking an idea and turning it into a book is no small feat, and I couldn’t havedone it without the help of the legion of hard-core professionals and kind soulswho contributed their time and effort to this project.
First, thanks to Mike Curwen from JavaRanch, who started it all by connectingme with Jackie Carter at Manning in early 2005. Jackie became my first develop-ment editor; she taught me how to write and encouraged me to keep going. Look-ing back at my first drafts, Jackie, I can see that what you did was a heroic act!
I’d also like to thank the rest of the team at Manning, especially publisher Mar-jan Bace, my second development editor Cynthia Kane, technical editor ErnestFriedman-Hill, review editor Karen Tegtmeyer, copy editor Laura Merrill, proof-reader Tiffany Taylor, and project editor Mary Piergies. It was a true pleasureworking with all of you.
I didn’t write this book behind closed doors. I had the pleasure of getting valu-able feedback early on and throughout the development process from an excel-lent cast of reviewers, including J. B. Rainsberger, Ron Jeffries, Laurent Bossavit,Dave Nicolette, Michael Feathers, Christopher Haupt, Johannes Link, DuncanPierce, Simon Baker, Sam Newman, David Saff, Boris Gloger, Cédric Beust, NatPryce, Derek Lakin, Bill Fly, Stuart Caborn, Pekka Enberg, Hannu Terävä, JukkaLindström, Jason Rogers, Dave Corun, Doug Warren, Mark Monster, Jon Skeet,Ilja Preuss, William Wake, and Bas Vodde. Your feedback not only made this a bet-ter book but also gave me confidence and encouragement.
xix

xx ACKNOWLEDGMENTS
My gratitude also goes to the MEAP readers of the early manuscript for theirvaluable feedback and comments. You did a great job pointing out remaining dis-crepancies and suggesting improvements, picking up where the reviewers left off.
I wouldn’t be writing this today if not for my past and present colleagues, fromwhom I’ve learned this trade. I owe a lot to Allan Halme and Joonas Lyytinen forshowing me the ropes. You continue to be my mentors, even if we no longer worktogether on a day-to-day basis. I’d like to thank my fellow moderators at Java-Ranch for keeping the saloon running. I’ve learned a lot through the thousandsof conversations I’ve had at the ranch. And speaking of conversations, I’d espe-cially like to thank Bas Vodde for all the far-out conversations we’ve had on trainsand in hotel lobbies.
Special thanks to my colleagues at Reaktor Innovations for their encourage-ment, support, enthusiasm, and feedback. You’ve taught me a lot and continue toamaze me with your energy and talent. It’s an honor to be working with you.
I’d also like to thank my clients: the ones I’ve worked with and the ones whohave attended my training sessions. You’ve given me the practical perspective formy work, and I appreciate it. I wouldn’t know what I was talking about if it weren’tfor the concrete problems you gave me to solve!
My life as a software developer has become easier every year due to the toolsthat open source developers around the world are creating free of charge for allof us. Parts 2 and 3 of this book are full of things that wouldn’t be possible withoutyour philanthropic efforts. Thank you, and keep up the good work. I hope toreturn the favor one day.
Finally, I’d like to thank my family and loved ones, who have endured thisproject with me. I appreciate your patience and unfailing support—even when Ihaven’t been there for you as much as I should have. And, most important, I loveyou guys!

about this bookTest-driven development was born in the hands and minds of software developerslooking for a way to develop software better and faster. This book was written byone such software developer who wishes to make learning TDD easier. Becausemost of the problems encountered by developers new to TDD relate to overcom-ing technical hindrances, we’ve taken an extremely hands-on approach. Not onlydo we explain TDD through an extended hands-on example, but we also devoteseveral chapters to showing you how to write unit tests for technology that’s gener-ally considered difficult to test. First-hand experiences will be the biggest learningopportunities you’ll encounter, but this book can act as the catalyst that gets youpast the steepest learning curve.
Audience
This book is aimed at Java programmers of all experience levels who are lookingto improve their productivity and the quality of the code they develop. Test-drivendevelopment lets you unleash your potential by offering a solid framework forbuilding software reliably in small increments. Regardless of whether you’re creat-ing a missile-control system or putting together the next YouTube, you can benefitfrom adopting TDD.
Our second intended audience includes Java programmers who aren’t neces-sarily interested in TDD but who are looking for help in putting their code undertest. Test-driven development is primarily a design and development technique; but
xxi

xxii ABOUT THIS BOOK
writing unit tests is such an essential activity in TDD that this book will lend you ahand during pure test-writing, too—we cover a lot of (so-called) difficult-to-test tech-nologies such as data-access code, concurrent programs, and user-interface code.
Whether you’re simply looking to get the job done or have a larger goal of per-sonal improvement in mind, we hope you’ll find this book helpful.
Roadmap
You’re reading a book that covers a lot of ground. In order to structure the mate-rial, we’ve divided the book into three parts with distinct focuses. Part 1 intro-duces the book’s main topics—test-driven development and acceptance test-driven development—starting with the very basics.
Chapter 1 begins with a problem statement—the challenges we need to over-come—and explains how TDD and acceptance TDD provide an effective solutionin the form of test-first programming, evolutionary design, test automation, andmerciless refactoring.
Chapter 2 gets our hands dirty, extending our understanding of TDD throughan in-depth example: a homegrown template engine we test-drive from scratch.Along the way, we discuss how to manage the tests we want to write in a test listand how to select the next test from that list.
Chapter 3 finishes what chapter 2 started, continuing the development of thetemplate engine through an extensive design change, starting with a spike—alearning experiment—and then proceeding to make the change to the templateengine in a controlled, disciplined manner.
Chapter 4 brings our perspective back to a higher level to explain the strate-gies in our toolkit, from selecting tests to making them pass. We also talk aboutessential testing concepts such as fixtures, test doubles, and the differencesbetween state- and interaction-based testing. After giving some guidelines for cre-ating testable designs, chapter 4 ends with an overview of a number of key test pat-terns and a section on working in a test-first manner with legacy code.
Part 2 is about getting dirty again, demonstrating through working exampleshow we can apply TDD when working with a variety of technologies that are some-times referred to as being “difficult to test-drive.” After part 2, you’ll know thatfolks who say that don’t know what they’re talking about!
Chapter 5 starts our journey through the trenches of web development. Welearn to test-drive request/response-style web layers using plain old Java Servletsand Spring Controllers, and we learn to test-drive the presentation layer built withJavaServer Pages and Apache Velocity templates. The chapter also contrasts theserequest/response examples with test-driving web applications using a component-based framework, Apache Wicket.

ABOUT THIS BOOK xxiii
Chapter 6 explains how to test-drive the data-access layer behind our web com-ponents. We’ll see examples of test-driving data-access objects based on raw JDBCcode, the Spring Framework’s JdbcTemplate API, and the de facto object-relationalmapping (ORM) tool, Hibernate. We’ll also discuss how to deal with the databasein our unit tests and how to fill in the gaps with integration tests. Finally, we sharea few tricks for dealing with the file system.
Chapter 7 takes us to the land of the unknown: nondeterministic behavior.After first examining our options for faking time, we turn our attention to multi-threading. We begin with a discussion of what we can and should test for, explor-ing topics such as thread safety, blocking operations, starting and stoppingthreads, and asynchronous execution. Our trip to the world of the unpredictableends with a tour of the new synchronization objects from java.util.concurrentthat were introduced in Java 5.
Chapter 8 is about face—the face of Java Swing applications, that is. Again, webegin by figuring out what we should test for when test-driving UI code. Then, welook at three design patterns that make our test-driven lives easier, and we brieflyintroduce two open source tools—Jemmy and Abbot—for unit-testing Swing com-ponents. We finish chapter 8 (and part 2) with an extended example, test-drivingthe face and behavior for a custom Swing component.
Part 3 is a change of tempo. We move from the concrete world of test-drivingobjects and classes into the fuzzier world of building whole systems in a test-firstmanner with acceptance TDD.
Chapter 9 gets us going with an introduction to user stories for managingrequirements, and to the essence of acceptance tests. Once we’re up to speed withthe what, we focus on the how—the process of acceptance TDD and what itrequires from the team. We also crystallize the benefits of and the reasons fordeveloping software with acceptance TDD. The chapter ends with a discussion ofwhat kinds of aspects our acceptance tests should specify about the system we’rebuilding and an overview of some of the tools in our disposal.
Chapter 10 makes acceptance TDD more concrete by taking a closer look at Fit,a popular acceptance-testing tool. Our Fit tutorial begins with a description of howthe developer can use Fit to collaborate with the customer, first sketching accep-tance tests in a tabular format and then touching them up into syntax recognizedby Fit. We then see how to implement the backing code that glues our tabular testsinto interaction with the system, first going through the three standard fixturesbuilt into Fit and then looking at additional utilities provided by the FitLibrary, an

xxiv ABOUT THIS BOOK
extension to Fit. Finally, we learn to run our precious Fit tests from the commandline and as part of an Apache Ant build.
Chapter 11 expands our perspective by looking at a number of strategies forimplementing our acceptance tests independent of the tools in use. After goingthrough our options for connecting tests to the system we’re developing, we dis-cuss the kinds of limitations and opportunities that technology puts in our way.We also share some tips for speeding up acceptance tests and keeping complexityin check.
Chapter 12 ends part 3 as a black sheep of sorts—a chapter on ensuring thesuccess of TDD adoption. We begin by exploring what ingredients should be inplace for us to achieve lasting change, both for ourselves and for our peers. Wethen focus on resistance: how to recognize it and how to deal with it. Finally, we gothrough a long list of things in our toolbox that can facilitate the successful adop-tion we’re seeking.
Because writing unit tests is so central to test-driven development, we’ve alsoprovided three brief tutorials on some of the essential tools; you can use them ascheat sheets. Appendices A and B are for the JUnit unit-testing framework, illus-trating the syntax for versions 4.3 and 3.8, respectively. Appendix C does the samefor EasyMock, a dynamic mock-object framework we can use to generate smarttest doubles.
Test-driving code in the comfort of our favorite IDE is cool, but we need tomake those tests part of our automated build. That’s why we’ve included appen-dix D: a brief tutorial for running JUnit tests with Apache Ant, the standard buildtool for Java developers.
Code conventions
The code examples presented in this book consist of Java source code as well as ahost of markup languages and output listings. We present the longer pieces ofcode as listings with their own headers. Smaller bits of code are run inline withthe text. In all cases, we present the code using a monospaced font, to differentiateit from the rest of the text. In part 2, we frequently refer from the text to elementsin code listings. Such references are also presented using a monospaced font, tomake them stand out from plain English. Many longer listings also have num-bered annotations that we refer to in the text.
Code downloads
The complete example code for the book can be downloaded from the Manningwebsite page for this book, at http://www.manning.com/koskela. This includes

ABOUT THIS BOOK xxv
the source code shown in the book as well as the omitted parts-everything you needto play and tinker with the code, taking it further from where we left off, or tearingit into pieces for a closer autopsy.
The download includes a Maven 2 POM file and instructions for installing andusing Maven (http://maven.apache.org) to compile and run the examples. Notethat the download doesn’t include the various dependencies, and you need tohave an Internet connection when running the Maven build for the first time—Maven will then download all the required dependencies from the Internet. Afterthat, you’re free to disconnect and play with the examples offline.
The code examples were written against Java 5, so you’ll need to have thatinstalled in order to compile and run the examples. You can download a suitableJava environment from http://java.sun.com/javase. (To compile the code, you’llneed to download the JDK, not the JRE.)
We seriously recommend installing a proper IDE as well. The example codecomes in the form of an Eclipse project, so you may want to download and installthe latest and greatest version of Eclipse (http://www.eclipse.org). Other main-stream tools such as IntelliJ IDEA (http://www.jetbrains.com/idea) and NetBeans(http://www.netbeans.org) should work fine, too—you’ll just need to configurethe project yourself.
Online chapter
There’s one hot topic that we don’t cover in the 12 chapters that made their wayinto the final manuscript: test-driving Enterprise JavaBeans. Instead, we’ve pro-vided more than 40 pages of detailed advice for developers working with this tech-nology in the form of an extra chapter that’s only available online.
This bonus chapter covers Enterprise JavaBeans, ranging from regular sessionbeans we use to encapsulate our applications’ business logic to the persistence-oriented entity beans to the asynchronous-message-driven beans and the Timer API.
Although we focus on covering the latest and greatest EJB 3.0 specification, weshow some key tips and tricks for both 3.0 and the older 2.x API. We do thisbecause many legacy systems continue to use the 2.x version of the EJB specifica-tion, regardless of the massive testability and design improvements introduced inthe EJB 3.0 specification.
You can download the bonus chapter from http://www.manning.com/koskela.
What’s next?
This book should give you enough ammunition to get going with test-drivendevelopment, but there’s bound to be a question or two that we haven’t managedto answer in full. Fortunately, Manning provides an online forum where you can

xxvi ABOUT THIS BOOK
talk to the authors of Manning titles, including the one you’re reading right now.You can reach Lasse at the Author Online forum for Test Driven at http://www.manning-sandbox.com/forum.jspa?forumID=306.
Test-driven development is a technique and a methodology that can’t bedescribed perfectly in a single written document, be it a short article or a series ofbooks. This is partly because TDD is a technique that evolves together with the prac-titioner and partly because writing tests—a central activity in TDD—varies so muchfrom one technology domain to the next. There are always new twists or tricks thatwe could’ve included but didn’t. Thus, it’s good to know where to go for furtherassistance. The testdrivendevelopment Yahoo! group is an excellent resource and fre-quently features interesting discussions about TDD and related issues. If you have aburning question and aren’t sure who to ask, ask the mailing list!
If tapping into the Yahoo! group isn’t enough to satisfy your need for passiveinformation-gathering about what’s happening in the community, I also suggestsubscribing your feed reader to http://www.testdriven.com, a web portal focusedon TDD. This portal gives you a heads-up about any relevant new article, blogentry, or development tool that appears on the scene. And, of course, many of theindustry conferences on agile methods feature content about or related to TDD,so why not start attending those if you haven’t already?
I’m looking forward to seeing you join the TDD community!
Author Online
Purchase of Test Driven includes free access to a private web forum run by Man-ning Publications, where you can make comments about the book, ask technicalquestions, and receive help from the author and from other users. To access theforum and subscribe to it, point your web browser to http://www.manning.com/koskela. This page provides information on how to get on the forum once you areregistered, what kind of help is available, and the rules of conduct on the forum.
Manning’s commitment to our readers is to provide a venue where a meaning-ful dialogue between individual readers and between readers and the author cantake place. It is not a commitment to any specific amount of participation on thepart of the author, whose contribution to the book’s forum remains voluntary(and unpaid). We suggest you try asking the author some challenging questions,lest his interest stray!
The Author Online forum and the archives of previous discussions will beaccessible from the publisher’s website as long as the book is in print.

about the cover illustrationThe figure on the cover of Test Driven is a Franc Comtois, an inhabitant of the FreeCounty of Burgundy in northeastern France. This territory of Burgundy was anindependent state for a large part of its history, becoming permanently ceded toFrance only in the seventeenth century. The region has its own traditions and lan-guage, called Franc-Comtois, which is still spoken today.
The illustration is taken from a French travel book, Encyclopedie des Voyages byJ. G. St. Saveur, published in 1796. Travel for pleasure was a relatively new phe-nomenon at the time and travel guides such as this one were popular, introduc-ing both the tourist as well as the armchair traveler to the inhabitants of otherregions of France and abroad.
The diversity of the drawings in the Encyclopedie des Voyages speaks vividly of theuniqueness and individuality of the world’s towns and provinces just 200 yearsago. This was a time when the dress codes of two regions separated by a few dozenmiles identified people uniquely as belonging to one or the other. The travelguide brings to life a sense of isolation and distance of that period and of everyother historic period except our own hyperkinetic present. Dress codes havechanged since then and the diversity by region, so rich at the time, has faded away.It is now often hard to tell the inhabitant of one continent from another. Perhaps,trying to view it optimistically, we have traded a cultural and visual diversity for amore varied personal life. Or a more varied and interesting intellectual and tech-nical life.
xxvii

xxviii ABOUT THE COVER ILLUSTRATION
We at Manning celebrate the inventiveness, the initiative, and the fun of thecomputer business with book covers based on the rich diversity of regional life twocenturies ago brought back to life by the pictures from this travel guide.

Part 1
A TDD primer
Part 1 is a test-driven development (TDD) primer, giving you a kick start inthe art of test driving. In chapter 1, you’ll learn about both TDD and its bigbrother, acceptance TDD, from the very basics, getting an overview of bothtechniques. Chapter 2 takes you deeper into the test-first realm through ahands-on tutorial that you can follow on your computer, editing and run-ning actual code as we go along. Chapter 3 continues on this path, develop-ing the hands-on example further by throwing in a larger-scale refactoringthat introduces significant changes to our design.
While teaching TDD to dozens and dozens of programmers over theyears, I’ve learned that practice is a better teacher than I am. By the timeyou’ve implemented a fully capable template engine through chapters 2 and3, you’ll be ready to add some heavily guarded trade secrets to your toolbox.Chapter 4 expands our idea of TDD with a number of tips and tricks, fromselecting the next test to different ways of making it pass. Design guidelinesand testing tools will get the coverage they deserve, too.


The big picture
I can stand brute force, but brute reason is quite unbearable.
—Oscar Wilde
3
4 CHAPTER 1
The big picture
“Only ever write code to fix a failing test.” That’s test-driven development, orTDD,1 in one sentence. First we write a test, then we write code to make the testpass. Then we find the best possible design for what we have, relying on the exist-ing tests to keep us from breaking things while we’re at it. This approach to build-ing software encourages good design, produces testable code, and keeps us awayfrom over-engineering our systems because of flawed assumptions. And all of thisis accomplished by the simple act of driving our design each step of the way withexecutable tests that move us toward the final implementation.
This book is about learning to take those small steps. Throughout the chap-ters, we’ll learn the principles and intricacies of TDD, we’ll learn to develop Javaand Enterprise Java applications with TDD, and we’ll learn to drive our overalldevelopment process with an extension to the core idea of TDD with what we callacceptance test-driven development (acceptance TDD or ATDD). We will drivedevelopment on the feature level by writing functional or acceptance tests for afeature before implementing the feature with TDD.
As a way of applying tests for more than just verification of the correctness ofsoftware, TDD is not exactly a new invention. Many old-timers have stories to tellabout how they used to write the tests before the code, back in the day. Today, thisway of developing software has a name—TDD. The majority of this book is dedi-cated to the “what” and “how” of test-driven development, applied to the varioustasks involved in developing software.
In terms of mainstream adoption, however, TDD is still new. Much like today’scommodities are yesterday’s luxury items, a programming and design techniqueoften starts as the luxury of a few experienced practitioners and then is adoptedby the masses some years later when the pioneers have proven and shapedthe technique. The technique becomes business as usual rather than a niche forthe adventurous.
I believe that mainstream adoption of TDD is getting closer every day. In fact, Ibelieve it has already started, and I hope that this book will make the landing a bitless bumpy.
We’ll start by laying out the challenge to deliver software using the current stateof the practice in software development. Once we’re on the same page about whatwe’d like to accomplish and what’s standing in our way, we’ll create a roadmap forexploring how TDD and acceptance TDD can help resolve those problems, and
1 The acronym TDD is sometimes expanded to Test-Driven Design. Another commonly used term forwhat we refer to as TDD is Test-First Programming. They’re just different names for the same thing.

The challenge: solving the right problem right 5
we’ll look at the kinds of tools we might want to employ during our journey becom-ing to master craftspeople.
1.1 The challenge: solving the right problem right
The function of software development is to support the operations and businessof an organization. Our focus as professional software developers should be ondelivering systems that help our organizations improve their effectiveness andthroughput, that lower the operational costs, and so forth.
Looking back at my years as a professional software developer and at thedecades of experience documented in printed literature and as evidenced bycraftsmen’s war stories around the world, we can only conclude that most organi-zations could do a lot better in the task of delivering systems that support theirbusiness. In short, we’re building systems that don’t work quite right; even if theywould work without a hitch, they tend to solve the wrong problems. In essence,we’re writing code that fails to meet actual needs.
Next, let’s look at how creating poorly written code and missing the movingtarget of the customer’s actual needs are parts of the challenge of being able todeliver a working solution to the right problem.
1.1.1 Creating poorly written code
Even after several decades of advancements in the software industry, the quality ofthe software produced remains a problem. Considering the recent years’ focus ontime to market, the growth in the sheer volume of software being developed, andthe stream of new technologies to absorb, it is no surprise that software develop-ment organizations have continued to face quality problems.
There are two sides to these quality problems: high defect rates and lack ofmaintainability.
Riddled with defectsDefects create unwanted costs by making the system unstable, unpredictable, orpotentially completely unusable. They reduce the value of the software wedeliver—sometimes to the point of creating more damage than value.
The way we try to get rid of defects is through testing—we see if the softwareworks, and then we try to break it somehow. Testing has been established as a crit-ical ingredient in software development, but the way testing is traditionally per-formed—a lengthy testing phase after the code is “frozen”—leaves much room forimprovement. For instance, the cost of fixing defects that get caught during testing

6 CHAPTER 1
The big picture
is typically a magnitude or two higher than if we’d caught them as they were intro-duced into the code base. Having defects means we’re not able to deliver. Theslower and the more costly it is to find and fix defects, the less able we become.
Defects might be the most obvious problem with poorly written code, but suchcode is also a nightmare to maintain and slow and costly to develop further.
Nightmare to maintain, slow to developWell-written code exhibits good design and a balanced division of responsibilitieswithout duplication—all the good stuff. Poorly written code doesn’t, and workingwith it is a nightmare in many aspects. One of them is that the code is difficult tounderstand and, thus, difficult to change. As if that wasn’t enough of a speedbump, changing problematic code tends to break functionality elsewhere in thesystem, and duplication wreaks havoc in the form of bugs that were supposed tobe fixed already. The list goes on.
“I don’t want to touch that. It’ll take forever, and I don’t know what will breakif I do.” This is a very real problem because software needs to change. Rather thanrewrite every time we need to change existing code or add new code, we need to beable to build on what we have. That’s what maintainability is all about, and that’swhat enables us to meet a business’s changing needs. With unmaintainable codewe’re moving slower than we’d like, which often leads to the ever-increasing pres-sure to deliver, which ends up making us deliver still more poorly written code.That’s a vicious cycle that must end if we want to be able to consistently deliver.
As if these problems weren’t enough, there’s still the matter of failing to meetactual needs. Let’s talk about that.
1.1.2 Failing to meet actual needs
Nobody likes buying a pig in a poke.2 Yet the customers of software developmentgroups have been constantly forced to do just that. In exchange for a specifica-tion, the software developers have set off to build what the specificationdescribes—only to find out 12 months later that the specification didn’t quitematch what the customer intended back then. Not to mention that, especially inthe modern day’s hectic world of business, the customer’s current needs are sig-nificantly different from what they were last year.
As a result of this repeated failure to deliver what the customer needs, we as anindustry have devised new ways of running software projects. We’ve tried workingharder (and longer) to create the specification, which has often made things even
2 A sack. Don’t buy a pig in a sack.

Solution: being test-driven 7
worse, considering that the extended period of time to a delivered system leaveseven more time for the world to change around the system. Plus, nailing downeven more details early on has a connection to building a house of cards. Errors inthe specification can easily bring down the whole project as assumptions are builton assumptions.
Our industry’s track record makes for gloomy reading. There’s no need to fallinto total depression, however, because there are known cures to these problems.Agile software development,3 including methods such as Extreme Programming(XP) and Scrum, represents the most effective antidote I am aware of. The rest ofthis book will give us a thorough understanding of a key ingredient of the agilityprovided by these methods—being test-driven.
1.2 Solution: being test-driven
Just like the problem we’re facing has two parts to it—poorly written code and fail-ure to meet actual needs—the solution we’re going to explore in the comingchapters is two-pronged as well. On one hand, we need to learn how to build thething right. On the other, we need to learn how to build the right thing. The solu-tion I’m describing in this book—being test-driven—is largely the same for bothhands. The slight difference between the two parts to the solution is in how wetake advantage of tests in helping us to create maintainable, working software thatmeets the customer’s actual, present needs.
On a lower level, we test-drive code using the technique we call TDD. On ahigher level—that of features and functionality—we test-drive the system using asimilar technique we call acceptance TDD. Figure 1.1 describes this combinationfrom the perspective of improving both external and internal quality.
3 Refer to Agile & Iterative Development: A Manager’s Guide (Addison-Wesley, 2003) by Craig Larman for agood introduction to agile methods.
External quality
Acceptance TDD
Internal quality
TDD
Figure 1.1TDD is a technique for improving the software’s internal quality, whereas acceptance TDD helps us keep our product’s external quality on track by giving it the correct features and functionality.

8 CHAPTER 1
The big picture
As we can see from figure 1.1, these two distinct levels on which we test-drive thesoftware collectively improve both the product’s internal quality and the external,or perceived, quality. In the following sections, we’ll discover how TDD and accep-tance TDD accomplish these improvements. Before we dig deeper into the tech-niques, let’s first concentrate on how these techniques help us overcome thechallenge of being able to deliver.
1.2.1 High quality with TDD
TDD is a way of programming that encourages good design and is a disciplinedprocess that helps us avoid programming errors. TDD does so by making us writesmall, automated tests, which eventually build up a very effective alarm system forprotecting our code from regression. You cannot add quality into software afterthe fact, and the short development cycle that TDD promotes is well gearedtoward writing high-quality code from the start.
The short cycle is different from the way we’re used to programming. We’vealways designed first, then implemented the design, and then tested the imple-mentation somehow—usually not too thoroughly. (After all, we’re good program-mers and don’t make mistakes, right?) TDD turns this thinking around and sayswe should write the test first and only then write code to reach that clear goal.Design is what we do last. We look at the code we have and find the simplestdesign possible.
The last step in the cycle is called refactoring. Refactoring is a disciplined way oftransforming code from one state or structure to another, removing duplication,and gradually moving the code toward the best design we can imagine. By constantlyrefactoring, we can grow our code base and evolve our design incrementally.
If you’re not quite sure what we’re talking about with the TDD cycle, don’tworry. We’ll take a closer look at this cycle in section 1.3.
To recap what we’ve learned about TDD so far, it is a programming techniquethat helps us write thoroughly tested code and evolve our code with the bestdesign possible at each stage. TDD simply helps us avoid the vicious circle ofpoorly written code. Prong number one of the test-driven solution!
Speaking of quality, let’s talk a bit about that rather abstract concept and whatit means for us.
Quality comes in many flavorsEvidenced by the quality assurance departments of the corporate world of today,people tend to associate the word quality with the number of defects found afterusing the software. Some consider quality to be other things such as the degree to

Solution: being test-driven 9
which the software fulfills its users’ needs and expectations. Some consider notjust the externally visible quality but also the internal qualities of the software inquestion (which translate to external qualities like the cost of development, main-tenance, and so forth). TDD contributes to improved quality in all of these aspectswith its design-guiding and quality-oriented nature.
Quite possibly the number one reason for a defect to slip through to produc-tion is that there was no test verifying that that particular execution path throughour code indeed works as it should. (Another candidate for that unwanted title isour laziness: not running all of the tests or running them a bit sloppily, therebyletting a bug crawl through.)
TDD remedies this situation by making sure that there’s practically no code inthe system that is not required—and therefore executed—by the tests. Throughextensive test coverage and having all of those tests automated, TDD effectivelyguarantees that whatever you have written a test for works, and the quality (interms of defects) becomes more of a function of how well we succeed in comingup with the right test cases.
One significant part of that task is a matter of testing skills—our ability toderive test cases for the normal cases, the corner cases, the foreseeable usererrors, and so forth. The way TDD can help in this regard is by letting us focus onthe public interfaces for our modules, classes, and what have you. By not knowingwhat the implementation looks like, we are better positioned to think out of thebox and focus on how the code should behave and how the developer of the cli-ent code would—or could—use it, either on purpose or by mistake.
TDD’s attention to quality of both code and design also has a significant effecton how much of our precious development time is spent fixing defects rather than,say, implementing new functionality or improving the existing code base’s design.
Less time spent fixing defectsTDD helps us speed up by reducing the time it takes to fix defects. It is commonsense that fixing a defect two months after its introduction into the system takestime and money—much more than fixing it on the same day it was introduced.Whatever we can do to reduce the number of defects introduced in the first place,and to help us find those defects as soon as they’re in, is bound to pay back.
Proceeding test-first in tiny steps makes sure that we will hardly ever need totouch the debugger. We know exactly which couple of lines we added that made thetest break and are able to drill down into the source of the problem in no time,avoiding those long debugging sessions we often hear about in fellow program-mers’ war stories. We’re able to fix our defects sooner, reducing the business’s cost

10 CHAPTER 1
The big picture
to the project. With each missed defect costing anywhere from several hundred toseveral thousand dollars,4 it’s big bucks we’re talking here. Not having to spendhours and hours looking at the debugger allows for more time to be spent on otheruseful activities.
The fact that we are delivering the required functionality faster means that wehave more time available for cleaning up our code base, getting up to speed onthe latest developments in tools and technologies, catching up with our cowork-ers, and so forth—more time available to improve quality, confidence, and speed.These are all things that feed back into our ability to test-drive effectively. It’s a vir-tuous cycle, and once you’re on it, there seems to be no end to the improvements!
We’ll soon talk about further benefits of adopting and practicing TDD—thebenefits for you and me as programmers—but before we go there, let’s talk a bitabout the second prong of our solution to the aforementioned challenge of beingable to deliver: acceptance TDD.
1.2.2 Meeting needs with acceptance TDD
TDD helps us build code with high technical quality—code that does what we expectit to do and code that’s easy to understand and work with. The correctness of thecode we develop with TDD, however, is tested for isolated blocks of logic rather thanfor features and system capabilities. Furthermore, even the best code written test-first can implement the wrong thing, something the customer doesn’t really need.That’s where acceptance test-driven development comes into the picture. The tra-ditional way of adding features into a system is to first write a requirements docu-ment of some kind, proceed with implementation, have the development team testthe feature, and then have the customer acceptance-test the feature. AcceptanceTDD differs from this method by moving the testing function before the implemen-tation, as shown in figure 1.2. In other words, we translate a requirement into a setof executable tests and then do the implementation against the tests rather thanagainst the developer’s interpretation of a verbal requirement.
Acceptance TDD provides the missing ingredient to delivering a good productby bridging the gap between the programmer and the customer. Rather than work-ing off of arbitrary requirements documents, in acceptance TDD we strive for closecollaboration and defining explicit, unambiguous tests that tell us exactly what itmeans when we say a feature is “done.” By defining the desired functionality in very
4 http://www.jrothman.com/Papers/Costtofixdefect.html.

Solution: being test-driven 11
concrete terms—via executable tests—we are effectively ensuring that we’re deliv-ering what the customer needs.
The process is much like the TDD cycle on the code level. With acceptanceTDD, we’re just talking about tests for the behavior of a system rather than tests forthe behavior of objects. This difference also means that we need to speak a lan-guage that both the programmer and the customer understand.
TDD and acceptance TDD often go hand in hand. On the system level, we runour development process with acceptance TDD; and inside the implementationstep of each feature; we employ TDD. They are by no means tightly coupled, butthey are powerful in combination and they do fit together seamlessly.
We should now have an idea of how TDD and acceptance TDD team togetherfor a solution to the challenge of being able to deliver high-quality software thattargets the right need. We’ll soon study in more detail what TDD is, how it helps uscreate high-quality code, and how to build it right. In section 1.4, we’ll talk moreabout how we can let tests drive our development on a higher level to help usmeet our customers’ needs—to build the right thing—with acceptance TDD.Before going farther, though, let’s talk a bit about how we, as programmers, bene-fit from working test-first.
1.2.3 What’s in it for me?
We don’t buy a new car for no reason, and we definitely shouldn’t adopt a newdevelopment technique just because it exists. There has to be something valu-able—something that improves our productivity—in order for it to make sensefor us to take on learning a new way of doing our job. We already know that TDDand acceptance TDD help us produce higher-quality software that meets our cus-tomers’ needs. Let’s spell out to ourselves how these techniques make our per-sonal work experience more enjoyable.
I can easily identify at least three clear benefits I have personally gained fromhaving adopted TDD back in the day:
Requirement Acceptance tests ImplementationFeedback
Figure 1.2 Acceptance test-driven development drives implementation of a requirement through a set of automated, executable acceptance tests.

12 CHAPTER 1
The big picture
■ I rarely get a support call or end up in a long debugging session.
■ I feel confident in the quality of my work.
■ I have more time to develop as a professional.
Let me explain what I mean by these benefits.
No more long debugging sessionsI still remember a particular programming task a few years back. I got the task offixing a defect in a homegrown parser for a proprietary file format. I read hun-dreds and hundreds of lines of code, going back and forth as I was trying to cometo grips with the design; eventually figured I knew what needed to be done.
Not yet having adopted TDD at that time, I started molding the parser towardthe new design I had envisioned that would get rid of the defect and make theparser easier to understand as a nice bonus. It took a couple of hours to get thenew design in place and the code base compiling. Full of excitement about myultra-smart design, I tabbed to a terminal window to install the parser to a testserver. And? The darn parser didn’t work. It just did not work, and I had no ideawhy. I ran the code in a debugger, but I still couldn’t figure out the problem. I’mpretty sure it took more than a couple of hours of stepping through the codeagain and again with the debugger before I found and fixed the problem. And itturned out to be a rather trivial one. Tired, hungry, and slightly pissed off, I leftthe office cursing my blindness for the error.
It was much later that I realized the problem was not with my blindness but theway I approached the task—the process, if you will—by taking way too big a step,effectively losing sight of the tree from the woods. If I had written small, focusedtests along the way as we do with TDD, I would’ve spotted the error immediatelyafter writing the flawed branching construct.
As if the deadly debugging session wasn’t enough, Murphy’s Law5 proved itselfyet again. I soon got a rather angry call due to the parser crashing in a customer’sproduction environment. It turns out that I had introduced at least one majordefect into the parser as I changed its design. It’s one thing to know that yourcode could exhibit a better design. It’s another thing to be awakened at 3:00 a.m.from sleep by an angry account manager who was just awakened by an evenangrier customer.
I would’ve slept at least two hours more that night—and better—if only I hadused a technique like TDD or, at the very least, written proper tests for the parser.
5 Murphy’s Law: If something bad can happen, it will happen.
Solution: being test-driven 13
That particular incident raised my interest in testing my changes significantlybecause I was suddenly painfully aware of having had false confidence in my work.And I like to feel confident with my work.
Feeling confident with my workDeep down, we want to write code that works. Our job might be at stake if wedeliver code that’s too buggy. On the other hand, we want to write code as fast aspossible. Our livelihood might also be at stake if we take too long writing thecode. As a result, we often have to decide when we are confident enough aboutthe code we’re writing to release it and move on to our next task.
For a moment, let’s take a trip down memory lane. Think about a program-ming session you’ve experienced, writing some piece—any piece—of code thatneeded to work or bad things would happen. Take a minute to reminisce aboutthat moment.
How did you go about writing that code? Did you design it first on a notepad?Did you write the code in one burst, getting it right the first time, or did you goback and start over? Did you spot an obvious error in your loop? Did it compile atfirst try?
How did you verify that the particular piece of code worked? Did you write amain method just for testing? Did you click through the user interface to see thatthe functionality was there? Did you spot errors in your tests? Did you stepthrough the code in a debugger? Did you have to go back multiple times to fixsome small issues? Overall, how long did it take to test it compared to writing thecode itself?
Whatever your answers were for these questions, I hope you’ve got some idearight now of the kind of things and activities you have done in order to crank outcode that you trust—code that you’re confident works. With this in mind, I have aquestion for you.
What if you could be confident that any code you release contains exactly zerodefects? If you could know that your code works exactly how the specification saysit should, would your stress level come falling down? Mine has. What if you couldspeed up the slow parts of that programming session you were thinking about—while increasing your confidence in the code’s correctness? Could you envisionworking that way all the time?
I cannot promise that adopting TDD would make your software defect-free. Inthe end it’s you who’s writing the code, and it’s up to you to avoid injecting bugsinto your code base. What I can promise, though, is that practicing TDD will make

14 CHAPTER 1
The big picture
you more confident about your software by letting you know exactly what yourcode does in which situations.
This added confidence does wonders to the internal quality of our software aswell. You might say it’s a virtuous cycle. The better your test suite is, the better thequality of your code and the more confident you can be about any changes youmake. The more confident you are about the changes you make, the morechanges you dare to make. The more changes you make, the better your internalquality becomes, the easier it is to write tests for your code, and so on. Clearly agood thing!
More time for other stuffTDD and acceptance TDD don’t make us type any faster, but they help us cut timefrom less productive activities such as debugging and cursing at unreadable code,or rework due to misunderstandings regarding requirements. As we proceed insmall steps, accumulating tests and becoming more confident about our code, weno longer feel the need to repeat the same tests over and over again “just in casethe computer would do something different this time,” or feel unsure whetherwe’ve checked that odd combination of data that could break things.
The more confidence we have, the faster we can move on to other tasks. Sure,our confidence can sometimes be false, but the occasion when that happens is, inmy experience, outweighed by the diminished time we spend pondering whetherwe have tested the code enough to pass it on or check it in and whether the fea-ture is implemented correctly or not.
TDD and acceptance TDD aren’t silver bullets, but they are one of the closestthings to that legendary shiny projectile we’ve seen since the invention of time-sharing machines. In the next section, we’ll talk about TDD in more detail. Afterthat, we’ll do the same for acceptance TDD.
Let’s go.
1.3 Build it right: TDD
So test-driven development is a development and design technique that helps usbuild up the system incrementally, knowing that we’re never far from a workingbaseline. And a test is our way of taking that next small step.
In this section, we’ll learn what makes TDD tick, and we’ll elaborate on why itworks and what kind of benefits we get from using the technique. It all begins withthe TDD cycle, which is the heartbeat of our work. After exploring the TDD cycle,we’ll talk about the meaning of having working software all the time, starting from

Build it right: TDD 15
day one. An essential part of building the system incrementally is to design for thepresent, rather than try to go for a design of the whole system up front. We’ll alsotalk through how TDD helps us do just that. Then, we’ll continue with a discussionof what makes this approach feasible—how to keep our software in good healthand working, all day, every day.
Let’s get going. Next stop, the TDD cycle of test-code-refactor.
1.3.1 Test-code-refactor: the heartbeat
As we learned in the first paragraph of this chapter, test-driven development, orTDD, is a programming technique based on a very simple rule:
Only ever write code to fix a failing test.
In other words, write the test first, and only then write the code that makes it pass.This rule is controversial to many of us who have been schooled to first produce athorough design, then implement the design, and finally test our software inorder to find all those bugs we’ve injected during implementation. TDD turns thiscycle around, as illustrated in figure 1.3.
Test first, then code, and design afterward. Does the thought of “designingafterward” feels awkward? That’s only natural. It’s not the same kind of designwe’re used to in the traditional design-code-test process. In fact, it’s such a differ-ent beast that we’ve given it a different name, too. We call it refactoring to bettercommunicate that the last step is about transforming the current design toward abetter design. With this little renaming operation, our TDD cycle really looks likethat in figure 1.4: test-code-refactor.
Design
Design
Code
Code
Test
Test
Traditional development cycle
Test-driven development cycle
Figure 1.3 TDD turns around the traditional design-code-test sequence. Instead, we test first, then write code, and design afterward.

16 CHAPTER 1
The big picture
In its deceptive simplicity, this little cycle, test-code-refactor, encompasses a signifi-cant power to improve the overall quality of our personal software process and,subsequently, that of the whole team, project, and organization.
We’ll take a closer look at this cycle in chapter 2, but let’s do a quick overview ofwhat we do in each of these three steps and why we do them. Then we’ll explorefurther the rationale and dynamics behind the technique.
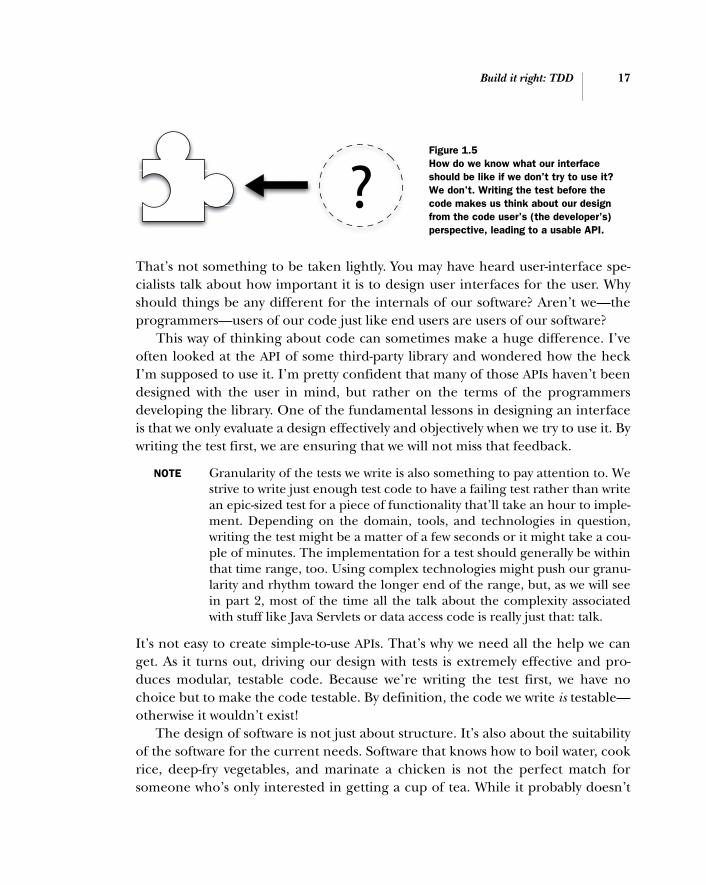
First we write a testWhen we write a test in the first step of the TDD cycle, we’re really doing morethan just writing a test. We’re making design decisions. We’re designing the API—the interface for accessing the functionality we’re testing. By writing the testbefore the code it’s testing, we are forcing ourselves to think hard about how wewant the code to be used. It’s a bit like putting together a jigsaw puzzle. As illus-trated by figure 1.5, it’s difficult to get the piece you need if you don’t know thepieces with which it should connect.
Test Code Refactor
Figure 1.4 Test-code-refactor is the mantra we test-driven developers like to chant. It describes succinctly what we do, it’s easy to spell, and it sounds cool.
Red-green-refactorRed-green-refactor is an alternative mnemonic for the TDD cycle of writing a test,making it pass, and making it pretty. What’s with the colors, you ask?
When we begin the TDD cycle by writing a test, it fails. It fails because oursystem is broken right now; it doesn’t have all the functionality we want it tohave. In some development environments, it fails by displaying a red bar—thusthe red in the mnemonic.
In the second step, making it pass, we implement the missing functionality sothat all tests pass—both the one we just added and all the ones we had already.At this time, the red bar turns to green, which takes us to green in the mnemonic.
The last part of the cycle, refactor, is just that—refactoring. As we improve thedesign of the code without altering its external behavior, all tests should passand, thus, we should remain green.
Red, green, green. Red, green, refactor. Quite catchy, isn’t it?
Build it right: TDD 17
That’s not something to be taken lightly. You may have heard user-interface spe-cialists talk about how important it is to design user interfaces for the user. Whyshould things be any different for the internals of our software? Aren’t we—theprogrammers—users of our code just like end users are users of our software?
This way of thinking about code can sometimes make a huge difference. I’veoften looked at the API of some third-party library and wondered how the heckI’m supposed to use it. I’m pretty confident that many of those APIs haven’t beendesigned with the user in mind, but rather on the terms of the programmersdeveloping the library. One of the fundamental lessons in designing an interfaceis that we only evaluate a design effectively and objectively when we try to use it. Bywriting the test first, we are ensuring that we will not miss that feedback.
NOTE Granularity of the tests we write is also something to pay attention to. Westrive to write just enough test code to have a failing test rather than writean epic-sized test for a piece of functionality that’ll take an hour to imple-ment. Depending on the domain, tools, and technologies in question,writing the test might be a matter of a few seconds or it might take a cou-ple of minutes. The implementation for a test should generally be withinthat time range, too. Using complex technologies might push our granu-larity and rhythm toward the longer end of the range, but, as we will seein part 2, most of the time all the talk about the complexity associatedwith stuff like Java Servlets or data access code is really just that: talk.
It’s not easy to create simple-to-use APIs. That’s why we need all the help we canget. As it turns out, driving our design with tests is extremely effective and pro-duces modular, testable code. Because we’re writing the test first, we have nochoice but to make the code testable. By definition, the code we write is testable—otherwise it wouldn’t exist!
The design of software is not just about structure. It’s also about the suitabilityof the software for the current needs. Software that knows how to boil water, cookrice, deep-fry vegetables, and marinate a chicken is not the perfect match forsomeone who’s only interested in getting a cup of tea. While it probably doesn’t
?Figure 1.5How do we know what our interface should be like if we don’t try to use it? We don’t. Writing the test before the code makes us think about our design from the code user’s (the developer’s) perspective, leading to a usable API.

18 CHAPTER 1
The big picture
bother you that your car’s engine has two extra valves on stand-by for those occa-sions when extra acceleration is needed, it certainly would bother you if youneeded to change all the valves from your engine. That’s the cost of over-engineering software.
You’re spending money on developing stuff that’s not really needed, andyou’re spending money on having to deal with the added complexity while work-ing on that over-engineered piece of code. You aren’t going to need it yet, so whyput it in? Instead, put those extras on a list somewhere so you don’t forget them. Itmight be that many of them never end up in the software—and for a good reason.
One way tests drive the design in TDD is that they tell you exactly what yoursoftware needs to be able to do now. Not tomorrow, not yesterday—now. Proceed-ing in these small steps, implementing just enough functionality to get that nexttest passing, we are in control of our software and its design. We have the safetynet of automated tests to make sure we don’t stumble in the dark, we have theclear sight of where we need to go, and we have the confidence that we’re imple-menting stuff that matters and stuff that we need right now.
This theme of focusing on the present is central to TDD. Indeed, the themerepeats itself in the second step of the TDD cycle, writing just enough code.
Then we write just enough codeThe second step of the TDD cycle is to write just enough code to make the testpass. Why just enough code? The test we’ve written is a test that’s failing. It’s point-ing out a gap between what the code does and what we expect it to do. It’s a smallgap, which we should be able to close in a few minutes, which, in turn, means thatthe code is never broken for long.
One of the fundamental ideas behind the concept of test-first development isto let the tests show you what to implement in order to make progress on develop-ing the software. You’re not just coding away, oblivious to the requirements of thepiece of code you’re writing. You’re satisfying an explicit, unambiguous require-ment expressed by a test. You’re making progress, and you’ve got a passing test toshow for it.
It’s worth noting that when we write just enough code, our main goal is to makethe test pass as quickly as possible. That often means an implementation that’s notoptimal. And that’s OK. We’ll take care of all that after we have the desired behav-ior in place—and tests to prove it. With the tests as our safety net, we can then pro-ceed to improving the design in the last step of the TDD cycle: refactoring.

Build it right: TDD 19
And then we refactorThe final step of the TDD cycle of test-code-refactor is when we take a step back,look at our design, and figure out ways of making it better. The refactoring step iswhat makes TDD sustainable. We could consider TDD without refactoring to be agood way of producing ugly code. Thoroughly tested ugly code, but still. The ugli-ness is directly proportionate to our productivity in working with and furtherdeveloping the code, which makes it pretty darn important to not forget to refac-tor. In fact, it’s so important that we’ll dedicate a whole section to talking aboutrefactoring in more detail.
Before we go there, though, let’s explore the big picture of developing soft-ware in small increments.
1.3.2 Developing in small increments
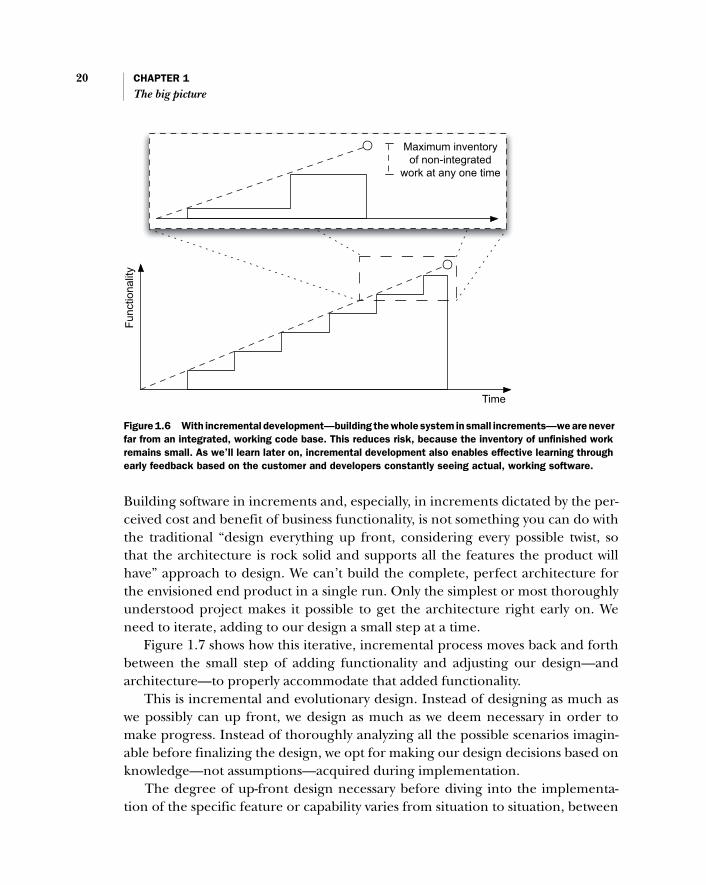
A common tenet of agile methods is that they all suggest producing a potentiallydeployable product as soon as possible—regardless of how little functionality ithas—and to keep on cranking out those deployable versions every day (someprojects have reported building a release package of their software several times aday) until the project is finished. This practice makes sure that when the deadlinecomes, you have something you can deliver and that works. It might not have all thefeatures the customer asked for, and it might not have everything your iterationplan said it would, but at least you’ve got something—and something that works.
Figure 1.6 shows an incremental progression of working, tested functionalitywhere the inventory of non-integrated, unfinished work is very small at any givenpoint in time.
Too many projects have pushed back their deadline again and again, eventu-ally getting canceled, without delivering a single line of working code. By buildingyour product in small increments, iteration by iteration, you don’t have to worryabout not making the deadline because you have a working (albeit not feature-complete) system starting from the first iteration. Similarly, too many projectshave delivered buggy code as a result of a last-minute rush of getting it togetherfor the deadline.
TDD removes this problem by proceeding in small steps, each of which resultsin a working product that’s one small step closer to the desired behavior. Becausethese steps are so small (calculated in minutes rather than hours or days), wedon’t end up with a pile of random code we need to quickly stitch together. Wekeep the software working by never letting it go too far away from that state. Like-wise, we keep the software lean and mean by designing for the present momentrather than looking too far ahead.
20 CHAPTER 1
The big picture
Building software in increments and, especially, in increments dictated by the per-ceived cost and benefit of business functionality, is not something you can do withthe traditional “design everything up front, considering every possible twist, sothat the architecture is rock solid and supports all the features the product willhave” approach to design. We can’t build the complete, perfect architecture forthe envisioned end product in a single run. Only the simplest or most thoroughlyunderstood project makes it possible to get the architecture right early on. Weneed to iterate, adding to our design a small step at a time.
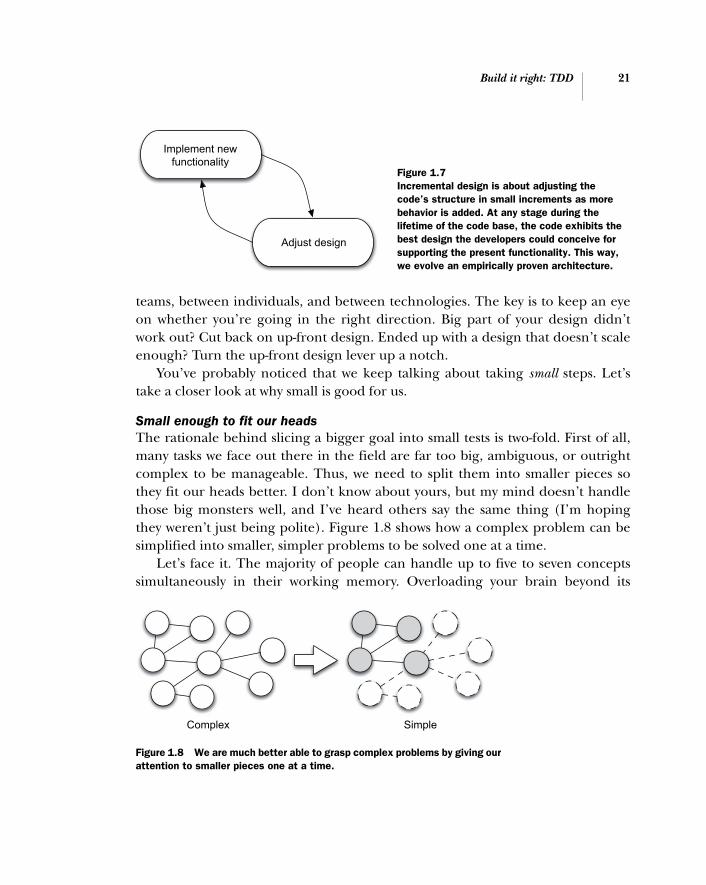
Figure 1.7 shows how this iterative, incremental process moves back and forthbetween the small step of adding functionality and adjusting our design—andarchitecture—to properly accommodate that added functionality.
This is incremental and evolutionary design. Instead of designing as much aswe possibly can up front, we design as much as we deem necessary in order tomake progress. Instead of thoroughly analyzing all the possible scenarios imagin-able before finalizing the design, we opt for making our design decisions based onknowledge—not assumptions—acquired during implementation.
The degree of up-front design necessary before diving into the implementa-tion of the specific feature or capability varies from situation to situation, between
Maximum inventoryof non-integrated
work at any one time
Func
tiona
lity
Time
Figure 1.6 With incremental development—building the whole system in small increments—we are never far from an integrated, working code base. This reduces risk, because the inventory of unfinished work remains small. As we’ll learn later on, incremental development also enables effective learning through early feedback based on the customer and developers constantly seeing actual, working software.
Build it right: TDD 21
teams, between individuals, and between technologies. The key is to keep an eyeon whether you’re going in the right direction. Big part of your design didn’twork out? Cut back on up-front design. Ended up with a design that doesn’t scaleenough? Turn the up-front design lever up a notch.
You’ve probably noticed that we keep talking about taking small steps. Let’stake a closer look at why small is good for us.
Small enough to fit our headsThe rationale behind slicing a bigger goal into small tests is two-fold. First of all,many tasks we face out there in the field are far too big, ambiguous, or outrightcomplex to be manageable. Thus, we need to split them into smaller pieces sothey fit our heads better. I don’t know about yours, but my mind doesn’t handlethose big monsters well, and I’ve heard others say the same thing (I’m hopingthey weren’t just being polite). Figure 1.8 shows how a complex problem can besimplified into smaller, simpler problems to be solved one at a time.
Let’s face it. The majority of people can handle up to five to seven conceptssimultaneously in their working memory. Overloading your brain beyond its
Implement newfunctionality
Adjust design
Figure 1.7 Incremental design is about adjusting the code’s structure in small increments as more behavior is added. At any stage during the lifetime of the code base, the code exhibits the best design the developers could conceive for supporting the present functionality. This way, we evolve an empirically proven architecture.
Complex Simple
Figure 1.8 We are much better able to grasp complex problems by giving our attention to smaller pieces one at a time.

22 CHAPTER 1
The big picture
capacity is bound to result in something getting overlooked while we’re swappingthings back and forth between the working and long-term memory (or a writtendocument). Having a sequence of smaller steps toward the end goal lets us mea-sure our progress in terms of something concrete, assuming that we will knowwhen each of those steps gets finished—which we do know because we’ve slicedour overall task into a sequence of small tests that make measurable progresstoward the ultimate goal.
TDD by its nature encourages such small steps with evolutionary design. We’reconstantly improving, changing the design in small increments. In practice, we’llhave to build some architecture as we go—we’ll just need to take that task into con-sideration when estimating the work.
Let’s take a closer look at how evolutionary design works, how it creates a livingcode base, and what kinds of implications it has for our way of working.
Evolutionary designMany programmers are familiar with a situation where a piece of code screams forsomeone to fix it but nobody does. Why? Because that piece of code happens tobe part of the interface between two components and is, thus, that much harderto change, so nobody ends up changing it. Evolutionary design is a mindset thatrequires us to make that change—nurture the living and growing code baseinstead of protecting it from the bad, bad world that wants change—and thusimprove the quality of our design and, indirectly, the quality of the whole system.
So, how does this evolutionary design work? It works in small steps. The sug-gested amount of up-front design varies from one agile method to another, butthe common idea is that you’ll only implement architecture that you know you’regoing to need. In one extreme, you know this only when you start working on afeature that requires, say, an email server. At that point, you know you’ll need anemail server, so you implement that email service architectural component, installthe email server, and so forth. Typically, this kind of architectural change can beadded just in time without too much pain. Sometimes, it’s not that easy.
Software systems can have certain needs—typically related to performance and/or networking capabilities—that may not be easy to add into the architecture afterthe fact. For example, splitting a single-user desktop application into a desktop cli-ent talking to a multi-user server over the network is something that’s bound to takeplenty of effort. Similarly, making a batch-processing application support real-timeupdates on the side might not be the easiest task the team will face.
Then again, these needs don’t tend to come to developers as a complete surprise.Although changes in requirements are generally something we cannot anticipate,

Build it right: TDD 23
the developers often see beforehand that certain evolution is going to take place atsome point, in light of the known requirements. We could call this anticipated change.As figure 1.9 points out, though, anticipated change is not guaranteed change. Someanticipated change never happens, and some may quickly turn to unanticipatedchange as the various unknowns reveal surprises.
Evolutionary design does not mean using common sense is prohibited. Thedevelopers should make use of what they know within the limits of commonsense, with awareness of the uncertainty of change itself, and while keeping inmind what the priorities are.
For example, consider a situation where we know that while the system nowneeds to handle an hourly batch update over the network from the company’scustomer relationship management (CRM) system, in a few months it will likely bedeveloped further into real-time integration, passing web service messages overthe hypertext transfer protocol (HTTP). With this information, what should we doto accommodate the possible future requirement for real-time integration?
Should we separate the data-processing logic from the data-receiving logic?Definitely! Should we already build the first, batch-based release on top of anapplication server so that we’ve got out-of-the-box web services support when theissue of handling web service messages becomes relevant? Perhaps we should, per-haps we shouldn’t.
The point here is to make a trade-off between avoiding unnecessary work onsomething that we don’t need and avoiding taking shortcuts now that will comeback to bite us. History has shown time and time again that for the most part, evo-lutionary design is less expensive than trying to get the final design on paper inthe beginning.
Anticipatedchange that
doesn’thappen
Anticipatedchange
Emergingdesign
Unanticipatedchange
Figure 1.9 The emerging, evolutionary design of a system is influenced by both anticipated and unanticipated change. It’s worth noting, though, that a significant amount of anticipated change doesn’t happen—or happens in a different form than expected, essentially making it unanticipated change. Our job is to apply common sense and good judgment when preparing for change that we know will happen. A lot of such change never does.

24 CHAPTER 1
The big picture
Discipline requiredAgain, the amount of up-front work varies from project to project (and itshould—one size doesn’t fit all), but evolutionary design means that in any caseyou’ll be doing a lot of changes to existing code to make room for the new fea-tures you’re adding into the system as the iterations go by. With a lot of changehappening all the time, we cannot afford having poorly written code. As such, weneed plenty of discipline on the part of developers to keep our code from rot-ting.6 The good news is that together with its supporting practices, evolutionarydesign will also help us weed out those problems and eventually stabilize our bugcount closer to zero7 instead of letting us build on a foundation of lurking defects.
What are these supporting practices? In short, it’s all about keeping your soft-ware in good health—at all times. An essential part of achieving this is refactoring.We already mentioned refactoring in passing as the last step of the TDD cycle oftest-code-refactor. For a longer explanation of how refactoring fits into the bigpicture, read on.
1.3.3 Keeping code healthy with refactoring
Proceeding in small increments means that we’re constantly extending the sys-tem to do something that its current design might not support. Consequently,we’re constantly extending the system’s design in ways that might break exist-ing concepts as well as introduce new ones. This, in turn, means that we’rebound to end up with a broken design that’s inconsistent, unbalanced, diffi-cult to understand, difficult to extend, or otherwise having a bad hair day. Ifwe’re out of luck, all of them. And that would seriously hamper our ability tokeep delivering software to our customers. Not to worry, though. There is away to practice evolutionary design without letting the design rot—that way iscalled refactoring.
Quoting Martin Fowler, the author of Refactoring: Improving the Design of ExistingCode (Addison-Wesley, 1999), refactoring is “a disciplined technique for restruc-turing an existing body of code, altering its internal structure without changing itsexternal behavior.” That description manages to pack a lot of information intosuch a short sentence. Let’s spell it out and see what it’s actually telling us aboutrefactoring, shall we?
6 http://www.objectmentor.com/resources/articles/Principles_and_Patterns.pdf.7 No, I’m not going to talk about whether zero-defect software is feasible. Feel free to voice your opinion,
though.

Build it right: TDD 25
Refactoring is disciplinedWhen refactoring (verb), we are not just altering the code’s structure but improv-ing the design by altering it in a controlled manner—by applying small behavior-preserving transformations that are called refactorings (noun). In other words,refactoring is about applying refactorings on code in a controlled manner. Thisrestructuring can be a significant change to the existing design, but it is alwaysperformed in small steps, verifying at each stage that the little transformationswe’ve made have not changed existing behavior.
We don’t just change code. We first identify specific problems in the design, andthen we select appropriate refactorings and apply them carefully and thoughtfully.We wait until a problem begins to present itself, and only then do we solve it. Wedon’t predict design problems beforehand and prepare for them—that wouldincrease the possibility of creating more problems with our system’s design thansolving them.
Refactorings are transformationsA refactoring can also be thought of as a transformation between two states. Thestarting state has some characteristic you’d like to get rid of or otherwise improveon, and the target state represents a design that would incorporate thatimprovement. Figure 1.10 shows an example of a refactoring called ReplaceInheritance with Delegation (also documented in Fowler’s book) that, as its nameimplies, moves our design from an inheritance-based solution to a delegation-based solution.
The reason for doing this refactoring might be, for instance, that the subclassis only extending the superclass in order to reuse a small part of its functionalityand, as an unwanted side effect, inherits a whole bunch of data and functionalitywe don’t care for.
Superclass
Subclass
Delegator Delegate- delegate+ method()
+ method()
+ method()
Figure 1.10 Refactorings are transformations between two functionally identical states or structures of the code. Here we see a transformation from using inheritance hierarchy to using a delegate to provide the same functionality while improving the design’s fitness for our current needs. These transformations are not absolute improvements—they’re simply disciplined transitions from one possible design to another. In fact, for many refactorings there exists a reverse refactoring, making the same transformation in the opposite direction.

26 CHAPTER 1
The big picture
Some of these refactorings are so well defined that modern development toolshave automated them. This automation has made refactoring evolutionarydesigns8feasible for applications and systems of pretty much any size and com-plexity. (Can you imagine yourself renaming a method for clarity if that wouldmean manually checking out some five dozen source files from version control,doing a search-and-replace, and then checking in?)
Refactorings alter internal structureSo these transformations are applied to the system’s internal structure—thecode—which means that many of the refactorings are very low-level. For example,one of the most common refactorings is called rename method. Renaming a methodor a local variable might not seem like too significant a change in the system’sdesign, but renaming a method from something ambiguous to something clearand concise can make a world of difference to someone new to the code andneeding to understand the existing code.
Also, such low-level refactorings are the fundamental building blocks to achiev-ing larger refactorings. These “larger” refactorings are typically those that dealwith moving the responsibilities around in your code, introducing or removing aninheritance hierarchy, or making other similar changes that (usually) involvemore than one class. In the end, all refactorings can be reduced into a series ofsmaller steps, such as renaming a variable; adding a new, empty class; changingthe return type of a method; and so forth.
8 A good Java-oriented reference for classic design patterns is Software Architecture Design Patterns in Java byPartha Kuchana (Auerbach, 2004).
Refactoring to patternsSometimes, one or both of the states we move between with our refactorings areknown design patterns,8 or known solutions to common design problems. Al-though most of the refactorings people apply on a daily basis are operating on alevel much smaller than that of design patterns, every now and then we do, infact, spot signs of a hidden pattern in our code and decide to move the designtoward that pattern, making it explicit. To read more about the relationship be-tween refactoring and design patterns, I heartily recommend Joshua Kerievsky’sRefactoring to Patterns (Addison-Wesley, 2004).

Build it right: TDD 27
Although technically the most common refactorings are things like renaminga method, the number-one reason for refactoring is duplication. It might be dupli-cation in terms of having two similar pieces of code in two methods or classes—something that could be extracted into a single method invoked in both places—but the duplication could also be in terms of responsibilities. Duplication, ofcourse, is bad for a code base because it makes the system more difficult tochange. Having logic and responsibility duplicated in multiple places is a guaran-teed way to introduce defects due to us forgetting to make the change in all neces-sary corners of the code base.
In addition to not introducing defects with our changes to the code’s internalstructure, we also don’t want our refactorings to add functionality. That is, refac-torings should preserve behavior.
Refactorings preserve behaviorThe latter part of the earlier quote by Martin Fowler says, “without changing[code’s] external behavior.” What does that mean? It means that whatever trans-formations you apply to the existing code, those transformations should onlyaffect the code’s design and structure—not its externally visible behavior or func-tionality. In other words, client code that uses the code you’re refactoring shouldnot notice any difference in how the refactored code behaves.
Renaming a method that’s part of a class’s public interface will obviouslyhave to ripple through to client code as well, but the behavior of that methodshould not change in any way. Similarly, restructuring the code behind the pub-lic interface should not in any way change the behavior visible through the pub-lic interface.
NOTE Now that we know what refactoring is, it’s worth mentioning what itisn’t. In the past few years, I have started hearing the word refactoring alot. Much to my disappointment, in most cases, it seems, the correctword would’ve been rewriting or editing without the discipline associatedwith refactoring.
So we think we’ve been successful at altering internal structure without changingexternal behavior. Cool. But how can we be sure that our refactorings haven’tchanged the code’s external behavior? By running tests against our code, of course!We want to keep our software working, and tests are the tool for ensuring that.

28 CHAPTER 1
The big picture
1.3.4 Making sure the software still works
It’s easy to say that we should deliver working software from day one, but it canseem like a daunting task to be constantly refactoring the design, all the whilemaking sure that whatever we’re changing does not break existing functionality.Yes, it is daunting. It is daunting to such a degree that we’re likely to slip if wedon’t have any help. Although the main purpose of tests in TDD is to help usdesign and develop working software, they also have a role to play in keeping itthat way in the future.
Contrary to popular belief, testing does not need to be a burden.9 However, it’strue that manual testing can be slow and error-prone, which is what turns develop-ers off about testing in general. Experience has shown that developers (and dedi-cated testers as well for that matter) tend to skip some aspects of manual tests,relying on their intuition that those tests could not have been broken by whateverchange it is they’re testing. Luckily, we’re in the business of automating stuff withsoftware so we’re best positioned to help ourselves by making the computer turntesting into something that’s fast and automated!
Protection with automated testsRegression in general is about moving back to a less developed state. In the caseof software, regression is existing, once-working functionality getting broken.That is, it regresses from a working state to a non-working state, as illustrated infigure 1.11.
Regression doesn’t just happen, though. It’s we developers who trigger regres-sion by introducing defects with our changes. As professional software developers,
9 In fact, writing tests is fun when you’re programming test-first!
Code base
Test harness
Regression Broken code base
Brokentest harness
Figure 1.11 Our test harness forms a mold around the code base. As a change is introduced that breaks the code base, the mold no longer fits, so it breaks and lets us know that we’ve been bad.
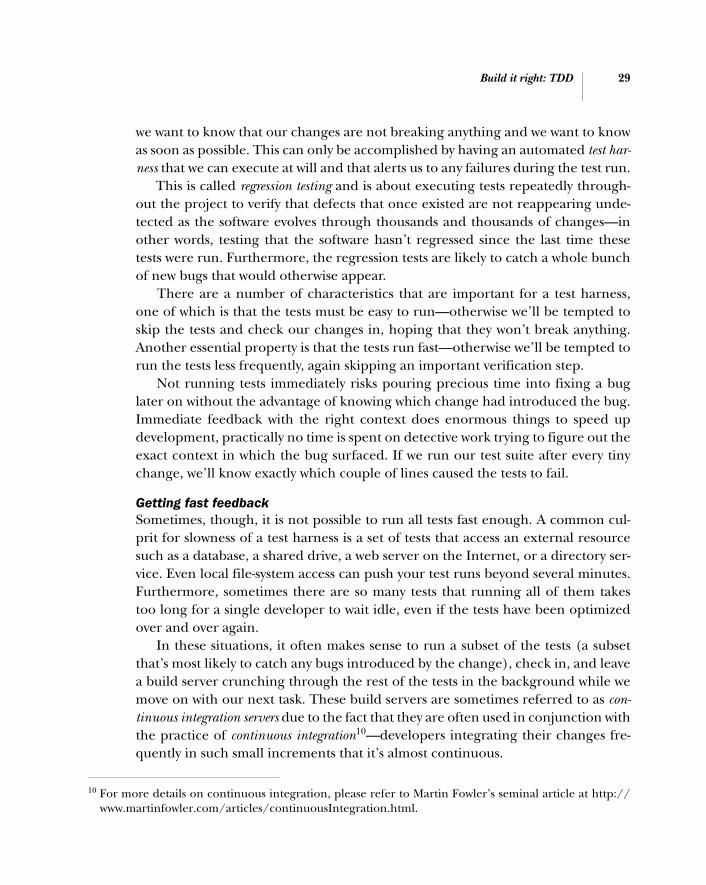
Build it right: TDD 29
we want to know that our changes are not breaking anything and we want to knowas soon as possible. This can only be accomplished by having an automated test har-ness that we can execute at will and that alerts us to any failures during the test run.
This is called regression testing and is about executing tests repeatedly through-out the project to verify that defects that once existed are not reappearing unde-tected as the software evolves through thousands and thousands of changes—inother words, testing that the software hasn’t regressed since the last time thesetests were run. Furthermore, the regression tests are likely to catch a whole bunchof new bugs that would otherwise appear.
There are a number of characteristics that are important for a test harness,one of which is that the tests must be easy to run—otherwise we’ll be tempted toskip the tests and check our changes in, hoping that they won’t break anything.Another essential property is that the tests run fast—otherwise we’ll be tempted torun the tests less frequently, again skipping an important verification step.
Not running tests immediately risks pouring precious time into fixing a buglater on without the advantage of knowing which change had introduced the bug.Immediate feedback with the right context does enormous things to speed updevelopment, practically no time is spent on detective work trying to figure out theexact context in which the bug surfaced. If we run our test suite after every tinychange, we’ll know exactly which couple of lines caused the tests to fail.
Getting fast feedbackSometimes, though, it is not possible to run all tests fast enough. A common cul-prit for slowness of a test harness is a set of tests that access an external resourcesuch as a database, a shared drive, a web server on the Internet, or a directory ser-vice. Even local file-system access can push your test runs beyond several minutes.Furthermore, sometimes there are so many tests that running all of them takestoo long for a single developer to wait idle, even if the tests have been optimizedover and over again.
In these situations, it often makes sense to run a subset of the tests (a subsetthat’s most likely to catch any bugs introduced by the change), check in, and leavea build server crunching through the rest of the tests in the background while wemove on with our next task. These build servers are sometimes referred to as con-tinuous integration servers due to the fact that they are often used in conjunction withthe practice of continuous integration10—developers integrating their changes fre-quently in such small increments that it’s almost continuous.
10 For more details on continuous integration, please refer to Martin Fowler’s seminal article at http://www.martinfowler.com/articles/continuousIntegration.html.

30 CHAPTER 1
The big picture
This approach basically trades in some of the confidence that the last changedidn’t break anything for speed of development, relying on the assumption thatmost of the time the change doesn’t break those parts of the system that weren’tcovered by the developer’s chosen subset of “fast” tests.
You can think of it as a form of optimistic locking for getting fast feedback. Ifno tests broke, we’re proceeding at maximum pace, not spending time runningthe full set of tests only to find that none of them broke. If one of the tests we leftto the build server breaks, however, we’ll end up paying extra to get it fixed sincewe’ve already lost the context, having moved on to our next task. That’s the trade-off we’re making—losing the context can easily mean a magnitude of differencein the time and effort it takes to correct a mistake.
An essential property of a regression test is that it’s being executed repeatedly.This means that we either need to pay for someone to spend a significant amountof time running and re-running our regression tests—of which we may have hun-dreds or thousands—or we can choose to automate some or all of them and havethe computer execute them automatically or upon request with minimal involve-ment on behalf of a human.
We now have an idea of what TDD is about, what it’s made of, and why we shoulduse it. Before we dive head first into the details of doing test-driven development inthe remaining chapters of parts 1 and 2, let’s explore the feature-level technique ofacceptance test-driven development a bit further and discuss how we can let accep-tance tests drive us toward the product that meets our customers’ needs.
Continuous integration is not about having a continuous integration serverContinuous integration servers should not be equated with the practice of contin-uous integration. Continuous integration servers provide machinery for automat-ed builds and fancy reports. If the developers aren’t integrating their changesfrequently, the continuous integration server will sit idle while the developers con-tinue diverging their private workspaces from each other, building up more con-flicts to merge!

Build the right thing: acceptance TDD 31
1.4 Build the right thing: acceptance TDD
Testing has always been an integral part of software development. However, theway testing has been carried out has changed significantly throughout thedecades. As programmers, we have always been interested in knowing that oursoftware works before handing it over to users. The means with which we obtainthis knowledge, however, has evolved quite a bit with the rise of agile softwaredevelopment processes such as Extreme Programming.
Furthermore, the role of tests themselves has morphed into other areas of soft-ware development than plain verification of conformance to specification. In fact,the solution to the second half of our problem of code that fails to meet actualneeds is to let tests drive our development on the level of features and functional-ity of the system we’re building. That is what practicing acceptance test-drivendevelopment is about. In short, we only ever start test-driving a feature into the systemwhen there is a test calling for it.
In essence, this means that tests are no longer merely a verification tool, butalso an integral part of requirements and specification as well as a medium forcustomer collaboration. In this section, we’ll go into more detail about these newroles for tests, starting with examining their part in nurturing close collaborationbetween developers, testers, and customers, and then discussing the use of tests asthe shared language facilitating this collaboration.
Before discussing the collaboration-oriented aspects of the technique, let’s firstfigure out the relationship between acceptance test-driven development and TDD.After all, their names are almost identical, so there must be something to it.
1.4.1 What’s in a name?
The name acceptance test-driven development implies that acceptance TDD is likelysomething similar to “regular” TDD. The suffix is obviously coming from TDD, butwhere is the rest coming from? What is an acceptance test? In short, acceptance testsare indicators of the completion of a requirement or feature. When all accep-tance tests for a requirement or feature are passing, you know you’re done.
Acceptance TDD as a technique is not coupled to any specific format forexpressing requirements. The same ideas can be applied much to the same effectwhether you’re implementing use cases, user stories, or some other equivalentmedium for documenting what needs to be done. It’s worth noting, though, thatteams using user stories to manage their requirements tend to talk about story test-driven development instead—which is a different name for the same technique. Yet

32 CHAPTER 1
The big picture
others prefer to call it customer test-driven development, which is also appropriateconsidering the tests’ nature of being customer-owned.
NOTE Although TDD and acceptance TDD have much in common and the bigbrother certainly borrows a lot from its little brother, both TDD andacceptance TDD can be adopted without the other. Programmers whohave no user story in sight or who don’t write tests for a feature beforeimplementing it can still adopt TDD and reap its benefits; teams whoaren’t programming test-first can still build features test-first. Having saidthat, these techniques do reinforce each other, and adopting both islikely to yield a lot more improvement than using either of them alone.
Regardless of what specific format or tool we use to manage requirements, the pri-mary goal of acceptance TDD is to support close collaboration between the cus-tomer and the development team. Let’s see how being test-driven helps us with that.
1.4.2 Close collaboration
Close collaboration is essential for any complex endeavors involving people, andsoftware development with acceptance TDD is no exception. In practice, we wantto have an integrated project team instead of separate development, businessanalysis, and testing teams, let alone a distant QA department.
The fundamental idea is that the way to achieve the best possible level of pro-ductivity for the whole team is to nurture rapid feedback and effective, face-to-facecommunication around concrete, working software instead of passing around testplans, requirements specifications, and bug reports between customers, testers,business analysts, and developers. With acceptance TDD, we are able to collaborateeffectively by bringing together the knowledge, skills, and abilities required fordoing a good job.
Let’s see how this close collaboration helps us deliver the right product byimproving our interactions and reducing the likelihood of misunderstoodrequirements and costly rework.
Seeing concrete, working softwareVery few customers have been completely satisfied with what the contractor deliversto them after several months of silence. By feeding the customer with completedfunctionality as a continuous stream, we’re making sure that, if there’s somethingwrong or missing, we’ll know about it right away. This early feedback reduces ourrisks and costs. Furthermore, by not keeping an inventory of supposedly “com-pleted” items that the customer hasn’t seen yet, we’re avoiding the usual illusion ofprogress that is built on assumptions and that is supported by document-drivenmethods and meaningless statements such as “development is 90% complete.”

Build the right thing: acceptance TDD 33
Building trust and confidenceAnother significant benefit of delivering working software early and often is thatwe’re building trust and confidence both between the team and the customer andwithin the team itself. By showing the customer (and ourselves) that we candeliver, we’re making life a lot easier for our whole team.
Customer in controlThere’s one key difference in the role and power of the customer between incre-mental development and the traditional waterfall, big design, up-front style ofdevelopment. With incremental development, the customer gets to choose whichfeatures they get first. Similarly, they also get to choose which features aredropped if the team is not able to implement all of them within the project’s allo-cated time or budget.
The customer’s decisions are, of course, influenced by the cost of the features,which the developers estimate—including the cost of delaying, the cost of build-ing things in a different order, and so forth.
The ability of the customer to decide what their money is spent on can reallychange the way they look at software projects. Finally, the customer is in control ofwhat their money is spent on. Talk about motivating the customer!
Evolving a shared languageBy encouraging close collaboration between testers, developers, and customers,we are effectively facilitating a situation where the information needed is obtainedas quickly as possible—in all directions. Furthermore, this continuous exposurewithin the team is likely to increase the efficiency of communication as people getto know each other better and begin to evolve a shared language. Software devel-opment is a people business, after all, and we shouldn’t neglect that fact.
Let’s contemplate for a while the possibility of using acceptance tests as thefoundation for that shared language between the whole team—including custom-ers, testers, and developers.
1.4.3 Tests as a shared language
One of the biggest problems of developing software for someone else is the preva-lent ambiguity in requirements. It is far from child’s play to express and commu-nicate requirements in such a way that no information is lost and that the originalidea is transmitted fully intact. Some would go as far as saying it’s impossible to doso. After all, we can’t read minds.11
11 If you can, please get in touch. We’ve got a job opening for a Senior Customer Mind Reader.
34 CHAPTER 1
The big picture
This problem is highlighted when the medium used for this communication iswritten documentation—a requirements specification, for example—which is farfrom being a perfect way to transfer information and understanding. If we wereable to transform the requirements into executable tests that verify whether thesystem conforms to each particular aspect of the specification, there would bemany fewer problems with ambiguity and less room for interpretation on behalfof developers. This is the wonderful premise of tests as specification.
Tests as specificationTests as specification provides a way to look at tests as something that’s essentiallyderived from requirements; therefore—in theory at least—a system that passesthe tests should by definition conform to the specification. This, however, assumesperfect test coverage, which is rarely—if ever—the case in the so-called “realworld” software projects.
Defects get through testing every now and then. That is hardly news to anyonewho’s lived through a couple of commercial software projects. In part, this is dueto our having missed a test that we should’ve considered. In part, this is due to ourhuman nature and our deceptive intuition, which manages to talk us out of run-ning some of the tests to “save time.”
This begs the question, are we really better off using tests as specification if thetests we have tend to leak in one way or another? Is it really feasible to use tests asspecification, effectively redefining the meaning of these concepts? Using tests asspecification is not a silver bullet either, but it does have a number of clear advan-tages that makes it worth considering:
■ Faster feedback through automation
■ More reliable test execution
■ One less translation step
First of all, there’s no denying that having automated, executable tests would getrid of a lot of grunt work and would accelerate our feedback loop enormouslycompared to manually executed test cases. Second, executable tests would effec-tively prevent our inherent laziness from getting us into trouble, because wewould be able to exploit the fact that the computer doesn’t suffer from the sameproblems of character that we humans are born with. Finally, we are already mak-ing the same errors in translating the true requirements into writing with our cur-rent practice, so would it really be any worse if we’d just change the format andmedium we’re using to document our test cases?

Build the right thing: acceptance TDD 35
There are still plenty of opportunities to err while transforming the require-ments into tests, of course, but the less knowledge transfer and human interpreta-tion is involved in running the tests, the less chance there is that something fallsinto the gaps after the test has been crafted.
Specification by exampleFurthermore, one of the most striking benefits of using tests as the specificationdriving development is that tests typically employ specification by example instead ofabstraction or prose (although there should almost invariably be some amount ofprose involved—things are not black and white in this respect either). In otherwords, instead of the traditional “the system shall calculate tax” pattern familiar inrequirements documents, specification by example promotes expressing therequirement through examples such as “for a $20 subscription with a tax rateof 10%, the system charges a total of $22 from the user’s account.”
For this simple requirement, the difference between the traditional “systemshall” and an example-based version might not be that significant—after all, we allknow how to calculate tax in such a trivial case. However, the requirements wemeet at work are typically not as trivial, and the risk of misunderstanding is muchhigher. For instance, applying multiple taxes for a given transaction might need toemploy different calculation rules in different locales, which can be clarified enor-mously through concrete examples.
Specification by example is a natural fit for our intuition and makes it easier torelate the requirements to the concrete world and our software. Specification byexample can also be seen in TDD. Whereas acceptance tests specify by examplethe desired behavior of the system, the examples and the desired behavior speci-fied with unit tests are specifications about the desired implementation ratherthan about the functionality delivered.
Higher quality inside and out, better confidence in our work, and the cus-tomer loving us for giving them software that meets their needs—who wouldn’tlike these improvements, especially if it’s not just talk? After all, in theory, any-thing and everything is possible. We’ll soon make our own transition from talkingthe talk to walking the walk in the rest of the book; but before that, let’s talk aboutthe tools at our disposal.

36 CHAPTER 1
The big picture
1.5 Tools for test-driven development
Tools are important. Without tools like compilers, editors, and operating systems,software development would be difficult compared to where we have ended up overdecades and decades of technical advancements. Test-driven development is noexception in this regard—as a code-intensive development technique, good toolscan make a huge difference. We’ll next take a condensed tour of three fundamentalor otherwise useful categories of tools and techniques: unit testing frameworks, con-tinuous integration with its supporting machinery, and code coverage.
1.5.1 Unit-testing with xUnit
A number of years ago, Kent Beck created a unit-testing framework for SmallTalkcalled SUnit (http://sunit.sf.net). That framework has since given birth to a realmovement within the software development community with practically every pro-gramming language in active use having gotten a port of its own.12 For a Javadeveloper, the de facto standard tool—also based on the design of SUnit—iscalled JUnit, available at http://www.junit.org/. The family of unit-testing frame-works that are based on the same patterns found in SUnit and JUnit is oftenreferred to as xUnit because of their similarities: If you know one, it’s not much ofa leap to start using another (provided that you’re familiar with the programminglanguage itself).
What exactly does a unit-testing framework mean in the context of xUnit? It meansthat the library provides supporting code for writing unit tests, running them, andreporting the test results. In the case of JUnit, this support is realized by providinga set of base classes for the developer to extend, a set of classes and interfaces to per-form common tasks such as making assertions, and so forth. For running the unittests written with JUnit, the project provides different test runners—classes that knowhow to collect a set of JUnit tests, run them, collect the test results, and presentthem to the developer either graphically or as a plain-text summary.
We’ll be using JUnit and Java in this book. In fact, we’ll be using plenty ofextensions to JUnit as we go about test-driving different kinds of components. Ifyou’re not familiar with JUnit, please refer to the appendices for an introductionto this wonderful little tool. Don’t get too immersed in the details of JUnit,though, because we’ve got a couple of additional categories of tools to talk
12 There are more or less direct ports of SUnit and JUnit for ColdFusion, C#, C and C++, Delphi, Action-Script, Haskell, JavaScript, Visual Basic and JScript, Lingo, LISP, Lua, Objective-C, PL/SQL, Perl, PHP,PowerBuilder, Python, Ruby, Scheme, Tcl/Tk, Korn Shell—and that’s not even all of them! Ron Jeffriesmaintains a list of xUnit frameworks at http://www.xprogramming.com/software.htm.

Tools for test-driven development 37
about—for example, the kind of tools we might look to for support in implement-ing acceptance TDD.
1.5.2 Test frameworks for acceptance TDD
Although the unit-testing framework scene has developed strongly around thexUnit concept, it’s not so homogeneous in the world of acceptance testing. Themain reason for this difference is that the idea of test-driving on the feature levelis relatively new, and the incumbent record-and-replay style of test automationtools don’t work well when there’s nothing to record.
Another thing to think about in the fragmented market is the fact that two sys-tems rarely have the exact same interfaces. The exception to the rule is web appli-cations, which can all be accessed with standard technologies such as the HTTPprotocol and the HTML markup language. What’s more important than the tech-nologies involved, however, is how the tools aim to support our primary interestwith acceptance TDD—close customer collaboration.
There are tools like Fit and Fitnesse, which are table oriented and employ a visualformat to aid developers, testers, and business analysts in collaborating with non-technical stakeholders. In addition to the tabular format championed by the Fitfamily of tools, another popular approach to describing executable tests is to rep-resent tests as statements in plain text. Perhaps the best-known example of toolsfrom this category is Exactor. Sometimes it’s sufficient for a given project’s purposesto use a more technical medium such as an actual scripting language for describingtests. In many cases, however, and despite of existing acceptance testing frameworksbeing readily available, the best option can also be a homegrown framework.
We’ll take a closer look at some of these tools in part 3 when exploring accep-tance test-driven development further. For now, let’s move on to the next tooling-related topic we have yet to cover—continuous build servers.
1.5.3 Continuous integration and builds
Working in a team that’s constantly changing code here and there creates pres-sure on the developers to integrate their changes significantly more often thansome are used to in more traditional environments. Teams using TDD are almostby definition13 employing collective code ownership, meaning that everyone isauthorized to change any code in the code base.
13 How well would the test-code-refactor cycle work out in an environment where developers would needto ask the owner of a given class to implement a refactoring? Not too well, I think. It doesn’t have to bestrictly black and white, however. There have been reports of teams successfully using a variety of hybridcode-ownership models.

38 CHAPTER 1
The big picture
In practice, this means that as long as the team is refactoring mercilessly aspart of their test-code-refactor cycle, there will be a constant stream of smallchanges to the source repository. With this in mind, waiting for two days beforechecking in your changes is likely to require manual merging—an activity that atleast I don’t like too much.
All this leads us to adopting a process of synchronizing our changes to thesource repository much more frequently than before. This highly frequent integra-tion of developers’ workspaces with the centralized source repository—continuousintegration—is generally considered to involve not just the integration of sourcecode (“it compiles!”) but also the verification of the integrated source code by run-ning automated tests (“it works!”). In practice, however, this full verification some-times requires certain practical trade-offs, which we’ll discuss next.
Practical trade-offsA common pattern with teams implementing continuous integration is to runonly a relevant subset of all tests before checking in their changes and to delegatethe running of the full test suite (including unit, integration, and functional tests)to a dedicated build server, also known as a continuous build server. Figure 1.12 illus-trates a basic setup with a continuous integration server polling for changes fromthe source repository.
In essence, this is a practical trade-off many teams decide to make. On the onehand, running the full test suite often takes too long (several minutes—even
Source repository Continuous integration server
Developer’sworkspace
(1) Developer runssubset of tests locally
(2) Developercommits changes
(3) Change triggersa new clean build
(4) Developer gets a build/test report via email
Figure 1.12 This is a typical scenario of a developer (1) running a relevant subset of automated tests locally before (2) committing the change to the source repository. In the third step (3), the change triggers a new build on the continuous integration server (using a commit-hook in the repository or by frequently polling the repository for changes). Finally, after running a clean build with the latest changes (4), the continuous integration server sends a build report to the developer via email.

Tools for test-driven development 39
hours) for a developer to wait for the green bar. On the other hand, most of thetests are unlikely to have been affected by the developer’s recent changes; that is,they are unlikely to reveal new information to the developer. Thus, having thedeveloper run only a selected subset of the tests (lasting some seconds) beforechecking in can make a lot of sense.
In the (we hope) rare case of the changes breaking some tests that the devel-oper hadn’t run on their machine before checking in, the build server will eventu-ally (often within 5–15 minutes) notify them and the rest of the team that thecode base was broken by the recent changes.
By now, if you’re anything like me and you’re new to continuous integration,you’ve started wondering about the technical implementation of such a buildserver. The short story is, there’s no need to write your own.
Build servers galoreFortunately, and perhaps not surprisingly, you don’t need to write your own tools torun a build server, because a selection of open source as well as commercial productsoffer the required functionality. Some of the more popular ones include Cruise-Control (http://cruisecontrol.sf.net), AntHill (http://www.urbancode.com),Continuum (http://maven.apache.org/continuum), and Bamboo (http://www.atlassian.com/software/bamboo/), and more are popping up all the time.
If you are interested in learning more about the philosophy behind continuousintegration and the associated tools, please refer to Martin Fowler’s article “Con-tinuous Integration”.14 James Shore has also done some great writing on the differ-ence between doing continuous integration and using continuous build servers.15
1.5.4 Code coverage
Many developers are familiar with static code analysis tools such as Lint and itsvariants (http://www.splint.org). Java developers, in particular, might have expe-riences running the PMD tool (http://pmd.sf.net) to detect anomalies regardingthe illegal use of certain constructs or to calculate complexity measurements. Theincreased attention to automated testing and, especially, unit testing has also cre-ated a number of tools over the years for measuring code coverage (also known astest coverage). In short, code coverage is a measurement of how thoroughly our
14 http://www.martinfowler.com/articles/continuousIntegration.html.15 http://www.jamesshore.com.

40 CHAPTER 1
The big picture
automated tests exercise the production code and its source code statements,branches, and expressions.16
The main benefit of incorporating code-coverage measures into our builds, forexample, is that we are constantly aware of how thoroughly our test suite exercisesour software. This can be especially helpful when a team is just starting to writeunit tests or adopting TDD, because it helps pointing out areas of the code basethat are not getting tested as thoroughly as other parts of the code.
Just like most other technical source code measurements,17 however, code cov-erage does have its potential risk of misuse. Blindly running after perfect codecoverage would be a dubious thing to do. Sometimes, due to the APIs our codeuses, going from 99% to 100% means testing for conditions that cannot happen.So, if you do decide to add code coverage to your toolbox, be careful not to shootyourself in the foot.
We are not going to look into code-coverage tools here, but some of the morepopular tools for measuring Java projects include Cenqua Clover (http://www.cenqua.com/clover), Cobertura (http://cobertura.sf.net), and EMMA (http://emma.sf.net).
16 See my article, “Introduction to Code Coverage” (http://www.javaranch.com/newsletter/200401/IntroToCodeCoverage.html), for a more thorough introduction to the theory and some of the codecoverage tools available.
17 Ever heard of people getting paid by the number of lines of code they’ve written? It has happened anddidn’t work out too well.
What degree of code coverage should I aim for?When we bring up the topic of code coverage, someone is bound to pop the ques-tion, “How high should I set the bar for code coverage?” Should it be 100%? Ormaybe 90%? 80%?
The answer is, it depends. It depends on the specific technologies, languages,and tools in use, and often a host of other things. What seems typical for Javaand J2EE projects is an average code coverage of 85%. That is not due to someparts of the code missing tests—the biggest source for the difference from 100%coverage is the warts and idioms of the language and APIs being used.
To quote a private conversation with fellow consultant and author J. B. Rains-berger, “Aim for 100% while learning—you’ll understand why 85% is nicer.”

Summary 41
I think that’s about enough of tooling. You’ll bump into a slew of useful tools asyou learn about testing components implemented with different technologies, butfor now it’s enough that we have an idea of the basics of unit testing frameworks suchas JUnit and how they relate to test-driven development.
Let’s wrap up this chapter with a quick summary. It’s about time we see someaction, so start pulling up your sleeves!
1.6 Summary
We started this chapter with an overview of the challenge of delivering software tosupport our organizations’ business and operations. Our traditional methods ofdeveloping systems have a lot to improve in this aspect: producing systems withhigh defect rates, that are hard and costly to change, and that don’t fulfill theirprimary purpose of meeting the customer’s actual needs.
Test-driven development is a development and design technique that helps usbuild working software starting from day one, add functionality and behavior insmall increments, and keep the software working all the way. This is made possibleby adopting an evolutionary approach to design and by employing refactoring tomaintain the best possible design at each step—not letting the living code base rotover time. TDD helps us build the product right.
In return for this disciplined way of working in small steps, we can lower ourdefect rates and generally deliver higher-quality software that’s maintainable andready for change. In the process, we gain confidence in our code and we are ableto move faster and faster because we have less code to write, we spend less time fix-ing defects, and we have more time for doing useful things.
In order to build the right product, we employ a technique we call acceptancetest-driven development. Acceptance TDD is not a testing technique but a powerfuldevelopment tool facilitating effective collaboration between different roles withinthe project, including customers, testers, and developers. Acceptance TDD sup-ports this collaboration by providing incrementally developing, concrete softwaredescribed by customer-oriented tests as the basis for discussion and feedback. Byseeing concrete features implemented throughout the project in a customer-defined priority order, we build trust and confidence, further supporting effectivecollaboration using a shared language.
In the following chapters of part 1, we will learn the ins and outs of test-drivendevelopment—a technique that carries enormous potential in aiding us towardsuccessful software projects with low defect counts and projects that deliver onschedule. Part 2 will show us ways to apply TDD in the context of specific Java and

42 CHAPTER 1
The big picture
J2EE technologies that are sometimes considered a challenge for test-driving—which is by and large a false assumption!
Once we have a grasp of TDD, we will go for the same kind of understanding ofacceptance TDD in part 3. We will dissect the process and build an understandingof how it delivers the most value possible in a given situation with user stories andacceptance tests as the magic ingredient.
I hope you’ll enjoy the journey!

Beginning TDD
Experience is a hard teacher because she gives the test first, the lesson afterward.
—Chinese proverb
43

44 CHAPTER 2
Beginning TDD
Something big airports are generally very good at is using signs. No matter whichairport I fly from, I never have to worry about not knowing which way to turn froma corner. Whenever I no longer know which way to walk, I look up and there it is:the sign that says, “Gate 42: continue straight forward.”
It wasn’t like that when I started writing software for a living. There was justone sign outside the terminal building saying, “Good luck.” Figuring out what Ishould change and ending up with a correct solution was a bit like trying to findyour way to the right gate at Heathrow without the hundreds of signs and displays.For software development, test-driven development with its simple rules and guid-ance is like those signs at the airport, making sure I end up where I need to be—and in time.
We already created a somewhat shallow idea in chapter 1 of what TDD is andtalked about the forces in play, such as incremental and evolutionary design, and the“reversed” cycle of development. As we learned in chapter 1, TDD is both a designand programming technique that’s essentially based on the simple rule of only writ-ing production code to fix a failing test. TDD turns the usual design-code-testsequence of activities around into what we call the TDD cycle: test-code-refactor,illustrated in figure 2.1 and reproduced from chapter 1.
We talked about TDD being a simple and effective technique for developinghigher-quality software that works and stays malleable through the continuousdesign we perform via frequent, merciless refactoring. Thanks to the enhancedconfidence we have in our code, along with lower defect rates and a thorough testsuite combined with better design, we become more productive and our work ismuch more enjoyable than in the times where a go-live was followed by an unde-termined period of late nights and angry customers.
In this chapter, we’ll develop further our understanding of what TDD is and whatthe secret (and not so secret) ingredients are that make it work. We’ll do that by writ-ing code test-first, learning by doing. We will be writing small tests, squeezing out thedesired behavior step by step, and refactoring our code mercilessly. We’re going to
Test Code Refactor
Figure 2.1 The TDD cycle is a three-step process of writing a test, making it pass by writing just enough production code, and finally improving the design by disciplined refactorings.

From requirements to tests 45
be adding and removing code, and we’re going to be changing code so that we canremove code. Along the way, we’ll introduce an increasingly robust and capableimplementation of a template engine, including some exception-handling func-tionality to accompany the “happy path” behavior we’re going to begin with. We willalso discuss how there are often two possible paths, breadth first and depth first, to theultimate goal of a feature-complete system.
It’ll be intensive, and there will be code listings after one another. Once we’rethrough all that, you should have a much better understanding of how TDD worksin practice and what kinds of sometimes awkward-seeming tricks we pull in orderto keep moving fast.
We’ll soon begin developing actual software using TDD. We’re going todevelop a template engine capable of rendering templates containing variables tobe populated dynamically at runtime. Because the first step in TDD is writing afailing test, we need to figure out what desired behavior we’d like to test for. So,before getting our hands dirty, let’s have a quick chat about how to get fromabstract requirements to concrete tests.
2.1 From requirements to tests
Imagine you are implementing a subsystem for the corporate collaboration soft-ware suite1 that’s responsible for providing mail-template functionality so that theCEO’s assistant can send all sorts of important, personalized emails to all person-nel with a couple of mouse-clicks. How would tests drive the development of thesaid subsystem? You’re going to know the answer to that question by the timeyou’ve finished reading this chapter; but, as with any system, it starts with decom-posing the requirements into something smaller and more concrete.
2.1.1 Decomposing requirements
With any requirements you may have envisioned for the subsystem, you’ve proba-bly already sliced and diced them into some kind of a set of “things we need todo”—let’s call them tasks—that will, when completed, lead to satisfying the origi-nal requirement. Now erase those tasks out of your head and do it all again, thistime slicing the requirements into a set of tests that, when passing, lead to therequirements being satisfied. Can you think of such tests? I’ll bet you can. It mightbe difficult at first, but I’m confident that you’ve already thought of a number oflittle tests that would verify some tiny part of the whole.
1 Now that’s a fancy way to say “email application”!

46 CHAPTER 2
Beginning TDD
“A mail template without any variable data is sent off as is.” “The place-holder for the recipient’s first name in a greeting should get replaced with eachindividual recipient’s name, respectively.” Soon, you’ll have a whole bunch ofthose tests, which together verify more than just a tiny part of the whole. Eventu-ally, you’ll have covered most if not all of your expectations for the product’sbehavior and functionality.
To clarify the difference between tasks and tests, table 2.1 contrasts a few of thepossible decompositions of the mail-template subsystem into tasks and tests,respectively. Decomposing into tasks (left-hand column) leads to items that donot represent progress in terms of produced software. Contrast this with the right-hand column of tests, which have a clear connection to capabilities of the pro-duced software.
Translating requirements into tests is far superior to merely decomposing require-ments into tasks because tasks such as those in table 2.1 make it is easy to lose sightof the ultimate goal—the satisfied requirement. Tasks only give us an idea of whatwe should do. Without a more concrete definition of done, we’re left with a situa-tion that’s not that different from saying we’ve won the lottery simply because wepurchased a lottery ticket.
We’ll see more examples of decomposing requirements into tests rather thantasks later in this chapter. There are a couple of topics I’d like to discuss beforethat, though.
Table 2.1 Alternative decompositions of a mail-template subsystem
Mail template subsystem decomposed into a set of tasks
Mail template subsystem decomposed into a set of test(s)
Write a regular expression for identifying variables from the template.
Template without any variables renders as is.
Implement a template parser that uses the regular expression.
Template with one variable is rendered with the variable replaced with its value.
Implement a template engine that provides a public API and uses the template parser internally.
Template with multiple variables is rendered with the appropriate placeholders replaced by the asso-ciated values.
… …

From requirements to tests 47
2.1.2 What are good tests made of?
So tests are generally better than tasks for guiding our work, but does it matterwhat kind of tests we write? Sure it does. Although there’s no universal definitionfor what constitutes a good test, there are some guidelines and heuristics we canuse to assess whether we’re writing good tests. There are plenty of rules for thetechnical implementation of a (unit) test,2 but from the perspective of decompos-ing requirements into tests, two properties of a good test can be identified as espe-cially important:
■ A good test is atomic.
■ A good test is isolated.
What these properties are saying is that a good test tests a small, focused, atomicslice of the desired behavior and that the test should be isolated from other testsso that, for example, the test assumes nothing about any previously executed tests.The atomicity of a test also helps us keep our eye on the ball—a small but steadystep toward the goal of a fully functional, working system.
As long as we represent our steps in the language of unambiguous tests, the men-tal connection between the individual steps and the ultimate destination remainsmuch stronger and much clearer, and we’re less likely to forget something.
Speaking of steps, we don’t just pick tests at random until we’re done. Let’s talkabout how we pick the next step or test to tackle.
2.1.3 Working from a test list
Armed with an initial set of tests, we can proceed to making them pass, one byone. To start with, we need to pick one of the tests—often the one we think is theeasiest to make pass or one that represents the most progress with the least effort.For now, we forget that any of those other tests exist. We’re completely focused onthe one test we picked. We’ll also come back to the question of which test to tacklenext several times in the remaining chapters in part 1. After all, it’s a decision weneed to make every couple of minutes when test-driving with small tests.
So, what next? We’ll start by writing the test code. We’ll go as far as to compileand execute the test before even thinking about writing the production code ourtest is exercising. We can’t write the test because it doesn’t compile? We can’t writea test for code we don’t have? Oh, yes we can. Let’s discuss how to do that.
2 Such as “tests should be isolated and order independent,” “tests should run fast,” “tests shouldn’trequire manual setup,” and so on.

48 CHAPTER 2
Beginning TDD
2.1.4 Programming by intention
When you’re writing tests before the production code they’re supposed to test,you inevitably face a dilemma: how to test something that doesn’t exist withoutbreaking our test-first rule. The answer is as simple as the rule was—imagine thecode you’re testing exists!
How’s that possible? What are we supposed to imagine? We imagine the idealshape and form of the production code from this particular test’s point of view.Isn’t that cheating? Yes, it is cheating, and we love it! You see, by writing our testswith the assumption that the production code is as easy to use as we could imag-ine, we’re making it a breeze to write the test and we’re effectively making surethat our production code will become as easy to use as we were able to imagine. Ithas to, because our tests won’t pass otherwise.
That’s what I call the power of imagination! And it has a name, too. It’s calledprogramming by intention. Programming by intention, the concept of writing code asif another piece of code exists—even if it doesn’t—is a technique that makes youfocus on what we could have instead of working around what we have. Programmingby intention tends to lead to code that flows better, code that’s easier to understandand use—code that expresses what it does and why, instead of how it does it.
Now that we know that we should split our requirements into small, focusedtests rather than tasks, and now that we understand how to progress through thelist of tests by programming by intention, it’s time to get busy developing a worldclass template engine test-first.
2.2 Choosing the first test
As promised, we’re going to develop a template engine using test-driven develop-ment. In order to not take too big a bite at once, we’ll restrict our focus to thebusiness logic of the template engine and not worry about the whole systemwithin which the template engine is being used for rendering personalized emailsand what not.
TIP At this point, I highly recommend launching your favorite IDE and fol-lowing along as we proceed to develop the template engine one smallstep at a time. Although I have done my best to write a chapter that helpsyou understand what we’re doing and why, there’s nothing more illustra-tive than doing it yourself!
The template engine we’re talking about needs to be capable of reading in a tem-plate, which is basically static text with an arbitrary number of variable placeholders

Choosing the first test 49
mixed in. The variables are marked up using a specific syntax; before the templateengine is asked to render the template, it needs to be given the values for thenamed variables.
Everything clear? Let’s get going. The first thing we need to do is process thedescription of the template engine into an initial list of tests and then choose oneof them to be implemented.
2.2.1 Creating a list of tests
Before we can come up with an initial list of tests, we need to have some require-ments. For our example, let’s use the following set of requirements for the mailtemplate subsystem:
■ The system replaces variable placeholders like ${firstname} and ${lastname}from a template with values provided at runtime.
■ The system attempts to send a template with some variables not populatedwill raise an error.
■ The system silently ignores values for variables that aren’t found from thetemplate.
■ The system supports the full Latin-1 character set in templates.
■ The system supports the full Latin-1 character set in variable values.
■ And so forth...
Those are detailed requirements, aren’t they? Are they tests? No. They’re require-ments smaller and more detailed than “implement a mail template subsystem,” butthey’re not tests. Tests are typically much more explicit, describing the expectedbehavior for specific scenarios rather than articulating a generic description ofthat behavior.
Here’s one attempt at turning the mail template subsystem’s requirements intoproper tests:
■ Evaluating template “Hello, ${name}” with the value “Reader” for variable“name” results in the string “Hello, Reader”.
■ Evaluating template “${greeting}, ${name}” with values “Hi” and “Reader”,respectively, results in the string “Hi, Reader”.
■ Evaluating template “Hello, ${name}” with no value for variable “name”raises a MissingValueError.

50 CHAPTER 2
Beginning TDD
■ Evaluating template “Hello, ${name}” with values “Hi” and “Reader” forvariables “doesnotexist” and “name”, respectively, results in the string“Hello, Reader”.
■ And so forth... (We could, for example, include some specific examples thatwould serve as proof that the system handles Latin-1 characters.)
See the difference? The requirements have been transformed into somethingthat’s clearly a degree more concrete, more executable, more example-like. Withthese tests as our completion criteria, there’s no question of whether we’re thereyet or not. With these tests, we don’t need to wonder, for example, what it meansto “raise an error” and, assuming it means throwing an exception, what kind of anexception it should be and what the exception message should say. The tests tellus that we should throw a MissingValueError exception and that we’re not inter-ested in the specific error message.
With this kind of test, we are finally able to produce that binary answer for thequestion, “am I done?” The test list itself is never done, however. The test list is aworking document to which we add new tests as we go. We’re bound to be missingsome tests from our initial list, and we’ll likely think of a bunch of them whilewe’re deep into implementing some other test. At that time, we write those testsdown and continue with what we’re working on.
We’ve got a list of tests that tell us exactly when the requirements have been ful-filled. Next, we start working through the list, making them pass one by one.
2.2.2 Writing the first failing test
Let’s take another example and practice our programming by intention a bitbefore continuing with our journey to test-driven development. Why don’t wetake the first test from the list and see how we might go about writing the testbefore the code?
Here’s our test again:
Evaluating template “Hello, ${name}” with the value “Reader” for variable“name” results in the string “Hello, Reader”.
NOTE At this point, we’re pulling out the IDE to write some code. We’ll be usingJUnit 4, the latest version of the de facto unit-testing framework for Javatoday (http://www.junit.org). If you’re not already familiar with JUnit,take a peek at appendix A for a short introduction. You won’t need to dothat quite yet, though, if you don’t feel like it. The JUnit stuff is not essen-tial here—the purpose is to see programming by intention in action—sojust focus on the code we’re writing inside the methods and pay no atten-tion to the weird annotations we’re using.

Choosing the first test 51
Because we’re going to implement the test first, let’s start by giving a name for ourtest class, in listing 2.1.
public class TestTemplate {}
Next, we need a test method. Let’s call it oneVariable, as shown in listing 2.2.
import org.junit.Test;public class TestTemplate { @Test public void oneVariable() throws Exception { }}
We’re making progress. Can you feel the wind? No? Well, that’s all right, becausewe know that small steps are good for us. Besides, we’re just about to get into theinteresting part—programming stuff by intention. The code in listing 2.3 is whatwe might feel like writing for the test, assuming that the implementation is there(even though it isn’t), exercising our freedom to design the template feature in away that makes it easy to use.
import org.junit.Test;import static org.junit.Assert.*;
public class TestTemplate { @Test public void oneVariable() throws Exception { Template template = new Template("Hello, ${name}"); template.set("name", "Reader"); assertEquals("Hello, Reader", template.evaluate()); }}
Listing 2.1 Creating a skeleton for our tests
Listing 2.2 Adding a test method
Listing 2.3 Writing the actual test

52 CHAPTER 2
Beginning TDD
In the test method in listing 2.3, we first create a Template object by passing thetemplate text as a constructor argument. We then set a value for the variable“name” and finally invoke a method named evaluate, asserting
the resulting output matches our expectation. How does that feel? Is that the way you’d like the template system to work?
That’s the way I felt like it should work. I’m a bit undecided about the name ofset because put would be consistent with the ubiquitous java.util.Map inter-face. I do think set sounds better to my ear than put, however, so let’s leave it likethat for now. Let’s proceed and see how we can make the compiler happy with ourimagination-powered snippet of code.
Making the compiler happyNow, the compiler is eager to remind us that, regardless of our intentions, theclass Template does not exist. We’ll have to add that. Next, the compiler pointsout that there’s no such constructor for Template that takes a String as a parame-ter. It’s also anxious to point out that the methods set and evaluate don’t existeither, so we’ll have to add those as well.3 We end up with the following skeletonof a class, in listing 2.4.
public class Template {
public Template(String templateText) { }
public void set(String variable, String value) { }
public String evaluate() { return null; }}
Finally, the code compiles. What’s next? Next, we run the test, of course.
3 Modern IDEs provide shortcuts for generating missing methods in a breeze, making our test-driven lifethat much easier.
Listing 2.4 Satisfying the compiler by adding empty methods and constructors

Choosing the first test 53
Running the testWhen we run our freshly written test, it fails—not surprisingly, because none ofthe methods we added are doing anything. (You didn’t implement the methodsalready, did you?)
I like to run the test at this point and see it fail before I proceed to making thetest pass. Why? Because then I know that when I’m clicking that Run button in myIDE, the test I’m working on is indeed executed, and I’m not looking at the resultof running some other test. That would be confusing. I know. I’ve done that. Andnot just once or twice. Plus, seeing the test fail tells me that the functionality I’mtesting for doesn’t exist yet—an unexpected green bar means that an assumptionI have made about the code base doesn’t hold!
Running the test, we get the output in figure 2.2, complaining about getting anull when it expected the string “Hello, Reader”.
We’re in the red phase of the TDD cycle, which means that we have written andexecuted a test that is failing—and our IDE indicates that by showing a redprogress bar. We’ve now written a test, programming by intention, and we have askeleton of the production code that our test is testing. At this point, all that’s leftis to implement the Template class so that our test passes and we can rest our eyeson a green progress bar.
A failing test is progressIf you’re thinking we haven’t even gotten started yet—after all, we haven’t imple-mented a single line of code for the behavior we’re testing for—consider the fol-lowing: What we have now is a test that tells us when we’re done with thatparticular task. Not a moment too soon, not a moment too late. It won’t try to tellus something like “you’re 90% done” or “just five more minutes.” We’ll knowwhen the test passes; that is, when the code does what we expect it to do.
I wouldn’t be surprised if you’re thinking I’ve got a marble or two missing. I’mpretty confident that you’ll figure out on your own exactly how significant a changethis way of looking at things is for you, personally—we’re not all alike, and certaintechniques help some more than others. Oh, and we’ll be writing a lot more codetest-first during the first half of the book, so there will be plenty of opportunitiesto evaluate how well the technique works in practice.

54 CHAPTER 2
Beginning TDD
2.2.3 Making the first test pass
We don’t have much code yet, but we’ve already made a number of significantdesign decisions. We’ve decided that there should be a class Template that loadsa template text given as an argument to the constructor, lets us set a value for anamed placeholder, and can evaluate itself, producing the wanted output.What’s next?
We had already written the skeleton for the Template class, shown in listing 2.5,so that our test compiles.
Figure 2.2Our first failing test. What a precious moment. What we see here is the Eclipse IDE’s JUnit runner. But all major IDEs have something similar to a red bar, some kind of hierarchical list of tests run, and access to the detailed error—the stack trace for failed tests.

Choosing the first test 55
public class Template {
public Template(String templateText) { }
public void set(String variable, String value) { }
public String evaluate() { return null; }}
All the constructors and methods are in place to make the compiler happy, butnone of those constructors and methods is doing anything so far. We’ve written asingle failing test to show us a path forward, we’ve added just enough productioncode to make the test compile, and the next thing to do is the often most brain-tickling part of creating the functionality our test is asking of us.
There’s more to making the test pass than just that, though. We want to makethe test pass in the easiest, quickest way possible. To put it another way, we’re nowfacing a red bar, meaning the code in our workspace is currently in an unstablestate. We want to get out of that state and into stable ground as quickly as possible.
Here’s an interesting decision. How do we make the test pass as quickly andeasily as possible? Evaluating a template that simple, “Hello, ${name}”, with astring-replace operation would be a matter of a few minutes of work, probably.There’s another implementation, however, of the functionality implied by ourfailing test that fits our goal of “as quickly as possible” a bit better. Listing 2.6shows us what that could look like.
public class Template {
public Template(String templateText) { }
public void set(String variable, String value) { }
public String evaluate() { return "Hello, Reader"; }}
Listing 2.5 Stubbing out methods of the Template class to make compilation succeed
Listing 2.6 Passing as quickly as possible with a hard-coded return statement
It couldn’t get much simpler than this

56 CHAPTER 2
Beginning TDD
To save space, from now on we’ll omit the two import statements from the test list-ings, but you’ll still need them to access the JUnit library.
Yes, I am serious. Hard-coding the evaluate method to return “Hello, Reader”is most certainly the quickest and easiest way to make the test pass. Although itmay not make much sense at first, it’s good to push ourselves a bit to squeeze outthe wanted behavior with our tests.
In this case, we’re making use of neither the actual variable nor the template.And that means we know at least two dimensions on which to push our codetoward a proper implementation. Let’s extend our test to squeeze out the imple-mentation we’re looking for.
2.2.4 Writing another test
Let’s say we want to first drive out hard-coding on the part of the variable’s value.Listing 2.7 presents one way to do this by extending the existing test throughanother assertion.
public class TestTemplate { @Test public void oneVariable() throws Exception { Template template = new Template("Hello, ${name}"); template.set("name", "Reader"); assertEquals("Hello, Reader", template.evaluate()); }
@Test public void differentValue() throws Exception { Template template = new Template("Hello, ${name}"); template.set("name", "someone else"); assertEquals("Hello, someone else", template.evaluate()); }}
We’ve added a second call to set—with different input—and a second assertionto verify that the Template object will re-evaluate the template with the latest valuefor the “name” variable. Our hard-coded evaluate method in the Template classwill surely no longer pass this test, which was our goal.
This technique is aptly named triangulation, referring to how we’re using multi-ple bearings to pinpoint the implementation toward the proper implementation.
Listing 2.7 Forcing out the hard-coded return statement with another test
Triangulate with adifferent value.

Choosing the first test 57
We could call it playing difficult, but it really can help in avoiding premature opti-mization, feature creep, and over-engineering in general.
Now, how could we make this enhanced test pass? Do you see a way aroundhaving to parse the actual template? I guess we could hard-code some more andpush the need for the real implementation a bit farther. Let’s see where thatwould take us, as illustrated by listing 2.8.
public class Template {
private String variableValue;
public Template(String templateText) { }
public void set(String variable, String value) { this.variableValue = value; }
public String evaluate() { return "Hello, " + variableValue; }}
Our test passes again with minimal effort. Obviously our test isn’t good enoughyet, because we’ve got that hard-coded part in there, so let’s continue triangulat-ing to push out the last bits of literal strings from our code. Listing 2.9 shows howwe alter our test to drive out not just the hard-coding of the variable value but alsothe template text around the variable.
public class TestTemplate { @Test public void oneVariable() throws Exception { Template template = new Template("Hello, ${name}"); template.set("name", "Reader"); assertEquals("Hello, Reader", template.evaluate()); }
@Test public void differentTemplate() throws Exception { Template template = new Template("Hi, ${name}"); template.set("name", "someone else");
Listing 2.8 Making the second test pass by storing and returning the set value
Listing 2.9 Applying triangulation for the static template text
Rename test to match what we’re doing

58 CHAPTER 2
Beginning TDD
assertEquals("Hi, someone else", template.evaluate()); }}
Red bar. Obviously our hard-coded return statement doesn’t cut it anymore. Atthis point, we’re facing the task of parsing the template text somehow. Perhaps weshould first implement the parsing logic and then come back to this test. What doyou think?
I’m thinking it’s time to discuss breadth and depth.
2.3 Breadth-first, depth-first
The software we build today is not something trivial that can be built in a matterof a couple of hours. I’ve worked with systems with tens of thousands of lines ofcode. One system had over a million lines of code. And I know there are plenty ofpeople out there who have developed and maintained systems that have hadmany more millions of lines of code than the one I had the privilege of beinginvolved with. Just like it’ll get messy if we try to swallow a muffin as a whole, tak-ing too big a bite talking about code will surely backfire as well.
In our template engine example, we just reached a point where we uncovereda muffin-size bit of complexity that we haven’t yet taken care of. At the same time,the test we were working on—evaluating a template—cannot work without thatparticular bit of complexity being tackled first. Or can it?
As you may remember from the algorithms course in school, there is morethan one way to traverse a tree. We can either traverse breadth-first or we cantraverse depth-first. The same holds true for test-driven development. Well, sortof. Figures 2.3 and 2.4 compare these two alternatives side by side.
We could decide to go breadth-first, writing tests against the public interface ofthe Template class; making them pass by faking the internals, the lower-level func-tionality; and only then proceed to writing tests for (and implementing) the layerbeneath the original one. Figure 2.3 illustrates this approach.
Squeeze out more hard coding
Template engine functionality Template engine functionalityTemplate engine functionality
ParsingParsing RenderingFakedparsing
Fakedrendering
Fakedrendering
Figure 2.3 With a breadth-first strategy, we implement the higher-level functionality first by faking the required lower-level functionality.

Breadth-first, depth-first 59
The other option would be to back out to a working state and start writing tests forthe template-parsing logic instead—and come back once we’ve got the template-parsing stuff in check. That is, traverse functionality depth-first and implementthe details first for one small vertical slice before moving on with the next slice.Figure 2.4 shows what this approach might look like.
In the case of our template engine having to deal with “Hello, ${name}”, we canfake the lower-level functionality—parsing the template—a little longer before weadd more functionality (more tests, that is) and see where that’ll lead us.
2.3.1 Faking details a little longer
First, we’ll need to start storing the variable value and the template text some-where. We’ll also need to make evaluate replace the placeholder with the value.Listing 2.10 shows one way to get our test passing.
public class Template {
private String variableValue;
private String templateText;
public Template(String templateText) { this.templateText = templateText; }
public void set(String variable, String value) { this.variableValue = value; }
public String evaluate() { return templateText.replaceAll("\\$\\{name\\}", variableValue); }}
Listing 2.10 Our first attempt at handling the variable for real
Template engine functionality Template engine functionalityTemplate engine functionality
ParsingParsing RenderingParsing RenderingRendering
Figure 2.4 With a depth-first strategy, we implement the lower-level functionality first and only compose the higher-level functionality once all the ingredients are present.
60 CHAPTER 2
Beginning TDD
Some might say what we’re doing here is cheating—we’re still hard-coding the reg-ular expression to look for “${name}”. It’s not really cheating, however. We’re beingdisciplined and not giving in to the temptation of “just write the code and be donewith it.” We’ll get there eventually. Baby steps, remember? All tests are passing,we’re on stable ground—with a green bar as evidence—and we know exactly wherethat ground is. What’s next?
Refactoring is what’s next. Do you see anything to refactor? Spot any duplica-tion that’s bothering you? Any less-than-ideal code constructs? Nothing strikes myeye, so I’ll go on and proceed to enhancing our test. Specifically, I’d like to driveout that hard-coded variable name. What better way to do that than by introduc-ing multiple variables into the template?
2.3.2 Squeezing out the fake stuff
It’s time to write a test for multiple variables on a template. This, by the way, is testnumber 2 on our test list. We’re proceeding almost at light-speed, aren’t we? Add-ing the following snippet to our test class should give us more to think about:
@Testpublic void multipleVariables() throws Exception { Template template = new Template("${one}, ${two}, ${three}"); template.set("one", "1"); template.set("two", "2"); template.set("three", "3"); assertEquals("1, 2, 3", template.evaluate());}
This test fails right now, telling us that evaluate returns the template text as isinstead of “1, 2, 3” (which is hardly a surprise because our regular expression islooking for just “${name}”). The big question now is how to deal with this addedlevel of variability in the template.
One way that comes to mind—to get the test passing as quickly as possible—would be to do the search-and-replace operation for each of the variable name-value pairs the Template knows about. That could be slow, and there could be someissues with variable values containing substrings that look like a “${variable}”, butthat should be good enough for us right now. Usually, when I think of worries ordeficiencies like the one with the regular expression approach we’re talking abouthere, I write them down as new tests on the list. Let’s do that right now:
Evaluate template “${one}, ${two}, ${three}” with values “1”, “${foo}”,and “3”, respectively, and verify that the template engine renders the result as“1, ${foo}, 3”.

Breadth-first, depth-first 61
When we find that, for example, something is wrongly implemented or missingaltogether while we’re working on one test, it’s usually a good idea to write down ashort reminder and continue with what we’re working on. This let’s us focus on onetask at a time instead of overloading our brains by jumping back and forth betweenmultiple things (and likely making a mess of our code base in the process).
Now, let’s see how we could apply the search-and-replace approach to pass ourcurrent failing test.
New and improved detailsBack to business. The search-and-replace-based implementation shown in list-ing 2.11 does indeed get us back to green.
import java.util.Map;import java.util.HashMap;import static java.util.Map.Entry;
public class Template {
private Map<String, String> variables; private String templateText;
public Template(String templateText) { this.variables = new HashMap<String, String>(); this.templateText = templateText; }
public void set(String name, String value) { this.variables.put(name, value); }
public String evaluate() { String result = templateText; for (Entry<String, String> entry : variables.entrySet()) { String regex = "\\$\\{" + entry.getKey() + "\\}"; result = result.replaceAll(regex, entry.getValue()); } return result; }}
Listing 2.11 Search-and-replace for handling multiple variables
Store variable values in HashMap
Store variable values in HashMap
Store variable values in HashMap
Loop through variables
Replace each variablewith its value

62 CHAPTER 2
Beginning TDD
The tests are running green again, which is cool. What’s next? Refactoring! I stilldon’t see much to refactor, however, so let’s skip that step again and move on tothe next test.
We’ve got the following tests still untouched on our list:
■ Evaluating template “Hello, ${name}” with no value for variable “name” raisesa MissingValueError.
■ Evaluating template “Hello, ${name}” with values “Hi” and “Reader” for vari-ables “doesnotexist” and “name”, respectively, results in the string “Hello,Reader”.
■ Evaluate template “${one}, ${two}, ${three}” with values “1”, “${foo}”, and “3”,respectively, and verify that the template engine renders the result as “1,${foo}, 3”.
I’m thinking the second of these seems like it should pass already. Let’s seewhether that’s the case.
Testing for a special caseThe following snippet introduces a new test with which we assert that if we set vari-ables that don’t exist in the template text, the variables are ignored by the Tem-plate class. I have a theory that our current implementation should pass this testwith flying colors without any changes:
@Testpublic void unknownVariablesAreIgnored() throws Exception { Template template = new Template("Hello, ${name}"); template.set("name", "Reader"); template.set("doesnotexist", "Hi"); assertEquals("Hello, Reader", template.evaluate());}
Yep. It passes right away. Or does it? My IDE runs unit tests so fast that every now and then I’m not 100% sure
whether I actually ran the tests or not. This is why you might want to considerinsisting on seeing red before green. In other words, fail the test intentionally atfirst, just to see that our test execution catches the failure—that we’re really exe-cuting the newly added test—and only then proceed to implement the test andsee the bar turn green again.

Let’s not forget to refactor 63
TIP Most modern IDEs let us customize the code templates used for code gen-eration. I have configured the “test” template in my Eclipse, for example,to include a statement to throw a RuntimeException with the messageNot implemented. This statement gets added into every test method I gener-ate by typing test and pressing Ctrl+Space, and it serves not only as a time-saver but also as a reminder for me to run the failing test first.
In this case, the code really does pass the new test with no changes. Wouldn’t it bewonderful if all development were this easy? Perhaps not, but it’s nice to have afreebie every now and then, isn’t it?
Moving on, it’s time for the refactoring step again.
2.4 Let’s not forget to refactor
We haven’t yet refactored anything, even though we’ve written a lot of code. Thereason is that we haven’t spotted anything that needs refactoring. Is there stillnothing to refactor? Probably not, because we didn’t add any code, right? Wrong.Even though we didn’t add any production code, we added test code, and that’scode just like any other—and we know better than to let our test code rot and getus into serious trouble later on.
Let’s see what we could do about our test code by first identifying any potentialrefactorings we might want to do and then deciding which of them we’ll carry out.Listing 2.12 presents our test class so far.
public class TestTemplate {
@Test public void oneVariable() throws Exception { Template template = new Template("Hello, ${name}"); template.set("name", "Reader"); assertEquals("Hello, Reader", template.evaluate()); }
@Test public void differentTemplate() throws Exception { template = new Template("Hi, ${name}"); template.set("name", "someone else"); assertEquals("Hi, someone else", template.evaluate()); }
@Test public void multipleVariables() throws Exception { Template template = new Template("${one}, ${two}, ${three}"); template.set("one", "1");
Listing 2.12 Our test code up to this point—can you spot anything to refactor?

64 CHAPTER 2
Beginning TDD
template.set("two", "2"); template.set("three", "3"); assertEquals("1, 2, 3", template.evaluate()); }
@Test public void unknownVariablesAreIgnored() throws Exception { Template template = new Template("Hello, ${name}"); template.set("name", "Reader"); template.set("doesnotexist", "Hi"); assertEquals("Hello, Reader", template.evaluate()); }}
Take a moment to think about what we could improve in the test code. Duplication.Semantic redundancy. Anything that jumps out. Anything we perhaps should cleanup. We’re next going to take a look at a couple of potential refactorings that I’vespotted, but I urge you to see what kind of smells you find from the code we haveso far. We’ll continue when you’re ready to compare notes.
2.4.1 Potential refactorings in test code
There are at least a couple of things that come to mind when scanning through thecode. First, all of our tests are using a Template object, so we probably shouldextract that into an instance variable rather than declare it over and over again. Sec-ond, we’re calling the evaluate method several times as an argument to assert-Equals. Third, we’re instantiating the Template class with the same template textin two places. That’s duplication and probably should be removed somehow.
However, one of the tests is using a different template text. Should we use twoinstance variables, one for each template text? If so, we probably should split theclass into two to deal with the two fixtures we clearly have.
NOTE If you’re not familiar with the concept of fixtures, they’re basically the setof objects—the state—we’ve initialized for our test to use. With JUnit, thefixture is effectively the set of instance variables and the other configuredstate of a test class instance. We’ll talk more about fixtures in chapter 4,but for now just think of the shared starting state between different testmethods of a test class.
There is an alternative, however, to splitting the class with TestTemplate. Let’s seewhat that alternative refactoring is.

Let’s not forget to refactor 65
2.4.2 Removing a redundant test
There’s a more fundamental type of duplication present in our test code betweenoneVariable, differentTemplate, and multipleVariables. Thinking about it,the latter test basically covers the first one as well, so we can safely get rid of thesingle-variable version if we also add a new test to verify that we can set a new valuefor a variable and re-evaluate the template. Furthermore, we can make unknown-VariablesAreIgnored use the same template text as multipleVariables. AndI’m not so sure we need differentTemplate either, so maybe that should go, too.
Let’s see what the refactored test code shown in listing 2.13 looks like.
import org.junit.Test;import org.junit.Before;import static org.junit.Assert.*;
public class TestTemplate {
private Template template;
@Before public void setUp() throws Exception { template = new Template("${one}, ${two}, ${three}"); template.set("one", "1"); template.set("two", "2"); template.set("three", "3"); }
@Test public void multipleVariables() throws Exception { assertTemplateEvaluatesTo("1, 2, 3"); }
@Test public void unknownVariablesAreIgnored() throws Exception { template.set("doesnotexist", "whatever"); assertTemplateEvaluatesTo("1, 2, 3"); }
private void assertTemplateEvaluatesTo(String expected) { assertEquals(expected, template.evaluate()); }}
Listing 2.13 Test code after removing a redundant test and unifying the fixture
A common fixture for all tests
Simple, focused test
Simple, focused test

66 CHAPTER 2
Beginning TDD
As you can see, we were able to mold our tests toward using a single template textand common setup,4 leaving the test methods themselves delightfully trivial andfocusing only on the essential—the specific aspect of functionality they’re testing.
But now, time for more functionality—that is, another test. I’m thinking itmight be a good time to look into error handling now that we have the basic func-tionality for a template engine in place.
2.5 Adding a bit of error handling
It’s again time to add a new test. The only one remaining on our list is the oneabout raising an error when evaluating a template with some variable left withouta value. You guessed right, we’re going to proceed by first writing a test, then mak-ing it pass, and refactoring it to the best design we can think of.
Now, let’s see how we’d like the template engine to work in the case of missingvalues, shall we?
2.5.1 Expecting an exception
How do we write a JUnit test that verifies that an exception is thrown? With the try-catch construct, of course, except that this time, the code throwing an exceptionis a good thing—the expected behavior. The approach shown in listing 2.14 is acommon pattern5 for testing exception-throwing behavior with JUnit.
@Testpublic void missingValueRaisesException() throws Exception { try { new Template("${foo}").evaluate(); fail("evaluate() should throw an exception if " + "a variable was left without a value!"); } catch (MissingValueException expected) { }}
Note the call to the fail method right after evaluate. With that call toorg.junit.Assert#fail, we’re basically saying, “if we got this far, something wentwrong” and the fail method fails the test. If, however, the call to evaluate throws
4 The @Before annotated method is invoked by JUnit before each @Test method.
Listing 2.14 Testing for an exception
5 See Recipe 2.8 in JUnit Recipes by J. B. Rainsberger (Manning Publications, 2005).

Adding a bit of error handling 67
an exception, we either catch it and ignore it—if it’s of the expected type—or let itbubble up to JUnit, which will then mark the test as having had an error.
OK. We’ve got a test that’s failing. Well, at first it’s not even compiling, but add-ing an empty MissingValueException class makes that go away:
public class MissingValueException extends RuntimeException { // this is all we need for now}
We have the red bar again, and we’re ready to make the test pass. And that meanswe have to somehow check for missing variables.
Once again, we’re faced with the question of how to get to the green as quicklyas possible. How do we know, inside evaluate, whether some of the variablesspecified in the template text are without a value? The simplest solution thatsprings to my mind right now is to look at the output and figure out whether itstill contains pieces that look like variables. This is by no means a robust solution,but it’ll do for now and it should be pretty easy to implement.
Sure enough, it was easy—as you can see from listing 2.15.
public String evaluate() { String result = templateText; for (Entry<String, String> entry : variables.entrySet()) { String regex = "\\$\\{" + entry.getKey() + "\\}";
Listing 2.15 Checking for remaining variables after the search-and-replace
Testing for exceptions with an annotationJUnit 4 brought us a handy annotation-based syntax for expressing exceptiontests such as our missingValueRaisesException in listing 2.14. Using the an-notation syntax, the same test could be written as follows:
@Test(expected=MissingValueException.class)public void testMissingValueRaisesException() throws Exception { new Template("${foo}").evaluate();}
Although this annotation-based version of our test is less verbose than our try-catch, with the try-catch we can also make further assertions about the ex-ception thrown (for example, that the error message contains a key piece of in-formation). Some folks like to use the annotation syntax where they can, whileothers prefer always using the same try-catch pattern. Personally, I use theannotation shorthand when I’m only interested in the type and use the try-catchwhen I feel like digging deeper.

68 CHAPTER 2
Beginning TDD
result = result.replaceAll(regex, entry.getValue()); } if (result.matches(".*\\$\\{.+\\}.*")) { throw new MissingValueException(); } return result;}
We’re back from red to green again. See anything to refactor this time? Nothingcritical, I think, but the evaluate method is starting to become rather big. “Big?”you say. “That tiny piece of code?” I think so. I think it’s time to refactor.
2.5.2 Refactoring toward smaller methods
There are differences in what size people prefer for their methods, classes, and soforth. Myself? I’m most comfortable with fewer than 10 lines of Java code permethod.6 Anything beyond that, and I start to wonder if there’s something I couldthrow away or move somewhere else. Also, evaluate is on the verge of doing toomany different things—replacing variables with values and checking for missingvalues. I’m starting to think it’s already over the edge.
Let’s apply some refactoring magic on evaluate to make it cleaner. I’m think-ing we could at least extract the check for missing values into its own method. List-ing 2.16 shows the refactored version of our evaluate method.
public String evaluate() { String result = templateText; for (Entry<String, String> entry : variables.entrySet()) { String regex = "\\$\\{" + entry.getKey() + "\\}"; result = result.replaceAll(regex, entry.getValue()); } checkForMissingValues(result); return result;}
private void checkForMissingValues(String result) { if (result.matches(".*\\$\\{.+\\}.*")) { throw new MissingValueException(); }}
6 A perhaps better indicator of too big a method would be a complexity metric such as McCabe. Longmethods are pretty good indicators of too high complexity as well, however.
Listing 2.16 Extracting the check for missing variables into a method
Does it look like we left a variable in there?
Hooray! We got rid of a whole if-block from evaluate()

Adding a bit of error handling 69
Much better already, but there’s still more to do. As we extracted the check formissing values from the evaluate method, we introduced a mismatch in the levelof abstraction present in the evaluate method. We made evaluate less balancedthan we’d like our methods to be. Let’s talk about balance for a minute beforemoving on with our implementation.
2.5.3 Keeping methods in balance
One property of a method that has quite an effect on the readability of our code isthe consistency of the abstraction level of the code within that method. Let’s takeanother look at evaluate as an example of what we’re talking about:
public String evaluate() { String result = templateText; for (Entry<String, String> entry : variables.entrySet()) { String regex = "\\$\\{" + entry.getKey() + "\\}"; result = result.replaceAll(regex, entry.getValue()); } checkForMissingValues(result); return result;}
The evaluate method is doing two things: replacing variables with values andchecking for missing values, which are at a completely different level of abstrac-tion. The for loop is clearly more involved than the method call to checkfor-MissingValues. It’s often easy to add little pieces of functionality by gluing a one-liner to an existing method, but without keeping an eye on inconsistencies inabstraction levels, the code is soon an unintelligible mess.
Fortunately, these kinds of issues usually don’t require anything more than asimple application of the extract method refactoring, illustrated by listing 2.17.
public String evaluate() { String result = replaceVariables(); checkForMissingValues(result); return result;}
private String replaceVariables() { String result = templateText; for (Entry<String, String> entry : variables.entrySet()) { String regex = "\\$\\{" + entry.getKey() + "\\}"; result = result.replaceAll(regex, entry.getValue()); } return result; }
Listing 2.17 Extracting another method from evaluate()
evaluate() method’s internals much better balanced
New method is simple and hassingle, clear purpose

70 CHAPTER 2
Beginning TDD
private void checkForMissingValues(String result) { if (result.matches(".*\\$\\{.+\\}.*")) { throw new MissingValueException(); }}
Running our tests, we realize that we didn’t break anything with the refactoring, sowe’re good to go. Doing these kinds of edits on working code would be a much big-ger effort if we didn’t have the test battery watching our back. Let’s face it: we mightnot have even carried out the refactoring we just did if we hadn’t had those tests.
Our tests are running green again, which is a good thing. We’re not done withthe exception case yet, however. There’s still one piece of functionality that wewant to have for handling missing values: a meaningful exception message.
2.5.4 Expecting details from an exception
While writing the test for the missing value, we just caught a MissingValueExcep-tion and called it a day. You can’t possibly know how many times I’ve stared at ameaningless exception message7 and cursed the developer who didn’t bother giv-ing even the least bit of information to help in problem solving. In this case, weprobably should embed the name of the variable missing a value into the excep-tion message. And, since we’re all set, why not do just that (see listing 2.18)?
@Testpublic void missingValueRaisesException() throws Exception { try { new Template("${foo}").evaluate(); fail("evaluate() should throw an exception if " + "a variable was left without a value!"); } catch (MissingValueException expected) { assertEquals("No value for ${foo}", expected.getMessage()); }}
As usual, the edit needed for making a test pass is a matter of a couple of minutes.This time, we need to use the java.util.regex API a bit differently in order to
7 Does “java.lang.NullPointerException: null” ring a bell...?
Listing 2.18 Testing for an expected exception
Exception should name missing variable

Loose ends on the test list 71
dig out the part of the rendered result that matches a variable pattern. Perhaps asnippet of code would explain that better:
import java.util.regex.Pattern;import java.util.regex.Matcher;private void checkForMissingValues(String result) { Matcher m = Pattern.compile("\\$\\{.+\\}").matcher(result); if (m.find()) { throw new MissingValueException("No value for " + m.group()); }}
Of course, we’ll also need to add a constructor to MissingValueException:
public class MissingValueException extends RuntimeException { public MissingValueException(String message) { super(message); }}
That’s it. A couple of minutes ago, we thought of a new test and decided to imple-ment it right away. If it would’ve seemed like a bigger task, we might have justadded it as a new test to our test list and come back to it later. Speaking of the testlist, I think it’s time for an update.
2.6 Loose ends on the test list
We’ve now implemented all the test cases that we thought of in the beginning. Wedid, however, spot some issues with our current implementation along the way. Forone, it doesn’t handle situations where the variable values contain delimiters suchas “${” and “}”. I’ve also got some worries with regard to how well our templateengine performs. Adding performance to our task list, these are the remaining tests:
■ Evaluate template “${one}, ${two}, ${three}” with values “1”, “${foo}”, and “3”,respectively, and verify that the template engine renders the result as “1,${foo}, 3”.
■ Verify that a template of 100 words and 20 variables with values of approxi-mately 15 characters each is evaluated in 200 milliseconds or less.
We should add tests to the list as soon as we think of them, just to be sure we don’tforget. That doesn’t mean, however, that we should immediately drop on all foursand start chasing cars—we don’t want to let these new tests interrupt our flow. Wewrite down a simple reminder and continue with what we’re currently workingwith, knowing that we’ll come back to that new test later.
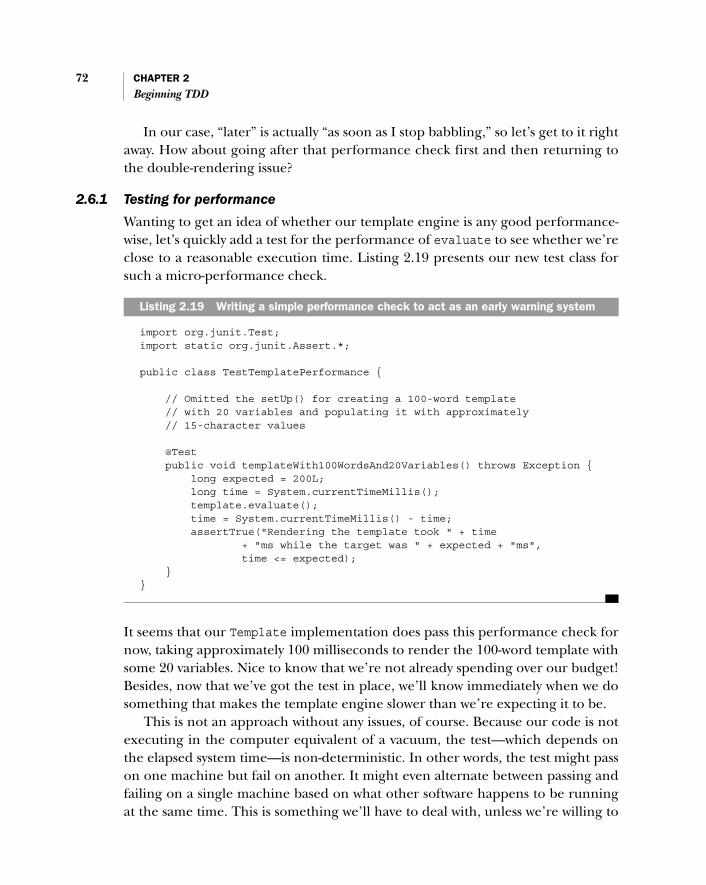
72 CHAPTER 2
Beginning TDD
In our case, “later” is actually “as soon as I stop babbling,” so let’s get to it rightaway. How about going after that performance check first and then returning tothe double-rendering issue?
2.6.1 Testing for performance
Wanting to get an idea of whether our template engine is any good performance-wise, let’s quickly add a test for the performance of evaluate to see whether we’reclose to a reasonable execution time. Listing 2.19 presents our new test class forsuch a micro-performance check.
import org.junit.Test;import static org.junit.Assert.*;
public class TestTemplatePerformance {
// Omitted the setUp() for creating a 100-word template // with 20 variables and populating it with approximately // 15-character values
@Test public void templateWith100WordsAnd20Variables() throws Exception { long expected = 200L; long time = System.currentTimeMillis(); template.evaluate(); time = System.currentTimeMillis() - time; assertTrue("Rendering the template took " + time + "ms while the target was " + expected + "ms", time <= expected); }}
It seems that our Template implementation does pass this performance check fornow, taking approximately 100 milliseconds to render the 100-word template withsome 20 variables. Nice to know that we’re not already spending over our budget!Besides, now that we’ve got the test in place, we’ll know immediately when we dosomething that makes the template engine slower than we’re expecting it to be.
This is not an approach without any issues, of course. Because our code is notexecuting in the computer equivalent of a vacuum, the test—which depends onthe elapsed system time—is non-deterministic. In other words, the test might passon one machine but fail on another. It might even alternate between passing andfailing on a single machine based on what other software happens to be runningat the same time. This is something we’ll have to deal with, unless we’re willing to
Listing 2.19 Writing a simple performance check to act as an early warning system

Summary 73
accept the fact that some of our test runs might fail seemingly sporadically. Mostof the time, it’s a good enough solution to tune the test such that it won’t fail toooften while still alerting us to a performance problem.
With that worry largely behind us, let’s see about that other test we added forthe double-rendering problem—the one about rendering variables that have val-ues that look like variable placeholders.
2.6.2 A looming design dead-end
Regarding the remaining test for variable values that contain “${” and “}”, thingsare starting to look more difficult. For one thing, we can’t just do a search-and-replace over and over again until we’ve covered all variable values set to the tem-plate, because some of the variable values rendered first could be re-renderedwith something completely different during later rounds of search-and-replace. Inaddition, we can’t rely on our method of detecting unset variables by looking for“${…}” in the result.
Before we go further, let’s stop all this speculation and write a test that proveswhether our assumptions about the code’s current behavior are correct! Addingthe following test into the TestTemplate class does just that:
@Testpublic void variablesGetProcessedJustOnce() throws Exception { template.set("one", "${one}"); template.set("two", "${three}"); template.set("three", "${two}"); assertTemplateEvaluatesTo("${one}, ${three}, ${two}");}
Running the test tells us that we certainly have a problem. This test is causing anIllegalArgumentException to be thrown from the regular expression codeinvoked from evaluate, saying something about an “illegal group reference,” soour code is definitely not handling the scenario well. I’m thinking it’s time to backout of that test, pick up the notepad, and sketch a bit. Instead, let’s sum up thechapter so far, take a break, and continue with this double-rendering issue in thenext chapter.
2.7 Summary
Test-driven development is a powerful technique that helps us write better soft-ware faster. It does so by focusing on what is absolutely needed right now, thenmaking that tiny piece work, and finally cleaning up any mess we might’ve madewhile making it work, effectively keeping the code base healthy. This cycle of

74 CHAPTER 2
Beginning TDD
first writing a test, then writing the code to make it pass, and finally refactoringthe design makes heavy use of programming by intention—writing the test as ifthe ideal implementation exists already—as a tool for creating usable and test-able designs.
In this chapter, we have seen TDD in action, we’ve lived through the TDD cycle,and we’ve realized that our current design for the template engine doesn’t quitecut it. We set out to write a template engine based on a short list of tests that spec-ify the expected behavior of the engine, and we followed the test-code-refactor (orred-green-green) cycle all the way.8 The code already satisfies most of our require-ments (we’ve got tests to prove it!) and would certainly be useful in many contextsas it is. We are able to make progress fast with the tests watching our backs, andwe’re not afraid to refactor knowing that the safety net will catch us should we failto retain functionality as it is.
Now, let’s flip the page to the next chapter and see how we can overcome theremaining issues and wrap up that template engine into a fully functional, beauti-fully constructed piece of product!
8 I’ll forgive you if you slipped. I do that, too. And it tends to come back to bite me, reminding of thevarious benefits of TDD. I'm sure you'll also get better and better at doing TDD as time goes by.

Refactoring in small steps
The most powerful designs are always the result of a continuous process of simplification and refinement.
—Kevin Mullet, Designing Visual Interfaces:Communication Oriented Techniques
75

76 CHAPTER 3
Refactoring in small steps
In the previous chapter, we began implementing a template engine using test-drivendevelopment, starting from basically nothing and ending up with a rather usefulchunk of code. In fact, we’ve gotten this far with almost laughably little code. If youlook at our Template class, it’s a lot smaller than I suppose most would’ve guessedbased on years of experience in waterfall-style, big-design-up-front development. Ormaybe it’s just me. Perhaps others have indeed come up with small and simple solu-tions while I devised fancy and complex designs.
We did bump into a problem, however, with our use of regular expressions toscan the template text for variables. I like to think of these kinds of obstacles asopportunities to make design decisions. A lot of the time while developing test-first, the steps we take are relatively trivial, obvious even. It’s refreshing when thegoing gets rough for a while and we need to stretch our imagination to figure outhow to solve the problem. In this chapter, we’ll learn to make a big change in ourdesign in small steps and in a controlled manner.
We’ll begin by mapping the territory with something we call spike solution. Aspike is basically throwaway prototyping with the goal of learning whether andwith how much effort a potential solution can be implemented. Once we’velearned whether and how Java’s regular expression API could help us in parsingour templates, we’ll use that knowledge in implementing a parser.
We’ll also refactor our existing implementation of the template engine into adesign that makes it easy to replace the existing parsing logic with our brand-newparser. Once we’ve finished introducing a proper template parser into ourengine, we’ll finish the chapter by further refactoring, promoting some implicittypes in our code into explicit, first-class concepts in our design.
All right, it’s time to start the spike.
3.1 Exploring a potential solution
Have you already thought about potential approaches to getting our problem ofdouble-rendering solved? If you haven’t, do take a few minutes to think about howyou would go about solving it.
Ready? Good. What did you do just now? Did you sketch something on paper?Did you write code to a temp file to figure out how the Java regular expression APIworks? Did you reach for Google and the Javadocs? Or did you just try to thinkyour way through to devise an approach completely different than regular expres-sions? From the point of view of TDD, the exploratory process of figuring outwhether a given solution would solve our problem or what might be the bestapproach to solving a given problem, is what the Extreme Programming vocabu-lary calls a spike.

Exploring a potential solution 77
3.1.1 Prototyping with spikes
Sometimes when facing a stop, breathe, design moment, we decide to dig deeperinto a potential solution—be it some fancy new technology, that ancient APInobody has used since the company’s infamous Y2K project, or an algorithm thatseems to fit the bill better than what we currently have. A spike is a short1 experi-ment with the purpose of familiarizing ourselves with the technology, tools, algo-rithms, and so forth, that we need for solving the problem at hand. A spike is a wayto make an unknown known—at least to a point where we know whether it’s worthcontinuing to dig that way or whether we should start looking for another way.
We typically don’t do our spikes quite as strictly as regular development withregard to programming test-first. Some do, however, stick to TDD also forspikes—and, since we’re getting so many nice benefits out of it for the rest of ourwork, why not! The important thing is, though, that we don’t just take what wehacked together in a spike and glue it on top of our production code. We want tokeep our software healthy, so we’ll write the test first and only then write thecode—not by copying and pasting the whole spike product piece by piece, butrather using our newly acquired knowledge from the spike and keeping thedesign lean and clean.
Now, let’s take a look at an example spike. We start by writing learning tests toincrease our understanding and knowledge of what we’re trying to learn—theJava regular expression API—and then begin making use of that new knowledge.Let’s go.
3.1.2 Learning by writing tests
Where were we? Ah, right. We wrote a test that reveals the deficiency in our Tem-plate class with regard to handling variable values, which look like variables them-selves. Call me persistent, but I’m still thinking regular expressions are a GoodThing™. We probably could keep our code pretty clean and tight by implementingthis latest challenge using Java’s regular expression API, java.util.regex.
The way I tend to do smaller spikes, like getting to know how some particularAPI works or whether it can do what I’m looking for, is by writing learning tests.Learning tests are automated tests whose purpose is to verify assumptions about apiece of code, therefore teaching us—by example—what works. In the case ofJava’s regular expression API, a learning test or two is a perfect way to map out a
1 “Short” relatively speaking—most spikes are a matter of 15 minutes to a couple of hours—a lot longerthan the TDD cycles we’re used to measuring in seconds or minutes rather than hours…

78 CHAPTER 3
Refactoring in small steps
potential solution for our situation in light of the new test our existing implemen-tation doesn’t pass.
The solution I’m thinking of is to parse the template at load time into plain-text segments and variable segments and then to evaluate them in sequence,appending to a StringBuilder or something similar. For example, given a tem-plate “${first} and ${second}”, the parsing logic would produce the followingsequence: variable named “first”, a plain-text segment “ and ”, and a variablenamed “second”. Evaluating these one by one would definitely prevent the prob-lem of a variable’s rendered value getting interpreted as another variable.
Let’s write some learning tests to see how this could be done with the regularexpression API.
3.1.3 Example spike for learning an API
There’s a nice method called groupCount in the java.util.regex.Matcher class,and I remember that groups in the Java regular expression vocabulary refer tostuff surrounded with parentheses, so let’s see if we could use that. I wrote the fol-lowing test to verify my understanding of an unfamiliar API:
public class RegexLearningTest { @Test public void testHowGroupCountWorks() throws Exception { String haystack = "The needle shop sells needles"; String regex = "(needle)"; Matcher matcher = Pattern.compile(regex).matcher(haystack); assertEquals(2, matcher.groupCount()); }}
And it fails. It fails because I thought (don’t ask why) that the groupCount methodwould give me the number of occurrences of the pattern in the data, not the num-ber of groups identified in the regular expression itself. Well, at least I found thatout before writing the whole implementation based on my incorrect assumptionabout the API.
This time, reading the Javadocs for java.util.regex.Matcher a bit more care-fully, I find the following sentence: “The find() method scans the input sequencelooking for the next subsequence that matches the pattern.” That looks promis-ing, especially since the documentation says the following:
[The method] attempts to find the next subsequence of the input sequence thatmatches the pattern. This method starts at the beginning of the input sequence or, ifa previous invocation of the method was successful and the matcher has not sincebeen reset, at the first character not matched by the previous match. If the match suc-ceeds then more information can be obtained via the start, end, and group methods.

Exploring a potential solution 79
Now let’s write some more learning tests to see whether we could loop through allmatches using the find method.
If I understood the documentation correctly, the find method should scan upuntil the first instance of “needle” in the data and return true because it findsone. Let’s first add an assertion to verify my interpretation:
@Testpublic void testFindStartAndEnd() throws Exception { String haystack = "The needle shop sells needles"; String regex = "(needle)"; Matcher matcher = Pattern.compile(regex).matcher(haystack); assertTrue(matcher.find());}
That’s correct. Next, we should be able to get some relevant character positionswith the start and end methods. Let’s write assertions for those as well:
@Testpublic void testFindStartAndEnd() throws Exception { String haystack = "The needle shop sells needles"; String regex = "(needle)"; Matcher matcher = Pattern.compile(regex).matcher(haystack); assertTrue(matcher.find()); assertEquals("Wrong start index of 1st match", 4, matcher.start()); assertEquals("Wrong end index of 1st match", 10, matcher.end());}
Cool. It works. I wonder if the next call to find will give us the correct indexes forthe second occurrence of “needle”? Listing 3.1 shows the resulting learning test.
@Testpublic void testFindStartAndEnd() throws Exception { String haystack = "The needle shop sells needles"; String regex = "(needle)"; Matcher matcher = Pattern.compile(regex).matcher(haystack);
assertTrue(matcher.find()); assertEquals("Wrong start index of 1st match.", 4, matcher.start()); assertEquals("Wrong end index of 1st match.", 10, matcher.end());
assertTrue(matcher.find()); assertEquals("Wrong start index of 2nd match.", 22, matcher.start()); assertEquals("Wrong end index of 2nd match.", 28, matcher.end());
assertFalse("Should not have any more matches", matcher.find());}
Listing 3.1 Making sure we can locate all matches within a given String

80 CHAPTER 3
Refactoring in small steps
Excellent! The test passes. Now we know how to get the indexes for all instances ofa regular expression within a given string. From there, I’m pretty confident we canwrite a relatively simple loop that collects all the variables and plain text segmentsinto a list of some sort. Time to face the challenge! No, wait! One more thing…
Don’t ask me why, but something about that regular expression I used in list-ing 3.1 caught my attention or, should I say, curiosity. For some reason, I used theregular expression “(needle)” in the test. It might be because parentheses aregenerally used for grouping in regular expressions; however, I’m not so surewhether those parentheses are important in this case. After all, we’re looking formatches for the whole regular expression, not a specific match group within the reg-ular expression.
It turns out that the test runs successfully even after removing the parenthesesfrom the regular expression. The match groups in the regular expression we usedhave no relevance for finding and iterating through matches. That’s another newpiece of information I just learned from such a small experiment.
NOTE The outcome of a spike is information and knowledge, not code. Don’tget me wrong—it’s essential in a spike to write code. It’s just that weshouldn’t expect the code itself to be of much value. Instead, we’reexpecting to have learned about the problem and a potential solution whiledoing the spike. And that’s what we’ve accomplished with our learningtests—we now know we can obtain the starting and ending indices of vari-able placeholders in a string; thus we’re able to split the template intoplain text and variable segments.
Going forward, our next task is to take this newly acquired knowledge and put itto practice. First of all, we probably should split the two logical phases—parsingthe template and rendering the result—into separate methods orchestrated fromthe public evaluate method. Making this change directly to the evaluatemethod might be a little too big a step for our taste, however. It’s time to go depth-first for a change, first implementing the new parsing logic and then swapping itin to the template engine itself.
3.2 Changing design in a controlled manner
As we discussed earlier in the context of breadth-first and depth-first, there ismore than one approach to plotting our way towards a full solution. At that time,we decided to keep faking the template parsing logic, effectively postponing theimplementation of that part until it was absolutely required. We could’ve decidedotherwise just as well. There are no hard and fast rules about which approach to

Changing design in a controlled manner 81
adopt—it’s very much a case-by-case decision. This time, we’ve come to realizethat it’s probably better to take the depth-first route, as our Template class is gain-ing more and more complexity.
To outline a rough plan of how we’re going to tackle this refactoring, we’refirst going to introduce a new class named TemplateParse, which will be responsi-ble for taking a template text and splitting it into a sequence of plain-text and vari-able segments. And we’re going to do that by writing tests, of course. Once wehave a good enough parser, we’ll switch Template to using that instead of the oldimplementation within the Template class.
Before we start, let’s run the tests once again to make sure we’re not workingagainst a broken code base. There. All tests are passing, now that we’ve tempo-rarily commented out the test that exposes the double-rendering problem.
3.2.1 Creating an alternative implementation
Our depth-first approach now means that we’re going to forget everything aboutthe Template class for a while and focus solely on adding the necessary functional-ity into a class named TemplateParse to support slicing and dicing a template textappropriately. The TemplateParse will essentially represent the result of parsing atemplate into segments. It’s a completely new class with no dependencies to exist-ing code, which means we’ll have to start from a clean plate. As mentionedbefore, an easy way to start fresh is to start with the simplest test we can think of.
Starting with a low-hanging fruitFeeling unsure about where to start? How about testing for an empty template? List-ing 3.2 shows our first stab at the new test class for our new TemplateParse class.
public class TestTemplateParse {
@Test public void emptyTemplateRendersAsEmptyString() throws Exception { TemplateParse parse = new TemplateParse(); List<String> segments = parse.parse(""); assertEquals("Number of segments", 1, segments.size()); assertEquals("", segments.get(0)); }}
Adding the missing TemplateParse class and stubbing out the parse method witha return null, we have a failing test to show us the way. Quickly adding a return
Listing 3.2 Parsing an empty template using the TemplateParse class

82 CHAPTER 3
Refactoring in small steps
statement for a List containing the template text as is (listing 3.3) is enough toget us back to green, which makes sense because a template without any variablesis essentially a single plain text segment for the TemplateParse class.
We’re moving fast, so let’s just see the next test:
@Testpublic void templateWithOnlyPlainText() throws Exception { TemplateParse parse = new TemplateParse(); List<String> segments = parse.parse("plain text only"); assertEquals("Number of segments", 1, segments.size()); assertEquals("plain text only", segments.get(0));}
Making the test pass is still next to trivial. In fact, the test passes with the imple-mentation we wrote for the previous test, as shown in listing 3.3.
import java.util.List;import java.util.Collections;
public class TemplateParse { public List<String> parse(String template) { return Collections.singletonList(template); }}
At this point, we’re again starting to collect duplication in our test code betweenemptyTemplateRendersAsEmptyString and templateWithOnlyPlainText. Beforewe start driving TemplateParse closer to where we want it to be, let’s take care ofthat duplication.
Removing duplication from testsAt this point, both of our tests are creating a TemplateParse and giving it a tem-plate to be parsed into a List of segments. That’s clearly duplication, so let’srefactor the common part into a nice little helper method that does all of that forus. Listing 3.4 shows how our tests look after getting rid of the duplication.
private List<String> parse(String template) { return new TemplateParse().parse(template);}
Listing 3.3 The simplest implementation that fulfills the plain-text only tests
Listing 3.4 Refactoring away duplication in our test method

Changing design in a controlled manner 83
@Testpublic void emptyTemplateRendersAsEmptyString() throws Exception { List<String> segments = parse(""); assertEquals("Number of segments", 1, segments.size()); assertEquals("", segments.get(0));}
@Testpublic void templateWithOnlyPlainText() throws Exception { List<String> segments = parse("plain text only"); assertEquals("Number of segments", 1, segments.size()); assertEquals("plain text only", segments.get(0));}
There’s some further refactoring to do. We’re asserting the size of the returned Listin both tests. We can see a clear pattern in what we really want to assert with the twoassertEquals calls in each test. Realizing this, we want to make our code commu-nicate that intent better. Let’s see if a bit of varargs magic, courtesy of Java 5,2 couldhelp us out.
private void assertSegments(List<? extends Object> actual, Object... expected) { assertEquals("Number of segments doesn't match.", expected.length, actual.size()); assertEquals(Arrays.asList(expected), actual);}
@Testpublic void emptyTemplateRendersAsEmptyString() throws Exception { List<String> segments = parse(""); assertSegments(segments, ""); }
@Testpublic void templateWithOnlyPlainText() throws Exception { List<String> segments = parse("plain text only"); assertSegments(segments, "plain text only"); }
2 Java 5 introduced the concept of variable-length argument lists into the language, which has made cer-tain things a lot easier to achieve than before. One good example is custom assertion methods that dealwith simple lists.
Listing 3.5 Refactoring the assertions to communicate intent better
Variable-length argument list
simplifies assertions

84 CHAPTER 3
Refactoring in small steps
Tests are still passing after the refactoring—as they should—so let’s try to shake itup by adding a variable or two into the mix. And, since we’re test-driven, we’ll dothat by adding another test:
@Testpublic void parsingMultipleVariables() throws Exception { List<String> segments = parse("${a}:${b}:${c}"); assertSegments(segments, "${a}", ":", "${b}", ":", "${c}");}
Aha! This is starting to get more interesting. It’s no longer enough to return a listwith the template text as the sole element. Let’s see how we can accomplish theactual parsing of the template text.
Applying learnings from the spikeAt this point, we pull our spike learnings from our short-term memory and applythem to the actual problem at hand. Here’s the first strategy that popped to mymind: a loop that reads plain text from the beginning of the template, then readsthe variable placeholder, sets a pointer to where in the template the loop shouldcontinue, and so forth. This strategy has been implemented in one big step as list-ing 3.6, using the features of the Java Regular Expression API we learned earlier inour spike and the existing tests as our safety net.
public class TemplateParse {
public List<String> parse(String template) { List<String> segments = new ArrayList<String>(); int index = collectSegments(segments, template); addTail(segments, template, index); addEmptyStringIfTemplateWasEmpty(segments); return segments; }
private int collectSegments(List<String> segs, String src) { Pattern pattern = Pattern.compile("\\$\\{[^}]*\\}"); Matcher matcher = pattern.matcher(src); int index = 0; while (matcher.find()) { addPrecedingPlainText(segs, src, matcher, index); addVariable(segs, src, matcher); index = matcher.end(); } return index; }
Listing 3.6 Parsing variables from plain text
The high-level parsing logic
Collect variables andintermediate plain text

Changing design in a controlled manner 85
private void addTail(List<String> segs, String template, int index) { if (index < template.length()) { segs.add(template.substring(index)); } }
private void addVariable(List<String> segs, String src,Matcher m) { segs.add(src.substring(m.start(), m.end())); }
private void addPrecedingPlainText(List<String> segs, String src, Matcher m, int index) { if (index != m.start()) { segs.add(src.substring(index, m.start())); } }
private void addEmptyStringIfTemplateWasEmpty(List<String> segs) { if (segs.isEmpty()) { segs.add(""); } }}
The structure presented in listing 3.6 is suddenly much more complex than it wasbefore. The public parse method is basically an outline describing an algorithm,which first parses the input into segments, then adds the remaining tail of plaintext after the last variable placeholder, and, if the list of segments found would oth-erwise remain empty, adds an empty string to represent a zero-length template.
Looking inside the collectSegments method, the segments are gathered intoan ArrayList. We’re basically enumerating through matches for the regularexpression of a variable placeholder. For each found variable placeholder, we addany plain text between the previous and the current match into the list. Then weadd the variable to the list and update the index variable to point to the end ofthe latest match. The private methods doing the work of extracting the segmentsfrom the template text are each relatively simple and easy to understand, largelybecause they have descriptive names.
We now have a class that knows how to parse a template into a parse tree ofplain-text segments and variable segments. Before we proceed to adding our shinynew parser to the template engine, however, let’s reflect a bit on what we just did.
Add remaining plain text, if any

86 CHAPTER 3
Refactoring in small steps
Quick reflection before moving onIt’s a good thing we decided to split this parsing logic into its own class. We did,however, take too large a leap at once: It took several minutes to get the parsinglogic together and the test passing. The TemplateParse implementation mightalso benefit from moving the list of segments being passed around into aninstance variable. That would require synchronizing the parse method, though, ifwe’d like to keep our parser thread-safe. Then again, we don’t have a need formultithreaded access, so not sharing instances of the parse object should be finefor now. Perhaps we’ll not go down that path right now—but feel free to refactoryour code further if you’re following along.
Having a helper method in our test class that doesn’t deal with setting up dataor objects’ state for the test might be an indicator that the method should be apublic method in production code—a static builder method in the Tem-plateParse class.
After adding a short note of this potential refactoring to our test list, decidingto take smaller steps from now on, and keeping an eye on the parser’s complexity,let’s turn our attention back to the Template class. Our next step is to changeTemplate by making it use TemplateParse for slicing the template.
3.2.2 Switching over safely
Now that we’ve got the necessary functionality in TemplateParse to give us anicely chewed list of segments in a template, we want to make the leap by adopt-ing TemplateParse as a replacement for our existing parsing logic in the Tem-plate class. We’re not changing any functionality here. In fact, that’s the lastthing we want to happen! Luckily, the tests are all green, so we can refactor safely.
Adopting the new implementationWithout further ado, listing 3.7 presents the current implementation of evaluatefrom the Template class, which we want to migrate to by using TemplateParse.
public String evaluate() { String result = replaceVariables(); checkForMissingValues(result); return result;}
Listing 3.7 The current implementation of evaluate()

Changing design in a controlled manner 87
Now, programming by intention, we change the evaluate method into:
public String evaluate() { TemplateParse parser = new TemplateParse(); List<String> segments = parser.parse(templateText); StringBuilder result = new StringBuilder(); for (String segment : segments) { append(segment, result); } return result.toString();}
Nice. That should do it. We’re basically just getting a TemplateParse and letting itdo the hard work of parsing the template. Then, we’re looping through the list ofparsed segments and appending them one by one to a StringBuilder. The com-piler is whining about not knowing about any append method so we add that next,already anxious to see our thorough test suite passing again:
private void append(String segment, StringBuilder result) { if (segment.startsWith("${") && segment.endsWith("}")) { String var = segment.substring(2, segment.length() - 1); if (!variables.containsKey(var)) { throw new MissingValueException("No value for " + segment); } result.append(variables.get(var)); } else { result.append(segment); }}
The append implementation concatenates segments based on their type. For vari-ables—that is, segments that are wrapped in the squiggly brackets after a dollarsign—we append the respective value from our variables map. For plain-text seg-ments, we append the segment itself.
Run the tests, and we get the familiar green bar indicating that our switchworked. That wasn’t too hard, was it? But what just happened? We had such nice,clean code, and then we write this? Well, at least the tests are passing, so we cansafely refactor that chunk toward something more hygienic. Besides, now thatwe’re using TemplateParse and appending segments into a StringBuilder, wecan get rid of the replaceVariables and checkForMissingValues methods fromour previous implementation. Maybe the code is not that bad after all. But let’s seeif we could improve it by refactoring again.
Keeping a uniform level of abstractionFirst, let’s do something about that evaluate method. The current implementa-tion, shown next, is again doing too much on two different levels of abstraction:

88 CHAPTER 3
Refactoring in small steps
public String evaluate() { TemplateParse parser = new TemplateParse(); List<String> segments = parser.parse(templateText); StringBuilder result = new StringBuilder(); for (String segment : segments) { append(segment, result); } return result.toString();}
Fortunately, extracting the rendering logic into a separate method is a piece ofcake, as illustrated in listing 3.8.
public String evaluate() { TemplateParse parser = new TemplateParse(); List<String> segments = parser.parse(templateText); return concatenate(segments); }
private String concatenate(List<String> segments) { StringBuilder result = new StringBuilder(); for (String segment : segments) { append(segment, result); } return result.toString();}
That’s not all we want to refactor, though. There’s still that ugly append methodwe’d like to trim into something we’re not ashamed to show to our colleagues.
Cleaning up by extracting methodsWhat are we going to do with the nasty if-else structure in append, shown in thefollowing code snippet?
private void append(String segment, StringBuilder result) { if (segment.startsWith("${") && segment.endsWith("}")) { String var = segment.substring(2, segment.length() - 1); if (!variables.containsKey(var)) { throw new MissingValueException("No value for " + segment); } result.append(variables.get(var)); } else { result.append(segment); }}
Listing 3.8 Extracting the rendering logic into a separate method
evaluate() is now more balanced…
…and concatenate() is doing just one thing

Changing design in a controlled manner 89
How about, say, extracting a couple of methods? We could take that code blockinside the if-block and turn it into a method. We should also make the conditionfor the if-block communicate its purpose better. That should leave append a bitless eye-straining. Listing 3.9 confirms that this is the case.
private void append(String segment, StringBuilder result) { if (isVariable(segment)) { evaluateVariable(segment, result); } else { result.append(segment); } }
private boolean isVariable(String segment) { return segment.startsWith("${") && segment.endsWith("}");}
private void evaluateVariable(String segment, StringBuilder result) { String var = segment.substring(2, segment.length() - 1); if (!variables.containsKey(var)) { throw new MissingValueException("No value for " + segment); } result.append(variables.get(var));}
Better, and definitely easier on the eyes. But that if-else structure in B appendstill has a stench I’d rather get rid of. We’re making a decision based on the typeof a segment object, which is a clear violation of the Pragmatic Programmers’“Tell, Don’t Ask” principle,3 and using strings to represent something more thantext smells a lot like Primitive Obsession.4 If we’d make those segments first-classobjects instead of mere Strings, we should be able to get rid of both of these codesmells. We could hide the if-else logic behind polymorphism and simply tell thesegments to do their thing instead of asking and then doing. Let’s see what thatwould take.
But first, let’s run the tests again—just to be sure. Good. All tests are passing, sowe’re good for another refactoring session. All these important Strings we callsegments really ought to be first-class objects.
Listing 3.9 The append() method after a quick diet
3 http://www.pragmaticprogrammer.com/ppllc/papers/1998_05.html.4 The Primitive Obsession code smell is described in Martin Fowler’s Refactoring: Improving the Design of
Existing Code (Addison-Wesley, 1999).
Branch execution based on segment type
B
Variables surrounded by“${“ and “}”
Render value of variable

90 CHAPTER 3
Refactoring in small steps
3.3 Taking the new design further
So far, we’ve adopted our alternative implementation for the core of the templateengine and refactored the resulting code a bit. There’s still more to do, however.
We’d like to be able to ignore the actual type of each segment and treat themall the same, meaning we wouldn’t need the smelly if-else structure and insteadwe could delegate the appending to the segments. Why not start, again, program-ming by intention and designing the way we want the new Segment interface tobehave? Listing 3.10 shows how I’d like it to work from the perspective of the Tem-plate class.
public String evaluate() { TemplateParse parser = new TemplateParse(); List<Segment> segments = parser.parse(templateText); return concatenate(segments);}
private String concatenate(List<Segment> segments) { StringBuilder result = new StringBuilder(); for (Segment segment : segments) { segment.appendTo(result, variables); } return result.toString();}
The code looks much better again. From listing 3.10, we see that we need tochange the parse method in TemplateParse to return a List of Segment objectsinstead of Strings. The Segment objects need to be able to append themselves ona given StringBuilder, possibly acquiring a variable value from a Map, which wealso pass in as an argument. That shouldn’t be a problem.
The question becomes how to proceed with this refactoring. We need tochange how TemplateParse works, so maybe we should change TemplateParse—test first, of course—and only then come back to the Template class. We don’t liketaking big steps, remember? Having learned from our past, let’s undo the changesto the evaluate method for now until we’ve implemented the new functionalityin TemplateParse and come back once we’ve gotten the other pieces in place.
3.3.1 Keeping things compatible
Not wanting to break any tests while introducing the concept of Segment objects,we might keep both the String-based and a new Segment object-based version of
Listing 3.10 Treating all segments the same
Use Segments instead of Strings
Let Segment append itself to buffer

Taking the new design further 91
the parse method around—only temporarily for backward compatibility. In prac-tice, that means that we add a new parseSegments method and let existing codecall the old parse until we get to switching them over.
Our test for driving out this new parsing method could, for instance, look likethis:
public class TestTemplateParse { @Test public void parsingTemplateIntoSegmentObjects() throws Exception { TemplateParse p = new TemplateParse(); List<Segment> segments = p.parseSegments("a ${b} c ${d}"); assertSegments(segments, new PlainText("a "), new Variable("b"), new PlainText(" c "), new Variable("d")); }}
Voilà. We’ve identified that we need two implementations of a Segment interface.Let’s quickly satisfy the compiler by creating those so that we get a failing test, asillustrated in listing 3.11.
public interface Segment {}
public class PlainText implements Segment { public PlainText(String text) { }}
public class Variable implements Segment { public Variable(String name) { }}
And here’s the skeleton for the missing parseSegments method in TemplateParse:
public List<Segment> parseSegments(String template) { return null;}
That’s all we need to have a red bar to work against. Now, let’s see how to get backto green.
Building on existing functionalityWe already have the code necessary for parsing a template into segment strings, solet’s start by building on that. We can basically just ask for the List of Strings andthen convert each into its respective Segment implementations. In fact, we already
Listing 3.11 The Segment interface and its initial implementations

92 CHAPTER 3
Refactoring in small steps
have some code in the Template class that handles this kind of stuff. Let’s look atwhether we could reuse some parts.
There is already a method for determining from a given String whether it rep-resents a variable segment or a plain text segment. It’s now a private instancemethod, but we should be able to make it public and static so that we can use itfrom TemplateParse as well, right? Quickly commenting out the failing test, run-ning the tests to see that they all pass, changing the isVariable method into pub-lic and static, and running all tests again to verify that we really can get awaywith that, we realize that we can now call the static method from Template, dis-played in listing 3.12, in our TemplateParse.
public class Template { ... public static boolean isVariable(String segment) { return segment.startsWith("${") && segment.endsWith("}"); }}
We can now implement the new parseSegments method by calling on the staticutility method. Yes, it’s a rather questionable dependency, but I’m sure we can fig-ure out a way to clean it up in the refactoring step.
Listing 3.13 presents an initial implementation of the parseSegments methodbuilt on top of the existing parsing logic.
public class TemplateParse { ... public List<Segment> parseSegments(String template) { List<Segment> segments = new ArrayList<Segment>(); List<String> strings = parse(template); for (String s : strings) { if (Template.isVariable(s)) { String name = s.substring(2, s.length() - 1); segments.add(new Variable(name)); } else { segments.add(new PlainText(s)); } } return segments; }}
Listing 3.12 Utility method for detecting whether a given segment represents a variable
Listing 3.13 Converting the List of Strings into a List of Segment objects
Parse template into String segments
Convert each String into Segment object
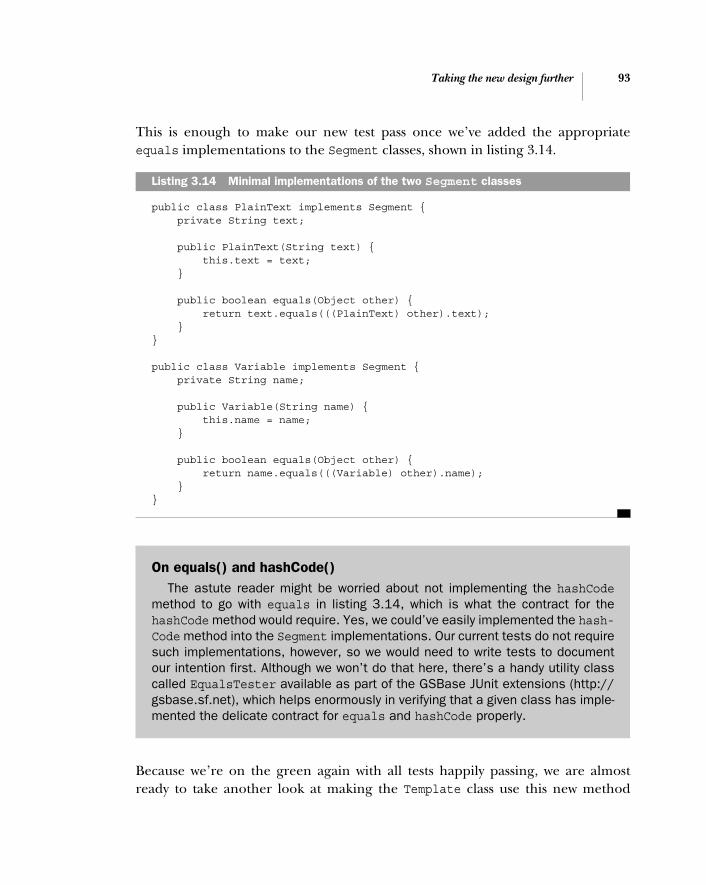
Taking the new design further 93
This is enough to make our new test pass once we’ve added the appropriateequals implementations to the Segment classes, shown in listing 3.14.
public class PlainText implements Segment { private String text;
public PlainText(String text) { this.text = text; }
public boolean equals(Object other) { return text.equals(((PlainText) other).text); }}
public class Variable implements Segment { private String name;
public Variable(String name) { this.name = name; }
public boolean equals(Object other) { return name.equals(((Variable) other).name); }}
Because we’re on the green again with all tests happily passing, we are almostready to take another look at making the Template class use this new method
Listing 3.14 Minimal implementations of the two Segment classes
On equals() and hashCode()The astute reader might be worried about not implementing the hashCode
method to go with equals in listing 3.14, which is what the contract for thehashCode method would require. Yes, we could’ve easily implemented the hash-Code method into the Segment implementations. Our current tests do not requiresuch implementations, however, so we would need to write tests to documentour intention first. Although we won’t do that here, there’s a handy utility classcalled EqualsTester available as part of the GSBase JUnit extensions (http://gsbase.sf.net), which helps enormously in verifying that a given class has imple-mented the delicate contract for equals and hashCode properly.

94 CHAPTER 3
Refactoring in small steps
instead of the old one. But before we can touch the Template class, let’s test-drivesome functionality into our two newly created Segment classes!
Refactoring logic into objectsAn essential part of our grand plan of avoiding ugly if-else blocks by means ofpolymorphism is to embed the varying functionality into the different implemen-tations of the polymorphic concept of Segment objects. In practice, this function-ality realizes itself as a method used for rendering a Segment with a Map of variablevalues. We’ll add a method evaluate to our Segment interface:
public interface Segment { String evaluate(Map<String, String> variables);}
Starting from the plain-text segment implementation, the test for introducing thisfunctionality is trivial, as can be seen from the code snippet in listing 3.15.
public class TestPlainTextSegment { @Test public void plainTextEvaluatesAsIs() throws Exception { Map<String, String> variables = new HashMap<String, String>(); String text = "abc def"; assertEquals(text, new PlainText(text).evaluate(variables)); }}
And, as is typical for such small and focused, test-driven steps, the implementationisn’t much trickier (see listing 3.16).
public class PlainText implements Segment {
private String text;
public PlainText(String text) { this.text = text; }
...
public String evaluate(Map<String, String> variables) { return text; }}
Listing 3.15 Test class for the plain-text segment
Listing 3.16 Implementation of the evaluate() method for plain-text segments
I wish programming was always this easy!

Taking the new design further 95
That covers the plain-text stuff. Doing the same for variables, the test in listing 3.17verifies that Variable objects render themselves by appending the matching valuefor the variable’s name from the given Map.
public class TestVariableSegment { @Test public void variableEvaluatesToItsValue() throws Exception { Map<String, String> variables = new HashMap<String, String>(); String name = "myvar"; String value = "myvalue"; variables.put(name, value); assertEquals(value, new Variable(name).evaluate(variables)); }}
The implementation is still rather straightforward, as listing 3.18 succinctly proves.
public class Variable implements Segment {
private String name;
public Variable(String name) { this.name = name; }
...
public String evaluate(Map<String, String> variables) { return variables.get(name); }}
Tests are running green, we have different kinds of Segments that know how toevaluate themselves given a Map of variables, and we’re finally ready to make thatswitchover in the Template class.
3.3.2 Making the switchover
With our tests as a safety net, we change the evaluate method on Template towhat we envisioned 10 minutes ago. For your convenience, listing 3.19 reproducesour vision.
Listing 3.17 Test class for variable segments
Listing 3.18 Implementation of evaluate() for variable segments
Variables aren’t that hard to render either.

96 CHAPTER 3
Refactoring in small steps
public String evaluate() { TemplateParse p = new TemplateParse(); List<Segment> segments = p.parseSegments(templateText); return concatenate(segments);}
private String concatenate(List<Segment> segments) { StringBuilder result = new StringBuilder(); for (Segment segment : segments) { result.append(segment.evaluate(variables)); } return result.toString();}
There. An almost trivial change, now that we already have the TemplateParse andSegment objects that know how to evaluate themselves. What’s interesting is that run-ning our tests after this change reveals that we forgot something rather important.
Getting caught by the safety netThe new evaluate method on the Template class seems to work as expected withone exception—we’re not raising an exception anymore upon missing variablevalues! It’s a good thing we have those tests, isn’t it?
Let’s remedy the situation by adding a test to handle this case and get us backon track. Now, where should we raise the exception for a missing variable value? Thefirst place that comes to mind—a place where we have access to both the variable’sname and the whole set of variable values—is the Variable class. Listing 3.20 pre-sents our full test class for the Variable class.
public class TestVariableSegment {
private Map<String, String> variables;
@Before public void setUp() { variables = new HashMap<String, String>(); }
@Test public void variableEvaluatesToItsValue() throws Exception { String name = "myvar"; String value = "myvalue";
Listing 3.19 Making the switchover in Template
Listing 3.20 The proper test for missing variable values
Parse template intoSegment objects
Let Segment objects evaluate themselves
Refactored duplicated code
into fixture

Taking the new design further 97
variables.put(name, value); assertEquals(value, new Variable(name).evaluate(variables)); }
@Test public void missingVariableRaisesException() throws Exception { String name = "myvar"; try { new Variable(name).evaluate(variables); fail("Missing variable value should raise an exception"); } catch (MissingValueException expected) { assertEquals("No value for ${" + name + "}", expected.getMessage()); } } }
We almost introduced a significant change to our template engine’s behavior byomitting that second test. Thanks to our test suite, we realized our mistake earlyand got a chance to correct our wrongdoing. Listing 3.21 shows our path torighteousness.
public class Variable implements Segment { ... public String evaluate(Map<String,String> variables) { if (!variables.containsKey(name)) { throw new MissingValueException( "No value for ${" + name + "}"); } return variables.get(name); }}
Running our tests, we’re once again greeted with a bright green bar telling us thateverything is well in the kingdom of template engines. Except...
Deleting dead code and further cleanupGlancing over our code after this switchover to using Segment objects in the Tem-plate class, we realize that a bunch of methods are no longer used by anyone.Deleting code is relieving, isn’t it? While getting rid of the dead code—includingthat ugly if-else block with the stench—we also notice the isVariable methodthat we blatantly made public and static in order to be able to call it from the
Listing 3.21 Checking for missing values in the Variable class at rendering time
Added test formissing variable
Raise exceptionfor missing value

98 CHAPTER 3
Refactoring in small steps
TemplateParse. Because it’s no longer used anywhere other than TemplateParse,we move it to the TemplateParse class and make it private again.
Phew. This has been a long and intensive session, but now that we’re throughit, our code does have a much better shape and a much cleaner division ofresponsibilities.
There would still be more to do before declaring our template engine a workof art, however. First, TemplateParse’s String-parsing method is also no longerused outside the TemplateParse class, so we should probably make that privateas well. Furthermore, now that nobody’s using the old parsing method, we shouldstreamline the TemplateParse class by skipping the string-to-segment object con-version in the first place and add PlainText and Variable objects to the Listwhere we’re now adding Strings. With a thorough test suite as our bodyguard,that shouldn’t be too big a task. Consider that refactoring an exercise for you.
Now, let’s wrap up the chapter so we can move on to other topics—there’splenty of stuff about test-driven development that we’ve yet to see!
3.4 Summary
Yes! We managed to put together a solid template engine using test-driven devel-opment, and it took, I speculate, no longer than doing all the design first andthen writing the code would have. Besides, now that we’ve got the extensive testsuite covering every branch of our production code, we don’t need to worry toomuch about breaking stuff when we add some new feature into the engine—again, the tests will tell us when we screw up.
Having said that, the template engine was a trivial example—most code weface in the field tends to not be as isolated as what we had the pleasure of writing.Not to worry, though. We’ll face some of these real-world challenges in the fol-lowing chapters, and we’ll discuss ways to get past those challenges. Part 2 ischock-full of just such real-world challenges posed by difficult APIs and trouble-some technologies.
Regardless of how fascinated we might be right now about TDD, it is not an all-encompassing silver bullet. Although test-driven development helps us produceworking software, we still need something extra to help us deliver working func-tionality—and the right functionality. In part 3, we will take the concepts of test-firstand TDD and apply them on a more coarse-grained level of user stories, features,and requirements through a technique called acceptance test-driven development.
That’s still to come, though. For now, let’s move on to chapter 4, where we willlearn some useful tricks of the trade and gain even more insight into the tech-nique of TDD.

Concepts andpatterns for TDD
I remember growing up with television, from the time it was just a test pattern, with maybe a little bit of programming once in a while.
—Francis Ford Coppola
99

100 CHAPTER 4
Concepts and patterns for TDD
In chapters 2 and 3, we saw test-driven development being used for developing atemplate engine. That example was intentionally what many would consider a triv-ial case—a sort of “ideal” scenario with no tough cookies to crack. In this chapter,we’ll study different patterns and techniques that a seasoned test-driven developercan pull out from their toolbox when the going gets tough. These patterns rangefrom design patterns that we can apply to our production code for making itmore testable to different ways of organizing and implementing our tests. I’mabout to reveal some heavily guarded secrets of the guild. Don’t tell anyone.
We’ll begin by asking how to write tests and approach the answer by looking ata handful of test-selection strategies and some more general principles we shouldkeep in mind. We’ll also discuss three slightly different strategies for making testspass—just as essential to TDD as writing tests is. Having learned some new tech-niques for writing tests and making them pass, we’ll look at some essential testingconcepts, including fixtures, test doubles, and the differing natures of state- versusinteraction-based testing. We’ll devote additional time and attention to dealingwith difficult collaborators by using test doubles; we’ll study three different kindsof test doubles: fakes, stubs, and mocks.
After winding up our discussion about testing concepts, we will turn the tablesand start looking at design. First, we’ll discuss four guidelines for creating testabledesigns. Then, we’ll explore a number of patterns related to unit tests, from dif-ferent types of assertion techniques to higher-level patterns of structuring ourtests.
To finish off, we’ll take a look at how to apply TDD with a legacy code base thattypically isn’t designed with testability in mind and that doesn’t have too thorougha test suite in place.
We’re going to cover a lot of ground in this chapter, and we’ll be moving fast.Not to worry, though. We’ll take a break if the pace gets too fast. Now, let’s askourselves how to write tests.
4.1 How to write tests and make them pass
Like so many other things in life, writing tests and test-driving are often easier saidthan done. For starters, one of the first decisions we need to make when startingto test-drive code is which test to start with—not necessarily an easy choice. Fur-thermore, the whole TDD cycle seems to rely heavily on the individual betweenthe chair and the keyboard in terms of what we test for, how we organize our tests,and so forth.
In an attempt to make the first TDD steps easier for the beginning test-driver,we’re going to look at a handful of test-selection strategies—simple heuristics—
How to write tests and make them pass 101
that we can use for evaluating which test we should write next. We’re also going totalk about more general principles of test-driving. You could think of those guide-lines as a short list of Very Important Practices you simply must follow—everythingelse you can ramp up on the side as you start feeling more comfortable with what’sgoing on around you.
First, let’s study some interesting test-selection strategies.
4.1.1 Test-selection strategies
Let’s say you’ve been thinking about buying yourself a new digital camera. Howdo you select one of the dozens and dozens of alternatives? If you’re anything likeme, you’ll spend hours browsing various websites and camera magazines readingreviews, comparing technical specifications, comparing prices, evaluating the aes-thetic form of the cameras, and procrastinating between a few different butequally good products. There’s no single property of a digital camera that wouldtell us which one to buy.
Selecting the next test to write from a list isn’t that different. We need to relyon our intuition and a variety of heuristics when thinking about the multipleproperties of the candidate tests. To start with, we might want to consider the fol-lowing four strategies to aid our decision of which test to write next:
■ Diving first into details versus starting with the big picture■ Exploring uncertain territory versus sticking with the familiar and comfort-
able■ Going for the highest value versus picking the low-hanging fruit first■ Treading the happy path1 first versus starting with handling error situations
Let’s briefly elaborate on these four strategies for evaluating which test we shouldwrite next.
Details vs. big pictureI’m confident we’ve both learned in a computer science class that there’s morethan one way to traverse a tree. Just as we can traverse a tree of nodes in a breadth-first or a depth-first order, we can proceed with test-driving through the envi-sioned design and functionality from different directions.
For example, we can choose to first implement the framework surrounding afaked algorithm and only start worrying about the algorithm once we’ve proventhat the rest of the component works. Another option could be to start with the
1 http://en.wikipedia.org/wiki/Happy_path.

102 CHAPTER 4
Concepts and patterns for TDD
algorithm—the details—and start building the surrounding structures—the bigpicture—after we’ve test-driven the building blocks into existence.
I call these two approaches details first and big picture first. Both approaches havetheir unique advantages and disadvantages, of course. Details first is a good way oftackling risks such as, “Are we able to recognize a pattern from a user-submittedimage?” but solving the pattern recognition problem delays progress (certainty)regarding the big picture. Big-picture first, on the other hand, is a good way of test-ing out the envisioned design quickly without needing to worry about the details.The downside of big-picture first is that we’re delaying progress on the details.
In practice, we identify the risks and uncertainties associated with these alter-native foci and usually (but not necessarily—which we’ll discuss in the next sec-tion) tackle the aspect we’re more concerned about. Which leads us directly toour second test-selection strategy—choosing between exploring the uncertain ver-sus sticking with the familiar.
Uncertain vs. familiarReducing uncertainty is one factor we might consider when selecting the nexttest. The alternative for reducing uncertainty would be to stick with the familiarand proceed on a safe, known path for the moment, dealing with the uncertainlater. The advantage of exploring the uncertain is simple and straightforward—we’re effectively reducing risks by turning the unknown into the known.
So what’s the advantage of sticking with the cozy old couch, the familiar area ofour design that isn’t likely to reveal that much new information? Well, it turns outthat not all paths embed an equal amount of value in return for the effort spent.Although there is value in reducing risk, sometimes there’s even more value inquickly beating down a known path and picking the low-hanging fruit first,instead of climbing the tree right away to figure out whether we can do it.2
Which brings us to our third test-selection strategy—high value versus the low-hanging fruit.
High value vs. low-hanging fruitLooking at a list of tests we have yet to write, we can usually identify a couple oftests that are clearly more work than others. Similarly, we can usually identify dif-ferences in how valuable the behavior represented by the test in question is forthe larger whole. Ideally, we should try to identify and select tests that let us makethe most progress (yield the most value) with the smallest effort. Most of the time,
2 After all, we might not be hungry anymore after eating a dozen juicy apples from the low-hangingbranch.

How to write tests and make them pass 103
however, there’s no such clear candidate, and we need to decide among multipletests with more or less equal benefit-to-effort price tags.
A typical (if somewhat exaggerated) example of a high-value test versus a low-hanging fruit might be testing an object for positive functionality versus testingthe same object for handling null input. The positive functionality is likely morelaborious to implement but almost by definition yields more value. The defensivefunctionality, handling null input, is likely far easier to implement but also yieldsmuch, much less value in terms of functionality.
The essence of our fourth and last test-selection strategy is the happy path ver-sus error situations.
Happy path vs. error situationsAs a rule of thumb, I drive for the happy path first before proceeding to handleexceptional scenarios, such as exceptions thrown by third-party APIs, malformedinput, and so forth. The reason for doing so is mostly about value. Even the mostrobust system capable of handling any conceivable error situation is practicallyuseless when it isn’t able to perform its basic function. On the other hand, even asystem that, for example, is prone to crash if the network is temporarily down stillprovides value as long as the network isn’t down.
Having said that, every once in a while we might face a situation where it makessense to test-drive by leaving the happy path for last, first going through all errorsituations. These situations are typically such that proceeding through error sce-narios one by one provides a natural, intuitive progression—and we know that allof those error scenarios will need to be handled before the system really is valu-able. An example of such a situation might be one where we need to implementstate machine-like functionality or some kind of a well-defined workflow where anerror situation effectively short-circuits the process, bypassing the remainder oflogic in the workflow. Having said that, the happy path should still be your firstchoice over an error situation!
We’re now aware of a handful of different strategies for selecting the next testto write. Don’t think too much about which test is the “right” one to write next.There’s no right sequence in the first place, and these test-selection strategies willbecome second nature over time. As a rule of thumb, though, it’s probably a goodidea to start with an easy test—something you feel can be made to pass veryquickly. Once you’ve got that first test nailed down, it’s much easier to start think-ing about what the next test should be.
Before we can select the next test, though, we need to make the first one pass.Let’s see how we can do that.

104 CHAPTER 4
Concepts and patterns for TDD
4.1.2 Implementation strategies
Just like there are many ways to select and write a test, there are many ways tomake those tests pass. In his excellent introductory text on TDD, Test-Driven Devel-opment by Example, (Addison-Wesley, 2002), Kent Beck lists three ways to makeprogress: faking it, triangulation, and obvious implementation. In this section,we’ll familiarize ourselves with these three strategies.
Let’s begin with the most straightforward—faking it.
Faking itSometimes after writing a failing test, we don’t have an idea how to correctlyimplement the code that makes the test pass. In such cases, we might want toresort to faking the particular functionality so that we get back to green. Thismight be because we’ve taken too big a step, or it might be because we’ve reachedsome virtual boundary within our system. Whatever the reason, our primary goalis to get to a solid state by making the tests pass, and faking it is better than stayingin the red for a long time. As it happens, the easiest way to fake something is oftento return hard-coded results—you might remember us doing just that back inchapter 2 with our first tests for the template engine.
After we’ve faked something, it’s easy to switch into triangulation mode, mainlybecause we know there’s that one tiny snippet of clearly non-production-qualitycode in our code base that we need to somehow smoke out and replace with a realimplementation. We do so—by writing a new failing test, of course.
TriangulationWe already saw triangulation in effect in chapter 3 when we wanted to squeeze outa hard-coded string from our production code. Triangulation is a useful tech-nique for evolving toward a correct implementation when we don’t yet have aclear concept of how to generalize a given piece of hard-coded logic.
We call the technique triangulation because it’s a lot like how the cops on TVtrack down bad guys based on their cell-phone signals. The cops’ triangulationinvolves observing the direction of the subject’s signal from multiple locations.Knowing the locations of the observation stations, the cops can draw two lines ona map and see where the lines intercept.
In the triangulation technique we TDD folks use, we don’t observe signals andwe don’t draw lines on maps. Instead, each of the tests we write constrains theavailable solution space to one dimension. When we have enough tests, as illus-trated in figure 4.1, the tests effectively narrow down—triangulate—the exactsolution we were looking for.

How to write tests and make them pass 105
For example, in developing a credit-card validation component, we might notknow how to structure our class hierarchy for supporting multiple credit cardswith their slightly differing number lengths and validation rules.3 Using triangula-tion, we might first write tests and implement the code for validating just onebrand of cards, say, MasterCard. These tests would be easy to write, and the codeto satisfy those tests would be just as straightforward.
Next, we’d pick another card vendor, say, Visa, and we’d write tests to verifythat our component handles Visa as well as MasterCard, distinguishing betweenthem where necessary. These new tests would slowly start pushing our codetoward a state where the suitable places for generalization become obvious. By thetime we’re adding a test for Diners Club, it’s likely that we’ll see where the codewants us to generalize.
Obvious implementationLuckily, most of the time the necessary step to make a test pass is an obvious one.We don’t mean obvious as in hard coding something, but rather as the “correct”implementation being obvious. In such situations, we can simply proceed withwhat we consider an obvious implementation, taking a slightly bigger step than weusually take when triangulating or faking our way towards the ultimate goal.
An example of an obvious implementation could be a regularly occurring pat-tern, such as collecting a subset of items from a collection based on a given predi-cate. When going for an obvious implementation, we type in the solution and seeif it worked—if the test passes. If it doesn’t, we back it out. All of it! No secondchances with this one.
3 Major credit-card vendors currently use the Luhn formula for calculating a checksum and a set ofassigned prefixes to distinguish the various brands from each other. Google “credit card validation” and“luhn formula” for more details.
Figure 4.1Triangulation is about narrowing down the solution space until it matches our exact needs.

106 CHAPTER 4
Concepts and patterns for TDD
In the next section, we’re going to look at an extremely simple set of guide-lines for test-driving that you can start with. Over time, as you become more famil-iar with TDD, you can start giving more attention to the various test selectionstrategies, but these first guidelines for test-driving should be enough to keep youon the right track while you’re learning.
4.1.3 Prime guidelines for test-driving
I’ve been running classroom trainings on test-driven development with my friendBas for some time. Along the way, we’ve seen many aspiring developers strugglewith the variety of practices involved in writing good tests, test-driving effectively,and gotchas to look out for.
One day, we were sitting on a train on our way to run another training sessionand started talking about the kind of short list of principles we could come upwith to help people stay on track without the presence of a more experiencedTDD’er. We wanted the list to be extremely short so that it’s easy to remember. Aswell as helping people get started, the list would also need to act as a lighthouse,guiding a test-driven developer safely toward the port of productivity.
We ended up with the following list of guidelines:
■ Do. Not. Skip. Refactoring.■ Get to green fast.■ Slow down after a mistake.
Let’s go through these guidelines one by one, examining what makes them soimportant that they made it to our short list.
Do. Not. Skip. Refactoring.If you haven’t yet considered tattooing the word refactor on the back of both yourhands, now would be a good time to do that. And I’m only half joking. The singlebiggest problem I’ve witnessed after watching dozens of teams take their first stepsin test-driven development is insufficient refactoring.
Not refactoring mercilessly and leaving duplication in the code base is aboutthe closest thing to attaching a time bomb to your chair. Unfortunately, we aregood at remembering the “test” and “code” steps of the TDD cycle and extremelyproficient at neglecting a code smell that screams for the missing step.
Thus, I urge you to pay attention to not skipping refactoring. If you have some-one to pair with, do so. Crosscheck with your programming buddy to spot anyduplication you may have missed. Bring Fowler’s Refactoring book with you to the

How to write tests and make them pass 107
toilet.4 Learn to use your IDE’s automated refactorings. It’s good for you—thedoctor said so!
I apologize if I’m being too patronizing, but following the TDD cycle all theway is important. Now that we’ve got that in check, there are two more guidelinesfor us to go through. The first of them relates to the code step of the TDD cycle—get to green fast. Let’s talk about that.
Get to green fastAs we test-drive, we’re basically aiming for the simplest design we can think of forthe problem at hand. We don’t, however, go for the simplest design right off thebat in the code step. Instead, we should strive to get back to green fast. The codestep is where we get to that green bar with as few edits as possible. The refactoringstep is where we perfect our design.
You might want to read the previous paragraph out loud. Don’t worry aboutothers looking at you like you’re a freak. You’re just pointing out facts.
Speaking of facts, it’s more than likely that you will make one or two mistakesin your career even after adopting TDD. Our third guideline tells us to slow downonce the proverbial smelly substance hits the fan.
Slow down after a mistakeIt is common for developers practicing TDD to start taking slightly bigger and big-ger steps as time goes by. At some point, however, we’ll take too big a bite off ourtest list and end up reverting our changes. At these points, we should realize thatthe steps we’re taking are too big compared to our ability to understand theneeded changes to our implementation. We need to realize that we must tightenour play. Small steps. Merciless refactoring. It’s that simple. Walking to the watercooler might not be a bad idea either.
These guidelines are certainly not a complete reference to successful test-driving. Practices and guidelines don’t create success. People do. Having saidthat, I hope they will help you find your way to working more productively andto avoiding some of the pitfalls I’ve seen many people stumble into as begin-ning TDD’ers.
We’ll soon talk about similar guidelines and strategies for creating testabledesigns; but before that, we should establish some basic concepts that we haveencountered and will continue to encounter as we’re working with automatedtests and test-driven development.
4 I’m sure Martin won’t mind. After all, you’re just being passionate about your profession.

108 CHAPTER 4
Concepts and patterns for TDD
4.2 Essential testing concepts
French political scientist Alexis de Tocqueville has said that the “last thing a [polit-ical] party abandons is its vocabulary.”5 You could say the same thing about soft-ware engineers. Vocabulary is not just words, though. A shared vocabulary helpsus communicate with our fellow engineers about our work, and a good vocabularyhelps us understand the purpose and intent of the concepts it describes.
There are a few basic concepts related to the unit tests that we write as part oftest-driven development that I feel deserve more of our attention than we’ve giventhem so far. Next, we’re going to fix the situation by discussing the meaning ofterms such as fixtures and test doubles. We’ll also highlight two differentapproaches of verification that we can make use of in our tests. Finally, before tak-ing a closer look into test doubles in section 4.3, we’ll discuss when to use whichapproach—or whether we can use both.
And now, back to our regularly scheduled programming. Fixtures.
4.2.1 Fixtures are the context for tests
In chapter 2, we quickly defined a fixture as being the shared state from which allthe different test methods of a test class begin their execution. Let’s explore thatdefinition further and clarify why we want to have fixtures in the first place. Let’sbegin by discussing the components of the shared starting state and then con-tinue to answer the good ol’ “why” question.
Holistic view of stateSo far we’ve seen a fixture being built by creating objects and object graphs in somekind of a setup method that prepares the context—the fixture—for each individualtest method. Fixtures are more than just what we create in the setup method.
If you remember, in chapter 2 we said that (assuming JUnit is the unit-testingframework being used) the fixture is formed by the instance variables of a testcase class that are populated in the class’s setup method and other configured state.What is this “other configured state”?
In practice, the other configured state refers to the state of the runtime (forexample, the Java Virtual Machine instance that’s running our unit tests) whenJUnit invokes the setup method. A typical example of such a state is static variablesand objects created at class-loading time through static initializer blocks. Thisincludes static variables both in our test code and our production code.
5 Alexis de Tocqueville, The Old Regime and the French Revolution, ed. J. P. Mayer and A. P. Kerr (Doubleday,1955).

Essential testing concepts 109
For example, we might have some kind of a platform class that assigns animplementation of itself to a static variable based on the system properties avail-able at class-loading time. When running a single unit test, the system’s state iseffectively configured to something that becomes part of the fixture for that unittest—the state from which the test begins its execution.
To summarize the essence of fixtures, they’re the whole shebang—the state ofthe whole runtime environment—rather than just the instance variables of a testclass instance and the internal state of those objects.
So what about the “why” question? Why should we care about fixtures? Whatmakes them worth worrying about? The answer is this: because we want to avoidduplication and because we want our tests to be clear and focused.
Fixtures remove duplicationThe first half of our answer to why we should care about our fixtures is becausefixtures are all about good design. In fact, we can evaluate our fixtures with thesame principles of good design that we apply to our production code. Perhaps themost essential one of those principles is the lack of duplication. Fixtures move theshared state for multiple tests into one place, effectively removing duplication.
Just as with design principles in general, there’s no absolute best. For example,it might not always be better to literally get rid of every single bit of duplication.Although removing all duplication is definitely a good rule of thumb, sometimes it’sbetter to leave some duplication in our test code for the sake of readability.
The opposite, however, is rarely true. That is, having test code with what we calla clean slate fixture—a fixture that’s built by each test method from scratch withzero commonalities in setup—is definitely an anti-pattern and should be reme-died. Either there’s too much duplication between the tests or there’s no cohe-sion between them, the latter of which is a clear indicator that the test class shouldbe split into two or more classes.
Although the removal of duplication in our test code should be enough to makeus care about fixtures, there’s another benefit that is worth mentioning. Payingattention to having proper fixtures for our tests facilitates more focused tests.
Fixtures allow for focused testsExperienced TDD’ers are often good at creating focused tests. A key to beingable to have a focused test is to have a suitable fixture that brings the system andthe objects involved to a state in which the test doesn’t need to do much morethan a single assertion call, possibly after first invoking a one-liner on the objectbeing tested.
The benefit of letting each test method focus on exactly what it’s testing andnothing else is clear—we can immediately see the forest for the trees. That is, we

110 CHAPTER 4
Concepts and patterns for TDD
don’t waste any of our precious time wading through code, trying to figure outwhere “it” happens. When our fixture is built well, the fixture tells us the contextand the test goes straight to the point.
And as if that wasn’t reason enough, being aware of what our fixtures look likein terms of cohesion and complexity pushes our tests toward being good, focusedtests that communicate intent effectively, rather than complex tests that are sounfathomable that a week later we can’t tell whether the test is correct or not. Sokeep an eye on your fixtures. Doctor’s orders.
From fixtures, let’s hop topics again and turn our attention to another essen-tial testing concept that hasn’t gotten much face time in the earlier chapters—testdoubles.
4.2.2 Test doubles stand in for dependencies
Many, if not most, of our difficulties in testing a given class or object have to dowith their collaborators and other kinds of dependencies. For example, we mighthave a class that takes an instance of java.sql.ResultSet as argument for thesole constructor. The java.sql.* interfaces are notoriously difficult to instantiatebecause there’s no standard, standalone implementation for those interfaces—it’sthe JDBC driver vendor which provides the implementations, and that implemen-tation is typically tightly coupled to creating a live connection to a database. Thismakes such dependencies difficult to deal with.
These are the kind of issues that we need to contend with at times if we want todo test-driven development and write automated unit tests. Difficult objects. Luck-ily, most of the time there is a workaround to make our job easier without sacrific-ing quality, speed, or effort, and that workaround is called test doubles.
Test doubles are objects that stand in for the real thing. They pretend to be some-thing they’re not, but they do it in a way that the client has no idea, and they typicallydo it faster than the real thing—often in terms of both execution time and timespent writing and maintaining the test. A typical use of test doubles in our unit testsis to first create the test double (or multiple, depending on your needs), then con-figure state and/or behavior and/or expectations for the test double, pass the testdouble to the code you’re testing, and verify the results.
We now have a general idea of what test doubles are. Before taking a closerlook at different kinds of test doubles, let’s talk a bit about two different styles oftesting we can do.
4.2.3 State and interaction-based testing
On the highest level, the use of test doubles can be divided into two generalgroups based on their approach to verifying the expected behavior. Those

Essential testing concepts 111
approaches are called state-based and interaction-based testing, respectively.6 Let’stake a closer look at each.
State-based testingState-based testing refers to the use of the fixture objects’ (the objects that makeup the test fixture) internal state after invoking the class under test in order toverify the correct behavior. We verify the correctness by comparing the primary(class under test) and the collaborator objects’ state to what we expect them to be.
To better understand what that means, let’s look at the following snippet,which presents one example of a state-based test:
@Testpublic void listShouldNotBeEmptyAfterAddingSomethingToIt() throws Exception { List<String> list = new ArrayList<String>(); assertTrue(list.isEmpty()); list.add("something"); assertFalse(list.isEmpty());}
The previous snippet is state-based testing in its simplest form—using the realproduction classes throughout. The same approach can be applied with test dou-bles, too. We might, for example, replace the real System.out in our tests withan alternative PrintStream implementation that appends its output into an in-memory buffer. The benefit of doing this is that the tests would then be able toassert that the buffer’s content matches what we expected the code under test towrite into System.out.
In some cases, when the fixture is small and doesn’t need much setup, state-based testing is a good way to use test doubles, especially if we can use a readilyavailable stub implementation for the required interface instead of writing ourown. In some cases, however, we might want to test for interactions rather thanchanges in the objects’ states.
Testing for interactionsInteraction-based testing takes a vastly different approach to verifying correctbehavior. Instead of asserting that the ending states of the object under test andits collaborators match what we expect, interaction-based tests verify that theobject under test interacted with its collaborators as we expected. In other words,we are not interested in the internal state of the collaborators, but we are inter-
6 For more discussion on state-based and interaction-based testing, refer to Martin Fowler’s article“Mocks Aren’t Stubs” at http://www.martinfowler.com/articles/mocksArentStubs.html.

112 CHAPTER 4
Concepts and patterns for TDD
ested in whether the object being tested made the expected method calls with theexpected parameters and, if applicable, in the expected sequence.
Interaction-based tests are made possible by what we call dynamic mock objectlibraries. Examples of such libraries for Java include EasyMock,7 jMock,8 andrMock,9 which are all open source and have fairly large user bases.
What these libraries do is let us point to an interface (or a class) and specifythe expected collaborations (method calls); the library then gives us a test doublethat implements that interface. We can then pass on the test double, which wegenerally refer to as a mock object, to our code under test. After executing the classunder test, we can ask the mock object to verify that its expectations were indeedmet. Look at appendix C for an example of an interaction-based test using theEasyMock API.
There’s one important thing to watch when testing for interactions: when theinteractions become long and complex, it’s time to refactor. Not doing so tends tolead to brittle tests—ones that fail because of some irrelevant change in the waytwo objects interact. This is often a sign of either an interface being too big orthere being interactions among objects at different levels of abstraction.10
When to use which approach?As you can see, the dynamic mock object or interaction-based version of our test ismore complex and more verbose than the earlier state-based version. That is typi-cal for simple test fixtures like ours in this example. The benefits of not having towrite or populate a state-based test double implementation start showing whendealing with more complex tests focusing on collaboration between multiple
7 http://www.easymock.org.8 http://www.jmock.org.9 http://rmock.sf.net.10 Thanks to J. B. Rainsberger for offering the eloquent description of this code smell in a private email
exchange.
Homegrown interaction-based mock objectsIt is certainly possible to write homegrown mock objects that count the numberof function calls received and their arguments. Having said that, using a full-blownmock object framework is usually less work than a static stub with some addedsmarts. Frameworks also support more complex features such as mocking con-crete classes with byte code manipulation, which isn’t exactly a walk in the parkto implement yourself.
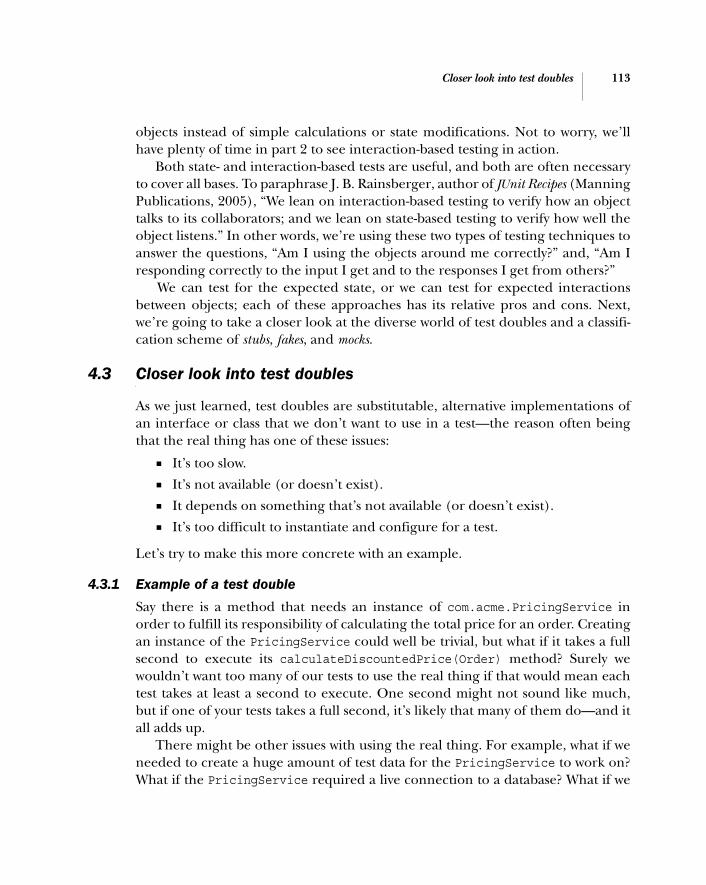
Closer look into test doubles 113
objects instead of simple calculations or state modifications. Not to worry, we’llhave plenty of time in part 2 to see interaction-based testing in action.
Both state- and interaction-based tests are useful, and both are often necessaryto cover all bases. To paraphrase J. B. Rainsberger, author of JUnit Recipes (ManningPublications, 2005), “We lean on interaction-based testing to verify how an objecttalks to its collaborators; and we lean on state-based testing to verify how well theobject listens.” In other words, we’re using these two types of testing techniques toanswer the questions, “Am I using the objects around me correctly?” and, “Am Iresponding correctly to the input I get and to the responses I get from others?”
We can test for the expected state, or we can test for expected interactionsbetween objects; each of these approaches has its relative pros and cons. Next,we’re going to take a closer look at the diverse world of test doubles and a classifi-cation scheme of stubs, fakes, and mocks.
4.3 Closer look into test doubles
As we just learned, test doubles are substitutable, alternative implementations ofan interface or class that we don’t want to use in a test—the reason often beingthat the real thing has one of these issues:
■ It’s too slow.■ It’s not available (or doesn’t exist).■ It depends on something that’s not available (or doesn’t exist).■ It’s too difficult to instantiate and configure for a test.
Let’s try to make this more concrete with an example.
4.3.1 Example of a test double
Say there is a method that needs an instance of com.acme.PricingService inorder to fulfill its responsibility of calculating the total price for an order. Creatingan instance of the PricingService could well be trivial, but what if it takes a fullsecond to execute its calculateDiscountedPrice(Order) method? Surely wewouldn’t want too many of our tests to use the real thing if that would mean eachtest takes at least a second to execute. One second might not sound like much,but if one of your tests takes a full second, it’s likely that many of them do—and itall adds up.
There might be other issues with using the real thing. For example, what if weneeded to create a huge amount of test data for the PricingService to work on?What if the PricingService required a live connection to a database? What if we

114 CHAPTER 4
Concepts and patterns for TDD
haven’t yet implemented the PricingService in the first place? Further examplesof issues with regard to testability of objects could include nondeterministicbehavior, such as primary-key generation or time-dependent functionality. Addi-tionally, it is often difficult to cause exceptions when using real objects in tests (forexample, try to think of a way to unplug and plug the network cable from yourunit test in order to cause a temporary network error).
Listing 4.1 illustrates how we might use a test double in the previous scenarioto stand in for the real PricingService implementation.
public class PricingServiceTestDouble extends PricingService { private float discount;
public PricingServiceTestDouble(float discount) { this.discount = discount; }
public float getDiscountPercentage(Customer c, Product p) { return discount; } }
public class OrderProcessorTest { @Test public void testOrderProcessorWithMockObject() throws Exception { float initialBalance = 100.0f; float listPrice = 30.0f; float discount = 10.0f; float expectedBalance = (initialBalance - (listPrice * (1 - discount/100)));
Customer customer = new Customer(initialBalance); Product product = new Product("TDD in Action", listPrice); OrderProcessor processor = new OrderProcessor(); PricingService service = new PricingServiceTestDouble(discount); processor.setPricingService(service);
processor.process(new Order(customer, product));
assertEquals(expectedBalance, customer.getBalance(), 0.001f); }}
Listing 4.1 Typical usage pattern for a test double
Test doublefakes behavior B
ARRANGE test dataand fake collaborator
C
ACT out operationD
ASSERT that result is as expected E

Closer look into test doubles 115
In short, the example in listing 4.1 shows how we can transparently hand out a Bfake implementation of the PricingService interface to the class under test,OrderProcessor, and thus bypass the costly step of connecting to the database anddoing all sorts of customer behavior calculations and adjustments—which we don’tcare about right now for this test’s purpose and which would take forever to executecompared to a blazing fast fake implementation. Instead, we C configure ourobject under test to use the test double, D invoke the object under test, and E ver-ify that the expected stuff happened.
We just saw one example of a test double. There are, however, more than onetype of test double that we can differentiate using the simple classification schemeof stubs, fakes, and mocks. Let’s talk about those next.
4.3.2 Stubs, fakes, and mocks
The French poet Victor Hugo wrote, “The future has many names: For the weak,it means the unattainable. For the fearful, it means the unknown. For the coura-geous, it means opportunity.” Test doubles are a bit like that. We have differentnames to use for referring to test doubles, but there’s also a slightly different sub-stance behind those names. I will try to present a reasonably global definition intable 4.1, although there are other (sometimes conflicting) taxonomies out there.
As mentioned, this is just one way to define the terms stub, fake, and mock, andI’m sure you will encounter other, partly conflicting definitions. One source forsuch definitions is Gerard Meszaros’ website, xunitpatterns.com (see “Test Dou-ble Patterns”). From here on, however, I will be using the terms mock and test
Table 4.1 Categorization of different types of mock objects
Type of mock Description
Stubs Stubs are essentially the simplest possible implementation of a given interface you can think of. For example, stubs’ methods typically return hardcoded, mean-ingless values.
Fakes Fakes are a degree more sophisticated than stubs in that they can be consid-ered an alternative implementation of the interface. In other words, a fake looks like a duck and walks like a duck even though it isn’t a real duck. In contrast, a stub only looks like a duck.
Mocks Mocks can be considered even more sophisticated in terms of their implementa-tion, because they incorporate assertions for verifying expected collaboration with other objects during a test. Depending on the implementation of a mock, it can be set up either to return hardcoded values or to provide a fake implementa-tion of the logic. Mocks are typically generated dynamically with frameworks and libraries, such as EasyMock, but they can also be implemented by hand.

116 CHAPTER 4
Concepts and patterns for TDD
double rather liberally to refer to using any of the three types of test doublesdescribed previously, unless it the type is significant in the particular context Iam talking about.
The definitions of stubs and fakes are straightforward, really—they’re just alter-native implementations for a given interface or class. The third category of testdoubles, however, requires more elaboration. Maybe we should take a look at mockobjects in action to understand what that gibberish in table 4.1 means in practice.
4.3.3 Mock objects in action
Do you recall listing 4.1 in which we passed in a fake PricingService implemen-tation to an OrderProcessor because using the real implementation would’verequired a network connection, be slow, and all that nasty stuff? The test doublewe used in listing 4.1 was a fake because it employed a simplified algorithm forpricing products—the test double was hard coded to always give a discount of $10.
To illustrate the dynamic and self-verifying nature of the most sophisticatedtype of test double—a mock object—let’s rewrite our test from listing 4.1 to useinteraction-based testing, passing in a mock object as the PricingService imple-mentation. Listing 4.2 shows how we could implement the OrderProcessorTestfrom listing 4.1 using a dynamic mock object created with the EasyMock library.11
import static org.easymock.classextension.EasyMock.*;import static org.junit.Assert.*;import org.junit.*;
public class OrderProcessorEasymockTest {
@Test public void testOrderProcessorWithEasyMock() throws Exception { // arrange float initialBalance = 100.0f; float listPrice = 30.0f; float discount = 10.0f; float expectedBalance = initialBalance - (listPrice * (1 - discount / 100)); Customer customer = new Customer(initialBalance); Product product = new Product("TDD in Action", listPrice);
Listing 4.2 (Re)implementing OrderProcessorTest with dynamic mock
11 Technically, we’re using EasyMock along with its class extension, which gives EasyMock the ability tomock concrete classes in addition to plain interfaces.
Set up regular objectsand data for test

Closer look into test doubles 117
// record expected collaboration with mock PricingService PricingService mock = createMock(PricingService.class); expect(mock.getDiscountPercentage(customer, product)) .andReturn(discount); replay(mock);
// act OrderProcessor processor = new OrderProcessor(); processor.setPricingService(mock); processor.process(new Order(customer, product));
// assert assertEquals(expectedBalance, customer.getBalance(), 0.001f); verify(mock); }}
The example test in listing 4.2 first creates a bunch of regular objects to be used inthe test and then proceeds to create a mock object for the difficult collaborator,PricingService. EasyMock is based on a concept where each mock object is bornin recording mode. In the recording mode, we record the expected interactions andthe mock object’s behavior by calling methods on the mock object itself and tell-ing EasyMock how the mock object should react—for example, what return valueit should return or what exception it should throw. In listing 4.2, this is exactlywhat the following lines accomplish:
PricingService mock = createMock(PricingService.class);expect(mock.getDiscountPercentage(customer, product)).
➥andReturn(discount);
When we’re done recording the expected collaboration and behavior of the mockobject, we tell EasyMock to move our mock to replay mode by passing it to thereplay method. At that point, the mock object begins capturing events. As wehand our mock object to the code under test, the code under test invokes its col-laborators—including our mock object—and the mock object automatically failsthe test if a given collaboration was not expected (that is, recorded before movingto replay mode).
Finally, after we’ve exercised the code under test by using mock objects as col-laborators, and assuming that the mock objects hadn’t already blown the whistleon an unexpected method call, we ask the mock object to verify that all expectedcollaboration has taken place.
Create dynamic mockfor PricingService
Pass mock to code under test
Ask mock to verify expectations

118 CHAPTER 4
Concepts and patterns for TDD
That’s enough about test doubles for now. Before moving on to discussingabout the application of TDD in the context of legacy code, I’d like to spend amoment talking about design and how certain guidelines can help us producemore testable designs.12
4.4 Guidelines for testable designs
It’s all fine and dandy to know about the different kinds of test doubles we mightemploy in improving the maintainability and execution speed of test code, butthat’s only one aspect to consider when talking about testability. The low-leveltechniques like stubs, fakes, and mocks or state- versus interaction-based tests arewhat we might consider tools for solving technical challenges in testing our code.Although it’s good to have an array of tools at hand, it would be much better if wedidn’t have to resort to working around a design in the first place, wouldn’t it?
When we test-drive code, we’re making design decisions, and those decisionshave a direct effect on how easy it is for us to work with that code in the future.Writing the tests before the code does indeed enforce a certain level of testabil-ity, but it helps if we’re aware of what kinds of designs promote testability andwhat kinds of designs might work now but will likely blow up soon after. Forexample, when we know that the Singleton pattern13 often becomes a testabilityproblem, we know not to write a test that drives the production code to use theSingleton pattern.
Aiming at helping you avoid creating testability challenges for yourself, hereare a few simple design guidelines that we should pay attention to:
■ Choose composition over inheritance.■ Avoid static and the Singleton.■ Isolate dependencies.■ Inject dependencies.
This is certainly not a comprehensive list for design principles that lead to moretestable design, but these four simple items take us a long way. How about a closerlook at each of these?
12 After all, we don’t want to leave a bad legacy to our fellow engineers, do we?13 http://en.wikipedia.org/wiki/Singleton_pattern.

Guidelines for testable designs 119
4.4.1 Choose composition over inheritance
One particular aspect of how to structure your code inorder to make it more testable is the way we build com-plex objects out of smaller islands of functionality. Inobject-oriented programming languages, the main can-didates for doing that are inheritance and composition.
Inheritance, having a class inherit functionalityfrom a superclass as shown in figure 4.2, has tradition-ally been used to enable reuse of functionality within aclass hierarchy. Although it's a nice feature for a pro-gramming language, inheritance does have its down-side when it comes to testability, maintainability, andoverall flexibility of design.
Specifically, having to deal with an inheritance hier-archy can sometimes make it unnecessarily difficult toinstantiate our objects in a test harness. In Java, forexample, we might have to provide valid input only needed by the superclass con-structor even though we’re just interested in an aspect of the child class. This canbe a real pain if the input itself is a complex object graph and, thus, difficult orlaborious to instantiate.
Furthermore, even the smallest of changes could potentially cause a rippleeffect throughout the class hierarchy, which is obviously not an ideal situation.Inheritance is often too restrictive to be an easily testable construct. This leads usto the alternative—composition—shown in figure 4.3.
Composition is a way to build objects that provide complex functionality by com-bining a set of less complex component objects. The top-level composite object del-egates work to its components instead of invoking methods from its superclass.14 Inessence, composition is based on object-level division of responsibility instead of
14 …or its superclass’s superclass’s superclass’s superclass.
Composite Component
? Figure 4.3Composition allows for a more flexible design solution for reusing functionality from another class. For example, we can instantiate the composite object with alternative implementations of its components if they are difficult to obtain in a test harness.
Superclass
Subclass
Figure 4.2 Inheriting from a superclass lets the subclass inherit all the functionality of the superclass. It does, however, also introduce inconvenient constraints related to instantiating the subclass in a test harness.
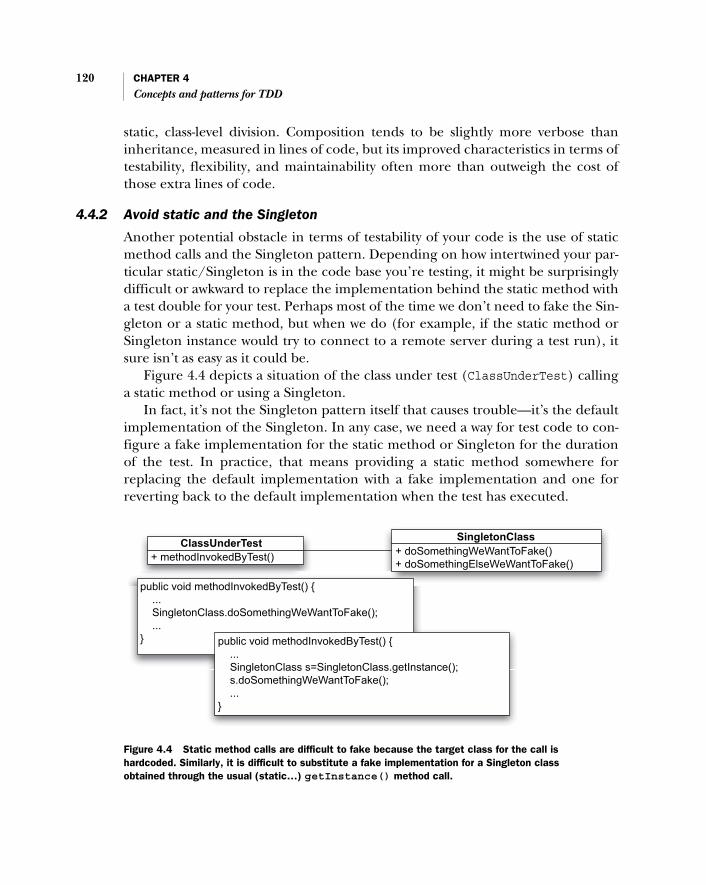
120 CHAPTER 4
Concepts and patterns for TDD
static, class-level division. Composition tends to be slightly more verbose thaninheritance, measured in lines of code, but its improved characteristics in terms oftestability, flexibility, and maintainability often more than outweigh the cost ofthose extra lines of code.
4.4.2 Avoid static and the Singleton
Another potential obstacle in terms of testability of your code is the use of staticmethod calls and the Singleton pattern. Depending on how intertwined your par-ticular static/Singleton is in the code base you’re testing, it might be surprisinglydifficult or awkward to replace the implementation behind the static method witha test double for your test. Perhaps most of the time we don’t need to fake the Sin-gleton or a static method, but when we do (for example, if the static method orSingleton instance would try to connect to a remote server during a test run), itsure isn’t as easy as it could be.
Figure 4.4 depicts a situation of the class under test (ClassUnderTest) callinga static method or using a Singleton.
In fact, it’s not the Singleton pattern itself that causes trouble—it’s the defaultimplementation of the Singleton. In any case, we need a way for test code to con-figure a fake implementation for the static method or Singleton for the durationof the test. In practice, that means providing a static method somewhere forreplacing the default implementation with a fake implementation and one forreverting back to the default implementation when the test has executed.
ClassUnderTest SingletonClass
+ methodInvokedByTest()
public void methodInvokedByTest() { ... SingletonClass.doSomethingWeWantToFake(); ...} public void methodInvokedByTest() {
... SingletonClass s=SingletonClass.getInstance(); s.doSomethingWeWantToFake(); ...}
+ doSomethingWeWantToFake()+ doSomethingElseWeWantToFake()
Figure 4.4 Static method calls are difficult to fake because the target class for the call is hardcoded. Similarly, it is difficult to substitute a fake implementation for a Singleton class obtained through the usual (static…) getInstance() method call.

Guidelines for testable designs 121
In most cases, however, I’d recommend first looking at ways to get rid of the staticmethods by converting them into instance methods. In many cases, and withobject instantiation being dirt cheap with modern virtual machines, that’s a ques-tion of simply removing the static keyword and replacing static references withinstance method calls.
To showcase the problem static variables and methods present for testability,refer to listing 4.3, which illustrates a situation where it’s technically not possibleto fake a method by simply subclassing and overriding it.
public class Database { public static Object findById(String id) { // fetch an object from the database, // returning a null if the id is not found }
public static boolean objectExists(String id) { return (findById(id) != null); }}
public class TestDatabase { @Test public void testObjectExists() throws Exception { // How can I fake findById() to return // "true" or "false" as I wish? assertTrue(Database.objectExists("123")); }}
In the code shown in listing 4.3, there’s just no way to fake findById without alteringthe compiled byte code because the code under tests references the specific imple-mentation class explicitly. We can’t subclass and override it because it’s all static.15
A common trend in how people use Singleton classes revolves around the pat-tern’s characteristic of providing a single point of access. Although it’s good tohave that single point of access, it can become problematic if the access to thatsingle point of access is sprinkled throughout the rest of your code base. Forexample, consider the example in listing 4.4 of a method making use of a staticmethod to obtain a dependency.
Listing 4.3 The problem with static methods and testability
15 We could alter byte code, but that’s quite an investment that we’re not ready to make right now.

122 CHAPTER 4
Concepts and patterns for TDD
public class OrderProcessor { public void process(Order order) { PricingService service = PricingService.getInstance(); // use the PricingService object for processing the order }}
This is bad form. We’re mixing the acquisition of the dependencies with the logicthat makes use of those dependencies. In short, we need to…
4.4.3 Isolate dependencies
In order to facilitate replacement of dependencies with test doubles, it is essentialto first isolate the dependencies in a way that lets us perform the replacement aseasily as possible. One delightfully trivial way to do that is to wrap access to staticmethods like the one in listing 4.4 into instance methods. This makes for morecode, yes, but it also lets us override the method in question, thereby eliminatingthe tightly coupled dependency caused by a static method call. Listing 4.5 pre-sents the same example with this isolation.
public class OrderProcessor { public void process(Order order) { PricingService service = getPricingService(); // use the PricingService object for processing the order }
protected PricingService getPricingService() { return PricingService.getInstance(); } }
In Working Effectively with Legacy Code,16 Michael Feathers defines the concept ofseams: “a place where you can alter behavior in your program without editing inthat place.” In other words, seams are places where we can replace a piece of codewith other code for the duration of a test run, for example, without touching the
Listing 4.4 Code smell: methods obtaining dependencies through static method calls
Listing 4.5 Code smell relieved: static method call wrapped into an instance method
16 Michael Feathers, Working Effectively with Legacy Code (Addison-Wesley, 2004). I can’t possibly recom-mend it enough. If you’re working with software that needs to survive the test of time, you practicallyowe yourself reading that book.
Obtain dependency through getter
Can be overridden to return test double

Guidelines for testable designs 123
code under test. In listing 4.5, the call to the getPricingService method is aseam from the point of view of a test case exercising the process method. A seamis by definition accompanied by one or more enabling points, that is, ways to exploitthe seam. In listing 4.5, the enabling point is the getPricingService methoditself, which we can exploit by overriding it as illustrated by listing 4.6.
public class OrderProcessor { public void process(Order order) { PricingService service = getPricingService(); // use the PricingService object for processing the order }
protected PricingService getPricingService() { return PricingService.getInstance(); }}
public class OrderProcessorTest { @Test public void testOrderProcessorByExploitingTheSeam() throws exception { OrderProcessor p = new OrderProcessor() { protected PricingService getPricingService() { return new FakePricingService(); } }; ... }}
The seam we just saw is an example of what Feathers calls an object seam, referringto the use of the object-oriented feature of being able to override the methodtransparently to the code that calls it. There are other kinds of seams as well (anddifferences between programming languages), namely preprocessing seams and linkseams. For example, C/C++ developers can take advantage of preprocessing seamsrepresented by ifdefs and macros. Similarly, a Java developer might decide totreat configuration items such as property files, XDoclet tags, and so on. as seamsto be exploited with a smart Ant script or two. Examples of link seams could bereplacing a dynamic library with a fake version or swapping a JAR file with a fakeone using an environment variable such as LD_LIBRARY_PATH or CLASSPATH.
Isolating dependencies is critical for testability and maintainability. We’llencounter plenty more examples of isolating dependencies in part 2 of thisbook. Also, Michael Feathers’ Working Effectively with Legacy Code offers a thorough
Listing 4.6 Exploiting a seam
That’s a seam!
Enabling point
Exploit seam through enabling point

124 CHAPTER 4
Concepts and patterns for TDD
coverage of the topic, but I cannot proceed without highlighting one especiallyhelpful pattern. An especially helpful way this isolation improves testability is byletting us turn around the dependencies and, instead of having the productioncode obtain its dependencies, having someone external inject those dependenciesin our production code.
4.4.4 Inject dependencies
Dependency injection (DI)17 is one of the recent buzzwords in software circles. Itis an approach to structuring code in a way that reduces direct dependencies toindirect dependencies or, to put it another way, replaces the getter with a setter.Before I manage to confuse you any further, let’s use our earlier example, repro-duced in listing 4.7, to explain what the name of the game is.
public class OrderProcessor { public void process(Order order) { PricingService service = getPricingService(); // use the PricingService object for processing the order }
protected PricingService getPricingService() { return PricingService.getInstance(); }}
What we have here is an isolated dependency—a dependency we isolated with theintention of making it possible to swap in an alternative implementation forPricingService. My reference to the getter is that the default implementation ofgetPricingService actively obtains a PricingService implementation from thePricingService class using a static get method. The OrderProcessor class istightly coupled to the PricingService class and its getInstance method.Although this sort of coupling is no longer a problem in terms of testabilitybecause we can override the getPricingService method in our tests, we couldmake it a notch easier still.
17 Inversion of Control is reported as the original name for the concept of reversing the direction ofdependencies. Martin Fowler from ThoughtWorks soon coined the term Dependency Injection inorder to better express what many—if not most—people valued IoC for the most: injecting dependen-cies on objects instead of having them ask for the same.
Listing 4.7 A getter dependency
Production code actively “gets” its
dependency
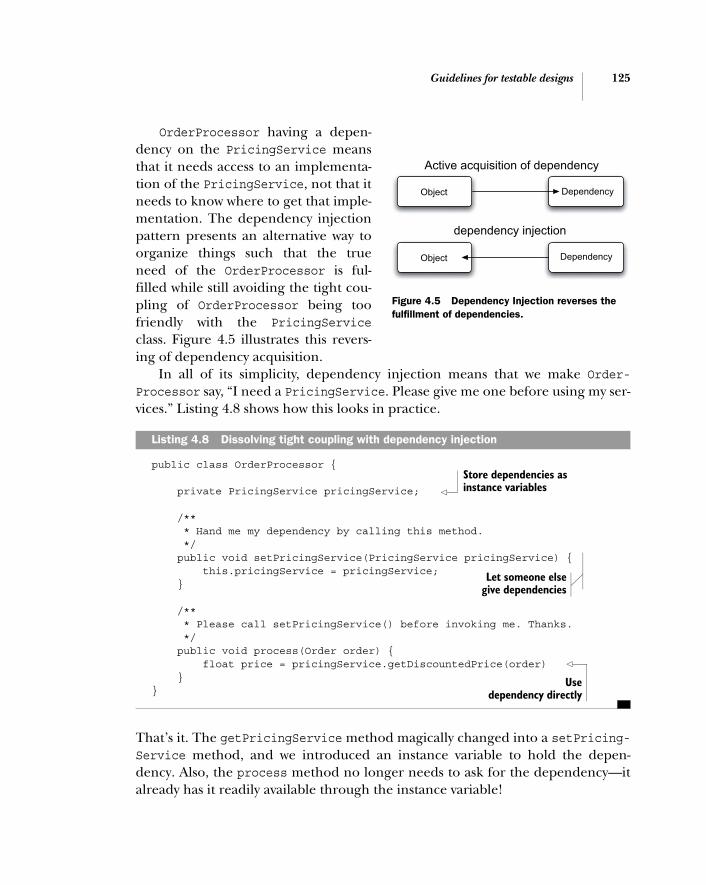
Guidelines for testable designs 125
OrderProcessor having a depen-dency on the PricingService meansthat it needs access to an implementa-tion of the PricingService, not that itneeds to know where to get that imple-mentation. The dependency injectionpattern presents an alternative way toorganize things such that the trueneed of the OrderProcessor is ful-filled while still avoiding the tight cou-pling of OrderProcessor being toofriendly with the PricingServiceclass. Figure 4.5 illustrates this revers-ing of dependency acquisition.
In all of its simplicity, dependency injection means that we make Order-Processor say, “I need a PricingService. Please give me one before using my ser-vices.” Listing 4.8 shows how this looks in practice.
public class OrderProcessor {
private PricingService pricingService;
/** * Hand me my dependency by calling this method. */ public void setPricingService(PricingService pricingService) { this.pricingService = pricingService; }
/** * Please call setPricingService() before invoking me. Thanks. */ public void process(Order order) { float price = pricingService.getDiscountedPrice(order) }}
That’s it. The getPricingService method magically changed into a setPricing-Service method, and we introduced an instance variable to hold the depen-dency. Also, the process method no longer needs to ask for the dependency—italready has it readily available through the instance variable!
Listing 4.8 Dissolving tight coupling with dependency injection
Store dependencies as instance variables
Let someone elsegive dependencies
Usedependency directly
Active acquisition of dependency
dependency injection
Object Dependency
DependencyObject
Figure 4.5 Dependency Injection reverses the fulfillment of dependencies.

126 CHAPTER 4
Concepts and patterns for TDD
In case you were wondering how this change would affect our test code, list-ing 4.9 shows that the moderately awkward overriding of getPricingService isno longer necessary, and configuring the object under test is much morestraightforward.
public class OrderProcessorTest { @Test public void testOrderProcessorWithDependencyInjection() throws Exception { OrderProcessor p = new OrderProcessor(); p.setPricingService(new FakePricingService()); ... }}
Cool beans! Where do I sign? Although dependency injection does wonders for our code’s general testabil-
ity, it does have its cost. Test code immediately becomes much cleaner thanbefore, now that our tests are free to configure the fixture objects as they wish; butthe cost of dependency injection rears its head when we start to think about howthings are handled when executing in production mode—someone (or some-thing) needs to hand out all those dependencies to our components.
Listing 4.9 Test code made more readable thanks to Dependency Injection
Different types of dependency injectionListings 4.8 and 4.9 illustrate what is known as setter-based dependency injec-tion, due to the dependency getting injected through a method invocation. Thisis not the only type of approach at our disposal, however. The other two typescommonly in use are field-based and constructor-based dependency injection.
Field-based injection is fundamentally the same as setter-based injection, ex-cept that the implementation is populated directly into an instance variable andthe receiving object does not have a chance to perform any computation uponreceiving the dependency. In part due to this fact, the primary use case for field-based injection is in framework code, using the Reflection API to inject depen-dencies to arbitrary objects without requiring the application developer to writeboilerplate code for dumb setter methods.
Constructor-based dependency injection simply means that the object receivesits dependencies as constructor arguments. This can be considered a better ap-proach than setter-based injection because with setter-based injection, the pro-grammer is expected to take responsibility for knowing the order in which thedependencies should be injected. In other words, setter-based injection leavesthe possibility of having half-configured objects in the wild.

Unit-testing patterns 127
In theory, we could do the necessary wiring with some bootstrap code, by creatingsome abstract factories, or by scattering factory methods all over the code base. Inpractice, we need an inversion of control (IoC) container to do that for us. Such con-tainers will effectively take care of the bootstrapping of dependencies to imple-mentations, generally using some centralized method of configuration (typicallyXML or property files of some sort). Examples of popular IoC containers includethe BeanFactory of the Spring Framework,18 PicoContainer,19 and its big brotherNanoContainer.20
We’ll see DI and IoC in action in part 2 as well, but there are a few more topicsI’d like to spend some time with before we go there. The first one is common pat-terns related to unit tests, followed by a discussion of different ways to tackle thedreaded source of headache and work-related stress we sometimes call legacy code.A lot of stuff still ahead, so we better keep moving!
4.5 Unit-testing patterns
Unit tests are an integral part of TDD. Thus, it’s good for us to be aware of com-mon patterns of writing unit tests. In this section, we will get to know a handful ofcommon patterns, including the following:
■ Patterns for writing assertions■ Patterns for structuring and building fixtures■ Patterns for test-case classes in general
18 Spring Framework (www.springframework.org) is a popular open source project providing a collectionof frameworks for things like Aspect-Oriented Programming, MVC in web applications, and depen-dency injection.
19 PicoContainer (www.picocontainer.org) was one of the first open source DI/IoC frameworks and con-tainers to reach a wider audience. It is an extremely primitive container, supporting only programmaticconfiguration, and it has limitations such as only supporting a single implementation of a given inter-face at one time.
20 NanoContainer (www.nanocontainer.org), also open source, extends PicoContainer with a host of use-ful features its little brother is missing.
Different types of dependency injection (continued)The downsides of constructor-based dependency are that there is no way of definingan interface through which framework code could inject dependencies to an existingobject and that long lists of dependencies might clutter the constructor’s usage(which, on the other hand, might be a welcome warning sign of a design flaw).

128 CHAPTER 4
Concepts and patterns for TDD
We’ll run these through quickly because they’re straightforward patterns—sostraightforward, in fact, that we won’t need UML diagrams to understand them!Let’s get started with five different patterns for assertions.
4.5.1 Assertion patterns
Assertions are the essence of our tests—after all, a test is not worth much if itdoesn’t assert anything. We’ve seen a number of tests and assertions in part 1, andwe’ll see plenty of more in part 2. Having had some exposure to unit tests andassertions, I think now is a good time to highlight some of the common patternswe’ve seen and give them a name. The patterns we’re describing here are basedon Gerard Meszaros’ excellent work at xunitpatterns.com. Refer to Gerard’s web-site for some additional variations and more elaborate descriptions of these asser-tion patterns.
Now, let’s look at the first of our assertion patterns—the Resulting StateAssertion.
Resulting State AssertionThe Resulting State Assertion pattern is the single most common way to performassertions in a unit test. The fundamental idea is to exercise some functionality onthe fixture objects and afterward assert that the internal state of the fixtureobjects match our expectations. The following snippet demonstrates this patternin code:
@Testpublic void sizeOfListReflectsItemsAddedToIt() throws Exception { List<String> list = new ArrayList<String>(); list.add("something"); assertEquals(1, list.size()); // state verification}
Notice how our assertion tests that the list object is not empty after invoking theadd method? Technically, this test doesn’t enforce the desired behavior. In otherwords, the previous test would pass with an implementation of size that alwaysreturns 1. In this case, the test is simple enough for anyone to deduce the intentof the test author. In some cases, however, it’s worth it to not just assert the afterstate but also the before state, which is where the Guard Assertion pattern comesinto play.
Guard AssertionThe Guard Assertion pattern is about making explicit the assumptions madeabout the fixture right before invoking the functionality we want to test. Here’s asimple example that features a Guard Assertion:

Unit-testing patterns 129
@Testpublic void listIsNoLongerEmptyAfterAddingAnItemToIt() throws Exception { List<String> list = new ArrayList<String>(); assertTrue(list.isEmpty()); // guard assertion list.add("something"); assertFalse(list.isEmpty()); // state verification}
Notice how the Guard Assertion ensures that the list’s isEmpty method correctlyreturns true for an empty list before we invoke the add method—which we’rereally testing with this test.
The Guard Assertion pattern is a common accomplice of the Resulting StateAssertion pattern. That is, the two are often combined into a sequence where thetest first asserts that the before state matches the test author’s expectations andonly then proceeds to invoke the functionality and assert against the resultingstate—exactly what’s happening in the previous example.
Sometimes, however, the purpose of adding a Guard Assertion is to make surethat an assumption about the fixture’s starting state is correct. In these cases, itmay make sense to move the Guard Assertion(s) into the end of the setupmethod. After all, the setup method is what those assertions are testing.
Delta AssertionSometimes we may need to work with code that we don’t have full control over inour tests. Specifically, our tests may have a fixture we’re not in control of. Thisyields the problem of how to write reliable, robust, self-checking tests when wecannot hard code the fixture’s state. The solution is to not assert against the abso-lute state after invoking the code under test, but rather to test that the differ-ence—or delta—between the initial and after states is what we expect.
Listing 4.10 illustrates the basic logic of this pattern we call the Delta Assertion.
public class TestAddingToArrayList {
private ArrayList<String> list;
// setup method omitted for brevity
@Test public void sizeOfListReflectsItemsAddedToIt() throws Exception { int sizeBefore = list.size(); // record the "before" state list.add("something"); assertEquals(sizeBefore + 1, list.size()); // delta verification }}
Listing 4.10 Example of the Delta Assertion pattern

130 CHAPTER 4
Concepts and patterns for TDD
This example is ridiculously trivial but highlights nicely the key aspects of the pat-tern: recording the state before exercising the code under test in order to be ableto express the final assertion relative to the before state.
While admittedly somewhat more complex to write, Delta Assertions also havethe advantage over regular Resulting State Assertions in that the test is morefocused on the essence of what it’s testing rather than throwing seemingly arbitraryvalues at the poor co-worker trying to make sense of why our test expects the list tocontain some magic number of items. Making tests communicate better is always agood idea. Indeed, that’s exactly what our next assertion pattern is geared at.
Custom AssertionSometimes the amount of code verifying our expectations vastly exceeds theamount of code required to invoke the code under test. When that happens (andespecially if it happens more than once), it’s often a good idea to extract a Cus-tom Assertion method from the test in order to encapsulate complex verificationlogic behind a nice little method we can call from the test. Listing 4.11 illustratesthis pattern with a simple example.
public class TestMeetingCalendar {
@Test public void timeslotsAreOnWeekdays() throws Exception { MeetingCalendar calendar = new MeetingCalendar(); // omitted: add appointments to calendar until // end of office hours next Friday Date time = calendar.nextAvailableStartingTime(); assertIsDuringOfficeHoursOnWeekday(time); // encapsulate logic }
private void assertIsDuringOfficeHoursOnWeekday(Date time) { // actual assertion logic omitted for brevity }}
A common reason for using a Custom Assertion is the ability to perform differenttypes of fuzzy matching. For example, we might want to compare two objects basedonly on a subset of their properties. Another common reason is a situation wherethe objects in question don’t implement the equals method in a suitable way andwe cannot modify those classes to fix their equals methods. Furthermore, creating
Listing 4.11 Example of a Custom Assertion method

Unit-testing patterns 131
a Custom Assertion allows us to provide more meaningful error messages21 in caseof test failure.
Next in our pattern catalog is a slightly bigger deviation from the assertion pat-terns we’ve seen so far. It’s called the Interaction Assertion and is the integral vehi-cle for interaction-based tests.
Interaction AssertionThe last of our assertion patterns is called the Interaction Assertion. InteractionAssertions are funny things, in that they don’t verify that our code produces the cor-rect results. Instead, they verify that our code interacts with its collaborator objectsas we expect it to. Let’s clarify this with a small example, shown in listing 4.12.
public class TestExpectedInteractions {
private List<Customer> delivered;
@Before public void setup() { delivered = new ArrayList<Customer>(); }
private class MockCustomer extends Customer { @Override public void onPaperDelivery(DailyPaper paper) { delivered.add(this); } }
@Test public void paperBoyShouldDeliverPapers() throws Exception { Customer david = new MockCustomer(); Customer esther = new MockCustomer(); PaperBoy paperboy = new PaperBoy(); paperboy.addToRoute(david); paperboy.addToRoute(esther);
paperboy.deliver(new DailyPaper()); assertTrue(delivered.contains(david); assertTrue(delivered.contains(esther); }}
21 A meaningful error message is a highly useful aid, especially if your tests tend to be bigger than theyperhaps should be.
Listing 4.12 Example of Interaction Assertions
Have test double record interactionsB
Check for expected interactions
C

132 CHAPTER 4
Concepts and patterns for TDD
The test class in listing 4.12 is simple. We B create an empty list object for every newtest and have a test double record the interactions to the list. This means that we areable to invoke the production code—ask the paperboy to deliver the daily paper—and then C perform a couple of Interaction Assertions to check that both custom-ers on the paper boy’s route received their paper.
The implementation of the test double in listing 4.12 is similar to how dynamicmock object libraries like EasyMock work internally. They record actual andexpected method calls into list-like data structures and eventually compare theexpected list against the actual. It’s worth noting, though, that our test in listing 4.12doesn’t verify that a paper was delivered—only that the paperboy cycled past bothcustomers’ houses—because we never assert what was delivered!
In this example, our whole fixture consisted of hand-made, interaction-basedtest doubles—mock objects. In practice, we can mix and match the state-basedand interaction-based styles of testing into a single test as we see fit. For example,in our paperboy test in listing 4.12, we could use Interaction Assertions to checkthat the paperboy delivered the papers correctly (as we did in listing 4.12) and aResulting State Assertion to verify that the paperboy has no papers left after com-pleting his route.
Enough assertions for now. Let’s take a step back and look at some patternsrelated to setting up and tearing down fixtures.
4.5.2 Fixture patterns
The fixture is an important part of a test. It’s also not always a trivial construct,and I’ve seen plenty of massive fixtures, creating hordes of objects in a massivesetup method I can’t fit on one screen. Complex, massive code is a problemwhether it’s in production code or test code. Luckily, we have found a number ofpatterns over the years that help keep our fixtures in check.
We’re going to look at three such patterns. The first two of them are directlyrelated to creating objects in a fixture, and the third ties this object creation togetting rid of the fixture at the end of a test. Ready?
Parameterized Creation MethodA lot of the objects in a typical fixture are so-called entity objects in that they repre-sent something that exists in the business domain either as a concrete thing or asa virtual concept. These types of objects generally have a lot of attributes, andmost of the code in the bad fixtures I see is about populating those attributes—even though the vast majority of them are of no importance to the test at hand.

Unit-testing patterns 133
The following snippet shows an example of a setup method that populates alot of attributes for fixture objects—most of which aren’t likely to be of impor-tance to the actual tests:
@Beforepublic void setUp() throws Exception { alice = new Person(); alice.setId(1L); alice.setFirstname("Alice"); alice.setLastname("Adams"); alice.setSsn("111111");
billy = new Person(); billy.setId(2L); billy.setFirstname("Billy"); billy.setLastname("Burke"); billy.setSsn("222222");
clark = new Person(); clark.setId(3L); clark.setFirstname("Clark"); clark.setLastname("Cable"); clark.setSsn("333333");
alice.isInLoveWith(billy);}
The Parameterized Creation Method attacks this situation by hiding the non-important attributes from the setup by extracting the object creation into a separatecreation method, which takes the variable attributes as arguments and populatesthe non-important ones with constant or random values. Furthermore, the Param-eterized Creation Method can take care of populating attributes that aren’t essen-tial for the test but that have, for example, uniqueness requirements.
Listing 4.13 shows the Parameterized Creation Method in action, hiding thenon-important attributes from the setup (for the sake of example, let’s assumethat the first and last name of each person are meaningful regarding the behaviorwe’re testing).
public class ParameterizedCreationMethodExample {
private Person alice, billy, clark;
@Before public void setUp() throws Exception { clark = createPerson("Clark", "Cable"); billy = createPerson("Billy", "Burke"); alice = createPerson("Alice", "Adams");
Listing 4.13 Example of a Parameterized Creation Method
Important attributes visible in setup
B

134 CHAPTER 4
Concepts and patterns for TDD
alice.isInLoveWith(billy); }
private Person createPerson(String firstName, String lastName) { Person person = new Person(); person.setFirstname(firstName); person.setLastname(lastName); person.setId(UniqueNumber.next()); person.setSsn(String.valueOf(UniqueNumber.next())); return person; }
@Test public void aliceShouldAcceptWhenProposedToByBilly() throws Exception { billy.proposeTo(alice); assertTrue(alice.isEngagedWith(billy)); }}
In listing 4.13 we can see how the Parameterized Creation Method leaves onlythe B important attributes visible in the setup method and C hides the non-important ones behind the creation method. The result is that we have no dupli-cation in how we instantiate and populate the Person objects for our fixture,and we can immediately see what’s happening in the setup because we don’thave to wade through three times as much code. Our fixture setup is focused onthe essential.
A special case of the Parameterized Creation Method is one where we’re notconcerned about any specific parameters as long as they fulfill all uniqueness andformat requirements, such as every person having a Social Security number that isunique, numeric, and n digits long. It’s also a common scenario to use multipledifferent creation methods for different objects in our fixture. That’s where ournext pattern, Object Mother, comes in handy.
Object MotherAt first, we can do a lot of good by refactoring our test classes to use local cre-ation methods instead of duplicating code. Soon, we’re likely to find ourselvesduplicating the creation methods between different test classes. The next naturalstep in removing that duplication is to move the creation methods into a separatehelper class. The Object Mother pattern describes just such an aggregate of cre-ation methods.
Populate non-importantattributes in creation method
C

Unit-testing patterns 135
In essence, the Object Mother, as described in the original paper22 by PeterSchuh and Stephanie Punke, is an object or a set of objects that does the following:
■ Provides a fully-formed business object along with all of its requiredattribute objects
■ Returns the requested object at any point in its lifecycle■ Facilitates customization of the delivered object■ Allows for updating of the object during the testing process■ When required, terminates the object and all its related objects at the end
of the test process
To summarize, the Object Mother pattern might be realized as a sophisticatedobject factory that provides access to a complete object graph of valid domainobjects, including instances in different states. In addition to this, the ObjectMother might provide methods for modifying the given domain objects by, forexample, attaching objects to each other, removing relationships, or moving thegiven objects to a desired state.
In addition to reducing duplication in our test code, the Object Mother pat-tern makes it easy for programmers new to unit-testing to access the objects theyneed, thus encouraging them to write more tests where they might otherwisegrind to a halt.
The Object Mother pattern can be especially powerful when integrated withpersonas23 used by the development team in the real world. For example, if theteam has developed personas such as Alice, Billy, and Clark—each presenting adifferent user role of a trading system—the Object Mother can and should usethose same personas in its API. Such a mental connection again makes it easier tocreate tests when we don’t need to scan through the API and perhaps even lookinside the creation methods to figure out which object we should use for the test.Instead, we simply say, “OK. I need a purchase order that Clark wants to submitbut Jim needs to approve.”
Although it's a powerful tool and catalyst to motivate test writing, ObjectMothers take time to build. As such, I would recommend taking small steps refac-toring your current test code base toward having cohesive creation methods andeventually refactor the creation methods and their canned test data into one ormore Object Mothers.
22 http://www.agilealliance.org/system/article/file/910/file.pdf.23 Alan Cooper, The Inmates are Running the Asylum (SAMS, 1999).

136 CHAPTER 4
Concepts and patterns for TDD
Still recall the Parameterized Creation Method pattern a couple of pages back?There’s one reason to use a creation method, whether parameterized or not, thatwe didn’t mention yet; it has to do with automated teardown.
Automated TeardownThe point of testing frameworks such as JUnit having a teardown method is to beable to perform any necessary cleanup after executing a test method. Examples ofsuch necessary cleanup might be integration tests cleaning up created objectsfrom a database or wiping generated files from a file system. When the teardownlogic is complex or there are simply a lot of objects to tear down, our tests becomecluttered and we can easily skip cleaning up something accidentally. And that cancreate problems down the road that are extremely hard to debug and trace backto the source.
The Automated Teardown pattern tackles this problem by encapsulating theteardown logic into a separate class and bringing the responsibility for triggeringthat logic right next to where the objects are created in the first place, as shown infigure 4.6.
As we can see, in the Automated Teardown pattern the fixture setup not only cre-ates the fixture objects but also24 registers them with a test object registry. The registryis a simple collection of references to the registered objects and is responsible forperforming cleanup for each individual registered fixture object when the fixtureteardown pokes the registry, triggering a wholesale teardown.
24 These two steps are often encapsulated inside creation methods.
Fixture setup
Test method
Fixtureteardown
Create
Fixture
Test objectregistry
Deleteregistered
objects
Triggerautomatic teardown
Register object(s) forautomatic teardown
Figure 4.6Registering fixture objects to a registry allows us to trigger a wholesale teardown easily for all registered objects during fixture teardown.

Unit-testing patterns 137
Although most of the use cases for the Automated Teardown pattern tend torevolve around integration tests, there’s one specific variation that can beextremely useful for pure unit tests: creating self-checking mock objects through acreation method that registers the mock objects for some kind of a wholesale oper-ation. In other words, instead of having to call, say, replay and verify for all of ourmock objects individually (potentially forgetting to call one or two), we can nowcall a replayAll or verifyAll and be sure that every mock object receives the call.
Now that we’ve seen some patterns related to low-level assertions and patternsfor setting up and tearing down fixtures, it’s time to look at some patterns, tips,and tricks for writing tests in general.
4.5.3 Test patterns
We’ve already seen a number of testing-related patterns from the Guard Assertionto the Object Mother. Before we jump in to discuss the chapter’s final topic ofworking with legacy code, we’re going to look at a number of more generic testpatterns. These patterns are a miscellaneous bunch of workarounds to make theuntestable testable and handy tricks for using Java syntax to create compact, nicelystructured tests.
Our first test pattern, the Parameterized Test, is geared toward creating data-driven tests that reuse the same test logic run against different inputs.
Parameterized TestEvery now and then, we find ourselves writing almost identical tests—tests whereonly a few input values are different but the logic is essentially the same. Inthose situations, we might want to consider turning our test class into a Parame-terized Test.
The fundamental idea is that there’s one and only one test method, which encap-sulates the test logic to be applied to the parameterized data. There obviously alsoneeds to be a method that provides the parameterized data, and there needs to besome code to bind the provided data to invocations to the test method.
Fortunately, the necessary plumbing is already built into JUnit 4, so adoptingthe Parameterized Test pattern is simply a matter of annotating our test classproperly. Listing 4.14 presents an example test class that realizes the Parameter-ized Test pattern with JUnit 4.
import org.junit.runner.RunWith;import org.junit.runners.Parameterized;import org.junit.runners.Parameterized.Parameters;
Listing 4.14 Example of the Parameterized Test pattern using JUnit 4

138 CHAPTER 4
Concepts and patterns for TDD
@RunWith(Parameterized.class)public class ParameterizedTest {
@Parameters public static Collection<Object[]> parameters() { Object[][] data = new Object[][] { { 0, 0, 0 }, { 1, 1, 0 }, { 2, 1, 1 }, { 3, 2, 1 }, { 4, 3, 1 }, { 5, 5, 0 }, { 6, 8, -2 } }; return Arrays.asList(data); }
public int expected, input1, input2;
public ParameterizedTest(int expected, int input1, int input2) { this.expected = expected; this.input1 = input1; this.input2 = input2; }
@Test public void executeParameterizedTest() throws Exception { assertEquals(expected, new Calculator().add(input1, input2)); }}
The Parameterized Test in listing 4.14 builds up from three parts. First of all, B weprovide JUnit with the parameterized data through a static method annotated with@Parameters. The method returns a Collection of object arrays where each arrayrepresents a single data set or a test instance. In other words, JUnit instantiates ourtest class once for each object array. The instantiation happens by JUnit C passingthe object array’s contents to the constructor, which typically stores the values tofields for later access. Finally, JUnit invokes the D test method, identified by theusual @Test annotation. And that’s it.
The Parameterized Test pattern is a good way of supporting some degree of data-driven testing. Once we’ve written a skeleton like that in listing 4.14, it’s extremelyfast to start adding new test cases by adding a new object array into the data.
Adding stuff to an object array in Java code isn’t exactly the user-friendliest wayto create new test cases, however. The example in listing 4.14 would also be muchmore readable with each of its test cases implemented as separate one-line asser-tions. Indeed, perhaps the most compelling use case for the Parameterized Testpattern is where the amount of test data is huge and comes from an external data
Provide parameterized data
B
Data is bound through constructor
C
Test method invokedonce for each data set D

Unit-testing patterns 139
source such as an XML document or an ASCII text file, parsed by the @Parametersannotated method. This way, the test class becomes again slightly more complex,but it has the benefit of being able to describe the test data in a more suitable syn-tax and file format.
Tests that deal with a lot of data are the minority, however, so let’s move on todiscuss something that’s closer to everyday business. Because many objects needto collaborate with dependencies, I’m thinking the Self-Shunt might be an excel-lent test pattern to cover next.
Self-ShuntEarlier in section 4.3, we talked about different kinds of test doubles. What wedidn’t talk about there was the Self-Shunt, which is kind of a test double-except thatit’s our test class. Yes, you got that right. The Self-Shunt pattern, first documentedby Michael Feathers,25 is one where the test class instance acts as a test double in itsown tests. Listing 4.15 illustrates this concept with a concrete example.
public class SelfShuntExample implements PricingService {
@Override public float getDiscountPercentage(Customer c, Product p) { return 10.0f; }
@Test public void testOrderProcessorWithMockObject() throws Exception { // some setup omitted for brevity... OrderProcessor processor = new OrderProcessor(); processor.setPricingService(this); processor.process(new Order(customer, product)); assertEquals(expectedBalance, customer.getBalance(), 0.001f); }}
In listing 4.15, we can see how the test class B implements the PricingServiceinterface, which means we can then C pass this to the object under test as its col-laborator instead of having to create a separate test double class or clutter our testcode with an anonymous implementation. An anonymous class isn’t a bad idea for
25 http://objectmentor.com/resources/articles/SelfShunPtrn.pdf.
Listing 4.15 Example of the Self-Shunt pattern in action
BImplement
PricingService interface
Pass “this” to object under test
C

140 CHAPTER 4
Concepts and patterns for TDD
this kind of simple alternative implementation; but as the fake grows in size, sodoes the degree of cluttering, driving us toward having a Self-Shunt or an actual,named test-double class.
In other words, the Self-Shunt pattern is an excellent tool for implementingsimple test-double logic near the tests that use it. As the logic grows more com-plex, however, it is often a good idea to move toward a full-blown test double. Hav-ing said that, we do have to remember that full-blown test doubles have their owndisadvantages, too. If we’d like to share objects and states between our test meth-ods and the test double, an Intimate Inner Class might be a better option.
Intimate Inner ClassThere are occasions when we’d like to share some objects between the test classand a test double. This kind of a need can be fulfilled in a number of ways (add-ing a get method being one of them), but the Intimate Inner Class pattern is per-haps one of the less obvious solutions. That does not mean that it wouldn’t be anelegant solution, however. In fact, the ability of a non-static inner class to accessand assign to the test class’s fields can yield nice, compact test code compared to,for example, exposing the internals of a test double through getter methods.
Let’s clarify the role of the Intimate Inner Class through a code example. List-ing 4.16 presents an example scenario where we’d like to test that a Server objectobtains a Thread from its configured ThreadFactory upon startup and suspends itwhen stopped. The solution is to use an Intimate Inner Class, which assigns thenewly created Thread instance to the thread field on the surrounding test class.
public class IntimateAnonymousInnerClassExample {
private StartStopSynchronizedThread thread;
@Test public void testStartingAndStoppingThreadsThroughAnExecutorService() throws Exception { Server server = new Server(); server.setThreadFactory(new ThreadFactory() { public Thread newThread(Runnable task) { thread = new StartStopSynchronizedThread(task); return thread; } });
Listing 4.16 Example of an Intimate Inner Class
Shared between testclass and test double B
Intimate Inner Class C

Unit-testing patterns 141
server.start(); thread.shouldBeStartedWithin(1, TimeUnit.SECONDS); server.stop(); thread.shouldBeStoppedWithin(1, TimeUnit.SECONDS); }}
Notice how C the Intimate Inner Class is B sharing the thread field with the testclass, allowing the test to D access the underlying Thread instance for its assertions.
Technically, the Intimate Inner Class can be implemented as an anonymous ornested inner class. An anonymous inner class, like the one in listing 4.16, canbecome unwieldy but can access final variables from the method it’s createdfrom. A nested inner class, on the other hand, is somewhat cleaner but also morerestricted in its access. Both alternatives have the benefit of being able to accessthe test class’s fields.
Speaking of accessing fields, our next pattern is all about accessing fields we’renot supposed to.
Privileged AccessYou may have been in a situation where you needed to change that one bit of legacycode in order to test your stuff—but there was some reason you couldn’t touch thelegacy code. In such situations, it may be a reasonable workaround to invade thelegacy code’s privacy and directly tweak its internals through the Reflection API inorder to make it possible for us to write tests—Privileged Access, if you will.
In doing so, the PrivilegedAccessor class available from the files section ofthe JUnit mailing list26 is a useful aid. A similar utility called PrivateAccessor isavailable as part of the JUnit-Addons open source library;27 and the LaughingPanda community has developed BeanInject,28 which knows the same tricks. Forexample, with the BeanInject project’s Inject class, we can forcibly substitute atest double into a private field of a legacy class with one line of code:
Inject.staticField("foo").of(LegacyCode.class).with(ourTestDouble);
The ability to inject or read private fields of classes or objects isn’t too useful forprojects that have been using TDD from the get-go, but for those working withmounds of legacy code not designed with testability in mind, these kinds of tricks
26 http://groups.yahoo.com/group/junit/files/src/PrivilegedAccessor.java (you need to join the groupto gain access).
27 http://junit-addons.sourceforge.net/junitx/util/PrivateAccessor.html.28 http://www.laughingpanda.org/mediawiki/index.php/Bean_Inject.
Test can access shared field
D

142 CHAPTER 4
Concepts and patterns for TDD
and utilities can save the day. However, if we can change the legacy code we shouldprefer doing that instead of falling back to some Reflection trickery. In fact, ournext test pattern is just such a change—one that makes code testable.
Extra ConstructorThe world of computing is full of monolithic code bases that look like a spaghettimonster. When working in these code bases, it’s not uncommon to have a head-ache because we can’t seem to instantiate some class without pulling in a dozenother classes along the way. The problem, of course, is that the dependencies ofthe class we’d like to use haven’t been properly isolated. The proper solutionwould be to isolate the dependencies, perhaps by driving the architecture towarddependency injection, but that might take time. The Extra Constructor pattern,however, provides us with a nice temporary solution.
The basic idea is that because we cannot substitute the dependencies from theoutside, we need to do it from the inside. Thus, we add a new constructor to theclass we want to test—one that takes as arguments the dependencies we’d like tosubstitute. This new constructor can then first delegate to the real constructorand subsequently store the passed-in test-double implementations in place of thereal dependencies.
If the original constructor is the place where the real dependencies are instan-tiated (or if we move them there), we can turn the situation around and make theoriginal constructor delegate to the new constructor, as shown in listing 4.17.
public class LogFileMerge {
private URL logFileA, logFileB;
public LogFileMerge() { this(new URL("http://server1/system.log"), new URL("http://server2/system.log")); }
LogFileMerge(URL a, URL b) { this.logFileA = a; this.logFileB = b; }
...}
Listing 4.17 is a trivial example but serves well in highlighting the Extra Constructorpattern. In the class under test, LogFileMerge, the B original constructor creates
Listing 4.17 Example of Extra Constructor exposing dependencies
Original delegates to Extra Constructor
B
Dependencies exposed to tests
C

Unit-testing patterns 143
two URL objects with hard-coded network addresses to server1 and server2. First,we don’t want our unit tests to access the network. Second, making sure that the logfiles on those two servers contain what we expect them to contain is hardly an easything to do.
Thus, instead of assigning the URL objects to the private fields directly in theoriginal constructor, we C introduce an Extra Constructor and make the originaldelegate to the new constructor. This way, leaving the Extra Constructor’s visibilityto package private, protected, or public, our tests can instantiate the LogFile-Merge class using the Extra Constructor, passing in URL objects that point to, forexample, local files instead of network addresses.
Again, this pattern is mostly used for working around the bad design of codethat hasn’t been test-driven. Our next and last pattern is also an instrument forfacilitating test-driven development in the midst of such legacy code.
Test-Specific SubclassAnother common anti-pattern I’ve seen a lot during my programming career isthe violation of the Single Responsibility Principle.29 Imagine we’re test-drivingsome billing functionality that needs to use a complex credit-card processing facil-ity. That facility combines in one class everything related to credit-card transac-tions and is developed by another team within our company.
Now, let’s say the class is built such that there’s no way to validate a credit-card number without contacting a merchant service provider, because the num-ber validation logic is hidden behind a protected method, as shown in the fol-lowing snippet:
public class CreditCardProcessing {
public boolean isValid(String cardnumber) { return validationCodeMatches(cardnumber) && cardIsActive(cardnumber); }
protected boolean validationCodeMatches(String cardnumber) { // validation logic omitted for brevity... }
protected boolean cardIsActive(String cardnumber) { // access to merchant system's web service // omitted for brevity... }}
29 http://www.objectmentor.com/resources/articles/srp.pdf.

144 CHAPTER 4
Concepts and patterns for TDD
Also, for the sake of the example, let’s assume that modifying the class is out ofthe question due to corporate politics and code ownership. What can we do? Isthere a way to handle this situation other than to copy-paste the validation codesomewhere else, creating loads and loads of duplication?
The Test-Specific Subclass pattern lets us expose or modify internal state orbehavior in scenarios like the one we just described. In our credit-card processingexample, we might create a behavior-modifying subclass of the CreditCardPro-cessing class and override the cardIsActive method to always return true. We’deffectively be testing our code with a partially stubbed version of the credit-cardprocessing facility—which is OK as long as our functionality does not need tomake a difference between why a given card is considered invalid.
Other common variations of the Test-Specific Subclass pattern include behav-ior and/or state-exposing subclasses where we don’t need to change the way aclass works, but rather need information about its internal state or informationabout what the class is doing internally when its public API is invoked. Once again,the pattern is mostly useful where not all code we write is TDD’d and beautiful butrather ugly legacy code.
Speaking of ugly legacy code, we are going to finish off this chapter in the nextsection with a foray into the grim world of legacy code—and how to be test-drivenwhen you’re surrounded by code without tests and code that exhibits bad design.
4.6 Working with legacy code
Legacy code is traditionally considered to mean code written by someone else some-where at some point in time. Old code, that is. Old code with a bad stench! Thesource for that bad stench is not the fact that the code is old but that it’s difficultto read and possibly buggy, and there’s no way of telling whether changing onething here will break stuff elsewhere. Based on this thinking, Michael Feathers, inthe preface of his book Working Effectively with Legacy Code, coined a new definitionfor legacy code: “code without tests.”30
NOTE If we define legacy code as “code without tests,” then writing code not test-first would basically be like writing instant legacy code.
30 Michael first introduced this definition in an article with the same title (http://www.objectmentor.com/resources/articles/WorkingEffectivelyWithLegacyCode.pdf), but it didn’t seem to catch on until thebook came out. In any case, the definition itself is a remarkably good one, in my opinion.

Working with legacy code 145
Probably the vast majority of us are not working on green-field projects but rathermaintaining, developing further, and integrating with systems that have been andwill be running in production for an arbitrary number of months, years, or evendecades. This means that we must be able to use TDD in the context of an existingcode base that wasn’t developed test-first from the beginning.
How do we test-drive on top of a legacy code base? While you’re putting in anorder for Michael’s book, which is the bible for working with legacy code, I’ll tryto summarize the process of test-driving changes into legacy code.
4.6.1 Test-driven legacy development
The way to develop test-first in the context of legacy code is similar to what weneed to do when others on our team or project don’t write tests first or at all. Webegin by writing tests around the code we want to change. That might require firstbreaking some dependencies without having tests to watch our back, which meansproceeding more slowly than usual. That shouldn’t discourage you, however,because breaking those dependencies and getting in those tests will pay back theinvestment sooner than you think.
In his book, Michael also describes a process for working with legacy code,illustrated in figure 4.7, which aims to make changing legacy code a disciplinedact of software development rather than a cross-fingers-and-press-Enter type ofmarathon of trial, error, and debugging.
3a. Break external dependencies3b. Break internal dependencies3c. Write tests
3. Cover theinflection point
2. Indentifyinflection point
1. Identifychange points
4. Makechanges
5. Refactorcovered code
How to dealwith legacy code
STABLE CODE BASE
Figure 4.7 The process of working with legacy code

146 CHAPTER 4
Concepts and patterns for TDD
The process described in figure 4.7 could be split into three main phases:
■ Analyzing the change■ Preparing for the change■ Test-driving the change
The process begins from a (we hope) stable code base and a need to change thesystem in some way. For example, we might need to add a new configurationparameter that switches between two alternative behaviors. From this state, we gothrough the three phases of first analyzing the change, then preparing for makingthe change in a safe and controlled manner, and finally test-driving the change.Eventually, we have created a new stable code base, including our change.
Next, let’s look at each of these phases in more detail and explore what the fivedetailed steps shown in figure 4.7 mean in practice.
4.6.2 Analyzing the change
When we start analyzing the change we want to make, we first identify the changepoints. Change points are the places in the code base where we need to edit codein order to implement the desired change. This is fundamentally no differentfrom the analysis we carry out with any kind of code base, legacy or not. The maindifference is that a legacy code base is generally more difficult to learn and under-stand than one with thorough unit tests documenting the intent and purpose ofindividual classes and methods.
When we know where the change should take place, we identify the inflectionpoint. The inflection point (or test point) is the point “downstream” in our codewhere we can detect any relevant change in the system’s behavior after touchingthe code in the change points. Typical inflection points are close-proximity seamssuch as method invocations after or around the change points. Figure 4.8attempts to illustrate a situation where we have opted for a close-proximity inflec-tion point—that is, testing close to the actual change.
Code base
Change point
Close-proximityinflection point
Figure 4.8Close-proximity inflection points typically cover the change point tightly, making it easy to test for the current behavior in detail.

Working with legacy code 147
Sometimes, however, it might make sense to find the inflection point farther awayfrom the change point, as shown in figure 4.9. Examples of such distant inflectionpoints might be network connections to external systems and log output pro-duced by the code in and around the change point. In some cases, it might evenbe sufficient to treat the system’s persistent data source as the inflection point.The trade-off to make is basically between the ease of writing tests at the choseninflection point and the certainty provided by those tests.
Close-proximity inflection points tend to provide a more localized checkpointwithout too much noise around the signal. Distant inflection points, on the otherhand, are more likely to catch side effects our analysis hadn’t found—but inexchange for potentially more effort in writing the tests because we often don’thave access to the kind of detailed information we usually have when testing closeto the change point.
After having analyzed the code base looking for the change and inflection points,we know what we need to change and where we can test for the expected behavior.In the next phase, we prepare to make the change in a safe, test-driven manner.
4.6.3 Preparing for the change
Once we’ve spotted the change and inflection points, we proceed to cover theinflection point with tests that nail down the current behavior before we make ourchange. This might involve breaking dependencies with careful edits that exposethe dependency through a seam we can manipulate in our tests.
The tests we write to cover the inflection point are typically what we call charac-terization tests, meaning that they nail down the current functionality as is, withoutworrying about whether that behavior is correct. Characterization tests are oftenalso learning tests in the sense that we use them to verify assumptions we’ve madewhile identifying the change points.
Code base
Change point
Distantinflection point
Figure 4.9More distant inflection points by definition cover more ground and, thus, may protect us from side effects of the change that our analysis had missed.

148 CHAPTER 4
Concepts and patterns for TDD
With sufficient characterization tests in place, we’re ready to move on to thethird phase of our test-driven legacy development process—making the change.
4.6.4 Test-driving the change
After we’ve written tests around the change and inflection points to the degreethat we’re comfortable with our test coverage, we make the change by adding atest for the desired new functionality. As we proceed with implementing thechange, our characterization tests tell us if we broke anything while editing thelegacy code, and the newly added tests tell us when we have managed to imple-ment the desired change correctly. Finally, once we’ve successfully made thechange and all tests are passing, we refactor the code as usual, enjoying the coverof our automated tests.
That’s all there is to working with legacy code in general. The main differencesbetween the regular test-driven development cycle and the process described arethat we need to write tests for the existing behavior before adding a test for thenew behavior and that we often need to make small dependency-breaking editswithout our safety net in order to be able to start writing those tests. It justrequires a bit more care and thought.
4.7 Summary
In this last chapter of part 1, we’ve taken a peek at some of the heavily (or not soheavily) guarded secrets of test-driven developers. These are not silver bullets;31
they are just techniques. They go into our personal toolbox, and we grab themwhen we consider them useful.
We started by asking ourselves how to write tests, and we answered the questionwith a set of test-selection strategies with which we can decide on the next test towrite. From test writing, we then moved over to discussing the most fundamentaltechniques of making tests pass: faking the functionality, triangulating toward thecorrect functionality, and the occasional obvious implementation. Then, we for-mulated a set of three prime guidelines for starting our test-driving journey: refac-toring mercilessly, getting to green fast, and slowing down when we stumble.
Next, we took some space to discuss a number of essential testing concepts. Wedefined fixtures as the state and context upon which our tests operate and begintheir execution. We studied the fascinating world of test doubles and learnedabout the categorization of test doubles into fakes, stubs, and mocks. Then, we
31 Fred Brooks got it wrong. There are silver bullets—it’s the werewolves that don’t exist.

Summary 149
contrasted the state-based style of testing with the more sophisticated, interaction-based testing.
After elaborating and furthering our understanding of the taxonomy of testdoubles through a closer look at fakes, stubs, and especially mock objects, weturned our attention to higher-level guidelines for enabling testability by discuss-ing the relative merits of composition versus inheritance and the lurking troubleof static methods and the Singleton pattern. After talking about isolating the trou-blemakers behind seams, we ventured further into reversing the dependency withdependency injection.
Having an understanding of the key testing concepts and principles that drivetestable designs, it was time to put our patterns hat on, inspired by the great workof Gerard Meszaros at xunitpatterns.com. We explored a vast number of differentpatterns related to unit testing, from the itsy bitsy differences between various kindsof assertions to the more grandiose patterns of setting up and tearing down fixtures.
Our journey in the land of patterns concluded with six more generic test pat-terns, many of which were especially targeted at surviving in the presence of leg-acy code—the topic of the last section of this chapter, where we got a briefintroduction into working effectively with legacy code, drawing from MichaelFeathers’ excellent work.
These tips and tricks are something we make use of almost daily when test-driving, regardless of the technology involved. In part 2, we’ll focus on tacklingspecific problems with applying test-driven development on the tough cookies ofJava Enterprise Edition technology. Java Enterprise Edition is a platform that givesus much power but also makes our lives that much harder when it comes to verify-ing that the code we’ve crunched out works as we expect. Or maybe that’s just amyth. I guess we’ll know soon enough!
Hang on tight. It’s going to be a bit of a wild ride, but I assure you we’ll do justfine.


Part 2
Applying TDDto specific technologies
In part 1, you learned to test-drive plain old Java code and put a selectionof handy tricks and techniques up your sleeve. Unfortunately, most of thetime we won’t be lucky enough to get to work with plain old Java code for aliving. Instead, we get all that enterprise stuff that they say is “impossible totest-drive.” Obviously, that’s not true; and in part 2, we’ll bust that myth, onetechnology at a time.
In chapter 5, we learn to test-drive Java EE web applications—not just pureJava like Java servlets and Spring controllers, but also the view templates weuse for generating markup. In chapter 6, we step behind the face of ourapplications and learn to test and test-drive data-access code: code that oper-ates on and manipulates data using not just raw JDBC but also Spring Frame-work’s JdbcTemplate and the popular Hibernate object-relational mappingframework. In chapter 7, we tread farther outside our comfort zone and sortout how to test for concurrent and otherwise unpredictable code. We finishpart 2 with a full treatment of test-driving Java Swing applications, includinga number of design patterns that simplify that task.


Test-drivingweb components
Test-driving Java EE web components is hard.—A myth
153

154 CHAPTER 5
Test-driving web components
In this chapter, we’ll tackle some of the most common headaches of the modernday Java Platform Enterprise Edition (Java EE) developer trying to apply test-drivendevelopment in their everyday job—web components. So far, we’ve mostly seen thekind of stuff that a typical TDD classroom training would present as introductorymaterial. That’s the kind of material that helps us understand the concepts behindthe technique and see progress. It’s not that easy to do the same when you have todeal with not just plain old Java objects but with the sometimes heinous Java EEinterfaces that allow for great flexibility on paper, but at the cost of non-trivialeffort on the part of the developer. After finishing this chapter, we will have ideasand ammunition to take on developing Java EE web components test-first.
Speaking of great flexibility and Java EE, there’s only so much we can cover inone chapter. Within these limits, we want to cover both the C and the V of theModel-View-Controller (MVC) design pattern so prevalent in today’s Java EE archi-tectures for web applications. If you aren’t familiar with the MVC pattern, I warmlyrecommend doing a quick web search or picking up a patterns book such as CoreJ2EE Patterns (Prentice-Hall, 2003). Again, there’s a horde of different frameworksout there to help us implement our controllers and views. In an attempt to coveras much ground with as little effort as we can, we’ll cherry-pick two technologiesfrom each camp for a closer look.
We’ll look at implementing our controllers as raw Java Servlets to get an ideaof how to proceed when there is no framework to help us, and we’ll look at imple-menting our controllers using the Spring Framework to get an idea of how thistask is simplified when using a testing-friendly framework such as Spring.
On the view side, we’ll investigate how to test-drive views based on JavaServerPages without running them inside a web container to cover the worst-case sce-nario. Again, we’ll glance at an alternative technology, Apache Velocity, to get apicture of how easy test-driving our views can be when the technologies involvedare amenable for testing outside the container.
Finally, we’ll talk a little bit about component-based frameworks and how test-driving components and pages with those frameworks differs (or doesn’t differ!)from request-response technologies. We’ll also get our hands dirty with compo-nents using Wicket, an open source component-based web framework.
As I’ve said before, it’s going to be a rough ride these following chapters, but Ipromise we’ll come out that much wiser in the end.
5.1 MVC in web applications in 60 seconds
Before jumping head first into test-driving these controller things, let’s remindourselves what the MVC pattern is all about.
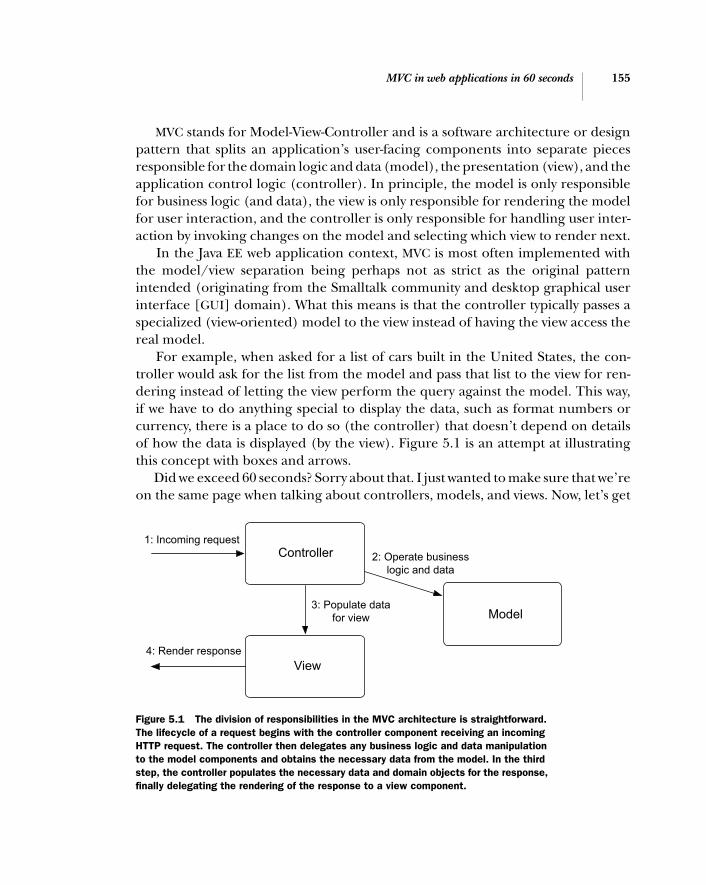
MVC in web applications in 60 seconds 155
MVC stands for Model-View-Controller and is a software architecture or designpattern that splits an application’s user-facing components into separate piecesresponsible for the domain logic and data (model), the presentation (view), and theapplication control logic (controller). In principle, the model is only responsiblefor business logic (and data), the view is only responsible for rendering the modelfor user interaction, and the controller is only responsible for handling user inter-action by invoking changes on the model and selecting which view to render next.
In the Java EE web application context, MVC is most often implemented withthe model/view separation being perhaps not as strict as the original patternintended (originating from the Smalltalk community and desktop graphical userinterface [GUI] domain). What this means is that the controller typically passes aspecialized (view-oriented) model to the view instead of having the view access thereal model.
For example, when asked for a list of cars built in the United States, the con-troller would ask for the list from the model and pass that list to the view for ren-dering instead of letting the view perform the query against the model. This way,if we have to do anything special to display the data, such as format numbers orcurrency, there is a place to do so (the controller) that doesn’t depend on detailsof how the data is displayed (by the view). Figure 5.1 is an attempt at illustratingthis concept with boxes and arrows.
Did we exceed 60 seconds? Sorry about that. I just wanted to make sure that we’reon the same page when talking about controllers, models, and views. Now, let’s get
1: Incoming request
4: Render response
3: Populate datafor view
2: Operate businesslogic and data
Controller
View
Model
Figure 5.1 The division of responsibilities in the MVC architecture is straightforward. The lifecycle of a request begins with the controller component receiving an incoming HTTP request. The controller then delegates any business logic and data manipulation to the model components and obtains the necessary data from the model. In the third step, the controller populates the necessary data and domain objects for the response, finally delegating the rendering of the response to a view component.

156 CHAPTER 5
Test-driving web components
back to our regularly scheduled test-first programming, shall we? Because the codethat belongs to the model in MVC is pretty much regular Java code for which wealready know how to write tests first, we’ll focus on test-driving the stuff that goes intocontrollers and views, and only discuss the role of the model where necessary.
Let’s start by taming the controller logic and continue to the view once we’vegot our controllers in check.
5.2 Taming the controller
Controllers in the web application MVC architecture are the plumbing betweenthe application and the HTTP traffic coming from the browser. As such, their roleis essential in the overall functionality of the web application even though theydon’t (or at least should not!) contain core business logic. In other words, we’dvery much benefit from having our controllers covered under automated unittests just like we have our model code.
The main difficulties related to test-driving controller code, or writing auto-mated tests for it in general, originate from dependencies to awkward or difficultAPIs to mock. The awkwardness of such APIs typically springs from the need tomock up an entire hierarchy of interfaces rather than just one because your appli-cation code needs information or functionality provided not by the direct depen-dency but by an indirect dependency—an object you get access to only by askinganother object to give you one. This is what the Pragmatic Programmers AndyHunt and Dave Thomas refer to with their infamous design principles “Tell, Don’tAsk” and the “Law of Demeter.”1
The mother of all controller-layer technologies in the Java EE world is JavaServlets, so let’s start from there and move on to more advanced controller frame-works using the already ubiquitous Spring Framework as our guinea pig.
5.2.1 Test-driving Java Servlets
Servlets are the fundamental building block of Java web applications. Even asfewer and fewer web applications are built directly on top of the Servlet API—withmost green-field projects favoring frameworks like Spring, WebWork, Struts, Tap-estry, Wicket, or JavaServer Faces (JSF)—many of us will continue to face legacycode bases full of Servlets.2
Before we start test-driving Servlets, however, let’s first go through some basics.
1 http://www.pragmaticprogrammer.com/ppllc/papers/1998_05.html.2 Besides, it might be better for more web applications to start with a plain Servlet, adopting a more com-
plicated framework only when facing a real need. Who knows, that real need might never come…

Taming the controller 157
Servlet API basicsTo make sure we’re on the same page, let’s look at a trivial example Servlet. List-ing 5.1 shows a Servlet class responsible for echoing the request parameters itreceives back to the requester in plain text, one parameter value per line.
import javax.servlet.*;import javax.servlet.http.*;import java.io.*;import java.util.Enumeration;
public class EchoServlet extends HttpServlet {
protected void doGet(HttpServletRequest request, HttpServletResponse response) throws ServletException, IOException { response.setHeader("Content-Type", "text/plain"); PrintWriter writer = response.getWriter(); Enumeration e = request.getParameterNames(); while (e.hasMoreElements()) { String parameter = String.valueOf(e.nextElement()); String[] values = request.getParameterValues(parameter); for (int i = 0; i < values.length; i++) { writer.write(parameter + "=" + values[i]); writer.write("\n"); } } writer.close(); }}
Servlets usually have just one or two public methods like the doGet method in list-ing 5.1, each handling a specific type of HTTP request (GET, POST, HEAD, PUT,and so forth, and each mapping to a method named doXXX). GET and POST arethe usual suspects, although sometimes the developer might want the Servlet toalso handle HTTP HEAD or other more exotic types of requests. The commonbase class for all Servlets—javax.servlet.http.HttpServlet—carries out thismapping of HTTP request types to the doXXX methods, as illustrated in figure 5.2.
The EchoServlet class in listing 5.1 only handles GET requests with its doGetmethod. A request of any other type directed at the EchoServlet would result inan error response being sent, which is kind of natural because the EchoServlet’sauthor wasn’t prepared to handle any other kinds of requests.
Listing 5.1 Example Servlet echoing request parameters
Response object generates response
Request objectencapsulates
requestparameters
Response objectgeneratesresponse

158 CHAPTER 5
Test-driving web components
Now let’s take a closer look at what all those weird interfaces and classes represent. The first method argument, HttpServletRequest, represents the incoming
HTTP request and encapsulates the associated request parameters, HTTP headers,and so forth. The request object also acts as a medium for passing data from onerequest-handling component to another in the form of request attributes. Forexample, a Servlet might need to do some pre-processing for a given request, storethe intermediate results as objects in the request’s attributes, and then forward therequest to another Servlet for further processing. In listing 5.1, the doGet methodinterrogates the request object for the names of all request parameters presentand then loops through each of them, obtaining the values for those.
The second argument, the HttpServletResponse object, is the gateway to gen-erating a response to the client. Any HTTP headers you want to send back to theweb browser are set on the response object. Any output you want to write goesthrough the PrintWriter and ServletOutputStream objects acquired from theresponse object. In listing 5.1, for example, the Servlet is writing the receivedrequest parameters back into the response object’s PrintWriter.
That’s it. It’s definitely not a complicated API. How about looking at how wetest these things? In short, we fake the request and the response.
Faking the request and responseNow, if we’d like to write a test for the previous Servlet, verifying that it doesindeed generate the expected response, we’ll have to provide instances of theHttpServletRequest and HttpServletResponse interfaces that the Servlet caninvoke. Listing 5.2 shows us what a unit test for the EchoServlet might look like.
Incoming HTTP requests javax.servlet.http.HttpServlet
public void service(...) { }
com.acme.CustomServlet
protected void doGet(...) { }
protected void doPost(...) { }
protected void doPut(...) { }
protected void doHead(...) { }
...
Figure 5.2 Incoming HTTP requests are handled by the service() method of the HttpServlet base class from which our custom Servlets inherit. The service() method looks at the type of the HTTP request and subsequently dispatches the request to the matching doXXX() method.

Taming the controller 159
import org.springframework.mock.web.MockHttpServletRequest;import org.springframework.mock.web.MockHttpServletResponse;
public class TestEchoServlet { @Test public void testEchoingParametersWithMultipleValues() throws Exception { MockHttpServletRequest request = new MockHttpServletRequest(); MockHttpServletResponse response = new MockHttpServletResponse(); request.addParameter("param1", "param1value1"); request.addParameter("param2", "param2value1"); request.addParameter("param2", "param2value2");
new EchoServlet().doGet(request, response);
String[] lines = response.getContentAsString().split("\n"); assertEquals( "Expected as many lines as we have parameter values", 3, lines.length); assertEquals("param1=param1value1", lines[0]); assertEquals("param2=param2value1", lines[1]); assertEquals("param2=param2value2", lines[2]); }}
Looking at listing 5.2, it’s not as bad as I painted it to be, is it? I guess it isn’t, espe-cially if we already have the MockHttpServletRequest and MockHttpServlet-Response classes at our disposal.3 We create two test doubles in B and populatethem with suitable request parameters, headers, requested URIs, and so forth tosimulate a request coming from a web browser. After invoking our Servlet withour fake request and response objects in C, all we need to do is D ask theresponse object for the generated response and perform some assertions just likein any other JUnit test.
So that’s how we can test Servlets—by faking the request and response objectswith readily available third-party test doubles (although writing our own wouldn’tbe that hard either). Then again, the previous test is exercising a trivial Servlet.What if we need to test something more real life and complex? We need something
Listing 5.2 Example unit test for the EchoServlet
3 The mock-object implementations used in listing 5.2 have been imported from the Spring Framework.There are also a bunch of other freely available mock object libraries floating around on the Internet.
Create and populate mock objects
B
Executeproduction
code withmocks
C
Makeassertions
againstresponse D

160 CHAPTER 5
Test-driving web components
more realistic than an EchoServlet, because we’re about to start implementing ourfirst Servlet test-first!
Testing for redirectionsLet’s see, what could be an example of a real-world Servlet that would be interest-ing to test-drive? How about a Servlet that handles logins? Let’s make it a tad bitmore interesting still and say that the Servlet is responsible for first authenticatinglogin requests and then redirecting the user to the front page or the “change pass-word” page, depending on whether it’s been 90 days since the last passwordchange. Sounds like a plan? Great!
What should we test first? I’m tempted to start with a failing login becauserejecting a login sounds like an easy thing to do. We could test that the Login-Servlet doesn’t let a wrong password through but forwards the request to anerror page of some kind. Let’s see how that might look like in Java code:
MockHttpServletRequest request = new MockHttpServletRequest();MockHttpServletResponse response = new MockHttpServletResponse();HttpServlet servlet = new LoginServlet();servlet.service(request, response);assertEquals("/invalidlogin", response.getRedirectedUrl());
We’ll want to simulate a request, and we’ll want to check that the request was redi-rected to the error page. The fake implementation of HttpServletResponse letsus do that elegantly.
Oh, and obviously we’ll need to fake the user’s login credentials somehow.Because we’re doing Java EE stuff, how about using request parameters namedj_username and j_password for the credentials? Also, we need some kind of fakeimplementations of the request and response objects so that we can fake theparameters and assert that the redirection takes place.
We could use a dynamic mock-object framework like EasyMock for this, or wecould grab a library of static fake implementations. The Spring Frameworkproject comes with a handy set of just such mock implementations for a bunch ofjavax interfaces—including HttpServletRequest and HttpServletResponse.Let’s use those in our tests for now, even though we’re not using Spring in ourproduction code.
Listing 5.3 shows our first test for the LoginServlet.
import javax.servlet.http.HttpServlet;import org.junit.Test;import static org.junit.Assert.assertEquals;import org.springframework.mock.web.MockHttpServletRequest;import org.springframework.mock.web.MockHttpServletResponse;
Listing 5.3 First test for the LoginServlet

Taming the controller 161
public class TestLoginServlet {
@Test public void wrongPasswordShouldRedirectToErrorPage() throws Exception { HttpServlet servlet = new LoginServlet(); MockHttpServletRequest request = new MockHttpServletRequest("GET", "/login"); request.addParameter("j_username", "nosuchuser"); request.addParameter("j_password", "wrongpassword"); MockHttpServletResponse response = new MockHttpServletResponse(); servlet.service(request, response); assertEquals("/invalidlogin", response.getRedirectedUrl()); }}
That was easy. We added two request parameters for the username and passwordto be used in the login request, invoked an instance of the forthcoming Login-Servlet class (the code doesn’t exist yet, remember?), and finally asked the fakeresponse object to verify that it was told to redirect to the URL /invalidlogin asexpected. At this time, we’re not interested in what happens when the browserrequests the /invalidlogin URL. We’re specifying that failed login attempts beredirected there.
Now, it’s time to make our first cut at bringing the LoginServlet into being.We create the LoginServlet class, as instructed by our compiler, and run the testto assure ourselves that we’re running the right test—and that it’s failing asexpected. Then, we proceed to writing an implementation for the servicemethod. The simplest code that can make our test pass always redirects the user to/invalidlogin, regardless of the request parameters, as we’ve done in listing 5.4.
public class LoginServlet extends HttpServlet { @Override protected void service(HttpServletRequest request, HttpServletResponse response) throws ServletException, IOException { response.sendRedirect("/invalidlogin"); }}
Running our test against this tiny snippet does indeed prove that we pass withflying colors. Obviously we’re still far from being finished with our functionality,
Listing 5.4 Our first cut at the LoginServlet (rejects any login attempt)
Create fake request object …
Assert expected outcome
… and fake response object
Always reject login

162 CHAPTER 5
Test-driving web components
and things start getting more interesting when we write a test for a login withvalid credentials.
Working with parameters and the sessionHmm. How will we know whether the login has been successful? At least we needto redirect the user to the front page. Also, we need to somehow remember thatthe user has logged in. At some point, we might end up using a more sophisti-cated authentication framework, but for now it should suffice if we store the user’slogin name into the user’s session.
Confident that this is the way to go, we write our second test, shown in listing 5.5.
@Testpublic void validLoginForwardsToFrontPageAndStoresUsername() throws Exception { HttpServlet servlet = new LoginServlet(); MockHttpServletRequest request = new MockHttpServletRequest("GET", "/login"); request.addParameter("j_username", "validuser"); request.addParameter("j_password", "correctpassword"); MockHttpServletResponse response = new MockHttpServletResponse(); servlet.service(request, response); assertEquals("/frontpage", response.getRedirectedUrl()); assertEquals("validuser", request.getSession().getAttribute("username"));}
There’s little difference in this test compared to our first test, except that this testwill force us to implement some logic into the LoginServlet rather than alwaysrejecting any and all login attempts. We’re also checking for the addition of a ses-sion attribute named “username” as a means of verifying that the user has beenlogged in. This was a design decision made on the spot and a decision that wemight change later on. For now, storing the username in the session shall indicatea logged-in user.
As I switch back to the LoginServlet implementation in my IDE, the need foranother design decision dawns on me. How does our LoginServlet know that“validuser” is a valid user and that “correctpassword” happens to be that specificuser’s password? Or, let’s put it the other way around. How are we going to tell theLoginServlet which users exist in the system? Let’s put our designer hats on andthink about it for a while.
Listing 5.5 Sketch of our next test, verifying that a valid login attempt succeeds

Taming the controller 163
Evolving towards a better designThe introduction of the additional login test is essentially forcing us to treat validand invalid credentials differently. Not wanting to dip ourselves into the authenti-cation implementation yet—whether it’s based on a file system, a relational data-base, or an LDAP server—we’re naturally driven toward a modular design. Inshort, we want our Servlet to delegate the authentication decision to someone elseand only worry about what the Servlet is responsible for as an MVC controller.
Following our intuition, we might end up with an interface like that shown inlisting 5.6 for the authentication service.
public interface AuthenticationService { boolean isValidLogin(String username, String password);}
Because we don’t have a real user database or other authentication service to use,we’ll also sketch up a simple fake implementation for the AuthenticationSer-vice interface, shown as listing 5.7.
public class FakeAuthenticationService implements AuthenticationService {
private Map<String, String> users = new HashMap<String, String>();
public void addUser(String user, String pass) { users.put(user, pass); }
public boolean isValidLogin(String user, String pass) { return users.containsKey(user) && pass.equals(users.get(user)); }}
Our fake authentication service uses a simple Map containing usernames and pass-words. We also included a method for adding valid users into the Map so that wecan control the “user database” from our test code.
Now, the next question is, how will the LoginServlet get hold of the Authen-ticationService implementation? Knowing that the Servlet container will
Listing 5.6 The AuthenticationService interface
Listing 5.7 Fake implementation of the AuthenticationService interface

164 CHAPTER 5
Test-driving web components
instantiate our Servlet classes, we can’t use constructor injection for dependen-cies.4 We could make AuthenticationService into an abstract class with a staticgetter for the currently configured implementation and a matching setter wecould use from our test code. That doesn’t sound good, though—proper depen-dency injection would be cleaner.
Instead of pondering for too long about this architectural issue, let’s postponeit for now and specify that the LoginServlet should obtain its Authentication-Service through a protected getter method—something we can override in ourtest code to return our fake AuthenticationService implementation.
Listing 5.8 shows our test from listing 5.5 rewritten to use the Authentica-tionService interface.
@Testpublic void validLoginForwardsToFrontPageAndStoresUsername() throws Exception { final String validUsername = "validuser"; final String validPassword = "validpassword";
final FakeAuthenticationService authenticator = new FakeAuthenticationService(); authenticator.addUser(validUsername, validPassword);
LoginServlet servlet = new LoginServlet() { @Override protected AuthenticationService getAuthenticationService() { return authenticator; } };
MockHttpServletRequest request = new MockHttpServletRequest(); request.addParameter("j_username", validUsername); request.addParameter("j_password", validPassword); MockHttpServletResponse response = new MockHttpServletResponse();
servlet.service(request, response); assertEquals("/frontpage", response.getRedirectedUrl()); assertEquals("validuser", request.getSession().getAttribute("username"));}
4 Not without overloading the constructor for testing purposes, that is.
Listing 5.8 Valid login test rewritten to specify use of AuthenticationService
Configure fake Authentication-Service
Use fake insteadof real thing

Taming the controller 165
Wow. That’s a big test method. We’ll have to do some serious refactoring as soonas we get back to green. In fact, the code is not even compiling right now, so let’sfix that first by giving LoginServlet the missing getter method our IDE is com-plaining about:
public class LoginServlet extends HttpServlet {
protected AuthenticationService getAuthenticationService() { return null; }
@Override protected void service(HttpServletRequest request, HttpServletResponse response) throws ServletException, IOException { response.sendRedirect("/invalidlogin"); }}
That gets us through the compiler error, and our test is failing—as expected—because we’re getting redirected to the wrong place. Time to add functionality.
Although the introduction of an AuthenticationService interface is signifi-cant for our design, the implementation step in order to get our currently failingtest back to green shouldn’t be complicated. The implementation in listing 5.9should pass our tests with flying colors.
public class LoginServlet extends HttpServlet {
protected AuthenticationService getAuthenticationService() { return null; }
@Override protected void doGet(HttpServletRequest request, HttpServletResponse response) throws ServletException, IOException { String user = request.getParameter("j_username"); String pass = request.getParameter("j_password"); if (getAuthenticationService().isValidLogin(user, pass)) { response.sendRedirect("/frontpage"); request.getSession().setAttribute("username", user); } else { response.sendRedirect("/invalidlogin"); } }}
Listing 5.9 LoginServlet delegating authentication to a separate service interface
No need to implement this method yet
Branch executionbased on Authentication-
Service’s ruling

166 CHAPTER 5
Test-driving web components
Oops. Our test is passing, but we broke our previous test because we’re not config-uring an AuthenticationService implementation for the LoginServlet instancein the first test. Let’s remedy that situation by pulling out some common setupcode from our second test.
Let’s see—we can convert the anonymously subclassed LoginServlet instanceinto a field as well as the FakeAuthenticationService instance. Also, we’re usingthe fake request and response objects in both tests, so let’s move those into fieldsas well. And how about turning some of those duplicated strings into constants. Thatshould clean up the mess. The resulting test class structure is shown in listing 5.10.
public class TestLoginServlet {
private static final String CORRECT_PASSWORD = "correctpassword"; private static final String VALID_USERNAME = "validuser";
private LoginServlet servlet; private FakeAuthenticationService authenticator; private MockHttpServletRequest request; private MockHttpServletResponse response;
@Before public void setUp() { authenticator = new FakeAuthenticationService(); authenticator.addUser(VALID_USERNAME, CORRECT_PASSWORD);
servlet = new LoginServlet() { @Override protected AuthenticationService getAuthenticationService() { return authenticator; } };
request = new MockHttpServletRequest(); response = new MockHttpServletResponse(); }
@Test public void wrongPasswordShouldRedirectToErrorPage() throws Exception { request.addParameter("j_username", VALID_USERNAME); request.addParameter("j_password", "wrongpassword"); servlet.service(request, response); assertEquals("/invalidlogin", response.getRedirectedUrl()); }
Listing 5.10 Configuring a LoginServlet with an AuthenticationService
…our testmethods aremuch, much
more conciseand to the point
By moving common objects into fields...

Taming the controller 167
@Test public void validLoginForwardsToFrontPageAndStoresUsername() throws Exception { request.addParameter("j_username", VALID_USERNAME); request.addParameter("j_password", CORRECT_PASSWORD); servlet.service(request, response); assertEquals("/frontpage", response.getRedirectedUrl()); assertEquals(VALID_USERNAME, request.getSession() .getAttribute("username")); }}
After using the same setup for the LoginServlet and the FakeAuthentication-Service for both of our tests, they run successfully, giving us a green bar. There’ssome duplication in the form of the literal strings “j_username” and “j_password”,which we possibly should refactor into constants. Sometimes, readability overridesthe “no duplication” rule, but in this case, I’m strongly leaning toward refactor-ing. The duplication involves not just our test code but is shared between the testsand the production code. One possibility would be to define public constants forthe two request parameters in our production code and reference them fromboth places. Consider that an exercise for you.
We could easily go on for another 10 pages or so; but to leave time to discussother technologies, let’s wrap up this Servlet example. Now we can move on totest-driving a controller on top of a slightly different technology than the bareServlet API.
Reflecting on test-driving ServletsNow, let’s see what we did here with the AuthenticationService interface. Weintroduced the AuthenticationService interface to prevent the LoginServletfrom knowing how to authenticate login attempts. We decided to postpone thedecision of how to inject the AuthenticationService for now, using a gettermethod we override in our tests. We only have a fake implementation of theAuthenticationService interface, and we can implement the real thing later.
The key to keeping our Java Servlets clean and testable is to divide and con-quer. Programming by intention, aiming to get our tests passing in the smalleststeps we dare, we approach a fully test-driven Servlet component piece by piece.As we witnessed first-hand with our LoginServlet example, if we don’t try to cutcorners, we find that Servlets aren’t any more of a pain to test-drive than a regularJava class.
…test methods are muchmore concise and to the point
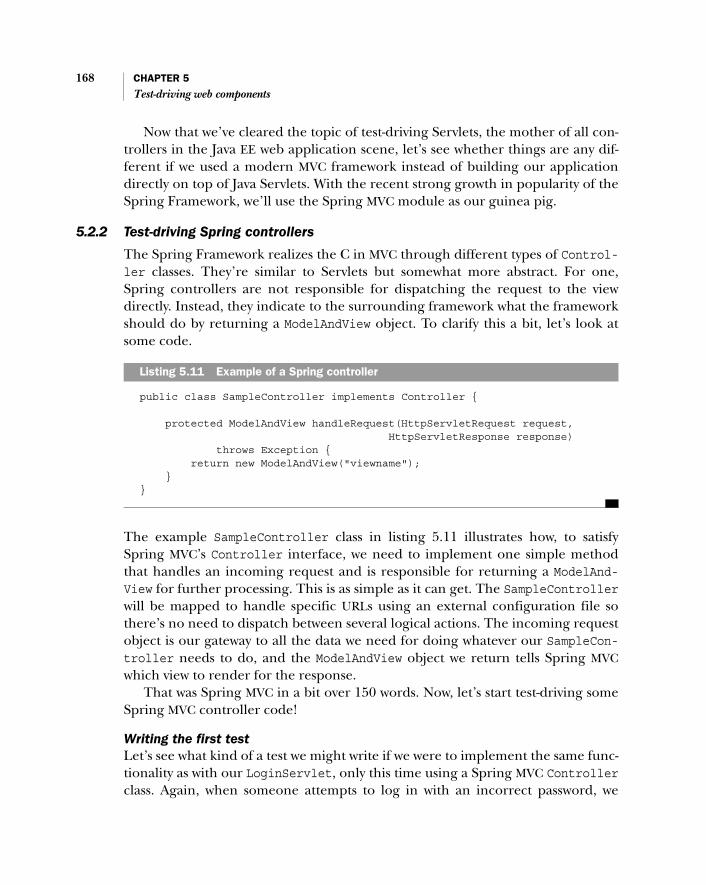
168 CHAPTER 5
Test-driving web components
Now that we’ve cleared the topic of test-driving Servlets, the mother of all con-trollers in the Java EE web application scene, let’s see whether things are any dif-ferent if we used a modern MVC framework instead of building our applicationdirectly on top of Java Servlets. With the recent strong growth in popularity of theSpring Framework, we’ll use the Spring MVC module as our guinea pig.
5.2.2 Test-driving Spring controllers
The Spring Framework realizes the C in MVC through different types of Control-ler classes. They’re similar to Servlets but somewhat more abstract. For one,Spring controllers are not responsible for dispatching the request to the viewdirectly. Instead, they indicate to the surrounding framework what the frameworkshould do by returning a ModelAndView object. To clarify this a bit, let’s look atsome code.
public class SampleController implements Controller {
protected ModelAndView handleRequest(HttpServletRequest request, HttpServletResponse response) throws Exception { return new ModelAndView("viewname"); }}
The example SampleController class in listing 5.11 illustrates how, to satisfySpring MVC’s Controller interface, we need to implement one simple methodthat handles an incoming request and is responsible for returning a ModelAnd-View for further processing. This is as simple as it can get. The SampleControllerwill be mapped to handle specific URLs using an external configuration file sothere’s no need to dispatch between several logical actions. The incoming requestobject is our gateway to all the data we need for doing whatever our SampleCon-troller needs to do, and the ModelAndView object we return tells Spring MVCwhich view to render for the response.
That was Spring MVC in a bit over 150 words. Now, let’s start test-driving someSpring MVC controller code!
Writing the first testLet’s see what kind of a test we might write if we were to implement the same func-tionality as with our LoginServlet, only this time using a Spring MVC Controllerclass. Again, when someone attempts to log in with an incorrect password, we
Listing 5.11 Example of a Spring controller

Taming the controller 169
want our controller to send us to the “wrong password” page. To do this withSpring MVC, it means having the controller’s handleRequest method return aModelAndView object for a view named “wrongpassword”. Listing 5.12 presents atest that verifies that.
public class TestLoginController { @Test public void wrongPasswordShouldRedirectToErrorPage() throws Exception { MockHttpServletRequest request = new MockHttpServletRequest(); request.addParameter("j_username", "nosuchusername"); request.addParameter("j_password", "nosuchpassword"); MockHttpServletResponse response = new MockHttpServletResponse();
Controller c = new LoginController(); ModelAndView v = c.handleRequest(request, response);
assertEquals("wrongpassword", v.getViewName()); }}
As you can see, there isn’t much of a difference between the “failed login” testcase for the Spring controller versus the Servlet-based implementation. We B cre-ate test doubles for the standard request and response interfaces, then C invokethe controller’s request-handling method with our test doubles, and finally D per-form assertions to verify expected behavior.
The small difference in asserting the outcome of a Spring controller’s execu-tion compared to that of a Servlet’s is that Spring has the ModelAndView conceptas an abstraction between the controller and the view implementation. The con-troller only needs to return a ModelAndView object, which carries all the data theview should need for rendering itself plus the name of the view. The remainder ofthe Spring MVC framework then takes care of mapping and rendering the namedview—whatever technology it is implemented with—using the data receivedwithin the ModelAndView object.
So, where are we now? We’ve got a test, and once we’ve created the missingLoginController class, we can run it and see the familiar red bar telling us we’vegot work to do.
Listing 5.12 Sample unit test for the LoginController
Populate mock objects
B
User should land on“wrong password” page
Invoke Controller’shandle-Request() method
C
D
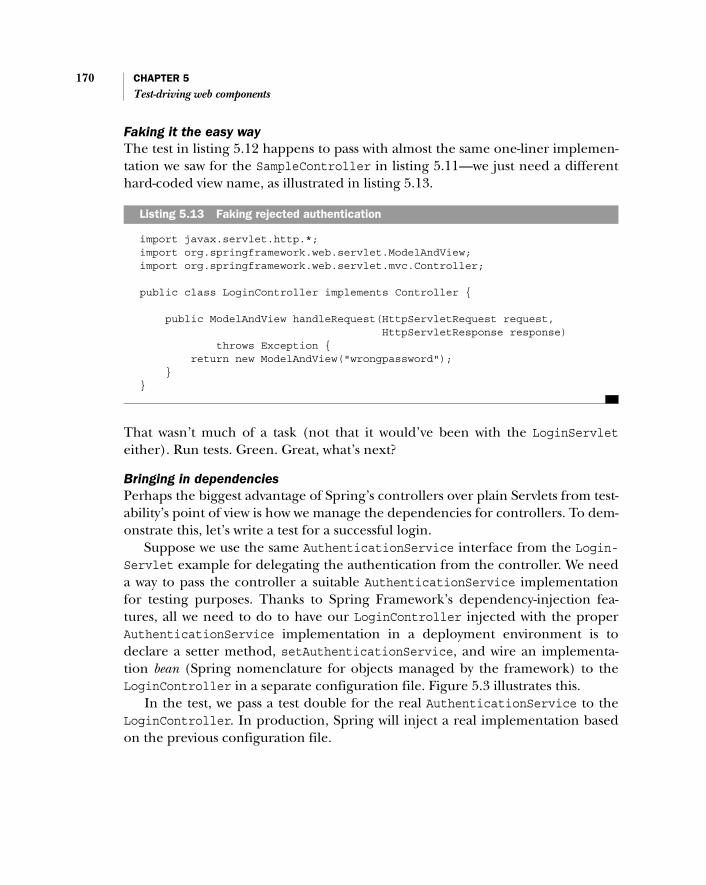
170 CHAPTER 5
Test-driving web components
Faking it the easy wayThe test in listing 5.12 happens to pass with almost the same one-liner implemen-tation we saw for the SampleController in listing 5.11—we just need a differenthard-coded view name, as illustrated in listing 5.13.
import javax.servlet.http.*;import org.springframework.web.servlet.ModelAndView;import org.springframework.web.servlet.mvc.Controller;
public class LoginController implements Controller {
public ModelAndView handleRequest(HttpServletRequest request, HttpServletResponse response) throws Exception { return new ModelAndView("wrongpassword"); }}
That wasn’t much of a task (not that it would’ve been with the LoginServleteither). Run tests. Green. Great, what’s next?
Bringing in dependenciesPerhaps the biggest advantage of Spring’s controllers over plain Servlets from test-ability’s point of view is how we manage the dependencies for controllers. To dem-onstrate this, let’s write a test for a successful login.
Suppose we use the same AuthenticationService interface from the Login-Servlet example for delegating the authentication from the controller. We needa way to pass the controller a suitable AuthenticationService implementationfor testing purposes. Thanks to Spring Framework’s dependency-injection fea-tures, all we need to do to have our LoginController injected with the properAuthenticationService implementation in a deployment environment is todeclare a setter method, setAuthenticationService, and wire an implementa-tion bean (Spring nomenclature for objects managed by the framework) to theLoginController in a separate configuration file. Figure 5.3 illustrates this.
In the test, we pass a test double for the real AuthenticationService to theLoginController. In production, Spring will inject a real implementation basedon the previous configuration file.
Listing 5.13 Faking rejected authentication

Taming the controller 171
Listing 5.14 demonstrates how our test for the valid login looks much like the onewe wrote for the LoginServlet.
private static final String CORRECT_PASSWORD = "correctpassword";private static final String VALID_USERNAME = "validuser";...
@Testpublic void validLoginForwardsToFrontPage() throws Exception { MockHttpServletRequest request = new MockHttpServletRequest(); request.setMethod("GET"); request.addParameter("j_username", VALID_USERNAME); request.addParameter("j_password", CORRECT_PASSWORD); MockHttpServletResponse response = new MockHttpServletResponse();
FakeAuthenticationService mock = new FakeAuthenticationService(); mock.addUser(VALID_USERNAME, CORRECT_PASSWORD);
LoginController c = new LoginController(); c.setAuthenticationService(mock); ModelAndView v = c.handleRequest(request, response);
assertEquals("frontpage", v.getViewName());}
Listing 5.14 Testing a valid login
LoginController Authenticator
LdapAuthenticator
<<interface>>
+ setAuthenticator(Authenticator) + isValidLogin(String, String)
+ isValidLogin(String, String)
Maps to“setAuthenticator”
<beans> <bean id=”login” class=”com.tddinaction.LoginController”> <property name=”authenticator”> <ref bean=”ldapAuthenticator” /> </property> </bean> <bean id=”ldapAuthenticator” class=”com.tddinaction.LdapAuthenticator”> <property name=”host” value=”12.34.56.78” /> <property name=”basedn” value=”...” /> ... </bean></beans>
Figure 5.3 Mapping between LoginController and its dependency to an AuthenticationService implementation
Simulate dependency injection

172 CHAPTER 5
Test-driving web components
The only differences between our LoginServlet tests and LoginController testsseem to be that we’re invoking a different handler method (service for a Servletversus handleRequest for a Spring controller) and that with Spring MVC, we don’tneed to worry about designing a dependency-injection architecture becauseSpring gives us one out of the box—we can add a setter, and we know that the restis configuration.
Before wrapping up this topic, let’s quickly see how we could make the testspass again. Listing 5.15 shows the full controller implementation.
public class LoginController implements Controller {
private AuthenticationService authenticator;
public void setAuthenticationService(AuthenticationService authService) { this.authenticator = authService; }
public ModelAndView handleRequest(HttpServletRequest request, HttpServletResponse response) throws Exception { String user = request.getParameter("j_username"); String pass = request.getParameter("j_password"); if (authenticator.isValidLogin(user, pass)) { return new ModelAndView("frontpage"); } return new ModelAndView("wrongpassword"); }}
Nothing fancy there. Running our tests, we again realize that the valid login testpasses but that our first test now fails because the test didn’t inject an Authenti-cationService implementation for it. The test is broken, so we need to fix it bymoving the common setup into instance variables being set up in a @Beforemethod. Although we’re not going to look at the result of that cleanup, if you’refollowing along, by all means try it and see how it works out and how muchcleaner your code becomes.
In the light of these examples, there’s hardly a valid argument to claim thattest-driving controller classes in modern MVC frameworks is somehow difficult orlaborious. It’s all plain Java—the interfaces just tend to be slightly larger than ourapplication-specific ones typically are.
Now that we have seen how test-driving MVC controllers is possible withoutbending over backward, let’s move on to tackling the “V” next.
Listing 5.15 LoginController implementation, complete with dependency injection

Creating the view test-first 173
5.3 Creating the view test-first
Perhaps the biggest obstacle, as usual, to testing the view layer automatically islack of faith: lack of faith that it can be done or that it makes sense in the firstplace. Speaking of web applications, there are certain things that must always beverified visually, such as the overall aesthetics
and that the pixels line up as intended on all supported browsers. This is notsomething we’ll likely want to automate, because the effort of creating such testswould be unreasonably high considering the information value provided by suchtests (can we trust a computer to tell whether a web page looks alright?) and con-sidering such tests’ tendency towards brittleness. Figure 5.4 illustrates this divisionbetween things we need to verify visually and things for which we can automatethe tests.
There are, however, aspects of the view layer that it makes sense to verify auto-matically. Let’s call those aspects the view logic. By view logic, we mean stuff like“given a list of items, the details of the first item are rendered in full and only thename is rendered for the rest of the list.” Not only that, but it’s something we wantto test-drive into our view!
From a technology perspective, the view layer sometimes poses some extra hur-dles we’ll need to jump over if we want to employ an extremely short TDD cycle.
“What itlooks like”
“What itdoes” This we can test fully...
...some of this, too
The view
This we cannot reallytest automatically
Figure 5.4 Although it’s not practical to write tests for what the view looks like, it is most certainly possible to test the view logic. That is, it’s possible to test what the view does. In addition, although it’s typically not feasible to fully test the left side of the pie with automated tests, there are often some small aspects of the view that can be tested. For instance, we might want to have an automated test for checking that our web pages comply with the accessibility requirements of Section 508 (that is, those parts of Section 508 that don’t require human judgment—such as every image tag having a text equivalent defined with the alt attribute).

174 CHAPTER 5
Test-driving web components
The prime example of such hurdles must be JavaServer Pages (JSP), which requirea JSP engine in order to render into HTML (or whatever markup language orother form of content your specific JSP components are supposed to generate).
All hope is not lost, however, because there is a way to embed a lightweight JSPengine into our unit tests. Being lightweight, such a JSP engine doesn’t take long toinitialize and lets our unit tests run reasonably quickly compared to the alternativeof deploying the view components under test on a full-blown application server.
Let’s first see how to test-drive the classic login page using JavaServer Pages as theview technology. Once we’ve got that covered, we’ll take a quick look at how an alter-native template technology, Velocity, would mold in our test-driven hands. Finally,we’ll venture into the world of component-based web frameworks and figure outwhether there’s anything special about test-driving views using such technology.
5.3.1 Test-driving JSPs with JspTest
As we already discussed, test-driving JavaServer Pages requires infrastructure inthe form of a JSP engine. We’ll use a little open source library named JspTest.5
JspTest is essentially the smallest slice of infrastructure necessary for compilingJavaServer Pages into Servlet classes and then invoking the compiled Servlet.Internally, JspTest uses Jasper, the JSP engine used by Apache Tomcat, Jetty, Glass-fish, and a bunch of other web containers and application servers. It’s not themost mature Java library around, but it is already usable and faster than test-driv-ing JSP development against a full-blown web container.
But now, let’s get back to work!
Building just enough plumbingLet’s start building up our infrastructure in a piecemeal fashion so we know what’sgoing on under the hood when running the tests.
Our interface toward JspTest is the abstract HtmlTestCase class, which ourtests need to extend. The HtmlTestCase class provides us with methods for ren-dering a given JSP file with a simulated HTTP request as well as a bunch of HTML-oriented assertion methods we can use for verifying the expected output.
Let’s say we have our JSP source files in a directory named websrc/jsp. Bydefault, JspTest will look for the given JSP path starting from the current workingdirectory, which means that we’ll need to always spell out the full path, includingwebsrc/jsp. Obviously we don’t want to do that every time, so we override thegetWebRoot method in our own custom, abstract base class for all of our JSP tests:
5 http://jsptest.sf.net.

Creating the view test-first 175
import net.sf.jsptest.HtmlTestCase;
public abstract class MyJspTestCase extends HtmlTestCase { @Override protected String getWebRoot() { return "./websrc/jsp"; }}
There. Now we can render websrc/jsp/foo.jsp by saying /foo.jsp. Perhaps not abig difference now, but it all adds up—especially when we’re told to move our JSPsources into some other directory.
Actually, that’s about the entire infrastructure we’re going to need for now(other than putting the JspTest dependencies into our class path), so let’s startwriting some real tests.
Testing for rendered contentWe’re on our way to developing a simple login page using JavaServer Pages as ourtechnology and test-driven development as our method. One easy choice for thefirst test could be to test that the necessary form elements are present on the ren-dered page when a user arrives on the page. Stretching our programming byintention skills, we come up with the test shown in listing 5.16.
public class TestLoginPage extends MyJspTestCase {
public void testFormFieldsArePresent() throws Exception { get("/login.jsp"); form().shouldHaveField("j_username"); form().shouldHaveField("j_password"); form().shouldHaveSubmitButton("login"); }}
In all of its simplicity, this test expresses our intention of rendering login.jsp usingan HTTP GET request and asserting that the page includes form fields named“j_username” and “j_password” as well as a submit button named “login”. Hey, Ithink we’re done with the test—let’s run it!
Red bar due to JspTest not being able to find login.jsp from our web root—andit shouldn’t, because we’re test-driving! Now, let’s go and write some JSP code toget back to green.
Listing 5.16 Making use of our abstract JspTest base class

176 CHAPTER 5
Test-driving web components
Creating just enough JSPIn order to quickly see if we’re adding the JSP to the right place in the file system,we start with the simplest JavaServer Page we can think of, shown in listing 5.17.
An empty page. It can’t get any simpler than that. That’s enough to make surewe’re not plowing ahead full-speed only to find out that our test isn’t even execut-ing the file we’re editing. Later on, we’ll probably speed up a bit, but it’s oftengood to go slow in the beginning.
Running our test again, we learn that JspTest finds our JSP from the file system.We now see our test failing because there’s no form field named “j_username” onthe page. No surprise, really, because all we have is an empty JSP file. That is, wedid until we now add a rudimentary form along with the HTML skeleton. The fail-ure point moves to the next assertion, “j_password”, and then to complainingabout the missing submit button, and eventually we get the familiar green bar aswe add all the missing pieces, as shown in listing 5.18.
<%@ page language="Java" %><html> <body> <form> <input type="text" name="j_username" /> <input type="password" name="j_password" /> <input type="submit" name="login" /> </form> </body></html>
Listing 5.17 Our first cut at login.jsp
Listing 5.18 The JSP that passes our first test
Why aren’t we using the JUnit 4 annotations?Even though we’re lucky enough to be able to use the latest and greatest, theJspTest project needs to support those who are still stuck with Java 1.4 or(shrug) older. Thus, we rely on JUnit 4’s backward compatibility for running ourJspTest tests alongside our other, annotation-laden test code.

Creating the view test-first 177
There. Our first test is running and we’ve test-driven a concrete piece of our userinterface. We had to do some plumbing to get here, and we’re likely to add moreplumbing as we encounter the need for more elaborate assertions and so forth, butit wasn’t a big hurdle to jump to get started, was it? Now, we can continue by addingmore tests, each nudging our JSP template an inch closer to being complete.
Driving behavior into our pageLet’s continue developing our login page for a moment. We’re curious as to howwe could test-drive a bit of dynamic behavior into our page, so let’s write a test forverifying that the login page auto-populates the user’s login name into the“j_username” field upon a failed login attempt. Listing 5.19 shows our test.
public void testPreviousUsernameIsRetained() throws Exception { setRequestAttribute("j_username", "bob"); get("/login.jsp"); form().field("j_username").shouldHaveValue("bob");}
Our test is saying that the JSP should know to render the value of a request param-eter named “j_username” into one of the input fields upon rendering. Runningthe test, the assertion indeed fails because the input field’s value is not set at all.The scriptlet shown in listing 5.20 remedies the situation, and we’re soon ongreen again.
<%@ page language="Java" %><html> <body> <form> <% String username = (String) request.getAttribute("j_username"); if (username == null) username = ""; %> <input type="text" name="j_username" value="<%= username %>"/> <input type="password" name="j_password" /> <input type="submit" name="login" /> </form> </body></html>
Listing 5.19 Test for retaining the username but not the password upon a failed login
Listing 5.20 Adding a scriptlet to pre-populate the username field upon failed login

178 CHAPTER 5
Test-driving web components
Wasn’t that easy? Who said that you can’t unit-test JavaServer Pages? I’m surewe’re both confident by now that test-driving JavaServer Pages is feasible and wellwithin our reach—and without much ramp-up time needed.
Alternatives to JspTestThe JspTest project is an extremely suitable approach to testing what’s probablythe majority of JavaServer Pages. It is a young project, however, and thus it doeshave its shortcomings. For example, the available set of HTML-oriented and othercontent assertions is still somewhat limited. Furthermore, not all aspects of thebuilt-in objects (request, response, session, pageContext, and so on) can befully controlled, which might mean that another approach is needed to accom-pany our JspTest tests.
Beyond JspTest, the best alternative approach for unit-testing JavaServer Pagesat the time of writing this book is probably the ServletRunner (part of the Http-Unit project), which is a lightweight web container purpose-built for testing Serv-lets and, by means of forwarding, JavaServer Pages. You can refer to Recipe 12.3 inJ. B. Rainsberger’s excellent JUnit Recipes (Manning Publications, 2005) for detailson using the ServletRunner. Figure 5.5 shows the architecture of this approach ofusing a special forwarding Servlet for accessing and testing JSP output.
Other alternatives include embedding an Java EE web container in our tests.Jetty6 is just such a lightweight, standards-compliant web container that we canrun in embedded mode. Jetty does, however, require a valid web application con-text and, thus, requires more infrastructure than JspTest (mostly because JspTesthides all that complexity under its hood).
6 http://jetty.mortbay.org.
TestsServlet
container Deployed web components
ForwardingServlet
JSP
Figure 5.5 One possibility for test-driving JavaServer Pages is to deploy them into a lightweight, embeddable Servlet container and access them either using HTTP requests or through the container’s internal API.

Creating the view test-first 179
Deploying our JSP code on a separate, standalone container instance is also anoption but is again much slower compared to the embedded alternatives. If youfeel like going for this kind of in-container (integration) testing, look at JakartaCactus, which is the leading open source framework in that domain. Be warned,though, it’s not nearly as suitable for blazing-fast feedback as JspTest and friends!
I think that’s about enough of JavaServer Pages for now. Let’s take a peek athow green the grass is on the open source side of the Java view template fence.
5.3.2 Test-driving Velocity templates
Velocity7 is a general-purpose template engine without any ties to the Java EE plat-form. Although this might sound like a handicap from the perspective of a Java EEweb application developer, it is a strong advantage over other, more complex andfully featured technologies like JavaServer Pages.
We already mentioned in passing that Velocity is a lightweight view technology.What does that mean? Well, if we look at the plumbing inside frameworks likeJspTest, it’s not exactly a small chunk of code. Rendering a JSP requires a lot ofplumbing. Yes, someone else has already done most of the work for us, but my guttells me that rendering a view template should not be such a difficult thing to do.
Velocity is designed to be embedded into tools and applications of all kinds anddoesn’t have any dependencies to the Java EE stack. This is the key in making it alightweight alternative for our purposes. We still need some plumbing to support asmooth test-driven development experience, but a lot less than for JavaServerPages. Namely, we don’t need a container in front of the template engine, and thetemplate engine itself (Velocity) is also smaller than, say, Apache Tomcat’s Jasper.
Before we dive deeper, let’s familiarize ourselves with the basics of Velocitytemplates and the Velocity API.
Velocity basicsVelocity’s concept is simple: We take a template, we take a mapping of variablesand their values, and we shove those two through Velocity, evaluating the mixtureof plain text, variables, and basic conditional and looping constructs in the tem-plate in the context of the given variable values. Figure 5.6 illustrates this withboxes and arrows.
Velocity’s API isn’t much more complicated. You create a VelocityContextobject and populate it with a bunch of named attributes (key-value pairs), andthen you create a VelocityEngine and ask the engine to evaluate the template,rendering the output to a given output stream (a java.io.Writer, to be more
7 http://velocity.apache.org.

180 CHAPTER 5
Test-driving web components
specific). In other words, what we need to do in our tests to render a Velocity tem-plate is more or less the following:
String template = "Hello $user";StringWriter writer = new StringWriter();VelocityContext context = new VelocityContext();context.put("user", "Reader");VelocityEngine engine = new VelocityEngine();engine.init();engine.evaluate(context, writer, "test", template);
After executing the previous sequence of statements, the StringWriter instancecontains the rendered output from the template—we hope it’s something thatresembles “Hello Reader” because we populated a value “Reader” for the variable“user” in the VelocityContext we used for rendering the template.
Let’s now move on to seeing what kind of plumbing we might need in order towrite compact, expressive tests for driving our Velocity template into the loginpage we’re after.
Building the plumbingAs we just saw, the pieces of information required for rendering a Velocity tem-plate include a VelocityContext (encapsulating the equivalent to requestattributes in the JSP and the Servlets domain), a Writer to render the output to, aname for the template (for logging purposes), and the template text. As such, andconsidering that we’d like to read the Velocity template from the file system, thekind of tests we’d like to write would look something like listing 5.21.
Velocity template
Variable data
Rendered output
Velocity
Hello, $name. Would you like totry test-driving some $adjective
Velocity templates?
name=”Reader”adjective=”spiffy”
Hello, Reader. Would you like totry test-driving some spiffy
Velocity templates?
Figure 5.6 Velocity’s basic concept is extremely simple. Velocity eats template text consisting of specialized markup for variable data and basic programming constructs, drinks some variable values on top, and spits out the rendered output.
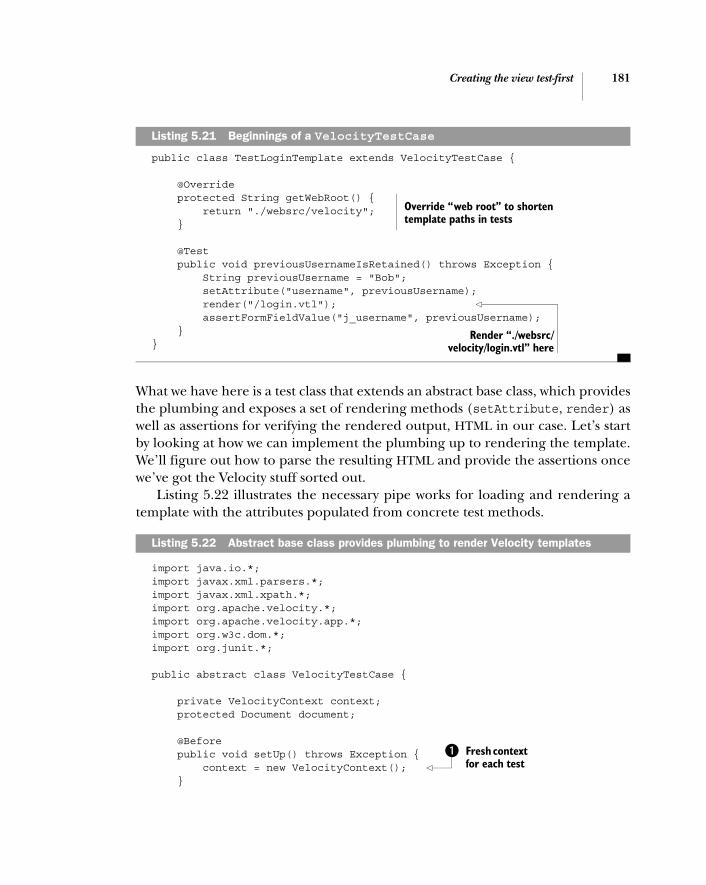
Creating the view test-first 181
public class TestLoginTemplate extends VelocityTestCase {
@Override protected String getWebRoot() { return "./websrc/velocity"; }
@Test public void previousUsernameIsRetained() throws Exception { String previousUsername = "Bob"; setAttribute("username", previousUsername); render("/login.vtl"); assertFormFieldValue("j_username", previousUsername); }}
What we have here is a test class that extends an abstract base class, which providesthe plumbing and exposes a set of rendering methods (setAttribute, render) aswell as assertions for verifying the rendered output, HTML in our case. Let’s startby looking at how we can implement the plumbing up to rendering the template.We’ll figure out how to parse the resulting HTML and provide the assertions oncewe’ve got the Velocity stuff sorted out.
Listing 5.22 illustrates the necessary pipe works for loading and rendering atemplate with the attributes populated from concrete test methods.
import java.io.*;import javax.xml.parsers.*;import javax.xml.xpath.*;import org.apache.velocity.*;import org.apache.velocity.app.*;import org.w3c.dom.*;import org.junit.*;
public abstract class VelocityTestCase {
private VelocityContext context; protected Document document;
@Before public void setUp() throws Exception { context = new VelocityContext(); }
Listing 5.21 Beginnings of a VelocityTestCase
Listing 5.22 Abstract base class provides plumbing to render Velocity templates
Override “web root” to shorten template paths in tests
Render “./websrc/velocity/login.vtl” here
Fresh context for each test
B

182 CHAPTER 5
Test-driving web components
protected String getWebRoot() { return "."; }
protected void setAttribute(String name, Object value) { context.put(name, value); }
protected void render(String templatePath) throws Exception { File templateFile = new File(getWebRoot(), templatePath); String template = readFileContent(templateFile); String renderedHtml = renderTemplate(template); this.document = parseAsXml(renderedHtml); }
private String renderTemplate(String template) throws Exception { VelocityEngine engine = new VelocityEngine(); engine.init(); StringWriter writer = new StringWriter(); engine.evaluate(context, writer, "test", template); return writer.toString(); }
private Document parseAsXml(String html) throws Exception { // omitted for brevity... }
private String readFileContent(File file) throws Exception { // omitted for brevity... }}
In listing 5.22, we B create a fresh VelocityContext for each new test so that sub-sequent tests are safe from random data that prior tests have C populated into thecontext. In the render method, we basically create a new VelocityEngine and Devaluate the specified template in memory using a StringWriter. Finally, when thetemplate has been rendered, we E parse the resulting HTML into a DOM tree, whichwe can later perform assertions against.
In fact, those couple of assertions are the only things still keeping us from see-ing the red bar. Let’s add those so that we can finally get our code base back to aknown state.
Adding assertionsWe should now have a Document object—a DOM tree—for the rendered template.And our compiler is telling us that we need to implement the assertion, assert-FormFieldValue. Because we already have a DOM tree, and Java 5 finally introduced
Tests need topopulate attributes
to VelocityContext C
Parse rendered HTML into DOM tree E
DRender template
in memory

Creating the view test-first 183
XPath into the standard libraries, how about using XPath queries for verifying thatour template renders the appropriate HTML elements?
Listing 5.23 illustrates the implementation of the missing assertions, using thestandard DOM and XPath APIs.
import static org.junit.Assert.*;import javax.xml.parsers.*;import javax.xml.xpath.*;import org.w3c.dom.*;...
public abstract class VelocityTestCase { ... protected void assertFormFieldValue(String name, String expectedValue) throws Exception { String xpath = xpathForField(name); assertNodeExists(xpath); String actual = getString(xpath + "/@value"); assertEquals(expectedValue, actual); }
private String xpathForField(String name) { return "//form//input[@name='" + name + "']"; }
private void assertNodeExists(String xpath) throws Exception { assertNotNull("Node doesn't exist: " + xpath, getNode(xpath)); }
private Node getNode(String xpath) throws Exception { return (Node) evaluate(xpath, XPathConstants.NODE); }
private String getString(String xpath) throws Exception { return (String) evaluate(xpath, XPathConstants.STRING); }
private Object evaluate(String xpath, QName type) throws Exception { XPath engine = XPathFactory.newInstance().newXPath(); return engine.evaluate(xpath, getResponse(), type); } }
Listing 5.23 Parsing the generated HTML file with HttpUnit

184 CHAPTER 5
Test-driving web components
Finally! A red bar, saying that the login.vtl template we’re trying to render doesn’texist. From here on out, it’s back to our stress-free short cycles of test-code-refactor.In the name of completeness, listing 5.24 presents the little Velocity template thatwe save as login.vtl to get our green bar.
<html> <body> <form> <input type="text" name="j_username" /> <input type="password" name="j_password" /> <input type="submit" name="login" /> </form> </body></html>
I think we’ve already gotten the idea of how we could test-drive Velocity templatesfrom here. We basically need two things: a way to render our templates and a wayto assert the rendered output. Velocity is so simple a technology that we couldwrite the rendering facility from scratch in a matter of minutes rather than hours.Furthermore, the problem of asserting an HTML document is the same as withany other view template technology, so we should be able to reuse existing librar-ies as well; pointing a tool such as HttpUnit at a locally stored file containing therendered output might not be such a bad idea either.
But now, let’s wrap up our templates and turn our attention to test-driving yetmore exciting web components and technologies. Earlier, we talked about howeasy it is to test-drive both controllers and the view part of request-response-styleMVC frameworks. We’ll finish this chapter on test-driving web components bylooking at the situation over at component-based frameworks’ side of the fence.
5.4 TDD with component-based web frameworks
We could argue that one of the biggest influences on the relative ease with whichwe test-drive web components like Servlets and Spring’s controllers is the availabil-ity of freely available tools and test-double libraries for faking the key interfaces andobjects, whether they’re from standard Java EE APIs or from an open source frame-work such as the Spring Framework. Effectively, the maturity of the involved tech-nologies gives us a head start that we might not have with brand-new technologies.8
Listing 5.24 Velocity template for our login page
8 Although it has to be said that many open source projects these days deliver proper support for auto-mated testing as the norm rather than the exception.

TDD with component-based web frameworks 185
But what about component-based frameworks, such as Apache Tapestry, Wicket, orthe Java EE standards’ representative, JavaServer Faces (JSF)?
The request-response design embodied in technologies such as the Servlet APIand Spring MVC is by far the dominant genre in the Java EE web-developmentarena. It is not, however, the only viable option for developing web applications.We are seeing the rise of a number of component-based frameworks that offerbetter reuse throughout the applications’ code bases and a higher level of abstrac-tion. These attributes let us developers focus on the gist of what we’re supposed todo rather than always thinking in terms of request parameters, parsing strings intodate objects, and so forth.
Let’s begin this last leg of our journey in the world of web components by dis-secting the term component-based framework and what it really means. Then let’smove on to test-driving components with the latest and greatest that the opensource community has to offer for component-based web development.
5.4.1 Anatomy of a typical framework
Looking at component-based frameworks, we can identify certain patterns emerg-ing from their respective architectures. And looking at these patterns, we canalready say a lot about how receptive these frameworks are for unit-testing and,specifically, test-driven development.
Components provide the behaviorFirst of all, the word component in component-based refers to the existence of UI com-ponents. These are widgets implemented as regular Java classes, often extendingthe selected framework’s built-in base classes or implementing specific interfaces.The framework itself takes the responsibility of handling all interaction betweenthe component instances and the requests coming from the web browser accord-ing to some kind of a component life cycle. This approach makes test-driving thecomponents themselves often simple because what we’re dealing with is not muchdifferent from other regular Java code. And, as we know by now, we can test-drivepretty much any piece of regular Java code.
Templates encapsulate the visualsThe components are usually9 laid out in HTML pages using a template language.These components and templates are sometimes accompanied by additional
9 JSF templates are pretty much markup agnostic in the sense that pages consisting of components canoften be rendered not just to HTML but also to alternative markup languages without changes to thetemplate.

186 CHAPTER 5
Test-driving web components
configuration files (usually XML), which provide mapping information for theframework so that the framework knows which component to bind to whichplaceholder in the template, which other resources the component needs to behooked up with upon initialization, and which client-generated events should berouted to which method on which component instance. Some frameworks makeheavy use of Java 5 annotations for centralizing this additional configuration intothe same source files where the developer implements the component. Wicketgoes as far as representing pages in the web application as Java classes, makingthe HTML templates the only non-Java artifacts to deal with, except for our goodold friend, web.xml, of course.
Differences in testabilityWhile test-driving the components is usually not an issue, as we mentioned earlier,testing the page templates in a meaningful way outside a real container is not alost battle either. The Apache Shale project, building an open source JSF-basedweb framework, provides a handy library of test-double implementations for fak-ing the javax.faces interfaces and simple base classes for your own JUnit tests toextend. These base classes provide access to pre-configured fake implementationsfor the key JSF interfaces, which is a vital asset to have when trying to get JSF com-ponents under test.
Neither Tapestry nor JSF is particularly supportive of unit testing, however,which shows in the amount of work involved in writing tests for various artifactsunder these frameworks. In fact, the majority of developers seem to have optedfor in-container and functional testing for their JSF and Tapestry applications.
For this reason, my personal bias is strongly toward Wicket, which has beendeveloped with testability in mind from the beginning. Let’s take a journey intothe Wicket world of pages and components for a while and see how this test-driven thing operates in this context.
5.4.2 Fleshing out Wicket pages test-first
Wicket10 is an open source framework for component-based web development.Although that doesn’t make it unique, its implementation most certainly is ratherunique at the moment. Let’s begin by sorting out what’s what in Wicket and whatkind of artifacts Wicket applications consist of.
10 We’re using the 1.3.0 release of Wicket in our examples.

TDD with component-based web frameworks 187
Simplicity without a configuration jungleFirst of all, everything in Wicket is either Java or HTML (or JavaScript, or CSS).What this means is that there’s no scripting language involved in defining viewtemplates—the HTML is just HTML without a single scriptlet mixed in. All logic,including view logic, is embedded into Java classes that build up the application.In fact, a Wicket-based web application is represented by a Java class that extendsorg.apache.wicket.protocol.http.WebApplication. The same goes for theweb pages that are part of the application—they’re Java classes extending fromorg.apache.wicket.markup.html.WebPage.
The only configuration that’s required for a Wicket application is an entry inthe standard web.xml registering a WicketFilter, telling it the name of yourapplication class, and the filter-mapping for binding the WicketFilter to yourapplication’s URLs. Listing 5.25 shows an example of this configuration.
<?xml version="1.0" encoding="UTF-8"?><!DOCTYPE web-app PUBLIC "-//Sun Microsystems, Inc.//DTD Web Application 2.3//EN"
"http://java.sun.com/dtd/web-app_2_3.dtd"><web-app>
<filter> <filter-name>MyWicketApplication</filter-name> <filter-class>org.apache.wicket.protocol.http.WicketFilter
➥</filter-class> <init-param> <param-name>applicationClassName</param-name> <param-value>com.tddinaction.wicket.MyWicketApp</param-value> </init-param> </filter>
<filter-mapping> <filter-name>MyWicketApplication</filter-name> <url-pattern>/*</url-pattern> </filter-mapping> </web-app>
This is the entire configuration that is required for a simple Wicket application.Wicket can be configured further in the application class or by passing an “appli-cationFactoryClassName” init-param element to the WicketFilter in web.xmlrather than the “applicationClassName,” as seen in listing 5.25.
Listing 5.25 Example web.xml for a Wicket application
Wicket needs applicationclass from us
WicketFilter handles all HTTP traffic

188 CHAPTER 5
Test-driving web components
Starting from the home pageThe first thing to do when ramping up a Wicket project—right after downloadingthe associated JAR files and setting up the necessary directory structures—is tocreate your application class. Because we’re into test-driving our way toward ahealthy code base that will stay that way, let’s write the standard first test, shown inlisting 5.26.
import org.apache.wicket.protocol.http.WebApplication;import org.junit.*;
public class TestApplicationClass { @Test public void homePageHasBeenDefined() throws Exception { WebApplication app = new MyWicketApp(); assertEquals(MyHomePage.class, app.getHomePage()); }}
This test is basically telling us two things. First, MyWicketApp should extendWicket’s WebApplication class. Second, its getHomePage method should returnthe class we’re about to use as our home page. This is also a good example ofhow Wicket treats pages as classes—just pass the page class, and Wicket takes careof the rest.
The implementation in listing 5.27 that turns our red bar into a green oneisn’t any closer to space technology either, as you might have guessed.
import org.apache.wicket.protocol.http.WebApplication;import org.apache.wicket.Page;
public class MyWicketApp extends WebApplication {
public Class<? extends Page> getHomePage() { return MyHomePage.class; }}
The getHomePage method in our application class is our way of telling Wicketwhich page should be displayed first when a user points their web browser at our
Listing 5.26 Nailing down our application class and home page
Listing 5.27 Application class implemented

TDD with component-based web frameworks 189
application. In order to get our code compiling, we obviously needed to createthe MyHomePage class, so while we’re here let’s take a peek at its contents:
import org.apache.wicket.markup.html.WebPage;
public class MyHomePage extends WebPage {}
That’s it. What we just saw is a blank web page, Wicket style. Well, a not functionalblank web page. In order for Wicket to know what to render for the web browser,we also need to create an HTML template to go with the page class before Wicketcan render our page. Let’s not create that one yet, however. After all, we don’t yethave a failing test and thus no permission to add functionality!
Testing with the WicketTesterOne way in which the attention given to testability within the Wicket project isshowing is the existence of tools such as the WicketTester class that’s part of theWicket distribution. WicketTester is essentially a testing tool for running ourWicket pages and components outside of a web container. In order to see Wick-etTester in action, let’s write a little test for our home page. Listing 5.28 shows aregular JUnit test class making use of the WicketTester.
import org.junit.*;import org.apache.wicket.util.tester.WicketTester;
public class TestMyHomePage { @Test public void homePageHasWelcomeText() throws Exception { WicketTester tester = new WicketTester(); tester.startPage(MyHomePage.class);
tester.assertRenderedPage(MyHomePage.class); tester.assertNoErrorMessage();
tester.assertContains("Welcome to the home page!"); }}
In listing 5.28, we first B create an instance of the WicketTester and point it to thepage we want to test. Then, we C assert that the given page was rendered withouterrors or redirects, and finally we D assert that the rendered HTML contains thephrase “Welcome to the home page!” This test finally forces us to add MyHome-Page.html into our source tree, as shown in listing 5.29.
Listing 5.28 Our first WicketTester test
Create Wicket-Tester for pageB
Check for rendering errorsC
Assert page contents D

190 CHAPTER 5
Test-driving web components
<?xml version="1.0" encoding="UTF-8" ?><!DOCTYPE html PUBLIC "-//W3C//DTD XHTML 1.0 Strict//EN" "http://www.w3.org/TR/xhtml1/DTD/xhtml1-strict.dtd"><html xmlns:wicket="http://wicket.sourceforge.net/"> <body> <p>Welcome to the home page!</p> </body></html>
The standard convention in Wicket is to place the view templates—the HTMLfiles—into the same directory where the Java class for that page resides. Thismight seem odd at first but is helpful because we don’t have to go out of our wayto locate the view template when it’s right next to the Java code we’re working on.There are other options as well, but those require additional configuration. Inpractice, this means either telling Wicket the location of the directory structureholding our HTML or, alternatively, implementing a custom resource locator. Thelatter is obviously more laborious but also gives us more flexibility and power indetermining where we want to keep (and deploy) our view templates.
We’ve now seen how we can test-drive a simple Wicket page using nothing butgood ol’ JUnit and the WicketTester. Most applications are not just static webpages, however, so it would be nice to see how Wicket lets us test-drive functional-ity into our pages. Let’s spend a few minutes linking our newly created home pageto another page using Wicket components.
Adding components to the pictureAs mentioned before, almost everything in Wicket is represented by Java classes,and that is the case for components as well. When we’re talking about Wicket, theword component refers to any dynamic element on our web pages. For example, alink from one Wicket page to another is a component, a label with dynamicallyresolved content is a component, and a form—and the associated form ele-ments—are all components.
It’s simple, really, but before we get ahead of ourselves, let’s add a test thatpushes us toward having some components on our home page. Evolving fromlisting 5.28, listing 5.30 again makes use of the WicketTester.
Listing 5.29 Humble beginnings of a home page
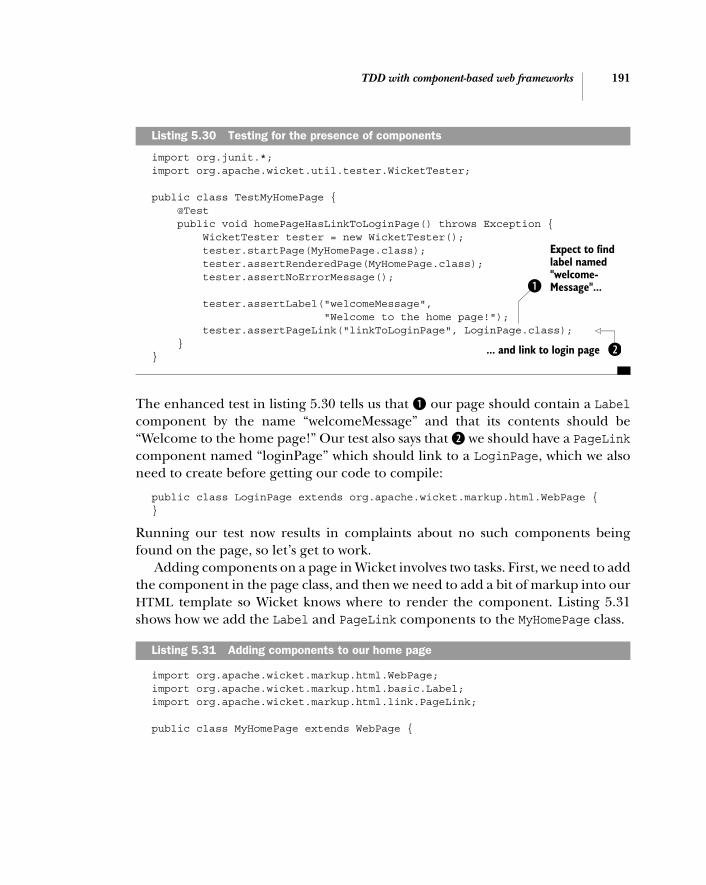
TDD with component-based web frameworks 191
import org.junit.*;import org.apache.wicket.util.tester.WicketTester;
public class TestMyHomePage { @Test public void homePageHasLinkToLoginPage() throws Exception { WicketTester tester = new WicketTester(); tester.startPage(MyHomePage.class); tester.assertRenderedPage(MyHomePage.class); tester.assertNoErrorMessage();
tester.assertLabel("welcomeMessage", "Welcome to the home page!"); tester.assertPageLink("linkToLoginPage", LoginPage.class); }}
The enhanced test in listing 5.30 tells us that B our page should contain a Labelcomponent by the name “welcomeMessage” and that its contents should be“Welcome to the home page!” Our test also says that C we should have a PageLinkcomponent named “loginPage” which should link to a LoginPage, which we alsoneed to create before getting our code to compile:
public class LoginPage extends org.apache.wicket.markup.html.WebPage {}
Running our test now results in complaints about no such components beingfound on the page, so let’s get to work.
Adding components on a page in Wicket involves two tasks. First, we need to addthe component in the page class, and then we need to add a bit of markup into ourHTML template so Wicket knows where to render the component. Listing 5.31shows how we add the Label and PageLink components to the MyHomePage class.
import org.apache.wicket.markup.html.WebPage;import org.apache.wicket.markup.html.basic.Label;import org.apache.wicket.markup.html.link.PageLink;
public class MyHomePage extends WebPage {
Listing 5.30 Testing for the presence of components
Listing 5.31 Adding components to our home page
... and link to login page C
Expect to find label named "welcome-Message"...B

192 CHAPTER 5
Test-driving web components
public MyHomePage() { add(new Label("welcomeMessage", "Welcome to the home page!")); add(new PageLink("linkToLoginPage", LoginPage.class)); }}
That’s it. Not exactly what I’d call a laborious step! What we’ve done here inlisting 5.31 is construct the component tree for Wicket by instantiating a Labelcomponent and a PageLink component passing the LoginPage object to theirconstructor (effectively telling them, “you belong to this container”). The tree forMyHomePage now contains two child components named “welcome- Message” and“linkToLoginPage”. At this point, if we run our unit test from listing 5.30, we get arather descriptive error message indicating what we need to do next:
org.apache.wicket.WicketRuntimeException: The component(s) below failed to render. A common problem is that you have added a component in code but forgot to reference it in the markup (thus the component will never be rendered).
Yes, that is our problem—we have added the components into the componenttree but we haven’t referenced them in our HTML markup. Listing 5.32 fixes that.
<?xml version="1.0" encoding="UTF-8" ?><!DOCTYPE html PUBLIC "-//W3C//DTD XHTML 1.0 Strict//EN" "http://www.w3.org/TR/xhtml1/DTD/xhtml1-strict.dtd"><html xmlns:wicket="http://wicket.sourceforge.net/"> <body> <span wicket:id="welcomeMessage">welcome message goes here</span> Please, <a href="#" wicket:id="linkToLoginPage">log in</a>. </body></html>
You can probably figure out from the previous snippet what Wicket is doing whenit renders this view template. When it encounters an HTML element with theattribute “wicket:id”, Wicket looks up a component with that specific name fromthe component tree and asks the component to render itself. In other words, whatgets rendered to the web browser would not be “welcome message goes here” butrather “Welcome to the home page!” (or whatever value was given for the label inthe Java code).
Listing 5.32 Laying out our components in the HTML

Summary 193
Now that we have components on our pages, how about seeing how we caninteract with them in our tests? After all, some of our components might havestate, and just seeing a button on a page does not mean that the button does whatwe expect it to do!
Interacting with componentsIt’s trivial to verify the presence of components on a page with the WicketTester.How about testing for the behavior of those components when we try to interactwith them? We’ll do one better than just answering that question—let’s see someconcrete tests that demonstrate the answer in action.
We have a home page with a link to the login page. Let’s quickly write a testthat verifies we can click that link and get to the login page:
@Testpublic void interactingWithComponents() throws Exception { WicketTester tester = new WicketTester(); tester.startPage(MyHomePage.class); tester.assertRenderedPage(MyHomePage.class); tester.clickLink("linkToLoginPage"); tester.assertRenderedPage(LoginPage.class);}
Can’t get much simpler than that, can it? The WicketTester provides a handyclickLink method for simulating clicks on link components. After clicking a link,we can use the assertRenderedPage method for asserting that we landed on theexpected page as a result.
This has only been a quick scratch on the surface of the Wicket framework, butwe now have a better idea of how test-driving works in general with component-based frameworks. For a more thorough introduction to the technology, refer totitles such as JavaServer Faces in Action (Kito Mann; Manning, 2004) for JSF, Tapestryin Action (Howard M. Lewis Ship; Manning, 2004) for Apache Tapestry, and Wicketin Action (Martijn Dashorst and Eelco Hillenius; Manning, 2008) for Wicket. Thelatter book includes a whole chapter dedicated to testing Wicket components.
5.5 Summary
We’ve just seen that test-driving web components is far from mission impossibleand, indeed, a feasible approach that gives us all the quality-improving benefits ofTDD while keeping our code from suffering unnecessary bloat.
So, in addition to the model (which we didn’t discuss in this chapter because it’sbasically regular Java code that we already know we can test-drive), the controllerand the view portions of the MVC triplet also can be effectively developed test-first.

194 CHAPTER 5
Test-driving web components
It’s not quite like working with plain Java code, but it’s close. With a bit of plumbingtucked away into a base class for our unit tests, we’re in a good position to follow ourtight loop of test-code-refactor without having to think too much about things we’renot interested in for a given test.
When developing controller components, our attention is not tied to deal-ing with awkward APIs; instead we’re focused on the behavior desired from ourcomponents. While doing that, we’re facing a lot of the obstacles we discussed inpart 1—and the solutions presented in part 1 work here, too.
Although view components such as JavaServer Pages and Velocity templatesaren’t, perhaps, as trivial to test as controller components, there are ways of test-driving these without resorting to the slow alternative of deploying to an externalweb container. The JspTest framework gives us the means to render JavaServerPages in our unit tests quickly; using an embedded Jetty web container isn’t a badoption either. For test-driving Velocity templates, we hardly need any plumbing atall, because the Velocity API makes it easy to render templates without any depen-dencies on any kind of containers whatsoever.
Component-based web frameworks have been rearing their heads recently alongwith the release of JavaServer Faces and the success of open source projects such asApache Tapestry and the Wicket framework. These technologies are generallyslightly more complex to embed into a test harness than their request-response-stylecounterparts, which makes test-driving that much harder. The Wicket framework,however, leads the pack as a prime example of awareness for testability, making test-driven web development with Wicket seem like a walk in the park.
In the next chapter, having already tamed the Java EE web development scene,we’ll move from the web tier to the so-called data access layer and, of course, to anexplanation of how to deploy our test-driven way of working in that context.

Test-driving data access
Information is the currency of democracy.—Thomas Jefferson
195

196 CHAPTER 6
Test-driving data access
Data is everywhere. Think about it. How many systems have you worked with inyour professional career where the business logic you implemented did not oper-ate on persistent data? Exceptions do exist, of course, but the majority of systemsin today’s enterprises deal with persistent data—and with lots of it. As such, datahas a central role in the development of these systems and in the day-to-day livesof software developers. Furthermore, if you’d have to pick one component of anenterprise system as the single most important, it’d have to be the data. Yet soft-ware developers have a long tradition of relying on manual, visual inspection fortesting their data-access code. Visual inspection is slow and error-prone—not howwe as professional craftsmen want to work.
So far, we’ve ignored data as an element in our tests by faking where it’s com-ing from. In other words, although we have seen how we can implement businesslogic that needs persistence services using test-driven development and test dou-bles, we haven’t seen how to implement the persistence layer itself. In this chap-ter, we’ll pick up the slack and give the data layer our full attention.
After finishing this chapter, we’ll have all the tools necessary for using test-driven development on code that accesses and manipulates data, be it on the filesystem or in a relational database. We will focus on facilitating our test-driven pro-cess with testability-aware design and with technology that helps us get the jobdone. Along the way, we will also discuss the relative advantages and disadvantagesof test-driving with unit tests and integration tests and of different strategies formanaging our test data.
Ready. Set. Go.
6.1 Exploring the problem domain
Let’s begin by exploring the problem space before getting grease on our hands.First of all, we need to establish what supposedly makes test-driving data accesscode somehow different from test-driving “regular” code (for whatever definitionof “regular”).
The main difference in data-access code compared to most other code is thatits behavior typically spans multiple layers of a system’s architecture. Anothercommon difference is that data-access code tends to make use of third-party APIsthat are, nicely put, sometimes not as testing-friendly as they could be. In order tobe able to test without all of the third-party stuff constantly hitting the disk or adatabase server, we need to be able to separate these issues.
Let’s continue our journey by identifying what kinds of boundaries data-accesscode typically crosses in Java and Java EE applications. Then let’s briefly study adesign pattern that helps us implement our data access code using a testable design.

Exploring the problem domain 197
6.1.1 Data access crosses boundaries
Data-access code almost by definition crosses boundaries in a system. Our applica-tion logic talks to our persistence logic, and the persistence logic talks to a persis-tence framework such as Hibernate or the EJB 3.0 EntityManager interface, ordirectly to the JDBC API, which in turn is implemented by a JDBC driver, which inturn connects to a relational database. Figure 6.1 illustrates this stack of layers ontop of layers.
TIP Test-driving EJB 3.0 code is covered in the bonus chapter, availableonline.
Ideally, we’d want to test-drive the code we’re working on without involving thelayer below. We want our tests to be independent and running fast. Including toomuch from the layers below into our unit test increases the coupling in our testsand inevitably makes our tests run slower—and setting up the other layers wouldmost definitely be more work we’d rather not do. Furthermore, the layer belowmight not exist yet.
With this in mind, let’s look at our options of test-driving the code inside thelayers in figure 6.1. Working on the application logic layer, it’s easy to stub out thepersistence logic. We verify that the chunk of business logic we’re testing invokesthe appropriate methods on a persistence logic layer interface with the appropri-ate parameters. But looking at how to test-drive the persistence logic layer, we facea slightly more difficult decision—should we stub or mock the JDBC API (or theselected persistence framework’s interfaces, if applicable), or should we hit a data-base? Furthermore, should we hit a real database or a lightweight, in-memorydatabase that is faster but not exactly identical to the real thing?
Later in this chapter, we will look at each of these different strategies one at atime, always implementing the same example scenario so that we can do a subjec-tive comparison between them. First, though, let’s familiarize ourselves with adesign pattern that helps us separate our code base into appropriate layers.
Application logic
Persistence logic
JDBC APIPersistence frameworks
JDBC driver
Relational database
Figure 6.1A pile of logical layers of a system. If we want to test-drive the persistence logic layer, which of the underlying layers should our tests exercise?

198 CHAPTER 6
Test-driving data access
6.1.2 Separating layers with the DAO pattern
It might have something to do with the Java EE community’s long-time affectionfor design patterns and architecture blueprints (or it might be just that this stuffmakes sense), but for one reason or another, most of the Java EE systems I’ve seenduring the past five years have applied some kind of a variation of the Data AccessObject (DAO) pattern, described in Core J2EE Patterns: Best Practices and Design Strat-egies (Deepak Alur, Dan Malks, and John Crupi; Addison-Wesley, 2003).
The core of the pattern is that for each persistent domain object, there is a DataAccess Object interface (and implementation) for persisting the said type of objectto a database, be it a relational database, an object database, or a bunch of XML fileson the file system. The point is that the object itself doesn’t know and whoever isusing the DAO doesn’t know where (and whether) the object was persisted or whereit came from. As a result, we can swap the actual persistence technology without theapplication noticing. Figure 6.2 illustrates this with boxes and lines.
In the following sections, we’ll reuse this pattern to illustrate the process of test-driving data-access-related code using different technologies. To give you a betteridea of what a DAO interface might look like and to give us a basis for later examples,listing 6.1 shows a simple PersonDao interface for persisting Person objects.
public interface PersonDao { Person find(Integer id); void save(Person person); void update(Person person); void delete(Person person); List<Person> findAll(); List<Person> findByLastname(String lastname);}
Listing 6.1 PersonDao interface hiding the implementation from application code
<<interface>>PersonDao Person
RealPersonDao FakePersonDao
persist
Figure 6.2Data Access Object pattern: Domain objects being created, retrieved, and persisted through a Data Access Object interface without knowledge of the underlying database technology

Driving data access with unit tests 199
The DAO pattern is enormously helpful compared to scattering data access allaround the business logic. Also, although the DAO pattern typically reduces theabsolute volume of data access code we need to write, adopting freely availableopen source persistence frameworks like Hibernate or more trivial support librar-ies like the JdbcTemplate facility from the Spring Framework can radically reducethis work. Essentially, a good framework can do most of the plumbing work for youand leave you to worry about the persistence logic rather than the gritty details ofthe persistence technology.
TIP The implementation for the Person class referenced by the PersonDaointerface is available as part of the source code download at the book’swebsite.
Without further ado, let’s roll up our sleeves again and start test-driving code thatneeds data and, therefore, needs to use a DAO to get at that data. We’ll start froma plain JDBC implementation of the PersonDao interface in listing 6.1, acknowl-edge its main problems, and then introduce Spring Framework’s JdbcTemplateand Hibernate as alternative solutions that simplify our work quite a bit.
6.2 Driving data access with unit tests
Traditionally, Java developers have written raw JDBC code for accessing data in rela-tional databases. Especially during the late nineties when the IT bubble was at itspeak and everyone became a Java programmer, we could see JDBC calls scatteredthroughout a code base—with the result of having to change things all over whenrenaming a column in the database, for example. This was obviously a bad thing,and developers today are much more aware of the need to avoid such mistakes.
In this section, we’ll look at two frameworks that simplify our data-access codeand the way we can test-drive such code with our unit tests. Those two frameworksare the Spring Framework and its JdbcTemplate and the Hibernate persistenceframework. We’ll start, however, by looking at the foundation of all Java databaseaccess—the JDBC API—and how to test-drive JDBC-based data-access code.
Before we begin, perhaps we should clarify what we mean by unit tests in thiscontext. I’ve seen people utter the words unit test when talking about a wide vari-ety of things, including JUnit test classes running external system commands thatfork JVM instances to run Java classes’ main methods. Those might be calleddeveloper tests, but they’re most certainly not unit tests according to my defini-tion. I personally subscribe to Michael Feathers’ definition for unit tests,1 whichsays that a test is not a unit test if:
1 Working Effectively With Legacy Code (Addison-Wesley, 2005)
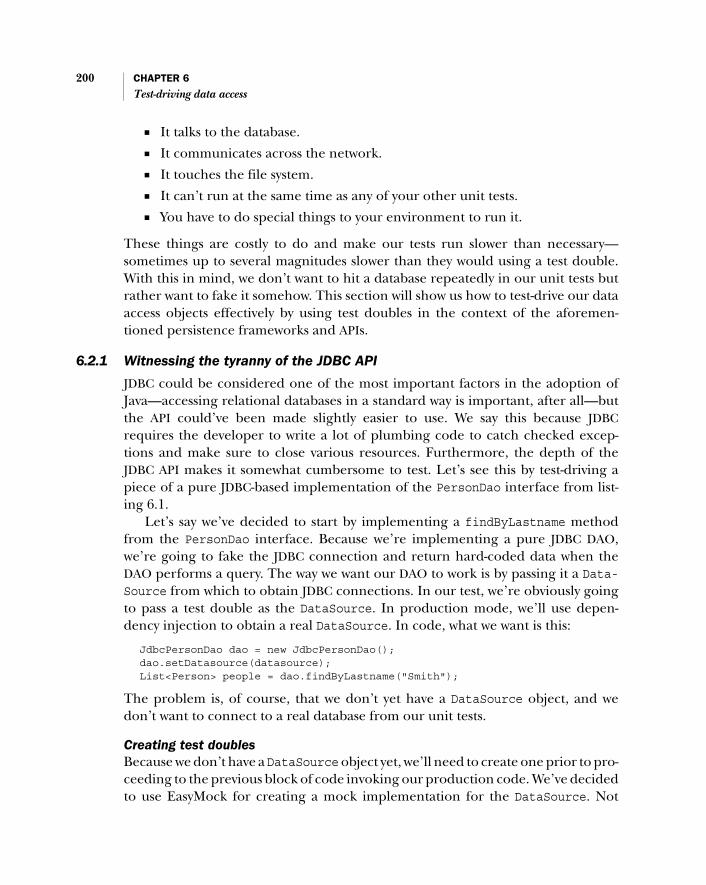
200 CHAPTER 6
Test-driving data access
■ It talks to the database.■ It communicates across the network.■ It touches the file system.■ It can’t run at the same time as any of your other unit tests.■ You have to do special things to your environment to run it.
These things are costly to do and make our tests run slower than necessary—sometimes up to several magnitudes slower than they would using a test double.With this in mind, we don’t want to hit a database repeatedly in our unit tests butrather want to fake it somehow. This section will show us how to test-drive our dataaccess objects effectively by using test doubles in the context of the aforemen-tioned persistence frameworks and APIs.
6.2.1 Witnessing the tyranny of the JDBC API
JDBC could be considered one of the most important factors in the adoption ofJava—accessing relational databases in a standard way is important, after all—butthe API could’ve been made slightly easier to use. We say this because JDBCrequires the developer to write a lot of plumbing code to catch checked excep-tions and make sure to close various resources. Furthermore, the depth of theJDBC API makes it somewhat cumbersome to test. Let’s see this by test-driving apiece of a pure JDBC-based implementation of the PersonDao interface from list-ing 6.1.
Let’s say we’ve decided to start by implementing a findByLastname methodfrom the PersonDao interface. Because we’re implementing a pure JDBC DAO,we’re going to fake the JDBC connection and return hard-coded data when theDAO performs a query. The way we want our DAO to work is by passing it a Data-Source from which to obtain JDBC connections. In our test, we’re obviously goingto pass a test double as the DataSource. In production mode, we’ll use depen-dency injection to obtain a real DataSource. In code, what we want is this:
JdbcPersonDao dao = new JdbcPersonDao();dao.setDatasource(datasource);List<Person> people = dao.findByLastname("Smith");
The problem is, of course, that we don’t yet have a DataSource object, and wedon’t want to connect to a real database from our unit tests.
Creating test doublesBecause we don’t have a DataSource object yet, we’ll need to create one prior to pro-ceeding to the previous block of code invoking our production code. We’ve decidedto use EasyMock for creating a mock implementation for the DataSource. Not

Driving data access with unit tests 201
counting the static import statement, creating the test double with EasyMock isa one-liner:
import static org.easymock.EasyMock.*;...DataSource datasource = createMock(DataSource.class);
Now, when we execute findByLastName, we expect the DAO implementation toask the DataSource for a Connection. That means we need a test double for theConnection interface. Then, we expect the DAO to ask the connection object toprepare a statement with an SQL template string and to populate the statementwith the last name given as argument. So, we also need a test double for the Pre-paredStatement interface. Let’s look at what we’ve got so far for creating all ofthese mock objects and expectations:
DataSource datasource = createMock(DataSource.class);Connection connection = createMock(Connection.class);expect(datasource.getConnection()).andReturn(connection);String sql = "SELECT * FROM people WHERE last_name = ?";PreparedStatement stmt = createMock(PreparedStatement.class);expect(connection.prepareStatement(sql)).andReturn(stmt);
stmt.setString(1, "Smith");
That’s a lot of mock objects already, and there are more to come. Next, we’d likethe DAO to execute the statement object. The executeQuery method returns ajava.sql.ResultSet interface for which we still need one more test double.
Faking the ResultSet with a static mockThis time, we’ll decide to not use EasyMock but rather a fake implementation pro-vided by the MockObjects.com library. This is because (especially for large resultsets) setting expectations for each and every method call would quickly explodethe volume of our test code, and we’re not interested in how the DAO pulls outthe pieces of data from the ResultSet—we’re interested in knowing that it buildsand returns the right kind of list of people from the result set.
The following snippet shows how we configure a MockMultiRowResultSetobject and make our mock PreparedStatement object return it when execute-Query is called:
MockMultiRowResultSet resultset = new MockMultiRowResultSet();String[] columns = new String[] { "first_name", "last_name" };resultset.setupColumnNames(columns);List<Person> smiths = createListOfPeopleWithLastname("Smith");resultset.setupRows(convertIntoResultSetArray(smiths));expect(stmt.executeQuery()).andReturn(resultset);

202 CHAPTER 6
Test-driving data access
The MockMultiRowResultSet object expects the data to be given to it as a two-dimensional array. In the end, we’d like to be able to compare the List of Personobjects returned by the DAO’s findByLastname method with something. In orderto minimize duplication of data, we want to create the list of people just once,convert the list into a two-dimensional object array for the MockMultiRowResult-Set, and use the same list in comparing the DAO’s output.
After everything else, we still want our DAO implementation to do some-thing—release (close) all of the JDBC resources:
resultset.setExpectedCloseCalls(1);stmt.close();connection.close();
Writing a test for JDBC codeListing 6.2 shows our test in its final form, specifying the wanted behavior for ourDAO implementation—that is, when everything goes according to plan and thedatabase contains three matching people.
import static org.junit.Assert.*;import static org.easymock.EasyMock.*;import com.mockobjects.sql.*;import org.junit.*;import java.sql.*;import javax.sql.*;import java.util.*;
public class JdbcPersonDaoTest {
@Test public void testFindByLastname() throws Exception { DataSource datasource = createMock(DataSource.class); Connection connection = createMock(Connection.class); expect(datasource.getConnection()).andReturn(connection); String sql = "SELECT * FROM people WHERE last_name = ?"; PreparedStatement stmt = createMock(PreparedStatement.class); expect(connection.prepareStatement(sql)).andReturn(stmt); stmt.setString(1, "Smith");
MockMultiRowResultSet resultset = new MockMultiRowResultSet(); String[] columns = new String[] { "first_name", "last_name" }; resultset.setupColumnNames(columns); List<Person> smiths =
Listing 6.2 Test for a pure JDBC DAO implementation
Mockdatabase
connection B
Fake query resultC

Driving data access with unit tests 203
createListOfPeopleWithLastname("Smith"); resultset.setupRows(asResultSetArray(smiths)); expect(stmt.executeQuery()).andReturn(resultset);
resultset.setExpectedCloseCalls(1); stmt.close(); connection.close();
replay(datasource, connection, stmt);
JdbcPersonDao dao = new JdbcPersonDao(); dao.setDatasource(datasource); List<Person> people = dao.findByLastname("Smith"); assertEquals(smiths, people); verify(datasource, connection, stmt); resultset.verify(); }
private List<Person> createListOfPeopleWithLastname(String lastName) { List<Person> expected = new ArrayList<Person>(); expected.add(new Person("Alice", lastName)); expected.add(new Person("Billy", lastName)); expected.add(new Person("Clark", lastName)); return expected; }
private Object[][] asResultSetArray(List<Person> people) { Object[][] array = new Object[people.size()][2]; for (int i = 0; i < array.length; i++) { Person person = people.get(i); array[i] = new Object[] { person.getFirstName(), person.getLastName() }; } return array; }}
That’s what I call a big test. First, we B create and configure mock implementationsfor the DataSource, Connection, and PreparedStatement JDBC interfaces by usingEasyMock. Then, we C populate a test double for the ResultSet JDBC interfaceusing a static mock object from the MockObjects.com library. Finally, after Drecording the expected release of all JDBC resources, we E inject our mock Data-Source into a JdbcPersonDao instance, invoke the finder method, and compare thereturned list of Person objects to the one with which we populated the mockResultSet. Not the most compact test method we’ve seen (although I have seenworse), but this is to be expected when working with the JDBC interfaces.
Fake query result
C
We want resources released
D
Act and verify
e

204 CHAPTER 6
Test-driving data access
Writing code to pass the testFor the sake of completeness, listing 6.3 shows an implementation of the findBy-Lastname method that passes the previous test with flying colors.
import javax.sql.*;import java.sql.*;import java.util.*;
public class JdbcPersonDao implements PersonDao {
private DataSource datasource;
public void setDatasource(DataSource datasource) { this.datasource = datasource; }
public List<Person> findByLastname(String lastname) { try { Connection conn = datasource.getConnection(); String sql = "SELECT * FROM people WHERE last_name = ?"; PreparedStatement stmt = conn.prepareStatement(sql); stmt.setString(1, lastname); ResultSet rset = stmt.executeQuery(); List<Person> people = new ArrayList<Person>(); while (rset.next()) { String firstName = rset.getString("first_name"); String lastName = rset.getString("last_name"); people.add(new Person(firstName, lastName)); } rset.close(); stmt.close(); conn.close(); return people; } catch (SQLException e) { throw new RuntimeException(e); } } // Other PersonDao methods not shown}
Note that our implementation is only closing the JDBC connection, for example,if everything goes fine and none of the prior method invocations to the JDBC APIthrow exceptions. In other words, we’d still need to write a couple of tests to verifythat the proper close calls take place even though a query throws an exception,for example.
Listing 6.3 Pure JDBC DAO implementation
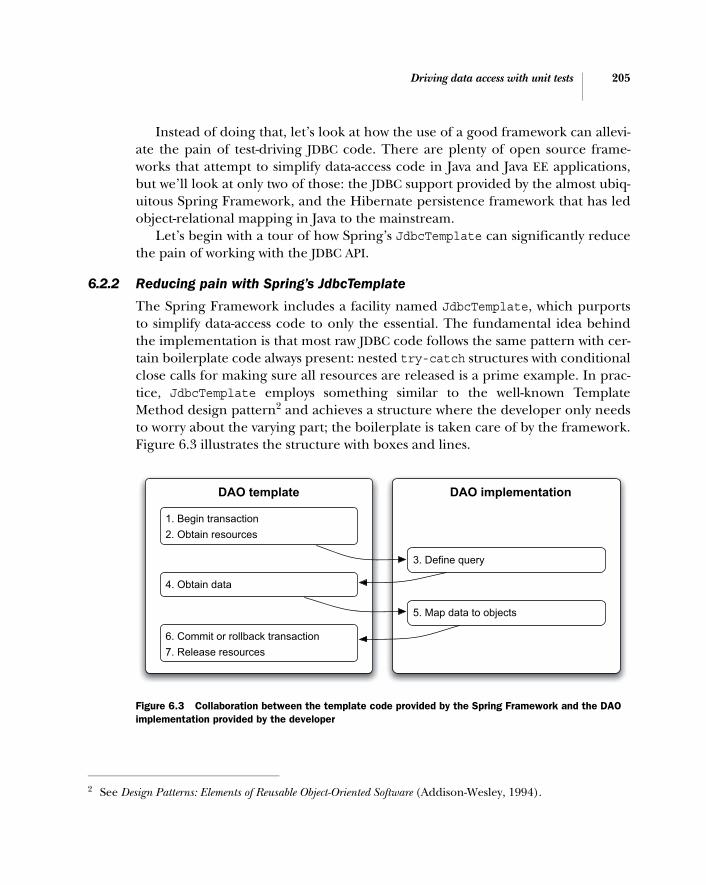
Driving data access with unit tests 205
Instead of doing that, let’s look at how the use of a good framework can allevi-ate the pain of test-driving JDBC code. There are plenty of open source frame-works that attempt to simplify data-access code in Java and Java EE applications,but we’ll look at only two of those: the JDBC support provided by the almost ubiq-uitous Spring Framework, and the Hibernate persistence framework that has ledobject-relational mapping in Java to the mainstream.
Let’s begin with a tour of how Spring’s JdbcTemplate can significantly reducethe pain of working with the JDBC API.
6.2.2 Reducing pain with Spring’s JdbcTemplate
The Spring Framework includes a facility named JdbcTemplate, which purportsto simplify data-access code to only the essential. The fundamental idea behindthe implementation is that most raw JDBC code follows the same pattern with cer-tain boilerplate code always present: nested try-catch structures with conditionalclose calls for making sure all resources are released is a prime example. In prac-tice, JdbcTemplate employs something similar to the well-known TemplateMethod design pattern2 and achieves a structure where the developer only needsto worry about the varying part; the boilerplate is taken care of by the framework.Figure 6.3 illustrates the structure with boxes and lines.
2 See Design Patterns: Elements of Reusable Object-Oriented Software (Addison-Wesley, 1994).
DAO template DAO implementation
1. Begin transaction2. Obtain resources
3. Define query
4. Obtain data
5. Map data to objects
6. Commit or rollback transaction7. Release resources
Figure 6.3 Collaboration between the template code provided by the Spring Framework and the DAO implementation provided by the developer

206 CHAPTER 6
Test-driving data access
Spring implements this division of responsibilities through an abstract base classnamed JdbcDaoSupport, which our specific data-access object implementationscan extend. Figure 6.4 depicts this structure.
What the abstract base class in figure 6.4—JdbcDaoSupport—provides is essen-tially one getter method for obtaining an instance of the JdbcTemplate class. TheJdbcTemplate class encapsulates the gritty details of raw JDBC interfaces, offeringinstead higher-level methods to the DAO implementor’s disposal. The signature ofone of these higher-level methods is shown here as an example:
List query(String sql, Object[] args, RowMapper rowMapper)
Notice how there’s no reference to a Connection, a PreparedStatement, or any-thing else JDBC. We pass in a SQL statement, the argument values with which topopulate any parameter placeholders, and something named RowMapper. TheRowMapper is an interface provided by Spring and basically represents an objectthat knows how to convert a row in a database table into an object. The RowMapperinterface is presented here in full:
public interface RowMapper { Object mapRow(ResultSet rs, int rowNumber)}
The RowMapper interface has a dependency to the JDBC ResultSet interface, butthis single dependency doesn’t pose a problem when testing DAO implementa-tions because it’s hidden inside a RowMapper implementation—which can be test-driven separately. Furthermore, the same RowMapper implementation can bereused for practically all queries dealing with the table in question.
Although the JdbcTemplate class provides a horde of other methods inaddition to the query method we just saw, we’ll ignore those others for now andget our hands dirty again, implementing a JdbcTemplate-based DAO class test-first. We’ll again implement the findByLastname method from the PersonDaointerface introduced in listing 6.1. For that purpose, we’re going to need a
implements
extends
<<abstract>>JdbcDaoSupport
PersonDaoImpl<<interface>>
PersonDao
Figure 6.4DAO implementation extends from Spring’s JdbcDaoSupport class that provides JdbcTemplate functionality

Driving data access with unit tests 207
RowMapper implementation that converts rows into Person objects, so why notstart from there?
Implementing a RowMapperLet’s assume for the sake of this example that a Person object consists of only twoproperties—first name and last name—and that these properties map to columnsfirst_name and last_name in the database. With these assumptions, we couldwrite the test in listing 6.4.
import org.springframework.jdbc.core.RowMapper;import com.mockobjects.sql.MockSingleRowResultSet;import java.util.*;import org.junit.*;import static org.junit.Assert.*;
public class PersonRowMapperTest {
@Test public void testMappingRow() throws Exception { Person expected = new Person("John", "Doe");
Map<String, Object> data = new HashMap<String, Object>(); data.put("first_name", expected.getFirstName()); data.put("last_name", expected.getLastName()); MockSingleRowResultSet rs = new MockSingleRowResultSet(); rs.addExpectedNamedValues(data);
assertEquals(expected, new PersonRowMapper().mapRow(rs, 1)); }}
In listing 6.4, we’re B creating a mock ResultSet object representing a singlerow and then C comparing the return value from the RowMapper implementationto a Person instance populated with the expected values. The matching imple-mentation is shown in listing 6.5.
import java.sql.*;import org.springframework.jdbc.core.RowMapper;
public class PersonRowMapper implements RowMapper {
Listing 6.4 Test for the RowMapper implementation for Person objects
Listing 6.5 Trivial PersonRowMapper implementation
Populate mockResultSet object B
Perform mapping and compare result C

208 CHAPTER 6
Test-driving data access
public Object mapRow(ResultSet rs, int rowNum) throws SQLException { return new Person(rs.getString("first_name"), rs.getString("last_name")); }}
This is the basic scenario—straightforward mapping of a row to an object—butthere can be other kinds of scenarios as well. For example, we might want thePersonRowMapper to populate several fields of the Person object based on a singlecolumn value. Null values, conversions between Booleans and numeric values,and so forth are other scenarios where a more elaborate implementation—andthe associated tests—would be necessary.
But now that we have a PersonRowMapper implementation, let’s move on andtest some functionality in the JdbcTemplate DAO implementation.
Test-driving the DAO using JdbcTemplateIn addition to implementing the PersonDao interface, our JdbcTemplate-basedDAO implementation should also extend JdbcDaoSupport from the SpringFramework. The JdbcDaoSupport provides all the plumbing for our DAO classand exposes access to JdbcTemplate through a simple getter method, getJdbc-Template. The DAO can then invoke JdbcTemplate’s methods and the frameworktakes care of cleaning up resources afterwards.
In our case, we want to test-drive an implementation for the findByLastnamemethod and decide that the DAO should use the query method that takes the SQLtemplate, an array of query parameters, and a RowMapper implementation as argu-ments. We also need to stub the JdbcTemplate class itself in our test and make itreturn our hard-coded list of Person objects when the query method is invoked.
Listing 6.6 shows our test in its full glory.
import static org.easymock.classextension.EasyMock.*;import static org.junit.Assert.*;import java.util.*;import org.junit.Test;import org.springframework.jdbc.core.JdbcTemplate;
public class JdbcTemplatePersonDaoTest {
@Test public void testFindByLastname() throws Exception { final String lastName = "Smith";
Listing 6.6 Full test for the JdbcTemplate-based PersonDao implementation

Driving data access with unit tests 209
final List<Person> smiths = createListOfPeopleNamed(lastName);
JdbcTemplate template = createMock(JdbcTemplate.class); template.query( eq("SELECT * FROM employee WHERE last_name = ?"), aryEq(new Object[] { lastName }), isA(PersonRowMapper.class)); expectLastCall().andReturn(smiths);
replay(template);
JdbcTemplatePersonDao dao = new JdbcTemplatePersonDao(); dao.setJdbcTemplate(template); assertEquals(smiths, dao.findByLastname(lastName));
verify(template); }
private List<Person> createListOfPeopleNamed(String lastName) { List<Person> expectedList = new ArrayList<Person>(); expectedList.add(new Person("Alice", lastName)); expectedList.add(new Person("Billy", lastName)); expectedList.add(new Person("Clark", lastName)); return expectedList; }}
Our test in listing 6.6 creates a mock implementation of the JdbcTemplate classand B configures it to return a hard-coded list of Person objects for the SELECT *FROM employee WHERE last_name = ? query. Then we C inject our mock JdbcTem-plate into the DAO and D invoke the finder method, verifying that it returns thelist received from the query method.
Listing 6.6 also uses EasyMock’s custom argument-matching functionalitybecause we need to make our test double expect a method call that involves arrays,and the default matching logic doesn’t work with arrays. As you might not be famil-iar with custom matchers just yet, perhaps a word about them is called for. Let’s takea closer look at what we instructed EasyMock to do regarding the query call.
EasyMock and custom matchersThe common case with recording expectations with EasyMock is to invoke themethod and specify a return value with andReturn or by asking EasyMock for aninterface to tell the return value for the previous method call. In replay mode,EasyMock then records the method calls as they take place. Finally, when we askEasyMock to verify that our mock objects’ expected collaboration did take place,
Return hard-codedlist of people from query() B
DAO shouldreturn list as is D
Populate DAO with mock JdbcTemplate C

210 CHAPTER 6
Test-driving data access
EasyMock takes the list of recorded method calls and the list of method calls andperforms a simple comparison, using the objects’ equals method to compareargument values.
In some cases, the equals method is not a valid strategy for comparing theexpected with the actual. Arrays are a good example—two array objects claimthey’re not equal even though they contain objects that are equal between the twoarrays. Furthermore, in some cases we’re not interested in the exact argumentsbeing passed. For example, we might only be interested to know that a Stringstarting with certain characters is passed or that the argument is an instance of acertain class. For these cases, EasyMock gives us a way to override the defaultbehavior of using equals for argument matching.
In listing 6.6 we executed the following statement:
template.query( eq("SELECT * FROM employee WHERE last_name = ?"), aryEq(new Object[] { lastName }), isA(PersonRowMapper.class));
The eq, aryEq, and isA methods were statically imported from the EasyMockclass. The implementations of these methods do exactly one thing: register animplementation of the IArgumentMatcher interface with the current executioncontext. The eq method registers an implementation that uses the equalsmethod. The aryEq method registers an implementation that first compares thelengths of the expected and actual array and then (if the array lengths match)loops through the arrays, comparing each entry with its equals method. The isAmethod registers an implementation that only checks that the actual argument isan instance of the expected class.
Because of Java’s language semantics, the eq, aryEq, and isA methods are exe-cuted before the query method. As a result, when the mock object receives thequery invocation, EasyMock notices it has custom argument-matchers registeredand knows to use those matcher implementations when the method is later calledwhen the mock is in replay mode.
You can learn more about the advanced features of the EasyMock frameworkfrom the project’s website. Now, let’s get back to the PersonDao implementation.
Implementing the DAO with JdbcDaoSupportIn our test, we injected a JdbcTemplate into the DAO, expecting the templateobject’s query method to be called with certain arguments. In fact, that’s prettymuch all we need to do in our DAO because JdbcTemplate takes full care of han-dling the JDBC resources. Listing 6.7 shows the complete DAO implementation.

Driving data access with unit tests 211
import java.util.List;import org.springframework.jdbc.core.RowMapper;import org.springframework.jdbc.core.support.JdbcDaoSupport;
public class JdbcTemplatePersonDao extends JdbcDaoSupport implements PersonDao {
public List<Person> findByLastname(String lastname) { String sql = "SELECT * FROM employee WHERE last_name = ?"; String[] args = new String[] { lastname }; RowMapper mapper = new PersonRowMapper(); return getJdbcTemplate().query(sql, args, mapper); }}
As we can see, JdbcTemplate takes away all the boilerplate from our data-accessobjects and leaves us to worry about the query logic alone—making our tests morecompact and maintainable in the process.
As much as I appreciate the band-aid JdbcTemplate brings to both writing andtesting data-access code, I personally like our next subject—the Hibernate frame-work—even more. Enough that the section’s title includes the word nirvana!
6.2.3 Closer to test-driven nirvana with Hibernate
Although Spring’s JdbcTemplate and the RowMapper interface make JDBC codeless of a pain to work with, the code we write for mapping our domain objects intodatabase columns is still boilerplate we’d rather not write (and maintain). Afterall, because we’re going to add a new field and accessor methods to our domainobject anyway, why should we need to tell our RowMapper implementation aboutthe new field? Wouldn’t it be nice if our persistence infrastructure would pick upthe new field automatically?
This is what modern object-relational mapping (ORM) frameworks like Hiber-nate do for us. Hibernate lets us define our persistent fields in exactly one place—in the code with simple annotations. The framework takes care of mapping anno-tated fields on a domain object into a database table and columns. The key is hav-ing smart defaults. Most of the time, we can add a field, and it is by defaultconsidered persistent. On those occasions when this default doesn’t suit our pur-poses, we can declare the field as being transient either by adding [email protected] annotation on the field or by using Java’s tran-sient keyword.
Listing 6.7 JdbcTemplate-based PersonDao implementation
Delegate hard workto JdbcTemplate
Use PersonRow-Mapper to convert
rows to objects

212 CHAPTER 6
Test-driving data access
These advantages have made Hibernate one of the most popular Java persis-tence frameworks. Considering how Hibernate has spread all over the place, we’dbetter know how to work with it and, especially, how to test and test-drive the data-access objects of a Hibernate-based application. Before looking at how Hibernatechanges the way we write our unit tests and how it simplifies our data-access code,let’s take a brief tour of some of the main concepts in the Hibernate API.
Essentials of the Hibernate APIThe Hibernate API has been designed to give its users complete independence ofthe JDBC API—if that’s what they want—while still leaving enough hooks in placeto bypass Hibernate’s abstractions when necessary, exposing access to the underly-ing JDBC connections. Furthermore, Hibernate gives us a specialized query lan-guage named Hibernate Query Language (HQL) while also supporting SQL-basedqueries for situations where proprietary database features are required.
For the majority of users, the Hibernate API’s most important abstractions arethe SessionFactory, Session, and Query interfaces; their collaboration isdescribed on a high level in figure 6.5.
The SessionFactory acts as the starting point for everything related to Hiber-nate. The SessionFactory is configured to wrap the DataSource and is responsi-ble for keeping up a façade, handing out Session objects when asked. We couldconsider sessions the rough equivalent of connections in the JDBC API, exceptthat they’re responsible for some serious persistence and optimization magic thatleaves the JDBC API spinning its wheels. With the Session object, we performbasic CRUD operations directly by using methods defined in the Session inter-face, or more elaborate queries by asking the Session object to create a Query.The Query interface gives us ways to build dynamic queries at runtime.
These three interfaces are—most of the time—all we need to worry about whendeveloping data access objects using Hibernate. So, if they’re all interfaces and theSessionFactory is our access point to the triad, where does the SessionFactory
Application code SessionFactory
JDBC Connection
Query Session
uses
creates
createsuses
uses
Figure 6.5 The SessionFactory, Session, and Query interfaces represent the main concepts of the Hibernate API.

Driving data access with unit tests 213
come from? You might’ve guessed already that we typically pass the SessionFactoryto our data-access objects using dependency injection, but we haven’t yet discussedhow to get an instance to inject in the first place. There are two answers to this ques-tion—both involving the Configuration class.
The first and more common way to obtain a SessionFactory instance is todefine an external configuration file as either a properties file or an XML document(named hibernate.properties or hibernate.cfg.xml, respectively) in our class pathand let the Configuration class load the configuration from there, constructing animplementation of the SessionFactory on top of the configured database, usingthe configured connection details, pooling, caching strategy, and so on.
The other, less frequently encountered means of obtaining a SessionFactoryinstance is to tweak a Configuration object programmatically in Java and thus geta dynamically configured SessionFactory object. The programmatic configura-tion can come extremely handy in building a suite of automated integration testswith a framework like JUnit. On the other hand, an external file representing a testconfiguration might be easier to keep in sync with the production configuration.
Because this is a chapter about test-driven development and not Hibernate,this is as far as we’ll go with regard to Hibernate details. What we know about theresponsibilities of the SessionFactory, Session, and Query interfaces is enoughfor us to be able to start test-driving Hibernate DAOs. In fact, because we don’twant our unit tests to touch the database, we’re going to mock everything! Let’sredo the PersonDao one more time, Hibernate-style.
Writing a test for expected interactionLet’s build up our first test for a Hibernate-based DAO in small steps—the API ispretty simple and the patterns are easy to pick up, leading to a somewhat routineprocess (which is good news because it means we can move the little plumbing weneed into a common setup shared between tests and test classes).
Say we want to start again by implementing the findByLastname method intoour DAO. We know we’re going to need a SessionFactory as well as a Session.We also know that we’re going to use the Query interface for implementing thisspecific finder, so we’ll need one of those as well. Our first step in writing a test isthus creating dynamic mock objects for these three interfaces using EasyMock, asshown in listing 6.8.
import static org.easymock.EasyMock.*;import org.junit.*;import org.hibernate.*;import org.hibernate.classic.Session;
Listing 6.8 Basic plumbing for test-driving a Hibernate-based DAO

214 CHAPTER 6
Test-driving data access
public class HibernatePersonDaoTest {
private SessionFactory factory; private Session session; private Query query;
@Before public void setUp() { factory = createMock(SessionFactory.class); session = createMock(Session.class); query = createMock(Query.class); }}
With the plumbing in place, we are ready to proceed to defining our test. I’vedeveloped a habit of defining the expected HQL statement and any parametersfor the query in the beginning of the test method. In the case of looking up peo-ple by their last name, we might type something like this:
@Testpublic void testFindByLastname() throws Exception { String hql = "from Person p where p.lastname = :lastname"; String lastname = "Smith"; ...}
We also need to make our mock objects return a bunch of Person objects whenasked for people named Smith, so let’s quickly create a list of Smiths:
...String name = "Smith";List<Person> theSmiths = new ArrayList<Person>();theSmiths.add(new Person("Alice", name));theSmiths.add(new Person("Billy", name));theSmiths.add(new Person("Clark", name));...
That should do it. Now, what remains is the meat of our test—that is, defining theway we expect our DAO to interact with the Hibernate API.
Let’s assume for a while that we’re using an architecture where the openingand closing of sessions is performed in a crosscutting way using something like aServlet filter—a component that executes around the Servlet itself, freeing theServlet from worrying about the session getting closed.
In other words, all of our DAO classes should use the current session ratherthan ask the SessionFactory to create a new one. Next, having a reference to aSession object, we want our DAO to ask the Session for a Query, passing the HQL

Driving data access with unit tests 215
statement as an argument. Finally, after populating any query parameters in theQuery object, we expect our DAO to ask the Query to list all matching Personobjects (and to return that list). Listing 6.9 shows how these expectations translateto the EasyMock syntax.
...expect( factory.getCurrentSession() ).andReturn(session);expect( session.createQuery(hql) ).andReturn(query);expect( query.setParameter("lastname", name) ).andReturn(query);expect( query.list() ).andReturn(people);...
Having configured the SessionFactory’s getCurrentSession method to returnour mock Session, which in turn is configured to return our mock Query, we’reall set for switching our mocks into replay mode and invoking the productioncode. Listing 6.10 shows our complete test for the findByLastname method.
import static org.easymock.EasyMock.*;import static org.junit.Assert.*;import org.junit.*;import java.util.*;import org.hibernate.*;import org.hibernate.classic.Session;
public class HibernatePersonDaoTest {
private SessionFactory factory; private Session session; private Query query;
@Before public void setUp() { factory = createMock(SessionFactory.class); session = createMock(Session.class); query = createMock(Query.class); }
@Test public void testFindByLastname() throws Exception { String hql = "from Person p where p.lastname = :lastname"; String name = "Smith";
List<Person> theSmiths = new ArrayList<Person>();
Listing 6.9 Setting up expectations for a Hibernate DAO
Listing 6.10 Full test for finding people by their last name

216 CHAPTER 6
Test-driving data access
theSmiths.add(new Person("Alice", name)); theSmiths.add(new Person("Billy", name)); theSmiths.add(new Person("Clark", name));
expect(factory.getCurrentSession()).andReturn(session); expect(session.createQuery(hql)).andReturn(query); expect(query.setParameter("lastname", name)).andReturn(query); expect(query.list()).andReturn(theSmiths);
replay(factory, session, query);
HibernatePersonDao dao = new HibernatePersonDao(); dao.setSessionFactory(factory); assertEquals(theSmiths, dao.findByLastname(name));
verify(factory, session, query); }}
B Recording the expected interaction with the Hibernate API using EasyMock iseasy compared to a similar test for a JDBC-based implementation. This is bothbecause there are not many method calls to make to the Hibernate interfaces inthe first place and, especially with more complex queries, because the Query APIhappens to have almost no void methods, thus making it possible to use the com-pact expect(...).andReturn(...) syntax. With a dependency injection-baseddesign, it’s also straightforward to wire our DAO implementation with our smallgraph of test doubles.
Enough praise for the Hibernate API; let’s look at what kind of implementa-tion would satisfy our test in listing 6.10.
Making the interaction happenThe implementations for most finder methods in Hibernate-based DAO classesare almost trivial, and this is certainly the case with our findByLastname method,shown in listing 6.11. We B store the injected SessionFactory into a privatefield, C ask for the current session when a method call comes in, D createand E populate a query object, and return the resulting List directly. This is alllisting 6.11 does.
import java.util.*;import org.hibernate.*;
Listing 6.11 Hibernate-based implementation of the PersonDao
Record expectedAPI calls B
Expect finder method to return hard-coded list
Inject SessionFactorywith setter

Driving data access with unit tests 217
public class HibernatePersonDao implements PersonDao {
private SessionFactory sessionFactory;
public void setSessionFactory(SessionFactory sessionFactory) { this.sessionFactory = sessionFactory; }
public List<Person> findByLastname(String lastname) { Session session = sessionFactory.getCurrentSession(); String hql = "from Person p where p.lastname = :lastname"; Query query = session.createQuery(hql); query.setParameter("lastname", lastname); return query.list(); }}
The implementation is straightforward—too straightforward, actually. Our testhasn’t pushed our implementation to handle exceptions properly yet. Before itbecomes a habit to skip the exception cases, let’s look at how such a variationmight look like for our Hibernate-based DAO.
Testing for exceptionsLet’s say we’d like our DAO to throw an unchecked exception from the findBy-Lastname method when there’s an exception thrown from the Hibernate API.Further, let’s say we want the original exception to be chained as the cause forthe unchecked exception. For that behavior, we might write a test like that in list-ing 6.12.
@Testpublic void testFindByLastnameReturnsEmptyListUponException() throws Exception { String hql = "from Person p where p.lastname = :lastname"; String name = "Smith"; HibernateException hibernateError = new HibernateException("");
expect(factory.getCurrentSession()).andReturn(session); expect(session.createQuery(hql)).andReturn(query); expect(query.setParameter("lastname", name)).andReturn(query); expect(query.list()).andThrow(hibernateError);
replay(factory, session, query);
HibernatePersonDao dao = new HibernatePersonDao();
Listing 6.12 Testing that the session is closed even after an exception
Store injectedSessionFactory
B
Populate Query ED Create Query
Get Session
C
Make list() throw exceptionB
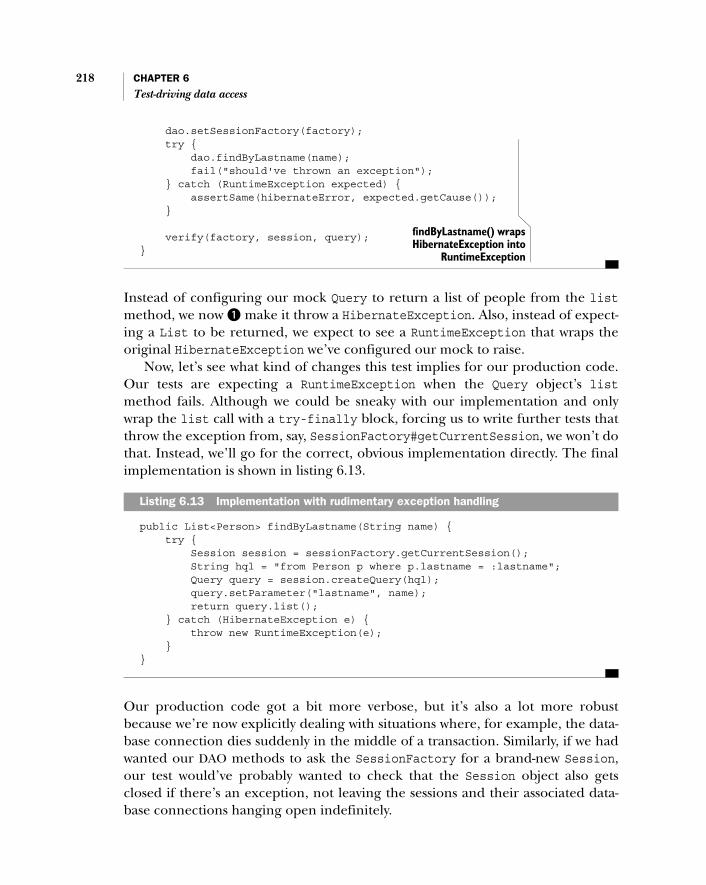
218 CHAPTER 6
Test-driving data access
dao.setSessionFactory(factory); try { dao.findByLastname(name); fail("should've thrown an exception"); } catch (RuntimeException expected) { assertSame(hibernateError, expected.getCause()); }
verify(factory, session, query);}
Instead of configuring our mock Query to return a list of people from the listmethod, we now B make it throw a HibernateException. Also, instead of expect-ing a List to be returned, we expect to see a RuntimeException that wraps theoriginal HibernateException we’ve configured our mock to raise.
Now, let’s see what kind of changes this test implies for our production code.Our tests are expecting a RuntimeException when the Query object’s listmethod fails. Although we could be sneaky with our implementation and onlywrap the list call with a try-finally block, forcing us to write further tests thatthrow the exception from, say, SessionFactory#getCurrentSession, we won’t dothat. Instead, we’ll go for the correct, obvious implementation directly. The finalimplementation is shown in listing 6.13.
public List<Person> findByLastname(String name) { try { Session session = sessionFactory.getCurrentSession(); String hql = "from Person p where p.lastname = :lastname"; Query query = session.createQuery(hql); query.setParameter("lastname", name); return query.list(); } catch (HibernateException e) { throw new RuntimeException(e); }}
Our production code got a bit more verbose, but it’s also a lot more robustbecause we’re now explicitly dealing with situations where, for example, the data-base connection dies suddenly in the middle of a transaction. Similarly, if we hadwanted our DAO methods to ask the SessionFactory for a brand-new Session,our test would’ve probably wanted to check that the Session object also getsclosed if there’s an exception, not leaving the sessions and their associated data-base connections hanging open indefinitely.
Listing 6.13 Implementation with rudimentary exception handling
findByLastname() wrapsHibernateException into
RuntimeException

Writing integration tests before the code 219
Speaking of database connections, let’s pull away from test-driving data-accessobjects with test doubles for a moment and think about the big picture. So far,we’ve executed our code only against test doubles, and we’ve configured them toexpect certain queries with certain parameters, making them return hard-codeddata. How do we know that the query we expected would work against the realdatabase schema?
The answer is, we don’t. Knowing our tools well does make for a good proba-bility that we’ve gotten a simple parameterized query correct, but we don’t reallyknow until we’ve tested that it does work with the real thing. And this leads us toour next topic—driving our data-access code with integration tests rather thanunit tests.
6.3 Writing integration tests before the code
So far, we’ve written unit tests for our data-access objects that have led to an imple-mentation that works correctly against our test doubles—mock objects we’ve con-figured expectations for based on our understanding of what the underlyingdatabase schema is (or will be) or what kind of a query the data-access code shoulduse. Mock objects are a powerful tool for testing exception situations and avoidingthe burden of having to maintain a test database. On the other hand, as already
Reducing duplication with fuzzy matching and named queriesBy configuring the expected query string in our test, we are effectively duplicatingdata between our test and production code. We could make our test reference aconstant defined in our production code but that’s not the cleanest of solutionseither, at least if you share my taste for code aesthetics.
One way of reducing this duplication is to use fuzzy matching in our tests, leav-ing the specific query string unverified. In other words, we would be relying onintegration tests to verify that the query does work. EasyMock, for example, al-lows custom argument matching, which makes the use of regular expressionsand similar techniques almost trivial. Following this approach, our mock objectswould be only checking that the production code passes the right arguments tothe persistence API.
Another useful technique for reducing duplication is the concept of namedqueries. Hibernate, among other modern ORM tools, supports externally config-ured, named queries in its API, which makes it possible to write unit tests usingtest doubles without dictating the query syntax. Again, the correctness of thequeries would need to be verified with integration tests.

220 CHAPTER 6
Test-driving data access
noted, we can’t be sure that we got our expectations correct until we execute ourdata-access code and our selected persistence framework against a real database.
Thus, we might also want to consider test-driving our data-access code with inte-gration tests.
6.3.1 What is an integration test?
Integration tests for data-access code are tests that connect the code under testinto a database. In other words, looking back at figure 6.1, on page 198, we’re test-ing everything from the persistence logic layer down to the relational database.Or, at least, down to the JDBC driver. What exactly do we mean by “at least”? Letme explain.
In other words, we’re testing the end-to-end integration of our data-accesscomponents, the persistence framework employed, and the relational database.Having said that, we might stretch the definition of “end to end” a bit by swappinga different relational database product for our tests than we have in production.This is where we need to make informed decisions about what are acceptable dif-ferences between the environment used for integration testing and the produc-tion environment.
Differences between production and testingOur production environment might be composed of a cluster of application serv-ers, connecting to a cluster of database servers running Oracle, for example, andwe might have configured our application server with a cluster-aware DataSource.In production, our persistence logic would connect to our persistence framework,which would talk to a JDBC connection, which would talk to a cluster-aware JDBCdriver, which would talk to a whole bunch of other stuff before our request wouldhit the database node. All of this might be awesome for the system’s high availabil-ity or scalability, but it’s also probably at least a couple of magnitudes slower thana test double returning hard-coded data. And speed of test execution is crucial fortest-driven development.
Not all systems require a heavy, clustered, load-balanced infrastructure for per-sistence. Some systems are perfectly suitable for a standalone relational databaseproduct running locally to the application server. Furthermore, some systemsmight deploy an embedded relational database. Even with all this variancebetween different systems, we can be reasonably confident about our persistencelogic by using some kind of a relational database.
With that in mind, let’s think about what we’re interested in testing when itcomes to data-access code. That is, what problems might’ve we missed with ourunit tests?

Writing integration tests before the code 221
What might’ve we missed with our unit tests?We want fast tests. Blazing fast. If we can’t get that, we want almost blazing fast.What we don’t need is the absolute best, identical representation of the produc-tion environment for our integration tests. Thinking about the kinds of assump-tions we make while writing pure unit tests for data-access code, we can identifythree aspects that are more or less the biggest risks:
■ Assumptions about the database schema or domain model■ Assumptions about the query statements used■ Assumptions about the object-relational mappings, if applicable
We have already eliminated things like correct use of the persistence API, becausethat’s what our unit tests are verifying. We have also eliminated the JDBC driver asa risk (as well as the underlying database), because we should be able to expectthird-party code to function properly.3 Let’s take a closer look at the three risksthat remain on our list.
The assumptions we make about the database schema or domain model arelargely about the existence of and the naming of fields and columns. This is a riskbecause the references to fields or columns in our data-access code are often lit-eral, expressed as strings rather than as part of our programming language syntax,which our compiler would be able to verify for us.
Similarly, to the compiler, our query statements are just strings and nothingmore. Our ability to get them right is solely dependent on our knowledge of thequery language syntax. In some cases, it’s also dependent on the support for thesyntax features used by the underlying database engine. In other words, we needto know our tools and, believe it or not, sometimes we make mistakes anyway.
The assumptions about our object-relational mappings are effectively an exten-sion of the first class of assumptions. For example, when we wrote unit tests forour Hibernate-backed DAO, we configured our mock objects to expect a certainkind of query statement and to return data upon that query. In doing that, wemade assumptions about the mapping of the fields used in the query. Namingconventions do help, but still we inevitably sometimes leave a typo in, only to bediscovered later when someone happens to use the functionality in a real deploy-ment environment—finding out that lastName should’ve been lastname.
So the question becomes, how do we respond to the risks that are built in tothese assumptions?
3 There are valid reasons for having tests for third-party software, including learning tests, but nonedirectly related to test-driving data-access code.

222 CHAPTER 6
Test-driving data access
How do we make up for what we’ve missed?These are all things that we might go wrong even though we’ve built up a thoroughsuite of unit tests as part of our test-driven development. The good news is thatthese are all things that we can verify well enough with any standards-compliantrelational database, even if it wouldn’t be the exact same product with which we’regoing to deploy to production. After all, what we need is to execute our JDBC codeagainst a database schema on pretty much any database that supports the SQL fea-tures we’re using; or, if we’re using an ORM framework like Hibernate, we need toexecute our persistence logic and the framework code against any database sup-ported by the framework.
Saying “any database” sounds perhaps a bit too grandiose to be accurate,though. Let’s talk a bit more about our options and their relative pros and cons inorder to help us grasp the limits of this flexibility and what properties to considerwhen selecting the database for use in our integration tests.
6.3.2 Selecting the database
When it comes to deciding which database to use in our integration tests, thereare a few factors to consider:
■ How closely the setup matches our production environment■ How easy it is to share and manage the configuration within the team■ How easy it is to access and control the database
Starting from the first…
Close enough to the production setupEven though the JDBC API is a standard and seemingly common denominatoramong any databases we connect to from a Java application, there are differencesthat matter. These differences can make our system incompatible with the produc-tion database, somewhat dysfunctional, or behave seemingly erratically in produc-tion, even though all of our integration tests are passing against the test database.
The most obvious differences are in support for identity and uniqueness-relateddatabase features. For example, the concept of database sequences is a featurecommonly used in high-end commercial databases such as Oracle and DB2 but nottoo widespread among popular open source databases.4 This can cause some grayhairs for developers, for example, when the production database is MySQL, whichdoesn’t support SEQUENCE objects but rather uses its own AUTO_INCREMENT columntype, which practically no other database supports. Furthermore, although two
4 I’m certainly hoping this will change, because the SQL:2003 standard introduced sequence generators.

Writing integration tests before the code 223
database products might have support for the same concept, the syntax for usingthe concept might be different. Sequence or identity generators and stored proce-dures are prime examples.
Because we need the same SQL syntax to work for both the production data-base and for whatever database product we use in our integration tests, a commonsolution is to pull the responsibility for generating unique identifiers from thedatabase and inside the application’s persistence layer. Such an approach alsotackles another related problem—how to figure out the assigned identifier for thenewly persisted object/row—which also requires the use of proprietary databasefeatures. Generating identifiers in the application is not necessarily a mereworkaround, however, because it does give our code base full control of the iden-tity information for our domain objects.
Effectively, we’re talking about a trade-off between architectural complexity(having a portion of our application logic reside in the database) and code com-plexity (having to implement a sequence generator). Luckily, many persistenceframeworks (including Hibernate) provide such functionality out of the box.Hibernate supports primary-key generators based on standalone algorithms aswell as database concepts like sequences and identity columns, for example.
Another common problem with compatibility between two database productsis the use of reserved words. For example, we might have a legacy system runningon MySQL for which we’d like to start writing automated integration tests using amore lightweight database, HSQLDB.5 Now, there’s a table that stores items thatbelong to ordered lists. For each row, there’s one column referring to the list itbelongs to and another column indicating the absolute position of that item inthe list. I’d wager that there’s a fifty-fifty chance that the developers have namedthe positional column “position” rather than something like “indx” or “ordinal.”The bad news is that although “position” is a perfect name for that column, it’salso a reserved word in HSQLDB. The good news is that columns and tables areeasy to rename, so this is mostly a small annoyance rather than a showstopper forusing a lighter-weight database.
There can also be more subtle differences between databases, such as the seman-tics of UNIQUE constraints for multiple columns. Although in most databases a multi-column UNIQUE constraint allows duplicates if at least one of the constituent valuesis NULL, this might not be the case with the database you’re planning to use for pro-duction or testing.
Even after all of these gotchas, it still makes sense to see if there’s a way to use asubstitute for the real database in our integration tests. After all, we’re interested
5 http://www.hsqldb.org/.

224 CHAPTER 6
Test-driving data access
in improving our productivity, and getting to use a database in our integrationtests that’s easier and faster to set up can be a huge improvement—huge enoughthat it might well be worth the trouble of changing our code base to accommo-date for differences between the database products.
And speaking of ease of use, it’s not just about one developer, but a wholeteam. In other words, our setup needs to be easily shared and maintainable.
Easily shared configurationAnother important aspect to consider when deciding which database to run ourintegration tests against is the amount of work involved in getting a fresh develop-ment environment set up and the tests running. Ideally, everything should workout of the box with no software to install manually. In practice, it’s often accept-able to be required to install software such as a database server as long as theinstallation doesn’t require too much configuration.
The problem with non-default configurations is that it suddenly becomes nec-essary to have developers maintain a custom configuration file somewhere specify-ing, for example, which port the database server is listening to and what are theusername and password for connecting to it. A much better setup is one where allconfiguration information is maintained in the configuration management sys-tem, versioned along with revisions of the software itself and not requiring a newdeveloper to perform any manual work in order to get going.
The ultimate ease of maintenance is reached when the database server isdownloaded from version control and installed by automated build scripts, if nec-essary. Such a scenario is possible with many embedded or otherwise extremelylightweight database servers such as HSQLDB or McKoi.6 We’ll soon see howHSQLDB can be embedded into our test suite, but before we go there let’s talkabout the third factor that might affect our selection of the database for our inte-gration tests.
Access and control over the serverHaving a database server for our integration tests to successfully run against is onething. It’s another thing to find out what went wrong when a test fails. Dependingon the database server, the JDBC driver, and our persistence framework, the reasonfor a given failure might be blatantly obvious from the error message or it mightrequire an elaborate debugging session. In some situations, it’s not that simple—especially when there’s no exception telling us that we’ve tried to use invalid syntaxor that there’s “no such column” in the table we attempted to query. Analyzing our
6 http://mckoi.com/database/.

Integration tests in action 225
way down to the root cause of a discrepancy between what a query returns and whatwe expected it to return can be extremely tasking unless we can easily browse thecontents of the database.
Having a local installation of a standalone database server listening for incom-ing connections on a network interface is probably the easiest of our optionswhen it comes to access. This is because we can choose to use pretty much anygraphical or command-line tool for browsing the database, executing SQL state-ments against it, and so forth. Embedded databases fare worse in this regard,because we typically need to access them through the Java API in-process ratherthan be able to connect remotely with our favorite graphical database browser.Then there’s the middle ground of an embedded database to which the applica-tion still connects over a network connection.
My personal preference is toward using a pure embedded database likeHSQLDB because of its ease of integration with the test suite and zero installation.There are some downsides to using HSQLDB in embedded mode as we’ve justlearned, of course, but these can be mitigated to a large degree by building simpletools for dumping the contents of the database to an external file, for example.Furthermore, there’s hardly anything faster than HSQLDB for integration-testingdata-access objects written in Java.
We’re now going to look more closely at integrating HSQLDB into our integra-tion test suite and test-drive a bit of data-access code. It’s still not rocket science,though, and we’ll proceed in small steps as usual.
6.4 Integration tests in action
In this section, we’ll add more functionality into the Hibernate-based PersonDaoimplementation we started developing earlier in this chapter. The ultimate pur-pose in this is to see first-hand what kind of infrastructure we might have for inte-gration testing and what kind of obstacles we need to overcome. Even thoughwe’re using Hibernate here as our persistence framework, after we’re throughwith our examples, you’ll be well-equipped to establish a similar setup for yourspecific technology stack.
We’ll begin by writing a simple integration test for persisting a transient objectinto the database. Once we’ve sketched an outline for the test, we’ll look intousing an in-memory database and learn how to create the database schema for atest database built from scratch. After we’ve gotten that test implemented andrunning green, we’ll move on to discuss how we can keep our test data intact fromone test to another using transactional fixtures.
That’s a lot to cover, so let’s get started!
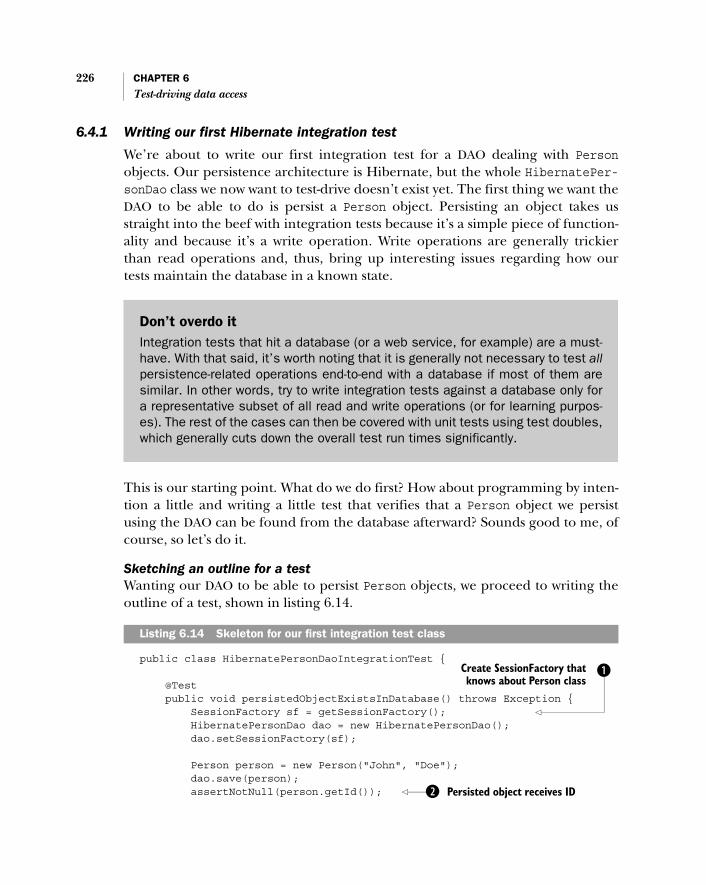
226 CHAPTER 6
Test-driving data access
6.4.1 Writing our first Hibernate integration test
We’re about to write our first integration test for a DAO dealing with Personobjects. Our persistence architecture is Hibernate, but the whole HibernatePer-sonDao class we now want to test-drive doesn’t exist yet. The first thing we want theDAO to be able to do is persist a Person object. Persisting an object takes usstraight into the beef with integration tests because it’s a simple piece of function-ality and because it’s a write operation. Write operations are generally trickierthan read operations and, thus, bring up interesting issues regarding how ourtests maintain the database in a known state.
This is our starting point. What do we do first? How about programming by inten-tion a little and writing a little test that verifies that a Person object we persistusing the DAO can be found from the database afterward? Sounds good to me, ofcourse, so let’s do it.
Sketching an outline for a testWanting our DAO to be able to persist Person objects, we proceed to writing theoutline of a test, shown in listing 6.14.
public class HibernatePersonDaoIntegrationTest {
@Test public void persistedObjectExistsInDatabase() throws Exception { SessionFactory sf = getSessionFactory(); HibernatePersonDao dao = new HibernatePersonDao(); dao.setSessionFactory(sf);
Person person = new Person("John", "Doe"); dao.save(person); assertNotNull(person.getId());
Listing 6.14 Skeleton for our first integration test class
Don’t overdo itIntegration tests that hit a database (or a web service, for example) are a must-have. With that said, it’s worth noting that it is generally not necessary to test allpersistence-related operations end-to-end with a database if most of them aresimilar. In other words, try to write integration tests against a database only fora representative subset of all read and write operations (or for learning purpos-es). The rest of the cases can then be covered with unit tests using test doubles,which generally cuts down the overall test run times significantly.
Create SessionFactory thatknows about Person class
B
Persisted object receives IDC

Integration tests in action 227
Session s = sf.openSession(); Object copy = s.get(Person.class, person.getId()); assertEquals(person, copy); }}
We first create an instance of the HibernatePersonDao class and B configure itwith a Hibernate SessionFactory that knows of the Person class. We’ve omittedthe implementation of the getSessionFactory method so far—we’re just pro-gramming by intention for now.
Next we proceed to the “act” portion of our test in listing 6.14. We create a new,transient Person object and ask the HibernatePersonDao to save it. We then C ver-ify that the object received an ID and that D an identical Person object can be foundfrom the database with that specific ID.
That seems like a sufficient test for verifying that the DAO successfully persists theobject through the Hibernate API into the database. Now, let’s look at how wecould implement the missing getSessionFactory method.
Configuring Hibernate for testingThe problem we’re facing is that we need to have two different Hibernate config-urations—one for production and one for integration testing. And we need to beable to swap in the testing configuration transparently and, preferably, withoutduplicating data unnecessarily between the two configurations.
One solution that I’ve been using is to maintain the production configurationin the standard hibernate.properties file in the class path and the differing prop-erties in a testing-only configuration file named hibernate.test.properties. Thetrick is to have the testing configuration override the production configurationwhere there is overlap. This helps us minimize the risk of finding a configuration
John Doe now in database
D
Beware of reusing a Session in testsNotice how in listing 6.14 we obtain a new Session for verifying that the givenPerson object was indeed persisted. We could’ve just asked the SessionFac-tory for the current Session instead of creating a new one, but using an entirelyseparate Session is a more reliable technique. Using the same Session cansometimes hide a nasty bug when there is transactional behavior involved be-cause all changes are visible within a given Session, regardless of whether ornot those changes have been committed as part of the transaction.

228 CHAPTER 6
Test-driving data access
issue only after deploying the application to a testing environment—we’ll catchmost of our Hibernate-related integration problems with data access already inthe developer’s workspace.
Now, let’s look at listing 6.15 to see how we can implement the missing get-SessionFactory method from listing 6.14 and realize the approach I’vedescribed.
public class HibernatePersonDaoIntegrationTest {
...
private SessionFactory getSessionFactory() throws Exception { return createConfiguration().buildSessionFactory(); }
private Configuration createConfiguration() throws Exception { Configuration cfg = loadProductionConfiguration(); loadTestConfigInto(cfg, "/hibernate.test.properties"); return cfg; }
private Configuration loadProductionConfiguration() { return new Configuration().configure(); }
private void loadTestConfigInto(Configuration cfg, String path) throws Exception { Properties properties = loadPropertiesFrom(path); Enumeration keys = properties.keys(); while (keys.hasMoreElements()) { String key = (String) keys.nextElement(); String value = properties.getProperty(key); cfg.setProperty(key, value); } }
private Properties loadPropertiesFrom(String path) throws Exception { InputStream stream = getClass().getResourceAsStream(path); assertNotNull("Resource not found: " + path, stream); Properties props = new Properties(); props.load(stream); stream.close(); return props; }}
Listing 6.15 Configuring a SessionFactory for tests
Load production configfrom classpath
B
Override individual propertiesD
BLoad production configfrom classpath
Load test config from file C

Integration tests in action 229
In order to obtain a SessionFactory, we need a Configuration object that knowshow to create one. In listing 6.15, we first B load a Configuration object basedon the default production configuration from the hibernate.properties file sittingsomewhere in our class path. We then pass on the production configurationobject to another method that C loads the test configuration on top of the pro-duction configuration, D overriding any preexisting properties.
That’s quite a bit of code just to get Hibernate to connect to our test database,but the good news is that we’ll only need to write this code once. Speaking of con-necting to the database, we should probably specify the test configuration forHibernate at this point so that we’re not letting our integration tests hit a slowremote database or (gasp) the production database.
Configuring an in-memory HSQLDB databaseThe next question is, if our test configuration file should override databaseconnection-related properties, what exactly are those properties? In our case, wewant the integration tests to run against an in-memory HSQLDB database.Assuming that HSQLDB isn’t also our production database, that means we needto override at least the SQL dialect and a number of properties prefixed withhibernate.connection. Listing 6.16 lists a sample properties file that doesthe trick.
hibernate.dialect=org.hibernate.dialect.HSQLDialecthibernate.connection.driver_class=org.hsqldb.jdbcDriverhibernate.connection.url=jdbc:hsqldb:mem:testdbhibernate.connection.username=sahibernate.connection.password=hibernate.show_sql=truehibernate.hbm2ddl.auto=create-drop
The configurations in listing 6.16 aren’t much different than for a productionsetup—we just need to tell Hibernate which product-specific dialect of SQL togenerate, where the database is located (the JDBC URL), which JDBC driver to usefor connecting to the database, and what user account to use. The last configura-tion, hibernate.show_sql, isn’t required but is useful for testing purposes. Byenabling the show_sql feature, Hibernate will print out the generated SQL state-ments as it executes them, which can be extremely helpful in figuring out whythings don’t work the way we expect.
The hibernate.connection.url property’s value, jdbc:hsqldb:mem:testdb,is basically saying that we want to connect to an in-memory HSQLDB databasenamed “testdb.” If such a database doesn’t exist already in the running JVM,
Listing 6.16 Hibernate configuration file for an in-memory HSQLDB

230 CHAPTER 6
Test-driving data access
HSQLDB creates one. Using an in-memory database also means that, becausewe’re creating the database from scratch, there are no tables to begin with. Some-how, we need to initialize our database schema when the database is created.
Finally, with the hibernate.hbm2ddl.auto value of create-drop, we’reinstructing Hibernate to automatically create and drop the database schema whenthe SessionFactory is created and closed, respectively. That’s not the only way togo about creating the database schema, though. Let’s see what our options are.
6.4.2 Creating the database schema
The database schema is part of the code base. With this in mind, and consideringthat the database schema should be versioned along with the rest of the system,we quickly come to the conclusion that we need to have a single representation ofthe schema in a file (or files) that’s under version control.
The universal SQL scriptThe traditional solution has been to maintain the DDL (data definition language)statements used for creating the schema in an SQL script file (or a set of SQLscripts). This has many benefits: it’s easy to put under version control, and it usesthe familiar SQL statements that the database administrator and the developersare already familiar with.
The downside with external SQL scripts is two-fold. First, we need some way toexecute such scripts from Java code in order to set up the schema for our integra-tion tests. Second, if we’d like to use a different database for integration tests thanin production, the DDL statements must also be compatible between the twoproducts. Otherwise, we’ll have to maintain two schema-definition files, and that’sjust asking for trouble.
The first of these issues can be tackled easily by hacking together a utility thatcan parse SQL statements from a file and feed them to the JDBC API. The second,however, is trickier. Unless you happen to be using Hibernate, that is.
Letting Hibernate take care of everythingFortunate for those of us who are using Hibernate, Hibernate offers a way to auto-matically export the schema into the configured database when the SessionFac-tory is created. Hibernate accomplishes this based on the mapping documents.The good news is that the only thing required from the developer is to add thehibernate.hbm2ddl.auto=create-drop property to our integration test configu-ration. The not-so-good thing about it is that the schema derived from mappingfiles is typically not identical to what we’d create by hand.
For example, Hibernate by default might create a VARCHAR(255) column for afield of type java.lang.String, whereas we might prefer an arbitrary long data

Integration tests in action 231
type instead of one limited to 255 characters. This has caused more than a fewgray hairs in the past: Some database products silently crop the incoming datawhen it doesn’t fit into the allocated column length. The defaults can be overrid-den in the mapping documents by defining the sql-type attribute for each col-umn for which we want to explicitly declare its type. This may or may not be aproblem for you, depending on whether your production database and your testdatabase both support the same data type.
Before we continue with our integration test cycle by implementing the miss-ing production code, there’s one more thing about the SQL scripts I feel youshould know. I call it incremental DDL scripts.
Incremental DDL scriptsIf you’ve ever been elbow-deep in grease on a production deployment gonewrong, you’ve probably witnessed a database rollback. It’s relatively simple to rollback application code—just take the current stuff out and put something else backin. It’s not that simple with the database, however, because the database is not justthe schema. It’s also the data stored in that schema, and it’s that data that makesthings more difficult—we can’t just throw away all of the data and create theschema again from scratch. This is where incremental DDL scripts come into play.
The fundamental idea of incremental DDL scripts is that every big schema canbe created in small steps, adding one column or one table at a time—and thatthese little steps are often reversible! If we define the database schema as anordered sequence of small DDL scripts “patching” the current version of theschema in a database, we can easily re-create an arbitrary version of the schema,and we can revert from a newer version back to an older version of the schemawithout losing all of our data.
Probably the first public incremental DDL script implementation I’ve seen ismigrations in the Ruby on Rails web framework.7 This is a Java-oriented book,however, so let’s not talk about Rails migrations. The closest thing to the incre-mental DDL scripts idea I’ve seen in the Java world is an open source projectnamed dbdeploy.8
The dbdeploy tool is a database change-management tool that generates anSQL script from a set of smaller SQL scripts. The small patch files are sorted bytheir numerical prefix that identifies the patch file’s version. For instance, wemight have a directory structure of delta scripts such as that shown in figure 6.6.
7 http://wiki.rubyonrails.com/rails/pages/UnderstandingMigrations.8 http://dbdeploy.com/.

232 CHAPTER 6
Test-driving data access
In our example in figure 6.6, we have four delta scripts that dbdeploy will apply inthe order specified by the numerical prefix. Each of the four delta files would thencontain plain ol’ SQL statements and, optionally, an undo block that dbdeployapplies when rolling back to an older version of the schema. For instance, the deltafile named 00002_create_order_items_table.sql might look like listing 6.17.
CREATE TABLE ORDER_ITEMS ( ID INTEGER NOT NULL, ORDER_ID INTEGER NOT NULL, ITEM_DESCRIPTION VARCHAR(100));ALTER TABLE ORDER_ITEMS ADD (CONSTRAINT PK_ORDER_ITEMS) PRIMARY KEY (ID);ALTER TABLE ORDER_ITEMS ADD (CONSTRAINT FK_ORDER_ITEMS_ORDER) FOREIGN KEY (ORDER_ID) REFERENCES ORDER(ID);
--//@UNDO ALTER TABLE ORDER_ITEMS DROP CONSTRAINT FK_ORDERS_ORDER_ITEMS;DROP TABLE ORDER_ITEMS;
The dbdeploy tool would read the SQL statements in listing 6.17 until it encoun-ters a row containing the B magic string --//@UNDO, which effectively says, “that’sall there is for updating the schema—the rest of the file is rollback statements.”
Now, dbdeploy can be pointed to a database and a set of delta scripts, and it willgenerate migration scripts for that specific database. But how does dbdeploy knowwhich delta files have already been applied? For that purpose, we need to maintain
Listing 6.17 Example delta script with an @UNDO-block for rollback
Figure 6.6Example directory structure with a set of delta change scripts for creating the database schema incrementally. The four scripts in the directory src/db/deltas will be applied in order according to the numerical prefix.
Everything after this line is rollback
B

Integration tests in action 233
a dedicated table in the database that contains information about the deltasapplied to that specific database. We need to create the table manually; but thedbdeploy distribution contains the necessary SQL scripts for doing that, so we justneed to execute it once when creating a database.
An incremental DDL-script solution such as dbdeploy is definitely worth con-sidering. It is yet another tool to learn, but it also gives a number of benefits thatare hard to argue. For this chapter’s purposes, however (and especially for ourintegration test example, which we still haven’t finished!), we’ll go with the Hiber-nate solution, letting it drop and create our database schema behind the scenes.Now, let’s pick up our integration test again and finally make it pass.
6.4.3 Implementing the production code
Let’s recap what our test back in listing 6.14 was expecting of us. We wanted theHibernatePersonDao class, configured with a proper SessionFactory object, tosave the given Person object so that it is indeed persisted into the underlying data-base behind the SessionFactory. Listing 6.18 presents a sufficient implementa-tion in all of its glory.
public class HibernatePersonDao {
private SessionFactory sessionFactory;
public void setSessionFactory(SessionFactory sessionFactory) { this.sessionFactory = sessionFactory; }
public void save(Person person) { Session session = sessionFactory.getCurrentSession(); Transaction tx = session.beginTransaction(); session.save(person); tx.commit(); }}
All that our DAO implementation needs to do to make the test pass is to B storethe SessionFactory that was passed in into a private field and in the savemethod use it for the persistence operation. In the save method, we C obtain anexisting Session from the SessionFactory (or let it create a new one if there’s noexisting session), D begin a transaction, invoke save(person) on the Sessionobject, and commit the transaction.
Listing 6.18 Skeleton for our first integration test class
BHang on to SessionFactory
CObtain existingsession, if applicable
Persist Person within transaction
D

234 CHAPTER 6
Test-driving data access
Speaking of transactions, let’s look at a concept called transactional fixtures andwhy we should consider using such things.
6.4.4 Staying clean with transactional fixtures
It’s a piece of cake to test read operations. They’re straightforward: We have somedata in the database, and the read operation returns objects that represent thatdata (or a subset of that data). Write operations change the state of the database,so we need to check that the expected change happened. They’re also difficultbecause the state of the database is not the same anymore for the next test. If wedon’t make sure that the database’s state is retained from one test to another, theread operations quickly become part of this non-trivial problem as well. So, howdo we keep the state of the database from changing?
We could, of course, implement a set of undo operations into our teardownmethods for each test, essentially undoing all changes made to the integration testdatabase during the execution of the previous test method. The complexity ofsuch undo-logic would soon explode in our faces, however, so we need anothersolution. Possibly our best option is something we call a transactional fixture.
A transactional fixture is a fixture—the state upon which our test methodsoperate—that gets rolled back into its original state automatically at teardown. Asthe name implies, we use the persistence framework’s and the database’s transac-tional capabilities for implementing this. In other words, we literally begin a data-base transaction in our setup method and perform a rollback in our teardownmethod. Listing 6.19 shows how this can be done with our Hibernate example.
public class HibernatePersonDaoIntegrationTest extends HibernateIntegrationTestCase {
private SessionFactory sf; private Transaction tx; ...
@Before public void setUp() throws Exception { sf = getSessionFactory(); ... tx = sf.getCurrentSession().beginTransaction(); tx.begin(); }
Listing 6.19 Integration test rolls back changes using a transactional fixture
Begin transaction in setup
B

Populating data for integration tests 235
@After public void tearDown() { tx.rollback(); }
...}
We begin each test execution by B starting a Transaction for the Session insidethe setUp method. From this point onward, all database operations through theassociated Session object are part of the database transaction and will be rolledback when we later C invoke rollback on the Transaction object in our tear-Down method.
The fundamental advantage of using transactional fixtures over having our testsuite constantly populate the database into a known state before each and everytest is speed. Importing data from an external file can take a lot of time, and evenwith small data sets, the number of tests accumulates the problem with slower testexecution. With transactional fixtures, we can choose to populate our test data-base just once before running our tests, knowing that our tests will always leavethe database exactly as they found it.
The only significant disadvantage of transactional fixtures is that they cannotbe used for testing transactional behavior. That is, if our test is supposed to testthat a certain piece of code commits the ongoing transaction, it’s too late for us tocry for a rollback in teardown.
If transactional fixtures help us retain the state of the database throughout ourtest run, how can we populate the known state into the database in the first place?Let’s talk about populating test data into a database for our integration tests.
6.5 Populating data for integration tests
Let’s say we’re writing an integration test for a read operation such as findByLast-name. Because we’re no longer faking the results coming from the persistenceframework, we need some data in the database. A somewhat classic but brutal wayof accomplishing this has been to execute SQL scripts with a bunch of INSERT state-ments. Although technically a feasible solution, SQL scripts are hardly the most user-friendly and far from the most portable way of populating our test database.
We’d very much like some alternatives, and, luckily, we have at least a couple:Hibernate, if applicable, and an open source framework named DbUnit. Let’stake a closer look at these two.
Rollback in teardown
C

236 CHAPTER 6
Test-driving data access
6.5.1 Populating objects with Hibernate
If we happen to be using an object-relational mapping framework like Hibernate,why not take advantage of the capability of creating object graphs in plain Javaand of having them automatically persisted into the database? In many aspects,representing the state of the database in the same language—and same loca-tion—as the rest of our test assets makes perfect sense. Let’s look at an example inlisting 6.20.
@Testpublic void testFindingAllSmiths() throws Exception { List<Person> theSmiths = new ArrayList<Person>(); theSmiths.add(new Person("Alice", "Smith")); theSmiths.add(new Person("Billy", "Smith")); List<Person> allPeople = new ArrayList<Person>(); allPeople.addAll(theSmiths); allPeople.add(new Person("John", "Doe"));
persist(allPeople); assertEquals(theSmiths, dao.findByLastname("Smith"));}
private void persist(List<? extends Object> objects) { Session s = sf.getCurrentSession(); for (Object object : objects) { s.save(object); } s.flush(); }
The test for the findByLastname method on our familiar HibernatePersonDaoclass starts by B creating a bunch of Person objects and then C using the Hiber-nate API for persisting them into the database, flushing the session to make surethe objects are saved right away. Then, it uses the DAO to find the subset of thosePerson objects—now records in a database table—that have the last name Smith.
Notice how the test data in this test is right next to the production code we’reinvoking. Contrast this to a situation when our test would call the finder methodand expect a list containing Alice and Billy Smith. Why is that so? Because theexternal SQL file that’s associated with this particular test class has insertedexactly those two Smiths into the database before this test runs. When the testdata and test logic are separated, it’s much harder to figure out what’s going onwhen a test fails.
Listing 6.20 Integration test populating data using the Hibernate API
Create objectsB
Persist objects with Hibernate API
C

Populating data for integration tests 237
NOTE Although we’re populating the database inside a test method in list-ing 6.20, it is possible to use the same Hibernate API for populating thedatabase just once in a suite or class-level setup.
Having said all that, there are also some downsides to using the API of an object-relational mapping tool to populate our test data. For instance, by relying solelyon the object-relational mappings and the persistence framework, we might bemissing problems that would become blatantly obvious if we had populated thedata using raw SQL or some other lower-level format. Also, not all projects useORM frameworks like Hibernate, so another alternative for plain SQL scripts is stillwarmly welcomed. Yet another potential downside is that it’s harder to test-drivewhen we might not yet have a suitable data-access object to use for populating thedata we need!
For a couple of years, and for many projects, that other alternative has been atool named DbUnit.9
6.5.2 Populating data with DbUnit
DbUnit is an all-around workhorse for testing database code with externallydefined test data. It can be used for populating the contents of a database fromdata files in various formats—most notably two alternative forms of XML—as wellas for exporting the contents of a database into a data file. Furthermore, DbUnitlets us perform comparisons between two data sets, typically an external data fileand the current contents of a database. We’re not going too deep into usingDbUnit (the project’s website offers sufficient documentation and examples forgetting started), but let’s take a brief glance at how populating test data fromexternal files works.
Getting to a known stateDbUnit provides a base class named DatabaseTestCase for us to extend. Thisbase class makes sure to populate the appointed database with the appointed dataset in the setup method. The developer’s responsibility is to provide the base classwith the database connection and the data set through a pair of abstract methods.
In practice, though, it makes sense to create an abstract base class of our ownfor our DbUnit tests, isolating the database connection and data-loading detailsinto a single place rather than dealing with them everywhere. With that in mind,listing 6.21 illustrates what such a class might look like.
9 http://dbunit.sf.net.

238 CHAPTER 6
Test-driving data access
import java.io.InputStream;import java.sql.*;import org.dbunit.database.*;import org.dbunit.DatabaseTestCase;import org.dbunit.dataset.IDataSet;import org.dbunit.dataset.xml.FlatXmlDataSet;import org.junit.Before;
/** * Abstract base class for integration tests using DbUnit for * populating the database to a known state before each test run. */public abstract class DbUnitIntegrationTestCase extends DatabaseTestCase {
protected Connection getJdbcConnection() throws SQLException { // obtain a JDBC connection to the database }
@Override protected IDatabaseConnection getConnection() throws Exception { return new DatabaseConnection(getJdbcConnection()); }
@Override protected IDataSet getDataSet() throws Exception { String resource = getClass().getSimpleName() + ".initial.xml"; InputStream stream = getClass().getResourceAsStream(resource); assertNotNull("Resource " + resource + " not found.", stream); return new FlatXmlDataSet(stream); }}
The two responsibilities of the developer have been fulfilled by overriding twoabstract methods from DatabaseTestCase. In listing 6.21, we first B create a JDBCconnection using whatever means necessary (using java.sql.DriverManager, forexample) and C wrap the connection object with a DbUnit-specific Database-Connection object. The second responsibility, appointing the initial data set forDbUnit to populate to our database, is implemented by D loading an XML filefrom the class path based on the test class’s name and E parsing the file as a flatXML data set.
Listing 6.21 Abstract base class for DbUnit-based integration tests
Create JDBC connection B
Wrap connection for DbUnit
C
Load data set from disk
D
Feed data to DbUnitE

Populating data for integration tests 239
With this base class, we can extend from DbUnitIntegrationTestCase, createan XML file to describe the data set our tests should begin with, and start writingthe Java code for executing our data-access code against the same database con-nection that we gave to DbUnit. Listing 6.22 shows an example of a concrete testclass that extends our abstract base class.
import java.sql.*import java.util.*;import org.apache.commons.dbcp.BasicDataSource;import org.junit.*;
public class PersonDaoDbunitIntegrationTest extends DbUnitIntegrationTestCase {
private List<Person> expectedList;
@Before @Override public void setUp() throws Exception { super.setUp(); expectedList = new ArrayList<Person>(); expectedList.add(new Person("Al", "Freeman")); expectedList.add(new Person("Bill", "Brewster")); expectedList.add(new Person("Juan", "Alvarez")); }
@Test public void testFindAll() throws Exception { JdbcTemplatePersonDao dao = new JdbcTemplatePersonDao(); dao.setDataSource(new BasicDataSource() { @Override public Connection getConnection() throws SQLException { return getJdbcConnection(); } }); assertEquals(expectedList, dao.findAll()); }}
After B letting DbUnit populate the database from an XML file named after thetest class, we C create a List of Person objects named expectedList, then Dconfigure our data-access code to connect to the same database our base classappointed to DbUnit, and E assert that the List returned by the findAllmethod matches our expectations. We’re basically assuming (correctly) that
Listing 6.22 Concrete test class extending the base class from listing 6.21
BInvoke superclass,populating database
Set up expected result
C
Configure code under test D
Match expected with actual E

240 CHAPTER 6
Test-driving data access
DbUnit will have populated “Al Freeman”, “Bill Brewster”, and “Juan Alvarez” intothe database before our test method runs. The assumption is correct as long aswe’ve placed a file named PersonDaoDbUnitIntegrationTest.initial.xml some-where in our class path where the class loader can find it. How about peeking atexactly what the data file should contain?
Defining a data setListing 6.23 illustrates how we would tell DbUnit to populate Al, Bill, and Juaninto a table named “employees” and their salaries into a table named “salaries”using DbUnit’s so-called “flat” XML format.
<?xml version='1.0' encoding='UTF-8'?><dataset> <employees employee_uid="1" start_date="2005-01-01" ssn="000-29-2030" first_name="Al" last_name="Freeman" /> <employees employee_uid='2' start_date="2005-04-04" ssn="000-90-0000" first_name="Bill" last_name="Brewster" /> <employees employee_uid='3' start_date="2006-06-03" ssn="000-67-0000" first_name="Juan" last_name="Alvarez" /> <salaries employee_uid="1" salary="45000" /> <salaries employee_uid="2" salary="50000" /> <salaries employee_uid="3" salary="47000" /></dataset>
The flat XML format works by encoding each row to be populated into a singleXML element under the dataset root element. The element’s name identifies thename of the table into which DbUnit should insert the record, and each attributefor the element represents a column name-value pair. DbUnit is smart enough tofigure out basic type conversions based on the data type information provided bythe JDBC connection. For example, the attribute values for the start_date col-umn are nicely parsed into java.sql.Date objects if the column’s data type hasbeen defined as DATE.
Defining our test data in an XML format such as that shown in listing 6.23translates to easier maintenance, as we don’t need to change our test data whenswitching our test database, for example. Furthermore, the XML format is easierto read than SQL statements. The main downside to this approach of definingour test data in external files the way we’ve seen in listings 6.22 and 6.23 is thatwe’ve duplicated our test data in two places. One way to get rid of this kind of
Listing 6.23 Sample data set in the flat XML format

Populating data for integration tests 241
annoyance when testing write operations is to use DbUnit’s provided data setassertions, which we’ll look at next.
Comparing data sets with DbUnitWe can make effective use of DbUnit’s ability to export the contents of a databaseas an IDataSet object in the context of comparing two data sets with each other.Compared to going back and forth between an XML document and Java sourcecode, it is somewhat more natural to express the expected contents of the data-base in the same format we use to define the initial data.
There are three steps to accomplishing this—the first of which is to export thecurrent contents of the database. That’s as simple as taking the same connectionobject we’ve given DbUnit for populating initial data and asking it to create anIDataSet for us:
IDataSet fullDatabase = getConnection().createDataSet();String[] tables = { "apples", "oranges" };IDataSet justSomeTables = getConnection().createDataSet(tables);
Next, we need to get another IDataSet to compare the data set with. We can employthe same code we added earlier to our base class, after a small refactoring:
@Overrideprotected IDataSet getDataSet() throws Exception { return getDataSet("initial");}
protected IDataSet getDataSet(String name) throws Exception { String resource = getClass().getSimpleName() + "." + name + ".xml"; InputStream stream = getClass().getResourceAsStream(resource); assertNotNull("Resource " + resource + " not found.", stream); return new FlatXmlDataSet(stream);}
By extracting the logical name of the data-set file into a method parameter, wecan use the overloaded getDataSet(String) method in our test methods forreading an arbitrary data file from the disk and parse it into an IDataSet.
Now that we know how to get two data set objects to compare—the actualand the expected—we just need to compare them somehow. DbUnit offers ahelping hand in the form of the Assertion class, which defines two overloadedassertion methods:
void assertEquals(IDataSet expected, IDataSet actual);void assertEquals(ITable expected, ITable actual);
The former compares two data sets, whereas the latter compares two individualtables. The latter is useful when we’re only interested in the contents of a

242 CHAPTER 6
Test-driving data access
specific table. By comparing one table, we can maintain just the specific part ofthe full database contents in our “expected” data-set file that we’re interested in.Perhaps a more common approach to narrowing the comparison to what’srelevant is, though, to ask DbUnit to export only certain tables rather than everytable in the database.
With these two assertion methods at our disposal, and with the code snippets forexporting the current contents of the database and for reading a data set from thefile system, we could now proceed to write a test such as that shown in listing 6.24.
@Testpublic void testSavePerson() throws Exception { JdbcTemplatePersonDao dao = new JdbcTemplatePersonDao(); dao.setDataSource(new BasicDataSource() { @Override public Connection getConnection() throws SQLException { return getJdbcConnection(); } }); Person person = new Person("John", "Doe"); dao.save(person);
IDataSet expectedData = getDataSet("afterSavePerson"); String[] tables = new String[] { "employee", "salary" }; IDataSet actualData = getConnection().createDataSet(tables); Assertion.assertEquals(expectedData, actualData);}
After configuring and invoking some data access code, we B read the expectedcontents of tables “employee” and “salary” from a file, C ask DbUnit to extractthe current contents of tables “employee” and “salary” from the database, and Dcompare the two data sets to find out any discrepancies. Pretty simple, eh?
That’s about all we need to know about DbUnit to get started. It’s a simpletool that can make our lives a lot easier. It is, of course, up to you to decidewhether to use DbUnit or not. In fact, we’ve now seen a lot of unit-testing andintegration-testing techniques for data-access code, but we haven’t yet discussedhow exactly these two mix in our development process. The main question iswhether we should drive the development of our data-access code with unit orintegration tests.
Listing 6.24 Using DbUnit for comparing data sets
Read expected “after” state from disk B
C
Read state from database
Ask DbUnit to do hard work D

Should I drive with unit or integration tests? 243
6.6 Should I drive with unit or integration tests?
In a traditional development process, we proceed through stages of testing fromunit-level tests to integration tests to system-level tests. But test-driven develop-ment is not a traditional development process. To start with, we don’t have any-thing to test until after we’ve written our first test. From the perspective of gettingproduction code implemented, there’s little difference between driving with unittests using test doubles and driving with integration tests that hit a database. Hav-ing said that, there are differences in what we can do with each type of test andwhat kind of a rhythm our development follows.
Let’s first see at what our TDD cycle would look like if we were to use integra-tion tests to drive development; then, we’ll discuss how integration tests and unittests mesh in our overall process.
6.6.1 TDD cycle with integration tests
Perhaps you’ve noticed that integration tests require some plumbing before wecan get down to business. Building enough plumbing to get the first test writtencan take time—especially when using a specific tool or technology for the firsttime—but once the basic plumbing is in place, its evolution follows the same pathas the rest of our test code through small refactorings and removing duplicationby moving shared functionality toward utility classes or higher up in the inherit-ance tree.
Integration tests with plain Java don’t differ from regular unit test–based TDD,except that the tests are somewhat slower to run. Integration tests making use ofDbUnit, however, are more interesting. What happens once we have the necessaryplumbing in place for DbUnit is akin to the following sequence:
1 Write a test method.
2 Run the test, getting a complaint about missing data file(s).
3 Edit the data file(s).
4 Run the test, getting a complaint about missing table, column, and so on (ifapplicable).
5 Implement a change to the database schema (if applicable).
6 Run the test, getting the expected complaint about missing functionality.
7 Implement functionality.
8 Run the test, getting a green bar.

244 CHAPTER 6
Test-driving data access
This isn’t radically different from regular unit test–based TDD, but it includessteps that imply a longer round-trip between two green states. In other words, ourcycle becomes longer. Also worth noting is that, because we might need to makechanges to the database schema, we might need to do some code as well as data-base refactorings10 before getting to a form where it’s straightforward to intro-duce the new functionality.
In my experience, integration tests can be used to test-drive data-access codeeffectively as long as the toolset is in place—a persistence framework that doesmost of the plumbing, a test harness that facilitates adding new tests easily, and adatabase that’s fast to work with. That’s not to say that we should start runningaround with just one hammer in hand, though.
6.6.2 Best of both worlds
As you know, integration tests can yield valuable information about our data-access code working properly with a database—something that we verify in unittests only indirectly, relying on our knowledge of how the persistence framework’squery language works, how we should use the API, and so forth.
One of the biggest downsides with integration tests is that the tests are slower toexecute. The slowness starts to show with only a handful of tests; and with the fullintegration test suite taking up to 10 minutes to execute, the temptation to commitchanges before knowing their full effect on the health of the code base increases.
Another downside of integration tests as a driver for development is thatthey’re incapable of simulating certain situations, and writing a unit test using testdoubles is often easier than setting up the test data for an integration test. Forinstance, it’s pretty darn difficult to make a database connection fail temporarilyjust at the right time, although it’s trivial to simulate the symptoms (an exception)with test doubles. Further, it’s generally easier to wire a test double to return a setof domain objects than it is to populate a database with equivalent data.
With these trade-offs in mind, we don’t want to make an either-or decision;instead, we want to find some kind of golden middle ground that mixes the bestof both worlds. Although it makes sense to have a degree of consistency withregard to the kinds of tests our team writes for data-access code, it also makessense to keep both tools in our bag and be able to pick the one most suitable forthe task at hand.
10 Scott Ambler’s and Pramodkumar Sadalage’s Refactoring Databases (Addison-Wesley, 2006) is the primeresource on the topic of evolving a database schema in a disciplined manner.

File-system access 245
Before summing up what we’ve gone through in this chapter so far, let’s take aquick look at a domain of data access we haven’t yet touched—the good ol’ filesystem.
6.7 File-system access
Remember Michael Feathers’ definition of a unit test, which we saw earlier in sec-tion 6.2? Among other things, the definition says that a unit test does not touch thefile system; a unit test can run in parallel with other unit tests; and a unit test doesn’trequire you to do special things to your environment to run it. The main reasonsfor having these rules for unit tests are speed and maintainability. Now, keeping thegoal of fast test execution and maintainable test code in mind, what should we dowith file-system access?
In short, we should avoid file system access as far as possible, instead abstract-ing files with Java’s streams or the java.io.Writer and java.io.Reader inter-faces. After all, most of the time we’re interested in the data inside the file, not thefile itself, and streams are well-suited for feeding data to our classes.
The question remains, then, how should we test that thin slice of our code baseresponsible for adapting the File API to our application’s needs? We’re going toanswer that exact question in this section. Let’s start with a little story from a pastproject of mine.
6.7.1 A tale from the trenches
I recently faced a requirement for downloading content updates in the back-ground over the network from another server. The background download compo-nent was supposed to first download the new packages into a temporary file, applysome integrity checks, and then copy the downloaded package over the previousversion of the package. This led to the introduction of a ContentStorage inter-face, which the ContentDownload class used for writing files and moving themaround inside the system’s content directory structure.
By faking the ContentStorage interface in unit tests, we avoided file accessand the trouble of configuring file paths for the real storage implementation andcleaning up afterward. Furthermore, we only needed to deal with the file systemin a handful of focused tests for the real, disk-based ContentStorage implementa-tion, which limited the number of slow tests performing file I/O and the need toclean up the file system after each test.
Realizing that file access can be made to support testing is the first step towardimproved testability. In the next section, before wrapping up this chapter, we’lllook at a handful of practical tips for improving our file-access code’s testability.

246 CHAPTER 6
Test-driving data access
6.7.2 Practices for testable file access
Following good design principles generally leads to testable designs. There’ssomething about file access, however, that somehow seems to make us drop ourdesign awareness when it comes to reading from or writing to the file system. Forsome reason, we Java developers have traditionally not given a second thought to,for example, using the java.io.File* API directly from pretty much everywherein our code base. OK, maybe it’s just what I used to do, but I’d like to think that Iwasn’t alone. In any case, what follows is a handful of design tips for simplifyingour life with file access and, specifically, making the test-driving of file access-related functionality as easy as possible.
Isolate file access behind an interfaceJava’s File API is good for the most part, but that’s no reason to scatter file accessall around the code base. The problem is perhaps most visible when we need toadd or change functionality in legacy code, which does direct file access. If you’reas lucky as me, you might need to create a whole directory structure in your test inorder to successfully invoke the code you want to change. By encapsulating fileaccess behind a custom interface and having the rest of the code base use thatinterface, we can usually get away with less setup code in our tests.
Pass around streams instead of filesWhen we have a piece of code that needs to, say, perform a diff operation on twofiles, the code easily ends up taking in two java.io.File objects. It makes perfectsense because we’re supposed to be comparing two files. However, as it turns out,it doesn’t make perfect sense. The problem is that the diff operation, for exam-ple, doesn’t care about the file as such—it cares about the file’s contents. In otherwords, the code needs to open a FileInputStream in order to read the files’ con-tents, which in turn means that the File objects must refer to an actual, existingfile in the file system. And this tends to require more code to accomplish com-pared to a situation where we could feed the file contents directly from Java code.Passing around stream objects rather than file handles removes this problemnicely for the majority of cases.
Use custom File objectsWe’re better off passing around stream objects than file handles in the majority of—but not all—cases. The exception is situations where the code needs more than justthe contents of the file: for example, information about the file’s location, size, andso forth. Even in these situations, however, we shouldn’t blindly fall back on passingaround java.io.File objects, because the testability hindrances are still there.

Summary 247
Instead, it might make sense to introduce a custom file interface, which wouldbe a façade for the java.io.File API, offering access both to metadata such asthe file’s path as well as to the file’s contents. With this kind of an interface, codedealing with files becomes easier to test, because we can truly simulate files with-out messing around with temporary files and directories.
A good candidate for implementing a custom API for the file system is theJakarta Commons VFS project.11 The VFS stands for virtual file system and doesjust that—allows us to swap in a purely virtual, in-memory file system for use inour tests while running with the regular, disk-based file system in production.
Use a dedicated temp directoryIf we are facing a situation where we need to generate actual, physical files on thefile system, it makes sense to use a dedicated temporary directory for all of ouroutput files as well as for dynamically generated input files. By isolating all testfiles under a single directory, we simplify our test cleanup procedures into wipinga single directory.
Clean up before, not afterSpeaking of cleaning up, sometimes it might make sense to perform cleanup onlybefore each test and not clean up generated files afterward. The reason for this isthat sometimes the generated data might be non-trivial in size. With large datasets, it’s useful to be able to study discrepancies between the expected and actualdata manually by using our chosen tools (a diff tool, for example) rather thanhave the failing test wipe out all of our evidence.
These are simple practices—not silver bullets—but they can make our lives a loteasier when we need to work with file-access-related functionality. But now, let’ssum up the chapter and move on to yet other interesting and challenging topics.
6.8 Summary
In this chapter, we took a dive into the world of test-driving data-access code. Andwe came out alive and well! It turns out that test-driving data-access code isn’t allthat complicated after all. We tackled this on two fronts—using both unit tests andintegration tests to drive our production code.
We started off by discussing how data-access code differs from general applica-tion or business logic and how data access spans several layers. From there, wemoved on to refresh our knowledge of the DAO pattern and how it can make test-ing our code a far less taxing task than it could be.
11 http://jakarta.apache.org/commons/vfs/.

248 CHAPTER 6
Test-driving data access
Next, we rolled up our sleeves and went on to test-drive a simple DAO class usingthree different persistence technologies: the plain JDBC API, JdbcTemplate fromthe Spring Framework, and the Hibernate API. With each of these technologies, wesaw the same piece of functionality build up and watched how the technologiesfacilitated test-driven development through their respective flavors of testability.
After learning how to test-drive data-access code with unit tests, we switchedgears and grabbed a larger piece of the puzzle: writing integration tests for a DAOclass against an in-memory HSQLDB database. We discussed issues to considerwhen picking a lightweight database for integration tests, including the impor-tance of being able to put the full configuration under version control.
We learned to build the necessary plumbing for making integration tests abreeze to write, discussed ways of creating the database schema with SQL scripts aswell as using the Hibernate API, and touched on the use of transactional fixturesfor cleaning up after our tests. To complete our discussion of integration tests, weintroduced DbUnit as a tool for populating a database and performing compari-sons based on externally defined XML data files.
After seeing two different strategies for test-driving data access code, we con-cluded that they both have their sweet spots and should both be kept in our tool-box. We should use the best tool for the job.
To finish the chapter, we briefly discussed the nuances with file access and howto design our code to simplify dealing with the file system.
In the next chapter, we’ll move a notch closer to the underlying platform andset out to conquer more unpredictable genres of programming tasks with our test-driven method: time-dependent functionality and concurrent programming.

Test-drivingthe unpredictable
Horses are predictably unpredictable. —Loretta Gage, the oldest student at Colorado State University’s College of Veterinary Medicine
249

250 CHAPTER 7
Test-driving the unpredictable
So far, we’ve dealt with data-access code, web components, and regular businesslogic. The common denominator for what we’ve seen so far is that this type ofcode executes somewhat detached from the underlying platform and, most nota-bly, executes in a predictable manner. Not all code is like that. In this chapter,we’ll drop the gloves and go knuckle-to-knuckle against specific domains of pro-gramming in Java, which involve unpredictable functionality and are typicallysomewhat more complex to work with in a test-first manner:
■ Time-dependent functionality■ Multithreaded programming
We’ll start from time-dependent functionality because it’s the least troublesome ofthe bunch, and then we’ll move on to discuss the kinds of problems multithreadingand concurrent programming represent to testing and, thus, to test-driven devel-opment. To finish off the chapter, we’ll arm ourselves with knowledge of the basicsynchronization objects provided by the java.util.concurrent package.
7.1 Test-driving time-based functionality
Many developers have at least once been faced with the problem of writing a testfor a piece of code whose output or behavior depends on the current time. Theproblem with time is that we can’t control it. That is, unless we make it so. Let usconcretize the problem and the solution with an example.
7.1.1 Example: logs and timestamps
Say we want to implement a logging component for our home-grown Java EEapplication server1 that takes an HttpServletRequest object and produces amatching log entry in the common log format,2 which looks like this
1.2.3.4 - bob [09/Jun/2006:20:55:59 +0300] "GET /page.html HTTP/1.1" 200 5678
or this:
host - user [timestamp] "request line" status bytes
1 You’d probably win pretty much any bragging contest among a bunch of Java geeks by revealing thatyou didn’t feel the quality of available application server offerings was in line with your standards andthat you decided to implement one yourself.
2 http://www.w3.org/Daemon/User/Config/Logging.html#common_logfile_format.
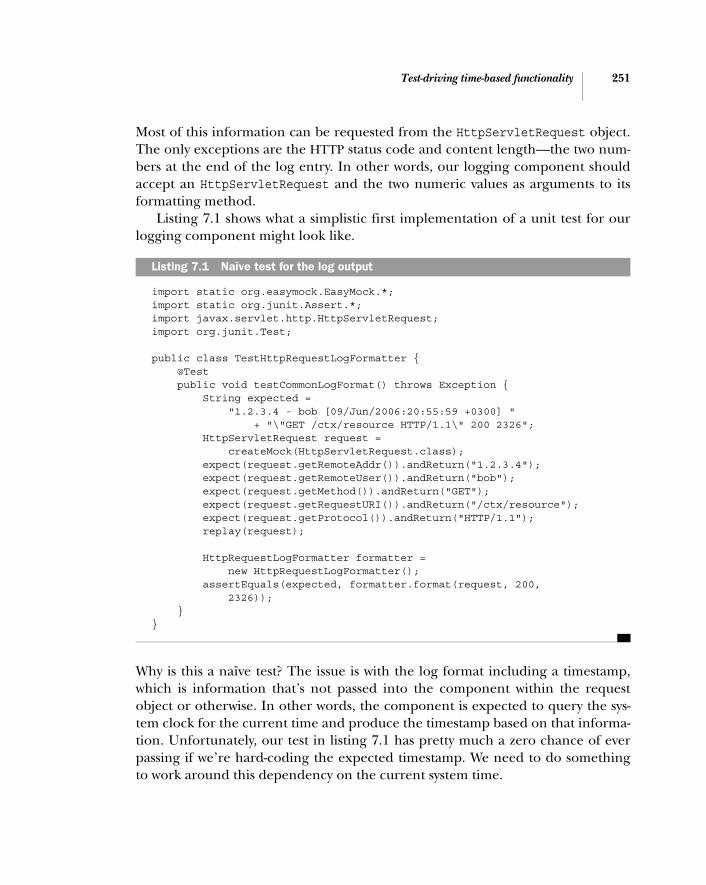
Test-driving time-based functionality 251
Most of this information can be requested from the HttpServletRequest object.The only exceptions are the HTTP status code and content length—the two num-bers at the end of the log entry. In other words, our logging component shouldaccept an HttpServletRequest and the two numeric values as arguments to itsformatting method.
Listing 7.1 shows what a simplistic first implementation of a unit test for ourlogging component might look like.
import static org.easymock.EasyMock.*;import static org.junit.Assert.*;import javax.servlet.http.HttpServletRequest;import org.junit.Test;
public class TestHttpRequestLogFormatter { @Test public void testCommonLogFormat() throws Exception { String expected = "1.2.3.4 - bob [09/Jun/2006:20:55:59 +0300] " + "\"GET /ctx/resource HTTP/1.1\" 200 2326"; HttpServletRequest request = createMock(HttpServletRequest.class); expect(request.getRemoteAddr()).andReturn("1.2.3.4"); expect(request.getRemoteUser()).andReturn("bob"); expect(request.getMethod()).andReturn("GET"); expect(request.getRequestURI()).andReturn("/ctx/resource"); expect(request.getProtocol()).andReturn("HTTP/1.1"); replay(request);
HttpRequestLogFormatter formatter = new HttpRequestLogFormatter(); assertEquals(expected, formatter.format(request, 200, 2326)); }}
Why is this a naïve test? The issue is with the log format including a timestamp,which is information that’s not passed into the component within the requestobject or otherwise. In other words, the component is expected to query the sys-tem clock for the current time and produce the timestamp based on that informa-tion. Unfortunately, our test in listing 7.1 has pretty much a zero chance of everpassing if we’re hard-coding the expected timestamp. We need to do somethingto work around this dependency on the current system time.
Listing 7.1 Naïve test for the log output

252 CHAPTER 7
Test-driving the unpredictable
A quick hack would be to externalize the current time into an additionalmethod parameter for the formatter. That, however, would postpone the need todeal with the time issue for only so long. At some point, we need to obtain the realsystem time from somewhere. Besides, passing the current time all around thecode base would likely trigger all the code police within 50 miles. So, how aboutskipping that option and looking for something better?
Another, less ugly solution would be to extract the time-dependent part of ourcode under test into a method we can override in our tests. This would be a relativelyclean solution for the logging component alone. Let’s think a bit further, though.
Logging components aren’t the only kinds of components in enterprise systemsthat care about time. Overall, we’d rather have a generic solution than fumble ourway through each instance of system-time access with an overridden method—evenif it would be just a simple one-liner delegating to System#currentTimeMillis.
Let’s think about how to abstract system time so that we can fake it as transpar-ently as possible.
7.1.2 Abstracting system time
There are a couple of ways a Java application obtains the current time and date.One is to invoke the static method System#currentTimeMillis; another way is tocreate a new java.util.Date object; and a third way is to ask the java.util.Cal-endar class for an instance.3 What if we—instead of instantiating these classes orcalling the System class directly—obtain our time objects through our own Sys-temTime class?4
Perhaps the least intrusive way of refactoring our code base toward a system-time abstraction is to replace the existing static method calls (System#current-TimeMillis and Calendar#getInstance) and direct construction (new Date())with a set of static method calls to a different class, which by default delegates tothe usual suspects:
long time = SystemTime.asMillis();Calendar calendar = SystemTime.asCalendar();Date date = SystemTime.asDate();
In order to fake the system time, we’d then reconfigure the way our SystemTimeclass obtains its time. Because we’d like to have multiple sources for the time, wemight introduce an interface named TimeSource, shown here:
3 If you haven’t already, do look at the excellent Joda-Time library that simplifies working with dates inJava (http://joda-time.sourceforge.net).
4 The idea of an abstract system clock comes from a paper by Paolo Perrotta, originally published in theextremeprogramming Yahoo! group in 2003. http://www.nusco.org/docs/virtual_clock.pdf.

Test-driving time-based functionality 253
public interface TimeSource { long millis();}
By default, our SystemTime class would use a TimeSource that delegates to Sys-tem#currentTimeMillis. In our unit tests, we could swap in our own fake Time-Source implementation. Let’s see how that would work out—with the appropriatetests, of course.
Listing 7.2 presents a simple test, which verifies that SystemTime by defaultreturns whatever time the System#currentTimeMillis method returns.
import static org.junit.Assert.*;import org.junit.*;
public class TestSystemTimeAbstraction {
@Test public void clockReturnsValidTimeInMilliseconds() throws Exception { long before = System.currentTimeMillis(); long clock = SystemTime.asMillis(); long after = System.currentTimeMillis(); assertBetween(before, clock, after); }
private void assertBetween(long before, long actual, long after) { assertTrue("Should've returned something between " + before + " and " + after + " (instead of " + actual + ")", before <= actual && actual <= after); }}
Listing 7.2 tells our SystemTime class to delegate directly to the System class,which is exactly what our implementation in listing 7.3 does.
public class SystemTime { public static long asMillis() { return System.currentTimeMillis(); }}
Listing 7.2 Test for verifying that SystemTime obtains real time
Listing 7.3 Trivial solution delegating directly to System.currentTimeMillis()
Triangulate SystemTime’s correctness with System.currentTimeMillis()

254 CHAPTER 7
Test-driving the unpredictable
This was just the first step, though. We’d like to be able to configure an alternativeTimeSource for the SystemTime class. Time for another test, shown as listing 7.4.
import static org.junit.Assert.*;import org.junit.*;
public class TestSystemTimeAbstraction {
@After public void resetTimeSource() { SystemTime.reset(); }
...
@Test public void clockReturnsFakedTimeInMilliseconds() throws Exception { final long fakeTime = 123456790L; SystemTime.setTimeSource(new TimeSource() { public long millis() { return fakeTime; } }); long clock = SystemTime.asMillis(); assertEquals("Should return fake time", fakeTime, clock); }}
In listing 7.4, we’ve B introduced a teardown method for resetting the System-Time class to use the default TimeSource. Not doing this might lead to a nastydebugging session when the remainder of our test suite would run against a differ-ent TimeSource implementation than we expect. All we need to do in order todrive in the configurability we’re looking for is to C inject a custom TimeSourceimplementation that returns an arbitrary, fixed time. Once we’ve done that, DSystemTime should return our arbitrary time instead of the real system time.5
Now, let’s see what the implementation might look like; see listing 7.5.
Listing 7.4 Test for verifying that SystemTime uses the configured TimeSource
5 As soon as we’re doing this more than twice, we’ll obviously extract the anonymous implementation intoa top-level class named, for example, FixedTimeSource.
Reset default TimeSource after each test
B
Swap in fixed time source
C
SystemTime should use our TimeSourceD

Test-driving time-based functionality 255
import java.util.Date;
public class SystemTime {
private static final TimeSource defaultSrc = new TimeSource() { public long millis() { return System.currentTimeMillis(); } };
private static TimeSource source = null;
public static long asMillis() { return getTimeSource().millis(); }
public static Date asDate() { return new Date(asMillis()); }
public static void reset() { setTimeSource(null); }
public static void setTimeSource(TimeSource source) { SystemTime.source = source; }
private static TimeSource getTimeSource() { return (source != null ? source : defaultSrc); }}
The SystemTime class keeps its B default TimeSource implementation stashed in afinal static field. When C asked for the time, the System- Time D checkswhether there’s an explicitly configured TimeSource implementation available oruses the default TimeSource.
This is a simple facility implementing the Strategy design pattern that yields alot of power when all of our production code obtains its time through the Sys-temTime class rather than directly from the standard API. The use of a TimeSourceinterface rather than setting a fixed time for the SystemTime class to return and
Listing 7.5 The configurable SystemTime implementation
Default TimeSource delegates to system clock
B
SystemTime asks for active TimeSource implementationC
Use configured TimeSource, if present D

256 CHAPTER 7
Test-driving the unpredictable
returning a hard-coded time, also enables more sophisticated schemes. For exam-ple, we could effectively turn the hands of time from a unit test by providing aconfigurable TimeSource implementation.
Let’s see how we could apply our newfangled SystemTime class to test-drive therequest logging component—the one that got us into all this time-faking stuff.
7.1.3 Testing log output with faked system time
We need to change two things about our existing code: the way we obtain the cur-rent time in the production code and the way we define the expected output in ourtest. Neither of these changes is too big, so let’s go ahead and see what our test lookslike after adopting the SystemTime class. The rewrite of our log-formatter test isshown in listing 7.6.
public class TestHttpRequestLogFormatter {
@After public void tearDown() { SystemTime.reset(); }
@Test public void testCommonLogFormat() throws Exception { final long time = SystemTime.asMillis(); SystemTime.setTimeSource(new TimeSource() { public long millis() { return time; } });
DateFormat dateFormat = HttpRequestLogFormatter.dateFormat; String timestamp = dateFormat.format(SystemTime.asDate()); String expected = "1.2.3.4 - bob [" + timestamp + "] \"GET /ctx/resource HTTP/1.1\" 200 2326";
HttpServletRequest request = createMock(HttpServletRequest.class); expect(request.getRemoteAddr()).andReturn("1.2.3.4"); expect(request.getRemoteUser()).andReturn("bob"); expect(request.getMethod()).andReturn("GET"); expect(request.getRequestURI()).andReturn("/ctx/resource"); expect(request.getProtocol()).andReturn("HTTP/1.1");
Listing 7.6 HTTP request log-formatter test using faked system time
Don’t leave residue
B
Configure fixed time
C
Build expectedoutput based on
fixed time
D

Test-driving time-based functionality 257
replay(request);
HttpRequestLogFormatter formatter = new HttpRequestLogFormatter(); assertEquals(expected, formatter.format(request, 200, 2326)); }}
Again, the first thing to do is to B make sure that after its execution, our testdoesn’t leave any residue in the form of a fake TimeSource, because the remain-ing tests might assume the real system time and we don’t like surprises. Not thatmuch, at least. Inside our test method, we C fix the time to a known value byinjecting a custom TimeSource into SystemTime. Having done this, we can safelyproceed to D generate the expected timestamp based on the fixed point in time.
With this relatively small change, we have suddenly made our test robustagainst time.
Adopting the abstract system time APIUsing the SystemTime class in production code is simple, as you can see in listing 7.7.
import java.text.*;import javax.servlet.http.HttpServletRequest;
public class HttpRequestLogFormatter {
public static DateFormat dateFormat = new SimpleDateFormat("dd/MMM/yyyy:HH:mm:ss Z");
public String format(HttpServletRequest request, int httpStatusCode, int contentLength) { StringBuffer line = new StringBuffer(); line.append(request.getRemoteAddr()); line.append(" - "); line.append(request.getRemoteUser()); line.append(" [");
line.append(dateFormat.format(SystemTime.asDate()));
line.append("] \"").append(request.getMethod()); line.append(" ").append(request.getRequestURI()); line.append(" ").append(request.getProtocol());
Listing 7.7 HTTP request log formatter implementation using SystemTime
Obtain current date andtime from SystemTime
B

258 CHAPTER 7
Test-driving the unpredictable
line.append("\" ").append(httpStatusCode); line.append(" ").append(contentLength); return line.toString(); }}
All we need to do in our production code is to B call SystemTime#asDate insteadof System#currentTimeMillis and use that time for creating the timestamp. Thisis good news, of course, especially considering that we might have a legacy codebase that we’d like to migrate to using the SystemTime abstraction.
Before moving on, there’s one thing about our log-formatter test that mightwarrant a bit of discussion: Our test used a static reference to the public DateFor-mat instance on the production code.
Testing for timestamp formatIn listing 7.6, our test code used a DateFormat object defined on the class undertest for building up the expected timestamp string. Isn’t this a bit odd? Techni-cally, the DateFormat could be anything but the common log format we want, andour test would still pass.
We could’ve specified the exact expected format for the timestamp separately inour test code. That way, our test would’ve enforced the correct implementation thefirst time. It would also introduce duplication between production code and testcode. We could accept the duplication or refactor it away into a constant, or add aseparate test that verifies the exact format of the timestamp (see listing 7.8).
public class TestHttpRequestLogFormatter { ...
@Test public void testTimestampFormat() throws Exception { String date = "\\d{2}/\\w{3}/\\d{4}"; String time = "\\d{2}:\\d{2}:\\d{2}"; String timezone = "(-|\\+)\\d{4}"; String regex = date + ":" + time + " " + timezone;
DateFormat dateFormat = HttpRequestLogFormatter.dateFormat; String timestamp = dateFormat.format(new Date()); assertTrue("DateFormat should be
➥\"dd/mon/yyyy:HH:mm:ss Z\"", timestamp.matches(regex)); }}
Listing 7.8 Nailing down the exact date format

Test-driving multithreaded code 259
Listing 7.8 effectively nails down the exact format for the timestamp by matchingit against a regular expression. Although not an exact comparison, the regularexpression combined with our previous test is sufficient for keeping the imple-mentation in check.
Note that we could’ve used a regular expression to compare the full log-formatter output. That approach would’ve, however, effectively ignored the exacttimestamp as long as it was in the right format. In other words, another testwould’ve been necessary for checking that the formatter uses the current systemtime. We could’ve also made our first test more elaborate by defining the fixedtime as a string that is parsed into a numeric representation by using the Date-Format object, thus enforcing the correct format as well as keeping the test rela-tively simple. That change, however, is left as an exercise for you.
We’ll now move on to another inherently unpredictable domain of program-ming, where the unpredictability manifests itself in the form of not knowingexactly what gets executed at what time.
7.2 Test-driving multithreaded code
The idea in concurrent programming is that things appear to happen simulta-neously. In Java, this concurrency is mostly virtual, which means that things hap-pen serially but it all looks like it’s happening in parallel because the threadscheduler interweaves tiny bits of the multiple threads’ execution within the pro-cess to the CPU. What happens within each thread, however, is largely the samestuff that we do in sequential programs. After all, if we’re only looking at a singlethread, it looks entirely sequential.
This is also why many ideas and techniques we’ve learned for testing and test-driving sequential programs are perfectly valid for concurrent programs as well,although sometimes we may need to derive more elaborate techniques to takecare of the intricacies of the concurrent implementation.
As a rule of thumb, it makes sense to start test-driving the functionality first in asequential manner and then move on to putting in place tests that verify correctconcurrent behavior. Isolating the sequential logic into a class or behind an inter-face makes it easier to test the logic in isolation and can simplify the tests we needto write for verifying the concurrent behavior as well. It is important to remember,however, that any synchronization activities within the isolated logic can have aneffect on the concurrent behavior of the surrounding thread.
We’ll soon go into more depth regarding how we can test for desired concur-rent behavior. Before doing so, however, let’s talk about the differences betweenthe predictable domain of sequential programs and the unpredictable domain ofconcurrent programs.

260 CHAPTER 7
Test-driving the unpredictable
7.2.1 What are we testing for?
With plain ol’ sequential code, we’re talking about simple program flows withclear rules and deterministic execution of the program logic. Concurrent, multi-threaded code is different. The execution isn’t as deterministic anymore, withmultiple threads interacting with each other and competing for access to thesame objects.
Likewise, there’s a difference between sequential and concurrent code in howwe test for the desired behavior of our code. When test-driving code for concurrentsystems, we are interested in writing tests not just for the sequential behavior butalso for the concurrent behavior and, subsequently, a larger error-situation space.
Let’s take a closer look at these two aspects.
Wider error-situation spaceIn concurrent programming, there are more ways things can go wrong, and thescenarios are more difficult to simulate. In other words, concurrent programshave a much larger error-situation space than their sequential counterparts. Fur-thermore, the test code might inadvertently affect the concurrency of the codeunder test, causing the phenomenon referred to as Heisenbugs—bugs that disap-pear when adding test or debugging code.
This difference in the number of potential errors is significant enough for it tobe impractical for us to exhaust every possible error situation with our tests.Instead, we’ll have to resort to simulating a select few explicitly, using our knowl-edge of Java’s concurrency features and the driving design principles of the sys-tem we’re developing.
Although such a manual analysis can weed out the most obvious—and perhapsthe majority of—errors, we should also consider increasing our confidence in thesystem’s concurrent behavior using repeated, long test runs to identify errors thatseem to occur at random.
Speaking of different types of errors, what is it exactly that we want to test forwhen developing concurrent programs that isn’t present in sequential programs?Well, the concurrent behavior, of course. But what is that?
Variety of concurrent behaviorThere are two major categories of behavior that we typically target with ourconcurrency-oriented unit tests:
■ Good stuff■ Bad stuff

Test-driving multithreaded code 261
In other words, there’s some concurrent behavior that we want our system toexhibit, and there’s some that we definitely don’t want happening. We mightdefine the good stuff as being desired functionality, such as a service being car-ried out asynchronously after a delay rather than synchronously upon request.The bad stuff typically consists of different situations or states we don’t want oursystem to enter. The computer science literature on concurrent programmingdocuments a number of such common problems with multithreaded code. Per-haps the two most important are deadlocks and starvation.6
A deadlock is a situation where two or more threads enter a state where each iswaiting for an action on the other thread’s part (which will never happen becauseboth threads are waiting). Starvation, on the other hand, is a situation where athread doesn’t get a chance to execute, because the thread scheduler for one rea-son or another doesn’t schedule CPU cycles for the starving thread. Deadlocksand starvation basically take away the program’s liveness—that is, the system’sthreads’ ability to eventually finish execution.
If these are things that we don’t want to happen, what kind of things do wewant to happen? Things we want to ensure happen correctly include these:
■ Sharing objects or resources between threads (thread-safety)■ Method blocking behavior■ Starting and stopping of threads■ Asynchronous execution of requested service■ Synchronization between threads
The previous behavior is something we can, to a certain degree, test-drive into oursystem, and that’s exactly what we’re going to do next.
Let’s tackle these one at a time, getting our hands dirty again, starting withobject thread-safety.
7.2.2 Thread-safety
Code being thread-safe means that its semantics are preserved even when multi-ple threads execute the code concurrently or use a shared resource. Even thoughwe as programmers think in terms of source-code statements being executedsequentially, the reality is that the compiler crunches our pretty lines of code intoone or more tiny byte-code instructions. Instructions whose execution might getinterwoven with that of other threads!
6 With names like these, it doesn’t take a degree in computer science to figure out that they should beavoided.

262 CHAPTER 7
Test-driving the unpredictable
Java gives us programmatic control over multithreaded access to our code; but,unfortunately, our facilities aren’t good enough for testing that our supposedlythread-safe code really is thread-safe. We do have some means of increasing ourconfidence, however.
Facing the limitationsThe fundamental problem is that we don’t want our test code to affect the concur-rency of the code under test, which means that hooks through which our tests cancontrol the execution of production code shouldn’t be used because they ofteninvolve synchronization and thus can affect the behavior we’re testing. Basically,we’re looking for properties and invariants in our code that we can assert withoutany synchronization.
As primitive it sounds, a typical approach to testing for thread-safety in theabsence of safely accessible invariants is an intelligent brute-force test. By intelli-gent, we mean a test that is engineered to maximize the chances of error situa-tions taking place during the execution. Typically, this kind of test launchesmultiple threads to access a given piece of code under test, aiming at as high aconcurrency as possible with the use of synchronization objects like barriers andlatches. Without the use of rendezvous points like barriers and latches, the over-head of starting threads might even result in entirely sequential execution—witheach thread executing to the end before the next one is started.
Let’s look at a contrived example to illustrate a typical mix of brute forcemixed with Java 5’s synchronization objects.
Example of testing for thread-safetyLet’s say we need a thread-safe counter, which knows how to increment a numberand doesn’t get messed up even when there are multiple threads incrementingthe same counter.
To start with the basic functionality, we might write the following test toenforce the correct behavior in the case of normal, single-threaded access:
@Testpublic void testBasicFunctionality() throws Exception { Counter counter = new Counter(); assertEquals(0, counter.value()); counter.increment(); assertEquals(1, counter.value()); counter.increment(); assertEquals(2, counter.value());}

Test-driving multithreaded code 263
This would lead us to the implementation shown in listing 7.9.
public class Counter { private int counter;
public void increment() { counter++; }
public int value() { return counter; }}
Now, how do we ensure that our Counter class also functions properly whenaccessed by multiple threads simultaneously? By testing, of course. We need tosomehow make multiple threads access the same Counter instance and verify thatno increment was lost because of the concurrent access.
Listing 7.10 illustrates one possible way to accomplish this.
@Testpublic void testForThreadSafety() throws Exception { final Counter codeUnderTest = new Counter(); final int numberOfThreads = 20; final int incrementsPerThread = 100;
Runnable runnable = new Runnable() { public void run() { for (int i = 0; i < incrementsPerThread; i++) { codeUnderTest.increment(); } } };
for (int i = 0; i < numberOfThreads; i++) { new Thread(runnable).start(); }
Thread.sleep(500); assertEquals(numberOfThreads * incrementsPerThread, codeUnderTest.value()); }
Listing 7.9 Sufficient implementation for single-threaded access
Listing 7.10 Starting multiple threads to increment the counter
Start threadsB
CWait for threads to finishand assert counter’s value

264 CHAPTER 7
Test-driving the unpredictable
Our test in listing 7.10 essentially B starts multiple threads to invoke a Counterobject simultaneously and C verify that the Counter’s resulting value matches thenumber of calls to its increment method.
The problem with the test that it fails only roughly half the time even thoughour implementation is clearly not thread-safe (the ++ operation is not atomic, andwe’re not synchronizing the execution of that piece of code in any way—Thread#sleep is about as reliable as the town drunk when it comes to synchroni-zation). There are a couple of ways in which we can improve our test.
Maximizing concurrency in the testThe reason why our test in listing 7.10 passes every now and then is that thethreads happen to execute sequentially, not in parallel. We can increase the con-currency of this setup by prolonging the activity so that the other threads getstarted before the first one finishes. In our contrived example, this might meanincreasing the number of increments each thread will perform on the Counter.
Another solution, which also helps us get rid of the annoying Thread#sleepcall (which slows down our test unnecessarily and still doesn’t guarantee that allthreads have finished their execution after the hard-coded sleep time), is to use asynchronization object such as a barrier to make sure that all threads have beenstarted before letting them proceed to the incrementing loop.
Listing 7.11 shows an improved version of our test with the number of incre-ments per thread raised 10-fold and using a CyclicBarrier to minimize the effectof thread startup overhead on the wanted concurrency. (We’ll talk more aboutthe CyclicBarrier and its friends later in this chapter.)
@Testpublic void testForThreadSafetyUsingCyclicBarrierToMaximizeConcurrency() throws Exception { final Counter codeUnderTest = new Counter(); final int numberOfThreads = 20; final int incrementsPerThread = 1000;
CyclicBarrier entryBarrier = new CyclicBarrier(numberOfThreads + 1); CyclicBarrier exitBarrier = new CyclicBarrier(numberOfThreads + 1);
Runnable runnable = new Runnable() { public void run() { for (int i = 0; i < incrementsPerThread; i++) { codeUnderTest.increment();
Listing 7.11 Improved version of our thread-safety test
Create barrier for all created threads plus current one
B

Test-driving multithreaded code 265
} } };
for (int i = 0; i < numberOfThreads; i++) { new SynchedThread(runnable, entryBarrier, exitBarrier).start(); }
assertEquals(0, codeUnderTest.value()); entryBarrier.await(); exitBarrier.await(); assertEquals(numThreads * incrementsPerThread, codeUnderTest.value());}
Listing 7.11 B introduces two synchronizing objects of type CyclicBarrier. ACyclicBarrier acts as a kind of a flood gate: It only lets awaiting threads pass thebarrier when the expected number of threads have arrived at the barrier andinvoked await on it. We make use of these synchronizing objects inside a C cus-tom Thread class, shown in listing 7.12, which waits on the given entry barrierbefore executing its logic and waits on the exit barrier after executing its logic inorder to rendezvous with other threads.
Because our incrementing threads are all waiting on the entry barrier, we can Dinvoke the entry barrier from our test method in order to let the threads proceedonly when all of them have been started—essentially not letting the thread startupoverhead to affect our concurrency—and to E invoke the exit barrier to block ourtest method execution until all threads have finished their increments.
import java.util.concurrent.CyclicBarrier;
public class SynchedThread extends Thread {
private CyclicBarrier entryBarrier; private CyclicBarrier exitBarrier;
public SynchedThread(Runnable runnable, CyclicBarrier entryBarrier, CyclicBarrier exitBarrier) { super(runnable); this.entryBarrier = entryBarrier; this.exitBarrier = exitBarrier; }
@Override
Listing 7.12 The custom Thread class for synchronized execution
Custom Thread implementation waits on barrier
C
Threads begin executing logic
D
Wait for all threads to finishE
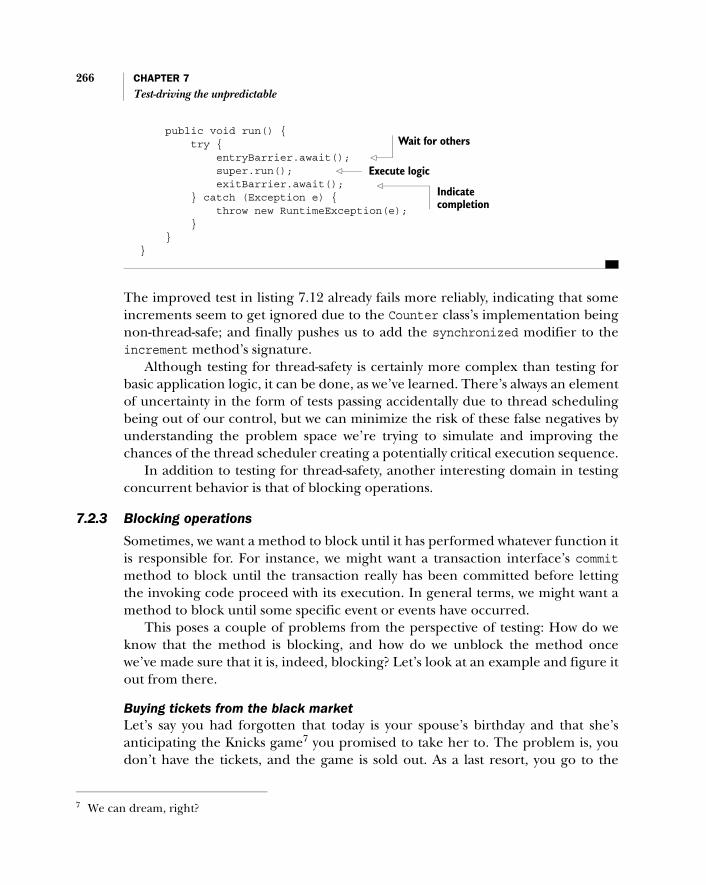
266 CHAPTER 7
Test-driving the unpredictable
public void run() { try { entryBarrier.await(); super.run(); exitBarrier.await(); } catch (Exception e) { throw new RuntimeException(e); } }}
The improved test in listing 7.12 already fails more reliably, indicating that someincrements seem to get ignored due to the Counter class’s implementation beingnon-thread-safe; and finally pushes us to add the synchronized modifier to theincrement method’s signature.
Although testing for thread-safety is certainly more complex than testing forbasic application logic, it can be done, as we’ve learned. There’s always an elementof uncertainty in the form of tests passing accidentally due to thread schedulingbeing out of our control, but we can minimize the risk of these false negatives byunderstanding the problem space we’re trying to simulate and improving thechances of the thread scheduler creating a potentially critical execution sequence.
In addition to testing for thread-safety, another interesting domain in testingconcurrent behavior is that of blocking operations.
7.2.3 Blocking operations
Sometimes, we want a method to block until it has performed whatever function itis responsible for. For instance, we might want a transaction interface’s commitmethod to block until the transaction really has been committed before lettingthe invoking code proceed with its execution. In general terms, we might want amethod to block until some specific event or events have occurred.
This poses a couple of problems from the perspective of testing: How do weknow that the method is blocking, and how do we unblock the method oncewe’ve made sure that it is, indeed, blocking? Let’s look at an example and figure itout from there.
Buying tickets from the black marketLet’s say you had forgotten that today is your spouse’s birthday and that she’santicipating the Knicks game7 you promised to take her to. The problem is, youdon’t have the tickets, and the game is sold out. As a last resort, you go to the
7 We can dream, right?
Wait for others
Execute logic
Indicate completion

Test-driving multithreaded code 267
black market for tickets, but you can’t come find one. What you’ve got is a case ofa blocking method: BlackMarket#buyTicket.
Because the method we want to test should block, we need to invoke it inanother thread. Also, we need to know in our test method’s thread whether themethod succeeded or whether it did, in fact, block. Once the method has (wehope) blocked, we also need to unblock it by interrupting the thread in questionand by verifying that the thread did interrupt and finish its execution.
Listing 7.13 shows an example test that does all of this.
@Testpublic void testBlockingBehavior() throws Exception { final AtomicBoolean blocked = new AtomicBoolean(true);
Thread buyer = new Thread() { @Override public void run() { try { new BlackMarket().buyTicket(); blocked.set(false); } catch (InterruptedException expected) { } } };
buyer.start(); Thread.sleep(1000); buyer.interrupt(); buyer.join(1000);
assertFalse("Thread didn't interrupt!", buyer.isAlive()); assertTrue("Method didn't block!", blocked.get()); }
In listing 7.13, we start a new thread for B invoking the buyTicket method on theBlackMarket. The method should block because nobody has yet called sell-Ticket. If the method call does not block for some reason, we C set a flag so ourtest can fail as a result of buyTicket not blocking. We’re catching anInterruptedException around the call to buyTicket because, later on, we’regoing to interrupt the thread and let it exit normally.
Listing 7.13 Testing for a method blocking and interrupting properly
Invoke blocking method in another thread
B
Set flag if method succeededC
Start thread, wait, and interrupt
DAssert
expectedbehavior E

268 CHAPTER 7
Test-driving the unpredictable
Once we’ve created this kind of a thread, we D start it and sleep for a second,letting the thread’s execution reach the blocking method;8 then, we interrupt thethread and wait for the thread’s execution to finish. Finally, we E assert that thethread did finish its execution and that the method call really blocked.
Again, perhaps a verbose test, considering that we’re only testing for a methodblocking as expected (and interrupting properly). Yet it can be done, and with alittle refactoring we could easily extract all the plumbing into a reusable base classfor testing blocking methods. Consider that an exercise for you.
Before we move on, however, there’s one thing worth noting about the ThreadAPI.
Don’t rely on Thread statesIf you’ve been working with Java’s Thread API, you may have noticed that theThread class has a method named getState, which might sound like the perfectfit for testing whether a thread is blocking. Unfortunately, Thread#getState can-not be trusted for testing for blocking behavior. The reason is that there’s nothingin the JVM specification that requires a thread to ever enter a waiting (blocking)state. Furthermore, because spurious wakeups from Object#wait are also possi-ble, a blocking thread might even temporarily enter the running state as well.
In other words, let’s forget about Thread#getState and go look at other stuff.
7.2.4 Starting and stopping threads
One of the things multithreaded systems do is start and stop threads. Some sys-tems start and stop a lot of them, and some less. Some software architectures hidethe threads from the application developer, and some expose all the gritty details.Just in case we need to write code that starts and stops threads, let’s look at a smallexample using some of the new APIs introduced as part of the java.util.con-current package in Java 5.
Starting threads in a factoryBefore Java 5, our only option for launching threads was to directly create a newThread instance and start it. Java 5 introduced the ThreadFactory,9 an interfaceshown in listing 7.14, which is exactly that—a factory class that creates a Threadobject when asked for one.
8 We’re using Thread#sleep instead of a synchronization object for the purpose of simplicity of theexample.
9 If you’re not using Java 5, you can still create a similar interface of your own. After all, it’s just an interface!

Test-driving multithreaded code 269
public interface ThreadFactory {
public Thread newThread(Runnable runnable);}
In practice, the ThreadFactory interface acts as a handy indirection betweencode that needs to launch threads and the actual Thread implementations. Byemploying an interface like the ThreadFactory and adding a bit of dependencyinjection into the mix, we can make testing for proper starting and stopping ofthreads much like stealing candy from a child (albeit less morally suspicious).
Let’s explore this with a little example.
Using ThreadFactory and custom threadsLet’s say we are developing some kind of a Server class, which we want to be ableto start and stop. When the Server is started, it starts a thread in the backgroundto listen for (for example—we don’t care) incoming network connections. Whenthe Server is stopped, the background thread is also stopped.
We’re going to give the Server a custom ThreadFactory, which creates aThread object we can observe from our test. First, we need a custom Thread classthat provides the necessary information. Listing 7.15 shows one such Thread class.
import java.util.concurrent.*;import static junit.framework.Assert.*;
public class StartStopSynchronizedThread extends Thread {
private CountDownLatch threadStarted; private CountDownLatch threadStopped;
public StartStopSynchronizedThread(Runnable task) { super(task); threadStarted = new CountDownLatch(1); threadStopped = new CountDownLatch(1); }
@Override public void run() { threadStarted.countDown(); super.run(); threadStopped.countDown(); }
Listing 7.14 The java.util.concurrent.ThreadFactory interface
Listing 7.15 Custom Thread class offering synchronization points
B Trigger latches when thread starts and stops

270 CHAPTER 7
Test-driving the unpredictable
public void waitForStarted(long timeout, TimeUnit unit) throws InterruptedException { assertTrue("Thread not started within timeout.", threadStarted.await(timeout, unit)); }
public void waitForStopped(int timeout, TimeUnit unit) throws InterruptedException { assertTrue("Thread not stopped within timeout.", threadStopped.await(timeout, unit)); } }
What we have in listing 7.15 is a simple class that B wraps the regular Threadimplementation’s run method with two synchronization objects we call latches.These latches are used for waiting until the thread has started and until it is stop-ping—that is, exiting its run method. The C waitForStarted and waitFor-Stopped methods can be used by other threads to block until this thread has beenstarted or until it has completed its execution.
Now, let’s see how we could make use of this nifty utility in test-driving thestart and stop methods into our Server class. Listing 7.16 shows one example ofhow this could be done.
import java.util.concurrent.ThreadFactory;import org.junit.*;
public class TestServerStartsAndStopsThread {
private StartStopSynchronizedThread thread;
@Test public void testStartingAndStoppingServerThread() throws Exception { ThreadFactory threadFactory = new ThreadFactory() { public Thread newThread(Runnable task) { thread = new StartStopSynchronizedThread(task); return thread; } };
Server server = new Server(); server.setThreadFactory(threadFactory);
server.start();
Listing 7.16 Test to verify that a thread is started and stopped
Provide methods that block until thread starts/stops
C
B
Create custom thread and store for later reference
Configure Server with custom ThreadFactory
C

Test-driving multithreaded code 271
thread.waitForStarted(1, TimeUnit.SECONDS);
server.stop(); thread.waitForStopped(1, TimeUnit.SECONDS); }}
Our test in listing 7.16 boils down to creating a custom ThreadFactory, which Breturns an instance of our custom thread class and stores the object to a field forlater reference. After creating the ThreadFactory, we C pass the ThreadFactoryto the Server instance under test with the intention of the Server class using thegiven ThreadFactory instead of the default ThreadFactory available through thejava.util.concurrent.Executors class.
The remainder of the test starts the Server and starts D waiting on the customthread class’s latch for the thread to start (or a timeout, in which case the test fails).When the start latch is triggered, we then stop the Server and wait on the stoplatch, expecting the stop call to cause the background thread to finish execution.
7.2.5 Asynchronous execution
We’ve just seen how we can test for the starting of a thread and that a thread even-tually finishes its execution after a specific event has occurred. What our tests inthe previous section did not verify, however, is what happens within the launchedthread. There’s (we hope) a reason for our allocating a thread, so we’re probablyalso interested in what happens in that thread. But how can we know?
Isolating the problem with typed RunnablesOne possibility is to use typed Runnable implementations, verifying in our customThreadFactory that the code under test passed in a Runnable of the expected type(with certain expected properties, if applicable). Then we could separately test aninstance of that type of Runnable with the same properties. In essence, we’d be split-ting one problem into two—both of which are easy to solve in isolation and whichtogether give us reasonable certainty of our code’s correct behavior.
This would arguably be a rather odd way to program, however, and certainly isnot an established idiom in Java concurrent programming, so let’s consider amore typical (not necessarily better, mind you) alternative: waiting for results.
Waiting for resultsProbably every programmer I’ve seen facing the problem of how to verify resultsfrom asynchronous service has solved it by waiting. Waiting long enough. List-ing 7.17 illustrates this pattern with an imaginary test case.
Use custom thread’s latches to verify that thread is started/stopped
D

272 CHAPTER 7
Test-driving the unpredictable
LongLastingCalculation calc = new LongLastingCalculation();calc.start();Thread.sleep(2000); assertEquals(42, calc.getResult());
How long “enough” is obviously depends on the service in question, and the nec-essary wait time between two test runs can vary a lot. Because we don’t like ourtests to fail randomly, we have to bump up our wait time so that we know the asyn-chronous service has had time to complete its processing. In this example, wemake our test thread sleep before asserting for the calculation’s results, assumingthat two seconds is long enough. If the calculation typically takes one second,we’re wasting (on average) an extra second every time we run this test.
Ideally, we’d register some kind of a callback for when the results are available,but sometimes this is not possible for one reason or another (for example, whenwe’re working with an external API). Even when a callback is out of the question,however, we might be able to optimize a little by polling for the results beingavailable. Listing 7.18 shows a handy utility class named RetriedAssert, adaptedfor JUnit 4 from code originally written by Kevin Bourrillion and freely availablefrom the file area of the JUnit Yahoo! Group.10 The RetriedAssert lets us per-form an arbitrary assertion in a loop until the assertion succeeds or when wereach the timeout.
/** * This class allows you to assert a condition that may not be * true right at the moment, but should become true within a * specified time frame. To use it, simply replace calls like: * * assert(someCondition); * * With: * * new RetriedAssert(5000, 250) { // timeout, interval * public void run() throws Exception { * assert(someCondition); * } * }.start();
Listing 7.17 Test waiting for results from an asynchronous service
10 http://groups.yahoo.com/group/junit/files/src/ (free group membership is required for access).
Listing 7.18 Retrying an assertion until it succeeds or a timeout is reached
Calculation takes 1 second; wait 2, to be sure

Test-driving multithreaded code 273
* * The start() and run() methods were named after those in * java.lang.Thread, whose function they mimic. * * This class was written by Model N, Inc. You may use it and * modify it any way you wish--but please leave this message intact. * * @author Kevin Bourrillion ([email protected]) */public abstract class RetriedAssert {
private int _timeOutMs; private int _intervalMs;
protected RetriedAssert(int timeOutMs, int intervalMs) { _timeOutMs = timeOutMs; _intervalMs = intervalMs; }
public final void start() throws Exception { long stopAt = System.currentTimeMillis() + _timeOutMs; while (System.currentTimeMillis() < stopAt) { try { run(); return; } catch (AssertionError ignoreAndRetry) { } try { Thread.sleep(_intervalMs); } catch (InterruptedException ie) {} } // All tries have failed so far. Try one last time, // now letting any failure pass out to the caller. run(); }
public abstract void run() throws Exception;}
The idea behind the RetriedAssert is that we can B execute a loop until wereach the configured timeout, with the loop C attempting to perform our asser-tion over and over again, and D sleeping for the specified interval in betweenattempts until either the assertion passes or we reach the specified timeout—inwhich case the last assertion failure is propagated back to the caller.
Listing 7.19 shows an example of how we might make use of this utility class totest a long-lasting, asynchronous service without excessive unnecessary waiting.
Loop until wereach configured
timeout B
Attempt assertion and return if it passes
C
Sleep before retrying assertionD

274 CHAPTER 7
Test-driving the unpredictable
@Testpublic void testByRetryingTheAssertOften() throws Exception { final LongLastingCalculation calc = new LongLastingCalculation(); calc.start(); new RetriedAssert(2000, 100) { @Override public void run() { assertEquals(42, calc.getResult()); } }.start();}
As we can see, using the RetriedAssert class is not exactly rocket science;11 allwe need to do is to B specify a timeout and the frequency or interval with whichthe RetriedAssert will retry our assertion and then C specify the assertion itself.Assuming that the LongLastingCalculation in listing 7.19 typically completes itscalculation in one second, this test will typically complete successfully in lessthan 1100 milliseconds. If the calculation takes longer than two seconds to com-plete, the assertion will time out and alert us at around two seconds.
Note that in the case of a wrong result (say, 13 instead of 42 as we’re expect-ing), we’ll not fail fast but instead wait for the RetriedAssert’s timeout. Still, bet-ter than nothing.
So far, we’ve learned tricks and seen helpful utilities for testing code thatinvolves launching threads in the background for producing some results (orwanted side effects) asynchronously. What we haven’t discussed yet is scenarioswhere multiple threads collaborate in order to produce an expected outcome.That is, we don’t know how to test for collaborative synchronization betweenthreads. Or do we?
7.2.6 Synchronization between threads
Accomplishing big things often requires collaboration between multiple autono-mously behaving parties. For example, constructing a summer cabin involvescraftspeople of many domains ranging from woodwork to plumbing to insulationto painting. The painter, for example, can only paint a surface once the surfaceexists, so they have to occasionally wait for other workers to finish some tasks. In
Listing 7.19 Example usage of RetriedAssert
11 That is, unless you happen to be getting your monthly paycheck from NASA.
Specify suitable timeout and retry interval
B
Override abstract run() method
C

Standard synchronization objects 275
terms of software, there are synchronization needs between (worker) threads.How do we test for this synchronization happening?
In many situations, we can let the threads run until completion and assert thatthe expected invariants hold during and after the execution. This approach, com-bined with a pinch of divide-and-conquer, is often a good enough harness forensuring correct behavior. After all, the whole point in having multiple threads isthat they execute independently from other threads until they reach a synchroni-zation point of some kind. With a little bit of effort and possibly test doubles, wecan ensure the proper behavior of each individual thread, exercising our code forthe major error situations.
Essentially, the problem of multithread collaboration breaks down to a seriesof simple synchronization problems—each of which can be tested for rather easilyas long as we know our tools. Before we sum up the chapter, let’s take a brief tourthrough the standard synchronization objects available in Java 5.
7.3 Standard synchronization objects
Although shared-nothing is the ideal when it comes to multithreaded program-ming, we cannot avoid solving the occasional synchronization need. Furthermore,we’re not all rocket scientists,12 and multithreaded programming is among thetoughest domains in computer programming. This means that it’s highly recom-mended to know and use the abstractions for interthread communicationincluded in the new java.util.concurrent package in Java 5, rather than toinvent our own wheels on top of low-level locks and the wait/notify methods.
We’ve seen some of the standard synchronization objects in action earlier in thischapter. We’ll now cover all of them briefly, so we know roughly what’s there andwhat kinds of problems we can solve with readily available objects.
Let’s start with the simplest of them all, the semaphore.
7.3.1 Semaphores
A semaphore is essentially a limited set of permissions. Threads acquire a permis-sion from a semaphore in order to do something. When the thread is done withwhatever it was doing, it releases the permit back to the semaphore, making itavailable for another thread to acquire.
Perhaps the most common use for a semaphore is a counting semaphore, wherethe semaphore holds multiple permits, thus limiting the maximum number ofthreads concurrently doing something protected with the semaphore in question.
12 I promise to cut back on using this particular metaphor.

276 CHAPTER 7
Test-driving the unpredictable
As an example of where a counting semaphore might be used, we could build apeer-to-peer application supporting a limited number of simultaneous downloadsby having each download thread acquire a permit before proceeding. A com-pleted or cancelled download would result in the permit being released back tothe semaphore so that the next download in queue can acquire it, and so forth.
The other type of semaphore is one with a single permit, which essentiallyboils down to the classic synchronization lock—allowing only one thread access ashared resource to perform some critical work at a time.
When a simple semaphore does not cut it, we can turn to the more sophisti-cated synchronizers, such as a latch.
7.3.2 Latches
A latch is like a dam. It keeps all threads reaching the latch from going forwarduntil the latch—or the dam, if you will—is released. And when the latch has beenreleased, it stays open forever. In other words, latches are disposable synchroniza-tion points.
The java.util.concurrent package includes the CountDownLatch class,which releases itself after having received the predetermined number of count-down calls. We’ve already seen a CountDownLatch being used in several code list-ings (such as listing 7.15), mainly for blocking the main thread until the parallelthreads have reached a certain point in their execution.
7.3.3 Barriers
Barriers can be considered a special breed of latches. Perhaps the most funda-mental difference between a barrier and a latch is that whereas a latch is dispos-able, the CyclicBarrier class allows us to reuse the same barrier instancemultiple times. Additionally, although a latch could be released before all threadshave passed it, a barrier typically requires all threads to meet at the barrier beforereleasing them in one big batch.
We could implement a poor man’s reality TV show using barriers by creating aCyclicBarrier for, say, five threads. Each thread would upon startup call awaiton the barrier object, effectively waiting until all competitors are ready for a com-mon start. When all parties reach the barrier, the barrier breaks, and all five pro-ceed to carry out the next task, eventually reaching the barrier—again waiting forall the other competitors before proceeding to the next leg of the competition.
In addition to the CyclicBarrier, the java.util.concurrent package pro-vides the Exchanger, which is a special kind of barrier for two threads exchangingdata at the barrier. The canonical example of how we might use the Exchanger isan I/O component with separate threads for reading data from one source and

Summary 277
writing the data to another. The two threads would basically swap buffers at thebarrier when the reader thread has filled its buffer and the writer thread has writ-ten the old one.
Speaking of exchanging data, there’s one more standard synchronizer we’llcover before moving on—futures.
7.3.4 Futures
Futures, represented by the Future interface and implemented by the FutureTaskclass, are essentially cancelable asynchronous tasks that produce a result. Insteadof building a homegrown callback with the appropriate synchronization, we canshare a Future between the calling thread and the thread that computes theresult in the background. The calling thread can invoke get on the Future, block-ing until the result is available (or timing out if using the overloaded method for aconfigured timeout).
These four synchronizers—semaphore, latch, barrier, and future—are thebasic building blocks that we can use for constructing multithreaded behavior rel-atively easily into our applications. And knowing about them certainly doesn’thurt our ability to test-drive our multithreading programs!
And now, time for a short summary of all the things we’ve seen and learned inthis chapter.
7.4 Summary
This chapter’s title refers to test-driving unpredictable code. The two mostimportant categories of unpredictable are time-dependence and multithreadedfunctionality.
We started off by investigating a simple example of a logging component,which needs to print a timestamp along with the log messages. We devised a cou-ple of solutions for testing the logging component’s correct behavior, includingfuzzy matching for the timestamp portion of the log output as well as isolating thetime-dependent part of the code and overriding it with a known value we can triv-ially assert against.
Along with these more primitive approaches, we also discussed a way of turn-ing time from being something unpredictable into something predictable byabstracting the system time behind an interface we can control. Introducing a cus-tom class into a code base to represent system time can make many seeminglycomplex testing targets significantly less difficult to write tests for and to test-drive.
After solving the whole thing with time being somehow outside of our control,we turned our attention to testing multithreaded programs. More specifically, we

278 CHAPTER 7
Test-driving the unpredictable
started by clarifying what it is about multithreaded programs that make it differ-ent from sequential code.
We dedicated most of the rest of the chapter to discussing how we can test-drive the various aspects of concurrent behavior we are looking for in our code.We discussed ways of testing for thread-safety and proper synchronization ofaccess to shared resources. We discussed ways of testing for blocking behavior(and how to unblock), and we figured out ways to test for threads being startedand stopped as expected. Finally, we learned how to test for asynchronous execu-tion and how interthread synchronization essentially breaks down to simple prob-lems we already know how to solve.
To give more ammunition for our forthcoming challenges with concurrentprograms, we finished with a brief tour of the basic synchronizer objects providedby the standard Java API.
All in all, concurrent tests are sometimes more intimate with the code they’retesting—and arguably somewhat more complex—than their sequential counter-parts; but as we’ve seen, we can employ test-first programming and build confidencein our multithreaded code. As a matter of fact, it is specifically the relative complex-ity of concurrent programming that makes having tests that much more important.And there’s no better way to ensure testability than by writing the tests first.

Test-driving Swing
Design is not just what it looks like and feels like. Design is how it works.
—Steve Jobs
279
280 CHAPTER 8
Test-driving Swing
I have spent most of my programming career developing backend systems. Thatis, things without a face—a user interface. Such systems are easy to write auto-mated tests for because there’s always some kind of a technical interface to auto-mate. Things aren’t as straightforward when there’s a graphical user interface(GUI) involved, however. With GUIs, it’s not just about the behavior of the widgetslaid out on the screen. It’s also about the GUI being easy to learn and use by ahuman being. It’s also about the GUI looking good.
In this chapter, we will explore test-driven development in the context of JavaSwing development. We’ll begin by asking ourselves what to test in a Swing userinterface. We’re asking because there are aspects of a GUI that don’t make senseto try to verify with automated tests—and similarly don’t make sense to test-driveinto the code base. After we’ve created an understanding of what kind of thingswe’d like to test for in a GUI, we’ll introduce a couple of design patterns for thepresentation layer that help us test-drive our GUI code.
After determining what we’d like to test for and how we’d go about structuringour Swing GUI, we then move on to figure out what kinds of tools we should con-sider adopting for testing our Swing code, taking a closer look at one open sourcetool—Abbot. Finally, we’ll test-drive a bit of Swing code from scratch by usingplain JUnit and the Abbot library.
Ready to improve your swing?
8.1 What to test in a Swing UI
What kind of things should we test for in a graphical user interface? That’s not theeasiest of questions unless you’ll accept “it depends” as the answer. Althoughthere’s no simple answer or a universal testing guideline for the Swing developer,we can identify a number of disparate categories or properties of Swing code andcome up with some answers by focusing on just one of those categories at a time.
Let’s consider the following aspects of a Swing GUI:
■ Internal plumbing and utilities■ Rendering and layout■ Interaction
Next, we’ll run through each of these three items and discuss whether and howwe might want to test our Swing code for or in relation to those aspects. Let’s startwith the internal plumbing because it’s a nice low-hanging fruit.

What to test in a Swing UI 281
8.1.1 Internal plumbing and utilities
Although user interfaces mainly deal with presentation and visual aspects in gen-eral, that doesn’t mean that there wouldn’t be plenty of tiny bits of code that arepractically identical to the stuff we might write when developing backend systems,batch processing programs, or other less visuals-oriented systems.
Swing user interfaces need to perform validations and type conversions foruser input, format strings for presentation, and so forth. This is typically stuff thathas nothing at all to do with the Swing API, and it’s just as easy to test-drive as theplain old Java code we write for any other domain—and it makes just as muchsense to test-drive this kind of code as it does in other domains!
Conversely, where Swing user interface development differs from other domainsis where we need to work with the Swing API, which leads us to the next of our threeaspects: rendering and layout.
8.1.2 Rendering and layout
The Swing API is all about the rendering and layout of GUI components. If wewant a button on the screen, we place a button component into a layout. If wewant to display a lot of content in a small physical space, we wrap the componentcontaining the content into another component that knows how to render scroll-bars for navigating the content. If we want to display a graph plotting data from adatabase, we create a custom canvas component that knows how to place and con-nect the dots appropriately. This is the visual aspect of a Swing GUI. Now the ques-tion is, what kinds of things should we test for from the perspective of correctrendering and layout?
TIP Don’t test for looks or layout.
As a rule of thumb, I don’t test for layout. That is, if I’m developing a panel widgetthat contains two buttons, I don’t write a test for the first button’s dimensionsbeginning 3 pixels from the top and 5 pixels from the left. Testing for such apixel-precise layout seems to (most of the time) slow me down more than it wouldhelp improve the code base’s internal quality. In other words, I’d rather leave cor-rect layout to be verified as part of the visual inspection we need to do for theGUI1 anyway.
1 An exception to the rule might be a library of widgets that you publish to third parties. In that case, itmight make sense to have automated tests for the precise locations and dimensions of your widgetswhen deployed into various kinds of layouts.

282 CHAPTER 8
Test-driving Swing
What I’ve sometimes done is test for rough layout. That is, I might write a testthat says “button A should be above button B when panel C is rendered” or “but-ton A and button B should have the same width when rendered on screen.” Thesetests are less precise but also more robust because small visual changes in the com-ponent under test don’t blow up all of my tests (for example, because the compo-nent’s width decreased from 200 pixels to 196 pixels).
Having said that, there are occasions when it makes sense to test pixel-precise.An example of such an occasion might be the plotting canvas component. Wemight write a couple of pixel-precise tests to nail down aspects like a small circlebeing drawn around the center of each plot or the color of a line being green orred depending on whether one of its ends is plotted below the zero level on theY-axis, and so forth.
When writing pixel-precise tests, we need to remember not to overdo it. Forexample, for our plotter component we should probably write most of our tests byverifying against an internal model—the plotting data—and have only a couple oftests that draw on a canvas using simple plotting data. If it’s not truly necessary totest by examining pixels on the screen, don’t do it.
Utility code, rendering, and layout aren’t the only aspects of a Swing GUI,however. Utility code is just that—isolated utilities and functions—and the ren-dering and layout are basically read-only stuff. What we haven’t discussed yet isthe write operations for a GUI—the interactions that happen between differentGUI components as a result of external input from the user or triggered by abackground thread.
8.1.3 Interaction
Buttons, drop-down selections, and other nifty GUI widgets would be useless on aGUI if the user couldn’t use them to interact with the application. The widgets aresupposed to receive user input and alter the application’s state. Sometimes, the wid-gets are supposed to interact with other GUI components—for example, to filter outavailable selections from a drop-down widget based on the state of another widget.
This kind of interaction is not as trivial to test for as the utility code thatdoesn’t have any dependencies on the Swing API. It doesn’t require a PhD inastrophysics either, though, because we can test for the desired interactions easilyas long as we know the Swing API. For example, we need to know how a Swingcomponent receives user input in order to simulate or expect it in our unit tests.
It’s far more effective to describe ways of testing for this kind of interactionthrough an example, which we’ll get to later in this chapter. Before we go there,however, we need to talk about a couple of design patterns for user interface codein order to separate presentation from the behavior of our GUI widgets.

Patterns for testable UI code 283
8.2 Patterns for testable UI code
We cannot talk about user interface imple-mentation patterns without mentioningthe Model-View-Controller (MVC) archi-tecture that emerged from Smalltalk-80and that has been a major influence on theway we build GUI applications still today. Tocut the story short, figure 8.1 describes therelationships among the three componentsof MVC.
In MVC, the controller’s responsibility isto capture user input from the view’s wid-gets and inflict the appropriate changes tothe model, causing the view to update. Themodel’s only job is to encapsulate domain logic and, if using the Observer pattern,notify registered views of the change. What’s left to the view is the presentation—displaying the data it gets from the model.
Java Swing was heavily influenced by MVC, although it cannot be described asMVC as such. This is because the separation of the view and the controller inSwing has been collapsed into a single object “because the view and controllerparts of a component required a tight coupling.”2
The collapsing of the view and the controller into a single object is also whatcan make the traditional quasi-MVC blueprint architecture for Swing UIs slightlytroublesome to test. The culprit is that we cannot test the controller logic sepa-rately from the view—and, to paraphrase Martin Fowler, visual objects are usuallyharder to test than non-visual ones. In most cases, it’s possible (and strongly rec-ommended) to test the controller and view logic by instantiating the appropriatewidgets into a simple container window and then to operate the widget program-matically to simulate user interaction.
This approach doesn’t work in all cases, though, or it introduces inconve-niences such as slower test execution and difficulties in setting up an automatedbuild on a headless server. Thus, if possible, we’d obviously prefer something thatlets us test the controller logic and the presentation separately. Luckily, there aresome close cousins of MVC that do just that.
Next, we’re going to briefly describe three interrelated patterns that help struc-ture our UI code in a way that supports testability and thus enables easier test-drivendevelopment of the UI for our rich client applications. Those patterns are:
2 http://java.sun.com/products/jfc/tsc/articles/architecture/.
View Controller
Model
Figure 8.1 The MVC triad and its relationships. The controller acts on the model based on input from the view, the model worries about domain logic unaware of any details of the view or the controller, and the view registers with the model for change notifications and renders the data it obtains from the model.

284 CHAPTER 8
Test-driving Swing
■ Classic Model-View-Presenter■ Supervising Controller■ Passive View or The Humble Dialog Box
These are all more or less variations of the same theme—moving logic away fromthe view, making it as dumb as possible and, thus, alleviating the testability prob-lem. In fact, we could consider the latter two to be variations of the classic Model-View-Presenter pattern.
Let’s look at the patterns in a bit more detail, starting from a quick overview ofthe Model-View-Presenter and continuing with a closer look at how the Supervis-ing Controller and the Passive View (a.k.a. The Humble Dialog Box) twist thegeneric MVP to their slightly different advantages.
8.2.1 Classic Model-View-Presenter
Model-View-Presenter (MVP) is a pattern that emerged from the work of Taligent,Inc., back in 1996.3 In Taligent’s MVP, the widgets that make up the view receiveuser input only to delegate them to a presenter object, which is ultimately incharge of handling the event. View state in this classic MVP was handled by theview listening to model updates using an Observer pattern.
The view is left devoid of any logic beyond rendering a face for the model,which makes the view straightforward to test with test doubles for the presenterand model. Similarly, the presenter has no dependency whatsoever on the SwingAPI and can be tested easily by passing in event objects and verifying that themodel receives the expected changes.
In practice, this classic MVP pattern is more often implemented in one of thevariations documented by Martin Fowler, the author of a number of populardesign and architecture-related books. These variations are called Supervising Con-troller and Passive View. Let’s take a look.
8.2.2 Supervising Controller
The Supervising Controller pattern4 is a variation of MVP where the presenter (orcontroller) is responsible for handling all user input (the view delegates all user ges-tures directly to the registered presenters), and the majority of view-model syn-chronization happens through data binding, typically using something like the
3 Mike Potel, “MVP: Model-View-Presenter, The Taligent Programming Model for C++ and Java,” Tali-gent Inc., 1996, http://www.arsip.or.id/free_doc/m/mvp/mvp.pdf.
4 http://www.martinfowler.com/eaaDev/SupervisingPresenter.html.

Patterns for testable UI code 285
Observer pattern where model objects notify registered listeners—the present-ers—of changes, who in turn trigger view widgets to pull the changed data fromthe model.
In practice, this organization of the presenter and view objects leaves littlelogic in the view layer. This, in turn, is important because view-layer code is gener-ally somewhat harder to test than plain ol’ Java objects. Not much, mind you, butdifficult nevertheless.
Let’s look at an example to see if it’ll make things clearer. Let’s say we’re devel-oping a GUI for a unit-testing framework. Such things cannot exist without apretty green bar, so we definitely need one. Figure 8.2 depicts our SupervisingController-based design for our green-bar UI.
In figure 8.2, as the basis of everything we have a domain object named Green-BarModel. The GreenBarModel is our model object and represents the most recentlyexecuted test run, which our green-bar widget should visualize. The GreenBar-SupervisingController listens to changes in the GreenBarModel object and tellsthe GreenBarView to update its color according to the results of the GreenBar-Model—the model. GreenBarSupervisingController also registers through theview for handling user gestures (in our case, let’s say clicks of a Run button).
Listing 8.1 shows how our simple presenter class could look.
User gestures(”User clicked the Run button”)
GreenBarView GreenBarController
GreenBarModel Change notifications(”I just finished a new test run”)
View synchronizes itselfactively from the model
(”How many tests failed?”)
Update notifications(”Test status has changed”)
Operates(”Re-run the tests”)
Figure 8.2 Diagram showing the interactions between the Supervising Controller MVP-triplet for a green bar user interface

286 CHAPTER 8
Test-driving Swing
public class GreenBarSupervisingController {
private final GreenBarModel model; private final GreenBarView view;
public GreenBarController(GreenBarView view, GreenBarModel model) { this.view = view; this.model = model; view.addRunButtonListener(new RunButtonListener() { public void onRunButtonClick() { model.runTests(); updateView(); } }); updateView(); }
private void updateView() { view.update(model); } }
As we can see from listing 8.1, the responsibilities of the presenter class are to Bregister handlers for the various user gestures coming from the view, to C operateon the model objects as appropriate in response to the user gestures, and to Dtrigger view updates. Considering that the GreenBarView is an interface and thatthe GreenBarModel is a plain ol’ Java object, the presenter is just as easy to test(and test-drive!) as any regular Java code. Also note that there’s not a singlejavax.swing.* interface in sight—that’s all left to the view.
Speaking of the view, let’s take a quick look at the view interface for a Supervis-ing Controller-style MVP triad—the GreenBarView, that is:
public interface GreenBarView {
public void addRunButtonListener(RunButtonListener listener);
void update(GreenBarModel model);}
That’s a pretty simple interface. There’s one method for registering new user-gesture handlers and one for telling the view to update itself from the givenGreenBarModel. We can imagine the concrete Swing implementation of theGreenBarView interface will be easy to test:
Listing 8.1 The presenter implemented in a Supervising Controller style
Tell view to update itself
COperate on model objects
Register foruser gestures B
D

Patterns for testable UI code 287
■ Instantiate the view class, register a listener, simulate a click on the Run but-ton, and verify that the registered listener received the event.
■ Instantiate the view class, pass it a model to update from, and verify that theappropriate widgets now hold the new data.
We’re going to look at how to implement these tests soon. For now, though, let’sfocus on the presenter and the overall pattern.
Notice how in listing 8.1 the presenter throws the whole model object to theview for synchronizing its widgets? That’s just how I decided to do it for this exam-ple. In practice, the presenter could trigger view updates on a much finer-grainedlevel. The trade-off is between coupling and performance (and becomes muchmore relevant when talking about complex UI panels rather than a simple onelike our green bar).
Coarse-grained full-screen updates can be a serious performance and usabilityissue, which we could avoid by triggering more focused updates of only thoseparts of the screen that need to update. On the other hand, more detailedupdates create more coupling between the controller and the view, which we’dobviously like to avoid. In practice, I’d recommend starting with updates ascoarse-grained as feels natural; over time, if the performance becomes an issue,split up the update events as necessary.
That was the Supervising Controller variation of the MVP pattern. Let’s seehow the Passive View twists the MVP triad, making the view even thinner (and thuseasier to test) than with the Supervising Controller.
8.2.3 Passive View
The Passive View pattern5 (also known as the Humble Dialog Box, according toMichael Feathers’ seminal article of the same name6) is a variation of MVP wherethe presenter is responsible for both handling user gestures and updating theview. The view only needs to capture user gestures and pass them on to the pre-senter; if something needs to change in the view, the presenter will explicitly tellthe view what data it should present. In other words, there’s no connection at allbetween the view and the model objects.
The advantage of Passive View is that the view layer has even less code to testthan with the Supervising Controller variation of MVP. The view objects literallycan’t do anything else but display what they’re told. This is also illustrated in fig-ure 8.3.
5 http://www.martinfowler.com/eaaDev/PassiveScreen.html.6 http://www.objectmentor.com/resources/articles/TheHumbleDialogBox.pdf.

288 CHAPTER 8
Test-driving Swing
In our Passive View–based design in figure 8.3, we once again have a domainobject named GreenBarModel as the basis of everything. In this second variationof MVP, the GreenBarPresenter listens to changes in the GreenBarModel object,figures out based on the state of the model which color the bar should display,and then tells the GreenBarView to update its bar color. Just like in the Supervis-ing Controller variation, the GreenBarPresenter also registers through the viewfor handling user gestures.
Listing 8.2 clarifies figure 8.3 by showing one possible presenter implementa-tion.
public class GreenBarPresenter {
private final GreenBarModel model; private final GreenBarView view;
public GreenBarPresenter(final GreenBarModel model, final GreenBarView view) { this.model = model; this.view = view; view.addRunButtonListener(new RunButtonListener() { public void onRunButtonClick() { model.runTests(); updateView(); } });
Listing 8.2 The presenter implemented in a Passive View style
GreenBarView GreenBarPresenter
GreenBarModel
User gestures(”User clicked the Run button”)
Change notifications(”I just finished a new test run”)
Updates view(”Set color to green”) The presenter contains view logic
such as “which color to tell viewto display, given that the latesttest run has 3 failed tests.”
Operates(”Re-run the test”)
Figure 8.3 Passive View (or The Humble Dialog Box) makes the view as thin as possible, encapsulating as much view logic as possible into the presenter.
Update view D
Operate modelC
Register for gestures
B

Patterns for testable UI code 289
updateView(); }
private void updateView() { Color newColor = (model.numberOfFailures() == 0) ? Colors.testsPassed() : Colors.testsFailed(); view.setBarColor(newColor); }}
Looking at listing 8.2 and comparing it to listing 8.1, there’s not that much differ-ence. We still B register for handling user gestures from the view, we still C oper-ate on the model based on the gestures, and we still D update the view. What’sdifferent is that instead of asking the view to update itself from the model, it’s thepresenter that’s now E doing the work of figuring out what to display.
In the Passive View variation of MVP, the view doesn’t even know that there’s amodel involved—all it knows is that somebody is telling it to paint the bar with agiven color. The following code snippet shows our passive GreenBarView interfaceto confirm just that:
public interface GreenBarView {
public void addRunButtonListener(RunButtonListener listener);
public void setBarColor(Color color);}
As we can deduce from listing 8.2 and the previous view interface, the PassiveView pattern moves even more view logic from the view into the presenter, reduc-ing the view’s responsibilities to delegating user gestures to registered listenersand displaying what it’s told to display. This makes the view implementation evensimpler to test than with the Supervising Controller:
■ Instantiate the view class, register a listener, simulate a click on the Run but-ton, and verify that the registered listener received the event.
■ Instantiate the view class, pass it a piece of data to display, and verify that theappropriate widget now holds the new data.
I think we’ve talked enough about patterns for now. Although the different varia-tions of the MVP pattern (and many others, I’m sure) help us by separating con-cerns cleanly to allow for easier unit-testing and test-driven development, itshould be noted (to the delight of Swing developers working on legacy codebases) that Swing code can generally be unit-tested even without a proper separa-tion of the M, V, and C.
View logic is in presenter
E

290 CHAPTER 8
Test-driving Swing
The stepping-stone for being able to do that is the low-level access we can getto the component hierarchy of a Swing application using a variety of open sourcetesting tools, which we’ll look at next.
8.3 Tools for testing view components
In the previous section, we talked about making the view layer of our Swing appli-cation as thin as possible so that the only two things we need to test are that usergestures are captured and passed on the registered listeners and that the compo-nent displays on the screen what it’s supposed to display. What we didn’t talkabout was how to do this. And this is where the need for tools comes into play.
8.3.1 Why do we need tools?
Why do we need tools? In order to answer that question, I’m afraid we need to doa bit of legwork. Let’s look back at one of the view interfaces we saw earlier, shownagain here:
public interface GreenBarView {
public void addRunButtonListener(RunButtonListener listener);
public void setBarColor(Color color);}
Now, say we’d like to implement the view in question as a javax.swing.JPanel.How would we go about it?
We want the UI to have two widgets: a button for running tests and some kindof a colored box to serve as our green bar. The first steps in programming a unittest for the view implementation are simple and shown in listing 8.3.
public class TestGreenBarViewImpl {
private GreenBarView view; private boolean listenerReceivedClick;
@Before public void setUp() { view = new GreenBarViewImpl(); view.addRunButtonListener(new RunButtonListener() { public void onRunButtonClick() { listenerReceivedClick = true; } });
Listing 8.3 How to verify that the view works?
Check for received events
B

Tools for testing view components 291
}
@Test public void viewShouldDisplayTheBarInTheGivenColor() throws Exception { view.setBarColor(Color.GREEN); // How to verify that the bar really is green? }
@Test public void viewShouldDelegateGesturesToListener() throws Exception { // How to simulate a click on the "Run" button? // How to know whether the button is there at all? assertTrue(listenerReceivedClick); }}
Listing 8.3 illustrates how we have easily solved half of both of our problems butneither completely. We can easily B register our own handler for the user ges-tures passed on from the view, but we don’t know how to trigger a user gesture onthe button. In fact, we don’t even know how to test that the button exists in thecomponent. On the other hand, we can easily C simulate the presenter tellingthe view what to display, but we don’t know how to verify that the view does whatit’s told.
Let’s think about some options. Essentially, what we need is access to the Runbutton for triggering a click event and access to the bar widget for comparing itscolor to the expected color. We could have our tests announce that those particu-lar components are public fields on the view class or are accessible through pub-lic accessor methods. But we don’t want to do that. Even without mentioning theword encapsulation and the standard Swing idioms of creating anonymous classesall around the place, we’d be exposing individual widgets by and large for the solepurpose of being able to operate them from our unit tests. No thanks.
Fortunately, there’s another way made possible by Swing’s component hierar-chy and Java’s powerful Reflection API. Having a reference to a top-level con-tainer such as a JFrame, we can use the Reflection API to recursively searchthrough the nested container components until we find the one Swing compo-nent we want to manipulate.
If that sounds like a lot of work, you’re right. It is. And that’s why Other Peo-ple™ have created tools for automating the grudge of the work! Let’s talk a bitabout what we want from such a tool, compare two of the most popular such tools,and then have a closer look at one of them in particular.
Check for received events B
Simulate the presenterC

292 CHAPTER 8
Test-driving Swing
8.3.2 TDD-friendly tools
What do we want from a tool for testing and test-driving Swing components? It’sobvious that we want to find components from a hierarchy and operate on them.The different ways we’d like to be able to do that are various, however.
Most of the time, we can probably just refer to a component by its uniquename or identifier; but sometimes we want to be less specific and, say, refer to arelative position in the hierarchy. Sometimes we’d like to just get the only buttonon the pop-up window with a specific title, and sometimes it’d be nice to find thecomponent based on its class. The more of these different ways a tool supports,the better.
What about manipulating the widgets? We need to be able to click buttons andchange the content of text fields, but there’s more. In some cases, we don’t wantto just change the content of a text field. Sometimes we want to t-y-p-e into one,keystroke by keystroke, and verify that the field reacts as expected. We want to sim-ulate durations. We might want a component to accelerate whatever it’s doing thelonger the user keeps a key pressed down. And then there’s the mouse, which hasmany more gestures we might need to simulate.
It’s obvious that there’s a lot to expect from a Swing test automation library. Atthe moment there are two libraries in particular that satisfy our needs well.They’re called Abbot and Jemmy, they’re both open source, and they’re bothmature projects and have seen plenty of usage around the world. Let’s start ourtour with the latter. Oh, and before we start the tour, the goal is not to learn bothof these APIs throughout but rather to get an idea of what the APIs look like.
JemmyJemmy (http://jemmy.netbeans.org/) is a library originally developed by the Net-Beans team for their own use7 and later open sourced to the benefit of the wholeSwing-developing Java community. In short, Jemmy provides an API for accessingthe internals of a Java Swing UI. It does this by hooking onto the Swing eventqueue, listening for events, and locating individual components through thoseevents. Having a reference to a component, we can then use Jemmy’s API for sim-ulating keystrokes and mouse gestures or interrogate components for their pre-cious data from our unit tests.
7 There’s also an extension to Jemmy called JellyTools (http://jellytools.netbeans.org), also developedby the NetBeans team, which provides additional features for working with NetBeans platform-specificcomponents.

Tools for testing view components 293
Listing 8.4 shows how we might’ve implemented the tests from listing 8.3 usingthe Jemmy API.
import org.netbeans.jemmy.operators.JButtonOperator;import org.netbeans.jemmy.operators.JComponentOperator;import org.netbeans.jemmy.operators.JFrameOperator;
public class TestGreenBarViewWithJemmy {
private int buttonClicks;
private GreenBarViewImpl view;
private JFrameOperator frameOp;
@Before public void setUp() { view = new GreenBarViewImpl(); buttonClicks = 0; view.addRunButtonListener(new RunButtonListener() { public void onRunButtonClick() { buttonClicks++; } }); showFrame(view); }
@After public void tearDown() { frameOp.dispose(); }
private void showFrame(Component component) { JFrame frame = new JFrame(); frame.getContentPane().add(component); frame.pack(); frame.setVisible(true); frameOp = new JFrameOperator(frame); }
@Test public void viewShouldDisplayTheBarInTheGivenColor() throws Exception { Color desiredColor = Color.GREEN; view.setBarColor(desiredColor); JComponentOperator barOp = new JComponentOperator( frameOp, new NameBasedChooser("bar")); assertEquals(desiredColor, barOp.getBackground());
Listing 8.4 View tests implemented with Jemmy
Display component in JFrame
Dispose of frame afterward
C
D Locate components using operators and choosers
B

294 CHAPTER 8
Test-driving Swing
assertEquals(desiredColor, barOp.getForeground()); }
@Test public void viewShouldDelegateGesturesToListener() throws Exception { JButtonOperator buttonOp = new JButtonOperator( frameOp, new NameBasedChooser("run_button")); assertEquals(0, this.buttonClicks); buttonOp.doClick(); assertEquals(1, this.buttonClicks); }}
In listing 8.4, our test class’s setup method creates the view component we want totest and B places it into a JFrame for display onscreen. Because we’re creatingnew frames in the setup, we also need to get rid of them by C disposing of theframes in the teardown method. This is the kind of common plumbing code thatwe should move into a common base class as soon as we create our second Jemmytest case.
Now, how do we solve our problem of getting access to the widgets we want tomanipulate? With Jemmy, we do that with the help of two good friends—a componentoperator and a component chooser. As we can see in listing 8.4, in both test methodswe’re D creating some kind of an operator object, passing in a JFrameOperator anda NameBasedChooser as arguments. What’s happening here is that we’re telling, forexample, the constructor of the JButtonOperator class to search through the com-ponents inside a given container—the JFrame—and consult the given chooserobject regarding which of the child components is the one we’re looking for. In thecase of the NameBasedChooser, the component is identified by its name property,accessed using Component#getName.
An essential part of the API is the ComponentChooser interface, and in listing 8.4we’re using a concrete implementation named NameBasedChooser. This is not partof the Jemmy API; it’s part of our own implementation, shown in listing 8.5.
import org.netbeans.jemmy.ComponentChooser;
public class NameBasedChooser implements ComponentChooser {
private final String name;
public NameBasedChooser(String name) { this.name = name;
Listing 8.5 Custom name-based ComponentChooser implementation for Jemmy
D Locate components using operators and choosers
Simulate user gestures with operators

Tools for testing view components 295
}
public boolean checkComponent(Component c) { return name.equals(c.getName()); }
public String getDescription() { return "Component named '" + name + "'"; }}
From listing 8.5, we can see that the ComponentChooser interface is probably notamong the biggest we’ve seen. It defines a checkComponent method, which we’veimplemented in listing 8.5 by comparing the return value of the candidate com-ponent’s getName method to the one we’re looking for. The other methoddefined in the ComponentChooser interface is called getDescription and existspurely for informative purposes—Jemmy by default prints out what it’s doing tothe standard output using the different component choosers’ getDescriptionmethod to provide a meaningful description. Also, when an operator doesn’t findwhat it’s looking for within the configured timeout, Jemmy uses the chooser’sdescription to render a meaningful failure message.
Basic component-finding implementations such as the one in listing 8.5 arearguably something that a tool such as Jemmy should provide. The different Com-ponentChooser implementations we typically need aren’t too difficult to imple-ment, however, so it’s not exactly a showstopper.
I’ve been using Jemmy for as long as I can remember and haven’t looked backall that much—it’s easy to use, and once the initial plumbing is in place, it just works(which can’t be said about all of the tools I’ve used along the years). Having saidthat, Jemmy does have a worthy competitor in Abbot, which we’ll introduce next.
AbbotAbbot (http://abbot.sourceforge.net) is not a new player in the Swing-testingscene. Its development has, however, recently picked up (including the supportfor the Eclipse Standard Widget Toolkit [SWT] graphics library in addition toSwing). Abbot uses a slightly different approach compared to Jemmy. WhereasJemmy works its magic on the Swing event queue, Abbot makes more use of oper-ating-system-level events. This gives Abbot the benefit of being closer to the realthing, although the difference isn’t that significant in my experience.
What’s perhaps a more important difference is that Abbot provides explicitsupport for unit testing. This is illustrated to some degree in listing 8.6, which usesAbbot to re-implement the test we saw earlier in listing 8.4.
Identify desired component by name

296 CHAPTER 8
Test-driving Swing
import junit.extensions.abbot.ComponentTestFixture;import abbot.finder.matchers.NameMatcher;import abbot.tester.ComponentTester;
public class TestGreenBarViewWithAbbot extends ComponentTestFixture {
private GreenBarViewImpl view; private int buttonClicks;
@Override protected void setUp() throws Exception { super.setUp(); view = new GreenBarViewImpl(); buttonClicks = 0; view.addRunButtonListener(new RunButtonListener() { public void onRunButtonClick() { buttonClicks++; } }); showFrame(view); }
public void testViewShouldDisplayTheBarInTheGivenColor() throws Exception { Color desiredColor = Color.GREEN; view.setBarColor(desiredColor); Component bar = componentNamed("bar"); assertEquals(desiredColor, bar.getBackground()); assertEquals(desiredColor, bar.getForeground()); }
public void testViewShouldDelegateGesturesToListener() throws Exception { Component button = componentNamed("run_button"); assertEquals(0, buttonClicks); new ComponentTester().actionClick(button); assertEquals(1, buttonClicks); }
private Component componentNamed(String name) throws Exception { return getFinder().find(view, new NameMatcher(name)); } }
Listing 8.6 View tests implemented with Abbot
Ask Abbot to place component in frame
B
Locatecomponents by
names
Simulate user gestureswith ComponentTester D
C

Test-driving a view component 297
In listing 8.6, we can observe some of Abbot’s main features in action. For starters,after creating and configuring our view component in the setup method, we B askAbbot to put our component into a JFrame so that we can test it. In our two testmethods, we can see how Abbot lets us locate components using what Abbot callsmatchers. In both tests, we C use a name-based matcher to find the Run button andthe green bar. Finally, in testViewShouldDelegateGesturesToListener, we D useAbbot’s ComponentTester utility to simulate a click on the Run button.
As you may have noticed, although the Jemmy project only provides a libraryfor connecting to Swing components, the Abbot project also provides these nicelittle utilities, such as a base class to extend our own tests from, moving someplumbing away from our eyes.
One such base class that’s especially handy is the ComponentTestFixture, fromwhich our test in listing 8.6 extends. In addition to giving us access to the compo-nent finder and the showFrame method, the ComponentTestFixture also, forexample, catches exceptions thrown on the event dispatch thread and re-throwsthem as test failures—which is an ugly business to do yourself.
All in all Abbot has a lot going for it, and it’s being developed further. Whenpush comes to shove, either of these two tools we’ve seen can pull through, so it’smore about personal preference regarding which of the two slightly different APIsseems to fit your hands better.
We’ve now talked about making our views as thin as possible with design pat-terns such as Passive View and Supervising Controller. We’ve also seen two opensource libraries that facilitate testing view components, giving us access to widgetswe can operate. So far we haven’t, however, written much view code. It’s time tocorrect that by test-driving a view component from scratch, making use of every-thing we have in our TDD trick bag—including Abbot and Jemmy, the two Swingtesting libraries we just learned about.
8.4 Test-driving a view component
To finish this chapter, we’re going to test-drive a view component. Exactly whatkind of a view component? That’s a good question, and I’m glad you asked. We’regoing to build a plot map component. What do I mean by a plot map component?Let’s pull up some virtual pen and paper and look at figure 8.4.
Let’s go through the individual UI widgets shown in the design sketch one at atime. First of all, there’s a canvas on which the component should draw a seriesof plot points connected with straight lines. In the bottom-left corner of the UIare two text fields for typing in the X and Y coordinates for a new plot point; thisadds a button with the text ADD on it for adding the plot point. In addition to the

298 CHAPTER 8
Test-driving Swing
text fields and the button, the plot points drawn on the canvas should respond tomouse clicks, triggering the removal of the plot point in question.
In the following sections, we will set out to develop this small graphical compo-nent with test-driven development. We’ll begin by laying out the bits and pieces ofour MVP-based design and then proceed to building up the widget. We’ll firstdrive the component widgets, such as text fields and buttons, into the view andwire them up with behavior. Then, we’ll add a bit of custom-drawn graphics andeventually make the widget react properly to user gestures on our graph.
Now, let’s talk about what should happen under the hood when we’re done.
8.4.1 Laying out the design
At this point, we have some kind of a sketch drawing of the widget and an idea ofwhat the widget needs to do. Now, we need to fill the pretty picture with some-thing concrete: code.
Technically speaking, our widget will be connected to a model object that con-sists of a series of points described in terms of X and Y coordinates. The modelclass is called PlotMapModel; we’ll assume that we’ve already implemented it.
The view component we need to implement should implement the PlotMap-View interface, shown here:
ADD
Clicking a plot pointtriggers a removal event.
The added plot point’scoordinates are obtained
from two text fields.
When user clicks theADD button, the view
triggers an addition eventto its presenter.
Figure 8.4 UI design sketch for the plot map component explaining the desired responses to user gestures

Test-driving a view component 299
public interface PlotMapView {
void registerAdditionListener(PlotAdditionListener listener);
void registerRemovalListener(PlotRemovalListener listener);
void drawPlotMap(PlotMapModel model);}
From this interface, we can already deduce that there will be two kinds of user ges-tures the view should delegate to its registered listeners (the presenter): the useradding a new plot point and the user removing an existing plot point. The draw-PlotMap method is how the presenter tells the view to update itself.
The two listener interfaces are also straightforward, as can be seen from thefollowing snippets:
import java.awt.Point;
public interface PlotAdditionListener {
void plotWasAdded(Point plot);}
public interface PlotRemovalListener {
void plotWasRemoved(Point plot);}
When an addition or removal event reaches the plot map component’s presenter,the presenter will modify the underlying PlotMapModel accordingly and subse-quently invoke the PlotMapView’s drawPlotMap method to synchronize the view.
For the sake of completeness, listing 8.7 shows the outline of the model class,PlotMapModel.
import java.util.*;import java.awt.Point;
public class PlotMapModel {
private List<Point> plots = new ArrayList<Point>();
public void add(Point plot) { plots.add(plot); }
public void remove(Point plot) { plots.remove(plot);
Listing 8.7 The model class in all of its simplicity

300 CHAPTER 8
Test-driving Swing
}
public List<Point> points() { return plots; }}
Looking at listing 8.7, the add and remove methods are invoked by the presenter,and the points method will be used by the view for pulling the plot points itneeds to draw.
We should now have an idea of what we need to bring into life. It comes downto the following three features:
■ Adding plot points—Add a pair of text fields and a button that, when clicked,triggers the expected event.
■ Drawing plot points—Given a series of plot points, the view should draw themon its canvas.
■ Removing plot points—Given a set of plot points drawn on the canvas, clickingone of them should trigger a removal event for that specific plot point.
How about working on the list top down, starting with adding plot points?
8.4.2 Adding and operating standard widgets
We’re about to drop some serious UI development-fu. The first move will be get-ting those text fields and the Add button in there.
Using Abbot for setting up our test harness, we whip up the plumbing shownin listing 8.8.
import junit.extensions.abbot.ComponentTestFixture;import abbot.finder.matchers.NameMatcher;import abbot.tester.ComponentTester;import java.awt.Point;import java.awt.Component;
public class TestPlotMapViewImpl extends ComponentTestFixture implements PlotAdditionListener {
private Point addedPoint;
public void plotWasAdded(Point plot) { addedPoint = plot; }
Listing 8.8 Plumbing for a test operating the view implementation
Test class acts as listener
Keep added point for tests to assert

Test-driving a view component 301
public void setUp() throws Exception { super.setUp(); addedPoint = null; PlotMapViewImpl view = new PlotMapViewImpl(); view.registerAdditionListener(this); showFrame(view); }}
What we have here is a test class similar to what we saw earlier when discussingAbbot. Perhaps the biggest difference is that this time I’ve decided to use the SelfShunt pattern,8 making the test class act as a test double—this time, registering asa PlotAdditionListener. What’s most important is that when the test methodsbegin their execution there’s a PlotMapViewImpl waiting for them on the screen.
Now, let’s write a test. With listing 8.9, we add a test for the registered listener.It receives an addition event for the correct plot-point coordinates when we typesome coordinates in the text fields and click a button.
public class TestPlotMapViewImpl extends ComponentTestFixture implements PlotAdditionListener { ... private ComponentTester tester = new ComponentTester();
public void testAdditionEventGetsTriggered() throws Exception { Point point = new Point(3, 5); typeIntoTextField("x_coord_textfield", "" + point.x); typeIntoTextField("y_coord_textfield", "" + point.y); tester.actionClick(namedComponent("add_button")); assertEquals(point, addedPoint); }
private void typeIntoTextField(String name, String value) throws Exception { tester.actionKeyString(namedComponent(name), value); }
private Component namedComponent(String name) throws Exception { return getFinder().find(new NameMatcher(name)); }}
8 http://www.objectmentor.com/resources/articles/SelfShunPtrn.pdf.
Listing 8.9 Test for typing in coordinates and clicking the Add button

302 CHAPTER 8
Test-driving Swing
Adding just enough of the PlotMapViewImpl class, we now have a test that failsbecause Abbot can’t find a component named x_coord_textfield on the screen.Adding the missing components one by one, we end up with our implementationlooking like listing 8.10.
import javax.swing.*;
public class PlotMapViewImpl extends JPanel implements PlotMapView {
public PlotMapViewImpl() { add(createTextField("x_coord_textfield")); add(createTextField("y_coord_textfield")); JButton addButton = new JButton(); addButton.setName("add_button"); add(addButton); }
private JTextField createTextField(String name) { JTextField field = new JTextField(); field.setName(name); return field; }
public void registerAdditionListener(PlotAdditionListener listener) { }
public void registerRemovalListener(PlotRemovalListener listener) { }
public void drawPlotMap(PlotMapModel model) { }}
We’ve made PlotMapViewImpl create the three widgets and add them into itsdefault layout. This is enough for our test to get one step further, now failingbecause clicking the button doesn’t seem to do anything—which is correctbecause we haven’t wired up any functionality behind the widgets. Let’s do thatright now and get that test passing.
Listing 8.10 View implementation with the necessary widgets in place
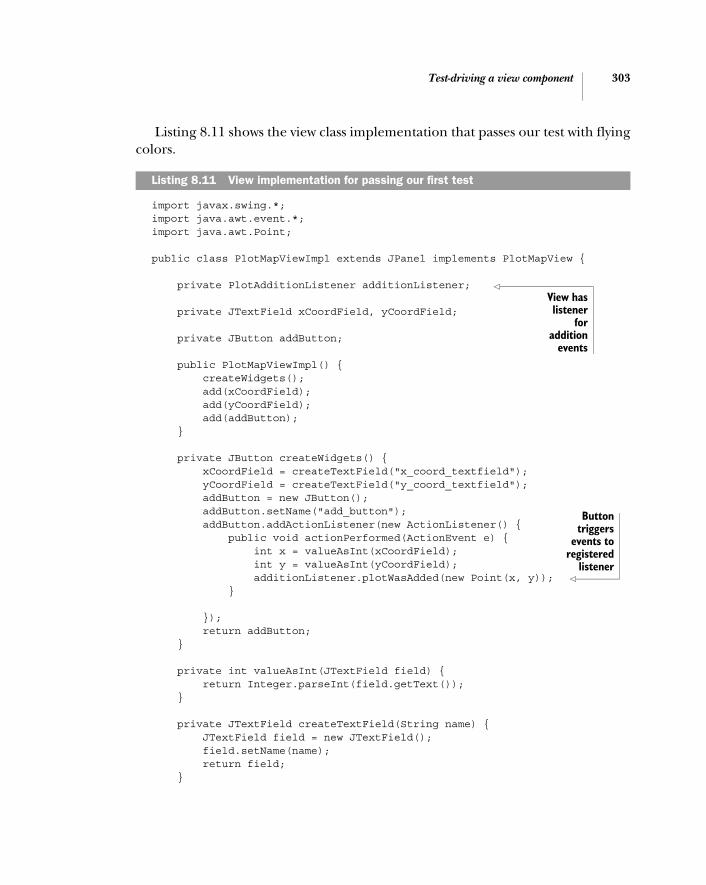
Test-driving a view component 303
Listing 8.11 shows the view class implementation that passes our test with flyingcolors.
import javax.swing.*;import java.awt.event.*;import java.awt.Point;
public class PlotMapViewImpl extends JPanel implements PlotMapView {
private PlotAdditionListener additionListener;
private JTextField xCoordField, yCoordField;
private JButton addButton;
public PlotMapViewImpl() { createWidgets(); add(xCoordField); add(yCoordField); add(addButton); }
private JButton createWidgets() { xCoordField = createTextField("x_coord_textfield"); yCoordField = createTextField("y_coord_textfield"); addButton = new JButton(); addButton.setName("add_button"); addButton.addActionListener(new ActionListener() { public void actionPerformed(ActionEvent e) { int x = valueAsInt(xCoordField); int y = valueAsInt(yCoordField); additionListener.plotWasAdded(new Point(x, y)); }
}); return addButton; }
private int valueAsInt(JTextField field) { return Integer.parseInt(field.getText()); }
private JTextField createTextField(String name) { JTextField field = new JTextField(); field.setName(name); return field; }
Listing 8.11 View implementation for passing our first test
View haslistener
foraddition
events
Buttontriggers
events toregistered
listener

304 CHAPTER 8
Test-driving Swing
public void registerAdditionListener(PlotAdditionListener listener) { this.additionListener = listener; }
public void registerRemovalListener(PlotRemovalListener listener) { }
public void drawPlotMap(PlotMapModel model) { }}
In listing 8.11, the view class’s constructor does two things: creates the child wid-gets and adds them on the screen; there’s nothing special about that. What’s per-haps more interesting is how we wire the Add button to trigger events on theregistered PlotAdditionListener by pulling data from the text fields inside thebutton’s ActionListener. It’s worth noting that the current implementationshown in listing 8.11 makes some assumptions. For example, it assumes thatthere’s going to be exactly one registered listener at any time (and that there’salways going to be one).
Also, as I was implementing the ActionListener for the Add button, I realizedthat the user might type non-numeric input into the coordinate text fields. That’ssomething we should prevent, so I added that on my task list. I’m thinking wecould have the Add button enabled only while there are valid coordinates in thetext fields. And after adding a point to the plot map, we should clear out the coor-dinate text fields. To keep things interesting, let’s leave these as exercises for youand move on to doing something slightly different: drawing custom graphics.
8.4.3 Drawing custom graphics
It’s one thing to slap together a bunch of off-the-shelf components to build a UI.It’s another thing to build one from scratch, literally drawing your custom compo-nent on the screen. That’s basically what we’re up to with our next task: drawingthe plot map on a canvas.
Let’s first make sure we’ve got the big picture in check. What we have in placenow in our PlotMapViewImpl class is a couple of text fields and a button that trig-gers an addition event on a registered listener. The view class does not, however,do anything when it’s asked to draw the given PlotMapModel. Eventually, we’d liketo be able to see a canvas with plot points, and connecting lines on it. I’m afraidgraphics has never been one of my strong points, and doing all of this in one stepsounds like too big a bite to take at once. Thus, we’ll divide and conquer.
Register listener for addition events

Test-driving a view component 305
Isolating the problemWhat I’m thinking is that we should separate the drawing responsibility to a sepa-rate canvas class and just check that the PlotMapViewImpl passes through therequest to draw plots to the canvas object. In other words, we won’t mix the canvasstuff with the top-level panel component but instead have the PlotMapViewImplhold on to a PlotMapCanvas, an interface that we can stub away for now. Shrinkingthe canvas down to as small a piece of code as possible will make it easier to test.
But we’re not yet working on the canvas, so let’s focus on the view-canvas inter-action. Listing 8.12 presents our next test for verifying the desired interactionbetween the view component and its canvas component.
public class TestPlotMapViewImpl extends ComponentTestFixture implements PlotAdditionListener { ... private PlotMapCanvasStub canvas;
public void setUp() throws Exception { ... canvas = new PlotMapCanvasStub(); view = new PlotMapViewImpl() { @Override protected PlotMapCanvas createCanvas() { return canvas; } }; }
public void testViewPassesModelToSeparateCanvasObjectForDrawing() throws Exception { Point p1 = new Point(1, 3); Point p2 = new Point(2, 1); Point p3 = new Point(5, 4); PlotMapModel model = new PlotMapModel(); model.add(p1); model.add(p2); model.add(p3); view.drawPlotMap(model); assertEquals(Arrays.asList(p1, p2, p3), canvas.plottedPoints); }}
Listing 8.12 Testing for the view delegating drawing to a PlotMapCanvas
B Use test double for canvas
View creates its canvas with this method
C

306 CHAPTER 8
Test-driving Swing
In listing 8.12, we’re B using a test double called PlotMapCanvasStub for captur-ing the expected interaction. I decided to swap it in by C overriding a protectedfactory method to return our test double. The only thing we need from the fakecanvas, shown in listing 8.13, is for it to record what it was asked to draw so that wecan compare the actual against the expected in our test.
public class PlotMapCanvasStub implements PlotMapCanvas {
public List<Point> plottedPoints = new ArrayList<Point>();
public void plot(Point point) { plottedPoints.add(point); }}
That’s all we need for now to get our test to fail for the right reason—the missingbehavior for delegating the drawing of the model to the view’s canvas component.
Walking the path of least pain, listing 8.14 shows the handful of lines of codewe add to make the test turn green.
public class PlotMapViewImpl extends JPanel implements PlotMapView { ...
protected PlotMapCanvas createCanvas() { return null; }
public void drawPlotMap(PlotMapModel model) { for (Point point : model.points()) { createCanvas().plot(point); } }}
The astute reader may have noticed a couple of interesting shortcuts in list-ing 8.14. First, we’re returning null from the createCanvas method (which onlyexists because of the @Override annotation in the test)—that’s all we need fornow. At some point, we’ll want the production code to create a canvas, but we’renot there yet.
Listing 8.13 Test double for the PlotMapCanvas
Listing 8.14 Making view pass model to a separate canvas for drawing
Needed to make code compile
Tell canvas to draw model’s plot points

Test-driving a view component 307
Second, we’re invoking the createCanvas method for each plot point we’redrawing. This is obviously not the correct implementation—it passes the testbecause the overridden createCanvas always returns the same object instance—but I wanted to push myself to write a test that explicitly documents our intentionof drawing everything on a single canvas.
Listing 8.15 adds a test that brings this shortcoming to light.
public void testViewCreatesItsCanvasJustOnce() throws Exception { final MutableInt canvasesCreated = new MutableInt (); view = new PlotMapViewImpl() { @Override protected PlotMapCanvas createCanvas() { canvasesCreated.increment(); return new PlotMapCanvasStub(); } }; PlotMapModel model = new PlotMapModel(); model.add(new Point(1, 1)); view.drawPlotMap(model); view.drawPlotMap(model); assertEquals(1, canvasesCreated.intValue()); }
By B incrementing a mutable counter object9 on every call to createCanvas andcalling the drawPlotMap method on the view several times (and with some pointsto draw), we can C verify that the view only creates one canvas for itself.
Now what do we still need to do before we can move on to implementing thecanvas? At least there’s the null-returning createCanvas method that we shouldmake create an instance of the real thing. There’s also one small glitch in ourdrawPlotMap method—it doesn’t clear out the previously drawn plots beforedrawing new ones! I think we need to add a clear method to our PlotMapCanvasinterface and make the PlotMapViewImpl call that before (re)drawing a model.
We’re not going to go there, although I’ll be happy to wait while you go aheadwriting some tests and fixing those shortcomings. Once you’re done with them,we need to move on to implementing our custom canvas object!
Listing 8.15 Explicitly specifying that a view should create exactly one canvas
9 I used to write my own until the Jakarta Commons Lang project’s (http://jakarta.apache.org/com-mons/lang) 2.2 release gave me proper mutable primitives.
Increment a counter
B
Should have been exactly one canvas
C

308 CHAPTER 8
Test-driving Swing
Testing for physical dimensionsAs usual, there are many ways to skin a cat. In the case of trying to develop agraphical component that draws itself like our PlotMapViewImpl will need to do,perhaps the easiest place to start is with the dimensions; I’m tempted to start fromthere. To begin, let’s make the canvas a fixed size. Listing 8.16 presents a two-linerthat gets the ball rolling, nailing the canvas’s size to 200x100 pixels.
public class TestPlotMapCanvasImpl {
@Test public void testDimensionsShouldBeAutomaticallySet() throws Exception { Component canvas = new PlotMapCanvasImpl(); assertEquals(new Dimension(200, 100), canvas.getSize()); }}
Nice. Quick. Simple. Just like the implementation, shown in listing 8.17.
public class PlotMapCanvasImpl extends Component implements PlotMapCanvas {
public PlotMapCanvasImpl() { setSize(200, 100); } public void plot(Point point) { }}
Not much special in listing 8.17, either. We set the component’s size in its con-structor and include default implementations of the interface methods. Our testreferred to the canvas component as a java.awt.Component, so we inherit fromthat for now.
The test is now passing, but it turns out that it shouldn’t. Why? Because settingthe size of a Component doesn’t mean that its physical size when rendered is that size.This is where our Swing knowledge comes into play—without that knowledge, we’doften find out about such quirks only after we’ve tried to render the component
Listing 8.16 Testing for canvas size
Listing 8.17 The first incarnation of our canvas class
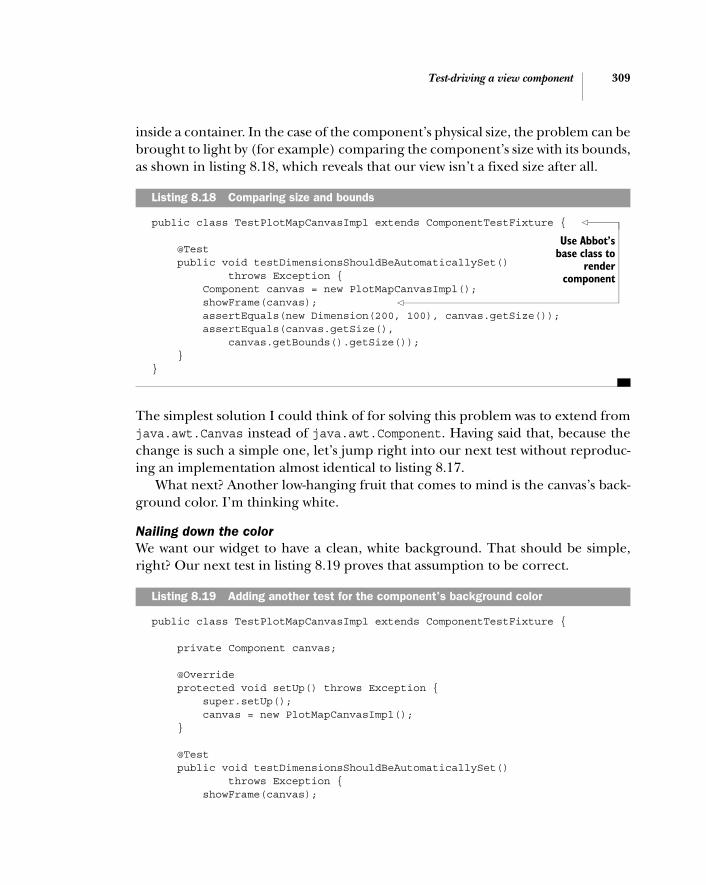
Test-driving a view component 309
inside a container. In the case of the component’s physical size, the problem can bebrought to light by (for example) comparing the component’s size with its bounds,as shown in listing 8.18, which reveals that our view isn’t a fixed size after all.
public class TestPlotMapCanvasImpl extends ComponentTestFixture {
@Test public void testDimensionsShouldBeAutomaticallySet() throws Exception { Component canvas = new PlotMapCanvasImpl(); showFrame(canvas); assertEquals(new Dimension(200, 100), canvas.getSize()); assertEquals(canvas.getSize(), canvas.getBounds().getSize()); }}
The simplest solution I could think of for solving this problem was to extend fromjava.awt.Canvas instead of java.awt.Component. Having said that, because thechange is such a simple one, let’s jump right into our next test without reproduc-ing an implementation almost identical to listing 8.17.
What next? Another low-hanging fruit that comes to mind is the canvas’s back-ground color. I’m thinking white.
Nailing down the colorWe want our widget to have a clean, white background. That should be simple,right? Our next test in listing 8.19 proves that assumption to be correct.
public class TestPlotMapCanvasImpl extends ComponentTestFixture {
private Component canvas;
@Override protected void setUp() throws Exception { super.setUp(); canvas = new PlotMapCanvasImpl(); }
@Test public void testDimensionsShouldBeAutomaticallySet() throws Exception { showFrame(canvas);
Listing 8.18 Comparing size and bounds
Listing 8.19 Adding another test for the component’s background color
Use Abbot’sbase class to
rendercomponent

310 CHAPTER 8
Test-driving Swing
assertEquals(new Dimension(200, 100), canvas.getSize()); assertEquals(canvas.getSize(), canvas.getBounds().getSize()); }
@Test public void testBackgroundColorIsWhite() throws Exception { assertEquals(Color.WHITE, canvas.getBackground()); }}
As you can see, I also decided to refactor a bit and move the canvas componentinto a field populated in the setup method. Making this test pass is once again atrivial one-liner, shown in listing 8.20.
public class PlotMapCanvasImpl extends Canvas implements PlotMapCanvas { ...
public PlotMapCanvasImpl() { setSize(200, 100); setBackground(Color.WHITE); } ...}
What’s perhaps more interesting than these low-hanging fruits is how we’re goingto verify that the plots are drawn correctly on the canvas. Somehow we need to testfor the actual graphical output.
Testing for graphical outputTesting for graphical output can be a tricky challenge. Again, there are many waysto skin the cat, but not all of those ways are equally good. We could pass a test dou-ble for a java.awt.Graphics to our component and verify that the expecteddrawing operations happened. That could work out nicely, but it would also cou-ple our test strongly to our implementation. I’m not that worried about couplingwhen it’s unit tests we’re talking about, but there’s another option that’s powerfulin situations where we’re not dealing with massive volumes of image data butrather a few pixels here and there.
The other option I’m referring to is to render the component on a buffer,extract a bitmap raster from the buffer, and specify our tests in terms of pixels in
Listing 8.20 Setting the background in the component’s constructor

Test-driving a view component 311
the raster. That might sound like a lot of work—it can be—but I’m pretty sure thatit’ll work out for our case. Before we start worrying about pixel-precise tests, weneed to figure out how to render our component on a buffer.
There are a couple of ways to do this, but the one I’m accustomed to using isshown in listing 8.21.
import java.awt.Color;import java.awt.Component;import java.awt.Graphics2D;import java.awt.image.BufferedImage;import java.awt.image.Raster;
public class Bitmap {
public static Raster of(Component c) throws Exception { BufferedImage image = new BufferedImage(c.getWidth(), c.getHeight(), BufferedImage.TYPE_INT_RGB); Graphics2D graphics = image.createGraphics(); graphics.setColor(Color.WHITE); graphics.fillRect(0, 0, c.getWidth(), c.getHeight()); c.paint(graphics); graphics.dispose(); return image.getRaster(); }}
The key is to create an in-memory buffer, a java.awt.image.BufferedImage thatwe can B ask the component to paint on. Once the component has painted itselfon the buffer, we can C extract the bit raster from the image.
Now, with a little effort we can put together a test for the canvas drawing theplot points to the correct coordinates. Listing 8.22 shows just such a test—onethat verifies individual pixels’ colors around the specific point where we plotted apoint.
public class TestPlotMapCanvasImpl extends ComponentTestFixture { ...
@Test public void testPlotIsDrawnOnScreen() throws Exception { canvas.plot(new Point(2, 2)); Raster raster = Bitmap.of(canvas);
Listing 8.21 Utility class for capturing a bitmap of a Swing component
Listing 8.22 Test for the canvas drawing the right stuff
Extract raster from bufferC
Tell component to paint itself on bufferB
Capture rasterB

312 CHAPTER 8
Test-driving Swing
Pixel.in(raster).at(2, 2).shouldBe(Color.BLACK); Pixel.in(raster).around(2, 2).shouldBe(Color.WHITE); }}
In listing 8.22, we’re using a couple of utilities for making the test more compact.First, we B capture the bitmap of the component into a raster object using theBitmap class we saw in listing 8.21. Then, we’re using another utility class that I’veomitted for brevity (check out the book’s source code online) to C assert thecolor of specific pixels in the raster. After plotting a point at the coordinates [2,2],we expect the pixel at [2,2] to be black and everything around it to be white.
This test finally gives us permission to implement the PlotMapCanvasImpl’spaint method, as shown in listing 8.23.
public class PlotMapCanvasImpl extends Canvas implements PlotMapCanvas {
private List<Point> plots = new ArrayList<Point>(); ...
@Override public void paint(Graphics g) { g.setColor(Color.BLACK); for (Point p : plots) { g.drawLine(p.x, p.y, p.x, p.y); } }}
Our test is now passing, and we’re drawing plot points onscreen. We do that by Cdrawing a line in black from the location of each plot point to itself. We’re draw-ing a line because the Graphics class doesn’t seem to offer a way to color a singlepixel. Also, if you’re not familiar with the Swing API, we first need to B set theactive color to black to let the Graphics object know with which color the draw-Line operation should draw.
And speaking of drawing lines, that’s what we still need to do—connect ourplot points with lines in the rendered custom canvas. Let’s see how that goes.
Listing 8.23 Rudimentary implementation of drawing custom graphics
Assert color of individualpixels from raster
C
Use black color for drawing
B
Paint pixel at each point
C

Test-driving a view component 313
Testing for patternsWhere are we? We’ve drawn plot points on the screen, and we need to connectthem. The first question is, of course, how can we test for the canvas correctlydrawing the connecting lines?
We could, of course, use the exact same approach for verifying the color of 142pixels as we did for 2 pixels in listing 8.22, asserting each pixel between two coor-dinates explicitly. The downside is that our test method would rise straight intothe hall of fame for historically long methods. Clearly we don’t want test methodswith line count in the hundreds. We need something simpler, and I can think of atleast two ways to write a simpler test than explicitly checking for all 142 pixelsalong the line:
■ Make the line shorter.■ Use an algorithm to find the connecting line.
By using as simple as possible a scenario—an extremely short line—we effec-tively make it feasible to hard-code assertions for specific pixels into our test. Byusing an algorithm to find the connecting line, we spend some time and moneyon implementing an algorithm that takes the starting point and the endingpoint and figures out whether there’s a path of colored points between the startand end points. Because the algorithm can get verbose and we can come upwith a reasonably simple scenario for our test, let’s go with the first option. List-ing 8.24 shows a test for the canvas drawing a connecting line between twopoints we’ve plotted.
public class TestPlotMapCanvasImpl extends ComponentTestFixture { ...
@Test public void testPlotsShouldBeConnected() throws Exception { canvas.plot(new Point(2, 9)); canvas.plot(new Point(5, 6)); Raster raster = Bitmap.of(canvas); Pixel.in(raster).at(2, 9).shouldBe(Color.BLACK); Pixel.in(raster).at(3, 8).shouldBe(Color.BLACK); Pixel.in(raster).at(4, 7).shouldBe(Color.BLACK); Pixel.in(raster).at(5, 6).shouldBe(Color.BLACK); }}
Listing 8.24 Test for plot points getting connected
Check manually calculated coordinates

314 CHAPTER 8
Test-driving Swing
In listing 8.24, we’re using the same Pixel utility as before to check the color ofindividual pixels. In this case, we’ve hard-coded the coordinates between [2,9]and [5,6] to be [3,8] and [4,7]. And that’s all. The test case fails correctly andcomplains about the intermediary pixels not being black, giving us permission todraw the connecting lines, as shown in listing 8.25.
public class PlotMapCanvasImpl extends Canvas implements PlotMapCanvas { ...
@Override public void paint(Graphics g) { g.setColor(Color.BLACK); Point previous = null; for (Point current : plots) { if (previous == null) { previous = current; } g.drawLine(previous.x, previous.y, current.x, current.y); previous = current; } }}
The implementation in listing 8.25 draws the connecting lines with the exactsame drawLine method of the Graphics object we used before for drawing thesingle plot points. The difference is that we’re now C drawing the line from theprevious point’s coordinates to the current point’s coordinates inside the loop.We also tackle the problem of the first current point not having a predecessor byproactively B using the same point as the previous and the current point. Theremaining points, however, have their previous set because we always D update itafter drawing a line.
Let’s call it a day as far as drawing custom graphics goes and tackle the thirdand last item on our list: removing plot points from the canvas through user ges-tures (mouse clicks, in our case).
8.4.4 Associating gestures with coordinates
We want the canvas to capture mouse clicks on it and to notify its container—thePlotMapViewImpl—about the event. To be more specific, we’d like the canvas to
Listing 8.25 Drawing lines between plots
First point doesn’t have previous
B
Draw line from previous to currentC
Prepare for nextloop iteration D

Test-driving a view component 315
notify about only those mouse clicks that hit one of the plotted points. So how dowe go about this?
First of all, we need some kind of a callback mechanism with which the viewcan register a handler for the mouse clicks. For this purpose, we create thePointEventListener interface:
public interface PointEventListener {
void onPointEvent(Point point);}
We also need a way for the view to register a PointEventListener with the Plot-MapCanvas. That we can provide by adding an addRemoveListener method to thePlotMapCanvas interface, as follows:
public interface PlotMapCanvas {
void plot(Point point);
void addRemoveListener(PointEventListener listener);}
We have just quickly designed the necessary interfaces, so let’s see how we mightwrite our next failing test by making use of these interfaces.
Simulating and responding to mouse clicksWe want our widget to respond to the user clicking our canvas with the mouse. Inorder to verify that this behavior is in place, we need a way to simulate mouseclicks. Luckily, the java.awt.Component class, which our canvas inherits from,offers a handy method called dispatchEvent. The dispatchEvent method can beused for simulating pretty much any kind of mouse event, including the simpleleft-click that we want.
Listing 8.26 shows our next test, simulating a mouse click and registering a testdouble to listen for the expected remove events.
public class TestPlotMapCanvasImpl extends ComponentTestFixture {
private PlotMapCanvasImpl canvas;
...
@Test public void testPlotsShouldReactToClicksByTriggeringRemoveEvents() throws Exception {
Listing 8.26 Test handling of user gestures

316 CHAPTER 8
Test-driving Swing
final List<Point> removedPoints = new ArrayList<Point>(); canvas.addRemoveListener(new PointEventListener() { public void onPointEvent(Point point) { removedPoints.add(point); } }); Point point = new Point(5, 20); canvas.plot(point); canvas.dispatchEvent(new MouseEvent(canvas, MouseEvent.MOUSE_CLICKED, System.currentTimeMillis(), MouseEvent.BUTTON1_DOWN_MASK, point.x, point.y, 1, false)); assertTrue(removedPoints.contains(point)); }}
Our test in listing 8.26 is supposed to simulate a mouse click on a plotted pointand verify that the proper event is delegated to the registered listener. It accom-plishes this by B creating an anonymous implementation of our newPointEventListener interface that adds the received Points into a List. Afterregistering the fake listener, our test C simulates a mouse click using the dis-patchEvent method.
As expected, our test fails until we get around to implementing the canvas’saddRemoveListener. Listing 8.27 shows our PlotMapCanvasImpl implementation.
public class PlotMapCanvasImpl extends Canvas implements PlotMapCanvas { ...
public void addRemoveListener(final PointEventListener listener) { addMouseListener(new MouseAdapter() { public void mouseClicked(MouseEvent e) { listener.onPointEvent(e.getPoint()); } }); }}
In listing 8.27, our canvas registers an anonymous MouseAdapter implementationwith itself to delegate the mouse clicks to calls to the PointEventListener.
Listing 8.27 Canvas delegating mouse clicks to registered listener
Register remove listener
B
Simulate mouse click
C
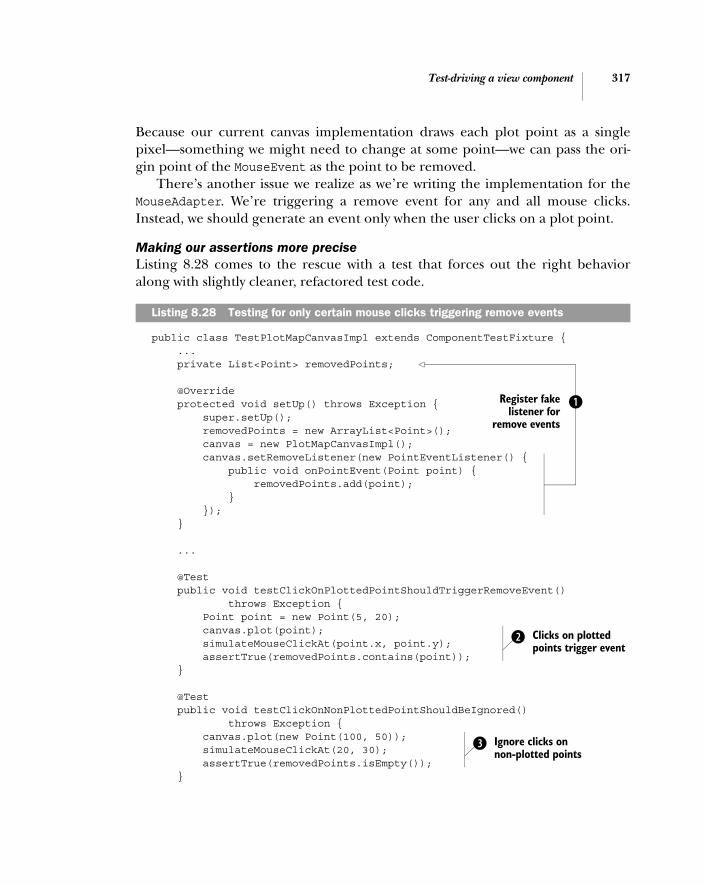
Test-driving a view component 317
Because our current canvas implementation draws each plot point as a singlepixel—something we might need to change at some point—we can pass the ori-gin point of the MouseEvent as the point to be removed.
There’s another issue we realize as we’re writing the implementation for theMouseAdapter. We’re triggering a remove event for any and all mouse clicks.Instead, we should generate an event only when the user clicks on a plot point.
Making our assertions more preciseListing 8.28 comes to the rescue with a test that forces out the right behavioralong with slightly cleaner, refactored test code.
public class TestPlotMapCanvasImpl extends ComponentTestFixture { ... private List<Point> removedPoints;
@Override protected void setUp() throws Exception { super.setUp(); removedPoints = new ArrayList<Point>(); canvas = new PlotMapCanvasImpl(); canvas.setRemoveListener(new PointEventListener() { public void onPointEvent(Point point) { removedPoints.add(point); } }); }
...
@Test public void testClickOnPlottedPointShouldTriggerRemoveEvent() throws Exception { Point point = new Point(5, 20); canvas.plot(point); simulateMouseClickAt(point.x, point.y); assertTrue(removedPoints.contains(point)); }
@Test public void testClickOnNonPlottedPointShouldBeIgnored() throws Exception { canvas.plot(new Point(100, 50)); simulateMouseClickAt(20, 30); assertTrue(removedPoints.isEmpty()); }
Listing 8.28 Testing for only certain mouse clicks triggering remove events
Register fakelistener for
remove events
B
Clicks on plotted points trigger event
C
Ignore clicks on non-plotted points
D

318 CHAPTER 8
Test-driving Swing
private void simulateMouseClickAt(int x, int y) { canvas.dispatchEvent(new MouseEvent(canvas, MouseEvent.MOUSE_CLICKED, System.currentTimeMillis(), MouseEvent.BUTTON1_DOWN_MASK, x, y, 1, false)); }}
Just like in listing 8.26, we’re B registering a fake PointEventListener with thePlotMapCanvasImpl that we’re testing. This time, however, we’re not just testingthat C mouse clicks on top of a plotted point trigger a remove event. We’re alsotesting that D a click that’s not targeted at one of the plotted points will not triggera remove event.
And, sure enough, the test fails because we’re not comparing the origins ofthe mouse events against our list of plotted points inside PlotMapCanvasImpl.Listing 8.29 introduces our implementation, which fortunately is still compactand elegant.
public class PlotMapCanvasImpl extends Canvas implements PlotMapCanvas { private List<Point> plots; ...
public void setRemoveListener(final PointEventListener listener) { addMouseListener(new MouseAdapter() { public void mouseClicked(MouseEvent e) { Point point = e.getPoint(); if (plots.contains(point)) { listener.onPointEvent(point); } } }); }}
Listing 8.29 doesn’t introduce much extra code to prevent non-plotted points fromtriggering remove events for the registered PointEventListeners. We check thatthe Point object associated with the MouseEvent matches one of the plotted points.
Our canvas object now has the basic functionality in place for drawing plottedpoints with connecting lines between them, and delegating remove events back to
Listing 8.29 Comparing the source of the mouse click before triggering events
Interested only in plotted points

Summary 319
the view component. We’re not going to continue further with the example,although there would be a lot of interesting stuff to do (such as making the plot-ted points draw a more elaborate sprite on the screen than a single pixel). Thereason for not continuing is that we could go on for hours; and I’m sure that bynow, you’ve gotten plenty of ideas for structuring and test-driving your customSwing components—even those that draw themselves!
Let’s do a quick summary of what we’ve learned in this chapter and prepare toshift gears to part 3, which takes us to a whole new level of test-driven develop-ment—the acceptance testing level.
8.5 Summary
In this chapter, we have learned about testing and test-driving Swing code. Webegan by talking about how we should test internal plumbing, utilities, and theinteraction or UI logic of our components. Rendering and layout are things wehave to verify visually anyway and, considering the higher effort associated withtesting such things in a meaningful way, we usually don’t test for these aspects.
In order to help us make the things we do want to test as testable as possible,we learned about a handful of design patterns for testable UI code. Based on theclassic Model-View-Presenter (MVP) pattern, Supervising Controller and the Pas-sive View make the view as thin as possible, moving almost all logic outside of theview where it’s easier to test.
Having figured out how we can test the majority of the logic in our user inter-faces easily by employing these design patterns, we still need to test the little logicthat remains in the view. To help us succeed in this task, we explored the tech-niques and tools available for testing visual Swing components. We looked at twotools in particular—Jemmy and Abbot—and acknowledged that they’re equallysuitable for the job at hand and that making the decision between the two islargely a matter of personal preference.
Finally, we set out to test-drive the visual portion of a simple view componentthat incorporates both standard widgets, such as text fields and buttons, but alsocustom graphics. We saw first-hand how to push the desired interactions into theimplementation, whether initiated by changes in the model or by user gestures.We also saw how custom-drawn components can indeed be tested in a relativelysimple manner. The key is to divide the problem into small pieces that we canconquer easily.
This chapter completes part 2 of the book. In part 3, we’ll change our focus fromthe low-level, code-oriented test-driven development to the product-oriented andteam level process of acceptance test-driven development.


Part 3
Building products with Acceptance TDD
Now that we’ve mastered the art of test-driving any and all kinds of Javacode, part 3 turns our attention to the next level of test-driven-ness: accep-tance TDD.
In chapter 9, we’ll learn about not just acceptance TDD but also user sto-ries, acceptance tests, and what those tests should be testing. We’ll also pro-vide a brief overview of the kind of tool support that’s available. In chapter 10,we’ll discuss how to use the open source Fit framework to implement execut-able acceptance tests in a handy tabular format. In chapter 11, we’ll learn dif-ferent strategies for connecting our executable acceptance tests into thesystem under test.
By the time you’ve flipped the last page of chapter 11, you’ll be ready andset for test-driving applications the right way and the smart way. However, it’sprobably not going to be a walk in the park to adopt these techniques—letalone have your whole team adopt them. For that reason, chapter 12 examinesa number of gotchas and techniques for helping you and your colleagues.After all, you’re not reading this book just for laughs, are you? That’s what Ifigured. Let’s get started!


Acceptance TDD explained
In the spacecraft business no design can survive the review process, without first answering the question—how are we going to test this thing?
—Glen B. Alleman, Director StrategicConsulting for Lewis & Fowler
323

324 CHAPTER 9
Acceptance TDD explained
In the previous chapters, we have explored the developer-oriented practice of test-driven development, covering the fundamental process itself as well as a host oftechniques for employing TDD on a variety of Java technologies. In this chapter, we’lltake the core idea of TDD and apply it to the overall product development process.
TDD helps software developers produce working, high-quality code that’s main-tainable and, most of all, reliable. Our customers are rarely, however, interested inbuying code. Our customers want software that helps them to be more productive,make more money, maintain or improve operational capability, take over a market,and so forth. This is what we need to deliver with our software—functionality to sup-port business function or market needs. Acceptance test-driven development(acceptance TDD) is what helps developers build high-quality software that fulfillsthe business’s needs as reliably as TDD helps ensure the software’s technical quality.
Acceptance TDD helps coordinate software projects in a way that helps us deliverexactly what the customer wants when they want it, and that doesn’t let us imple-ment the required functionality only half way. In this chapter, we will learn whatacceptance test-driven development is, why we should consider doing it, what thesemysterious acceptance tests are, and how acceptance TDD integrates with TDD.
Acceptance test-driven development as a name sounds similar to test-drivendevelopment, doesn’t it? So, what’s the difference between the two? Surely it hassomething to do with the word acceptance prefixed onto TDD, but is there some-thing else beneath the surface that differentiates the two techniques? What exactlyare these acceptance tests? And what are we accepting with our tests in the firstplace? These are the questions we’re going to find answers to as we start our journeyinto the world of acceptance tests and acceptance test-driven development.
We’ll begin by describing a lightweight and extremely flexible requirementsformat called user stories. After all, we need to know how our system shouldbehave, and that’s exactly what user stories tell us. From there, we’ll continue byexploring what acceptance tests are and what kinds of properties they shouldexhibit. By then, we will know what our requirements—the user stories—mightlook like, and we will know how our acceptance tests should look, which meanswe’ll be ready to figure out how we work with these artifacts or what the process ofacceptance TDD looks like.
An essential property of acceptance TDD is that it’s a team activity and a teamprocess, which is why we’ll also discuss team-related topics such as the rolesinvolved and who might occupy these roles. We’ll also ask ourselves why we shoulddo this and respond by identifying a number of benefits of acceptance TDD.Finally, we’ll talk about what exactly we are testing with our acceptance tests andwhat kind of tools we have at our disposal.
But now, let us introduce ourselves with a handy requirements format we calluser stories.

Introduction to user stories 325
9.1 Introduction to user stories
User stories are an extremely simple way to express requirements. In its classicform, a user story is a short sentence stating who does what and why. In practice,most stories just tell us who and what, with the underlying motivation consideredapparent from the context. The reason a story is typically only one sentence long(or, in some cases, just one or two words that convey meaning to the customer anddevelopers) is that the story is not intended to document the requirement. Thestory is intended to represent the requirement, acting as a promise of a future conversa-tion between the customer and the developer.
9.1.1 Format of a story
A number of people have suggested writing user stories that follow an agreed for-mat such as “As a (role) I want (functionality) so that (benefit).” However, I and anumber of other proponents of user stories for requirements management rec-ommend not fixing the format as such but focusing on the user story staying on alevel of detail that makes sense, using terms that make sense to the customer. Thisis not to say that such a template would be a bad idea—which it isn’t; it’s just thatone size doesn’t fit all, and the people in your organization might feel differentlyabout the format than I do.1
9.1.2 Power of storytelling
Hannah Arendt, a German political scientist, has said, “storytelling revealsmeaning without committing the error of defining it.”2 This particular quoteeloquently communicates how user stories focus on meaning without stumblingon nitty-gritty details.
1 Ron Jeffries, “Essential XP: Card, Conversation, Confirmation,” XP Magazine, August 30, 2001.2 Hannah Arendt, Men in Dark Times (Harvest Books, 1970).
On the physical format of user storiesIn part because user stories are concise, many co-located teams keep their userstories written on small index cards or sticky notes, managing them on a whiteboardor other task board. This method is beneficial because communication is clearand progress is immediately obvious. Therefore, more and more multisite projectsare also adopting such physical story cards for managing their work locally. Afterall, the benefits often far outweigh the hassle of relaying the status from the taskboard to electronic format for distribution. The use of index cards on an early XPproject gave birth to the mnemonic of 3 Cs: card, conversation, confirmation.

326 CHAPTER 9
Acceptance TDD explained
User stories are in many ways a form of storytelling, which is an effective mediumfor transferring knowledge. For one, people like listening to stories. Storytellersare good at keeping our attention—a lot more so than, say, structured documentsof equal volume—and it’s not just audible stories that have this advantage; prosewith a storyline and context is far more interesting reading than a seeminglyunconnected sequence of statements.
Let’s see how much this property shows through in practice by looking at acouple of examples of user stories.
9.1.3 Examples of user stories
To get a better idea of what user stories look like, here are some examples of thekinds of user stories I personally tend to write:
■ “Support technician sees customer’s history onscreen at the start of a call”■ “The system prevents user from running multiple instances of the applica-
tion simultaneously”■ “Application authenticates with the HTTP proxy server”
These user stories express just enough for the customer to be able to prioritizethe feature in relation to other features and for the developer to be able to comeup with a rough effort estimate for the story. Yet these stories don’t burden thedeveloper by prescribing the implementation, and they don’t drown the teamwith excessive detail.
The first story about a technical-support application doesn’t tell us what thescreen will look like; and the second story doesn’t talk about desktop shortcuts,scanning process listings, and so on. They convey what provides value to the cus-tomer—not how the system should provide that value. The third story is a bit dif-ferent. It’s clearly a technical user story, not having much to do with businessfunctionality. It does, however, have enabling value, and it expresses that need in aclear manner. Furthermore, although harder to quantify, some technical storiesmight create value for the customer through lower total cost of ownership.
Inside every story is another one trying to come outJust like there are multiple solutions to most computing problems, there is al-ways another way to write a given user story. Indeed, it might make sense to takea closer look at a user story before rubberstamping it as a technical story. Thereis usually a way to express the story in a way that conveys the underlying value—the rationale—of the story. If you can’t figure out that value, try again.

Acceptance tests 327
That’s about all we’re going to say about user stories for now. For a more in-depthdescription of user stories as a requirements management and planning tool, agreat pick would be Mike Cohn’s book User Stories Applied (Addison-Wesley, 2004).
As we already mentioned, the format of a user story doesn’t matter all that muchas long as it communicates the necessary information—who, what, why—to allinvolved parties, either explicitly or implicitly. In fact, just like the format of a storyisn’t one-size-fits-all, using stories as a requirements-management or planning toolisn’t in any way a requirement for doing acceptance test-driven development—it’sa natural fit.
Now that we know what the mysterious stories are (or what they can be), let’sfigure out what we mean by acceptance tests.
9.2 Acceptance tests
Acceptance tests are specifications for the desired behavior and functionality of asystem. They tell us, for a given user story, how the system handles certain condi-tions and inputs and with what kinds of outcomes. There are a number of proper-ties that an acceptance test should exhibit; but before taking a closer look, let’ssee an example.
9.2.1 Example tests for a story
Let’s consider the following example of a user story and see what our acceptancetests for that particular story might look like. I present you figure with 9.1.
The functionality that we’re interested in is for the system to obtain and dis-play the customer’s history of records when a call comes through the customer
Figure 9.1 Example of a user story, written on a story card

328 CHAPTER 9
Acceptance TDD explained
support system. I might, for example, think of the tests for this story that are scrib-bled down as figure 9.2.
These three tests would essentially tell us whether the system behaves correctlyfrom the perspective of a user—conditions of satisfaction. They tell us nothingabout how the system implements that behavior.
Now, with these example tests in mind, let’s look at some essential propertiesof acceptance tests, starting with who owns them and who writes them.
9.2.2 Properties of acceptance tests
So far, you’ve probably deduced that acceptance tests are typically short and some-what informal. There’s more to the nature of acceptance tests, however, and nextwe’re going to look at some general properties.
To make a long story short, acceptance tests are
■ Owned by the customer■ Written together with the customer, developer, and tester■ About the what and not the how■ Expressed in the language of the problem domain■ Concise, precise, and unambiguous
Let’s expand these sound bites one by one and see what they mean.
Owned by the customerAcceptance tests should be owned by the customer because their main purpose isto specify acceptance criteria for the user story, and it’s the customer—the business
Figure 9.2 Example tests for the story, written on the back of the story card from figure 9.1

Acceptance tests 329
expert—who is best positioned to spell out those criteria. This also leads to the cus-tomer being the one who should ideally be writing the acceptance tests.
Having the customer write the acceptance tests helps us avoid a common prob-lem with acceptance tests written by developers: Developers often fall into the pitof specifying technical aspects of the implementation rather than specifying thefeature itself. And, after all, acceptance tests are largely a specification of function-ality rather than tests for technical details (although sometimes they’re that, too).
Written togetherEven though the customer should be the one who owns the acceptance tests, theydon’t need to be the only one to write them. Especially when we’re new to user sto-ries and acceptance tests, it is important to provide help and support so thatnobody ends up isolating themselves from the process due to lack of understandingand, thus, being uncomfortable with the tools and techniques. By writing teststogether, we can encourage the communication that inevitably happens when thecustomer and developer work together to specify the acceptance criteria for a story.
With the customer in their role as domain expert, the developer in the role ofa technical expert, and the tester in a role that combines a bit of both, we’ve goteverything covered. Of course, there are times when the customer will write sto-ries and acceptance tests by themselves—perhaps because they were having ameeting offsite or because they didn’t have time for a discussion about the storiesand their accompanying tests.
The same goes for a developer or tester who occasionally has to write accep-tance tests without access to the customer. On these occasions, we’ll have to makesure that the necessary conversation happens at some point. It’s not the end ofthe world if a story goes into the backlog with a test that’s not ideal. We’ll noticethe problem and deal with it eventually. That’s the beauty of a simple requirementformat like user stories!
Another essential property for good acceptance tests ties in closely with thecustomer being the one who’s writing the tests: the focus and perspective fromwhich the tests are written.
Focus on the what, not the howOne of the key characteristics that make user stories so fitting for delivering valueearly and often is that they focus on describing the source of value to the customerinstead of the mechanics of how that value is delivered. User stories strive to con-vey the needs and wants—the what and why—and give the implementation—the

330 CHAPTER 9
Acceptance TDD explained
how—little attention. In the vast majority of cases, the customer doesn’t care howthe business value is derived.3
Let’s look at an example to better illustrate this difference between what andwhy and how. Figure 9.3 shows an example of acceptance tests that go into toomuch detail about the solution rather than focusing on the problem—the cus-tomer’s need and requirement. All three tests shown on the card address the userinterface—effectively suggesting an implementation, which isn’t what we want.While doing that, they’re also hiding the real information—“what are we actuallytesting here?”—behind the technology.
Instead, we should try to formulate our tests in terms of the problem and leavethe solution up to the developers and the customer to decide and discuss at a latertime when we’re implementing the tests and the story itself. Figure 9.4 illustrates apossible rewrite of the tests in figure 9.3 in a way that preserves the valuable infor-mation and omits the unnecessary details, which only clutter our intent.
Notice how, by reading these three lines, a developer is just as capable of figur-ing out what to test as they would be by reading the more solution-oriented testsfrom figure 9.3. Given these two alternatives, which would you consider easier tounderstand and parse? The volume and focus of the words we choose to write ourtests with have a big effect on the effectiveness of our tests as a tool. We shouldn’tneglect that fact.
3 Well, they shouldn’t. Part of the reason many customers like to dictate the how is our lousy track recordas an industry. It’s time to change that flawed perception by showing that we can deliver what the cus-tomer wants as long as we get constant feedback on how we’re doing.
Figure 9.3 Acceptance tests focusing too much on the implementation

Acceptance tests 331
There’s more to words, though, than just volume and focus. We also have to watchfor our language.
Use the language of the domainAn important property of acceptance tests is that they use the language of thedomain and the customer instead of geek-speak only the programmer under-stands. This is the fundamental requirement for having the customer involved inthe creation of acceptance tests and helps enormously with the job of validatingthat the tests are correct and sufficient. Scattering too much technical lingo intoour tests makes us more vulnerable to having a requirement bug sneak into a pro-duction release—because the customer’s eyes glaze over when reading geek-speakand the developers are drawn to the technology rather than the real issue of spec-ifying the right thing.
By using a domain language in specifying our tests, we are also not unnecessar-ily tied to the implementation, which is useful since we need to be able to refactorour system effectively. By using domain language, the changes we need to make toour existing tests when refactoring are typically non-existent or at most trivial.
Concise, precise, and unambiguousLargely for the same reasons we write our acceptance tests using the domain’sown language, we want to keep our tests simple and concise. We write each of ouracceptance tests to verify a single aspect or scenario relevant to the user story athand. We keep our tests uncluttered, easy to understand, and easy to translate toexecutable tests. The less ambiguity involved, the better we are at avoiding mis-takes and the working with our tests.
Figure 9.4 Trimmed-down version of the tests from figure 9.3
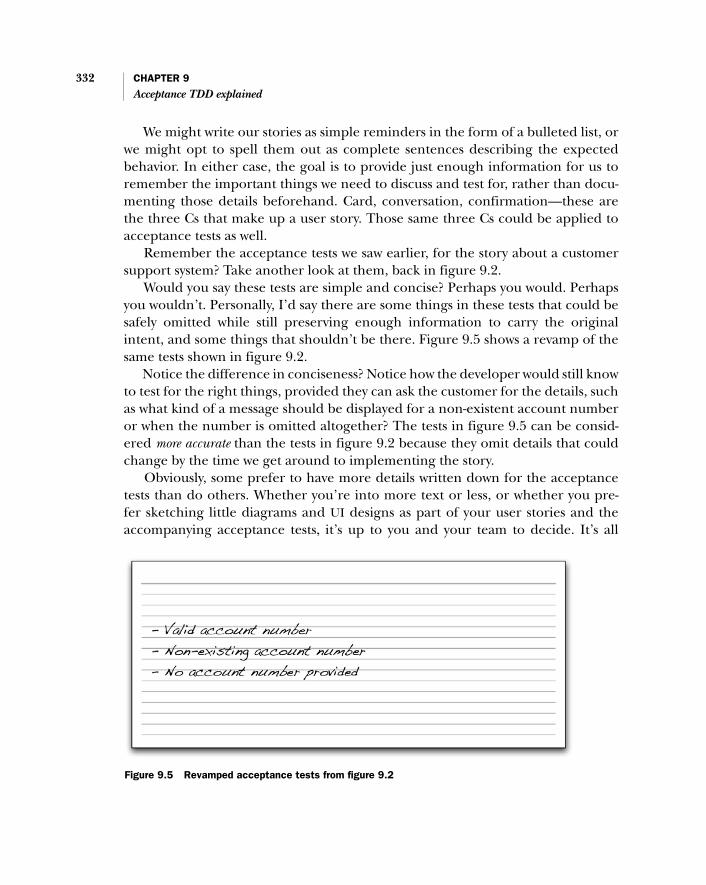
332 CHAPTER 9
Acceptance TDD explained
We might write our stories as simple reminders in the form of a bulleted list, orwe might opt to spell them out as complete sentences describing the expectedbehavior. In either case, the goal is to provide just enough information for us toremember the important things we need to discuss and test for, rather than docu-menting those details beforehand. Card, conversation, confirmation—these arethe three Cs that make up a user story. Those same three Cs could be applied toacceptance tests as well.
Remember the acceptance tests we saw earlier, for the story about a customersupport system? Take another look at them, back in figure 9.2.
Would you say these tests are simple and concise? Perhaps you would. Perhapsyou wouldn’t. Personally, I’d say there are some things in these tests that could besafely omitted while still preserving enough information to carry the originalintent, and some things that shouldn’t be there. Figure 9.5 shows a revamp of thesame tests shown in figure 9.2.
Notice the difference in conciseness? Notice how the developer would still knowto test for the right things, provided they can ask the customer for the details, suchas what kind of a message should be displayed for a non-existent account numberor when the number is omitted altogether? The tests in figure 9.5 can be consid-ered more accurate than the tests in figure 9.2 because they omit details that couldchange by the time we get around to implementing the story.
Obviously, some prefer to have more details written down for the acceptancetests than do others. Whether you’re into more text or less, or whether you pre-fer sketching little diagrams and UI designs as part of your user stories and theaccompanying acceptance tests, it’s up to you and your team to decide. It’s all
Figure 9.5 Revamped acceptance tests from figure 9.2

Acceptance tests 333
good as long as you remember to keep your acceptance tests simple and concise,and as long as you avoid writing down ambiguous things that can be interpretedwrongly at a later stage. Specifically, avoid writing down details that are easy tofind out later and that don’t add crucial information for estimating the size ofthe story.
The last property of acceptance tests that we’ll list here has more to do withautomating the tests than the way or form in which they’re written.
9.2.3 Implementing acceptance tests
Yet another common property of acceptance tests is that they might not be imple-mented (translation: automated) using the same programming language as thesystem they are testing. Whether this is the case depends on the technologiesinvolved and on the overall architecture of the system under test. For example,some programming languages are easier to interoperate with than others. Simi-larly, it is easy to write acceptance tests for a web application through the HTTPprotocol with practically any language we want, but it’s often impossible to runacceptance tests for embedded software written in any language other than that ofthe system itself.
The main reason for choosing a different programming language for imple-menting acceptance tests than the one we’re using for our production code (and,often, unit tests) is that the needs of acceptance tests are often radically differentfrom the properties of the programming language we use for implementing oursystem. To give you an example, a particular real-time system might be feasible toimplement only with native C code, whereas it would be rather verbose, slow, anderror-prone to express tests for the same real-time system in C compared to, forexample, a scripting language.
The ideal syntax for expressing our acceptance tests could be a declarative,tabular structure such as a spreadsheet, or it could be something closer to asequence of higher-level actions written in plain English. If we want to have ourcustomer collaborate with developers on our acceptance tests, a full-blown pro-gramming language such as Java, C/C++, or C# is likely not an option. “Best toolfor the job” means more than technically best, because the programmer’s jobdescription also includes collaborating with the customer.
Now that we know something about acceptance tests and we have an idea ofwho’s writing the tests in the first place, let’s see how we use them to drive ourdevelopment. What does acceptance test-driven development look like on paper?

334 CHAPTER 9
Acceptance TDD explained
9.3 Understanding the process
Test-driven development gives a programmer the tools for evolving their softwarein small steps, always certain of the software working as expected. This certaintycomes from the programmer expressing their expectations in the form of auto-mated unit tests. In acceptance test-driven development, this certainty is gainednot on the level of technical correctness but rather on the feature level of, “doesthe software do what I want it to do?”
In other words, although in TDD we’re first defining the specific behavior wewant our code base to exhibit and only then implementing the said behavior, inacceptance TDD we first define the specific user- or customer-valued functionalitywe want our system as a whole to exhibit and only then implement the said behav-ior, most likely using TDD as our vehicle of choice.
Because we know what acceptance tests look like, how about if we take aquick tour through the overall process of acceptance test-driven developmentand then broaden our view and look at what happens on the scale of a wholeiteration? After that, we can go back and zoom in on the details of the moreinteresting bits.
But now, I present you with the process of acceptance test-driven development,distilled into four small steps.
9.3.1 The acceptance TDD cycle
In its simplest form, the process of acceptance test-driven development can beexpressed as the simple cycle illustrated by figure 9.6.
About the customerYou may have noticed that user stories as a requirements-management tech-nique tend to stress having close and frequent interaction with the customer. Ifyou’re worried about not having an on-site customer, or having a customer who’snot keen on having much to do with developing the software, you can stop wor-rying. There are ways around this obvious limitation, and we’ll talk about thoselater on. For now, just consider the customer as referring to a role rather than aspecific person—a role that can be played by, say, one of the test engineers ordevelopers who knows enough about the product’s domain to be able to makethe kinds of decisions a real customer would make.

Understanding the process 335
This cycle continues throughout the iteration as long as we have more stories toimplement, starting over again from picking a user story; then writing tests for thechosen story, then turning those tests into automated, executable tests; and finallyimplementing the functionality to make our acceptance tests pass.
In practice, of course, things aren’t always that simple. We might not yet haveuser stories, the stories might be ambiguous or even contradictory, the storiesmight not have been prioritized, the stories might have dependencies that affecttheir scheduling, and so on. We’ll get to these complications later. For now, let’skeep our rose-tinted glasses on and continue thinking about the simple stepsoutlined previously. Speaking of steps, let’s take a closer look at what those stepsconsist of.
Step 1: Pick a user storyThe first step is to decide which story to work on next. Not always an easy job; but,fortunately, most of the time we’ll already have some relative priorities in place forall the stories in our iteration’s work backlog. Assuming that we have such priori-ties, the simplest way to go is to always pick the story that’s on top of the stack—that is, the story that’s considered the most important of those remaining. Again,sometimes, it’s not that simple.
Generally speaking, the stories are coming from the various planning meetingsheld throughout the project where the customer informally describes new fea-tures, providing examples to illustrate how the system should work in each situa-tion. In those meetings, the developers and testers typically ask questions aboutthe features, making them a medium for intense learning and discussion. Some ofthat information gets documented on a story card (whether virtual or physical),and some of it remains as tacit knowledge. In those same planning meetings, thecustomer prioritizes the stack of user stories by their business value (includingbusiness risk) and technical risk (as estimated by the team).
Implementfunctionality
Automate tests
Pick a story
Write tests
Figure 9.6The acceptance TDD cycle

336 CHAPTER 9
Acceptance TDD explained
What kinds of issues might we have when picking stories from this stack of userstories? There are times when the highest-priority story requires skills that wedon’t possess, or we consider not having enough of. In those situations, we mightwant to skip to the next task to see whether it makes more sense for us to work onit. Teams that have adopted pair programming don’t suffer from this problem asoften. When working in pairs, even the most cross-functional team can usuallyaccommodate by adjusting their current pairs in a way that frees the necessaryskills for picking the highest priority task from the pile.
There can be more issues to deal with regarding picking user stories, but most ofthe time the solution comes easily through judicious application of commonsense. For now, let’s move on to the second step in our process: writing tests forthe story we’ve just picked.
Step 2: Write tests for a storyWith a story card in hand (or onscreen if you’ve opted for managing your storiesonline), our next step is to write tests for the story. If you paid attention earlier inthis chapter, we just learned that it’s the customer who should be writing the tests.So how does this play out?
The first thing to do is, of course, get together with the customer. In practice,this means having a team member sit down with the customer (they’re the onewho should own the tests, remember?) and start sketching out a list of tests for thestory in question.
As usual, there are personal preferences for how to go about doing this, but mycurrent preference (yes, it changes from time to time) is to quickly scram out a listof rough scenarios or aspects of the story we want to test in order to say that thefeature has been implemented correctly. There’s time to elaborate on those
The least qualified personThe traditional way of dividing work on a team is for everyone to do what they dobest. It’s intuitive. It’s safe. But it might not be the best way of completing thetask. Arlo Belshee presented an experience report at the Agile 2005 conference,where he described how his company had started consciously tweaking the waythey work and measuring what works and what doesn’t. Among their findingsabout stuff that worked was a practice of giving tasks to the least qualified per-son. For a full closure on their experience and an explanation of why this ap-proach works, listen to Arlo’s interview at the Agile Toolkit Podcast website(http://agiletoolkit.libsyn.com/).

Understanding the process 337
rough scenarios later on when we’re implementing the story or implementing theacceptance tests. At this time, however, we’re only talking about coming up with abulleted list of things we need to test—things that have to work in order for us toclaim the story is done.
We already saw a couple of examples of the kind of tests we’re referring towhen we discussed the properties of acceptance tests. For example, you mightwant to peek back at figure 9.4, showing three tests on the back of a story card.That is the kind of rough list we’re after in this step.
Once we have such a rough list, we start elaborating the tests, adding more detailand discussing about how this and that should work, whether there are any specif-ics about the user interface the customer would like to dictate, and so forth.Depending on the type of feature, the tests might be a set of interactionsequences or flows, or they might be a set of inputs and expected outputs. Often,especially with flow-style tests, the tests specify some kind of a starting state, a con-text the test assumes is part of the system.
Other than the level of detail and the sequence in which we work to add thatdetail, there’s a question of when—or whether—to start writing the tests into anexecutable format. Witness step 3 in our process: automating the tests.
Step 3: Automate the testsThe next step once we’ve got acceptance tests written down on the back of a storycard, on a whiteboard, in some electronic format, or on pink napkins, is to turnthose tests into something we can execute automatically and get back a simplepass-or-fail result. Whereas we’ve called the previous step writing tests, we mightcall this step implementing or automating those tests.
On timingEspecially in projects that have been going on for a while already, the customerand the development team probably have some kind of an idea of what’s goingto get scheduled into the next iteration in the upcoming planning meeting. Insuch projects, the customer and the team have probably spent some time duringthe previous iteration sketching acceptance tests for the features most likely toget picked in the next iteration’s planning session. This means that we might bewriting acceptance tests for stories that we’re not going to implement until may-be a couple of weeks from now. We also might think of missing tests during im-plementation, for example, so this test-writing might happen pretty much at anypoint in time between writing the user story and the moment when the customeraccepts the story as completed.
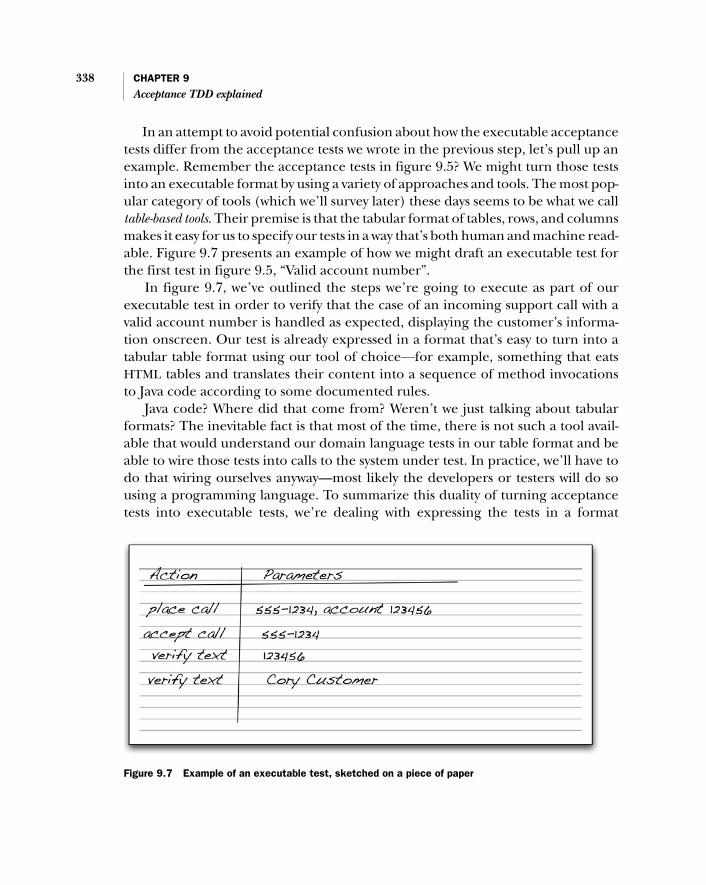
338 CHAPTER 9
Acceptance TDD explained
In an attempt to avoid potential confusion about how the executable acceptancetests differ from the acceptance tests we wrote in the previous step, let’s pull up anexample. Remember the acceptance tests in figure 9.5? We might turn those testsinto an executable format by using a variety of approaches and tools. The most pop-ular category of tools (which we’ll survey later) these days seems to be what we calltable-based tools. Their premise is that the tabular format of tables, rows, and columnsmakes it easy for us to specify our tests in a way that’s both human and machine read-able. Figure 9.7 presents an example of how we might draft an executable test forthe first test in figure 9.5, “Valid account number”.
In figure 9.7, we’ve outlined the steps we’re going to execute as part of ourexecutable test in order to verify that the case of an incoming support call with avalid account number is handled as expected, displaying the customer’s informa-tion onscreen. Our test is already expressed in a format that’s easy to turn into atabular table format using our tool of choice—for example, something that eatsHTML tables and translates their content into a sequence of method invocationsto Java code according to some documented rules.
Java code? Where did that come from? Weren’t we just talking about tabularformats? The inevitable fact is that most of the time, there is not such a tool avail-able that would understand our domain language tests in our table format and beable to wire those tests into calls to the system under test. In practice, we’ll have todo that wiring ourselves anyway—most likely the developers or testers will do sousing a programming language. To summarize this duality of turning acceptancetests into executable tests, we’re dealing with expressing the tests in a format
Figure 9.7 Example of an executable test, sketched on a piece of paper

Understanding the process 339
that’s both human and machine readable and with writing the plumbing code toconnect those tests to the system under test.
With regard to writing things down (and this is probably not coming as a sur-prise), there are variations on how different teams do this. Some start writing thetests right away into electronic format using a word processor; some even go so faras to write them directly in an executable syntax. Some teams run their tests asearly as during the initial authoring session. Some people, myself included, preferto work on the tests alongside the customer using a physical medium, leaving therunning of the executable tests for a later time. For example, I like to sketch theexecutable tests on a whiteboard or a piece of paper first, and pick up the comput-erized tools only when I’ve got something I’m relatively sure won’t need to bechanged right away.
The benefit is that we’re less likely to fall prey to the technology—I’ve noticedthat tools often steal too much focus from the topic, which we don’t want. Usingsoftware also has this strange effect of the artifacts being worked on somehowseeming more formal, more final, and thus needing more polishing up. All thatcosts time and money, keeping us from the important work.
In projects where the customer’s availability is the bottleneck, especially in thebeginning of an iteration (and this is the case more often than not), it makes a lotof sense to have a team member do the possibly laborious or uninteresting transla-tion step on their own rather than keep the customer from working on elaboratingtests for other stories. The downside to having the team member formulate theexecutable syntax alone is that the customer might feel less ownership in the accep-tance tests in general—after all, it’s not the exact same piece they were working on.Furthermore, depending on the chosen test-automation tool and its syntax, thecustomer might even have difficulty reading the acceptance tests once they’vebeen shoved into the executable format dictated by the tool.
On styleThe example in figure 9.7 is a flow-style test, based on a sequence of actions andparameters for those actions. This is not the only style at our disposal, however.A declarative approach to expressing the desired functionality or business rulecan often yield more compact and more expressive tests than what’s possiblewith flow-style tests. The volume of detail in our tests in the wild is obviously big-ger than in this puny example. Yet our goal should—once again—be to keep ourtests as simple and to the point as possible, ideally speaking in terms of whatwe’re doing instead of how we’re doing it.

340 CHAPTER 9
Acceptance TDD explained
Just for laughs, let’s consider a case where our test-automation tool is a frame-work for which we express our tests in a simple but powerful scripting languagesuch as Ruby. Figure 9.8 highlights the issue with the customer likely not being ascapable of feeling ownership of the implemented acceptance test compared tothe sketch, which they have participated in writing. Although the executable snip-pet of Ruby code certainly reads nicely to a programmer, it’s not so trivial for anon-technical person to relate to.
Another aspect to take into consideration is whether we should make all testsexecutable to start with or whether we should automate one test at a time as weprogress with the implementation. Some teams—and this is largely dependent onthe level of certainty regarding the requirements—do fine by automating all knowntests for a given story up front before moving on to implementing the story.
Some teams prefer moving in baby steps like they do in regular test-drivendevelopment, implementing one test, implementing the respective slice of thestory, implementing another test, and so forth. The downside to automating alltests up front is, of course, that we’re risking more unfinished work—inventory, ifyou will—than we would be if we’d implemented one slice at a time. My personalpreference is strongly on the side of implementing acceptance tests one at a timerather than try getting them all done in one big burst.4
4 It should be mentioned, though, that elaborating acceptance tests toward their executable form duringplanning sessions could help a team understand the complexity of the story better and, thus, aid in mak-ing better estimates.
Figure 9.8 Contrast between a sketch and an actual, implemented executable acceptance test

Understanding the process 341
Many of the decisions regarding physical versus electronic medium, translating toexecutable syntax together or not, and so forth also depend to a large degree onthe people. Some customers have no trouble working on the tests directly in theexecutable format (especially if the tool supports developing a domain-specificlanguage). Some customers don’t have trouble identifying with tests that havebeen translated from their writing. As in so many aspects of software develop-ment, it depends.
Regardless of our choice of how many tests to automate at a time, after finish-ing this step of the cycle we have at least one acceptance test turned into an exe-cutable format; and before we proceed to implementing the functionality inquestion, we will have also written the necessary plumbing code for letting thetest-automation tool know what those funny words mean in terms of technology.That is, we will have identified what the system should do when we say “select atransaction” or “place a call”—in terms of the programming API or other inter-face exposed by the system under test.
To put it another way, once we’ve gotten this far, we have an acceptance testthat we can execute and that tells us that the specified functionality is missing.The next step is naturally to make that test pass—that is, implement the function-ality to satisfy the failing test.
Step 4: Implement the functionalityNext on our plate is to come up with the functionality that makes our newlyminted acceptance test(s) pass. Acceptance test-driven development doesn’t sayhow we should implement the functionality; but, needless to say, it is generallyconsidered best practice among practitioners of acceptance TDD to do the imple-mentation using test-driven development—the same techniques we’ve been dis-cussing in the previous parts of this book.
In general, a given story represents a piece of customer-valued functionalitythat is split—by the developers—into a set of tasks required for creating that func-tionality. It is these tasks that the developer then proceeds to tackle using what-ever tools necessary, including TDD. When a given task is completed, thedeveloper moves on to the next task, and so forth, until the story is completed—which is indicated by the acceptance tests executing successfully.
In practice, this process means plenty of small iterations within iterations. Fig-ure 9.9 visualizes this transition to and from test-driven development inside theacceptance TDD process.
As we can see, the fourth step of the acceptance test-driven development cycle,implementing the necessary functionality to fix a failing acceptance test, can beexpanded into a sequence of smaller TDD cycles of test-code-refactor, building upthe missing functionality in a piecemeal fashion until the acceptance test passes.

342 CHAPTER 9
Acceptance TDD explained
The proportions in the figure should not be considered to reflect reality, however.Whereas the TDD cycle might range from one minute to a dozen, we might bechopping out code for a couple of hours or even the whole day before the accep-tance test is passing.
While the developer is working on a story, frequently consulting with the cus-tomer on how this and that ought to work, there will undoubtedly be occasionswhen the developer comes up with a scenario—a test—that the system shouldprobably handle in addition to the customer/developer writing those thingsdown. Being rational creatures, we add those acceptance tests to our list, perhapsafter asking the customer what they think of the test. After all, they might notassign as much value to the given aspect or functionality of the story as we thedevelopers might.
At some point, we’ve iterated through all the tasks and all the tests we’ve iden-tified for the story, and the acceptance tests are happily passing. At this point,depending on whether we opted for automating all tests up front (which I per-sonally don’t recommend) or automating them just in time, we either go back toStep 3 to automate another test or to Step 1 to pick a brand-new story to work on.
Acceptance test-driven development Test-driven development
Failingacceptance
testTest
Code
Refactor
Refactor
Refactor
Code
Code
Test
Test
Implementan acceptance test
Write acceptancetests for the story
Write auser story
Customeracceptance
RefactoringPassing
acceptancetest
Figure 9.9 The relationship between test-driven development and acceptance test-driven development

Understanding the process 343
It would probably not hurt to walk around a bit and maybe have a cup of cof-fee, possibly check out your email. Getting acceptance tests passing is intensivework. As soon as you’re back from the coffee machine, we’ll continue with abroader view of how this simple four-step cycle with its small steps fits into the big-ger picture of a complete iteration within a project.
9.3.2 Acceptance TDD inside an iteration
A healthy iteration consists mostly of hard work. Spend too much time in meet-ings or planning ahead, and you’re soon behind the iteration schedule and needto de-scope (which might translate to another planning meeting…ugh!). Given aclear goal for the iteration, good user stories, and access to someone to answerour questions, most of the iteration should be spent in small cycles of a few hoursto a couple of days writing acceptance tests, collaborating with the customerwhere necessary, making the tests executable, and implementing the missingfunctionality with our trusted workhorse, test-driven development.
As such, the four-step acceptance test-driven development cycle of picking astory, writing tests for the story, implementing the tests, and implementing thestory is only a fraction of the larger continuum of a whole iteration made of multi-ple—even up to dozens—of user stories, depending on the size of your team andthe size of your stories. In order to gain understanding of how the small four-stepcycle for a single user story fits into the iteration, we’re going to touch the zoomdial and see what an iteration might look like on a time line with the acceptanceTDD–related activities scattered over the duration of a single iteration.
Figure 9.10 is an attempt to describe what such a time line might look like for asingle iteration with nine user stories to implement. Each of the bars represents asingle user story moving through the steps of writing acceptance tests, implement-ing acceptance tests, and implementing the story itself. In practice, there could(and probably would) be more iterations within each story, because we generallydon’t write and implement all acceptance tests in one go but rather proceedthrough tests one by one.
Notice how the stories get completed almost from the beginning of the itera-tion? That’s the secret ingredient that acceptance TDD packs to provide indica-tion of real progress. Our two imaginary developers (or pairs of developers and/or testers, if we’re pair programming) start working on the next-highest prioritystory as soon as they’re done with their current story. The developers don’t beginworking on a new story before the current story is done. Thus, there are alwaystwo user stories getting worked on, and functionality gets completed throughoutthe iteration.

344 CHAPTER 9
Acceptance TDD explained
So, if the iteration doesn’t include writing the user stories, where are they comingfrom? As you may know if you’re familiar with agile methods, there is usually somekind of a planning meeting in the beginning of the iteration where the customerdecides which stories get implemented in that iteration and which stories are leftin the stack for the future. Because we’re scheduling the stories in that meeting,clearly we’ll have to have those stories written before the meeting, no?
That’s where continuous planning comes into the picture.
Continuous planningAlthough an iteration should ideally be an autonomous, closed system thatincludes everything necessary to meet the iteration’s goal, it is often necessary—and useful—to prepare for the next iteration during the previous one by allocat-ing some amount of time for pre-iteration planning activities.5 Otherwise, we’dhave long-lasting planning meetings, and you’re probably not any more a friendof long-lasting meetings than I am.
In practice, these pre-iteration planning activities might involve going throughthe backlog of user stories, identifying stories that are most likely to get scheduledfor the next iteration, identifying stories that have been rendered obsolete, and so
5 Suggestions regarding the time we should allocate for this continuous planning range from 10–15% ofthe team’s total time available during the iteration. As usual, it’s good to start with something that hasworked for others and, once we’ve got some experience doing things that way, begin zeroing in on anumber that seems to work best in our particular context.
Writingstory tests
Automatingstory tests
Implementingthe user story
Iteration N-1Iteration N-1 Iteration N
Story 1
Story 9
Story 8
Story 4
Story 5
Story 6
Story 7
Story 3
Story 2
Figure 9.10 Putting acceptance test-driven development on a time line

Understanding the process 345
forth. This ongoing pre-iteration planning is also the context in which we carryout the writing of user stories and, to some extent, the writing of the first accep-tance tests. The rationale here is to be prepared for the next iteration’s beginningwhen the backlog of stories is put on the table. At that point, the better we knowour backlog, the more smoothly the planning session goes, and the faster we getback to work, crunching out valuable functionality for our customer.
By writing, estimating, splitting if necessary, and prioritizing user stories beforethe planning meeting, we ensure quick and productive planning meetings andare able to get back to delivering valuable features sooner.
When do we write acceptance tests?It would be nice if we had all acceptance tests implemented (and failing) beforewe start implementing the production code. That is often not a realistic scenario,however, because tests require effort as well—they don’t just appear from thinair—and investing our time in implementing the complete set of acceptancetests up front doesn’t make any more sense than big up-front design does in thelarger scale. It is much more efficient to implement acceptance tests as we go,user story by user story.
Teams that have dedicated testing personnel can have the testing engineerswork together with the customer to make acceptance tests executable while de-velopers start implementing the functionality for the stories. I’d hazard a guessthat most teams, however, are much more homogeneous in this regard and par-ticipate in writing and implementing acceptance tests together, with nobody des-ignated as “the acceptance test guy.”
The process is largely dependent on the availability of the customer and thetest and software engineers. If your customer is only onsite for a few days in thebeginning of each iteration, you probably need to do some trade-offs in order tomake the most out of those few days and defer work that can be deferred untilafter the customer is no longer available. Similarly, somebody has to write code,and it’s likely not the customer who’ll do that; software and test engineers needto be involved at some point.
Sometimes, we might do a couple of test sketches during iteration planningin order to have a basis for better estimates. As a rule of thumb, however, webegin translating our acceptance tests from behind the story cards (or from what-ever medium we’ve settled on for authoring your requirements) into automatedacceptance tests as soon as we have finished iteration planning.

346 CHAPTER 9
Acceptance TDD explained
The mid-iteration sanity checkI like to have an informal sanity check in the middle of an iteration. At that point,we should have approximately half of the stories scheduled for the iteration run-ning and passing. This might not be the case for the first iteration, due to havingto build up more infrastructure than in later iterations; but, especially as we get bet-ter at estimating our stories, it should always be in the remote vicinity of having 50%of the stories passing their tests.
Of course, we’ll be tracking story completion throughout the iteration. Some-times we realize early on that our estimated burn rate was clearly off, and we mustadjust the backlog immediately and accordingly. By the middle of an iteration, how-ever, we should generally be pretty close to having half the stories for the iterationcompleted. If not, the chances are that there’s more work to do than the team’scapacity can sustain, or the stories are too big compared to the iteration length.
Learning from our mistakes, we’ve come to realize that a story’s burn-downrate is constantly more accurate a source of prediction than an inherently optimis-tic software developer. If it looks like we’re not going to live up to our plannediteration content, we decrease our load.
Decreasing the loadWhen it looks like we’re running out of time, we decrease the load. We don’t workharder (or smarter). We’re way past that illusion. We don’t want to sacrifice qual-ity, because producing good quality guarantees the sustainability of our productiv-ity, whereas bad quality only creates more rework and grinds our progress to ahalt. We also don’t want to have our developers burn out from working overtime,especially when we know that working overtime doesn’t make any difference in
When do we write acceptance tests? (continued)We start from those stories we’ll be working on first, of course, and implementthe user story in parallel with automating the acceptance tests that we’ll use toverify our work. And, if at all possible, we avoid having the same person imple-ment the tests and the production code in order to minimize our risk of humannature playing its tricks on us.
Again, we want to keep an eye on putting too much up-front effort in automat-ing our acceptance tests—we might end up with a huge bunch of tests but noworking software. It’s much better to proceed in small steps, delivering one storyat a time. No matter how valuable our acceptance tests are to us, their value tothe customer is negligible without the associated functionality.

Understanding the process 347
the long run.6 Instead, we adjust the one thing we can: the iteration’s scope—toreality. In general, there are three ways to do that: swap, drop, and split.
Swapping stories is simple. We trade one story for another, smaller one,thereby decreasing our workload. Again, we must consult the customer in orderto assure that we still have the best possible content for the current iteration,given our best knowledge of how much work we can complete.
Dropping user stories is almost as straightforward as swapping them. “This low-priority story right here, we won’t do in this iteration. We’ll put it back into theproduct backlog.” But dropping the lowest-priority story might not always be thebest option, considering the overall value delivered by the iteration—that particu-lar story might be of low priority in itself, but it might also be part of a biggerwhole that our customer cares about. We don’t want to optimize locally. Instead,we want to make sure that what we deliver in the end of the iteration is a cohesivewhole that makes sense and can stand on its own.
The third way to decrease our load, splitting, is a bit trickier compared to drop-ping and swapping—so tricky that we’d better give the topic its own little section.
Splitting storiesHow do we split a story we already tried hard to keep as small as possible duringthe initial planning game? In general, we can split stories by function or by detail(or both). Consider a story such as “As a regular user of the online banking application,I want to optionally select the recipient information for a bank transfer from a list of most fre-quently and recently used accounts based on my history so that I don’t have to type in thedetails for the recipients every time.”
Splitting this story by function could mean dividing the story into “…from a listof recently used accounts” and “…from a list of most frequently used accounts.”Plus, depending on what the customer means by “most frequently and recentlyused,” we might end up adding another story along the lines of “…from aweighted list of most frequently and recently used accounts” where the weightedlist uses an algorithm specified by the customer. Having these multiple smaller sto-ries, we could then start by implementing a subset of the original, large story’sfunctionality and then add to it by implementing the other slices, building onwhat we have implemented for the earlier stories.
Splitting it by detail could result in separate stories for remembering only theaccount numbers, then also the recipient names, then the VAT numbers, and so
6 Tom DeMarco and Timothy Lister have done a great favor to our industry with their best-selling booksSlack (DeMarco; Broadway, 2001) and Peopleware (DeMarco, Lister; Dorset House, 1999), which explainhow overtime reduces productivity.

348 CHAPTER 9
Acceptance TDD explained
forth. The usefulness of this approach is greatly dependent on the distribution ofthe overall effort between the details—if most of the work is in building the commoninfrastructure rather than in adding support for one more detail, then splitting byfunction might be a better option. On the other hand, if a significant part of theeffort is in, for example, manually adding stuff to various places in the code base tosupport one new persistent field, splitting by detail might make sense.
Regardless of the chosen strategy, the most important thing to keep in mind isthat, after the splitting, the resulting user stories should still represent somethingthat makes sense—something valuable—to the customer.
Now that we have an idea of acceptance TDD as a process and about what’s in itfor us, let’s talk about what powers that process: the team.
9.4 Acceptance TDD as a team activity
Because we’re talking about a process for software development, which is inher-ently a people business, we cannot bypass the topic of team structure. Regardlessof your professional background, I’m sure you have questions about the kind ofteam a project employing acceptance test-driven development might have, whatkinds of roles there would be, and who would be doing what. Let’s start from thesingle most important role a software project has: the role of the customer.
9.4.1 Defining the customer role
Having seen a variety of businesses, from big to small, from high-tech to brick-and-mortar, I’ve seen many variations on who the customer is for a software project. Insome places, the customer is the one who pays, in some it’s the one who will beusing the system, and in others it’s the one who will be selling the system. The cus-tomer may be the one who knows most about the application domain; or if man-agement can’t come up with anything else for someone to do, they may make thatperson the customer.
With perhaps the exception of that last example, all of these are potentiallyvalid, smart ways to decide who will act as the customer. Generally speaking, thecustomer should derive direct or indirect benefit from the end product, although,especially in commercial settings (and even more so when talking about shrink-wrap software products) the level of indirection is rather deep.
Note that we’re talking about customer as a role, not as an individual. Althoughthe majority of projects might have a single person who acts as the customer, itdoesn’t have to be so. Indeed, many systems span multiple domains that might befar too complex for one person to understand thoroughly. In such contexts ateam of customers typically occupies the customer role. When dealing with such a

Acceptance TDD as a team activity 349
setup, it is crucial that the customer team has the necessary mechanisms to makeand negotiate decisions quickly.
To better describe the ideal customer for a software project, let’s look at someproperties we would like to see in our customer(s).
Shared interest in successThe ideal customer shares the team’s interest in the overall success of the project.Sharing that interest is essential in making sure that the team and the customerare working toward the same goal. Without that shared interest, it is difficult tosustain the high-bandwidth communication and heavy involvement of the cus-tomer in the daily work of the project team—doubly so if the customer has othercommitments in addition to your project. When we have the right customer,they’re an integral part of the team rather than an outsider expressing requestsabout what the team should be doing.
Authority to make decisionsAlthough getting empathy is better than facing cold ignorance, a customer with-out the authority to make decisions is not much more than a messenger betweenthe team and the real customer. In an agile project relying on the ability to reactto changes as they happen, having the authority to make decisions within theteam (after all, the customer is part of the team) is essential. Decisions regardingprioritization and what a given user story entails must be made in a timely mannerif we’re to keep up with our capacity of delivering working software—after all, weneed to know what to build in order to build it.
Ability to understand implicationsMaking decisions is not enough. Those decisions must be—within certain limits—smart decisions based on the best knowledge at that time and considering theimplications of such decisions. For a customer on a software project, this mightrequire consulting the development team with regard to technical implications ofpresent alternatives, including the estimated cost and effort associated with agiven decision.
Ability to explain the domainAn important characteristic—and unfortunately an aspect often lacking the atten-tion it warrants—of a customer is the ability to explain the application domain tothe team. The team is expected to speak the customer’s language using the businessdomain’s own terms, but they should not be expected to learn the domain on theirown. After all, it could take years to learn a domain well enough without continuous

350 CHAPTER 9
Acceptance TDD explained
interaction with the customer. Having a customer that’s able to communicate effec-tively with the team is an essential building block for success.
We now have an idea of what is expected from the customer role. Earlier, wementioned that the customer works with members of the development team inwriting acceptance tests. This rather vague wording begs the question, who is thismember of the development team that the customer collaborates with so closelyin writing acceptance tests?
9.4.2 Who writes tests with the customer?
In some teams, it might be the customer and a tester who together create accep-tance tests. In others, it might be the customer and a developer. In still others, itmight be the customer and a group consisting of any combination of testers anddevelopers. My personal experience has been with teams where developers takesignificant responsibility in testing their software beyond unit testing and TDD, soI’ve mostly seen teams where it’s the customer and a developer who write accep-tance tests. There are certain advantages, however, in having testers work on theacceptance tests with the customer and developers.
Perhaps the main differentiator in having a tester versus having a developerwrite acceptance tests with the customer comes from the slightly different per-spective these team members generally possess for the system being developed.The developers are intimately familiar with how the system is structured, whatkinds of changes will be required to support a given story, and so forth. That helpsenormously in formulating possible solutions to fulfill the customer’s need. Thetesters, on the other hand, are more familiar with the system as a whole and—typ-ically—with the application domain in general. This makes testers ideal candi-dates for writing acceptance tests, because they already have the right perspectivefor defining how the system should work.
In practice, however, there is no hard and fast rule here either. In most cases, itseems, the ideal would be to have the whole team participate in writing accep-tance tests. The benefits from doing so include not just spreading the knowledgebut also the building of relationships between individual team members and thecustomer. The more people work together, the more fluent their collaborationbecomes, and again that’s essential in determining how well the team is able tobuild the features the customer wants.
9.4.3 How many testers do we need?
Some organizations—Microsoft being probably the best known—have establisheda practice of pairing a dedicated tester for each developer. Whether this is a goodidea for your organization or not, I don’t know. According to my experience, most

Benefits of acceptance TDD 351
teams do well with one tester per two developers or so, and most teams fare OKwith even fewer testers as long as the developers are good at wearing the testerhat. (This isn’t that easy, really: Professional testers often have a different mindsetthan most professional programmers.) In short, I’d suggest starting out with onetester per two to three developers and scaling up or down from there as you gainexperience in your particular environment.
By now we know acceptance TDD is a team-level process that affects the way awhole team produces software together. We haven’t talked about the benefits ofacceptance TDD, however, beyond a passing mention of “better software faster.” Ithink it’s about time to discuss those benefits in more detail now that we have anidea of the process in general.
9.5 Benefits of acceptance TDD
Why were we doing this acceptance test-driven thing again? The reason is sim-ple—it helps us write better software, the right software, and it helps us do thatwithout spending our precious time and money on things of secondary impor-tance. It sounds good all right. How about a closer look at how this support real-izes itself?
To a large degree, the benefits of acceptance TDD could be seen as a directextension of many of the benefits of user stories—being able to focus on the rightthings, getting the important stuff done while minimizing the waste in the process,and maximizing the value our customer gets out of the whole process. With that inmind, let’s see how acceptance TDD expands on that already huge potential.
9.5.1 Definition of “done”
In a class about project management, one of the first things we learn is that projectshave a beginning and an end. Otherwise, they’re not projects. Quite likely, in thesame class we’re told about Parkinson’s Law, which says, “Work expands to fill thetime available for its completion.” What do these two teachings have to do withacceptance TDD, you may ask? The key issue here is, knowing where we are and know-ing when to stop. We need a definition of done, and acceptance TDD gives us a simplebinary criterion that does just that: “Do all tests for the story pass?”
NOTE If you’re familiar with the Scrum process, for example, you’re probablyalready familiar with this concept. The definition of done is one of thefirst things a Scrum coach will ask the team to come up with if there isnone. A mutual, shared working agreement about what counts as done is amust-have for reliable measures of progress.

352 CHAPTER 9
Acceptance TDD explained
With our acceptance criteria expressed as automated (or automatable) accep-tance tests, we have a lot of the means necessary to set ourselves up for productivesoftware development as far as knowing when we’re done is concerned. Not allacceptance criteria are written down as automated acceptance tests, however.Some of them remain as the result of objective manual testing and evaluation bythe customer. A good example is user interfaces.
Whatever the means of determining when we’re done, the important thing is foreveryone to know and agree to the way of determining when a given task is consid-ered completed—whether it’s a matter of all acceptance tests passing or a morecomplicated scenario involving subjective evaluations. In any case, acceptanceTDD puts the act of thinking about and specifying those tests and evaluations inthe beginning of the development cycle of implementing a user story. It makes it aheck of a lot easier to work effectively when we know how to tell when we’re done.
And this feeds back to our two key issues: knowing where we are and knowing whento stop.
Knowing where we areAcceptance tests don’t drive development quite as the unit tests in TDD do. Instead,they drive development by giving us a concrete goal to aim at and the means to
User interfaces are not done until a human being says soThe user interface created for exposing functionality developed as part of a givenstory might be as crucial to get right—in some cases even more crucial—thanimplementing the functionality itself 100% correctly. If the user cannot accessthe functionality, or if the user interface is so horrid that they give up halfwaythrough, the value of having the functionality is far less than if it was accessible.
The acceptable level of usability of a user interface is difficult to translate intoan automated test. Instead of a set of automated tests, we might end up ex-pressing the acceptance criteria as a combination of simple constraints such as“a maximum of three mouse-clicks required to access feature X” or “implemen-tation must validate against modern web standards” and a sequence of subjec-tive evaluations by the customer as we make progress with implementing thestory (or, if that doesn’t scale too well in a particular environment, once the de-velopers feel sufficiently confident they’ve satisfied the story’s usability require-ments). In a sense, such subjective evaluations could be considered acceptancetests that define done as “when Simon says so” (which goes for all stories, bythe way—it’s never done until Simon says so, although the passing acceptancetests are a pretty darn good indicator).
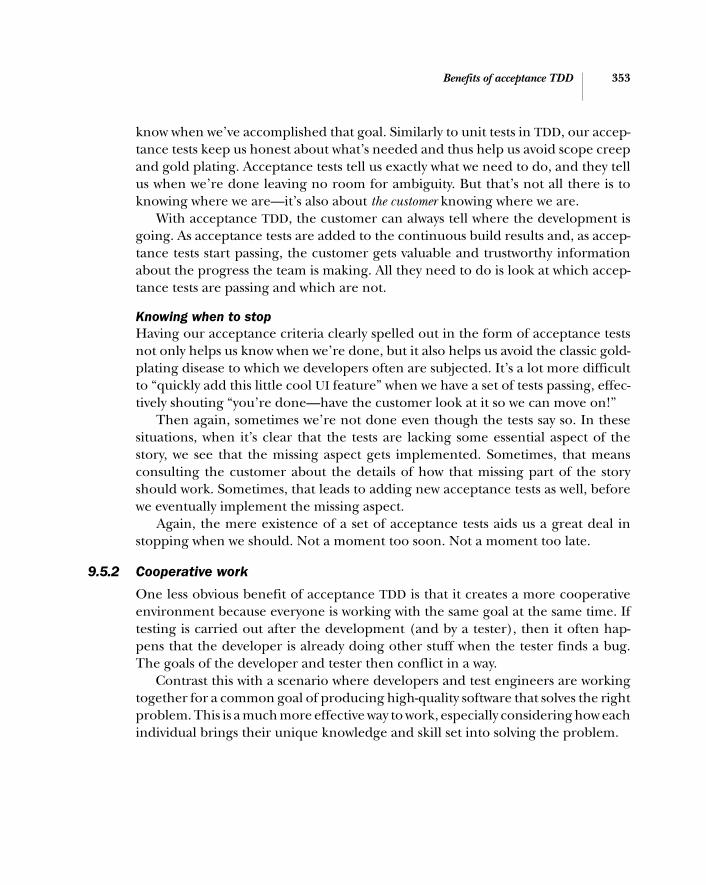
Benefits of acceptance TDD 353
know when we’ve accomplished that goal. Similarly to unit tests in TDD, our accep-tance tests keep us honest about what’s needed and thus help us avoid scope creepand gold plating. Acceptance tests tell us exactly what we need to do, and they tellus when we’re done leaving no room for ambiguity. But that’s not all there is toknowing where we are—it’s also about the customer knowing where we are.
With acceptance TDD, the customer can always tell where the development isgoing. As acceptance tests are added to the continuous build results and, as accep-tance tests start passing, the customer gets valuable and trustworthy informationabout the progress the team is making. All they need to do is look at which accep-tance tests are passing and which are not.
Knowing when to stopHaving our acceptance criteria clearly spelled out in the form of acceptance testsnot only helps us know when we’re done, but it also helps us avoid the classic gold-plating disease to which we developers often are subjected. It’s a lot more difficultto “quickly add this little cool UI feature” when we have a set of tests passing, effec-tively shouting “you’re done—have the customer look at it so we can move on!”
Then again, sometimes we’re not done even though the tests say so. In thesesituations, when it’s clear that the tests are lacking some essential aspect of thestory, we see that the missing aspect gets implemented. Sometimes, that meansconsulting the customer about the details of how that missing part of the storyshould work. Sometimes, that leads to adding new acceptance tests as well, beforewe eventually implement the missing aspect.
Again, the mere existence of a set of acceptance tests aids us a great deal instopping when we should. Not a moment too soon. Not a moment too late.
9.5.2 Cooperative work
One less obvious benefit of acceptance TDD is that it creates a more cooperativeenvironment because everyone is working with the same goal at the same time. Iftesting is carried out after the development (and by a tester), then it often hap-pens that the developer is already doing other stuff when the tester finds a bug.The goals of the developer and tester then conflict in a way.
Contrast this with a scenario where developers and test engineers are workingtogether for a common goal of producing high-quality software that solves the rightproblem. This is a much more effective way to work, especially considering how eachindividual brings their unique knowledge and skill set into solving the problem.

354 CHAPTER 9
Acceptance TDD explained
9.5.3 Trust and commitment
In acceptance TDD, we write acceptance tests to specify what it means when thatgiven user story has been implemented correctly. Having the customer write thoseacceptance tests together with the development team significantly solidifies themeaning of user stories. This is because there’s a direct connection between whatthe customer specifies and what they get.
Part of this solidified meaning of user stories is also coming from the associa-tion of the customer seeing the development team implementing exactly whatthey ask for without holding them hostage to things they’ve said before or thingsthey wrote down as requirements earlier. Part of it is coming from the developersseeing the customer write the acceptance tests, which clearly communicates thevalue coming out of completed code.
In short, the customer sees that their needs are indeed being met, and thedevelopers see that the work they’re doing is valued by the customer. Demonstrat-ing the implemented user stories to the customer together with running (andpassing!) acceptance tests is by far the best way I know to accomplish just that.
The ways in which tests are written in acceptance TDD do have significance. Somuch significance, in fact, that the next benefit of acceptance TDD on our list isspecification by example.
9.5.4 Specification by example
An important aspect of acceptance tests is that they represent specification by example,a way to express requirements by the way of comprehensible examples rather thancomplex formulas and ambiguous prose. This brings us a number of advantages.
Generic descriptions that are full of ambiguity and subject to interpretationare an order of magnitude harder to translate into executable tests. Furthermore,for the customer it is much more difficult to validate whether a test is correctwhen they need to interpret the original intent among the ambiguities.
In short, tests expressed with concrete examples are easier to read, easier tounderstand, and easier to validate—not to mention easier to write in the firstplace! That last advantage becomes critical when our goal is to have the customerinvolved in specifying and writing tests for our system.
9.5.5 Filling the gap
Regardless of how well our unit tests cover our production code, they are not test-ing our system. They are testing our code and components in isolation. To put itanother way, unit tests give us a good indication of whether our code works; butwithout some additional testing, we don’t know whether our software as a whole

What are we testing, exactly? 355
works as it should work. In fact, in most cases our unit tests don’t even tell uswhether the individual components we’re testing work together, although judi-cious use of contracts and interaction-based tests help close this gap. Althoughunit testing—especially in the form of test-first programming—is an enormouslyhelpful practice in producing quality software, we often need something more toput our whole system under an automated test harness.
Some have even questioned the need for unit tests in the presence of a thor-ough acceptance test suite. Some successful programmers rely solely on auto-mated acceptance tests to give them feedback and guard for regression duringdevelopment. Personally, I feel that even though automated acceptance tests canindeed provide good enough protection for regression in some situations, theother benefits of writing unit tests to support TDD are more than enough to justifywriting them. Generally speaking, one size does not fit all.
I’d go as far as warning you about the looming danger of using acceptancetests like unit tests in TDD—it might happen that we lose sight of the big pictureof what’s needed for the story, or we might stop writing good unit tests, effectivelychewing away at our ability to refactor efficiently as we no longer have as thick asafety net as we used to with TDD. Acceptance test-driven development accompa-nies test-driven development—it doesn’t replace it.
Now that we have an idea of the overall process of acceptance TDD and who’sdoing what, I think it’s a good time to dig deeper into what exactly—technicallyspeaking—we are testing with our acceptance tests.
9.6 What are we testing, exactly?
Just saying acceptance tests test user stories is often not enough to convey the ideaof what exactly acceptance tests should test. Yes, acceptance tests are meant to ver-ify that a user story is implemented correctly as specified. However, there aremany ways to do that. We’ll explore these ways further in chapter 11, but let’sunderstand the fundamentals right now in order to create a crisp picture of whatwe should be testing with our acceptance tests.
9.6.1 Should we test against the UI?
Perhaps the most common question regarding acceptance tests is whether theyshould exercise the system under test through the real user interface (or the exter-nal interface of a machine-to-machine system) or some kind of an API beneath theuser interface. The answer is, of course, “it depends.” In general, however, our goalis to gain as much confidence as possible with as little effort as possible. Whether

356 CHAPTER 9
Acceptance TDD explained
this is best achieved by writing end-to-end tests or by a divide-and-conquer strategyof writing smaller, more isolated tests is very much context-dependent.
When trying to decide whether to write acceptance tests against the system’sreal interface, against an abstract user interface (for example, when using the Pre-senter pattern described in chapter 8), or against some sort of a service layerexposing the business logic to the user interface, we might ask ourselves questionssuch as the following:
■ How easy is it to write tests against the selected interface?■ How fragile will the tests be if written against the selected interface?■ Is the performance of the selected interface an issue?
For some systems, and especially for machine-to-machine–style backend systems,testing against the external interface is the best option. This is because thoseinterfaces are typically well defined and do not exhibit as much turbulence as userinterfaces. In general, machine-to-machine interfaces are easy to test.
Graphical user interfaces (GUIs) are a much more difficult class of interfacesfrom a testing perspective. One of the reasons for this is that GUIs often changemore frequently than machine-to-machine interfaces as new functionality isadded. This problem can be mitigated to some degree with careful design of theGUI implementation as well as that of the implementation of the tests themselves.Most often, however, it’s not a question of technology that leans our decision ineither direction.
Not a question of technology With the tools available for the modern developer, moving a button on the screenor otherwise changing the basic layout is rarely a big issue for the maintainability ofacceptance tests written against the GUI. Some extra care must be given, however,to avoid ending up with tests that are far more complex and verbose than the asso-ciated business logic would imply. In practice, it often makes sense to map a concisetesting language on top of the technical interface to keep the complexity of tests incheck. This way, we can keep the effort of writing acceptance tests against the GUIclose to the effort of writing the same tests against an internal API.
Performance might matterSometimes, the motivation for having our acceptance tests bypass the real interfaceand go directly against the internal API is performance. The external interfacecould be a serial port with limited bandwidth, and we might have tens of megabytesof data to push through the thin pipe while executing our acceptance tests. In this

What are we testing, exactly? 357
type of scenario, it often makes sense to execute the tests without going through thebottleneck, effectively trading coverage for speed of feedback.
Even if we end up running our tests against an internal API, we still want to runat least some of our tests (although maybe not as often as the rest) against the realthing. Things are rarely either-or when talking about software development. Inpractice, we typically have acceptance tests operate on all available layers from theGUI, through internal APIs, and all the way down to isolated business logic.
A somewhat similar situation warranting testing against an internal API is thecomplete lack of access to the real thing. For example, we might not have thedevice with which our system is accessed. We might not have the exact hardwareon which our system is supposed to be deployed. This leads us to the next ques-tion regarding what we’re testing, exactly.
9.6.2 Should we stub parts of our system?
For many of the same reasons as for writing our tests against an internal interfaceinstead of the external one, there are certain situations where we feel like replac-ing some part of our system—not necessarily just the external interface—with afake implementation.
For example, our tests might require that a database be set up with largedatasets before each test, and the particular database could prove to be too slowto do this while still retaining a fast enough feedback cycle. In this situation, wemight be tempted to have our application use an in-memory database instead ofthe real one in order to avoid the cost of hitting the wire every time our tests orthe application itself touches the database. Or we might be tempted to use a localdatabase running on the same machine as the application in order to at least min-imize the cost of network I/O.
The question remains: Should we do that? Should we replace some parts of thesystem with fake or alternative implementations in the name of convenience orspeed?
Sufficiently close to the real thingWhether we should stub or not is a question for which the answer is mostly depen-dent on the degree of certainty we have in the specific replacement being closeenough to the real thing from the tests’ perspective. In our example of replacingthe real database with one that’s physically located on the same machine as theapplication instead of on a separate one, the difference between the real thing andthe replacement is insignificant. Replacing the real database product with a differ-ent one—or sometimes even using the same database in in-memory mode insteadof running it as a server—is already more complex decision to make.

358 CHAPTER 9
Acceptance TDD explained
Differences in the SQL syntax supported by different databases, differences inhow each database product handles certain data types, and so forth can be bigenough risks to bite the bullet and use the real thing—even if the acceptance testsrun slower with it. Whether to stub or not is ultimately a subjective decision, andthere’s no blanket answer that would be globally correct. We need to evaluate thetrade-offs involved and make a decision case by case.
Sometimes a stub is our only optionSome situations remain where the stub is our only viable option, however. For exam-ple, some teams developing embedded or highly hardware-dependent software canbe constrained because the sheer cost of a particular hardware chip or device is pro-hibitive. Another perhaps more common scenario is one where the constrainedhardware is available infrequently and only for short periods of time. In situationslike that, it’s often better to run your acceptance tests on top of a simulator insteadof only being available to run your tests for three hours every two weeks.
The question of stubbing parts of our system when running acceptance tests ismore complex than defining what’s close enough to the real thing, however.Acceptance tests are not all alike, and not all aspects of what our customer is inter-ested in involve system-level properties. A good example of this is domain-specificbusiness logic, which is a topic of its own.
9.6.3 Should we test business logic directly?
Just as traditional testing is not only about testing against functional requirementsbut also non-functional requirements, acceptance tests are written to cover a rangeof aspects of the system being developed. Perhaps the majority of acceptance testsare functionality-oriented, specifying correct behavior for a variety of differentinteraction sequences. Usually, a smaller portion of acceptance tests are those thatspecify systemic and non-functional requirements, such as the system’s ability tohandle simultaneous connections or to survive a crashing database or networkdowntime. Yet another class of acceptance tests specifies the core business logic—the stuff that happens behind the curtains when we interact with the system.
Thinking from the customer’s perspective, testing domain-specific businesslogic directly makes a lot of sense. In many domains, the business logic involved ismore than enough to warrant isolation and focus. It is much easier to wrap ourheads around the logic when it’s no longer muddled with irrelevant informationrelated to populating forms, for example. From the developer’s perspective, it’sthe exact same outcome—by focusing on the business logic directly, we are muchmore able to understand what the system needs to do.

Brief overview of available tools 359
To summarize, if your particular domain involves non-trivial business logic, byall means, specify and test it directly rather than hide it behind a sequence ofactions through an external interface.
Speaking of summaries, before we wrap up this chapter, let’s take a little tourthrough the various tools we have at our disposal for supporting the implementa-tion of acceptance tests as part of acceptance TDD.
9.7 Brief overview of available tools
As in so many other aspects of software development, using the right tools canmake the difference between night and day. What we are typically looking for in atool for acceptance testing is support for:
■ Writing our tests■ Implementing our tests■ Running our tests■ Reporting test results
Writing our tests refers to our need for a customer-friendly format that facilitateseffective collaboration between developers, testers, and customers. The tool alsoneeds to help us convert that customer-friendly format into something executable(if it isn’t already) and to execute them—after all, that’s what automated means.There is more to running our tests than that, though.
Because we will likely want to incorporate our acceptance tests into a continu-ous integration server to be run as a background job at configured intervals, thetools should support running the tests in batch mode—that is, without any man-ual intervention by whomever wants to run the tests. Finally, there’s little use inrunning tests if we don’t know whether they passed or not. Therefore, our toolsetshould also provide a way to report test results.
There are a variety of tools available for acceptance testing that all meet theprevious requirements in one way or another. I’ll introduce some of the morecommon ones briefly before diving into one of them in more detail.
9.7.1 Table-based frameworks
The latest fad in acceptance-testing tools is to express the tests in the form of tables.The common use case is that the customer (usually together with the developer)creates a table consisting of rows and columns, which is then interpreted by the test-ing framework based on the semantics and data embedded into the table cells. Thecustomer could, for example, author the test table with the same office productivity

360 CHAPTER 9
Acceptance TDD explained
tools with which they’re already familiar and then save the document into a formatthat can be read and parsed by the testing framework—often either HTML (if usingMicrosoft Word) or XLS (if using Microsoft Excel).
Examples of tools in this category include Fit, FitNesse, and Selenium.
Fit: smart parsing for simple tablesFit (Framework for Integrated Tests) was developed by Ward Cunningham tobridge the gap between the customer and the developer in the context of author-ing acceptance tests. Fit essentially provides syntax for constructing test fixturesfrom HTML tables and a way to hook those fixtures into their implementations invarious programming languages, such as Java, C#, Python, and so forth.
Given an HTML document, Fit parses the document looking for tables and, whenit finds one, invokes the underlying code associated with the specific table. Finally,Fit renders the input document with all the table cells colored according to testresults—a cell containing an assertion that failed would be colored red, and a cellcontaining an assertion that passed would be colored green. Anything that’s not atable is considered narrative and is not processed by Fit. Fit is currently rather pop-ular among teams adopting agile methods and, especially, Extreme Programming.
FitNesse: Fit in a WikiThe guys at ObjectMentor built FitNesse to make writing Fit tests easier. FitNesseis essentially a combination of a web server, Fit, and a wiki web application thatlets users edit web pages online using a more compact wiki syntax instead of rawHTML (which is a pain to edit by hand without graphical tools). The lightweightand simple markup language used to structure tables, headings, bulleted lists, andso forth can be a remarkable boost in productivity when working on the accep-tance tests because the tests are more malleable and readily editable.
Selenium: controlling a browserSelenium is a tool focused on testing web applications through the real userinterface. What makes Selenium relatively unique is the way it accomplishes this,however.
Selenium tests are written as HTML tables just like in Fit and FitNesse, but theyare implemented under the hood in JavaScript and executed by the JavaScriptengine of the real web browser, such as Internet Explorer or Mozilla Firefox. Thisprovides certain advantages over tools and libraries that exercise a web applica-tion by simulating a browser—specifically because of the varying level of supportfor JavaScript by the libraries and because of the differences in JavaScript supportby the various browsers.

Brief overview of available tools 361
It is worth noting that Selenium also includes a remote-control mode, whichallows for writing the tests in a programming language like Java or a scripting lan-guage like Ruby, while still executing the tests through a live web browser.
9.7.2 Text-based frameworks
Although table-based frameworks might be the mainstream right now, they arenot the only class of frameworks suitable for acceptance testing. Not everyonelikes authoring tests as tables. The text written into the cells of test tables is oftenclose to written English, but the table structure brings with it a degree of syntax.Fortunately, some tools exist that let us author our tests in plain text instead ofstructured documents such as HTML.
Exactor: simple keyword-driven testingBrian Swan of Exoftware developed a framework named Exactor to aid the devel-opers in writing automated acceptance tests in a concise manner while still notrestricting the test implementation too much. Instead of structuring tests intocells in an HTML table, Exactor tests are expressed in plain text files following acouple of simple rules: Every line that’s empty or starts with the hash character isconsidered narrative, and all other lines represent a combination of an action andits parameters, separated by the tab character. The framework maps the names ofactions into names of Java classes, and the parameters are passed to the executemethod of an instance of the resolved class.
TextTest: testing with logsAnother testing framework based on raw text in contrast to structured documentsis TextTest, written by Geoffrey Bache. TextTest’s approach is unique in that itstests are written as log files. The fundamental idea is that the customer canexpress tests in a plain text file using whatever language he wishes, and the devel-oper then implements the tests by adding logging statements to appropriateplaces in the production code. TextTest then verifies the correct functionality bycomparing the expected and log files after running a test.
9.7.3 Scripting language-based frameworks
There is another category of acceptance-testing tools that can offer a great deal ofpower through the flexibility and friendliness of a scripting language. These toolsare typically frameworks that attempt to deliver the promise of a domain-specificlanguage through a generic scripting language such as Python or Ruby.
The obvious downside of these tools is that they’re limited by the selected script-ing language’s suitability in defining a custom vocabulary within the limits of the
362 CHAPTER 9
Acceptance TDD explained
language syntax. On the other hand, if the more complex syntax is not an issue (forexample, if the customer possesses enough programming skills to be able to dealwith the syntax), these tools enable an enormous scale of possibilities in terms ofimplementing tests—a full-blown scripting language is available, after all.
A good example of this category of tools is Systir,7 which makes use of the Rubyscripting language’s malleable syntax for building reasonably good, custom-domain–specific languages.
9.7.4 Homegrown tools
One important class of testing tools is those that are created in-house according toa specific development team’s specific needs. Homegrown tools are in the core ofthe buy versus build dilemma. Writing our own testing framework does have itsassociated cost (both in building as well as maintaining it), and it might take sometime to get started writing tests if we also need to implement a framework as you go.
The advantage of writing our own is, of course, that it will be tailor fit and willlikely serve our needs better than a tool built by someone else on the other side ofthe globe. Also, the cost of writing our own testing framework is often less thanwe’d expect. I once wrote in one day a basic table-based testing framework fortesting a web application according to a test script expressed as an Excel sheet.With that in mind, my suggestion would be to first evaluate whether it would bethat costly to write your own instead of using a readily available framework that’sslightly awkward to use in your particular context.
There’s a thin line between homegrown and off-the-shelf testing tools orframeworks. In fact, most projects tend to grow some sort of a testing frame-work—sometimes from scratch and sometimes on top of an existing tool such asFit. It’s a question of how much third-party software you leverage beneath yourcustom test automation assets, be it tests or tooling.
OK, enough talk about tools. Let’s wrap up the chapter with a quick summary.
9.8 Summary
By now, we know that user stories are a useful, lightweight technique for managingrequirements. In this chapter, we discussed their connection with what we call accep-tance tests—automated tests that can be used to drive development on the featurelevel a bit like we do on the code level with unit tests and test-driven development.
We started by clarifying to ourselves what acceptance tests are and what theyshould look like. From there, we continued to examine the process of acceptance
7 http://atomicobject.com/pages/System+Testing+in+Ruby.

Summary 363
test-driven development, getting familiar with the four steps involved: picking astory, writing acceptance tests for it, automating those tests, and implementingthe functionality to make the tests pass. We also looked at how this four-step cyclefits into the bigger picture of a whole iteration of an agile process and the kindsof activities related to stories and acceptance tests that we perform throughoutthe iteration.
After discussing the benefits of acceptance TDD, we turned our attention tothe team and some common questions related to acceptance TDD: specifically, thecustomer’s role in the process. Finally, we briefly talked about what we are testingwith our acceptance tests and took a quick tour of available open source tools forimplementing acceptance tests.
Now that we’re aware of this fascinating technique called acceptance test-drivendevelopment and how it works, it’s time to take a closer look at one specific tool forautomating acceptance tests. In the next chapter, we’ll introduce Fit, one of theopen source tools we mentioned earlier and possibly the most used acceptance test-ing framework today. Once we know how Fit works and how we can use it for author-ing and automating acceptance tests, we’ll dedicate chapter 11 to discussing variousstrategies for implementing acceptance tests—that is, how to connect the test logicinto the system under test.
Creating acceptance tests with Fit
We are searching for some kind of harmony between two intangibles: a form which we have not yet designed and a context which we cannot properly describe.
—Christopher Alexander, father of the Pattern Language movement
364

What’s Fit? 365
It is safe to say that, at the time of writing this book, the Fit framework is by far themost popular acceptance-testing framework in use. It also happens to be good atwhat it does. For that reason, we’ll be using Fit in this book to demonstrate howwe can go about automating acceptance tests with a tool that supports customercollaboration as well as lending a hand to the programmer or tester for automat-ing the tests’ execution. Before getting down to the business of acceptance test-driven development with Fit, we need to know something about how Fit worksand how to express acceptance tests with Fit. That is the goal of this chapter.
We’ll begin by drawing the big picture of what Fit is, what it does, and how itcan be used in acceptance TDD. We’ll continue by familiarizing ourselves withthe core concepts of Fit—test documents and fixture tables. From there, we’ll con-tinue with studying how Fit turns fixture tables into executable tests by binding thetables it encounters to fixture classes. We’ll gain understanding of the way Fit doesthis by looking at three built-in fixture types called the ColumnFixture, RowFix-ture, and ActionFixture.
Having learned about the three built-in fixture types, we will shortly discusshow fixtures can (and should) be extended and customized for our specificneeds. We’ll also look at a couple of additional fixtures provided by an extensionto Fit called FitLibrary. Finally, we’ll look at how we can execute our Fit tests fromthe command line and as part of an automated build using Apache Ant.1
For a more thorough exploration into the Fit framework, I highly recommendpicking up a copy of Fit for Developing Software (Addison-Wesley, 2005) by WardCunningham and Rick Mugridge, the original authors of Fit and FitLibrary,respectively. That book is the definitive tome that documents Fit’s features in farmore depth and breadth than what is possible within the constraints of a singlechapter. Having said that, once reaching this chapter’s summary, we will alreadyhave good enough a grasp of Fit’s concepts and underpinnings to be able to startautomating acceptance tests on our project.
And now, let’s get Fit.
10.1 What’s Fit?
Fit, originally an acronym that stood for Framework for Integrated Tests, wasdeveloped by Ward Cunningham a couple of years ago to help getting customersinvolved in writing acceptance tests. Fit is available for a number of mainstream
1 http://ant.apache.org.

366 CHAPTER 10
Creating acceptance tests with Fit
(and not quite so mainstream) programming languages and is essentially a thinframework that parses table-based documents and interprets and translates theminto a sequence of method calls into the underlying fixture classes implementedwith a programming language such as Java, C#, Python, or Ruby. Fit also supportsreporting test results by producing a user-friendly, color-coded output of the testdocument, highlighting the fail/pass status of each table row with a green or redbackground color for each respective table cell.
Before we get any more tangled with who interprets what and what translatesto what, let’s talk a bit about how Fit fits into the process of acceptance TDD.
10.1.1 Fit for acceptance TDD
To quote the Fit homepage,2 “Fit creates a feedback loop between customers andprogrammers. Fit allows customers and testers to use tools like Microsoft Office togive examples of how a program should behave—without being programmersthemselves. Fit automatically checks those examples against the actual program,thus building a simple and powerful bridge between the business and softwareengineering worlds.”
This feedback and collaboration build around the ability of the customers tostay within their familiar productivity tools using the familiar table structurewithin a document to describe the wanted program behavior and verify for them-selves whether a given behavior is in place or not. However, there’s still a way to gofrom a document containing text in tables to the computer executing code thatchecks the specification against the system under test. Figure 10.1 gives an overallpicture of what happens when a team follows acceptance TDD in this way.
Looking at figure 10.1, the process for creating an executable acceptance testusing Fit starts from the top-left corner. Let’s go through what’s happening ineach of these steps.
Customer creates a sketchThe first step is for the customer (possibly in collaboration with a member of thedevelopment team) to write an initial sketch of the test document. Sketch in thiscontext means that the document probably isn’t yet in its final, executable formatbut it already describes the desired behavior for a user story, providing examplesof that behavior in the form of tables.
2 http://fit.c2.com/.

What’s Fit? 367
In this sketch stage, the test document should first and foremost act as a tool forthe customer to express their vision. Thus, even if the document is writtentogether with a technical staff member, the focus should not be on creating theexamples’ tables in a format understood by Fit. Some teams like creating thesesketches on paper, leaving the conversion to electronic format to be carried out inthe next step—cleaning up the sketch tables.
Testdocument(HTML or
paper) withsketch tables
Feedback
EXECUTABLE TEST
Testdocument
(HTML) withsanitized
tables
Tehnical staff enhance thetables in the test documentby adding bits of informationneeded by Fit and making it“syntactically correct.”
Testdocument
(HTML) andbacking code(e.g., Java)
Tehnical staff implementsfixture classes that Fit cancall when it processes therespective fixture tables inthe test document.
Customer writes a testdocument containing examplesof desired behavior, encodedinto tables.
Figure 10.1 The transitions from a test document informally described by the customer to an executable test. After the customer has created the initial test document, the development team first sanitizes the tables so that Fit can interpret it correctly. With a syntactically valid test document, the development team next implements the backing code—the fixture classes—so that Fit has something to invoke when processing the test document. When all three of these steps are done, we have an executable test in the form of the combination of a document containing fixture tables and code that implements the tables.

368 CHAPTER 10
Creating acceptance tests with Fit
Team cleans up the sketch tablesIn the second step, the development team (developer, testing engineer, businessanalyst—anyone familiar with Fit and the already existing fixture classes) takes thesketch and enhances it so that it’s ready for Fit to process.
In practice, this often means adding a header row to the tables created by thecustomer with some metadata for Fit (later we’ll see why), altering the exact word-ing used by the customer to match suitable pre-existing fixture classes, splitting atable created by the customer into two tables for technical reasons, and so forth.
Although the test document can experience a lot of refactoring as tables gettouched up, split up, and moved around, the team should take care to retain thecustomer’s original intent. In other words, although the sketch needs to be sani-tized enough for Fit to be able to process it, the document must also remainunderstandable by the customer. This might mean that, for example, a certainamount of duplication between multiple tables should be allowed in the name ofreadability rather than mercilessly removing the duplication with the side effect ofmaking the examples more difficult to follow.
After the development team is finished cleaning up the test document, Fit isable to parse and process the document. However, at this stage the vast majority oftests are typically failing because Fit doesn’t know what “accumulated interest” or“number of bonds in portfolio” means in terms of the technical implementationof the system under test. This is why we need the third step in figure 10.1, whichwe’ll discuss next.
Team implements backing codeOnce the customer has described examples of the desired behavior as tables andthe development team has cleaned up the tables for Fit, it is the programmer’s jobto implement the underlying fixture classes to glue the tables in the test docu-ment into the system under test. Figure 10.2 illustrates the translation that takesplace, carried out by the Fit framework.
When Fit parses a test document and encounters a table, it needs to process thetable somehow. The problem is, of course, that the table describes the desiredbehavior in the customer’s language (for example, English); however, the systemunder test only understands ones and zeros, so some kind of translation is needed.
The Fit framework acts as a dumb translator that understands the format andstructure of the fixture tables and, following certain rules, knows how to feed thebits and pieces in a fixture table to someone else—that someone else being a fix-ture class. The fixture class then does whatever it needs to do—Fit doesn’t care—

What’s Fit? 369
and communicates back following certain rules.3 We’ll look at these rules later inthis chapter when we talk about a number of concrete fixture classes.
In order to connect fixture tables to the system under test, Fit needs to have amatching fixture class for each fixture table. Luckily, most fixture classes can andwill be used in more than one test document. Or, the other way around, sometimesthe team doesn’t need to implement new fixture classes for a test documentbecause the document uses fixture tables that are backed by existing fixture classes.
We’ve already mentioned in passing the concepts of a test document, fixture table,and fixture class. Let’s see what those peculiar things look like, starting from thedocuments and tables.
10.1.2 Test documents contain fixture tables
In Fit, the concept of a test is loosely defined through a test document containingan arbitrary mixture of narrative text and executable fixture tables. When we’rerunning such a test document with Fit, the narrative text sections are ignored,and the fixture tables are interpreted, one by one, in the order Fit encountersthem in the document.
Although it is possible to author these test documents in other formats, HTMLis by far the most common among projects using Fit. Some teams, for example,choose to author their test documents using Microsoft Word, saving the docu-ments as HTML. Figure 10.3 shows an example of an HTML test document openedin Microsoft Word for editing.
3 For example, a fixture class throwing an exception generally means that the test has failed….
Fixture tables Fit Fixture classes
Customer’s language Translation Computer’s language
Figure 10.2 The Fit framework translates the customer’s language encoded in fixture tables into the computer’s language encoded in fixture classes. The fixture classes can be implemented with a variety of programming languages, typically—but not necessarily—in the same language as the system under test is implemented. Scripting languages, for example, are often a good candidate for implementing the backing code for fixture tables due to their flexibility and ability to integrate with other technologies.
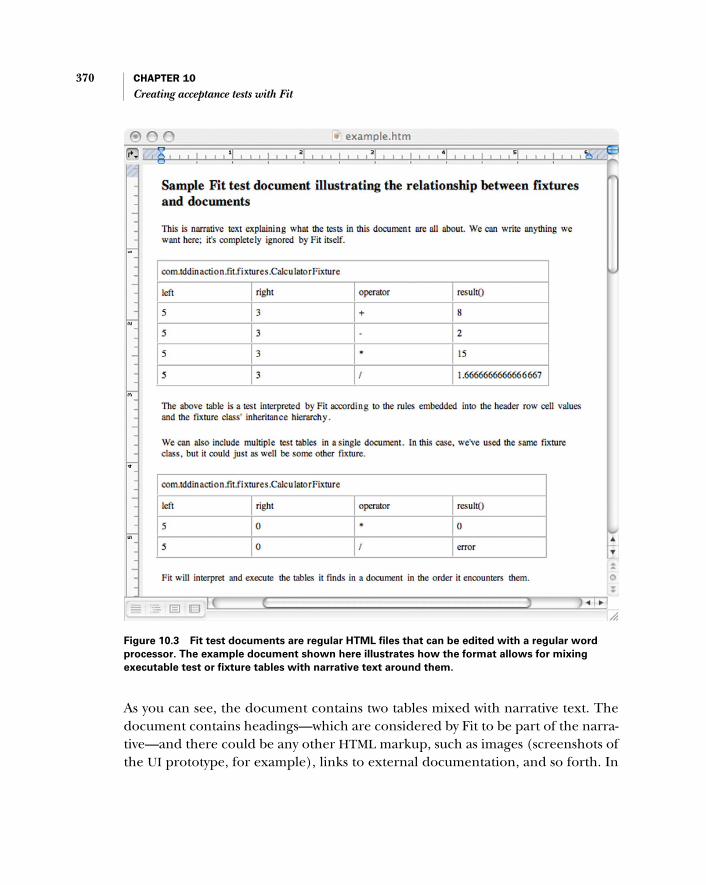
370 CHAPTER 10
Creating acceptance tests with Fit
As you can see, the document contains two tables mixed with narrative text. Thedocument contains headings—which are considered by Fit to be part of the narra-tive—and there could be any other HTML markup, such as images (screenshots ofthe UI prototype, for example), links to external documentation, and so forth. In
Figure 10.3 Fit test documents are regular HTML files that can be edited with a regular word
processor. The example document shown here illustrates how the format allows for mixing
executable test or fixture tables with narrative text around them.
What’s Fit? 371
short, Fit doesn’t care. What Fit does care about is the two tables present in thedocument, which represent something Fit needs to execute somehow.
The two tables in figure 10.3 represent the executable portions of the test doc-ument and are the infamous fixture tables to which we’ve already alluded to. Fix-ture is arguably a loaded word in the world of test automation. As we learned inpart 1, a fixture in the context of unit-testing is the state or a set of objects used bya test class for carrying out an automated test. In the context of Fit, however, theword fixture has a different meaning. Let’s talk about that next.
10.1.3 Fixtures: combinations of tables and classes
What we’ve learned about Fit’s nomenclature so far is that the tables in a test doc-ument are called fixture tables. From a programmer’s perspective—or whomevercarries out the final step of implementing the backing code for a fixture table—thetwo tables in figure 10.3 represent instances of a class named CalculatorFixture,which the programmer creates for mapping the table data into method calls to oursystem under test. We could say that fixtures are the programming language imple-mentations of the abstract fixture tables in a test document. Let’s look at figure 10.4for a close-up of one of the tables in figure 10.3 and see what it tells us.
The first cell on the first row is the name of a fixture class, in this case,com.tddinaction.fit.fixtures.CalculatorFixture. When it encounters atable, Fit loads a class with the name indicated in the first cell and instantiates anobject of that class using the default (no-argument) constructor. The fixture classis what makes a fixture table “alive,” giving Fit something to invoke when encoun-tering a fixture table that references the class. What happens when Fit encounters
Creating a common template for test documentsAlthough there’s no technical requirement for test documents to look the same,most projects end up creating some kind of a template for their Fit tests. For ex-ample, one project always included a special table in the top of the document,recording information such as the associated use case and the number of theiteration in which the test was created. In practice, this table was just anotherfixture table from Fit’s perspective, so the people working on the project neededto have a backing fixture class for it. As far as I can remember, though, the fixtureclass didn’t do anything because the table’s purpose was to document the testitself, not to test the system.

372 CHAPTER 10
Creating acceptance tests with Fit
a fixture table is dependent on the specific fixture class; but whatever that is, theFit table parser drives it by feeding the table rows to the fixture object one by one.
We have fixture tables and fixture classes. What about just plain fixture? If youvisit a team that’s using Fit, they’re probably talking about fixtures whether theirfinger is pointing at an HTML document or a Java class. Some people use the termfixture as shorthand for fixture table or fixture class, trusting that the meaning can bededuced from the context. There’s another way to look at it, though.
If we consider the whole journey from the customer’s first sketch to an actual,running, automated acceptance test, we’re all the time working on a unit that isrepresented by a table (customer’s view) or a class (programmer’s view) or both.In that sense, and considering that the fixture table and fixture class are tightlycoupled, we can generally refer to the combination of a fixture table and thebacking fixture class as a fixture.
That’s pretty much all there is to say about fixtures in general. It’s time to intro-duce some concrete fixture classes in order to extend our understanding of what fix-tures are and what they can do. How about starting with the three built-in fixtures?
10.2 Three built-in fixtures
Fit comes with three built-in fixture classes: ColumnFixture, RowFixture, andActionFixture. The idea is that projects will create their own, application-specificfixture libraries to support their particular application domain, preferences, andso forth. Before we begin creating custom fixtures, however, we should first learnabout the three most basic ones by taking a little tour through the available built-in fixture classes and the kinds of fixture tables they support.
Figure 10.4 One of the fixture tables from the test document captured in figure 10.3. The first row on the table tells Fit which fixture class to use to execute this table. The interpretation of the remaining rows depends on the fixture class.

Three built-in fixtures 373
That’s what we’ll do next. We’ll begin with perhaps the most intuitive one ofthe triplet—the ColumnFixture. Once we’ve grokked how the ColumnFixture canbe used for specifying expected outcome with a given input for the logic undertest, we’ll move on to discover RowFixtures, a more data-oriented colleague of theColumnFixture. Finally, we’ll shake hands with the last of the three built-in fix-tures, the ActionFixture, which facilitates expressing interaction-oriented tests.
First up: the ColumnFixture.
10.2.1 ColumnFixture
The ColumnFixture is perhaps the simplest4 of the three built-in fixtures. Its sim-plicity stems from the straightforward mapping Fit performs between columns ina fixture table to public fields and methods on the underlying fixture class inorder to let the fixture class carry out simple calculations based on the table’s con-tents. Before you start wondering how that mapping works, let’s look at the struc-ture of a ColumnFixture table.
The second row of a ColumnFixture table—the one right after the fixture classname—is called the header row. The column values in the header row indicate to Fitwhat it should do with the rest of the rows on the table. If a cell on the header rowhas the value left, Fit knows that, for that column in the following rows, it shouldset the cell’s content as the value of a public field named left on the underlyingfixture object. Figure 10.5 highlights the essential pieces of the ColumnFixturetable we saw in figure 10.4.
4 Simplest does not mean the least powerful, though. Some might argue that ColumnFixture is the mostadept of the built-in fixtures to support testing business logic.
The first row/cell tells Fit which fixture classto interact with while executing the table.
The header row tells Fit what to do withthe rest of the rows in this table.
com.tddinaction.fit.fixtures.CalculatorFixtures
left right operator result()
55
5
33
3
A header cell with a value not ending withparentheses implies that Fit should injectthe cell’s value into a public field by thesame name on the active fixture object.
+-
*/
82
15
1.6666666
A header cell with a value ending withparentheses indicates to Fit that it shouldinvoke a method with that name for eachrow and compare the return value to the
respective contents of this column.
Figure 10.5 The column fixture table from figure 10.4 with explanations of the meaning of key elements of the table structure

374 CHAPTER 10
Creating acceptance tests with Fit
If a cell on the header row has the value result() (note the parentheses), Fitknows it’s an expected result column. This means for that column and for each row,Fit will call a method named result and compare its return value to the expectedvalue indicated in the current row’s cell value. Due to this way of mapping col-umns to field and method access, the ColumnFixture is mostly used for relativelysimple calculation-style tests, which are focused on verifying the correct results ofexecuting specific business rules for a variety of different kinds of input.
Our fixture class from the sample Fit document, CalculatorFixture, is a sub-class of fit.ColumnFixture. Let’s look under the hood and figure out exactlyhow Fit performs the previous mapping of table data to the fixture class andwhere we write the glue code that interacts with the system under test. Consider-ing the CalculatorFixture table in figure 10.5, the fixture class implementationcould look like listing 10.1.
public class CalculatorFixture extends fit.ColumnFixture {
public double left; public double right; public char operator;
public double result() { Calculator calculator = Calculator.getInstance(); switch (operator) { case '+': return calculator.add(left, right); case '-': return calculator.subtract(left, right); case '*': return calculator.multiply(left, right); case '/': return calculator.divide(left, right); default: throw new IllegalArgumentException( "Unknown operator: " + operator); } }}
In listing 10.1, we can see the B three public instance variables to which Fit bindsour fixture table’s input columns. Note how the “left” and “right” columns’ contentsare converted to primitive double values and how the “operator” column’s symbolis converted into a char. Most of the basic types like Java’s primitives and basic datatypes from the java.lang package are converted automatically. For the rest, weneed to perform the conversion ourselves. (But that’s a topic for another book.)
Listing 10.1 CalculatorFixture.java
Fields for input
b
Methods produce output
C
result() method hasaccess to row’s data
D

Three built-in fixtures 375
Looking at the c result method, we can see how columns that have a trailing“()” are mapped to public methods that don’t take any arguments and returnsomething. Again, Fit doesn’t care about the method’s return type—after firstpopulating a row’s values from input columns to instance variables, Fit invokes themethods matching each expected result column, comparing the actual returnvalue to the expected one that is defined in the fixture table. In other words, dthe methods have full access to the values of the current row’s input fields.
With the CalculatorFixture class (and the production code5) implemented,we can now tell Fit to run our test document against the fixture implementationto test our production code. We’ll talk about how we can run Fit tests later in thischapter. For now, let’s skip directly to the outcome. Figure 10.6 shows an exampleof what kind of a result document Fit could produce from our test run.
5 We could, of course, run the test without the production code in place. It’s just that it wouldn’t makemuch sense because our fixture class wouldn’t be testing anything or wouldn’t compile.
Figure 10.6 As Fit executes our tests, the relevant table cells are colored to indicate success and failure. For any mismatch, both the expected and actual values are displayed next to each other.

376 CHAPTER 10
Creating acceptance tests with Fit
Figure 10.6 demonstrates how Fit renders variations between the expected andactual output of the expected result cells with a pink background and both theexpected and actual values separated with a horizontal line. (The colors don’tappear in this book’s black-and-white images, but you can discern them fromtheir gray shading.) Apparently we “mistakenly” wired addition and subtractionthe wrong way around. How clumsy of us… (In practice, we expect most errors inour Fit tables to be about missing functionality, not trivial programming errorslike this.)
Passing checks, on the other hand, are indicated by light green background.Note that all the other cells are left alone because they’re not performing anyassertions—they’re just set up for the assertion (result) cells of that specific row.
I think we’ve seen enough of ColumnFixture for now. Let’s look at the nextbuilt-in fixture, the RowFixture.
10.2.2 RowFixture
The RowFixture can be used to compare the results of more complex queries,typically to verify the system’s state after having prior fixtures simulate interactionwith or invoke functionality in the system. As an example, we will use the RowFix-ture to verify that our calculator remembers the last five computations.
Like ColumnFixture, the RowFixture is to be subclassed by our own, customfixture class. RowFixture differs from ColumnFixture in that it doesn’t map col-umns to fields or methods on the fixture class. Instead, a RowFixture is used tocompare the results of a single query method on the fixture class to the rows of thefixture table. The idea is that each row represents a single domain object, and thelist of domain objects formed by the rows in our fixture table should match the listreturned by the fixture’s query method.6 Fit then compares the returned domainobjects and rows in the fixture table using reflection.
As an example, let’s write a test for checking our calculator’s short-term mem-ory. That is, when queried for the operation history, the Calculator objectreturns a list of objects that matches what we have written into the fixture table.Figure 10.7 presents a fixture table we might write for such functionality.
6 For more details about the actual algorithm with which Fit determines whether the lists match, refer tohttp://fit.c2.com/wiki.cgi?RowFixture and the source code for fit.RowFixture.

Three built-in fixtures 377
Note that our test is verifying that the calculator only remembers the last fiveoperations performed. The fixture class, shown in listing 10.2, is straightforwardto implement.
public class CalculatorHistoryFixture extends fit.RowFixture {
public Class getTargetClass() { return Operation.class; }
public Object[] query() throws Exception { java.util.List history = Calculator.getInstance().getOperations(); return history.toArray(new Operation[history.size()]); }}
Listing 10.2 Example RowFixture verifying that calculator records history correctly
Figure 10.7 The RowFixture can be used to compare larger datasets easily. The RowFixture compares the set of objects described by the table rows to the set of objects returned by a query method on the fixture class.
Return Operation objects
Query method that Fit calls

378 CHAPTER 10
Creating acceptance tests with Fit
From listing 10.2, we see that our RowFixture advertises that its target class isOperation. Internally, Fit uses this information to determine which fields ormethods it should compare between the objects in the table and the objectsreturned by the fixture’s query method.
Listing 10.3 presents the Operation class, using public fields to represent col-umn values.
public class Operation { public int index; public double left; public double right; public char operator; }
Because we haven’t yet implemented the limitation of history size, the matchingalgorithm of RowFixture notices that the returned list and the table contents don’tmatch, reporting them appropriately with the pink background in figure 10.8.
Listing 10.3 The domain object class returned by the query method
Domain object class representing performed operation
Locationin history
Figure 10.8 RowFixture finds and highlights differences between the expected and actual data by invoking a query method that returns an array of objects, comparing it to the array of objects constructed from the fixture table’s rows. Any surplus or missing records will be highlighted with a pink background while the matching records get the familiar green shade.

Three built-in fixtures 379
The output in figure 10.8 indicates that the RowFixture found a surplus objectfrom the array returned by our fixture’s query method, compared to what weexpected. If we had returned a list missing some of the operations, we would’vegotten a similar output with the message missing to indicate that the returnedarray was missing some rows that we expected it to contain.
As I believe you’ve already deduced from this example, the RowFixture is par-ticularly well-suited for comparing datasets and, as such, is a nice (although not toocommonly used) companion for the more computation-oriented ColumnFixture.However, when using the RowFixture for comparing datasets, we should know thatthe fixture table’s rows and the objects returned by the query method are sortedbefore matching the expected with the actual. In practice, this means that theorder of the returned objects is ignored—an important feature of the RowFixture,which isn’t too clearly spelled out in Fit’s documentation! In other words, the Row-Fixture isn’t the right tool for the job if you want to test the order, too.
Next up is the oddball of Fit fixtures—the ActionFixture.
10.2.3 ActionFixture
The ActionFixture is a more action-oriented alternative compared to the otherbuilt-in fixtures. Originally created for writing fixtures to test graphical user inter-faces, the ActionFixture has become an all-round workhorse that people extendand use for a variety of purposes; but still, at its heart, it models interaction with atleast an abstract user interface.
Let’s make sure we understand the standard functionality provided by theActionFixture, before getting ahead of ourselves by extending it.
Unlike ColumnFixture and RowFixture, ActionFixture does not depend on aheader row. The only concern the ActionFixture has is that the first column oneach row contains a keyword—the name of an action. These actions are mapped byFit to method calls on an object called “actor” in Fit nomenclature. The actorobject is typically the ActionFixture itself or some other object capable of dele-gating our actions to the system under test—sometimes the actor object can be apart of the system under test, if the method names in our production code baseare on a suitable level of abstraction (that is, if they make sense from the perspec-tive of the user, for example).
The ActionFixture class comes with a set of four built-in actions: “start”,“enter”, “press”, and “check”. Here’s a brief description of each:

380 CHAPTER 10
Creating acceptance tests with Fit
■ start—The equivalent of navigating to a screen for the first time. When theActionFixture encounters the “start” action, it replaces the current actorobject with a new instance of the class of which the name is in the secondcolumn following the “start” keyword. From that point on, all actions areinvoked on this new actor object.
■ enter—Like typing information into a text box. When the ActionFixtureencounters the “enter” action, it tries to call a method on the current actorobject with the method’s name indicated in the second column after theenter keyword. The arguments passed into the method are collected start-ing from the third column.
■ press—Like clicking a button on a user interface. When the ActionFixtureencounters the “press” action, it tries to call a simple, no-argument methodon the current actor object with the method’s name indicated in the secondcolumn after the press keyword.
■ check—Like saying, “compare these two values—they should be equal.”When ActionFixture encounters the “check” action, it calls a no-argumentmethod on the current actor object with the method’s name indicated inthe second column after the check keyword and compares the return valueto the value of the third column.
To see these actions in action (pun intended), look at the fixture table in fig-ure 10.9, which exercises our Calculator class in an imperative manner, simulat-ing a user pushing the buttons on the calculator and asserting that the calcula-tor’s display is showing the correct output after certain sequences of input.
Figure 10.9ActionFixtures are, as their name implies, action-oriented and are suited for modeling interaction with the system under test. The four available actions to use in the fixture table are “start”, “check”, “enter”, and “press”.

Three built-in fixtures 381
This table would translate to roughly the following execution sequence on behalfof the Fit framework:
1 Create an instance of CalculatorActionFixture, and set it as the currentactor.
2 Call display on the CalculatorActionFixture instance, expecting 0.
3 Call input on the CalculatorActionFixture instance, which takes 1 as theparameter.
4 Call display again—it should now return 1.
5 Call plus on the CalculatorActionFixture instance.
6 Call display again, and verify that it’s still returning 1.
7 Call input on the CalculatorActionFixture instance, which takes 3 as theparameter.
8 Call display again, and verify that it’s now returning 3.
9 Call equals on the CalculatorActionFixture instance.
10 Call display one last time, this time verifying that it returns 4, which is ourfinal result.
Under the hood, our custom ActionFixture class translates these application-oriented actions such as display, input, plus, and equals, into method calls to thesystem under test. For example, if we’re launching the system under test insidethe same process our Fit tests are running in, we could create a new instance ofthe calculator user interface in our fixture class’s constructor. Following such anapproach, the CalculatorActionFixture class could look like listing 10.4.
public class CalculatorActionFixture extends fit.ActionFixture {
private CalculatorPresenter presenter;
public CalculatorActionFixture() { actor = this; presenter = new CalculatorPresenter(new Calculator()); }
public double display() { return presenter.display(); }
public void equals() {
Listing 10.4 CalculatorActionFixture.java
Associate ourselves as current actor
Obtainreference to
systemunder test
Actions map directly to methods on code

382 CHAPTER 10
Creating acceptance tests with Fit
presenter.evaluate(); }
public void input(double input) { presenter.inputValue(input); }
public void plus() { presenter.plusClicked(); } }
The four built-in actions of the ActionFixture are enough to construct tests foreven surprisingly complex functionality. However, the intent is to build fixtureclasses to support our specific application and domain as well as possible. In prac-tice, that’s likely something other than “start”, “enter”, “press”, and “check”,although we still use the same fundamental logic of the ActionFixture and itsaction keywords in the first column. For example, we might extend the built-inActionFixture by overriding certain parts, effectively giving us an option of say-ing “verify display is showing | X” instead of “check | display | X” or just “plus”instead of “press | plus”.
Although the three built-in fixtures, ColumnFixture, RowFixture, and Action-Fixture, are somewhat sufficient for building any kind of tests from a purely tech-nical point of view, the reality is that we don’t want to limit our tests to using justthese three fixture classes. Instead, we extend them and create our own, tailoredfixtures for our specific needs—a bit like we’ve done with the three different Cal-culator fixtures we’ve already seen but also tweaking the fixture tables’ execution.Let’s spend a minute looking at an example illustrating what we mean by that.
10.2.4 Extending the built-in fixtures
The three built-in fixtures each provide their own way of extending themselves tosolve a specific type of test-authoring problem. Sometimes, however, the exten-sion facilities provided by these fixtures aren’t the perfect match we’re lookingfor. This means we’ll need to go one step further and dig into the built-in fixtures’source code to find alternative extension points.
Example: setting up data for our testsFor instance, we might want to create a fixture that lets us define data to be popu-lated into a database. We could abuse the standard ColumnFixture to do so by usinga combination of input fields receiving the data to populate and having an “add()”column that maps to a method call that inserts the record into the system. The
Actions map directly to methods on code

Three built-in fixtures 383
“add()” column’s only function would be to offer us a hook into the appropriatepoint in time when we have all the data from a row. In essence, this would be anunwanted extra column in our test document—noise we’d rather not have there.
A better solution would be to create a custom fixture that extends from Column-Fixture and overrides the reset and execute methods to accomplish the sameend result—a record being added for each row in the table. Listing 10.5 shows arough sketch of what this approach would look like in Java code.
public class HandmadeSetUpFixture extends fit.ColumnFixture {
public String name; public String email;
@Override public void reset() throws Exception { name = null; email = null; }
@Override public void execute() throws Exception { // ... }}
As we can see in listing 10.5, we’re not providing an add method to trigger thedata population, but instead we’re overriding two methods (reset and execute)in order to accomplish the same thing without littering our test document withunnecessary columns. These two methods happen to get invoked in the appropri-ate phases of the fixture’s lifecycle: reset gets called before processing each row,and execute gets called when all input columns of each row have been processedand Fit is about to start going through the output columns (which we don’t have).The execute method is the perfect match for taking the data we’ve received so farfor the current row and stuffing it into a database of some kind.
Better test specs with extra codeIn the previous example, we’re doing the same thing in execute that we’d do insome other void, no-argument method if we’d add an extra output column just toperform the data population. In addition, we need to implement the resetmethod to null out the previous row’s data—this is something we wouldn’t need
Listing 10.5 Extending ColumnFixture to create a data-population fixture
Fields collect data to populate
Reset data before each row
Populate data in execute()

384 CHAPTER 10
Creating acceptance tests with Fit
to do with our uglier approach. The added effort, however, is negligible com-pared to the improvement in our fixture table’s usability, removing the need foran extra column with just a couple of lines of code.
Speaking of needs, there are some common needs that haven’t been attendedto by the built-in fixtures (or that are more cumbersome than we’d like). Fit isopen source, and extending the built-in fixtures is probably not among the hard-est programming tasks you’ve encountered. However, it’s work we’d rather notneed to do. Fortunately, Professor Rick Mugridge from Auckland University hasalready put in the effort of creating a library of handy add-ons for Fit—add-onsthat are much appreciated and widely used by the Fit community.
10.3 Beyond the built-ins with FitLibrary
An ongoing effort by Rick Mugridge and Ward Cunningham, the FitLibraryproject7 includes plenty of extensions and utilities that provide a solid steppingstone and make Fit more accessible to the beginning acceptance tester. Althoughthe FitLibrary consists of more than these, we’ll focus on two fixtures from theFitLibrary with specific characteristics—DoFixture and SetUpFixture.
10.3.1 DoFixture
Those who have set out to extend the built-in ActionFixture class to provide atest-definition language closer to the business’s own lingo may have noticed thatActionFixture is not the easiest class to extend. There are subtle limitations com-ing from ActionFixture’s handling of the table structure, which shows in usbeing able to build keywords that are close to but not quite what we’d like them tobe like. DoFixture brings a great relief in this regard, in being a superior basefrom which to start building our own flow-style fixtures.
Writing tests in natural languageWhat makes DoFixture different from ActionFixture? First, DoFixture allows usto mix keyword cells with argument cells in our table, effectively allowing us towrite tests that spell out almost as natural language. For example, compare the fol-lowing row in a regular ActionFixture table
7 http://sourceforge.net/projects/fitlibrary.
transfer 100,00 AC0001 AC0002

Beyond the built-ins with FitLibrary 385
to one with the keywords intertwined with variable data in a DoFixture table row:
The difference in syntax reaches beyond the table and to the Java code backingour fixture tables. First, the classic version:
public void transfer(float amount, String from, String to) { ...}
And then the DoFixture version:
public boolean transferDollarsFromTo(float amount, String from, String to) { ...}
The logic used by DoFixture to construct the method name from the columns issurprisingly straightforward: It expects the columns to alternate between being akeyword and an argument, applying the usual camel-casing logic to the resultinglist of words. Doesn’t get much simpler than that!
Although we could use a more meaningful name for the action in our customActionFixture class, effectively making the backing code equivalent to theDoFixture version, there’s a huge advantage in terms of the readability of our testdocuments with DoFixture’s intertwined syntax, which makes it a clear winner inmy eyes compared to ActionFixture.
This added flexibility and power come with a cost, however. The implementationof DoFixture requires that it be the first fixture on the test document. This is rarelyan issue, though, and certainly a price I’m willing to pay for the improved ability toconstruct flow-style tests with something that reminds us of natural language.
Delegating to child fixturesAnother advantage gained by using the DoFixture is the ability to easily split partsof the fixture into separate tables in the test document. This is largely due to thefact that, by default, all tables in a test document are handled by the initial DoFix-ture without an explicit fixture class declaration row for each table. Actions onthe DoFixture can choose to return a fixture object. When this happens, Fit usesthe returned fixture object to handle the remainder of a table. One of the mostcommon uses for this feature of DoFixture is to run another useful addition fromFitLibrary—SetUpFixture—which we will look into in a minute.
transfer 100,00 dollars from AC0001 to AC0002

386 CHAPTER 10
Creating acceptance tests with Fit
Figure 10.10 shows an example of a test making use of DoFixture. The docu-ment consists of several fixture tables of different kinds, showcasing some of themain features of DoFixture including two different types of SetUpFixtures, rowsrepresenting actions, assertions about the system’s state, and usage of the alternat-ing cells’ syntax for the kind of natural language actions we just discussed.
Figure 10.10 Example of a test making use of a custom DoFixture and ReviewsDoFixture, showcasing some of DoFixture’s additional features compared to the built-in ActionFixture. Although the document contains multiple fixture tables, they’re all handled by the ReviewsDoFixture, activated with the first table on the page. The remaining tables and rows map to methods on the ReviewsDoFixture instance, except when such a method returns a Fixture. When the method returns a Fixture object, that particular Fixture object handles the remainder of that table.

Beyond the built-ins with FitLibrary 387
The first table on the page in figure 10.10 declares to Fit that this document will behandled by an instance of ReviewsDoFixture, our custom DoFixture class. Afterthis bit, Fit knows that (unless the DoFixture tells it otherwise) all the remainingtables on the page shall be handed to the ReviewsDoFixture for processing.
The next table begins with an action named “setup book data” with no argu-ments. Fit maps this action to a method called setupBookData on the ReviewsDo-Fixture class. In this case, the setupBookData method returns a SetUpFixturefor setting up test data for the system under test, as illustrated in listing 10.6.
public class ReviewsDoFixture extends fit.DoFixture {
public Fixture setupBookData() throws Exception { return new BookSetupFixture(); }}
This effectively means that the remaining four rows of the table are handled bythe BookSetupFixture (a subclass of SetUpFixture that we’ll talk about in thenext section) that we passed back to Fit. Similarly, the first action on the nexttable, “setup review data”, maps to another method on the ReviewsDoFixtureclass because the scope of the BookSetupFixture doesn’t span across table bor-ders. Adding that to our ReviewsDoFixture class, we’re looking at the piece ofcode in listing 10.7.
public class ReviewsDoFixture extends fit.DoFixture {
public Fixture setupBookData() throws Exception { return new BookSetupFixture(); }
public Fixture setupReviewData() throws Exception { return new ReviewSetupFixture(); }}
The next table after our two initial SetUpFixture tables is closer to a regularActionFixture again, with two actions mapping to methods goToFrontPage andtextPresent(String). Here’s the corresponding Java code for reference:
Listing 10.6 DoFixture returning SetUpFixture to handle remainder of table
Listing 10.7 DoFixture from listing 10.6, returning two different SetUpFixtures

388 CHAPTER 10
Creating acceptance tests with Fit
public class ReviewsDoFixture extends fit.DoFixture { ...
public boolean goToFrontPage() { ... }
public boolean textPresent(String expected) { ... }}
But wait. We can’t see that ensure word from our table anywhere in the Java code.That’s because “ensure” is one of a few special actions supported by DoFixture.It’s basically saying to Fit that this particular action’s outcome should be checkedfor success (return a value of true). Other such keywords include, for instance,8
check, which compares the return value of the action to the value in the last col-umn on the row, and reject, which checks that the action fails, as expected.
The rest of the table is mostly a combination of using a SetUpFixture again toadd reviews to the system and the same two regular actions: “go to front page” and“text present”. The last table, however, is an excellent example of how we can mixkeywords with their arguments to produce readable tests. Not to mention our abil-ity to add descriptive blocks of text in between the tables, of course.
Enough about DoFixture. Let’s take a closer look at those SetUpFixtureswe’ve already seen used in the previous example.
10.3.2 SetUpFixture
SetUpFixture, another addition to our toolbox from FitLibrary, has a self-descriptive name. Its main purpose is to make creating setup tables as intuitive aspossible—a lot like our homegrown data population fixture in listing 10.5. Let’s dis-sect the “setup review data” table from our previous example, shown in figure 10.11.
8 For a full list of supported special actions, refer to FitLibrary documentation in the download.
Figure 10.11This fixture table from figure 10.8 shows an example of a DoFixture on the first row creating and returning a SetUpFixture object to handle the remaining five rows.

Beyond the built-ins with FitLibrary 389
Here, the “setup review data” action is part of the DoFixture, creating and return-ing an instance of our setup fixture class, ReviewSetupFixture. In other words,the first table row from figure 10.11 processed by our ReviewSetupFixture objectis the header row listing names for the columns in the rest of the table. SetUpFix-ture uses the values on this header row to figure out the method name to callupon parsing each row, meaning that, in our example, the ReviewSetupFixturewould get a call to a method named titleEditionReviewDateReviewText withfour arguments, for each data row in the table.
Listing 10.8 shows the Java code matching the fixture table.
public class ReviewSetupFixture extends fit.SetUpFixture {
public ReviewSetupFixture() throws Exception { super.registerParseDelegate( Date.class, new SimpleDateFormat("yyyy-MM-dd")); deleteReviewData(); }
private void deleteReviewData() throws Exception { // implementation omitted for brevity }
public void titleEditionReviewDateReviewText(String title, int edition, Date date, String text) throws Exception { // create a Review object from the arguments and // persist it to the system under test } }
The method titleEditionReviewDateReviewText takes not just String argu-ments but also integers and java.util.Date values. Fit knows how to parsestrings into integers and other numeric values, but it doesn’t know which date for-mat we want to use in our test documents; we have to tell it explicitly by invokingthe registerParseDelegate method, inherited from SetUpFixture.
Listing 10.8 also illustrates a common pattern in SetUpFixtures—the fixtureremoves all existing data from the system in the constructor (executed whenencountering a setup table) and adds new data one by one in the add method (inour example, titleEditionReviewDateReviewText).
It’s worth noting that the same kind of setup could be performed with the built-in ColumnFixture by adding an “add()” column to the table (or overriding the
Listing 10.8 Example of a SetUpFixture
Delete existing data before processing table
Handle rows insetup table one by one
Configuredate format

390 CHAPTER 10
Creating acceptance tests with Fit
execute() method from the superclass), effectively mapping to our titleEdi-tionReviewDateReviewText method in listing 10.8. The benefit of using a Column-Fixture like that would be that the Java code remains relatively clean, especially forlarge setup tables with a long list of arguments for the add method. The downside,on the other hand, is the extra column just to know when to create and store anobject from whatever field values have been populated at that time.
10.3.3 There’s more
The previous two fixtures, DoFixture and SetUpFixture, are not the only usefuladditions to our toolbox from the FitLibrary. There are additional fixtures for deal-ing with ordered and unordered lists, and fixtures for supporting tests that verifybusiness logic through calculations, checking constraints, and combinations.There’s also support for file system-based comparisons, images, and whatnot.
In addition, one of the FitLibrary’s most useful contributions has not beenmentioned yet, but we’ll get to that in a moment. You see, it’s related to runningFit tests, and that’s what we’re going to discuss next.
10.4 Executing Fit tests
We’ve now seen the three built-in fixtures of the Fit framework with examples ofthe fixture tables and their associated fixture class implementations as well as ofthe output generated by Fit when running the tests. Next, we’ll look at how werun those tests! But first, some basics.
What artifacts do we need in order to run our Fit test documents? We need thetest documents themselves, of course, and we need the fixture classes that are ref-erenced from our test documents’ fixture tables. We also need the productioncode and any library dependencies for our fixture classes to be able to connect tothe system under test. How all of these artifacts are created depends on the pro-gramming language with which we’ve decided to implement our fixture classes.In the case of Java, we need to compile our fixture classes before we can run ourtest documents, and we need to provide all of the mentioned artifacts—except thetest documents—in the class path when running Fit.
If the test documents aren’t put into the class path, then where are theylocated? That’s a good question, and we should say something about storing testdocuments before we start talking about the different ways of executing them.
If our customer is to be able to write and update test documents on their own,they had better be in a place where they can access them—a shared network drive,

Executing Fit tests 391
for example. Another way could be to employ a web-based solution, such as Fitnesse.The simplest solution, in my opinion, is to keep the Fit test documents in the sameplace as the source code—in the configuration-management tool. As long as thecustomer is onsite and has access to the repository, that’s more than enough.
Although we might end up using a more elaborate solution, we’ll likely startwith a plain vanilla “Fit and HTML files on the local disk” approach. Let’s look athow to run our tests in such a setup—first for running a single Fit test document,then for running a whole folder structure of tests, and, finally, for running Fit testsas part of an Apache Ant-based build script.
10.4.1 Using a single test document
The Fit distribution includes a basic test-runner class for Fit tests calledfit.FileRunner. The basic usage is to pass the FileRunner a path to a test docu-ment and the path to where we want the result document to be generated. Here’san example of how we might invoke the FileRunner from the command line:
$ java –classpath fit.jar:classes:. fit.FileRunner \ src/story/tests/example.htm testresults/example.htm
Running this command produces a result summary output into stderr that lookslike the following:
$ java –classpath fit.jar;classes;. fit.FileRunner ... 23 right, 4 wrong, 0 ignored, 0 exceptions
This is all the output that the FileRunner produces on the console—a summaryof how many tests passed, how many had failing assertions, how many tests wereignored, and how many unexpected exceptions were thrown during the test run.The result document contains the details, of course, so this simplicity is nice.
The FileRunner also adjusts its exit code according to the number of failed(“wrong” and “exceptions”) tests. If no test failed, the exit code is 0; if five testsfailed the exit code is 5; and so forth. This is nice to know if we plan on integrat-ing our Fit tests into our build cycle using shell scripts, for example!
10.4.2 Placing all tests in a folder structure
Obviously, running a single Fit test document is not always enough for everyone.Although we typically work with a single story, perhaps running a single Fit testdocument at a time (at which point using the FileRunner from within the IDE oron the command line can be sufficient), in some cases we would like to run all ofour acceptance tests—or a subset of them—in an automated manner with as little

392 CHAPTER 10
Creating acceptance tests with Fit
manual effort as possible. For that purpose, Rick Mugridge developed theFolderRunner class that is part of the FitLibrary.9
The usage of FolderRunner is remarkably similar to that of FileRunner. Theonly difference is that instead of passing in the path to a test file and the resultfile, we pass in a path to a folder containing test files and the path to a folderwhere we want the result files written, respectively:
$ java –classpath fit.jar:fitlibrary.jar:classes:. fit.FolderRunner src/story/tests/ testresults/
If the source folder contains a hierarchy of subfolders with test documents, theFolderRunner will create the exact same directory structure under the resultfolder with a test result HTML document for each source HTML document. TheFolderRunner also produces a handy report of the whole test run, showing sum-maries for all levels of the hierarchy of executed test documents.
The FolderRunner also supports a relatively sophisticated setup/teardown. Wecan place test documents named setup.htm and setup.html (or setup.xls—theFolderRunner supports Excel sheets as well) into our test folders, and the Folder-Runner will execute each setup document higher or on the same level in the sourcetree as the current test document. And the same goes for teardown documentsnamed teardown.htm, teardown.html, and teardown.xls. This allows us to avoidduplicating special setup fixtures in each of our test documents and concentrateon the essential.
10.4.3 Testing as part of an automated build
We could certainly do away with invoking Fit’s test-runner classes from the com-mand prompt, and we could encapsulate those commands into shell scripts, butthat is far from being an ideal solution in certain aspects. For one thing, maintain-ing the scripts for multiple platforms such as Windows and Linux is a hassle we’dlike to avoid; and we wouldn’t want to edit the script every time we add a newpackage or a new library to our project, meaning that we’d have to resort to someadvanced shell-scripting to traverse through the file system in order to constructthe appropriate class path, for example.
In practice, the Java projects of today more often than not choose to use a mod-ern build tool such as Apache Ant or Apache Maven (http://maven.apache.org),in part because of a need to easily execute their Fit tests as part of an automated
9 An ongoing effort by Rick Mugridge and Ward Cunningham, the FitLibrary project provides plenty ofother utilities in addition to the FolderRunner, as we’ve seen in the previous sections of this chapter.

Executing Fit tests 393
build. Although the Fit distribution doesn’t currently come with a custom Ant task(or a Maven goal, for that matter) for running Fit tests, it’s straightforward to wrapcommand-line tools we’ve already seen into an Ant target, as shown in listing 10.9.
<project name="SampleProject" default="..."> ... <path id="myclasspath"> <path location="classes" /> <fileset dir="lib" includes="*.jar" /> </path>
<target name="acceptance-test" depends="compile, unit-test"> <java classname="fit.runner.FolderRunner" classpathref="myclasspath"> <arg line="src/fit-tests" /> <arg line="reports/fit" /> </java> </target></project>
The nice thing about Ant is that we have all of Ant’s power in our hands withregard to constructing the necessary class path for running Fit, and we have allthe file system-manipulation tasks at hand for, say, creating missing output direc-tories, deleting the results of a previous test run, and so forth.
Running our Fit tests as part of the automated build is often not enough, how-ever. Whereas we could get a binary result of “some tests failed” versus “all testspassed” by letting the <java/> task fail our build if the FolderRunner exits with anon-zero return code (to signify the number of assertion failures and unexpectedexceptions during the test run), the more important information is often the testdocuments, annotated with colors and exception messages, as appropriate. Acommon way of making these reports accessible for an automated build is to copythem to a web server. The following listing shows one way to do that, using Ant’soptional FTP task:
<ftp server="ftp.ourserver.com" port="21" remotedir="/www/reports/acceptance" userid="coder" password="java1"> <fileset dir="reports/fit"> <include name="**/*.html"/> </fileset></ftp>
Listing 10.9 Running Fit with an Ant build script
Depend on Fit,FitLibrary, and
our fixtures
ExecuteFolderRunner
Specify source and result directories

394 CHAPTER 10
Creating acceptance tests with Fit
Another common approach to publishing the generated reports would be to let acontinuous integration server such as CruiseControl take care of publishing thefiles on the web server, but that’s a topic for another whole book.
That’s enough Fit for now. We’ll learn more about the intricacies of Fit in thefollowing chapter, and what we’ve seen so far should be more than enough to getstarted.
10.5 Summary
Phew. That was a compact run-through of Fit, the acceptance-testing framework dechoix for what possibly represents a majority of software projects out there usingagile methods.
We began by discussing how Fit fits (sorry) into the acceptance test-drivendevelopment process, describing the three steps involved in translating a userstory or a use case into an automated acceptance test: sketch a test document withexamples described in tables, clean up the fixture tables in the test document,and implement the backing fixture tables. After having gained an understandingof how Fit can be used to test-drive features, we switched our focus to studying theFit framework itself.
Fit test documents consist of a mixture of narrative text and different types ofexecutable fixture tables. Fit comes with three built-in fixture types for bindingthe test tables into the system under test—ColumnFixture, RowFixture, andActionFixture—which we can extend for our project’s needs.
One of the most essential additions to our Fit toolbox is the FitLibrary exten-sion, which provides a whole bunch of additional fixtures we can use and extend.Finally, we can easily execute our tests from the command prompt or as part of anautomated build using Ant, in large part due to the handy FolderRunner that’spart of the FitLibrary. The FolderRunner lets us organize our Fit tests into a direc-tory structure with multilevel setup fixtures and informative summary reports.
This was just a glimpse at the features and intricacies of Fit and the FitLibrary.You might want to pick up the official Fit bible, Fit for Developing Software (Addison-Wesley, 2005) by Ward Cunningham and Rick Mugridge, for a more thorough tuto-rial and reference. And don’t forget to check out the FitLibrary and Fit websites athttp://sourceforge.net/projects/fitlibrary and http://fit.c2.com, respectively.
Now that we know the essential concepts of Fit and have an idea of what’sinvolved in writing and automating Fit tests, we’re ready to take Fit into use in our,real-life software projects for improving the communication both within our teamas well as with our stakeholders. There’s more to acceptance testing, however,

Summary 395
than just selecting a tool and running with it. There’s also the question of how toconnect our tests with the system under test—not always a straightforward deci-sion to make. Largely for that reason, the next chapter is dedicated to discussingthe ins and outs of different approaches to making that crucial connection.

Strategies forimplementing
acceptance tests
Drawings help people to work out intricate relationships between parts.
—Christopher Alexander, father of thePattern Language movement
396

What should acceptance tests test? 397
We’ve now been introduced to acceptance tests, and we’ve gained an understand-ing of how to work with acceptance tests in the context of a team using an agile oriterative process. We’ve also taken a brief look into the Fit framework, which isprobably the most popular acceptance-test tool around. Along the way, we sawwhat the technical representation of our acceptance tests might look like androughly what is involved in automating those tests. In this chapter, we’ll changeour focus toward the technical gotchas of making our acceptance tests—fixtureclasses, in the case of Fit—interact with the system under test.
The traditional craft of quality assurance (QA) with manual testing andscripted test cases1 has long taught us to think of testing as being about testing thesystem as a whole, end to end, in order to verify functionality. And it makes sense.After all, we want to know that the system as a whole works correctly rather thanthat all the pieces work correctly in isolation. The world has more shades of graythan that, however. There is clearly value in testing on levels beneath the wholesystem. More than anything, it’s a question of cost versus value.
In order to explore the alternatives at our disposal, we’ll first discuss the vari-ables that influence our decisions, three general approaches to connecting accep-tance tests with the system under test, and a couple of lower-level techniques thatsupport the more general approaches. Once we’ve clarified the playing field a bitin terms of these general approaches, we’ll move on to examining some specifictechnologies and how they can affect the way we connect our tests with the system.Finally, we’ll answer some frequently asked questions regarding the practicalitiesof how to set up automated tests.
Let’s get started.
11.1 What should acceptance tests test?
One of the first questions that comes to mind is what to test. Yes, we want to knowthat our system works correctly and that there are no defects and that the system isusable. But are these aspects the kind of stuff we want to verify with our automatedacceptance tests?
There’s a saying about using the best tool for the job at hand, and that ringstrue in the case of testing. We cannot omit manual, visual testing, because com-puters aren’t good at evaluating the usability and attractiveness of our applica-tions. Or, perhaps more accurately, we humans aren’t good at telling thecomputer how to determine what pleases our eye and intuition. Similarly, humans
1 “Scripted” in the sense of “documented steps to carry out,” not in the sense of automating tests into exe-cutable scripts.

398 CHAPTER 11
Strategies for implementing acceptance tests
aren’t good at performing mundane, repeating tasks indefinitely, which makes agood case for automating the majority of our regression tests. The best tool forthe job… Or, the other way around, acceptance tests don’t need to test everything!
The answer to “what should acceptance tests test?” is simple: They should test thecorrect fulfillment of requirements as specified by our user stories (or whatevermedium is in use). Sometimes, that might mean testing algorithms. For some, itmight mean testing user action sequences. Ask yourself what kind of test would bejust enough to tell you that this specific user story has been implemented properly.In other words, focus on the essential. It’s good to have functionality end-to-endunder automated tests, but not at any cost.
To make smart decisions about what to test and how, we need to consider threethings: the story, turbulence, and technology. In this section, we’ll figure out howto do just that. Let’s start with the story.
11.1.1 Focus on what’s essential
If the requirement for which we’re implementing tests is about calculating some-thing correctly, it’s likely that we should focus on the logic related to the calcula-tion rather than go through the UI and see the correct numbers on the screen foreach and every interesting case. Whether the numbers are displayed is one thing;whether the numbers are correct is another. No need to mix the two—it’d makethings more difficult to change in the long run if we hardwired domain logictogether with presentation.
Let’s say we’ve got a user story about checking out a shopping cart in ouronline store using a Visa or MasterCard. We need to check that the applicationrejects invalid card numbers, verification numbers, and more. We’ve written ouracceptance tests so that they log on through the web interface and navigate to thecorrect page, filling in the invalid data, submitting the form, and checking for the
Professional tester wantedNo matter how much we preach about the importance of test automation for sus-tainable software development, no automated test can have the intuition andsmarts of a good tester. A good tester can use their skills to identify scenariosand interaction sequences where a system might behave unexpectedly. To freetheir intuition, however, they must be freed from the burden of routine test repe-tition. That’s exactly what our automated regression tests are for. They nail downthe risks we have already identified while the human brain is given a chance tofocus on identifying new risks we haven’t yet found.

What should acceptance tests test? 399
expected rejection message. We’re not interested in all that other stuff, so whyshould we write our acceptance tests in terms of it? It doesn’t make sense.
Some stories, on the other hand, should be tested through the actual UI. Forinstance, a story about the user getting redirected to our online store’s login pagewhen their session has timed out is a good candidate for a test that would operatethrough the web interface, simulating an end-to-end scenario. Although we’d likelymake the user’s session expire right after logging in rather than waiting for 20 min-utes, it would make sense to test this kind of functionality in terms of the user oper-ating a web browser.
The story itself can tell us something about what its tests should be testing.There’s more guidance available, however, if we take into consideration the aspectof turbulence—something, that makes it even more important for us to be testingthe right things!
11.1.2 Avoid turbulent interfaces
The biggest danger with automated tests is that they can become a maintenancenightmare. A huge influencer in that respect is the kind of turbulence we canexpect around the parts where our acceptance tests connect with the systemunder test. We don’t want to increase the effects of any such turbulence we mighthave to go through. This brings us back to the point about not mixing domainlogic with presentation.
Let’s think about the credit-card validation story again. What if our customerwants us to add support for American Express in addition to the two existing cardtypes? Do we want to write all that web-page navigation stuff again? I wouldn’t.Even if the navigation would be nicely encapsulated2 into a single piece of codethat our tests invoke as a one-liner as part of our setup, it would still be noisearound the signal—noise we’d rather do without.
Suppose we added support for American Express, and we now support threedifference credit cards. Next, our customer wants to redo the whole checkout pro-cess. We realize that we’ll have to update all of our credit-card validation testsbecause they’re exercising the functionality through the checkout form—which isnow getting scrapped. If we’d tested the validation directly, without going throughthe UI, we’d only need to update that one test we had that verified that the credit-card validation is invoked as part of the checkout instead of updating all of them.And we certainly don’t want to have to edit a whole bunch of acceptance testswhen something completely unrelated changes.
2 Although our tests might operate through the user interface, they should still be expressed in terms ofthe story and the domain, hiding the implementation and the user interface.

400 CHAPTER 11
Strategies for implementing acceptance tests
Things change fast in software development, so there will always be turbu-lence. If we’re not testing on the proper level for a given story, the turbulence justgets worse. That’s why we need to consider how turbulent our chosen interfacefor acceptance tests is. And how much rework will be needed when the systemchanges. The cost of change aspect is not all there is, however. We also need toconsider how easy or difficult it is to create those tests in the first place. And that’swhere technology has a big role to play.
11.1.3 Cross the fence where it is lowest
Technology is just a means to achieving greater goals. Yet the limitations andbiases of the available technology also constrain our options in reaching for thosegoals. Technology is also something we must take into consideration when makingdecisions about our approach to acceptance testing. Sometimes it makes sense tocross the technological fence where it is lowest, and sometimes it makes sense toclimb higher because of a truly greener pasture on the other side.
We can start our considerations by determining the hard limits set by technology.If the software we’re building runs on a proprietary embedded operating system,we’re limited to what the operating system provides. If the software we’re buildingis written in C, we’re limited to the tools that the C language, compiler, and theunderlying platform provide us. In the other extreme, the more entry points thetechnology platform offers, the more alternative interfaces the system under testexposes and the less constrained we are with regard to the approaches available.
When we know the hard limitations of what is possible to do with the technology,we can then evaluate whether our chosen technology stack supports some specificapproach or approaches to automated testing better than the others. Virtualmachine-based technologies such as Java with dynamic reflection capabilities tendto facilitate intrusive white box–style techniques better than non-intrusive access toUI components on the operating system level, for example. On the other hand,technologies making use of native UI components tend to make interrogating andoperating upon the UI widgets easy, while simultaneously making it relatively farmore laborious to provide API-level access to the application’s functionality.
Although technology can have a significant effect on our options and their rel-ative advantages and disadvantages, we can affect the influence our technologyimposes on us in many ways. By designing our systems to be testable on the unit andmodule level and by evolving the software architecture appropriately, we can effec-tively give ourselves more options to choose from as we make entirely new ways ofaccessing the system possible. For example, by structuring our application with aclean service layer fronting our business logic and infrastructure services, and by

Implementation approaches 401
exposing that service layer to our tests, we create for ourselves the opportunity toimplement our tests against the domain-level functionality rather than the UI.
Technology is a central variable in the equation, and connecting acceptancetests with the system under test is largely about technology. We will continue dis-cussing this subject in more detail in the context of specific types of systems laterin this chapter. Before we do that, however, it is useful to identify the main high-level approaches to connecting with the system under test.
11.2 Implementation approaches
There are probably as many ways to test a system as there are technologies andteams to do so. However, as in many other domains, patterns emerge from theswirling chaos. We have identified a handful of classes of approaches or styles ofacceptance testing that we believe cover the majority of teams doing acceptancetest-driven development.
Paying our respects to the fine tradition of coining fancy terms for simplethings, we’ll call the first three of these styles going end-to-end, crawling under theskin, and exercising the internals. These three approaches represent higher-levelstrategies. There are also fourth and fifth supplemental strategies that we’ll dis-cuss after the higher-level strategies. They should be considered complimentaryapproaches and work well with any of the three higher-level strategies.
Let’s begin with the first of our triplet, going end-to-end.
11.2.1 Going end-to-end
Ideally, when we test a system, we’re testing the system as a whole. In other words,the system is exercised as is, just like it will be used when deployed to the produc-tion environment. We’re testing the functionality through the real interface, be ita GUI or a machine-to-machine type oftechnical interface. We’re testing end-to-end, including any and all componentsthat make up the system. Even though wemight be drilling directly into the data-base backend, for example, to check cor-rect behavior, we’re testing theapplication itself end-to-end in black boxstyle, as illustrated in figure 11.1.
A typical example of an end-to-endscenario is to write acceptance tests for aweb application using a library, such as
TestSystem as a
black box
Figure 11.1 End-to-end test scenario with the test accessing the system through its external interface, knowing nothing about the system’s internals

402 CHAPTER 11
Strategies for implementing acceptance tests
jWebUnit. The jWebUnit source repository includes a Fit fixture class for usingjWebUnit with Fit.3 In practice, we would extend from jWebUnit’s WebFixture andcreate our own vocabulary on top of jWebUnit’s API, as illustrated in listing 11.1.
public class WebFixture extends net.sourceforge.jwebunit.fit.WebFixture {
public boolean goToFrontPage() { beginAt("/home"); return true; }
public boolean logInAs(String username) { page("/login"); enter("j_username", username); enter("j_password", TestConfig.getPasswordFor(username)); submit(); tester.assertTextPresent("Welcome"); return true; }
...}
Depending on the available tools and libraries for connecting to the system undertest, fixture classes like the one in listing 11.1 can be straightforward to imple-ment, with the fixture classes’ main purpose being translating the customer’s lan-guage to lower-level steps in navigating the web application being tested.
Why test the whole system?In the beginning of this section, we said, “Ideally, when we test a system, we’re test-ing the system as a whole.” Why ideally? The main reason is that end-to-end testingis the type of testing that’s most representative of the system’s real-world setting.In other words, end-to-end testing tends to cover the system as broadly as possible.It’s also the most intuitive strategy for nontechnical stakeholders to understandbecause the tests operate on the system as a black box—which is how the said
3 The jWebUnit project is currently undergoing significant change, and the jWebFit subproject seems tohave been left without much attention lately. You might need to patch the code available from theproject’s repository in order to get it working.
Listing 11.1 Example of an end-to-end oriented fixture class for testing web applications

Implementation approaches 403
stakeholders perceive the system. Being able to map the tests directly to the user-accessible functionality and operations of the system reduces the risk of havingthe stakeholders become estranged from the system.
These are benefits that we’d like to take advantage of. However, this strategyhas a downside as well. Perhaps the biggest handicap of the end-to-end approachis that the tests tend to be more brittle than they could be, because they’re depen-dent on the UI, which typically changes more frequently than the business logicunderneath—and in ways that should not affect the correctness of the logicunderneath. Furthermore, writing the tests in the first place can be a laborioustask because of the need to satisfy the UI’s requirements, effectively clicking ourway through to the functionality we want to test.
Another factor to consider is the speed of test execution.
Trading speed for certaintySuch tests are also often up to a magnitude slower compared to tests that bypassthe UI and otherwise loosen up the concept of treating the system under test as ablack box. The speed of test execution is not something we can dismiss. Whileimplementing a user story, we want to be able to run the associated acceptancetests quickly and easily, again and again until they pass. Preferably, we’ll also runthe full suite of acceptance tests before moving on to other tasks. Every secondcounts, because larger projects can easily have hundreds or thousands of accep-tance tests.
Not being able to run the full test suite means we’re forced to make a trade-offbetween the certainty of the overall system correctness and the pace of develop-ment, as illustrated in figure 11.2.
We’re effectively delaying the full feedback to our continuous-integration sys-tem, which dutifully churns through the full test suite in the background whilewe’re already starting on the next story. As the time between a question and itsanswer increases, so does the cost of asking the question. That is, we’re trading abit of time from each integration cycle, accepting the risk of the occasional hit ofa test failing after we’ve already moved on—making it more costly to respond tothe failing test.
The end-to-end strategy for accep-tance tests is an admirable goal thatyields great benefit as long as we canwork around the risk of brittle andburdensome tests that are slow to run.We can reduce these risks throughcareful design and merciless refactor-
More tests Fewer tests
Certainty and confidence Fast feedback
Figure 11.2 We often face a trade-off between running the full suite of tests that provide a high level of certainty and running fewer tests that provide less feedback (certainty) but do it faster.

404 CHAPTER 11
Strategies for implementing acceptance tests
ing of our acceptance tests and their implementation. However, a slightly differ-ent strategy can sometimes yield more bang for the buck. Testing through the UIis the biggest culprit of the end-to-end strategy with regard to brittleness and slow-ness; we call such a strategy crawling under the skin.
11.2.2 Crawling under the skin
Crawling under the skin means just that: having our tests crawl under the system’sskin (the UI). We could think of it as introducing a new, alternative UI—anabstract UI—to connect with the core of the system under test. The main driverfor this strategy could be considered the main downsides of the end-to-end strat-egy as described previously, largely related to testing through the UI.
Avoiding needless changeBy interfacing our acceptance tests against the application and domain logicinstead of the concepts of the UI, or against an abstract UI instead of a concrete andtechnology-specific one, we can reduce the risk of ending up with a pile of high-maintenance test code that cries for our attention every time we touch the skin ofour system. Again, that risk can be minimized even if we do test against the real UI—it’s just much easier if we bypass the UI orat least couple our tests with UI conceptsinstead of concrete widgets.
Figure 11.3 illustrates a test not justaccessing the UI but also going beneaththe skin to operate an abstract UI orinternal APIs.
In figure 11.3, the tests are exercisingthe system under test through three dif-ferent channels: the external UI, anabstract UI, and an internal service layerAPI. Whether all of these make sense for agiven system depends largely on the archi-tecture of the system. Listing 11.2 showssome examples of how these differentapproaches to crawling under the skinmight look from the fixture class’s pointof view when testing a weblog application.
Test
AP
IA
PI
AP
I
AB
STR
AC
T UI
US
ER
INTE
RFA
CE
Figure 11.3 Test operating against an internal API or an abstract UI in addition to or instead of the real UI

Implementation approaches 405
public class WeblogApplicationFixture extends fit.DoFixture { ... public boolean subscribeForAnnouncements(String email) { InitialContext ctx = new InitialContext(serverConfig); Subscriptions bean = (Subscriptions) ctx.lookup("ejb/Subscriptions"); bean.subscribe(email); } ... public boolean postNewBlogEntry(String title, String content) { BlogEntry entry = new BlogEntry(); entry.setTitle(title); entry.setContent(content); BloggingAPI api = applicationContext.getBloggingAPI(); api.saveEntry(entry); } ... public boolean undo() { Command command = new UndoLastEdit(); applicationEventQueue.append(command); command.waitForCompletion(); }}
Let’s see what kinds of approaches we use in listing 11.2 to skin the weblog. Thefirst action method, subscribeForAnnouncements, B performs a Java Namingand Directory Interface (JNDI) lookup to a remote application server where thesystem under test is running. This approach exploits the system’s architecture thathappens to make the internal API easily accessible also from tests running in aremote Java Virtual Machine (JVM).
The second method, postNewBlogEntry, on the other hand, C accesses aninternal service layer directly using a normal Java API call, which is possible whenthe tests are running within the same JVM as the system under test.
The third method, undo, is an example of accessing not an internal servicelayer API but rather an internal, abstract UI API. In our example, there is an eventqueue to which the real interface would delegate application-specific commandobjects, which in turn should trigger some kind of behavior in the application. Inthis approach, we D create the abstract command objects ourselves and appendthem to the event queue rather than using the real UI.
Listing 11.2 Examples of different styles of crawling under the system’s skin
D
Bypass UI andconnect to service
API directly
B
Access API in same JVM C
Operate abstract UI through internal event queue API

406 CHAPTER 11
Strategies for implementing acceptance tests
None of these three alternatives to implementing acceptance tests for ourweblog should be affected by a change in the UI such as renaming a submit but-ton or replacing a radio group with a drop-down selection—because they’reexpressed in terms of abstract UI concepts or the underlying business logic ratherthan widgets and other concrete UI details.
Acceptance tests implemented against a programming interface just beneaththe UI help us sustain our pace all the way until and through the long mainte-nance phase. Are there other advantages to count for this strategy than cheapermaintenance? Yes.
Easier implementationIn addition to such tests being less costly to maintain, they also tend to be easier toimplement. This is where things get a bit unintuitive at first. We’re accustomed tothinking about the system through what we can do with it. Why, then, is it easier towrite our acceptance tests against something other than the level of abstractionwe’re naturally wired to think in?
The main reason lies in the impedance mismatch between a human looking ata visual interface and a computer looking at a sequence of zeros and ones. Inorder to be able to write robust tests against a UI, we need to accommodate for theacceptance tests to be able to hook onto and operate the relevant bits of the inter-face. This could be almost a deal-breaker for productivity or it could be no bigdeal, largely depending on the actual UI technology and the availability of testingtools that are able to interface with our chosen technology stack.
For a web application, for example, we might need to devise naming conven-tions for specific elements on a set of dynamically generated web pages. Other-wise, how else are we going to automate a test, which involves clicking the correctlink on a database-driven list of products? We could of course determine that weshould go for the fourth link in a given panel, but that would render our test help-less in the face of someone adding some new test data into the database.
Now, consider the same test involving selecting a specific product, this timenot operating through the web interface but through a programming API. We nolonger need to tweak regular expressions and come up with all sorts of heuristicsfor identifying the link we want to click. Instead, we pull a list of product objectsthrough an API, identify the product we’re interested in with all the expressive-ness of the programming language of our choice, tell a service interface to set thegiven product as selected, and so forth. Depending on our design, we can achieveremarkably robust tests with this approach.
Acceptance tests that go against a programming interface are also generallyfaster to execute, compared to end-to-end tests going through the UI. Surelythere must be some downsides to crawling under the skin, right? Yes. Let’s take aquick tour.
Implementation approaches 407
Downsides to skinning the appAlthough we might consider testing only the essential functionality to be a goodthing, it’s not always that black and white. The downside is that we’re compromis-ing the admirable goal of having the system tested in its natural habitat. We’re skip-ping an essential part of the puzzle—the UI—and we have to balance that fact withmanual testing. Granted, computers are lousy at evaluating the quality of graphicalUIs, and techniques like context-driven and exploratory testing are helpful inspending our manual testing efforts where they’re most likely to yield new infor-mation. Nevertheless, we must acknowledge the consequences—the risks—of ourchosen strategy.
One of those risks is that by skipping the UI, we’re slightly more vulnerable toalienating our nontechnical stakeholders. One side of the solution is to not com-promise the language with which we express our tests even though the implementa-tion of the tests would be purely technical. The other side of the same solution isto focus on creating a mutual, domain-specific language, which lets nontechnicalstakeholders discuss and understand the acceptance tests even though there is nomention of buttons, links, sliders, and other UI widgets.
This strategy also poses a challenge for technical team members. Just as theusers, the customer, and other nonprogrammers are treading foreign landscapewhen we drop the UI from the picture, the programmers face a similar change ofthinking around the test implementation. This shows best in the need to exposefunctionality through such a test interface just for testing, because we haven’t tra-ditionally needed to expose our internals to more than one client.
The challenge is in this practice conflicting with our long culture of promotingstrict encapsulation and design based on the need to know. The added exposurealso boasts some positive side effects, however. The need to expose our domainlogic to a test interface as well as the real UI can help us develop a good, testable,modular design for that critical section of our software.
Knowing that we’re living in a world full of different shades of gray, we mustask, does this path lead further? Is there still some slice of bad influence that wecould shave off of our acceptance tests? Perhaps not surprisingly, yes, there are sit-uations where an even slimmer profile for an acceptance test can be well-suitedfor our purpose. We call this third strategy to implementing acceptance tests exer-cising the internals.
11.2.3 Exercising the internals
Exercising the internals is all about testing a specific internal portion of the sys-tem’s business or application logic, without going through any UI or API designedfor the purpose. It’s kind of like crawling under the skin taken to the extreme.

408 CHAPTER 11
Strategies for implementing acceptance tests
Good examples of this strategy would be acceptance tests that verify a bunch ofbusiness rules related to a user story.
For example, we might have separate acceptance tests for checking the user-visible functionality through tests like “try with valid input,” “try with missing info,”and “try with invalid info.” We also might have separate, internals-targeted accep-tance tests that would test (and document!) the exact validation rules directlyagainst the validation logic, rather than indirectly in the context of a user operation.
Figure 11.4 visualizes how a test might probe the system’s business logicdirectly, bypassing the UI (whether concrete or abstract) and other external APIs.Again, let’s see how this approach might look in a Fit fixture class. Listing 11.3presents an example fixture class for testing credit-card validation logic.
public class CreditCardValidationFixture extends fit.ColumnFixture {
public String cardNumber; public boolean isValid() { return "".equals(validationMessage()); } public String validationMessage() { try { CreditCard card = new CreditCard(cardNumber); return ""; } catch (ValidationException e) { return e.getMessage(); } }}
Listing 11.3 Example of a Fit fixture class that digs right into the core business logic
Test
Bizlogic
Bizlogic
Bizlogic
Figure 11.4Acceptance tests can also access a system’s business logic directly, bypassing any external interface or API.

Implementation approaches 409
The ColumnFixture presented in listing 11.3 is certainly not a manifestation of aheavyweight acceptance test pulling in the whole system under test and half of thenetwork. It’s so simple and isolated that it looks like a unit test!
The main advantage of this strategy is the precision of testing exactly what wewant to test and nothing more. The number and complexity of the business rulespresent in today’s enterprise systems can be mind-boggling, and isolating the busi-ness rules into these high-precision tests can be of significant help in keepingtrack of them. Without any unnecessary clutter around the business rules, we areable to express them more clearly, making it easier for the development team andthe customer to pick up discrepancies and missing variations in the specification(that is, in the tests).
What is the difference, then, between these internals-exercising acceptancetests and unit tests? First, although unit tests are written in the language of theimplementation, all acceptance tests—even the likes of these—should be writtenin the language of the business domain. Even though we might effectively be test-ing a single class or a small set of closely related classes with our acceptance tests,just as we do in our unit tests, there is a difference. It’s mostly semantic, but still.The point is that the unit tests were written for the developer, and the acceptancetests were written for (and sometimes by) the customer—and the vocabulary theyuse should reflect the audience’s interested in the tests’ results.
Just as unit tests alone aren’t usually sufficient for verifying that a system worksas it should, the kind of acceptance tests that only exercise the internals in a selec-tive manner are also not sufficient. In practice, we are likely following one of thefirst two strategies—going end-to-end or crawling under the skin—for most of ouracceptance tests, and we only employ the internals-oriented strategy to a select fewplaces dominated by business rules or other logic of interest to the customer.Speaking of supplementary strategies, there’s another one we’d like to discuss:stubbing out irrelevant components that are making life difficult for our tests.
11.2.4 Stubbing out the irrelevant
One important card to have in our sleeve is what we call stubbing out the irrelevant.This means testing the system not in its full, production-like setup but rather withsome non-essential components replaced with stubs, simulators, or alternativeimplementations in favor of testability. Replacing the production database with anin-memory database is a common example of such a replacement.
Most of the time, the parts we stub out for our acceptance tests with an alterna-tive implementation are external resources such as relational databases, third-party web services, directory services, and so forth. Figure 11.5 shows a scenariowhere we have stubbed out a web service proxy.

410 CHAPTER 11
Strategies for implementing acceptance tests
Sometimes, however, we also stub out integral parts of the system under test. Rea-sons might include speed of execution, ease of manipulating the system’s state inour tests, or the specific component not being available (which might be becauseit just doesn’t exist or because the component costs $1 million a pop and the mil-lions aren’t growing on trees).
Like exercising the internals, stubbing the irrelevant is also a supplementarystrategy for acceptance tests. We cannot risk going to production with a systemthat has never been deployed with the correct database, which has never con-nected to the third-party payment gateway, and which has never endured a loadtest with the CPU or I/O heavy component in place. It’s obvious that we need totest these integrations at least to some degree.
Most of the time, we opt for running the majority of our acceptance testsagainst the stubbed system and run only a small, focused set of tests with the diffi-cult components in place. Having an architecture and design that modularizethese stubbed-out components nicely is crucial from a risk-management point ofview. We want to be confident that the system works when put together and intoproduction. A design that’s simple and built for the purpose is a great aid inachieving that confidence because we are able to analyze the overall coverage ofour tests: “A and B have been tested working together, and B and C as well, whichmeans that when we plug together all three, they will indeed work.”
Many motivations for stubbing a component for our acceptance tests have some-thing to do with the limitations and constraints of technology. If our system is read-ing and writing to disk a lot, it can make sense to abstract away the file system andsupply a blazing-fast in-memory implementation for testing only. Slow I/O is but oneexample of a technology constraint. Technology influences not just how and whenwe stub out parts of the system for acceptance testing; it influences our applicationof the other strategies as well.
Technology can also create opportunities and enable us to exploit yet anotherstrategy in implementing our acceptance tests. J.B. Rainsberger likes to call themtesting backdoors.
Test System
STU
B
Webservice
Figure 11.5Testing a system with a less relevant component replaced with a testing-friendly, fast-executing stub

Technology-specific considerations 411
11.2.5 Testing backdoors
Every now and then, it makes sense to usea backdoor. In the context of computersystems and acceptance testing, a back-door—a testing backdoor—is a sort of alter-native interface through which anoutsider, such as an acceptance test, canpeek inside the system to verify somethingor possibly to reorder some digital furni-ture for a test that isn’t satisfied by the inte-riors designed for the previous test.
A typical case of a testing backdoor inmodern enterprise systems is the data-base, also illustrated in figure 11.6. Thedatabase is part of the system as a whole,but it also happens to have an externalinterface that’s equally visible to our acceptance tests as it is to the rest of the sys-tem under test. This means that we can, for example, set up test data by pushing itdirectly into the database rather than using the system’s API. Sometimes thereisn’t such an API, and connecting directly to the database is our only option. Onthe other hand, a testing backdoor such as the database might be the only feasibleway of verifying desired side effects of an acceptance test.
It is also not unheard-of for something that started life as a testing backdoor toevolve into a part of the system’s public API, allowing the application to developinto new directions. For instance, a backdoor that was born due to a need for teststo be able to register to receive notifications of failed transactions might over timegrow into groundbreaking monitoring and fault-management functionality thattips the market and flushes out the competition.
In short, testing backdoors are solutions created for overcoming a technicallimitation, but the technology can take on a life of its own as something morethan a small just-for-testing hack.
Speaking of technology, let’s change our focus and do some tech-talk in orderto find out how exactly certain mainstream technologies affect our acceptancetesting strategies.
11.3 Technology-specific considerations
As we’ve already established, technology cannot be ignored when deciding on ourstrategy of connecting acceptance tests with the system under test. There are hard
TestSystem as a
black box
Database
testing backdoor
Figure 11.6 Making use of a testing backdoor in our acceptance tests

412 CHAPTER 11
Strategies for implementing acceptance tests
limits, and there are less-hard limits. There is a little extra effort, and there aremajor overhauls. There are all sorts of annoyances big and small, most of themhaving to do with technology. In this section, we’re going to talk about how thestrategies discussed earlier in this chapter mingle with the main categories of soft-ware we’re building today, ranging from simple programming libraries to userapplications to distributed systems.
We’ll start from the simpler end of the spectrum: programming librariesintended for use by developers in building applications that depend on the library.From there, we’ll move on to user-oriented applications, covering applications withboth console-based and graphical user interfaces. Finally, we’ll check up on net-worked, distributed systems and what strategies might work well in that domain.
11.3.1 Programming libraries
Programming libraries are the building blocks with which we create larger soft-ware without having to implement everything from scratch ourselves. Program-ming libraries are written by a developer, for a developer, and that’s somethingthat makes our life much easier in some respects, regarding the practice of accep-tance tests.
Let’s say we’re developing an XPath4 engine for pulling out information fromXML documents with simple XPath expressions rather than traversing through aDOM tree or resorting to incomprehensible regular expressions. Our user storiesare worded in technical terms and for a good reason—our customer is a program-mer. For example, one of the stories could be about pulling the value of a namedattribute from an identified XML element. For such a story, one of the first accep-tance tests could involve an XML document like the following, with the test verify-ing that our library is able to return value when we ask for the root element’sattribute named attr:
<root attr="value" />
How do we implement such a test? Should we go through the UI or go under theskin? Should we operate directly on the internals? The relative simplicity of choos-ing a strategy for testing programming libraries is that there isn’t much choice. Inessence, for programming libraries, we’re always going under the skin becausethere is no skin, but we’re also going end-to-end because the public programminginterface is our UI. The only real decision to make is whether some pieces of logicwithin the library should be tested directly even though it would not be exposeddirectly through the public API.
4 http://www.w3.org/TR/xpath.

Technology-specific considerations 413
For this test, our implementation might well be a snippet of Java code like theone shown here:
public class XPathTest { @Test public void retrievingValueOfAttributeFromEmptyRootElement() throws Exception { Document doc = parse("<root attr=\"value\" />"); assertEquals("value", XPathEngine.valueOf("root/@attr", doc)); }}
The question remains whether the example test is on the level of abstraction we’dlike to have for our acceptance tests. What do you think? Could you refactor thetest to be more expressive? I’m pretty sure you can think of at least something. Butwould we go so far as to replace JUnit as a testing framework and try somethingless technical? Would it make sense to use, say, a table-based tool such as Fit forthe acceptance tests of such a programming library? Perhaps it would, perhaps itwouldn’t. I consider it likely that most teams would stick to JUnit and effectivelymerge their unit tests and acceptance tests. I would not, however, be too surprisedto meet a team that would consider it valuable to be able to express its tests in amore accessible format than Java code with all those escaped quote charactersand line feeds.
What about stubbing, then? Should we sometimes consider it an option to stubparts of the library for our acceptance tests? Sure. Why not, if it makes sense? Forexample, it might make our lives a lot easier if we’d decide to stub out the systemclock for the duration of our acceptance tests or if we’d plug in a logging compo-nent that would keep all output in memory instead of writing it to disk.
That’s about all we can say about acceptance testing programming libraries, solet’s move on to bigger things with some kind of distributed elements—applica-tions with a networking interface.
11.3.2 Faceless, distributed systems
In today’s world of corporate IT, practically all software does some kind of commu-nications over a network connection. We have all sorts of specialized web applica-tions serving client applications with static or, more commonly, dynamic datatransmitted over the HTTP protocol. We have web services exposing our system’scapabilities to the neighboring department’s systems over standards like SOAP.5
5 SOAP, a specification maintained by the World Wide Web Consortium (http://www.w3.org), used tostand for Simple Object Access Protocol. In the latest version of the specification, however, the nameno longer stands for anything—it’s just SOAP.

414 CHAPTER 11
Strategies for implementing acceptance tests
There might be a continuous stream of updates coming from our ERP system overa proprietary communications protocol and API. These are effectively new inter-faces to our system—the system we want to be able to test for correctness. It’sclearly a lot more involved than testing a programming library. The question is,how does that added complexity in terms of external interfaces show in our deci-sions about our acceptance-test implementation strategy?
First, even though the software in distributed systems can be arguably a lotmore complex than in typical programming libraries, and a large portion of thatextra complexity lies in the areas directly adjacent to the network, we’re stillmostly interested in the actual functionality rather than in how that functional-ity is accessed. This would imply that perhaps we should write most of our testsunder the skin, accessing internal APIs instead of talking to a network socket,and only implement some end-to-end tests as a sanity check for the overall archi-tecture and for the networking libraries in the opposing ends of the wire beingable to understand each other. Figure 11.7 illustrates this hybrid approach withboxes and arrows.
Then again, most machine-to-machine interfaces are relatively easy to automate,partly because they are designed to be used by a machine and, thus, do not requireadvanced pattern recognition and artificial intelligence in order to fake a humanuser. Part of it is because machine-to-machine interfaces are often specialized andfocused on a single service. Thanks to this relative simplicity and easy automation,the added cost or effort of going for an end-to-end acceptance-testing strategy mightnot be too big.
An exception to this could be a proprietary, closed interface, which we’d eitherhave to reverse-engineer first before implementing our own testing library for itor have to operate using the vendor’s client-side API—assuming such a thing is
Test
SystemMajority of tests
access the API directly
Subset of testsaccess through the
networking API
Network
Java API
Networking API
Figure 11.7Networking is slow compared to direct access to a Java API, which suggests that we should consider implementing most of our acceptance for a “faceless” system against internal APIs and let a smaller subset of tests verify that the networking API processes incoming data correctly and renders the system’s response properly back to the wire.

Technology-specific considerations 415
available; or, perhaps we’d be forced to test through the client-side application’sUI! Luckily, most of the time, we can fare well with having our acceptance testsbombard the network interface. In those rare cases where this is not feasible,crawling under the skin isn’t a bad option either.
Now, if it’s the nature of machine-to-machine interfaces that makes facelessdistributed systems easy to automate and thus easy targets for the end-to-end strat-egy of acceptance testing, what about applications with UIs? Let’s start our excava-tion from the original archetype of applications with UIs—console applications.
11.3.3 Console applications
The simplest of UIs these days are found in the so-called console applications, alsoknown as command-line interface(CLI) applications. Let’s pick an example manyof us are familiar with. Consider a command-line FTP client—the universal file-transfer tool, which nowadays ships along with practically all operating systems.
Most command-line FTP clients have an interactive text-based UI, which essen-tially works by the way of the application prompting the user for a command andthen proceeding to execute the given command, eventually returning with aprompt for the next command. Listing 11.4 illustrates this with a sample sequenceof interactions between a user and an FTP client.
$ ftp ftp.myserver.comConnected to ftp.myserver.com220 ProFTPD 1.3.0rc2 Server [123.123.123.123]User (ftp.myserver.com:(none)): lasse331 Password required for lasse.Password: *****230 User lasse logged in.ftp> helpCommands may be abbreviated. Commands are:
! delete literal prompt send? debug ls put statusappend dir mdelete pwd traceascii disconnect mdir quit typebell get mget quote userbinary glob mkdir recv verbosebye hash mls remotehelpcd help mput renameclose lcd open rmdirftp> quitBye.$
Listing 11.4 Sample interaction with a CLI application

416 CHAPTER 11
Strategies for implementing acceptance tests
The interaction in listing 11.4 shows how we start the application from the operat-ing system’s shell or console, give our credentials when prompted for them, exe-cute the help command, and then exit the program with the quit command.
Most of the functionality of such an application could be mapped to the avail-able commands and variations of their arguments. For example, assuming wewere building the world’s greatest command-line-based FTP client, we might havea story and the accompanying acceptance tests for uploading a file from the localfile system, which would effectively map to using the put command with the pathof the local file given as an argument. Similarly, we might have acceptance testsfor handling error situations like displaying a descriptive error message if thegiven path doesn’t point to any existing file on the local file system. Which strate-gies might we use for implementing such acceptance tests?
An end-to-end strategy would be relatively easy to implement, considering howtrivial the UI is—an interactive prompt of ASCII characters to which we could eas-ily feed automated input and from which we could parse the application’sresponse. The semantic overhead introduced by the UI on top of the actual appli-cation domain (network file transfer, in our case) is often minimal with console-based applications—uploading a file to the server from the local file system has aone-to-one mapping to a single put command.
We could, of course, bypass the UI even if it’s this thin, and implement our“upload file from local disk” acceptance test directly against the programming APIbeneath the console prompt. This would likely be also a relatively trivial task,assuming the presentation has been properly separated from the applicationlogic. If we did that, we’d need to test the UI separately, which might or might notpresent more work compared to an end-to-end approach, considering both theeffort in implementing the tests as well as the expected frequency and impact ofchanges to the system under test over time.
Again, we might have some aspects of the application’s functionality thatwould make more sense to test directly, going for the internals rather than verify-ing it indirectly through externally visible operations. Similarly, we might want tostub out some pieces of the application in order to help us more easily verifyexpected behavior in error situations like when the network connection is pulledout in the middle of an upload, for example. In most cases, however, I’d vote forimplementing acceptance tests for a console application against the UI, followingthe end-to-end strategy.
If this is more or less the situation with console-based applications, how aboutthe ones with a fancy GUI?

Technology-specific considerations 417
11.3.4 GUI applications
When we talk about GUI applications, we are talking about the rich-client type ofdesktop applications such as Microsoft Outlook, Adobe Photoshop, and MozillaFirefox. Fortunately, most GUI applications developed in the corporate worldaren’t as big as Outlook or Photoshop. Having said that, they’re not far behind incomplexity. Speaking of complexity, desktop GUI applications probably have themost complex semantics in their UI, and this is what makes GUI applications oneof the most difficult types of systems to write automated tests for.
Semantic complexityBy semantic complexity, we are referring not just to the endless variety of differ-ent custom widgets found in such applications, but also to their nature as event-driven applications with a significant portion of all functionality happening in thebackground multithreaded. In practice, this means that testing correct behaviorfollowing an end-to-end approach might not be possible by typing text into aninput field, clicking a button, and verifying that a file was written to disk or that awarning message was removed from a status bar. The catch is that we don’t knowwhen those things will happen. In other words, we have to wait for an arbitrarytime before checking for the expected behavior to have happened, and that isbound to make our tests not just slower but also more brittle than we’d like.
The multithreaded nature of GUI applications and the short waits we likelyneed to inject into our test code are not the main obstacles for following the end-to-end strategy, however. Most often, the biggest challenge for GUI teams in auto-mating their acceptance tests through the UI is being able to locate and manipu-late the UI components. For example, a Java Swing application only exposes to theunderlying operating system and other applications the top frame of the GUI andits title and not much else.
Let’s see what approaches and twists we could use in tackling this semanticcomplexity with our acceptance-test implementation, going from the purest end-to-end approach to the less pure and the more “under the skin”–style approach.
Triggering operating system–level eventsWith desktop GUI applications, the technical UI is most often the keyboard andthe mouse. How would we simulate the user in this scenario, assuming we’d liketo follow the end-to-end strategy for acceptance testing? We could fake the sameUI events that a real user would create by sending raw operating system-levelevents through a native, operating system-specific API. Such events would need tobe targeted to specific coordinates within our application window, however, which

418 CHAPTER 11
Strategies for implementing acceptance tests
effectively means we’re testing blind, trusting that our hard-coded coordinatesare correct.
In practice, coordinate-based test automation is a swamp I don’t recommendentering. The tests are brittle, and their maintenance is a nightmare. Also, forJava Swing applications, for example, asserting the state of the application has tobe done through interrogating the internals using tools such as Jemmy or Abbot(similarly to what we did in chapter 8). This is because Swing components are notvisible to the underlying windowing system—unless we introduce some kind oflogging code into the application only for testing purposes and verify expectedbehavior by examining a log file. It sounds unattractive, and it most often is. Inshort, implementing our acceptance tests with this approach can be consideredour last straw.
What if we would be able to see all the UI components of the applicationunder test from outside the process? What would our options look like then?
Using a native APICertain GUI technologies, which use native widgets for rendering the text fields,the buttons, and so forth, offer a possibility to test the application end to endthrough a native API. In other words, we can write code that looks up a compo-nent by its name and type from a given application window, send some events to it(for instance, “click the left button”), and also interrogate the components’ state(“What’s this text field’s current value?” “Is that button enabled?”).
This approach gives us a chance to test the application as a black box, withoutmeddling with the internals. The downside is, of course, exactly that—we can’tmeddle with the internals. At least, this complicates our test implementationwhen we need to communicate both with the native API for operating on the wid-gets and with the internals through a custom hook we’ve exposed in order to facil-itate the necessary interprocess communication.
Personally, I find this kind of a black-box approach less than optimal for test-ing GUI applications. In the vast majority of cases, we have to (or at the least we’dlike to) be able to operate on the internals anyway. Second, having to express ourtests through what’s available in the UI is somewhat limiting, considering thatwe’d like to be able to test our application throughout the project, not just inthe end.
Having brought this up, let’s explore the idea of exposing hooks from theapplication a bit farther.
Exposing hooks from the applicationThe fundamental idea behind exposing different types of hooks from the applica-tion is to give our tests—running separately from the application under test—

Technology-specific considerations 419
access to locating, operating, and interrogating specific parts of our UI as well asthe application logic and state beneath. Testing through hooks exposed by theapplication can effectively facilitate testing things that it isn’t possible to testthrough the existing UI. This can basically be a form of crawling under the skin ora testing backdoor, in terms of the strategies we discussed earlier.
But what kind of hooks are we talking about, technically speaking? Well, inone project, we ended up exposing the full component hierarchy of a Java Swingapplication to the outside world by having the application start a Remote MethodInvocation (RMI) server and register an implementation of our testing interfaceas an RMI object. With this remoting scheme in place, we could connect to therunning application over an RMI connection and traverse the component treehowever we wanted.
Exposing hooks does not, however, need to mean such an elaborate low-levelaccess. Just giving a remotely accessible interface for initiating a predefined set ofoperations, assertions, and so on can be enough. Such hooks would aid us inkeeping our tests written on the proper level of abstraction—the level of user-val-ued functionality—rather than falling prey to the temptations of implementationdetails, such as a specific UI component’s name.
The main downside to exposing hooks from our application is the potentialeffort required to do so. Implementing a facility for remote access to your applica-tion’s widgets and internal state can be a significant investment, especially forsmaller projects. Furthermore, splitting our test implementation into two places—the test code and the hooks it uses—can slow things down. This notion brings us toquestion whether we could avoid splitting the work somehow. We know at least oneway to do that: by bringing the test code and the application inside the same process.
Merging tests and the applicationWe could consider embedding our tests into the application itself as a natural pro-gression on the path from pure black-box testing toward the lighter shades ofgray, eventually reaching a pure white-box approach. We already moved from theend-to-end class of strategies into the domain of crawling under the skin when westarted exposing hooks instead of going through the real UI—even if our hookswould operate on the GUI components using whatever API they’re built with. Withthis in mind, could there be a more honest and simple way to crawl under theapplication’s skin than to deploy our test code inside the application?
There are two ways of putting our test code together with the application code.We can either embed our tests into the application or embed our application intoour tests.

420 CHAPTER 11
Strategies for implementing acceptance tests
The latter approach of letting thetests launch the application program-matically, as illustrated in figure 11.8,is perhaps better suited for auto-mated testing because we are alreadywell-equipped to execute our tests aspart of automated builds, for exam-ple, and because our developmenttools also integrate the dominant test-ing frameworks. In short, it’s trivialfor us to launch our tests and have thetests launch the application they’retesting, whereas we’d have to do more work in order to be able to launch the appli-cation and then somehow initiate the tests’ execution and collect the test results.
Sometimes, however, it makes more sense to go with the former approach,embedding our tests into the application, and to put in that extra bit of work to beable to launch the tests within the application, as illustrated in figure 11.9.
A recent example of a situation where we opted for this approach was a JavaWebStart application. Java WebStart applications are essentially Swing applica-tions, except that they’re started with a special WebStart client that knows how todownload the application’s resources and even the correct runtime based on aconfiguration file placed on a web server. Thus, we should be able to use the sametesting libraries that we’d use for a regular Swing application.
However, because the WebStart application’s deployment configuration (mainlydependencies and security settings) was considered a source of risk—having cre-ated late-found problems with previ-ous releases—we wanted to launchthe application through the actualWebStart client instead. The solutionwe ended up with was to embed a spe-cific test module into the application,which could be invoked from an out-side process, running all of our auto-mated tests and reporting them backto the external process. This is morelaborious than we’d hoped, but cer-tainly doable and something we con-sidered worth the effort.
Again, as usual, some features arebest suited to be tested directly
Launch
Close
Test
Application
Interact
Figure 11.8 Application is started from the test
Regularbootstrapping
Start testmodule
Interact
Close
Application
Test
Figure 11.9 Tests are embedded into the application through a plug-in mechanism.

Technology-specific considerations 421
against the internals, and we might want to stub or replace some components forour tests. This is something the embedded approach supports well because we’retypically using a unit-testing framework, and the same programming language asthe application itself has been written for implementing our tests.
Unfortunately, this approach also means that our tests are effectively hiddenfrom nontechnical stakeholders, such as end users and the customer. The risks ofineffective or otherwise lacking collaboration are much higher than if we wouldbe able to collaborate on the tests directly and use that same medium—the accep-tance tests—as both a communication tool as well as an executable specification.
Enough talk about desktop applications. There’s a specific brand of applica-tions with graphical UIs we haven’t yet discussed—web applications. Let’s take alook at how or whether web technology changes the way we should think aboutour acceptance test implementation strategy.
11.3.5 Web applications
Web applications are perhaps the most essential category of enterprise applica-tions developers around the world are trying to tackle in today’s world of e-thisand online-that. Web application development today is characterized not just bythe distributed nature of the web or the request-response–based protocol that isHTTP, but also by the vast number of standards and the even broader range of dif-ferent implementations of said standards. The fact that web browsers handle espe-cially the more recently introduced features of web standards differently affectsour acceptance-testing strategy by simultaneously putting more weight on end-to-end testing with the real browser and making it more difficult to accomplish justthat. In short, it complicates things.
We can apply the same strategies of testing some details directly by exercisingthe internals that we use for testing any other types of applications. We can stubout components or resources that would be difficult to control. What piques ourinterest about implementing acceptance tests for a web application is the age-olddecision between testing through the UI or beneath it and, if we opt for the end-to-end approach, whether we should implement our acceptance tests by simulatinga web browser or controlling the real browser.
Through the UI or under the skin?The main reason web applications tend to put more weight on being able to testthrough the UI is the relatively essential role of the presentation layer, HTTP ses-sions, JavaScript, and other web infrastructure in achieving the application’sdesired behavior. Having automated acceptance tests go through the actual HTTPinterface would likely help us catch at least some of the errors we may introduce
422 CHAPTER 11
Strategies for implementing acceptance tests
in our web plumbing code or in the presentation layer—including browser com-patibility issues.
Regardless of these incentives for going end-to-end with our acceptance tests,testing through the UI requires extra effort and tends toward larger tests, whichconsequently translates to more brittle tests. Furthermore, testing a web applica-tion built on top of an application server platform such as Java EE or .NETthrough the UI also introduces a performance hit in terms of test executionspeed—starting the application server and deploying an application can takemany more precious seconds than we’d like.
Choosing to crawl under the web application’s skin might give us the upperhand on both test brittleness and the slowness associated with bouncing the appli-cation server and deploying the application. Although the more intuitiveapproach to crawling under the application’s skin might be to use some kind ofremoting technology, perhaps the more valuable proposition is to embed the testsinto the same process as the application itself and to run the application raw with-out the real application server. For example, we could choose to hook our accep-tance tests into a service layer behind the web plumbing, dropping theapplication server startup and application deployment from the picture.
Knowing the advantages and disadvantages of following the end-to-end strat-egy for implementing acceptance tests for a web application, and assuming thatwe’ve decided to go end-to-end, the other interesting question is whether weshould simulate a web browser or control a real web browser.
Simulating or controlling a browserThe main point to consider when pondering simulating a web browser versus run-ning a web browser under the control of our acceptance tests is whether existingsimulation libraries (such as jWebUnit for Java or Twill for Python, for example)can handle our use of JavaScript or other technologies that are often not sup-ported at all or only partially supported by the available libraries.
These simulation libraries fake the HTTP traffic toward the web applicationand parse and interpret the returned HTML pages, offering an object hierarchy ofthe page elements that we can then operate on. Such libraries have to duplicateall the functionality of actual web browsers except the rendering (because theydon’t need to display the pages). That’s why using a simulation library is not fullyrepresentative of a real web browser.
Listing 11.5 shows an example of an acceptance test written using JUnit andthe jWebUnit library; it connects to a remote web server and interacts with it usingthe HTTP protocol, but there’s no web browser whatsoever involved.

Technology-specific considerations 423
import net.sourceforge.jwebunit.junit.WebTestCase;import org.junit.Before;import org.junit.Test;
public class TestWebApplicationWithJWebUnit extends WebTestCase {
@Before protected void setUp() throws Exception { getTestContext().setBaseUrl("http://www.manning.com/"); setScriptingEnabled(false); }
@Test public void testManningWebsiteWithJWebUnit() throws Exception { beginAt("/"); assertLinkPresentWithText("Ordering Info"); clickLinkWithText("Ordering Info"); String[] paymentOptions = { "Visa", "MasterCard", "American Express", "Discover Card", "eCheck", "PayPal" }; for (String option : paymentOptions) { assertTextPresent(option); } }}
The advantage of using simulation libraries like the ones mentioned is thatthey’re built for the purpose of testing and, thus, they incorporate plenty of built-in assertions and operations. In other words, the API they give us is sufficient formost of our needs, and they yield enough power to us so that we can add what’smissing ourselves.
Simulation tools give us an easy-to-use framework to build our tests with, butthey’re not sufficient for all applications, especially those that make heavy use ofthe more advanced features of web technologies like JavaScript. For example,Ajax6 techniques are likely to cause headaches for tools like jWebUnit. Could we
Listing 11.5 Example of using the JWebUnit library to test the Manning website
6 Ajax (or AJAX) stands for Asynchronous JavaScript and XML and represents the latest trend in Web 2.0development. The best resource on all things Ajax I’m aware of is Ajax in Action (Manning Publications,2005), written by my friend Eric Pascarello and David Crane. Dave also co-authored another fresh Man-ning title, Ajax in Practice (Manning Publications, 2007), which takes a cookbook approach to conquer-ing the world of JavaScript.

424 CHAPTER 11
Strategies for implementing acceptance tests
avoid these pitfalls by programmatically controlling the real web browser instead?Yes, to some degree, although that approach isn’t without drawbacks.
The prerequisite for us to be able to control a web browser like InternetExplorer, Mozilla Firefox, or Safari is that the browser—a native application—exposes an API that is rich enough for us to use for testing purposes.
Fortunately, Internet Explorer on Windows does a decent job at this throughthe COM component model. In essence, Internet Explorer is registered with theWindows operating system as a COM component, and we can launch a newinstance of Internet Explorer by obtaining a new instance of the COM compo-nent. From there, we can invoke any operations exposed by the COM interface.This is the premise on which tools like Watir (for Ruby), jWatir (for Java), Pamie(for Python), and Samie (for Perl) base their implementation.
The problem is that, at the time of writing this, no cross-platform solution isavailable that works on all major development platforms (Windows, Linux, andMac OS X). For instance, on Mac OS X, our only option for controlling a browserseems to be SafariWatir, a Watir extension for controlling Safari, the defaultbrowser on Mac OS X. Figure 11.10 shows the SafariWatir extension in action.
The Mozilla project does have its XPCOM, modeled after Microsoft’s COM,which should be cross-platform; but it’s far from being ready for mainstreamadoption. There’s also a plug-in for Mozilla-based browsers that lets an externalprocess control the browser over a Telnet connection; however, the only availableversion of the plug-in is for the Windows operating system.
Figure 11.10 A Ruby script controlling a Safari web browser on Mac OS X using the SafariWatir library

Tips for common problems 425
The Selenium project is well on its way toward this admirable goal, although itsreporting and build-integration capabilities are still lacking at the time of writingthis book. We’re also missing glue for making Selenium tests support active cus-tomer collaboration better, but I’m sure the situation will improve over time.
Another problem with this approach of controlling an actual web browser isspeed—we’re adding yet another variable into the picture, and the communica-tion between the testing library and the browser can be sluggish. Furthermore,we’d often like to start a fresh session for every test, which might require launch-ing a fresh instance of the browser, again adding to the duration of our tests. Ifthese aren’t an issue for you, though, controlling a real browser can be a goodalternative implementation for an end-to-end acceptance testing strategy.
In conclusion, there are no easy choices with regard to an acceptance-testimplementation strategy for web applications. Not that the choice would be anyeasier with other types of applications with UIs. Although technology does have itssay in our decisions, an important factor should be our team’s preferences andskills. After all, software development is a people business, and the way we supportcollaboration through our acceptance tests does carry some weight.
Before we wrap up the chapter, it would probably make sense to cover somefrequently asked questions that are bound to come up when setting out to imple-ment test automation, whether you’re doing it test-first or not.
11.4 Tips for common problems
Implementing acceptance tests for complex systems is not the easiest of tasks.Many enterprise systems deal with enormous volumes of data, semantically com-plex calculations with a slew of variables, and exceptions to the rule. I have seenprojects quickly build up a test suite that’s almost as complex as the system they’retesting, because it’s so easy to forget that we should design and refactor our accep-tance tests just like we design and refactor our production code and unit tests.
The potential complexity of acceptance tests is not the only problem I see alot. Performance—the duration of test execution—is a real issue for many teams.One client has an eight-hour build, most of which goes into running hundredsand hundreds of end-to-end acceptance tests.7 Such long test duration means thatit might take a full working day before a team finds out that their changes havebroken something elsewhere in the system.
Clearly, there are a lot of issues that we’d like to avoid. The following sec-tions are intended to help you see the roadblock early on while you still have
7 Eight hours isn’t that bad, though, considering that it used to be somewhere around 48 hours!

426 CHAPTER 11
Strategies for implementing acceptance tests
time to maneuver. Let’s start by looking at how we could perhaps speed up ourtest suite.
11.4.1 Accelerating test execution
A slow acceptance test suite is the most common problem I’ve seen lately withprojects that are adopting automated acceptance tests. It’s usually not just that thetests take a long time to execute. It’s also that setting up the system before run-ning the tests takes time and that restoring the system back into a known state inbetween tests takes time.
A colleague once shared a word of wisdom with me after I had poured my frus-tration on him regarding having too much work to do within regular office hours.His advice was to “do less.” Doing less is indeed the key to speeding up test execu-tion as well. Let’s take a look at a handful of ways to do less.
Organizing testsIf you have a long-running setup routine for your test suite, one of the first thingsyou should do is to look at your tests and determine whether all of the tests needthat much setup. It’s often the case that you can find a number of subsets of tests,some of which could do with less (faster) setup.
One specific categorization that might help cut the overall test duration signif-icantly is to split your test suite into tests that have side effects and tests that don’thave side effects. For example, tests that verify business or validation rules areprobably not writing to the database—thus, those tests can be safely executed inthe “no side effects” suite before tests that do require repopulating the database,as illustrated in figure 11.11.
Other useful categorizations can be found by examining the target system’sinternal boundaries. For example, tests for an e-commerce system that only touchon the customer-related tables may not need to run the full setup for customerand product tables and vice versa.
There’s another way of speeding up the test suite that’s directly related to data-bases and persistence. I call it cheating on persistence.
Tests without side effects Tests with side effects
SetupSetup SetupTest 1 Test 5Test 4 Test 3Test 2
Figure 11.11 Tests without side effects can be executed one after another without running the full setup in between each test. Tests with side effects can then be executed as usual, with the setup before each individual test.

Tips for common problems 427
Cheating on persistenceDisk I/O is often the single biggest source of slow performance. And it’s usuallythe relational database or some other persistence solution that does most of thedisk I/O. Thus, if we could make our persistence solution do less disk I/O, weshould be able to accelerate our test suite quite a bit.
We could, for example, run our acceptance tests against a system that’s config-ured to use the database in in-memory mode (cheating on persistence in thatwe’re not writing to disk and therefore not persisting anything) or tweak its config-uration so that our tests initiate fewer disk writes from the database.
A less suspicious-sounding trick to doing less work is to share the workloadamong multiple workers. Let’s talk a bit about distributing work.
Distributing workDelegation can also be a form of doing less (yourself). For accelerating our accep-tance test suite, we might implement this idea by distributing test execution to agrid of several machines running tests in parallel. This would mean that each indi-vidual machine has less to do, each finishing its slice of the test suite in a fractionof the time it takes for a single machine to run the full suite.
When distributing the work, it should be noted that the advantage comes fromhaving more disk I/O and more CPU cycles available for the computationrequired to execute the test suite. Generally speaking, it’s not the tests that drainon these resources—it’s the system under test that spins the disk and crunches thenumbers. With this in mind, the distributed test farm wouldn’t make much senseunless we scale the number of instances of the system under test. In practice,we’re talking about one of the following options:
■ One-to-many■ Many-to-many■ Many-to-many-more
Let’s quickly discuss the relative pros and cons ofthe three patterns, starting from the one-to-manyscenario illustrated in figure 11.12.
In the one-to-many scenario, the test client isload-balancing individual test cases between multi-ple target systems. This setup has the benefit of thetest client being able to run another test case whilethe other is blocked, waiting for the system undertest to respond. In practice, this is a simple setup thatonly requires a simple multithreaded test runner
TestClient
System 1
System 2
Figure 11.12 Single test client load-balancing test cases between multiple target systems

428 CHAPTER 11
Strategies for implementing acceptance tests
and that scales well as long as the source of slowness ismostly within the system under test (such as test setupspopulating the underlying database) and not, for exam-ple, in the communication overhead or in the test pars-ing the system’s responses.
Another relatively simple way to distribute work is tohave multiple test clients running their slice of testsagainst their own dedicated target system, as illustratedin figure 11.13. This is just a matter of coordinating mul-tiple machines to execute tests in parallel and organiz-ing your acceptance tests into roughly equal-sized testsuites or, alternatively, making the coordinating testrunner smart enough to feed test cases to the test clients as they complete their pre-vious test case. This approach of having multiple test clients also means that thecoordinating test runner needs to be able to collect the test-execution results for acombined report.
If neither one-to-many nor many-to-many yield enough time savings to bringthe overall duration to an acceptable level, you might consider combining theminto our third scenario: having many test clients load-balance to their dedicatedsets of target systems. This scenario is depicted in figure 11.14.
By having multiple test clients and even more target systems, we can scale ourtest farm in all directions. We can add target systems until the test clients becomethe bottleneck. At that point, we add a new test client, making the ratio of test cli-ents to target systems such that the bottleneck is no longer the test client, and soforth. The downside to this approach is, of course, that the complexity of our testfarm is far bigger than either of the previous two scenarios alone.
Speaking of complexity, our next way to do less is also a trade-off of gettingfaster test execution in exchange for increased complexity.
System 1
TestClient 1
TestClient 2
System 6System 5System 4System 3System 2
Figure 11.14 Multiple test clients load-balancing test cases between multiple target systems
TestClient 1
TestClient 2
System 1
System 2
Figure 11.13 Multiple test clients executing their subset of tests against their dedicated target system

Tips for common problems 429
Minimizing setup with dependent testsFor many enterprise systems, the amount of setup performed before each testcauses a significant drag on test execution times. This setup typically involves pop-ulating a database with a known data set or stopping and starting a server. We cando less by performing this kind of setup just once. For example, we could popu-late the underlying database in the beginning of our test suite. This approach isillustrated in figure 11.15.
In practice, this typically creates a number of dependencies between individualtests because the tests affect the system’s internal state. For instance, test T1 mightverify that our online shop’s shopping cart handles successful purchases correctly,effectively creating a bunch of orders into the underlying database. If test T2 is sup-posed to check that the sales statistics are correct, we have a dependency betweentests T1 and T2 because changing T1 means that we need to change T2 as well.
Although we can easily speed up the overall test execution, there are signifi-cant downsides to creating dependencies between tests. Perhaps the most signifi-cant of these downsides is that our maintenance load grows exponentially as weadd more tests and more dependencies. Nobody likes editing several dozen testsjust to be able to add a new test.
Another issue with dependent tests is reporting. With dependencies betweentests, a single real test failure often triggers failures in most tests that depend onthe failing test—even though there’s nothing wrong with the functionality thosedependent tests are trying to verify—as illustrated in figure 11.16. In practice, thismeans that our test reports give us far less information than they could if onlylegitimate test failures were reported.
Setup Test 1 Test 6Test 5Test 3 Test 4Test 2
Figure 11.15 With ordered, dependent tests, we can perform a common setup just once in the beginning of the test suite. However, each test case may have assumptions about the side effects of earlier tests.
Setup Test 6Test 5Test 4Test 3Test 2Test 1
Figure 11.16 Test suite with dependencies between tests has test failures. Without analyzing test logs and wielding psychic powers, it’s impossible to say which of the four failing tests are failing for a legitimate reason and which are failing because a dependent test failed.

430 CHAPTER 11
Strategies for implementing acceptance tests
With dependent tests, the best we can do is to make the test runner ignore testsfor which a dependency failed to complete successfully. We’d basically know thatthere are failing tests, but we’d have no idea how many!
Although dependent tests are certainly not among my favorite techniques forspeeding up test execution, they are an option nevertheless. Just be aware of whatyou’re trading off if you choose to create those dependencies.
Now, let’s look at a less risky way of speeding up our acceptance tests—specifi-cally, those that modify the contents of a database.
Rolling back transactionsAcceptance tests often need to populate a database again and again with a knowndata set because the previous tests may have changed the data. A trick we learnedin chapter 6 may come in handy with acceptance tests as well: rolling back a trans-action after a test to restore the database to its original state.
The point behind rolling back a transaction instead of dropping the full data-base and repopulating it from scratch is that a rollback is typically several magni-tudes faster. We gain a lot of speed from this technique, but it’s not one of theeasiest approaches to implement. First, it requires an architecture that gives theacceptance tests access to the transaction. Second, this approach works only ifeach test works within a single transaction—which is hardly the case with a lot ofthe systems I’ve seen.
To summarize, this approach has a lot of potential but is feasible only in a rarefew cases. Nevertheless, it’s a technique worth being aware of! Now, let’s move onto our last way of doing less to speed up—the soft boot.
Soft bootingIt’s not that rare to encounter a software development project where acceptancetests frequently restart the target system to reset its internal state. Although this isusually a trivial thing to do with a couple of lines of Perl or Bash, it’s not a snap torestart a full-blown Java EE application server, for example. Instead of doing a fullrestart, try to find a way to do a soft boot.
A soft boot is one that doesn’t involve stopping processes, reallocating hundredsof megabytes of memory, re-reading a gigabyte of data from the database into anapplication-level cache, or performing other intensive and slow operations. A softboot is a smart operation that does less—one that does the absolute minimum setof tasks required in order to bring the system back into a known state.
A typical example of where the soft-boot technique fits in is a gateway systemthat processes and forwards network traffic, sitting between two networks. Insteadof restarting the whole system, we might, for example, flush the gateway’s internalcaches and queues.

Tips for common problems 431
The soft boot might not always be feasible. It might require careful architec-tural design and refactoring to ensure that the full state is indeed reset. Again, itisn’t an approach that does the trick for all cases but is certainly another handytool in our toolbox for speeding up our test suite.
We’ve now covered a handful of ways to accelerate our test suites’ execution, andit’s time to move on to our next common problem—that of complex test cases.
11.4.2 Reducing complexity of test cases
Verbose, complex acceptance tests are a problem with many a team. There’s dupli-cation all over the place; it’s difficult to see the forest for the trees when the test setupis 40 lines of code and talks about low-level implementation details instead of con-cepts from the associated user story. How can we reduce this complexity?
Beyond the usual rules of refactoring away duplication, renaming things to com-municate better (and in the appropriate language), and structuring our acceptancetests into cohesive units with common fixtures as we do for unit tests, there’s notmuch advice to give—those same techniques will get you far if done properly.
Having said that, acceptance tests for web applications, for example, can oftenbe simplified by turning common setups into context objects that know how to takethe target system and the test case into that state. Now, instead of creating a hier-archy of test cases with inherited setups, a test case can point to a context and say,“take me there.” Different contexts can build on top of each other, possibly creat-ing an inheritance hierarchy, but the inheritance hierarchy is now hidden fromthe test cases.
Taking the context-object pattern further, it’s possible to speed up test execu-tion by implementing what I call a caching context object, illustrated in figure 11.17.
Cachingcontext
Test-specificsequence
UI
Snapshot API
System
if snapshot exist, then restore snapshot with APIelse operate system through UI take snapshot with APIend
Figure 11.17 A caching context object not only knows how to operate the system into the correct state but also takes a snapshot of the system state after reaching the desired context. The snapshot can be used in later tests using the same caching context to restore the state quickly without redoing the full sequence of steps.

432 CHAPTER 11
Strategies for implementing acceptance tests
A caching context object differs from a regular one by its ability to take a snapshotof the session state after first execution and to restore the snapshot on subsequentruns, effectively skipping a number of potentially long-lasting HTTP requests. Inpractice, the implementation of such caching context objects needs to rely on thetarget system to expose an API for taking and restoring named snapshots of ses-sion data on the server-side.
The caching context object is relatively simple to implement as long as thestate to be restored doesn’t include external systems such as relational databases.Speaking of databases, the last common problem we’ll discuss is how to managetest data.
11.4.3 Managing test data
It’s one thing to maintain a beautiful code base of automated, executable accep-tance tests. It’s a different matter to maintain test data—the data our test setupspush into the database and the data our acceptance tests assume exist in the data-base. There’s no escape from the fact that managing test data will be more labori-ous than we’d like. However, we do have some simple guidelines to consider forkeeping our test data as manageable as possible:
■ Use a single data set.■ Generate the data set.■ Version-control our data.
Let’s see what we mean by these one-liners.
Using a single data setThe first of our guidelines for managing test data is to have only a single data setfor acceptance tests. The point about having a single data set is that our test datais probably massive enough already—and starting to duplicate data for individualtest cases will make things worse. Furthermore, keeping several data sets in syncwith each other is not what I’d call an easy task. I’ve found it much easier toextend a single data set when new requirements pop up—for example, when anew acceptance test needs a specific case that isn’t found in our current data set.
But doesn’t common knowledge about maintainable code and design suggestthat we should not have monolithic entities, whether it’s a class or a data set? Yes,we should try to partition our test data into smaller assets that, when combined,build up the full data set. At some point, our data set may grow beyond our abilityto handle it as a single asset. Having said that, we should not do that partitioningwithout considering the price tag. If we’re going to partition, it has to happen

Tips for common problems 433
around boundaries that don’t add too much to our cognitive load for managingthe overall data set.
One possible way to partition the data set is to switch from a static definition oftest data (such as SQL scripts, human-editable dump files, and so on) into adynamic definition. For example, we could generate the test data.
Generating the data setThe main benefit of generating test data versus defining the data statically is vol-ume. A script that generates data can be several magnitudes smaller in size, there-fore making it more manageable and easier to keep track of.
One specific pattern that I’ve personally found useful is to generate test datausing the target system’s own persistence implementation. For example, if the sys-tem uses Hibernate or an equivalent ORM solution for persisting domain objects,we could easily use the same domain classes and the same ORM solution for gener-ating the base data set for our acceptance tests. The obvious benefit of thisapproach is that our data set is described in terms of the domain, not in terms ofschemas, tables, columns, and SQL statements.
For our third guideline for managing test data, whether you’re using a static ordynamic approach, you should version-control your data set definition—and in ausable manner.
Version-controlling your dataOne of the trickiest challenges we can face in relation to test data is figuring outafter the fact what was changed in the data set between two test runs. With this inmind, we should strive to, first of all, version-control our data-set definition. But itdoesn’t stop there—we need to version-control the definition in a format that wecan effectively work with. Specifically, we need to be able to diff two versions of thedefinition: that is, figure out which lines differ between the two versions.
This effectively suggests that our data-set definition must use a text-based for-mat rather than a binary dump file, for example. It might be blatantly obvious,but I’ve seen plenty of projects maintaining their test data definitions in binaryfiles or, even worse, having the data as a schema on a running database server.Forcing developers and testing engineers to use a database client and SQL state-ments to explore and modify test data must be among the most effective ways ofhampering a team’s productivity.
I think we’ve covered test data well enough for now. There’s clearly no magicspell or silver bullet that will solve all of your test data-related problems but I hopethat these guidelines will give you ideas for keeping your troubles to a minimum.Let’s wrap up the chapter and move on.

434 CHAPTER 11
Strategies for implementing acceptance tests
11.5 Summary
We set out in the beginning of this chapter to explore our options for connectingacceptance tests with the system under test. We started by identifying the threemain factors to take into account when making a decision: the nature of the fea-ture and acceptance tests we want to implement, the expected turbulence or fre-quency and volume of change, and the technology involved. We discussed howthese factors might influence our preferences through simple examples.
After mapping out the surrounding area of what kind of forces are in play, wediscussed some strategies for implementing our acceptance tests. We started fromthe most intuitive alternative of testing the application end to end, going throughthe actual UI just like (or a bit like) a real user would. We continued by moving anotch closer to the metal, getting to know the approach we called crawling underthe application’s skin, or testing right beneath the UI. Finally, we quickly discussedthe other end of the spectrum between pure black-box and pure white-box test-ing, in the form of exercising the internals directly and, where appropriate, stub-bing out the irrelevant stuff that makes our application difficult to test or slowsour tests down too much. We also touched on the use of testing backdoors for ver-ifying expected behavior and desired side effects.
Next, we dove a bit deeper into the realm of the third major influence in ourstrategy—technology. We enumerated through some major types of softwareincluding programming libraries, distributed systems, console applications, desk-top applications with GUIs, and web applications. By looking closer at our possibil-ities in implementing acceptance tests for these kinds of systems, we’ve now builtup a foundation based on which we are able to make smart, informed decisionsabout our acceptance testing strategies.
To finish the chapter, we waded through a number of tips and tricks for tack-ling common problems teams face when their acceptance test suites grow into amess that’s as fast as a snail and too complex to grasp.
Writing good acceptance tests is difficult, and implementing them into execut-able tests well is not far behind. You should now feel better equipped to face thischallenge and not be afraid to explore the topic further.
In the next chapter, we’ll change focus once again, ending our journeythrough the world of test-driven development and acceptance test-driven develop-ment by concentrating on how to successfully adopt—and sustain—personal andteam-level practices like TDD and ATDD.

Adopting TDD
They say that time changes things, but you actually have to change them yourself.
—Andy Warhol
435

436 CHAPTER 12
Adopting TDD
You’re reading this book, so it’s likely that you’re already interested in TDD andquite possibly already in the process of adopting the technique in your work. It’salso likely, however, that not all of your co-workers share your interest in test-drivendevelopment. Having the rest of the team adopt test-driven development wouldobviously support your own adoption, not to mention the benefits to the organiza-tion as a whole—which is why you’d probably want your colleagues to get infectedwith the test-first bug as well. This chapter’s purpose is to help you both in your per-sonal adoption of TDD and in getting others aboard the adoption train.
We won’t focus too much on TDD itself, because the dynamics of personaladoption are universal regardless of the actual change being suggested. Whatwe’re going to cover are factors that influence our ability to lead change on a per-sonal level, whether for ourselves or for our colleagues—colleagues who are possi-bly on our client’s payroll, if we’re in the role of an external consultant.
Let’s begin by discussing what it takes to adopt a technique like TDD.
12.1 What it takes to adopt TDD
Adopting a new development technique is not an easy task, especially when thetechnique is as radically different from our old ways as TDD is. Further, it’s notenough to adopt the technique and master it once. We need constant rehearsaland practice in order to keep learning and improving. It all takes a lot of disci-pline. And it’s worth every bit of the effort.
Let’s begin by taking a look at some of the factors that influence our ability tosustain lasting change in our personal adoption of TDD (or pretty much any othertechnique, for that matter).
12.1.1 Getting it
Many of the best software engineers I know suffer from some weird programmer-specific form of attention deficit disorder, which lures them to constantly try outnew things, only to abandon the new tool, framework, or technique a couple ofweeks later.
A key factor in sustainable change is for the individual to really understand thedynamics underlying the change. Understanding why a technique is beneficialand should be considered is key. Lacking this understanding may lead to the tech-nique being dropped when the individual faces external pressure. As such, it isextremely important to discuss our ideas and thoughts with others to make surewe’re really getting it.
First-hand experience is also important for understanding the why. Repeating amantra such as “TDD is good for you” doesn’t go far in creating a lasting change.

What it takes to adopt TDD 437
The change becomes real when we see with our own eyes how we just preventedan angry customer from busting in through the phone line because we wrote ourtests first. We created the solution one small step at a time and realized somethingwe wouldn’t have thought of if we had designed the whole solution up front.
Having said that, it can be extremely difficult to truly appreciate the rationaleand benefits of a change if there’s no immediate need for improvement, no senseof urgency.
12.1.2 Sense of urgency
W. Edwards Deming, father of the Japanese post-war industrial revival and authorof Out of the Crisis (MIT Press, 1982), once said, “It is not necessary to change—survival is not mandatory.” This quote mirrors the way we often see changes suchas adopting a new development technique. We might be aware of the benefits thatthe change would bring, but the benefits are easy to forget if there’s no immedi-ate need for improvement. For most people, change represents a degree of risk.As long as there’s no immediate problem that needs solving or something thatneeds changing, we are happy with the status quo because we don’t want to riskmaking things worse.
Unfortunately, we typically don’t have the sense of urgency we seek. That’s notto say that there wouldn’t often be a sense of urgency in the form of pressure frommanagement, though. It just tends to be focused on short-term goals, such as com-pleting a project on time, rather than sustained improvements in the organiza-tion’s delivery capability. We can, however, create a sense of urgency for ourselves.
The sense of urgency we can create for ourselves has to build on our desire toimprove our skills as craftsmen, to improve our ability to deliver what we promisewhen we promise it, and to fulfill our clients’ needs. Having said that, the sense ofurgency must be something practical and concrete enough that we feel we can dosomething about it every day.
Here’s an example of creating a sense of urgency: A pair of developers decidedto tackle their growing list of defects once and for all. In just a couple of weeks, thedefects were all either fixed, closed, or assigned up-to-date priorities, and the rateof incoming defects had almost ground to a halt. Another example of a self-initiatedsense of urgency involved a developer who finally got fed up with having to go backand fix bugs from code they had written and so decided to stop making bugs. Theyramped up their testing practices and eventually adopted TDD, and the centralizedtesting function no longer revealed programming errors by that developer.
This kind of change requires discipline and determination for which a sense ofurgency is a great source of energy. Such a change, such discipline and determina-tion does not last forever, however, unless we get frequent positive feedback to

438 CHAPTER 12
Adopting TDD
reassure us that we are indeed making progress. In other words, we need a senseof achievement.
12.1.3 Sense of achievement
We don’t particularly like doing things that we’re bad at. At least I don’t. And welove doing things we’re constantly improving at. It is the frequent small wins andthe accumulating sense of achievement that keep our motivation high.
The power of a sense of achievement is at the heart of a sustainable change.We must choose goals that are small enough and concrete enough that we canachieve them quickly and often. And when we do achieve a goal, no matter howsmall, we should celebrate it and give ourselves credit for the accomplishment.When you finally get that legacy class instantiated in your test harness, get up andgrab a cup of coffee (or tea, or Jolt—whatever tickles your fancy). When you’vemanaged to test-drive code all day without lapses to the dark side, treat yourself byeating out.
The exact prize or reward isn’t all that important. What’s important is that weacknowledge that our achievement and concrete rewards, however small, are excel-lent motivators. Plus, your peers will also take note of your wide smile, the giant icecream, the spontaneous “Yippee!” and other small tokens of your progress.
With all of the celebration and patting ourselves on the back, we must not,however, turn a blind eye toward the occasional setbacks and ignore our failures.More specifically, we must exhibit integrity with our actions.
12.1.4 Exhibiting integrity
When adopting a new technique or practice in a team environment, it might notbe enough to internalize the fundamental reasons why we’re using the technique.Peer pressure is one of the biggest influences; and because we humans are bad ataccepting things we don’t understand, it is crucial to exhibit true integrity withour actions and behavior. An integral part of exhibiting integrity is being consis-tent with our actions and words and being open about what we do and what kindof results we’re seeing.
Being congruentPicture yourself as a tourist somewhere far from home, asking for directions toyour hotel from a local passing by. At first, the local points to their left. Wanting tobe sure you got it correct, you point at your little street map with your finger, andthe local starts waving to their right. Unsure about whether it’s left or right, youask again, and the local now waves to their left. How confident do you feel at thispoint about the local having any idea of where your hotel is?

What it takes to adopt TDD 439
If we are to convince others of the advantages of our adopting a new practice,we must be consistent with our communication as well as our actions. Behavingarbitrarily seriously harms our credibility as well as that of our arguments for thechange we’re leading. Issuing blanket statements, for example, makes little sensebecause we’ll eventually have to correct ourselves, effectively decreasing anyweight our message may have had in the eyes of others. If we’re promoting TDD toour colleagues, we’d better practice it ourselves, too. If we’re having trouble keep-ing up the practice when working on some area of the legacy code base, weshould be open about it and explain what we are doing to try to make it easier inthe long run. For example, we may decide to refactor and investigate potentialtools that could help alleviate the pain.
With this in mind, even more critical than avoiding constant reformulation ofthe message we’re communicating with our words and actions, the message mustnot be one-sided and focused only on the positive. We need to be truly open inorder to gain trust for what we’re doing.
Being openIt’s easy to publicize success, but openness has to include our failures and setbacksas well. People recognize and won’t give a positive response to propaganda. Fur-thermore, our goal should not be convincing others of how insanely great thechange we’re leading is. Our goal should be convincing others that we are rationalabout the change—and to communicate our experience truthfully and objectively.
In addition to how we talk the talk and walk the walk, when we walk the walkcan have a big impact on the chances of a lasting change. Let’s talk about select-ing the right time for the change before moving our attention toward getting oth-ers involved in our change.
12.1.5 Time for change
Change happens all the time. Among the things that change are the properties ofan environment where we aspire our envisioned change to take place. Thus, weshouldn’t blindly forge ahead with a change but instead spend a moment lookingahead and identifying the right time for the change.
Pressure and challenging schedulesConsidering the previous factors, it is important to choose a suitable time for start-ing the change. Adopting a new technique a week before a major deadline on ahigh-pressure project might not be the best idea.
Although we might personally understand how the change would improve ourproductivity, the improvement will probably follow a learning curve as we (andour coworkers) are adapting to and becoming familiar with our new way of doing
440 CHAPTER 12
Adopting TDD
things. Furthermore, the added pressure of a looming deadline is certainly nothelping our peers and management understand the reasons for the change andwill probably not yield their support. The utmost question in their mind wouldlikely be, “Why now, when we’re already neck-deep with the upcoming release?”
It is often best to introduce big changes at natural change boundaries, wherechange is seen as something to be expected rather than as something that pre-sents a risk.
Natural boundaries and piggybackingIn general, change is easiest to initiate at natural change boundaries rather thanin the middle of an activity such as a software project, especially if the group’s abil-ity to absorb risk is already lowered due to an external pressure of some kind.
Some of the more obvious natural boundaries for change include the begin-ning of a new project, a new release, or pretty much any restructuring of the team.Other less ideal but nonetheless attractive natural boundaries can be iterationboundaries, holiday seasons, or even off-site team events.
These natural boundaries essentially represent other changes that we’ve alreadyaccepted. Piggybacking a new change on top of another change (a change we’vealready accepted and are not questioning) works well because there’s already thenotion of something new starting. Therefore, our mental wiring is already in a statethat’s susceptible to an additional change—be it a new IDE or a development tech-nique like TDD or writing acceptance tests before implementation.
All of these factors we’ve discussed so far—really getting it, having a sense ofurgency and achievement, exhibiting integrity with what we do, and recognizingthe right time for the change—have an influence on how easy or difficult it is forus to lead sustainable change. These factors are equally important in getting oth-ers aboard the change, perhaps even more so because it’s likely that not everyoneis as excited about the change as we are.
12.2 Getting others aboard
Getting others aboard the change we’re leading (adopting TDD, for example)involves extending our own understanding of the change into the collectiveunderstanding of a group of people—the “us,” if you will. Part of this task entailsthe individuals in the group going through their own personal adoptions. Thesame forces are in play—it’s just that the balance is a bit different and there’ssomeone else championing the change and (we hope) looking after the health ofeach individual’s adoption process.

Getting others aboard 441
The champion is an important role, because they serve as the ultimate sourcefor motivation and energy. Luckily, the role of the champion can (and should, atleast eventually) be distributed among several individuals who are able and willingto take on this task. Speaking of roles, the change champion is a virtual role that isadded to the individual’s formal roles and responsibilities, and these other rolesaffect our chances of getting others aboard. Let’s take a closer look at how the for-mal role of a champion can influence that person’s ability to lead change withinthe group.
12.2.1 Roles and ability to lead change
Change can be initiated and lead from a variety of roles, although the underlyingdynamics in these situations differ to some degree. The common goal is to helpbuild an environment that facilitates sustainable change, including a sense ofurgency as well as a frequently felt sense of achievement. Although change cham-pions are typically senior colleagues acting in roles such as technical architect,tech lead, or senior engineer, the champion role can be taken by an individual orindividuals in nontechnical as well as junior technical roles.
Instead of focusing on a group of arbitrarily selected job titles, let’s approachthese different formal roles from the perspective of influence, which often corre-lates with seniority or authority in general within the group. We can identify threemain domains of influence: influence toward junior colleagues, influence towardpeers, and influence toward higher-ups. Let’s go through these one by one.
Mentoring junior colleaguesPerhaps the most common relationship of influence during a change is a seniorstaff member mentoring a junior staff member (note that “junior” does not neces-sarily mean younger). The formal role of the senior individual might be a techlead, a project manager—even a business manager. Motivating junior colleaguesand supporting their personal adoption processes is naturally made easierbecause of the leadership brought by seniority, be it through years of experienceor merely through organizational hierarchy.
For a senior mentoring a junior, it is important to steer away from yielding toomuch control over the individual being mentored. The junior colleague must haveenough time and space to take ownership over their personal adoption. The job ofthe mentor is to provide information, validation, feedback, and support in general.A mentor might give a junior colleague a link to a website that discusses unit-testingpatterns, teach their colleague pair-programming, perform peer reviews, or simplymake themself available for questions—all the while assuring the junior colleaguethat there’s no such thing as a stupid question.

442 CHAPTER 12
Adopting TDD
Although it might be necessary to push somewhat more in the beginning, ifthe mentor isn’t able to let go soon, there’s something wrong with one of the fun-damental forces driving the mentored individual’s personal adoption. They mightnot recognize the benefits of the change, or there might be a mismatch betweenthe adoption program and the employee’s incentives program. For example, anemployee might get a bonus based on how many billable hours they put in fortheir current client, whereas TDD might decrease the billable hours (by improv-ing productivity). Whatever the cause, it is the mentor’s job to keep an eye out forthese kinds of issues and act upon them.
A mentoring relationship between a senior and junior staff member is com-monplace and natural, but it isn’t quite as easy to build up between two peers—that is, two individuals with no perceived seniority.
Leading peers through changeI hope we’ve all had the chance to work with peers we really synched with. Theseare the kinds of working relationships where there is a constant spring-boardingof ideas and open sharing of great accomplishments and miserable failures. Theseare also the kinds of relationships where the necessary authority and mutualrespect are already in place for one peer to be able to lead change and mentorthe other—and vice versa. Not all relationships between peers are like this, how-ever, and this is where it gets tricky for the change agent.
Lacking an existing supporting relationship, we need to create one before wecan be effective. There’s no magic recipe for creating the necessary trust in a rela-tionship overnight, but the eventual success invariably requires openness andintegrity. Between technical craftsmen, the best way of creating trust and respect isto do as you say and demonstrate that you are knowledgeable about your craft andproficient in what you do.
They say, “It takes one to know one.” When it comes to developers and change,it often takes one to lead one. In short, we need to show that what we’re promot-ing works for us; and we must be sensitive enough to know how much we can pushwithout invading our colleagues’ safe zone, letting them come through at theirown pace.
When it comes to influencing our peers, we can’t come off as pushy know-it-alls. We must learn to listen to our colleagues, understand and respect their viewsof the change, and adapt our communication accordingly. Listening is also impor-tant for the last of the three domains of influence—the higher-ups.
Managing upwardEveryone has a boss. At least, most of us do. And our boss is likely interested in thechange we’re leading. We must manage upward, or we’ll risk failure resulting

Getting others aboard 443
from lack of understanding from above. The amount of managing upwardrequired will undoubtedly vary a lot from one organization and culture to thenext, but one thing is sure—our manager will have a different perspective on thechange than we do.
Let’s say I’m a software developer and I report to a project manager. Theproject manager is responsible for shepherding the project through to comple-tion on time, on budget, and without sacrificing quality. There’s no doubt that theproject manager wants to know how the change—say, the adoption of TDD willaffect the project’s progress. If I’m the project manager and driving the changefrom that position, I probably have a business manager (account manager, salesdirector, product manager, whatever) who’s going to want to know whether thechange will affect their work.
Furthermore, these higher-ups are not likely to understand the same languageas our peers and junior colleagues. We must take note of finding out what exactlyworries them and then formulate our message to answer those specific concerns.Without helping our superiors understand our change, we won’t get their com-mitment and support—often the opposite, because we generally resist things wedon’t understand.
This brings us to one of the obvious but also amazingly easy-to-forget pieces ofadvice for a change agent: Expect resistance and be prepared for a long battle,because change takes time.
12.2.2 Change takes time
Very few changes in our behavior happen overnight. As change agents, promotingthe adoption of a technique such as TDD means changing the way a professionalsoftware engineer works. That change might involve unlearning several decades’worth of experience doing things the old way. For that software engineer, thechange is almost certainly not going to be an easy one. People change slowly, andwe must be patient to be able to support our colleagues through their journeyuntil they’re ready for the change.
In addition to change taking calendar time, change also takes the time of thechange agent. With this in mind, we should avoid trying to support too many indi-viduals simultaneously. It’s often easier to lead one person at a time or one teamat a time through a change than to spread the change immediately to four teamsand not be able to support any of the four teams properly. Furthermore, the moreresistance we face from the individuals we are supporting, the fewer individualswe can support. After all, it takes a lot more effort, attention, and energy to sup-port a resisting individual than it takes to guide an enthusiastic colleague to makethe change.

444 CHAPTER 12
Adopting TDD
Speaking of resistance, Woodrow Wilson once said, “If you want to make ene-mies, try to change something.” In other words, not everyone will like us suggest-ing that they should start developing software in a radically different way fromwhat they’re used to doing. There will almost certainly be resistance against thechange; and, as change agents, we must face the resistance and try to overcome it.
In the next section, we’ll discuss ways of both recognizing resistance andresponding to it. And if you’re even remotely as anxious as I am to learn to dealwith resistance, I think I’d better stop babbling and let us move on.
12.3 How to fight resistance
“Resistance is futile.” I’m afraid that’s not how most change agents in corporateenvironments see it. I certainly didn’t consider the overwhelming resistance I saweverywhere a futile activity when I first tried to create a lasting change in myself.In fact, knowing how to fight resistance effectively is possibly the single mostimportant skill for a change agent.
In this section, we’ll learn about a number of techniques for fighting resis-tance. Before we can respond to resistance, however, we need to recognize theresistance and its root causes. For this reason, let’s first discuss how we can recog-nize resistance.
12.3.1 Recognizing resistance
Although you would think that I would recognize that there will be resistance formost change, I am constantly getting blind-sided by the kind of resistance I seewhen entering a new environment or even helping initiate change in a familiarone. Slowly, I’m getting better at spotting resistance earlier and adapting mybehavior accordingly. It isn’t easy, though, because resistance comes in at least asmany forms as there are people involved.
It’s easy to spot obvious forms of resistance, such as outright refusal to dothings differently. Here are a few categories of resistance that might not be soobvious at first.
Coinciding changeI once joined a software project that had been going on for several monthsalready. There was clear ownership of parts of the code base, and people werebasically working in their own pods eight hours straight, only pausing for lunchand the occasional status meeting. To get to the point, my trying to promote pair-programming in this project didn’t go down too well. A few weeks after basicallygiving up, I started to see things I hadn’t noticed before.

How to fight resistance 445
One of the developers had started coming to work earlier than usual, therebyalso leaving for home earlier. At first, I hadn’t given it a second thought—peopleoften do that in Finland during the summer when the sun starts to rise earlier.This developer also started having lunch earlier than others. Again, that didn’tstrike me as odd. I started wondering if this was a coincidence or whether it hadsomething to do with me pushing for more pair-programming on the project. Nottoo long after, over an after-work beer, I learned that this particular developerindeed didn’t feel comfortable pair-programming and that part of the motivationfor him changing his daily rhythm was to gain a couple of hours of time when hewould be guaranteed to get to work alone.
This wasn’t the only instance of resistance against change on that project, butit is a prime example of resistance appearing cloaked, in a form I most certainlydidn’t expect and didn’t notice at first. The key lesson for me was that we shouldtry to improve our awareness for coinciding change and see if there’s a relevantconnection with the change we’re trying to facilitate. We might learn somethingwe might otherwise never find out.
Look for actions beyond wordsIn addition to looking out for coinciding change, we should look for change inwhat people do, rather than simply in what they say. A seemingly common form ofresistance to change is false agreement. I visited a team for two days to do a quickhealth check and advise on possible improvements in their working practices, andeverything seemed to go smoothly with the team nodding in concert with prettymuch anything I said.1
A couple of weeks later, when checking in with the client, it turned out thatnothing had changed as a result of my visit. The team had held a meeting wherethey’d basically talked themselves out of every single one of my suggestions. Thisparticular gig taught me more than a couple of things about the craft of consult-ing, but perhaps the most relevant one in this context was that words (or othergestures) don’t mean a thing if there’s no concrete action to match those words.Look for those missing actions. But also listen for missing words.
Listen for the missing wordsNo matter what they say about silence being a sign of approval, it can actuallymean either yes or no. Especially in the context of introducing a change thataffects the way people work, silence should be considered a warning sign—apotential indicator of the individual in question having reservations they’re not
1 This should’ve been the give-away for me—nobody ever agrees with everything I say!

446 CHAPTER 12
Adopting TDD
bringing forth. Sure, it could be just that this particular individual doesn’t like tospeak as much as their peers do. The worst alternative is to ignore the silence andassume it means approval. It is much better to bring it up with the individual inquestion, ideally in private and in a neutral surrounding as to not put them intoan uncomfortable position.
Another case of missing words might be where someone is not giving full clo-sure—that is, they’re hiding information and thereby letting others create aflawed understanding of how things really are. Just as it is natural for us to resistchange we don’t feel ownership over, it is natural for us to avoid confrontationthat puts us into an uncomfortable situation. Being, say, the only member of ateam that does not want to adopt TDD can involve a lot of hidden peer pressure—pressure that nobody is knowingly creating but that exists nevertheless.
Again, we should see that the necessary confrontation takes place (and in a sup-portive setting) so that we can overcome the roadblock and proceed with theteam’s adoption process. Note that overcoming the roadblock might not mean thatthe individual in question goes with the flow. Sometimes, the best solution is toappreciate differences in views and live and let live. Bob and Chris, for example,can adopt TDD, even if Dave doesn’t think much of it. Simply making everyoneaware of the situation is already a much healthier situation and facilitates progress.
Yet another form of resistance related to words is one where we hear the rightwords but in a passive context.
The conditional “yes”The conditional “yes” is one that comes with an “if.” Let’s say you’re explaining toyour boss an idea about running the upcoming project using acceptance test-driven development, and they reply with, “I’ll back it 100% if you’ll put together arisk analysis and figure out a way to sell this to the customer and my boss.”Although your boss might be truly with you and the proposed change, it might bethat they’re skeptical; and instead of confronting you with their doubts, they’re try-ing to postpone the confrontation to the indefinite future by asking you to do stuff.
A common pitfall for an enthusiastic change agent hearing these words is todive right in, only to find out later that all the extra work they’ve been asked to doon top of their normal responsibilities is not addressing the boss’s real doubts.The key once again is to listen carefully and patiently before rushing to conclu-sions. A wise man once said that the gap between “yes” and “maybe” is much big-ger than the gap between “no” and “maybe.” Understanding the perspective fromwhich our peers and superiors are looking at the change is essential to identifyingand confronting the right issues.

How to fight resistance 447
In large organizations with lots of bureaucracy, it might be nothing out of theordinary to spend time writing piles of documents in order to make change hap-pen. One contributor to the apparent difficulty in implementing change is alsothat the parties who need to agree about the change are somewhat detachedfrom each other—an issue that often gets highlighted with our next example ofa not-so-obvious form of resistance.
Things that “can’t”When discussing a suggested change with others, we sometimes hear the words,“we can’t.” Quite a number of times after hearing those words, I have immediatelyresponded with something along the lines of, “Oh, you’re right. We can’t do that.”Some of those times, I probably should’ve replied with, “Why?” By getting down tothe root cause of “can’t,” we can get rid of self-imposed constraints and flawedassumptions that are feeding the resistance.
“We can’t” can mean a whole lot of things. Sometimes it really means we can’t,but sometimes it means we won’t—or I won’t. In these situations, we should try tofind out the underlying fear, expectation, or assumption that is at the source ofthis resistance. We could dig around with questions such as, “What’s going to hap-pen if we do?” and see if we could tackle or eliminate the bad things that wouldresult from that. It is likely that when TDD on a particular piece of code is referredto as “impossible,” it is really just “difficult” or something with which we are unfa-miliar—and therefore uncomfortable.
Generalizations in general are fertile ground for uncovering potential byreframing the solution space. Ask “Why?” a few times, and see where you end up.You just might find yourself looking over a brand new scenario.
Stream of higher prioritiesOne of the trickier forms of resistance I’ve seen over my years in consulting hasbeen the higher-priority syndrome. The symptoms of the higher-priority syndromeinclude the change at hand frequently getting overtaken by things that “are ofhigher priority.”
For instance, the database administration group of one client (an extremely tra-ditional, large organization) seemed to be overwhelmed with all sorts of emergen-cies whenever they were supposed to collaborate with our development team onputting together a development environment with private database schemas foreveryone. It turned out that the apparent busyness of the database administratorswas largely a result of them feeling uncomfortable with the new setup, not havinghad such an environment before. Again, the higher priorities might indeed bevalid issues that need taking care of, but they may represent resistance nevertheless.
448 CHAPTER 12
Adopting TDD
Setting up barricadesOne of our natural reactions to change that we feel threatening our safety or com-fort is to respond defensively or with an attack. This defensive behavior might dis-play itself in the form of words, actions, body gestures, or—perhaps morecommonly—all of them. What this behavior is essentially doing is building a barri-cade to protect the individual from the perceived threat of the suggested change.
When facing a barricade, we must resist becoming defensive ourselves. Instead,we need to address the resistance by disarming ourselves and responding withopenness. Acknowledge the resisting individual’s fear, and talk about that insteadof the suggested change. By making explicit the connections between the changeand the fear fueling the resistance, we are creating a safe environment for discus-sion where both parties are sitting on the same side of the table. Sooner or later,the barricade serves no purpose and will get torn down.
With all of these different kinds of resistance we might face as change agents,are there any more tricks to put in our sleeves for tackling them? Obviously Iwouldn’t be asking if there weren’t.
12.3.2 Three standard responses to resistance
Although it’s good—no, it’s downright essential—to be able to recognize andidentify the real source of resistance, we also need to tackle it. The big question is,of course, how? Unfortunately, there’s no magic formula for overcoming resis-tance beyond having an eye for social skills and psychology in general.
The following, however, is a list of things that are commonly applied by changeagents and are known to have worked at least once for everyone—whether in ourprofessional careers, with domestic issues involving the purchase of the latest over-priced electronics, or in the kindergarten courtyard.
LogicThe first line of defense against resistance is every geek’s best friend: logic. It cando miracles to simply go through what the proposed change means in practicalterms and to unravel the logic behind the change leading to the expected benefits.It is especially important to focus on things that directly affect the individual’s ownwork, again, in practical terms. After all, people will accept change for their ownreasons and their reasons alone. This is why we need to be able to show and tell howTDD, for example, contributes to improved productivity and work life.
TrialWhen good ol’ logic doesn’t cut it, we can always try to persuade the resisting indi-vidual to just “give it a shot.” It is far easier to say yes to something that’s perceivedas a temporary solution, a prototype, or a pilot rather than say yes to a decision

How to fight resistance 449
that we’ll have to live with for the rest of our lives. It’s much easier to give in to try-ing TDD for one month than to “start using it,” because for the individual the sen-tence might implicitly continue with “from now to eternity.” Once the individualhas agreed to give it a shot, we must not leave it at that, though. We also need tomake sure that we support the individual throughout the one shot and see that ithas a chance of being successful.
AppealEven if you don’t happen to have a puppy-eyes look that makes grown men shedtears, there’s a good chance that you can appeal to the resisting individual. Usefulalternatives include appealing to the common good (that of the team, the com-pany, and so forth) or to the individual’s professionalism. “Do it for me, Jake” hasalso worked before. Again, getting the individual to agree to give it a try is just thefirst step and motivating the appealed party during the adoption can be hard work.
Beyond these obvious strategies for overcoming resistance, we also have moreindirect and, perhaps, less obvious techniques to consider.
12.3.3 Techniques for overcoming resistance
Although the techniques of logic, trial, and appeal are sometimes enough for thechange agent to get by, sometimes these basic techniques fail to get us over theresistance we’re facing. What follows is a collection of techniques and thought-provokers that might yield extra leverage. Let’s start with changing the goal tosupport the suggested change.
Supporting change with goal settingWhen facing resistance to change, it is sometimes good to expand the solutionspace by changing the situation. We can potentially eliminate the issue by chang-ing the surroundings to be more favorable for the suggested new way of doingthings. By asking for something that’s easier to achieve using test-driven develop-ment than via the preexisting test-last practice, we are making it easier for theindividual to accept the change and make it their own.
What we’re asking for should not be obviously made up just for getting thatsomeone back into the ranks. People don’t like having their arm twisted, and dou-bly so if the twister does so behind our backs. We need to express our requirementsin terms of the results we want, not in terms of the way to achieve those results.
Listen—really listen—and empathizeIt is often said that the most important part of being able to converse effectively islistening. When we address another individual about their resistance, it is extremely

450 CHAPTER 12
Adopting TDD
important for us to show that we care by really listening to what the other has to sayand showing that we’re trying to understand their perspective.
A useful listening technique is to reformulate what we think we heard theother say in our own words, thereby getting confirmation for whether we got itright—a mutually significant piece of information—and perhaps to ask whetherwe left something out. Furthermore, we can try to empathize with the individ-ual by prompting for confirmation for our interpretation of and the sources oftheir feelings.
Having a relationship helps enormously in our ability to empathize with eachother, not least because assuming the best of others becomes easier the better weknow each other. It is amazing how problems magically shrink after we walk downthe corridor to sit with that someone we’ve so far known only as an email handle,really listening to and empathizing with what they have to say.
Don’t think of it as resistanceWhen facing resistance, explicitly labeling it as such might help resolve the prob-lem. Or it could hold us back from resolving the problem. The problem withthinking of resistance as resistance is that of a frame of reference.
The frame of reference in which we present a problem affects the way we thinkof the problem. Using a different frame of reference can yield new tools and putnew solutions at our disposal or even dissolve the problem altogether. In general,it is much better to think of resistance as useful information. In fact, sometimeswe might learn that we ourselves are the ones whose resistance needs to be over-come—it just might be that the change agent themself holds the key to resolvingthe problem at hand.
It might be that we’re promoting quality-oriented techniques to an organiza-tion that thrives not by delivering good software fast but rather by deliveringbloated software in long time frames with massive teams of consultants, effectivelygenerating the company a nice little cash cow in the form of maintenance con-tracts. Techniques like TDD or ATDD might be one of the last things in that spe-cific organization’s interest. In such a situation, we should choose to back offpolitely and focus on creating lasting change somewhere else.
Speaking of choice, sometimes having a choice is all that’s needed to over-come resistance.
Give choiceThey say that a great consultant always lets the client come up with the solution tothe problem. The same could be said about change agents.
People rarely resist an idea they’ve invented themselves or a proposed changethey have been developing. This bias toward easier acceptance of things that we

How to fight resistance 451
feel ownership over also affects the sustainability of a change. Thus, sometimes itmakes sense to create options, alternative solutions if you will, and step back, let-ting the resisting individual make a choice. Once they have made that choice,they’re likely much more committed to it than if they’d been talked into thechange by someone else.
So choice creates ownership. Having choice is not, however, guaranteed tomake it any easier for the resisting individual to overcome their underlying fears.With this in mind, we should also consider providing a degree of familiarity withthe proposed change before presenting the alternatives.
Provide familiarityRelated to our earlier notion of frames of reference, sometimes we can overcomeresistance that is caused by unfamiliarity with the suggested change by framingthe change in familiar terms or by associating it with a previous change, possiblychampioned by the resisting individual in question.
For example, if the resisting individual happens to be a proponent of test auto-mation in the domain of system testing, it might be worth it to try to explain therationale for TDD through the same benefits gained from system-level test automa-tion instead of going on and on about incremental, emerging design.
Another path to the desired sense of familiarity might be through small, safeexperiments where the resisting party can toy with the suggested change withoutbeing constrained by the source of their resistance. Some of my clients haveadopted the practice of organizing a weekly coding dojo,2 a form of structuredgroup-programming session to support the adoption of TDD. Such sessions aretypically considered a special environment where it’s generally acceptable to goofoff a bit and where it’s possible to fail in a safe environment. As such, these sessionsare a good vehicle for providing familiarity to TDD through a shared experience.
Another useful frame of reference to consider as a thinking tool for dealingwith resistance is to look at your situation through the Satir Change Model.
Satir Change ModelThe Satir Change Model describes change as a transformation through four states:the old status quo, chaos, practice and integration, and the new status quo. Changestarts from the current state of practice, moves to the chaos state as the foreign ele-ment—the change—is introduced into the system, eventually stabilizes into prac-tice, and, at some point, becomes the new status quo. One of our problems as
2 For more information, see the Agile Finland wiki (http://wiki.agilefinland.com). We’ll also talk aboutcoding dojos later in this chapter when discussing ways of facilitating change.
452 CHAPTER 12
Adopting TDD
change agents is that we’re likely in a different phase of this transformation thanare our colleagues.
Let’s say we’re coaching a team with their TDD adoption. We might have sev-eral years of active test-driving experience under our belts, whereas the teammember sitting next to us might’ve heard of TDD for the first time the day before.Our personal experience of going through the chaos of turning the design-code-test sequence around took place so long ago that we are less able to empathizewith the feeling. Yet we need to appreciate that the people around us might beexperiencing that chaos very vividly right now and spending a significant amountof energy and brainpower in changing the way they think about programming.
In the words of Dale Emery, a fellow consultant, “You see the beauty and splen-dor of your vision. They see confusion, pain, and risk immediately ahead.” Weneed to accept this difference and adjust our thinking in that frame of reference.Fears that seem unfounded to us can be very real to others. One technique thatcan do wonders for bridging this gap between different perspectives is to concret-ize the transition with a story.
Tell storiesStorytelling is central to how we humans learn. It is far easier to associate with astory than with raw facts laid out in tables or bullet points. As such, storytellingshould also have a place in our toolbox for dealing with resistance. By telling astory, we can help our audience relate to the protagonist in the story and use theplot as a medium for illustrating the feasibility and benefits of the suggestedchange. Listening to a little story can help us think about our situation in waysthat weren’t available to us before.
I have found that storytelling can be extremely effective even if the story doesn’tdirectly relate to the particular individual’s source of resistance. I once told a devel-oper a story of how another team I had trained and coached was having problemswith one of the testing engineers vocally resisting the idea of acceptance TDD andhow the team eventually got to the root cause of the resistance. The developer Itold the story to wasn’t resisting acceptance test-driven development but TDD. Yet,me telling the story about another team got the developer thinking analytically andreflecting about what was happening on that other team—and, as luck would haveit, he was able to continue applying the same analytic thinking to his own situation,digging out the root cause for his own resistance. Telling a story might help even ifit’s not about a situation identical to the present.
Whether in telling a story or in a discussion with an individual resisting thesuggested change, it is important to adjust the weight of our words to the context

How to fight resistance 453
in which they’re said. Most often, we should lighten up in order to improve ourability to influence.
Lighten upThose of us who have led a management role in a command- and control-ori-ented environment are perhaps most vulnerable to using unnecessarily strongwording to help deliver “the message.” In some cases, stressing a point withstrong, absolute words can be the last straw that tips the scale our way. In othercases, however, the added pressure of our words only grounds both parties deeperinto their respective positions. Using lighter words leaves us with more space forconstructive discussion. After all, our chances of resolving resistance suffer ifwe’re not willing to change ourselves.
This handful of techniques for overcoming resistance has helped many achange agent make way for a lasting change. For more useful tips and techniques,you may want to find a copy of Fearless Change by Mary Lynn Manns and Linda Ris-ing (Addison-Wesley, 2004). Right now, however, we need to talk about somethingwe may need to do when the resistance proves to be more than we can handle.
12.3.4 Picking our battles
It’s not easy to come up with the right strategy for overcoming resistance—largely because there’s never a single best strategy. Sometimes the right thing todo is to be persistent and persuasive rather than pushing harder, and sometimeswe really should just step back and slow down. And sometimes we simply need topick our battles.
Tale from the real worldI was once called in to train and coach a development team in TDD. I was facedwith the usual mix of skills and enthusiasm, but one team member in particulargot my attention because of his rather vocal indications of resistance to TDD.Throughout my tenure with the team, he kept expressing his skepticism withoutproviding real arguments. I kept trying to argue the benefits and feasibility of TDDwith the team member but, unfortunately, without success.
This experience taught me something important: some battles are not worthfighting. The troublesome team member represented what I consider a battlethat couldn’t be won—or, to be more accurate, a battle that couldn’t be won intime. After all, I had a limited amount of time available for helping the team asbest I could; and, in hindsight, I ended up spending way too much time fightinga lost battle.

454 CHAPTER 12
Adopting TDD
Compromise can make senseNot all people will adopt TDD, for example, no matter how hard we try to picktheir brain and find solutions for the source of their resistance. Although cer-tainly not the first option to fall back on when seeing the slightest resistance, itshould be considered a valid outcome to make up a compromise that allows forthe willing to continue with successful adoption and the not-so-willing to continuewith their old ways.
This is not to say that such compromises would be easy. It’s usually not a prob-lem to choose a specific portion of the project where the motivated team memberscan employ TDD to its fullest. What typically causes problems, however, is the inter-face between the TDD and non-TDD domains. For example, test-driving codearound a code base that suffers from bad testability is not the most trivial of prob-lems for a beginning test-driven developer. Similarly, the difference in the rhythmof integrating changes between those who develop test-first and those who don’t isoften a source of schism because the latter group typically has to perform largemerges while the former sees no problems whatsoever.
Picking our battles is something we’d like to avoid but sometimes cannot, espe-cially in large organizations with significant variations in people’s backgroundsand attitudes towards their craft.
12.4 How to facilitate adoption
Although no single intervention technique or strategy is a silver bullet, there are anumber of potential interventions that we carry in our proverbial change agenttool belts. We already discussed some such interventions earlier in this chapter,and the following should be considered additional tools from which to choose themost suitable. Furthermore, some of these tools are effectively extensions orabstractions of those we have discussed earlier.
Let’s start from what often happens to be among the first interventions leadingto the change—evangelizing for the change.
12.4.1 Evangelize
One of my largest clients is in the middle of a significant change involving thetransformation of software-intensive product development toward agile methods.The change was started with a series of free-of-charge, open seminars beingannounced within the product-development organization. The intent of theseseminars was to increase awareness of agile methods and to solicit interested par-ties to stand up and get in contact with the change agents representing an inter-nal quality organization. These seminars were run by a well-known consultant and

How to facilitate adoption 455
were well-attended, acting as an essential stepping-stone in triggering changethroughout the organization.
These seminars were pure evangelistic events designed to push a message—totell a positive story about how the future could be transformed by adopting thechange—and to create pull for the change from the audience.
DICEEGuy Kawasaki, the original Apple evangelist turned venture capitalist, coined theacronym DICEE3 to describe the characteristics of a great product:
■ Deep—A great product is deep.■ Indulgent—A great product is a luxury.■ Complete—A great product is more than a physical thing.■ Elegant—A great product has an elegant user interface.■ Emotive—A great product incites you to action.
Although we as change agents in software development organizations are morelikely to evangelize engineering practices and methodologies than products in thetraditional sense, we can extract important points from these characteristics tohelp us as we evangelize for change.
Let’s see how these aspects of evangelism might positively affect the targetaudience. In fact, let’s make things a bit more concrete by using TDD as our con-text—as the thing we’re evangelizing.
Show depthFirst of all, we should seek to present TDD as a deep solution that doesn’t run outof gas after the first five miles. As evangelists, we should show how TDD improvesquality and productivity, and how it works not just in a few special cases but as a holis-tic way of economically developing high-quality software. This means anticipatingand preparing for the inevitable objections starting with “But that won’t work in ourenvironment, because….” We should also pack an array of real-life examples, testi-monials from early adopters within the same organization, pointers to externalresources, and so forth—because our audience will want to see evidence.
Make it specialSecond, we want to present TDD as a luxury. We like to feel special; and by portrayingthe proposed practice as something special, as “something the best developers do,”
3 Guy Kawasaki, Rules for Revolutionaries: The Capitalist Manifesto for Creating and Marketing New Products andServices (Collins, 2000).

456 CHAPTER 12
Adopting TDD
we’re bringing our audience that much closer to taking the first step toward adopt-ing the practice. To paraphrase Guy, the audience should feel like they’re rewardingthemselves by buying our product, which in this case means adopting TDD. Thismeans that we should be talking not just about improving the technical quality ofthe code we produce or about the pragmatic conciseness of avoiding gold plating,but also about how TDD makes our work more exciting and meaningful.
Make it completeGreat evangelists don’t focus too much on the details but instead show their audi-ence how the proposed change fits nicely into the big picture. By offering a com-plete solution with no glaring gaps, we can tackle a lot of natural resistance to“unsafe” new things. Completeness shows that we have thought it through andwe’re not just talking to keep ourselves warm, leaving the really tough problemsfor others to solve. This completeness includes not just the message but also oursupport continuing forward. The audience wants to know that we’re there whenthey need help and support—whether that means off-the-shelf training, coachingand consulting, management sponsorship, or simply fighting the bigger powerbattles for them.
Show the eleganceAlthough the “Elegant” in DICEE refers to an elegant user interface, we have anequivalent need for elegance in evangelizing practices and methodologies. Toquote Guy again, “Things work the way you’d think they would. A great productdoesn’t fight you—it enhances you.” What this means in our context of evangeliz-ing TDD is that we must not fail to show how TDD works for us and how it alignswith our thinking. When weu’re giving a live demonstration to a room full ofdevelopers, we don’t stop at describing what we’re doing. We describe what we’rethinking—describe why we are doing what we are doing. Getting inside thethought processes of someone using TDD is a great way of showing the intuitiveelegance of the technique.
Make it emotiveGreat products sell themselves once we’ve gotten the first box on the market. Asevangelists, one of our primary goals is to turn our audience into evangelists forour “product.” This means we need to make the practice we’re evangelizing emo-tive—something that creates excitement and the urge to tell others. For someoneevangelizing TDD, making the product emotive is largely about conveying ourown excitement and the benefits of TDD as clearly as possible. Focus on how greatit is and get people to try it for themselves, ensuring that they’ll also experiencethe thrill of developing test-first. A key in ensuring this thrill is to have some low-hanging fruits for the audience to start from.

How to facilitate adoption 457
Speaking of low-hanging fruits and getting started with the change, let’s moveon from evangelization to our next intervention technique, which we call loweringthe bar.
12.4.2 Lower the bar
A frequent sense of achievement is important for keeping a change alive and well.We could argue that the single most important of these frequent achievements isthe first one. Making the proposed change seem like something that’s hard toachieve is opposite to our goals. Instead, we need to make it as easy as possible totake the first step, removing or lowering any and all barriers to entry.
Quick path to first successAs a concrete example of what this could be in practice, we might want to provideprepackaged, supported turnkey solutions for setting up a development environ-ment to support the new development practice. We might want to provide tem-plates and sample code. We might provide a five-minute screencast to go with thethorough but less accessible online documentation.
The quick first victory is only the beginning, of course. We must lower the pro-verbial bar not just for the first hurdle but for the whole first run. We do this bycreating slack.
SlackChances are you’ve at least heard of the term slack in the context of TomDemarco’s best-selling title Slack: Getting Past Burnout, Busywork, and the Myth ofTotal Efficiency (Broadway, 2001). Slack, as Demarco defines it, is “the degree offreedom in a company that allows it to change.”
This slack is the ingredient that makes it possible for an individual to take timeto reflect on the change at hand and to avoid feeling unnecessary pressure to per-form. Without enough slack, an individual generally has to take a leap of faith inorder to adopt a new way of working—because it’s their neck on the line if theimprovements promised by the new tool or technique aren’t realized fast enoughto balance out the initial drop in productivity.
Slack could be realized in many ways. For a team in the process of adoptingTDD, management could create slack simply by protecting the team from externalinterruptions such as fixing defects in previously released versions of the software.Another simple way might be to explicitly add a safety buffer by allocating lesswork for the team until they’ve had time to get up to speed with TDD.
Having slack is important for an organization for many reasons, but it is per-haps most essential for change to succeed. Which takes us to the third componentof lowering the bar—making failure an acceptable outcome.

458 CHAPTER 12
Adopting TDD
License to failSlack goes a long way in creating a runway for change to take off. No matter howlong or wide the runway is, however, the perceived risk will never be completelyeliminated. Therefore, we need to make sure that the individuals facing changehave a license to fail—and that they themselves know about having that license!
I was once talking to an ex–project manager who had later become the ScrumMaster (a process coach) for a team that was adopting Scrum, an agile method.Soon, he started seeing the need for improving the quality of code they weredelivering and started promoting TDD. All of the promotion didn’t seem to goanywhere, however: Only one developer started programming test-first, and therest wrote unit tests after the fact.
Interestingly, the ex–project manager was very suspicious of my suggestion to beexplicit with the team about failure being an option. For him, mentioning failureas an option was the equivalent of giving the devil a finger—“they’ll start slackingoff if I say that!” Obviously I didn’t agree with that notion, and neither should you.In fact, not giving the team a signal that it’s OK to fail will likely have a negative effecton the team’s productivity because the team members may feel the need to covertheir own butts in case the change doesn’t deliver the expected improvements.
We’ve talked about three ways to lower the bar in this section—the barrier toentry, if you will. The early success, slack, and a license to fail are tools that workfor many barriers, but they don’t instantaneously make everything alright. Theyalso don’t work unless we are able to recognize the barrier. The best way to recog-nize barriers to entry—the obstacles that are keeping our audience from takingtheir first step toward adoption—is to engage in conversations with our audience.These conversations might take place right after an evangelistic event, or theycould take place at the water cooler a week later. These conversations could (andshould) also take place after the audience has taken their first step—a step thatoften involves training and education.
12.4.3 Train and educate
The next step after evangelizing change is often to organize training. From amotivation point of view, having management that encourages projects and peo-ple to sign up for training is an important act of commitment. Just make sure thatyou’re not promising what you can’t deliver—if training resources are limited toonly a handful of teams during the next months, say so.
Having a great evangelist running through an organization and going on aboutthe next big thing without being followed by proper training can be more devas-tating to a company’s productivity than a natural disaster. After getting people

How to facilitate adoption 459
excited about a change, we must not leave them alone as they look for the path torighteousness. We need to be there to provide guidance and direction.
Over time, as the adoption is proceeding within a group, the role of trainingtends to change as well. I’ve seen a number of successful transitions that startedwith larger-scale, general training sessions for introducing the organization to thefundamentals of the change being adopted. As the teams gained experience withthe new practices and processes, the training leaned more and more toward spe-cific point solutions as responses to specific needs (for example, how to test-drivewhen we have a lot of legacy code or how to test-drive Swing code).
Although training is an economic way of moving information and knowledge,typically only a tiny portion of all the information being passed during a trainingcourse sticks with any given individual. The good news is that the group as a wholetends to catch a much larger portion of the information load. Related to this fact,our next intervention is all about spreading that information within the group.
12.4.4 Share and infect
As Jerry Weinberg, the consultants’ consultant, has taught us, the wider you spreadyour raspberry jelly, the thinner it gets.4 Although evangelists speaking to large audi-ences and experienced practitioners giving training classes are resources not to beignored, the most intensive learning happens on a completely different levelthrough personal, hands-on experiences. Considering that we all learn and seethings differently, being able to share our learning with others is something to whichwe need to pay attention.
We can identify three distinct levels of sharing: personal, team-level, and orga-nizational. We’ll next introduce a handful of tools for facilitating sharing throughall of these levels, starting from the power of proximity and then moving from thecenter of our circle of influence toward the outside.
Sit togetherOne of the easiest ways to increase sharing is to encourage the flow of informationthroughout the team5 by sitting together. Together doesn’t mean adjacent cubicles.Together means close by with a clear line of sight to our co-workers. What we’relooking for is an environment with not the slightest barrier to asking a question orsharing that handy little keyboard shortcut you just figured out. If we can always
4 Gerald M. Weinberg, Secrets of Consulting: A Guide to Giving and Getting Advice Successfully (Dorset HousePublishing Company, 1986).
5 Alistair Cockburn, the creator of the Crystal family of agile methods, refers to this phenomenon asosmotic communication in Agile Software Development (Addison-Wesley, 2001).

460 CHAPTER 12
Adopting TDD
see whether our colleagues are busy (on the phone, for example) and make adecision about whether we can interrupt them with a question or useful informa-tion, we’re more likely to interact with them. If, on the other hand, we have towalk down the hall to speak to someone, we may be disinclined to do so.
The obvious progression from sitting close enough to engage in spontaneousdiscussions is to work together in pairs.
Pair upIn the context of sharing our personal knowledge, working in pairs is about aspersonal as it can get. Specifically, when dealing with development techniquessuch as TDD, pair programming helps enormously in spreading good practices. Inaddition to all the cool keyboard shortcuts and programming tricks and idioms,pair-programming with our peers provides immediate feedback, moral support,and a fresh pair of eyes that contribute to supporting our personal adoption andunderstanding of good practices.
Having said that, it is also essential for people to have time and space forabsorbing the flux of change, letting them take personal ownership of thechange. Speaking of time and space, on a team level, we can and should considerputting aside some time for the whole team to sit down and share.
Organize sharing sessionsModern software development is very much a people-oriented activity—team-work. One of the components of effective teamwork is acting as a unit with sharedgoals, shared understanding, and—to some degree—shared opinions. In the mid-dle of a change, reinforcing the team’s consensus about its development practicesis as important as ever. Some examples of the kind of sharing sessions that wemight want to consider include brown bags and coding dojos.
Brown-bag sessions derive their name from people carrying their lunch into ameeting room in little brown bags, the idea being that people could listen to a col-league talking about some interesting topic while they’re eating their lunch. Inmost companies, however, the brown bags have turned to more or less regular ses-sions that take place after lunch or after office hours rather than during regularlunch (probably because people like having their lunch served on real plates).
Coding dojos, on the other hand, are more interactive sessions where softwareis developed on a single, shared machine, projecting the screen for everyone to see.The original6 coding dojos were more like presentations, with someone walking
6 The nice folks in the Paris XP community started running weekly gatherings in 2005 and named themthe Coding Dojo.

How to facilitate adoption 461
through a rehearsed development scenario, explaining every step along the way andthus sharing their thinking and technique with others. Since then, other codingdojos have been organized using a more interactive format, where the session isgiven a problem to solve and the participants develop the solution as a group, rotat-ing a pair of developers on the keyboard while others observe.
Brown-bag sessions and coding dojos are good for spreading knowledge andcreating a supportive, open environment where people feel safe to experimentand learn from their peers. There’s no reason to restrict such sessions to only indi-vidual teams or projects, however. These same session formats can be used equallywell for spreading knowledge on the organizational level.
Spread outAs change progresses to multiple little islands within the organization, sharingknowledge between these islands increases in importance. By organizing opensharing sessions that can be attended by anyone across organizational boundaries,we can start to build up communities of practice that help keep the change aliveand give direction. As the change grows beyond the capacity of the originalchange agents, having a network of communities of practice facilitates continuingsupport for those taking their first steps and provides a sounding board for thosefarther along in their adoption.
So far, we have discussed interventions ranging from the more abstract meansof evangelizing to the more personal level of sharing knowledge. Along with thesetechniques, it is almost always a good idea to provide fresh perspective and a nur-turing touch to teams’ adoption process through coaching and facilitation.
12.4.5 Coach and facilitate
Along with off-the-shelf–style training and formal forums for sharing information,it often makes sense to engage teams with a coach or facilitator. Whereas trainingtends to focus on providing information and on honing skills, coaching and facili-tation is more about taking a step back and looking at what we’re doing from anoutsider’s perspective. Coaching helps us learn things about ourselves and ourbehavior—and about coping with these findings—rather than about the changewe’re adopting.
Get a coachEffective coaching requires a degree of detachedness from the context in which thecoaching is happening. Even the most experienced coaches are vulnerable to biasand blind spots when they are part of the context. Thus, one of the first steps in ourquest for providing effective coaching for our team is to get a coach from outsidethe team. The coach doesn’t have to be an external consultant, though, as long as

462 CHAPTER 12
Adopting TDD
they have the skills, experience, and authority necessary to work effectively in acoaching role using inquiry, introspection, and discussion.
An experienced coach can work with the team and individuals, helping themfind solutions for the problems at hand and pointing out problems the team isn’table to see from where they’re standing. The coach is not a consultant in the tra-ditional sense, because they don’t bring solutions. Rather, they help clients findsolutions. The coach should not be just thrown at the team, however, because akey ingredient to a successful coaching relationship is a mutual agreement overthe scope and goal of the coaching. In other words, make the coach available, butdon’t force them down the team’s collective throat.
The coach’s job is to listen and observe and then to advise, educate, and actas a mirror for the team to reflect on their feelings and behavior. One specificarea where the skills of a professional coach can be especially helpful is in facili-tating meetings.
Facilitate meetingsThere’s more to facilitating meetings than keeping track of the agenda andother practical arrangements. In the context of helping a team through change,a much more important aspect of facilitating meetings is in helping participantsunderstand all alternatives and the underlying forces when making decisions.The facilitator plays an important role in increasing the participants’ awarenessof their own behaviors and biases in conflict situations, smoothing the team’sway toward a consensus.
The facilitator needs to stay aware of the undercurrents below the ongoinginteractions, making sure that everyone participates and that the team is aware ofall the issues—all the while ensuring that the environment remains safe and sup-portive rather than hostile and disruptive. In order to reach the meeting’s objec-tives, the facilitator needs to balance the meeting’s structure, pace, and style ofinteraction. In some cases, the focus should be on keeping the meeting enjoyable;in others, our focus should be on results and getting the job done. Sometimes thismight mean focusing on external threats in a cooperative mode, and other timesthe best approach might be more competitive.
Helping participants unleash their untapped resources is part of the coach’sjob, and techniques such as introspection and reflection are essential tools inachieving that. Let’s talk a bit more about the essence of stopping to talk.
Stop to talkA specific type of meeting we can use in coaching a team—or an individual—isthe reflection or retrospective meeting. A regular reflection meeting establishes aspace where participants can freely speak their minds about past successes and

How to facilitate adoption 463
failures and about conflicting opinions, and generally feel safe in bringing forthissues about the team’s way of working. By looking at how we’re doing with ouradoption, we keep the change alive and show ourselves that change is indeed hap-pening. This can be surprisingly important. I have more than once walked out ofa reflection meeting wondering, “Who are all these strange people?” after seeingthe team’s energy level jump from near-zero to way up there simply because theyfinally had a chance to speak up and talk things through.
Coaching and facilitation are very much involved with increasing participa-tion. As our next concrete intervention, let’s look at increasing participation andcommitment by giving the resisting individual a role that makes them part ofthe change.
12.4.6 Involve others by giving them roles
As we’ve learned by now, people resist change more when they aren’t involved inthat change. As such, it is obvious that we can reduce resistance by making peoplepart of the change. One of the ways of doing that includes giving people roles.
Involve stakeholder groupsThink of an organization that is trying to adopt acceptance TDD and is facingstrong resistance from the centralized QA department, whose team members arefeeling their jobs are at stake and cannot accept that “automated acceptance testscan replace professional test engineers.” We know that this is not what the changeis about—test engineers remain an important group of people with specialistskills—but the test engineers might not know that.
In this scenario, we should invest in educating the QA department about whatexactly acceptance TDD is and how the change will and will not affect them. Inaddition to enlightening the QA department, we can engage in a collaborative sys-tem of transforming the processes involved in moving toward acceptance TDD.Part of that process involves giving the test engineers new roles.
Turning threats into opportunitiesFor example, test engineers with programming skills could become responsiblefor automating test scenarios and consulting developers on the system’s testability.Test engineers who are lacking programming skills, on the other hand, couldfocus on exploratory, context-driven testing as a complementary testing practicefor automated tests, or have their new roles focus more on the customer-facingpart of the equation. Their responsibilities might revolve around developing spec-ifications with the customer representatives, analyzing test scenario coverage,coordinating non-functional testing, and so forth.

464 CHAPTER 12
Adopting TDD
With a little thought, we can turn threats that are acting as a source of resis-tance into exciting opportunities for personal development. When giving peoplenew roles, it is also important to pay attention to who we are giving what kinds ofroles. Social leaders are an especially powerful group in this situation.
Identify social leadersEvery group has informal, social leaders. Although the social leaders are often peo-ple who others look up to and rely on for advice, they are not necessarily the mostexperienced or the most skilled individuals in the group. People who have a natu-ral tendency to motivate others and generally keep the pack together are oftengreat social leaders. By giving a suitable role to such a social leader, we essentiallycreate a “deputy change agent” and give them a megaphone to run with.
Getting a social leader excited about the change is like throwing fuel on a fire—it can blow up obstacles faster than an external change agent ever could. Givingroles can also be used for bringing about change because doing so destabilizes thestatus quo by, for example, assigning roles outside of the individuals’ skill sets.
12.4.7 Destabilize
Status quo is about stability and safety. In order to disrupt the status quo and toencourage change, we can intentionally make the current safe place less safe,thereby causing people to seek for a new stable state—a safe place—throughchange. The logic behind this strategy is in our fundamental need for safety, con-trol, and certainty. As long as these needs are met, a change will cause resistance.When some or all of these are already lacking, further change will likely causemuch less of a reaction—especially if the announced change purports to restorethese needs.
We can disrupt the status quo in many ways, but all of them involve raisingawareness of what’s really happening. For example, by moving the focus from per-ceived threats within the organization to the real threat coming from the competi-tion, we can often turn resistance into powerful collaboration towards a commongoal—survival. One approach that has woken up resisters before is to presenthard numbers about the company’s less-than-favorable financial performance,showing how the competition is kicking ass. Yet another effective disruption hasbeen to bring developers in contact with an angry customer. Just be wary of desta-bilizing too much—the shock might make people freeze or rebel rather thanpush for change that we’re after.
As our final intervention technique before summing up, let’s discuss delayedrewards.

Summary 465
12.4.8 Delayed rewards
By now, we should realize the importance of people like the internal changeagents, external coaches, and social leaders. All of these roles have a lot to con-tribute to a successful adoption of change. Similarly, losing some of these key peo-ple might prove to be disastrous for the adoption process. (We’ve likely allwitnessed at least one initiative that has quietly faded away after such a key personleft the company or moved on to other tasks.) One way to minimize the risk of thishappening is to use delayed rewards.
The core idea behind delayed rewards is that there will be incentives for thekey people to see the whole thing through. The delayed reward might be purefame and glory, a promotion, or cold hard cash, possibly tied to improvements inthe company’s financial performance. The important things to remember arethat these rewards must be balanced and that the delayed rewards are not meantas a substitute for regular compensation but an extra on top. In other words, itdoesn’t mean not rewarding your key people—and everyone else involved in thechange—early and often!
12.5 Summary
In this chapter, we learned that the chances of successful personal adoption aregreater when we know our stuff, understand why we should be interested inadopting the suggested change in the first place, have a sense of achievementthroughout the adoption process, and exhibit integrity and openness all the wayin order to shield ourselves from unnecessary external pressure. We also learnedthat, although timing is perhaps not everything, it certainly matters.
Talking about getting others aboard, we recognized three directions we needto manage as change agents in different roles—upward, downward, and horizon-tally—and we discussed some of the distinct pitfalls we should avoid in each ofthese roles.
We also enumerated a number of indicators for not-so-obvious resistance,including spoken and unspoken communication and actions that masqueraderesistance as something else. We also discussed a number of techniques for deal-ing with resistance, starting from a handful of standard responses—good ol’ logic,a temporary agreement, and the power of appeal—and moving on to more indi-rect ways of overcoming resistance, such as thinking tools and more effectivelyadapting our behavior to the situation.
To finish our journey through being agents for organizational change, we wentthrough a number of possible interventions for facilitating adoption. We studiedthe secrets of evangelizing effectively, and we shared some tips for getting change

466 CHAPTER 12
Adopting TDD
started by lowering the bar and by providing support in the form of training andeducation. We further discussed ways to share our knowledge and infect peersand peer groups with this change. Finally, we talked about what we can achievewith coaching and facilitation, as well as by giving and communicating roles tothose involved. To top it off, we also threw in the possibility of encouragingchange by destabilizing the status quo, and we reminded ourselves about the needto keep key people involved, possibly using delayed rewards.
Leading change is one of the toughest jobs in any organization or culture. Yetit is one of the key capabilities for the continued survival of a company. As a finalpiece of advice for an aspiring change agent, be persistent. It’s going to be arough ride, whatever you do. Just keep your eyes and ears open, know your tool-box, and use your brain—and you’ll do just fine.
Plus, even if you feel like you’re stumbling and constantly falling in the mud pud-dle, check your pockets—you might have caught a lot of fish without knowing it.

appendix A:Brief JUnit 4 tutorial
467

468 APPENDIX A
Brief JUnit 4 tutorial
import static org.junit.Assert.*;import org.junit.*;import java.io.*;
public class TestConsoleLogger {
private static final String EOL = System.getProperty("line.separator"); private ConsoleLogger logger; private PrintStream originalSysOut, originalSysErr; private ByteArrayOutputStream sysOut, sysErr;
@Before public void createFixture() { logger = new ConsoleLogger(); originalSysOut = System.out; originalSysErr = System.err; sysOut = new ByteArrayOutputStream(); sysErr = new ByteArrayOutputStream(); System.setOut(new PrintStream(sysOut)); System.setErr(new PrintStream(sysErr)); }
@After public void resetStandardStreams() { System.setOut(originalSysOut); System.setErr(originalSysErr); }
@Test public void infoLevelGoesToSysOut() throws Exception { logger.info("msg"); streamShouldContain("[INFO] msg" + EOL, sysOut.toString()); }
@Test(timeout = 100) public void errorLevelGoesToSysErr() throws Exception { logger.error("Houston..."); streamShouldContain("[ERROR] Houston..." + EOL, sysErr.toString()); }
private void streamShouldContain(String expected, String actual) { assertEquals("Wrong stream content.", expected, actual); }}
We get assertion methods from JUnit’s Assert class through a static import.
The name of the class should indicate that it’s a test—for example, have the classname start with Test.
B
C
E
F
I
J
B
D
G H
B
C

APPENDIX A
Brief JUnit 4 tutorial 469
The instance variables set up in the @Before method represent the common fix-ture for the test methods.
We can prepare a known state for the test by tagging a public method with the@Before annotation.
We can clean up after our test by tagging a public method with the @After annota-tion.
All public void methods tagged with @Test are considered test cases by the JUnit 4TestRunner.
Test methods can declare any exceptions—JUnit catches them.
The @Test annotation also allows for timing tests, testing for expected exceptions,and so on.
We can declare any number of helper methods as long as they don’t look like testmethods.
D
E
F
G
H
I
J

appendix B:Brief JUnit 3.8 tutorial
470

APPENDIX B:
Brief JUnit 3.8 tutorial 471
import java.io.*;
public class TestConsoleLogger extends junit.framework.TestCase {
private static final String EOL = System.getProperty("line.separator"); private ConsoleLogger logger; private PrintStream originalSysOut, originalSysErr; private ByteArrayOutputStream sysOut, sysErr;
@Override protected void setUp() { logger = new ConsoleLogger(); originalSysOut = System.out; originalSysErr = System.err; sysOut = new ByteArrayOutputStream(); sysErr = new ByteArrayOutputStream(); System.setOut(new PrintStream(sysOut)); System.setErr(new PrintStream(sysErr)); }
@Override protected void tearDown() { System.setOut(originalSysOut); System.setErr(originalSysErr); }
public void testInfoLevelGoesToSysOut() throws Exception { logger.info("msg"); streamShouldContain("[INFO] msg" + EOL, sysOut); }
public void testErrorLevelGoesToSysErr() throws Exception { logger.error("Houston..."); streamShouldContain("[ERROR] Houston..." + EOL, sysErr); }
private void streamShouldContain(String expected, ByteArrayOutputStream stream) { assertEquals("Stream content doesn’t match expected. ", expected, stream.toString()); }}
The name of the class should indicate that it’s a test—for example, have the classname start with Test.
We extend from JUnit’s TestCase class.
The instance variables set up in the setUp() method represent the common fix-ture for the test methods.
BC
F
G
J
1)
D
H
I
F
E
B
C
D

472 APPENDIX B:
Brief JUnit 3.8 tutorial
We can prepare a known state for the test by overriding the protected setUp()method.
If using Java 5, it’s good to add the @Override annotation to setUp() and tear-Down() to avoid typos.
We can clean up after our test by overriding the protected tearDown() method.
All public void methods starting with test are considered test cases by the JUnit 3.8TestRunner.
Test methods can declare any exceptions—JUnit catches them.
We can declare any number of helper methods as long as they don’t look like testmethods.
Extending TestCase gives us, among other things, a bunch of assertion methodssuch as assertEquals().
E
F
G
H
I
J
1)

appendix C:Brief EasyMock tutorial
473

474 APPENDIX C:
Brief EasyMock tutorial
import static org.easymock.EasyMock.*; import org.easymock.EasyMock; import org.junit.Test;
public class TestInternetRelayChat {
@Test public void messagesAreOnlyDeliveredToOtherClients() throws Exception { String msg = "Maisk Maisk!";
Client koskela = EasyMock.createMock(Client.class); Client freeman = EasyMock.createMock(Client.class); Client himberg = EasyMock.createMock(Client.class);
expect(himberg.onMessage("lasse", msg)).andReturn(true);
freeman.onMessage("lasse", msg); expectLastCall().andReturn(true);
replay(freeman, koskela, himberg);
InternetRelayChat irc = new InternetRelayChat(); irc.join("inhuman", freeman); irc.join("vilbert", himberg); Prompt prompt = irc.join("lasse", koskela); prompt.say(msg);
verify(freeman, koskela, himberg); }}
Import static utility methods from EasyMock and the class itself.
Ask EasyMock to create mock objects for the given interface.
Record expected interactions.
This is an alternative, functionally equivalent syntax for the previous syntax.
When we’re done recording expectations, we move the mocks to replay mode.
With everything set up, we exercise the code under test.
We ask the mock objects to verify that the expected interactions took place.
C
D
E
G
H
F
B
C
D
E
F
G
H
B

appendix D:Running tests with Ant
475

476 APPENDIX D
Running tests with Ant
Apache Ant is the de facto build tool used by Java developers all around the world.Not surprisingly, Ant has had JUnit integration as long as I can remember. Here’sa quick tutorial for creating an Ant script that runs our unit tests and cranks out apretty HTML report of the results. If you’re not familiar with Ant, please refer tothe online documentation1 or grab one of the excellent books on the topic.2
Let’s start our little tutorial and see what kind of a project we’re dealing with.
D.1 Project directory structure
From the perspective of build scripts, we’re not interested in what our Java classescan do. We only care about the code compiling, us being able to run all auto-mated tests as part of our build, and getting a nice report out of the test run,which we can browse for details on test failures and so forth. The project’s direc-tory structure dictates a lot of what our build script needs to do. Consider the rel-atively simple directory structure depicted in listing D.1.
/SampleProject /src /main /com/tddinaction/.../ProductionCode.java /test /com/tddinaction/.../TestCode.java /bin /classes-main /com/tddinaction/... /classes-test /com/tddinaction/...
1 Especially the User’s Manual (http://ant.apache.org/manual) and the Ant Wiki (http://wiki.apache.org/ant).
2 I would personally recommend Ant in Action by Steve Loughran and Erik Hatcher (Manning Publica-tions, 2007). It’s basically a 2nd edition of their earlier book, Java Development with Ant (Manning Publi-cations, 2002).
Listing D.1 Sample directory structure
Apache Ant and JUnit 4 compatibilityJUnit 4 support was introduced in the 1.7 release of Apache Ant, which meansthat you’ll need to downgrade your tests to use JUnit 3.8 if you don’t have or can-not upgrade your Ant version to the 1.7 branch. The versions of Ant and JUnityou’re using do not, however, affect your build script.
Production code under src/main
B
Test code under src/testC
Compiled code follows similar separation
D

APPENDIX D
Running tests with Ant 477
/lib /main commons-logging.jar /test junit.jar build.xml
Our source code is split into two directories: B src/main and C src/test. Havingseparate source trees provides for an easier distinction between test code and pro-duction code and also because makes writing build scripts a lot easier—everythingunder X is about X, everything under Y is about Y.
We also have a similar split for compiled class files. D Compiled productioncode goes to bin/classes-main, and compiled test code goes to bin/classes-test.Not surprisingly, E the libraries we depend on are separated under lib/main andlib/test. Once again, the separation makes it easier to manage the different sets ofdependencies for runtime and development and simplifies the act of creating adeployment archive, which should only contain compiled production code andonly runtime dependencies.
The Ant build script, F build.xml, is located in the root of the project direc-tory. And speaking of the build script, we’re ready to look inside it. Let’s start withthe first step of getting all code compiled.
D.2 The basics: compiling all source code
For this project, the build.xml used for compiling all source code to their respec-tive output directories might look something like listing D.2.
<project name="SampleProject" default="compile">
<path id="classpath.main"> <fileset dir="lib/main" includes="**/*.jar" /> </path>
<path id="classpath.test"> <path refid="classpath.main" /> <pathelement location="bin/classes-main" /> <fileset dir="lib/test" includes="**/*.jar" /> </path>
<target name="clean"> <delete failonerror="false" includeemptydirs="yes"> <fileset dir="bin" includes="classes-*/**" />
Listing D.2 build.xml for compiling all code for the SampleProject
Dependencies separated for production and test code
E
F Build script in root of project directory
Different compilation class paths for production and test code
Target for cleaning up compilation artifacts
B

478 APPENDIX D
Running tests with Ant
</delete> </target>
<target name="compile"> <mkdir dir="bin/classes-main" /> <javac srcdir="src/main" destdir="bin/classes-main" debug="on" classpathref="classpath.main" />
<mkdir dir="bin/classes-test" /> <javac srcdir="src/test" destdir="bin/classes-test" debug="on" classpathref="classpath.test" /> </target>
</project>
This is familiar to those who have seen Ant build scripts. The script in listing D.2provides the developer with two targets to execute: B clean and C compile. WithAnt installed, typing ant clean on the command prompt deletes all compiledclass files. Typing ant compile compiles all .java source files into the bin directory.Typing ant clean compile first deletes existing class files and then compiles every-thing from scratch. And, because the project’s default target is configured as com-pile, just typing ant is the same as typing ant compile.
But what about running those tests we’re now compiling?
D.3 Adding a target for running tests
JUnit is integrated into Ant through the <junit/> task. In order to make runningour unit tests part of our build, we need to add a new target to build.xml, whichuses the <junit/> task. Listing D.3 shows an example of what this new targetmight look like.
<project name="SampleProject" default="test">
<property name="junit.data" value="reports/junit/data" /> ...
<target name="test" depends="compile"> <mkdir dir="${junit.data}" /> <junit printsummary="yes" fork="true" haltonfailure="no"> <classpath> <path refid="classpath.test" /> <pathelement location="bin/classes-test" /> </classpath>
Listing D.3 build.xml with a test target using Ant’s standard <junit/> task
Target for compiling all source code
C
Different compilation class paths for production and test code
Use test target as default from now on
Use property foroutput path to
reduce duplication
B
Need everything in class path including compiled test code
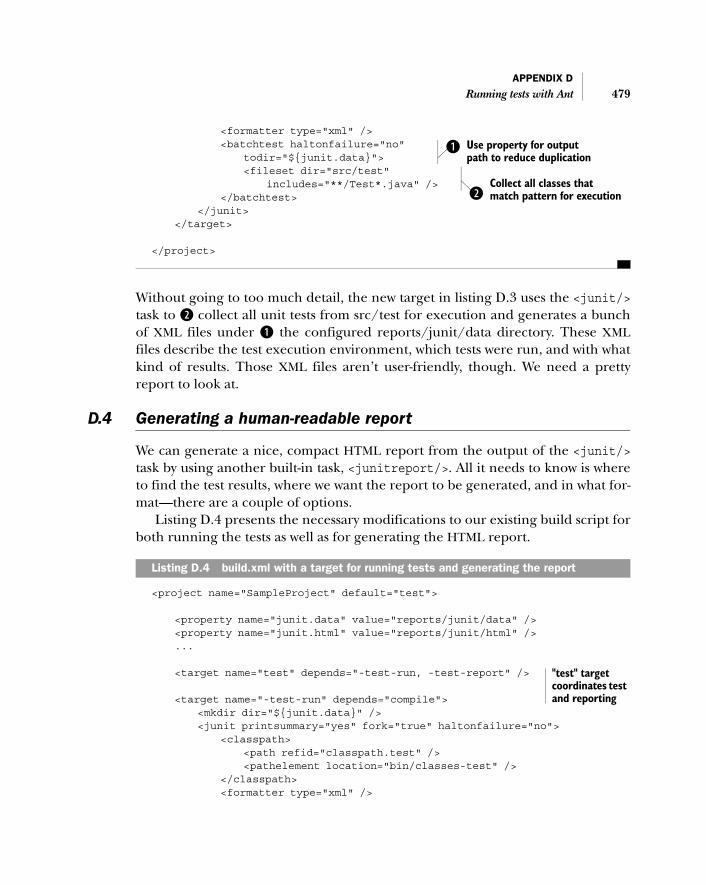
APPENDIX D
Running tests with Ant 479
<formatter type="xml" /> <batchtest haltonfailure="no" todir="${junit.data}"> <fileset dir="src/test" includes="**/Test*.java" /> </batchtest> </junit> </target>
</project>
Without going to too much detail, the new target in listing D.3 uses the <junit/>task to C collect all unit tests from src/test for execution and generates a bunchof XML files under B the configured reports/junit/data directory. These XMLfiles describe the test execution environment, which tests were run, and with whatkind of results. Those XML files aren’t user-friendly, though. We need a prettyreport to look at.
D.4 Generating a human-readable report
We can generate a nice, compact HTML report from the output of the <junit/>task by using another built-in task, <junitreport/>. All it needs to know is whereto find the test results, where we want the report to be generated, and in what for-mat—there are a couple of options.
Listing D.4 presents the necessary modifications to our existing build script forboth running the tests as well as for generating the HTML report.
<project name="SampleProject" default="test">
<property name="junit.data" value="reports/junit/data" /> <property name="junit.html" value="reports/junit/html" /> ...
<target name="test" depends="-test-run, -test-report" />
<target name="-test-run" depends="compile"> <mkdir dir="${junit.data}" /> <junit printsummary="yes" fork="true" haltonfailure="no"> <classpath> <path refid="classpath.test" /> <pathelement location="bin/classes-test" /> </classpath> <formatter type="xml" />
Listing D.4 build.xml with a target for running tests and generating the report
Use property for output path to reduce duplication
B
Collect all classes that match pattern for executionC
"test" target coordinates test and reporting

480 APPENDIX D
Running tests with Ant
<batchtest haltonfailure="no" todir="${junit.data}"> <fileset dir="src/test" includes="**/Test*.java" /> </batchtest> </junit> </target>
<target name="-test-report" depends="-test-run"> <mkdir dir="${junit.html}" /> <junitreport todir="${junit.data}"> <fileset dir="${junit.data}" includes="TEST-*.xml" /> <report format="frames" todir="${junit.html}" /> </junitreport> </target>
</project>
That’s it. We now have an Ant build script for compiling our code, running ourunit tests, and producing a pretty report of the results!
“test” target coordinates test execution and report generation
<junitreport/> generates aggre- gated XML in data directory…
…and produces HTML report in framesformat under reports/junit/html

resourcesWorks cited
Alur, Deepak, Dan Malks, and John Crupi. Core J2EE Patterns: Best Practices and Design Strategies. Prentice-Hall, 2003.
Ambler, Scott W. and Pramodkumar J. Sadalage. Refactoring Databases: Evolutionary Database Design. Addison-Wesley, 2006.
Cohn, Mike. User Stories Applied: For Agile Software Development. Addison-Wesley, 2004.
Cooper, Alan. The Inmates Are Running the Asylum: Why High Tech Products Drive Us Crazy and How to Restore the Sanity. Sams, 1999.
Crane, Dave, Bear Bibeault, Jord Sonneveld, Ted Goddard, Chris Gray, Ram Venkataraman, and Joe Walker. Ajax in Practice. Manning Publications, 2007.
Crane, Dave, Eric Pascarello, and Darren James. Ajax in Action. Manning Publications, 2005.
Cunningham, Ward and Rick Mugridge. Fit for Developing Software: Framework for Integrated Tests. Addison-Wesley, 2005.
DeMarco, Tom. Slack: Getting Past Burnout, Busywork, and the Myth of Total Efficiency. Broadway, 2001.
DeMarco, Tom and Timothy Lister. Peopleware: Productive Projects and Teams. Dorset House Pub-lishing Company, 1999.
Feathers, Michael. Working Effectively with Legacy Code. Addison-Wesley, 2004.
Fowler, Martin, Kent Beck, John Brant, and William Opdyke. Refactoring: Improving the Design of Existing Code. Addison-Wesley, 1999.
Gamma, Erich, Richard Helm, Ralph Johnson, and John Vlissides. Design Patterns: Elements of Reusable Object-Oriented Software. Addison-Wesley, 1995.
Hillenius, Eelco and Martijn Dashorst. Wicket in Action. Manning Publications, 2007.
Kawasaki, Guy. Rules for Revolutionaries: The Capitalist Manifesto for Creating and Marketing New Products and Services. Collins, 2000.
Kerievsky, Joshua. Refactoring to Patterns. Addison-Wesley, 2004.
Kuchana, Partha. Software Architecture Design Patterns in Java. Auerbach, 2004.
481

482 RESOURCES
Larman, Craig. Agile & Iterative Development: A Manager’s Guide. Addison-Wesley, 2003.
Loughran, Steve and Erik Hatcher. Ant in Action: Java Development with Ant, Second Edition. Manning Publications, 2007.
Mann, Kito. JavaServer Faces in Action. Manning Publications, 2005.
Manns, Mary Lynn and Linda Rising. Fearless Change: Patterns for Introducing New Ideas. Addison-Wesley, 2004.
Rainsberger, J. B. JUnit Recipes: Practical Methods for Programmer Testing. Manning Publications, 2005.
Ship, Howard M. Lewis. Tapestry in Action. Manning Publications, 2004.
Additional resources
Ambler, Scott W. Agile Database Techniques: Effective Strategies for the Agile Software Developer. Wiley, 2003.
Beck, Kent. Test Driven Development: By Example. Addison-Wesley, 2002.
Cohn, Mike. Agile Estimating and Planning. Prentice Hall PTR, 2005.
Duvall, Paul, Steve Matyas, and Andrew Glover. Continuous Integration: Improving Software Quality and Reducing Risk. Addison-Wesley, 2007.
Goetz, Brian, Tim Peierls, Joshua Bloch, Joseph Bowbeer, David Holmes, and Doug Lea. Java Con-currency in Practice. Addison-Wesley, 2006.
Meszaros, Gerard. xUnit Test Patterns: Refactoring Test Code. Addison-Wesley, 2007.
Newkirk, James W. and Alexei A. Vorontsov. Test-Driven Development in Microsoft .NET. Microsoft Press, 2004.
Schwaber, Ken and Mike Beedle. Agile Software Development with SCRUM. Prentice Hall, 2001.
Online resourcesAll URLs listed here were valid at the time of publishing. No doubt some of these willchange over time.
Agical AB. RMock: Java Mock Object Framework to Use with JUnit. http://rmock.sf.net.
Agile Finland Community. Agile Finland Community Wiki. http://wiki.agilefinland.com.
Apache Community. Apache Ant Community Wiki. http://wiki.apache.org/ant.
———. Apache Ant: A Java-Based Build Tool. http://ant.apache.org.
———. Apache Ant Manual. http://ant.apache.org/manual.
———. Apache Maven: A Java-Based Build Tool. http://maven.apache.org.
———. Continuum: A Continuous Integration Server. http://maven.apache.org/continuum.
———. Jakarta Commons Lang: A Utility Library for the java.util API. http://jakarta.apache.org/commons/lang.

RESOURCES 483
———. Jakarta Commons VFS: A Virtual File System API for Java. http://jakarta.apache.org/commons/vfs.
———. Wicket: A Component-Based Web Development Framework for Java. http://wicket.sf.net.
Ashley, Nick, Graham Tackley, and Sam Newman. dbdeploy: A Database Change Management Tool. http://dbdeploy.com/.
Atlassian Software Systems Pty Ltd. Bamboo: A Continuous Integration Server. http://www.atlassian.com/software/bamboo.
Atomic Object LLC. System Testing in Ruby. http://atomicobject.com/pages/System+Testing+in+Ruby.
Bossicard, Vladimir R. PrivateAccessor: A Utility Class for Overriding Access Modifiers in Java. http://junit-addons.sourceforge.net/junitx/util/PrivateAccessor.html.
Bowler, Mike. GSBase: A JUnit Extension of Test Utilities. http://gsbase.sf.net.
Cenqua. Clover: Code Coverage Analysis Tool for Java. http://www.cenqua.com/clover.
Cunningham, Ward. Fit: Framework for Integrated Test. http://fit.c2.com.
Diehl and Associates. Mckoi Database: A Lightweight, Java-Based Relational Database. http://mckoi.com/database.
Feathers, Michael. “The ‘Self’-Shunt Unit Testing Pattern.” January 2001. http://www.objectmentor.com/resources/articles/SelfShunPtrn.pdf.
———. “The Humble Dialog Box.” August 2002. http://www.objectmentor.com/resources/articles/TheHumbleDialogBox.pdf.
———. “Working Effectively With Legacy Code.” February 2002. http://www.objectmentor.com/resources/articles/WorkingEffectivelyWithLegacyCode.pdf.
Fowler, Amy. “A Swing Architecture Overview.” http://java.sun.com/products/jfc/tsc/articles/architecture/.
Fowler, Martin. “Continuous Integration.” May 1, 2006. http://www.martinfowler.com/articles/continuousIntegration.html.
———. “Mocks Aren’t Stubs.” January 2, 2007. http://www.martinfowler.com/articles/mocksArentStubs.html.
———. Passive View. July 18, 2006. http://www.martinfowler.com/eaaDev/PassiveScreen.html.
———. Supervising Controller. June 19, 2006. http://www.martinfowler.com/eaaDev/SupervisingPresenter.html.
Freeman, Steve, Tim Mackinnon, Nat Pryce, Mauro Talevi, and Joe Walnes. JMock: A Dynamic Mock Object Library for Java. http://www.jmock.org.
hsql Development Group. HSQLDB: A Lightweight, Java-Based Relational Database. http://www.hsqldb.org.
484 RESOURCES
Hubbard, Charlie and Prashant Dhokte. PrivilegedAccessor: A Utility Class for Overriding Access Modifiers in Java. http://groups.yahoo.com/group/junit/files/src/PrivilegedAccessor.java (requires a Yahoo! account).
Jeffries, Ron. “Essential XP: Card, Conversation, Confirmation.” August 30, 2001. http://www.xprogramming.com/xpmag/expCardConversationConfirmation.htm.
———. List of testing-related software. http://www.xprogramming.com/software.htm.
Koskela, Lasse. Bean Inject: Dependency Injection Framework for Java. http://www.laughingpanda.org/mediawiki/index.php/Bean_Inject.
———. Introduction to Code Coverage. January 2004. http://www.javaranch.com/newsletter/200401/IntroToCodeCoverage.html.
———. JspTest: A JUnit Extension for Unit Testing JavaServer Pages. http://sourceforge.net/projects/jsptest.
Martin, Robert C. “Design Principles and Design Patterns.” January 2000. http://www.objectmentor.com/resources/articles/Principles_and_Patterns.pdf.
———. “SRP: The Single Responsibility Principle.” February 2002. http://www.objectmentor.com/resources/articles/srp.pdf.
Meszaros, Gerard. xUnit Test Patterns. http://www.xunitpatterns.com.
Mort Bay Consulting. Jetty: An Embeddable Java EE Web Container. http://jetty.mortbay.com.
Mugridge, Rick. FitLibrary: An Extension Package for Fit and Fitnesse. http://sourceforge.net/projects/fitlibrary.
NetBeans Community. Jellytools Module: Jemmy Extension for Creating UI Tests for NetBeans IDE. http://jellytools.netbeans.org.
———. Jemmy: UI Testing Library for Java. http://jemmy.netbeans.org.
Payne, Bob. Agile Toolkit Podcast. Interview with Arlo Belshee at Agile 2005: “Promiscuous Pairing and the Least Qualified Implementer.” http://media.libsyn.com/media/agiletoolkit/ArloBelsheeAgile2005.mp3.
Perrotta, Paolo. The Virtual Clock Test Pattern. March 1, 2003. http://www.nusco.org/docs/virtual_clock.pdf.
Potel, Mike. MVP: Model-View-Presenter, The Taligent Programming Model for C++ and Java. 1996. http://www.arsip.or.id/free_doc/m/mvp/mvp.pdf.
Pragmatic Programmers, LLC. “Tell, Don’t Ask.” http://www.pragmaticprogrammer.com/ppllc/papers/1998_05.html.
Rothman, Johanna. “What Does It Cost You To Fix A Defect? And Why Should You Care?” 2000. http://www.jrothman.com/Papers/Costtofixdefect.html.
Ruby on Rails Community wiki. Understanding Migrations. August 1, 2007. http://wiki.rubyonrails.com/rails/pages/UnderstandingMigrations.

RESOURCES 485
Saff, David, Erich Gamma, Kent Beck, and Erik Meade. JUnit: A Simple Framework for Writing and Running Automated Tests. http://www.junit.org.
Schuh, Peter and Stephanie Punke. “ObjectMother: Easing Test Object Creation in XP.” 2001. http://www.agilealliance.org/system/article/file/910/file.pdf.
SourceForge.net. Cobertura: Code Coverage Analysis Tool for Java. http://cobertura.sf.net.
———. CruiseControl: A continuous integration server. http://cruisecontrol.sf.net.
———. DbUnit: A JUnit Extension for Testing Database Code. December 28, 2006. http://dbunit.sf.net.
———. EMMA: Code Coverage Analysis Tool for Java. http://emma.sf.net.
———. Joda-Time: A Time and Date API to Replace the Standard java.util Classes. http://joda-time.sourceforge.net.
———. PMD: Static Analysis Tool for Java. http://pmd.sf.net.
———. SUnit: The Mother of All Unit Testing Frameworks. http://sunit.sf.net.
Splint Community. Splint: Static Analysis Tool for C. http://splint.org.
Tammo Freese. EasyMock: A Dynamic Mock Object Library for Java. http://www.easymock.org.
Urban{code}, Inc. AnthillPro: A Continuous Integration Server. http://www.urbancode.com.
World Wide Web Consortium. Logging Control in W3C httpd. July 1995. http://www.w3.org/Daemon/User/Config/Logging.html#common_logfile_format.
———. XML Path Language (XPath). November 16, 1999. http://www.w3.org/TR/xpath.
Yahoo! Inc. JUnit Group and Online Mailing List. http://groups.yahoo.com/group/junit.

index
A
Abbot 295, 297, 300, 418ComponentTester utility 297ComponentTestFixture
class 297abstract base class 174, 181,
206, 237for DbUnit-based integration
tests 239Abstract Factory pattern 127abstract user interface 356abstraction 35, 212, 275
between MVC controller and view 169
keeping uniform level of87–88
level of 419level, consistency in
methods 69–70acceptance 450
exercising the internals 414acceptance criteria 353acceptance TDD See acceptance
test-driven developmentacceptance test 4, 33, 35, 324,
335, 341, 404, 440accelerating execution
426–431adding detail 337adding new 353as communication tool 421as indicator of completion 31as shared language 33as specification See tests as
specification
automating 337, 340, 345, 391automating through UI 417avoiding turbulent
interfaces 399brittleness 403categorization 426challenge of automating 417common fixtures
between 431complexity 425, 431connecting with system under
test 401crawling under the skin 404customer-friendly format 359dependency between
tests 429design 403detail in 332difference between unit test
and internals-exercising acceptance test 409
duplication 431embedding into system under
test 419end-to-end strategy 401example of 327, 330executable, syntax of 339, 341expressing with concrete
examples 354focus of 398for FTP client 416for programming library 413for web application 431generating data set for 433getting access to
transaction 430
heavyweight 409hooking into service layer 422identifying 342implementation
approaches 401–411implementing 333, 337, 406implementing against
programming API 416implementing for complex
systems 425introduction 327–333list of 336maintainability 429mapping to user-accessible
functionality 403merging with unit test 413organizing into test suites 428owned by customer 329passing 31performance 356properties 328–333reducing complexity 431refactoring 404, 425running against stubbed
system 410running on simulator 358side effects 411, 426structuring 431stubbing 357–358subsets of 426suite 403targeted at system
internals 408technology-specific
implications 411–425timing 337
487

488 INDEX
acceptance test (continued)tips 425–433tools for implementing 338translating to executable
test 338–339updating 399validation of 331what to test 397–401when to write 345–346writing 329, 337,
345, 350, 360writing with jWebUnit 401writing with wiki syntax 360
acceptance test-driven development 4, 7, 10, 31, 98, 324, 327, 341, 401
as team activity 348–351automating tests 337–341benefits 351benefits of 351–355continuous planning 344–346cooperative work 353customer properties 349–350cycle 334–343decreasing load 346defining customer role
348–350definition of “done” 351–353frameworks for 37homegrown tools 362implementing
functionality 341–343inside an iteration 343–348mid-iteration sanity test 346number of testers 350picking user story 335–336process 324process, understanding
334–348promoting 446, 463properties of 324scripting language–based
frameworks 361specification by example 354splitting stories 347table-based tools 359–361text-based frameworks 361tools 359–362trust and commitment 354what we’re testing 355–359
whether to stub parts of system 357
whether to test against UI 355–357
whether to test business logic 358
who writes tests with customer 350
with Fit 365–369acceptance testing 37, 361
approach to 400backdoor 411crawling under the skin
412, 414–415, 419end-to-end 406, 416–418,
421, 425exercising the internals
407, 412, 414, 421framework 37, 359, 365implementation
approaches 401strategy 412, 414, 416strategy, choosing 411strategy, cost 414stubbing out the
irrelevant 409technological
considerations 411tools 359
access point 212accessor method 211, 291accomplishment 438, 442account manager 12ActionFixture
372, 379–382, 384header row 379
ActionListener 304actor 379Adobe Photoshop 417adoption 4, 10, 436
assigning roles 463–464coaching and
facilitation 461–463destabilization 464evangelizing for change
454–457facilitating 454–465lowering bar to change
457–458of Java 200rewards, delayed 465
sharing information 459–461training and education 458
Agile 2005 336Agile Finland 451agile methods 19, 454, 458agile software development
7, 31Agile Toolkit Podcast 336agility
key ingredient of 7Ajax 423alarm system 8Alexander, Christopher
364, 396algorithm 58, 77, 85, 101,
116, 223, 378using to find connecting
line 313verbosity 313
Alleman, Glen B. 323alternative implementation 90,
111, 116, 120, 124, 140, 160alternative implementation
See test doubleAlur, Deepak 198ambiguity 21, 33–34Ambler, Scott 244analytic thinking 452annotation 50, 67, 186, 211anonymous class 291anonymous
implementation 139, 316anonymous inner class 141Ant See Apache AntAntHill 39antidote 7anti-pattern 109Apache Ant 365, 392
build script 391build script, adding target for
running tests 478–479build script, compiling source
code 477–478build script, directory
structure of 476–477build script, generating
report 479–480build script, running Fit
with 392FTP task 393

INDEX 489
Apache Maven 392Apache Shale 186Apache Tapestry 185–186, 193Apache Tomcat 174, 179Apache Velocity 174, 179
API 179basics 179–180template 179–180, 184template plumbing 180–182template, adding
assertions 182–184templates, test-driving
179–184API 213, 225, 244–245
API-level access 400awkwardness of 156correct use of 221designing with test 16exposing logic through
public API 412for controlling web
browser 424for Hibernate 212–214for regular expressions in
Java 84for Velocity 179independence of JDBC
API 212internal, testing through 404invoking public 144native, end-to-end testing
through 418obtaining system time
through standard API 255of jWebUnit 402operating system under test
through 406Swing API 282, 284third-party 103, 196
Apple 455application
console-based 416deployment 422desktop 417domain 416event-driven 417graphical user interface 417logic 419logic, separating from
presentation 416
under test, launching 420under test, state of 418
application domain 348–349application logic 197, 223application server 174, 220,
250, 422restarting 430
architectural change 22architecture 20, 22, 155–156
evolving 400exposing internal API 405for dependency injection 172for web applications 154system under test 333verifying with end-to-end
tests 414Arendt, Hannah 325artifact 186artificial intelligence 414ASCII 139assertion 56, 67, 79, 138,
176–177, 181–182, 241–242, 268, 272–273, 393
Customer Assertion pattern 130
Delta Assertion pattern 129for color of a pixel 312Guard Assertion pattern 128hard-coding 313HTML documents 183Interaction Assertion
pattern 131patterns of 128, 131, 137performing to verify expected
behavior 169Resulting State Assertion
pattern 128assertion pattern 128–132assertRenderedPage
method 193assumption 51, 221
about current behavior 73about database schema or
domain model 221about fixture 128about object-relational
mappings 221about query statements 221about thread scheduling 272flawed 4, 447
verifying with characterization tests 147
verifying with learning tests 77
asynchronous execution261, 271, 273
verifying 271–274ATDD See acceptance test-driven
developmentatomic operation 264atomicity
of test 47attack
responding with 448Auckland University 384authentication 160, 162–163authority 441, 462automated build 283
executing Fit tests 393Automated Teardown 136automated test
See executable testautomation 26, 28, 34, 173, 224availability 220awareness 246, 454
of one’s own behavior 462
B
Bache, Geoffrey 361backdoor See testing backdoorbackground thread 269, 271,
274, 277, 282backing code
for fixture table 371balance
between methods 69Bamboo 39barricade
to protect from change 448barrier 262, 264–265, 276–277barrier to entry 458baseline 14Bash 430batch 276batch processing 22battle
picking 453–454bean 170BeanInject 141Beck, Kent 36, 104

490 INDEX
behaviorchanges in 443close to desired 19correct, testing 417depending on system
time 250description of 49expected 49expected, testing for 147exposing or modifying 144externally visible 27nailing down 147of system 11of test double 110of view components 282preserving 27reflecting on 462test-driving into JavaServer
Page 177testing for 193triggering with event
queue 405value of 102verifying by examining log
file 418verifying expected 110
Belshee, Arlo 336benefit
of adopting TDD 14of delivering often 33of having adopted TDD 11of having proper fixtures 109of incremental DDL
scripts 233of using tests as
specification 35bias 462big picture 102, 456bitmap
capturing 312bitmap raster
extracting from buffer 310black market 267black-box testing
401–403, 418–419blanket statement 439blocking 261, 265–268, 270,
276–277blocking operation
test-driving 266–268
boilerplate 205, 211bootstrapping
dependencies 127bounds
comparing to size 309Bourrillion, Kevin 272breadth first 45breadth-first 58, 80, 101brittle test 112brittleness 173Brooks, Frederick P. 148brown bag session 460browser
simulating 360browser See web browserbrute force 262buffer 277
rendering component on 310BufferedImage 311bug count See defect ratebug report 32bugginess 144build
automated, testing during 392–394
building the right thing 7, 11building the thing right 7, 11
build cycleintegrating Fit 391
build script 224Ant, adding target for running
tests 478–479Ant, compiling source
code 477–478Ant, directory structure
of 476–477generating report 479–480
build server 29–30, 38–39build.xml 477burn rate 346business domain 132
language of 409business logic 48, 155–156,
196–197, 356–358testing directly 359, 408verifying 390
business rule 374isolating 409verifying 426verifying with acceptance
test 408
buttonwiring to trigger events 304
buy vs. build 362byte code 121, 261
C
C# 360, 366C++ 123caching 213, 430caching context object 431callback 272, 277, 315camel case
in DoFixture cells 385canvas component 281, 310capacity
of change agents 461of working memory 22
card See story cardcard, conversation,
confirmation 332catalyst 135centralized testing function 437certainty 102, 271, 464challenge
of being able to deliver 8champion 441change 440, 447
ability to lead 436ability to lead, as related to
role 441–443absorbing flux of 460accepting 449adopting facilitation 454–465anticipated change 23assigning roles 463–464benefits of 437, 442, 448,
452, 456boundary 440changing code 24changing interface 22coaching and
facilitation 461–463cost of 400daring to make 14encouraging by
destabilization 464evangelizing for 454–457getting others aboard
440–444in behavior 445

INDEX 491
change (continued)knowing what to change 44lowering bar 457–458making big change in small
steps 76making too big 80piggybacking on other
change 440reflecting on 457resistance against 445resistance to, fighting
444–454resistance to,
overcoming 449–453resistance to, picking
battles 453–454resistance to,
recognizing 444–448resistance to, three standard
responses 448–449reverting after too big
step 107rewards, delayed 465running tests after 96sharing information 459–461significance of 53software evolving through 29stimulating 464stream of small changes 38sustainability of 451sustainable 436, 438, 440testing changes 13time for 439training and education 458uncertainty of 23understanding 440, 443world changing around
system 7change agent 442–443, 446,
449–450, 454–455, 464–466change boundary 440change champion See championchange point 146–147characterization test 147check action 380checkComponent method 295child fixture
delegating to 385choice 451class
anonymous 291
class hierarchy 105, 119causing ripple effect
through 119class loader 240class loading 108class path 213, 227, 229, 240
loading XML file from 238class under test 111–112, 115,
142, 258classification
of test doubles 113, 115CLI See command-line interfaceclickLink method 193close proximity 146–147Clover 40cluster 220coach 461, 465coaching 452, 456, 461, 463, 466Cobertura 40Cockburn, Alistair 459code
dead, deleting 97failing to meet needs 6–7just enough code 18maintainability 324poorly written 5–6producing ugly code 19
code base 142, 145–146broken 81cleaning up 10growing 8internal quality of 281leaving duplication into
the 106refactoring toward system-
time abstraction 252code coverage See test coveragecode smell 64, 89, 106code without tests
See legacy codecoding dojo 451, 460cohesion 109Cohn, Mike 327coinciding change 444–445collaboration 10, 31–33, 37, 45,
112, 274, 350, 447, 463between developers, testers,
and customers 359between Hibernate
interfaces 212expected 117
for common goal 464ineffective, risk of 421of fixture objects 209supporting through
acceptance tests 425collaborator 110–111, 117, 139
interacting with 131testing interactions with 111
collective code ownership 37ColumnFixture 372–376, 389
example of 374extending 383
COM component model 424comfort 448command and control 453command object 405command-line interface 415commitment 354, 443,
451, 458, 463commodity 4common good
appealing to 449communication 32, 34, 110,
439, 442efficiency of 33making tests communicate
better 130sustaining 349
communication overhead 428community of practice 461comparison
between data sets241–242, 379
compatibility 91, 223compilation 47, 55compiler 36, 161, 182, 221, 261
satisfying 91completeness 456complexity 17, 21, 26, 110, 223
architectural 223gaining more and more 81keeping an eye on 86of business rules 409of desktop applications 417of interaction-based tests 112semantic, of desktop
applications 417tackling 58
componentcustom 304laying out with Swing API 281

492 INDEX
component (continued)layout with template
language 185plot map, adding and
operating standard widgets300–304
plot map, associating gestures with coordinates 314–319
plot map, drawing custom graphics 304–314
plot map, example 297–319plot map, layout design
298–300setting size 308UI 185view, adding and operating
standard widgets 300–304view, associating gestures with
coordinates 314–319view, drawing custom
graphics 304–314view, layout design 298–300view, test-driving 297–319view, tools for testing 290–297
component chooser 294component hierarchy 291–292
of Java Swing application 419component operator 294component tree 191–192, 419component-based framework
174, 185–186, 193test-driving 184–193typical 185–186
component-based web framework 154
ComponentChooser interface 294–295
ComponentTester utility 297ComponentTestFixture
class 297composition 119compromise 454concept
testing 108concurrency 260, 262, 264–265concurrent behavior 259, 261concurrent programming
250, 259–260, 271, 275literature on 261
conditional “yes” 446conditional construct 179
confidence 10, 12–14, 44–45, 262
false 13–14configurability 254configuration 127, 186–187
for Hibernate 213for Spring Framework 170managing database
configuration 222of Spring Framework 168problem with non-default
configurations 224programmatic configuration
of Hibernate 213test configuration for
Hibernate 227Configuration class 213, 229configuration management
224, 391conflict 462confrontation 446confusion 452congruency 439Connection interface 203consensus 460, 462consistency 439
of abstraction level 69console application 415constant 167, 258constraint 352
checking 390construct 39, 60, 119
try-catch 66–67constructor injection 164consulting 456context object 431context-driven testing 463continuous design 44continuous integration 29, 36,
38–39, 353, 359philosophy behind 39
continuous integration server 394
continuous planning 344Continuum 39control 262, 266, 464
yielding over junior colleague 441
controller154, 156–172, 283–284
in model-view-controller155, 163
in Spring Framework 168Spring, managing
dependencies 170–172Spring, test-driving 168–172
controller logic 283conversation 458conversion 91, 98, 206, 208, 240
of column contents 374of static methods into instance
methods 121of user input 281to executable test 367
Cooper, Alan 135cooperation
resulting from acceptance TDD 353
coordinateassociating with gesture in
view component 314, 319coordinates
associating with gestures 314correctness 10, 111, 271, 275cost
of acceptance test maintenance 406
of additional code 120of asking question 403of building and maintaining
homegrown framework 362of building things in specific
order 33of defects 5, 10of delaying feature 33of dependency injection 126of development 9of evolutionary design 23of fixing defects 5, 9of maintenance 9of over-engineering 18of tests accessing network 357operational 5perceived 20
CountDownLatch class 270, 276counting semaphore 275coupling 11, 122, 124,
197, 283, 310between controller and
view 287trade-off with
performance 287CPU 259, 261
INDEX 493
Crane, David 423createCanvas method 306creation method 134–135, 137credibility 439criteria
for completion 50CRM See customer relationship
managementcross-functional team 336CRUD operation 212CruiseControl 39, 394Crupi, John 198Crystal Clear 459CSS 187Cunningham, Ward 360, 365,
384, 392, 394Custom Assertion 130custom thread class 271customer 6, 10, 31–32, 464
asking for details 332, 335, 342, 347
authority 349availability of 339, 345collaborating with 329–330,
333, 343, 350, 359defining role in acceptance
TDD 348–350functionality valued by 341involvement 331, 349language 349needs of 5, 7, 11on-site 334role 33, 348–350satisfied 32selecting 348
customer relationship management 23
customer team 349customer test-driven develop-
ment See acceptance test-driven development
cycleacceptance TDD cycle
334, 341component life cycle 185integration test cycle 231of implementing user
story 352TDD cycle 8, 11, 15–16, 19,
38, 44, 106–107, 173, 184, 243, 341
TDD cycle with database integration tests 244
CyclicBarrier class 264–265, 276
D
DAO patternseparating layers with
198–199DAO See data access objectDashorst, Martijn 193data 155
as part of systems 196comparing datasets with
RowFixture 379creating test data 113displaying 283driving access with unit
tests 199–219exchanging at synchroniza-
tion point 276extending data set 432for acceptance tests 432generating test data 432–433inheriting 25managing test data 432–433operating on 196parameterized
See Parameterized Testpartitioning test data 432plotting from database 281populating 383, 388pulling from text fields 304setting up for unit test 86static definition of test
data 433test data 359
data binding 284data definition language
230–231data set
comparing with DbUnit241–242
defining 240–241definition of 433
data-access code 196, 198, 205crossing boundaries 197simplifying 199, 205
data-access object 198–201, 206, 219, 221, 225–226, 236–237
implementing with Hibernate213–214, 216, 218
implementing with JdbcDaoSupport 210
implementing with JdbcTemplate 208, 210
implementing with plain JDBC 200, 202
test-driving with JdbcTemplate 208–209
database 197–198, 222–223accessing and controlling 222as external resource 29browsing contents of 225cleaning up objects from 136closing connections to 218code, testing with DbUnit 237connecting directly to 411connecting to 115, 200, 229connection 218connection, providing to
DbUnit 237creating from scratch 230engine 221exporting contents of
237, 241–242initializing system from 430live connection to 110, 113maintaining in known
state 226mapping objects into 211populating 235, 237, 239, 430populating in test setup 429proprietary features of
212, 223refactoring 199, 244schema, creating 233selecting for integration
test 222–225sequence 222–223server 196, 220, 224
database administration 447database administrator 230database schema 219, 221–222,
230–231, 243–244automatically exporting with
Hibernate 230creating 230

494 INDEX
database schema (continued)creating as DDL scripts
231–233exporting into database 230
database sequence 223database server 224database transaction
See transactionDatabaseTestCase class 237–238data-driven testing 137–138DataSource 200–201,
203, 212, 220DB2 222dbdeploy 231–232DbUnit 235, 237–239, 242–243
data set, defining 240–241data sets, comparing 241DatabaseTestCase class 237file format 240populating data 237
DDL scriptincremental 231, 233
DDL See data definition language
de Tocqueville, Alexis 108dead code 97
deleting 97deadlock 261decision
delegating to someone else 163
implications of 349making 349of which test to write next 100
decision making 462decomposition
example of 46of requirements 45of requirements to tasks 46of requirements to tests 46
defect 5, 12, 24, 28, 34, 437, 457consequences of 6defect-free 13fixing 9introducing because of
duplication 27defect rate 5, 24, 44defensive behavior 448defensive functionality 103definition
of “done” 46of good test 47
of data set 433of unit test 199, 245
delayed reward 465delegation 25, 119, 142, 170,
252–253, 427of user gestures 284
Delta Assertion 129–130delta script 231–232DeMarco, Tom 347, 457Deming, W. Edwards 437dependency 81, 92, 110, 122,
170, 175, 282, 284acquisition of 122, 125between acceptance tests 429between user stories 335breaking out 145, 147holding in instance
variable 125injecting 124injection,
constructor-based 126injection, field-based 126injection, setter-based 126isolating 118, 122–124, 142on system time 251substituting 142to APIs that are difficult to
mock 156to Java EE 179to JDBC interface 206using constructor-injection
for 164dependency injection 118, 124,
126, 142, 200, 213, 216architecture for 172example of 125in Spring Framework 170
depth-first 45, 58, 80, 101design 44
adjusting 20bad 24based on dependency
injection 216based on
Model-View-Presenter 298based on need to know 407based on Passive View 288based on Supervising
Controller 285changing in controlled
manner 80–89decision 20, 54, 118, 162, 197
designing last 8, 15driving design with tests 17driving with executable tests 4encouraging good 4evaluating by trying to use 17for plot map component 297for testability 196guidelines for 118improving 9improving with refactoring 25incremental 8, 15keeping clean 77making decision 16of fixtures 109opportunity to make
decisions 76pattern 100, 154–155, 196,
198–199, 205, 255, 280, 284, 356
predicting problems with 25principles of good 246simplest we can think of 107tips for simplifying file
access 246up-front 21working around bad 143
design principle 156design-code-test 44destabilization 464detail 237, 268, 456
diving into 101implementing detail first
See depth-firstin user stories 325
deterministic execution See predictability
developerburnout 346collaborating with test
engineers 353dedicating tester to 350gap between customer
and 360splitting user story 341
developer test 199development
incremental 19, 24, 33development environment 457DI See dependency injectionDICEE 455–456diff 246directory service 29

INDEX 495
directory structure 188, 190, 245–246
discipline 24, 60, 436–437discussion 462dispatchEvent method 315distributed system 412–413, 421
automating 415distributed test farm 427
complexity 428many-to-many pattern for
scaling 427many-to-many-more pattern
for scaling 427one-to-many pattern for
scaling 427scaling 428
divide and conquer167, 275, 356
Document Object Model 182documentation 34, 78, 457DoFixture 384–388, 390
delegating to child fixtures 385–388
ensure action 388example of 385–386mapping actions to method
calls 387splitting tables 385writing tests in natural
language 384–385DOM See Document Object
Modeldomain 17, 275, 451, 454domain class 433domain language 331domain logic 155, 283
exposing to test interface 407not mixing with
presentation 399domain model 221domain object 135, 198, 211,
223, 244, 288persisting 433
domain of influence 442domain-specific language
341, 361creating 407
donedefinition of 351
double renderingtesting for 73, 76
drawinglines 312
dump file 433duplication 6, 8, 27, 60, 64, 106,
166–167, 243avoiding with fixtures 109between production and test
code 258creating with copy-paste 144in Fit fixtures 392in test document 368lack of 109, 134of configuration data 227of data 202of test data 240, 432reducing with fuzzy matching
and named queries 219removing from tests 82–84spotting 106
dynamic mock object See mock object
dynamics 441of change 436
E
early success 458EasyMock 112, 116–117,
132, 160, 200–201, 203, 209, 215–216
and custom matchers209–210
custom argument matching with 209–210
overriding default behavior of equals() 210
Eclipse 54, 295effort 102, 110
of creating pixel-precise tests 173
effort estimate 326EJB 197embedded database 197, 220,
224–225, 229–230embedded database
See also databaseembedded software 358emerging design 451Emery, Dale 452EMMA 40
enabling point 123enabling point See also seamenabling value 326encapsulation 158, 206,
283, 291of complex verification
logic 130of teardown logic 136of test logic 137
end method 79end-to-end 220end-to-end test 356ensure action 388enter action 380Enterprise Java See Java EEentity object 132EntityManager 197environment 200, 220–221, 245,
438–439, 441, 444, 451, 453, 459, 461
setting up 224, 447environment variable 123equals method
and hashCode 93overriding default behavior
with EasyMock 210EqualsTester class 93equipment
availability of 358ERP 414error handling
See exception handlingerror situation 275
maximizing chances of 262testing for 103
error situation space 260evaluate method 94evangelism 461evangelist 455–456, 458–459evangelization
455, 457–458, 465event 266, 271, 440, 458
handling 284listening for 292triggering with button 304
event object 284event queue 292, 295, 405evolutionary design
20, 22–24, 44Exactor 37, 361

496 INDEX
exampleexpressing requirement
through 35of desired behavior
See specification by exampleexception 96, 200, 204, 219, 244
catching from event dispatch thread 297
causing for testing purposes 114
testing for 66, 70throwing 67
exception handling 45, 50, 217–218, 416
adding to test 66–71exception message 70exception path 103Exchanger class 276executable acceptance test 366executable specification 50, 421executable test 10–11, 34,
37–38, 156, 331, 335, 337, 345, 365, 398
execute method 383execution
asynchronous, verifying271–274
execution path 9execution sequence 266Executors class 271Exoftware 361expectation 112–113, 201, 219
for test double 110on mock object 117
experienceshared 451
experiment 451, 461exploration
exploring the uncertain 102exploratory testing 463expression
of acceptance test 373extension point 382external interface 355external pressure 436, 440, 465external resource 29external threat 462Extra Constructor pattern 142extracting a method
68–69, 88–89, 252Extreme Programming 7, 31,
76, 360
F
façade 212, 247factory method
overriding 306Factory Method pattern 127failure 29, 439, 442, 458, 463faith
lack of 173fake 100–101, 113, 115–116,
118, 120, 140, 148faking data in tests 196faking JDBC connection 200faking method 121faking persistence layer 200
fake implementation160, 163–164, 167, 186, 253
for java.sql.ResultSet 201faking it 104–105, 148false agreement 445false negative 266familiarity 451fear 447–448, 452
overcoming 451feasibility 452Feathers, Michael 122–123, 139,
144, 199, 245, 287feature creep 57feedback 29, 34, 179,
437, 441, 460from tests 29from writing test 17reducing risks and
costs with 32speed of 357
fieldtransient 211
file access See file systemfile system 29, 136, 200, 245
abstracting away 410access 245–247in-memory 410persisting domain
objects on 198practices for testable
access 246–247reading data set from 242reading Velocity template
from 180 180virtual 247
FileRunner 391filter-mapping 187
find method 79finder method 213, 216, 236first test 243, 259
for Hibernate-based data access object 226
for JavaServer Page 175, 177for Wicket application 188
Fit 37, 360, 362, 365, 381, 387, 413
ActionFixture 379–382add-ons 384built-in fixture 365built-in fixture classes 372ColumnFixture 373–376executing tests 390–391fixture lifecycle 383fixture table 369–371fixtures 371–372fixtures, built-in 372–384fixtures, built-in,
extending 382–384for acceptance TDD 366–369introduction 365–372resulting of running test
document 375RowFixture 376–379rules for translating
tables 369running with Ant build
script 393template for test
documents 371test document 369–371test document, location
of 391test runner 391testing during automated
build 392–394tests, executing 390–394tests, executing with single test
document 391tests, in folder structure 391
fit.FileRunner class 391FitLibrary 365, 384, 388, 390
child fixtures, delegating to 385–388
DoFixture 384–388FolderRunner class 392SetUpFixture 388–390tests, writing in natural
language 384–385

INDEX 497
FitNesse 37, 360, 391fixture 64, 100, 108–112,
234, 371–372allowing for focused tests 109built-in 372, 379,
382, 384, 389built-in, extending 382–384child, delegating to 385–388clean slate fixture 109creating objects in 132custom 372, 382, 387flow-style 384getting rid of 132in unit testing 371making assumptions
about 128not being in control of 129patterns for creating 136patterns of 132removing duplication
with 109setting up and tearing
down 149transactional 234–235
fixture class 365–366, 368, 371built-in 372example of 404, 408for jWebUnit 402implementing 368setup 389
fixture library 372fixture object 126
created by setup method 136exercising functionality
on 128returning from
DoFixture 385fixture table 365, 368–371, 380
backing code 371fixure
custom, example 383flexibility 154, 190, 222
of design 119–120flow-style test 337focused test 48, 109, 245FolderRunner class 392–393
setup/teardown support 392formal role 441Fowler, Martin 24, 29, 39, 89,
106, 110, 283–284
frame of reference 450–452framework 101
component-based, test-driving 184–193
component-based, typical 185–186
Framework for Integrated Tests See Fit
FTP 415client 416task 393
functional requirement 358functional testing 186functionality 16, 46, 55, 221,
243, 261accessing 352adding 81breaking existing 28completing throughout
iteration 343defining 10implementing 345implementing with Spring
MVC Controller 168inheriting 25inheriting from
superclass 119islands of 119missing 16, 341, 343on domain-level 401permission to add 189reusing through
inheritance 25test-driving into web page 190testing through real
interface 401time-dependent 114unpredictable
functionality 250valued by customer 341wiring behind widget 302
Future interface 277FutureTask class 277fuzzy matching 130
G
Gamma, Erich 205generalization 104–105, 447
gestureassociating with coordinates in
view component 314–319getDataSet(String) method 241getDescription method 295getJdbcTemplate method 208getWebRoot method 174Glassfish 174goal 437–439
conflicting 353of acceptance test-driven
development 32of coaching 462of making test pass 104shared 460supporting change with 449
gold plating 353, 456good test
definition of 47granularity
of tests 17graphical output
testing for 310graphical user interface
155, 412evaluating quality of 407testing 356
graphicscustom 304custom, drawing in view
component 304–314testing for graphical
output 310Graphics class 310, 312, 314green bar 61, 107, 285
unexpected 53green field project 145group 440, 459, 464
developing solution as 461in Java regular expression 78
group programming 451groupCount method 78GSBase 93
JUnit extensions 93Guard Assertion 128, 137GUI See graphical user interfaceguideline
for good tests 47for test-driving 106

498 INDEX
H
happy path 45, 101, 103hard coding 56–57, 60,
104–105, 219–220returning hard-coded data
from DAO 200hashCode method 93Hatcher, Erik 476header row
of ColumnFixture 373–374of fixture tables 368of SetUpFixture 389
Heisenbug 260helper class
moving creation methods into 134
heuristic 101for good tests 47
Hibernate 197, 199, 205, 211–212, 214, 216–219, 221–223, 225–227, 229–230, 234–236, 433
API, essentials 212–213automatically exporting
database schema 230configuring for testing
227–229DAO, implementing 216–217DAO, testing 213–216DAO, testing for
exceptions 217populating data 236–237Query interface 212Session interface 212SessionFactory instance,
obtaining 213SessionFactory interface 212
Hibernate Query Language 212, 214
hierarchyof Java Swing application 290
higher priority syndrome 447Hillenius, Eelco 193hook 212, 262
exposing from application 418
for exposing system internals 418–419
HSQLDB 223–225, 229in-memory database,
configuring 229–230HTML 37, 181, 184–185, 187,
189–192, 360–361parsing and interpreting 422rendering JavaServer Pages
into 174HtmlTestCase 174HTTP 156, 174–175,
251, 413, 421faking traffic 422session 421writing acceptance tests 333
HTTP header 158–159HTTP request 157–158HTTP session 162HttpServletRequest
interface 158, 160, 250–251HttpServletResponse
interface 158, 160HttpUnit 178, 184Hugo, Victor 115Humble Dialog Box 284, 287Hunt, Andy 156
I
I/O component 276IDataSet 241IDE 50, 53, 107identifier 223, 227identity 222identity column 223identity generator 223impedance mismatch 406implementation
alternative 409, 425anonymous 316fake 357postponing 80pushing with tests 56replacing 120
implementation detail 431in-container testing 179, 186increment See incremental devel-
opmentincremental DDL script 231incremental design 20, 44, 451independent test 197
indicatorfor recognizing resistance 465of completion 31of having reservations 445
indirection 156, 269individual 448, 457, 462, 464
addressing about resistance 449
inflection point 146–147influence 441–442, 453, 459
domain of 441on ability to change 436to GUI development 283
information 33, 39, 459flow of 459from spike 80loss of 33revealing new 102to help in problem solving 70
informed decision 220infrastructure 174, 178, 220
for integration testing 225inheritance 25–26, 119,
243, 431inheritance hierarchy 119inherited setup 431initializer block 108in-memory database
See embedded databasein-memory file system See Jakarta
Commons VFSinput 119, 137
external input to user interface 282
handling malformed 103responding to 113
inquiry 462instantiation 121, 138, 142insulation 274integrated development
environment 440integration 23, 451, 454
continuous 353of developers’ work 38
integration test 136–137, 179, 213, 220–226, 229–230, 233–235, 243–244
differences between production and testing 220
example 225–235Hibernate 226–230

INDEX 499
integration test (continued)in TDD cycle 243–244introduction 220–222populating data for 235–242populating data with
DbUnit 237populating data with
Hibernate 236–237production code 233–234selecting database for
222–225test-driving with, vs.
unit tests 243what may be missed 221writing before code 219–225writing with Java 243
integration testing 220, 225, 242separate configuration
for 227integrity
exhibiting 440, 465intent
deducing from test 128documenting with tests
93, 146expressing with code 83, 175of tests 110preserving in acceptance
test 332interaction
between threads in concurrent programs 260
simulating 283Swing GUI 280testing for 111, 282testing for
See interaction-based testingverifying 305when to refactor 112with application 282
Interaction Assertion 131–132interaction sequence 358interaction-based test 355interaction-based testing 100,
111, 113, 116, 118, 132, 149example of 112
interaction-oriented test 373interface 247, 252, 269
alternative 411avoiding turbulence 399
between components 22closed 414default implementation 308designing behavior of 90encapsulating file access
behind 246example of DAO
interface 198faking with test doubles 184machine-to-machine,
automating 414mocking hierarchy of 156of Java Servlet API 158refactoring code behind
public 27too big 112toward JspTest 174turbulence 399
internal stateof fixture objects 109
internalsside effects of exposing 407
Internet Explorer 360, 424interpretation 34–35, 79, 450interprocess
communication 418interruption 457, 460inter-thread
communication 275intervention 454, 457, 459,
461, 464–465Intimate Inner Class
pattern 140–141intimate test 330introspection 462intuition 28, 34–35,
101, 103, 163invariant 275inversion of control
container 127IoC See inversion of controlisolation 47, 118, 237,
246–247, 271of dependencies 122, 124of sequential logic from multi-
threading logic 259iteration 19, 24, 339, 440
acceptance TDD in 343–348adjusting scope 347
goal for 343–344length 346planning for 344within iteration 341
iteration plan 19
J
Jakarta Cactus 179Jakarta Commons VFS 247Jakarta Velocity 154Jasper 174, 179Java 4, 83, 119, 137–138, 160,
172, 182, 185, 187, 199, 205, 210–211, 225, 236, 239, 360–361, 366
concurrent programming in 259, 262, 268, 271
dynamic mock object libraries for 112
executing SQL scripts from 230
launching threads in 268obtaining current time in 252regular expression API of 76writing integration tests
with 243Java 5
variable-length argument lists 83
Java Database Connectivity 110Java EE 155–156, 160, 168,
178, 184, 196, 198, 205, 250, 422, 430
headaches of 154Java Servlet 17, 154, 156, 163,
167, 169, 174, 178, 184, 214example of 157faking request and response
for 158–159first test for 160
Java Swing 280–281, 283, 308, 319, 417, 419–420, 459
and MVC 283component 418component size 308component, locating 292, 297custom component 281, 319interaction, what to test 282

500 INDEX
Java Swing (continued)internal plumbing and
utilities, what to test 281relative positions of
components 292rendering and layout,
what to test 281–282TDD-friendly tools 292–297test-driving view
components 297–319tools for testing view
components 290–297UI, what to test 280–282view component, adding and
operating standard widgets 300–304
view component, associating gestures with coordinates 314–319
view component, drawing custom graphics 304–314
view component, layout out design 298–300
why testing tools are needed 290–291
Java Swing API 281, 312layout of GUI
components 281rendering GUI
components 281Java Virtual Machine 108, 199,
229, 268Java WebStart 420java.awt.Canvas class 309java.awt.Component class
308–309, 315java.awt.image.BufferedImage
class 311java.util.Calendar class 252java.util.concurrent
package 268, 275–276java.util.Date class 252java.util.regex API 77java.util.regex.Matcher class 78Javadoc 76, 78JavaScript 187, 360, 421–423JavaServer Faces
156, 185–186, 193interfaces, fake
implementations of 186
JavaServer Pages154, 174, 176–179
test-driving with JspTest174–179
@javax.persistence.Transient211
javax.servlet.http.HttpServlet157
JButtonOperator 294JDBC 197, 206, 211, 220,
222, 229, 238code, writing code to pass
test 204–205code, writing test for 202–203exposing access to 212tyranny of 200
JDBC APItyranny of 200–205
JDBC driver 197, 220, 224, 229not testing 221
JdbcDaoSupport class 206, 208implementing DAO 210
JdbcTemplate class 199, 205, 208, 210–211
test-driving DAO 208–209Jeffries, Ron 36JellyTools 292Jemmy 292, 294–295, 319, 418
ComponentChooser interface 294
Jemmy API 293Jetty 174, 178JFCUnit 418JFrame 294, 297JFrameOperator 294jMock 112JSF See JavaServer FacesJSP engine See JavaServer PagesJSP See JavaServer PagesJspTest 174, 176, 178–179
alternatives to 178example of 174test-driving JSPs 174–179
JUnit 36, 41, 50, 64, 67, 93, 136–138, 141, 213, 272, 280, 413
extension, EqualsTester method 93
<junit/> task 478JUnit Yahoo! Group 272
JUnit-Addons 141<junitreport/> task 479jWatir 424jWebUnit 402, 422–423
K
Kawasaki, Guy 455Kerievsky, Joshua 26keystroke
simulating 292keyword 379, 388
transient 211known state
bringing system into 430moving target system into 431
Kuchana, Partha 26
L
languageof unambiguous tests 47shared 31, 33, 108understanding 443
Larman, Craig 7latch 262, 270–271, 276–277Laughing Panda 141Law of Demeter 156layer
separating with DAO pattern 198–199
layoutSwing GUI 280testing for 281
LDAP 163leading change 441–442, 466learning test 77–80, 221
example of 78–79least qualified person 336legacy code 100, 118, 127, 246,
439, 459analyzing change 146–147definition for 144preparing for change 147process for working with 145test-driving change 148test-driving development 146tweaking through Reflection
API 141working with 144–148

INDEX 501
level of abstraction 69, 87, 112, 185
librarydynamic mock object
libraries 112license to fail 458lifecycle 135
of Fit fixtures 383lightweight database 223–224line of sight 459link seam 123list 18
from RowFixture 379of acceptance tests 342of principles for test-
driving 106of tests 48–50, 60, 62,
71, 86, 102of Very Important
Practices 101listener
fake 316notifying 285
listening 449Lister, Timothy 347literal string 57, 167load
decreasing 346load-balancing 220log
test-driving 250–252testing output with faked
system time 256–259logging 180, 250logic 58–59
domain 398duplication of 27encapsulation of 130enforcing implementation
of 162isolated blocks of 10replacing 76, 86responding to resistance
with 448separating 23testing directly 412
looping construct 179Loughran, Steve 476lowering the bar 457–458, 466low-hanging fruit 81, 101, 103,
280, 309, 456
M
Mac OS X 424machine-to-machine 356macro 123mailing list 141main method 199maintainability 6–7, 24, 44,
118–120, 211, 219, 224, 230, 240, 245
isolating dependencies for 123
lack of 5of acceptance tests 356
maintenance 58nightmare 6
Malks, Dan 198management 457managing upward 442Mann, Kito 193Manns, Mary Lynn 453manual analysis 260manual intervention 359manual testing 28, 196, 352mapping 169
acceptance tests to user-accessible functionality 403
DoFixture actions to method calls 387
fixture tables to method calls 373
objects to database tables 211table data to fixture class
374–376table rows to objects 208
markup language174, 191–192, 360
matcher 297custom, and EasyMock
209–210matching
fuzzy, reducing duplication with 219
Maven See Apache MavenMcCabe
complexity metric 68McKoi database 224memory
long-term memory 22short-term 84working memory 21
mentoring 441
Meszaros, Gerard 115, 128metadata 247method
consistency of abstraction level 69–70
extracting 88–89keeping in balance 69–70size 313static, avoiding 120–122
methodology 455Microsoft Excel 360, 362Microsoft Office
using with Fit 366Microsoft Outlook 417Microsoft Windows 424Microsoft Word 360migration 86
of database schemas 231–232mismatch
between change and incentives 442
mock object 100, 112, 115, 118, 137, 148, 161, 201, 203, 207, 209–210, 214, 218–219, 221
creating for Hibernate interfaces 213
example 116–118mock object framework 160mock object library 132MockMultiRowResultSet
201–202MockObjects library 201MockObjects.com 203model 283
in Model-View-Controller 155model/view separation
See Model-View-ControllerModelAndView 168–169Model-View-Controller 154,
156, 163, 168, 172, 184, 283controller 156–172creating view test-first
173–184in web applications 154–156
Model-View-Presenter284, 286–287, 289, 298, 319
modular design 163mouse click
capturing 314simulating 316simulating and responding
to 315–317

502 INDEX
mouse gesturesimulating 292
MouseAdapter 316Mozilla Firefox 360, 417, 424Mugridge, Rick 365, 384,
392, 394multithreaded code
test-driving 259–275what to test for 260–261
multithreaded programming See concurrent programming
multithreading 86, 250, 260, 262, 268, 275, 277, 417
Murphys Law 12mutable
counter object 307MVC See Model-View-ControllerMVP See Model-View-PresenterMySQL 222–223
N
naming convention 221NanoContainer 127natural language 384need
anticipating 22changing 6failing to meet 6, 31
nested inner class 141.NET 422NetBeans 292network
tests communicating over 200network socket 414networked system
See distributed systemnetworking 22, 116, 225,
245, 269networking library 414nondeterministic 72, 114nonfunctional requirement 358
O
objectcreation 133transient 225, 227under test 111, 115, 139under test, configuring 126
object database 198
object factory 135object graph 108, 119, 216
providing access to 135Object Mother 134–135, 137object seam 123object seam See also seamobjection 455ObjectMentor 360object-oriented
programming 119, 123object-relational mapping 205,
211, 221–222, 236–237, 433assumptions about 221
Observer pattern 283–285obvious implementation
104–105, 148, 218openness 442, 448, 465optimistic locking 30optimization 212, 272Oracle 220, 222org.apache.wicket.markup.html.
WebPage 187org.apache.wicket.protocol.http.
WebApplication 187organizational change 465ORM See object-relational
mappingosmotic communication 459output
actual, in Fit 376expected, in Fit 376
over-engineering 4, 18, 57overhead
of thread startup262, 264–265
semantic 416overriding 121–122,
124, 126, 252default behavior of EasyMock
argument matching 210factory method 306getter method 167
ownership 144, 441, 444, 451, 460
P
pair programming 336, 343, 441, 444–445, 460
Pamie 424Parameterized Creation
Method 132–134, 136
parameterized query 219Parameterized Test
pattern 137–138Parkinsons Law 351parse method 85parseSegments method 91–92Pascarello, Eric 423Passive View pattern
284, 287–289, 297, 319pattern 26, 35–36, 38, 66, 71,
105, 142, 441assertion 128–132Automated Teardown
136–137Extra Constructor 142–143fixture 132–137for generating test data 433for testable UI code 283–290Intimate Inner Class 140Model-View-Presenter 284Object Mother 134–135occurrences of in data 78of component-based
frameworks 185of writing unit tests 127Parameterized Fixture
Method 132–134Parameterized Test 137–139Passive View 287Privileged Access 141–142Self-Shunt 139Supervising Controller
284–287test 137–144testing for 313Test-Specific Subclass
143–144unit-testing 127
pattern recognition 102, 414peer pressure 438, 446peer review 441peer-to-peer application 276peopleware 347perceived threat 448performance 22, 71–72, 103
testing for 72–73trade-off with coupling 287
Perl 424, 430permission 275permit 275Perrotta, Paolo 252

INDEX 503
persistence 196, 433, 453, 466cheating on 427
persistence framework197, 199–200, 205, 220, 222–226, 244
downsides to relying on 237faking results from 235
persistence layer 197, 223persistence logic 197, 199,
220, 222persistence technology 198–199persona 135personal adoption 440–441persuasion 448, 453phase
of changing legacy code 146PicoContainer 127pilot 448pixel-precise test 311planning 344
continuous See continuous planning
for iteration 344pre-iteration planning
See continuous planningplanning meeting
during acceptance TDD 335planning tool 327plot map component
adding and operating standard widgets 300–304
associating gestures with coordinates 314–319
drawing custom graphics 304–314
example 297–319layout out design 298–300
plot pointadding 300drawing 300removing 300
plumbing 156, 174, 199–200, 208, 294
for Abbot 300for integration testing 243for Java Swing
applications 280for Jemmy library 295for testing blocking
methods 268
for testing Hibernate-based data access object 213–214
for testing JavaServer Pages 177, 179
for testing Velocity templates 180–181
PMD See also static analysispoint solution 459polling 272polymorphism 89, 94pooling 213portability 235positive functionality 103Potel, Mike 284potential 447power of imagination 48Pragmatic Programmers 89, 156
“Tell, Don’t Ask” principle 89precision
of testing exactly what we want 409
premature optimization 57PreparedStatement 203preprocessing seam 123presentation 281, 283, 460
in web applications 421not mixing with domain
logic 399of view components 282separating from application
logic 416presentation layer 280presenter 284
responsibility 286–287, 289simulating 291
presenter class 285Presenter pattern 356presenter See also
Model-View-Presenterpress action 380primary key 114primary key generator 223Primitive Obsession code
smell 89principle
of good design 109, 118of test-driving 101Tell, Don’t Ask 89
PrintWriter 158PrivateAccessor 141Privileged Access 141
PrivilegedAccessor class 141problem 7
quality problem 5simplifying complex problem
to smaller problems 21solving wrong problem 5source of 9
problem space 196production code 44, 47, 86, 218,
236, 243, 257–258adding just enough 55controlling execution of 262injecting dependencies
into 124invoking from test 132obtaining system time 255sharing code between test
code 167skeleton of 53squeezing out hard-coding
from 104production database 229, 231production environment
12, 221–222productivity 11, 19, 32, 44, 107,
224, 439, 448, 455hampering 433initial drop in 457negative effect on 458
professionalism 449programming by intention
48, 50–51, 53, 87, 90, 167, 175, 226–227
programming language 36, 119, 123, 221, 371
expressiveness 406programming library
strategy for testing 412progress
delaying 102in terms of produced
software 46tests as measurable
progress 22three ways to make 104with least effort 47
project management 351project manager 441, 443, 458promise
of future conversation 325

504 INDEX
promptin command-line
interface 415propaganda 439property file 127prose 35prototyping 76–77proximity 459psychology 448Punke, Stephanie 135purpose
of tests 28Python 360–361, 366, 424
Q
quality 5, 443, 450, 454, 458external 7improving 10in terms of defects 9internal 7, 9, 14, 281of code 8of design 22of personal software
process 16perceived quality See external
qualitysacrificing 110, 346technical 10
quality assurance 8, 32, 397, 463query
named, reducing duplication with 219
Query interface212–213, 215–216, 218
query language 212, 221query method
of RowFixture 376, 379
R
Rainsberger, J. B. 40, 66, 112–113, 178, 410
rastercapturing bitmap into 312
rationale 451behind TDD 16for change 437
read operation 226, 234–235readability 14, 109, 167
read-only 282reality TV show
implementing with CyclicBarriers 276
record-and-replay 37recording
expected interactions 117recording mode
of EasyMock-generated mock objects 117
recursion 291red bar 53, 55red bar See also green barred-green-refactor 16redirection 189
of HTTP request160–161, 165
redundancy 64–65refactoring 8, 15, 18, 24, 28, 38,
44, 60, 62–66, 68–69, 81–82, 94, 98, 148, 243, 331, 439
ability to perform 355as transformation 25automated 107do not skip 106extract method 69lack of 106potential, in test code 64proceeding with 90removing duplication from
acceptance tests 431test document 368tests to be more
expressive 413toward cohesive creation
methods 135toward creation methods 134toward smaller methods
68–69toward system time
abstraction 252when tests become
complex 112reflection 462
in Fit 376Reflection API 141, 291registerParseDelegate
method 389regression 8, 28, 355regression test 29–30
regular expression 60, 73, 76–77, 80, 259, 412
enumerating matches for 85finding matches in 80groups in 78, 80
relational database 163, 196, 198–200, 220, 222
relational database See also database
relationshipbetween TDD and acceptance
TDD 31remote interface 419Remote Method Invocation 419remoting 419, 422rendering 45, 48, 72
component on buffer 311JavaServer Pages 175Swing GUI 280Velocity templates
179, 181–182rendezvous point 262, 265replay mode
of EasyMock-generated mock objects 117, 209–210, 215
request parameter 158–161, 167, 177, 185
request-response 154requirement 33, 45, 449
being oblivious to 18decomposing 45–46expressing 18expressing with user
stories 325for customer involvement 331for template engine 49format for expressing 31fulfilling 50, 398misunderstanding 14satisfying 45splitting 48translating into test 10, 46, 49
requirement bug 331requirement format 329requirement specification 32requirements document 10requirements management
325, 327, 334reserved word 223reset method 383

INDEX 505
resistance 443, 445, 456, 464addressing 448defense against 448feeding 447–448fighting 444–454forms of 447labeling 450overcoming 449–453picking battles 453–454recognizing 444–448responding to 444, 448, 452,
463, 465source of 447–448, 451–452,
454, 464strategies for overcoming 449three standard responses
to 448–449resource
shared 261, 276respect 442responding defensively 448responsibility 26, 45, 113, 185,
212, 237–238, 446, 463division of 6, 98, 119, 206duplication of 27for generating unique
identifiers 223for triggering teardown
logic 136in testing software 350of individual 441
resultexpected, in Fit 376
result columnexpected 374
Resulting State Assertion128–130, 132
ResultSet 203RetriedAssert class 272return type
of fixture class methods 375reuse 184–185, 198, 268reverse engineering 414reward
delayed 465rewrite 27rich client application 283Rising, Linda 453risk 221, 437, 440, 452, 458
of brittle tests 403of bypassing UI 407
of finding configuration issues during deployment 227
of misunderstanding 35of misuse 40of not integration-testing
data-access code 221of stakeholder
estrangement 403of unmaintainable test
code 404reducing through test
selection 102tackling by starting
implementation from details 102
risk management 410RMI See Remote Method
InvocationrMock 112robustness 45, 103,
129, 218, 257of UI tests 282
role 441, 462–464and ability to lead
change 441–443roles involved in
acceptance test-driven development 324
rollback 235of database change
231–232, 234rot
keeping code from rotting 24rotting 63RowFixture 372, 376, 379
comparing datasets 379example of 378
RowMapper interface206–208, 211
implementing 207–208Ruby 340, 361, 366, 424Ruby on Rails 231rule 44, 80
of no duplication 167of TDD 15of thumb 103, 109
Runnabletyped 271
runtime environment 109
S
Sadalage, Pramodkumar 244Safari 424SafariWatir 424safety 448, 451, 462, 464Samie 424sanity check
mid- iteration 346Satir Change Model 451scalability 220Schuh, Peter 135scope creep 353screencast 457scripting language 37, 187,
333, 340flexibility 361
Scrum 351, 458Scrum Master 458seam 122–123, 146, 149
link 123manipulating in test 147object 123preprocessing 123
section 508 173Segment interface 90–98Selenium 360, 425Self Shunt pattern 139–140, 301self-imposed constraint 447semaphore 275–277
counting 275single-permit 276
seniority 441sense of achievement 438, 440,
457, 465sense of urgency 437, 440separation
of test data from test logic 236of view and controller 283
sequential execution261–262, 264
sequential program 259–260service layer 356, 400service method 158Servlet
test-driving 167testing 158–160testing for redirections
160–162working with parameters and
session 162

506 INDEX
Servlet APIbasics 157–158
Servlet container 163, 178, 186Servlet filter 214ServletOutputStream 158ServletRunner 178
architecture of 178session attribute 162Session interface 212–214, 218,
227, 233, 235session state
snapshot of 432SessionFactory 212–216, 218,
227, 229–230, 233setup
shared 172setup document 392setup method 108, 129, 166,
234, 237, 294, 297creating fixture 132moving code into 310
SetUpFixture 384–385, 388, 390example of 388header row 389
sharing 459–460information, during
adoption 459–461of knowledge 461
shell script 391Ship, Howard M. Lewis 193Shore, James 39showFrame method 297simulation 193, 244,
247, 260, 266of user interaction 283
simulation library 422–423simulator 358single point of access 121Single Responsibility
Principle 143single-permit semaphore 276Singleton pattern
118, 120–121, 149avoiding 120–122single point of access 121
sitting together 459size
of code base 58of method 68
sketch 73, 76, 383of acceptance test 366, 368
skilltesting 9
slack 347, 457–458small steps 20, 22, 76, 90, 107,
135, 167, 225creating database schema
in 231proceeding in 18–19refactoring in 25
Smalltalk 36, 155, 283snapshot
of session state 432SOAP 413social leader 464social skill 448soft boot 430software
embedded 358hardware-dependent 358
software installation 224–225solution space 447, 449
constraining with tests 104specification 13, 34, 463
conformance to 31errors in 7for desired functionality
327, 329of correct behavior 358problem with up-front
specification 6specification by example 35, 354speed 245
of development 10, 13, 110spike
applying learnings from84–85
for learning API 78–80outcome of 80prototyping with 77
spike solution 76, 80, 84as exploratory process 76example of 77–78
splittingtest tables 368
sponsorship 456sporadic test 73Spring Framework 127, 154,
156, 160, 169, 184, 199, 206Controller, managing
dependencies 170–172
Controller, test-driving168–172
JdbcTemplate 205–211Spring MVC 168–169, 172SQL 212, 222–223, 235–236
creating database schema with 230
product-specific dialect of 229
readability of 240script, generating with
dbdeploy 231–232script, universal 230
stakeholder 463risk of alienating 407
standard 222Standard Widget Toolkit 295start action 380start method 79starvation 261state
altering through GUI widgets 282
asserting 128backing to working state 59configuring 108, 110exposing 419fixtures 108getting to known 182hard-coding fixture’s 129internal 144of application 418of code base 55of collaborators 111of concurrent program 261of fixture objects 111of model object 288of test database 234of view component
See view staterecording before exercising
code under test See Delta Assertion
representing state of database 236
resetting 430resetting with transaction 234restoring by rolling back
transaction 430shared 64, 108

INDEX 507
state (continued)testing for changes in
See state-based testingverifying with fixture class 376
state machine 103state of practice 4, 451state-based testing
100, 111–112, 118, 132, 149example of 111
static analysis 39static method 118, 120–121,
138, 149avoiding 120–122obtaining dependency
with 124wrapping access to 122
static reference 258static variable 108, 121stderr 391stench See code smellstored procedure 223story card 335story test-driven development
See acceptance test-driven development
storytelling 325, 452strategy
for making tests pass 100, 104for managing test data 196for overcoming resistance 453for selecting next test See test,
selecting nextStrategy pattern 255stream object 246structure 17, 27, 119, 124
altering code’s 25Struts 156stub 100, 113, 115, 118, 208,
409, 413, 421partially stubbed
implementation 144stubbing out JDBC API 197stubbing out persistence
logic 197stubbing 81, 305, 357–358subclassing 121subjective evaluation 352SUnit 36Supervising Controller
pattern 284–289, 297, 319Swan, Brian 361
Swing See Java SwingSWT See Standard Widget
Toolkitsynchronization 259, 261–262,
264, 275, 277between threads 274–275of GUI widgets 287view-model 284
synchronization lock 276synchronization object 250, 262,
264–265, 270, 275–277barrier 276future 277latch 276semaphore 275–276standard 275–277
synchronization point 275–276synchronizer See synchronization
objectsyntax 221, 223–224
annotation-based 67for expressing acceptance
tests 333of executable acceptance
tests 339, 341system
under test 333, 338, 368, 371, 379
under test, connecting to390, 402, 404, 411, 434
under test, exposing alternative interfaces 400
under test, frequency of changes to 416
under test, interacting with 374
under test, restarting 430under test, setting up 426under test, setting up
test data for 387system command 199system property 109system testing 451system time 251–252
abstract, adopting API257–258
abstracting 252–256faked, testing log output
with 256–259System#currentTimeMillis
method 252
systemic requirement 358SystemTime class 257Systir 362
T
table-based framework 359, 361Taligent, Inc. 284Tapestry 156target system
under test See systemtask 45, 53
vs. test 46taxonomy
of test doubles 149of test doubles See
classification of test doublesTDD See test-driven developmentteam 21, 440, 446, 461–462
building trust within 33cross-functional 336integrated project team 32relationships between
members of 350size of 343structure 348
teamwork 460teardown 234, 247teardown document 392teardown method 136, 234,
254, 294tech lead 441technical architect 441technical correctness 334technical quality 324, 456technical quality See also internal
qualitytechnical user story 326technique
adopting new 436technology
annoyances caused by 412bias 400catching up with 10effect on acceptance testing
productivity 406familiarizing with 77limitations 400limitations of 400, 410
Tell, Don’t Ask 89, 156Telnet 424

508 INDEX
template 457for Fit test documents 371for user stories 325Velocity, test-driving 179–184
template engine 45, 48, 72, 76, 80, 179
basic functionality for 66changing behavior of 97performance of 71
Template Method pattern 205template technology 174TemplateParse class 81–89temporary directory 247temporary file 247temporary solution 448test
adding error handling 66–71alternative strategies for
automation 397ambiguity 331, 333as safety net 18, 84, 95atomic 47automated 8automated, problems
with 399automation 18, 37, 77, 280,
339, 341–342, 346, 420, 425, 463
automation, coordinate-based 418
breadth-first 58–63breaking 166brittle 403, 417, 422characterization 147choosing first 48–58collecting result after
execution 420complexity 356conciseness 331–332coverage 410dependent 429depth-first 58–63, 80–89design guideline, avoid static
and Singleton 120–122design guideline, choose
composition over inheritance 119–120
design guideline, inject dependencies 124
design guideline, isolate dependencies 122–124
design guidelines 118–127designing from
requirements 45–48duration 425end-to-end scenario 399executable 331, 337execution as part of
automated build 420execution speed 357, 403,
417, 422, 425execution speed vs.
complexity 428execution through remoting
module 420execution, distributing 427execution, speeding up 426expressing requirement 18failing 15, 18, 44–45, 91, 104,
302, 314–315, 318, 341, 368failing acceptance test 341failing intentionally 62failing, as progress 53failing, commenting out 92failing, figuring out cause 236failing, making pass 54–56failing, writing 50–53failing, writing first 50–53failure 224, 297Fit, executing 390–394Fit, executing with single test
document 391Fit, placing in folder
structure 391flow-style 337, 385focused 12, 109, 130, 134for pixel-precise layout
281–282functional 4granularity 17guidelines for writing
47, 100–107how to make pass 100–107implementation
strategies 104–106implementation strategy, fak-
ing it 104implementation strategy, obvi-
ous implementation 105implementation strategy,
triangulation 104implementation, splitting 419
integration, differences between production and testing 220
integration, example 225–235integration, Hibernate
226–230integration,
introduction 220–222integration, populating data
for 235–242integration, populating data
with DbUnit 237integration, populating data
with Hibernate 236–237integration, production
code 233–234integration, selecting database
for 222–225integration, what may be
missed 221integration, writing before
code 219–225interaction-based 355intimate 330isolated 47learning 77–80list, creating 49–50list, working from 47maintainability 418naïve 251organizing 100passing 45, 47, 50, 53,
55–58, 81, 104–105, 161, 167, 233, 266
passing after refactoring 84passing as quickly as
possible 55performance 425properties of good 47redundant, removing 65refactoring 63–66refactoring safely with passing
tests 87removing duplication 82–84robustness 406selecting next 100–103, 106selection strategies 101–103selection strategy, details vs.
big picture 101selection strategy, happy path
vs. error situations 103

INDEX 509
test (continued)selection strategy, high value
vs. low-hanging fruit 102selection strategy, uncertain
vs. familiar 102self-checking 129simplicity 331skipping 34slow 29, 113, 403spotting errors in 13verbosity 356vs. task 46writing 16writing for sequential
behavior 260writing in natural
language 384test case
adding to Parameterized Test 138
deriving 9documenting 34hierarchy 431reducing complexity 431
test case class See test classtest class 51, 60, 64, 81, 96, 108,
134, 166, 189, 199, 238–239, 294, 301
becoming more complex 139for testing Velocity
templates 181helper methods in 86instantiating 138splitting due to lack of
cohesion 109turning into Parameterized
Test 137test configuration
for Hibernate 229test coverage 9, 34, 39, 148test data 135, 225, 236–237
defining in external file235, 237, 240
guidelines for managing 432setting up 244
test database 219, 225, 229, 231, 235, 240
test definition language 384test document 365, 369–371
Fit 391output 366
test double 100, 108, 110, 113, 116, 120, 169, 184, 186, 200–201, 209, 216, 243–245, 275, 284, 301, 306
dealing with difficult collaborators by using 100
example 113–115for HTTP request and
response objects 159for JDBC interfaces 201, 203generating with dynamic
mock object library 112implementing state-based 112mock object, example
116–118passing to Spring MVC
Controller 170standing in for
dependency 110state-based and interaction-
based testing 110state-based testing 111stubs, fakes, and mocks
115–116substituting 141substituting dependency
with 142testing for interactions 111types of 139
test engineeras customer See also testerratio of testers to
developers 351role of 345
test execution 29, 47, 53, 62, 109, 234–235, 260, 262, 381
cleaning up after 136distributed, bottleneck of 428duration of 72having side effects 257of Fit tests 390, 393parallel 428replacing code for duration
of 122results of 428running right test 161running subset of tests 29, 38speed of 110, 113, 115, 118,
197, 200, 220, 235, 243–245, 283, 406
speeding up 429–431tearing down after 120
test fixture See fixturetest harness 29, 244, 300,
355, 438instantiating objects in 119
test method 51–52, 64, 108–109, 137–138, 181, 214, 234, 240–241, 265, 267, 297, 301, 313
cleaning up after 136sharing state between 140size of 203
test object registry See Auto-mated Teardown
test plan 32test point 146test report 428test result 36, 53, 392
collecting 428color-coding of 366
test runner 36, 430Fit 391–392multithreaded 427
test setup 246, 431pushing data into
database 432test suite 29, 38, 44, 97,
224–225, 355organizing 426slow 426speeding up 427, 431splitting 426
testability 17, 100, 114, 118–121, 167, 170, 189, 196, 200, 246, 454
designing for 141enforcing by writing tests
before code 118improving by making use of
composition 149improving by stubbing out
components 409improving through depen-
dency injection 126improving through
isolation 124isolating dependencies
for 123issue with Singleton 118of file access code 245supporting 283
testable code See testability

510 INDEX
testable design 107, 118, 149, 196
testable design See testabilitytestable See testabilitytest-authoring problem 382test-code-refactor 15, 19, 24, 38,
44, 184test-code-refactor See TDD cycleTest-Driven Design See test-
driven developmenttest-driven development 4, 14,
110, 141, 156, 175, 179, 185, 196, 222, 243, 283, 350, 355
adopting 40, 436–437, 440, 443, 451
and ATDD 341cycle 15cycle, with integration
tests 243–244elegance of 456getting others aboard
440–444implementing spikes with 77implementing template
engine with 48of concurrent programs
250, 259of Java Swing
components 280, 298promoting 439, 443, 451, 455requirements to adopt 436resistance to 453simple rules of 44tools for 36training on 106
test-drivingguideline, don’t skip
refactoring 106guideline, get to green
fast 107guidelines 106–107slow down after mistake 107unit vs. integration tests 243
tester 28, 31–32as customer 334dedicated 350qualities of professional 398
Test-First Programming See test-driven development
testing 5, 28backdoor 419black-box 401–403, 418–419
context-driven 407cost vs. value 397crawling under the skin 404,
412, 414–415, 419end-to-end 401–402, 416–418,
421, 425essential concepts 108–113exercising the internals
407, 412, 421exploratory 407for interactions 111for patterns 313for special case 62framework 420framework, replacing 413in isolation 354intrusive 400library 420manual 407programming libraries 412programming library,
example 413state-based 111state-based and
interaction-based 110–113stubbing out irrelevant 409through UI 404white-box 400, 419
testing algorithm 398testing backdoor 411testing framework 50, 421testing language 356testing library 425testing phase 5testing tool
homegrown 362tests as specification 34Test-Specific Subclass
pattern 144text field
pulling data from 304TextTest 361thinking out of the box 9third-party software 362Thomas, Dave 156Thread 264, 268–269thread 259–261, 264–265, 267,
269, 274–277interrupting 267overhead of starting
262, 264–265starting 268–271
starting in factory 268stopping 268–271Swing event dispatch
thread 297synchronization
between 274–275tests launching multiple 262
Thread API 268thread class
custom 269, 271thread scheduler 259, 261, 266Thread state
don’t rely on 268Thread#getState method 268Thread#sleep method 264ThreadFactory 271ThreadFactory interface
268–269, 271using with custom
threads 269–271thread-safety 86, 261–262,
264, 266example of testing for
262–264limitations on testing 262maximizing concurrency
while testing 264–266throughput 5time
abstraction of system time 252, 254, 258
between question and answer 403
configuring alternative source for 254
current 252, 259depending on 72faking system 252for change 440problem with 250querying for current 251spent in maintaining tests 110spent in writing tests 110stubbing out system clock 413time-dependent
functionality 250to correct mistake 30to develop 12to fix defect 9
time lineof an iteration 343

INDEX 511
time-based functionalitytest-driving 250–259
timestamp 251, 257–259format, testing for 258–259test-driving 250–252
time-to-market 5trade-off 23, 30, 38training 106, 456, 458–459,
461, 466Transaction 235transaction 218, 227, 233,
235, 266rolling back 430
transactional behavior 227, 235transactional fixture
225, 234–235transformation 8, 15, 25, 50,
451, 454, 463applying to code 27applying to system’s internal
structure 26behavior-preserving 25of requirements into
executable tests 34of requirements into tests 35
transition 35, 459translation
of acceptance test to executable test 339
of requirements 46traversal 58tree
traversing 101trial 448triangulation
56–57, 104–105, 148turbulence
avoiding 399Twill 422typed Runnable 271typo 221
U
UIcode, patterns for
testable 283–290UI component 185UML See Unified Modeling
Language
uncertaintyreducing 102
understanding 32, 446existing code 26increasing with learning
tests 77lack of 443of TDD 44shared 460transferring 34verifying with learning
tests 78Unified Modeling
Language 128Uniform Resource
Identifier 159Uniform Resource Locator 168unit test 35, 47, 108, 110, 114,
127, 137, 146, 156, 158, 174, 213, 221, 243–244, 251, 253, 260, 352
accessing network 143controlling time from 256definition of 199, 245expressing expectations
with 334first steps in
programming 290merging with acceptance
test 413running 62test-driving data access code
with 199test-driving with, vs.
integration tests 243what may be missed 221writing 100, 104writing with Hibernate 212
unit testing 36, 39, 185–186, 242, 350, 441
framework 36, 41, 108, 285patterns 127support for 295
unpredictability See predictability
URI See Uniform Resource Identifier
URL See Uniform Resource Locator
usability 5use case 31
user action sequence See interaction sequence
user gesture 285–286delegating 289handling 287, 289reacting to 298responding to 315simulating 291, 297
user inputcapturing 283
user interface 13abstract 404–405abstract, testing through 404acceptance testing 352alternative 404building with off-the-shelf
components 304bypassing 416concept 404console-based 412depending on 403designing for user 17test-driving piece of 177testing below UI 404testing through 355, 412, 421text-based 415
user story 31, 324, 331–332, 366, 398, 416
acceptance criteria for 328and acceptance tests 327benefits of 351business value 335conditions of satisfaction
for 328conveying what and why 329dropping 347estimating 345estimating size 333example of 326–327, 398for programming
libraries 412format 325implementing 343introduction 325–327meaning of 354obsolete 344power of storytelling 325prioritizing 335, 345running acceptance tests
while implementing 403scheduling 344, 346
512 INDEX
user story (continued)selecting 335–336, 343size of 343splitting 345, 347splitting by detail 347splitting by function 347splitting into tasks 341splitting, strategy 348swapping 347technical risk 335writing 344–345writing tests for 336, 343
V
validation 105, 143, 441of user input 281
validation ruleverifying 426
value 11, 102expected 374of exceptional scenarios 103of software 5of test 173source of 329
varargs 83variability 60Variable class 96variable-length argument list 83Velocity See Apache VelocityVelocity template 180, 184VelocityContext 179–180verbosity 112, 120, 218, 268verification 29, 38, 108, 111,
173, 346against internal model 282of conformance to
specification 31of correctness 4of desired interaction 305of expectations 130
version control 26, 224, 230, 432–433
VFS See Jakarta Commons VFSview 154, 283
creating test-first 173–184implementation 288in model-view-controller
155, 168, 173
logic 187, 283making thin 287–288, 290,
297, 319synchronizing 299telling what to display 291
view component 298adding and operating
standard widgets 300–304associating gestures with
coordinates 314–319behavior 298drawing custom
graphics 304–314layout out design 298–300test-driving 297–319tools for testing 290–297
view implementation 290view logic See viewview object
See Model-View-Presenterview state 284view template 179, 184, 187,
190, 192visual inspection 196, 281visual inspection See also manual
testingvisual object 283visual verification 173vocabulary 108, 402
custom 361Vodde, Bas 106volume
of data-access code 199of image data 310of test code 201, 211
W
waitingfor thread 271
Watir 424web application 37, 155–156,
168, 173, 185–187, 406, 413, 421
acceptance test implementa-tion strategy 425
implementing acceptance tests for 421–422
testing 360
writing acceptance tests for 333
web browser 158–159, 173, 185, 188, 192, 421
controlling 421–422, 424–425simulating 421–422
web container 154, 178, 189web container
See Servlet containerweb infrastructure 421web server 29, 420web service 23, 413web standard 421WebFixture 402WebWork 156Weinberg, Gerald M. 459white-box testing 400, 419Wicket 154, 156,
185–188, 191–193adding components to
application 190–193applications, unit-testing
186, 193component 190interacting with
components 193treating pages as classes 188
WicketFilter class 187WicketTester class 189–190widget 185, 404
capturing user input from 283–284
child, creating 304color of 309exposing access to 419giving access to 297locating 417native 418sketch 298standard, adding to view
component 300–304variety of 417
wiki 360Wilson, Woodrow 444windowing system 418working software 7, 14, 19, 28,
31–32, 98workspace 38, 55, 228write operation 226, 234, 282

INDEX 513
X
XDoclet 123XLS 360
XML 127, 186, 198, 213, 237–239, 412
as source for data-driven testing 139
defining test data in 240
XP See extreme programmingXPath 183, 412XPCOM 424xUnit 36xunitpatterns.com 115, 128

1
Test-driving EJB components
Enterprise JavaBeans are all over the place!—Yours truly, back in 2003

2 CHAPTER 13
Test-driving EJB components
Enterprise applications have always been considered a demanding field,technology-wise. Everyone knows we need to have support for transactional pro-cessing, have high-availability properties, and be able to scale our systems by add-ing more hardware into our clusters. Ever since the new Millennium, the Javacommunity’s standard solution to these enterprise-grade requirements has beenJ2EE, or Java EE—Java Platform, Enterprise Edition.
Although it could be argued that a mass of other fundamental building blocksin the Java EE platform support fulfilling our enterprise-grade requirements,there’s no denying that the most visible piece of the Java EE platform is its compo-nent model, Enterprise JavaBeans (EJB). For some reason, most enterprise appli-cations developed in the corporate world in the beginning of the twenty-firstcentury have made use of this technology. Whether those reasons had any basis ornot, the fact is many corporate developers today are facing a legacy of EnterpriseJavaBeans. The arrival of the latest revision of the EJB specification, version 3.0,has breathed new life into the technology and is contributing to the rebirth ofEJB-based architectures.
In this chapter, we’ll talk about both the 2.x series of the technology and thenew EJB 3.0. Although few developers would prefer the old specification to the newrevision, the application-server vendors have recently started supporting EJB 3 withtheir latest product releases. Knowing how some corporate IT departments aresluggish in upgrading their rubber-stamped technology stack, it’ll be a whilebefore EJB 3 becomes mainstream.
We’re going to look into the future and focus on disarming EJB 3 with our test-driven mastery. Whenever we talk specifically about the 2.x version of the specifi-cation, I’ll be sure to make a note.
We’ll start our journey by exploring test-driven EJB development in the contextof session beans, the most used class of Enterprise JavaBeans. Once we’ve got thebasics in check, we’ll discuss other types of Enterprise JavaBeans, such as message-driven beans and entity beans—or entities, as they’re called in EJB 3 parlance.
Enterprise JavaBeans are here to stay, and that’s why we’re going to pull up oursleeves and get a grip on how to work with this technology in a test-driven way.Talking about enterprise applications doesn’t mean we shouldn’t be interested inproducing flexible, testable designs and high-quality software. Let’s start by learn-ing what has traditionally made working with Enterprise JavaBeans problematicfor test-infected developers.

The problem with testing managed objects 3
13.1 The problem with testing managed objects
EJB is a managed object–based technology. Managed objects can be a boon fordeveloper productivity in domains where applications can be written reliably with-out worrying about how the container—the system that manages the managedobjects—instantiates, uses, and reuses our managed objects. There’s nothing fun-damentally wrong with managed objects. It’s the implementation of the idea thatsometimes causes developers to grow grey hair.
From a test-driven developer’s point of view, the biggest issue with EJB as atechnology has been that the blueprints for writing EJB components have not—atleast, not until EJB 3—taken testability into consideration. Developers are facing asituation where the components are tightly coupled into the presence of the EJBcontainer as they rely on the services of the container. Moreover, a key prerequi-site for TDD is that we’re able to run our unit tests quickly; having to spin up aheavy-weight container is hardly good news in that respect.
To contrast the domain of unit-testing managed objects with unit-testing regu-lar Java objects, consider the usual structure of our tests. We typically start byinstantiating the object under test. Then, we populate the object with any depen-dencies it requires, often using mock implementations rather than the real thing.Finally, we invoke the functionality we want to test, and perform assertions on theobject’s and the collaborators’ states to verify correct behavior.
Now, let’s think about the managed-objects scene. Managed objects are, by def-inition, managed by someone else—the container. We typically don’t instantiatethe object ourselves directly; rather, we ask the container to give us a reference toour managed object. Figure 13.1 illustrates this difference between managed andregular Java objects.
For the same reason, we also typically don’t populate the dependencies onmanaged objects but instead rely on the container giving us a chance to do thatfrom within the component. This is the case with EJB 2.x, where dependencieshave traditionally been actively acquired by the object through lookup requests to
Figure 13.1 Distinction between container-managed objects and plain vanilla objects

4 CHAPTER 13
Test-driving EJB components
the application server’s Java Naming and Directory Interface (JNDI) tree. It’s allhappening in reverse compared to regular objects.
All these problems have solutions. EJB 3 incorporates many of these solutions,but those who are stuck with the legacy of EJB 2.x won’t have to suck it up. Onceyou’re finished with this chapter, you’ll have a good understanding of the neces-sary tricks and workarounds in bending EJB technology to the test-driven methodof developing software.
The most common type of EJB is the session bean, so let’s start from there.
13.2 Conquering session beans
We want to test-drive session beans, which are objects managed by an EJB con-tainer. The container is of no interest to us while writing unit tests for the code, solet’s get rid of the container as far as the unit tests are concerned. At some point,we’re likely to want to do some integration testing to verify that the transactionsettings and other related configurations are consistent with our intent, but rightnow we’re talking about test-driving application functionality into our compo-nent. No container in the mix, please.
In this section, we’ll see how to take the session beans out of the EJB containerand survive in the standalone environment of a unit-testing framework. Let’sbegin by talking about how to simulate the lifecycle of session beans and how towrite contract tests as a safety net to give an early warning when we’re about to dosomething that’s against the specification. I’ll talk in terms of the EJB 3 specifica-tion here, but most of the techniques are directly applicable to the older EJB 2.xAPI too. I’ll explicitly mention it when this isn’t the case.
After breaking out of the chains of containment, we’ll talk about faking depen-dencies—how to sneak test doubles into our session beans in our unit tests. We’llfirst discuss a couple of ways to intercept JNDI lookups performed by the sessionbean under test. This is most relevant for EJB 2.x session beans, which areexpected to actively acquire their dependencies.
After working around JNDI lookups, we’ll turn our attention to dependencyinjection as the alternative. Dependency injection is the way to go with the newerEJB 3 spec and is most relevant for EJB 3 session beans. The same technique canbe used with the 2.x generation of the EJB specification, too—with a little extraeffort, as we’ll learn.
But now, let’s get out of that enterprise jail cell—the EJB container.

Conquering session beans 5
13.2.1 Breaking out of the container
The good news with managed-object frameworks such as EJB is that the compo-nent lifecycle is documented—otherwise, developers wouldn’t know how toimplement the components properly. The documented lifecycle means we canoften step into the shoes of the real container and simulate its function for the pur-pose of a unit test, invoking the lifecycle methods in the proper order and passingin test doubles as necessary for each test.
This is the case with EJB as well. Each type of EJB component (session beans,entity beans, and message-driven beans) has a set of lifecycle methods that the con-tainer promises to invoke under certain conditions. What’s left to do is create thenecessary test-double implementations of the associated javax.ejb.* interfaces—or let tools like EasyMock do that. Let’s see what’s needed to simulate the lifecycle.
Simulating the EJB 3 lifecycleThe EJB 3 specification defines several optional callback methods that a sessionbean class can implement. The callback methods are tagged with an annotationso the container can recognize them from regular business methods. The annota-tions for the main callback methods are called @Init, @PostConstruct, @PrePas-sivate, @PostActivate, and @PreDestroy, as shown in figure 13.2.
Methods annotated with @Init or @PostConstruct are called by the containerimmediately after the object is instantiated. A method annotated with @PrePassi-vate or @PostActivate is called just before or after a stateful session bean is pas-sivated or activated, respectively. A method annotated with @PreDestroy is called
Figure 13.2 Simplified lifecycle of an EJB 3 session bean focusing on the lifecycle callback methods

6 CHAPTER 13
Test-driving EJB components
right before the container removes the bean instance from its object pool. This isa simple contract between the container and the session bean and is straightfor-ward to carry out in a unit test. We instantiate our bean class and invoke theappropriate lifecycle methods before and after invoking any business methods wewant to test. With this in mind, we could write a test similar to listing 13.1 with theintention of test-driving a business method into an EJB 3 session bean.
@Testpublic void discountIsCalculatedBasedOnVolumeOfPastPurchases() throws Exception { PricingServiceBean bean = new PricingServiceBean(); bean.myInitMethod(); bean.myPostConstructMethod(); Product product = new MockProduct(); Account account = new MockAccount(); Price p = bean.discountedPrice(product, account); // ...}
It’s as simple as that. We invoke some methods, and no container is in sight! Wehave a clear contract that our bean class and the container vendor must fulfill, sowe can use that contract as a natural boundary for isolating the unit under testfrom its production runtime environment—the EJB container.
If you’re familiar with the EJB 3 specification, you’re probably aware that beansare no longer required to implement any lifecycle methods. Plus, the lifecyclemethods can be named virtually anything we want. Assuming that the test in list-ing 13.1 would be our first test for the PricingServiceBean we’re developing andthat we know the implementation won’t need to perform any initialization in the@Init- or @PostConstruct-annotated methods in order to calculate a discount,why should we invoke those methods? Our test would be more compact if weomitted those method calls.
Listing 13.1 Simulating container by invoking lifecycle methods on a session bean
Invoke lifecycle methods
Lifecycle methods in EJB 2.xWe can simulate the lifecycle similarly with the old EJB 2.x specification. Themain difference is that although EJB 3 gives the developer the freedom to declareonly those lifecycle methods they need (and with arbitrary names), the EJB 2.xspecifications dictate that all the methods be declared with specific names suchas ejbCreate, ejbPostCreate, and so forth.

Conquering session beans 7
We could omit them. There’s a point to be made about consistency, however.Considering that a later refactoring might move some code from our businessmethods into an initialization method, for example, it would be useful to knowthat all of our tests comply with the lifecycle defined in the specification and thatthe production code passes those tests.
Speaking of being consistent and complying with the specification, it mightmake sense to build just enough testing infrastructure to verify that the bean devel-oper is abiding by the contract. Let’s see how much of an effort that would be.
Automating the EJB 3 session bean contractThose with experience in EJB development are bound to be familiar with the EJBcontainer’s aggravating complaint about the developer having missed an implicitcontract, such as a constraint on a lifecycle method’s signature that isn’t enforcedby the compiler. This is something we’d rather find out immediately during devel-opment than when we try to deploy the bean to a container. With that in mind, itmakes sense to establish some automation in this field.
There are two main aspects where extra automation might come in handy.First, it would be useful if we had unit tests to verify those aspects of the contractbetween our beans and the container that the IDE or compiler doesn’t catch. Sec-ond, it might be useful to encapsulate the invocation of lifecycle methods intocommon utility methods to avoid the arbitrary NullPointerException in situa-tions where our tests mistakenly invoke the bean’s methods differently than astandards-compliant container would, leaving the bean in an invalid state.
Listing 13.2 illustrates the first aspect in the form of a sketch of an abstractbase class providing tests for verifying the correct usage of annotations in the beanclass under test. These types of tests are generally referred to as contract tests.
public abstract class EJB3SessionBeanTestCase {
protected abstract Class<Object> getBeanClass(); @Test public void ejb3CompliantClassAnnotations() throws Exception { Class bean = getBeanClass(); Annotation stateless = bean.getAnnotation(Stateless.class); Annotation stateful = bean.getAnnotation(Stateful.class); assertFalse("Only one of @Stateless or @Stateful allowed", (stateless != null && stateful != null)); }
@Test public void backwardsCompatibilityWithEjb2Interface()
Listing 13.2 Abstract base class contributing test methods for the session bean contract
Subclasses need to implement this

8 CHAPTER 13
Test-driving EJB components
throws Exception { if (SessionBean.class.isAssignableFrom(getBeanClass())) { assertAnnotation(PreDestroy.class, "ejbRemove"); assertAnnotation(PostActivate.class, "ejbActivate"); assertAnnotation(PrePassivate.class, "ejbPassivate"); assertAnnotation(PostConstruct.class, "ejbCreate"); } }
@Test public void validNumberOfLifecycleAnnotations() throws Exception { assertMaxNumberOfAnnotations(1, PreDestroy.class); assertMaxNumberOfAnnotations(1, PostActivate.class); assertMaxNumberOfAnnotations(1, PrePassivate.class); assertMaxNumberOfAnnotations(1, PostConstruct.class); }
// assertion methods' implementations omitted for brevity}
With a base class like that in listing 13.2, we could declare our test class for a ses-sion bean to extend the base class, implement a one-liner method for returningthe bean class we’re testing, and inherit automatic checks for things like properuse of annotations.
Building these kinds of base classes may not be worth the effort if our applicationhas only one or two beans. However, for a project making heavy use of EnterpriseJavaBeans, it will pay off in improved speed of development, because certain typesof errors are caught in our TDD cycle rather than during integration testing.
Contract tests in EJB 2.xJust as we can codify the contract for an EJB 3 session bean into a reusable baseclass, we can do the same for the EJB 2.x generation of beans. The main differ-ence is, once again, that the EJB 2.x specifications nail down the contract inmore detail (such as standard names for lifecycle methods and mandatory inter-faces to implement).
Off-the-shelf contract tests with Ejb3UnitIf you’re not excited about writing your own contract tests, the open sourceproject ejb3unit (http://ejb3unit.sf.net) offers a set of abstract base classes forputting your EJB 3 session beans and entities under contract tests.

Conquering session beans 9
Container as a single point of accessRemoving the container from the picture by simulating the component lifecycledoesn’t seem too bad. But what happens if our session bean needs to use con-tainer services, such as programmatic transactions (through the javax.ejb.User-Transaction interface), or look up something from the JNDI tree—such as ajavax.sql.DataSource, another EJB, or a JMS queue or topic? The container isalso the single point of access to such dependencies.
For example, we might want our PricingServiceBean in listing 13.1 to dele-gate the lookup for the purchase history of the given Account object—perhaps toan AccountHistoryBean class. Although the delegation of responsibility is a gooddesign practice, these kinds of dependencies between beans have been annoyingin the past when it comes to testing. Let’s talk about dependencies and simpleways to alleviate the pain associated with them.
13.2.2 Faking dependencies
We can’t discuss dependencies in the context of EJB without bumping into JNDI.JNDI, the mother of all trees in enterprise Java, is the one place to which all the var-ious resources are bound and from which they can be obtained. For instance, everyEJB component we’ve deployed as part of our application can be found from theapplication server’s JNDI tree with a unique identifier—the JNDI name—eithergiven explicitly in our configuration files or derived from the bean’s class name.
Figure 13.3 illustrates a simple case of one EJB having a dependency to anotherwithin the same JNDI context. EJB #3 needs EJB #1 to fulfill its responsibility, what-ever that is. Somehow, we need to be able to test beans that have such dependen-cies without the implementation of that dependency.
Managing and working around dependencies in our unit tests is such a bigtopic that we should draw a couple of linesin the sand before rushing ahead. Thesolution to many testability issues, asyou’ve probably learned by now, is to addindirection or isolation and then exploitthe new lever we just added to simplify ourtest—which, by association, has the sameeffect on our production code.
Speaking of isolation and indirection,we have a few main approaches fromwhich to choose when it comes to refactor-ing our beans’ dependencies to some-thing more testable:
Figure 13.3 Enterprise JavaBeans and their dependencies in the JNDI tree

10 CHAPTER 13
Test-driving EJB components
■ Fake the JNDI tree—We can strive to keep the component we’re testing asmuch of a black box as possible and focus our efforts on substituting theJNDI tree with one that’s under our tests’ control.
■ Override JNDI-related code—We can cut the JNDI-related code out of the pic-ture, leaving that portion of the code base to be tested as part of our inte-gration test suite.
■ Reverse dependencies—We can turn the dependencies around with somethingcalled dependency injection.
These approaches are as much about design decisions as they are about testingtrickery. We’ll see how much they affect our design as we look at each of theseapproaches in more detail. Let’s start with faking the JNDI tree.
Faking the JNDI treeIf we want our tests knowing as little as possible about how—and when—the beanunder test obtains its dependencies, one of our best options has been an opensource project named MockEJB.1 Among other things, the MockEJB project sup-plies us with a fake implementation of a JNDI tree. More accurately, it providesmock implementations of the javax.naming.InitialContextFactory andjavax.naming.Context interfaces, which our beans indirectly use for connectingto the JNDI tree.
This means we can tell MockEJB to configure the current JVM runtime to useMockEJB’s own mock implementation of the JNDI interfaces and start runningour tests—during which the EJB being invoked will do JNDI lookups—knowingthat what the bean will get from JNDI is exactly what we put there. What we putinto the mocked-up JNDI tree is either plain old Java objects implementing theexpected interfaces or mock objects we’ve created with tools like EasyMock.
Listing 13.3 shows a snippet from the MockEJB source code for the MockCon-textFactory class, the mock implementation of one of the key JNDI interfaces.
public class MockContextFactory implements InitialContextFactory {
private static Map savedSystemProps = new HashMap(); ...
public static void setAsInitial() throws NamingException { // persist original system properties
1 http://www.mockejb.org.
Listing 13.3 Snippet from MockEJB, substituting a mock JNDI implementation

Conquering session beans 11
savedSystemProps.put(Context.INITIAL_CONTEXT_FACTORY, System.getProperty(key)); savedSystemProps.put(Context.URL_PKG_PREFIXES, System.getProperty(key)); // set system properties for mock JNDI implementation System.setProperty(Context.INITIAL_CONTEXT_FACTORY, MockContextFactory.class.getName()); System.setProperty(Context.URL_PKG_PREFIXES, "org.mockejb.jndi"); }
public static void revertSetAsInitial() { Iterator i = savedSystemProps.entrySet().iterator(); while(i.hasNext()) { Map.Entry entry = (Map.Entry) i.next(); restoreSystemProperty((String) entry.getKey(), (String) entry.getValue()); } rootContext = null; }}
What we can see from listing 13.3 is that the MockContextFactory class gives us astatic method called setAsInitial for replacing the current JNDI implementationwith MockEJB’s own. Similarly, a method called revertSetAsInitial reverts the sys-tem properties back to the way they were before calling setAsInitial. The key isthat between calls to these two static methods, the following code du jour for con-necting to the JNDI tree gets back an object talking to the MockEJB implementation:
MockContextFactory.setAsInitial();...// connect to JNDI, getting a mock rather than the real thingContext mockedUpJndiContext = new InitialContext();...MockContextFactory.revertSetAsInitial();
Obviously, we’ll want to ensure that the original system properties are reset aftereach test, which means we’ll likely call these static methods from our tests’ setupand teardown methods, respectively. Let’s write a test case, shown in listing 13.4,which makes use of the MockContextFactory.
import javax.naming.*;import org.junit.*;import static org.junit.Assert.*;import static org.easymock.EasyMock.*;
Listing 13.4 Using MockEJB and EasyMock to mock the JNDI tree

12 CHAPTER 13
Test-driving EJB components
public class PricingServiceBeanTest {
@Before public void setUp() throws Exception { MockContextFactory.setAsInitial(); }
@After public void tearDown() { MockContextFactory.revertSetAsInitial(); }
@Test public void discountBasedOnVolumeOfPastPurchases() throws Exception { Account account = new MockAccount(); Product product = new Product("", 10000); // price: $100
DiscountService ds = createMock(DiscountService.class); expect(ds.getDiscountPercentage(account)).andReturn(25); replay(ds);
InitialContext context = new InitialContext(); context.bind("example/DiscountServiceBean/local", ds);
PricingServiceBean bean = new PricingServiceBean(); bean.ejbCreate(); Price price = bean.discountedPrice(product, account);
assertEquals(new Price(7500), price); // $100 – 25% = $75 verify(ds); }}
Listing 13.4 isn’t rocket science. First, we B surround our test methods with calls tothe MockContextFactory’s setAsInitial and C revertSetAsInitial methods inorder to preserve isolation between tests. Then, inside our test method, we D createa mock implementation of the dependency (DiscountService) using EasyMockand E bind the mock object into the JNDI tree using the name we expect our beanunder test to use to look it up.
From there, we invoke the code under test using a combination of real objectsand mock objects, afterwards asserting that the outcome was what we expectedand that the expected collaboration took place between the code under test andour mock objects.
Use mock JNDI implementation
B
Reset everything after each test
C
DCreate mock ofdependency
E Bind mock dependency to JNDI

Conquering session beans 13
With the test in listing 13.4 in place, the simplest implementation that willmake the test pass would look something like listing 13.5.2
import javax.ejb.Stateless;import javax.naming.InitialContext;
@Statelesspublic class PricingServiceBean implements PricingService {
public Price discountedPrice(Product prod, Account account) { try { InitialContext ctx = new InitialContext(); DiscountService ds = (DiscountService) ctx .lookup("example/DiscountServiceBean/local");
int percentage = ds.getDiscountPercentage(account); float multiplier = (100 - percentage) / 100.0f; return new Price((int) (prod.getPrice() * multiplier)); } catch (Exception e) { throw new RuntimeException(e); } }}
All we need to do is acquire the DiscountService bean (which happens to be themock implementation), ask it for an account-specific discount percentage, andadjust the product’s list price accordingly. It’s simple, and that’s what we wantfrom an example focused on dealing with dependencies. Having a snippet ofcode to look at is also helpful, considering what we’re going to do next: ignore theJNDI lookup in our tests.
Ignoring JNDI lookupsIn listing 13.5, we saw an implementation of the discountedPrice businessmethod on our PricingServiceBean. We faked the JNDI implementation to pro-vide the bean under test with its dependencies. Although using the MockContext-Factory and binding things to the JNDI tree in the tests was hardly a laborioustask, it’s not the only trick. Focus on getting the functionality into place ratherthan thinking about the JNDI name with which the dependencies should bebound to the JNDI tree. In those cases, extract and override.
Listing 13.5 Implementation of the PricingServiceBean
2 Please don’t round numbers like this when implementing systems for the bank where I keep my money.
Look up depen-dency
Use dependency

14 CHAPTER 13
Test-driving EJB components
Let’s take another glance at listing 13.5. Two steps are involved: one to obtainthe dependency and one to use the dependency for implementing the businessfunctionality. Why don’t we refactor that method by pulling the first part into aseparate method? The result is presented in listing 13.6.
public Price discountedPrice(Product product, Account account) { try { DiscountService discounts = getDiscountService(); int discount = discounts.getDiscountPercentage(account); float multiplier = ((100 - discount) / 100.0f); return new Price((int) (product.getPrice() * multiplier)); } catch (Exception e) { throw new RuntimeException(e); }}
protected DiscountService getDiscountService() throws NamingException { String name = "example/DiscountServiceBean/local"; return (DiscountService) new InitialContext().lookup(name);}
This refactoring not only improves the code by increasing the cohesion withindiscountedPrice but also gives us the option of writing the tests by overriding thegetDiscountService method rather than faking the JNDI. To illustrate thisapproach, look at listing 13.7, which shows how we might have written our test forthe discountedPrice functionality had we wanted to ignore the JNDI lookuprather than fake the JNDI tree.
public void discountBasedOnVolumeOfPastPurchases() throws Exception { Account account = new MockAccount(); Product product = new Product("", 10000); // list price: $100
final DiscountService ds = createMock(DiscountService.class); expect(ds.getDiscountPercentage(account)).andReturn(25); replay(ds);
PricingServiceBean bean = new PricingServiceBean() { @Override protected DiscountService getDiscountService() { return ds;
Listing 13.6 Extracting the acquisition of a dependency into a separate method
Listing 13.7 Test that would’ve pushed our implementation toward listing 13.6
Use getter toacquire dependency
Override getter instead of binding mock to JNDI
Create mock DiscountService as before

Conquering session beans 15
} }; Price price = bean.discountedPrice(product, account); assertEquals(new Price(7500), price); // $100 – 25% = $75 verify(ds);}
The advantage with this approach is that the test is slightly simpler than the one inlisting 13.4, where we initialized a mock JNDI tree and bound the mock depen-dency into the tree. In this example, we use fewer lines of code—mostly becauseof not having to initialize and reset the mock JNDI implementation in the setupand teardown methods. The downside is we’re not testing that the proper JNDIlookup is performed. Also, the test knows too much about the bean implementa-tion’s details—the existence of a getter method—for my taste.
Having said that, the JNDI lookup is a trivial piece of code that could be consid-ered something that can’t break; remembering that we’ll have automated integra-tion and system tests, this might be an acceptable trade-off. We could still write a testfor the getter only, verifying that the JNDI lookup happens. It’s largely a matter ofpersonal preference, and balancing these pros and cons is ultimately left to us.
There’s a third approach to dealing with dependencies, which helps us avoidsuch a trade-off. The magic words are familiar from chapter 4: dependency injection.
Injecting dependencies with EJB 3The previous two techniques, faking the JNDI tree and overriding JNDI lookups,are valid whether our beans are written against the 2.x or 3 version of the EJB spec-ification. The third technique, dependency injection, is the one to go with if we’reusing EJB 3. That’s how the specification suggests we handle dependencies! Butdependency injection is worth serious consideration even if we’re using EJB 2.x.
The fundamental reason for having to fake the JNDI tree or override getter meth-ods to substitute dependencies is that the bean under test is actively acquiring itsdependencies. Now, consider a situation where the bean would instead expect thedependencies to be handed to it by someone else. If this was the case, we wouldn’thave the problem in the first place. That’s what dependency injection is all about—moving the responsibility for obtaining dependencies outside of the component.
As I hinted already, EJB 2.x versus 3 is important when we’re talking aboutEnterprise JavaBeans and dependency injection. In EJB 2.x, the specificationleaves little room for integrating a dependency-injection framework such as theSpring Framework or PicoContainer. EJB 3, on the other hand, has taken advan-tage of the state of the art in the open source world and incorporated depen-dency injection into the specification as the preferred way for Enterprise
Override getter instead of binding mock to JNDI

16 CHAPTER 13
Test-driving EJB components
JavaBeans to acquire their dependencies. An EJB 3 container is a dependencyinjection framework.
Let’s refresh our memory of how dependency injection works. Three thingshappen:
1 The component advertises its dependencies, typically in terms of interfacesor named services.
2 The component is registered to a dependency injection container alongwith other components.
3 Knowing the capabilities of all registered components, the containermakes sure each advertised dependency gets injected with a matchingimplementation.
In the case of Enterprise JavaBeans, the EJB 3 container acts as a dependencyinjection container. Beans advertise their dependencies either through metadataannotations on setter methods or member variables or, alternatively, in the exter-nal deployment descriptor. In EJB 2.x, it’s more complex. Listing 13.8 shows howwe could (and should!) rewrite the earlier discounted price test, knowing we havethe dependency-injection features of EJB 3 at our disposal.
@Testpublic void discountBasedOnVolumeOfPastPurchases() throws Exception { Account account = new MockAccount(); Product product = new Product("", 10000); // list price: $100
DiscountService ds = createMock(DiscountService.class); expect(ds.getDiscountPercentage(account)).andReturn(25); replay(ds);
PricingServiceBean bean = new PricingServiceBean(); bean.setDiscountService(ds);
Price price = bean.discountedPrice(product, account); assertEquals(new Price(7500), price); // $100 – 25% = $75 verify(ds);}
The simplicity of calling a setter is hard to compete with. Constructor-baseddependency injection is arguably even simpler than this. However, that comes
Listing 13.8 Using dependency injection to populate dependencies
Call setter like container would

Conquering session beans 17
with the trade-off of not being able to substitute the dependency after construc-tion, which makes it more difficult to organize test code where we’d like to use adifferent mock implementation for different test methods.3 It’s up to us to choosewhat fits our current need the best.
The change toward simpler code with the adoption of dependency injection isobvious on the implementation’s side as well, as we can see in listing 13.9.
@Statelesspublic class PricingServiceBean implements PricingService {
private DiscountService ds;
@EJB(businessInterface = DiscountService.class) public void setDiscountService(DiscountService impl) { this.ds = impl; }
public Price discountedPrice(Product prod, Account account) { try { int percentage = ds.getDiscountPercentage(account); float multiplier = (100 - percentage) / 100.0f; return new Price((int) (prod.getPrice() * multiplier)); } catch (Exception e) { throw new RuntimeException(e); } }}
We could go even further in simplifying our production code by employing fieldinjection rather than introducing a setter. All we’d need to do would be to movethe @EJB annotation on the private field and vanquish the setter method. How-ever, that would mean that in our test we’d need to resort to using the ReflectionAPI for populating the field—just like the EJB container would when facing suchan annotation on a private field. Another option would be to make the fieldmore visible. My personal preference is to not make fields public, so I generallyrecommend using either setters or reflection to inject to private fields.
Although the plumbing necessary for injecting to a private field requiressome work, there’s another point to consider that might tilt us toward going forfield injection (regardless of whether we’re talking about private, protected, or
3 Then again, that might be an indicator of the two tests belonging to two different test classes.
Listing 13.9 Bean class getting the dependency through a setter

18 CHAPTER 13
Test-driving EJB components
public fields): By using a utility method to inject dependencies to a named field,we can also check for the presence of the appropriate dependency-injection anno-tation. For example, the utility method in listing 13.10 alerts us to add a missing@EJB or @Resource annotation on a field we’re injecting to from our test.
/** * Inject the given dependency into the named field on the * target object, also verifying that the field has been * annotated properly. */public static void injectField(Object target, String fieldName, Object dep) throws Exception { Field field = target.getClass().getDeclaredField(fieldName); Annotation ejb = field.getAnnotation(EJB.class); Annotation res = field.getAnnotation(Resource.class); boolean wasFound = (ejb != null || res != null); assertTrue("Missing @EJB or @Resource annotation", wasFound); field.setAccessible(true); field.set(target, dep); }
The injectField method in listing 13.10 isn’t too shabby. It B ensures that thefield to which we inject has either an @EJB or a @Resource annotation, and it Cperforms the injection.
Injecting dependencies with EJB 2What about the EJB 2.x specification? How can we use dependency injection withEJB 2.x session beans? The injection of dependencies in our tests works the same aswith EJB 3 (except we wouldn’t check for the presence of an annotation). The ques-tion is how the injection takes place when we deploy our code to a real EJB container.
I’ve done this by having the appropriate lifecycle method (typically ejbCre-ate) look up the dependencies and inject them through a setter or directly into aprivate field. Our contract with the EJB container effectively guarantees that ourdependency injection will take place when running in a container, and we stillhave the benefit of being able to inject dependencies ourselves in a test. Nice!
There’s one more thing. How do we know the lifecycle method is injecting thedependencies correctly? We write a test for the expected behavior, of course. Thistest invokes the lifecycle method—either faking the JNDI tree or overriding thelookups—and asserts the correct objects were populated into the right places.Listing 13.11 shows this test.
Listing 13.10 Injecting a dependency using the Reflection API
BVerify field hasappropriateannotation
C Force (possibly private) field to be accessible and inject dependency

Commanding asynchronous services 19
@Testpublic void dependencyInjectionShouldHappenInEjbCreate() { final Dependency fakeDependency = new FakeDependency(); SomeEJB2xSessionBean bean = new SomeEJB2xSessionBean() { @Override protected Object lookupDependencyFromJNDI() { return fakeDependency; } }; assertNull(bean.dependency); bean.ejbCreate(); assertSame(fakeDependency, bean.dependency); }
In listing 13.11, an EJB 2.x–style session bean should obtain a dependency of typeDependency by performing a JNDI lookup when the container invokes the ejb-Create callback method. We codify this scenario into a test by B overriding theJNDI lookup to return a fake implementation of the dependency and by C check-ing that the same object gets assigned to the expected field during the invocationof ejbCreate. Another option would’ve been to let the bean do the lookup andfake the JNDI tree instead. Whichever way we go, dependency injection isn’t diffi-cult to adopt for EJB 2.x, although it’s easier in EJB 3.
That’s all we need to know about dealing with the dependencies our Enter-prise JavaBeans may have. Knowing these tools and tricks, we can write tests thatare independent of the real container and run blazing fast, and verify the beanunder test collaborates with its dependencies as expected. And it’s all simpleenough to let us write the test first!
We’ve been talking a lot about session beans—the all-round workhorse of theEJB specification—but that’s not all there is to Enterprise JavaBeans. Next, we’lljump to the asynchronous world of message-driven beans and the Timer service.No need to fret; the asynchronous nature doesn’t show much in the tests. Let’smove on before we’ve spilled the beans on it all. (Pun intended.)
13.3 Commanding asynchronous services
Although session beans represent the majority of Enterprise JavaBeans usage, theyare inherently about synchronous computing. Enterprise systems, however, oftenhave requirements that need asynchronous execution where multiple threadsconverse with each other, as illustrated in figure 13.4.
Listing 13.11 Testing that an EJB 2.x session bean injects dependencies
Override JNDI lookup
B
Dependency should be there after ejbCreate()
C

20 CHAPTER 13
Test-driving EJB components
The existence of legacy systems over several decades might call for a messagingbridge or a message bus, the nature of certain messages might call for a rese-quencer queue, and so forth. There is a host of reasons for introducing asynchro-nous messaging concepts like queues and topics into our application, andenterprise Java developers can’t avoid encountering messaging-related and event-based technologies.
We’re building on top of the Java Messaging System (JMS) API. JMS is a stan-dard interface through which application developers can connect to the underly-ing messaging system implementation. Although JMS is a simple API, we mustmanage connections to the messaging system and other related resources. This iswhere message-driven beans (MDB) come into play: They let a developer focus onthe application functionality, leaving the nasty details of resource management tothe EJB container.
It’s time to pull up our sleeves again and test-drive some asynchronous compo-nents.
13.3.1 Message-driven beans
Message-driven beans are possibly the simplest kind of Enterprise JavaBeans. Thisis because the interface (javax.jms.MessageListener) consists of one simplemethod:
public void onMessage(javax.jms.Message msg);
The only parameter to the onMessage method, javax.jms.Message, is an inter-face that’s easy to fake—it’s a map of key-value pairs—and a number of readilyavailable mock implementations exist.4
4 The MockEJB framework comes with one, for example.
Figure 13.4Asynchronous execution introduces time between actions as a new variable.

Commanding asynchronous services 21
What do message-driven beans do in the onMessage method? They typicallyprocess the message contents and either manipulate the system state (either byconnecting to a database directly or by invoking business logic through sessionbeans) or pass the message forward to the next queue or topic for further process-ing. That’s not an issue, though, because we’ve just learned how mocking depen-dencies is child’s play when we know the right tricks.
I’m sure you’re itching to see some action, so let’s look at a sample scenario forwhich we want to implement an MDB.
An example of asynchronous messagingSay we’re developing a search engine that works on a large, multi-gigabyte data setsitting on a remote file system where a single search might take up to 60 secondsto complete. Let’s also say the system has thousands of simultaneous users. Such ascenario would be good for performing the search operation asynchronously. Fig-ure 13.5 describes the workflow we’ve designed for handling the search opera-tions using a JMS queue and message-driven beans.
Our design in figure 13.5 says we’ll have two queues—one for deliveringincoming search requests and one for delivering the results of completedsearches. When a new search request comes through to the searches queue, theEJB container allocates an instance of our message-driven bean to consume themessage. Our bean is then expected to execute the search request synchronouslyusing a session bean; once the session bean generates the results, our bean sendsa new message containing the search results to the results queue.
Now that we have an idea of what we want to build, where should we start?We’ll need an instance of the message-driven bean, so let’s figure out how toinstantiate the bean class.
Figure 13.5A search request message comes in to the searches queue; the MDB consumes the message, delegates the work synchronously to a session bean, and sends a new message to the results queue.

22 CHAPTER 13
Test-driving EJB components
Just create oneSound familiar? Just like with session beans, there’s a strong case for the “just cre-ate one” approach to leaving the container out of the picture when test-drivingmessage-driven beans. The real EJB container might dynamically generate and usea subclass of the bean class at runtime, but it’s sufficient for our purposes to createan instance of the bean class with the new operator, call the appropriate lifecyclemethods if applicable, and invoke the functionality.
What next? We have an initialized instance of the message-driven bean, butwe’re not specifying what we expect it to do; let’s set up some expectations usingmock objects, invoke the business logic, and verify that the bean does what we want.
First, we need a bunch of mock objects for setting up the expected collabora-tion between the message-driven bean and the JMS API. Listing 13.12 shows thefixture and the associated setup code for the test class.
import javax.jms.*;import org.junit.*;import static org.easymock.EasyMock.*;
public class SearchListenerBeanTest {
private SearchService searchService; private QueueConnectionFactory factory; private QueueConnection connection; private QueueSession session; private QueueSender sender; private Queue queue; private ObjectMessage resultMessage; private ObjectMessage searchMessage;
@Before public void setUp() { searchService = createMock(SearchService.class); factory = createMock(QueueConnectionFactory.class); connection = createMock(QueueConnection.class); session = createMock(QueueSession.class); sender = createMock(QueueSender.class); queue = createMock(Queue.class); resultMessage = createMock(ObjectMessage.class); searchMessage = createMock(ObjectMessage.class); }}
Listing 13.12 The fixture for our first message-driven bean test

Commanding asynchronous services 23
There are a lot of mock objects—proof that the JMS API is deep in terms of itsobject hierarchy. The good news is the test itself is nothing special. We have mockobjects that we pass to the production code being tested, and we expect certainmethod calls to occur. Listing 13.13 shows the test method where we set up ourexpectations, instantiate the bean, and invoke the bean’s onMessage method.
public class SearchListenerBeanTest { ...
@Test public void searchRequestIsDelegatedAndResultsPassedForward() throws Exception { // non-mock input objects passed to the production code String[] keywords = new String[] { "keyword1", "keyword2" }; String[] results = new String[] { "match1", "match2" };
// expect the MDB to retrieve search request contents expect(searchMessage.getObject()).andReturn(keywords);
// expect a call to the SearchService EJB expect(searchService.search(aryEq(keywords))) .andReturn(results);
// expect MDB to submit search results to results queue expect(factory.createQueueConnection()) .andReturn(connection); expect(connection.createQueueSession( false, Session.AUTO_ACKNOWLEDGE)) .andReturn(session); expect(session.createSender(queue)) .andReturn(sender); expect(session.createObjectMessage(aryEq(results))) .andReturn(resultMessage); sender.send(resultMessage); connection.close();
// done recording expectations... replay(searchService, factory, connection, session, queue, sender, resultMessage, searchMessage);
// ...ready to invoke business logic SearchListenerBean bean = new SearchListenerBean(); bean.searchService = searchService; bean.connectionFactory = factory; bean.resultsQueue = queue; bean.onMessage(searchMessage);
Listing 13.13 A test for our message-driven bean’s business logic
Expectations for call to
SearchServiceB
CExpectations forsubmitting results
to JMS queue
DCreate one, injectdependencies, and
invoke onMessage()
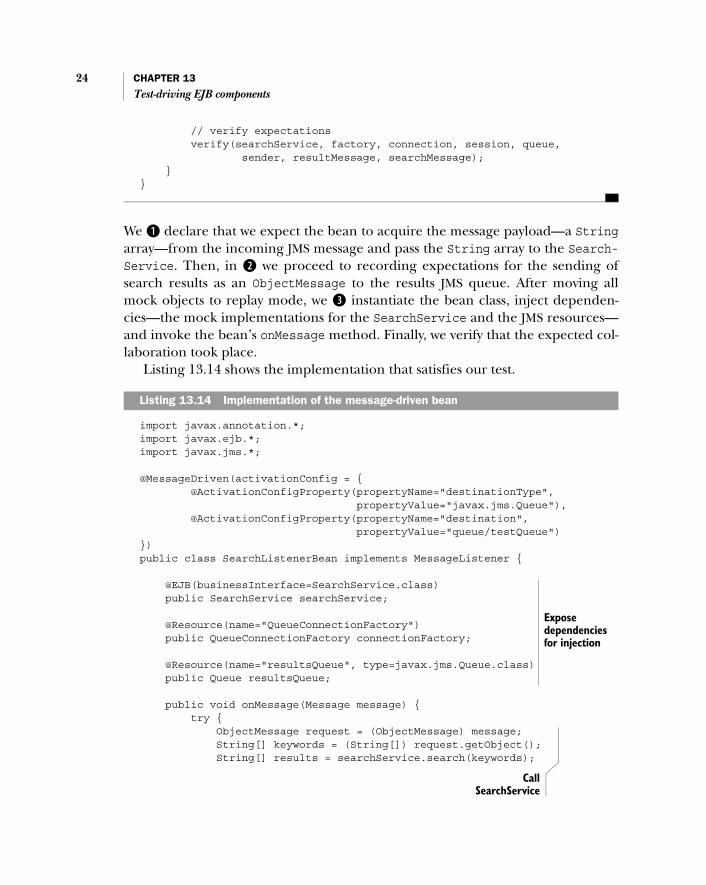
24 CHAPTER 13
Test-driving EJB components
// verify expectations verify(searchService, factory, connection, session, queue, sender, resultMessage, searchMessage); }}
We B declare that we expect the bean to acquire the message payload—a Stringarray—from the incoming JMS message and pass the String array to the Search-Service. Then, in C we proceed to recording expectations for the sending ofsearch results as an ObjectMessage to the results JMS queue. After moving allmock objects to replay mode, we D instantiate the bean class, inject dependen-cies—the mock implementations for the SearchService and the JMS resources—and invoke the bean’s onMessage method. Finally, we verify that the expected col-laboration took place.
Listing 13.14 shows the implementation that satisfies our test.
import javax.annotation.*;import javax.ejb.*;import javax.jms.*;
@MessageDriven(activationConfig = { @ActivationConfigProperty(propertyName="destinationType", propertyValue="javax.jms.Queue"), @ActivationConfigProperty(propertyName="destination", propertyValue="queue/testQueue")})public class SearchListenerBean implements MessageListener {
@EJB(businessInterface=SearchService.class) public SearchService searchService;
@Resource(name="QueueConnectionFactory") public QueueConnectionFactory connectionFactory;
@Resource(name="resultsQueue", type=javax.jms.Queue.class) public Queue resultsQueue;
public void onMessage(Message message) { try { ObjectMessage request = (ObjectMessage) message; String[] keywords = (String[]) request.getObject(); String[] results = searchService.search(keywords);
Listing 13.14 Implementation of the message-driven bean
Expose dependencies for injection
CallSearchService

Commanding asynchronous services 25
QueueConnection qc = connectionFactory.createQueueConnection(); QueueSession qs = qc.createQueueSession( false, Session.AUTO_ACKNOWLEDGE); QueueSender sender = qs.createSender(resultsQueue); message = qs.createObjectMessage(results); sender.send(message); qc.close(); } catch (Exception e) { throw new RuntimeException(e); } }}
This test, although not difficult to follow, is verbose. Proceeding with further tests(to add proper handling of JMS exceptions, for example), we could refactor thesetting of expectations into private methods on the test class. That would simplifyour tests to a more compact form. We should also consider extracting the differ-ent sections of the onMessage implementation into separate methods, making ourproduction code more pleasant to the eye. I’ll leave such refactorings as an exer-cise for you, because I have a lot to discuss regarding the services provided by theEJB specification.
Using an embedded JMS brokerIt’s possible to use a lightweight, embedded JMS broker instead of mock objectswhen testing code that needs to use JMS interfaces. The Apache ActiveMQ projectprovides such an implementation.
Although I’ve left rewriting the test in listing 13.13 as an exercise for you, list-ing 13.15 presents an abstract base class that can be used as the basis of such tests.
import java.util.logging.*;import javax.jms.*;import org.junit.*;import org.apache.activemq.ActiveMQConnectionFactory;
public abstract class AbstractJmsTestCase {
protected QueueConnectionFactory queueConnectionFactory; protected QueueConnection queueConnection; protected QueueSession queueSession;
protected TopicConnectionFactory topicConnectionFactory;
Listing 13.15 Abstract base class for tests using the embedded ActiveMQ JMS broker
Publish search results
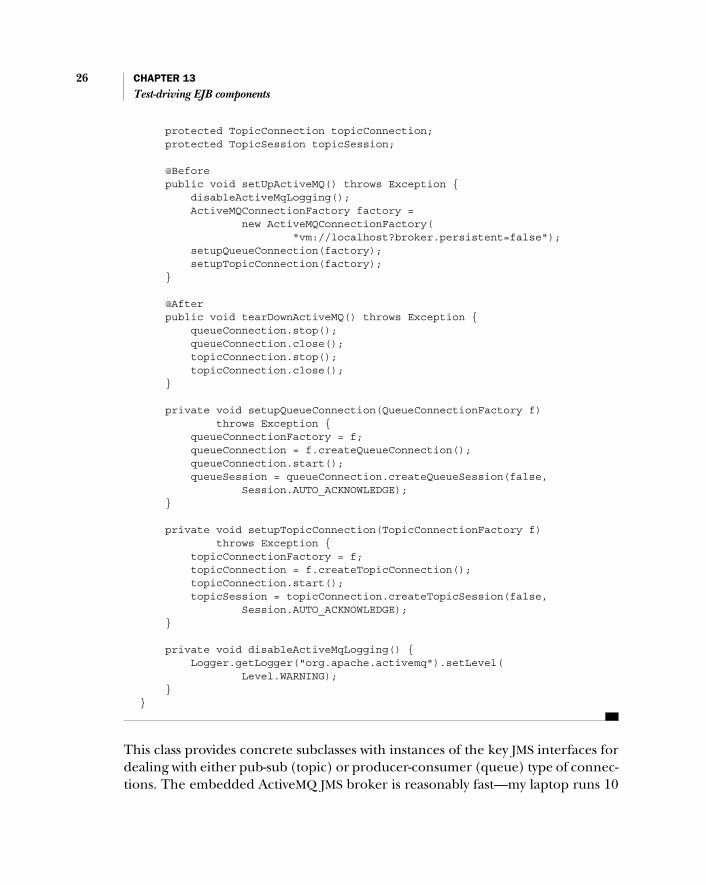
26 CHAPTER 13
Test-driving EJB components
protected TopicConnection topicConnection; protected TopicSession topicSession;
@Before public void setUpActiveMQ() throws Exception { disableActiveMqLogging(); ActiveMQConnectionFactory factory = new ActiveMQConnectionFactory( "vm://localhost?broker.persistent=false"); setupQueueConnection(factory); setupTopicConnection(factory); }
@After public void tearDownActiveMQ() throws Exception { queueConnection.stop(); queueConnection.close(); topicConnection.stop(); topicConnection.close(); }
private void setupQueueConnection(QueueConnectionFactory f) throws Exception { queueConnectionFactory = f; queueConnection = f.createQueueConnection(); queueConnection.start(); queueSession = queueConnection.createQueueSession(false, Session.AUTO_ACKNOWLEDGE); }
private void setupTopicConnection(TopicConnectionFactory f) throws Exception { topicConnectionFactory = f; topicConnection = f.createTopicConnection(); topicConnection.start(); topicSession = topicConnection.createTopicSession(false, Session.AUTO_ACKNOWLEDGE); }
private void disableActiveMqLogging() { Logger.getLogger("org.apache.activemq").setLevel( Level.WARNING); }}
This class provides concrete subclasses with instances of the key JMS interfaces fordealing with either pub-sub (topic) or producer-consumer (queue) type of connec-tions. The embedded ActiveMQ JMS broker is reasonably fast—my laptop runs 10

Commanding asynchronous services 27
simple integration tests against ActiveMQ in one second. Not blazing fast, butacceptable if we have only a handful of JMS-related tests.
Before moving on to discussing entity beans and EJB 3 persistence, let’s look atone more type of asynchronous service. JMS and message-driven beans aren’t theonly type of asynchronous service available to the enterprise Java developer. TheEJB 2.1 specification introduced the Timer service, a facility for scheduling one-offand repeating events, optionally with an initial delay. Let’s look at how the Timerservice works and an example of test-driving a piece of code that uses this service.
13.3.2 Working with Timer service API
With the introduction of the Timer service in EJB 2.1, enterprise Java developersgot a standard facility for executing business logic based on scheduled events or onrepeating intervals. The Timer service is made available to EJB componentsthrough the EJBContext interface (as well as through SessionContext, Entity-Context, and MessageDrivenContext, which extend EJBContext). We ask the EJB-Context object for a TimerService interface and then ask the TimerService tocreate a Timer. In EJB 3, the TimerService can also be injected directly into a pri-vate field of a managed object through the @Resource annotation.
The TimerService implementation is aware of the identity of the EJB instancecreating the timer. After the timer’s timeout interval, the EJB container takes careof obtaining a reference to the EJB instance and invokes its ejbTimeout method,passing the Timer object as the sole argument. Figure 13.6 illustrates these events.
Figure 13.6 The TimerService creating a Timer that performs a callback when it times out

28 CHAPTER 13
Test-driving EJB components
For example, consider a scenario where we have an entity bean representing auser account. Call the bean class UserBean. Now, implement a password-expiryfeature by letting the UserBean instances set a password-expiry timer every timethe bean’s password field is changed. Such a timer is started when a new UserBeaninstance is created. When the timer times out, the bean sets a flag indicating thatthe password has expired and should be changed upon next login.
Say our UserBean is an EJB 2.1 container-managed persistence (CMP) type ofan entity bean, meaning we don’t write any JDBC code but rather let the EJB con-tainer generate that plumbing for us. For now, we’re only interested in test-drivingthe timer logic in place to our entity bean, so we’ll ignore most of the lifecyclemethods required from the entity bean and focus on the handful we need to setup our timers.
Time to get busy.
Setting expectationsI’ve decided to start small. We’re first going to write a test for the initial timer,which is started when a new bean instance (a new user account) is created. We’vedetermined that ejbPostCreate (or @PostConstruct if we’re using EJB 3) is asuitable lifecycle method for doing that. Knowing that the ejbPostCreatemethod will need to obtain a TimerService from an EntityContext and a Timerfrom the TimerService, we set out to write a skeleton for our first test using theEasyMock framework for obtaining mock implementations of these three inter-faces. The code is shown in listing 13.16.
import static org.easymock.classextension.EasyMock.*;import org.junit.*;import javax.ejb.*;
public class PasswordExpiryTimerTest {
@Test public void timerIsCreatedUponCreatingNewUserAccount() throws Exception { EntityContext context = createMock(EntityContext.class); TimerService timers = createMock(TimerService.class); Timer timer = createMock(Timer.class);
expect(context.getTimerService()).andReturn(timers); expect(timers.createTimer( BunchOfConstants.TWO_MONTHS, "password expired")) .andReturn(timer);
Listing 13.16 Expected collaboration toward the TimerService

Commanding asynchronous services 29
replay(context, timers, timer);
// TODO: invoke ejbPostCreate()
verify(context, timers, timer); }}
We expect the EntityContext mock to receive a call to getTimerService and thereturned TimerService mock to receive a call to createTimer, with the parame-ters indicating that we expect the bean to set the timer to use a two-month delaybefore triggering. After recording the expected collaboration toward the Entity-Context and TimerService interfaces, we move our mock objects to replay mode,invoke ejbPostCreate, and then ask our mock objects to verify that the expectedcollaboration took place.
The stuff that should happen between the replay and verify calls doesn’texist yet. Let’s see how we can realize the comment into Java code.
Instantiating the bean under testThe next thing to do is figure out how to instantiate the entity bean. We want thebean to use container-managed persistence, which means—according to the EJBspecification—our bean class must be abstract and enumerate all persistent fieldsas pairs of abstract getter and setter methods. After briefly sketching on a piece ofpaper, we reach a decision: Our user bean needs to have a primary key, a usernamefield, a password field, and a boolean field for storing the knowledge of whetherthe password has expired. For the purposes of our test, we’re only interested in the“password expired” field. So, for now, treat UserBean as a regular Java class.
Listing 13.17 shows the remainder of our test, invoking the ejbPostCreatemethod, which should trigger the creation of a new timer.
import static org.easymock.classextension.EasyMock.*;import org.junit.*;import javax.ejb.*;
public class PasswordExpiryTimerTest {
@Test public void timerIsCreatedUponCreatingNewUserAccount() throws Exception { ... replay(context, timers, timer);
Listing 13.17 Expected collaboration toward the TimerService

30 CHAPTER 13
Test-driving EJB components
UserBean entity = new UserBean(); entity.setEntityContext(context); entity.ejbPostCreate("someusername", "somepassword");
verify(context, timers, timer); }}
There! A failing test. EasyMock is complaining that nobody’s asking our Entity-Context for a TimerService and, thus, nobody’s asking the TimerService to cre-ate any timers. It’s time to write some production code to make our test pass.Listing 13.18 shows the simplest and yet most sufficient implementation thatcomes to mind.
public class UserBean {
private EntityContext ctx;
public void setEntityContext(EntityContext ctx) { this.ctx = ctx; }
public void ejbPostCreate(String username, String password) { ctx.getTimerService().createTimer( BunchOfConstants.TWO_MONTHS, "password expired"); }}
We know the UserBean class should be abstract, implement the javax.ejb.Enti-tyBean interface, and so forth, in order to be a valid entity bean implementation,according to the EJB 2.1 specification. Consider writing some contract tests forchecking such things for our entity beans. Leaving that thought behind for awhile, we set out to tackle the other half of creating a timer—the stuff that hap-pens when the timer goes off.
Triggering the timerIn practice, we’re looking for a call to set a passwordExpired field to true whenthe timer goes off (when the EJB container invokes the bean’s ejbTimeoutmethod). The simplest way to express our intent is to declare an anonymous sub-class of the UserBean in our test method and override the setter from the parentclass to set our boolean field. Listing 13.19 shows this approach in action.
Listing 13.18 Letting ejbPostCreate() create a Timer

Commanding asynchronous services 31
public class PasswordExpiryTimerTest {
protected boolean passwordExpired;
@Before public void setUp() { passwordExpired = false; }
// ...
@Test public void flagIsSetWhenTimerGoesOff() throws Exception { UserBean entity = new UserBean() { @Override public void setPasswordExpired(boolean expired) { passwordExpired = expired; } }; Assert.assertFalse(passwordExpired); entity.ejbTimeout(null); Assert.assertTrue(passwordExpired); }}
Noticing the @Override annotation on the setPasswordExpire method, the com-piler prompts us to add the missing setPasswordExpired to our UserBean class.The ejbTimeout method doesn’t exist yet, so we’ll need to add that too. In a shorttime, we have a failing test and permission to write production code. Listing 13.20shows the full implementation.
public class UserBean {
private EntityContext ctx;
public void setEntityContext(EntityContext ctx) { this.ctx = ctx; }
public void setPasswordExpired(boolean expired) { }
public void ejbPostCreate(String username, String password) { ctx.getTimerService().createTimer(
Listing 13.19 Test for setting the flag when the timer goes off
Listing 13.20 Implementation for setting the “password expired” field upon timeout

32 CHAPTER 13
Test-driving EJB components
BunchOfConstants.TWO_MONTHS, "password expired"); }
public void ejbTimeout(Timer timer) { setPasswordExpired(true); }}
We’ve just stepped through what constitutes a representative example of test-drivingEJB components that make use of the Timer service. Our UserBean class didn’treach a state where it could be deployed to an EJB container (being non-abstract andmissing a bunch of other lifecycle methods, as well as not implementing the Enti-tyBean interface), but it’s getting there.
In practice, if we would continue developing our UserBean further from here,we’d probably add the setters and getters, make the UserBean class abstract, let itimplement the proper interfaces, and then—in order to not bloat our test codewith empty implementations of a gazillion getter and setter methods—add a stubclass (such as UserBeanStub), which would be a concrete class, implementing allthe abstract methods. In our tests, we could then extend UserBeanStub instead ofUserBean and override just those methods in which we’re interested for that spe-cific test.
In the tradition of lazy book authors, I’ll leave that as an exercise for you, andmove on to the next topic. The last subject on the agenda for this chapter is entitybeans and the new EJB 3 Persistence API. Even though entity beans can be a painin the behind, you’ll be surprised by the glaring simplicity and the ease of test-driving persistent entities using EJB 3.
13.4 Entities and entity beans
EJB 3 entities and EJB 2.x entity beans are different beasts from the other kinds ofEnterprise JavaBeans, session beans, and message-driven beans. Entities representdata and operations related to finding entities by various criteria, modifying thedata represented by a given entity bean instance, and creating and deletingdata—in other words, persistent objects.
The majority of entity beans written by corporate developers have traditionallyhad no functionality beyond what’s generated by the EJB container for imple-menting the persistence to a backing database—with the exception of entities thatuse bean-managed persistence (BMP), implementing their own persistence logic(typically using the JDBC API). Figure 13.7 illustrates this common division ofresponsibility, which hasn’t promoted good object-oriented design in many enter-prise systems.

Entities and entity beans 33
This has been our playing field for the past several years when it comes to the EJB2.x specification and persistent objects. Along with the EJB 3 specification, we gota new Persistence API to supersede entity beans. The Persistence API simplifies theway persistent entities are developed, also making quantum leaps in terms of test-ability. The downside of the improvement is, unfortunately, that all this time “eas-ily testable entity beans” has been an oxymoron.
For the remainder of this chapter, we’ll look into how we can test and test-driveentity beans. I’ll start by discussing the old EJB 2.x API and what our options areregarding unit testing and test-driven development.5 Then, we’ll look moreclosely into how the new Persistence API enables our TDD process for developingentity beans.
13.4.1 Testing EJB 2.x entity beans
Entity beans have always been the black sheep of the EJB family. The first versionsof the specification were unusable. Even after numerous huge improvements thatarrived along with the 2.0 version of the EJB specification, entity beans remainedone tough cookie for test-infected developers like yours truly.
Of all types of Enterprise JavaBeans, entity beans have always been the mostdependent on container-provided functionality. This was the case with the most-
5 For a more thorough discussion of the topic of testing EJB 2.x entity beans, consider picking up JUnitRecipes by J. B. Rainsberger (Manning Publications, 2005), and refer to the documentation for the Mock-EJB test harness at www.mockejb.org.
Figure 13.7 The only role of entity beans in a typical EJB-based architecture is persistence.

34 CHAPTER 13
Test-driving EJB components
anticipated feature (perhaps a bit ironically, in hindsight) of the EJB 2.0 specifica-tion: container-managed persistence.
The traditional bean-managed persistence—where the developer still wroteJDBC code by hand in the lifecycle methods defined by the EJB specification—hasnever been a problem. This was because testing BMP entity beans doesn’t differfrom testing any other kind of JDBC code—it’s a combination of putting a Data-Source (mock) into the JNDI tree and verifying that the proper interaction hap-pened between the entity bean and the JDBC interfaces when the test invokescertain lifecycle methods.
We were left with a few options for writing tests for the CMP entity beans, butnone supports test-driven development well. Let’s take a quick look at theseoptions and their respective advantages and disadvantages from a TDD practition-er’s point of view.
Testing inside the containerOne of the first and most popular approaches to testing CMP entity beans was torun the tests inside a real EJB container. Frameworks like Jakarta Cactus—anexample of which is shown in figure 13.8—extending the JUnit framework werehelpful in setting up such a test harness. In practice, we wrote our tests assumingthey would be executed in the presence of the real container’s JNDI tree, with thereal Enterprise JavaBeans deployed to the JNDI tree, and sometimes with the Data-Source objects connected to the real database.
Running these in-container tests meant running a build script, which compiledour code, packaged our components, deployed them on the application server,and then invoked the deployed test code remotely. All the remote invocation logic
Figure 13.8 In-container tests using Jakarta Cactus. We run two copies of a TestCase. The client-side copy only talks to the server-side redirector proxy, and the server-side copy executes the test logic on request.

Entities and entity beans 35
was handled by the framework (Jakarta Cactus, for example), and from the buildscript’s perspective, the output was identical to any regular JUnit test run.
Listing 13.21 shows an example of a Jakarta Cactus-based unit test that assumesit will be running inside the real container.
import javax.naming.*;import org.apache.cactus.*;
public class ConverterTest extends ServletTestCase {
public void testEntityBeanOnServerSide() throws Exception { Context ctx = new InitialContext(); ProductHome home = (ProductHome) ctx.lookup("java:comp/ejb/Product"); Collection manningBooks = home.findByVendor("Manning"); assertEquals(1, manningBooks.size()); Product first = (Product) manningBooks.get(0); assertEquals("TDD in Action", first.getName()); }}
The problem with this approach is two-fold: It requires a complex infrastructure(figure 13.8), and it’s slow. Waiting for half a minute for the components to bedeployed doesn’t promote running our tests after each tiny change, which is whatwe’d like to be able to do. As application servers are slowly starting to get theirhot-deployment features working reliably, this becomes less of a problem com-pared to recent history, where each deployment had to include restarting theserver—taking even more time.
The fact that using a full-blown container slows our test cycle significantly natu-rally leads us to consider a lightweight alternative: an embedded container.
Using a lightweight embedded containerAlong with providing a mock implementation of the JNDI tree, the MockEJBframework provides a lightweight, embeddable EJB container. Although not a full-blown, specification-compliant implementation of the EJB specification, Mock-EJB’s container implementation provides all the necessary bits for sufficiently unit-or integration-testing our EJB 2.x components.
Listing 13.22 shows the steps for deploying an entity bean to MockEJB’s con-tainer.
Listing 13.21 Jakarta Cactus test assuming real runtime environment
Connect toreal JNDI tree

36 CHAPTER 13
Test-driving EJB components
EntityBeanDescriptor descriptor = new EntityBeanDescriptor( "ejb/Product", ProductHome.class, Product.class, ProductBean.class);
MockContextFactory.setAsInitial(); Context context = new InitialContext();
MockContainer mockContainer = new MockContainer(context); mockContainer.deploy(descriptor);
What we do in listing 13.22 is simple. The first step is to B create a descriptorobject to act as a substitute for the standard XML deployment descriptor (ejb-jar.xml). The information needed includes the JNDI name with which the con-tainer should bind the bean’s home interface to the JNDI tree, the home andbusiness interfaces of the bean, and the bean class. Next, we C initialize Mock-EJB’s own JNDI implementation and connect to it by creating a new InitialCon-text with the default constructor. Finally, we D create a new MockContainerinstance on top of the InitialContext and deploy any bean descriptors weneed. From here on, we can look up the entity bean’s home interface from theJNDI tree as usual. If we want to test two or more beans together, we create a suit-able descriptor for each and deploy them.
The MockContainer also gives us an EntityDatabase to which we can manuallyadd entity instances, and the MockContainer takes care of returning the entity witha matching primary key from the EntityDatabase when that particular homeinterface’s finders are invoked, for example. Furthermore, an interceptor frame-work is built into the MockContainer, which lets us intercept calls to deployedbeans and their home interfaces. This interceptor framework is needed, forinstance, for allocating created entity bean instances with unique primary keys.
Being able to deploy the entity beans without a slow, full-blown container is aclear advantage over using the real thing. The only major downside for thisapproach has been that dealing with the interceptors isn’t typically a walk in thepark. The fact that the MockContainer isn’t the same thing as the real EJB con-tainer doesn’t matter much—we’re mostly interested in getting the business logicin place, and these tests give us enough confidence in that regard.
It’s time to move on to the successor for the legacy entity beans: the EJB 3 spec-ification and the new Persistence API. The good news is that virtually everything
Listing 13.22 Deploying an EJB 2.x entity bean with MockEJB
B Create deployment descriptor
C Initialize and connect to mock JNDI tree
D Create Mock-Container and deploy bean

Entities and entity beans 37
about the new specification is significantly easier to unit-test—let alone test-drive—and that includes persistent objects!
13.4.2 Test-driving EJB 3 entities
The new Java Persistence API, introduced as part of the EJB 3 specification, is acomplete revamp as far as entity beans are concerned. The old EJB 2.x-style entitybeans are still supported in the name of backward compatibility, but it’s safe to saythe new API will take the throne faster than we can say “dependency injection andannotations.” This is because of the new API’s approach of making the entitybeans plain old Java objects and letting the developer define database-mappingusing annotations rather than an external configuration file.6
Before stretching our test-driven muscles again, let’s look at what EJB 3 entitiesconsist of.
Benefits of being 100% JavaBefore, we had CMP entity beans with abstract setters and getters, BMP entity beanslittered with JDBC code, JNDI lookups all over the place, and a bunch of mandatorylifecycle methods doing nothing. The new Persistence API gets rid of that. Persis-tent objects are plain old Java objects with certain annotations used for indicatingpersistent fields, dependencies, and so forth. One of the welcome changes is thefact that persistent fields don’t require a pair of getters and setters when using fieldinjection. For example, consider the persistent entity in listing 13.23, representinga user in our system.
import javax.persistence.*;
@Entity @Table(name = "USERS") public class User {
@Id @GeneratedValue(strategy = GenerationType.AUTO) private Integer id;
private String username; private String password;
6 Although in some cases the external configuration file has its merits, the vast majority of projects willfind that embedding the object-relational mapping annotations into the source code provides morebang for the buck.
Listing 13.23 Example of an EJB 3 entity
Declare persistent class
B
Declare primary key field
C

38 CHAPTER 13
Test-driving EJB components
public Integer getId() { return id; }
public String getUsername() { return username; }
public void setUsername(String username) { this.username = username; }
public void setPassword(String password) { this.password = password; }
public boolean matchesPassword(String password) { return this.password.equals(password); }}
This code is all we need to introduce a persistent entity into our system. The class-level annotations B tell the EJB container the plain old Java class being definedshould be persisted and instances of the class should be stored in a database tablenamed USERS. (By default, the class name is used—in this case, User.)
The EJB 3 specification supports both field- and property-based (setter/getter)persistent fields. We can use either of these, but only one at a time for a specificclass. In C we’re tacking a couple of persistence annotations on the private fieldid to declare id as the primary key field; we’re further specifying a mechanism forthe container to auto-generate the primary key for new instances. By doing this,we’ve committed to using field-based persistence; all nontransient members ofthe class (whether declared using the transient modifier or the @Transientannotation) will be considered persistent fields.
With this approach, we’re free to D define only those setter and getter meth-ods in our persistent class that our application needs—no need to add a getter ora setter to satisfy a contract defined in the specification. For example, we don’twant to expose a setter for the User class’s primary key, but we do want to giveread-only access to it. Similarly, we might not want to provide a getter for the Userobject’s password but rather provide a matchesPassword method that comparesthe given password with the value of the private field.
If that’s all there is to EJB 3 entities, then how does test-driving them differ fromtest-driving plain old Java code? That’s the thing—it doesn’t. Entities in EJB 3 areplain old Java objects! We could test-drive the annotations into our entity class
Provide only accessors we need
D

Entities and entity beans 39
(relationship annotations such as @OneToMany, @ManyToMany, and so on come tomind) and have automated tests for checking that certain rules are followed (suchas not mixing the field- and property-based persistence within a class hierarchy).There’s another caveat, however.
Although we can instantiate our entity classes with the new operator and oper-ate on the instances just as we can with any other Java objects, I haven’t seen howwe save, find, update, and remove these entities to and from the database—whichis what I’ll talk about next.
Introducing the EntityManager APIWe aren’t likely to want to test setters andgetters directly (with the possible exceptionof @Transient accessor methods that mighthave additional behavior), but we probablyneed to find, create, update, and delete ourentity beans somewhere in our application.
In the EJB 3 specification, all CRUD7 oper-ations are performed using the Entity-Manager API—specifically the javax.per-sistence.EntityManager interface. TheEntityManager is a generic facility for per-forming CRUD operations on any persistent entity class, as illustrated in figure 13.9.Listing 13.24 shows some of the methods available on the EntityManager interface.
package javax.persistence;
public interface EntityManager {
// methods for creating finder queries using EJB-QL, SQL, or // using a named query configured externally Query createQuery(String ejbqlString); Query createNativeQuery(String sqlString); Query createNamedQuery(String name);
// method for finding an entity by its class and primary key T find(Class<T> entityClass, Object primaryKey);
// methods for saving, loading, deleting, and updating entities
7 CRUD (create, read, update, delete) refers to the common database operations we perform with per-sistent objects.
Listing 13.24 Some of the essential methods on the EntityManager interface
Figure 13.9 The EntityManager’s role is to persist plain old Java objects representing persistent entities.

40 CHAPTER 13
Test-driving EJB components
void persist(Object entity); void refresh(Object entity); void remove(Object entity); T merge(T entity);
// method for synchronizing the persistence context to database void flush();
// some less common methods omitted for brevity...}
Components wanting to manipulate persistent objects need to use the Entity-Manager interface to do so. This simplifies our life because the EntityManagerinterface is almost without exception injected into the component using it. Evenif this isn’t the case, setting up a fake JNDI tree isn’t impossible, although it’smore involved.
With this in mind, let’s try some test-driving. How about a UserManagerBeanthat can do all sorts of things with persistent User objects?
Test-driving with the EntityManagerWe’re developing a UserManagerBean. Say we want it to be a stateless session bean.What behavior do we want from the UserManagerBean? We need to be able tolocate a User object by its username, so we’ll start from there.
We’ll need a mock implementation of the EntityManager interface, and wedecide to use EasyMock. Starting to sketch the interaction we expect the User-ManagerBean to initiate toward the EntityManager, we find we also need a mockobject for the javax.persistence.Query interface, and we need a User object.After organizing our sketch and adding the invocation of the UserManagerBean,we arrive at listing 13.25, which is a compact test regardless of the behavioralmocking of the EntityManager and Query interfaces.
import javax.persistence.*;import org.junit.*;import org.laughingpanda.beaninject.Inject;import static org.easymock.EasyMock.*;
public class UserManagerBeanTest {
private final String username = "bob";
@Test public void findingUserByUsername() throws Exception {
Listing 13.25 Testing for expected usage of the EntityManager API

Summary 41
EntityManager em = createMock(EntityManager.class); Query q = createMock(Query.class); User user = createDummyUser(username);
expect(em.createNamedQuery("findUserByUsername")) .andReturn(q); |#2 expect(q.setParameter("username", username)).andReturn(q); expect(q.getSingleResult()).andReturn(user);
replay(em, q);
UserManagerBean userManager = new UserManagerBean(); Inject.bean(userManager).with(em); Assert.assertEquals(user, bean.findByUsername(username));
verify(em, q); }
// helper methods omitted for brevity}
By C using the open source Bean Inject library 8 to inject our mock EntityManager
into the UserManagerBean, we state that the UserManagerBean should have a fieldor setter method for an EntityManager. We also state that when findByUsername()is called, B the UserManagerBean should use a named query findUserByUsernameand populate a query parameter named username with the username we passed in.It’s simple once we get used to EasyMock’s expect-and-return syntax.
This was a trivial read-only scenario, but it proved that test-driving EJB 3 enti-ties is no different from testing regular Java classes. Don’t you love dependencyinjection? We’ll wrap up with a quick summary of what we’ve seen in this chapter,but by all means continue driving more functionality into the UserManagerBean ifyou’re following along and feeling the thrill!
13.5 Summary
That was a rough ride through the various types of Enterprise JavaBeans and thetwo current versions of the specification—not to mention that the two specifica-tions seem to have almost nothing in common. You made it this far and shouldpat yourself on the back. Let’s recap the main topics covered.
8 http://www.laughingpanda.org/mediawiki/index.php/Bean_Inject.
Create mocks for EntityManager
and Query
BExpect bean to named query
C
Inject mockEntityManager using
Bean Inject library

42 CHAPTER 13
Test-driving EJB components
We started by considering the fundamental issue that has plagued test-infectedEJB developers for several years: the problem of managed objects being too tightlycoupled to the services provided by the container and the real container beingtoo heavy to be included as part of our unit test harness. Having stated the prob-lem, we set out to discuss the different types of EJB components, beginning fromthe session bean.
First, we found it isn’t difficult to let our unit tests simulate the EJB containerand the way it manages our bean class’s lifecycle. We also determined that it mightmake sense to write automated tests to verify the implicit correctness of our beanclass—it defines the methods and annotations required by the specification.
Soon we stumbled on the problem of how EJB components have traditionallyacquired their dependencies by actively performing JNDI lookups. We devisedthree strategies for tackling this problem: faking the JNDI tree with a mock imple-mentation, extracting the lookup operations into simple getter methods we canoverride in our tests, and making the former easier to do in our tests by adoptinga poor-man’s implementation of dependency injection.
Next, we turned our attention to the major asynchronous components of theEJB specification: message-driven beans and the Timer service. We came up with aneed for a message-driven bean and proceeded to test-drive the onMessagemethod’s implementation into place. For the Timer service, we implemented ascenario where a User entity set a timer upon creation and expired its passwordwhen the timer timed out. Once again, we found there’s nothing special to test-driving timers—we need a flexible mock-object framework like EasyMock, andwe’re all set.
We spent the remainder of the chapter discussing entity beans. First, wetalked about the few options available for testing EJB 2.x entity beans, focusingon container-managed persistence. After reviewing our options of running testsinside a real container and using an embedded, lightweight container, we delvedinto the new Persistence API in EJB 3. We discovered that entities in EJB 3 areplain old Java objects and thus a no-brainer to test-drive. We also discovered thatthe EntityManager interface takes care of performing the persistence opera-tions for our entity beans, so we proceeded to test-drive a session bean that usesthe EntityManager API to locate persistent entities. Again, it wasn’t much differ-ent from test-driving regular Java classes.
Having plowed through this chapter at a pretty fast pace, we now know thattest-driven EJB development isn’t an oxymoron. Even if you didn’t have muchbackground in Enterprise JavaBeans, I’m sure you have an idea of where to start ifyou find yourself on the new EJB project at work next Monday.