SVF Ver.10.0 Migration Procedure - WingArc1st
176
About this manual SVF Ver.10.0 Migration Procedure
-
Upload
khangminh22 -
Category
Documents
-
view
5 -
download
0
Transcript of SVF Ver.10.0 Migration Procedure - WingArc1st

About this manual
SVF Ver.10.0 Migration Procedure
Table of contents
2
Table of contents About this manual ............................................................................................................................... 5 Chapter 1. Overview of migration tools ............................................................................................... 9
1-1 Types of migration tools...................................................................................................................... 10 1-2 Availability of SVF Migration Tool for each product ............................................................................ 11 1-3 Availability of SVF PDL Maker and SVF PDL Viewer for each printer model .................................... 13 1-4 Operating environment for migration tools ......................................................................................... 14
Chapter 2. Automatic migration ......................................................................................................... 15 2-1 Workflow for migration in the same environment ............................................................................... 16 2-2 Workflow for migrating to another environment ................................................................................. 19 2-3 Before starting migration .................................................................................................................... 22 2-4 Automatic migration procedure in Windows environment .................................................................. 24
2-4-1 Prepare SVF Migration Tool ....................................................................................................... 25 2-4-2 Configure operational settings for SVF Migration Tool .............................................................. 27 2-4-3 Extract migration data ................................................................................................................ 31 2-4-4 Configure settings for changing the data file path in the new environment ............................... 35 2-4-5 Apply migration data .................................................................................................................. 37 2-4-6 Confirm the installed product and version ................................................................................. 41 2-4-7 Works after migration ................................................................................................................. 44
2-5 Automatic migration procedure in UNIX/Linux environment .............................................................. 45 2-5-1 Prepare SVF Migration Tool ....................................................................................................... 46 2-5-2 Configure operational settings for SVF Migration Tool .............................................................. 48 2-5-3 Extract migration data ................................................................................................................ 52 2-5-4 Configure settings for changing the data file path in the new environment ............................... 55 2-5-5 Apply migration data .................................................................................................................. 57 2-5-6 Confirm the installed product and version ................................................................................. 62 2-5-7 Works after migration ................................................................................................................. 65
2-6 Restore to the status immediately after Ver. 10.0 installation ............................................................ 66 2-6-1 Restoration procedure in Windows environment ....................................................................... 67 2-6-2 Restoration procedure in UNIX/Linux environment ................................................................... 69
2-7 Notes on SVF Migration Tool .............................................................................................................. 71 Chapter 3. Manual migration ............................................................................................................. 73
3-1 Workflow for migration in the same environment ............................................................................... 74 3-2 Workflow for migrating to another environment ................................................................................. 76 3-3 Before starting migration .................................................................................................................... 78 3-4 Manual migration procedure in Windows environment ...................................................................... 79
3-4-1 Extract migration data ................................................................................................................ 80

Table of contents
3
3-4-2 Backup ....................................................................................................................................... 81 3-4-3 Apply migration data .................................................................................................................. 82 3-4-4 Confirm the installed product and version ................................................................................. 83
3-5 Manual migration procedure in UNIX/Linux environment................................................................... 85 3-5-1 Extract migration data ................................................................................................................ 86 3-5-2 Backup ....................................................................................................................................... 87 3-5-3 Apply migration data .................................................................................................................. 88 3-5-4 Confirm the installed product and version ................................................................................. 89
3-6 Restore to the state immediately after Ver. 10.0 installation .............................................................. 90 3-6-1 Restoration procedure in Windows environment ....................................................................... 91 3-6-2 Restoration procedure in UNIX/Linux environment ................................................................... 92
Chapter 4. Compare print data after migration .................................................................................. 93 4-1 Workflow for comparing print data ...................................................................................................... 94 4-2 4-2 Before comparing print data ......................................................................................................... 97 4-3 Procedure for creating print data in Windows environment ............................................................... 98
4-3-1 Prepare SVF PDL Maker ........................................................................................................... 99 4-3-2 Configure operational settings for SVF PDL Maker ................................................................. 102 4-3-3 Create CSV data file (when using text editor) ......................................................................... 104 4-3-4 Create CSV data file (when using support tool) ...................................................................... 106 4-3-5 Specify API function to be executed during printing ................................................................ 108 4-3-6 Create job definition file ........................................................................................................... 111 4-3-7 Create print data ...................................................................................................................... 113
4-4 Procedure for creating print data in UNIX/Linux environment .......................................................... 114 4-4-1 Prepare SVF PDL Maker ......................................................................................................... 115 4-4-2 Configure operational settings for SVF PDL Maker ................................................................. 118 4-4-3 Create CSV data file (when using text editor) ......................................................................... 119 4-4-4 Create CSV data file (when using support tool) ...................................................................... 121 4-4-5 Specify API function to be executed during printing ................................................................ 123 4-4-6 Create job definition file ........................................................................................................... 126 4-4-7 Create print data ...................................................................................................................... 128
4-5 Procedure for comparing print data .................................................................................................. 129 4-5-1 Prepare SVF PDL Viewer ........................................................................................................ 130 4-5-2 Configure operational settings for SVF PDL Viewer ................................................................ 131 4-5-3 Settings in "Preferences" dialog .............................................................................................. 133 4-5-4 Output comparison results ....................................................................................................... 141 4-5-5 Confirm output comparison results .......................................................................................... 145 4-5-6 Judge and record comparison results ..................................................................................... 148
4-6 Restrictions on SVF PDL Maker ....................................................................................................... 151

Table of contents
4
4-7 Restrictions on SVF PDL Viewer ...................................................................................................... 152 Appendix ......................................................................................................................................... 154
Appendix 1. File structure of migration tools .......................................................................................... 155 Appendix 1-1. File structure of SVF Migration Tool ........................................................................... 157 Appendix 1-2. File structure of SVF PDL Maker ............................................................................... 159 Appendix 1-3. File structure of SVF PDL Viewer .............................................................................. 161 Appendix 1-4. Structure of runtime folder (directory) ........................................................................ 162
Appendix 2. Operation method of SMT settings support tool ................................................................. 164 Appendix 2-1. Configure operational settings for SVF Migration Tool .............................................. 165 Appendix 2-2. Configure settings for changing the data file path in the new environment ............... 167
Appendix 3. Solution for errors and warnings ........................................................................................ 169 Appendix 3-1. SVF Migration Tool error codes ................................................................................. 170 Appendix 3-2. SVF Migration Tool warnings ..................................................................................... 174 Appendix 3-3. SVF PDL Maker error messages ............................................................................... 175 Appendix 3-4. SVF PDL Viewer error messages .............................................................................. 176

About this manual
5
About this manual SVF Migration Tool for Java Edition migrates SVF product data by updating it into the latest version's format. This tool is also designed to help users to verify and compare print result between the existing and new environments. This manual describes the SVF migration procedure using the SVF Migration Tool for Java Edition and the procedure for comparing the print result of the old and new versions.
▌A list of manuals The list of manuals related to migration is as follows.
Manual name Content Target audience
SVF Migration Guide This describes the overview of SVF migration, the data to be migrated by the migration tool, and differences from the old version.
System developer, Form developer, Administrator
SVF Migration Procedure This describes the SVF migration procedure using the SVF Migration Tool for Java Edition and the procedure for comparing the print result of the old and new versions.
System developer, Form developer, Administrator
A list of SVF manuals is as follows:
Category Manual name Description Target audience
Form design (SVF designer product)
SVFX-Designer Creating Forms Describes how to set up SVFX-Designer and how to design forms and queries.
Form developer
SVFX-Designer First Step Guide
Provides step-by-step descriptions of how to design a form using sample data for users who are new to SVFX-Designer.
Form developer
SVF Web Designer Administrator Guide
Describes how to set up SVF Web Designer and how to manage SVF Web Designer server.
Form developer, Administrator
SVF Web Designer Creating Forms Describes how to design forms with SVF Web Designer.
Form developer
Various system linkage
Universal Connect/X Administrator Guide
Describes how to set up, configure, and manage Universal Connect/X, and how to use UCXSingle. In addition, describes step-by-step procedures from hot to set preferences of Universal Connect/X to output a form.
System developer, Administrator
SVF for Web/Client Administrator Guide
Describes how to set up and execute SVF for Web/Client.
System developer, Administrator
SVF Connect for Java API Administrator Guide
Describes how to install SVF Connect for Java API and how to register a Windows service.
System developer, Administrator
SVF Connect for ASP/COM API Administrator Guide
Describes how to install SVF Connect for ASP/COM API and how to register a Windows service.
System developer, Administrator
SVF Connect for .NET Framework API Administrator Guide
Describes how to install SVF Connect for .NET Framework API
System developer, Administrator

About this manual
6
Category Manual name Description Target audience and how to register a Windows service.
SVF Client for .NET Framework API Plus Administration Guide
Describes how to install SVF Client for .NET Framework API Plus, how to create an application, and details on libraries.
System developer, Administrator
Print operations management
Report Director Enterprise Administrator Guide
Describes how to set up Report Director Enterprise, server settings and operation, and client (RDE utility) operations.
System developer, Administrator
RDE Option Administrator Guide Describes how to set up RDE Option and configure printers by model.
System developer, Administrator
RDE Utility Developer's Kit Development Guide
Describes how to install RDE Utility Developer's Kit and details of libraries.
System developer
RDE Scalable Configuration Guide This describes how to setup server modules of Report Director Enterprise on multiple server machines and configure the settings and operations.
System developer, Administrator
Form output (SVF output engine product)
SVF for Java Print Administrator Guide
Describes how to set up SVF for Java Print and how to configure the SVF server and printers by model.
System developer, Administrator
SVF for PDF Administrator Guide Describes how to set up SVF for PDF and how to configure the SVF server and printers by model.
System developer, Administrator
SVF for Optional Models Administrator Guide
This manual is for optional products of both SVF for Java Print and SVF for PDF. Describes how to add options and how to configure the options for each model.
System developer, Administrator
SVF for TIFF Drawing Administrator Guide
Describes how to set up SVF for TIFF drawing and execute it.
System developer, Administrator
SVF Java PRODUCT API function Reference manual
Describes API functions provided by SVF output engine.
System developer
Form Output Guide (Non-Japanese Language)
Describes the settings and restrictions for outputting forms in languages other than Japanese using the SVF product series.
System developer, Administrator
Excel Forms User Guide Describes the settings and restrictions for reading an Excel file as a form file and outputting a form using the SVF product series.
System developer, Form developer, Administrator
Cooperation platform for others solution
SVF for Oracle E-Business Suite Administrator Guide
Describes how to install SVF for Oracle E-Business Suite/Java Edition and SVF for Oracle E-Business Suite Connect output engine, and how to output forms.
System developer, Administrator
Error code SVF Product Error Code List Describes the error codes of SVF server products and their descriptions as well as causes and measures.
System developer, Administrator
About this manual
7
■ Target audience This manual is intended for the following targets.
User Description
Administrator Personnel who operate and maintain the SVF product series, serving as the contact person for general users. This manual presumes that they have knowledge about servers and networks.
System developer Personnel who are responsible for tasks such as system design of SVF product series, user application development, and server product setup. This manual presumes that they have knowledge about databases and programming.
Form developer Personnel who develop forms using the form design application. This guide presumes that they can perform basic operations with Windows and Microsoft Office products.
General user Personnel who use SVF product series to print forms. This guide presumes that they can perform basic operations with Windows and Microsoft Office products.

About this manual
8
▌Notational and typographic conventions This section describes the notational conventions used in this manual.
■ Notes, references, and restrictions In this manual, notes, references, and restrictions are shown in separate sections as follows:
Note When operations cannot be undone, or are difficult to undo, such information is shown in this section.
Reference Supplementary information on using the product is shown in this section.
Restrictions Restrictions on the product are shown in this section.
■ Symbol The following typographic conventions are used in this manual:
Symbol Example Description
Bold File menu Indicates item names and menu names displayed on the product screen. Item names and menu names for the OS and for third party products are displayed in the same way.
<> http://<IP_address_or_server_name> Indicates a string which depends on the environment, such as a URL or part of a file name.
▌Trademarks Company and product names referenced in this manual are trademarks or registered trademarks of the respective owners.
▌Copyright (C) 1995 WingArc1st Inc. All rights reserved.
▌Other The content of this manual is subject to change without notice.
▌Issued First Edition: December 2nd, 2019

Chapter 1. Overview of migration tools
9
Chapter 1. Overview of migration tools SVF provides "SVF Migration Tool for Java Edition" (hereinafter referred to as migration tool) as a tool to support migration. The functions of the Migration Tool are as follows:
• Data asset migration Extract the various setting information, form file, query form file, and spool data (when using Report Director Enterprise) from the existing environment, convert it to a format that can be used in the latest version, and then update the new environment.
• Comparison of print result Output test forms from the existing environment and the new environment, and compare the print result. This tool will help you perceive differences in the print result, probably caused by migrating to the new environment, in comparison with those from the existing environment.
The migration tool can be used to migrate both within the same computer and between different computers. By using a migration tool, you can automate much of your work and migrate SVF products efficiently. However, some products have limited migration tool functionality, and you must manually migrate data assets. In addition, some products that can use the migration tool are not migrated by the migration tool, so there are some data that must be migrated manually. This section describes the types of migration tools, the availability of migration tool for each product and printer model, and the operating environment for migration tool. For the overview of migration in SVF and the data to be migrated/excluded by the migration tool, see "SVF Migration Guide".
▌Outline of this chapter
• 1-1 Types of migration tools (P. 10)
• 1-2 Availability of SVF Migration Tool for each product (P. 11)
• 1-3 Availability of SVF PDL Maker and SVF PDL Viewer for each printer model (P. 13)
• 1-4 Operating environment for migration tools (P. 14)

Chapter 1. Overview of migration tools
10
1-1 Types of migration tools The migration tool consists of multiple tools. The tools included in the migration tool are as follows:
▌SVF Migration Tool This tool automates the migration of data assets. Extract data from the existing environment, convert the extracted data format to the latest version format, and then migrate to the new environment. It is used in the following products:
• SVF for Java Print, SVF for PDF, and optional products (hereinafter collectively referred to as "SVF
output engine products")
• SVF for Oracle E-Business Suite
• Report Director Enterprise, RDE Limited (hereinafter abbreviated as "RDE")
• Universal Connect/X (hereinafter abbreviated as "UC/X")
• SVF Connect for Java API, SVF Connect for ASP/COM API, SVF Connect for .NET Framework API
(hereinafter collectively referred to as "SVF Connect")
• SVFX-Designer
• SVF Web Designer
▌SVF PDL Maker This tool outputs print data for test forms from the existing environment and the new environment. When SVF PDL Maker is executed using the form file and data file (CSV format) for which the print result are to be compared, the data printed with the SVF output engine product or RDE without being output from the printer used in actual operation can be created. You can also create simple CSV data using SVF PDL Maker. It also supports creation of print data from SVF for .NET Framework Ver. 2.3.
▌SVF PDL Viewer This tool compares the print data of forms output by SVF PDL Maker with images. You can use this tool only in the Windows environment. You can also run this tool in an environment where no SVF product is installed. For Zebra models, the print data is processed using the Zebra printer functions, so it must be executed in an environment that can be connected to the Zebra printer.

Chapter 1. Overview of migration tools
11
1-2 Availability of SVF Migration Tool for each product Some products and modules cannot be migrated using the SVF Migration Tool and must be migrated manually. For data migration, the availability of SVF Migration Tool for each product (module) is shown below.
Availability of SVF Migration Tool for each product Product (module) name Data migration *1
SVF output engine (including optional products) ✔
SVF for Oracle E-Business Suite ✔
Report Director Enterprise (including optional products) ✔ *2
RDE Limited ✔
Universal Connect/X ✔
SVF Connect for Java API ✔
SVF Connect for ASP/COM API ✔
SVF Connect for .NET Framework API ✔
SVFX-Designer ✔
SVF Web Designer ✔
PAlite ✘
Print Assistant ✘
RDE Utility Developers KIT ✘
UCXSingle C Version -
Java version
.NET version
SVF for Web/Client -
SVF Client for .NET Framework API Plus -
* 1 ✔: Tool can be used, ✘: Perform manually, -: Not required * 2 Data migration to scalable configuration and data migration from scalable configuration are not supported. For details, contact our support center.
▌How to read this manual for each product When migrating the products which data can be migrated by SVF Migration Tool, execute by referring "Chapter 2. Automatic migration (P.15)" and "Chapter 4. Compare print data after migration (P.93)".

Chapter 1. Overview of migration tools
12
When migrating the products which data cannot be migrated by SVF Migration Tool, execute by referring "Chapter 3. Manual migration (P.73)" and "Chapter 4. Compare print data after migration (P.93)".

Chapter 1. Overview of migration tools
13
1-3 Availability of SVF PDL Maker and SVF PDL Viewer for each printer model Depending on the printer model, comparison of the print result of forms using SVF PDL Maker and SVF PDL Viewer is not supported. The supported printer models and unsupported printer models are shown below.
▌Supported printer models PDF, EMF, LIPS4, DotPrinter, ART4, FX-STDOUT, FiBridge II, Prinfina MANAGER ESCP, RPCS, SATO, TEC, TIFF, Zebra
▌Unsupported printer models EMFPLUS, PostScript, LIPS3, ESC/Page, DP Series, VSP, PCL5, Prinfina MANAGER PS, PRESCRIBE, NPDL2, RPDL2, JPP, PlainTXTII, NEC MultiCoder, CSV, Excel, RV, PIFVIEWER, SVG

Chapter 1. Overview of migration tools
14
1-4 Operating environment for migration tools This section describes the operating environment required for executing the migration tool. Any fault arising from the use of an environment (OS, Web browser, various peripheral software and so on) that is no longer supported by the manufacturer is outside the scope of general maintenance service. For details, see the "Support Policy" found on our support site.
▌Operating environment for SVF Migration Tool and SVF PDL Maker Operating environment for SVF Migration Tool and SVF PDL Maker follows the operating environment of the products to be migrated. This section describes only the exception.
• If the migration source environment is Windows 2000, it is necessary to build an environment that uses
the SVF Migration Tool as follows: Download the resource kit and arrange sc.exe in C:\WINNT\System32 or C:\Windows\System32. Install the Windows 2000 support tool provided with the Windows 2000 CD-ROM.
• There are restrictions on the Java runtime environment.
○ Migration source environment: Java 5 or later is required.
○ Migration destination environment: Java 7 or later is required.
• The minimum required memory capacity is 512MB. Set according to the actual operation requirements.
▌Operating environment for SVF PDL Viewer The following is the operating environment required for executing SVF PDL Viewer:
OS Microsoft Windows Vista Business, Enterprise, Ultimate(x86 32bit, x64 64bit)
Microsoft Windows 7 Professional, Enterprise, Ultimate(x86 32bit, x64 64bit)
Microsoft Windows 8 Pro, Enterprise (x86 32-bit, x64 64-bit)
Microsoft Windows 8.1 Pro, Enterprise(x86 32bit, x64 64bit)
Microsoft Windows 10 Pro, Enterprise (x86 32-bit, x64 64-bit)
Supported JDKs Use the included runtime.
Memory capacity Minimum of 512 MB (1 GB or more is recommended) *1
*1 Set according to the actual operation requirements.

Chapter 2. Automatic migration
15
Chapter 2. Automatic migration This section describes the automatic migration procedure using the SVF Migration Tool. The SVF Migration Tool extracts data from the existing environment, converts the extracted data to a format that can be used in the latest version, and then updates the new environment. In addition, the function to display information about installed products enables you to check the products and versions installed in the new environment. Run the SVF Migration Tool in both the existing environment and the new environment. The products that support automatic migration are listed below. The SVF Migration Tool can only be executed in an environment where these products are installed.
• SVF output engine (including optional products)
• SVF for Oracle E-Business Suite
• RDE
• UC/X
• SVF Connect
• SVFX-Designer
• SVF Web Designer
▌Outline of this chapter
• 2-1 Workflow for migration in the same environment (P.16)
• 2-2 Workflow for migrating to another environment (P.19)
• 2-3 Before starting migration (P.22)
• 2-4 Automatic migration procedure in Windows environment (P.24)
• 2-5 Automatic migration procedure in UNIX/Linux environment (P.45)
• 2-6 Restore to the status immediately after Ver. 10.0 installation (P.66)
• 2-7 Notes on SVF Migration Tool (P.71)

Chapter 2. Automatic migration
16
2-1 Workflow for migration in the same environment When migrating in the same environment, prepare migration data and test forms in the existing environment before upgrading the product. After the version upgrade, execute the data migration in the new environment and comparison of the print data of the form. The following shows the workflow for migration in the same environment.

Chapter 2. Automatic migration
17
Perform pre-work (existing environment) Execute the following works in the existing environment: Execute these works before uninstalling the old version.
• Backup (if necessary)
• Prepare for migrating settings and files that cannot be migrated by the tool
• Create test forms For details, see "2-3 Before starting migration (P.22)".
Prepare SVF Migration Tool (existing environment) Arrange the SVF Migration Tool in the server environment and client environment of the existing environment. The arranged module will be used in the new environment. For Windows environment, see "2-4-1 Prepare SVF Migration Tool (P.25)", and for UNIX/Linux environment, see "2-5-1 Prepare SVF Migration Tool (P.46)".
Configure operational settings for SVF Migration Tool (existing environment) Describe the settings for controlling the operation of the SVF Migration Tool in the settings file. For Windows environment, see "2-4-2 Configure operational settings for SVF Migration Tool (P.27)", and for UNIX/Linux environment, see "2-5-2 Configure operational settings for SVF Migration Tool (P.48)".
Extract migration data (existing environment) Extract various setting information such as environment settings and printer information, form file, query form file, and RDE spool data from the existing environment. For Windows environment, see "2-4-3 Extract migration data (P.31)", and for UNIX/Linux environment, see "2-5-3 Extract migration data (P.52)".
Configure settings for changing the data file path (existing environment) When changing the data file path from the existing environment, describe the correspondence between the file path of the existing environment and the new environment in the settings file. Also set when migrating between Windows and UNIX/Linux environments. For Windows environment,see "2-4-4 Configure settings for changing the data file path in the new environment (P. 35)", and for UNIX/Linux environment, see "2-5-4 Configure settings for changing the data file path in the new environment (P.55)".
Uninstall the old version (existing environment) Uninstall the old version of SVF product.
Install the latest version (new environment) Install the latest version of the SVF product. At this time, the existing environment and the new environment must have the same product configuration for the SVF output engine product, RDE, and UC/X (excluding optional products). When adding products to be used in the new environment, install the products to be added after migration.
Apply migration data (new environment) Migrate the data extracted in the existing environment to the new environment. If you copy the data to the location where the SVF Migration Tool module is located and execute the SVF Migration Tool, the copied data is converted to Ver. 10.0 format and migrated. At this time, the new environment version 10.0 is backed up. For Windows environment, see "2-4-5 Apply migration data (P.37)", and for UNIX/Linux environment, see "2-5-5 Apply migration data (P.57)". FRM form files and XML form files up to Ver. 9.2 are automatically converted to Ver. 10.0 format, but the form file conversion tool (SFM.bat) included in SVF Migration Tool can also be executed independently.

Chapter 2. Automatic migration
18
Check installed product information (new environment) Check the installed product and version to confirm that the version has been updated correctly. For Windows environment, see "2-4-6 Confirm the installed product and version (P.41)", and for UNIX/Linux environment, see "2-5-6 Confirm the installed product and version (P.62)".
Perform post-work (new environment) Execute the following works in the new environment:
• Migrate settings and files that cannot be migrated by the tool
• Comparison of print data of forms
• Install products to be added in the new environment (if necessary) For Windows environment, see "2-4-7 About the subsequent work (P.44)", and for UNIX/Linux environment, see "2-5-7 About the subsequent work (P.65)".

Chapter 2. Automatic migration
19
2-2 Workflow for migrating to another environment When migrating to another environment, match the product configuration and fonts in the existing environment and the new environment in advance. After that, migrate the data from the existing environment to the new environment and compare the print data of the form. The following shows the workflow for migration to another environment.

Chapter 2. Automatic migration
20
Perform pre-work (existing environment, new environment) Execute the following works in the existing environment:
• Prepare for migrating settings and files that cannot be migrated by the tool
• Uninstall products not used in the new environment (if necessary) Execute the following works in the new environment:
• Prepare fonts (if necessary)
• Installation of the latest version For details, see "2-3 Before starting migration (P.22)".
Prepare SVF Migration Tool (existing environment, new environment) Arrange SVF Migration Tool in the server and client environments for both the existing and new environments. For Windows environment, see "2-4-1 Prepare SVF Migration Tool (P.25)", and for UNIX/Linux environment, see "2-5-1 Prepare SVF Migration Tool (P.46)".
Configure operational settings for SVF Migration Tool (existing environment, new environment)
Describe the settings for controlling the operation of the SVF Migration Tool in the settings file. For Windows environment, see "2-4-2 Configure operational settings for SVF Migration Tool (P.27)", and for UNIX/Linux environment, see "2-5-2 Configure operational settings for SVF Migration Tool (P.48)".
Extract migration data (existing environment) Extract various setting information such as environment settings and printer information, form file, query form file, and RDE spool data from the existing environment. For Windows environment, see "2-4-3 Extract migration data (P.31)", and for UNIX/Linux environment, see "2-5-3 Extract migration data (P.52)".
Configure settings for changing the data file path (existing environment) When changing the data file path from the existing environment, describe the correspondence between the file path of the existing environment and the new environment in the settings file. Also set when migrating between Windows and UNIX/Linux environments. For Windows environment,see "2-4-4 Configure settings for changing the data file path in the new environment (P. 35)", and for UNIX/Linux environment, see "2-5-4 Configure settings for changing the data file path in the new environment (P.55)".

Chapter 2. Automatic migration
21
Apply migration data (new environment) Migrate the data extracted in the existing environment to the new environment. If you copy the data to the location where the SVF Migration Tool module in new environment is located and execute the SVF Migration Tool, the copied data is converted to Ver. 10.0 format and migrated. At this time, the new environment version 10.0 is backed up. For Windows environment, see "2-4-5 Apply migration data (P.37)", and for UNIX/Linux environment, see "2-5-5 Apply migration data (P.57)". FRM form files and XML form files up to Ver. 9.2 are automatically converted to Ver. 10.0 format, but the form file conversion tool (SFM.bat) included in SVF Migration Tool can also be executed independently.
Check installed product information (new environment) Check the installed product and version to confirm that the version has been updated correctly. For Windows environment, see "2-4-6 Confirm the installed product and version (P.41)", and for UNIX/Linux environment, see "2-5-6 Confirm the installed product and version (P.62)".
Perform post-work (existing environment, new environment) Execute the following works in the existing environment:
• Create test forms
• Uninstall the old version Execute the following works in the new environment:
• Migrate settings and files that cannot be migrated by the tool
• Comparison of print data of forms
• Install products to be added in the new environment (if necessary) For Windows environment, see "2-4-7 About the subsequent work (P.44)", and for UNIX/Linux environment, see "2-5-7 About the subsequent work (P.65)".

Chapter 2. Automatic migration
22
2-3 Before starting migration This section describes the tasks to be performed before starting automatic migration and the precautions when migrating from RDE Ver. 9.1 SP2 or earlier. When the work described here is finished, automatic migration starts. The explanation of the automatic migration procedure is divided between Windows and UNIX/Linux. Proceed by referring to the corresponding page.
▌Pre-work when migrating in the same environment Before uninstalling the previous version of the SVF product, execute the following works:
• Backup The SVF Migration Tool backs up the existing environment while it is executing, but it is not intended to be restored by the user. If necessary, back up the existing environment using backup software.
• Prepare for migrating settings and files that cannot be migrated by the tool Some settings and files are not eligible for migration with the SVF Migration Tool. In addition, due to specification differences from the old version, there are settings and files that cannot be migrated, and items that cannot be handled by migration with the SVF Migration Tool. Investigate the affected area in advance and prepare for manual migration. For details on settings and files to be migrated/excluded, as well as differences in specifications with old versions, see "SVF Migration Guide".
• Create test forms It is necessary when comparing the used forms with the print result after migration.

Chapter 2. Automatic migration
23
▌Pre-work when migrating to another environment Execute the following works in the existing environment:
• Prepare for migrating settings and files that cannot be migrated by the tool Some settings and files are not eligible for migration with the SVF Migration Tool. In addition, due to specification differences from the old version, there are settings and files that cannot be migrated, and items that cannot be handled by migration with the SVF Migration Tool. Investigate the affected area in advance and prepare for manual migration. For details on settings and files to be migrated/excluded, as well as differences in specifications with old versions, see "SVF Migration Guide".
• Uninstall products not used in the new environment Product configurations for SVF output engine, RDE, and UCX must be the same both in the existing and new environments (excluding optional products). When reducing the number of products used in the new environment, uninstall the corresponding product in the existing environment, and then migrate after aligning the new environment with the product configuration.
Execute the following works in the new environment:
• Prepare fonts Check that the font specified in the form file or the Font settings of the printer created by the user with the SVF output engine product also exists in the new environment. If the font used in the existing environment does not exist in the new environment, the form output in font embedding or graphic mode will have different output results or will terminate abnormally at runtime.
• Installation of the latest version Product configurations for SVF output engine, RDE, and UCX must be the same both in the existing and new environments (excluding optional products). When adding products to be used in the new environment, install the products to be added after migration.
▌Notes when migrating from RDE Ver. 9.1 SP2 or earlier For RDE Ver. 9.1 SP2 or earlier (including no SP application), data extraction may fail. If the environment is applicable, database maintenance is required. Contact the support center. This problem occurs in environments that have been operating for a long time with RDE Ver. 9.1, Ver. 9.1 SP1, and Ver. 9.1 SP2.
▌Related items
• 2-4 Automatic migration procedure in Windows environment (P.24)
• 2-5 Automatic migration procedure in UNIX/Linux environment (P.45)

Chapter 2. Automatic migration
24
2-4 Automatic migration procedure in Windows environment This section describes the automatic migration procedure in Windows environment using the SVF Migration Tool.

Chapter 2. Automatic migration
25
2-4-1 Prepare SVF Migration Tool Arrange the SVF Migration Tool in the existing server environment and client environment when migrating in the same environment, and in the existing and new server environment and client environment when migrating to another environment. This section describes the procedure for arranging the SVF Migration Tool in a Windows environment.
▌Procedure
Copy the following two archive files into any folder:
• SMT.zip This is an archive file for SVF Migration Tool. Start SVF Migration Tool with SMT_CUI.bat in the SMT folder.
• runtime.zip This is an archive file for the Java runtime environment. The runtime folder stores the Java runtime environment (Java5 and Java7) used by the SVF Migration Tool. Copy if the Java runtime environment is not installed or the Java runtime environment is Java 1.4 or earlier.
Unzip the archive file. The following points should be noted regarding the unzip destination of the archive file.
• Arrange SVF Migration Tool in the path as short as possible (C:\temp, and so on). SVF Migration Tool processing fails if the number of characters or bytes of the file path exceeds the limit supported by the operating system (255 characters for Windows). However, if "%SystemRoot%/System32/Robocopy.exe" exists in the execution environment, it can be applied.
• Do not arrange SVF Migration Tool in a folder that contains the following characters: "&" (ampersand), "(" (round bracket), "," (comma), ";" (semicolon), "=" (equal sign), "^" (caret)

Chapter 2. Automatic migration
26
• Do not arrange SVF Migration Tool under the following folders:
○ %FIT_PRODUCTS_BASE%
○ PostgreSQL installation folder (when using RDE)
○ PostgreSQL database folder (when using RDE)
○ Folder where SVF Connect client module is installed
If necessary, set JAVA_HOME and Path as environment variables for the Java runtime environment. This step is not necessary if all of the following conditions are met:
• Java5 to Java8 are installed for the existing environment, and Java7 or Java8 are installed for the new
environment
• JAVA_HOME and Path have been set as environment variables for the Java runtime environment Edit SMT_CUI.bat in the SMT folder with any text editor and set environment variables as shown in the following example.
Setting example when using x64 (64bit) of Java7 in runtime folder
set JAVA_HOME=C:\work\runtime\Java7\win\x64\jre set PATH=%JAVA_HOME%\bin;%PATH%
On the right side of "JAVA_HOME", specify the Java runtime environment installation folder with an absolute path. In an environment where Java is not installed, specify the absolute path of the jre folder in the runtime folder. The Java runtime environment must be Java5 or later in the existing environment (during data extraction), Java7 or later in the new environment (during data migration), and the target SVF product must be supported. There are two types, x86 (32bit) and x64 (64bit). Specify a Java runtime environment that matches the execution environment of SVF Migration Tool.
▌Related items
• Appendix 1-1. File structure of SVF Migration Tool (P. 157)
• Appendix 1-4. Structure of runtime folder (directory) (P. 162)

Chapter 2. Automatic migration
27
2-4-2 Configure operational settings for SVF Migration Tool Describe the settings to control the operation of the arranged SVF Migration Tool in SMT.properties. The following settings can be made:
• Configure operational settings for SVF Migration Tool such as log output
• Operation settings when extracting and applying migration data
• Settings for form files
• Setting the path where the SVF Connect client module to be updated exists There are two ways to edit SMT.properties: open it with a text editor and use the SMT settings support tool. SMT settings support tool uses the Excel file included in the SMT folder. For the operational settings procedure of SVF Migration Tool using SMT settings support tool, see "Appendix 2-1. SVF Migration Tool settings (P.165)". This section describes the operational settings procedure of the SVF Migration Tool operation using a text editor in a Windows environment, and the setting items of SMT.properties.
▌Procedure
Edit SMT.properties in the SMT folder with any text editor.
Describe the settings in SMT.properties and save in "UTF-8" format.

Chapter 2. Automatic migration
28
▌SMT.properties setting items The setting items of SMT.properties are as follows.
Item Description
Log.level Specifies the output level of the log. Logs at the specified level and those at the lower levels (in the case of INFO, both INFO and ERROR) are output. The default value is "WARN".
Log level Content
DEBUG Used for investigating the cause in case of trouble.
WARN Used when a continuable error occurs.
INFO Outputs start/end information of processes.
ERROR Used when a non-continuable error occurs.
NONE No log data is output.
Note If you specify DEBUG, a large amount of logs will be output, which may degrade the performance.
Reference Logs for SVF Migration Tool will be created under the SVF Migration Tool folder (directory) with the file name "SMT-<date>.log". If SVF Migration Tool is started multiple times on the same day, it will be created with the file name "SMT-Date-Number.log".
Backup.SaveDir Specifies the path to save the backup files. A folder (directory) will be created at the specified path with the date and time of the backup, and backup files is arranged in that folder. If you do not specify a path, the data will be arranged under the folder where the modules of SVF Migration Tool are arranged.
Ripping.SearchPath Specifies a source path for searching files data in order to extract form files (.xml and .frm) and query form files (.vrq) when extracting. Search the path specified when Search path is used in SVF Configuration Tool, and the path specified when Form file search path is used in UCX operation settings. In both cases, subfolders will be targeted to search. Separate multiple items with commas.
Example
Ripping.SearchPath=C:\data,D:\data
Ripping.SaveDir Specifies the path to save the extracted data. A RIPPING folder is created in the specified path, and the extracted data is arranged in it. If you do not specify a path, the data will be arranged under the folder where the modules of SVF Migration Tool are arranged.
Note Do not specify a reverse pointer, symbolic link, virtual drive or virtual network drive.
Convert.Backup.MaxCount Specifies the maximum number of backup files to be saved when backing up during data migration. The default value is 5. If the number of backup folders exceeds the specified maximum number, the folder name that contains the oldest date and time will be deleted.
Form.FrmExtension Specifies the extension of FRM form files to be extracted. The default value is

Chapter 2. Automatic migration
29
Item Description "frm".
Form.XmlExtension Specifies the extension of XML form files to be extracted and converted. The default value is "xml".
Form.Backup Specifies whether or not to create a backup of the original file when converting a form file. The default value is "true".
Value Description
true Creates a backup.
false Does not create a backup.
Form. FormDefaults Specifies whether or not to delete properties that have the same value as the default value (initial value for printing) when converting FRM form files. The default value is "true".
Value Description
true Deletes properties.
false Does not delete properties.
Note Specify "false" if you convert the converted XML form files into FDL files using "SVF Form Export for PlainTXTII", "SVF Form Export for FiBridgeII", or "SVF Form Export for FX-STDOUT".
RDE.ServerMapping When migrating RD server and PA server, if there is no server with the same name as the existing environment, specify the server to be replaced with the format "[" server name of existing environment "," server name of new environment "]". Separate multiple items with commas. If there is only one server of the same type in the existing environment and the new environment, it will be automatically migrated and there is no need to set it.
Example
RDE.ServerMapping=["RDServer1","RDServer2"],["PAServer1","PAServer2"]
RDE.Document.ImportRule Specifies a processing method if the same document management number exists when migrating RDE spool data. The default value is "DUPLICATED_IGNORE".
Value Description
DUPLICATED_ERROR If registered spool data exists, it will end with an error.
DUPLICATED_IGNORE If registered spool data exists, the spool data is not migrated.
DUPLICATED_REALLOCATE If registered spool data exists, reassign the document management number and migrate.
REALLOCATE The data will be migrated after a new document management number has been assigned to all the spool data.
RDE.Document.ImportManageNums When migrating RDE spool data, specify the document management number to be migrated when specifying "Migrate Differences Only". If not specified, the documents after the document management number assigned by the migration destination RDE will be migrated. Use a comma to separate multiple numbers,

Chapter 2. Automatic migration
30
Item Description and use a hyphen to specify a range.
Example of migrating spool documents with document management numbers 1, 2, and 5-10
RDE.Document.ImportManageNums=1,2,5-10
RDE.Document.RegistSearchField Specifies whether or not to register all the fields in a form file used for spool data as the full-text search fields when migrating data from RDE Ver.2.6a or earlier. The default value is "true".
Value Description
true Registers the fields.
false Does not register the fields.
RDE.Document.ImportCommitCount Specifies the number of documents to be committed to the database at once when migrating RDE spool data.
SVFConnect.ModulePath Specifies the absolute path of the folder where the client module of SVF Connect is installed. Separate multiple products with commas to specify. The same product cannot be specified multiple number. For example, you can specify SVF Connect for Java API together with SVF Connect for ASP/COM AP, but you cannot specify multiple SVF Connect for Java API.

Chapter 2. Automatic migration
31
2-4-3 Extract migration data Extract various setting information such as environment settings and printer information, form file, query form file, and RDE spool data from the existing environment. This section describes the procedure for extracting migration data in an existing Windows environment.
▌Prerequisites
• If you are using RDE, start the PostgreSQL service in advance. For other services of RDE/SVF, their states can be either started or stopped.
• For RDE Ver. 9.1 SP2 or earlier (including no SP application), database maintenance has been
completed. For RDE Ver. 9.1 SP2 or earlier (including no SP application), data extraction may fail. If the environment is applicable, database maintenance is required. Contact the support center. This problem occurs in environments that have been operating for a long time with RDE Ver. 9.1, Ver. 9.1 SP1, and Ver. 9.1 SP2.
▌Procedure
■ Start SVF Migration Tool and select the display language
Execute SMT_CUI.bat in the SMT folder with administrator privileges.
Select the display language from the menu of SVF Migration Tool. Select the display language to display the main menu.

Chapter 2. Automatic migration
32
■ Extract data
Input '1' (extract data) in the main menu and press ENTER.
Reference If data extraction is repeated in the same environment, the following message is displayed and the extracted data is overwritten.
Data has already been extracted. Do you extract data again? (y/n)
For the environments where RDE is installed, select the type of data to be extracted. For the environment where RDE is not installed, this menu will not be displayed and you will proceed to the confirmation screen. The types of data to be extracted are as follows.
• Extract All Extracts all the data to be migrated. For the migration target data by the migration tool, see "SVF Migration Guide".
• Extract Settings Data Only Extract only the setting data from the migration target data. RDE spool data is not extracted.
• Extract Spooled Document Data Only Extract only the RDE spool data from migration target data.
Reference If you migrate RDE spool data to a new environment and then extracted again, the only data spooled in the existing environment during that time can be migrated.
The confirmation screen appears. After confirming the screen, if there are no problems, input 'y' and press ENTER.
Note Do not add, update, or delete settings data including the environment settings during data extraction. You can output forms.

Chapter 2. Automatic migration
33
If you are using RDE and setting password authentication in pg_hba.conf for PowerGres and PostgreSQL, you are prompted to enter your password as follows. Input your password and press ENTER.
Password:
▌Operation result The following message is displayed and the data extraction process is completed. The message displayed during processing varies depending on the installed SVF product.
Backing up Extracting data Retrieving database dump Compressing extracted data Number of warnings: 4 Check following log for details: C:\work\SMT\SMT-20161130.log Successfully finished.
Once the data extraction process is completed, the extracted data will be arranged in the RIPPING folder under the folder set at the operation settings (SMT.properties). In addition, dirconf.txt in the "RIPPING" folder lists the folder settings for the extracted data. In an environment where RDE is installed, it may take time to complete the data extraction process because a backup is taken after a database dump is obtained.
Chapter 2. Automatic migration
34
▌Work required after operation
• When changing the data file path from the existing environment, edit dirconf.txt with any text editor and
change the location of the extracted data and the file path settings. Also change when migrating between Windows and UNIX/Linux environments.
• If the number of warnings appears after completing data extraction, confirm the row containing [WARN]
in the log file.
▌Related items
• 2-4-4 Configure settings for changing the data file path in the new environment (P.35)
• Appendix 3-1. SVF Migration Tool error codes (P.170)
• Appendix 3-2. SVF Migration Tool warnings (P.174)

Chapter 2. Automatic migration
35
2-4-4 Configure settings for changing the data file path in the new environment Once the data extraction process is completed, the extracted data will be arranged in the RIPPING folder under the folder set at the operation settings (SMT.properties). Dirconf.txt in the RIPPING folder lists the folder settings of the extracted data. By editing dirconf.txt, you can change the data location and setting value of file path in the new environment and migrate the data. To migrate data between the Windows and UNIX/Linux environments, you need to edit diconf.txt. You can edit dirconf.txt by opening it with a text editor or using the SMT settings support tool. SMT settings support tool uses the Excel file included in the SMT folder. For the procedure for changing the data file path using the SMT settings support tool, see "Appendix 2-2. Configure settings for changing the data file path in the new environment (P.167)". This section describes the procedure for changing the data file path using a text editor in an existing Windows environment, and the setting items of dirconf.txt.
▌Procedure
Edit dirconf.txt in the SMT folder with any text editor.
Describe the setting contents in dirconf.txt and save in "UTF-8" format. Set the path of the new environment to the value on the right side of "=", and do not change the value on the left side of "=".
Chapter 2. Automatic migration
36
▌dirconf.txt setting items The setting items of dirconf.txt are as follows.
Section name Content Related products (files)
[DataDirectory] Data location in the existing environment = Data location in the new environment
Reference If the file path contains an equal sign "=", this description is delimited at the equal sign.
Form file, Query form file
[SVF,<file_name>] Settings name=File path SVF output engine products
[RDE,<database_table_name>,<model_name>,<locale_name>] Settings name=File path RDE
[RDE,<file_name>] Settings name=File path RDE
[UCX,<file_name>] Settings name=File path
Reference If the file path contains an equal sign "=", the equal sign appears as "&equ;".
UC/X
[SVFConnectForJava,<file_name>] Settings name=File path SVF Connect for Java API
[SVFConnectForASPCOM,<file_name>] Settings name=File path SVF Connect for ASP/COM API
[SVFConnectForDotNET,<file_name>] Settings name=File path SVF Connect for .NET Framework API

Chapter 2. Automatic migration
37
2-4-5 Apply migration data Migrate the data extracted from the existing environment into the new environment. If you copy the data to the location where the SVF Migration Tool module is arranged and execute the SVF Migration Tool, the copied data is converted to Ver. 10.0 format and migrated. If you migrate RDE spool data to a new environment and then extracted again, the only document data spooled in the existing environment during that time can be migrated. This section describes the procedure for applying migration data in a new Windows environment.
▌Prerequisites
• Install and activate the latest version of the SVF product in the new environment For migration in the same environment, uninstall the old version and then install the latest version.
• If the connection runtime for SVF Connect is registered by a service name other than
"SvfJavaConnectServer" or "SvfrServer", stop the service manually. Because the service is not automatically stopped or started, it must be stopped manually before applying the migration data and started manually after the application.
• Stop connecting RDE with the following products and functions:
○ SPA Bridge service
○ SPA Loader service
○ SVF PDF Loader
○ SPA Tablet Option
○ SVF for Tablet These products cannot execute the processes for RDE while applying migration data.
• When migrating only spool data of a specific document management number, specify the document
management number of the data to be migrated in "RDE.Document.ImportManageNums" in the
operation settings (SMT.properties).
▌Procedure
■ Arrange the extracted data in the existing environment
Copy the RIPPING folder extracted in the existing environment to the SMT folder in the new environment.
■ Start SVF Migration Tool and select the display language
Execute SMT_CUI.bat in the SMT folder with administrator privileges.

Chapter 2. Automatic migration
38
Select the display language from the menu of SVF Migration Tool. Select the display language to display the main menu.
■ Migrate data
Input '2' (migrate data) in the main menu and press ENTER.
In the environment where RDE is installed, if you select Extract All and extract the data, select the type of data to be migrated. If RDE is not installed, or if you extract data by selecting Extract Settings Data Only, this menu will not be displayed and you will proceed to the confirmation screen. In addition, if you select Migrate Spooled Document Data Only and extract the data, this menu will not be displayed and you will proceed to the screen for selecting the method for migrating spool data. There are the following types of data to be migrated:
• Migrate All Migrate all data to be migrated. For the migration target data by the migration tool, see "SVF Migration Guide".
• Migrate Settings Data Only Of the migration target data, migrate the setting data only. RDE spool data is not migrated.
• Migrate Spooled Document Data Only Migrate only the RDE spool data from migration target data.
If you selected Extract Spooled Document Data Only, and if you selected Migrate Spooled Document Data Only in the previous step, select a method for migrating spool data. There are the following types of methods for migrating spool data.
• Migrate All Migrate all spool data.
• Migrate Differences Only Compare the document management number between the extracted spool data and the spool data of RDE in the new environment, and migrate the spool data after the document management number assigned by RDE in the new environment. You can also specify the document management number of the data to be migrated in "RDE.Document.ImportManageNums" in the operation settings (SMT.properties).
The confirmation screen appears. After confirming the screen, if there are no problems, input 'y' and press ENTER.
If the same file exists both in the existing environment and the new environment, a confirmation message asking whether to overwrite is displayed. After confirming the screen, input 'y' (overwrite), 'n' (do not overwrite), or 'all' (overwrite all). When you input 'all', all files are overwritten without a confirmation message.

Chapter 2. Automatic migration
39
▌Operation result The message "Successfully finished. " appears, and the data migration is completed.
Unzipping extracted data Stopping services Backing up Starting PostgreSQL service Updating modules Migrating data Starting services Number of warnings: 10 Check following log for details: C:/work/SMT/SMT-20181221.log Successfully finished.
After the RDE spool data migration is completed, if "docImportInfo.serialize" exists in the SMT folder, the following message is displayed and the migration of text data can be resumed.
Resume document migration from the previous time?
■ Backup SVF Migration Tool backs up the new environment before the data migration process. The SVFJP folder of the new environment (registered in the environment variable FIT_PRODUCTS_BASE) and the folder where the SVF Connect client module is installed are copied. If the PostgreSQL main unit and data area are arranged under other than the SVFJP folder, they are also copied. Using the files backed up by SVF Migration Tool, you can return to the status immediately after Ver. 10.0 installation (you can restore).
▌Work required after operation
• Confirm whether each product can be used If it is not available, activate the product again.
• If the connection runtime for SVF Connect is registered by a service name other than
"SvfJavaConnectServer" or "SvfrServer", start the service manually. Because the service is not automatically stopped or started, it must be stopped manually before applying the migration data and started manually after the application.
• If an error occurs during data migration and the process ends, restore the data using the files backed up
by SVF Migration Tool, and then migrate the data again
• If the number of warnings appears after completing data migration, check the row containing [WARN] in
the log file.
▌Related items
• 2-4-2 Configure operational settings for SVF Migration Tool (P.27)
• 2-6 Restore to the status immediately after Ver. 10.0 installation (P.66)

Chapter 2. Automatic migration
40
• Appendix 3-1. SVF Migration Tool error codes (P.170)
• Appendix 3-2. SVF Migration Tool warnings (P.174)

Chapter 2. Automatic migration
41
2-4-6 Confirm the installed product and version Confirm the product and version installed in the new environment. This section describes the procedure for confirming the products and versions installed in the new Windows environment.
▌Procedure
■ Start SVF Migration Tool and select the display language
Execute SMT_CUI.bat in the SMT folder with administrator privileges.
Select the display language from the menu of SVF Migration Tool. Select the display language to display the main menu.
■ Display product information
Input '4' (show product information) in the main menu and press ENTER.

Chapter 2. Automatic migration
42
▌Operation result The installed product information is displayed. The following is a display example in the environment where Ver.10.0 of SVF output engine and UCX/x are installed:
<Product Information> The following products are currently installed: SVF: svf.jar Ver.10.0.0.21 svfgrph.jar Ver.10.0.0.21 svfpdfparser.jar Ver.10.0.0.17 forme.jar Ver.10.0.0.11 SVFWebServices Ver.10.0.0.2 FontUtilWeb Ver.10.0.0.0 SVFConfig Ver.10.0.0.9 SVFSpooler Ver.10.0.0.5 SVFHttpServer Ver.10.0.0.0 UCX: UniConXJ.jar Ver.10.0.0.5 (build 201908091841) UniConX Ver.9.2.1.0 UcxConfig Ver.10.0.0.6
Chapter 2. Automatic migration
43
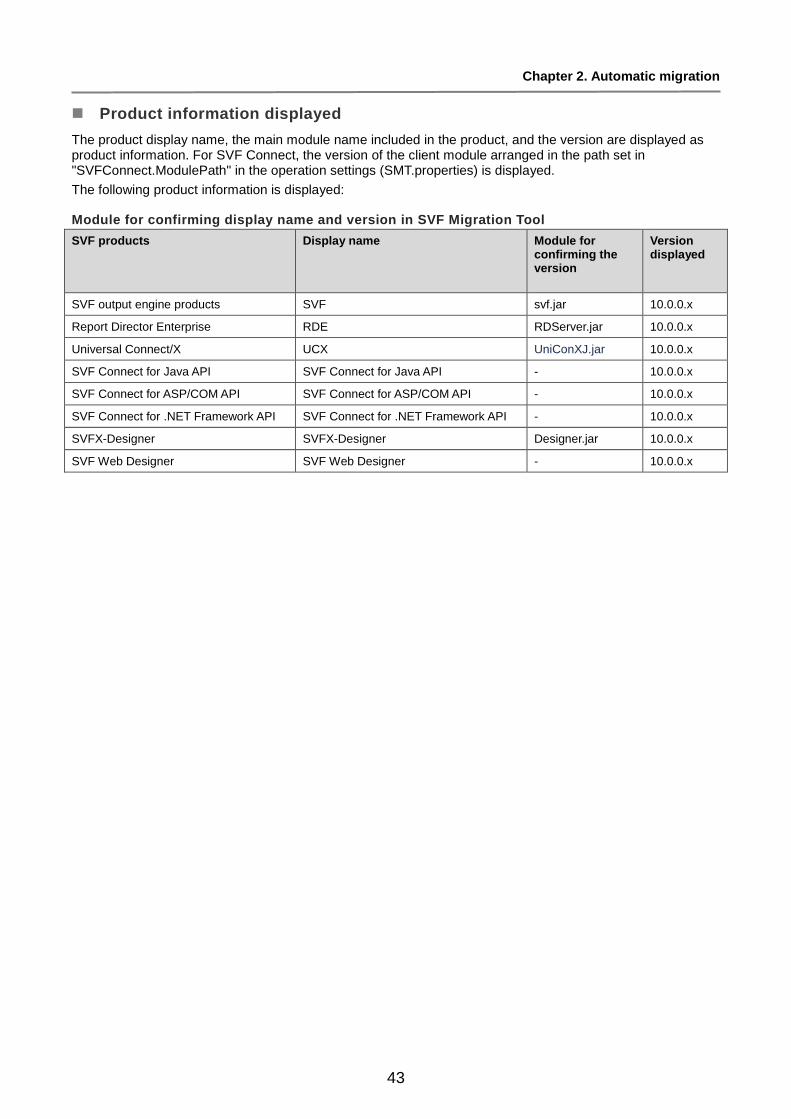
■ Product information displayed The product display name, the main module name included in the product, and the version are displayed as product information. For SVF Connect, the version of the client module arranged in the path set in "SVFConnect.ModulePath" in the operation settings (SMT.properties) is displayed. The following product information is displayed:
Module for confirming display name and version in SVF Migration Tool SVF products Display name Module for
confirming the version
Version displayed
SVF output engine products SVF svf.jar 10.0.0.x
Report Director Enterprise RDE RDServer.jar 10.0.0.x
Universal Connect/X UCX UniConXJ.jar 10.0.0.x
SVF Connect for Java API SVF Connect for Java API - 10.0.0.x
SVF Connect for ASP/COM API SVF Connect for ASP/COM API - 10.0.0.x
SVF Connect for .NET Framework API SVF Connect for .NET Framework API - 10.0.0.x
SVFX-Designer SVFX-Designer Designer.jar 10.0.0.x
SVF Web Designer SVF Web Designer - 10.0.0.x

Chapter 2. Automatic migration
44
2-4-7 Works after migration This section describes the tasks to be executed after automatic migration. When the tasks described here are completed, the SVF migration using the SVF Migration Tool is completed. If you are using a product that is not supported by the SVF Migration Tool, continue with the manual migration.
▌Post-work when migrating in the same environment Execute the following works:
• Migrate settings and files that cannot be migrated by the tool Manually migrate settings and files prepared before migration to the new environment.
• Comparison of print data of forms Create a test form in the new environment, and compare the print data with the test form created in the existing environment before migration. Compare the print data in any Windows environment.
• Install products to be added in the new environment (if necessary) When adding products to be used, install the products to be added in the new environment.
▌Post-work when migrating to another environment Execute the following works:
• Migrate settings and files that cannot be migrated by the tool Manually migrate settings and files prepared before migration to the new environment.
• Comparison of print data of forms Create test forms in each of the existing environment and the new environment, and compare the print data. Compare the print data in any Windows environment.
• Install products to be added in the new environment (if necessary) When adding products to be used, install the products to be added in the new environment.
• Uninstall the old version When all work is completed, uninstall the old version of the product from the existing environment.
▌Related items
• Chapter 3. Manual migration (P.73)
• Chapter 4. Compare print data after migration (P.93)
Chapter 2. Automatic migration
45
2-5 Automatic migration procedure in UNIX/Linux environment This section describes the automatic migration procedure in UNIX/Linux environment using the SVF Migration Tool.

Chapter 2. Automatic migration
46
2-5-1 Prepare SVF Migration Tool Arrange the SVF Migration Tool in the existing server environment and client environment when migrating in the same environment, and in the existing and new server environment and client environment when migrating to another environment. This section describes the procedure for arranging the SVF Migration Tool in a UNIX/Linux environment.
▌Procedure
Copy the following two archive files to any directory:
• SMT.tar.gz This is an archive file for SVF Migration Tool. Start SVF Migration Tool with SMT_CUI.sh in the SMT directory.
• runtime.tar.gz This is an archive file for the Java runtime environment. The runtime directory stores the Java runtime environment (Java5 and Java7) used by the SVF Migration Tool. Copy if the Java runtime environment is not installed or the Java runtime environment is Java 1.4 or earlier. It is available only in Linux environment.
Usage example
cp /mnt/cdrom/unix/SMT.tar.gz /home/svf/work/SMT
Move to the directory to which you copied the archive file.
Usage example
cd /home/svf/work/SMT
Unzip the archive file.
Usage example
gzip -cd SMT.tar.gz | tar -xvf -
The following points should be noted regarding the unzip destination of the archive file.
• Arrange the SVF Migration Tool in as short a path as possible. If the number of characters or bytes in the file path exceeds the OS limit (1,023 bytes for UNIX/Linux), SVF Migration Tool processing will fail.
• Do not arrange SVF Migration Tool under the following directories:
○ $FIT_PRODUCTS_BASE
○ PostgreSQL installation directory (when using RDE)
○ PostgreSQL database directory (when using RDE)
○ Directory where SVF Connect client module is installed

Chapter 2. Automatic migration
47
If necessary, set JAVA_HOME and Path as environment variables for the Java runtime environment. This step is not necessary if all of the following conditions are met:
• Java5 to Java8 are installed for the existing environment, and Java7 or Java8 are installed for the new
environment
• JAVA_HOME and Path have been set as environment variables for the Java runtime environment Edit SMT_CUI.sh in the SMT directory with a text editor and set environment variables as shown in the following example.
Setting example when using x64 (64bit) of Java7 in runtime directory
JAVA_HOME=/home/svf/work/runtime/Java7/linux/x64/jre export JAVA_HOME PATH=$JAVA_HOME/bin:$PATH export PATH
On the right side of "JAVA_HOME", specify the Java execution environment installation directory with an absolute path. In an environment where Java is not installed, specify the jre directory in the runtime directory with the absolute path of . However, since "runtime.tar.gz" bundled with the migration tool is for Linux, it is necessary to prepare a separate Java execution environment for other UNIX OS. The Java runtime environment must be Java5 or later in the existing environment (during data extraction), Java7 or later in the new environment (during data migration), and the target SVF product must be supported. There are two types, x86 (32bit) and x64 (64bit). Specify a Java runtime environment that matches the execution environment of SVF Migration Tool.
▌Related items
• Appendix 1-1. File structure of SVF Migration Tool (P. 157)
• Appendix 1-4. Structure of runtime folder (directory) (P. 162)

Chapter 2. Automatic migration
48
2-5-2 Configure operational settings for SVF Migration Tool Describe the settings to control the operation of the arranged SVF Migration Tool in SMT.properties. The following settings can be made:
• Configure operational settings for SVF Migration Tool such as log output
• Operation settings when extracting and applying migration data
• Settings for form files
• Setting the path where the SVF Connect client module to be updated exists This section describes the procedure for setting the SVF Migration Tool operation in the UNIX/Linux environment and the setting items of SMT.properties.
▌Procedure
Edit SMT.properties in the SMT directory with any text editor.
Describe the settings in SMT.properties and save in "UTF-8" format.

Chapter 2. Automatic migration
49
▌Settings of SMT.properties The setting items of SMT.properties are as follows.
Item Description
Log.level Specifies the output level of the log. Logs at the specified level and those at the lower levels (in the case of INFO, both INFO and ERROR) are output. The default value is "WARN".
Log level Content
DEBUG Used for investigating the cause in case of trouble.
WARN Used when a continuable error occurs.
INFO Outputs start/end information of processes.
ERROR Used when a non-continuable error occurs.
NONE No log data is output.
Note If you specify DEBUG, a large amount of logs will be output, which may degrade the performance.
Reference Logs for SVF Migration Tool will be created under the SVF Migration Tool directory with the file name "SMT-<date>.log". If SVF Migration Tool is started multiple times on the same day, it will be created with the file name "SMT-Date-Number.log".
Backup.SaveDir Specifies the path to save the backup files. A directory will be created at the specified path with the date and time of the backup, and backup files will be placed in the directory. If you do not specify a path, the data will be arranged under the directory where the SVF Migration Tool module are arranged.
Ripping.SearchPath Specifies a source path for searching files data in order to extract form files (.xml and .frm) and query form files (.vrq) when extracting. Search the path specified when Search path is used in SVF Configuration Tool, and the path specified when Form file search path is used in UCX operation settings. In both cases, subdirectory is targeted to search. Separate multiple items with commas.
Example
Ripping.SearchPath=/home/data,/opt/data
Ripping.SaveDir Specifies the path to save the extracted data. The RIPPING directory is created in the specified path, and the extracted data is arranged in it. If you do not specify a path, the data will be arranged under the directory where the SVF Migration Tool module are arranged.
Note Do not specify a reverse pointer, symbolic link, virtual drive or virtual network drive.
Convert.Backup.MaxCount Specifies the maximum number of backup files to be saved when backing up during data migration. The default value is 5. If the number of backup filed exceeds the specified maximum number, the folder name that contains the oldest date and time will be deleted.
Form.FrmExtension Specifies the extension of FRM form files to be extracted. The default value is

Chapter 2. Automatic migration
50
Item Description "frm".
Form.XmlExtension Specifies the extension of XML form files to be extracted and converted. The default value is "xml".
Form.Backup Specifies whether or not to create a backup of the original file when converting a form file. The default value is "true".
Value Description
true Creates a backup.
false Does not create a backup.
Form. FormDefaults Specifies whether or not to delete properties that have the same value as the default value (initial value for printing) when converting FRM form files. The default value is "true".
Value Description
true Deletes properties.
false Does not delete properties.
Note Specify "false" if you convert the converted XML form files into FDL files using "SVF Form Export for PlainTXTII", "SVF Form Export for FiBridgeII", or "SVF Form Export for FX-STDOUT".
RDE.ServerMapping When migrating RD server and PA server, if there is no server with the same name as the existing environment, specify the server to be replaced with the format "[" server name of existing environment "," server name of new environment "]". Separate multiple items with commas. If there is only one server of the same type in the existing environment and the new environment, it will be automatically migrated and there is no need to set it.
Example
RDE.ServerMapping=["RDServer1","RDServer2"],["PAServer1","PAServer2"]
RDE.Document.ImportRule Specifies a processing method if the same document management number exists when migrating RDE spool data. The default value is "DUPLICATED_IGNORE".
Value Description
DUPLICATED_ERROR If registered spool data exists, it will end with an error.
DUPLICATED_IGNORE If registered spool data exists, the spool data is not migrated.
DUPLICATED_REALLOCATE If registered spool data exists, reassign the document management number and migrate.
REALLOCATE The data will be migrated after a new document management number has been assigned to all the spool data.
RDE.Document.ImportManageNums When migrating RDE spool data, specify the document management number to be migrated when specifying "Migrate Differences Only". If not specified, the documents after the document management number assigned by the migration destination RDE will be migrated. Use a comma to separate multiple numbers,

Chapter 2. Automatic migration
51
Item Description and use a hyphen to specify a range.
Specification example for migrating spool document data with document management numbers 1, 2, and 5-10
RDE.Document.ImportManageNums=1,2,5-10
RDE.Document.RegistSearchField Specifies whether or not to register all the fields in a form file used for spool data as the full-text search fields when migrating data from RDE Ver.2.6a or earlier. The default value is "true".
Value Description
true Registers the fields.
false Does not register the fields.
RDE.Document.ImportCommitCount Specifies the number of documents to be committed to the database at once when migrating RDE spool data.
SVFConnect.ModulePath Specifies the absolute path of the directory where the client module of SVF Connect is installed. Separate multiple products with commas to specify. The same product cannot be specified multiple number. For example, you can specify SVF Connect for Java API together with SVF Connect for ASP/COM AP, but you cannot specify multiple SVF Connect for Java API.
Chapter 2. Automatic migration
52
2-5-3 Extract migration data Extract various setting information such as environment settings and printer information, form file, query form file, and RDE spool data from the existing environment. This section describes the procedure for extracting migration data in an existing UNIX/Linux environment.
▌Prerequisites
• If you are using RDE, start the PostgreSQL process in advance. For other process of RDE/SVF, their states can be either started or stopped.
• If you are using RDE and the PostgreSQL data area is changed from the default
"$ POSTGRESQL_HOME/data", define the changed location in the environment variable "PGDATA". If you do not define this location, SVF Migration Tool does not work properly.
• For RDE Ver. 9.1 SP2 or earlier (including no SP application), database maintenance has been
completed. For RDE Ver. 9.1 SP2 or earlier (including no SP application), data extraction may fail. If the environment is applicable, database maintenance is required. Contact the support center. This problem occurs in environments that have been operating for a long time with RDE Ver. 9.1, Ver. 9.1 SP1, and Ver. 9.1 SP2.
▌Procedure
■ Start SVF Migration Tool and select the display language
Execute SMT_CUI.sh in SMT directory as the user who installed the SVF product.
Select the display language from the menu of SVF Migration Tool. In the UNIX/Linux environment, the language selection appears in English. Select the display language to display the main menu.
■ Extract data
Input '1' (extract data) in the main menu and press ENTER.
Chapter 2. Automatic migration
53
Reference If data extraction is repeated in the same environment, the following message is displayed and the extracted data is overwritten.
Data has already been extracted. Do you extract data again? (y/n)
For the environments where RDE is installed, select the type of data to be extracted. For the environment where RDE is not installed, this menu will not be displayed and you will proceed to the confirmation screen. The types of data to be extracted are as follows.
• Extract All Extracts all the data to be migrated. For the migration target data by the migration tool, see "SVF Migration Guide".
• Extract Settings Data Only Extract only the setting data from the migration target data. RDE spool data is not extracted.
• Extract Spooled Document Data Only Extract only the RDE spool data from migration target data.
Reference If you migrate RDE spool data to a new environment and then extracted again, the only data spooled in the existing environment during that time can be migrated.
The confirmation screen appears. After confirming the screen, if there are no problems, input 'y' and press ENTER.
Note Do not add, update, or delete settings data including the environment settings during data extraction. You can output forms.

Chapter 2. Automatic migration
54
If you are using RDE and setting password authentication in pg_hba.conf for PowerGres and PostgreSQL, you are prompted to enter your password as follows. Input your password and press ENTER.
Password:
▌Operation result A message is displayed and the data extraction process is completed. The message displayed during processing varies depending on the installed SVF product. Once the data extraction process is completed, the extracted data will be arranged in the RIPPING directory under the directory specified at the operation settings (SMT.properties). In addition, dirconf.txt in the RIPPING folder lists the directory settings for the extracted data. In an environment where RDE is installed, it may take time to complete the data extraction process because a backup is taken after a database dump is obtained.
▌Work required after operation
• When changing the data file path from the existing environment, edit dirconf.txt with any text editor and
change the location of the extracted data and the file path settings. Also change when migrating between Windows and UNIX/Linux environments.
• If the number of warnings appears after completing data extraction, confirm the row containing [WARN]
in the log file.
▌Related items
• 2-5-4 Configure settings for changing the data file path in the new environment (P.55)
• Appendix 3-1. SVF Migration Tool error codes (P.170)
• Appendix 3-2. SVF Migration Tool warnings (P.174)

Chapter 2. Automatic migration
55
2-5-4 Configure settings for changing the data file path in the new environment Once the data extraction process is completed, the extracted data will be arranged in the RIPPING directory under the directory specified at the operation settings (SMT.properties). In addition, dirconf.txt in the RIPPING folder lists the directory settings for the extracted data. By opening and editing dirconf.txt in any text editor, you can change the data location and file path settings in the new environment and migrate the data. To migrate data between the Windows and UNIX/Linux environments, you need to edit diconf.txt. This section describes the procedure for changing the data file path in the existing UNIX/Linux environment and the setting items of dirconf.txt.
▌Procedure
Edit dirconf.txt in the SMT directory with any text editor.
Describe the setting contents in dirconf.txt and save in "UTF-8" format. Set the path of the new environment to the value on the right side of "=", and do not change the value on the left side of "=".
▌dirconf.txt setting items The setting items of dirconf.txt are as follows.
Section name Content Related products (File)
[DataDirectory] Data location in the existing environment = Data location in the new environment
Reference If the file path contains an equal sign "=", this description is delimited at the equal sign.
Form file, Query form file
[SVF,<file_name>] Settings name=File path SVF output engine products
[RDE,<database_table_name>,<model_name>,<locale_name>] Settings name=File path RDE
[RDE,<file_name>] Settings name=File path RDE
[UCX,<file_name>] Settings name=File path
Reference If the file path contains an equal sign "=", the equal sign appears as "&equ;".
UC/X

Chapter 2. Automatic migration
56
Section name Content Related products (File)
[SVFConnectForJava,<file_name>] Settings name=File path SVF Connect for Java API
[SVFConnectForASPCOM,<file_name>] Settings name=File path SVF Connect for ASP/COM API
[SVFConnectForDotNET,<file_name>] Settings name=File path SVF Connect for .NET Framework API

Chapter 2. Automatic migration
57
2-5-5 Apply migration data Migrate the data extracted from the existing environment into the new environment. If you copy the data to the location where the SVF Migration Tool module is arranged and execute the SVF Migration Tool, the copied data is converted to Ver. 10.0 format and migrated. If you migrate RDE spool data to a new environment and then extracted again, the only document data spooled in the existing environment during that time can be migrated. This section describes the procedure for extracting migration data in a new UNIX/Linux environment.
▌Prerequisites
• Install and activate the latest version of the SVF product in the new environment For migration in the same environment, uninstall the old version and then install the latest version.
• After installing and activating the SVF output engine product, RDE, UC/X Ver. 10.0, start the process
once with svf_startup.sh If you do not start the processes at least once after activation, application of the migration data will fail.
• Stop connecting RDE with the following products and functions:
○ SPA Bridge service
○ SPA Loader service
○ SVF PDF Loader
○ SPA Tablet Option
○ SVF for Tablet These products cannot execute the processes for RDE while applying migration data.
• When migrating only spool data of a specific document management number, specify the document
management number of the data to be migrated in "RDE.Document.ImportManageNums" in the
operation settings (SMT.properties).
▌Procedure
■ Arrange the extracted data in the existing environment
Copy the RIPPING directory extracted from the existing environment to the SMT directory in the new environment.
■ Start SVF Migration Tool and select the display language
Execute SMT_CUI.sh in SMT directory as the user who installed the SVF product.

Chapter 2. Automatic migration
58
Select the display language from the menu of SVF Migration Tool. In the UNIX/Linux environment, the language selection appears in English. Select the display language to display the main menu.
■ Migrate data
Input '2' (migrate data) in the main menu and press ENTER.
In the environment where RDE is installed, if you select Extract All and extract the data, select the type of data to be migrated. If RDE is not installed, or if you extract data by selecting Extract Settings Data Only, this menu will not be displayed and you will proceed to the confirmation screen. In addition, if you select Migrate Spooled Document Data Only and extract the data, this menu will not be displayed and you will proceed to the screen for selecting the method for migrating spool data. There are the following types of data to be migrated:
• Migrate All Migrate all data to be migrated. For details on data to be migrated, see "Chapter 2. Data to be migrated by the migration tool" in "SVF Migration Description".
• Migrate Settings Data Only Of the migration target data, migrate the setting data only. RDE spool data is not migrated.
• Migrate Spooled Document Data Only Migrate only the RDE spool data from migration target data.

Chapter 2. Automatic migration
59
If you selected Extract Spooled Document Data Only, and if you selected Migrate Spooled Document Data Only in the previous step, select a method for migrating spool data. There are the following types of methods for migrating spool data.
• Migrate All Migrate all spool data.
• Migrate Differences Only Compare the document management number between the extracted spool data and the spool data of RDE in the new environment, and migrate the spool data after the document management number assigned by RDE in the new environment. You can also specify the document management number of the data to be migrated in "RDE.Document.ImportManageNums" in the operation settings (SMT.properties).
The confirmation screen appears. After confirming the screen, if there are no problems, input 'y' and press ENTER.
If the same file exists both in the existing environment and the new environment, a confirmation message asking whether to overwrite is displayed. After confirming the screen, input 'y' (overwrite), 'n' (do not overwrite), or 'all' (overwrite all). When you input 'all', all files are overwritten without a confirmation message.
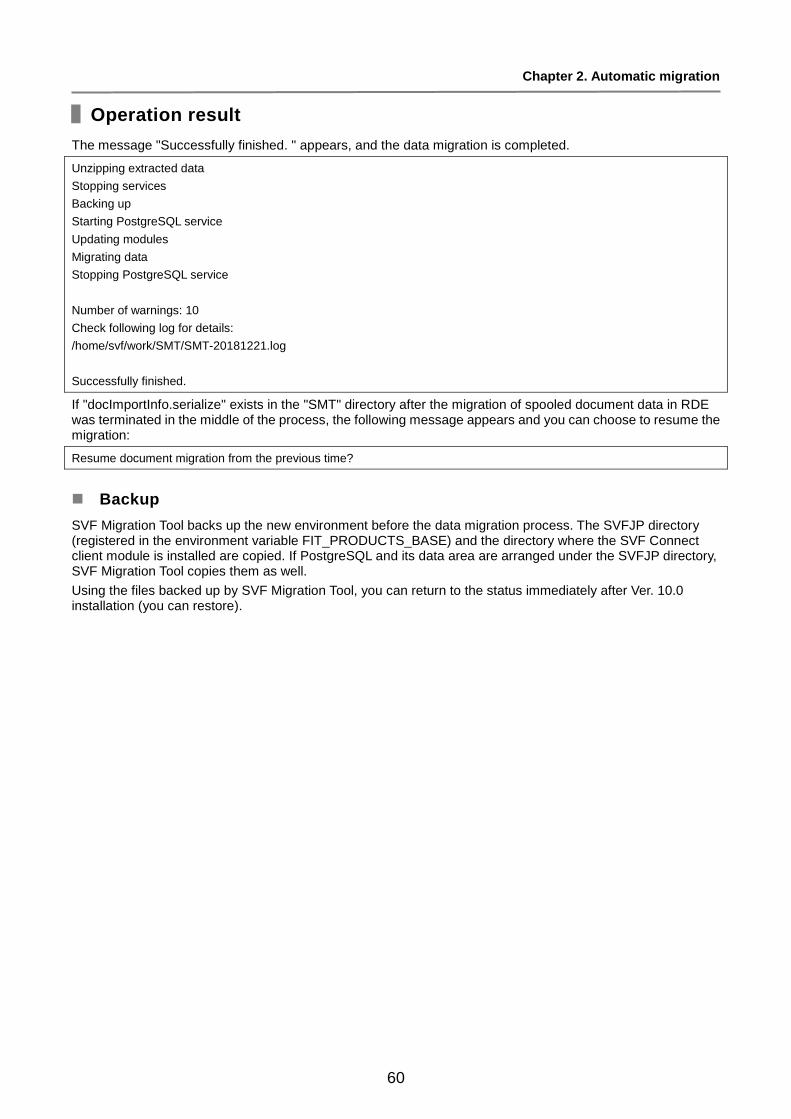
Chapter 2. Automatic migration
60
▌Operation result The message "Successfully finished. " appears, and the data migration is completed.
Unzipping extracted data Stopping services Backing up Starting PostgreSQL service Updating modules Migrating data Stopping PostgreSQL service Number of warnings: 10 Check following log for details: /home/svf/work/SMT/SMT-20181221.log Successfully finished.
If "docImportInfo.serialize" exists in the "SMT" directory after the migration of spooled document data in RDE was terminated in the middle of the process, the following message appears and you can choose to resume the migration:
Resume document migration from the previous time?
■ Backup SVF Migration Tool backs up the new environment before the data migration process. The SVFJP directory (registered in the environment variable FIT_PRODUCTS_BASE) and the directory where the SVF Connect client module is installed are copied. If PostgreSQL and its data area are arranged under the SVFJP directory, SVF Migration Tool copies them as well. Using the files backed up by SVF Migration Tool, you can return to the status immediately after Ver. 10.0 installation (you can restore).

Chapter 2. Automatic migration
61
▌Work required after operation
• Start the process manually
• Confirm whether each product can be used If it is not available, activate the product again.
• If an error occurs during data migration and the process ends, restore the data using the files backed up
by SVF Migration Tool, and then migrate the data again
• If the number of warnings appears after completing data migration, check the row containing [WARN] in
the log file.
▌Related items
• 2-5-2 Configure operational settings for SVF Migration Tool (P.48)
• 2-6 Restore to the status immediately after Ver. 10.0 installation (P.66)
• Appendix 3-1. SVF Migration Tool error codes (P.170)
• Appendix 3-2. SVF Migration Tool warnings (P.174)

Chapter 2. Automatic migration
62
2-5-6 Confirm the installed product and version Confirm the product and version installed in the new environment. This section describes the procedure for confirming the products and versions installed in the new UNIX/Linux environment.
▌Procedure
■ Start SVF Migration Tool and select the display language
Execute SMT_CUI.sh in SMT directory as the user who installed the SVF product.
Select the display language from the menu of SVF Migration Tool. In the UNIX/Linux environment, the language selection appears in English. Select the display language to display the main menu.
■ Display product information
Input '4' (show product information) in the main menu and press ENTER.

Chapter 2. Automatic migration
63
▌Operation result The installed product information is displayed. The following is a display example in the environment where Ver.10.0 of SVF output engine and UCX/x are installed:
<Product Information> The following products are currently installed: SVF: svf.jar Ver.10.0.0.21 svfgrph.jar Ver.10.0.0.21 svfpdfparser.jar Ver.10.0.0.17 forme.jar Ver.10.0.0.11 SVFWebServices Ver.10.0.0.2 FontUtilWeb Ver.10.0.0.0 SVFConfig Ver.10.0.0.9 SVFSpooler Ver.10.0.0.5 SVFHttpServer Ver.10.0.0.0 UCX: UniConXJ.jar Ver.10.0.0.5 (build 201908091841) UniConX Ver.9.2.1.0 UcxConfig Ver.10.0.0.6

Chapter 2. Automatic migration
64
■ Product information displayed The product display name, the main module name included in the product, and the version are displayed as product information. For SVF Connect, the version of the client module arranged in the path set in "SVFConnect.ModulePath" in the operation settings (SMT.properties) is displayed. The following product information is displayed:
Module for confirming display name and version in SVF Migration Tool SVF products Display name Module for
confirming the version
Version displayed
SVF output engine products SVF svf.jar 10.0.0.x
Report Director Enterprise RDE RDServer.jar 10.0.0.x
Universal Connect/X UCX UniConXJ.jar 10.0.0.x
SVF Connect for Java API SVF Connect for Java API - 10.0.0.x
SVF Connect for ASP/COM API SVF Connect for ASP/COM API - 10.0.0.x
SVF Connect for .NET Framework API SVF Connect for .NET Framework API - 10.0.0.x
SVFX-Designer SVFX-Designer Designer.jar 10.0.0.x
SVF Web Designer SVF Web Designer - 10.0.0.x

Chapter 2. Automatic migration
65
2-5-7 Works after migration This section describes the tasks to be executed after automatic migration. When the tasks described here are completed, the SVF migration using the SVF Migration Tool is completed. If you are using a product that is not supported by the SVF Migration Tool, continue with the manual migration.
▌Post-work when migrating in the same environment Execute the following works:
• Migrate settings and files that cannot be migrated by the tool Manually migrate settings and files prepared before migration to the new environment.
• Comparison of print data of forms Create a test form in the new environment, and compare the print data with the test form created in the existing environment before migration. Compare the print data in any Windows environment.
• Install products to be added in the new environment (if necessary) When adding products to be used, install the products to be added in the new environment.
▌Post-work when migrating to another environment Execute the following works:
• Migrate settings and files that cannot be migrated by the tool Manually migrate settings and files prepared before migration to the new environment.
• Comparison of print data of forms Create test forms in each of the existing environment and the new environment, and compare the print data. Compare the print data in any Windows environment.
• Install products to be added in the new environment (if necessary) When adding products to be used, install the products to be added in the new environment.
• Uninstall the old version When all work is completed, uninstall the old version of the product from the existing environment.
▌Related items
• Chapter 3. Manual migration (P.73)
• Chapter 4. Compare print data after migration (P.93)

Chapter 2. Automatic migration
66
2-6 Restore to the status immediately after Ver. 10.0 installation Using the files backed up by the SVF Migration Tool during data migration, to return the new environment to the state immediately after installation of Ver. 10.0 is called "restore". You can select restore from the menu displayed after starting SVF Migration Tool. Execute this procedure when re-executing the data migration process or when migrating again with newly extracted data.
▌Notes on restoration
• The restoring is available only in the new environment after data migration. It cannot be restored in an
existing environment.
• Do not restore the environment where the configuration of the SVF products has been changed. It
causes a problem. The SVF product configuration must be the same as that at the time of backup (automatic retrieve during data migration) and restoration. Changing the SVF product configuration means executing the following operations after applying the migration data.
○ Installation and uninstallation of products supported by SVF Migration Tool
○ Adding, updating, and deleting product license information
○ Adding and deleting product options
▌Related items
• 2-6-1 Restoration procedure in Windows environment (P.67)
• 2-6-2 Restoration procedure in UNIX/Linux environment (P.69)

Chapter 2. Automatic migration
67
2-6-1 Restoration procedure in Windows environment Use the file that SVF Migration Tool backed up when applying the migration data to restore the new environment to the state just after the installation of Ver. 10.0. This section describes the procedure for restoring a new Windows environment.
▌Prerequisites
• The migration data application procedure has executed (SVF Migration Tool has a backup of the new
environment)
• Do not use the Java runtime environment under the SVFJP folder Since the SVF products are temporarily deleted during the restoring process, you will not be able to use the Java runtime environment under the "SVFJP" folder. Use a Java runtime environment other than the SVFJP folder. For details on setting the Java runtime environment, see "2-4-1 Prepare SVF Migration Tool (P.25)".
• If the connection runtime for SVF Connect is registered by a service name other than
"SvfJavaConnectServer" or "SvfrServer", stop the service manually.
• To restore RDE in an environment where RDE and RDE Utility Developer's Kit are used, restore RDE
Utility Developer's Kit manually. For details about the manual restoration of RDE Utility Developer's Kit, see "3-6-1 Restoration procedure in Windows environment (P.91)".
▌Procedure
■ Start SVF Migration Tool and select the display language
Execute SMT_CUI.bat in the SMT folder with administrator privileges.
Select the display language from the menu of SVF Migration Tool. Select the display language to display the main menu.
■ Restore
Input '5' (Restore) in the main menu and press ENTER.

Chapter 2. Automatic migration
68
Select the backup file to be restored.
<Restore> Select the backup files to be restored. 1: Backup date 2016/05/30 10:30:00 2: Backup date 2016/06/02 10:30:00 3: Backup date 2016/06/03 10:30:00 r: Return to main menu
▌Operation result The message "Successfully finished. " appears, and the new environment restores to the state immediately after Ver.10.0 installation.
Stopping services Restoring Starting services Successfully finished.
▌Work required after operation
• If the connection runtime for SVF Connect is registered by a service name other than
"SvfJavaConnectServer" or "SvfrServer", start the service manually.
• If an error occurs during the restoring process and you cannot restore files any more, manually restore
the files in the following procedure:
1. Select the file to be restored in the path where the backup file is saved.
2. If the folder where the product is installed does not exist, create a new folder.
3. Copy the files into the folder where the product is installed.

Chapter 2. Automatic migration
69
2-6-2 Restoration procedure in UNIX/Linux environment Use the file that SVF Migration Tool backed up when applying the migration data to restore the new environment to the state just after the installation of Ver. 10.0. This section describes the procedure for restoring a new UNIX/Linux environment.
▌Prerequisites
• The migration data application procedure has executed (SVF Migration Tool has a backup of the new
environment)
• Do not use the Java runtime environment under the SVFJP directory Since the SVF products are temporarily deleted during the restoring process, you will not be able to use the Java runtime environment under the "SVFJP" directory. Use a Java runtime environment other than the SVFJP directory. For details about the settings of Java runtime environment, see "2-5-1 Prepare SVF Migration Tool (P.46)".
• To restore RDE in an environment where RDE and RDE Utility Developer's Kit are used, restore RDE
Utility Developer's Kit manually. For details about the restoration of RDE Utility Developer's Kit, see "3-6-2 Restoration procedure in UNIX/Linux environment (P.92)".
▌Procedure
■ Start SVF Migration Tool and select the display language
Execute SMT_CUI.sh in SMT directory as the user who installed the SVF product.
Select the display language from the menu of SVF Migration Tool. In the UNIX/Linux environment, the language selection appears in English. Select the display language to display the main menu.
■ Restore
Input '5' (Restore) in the main menu and press ENTER.
Select the backup file to be restored.
<Restore> Select the backup files to be restored.

Chapter 2. Automatic migration
70
1: Backup date 2016/05/30 10:30:00 2: Backup date 2016/06/02 10:30:00 3: Backup date 2016/06/03 10:30:00 r: Return to main menu
▌Operation result The message "Successfully finished. " appears, and the new environment restores to the state immediately after Ver.10.0 installation.
▌Work required after operation
• Start the process manually
• If an error occurs during the restoring process and you cannot restore files any more, manually restore
the files in the following procedure:
1. Select the file to be restored in the path where the backup file is saved.
2. Unzip the archive file in the directory where the backup file is stored.
3. If the directory where the product is installed does not exist, create a directory.
4. Copy the files into the directory where the product is installed.

Chapter 2. Automatic migration
71
2-7 Notes on SVF Migration Tool Notes on using SVF Migration Tool are as follows:
• It can be executed only in the environment where the target product of SVF Migration Tool is installed.
• When you extract and apply migration data, you need to use the same version of SVF Migration Tool.
• In a Windows environment, execute the batch file (SMT_CUI.bat) that starts SVF Migration Tool with
administrator privileges.
• In UNIX/Linux environment, execute the shell script (SMT_CUI.sh) that starts the SVF Migration Tool as
the user who installed the SVF product.
• Arrange the SVF Migration Tool in as short a path as possible (C: \temp, and so on). If the number of characters or bytes of the file path exceeds the OS limit (255 characters for Windows, 1,023 bytes for UNIX/Linux), SVF Migration Tool processing will fail. However, you can avoid this failure if "%SystemRoot%/System32/Robocopy.exe" exists in the Windows runtime environment.
• Do not arrange SVF Migration Tool in a folder that contains the following characters: "&" (ampersand), "(" (round bracket), "," (comma), ";" (semicolon), "=" (equal sign), "^" (caret)
• There is no features to check multiple starts of SVF Migration Tool.
• You need to use the proper Java runtime environment according to your environment. Except for the
restoring process, we recommend to use the Java runtime environment that is used by the installed SVF
products.
• You can still output a form during data extraction, however, do not add, update, or delete settings data
such as the environment settings.
• In the UNIX/Linux environment, start the processes at least once with svf_startup.sh after installing and
activating SVF, RDE, or UC/X Ver.10.0. If you do not start the processes at least once after activation,
application of the migration data will fail.
• If the process was terminated due to an error during data migration, you need to restore the environment
to the status before applying the migration data.
• After data migration, you need to start the process manually in UNIX/Linux environment.
• Confirm whether each product is available after data migration. If it is not available, activate the product
again.
Chapter 2. Automatic migration
72
• For restoration, the SVF product configuration must be the same as that at the time of back up
(automatic retrieve when applying migration data). Do not restore the environment where the
configuration of the SVF products has been changed. It causes a problem. Changing the SVF product configuration means executing the following operations after applying the migration data.
○ Installation and uninstallation of products supported by SVF Migration Tool
○ Adding, updating, and deleting product license information
○ Adding and deleting product options
• Restore is only available in the new environment. It cannot be restored in an existing environment.
• The following notes apply to the conversion of form files.
○ When converting a FRM format file, if there is a file with the same name with the extension "XML", an
error occurs and the format file is not converted. At this time, the migration process continues.

Chapter 3. Manual migration
73
Chapter 3. Manual migration This section describes the manual migration procedure that does not use the SVF Migration Tool. To migrate products that are not supported by the SVF Migration Tool, follow the procedure described here. In manual migration, the user extracts data from the existing environment and migrates the extracted data to the new environment. If you migrate data manually, you also need to back up Ver.10.0 of the new environment manually. If you want to redo data migration, you can restore to the status immediately after Ver. 10.0 installation by backing up. The products (modules) that require manual migration are as follows:
• PAlite
• Print Assistant
• RDE Utility Developer's Kit
▌Outline of this chapter
• 3-1 Workflow for migration in the same environment (P.74)
• 3-2 Workflow for migrating to another environment (P.76)
• 3-3 Before starting migration (P.78)
• 3-4 Manual migration procedure in Windows environment (P.79)
• 3-5 Manual migration procedure in UNIX/Linux environment (P.85)
• 3-6 Restore to the status immediately after Ver. 10.0 installation (P.90)

Chapter 3. Manual migration
74
3-1 Workflow for migration in the same environment When migrating in the same environment, prepare the migration data in the existing environment before upgrading the product version. After upgrading, execute the backup and data migration in the new environment. The following shows the workflow for migration in the same environment.
Backup (existing environment) If necessary, back up the existing environment using backup software.
Extract migration data (existing environment) Retrieve the files such as setting data required for migration in the existing environment. For Windows environment, see "3-4-1 Extract migration data (P.80)", for UNIX/Linux environment, see "3-5-1 Extract migration data (P.86)".
Uninstall the old version (existing environment) Uninstall the old version of SVF product.
Install the latest version (new environment) Install the latest version of the SVF product.
Backup (new environment) Retrieve a backup of the new environment. For Windows environment, see "3-4-2 Backup (P.81)", for UNIX/Linux environment, see "3-5-2 Backup (P.87)".
Apply migration data (new environment) Overwrite the new environment data with the data extracted in the existing environment. For Windows environment, see "3-4-3 Apply migration data (P.82)", and for UNIX/Linux environment, see "3-5-3 Apply migration data (P.88)".

Chapter 3. Manual migration
75
Check installed product information (new environment) Check the installed product and version to confirm that the version has been updated correctly. For Windows environment, see "3-4-4 Confirm the installed product and version (P.83)", and for UNIX/Linux environment, see "3-5-4 Confirm the installed product and version (P.89)".

Chapter 3. Manual migration
76
3-2 Workflow for migrating to another environment When migrating to another environment, extract the migration data in the existing environment, and execute the backup and data migration in the new environment. The following shows the workflow for migration to another environment.
Perform pre-work (new environment) Execute the following works in the new environment:
• Prepare fonts (if necessary)
• Installation of the latest version For details, see "3-3 Before starting migration (P.78)".
Extract migration data (existing environment) Retrieve the files such as setting data required for migration in the existing environment. For Windows environment, see "3-4-1 Extract migration data (P.80)", for UNIX/Linux environment, see "3-5-1 Extract migration data (P.86)".
Backup (new environment) Retrieve a backup of the new environment. For Windows environment, see "3-4-2 Backup (P.81)", for UNIX/Linux environment, see "3-5-2 Backup (P.87)".
Apply migration data (new environment) Overwrite the new environment data with the data extracted in the existing environment. For Windows environment, see "3-4-3 Apply migration data (P.82)", and for UNIX/Linux environment, see "3-5-3 Apply migration data (P.88)".

Chapter 3. Manual migration
77
Check installed product information (new environment) Check the installed product and version to confirm that the version has been updated correctly. For Windows environment, see "3-4-4 Confirm the installed product and version (P.83)", and for UNIX/Linux environment, see "3-5-4 Confirm the installed product and version (P.89)".
Uninstall the old version (existing environment) When all work is completed, uninstall the old version of the product from the existing environment.

Chapter 3. Manual migration
78
3-3 Before starting migration This section describes the works to be executed before starting manual migration. After completing the works described here, start the manual migration. The explanation of the manual migration procedure is divided between Windows and UNIX/Linux. Proceed by referring to the corresponding page.
▌Pre-work when migrating in the same environment Before uninstalling the old version of the SVF product, back up the existing environment using backup software if necessary.
▌Pre-work when migrating to another environment Execute the following works in the new environment:
• Prepare fonts Check that the font specified in the form file or the Font settings of the printer created by the user with the SVF output engine product also exists in the new environment. If the font used in the existing environment does not exist in the new environment, the form output in font embedding or graphic mode will have different output results or will terminate abnormally at runtime.
• Installation of the latest version Install the latest version of the product migrated manually in the new environment.

Chapter 3. Manual migration
79
3-4 Manual migration procedure in Windows environment This section describes the manual migration procedure in the Windows environment.

Chapter 3. Manual migration
80
3-4-1 Extract migration data For the products to be migrated manually, you must extract the migration data manually from existing environment to new environment. This section describes the procedure for extracting migration data in an existing Windows environment.
▌Procedure
Copy the following settings file to any folder.
Product (module) name Settings file
PAlite • Fit.PAlite.ini (when the existing environment is Ver. 9.0 or later)
• traymap.ini (if used)
RDE Utility Developer's Kit rdsdk.properties
Print Assistant traymap.ini (if used)
Chapter 3. Manual migration
81
3-4-2 Backup Before migration, you can restore to the state immediately after Ver.10.0 installation by backing up Ver. 10.0 in the new environment. This section describes the procedure for backup of a new Windows environment.
▌Prerequisite
• The latest version of the SVF product is installed in the new environment For migration in the same environment, uninstall the old version and then install the latest version.
▌Procedure
Stop the services of the products (modules) to be backed up. For how to stop, see the manual of each product.
Copy the following folders and files to any folder.
Product (module) name Folders and files
PAlite • Fit.PAlite.ini (when the existing environment is Ver. 9.0 or later)
• traymap.ini (if used)
Print Assistant Installation folder of Print Assistant
RDE Utility Developer's Kit • RDESDK.jar
• rdsdk.properties
• UdkWS folder
Start the stopped service. For how to start, see the manual of each product.
Chapter 3. Manual migration
82
3-4-3 Apply migration data Migrate the data extracted from the existing environment into the new environment. Compare the settings file extracted from the existing environment with the file with the same name in the new environment, and change the settings file in the new environment to the same settings as in the existing environment. This section describes the procedure for applying migration data in a new Windows environment.
▌Procedure
Stop the services of the products (modules) to be applied the migration data. For how to stop, see the manual of each product.
Overwrites the new environment with the following settings file extracted in the existing environment.
Product (module) name Settings file
PAlite • Fit.PAlite.ini (when the existing environment is Ver. 9.0 or later)
• traymap.ini (if used)
RDE Utility Developer's Kit rdsdk.properties
Print Assistant traymap.ini (if used)
Start the stopped service. For how to start, see the manual of each product.

Chapter 3. Manual migration
83
3-4-4 Confirm the installed product and version Confirm the product and version installed in the new environment. This section describes the procedure for confirming the products (module) and versions installed in the new Windows environment.
• PAlite (P.83)
• Print Assistant (P.84)
• RDE Utility Developer's KIT (P.84)
▌PAlite Confirm by one of the following methods:
• If the PAlite icon is displayed in the task tray, confirm it in the Settings dialog.
• If the PAlite icon is not displayed in the task tray, confirm the version on the Detail tab of the
Fit.PAlite.exe properties.
■ Procedure for confirming in "Settings" dialog
Right-click on the PAlite icon in the task tray.
Select Settings from the right-click menu.
Confirm the Version in the Settings dialog.

Chapter 3. Manual migration
84
▌Print Assistant Confirm by one of the following methods:
• If the Print Assistant icon is displayed in the task tray, confirm it in the Print Assistant dialog.
• If the Print Assistant icon is not displayed in the task tray, confirm the version on the Detail tab of the
PAssiSvc.exe properties.
■ Procedure for confirming in "Print Assistant" dialog
Click the Print Assistant icon in the task tray.
Confirm the version displayed in the Print Assistant dialog.
▌RDE Utility Developer's KIT Execute the following command to confirm the version:
java -jar RDESDK.jar

Chapter 3. Manual migration
85
3-5 Manual migration procedure in UNIX/Linux environment This section describes the procedure for the manual migration in the Windows environment.

Chapter 3. Manual migration
86
3-5-1 Extract migration data For the products to be migrated manually, you must extract the migration data manually from existing environment to new environment. This section describes the procedure for extracting migration data in an existing UNIX/Linux environment.
▌Procedure
Copy the following setting files in existing environment to any directory:
Product (module) name Settings file
RDE Utility Developer's Kit rdsdk.properties
Chapter 3. Manual migration
87
3-5-2 Backup Before migration, you can restore to the state immediately after Ver.10.0 installation by backing up Ver. 10.0 in the new environment. This section describes the procedure for backing up a new UNIX/Linux environment.
▌Prerequisite
• The latest version of the SVF product is installed in the new environment For migration in the same environment, uninstall the old version and then install the latest version.
▌Procedure
Terminate the process of the product (module) to be backed up. For details on how to terminate, see the manual of each product.
Copy the following setting files to any directory:
Product (module) name Directory
RDE Utility Developer's Kit • RDESDK.jar
• rdsdk.properties
• UdkWS directory
Start the terminated process. For details on how to start, see the manual of each product.
Chapter 3. Manual migration
88
3-5-3 Apply migration data Migrate the data extracted from the existing environment into the new environment. Compare the settings file extracted from the existing environment with the file with the same name in the new environment, and change the settings file in the new environment to the same settings as in the existing environment. This section describes the procedure for extracting migration data in a new UNIX/Linux environment.
▌Procedure
Terminate the process of the product (module) to be applied the migration data. For details on how to terminate, see the manual of each product.
Overwrites the new environment with the following settings file extracted in the existing environment.
Product (module) name Settings file
RDE Utility Developer's Kit rdsdk.properties
Start the terminated process. For details on how to start, see the manual of each product.

Chapter 3. Manual migration
89
3-5-4 Confirm the installed product and version Confirm the product and version installed in the new environment. This section describes how to check the products and versions installed in the new UNIX/Linux environment.
▌RDE Utility Developer's KIT Execute the following command to confirm the version:
java -jar RDESDK.jar

Chapter 3. Manual migration
90
3-6 Restore to the state immediately after Ver. 10.0 installation To restore a new environment to the state immediately after Ver. 10.0 installation using files backed up by the user before data migration is called "restore". Execute this procedure when re-executing the data migration process or when migrating again with newly extracted data.
▌Related items
• 3-6-1 Restoration procedure in Windows environment (P.91)
• 3-6-2 Restoration procedure in UNIX/Linux environment (P.92)
Chapter 3. Manual migration
91
3-6-1 Restoration procedure in Windows environment Using the files backed up by user before migration, restore the new environment to the state immediately after Ver.10.0. This section describes the procedure for restoring a new Windows environment.
▌Prerequisite
• Retrieve a backup of the new environment
▌Procedure
Stop the services of the installed products (modules). For how to stop, see the manual of each product.
Restore. The procedure for each product is as follows:
Product Procedure
PAlite Overwrite the backed up files to the installed file.
Print Assistant Overwrite the backed up files to the installed folder.
RDE Utility Developer's Kit Overwrite the backed up files and folders to the folder where RDESDK.jar is arranged.
Start the stopped service. For how to start, see the manual of each product.
▌Related item
• 3-4-2 Backup (P.81)

Chapter 3. Manual migration
92
3-6-2 Restoration procedure in UNIX/Linux environment Using the files backed up by user before migration, restore the new environment to the state immediately after Ver.10.0. This section describes the procedure for restoring a new UNIX/Linux environment.
▌Prerequisite
• Retrieve a backup of the new environment
▌Procedure
Terminate the process of the installed product (module). For details on how to terminate, see the manual of each product.
Restore in the following procedure:
Product Procedure
RDE Utility Developer's Kit Overwrite the backed up files and directory to the directory where RDESDK.jar is arranged.
Start the terminated process. For details on how to start, see the manual of each product.
▌Related item
• 3-5-2 Backup (P.87)

Chapter 4. Compare print data after migration
93
Chapter 4. Compare print data after migration This section describes the procedure for comparing print data after migration using SVF PDL Maker and SVF PDL Viewer.
▌Outline of this chapter
• 4-1 Workflow for comparing print data (P.94)
• 4-2 Before starting print data comparison (P.97)
• 4-3 Procedure for creating print data in Windows environment (P.98)
• 4-4 Procedure for creating print data in UNIX/Linux environment (P.114)
• 4-5 Procedure for comparing print data (P.129)
• 4-6 Restrictions on SVF PDL Maker (P.151)
• 4-7 Restrictions on SVF PDL Viewer (P.152)

Chapter 4. Compare print data after migration
94
4-1 Workflow for comparing print data After migration, to confirm whether there is a difference between the old and new print result, use SVF PDL Maker to output print data of the test form from the existing environment and the new environment, and then use SVF PDL Viewer to compare print data. SVF PDL Viewer can be execute in an environment where no SVF product is installed in Windows environment. The following shows the workflow for comparing print data.
Prepare SVF PDL Maker (existing environment, new environment) Arrange SVF PDL Maker in both existing and new server environment. In order to create print data using the SVF output engine product or RDE, the SVF output engine product or RDE must be installed. For Windows environment, see "4-3-1 Prepare SVF PDL Maker (P.99)", and for UNIX/Linux environment, see "4-4-1 Prepare SVF PDL Maker (P.115)".
Configure operational settings for SVF PDL Maker (existing environment, new environment)
Describe the settings for controlling the operation of SVF PDL Maker in the settings file. For Windows environment, see "4-3-2 Configure operational settings for SVF PDL Maker (P.102)", and for UNIX/Linux environment, see "4-4-2 Configure operational settings for SVF PDL Maker (P.118)".

Chapter 4. Compare print data after migration
95
Create CSV data file (existing environment, new environment) Create a CSV data file for printing data in the form file field. Use the same CSV data file when creating print data in both the existing and new environments. This step is not necessary when using CSV data automatically generated by SVF PDL Maker. For Windows environment, see "4-3-3 Create CSV data file (when using a text editor) (P.104)" or "4-3-4 Create CSV data file (when using a support tool) (P.106), and for UNIX/Linux environments, see "4-4-3 Create CSV data file (when using a text editor) (P.119)" or "4-4-4 Create CSV data file (support tool) (P.121).
Specify API function (existing environment, new environment) If necessary, specify the API function to be used when executing SVF PDL Maker in the CSV data file. For Windows environments, see "4-3-5 Specify API function to be executed during printing (P.108)", and for UNIX/Linux environments, see "4-4-5 Specify API function to be executed during printing (P.123)
Create job definition file (existing environment, new environment) Create a job definition file that specifies the format file name, CSV data file name, printer name, etc. to be used. Use the same job definition file when creating print data in both the existing and new environments. For Windows environment, see "4-3-6 Create job definition file (P.111)", and for UNIX/Linux environment, see "4-4-6 Create job definition file (P.126)".

Chapter 4. Compare print data after migration
96
Create print data (existing environment, new environment) Execute SVF PDL Maker to create print data. For Windows environment, see "4-3-7 Create print data (P.113)", and for UNIX/Linux environment, see "4-4-7 Create print data (P.128)".
Note When migrating in the same environment, create the print data in the existing environment before upgrading the product version.
Prepare SVF PDL Viewer (any Windows environment) Arrange SVF PDL Viewer in the Windows environment. In a Windows environment, SVF products do not need to be installed. For details, see "4-5-1 Prepare SVF PDL Viewer (P.130)".
Configure operational settings for SVF PDF Viewer (Windows environment with SVF PDL Viewer)
Set the SVF PDL Viewer operation and image processing settings in the dialog. For details, see "4-5-2 Configure operational settings for SVF PDL Viewer (P.131)".
Output comparison results (Windows environment with SVF PDL Viewer) Arrange the print data created with SVF PDL Maker in the environment where SVF PDL Viewer is installed. Execute SVF PDL Viewer to compare print result between the existing environment and new environment. For details, see "4-5-4 Output comparison results (P.141)".
Confirm comparison results (Windows environment with SVF PDL Viewer) Confirm the output comparison result. For details, see "4-5-5 Confirm output comparison results (P.145)".
Judge and record comparison results (Windows environment with SVF PDL Viewer)
If necessary, use the SVF PDL Viewer to judge whether there is a problem with the comparison results and to record the contents of the judgement. For details, see "4-5-6 Judge and record comparison results (P.148)".

Chapter 4. Compare print data after migration
97
4-2 4-2 Before comparing print data This section describes the preparations required before using SVF PDL Maker and SVF PDL Viewer to compare print data.
▌Preparations required before using SVF PDL Maker The following files are required to create print data with SVF PDL Maker.
• Form file Prepare the files used in actual operation. Sample files can be used for simple comparisons.
• CSV Data File This is a file for printing data in the form file field. You can specify the data provided for the fields of the form file as well as API functions to be used for executing. Prepare the file used in actual operation or create the file according to the procedure. If you want a simple comparison, you can also use a file automatically generated by SVF PDL Maker.
• Job Definition File This is a file for defining a job to be executed by SVF PDL Maker. Set a form file and CSV data file to use, and the name of an output printer. Follow the procedure to create the file. A sample file can be used.
▌Preparations required before using SVF PDL Viewer SVF PDL Viewer can be used in a Windows environment. You do not need to install SVF products. If you are using an SVF product in a UNIX/Linux environment, prepare a Windows environment for SVF PDL Viewer execution.
Chapter 4. Compare print data after migration
98
4-3 Procedure for creating print data in Windows environment This section describes the procedure for creating print data in the Windows environment using SVF PDL Maker.

Chapter 4. Compare print data after migration
99
4-3-1 Prepare SVF PDL Maker Arrange the SVF Migration Tool in the existing server environment when migrating in the same environment, and in the existing and new server environment when migrating to another environment. This section describes the procedure for arranging SVF PDL Maker in a Windows environment.
▌Procedure
Copy the following two archive files into any folder:
• SPM.zip This is an archive file of SVF PDL Maker. Start SVF PDL Maker with SPM_SVF.bat, SPM_RDE.bat, SPM_dNET.bat, TestDataGenerator.bat, and TestDataGenerator_dNET.bat in the SPM folder.
• runtime.zip This is an archive file for the Java runtime environment. The runtime folder stores the Java runtime environment (Java5 and Java7) used by the SVF PDL Maker. Copy if the Java runtime environment is not installed or the Java runtime environment is Java 1.4 or earlier.
Unzip the archive file.

Chapter 4. Compare print data after migration
100
If necessary, set JAVA_HOME and Path as environment variables for the Java runtime environment. This step is not necessary if all of the following conditions are met:
• Java 5 or later is installed
• The environment variable for the Java runtime environment has been set Edit SPM_SVF.bat, SPM_RDE.bat, SPM_dNET.bat, TestDataGenerator.bat, and TestDataGenerator_dNET.bat in SPM folder with any text editor and set the environment variables as follows.
Setting example when using x64 (64bit) of Java7 in runtime folder
set JAVA_HOME=C:\work\runtime\Java7\win\x64\jre set PATH=%JAVA_HOME%\bin;%PATH%
On the right side of "JAVA_HOME", specify the Java runtime environment installation folder with an absolute path. In an environment where Java is not installed, specify the absolute path of the jre folder in the runtime folder. The Java runtime environment must be Java5 or later and the target SVF product must be supported. There are two types, x86 (32bit) and x64 (64bit). Specify a Java runtime environment that matches the execution environment of SVF PDL Maker.

Chapter 4. Compare print data after migration
101
If you execute SVF PDL Maker in SVF Ver.7.1 P1 or earlier, add the library to the CLASSPATH. Edit SPM_SVF.bat, SPM_RDE.bat, and TestDataGenerator.bat with any text editor, and insert the following library on the line between "pdfcrypter128.jar" and "svfpdlmaker.jar" in the CLASSPATH.
SVF version Mode of the form file to use Library to add
Ver.6.3 to Ver.7.1SP1 - BSPro.jar
Ver.7.0 to Ver.7.1SP1 Only form files in the basic mode svfpdfparser.jar
svfgrph.jar
xercesImpl.jar
xml-apis.jar
Contains graphic mode form files svfpdfparser.jar
svfgrph.jar
xercesImpl.jar
xml-apis.jar
jai_codec.jar
jai_core.jar
Setting example in the basic mode of SVF Ver.7.1
: set CLASSPATH=. set CLASSPATH=%CLASSPATH%;%FIT_PRODUCTS_BASE%\svfjpd\lib\svf.jar set CLASSPATH=%CLASSPATH%;%FIT_PRODUCTS_BASE%\svfjpd\lib\pdfcrypter128.jar set CLASSPATH=%CLASSPATH%;%FIT_PRODUCTS_BASE%\svfjpd\lib\BSPro.jar set CLASSPATH=%CLASSPATH%;%FIT_PRODUCTS_BASE%\svfjpd\lib\svfpdfparser.jar set CLASSPATH=%CLASSPATH%;%FIT_PRODUCTS_BASE%\svfjpd\lib\svfgrph.jar set CLASSPATH=%CLASSPATH%;%FIT_PRODUCTS_BASE%\SimpleHttpd\xercesImpl.jar set CLASSPATH=%CLASSPATH%;%FIT_PRODUCTS_BASE%\SimpleHttpd\xml-apis.jar set CLASSPATH=%CLASSPATH%;lib\svfpdlmaker.jar :
▌Related items
• Appendix 1-2. File structure of SVF PDL Maker (P.159)
• Appendix 1-4. Structure of runtime folder (directory) (P. 162)

Chapter 4. Compare print data after migration
102
4-3-2 Configure operational settings for SVF PDL Maker Describe the settings to control the operation of the arranged SVF Migration Tool in SPM.properties. This section describes the procedure for setting the SVF PDL Maker settings in a Windows environment and the setting items of SPM.properties.
▌Procedure
Edit SPM.properties in the SPM folder with any text editor.
Describe the settings in SPM.properties and save in "UTF-8" format.

Chapter 4. Compare print data after migration
103
▌Settings of SPM.properties The settings of SPM.properties are as follows:
Item Description
Port Set the port number to receive spooled documents. If you use SPM_RDE.bat, add a printer for the "ReportDirector Spool Driver" model in SVF Configuration Tool, and specify the value set here for port number, so that SVF PDL Maker receives the documents instead of RDE.
CSV.DefaultEncoding Specify a file encoding to use for generating and analysis of a CSV data file.
CSV.RowCount Specify the number of rows of the CSV data file to be generated.
Debug.FileLevel Specify a log output level from OFF, INFO, WARNING, or SEVERE. The log file is created in the current directory with the name "SPM_<date>_<time>.log".
Debug.ConsoleLevel Specify a log output level for the console screen from OFF, INFO, WARNING, or SEVERE.
dNET.Version Specify the version of SVF for .NET Framework you want to execute when multiple versions of SVF for .NET Framework are installed. If you do not specify the version, the module specified in the environment variable "svf.cs.base" will be used.
SvfEncoding.<locale> If you do not specify "VrInit encoding" in a job definition file, specify an encoding to be set to the VrInit function. For the locale, specify "ja" for Japanese, "en" for English, or "zh_CN" for Simplified Chinese. If you do not specify the encoding, the VrInit function will be executed without arguments.
<printer_model_name>=<file_extension> Specify the extension of print data files for each printer model.
Example of setting the extension of the PDF printer model to "pdf"
PDF=pdf

Chapter 4. Compare print data after migration
104
4-3-3 Create CSV data file (when using text editor) Create a CSV data file for printing data in the form file field. The CSV data file can specify API functions to be used at the time of execution, along with the data given to the form file fields. If the data file used in actual operation can be prepared in CSV format, or if you use a CSV data file automatically generated by SVF PDL Maker, this operation is not necessary. There are two methods to create a CSV data file: a method using a text editor and a method using support tool (TestDataGenerator.bat, TestDataGenerator_dNET.bat). This section describes the procedure for creating a CSV data file using a text editor in a Windows environment.
▌Procedure
Open any text editor, and specify the field name of the form file on the first row and the data to be printed on the second and subsequent rows.
Example of a CSV data file
"IssuedDate","OrderNumber","Supplier","SupplierPostalCode","SupplierAddress"
"2013/03/01", "1000475", "○○ Corporation", "〒XXX-XXX1", "1-1-1, △△, □□city, 〇〇-ku, Tokyo
"2013/03/01", "1000476", "○○ Corporation", "〒XXX-XXX2", "2-2-2, △△, □□city, 〇〇-ku, Tokyo
"2013/03/01", "1000477", "○○ Corporation", "〒XXX-XXX3", "3-3-3, △△, □□city, 〇〇-ku, Tokyo
Describe according to the following rules:
• Be sure to enclose item names and data in double quotation marks (").
• When including " " " (double quotation) in the data, describe as" "" ".
• For a form using repeated fields, describe as many columns as the number of repeated lines in the
format of "field name.line number".
Example of setting Field1 as three repeated rows
"Field1.1","Field1.2","Field1.3" "10XXXXXXXX","10XXXXXXXX","10XXXXXXXX"
Describe the API function to be used at runtime as required.
Save the file as a "UTF-8" format CSV file.
▌Related items
• 4-3-4 Create CSV data file (when using support tool) (P.106)

Chapter 4. Compare print data after migration
105
• 4-3-5 Specify API function to be executed during printing (P.108)

Chapter 4. Compare print data after migration
106
4-3-4 Create CSV data file (when using support tool) By processing CSV data files generated by the support tools (TestDataGenerator.bat, TestDataGenerator_dNET.bat), you can promote efficiency of CSV data file creation. The CSV data file generated by the support tool is the same as the CSV data file automatically generated by SVF PDL Maker. Therefore, if you do not need to process the CSV data file, you can use the CSV data file automatically generated by SVF PDL Maker, and this work is unnecessary. This section describes the procedure for creating a CSV data file using a support tool in a Windows environment.
▌Procedure
Execute one of the following batch files in the SPM folder, specifying the form file or the folder where the form file is stored.
• TestDataGenerator.bat (when using SVF for Java Print or SVF for PDF)
• TestDataGenerator_dNET.bat (when using SVF for .NET Framework or SVF Client) If the form file is stored in multiple folders, specify each folder that stores the form file instead of the parent folder. You can also drag and drop a form file or a folder where the form file is stored.
Example of executing TestDataGenerator.bat for sample_ja.xml under the sample folder
TestDataGenerator.bat C:\work\SPM\sample\sample_ja.xml

Chapter 4. Compare print data after migration
107
▌Operation result A CSV data file is generated with the file name "format file name.csv".
Example of CSV data file generated by TestDataGenerator.bat and TestDataGenerator_dNET.bat
"IssuedDate","OrderNumber","Supplier","SupplierPostalCode","SupplierAddress" "10XXXXXXXX","12345678","30XXXXXXXXXXXXXXXXXXXXXXXXXXXX","20XXXXXXXXXXXXXXXXXX","36XXXXXXXXXXXXXXXXXXXXXXXXXXXXXXXXXX" "10XXXXXXXX","12345678","30XXXXXXXXXXXXXXXXXXXXXXXXXXXX","20XXXXXXXXXXXXXXXXXX","36XXXXXXXXXXXXXXXXXXXXXXXXXXXXXXXXXX" "10XXXXXXXX","12345678","30XXXXXXXXXXXXXXXXXXXXXXXXXXXX","20XXXXXXXXXXXXXXXXXX","36XXXXXXXXXXXXXXXXXXXXXXXXXXXXXXXXXX"
The contents of the generated CSV data file are as follows:
• If Data type of the field is Numeric, numeric data for the number of digits is output.
• If Field type of the field is Full-width, double-byte characters for the number of digits are output.
• For the format used repeat fields, use the "<field_name>.<row_number>" format to output columns for
the number of repeat rows.
Example of setting Field1 as three repeated rows
"Field1.1","Field1.2","Field1.3" "10XXXXXXXX","10XXXXXXXX","10XXXXXXXX"
▌Work after operation
• Process the generated CSV data file (such as specifying API functions to be used during execution)
▌Related items
• 4-3-3 Create CSV data file (when using text editor) (P.104)
• 4-3-5 Specify API function to be executed during printing (P.108)

Chapter 4. Compare print data after migration
108
4-3-5 Specify API function to be executed during printing The CSV data file used when executing SVF PDL Maker can specify the API function used during execution, along with the data given to the fields of the form file.
▌How to specify API functions The procedure for specifying API functions in the CSV data file is as follows:
• Describe API functions by enclosing with the <start> and <end> tags. API functions are executed in the
order in which they are described.
• Describe in the format of <API_function_name>=<Argument 1>,<Argument 2>.
• By describing the <start> <end> tag in the middle of the data row, the API function can be executed in
the middle of the data output.
• Describe field names on the row immediately after the <start> <end> tag. Even if the form file is changed
by using the VrSetForm function, you must specify field names on the row immediately after the <start>
<end> tag.
Example of specifying API functions
<start> VrSetForm=a.xml,4 <end> "column1","column2" "data1","data2" <start> VrSetForm=b.xml,4 <end> "column1","column2" "data1","data2"
▌Available API functions You can use the following API functions for CSV data files.
Reference For details on arguments specified in API functions, see "SVF Java PRODUCTS API Function Reference Manual".
■ Common functions
Function name Description of API
VrSetForm Specifies the XML form file and output mode for printing. Use this function to switch the form file since the form file described in the job definition file is executed for the first time.

Chapter 4. Compare print data after migration
109
Function name Description of API
VrSetPageCount Sets the default value and additional value for the PAGE function of design function.
VrCopy Specifies the number of copies.
VrAdjustd2 / VrAdjustm2 Adjusts the print position temporarily.
VrPage Specifies the page to be printed in an XML form file that consists of multiple pages of spelling.
VrSetCalcMode Supports the decimal calculation library with up to 37 digits (including integer and fraction digits).
VrComout=/{FOUT n}/ Specifies whether or not to output a form that does not contain fields.
VrComout=/{DATE DateData}/ Set so that the values returned by the design functions DATE () and TIME () are the specified date and time.
VrSetUserName Specifies the document user name.
VrComout=/{ALNK n}/ Sets the operation method of auto link fields.
VrComout=/{REDU n}/ Specifies the scaling mode.
■ Functions for SVF for Java Print
Function name Description of API
VrSetTray Specifies the paper feed tray for printing.
VrSetDuplex Specifies duplex printing.
VrSetOutputBin Specifies the output tray.
VrSetSort Specifies the sorting conditions for the output paper.
VrSetStaple Specifies the staple feature.
VrSetPunch Specifies the punch feature
VrComout=/{PTYP n}/ Specifies the paper type of the document.
VrComout=/{PSOP <device_name> n}/
Specifies the device name and ID.
■ Functions used for outputting PDF files Function name Description of API
VrComout=/{SECU n}/ Specifies whether or not to use the PDF security feature.
VrComout=/{PSWD Password}/ Specifies the password to open the PDF file.
VrComout=/{SECUPSWD Password}/ Specifies the security password for the PDF file.
VrComout=/{PERM n}/ Specifies prohibited items.
VrComout=/{PRESET <preset_name>=n ...}/
Gives print presets to PDF.
■ Report Director/RDE-related functions Function name Description of API
VrComout=/{DATR CopiesCollate=n}/ Specifies whether or not to enable collating from Report Director Enterprise.

Chapter 4. Compare print data after migration
110
■ EXCEL-related functions
Function name Description of API
VrComout=/{XSFN <file_path>}/ Specifies the template Excel file.
VrComout=/{XSCL FONTCOLOR=n1 BOLD=n2 ITALIC=n3 LOC=n4 SHEETNO=n5}/
Sets the cell format.
VrComout=/{XSCC FIELD=n1 CELLOUT=n2}/ Changes the output cell.
VrComout=/{XSSA <NO=n1 or NAME=n2>}/ Specifies the target worksheet. Specify the worksheet number or worksheet name.
VrComout=/{XSSC <NO=n1 or NAME=n2> <CHANGE=n3>}/ Copies the worksheet. Specify the worksheet number or worksheet name.
VrComout=/{XSSM <NO=n1 or NAME=n2> WHICH=n3}/ Moves the worksheet. Specify the worksheet number or worksheet name.
VrComout=/{XSCN <default_worksheet_name>}/ Specifies the name of the worksheet to be generated.
VrComout=/{XSHD <header_information>}/ Sets the worksheet header.
VrComout=/{XSFT <footer_information>}/ Sets the worksheet footer.

Chapter 4. Compare print data after migration
111
4-3-6 Create job definition file Before executing SVF PDL Maker, create a job definition file that specifies the name of a form file, CSV data file, and printer to be used. A sample file can be used for creating. This section describes the procedure for creating a job definition file in a Windows environment and the setting items of the job definition file.
▌Procedure
Edit one of the following sample files in any text editor.
• jobconf.csv (SVF Ver. 9.2 or later)
• jobconf_xml.csv (SVF Ver. 7.0 to Ver. 9.1)
• jobconf_frm.csv (SVF Ver. 6.3)
• jobconf_dNET.csv (when using SVF for .NET Framework or SVF Client)
Define the job that SVF PDL Maker will execute as follows:
<job_name>,<form_file_path>,<CSV_data_file_path>,<VrInit_encoding>,<printer_name>,<output_mode>,<CSV_encoding>
Specify one form file per job. If you define multiple jobs, you can describe them in a file with line breaks. You can omit the items other than the job name or the form file path. However, if you specify items after the omitted items, you need to add the same number of commas as the omitted items.
Example of omitting VrInit encoding and later
1,sample\sample_ja.xml,sample\sample_ja.csv
Example of omitting the VrInit encoding and specifying the printer name
1,sample\sample_ja.xml,sample\sample_ja.csv,,PDF
Save the file in "UTF-8" format.
▌Settings of job definition file The following table shows the settings of job definition file.
Item Description
<job_name> Specify a job name. The specified job name becomes the file name and print data is created. Specify a unique name. This is a required item. Do not use the following strings:
\, /, :, *, ?, ", <, >, |, AUX, CON, PRN, COM1, LPT1
Note

Chapter 4. Compare print data after migration
112
Item Description
Specify the same job name in the existing and new environments because SVF PDL Viewer compares the files with the same name that are created in the existing and new environments.
<form_file_path> Specify the path of the form file to execute. This is a required item.
<CSV_data_file_path> Specify the CSV data file path to be given to the format file field. If you do not specify this setting, a CSV data file is automatically created.
<VrInit_encoding> Specify the encoding that is set to the VrInit function. If you do not specify this setting, the value for SvfEncoding.<locale> in the settings file is used. If this setting is not specified, the VrInit function is executed without arguments.
Printer name Specify the printer name that creates print data. If you do not specify this setting, create print data on all the printers registered to SVF output engine and RDE (printers that have the same locale as the form file). If you specify multiple printers, separate them with commas and enclose the whole printer specification with double quotation marks.
Example of the printers enclosed with double quotations
1,sample\sample_ja.xml,sample\sample_ja.csv,,"PDF,EMF"
<output_mode> Specify the output mode set for the VrSetForm function. If you do not specify this setting, set "4" when the form file includes the record, otherwise, set "1". For details on the output mode, see "VrSetForm" in "SVF Java PRODUCTS API Function Reference Manual".
<CSV_encoding> Specify the file encoding for a CSV data file. If you do not specify this setting, use the value for CSV.DefaultEncoding in the settings file.

Chapter 4. Compare print data after migration
113
4-3-7 Create print data Execute SVF PDL Maker to create print data. This section describes the procedure for creating print data in a Windows environment.
▌Prerequisite
• If you use SPM_RDE.bat, add a Report Director Spool Driver model printer in SVF Configuration Tool
and set the value of Port in SPM.properties for Port.
▌Procedure
Execute one of the following batch files in the SPM folder with specifying a job definition file.
• SPM_SVF.bat (when using SVF for Java Print or SVF for PDF)
• SPM_RDE.bat (when using RDE)
• SPM_dNET.bat (when using SVF for .NET Framework) You can also execute by dragging and dropping job definition files. If you do not specify the job definition file, jobconf.csv in the same folder as the batch file is used.
Example of executing SPM_SVF.bat by specifying jobconf.csv under the SPM folder
SPM_SVF.bat C:\work\SPM\jobconf.csv
▌Operation result The print data is created in the following format in the output folder of the current folder.
output\<date> (yyyyMMdd_HHmmss format)\<printer_name>\<job_name>.<specified_extension>
For example, if you perform printing with the extension "pdf" for the PDF printer on June 30, 2016, the print data is created as follows:
output\20160630_183838\PDF\1.pdf
The print data is output to the printer with the same locale as the form file locale. When SPM_SVF.bat is executed, it is not output to the Report Director Spool Driver model.

Chapter 4. Compare print data after migration
114
4-4 Procedure for creating print data in UNIX/Linux environment This section describes the procedure for creating print data in the UNIX/Linux environment using SVF PDL Maker.

Chapter 4. Compare print data after migration
115
4-4-1 Prepare SVF PDL Maker Arrange the SVF Migration Tool in the existing server environment when migrating in the same environment, and in the existing and new server environment when migrating to another environment. This section describes the procedure for arranging SVF PDL Maker in a UNIX/Linux environment.
▌Procedure
Copy the following two archive files to any directory:
• SPM.tar.gz This is an archive file of SVF PDL Maker. Start SVF PDL Maker with SPM_SVF.sh, SPM_RDE.sh, and TestDataGenerator.sh in the SPM directory.
• runtime.tar.gz This is an archive file for the Java runtime environment. The runtime directory stores the Java runtime environment (Java5 or Java7) used by the SVF PDL Maker. Copy if the Java runtime environment is not installed or the Java runtime environment is Java 1.4 or earlier. It is available only in Linux environment.
Move to the directory to which you copied the archive file.
Usage example
cd /home/svf/work/SPM
Unzip the archive file.
Usage example
gzip -cd SPM.tar.gz | tar -xvf -

Chapter 4. Compare print data after migration
116
If necessary, set JAVA_HOME and Path as environment variables for the Java runtime environment. This step is not necessary if all of the following conditions are met:
• Java 5 or later is installed
• The environment variable for the Java runtime environment has been set Edit SPM_SVF.sh, SPM_RDE.sh, and TestDataGenerator.sh in any text editor and set the environment variables as following example.
Setting example when using x64 (64bit) of Java7 in runtime directory
JAVA_HOME=/home/svf/work/runtime/Java7/linux/x64/jre export JAVA_HOME PATH=$JAVA_HOME/bin:$PATH export PATH
On the right side of "JAVA_HOME", specify the Java execution environment installation directory with an absolute path. In an environment where Java is not installed, specify the jre directory in the runtime directory with the absolute path of . However, since "runtime.tar.gz" bundled with the migration tool is for Linux, it is necessary to prepare a separate Java execution environment for other UNIX OS. The Java runtime environment must be Java5 or later and the target SVF product must be supported. There are two types, x86 (32bit) and x64 (64bit). Specify a Java runtime environment that matches the execution environment of SVF PDL Maker.

Chapter 4. Compare print data after migration
117
If you execute SVF PDL Maker in SVF Ver.7.1 P1 or earlier, add the library to the CLASSPATH. Edit SPM_SVF.sh, SPM_RDE.sh, and TestDataGenerator.sh with any text editor, and insert the following library on the line between "pdfcrypter128.jar" and "svfpdlmaker.jar" in the CLASSPATH.
SVF version Mode of the form file to use Library to add
Ver.6.3 to Ver.7.1SP1 - BSPro.jar
Ver.7.0 to Ver.7.1SP1 Only form files in the basic mode svfpdfparser.jar
svfgrph.jar
xercesImpl.jar
xml-apis.jar
Contains graphic mode form files svfpdfparser.jar
svfgrph.jar
xercesImpl.jar
xml-apis.jar
jai_codec.jar
jai_core.jar
Setting example in the basic mode of SVF Ver.7.1
: CLASSPATH=. CLASSPATH=$CLASSPATH:$FIT_PRODUCTS_BASE/svfjpd/lib/svf.jar CLASSPATH=$CLASSPATH:$FIT_PRODUCTS_BASE/svfjpd/lib/pdfcrypter128.jar CLASSPATH=$CLASSPATH:$FIT_PRODUCTS_BASE/svfjpd/lib/BSPro.jar CLASSPATH=$CLASSPATH:$FIT_PRODUCTS_BASE/svfjpd/lib/svfpdfparser.jar CLASSPATH=$CLASSPATH:$FIT_PRODUCTS_BASE/svfjpd/lib/svfgrph.jar CLASSPATH=$CLASSPATH:$FIT_PRODUCTS_BASE/SimpleHttpd/xercesImpl.jar CLASSPATH=$CLASSPATH:$FIT_PRODUCTS_BASE/SimpleHttpd/xml-apis.jar CLASSPATH=$CLASSPATH:lib/svfpdlmaker.jar :
▌Related items
• Appendix 1-2. File structure of SVF PDL Maker (P.159)
• Appendix 1-4. Structure of runtime folder (directory) (P. 162)

Chapter 4. Compare print data after migration
118
4-4-2 Configure operational settings for SVF PDL Maker Describe the settings to control the operation of the arranged SVF Migration Tool in SPM.properties. This section describes the procedure for setting the SVF PDL Maker settings in a UNIX/Linux environment and the setting items of SPM.properties.
▌Procedure
Edit SPM.properties in the SPM directory with any text editor.
Describe the settings in SPM.properties and save in "UTF-8" format.
▌Settings of SPM.properties The settings of SPM.properties are as follows:
Item Description
Port Set the port number to receive spooled documents. If you use SPM_RDE.sh, add the "ReportDirector Spool Driver" model printer in SVF Configuration Tool, and specify the port number that you set here, so that SVF PDL Maker receives the document instead of RDE.
CSV.DefaultEncoding Specify a file encoding to use for generating and analysis of a CSV data file.
CSV.RowCount Specify the number of rows of the CSV data file to be generated.
Debug.FileLevel Specify a log output level from OFF, INFO, WARNING, or SEVERE. The log file is created in the current directory with the name "SPM_<date>_<time>.log".
Debug.ConsoleLevel Specify a log output level for the console screen from OFF, INFO, WARNING, or SEVERE.
dNET.Version Specify the version of SVF for .NET Framework you want to execute when multiple versions of SVF for .NET Framework are installed. If you do not specify the version, the module specified in the environment variable "svf.cs.base" will be used.
SvfEncoding.<locale> If you do not specify "VrInit encoding" in a job definition file, specify an encoding to be set to the VrInit function. For the locale, specify "ja" for Japanese, "en" for English, or "zh_CN" for Simplified Chinese. If you do not specify the encoding, the VrInit function will be executed without arguments.
<printer_model_name>=<file_extension> Specify the extension of print data files for each printer model.
Example of setting the extension of the PDF printer model to "pdf"
PDF=pdf

Chapter 4. Compare print data after migration
119
4-4-3 Create CSV data file (when using text editor) Create a CSV data file for printing data in the form file field. The CSV data file can specify API functions to be used at the time of execution, along with the data given to the form file fields. If the data file used in actual operation can be prepared in CSV format, or if you use a CSV data file automatically generated by SVF PDL Maker, this operation is not necessary. There are two methods to create a CSV data file: a method using a text editor and a method using support tool (TestDataGenerator.sh). This section describes the procedure for creating a CSV data file using a text editor in a UNIX/Linux environment.
▌Procedure
Open any text editor, and specify the field name of the form file on the first row and the data to be printed on the second and subsequent rows. Example of a CSV data file
"IssuedDate","OrderNumber","Supplier","SupplierPostalCode","SupplierAddress"
"2013/03/01", "1000475", "○○ Corporation", "〒XXX-XXX1", "1-1-1, △△, □□city, 〇〇-ku, Tokyo
"2013/03/01", "1000476", "○○ Corporation", "〒XXX-XXX2", "2-2-2, △△, □□city, 〇〇-ku, Tokyo
"2013/03/01", "1000477", "○○ Corporation", "〒XXX-XXX3", "3-3-3, △△, □□city, 〇〇-ku, Tokyo
Describe according to the following rules:
• Be sure to enclose item names and data in double quotation marks (").
• When including " " " (double quotation) in the data, describe as" "" ".
• For a form using repeated fields, describe as many columns as the number of repeated lines in the
format of "field name.line number".
Example of setting Field1 as three repeated rows
"Field1.1","Field1.2","Field1.3" "10XXXXXXXX","10XXXXXXXX","10XXXXXXXX"
Describe the API function to be used at runtime as required.
Save the file as a "UTF-8" format CSV file.
▌Related items
• 4-4-4 Create CSV data file (when using support tool) (P.121)

Chapter 4. Compare print data after migration
120
• 4-4-5 Specify API function to be executed during printing (P.123)

Chapter 4. Compare print data after migration
121
4-4-4 Create CSV data file (when using support tool) By processing CSV data files generated by the support tools (TestDataGenerator.sh), you can promote efficiency of CSV data file creation. The CSV data file generated by the support tool is the same as the CSV data file automatically generated by SVF PDL Maker. Therefore, if you do not need to process the CSV data file, you can use the CSV data file automatically generated by SVF PDL Maker, and this work is unnecessary. This section describes the procedure for creating a CSV data file using a support tool in a UNIX/Linux environment.
▌Procedure
Execute TestDataGenerator.sh in the SPM directory with specifying the form file or the directory where the form file is stored. If the form file is stored in multiple directory, specify each directory that stores the form file instead of the parent directory. Example of executing TestDataGenerator.sh for sample_ja.xml under the sample directory
./TestDataGenerator.sh ./sample/sample_ja.xml

Chapter 4. Compare print data after migration
122
▌Operation result A CSV data file is generated with the file name "format file name.csv".
Example of a CSV data file to be generated
"IssuedDate","OrderNumber","Supplier","SupplierPostalCode","SupplierAddress" "10XXXXXXXX","12345678","30XXXXXXXXXXXXXXXXXXXXXXXXXXXX","20XXXXXXXXXXXXXXXXXX","36XXXXXXXXXXXXXXXXXXXXXXXXXXXXXXXXXX" "10XXXXXXXX","12345678","30XXXXXXXXXXXXXXXXXXXXXXXXXXXX","20XXXXXXXXXXXXXXXXXX","36XXXXXXXXXXXXXXXXXXXXXXXXXXXXXXXXXX" "10XXXXXXXX","12345678","30XXXXXXXXXXXXXXXXXXXXXXXXXXXX","20XXXXXXXXXXXXXXXXXX","36XXXXXXXXXXXXXXXXXXXXXXXXXXXXXXXXXX"
The contents of the generated CSV data file are as follows:
• If Data type of the field is Numeric, numeric data for the number of digits is output.
• If Field type of the field is Full-width, double-byte characters for the number of digits are output.
• For the format used repeat fields, use the "<field_name>.<row_number>" format to output columns for
the number of repeat rows.
Example of setting Field1 as three repeated rows
"Field1.1","Field1.2","Field1.3" "10XXXXXXXX","10XXXXXXXX","10XXXXXXXX"
▌ Work after operation
• Process the generated CSV data file (such as specifying API functions to be used during execution)
▌Related items
• 4-4-3 Create CSV data file (when using text editor) (P.119)
• 4-4-5 Specify API function to be executed during printing (P.123)

Chapter 4. Compare print data after migration
123
4-4-5 Specify API function to be executed during printing The CSV data file used when executing SVF PDL Maker can specify the API function used during execution, along with the data given to the fields of the form file.
▌How to specify API functions The procedure for specifying API functions in the CSV data file is as follows:
• Describe API functions by enclosing with the <start> and <end> tags. API functions are executed in the
order in which they are described.
• Describe in the format of <API_function_name>=<Argument 1>,<Argument 2>.
• By describing the <start> <end> tag in the middle of the data row, the API function can be executed in
the middle of the data output.
• Describe field names on the row immediately after the <start> <end> tag. Even if the form file is changed
by using the VrSetForm function, you must specify field names on the row immediately after the <start>
<end> tag.
Example of specifying API functions
<start> VrSetForm=a.xml,4 <end> "column1","column2" "data1","data2" <start> VrSetForm=b.xml,4 <end> "column1","column2" "data1","data2"
▌Available API functions You can use the following API functions for CSV data files.
Reference For details on arguments specified in API functions, see "SVF Java PRODUCTS API Function Reference Manual".
■ Common functions
Function name Description of API
VrSetForm Specifies the XML form file and output mode for printing. Use this function to switch the form file since the form file described in the job definition file is executed for the first time.

Chapter 4. Compare print data after migration
124
Function name Description of API
VrSetPageCount Sets the default value and additional value for the PAGE function of design function.
VrCopy Specifies the number of copies.
VrAdjustd2 / VrAdjustm2 Adjusts the print position temporarily.
VrPage Specifies the page to be printed in an XML form file that consists of multiple pages of spelling.
VrSetCalcMode Supports the decimal calculation library with up to 37 digits (including integer and fraction digits).
VrComout=/{FOUT n}/ Specifies whether or not to output a form that does not contain fields.
VrComout=/{DATE DateData}/ Set so that the values returned by the design functions DATE () and TIME () are the specified date and time.
VrSetUserName Specifies the document user name.
VrComout=/{ALNK n}/ Sets the operation method of auto link fields.
VrComout=/{REDU n}/ Specifies the scaling mode.
■ Functions for SVF for Java Print
Function name Description of API
VrSetTray Specifies the paper feed tray for printing.
VrSetDuplex Specifies duplex printing.
VrSetOutputBin Specifies the output tray.
VrSetSort Specifies the sorting conditions for the output paper.
VrSetStaple Specifies the staple feature.
VrSetPunch Specifies the punch feature
VrComout=/{PTYP n}/ Specifies the paper type of the document.
VrComout=/{PSOP <device_name> n}/
Specifies the device name and ID.
■ Functions used for outputting PDF files Function name Description of API
VrComout=/{SECU n}/ Specifies whether or not to use the PDF security feature.
VrComout=/{PSWD Password}/ Specifies the password to open the PDF file.
VrComout=/{SECUPSWD Password}/ Specifies the security password for the PDF file.
VrComout=/{PERM n}/ Specifies prohibited items.
VrComout=/{PRESET <preset_name>=n ...}/ Gives print presets to PDF.
■ Report Director/RDE-related functions Function name Description of API
VrComout=/{DATR CopiesCollate=n}/ Specifies whether or not to enable collating from Report Director Enterprise.

Chapter 4. Compare print data after migration
125
■ EXCEL-related functions
Function name Description of API
VrComout=/{XSFN <file_path>}/ Specifies the template Excel file.
VrComout=/{XSCL FONTCOLOR=n1 BOLD=n2 ITALIC=n3 LOC=n4 SHEETNO=n5}/
Sets the cell format.
VrComout=/{XSCC FIELD=n1 CELLOUT=n2}/ Changes the output cell.
VrComout=/{XSSA <NO=n1 or NAME=n2>}/ Specifies the target worksheet. Specify the worksheet number or worksheet name.
VrComout=/{XSSC <NO=n1 or NAME=n2> <CHANGE=n3>}/ Copies the worksheet. Specify the worksheet number or worksheet name.
VrComout=/{XSSM <NO=n1 or NAME=n2> WHICH=n3}/ Moves the worksheet. Specify the worksheet number or worksheet name.
VrComout=/{XSCN <default_worksheet_name>}/ Specifies the name of the worksheet to be generated.
VrComout=/{XSHD <header_information>}/ Sets the worksheet header.
VrComout=/{XSFT <footer_information>}/ Sets the worksheet footer.

Chapter 4. Compare print data after migration
126
4-4-6 Create job definition file Before executing SVF PDL Maker, create a job definition file that specifies the name of a form file, CSV data file, and printer to be used. A sample file can be used for creating. This section describes the procedure for creating a job definition file in a UNIX/Linux environment and the setting items of the job definition file.
▌Procedure
Open one of the following sample files in any text editor:
• jobconf.csv (SVF Ver. 9.2 or later)
• jobconf_xml.csv (SVF Ver. 7.0 to Ver. 9.1)
• jobconf_frm.csv (SVF Ver. 6.3)
Define the job that SVF PDL Maker will execute as follows:
<job_name>,<form_file_path>,<CSV_data_file_path>,<VrInit_encoding>,<printer_name>,<output_mode>,<CSV_encoding>
Specify one form file per job. If you define multiple jobs, you can describe them in a file with line breaks. You can omit the items other than the job name or the form file path. However, if you specify items after the omitted items, you need to add the same number of commas as the omitted items.
Example of omitting VrInit encoding and later
1,sample/sample_ja.xml,sample/sample_ja.csv
Example of omitting the VrInit encoding and specifying the printer name
1,sample/sample_ja.xml,sample/sample_ja.csv,,PDF
Save the file in "UTF-8" format.
▌Settings of job definition file The following table shows the settings of job definition file.
Item Description
<job_name> Specify a job name. The specified job name becomes the file name and print data is created. Specify a unique name. This is a required item. Do not use the following strings:
\, /, :, *, ?, ", <, >, |, AUX, CON, PRN, COM1, LPT1
Note Specify the same job name in the existing and new environments because SVF PDL

Chapter 4. Compare print data after migration
127
Item Description Viewer compares the files with the same name that are created in the existing and new environments.
<form_file_path> Specify the path of the form file to execute. This is a required item.
<CSV_data_file_path> Specify the CSV data file path to be given to the format file field. If you do not specify this setting, a CSV data file is automatically created.
<VrInit_encoding> Specify the encoding that is set to the VrInit function. If you do not specify this setting, the value for SvfEncoding.<locale> in the settings file is used. If this setting is not specified, the VrInit function is executed without arguments.
Printer name Specify the printer name that creates print data. If you do not specify this setting, create print data on all the printers registered to SVF output engine and RDE (printers that have the same locale as the form file). If you specify multiple printers, separate them with commas and enclose the whole printer specification with double quotation marks.
Example of the printers enclosed with double quotations
1,sample/sample_ja.xml,sample/sample_ja.csv,,"PDF,EMF"
<output_mode> Specify the output mode set for the VrSetForm function. If you do not specify this setting, set "4" when the form file includes the record, otherwise, set "1". For details on the output mode, see "VrSetForm" in "SVF Java PRODUCTS API Function Reference Manual".
<CSV_encoding> Specify the file encoding for a CSV data file. If you do not specify this setting, use the value for CSV.DefaultEncoding in the settings file.

Chapter 4. Compare print data after migration
128
4-4-7 Create print data Execute SVF PDL Maker to create print data. This section describes the procedure for creating print data in a new UNIX/Linux environment.
▌Prerequisite
• If you use SPM_RDE.bat and SPM_RDE.sh, add a Report Director Spool Driver model printer in SVF
Configuration Tool and specify the value of Port in SPM.properties for Port.
▌Procedure
Execute one of the following shell scripts in the SPM directory with specifying the job definition file:
• SPM_SVF.sh (when using SVF for Java Print or SVF for PDF)
• SPM_RDE.sh (when using RDE) If you do not specify the job definition file, jobconf.csv in the same folder as the shell script is used.
Example of executing SPM_SVF.sh by specifying jobconf.csv under the SPM directory
./SPM_SVF.sh ./jobconf.csv
▌Operation result The print data is created in the following format in the output directory of the current directory.
output/<date> (yyyyMMdd_HHmmss format)/<printer_name>/<job_name>.<specified_extension>
For example, if you perform printing with the extension "pdf" for the PDF printer on June 30, 2016, the print data is created as follows:
output/20160630_183838/PDF/1.pdf
The print data is output to the printer with the same locale as the form file locale. When SPM_SVF.sh is executed, it is not output to the Report Director Spool Driver model.

Chapter 4. Compare print data after migration
129
4-5 Procedure for comparing print data This section describes the procedure for comparing the print data of the existing environment and the new environment using SVF PDL Viewer.

Chapter 4. Compare print data after migration
130
4-5-1 Prepare SVF PDL Viewer Arrange SVF PDL Viewer in the Windows environment. In a Windows environment, SVF products do not need to be installed.
▌Procedure
Copy the following two archive files into any folder:
• SPV.zip This is an archive file of SVF PDL Viewer. Start SVF PDL Viewer with svf_pdl_viewer_x86.exe or svf_pdl_viewer_x64.exe in the SPV folder.
• runtime.zip This is an archive file for the Java runtime environment. The runtime folder stores the Java runtime environment (Java5 and Java7) used by the SVF PDL Viewer. Be sure to copy it regardless of whether the Java runtime environment is installed.
Unzip the archive file.
In order to use the Java runtime environment in the runtime folder, arrange the runtime folder one level above svf_pdl_viewer_x64.exe or svf_pdl_viewer_x86.exe.
Example of folder location
runtime folder SPV folder ├──svf_pdl_viewer_x64.exe └──svf_pdl_viewer_x86.exe
▌Related items
• Appendix 1-3. File structure of SVF PDL Viewer (P.161)
• Appendix 1-4. Structure of runtime folder (directory) (P. 162)

Chapter 4. Compare print data after migration
131
4-5-2 Configure operational settings for SVF PDL Viewer You can configure various operation settings of SVF PDL Viewer in the Preferences dialog. In Preferences, configure the settings related to SVF PDL Viewer operations such as the screen display, and settings related to the print data image processing. This section describes the procedure for operating the Preferences dialog.
▌Procedure
■ Start SVF PDL Viewer
Execute one of the following files in the SPV folder:
• svf_pdl_viewer_x64.exe (x64 (64bit) Windows environment)
• svf_pdl_viewer_x86.exe (x86 (32bit) Windows environment) SVF PDL Viewer starts.
■ Set preferences
Select Edit - Preferences. The Preferences dialog is displayed.
Select a category from the list on the left to set each item, and click the Apply button.
Chapter 4. Compare print data after migration
132
Click the OK button. The Preferences dialog closes.
▌Related item
• 4-5-3 Settings in the "Preferences" dialog (P.133)

Chapter 4. Compare print data after migration
133
4-5-3 Settings in "Preferences" dialog This section describes the settings in the Preferences dialog of SVF PDL Viewer.
• Common (P.133)
• Comparison (P.133)
• Printer Model (P.134)
▌Common In Common, set the general operation of SVF PDL Viewer.
Item Description
Compare files in subfolders When this check box is selected, files in subfolders with the file path specified for the folder containing the print data are also compared.
Issue a warning if content is not saved
Select the check box to display a warning when you update a file list and when you exit SVF PDL Viewer if you have an editing work in progress that is not saved in SVF PDL Viewer.
Language Specify the display language for SVF PDL Viewer. Select a language from ja (Japanese), en (English), and zh_CN (Simplified Chinese). The menu and item names are displayed in the specified language.
Default Printer Model Specify the model selected by default when SVF PDL Viewer is started.
Restore Default Values Restores the settings of the Common dialog to initial values.
▌Comparison In Comparison, set the image comparison processing.
Item Description
Do not convert to images if no binary differences found
When this check box is selected, image is not converted if there are no differences in the print data file contents.
Use threads when outputting images
When this check box is selected, print data image is not converted in multiple threads. You can also input Number of Threads.
• Number of threads Specify the number of threads.
Reference If you increase the number of threads, the amount of resources (CPU and memory) to be used significantly increases. Set according to the specifications of the verification environment.
Highlight color Specify the color to fill in the area of differences and around them when highlighting the differences.
Highlight thickness Specify the thickness (dot) of color to fill in the area of differences and around them when highlighting the differences.
Highlight blink interval Specify the interval (sec.) to blink the area of differences when highlighting the differences.

Chapter 4. Compare print data after migration
134
Item Description
Differences color Specify the color to fill in the area of differences when filling in the area of differences.
Anti-alias Specifies whether to enable anti-aliasing during the imaging process. Set to OFF when comparing print data.
• OFF Creates an image with anti-alias disabled.
• ON Creates an image with anti-alias enabled.
Note This setting is invalid for TIFF and Zebra models.
Restore default Restores the settings of Comparison to initial values.
▌Printer Model In Printer Model, the image processing for each model is set.

Chapter 4. Compare print data after migration
135
■ Common settings
Item Settings
Extension Filters print data by the specified extension. This function is not case sensitive.
Converted image quality
Specify the quality of the image created by the image process from Basic, Middle, High, Very High, and Max. Basic is the standard quality and Max is the best quality. Increasing quality improves image quality, but uses more memory.
Restore default Restores the settings of Printer Model to initial values.
■ PDF/EMF/RPCS/LIPS4/ART4
Item Description
Extension See "Common settings (P.135)".
Converted image quality
See "Common settings (P.135)".
Restore default See "Common settings (P.135)".
■ TIFF
Item Description
Extension See "Common settings (P.135)".
Restore default See "Common settings (P.135)".
■ SATO
Item Description
Extension See "Common settings (P.135)".
Paper size Specify a paper size (mm). The range you can specify is "1 to 2540". The default value is 108 mm in Width and 80 mm in Height.
Converted image quality
See "Common settings (P.135)".
Device resolution
Specify resolution (dpi) for the assumed device. The range you can specify is "1 to 1200". Normally set 203 dpi or 305 dpi.
Device language Select a language from Japanese or Other according to the assumed device. Select Japanese to output Japanese.
Restore default See "Common settings (P.135)".
■ TEC Item Description
Extension See "Common settings (P.135)".
Paper size Specify a paper size (mm). The range you can specify is "1 to 2540". The default value is 100 mm in Width and 150 mm in Height.
Converted image quality See "Common settings (P.135)".
Device resolution Specify resolution (dpi) for the assumed device. The range you can specify is "1 to 1200". Normally set 300 dpi.
Restore default See "Common settings (P.135)".

Chapter 4. Compare print data after migration
136
■ Zebra
Item Description
Extension See "Common settings (P.135)".
Printer IP address Specify the IP address of the Zebra printer. This is a required item.
Printer device name Specify the device name of the Zebra printer that temporarily stores the generated image data. This is a required item.
Wait time Specify time (sec.) to wait for the print data imaging process on the Zebra printer. You need to specify an appropriate time in consideration of a print data size and a network environment. If the imaging process does not finish within the waiting time, the Error icon appears in the Results field in the file list.
Restore default See "Common settings (P.135)".

Chapter 4. Compare print data after migration
137
■ ESCP/IBM5577/PR201
Item Description
Extension See "Common settings (P.135)".
Paper size Specify a paper size (inch). The range you can specify is "1 to 100". The default values for ESCP and IBM5577 are 15.0 inch in Width and 11.0 inch in Height. The default values for PR201 are 13.2 inch in Width and 11.0 inch in Height.
Converted image quality See "Common settings (P.135)".
Restore default See "Common settings (P.135)".
Reference ESCP also supports the print data created with "Hitachi Prinfina MANAGER ESCP" and "DotPrinter ESCP".
■ FiBridge II Item Description
Extension See "Common settings (P.135)".
FDL extension Specify the extension of a FDL file that is converted by SVF Form Export for FiBridge II.
Converted image quality See "Common settings (P.135)".
Grid display Specify whether to display the grid from ON or OFF when imaging. ON displays the grid. OFF does not display the grid.
Restore default See "Common settings (P.135)".
■ FX-STDOUT
Item Description
Extension See "Common settings (P.135)".
FDL extension Specify extension of a FDL file that is converted by SVF Form Export for FX-STDOUT.
Converted image quality See "Common settings (P.135)".
Grid display Specify whether to display the grid from ON or OFF when imaging. ON displays the grid. OFF does not display the grid.
Start control code of first record Specify the start control code (first byte) of the first record in a page from "None", "FF", or "1'(ASA)". When creating print data, specify the same value as the Start control code of first record specified in the printer model settings.
Note If this setting does not match the start control code of the first record in print data, multiple pages will not be imaged successfully.
Start control code of records Specify the start control code (first byte) of the second and subsequent records in a page from "None" or "SP". Specify the same value that you specified for Start control code of records in the printer model settings when creating the print data.
End control code of last record Specify the end control code of records (the last record) in a page from "None", "CR/LF", "CR", "LF", "FF", and "CRFF". Specify the same value that you specified for End control code of last record in the printer model settings when creating the print data.
End control code of records Specify the end control code of records other than the last record in a page from "None", "CR/LF", "CR", and "LF". Specify the same value that you specified for End

Chapter 4. Compare print data after migration
138
Item Description control code of records in the printer model settings when creating the print data.
Register DJDE Specify whether to virtually configure and use DJDE commands. If you register DJDE, you do not need to add a DJDE record to print data. If you select the check box, the items of "Settings when DJDE is registered" are reflected for imaging. For details, see "Settings when DJDE is registered (P.139)". If you do not select the check box, the images are created without using the items of "Settings when DJDE is registered".
Note If a DJDE command is actually at the beginning of the print data, this setting is not enabled even if you select the check box. Use the DJDE command in the print data for imaging.
Restore default See "Common settings (P.135)".

Chapter 4. Compare print data after migration
139
■ Settings when DJDE is registered
Item Description
ANK font code
Specify a half-width font code in the following format:
<font_name>,<line_spacing>,<character_spacing>
Example
KFMT1,36 DOTS,22 DOTS
FontCode1
Specify Kanji code 1 in the following format:
<font_name>,<line_spacing>,<character_spacing>
Example
KJ24L,K1,44 DOTS
FontCode2
Specify Kanji code 2 in the following format:
<font_name>,<line_spacing>,<character_spacing>
Example
KJ30L,K2,33 DOTS
FontCode3
Specify Kanji code 3 in the following format:
<font_name>,<line_spacing>,<character_spacing>
Example
KJ32L,K3,66 DOTS
FontCode4
Specify Kanji code 4 in the following format:
<font_name>,<line_spacing>,<character_spacing>
Example
KJ38L,K4,22 DOTS
FontCode5
Specify Kanji code 5 in the following format:
<font_name>,<line_spacing>,<character_spacing>
Example
KJ40L,K5,48 DOTS
FontCode6
Specify Kanji code 6 in the following format:
<font_name>,<line_spacing>,<character_spacing>
Example
KJ50L,K6,44 DOTS
BEGIN Specify the print start position of a page in the following format:

Chapter 4. Compare print data after migration
140
Item Description
<position_of_the_first_character_in_the_vertical_direction>,<position_of_the_first_character_in_the_holizontal_direction>
Example
0.5 CM,0 CM
DATA Specify the data start position in a data record and the number of characters to print in the following format:
<data_offset>,<maximum_number_of_characters_to_print_from_the_start_position>
Example
1,150
TOF Specify the first line number of an output page.
Example
1
BOF Specify the last line number (255 at maximum) of an output page.
Example
68

Chapter 4. Compare print data after migration
141
4-5-4 Output comparison results This section describes the procedure to compare print data using SVF PDL Viewer.
▌Prerequisites
• When imaging FiBridge II, arrange the following two files in the same folder.
○ FDL file converted with "SVF Form Export for FiBridge II"
○ Print data output by "SVF for FiBridge II" (Specify the same file name as the FDL file, and specify the
same extension as that set in Preferences)
• When imaging FX-STDOUT, arrange the following two files in the same folder.
○ FDL file converted with "SVF Form Export for FX-STDOUT"
○ Print data output by "SVF for FX-STDOUT" (Specify the same file name as the FDL file, and specify
the same extension as that set in Preferences)
▌Procedure
■ Start SVF PDL Viewer
Execute one of the following files in the SPV folder:
• svf_pdl_viewer_x64.exe (x64 (64bit) Windows environment)
• svf_pdl_viewer_x86.exe (x86 (32bit) Windows environment) SVF PDL Viewer starts.
■ Output the comparison result
In 1 and 2, specify the folder that contains print data created in the existing environment and new environment, or print data you want to compare. When specifying a folder that contains print data, the file name and folder structure included in the folder must be the same. Use one of the following methods:
• Drag and drop a folder or a file into the text field.
• Click the button on the right and specify a folder in the Select Folder screen.
• Input the folder name or file name in the text field directly. A list of file names in the folder or the specified file name appears. The following example specifies a folder that contains print data.

Chapter 4. Compare print data after migration
142
Reference
• You can specify folders and files in the existing environment and new environment in both of 1 and 2.
• If you specify a folder or file only in 1, comparison process is not performed and you can use this tool as a print data viewer.

Chapter 4. Compare print data after migration
143
Select the model to compare from the pull-down menu. You can filter files to be displayed by selecting the Extension check box and specifying the printer model. Clear the Extension check box to display all the files in the folder.
Reference
• You can specify the extension in Preferences - Printer Model - Extension.
• You can specify whether to compare the files in subfolders in Preferences - Common.

Chapter 4. Compare print data after migration
144
Click the Execute button.
If you click the Run button while pressing and holding SHIFT or CTRL to select a file in the file list, you can process only the selected file. Each print data is imaged and a comparison process is executed.
Note The maximum number of files that can be processed is 1,000. In addition, the maximum number of pages that can be processed for one file is 100.
While the process is in progress, the Execute button changes to the progress indicator so that you can check the progress. If you click the progress indicator, you can abort the process.
▌Operation result Process results appear in the Results area.
Icon Description
No differences detected
Differences detected
Error
Reference
• The imaged file is saved in the current folder. Delete them as necessary after checking differences.
• For the files that have no differences in images, is also displayed automatically in Results judgement field.
• If there is a difference in even one page in the print data of multiple pages, is displayed.

Chapter 4. Compare print data after migration
145
4-5-5 Confirm output comparison results This section describes the procedure for confirming the comparison results using SVF PDL Viewer.
▌Procedure
Select a file name from the file list.
is displayed for the multiple print data. Because the for number of pages displays when you click, click the pages that you want to compare.
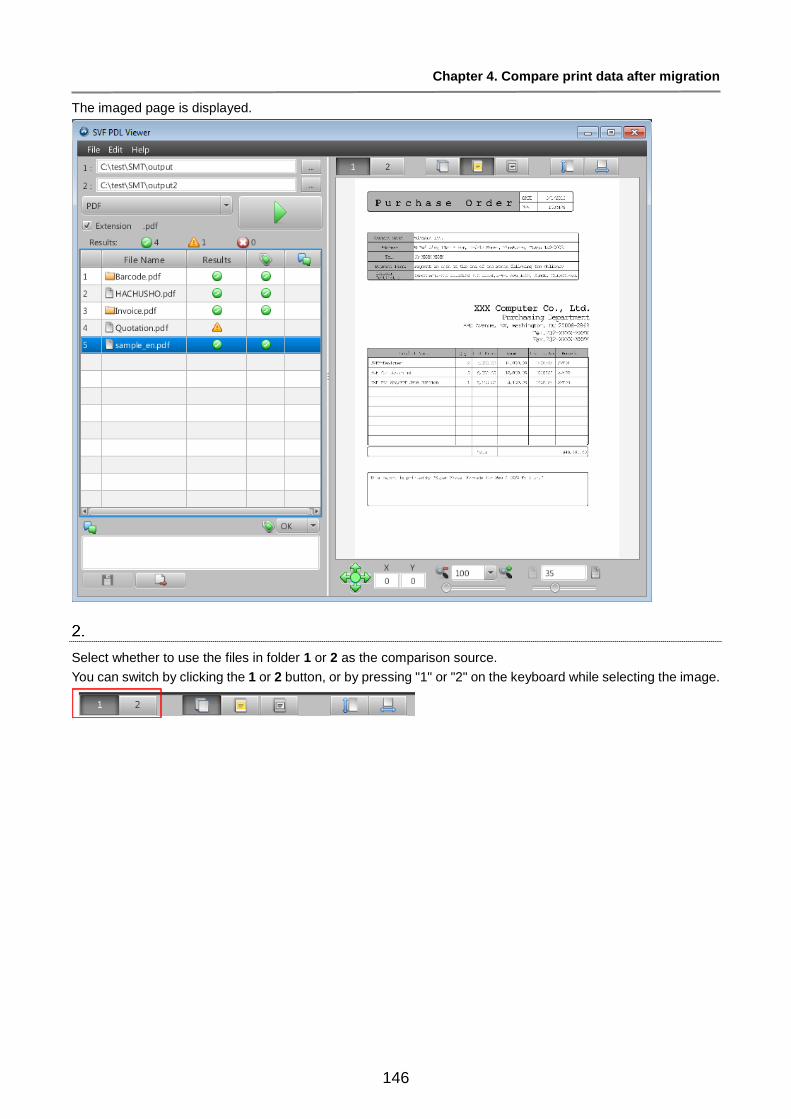
Chapter 4. Compare print data after migration
146
The imaged page is displayed.
Select whether to use the files in folder 1 or 2 as the comparison source. You can switch by clicking the 1 or 2 button, or by pressing "1" or "2" on the keyboard while selecting the image.
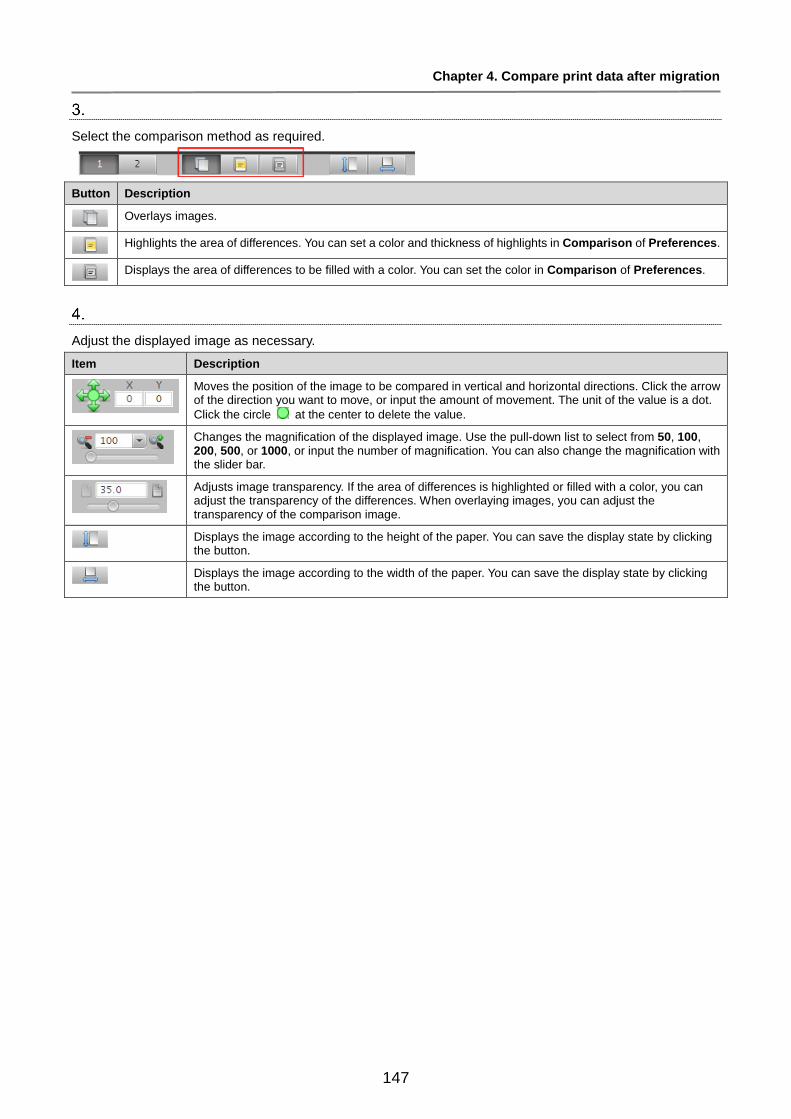
Chapter 4. Compare print data after migration
147
Select the comparison method as required.
Button Description
Overlays images.
Highlights the area of differences. You can set a color and thickness of highlights in Comparison of Preferences.
Displays the area of differences to be filled with a color. You can set the color in Comparison of Preferences.
Adjust the displayed image as necessary.
Item Description
Moves the position of the image to be compared in vertical and horizontal directions. Click the arrow of the direction you want to move, or input the amount of movement. The unit of the value is a dot. Click the circle at the center to delete the value.
Changes the magnification of the displayed image. Use the pull-down list to select from 50, 100, 200, 500, or 1000, or input the number of magnification. You can also change the magnification with the slider bar.
Adjusts image transparency. If the area of differences is highlighted or filled with a color, you can adjust the transparency of the differences. When overlaying images, you can adjust the transparency of the comparison image.
Displays the image according to the height of the paper. You can save the display state by clicking the button.
Displays the image according to the width of the paper. You can save the display state by clicking the button.

Chapter 4. Compare print data after migration
148
4-5-6 Judge and record comparison results You can judgement comparison results of SVF PDL Viewer for each piece of print data, and can input comments. The comparison results and judgement details can be recorded using the following methods:
• Save in SVF PDL Viewer
• How to export to CSV files
▌Procedure
■ Judgement the comparison result
Select a file from the file list and select OK or NG as a result judgement.
According to the judgement selected in Results judgement field , the following icon appears on the file list:
Judgment Icon
OK
NG
For files consisting of multiple pages (files that is displayed in the file list), appears when all pages are OK judgement. If there is at least one NG judgement, appears.
■ Input a comment
Input a comment in Memo.
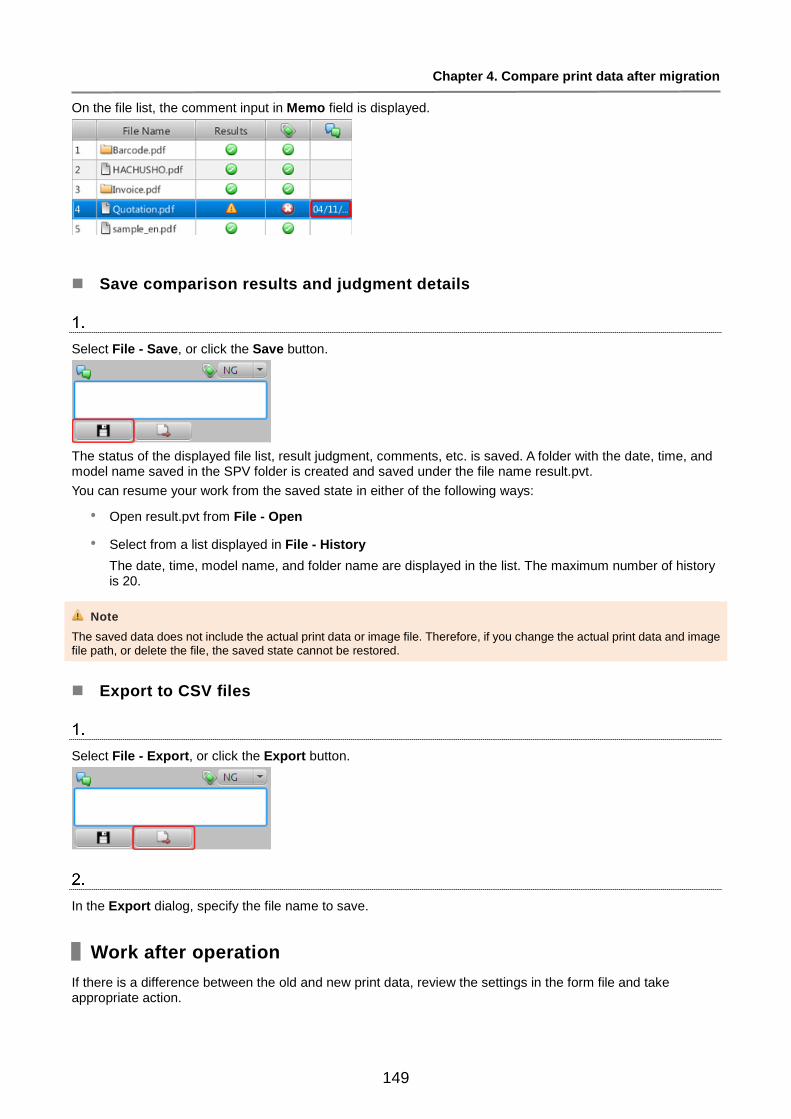
Chapter 4. Compare print data after migration
149
On the file list, the comment input in Memo field is displayed.
■ Save comparison results and judgment details
Select File - Save, or click the Save button.
The status of the displayed file list, result judgment, comments, etc. is saved. A folder with the date, time, and model name saved in the SPV folder is created and saved under the file name result.pvt. You can resume your work from the saved state in either of the following ways:
• Open result.pvt from File - Open
• Select from a list displayed in File - History The date, time, model name, and folder name are displayed in the list. The maximum number of history is 20.
Note The saved data does not include the actual print data or image file. Therefore, if you change the actual print data and image file path, or delete the file, the saved state cannot be restored.
■ Export to CSV files
Select File - Export, or click the Export button.
In the Export dialog, specify the file name to save.
▌Work after operation If there is a difference between the old and new print data, review the settings in the form file and take appropriate action.

Chapter 4. Compare print data after migration
150
For information on differences from old versions and actions to be taken when there are differences in print result, see "SVF Migration Guide".

Chapter 4. Compare print data after migration
151
4-6 Restrictions on SVF PDL Maker The notes on using SVF PDL Viewer are as follows:
▌When the printer name is not specified Print data is created using all printers registered with the SVF output engine product and RDE, but print data for models that are not supported by SVF PDL Viewer cannot be confirmed with SVF PDL Viewer.
▌For output printers via PAlite When creating print data using SPM_SVF.bat or SPM_SVF.sh, when the specified printer is an output printer via PAlite, the print data is not generated and output to the printer. An output printer via PAlite is a printer for which the printer port is specified in the SVF Configuration Tool in the format of <PAlite address>: <port number>: <PAlite printer name>. In this case, prepare the output port in the format of "IP address: queue name" or another printer with the same settings with the output port in the format of "IP address: queue name" to be used for SVF PDL Maker.

Chapter 4. Compare print data after migration
152
4-7 Restrictions on SVF PDL Viewer
▌Restrictions on usage The restrictions for using SVF PDL Viewer are as follows:
• The high DPI setting of a display is not supported.
• The high contrast theme setting of a display is not supported.
▌Restrictions for each printer model The restrictions of each printer model for using SVF PDL Viewer are as follows:
• Common for All Printer Models
○ The shape, size, and fill pattern of characters may differ from the results printed from an actual
printer.
○ PDF files with passwords cannot be displayed.
• EMF
○ The vertical text direction is not supported. Text appears in the horizontal direction.
○ If a 4-bit or 8-bit image is specified, the item is not displayed.
○ When a form file is in the graphic mode, if the level of Image Conversion Quality is low, the image is
displayed coarsely. Display with high level of Image Conversion Quality.
• RPCS
○ If Grayscale is specified in Fill pattern of rectangle, the displayed result can be different from the
result printed by an actual printer.
• LIPS4
○ The vertical text direction or rotation is not supported. Text appears in the horizontal direction without
rotation.
○ If an option other than No fill is specified in Fill pattern for a rectangle in the compatibility mode, the
displayed result can be different from the result printed by an actual printer.

Chapter 4. Compare print data after migration
153
• SATO
○ The vertical text direction is not supported. Text appears in the horizontal direction.
○ In a field, static text, Pitch(dot) is not supported if Fixed pitch is selected in static text.
○ A bar code that exceeds the range of paper size also appears, but it is not printed as actual output
from printer.
○ The position of label cut is not reflected.
○ Print data specified CL4NX for the printer model is not supported.
• TEC
○ Pitches of human-readable digits will be narrower than those of the results printed by an actual
printer.
• Zebra
○ In the 64-bit environment, use an execute file of 64-bit version.
• FX-STDOUT
○ An image and a bar code are not supported.
• IBM5577
○ An item that exceeds the range of paper size is not displayed, but it is printed at the left end of the
paper as output from an actual printer.
• PR201
○ An item that exceeds the range of paper size is not displayed, but it is printed at the left end of the
paper as output from an actual printer.
• ESCP
○ An item that exceeds the range of paper size is not displayed, but it is printed at the left end of the
paper as output from an actual printer.

Appendix
154
Appendix • Appendix 1. File structure of Migration Tool (P.155)
• Appendix 2. Operation method of SMT settings support tool (P.164)
• Appendix 3. Handling of errors and warnings (P.169)

Appendix
155
Appendix 1. File structure of migration tools Migration tools are provided for Windows and UNIX/Linux environments. If you downloaded the service pack from the support site, unzip the following self-extracting files:
├──SVF_V10_0_WINDOWS.zip └──SVF_V10_0_UNIX.zip
Unzipped files for SVF_V10_0_WINDOWS.zip
Windows folder
Unzipped files for SVF_V10_0_UNIX.zip
UNIX directory
Each file structure is as follows:
▌Windows environment
Windows folder ├──SMT.zip ├──SPM.zip ├──SPV.zip └──runtime.zip
Files and folders Description
SMT.zip This is an archive file used to execute SVF Migration Tool.
SPM.zip This is an archive file used to execute SVF PDL Maker.
SPV.zip This is an archive file used to execute SVF PDL Viewer.
runtime.zip This is an archive file for the Java runtime environment used by each tool.

Appendix
156
▌UNIX/Linux environment
UNIX directory ├──SPM.tar.gz ├──SPV.zip ├──runtime.zip └──runtime.tar.gz
File or directory Description
SMT.tar.gz This is an archive file used to execute SVF Migration Tool.
SPM.tar.gz This is an archive file used to execute SVF PDL Maker.
SPV.zip This is an archive file used to execute SVF PDL Viewer. Used in a Windows environment.
runtime.zip This is an archive file for the Java runtime environment used by SVF PDL Viewer. Used in a Windows environment.
runtime.tar.gz This is an archive file for the Java runtime environment used by each tool. Used in Linux environment.
▌Related items
• Appendix 1-1. File structure of SVF Migration Tool (P. 157)
• Appendix 1-2. File structure of SVF PDL Maker (P.159)
• Appendix 1-3. File structure of SVF PDL Viewer (P.161)
• Appendix 1-4. Structure of runtime folder (directory) (P. 162)

Appendix
157
Appendix 1-1. File structure of SVF Migration Tool SVF Migration Tool is available for Windows and UNIX/Linux environments. This section describes the file structure of the SVF Migration Tool.
▌Windows environment Unzip SMT.zip. The structure of the unzipped files is as follows:
SMT folder ├──lib folder ├──resource folder ├──UPDATE folder ├──SFM.bat ├──SMT.properties ├──SMT_CUI.bat ├──SMT_settings.xls ├──SMT_settings_en.xls └──svf_migration_tool.jar
File Description
SMT_CUI.bat This is a batch file used to execute SVF Migration Tool.
SMT.properties This is an operational settings file for SVF Migration Tool.
SFM.bat This is a batch file used to start only a conversion tool for form files. For details, see "About SFM.bat (p.158)".
SMT_settings.xls This is a SMT settings support tool.
SMT_settings_en.xls This is an English version of SMT settings support tool.

Appendix
158
▌UNIX/Linux environment Unzip SMT.tar.gz. The structure of the unzipped files is as follows:
SMT directory ├──lib directory ├──resource directory ├──UPDATE directory ├──SFM.bat ├──SMT.properties ├──SMT_CUI.sh └──svf_migration_tool.jar
File Description
SMT_CUI.sh This is a shell script file used to start SVF Migration Tool.
SMT.properties This is an operational settings file for SVF Migration Tool.
SFM.bat This is a batch file used to start only a conversion tool for form files. Used in a Windows environment. For details, see "About SFM.bat (p.158)".
▌About SFM.bat Apart from the SVF Migration Tool, the form file conversion tool can also be used alone. Drag and drop the form file to be converted to SFM.bat, or the folder where the form file is saved. A log file is output as "SFM.log". If you convert files for several times, the log file will be overwritten with the same name.

Appendix
159
Appendix 1-2. File structure of SVF PDL Maker SVF PDL Maker is available for Windows and UNIX/Linux environments. This section describes the file structure of SVF PDL Maker.
▌Windows environment Unzip SPM.zip. The structure of the unzipped files is as follows:
SPM ├──lib folder ├──sample folder ├──jobconf.csv ├──jobconf_dNET.csv ├──jobconf_frm.csv ├──jobconf_xml.csv ├──SPM.properties ├──SPM_dNET.bat ├──SPM_RDE.bat ├──SPM_SVF.bat ├──TestDataGenerator.bat └──TestDataGenerator_dNET.bat
File Description
SPM_SVF.bat This is a batch file used for creating print data with a printer registered in SVF output engine. Specify a job definition file to execute. If you do not specify the file, jobconf.csv in the same folder will be used.
SPM_RDE.bat This is a batch file used for creating print data with a printer registered in RDE. Specify a job definition file to execute. If you do not specify the file, jobconf.csv in the same folder will be used.
SPM_dNET.bat This is a batch file used for creating print data with a printer registered in SVF for .NET Framework. Specify a job definition file to execute. If you do not specify the file, jobconf.csv in the same folder will be used.
TestDataGenerator.bat This is a batch file used for creating CSV data file to execute SVF. Specify a form file or a folder containing form files to execute. The file name will be "<form_file_name>.csv".
TestDataGenerator_dNET.bat This is a batch file used for creating CSV data file to execute SVF for .NET Framework. Specify a form file or a folder containing form files to execute. The file name will be "<form_file_name>.csv".
SPM.properties This is a file used for settings of SVF PDL Maker.
jobconf.csv This is a sample job definition file. Used for SVF Ver. 9.2 or later.
jobconf_frm.csv This is a sample job definition file. Used for SVF Ver. 6.3 or later.
jobconf_xml.csv This is a sample job definition file. Used for SVF Ver. 7.0 to Ver. 9.1.
jobconf_dNET.csv This is a sample job definition file. Used for SVF for .NET Framework or SVF Client.

Appendix
160
▌UNIX/Linux environment Unzip SPM.tar.gz. The structure of the unzipped files is as follows:
SMT ├──lib directory ├──sample directory ├──jobconf.csv ├──jobconf_frm.csv ├──jobconf_xml.csv ├──SPM.properties ├──SPM_RDE.sh ├──SPM_SVF.sh └──TestDataGenerator.sh
File Description
SPM_SVF.sh This is a shell script file used for creating print data with a printer registered in SVF output engine products. Specify a job definition file to execute. If you do not specify the file, jobconf.csv in the same directory will be used.
SPM_RDE.sh This is a shell script file used for creating print data with a printer registered in RDE. Specify a job definition file to execute. If you do not specify the file, jobconf.csv in the same directory will be used.
TestDataGenerator.sh This is a shell script file used for creating a CSV data file. Specify a form file or a directory containing form files to execute. The file name will be "<form_file_name>.csv".
SPM.properties This is a file used for settings of SVF PDL Maker.
jobconf.csv This is a sample job definition file. Used for SVF Ver. 9.2 or later.
jobconf_frm.csv This is a sample job definition file. Used for SVF Ver. 6.3 or later.
jobconf_xml.csv This is a sample job definition file. Used for SVF Ver. 7.0 to Ver. 9.1.

Appendix
161
Appendix 1-3. File structure of SVF PDL Viewer SVF PDL Viewer can be used in a Windows environment. Unzip SPV.zip. The structure of the unzipped files is as follows:
SPV ├──lib folder ├──logback-config.xml ├──pvtcompare.master.properties ├──svf_pdl_viewer_x64.exe ├──svf_pdl_viewer_x86.exe └──svf-pdl-viewer-1.3.0.11.jar
File Description
svf_pdl_viewer_x86.exe This is an execution file to start SVF PDL Viewer in x86(32bit) Windows environment. Use the included 32-bit version JRE.
svf_pdl_viewer_x64.exe This is an execution file to start SVF PDL Viewer in x64(64bit) Windows environment. Use the included 64-bit version JRE.
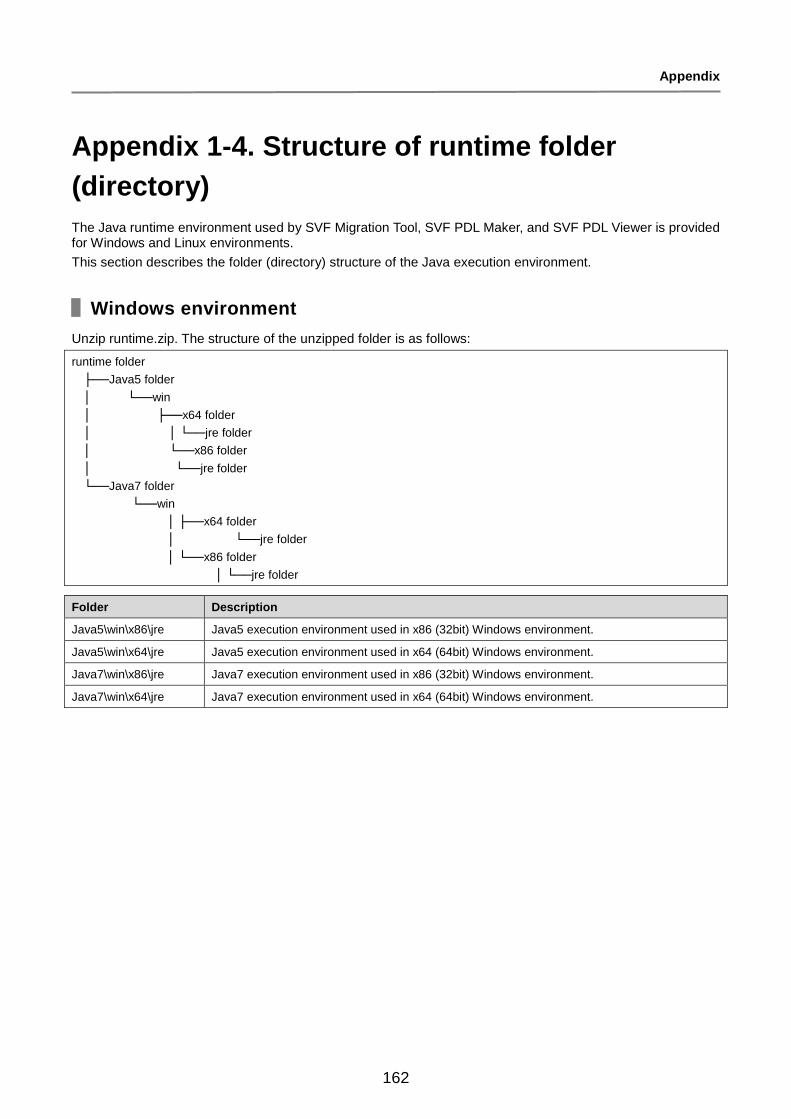
Appendix
162
Appendix 1-4. Structure of runtime folder (directory) The Java runtime environment used by SVF Migration Tool, SVF PDL Maker, and SVF PDL Viewer is provided for Windows and Linux environments. This section describes the folder (directory) structure of the Java execution environment.
▌Windows environment Unzip runtime.zip. The structure of the unzipped folder is as follows:
runtime folder ├──Java5 folder │ └──win │ ├──x64 folder │ │ └──jre folder │ └──x86 folder │ └──jre folder └──Java7 folder └──win │ ├──x64 folder │ └──jre folder │ └──x86 folder │ └──jre folder
Folder Description
Java5\win\x86\jre Java5 execution environment used in x86 (32bit) Windows environment.
Java5\win\x64\jre Java5 execution environment used in x64 (64bit) Windows environment.
Java7\win\x86\jre Java7 execution environment used in x86 (32bit) Windows environment.
Java7\win\x64\jre Java7 execution environment used in x64 (64bit) Windows environment.

Appendix
163
▌Linux environment Unzip runtime.tar.gz. The structure of the unzipped directory is as follows:
runtime directory ├──Java5 directory │ └──linux │ ├──x64 directory │ │ └──jre directory │ └──x86 directory │ └──jre directory └──Java7 directory └──linux │ ├──x64 directory │ └──jre directory │ └──x86 directory │ └──jre directory
Directory Description
Java5/linux/x86/jre Java5 execution environment used in x86 (32bit) Linux environment.
Java5/linux/x64/jre Java5 execution environment used in x64 (64bit) Linux environment.
Java7/linux/x86/jre Java7 execution environment used in x86 (32bit) Linux environment.
Java7/linux/x64/jre Java7 execution environment used in x64 (64bit) Linux environment.

Appendix
164
Appendix 2. Operation method of SMT settings support tool The SMT setting support tool is an Excel style settings support file for SVF Migration Tool settings and changing of the data file path in the new environment. After reading the file to be set and entering the setting value, operate with Microsoft Excel until the setting contents are written to the file. The SMT setting support tool has a list of setting items and is easy to see, so you can prevent settings omissions and errors. Also, you can prevent the errors caused by text editors such as character code differences. This section describes the operation method of the SMT setting support tool.
• Appendix 2-1. Configure operational settings for SVF Migration Tool (P.165)
• Appendix 2-2. Configure settings for changing the data file path in the new environment (P.167)

Appendix
165
Appendix 2-1. Configure operational settings for SVF Migration Tool Describe the settings to control the operation of SVF Migration Tool in SMT.properties. There are two ways to edit SMT.properties: open it with a text editor and use the SMT settings support tool. SMT setting support tool is SMT_settings.xls or SMT_settings_en.xls included in SMT folder. If you want to display the menu for the SMT settings support tool in English, use the "SMT_settings_en.xls" file. This section describes the procedure for editing SMT.properties using the SMT setting support tool (SMT_settings.xls).
▌Procedure
Start Microsoft Excel and open SMT_settings.xls in the SMT folder. Set the operation in "Reference/update of settings (SMT.properties)" of the "Cover page" sheet.
Click the Browse button for "1. Specify the Location of the Settings File" and specify the SMT folder.
Click the Read button for "2. Read/Write the Settings File".
When a confirmation message appears, click the OK button. An "SMT.properties" sheet is created.
Specify "Value (Update)" in the "SMT.properties" sheet.

Appendix
166
Rows for which you changed values are highlighted. For details on the settings, see "Settings of SMT.properties" (P.28).
Note By unlocking the sheet, you can change values in any cell. However, do not change any values except for "Value (Update)" (column D).
Use the radio button below the Write button on the "Cover" sheet to select a line break code. It is recommended to select CRLF as the line break code when using SMT.properties in the Windows environment and to select LF as the line break code when using it in the UNIX/Linux environment for writing.
Click the Write button in the "Cover page" sheet.
When a confirmation message appears, click the OK button. The settings are reflected in SMT.properties.
▌Related items
• 2-4-2 Configure operational settings for SVF Migration Tool (P.27) (Windows)
• 2-5-2 Configure operational settings for SVF Migration Tool (P.48) (UNIX/Linux)

Appendix
167
Appendix 2-2. Configure settings for changing the data file path in the new environment You can change the location of the data and extracted in the existing environment and the file path settings in the new environment to migrate. To change the data file path in the new environment, edit the dirconf.txt file that SVF Migration Tool outputs when extracting data. You can edit dirconf.txt by opening it with a text editor or using the SMT settings support tool. SMT setting support tool is SMT_settings.xls or SMT_settings_en.xls included in SMT folder. If you want to display the menu for the SMT settings support tool in English, use the "SMT_settings_en.xls" file. This section describes the procedure for editing dirconf.txt using the SMT setting support tool (SMT_settings.xls).
▌Procedure
Start Microsoft Excel and open SMT_settings.xls in the SMT folder. The settings configured in "Browse and update directory path settings (dirconf.txt)" on the "Cover" sheet.
Click the Browse button for "1. Specify the Location of the Settings File" and specify the RIPPING folder.
Click the Read button for "2. Read/Write the Settings File".
When a confirmation message appears, click the OK button. Worksheets will be created for each section name, such as "DataDirectory", "SVF", "RDE", and so on. The types of worksheets to be created depend on the installed products.

Appendix
168
Edit the "Value (Update)" column in the worksheets named "DataDirectory", "SVF", "RDE", and so on. To replace all the file paths at once, unlock the worksheet protection and select the column to replace. For details on the settings, see "Settings of dirconf.txt" (P.36).
Note By unlocking the sheet, you can change values in any cell. However, do not change any values except for "Value (Update)".
Use the radio button below the Write button on the "Cover" sheet to select a line break code. It is recommended to select CRLF as the line break code when using dirconf.txt in the Windows environment and to select LF as the line break code when using it in the UNIX/Linux environment for writing.
Click the Write button in the "Cover page" sheet.
When a confirmation message appears, click the OK button. The settings are reflected in dirconf.txt.
▌Related items
• 2-4-4 Configure settings for changing the data file path in the new environment (P.35)(Windows)
• 2-5-4 Configure settings for changing the data file path in the new environment (P.55)(UNIX/Linux)
Appendix
169
Appendix 3. Solution for errors and warnings This section describes how to solve errors and warnings output by the migration tool.
• Appendix 3-1. SVF Migration Tool error codes (P.170)
• Appendix 3-2. SVF Migration Tool warnings (P.174)
• Appendix 3-3. SVF PDL Maker error messages (P.175)
• Appendix 3-4. SVF PDL Viewer error messages (P.176)

Appendix
170
Appendix 3-1. SVF Migration Tool error codes This section describes the causes and solutions of errors that occur while SVF Migration Tool is processing. If SVF Migration Tool failed to start, an error code will not be output. The requirements for executing SVF Migration Tool may not be satisfied. Make sure that your operating environment meets the requirements for executing SVF Migration Tool, and that the Java version and Java runtime environment are set properly.
▌Error code The following are causes and solutions for errors that occurred when the exit code of SVF Migration Tool is other than 0:
Cord Error details Cause and solution
-1 Failed to load the settings file. • Cause
○ Failed to load the settings file "SMT.properties".
○ A property value of the settings file "SMT.properties" is invalid.
• Solution
○ Place SMT.properties in the same folder (directory) as that of svf_migration_tool.jar.
○ Confirm the property values in the settings file "SMT.properties".
-2 Initialization error. • Cause
○ Failed to initialize SVF Migration Tool.
○ No SVF products are installed.
• Solution
○ Set up SVF Migration Tool again. If the problem is not solved, contact our support center.
○ Confirm that the SVF products are installed.
-7 SVF product version retrieval error. • Cause
○ Failed to retrieve the SVF product version.
• Solution
○ Confirm that the SVF products are installed.
-21 Database connection error. • Cause
○ Failed to connect to database.
• Solution
○ Confirm that you can connect to PowerGres and PostgreSQL.
○ Confirm that RDE operates normally.

Appendix
171
Cord Error details Cause and solution
-22 Database dump file retrieval error. • Cause
○ Dump files for PowerGres and PostgreSQL are not found.
• Solution
○ Confirm whether the extracted data is used in the environment where RDE is installed.
-26 Database data retrieval error. • Cause
○ Failed to retrieve data from database.
• Solution
○ Confirm whether RDE operates normally in the existing and new environments.
-29 Database processing error. • Cause
○ Failed to process database.
• Solution
○ Try again after restoration.
-39 Service processing error. • Cause
○ Failed to process service.
• Solution
○ Confirm whether the service operates normally.
○ Confirm that the SVF products have been activated normally.
-61 File copy error. • Cause
○ Failed to copy file.
• Solution
○ Confirm whether you have access permission to the folder (directory) and file in the existing and new environments.
○ Confirm that the file is not open.
-62 File writing error. • Cause
○ Failed to write to file.
• Solution
○ Confirm whether you have access permission to the folder (directory) and file in the existing and new environments.
○ Confirm that the file is not open.
○ Confirm that the file is not saved with an invalid encoding.

Appendix
172
Cord Error details Cause and solution
-63 Directory creation error. • Cause
○ Failed to create folder (directory).
• Solution
○ Confirm whether you have access permission to the folder (directory) in the location to create.
-65 File loading error. • Cause
○ Failed to load file.
• Solution
○ Confirm whether you have access permission to the file.
○ Confirm that the file is not open.
○ Confirm that the file is not saved with an invalid encoding.
○ Confirm that the file was not saved in an invalid format.
-66 Free disk space retrieving error. • Cause
○ Failed to retrieve free disk space.
• Solution
○ Confirm whether you have access permission to the disk.
-69 File processing error. • Cause
○ Failed to process file.
• Solution
○ Confirm whether you have access permission to the file in the existing and new environments.
○ Confirm that the file is not open.
-71 Command input error. • Cause
○ Failed to input command.
• Solution
○ Confirm whether the SVF Migration Tool process is forcibly stopped.
-75 Command execution error. • Cause
○ Failed to execute command.
○ Failed to copy or delete the file or the folder (directory).
• Solution

Appendix
173
Cord Error details Cause and solution
○ Confirm that you execute SVF Migration Tool as an administrator.
○ Confirm that the file or the folder (directory) is not open.
-99 Unexpected error • Solution
○ Set "Log.level" in the settings file "SMT.properties" to "DEBUG", and try again. Then, contact our support center.

Appendix
174
Appendix 3-2. SVF Migration Tool warnings This section describes the cause and solution when a warning is output to the SVF Migration Tool log.
▌Warnings The following are causes and solutions when warnings are output to logs for SVF Migration Tool:
Warning message Cause and solution
• An error occurred while parsing the form file. Form file name [<Form_file_path>]
• Unsupported version: FRM form file version number
• Cause
○ Since the FRM form file version is earlier than 2.13, you cannot parse or convert the file.
• Solution
○ Save the FRM form file using Super Visual Formade designer Ver. 2.13 or later, and try to migrate again, or convert it to an XML form file with SFM.bat.
java.io.IOException: Rename failed: Form file path • Cause
○ Since an XML file with the same name exists in the same folder (directory) as the FRM form file, it cannot be converted to an XML form file.
• Solution
○ Change the FRM form file name and try to migrate again, or use SFM.bat to convert the FRM file to an XML form file.
Since the server is not migrated, printer is not migrated. Server name [<PA_server_name>] Printer name [<PA_printer_name>]
• Cause
○ Since there is no PA server in the new environment, the existing PA printer cannot be migrated.
• Solution
○ Add the PA server to the new environment before migration.
○ When using a different PA server name from that in the existing environment, set "RDE.ServerMapping" in settings.

Appendix
175
Appendix 3-3. SVF PDL Maker error messages This section describes causes and solutions of warnings output to the log after the process of SVF PDL Maker.
Error message Cause and solution
RDSpool model printer to be spooled is not found. JOB name [<JOB_name>]
• Cause
○ There is no "Report Director Spool Driver" model printer in which the value of "Port" in the settings is set.
• Solution
○ Confirm Port of a Report Director Spool Driver model printer.
An error occurred while executing SVF: SVF error code [<error_code>]
• Cause
○ An error occurred during the SVF output engine product processing.
• Solution
○ See the error code description in "SVF Product Error Code List".

Appendix
176
Appendix 3-4. SVF PDL Viewer error messages This section describes causes and solutions when the Error icon appears in the Results field of file list, and the following errors are output in the Memo field during the SVF PDL Viewer processing:
Error message Cause and solution
[Error] File is not found. • Cause
○ A file displayed in the file list is not found.
• Solution
○ Confirm whether the applicable file exists.
[Error] Number of pages exceeded limit. • Cause
○ Since print data that exceeds the upper limit (100 pages) of the number of pages is included, the pages exceeding the upper limit are not compared.
• Solution
○ Confirm the CSV data and adjust the data to be within 100 pages.
[Error] There are not enough pages in the first group of documents [Error] There are not enough pages in the second group of documents
• Cause
○ The number of pages of print data in the folders of 1: and 2: are different.
• Solution
○ Confirm whether the print data is created with the same job definition file in SVF PDL Maker.