
Sun Java System Application Server 8 Developer's Guide
432
Sun Java ™ System Application Server 8 Developer’s Guide Sun Microsystems, Inc. 4150 Network Circle Santa Clara, CA 95054 U.S.A. Part No: 817-6087
-
Upload
khangminh22 -
Category
Documents
-
view
1 -
download
0
Transcript of Sun Java System Application Server 8 Developer's Guide

Sun Java™ System
Application Server 8Developer’s Guide
Sun Microsystems, Inc.4150 Network CircleSanta Clara, CA 95054U.S.A.
Part No: 817-6087

Copyright © 2004 Sun Microsystems, Inc., 4150 Network Circle, Santa Clara, California 95054, U.S.A. All rights reserved.Sun Microsystems, Inc. has intellectual property rights relating to technology embodied in the product that is described in this document. In particular, and without limitation, these intellectual property rights may include one or more of the U.S. patents listed at http://www.sun.com/patents and one or more additional patents or pending patent applications in the U.S. and in other countries.THIS PRODUCT CONTAINS CONFIDENTIAL INFORMATION AND TRADE SECRETS OF SUN MICROSYSTEMS, INC. USE, DISCLOSURE OR REPRODUCTION IS PROHIBITED WITHOUT THE PRIOR EXPRESS WRITTEN PERMISSION OF SUN MICROSYSTEMS, INC.U.S. Government Rights - Commercial software. Government users are subject to the Sun Microsystems, Inc. standard license agreement and applicable provisions of the FAR and its supplements.Use is subject to license terms. This distribution may include materials developed by third parties.Sun, Sun Microsystems, the Sun logo, Java, and the Java Coffee Cup logo are trademarks or registered trademarks of Sun Microsystems, Inc. in the U.S. and other countries.This product is covered and controlled by U.S. Export Control laws and may be subject to the export or import laws in other countries. Nuclear, missile, chemical biological weapons or nuclear maritime end uses or end users, whether direct or indirect, are strictly prohibited. Export or reexport to countries subject to U.S. embargo or to entities identified on U.S. export exclusion lists, including, but not limited to, the denied persons and specially designated nationals lists is strictly prohibited.DOCUMENTATION IS PROVIDED “AS IS” AND ALL EXPRESS OR IMPLIED CONDITIONS, REPRESENTATIONS AND WARRANTIES, INCLUDING ANY IMPLIED WARRANTY OF MERCHANTABILITY, FITNESS FOR A PARTICULAR PURPOSE OR NON-INFRINGEMENT, ARE DISCLAIMED, EXCEPT TO THE EXTENT THAT SUCH DISCLAIMERS ARE HELD TO BE LEGALLY INVALID._______________________________________________________________________________________________________________Copyright © 2004 Sun Microsystems, Inc., 4150 Network Circle, Santa Clara, California 95054, Etats-Unis. Tous droits réservés.Sun Microsystems, Inc. détient les droits de propriété intellectuels relatifs à la technologie incorporée dans le produit qui est décrit dans ce document. En particulier, et ce sans limitation, ces droits de propriété intellectuelle peuvent inclure un ou plus des brevets américains listés à l’adresse http://www.sun.com/patents et un ou les brevets supplémentaires ou les applications de brevet en attente aux Etats - Unis et dans les autres pays.CE PRODUIT CONTIENT DES INFORMATIONS CONFIDENTIELLES ET DES SECRETS COMMERCIAUX DE SUN MICROSYSTEMS, INC. SON UTILISATION, SA DIVULGATION ET SA REPRODUCTION SONT INTERDITES SANS L’AUTORISATION EXPRESSE, ECRITE ET PREALABLE DE SUN MICROSYSTEMS, INC.L’utilisation est soumise aux termes de la Licence. Cette distribution peut comprendre des composants développés par des tierces parties.Sun, Sun Microsystems, le logo Sun, Java, et le logo Java Coffee Cup sont des marques de fabrique ou des marques déposées de Sun Microsystems, Inc. aux Etats-Unis et dans d’autres pays.Ce produit est soumis à la législation américaine en matière de contrôle des exportations et peut être soumis à la règlementation en vigueur dans d’autres pays dans le domaine des exportations et importations. Les utilisations, ou utilisateurs finaux, pour des armes nucléaires, des missiles, des armes biologiques et chimiques ou du nucléaire maritime, directement ou indirectement, sont strictement interdites. Les exportations ou réexportations vers les pays sous embargo américain, ou vers des entités figurant sur les listes d’exclusion d’exportation américaines, y compris, mais de manière non exhaustive, la liste de personnes qui font objet d’un ordre de ne pas participer, d’une façon directe ou indirecte, aux exportations des produits ou des services qui sont régis par la législation américaine en matière de contrôle des exportations et la liste de ressortissants spécifiquement désignés, sont rigoureusement interdites. LA DOCUMENTATION EST FOURNIE “EN L’ETAT” ET TOUTES AUTRES CONDITIONS, DECLARATIONS ET GARANTIES EXPRESSES OU TACITES SONT FORMELLEMENT EXCLUES, DANS LA MESURE AUTORISEE PAR LA LOI APPLICABLE, Y COMPRIS NOTAMMENT TOUTE GARANTIE IMPLICITE RELATIVE A LA QUALITE MARCHANDE, A L’APTITUDE A UNE UTILISATION PARTICULIERE OU A L’ABSENCE DE CONTREFACON.
3
Contents
About This Guide . . . . . . . . . . . . . . . . . . . . . . . . . . . . . . . . . . . . . . . . . . . . . . . . . . . . . . . . . . . . . . 19
Who Should Use This Guide . . . . . . . . . . . . . . . . . . . . . . . . . . . . . . . . . . . . . . . . . . . . . . . . . . . . . . . . . . . . . . . 19Using the Documentation . . . . . . . . . . . . . . . . . . . . . . . . . . . . . . . . . . . . . . . . . . . . . . . . . . . . . . . . . . . . . . . . . 20How This Guide Is Organized . . . . . . . . . . . . . . . . . . . . . . . . . . . . . . . . . . . . . . . . . . . . . . . . . . . . . . . . . . . . . . 21Related Information . . . . . . . . . . . . . . . . . . . . . . . . . . . . . . . . . . . . . . . . . . . . . . . . . . . . . . . . . . . . . . . . . . . . . . 22Documentation Conventions . . . . . . . . . . . . . . . . . . . . . . . . . . . . . . . . . . . . . . . . . . . . . . . . . . . . . . . . . . . . . . . 23
General Conventions . . . . . . . . . . . . . . . . . . . . . . . . . . . . . . . . . . . . . . . . . . . . . . . . . . . . . . . . . . . . . . . . . . 23Conventions Referring to Directories . . . . . . . . . . . . . . . . . . . . . . . . . . . . . . . . . . . . . . . . . . . . . . . . . . . . . . 24
Contacting Sun . . . . . . . . . . . . . . . . . . . . . . . . . . . . . . . . . . . . . . . . . . . . . . . . . . . . . . . . . . . . . . . . . . . . . . . . . . 25Give Us Feedback . . . . . . . . . . . . . . . . . . . . . . . . . . . . . . . . . . . . . . . . . . . . . . . . . . . . . . . . . . . . . . . . . . . . . 25Obtain Training . . . . . . . . . . . . . . . . . . . . . . . . . . . . . . . . . . . . . . . . . . . . . . . . . . . . . . . . . . . . . . . . . . . . . . 25Contact Product Support . . . . . . . . . . . . . . . . . . . . . . . . . . . . . . . . . . . . . . . . . . . . . . . . . . . . . . . . . . . . . . . . 25
Part I Developing Applications . . . . . . . . . . . . . . . . . . . . . . . . . . . . . . . . . . . . . . . . . . . . . . . . 27
Chapter 1 Setting Up a Development Environment . . . . . . . . . . . . . . . . . . . . . . . . . . . . . . . . . 29Installing and Preparing the Server for Development . . . . . . . . . . . . . . . . . . . . . . . . . . . . . . . . . . . . . . . . . . . . 29Development Tools . . . . . . . . . . . . . . . . . . . . . . . . . . . . . . . . . . . . . . . . . . . . . . . . . . . . . . . . . . . . . . . . . . . . . . 30
The asadmin Command . . . . . . . . . . . . . . . . . . . . . . . . . . . . . . . . . . . . . . . . . . . . . . . . . . . . . . . . . . . . . . . . 30The Administration Console . . . . . . . . . . . . . . . . . . . . . . . . . . . . . . . . . . . . . . . . . . . . . . . . . . . . . . . . . . . . . 31Apache Ant . . . . . . . . . . . . . . . . . . . . . . . . . . . . . . . . . . . . . . . . . . . . . . . . . . . . . . . . . . . . . . . . . . . . . . . . . . 31deploytool . . . . . . . . . . . . . . . . . . . . . . . . . . . . . . . . . . . . . . . . . . . . . . . . . . . . . . . . . . . . . . . . . . . . . . . . . . . 31Migration Tools . . . . . . . . . . . . . . . . . . . . . . . . . . . . . . . . . . . . . . . . . . . . . . . . . . . . . . . . . . . . . . . . . . . . . . 31Debugging Tools . . . . . . . . . . . . . . . . . . . . . . . . . . . . . . . . . . . . . . . . . . . . . . . . . . . . . . . . . . . . . . . . . . . . . 32Profiling Tools . . . . . . . . . . . . . . . . . . . . . . . . . . . . . . . . . . . . . . . . . . . . . . . . . . . . . . . . . . . . . . . . . . . . . . . 32
Sample Applications . . . . . . . . . . . . . . . . . . . . . . . . . . . . . . . . . . . . . . . . . . . . . . . . . . . . . . . . . . . . . . . . . . . . . 33

4 Application Server 8 • Developer’s Guide
Chapter 2 Securing J2EE Applications . . . . . . . . . . . . . . . . . . . . . . . . . . . . . . . . . . . . . . . . . . 35Sun Java System Application Server Security Goals . . . . . . . . . . . . . . . . . . . . . . . . . . . . . . . . . . . . . . . . . . . . 36Sun Java System Application Server Specific Security Features . . . . . . . . . . . . . . . . . . . . . . . . . . . . . . . . . . . 36Sun Java System Application Server Security Model . . . . . . . . . . . . . . . . . . . . . . . . . . . . . . . . . . . . . . . . . . . . 37
Web Application and URL Authorizations . . . . . . . . . . . . . . . . . . . . . . . . . . . . . . . . . . . . . . . . . . . . . . . . . 37Invocation of Enterprise Bean Methods . . . . . . . . . . . . . . . . . . . . . . . . . . . . . . . . . . . . . . . . . . . . . . . . . . . . 38ACC Client Invocation of Enterprise Bean Methods . . . . . . . . . . . . . . . . . . . . . . . . . . . . . . . . . . . . . . . . . . 38
Security Responsibilities Overview . . . . . . . . . . . . . . . . . . . . . . . . . . . . . . . . . . . . . . . . . . . . . . . . . . . . . . . . . . 38Application Developer . . . . . . . . . . . . . . . . . . . . . . . . . . . . . . . . . . . . . . . . . . . . . . . . . . . . . . . . . . . . . . . . . 38Application Assembler . . . . . . . . . . . . . . . . . . . . . . . . . . . . . . . . . . . . . . . . . . . . . . . . . . . . . . . . . . . . . . . . . 39Application Deployer . . . . . . . . . . . . . . . . . . . . . . . . . . . . . . . . . . . . . . . . . . . . . . . . . . . . . . . . . . . . . . . . . . 39
Common Security Terminology . . . . . . . . . . . . . . . . . . . . . . . . . . . . . . . . . . . . . . . . . . . . . . . . . . . . . . . . . . . . 39Authentication . . . . . . . . . . . . . . . . . . . . . . . . . . . . . . . . . . . . . . . . . . . . . . . . . . . . . . . . . . . . . . . . . . . . . . . 40Authorization . . . . . . . . . . . . . . . . . . . . . . . . . . . . . . . . . . . . . . . . . . . . . . . . . . . . . . . . . . . . . . . . . . . . . . . . 40Realms . . . . . . . . . . . . . . . . . . . . . . . . . . . . . . . . . . . . . . . . . . . . . . . . . . . . . . . . . . . . . . . . . . . . . . . . . . . . . 40Role Mapping . . . . . . . . . . . . . . . . . . . . . . . . . . . . . . . . . . . . . . . . . . . . . . . . . . . . . . . . . . . . . . . . . . . . . . . . 40
Container Security . . . . . . . . . . . . . . . . . . . . . . . . . . . . . . . . . . . . . . . . . . . . . . . . . . . . . . . . . . . . . . . . . . . . . . . 41Programmatic Security . . . . . . . . . . . . . . . . . . . . . . . . . . . . . . . . . . . . . . . . . . . . . . . . . . . . . . . . . . . . . . . . . 41Declarative Security . . . . . . . . . . . . . . . . . . . . . . . . . . . . . . . . . . . . . . . . . . . . . . . . . . . . . . . . . . . . . . . . . . . 41
Application Level Security . . . . . . . . . . . . . . . . . . . . . . . . . . . . . . . . . . . . . . . . . . . . . . . . . . . . . . . . . . . 42Component Level Security . . . . . . . . . . . . . . . . . . . . . . . . . . . . . . . . . . . . . . . . . . . . . . . . . . . . . . . . . . . 42
Guide to Security Information . . . . . . . . . . . . . . . . . . . . . . . . . . . . . . . . . . . . . . . . . . . . . . . . . . . . . . . . . . . . . . 42User Information . . . . . . . . . . . . . . . . . . . . . . . . . . . . . . . . . . . . . . . . . . . . . . . . . . . . . . . . . . . . . . . . . . . . . 43Security Roles . . . . . . . . . . . . . . . . . . . . . . . . . . . . . . . . . . . . . . . . . . . . . . . . . . . . . . . . . . . . . . . . . . . . . . . . 43
Realm Configuration . . . . . . . . . . . . . . . . . . . . . . . . . . . . . . . . . . . . . . . . . . . . . . . . . . . . . . . . . . . . . . . . . . . . . 44How to Configure a Realm and Set the Default Realm . . . . . . . . . . . . . . . . . . . . . . . . . . . . . . . . . . . . . . . . 44
Using the Administration Console . . . . . . . . . . . . . . . . . . . . . . . . . . . . . . . . . . . . . . . . . . . . . . . . . . . . . 45Using the asadmin Command . . . . . . . . . . . . . . . . . . . . . . . . . . . . . . . . . . . . . . . . . . . . . . . . . . . . . . . . . 45Editing the domain.xml File . . . . . . . . . . . . . . . . . . . . . . . . . . . . . . . . . . . . . . . . . . . . . . . . . . . . . . . . . . 46
How to Set a Realm for an Application or Module . . . . . . . . . . . . . . . . . . . . . . . . . . . . . . . . . . . . . . . . . . . 47Supported Realms . . . . . . . . . . . . . . . . . . . . . . . . . . . . . . . . . . . . . . . . . . . . . . . . . . . . . . . . . . . . . . . . . . . . . 47
file . . . . . . . . . . . . . . . . . . . . . . . . . . . . . . . . . . . . . . . . . . . . . . . . . . . . . . . . . . . . . . . . . . . . . . . . . . . . . . 48ldap . . . . . . . . . . . . . . . . . . . . . . . . . . . . . . . . . . . . . . . . . . . . . . . . . . . . . . . . . . . . . . . . . . . . . . . . . . . . . 50certificate . . . . . . . . . . . . . . . . . . . . . . . . . . . . . . . . . . . . . . . . . . . . . . . . . . . . . . . . . . . . . . . . . . . . . . . . . 51solaris . . . . . . . . . . . . . . . . . . . . . . . . . . . . . . . . . . . . . . . . . . . . . . . . . . . . . . . . . . . . . . . . . . . . . . . . . . . 53Creating a Custom Realm . . . . . . . . . . . . . . . . . . . . . . . . . . . . . . . . . . . . . . . . . . . . . . . . . . . . . . . . . . . . 54
JACC Support . . . . . . . . . . . . . . . . . . . . . . . . . . . . . . . . . . . . . . . . . . . . . . . . . . . . . . . . . . . . . . . . . . . . . . . . . . 55Using the Administration Console . . . . . . . . . . . . . . . . . . . . . . . . . . . . . . . . . . . . . . . . . . . . . . . . . . . . . 55Editing the domain.xml File . . . . . . . . . . . . . . . . . . . . . . . . . . . . . . . . . . . . . . . . . . . . . . . . . . . . . . . . . . 56
Pluggable Audit Module Support . . . . . . . . . . . . . . . . . . . . . . . . . . . . . . . . . . . . . . . . . . . . . . . . . . . . . . . . . . . 57Configuring an Audit Module . . . . . . . . . . . . . . . . . . . . . . . . . . . . . . . . . . . . . . . . . . . . . . . . . . . . . . . . . . . 57
Using the Administration Console . . . . . . . . . . . . . . . . . . . . . . . . . . . . . . . . . . . . . . . . . . . . . . . . . . . . . 57Using the asadmin Command . . . . . . . . . . . . . . . . . . . . . . . . . . . . . . . . . . . . . . . . . . . . . . . . . . . . . . . . . 58

Contents 5
Editing the domain.xml File . . . . . . . . . . . . . . . . . . . . . . . . . . . . . . . . . . . . . . . . . . . . . . . . . . . . . . . . . . 59The AuditModule Class . . . . . . . . . . . . . . . . . . . . . . . . . . . . . . . . . . . . . . . . . . . . . . . . . . . . . . . . . . . . . . . . 59
The server.policy File . . . . . . . . . . . . . . . . . . . . . . . . . . . . . . . . . . . . . . . . . . . . . . . . . . . . . . . . . . . . . . . . . . . . 60Default Permissions . . . . . . . . . . . . . . . . . . . . . . . . . . . . . . . . . . . . . . . . . . . . . . . . . . . . . . . . . . . . . . . . . . . 60Changing Permissions for an Application . . . . . . . . . . . . . . . . . . . . . . . . . . . . . . . . . . . . . . . . . . . . . . . . . . 61
Programmatic Login . . . . . . . . . . . . . . . . . . . . . . . . . . . . . . . . . . . . . . . . . . . . . . . . . . . . . . . . . . . . . . . . . . . . . 62Precautions . . . . . . . . . . . . . . . . . . . . . . . . . . . . . . . . . . . . . . . . . . . . . . . . . . . . . . . . . . . . . . . . . . . . . . . . . . 62Granting Programmatic Login Permission . . . . . . . . . . . . . . . . . . . . . . . . . . . . . . . . . . . . . . . . . . . . . . . . . . 63The ProgrammaticLogin Class . . . . . . . . . . . . . . . . . . . . . . . . . . . . . . . . . . . . . . . . . . . . . . . . . . . . . . . . . . . 63
User Authentication for Single Sign-on . . . . . . . . . . . . . . . . . . . . . . . . . . . . . . . . . . . . . . . . . . . . . . . . . . . . . . . 64Defining Roles . . . . . . . . . . . . . . . . . . . . . . . . . . . . . . . . . . . . . . . . . . . . . . . . . . . . . . . . . . . . . . . . . . . . . . . . . . 66Authenticating an Application Client Using the JAAS Module . . . . . . . . . . . . . . . . . . . . . . . . . . . . . . . . . . . . 67
Chapter 3 Assembling and Deploying J2EE Applications . . . . . . . . . . . . . . . . . . . . . . . . . . . . 75Overview of Assembly and Deployment . . . . . . . . . . . . . . . . . . . . . . . . . . . . . . . . . . . . . . . . . . . . . . . . . . . . . . 75
Modules . . . . . . . . . . . . . . . . . . . . . . . . . . . . . . . . . . . . . . . . . . . . . . . . . . . . . . . . . . . . . . . . . . . . . . . . . . . . 76Applications . . . . . . . . . . . . . . . . . . . . . . . . . . . . . . . . . . . . . . . . . . . . . . . . . . . . . . . . . . . . . . . . . . . . . . . . . 77J2EE Standard Descriptors . . . . . . . . . . . . . . . . . . . . . . . . . . . . . . . . . . . . . . . . . . . . . . . . . . . . . . . . . . . . . . 79Sun Java System Application Server Descriptors . . . . . . . . . . . . . . . . . . . . . . . . . . . . . . . . . . . . . . . . . . . . 80Naming Standards . . . . . . . . . . . . . . . . . . . . . . . . . . . . . . . . . . . . . . . . . . . . . . . . . . . . . . . . . . . . . . . . . . . . 81Directory Structure . . . . . . . . . . . . . . . . . . . . . . . . . . . . . . . . . . . . . . . . . . . . . . . . . . . . . . . . . . . . . . . . . . . . 81Runtime Environments . . . . . . . . . . . . . . . . . . . . . . . . . . . . . . . . . . . . . . . . . . . . . . . . . . . . . . . . . . . . . . . . . 83
Module Runtime Environment . . . . . . . . . . . . . . . . . . . . . . . . . . . . . . . . . . . . . . . . . . . . . . . . . . . . . . . . 83Application Runtime Environment . . . . . . . . . . . . . . . . . . . . . . . . . . . . . . . . . . . . . . . . . . . . . . . . . . . . . 84
Classloaders . . . . . . . . . . . . . . . . . . . . . . . . . . . . . . . . . . . . . . . . . . . . . . . . . . . . . . . . . . . . . . . . . . . . . . . . . 85The Classloader Hierarchy . . . . . . . . . . . . . . . . . . . . . . . . . . . . . . . . . . . . . . . . . . . . . . . . . . . . . . . . . . . 86Classloader Universes . . . . . . . . . . . . . . . . . . . . . . . . . . . . . . . . . . . . . . . . . . . . . . . . . . . . . . . . . . . . . . . 88Circumventing Classloader Isolation . . . . . . . . . . . . . . . . . . . . . . . . . . . . . . . . . . . . . . . . . . . . . . . . . . . 89
Assembling Modules and Applications . . . . . . . . . . . . . . . . . . . . . . . . . . . . . . . . . . . . . . . . . . . . . . . . . . . . . . . 91Tools for Assembly . . . . . . . . . . . . . . . . . . . . . . . . . . . . . . . . . . . . . . . . . . . . . . . . . . . . . . . . . . . . . . . . . . . 92
deploytool . . . . . . . . . . . . . . . . . . . . . . . . . . . . . . . . . . . . . . . . . . . . . . . . . . . . . . . . . . . . . . . . . . . . . . . . 92Apache Ant . . . . . . . . . . . . . . . . . . . . . . . . . . . . . . . . . . . . . . . . . . . . . . . . . . . . . . . . . . . . . . . . . . . . . . . 92The Deployment Descriptor Verifier . . . . . . . . . . . . . . . . . . . . . . . . . . . . . . . . . . . . . . . . . . . . . . . . . . . 92
Assembling a WAR Module . . . . . . . . . . . . . . . . . . . . . . . . . . . . . . . . . . . . . . . . . . . . . . . . . . . . . . . . . . . . 97Assembling an EJB JAR Module . . . . . . . . . . . . . . . . . . . . . . . . . . . . . . . . . . . . . . . . . . . . . . . . . . . . . . . . . 98Assembling a Lifecycle Module . . . . . . . . . . . . . . . . . . . . . . . . . . . . . . . . . . . . . . . . . . . . . . . . . . . . . . . . . . 98Assembling an Application . . . . . . . . . . . . . . . . . . . . . . . . . . . . . . . . . . . . . . . . . . . . . . . . . . . . . . . . . . . . . 99Assembling an ACC Client . . . . . . . . . . . . . . . . . . . . . . . . . . . . . . . . . . . . . . . . . . . . . . . . . . . . . . . . . . . . 100Assembling a J2EE CA Resource Adapter . . . . . . . . . . . . . . . . . . . . . . . . . . . . . . . . . . . . . . . . . . . . . . . . 100
Deploying Modules and Applications . . . . . . . . . . . . . . . . . . . . . . . . . . . . . . . . . . . . . . . . . . . . . . . . . . . . . . . 101Deployment Errors . . . . . . . . . . . . . . . . . . . . . . . . . . . . . . . . . . . . . . . . . . . . . . . . . . . . . . . . . . . . . . . . . . . 101The Deployment Life Cycle . . . . . . . . . . . . . . . . . . . . . . . . . . . . . . . . . . . . . . . . . . . . . . . . . . . . . . . . . . . . 102
Dynamic Deployment . . . . . . . . . . . . . . . . . . . . . . . . . . . . . . . . . . . . . . . . . . . . . . . . . . . . . . . . . . . . . . 102

6 Application Server 8 • Developer’s Guide
Disabling a Deployed Application or Module . . . . . . . . . . . . . . . . . . . . . . . . . . . . . . . . . . . . . . . . . . . 102Dynamic Reloading . . . . . . . . . . . . . . . . . . . . . . . . . . . . . . . . . . . . . . . . . . . . . . . . . . . . . . . . . . . . . . . . 103Automatic Deployment . . . . . . . . . . . . . . . . . . . . . . . . . . . . . . . . . . . . . . . . . . . . . . . . . . . . . . . . . . . . . 104
Tools for Deployment . . . . . . . . . . . . . . . . . . . . . . . . . . . . . . . . . . . . . . . . . . . . . . . . . . . . . . . . . . . . . . . . . 106Apache Ant . . . . . . . . . . . . . . . . . . . . . . . . . . . . . . . . . . . . . . . . . . . . . . . . . . . . . . . . . . . . . . . . . . . . . . 106The deploytool . . . . . . . . . . . . . . . . . . . . . . . . . . . . . . . . . . . . . . . . . . . . . . . . . . . . . . . . . . . . . . . . . . . . 106JSR 88 . . . . . . . . . . . . . . . . . . . . . . . . . . . . . . . . . . . . . . . . . . . . . . . . . . . . . . . . . . . . . . . . . . . . . . . . . . 106The FastJavac Compiler . . . . . . . . . . . . . . . . . . . . . . . . . . . . . . . . . . . . . . . . . . . . . . . . . . . . . . . . . . . . 106The asadmin Command . . . . . . . . . . . . . . . . . . . . . . . . . . . . . . . . . . . . . . . . . . . . . . . . . . . . . . . . . . . . . 107The Administration Console . . . . . . . . . . . . . . . . . . . . . . . . . . . . . . . . . . . . . . . . . . . . . . . . . . . . . . . . . 109
Deployment by Module or Application . . . . . . . . . . . . . . . . . . . . . . . . . . . . . . . . . . . . . . . . . . . . . . . . . . . 110Deploying a WAR Module . . . . . . . . . . . . . . . . . . . . . . . . . . . . . . . . . . . . . . . . . . . . . . . . . . . . . . . . . . . . . 110Deploying an EJB JAR Module . . . . . . . . . . . . . . . . . . . . . . . . . . . . . . . . . . . . . . . . . . . . . . . . . . . . . . . . . 111Deploying a Lifecycle Module . . . . . . . . . . . . . . . . . . . . . . . . . . . . . . . . . . . . . . . . . . . . . . . . . . . . . . . . . . 111
The asadmin Command . . . . . . . . . . . . . . . . . . . . . . . . . . . . . . . . . . . . . . . . . . . . . . . . . . . . . . . . . . . . . 111The Administration Console . . . . . . . . . . . . . . . . . . . . . . . . . . . . . . . . . . . . . . . . . . . . . . . . . . . . . . . . . 112
Deploying an Application Client . . . . . . . . . . . . . . . . . . . . . . . . . . . . . . . . . . . . . . . . . . . . . . . . . . . . . . . . 113Deploying a J2EE CA Resource Adapter . . . . . . . . . . . . . . . . . . . . . . . . . . . . . . . . . . . . . . . . . . . . . . . . . . 114Access to Shared Frameworks . . . . . . . . . . . . . . . . . . . . . . . . . . . . . . . . . . . . . . . . . . . . . . . . . . . . . . . . . . 114
Apache Ant Assembly and Deployment Tool . . . . . . . . . . . . . . . . . . . . . . . . . . . . . . . . . . . . . . . . . . . . . . . . . 115Ant Tasks for Sun Java System Application Server 8 . . . . . . . . . . . . . . . . . . . . . . . . . . . . . . . . . . . . . . . . 115
sun-appserv-deploy . . . . . . . . . . . . . . . . . . . . . . . . . . . . . . . . . . . . . . . . . . . . . . . . . . . . . . . . . . . . . . . . 116sun-appserv-undeploy . . . . . . . . . . . . . . . . . . . . . . . . . . . . . . . . . . . . . . . . . . . . . . . . . . . . . . . . . . . . . . 119sun-appserv-component . . . . . . . . . . . . . . . . . . . . . . . . . . . . . . . . . . . . . . . . . . . . . . . . . . . . . . . . . . . . 121sun-appserv-admin . . . . . . . . . . . . . . . . . . . . . . . . . . . . . . . . . . . . . . . . . . . . . . . . . . . . . . . . . . . . . . . . 123sun-appserv-jspc . . . . . . . . . . . . . . . . . . . . . . . . . . . . . . . . . . . . . . . . . . . . . . . . . . . . . . . . . . . . . . . . . . 125sun-appserv-update . . . . . . . . . . . . . . . . . . . . . . . . . . . . . . . . . . . . . . . . . . . . . . . . . . . . . . . . . . . . . . . . 126
Reusable Subelements . . . . . . . . . . . . . . . . . . . . . . . . . . . . . . . . . . . . . . . . . . . . . . . . . . . . . . . . . . . . . . . . 127component . . . . . . . . . . . . . . . . . . . . . . . . . . . . . . . . . . . . . . . . . . . . . . . . . . . . . . . . . . . . . . . . . . . . . . . 127fileset . . . . . . . . . . . . . . . . . . . . . . . . . . . . . . . . . . . . . . . . . . . . . . . . . . . . . . . . . . . . . . . . . . . . . . . . . . . 129
Chapter 4 Debugging J2EE Applications . . . . . . . . . . . . . . . . . . . . . . . . . . . . . . . . . . . . . . . . 131Enabling Debugging . . . . . . . . . . . . . . . . . . . . . . . . . . . . . . . . . . . . . . . . . . . . . . . . . . . . . . . . . . . . . . . . . . . . 131
Using the Administration Console . . . . . . . . . . . . . . . . . . . . . . . . . . . . . . . . . . . . . . . . . . . . . . . . . . . . . . . 132Editing the domain.xml File . . . . . . . . . . . . . . . . . . . . . . . . . . . . . . . . . . . . . . . . . . . . . . . . . . . . . . . . . . . . 133
JPDA Options . . . . . . . . . . . . . . . . . . . . . . . . . . . . . . . . . . . . . . . . . . . . . . . . . . . . . . . . . . . . . . . . . . . . . . . . . 133Generating a Stack Trace for Debugging . . . . . . . . . . . . . . . . . . . . . . . . . . . . . . . . . . . . . . . . . . . . . . . . . . . . 133The Java Debugger . . . . . . . . . . . . . . . . . . . . . . . . . . . . . . . . . . . . . . . . . . . . . . . . . . . . . . . . . . . . . . . . . . . . . 134Using the Sun ONE Studio IDE for Debugging . . . . . . . . . . . . . . . . . . . . . . . . . . . . . . . . . . . . . . . . . . . . . . . 134Using the NetBeans IDE for Debugging . . . . . . . . . . . . . . . . . . . . . . . . . . . . . . . . . . . . . . . . . . . . . . . . . . . . . 135Using the JBuilder IDE for Debugging . . . . . . . . . . . . . . . . . . . . . . . . . . . . . . . . . . . . . . . . . . . . . . . . . . . . . . 136Sun Java System Message Queue Debugging . . . . . . . . . . . . . . . . . . . . . . . . . . . . . . . . . . . . . . . . . . . . . . . . . 137Enabling Verbose Mode . . . . . . . . . . . . . . . . . . . . . . . . . . . . . . . . . . . . . . . . . . . . . . . . . . . . . . . . . . . . . . . . . 138

Contents 7
Using the Administration Console . . . . . . . . . . . . . . . . . . . . . . . . . . . . . . . . . . . . . . . . . . . . . . . . . . . . . . . 138Editing the domain.xml File . . . . . . . . . . . . . . . . . . . . . . . . . . . . . . . . . . . . . . . . . . . . . . . . . . . . . . . . . . . . 139
Logging . . . . . . . . . . . . . . . . . . . . . . . . . . . . . . . . . . . . . . . . . . . . . . . . . . . . . . . . . . . . . . . . . . . . . . . . . . . . . . 139Profiling . . . . . . . . . . . . . . . . . . . . . . . . . . . . . . . . . . . . . . . . . . . . . . . . . . . . . . . . . . . . . . . . . . . . . . . . . . . . . . 139
The HPROF Profiler . . . . . . . . . . . . . . . . . . . . . . . . . . . . . . . . . . . . . . . . . . . . . . . . . . . . . . . . . . . . . . . . . . 140The Optimizeit Profiler . . . . . . . . . . . . . . . . . . . . . . . . . . . . . . . . . . . . . . . . . . . . . . . . . . . . . . . . . . . . . . . . 142
Chapter 5 Deployment Descriptor Files . . . . . . . . . . . . . . . . . . . . . . . . . . . . . . . . . . . . . . . . . . 145Sun Java System Application Server Descriptors . . . . . . . . . . . . . . . . . . . . . . . . . . . . . . . . . . . . . . . . . . . . . . 145The sun-application.xml File . . . . . . . . . . . . . . . . . . . . . . . . . . . . . . . . . . . . . . . . . . . . . . . . . . . . . . . . . . . . . . 147
sun-application . . . . . . . . . . . . . . . . . . . . . . . . . . . . . . . . . . . . . . . . . . . . . . . . . . . . . . . . . . . . . . . . . . . 147web . . . . . . . . . . . . . . . . . . . . . . . . . . . . . . . . . . . . . . . . . . . . . . . . . . . . . . . . . . . . . . . . . . . . . . . . . . . . 148web-uri . . . . . . . . . . . . . . . . . . . . . . . . . . . . . . . . . . . . . . . . . . . . . . . . . . . . . . . . . . . . . . . . . . . . . . . . . 148context-root . . . . . . . . . . . . . . . . . . . . . . . . . . . . . . . . . . . . . . . . . . . . . . . . . . . . . . . . . . . . . . . . . . . . . . 148pass-by-reference . . . . . . . . . . . . . . . . . . . . . . . . . . . . . . . . . . . . . . . . . . . . . . . . . . . . . . . . . . . . . . . . . 149unique-id . . . . . . . . . . . . . . . . . . . . . . . . . . . . . . . . . . . . . . . . . . . . . . . . . . . . . . . . . . . . . . . . . . . . . . . . 150security-role-mapping . . . . . . . . . . . . . . . . . . . . . . . . . . . . . . . . . . . . . . . . . . . . . . . . . . . . . . . . . . . . . . 150role-name . . . . . . . . . . . . . . . . . . . . . . . . . . . . . . . . . . . . . . . . . . . . . . . . . . . . . . . . . . . . . . . . . . . . . . . . 150principal-name . . . . . . . . . . . . . . . . . . . . . . . . . . . . . . . . . . . . . . . . . . . . . . . . . . . . . . . . . . . . . . . . . . . . 150group-name . . . . . . . . . . . . . . . . . . . . . . . . . . . . . . . . . . . . . . . . . . . . . . . . . . . . . . . . . . . . . . . . . . . . . . 151realm . . . . . . . . . . . . . . . . . . . . . . . . . . . . . . . . . . . . . . . . . . . . . . . . . . . . . . . . . . . . . . . . . . . . . . . . . . . 151
Sample sun-application.xml File . . . . . . . . . . . . . . . . . . . . . . . . . . . . . . . . . . . . . . . . . . . . . . . . . . . . . . . . 151The sun-web.xml File . . . . . . . . . . . . . . . . . . . . . . . . . . . . . . . . . . . . . . . . . . . . . . . . . . . . . . . . . . . . . . . . . . . 151
General Elements . . . . . . . . . . . . . . . . . . . . . . . . . . . . . . . . . . . . . . . . . . . . . . . . . . . . . . . . . . . . . . . . . . . . 152sun-web-app . . . . . . . . . . . . . . . . . . . . . . . . . . . . . . . . . . . . . . . . . . . . . . . . . . . . . . . . . . . . . . . . . . . . . 152property . . . . . . . . . . . . . . . . . . . . . . . . . . . . . . . . . . . . . . . . . . . . . . . . . . . . . . . . . . . . . . . . . . . . . . . . . 154description . . . . . . . . . . . . . . . . . . . . . . . . . . . . . . . . . . . . . . . . . . . . . . . . . . . . . . . . . . . . . . . . . . . . . . . 155context-root . . . . . . . . . . . . . . . . . . . . . . . . . . . . . . . . . . . . . . . . . . . . . . . . . . . . . . . . . . . . . . . . . . . . . . 155
Security Elements . . . . . . . . . . . . . . . . . . . . . . . . . . . . . . . . . . . . . . . . . . . . . . . . . . . . . . . . . . . . . . . . . . . . 155security-role-mapping . . . . . . . . . . . . . . . . . . . . . . . . . . . . . . . . . . . . . . . . . . . . . . . . . . . . . . . . . . . . . . 156servlet . . . . . . . . . . . . . . . . . . . . . . . . . . . . . . . . . . . . . . . . . . . . . . . . . . . . . . . . . . . . . . . . . . . . . . . . . . 156servlet-name . . . . . . . . . . . . . . . . . . . . . . . . . . . . . . . . . . . . . . . . . . . . . . . . . . . . . . . . . . . . . . . . . . . . . 157role-name . . . . . . . . . . . . . . . . . . . . . . . . . . . . . . . . . . . . . . . . . . . . . . . . . . . . . . . . . . . . . . . . . . . . . . . . 157principal-name . . . . . . . . . . . . . . . . . . . . . . . . . . . . . . . . . . . . . . . . . . . . . . . . . . . . . . . . . . . . . . . . . . . . 157group-name . . . . . . . . . . . . . . . . . . . . . . . . . . . . . . . . . . . . . . . . . . . . . . . . . . . . . . . . . . . . . . . . . . . . . . 157
Session Elements . . . . . . . . . . . . . . . . . . . . . . . . . . . . . . . . . . . . . . . . . . . . . . . . . . . . . . . . . . . . . . . . . . . . 158session-config . . . . . . . . . . . . . . . . . . . . . . . . . . . . . . . . . . . . . . . . . . . . . . . . . . . . . . . . . . . . . . . . . . . . 158session-manager . . . . . . . . . . . . . . . . . . . . . . . . . . . . . . . . . . . . . . . . . . . . . . . . . . . . . . . . . . . . . . . . . . 158manager-properties . . . . . . . . . . . . . . . . . . . . . . . . . . . . . . . . . . . . . . . . . . . . . . . . . . . . . . . . . . . . . . . . 159store-properties . . . . . . . . . . . . . . . . . . . . . . . . . . . . . . . . . . . . . . . . . . . . . . . . . . . . . . . . . . . . . . . . . . . 160session-properties . . . . . . . . . . . . . . . . . . . . . . . . . . . . . . . . . . . . . . . . . . . . . . . . . . . . . . . . . . . . . . . . . 161cookie-properties . . . . . . . . . . . . . . . . . . . . . . . . . . . . . . . . . . . . . . . . . . . . . . . . . . . . . . . . . . . . . . . . . . 162

8 Application Server 8 • Developer’s Guide
Reference Elements . . . . . . . . . . . . . . . . . . . . . . . . . . . . . . . . . . . . . . . . . . . . . . . . . . . . . . . . . . . . . . . . . . 163resource-env-ref . . . . . . . . . . . . . . . . . . . . . . . . . . . . . . . . . . . . . . . . . . . . . . . . . . . . . . . . . . . . . . . . . . 164resource-env-ref-name . . . . . . . . . . . . . . . . . . . . . . . . . . . . . . . . . . . . . . . . . . . . . . . . . . . . . . . . . . . . . 164resource-ref . . . . . . . . . . . . . . . . . . . . . . . . . . . . . . . . . . . . . . . . . . . . . . . . . . . . . . . . . . . . . . . . . . . . . . 164res-ref-name . . . . . . . . . . . . . . . . . . . . . . . . . . . . . . . . . . . . . . . . . . . . . . . . . . . . . . . . . . . . . . . . . . . . . 165default-resource-principal . . . . . . . . . . . . . . . . . . . . . . . . . . . . . . . . . . . . . . . . . . . . . . . . . . . . . . . . . . . 165name . . . . . . . . . . . . . . . . . . . . . . . . . . . . . . . . . . . . . . . . . . . . . . . . . . . . . . . . . . . . . . . . . . . . . . . . . . . 166password . . . . . . . . . . . . . . . . . . . . . . . . . . . . . . . . . . . . . . . . . . . . . . . . . . . . . . . . . . . . . . . . . . . . . . . . 166ejb-ref . . . . . . . . . . . . . . . . . . . . . . . . . . . . . . . . . . . . . . . . . . . . . . . . . . . . . . . . . . . . . . . . . . . . . . . . . . 166ejb-ref-name . . . . . . . . . . . . . . . . . . . . . . . . . . . . . . . . . . . . . . . . . . . . . . . . . . . . . . . . . . . . . . . . . . . . . 167message-destination . . . . . . . . . . . . . . . . . . . . . . . . . . . . . . . . . . . . . . . . . . . . . . . . . . . . . . . . . . . . . . . 167message-destination-name . . . . . . . . . . . . . . . . . . . . . . . . . . . . . . . . . . . . . . . . . . . . . . . . . . . . . . . . . . 167jndi-name . . . . . . . . . . . . . . . . . . . . . . . . . . . . . . . . . . . . . . . . . . . . . . . . . . . . . . . . . . . . . . . . . . . . . . . . 168
Caching Elements . . . . . . . . . . . . . . . . . . . . . . . . . . . . . . . . . . . . . . . . . . . . . . . . . . . . . . . . . . . . . . . . . . . . 168cache . . . . . . . . . . . . . . . . . . . . . . . . . . . . . . . . . . . . . . . . . . . . . . . . . . . . . . . . . . . . . . . . . . . . . . . . . . . 168cache-helper . . . . . . . . . . . . . . . . . . . . . . . . . . . . . . . . . . . . . . . . . . . . . . . . . . . . . . . . . . . . . . . . . . . . . 170default-helper . . . . . . . . . . . . . . . . . . . . . . . . . . . . . . . . . . . . . . . . . . . . . . . . . . . . . . . . . . . . . . . . . . . . 171cache-mapping . . . . . . . . . . . . . . . . . . . . . . . . . . . . . . . . . . . . . . . . . . . . . . . . . . . . . . . . . . . . . . . . . . . 172url-pattern . . . . . . . . . . . . . . . . . . . . . . . . . . . . . . . . . . . . . . . . . . . . . . . . . . . . . . . . . . . . . . . . . . . . . . . 173cache-helper-ref . . . . . . . . . . . . . . . . . . . . . . . . . . . . . . . . . . . . . . . . . . . . . . . . . . . . . . . . . . . . . . . . . . . 173timeout . . . . . . . . . . . . . . . . . . . . . . . . . . . . . . . . . . . . . . . . . . . . . . . . . . . . . . . . . . . . . . . . . . . . . . . . . . 174refresh-field . . . . . . . . . . . . . . . . . . . . . . . . . . . . . . . . . . . . . . . . . . . . . . . . . . . . . . . . . . . . . . . . . . . . . . 174http-method . . . . . . . . . . . . . . . . . . . . . . . . . . . . . . . . . . . . . . . . . . . . . . . . . . . . . . . . . . . . . . . . . . . . . . 175key-field . . . . . . . . . . . . . . . . . . . . . . . . . . . . . . . . . . . . . . . . . . . . . . . . . . . . . . . . . . . . . . . . . . . . . . . . 175constraint-field . . . . . . . . . . . . . . . . . . . . . . . . . . . . . . . . . . . . . . . . . . . . . . . . . . . . . . . . . . . . . . . . . . . 176value . . . . . . . . . . . . . . . . . . . . . . . . . . . . . . . . . . . . . . . . . . . . . . . . . . . . . . . . . . . . . . . . . . . . . . . . . . . 176
Classloader Elements . . . . . . . . . . . . . . . . . . . . . . . . . . . . . . . . . . . . . . . . . . . . . . . . . . . . . . . . . . . . . . . . . 177class-loader . . . . . . . . . . . . . . . . . . . . . . . . . . . . . . . . . . . . . . . . . . . . . . . . . . . . . . . . . . . . . . . . . . . . . . 177
JSP Elements . . . . . . . . . . . . . . . . . . . . . . . . . . . . . . . . . . . . . . . . . . . . . . . . . . . . . . . . . . . . . . . . . . . . . . . 178jsp-config . . . . . . . . . . . . . . . . . . . . . . . . . . . . . . . . . . . . . . . . . . . . . . . . . . . . . . . . . . . . . . . . . . . . . . . . 178
Internationalization Elements . . . . . . . . . . . . . . . . . . . . . . . . . . . . . . . . . . . . . . . . . . . . . . . . . . . . . . . . . . . 181locale-charset-info . . . . . . . . . . . . . . . . . . . . . . . . . . . . . . . . . . . . . . . . . . . . . . . . . . . . . . . . . . . . . . . . . 181locale-charset-map . . . . . . . . . . . . . . . . . . . . . . . . . . . . . . . . . . . . . . . . . . . . . . . . . . . . . . . . . . . . . . . . 182parameter-encoding . . . . . . . . . . . . . . . . . . . . . . . . . . . . . . . . . . . . . . . . . . . . . . . . . . . . . . . . . . . . . . . . 183
Sample sun-web.xml File . . . . . . . . . . . . . . . . . . . . . . . . . . . . . . . . . . . . . . . . . . . . . . . . . . . . . . . . . . . . . . 183The sun-ejb-jar.xml File . . . . . . . . . . . . . . . . . . . . . . . . . . . . . . . . . . . . . . . . . . . . . . . . . . . . . . . . . . . . . . . . . 184
General Elements . . . . . . . . . . . . . . . . . . . . . . . . . . . . . . . . . . . . . . . . . . . . . . . . . . . . . . . . . . . . . . . . . . . . 185description . . . . . . . . . . . . . . . . . . . . . . . . . . . . . . . . . . . . . . . . . . . . . . . . . . . . . . . . . . . . . . . . . . . . . . . 185ejb . . . . . . . . . . . . . . . . . . . . . . . . . . . . . . . . . . . . . . . . . . . . . . . . . . . . . . . . . . . . . . . . . . . . . . . . . . . . . 185ejb-name . . . . . . . . . . . . . . . . . . . . . . . . . . . . . . . . . . . . . . . . . . . . . . . . . . . . . . . . . . . . . . . . . . . . . . . . 188enterprise-beans . . . . . . . . . . . . . . . . . . . . . . . . . . . . . . . . . . . . . . . . . . . . . . . . . . . . . . . . . . . . . . . . . . . 188is-read-only-bean . . . . . . . . . . . . . . . . . . . . . . . . . . . . . . . . . . . . . . . . . . . . . . . . . . . . . . . . . . . . . . . . . . 189name . . . . . . . . . . . . . . . . . . . . . . . . . . . . . . . . . . . . . . . . . . . . . . . . . . . . . . . . . . . . . . . . . . . . . . . . . . . 189

Contents 9
property . . . . . . . . . . . . . . . . . . . . . . . . . . . . . . . . . . . . . . . . . . . . . . . . . . . . . . . . . . . . . . . . . . . . . . . . . 190refresh-period-in-seconds . . . . . . . . . . . . . . . . . . . . . . . . . . . . . . . . . . . . . . . . . . . . . . . . . . . . . . . . . . . 190sun-ejb-jar . . . . . . . . . . . . . . . . . . . . . . . . . . . . . . . . . . . . . . . . . . . . . . . . . . . . . . . . . . . . . . . . . . . . . . . 190unique-id . . . . . . . . . . . . . . . . . . . . . . . . . . . . . . . . . . . . . . . . . . . . . . . . . . . . . . . . . . . . . . . . . . . . . . . . 191value . . . . . . . . . . . . . . . . . . . . . . . . . . . . . . . . . . . . . . . . . . . . . . . . . . . . . . . . . . . . . . . . . . . . . . . . . . . 191
Role Mapping Elements . . . . . . . . . . . . . . . . . . . . . . . . . . . . . . . . . . . . . . . . . . . . . . . . . . . . . . . . . . . . . . . 191group-name . . . . . . . . . . . . . . . . . . . . . . . . . . . . . . . . . . . . . . . . . . . . . . . . . . . . . . . . . . . . . . . . . . . . . . 191principal . . . . . . . . . . . . . . . . . . . . . . . . . . . . . . . . . . . . . . . . . . . . . . . . . . . . . . . . . . . . . . . . . . . . . . . . . 192principal-name . . . . . . . . . . . . . . . . . . . . . . . . . . . . . . . . . . . . . . . . . . . . . . . . . . . . . . . . . . . . . . . . . . . . 192role-name . . . . . . . . . . . . . . . . . . . . . . . . . . . . . . . . . . . . . . . . . . . . . . . . . . . . . . . . . . . . . . . . . . . . . . . . 192security-role-mapping . . . . . . . . . . . . . . . . . . . . . . . . . . . . . . . . . . . . . . . . . . . . . . . . . . . . . . . . . . . . . . 192server-name . . . . . . . . . . . . . . . . . . . . . . . . . . . . . . . . . . . . . . . . . . . . . . . . . . . . . . . . . . . . . . . . . . . . . . 193
Reference Elements . . . . . . . . . . . . . . . . . . . . . . . . . . . . . . . . . . . . . . . . . . . . . . . . . . . . . . . . . . . . . . . . . . 193ejb-ref . . . . . . . . . . . . . . . . . . . . . . . . . . . . . . . . . . . . . . . . . . . . . . . . . . . . . . . . . . . . . . . . . . . . . . . . . . 193ejb-ref-name . . . . . . . . . . . . . . . . . . . . . . . . . . . . . . . . . . . . . . . . . . . . . . . . . . . . . . . . . . . . . . . . . . . . . 194jndi-name . . . . . . . . . . . . . . . . . . . . . . . . . . . . . . . . . . . . . . . . . . . . . . . . . . . . . . . . . . . . . . . . . . . . . . . . 194pass-by-reference . . . . . . . . . . . . . . . . . . . . . . . . . . . . . . . . . . . . . . . . . . . . . . . . . . . . . . . . . . . . . . . . . 195res-ref-name . . . . . . . . . . . . . . . . . . . . . . . . . . . . . . . . . . . . . . . . . . . . . . . . . . . . . . . . . . . . . . . . . . . . . 196resource-env-ref . . . . . . . . . . . . . . . . . . . . . . . . . . . . . . . . . . . . . . . . . . . . . . . . . . . . . . . . . . . . . . . . . . 196resource-env-ref-name . . . . . . . . . . . . . . . . . . . . . . . . . . . . . . . . . . . . . . . . . . . . . . . . . . . . . . . . . . . . . 197resource-ref . . . . . . . . . . . . . . . . . . . . . . . . . . . . . . . . . . . . . . . . . . . . . . . . . . . . . . . . . . . . . . . . . . . . . . 197message-destination . . . . . . . . . . . . . . . . . . . . . . . . . . . . . . . . . . . . . . . . . . . . . . . . . . . . . . . . . . . . . . . 198message-destination-name . . . . . . . . . . . . . . . . . . . . . . . . . . . . . . . . . . . . . . . . . . . . . . . . . . . . . . . . . . 198
Messaging Elements . . . . . . . . . . . . . . . . . . . . . . . . . . . . . . . . . . . . . . . . . . . . . . . . . . . . . . . . . . . . . . . . . . 199activation-config . . . . . . . . . . . . . . . . . . . . . . . . . . . . . . . . . . . . . . . . . . . . . . . . . . . . . . . . . . . . . . . . . . 199activation-config-property . . . . . . . . . . . . . . . . . . . . . . . . . . . . . . . . . . . . . . . . . . . . . . . . . . . . . . . . . . . 200activation-config-property-name . . . . . . . . . . . . . . . . . . . . . . . . . . . . . . . . . . . . . . . . . . . . . . . . . . . . . . 200activation-config-property-value . . . . . . . . . . . . . . . . . . . . . . . . . . . . . . . . . . . . . . . . . . . . . . . . . . . . . . 200jms-durable-subscription-name . . . . . . . . . . . . . . . . . . . . . . . . . . . . . . . . . . . . . . . . . . . . . . . . . . . . . . . 200jms-max-messages-load . . . . . . . . . . . . . . . . . . . . . . . . . . . . . . . . . . . . . . . . . . . . . . . . . . . . . . . . . . . . 200mdb-connection-factory . . . . . . . . . . . . . . . . . . . . . . . . . . . . . . . . . . . . . . . . . . . . . . . . . . . . . . . . . . . . 201mdb-resource-adapter . . . . . . . . . . . . . . . . . . . . . . . . . . . . . . . . . . . . . . . . . . . . . . . . . . . . . . . . . . . . . . 201resource-adapter-mid . . . . . . . . . . . . . . . . . . . . . . . . . . . . . . . . . . . . . . . . . . . . . . . . . . . . . . . . . . . . . . . 201
Security Elements . . . . . . . . . . . . . . . . . . . . . . . . . . . . . . . . . . . . . . . . . . . . . . . . . . . . . . . . . . . . . . . . . . . . 202as-context . . . . . . . . . . . . . . . . . . . . . . . . . . . . . . . . . . . . . . . . . . . . . . . . . . . . . . . . . . . . . . . . . . . . . . . 202auth-method . . . . . . . . . . . . . . . . . . . . . . . . . . . . . . . . . . . . . . . . . . . . . . . . . . . . . . . . . . . . . . . . . . . . . . 203caller-propagation . . . . . . . . . . . . . . . . . . . . . . . . . . . . . . . . . . . . . . . . . . . . . . . . . . . . . . . . . . . . . . . . . 203confidentiality . . . . . . . . . . . . . . . . . . . . . . . . . . . . . . . . . . . . . . . . . . . . . . . . . . . . . . . . . . . . . . . . . . . . 203default-resource-principal . . . . . . . . . . . . . . . . . . . . . . . . . . . . . . . . . . . . . . . . . . . . . . . . . . . . . . . . . . . 203establish-trust-in-client . . . . . . . . . . . . . . . . . . . . . . . . . . . . . . . . . . . . . . . . . . . . . . . . . . . . . . . . . . . . . 204establish-trust-in-target . . . . . . . . . . . . . . . . . . . . . . . . . . . . . . . . . . . . . . . . . . . . . . . . . . . . . . . . . . . . . 204integrity . . . . . . . . . . . . . . . . . . . . . . . . . . . . . . . . . . . . . . . . . . . . . . . . . . . . . . . . . . . . . . . . . . . . . . . . . 204ior-security-config . . . . . . . . . . . . . . . . . . . . . . . . . . . . . . . . . . . . . . . . . . . . . . . . . . . . . . . . . . . . . . . . . 204

10 Application Server 8 • Developer’s Guide
name . . . . . . . . . . . . . . . . . . . . . . . . . . . . . . . . . . . . . . . . . . . . . . . . . . . . . . . . . . . . . . . . . . . . . . . . . . . 205password . . . . . . . . . . . . . . . . . . . . . . . . . . . . . . . . . . . . . . . . . . . . . . . . . . . . . . . . . . . . . . . . . . . . . . . . 205realm . . . . . . . . . . . . . . . . . . . . . . . . . . . . . . . . . . . . . . . . . . . . . . . . . . . . . . . . . . . . . . . . . . . . . . . . . . . 205required . . . . . . . . . . . . . . . . . . . . . . . . . . . . . . . . . . . . . . . . . . . . . . . . . . . . . . . . . . . . . . . . . . . . . . . . . 205sas-context . . . . . . . . . . . . . . . . . . . . . . . . . . . . . . . . . . . . . . . . . . . . . . . . . . . . . . . . . . . . . . . . . . . . . . . 205transport-config . . . . . . . . . . . . . . . . . . . . . . . . . . . . . . . . . . . . . . . . . . . . . . . . . . . . . . . . . . . . . . . . . . . 206
Persistence Elements . . . . . . . . . . . . . . . . . . . . . . . . . . . . . . . . . . . . . . . . . . . . . . . . . . . . . . . . . . . . . . . . . 206cmp . . . . . . . . . . . . . . . . . . . . . . . . . . . . . . . . . . . . . . . . . . . . . . . . . . . . . . . . . . . . . . . . . . . . . . . . . . . . 207cmp-resource . . . . . . . . . . . . . . . . . . . . . . . . . . . . . . . . . . . . . . . . . . . . . . . . . . . . . . . . . . . . . . . . . . . . . 208create-tables-at-deploy . . . . . . . . . . . . . . . . . . . . . . . . . . . . . . . . . . . . . . . . . . . . . . . . . . . . . . . . . . . . . 208database-vendor-name . . . . . . . . . . . . . . . . . . . . . . . . . . . . . . . . . . . . . . . . . . . . . . . . . . . . . . . . . . . . . . 209drop-tables-at-undeploy . . . . . . . . . . . . . . . . . . . . . . . . . . . . . . . . . . . . . . . . . . . . . . . . . . . . . . . . . . . . 209finder . . . . . . . . . . . . . . . . . . . . . . . . . . . . . . . . . . . . . . . . . . . . . . . . . . . . . . . . . . . . . . . . . . . . . . . . . . . 209is-one-one-cmp . . . . . . . . . . . . . . . . . . . . . . . . . . . . . . . . . . . . . . . . . . . . . . . . . . . . . . . . . . . . . . . . . . . 210mapping-properties . . . . . . . . . . . . . . . . . . . . . . . . . . . . . . . . . . . . . . . . . . . . . . . . . . . . . . . . . . . . . . . . 210method-name . . . . . . . . . . . . . . . . . . . . . . . . . . . . . . . . . . . . . . . . . . . . . . . . . . . . . . . . . . . . . . . . . . . . . 210one-one-finders . . . . . . . . . . . . . . . . . . . . . . . . . . . . . . . . . . . . . . . . . . . . . . . . . . . . . . . . . . . . . . . . . . . 210pm-class-generator . . . . . . . . . . . . . . . . . . . . . . . . . . . . . . . . . . . . . . . . . . . . . . . . . . . . . . . . . . . . . . . . 211pm-config . . . . . . . . . . . . . . . . . . . . . . . . . . . . . . . . . . . . . . . . . . . . . . . . . . . . . . . . . . . . . . . . . . . . . . . 211pm-descriptor . . . . . . . . . . . . . . . . . . . . . . . . . . . . . . . . . . . . . . . . . . . . . . . . . . . . . . . . . . . . . . . . . . . . 211pm-descriptors . . . . . . . . . . . . . . . . . . . . . . . . . . . . . . . . . . . . . . . . . . . . . . . . . . . . . . . . . . . . . . . . . . . . 212pm-identifier . . . . . . . . . . . . . . . . . . . . . . . . . . . . . . . . . . . . . . . . . . . . . . . . . . . . . . . . . . . . . . . . . . . . . 212pm-inuse . . . . . . . . . . . . . . . . . . . . . . . . . . . . . . . . . . . . . . . . . . . . . . . . . . . . . . . . . . . . . . . . . . . . . . . . 212pm-mapping-factory . . . . . . . . . . . . . . . . . . . . . . . . . . . . . . . . . . . . . . . . . . . . . . . . . . . . . . . . . . . . . . . 213pm-version . . . . . . . . . . . . . . . . . . . . . . . . . . . . . . . . . . . . . . . . . . . . . . . . . . . . . . . . . . . . . . . . . . . . . . . 213query-filter . . . . . . . . . . . . . . . . . . . . . . . . . . . . . . . . . . . . . . . . . . . . . . . . . . . . . . . . . . . . . . . . . . . . . . . 213query-ordering . . . . . . . . . . . . . . . . . . . . . . . . . . . . . . . . . . . . . . . . . . . . . . . . . . . . . . . . . . . . . . . . . . . . 213query-params . . . . . . . . . . . . . . . . . . . . . . . . . . . . . . . . . . . . . . . . . . . . . . . . . . . . . . . . . . . . . . . . . . . . . 214query-variables . . . . . . . . . . . . . . . . . . . . . . . . . . . . . . . . . . . . . . . . . . . . . . . . . . . . . . . . . . . . . . . . . . . 214schema-generator-properties . . . . . . . . . . . . . . . . . . . . . . . . . . . . . . . . . . . . . . . . . . . . . . . . . . . . . . . . . 214
Pooling and Caching Elements . . . . . . . . . . . . . . . . . . . . . . . . . . . . . . . . . . . . . . . . . . . . . . . . . . . . . . . . . . 215bean-cache . . . . . . . . . . . . . . . . . . . . . . . . . . . . . . . . . . . . . . . . . . . . . . . . . . . . . . . . . . . . . . . . . . . . . . . 216bean-pool . . . . . . . . . . . . . . . . . . . . . . . . . . . . . . . . . . . . . . . . . . . . . . . . . . . . . . . . . . . . . . . . . . . . . . . . 217cache-idle-timeout-in-seconds . . . . . . . . . . . . . . . . . . . . . . . . . . . . . . . . . . . . . . . . . . . . . . . . . . . . . . . 217cmt-timeout-in-seconds . . . . . . . . . . . . . . . . . . . . . . . . . . . . . . . . . . . . . . . . . . . . . . . . . . . . . . . . . . . . . 218commit-option . . . . . . . . . . . . . . . . . . . . . . . . . . . . . . . . . . . . . . . . . . . . . . . . . . . . . . . . . . . . . . . . . . . . 218is-cache-overflow-allowed . . . . . . . . . . . . . . . . . . . . . . . . . . . . . . . . . . . . . . . . . . . . . . . . . . . . . . . . . . 218max-cache-size . . . . . . . . . . . . . . . . . . . . . . . . . . . . . . . . . . . . . . . . . . . . . . . . . . . . . . . . . . . . . . . . . . . 218max-pool-size . . . . . . . . . . . . . . . . . . . . . . . . . . . . . . . . . . . . . . . . . . . . . . . . . . . . . . . . . . . . . . . . . . . . 219max-wait-time-in-millis . . . . . . . . . . . . . . . . . . . . . . . . . . . . . . . . . . . . . . . . . . . . . . . . . . . . . . . . . . . . 219pool-idle-timeout-in-seconds . . . . . . . . . . . . . . . . . . . . . . . . . . . . . . . . . . . . . . . . . . . . . . . . . . . . . . . . 219removal-timeout-in-seconds . . . . . . . . . . . . . . . . . . . . . . . . . . . . . . . . . . . . . . . . . . . . . . . . . . . . . . . . . 219resize-quantity . . . . . . . . . . . . . . . . . . . . . . . . . . . . . . . . . . . . . . . . . . . . . . . . . . . . . . . . . . . . . . . . . . . . 220

Contents 11
steady-pool-size . . . . . . . . . . . . . . . . . . . . . . . . . . . . . . . . . . . . . . . . . . . . . . . . . . . . . . . . . . . . . . . . . . . 221victim-selection-policy . . . . . . . . . . . . . . . . . . . . . . . . . . . . . . . . . . . . . . . . . . . . . . . . . . . . . . . . . . . . . 221
Class Elements . . . . . . . . . . . . . . . . . . . . . . . . . . . . . . . . . . . . . . . . . . . . . . . . . . . . . . . . . . . . . . . . . . . . . . 222gen-classes . . . . . . . . . . . . . . . . . . . . . . . . . . . . . . . . . . . . . . . . . . . . . . . . . . . . . . . . . . . . . . . . . . . . . . . 222local-home-impl . . . . . . . . . . . . . . . . . . . . . . . . . . . . . . . . . . . . . . . . . . . . . . . . . . . . . . . . . . . . . . . . . . 223local-impl . . . . . . . . . . . . . . . . . . . . . . . . . . . . . . . . . . . . . . . . . . . . . . . . . . . . . . . . . . . . . . . . . . . . . . . 223remote-home-impl . . . . . . . . . . . . . . . . . . . . . . . . . . . . . . . . . . . . . . . . . . . . . . . . . . . . . . . . . . . . . . . . . 223remote-impl . . . . . . . . . . . . . . . . . . . . . . . . . . . . . . . . . . . . . . . . . . . . . . . . . . . . . . . . . . . . . . . . . . . . . . 223
Sample sun-ejb-jar.xml File . . . . . . . . . . . . . . . . . . . . . . . . . . . . . . . . . . . . . . . . . . . . . . . . . . . . . . . . . . . . 224The sun-cmp-mappings.xml File . . . . . . . . . . . . . . . . . . . . . . . . . . . . . . . . . . . . . . . . . . . . . . . . . . . . . . . . . . . 225
check-all-at-commit . . . . . . . . . . . . . . . . . . . . . . . . . . . . . . . . . . . . . . . . . . . . . . . . . . . . . . . . . . . . . . . 226check-modified-at-commit . . . . . . . . . . . . . . . . . . . . . . . . . . . . . . . . . . . . . . . . . . . . . . . . . . . . . . . . . . 226cmp-field-mapping . . . . . . . . . . . . . . . . . . . . . . . . . . . . . . . . . . . . . . . . . . . . . . . . . . . . . . . . . . . . . . . . 226cmr-field-mapping . . . . . . . . . . . . . . . . . . . . . . . . . . . . . . . . . . . . . . . . . . . . . . . . . . . . . . . . . . . . . . . . . 227cmr-field-name . . . . . . . . . . . . . . . . . . . . . . . . . . . . . . . . . . . . . . . . . . . . . . . . . . . . . . . . . . . . . . . . . . . 227column-name . . . . . . . . . . . . . . . . . . . . . . . . . . . . . . . . . . . . . . . . . . . . . . . . . . . . . . . . . . . . . . . . . . . . . 227column-pair . . . . . . . . . . . . . . . . . . . . . . . . . . . . . . . . . . . . . . . . . . . . . . . . . . . . . . . . . . . . . . . . . . . . . . 227consistency . . . . . . . . . . . . . . . . . . . . . . . . . . . . . . . . . . . . . . . . . . . . . . . . . . . . . . . . . . . . . . . . . . . . . . 228ejb-name . . . . . . . . . . . . . . . . . . . . . . . . . . . . . . . . . . . . . . . . . . . . . . . . . . . . . . . . . . . . . . . . . . . . . . . . 228entity-mapping . . . . . . . . . . . . . . . . . . . . . . . . . . . . . . . . . . . . . . . . . . . . . . . . . . . . . . . . . . . . . . . . . . . 229fetched-with . . . . . . . . . . . . . . . . . . . . . . . . . . . . . . . . . . . . . . . . . . . . . . . . . . . . . . . . . . . . . . . . . . . . . . 229field-name . . . . . . . . . . . . . . . . . . . . . . . . . . . . . . . . . . . . . . . . . . . . . . . . . . . . . . . . . . . . . . . . . . . . . . . 230level . . . . . . . . . . . . . . . . . . . . . . . . . . . . . . . . . . . . . . . . . . . . . . . . . . . . . . . . . . . . . . . . . . . . . . . . . . . . 230lock-when-loaded . . . . . . . . . . . . . . . . . . . . . . . . . . . . . . . . . . . . . . . . . . . . . . . . . . . . . . . . . . . . . . . . . 230lock-when-modified . . . . . . . . . . . . . . . . . . . . . . . . . . . . . . . . . . . . . . . . . . . . . . . . . . . . . . . . . . . . . . . 231named-group . . . . . . . . . . . . . . . . . . . . . . . . . . . . . . . . . . . . . . . . . . . . . . . . . . . . . . . . . . . . . . . . . . . . . 231none . . . . . . . . . . . . . . . . . . . . . . . . . . . . . . . . . . . . . . . . . . . . . . . . . . . . . . . . . . . . . . . . . . . . . . . . . . . . 231read-only . . . . . . . . . . . . . . . . . . . . . . . . . . . . . . . . . . . . . . . . . . . . . . . . . . . . . . . . . . . . . . . . . . . . . . . . 231schema . . . . . . . . . . . . . . . . . . . . . . . . . . . . . . . . . . . . . . . . . . . . . . . . . . . . . . . . . . . . . . . . . . . . . . . . . . 231secondary-table . . . . . . . . . . . . . . . . . . . . . . . . . . . . . . . . . . . . . . . . . . . . . . . . . . . . . . . . . . . . . . . . . . . 232sun-cmp-mapping . . . . . . . . . . . . . . . . . . . . . . . . . . . . . . . . . . . . . . . . . . . . . . . . . . . . . . . . . . . . . . . . . 232sun-cmp-mappings . . . . . . . . . . . . . . . . . . . . . . . . . . . . . . . . . . . . . . . . . . . . . . . . . . . . . . . . . . . . . . . . 233table-name . . . . . . . . . . . . . . . . . . . . . . . . . . . . . . . . . . . . . . . . . . . . . . . . . . . . . . . . . . . . . . . . . . . . . . . 233
Sample Database Schema Definition . . . . . . . . . . . . . . . . . . . . . . . . . . . . . . . . . . . . . . . . . . . . . . . . . . . . . 233Sample sun-cmp-mappings.xml File . . . . . . . . . . . . . . . . . . . . . . . . . . . . . . . . . . . . . . . . . . . . . . . . . . . . . 234
The sun-application-client.xml file . . . . . . . . . . . . . . . . . . . . . . . . . . . . . . . . . . . . . . . . . . . . . . . . . . . . . . . . . 237sun-application-client . . . . . . . . . . . . . . . . . . . . . . . . . . . . . . . . . . . . . . . . . . . . . . . . . . . . . . . . . . . . . . 237resource-ref . . . . . . . . . . . . . . . . . . . . . . . . . . . . . . . . . . . . . . . . . . . . . . . . . . . . . . . . . . . . . . . . . . . . . . 238res-ref-name . . . . . . . . . . . . . . . . . . . . . . . . . . . . . . . . . . . . . . . . . . . . . . . . . . . . . . . . . . . . . . . . . . . . . 238default-resource-principal . . . . . . . . . . . . . . . . . . . . . . . . . . . . . . . . . . . . . . . . . . . . . . . . . . . . . . . . . . . 239name . . . . . . . . . . . . . . . . . . . . . . . . . . . . . . . . . . . . . . . . . . . . . . . . . . . . . . . . . . . . . . . . . . . . . . . . . . . 239password . . . . . . . . . . . . . . . . . . . . . . . . . . . . . . . . . . . . . . . . . . . . . . . . . . . . . . . . . . . . . . . . . . . . . . . . 239ejb-ref . . . . . . . . . . . . . . . . . . . . . . . . . . . . . . . . . . . . . . . . . . . . . . . . . . . . . . . . . . . . . . . . . . . . . . . . . . 239

12 Application Server 8 • Developer’s Guide
ejb-ref-name . . . . . . . . . . . . . . . . . . . . . . . . . . . . . . . . . . . . . . . . . . . . . . . . . . . . . . . . . . . . . . . . . . . . . 240resource-env-ref . . . . . . . . . . . . . . . . . . . . . . . . . . . . . . . . . . . . . . . . . . . . . . . . . . . . . . . . . . . . . . . . . . 240resource-env-ref-name . . . . . . . . . . . . . . . . . . . . . . . . . . . . . . . . . . . . . . . . . . . . . . . . . . . . . . . . . . . . . 240message-destination . . . . . . . . . . . . . . . . . . . . . . . . . . . . . . . . . . . . . . . . . . . . . . . . . . . . . . . . . . . . . . . 241message-destination-name . . . . . . . . . . . . . . . . . . . . . . . . . . . . . . . . . . . . . . . . . . . . . . . . . . . . . . . . . . 241jndi-name . . . . . . . . . . . . . . . . . . . . . . . . . . . . . . . . . . . . . . . . . . . . . . . . . . . . . . . . . . . . . . . . . . . . . . . . 241
The sun-acc.xml File . . . . . . . . . . . . . . . . . . . . . . . . . . . . . . . . . . . . . . . . . . . . . . . . . . . . . . . . . . . . . . . . . . . . 241client-container . . . . . . . . . . . . . . . . . . . . . . . . . . . . . . . . . . . . . . . . . . . . . . . . . . . . . . . . . . . . . . . . . . . 242target-server . . . . . . . . . . . . . . . . . . . . . . . . . . . . . . . . . . . . . . . . . . . . . . . . . . . . . . . . . . . . . . . . . . . . . . 243description . . . . . . . . . . . . . . . . . . . . . . . . . . . . . . . . . . . . . . . . . . . . . . . . . . . . . . . . . . . . . . . . . . . . . . . 244client-credential . . . . . . . . . . . . . . . . . . . . . . . . . . . . . . . . . . . . . . . . . . . . . . . . . . . . . . . . . . . . . . . . . . . 244log-service . . . . . . . . . . . . . . . . . . . . . . . . . . . . . . . . . . . . . . . . . . . . . . . . . . . . . . . . . . . . . . . . . . . . . . . 245security . . . . . . . . . . . . . . . . . . . . . . . . . . . . . . . . . . . . . . . . . . . . . . . . . . . . . . . . . . . . . . . . . . . . . . . . . 245ssl . . . . . . . . . . . . . . . . . . . . . . . . . . . . . . . . . . . . . . . . . . . . . . . . . . . . . . . . . . . . . . . . . . . . . . . . . . . . . . 246cert-db . . . . . . . . . . . . . . . . . . . . . . . . . . . . . . . . . . . . . . . . . . . . . . . . . . . . . . . . . . . . . . . . . . . . . . . . . . 247auth-realm . . . . . . . . . . . . . . . . . . . . . . . . . . . . . . . . . . . . . . . . . . . . . . . . . . . . . . . . . . . . . . . . . . . . . . . 247property . . . . . . . . . . . . . . . . . . . . . . . . . . . . . . . . . . . . . . . . . . . . . . . . . . . . . . . . . . . . . . . . . . . . . . . . . 248
Web Service Elements . . . . . . . . . . . . . . . . . . . . . . . . . . . . . . . . . . . . . . . . . . . . . . . . . . . . . . . . . . . . . . . . . . . 249webservice-description . . . . . . . . . . . . . . . . . . . . . . . . . . . . . . . . . . . . . . . . . . . . . . . . . . . . . . . . . . . . . 250webservice-description-name . . . . . . . . . . . . . . . . . . . . . . . . . . . . . . . . . . . . . . . . . . . . . . . . . . . . . . . . 250wsdl-publish-location . . . . . . . . . . . . . . . . . . . . . . . . . . . . . . . . . . . . . . . . . . . . . . . . . . . . . . . . . . . . . . 250service-ref . . . . . . . . . . . . . . . . . . . . . . . . . . . . . . . . . . . . . . . . . . . . . . . . . . . . . . . . . . . . . . . . . . . . . . . 251service-ref-name . . . . . . . . . . . . . . . . . . . . . . . . . . . . . . . . . . . . . . . . . . . . . . . . . . . . . . . . . . . . . . . . . . 251port-info . . . . . . . . . . . . . . . . . . . . . . . . . . . . . . . . . . . . . . . . . . . . . . . . . . . . . . . . . . . . . . . . . . . . . . . . . 252service-endpoint-interface . . . . . . . . . . . . . . . . . . . . . . . . . . . . . . . . . . . . . . . . . . . . . . . . . . . . . . . . . . . 252wsdl-port . . . . . . . . . . . . . . . . . . . . . . . . . . . . . . . . . . . . . . . . . . . . . . . . . . . . . . . . . . . . . . . . . . . . . . . . 252namespaceURI . . . . . . . . . . . . . . . . . . . . . . . . . . . . . . . . . . . . . . . . . . . . . . . . . . . . . . . . . . . . . . . . . . . 253localpart . . . . . . . . . . . . . . . . . . . . . . . . . . . . . . . . . . . . . . . . . . . . . . . . . . . . . . . . . . . . . . . . . . . . . . . . . 253stub-property . . . . . . . . . . . . . . . . . . . . . . . . . . . . . . . . . . . . . . . . . . . . . . . . . . . . . . . . . . . . . . . . . . . . . 253call-property . . . . . . . . . . . . . . . . . . . . . . . . . . . . . . . . . . . . . . . . . . . . . . . . . . . . . . . . . . . . . . . . . . . . . 254name . . . . . . . . . . . . . . . . . . . . . . . . . . . . . . . . . . . . . . . . . . . . . . . . . . . . . . . . . . . . . . . . . . . . . . . . . . . 254value . . . . . . . . . . . . . . . . . . . . . . . . . . . . . . . . . . . . . . . . . . . . . . . . . . . . . . . . . . . . . . . . . . . . . . . . . . . 255wsdl-override . . . . . . . . . . . . . . . . . . . . . . . . . . . . . . . . . . . . . . . . . . . . . . . . . . . . . . . . . . . . . . . . . . . . . 255service-impl-class . . . . . . . . . . . . . . . . . . . . . . . . . . . . . . . . . . . . . . . . . . . . . . . . . . . . . . . . . . . . . . . . . 255service-qname . . . . . . . . . . . . . . . . . . . . . . . . . . . . . . . . . . . . . . . . . . . . . . . . . . . . . . . . . . . . . . . . . . . . 255webservice-endpoint . . . . . . . . . . . . . . . . . . . . . . . . . . . . . . . . . . . . . . . . . . . . . . . . . . . . . . . . . . . . . . . 256port-component-name . . . . . . . . . . . . . . . . . . . . . . . . . . . . . . . . . . . . . . . . . . . . . . . . . . . . . . . . . . . . . . 256endpoint-address-uri . . . . . . . . . . . . . . . . . . . . . . . . . . . . . . . . . . . . . . . . . . . . . . . . . . . . . . . . . . . . . . . 257login-config . . . . . . . . . . . . . . . . . . . . . . . . . . . . . . . . . . . . . . . . . . . . . . . . . . . . . . . . . . . . . . . . . . . . . . 257auth-method . . . . . . . . . . . . . . . . . . . . . . . . . . . . . . . . . . . . . . . . . . . . . . . . . . . . . . . . . . . . . . . . . . . . . . 258transport-guarantee . . . . . . . . . . . . . . . . . . . . . . . . . . . . . . . . . . . . . . . . . . . . . . . . . . . . . . . . . . . . . . . . 258tie-class . . . . . . . . . . . . . . . . . . . . . . . . . . . . . . . . . . . . . . . . . . . . . . . . . . . . . . . . . . . . . . . . . . . . . . . . . 258servlet-impl-class . . . . . . . . . . . . . . . . . . . . . . . . . . . . . . . . . . . . . . . . . . . . . . . . . . . . . . . . . . . . . . . . . 258

Contents 13
Part II Developing Application Components . . . . . . . . . . . . . . . . . . . . . . . . . . . . . . . . . . . . 259
Chapter 6 Developing Web Applications . . . . . . . . . . . . . . . . . . . . . . . . . . . . . . . . . . . . . . . . . 261Introducing Web Applications . . . . . . . . . . . . . . . . . . . . . . . . . . . . . . . . . . . . . . . . . . . . . . . . . . . . . . . . . . . . . 261
Internationalization Issues . . . . . . . . . . . . . . . . . . . . . . . . . . . . . . . . . . . . . . . . . . . . . . . . . . . . . . . . . . . . . 262The Server . . . . . . . . . . . . . . . . . . . . . . . . . . . . . . . . . . . . . . . . . . . . . . . . . . . . . . . . . . . . . . . . . . . . . . . 262Servlets . . . . . . . . . . . . . . . . . . . . . . . . . . . . . . . . . . . . . . . . . . . . . . . . . . . . . . . . . . . . . . . . . . . . . . . . . 262
Virtual Servers . . . . . . . . . . . . . . . . . . . . . . . . . . . . . . . . . . . . . . . . . . . . . . . . . . . . . . . . . . . . . . . . . . . . . . 263Using the Administration Console . . . . . . . . . . . . . . . . . . . . . . . . . . . . . . . . . . . . . . . . . . . . . . . . . . . . 264Editing the domain.xml File . . . . . . . . . . . . . . . . . . . . . . . . . . . . . . . . . . . . . . . . . . . . . . . . . . . . . . . . . 264
Default Web Modules . . . . . . . . . . . . . . . . . . . . . . . . . . . . . . . . . . . . . . . . . . . . . . . . . . . . . . . . . . . . . . . . . 265Configuring Logging in the Web Container . . . . . . . . . . . . . . . . . . . . . . . . . . . . . . . . . . . . . . . . . . . . . . . . 265
Using Servlets . . . . . . . . . . . . . . . . . . . . . . . . . . . . . . . . . . . . . . . . . . . . . . . . . . . . . . . . . . . . . . . . . . . . . . . . . 265Handling Threading Issues . . . . . . . . . . . . . . . . . . . . . . . . . . . . . . . . . . . . . . . . . . . . . . . . . . . . . . . . . . . . . 266Invoking a Servlet with a URL . . . . . . . . . . . . . . . . . . . . . . . . . . . . . . . . . . . . . . . . . . . . . . . . . . . . . . . . . . 266Servlet Output . . . . . . . . . . . . . . . . . . . . . . . . . . . . . . . . . . . . . . . . . . . . . . . . . . . . . . . . . . . . . . . . . . . . . . . 267
Using the Administration Console . . . . . . . . . . . . . . . . . . . . . . . . . . . . . . . . . . . . . . . . . . . . . . . . . . . . 268Editing the domain.xml File . . . . . . . . . . . . . . . . . . . . . . . . . . . . . . . . . . . . . . . . . . . . . . . . . . . . . . . . . 268
Caching Servlet Results . . . . . . . . . . . . . . . . . . . . . . . . . . . . . . . . . . . . . . . . . . . . . . . . . . . . . . . . . . . . . . . 268Caching Features . . . . . . . . . . . . . . . . . . . . . . . . . . . . . . . . . . . . . . . . . . . . . . . . . . . . . . . . . . . . . . . . . . 269Default Cache Configuration . . . . . . . . . . . . . . . . . . . . . . . . . . . . . . . . . . . . . . . . . . . . . . . . . . . . . . . . 270Caching Example . . . . . . . . . . . . . . . . . . . . . . . . . . . . . . . . . . . . . . . . . . . . . . . . . . . . . . . . . . . . . . . . . 270CacheHelper Interface . . . . . . . . . . . . . . . . . . . . . . . . . . . . . . . . . . . . . . . . . . . . . . . . . . . . . . . . . . . . . . 271CacheKeyGenerator Interface . . . . . . . . . . . . . . . . . . . . . . . . . . . . . . . . . . . . . . . . . . . . . . . . . . . . . . . . 273
About the Servlet Engine . . . . . . . . . . . . . . . . . . . . . . . . . . . . . . . . . . . . . . . . . . . . . . . . . . . . . . . . . . . . . . 274Instantiating and Removing Servlets . . . . . . . . . . . . . . . . . . . . . . . . . . . . . . . . . . . . . . . . . . . . . . . . . . . 274Request Handling . . . . . . . . . . . . . . . . . . . . . . . . . . . . . . . . . . . . . . . . . . . . . . . . . . . . . . . . . . . . . . . . . 274Allocating Servlet Engine Resources . . . . . . . . . . . . . . . . . . . . . . . . . . . . . . . . . . . . . . . . . . . . . . . . . . 275
Using JavaServer Pages . . . . . . . . . . . . . . . . . . . . . . . . . . . . . . . . . . . . . . . . . . . . . . . . . . . . . . . . . . . . . . . . . . 275JSP Tag Libraries and Standard Portable Tags . . . . . . . . . . . . . . . . . . . . . . . . . . . . . . . . . . . . . . . . . . . . . 276JSP Caching . . . . . . . . . . . . . . . . . . . . . . . . . . . . . . . . . . . . . . . . . . . . . . . . . . . . . . . . . . . . . . . . . . . . . . . . 276
cache . . . . . . . . . . . . . . . . . . . . . . . . . . . . . . . . . . . . . . . . . . . . . . . . . . . . . . . . . . . . . . . . . . . . . . . . . . . 277flush . . . . . . . . . . . . . . . . . . . . . . . . . . . . . . . . . . . . . . . . . . . . . . . . . . . . . . . . . . . . . . . . . . . . . . . . . . . . 279
Compiling JSPs: The Command-Line Compiler . . . . . . . . . . . . . . . . . . . . . . . . . . . . . . . . . . . . . . . . . . . . 280Creating and Managing User Sessions . . . . . . . . . . . . . . . . . . . . . . . . . . . . . . . . . . . . . . . . . . . . . . . . . . . . . . 282
Configuring Sessions . . . . . . . . . . . . . . . . . . . . . . . . . . . . . . . . . . . . . . . . . . . . . . . . . . . . . . . . . . . . . . . . . 282Session Managers . . . . . . . . . . . . . . . . . . . . . . . . . . . . . . . . . . . . . . . . . . . . . . . . . . . . . . . . . . . . . . . . . . . . 282
The memory Persistence Type . . . . . . . . . . . . . . . . . . . . . . . . . . . . . . . . . . . . . . . . . . . . . . . . . . . . . . . 282The file Persistence Type . . . . . . . . . . . . . . . . . . . . . . . . . . . . . . . . . . . . . . . . . . . . . . . . . . . . . . . . . . . 283

14 Application Server 8 • Developer’s Guide
Chapter 7 Using Enterprise JavaBeans Technology . . . . . . . . . . . . . . . . . . . . . . . . . . . . . . 285Summary of EJB 2.1 Changes . . . . . . . . . . . . . . . . . . . . . . . . . . . . . . . . . . . . . . . . . . . . . . . . . . . . . . . . . . . . . 285Value Added Features . . . . . . . . . . . . . . . . . . . . . . . . . . . . . . . . . . . . . . . . . . . . . . . . . . . . . . . . . . . . . . . . . . . 286
Read-Only Beans . . . . . . . . . . . . . . . . . . . . . . . . . . . . . . . . . . . . . . . . . . . . . . . . . . . . . . . . . . . . . . . . . . . . 286pass-by-reference . . . . . . . . . . . . . . . . . . . . . . . . . . . . . . . . . . . . . . . . . . . . . . . . . . . . . . . . . . . . . . . . . . . . 287Pooling and Caching . . . . . . . . . . . . . . . . . . . . . . . . . . . . . . . . . . . . . . . . . . . . . . . . . . . . . . . . . . . . . . . . . . 287
Pooling Parameters . . . . . . . . . . . . . . . . . . . . . . . . . . . . . . . . . . . . . . . . . . . . . . . . . . . . . . . . . . . . . . . . 288Caching Parameters . . . . . . . . . . . . . . . . . . . . . . . . . . . . . . . . . . . . . . . . . . . . . . . . . . . . . . . . . . . . . . . . 288
Bean-Level Container-Managed Transaction Timeouts . . . . . . . . . . . . . . . . . . . . . . . . . . . . . . . . . . . . . . 288EJB Timer Service . . . . . . . . . . . . . . . . . . . . . . . . . . . . . . . . . . . . . . . . . . . . . . . . . . . . . . . . . . . . . . . . . . . . . . 289Using Session Beans . . . . . . . . . . . . . . . . . . . . . . . . . . . . . . . . . . . . . . . . . . . . . . . . . . . . . . . . . . . . . . . . . . . . 290
About the Session Bean Containers . . . . . . . . . . . . . . . . . . . . . . . . . . . . . . . . . . . . . . . . . . . . . . . . . . . . . . 290Stateless Container . . . . . . . . . . . . . . . . . . . . . . . . . . . . . . . . . . . . . . . . . . . . . . . . . . . . . . . . . . . . . . . . 290Stateful Container . . . . . . . . . . . . . . . . . . . . . . . . . . . . . . . . . . . . . . . . . . . . . . . . . . . . . . . . . . . . . . . . . 291
Restrictions and Optimizations . . . . . . . . . . . . . . . . . . . . . . . . . . . . . . . . . . . . . . . . . . . . . . . . . . . . . . . . . . 291Optimizing Session Bean Performance . . . . . . . . . . . . . . . . . . . . . . . . . . . . . . . . . . . . . . . . . . . . . . . . . 291Restricting Transactions . . . . . . . . . . . . . . . . . . . . . . . . . . . . . . . . . . . . . . . . . . . . . . . . . . . . . . . . . . . . 292
Using Read-Only Beans . . . . . . . . . . . . . . . . . . . . . . . . . . . . . . . . . . . . . . . . . . . . . . . . . . . . . . . . . . . . . . . . . . 292Read-Only Bean Characteristics and Life Cycle . . . . . . . . . . . . . . . . . . . . . . . . . . . . . . . . . . . . . . . . . . . . 293Read-Only Bean Good Practices . . . . . . . . . . . . . . . . . . . . . . . . . . . . . . . . . . . . . . . . . . . . . . . . . . . . . . . . 294Refreshing Read-Only Beans . . . . . . . . . . . . . . . . . . . . . . . . . . . . . . . . . . . . . . . . . . . . . . . . . . . . . . . . . . . 294
Invoking a Transactional Method . . . . . . . . . . . . . . . . . . . . . . . . . . . . . . . . . . . . . . . . . . . . . . . . . . . . . 294Refreshing Periodically . . . . . . . . . . . . . . . . . . . . . . . . . . . . . . . . . . . . . . . . . . . . . . . . . . . . . . . . . . . . . 294Refreshing Programmatically . . . . . . . . . . . . . . . . . . . . . . . . . . . . . . . . . . . . . . . . . . . . . . . . . . . . . . . . 294
Deploying Read Only Beans . . . . . . . . . . . . . . . . . . . . . . . . . . . . . . . . . . . . . . . . . . . . . . . . . . . . . . . . . . . 295Using Message-Driven Beans . . . . . . . . . . . . . . . . . . . . . . . . . . . . . . . . . . . . . . . . . . . . . . . . . . . . . . . . . . . . . 296
Message-Driven Bean Configuration . . . . . . . . . . . . . . . . . . . . . . . . . . . . . . . . . . . . . . . . . . . . . . . . . . . . . 296Connection Factory and Destination . . . . . . . . . . . . . . . . . . . . . . . . . . . . . . . . . . . . . . . . . . . . . . . . . . . 296Message-Driven Bean Pool . . . . . . . . . . . . . . . . . . . . . . . . . . . . . . . . . . . . . . . . . . . . . . . . . . . . . . . . . . 297Domain-Level Settings . . . . . . . . . . . . . . . . . . . . . . . . . . . . . . . . . . . . . . . . . . . . . . . . . . . . . . . . . . . . . 297Automatic Reconnection to JMS Provider . . . . . . . . . . . . . . . . . . . . . . . . . . . . . . . . . . . . . . . . . . . . . . 298
Restrictions and Optimizations . . . . . . . . . . . . . . . . . . . . . . . . . . . . . . . . . . . . . . . . . . . . . . . . . . . . . . . . . . 298Pool Tuning and Monitoring . . . . . . . . . . . . . . . . . . . . . . . . . . . . . . . . . . . . . . . . . . . . . . . . . . . . . . . . . 298onMessage Runtime Exception . . . . . . . . . . . . . . . . . . . . . . . . . . . . . . . . . . . . . . . . . . . . . . . . . . . . . . . 299
Sample Message-Driven Bean XML Files . . . . . . . . . . . . . . . . . . . . . . . . . . . . . . . . . . . . . . . . . . . . . . . . . 300Sample ejb-jar.xml File . . . . . . . . . . . . . . . . . . . . . . . . . . . . . . . . . . . . . . . . . . . . . . . . . . . . . . . . . . . . . 300Sample sun-ejb-jar.xml File . . . . . . . . . . . . . . . . . . . . . . . . . . . . . . . . . . . . . . . . . . . . . . . . . . . . . . . . . 301
Handling Transactions with Enterprise Beans . . . . . . . . . . . . . . . . . . . . . . . . . . . . . . . . . . . . . . . . . . . . . . . . . 302Flat Transactions . . . . . . . . . . . . . . . . . . . . . . . . . . . . . . . . . . . . . . . . . . . . . . . . . . . . . . . . . . . . . . . . . . . . 302Global and Local Transactions . . . . . . . . . . . . . . . . . . . . . . . . . . . . . . . . . . . . . . . . . . . . . . . . . . . . . . . . . . 302Commit Options . . . . . . . . . . . . . . . . . . . . . . . . . . . . . . . . . . . . . . . . . . . . . . . . . . . . . . . . . . . . . . . . . . . . . 303Administration and Monitoring . . . . . . . . . . . . . . . . . . . . . . . . . . . . . . . . . . . . . . . . . . . . . . . . . . . . . . . . . 304

Contents 15
Chapter 8 Using Container-Managed Persistence for Entity Beans . . . . . . . . . . . . . . . . . . . 305Sun Java System Application Server Support . . . . . . . . . . . . . . . . . . . . . . . . . . . . . . . . . . . . . . . . . . . . . . . . . 305Container-Managed Persistence Mapping . . . . . . . . . . . . . . . . . . . . . . . . . . . . . . . . . . . . . . . . . . . . . . . . . . . . 306
The Mapping Deployment Descriptor File . . . . . . . . . . . . . . . . . . . . . . . . . . . . . . . . . . . . . . . . . . . . . . . . . 307Mapping Capabilities . . . . . . . . . . . . . . . . . . . . . . . . . . . . . . . . . . . . . . . . . . . . . . . . . . . . . . . . . . . . . . . . . 308Automatic Mapping Options . . . . . . . . . . . . . . . . . . . . . . . . . . . . . . . . . . . . . . . . . . . . . . . . . . . . . . . . . . . 308Supported Data Types for Mapping . . . . . . . . . . . . . . . . . . . . . . . . . . . . . . . . . . . . . . . . . . . . . . . . . . . . . . 312BLOB Support . . . . . . . . . . . . . . . . . . . . . . . . . . . . . . . . . . . . . . . . . . . . . . . . . . . . . . . . . . . . . . . . . . . . . . 314CLOB Support . . . . . . . . . . . . . . . . . . . . . . . . . . . . . . . . . . . . . . . . . . . . . . . . . . . . . . . . . . . . . . . . . . . . . . 315Capturing the Database Schema Automatically . . . . . . . . . . . . . . . . . . . . . . . . . . . . . . . . . . . . . . . . . . . . . 316Using the capture-schema Utility . . . . . . . . . . . . . . . . . . . . . . . . . . . . . . . . . . . . . . . . . . . . . . . . . . . . . . . . 316
Configuring the Resource Manager . . . . . . . . . . . . . . . . . . . . . . . . . . . . . . . . . . . . . . . . . . . . . . . . . . . . . . . . . 318Configuring Queries for 1.1 Finders . . . . . . . . . . . . . . . . . . . . . . . . . . . . . . . . . . . . . . . . . . . . . . . . . . . . . . . . 319
About JDOQL Queries . . . . . . . . . . . . . . . . . . . . . . . . . . . . . . . . . . . . . . . . . . . . . . . . . . . . . . . . . . . . . . . . 319Query Filter Expression . . . . . . . . . . . . . . . . . . . . . . . . . . . . . . . . . . . . . . . . . . . . . . . . . . . . . . . . . . . . . . . 320Query Parameters . . . . . . . . . . . . . . . . . . . . . . . . . . . . . . . . . . . . . . . . . . . . . . . . . . . . . . . . . . . . . . . . . . . . 321Query Variables . . . . . . . . . . . . . . . . . . . . . . . . . . . . . . . . . . . . . . . . . . . . . . . . . . . . . . . . . . . . . . . . . . . . . 322
Restrictions and Optimizations . . . . . . . . . . . . . . . . . . . . . . . . . . . . . . . . . . . . . . . . . . . . . . . . . . . . . . . . . . . . 323Eager Loading of Field State . . . . . . . . . . . . . . . . . . . . . . . . . . . . . . . . . . . . . . . . . . . . . . . . . . . . . . . . . . . 323Restrictions on Remote Interfaces . . . . . . . . . . . . . . . . . . . . . . . . . . . . . . . . . . . . . . . . . . . . . . . . . . . . . . . 323Sybase Finder Limitation . . . . . . . . . . . . . . . . . . . . . . . . . . . . . . . . . . . . . . . . . . . . . . . . . . . . . . . . . . . . . . 324Date and Time Fields as CMP Field Types . . . . . . . . . . . . . . . . . . . . . . . . . . . . . . . . . . . . . . . . . . . . . . . . 324
Chapter 9 Developing Java Clients . . . . . . . . . . . . . . . . . . . . . . . . . . . . . . . . . . . . . . . . . . . . . 325Introducing the Application Client Container . . . . . . . . . . . . . . . . . . . . . . . . . . . . . . . . . . . . . . . . . . . . . . . . . 325Developing Clients Using the ACC . . . . . . . . . . . . . . . . . . . . . . . . . . . . . . . . . . . . . . . . . . . . . . . . . . . . . . . . . 326
Using an Application Client to Access an EJB Component . . . . . . . . . . . . . . . . . . . . . . . . . . . . . . . . . . . . 326Using an Application Client to Access a JMS Resource . . . . . . . . . . . . . . . . . . . . . . . . . . . . . . . . . . . . . . 328Authenticating an Application Client . . . . . . . . . . . . . . . . . . . . . . . . . . . . . . . . . . . . . . . . . . . . . . . . . . . . . 330Running an Application Client Using the ACC . . . . . . . . . . . . . . . . . . . . . . . . . . . . . . . . . . . . . . . . . . . . . 330Packaging an Application Client Using the ACC . . . . . . . . . . . . . . . . . . . . . . . . . . . . . . . . . . . . . . . . . . . 331
Editing the Configuration File . . . . . . . . . . . . . . . . . . . . . . . . . . . . . . . . . . . . . . . . . . . . . . . . . . . . . . . . 331Editing the appclient Script . . . . . . . . . . . . . . . . . . . . . . . . . . . . . . . . . . . . . . . . . . . . . . . . . . . . . . . . . . 332Editing the sun-acc.xml File . . . . . . . . . . . . . . . . . . . . . . . . . . . . . . . . . . . . . . . . . . . . . . . . . . . . . . . . . 332Setting Security Options . . . . . . . . . . . . . . . . . . . . . . . . . . . . . . . . . . . . . . . . . . . . . . . . . . . . . . . . . . . . 332Using the package-appclient Script . . . . . . . . . . . . . . . . . . . . . . . . . . . . . . . . . . . . . . . . . . . . . . . . . . . . 333
Developing Clients Without the ACC . . . . . . . . . . . . . . . . . . . . . . . . . . . . . . . . . . . . . . . . . . . . . . . . . . . . . . . 334Using a Stand-Alone Client to Access an EJB Component . . . . . . . . . . . . . . . . . . . . . . . . . . . . . . . . . . . . 335Using a Stand-Alone Client to Access a JMS Resource . . . . . . . . . . . . . . . . . . . . . . . . . . . . . . . . . . . . . . 336Authenticating a Stand-Alone Client . . . . . . . . . . . . . . . . . . . . . . . . . . . . . . . . . . . . . . . . . . . . . . . . . . . . . 337
Configuring the ORB . . . . . . . . . . . . . . . . . . . . . . . . . . . . . . . . . . . . . . . . . . . . . . . . . . . . . . . . . . . . . . . . . . . . 339ORB Support Architecture . . . . . . . . . . . . . . . . . . . . . . . . . . . . . . . . . . . . . . . . . . . . . . . . . . . . . . . . . . . . . 339Configuring Load-Balancing for EJB Client Applications . . . . . . . . . . . . . . . . . . . . . . . . . . . . . . . . . . . . 340

16 Application Server 8 • Developer’s Guide
Third Party ORB Support . . . . . . . . . . . . . . . . . . . . . . . . . . . . . . . . . . . . . . . . . . . . . . . . . . . . . . . . . . . . . . 342Installing Orbix . . . . . . . . . . . . . . . . . . . . . . . . . . . . . . . . . . . . . . . . . . . . . . . . . . . . . . . . . . . . . . . . . . . 342Configuring Sun Java System Application Server to Use Orbix . . . . . . . . . . . . . . . . . . . . . . . . . . . . . 342Overriding the Built-in ORB . . . . . . . . . . . . . . . . . . . . . . . . . . . . . . . . . . . . . . . . . . . . . . . . . . . . . . . . . 343
Chapter 10 Developing Lifecycle Listeners . . . . . . . . . . . . . . . . . . . . . . . . . . . . . . . . . . . . . . 347Server Life Cycle Events . . . . . . . . . . . . . . . . . . . . . . . . . . . . . . . . . . . . . . . . . . . . . . . . . . . . . . . . . . . . . . . . . 347The LifecycleListener Interface . . . . . . . . . . . . . . . . . . . . . . . . . . . . . . . . . . . . . . . . . . . . . . . . . . . . . . . . . . . . 348The LifecycleEvent Class . . . . . . . . . . . . . . . . . . . . . . . . . . . . . . . . . . . . . . . . . . . . . . . . . . . . . . . . . . . . . . . . 350The Server Lifecycle Event Context . . . . . . . . . . . . . . . . . . . . . . . . . . . . . . . . . . . . . . . . . . . . . . . . . . . . . . . . 350Assembling and Deploying a Lifecycle Module . . . . . . . . . . . . . . . . . . . . . . . . . . . . . . . . . . . . . . . . . . . . . . . 351Considerations for Lifecycle Modules . . . . . . . . . . . . . . . . . . . . . . . . . . . . . . . . . . . . . . . . . . . . . . . . . . . . . . . 352
Part III Using Services and APIs . . . . . . . . . . . . . . . . . . . . . . . . . . . . . . . . . . . . . . . . . . . . . . 353
Chapter 11 Using the JDBC API for Database Access . . . . . . . . . . . . . . . . . . . . . . . . . . . . . 355General Steps for Creating a JDBC Resource . . . . . . . . . . . . . . . . . . . . . . . . . . . . . . . . . . . . . . . . . . . . . . . . . 356
Integrating the JDBC Driver . . . . . . . . . . . . . . . . . . . . . . . . . . . . . . . . . . . . . . . . . . . . . . . . . . . . . . . . . . . 356Supported Database Drivers . . . . . . . . . . . . . . . . . . . . . . . . . . . . . . . . . . . . . . . . . . . . . . . . . . . . . . . . . 356Making the JDBC Driver JAR Files Accessible . . . . . . . . . . . . . . . . . . . . . . . . . . . . . . . . . . . . . . . . . . 357
Creating a Connection Pool . . . . . . . . . . . . . . . . . . . . . . . . . . . . . . . . . . . . . . . . . . . . . . . . . . . . . . . . . . . . 357Using the Administration Console . . . . . . . . . . . . . . . . . . . . . . . . . . . . . . . . . . . . . . . . . . . . . . . . . . . . 357Using the Command Line Interface . . . . . . . . . . . . . . . . . . . . . . . . . . . . . . . . . . . . . . . . . . . . . . . . . . . 360
Testing a Connection Pool . . . . . . . . . . . . . . . . . . . . . . . . . . . . . . . . . . . . . . . . . . . . . . . . . . . . . . . . . . . . . 361Creating a JDBC Resource . . . . . . . . . . . . . . . . . . . . . . . . . . . . . . . . . . . . . . . . . . . . . . . . . . . . . . . . . . . . . 362
Using the Administration Console . . . . . . . . . . . . . . . . . . . . . . . . . . . . . . . . . . . . . . . . . . . . . . . . . . . . 362Using the Command Line Interface . . . . . . . . . . . . . . . . . . . . . . . . . . . . . . . . . . . . . . . . . . . . . . . . . . . 363
Configurations for Specific JDBC Drivers . . . . . . . . . . . . . . . . . . . . . . . . . . . . . . . . . . . . . . . . . . . . . . . . . . . 364PointBase Type4 Driver . . . . . . . . . . . . . . . . . . . . . . . . . . . . . . . . . . . . . . . . . . . . . . . . . . . . . . . . . . . . . . . 365IBM DB2 8.1 Type2 Driver . . . . . . . . . . . . . . . . . . . . . . . . . . . . . . . . . . . . . . . . . . . . . . . . . . . . . . . . . . . . 366Inet Oraxo JDBC Driver for Oracle 8.1.7 and 9.x Databases . . . . . . . . . . . . . . . . . . . . . . . . . . . . . . . . . . 366Inet Merlia JDBC Driver for Microsoft SQL Server Databases . . . . . . . . . . . . . . . . . . . . . . . . . . . . . . . . 367Inet Sybelux JDBC Driver for Sybase Databases . . . . . . . . . . . . . . . . . . . . . . . . . . . . . . . . . . . . . . . . . . . 368Data Direct Connect JDBC3.0/ Type4 Driver for IBM DB2 Databases . . . . . . . . . . . . . . . . . . . . . . . . . . 369Oracle Thin/Type4 Driver for Oracle 8.1.7 and 9.x Databases . . . . . . . . . . . . . . . . . . . . . . . . . . . . . . . . . 369OCI Oracle Type2 Driver for Oracle 8.1.7 and 9.x Databases . . . . . . . . . . . . . . . . . . . . . . . . . . . . . . . . . . 370Data Direct Connect JDBC3.0/ Type4 Driver for Oracle 8.1.7 and 9.x Databases . . . . . . . . . . . . . . . . . . 371Data Direct Connect JDBC3.0/ Type4 Driver for Microsoft SQL Server Databases . . . . . . . . . . . . . . . . 372Sybase JConnect/Type4 Driver . . . . . . . . . . . . . . . . . . . . . . . . . . . . . . . . . . . . . . . . . . . . . . . . . . . . . . . . . 372Data Direct Connect JDBC3.0/ Type4 Driver for Sybase Databases . . . . . . . . . . . . . . . . . . . . . . . . . . . . 373Data Direct Connect JDBC3.0/ Type4 Driver for Informix Databases . . . . . . . . . . . . . . . . . . . . . . . . . . . 373

Contents 17
IBM Informix Type4 Driver . . . . . . . . . . . . . . . . . . . . . . . . . . . . . . . . . . . . . . . . . . . . . . . . . . . . . . . . . . . . 374MM MySQL Type4 Driver . . . . . . . . . . . . . . . . . . . . . . . . . . . . . . . . . . . . . . . . . . . . . . . . . . . . . . . . . . . . 375CloudScape 5.1 Type4 Driver . . . . . . . . . . . . . . . . . . . . . . . . . . . . . . . . . . . . . . . . . . . . . . . . . . . . . . . . . . 375
Creating Applications That Use the JDBC API . . . . . . . . . . . . . . . . . . . . . . . . . . . . . . . . . . . . . . . . . . . . . . . . 376Sharing Connections . . . . . . . . . . . . . . . . . . . . . . . . . . . . . . . . . . . . . . . . . . . . . . . . . . . . . . . . . . . . . . . . . . 376Using JDBC Transaction Isolation Levels . . . . . . . . . . . . . . . . . . . . . . . . . . . . . . . . . . . . . . . . . . . . . . . . . 377
Chapter 12 Using the Transaction Service . . . . . . . . . . . . . . . . . . . . . . . . . . . . . . . . . . . . . . . 379Transaction Resource Managers . . . . . . . . . . . . . . . . . . . . . . . . . . . . . . . . . . . . . . . . . . . . . . . . . . . . . . . . . . . 380Transaction Scope . . . . . . . . . . . . . . . . . . . . . . . . . . . . . . . . . . . . . . . . . . . . . . . . . . . . . . . . . . . . . . . . . . . . . . 380Configuring the Transaction Service . . . . . . . . . . . . . . . . . . . . . . . . . . . . . . . . . . . . . . . . . . . . . . . . . . . . . . . . 382
Using the Administration Console . . . . . . . . . . . . . . . . . . . . . . . . . . . . . . . . . . . . . . . . . . . . . . . . . . . . . . . 382Using the Command Line Interface . . . . . . . . . . . . . . . . . . . . . . . . . . . . . . . . . . . . . . . . . . . . . . . . . . . . . . 384
Transaction Logging . . . . . . . . . . . . . . . . . . . . . . . . . . . . . . . . . . . . . . . . . . . . . . . . . . . . . . . . . . . . . . . . . . . . 385
Chapter 13 Using the Java Naming and Directory Interface . . . . . . . . . . . . . . . . . . . . . . . . . 387Accessing the Naming Context . . . . . . . . . . . . . . . . . . . . . . . . . . . . . . . . . . . . . . . . . . . . . . . . . . . . . . . . . . . . 387
Naming Environment for J2EE Application Components . . . . . . . . . . . . . . . . . . . . . . . . . . . . . . . . . . . . . 388Accessing EJB Components Using the CosNaming Naming Context . . . . . . . . . . . . . . . . . . . . . . . . . . . . 389Accessing EJB Components in a Remote Application Server . . . . . . . . . . . . . . . . . . . . . . . . . . . . . . . . . . 389Naming Environment for Lifecycle Modules . . . . . . . . . . . . . . . . . . . . . . . . . . . . . . . . . . . . . . . . . . . . . . . 390
Configuring Resources . . . . . . . . . . . . . . . . . . . . . . . . . . . . . . . . . . . . . . . . . . . . . . . . . . . . . . . . . . . . . . . . . . 390External JNDI Resources . . . . . . . . . . . . . . . . . . . . . . . . . . . . . . . . . . . . . . . . . . . . . . . . . . . . . . . . . . . . . . 391
Using the Administration Console . . . . . . . . . . . . . . . . . . . . . . . . . . . . . . . . . . . . . . . . . . . . . . . . . . . . 391Using the Command Line Interface . . . . . . . . . . . . . . . . . . . . . . . . . . . . . . . . . . . . . . . . . . . . . . . . . . . 392
Custom Resources . . . . . . . . . . . . . . . . . . . . . . . . . . . . . . . . . . . . . . . . . . . . . . . . . . . . . . . . . . . . . . . . . . . 393Using the Administration Console . . . . . . . . . . . . . . . . . . . . . . . . . . . . . . . . . . . . . . . . . . . . . . . . . . . . 393Using the Command Line Interface . . . . . . . . . . . . . . . . . . . . . . . . . . . . . . . . . . . . . . . . . . . . . . . . . . . 394
Mapping References . . . . . . . . . . . . . . . . . . . . . . . . . . . . . . . . . . . . . . . . . . . . . . . . . . . . . . . . . . . . . . . . . . . . 395
Chapter 14 Using the Java Message Service . . . . . . . . . . . . . . . . . . . . . . . . . . . . . . . . . . . . . 397The JMS Provider . . . . . . . . . . . . . . . . . . . . . . . . . . . . . . . . . . . . . . . . . . . . . . . . . . . . . . . . . . . . . . . . . . . . . . 397Administration of the JMS Service . . . . . . . . . . . . . . . . . . . . . . . . . . . . . . . . . . . . . . . . . . . . . . . . . . . . . . . . . 398
Configuring the JMS Service . . . . . . . . . . . . . . . . . . . . . . . . . . . . . . . . . . . . . . . . . . . . . . . . . . . . . . . . . . . 398Using the Administration Console . . . . . . . . . . . . . . . . . . . . . . . . . . . . . . . . . . . . . . . . . . . . . . . . . . . . 399Using the Command Line Interface . . . . . . . . . . . . . . . . . . . . . . . . . . . . . . . . . . . . . . . . . . . . . . . . . . . 400
Checking Whether the JMS Provider Is Running . . . . . . . . . . . . . . . . . . . . . . . . . . . . . . . . . . . . . . . . . . . 401Creating Physical Destinations . . . . . . . . . . . . . . . . . . . . . . . . . . . . . . . . . . . . . . . . . . . . . . . . . . . . . . . . . . 401
Using the Administration Console . . . . . . . . . . . . . . . . . . . . . . . . . . . . . . . . . . . . . . . . . . . . . . . . . . . . 402Using the Command Line Interface . . . . . . . . . . . . . . . . . . . . . . . . . . . . . . . . . . . . . . . . . . . . . . . . . . . 402
Creating JMS Resources: Destinations and Connection Factories . . . . . . . . . . . . . . . . . . . . . . . . . . . . . . . 403Using the Administration Console . . . . . . . . . . . . . . . . . . . . . . . . . . . . . . . . . . . . . . . . . . . . . . . . . . . . 404

18 Application Server 8 • Developer’s Guide
Using the Command Line Interface . . . . . . . . . . . . . . . . . . . . . . . . . . . . . . . . . . . . . . . . . . . . . . . . . . . 406Message Queue Resource Adapter . . . . . . . . . . . . . . . . . . . . . . . . . . . . . . . . . . . . . . . . . . . . . . . . . . . . . . . . . 406ConnectionFactory Authentication . . . . . . . . . . . . . . . . . . . . . . . . . . . . . . . . . . . . . . . . . . . . . . . . . . . . . . . . . 407Message Queue varhome Directory . . . . . . . . . . . . . . . . . . . . . . . . . . . . . . . . . . . . . . . . . . . . . . . . . . . . . . . . . 407Delivering SOAP Messages Using the JMS API . . . . . . . . . . . . . . . . . . . . . . . . . . . . . . . . . . . . . . . . . . . . . . 407
Sending SOAP Messages Using the JMS API . . . . . . . . . . . . . . . . . . . . . . . . . . . . . . . . . . . . . . . . . . . . . . 408Receiving SOAP Messages Using the JMS API . . . . . . . . . . . . . . . . . . . . . . . . . . . . . . . . . . . . . . . . . . . . 409
Chapter 15 Using the JavaMail API . . . . . . . . . . . . . . . . . . . . . . . . . . . . . . . . . . . . . . . . . . . . . 411Introducing JavaMail . . . . . . . . . . . . . . . . . . . . . . . . . . . . . . . . . . . . . . . . . . . . . . . . . . . . . . . . . . . . . . . . . . . . 411Creating a JavaMail Session . . . . . . . . . . . . . . . . . . . . . . . . . . . . . . . . . . . . . . . . . . . . . . . . . . . . . . . . . . . . . . 412
Using the Administration Console . . . . . . . . . . . . . . . . . . . . . . . . . . . . . . . . . . . . . . . . . . . . . . . . . . . . . . . 412Using the Command Line Interface . . . . . . . . . . . . . . . . . . . . . . . . . . . . . . . . . . . . . . . . . . . . . . . . . . . . . . 413
JavaMail Session Properties . . . . . . . . . . . . . . . . . . . . . . . . . . . . . . . . . . . . . . . . . . . . . . . . . . . . . . . . . . . . . . 414Looking Up a JavaMail Session . . . . . . . . . . . . . . . . . . . . . . . . . . . . . . . . . . . . . . . . . . . . . . . . . . . . . . . . . . . 415Sending Messages Using JavaMail . . . . . . . . . . . . . . . . . . . . . . . . . . . . . . . . . . . . . . . . . . . . . . . . . . . . . . . . . 415Reading Messages Using JavaMail . . . . . . . . . . . . . . . . . . . . . . . . . . . . . . . . . . . . . . . . . . . . . . . . . . . . . . . . . 416
Index . . . . . . . . . . . . . . . . . . . . . . . . . . . . . . . . . . . . . . . . . . . . . . . . . . . . . . . . . . . . . . . . . . . . . . . . 417

19
About This Guide
This guide describes how to create and run Java™ 2 Platform, Enterprise Edition (J2EE™ platform) applications that follow the new open Java standards model for Java™ Servlet, JavaServer Pages™ (JSP™), Enterprise JavaBeans™ (EJB™), and other J2EE components in the Sun Java™ System Application Server Platform Edition 8 environment. In addition to describing programming concepts and tasks, this guide offers sample code, implementation tips, reference material, and a glossary. Topics include application design, developer tools, security, assembly, deployment, debugging, and creating lifecycle modules.
This preface contains information about the following topics:
• Who Should Use This Guide
• Using the Documentation
• How This Guide Is Organized
• Related Information
• Documentation Conventions
• Contacting Sun
Who Should Use This GuideThe intended audience for this guide is the person who develops, assembles, and deploys J2EE applications in a corporate enterprise.
This guide assumes you are familiar with the following topics:
• J2EE specification
• HTML

Using the Documentation
20 Application Server 8 • Developer’s Guide
• Java programming
• Java APIs as defined in the Java™ Servlet, JavaServer Pages™ (JSP™), Enterprise JavaBeans™ (EJB™), and Java™ Database Connectivity (JDBC™) specifications
• Structured database query languages such as SQL
• Relational database concepts
• Software development processes, including debugging and source code control
Using the DocumentationThe Sun Java System Application Server Platform Edition manuals are available as online files in Portable Document Format (PDF) and Hypertext Markup Language (HTML).
The following table lists tasks and concepts described in the Sun Java System Application Server manuals.
Table 1 Sun Java System Application Server Documentation RoadmapFor information about See the following
Late-breaking information about the software and the documentation. Includes a comprehensive, table-based summary of supported hardware, operating system, JDK, and JDBC/RDBMS.
Release Notes
Installing the Sun Java System Application Server software and its components, such as sample applications, the Administration Console, and the high-availability components. Instructions for implementing a basic high-availability configuration are included.
Installation Guide
Creating and implementing Java™ 2 Platform, Enterprise Edition (J2EE™ platform) applications intended to run on the Sun Java System Application Server that follow the open Java standards model for J2EE components and APIs. Includes general information about application design, developer tools, security, assembly, deployment, debugging, and creating lifecycle modules. A comprehensive Sun Java System Application Server glossary is included.
Developer’s Guide
Using J2EE 1.4 platform technologies and APIs to develop J2EE applications and deploying the applications on the Sun Java System Application Server.
J2EE 1.4 Tutorial
Information and instructions on the configuration, management, and deployment of the Sun Java System Application Server subsystems and components, from both the Administration Console and the command-line interface. Topics include cluster management, the high-availability database, load balancing, and session persistence. A comprehensive Sun Java System Application Server glossary is included.
Administration Guide
Editing the Sun Java System Application Server configuration file, domain.xml. Reference

How This Guide Is Organized
About This Guide 21
How This Guide Is OrganizedThis guide provides a Sun Java System Application Server environment overview for developing applications, and includes the following topics:
• Part I, “Developing Applications”
❍ Chapter 1, “Setting Up a Development Environment”
❍ Chapter 2, “Securing J2EE Applications”
❍ Chapter 3, “Assembling and Deploying J2EE Applications”
❍ Chapter 4, “Debugging J2EE Applications”
❍ Chapter 5, “Deployment Descriptor Files”
• Part II, “Developing Application Components”
❍ Chapter 6, “Developing Web Applications”
❍ Chapter 7, “Using Enterprise JavaBeans Technology”
❍ Chapter 8, “Using Container-Managed Persistence for Entity Beans”
❍ Chapter 9, “Developing Java Clients”
❍ Chapter 10, “Developing Lifecycle Listeners”
• Part III, “Using Services and APIs”
❍ Chapter 11, “Using the JDBC API for Database Access”
Migrating your applications to the new Sun Java System Application Server programming model, specifically from iPlanet Application Server 6.x and from Netscape Application Server 4.0. Includes a sample migration.
Migrating and Redeploying Server Applications Guide
Information on solving Sun Java System Application Server problems. Troubleshooting Guide
Utility commands available with the Sun Java System Application Server; written in manpage style.
Utility Reference Manual
Using the Sun™ Java System Message Queue 3.5 software. The Sun Java System Message Queue documentation at:
http://docs.sun.com/db?p=prod/s1.s1msgqu
Table 1 Sun Java System Application Server Documentation Roadmap (Continued)For information about See the following

Related Information
22 Application Server 8 • Developer’s Guide
❍ Chapter 12, “Using the Transaction Service”
❍ Chapter 13, “Using the Java Naming and Directory Interface”
❍ Chapter 14, “Using the Java Message Service”
❍ Chapter 15, “Using the JavaMail API”
Finally, an Index is provided.
Related Information You can find a directory of URLs for the official specifications at install_dir/docs/index.htm. Additionally, the following resources may be useful:
General J2EE Information:
The J2EE 1.4 Tutorial:
http://java.sun.com/j2ee/1.4/docs/tutorial/doc/index.html
Core J2EE Patterns: Best Practices and Design Strategies by Deepak Alur, John Crupi, & Dan Malks, Prentice Hall Publishing
Java Security, by Scott Oaks, O’Reilly Publishing
Programming with Servlets and JSPs:
Java Servlet Programming, by Jason Hunter, O’Reilly Publishing
Java Threads, 2nd Edition, by Scott Oaks & Henry Wong, O’Reilly Publishing
Programming with EJB components:
Enterprise JavaBeans, by Richard Monson-Haefel, O’Reilly Publishing
Programming with JDBC:
Database Programming with JDBC and Java, by George Reese, O’Reilly Publishing
JDBC Database Access With Java: A Tutorial and Annotated Reference (Java Series), by Graham Hamilton, Rick Cattell, & Maydene Fisher

Documentation Conventions
About This Guide 23
Documentation ConventionsThis section describes the types of conventions used throughout this guide:
• General Conventions
• Conventions Referring to Directories
General ConventionsThe following general conventions are used in this guide:
• File and directory paths are given in UNIX® format (with forward slashes separating directory names). For Windows versions, the directory paths are the same, except that backslashes are used to separate directories.
• URLs are given in the format:
http://server.domain/path/file.html
In these URLs, server is the server name where applications are run; domain is your Internet domain name; path is the server’s directory structure; and file is an individual filename. Italic items in URLs are placeholders.
• Font conventions include:
❍ The monospace font is used for sample code and code listings, API and language elements (such as function names and class names), file names, pathnames, directory names, and HTML tags.
❍ Italic type is used for code variables.
❍ Italic type is also used for book titles, emphasis, variables and placeholders, and words used in the literal sense.
❍ Bold type is used as either a paragraph lead-in or to indicate words used in the literal sense.
• Installation root directories for most platforms are indicated by install_dir in this document. Exceptions are noted in “Conventions Referring to Directories” on page 24.
By default, the location of install_dir on most platforms is:
❍ Solaris and Linux file-based installations, non-root user:
user’s home directory/SUNWappserver

Documentation Conventions
24 Application Server 8 • Developer’s Guide
❍ Solaris and Linux file-based installations, root user:
/opt/SUNWappserver
❍ Windows, all installations:
system drive:\Sun\AppServer
For the platforms listed above, default_config_dir is identical to install_dir. See “Conventions Referring to Directories” on page 24 for exceptions and additional information.
• Domain root directories are indicated by domain_dir in this document, which by default is an abbreviation for the following:
install_dir/domains/domain_dir
However, for package-based installations, the directory containing all the domains can be changed from install_dir/domains/ to another directory during installation. In configuration files, you may see domain_dir represented as follows:
${com.sun.aas.instanceRoot}
• UNIX-specific descriptions throughout this manual apply to the Linux operating system as well, except where Linux is specifically mentioned.
Conventions Referring to DirectoriesBy default, when using the Solaris package-based or Linux RPM-based installation, the application server files are spread across several root directories. This guide uses the following document conventions to correspond to the various default installation directories provided:
• install_dir refers to /opt/SUNWappserver, which is the default location for the static portion of the installation image. All utilities, executables, and libraries that make up the application server reside in this location.
• default_config_dir refers to /var/opt/SUNWappserver/domains, which is the default location for any domains that are created.

Contacting Sun
About This Guide 25
Contacting SunYou might want to contact Sun Microsystems in order to:
• Give Us Feedback
• Obtain Training
• Contact Product Support
Give Us FeedbackIf you have general feedback on the product or documentation, please send this to [email protected].
Obtain TrainingApplication Server training courses are available at:
http://training.sun.com/US/catalog/enterprise/web_application.html/
Visit this site often for new course availability on the Sun Java System Application Server.
Contact Product SupportIf you have problems with your system, contact customer support using one of the following mechanisms:
• The online support web site at:
http://www.sun.com/supportraining/
• The telephone dispatch number associated with your maintenance contract
Please have the following information available prior to contacting support. This helps to ensure that our support staff can best assist you in resolving problems:
• Description of the problem, including the situation where the problem occurs and its impact on your operation
• Machine type, operating system version, and product version, including any patches and other software that might be affecting the problem. Here are some of the commonly used commands:
❍ Solaris: pkginfo, showrev

Contacting Sun
26 Application Server 8 • Developer’s Guide
❍ Linux: rpm
❍ All: asadmin version --verbose
• Detailed steps on the methods you have used to reproduce the problem
• Any error logs or core dumps
• Configuration files such as:
❍ domain_dir/config/domain.xml
❍ a web application’s web.xml file,when a web application is involved in the problem
• For an application, whether the problem appears when it is running in a cluster or standalone

Part I
Developing Applications
Chapter 1, “Setting Up a Development Environment”
Chapter 2, “Securing J2EE Applications”
Chapter 3, “Assembling and Deploying J2EE Applications”
Chapter 4, “Debugging J2EE Applications”
Chapter 5, “Deployment Descriptor Files”


29
Chapter 1
Setting Up a DevelopmentEnvironment
This chapter gives guidelines for setting up an application development environment in the Sun Java™ System Application Server. Setting up an environment for creating, assembling, deploying, and debugging your code involves installing the mainstream version of Sun Java System Application Server and making use of development tools. In addition, sample applications are available. These topics are covered in the following sections:
• Installing and Preparing the Server for Development
• Development Tools
• Sample Applications
Installing and Preparing the Server for Development
The following components are included in the full installation. For more information, see the Sun Java System Application Server Installation Guide.
• Sun Java System Application Server core, including:
❍ Sun Java™ System Message Queue
❍ PointBase
❍ deploytool
❍ Administration Console
• JDK
• Sample Applications

Development Tools
30 Application Server 8 • Developer’s Guide
After you have installed Sun Java System Application Server, you can further optimize the server for development in these ways:
• Locate utility classes and libraries so they can be accessed by the proper classloaders. For more information, see “Using the System Classloader” on page 89 or “Using the Common Classloader” on page 90.
• Set up debugging. For more information, see Chapter 4, “Debugging J2EE Applications.”
• Configure the Java™ Virtual Machine (JVM™) software. For more information, see the Sun Java System Application Server Administration Guide.
Development ToolsThe following general tools are provided with Sun Java System Application Server:
• The asadmin Command
• The Administration Console
The following development tools are provided with Sun Java System Application Server or downloadable from Sun:
• Apache Ant
• deploytool
• Migration Tools
The following third-party tools may also be useful:
• Debugging Tools
• Profiling Tools
The asadmin CommandThe asadmin command allows you to configure a local or remote server and perform both administrative and development tasks at the command line. For general information about asadmin, see the Sun Java System Application Server Administration Guide.

Development Tools
Chapter 1 Setting Up a Development Environment 31
The Administration ConsoleThe Administration Console lets you configure the server and perform both administrative and development tasks using a web browser. For general information about the Administration Console, see the Sun Java System Application Server Administration Guide.
Apache AntYou can use the automated assembly features available through Ant, a Java-based build tool available through the Apache Software Foundation:
http://ant.apache.org/
Ant is a java-based build tool that is extended using Java classes. Instead of using shell commands, the configuration files are XML-based, calling out a target tree where tasks get executed. Each task is run by an object that implements a particular task interface.
Apache Ant 1.5.4 is provided with Sun Java System Application Server, and can be launched from the bin directory using the command asant. Sun Java System Application Server also provides server-specific Ant tasks for deployment and administration with the sample applications. For more information about using Ant with Sun Java System Application Server, see “Apache Ant Assembly and Deployment Tool” on page 115.
deploytoolYou can use the deploytool, provided with Sun Java System Application Server, to assemble J2EE applications and modules, configure deployment parameters, perform simple static checks, and deploy the final result. For more information about using the deploytool, see the J2EE 1.4 Tutorial:
http://java.sun.com/j2ee/1.4/docs/tutorial/doc/index.html
Migration ToolsThe following automated migration tools are downloadable from Sun:
• The Migration Tool for Application Servers reassembles J2EE applications and modules developed on these servers:
❍ IBM Websphere Application Server 4.0
❍ BEA WebLogic Server 5.1, 6.0, and 6.1

Development Tools
32 Application Server 8 • Developer’s Guide
❍ JBoss 3.0
❍ J2EE 1.3.1 Reference Implementation
❍ Tomcat Web Server 4.1
❍ Sun ONE Application Server 6.5 and 7
❍ Sun ONE Web Server 6.0
You can download the Migration Tool from here:
http://java.sun.com/j2ee/tools/asmt_14dr.html
• The Migration Toolbox helps you migrate applications developed on NetDynamics and Netscape Application Servers.
For more information, see Sun Java System Application Server Migrating and Redeploying Server Applications.
Debugging Tools You can use several debuggers with the Sun Java System Application Server. For more information, see Chapter 4, “Debugging J2EE Applications.”
Profiling Tools You can use several profilers with the Sun Java System Application Server. For more information, see “Profiling” on page 139.

Sample Applications
Chapter 1 Setting Up a Development Environment 33
Sample ApplicationsSample applications that you can examine and deploy are included with the full installation of the Sun Java System Application Server. You can also download these samples separately if you installed the Sun Java System Application Server without them initially.
If installed with the Sun Java System Application Server, the samples are in the install_dir/samples directory. The samples are organized in categories such as ejb, jdbc, connectors, i18n, and so on. Each sample category is further divided into subcategories. For example, under the ejb category are stateless, stateful, security, mdb, bmp, and cmp subcategories.
Most Sun Java System Application Server samples have the following directory structure:
• The docs directory contains instructions for how to use the sample.
• The src directory contains:
❍ Source code
❍ The build.xml file, which defines asant targets for the sample (see “Apache Ant” on page 31)
❍ Deployment descriptors
• The build, assemble, and javadocs directories are generated as a result of targets specified in the build.xml file.
The install_dir/samples/common.xml file defines properties common to all sample applications and implements targets needed to compile, assemble, deploy and undeploy sample applications. In most sample applications, the build.xml file includes common.xml.
NOTE Before using the samples under install_dir/samples/webservices, make sure to copy the Java XML Pack JAR files into the jre/lib/endorsed directory to override the files bundled with the JDK.

Sample Applications
34 Application Server 8 • Developer’s Guide
The following figure shows the structure of the helloworld sample:
Figure 1-1 The helloworld sample
After you deploy the sample in Sun Java System Application Server, you can invoke it using the following URL:
http://server:port/helloworld
For a detailed description of the sample and how to deploy and run it, see the associated documentation at:
install_dir/samples/ejb/stateless/simple/docs/index.html
GreeterEjbmodule
(stateless-simpleEjb.jar)
GreeterServletmodule
(stateless-simple.war)
J2EE Application(stateless-simple.ear)
J2EE Modules(.jar and .war files)
sun-ejb-jar.xmlSun
sun-web.xmlSun
J2EEejb-jar.xml
J2EEweb.xml
application.xmlJ2EE
sun-application.xmlSun

35
Chapter 2
Securing J2EE Applications
This chapter describes how to write secure J2EE applications, which contain components that perform user authentication and access authorization for servlets and EJB business logic. For information about administrative security for the server, see the Sun Java System Application Server Administration Guide.
This chapter contains the following sections:
• Sun Java System Application Server Security Goals
• Sun Java System Application Server Specific Security Features
• Sun Java System Application Server Security Model
• Security Responsibilities Overview
• Common Security Terminology
• Container Security
• Guide to Security Information
• Realm Configuration
• JACC Support
• Pluggable Audit Module Support
• The server.policy File
• Programmatic Login
• User Authentication for Single Sign-on
• Defining Roles
• Authenticating an Application Client Using the JAAS Module

Sun Java System Application Server Security Goals
36 Application Server 8 • Developer’s Guide
Sun Java System Application Server Security Goals
In an enterprise computing environment, there are many security risks. The Sun Java System Application Server’s goal is to provide highly secure, interoperable, and distributed component computing based on the J2EE security model. Security goals include:
• Full compliance with the J2EE security model (for more information, see the J2EE specification, v1.4 Chapter 3 Security)
• Full compliance with the EJB v2.1 security model (for more information, see the Enterprise JavaBean specification v2.1 Chapter 15 Security Management). This includes EJB role-based authorization.
• Full compliance with the Java Servlet v2.3 security model (for more information, see the Java Servlet specification, v2.3 Chapter 11 Security). This includes servlet role-based authorization.
• Support for single sign-on across all Sun Java System Application Server applications within a single security domain.
• Security support for ACC Clients.
• Support for several underlying authentication realms, such as simple file and LDAP. Certificate authentication is also supported for SSL client authentication. For Solaris, OS platform authentication is supported in addition to these.
• Support for declarative security via Sun Java System Application Server specific XML-based role mapping.
• Support for JACC (Java Authorization Contract for Containers) pluggable authorization as included in the J2EE 1.4 specification and defined by JSR-115.
Sun Java System Application Server Specific Security Features
The Sun Java System Application Server supports the J2EE v1.4 security model, as well as the following features which are specific to the Sun Java System Application Server:
• Single sign-on across all Sun Java System Application Server applications within a single security domain
• Programmatic login
• A GUI-based deploytool for building XML files containing the security information.

Sun Java System Application Server Security Model
Chapter 2 Securing J2EE Applications 37
Sun Java System Application Server Security Model
Secure applications require a client to be authenticated as a valid application user and have authorization to access servlets, JSPs, and EJB business logic. Sun Java System Application Server supports security for web, ACC, web service, and JMS clients.
Applications with secure web and EJB containers may enforce the following security processes for clients:
• Authenticate the caller
• Authorize the caller for access to the EJB business methods
The following diagram shows the Sun Java System Application Server security model.
Web Application and URL Authorizations Secure web applications may have authentication and authorization properties. The web container supports three types of authentication: basic, certificate, and form-based. When a browser requests the main application URL, the web container collects the user authentication information (for example, username and password) and passes it to the security service for authentication.
Servlet/JSP
EJB
Sun Java System Application Server
ACC.
Realm
Web
Client
Web Server(optional)
ServiceClient
MDBJMSClient
Web Server(optional)
Browser
JMSProvider

Security Responsibilities Overview
38 Application Server 8 • Developer’s Guide
Sun Java System Application Server consults the security policies (derived from the deployment descriptors) associated with the web resource to determine the security roles used to permit resource access. The web container tests the user credentials against each role to determine if it can map the user to the role.
Invocation of Enterprise Bean MethodsOnce the browser client has been authenticated and authorized by the web container and the servlet or JSP performs a method call to the EJB component, the user’s credentials (gathered during the authentication process) are propagated to the EJB container. A secure EJB container has a deployment descriptor with authorization properties, which are used to enforce access control on the bean method. The EJB container uses role information received from the EJB JAR deployment descriptors to decide whether it can map the caller to the role and allow access to the bean method.
ACC Client Invocation of Enterprise Bean MethodsFor ACC clients, a secure EJB container consults its security policies (obtained from the deployment descriptors) to determine if the caller has the authority to access the bean method. This process is the same for both web and ACC clients.
Security Responsibilities Overview A J2EE platform’s primary goal is to isolate the developer from the security mechanism details and facilitate a secure application deployment in diverse environments. This goal is addressed by providing mechanisms for the application security specification requirements declaratively and outside the application.
Application DeveloperThe application developer is responsible for the following:
• Specifying application roles.
• Defining role-based access restrictions for the application components (Servlets/JSPs and EJB components).

Common Security Terminology
Chapter 2 Securing J2EE Applications 39
• If programmatic security is used, verifying the user roles and authorizing access to features based on these roles. (Programmatic security management is discouraged since it hard codes the security login in the application instead of allowing the containers to manage it.)
Application AssemblerThe application assembler or application component provider must identify all security dependencies embedded in a component including:
• All role names used by the components that call isCallerInRole or isUserInRole.
• References to all external resources accessed by the components.
• References to all intercomponent calls made by the component.
Application DeployerThe Sun Java System Application Server deploytool is used to map the views provided by the assembler to the policies and mechanisms specific to the operational environment. The security mechanisms configured by the application deployer are implemented by the containers on behalf of the components hosted in the containers.
The application deployer takes all component security views provided by the assembler and uses them to secure a particular enterprise environment in the application, including:
• Assigning users or groups (or both) to security roles.
• Refines the privileges required to access component methods to suit the requirements of the specific deployment scenario.
Common Security TerminologyThe most common security processes are authentication, authorization, realm assignment, and role mapping. The following sections define this terminology.

Common Security Terminology
40 Application Server 8 • Developer’s Guide
AuthenticationAuthentication verifies the user. For example, the user may enter a username and password in a web browser, and if those credentials match the permanent profile stored in the active realm, the user is authenticated. The user is associated with a security identity for the remainder of the session.
AuthorizationAuthorization permits a user to perform the desired operations, after being authenticated. For example, a human resources application may authorize managers to view personal employee information for all employees, but allow employees to only view their own personal information.
RealmsA realm, also called a security policy domain or security domain in the J2EE specification, is a scope over which a common security policy is defined and enforced by the security administrator of the security service. Supported realms in Sun Java System Application Server are file, ldap, certificate, and solaris. For information about how to configure a realm, see “Realm Configuration” on page 44.
Role MappingA client may be defined in terms of a security role. For example, a company might use its employee database to generate both a company wide phone book application and to generate payroll information. Obviously, while all employees might have access to phone numbers and email addresses, only some employees would have access to the salary information. Employees with the right to view or change salaries might be defined as having a special security role.
A role is different from a user group in that a role defines a function in an application, while a group is a set of users who are related in some way. For example, members of the groups astronauts, scientists, and (occasionally) politicians all fit into the role of SpaceShuttlePassenger.
The EJB security model describes roles (as distinguished from user groups) as being described by an application developer and independent of any particular domain. Groups are specific to a deployment domain. It is up to the deployer to map roles into one or more groups for each application or module.

Container Security
Chapter 2 Securing J2EE Applications 41
In the Sun Java System Application Server, roles correspond to users or groups (or both) configured in the active realm.
Container SecurityThe component containers are responsible for providing J2EE application security. There are two security forms provided by the container:
• Programmatic Security
• Declarative Security
Programmatic SecurityProgrammatic security is when an EJB component or servlet uses method calls to the security API, as specified by the J2EE security model, to make business logic decisions based on the caller or remote user’s security role. Programmatic security should only be used when declarative security alone is insufficient to meet the application’s security model.
The J2EE specification, v1.4 defines programmatic security as consisting of two methods of the EJB EJBContext interface and two methods of the servlet HttpServletRequest interface. The Sun Java System Application Server supports these interfaces as specified in the specification.
For more information on programmatic security, see the following:
• Section 3.3.6, Programmatic Security, in the J2EE Specification,v1.4
• “Programmatic Login” on page 62
Declarative SecurityDeclarative security means that the security mechanism for an application is declared and handled externally to the application. Deployment descriptors describe the J2EE application’s security structure, including security roles, access control, and authentication requirements.
The Sun Java System Application Server supports the DTDs specified by J2EE v1.4 and has additional security elements included in its own deployment descriptors. Declarative security is the application deployer’s responsibility.

Guide to Security Information
42 Application Server 8 • Developer’s Guide
There are two levels of declarative security, as follows:
• Application Level Security
• Component Level Security
Application Level SecurityThe application XML deployment descriptor (application.xml) contains authorization descriptors for all user roles for accessing the application’s servlets and EJB components. On the application level, all roles used by any application container must be listed in a role-name element in this file. The role names are scoped to the EJB XML deployment descriptors (ejb-jar.xml and sun-ejb-jar.xml files) and to the servlet XML deployment descriptors (web.xml and sun-web.xml files). The sun-application.xml file must also contain matching security-role-mapping elements for each role-name used by the application.
Component Level SecurityComponent level security encompasses web components and EJB components.
A secure web container authenticates users and authorizes access to a servlet or JSP by using the security policy laid out in the servlet XML deployment descriptors (web.xml and sun-web.xml files). Once the user has been authenticated and authorized, the servlet passes on user credentials to an EJB component to establish a secure association with the bean.
The EJB container is responsible for authorizing access to a bean method by using the security policy laid out in the EJB XML deployment descriptors (ejb-jar.xml and sun-ejb-jar.xml files).
Guide to Security InformationEach information type below is shown with a short description, the location where the information resides, how to create the information, how to access the information, and where to look for further information.
• User Information
• Security Roles

Guide to Security Information
Chapter 2 Securing J2EE Applications 43
User Information User name, password, and so on.
Location:The location of the user information depends on the realm being used:
• For the file realm, the users and groups are listed in the key file, which is located in domain_dir/config.
• For the ldap realm, the users and groups are stored in an external LDAP directory.
• For the certificate realm, the user identities are obtained from cryptographically verified client certificates in the cacerts.jks and keystore.jks files. These files are located in domain_dir/config by default.
• For the solaris realm, the users and groups are stored in the underlying Solaris user database, as determined by the system’s PAM configuration.
For more information about these realms, see “Realm Configuration” on page 44.
How to Create:How to create users and define groups is specific to the realm being used. The Sun Java System Application Server does not provide administration capabilities for external realms such as Solaris/PAM or LDAP. Consult your Solaris or LDAP server documentation for details.
Security Roles Role that defines an application function, made up of a number of users, groups, or both. The relationship between users and groups is determined by the specific realm implementation being used.
Location:Roles are defined in the J2EE application deployment descriptors.
How to Create:Use the Sun Java System Application Server Administration Console, the deploytool, or the asadmin deploy command for application assembly and deployment.
How To Access:Use isCallerInRole() to test for a user’s role membership. For example, in the following code, if securedMethod() can be accessed by the Manager role, the call to sctx.isCallerInRole("Manager") returns true.

Realm Configuration
44 Application Server 8 • Developer’s Guide
public class SecTestEJB implements SessionBean {
private SessionContext sctx = null;
public void setSessionContext(SessionContext sc) {
sctx = sc; }
public void securedMethod( ) {
System.out.println( sctx.isCallerInRole( "Manager" ) ); }
}
Realm ConfigurationThis section covers the following topics:
• How to Configure a Realm and Set the Default Realm
• How to Set a Realm for an Application or Module
• Supported Realms
How to Configure a Realm and Set the Default RealmYou can configure a realm in one of these ways:
• Using the Administration Console
• Using the asadmin Command
• Editing the domain.xml File
If you use the Administration Console or edit the domain.xml file, you can set the default realm.

Realm Configuration
Chapter 2 Securing J2EE Applications 45
Using the Administration ConsoleTo configure a realm using the Administration Console:
1. Login to the Administration Console by going to the following URL in your web browser:
http://host:port/asadmin
For example:
http://localhost:4848/asadmin
2. Open the Security component.
3. Open the Realms component under the Security component.
4. Go to the Realms page.
5. Click on the check boxes of the realms you wish to activate.
6. Use the New and Delete buttons to add and remove realms. To edit a realm, click on its name.
7. If you are adding or editing a realm, enter the realm’s name and classname.
8. To add a property, click the Add Property button and enter the property name and value. To delete properties, check the properties you want to delete, then click the Delete Properties button.
9. For the file realm, you can click on the Manage Users button to add, delete, or edit users. See “file” on page 48.
10. Select the Save button to finish adding or editing the realm.
11. Go to the Security page.
12. Select a default realm, then select the Save button.
13. Restart the server.
Using the asadmin CommandYou can use the asadmin command to configure realms on local servers.
asadmin create-auth-realmThe asadmin create-auth-realm command configures a realm. The syntax is as follows, with defaults shown for optional parameters that have them:
asadmin create-auth-realm --user user --classname realm_class [--isdefault=true] [--property (name=value)[:name=value]*] realm_name

Realm Configuration
46 Application Server 8 • Developer’s Guide
For more information about the optional general asadmin parameters (--password, --passwordfile, --host, --port, --secure, --terse, --echo, and --interactive), see the Sun Java System Application Server Administration Guide.
For example, the following command configures the certificate realm:
asadmin create-auth-realm --user joeuser --classname com.sun.enterprise.security.auth.realm.certificate.CertificateRealm certificate
asadmin delete-auth-realmThe asadmin delete-auth-realm command deactivates a realm. The syntax is as follows, with defaults shown for optional parameters that have them:
asadmin delete-auth-realm --user user realm_name
For example, the following command deactivates the certificate realm:
asadmin delete-auth-realm --user joeuser certificate
asadmin list-auth-realmsThe asadmin list-auth-realms command lists all realms. The syntax is as follows, with defaults shown for optional parameters that have them:
asadmin list-auth-realms --user user [config_name]
For example, the following command lists all realms:
asadmin list-auth-realms --user joeuser
Editing the domain.xml FileBehind the scenes, the default realm is set in the security-service element in the domain.xml file. The security-service configuration looks like this:
<security-service default-realm="file"><auth-realm name="file"
classname="com.sun.enterprise.security.auth.realm.file.FileRealm"> <property name="file" value="domain_dir/config/keyfile"/> <property name="jaas-context" value="fileRealm"/>
</auth-realm>...
</security-service>
The default-realm attribute points to the realm the server is using. It must point to one of the configured auth-realm names. The default is the file realm.
The audit flag determines whether auditing information is logged. If set to true, the server logs audit messages for all authentication and authorization events.

Realm Configuration
Chapter 2 Securing J2EE Applications 47
If you change the realm configuration, you must restart the server for the change to take effect.
For more information about the domain.xml file, see the Sun Java System Application Server Reference.
How to Set a Realm for an Application or ModuleThe following deployment descriptor elements have optional realm or realm-name data subelements that override the domain’s default realm:
• sun-application element in sun-application.xml
• web-app element in web.xml
• sun-ejb-jar element in sun-ejb-jar.xml
If modules within an application specify conflicting realms, these are ignored. If present, the realm defined in sun-application.xml is used, otherwise the domain’s default realm is used.
For example, a realm is specified in sun-application.xml as follows:
<sun-application>...<realm>ldap</realm>
</sun-application>
For more information about the deployment descriptor files and elements, see Chapter 5, “Deployment Descriptor Files.”
Supported RealmsThe following realms are supported in Sun Java System Application Server:
• file
• ldap
• certificate
• solaris
• Creating a Custom Realm

Realm Configuration
48 Application Server 8 • Developer’s Guide
fileThe file realm is the default realm when you first install the Sun Java System Application Server. It has the following configuration characteristics:
• Name - file
• Classname - com.sun.enterprise.security.auth.realm.file.FileRealm
Required properties are as follows:
• file - The name of the file that stores user information. By default this file is named keyfile and is in the domain root directory, typically install_dir/domains/domain_dir/config.
• jaas-context - The value must be fileRealm.
The user information file is initially empty, so you must add users before you can use the file realm. You can configure users in one of these ways:
• Using the Administration Console
• Using the asadmin Command
Using the Administration ConsoleTo configure a user in the file realm using the Administration Console:
1. Login to the Administration Console by going to the following URL in your web browser:
http://host:port/asadmin
For example:
http://localhost:4848/asadmin
2. Open the Security component.
3. Open the Realms component under the Security component.
4. Go to the file page.
5. Click on the Manage Users button.
6. To activate a user, check the box by the user’s name.
7. To add a new user, click on the New button. To modify information for a user, click on the user’s name in the list. In either case, enter the following information:
❍ User ID (required if new) - The name of the user.
❍ Password (required) - The user’s password.

Realm Configuration
Chapter 2 Securing J2EE Applications 49
❍ Retype Password (required) - The user’s password again, for verification.
❍ Group List (optional) - A comma-separated list of the groups the user belongs to.
8. Click on the Save button.
9. You do not need to restart the server.
Using the asadmin CommandThe asadmin create-file-user command creates one user in the file realm. Its syntax is as follows, with defaults shown for optional parameters that have them:
asadmin create-file-user --user user [--userpassword user_password] [--authrealmname auth_realm_name] [--groups user_group[:user_group]*] user_name
For more information about the optional general asadmin parameters (--password, --passwordfile, --host, --port, --secure, --terse, --echo, and --interactive), see the Sun Java System Application Server Administration Guide.
For example, the following command adds user dsanchez to the file realm and assigns secret as this user’s password. The --user parameter specifies the administrative user.
asadmin create-file-user --user joeuser --userpassword secret dsanchez
The asadmin delete-file-user command removes one user from the file realm. Its syntax is as follows, with defaults shown for optional parameters that have them:
asadmin delete-file-user --user user user_name
For example, the following command removes user dsanchez from the file realm. The --user parameter specifies the administrative user.
asadmin delete-file-user --user joeuser dsanchez
The asadmin update-file-user command changes information for one user in the file realm. Its syntax is as follows, with defaults shown for optional parameters that have them:
asadmin update-file-user --user user [--userpassword user_password] [--groups user_group[:user_group]*] user_name
For example, the following command changes the password for user dsanchez to private. The --user parameter specifies the administrative user.
asadmin update-file-user --user joeuser --userpassword private dsanchez
The asadmin list-file-users command lists users in the file realm. Its syntax is as follows, with defaults shown for optional parameters that have them:
asadmin list-file-users --user user [config_name]

Realm Configuration
50 Application Server 8 • Developer’s Guide
For example, the following command lists file realm users. The --user parameter specifies the administrative user.
asadmin list-file-users --user joeuser
The asadmin list-file-groups command lists groups in the file realm. Its syntax is as follows, with defaults shown for optional parameters that have them:
asadmin list-file-groups --user user [--name user_name] [config_name]
For example, the following command lists file realm groups for user dsanchez. The --user parameter specifies the administrative user.
asadmin list-file-groups --user joeuser --name dsanchez
ldapThe ldap realm allows you to use an LDAP database for user security information. It has the following configuration characteristics:
• Name - ldap
• Classname - com.sun.enterprise.security.auth.realm.ldap.LDAPRealm
Required properties are as follows:
• directory - The LDAP URL to your server.
• base-dn - The base DN for the location of user data. This base DN can be at any level above the user data, since a tree scope search is performed. The smaller the search tree, the better the performance.
• jaas-context - The value must be ldapRealm.
You can add the following optional properties to tailor the LDAP realm behavior.
• search-filter - The search filter to use to find the user. The default is uid=%s (%s expands to the subject name).
• group-base-dn - The base DN for the location of groups data. By default it is same as the base-dn, but it can be tuned if necessary.
• group-search-filter - The search filter to find group memberships for the user. The default is uniquemember=%d (%d expands to the user element DN).
• group-target - The LDAP attribute name that contains group name entries. The default is CN.
• search-bind-dn - An optional DN used to authenticate to the directory for performing the search-filter lookup. Only required for directories that do not allow anonymous search.

Realm Configuration
Chapter 2 Securing J2EE Applications 51
• search-bind-password - The LDAP password for the DN given in search-bind-dn.
You must create the user(s) in your LDAP directory. You can do this from the Sun Java™ System Directory Proxy Server 5 2004Q2 console in the Users & Groups main tab, or through any other administration tool which supports LDAP and your directory’s schema.
The principal-name used in the deployment descriptors must correspond to your LDAP user information.
For example, suppose an LDAP user, joe java, is defined in your LDAP directory as follows:
uid=jjava,ou=People,dc=acme,dc=comuid=jjavagivenName=joeobjectClass=topobjectClass=personobjectClass=organizationalPersonobjectClass=inetorgpersonsn=javacn=joe java
The required properties in the ldap realm configuration would be as follows:
• The directory would be the LDAP URL to your server, for example:
ldap://ldap.acme.com:389
• The base-dn could be ou=People,dc=acme,dc=com. Note that it could also be rooted at a higher point, for example dc=acme,dc=com, but searches would traverse a larger part of the tree, impacting performance.
• The jaas-context must be ldapRealm.
certificateThe certificate realm supports SSL authentication. This realm sets up the user identity in the Sun Java System Application Server’s security context, and populates it with user data obtained from cryptographically verified client certificates in the cacerts.jks and keystore.jks files, which are located in domain_dir/config by default. The J2EE containers then handle authorization processing based on each user’s DN from his or her certificate. This realm has the following configuration characteristics:
• Name - certificate
• Classname -
com.sun.enterprise.security.auth.realm.certificate.CertificateRealm

Realm Configuration
52 Application Server 8 • Developer’s Guide
You can add the following optional property to tailor the certificate realm behavior.
• assign-groups - If this property is set, its value is taken to be a comma-separated list of group names. All clients who present valid certificates are assigned membership to these groups for the purposes of authorization decisions in the web and EJB containers.
When you deploy an application, you must specify CLIENT-CERT as the authentication mechanism in the web.xml file as follows:
<login-config> <auth-method>CLIENT-CERT</auth-method>
</login-config>
You must obtain a client certificate and install it in your browser to complete the setup for client certificate authentication. For details on how to set up the server and client certificates, see the Sun Java System Application Server Administration Guide.
You can configure SSL authentication in these ways:
• Configure an ssl subelement of an http-listener or iiop=listener element in domain.xml, then restart the server. For more information about the domain.xml file, see the Sun Java System Application Server Reference.
• Use the Administration Console, as follows:
a. Login to the Administration Console by going to the following URL in your web browser:
http://host:port/asadmin
For example:
http://localhost:4848/asadmin
b. Open the HTTP Service or ORB component.
c. Open the HTTP Listeners or IIOP Listeners component.
d. Select the listener for which you want to configure SSL.
e. Edit the SSL3/TLS Settings for the listener.
f. Select the Save button.
g. Restart the server.
You can change the location of the cacerts.jks and keystore.jks files as follows:
1. Set the $TRUSTSTORE and $KEYSTORE system variables to the locations of the cacerts.jks and keystore.jks files.

Realm Configuration
Chapter 2 Securing J2EE Applications 53
2. Login to the Administration Console by going to the following URL in your web browser:
http://host:port/asadmin
For example:
http://localhost:4848/asadmin
3. Go to the Application Server page.
4. Select the JVM Settings tab and the General option (JVM™ is an abbreviation of Java™ Virtual Machine).
5. Add the following to the Debug Options field:
-Djavax.net.ssl.trustStore=$TRUSTSTORE -Djavax.net.ssl.keyStore=$KEYSTORE
6. Click Save.
7. Restart the server.
solarisThe solaris realm allows authentication using Solaris username+password data. This realm is only supported on Solaris 9. It has the following configuration characteristics:
• Name - solaris
• Classname - com.sun.enterprise.security.auth.realm.solaris.SolarisRealm
Required properties are as follows:
• jaas-context - The value must be solarisRealm.
NOTE The Solaris realm invokes the underlying PAM infrastructure for authenticating. If the configured PAM modules require root privileges, the domain must run as root to use this realm. For details, see the “Using Authentication Services (Tasks)” chapter in the Solaris 9 Systems Administrators Guide: Security Services.
Solaris supports an enhanced method for controlling access to resources called Role Based Access Control (RBAC). Sun Java System Application Server includes RBAC facilities for its administrative commands. For details, see the “Role-Based Access Control (Overview)” chapter in the Solaris 9 Systems Administrators Guide: Security Services.

Realm Configuration
54 Application Server 8 • Developer’s Guide
Creating a Custom RealmYou can create a custom realm by providing a Java Authentication and Authorization Service (JAAS) login module and a realm implementation. Note that client-side JAAS login modules are not suitable for use with Sun Java System Application Server. For more information about JAAS, refer to the JAAS specification for Java 2 SDK, v 1.4, available here:
http://java.sun.com/products/jaas/
A sample application that uses a custom realm is available with the Sun Java System Application Server here:
install_dir/samples/security/realms
Custom realms must extend the com.sun.enterprise.security.auth.login.PasswordLoginModule class. This class extends javax.security.auth.spi.LoginModule. Custom realms must not extend LoginModule directly.
Custom login modules must provide an implementation for one abstract method defined in PasswordLoginModule:
abstract protected void authenticate() throws LoginException
This method performs the actual authentication. The custom login module must not implement any of the other methods, such as login(), logout(), abort(), commit(), or initialize(). Default implementations are provided in PasswordLoginModule which hook into Sun Java System Application Server infrastructure.
The custom login module can access the following protected object fields, which it inherits from PasswordLoginModule. These contain the user name and password of the user to be authenticated:
protected String _username;
protected String _password;
The authenticate() method must end with the following sequence:
String[] grpList;// populate grpList with the set of groups to which// _username belongs in this realm, if anyreturn commitAuthentication(_username, _password, _currentRealm, grpList);
Custom realms must also implement a Realm class which extends the com.sun.enterprise.security.auth.realm.IASRealm class.

JACC Support
Chapter 2 Securing J2EE Applications 55
Custom realms must implement the following methods:
public void init(Properties props) throws BadRealmException, NoSuchRealmException
This method is invoked during server startup when the realm is initially loaded. The props argument contains the properties defined for this realm in domain.xml. The realm can do any initialization it needs in this method. If the method returns without throwing an exception, Sun Java System Application Server assumes the realm is ready to service authentication requests. If an exception is thrown, the realm is disabled.
public String getAuthType()
This method returns a descriptive string representing the type of authentication done by this realm.
public abstract Enumeration getGroupNames(String username) throws InvalidOperationException, NoSuchUserException
This method returns an Enumeration (of String objects) enumerating the groups (if any) to which the given username belongs in this realm.
JACC SupportJACC (Java Authorization Contract for Containers) is part of the J2EE 1.4 specification and defined by JSR-115. JACC defines an interface for pluggable authorization providers. This provides third parties with a mechanism to develop and plug in modules that are responsible for answering authorization decisions during J2EE application execution. The interfaces and rules used for developing JACC providers are defined in the JACC 1.0 specification.
The Sun Java System Application Server provides a simple file-based JACC-compliant authorization engine as a default JACC provider. As part of specifying an alternate provider, you can configure the provider in the Sun Java System Application Server in one of these ways:
• Using the Administration Console
• Editing the domain.xml File
Using the Administration ConsoleTo specify an alternate JACC provider using the Administration Console:
1. Login to the Administration Console by going to the following URL in your web browser:
http://host:port/asadmin

JACC Support
56 Application Server 8 • Developer’s Guide
For example:
http://localhost:4848/asadmin
2. Open the Security component.
3. Open the JACC Providers component under the Security component.
4. Go to the JACC Providers page.
5. Click on the check boxes of the JACC providers you wish to activate.
6. Use the New and Delete buttons to add and remove JACC providers. To edit a JACC provider, click on its name.
7. If you are adding or editing a JACC provider, enter the following information:
❍ Name - The application name as displayed in the deployed application list
❍ Policy Configuration - The name of the class that implements the policy configuration factory
❍ Policy Provider - The name of the class that implements the policy factory
8. Select the Save button.
9. Restart the server.
Editing the domain.xml FileBehind the scenes, the JACC provider is set in the security-service element in the domain.xml file. The security-service configuration looks like this:
<security-service jacc="default">...<jacc-provider
name="default" policy-provider="com.sun.enterprise.security.provider.PolicyWrapper"policy-configuration-factory-provider="com.sun.enterprise.security.
provider.PolicyConfigurationFactoryImpl"><property name="repository"
value="domain_dir/generated/policy"/></jacc-provider>...
</security-service>
For more information about the domain.xml file, see the Sun Java System Application Server Reference.

Pluggable Audit Module Support
Chapter 2 Securing J2EE Applications 57
Pluggable Audit Module SupportYou can create a custom audit module. This section covers the following topics:
• Configuring an Audit Module
• The AuditModule Class
Configuring an Audit ModuleTo configure an audit module, you can perform one of the following tasks:
• Using the Administration Console
• Using the asadmin Command
• Editing the domain.xml File
Using the Administration ConsoleTo specify an audit module using the Administration Console:
1. Login to the Administration Console by going to the following URL in your web browser:
http://host:port/asadmin
For example:
http://localhost:4848/asadmin
2. Open the Security component.
3. Open the Audit Modules component under the Security component.
4. Go to the Audit Modules page.
5. Click on the check boxes of the audit modules you wish to activate.
6. Use the New and Delete buttons to add and remove audit modules. To edit an audit module, click on its name.
7. If you are adding or editing an audit module, enter the following information:
❍ Name - The application name as displayed in the deployed application list
❍ Classname - The fully qualified name of the class that implements this module
8. Select the Save button.

Pluggable Audit Module Support
58 Application Server 8 • Developer’s Guide
9. Restart the server.
Using the asadmin CommandYou can use the asadmin command to configure realms on local servers.
asadmin create-audit-moduleThe asadmin create-audit-module command configures an audit module. The syntax is as follows, with defaults shown for optional parameters that have them:
asadmin create-audit-module --user user --classname audit_module_class [--property (name=value)[:name=value]*] audit_module_name
For more information about the optional general asadmin parameters (--password, --passwordfile, --host, --port, --secure, --terse, --echo, and --interactive), see the Sun Java System Application Server Administration Guide.
For example:
asadmin create-audit-module --user joeuser --classname com.sun.enterprise.security.Audit audit1
asadmin delete-audit-moduleThe asadmin delete-audit-module command deactivates an audit module. The syntax is as follows, with defaults shown for optional parameters that have them:
asadmin delete-audit-module --user user audit_module_name
For example:
asadmin delete-audit-module --user joeuser audit1
asadmin list-audit-modulesThe asadmin list-audit-modules command lists all audit modules. The syntax is as follows, with defaults shown for optional parameters that have them:
asadmin list-audit-modules --user user [config_name]
For example, the following command lists audit modules.
asadmin list-audit-modules --user joeuser

Pluggable Audit Module Support
Chapter 2 Securing J2EE Applications 59
Editing the domain.xml FileBehind the scenes, an audit module can be set in the security-service element in the domain.xml file. The security-service configuration looks like this:
<security-service>...<audit-module
name="default"classname="com.sun.enterprise.security.Audit"><property name="auditOn" value="false"/>
</audit-module>...
</security-service>
The classname must extend com.sun.appserv.security.AuditModule.
For more information about the domain.xml file, see the Sun Java System Application Server Reference.
The AuditModule ClassYou can create a custom audit module by implementing a class that extends com.sun.appserv.security.AuditModule. The AuditModule class provides default “no-op” implementations for each of the following methods, which your custom class can override.
public void init(Properties props)
This method is invoked during server startup when the audit module is initially loaded. The props argument contains the properties defined for this module in domain.xml. The module can do any initialization it needs in this method. If the method returns without throwing an exception, Sun Java System Application Server assumes the module realm is ready to service audit requests. If an exception is thrown the module is disabled.
public void authentication(String user, String realm, boolean success)
This method is invoked when an authentication request has been processed by a realm for the given user. The success flag indicates whether the authorization was granted or denied.
public void webInvocation(String user, HttpServletRequest req, String type, boolean success)
This method is invoked when a web container call has been processed by authorization. The success flag indicates whether the authorization was granted or denied. The req object is the standard HttpServletRequest object for this request. The type string is one of hasUserDataPermission or hasResourcePermission (see JSR-115).

The server.policy File
60 Application Server 8 • Developer’s Guide
public void ejbInvocation(String user, String ejb, String method, boolean success)
This method is invoked when an EJB container call has been processed by authorization. The success flag indicates whether the authorization was granted or denied. The ejb and method strings describe the EJB component and its method that is being invoked.
public void shutdown()
This method is invoked once, during normal server shutdown. It provides the audit module an opportunity to record server shutdown events and to perform any necessary internal cleanup.
The server.policy FileEach Sun Java System Application Server domain has its own standard J2SE policy file, located in the domain root directory, typically install_dir/domains/domain_dir/config. The file is named server.policy.
Sun Java System Application Server is a J2EE 1.4-compliant application server. As such, it follows the requirements of the J2EE specification, including the presence of the security manager (the Java component that enforces the policy) and a limited permission set for J2EE application code.
This section covers the following topics:
• Default Permissions
• Changing Permissions for an Application
Default PermissionsInternal server code is granted all permissions. These are covered by the AllPermission grant blocks to various parts of the server infrastructure code. Do not modify these entries.
Application permissions are granted in the default grant block. These permissions apply to all code not part of the internal server code listed previously. Sun Java System Application Server does not distinguish between EJB and web module permissions. All code is granted the minimal set of Web component permissions (which is a superset of the EJB minimal set).
A few permissions above the minimal set are also granted in the default server.policy file. These are necessary due to various internal dependencies of the server implementation. J2EE application developers must not rely on these additional permissions.

The server.policy File
Chapter 2 Securing J2EE Applications 61
One additional permission is granted specifically for using connectors. If connectors are not used in a particular domain, you should remove this permission, because it is not otherwise necessary.
Changing Permissions for an ApplicationThe default policy for each domain limits the permissions of J2EE deployed applications to the minimal set of permissions required for these applications to operate correctly. If you develop applications that require more than this default set of permissions, you can edit the server.policy file to add the custom permissions that your applications need.
You should add the extra permissions only to the applications that require them, not to all applications deployed to a domain. Do not add extra permissions to the default set (the grant block with no codebase, which applies to all code). Instead, add a new grant block with a codebase specific to the application requiring the extra permissions, and only add the minimally necessary permissions in that block.
As noted in the J2EE specification, an application should provide documentation of the additional permissions it needs. If an application requires extra permissions but does not document the set it needs, contact the application author for details.
As a last resort, you can iteratively determine the permission set an application needs by observing AccessControlException occurrences in the server log. If this is not sufficient, you can add the -Djava.security.debug=all JVM option to the domain. For details, see the Sun Java System Application Server Administration Guide or the Sun Java System Application Server Reference.
You can use the J2SE standard policytool or any text editor to edit the server.policy file. For more information, see:
http://java.sun.com/docs/books/tutorial/security1.2/tour2/index.html
For detailed information about the permissions you can set in the server.policy file, see:
http://java.sun.com/j2se/1.4/docs/guide/security/permissions.html
The Javadoc for the Permission class is here:
http://java.sun.com/j2se/1.4/docs/api/java/security/Permission.html
NOTE Do not add java.security.AllPermission to the server.policy file for application code. Doing so completely defeats the purpose of the security manager, yet you still get the performance overhead associated with it.

Programmatic Login
62 Application Server 8 • Developer’s Guide
Programmatic LoginProgrammatic login allows a deployed J2EE application to invoke a login method. If the login is successful, a SecurityContext is established as if the client had authenticated using any of the conventional J2EE mechanisms.
Programmatic login is useful for an application that has special needs which cannot be accommodated by any of the J2EE standard authentication mechanisms.
This section contains the following topics:
• Precautions
• Granting Programmatic Login Permission
• The ProgrammaticLogin Class
PrecautionsThe Sun Java System Application Server is not involved in how the login information (user, password) is obtained by the deployed application. Programmatic login places the burden on the application developer with respect to assuring that the resulting system meets their security requirements. If the application code reads the authentication information across the network, it is up to the application to determine whether to trust the user.
Programmatic login allows the application developer to bypass the application server-supported authentication mechanisms and feed authentication data directly to the security service. While flexible, this capability should not be used without some understanding of security issues.
Since this mechanism bypasses the container-managed authentication process and sequence, the application developer must be very careful in making sure that authentication is established before accessing any restricted resources or methods. It is also the application developer’s responsibility to verify the status of the login attempt and to alter the behavior of the application accordingly.
The programmatic login state does not necessarily persist in sessions or participate in single sign-on.
NOTE Programmatic login is specific to Sun Java System Application Server and not portable to other application servers.

Programmatic Login
Chapter 2 Securing J2EE Applications 63
Lazy authentication is not supported for programmatic login. If an access check is reached and the deployed application has not properly authenticated via the programmatic login method, access is denied immediately and the application may fail if not properly coded to account for this occurrence.
Granting Programmatic Login PermissionThe ProgrammaticLoginPermission permission is required to invoke the programmatic login mechanism for an application. This permission is not granted by default to deployed applications because this is not a standard J2EE mechanism.
To grant the required permission to the application, add the following to the domain_dir/config/server.policy file:
grant codeBase "file:jar_file_path" { permission com.sun.appserv.security.ProgrammaticLoginPermission "login";
};
The jar_file_path is the path to the application’s JAR file.
For more information about the server.policy file, see “The server.policy File” on page 60.
The ProgrammaticLogin ClassThe com.sun.appserv.security.ProgrammaticLogin class enables a user to perform login programmatically. This class has four login methods, two for servlets or JSPs and two for EJB components.
The login methods for servlets or JSPs have the following signatures:
public Boolean login(String user, String password, javax.servlet.http.HttpServletRequest request, javax.servlet.http.HttpServletResponse response)
public Boolean login(String user, String password, String realm, javax.servlet.http.HttpServletRequest request, javax.servlet.http.HttpServletResponse response, boolean errors) throws Exception
The login methods for EJB components have the following signatures:
public Boolean login(String user, String password)

User Authentication for Single Sign-on
64 Application Server 8 • Developer’s Guide
public Boolean login(String user, String password, String realm, boolean errors) throws Exception
All of theselogin methods:
• Perform the authentication
• Return true if login succeeded, false if login failed
The methods with errors flags propagate to the caller any exceptions encountered during the authentication and return true upon a successful authentication. The login occurs on the realm specified unless it is null, in which case the domain’s default realm is used. The methods with no realm parameter use the domain’s default realm.
The logout method for servlets or JSPs has the following signature:
public Boolean login(String user, String password, String realm, HttpServletRequest request, HttpServletResponse response, boolean errors) throws Exception
The logout method for EJB components has the following signature:
public Boolean login(String user, String password, String realm, boolean errors) throws Exception
The errors flags are used to propagate to the caller any exceptions encountered during the logout. These methods return true upon a successful logout. The logout occurs on the realm specified unless it is null, in which case the domain’s default realm is used.
User Authentication for Single Sign-on The single sign-on across applications on the Sun Java System Application Server is supported by the Sun Java System Application Server servlets and JSPs. This feature allows multiple applications that require the same user sign-on information to share this information between them, rather than having the user sign-on separately for each application. These applications are created to authenticate the user one time, and when needed this authentication information is propagated to all other involved applications.
An example application using the single sign-on scenario could be a consolidated airline booking service that searches all airlines and provides links to different airline web sites. Once the user signs on to the consolidated booking service, the user information can be used by each individual airline site without requiring another sign-on.

User Authentication for Single Sign-on
Chapter 2 Securing J2EE Applications 65
Single sign-on operates according to the following rules:
• Single sign-on applies to web applications configured for the same realm and virtual server. The realm is defined by the realm-name element in the web.xml file. For information about virtual servers, see the Sun Java System Application Server Administration Guide or the Sun Java System Application Server Reference.
• As long as users access only unprotected resources in any of the web applications on a virtual server, they are not challenged to authenticate themselves.
• As soon as a user accesses a protected resource in any web application associated with a virtual server, the user is challenged to authenticate himself or herself, using the login method defined for the web application currently being accessed.
• Once authenticated, the roles associated with this user are used for access control decisions across all associated web applications, without challenging the user to authenticate to each application individually.
• When the user logs out of one web application (for example, by invalidating or timing out the corresponding session if form based login is used), the user’s sessions in all web applications are invalidated. Any subsequent attempt to access a protected resource in any application requires the user to authenticate himself or herself again.
The single sign-on feature utilizes HTTP cookies to transmit a token that associates each request with the saved user identity, so it can only be used in client environments that support cookies.
To configure single sign-on, set the following properties in the virtual-server element of the domain.xml file:
• sso-enabled - If false, single sign-on is disabled for this virtual server, and users must authenticate separately to every application on the virtual server. The default is true.
• sso-max-inactive-seconds - Specifies the time after which a user’s single sign-on record becomes eligible for purging if no client activity is received. Since single sign-on applies across several applications on the same virtual server, access to any of the applications keeps the single sign-on record active. The default value is 5 minutes (300 seconds). Higher values provide longer single sign-on persistence for the users at the expense of more memory use on the server.
• sso-reap-interval-seconds - Specifies the interval between purges of expired single sign-on records. The default value is 60.

Defining Roles
66 Application Server 8 • Developer’s Guide
Here is an example configuration with all default values:
<virtual-server id="server1" ... > ...<property name="sso-enabled" value="true"/> <property name="sso-max-inactive-seconds" value="300"/> <property name="sso-reap-interval-seconds" value="60"/>
</virtual-server>
Defining RolesYou define roles in the J2EE deployment descriptor file, web.xml, and the corresponding role mappings in the Sun Java System Application Server deployment descriptor file, sun-application.xml (or sun-web.xml for individually deployed web modules).
For more information regarding web.xml elements, see Chapter 13, “Deployment Descriptor,” of the Java Servlet Specification, v2.3. For more information regarding sun-web.xml and sun-application.xml elements, see Chapter 5, “Deployment Descriptor Files.”
Each security-role-mapping element in the sun-application.xml or sun-web.xml file maps a role name permitted by the web application to principals and groups. For example, a sun-web.xml file for an individually deployed web module might contain the following:
<sun-web-app><security-role-mapping>
<role-name>manager</role-name><principal-name>jgarcia</principal-name><principal-name>mwebster</principal-name><group-name>team-leads</group-name>
</security-role-mapping><security-role-mapping>
<role-name>administrator</role-name><principal-name>dsmith</principal-name>
</security-role-mapping></sun-web-app>
Note that the role-name in this example must match the role-name in the security-role element of the corresponding web.xml file.

Authenticating an Application Client Using the JAAS Module
Chapter 2 Securing J2EE Applications 67
Note that for J2EE applications (EAR files), all security role mappings for the application modules must be specified in the sun-application.xml file. For individually deployed web modules, the roles are always specified in the sun-web.xml file. A role can be mapped to either specific principals or to groups (or both). The principal or group names used must be valid principals or groups in the current default realm.
Authenticating an Application Client Using the JAAS Module
Using the JAAS module, you can provide security in your application client code by creating a LoginModule that describes the interface implemented by authentication technology providers. For general information about application clients, see Chapter 9, “Developing Java Clients.”
The following steps are involved in creating a LoginModule:
1. Write the LoginModule interface.
public class ClientPasswordLoginModule implements LoginModule{private static Logger _logger=null;
static{_logger=LogDomains.getLogger(LogDomains.SECURITY_LOGGER);}
}private Subject subject;private CallbackHandler callbackHandler;private Map sharedState;private Map options;...
}
The standard JAAS package required by this class is javax.security. The code line below illustrates how you can import the package in your client application:
import javax.security.*;
2. Initialize the LoginModule interface that you just created.
public void initialize(Subject subject, CallbackHandler callbackHandler, Map sharedState, Map options) {
this.subject = subject;this.callbackHandler = callbackHandler;this.sharedState = sharedState;this.options = options;
}

Authenticating an Application Client Using the JAAS Module
68 Application Server 8 • Developer’s Guide
❍ The parameter subject, is the subject to be authenticated.
❍ callbackHandler, for communicating with the end user which prompts for the username and password.
❍ sharedState, is the shared LoginModule state.
❍ options, the options specified in the configuration file of the LoginModule.
3. Use login() method to fetch the login information from the client application and authenticate the user.
public boolean login() throws LoginException {if (uname != null) {
username = new String (uname);pswd = System.getProperty (LOGIN_PASSWORD);
...}
The login information is fetched using the CallBackHandler.
Callback[] callbacks = new Callback[2];
callbacks[0] = new NameCallback(localStrings.getLocalString("login.username", "ClientPasswordModule username: "));
callbacks[1] = new PasswordCallback(localStrings.getLocalString("login.password", "ClientPasswordModule password: "), false);
username = ((NameCallback)callbacks[0]).getName();
char[] tmpPassword = ((PasswordCallback)callbacks[1]).getPassword();
The login() method tries to connect to the server using the login information that is fetched. If the connection is established, the method returns the value true.
4. Use commit() method to set the subject in the session to the user name that is verified by the login method. If the commit method returns a value true, then this method associates PrincipalImpl with the subject located in the LoginModule. If this LoginModule’s own authentication attempt is failed, then this method removes any state that was originally saved.
public boolean commit() throws LoginException {if (succeeded == false) {
return false;} else {// add a Principal (authenticated identity)to the Subject

Authenticating an Application Client Using the JAAS Module
Chapter 2 Securing J2EE Applications 69
// assume the user we authenticated is the PrincipalImpluserPrincipal = new PrincipalImpl(username);
...}
5. Use logout() method to remove the privilege settings associated with the roles of the subject.
public boolean logout() throws LoginException {subject.getPrincipals().remove(userPrincipal);succeeded = false;succeeded = commitSucceeded;username = null;if (password != null) {
for (int i = 0; i < password.length; i++)password[i] = ’ ’;password = null;
}userPrincipal = null;return true;
}
6. Edit the sun-acc.xml deployment descriptor to configure JAAS authentication for the client.
7. Integrate the LoginModule with the application server. Edit the deployment descriptor to make the following changes:
❍ Configure the server with a realm that uses a specific LoginModule for security authentication.
❍ Map the application realm and roles to the realm and roles defined by the LoginModule.
8. Assemble the application client.
Sample CodeThe sample code of ClinetLoginPasswordModule is given below:
package com.sun.enterprise.security.auth.login;
import java.util.*;import java.io.IOException;import javax.security.auth.*;import javax.security.auth.callback.*;import javax.security.auth.login.*;import javax.security.auth.spi.*;import com.sun.enterprise.security.auth.login.PasswordCredential;

Authenticating an Application Client Using the JAAS Module
70 Application Server 8 • Developer’s Guide
import com.sun.enterprise.security.PrincipalImpl;import com.sun.enterprise.security.auth.LoginContextDriver;import com.sun.enterprise.util.LocalStringManagerImpl;import java.util.logging.*;import com.sun.logging.*;
public class ClientPasswordLoginModule implements LoginModule {
private static Logger _logger=null;static{
_logger=LogDomains.getLogger(LogDomains.SECURITY_LOGGER);}
private static final String DEFAULT_REALMNAME = "default";private static LocalStringManagerImpl localStrings =
new LocalStringManagerImpl(ClientPasswordLoginModule.class);
// initial state
private Subject subject;private CallbackHandler callbackHandler;private Map sharedState;private Map options;
private boolean debug = com.sun.enterprise.util.logging.Debug.enabled;
// the authentication status
private boolean succeeded = false;private boolean commitSucceeded = false;
// username and password
private String username;private char[] password;
private final PasswordCredential passwordCredential=null;
// testUser’s PrincipalImpl
private PrincipalImpl userPrincipal;public static String LOGIN_NAME = "j2eelogin.name";public static String LOGIN_PASSWORD = "j2eelogin.password";
public void initialize(Subject subject, CallbackHandler callbackHandler, Map sharedState, Map options) {
this.subject = subject;this.callbackHandler = callbackHandler;this.sharedState = sharedState;this.options = options;

Authenticating an Application Client Using the JAAS Module
Chapter 2 Securing J2EE Applications 71
// initialize any configured options
debug = "true".equalsIgnoreCase((String)options.get("debug"));
}
/* Authenticate the user by prompting for a username and password. @return true in all cases since this <code>LoginModule</code> should not be ignored.*/
/* @exception FailedLoginException if the authentication fails. @exception LoginException if this <code>LoginModule</code> is unable to perform the authentication.*/
public boolean login() throws LoginException {
// prompt for a username and password
if (callbackHandler == null){
String failure = localStrings.getLocalString("login.nocallback","Error: no CallbackHandler available to garner authentication information from the user");
throw new LoginException(failure);}
String uname = System.getProperty (LOGIN_NAME);String pswd;
if (uname != null) {
username = new String (uname);pswd = System.getProperty (LOGIN_PASSWORD);char[] dest;if (pswd == null){
dest = new char[0];password = new char[0];
} else {int length = pswd.length();dest = new char[length];pswd.getChars(0, length, dest, 0 );password = new char[length];
}System.arraycopy (dest, 0, password, 0, dest.length);
} else { Callback[] callbacks = new Callback[2];callbacks[0] = new
NameCallback(localStrings.getLocalString("login.username",

Authenticating an Application Client Using the JAAS Module
72 Application Server 8 • Developer’s Guide
"ClientPasswordModule username: "));callbacks[1] = new
PasswordCallback(localStrings.getLocalString("login.password", "ClientPasswordModule password: "), false);
}
try {callbackHandler.handle(callbacks);username = ((NameCallback)callbacks[0]).getName();if(username == null){
String fail = localStrings.getLocalString("login.nousername", "No user specified");
throw new LoginException(fail);}
char[] tmpPassword = ((PasswordCallback)callbacks[1]).getPassword();
if (tmpPassword == null) {// treat a NULL password as an empty password
tmpPassword = new char[0];}password = new char[tmpPassword.length];System.arraycopy(tmpPassword, 0,
password, 0, tmpPassword.length);((PasswordCallback)callbacks[1]).clearPassword();
} catch (java.io.IOException ioe) {throw new LoginException(ioe.toString());
} catch (UnsupportedCallbackException uce) {String nocallback =
localStrings.getLocalString("login.callback","Error: Callback not available to garner authentication information from user(CallbackName):" );
throw new LoginException(nocallback + uce.getCallback().toString());
}
// print debugging informationif (debug) {
for (int i = 0; i < password.length; i++){//System.out.print(password[i]);
}//System.out.println();
}

Authenticating an Application Client Using the JAAS Module
Chapter 2 Securing J2EE Applications 73
// by default - the client side login module will always say// that the login successful. The actual login will take place // on the server side.
if (debug) {_logger.log(Level.FINE,"[ClientPasswordLoginModule] "
+"authentication succeeded");succeeded = true;return true;
}
}
public boolean commit() throws LoginException {if (succeeded == false) {
return false;} else {// add a Principal (authenticated identity)to the Subject// assume the user we authenticated is the PrincipalImpl
userPrincipal = new PrincipalImpl(username);if (!subject.getPrincipals().contains(userPrincipal))
subject.getPrincipals().add(userPrincipal);if (debug) {
_logger.log(Level.FINE,"[ClientPasswordLoginModule] " + "added PrincipalImpl to Subject");
}
PasswordCredential pc = new PasswordCredential(username, new String(password), realm);
if(!subject.getPrivateCredentials().contains(pc))subject.getPrivateCredentials().add(pc);
username = null;for (int i = 0; i < password.length; i++){
password[i] = ’ ’;password = null;commitSucceeded = true;return true;
}}
}
public boolean abort() throws LoginException {if (succeeded == false) {
return false;} else if (succeeded == true && commitSucceeded == false) {
// login succeeded but overall authentication failedsucceeded = false;

Authenticating an Application Client Using the JAAS Module
74 Application Server 8 • Developer’s Guide
username = null;if (password != null) {
for (int i = 0; i < password.length; i++)password[i] = ’ ’;password = en das ull;
}
userPrincipal = null;} else {
// overall authentication succeeded and commit succeeded,// but someone else’s commit failedlogout();}return true;
}
public boolean logout() throws LoginException {subject.getPrincipals().remove(userPrincipal);succeeded = false;succeeded = commitSucceeded;username = null;if (password != null) {
for (int i = 0; i < password.length; i++)password[i] = ’ ’;password = null;
}userPrincipal = null;return true;
}
}

75
Chapter 3
Assembling and Deploying J2EEApplications
This chapter describes Sun Java System Application Server modules and how these modules are assembled separately or together in an application.
Sun Java System Application Server modules and applications include J2EE standard elements and Sun Java System Application Server specific elements. Only Sun Java System Application Server specific elements are described in detail in this chapter.
The following topics are presented in this chapter:
• Overview of Assembly and Deployment
• Assembling Modules and Applications
• Deploying Modules and Applications
• Apache Ant Assembly and Deployment Tool
Overview of Assembly and DeploymentApplication assembly (also known as packaging) is the process of combining discrete components of an application into a single unit that can be deployed to a J2EE-compliant application server. A package can be classified either as a module or as a full-fledged application. This section covers the following topics:
• Modules
• Applications
• J2EE Standard Descriptors
• Sun Java System Application Server Descriptors

Overview of Assembly and Deployment
76 Application Server 8 • Developer’s Guide
• Naming Standards
• Directory Structure
• Runtime Environments
• Classloaders
ModulesA J2EE module is a collection of one or more J2EE components of the same container type (for example, web or EJB) with deployment descriptors of that type. One descriptor is J2EE standard, the other is Sun Java System Application Server specific. Types of J2EE modules are as follows:
• Web Application Archive (WAR): A web application is a collection of servlets, HTML pages, classes, and other resources that can be bundled and deployed to several J2EE application servers. A WAR file can consist of the following items: servlets, JSPs, JSP tag libraries, utility classes, static pages, client-side applets, beans, bean classes, and deployment descriptors (web.xml and optionally sun-web.xml).
• EJB JAR File: The EJB JAR file is the standard format for assembling enterprise beans. This file contains the bean classes (home, remote, local, and implementation), all of the utility classes, and the deployment descriptors (ejb-jar.xml and sun-ejb-jar.xml). If the EJB component is an entity bean with container managed persistence, a .dbschema file and a CMP mapping descriptor, sun-cmp-mapping.xml, must be included as well.
• Application Client Container JAR File: An ACC client is a Sun Java System Application Server specific type of J2EE client. An ACC client supports the standard J2EE Application Client specifications, and in addition, supports direct access to the Sun Java System Application Server. Its deployment descriptors are application-client.xml and sun-application-client.xml.
• Resource RAR File: RAR files apply to J2EE CA connectors. A connector module is like a device driver. It is a portable way of allowing EJB components to access a foreign enterprise system. Each Sun Java System Application Server connector has a J2EE XML file, ra.xml.
Package definitions must be used in the source code of all modules so the classloader can properly locate the classes after the modules have been deployed.
Because the information in a deployment descriptor is declarative, it can be changed without requiring modifications to source code. At run time, the J2EE server reads this information and acts accordingly.

Overview of Assembly and Deployment
Chapter 3 Assembling and Deploying J2EE Applications 77
Sun Java System Application Server also supports lifecycle modules. See Chapter 10, “Developing Lifecycle Listeners,” for more information.
EJB JAR and Web modules can also be assembled as separate JAR or WAR files and deployed separately, outside of any application, as in the following figure.
Figure 3-1 Module Assembly and Deployment
ApplicationsA J2EE application is a logical collection of one or more J2EE modules tied together by application deployment descriptors. Components can be assembled at either the module or the application level. Components can also be deployed at either the module or the application level.
The following diagram illustrates how components are assembled into modules and then assembled into a Sun Java System Application Server application EAR file ready for deployment.
EJB
EJB
EJB
EJBmodule
Webmodule
(.jar file)
(.war file)
J2EE Modules(.jar and .war files)
J2EE Components
Deploymentto the
Application
sun-ejb-jar.xmlSun
sun-web.xmlSun
J2EEejb-jar.xml
J2EEweb.xmlWEB
Servlet
WEBJSP
Server

Overview of Assembly and Deployment
78 Application Server 8 • Developer’s Guide
Figure 3-2 Application Assembly and Deployment
Each module has a Sun Java System Application Server deployment descriptor and a J2EE deployment descriptor. The Sun Java System Application Server Administration Console uses the deployment descriptors to deploy the application components and to register the resources with the Sun Java System Application Server.
EJB
EJB
EJB
EJBmodule
Webmodule
(.jar file)
(.war file)
J2EE Application(.ear file)
J2EE Modules(.jar, .war files)
J2EE Components
Deploymentto the
Application
sun-ejb-jar.xmlSun
sun-web.xmlSun
sun-application-client.xmlSun
J2EE
Application Clientmodule(.jar file)
ejb-jar.xml
J2EEweb.xml
J2EE
WEBServlet
WEBJSP
Sun Java System Application Server File Set
Server
application-client.xml
application.xmlJ2EE
sun-application.xmlSun
Connectormodule(.rar file)
J2EEra.xml

Overview of Assembly and Deployment
Chapter 3 Assembling and Deploying J2EE Applications 79
An application consists of one or more modules, an optional Sun Java System Application Server deployment descriptor, and a required J2EE application deployment descriptor. All items are assembled, using the Java ARchive (.jar) file format, into one file with an extension of .ear.
J2EE Standard DescriptorsThe J2EE platform provides assembly and deployment facilities. These facilities use WAR, JAR, and EAR files as standard packages for components and applications, and XML-based deployment descriptors for customizing parameters.
J2EE standard deployment descriptors are described in the J2EE specification, v1.4. You can find the specification here:
http://java.sun.com/products/
To check the correctness of these deployment descriptors prior to deployment, see “The Deployment Descriptor Verifier” on page 92.
The following table shows where to find more information about J2EE standard deployment descriptors.
Table 3-1 J2EE Standard DescriptorsDeployment Descriptor Where to Find More Information
application.xml Java 2 Platform Enterprise Edition Specification, v1.4, Chapter 8, “Application Assembly and Deployment - J2EE:application XML DTD”
web.xml Java Servlet Specification, v2.3 Chapter 13, “Deployment Descriptor,” and JavaServer Pages Specification, v1.2, Chapter 7, “JSP Pages as XML Documents,” and Chapter 5, “Tag Extensions”
ejb-jar.xml Enterprise JavaBeans Specification, v2.1, Chapter 16, “Deployment Descriptor”
application-client.xml Java 2 Platform Enterprise Edition Specification, v1.4, Chapter 9, “Application Clients - J2EE:application-client XML DTD”
ra.xml Java 2 Enterprise Edition, J2EE Connector Architecture Specification, v1.0, Chapter 10, “Packaging and Deployment.”

Overview of Assembly and Deployment
80 Application Server 8 • Developer’s Guide
Sun Java System Application Server DescriptorsSun Java System Application Server uses additional deployment descriptors for configuring features specific to the Sun Java System Application Server. The sun-application.xml and sun-web.xml files are optional; all the others are required.
The DTD schema files for all the Sun Java System Application Server deployment descriptors are located in the install_dir/lib/dtds directory. Do not edit these files.
To check the correctness of these deployment descriptors prior to deployment, see “The Deployment Descriptor Verifier” on page 92.
The following table lists the Sun Java System Application Server deployment descriptors and their schema files. For complete descriptions of these files, see Chapter 5, “Deployment Descriptor Files.”
Table 3-2 Sun Java System Application Server DescriptorsDeployment Descriptor Schema File Description
sun-application.xml sun-application_1_4-0.dtd Configures an entire J2EE application (EAR file).
sun-web.xml sun-web-app_2_4-0.dtd Configures a web application (WAR file).
sun-ejb-jar.xml sun-ejb-jar_2_1-0.dtd Configures an enterprise bean (EJB JAR file).
sun-cmp-mappings.xml sun-cmp-mapping_1_1.dtd Configures container-managed persistence for an enterprise bean.
sun-application-client.xml sun-application-client_1_4-0.dtd Configures an Application Client Container (ACC) client (JAR file).
sun-acc.xml sun-application-client-container_1_0.dtd Configures the Application Client Container.
NOTE The Sun Java System Application Server deployment descriptors must be readable and writable by the file owners.

Overview of Assembly and Deployment
Chapter 3 Assembling and Deploying J2EE Applications 81
Naming StandardsNames of applications and individually deployed EJB JAR, WAR, and connector RAR modules (as specified by the name attributes in the domain.xml file) must be unique within a Sun Java System Application Server domain. Modules of the same type within an application must have unique names. In addition, for entity beans that use CMP,.dbschema file names must be unique within an application.
If you do not explicitly specify a name, the default name is the first portion of the file name (without the .war or .jar extension). Modules of different types can have the same name within an application, because the directories holding the individual modules are named with _jar, _war and _rar suffixes. This is the case when you use the Administration Console, the asadmin command, or the deploytool to deploy an application or module. See “Tools for Deployment” on page 106.
Make sure your package and file names do not contain spaces or characters that are illegal for your operating system.
If you are writing your own JSR 88 client to deploy applications to the Sun Java System Application Server using the following API, the name of the application is taken from the display-name entry in the J2EE standard deployment descriptor, because there is no file name in this case.
javax.enterprise.deploy.spi.DeploymentManager.distribute(Target[], InputStream, InputStream)
Neither the Administration Console, the asadmin command, nor the deploytool uses this API.
For details about domain.xml, see the Sun Java System Application Server Reference. For more information about JSR 88, see the JSR 88 page:
http://jcp.org/en/jsr/detail?id=88
Directory StructureWhen you deploy an application, the application is expanded to an open directory structure, and the directories holding the individual modules are named with _jar, _war and _rar suffixes. If you use the asadmin deploydir command to deploy a directory instead of an EAR file, your directory structure must follow this same convention.
Module and application directory structures follow the structure outlined in the J2EE specification. Here is an example directory structure of a simple application containing a web module, an EJB module, and a client module.

Overview of Assembly and Deployment
82 Application Server 8 • Developer’s Guide
Here is an example directory structure of an individually deployed connector module.
+ converter_1/|--- converterClient.jar|--+ META-INF/| |--- MANIFEST.MF| |--- application.xml| '--- sun-application.xml|--+ war-ic_war/| |--- index.jsp| |--+ META-INF/| | |--- MANIFEST.MF| '--+ WEB-INF/| |--- web.xml| '--- sun-web.xml|--+ ejb-jar-ic_jar/| |--- Converter.class| |--- ConverterBean.class| |--- ConverterHome.class| '--+ META-INF/| |--- MANIFEST.MF| |--- ejb-jar.xml| '--- sun-ejb-jar.xml'--+ app-client-ic_jar/
|--- ConverterClient.class'--+ META-INF/
|--- MANIFEST.MF|--- application-client.xml'--- sun-application-client.xml
+ MyConnector/|--- readme.html|--- ra.jar|--- client.jar|--- win.dll|--- solaris.so'--+ META-INF/
|--- MANIFEST.MF'--- ra.xml

Overview of Assembly and Deployment
Chapter 3 Assembling and Deploying J2EE Applications 83
Runtime EnvironmentsWhether you deploy an individual module or an application, deployment affects both the file system and the server configuration. See the following “Module runtime environment” and “Application runtime environment” figures.
Module Runtime EnvironmentThe following figure illustrates the environment for individually deployed module-based deployment.
Figure 3-3 Module runtime environment
For file system entries, modules are extracted as follows:
domain_dir/applications/j2ee-modules/module_name domain_dir/generated/ejb/j2ee-modules/module_name domain_dir/generated/jsp/j2ee-modules/module_name
The applications directory contains the directory structures described in “Directory Structure” on page 81. The generated/ejb directory contains the stubs and ties that an ACC client needs to access the module; the generated/jsp directory contains compiled JSPs.
Lifecycle modules (see Chapter 10, “Developing Lifecycle Listeners”) are extracted as follows:
domain_dir/applications/lifecycle-modules/module_name
Configuration: File System:
packagingEJB.jar
<ejb-module> element in domain.xml
domain_dir/applications/j2ee-modules/packagingEJB/*

Overview of Assembly and Deployment
84 Application Server 8 • Developer’s Guide
Configuration entries are added in the domain.xml file as follows:
<server><applications>
<type-module>...module configuration...
</type-module></applications>
</server>
The type of the module in domain.xml can be lifecycle, ejb, web, or connector. For details about domain.xml, see the Sun Java System Application Server Reference.
Application Runtime EnvironmentThe following figure illustrates the environment for application-based deployment.
Figure 3-4 Application runtime environment
For file system entries, applications are extracted as follows:
domain_dir/applications/j2ee-apps/app_name domain_dir/generated/ejb/j2ee-apps/app_name domain_dir/generated/jsp/j2ee-apps/app_name
The applications directory contains the directory structures described in “Directory Structure” on page 81. The generated/ejb directory contains the stubs and ties that an ACC client needs to access the module; the generated/jsp directory contains compiled JSPs.
Configuration: File System:
packagingApp.ear
packagingEJB.jar
<j2ee-application>element in domain.xml
domain_dir/applications/j2ee-apps/packagingApp/packagingEJB/*

Overview of Assembly and Deployment
Chapter 3 Assembling and Deploying J2EE Applications 85
Configuration entries are added in the domain.xml file as follows:
<server><applications>
<j2ee-application>...application configuration...
</j2ee-application></applications>
</server>
For details about domain.xml, see the Sun Java System Application Server Reference.
ClassloadersUnderstanding Sun Java System Application Server classloaders can help you determine where and how you can position supporting JAR and resource files for your modules and applications.
In a Java Virtual Machine (JVM), the classloaders dynamically load a specific java class file needed for resolving a dependency. For example, when an instance of java.util.Enumeration needs to be created, one of the classloaders loads the relevant class into the environment. This section includes the following topics:
• The Classloader Hierarchy
• Classloader Universes
• Circumventing Classloader Isolation

Overview of Assembly and Deployment
86 Application Server 8 • Developer’s Guide
The Classloader HierarchyClassloaders in the Sun Java System Application Server runtime follow a hierarchy that is illustrated in the following figure.
Figure 3-5 Classloader runtime hierarchy
ConnectorClassloader
EJBClassloader*
Web ContainerClassloader
SystemClassloader
WebClassloader*
JSP EngineClassloader*
*There are separate classloader instances for each application(one of these classloaders is in each application classloader universe).
LifeCycleModuleClassloader
BootstrapClassloader
CommonClassloader

Overview of Assembly and Deployment
Chapter 3 Assembling and Deploying J2EE Applications 87
Note that this is not a Java inheritance hierarchy, but a delegation hierarchy. In the delegation design, a classloader delegates classloading to its parent before attempting to load a class itself. A classloader parent can be either the System Classloader or another custom classloader. If the parent classloader can’t load a class, the findClass() method is called on the classloader subclass. In effect, a classloader is responsible for loading only the classes not available to the parent.
The Servlet specification recommends that the Web Classloader look in the local classloader before delegating to its parent. You can make the Web Classloader follow the delegation model in the Servlet specification by setting delegate="false" in the class-loader element of the sun-web.xml file. It’s safe to do this only for a web module that does not interact with any other modules.
The default value is delegate="true", which causes the Web Classloader to delegate in the same manner as the other classloaders. You must use delegate="true" for a web application that accesses EJB components or that acts as a web service client or endpoint. For details about sun-web.xml, see “The sun-web.xml File” on page 151.
The following table describes Sun Java System Application Server classloaders.
Table 3-3 Sun Java System Application Server ClassloadersClassloader Description
Bootstrap The Bootstrap Classloader loads all the JDK classes.
System The System Classloader loads most of the core Sun Java System Application Server classes. It is created based on the classpath-prefix, server-classpath, and classpath-suffix attributes of the java-config element in the domain.xml file. The environment classpath is included if env-classpath-ignored="false" is set in the java-config element.
Common The Common Classloader loads classes in the domain_dir/lib/classes directory, followed by JAR and ZIP files in the domain_dir/lib directory. No special classpath settings are required. The existence of these directories is optional; if they don’t exist, the Common Classloader is not created.
Connector The Connector Classloader is a single classloader instance that loads individually deployed connector modules, which are shared across all applications.
LifeCycleModule The LifeCycleModule Classloader is the parent classloader for lifecycle modules. Each lifecycle module’s classpath is used to construct its own classloader.
EJB The EJB Classloader loads the enabled EJB classes in a specific enabled EJB module or J2EE application. One instance of this classloader is present in each classloader universe. The EJB Classloader is created with a list of URLs that point to the locations of the classes it needs to load.

Overview of Assembly and Deployment
88 Application Server 8 • Developer’s Guide
Classloader UniversesAccess to components within applications and modules installed on the server occurs within the context of isolated classloader universes, each of which has its own EJB, Web, and JSP Engine classloaders.
• Application Universe: Each J2EE application has its own classloader universe, which loads the classes in all the modules in the application.
• Individually Deployed Module Universe: Each individually deployed EJB JAR, web WAR, or lifecycle module has its own classloader universe, which loads the classes in the module.
Web The Web Classloader loads the servlets and other classes in a specific enabled web module or J2EE application. One instance of this classloader is present in each classloader universe. The Web Classloader is created with a list of URLs that point to the locations of the classes it needs to load.
JSP Engine The JSP Engine Classloader loads compiled JSP classes of enabled JSPs. One instance of this classloader is present in each classloader universe. The JSP Engine Classloader is created with a list of URLs that point to the locations of the classes it needs to load.
NOTE A resource such as a file that is accessed by a servlet, JSP, or EJB component must be in a directory pointed to by the classloader’s classpath. For example, the web classloader’s classpath includes these directories:
module_name/WEB-INF/classesmodule_name/WEB-INF/lib
If a servlet accesses a resource, it must be in one of these directories or it will not be loaded.
NOTE In iPlanet Application Server 6.x, individually deployed modules shared the same classloader. In Sun Java System Application Server 8, each individually deployed module has its own classloader universe.
Table 3-3 Sun Java System Application Server Classloaders (Continued)Classloader Description

Overview of Assembly and Deployment
Chapter 3 Assembling and Deploying J2EE Applications 89
Circumventing Classloader IsolationSince each application or individually deployed module classloader universe is isolated, an application or module cannot load classes from another application or module. This prevents two similarly named classes in different applications from interfering with each other.
To circumvent this limitation for libraries, utility classes, or individually deployed modules accessed by more than one application, you can include the relevant path to the required classes in one of these ways:
• Using the System Classloader
• Using the Common Classloader
• Using the Java Optional Package Mechanism
• Packaging the Client JAR for One Application in Another Application
Using the System ClassloaderTo use the System Classloader, do one of the following, then restart the server:
• Use the Administration Console:
a. Login to the Administration Console by going to the following URL in your web browser:
http://host:port/asadmin
For example:
http://localhost:4848/asadmin
b. Go to the Application Server page.
c. Select the JVM Settings tab and the Path Settings option.
d. Edit the Classpath Suffix field.
e. Select Save.
• Edit the classpath-suffix attribute of the java-config element in the domain.xml file. For details about domain.xml, see the Sun Java System Application Server Reference.
Using the System Classloader makes an application or module accessible to any other application or module across the domain.

Overview of Assembly and Deployment
90 Application Server 8 • Developer’s Guide
Using the Common ClassloaderTo use the Common Classloader, copy the JAR and ZIP files into the domain_dir/lib directory or copy the .class files into the domain_dir/lib/classes directory, then restart the server.
Using the Common Classloader makes an application or module accessible to any other application or module across the domain.
Using the Java Optional Package MechanismTo use the Java optional package mechanism, copy the JAR and ZIP files into the domain_dir/lib/ext directory, then restart the server.
Using the Java optional package mechanism makes an application or module accessible to any other application or module across the domain. For example, this is the recommended way of adding JDBC drivers to the Sun Java System Application Server.
Packaging the Client JAR for One Application in Another ApplicationBy packaging the client JAR for one application in a second application, you allow an EJB or web component in the second application to call an EJB component in the first (dependent) application, without making either of them accessible to any other application or module.
As an alternative for a production environment, you can have the Common Classloader load client JAR of the dependent application as described in “Using the Common Classloader” on page 90. Server performance is better, but you must restart the server to make the dependent application accessible, and it is accessible across the domain.
To package the client JAR for one application in another application:
1. Deploy the dependent application.
2. Add the dependent application’s client JAR file to the calling application.
❍ For a calling EJB component, add the client JAR file at the same level as the EJB component. Then add a Class-Path entry to the MANIFEST.MF file of the calling EJB component. The Class-Path entry has this syntax:
Class-Path: filepath1.jar filepath2.jar ...
Each filepath is relative to the directory or JAR file containing the MANIFEST.MF file. For details, see the J2EE specification, section 8.1.1.2, “Dependencies.”
❍ For a calling web component, add the client JAR file under the WEB-INF/lib directory.

Assembling Modules and Applications
Chapter 3 Assembling and Deploying J2EE Applications 91
3. For most applications, packaging the client JAR file with the calling EJB component should suffice. You do not need to package the client JAR file with both the EJB and web components unless the web component is directly calling the EJB component in the dependent application. If you need to package the client JAR with both the EJB and web components, set delegate="true" in the class-loader element of the sun-web.xml file. This changes the Web Classloader so it follows the standard classloader delegation model and delegates to its parent before attempting to load a class itself.
4. Deploy the calling application.
Assembling Modules and ApplicationsAssembling (or packaging) modules and applications in Sun Java System Application Server conforms to all of the customary J2EE-defined specifications. The only difference is that when you assemble in Sun Java System Application Server, you include Sun Java System Application Server-specific deployment descriptors (such as sun-web.xml and sun-ejb-jar.xml) that enhance the functionality of the application server.
This section covers the following topics:
• Tools for Assembly
• Assembling a WAR Module
• Assembling an EJB JAR Module
• Assembling a Lifecycle Module
• Assembling an Application
• Assembling an ACC Client
• Assembling a J2EE CA Resource Adapter
NOTE The calling EJB or web component must specify in its sun-ejb-jar.xml or sun-web.xml file the JNDI name of the EJB component in the dependent application. Using an ejb-link mapping does not work when the EJB component being called resides in another application.

Assembling Modules and Applications
92 Application Server 8 • Developer’s Guide
Tools for AssemblyThe Sun Java System Application Server provides these methods for assembling a module or an application:
• deploytool
• Apache Ant
• The Deployment Descriptor Verifier
deploytoolYou can use the deploytool, provided with Sun Java System Application Server, to assemble J2EE applications and modules, configure deployment parameters, perform simple static checks, and deploy the final result. For more information about using the deploytool, see the J2EE 1.4 Tutorial:
http://java.sun.com/j2ee/1.4/docs/tutorial/doc/index.html
Apache AntAnt can help you assemble and deploy modules and applications. For details, see “Apache Ant Assembly and Deployment Tool” on page 115.
The Deployment Descriptor VerifierThe verifier tool validates both J2EE and Sun Java System Application Server specific deployment descriptors against their corresponding DTD files and gives errors and warnings if a module or application is not J2EE and Sun Java System Application Server compliant. You can verify deployment descriptors in EAR, WAR, RAR, and JAR files.
The verifier tool is not simply an XML syntax verifier. Rules and interdependencies between various elements in the deployment descriptors are verified. Where needed, user application classes are introspected to apply validation rules.
The verifier is integrated into Sun Java System Application Server deployment, the deploytool, and the sun-appserv-deploy Ant task. You can also run it as a stand-alone utility from the command line.
When you run the verifier during Sun Java System Application Server deployment, the output of the verifier is written to the tempdir/verifier-results/ directory, where tempdir is the temporary directory defined in the operating system. Deployment fails if any failures are reported during the verification process. The verifier also logs information about verification progress to the standard output.
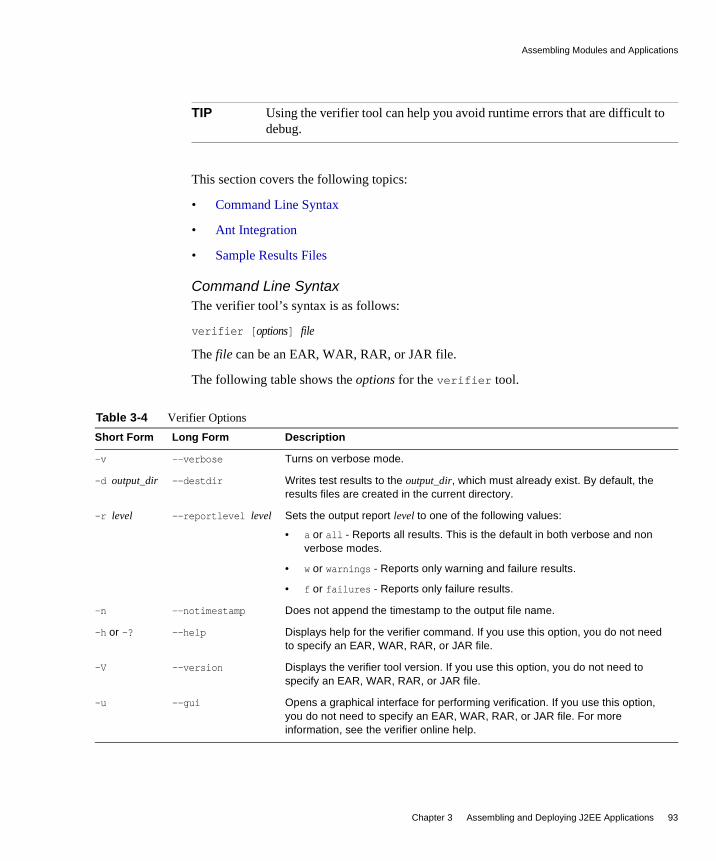
Assembling Modules and Applications
Chapter 3 Assembling and Deploying J2EE Applications 93
This section covers the following topics:
• Command Line Syntax
• Ant Integration
• Sample Results Files
Command Line SyntaxThe verifier tool’s syntax is as follows:
verifier [options] file
The file can be an EAR, WAR, RAR, or JAR file.
The following table shows the options for the verifier tool.
TIP Using the verifier tool can help you avoid runtime errors that are difficult to debug.
Table 3-4 Verifier OptionsShort Form Long Form Description
-v --verbose Turns on verbose mode.
-d output_dir --destdir Writes test results to the output_dir, which must already exist. By default, the results files are created in the current directory.
-r level --reportlevel level Sets the output report level to one of the following values:
• a or all - Reports all results. This is the default in both verbose and non verbose modes.
• w or warnings - Reports only warning and failure results.
• f or failures - Reports only failure results.
-n --notimestamp Does not append the timestamp to the output file name.
-h or -? --help Displays help for the verifier command. If you use this option, you do not need to specify an EAR, WAR, RAR, or JAR file.
-V --version Displays the verifier tool version. If you use this option, you do not need to specify an EAR, WAR, RAR, or JAR file.
-u --gui Opens a graphical interface for performing verification. If you use this option, you do not need to specify an EAR, WAR, RAR, or JAR file. For more information, see the verifier online help.
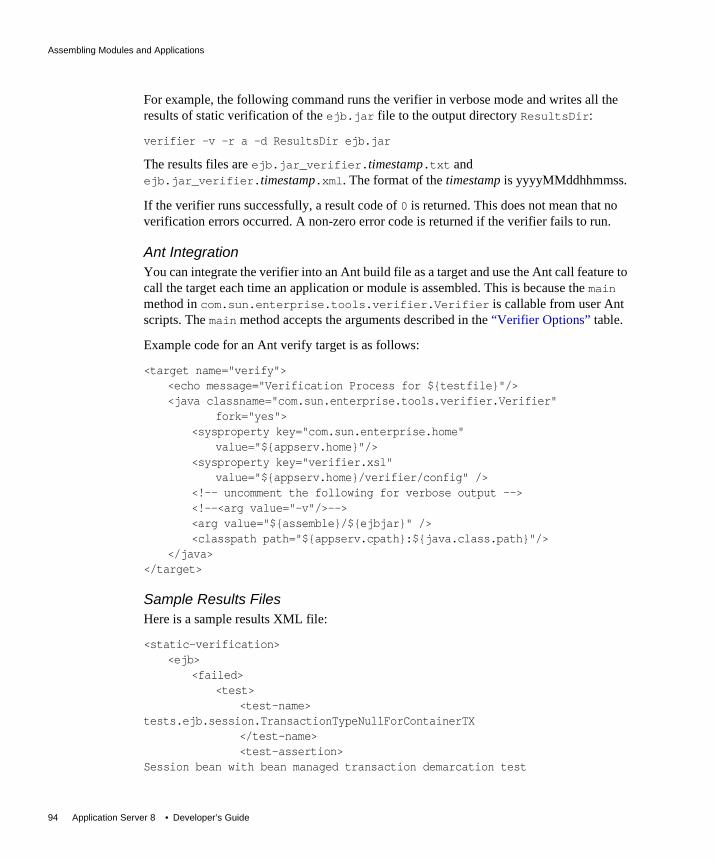
Assembling Modules and Applications
94 Application Server 8 • Developer’s Guide
For example, the following command runs the verifier in verbose mode and writes all the results of static verification of the ejb.jar file to the output directory ResultsDir:
verifier -v -r a -d ResultsDir ejb.jar
The results files are ejb.jar_verifier.timestamp.txt and ejb.jar_verifier.timestamp.xml. The format of the timestamp is yyyyMMddhhmmss.
If the verifier runs successfully, a result code of 0 is returned. This does not mean that no verification errors occurred. A non-zero error code is returned if the verifier fails to run.
Ant IntegrationYou can integrate the verifier into an Ant build file as a target and use the Ant call feature to call the target each time an application or module is assembled. This is because the main method in com.sun.enterprise.tools.verifier.Verifier is callable from user Ant scripts. The main method accepts the arguments described in the “Verifier Options” table.
Example code for an Ant verify target is as follows:
<target name="verify"> <echo message="Verification Process for ${testfile}"/> <java classname="com.sun.enterprise.tools.verifier.Verifier"
fork="yes"> <sysproperty key="com.sun.enterprise.home"
value="${appserv.home}"/> <sysproperty key="verifier.xsl"
value="${appserv.home}/verifier/config" /> <!-- uncomment the following for verbose output --> <!--<arg value="-v"/>--> <arg value="${assemble}/${ejbjar}" /> <classpath path="${appserv.cpath}:${java.class.path}"/>
</java> </target>
Sample Results FilesHere is a sample results XML file:
<static-verification> <ejb>
<failed> <test>
<test-name>tests.ejb.session.TransactionTypeNullForContainerTX
</test-name> <test-assertion>
Session bean with bean managed transaction demarcation test

Assembling Modules and Applications
Chapter 3 Assembling and Deploying J2EE Applications 95
</test-assertion> <test-description>
For [ TheGreeter ] Error: Session Beans [ TheGreeter ] with [ Bean ] managed transaction demarcation should not have container transactions defined.
</test-description> </test>
</failed> </ejb>
...</static-verification>
Here is a sample results TXT file:
--------------------------- STATIC VERIFICATION RESULTS --------------------------- ---------------------------------- NUMBER OF FAILURES/WARNINGS/ERRORS ----------------------------------
# of Failures : 3 # of Warnings : 6 # of Errors : 0
----------------------------- RESULTS FOR EJB-RELATED TESTS ----------------------------- -------------- FAILED TESTS : --------------
Test Name : tests.ejb.session.TransactionTypeNullForContainerTX Test Assertion : Session bean with bean managed transaction demarcation test Test Description : For [ TheGreeter ] Error: Session Beans [ TheGreeter ] with [ Bean ] managed transaction demarcation should not have container transactions defined.
...
--------------- PASSED TESTS : ---------------
Test Name : tests.ejb.session.ejbcreatemethod.EjbCreateMethodStatic Test Assertion : Each session Bean must have at least one non-static

Assembling Modules and Applications
96 Application Server 8 • Developer’s Guide
ejbCreate method test Test Description : For [ TheGreeter ] For EJB Class [ samples.helloworld.ejb.GreeterEJB ] method [ ejbCreate ] [ samples.helloworld.ejb.GreeterEJB ] properly declares non-static ejbCreate(...) method.
...
----------- WARNINGS : -----------
Test Name : tests.ejb.businessmethod.BusinessMethodException Test Assertion : Enterprise bean business method throws RemoteException test Test Description :
Test Name : tests.ejb.ias.beanpool.IASEjbBeanPool Test Assertion : Test Description : WARNING [IAS-EJB ejb] : bean-pool should be defined for Stateless Session and Message Driven Beans
...
--------------------- NOTAPPLICABLE TESTS : ---------------------
Test Name : tests.ejb.entity.pkmultiplefield.PrimaryKeyClassFieldsCmp Test Assertion : Ejb primary key class properly declares all class fields within subset of the names of the container-managed fields test. Test Description : For [ TheGreeter ] class com.sun.enterprise.tools.verifier.tests.ejb.entity.pkmultiplefield.PrimaryKeyClassFieldsCmp expected Entity bean, but called with Session.
Test Name : tests.ejb.entity.ejbcreatemethod.EjbCreateMethodReturn Test Assertion : Each entity Bean may have zero or more ejbCreate methods which return primary key type test Test Description : For [ TheGreeter ] class com.sun.enterprise.tools.verifier.tests.ejb.entity.ejbcreatemethod.EjbCreateMethodReturn expected Entity bean, but called with Session bean.
...
-----------------------------------

Assembling Modules and Applications
Chapter 3 Assembling and Deploying J2EE Applications 97
RESULTS FOR OTHER XML-RELATED TESTS ----------------------------------- --------------- PASSED TESTS : ---------------
Test Name : tests.dd.ParseDD Test Assertion : Test parses the deployment descriptor using a SAX parser to avoid the dependency on the DOL Test Description : PASSED [EJB] : [ remote ] and [ home ] tags present. PASSED [EJB]: session-type is Stateless. PASSED [EJB]: trans-attribute is NotSupported. PASSED [EJB]: transaction-type is Bean.
...
Assembling a WAR ModuleTo assemble a WAR module, follow these steps:
1. Create a working directory, and copy the contents of your web module into it.
2. Create two deployment descriptor files with these names: web.xml (required) and sun-web.xml (optional). For more information about sun-web.xml, see Chapter 5, “Deployment Descriptor Files.”
3. Execute this command to create the WAR file:
jar -cvf module_name.war *
TIP The first time, you can assemble the WAR module and create the deployment descriptors using the deploytool. The resulting WAR file can be extracted to yield the deployment descriptors.
TIP The assembly process can be automated using the Ant tool. To learn more, see “Apache Ant Assembly and Deployment Tool” on page 115.

Assembling Modules and Applications
98 Application Server 8 • Developer’s Guide
Assembling an EJB JAR ModuleTo assemble an EJB JAR module, follow these steps:
1. Create a working directory, and copy the contents of your module into it.
2. Create two deployment descriptor files with these names: ejb-jar.xml and sun-ejb-jar.xml (both required). If the EJB component is an entity bean with container-managed persistence, you must also create a .dbschema file and a sun-cmp-mapping.xml file. For more information about sun-ejb-jar.xml and sun-cmp-mapping.xml, see Chapter 5, “Deployment Descriptor Files.”
3. Execute this command to create the JAR file:
jar -cvf module_name.jar *
Assembling a Lifecycle ModuleTo assemble a lifecycle module, follow these steps:
1. Create a working directory, and copy the contents of your module into it.
2. Execute this command to create the JAR file:
jar -cvf module_name.jar *
TIP The first time, you can assemble the EJB JAR module and create the deployment descriptors using the deploytool. The resulting EJB JAR file can be extracted to yield the deployment descriptors.
TIP The assembly process can be automated using the Ant tool. To learn more, see “Apache Ant Assembly and Deployment Tool” on page 115.
NOTE According to the J2EE specification, section 8.1.1.2, “Dependencies,” you cannot package utility classes within an individually deployed EJB module. Instead, package the EJB module and utility JAR within an application using the JAR Extension Mechanism Architecture. For other alternatives, see “Circumventing Classloader Isolation” on page 89.

Assembling Modules and Applications
Chapter 3 Assembling and Deploying J2EE Applications 99
For general information about lifecycle modules, see Chapter 10, “Developing Lifecycle Listeners.”
Assembling an ApplicationTo assemble an application, follow these steps:
1. Create a working directory, and copy the contents of your application into it, including all modules.
2. Create two deployment descriptor files with these names: application.xml (required) and sun-application.xml (optional). For more information about sun-application.xml, see Chapter 5, “Deployment Descriptor Files.”
3. Execute this command to create the J2EE application EAR file:
jar -cvf app_name.ear *
TIP The assembly process can be automated using the Ant tool. To learn more, see “Apache Ant Assembly and Deployment Tool” on page 115.
TIP The first time, you can assemble the application and create the deployment descriptors using the deploytool. The resulting EAR file can be extracted to yield the deployment descriptors.
TIP The assembly process can be automated using the Ant tool. To learn more, see “Apache Ant Assembly and Deployment Tool” on page 115.

Assembling Modules and Applications
100 Application Server 8 • Developer’s Guide
Assembling an ACC ClientThis section provides some brief pointers for assembling ACC clients. For more detailed information, see Chapter 9, “Developing Java Clients.” To assemble an ACC client JAR module, follow these steps:
1. Create a working directory, and copy the contents of your module into it.
2. Create deployment descriptor files with these names: application-client.xml and sun-application-client.xml (both required). For more information about sun-application-client.xml, see “The sun-application-client.xml file” on page 237
3. Execute this command to create the client JAR file:
jar -cvfm module_name.jar META-INF/MANIFEST.MF *
For a brief description of how to deploy an ACC client and prepare the client machine, see “Deploying an Application Client” on page 113.
Assembling a J2EE CA Resource AdapterThis section provides some brief pointers for assembling J2EE CA resource adapters. To assemble a connector RAR module, follow these steps:
1. Create a working directory, and copy the contents of your module into it.
2. Create the deployment descriptor file with this name: ra.xml. The ra.xml file is required for deploying a connector to the application server. This file is based on the J2EE CA specification and is packaged with the connector.
TIP The first time, you can assemble the client JAR module and create the deployment descriptors using the deploytool. The resulting client JAR file can be extracted to yield the deployment descriptors.
TIP The assembly process can be automated using the Ant tool. To learn more, see “Apache Ant Assembly and Deployment Tool” on page 115.

Deploying Modules and Applications
Chapter 3 Assembling and Deploying J2EE Applications 101
3. Execute this command to create the RAR file:
jar -cvf module_name.rar *
Deploying Modules and ApplicationsThis section describes the different ways to deploy J2EE applications and modules to the Sun Java System Application Server. It covers the following topics:
• Deployment Errors
• The Deployment Life Cycle
• Tools for Deployment
• Deployment by Module or Application
• Deploying a WAR Module
• Deploying an EJB JAR Module
• Deploying a Lifecycle Module
• Deploying an Application Client
• Deploying a J2EE CA Resource Adapter
• Access to Shared Frameworks
Deployment ErrorsIf an error occurs during deployment, the application or module is not deployed. If a module within an application contains an error, the entire application is not deployed. This prevents a partial deployment that could leave the server in an inconsistent state.
TIP The first time, you can assemble the RAR module and create the deployment descriptors using the deploytool. The resulting RAR file can be extracted to yield the deployment descriptors.
TIP The assembly process can be automated using the Ant tool. To learn more, see “Apache Ant Assembly and Deployment Tool” on page 115.

Deploying Modules and Applications
102 Application Server 8 • Developer’s Guide
The Deployment Life CycleAfter an application is initially deployed, it may be modified and reloaded, redeployed, disabled, re-enabled, and finally undeployed (removed from the server). This section covers the following topics related to the deployment life cycle:
• Dynamic Deployment
• Disabling a Deployed Application or Module
• Dynamic Reloading
• Automatic Deployment
Dynamic DeploymentYou can deploy, redeploy, and undeploy an application or module without restarting the server. This is called dynamic deployment.
Although primarily for developers, dynamic deployment can be used in operational environments to bring new applications and modules online without requiring a server restart. Whenever a redeployment is done, the sessions at that transit time become invalid. The client must restart the session.
Disabling a Deployed Application or ModuleYou can disable a deployed application or module without removing it from the server. Disabling an application makes it inaccessible to clients.
To disable an application or module, you can do one of the following:
• Set enabled="false" for the application or module in the domain.xml file. For details about domain.xml, see the Sun Java System Application Server Reference.
• Use the Administration Console:
a. Login to the Administration Console by going to the following URL in your web browser:
http://host:port/asadmin
NOTE You can overwrite a previously deployed application by using the --force option of asadmin deploy or by checking the appropriate box in the Administration Console during deployment. However, you must remove a preconfigured resource before you can update it.

Deploying Modules and Applications
Chapter 3 Assembling and Deploying J2EE Applications 103
For example:
http://localhost:4848/asadmin
b. Open the Applications component.
c. Go to the page for the type of application or module. For example, for a web application, go to the Web Applications page.
d. Click on the name of the application or module you wish to disable.
e. Uncheck the Status Enabled box.
f. Click Save.
Dynamic ReloadingIf dynamic reloading is enabled (it is by default), you do not have to redeploy an application or module when you change its code or deployment descriptors. All you have to do is copy the changed JSP or class files into the deployment directory for the application or module. The server checks for changes periodically and redeploys the application, automatically and dynamically, with the changes.
This is useful in a development environment, because it allows code changes to be tested quickly. In a production environment, however, dynamic reloading may degrade performance. In addition, whenever a reload is done, the sessions at that transit time become invalid. The client must restart the session.
To enable dynamic reloading, you can do one of the following:
• Use the Administration Console:
a. Login to the Administration Console by going to the following URL in your web browser:
http://host:port/asadmin
For example:
http://localhost:4848/asadmin
b. Open the Applications component.
c. Go to the Applications page.
d. Check the Reload Enabled box to enable dynamic reloading.
e. Enter a number of seconds in the Reload Poll Interval field to set the interval at which applications and modules are checked for code changes and dynamically reloaded. The default is 2.

Deploying Modules and Applications
104 Application Server 8 • Developer’s Guide
f. Click on the Save button.
For details, see the Sun Java System Application Server Administration Guide.
• Edit the following attributes of the domain.xml file’s applications element:
❍ dynamic-reload-enabled="true" enables dynamic reloading.
❍ dynamic-reload-poll-interval-in-seconds sets the interval at which applications and modules are checked for code changes and dynamically reloaded.
For details about domain.xml, see the Sun Java System Application Server Reference.
In addition, to load new servlet files, reload EJB related changes, or reload deployment descriptor changes, you must do the following:
1. Create an empty file named .reload at the root of the deployed application:
domain_dir/applications/j2ee-apps/app_name/.reload
or individually deployed module:
domain_dir/applications/j2ee-modules/module_name/.reload
2. Explicitly update the .reload file’s timestamp (touch .reload in UNIX) each time you make the above changes.
Automatic DeploymentAutomatic deployment, also called autodeployment, involves copying an application or module file (JAR, WAR, RAR, or EAR) into a special directory, where it is automatically deployed by the Sun Java System Application Server. To undeploy an automatically deployed application or module, simply remove its file from the special autodeployment directory. This is useful in a development environment, because it allows new code to be tested quickly.
Autodeployment is enabled by default. To enable and configure or to disable autodeployment, you can do one of the following:
• Use the Administration Console:
a. Login to the Administration Console by going to the following URL in your web browser:
http://host:port/asadmin
For example:
http://localhost:4848/asadmin
b. Open the Applications component.

Deploying Modules and Applications
Chapter 3 Assembling and Deploying J2EE Applications 105
c. Go to the Applications page.
d. Check the Auto Deploy Enabled box to enable autodeployment, or uncheck this box to disable autodeployment.
e. Enter a number of seconds in the Auto Deploy Poll Interval field to set the interval at which applications and modules are checked for code changes and dynamically reloaded. The default is 2.
f. You can change the Auto Deploy Directory if you like. The default is domain_dir/autodeploy. You can enter an absolute or relative path. A relative path is relative to domain_dir.
g. You can check the Verifier Enabled box to verify your deployment descriptor files. This is optional. For details about the verifier, see “The Deployment Descriptor Verifier” on page 92.
h. Check the Precompile Enabled box if you would like any JSPs to be precompiled.
i. Click on the Save button.
For details, see the Sun Java System Application Server Administration Guide.
• Edit the following attributes of the domain.xml file’s applications element:
❍ autodeploy-enabled="true" enables autodeployment; false disables it.
❍ autodeploy-polling-interval-in-seconds sets the interval at which the autodeployment directory is checked for changes.
❍ autodeploy-dir sets the location of the autodeployment directory. You can enter an absloute or relative path. A relative path is relative to domain_dir.
❍ autodeploy-verifier-enabled verifies your deployment descriptor files. This is optional. For details about the verifier, see “The Deployment Descriptor Verifier” on page 92.
❍ autodeploy-jsp-precompilation-enabled precompiles any JSPs.
For details about domain.xml, see the Sun Java System Application Server Reference.

Deploying Modules and Applications
106 Application Server 8 • Developer’s Guide
Tools for Deployment This section discusses the various tools that can be used to deploy modules and applications. The deployment tools include:
• Apache Ant
• The deploytool
• JSR 88
• The FastJavac Compiler
• The asadmin Command
• The Administration Console
Apache AntAnt can help you assemble and deploy modules and applications. For details, see “Apache Ant Assembly and Deployment Tool” on page 115.
The deploytoolYou can use the deploytool, provided with Sun Java System Application Server, to assemble J2EE applications and modules, configure deployment parameters, perform simple static checks, and deploy the final result. For more information about using the deploytool, see the J2EE 1.4 Tutorial:
http://java.sun.com/j2ee/1.4/docs/tutorial/doc/index.html
JSR 88You can write your own JSR 88 client to deploy applications to the Sun Java System Application Server. For more information, see the JSR 88 page:
http://jcp.org/en/jsr/detail?id=88
See “Naming Standards” on page 81 for application and module naming considerations.
The FastJavac CompilerBy default, Sun Java System Application Server uses the built-in JDK compiler to compile applications during deployment. You can also use Sun ONE Studio’s FastJavac compiler, which has a faster compilation rate, during deployment.
To use the FastJavac compiler, you must configure the administration server’s domain.xml file with the path to the compiler. Edit the java-config element as follows:

Deploying Modules and Applications
Chapter 3 Assembling and Deploying J2EE Applications 107
<java-config java-home="/install_dir/jdk" server-classpath="classpath" ... >...<jvm-options>
-Dcom.sun.aas.deployment.java.compiler=/install_dir/studio5/bin/fastjavac/fastjavac.sun</jvm-options>...<property name="com.sun.aas.deployment.java.compiler.options"
value="-jdk /install_dir/jdk" />...
</java-config>
The asadmin CommandYou can use the asadmin command to deploy or undeploy applications and individually deployed modules on local servers. This section describes the asadmin command only briefly. For full details, see the Sun Java System Application Server Administration Guide.
To deploy a lifecycle module, see “Deploying a Lifecycle Module” on page 111.
asadmin deployThe asadmin deploy command deploys a WAR, JAR, RAR, or EAR file. The syntax is as follows, with defaults shown for optional parameters that have them:
asadmin deploy --user user [--virtualservers virtual_servers] [--contextroot contextroot] [--force=true] [--precompilejsp=false] [--verify=false] [--name component_name] [--upload=true] [--retrieve local_dirpath] [--dbvendorname dbvendorname] [--createtables=false] --dropandcreatetables=false] [--uniquetablenames=false] [--enable=true] [--deploymentplan deployment_plan] filepath
For more information about the --dbvendorname, --createtables, --dropandcreatetables, and --uniquetablenames parameters, see “Automatic Mapping Options” on page 308.
For more information about the optional general asadmin parameters (--password, --passwordfile, --host, --port, --secure, --terse, --echo, and --interactive), see the Sun Java System Application Server Administration Guide.
For example, the following command deploys an individual EJB module:
asadmin deploy --user joeuser packagingEJB.jar
If upload is set to false, the filepath must be an absolute path on the server machine.

Deploying Modules and Applications
108 Application Server 8 • Developer’s Guide
asadmin deploydirThe asadmin deploydir command deploys an application or module in an open directory structure. The structure must be as specified in “Directory Structure” on page 81. The location of the dirpath under domain_dir/applications/j2ee-apps or domain_dir/applications/j2ee-modules determines whether it is an application or individually deployed module.
The syntax is as follows, with defaults shown for optional parameters that have them:
asadmin deploydir --user user [--virtualservers virtual_servers] [--contextroot contextroot] [--force=true] [--precompilejsp=false] [--verify=false] [--name component_name] [--dbvendorname dbvendorname] [--createtables=false] --dropandcreatetables=false] [--uniquetablenames=false] dirpath
For more information about the --dbvendorname, --createtables, --dropandcreatetables, and --uniquetablenames parameters, see “Automatic Mapping Options” on page 308.
For example, the following command deploys an individual EJB module:
asadmin deploydir --user joeuser packagingEJB
If upload is set to false, the filepath must be an absolute path on the server machine.
asadmin undeployThe asadmin undeploy command undeploys an application or module. The syntax is as follows, with defaults shown for optional parameters that have them:
asadmin undeploy --user user [--droptables=false] [--cascade=false] component_name
For more information about the --droptables parameter, see “Automatic Mapping Options” on page 308.
For example, the following command undeploys an individual EJB module:
asadmin undeploy --user joeuser packagingEJB
NOTE On Windows, if you are deploying a directory on a mapped drive, you must be running Sun Java System Application Server as the same user to which the mapped drive is assigned, or Sun Java System Application Server won’t see the directory.

Deploying Modules and Applications
Chapter 3 Assembling and Deploying J2EE Applications 109
The Administration ConsoleYou can use the Administration Console to deploy modules and applications to both local and remote Sun Java System Application Server sites. To use this tool, follow these steps:
1. Login to the Administration Console by going to the following URL in your web browser:
http://host:port/asadmin
For example:
http://localhost:4848/asadmin
2. Open the Applications component.
3. Go to the page for the type of application or module. For example, for a web application, go to the Web Applications page.
4. Click on the Deploy button. (You can also undeploy, enable, or disable an application or module from this page.)
5. If your application or module is in an archive file rather than an open directory structure, click Yes next to Upload File.
6. Enter the full path to the module or application directory or archive file (or click on Browse to find it), then click on the Next button.
7. Enter the module or application name.
8. For an application or web module, enter the context root.
9. Assign the application or web module to one or more virtual servers by entering the virtual server names.
10. You can also redeploy the module or application if it already exists (called forced deployment) by checking the If Exists Redeploy box. This is optional.
11. You can check the Verifier Enabled box to verify your deployment descriptor files. This is optional. For details about the verifier, see “The Deployment Descriptor Verifier” on page 92.
12. Other fields are displayed depending on the type of module. Check appropriate boxes and enter appropriate values. Required fields are marked with asterisks (*).
13. Click on the Finish button.
To deploy a lifecycle module, see “Deploying a Lifecycle Module” on page 111.

Deploying Modules and Applications
110 Application Server 8 • Developer’s Guide
Deployment by Module or ApplicationYou can deploy applications or individual modules that are independent of applications. The runtime and file system implications of application-based or individual module-based deployment are described in “Runtime Environments” on page 83.
Individual module-based deployment is preferable when components need to be accessed by:
• Other modules
• J2EE Applications
• ACC clients (Module-based deployment allows shared access to a bean from an ACC client, a servlet, or an EJB component.)
Modules can be combined into an EAR file and then deployed as a single module. This is similar to deploying the modules of the EAR independently.
Deploying a WAR ModuleYou deploy a WAR module as described in “Tools for Deployment” on page 106.
You can precompile JSPs during deployment by checking the appropriate box in the Administration Console or by using the --precompilejsp option of the asadmin deploy or asadmin deploydir command. The sun-appserv-deploy and sun-appserv-jspc Ant tasks also allow you to precompile JSPs.
You can keep the generated source for JSPs by adding the -keepgenerated flag to the jsp-config element in sun-web.xml. If you include this property when you deploy the WAR module, the generated source is kept in domain_dir/generated/jsp/j2ee-apps/app_name/module_name if it is in an application or domain_dir/generated/jsp/j2ee-modules/module_name if it is in an individually deployed web module.
For more information about JSP precompilation, see “Compiling JSPs: The Command-Line Compiler” on page 280. For more information about the -keepgenerated property, see “JSP Elements” on page 178.

Deploying Modules and Applications
Chapter 3 Assembling and Deploying J2EE Applications 111
Deploying an EJB JAR ModuleYou deploy an EJB JAR module as described in “Tools for Deployment” on page 106.
You can keep the generated source for stubs and ties by adding the -keepgenerated flag to the rmic-options attribute of the java-config element in domain.xml. If you include this flag when you deploy the EJB JAR module, the generated source is kept in domain_dir/generated/ejb/j2ee-apps/app_name/module_name if it is in an application or domain_dir/generated/ejb/j2ee-modules/module_name if it is in an individually deployed EJB JAR module. For more information about the -keepgenerated flag, see the Sun Java System Application Server Reference.
Generation of stubs and ties is performed asynchronously, so unless you request their generation during deployment (for example, using the --retrieve option of the asadmin deploy command), stubs and ties are not guaranteed to be available immediately after deployment. You can use the asadmin get-client-stubs command to retrieve the stubs and ties whether or not you requested their generation during deployment. The syntax is as follows:
asadmin get-client-stubs --user user --appname app_name local_dirpath
Deploying a Lifecycle ModuleFor general information about lifecycle modules, see Chapter 10, “Developing Lifecycle Listeners.”
You can deploy a lifecycle module using the following tools:
• The asadmin Command
• The Administration Console
The asadmin CommandTo deploy a lifecycle module, use the asadmin create-lifecycle-module command. The syntax is as follows, with defaults shown for optional parameters that have them:
asadmin create-lifecycle-module --user user --classname classname [--classpath classpath] [--loadorder load_order_number] [--failurefatal=false] [--enabled=true] [--description text_description] [--property (name=value)[:name=value]*] modulename
For more information about the optional general asadmin parameters (--password, --passwordfile, --host, --port, --secure, --terse, --echo, and --interactive), see the Sun Java System Application Server Administration Guide.

Deploying Modules and Applications
112 Application Server 8 • Developer’s Guide
For example:
asadmin create-lifecycle-module --user joeuser --classname RMIServer MyRMIServer
To undeploy a lifecycle module, use the asadmin delete-lifecycle-module command. The syntax is as follows, with defaults shown for optional parameters that have them:
asadmin delete-lifecycle-module --user user module_name
For example:
asadmin delete-lifecycle-module --user joeuser MyRMIServer
To list the lifecycle modules that are deployed, use the asadmin list-lifecycle-modules command. The syntax is as follows, with defaults shown for optional parameters that have them:
asadmin list-lifecycle-modules --user user
For example:
asadmin list-lifecycle-module --user joeuser
The Administration ConsoleYou can also use the Administration Console to deploy a lifecycle module. Follow these steps:
1. Login to the Administration Console by going to the following URL in your web browser:
http://host:port/asadmin
For example:
http://localhost:4848/asadmin
2. Open the Applications component.
3. Go to the Lifecycle Modules page.
4. Click on the New button.
5. Enter the following information:
❍ Name (required) - The name of the lifecycle module.
❍ Class Name (required) - The fully qualified name of the lifecycle module’s class file.
❍ Classpath (optional) - The classpath for the lifecycle module. Specifies where the module is located. The default location is under the application root directory.

Deploying Modules and Applications
Chapter 3 Assembling and Deploying J2EE Applications 113
❍ Load Order (optional) - Determines the order in which lifecycle modules are loaded at startup. Modules with smaller integer values are loaded sooner. Values can range from 101 to the operating system’s MAXINT. Values from 1 to 100 are reserved.
❍ On Load Failure Prevent Server Startup (optional) - Determines whether the server is shut down if the lifecycle module fails. The default is false.
❍ Status Enabled (optional) - Determines whether the lifecycle module is enabled. The default is true.
❍ Description (optional) - A text description of the lifecycle module.
6. Click on the OK button.
Deploying an Application ClientDeployment is only necessary for application clients that communicate with EJB components. To deploy an application client:
1. Assemble the necessary client files (as described in “Assembling an ACC Client” on page 100).
2. Assemble the EJB components to be accessed by the client.
3. Package the client and EJB components together in an application.
4. Deploy the application as described in “Tools for Deployment” on page 106. You can use the --retrieve option to get the client JAR file.
You can also use the asadmin get-client-stubs command to retrieve the stubs and ties whether or not you requested their generation during deployment. The syntax is as follows:
asadmin get-client-stubs --user user --appname app_name local_dirpath
5. The client JAR contains the ties and necessary classes for the ACC client. Copy this file to the client machine, and set the APPCPATH environment variable on the client to point to this JAR.
If you wish to execute the client on the Sun Java System Application Server machine to test it, you can use the appclient script in the install_dir/bin directory. The only required option is -client. For example:
appclient -client converterClient.jar
The -xml parameter specifies the location of the sun-acc.xml file.

Deploying Modules and Applications
114 Application Server 8 • Developer’s Guide
Before you can execute an ACC client on a different machine, you must prepare the client machine:
1. You can use the package-appclient script in the install_dir/bin directory to create the ACC package JAR file. This is optional. This JAR file is created in the install_dir/lib/appclient directory.
2. Copy the ACC package JAR file to the client machine and unjar it.
3. Configure the sun-acc.xml file, located in the appclient/appserv/lib/appclient directory by default if you used the package-appclient script.
4. Configure the asenv.conf (asenv.bat on Windows) file, located in appclient/appserv/bin by default if you used the package-appclient script.
5. Copy the client JAR file to the client machine. You are now ready to execute the client.
For more detailed information about the appclient and package-appclient scripts, see Chapter 9, “Developing Java Clients.”
Deploying a J2EE CA Resource AdapterYou deploy a connector module as described in “Tools for Deployment” on page 106. After deploying the module, you must configure it as described in the following document:
http://developers.sun.com/prodtech/appserver/reference/techart/as8_connectors
Access to Shared Frameworks When J2EE applications and modules use shared framework classes (such as utility classes and libraries) the classes can be put in the path for the System Classloader or the Common Classloader rather than in an application or module. If you assemble a large, shared library into every module that uses it, the result is a huge file that takes too long to register with the server. In addition, several versions of the same class could exist in different classloaders, which is a waste of resources. For more information, see “Circumventing Classloader Isolation” on page 89.

Apache Ant Assembly and Deployment Tool
Chapter 3 Assembling and Deploying J2EE Applications 115
Apache Ant Assembly and Deployment ToolYou can use the automated assembly features available through Ant, a Java-based build tool available through the Apache Software Foundation:
http://ant.apache.org/
Ant is a Java-based build tool that is extended using Java classes. Instead of using shell commands, you declare the assembly steps using an XML document. Each task is run by an object that implements a particular task interface.
Apache Ant 1.5.4 is provided with Sun Java System Application Server. The sample applications provided with Sun Java System Application Server have Ant build.xml files; see “Sample Applications” on page 33.
Make sure you have done these things before using Ant:
• Include install_dir/bin in the PATH environment variable. The Ant script provided with Sun Java System Application Server, asant, is located in this directory. For details on how to use asant, see the sample applications documentation in the install_dir/samples/docs/ant.html file.
❍ If you are executing platform-specific applications, such as the exec or cvs task, the ANT_HOME environment variable must be set to the Ant installation directory.The ANT_HOME environment variable for all platforms is install_dir/lib.
This section covers the following Ant-related topics:
• Ant Tasks for Sun Java System Application Server 8
• Reusable Subelements
For information about standard Ant tasks, see the Ant documentation:
http://computing.ee.ethz.ch/sepp/ant-1.5.4-ke/manual/index.html
Ant Tasks for Sun Java System Application Server 8Use the Ant tasks provided by Sun Java System Application Server for assembling, deploying, and undeploying modules and applications, and for configuring the server. The tasks are as follows:
• sun-appserv-deploy
• sun-appserv-undeploy

Apache Ant Assembly and Deployment Tool
116 Application Server 8 • Developer’s Guide
• sun-appserv-component
• sun-appserv-admin
• sun-appserv-jspc
• sun-appserv-update
sun-appserv-deployDeploys any of the following.
• Enterprise application (EAR file)
• Web application (WAR file)
• Enterprise Java Bean (EJB-JAR file)
• Enterprise connector (RAR file)
• Application client
SubelementsThe following table describes subelements for the sun-appserv-deploy task. These are objects upon which this task acts.
AttributesThe following table describes attributes for the sun-appserv-deploy task.
Table 3-5 sun-appserv-deploy SubelementsElement Description
component A component to be deployed.
fileset A set of component files that match specified parameters.
Table 3-6 sun-appserv-deploy AttributesAttribute Default Description
file none (optional if a component or fileset subelement is present, otherwise required) The component to deploy. If this attribute refers to a file, it must be a valid archive. If this attribute refers to a directory, it must contain a valid archive in which all components have been exploded. If upload is set to false, this must be an absolute path on the server machine.

Apache Ant Assembly and Deployment Tool
Chapter 3 Assembling and Deploying J2EE Applications 117
name file name without extension
(optional) The display name for the component being deployed.
type determined from the file or directory name extension
(optional) The type of component being deployed. Valid types are application, ejb, web, and connector. If not specified, the file (or directory) extension is used to determine the component type: .ear for applicaton, .jar for ejb, .war for web, and .rar for connector. If it’s not possible to determine the component type using the file extension, the default is application.
force true (optional) If true, the component is overwritten if it already exists on the server. If false, sun-appserv-deploy fails if the component exists.
retrievestubs client stubs not saved
(optional) The directory where client stubs are saved. This attribute is inherited by nested component elements.
precompilejsp false (optional) If true, all JSPs found in an enterprise application (.ear) or web application (.war) are precompiled. This attribute is ignored for other component types. This attribute is inherited by nested component elements.
verify false (optional) If true, syntax and semantics for all deployment descriptors are automatically verified for correctness. This attribute is inherited by nested component elements.
contextroot file name without extension
(optional) The context root for a web module (WAR file). This attribute is ignored if the component is not a WAR file.
upload true (optional) If true, the component is transferred to the server for deployment. If the component is being deployed on the local machine, set upload to false to reduce deployment time. If a directory is specified for deployment, upload must be false.
virtualservers default virtual server only
(optional) A comma-separated list of virtual servers to be deployment targets. This attribute applies only to application (.ear) or web (.war) components and is ignored for other component types.
user admin (optional) The user name used when logging into the application server.
password none The password used when logging into the application server.
Table 3-6 sun-appserv-deploy Attributes (Continued)Attribute Default Description

Apache Ant Assembly and Deployment Tool
118 Application Server 8 • Developer’s Guide
ExamplesHere is a simple application deployment script with many implied attributes:
<sun-appserv-deployfile="${assemble}/simpleapp.ear"password="${password}" />
Here is an equivalent script showing all the implied attributes:
<sun-appserv-deploy file="${assemble}/simpleapp.ear" name="simpleapp" type="application" force="true" precompilejsp="false"verify="false"upload="true" user="admin" password="${password}" host="localhost" port="4848" sunonehome="${sunone.home}" />
This example deploys multiple components to the same Sun Java System Application Server running on a remote server:
host localhost (optional) Target server. When deploying to a remote server, use the fully qualified host name.
port 4848 (optional) The administration port on the target server.
sunonehome see description
(optional) The installation directory for the local Sun Java System Application Server 8 installation, which is used to find the administrative classes. If not specified, the command checks to see if the sunone.home parameter has been set. Otherwise, administrative classes must be in the system classpath.
Table 3-6 sun-appserv-deploy Attributes (Continued)Attribute Default Description

Apache Ant Assembly and Deployment Tool
Chapter 3 Assembling and Deploying J2EE Applications 119
<sun-appserv-deploy password="${password}" host="greg.sun.com" sunonehome="/opt/sun" >
<component file="${assemble}/simpleapp.ear"/> <component file="${assemble}/simpleservlet.war"
contextroot="test"/> <component file="${assemble}/simplebean.jar"/>
</sun-appserv-deploy>
This example deploys the same components as the previous example because the three components match the fileset criteria, but note that it’s not possible to set some component-specific attributes. All component-specific attributes (name, type, and contextroot) use their default values.
<sun-appserv-deploy password="${password}" host="greg.sun.com" sunonehome="/opt/sun" >
<fileset dir="${assemble}" includes="**/*.?ar" /> </sun-appserv-deploy>
sun-appserv-undeployUndeploys any of the following.
• Enterprise application (EAR file)
• Web application (WAR file)
• Enterprise Java Bean (EJB-JAR file)
• Enterprise connector (RAR file)
• Application client
SubelementsThe following table describes subelements for the sun-appserv-undeploy task. These are objects upon which this task acts.
AttributesThe following table describes attributes for the sun-appserv-undeploy task.
Table 3-7 sun-appserv-undeploy SubelementsElement Description
component A component to be deployed.
fileset A set of component files that match specified parameters.

Apache Ant Assembly and Deployment Tool
120 Application Server 8 • Developer’s Guide
ExamplesHere is a simple application undeployment script with many implied attributes:
<sun-appserv-undeploy name="simpleapp" password="${password}" />
Here is an equivalent script showing all the implied attributes:
<sun-appserv-undeploy name="simpleapp" type="application" user="admin"
Table 3-8 sun-appserv-undeploy AttributesAttribute Default Description
name file name without extension
(optional if a component or fileset subelement is present or the file attribute is specified, otherwise required) The display name for the component being undeployed.
file none (optional) The component to undeploy. If this attribute refers to a file, it must be a valid archive. If this attribute refers to a directory, it must contain a valid archive in which all components have been exploded.
type determined from the file or directory name extension
(optional) The type of component being undeployed. Valid types are application, ejb, web, and connector. If not specified, the file (or directory) extension is used to determine the component type: .ear for applicaton, .jar for ejb, .war for web, and .rar for connector. If it’s not possible to determine the component type using the file extension, the default is application.
user admin (optional) The user name used when logging into the application server.
password none The password used when logging into the application server.
host localhost (optional) Target server. When deploying to a remote server, use the fully qualified host name.
port 4848 (optional) The administration port on the target server.
sunonehome see description
(optional) The installation directory for the local Sun Java System Application Server 8 installation, which is used to find the administrative classes. If not specified, the command checks to see if the sunone.home parameter has been set. Otherwise, the administrative classes must be in the system classpath.

Apache Ant Assembly and Deployment Tool
Chapter 3 Assembling and Deploying J2EE Applications 121
password="${password}" host="localhost" port="4848" sunonehome="${sunone.home}" />
This example demonstrates using the archive files (EAR and WAR, in this case) for the undeployment, using the component name and type (for undeploying the EJB component in this example), and undeploying multiple components.
<sun-appserv-undeploy password="${password}"> <component file="${assemble}/simpleapp.ear"/> <component file="${assemble}/simpleservlet.war"/> <component name="simplebean" type="ejb"/>
</sun-appserv-undeploy>
sun-appserv-component Enables or disables the following J2EE component types that have been deployed to Sun Java System Application Server 8.
• Enterprise application (EAR file)
• Web application (WAR file)
• Enterprise Java Bean (EJB-JAR file)
• Enterprise connector (RAR file)
• Application client
You don’t need to specify the archive to enable or disable a component: only the component name is required. You can use the component archive, however, because it implies the component name.
SubelementsThe following table describes subelements for the sun-appserv-component task. These are objects upon which this task acts.
Table 3-9 sun-appserv-component SubelementsElement Description
component A component to be deployed.
fileset A set of component files that match specified parameters.

Apache Ant Assembly and Deployment Tool
122 Application Server 8 • Developer’s Guide
AttributesThe following table describes attributes for the sun-appserv-component task.
ExamplesHere is a simple example of disabling a component:
<sun-appserv-component action="disable" name="simpleapp" password="${password}" />
Table 3-10 sun-appserv-component AttributesAttribute Default Description
action none The control command for the target application server. Valid values are enable and disable.
name file name without extension
(optional if a component or fileset subelement is present or the file attribute is specified, otherwise required) The display name for the component being enabled or disabled.
file none (optional) The component to enable or disable. If this attribute refers to a file, it must be a valid archive. If this attribute refers to a directory, it must contain a valid archive in which all components have been exploded.
type determined from the file or directory name extension
(optional) The type of component being enabled or disabled. Valid types are application, ejb, web, and connector. If not specified, the file (or directory) extension is used to determine the component type: .ear for applicaton, .jar for ejb, .war for web, and .rar for connector. If it’s not possible to determine the component type using the file extension, the default is application.
user admin (optional) The user name used when logging into the application server.
password none The password used when logging into the application server.
host localhost (optional) Target server. When enabling or disabling a remote server, use the fully qualified host name.
port 4848 (optional) The administration port on the target server.
sunonehome see description
(optional) The installation directory for the local Sun Java System Application Server 8 installation, which is used to find the administrative classes. If not specified, the command checks to see if the sunone.home parameter has been set. Otherwise, the administrative classes must be in the system classpath.

Apache Ant Assembly and Deployment Tool
Chapter 3 Assembling and Deploying J2EE Applications 123
Here is a simple example of enabling a component:
<sun-appserv-component action="enable" name="simpleapp" password="${password}" />
Here is an equivalent script showing all the implied attributes:
<sun-appserv-component action="enable" name="simpleapp" type="application" user="admin" password="${password}" host="localhost" port="4848" sunonehome="${sunone.home}" />
This example demonstrates disabling multiple components using the archive files (EAR and WAR, in this case) and using the component name and type (for an EJB component in this example).
<sun-appserv-component action="disable" password="${password}"> <component file="${assemble}/simpleapp.ear"/> <component file="${assemble}/simpleservlet.war"/> <component name="simplebean" type="ejb"/>
</sun-appserv-component>
sun-appserv-adminEnables arbitrary administrative commands and scripts to be executed on the Sun Java System Application Server 8. This is useful for cases where a specific Ant task hasn’t been developed or a set of related commands are in a single script.
Subelementsnone
AttributesThe following table describes attributes for the sun-appserv-admin task.

Apache Ant Assembly and Deployment Tool
124 Application Server 8 • Developer’s Guide
Table 3-11 sun-appserv-admin AttributesAttribute Default Description
command none (exactly one of these is required: command, commandfile, or explicitcommand) The command to execute. If the user, password, host, or port attributes are also specified, they are automatically inserted into the command before execution. If any of these options are specified in the command string, the corresponding attribute values are ignored.
commandfile none (exactly one of these is required: command, commandfile, or explicitcommand) The command script to execute. If commandfile is used, the values of all other attributes are ignored. Be sure to end the script referenced by commandfile with the exit command; if you omit exit, the Ant task may appear to hang after the command script is called.
explicitcommand none (exactly one of these is required: command, commandfile, or explicitcommand) The exact command to execute. No command processing is done, and all other attributes are ignored.
user admin (optional) The user name used when logging into the application server.
password none (optional) The password used when logging into the application server.
host localhost (optional) Target server. If it is a remote server, use the fully qualified host name.
port 4848 (optional) The administration port on the target server.
sunonehome see description
(optional) The installation directory for the local Sun Java System Application Server 8 installation, which is used to find the administrative classes. If not specified, the command checks to see if the sunone.home parameter has been set. Otherwise, the administrative classes must be in the system classpath.

Apache Ant Assembly and Deployment Tool
Chapter 3 Assembling and Deploying J2EE Applications 125
sun-appserv-jspcPrecompiles JSP source code into Sun Java System Application Server compatible Java code for initial invocation by Sun Java System Application Server. Use this task to speed up access to JSP pages or to check the syntax of JSP source code. You can feed the resulting Java code to the javac task to generate class files for the JSPs.
Subelementsnone
AttributesThe following table describes attributes for the sun-appserv-jspc task.
Table 3-12 sun-appserv-jspc AttributesAttribute Default Description
destdir The destination directory for the generated Java source files.
srcdir (exactly one of these is required: srcdir or webapp) The source directory where the JSP files are located.
webapp (exactly one of these is required: srcdir or webapp) The directory containing the web application. All JSP pages within the directory are recursively parsed. The base directory must have a WEB-INF subdirectory beneath it. When webapp is used, sun-appserv-jspc hands off all dependency checking to the compiler.
verbose 2 (optional) The verbosity integer to be passed to the compiler.
classpath (optional) The classpath for running the JSP compiler.
classpathref (optional) A reference to the JSP compiler classpath.
uribase / (optional) The URI context of relative URI references in the JSP pages. If this context does not exist, it is derived from the location of the JSP file relative to the declared or derived value of uriroot. Only pages translated from an explicitly declared JSP file are affected.
uriroot see description
(optional) The root directory of the web application, against which URI files are resolved. If this directory is not specified, the first JSP page is used to derive it: each parent directory of the first JSP page is searched for a WEB-INF directory, and the directory closest to the JSP page that has one is used. If no WEB-INF directory is found, the directory sun-appserv-jspc was called from is used. Only pages translated from an explicitly declared JSP file (including tag libraries) are affected.

Apache Ant Assembly and Deployment Tool
126 Application Server 8 • Developer’s Guide
ExampleThe following example uses the webapp attribute to generate Java source files from JSP files. The sun-appserv-jspc task is immediately followed by a javac task, which compiles the generated Java files into class files. The classpath value in the javac task must be all on one line with no spaces.
<sun-appserv-jspc destdir="${assemble.war}/generated" webapp="${assemble.war}" classpath="${assemble.war}/WEB-INF/classes" sunonehome="${sunone.home}" />
<javac srcdir="${assemble.war}/WEB-INF/generated" destdir="${assemble.war}/WEB-INF/generated" debug="on" classpath="${assemble.war}/WEB-INF/classes:${sunone.home}/lib/
appserv-rt.jar:${sunone.home}/lib/appserv-ext.jar"> <include name="**/*.java"/>
</javac>
sun-appserv-updateEnables deployed applications (EAR files) and modules (EJB JAR, RAR, and WAR files) to be updated and reloaded for fast iterative development. This task copies modified class files, XML files, and other contents of the archive files to the appropriate subdirectory of the domain_dir/applications directory, then touches the .reload file to cause dynamic reloading to occur.
This is a local task and must be executed on the same machine as the application server.
package (optional) The destination package for the generated Java classes.
failonerror true (optional) If true, JSP compilation fails if errors are encountered.
sunonehome see description
(optional) The installation directory for the local Sun Java System Application Server 8 installation, which is used to find the administrative classes. If not specified, the command checks to see if the sunone.home parameter has been set. Otherwise, the administrative classes must be in the system classpath.
Table 3-12 sun-appserv-jspc Attributes (Continued)Attribute Default Description

Apache Ant Assembly and Deployment Tool
Chapter 3 Assembling and Deploying J2EE Applications 127
Subelementsnone
AttributesThe following table describes attributes for the sun-appserv-update task.
ExampleThe following example updates the J2EE application foo.ear, which is deployed to the default domain, domain1.
<sun-appserv-update file="foo.ear"/>
Reusable SubelementsReusable subelements of the Ant tasks for Sun Java System Application Server 8 are as follows. These are objects upon which the Ant tasks act.
• component
• fileset
componentSpecifies a J2EE component. Allows a single task to act on multiple components. The component attributes override corresponding attributes in the parent task; therefore, the parent task attributes function as default values.
Subelementsnone
AttributesThe following table describes attributes for the component element.
Table 3-13 sun-appserv-update AttributesAttribute Default Description
file none The component to update, which must be a valid archive.
domain domain1 (optional) The domain in which the application has been previously deployed.

Apache Ant Assembly and Deployment Tool
128 Application Server 8 • Developer’s Guide
ExamplesYou can deploy multiple components using a single task. This example deploys each component to the same Sun Java System Application Server running on a remote server.
Table 3-14 component AttributesAttribute Default Description
file none (optional if the parent task is sun-appserv-undeploy or sun-appserv-component) The target component. If this attribute refers to a file, it must be a valid archive. If this attribute refers to a directory, it must contain a valid archive in which all components have been exploded. If upload is set to false, this must be an absolute path on the server machine.
name file name without extension
(optional) The display name for the component.
type determined from the file or directory name extension
(optional) The type of component. Valid types are application, ejb, web, and connector. If not specified, the file (or directory) extension is used to determine the component type: .ear for applicaton, .jar for ejb, .war for web, and .rar for connector. If it’s not possible to determine the component type using the file extension, the default is application.
force true (applies to sun-appserv-deploy only, optional) If true, the component is overwritten if it already exists on the server. If false, the containing element’s operation fails if the component exists.
precompilejsp false (applies to sun-appserv-deploy only, optional) If true, all JSPs found in an enterprise application (.ear) or web application (.war) are precompiled. This attribute is ignored for other component types.
retrievestubs client stubs not saved
(applies to sun-appserv-deploy only, optional) The directory where client stubs are saved.
contextroot file name without extension
(applies to sun-appserv-deploy only, optional) The context root for a web module (WAR file). This attribute is ignored if the component is not a WAR file.
verify false (applies to sun-appserv-deploy only, optional) If true, syntax and semantics for all deployment descriptors is automatically verified for correctness.

Apache Ant Assembly and Deployment Tool
Chapter 3 Assembling and Deploying J2EE Applications 129
<sun-appserv-deploy password="${password}" host="greg.sun.com" sunonehome="/opt/s1as8" >
<component file="${assemble}/simpleapp.ear"/><component file="${assemble}/simpleservlet.war"
contextroot="test"/><component file="${assemble}/simplebean.jar"/>
</sun-appserv-deploy>
You can also undeploy multiple components using a single task. This example demonstrates using the archive files (EAR and WAR, in this case) and the component name and type (for the EJB component).
<sun-appserv-undeploy password="${password}"><component file="${assemble}/simpleapp.ear"/<component file="${assemble}/simpleservlet.war"/><component name="simplebean" type="ejb"/>
</sun-appserv-undeploy>
You can enable or disable multiple components. This example demonstrates disabling multiple components using the archive files (EAR and WAR, in this case) and the component name and type (for the EJB component).
<sun-appserv-component action="disable" password="${password}"><component file="${assemble}/simpleapp.ear"/><component file="${assemble}/simpleservlet.war"/><component name="simplebean" type="ejb"/>
</sun-appserv-component>
filesetSelects component files that match specified parameters. When fileset is included as a subelement, the name and contextroot attributes of the containing element must use their default values for each file in the fileset. For more information, see:
http://computing.ee.ethz.ch/sepp/ant-1.5.4-ke/manual/CoreTypes/fileset.html

Apache Ant Assembly and Deployment Tool
130 Application Server 8 • Developer’s Guide

131
Chapter 4
Debugging J2EE Applications
This chapter gives guidelines for debugging applications in Sun Java System Application Server. It includes the following sections:
• Enabling Debugging
• JPDA Options
• Generating a Stack Trace for Debugging
• The Java Debugger
• Using the Sun ONE Studio IDE for Debugging
• Using the NetBeans IDE for Debugging
• Using the JBuilder IDE for Debugging
• Sun Java System Message Queue Debugging
• Enabling Verbose Mode
• Logging
• Profiling
The domain.xml file described in this chapter is located at domain_dir/config/domain.xml. For more information about this file, see the Sun Java System Application Server Reference.
Enabling DebuggingWhen you enable debugging, you enable both local and remote debugging. To start the server in debug mode, use the --debug option as follows:
asadmin start-domain --debug [domain_name]

Enabling Debugging
132 Application Server 8 • Developer’s Guide
You can then attach to the server from the debugger at its default JPDA port, which is 1044. For example, for UNIX systems:
jdb -attach 1044
For Windows:
jdb -connect com.sun.jdi.SocketAttach:port=1044
You can enable debugging even when the application server is started without the --debug option. This is useful if you start the application server from the Windows Start Menu or if you want to make sure that debugging is always turned on. You can set the server to automatically start up in debug mode in one of these ways:
• Using the Administration Console
• Editing the domain.xml File
Sun Java System Application Server debugging is based on the JPDA (Java Platform Debugger Architecture). For more information, see “JPDA Options” on page 133.
Using the Administration ConsoleTo enable debugging for each server restart:
1. Login to the Administration Console by going to the following URL in your web browser:
http://host:port/asadmin
For example:
http://localhost:4848/asadmin
2. Go to the Application Server page.
3. Select the JVM Settings tab and the General option.
4. Check the Debug Enabled box.
5. To specify a different port (from 1044, the default) to use when attaching the JVM to a debugger, specify address=port_number in the Debug Options field.
6. If you wish to add JPDA options, add any desired JPDA debugging options in Debug Options. See “JPDA Options” on page 133.
7. Select the Save button.

JPDA Options
Chapter 4 Debugging J2EE Applications 133
Editing the domain.xml FileTo enable debugging for each server restart, set the following attributes of the java-config element in the domain.xml file:
• Set debug-enabled="true" to turn on debugging.
• To specify a different port (from 1044, the default) to use when attaching the JVM to a debugger, specify address=port_number in the debug-options attribute.
• Add any desired JPDA debugging options in the debug-options attribute. See “JPDA Options” on page 133.
For details about the domain.xml file, see the Sun Java System Application Server Reference.
JPDA OptionsThe default JPDA options in Sun Java System Application Server are as follows:
-Xdebug -Xrunjdwp:transport=dt_socket,server=y,suspend=n,address=1044
For Windows, you must change dt_socket to dt_shmem.
If you substitute suspend=y, the JVM starts in suspended mode and stays suspended until a debugger attaches to it. This is helpful if you want to start debugging as soon as the JVM starts.
To specify a different port (from 1044, the default) to use when attaching the JVM to a debugger, specify address=port_number.
You can include additional options. A list of JPDA debugging options is available here:
http://java.sun.com/products/jpda/doc/conninv.html#Invocation
Generating a Stack Trace for DebuggingYou can generate a Java stack trace for debugging as described here if the Sun Java System Application Server is in verbose mode (see “Enabling Verbose Mode” on page 138):
http://developer.java.sun.com/developer/technicalArticles/Programming/Stacktrace/
The stack trace goes to the domain_dir/logs/server.log file and also appears on the command prompt screen.

The Java Debugger
134 Application Server 8 • Developer’s Guide
If the -Xrs flag is set (for reduced signal usage) in the domain.xml file (under <jvm-options>), comment it out before generating the stack trace. If the -Xrs flag is used, the server may simply dump core and restart when you send the signal to generate the trace. For more about the domain.xml file, see the Sun Java System Application Server Reference.
The Java DebuggerThe Java Debugger (jdb) helps you find and fix bugs in Java language programs. When using the jdb debugger with Sun Java System Application Server, you must attach to the server from the debugger at its default JPDA port, which is 1044. For example, for UNIX systems:
jdb -attach 1044
For Windows:
jdb -connect com.sun.jdi.SocketAttach:port=1044
For more information about the jdb debugger, see the following links:
http://java.sun.com/products/jpda/doc/soljdb.html
http://java.sun.com/products/jpda/doc/conninv.html#JDB
http://java.sun.com/products/jdk/1.2/debugging/JDBTutorial.html
Using the Sun ONE Studio IDE for DebuggingTo use the Sun ONE Studio 5 debugger with Sun Java System Application Server:
1. Start Sun ONE Studio, and mount the directory that contains the application source code you want to debug.
2. Select the Debug menu and the Attach... option.
3. Change the Connector:text field to SocketAttach.
4. Type the host name of the Application Server in the Host text box.
5. Type the port number you specified when you enabled debugging in the Sun Java System Application Server in the Port text box (the default is 1044), then select OK.
You should be able to debug your Java classes now using Sun ONE Studio.

Using the NetBeans IDE for Debugging
Chapter 4 Debugging J2EE Applications 135
For help on debugging applications with Sun ONE Studio, select Help, select Contents, then select Debugging Java Programs. You can also consult the Sun ONE Studio documentation.
Using the NetBeans IDE for DebuggingTo use the NetBeans 3.5.1 IDE with the Sun Java System Application Server:
1. Download the latest version of NetBeans from www.netbeans.org.
2. Set up the classpath in NetBeans to compile J2EE applications using the standard J2EE 1.4 API libraries provided with the Sun Java System Application Server. Perform the following steps in the NetBeans IDE:
a. In the Menu bar, click on the File menu and select Mount Filesystem.
b. In the wizard dialog box, select Archive Files as the Filesystem type and click Next.
c. Navigate the file chooser to the Sun Java System Application Server directory install_dir/lib.
d. Select j2ee.jar. If you plan to use Sun-specific public APIs provided in the Sun Java System Application Server, you should also select the appserv-ext.jar archive. Click Finish.
The j2ee.jar file should appear in the list of mounted file systems under the Editing pane inside the Filesystems tab of the NetBeans IDE. You can now import J2EE 1.4 API packages in your source files and compile the source files.
3. Build your application in the NetBeans IDE.
4. Assemble your application into a J2EE archive file (WAR, JAR, RAR or EAR file) and deploy it to the Sun Java System Application Server.
5. Start the Sun Java System Application Server with debugging enabled. See “Enabling Debugging” on page 131.
6. Attach to the Sun Java System Application Server using the Netbeans IDE debugger:
a. Click on the Debug menu, select Start Session, then select Attach.
b. In the Attach dialog box, make sure the host (default localhost) and port (default 1044) correspond to the host and JPDA debug port of the Sun Java System Application Server. Click OK.

Using the JBuilder IDE for Debugging
136 Application Server 8 • Developer’s Guide
The Output Window of the Debugger Console should display the message Connection established.
7. Set break points in your source file in the NetBeans IDE as usual, and run the application.
8. When finished with debugging, detach from the server by clicking Finish in the Debug menu.
Using the JBuilder IDE for DebuggingTo use the JBuilder X Developer or JBuilder X Enterprise debugger with the Sun Java System Application Server:
1. Start JBuilder X.
2. If you are using JBuilder X Developer, create a library that holds the J2EE interfaces. This step is not necessary if you are using JBuilder X Enterprise.
a. Select the Configure Libraries item from the Tools menu. This opens the Configure Libraries dialog box.
b. Press the New button. This opens the New Library Wizard.
c. Enter a library name and location.
d. Press the Add button. This opens a file/directory chooser dialog box.
e. Navigate through the chooser to select install_dir/lib/j2ee.jar.
f. If you plan to use Sun-specific public APIs provided with the Sun Java System Application Server, you should also include the install_dir/lib/appserv-ext.jar archive in this library.
g. Press OK to accept the selection and dismiss the chooser.
h. Press OK to accept and dismiss the New Library Wizard.
i. Press OK to accept and dismiss the Configure Libraries dialog box.
3. Create a project for the application source code.
4. Add the library created in Step 2 to the project created in Step 3.
a. Select the Project Properties item from the Project menu. This opens the Project Properties dialog box.
b. Select the Paths node in the tree on the left side of the dialog box.

Sun Java System Message Queue Debugging
Chapter 4 Debugging J2EE Applications 137
c. Select the Required libraries tab that appears on right side of the dialog box.
d. Press the Add button. This opens a tree chooser dialog box. The library that was created in Step 2 should appear in the list of libraries.
e. Select the library created in Step 2.
f. Press OK to accept the selection and dismiss this dialog box.
g. Press OK to accept and dismiss the Project Properties dialog box.
5. Open the project created in Step 3.
6. Select the Configurations item from the Run menu. This opens the Runtime Configurations dialog box.
7. Use the New button to create a runtime configuration to be used for debugging your application code. This opens the New Runtime Configuration dialog box.
8. Give the configuration a unique name.
9. Expand the Debug node in the tree on the left side of the dialog box.
10. Select the Remote node.
11. Set Enable remote debugging to true.
12. Set the action to Attach.
13. In the Transport panel, make sure the address (default localhost) and port (default 1044) correspond to the host and JPDA debug port of the Sun Java System Application Server. Select OK.
14. Assemble your application into a J2EE archive file (WAR, JAR, RAR or EAR file) and deploy it to the Sun Java System Application Server.
15. Start the Sun Java System Application Server with debugging enabled. See “Enabling Debugging” on page 131.
16. To use the remote debugging capabilities of the JBuilder X debugger by attaching to the running server process, press Shift+F9.
Sun Java System Message Queue DebuggingSun Java System Message Queue has a broker logger, which can be useful for debugging JMS, including message-driven bean, applications. You can adjust the logger’s verbosity, and you can send the logger output to the broker’s console using the broker’s -tty option. For more information, see the Sun Java System Message Queue Administrator’s Guide.

Enabling Verbose Mode
138 Application Server 8 • Developer’s Guide
Enabling Verbose ModeIf you want to see the server logs and messages printed to System.out or System.err on your command prompt screen, you can start the server in verbose mode. This makes it easy to do simple debugging using print statements, without having to view the server.log file every time.
When the server is in verbose mode, messages are logged to the client in addition to the log file. In addition, pressing Ctrl-C stops the server and pressing Ctrl-\ prints a thread dump. To start the server in verbose mode, use the --verbose option as follows:
asadmin start-domain --verbose [domain_name]
You can enable verbose mode even when the application server is started without the --verbose option. This is useful if you start the application server from the Windows Start Menu or if you want to make sure that verbose mode is always turned on. You can set the server to automatically start up in verbose mode in one of these ways:
• Using the Administration Console
• Editing the domain.xml File
Using the Administration ConsoleTo enable verbose mode for each server restart:
1. Login to the Administration Console by going to the following URL in your web browser:
http://host:port/asadmin
For example:
http://localhost:4848/asadmin
2. Go to the Application Server page.
3. Select the Logging tab and the General option.
4. Check the Log Messages to Standard Error box.
5. Select the Save button.

Logging
Chapter 4 Debugging J2EE Applications 139
Editing the domain.xml FileTo enable verbose mode for each server restart, set the attributes of the log-service element in the domain.xml file.
You can send exceptions to the client in addition to the log file. Set the following parameter in domain.xml. If the client is a browser, exceptions are displayed in the browser.
<log-service ... log-to-console=true ... />
For details about the domain.xml file, see the Sun Java System Application Server Reference.
LoggingYou can use the Sun Java System Application Server’s log files to help debug your applications. For general information about logging, see the Sun Java System Application Server Administration Guide. For information about configuring logging in the domain.xml file, see the Sun Java System Application Server Reference.
ProfilingYou can use a profiler to perform remote profiling on the Sun Java System Application Server to discover bottlenecks in server-side performance. This section describes how to configure these profilers for use with Sun Java System Application Server:
• The HPROF Profiler
• The Optimizeit Profiler

Profiling
140 Application Server 8 • Developer’s Guide
The HPROF ProfilerHPROF is a simple profiler agent shipped with the Java 2 SDK. It is a dynamically linked library that interacts with the JVMPI and writes out profiling information either to a file or to a socket in ASCII or binary format.
HPROF can present CPU usage, heap allocation statistics, and monitor contention profiles. In addition, it can also report complete heap dumps and states of all the monitors and threads in the Java virtual machine. For more details on the HPROF profiler, see the JDK documentation at:
http://java.sun.com/products/jpda/doc/soljdb.html
Once HPROF is enabled using the following instructions, its libraries are loaded into the server process. To use HPROF profiling on UNIX, follow these steps:
1. Configure Sun Java System Application Server in one of these ways:
❍ Use the Administration Console:
I. Login to the Administration Console by going to the following URL in your web browser:
http://host:port/asadmin
For example:
http://localhost:4848/asadmin
II. Go to the Application Server page.
III. Select the JVM Settings tab and the Profiler option.
IV. Edit the following fields:
• Profiler Name: hprof
• Profiler Enabled: true
• Classpath: (leave blank)
• Native Library Path: (leave blank)
• JVM Option: For each of these options, select Add, type the option in the Value field, then check its box:
-Xrunhprof:file=log.txt,options
V. Select the Save button.

Profiling
Chapter 4 Debugging J2EE Applications 141
❍ Edit the domain.xml file as appropriate:
<!-- hprof options --><profiler name="hprof" enabled="true">
<jvm-options>-Xrunhprof:file=log.txt,options
</jvm-options></profiler>
Here is an example of options you can use:
-Xrunhprof:file=log.txt,thread=y,depth=3
The file option determines where the stack dump is written in Step 2.
The syntax of HPROF options is as follows:
-Xrunhprof[:help]|[:option=value,option2=value2, ...]
Using help lists options that can be passed to HPROF. The output is as follows:
Hprof usage: -Xrunhprof[:help]|[:<option>=<value>, ...]
Option Name and Value Description Default--------------------- ----------- -------heap=dump|sites|all heap profiling allcpu=samples|old CPU usage offformat=a|b ascii or binary output afile=<file> write data to file java.hprof (.txt for ascii)net=<host>:<port> send data over a socket write to filedepth=<size> stack trace depth 4cutoff=<value> output cutoff point 0.0001lineno=y|n line number in traces? ythread=y|n thread in traces? ndoe=y|n dump on exit? y
2. Restart the Application Server. This writes an HPROF stack dump to the file you specified using the file HPROF option in Step 1.
NOTE Do not use the -Xrs flag.

Profiling
142 Application Server 8 • Developer’s Guide
The Optimizeit ProfilerYou can purchase Optimizeit™ 4.2 from Intuitive Systems at:
http://www.optimizeit.com/index.html
Once Optimizeit is enabled using the following instructions, its libraries are loaded into the server process. To enable remote profiling with Optimizeit, do one of the following:
1. Configure your operating system:
❍ On Solaris, add Optimizeit_dir/lib to the LD_LIBRARY_PATH environment variable.
❍ On Windows, add Optimizeit_dir/lib to the PATH environment variable.
2. Configure Sun Java System Application Server in one of these ways:
❍ Use the Administration Console:
I. Login to the Administration Console by going to the following URL in your web browser:
http://host:port/asadmin
For example:
http://localhost:4848/asadmin
II. Go to the Application Server page.
III. Select the JVM Settings tab and the Profiler option.
IV. Edit the following fields:
• Profiler Name: optimizeit
• Profiler Enabled: true
• Classpath: Optimizeit_dir/lib/optit.jar
• Native Library Path: Optimizeit_dir/lib
• JVM Option: For each of these options, select Add, type the option in the Value field, then check its box:
-DOPTITHOME=Optimizeit_dir-Xrunpri -Xbootclasspath/Optimizeit_dir/lib/oibcp.jar
V. Select the Save button.

Profiling
Chapter 4 Debugging J2EE Applications 143
❍ Edit the domain.xml file as appropriate:
<!-- Optimizeit options --><profiler name="optimizeit" classpath="Optimizeit_dir/lib/optit.jar"
native-library-path="Optimizeit_dir/lib" enabled="true"><jvm-options>-DOPTIT_HOME=Optimizeit_dir</jvm-options><jvm-options>-Xrunpri</jvm-options><jvm-options>-Xbootclasspath/Optimizeit_dir/lib/oibcp.jar</jvm-options>
</profiler>
3. In addition, you may have to set the following in your server.policy file. For more information about the server.policy file, see “The server.policy File” on page 60.
grant codeBase "file:Optimizeit_dir/lib/optit.jar" {permission java.security.AllPermission;
};
4. Restart the Application Server.
When the server starts up with this configuration, you can attach the profiler. For further details, see the Optimizeit documentation.
NOTE If any of the configuration options are missing or incorrect, the profiler may experience problems that affect the performance of the Sun Java System Application Server.

Profiling
144 Application Server 8 • Developer’s Guide

145
Chapter 5
Deployment Descriptor Files
This chapter describes deployment descriptor files specific to Sun Java System Application Server in the following sections:
• Sun Java System Application Server Descriptors
• The sun-application.xml File
• The sun-web.xml File
• The sun-ejb-jar.xml File
• The sun-cmp-mappings.xml File
• The sun-application-client.xml file
• The sun-acc.xml File
• Web Service Elements
Sun Java System Application Server DescriptorsSun Java System Application Server uses deployment descriptors in addition to the J2EE standard descriptors for configuring features specific to the Sun Java System Application Server. The sun-application.xml and sun-web.xml files are optional; all the others are required.
Each deployment descriptor (or XML) file has a corresponding schema (or DTD) file, which defines the elements, data, and attributes that the deployment descriptor file can contain. For example, the sun-application_1_4-0.dtd schema file defines the structure of the sun-application.xml file. All of the DTD files are located in the install_dir/lib/dtds directory.

Sun Java System Application Server Descriptors
146 Application Server 8 • Developer’s Guide
For general information about DTD files and XML, see the XML specification at:
http://www.w3.org/TR/REC-xml
The following table lists the Sun Java System Application Server deployment descriptors and their DTD schema files.
NOTE Do not edit the DTD files; their contents change only with new versions of Sun Java System Application Server.
Table 5-1 Sun Java System Application Server DescriptorsDeployment Descriptor DTD Schema File Description
sun-application.xml sun-application_1_4-0.dtd Configures an entire J2EE application (EAR file).
sun-web.xml sun-web-app_2_4-0.dtd Configures a web application (WAR file).
sun-ejb-jar.xml sun-ejb-jar_2_1-0.dtd Configures an enterprise bean (EJB JAR file).
sun-cmp-mappings.xml sun-cmp-mapping_1_1.dtd Configures container-managed persistence for an enterprise bean.
sun-application-client.xml sun-application-client_1_4-0.dtd Configures an Application Client Container (ACC) client (JAR file).
sun-acc.xml sun-application-client-container_1_0.dtd Configures the Application Client Container.
NOTE The Sun Java System Application Server deployment descriptors must be readable and writable by the file owners.
In each deployment descriptor file, subelements must be defined in the order in which they are listed under each Subelements heading unless otherwise noted.

The sun-application.xml File
Chapter 5 Deployment Descriptor Files 147
The sun-application.xml FileThis section describes the XML elements in the sun-application.xml file and provides an example file in the following sections:
• sun-application
• web
• web-uri
• context-root
• pass-by-reference
• unique-id
• security-role-mapping
• role-name
• principal-name
• group-name
• realm
• Sample sun-application.xml File
sun-applicationDefines Sun Java System Application Server specific configuration for an application. This is the root element; there can only be one sun-application element in a sun-application.xml file.
SubelementsThe following table describes subelements for the sun-application element.
Table 5-2 sun-application SubelementsElement Required Description
web zero or more Specifies the application’s web tier configuration.
pass-by-reference zero or one Determines whether EJB modules use pass-by-value or pass-by-reference semantics.
unique-id zero or one Contains the unique ID for the application.

The sun-application.xml File
148 Application Server 8 • Developer’s Guide
webSpecifies the application’s web tier configuration.
SubelementsThe following table describes subelements for the web element.
web-uri Contains the web URI for the application. Must match the corresponding element in the application.xml file.
Subelementsnone
context-root Contains the web context root for the application. Overrides the corresponding element in the application.xml file.
If you are setting up load balancing, web module context roots must be unique within a cluster. See the Sun Java System Application Server Administration Guide for more information about load balancing.
Subelementsnone
security-role-mapping zero or more Maps a role in the corresponding J2EE XML file to a user or group.
realm zero or one Specifies an authentication realm.
Table 5-3 web SubelementsElement Required Description
web-uri only one Contains the web URI for the application.
context-root only one Contains the web context root for the application.
Table 5-2 sun-application Subelements (Continued)Element Required Description

The sun-application.xml File
Chapter 5 Deployment Descriptor Files 149
pass-by-reference Specifies the passing method used by a servlet or enterprise bean calling a remote interface method in another bean that is co-located within the same process.
• If false (the default if this element is not present), this application uses pass-by-value semantics.
• If true, this application uses pass-by-reference semantics.
When a servlet or enterprise bean calls a remote interface method in another bean that is co-located within the same process, by default the Sun Java System Application Server makes copies of all the call parameters in order to preserve the pass-by-value semantics. This increases the call overhead and decreases performance.
However, if the calling method does not mutate the object being passed as a parameter, it is safe to pass the object itself without making a copy of it. To do this, set the pass-by-reference value to true.
The setting of this element in the sun-application.xml file applies to all EJB modules in the application. For an individually deployed EJB module, you can set the same element in the sun-ejb-jar.xml file. If you want to use pass-by-reference at both the bean and application level, the bean level takes precedence. For more information about the sun-ejb-jar.xml file, see “The sun-ejb-jar.xml File” on page 184.
Subelementsnone
NOTE The pass-by-reference element only applies to remote calls. As defined in the EJB 2.1 specification, section 5.4, calls to local interfaces use pass-by-reference semantics.
If the pass-by-reference element is set to its default value of false, the passing semantics for calls to remote interfaces comply with the EJB 2.1 specification, section 5.4. If set to true, remote calls involve pass-by-reference semantics instead of pass-by-value semantics, contrary to this specification.
Portable programs should not assume that a copy of the object is made during such a call, and thus that it’s safe to modify the original. Nor should they assume that a copy is not made, and thus that changes to the object are visible to both caller and callee. When this element is set to true, parameters and return values should be considered read-only. The behavior of a program that modifies such parameters or return values is undefined.

The sun-application.xml File
150 Application Server 8 • Developer’s Guide
unique-id Contains the unique ID for the application. This value is automatically updated each time the application is deployed or redeployed. Do not edit this value.
Subelementsnone
security-role-mappingMaps roles to users and groups. At least one principal or group name is required, but you do not need to have one of each.
SubelementsThe following table describes subelements for the security-role-mapping element.
role-name Contains the role-name in the security-role element of the application.xml file.
Subelementsnone
principal-name Contains the principal (user) name.
Subelementsnone
Table 5-4 security-role-mapping SubelementsElement Required Description
role-name only one Contains the role-name in the security-role element of the application.xml file.
principal-name one or more if no group-name, otherwise zero or more
Contains the principal (user) name.
group-name one or more if no principal-name, otherwise zero or more
Contains the group name.

The sun-web.xml File
Chapter 5 Deployment Descriptor Files 151
group-name Contains the group name.
Subelementsnone
realm Contains the name of the realm used to process all authentication requests associated with this application. If this element is not specified or does not match the name of a configured realm, the default realm is used. For more information about realms, see “Realm Configuration” on page 44.
Subelementsnone
Sample sun-application.xml File<?xml version="1.0" encoding="UTF-8"?>
<!DOCTYPE sun-application PUBLIC '-//Sun Microsystems, Inc.//DTD Application Server 8.0 J2EE Application 1.4//EN' 'http://www.sun.com/software/appserver/dtds/sun-application_1_4-0.dtd'>
<sun-application>
<unique-id>67488732739338240</unique-id>
</sun-application>
The sun-web.xml FileThis section describes the XML elements in the sun-web.xml file and provides an example file in the following sections:
• General Elements
• Security Elements
• Session Elements
• Reference Elements
• Caching Elements

The sun-web.xml File
152 Application Server 8 • Developer’s Guide
• Classloader Elements
• JSP Elements
• Internationalization Elements
• Web Service Elements
• Sample sun-web.xml File
General ElementsGeneral elements are as follows:
• sun-web-app
• property
• description
• context-root
sun-web-appDefines Sun Java System Application Server specific configuration for a web module. This is the root element; there can only be one sun-web-app element in a sun-web.xml file.
SubelementsThe following table describes subelements for the sun-web-app element.
Table 5-5 sun-web-app SubelementsElement Required Description
context-root zero or one Contains the web context root for the web application.
security-role-mapping zero or more Maps roles to users or groups in the currently active realm.
servlet zero or more Specifies a principal name for a servlet, which is used for the run-as role defined in web.xml.
session-config zero or one Specifies session manager, session cookie, and other session-related information.
ejb-ref zero or more Maps the absolute JNDI name to the ejb-ref in the corresponding J2EE XML file.

The sun-web.xml File
Chapter 5 Deployment Descriptor Files 153
Attributesnone
PropertiesThe following table describes properties for the sun-web-app element.
resource-ref zero or more Maps the absolute JNDI name to the resource-ref in the corresponding J2EE XML file.
resource-env-ref zero or more Maps the absolute JNDI name to the resource-env-ref in the corresponding J2EE XML file.
service-ref zero or more Specifies runtime settings for a web service reference.
cache zero or one Configures caching for web application components.
class-loader zero or one Specifies classloader configuration information.
jsp-config zero or one Specifies JSP configuration information.
locale-charset-info zero or one Specifies internationalization settings.
property zero or more Specifies a property, which has a name and a value.
message-destination zero or more Specifies the name of a logical message destination.
webservice-description zero or more Specifies a name and optional publish location for a web service.
Table 5-6 sun-web-app PropertiesProperty Default Description
crossContextAllowed true If true, allows this web application to access the contexts of other web applications using the ServletContext.getContext()method.
Table 5-5 sun-web-app Subelements (Continued)Element Required Description

The sun-web.xml File
154 Application Server 8 • Developer’s Guide
property Specifies a property, which has a name and a value. A property adds configuration information to its parent element that is one or both of the following:
• Optional with respect to Sun Java System Application Server
• Needed by a system or object that Sun Java System Application Server doesn’t have knowledge of, such as an LDAP server or a Java class
For example, a manager-properties element can include property subelements:
<manager-properties><property name="reapIntervalSeconds" value="20" />
</manager-properties>
Which properties a manager-properties element uses depends on the value of the parent session-manager element’s persistence-type attribute. For details, see the description of the session-manager element.
SubelementsThe following table describes subelements for the property element.
AttributesThe following table describes attributes for the property element.
tempdir domain_dir/generated/j2ee-apps/app_name
or
domain_dir/generated/j2ee-modules/module_name
Specifies a temporary directory for use by this web module. This value is used to construct the value of the javax.servlet.context.tempdir context attribute. Compiled JSPs are also placed in this directory.
singleThreadedServletPoolSize 5 Specifies the maximum number of servlet instances allocated for each SingleThreadModel servlet in the web application.
Table 5-7 property SubelementsElement Required Description
description zero or one Specifies an optional text description of a property.
Table 5-6 sun-web-app Properties (Continued)Property Default Description

The sun-web.xml File
Chapter 5 Deployment Descriptor Files 155
descriptionContains data that specifies a text description of the containing element.
Subelementsnone
Attributesnone
context-root Contains the web context root for the web application. Overrides the corresponding element in the web.xml file.
If you are setting up load balancing, web module context roots must be unique within a cluster. See the Sun Java System Application Server Administration Guide for more information about load balancing.
Subelementsnone
Security ElementsSecurity elements are as follows:
• security-role-mapping
• servlet
• servlet-name
• role-name
• principal-name
• group-name
Table 5-8 property AttributesAttribute Default Description
name none Specifies the name of the property.
value none Specifies the value of the property.

The sun-web.xml File
156 Application Server 8 • Developer’s Guide
security-role-mappingMaps roles to users or groups in the currently active realm. See “Realm Configuration” on page 44 for how to define the currently active realm.
SubelementsThe following table describes subelements for the security-role-mapping element.
Attributesnone
servlet Specifies a principal name for a servlet, which is used for the run-as role defined in web-xml.
SubelementsThe following table describes subelements for the servlet element.
Attributesnone
Table 5-9 security-role-mapping SubelementsElement Required Description
role-name only one Contains the role name.
principal-name requires at least one principal-name or group-name
Contains a principal (user) name in the current realm.
group-name requires at least one principal-name or group-name
Contains a group name in the current realm.
Table 5-10 servlet SubelementsElement Required Description
servlet-name only one Contains the name of a servlet, which is matched to a servlet-name in web.xml.
principal-name zero or one Contains a principal (user) name in the current realm.
webservice-endpoint zero or more Specifies information about a web service endpoint.

The sun-web.xml File
Chapter 5 Deployment Descriptor Files 157
servlet-name Contains data that specifies the name of a servlet, which is matched to a servlet-name in web.xml. This name must be present in web.xml.
Subelementsnone
Attributesnone
role-name Contains data that specifies the role-name in the security-role element of the web.xml file.
Subelementsnone
Attributesnone
principal-name Contains data that specifies a principal (user) name in the current realm.
Subelementsnone
Attributesnone
group-name Contains data that specifies a group name in the current realm.
Subelementsnone
Attributesnone

The sun-web.xml File
158 Application Server 8 • Developer’s Guide
Session ElementsSession elements are as follows:
• session-config
• session-manager
• manager-properties
• store-properties
• session-properties
• cookie-properties
session-configSpecifies session configuration information. Overrides the web container settings for an individual web application.
SubelementsThe following table describes subelements for the session-config element.
Attributesnone
session-managerSpecifies session manager information.
SubelementsThe following table describes subelements for the session-manager element.
Table 5-11 session-config SubelementsElement Required Description
session-manager zero or one Specifies session manager configuration information.
session-properties zero or one Specifies session properties.
cookie-properties zero or one Specifies session cookie properties.

The sun-web.xml File
Chapter 5 Deployment Descriptor Files 159
AttributesThe following table describes attributes for the session-manager element.
manager-propertiesSpecifies session manager properties.
SubelementsThe following table describes subelements for the manager-properties element.
Attributesnone
PropertiesThe following table describes properties for the manager-properties element.
Table 5-12 session-manager SubelementsElement Required Description
manager-properties zero or one Specifies session manager properties.
store-properties zero or one Specifies session persistence (storage) properties.
Table 5-13 session-manager AttributesAttribute Default Description
persistence-type memory (optional) Specifies the session persistence mechanism. Allowed values are memory and file.
The ha and custom values are not implemented and should not be used.
Table 5-14 manager-properties SubelementsElement Required Description
property zero or more Specifies a property, which has a name and a value.

The sun-web.xml File
160 Application Server 8 • Developer’s Guide
store-propertiesSpecifies session persistence (storage) properties.
SubelementsThe following table describes subelements for the store-properties element.
Attributesnone
Table 5-15 manager-properties PropertiesProperty Default Description
reapIntervalSeconds 60 Specifies the number of seconds between checks for expired sessions.
If the persistence-type attribute of the session-manager element is file, sessions are passivated if maxSessions has been exceeded.
You should set this value lower than the frequency at which session data changes to prevent data inconsistency. For example, this value should be as low as possible (1 second) for a hit counter servlet on a frequently accessed website, or you could lose the last few hits each time you restart the server.
maxSessions -1 Specifies the maximum number of sessions that can be in cache, or -1 for no limit. After this, an attempt to create a new session causes an IllegalStateException to be thrown.
If the persistence-type attribute of the session-manager element is file, the session manager passivates sessions to the persistent store when this maximum is reached.
sessionFilename none; state is not preserved across restarts
Specifies the absolute or relative path to the directory in which the session state is preserved between application restarts, if preserving the state is possible. A relative path is relative to the temporary directory for this web application.
Applicable only if the persistence-type attribute of the session-manager element is memory.
Table 5-16 store-properties SubelementsElement Required Description
property zero or more Specifies a property, which has a name and a value.

The sun-web.xml File
Chapter 5 Deployment Descriptor Files 161
PropertiesThe following table describes properties for the store-properties element.
session-propertiesSpecifies session properties.
SubelementsThe following table describes subelements for the session-properties element.
Attributesnone
PropertiesThe following table describes properties for the session-properties element.
Table 5-17 store-properties PropertiesProperty Default Description
directory domain_dir/generated/jsp/j2ee-apps/ appname/appname_war
Specifies the absolute or relative pathname of the directory into which individual session files are written. A relative path is relative to the temporary work directory for this web application.
Applicable only if the persistence-type attribute of the session-manager element is file.
Table 5-18 session-properties SubelementsElement Required Description
property zero or more Specifies a property, which has a name and a value.

The sun-web.xml File
162 Application Server 8 • Developer’s Guide
cookie-propertiesSpecifies session cookie properties.
SubelementsThe following table describes subelements for the cookie-properties element.
Attributesnone
PropertiesThe following table describes properties for the cookie-properties element.
Table 5-19 session-properties PropertiesProperty Default Description
timeoutSeconds 600 Specifies the default maximum inactive interval (in seconds) for all sessions created in this web module. If set to 0 or less, sessions in this web module never expire.
If a session-timeout element is specified in the web.xml file, the session-timeout value overrides any timeoutSeconds value. If neither session-timeout nor timeoutSeconds is specified, the timeoutSeconds default is used.
Note that the session-timeout element in web.xml is specified in minutes, not seconds.
enableCookies true Uses cookies for session tracking if set to true.
enableURLRewriting true Enables URL rewriting. This provides session tracking via URL rewriting when the browser does not accept cookies. You must also use an encodeURL or encodeRedirectURL call in the servlet or JSP.
idLengthBytes 16 Specifies the number of bytes in this web module’s session ID.
Table 5-20 cookie-properties SubelementsElement Required Description
property zero or more Specifies a property, which has a name and a value.

The sun-web.xml File
Chapter 5 Deployment Descriptor Files 163
Reference ElementsReference elements are as follows:
• resource-env-ref
• resource-env-ref-name
• resource-ref
• res-ref-name
• default-resource-principal
• name
• password
• ejb-ref
• ejb-ref-name
• message-destination
• message-destination-name
• jndi-name
Table 5-21 cookie-properties PropertiesProperty Default Description
cookiePath Context path at which the web module is installed.
Specifies the pathname that is set when the cookie is created. The browser sends the cookie if the pathname for the request contains this pathname. If set to / (slash), the browser sends cookies to all URLs served by the Sun Java System Application Server. You can set the path to a narrower mapping to limit the request URLs to which the browser sends cookies.
cookieMaxAgeSeconds -1 Specifies the expiration time (in seconds) after which the browser expires the cookie.
cookieDomain (unset) Specifies the domain for which the cookie is valid.
cookieComment Sun Java System Application Server Session Tracking Cookie
Specifies the comment that identifies the session tracking cookie in the cookie file. Applications can provide a more specific comment for the cookie.

The sun-web.xml File
164 Application Server 8 • Developer’s Guide
resource-env-refMaps the res-ref-name in the corresponding J2EE web.xml file resource-env-ref entry to the absolute jndi-name of a resource.
SubelementsThe following table describes subelements for the resource-env-ref element.
Attributesnone
resource-env-ref-name Contains data that specifies the res-ref-name in the corresponding J2EE web.xml file resource-env-ref entry.
Subelementsnone
Attributesnone
resource-refMaps the res-ref-name in the corresponding J2EE web.xml file resource-ref entry to the absolute jndi-name of a resource.
SubelementsThe following table describes subelements for the resource-ref element.
Table 5-22 resource-env-ref SubelementsElement Required Description
resource-env-ref-name only one Specifies the res-ref-name in the corresponding J2EE web.xml file resource-env-ref entry.
jndi-name only one Specifies the absolute jndi-name of a resource.

The sun-web.xml File
Chapter 5 Deployment Descriptor Files 165
Attributesnone
res-ref-name Contains data that specifies the res-ref-name in the corresponding J2EE web.xml file resource-ref entry.
Subelementsnone
Attributesnone
default-resource-principal Specifies the default principal (user) for the resource.
If this element is used in conjunction with a JMS Connection Factory resource, the name and password subelements must be valid entries in the Sun Java™ System Message Queue broker user repository. See the “Security Management” chapter in the Sun Java System Message Queue Administrator’s Guide for details.
SubelementsThe following table describes subelements for the default-resource-principal element.
Table 5-23 resource-ref SubelementsElement Required Description
res-ref-name only one Specifies the res-ref-name in the corresponding J2EE web.xml file resource-ref entry.
jndi-name only one Specifies the absolute jndi-name of a resource.
default-resource-principal
zero or one Specifies the default principal (user) for the resource.
Table 5-24 default-resource-principal SubelementsElement Required Description
name only one Contains the name of the principal.

The sun-web.xml File
166 Application Server 8 • Developer’s Guide
Attributesnone
name Contains data that specifies the name of the principal.
Subelementsnone
Attributesnone
password Contains data that specifies the password for the principal.
Subelementsnone
Attributesnone
ejb-refMaps the ejb-ref-name in the corresponding J2EE web.xml file ejb-ref entry to the absolute jndi-name of a resource.
SubelementsThe following table describes subelements for the ejb-ref element.
password only one Contains the password for the principal.
Table 5-25 ejb-ref SubelementsElement Required Description
ejb-ref-name only one Specifies the ejb-ref-name in the corresponding J2EE web.xml file ejb-ref entry.
jndi-name only one Specifies the absolute jndi-name of a resource.
Table 5-24 default-resource-principal Subelements (Continued)Element Required Description

The sun-web.xml File
Chapter 5 Deployment Descriptor Files 167
Attributesnone
ejb-ref-name Contains data that specifies the ejb-ref-name in the corresponding J2EE web.xml file ejb-ref entry.
Subelementsnone
Attributesnone
message-destinationSpecifies the name of a logical message-destination defined within an application. The message-destination-name matches the corresponding message-destination-name in the web.xml file.
SubelementsThe following table describes subelements for the message-destination element.
Attributesnone
message-destination-name Contains data that specifies the name of a logical message destination defined within the corresponding web.xml file.
Subelementsnone
Table 5-26 message-destination subelements Element Required Description
message-destination-name only one Specifies the name of a logical message destination defined within the corresponding web.xml file.
jndi-name only one Specifies the jndi-name of the associated entity.

The sun-web.xml File
168 Application Server 8 • Developer’s Guide
Attributesnone
jndi-name Contains data that specifies the absolute jndi-name of a URL resource or a resource in the domain.xml file.
Subelementsnone
Attributesnone
Caching ElementsFor details about response caching as it pertains to servlets and JSP caching, see “Caching Servlet Results” on page 268 and “JSP Caching” on page 276.
Caching elements are as follows:
• cache
• cache-helper
• default-helper
• cache-mapping
• url-pattern
• timeout
• http-method
• key-field
• constraint-field
• value
cacheConfigures caching for web application components.
SubelementsThe following table describes subelements for the cache element.

The sun-web.xml File
Chapter 5 Deployment Descriptor Files 169
AttributesThe following table describes attributes for the cache element.
PropertiesThe following table describes properties for the cache element.
Table 5-27 cache SubelementsElement Required Description
cache-helper zero or more Specifies a custom class that implements the CacheHelper interface.
default-helper zero or one Allows you to change the properties of the default, built-in cache-helper class.
property zero or more Specifies a cache property, which has a name and a value.
cache-mapping zero or more Maps a URL pattern or a servlet name to its cacheability constraints.
Table 5-28 cache AttributesAttribute Default Description
max-entries 4096 (optional) Specifies the maximum number of entries the cache can contain. Must be a positive integer.
timeout-in-seconds 30 (optional) Specifies the maximum amount of time in seconds that an entry can remain in the cache after it is created or refreshed. Can be overridden by a timeout element.
enabled false (optional) Determines whether servlet and JSP caching is enabled.
Table 5-29 cache PropertiesProperty Default Description
cacheClassName com.sun.appserv.web.cache.LruCache
Specifies the fully qualified name of the class that implements the cache functionality. The “cacheClassName Values” table below lists possible values.

The sun-web.xml File
170 Application Server 8 • Developer’s Guide
Cache Class NamesThe following table lists possible values of the cacheClassName property.
cache-helper Specifies a class that implements the CacheHelper interface. For details, see “CacheHelper Interface” on page 271.
SubelementsThe following table describes subelements for the cache-helper element.
MultiLRUSegmentSize 4096 Specifies the number of entries in a segment of the cache table that should have its own LRU (least recently used) list. Applicable only if cacheClassName is set to com.sun.appserv.web.cache.MultiLruCache.
MaxSize unlimited; Long.MAX_VALUE
Specifies an upper bound on the cache memory size in bytes (KB or MB units). Example values are 32 KB or 2 MB. Applicable only if cacheClassName is set to com.sun.appserv.web.cache.BoundedMultiLruCache.
Table 5-30 cacheClassName ValuesValue Description
com.sun.appserv.web.cache.LruCache
A bounded cache with an LRU (least recently used) cache replacement policy.
com.sun.appserv.web.cache.BaseCache
An unbounded cache suitable if the maximum number of entries is known.
com.sun.appserv.web.cache.MultiLruCache
A cache suitable for a large number of entries (>4096). Uses the MultiLRUSegmentSize property.
com.sun.appserv.web.cache.BoundedMultiLruCache
A cache suitable for limiting the cache size by memory rather than number of entries. Uses the MaxSize property.
Table 5-31 cache-helper SubelementsElement Required Description
property zero or more Specifies a property, which has a name and a value.
Table 5-29 cache Properties (Continued)Property Default Description

The sun-web.xml File
Chapter 5 Deployment Descriptor Files 171
AttributesThe following table describes attributes for the cache-helper element.
default-helper Allows you to change the properties of the built-in default cache-helper class.
SubelementsThe following table describes subelements for the default-helper element.
Attributesnone
PropertiesThe following table describes properties for the default-helper element.
Table 5-32 cache-helper AttributesAttribute Default Description
name default Specifies a unique name for the helper class, which is referenced in the cache-mapping element.
class-name none Specifies the fully qualified class name of the cache helper, which must implement the com.sun.appserv.web.CacheHelper interface.
Table 5-33 default-helper SubelementsElement Required Description
property zero or more Specifies a property, which has a name and a value.

The sun-web.xml File
172 Application Server 8 • Developer’s Guide
cache-mappingMaps a URL pattern or a servlet name to its cacheability constraints.
SubelementsThe following table describes subelements for the cache-mapping element.
Table 5-34 default-helper PropertiesProperty Default Description
cacheKeyGeneratorAttrName Uses the built-in default cache-helper key generation, which concatenates the servlet path with key-field values, if any.
The caching engine looks in the ServletContext for an attribute with a name equal to the value specified for this property to determine whether a customized CacheKeyGenerator implementation is used. An application may provide a customized key generator rather than using the default helper. See “CacheKeyGenerator Interface” on page 273.
Table 5-35 cache-mapping SubelementsElement Required Description
servlet-name requires one servlet-name or url-pattern
Contains the name of a servlet.
url-pattern requires one servlet-name or url-pattern
Contains a servlet URL pattern for which caching is enabled.
cache-helper-ref required if timeout, refresh-field, http-method, key-field, and constraint-field are not used
Contains the name of the cache-helper used by the parent cache-mapping element.
timeout zero or one if cache-helper-ref is not used
Contains the cache-mapping specific maximum amount of time in seconds that an entry can remain in the cache after it is created or refreshed.
refresh-field zero or one if cache-helper-ref is not used
Specifies a field that gives the application component a programmatic way to refresh a cached entry.

The sun-web.xml File
Chapter 5 Deployment Descriptor Files 173
Attributesnone
url-pattern Contains data that specifies a servlet URL pattern for which caching is enabled. See the Servlet 2.3 specification section SRV. 11.2 for applicable patterns.
Subelementsnone
Attributesnone
cache-helper-refContains data that specifies the name of the cache-helper used by the parent cache-mapping element.
Subelementsnone
Attributesnone
http-method zero or more if cache-helper-ref is not used
Contains an HTTP method that is eligible for caching.
key-field zero or more if cache-helper-ref is not used
Specifies a component of the key used to look up and extract cache entries.
constraint-field zero or more if cache-helper-ref is not used
Specifies a cacheability constraint for the given url-pattern or servlet-name.
Table 5-35 cache-mapping Subelements (Continued)Element Required Description

The sun-web.xml File
174 Application Server 8 • Developer’s Guide
timeoutContains data that specifies the cache-mapping specific maximum amount of time in seconds that an entry can remain in the cache after it is created or refreshed. If not specified, the default is the value of the timeout attribute of the cache element.
Subelementsnone
AttributesThe following table describes attributes for the timeout element.
refresh-fieldSpecifies a field that gives the application component a programmatic way to refresh a cached entry.
Subelementsnone
AttributesThe following table describes attributes for the refresh-field element.
Table 5-36 timeout AttributesAttribute Default Description
name none Specifies the timeout input parameter, whose value is interpreted in seconds. The field’s type must be java.lang.Long or java.lang.Integer.
scope request.attribute (optional) Specifies the scope from which the input parameter is to be retrieved. Allowed values are context.attribute, request.header, request.parameter, request.cookie, request.attribute, and session.attribute.
Table 5-37 refresh-field AttributesAttribute Default Description
name none Specifies the input parameter name.

The sun-web.xml File
Chapter 5 Deployment Descriptor Files 175
http-method Contains data that specifies an HTTP method that is eligible for caching. The default is GET.
Subelementsnone
Attributesnone
key-fieldSpecifies a component of the key used to look up and extract cache entries. The web container looks for the named parameter, or field, in the specified scope.
If this element is not present, the web container uses the Servlet Path (the path section that corresponds to the servlet mapping that activated the current request). See the Servlet 2.3 specification, section SRV 4.4, for details on the Servlet Path.
Subelementsnone
AttributesThe following table describes attributes for the key-field element.
scope request.parameter (optional) Specifies the scope from which the input parameter is to be retrieved. Allowed values are context.attribute, request.header, request.parameter, request.cookie, session.id, and session.attribute.
Table 5-38 key-field AttributesAttribute Default Description
name none Specifies the input parameter name.
scope request.parameter (optional) Specifies the scope from which the input parameter is to be retrieved. Allowed values are context.attribute, request.header, request.parameter, request.cookie, session.id, and session.attribute.
Table 5-37 refresh-field Attributes (Continued)Attribute Default Description

The sun-web.xml File
176 Application Server 8 • Developer’s Guide
constraint-fieldSpecifies a cacheability constraint for the given url-pattern or servlet-name.
All constraint-field constraints must pass for a response to be cached. If there are value constraints, at least one of them must pass.
SubelementsThe following table describes subelements for the constraint-field element.
AttributesThe following table describes attributes for the constraint-field element.
value Contains data that specifies a value to be matched to the input parameter value. The matching is case sensitive. For example:
<value match-expr="in-range">1-60</value>
Subelementsnone
Table 5-39 constraint-field SubelementsElement Required Description
value zero or more Contains a value to be matched to the input parameter value.
Table 5-40 constraint-field AttributesAttribute Default Description
name none Specifies the input parameter name.
scope request.parameter (optional) Specifies the scope from which the input parameter is to be retrieved. Allowed values are context.attribute, request.header, request.parameter, request.cookie, request.attribute, and session.attribute.
cache-on-match true (optional) If true, caches the response if matching succeeds. Overrides the same attribute in a value subelement.
cache-on-match-failure
false (optional) If true, caches the response if matching fails. Overrides the same attribute in a value subelement.

The sun-web.xml File
Chapter 5 Deployment Descriptor Files 177
AttributesThe following table describes attributes for the value element.
Classloader ElementsClassloader elements are as follows:
• class-loader
class-loaderConfigures the classloader for the web module.
Subelementsnone
AttributesThe following table describes attributes for the class-loader element.
Table 5-41 value AttributesAttribute Default Description
match-expr equals (optional) Specifies the type of comparison performed with the value. Allowed values are equals, not-equals, greater, lesser, and in-range.
If match-expr is greater or lesser, the value must be a number. If match-expr is in-range, the value must be of the form n1-n2, where n1 and n2 are numbers.
cache-on-match true (optional) If true, caches the response if matching succeeds.
cache-on-match-failure
false (optional) If true, caches the response if matching fails.
Table 5-42 class-loader AttributesAttribute Default Description
extra-class-path null (optional) Specifies additional classpath settings for this web module.

The sun-web.xml File
178 Application Server 8 • Developer’s Guide
JSP ElementsJSP elements are as follows:
• jsp-config
jsp-configSpecifies JSP configuration information.
SubelementsThe following table describes subelements for the jsp-config element.
delegate true (optional) If true, the web module follows the standard classloader delegation model and delegates to its parent classloader first before looking in the local classloader. You must set this to true for a web application that accesses EJB components or that acts as a web service client or endpoint.
If false, the web module follows the delegation model specified in the Servlet specification and looks in its classloader before looking in the parent classloader. It’s safe to set this to false only for a web module that does not interact with any other modules.
NOTE If the delegate element is set to false, the classloader delegation behavior complies with the Servlet 2.3 specification, section 9.7.2. If set to its default value of true, classes and resources residing in container-wide library JAR files are loaded in preference to classes and resources packaged within the WAR file.
Portable programs that use this element should not be packaged with any classes or interfaces that are a part of the J2EE specification. The behavior of a program that includes such classes or interfaces in its WAR file is undefined.
Table 5-42 class-loader Attributes (Continued)Attribute Default Description

The sun-web.xml File
Chapter 5 Deployment Descriptor Files 179
Attributesnone
PropertiesThe default property values are tuned for development of JSP pages at the cost of performance. To maximize performance, set jsp-config properties to these non-default values:
• development - false
• reloading - false
• mappedfile - false
• trimSpaces - true
• suppressSmap - true
• fork - false (on Solaris)
• classdebuginfo - false
The following table describes properties for the jsp-config element.
Table 5-43 jsp-config SubelementsElement Required Description
property zero or more Specifies a property.
Table 5-44 jsp-config PropertiesProperty Default Description
ieClassId clsid:8AD9C840-044E-11D1-B3E9-00805F499D93
Specifies the Java plug-in COM class ID for Internet Explorer. Used by the <jsp:plugin> tags.
javaEncoding UTF8 Specifies the encoding for the generated Java servlet. This encoding is passed to the Java compiler used to compile the servlet as well. By default, the web container tries to use UTF8. If that fails, it tries to use the javaEncoding value.
For encodings you can use, see:
http://java.sun.com/j2se/1.4/docs/guide/intl/encoding.doc.html
classdebuginfo true Specifies whether the generated Java servlets should be compiled with the debug option set (-g for javac).

The sun-web.xml File
180 Application Server 8 • Developer’s Guide
keepgenerated true If set to true, keeps the generated Java files. If false, deletes the Java files.
mappedfile true If set to true, generates static content with one print statement per input line, to ease debugging.
scratchdir The default work directory for the web application
Specifies the working directory created for storing all the generated code.
checkInterval 300 Specifies the time in seconds between checks to see if a JSP page needs to be recompiled. Applicable if development is false and reloading is true, which enables background recompiles.
compiler javac Specifies the compiler Ant uses to compile JSP pages. See the Ant documentation for more information:
http://computing.ee.ethz.ch/sepp/ant-1.5.4-ke/manual/index.html
classpath created dynamically based on the current web application
Specifies the classpath to use when compiling generated servlets.
development true If set to true, checks JSP pages for modification on every access.
enablePooling true If set to true, tag handler pooling is enabled.
fork true Specifies that Ant forks compiles of JSP pages so that a separate JVM is used for JSP page compiles from the one in which Tomcat is running.
trimSpaces false If set to true, trims white spaces in template text between actions or directives.
reloading true If set to true, checks for modified JSP pages.
suppressSmap false If set to true, generation of SMAP information for JSR 45 debugging is suppressed.
dumpSmap false If set to true, dumps SMAP information for JSR 45 debugging to a file. Set to false if suppressSmap is true.
genStrAsCharArray false If set to true, generates text strings as char arrays, which improves performance in some cases.
errorOnUseBeanInvalidClassAttribute
false If set to true, issues an error when the value of the class attribute in a useBean action is not a valid bean class.
xpoweredBy true If set to true, the X-Powered-By response header is added by the generated servlet.
Table 5-44 jsp-config Properties (Continued)Property Default Description

The sun-web.xml File
Chapter 5 Deployment Descriptor Files 181
Internationalization ElementsInternationalization elements are as follows:
• locale-charset-info
• locale-charset-map
• parameter-encoding
locale-charset-infoSpecifies information about the application’s internationalization settings.
SubelementsThe following table describes subelements for the locale-charset-info element.
AttributesThe following table describes attributes for the locale-charset-info element.
Table 5-45 locale-charset-info SubelementsElement Required Description
locale-charset-map one or more Maps a locale and an agent to a character encoding. Provided for backward compatibility. Used only for request processing, and only if no parameter-encoding is defined.
parameter-encoding zero or one Determines the default request character encoding and how the web container decodes parameters from forms according to a hidden field value.
Table 5-46 locale-charset-info AttributesAttribute Default Description
default-locale none Although a value is required, the value is ignored. Use the default-charset attribute of the parameter-encoding element.
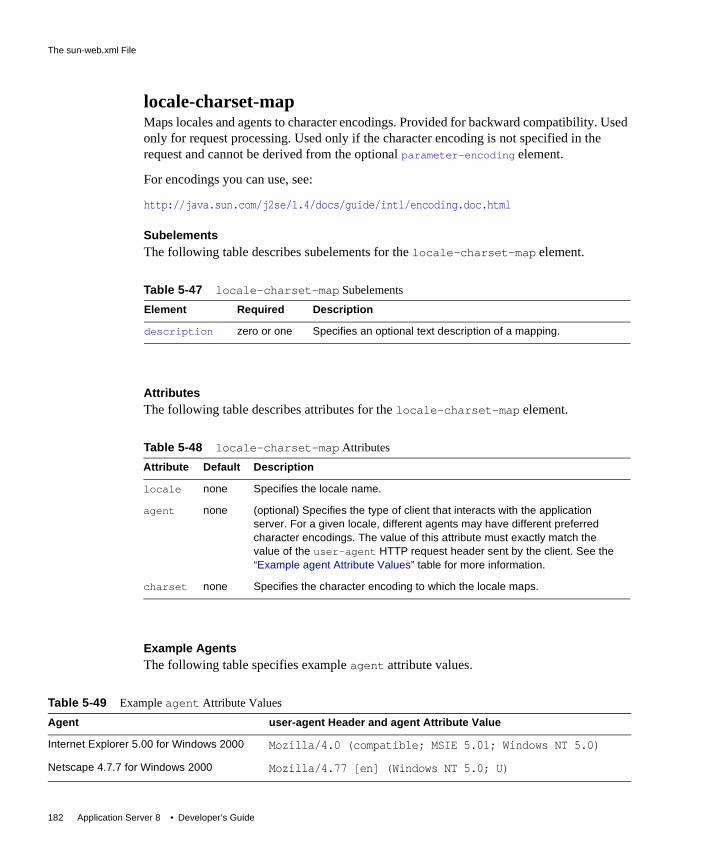
The sun-web.xml File
182 Application Server 8 • Developer’s Guide
locale-charset-mapMaps locales and agents to character encodings. Provided for backward compatibility. Used only for request processing. Used only if the character encoding is not specified in the request and cannot be derived from the optional parameter-encoding element.
For encodings you can use, see:
http://java.sun.com/j2se/1.4/docs/guide/intl/encoding.doc.html
SubelementsThe following table describes subelements for the locale-charset-map element.
AttributesThe following table describes attributes for the locale-charset-map element.
Example AgentsThe following table specifies example agent attribute values.
Table 5-47 locale-charset-map SubelementsElement Required Description
description zero or one Specifies an optional text description of a mapping.
Table 5-48 locale-charset-map AttributesAttribute Default Description
locale none Specifies the locale name.
agent none (optional) Specifies the type of client that interacts with the application server. For a given locale, different agents may have different preferred character encodings. The value of this attribute must exactly match the value of the user-agent HTTP request header sent by the client. See the “Example agent Attribute Values” table for more information.
charset none Specifies the character encoding to which the locale maps.
Table 5-49 Example agent Attribute ValuesAgent user-agent Header and agent Attribute Value
Internet Explorer 5.00 for Windows 2000 Mozilla/4.0 (compatible; MSIE 5.01; Windows NT 5.0)
Netscape 4.7.7 for Windows 2000 Mozilla/4.77 [en] (Windows NT 5.0; U)

The sun-web.xml File
Chapter 5 Deployment Descriptor Files 183
parameter-encodingSpecifies the default request character encoding and how the web container decodes parameters from forms according to a hidden field value.
For encodings you can use, see:
http://java.sun.com/j2se/1.4/docs/guide/intl/encoding.doc.html
Subelementsnone
AttributesThe following table describes attributes for the parameter-encoding element.
Sample sun-web.xml File<?xml version="1.0" encoding="UTF-8"?>
<!DOCTYPE sun-web-app PUBLIC '-//Sun Microsystems, Inc.//DTD Application Server 8.0 Servlet 2.4//EN' 'http://www.sun.com/software/appserver/dtds/sun-web-app_2_4-0.dtd'>
<sun-web-app>
<session-config>
<session-manager/>
</session-config>
Netscape 4.7 for Solaris Mozilla/4.7 [en] (X11; u; Sun OS 5.6 sun4u)
Table 5-50 parameter-encoding AttributesAttribute Default Description
form-hint-field none (optional) The name of the hidden field in the form that specifies the character encoding the web container uses for request.getParameter and request.getReader calls when the charset is not set in the request’s content-type header.
default-charset ISO-8859-1 (optional) The default request character encoding.
Table 5-49 Example agent Attribute Values (Continued)Agent user-agent Header and agent Attribute Value

The sun-ejb-jar.xml File
184 Application Server 8 • Developer’s Guide
<resource-ref>
<res-ref-name>mail/Session</res-ref-name>
<jndi-name>mail/Session</jndi-name>
</resource-ref>
<jsp-config/>
</sun-web-app>
The sun-ejb-jar.xml FileThis section describes the XML elements in the sun-ejb-jar.xml file and provides an example file in the following sections:
• General Elements
• Role Mapping Elements
• Reference Elements
• Messaging Elements
• Security Elements
• Persistence Elements
• Pooling and Caching Elements
• Class Elements
• Web Service Elements
• Sample sun-ejb-jar.xml File
NOTE If any configuration for an enterprise bean is not specified in the sun-ejb-jar.xml file, it can default to a corresponding value in the ejb-container element of the domain.xml file if an equivalency exists. You can change the default values in the domain.xml file; these changes will be reflected in any enterprise bean that does not have that value defined.

The sun-ejb-jar.xml File
Chapter 5 Deployment Descriptor Files 185
General ElementsGeneral elements are as follows:
• description
• ejb
• ejb-name
• enterprise-beans
• is-read-only-bean
• name
• property
• refresh-period-in-seconds
• sun-ejb-jar
• unique-id
• value
descriptionContains data that specifies a text description of the containing element.
Subelementsnone
ejbDefines runtime properties for a single enterprise bean within the application. The subelements listed below apply to particular enterprise beans as follows:
• All types of beans: ejb-name, ejb-ref, resource-ref, resource-env-ref, cmp, ior-security-config, gen-classes, jndi-name
• Stateless session beans and message-driven beans: bean-pool
• Stateful session beans and entity beans: bean-cache
• Entity beans: commit-option, bean-cache, bean-pool, is-read-only-bean (BMP only), refresh-period-in-seconds (BMP only)
• Message-driven beans: mdb-connection-factory, jms-durable-subscription-name, jms-max-messages-load, bean-pool

The sun-ejb-jar.xml File
186 Application Server 8 • Developer’s Guide
SubelementsThe following table describes subelements for the ejb element.
Table 5-51 ejb SubelementsSubelement Required Description
ejb-name only one Matches the ejb-name in the corresponding ejb-jar.xml file.
jndi-name zero or more Specifies the absolute jndi-name.
ejb-ref zero or more Maps the absolute JNDI name to the ejb-ref element in the corresponding J2EE XML file.
resource-ref zero or more Maps the absolute JNDI name to the resource-ref in the corresponding J2EE XML file.
resource-env-ref zero or more Maps the absolute JNDI name to the resource-env-ref in the corresponding J2EE XML file.
service-ref zero or more Specifies runtime settings for a web service reference.
pass-by-reference zero or one Specifies the passing method used by an enterprise bean calling a remote interface method in another bean that is co-located within the same process.
cmp zero or one Specifies runtime information for a container-managed persistence (CMP) EntityBean object for EJB1.1 and EJB2.1 beans.
principal zero or one Specifies the principal (user) name in an enterprise bean that has the run-as role specified.
mdb-connection-factory zero or one Specifies the connection factory associated with a message-driven bean.
jms-durable-subscription-name zero or one Contains data that specifies the durable subscription associated with a message-driven bean.
jms-max-messages-load zero or one Specifies the maximum number of messages to load into a Java Message Service session at one time for a message-driven bean to serve. The default is 1.
ior-security-config zero or one Specifies the security information for the IOR.
is-read-only-bean zero or one Specifies that this bean is read-only (BMP only).
refresh-period-in-seconds zero or one Specifies the rate at which a read-only-bean must be refreshed from the data source.
commit-option zero or one Contains data that has valid values of B or C. Default value is B.
cmt-timeout-in-seconds zero or one Contains data that overrides the Transaction Timeout setting of the Transaction Service for an individual bean.
use-thread-pool-id zero or one This element is not implemented.

The sun-ejb-jar.xml File
Chapter 5 Deployment Descriptor Files 187
Example<ejb>
<ejb-name>CustomerEJB</ejb-name> <jndi-name>customer</jndi-name> <resource-ref>
<res-ref-name>jdbc/SimpleBank</res-ref-name> <jndi-name>jdbc/PointBase</jndi-name>
</resource-ref> <is-read-only-bean>false</is-read-only-bean> <commit-option>B</commit-option> <bean-pool>
<steady-pool-size>10</steady-pool-size><resize-quantity>10</resize-quantity> <max-pool-size>100</max-pool-size> <pool-idle-timeout-in-seconds>600</pool-idle-timeout-in-seconds>
</bean-pool> <bean-cache>
<max-cache-size>100</max-cache-size> <resize-quantity>10</resize-quantity> <removal-timeout-in-seconds>3600</removal-timeout-in-seconds> <victim-selection-policy>LRU</victim-selection-policy>
</bean-cache> </ejb>
gen-classes zero or one Specifies all the generated class names for a bean.
bean-pool zero or one bean-pool
Specifies the bean pool properties. Used for stateless session beans, entity beans, and message-driven bean pools.
bean-cache zero or one bean-pool
Specifies the bean cache properties. Used only for stateful session beans and entity beans
mdb-resource-adapter zero or one Specifies runtime configuration information for a message-driven bean.
webservice-endpoint zero or more Specifies information about a web service endpoint.
Table 5-51 ejb Subelements (Continued)Subelement Required Description

The sun-ejb-jar.xml File
188 Application Server 8 • Developer’s Guide
ejb-nameMatches the ejb-name in the corresponding ejb-jar.xml file. The name must be unique among the names of the enterprise beans in the same EJB JAR file.
There is no architected relationship between the ejb-name in the deployment descriptor and the JNDI name that the deployer assigns to the EJB component’s home.
Subelementsnone
Example<ejb-name>EmployeeService</ejb-name>
enterprise-beansSpecifies all the runtime properties for an EJB JAR file in the application.
SubelementsThe following table describes subelements for the enterprise-beans element.
Table 5-52 enterprise-beans SubelementsSubelement Required Description
name zero or one Specifies the name string.
unique-id zero or one Specifies a unique system identifier. This data is automatically generated and updated at deployment/redeployment. Developers should not specify or edit this value.
ejb zero or more Defines runtime properties for a single enterprise bean within the application.
pm-descriptors zero or one Specifies one or more persistence manager descriptors, but only one of them must be in use at any given time. If none are specified, the Sun CMP persistence manager is used.
cmp-resource zero or one Specifies the database to be used for storing container-managed persistence (CMP) beans in an EJB JAR file.
message-destination zero or more Specifies the name of a logical message destination.
webservice-description zero or more Specifies a name and optional publish location for a web service.

The sun-ejb-jar.xml File
Chapter 5 Deployment Descriptor Files 189
Example<enterprise-beans>
<ejb> <ejb-name>CustomerEJB</ejb-name> <jndi-name>customer</jndi-name> <resource-ref>
<res-ref-name>jdbc/SimpleBank</res-ref-name> <jndi-name>jdbc/PointBase</jndi-name>
</resource-ref> <is-read-only-bean>false</is-read-only-bean> <commit-option>B</commit-option> <bean-pool>
<steady-pool-size>10</steady-pool-size><resize-quantity>10</resize-quantity> <max-pool-size>100</max-pool-size> <pool-idle-timeout-in-seconds>600</pool-idle-timeout-in-seconds>
</bean-pool> <bean-cache>
<max-cache-size>100</max-cache-size> <resize-quantity>10</resize-quantity> <removal-timeout-in-seconds>3600</removal-timeout-in-seconds> <victim-selection-policy>LRU</victim-selection-policy>
</bean-cache> </ejb>
</enterprise-beans>
is-read-only-beanSpecifies that this bean is a read-only bean (BMP only).
Subelementsnone
Example<is-read-only-bean>false</is-read-only-bean>
nameContains data that specifies the name of the entity.
Subelementsnone

The sun-ejb-jar.xml File
190 Application Server 8 • Developer’s Guide
propertySpecifies the name and value of a property.
SubelementsThe following table describes subelements for the property element.
refresh-period-in-secondsSpecifies the rate at which a read-only-bean must be refreshed from the data source. If the value is less than or equal to zero, the bean is never refreshed; if the value is greater than zero, the bean instances are refreshed at specified intervals. This rate is just a hint to the container. Default is 0 (no refresh).
Subelementsnone
sun-ejb-jarDefines the Sun Java System Application Server-specific configuration for an EJB JAR file in the application. This is the root element; there can only be one sun-ejb-jar element in an sun-ejb-jar.xml file.
Refer to “Sample sun-web.xml File” on page 183 for example of this file.
SubelementsThe following table describes subelements for the sun-ejb-jar element.
Table 5-53 property subelements Element Required Description
name only one Specifies the name of the entity.
value only one Specifies the value of the entity.
Table 5-54 sun-ejb-jar SubelementsSubelement Required Description
security-role-mapping zero or more Maps a role in the corresponding J2EE XML file to a user or group.
enterprise-beans only one Describes all the runtime properties for an EJB JAR file in the application.

The sun-ejb-jar.xml File
Chapter 5 Deployment Descriptor Files 191
unique-idSpecifies a unique system identifier. This data is automatically generated and updated at deployment/redeployment. Developers should not specify or edit this value.
Subelementsnone
valueContains data that specifies the value of the entity.
Subelementsnone
Role Mapping ElementsThe role mapping element maps a role, as specified in the EJB JAR role-name entries, to a environment-specific user or group. If it maps to a user, it must be a concrete user which exists in the current realm who can log into the server using the current authentication method. If it maps to a group, the realm must support groups and it must be a concrete group which exists in the current realm. To be useful, there must be at least one user in that realm who belongs to that group.
Role mapping elements are as follows:
• group-name
• principal
• principal-name
• role-name
• security-role-mapping
• server-name
group-name Specifies the group name.
Subelementsnone

The sun-ejb-jar.xml File
192 Application Server 8 • Developer’s Guide
principalDefines a node that specifies a user name on the platform.
SubelementsThe following table describes subelements for the principal element.
principal-name Specifies the principal (user) name in an enterprise bean that has the run-as role specified.
Subelementsnone
role-name Specifies the role-name in the security-role element of the ejb-jar.xml file.
Subelementsnone
Example<role-name>employee</role-name>
security-role-mappingMaps roles to users and groups.
SubelementsThe following table describes subelements for the security-role-mapping element.
Table 5-55 principal SubelementsSubelement Required Description
name only one Specifies the name of the user.
Table 5-56 security-role-mapping SubelementsSubelement Required Description
role-name only one Specifies the role-name from the ejb-jar.xml file being mapped.

The sun-ejb-jar.xml File
Chapter 5 Deployment Descriptor Files 193
server-nameSpecifies the name of the server where the application is being deployed.
Subelementsnone
Reference ElementsReference elements are as follows:
• ejb-ref
• ejb-ref-name
• jndi-name
• pass-by-reference
• res-ref-name
• resource-env-ref
• resource-env-ref-name
• resource-ref
• message-destination
• message-destination-name
ejb-refMaps the absolute jndi-name name to the ejb-ref element in the corresponding J2EE XML file, ejb-jar.xml. The ejb-ref element is used for the declaration of a reference to an EJB’s home. Applies to session beans or entity beans.
principal-name requires at least one principal-name or group-name
Specifies the principal (user) name in a bean that has the run-as role specified.
group-name requires at least one principal-name or group-name
Specifies the group name.
Table 5-56 security-role-mapping Subelements (Continued)Subelement Required Description

The sun-ejb-jar.xml File
194 Application Server 8 • Developer’s Guide
SubelementsThe following table describes subelements for the ejb-ref element.
ejb-ref-name Specifies the ejb-ref-name in the corresponding J2EE XML file ejb-ref entry. The name must be unique within the enterprise bean, and should be prefixed with ejb/.
Subelementsnone
Example<ejb-ref-name>ejb/Payroll</ejb-ref-name>
jndi-name Specifies the absolute jndi-name.
For entity beans and session beans, this value specifies the global JNDI name of the EJBHome object. It is only needed if the entity or session bean exposes a remote view.
For JMS message-driven beans, this is the JNDI name of the JMS resource from which the message-driven bean should consume JMS messages. This information can alternatively be specified within the activation-config subelement of the mdb-resource-adapter element. For more information about JMS resources, see Chapter 14, “Using the Java Message Service.”
Subelementsnone
Example<jndi-name>ejb/OrderEJB</jndi-name>
Table 5-57 ejb-ref SubelementsSubelement Required Description
ejb-ref-name only one Specifies the ejb-ref-name in the corresponding J2EE EJB JAR file ejb-ref entry.
jndi-name only one Specifies the absolute jndi-name.

The sun-ejb-jar.xml File
Chapter 5 Deployment Descriptor Files 195
pass-by-referenceSpecifies the passing method used by a servlet or enterprise bean calling a remote interface method in another bean that is co-located within the same process.
• If false (the default if this element is not present), this application uses pass-by-value semantics.
• If true, this application uses pass-by-reference semantics.
When a servlet or enterprise bean calls a remote interface method in another bean that is co-located within the same process, by default the Sun Java System Application Server makes copies of all the call parameters in order to preserve the pass-by-value semantics. This increases the call overhead and decreases performance.
However, if the calling method does not mutate the object being passed as a parameter, it is safe to pass the object itself without making a copy of it. To do this, set the pass-by-reference value to true.
To apply pass-by-reference semantics to an entire J2EE application containing multiple EJB modules, you can set the same element in the sun-application.xml file. If you want to use pass-by-reference at both the bean and application level, the bean level takes precedence. For information about the sun-application.xml file, see “The sun-application.xml File” on page 147.
Subelementsnone
NOTE The pass-by-reference element only applies to remote calls. As defined in the EJB 2.1 specification, section 5.4, calls to local interfaces use pass-by-reference semantics.
If the pass-by-reference element is set to its default value of false, the passing semantics for calls to remote interfaces comply with the EJB 2.1 specification, section 5.4. If set to true, remote calls involve pass-by-reference semantics instead of pass-by-value semantics, contrary to this specification.
Portable programs should not assume that a copy of the object is made during such a call, and thus that it’s safe to modify the original. Nor should they assume that a copy is not made, and thus that changes to the object are visible to both caller and callee. When this element is set to true, parameters and return values should be considered read-only. The behavior of a program that modifies such parameters or return values is undefined.

The sun-ejb-jar.xml File
196 Application Server 8 • Developer’s Guide
res-ref-name Specifies the res-ref-name in the corresponding J2EE ejb-jar.xml file resource-ref entry. The res-ref-name element specifies the name of a resource manager connection factory reference. The name must be unique within an enterprise bean.
Subelementsnone
Example<res-ref-name>jdbc/SimpleBank</res-ref-name>
resource-env-refMaps the resource-env-ref-name in the corresponding J2EE ejb-jar.xml file resource-env-ref entry to an absolute jndi-name in the resources element in the domain.xml file. The resource-env-ref element contains a declaration of an enterprise bean's reference to an administered object associated with a resource in the bean's environment.
Used in entity, message-driven, and session beans.
SubelementsThe following table describes subelements for the resource-env-ref element.
Example<resource-env-ref>
<resource-env-ref-name>jms/StockQueueName</resource-env-ref-name><jndi-name>jms/StockQueue</jndi-name>
</resource-env-ref>
Table 5-58 resource-env-ref SubelementsSubelement Required Description
resource-env-ref-name only one Specifies the resource-env-ref-name in the corresponding J2EE ejb-jar.xml file resource-env-ref entry.
jndi-name only one Specifies the absolute jndi-name.

The sun-ejb-jar.xml File
Chapter 5 Deployment Descriptor Files 197
resource-env-ref-name Specifies the resource-ref-name in the corresponding J2EE ejb-jar.xml file resource-env-ref entry. The resource-env-ref-name element specifies the name of a resource environment reference; its value is the environment entry name used in the EJB code. The name must be unique within an enterprise bean.
Subelementsnone
Example<resource-env-ref-name>jms/StockQueue</resource-env-ref-name>
resource-refMaps the res-ref-name in the corresponding J2EE ejb-jar.xml file resource-ref entry to the absolute jndi-name in the resources element in the domain.xml file. The resource-ref element contains a declaration of an EJB’s reference to an external resource. Used in entity, message-driven, and session beans.
SubelementsThe following table describes subelements for the resource-ref element.
NOTE Connections acquired from JMS connection factories are not shareable in the current release of the Sun Java System Application Server. The res-sharing-scope element in the ejb-jar.xml file resource-ref element is ignored for JMS connection factories.
When resource-ref specifies a JMS connection factory for the Sun Java System Message Queue, the default-resource-principal (name/password) must exist in the Sun Java System Message Queue user repository. Refer to the Security Management chapter in the Sun Java System Message Queue Administrator's Guide for information on how to manage the Sun Java System Message Queue user repository.
Table 5-59 resource-ref SubelementsSubelement Required Description
res-ref-name only one Specifies the res-ref-name in the corresponding J2EE ejb-jar.xml file resource-ref entry.
jndi-name only one Specifies the absolute jndi-name.

The sun-ejb-jar.xml File
198 Application Server 8 • Developer’s Guide
Example<resource-ref>
<res-ref-name>jdbc/EmployeeDBName</res-ref-name><jndi-name>jdbc/EmployeeDB</jndi-name>
</resource-ref>
message-destinationSpecifies the name of a logical message-destination defined within an application. The message-destination-name matches the corresponding message-destination-name in the ejb-jar.xml file.
SubelementsThe following table describes subelements for the message-destination element.
message-destination-name Contains data that specifies the name of a logical message destination defined within the corresponding ejb-jar.xml file.
Subelementsnone
default-resource-principal zero or one Specifies the default sign-on (name/password) to the resource manager.
Table 5-60 message-destination subelements Element Required Description
message-destination-name only one Specifies the name of a logical message destination defined within the corresponding ejb-jar.xml file.
jndi-name only one Specifies the jndi-name of the associated entity.
Table 5-59 resource-ref Subelements (Continued)Subelement Required Description

The sun-ejb-jar.xml File
Chapter 5 Deployment Descriptor Files 199
Messaging ElementsThis section contains the following elements associated with messaging:
• activation-config
• activation-config-property
• activation-config-property-name
• activation-config-property-value
• jms-durable-subscription-name
• jms-max-messages-load
• mdb-connection-factory
• mdb-resource-adapter
• message-destination
• message-destination-name
• resource-adapter-mid
activation-configSpecifies an activation configuration, which includes the runtime configuration properties of the message-driven bean in its operational environment. For example, this may include information about the name of a physical JMS destination. Matches and overrides the activation-config element in the ejb-jar.xml file.
SubelementsThe following table describes subelements for the activation-config element.
Table 5-61 activation-config subelements Element Required Description
description zero or one Specifies a text description of the activation configuration.
activation-config-property one or more Specifies an activation configuration property.

The sun-ejb-jar.xml File
200 Application Server 8 • Developer’s Guide
activation-config-propertySpecifies the name and value of an activation configuration property.
SubelementsThe following table describes subelements for the activation-config-property element.
activation-config-property-nameContains data that specifies the name of an activation configuration property.
Subelementsnone
activation-config-property-valueContains data that specifies the value of an activation configuration property.
Subelementsnone
jms-durable-subscription-nameSpecifies the durable subscription associated with a message-driven bean class. Only applies to the Java Message Service Topic Destination type, and only when the message-driven bean deployment descriptor subscription durability is Durable.
Subelementsnone
jms-max-messages-loadSpecifies the maximum number of messages to load into a Java Message Service session at one time for a message-driven bean to serve. The default is 1.
Table 5-62 activation-config-property subelements Element Required Description
activation-config-property-name only one Specifies the name of an activation configuration property.
activation-config-property-value only one Specifies the value of an activation configuration property.

The sun-ejb-jar.xml File
Chapter 5 Deployment Descriptor Files 201
Subelementsnone
mdb-connection-factorySpecifies the connection factory associated with a message-driven bean. Queue or Topic type must be consistent with the Java Message Service Destination type associated with the message-driven bean class.
SubelementsThe following table describes subelements for the mdb-connection-factory element.
mdb-resource-adapterSpecifies runtime configuration information for a message-driven bean.
SubelementsThe following table describes subelements for the mdb-resource-adapter element.
resource-adapter-midContains data that specifies the module ID of the resource adapter that is responsible for delivering messages to the message-driven bean.
Subelementsnone
Table 5-63 mdb-connection-factory SubelementsSubelement Required Description
jndi-name only one Specifies the absolute jndi-name.
default-resource-principal zero or one Specifies the default sign-on (name/password) to the resource manager.
Table 5-64 mdb-resource-adapter subelements Element Required Description
resource-adapter-mid zero or one Specifies a resource adapter module ID.
activation-config one or more Specifies an activation configuration.

The sun-ejb-jar.xml File
202 Application Server 8 • Developer’s Guide
Security ElementsThis section describes the elements that are associated with authentication, authorization, and general security. The following elements are included:
• as-context
• auth-method
• caller-propagation
• confidentiality
• default-resource-principal
• establish-trust-in-client
• establish-trust-in-target
• integrity
• ior-security-config
• name
• password
• realm
• required
• sas-context
• transport-config
as-contextSpecifies the authentication mechanism that will be used to authenticate the client. If specified, it will be USERNAME_PASSWORD.
SubelementsThe following table describes subelements for the as-context element.
Table 5-65 as-context SubelementsSubelement Required Description
auth-method only one Specifies the authentication method. The only supported value is USERNAME_PASSWORD.
realm only one Specifies the realm in which the user is authenticated.

The sun-ejb-jar.xml File
Chapter 5 Deployment Descriptor Files 203
auth-methodSpecifies the authentication method. The only supported value is USERNAME_PASSWORD.
Subelementsnone
caller-propagationSpecifies if the target will accept propagated caller identities. The values are NONE, SUPPORTED, or REQUIRED.
Subelementsnone
confidentialitySpecifies if the target supports privacy-protected messages. The values are NONE, SUPPORTED, or REQUIRED.
Subelementsnone
default-resource-principalSpecifies the default sign-on (name/password) to the resource manager.
SubelementsThe following table describes subelements for the default-resource-principal element.
required only one Specifies if the authentication method specified is required to be used for client authentication. If so, the EstablishTrustInClient bit will be set in the target_requires field of as-context. The value is true or false.
Table 5-66 default-resource-principal SubelementsSubelement Required Description
name only one Specifies the default resource principal name used to sign on to a resource manager.
Table 5-65 as-context Subelements (Continued)Subelement Required Description

The sun-ejb-jar.xml File
204 Application Server 8 • Developer’s Guide
establish-trust-in-clientSpecifies if the target is capable of authenticating a client. The values are NONE, SUPPORTED, or REQUIRED.
Subelementsnone
establish-trust-in-targetSpecifies if the target is capable of authenticating to a client. The values are NONE, SUPPORTED, or REQUIRED.
Subelementsnone
integritySpecifies if the target supports integrity-protected messages. The values are NONE, SUPPORTED, or REQUIRED.
Subelementsnone
ior-security-configSpecifies the security information for the input-output redirection (IOR).
SubelementsThe following table describes subelements for the ior-security-config element.
password only one Specifies password of the default resource principal.
Table 5-67 ior-security-config SubelementsSubelement Required Description
transport-config zero or one Specifies the security information for transport.
as-context zero or one Describes the authentication mechanism that will be used to authenticate the client. If specified, it will be USERNAME_PASSWORD.
Table 5-66 default-resource-principal Subelements (Continued)Subelement Required Description

The sun-ejb-jar.xml File
Chapter 5 Deployment Descriptor Files 205
nameSpecifies the name of an entity.
Subelementsnone
passwordSpecifies the password that security needs to complete authentication.
Subelementsnone
realmSpecifies the realm in which the user is authenticated.
Subelementsnone
requiredSpecifies if the authentication method specified is required to be used for client authentication. If so, the EstablishTrustInClient bit will be set in the target_requires field of as-context. The value is either true or false.
Subelementsnone
sas-contextDescribes the sas-context fields.
SubelementsThe following table describes subelements for the sas-context element.
sas-context zero or one Describes the sas-context fields.
Table 5-67 ior-security-config Subelements (Continued)Subelement Required Description

The sun-ejb-jar.xml File
206 Application Server 8 • Developer’s Guide
transport-configSpecifies the security transport information.
SubelementsThe following table describes subelements for the transport-config element.
Persistence ElementsThis section describes the elements associated with container-managed persistence (CMP), the persistence manager, and the persistence vendor. For information on using these elements, refer to Chapter 8, “Using Container-Managed Persistence for Entity Beans.”
The following elements are included:
• cmp
• cmp-resource
• create-tables-at-deploy
• database-vendor-name
Table 5-68 sas-context SubelementsSubelement Required Description
caller-propagation only one Specifies if the target will accept propagated caller identities. The values are NONE, SUPPORTED, or REQUIRED.
Table 5-69 transport-config SubelementsSubelement Required Description
integrity only one Specifies if the target supports integrity-protected messages. The values are NONE, SUPPORTED, or REQUIRED.
confidentiality only one Specifies if the target supports privacy-protected messages. The values are NONE, SUPPORTED, or REQUIRED.
establish-trust-in-target only one Specifies if the target is capable of authenticating to a client. The values are NONE, SUPPORTED, or REQUIRED.
establish-trust-in-client only one Specifies if the target is capable of authenticating a client. The values are NONE, SUPPORTED, or REQUIRED.

The sun-ejb-jar.xml File
Chapter 5 Deployment Descriptor Files 207
• drop-tables-at-undeploy
• finder
• is-one-one-cmp
• mapping-properties
• method-name
• one-one-finders
• pm-class-generator
• pm-config
• pm-descriptor
• pm-descriptors
• pm-identifier
• pm-inuse
• pm-mapping-factory
• pm-version
• query-filter
• query-ordering
• query-params
• query-variables
• schema-generator-properties
cmpDescribes runtime information for a CMP entity bean object for EJB1.1 and EJB2.1 beans.
SubelementsThe following table describes subelements for the cmp element.
Table 5-70 cmp SubelementsSubelement Required Description
mapping-properties zero or one This element is not implemented.
is-one-one-cmp zero or one This element is not implemented.

The sun-ejb-jar.xml File
208 Application Server 8 • Developer’s Guide
cmp-resourceSpecifies the database to be used for storing CMP beans. For more information about this element, see “Configuring the Resource Manager” on page 318.
SubelementsThe following table describes subelements for the cmp-resource element.
create-tables-at-deployContains data that specifies whether database tables are created for beans that are automatically mapped by the EJB container. If true, creates tables in the database. If false, does not create tables.
This element can be overridden during deployment. See Table 8-2 on page 310.
Subelementsnone
one-one-finders zero or one Describes the finders for CMP 1.1 beans.
Table 5-71 cmp-resource SubelementsSubelement Required Description
jndi-name only one Specifies the absolute jndi-name.
default-resource-principal zero or one Specifies the default runtime bindings of a resource reference.
property zero or more Specifies a property name and value.
create-tables-at-deploy zero or one If true, specifies that database tables are created for beans that are automatically mapped by the EJB container.
drop-tables-at-undeploy zero or one If true, specifies that database tables that were automatically created when the bean(s) were last deployed are dropped when the bean(s) are undeployed.
database-vendor-name zero or one Specifies the name of the database vendor for which tables can be created.
schema-generator-properties zero or one Specifies field-specific type mappings and allows you to set the use-unique-table-names property.
Table 5-70 cmp Subelements (Continued)Subelement Required Description

The sun-ejb-jar.xml File
Chapter 5 Deployment Descriptor Files 209
database-vendor-nameContains data that specifies the name of the database vendor for which tables can be created. Allowed values are db2, mssql, oracle, pointbase, and sybase, case-insensitive.
If no value is specified, a connection is made to the resource specified by the jndi-name subelement of the cmp-resource element, and the database vendor name is read. If the connection cannot be established, or if the value is not recognized, SQL-92 compliance is presumed.
This element can be overridden during deployment. See Table 8-2 on page 310.
Subelementsnone
drop-tables-at-undeployContains data that specifies whether database tables that were automatically created when the bean(s) were last deployed are dropped when the bean(s) are undeployed. If true, drops tables from the database. If false, does not drop tables.
This element can be overridden during deployment. See Table 8-2 on page 310.
Subelementsnone
finderDescribes the finders for CMP 1.1 with a method name and query.
SubelementsThe following table describes subelements for the finder element.
Table 5-72 finder SubelementsSubelement Required Description
method-name only one Specifies the method name for the finder.
query-params zero or one Specifies the query parameters for the CMP 1.1 finder.
query-filter zero or one Specifies the query filter for the CMP 1.1 finder.
query-variables zero or one Specifies variables in query expression for the CMP 1.1 finder.

The sun-ejb-jar.xml File
210 Application Server 8 • Developer’s Guide
is-one-one-cmpThis element is not implemented.
Subelementsnone
mapping-propertiesThis element is not implemented.
Subelementsnone
method-nameSpecifies the method name for the finder. The method-name element contains a name of an EJB method.
Examples<method-name>findTeammates</method-name>
<method-name>*</method-name>
Subelementsnone
one-one-findersDescribes the finders for CMP 1.1 beans.
SubelementsThe following table describes subelements for the one-one-finders element.
query-ordering zero or one Specifies the query ordering for the CMP 1.1 finder.
Table 5-72 finder Subelements (Continued)Subelement Required Description

The sun-ejb-jar.xml File
Chapter 5 Deployment Descriptor Files 211
pm-class-generatorSpecifies which vendor-specific concrete class generator is to be used. This is the name of the class specific to the vendor.
Subelementsnone
pm-configSpecifies the vendor-specific configuration file to be used.
Subelementsnone
pm-descriptorDescribes the properties of the persistence manager associated with an entity bean.
SubelementsThe following table describes subelements for the pm-descriptor element.
Table 5-73 one-one-finders SubelementsSubelement Required Description
finder one or more Describes the finders for CMP 1.1 with a method name and query.
Table 5-74 pm-descriptor SubelementsSubelement Required Description
pm-identifier only one Specifies the vendor who provided the persistence manager implementation. For example, this could be Sun Java System Application Server CMP or a third-party vendor.
pm-version only one Specifies which version of the persistence manager vendor product is to be used.
pm-config zero or one Specifies the vendor-specific configuration file to be used.
pm-class-generator zero or one Specifies which vendor-specific concrete class generator is to be used. This is the name of the class specific to the vendor.

The sun-ejb-jar.xml File
212 Application Server 8 • Developer’s Guide
pm-descriptorsSpecifies one or more persistence manager descriptors, but only one of them must be in use at any given time. If none are specified, the Sun CMP persistence manager is used.
SubelementsThe following table describes subelements for the pm-descriptors element.
pm-identifierSpecifies the vendor who provided the persistence manager implementation. For example, this could be Sun Java System Application Server CMP or a third-party vendor.
Subelementsnone
pm-inuseSpecifies whether this particular persistence manager must be used or not.
SubelementsThe following table describes subelements for the pm-inuse element.
pm-mapping-factory zero or one Specifies which vendor-specific mapping factory is to be used. This is the name of the class specific to the vendor.
Table 5-75 pm-descriptors SubelementsSubelement Required Description
pm-descriptor one or more Describes the properties of the persistence manager associated with an entity bean.
pm-inuse only one Specifies whether this particular persistence manager must be used or not.
Table 5-74 pm-descriptor Subelements (Continued)Subelement Required Description

The sun-ejb-jar.xml File
Chapter 5 Deployment Descriptor Files 213
pm-mapping-factorySpecifies which vendor-specific mapping factory is to be used. This is the name of the class specific to the vendor.
Subelementsnone
pm-versionSpecifies which version of the persistence manager vendor product is to be used.
Subelementsnone
query-filterSpecifies the query filter for the CMP 1.1 finder.
Subelementsnone
query-orderingSpecifies the query ordering for the CMP 1.1 finder.
Subelementsnone
Table 5-76 pm-insue SubelementsSubelement Required Description
pm-identifier only one Contains data that specifies the vendor who provided the persistence manager implementation. For example, this could be Sun Java System Application Server CMP or a third-party vendor.
pm-version only one Contains data that specifies which version of the persistence manager vendor product is to be used.

The sun-ejb-jar.xml File
214 Application Server 8 • Developer’s Guide
query-paramsSpecifies the query parameters for the CMP 1.1 finder.
Subelementsnone
query-variablesSpecifies variables in query expression for the CMP 1.1 finder.
Subelementsnone
schema-generator-propertiesSpecifies field-specific type mappings in property subelements.
Also allows you to set the use-unique-table-names property. If true, this property specifies that generated table names are unique within each application server domain. The default is false. This property can be overridden during deployment. See Table 8-2 on page 310.
SubelementsThe following table describes subelements for the schema-generator-properties element.
Example<schema-generator-properties>
<property><name>
Employee.firstName.jdbc-type</name><value>char</value>
</property><property>
<name>Employee.firstName.jdbc-maximum-length
Table 5-77 schema-generator-properties SubelementsSubelement Required Description
property zero or more Specifies a property name and value.

The sun-ejb-jar.xml File
Chapter 5 Deployment Descriptor Files 215
</name><value>25</value>
</property><property>
<name>use-unique-table-names
</name><value>true</value>
</property></schema-generator-properties>
Pooling and Caching ElementsThis section describes the elements associated with cache, timeout, and the EJB pool. These elements are used to control memory usage and performance tuning. For more information, refer to the Sun Java System Application Server Performance Tuning Guide.
The following elements are discussed:
• bean-cache
• bean-pool
• cache-idle-timeout-in-seconds
• cmt-timeout-in-seconds
• commit-option
• is-cache-overflow-allowed
• max-cache-size
• max-pool-size
• max-wait-time-in-millis
• pool-idle-timeout-in-seconds
• removal-timeout-in-seconds
• resize-quantity
• steady-pool-size
• victim-selection-policy

The sun-ejb-jar.xml File
216 Application Server 8 • Developer’s Guide
bean-cacheSpecifies the entity bean cache properties. Used for entity beans and stateful session beans.
SubelementsThe following table describes subelements for the bean-cache element.
Example<bean-cache>
<max-cache-size>100</max-cache-size><cache-resize-quantity>10</cache-resize-quantity><removal-timeout-in-seconds>3600</removal-timeout-in-seconds><victim-selection-policy>LRU</victim-selection-policy>
<cache-idle-timeout-in-seconds>600</cache-idle-timeout-in-seconds>
<removal-timeout-in-seconds>5400</removal-timeout-in-seconds></bean-cache>
Table 5-78 bean-cache SubelementsSubelement Required Description
max-cache-size zero or one Specifies the maximum number of beans allowable in cache.
is-cache-overflow-allowed zero or one Deprecated.
cache-idle-timeout-in-seconds zero or one Specifies the maximum time that a stateful session bean or entity bean is allowed to be idle in cache before being passivated. Default value is 10 minutes (600 seconds).
removal-timeout-in-seconds zero or one Specifies the amount of time a bean remains before being removed. If removal-timeout-in-seconds is less than idle-timeout, the bean is removed without being passivated.
resize-quantity zero or one Specifies the number of beans to be created if the pool is empty (subject to the max-pool-size limit). Values are from 0 to MAX_INTEGER.
victim-selection-policy zero or one Specifies the algorithm that must be used by the container to pick victims. Applies only to stateful session beans.

The sun-ejb-jar.xml File
Chapter 5 Deployment Descriptor Files 217
bean-poolSpecifies the pool properties of stateless session beans, entity beans, and message-driven bean.
SubelementsThe following table describes subelements for the bean-pool element.
Example<bean-pool>
<steady-pool-size>10</steady-pool-size><resize-quantity>10</resize-quantity> <max-pool-size>100</max-pool-size> <pool-idle-timeout-in-seconds>600</pool-idle-timeout-in-seconds>
</bean-pool>
cache-idle-timeout-in-secondsSpecifies the maximum time that a bean can remain idle in the cache. After this amount of time, the container can passivate this bean. A value of 0 specifies that beans may never become candidates for passivation. Default is 600.
Applies to stateful session beans and entity beans.
Subelementsnone
Table 5-79 bean-pool SubelementsSubelement Required Description
steady-pool-size zero or one Specifies the initial and minimum number of beans maintained in the pool. Default is 32.
resize-quantity zero or one Specifies the number of beans to be created if the pool is empty (subject to the max-pool-size limit). Values are from 0 to MAX_INTEGER.
max-pool-size zero or one Specifies the maximum number of beans in the pool. Values are from 0 to MAX_INTEGER. Default is to domain.xml or 60.
max-wait-time-in-millis zero or one Deprecated.
pool-idle-timeout-in-seconds zero or one Specifies the maximum time that a bean is allowed to be idle in the pool. After this time, the bean is removed. This is a hint to the server. Default time is 600 seconds (10 minutes).

The sun-ejb-jar.xml File
218 Application Server 8 • Developer’s Guide
cmt-timeout-in-secondsContains data that overrides the Transaction Timeout setting of the Transaction Service for an individual bean. The default value, 0, specifies that the default Transaction Service timeout is used. If positive, this value is used for all methods in the bean that start a new container-managed transaction. This value is not used if the bean joins a client transaction.
Subelementsnone
commit-optionSpecifies the commit option that will be used on transaction completion. Valid values for the Sun Java System Application Server are B or C. Default value is B.
Applies to entity beans.
Subelementsnone
Example<commit-option>B</commit-option>
is-cache-overflow-allowedThis element is deprecated and should not be used.
max-cache-sizeSpecifies the maximum number of beans allowable in cache. A value of zero indicates an unbounded cache. In reality, there is no hard limit. The max-cache-size limit is just a hint to the cache implementation. Default is 512.
Applies to stateful session beans and entity beans.
Subelementsnone
Example<max-cache-size>100</max-cache-size>
NOTE Commit option A is not supported for the Sun Java System Application Server 8 release.

The sun-ejb-jar.xml File
Chapter 5 Deployment Descriptor Files 219
max-pool-sizeSpecifies the maximum number of bean instances in the pool. Values are from 0 (1 for message-driven bean) to MAX_INTEGER. A value of 0 means the pool is unbounded. Default is 64.
Applies to all beans.
Subelementsnone
Example<max-pool-size>100</max-pool-size>
max-wait-time-in-millisThis element is deprecated and should not be used.
pool-idle-timeout-in-secondsSpecifies the maximum time, in seconds, that a bean instance is allowed to remain idle in the pool. When this timeout expires, the bean instance in a pool becomes a candidate for passivation or deletion. This is a hint to the server. A value of 0 specifies that idle beans can remain in the pool indefinitely. Default value is 600.
Applies to stateless session beans, entity beans, and message-driven beans.
Subelementsnone
Example<pool-idle-timeout-in-seconds>600</pool-idle-timeout-in-seconds>
removal-timeout-in-secondsSpecifies the amount of time a bean instance can remain idle in the container before it is removed (timeout). A value of 0 specifies that the container does not remove inactive beans automatically. The default value is 5400.
NOTE For a stateless session bean or a message-driven bean, the bean can be removed (garbage collected) when the timeout expires.

The sun-ejb-jar.xml File
220 Application Server 8 • Developer’s Guide
If removal-timeout-in-seconds is less than or equal to cache-idle-timeout-in-seconds, beans are removed immediately without being passivated.
Applies to stateful session beans.
For related information, see cache-idle-timeout-in-seconds.
Subelementsnone
Example<removal-timeout-in-seconds>3600</removal-timeout-in-seconds>
resize-quantitySpecifies the number of bean instances to be:
• Created, if a request arrives when the pool has less than steady-pool-size quantity of beans (applies to pools only for creation). If the pool has more than steady-pool-size minus resize-quantity of beans, then resize-quantity is still created.
• Removed, when the pool-idle-timeout-in-seconds timer expires and a cleaner thread removes any unused instances.
❍ For caches, when max-cache-size is reached, resize-quantity beans will be selected for passivation using victim-selection-policy. In addition, the cache-idle-timeout-in-seconds or cache-remove-timeout-in-seconds timers will passivate beans from the cache.
❍ For pools, when the max-pool-size is reached, resize-quantity beans will be selected for removal. In addition the pool-idle-timeout-in-seconds timer will remove beans until steady-pool-size is reached.
Values are from 0 to MAX_INTEGER. The pool is not resized below the steady-pool-size. Default is 16.
Applies to stateless session beans, entity beans, and message-driven beans.
For EJB pools, the default value can be the value of the ejb-container element pool-resize-quantity in the domain.xml file. Default is 16.
For EJB caches, the default value can be the value of the ejb-container element cache-resize-quantity in the domain.xml file. Default is 32.
For message-driven beans, the default can be the value of the mdb-container pool-resize-quantity element in the domain.xml file. Default is 2.

The sun-ejb-jar.xml File
Chapter 5 Deployment Descriptor Files 221
Subelementsnone
Example<resize-quantity>10</resize-quantity>
steady-pool-sizeSpecifies the initial and minimum number of bean instances that should be maintained in the pool. Default is 32. Applies to stateless session beans and message-driven beans.
Subelementsnone
Example<steady-pool-size>10</steady-pool-size>
victim-selection-policySpecifies how stateful session beans are selected for passivation. Possible values are First In, First Out (FIFO), Least Recently Used (LRU), Not Recently Used (NRU). The default value is NRU, which is actually pseudo-LRU.
The victims are generally passivated into a backup store (typically a file system or database). This store is cleaned during startup, and also by a periodic background process that removes idle entries as specified by removal-timeout-in-seconds. The backup store is monitored by a background thread (or sweeper thread) to remove unwanted entries.
Applies to stateful session beans.
Subelementsnone
Example<victim-selection-policy>LRU</victim-selection-policy>
NOTE The user cannot plug in his own victim selection algorithm.

The sun-ejb-jar.xml File
222 Application Server 8 • Developer’s Guide
Class ElementsThis section describes the elements associated with classes. The following elements are included:
• gen-classes
• local-home-impl
• local-impl
• remote-home-impl
• remote-impl
gen-classesSpecifies all the generated class names for a bean.
SubelementsThe following table describes subelements for the gen-class element.
NOTE This is automatically generated by the server at deployment/redeployment time. It should not be specified by the developer or changed after deployment.
Table 5-80 gen-classes SubelementsSubelement Required Description
remote-impl zero or one Specifies the fully-qualified class name of the generated EJBObject impl class.
local-impl zero or one Specifies the fully-qualified class name of the generated EJBLocalObject impl class.
remote-home-impl zero or one Specifies the fully-qualified class name of the generated EJBHome impl class.
local-home-impl zero or one Specifies the fully-qualified class name of the generated EJBLocalHome impl class.

The sun-ejb-jar.xml File
Chapter 5 Deployment Descriptor Files 223
local-home-implSpecifies the fully-qualified class name of the generated EJBLocalHome impl class.
Subelementsnone
local-implSpecifies the fully-qualified class name of the generated EJBLocalObject impl class.
Subelementsnone
remote-home-implSpecifies the fully-qualified class name of the generated EJBHome impl class.
Subelementsnone
remote-implSpecifies the fully-qualified class name of the generated EJBObject impl class.
NOTE This is automatically generated by the server at deployment/redeployment time. It should not be specified by the developer or changed after deployment.
NOTE This is automatically generated by the server at deployment/redeployment time. It should not be specified by the developer or changed after deployment.
NOTE This is automatically generated by the server at deployment/redeployment time. It should not be specified by the developer or changed after deployment.

The sun-ejb-jar.xml File
224 Application Server 8 • Developer’s Guide
Subelementsnone
Sample sun-ejb-jar.xml FileFor information on these elements, refer to “The sun-ejb-jar.xml File” on page 184.
<?xml version="1.0" encoding="UTF-8"?>
<!DOCTYPE sun-ejb-jar PUBLIC '-//Sun Microsystems, Inc.//DTD Application Server 8.0 EJB 2.1//EN' 'http://www.sun.com/software/appserver/dtds/sun-ejb-jar_2_1-0.dtd'>
<sun-ejb-jar><display-name>First Module</display-name><enterprise-beans>
<ejb><ejb-name>CustomerEJB</ejb-name><jndi-name>customer</jndi-name><bean-pool>
<steady-pool-size>10</steady-pool-size><resize-quantity>10</resize-quantity><max-pool-size>100</max-pool-size><pool-idle-timeout-in-seconds>600</pool-idle-timeout-in-seconds>
</bean-pool><bean-cache>
<max-cache-size>100</max-cache-size><resize-quantity>10</resize-quantity><removal-timeout-in-seconds>3600</removal-timeout-in-seconds><victim-selection-policy>LRU</victim-selection-policy>
</bean-cache></ejb><cmp-resource>
<jndi-name>jdbc/PointBase</jndi-name><create-tables-at-deploy>true</create-tables-at-deploy><drop-tables-at-undeploy>true</drop-tables-at-undeploy>
</cmp-resource></enterprise-beans>
</sun-ejb-jar>
NOTE This is automatically generated by the server at deployment/redeployment time. It should not be specified by the developer or changed after deployment.

The sun-cmp-mappings.xml File
Chapter 5 Deployment Descriptor Files 225
The sun-cmp-mappings.xml FileThis section describes the XML elements in the sun-cmp-mappings.xml file and provides database schema and XML file examples in the following sections:
• check-all-at-commit
• check-modified-at-commit
• cmp-field-mapping
• cmr-field-mapping
• cmr-field-name
• column-name
• column-pair
• consistency
• ejb-name
• entity-mapping
• fetched-with
• field-name
• level
• lock-when-loaded
• lock-when-modified
• named-group
• none
• read-only
• schema
• secondary-table
• sun-cmp-mapping
• sun-cmp-mappings
• table-name
• Sample Database Schema Definition
• Sample sun-cmp-mappings.xml File

The sun-cmp-mappings.xml File
226 Application Server 8 • Developer’s Guide
“Persistence Elements” on page 206 provides information on persistence-related elements in the sun-ejb-jar.xml file.
check-all-at-commitThis element is not implemented. Do not use.
Subelementsnone
check-modified-at-commitChecks concurrent modification of fields in modified beans at commit time.
Subelementsnone
cmp-field-mappingThe cmp-field-mapping element associates a field with one or more columns that it maps to. The column can be from a bean’s primary table or any defined secondary table. If a field is mapped to multiple columns, the column listed first in this element is used as a source for getting the value from the database. The columns are updated in the order they appear. There is one cmp-field-mapping element for each cmp-field element defined in the ejb-jar.xml file.
SubelementsThe following table describes subelements for the cmp-field-mapping element.
Table 5-81 cmp-field-mapping SubelementsSubelement Required Description
field-name only one Specifies the Java identifier of a field. This identifier must match the value of the field-name subelement of the cmp-field that is being mapped.
column-name one or more Specifies the name of a column from the primary table, or the qualified table name (TABLE.COLUMN) of a column from a secondary or related table.
read-only zero or one Specifies that a field is read-only.
fetched-with zero or one Specifies the fetch group for this CMP field’s mapping.

The sun-cmp-mappings.xml File
Chapter 5 Deployment Descriptor Files 227
cmr-field-mappingA container-managed relationship field has a name and one or more column pairs that define the relationship. There is one cmr-field-mapping element for each cmr-field element in the ejb-jar.xml file. A relationship can also participate in a fetch group.
SubelementsThe following table describes subelements for the cmr-field-mapping element.
cmr-field-nameSpecifies the Java identifier of a field. Must match the value of the cmr-field-name subelement of the cmr-field element in the ejb-jar.xml file.
Subelementsnone
column-nameSpecifies the name of a column from the primary table, or the qualified table name (TABLE.COLUMN) of a column from a secondary or related table.
Subelementsnone
column-pairSpecifies the pair of columns that determine the relationship between two database tables. Each column-pair must contain exactly two column-name subelements, which specify the column’s names. The first column-name element names the table that this bean is mapped to, and the second column-name names the column in the related table.
Table 5-82 cmr-field-mapping SubelementsSubelement Required Description
cmr-field-name only one Specifies the Java identifier of a field. Must match the value of the cmr-field-name subelement of the cmr-field that is being mapped.
column-pair one or more Specifies the pair of columns that determine the relationship between two database tables.
fetched-with zero or one Specifies the fetch group for this CMR field’s relationship.

The sun-cmp-mappings.xml File
228 Application Server 8 • Developer’s Guide
SubelementsThe following table describes subelements for the column-pair element.
consistencySpecifies container behavior in guaranteeing transactional consistency of the data in the bean.
Subelements
The following table describes subelements for the consistency element.
ejb-nameSpecifies the ejb-name of the entity bean in the ejb-jar.xml file to which the container-managed persistence (CMP) beans corresponds.
Subelementsnone
Table 5-83 column-pair SubelementsSubelement Required Description
column-name two Specifies the name of a column from the primary table, or the qualified table name (TABLE.COLUMN) of a column from a secondary or related table.
Table 5-84 consistency SubelementsSubelement Required Description
check-all-at-commit exactly one of these elements is required
This element is not implemented. Do not use.
check-modified-at-commit Checks concurrent modification of fields in modified beans at commit time.
lock-when-loaded Obtains an exclusive lock when the data is loaded.
lock-when-modified This element is not implemented. Do not use.
none No consistency checking occurs.

The sun-cmp-mappings.xml File
Chapter 5 Deployment Descriptor Files 229
entity-mappingSpecifies the mapping a bean to database columns.
SubelementsThe following table describes subelements for the entity-mapping element.
fetched-withSpecifies the fetch group configuration for fields and relationships. The fetched-with element has different default values based on its parent element.
• If there is no fetched-with subelement of a cmp-field-mapping, the default value is assumed to be:
<fetched-with><level>0</level></fetched-with>
The CMP field is placed into a default fetch group, which means it is fetched any time the bean is loaded from a database.
• If there is no fetched-with subelement of a cmr-field-mapping, the default value is assumed to be:
<fetched-with><none/></fetched-with>
Table 5-85 entity-mapping SubelementsSubelement Required Description
ejb-name only one Specifies the name of the entity bean in the ejb-jar.xml file to which the CMP bean corresponds.
table-name only one Specifies the name of a database table. The table must be present in the database schema file.
cmp-field-mapping one or more Associates a field with one or more columns that it maps to.
cmr-field-mapping zero or more A container-managed relationship field has a name and one or more column pairs that define the relationship.
secondary-table zero or more Describes the relationship between a bean’s primary and secondary table.
consistency zero or one Specifies container behavior in guaranteeing transactional consistency of the data in the bean.

The sun-cmp-mappings.xml File
230 Application Server 8 • Developer’s Guide
The CMR field is placed into a separate fetch group, which means it is loaded from a database the first time it is accessed in this transaction.
SubelementsThe following table describes subelements for the fetched-with element.
field-nameSpecifies the Java identifier of a field. This identifier must match the value of the field-name subelement of the cmp-field element in the ejb-jar.xml file.
Subelementsnone
levelSpecifies the name of a hierarchical fetch group. The name must be an integer. Fields and relationships that belong to a hierarchical fetch group of equal (or lesser) value are fetched at the same time. The value of level must be greater than zero. Only one is allowed.
Subelementsnone
lock-when-loadedPlaces a database update lock on the rows corresponding to the bean whenever the bean is loaded. How the lock is placed is database-dependent. The lock is released when the transaction finishes (commit or rollback). While the lock is placed, other database users have read access to the bean.
Subelementsnone
Table 5-86 fetched-with SubelementsSubelement Required Description
level exactly one of these elements is required
Specifies the name of a hierarchical fetch group.
named-group Specifies the name of an independent fetch group.
none Specifies that this field or relationship is fetched by itself.
The sun-cmp-mappings.xml File
Chapter 5 Deployment Descriptor Files 231
lock-when-modifiedThis element is not implemented. Do not use.
Subelementsnone
named-groupSpecifies the name of an independent fetch group. All the fields and relationships that are part of a named group are fetched at the same time. A field can only belong to one fetch group, regardless of what type of fetch group is used. One is allowed.
Subelementsnone
noneSpecifies that this field or relationship is fetched by itself, with no other fields or relationships.
Subelementsnone
read-onlySpecifies that a field is read-only.
Subelementsnone
schemaSpecifies the file that contains a description of the database schema to which the beans in this sun-cmp-mappings.xml file are mapped. If this element is empty, the database schema file is automatically generated at deployment time. Otherwise, the schema element should name a .dbschema file with a pathname relative to the directory containing the sun-cmp-mappings.xml file, but without the .dbschema extension. For example:
<schema/> <!-- use automatic schema generation -->
<schema>CompanySchema</schema> <!-- use "CompanySchema.dbschema" -->
See “Capturing the Database Schema Automatically” on page 316.

The sun-cmp-mappings.xml File
232 Application Server 8 • Developer’s Guide
Subelementsnone
secondary-tableSpecifies a bean’s secondary table(s).
SubelementsThe following table describes subelements for the secondary-table element.
sun-cmp-mappingSpecifies beans mapped to a particular database schema.
SubelementsThe following table describes subelements for the sun-cmp-mapping element.
Table 5-87 secondary table SubelementsSubelement Required Description
table-name only one Specifies the name of a database table.
column-pair one or more Specifies the pair of columns that determine the relationship between two database tables.
NOTE A bean cannot be related to a bean that maps to a different database schema, even if the beans are deployed in the same EJB JAR file.
Table 5-88 sun-cmp-mapping SubelementsSubelement Required Description
schema only one Specifies the file that contains a description of the database schema.
entity-mapping one or more Specifies the mapping of a bean to database columns.

The sun-cmp-mappings.xml File
Chapter 5 Deployment Descriptor Files 233
sun-cmp-mappingsSpecifies the set of sun-cmp-mapping elements for all the beans that are mapped in an EJB JAR collection.
SubelementsThe following table describes subelements for the sun-cmp-mappings element.
table-nameSpecifies the name of a database table. The table must be present in the database schema file. See “Capturing the Database Schema Automatically” on page 316.
Subelementsnone
Sample Database Schema Definitioncreate table TEAMEJB (
TEAMID varchar2(256) not null, NAME varchar2(120) null, CITY char(30) not null, LEAGUEEJB_LEAGUEID varchar2(256) null, constraint PK_TEAMEJB primary key (TEAMID)
)
create table PLAYEREJB (POSITION varchar2(15) null, PLAYERID varchar2(256) not null, NAME char(64) null, SALARY number(10, 2) not null, constraint PK_PLAYEREJB primary key (PLAYERID)
)
Table 5-89 sun-cmp-mappings SubelementsSubelement Required Description
sun-cmp-mapping one or more Specifies beans mapped to a particular database schema.

The sun-cmp-mappings.xml File
234 Application Server 8 • Developer’s Guide
create table LEAGUEEJB (LEAGUEID varchar2(256) not null, NAME varchar2(256) null, SPORT varchar2(256) null, constraint PK_LEAGUEEJB primary key (LEAGUEID)
)
create table PLAYEREJBTEAMEJB (PLAYEREJB_PLAYERID varchar2(256) null, TEAMEJB_TEAMID varchar2(256) null
)
alter table TEAMEJBadd constraint FK_LEAGUE foreign key (LEAGUEEJB_LEAGUEID)references LEAGUEEJB (LEAGUEID)
alter table PLAYEREJBTEAMEJBadd constraint FK_TEAMS foreign key (PLAYEREJB_PLAYERID)references PLAYEREJB (PLAYERID)
alter table PLAYEREJBTEAMEJBadd constraint FK_PLAYERS foreign key (TEAMEJB_TEAMID)references TEAMEJB (TEAMID)
Sample sun-cmp-mappings.xml FileThe following mapping would be in a deployable EJB JAR file’s META-INF/sun-cmp-mappings.xml file:
<?xml version="1.0" encoding="UTF-8"?><sun-cmp-mappings>
<sun-cmp-mapping><schema>Roster</schema><entity-mapping>
<ejb-name>TeamEJB</ejb-name><table-name>TEAMEJB</table-name><cmp-field-mapping>
<field-name>teamId</field-name><column-name>TEAMEJB.TEAMID</column-name>
</cmp-field-mapping><cmp-field-mapping>
<field-name>name</field-name><column-name>TEAMEJB.NAME9</column-name>
</cmp-field-mapping><cmp-field-mapping>
<field-name>city</field-name>

The sun-cmp-mappings.xml File
Chapter 5 Deployment Descriptor Files 235
<column-name>TEAMEJB.CITY</column-name></cmp-field-mapping><cmr-field-mapping>
<cmr-field-name>league</cmr-field-name><column-pair>
<column-name>TEAMEJB.LEAGUEEJB_LEAGUEID</column-name><column-name>LEAGUEEJB.LEAGUEID</column-name>
</column-pair><fetched-with>
<none/></fetched-with>
</cmr-field-mapping><cmr-field-mapping>
<cmr-field-name>players</cmr-field-name><column-pair>
<column-name>TEAMEJB.TEAMID</column-name><column-name>PLAYEREJBTEAMEJB.TEAMEJB_TEAMID</column-name>
</column-pair><column-pair>
<column-name>PLAYEREJBTEAMEJB.PLAYEREJB_PLAYERID</column-name><column-name>PLAYEREJB.PLAYERID</column-name>
</column-pair><fetched-with>
<none/></fetched-with>
</cmr-field-mapping></entity-mapping><entity-mapping>
<ejb-name>PlayerEJB</ejb-name><table-name>PLAYEREJB</table-name><cmp-field-mapping>
<field-name>position</field-name><column-name>PLAYEREJB.POSITION9</column-name>
</cmp-field-mapping><cmp-field-mapping>
<field-name>playerId</field-name><column-name>PLAYEREJB.PLAYERID</column-name>
</cmp-field-mapping><cmp-field-mapping>
<field-name>name</field-name><column-name>PLAYEREJB.NAME9</column-name>
</cmp-field-mapping><cmp-field-mapping>
<field-name>salary</field-name><column-name>PLAYEREJB.SALARY</column-name>

The sun-cmp-mappings.xml File
236 Application Server 8 • Developer’s Guide
</cmp-field-mapping><cmr-field-mapping>
<cmr-field-name>teams</cmr-field-name><column-pair>
<column-name>PLAYEREJB.PLAYERID</column-name><column-name>PLAYEREJBTEAMEJB.PLAYEREJB_PLAYERID</column-name>
</column-pair><column-pair>
<column-name>PLAYEREJBTEAMEJB.TEAMEJB_TEAMID</column-name><column-name>TEAMEJB.TEAMID</column-name>
</column-pair><fetched-with>
<none/></fetched-with>
</cmr-field-mapping></entity-mapping><entity-mapping>
<ejb-name>LeagueEJB</ejb-name><table-name>LEAGUEEJB</table-name><cmp-field-mapping>
<field-name>leagueId</field-name><column-name>LEAGUEEJB.LEAGUEID</column-name>
</cmp-field-mapping><cmp-field-mapping>
<field-name>name</field-name><column-name>LEAGUEEJB.NAME9</column-name>
</cmp-field-mapping><cmp-field-mapping>
<field-name>sport</field-name><column-name>LEAGUEEJB.SPORT</column-name>
</cmp-field-mapping><cmr-field-mapping>
<cmr-field-name>teams</cmr-field-name><column-pair>
<column-name>LEAGUEEJB.LEAGUEID</column-name><column-name>TEAMEJB.LEAGUEEJB_LEAGUEID</column-name>
</column-pair><fetched-with>
<none/></fetched-with>
</cmr-field-mapping></entity-mapping>
</sun-cmp-mapping></sun-cmp-mappings>

The sun-application-client.xml file
Chapter 5 Deployment Descriptor Files 237
The sun-application-client.xml fileThis section describes the XML elements in the sun-application-client.xml file in the following sections:
• sun-application-client
• resource-ref
• res-ref-name
• default-resource-principal
• name
• password
• ejb-ref
• ejb-ref-name
• resource-env-ref
• resource-env-ref-name
• message-destination
• message-destination-name
• jndi-name
• Web Service Elements (service-ref and subelements only)
sun-application-clientThis is the root element describing all the runtime bindings of a single application client.
SubelementsThe following table describes subelements for the sun-application-client element.
Table 5-90 sun-application-client subelements Element Required Description
ejb-ref zero or more Maps the absolute JNDI name to the ejb-ref in the corresponding J2EE XML file.
resource-ref zero or more Maps the absolute JNDI name to the resource-ref in the corresponding J2EE XML file.

The sun-application-client.xml file
238 Application Server 8 • Developer’s Guide
resource-refMaps the absolute JNDI name to the resource-ref element in the corresponding J2EE XML file.
SubelementsThe following table describes subelements for the resource-ref element.
res-ref-name Specifies the res-ref-name in the corresponding J2EE application-client.xml file resource-ref entry.
Subelementsnone
resource-env-ref zero or more Maps the absolute JNDI name to the resource-env-ref in the corresponding J2EE XML file.
service-ref zero or more Specifies runtime settings for a web service reference.
message-destination zero or more Specifies the name of a logical message destination.
Table 5-91 resource-ref subelements Element Required Description
res-ref-name only one Specifies the res-ref-name in the corresponding J2EE application-client.xml file.
jndi-name only one Specifies the absolute jndi name of a resource.
default-resource-principal
zero or more Specifies the default principal (user) that the container uses to access a resource.
Table 5-90 sun-application-client subelements (Continued)Element Required Description

The sun-application-client.xml file
Chapter 5 Deployment Descriptor Files 239
default-resource-principalSpecifies the default principal (user) that the container uses to access a resource.
If this element is used in conjunction with a JMS Connection Factory resource, the name and password subelements must be valid entries in Sun Java System Message Queue’s broker user repository. See the “Security Management” chapter in the Sun Java System Message Queue Administrator’s Guide for details.
SubelementsThe following table describes subelements for the default-resource-principal element.
nameContains data that specifies the name of the entity.
Subelementsnone
passwordContains data that specifies the password for the principal.
Subelementsnone
ejb-refMaps the ejb-ref-name in the corresponding J2EE application-client.xml file ejb-ref entry to the absolute jndi-name of a bean.
SubelementsThe following table describes subelements for the ejb-ref element.
Table 5-92 default-resource-principal subelements Element Required Description
name only one Specifies the name of the principal.
password only one Specifies the password for the principal.

The sun-application-client.xml file
240 Application Server 8 • Developer’s Guide
ejb-ref-nameContains data that specifies the ejb-ref-name in the corresponding J2EE application-client.xml file ejb-ref entry. This element locates the name of the EJB reference in the application.
Subelementsnone
resource-env-refSpecifies the name of a resource env reference.
SubelementsThe following table describes subelements for the resource-env-ref element.
resource-env-ref-name Contains data that specifies the res-ref-name in the corresponding J2EE application-client.xml file resource-env-ref entry.
Subelementsnone
Table 5-93 ejb-ref subelements Element Required Description
ejb-ref-name only one Specifies the name of a ejb reference in the corresponding J2EE application-client.xml file.
jndi-name only one Specifies the absolute JNDI name of a bean.
Table 5-94 resource-env-ref subelements Element Required Description
resource-env-ref-name only one Specifies the res-ref-name in the corresponding J2EE application-client.xml file resource-env-ref entry.
default-resource-principal only one Specifies the default principal (user) that the container uses to access a resource.
jndi-name only one Specifies the jndi-name of the associated entity.

The sun-acc.xml File
Chapter 5 Deployment Descriptor Files 241
message-destinationSpecifies the name of a logical message-destination defined within an application. The message-destination-name matches the corresponding message-destination-name in the application-client.xml file.
SubelementsThe following table describes subelements for the message-destination element.
message-destination-name Contains data that specifies the name of a logical message destination defined within the corresponding application-client.xml file.
Subelementsnone
jndi-nameContains data that specifies the absolute jndi-name of a URL resource or a resource in the application-client.xml file.
Subelementsnone
The sun-acc.xml FileThis section describes the XML elements in the sun-acc.xml file:
• client-container
• target-server
• description
Table 5-95 message-destination subelements Element Required Description
message-destination-name only one Specifies the name of a logical message destination defined within the corresponding application-client.xml file.
jndi-name only one Specifies the jndi-name of the associated entity.

The sun-acc.xml File
242 Application Server 8 • Developer’s Guide
• client-credential
• log-service
• security
• ssl
• cert-db
• auth-realm
• property
client-containerDefines Sun Java System Application Server specific configuration for the ACC. This is the root element; there can only be one client-container element in a sun-acc.xml file.
SubelementsThe following table describes subelements for the client-container element.
AttributesThe following table describes attributes for the client-container element.
Table 5-96 client-container subelements Element Required Description
target-server only one Specifies the IIOP listener configuration of the target server.
auth-realm zero or one Specifies the optional configuration for JAAS authentication realm.
client-credential zero or one Specifies the default client credential that will be sent to the server.
log-service zero or one Specifies the default log file and the severity level of the message.
property zero or more Specifies a property which has a name and a value.

The sun-acc.xml File
Chapter 5 Deployment Descriptor Files 243
target-serverDefines the IIOP listener configuration of the target server.
SubelementsThe following table describes subelements for the target-server element.
AttributesThe following table describes attributes for the target-server element.
Table 5-97 client-container attributes Attribute Default Description
send-password true If true, specifies that client authentication credentials should be sent to the server. Without authentication credentials, all access to protected EJB components results in exceptions.
Table 5-98 target-server subelements Element Required Description
description zero or one Specifies the description of the target server.
security zero or one Specifies the security configuration for the IIOP/SSL communication with the target server.
Table 5-99 target-server attributes Attribute Default Description
name none Specifies the name of the application server instance accessed by the client container.
address none Specifies the host name or IP address (resolvable by DNS) of the server this client should attach to.
port none Specifies the naming service port number (orb.port in domain.xml) of the server this client should attach to.
For a new server instance, you need to assign a port number other than 3700. You can change the port number in the Administration Console. See the Sun Java System Application Server Administration Guide for more information.

The sun-acc.xml File
244 Application Server 8 • Developer’s Guide
descriptionContains data that specifies a text description of the containing element.
Subelementnone
Attributesnone
client-credentialDefault client credentials that are sent to the server. If this element is present, the credentials are automatically sent to the server, without prompting the user for the user name and password on the client side.
SubelementsThe following table describes subelements for the client-credential element.
AttributesThe following table describes attributes for the client-credential element.
Table 5-100 client-credential subelementElement Required Description
property zero or more Specifies a property, which has a name and a value.
Table 5-101 client-credential attributes Attribute Default Description
user-name none The user name used to authenticate the Application client container.
password none The password used to authenticate the Application client container.
realm the default realm for the domain
(optional) The realm (specified by name) where credentials are to be resolved.

The sun-acc.xml File
Chapter 5 Deployment Descriptor Files 245
log-serviceSpecifies configuration settings for the log file.
SubelementsThe following table describes subelements for the log-service element.
AttributesThe following table describes attributes for the log-service element.
securityDefines SSL security configuration for IIOP/SSL communication with the target server.
SubelementsThe following table describes subelements for the security element.
Table 5-102 log-service subelement Element Required Description
property zero or more Specifies a property, which has a name and a value.
Table 5-103 log-service attributes Attribute Default Description
log-file your_ACC_dir/logs/client.log (optional) Specifies the file where the application client container logging information is stored.
level SEVERE (optional) Sets the base level of severity. Messages at or above this setting get logged to the log file.
Table 5-104 security subelement Element Required Description
ssl only one Specifies the SSL processing parameters.
cert-db only one Specifies the location and authentication to read the certification database.

The sun-acc.xml File
246 Application Server 8 • Developer’s Guide
Attributesnone
sslDefines SSL processing parameters.
Subelementsnone
AttributesThe following table describes attributes for the SSL element.
Table 5-105 ssl attributes
Attribute Default Description
cert-nickname none (optional) The nickname of the server certificate in the certificate database or the PKCS#11 token.In the certificate, the name format is tokenname:nickname. Including the tokenname: part of the name in this attribute is optional.
ssl2-enabled false (optional) Determines whether SSL2 is enabled.
ssl2-ciphers none (optional) A space-separated list of the SSL2 ciphers used with the prefix + to enable or - to disable. For example, +rc4. Allowed values are rc4, rc4export, rc2, rc2export, idea, des, desede3.
ssl3-enabled true (optional) Determines whether SSL3 is enabled.
ssl3-tls-ciphers none (optional) A space-separated list of the SSL3 ciphers used, with the prefix + to enable or - to disable, for example +rsa_des_sha. Allowed SSL3 values are rsa_rc4_128_md5, , rsa_des_sha, rsa_rc4_40_md5, rsa_rc2_40_md5, rsa_null_md5. Allowed TLS values are rsa_des_56_sha, rsa_rc4_56_sha.
tls-enabled true (optional) Determines whether TLS is enabled.
tls-rollback-enabled true (optional) Determines whether TLS rollback is enabled.TLS rollback should be enabled for MicroSoft Internet Explorer 5.0 and 5.5.

The sun-acc.xml File
Chapter 5 Deployment Descriptor Files 247
If both SSL2 and SSL3 are enabled, the server tries SSL3 encryption first. If that fails, the server tries SSL2 encryption. If both SSL2 and SSL3 are enabled for a virtual server, the server tries SSL3 encryption first. If that fails, the server tries SSL2 encryption.
cert-dbLocation and password to read the certificate database. Sun Java System Application Server provides utilities with which a certificate database can be created. certutil, distributed as part of NSS can also be used to create certificate database.
Subelement none
AttributesThe following table describes attributes for the cert-db element.
auth-realmJAAS is available on the ACC. Defines the optional configuration for JAAS authentication realm.
Authentication realms require provider-specific properties, which vary depending on what a particular implementation needs.
For more information about how to define realms, see “Realm Configuration” on page 44.
Here is an example of the default file realm:
<auth-realm name="file" classname="com.sun.enterprise.security.auth.realm.file.FileRealm">
<property name="file" value="domain_dir/config/keyfile"/> <property name="jaas-context" value="fileRealm"/>
</auth-realm>
Which properties an auth-realm element uses depends on the value of the auth-realm element’s name attribute. The file realm uses file and jaas-context properties. Other realms use different properties.
Table 5-106 cert-db attributes Attribute Default Description
path none Specifies the absolute path of the certificate database (cert7.db).
password none Specifies the password to access the certificate database.

The sun-acc.xml File
248 Application Server 8 • Developer’s Guide
SubelementsThe following table describes subelements for the auth-realm element.
AttributesThe following table describes attributes for the auth-realm element.
propertySpecifies a property, which has a name and a value.
Subelementnone
AttributesThe following table describes attributes for the property element.
Table 5-107 auth-realm subelement Element Required Description
property zero or more Specifies a property, which has a name and a value.
Table 5-108 auth-realm attributes Attribute Default Description
name none Defines the name of this realm.
classname none Defines the Java class which implements this realm.
Table 5-109 property attributes Attribute Default Description
name none Specifies the name of the property.
value none Specifies the value of the property.

Web Service Elements
Chapter 5 Deployment Descriptor Files 249
Web Service ElementsThe optional web service elements described here apply to the sun-web.xml and sun-ejb-jar.xml files. The service-ref element and its subelements also apply to the sun-application-client.xml file. Web service elements are as follows:
• webservice-description
• webservice-description-name
• wsdl-publish-location
• service-ref
• service-ref-name
• port-info
• service-endpoint-interface
• wsdl-port
• namespaceURI
• localpart
• stub-property
• call-property
• name
• value
• wsdl-override
• service-impl-class
• service-qname
• webservice-endpoint
• port-component-name
• endpoint-address-uri
• login-config
• auth-method
• transport-guarantee
• tie-class

Web Service Elements
250 Application Server 8 • Developer’s Guide
• servlet-impl-class
webservice-descriptionSpecifies a name and optional publish location for a web service.
SubelementsThe following table describes subelements for the webservice-description element.
webservice-description-nameContains data that specifies a unique name for the web service within a web or EJB module.
Subelementsnone
wsdl-publish-locationSpecifies the URL of a directory to which a web service’s WSDL should be published during deployment. Any required files are published to this directory, preserving their location relative to the module-specific WSDL directory (META-INF/wsdl or WEB-INF/wsdl). For example, suppose you have an ejb.jar file whose webservices.xml file’s wsdl-file element contains the following reference:
META-INF/wsdl/a/Foo.wsdl
Suppose your sun-ejb-jar file contains the following element:
<wsdl-publish-location>file:/home/user1/publish</wsdl-publish-location>
The final WSDL is stored in /home/user1/publish/a/Foo.wsdl.
Subelementsnone
Table 5-110 webservice-description subelements Element Required Description
webservice-description-name only one Specifies a unique name for the web service within a web or EJB module.
wsdl-publish-location zero or one Specifies the URL of a directory to which a web service’s WSDL should be published during deployment.

Web Service Elements
Chapter 5 Deployment Descriptor Files 251
service-refSpecifies runtime settings for a web service reference. Runtime information is only needed in the following cases:
• To define the port used to resolve a container-managed port
• To define the default Stub/Call property settings for Stub objects
• To define the URL of a final WSDL document to be used instead of the one associated with the service-ref in the standard J2EE deployment descriptor
SubelementsThe following table describes subelements for the service-ref element.
service-ref-nameContains data that specifies the web service reference name relative to java:comp/env.
Subelementsnone
Table 5-111 service-ref subelements Element Required Description
service-ref-name only one Specifies the web service reference name relative to java:comp/env.
port-info zero or more Specifies information for a port within a web service reference.
call-property zero or more Specifies JAX-RPC property values that should be set on a javax.xml.rpc.Call object before it is returned to the web service client.
wsdl-override zero or one Specifies a valid URL pointing to a final WSDL document.
service-impl-class zero or one Specifies the name of the generated service implementation class.
service-qname zero or one Specifies the WSDL service element that is being referred to.

Web Service Elements
252 Application Server 8 • Developer’s Guide
port-infoSpecifies information for a port within a web service reference.
Either a service-endpoint-interface or a wsdl-port or both should be specified. If both are specified, wsdl-port specifies the port that the container should choose for container-managed port selection.
The same wsdl-port value must not appear in more than one port-info element within the same service-ref.
If a service-endpoint-interface is using container-managed port selection, its value must not appear in more than one port-info element within the same service-ref.
SubelementsThe following table describes subelements for the port-info element.
service-endpoint-interfaceContains data that specifies the web service reference name relative to java:comp/env.
Subelementsnone
wsdl-portSpecifies the WSDL port.
SubelementsThe following table describes subelements for the wsdl-port element.
Table 5-112 port-info subelements Element Required Description
service-endpoint-interface zero or one Specifies the web service reference name relative to java:comp/env.
wsdl-port zero or one Specifies the WSDL port.
stub-property zero or more Specifies JAX-RPC property values that should be set on a javax.xml.rpc.Stub object before it is returned to the web service client.
call-property zero or more Specifies JAX-RPC property values that should be set on a javax.xml.rpc.Call object before it is returned to the web service client.

Web Service Elements
Chapter 5 Deployment Descriptor Files 253
namespaceURIContains data that specifies the namespace URI.
Subelementsnone
localpartContains data that specifies the local part of a QNAME.
Subelementsnone
stub-propertySpecifies JAX-RPC property values that should be set on a javax.xml.rpc.Stub object before it is returned to the web service client. The property names can be any properties supported by the JAX-RPC Stub implementation.
SubelementsThe following table describes subelements for the stub-property element.
Table 5-113 wsdl-port subelements Element Required Description
namespaceURI only one Specifies the namespace URI.
localpart only one Specifies the local part of a QNAME.
Table 5-114 stub-property subelements Element Required Description
name only one Specifies the name of the entity.
value only one Specifies the value of the entity.

Web Service Elements
254 Application Server 8 • Developer’s Guide
Example<service-ref>
<service-ref-name>service/FooProxy</service-ref-name><port-info>
<service-endpoint-interface>a.FooPort</service-endpoint-interface><wsdl-port>
<namespaceURI>urn:Foo</namespaceURI><localpart>FooPort</localpart>
</wsdl-port><stub-property>
<name>javax.xml.rpc.service.endpoint.address</name><value>http://localhost:8080/a/Foo</value>
</stub-property></port-info>
</service-ref>
call-propertySpecifies JAX-RPC property values that should be set on a javax.xml.rpc.Call object before it is returned to the web service client. The property names can be any properties supported by the JAX-RPC Call implementation.
SubelementsThe following table describes subelements for the call-property element.
nameContains data that specifies the name of the entity.
Subelementsnone
Table 5-115 call-property subelements Element Required Description
name only one Specifies the name of the entity.
value only one Specifies the value of the entity.

Web Service Elements
Chapter 5 Deployment Descriptor Files 255
valueContains data that specifies the value of the entity.
Subelementsnone
wsdl-overrideContains data that specifies a valid URL pointing to a final WSDL document. If not specified, the WSDL document associated with the service-ref in the standard J2EE deployment descriptor is used.
Subelementsnone
Example// available via HTTP<wsdl-override>http://localhost:8000/myservice/myport?WSDL</wsdl-override>
// in a file<wsdl-override>file:/home/user1/myfinalwsdl.wsdl</wsdl-override>
service-impl-classContains data that specifies the name of the generated service implementation class.
Subelementsnone
service-qnameSpecifies the WSDL service element that is being referred to.
SubelementsThe following table describes subelements for the service-qname element.
Table 5-116 service-qname subelements Element Required Description
namespaceURI only one Specifies the namespace URI.
localpart only one Specifies the local part of a QNAME.

Web Service Elements
256 Application Server 8 • Developer’s Guide
webservice-endpointSpecifies information about a web service endpoint.
SubelementsThe following table describes subelements for the webservice-endpoint element.
port-component-nameContains data that specifies a unique name for a port component within a web or EJB module.
Subelementsnone
Table 5-117 webservice-endpoint subelements Element Required Description
port-component-name only one Specifies a unique name for a port component within a web or EJB module.
endpoint-address-uri zero or one Specifies the automatically generated endpoint address.
login-config zero or one Specifies the authentication configuration for an EJB web service endpoint.
transport-guarantee zero or one Specifies that the communication between client and server should be NONE, INTEGRAL, or CONFIDENTIAL.
service-qname zero or one Specifies the WSDL service element that is being referred to.
tie-class zero or one Specifies the automatically generated name of a tie implementation class for a port component.
servlet-impl-class zero or one Specifies the automatically generated name of the generated servlet implementation class.

Web Service Elements
Chapter 5 Deployment Descriptor Files 257
endpoint-address-uriContains data that specifies the relative path combined with the web server root to form the fully qualified endpoint address for a web service endpoint. This is a required element for EJB endpoints and an optional element for servlet endpoints.
For servlet endpoints, this value is relative to the web application context root. For EJB endpoints, the URI is relative to root of the web server (the first portion of the URI is a context root). The context root portion should not conflict with the context root of any web application deployed to the same web server.
In all cases, this value must be a fixed pattern (no ‘*’ allowed).
If the web service endpoint is a servlet that implements only a single endpoint and has only one url-pattern, it is not necessary to set this value, because the web container can derive it from the web.xml file.
Subelementsnone
ExampleIf the web server is listening at http://localhost:8080, the following endpoint-address-uri:
<endpoint-address-uri>StockQuoteService/StockQuotePort</endpoint-address-uri>
results in the following target endpoint address:
http://localhost:8080/StockQuoteService/StockQuotePort
login-configSpecifies the authentication configuration for an EJB web service endpoint. Not needed for servlet web service endpoints. A servlet’s security configuration is contained in the web.xml file.
SubelementsThe following table describes subelements for the login-config element.
Table 5-118 login-config subelements Element Required Description
auth-method only one Specifies the authentication mechanism.

Web Service Elements
258 Application Server 8 • Developer’s Guide
auth-methodContains data that specifies the authentication mechanism for the web service endpoint. As a prerequisite to gaining access to any web resources protected by an authorization constraint, a user must have authenticated using the configured mechanism.
Subelementsnone
transport-guaranteeContains data specifying that the communication between client and server should be NONE, INTEGRAL, or CONFIDENTIAL.
• NONE means the application does not require any transport guarantees.
• INTEGRAL means the application requires that the data sent between client and server be sent in such a way that it can’t be changed in transit.
• CONFIDENTIAL means the application requires that the data be transmitted in a fashion that prevents other entities from observing the contents of the transmission.
In most cases, a value of INTEGRAL or CONFIDENTIAL indicates that the use of SSL is required.
Subelementsnone
tie-classContains data that specifies the automatically generated name of a tie implementation class for a port component.
Subelementsnone
servlet-impl-classContains data that specifies the automatically generated name of the servlet implementation class.
Subelementsnone

Part II
Developing Application Components
Chapter 6, “Developing Web Applications”
Chapter 7, “Using Enterprise JavaBeans Technology”
Chapter 8, “Using Container-Managed Persistence for Entity Beans”
Chapter 9, “Developing Java Clients”
Chapter 10, “Developing Lifecycle Listeners”


261
Chapter 6
Developing Web Applications
This chapter describes how web applications are supported in Sun Java System Application Server 8 and includes the following sections:
• Introducing Web Applications
• Using Servlets
• Using JavaServer Pages
• Creating and Managing User Sessions
For general information about web applications, see the J2EE tutorial:
http://java.sun.com/j2ee/1.4/docs/tutorial/doc/WebApp.html#wp76431
Introducing Web ApplicationsThis section includes summaries of the following topics:
• Internationalization Issues
• Virtual Servers
• Default Web Modules
• Configuring Logging in the Web Container

Introducing Web Applications
262 Application Server 8 • Developer’s Guide
Internationalization Issues This section covers internationalization as it applies to the following:
• The Server
• Servlets
The ServerTo set the default locale of the entire Sun Java System Application Server, which determines the locale of the Administration Console, the logs, and so on, do one of the following:
• Use the Administration Console:
a. Login to the Administration Console by going to the following URL in your web browser:
http://host:port/asadmin
For example:
http://localhost:4848/asadmin
b. Go to the Application Server page.
c. Click on the Advanced tab.
d. Type a value in the Locale field.
e. Select Save.
• Set the locale attribute of the domain element in the domain.xml file, then restart the server. For more information about this file, see the Sun Java System Application Server Reference.
ServletsThis section explains how the Sun Java System Application Server determines the character encoding for the servlet request and the servlet response.
For encodings you can use, see:
http://java.sun.com/j2se/1.4/docs/guide/intl/encoding.doc.html

Introducing Web Applications
Chapter 6 Developing Web Applications 263
Servlet RequestWhen processing a servlet request, the server uses the following order of precedence, first to last, to determine the request character encoding:
• The setCharacterEncoding() method.
• A hidden field in the form, specified by the form-hint-field attribute of the parameter-encoding element in the sun-web.xml file.
• The character encoding set in the default-charset attribute of the parameter-encoding element in the sun-web.xml file.
• The default, which is ISO-8859-1.
For more information about the parameter-encoding element, see “parameter-encoding” on page 183.
Servlet ResponseWhen processing a servlet response, the server uses the following order of precedence, first to last, to determine the response character encoding:
• The setCharacterEncoding() or setContentType() method.
• The setLocale() method.
• The default, which is ISO-8859-1.
Virtual ServersA virtual server, also called a virtual host, is a virtual web server that serves content targeted for a specific URL. Multiple virtual servers may serve content using the same or different host names, port numbers, or IP addresses. The HTTP service can direct incoming web requests to different virtual servers based on the URL.
When you first install Sun Java System Application Server, a default virtual server is created. (You can also assign a default virtual server to each new HTTP listener you create. For details, see the Sun Java System Application Server Administration Guide.)
Web applications and J2EE applications containing web components can be assigned to virtual servers. You can assign virtual servers in either of these ways:
• Using the Administration Console
• Editing the domain.xml File

Introducing Web Applications
264 Application Server 8 • Developer’s Guide
Using the Administration ConsoleTo use the Administration Console to assign virtual servers:
1. Deploy the application or web module and assign the desired virtual server to it as described in “Tools for Deployment” on page 106.
2. Login to the Administration Console by going to the following URL in your web browser:
http://host:port/asadmin
For example:
http://localhost:4848/asadmin
3. Open the HTTP Service component.
4. Open the Virtual Servers component under the HTTP Service component.
5. Select the virtual server to which you want to assign a default web module.
6. Select the application or web module from the Default Web Module drop-down list.
7. Select the Save button.
For more information, see “Default Web Modules” on page 265.
Editing the domain.xml FileWhen a web module is deployed as part of an application, a j2ee-application element is created for it in domain.xml during deployment. When a web module is deployed as an individual module, a web-module element is created for it in domain.xml during deployment. The j2ee-application and web-module elements both have a virtual-servers attribute, which specifies a list of virtual server IDs. The virtual-servers attribute is empty by default, which means that the web application is assigned to all virtual servers.
Each virtual-server element in domain.xml has a default-web-module attribute, which allows you to configure a default web module for each virtual server. A default web module for the default virtual server is provided at installation. For more information, see “Default Web Modules” on page 265.
For more information about domain.xml and virtual servers, see the Sun Java System Application Server Reference.

Using Servlets
Chapter 6 Developing Web Applications 265
Default Web ModulesYou can assign a default web module to the default virtual server and to each new virtual server you create. For details, see “Virtual Servers” on page 263. To access the default web module for a virtual server, point your browser to the URL for the virtual server, but do not supply a context root. For example:
http://myvserver:3184/
A virtual server with no default web module assigned serves HTML or JSP content from its document root, which is usually domain_dir/docroot. To access this HTML or JSP content, point your browser to the URL for the virtual server, do not supply a context root, but specify the target file.
For example:
http://myvserver:3184/hellothere.jsp
Configuring Logging in the Web ContainerYou can configure logging in the web container for the entire server in these ways:
• By using the Administration Console; see the Sun Java System Application Server Administration Guide.
• By editing the domain.xml file; see the Sun Java System Application Server Reference.
Using ServletsSun Java System Application Server supports the Java Servlet Specification version 2.4.
To develop servlets, use Sun Microsystems’ Java Servlet API. For information about using the Java Servlet API, see the documentation provided by Sun Microsystems at:
http://java.sun.com/products/servlet/index.html
NOTE Servlet API version 2.4 is fully backward compatible with version 2.3, so all existing servlets will continue to work without modification or recompilation.

Using Servlets
266 Application Server 8 • Developer’s Guide
This section describes how to create effective servlets to control application interactions running on a Sun Java System Application Server, including standard servlets. In addition, this section describes the Sun Java System Application Server features to use to augment the standards.
This section contains the following topics:
• Handling Threading Issues
• Invoking a Servlet with a URL
• Servlet Output
• Caching Servlet Results
• About the Servlet Engine
Handling Threading IssuesBy default, servlets are not thread-safe. One way to make a servlet (or a block within a servlet) thread-safe is to use the javax.servlet.SingleThreadModel class to create a single-threaded servlet. When a single-threaded servlet is deployed to the Sun Java System Application Server, the servlet engine creates a servlet instance pool used for incoming requests (multiple copies of the same servlet in memory).
You can change the number of servlet instances in the pool by setting the singleThreadedServletPoolSize property of the sun-web-app element in the sun-web.xml file. For more information on sun-web.xml, see “The sun-web.xml File” on page 151.
A single-threaded servlet is slower under load because new requests must wait for a free servlet instance in order to proceed, but this is not a problem with distributed, load-balanced applications since the load automatically shifts to a less busy process.
Invoking a Servlet with a URLYou can call servlets deployed to the Sun Java System Application Server by using URLs embedded as links in an application’s HTML or JSP pages. The format of these URLs is as follows:
http://server:port/context_root/servlet_name?name=value
NOTE The javax.servlet.SingleThreadModel class is deprecated in the Servlet API version 2.4.

Using Servlets
Chapter 6 Developing Web Applications 267
The following table describes each URL section.
In this example, localhost is the host name, MortPages is the context root, and calcMortgage is the servlet name:
http://localhost:8080/MortPages/calcMortgage?rate=8.0&per=360&bal=180000
Servlet OutputServletContext.log messages are sent to the server log.
By default, the System.out and System.err output of servlets are sent to the server log, and during start-up server log messages are echoed to the System.err output. Also by default, there is no Windows-only console for the System.err output. You can change these defaults in these ways:
• Using the Administration Console
• Editing the domain.xml File
Table 6-1 URL Fields for Servlets Within an ApplicationURL element Description
server:port The IP address (or host name) and optional port number.
To access the default web module for a virtual server, specify only this URL section. You do not need to specify the context_root or servlet_name unless you also wish to specify name-value parameters.
context_root For an application, the context root is defined in the context-root element of the application.xml or sun-application.xml file. For an individually deployed web module, you specify the context root during deployment.
servlet_name The servlet-name (or servlet-mapping if defined) as configured in the web.xml file.
?name=value... Optional servlet name-value parameters.

Using Servlets
268 Application Server 8 • Developer’s Guide
Using the Administration ConsoleUse the Administration Console as follows:
1. Login to the Administration Console by going to the following URL in your web browser:
http://host:port/asadmin
For example:
http://localhost:4848/asadmin
2. Select the Application Server page.
3. Click on the Logging tab.
4. Check or uncheck these boxes:
❍ Log Messages to Standard Error - If checked, System.err output is sent to the server log.
❍ Write to System Log - If checked, System.out output is sent to the server log.
5. Select Save.
For more information, see the Sun Java System Application Server Administration Guide.
Editing the domain.xml FileEdit the domain.xml file, entering the desired true or false values, then restart the server:
<log-service use-system-logging=true log-to-console=true />
For more information about domain.xml, see the Sun Java System Application Server Reference.
Caching Servlet ResultsThe Sun Java System Application Server can cache the results of invoking a servlet, a JSP, or any URL pattern to make subsequent invocations of the same servlet, JSP, or URL pattern faster. The Sun Java System Application Server caches the request results for a specific amount of time. In this way, if another data call occurs, the Sun Java System Application Server can return the cached data instead of performing the operation again. For example, if your servlet returns a stock quote that updates every 5 minutes, you set the cache to expire after 300 seconds.

Using Servlets
Chapter 6 Developing Web Applications 269
Whether to cache results and how to cache them depends on the data involved. For example, it makes no sense to cache the results of a quiz submission, because the input to the servlet is different each time. However, you could cache a high level report showing demographic data taken from quiz results that is updated once an hour.
You can define how a Sun Java System Application Server web application handles response caching by editing specific fields in the sun-web.xml file. In this way, you can create portable servlets that still take advantage of this valuable Sun Java System Application Server feature.
For more information about JSP caching, see “JSP Caching” on page 276.
The rest of this section covers the following topics:
• Caching Features
• Default Cache Configuration
• Caching Example
• CacheHelper Interface
• CacheKeyGenerator Interface
Caching FeaturesSun Java System Application Server 8 has the following web application response caching capabilities:
• Caching is configurable based on the servlet name or the URI.
• When caching is based on the URI, this includes user specified parameters in the query string. For example, a response from /garden/catalog?category=roses is different from a response from /garden/catalog?category=lilies. These responses are stored under different keys in the cache.
• Cache size, entry timeout, and other caching behaviors are configurable.
• Entry timeout is measured from the time an entry is created or refreshed. You can override this timeout for an individual cache mapping by specifying the cache-mapping subelement timeout.
• You can determine caching criteria programmatically by writing a cache helper class. For example, if a servlet only knows when a back end data source was last modified, you can write a helper class to retrieve the last modified timestamp from the data source and decide whether to cache the response based on that timestamp. See “CacheHelper Interface” on page 271.

Using Servlets
270 Application Server 8 • Developer’s Guide
• You can determine cache key generation programmatically by writing a cache key generator class. See “CacheKeyGenerator Interface” on page 273.
• All non-ASCII request parameter values specified in cache key elements must be URL encoded. The caching subsystem attempts to match the raw parameter values in the request query string.
• Since newly updated classes impact what gets cached, the web container clears the cache during dynamic deployment or reloading of classes.
• The following HttpServletRequest request attributes are exposed:
❍ com.sun.appserv.web.cachedServletName, the cached servlet target
❍ com.sun.appserv.web.cachedURLPattern, the URL pattern being cached
Default Cache ConfigurationIf you enable caching but do not provide any special configuration for a servlet or JSP, the default cache configuration is as follows:
• The default cache timeout is 30 seconds.
• Only the HTTP GET method is eligible for caching.
• HTTP requests with cookies or sessions automatically disable caching.
• No special consideration is given to Pragma:, Cache-control:, or Vary: headers.
• The default key consists of the Servlet Path (minus pathInfo and the query string).
• A “least recently used” list is maintained to evict cache entries if the maximum cache size is exceeded.
• Key generation concatenates the servlet path with key field values, if any are specified.
Caching ExampleHere is an example cache element in the sun-web.xml file:
<cache max-capacity="8192" timeout="60"><cache-helper name="myHelper" class-name="MyCacheHelper"/><cache-mapping>
<servlet-name>myservlet</servlet name<timeout name="timefield">120</timeout><http-method>GET</http-method><http-method>POST</http-method>
</cache-mapping><cache-mapping>
<url-pattern> /catalog/* </url-pattern>

Using Servlets
Chapter 6 Developing Web Applications 271
<!-- cache the best selling category; cache the responses to -- this resource only when the given parameters exist. cache -- only when the catalog parameter has 'lilies' or 'roses' -- but no other catalog varieties:-- /orchard/catalog?best&category='lilies'-- /orchard/catalog?best&category='roses'-- but not the result of -- /orchard/catalog?best&category='wild'
--><constraint-field name='best' scope='request.parameter'/><constraint-field name='category' scope='request.parameter'>
<value> roses </value><value> lilies </value>
</constraint-field> <!-- Specify that a particular field is of given range but the -- field doesn't need to be present in all the requests -->
<constraint-field name='SKUnum' scope='request.parameter'><value match-expr='in-range'> 1000 - 2000 </value>
</constraint-field><!-- cache when the category matches with any value other than -- a specific value -->
<constraint-field name="category" scope="request.parameter><value match-expr="equals" cache-on-match-failure="true">bogus</value>
</constraint-field></cache-mapping><cache-mapping>
<servlet-name> InfoServlet </servlet name><cache-helper-ref>myHelper</cache-helper-ref>
</cache-mapping></cache>
For more information about the sun-web.xml caching settings, see “Caching Elements” on page 168.
CacheHelper InterfaceHere is the CacheHelper interface:
package com.sun.appserv.web.cache;
import java.util.Map
import javax.servlet.ServletContext;import javax.servlet.http.HttpServletRequest;
/** CacheHelper interface is an user-extensible interface to customize:

Using Servlets
272 Application Server 8 • Developer’s Guide
* a) the key generation b) whether to cache the response.*/public interface CacheHelper {
// name of request attributespublic static final String ATTR_CACHE_MAPPED_SERVLET_NAME =
"com.sun.appserv.web.cachedServletName";public static final String ATTR_CACHE_MAPPED_URL_PATTERN =
"com.sun.appserv.web.cachedURLPattern";
public static final int TIMEOUT_VALUE_NOT_SET = -2;
/** initialize the helper * @param context the web application context this helper belongs to * @exception Exception if a startup error occurs*/public void init(ServletContext context, Map props) throws Exception;
/** getCacheKey: generate the key to be used to cache this request * @param request incoming <code>HttpServletRequest</code> object* @returns the generated key for this requested cacheable resource.*/public String getCacheKey(HttpServletRequest request);
/** isCacheable: is the response to given request cachebale? * @param request incoming <code>HttpServletRequest</code> object* @returns <code>true</code> if the response could be cached. or * <code>false</code> if the results of this request must not be cached.*/public boolean isCacheable(HttpServletRequest request);
/** isRefreshNeeded: is the response to given request be refreshed?* @param request incoming <code>HttpServletRequest</code> object* @returns <code>true</code> if the response needs to be refreshed.* or return <code>false</code> if the results of this request * don't need to be refreshed.*/public boolean isRefreshNeeded(HttpServletRequest request);
/** get timeout for the cached response.* @param request incoming <code>HttpServletRequest</code> object* @returns the timeout in seconds for the cached response; a return* value of -1 means the response never expires and a value of -2 indicates* helper cannot determine the timeout (container assigns default timeout)*/

Using Servlets
Chapter 6 Developing Web Applications 273
public int getTimeout(HttpServletRequest request);
/*** Stop the helper from active use* @exception Exception if an error occurs*/public void destroy() throws Exception;
}
CacheKeyGenerator InterfaceThe built-in default CacheHelper implementation allows web applications to customize the key generation. An application component (in a servlet or JSP) can set up a custom CacheKeyGenerator implementation as an attribute in the ServletContext.
The name of the context attribute is configurable as the value of the cacheKeyGeneratorAttrName property in the default-helper element of the sun-web.xml deployment descriptor. For more information, see “default-helper” on page 171.
Here is the CacheKeyGenerator interface:
package com.sun.appserv.web.cache;
import javax.servlet.ServletContext; import javax.servlet.http.HttpServletRequest;
/** CacheKeyGenerator: a helper interface to generate the key that * is used to cache this request. * * Name of the ServletContext attribute implementing the * CacheKeyGenerator is configurable via a property of the * default-helper in sun-web.xml: * <default-helper> * <property * name="cacheKeyGeneratorAttrName" * value="com.acme.web.MyCacheKeyGenerator" /> * </default-helper> * * Caching engine looks up the specified attribute in the servlet * context; the result of the lookup must be an implementation of the * CacheKeyGenerator interface. */
public interface CacheKeyGenerator {

Using Servlets
274 Application Server 8 • Developer’s Guide
/** getCacheKey: generate the key to be used to cache the * response. * @param context the web application context * @param request incoming <code>HttpServletRequest</code> * @returns key string used to access the cache entry. * if the return value is null, a default key is used. */ public String getCacheKey(ServletContext context,
HttpServletRequest request); }
About the Servlet Engine Servlets exist in and are managed by the servlet engine in the Sun Java System Application Server. The servlet engine is an internal object that handles all servlet meta functions. These functions include instantiation, initialization, destruction, access from other components, and configuration management. This section covers the following topics:
• Instantiating and Removing Servlets
• Request Handling
• Allocating Servlet Engine Resources
Instantiating and Removing Servlets After the servlet engine instantiates the servlet, the servlet engine runs its init() method to perform any necessary initialization. Override this method to perform an initialization function for the servlet’s life, such as initializing a counter.
When a servlet is removed from service, the servlet engine calls the destroy() method in the servlet so that the servlet can perform any final tasks and deallocate resources. Override this method to write log messages or clean up any lingering connections that won’t be caught in garbage collection.
Request Handling When a request is made, the Sun Java System Application Server hands the incoming data to the servlet engine. The servlet engine processes the request’s input data, such as form data, cookies, session information, and URL name-value pairs, into an HttpServletRequest request object type.
The servlet engine also creates an HttpServletResponse response object type. The engine then passes both as parameters to the servlet’s service() method.

Using JavaServer Pages
Chapter 6 Developing Web Applications 275
In an HTTP servlet, the default service() method routes requests to another method based on the HTTP transfer method: POST, GET, DELETE, HEAD, OPTIONS, PUT, or TRACE. For example, HTTP POST requests are sent to the doPost() method, HTTP GET requests are sent to the doGet() method, and so on. This enables the servlet to process request data differently, depending on which transfer method is used. Since the routing takes place in the service method, you generally do not override service() in an HTTP servlet. Instead, override doGet(), doPost(), and so on, depending on the request type you expect.
To perform the tasks to answer a request, override the service() method for generic servlets, and the doGet() or doPost() methods for HTTP servlets. Very often, this means accessing EJB components to perform business transactions, collating the information in the request object or in a JDBC ResultSet object, and then passing the newly generated content to a JSP for formatting and delivery back to the user.
Allocating Servlet Engine Resources By default, the servlet engine creates a thread for each new request. This is less resource intensive than instantiating a new servlet copy in memory for each request. Avoid threading issues, since each thread operates in the same memory space where servlet object variables can overwrite each other.
If a servlet is specifically written as a single thread, the servlet engine creates a pool of servlet instances to be used for incoming requests. If a request arrives when all instances are busy, it is queued until an instance becomes available. The number of pool instances is configurable in the sun-web.xml file, in the singleThreadedServletPoolSize property of the sun-web-app element.
For more information about the sun-web.xml file, see “The sun-web.xml File” on page 151. For more information on threading issues, see “Handling Threading Issues” on page 266.
Using JavaServer PagesSun Java System Application Server 8 supports the following JSP features:
• JavaServer Pages (JSP) Specification version 2.0
• Precompilation of JSPs, which is especially useful for production servers
• JSP tag libraries and standard portable tags
For information about creating JSPs, see Sun Microsystem’s JavaServer Pages web site at:
http://java.sun.com/products/jsp/index.html

Using JavaServer Pages
276 Application Server 8 • Developer’s Guide
For information about Java Beans, see Sun Microsystem’s JavaBeans web page at:
http://java.sun.com/beans/index.html
This section describes how to use JavaServer Pages (JSPs) as page templates in a Sun Java System Application Server web application. This section contains the following topics:
• JSP Tag Libraries and Standard Portable Tags
• JSP Caching
• Compiling JSPs: The Command-Line Compiler
JSP Tag Libraries and Standard Portable TagsSun Java System Application Server supports tag libraries and standard portable tags. For more information, see the JavaServer Pages Standard Tag Library (JSTL) page:
http://java.sun.com/products/jsp/jstl/index.jsp
Web applications don’t need to bundle copies of the jsf-impl.jar or appserv-jstl.jar JSP tag libraries (in install_dir/lib) to use JavaServer™ Faces technology or JSTL, respectively. These tag libraries are automatically available to all web applications.
However, the install_dir/lib/appserv-tags.jar tag library for JSP caching is not automatically available to web applications. See “JSP Caching,” next.
JSP CachingJSP caching lets you cache JSP page fragments within the Java engine. Each can be cached using different cache criteria. For example, suppose you have page fragments to view stock quotes, weather information, and so on. The stock quote fragment can be cached for 10 minutes, the weather report fragment for 30 minutes, and so on.
For more information about response caching as it pertains to servlets, see “Caching Servlet Results” on page 268.
JSP caching is implemented by a tag library packaged into the install_dir/lib/appserv-tags.jar file, which you can copy into the WEB-INF/lib directory of your web application. The appserv-tags.tld tag description file is in this JAR file.
NOTE Web applications that use this tag library are not portable.

Using JavaServer Pages
Chapter 6 Developing Web Applications 277
To allow all web applications to share this tag library, change the following element in the domain.xml file:
<jvm-options>-Dcom.sun.enterprise.taglibs=appserv-jstl.jar,jsf-impl.jar</jvm-options>
to this:
<jvm-options>-Dcom.sun.enterprise.taglibs=appserv-jstl.jar,jsf-impl.jar,appserv-tags.jar </jvm-options>
For more information about the domain.xml file, see the Sun Java System Application Server Reference.
You refer to these tags in your JSP files as follows:
<%@ taglib prefix="prefix" uri="Sun ONE Application Server Tags" %>
Subsequently, the cache tags are available as <prefix:cache> and <prefix:flush>. For example, if your prefix is mypfx, the cache tags are available as <mypfx:cache> and <mypfx:flush>.
If you wish to use a different URI for this tag library, you can use an explicit <taglib> element in your web.xml file.
The tags are as follows:
• cache
• flush
cacheThe cache tag caches the body between the beginning and ending tags according to the attributes specified. The first time the tag is encountered, the body content is executed and cached. Each subsequent time it is run, the cached content is checked to see if it needs to be refreshed and if so, it is executed again, and the cached data is refreshed. Otherwise, the cached data is served.
AttributesThe following table describes attributes for the cache tag.
Table 6-2 cache AttributesAttribute Default Description
key ServletPath_Suffix (optional) The name used by the container to access the cached entry. The cache key is suffixed to the servlet path to generate a key to access the cached entry. If no key is specified, a number is generated according to the position of the tag in the page.

Using JavaServer Pages
278 Application Server 8 • Developer’s Guide
ExampleThe following example represents a cached JSP page:
<%@ taglib prefix="mypfx" uri="Sun ONE Application Server Tags" %>
<% String cacheKey = null; if (session != null)
cacheKey = (String)session.getAttribute("loginId");
// check for nocache boolean noCache = false; String nc = request.getParameter("nocache"); if (nc != null)
noCache = "true";
// force reload boolean reload=false; String refresh = request.getParameter("refresh"); if (refresh != null)
reload = true; %>
<mypfx:cache key="<%= cacheKey %>" nocache="<%= noCache %>" refresh="<%= reload %>" timeout="10m">
timeout 60s (optional) The time in seconds after which the body of the tag is executed and the cache is refreshed. By default, this value is interpreted in seconds. To specify a different unit of time, add a suffix to the timeout value as follows: s for seconds, m for minutes, h for hours, d for days. For example, 2h specifies two hours.
nocache false (optional) If set to true, the body content is executed and served as if there were no cache tag. This offers a way to programmatically decide whether the cached response should be sent or whether the body has to be executed, though the response is not cached.
refresh false (optional) If set to true, the body content is executed and the response is cached again. This lets you programmatically refresh the cache immediately regardless of the timeout setting.
Table 6-2 cache Attributes (Continued)Attribute Default Description

Using JavaServer Pages
Chapter 6 Developing Web Applications 279
<% String page = request.getParameter("page"); if (page.equals("frontPage") {
// get headlines from database } else {
..... %> </mypfx:cache>
<mypfx:cache timeout="1h"> <h2> Local News </h2> <%
// get the headline news and cache them %> </mypfx:cache>
flushForces the cache to be flushed. If a key is specified, only the entry with that key is flushed. If no key is specified, the entire cache is flushed.
AttributesThe following table describes attributes for the flush tag.
ExamplesTo flush the entry with key="foobar":
<mypfx:flush key="foobar"/>
To flush the entire cache:
<c:if test="${empty sessionScope.clearCache}"><mypfx:flush />
</c:if>
Table 6-3 flush AttributesAttribute Default Description
key ServletPath_Suffix (optional) The name used by the container to access the cached entry. The cache key is suffixed to the servlet path to generate a key to access the cached entry. If no key is specified, a number is generated according to the position of the tag in the page.

Using JavaServer Pages
280 Application Server 8 • Developer’s Guide
Compiling JSPs: The Command-Line CompilerSun Java System Application Server provides the following ways of compiling JSP 2.0 compliant source files into servlets:
• JSPs are automatically compiled at runtime.
• The asadmin deploy command has a precompilejsp option; see “asadmin deploy” on page 107.
• The sun-appserv-jspc Ant task allows you to precompile JSPs; see “sun-appserv-jspc” on page 125.
• The jspc command line tool, described in this section, allows you to precompile JSPs at the command line.
The jspc command line tool is located under install_dir/bin (make sure this directory is in your path). The format of the jspc command is as follows:
jspc [options] file_specifier
The following table shows what file_specifier can be in the jspc command.
The following table shows the options for the jspc command.
Table 6-4 File Specifiers for the jspc CommandFile Specifier Description
files One or more JSP files to be compiled.
-webapp dir A directory containing a web application. All JSPs in the directory and its subdirectories are compiled. You cannot specify a WAR, JAR, or ZIP file; you must first extract it to an open directory structure.
-uriroot dir Same as -webapp.
Table 6-5 jspc OptionsOption Description
-d dir Specifies the output directory for the compiled JSPs. Package directories are automatically generated based on the directories containing the uncompiled JSPs. The default top-level directory is the directory from which jspc is invoked.

Using JavaServer Pages
Chapter 6 Developing Web Applications 281
For example, this command compiles all the JSP files in the web application under webappdir into class files under webappdir/classes and creates the web.xml file:
jspc -d webappdir/classes -webapp webappdir -webxml web.xml
To use these precompiled JSPs in a web application, put the classes under webappdir/classes into a JAR file, and place the JAR file under WEB-INF/lib.
The presence of both the precompiled classes and the servlet mappings in web.xml prevents the JSP compiler from being invoked when the web application is invoked.
-p name Specifies the name of the target package for all specified JSPs, overriding the default package generation performed by the -d option.
-c name Specifies the target class name of the first JSP compiled. Subsequent JSPs are unaffected. Useful only with the files file specifier.
-v Enables verbose mode.
-mapped Generates separate write calls for each HTML line and comments that describe the location of each line in the JSP file. By default, all adjacent write calls are combined and no location comments are generated.
-die [code] Returns the error number specified by code if an error occurs. If the code is absent or unparseable it defaults to 1. If the code is not 0, any exception during precompilation causes a call to java.lang.System.exit() with the specified code.
-webinc file Creates partial servlet mappings for the -webapp option, which can be pasted into a web.xml file.
-webxml file Creates an entire web.xml file for the -webapp option.
-ieplugin class_id Specifies the Java plug-in COM class ID for Internet Explorer. Used by the <jsp:plugin> tags.
-xpoweredBy Causes an X-Powered-By: JSP/2.0 response header to be added to JSP generated responses. This may be useful for gathering statistical information about JSP technology.
Table 6-5 jspc Options (Continued)Option Description

Creating and Managing User Sessions
282 Application Server 8 • Developer’s Guide
Creating and Managing User SessionsThis chapter describes how to create and manage a session that allows users and transaction information to persist between interactions.
This chapter contains the following sections:
• Configuring Sessions
• Session Managers
Configuring Sessions You can configure whether and how sessions use cookies and URL rewriting by editing the session-properties and cookie-properties elements in the sun-web.xml file for an individual web application. See “session-properties” on page 161 and “cookie-properties” on page 162 for more about the properties you can configure.
Session ManagersA session manager automatically creates new session objects whenever a new session starts. In some circumstances, clients do not join the session, for example, if the session manager uses cookies and the client does not accept cookies.
Sun Java System Application Server gives you these session management options, determined by the session-manager element’s persistence-type attribute in the sun-web.xml file:
• The memory Persistence Type, the default
• The file Persistence Type, which uses a file to store session data
The memory Persistence TypeThis persistence type is not designed for a production environment. It provides no session persistence. However, you can configure it so that the session state in memory is written to the file system prior to server shutdown.
NOTE If the session manager configuration contains an error, the error is written to the server log and the default (memory) configuration is used.

Creating and Managing User Sessions
Chapter 6 Developing Web Applications 283
To specify the memory persistence type for a specific web application, edit the sun-web.xml file as in the following example. The persistence-type property is optional, but must be set to memory if included.
<sun-web-app>...<session-config>
<session-manager persistence-type=memory><manager-properties>
<property name="reapIntervalSeconds" value="20" /></manager-properties>
</session-manager>...
</session-config>...
</sun-web-app>
The memory persistence type supports all the manager properties listed under “manager-properties” on page 159.
For more information about the sun-web.xml file, see “The sun-web.xml File” on page 151.
The file Persistence TypeThis persistence type provides session persistence to the local file system, and allows a single server domain to recover the session state after a failure and restart. The session state is persisted in the background, and the rate at which this occurs is configurable. The store also provides passivation and activation of the session state to help control the amount of memory used. This option is not supported in a production environment.
To specify the file persistence type for a specific web application, edit the sun-web.xml file as in the following example. Note that persistence-type must be set to file.
<sun-web-app>...<session-config>
<session-manager persistence-type=file><store-properties>
<property name=directory value=sessiondir /></store-properties>
</session-manager>...
</session-config>...
</sun-web-app>

Creating and Managing User Sessions
284 Application Server 8 • Developer’s Guide
The file persistence type supports all the manager properties listed under “manager-properties” on page 159 except sessionFilename, and the directory store property listed under “store-properties” on page 160.
For more information about the sun-web.xml file, see “The sun-web.xml File” on page 151.

285
Chapter 7
Using Enterprise JavaBeansTechnology
This section provides an overview of how the Java™ 2 Platform, Enterprise Edition (J2EE™ platform) Enterprise JavaBeans™ (EJB™) technology works in the application programming model of the Sun Java™ System Application Server environment. This section addresses the following topics:
• Summary of EJB 2.1 Changes
• Value Added Features
• EJB Timer Service
• Using Session Beans
• Using Read-Only Beans
• Using Message-Driven Beans
• Handling Transactions with Enterprise Beans
Summary of EJB 2.1 ChangesSun Java System Application Server supports the Sun Microsystems Enterprise JavaBeans (EJB) architecture as defined by the Enterprise JavaBeans Specification, v2.1 and is compliant with the Enterprise JavaBeans Specification, v2.0.
NOTE You can deploy existing 2.0 beans in the Sun Java System Application Server, but new beans should be developed as 2.1 enterprise beans.

Value Added Features
286 Application Server 8 • Developer’s Guide
The changes in the Enterprise JavaBeans Specification, v2.1 that impact enterprise beans in the Sun Java System Application Server environment are as follows:
• EJB Timer Service: This is a container-managed, reliable, and transactional notification service that provides methods to allow callbacks to be scheduled for time-based events. See “EJB Timer Service” on page 289.
• Message-driven beans: This type of enterprise bean can consume any inbound messages from a Connector 1.5 inbound resource adapter, primarily but not exclusively JMS messages. See “Using Message-Driven Beans” on page 296.
• EJB Web Services: A stateless session bean can serve as a web service endpoint. In addition, all EJB component types can act as web service clients. For details, see the web service elements in the sun-ejb-jar.xml file, described in “The sun-ejb-jar.xml File” on page 184.
Value Added FeaturesThe Sun Java System Application Server provides a number of value additions that relate to EJB development. These capabilities are discussed in the following sections (references to more in-depth material are included):
• Read-Only Beans
• pass-by-reference
• Pooling and Caching
• Bean-Level Container-Managed Transaction Timeouts
Read-Only BeansAnother feature that the Sun Java System Application Server provides is the read-only bean, an entity bean that is never modified by an EJB client. Read-only beans avoid database updates completely. A read-only bean must use bean-managed persistence and is not portable.
A read-only bean can be used to cache a database entry that is frequently accessed but rarely updated (externally by other beans). When the data that is cached by a read-only bean is updated by another bean, the read-only bean can be notified to refresh its cached data.

Value Added Features
Chapter 7 Using Enterprise JavaBeans Technology 287
The Sun Java System Application Server provides a number of ways by which a read-only bean’s state can be refreshed. By setting the refresh-period-in-seconds element in the sun-ejb-jar.xml file and the trans-attribute element in the ejb-jar.xml file, it is easy to configure a read-only bean that is (a) always refreshed, (b) periodically refreshed, (c) never refreshed, or (d) programmatically refreshed.
Read-only beans are best suited for situations where the underlying data never changes, or changes infrequently. For further information and usage guidelines, see “Using Read-Only Beans” on page 292.
pass-by-referenceThe pass-by-reference element in the sun-ejb-jar.xml file allows you to specify the parameter passing semantics for co-located remote EJB invocations. This is an opportunity to improve performance. Use of this feature can result in non-portable applications. See “pass-by-reference” on page 195.
Pooling and CachingThe EJB container of the Sun Java System Application Server pools anonymous instances (message-driven beans, stateless session beans, and entity beans) to reduce the overhead of creating and destroying objects. The EJB container maintains the free pool for each bean that is deployed. Bean instances in the free pool have no identity (that is, no primary key associated) and are used to serve the method calls of the home interface. The free beans are also used to serve all methods for stateless session beans.
Bean instances in the free pool transition from a Pooled state to a Cached state after ejbCreate and the business methods run. The size and behavior of each pool can be controlled using pool-related properties in the domain.xml and sun-ejb-jar.xml files.
In addition, the Sun Java System Application Server supports a number of tunable parameters that can be used to control the number of “stateful” instances (stateful session beans and entity beans) cached as well as the duration they are cached. Multiple bean instances that refer to the same database row in a table can be cached. The EJB container maintains a cache for each bean that is deployed.
To achieve scalability, the container will selectively evicts some bean instances from the cache, usually when cache overflows. These evicted bean instances return to the free bean pool. The size and behavior of each cache can be controlled using the cache-related properties in the domain.xml and sun-ejb-jar.xml files.
Pooling and caching parameters for the sun-ejb-jar.xml file are discussed in “Pooling and Caching Elements” on page 215.

Value Added Features
288 Application Server 8 • Developer’s Guide
Pooling ParametersOne of the most important parameters of Sun Java System Application Server pooling is steady-pool-size. When steady-pool-size is set to greater than 0, the container not only pre-populates the bean pool with the specified number of beans, but also attempts to ensure that there is always this many beans in the free pool. This ensures that there are enough beans in the ready to serve state to process user requests.
This parameter does not necessarily guarantee that no more than steady-pool-size instances exist at a given time. It only governs the number of instances that are pooled over a long period of time. For example, suppose an idle stateless session container has a fully-populated pool with a steady-pool-size of 10. If 20 concurrent requests arrive for the EJB component, the container creates 10 additional instances to satisfy the burst of requests. The advantage of this is that it prevents the container from blocking any of the incoming requests. However, if the activity dies down to 10 or fewer concurrent requests, the additional 10 instances are discarded.
Another parameter, pool-idle-timeout-in-seconds, allows the administrator to specify, through the amount of time a bean instance can be idle in the pool. When pool-idle-timeout-in-seconds is set to greater than 0, the container removes/destroys any bean instance that is idle for this specified duration.
Caching ParametersSun Java System Application Server provides a way that completely avoids caching of entity beans, using commit-C option. Commit-C option is particularly useful if beans are accessed in large number but very rarely reused. For additional information, refer to “Commit Options” on page 303.
The Sun Java System Application Server caches can be either bounded or unbounded. Bounded caches have limits on the number of beans that they can hold beyond which beans are passivated. For stateful session beans, there are three ways (LRU, NRU and FIFO) of picking victim beans when cache overflow occurs. Caches can also be configured to passivate beans that were idle (not accessed for a specified duration) to be passivated.
Bean-Level Container-Managed Transaction TimeoutsThe default transaction timeout for the domain is specified using the Transaction Timeout setting of the Transaction Service. A transaction started by the container must commit (or rollback) within this time, regardless of whether the transaction is suspended (and resumed), or the transaction is marked for rollback.

EJB Timer Service
Chapter 7 Using Enterprise JavaBeans Technology 289
You can override this timeout for an individual bean using the optional cmt-timeout-in-seconds element in sun-ejb-jar.xml. The default value, 0, specifies that the default Transaction Service timeout is used. The value of cmt-timeout-in-seconds is used for all methods in the bean that start a new container-managed transaction. This value is not used if the bean joins a client transaction.
EJB Timer ServiceThe EJB Timer Service uses a database to store persistent information about EJB timers. By default, the EJB Timer Service in Sun Java System Application Server is preconfigured to use an embedded version of PointBase. You can change the EJB Timer Service configuration to store persistent timer information in any database supported by the Sun Java System Application Server CMP container. See “Configurations for Specific JDBC Drivers” on page 364.
To change the database used by the EJB Timer Service, set the EJB Timer Service’s Timer Datasource setting to a valid JDBC resource. You must also create the timer database table. DDL files for PointBase (ejbtimer_pointbase.sql) and Oracle (ejbtimer_oracle.sql) are located in install_dir/lib/install/databases.
Using the EJB Timer Service is equivalent to interacting with a single JDBC resource manager. If an EJB component or application accesses a database either directly through JDBC or indirectly (for example, through an entity bean’s persistence mechanism), and also interacts with the EJB Timer Service, its data source must be configured with an XA JDBC driver.
You can change the following EJB Timer Service settings. You must restart the server for the changes to take effect.
• Minimum Delivery Interval - Specifies the minimum time in milliseconds before an expiration for a particular timer can occur. This guards against extremely small timer increments that can overload the server. The default is 7000.
• Maximum Redeliveries - Specifies the maximum number of times the EJB timer service attempts to redeliver a timer expiration due for exception or rollback. The default is 1.
• Redelivery Interval - Specifies how long in milliseconds the EJB timer service waits after a failed ejbTimeout delivery before attempting a redelivery. The default is 5000.
• Timer Datasource - Specifies the database used by the EJB Timer Service. The default is jdbc/__TimerPool.

Using Session Beans
290 Application Server 8 • Developer’s Guide
Using Session BeansThis section provides guidelines for creating session beans in the Sun Java System Application Server 8 environment. This section addresses the following topics:
• About the Session Bean Containers
• Restrictions and Optimizations
Extensive information on session beans is contained in the chapters 6, 7, and 8 of the Enterprise JavaBeans Specification, v2.1.
About the Session Bean ContainersLike an entity bean, a session bean can access a database through Java™ Database Connectivity (JDBC™) calls. A session bean can also provide transaction settings. These transaction settings and JDBC calls are referenced by the session bean’s container, allowing it to participate in transaction managed by the container.
A container managing stateless session beans has a different charter from a container managing stateful session beans.
Stateless ContainerThe stateless container manages the stateless session beans, which, by definition, do not carry client-specific states. Therefore, all session beans (of a particular type) are considered equal.
A stateless session bean container uses a bean pool to service requests. The Sun Java System Application Server-specific deployment descriptor file, sun-ejb-jar.xml, contains the properties that define the pool:
• steady-pool-size
• resize-quantity
• max-pool-size
• pool-idle-timeout-in-seconds
For more information about sun-ejb-jar.xml, see “The sun-ejb-jar.xml File” on page 184.

Using Session Beans
Chapter 7 Using Enterprise JavaBeans Technology 291
Stateful ContainerThe stateful container manages the stateful session beans, which, by definition, carry the client-specific state. There is a one-to-one relationship between the client and the stateful session beans. At creation, each stateful session bean is given a unique session ID that is used to access the session bean so that an instance of a stateful session bean is accessed by a single client only.
Stateful session beans are managed using cache. The size and behavior of stateful session beans cache can be controlled by specifying the following sun-ejb-jar.xml parameters:
• max-cache-size
• resize-quantity
• cache-idle-timeout-in-seconds
• removal-timeout-in-seconds
• victim-selection-policy
The max-cache-size element specifies the maximum number of session beans that are held in cache. If the cache overflows (when the number of beans exceeds max-cache-size), the container then passivates some beans or writes out the serialized state of the bean into a file. The directory in which the file is created is obtained from the domain.xml file using the configuration APIs.
For more information about sun-ejb-jar.xml, see “The sun-ejb-jar.xml File” on page 184.
The passivated beans are stored on the file system.The Session Store Location setting in the EJB container allows the administrator to specify the directory where passivated beans are stored. By default, passivated stateful session beans are stored in application-specific subdirectories created under domain_dir/session-store.
Restrictions and Optimizations This section discusses restrictions on developing session beans and provides some optimization guidelines:
• Optimizing Session Bean Performance
• Restricting Transactions
Optimizing Session Bean PerformanceFor stateful session beans, co-locating the stateful beans with their clients so that the client and bean are executing in the same process address space will improve performance.

Using Read-Only Beans
292 Application Server 8 • Developer’s Guide
Restricting TransactionsThe following restrictions on transactions are enforced by the container and must be observed as you develop session beans:
• A session bean can participate in, at most, a single transaction at a time.
• If a session bean is participating in a transaction, a client cannot invoke a method on the bean such that the trans-attribute element in the ejb-jar.xml file would cause the container to execute the method in a different or unspecified transaction context or an exception is thrown.
• If a session bean instance is participating in a transaction, a client cannot invoke the remove method on the session object’s home or component interface object or an exception is thrown.
Using Read-Only BeansA read-only bean is an entity bean that is never modified by an EJB client. The data that a read-only bean represents may be updated externally by other enterprise beans, or by other means, such as direct database updates.
Read-only beans are best suited for situations where the underlying data never changes, or changes infrequently. The following topics are addressed in this section:
• Read-Only Bean Characteristics and Life Cycle
• Read-Only Bean Good Practices
• Refreshing Read-Only Beans
• Deploying Read Only Beans
NOTE For this release of Sun Java System Application Server, only entity beans that use bean-managed persistence can be designated as read-only.
Read-only beans are specific to Sun Java System Application Server and are not part of the Enterprise JavaBeans Specification, v2.1. Use of this feature results in a non-portable application.

Using Read-Only Beans
Chapter 7 Using Enterprise JavaBeans Technology 293
Read-Only Bean Characteristics and Life CycleRead-only beans are best suited for situations where the underlying data never changes, or changes infrequently. For example, a read-only bean can be used to represent a stock quote for a particular company, which is updated externally. In such a case, using a regular entity bean may incur the burden of calling ejbStore, which can be avoided by using a read-only bean.
Read-only beans have the following characteristics:
• Only entity beans can be read-only beans.
• Only bean-managed persistence is allowed.
• Only container-managed transactions are allowed; read-only beans cannot start their own transactions.
• Read-only beans don’t update any bean state.
• ejbStore is never called by the container.
• ejbLoad is called only when a transactional method is called or when the bean is initially created (in the cache), or at regular intervals controlled by the bean’s refresh-period-in-seconds element in the sun-ejb-jar.xml file.
• The home interface can have any number of find methods. The return type of the find methods must be the primary key for the same bean type (or a collection of primary keys).
• If the data that the bean represents can change, then refresh-period-in-seconds must be set to refresh the beans at regular intervals. ejbLoad is called at this regular interval.
A read-only bean comes into existence using the appropriate find methods.
Read-only beans are cached and have the same cache properties as entity beans. When a read-only bean is selected as a victim to make room in the cache, ejbPassivate is called and the bean is returned to the free pool. When in the free pool, the bean has no identity and will be used only to serve any finder requests.
Read-only beans are bound to the naming service like regular read-write entity beans, and clients can look up read-only beans the same way read-write entity beans are looked up.

Using Read-Only Beans
294 Application Server 8 • Developer’s Guide
Read-Only Bean Good Practices• Avoid having any create or remove methods in the home interface
• Use any of the valid EJB 2.1 transaction attributes for the trans-attribute element
The reason for having TX_SUPPORTED is to allow reading uncommitted data in the same transaction. Also, the transaction attributes can be used to force ejbLoad.
Refreshing Read-Only BeansThere are several ways of refreshing read-only beans as addressed in the following sections:
• Invoking a Transactional Method
• Refreshing Periodically
• Refreshing Programmatically
Invoking a Transactional Method Invoking any transactional method will invoke ejbLoad.
Refreshing Periodically Read-only beans can be refreshed periodically by specifying the refresh-period-in-seconds element in the sun-ejb-jar.xml file.
• If the value specified in refresh-period-in-seconds is zero or not specified, which is the default, the bean is never refreshed (unless a transactional method is accessed).
• If the value is greater than zero, the bean is refreshed at the rate specified.
Refreshing Programmatically Typically, beans that update any data that is cached by read-only beans need to notify the read-only beans to refresh their state. You can use ReadOnlyBeanNotifier to force the refresh of read-only beans.
NOTE This is the only way to refresh the bean state if the data can be modified external to the Sun Java System Application Server.

Using Read-Only Beans
Chapter 7 Using Enterprise JavaBeans Technology 295
To do this, invoke the following methods on the ReadOnlyBeanNotifier bean:
public interface ReadOnlyBeanNotifier extends java.rmi.Remote
{ refresh(Object PrimaryKey)
throws RemoteException; }
The implementation of the ReadOnlyBeanNotifier interface is provided by the container. The user can look up ReadOnlyBeanNotifier using a fragment of code such as the following example:
com.sun.appserv.ejb.ReadOnlyBeanHelper helper = new com.sun.appserv.ejb.ReadOnlyBeanHelper();com.sun.appserv.ejb.ReadOnlyBeanNotifier notifier = helper.getReadOnlyBeanNotifier("java:comp/env/ejb/ReadOnlyCustomer"); notifier.refresh(PrimaryKey);
For a local read-only bean notifier, the lookup has this modification:
helper.getReadOnlyBeanLocalNotifier("java:comp/env/ejb/LocalReadOnlyCustomer");
Beans that update any data that is cached by read-only beans need to call the refresh methods. The next (non-transactional) call to the read-only bean invokes ejbLoad.
Deploying Read Only Beans Read-only beans are deployed in the same manner as other entity beans. However, in the entry for the bean in the Sun Java System Application Server-specific XML file, the is-read-only-bean element must be set to true. That is:
<is-read-only-bean>true</is-read-only-bean>
Also, the refresh-period-in-seconds element in the sun-ejb-jar.xml file may be set to some value that specifies the rate at which the bean is refreshed. If this element is missing, no refresh occurs.
All requests with the same transaction context are routed to the same read-only bean instance. The deployer can specify if such multiple requests have to be serialized by setting the allow-concurrent-access element to either true (to allow concurrent accesses) or false (to serialize concurrent access to the same read-only bean). The default is false.
For further information on these elements, refer to the Sun Java System Application Server Reference.

Using Message-Driven Beans
296 Application Server 8 • Developer’s Guide
Using Message-Driven BeansThis section describes message-driven beans and explains the requirements for creating them in the Sun Java System Application Server 8 environment. This section contains the following topics:
• Message-Driven Bean Configuration
• Restrictions and Optimizations
• Sample Message-Driven Bean XML Files
Message-Driven Bean ConfigurationThis section addresses the following configuration topics:
• Connection Factory and Destination
• Message-Driven Bean Pool
• Domain-Level Settings
• Automatic Reconnection to JMS Provider
Connection Factory and DestinationA message-driven bean is a client to a Connector 1.5 inbound resource adapter. The message-driven bean container uses the JMS service integrated into the Sun Java System Application Server for message-driven beans that are JMS clients. JMS clients use JMS Connection Factory- and Destination-administered objects. A JMS Connection Factory administered object is a resource manager Connection Factory object that is used to create connections to the JMS provider.
The mdb-connection-factory element in the sun-ejb-jar.xmlfile for a message-driven bean can be used to specify the connection factory used by the container to create the container connection to the JMS provider.
If the mdb-connection-factory element is not specified, a default one created at server startup is used. This provides connection to the built-in Sun Java System Message Queue broker on the port that is specified in the jms-service element (if enabled) in the domain.xml file, using the default user name/password (resource principal) of the Sun Java System Message Queue. Refer to the Sun Java System Message Queue Developer’s Guide for more information.

Using Message-Driven Beans
Chapter 7 Using Enterprise JavaBeans Technology 297
The jndi-name element of the ejb element in the sun-ejb-jar.xml file specifies the JNDI name of the administered object for the JMS Queue or Topic destination that is associated with the message-driven bean.
Message-Driven Bean PoolThe container manages a pool of message-driven beans for the concurrent processing of a stream of messages. The sun-ejb-jar.xml file contains the elements that define the pool (that is, the bean-pool element):
• steady-pool-size
• resize-quantity
• max-pool-size
• pool-idle-timeout-in-seconds
For more information about sun-ejb-jar.xml, see “The sun-ejb-jar.xml File” on page 184.
Domain-Level SettingsYou can control the following domain-level message-driven bean settings in the EJB container:
• Initial and Minimum Pool Size - Specifies the initial and minimum number of beans maintained in the pool. The default is 0.
• Maximum Pool Size - Specifies the maximum number of beans that can be created to satisfy client requests. The default is 32.
• Pool Resize Quantity - Specifies the number of beans to be created if a request arrives when the pool is empty (subject to the Initial and Minimum Pool Size), or the number of beans to remove if idle for more than the Idle Timeout. The default is 8.
• Idle Timeout - Specifies the maximum time in seconds that a bean can remain idle in the pool. After this amount of time, the bean is destroyed. The default is 600 (10 minutes). A value of 0 means a bean can remain idle indefinitely.
For information on monitoring message-driven beans, see the Sun Java System Application Server Administration Console online help and Administration Guide.
NOTE Running monitoring when it is not need may impact performance, so you may choose to turn monitoring off using the asadmin command or the Administration Console when it is not in use.

Using Message-Driven Beans
298 Application Server 8 • Developer’s Guide
Automatic Reconnection to JMS ProviderWhen the Sun Java System Application Server is started, for each deployed message-driven bean that is a JMS client, its container keeps a connection to the JMS provider. When the connection is broken, the container is not able to receive messages from the JMS provider and, therefore, is unable to deliver messages to its message-driven bean instances. When the auto reconnection feature is enabled, the container automatically tries to reconnect to the JMS provider if the connection is broken.
The mdb-container element in the domain.xml file contains auto reconnection properties. By default, reconnect-enabled is set to false and reconnect-delay-in-seconds is set to 60 seconds. That is, there is a delay of 60 seconds before each attempt to reconnect, and reconnect-max-retries is set to 60.
The container logs messages for each reconnect attempt.
Refer to the Sun Java System Application Server Reference for information on auto reconnect properties of the mdb-container element in the domain.xml file.
Restrictions and OptimizationsThis section discusses the following restrictions and performance optimizations that you should be aware of in developing message-driven beans:
• Pool Tuning and Monitoring
• onMessage Runtime Exception
Pool Tuning and MonitoringThe message-driven bean pool is also a pool of threads, with each message-driven bean instance in the pool associating with a server session, and each server session associating with a thread. Therefore, a large pool size also means a high number of threads, which will impact performance and server resources.
NOTE Depending on where the message processing stage is, if the connection is broken, the onMessage method may not be able to complete successfully, or the transaction may be rolled back due to a JMS exception. When the container reestablishes connection to the JMS provider, JMS message redelivery semantics apply.

Using Message-Driven Beans
Chapter 7 Using Enterprise JavaBeans Technology 299
When configuring message-driven bean pool properties, you must consider factors such as message arrival rate and pattern, onMessage method processing time, overall server resources (threads, memory, and so on), and any concurrency requirements and limitations from other resources that the message-driven bean may access.
Performance and resource usage tuning should also consider potential JMS provider properties for the connection factory that is used by the container (mdb-connection-factory element in deployment descriptor). For example, the Sun Java System Message Queue flow control related properties for connection factory should be tuned in situations where the message incoming rate is much higher than max-pool-size can handle.
Refer to the Sun Java System Application Server Administration Guide for information on how to get message-driven bean pool statistics.
onMessage Runtime ExceptionMessage-driven beans, like other well-behaved MessageListeners, should not, in general, throw runtime exceptions. If a message-driven bean’s onMessage method encounters a system-level exception or error that does not allow the method to successfully complete, the Enterprise JavaBeans Specification, v2.1 provides the following guidelines:
• If the bean method encounters a runtime exception or error, it should simply propagate the error from the bean method to the container.
• If the bean method performs an operation that results in a checked exception that the bean method cannot recover, the bean method should throw the javax.ejb.EJBException that wraps the original exception.
• Any other unexpected error conditions should be reported using javax.ejb.EJBException (javax.ejb.EJBException is a subclass of java.lang.RuntimeException).
Under container-managed transaction demarcation, upon receiving a runtime exception from a message-driven bean’s onMessage method, the container rolls back the container-started transaction and the message is redelivered. This is because the message delivery itself is part of the container-started transaction. By default, the Sun Java System Application Server container closes the container’s connection to the JMS provider when the first runtime exception is received from a message-driven bean instance’s onMessage method. This avoids potential message redelivery looping and protects server resources if the message-driven bean’s onMessage method continues misbehaving. This default container behavior can be changed using the cmt-max-runtime-exceptions property of the mdb-container element in the domain.xml file.

Using Message-Driven Beans
300 Application Server 8 • Developer’s Guide
The cmt-max-runtime-exceptions property specifies the maximum number of runtime exceptions allowed from a message-driven bean’s onMessage method before the container starts to close the container’s connection to the message source. By default this value is 1; -1 disables this container protection.
A message-driven bean’s onMessage method can use the javax.jms.Message getJMSRedelivered method to check whether a received message is a redelivered message.
Sample Message-Driven Bean XML FilesThis section includes the following sample files:
• Sample ejb-jar.xml File
• Sample sun-ejb-jar.xml File
For general information on the sun-ejb-jar.xml file, see “The sun-ejb-jar.xml File” on page 184.
Sample ejb-jar.xml File<?xml version="1.0" encoding="UTF-8"?>
<!DOCTYPE ejb-jar PUBLIC '-//Sun Microsystems, Inc.//DTD Enterprise JavaBeans 2.0//EN' 'http://java.sun.com/dtd/ejb-jar_2_0.dtd'>
<ejb-jar><enterprise-beans><message-driven>
<ejb-name>MessageBean</ejb-name><ejb-class>samples.mdb.ejb.MessageBean</ejb-class><transaction-type>Container</transaction-type><message-driven-destination><destination-type>javax.jms.Queue</destination-type></message-driven-destination><resource-ref><res-ref-name>jms/QueueConnectionFactory</res-ref-name><res-type>javax.jms.QueueConnectionFactory</res-type><res-auth>Container</res-auth></resource-ref>
</message-driven></enterprise-beans>
NOTE The cmt-max-runtime-exceptions property may be deprecated in the future.

Using Message-Driven Beans
Chapter 7 Using Enterprise JavaBeans Technology 301
<assembly-descriptor><container-transaction><method>
<ejb-name>MessageBean</ejb-name><method-intf>Bean</method-intf><method-name>onMessage</method-name><method-params><method-param>javax.jms.Message</method-param></method-params>
</method><trans-attribute>NotSupported</trans-attribute>
</container-transaction></assembly-descriptor
</ejb-jar>
Sample sun-ejb-jar.xml File<?xml version="1.0" encoding="UTF-8"?>
<!DOCTYPE sun-ejb-jar PUBLIC '-//Sun Microsystems, Inc.//DTD Application Server 8.0 EJB 2.1//EN' 'http://www.sun.com/software/appserver/dtds/sun-ejb-jar_2_1-0.dtd'>
<sun-ejb-jar><enterprise-beans><ejb>
<ejb-name>MessageBean</ejb-name><jndi-name>jms/sample/Queue</jndi-name><resource-ref><res-ref-name>jms/QueueConnectionFactory</res-ref-name><jndi-name>jms/sample/QueueConnectionFactory</jndi-name><default-resource-principal>
<name>guest</name><password>guest</password>
</default-resource-principal></resource-ref><mdb-connection-factory><jndi-name>jms/sample/QueueConnectionFactory</jndi-name><default-resource-principal>
<name>guest</name><password>guest</password>
</default-resource-principal></mdb-connection-factory>
</ejb></enterprise-beans>
</sun-ejb-jar>

Handling Transactions with Enterprise Beans
302 Application Server 8 • Developer’s Guide
Handling Transactions with Enterprise BeansThis section describes the transaction support built into the Enterprise JavaBeans (EJBs) programming model for Sun Java System Application Server 8.
As a developer, you can write an application that updates data in multiple databases which may be distributed across multiple sites. The site may use EJB servers from different vendors. This section provides overview information on the following topics:
• Flat Transactions
• Global and Local Transactions
• Commit Options
• Administration and Monitoring
Flat TransactionsThe Enterprise JavaBeans Specification, v2.1 requires support for flat (as opposed to nested) transactions. In a flat transaction, each transaction is decoupled from and independent of other transactions in the system. You cannot start another transaction in the same thread until the current transaction ends.
Flat transactions are the most prevalent model and are supported by most commercial database systems. Although nested transactions offer a finer granularity of control over transactions, they are supported by far fewer commercial database systems.
Global and Local TransactionsUnderstanding the distinction between global and local transactions is crucial in understanding the Sun Java System Application Server support for transactions. See “Transaction Scope” on page 380.
Both local and global transactions are demarcated using the javax.transaction.UserTransaction interface, which the client must use. Local transactions bypass the transaction manager and are faster. For more information, see “Naming Environment for J2EE Application Components” on page 388.

Handling Transactions with Enterprise Beans
Chapter 7 Using Enterprise JavaBeans Technology 303
Commit Options The EBJ protocol is designed to give the container the flexibility to select the disposition of the instance state at the time a transaction is committed. This allows the container to best manage caching an entity object’s state and associating an entity object identity with the EJB instances.
There are three commit-time options:
• Option A: The container caches a ready instance between transactions. The container ensures that the instance has exclusive access to the state of the object in persistent storage.
In this case, the container does not have to synchronize the instance’s state from the persistent storage at the beginning of the next transaction.
• Option B: The container caches a ready instance between transactions, but the container does not ensure that the instance has exclusive access to the state of the object in persistent storage. This is the default.
In this case, the container must synchronize the instance’s state by invoking ejbLoad from persistent storage at the beginning of the next transaction.
• Option C: The container does not cache a ready instance between transactions, but instead returns the instance to the pool of available instances after a transaction has completed.
The life cycle for every business method invocation under commit option C looks like this:
ejbActivate->ejbLoad ->
business method -> ejbStore ->
ejbPassivate
If there is more than one transactional client concurrently accessing the same entity EJBObject, the first client gets the ready instance and subsequent concurrent clients get new instances from the pool.
The Sun Java System Application Server deployment descriptor has an element, commit-option, that specifies the commit option to be used. Based on the specified commit option, the appropriate handler is instantiated.
NOTE Commit option A is not supported for Sun Java System Application Server 8.

Handling Transactions with Enterprise Beans
304 Application Server 8 • Developer’s Guide
Administration and MonitoringAn administrator can control a number of domain-level Transaction Service settings. For details, see “Configuring the Transaction Service” on page 382.
The Transaction Timeout setting can be overridden by a bean. See “Bean-Level Container-Managed Transaction Timeouts” on page 288.
In addition, the administrator can monitor transactions using statistics from the transaction manager that provide information on such activities as the number of transactions completed, rolled back, or recovered since server startup, and transactions presently being processed.
For information on administering and monitoring transactions, see the Sun Java System Application Server Administration Console online help and the Sun Java System Application Server Administration Guide.

305
Chapter 8
Using Container-ManagedPersistence for Entity Beans
This section contains information on how container-managed persistence (CMP) works in the Sun Java System Application Server environment in the following topics:
• Sun Java System Application Server Support
• Container-Managed Persistence Mapping
• Configuring the Resource Manager
• Configuring Queries for 1.1 Finders
• Restrictions and Optimizations
Extensive information on CMP is contained in chapters 10, 11, and 14 of the Enterprise JavaBeans Specification, v2.1.
Sun Java System Application Server SupportSun Java System Application Server support for CMP includes:
• Full support for the J2EE v 1.4 specification’s CMP model.
❍ Support for commit options B and C for transactions as defined in the Enterprise JavaBeans Specification, v2.1. See “Commit Options” on page 303.
❍ The primary key class must be a subclass of java.lang.Object. This ensures portability, and is noted because some vendors allow primitive types (such as int) to be used as the primary key class.

Container-Managed Persistence Mapping
306 Application Server 8 • Developer’s Guide
• The Sun Java System Application Server CMP implementation, which provides:
❍ An Object/Relational (O/R) mapping tool that creates XML deployment descriptors for EJB JAR files that contain beans that use CMP
❍ Support for compound (multi-column) primary keys
❍ Support for sophisticated custom finder methods
❍ Standards-based query language (EJB QL)
❍ CMP runtime support. For a list of JDBC driver and database combinations that are supported for Sun Java System Application Server, see “Configurations for Specific JDBC Drivers” on page 364. These combinations have been tested with the Sun Java System Application Server and are found to be J2EE compatible. Other drivers have been used with Sun Java System Application Server, but J2EE compliance tests have not been completed with these drivers.
For an up to date list of the JDBC drivers supported by the Sun Java System Application Server, see the Sun Java System Application Server Release Notes.
Container-Managed Persistence MappingImplementation for entity beans that use CMP is mostly a matter of mapping CMP fields and CMR fields (relationships) to the database. This section addresses the following topics:
• The Mapping Deployment Descriptor File
• Mapping Capabilities
• Automatic Mapping Options
• Supported Data Types for Mapping
• BLOB Support
• CLOB Support
• Capturing the Database Schema Automatically
• Using the capture-schema Utility

Container-Managed Persistence Mapping
Chapter 8 Using Container-Managed Persistence for Entity Beans 307
The Mapping Deployment Descriptor FileEach module with CMP beans must have the following files:
• ejb-jar.xml: Contains information such as the transactional attributes of the beans and the fields of a bean that are going to be container-managed.
• sun-ejb-jar.xml: The Sun Java System Application Server standard file for assembling enterprise beans. For a detailed description, see “The sun-ejb-jar.xml File” on page 184.
• sun-cmp-mappings.xml: The file for mapping CMP. This file can be automatically generated and does not have to exist prior to deployment. For a detailed description, see “The sun-cmp-mappings.xml File” on page 225.
The sun-cmp-mappings.xml file maps CMP fields and CMR fields (relationships) to the database. A primary table must be selected for each CMP bean, and optionally, multiple secondary tables. CMP fields are mapped to columns in either the primary or secondary table(s). CMR fields are mapped to pairs of column lists (normally, column lists are the list of columns associated with pairs of primary and foreign keys).
The sun-cmp-mappings.xml file conforms to the sun-cmp-mapping_1_1.dtd file and is packaged with the user-defined bean classes in the EJB JAR file under the META-INF directory.
The Sun Java System Application Server or the deploytool creates the mappings in the sun-cmp-mappings.xml file automatically during deployment if the file is not present. For information on how to use the deploytool for mapping, see the deploytool online help.
Automatic generation of the sun-cmp-mappings.xml file can be controlled by deployment options specified in the sun-ejb-jar.xml file and during deployment (see “Automatic Mapping Options” on page 308). If you use automatic mapping, you only need to understand the Java programming language objects; you do not need to know or understand the underlying database schema.
You can map the fields and relationships of your entity beans manually, by editing the sun-cmp-mappings.xml deployment descriptor. You should only do this if you are proficient in editing XML.
A listing of the mapping elements in the CMP deployment descriptors is contained in “The sun-cmp-mappings.xml File” on page 225. A sample XML file is contained in “Sample Database Schema Definition” on page 233.

Container-Managed Persistence Mapping
308 Application Server 8 • Developer’s Guide
The mapping information is developed in conjunction with the database schema (.dbschema) file, which can be automatically captured when you deploy the bean (see “Capturing the Database Schema Automatically” on page 316). You can manually generate the schema using the capture-schema utility (“Using the capture-schema Utility” on page 316).
Mapping CapabilitiesMapping refers to the ability to tie an object-based model to a relational model of data, usually the schema of a relational database. The CMP implementation provides the ability to tie a set of interrelated beans containing data and associated behaviors to the schema. You can then use this object representation of the database as part of a Java application. You can also customize this mapping to optimize these beans for the particular needs of an application. The result is a single data model through which you can access both persistent database information and regular transient program data.
The mapping capabilities provided by the Sun Java System Application Server include:
• Mapping a CMP bean to one or more tables
• Mapping CMP fields to one or more columns
• Mapping CMP fields to different column types
• Mapping tables with compound primary keys
• Mapping CMP relationships to foreign key columns
• Mapping tables with overlapping primary and foreign keys
Automatic Mapping OptionsYou can control automatic mapping in the following ways using deployment descriptor elements or command line options. You can:
• Create tables during deployment
• Drop tables during undeployment
• Create and drop tables during redeployment
• Specify the database vendor
• Specify that table names are unique
• Specify type mappings for individual CMP fields

Container-Managed Persistence Mapping
Chapter 8 Using Container-Managed Persistence for Entity Beans 309
The following optional data subelements of the cmp-resource element in the sun-ejb-jar.xml file control the automatic creation of database tables at deployment. For more information about the cmp-resource element, see “Configuring the Resource Manager” on page 318.
Table 8-1 sun-ejb-jar.xml Mapping ElementsElement Default Description
create-tables-at-deploy false If true, causes database tables to be created for beans that are automatically mapped by the EJB container. If false, does not create tables.
drop-tables-at-undeploy false If true, causes database tables that were automatically created when the bean(s) were last deployed to be dropped when the bean(s) are undeployed. If false, does not drop tables.
database-vendor-name none Specifies the name of the database vendor for which tables can be created. Allowed values are db2, mssql, oracle, pointbase, and sybase, case-insensitive.
If no value is specified, a connection is made to the resource specified by the jndi-name subelement of the cmp-resource element in the sun-ejb-jar.xml file, and the database vendor name is read. If the connection cannot be established, or if the value is not recognized, SQL-92 compliance is presumed.
schema-generator-properties none Allows you to specify field-specific type mappings in property subelements.
Also allows you to set the use-unique-table-names property. If true, this property specifies that generated table names are unique within each application server domain. The default is false.
For example:
<schema-generator-properties><property>
<name>Employee.firstName.jdbc-type
</name><value>char</value>
</property><property>
<name>Employee.firstName.jdbc-maximum-length</name><value>25</value>
</property>

Container-Managed Persistence Mapping
310 Application Server 8 • Developer’s Guide
The following options of the asadmin deploy or asadmin deploydir command control the automatic creation of database tables at deployment:
<property><name>
use-unique-table-names</name><value>true</value>
</property></schema-generator-properties>
Table 8-2 asadmin deploy and asadmin deploydir Mapping OptionsOption Default Description
--createtables none If true, causes database tables to be created for beans that need them. If false, does not create tables. If not specified, the value of the create-tables-at-deploy attribute in sun-ejb-jar.xml is used.
--dropandcreatetables none If true, and if tables were automatically created when this application was last deployed, tables from the earlier deployment are dropped and fresh ones are created.
If true, and if tables were not automatically created when this application was last deployed, no attempt is made to drop any tables. If tables with the same names as those that would have been automatically created are found, the deployment proceeds, but a warning indicates that tables could not be created.
If false, settings of create-tables-at-deploy or drop-tables-at-undeploy in the sun-ejb-jar.xml file are overridden.
--uniquetablenames none If true, specifies that table names are unique within each application server domain. If not specified, the value of the use-unique-table-names property in sun-ejb-jar.xml is used.
Table 8-1 sun-ejb-jar.xml Mapping ElementsElement Default Description

Container-Managed Persistence Mapping
Chapter 8 Using Container-Managed Persistence for Entity Beans 311
If you have manually mapped one or more of the beans in the module and you use any of the asadmin deploy or asadmin deploydir options, the deployment is not harmed in any way, but the options have no effect, and you get a warning in the server log.
If you used the deploytool to map one or more of the beans, the --uniquetablenames option has no effect when you run asadmin deploy or asadmin deploydir. The uniqueness of the table names was established when deploytool created the mapping.
The following options of the asadmin undeploy command control the automatic removal of database tables at undeployment:
For more information about the asadmin deploy, asadmin deploydir, and asadmin undeploy commands, see “The asadmin Command” on page 107
When command line and sun-ejb-jar.xml options are both specified, the asadmin options take precedence.
--dbvendorname none Specifies the name of the database vendor for which tables can be created. Allowed values are db2, mssql, oracle, pointbase, and sybase, case-insensitive.
If not specified, the value of the database-vendor-name attribute in sun-ejb-jar.xml is used.
If no value is specified, a connection is made to the resource specified by the jndi-name subelement of the cmp-resource element in the sun-ejb-jar.xml file, and the database vendor name is read. If the connection cannot be established, or if the value is not recognized, SQL-92 compliance is presumed.
Table 8-3 asadmin undeploy Mapping OptionsOption Default Description
--droptables none If true, causes database tables that were automatically created when the bean(s) were last deployed to be dropped when the bean(s) are undeployed. If false, does not drop tables.
If not specified, the value of the drop-tables-at-undeploy attribute in sun-ejb-jar.xml is used.
Table 8-2 asadmin deploy and asadmin deploydir Mapping OptionsOption Default Description

Container-Managed Persistence Mapping
312 Application Server 8 • Developer’s Guide
Supported Data Types for MappingCMP supports a set of JDBC data types that are used in mapping Java data fields to SQL types. Supported JDBC data types are as follows:
The following table contains suggested Java type to JDBC type mappings.
BIGINT BIT BLOB CHAR CLOB
DATE DECIMAL DOUBLE FLOAT INTEGER
LONGVARBINARY LONGVARCHAR NUMERIC REAL SMALLINT
TIME TIMESTAMP TINYINT VARCHAR
Table 8-4 Suggested Java Type to JDBC Type MappingsJava Type JDBC Type Nullability
boolean BIT No
java.lang.Boolean BIT Yes
byte TINYINT No
java.lang.Byte TINYINT Yes
double DOUBLE No
java.lang.Double DOUBLE Yes
float REAL No
java.lang.Float REAL Yes
int INTEGER No
java.lang.Integer INTEGER Yes
long BIGINT No
java.lang.Long BIGINT Yes
short SMALLINT No
java.lang.Short SMALLINT Yes
java.math.BigDecimal DECIMAL Yes
java.math.BigInteger DECIMAL Yes
char CHAR No
java.lang.char CHAR Yes

Container-Managed Persistence Mapping
Chapter 8 Using Container-Managed Persistence for Entity Beans 313
The following table contains suggested mappings of JDBC types to database vendor specific types. For more information about the JDBC driver and database combinations that are supported for Sun Java System Application Server, see “Configurations for Specific JDBC Drivers” on page 364.
java.lang.StringBuffer VARCHAR Yes
java.lang.String VARCHAR Yes
java.lang.String CLOB Yes
Serializable BLOB Yes
byte[] BLOB Yes
java.util.Date TIMESTAMP Yes
java.sql.Time TIME Yes
java.sql.Date DATE Yes
java.sql.Timestamp TIMESTAMP Yes
NOTE Java types assigned to CMP fields must be restricted to Java primitive types, Java Serializable types, java.util.Date, java.sql.Date, java.sql.Time, or java.sql.Timestamp. An entity bean local interface type (or a collection of such) can be the type of a CMR field.
Table 8-5 Suggested Mappings of JDBC Types to Database Vendor Specific TypesJDBC Type PointBase Oracle DB2 Sybase ASE
12.5MS-SQL Server
BIT BOOLEAN SMALLINT SMALLINT BIT BIT
BOOLEAN BOOLEAN SMALLINT SMALLINT TINYINT BIT
TINYINT SMALLINT SMALLINT SMALLINT TINYINT TINYINT
SMALLINT SMALLINT SMALLINT SMALLINT SMALLINT SMALLINT
INTEGER INTEGER INTEGER INTEGER INTEGER INT
BIGINT BIGINT NUMBER BIGINT NUMERIC DECIMAL
REAL REAL REAL REAL REAL REAL
FLOAT FLOAT FLOAT FLOAT FLOAT FLOAT
Table 8-4 Suggested Java Type to JDBC Type Mappings (Continued)Java Type JDBC Type Nullability

Container-Managed Persistence Mapping
314 Application Server 8 • Developer’s Guide
BLOB SupportBinary Large Object (BLOB) is a data type used to store and retrieve complex object fields. BLOBs are binary or Serializable objects, such as pictures, that translate into large byte arrays which are then serialized into CMP fields.
If a CMP field is defined as Serializable, it is serialized into a byte[] before being stored in the database. Similarly, the value fetched from the database is deserialized. However, if a CMP field is defined as byte[], it is stored directly instead of being serialized and deserialized when stored and fetched, respectively.
To enable BLOB support in the Sun Java System Application Server environment, define a CMP field of type byte[] or a user-defined type that implements the java.io.Serializable interface. If you map the CMP bean to an existing database schema, map the field to a column of type BLOB.
DOUBLE DOUBLE PRECISION
DOUBLE PRECISION
DOUBLE DOUBLE PRECISION
DOUBLE PRECISION
NUMERIC(p,s) NUMERIC(p,s) NUMBER(p,s) DECIMAL(p,s) NUMERIC(p,s) NUMERIC(p,s)
DECIMAL(p,s) NUMERIC(p,s) NUMBER(p,s) DECIMAL(p,s) DECIMAL(p,s) DECIMAL(p,s)
VARCHAR VARCHAR VARCHAR2 VARCHAR VARCHAR VARCHAR
DATE DATE DATE DATE DATETIME, SMALLDATETIME
DATETIME, SMALLDATETIME
TIME TIME DATE TIME DATETIME, SMALLDATETIME
DATETIME, SMALLDATETIME
TIMESTAMP TIMESTAMP TIMESTAMP TIMESTAMP DATETIME DATETIME
BLOB BLOB BLOB BLOB IMAGE IMAGE
CLOB CLOB CLOB CLOB TEXT TEXT
NOTE The mappings in Table 8-5 are suggested and not supported. If these mappings don’t work, please refer to your database and JDBC driver documentation.
Table 8-5 Suggested Mappings of JDBC Types to Database Vendor Specific Types (Continued)JDBC Type PointBase Oracle DB2 Sybase ASE
12.5MS-SQL Server

Container-Managed Persistence Mapping
Chapter 8 Using Container-Managed Persistence for Entity Beans 315
If you are using the Oracle Inet driver for CMP, you need to set a special property if you are using BLOB or CLOB datatypes. For details, see “Inet Oraxo JDBC Driver for Oracle 8.1.7 and 9.x Databases” on page 366.
If you use automatic mapping, you might need to change the default BLOB column length for the generated schema using the schema-generator-properties element in sun-ejb-jar.xml. See your database vendor documentation to determine whether you need to specify the length. For example:
<schema-generator-properties><property>
<name>Employee.voiceGreeting.jdbc-type</name><value>BLOB</value>
</property><property>
<name>Employee.voiceGreeting.jdbc-maximum-length</name><value>10240</value>
</property>...
</schema-generator-properties>
CLOB SupportCharacter Large Object (CLOB) is a data type used to store and retrieve very long text fields. CLOBs translate into long strings.
To enable CLOB support in the Sun Java System Application Server environment, define a CMP field of type java.lang.String. If you map the CMP bean to an existing database schema, map the field to a column of type CLOB.
If you are using the Inet driver for CMP, you need to set a special property if you are using BLOB or CLOB datatypes. For details, see “Inet Oraxo JDBC Driver for Oracle 8.1.7 and 9.x Databases” on page 366.
If you use automatic mapping, you might need to change the default CLOB column length for the generated schema using the schema-generator-properties element in sun-ejb-jar.xml. See your database vendor documentation to determine whether you need to specify the length. For example:
<schema-generator-properties><property>
<name>Employee.resume.jdbc-type</name><value>CLOB</value>
</property><property>

Container-Managed Persistence Mapping
316 Application Server 8 • Developer’s Guide
<name>Employee.resume.jdbc-maximum-length</name><value>10240</value>
</property>...
</schema-generator-properties>
Capturing the Database Schema AutomaticallyYou can configure a CMP bean in the deploytool or Sun Java System Application Server to automatically capture the database metadata and save it in a .dbschema file during deployment. If the sun-cmp-mappings.xml file contains an empty <schema/> entry, the cmp-resource entry in the sun-ejb-jar.xml file is used to get a connection to the database, and automatic generation of the schema is performed. When the sun-cmp-mappings.xml file is itself automatically generated, it contains the <schema/> entry by default. If the database table structure is changed, you must redeploy the beans to automatically remap the CMP fields and relationships.
Using the capture-schema UtilityYou can use the capture-schema command to manually generate the database metadata (.dbschema) file.
NOTE An Oracle database user running the capture-schema command needs ANALYZE ANY TABLE privileges if that user does not own the schema. These privileges are granted to the user by the database administrator.
The capture-schema utility does not modify the schema in any way. Its only purpose is to provide the persistence engine with information about the structure of the database (the schema).
The name of a .dbschema file must be unique across all deployed modules in a domain.

Container-Managed Persistence Mapping
Chapter 8 Using Container-Managed Persistence for Entity Beans 317
Syntaxcapture-schema -username name -password password -dburl url -driver jdbcdriver -out filename [-schemaname schemaname] [-table tablename]*
Where:
• -username name: Specifies the user name for authenticating access to a database.
• -password password: Specifies the password for accessing the selected database.
• -dburl url: Specifies the JDBC URL expected by the driver for accessing a database.
• -driver jdbcdriver: Specifies the JDBC driver class name. This class must be in your CLASSPATH.
• -out filename: Specifies the output target. If the output file name does not have an extension, .dbschema is appended. If the output file name has a different extension, .dbschema is appended in addition to the specified extension, and a warning is displayed.
For CMP mapping, the -out parameter correlates to the schema subelement of the sun-cmp-mapping element in the sun-cmp-mappings.xml file. In this file, this file name must be specified without the .dbschema suffix. For example:
<schema>RosterSchema</schema>
• -schemaname schemaname: Specifies the name of the user schema being captured. If not specified, the default is to capture metadata for all tables from all the schemas accessible to this user.
• -table tablename: Specifies a table name. You can use this parameter multiple times to capture metadata for multiple tables. If not specified, all the tables in the database schema are captured.
Examplecapture-schema -dburl jdbc:pointbase:server://localhost:9092/sample -username public -password public -driver com.pointbase.jdbc.jdbcUniversalDriver -out RosterSchema.dbschema
NOTE If more than one schema is accessible for this user, more than one table with the same name might be captured if this parameter is not set.

Configuring the Resource Manager
318 Application Server 8 • Developer’s Guide
Configuring the Resource Manager The resource manager used by the CMP implementation is PersistenceManagerFactory, which is configured using the Sun Java System Application Server XML file, domain.xml. Refer to the Sun Java System Application Server Administration Guide for information on creating a new persistence manager.
To deploy an EJB module that contains CMP beans, you need to specify the JNDI name of the Persistence Manager’s resource in the jndi-name subelement of the cmp-resource element in the sun-ejb-jar.xml file. The Persistence Manager’s resource is a jdbc-resource or persistence-manager-factory-resource entry in the domain.xml file. Using a jdbc-resource is recommended. This name is used at run time to manage persistent resources.
If the JNDI name refers to a jdbc-resource entry, you can also set PersistenceManagerFactory properties as properties of the cmp-resource element in the sun-ejb-jar.xml file.
For example, if you have the following entry in the domain.xml file:
<jdbc-resourcejndi-name="jdbc/pmf" pool-name="jdbc/oracle_pool">
Set the CMP resource in the sun-ejb-jar.xml file as follows:
<cmp-resource><jndi-name>jdbc/pmf</jndi-name>
</cmp-resource>
For another example, if you have the following entry in the domain.xml file:
<persistence-manager-factory-resourcefactory-class="com.sun.jdo.spi.persistence.support.sqlstore.impl.PersistenceManagerFactoryImpl"
enabled="true" jndi-name="jdo/pmf" jdbc-resource-jndi-name="jdbc/pmfPM">
Set the CMP resource in the sun-ejb-jar.xml file as follows:
<cmp-resource><jndi-name>jdo/pmf</jndi-name>
</cmp-resource>

Configuring Queries for 1.1 Finders
Chapter 8 Using Container-Managed Persistence for Entity Beans 319
Configuring Queries for 1.1 FindersThis section contains the following topics:
• About JDOQL Queries
• Query Filter Expression
• Query Parameters
• Query Variables
About JDOQL QueriesThe Enterprise JavaBeans Specification, v1.1 spec does not specify the format of the finder method description. The Sun Java System Application Server uses an extension of Java Data Objects Query Language (JDOQL) queries to implement finder and selector methods. For EJB 2.1, the container automatically maps an EJB QL query to JDOQL. For EJB 1.1, this mapping is done by the developer. You can specify the following elements of the underlying JDOQL query:
• Filter expression: A Java-like expression that specifies a condition that each object returned by the query must satisfy. Corresponds to the WHERE clause in EJB QL.
• Query parameter declaration: Specifies the name and the type of one or more query input parameters. Follows the syntax for formal parameters in the Java language.
• Query variable declaration: Specifies the name and type of one or more query variables. Follows the syntax for local variables in the Java language. Query variables might be used in the filter to implement joins.
• Query ordering declaration: Specifies the ordering expression of the query. Corresponds to the ORDER BY clause of EJBQL.
The Sun Java System Application Server-specific deployment descriptor (sun-ejb-jar.xml) provides the following elements to store the EJB 1.1 finder method settings:
query-filterquery-paramsquery-variablesquery-ordering

Configuring Queries for 1.1 Finders
320 Application Server 8 • Developer’s Guide
The Sun Java System Application Server constructs a JDOQL query of the EJB 1.1 entity bean. It adds the filter, parameter declarations, and variable declaration and ordering as specified by the developer to the JDOQL query. It executes the query using the finder method parameters. The objects from the JDOQL query result set are converted into primary key instances to be returned by the EJB 1.1 ejbFind method.
The JDO specification (see JSR 12) provides a comprehensive description of JDOQL. The following information summarizes the elements used to define EJB 1.1 finders.
Query Filter ExpressionThe filter expression is a String containing a boolean expression evaluated for each instance of the candidate class. If the filter is not specified, it defaults to true. Rules for constructing valid expressions follow the Java language, with the following differences:
• Equality and ordering comparisons between primitives and instances of wrapper classes are valid.
• Equality and ordering comparisons of Date fields and Date parameters are valid.
• Equality and ordering comparisons of String fields and String parameters are valid.
• White space (non-printing characters space, tab, carriage return, and line feed) is a separator and is otherwise ignored.
• The following assignment operators are not supported:
❍ =, +=, etc.
❍ pre- and post-increment
❍ pre- and post-decrement
• Methods, including object construction, are not supported, except for:
Collection.contains(Object o)Collection.isEmpty()String.startsWith(String s)String.endsWith(String e)
In addition, the Sun Java System Application Server supports the following non-standard JDOQL methods:

Configuring Queries for 1.1 Finders
Chapter 8 Using Container-Managed Persistence for Entity Beans 321
String.like(String pattern)String.like(String pattern, char escape)String.substring(int start, int length)String.indexOf(String str), String.indexOf(String str, int start)String.length()Math.abs(numeric n), and Math.sqrt(double d)
• Navigation through a null-valued field, which would throw NullPointerException, is treated as if the subexpression returned false.
The following expressions are supported:
• Operators applied to all types where they are defined in the Java language:
❍ relational operators (==, !=, >, <, >=, <=)
❍ boolean operators (&, &&, |, ||, ~, !)
❍ arithmetic operators (+, -, *, /)
String concatenation is supported only for String + String.
• Parentheses to explicitly mark operator precedence
• Cast operator
• Promotion of numeric operands for comparisons and arithmetic operations. The rules for promotion follow the Java rules (see the numeric promotions of the Java language specification) extended by BigDecimal, BigInteger, and numeric wrapper classes.
Query ParametersThe parameter declaration is a String containing one or more parameter type declarations separated by commas. This follows the Java syntax for method signatures.
NOTE Comparisons between floating point values are by nature inexact. Therefore, equality comparisons (== and !=) with floating point values should be used with caution. Identifiers in the expression are considered to be in the name space of the candidate class, with the addition of declared parameters and variables. As in the Java language, this is a reserved word, and refers to the current instance being evaluated.

Configuring Queries for 1.1 Finders
322 Application Server 8 • Developer’s Guide
Query VariablesThe type declarations follow the Java syntax for local variable declarations.
Example1The following query returns all players called Michael. It defines a filter that compares the name field with a string literal:
name == "Michael"
The finder element of the sun-ejb-jar.xml file would look like this:
<finder><method-name>findPlayerByName</method-name><query-filter>name == "Michael"</query-filter>
</finder>
Example 2This query returns all products in a specified price range. It defines two query parameters which are the lower and upper bound for the price: double low, double high. The filter compares the query parameters with the price field:
low < price && price < high
Query ordering is set to price ascending.
The finder element of the sun-ejb-jar.xml file would look like this:
<finder><method-name>findInRange</method-name><query-params>double low, double high</query-params><query-filter>low < price && price < high</query-filter><query-ordering>price ascending</query-ordering>
</finder>
Example 3This query returns all players having a higher salary than the player with the specified name. It defines a query parameter for the name java.lang.String name. Furthermore, it defines a variable for the player to compare with. It has the type of the persistence capable class that corresponds to the bean:
mypackage.PlayerEJB_170160966_JDOState player
The filter compares the salary of the current player denoted by this keyword with the salary of the player with the specified name:
(this.salary > player.salary) && (player.name == name)

Restrictions and Optimizations
Chapter 8 Using Container-Managed Persistence for Entity Beans 323
The finder element of the sun-ejb-jar.xml file would look like this:
<finder><method-name>findByHigherSalary</method-name><query-params>java.lang.String name</query-params><query-filter>
(this.salary > player.salary) && (player.name == name)</query-filter><query-variables>mypackage.PlayerEJB_170160966_JDOState player</query-variables>
</finder>
Restrictions and OptimizationsThis section discusses any restrictions and performance optimizations you should be aware of in using CMP entity beans.
• Eager Loading of Field State
• Restrictions on Remote Interfaces
• Sybase Finder Limitation
• Date and Time Fields as CMP Field Types
Eager Loading of Field StateBy default, the EJB container loads the state for all CMP fields (except BLOB and CLOB fields) before invoking the ejbLoad method of the abstract bean. This approach may not be optimal for entity objects with large state if most business methods require access to only parts of the state. If this is an issue, use the fetched-with element in sun-cmp-mappings.xml for fields that are used infrequently.
Restrictions on Remote InterfacesThe following restrictions apply to the remote interface of an entity bean that uses CMP:
• Do not expose the get and set methods for CMR fields or the persistence collection classes that are used in container-managed relationships through the remote interface of the bean.
However, you are free to expose the get and set methods that correspond to the CMP fields of the entity bean through the bean’s remote interface.

Restrictions and Optimizations
324 Application Server 8 • Developer’s Guide
• Do not expose the container-managed collection classes that are used for relationships through the remote interface of the bean.
• Do not expose local interface types or local home interface types through the remote interface or remote home interface of the bean.
Dependent value classes can be exposed in the remote interface or remote home interface, and can be included in the client EJB JAR file.
Sybase Finder LimitationIf you execute any finder method with an input greater than 255 characters and map the primary key column to a VARCHAR column, Sybase attempts to convert type VARCHAR to type TEXT and generates the following error:
com.sybase.jdbc2.jdbc.SybSQLException: Implicit conversion from datatype 'TEXT' to 'VARCHAR' is not allowed. Use the CONVERT function to run this query.
To avoid this error, make sure your finder method input is less than 255 characters.
Date and Time Fields as CMP Field TypesIf a CMP field type is a Java date or time type (java.util.Date, java.sql.Date, java.sql.Time, java.sql.Timestamp), make sure that the field value exactly matches the value in the database.
For example, the following code uses a java.sql.Date type as a primary key field:
java.sql.Date myDate = new java.sql.Date(System.currentTimeMillis())beanHome.create(myDate, ...);
For some databases, this code results in only the year, month, and date portion of the field value being stored in the database. Later on if the client tries to find this bean by primary key as follows:
myBean = beanHome.findByPrimaryKey(myDate);
the bean is not found in the database because the value does not match the one that is stored in the database.
Similar problems can happen if the database truncates the timestamp value while storing it, or if a custom query has a date or time value comparison in its WHERE clause.
When you use automatic mapping and an Oracle database, all fields of type java.util.Date, java.sql.Date, java.sql.Time, and java.sql.Timestamp are mapped to Oracle’s DATE data type.

325
Chapter 9
Developing Java Clients
This chapter describes how to develop, assemble, and deploy J2EE Application Clients in the following sections:
• Introducing the Application Client Container
• Developing Clients Using the ACC
• Developing Clients Without the ACC
• Configuring the ORB
Introducing the Application Client ContainerThe Application Client Container (ACC) includes a set of Java classes, libraries, and other files that are required for and distributed with Java client programs that execute in their own Java Virtual Machine (JVM). The ACC manages the execution of J2EE application client components, which are used to access a variety of J2EE services (such as JMS resources, EJB components, web services, security, and so on.) from a JVM outside the Sun Java System Application Server.
The ACC communicates with the Application Server using RMI/IIOP protocol and manages the details of RMI/IIOP communication using the client ORB that is bundled with it. Compared to other J2EE containers, the ACC is lightweight.
SecurityThe ACC is responsible for collecting authentication data such as the username and password and sending the collected data to the Application Server. The server then processes the authentication data using the configured JavaTM Authentication and Authorization Service (JAAS) module. See “Authenticating an Application Client” on page 330.

Developing Clients Using the ACC
326 Application Server 8 • Developer’s Guide
Authentication techniques are provided by the client container, and are not under the control of the application client component. The container integrates with the platform’s authentication system. When you execute a client application, it displays a login window and collects authentication data from the user. It also support SSL (Secure Socket Layer)/IIOP if configured and when necessary.
NamingThe client container enables the application clients to use the Java Naming and Directory Interface (JNDI) to look up J2EE services (such as JMS resources, EJB components, web services, security, and so on.) and to reference configurable parameters set at the time of deployment.
Developing Clients Using the ACCThis section describes the procedure to develop, assemble, and deploy client applications using the ACC. This section describes the following topics:
• Using an Application Client to Access an EJB Component
• Using an Application Client to Access a JMS Resource
• Authenticating an Application Client
• Running an Application Client Using the ACC
• Packaging an Application Client Using the ACC
For information about Java-based clients that are not packaged using the ACC, see “Developing Clients Without the ACC” on page 334.
Using an Application Client to Access an EJB ComponentTo access an EJB component from an application client, perform the following steps:
1. In your client code, instantiate the InitialContext using the default (no argument) constructor:
InitialContext ctx = new InitialContext();
It is not necessary to explicitly instantiate a naming context that points to the CosNaming service.

Developing Clients Using the ACC
Chapter 9 Developing Java Clients 327
2. In your client code, look up the home object by specifying the JNDI name of the home object as specified in the ejb-jar.xml file. For example:
Object ref = ctx.lookup("beanA_JNDI_name");BeanAHome = (BeanAHome)PortableRemoteObject.narrow(ref,BeanAHome.class);
For more information about naming and lookups, see “Accessing the Naming Context” on page 387.
3. Define the ejb-ref elements in the application-client.xml file and the corresponding sun-application-client.xml file.
For more information on the sun-application-client.xml file, see “The sun-application-client.xml file” on page 237. For a general explanation of how to map JNDI names using reference elements, see “Mapping References” on page 395.
4. Deploy the application client and EJB component together in an application. For more information on deployment, see “Tools for Deployment” on page 106. You can use the --retrieve option to get the client JAR file.
You can also use the asadmin get-client-stubs command to retrieve the stubs and ties whether or not you requested their generation during deployment. The syntax is as follows:
asadmin get-client-stubs --user user --appname app_name local_dirpath
5. Ensure that the client JAR file includes the following files:
❍ a Java class to access the bean
❍ application-client.xml - J2EE 1.4 application client deployment descriptor
❍ sun-application-client.xml - Sun Java System Application Server specific client deployment descriptor. For information on the sun-application-client.xml file, see “The sun-application-client.xml file” on page 237.
❍ The MANIFEST.MF file. This file contains the main class, which states the complete package prefix and classname of the Java client.
You can package the application client using the package-appclient script. This is optional. See “Packaging an Application Client Using the ACC” on page 331.
6. Copy the following JAR files to the client machine and include them in the classpath on the client side:
❍ appserv-rt.jar - available at install_dir/lib
❍ j2ee.jar - available at install_dir/lib
❍ The client JAR file

Developing Clients Using the ACC
328 Application Server 8 • Developer’s Guide
7. If you need to access EJB components that are residing in a remote system other than the system where the application client is being developed, make the following changes to the sun-acc.xml file:
❍ Define the <target-server> address attribute to reference the remote server machine.
❍ Define the <target-server> port attribute to reference the ORB port on the remote server.
This information can be obtained from the domain.xml file on the remote system. For more information on domain.xml file, see the Sun Java System Application Server Reference.
For more information about the sun-acc.xml file, see “The sun-acc.xml File” on page 241.
8. Run the application client. See “Running an Application Client Using the ACC” on page 330.
Using an Application Client to Access a JMS ResourceTo access a JMS resource from an application client, perform the following steps:
1. Create a JMS client. For detailed instructions on developing a JMS client, see the J2EE tutorial:
http://java.sun.com/j2ee/1.4/docs/tutorial/doc/JMS.html#wp84181
2. Next, configure a JMS resource on the Sun Java System Application Server. For information on configuring JMS resources, see “Creating JMS Resources: Destinations and Connection Factories” on page 403.
3. Set the environment variable LD_LIBRARY_PATH. This variable should point to the Application Server, the Sun Java System Message Queue JAR files, and shared libraries:
LD_LIBRARY_PATH=/usr/lib/mps:/opt/SUNWappserver/lib:/usr/lib
If the Application Server is on a different system, copy all the JAR files and shared libraries from the /opt/SUNWappserver/lib, /usr/share/lib/imq, and /usr/lib/mps directories to the target system.

Developing Clients Using the ACC
Chapter 9 Developing Java Clients 329
4. Define the resource-ref elements in the application-client.xml file and the corresponding sun-application-client.xml file.
For more information on the sun-application-client.xml file, see “The sun-application-client.xml file” on page 237. For a general explanation of how to map JNDI names using reference elements, see “Mapping References” on page 395.
5. Ensure that the client JAR file includes the following files:
❍ a Java class to access the resource
❍ application-client.xml - J2EE 1.4 application client deployment descriptor
❍ sun-application-client.xml - Sun Java System Application Server specific client deployment descriptor. For information on the sun-application-client.xml file, see “The sun-application-client.xml file” on page 237.
❍ The MANIFEST.MF file. This file contains the main class, which states the complete package prefix and classname of the Java client.
You can package the application client using the package-appclient script. This is optional. See “Packaging an Application Client Using the ACC” on page 331.
6. Copy the following JAR files to the client machine and include them in the classpath on the client side:
❍ appserv-rt.jar - available at install_dir/lib
❍ j2ee.jar - available at install_dir/lib
❍ The client JAR file
7. Set the values for the Java Virtual Machine startup options:
jvmarg value = "-Dorg.omg.CORBA.ORBInitialHost=${ORBhost}"jvmarg value = "-Dorg.omg.CORBA.ORBInitialPort=${ORBport}"
Here ORBhost is the Application Server hostname and ORBport is the ORB port number (default 3700).
This information can be obtained from the domain.xml file. For more information on domain.xml file, see the Sun Java System Application Server Reference.
8. Run the application client. See “Running an Application Client Using the ACC” on page 330.

Developing Clients Using the ACC
330 Application Server 8 • Developer’s Guide
Authenticating an Application ClientUsing the JAAS module, you can provide security in your application client code. See “Authenticating an Application Client Using the JAAS Module” on page 67.
Running an Application Client Using the ACCTo run an application client, launch the ACC using the appclient script.
appclient -client client_application_jar [-mainclass client_application_main_class_name|-name display_name][-xml sun-acc.xml] [-textauth] [-user user_name] [-password password] [app_args]
• -client: Specifies the name and location of the client JAR file. This is a required parameter.
• -mainclass: Specifies the class name whose main() method is to be invoked. By default, the class specified in the client JAR’s Main-class attribute of the MANIFEST file is used. This is optional.
• -name: Specifies the display name that is located in the client JAR file. By default, the display name is specified in the client JAR application-client.xml file and identified by the display-name attribute. This is optional.
• -xml: Specifies the name and location of the ACC configuration XML file, which is required if you are not using the default domain. By default, the ACC uses domain_dir/config/sun-acc.xml for clients running on the application server, or install_dir/lib/appclient/sun-acc.xml for clients that are packaged using the package-applclient script.
• -textauth: Specifies authentication using the text format. This is optional.
• -user: Specifies the user.
NOTE The class name must be the full name, for example, com.sun.test.AppClient.
NOTE The -mainclass and -name parameters are optional for a single client application. For multiple client applications, you must use either the -classname option or the -name option.

Developing Clients Using the ACC
Chapter 9 Developing Java Clients 331
• -password: Specifies the user’s password.
• app_args: Specifies the arguments passed to the client’s main() method. This is optional.
The following example shows how to run the sample application client, rmiConverter:
appclient -client rmi-simpleClient.jar
Packaging an Application Client Using the ACCThe package-appclient script, located in the install_dir/bin directory, is used to package a client application into a single appclient.jar file. Packaging an application client involves the following main steps:
• Editing the Configuration File
• Editing the appclient Script
• Editing the sun-acc.xml File
• Setting Security Options
• Using the package-appclient Script
Editing the Configuration FileModify the environment variables in asenv.conf file located in the default-config_dir directory as shown below:
• $AS_INSTALL to reference the location where the package was un-jared plus /appclient. For example: $AS_INSTALL=/install_dir/appclient.
• $AS_NSS to reference the location of the nss libs.
For example:
UNIX:
$AS_NSS=/install_dir/appclient/lib
WINDOWS:
%AS_NSS%=\install_dir\appclient\bin
• $AS_JAVA to reference the location where you have installed the JDK.
• $AS_ACC_CONFIG to reference the configuration xml (sun-acc.xml). The sun-acc.xml is located at install_dir/config.

Developing Clients Using the ACC
332 Application Server 8 • Developer’s Guide
• $AS_IMQ_LIB to reference the imq home. It should be: domain_dir/imq/lib.
Editing the appclient ScriptModify the appclient script file as follows:
UNIX:
Change $CONFIG_HOME/asenv.conf to your_ACC_dir/config/asenv.conf.
Windows:
Change %CONFIG_HOME%\config\asenv.bat to your_ACC_dir\config\asenv.bat
Editing the sun-acc.xml FileModify sun-acc.xml file to set the following attributes:
• Ensure that the DOCTYPE references %%%SERVER_ROOT%%%/lib/dtds to your_ACC_dir/lib/dtds.
• Ensure that the <target-server> address attribute references the remote server machine.
• Ensure that the <target-server> port attribute references the ORB port on the remote server.
• If you want to log the messages in a file, specify a file name for the <log-service> file attribute. You can also set the log level. For example:
<?xml version="1.0" encoding="UTF-8"?>
<!DOCTYPE client-container SYSTEM "file:{Your installed server root}/lib/dtds/sun-application-client-container_1_0.dtd">
<client-container>
<target-server name="qasol-e1" address="qasol-e1" port="3700">
<log-service level="WARNING"/>
</client-container>
For more information on the sun-acc.xml file, see “The sun-acc.xml File” on page 241.
Setting Security OptionsYou can run the application client using SSL with certificate authentication. In order to set the security options, modify the sun-acc.xml file as shown in the code illustration below. For more information on the sun-acc.xml file, see “The sun-acc.xml File” on page 241.
<?xml version="1.0" encoding="UTF-8"?>

Developing Clients Using the ACC
Chapter 9 Developing Java Clients 333
<!DOCTYPE client-container SYSTEM "file:////opt/SUNWappserver/lib/dtds/sun-application-client-container_1_0.dtd">
<client-container>
<target-server name="qasol-e1" address="qasol-e1" port="3700">
<security>
<ssl cert-nickname="cts"
ssl2-enabled="false"
ssl2-ciphers="-rc4,-rc4export,-rc2,-rc2export,-des,-desede3"
ssl3-enabled="true"
ssl3-tls-ciphers="+rsa_rc4_128_md5,-rsa_rc4_40_md5,+rsa3_des_sha,+rsa_des_sha,-rsa_rc2_40_md5,-rsa_null_md5,-rsa_des_56_sha,-rsa_rc4_56_sha"
tls-enabled="true"
tls-rollback-enabled="true"/>
<cert-db path="/export3/ctsdata/ctscertdb" password="changeit"/>
</security>
</target-server>
<client-credential user-name="j2ee" password="j2ee"/>
<log-service level="WARNING"/>
</client-container>
Using the package-appclient ScriptThe following steps describe the procedure to use the package-appclient script that is bundled with Sun Java System Application Server:
1. Under install_dir/bin directory, run the package-appclient script. This creates an appclient.jar file and stores it under install_dir/lib/appclient/ directory.
NOTE The appclient.jar file provides an application client container package targeted at remote hosts and does not contain a server installation. You can run this file from a remote machine with the same operating system as where it is created. That is, appclient.jar created on a Solaris platform will not function on Windows.

Developing Clients Without the ACC
334 Application Server 8 • Developer’s Guide
2. Copy the install_dir/lib/appclient/appclient.jar file to the desired location. The appclient.jar file contains the following files:
❍ appclient/bin - contains the appclient script which you use to launch the ACC.
❍ appclient/lib - contains the JAR and runtime shared library files.
❍ appclient/lib/appclient - contains the following files:
• sun-acc.xml - the ACC configuration file.
• client.policy file- the security manager policy file for the ACC.
• appclientlogin.conf file - the login configuration file.
• client.jar file - is created during the deployment of the client application.
❍ appclient/lib/dtds - contains sun-application_client-container_1_0.dtd which is the DTD corresponding to sun-acc.xml.
client.policyclient.policy file is the J2SE policy file used by the application client. Each application client has a client.policy file. The default policy file limits the permissions of J2EE deployed application clients to the minimal set of permissions required for these applications to operate correctly. If you develop an application client that requires more than this default set of permissions, you can edit the client.policy file to add the custom permissions that your applications need. You can use the J2SE standard policy tool or any text editor to edit this file.
For more information on using the J2SE policy tool, visit the following URL:
http://java.sun.com/docs/books/tutorial/security1.2/tour2/index.html
For more information about the permissions you can set in the client.policy file, visit the following URL:
http://java.sun.com/j2se/1.4/docs/guide/security/permissions.html
Developing Clients Without the ACCThis section describes the procedure to create, assemble, and deploy a Java-based client that is not packaged using the Application Client Container (ACC). This section describes the following topics:
• Using a Stand-Alone Client to Access an EJB Component

Developing Clients Without the ACC
Chapter 9 Developing Java Clients 335
• Using a Stand-Alone Client to Access a JMS Resource
• Authenticating a Stand-Alone Client
For information about using the ACC, see “Developing Clients Using the ACC” on page 326.
Using a Stand-Alone Client to Access an EJB ComponentTo access an EJB component from a stand-alone client, perform the following steps:
1. In your client code, instantiate the InitialContext using the default (no argument) constructor:
InitialContext ctx = new InitialContext();
It is not necessary to explicitly instantiate a naming context that points to the CosNaming service.
2. In your client code, look up the home object by specifying the interoperable name of the home object. For example:
Object ref = ctx.lookup("beanA_interop_name");BeanAHome = (BeanAHome)PortableRemoteObject.narrow(ref,BeanAHome.class);
For more information about naming and lookups, see “Accessing the Naming Context” on page 387.
3. Deploy the EJB component to be accessed. For more information on deployment, see “Tools for Deployment” on page 106. You can use the --retrieve option to get the client JAR file.
You can also use the asadmin get-client-stubs command to retrieve the stubs and ties whether or not you requested their generation during deployment. The syntax is as follows:
asadmin get-client-stubs --user user --appname app_name local_dirpath
4. Ensure that the client JAR file includes the following files:
❍ a Java class to access the bean
❍ The MANIFEST.MF file. This file contains the main class, which states the complete package prefix and classname of the Java client.
5. Copy the following JAR files to the client machine and include them in the classpath on the client side:

Developing Clients Without the ACC
336 Application Server 8 • Developer’s Guide
❍ appserv-rt.jar - available at install_dir/lib
❍ j2ee.jar - available at install_dir/lib
❍ The client JAR file
6. If you need to access EJB components that are residing in a remote system other than the system where the application client is being developed, set the values for the Java Virtual Machine startup options:
jvmarg value = "-Dorg.omg.CORBA.ORBInitialHost=${ORBhost}"jvmarg value = "-Dorg.omg.CORBA.ORBInitialPort=${ORBport}"
Here ORBhost is the Application Server hostname and ORBport is the ORB port number (default 3700).
This information can be obtained from the domain.xml file on the remote system. For more information on domain.xml file, see the Sun Java System Application Server Reference.
7. Run the stand-alone client. As long as the client environment is set appropriately and you are using a compatible JVM, you merely need to run the main class.
Using a Stand-Alone Client to Access a JMS ResourceTo access a JMS resource from a stand-alone client, perform the following steps:
1. Create a JMS client. For detailed instructions on developing a JMS client, see the J2EE tutorial:
http://java.sun.com/j2ee/1.4/docs/tutorial/doc/JMS.html#wp84181
2. Next, configure a JMS resource on the Sun Java System Application Server. For information on configuring JMS resources, see “Creating JMS Resources: Destinations and Connection Factories” on page 403.
3. Set the environment variable LD_LIBRARY_PATH. This variable should point to the Application Server, the Sun Java System Message Queue JAR files, and shared libraries:
LD_LIBRARY_PATH=/usr/lib/mps:/opt/SUNWappserver/lib:/usr/lib
If the Application Server is on a different system, copy all the JAR files and shared libraries from the /opt/SUNWappserver/lib, /usr/share/lib/imq, and /usr/lib/mps directories to the target system.

Developing Clients Without the ACC
Chapter 9 Developing Java Clients 337
4. Ensure that the client JAR file includes the following files:
❍ a Java class to access the resource
❍ The MANIFEST.MF file. This file contains the main class, which states the complete package prefix and classname of the Java client.
5. Copy the following JAR files to the client machine and include them in the classpath on the client side:
❍ appserv-rt.jar - available at install_dir/lib
❍ j2ee.jar - available at install_dir/lib
❍ The client JAR file
6. Set the values for the Java Virtual Machine startup options:
jvmarg value = "-Dorg.omg.CORBA.ORBInitialHost=${ORBhost}"jvmarg value = "-Dorg.omg.CORBA.ORBInitialPort=${ORBport}"
Here ORBhost is the Application Server hostname and ORBport is the ORB port number (default 3700).
This information can be obtained from the domain.xml file. For more information on domain.xml file, see the Sun Java System Application Server Reference.
7. Run the stand-alone client. As long as the client environment is set appropriately and you are using a compatible JVM, you merely need to run the main class.
Authenticating a Stand-Alone ClientThis section describes the necessary steps and procedure to create a client that accesses secure EJBs from outside the ACC.
First, you must setup your client development environment using the following steps:
1. Set org.omg.CORBA.ORBInitialHost to the host on which the IIOP listener is running.
env.setProperty("org.omg.CORBA.ORBInitialHost", "name service hostname");
2. Set org.omg.CORBA.ORBInitialPort to the port on which the IIOP listener is listening (usually 3700).
env.setProperty("org.omg.CORBA.ORBInitialPort", "3700");

Developing Clients Without the ACC
338 Application Server 8 • Developer’s Guide
3. Set the following property:
env.setProperty("com.sun.CORBA.connection.ORBSocketFactory", "com.sun.enterprise.iiop.IIOPSSLSocketFactory");
4. Set java.security.auth.login.config to install_dir/lib/appclient/appclientlogin.conf
Next, add the following code to the client application:
1. Obtain a username and a password. To obtain a username and a password, you can either write your own JAAS login callback handler or use the standard one provided with Sun Java System Application Server (com.sun.enterprise.security.auth.login.LoginCallbackHandler).
The following code line illustrates the use of standard handler using GUI-based authentication:
LoginCallbackHandler handler = new LoginCallbackHandler(true);
The following code line illustrates the use of standard handler using the text authentication:
LoginCallbackHandler handler = new LoginCallbackHandler(false);
The following code line is an example code for writing your own login callback handler:
import javax.security.auth.callback.CallbackHandler;import javax.security.auth.callback.UnsupportedCallbackException;import javax.security.auth.callback.Callback;import javax.security.auth.callback.NameCallback;import javax.security.auth.callback.PasswordCallback;
public class LoginCallbackHandler implements CallbackHandler {
private String username = "j2ee";private String password = "j2ee";
public void handle(Callback[] callbacks) throws UnsupportedCallbackException { try {
for (int i = 0; i <callbacks.length; i++) {if (callbacks[i] instanceof NameCallback) {
NameCallback nc = (NameCallback)callbacks[i];
NOTE Do not set java.naming.factory.initial. The default JNDI provider is by default picked from the set classpath.

Configuring the ORB
Chapter 9 Developing Java Clients 339
nc.setName(username);} else if(callbacks[i] instanceof PasswordCallback) {
PasswordCallback pc = (PasswordCallback)callbacks[i];pc.setPassword(password.toCharArray());
}}
} catch (Exception ex) {ex.printStackTrace();
}}
}
2. Pass an instance of your handler to the security infrastructure using the following call:
LoginContextDriver.doClientLogin(AppContainer.USERNAME_PASSWORD, handler);
The following two imports are required for the above call:
import com.sun.enterprise.appclient.AppContainer;import com.sun.enterprise.security.auth.LoginContextDriver;
Configuring the ORBThis section describes how to configure the built-in ORB or a third party ORB in the following topics:
• ORB Support Architecture
• Configuring Load-Balancing for EJB Client Applications
• Third Party ORB Support
ORB Support ArchitectureCORBA client support in the Application Server involves communication between the ORB on the client and the ORB on the server, as shown in the following figure.

Configuring the ORB
340 Application Server 8 • Developer’s Guide
Figure 9-1 ORB Support Architecture
You can use the ORB that is bundled as part of the Application Server, or you can use a third-party ORB (ORBIX 2000 or ORBacus 4.1).
Configuring Load-Balancing for EJB Client ApplicationsIf you are using built-in Sun Java System Application Server ORB, you can configure client-side load balancing using the Round Robin DNS approach.
To implement a simple load balancing scheme without making source code changes to your client, you can leverage the round robin feature of DNS. In this approach, you define a single virtual host name representing multiple physical IP addresses on which server instance ORBs are listening. Assuming that you configure all of the ORBs to listen on a common IIOP port number, the client applications can use a single host_name: IIOP port during the JNDI lookup. The DNS server resolves the host name to a different IP address each time the client is executed.
You can also implement client-side load balancing using the Sun Java System Application Server-specific naming factory class SIASCtxFactory. You can use this class both on the client-side and on the server-side which maintains a pool of ORB instances in order to limit the number of ORB instances that are created in a given process.
Sun Java System Application Server
RMI/IIOP
Java Engine
EJB
EJB Container
ClientORB
SunORB
SunORB
OtherORB
RMI/IIOPJavaClient
BackendCORBAServerIIOP

Configuring the ORB
Chapter 9 Developing Java Clients 341
The following code illustrates the use of S1ASCtxFactory class:
Properties env = new Properties();
env.setProperty("java.naming.factory.initial","com.sun.appserv.naming.S1ASCtxFactory");
env.setProperty("org.omg.CORBA.ORBInitialHost","name service hostname");
env.setProperty("org.omg.CORBA.ORBInitialPort", "name service port number");
InitialContext ic = new InitialContext(env);
If you set a single URL property for the host and port above, your code would look like this:
Properties env = new Properties();
env.setProperty("java.naming.factory.initial", "com.sun.appserv.naming.S1ASCtxFactory");
env.setProperty("java.naming.provider.url", "iiop://"name service hostname:name service port number");
InitialContext ic = new InitialContext(env);
If you prefer, you may set the host and port values and the URL value as Java System properties, instead of setting them in the environment as shown in the above code illustration. The values set in your code will, however, override any System property settings. Also, if you set both the URL and the host and port properties, the URL takes precedence.
Note that the [name service hostname] value mentioned above could be a name that maps to multiple IP addresses. The S1ASCtxFactory will appropriately round robin ORB instances across all the IP addresses everytime a user calls new InitialContext() method.
You can also use the following property of S1ASCtxFactory class to implement client-side load balancing:
com.sun.appserv.iiop.loadbalancingpolicy=roundrobin,host1:port1,host2:port2...
This property provides you with a list of host:port combinations to round robin the ORBs. These host names may also map to multiple IP addresses. If you use this property along with org.omg.CORBA.ORBInitialHost and org.omg.CORBA.ORBInitialPort as system properties, the round robin algorithm will round robin across all the values provided. If, however, you provide a host name and port number in your code, in the environment object, that value will override any such system property settings.

Configuring the ORB
342 Application Server 8 • Developer’s Guide
Third Party ORB SupportSun Java System Application Server provides a built-in ORB to support IIOP access to the EJBs. For information on configuring the built-in ORB for supporting CORBA clients, see the Sun Java System Application Server Administration Guide.
You can also install and configure a third party ORB to use IIOP with Application Server. J2EE components (such as Servlet and EJBs) deployed to Sun Java System Application Server can access backend CORBA objects through third party Object Request Brokers (ORBs). This support enables J2EE applications to leverage investments in the existing CORBA-based business components. In addition to supporting server side access to backend CORBA objects, you can also use the built-in ORB for RMI/IIOP-based access to EJB components from Java or C++ application clients as explained in the RMI/IIOP samples.
Configuring the Orbix ORB with the Sun Java System Application Server involves the following steps:
• Installing Orbix
• Configuring Sun Java System Application Server to Use Orbix
• Overriding the Built-in ORB
Installing OrbixTo install Orbix, perform the following steps:
• Ensure that you have the Orbix 2000 software available for installation.
• Install the software. For instructions, read the Orbix Installation Guide.
• Verify that the Orbix configuration is correct.
Configuring Sun Java System Application Server to Use OrbixYou must configure the runtime environment to enable the Sun Java System Application Server to load the Orbix ORB classes. Add the following to the classpath:
• Orbix classes
• OMG classes
• Directory containing the Orbix license file

Configuring the ORB
Chapter 9 Developing Java Clients 343
To edit the classpath using the Administration Console:
1. Login to the Administration Console by going to the following URL in your web browser:
http://host:port/asadmin
For example:
http://localhost:4848/asadmin
2. Go to the Application Server page.
3. Click on the JVM Settings tab, then click on Path Settings.
4. Append the following to the Classpath Suffix text field, all on one line:
/etc/opt/iona/:/opt/iona/orbix_art/1.2/classes/orbix2000.jar:/opt/iona/orbix_art/1.2/classes/omg.jar
5. Click Save.
Overriding the Built-in ORBSun Java System Application Server relies on a built-in ORB to support RMI/IIOP access to EJB components from Java application clients. When implementing servlets and EJB components that access backend CORBA-based applications residing outside of the application server, you may need to override the built-in ORB classes with the ORB classes from third party products such as Orbix 2000.
You can use any of the following approaches to override the built-in ORB classes with ORB classes from third party products:
• ORB.init() Properties Approach
• orb.properties Approach
• Providing JVM Start-up Arguments
ORB.init() Properties ApproachThe code illustration given below overrides the built-in ORB classes with ORB classes from IONA’s ORBIX 2000.
...
Properties orbProperties = new Properties();
orbProperties.put("org.omg.CORBA.ORBClass","com.iona.corba.art.artimpl.ORBImpl");
orbProperties.put("org.omg.CORBA.ORBSingletonClass","com.iona.corba.art.artimpl.ORBSingleton");
orb = ORB.init(args, orbProperties);
...

Configuring the ORB
344 Application Server 8 • Developer’s Guide
The advantage of this approach is that RMI/IIOP access to EJB components housed in the application server will still be performed using the built-in ORB classes while only access from servlets and EJB components to backend CORBA-based applications will use the third party ORB classes. This is the efficient method of supporting simultaneous use of multiple ORBs in the application server environment.
orb.properties ApproachIn Java 2 1.2.1 environment, the JVM’s orb.properties file contains property settings to identify the ORB implementation classes that are used by default throughout the JVM. To override the use of the built-in ORB classes, you can simply modify the orb.properties file to specify third party ORB classes and restart the application server.
For example, to set the implementation classes to specify the Orbix 2000 classes, make the following modification to the orb.properties file located at install_dir/jdk/jre/lib/.
Before:
org.omg.CORBA.ORBClass=com.sun.corba.se.internal.Interceptors.PIOR
org.omg.CORBA.ORBSingletonClass=com.sun.corba.se.internal.corba.ORBSingleton
After:
org.omg.CORBA.ORBClass=com.iona.corba.art.artimpl.ORBImpl
org.omg.CORBA.ORBSingletonClass=com.iona.corba.art.artimpl.ORBSingleton
The javax.rmi classes are used to support RMI/IIOP client access to EJB components housed in the application server. Since these classes are not used to access backend CORBA servers, you do not need to override these settings.
The main advantage of this approach is that it involves only one time setting for all applications deployed to the application server. There is no need for each servlet and/or EJB component that is acting as a client to a backend CORBA application to specify the ORB implementation classes.
Providing JVM Start-up ArgumentsYou can also specify the ORB implementation classes as server’s JVM_ARGS in the domain.xml file.
Go to domain_dir/config and edit the domain.xml file and add these JVM options as a subelement under <java-config> element.

Configuring the ORB
Chapter 9 Developing Java Clients 345
<jvm-options>-Dorg.omg.CORBA.ORBClass=com.iona.corba.art.artimpl.ORBImpl
</jvm-options> <jvm-options>
-Dorg.omg.CORBA.ORBSingletonClass=com.iona.corba.art.artimpl.ORBSingleton</jvm-options>
This approach gives the benefit of specifying the ORB implementation classes only once, but the main advantage when compared to changing the orb.properties file is that, the changes made to server’s configuration file are specific to server instance and are applicable to all the applications running on a particular instance only.

Configuring the ORB
346 Application Server 8 • Developer’s Guide

347
Chapter 10
Developing Lifecycle Listeners
Lifecycle listener modules provide a means of running short or long duration Java-based tasks within the application server environment, such as instantiation of singletons or RMI servers. These modules are automatically initiated at server startup and are notified at various phases of the server life cycle.
The following sections describe how to create and use a lifecycle module:
• Server Life Cycle Events
• The LifecycleListener Interface
• The LifecycleEvent Class
• The Server Lifecycle Event Context
• Assembling and Deploying a Lifecycle Module
• Considerations for Lifecycle Modules
Server Life Cycle EventsA lifecycle module listens for and performs its tasks in response to the following events in the server life cycle:
• During the INIT_EVENT, the server reads the configuration, initializes built-in subsystems (such as security and logging services), and creates the containers.
• During the STARTUP_EVENT, the server loads and initializes deployed applications.
• During the READY_EVENT, the server is ready to service requests.
• During the SHUTDOWN_EVENT, the server destroys loaded applications and stops.

The LifecycleListener Interface
348 Application Server 8 • Developer’s Guide
• During the TERMINATION_EVENT, the server closes the containers, the built-in subsystems, and the server runtime environment.
These events are defined in the LifecycleEvent class.
The lifecycle modules that listen for these events implement the LifecycleListener interface and are configured in the domain.xml file.
The LifecycleListener InterfaceTo create a lifecycle module is to configure a customized class that implements the com.sun.appserv.server.LifecycleListener interface. You can create and simultaneously execute multiple lifecycle modules.
The LifecycleListener interface defines this method:
• public void handleEvent(com.sun.appserv.server.LifecycleEvent
event) throws ServerLifecycleException
This method responds to a lifecycle event and throws a com.sun.appserv.server.ServerLifecycleException if an error occurs.
A sample implementation of the LifecycleListener interface is the LifecycleListenerImpl.java file, which you can use for testing lifecycle events:
package com.sun.appserv.server;
import java.util.Properties;
/*** LifecycleListenerImpl is a dummy implementation for the LifecycleListener * interface.This implementaion stubs out various lifecycle interface methods.*/
public class LifecycleListenerImpl implements LifecycleListener {
/** receive a server lifecycle event * @param event associated event* @throws <code>ServerLifecycleException</code> for exceptional condition.** Configure this module as a lifecycle-module in domain.xml:** <applications>* <lifecycle-module name="test" * class-name="com.sun.appserv.server.LifecycleListenerImpl" * is-failure-fatal="false">

The LifecycleListener Interface
Chapter 10 Developing Lifecycle Listeners 349
* <property name="foo" value="fooval"/>* </lifecycle-module>* </applications>** Set<code>is-failure-fatal</code>in domain.xml to <code>true</code> for * fatal conditions.*/public void handleEvent(LifecycleEvent event) throws ServerLifecycleException {
LifecycleEventContext context = event.getLifecycleEventContext();
context.log("got event" + event.getEventType() + " event data: " + event.getData());
Properties props;
if (LifecycleEvent.INIT_EVENT == event.getEventType()) {context.log("LifecycleListener: INIT_EVENT");
props = (Properties) event.getData();
// handle INIT_EVENTreturn;
}
if (LifecycleEvent.STARTUP_EVENT == event.getEventType()) {context.log("LifecycleListener: STARTUP_EVENT");
// handle STARTUP_EVENTreturn;
}
if (LifecycleEvent.READY_EVENT == event.getEventType()) {
context.log("LifecycleListener: READY_EVENT");
// handle READY_EVENTreturn;
}
if (LifecycleEvent.SHUTDOWN_EVENT== event.getEventType()) {context.log("LifecycleListener: SHUTDOWN_EVENT");
// handle SHUTDOWN_EVENTreturn;

The LifecycleEvent Class
350 Application Server 8 • Developer’s Guide
}
if (LifecycleEvent.TERMINATION_EVENT == event.getEventType()) {context.log("LifecycleListener: TERMINATE_EVENT");
// handle TERMINATION_EVENTreturn;
}}
}
The LifecycleEvent ClassThe com.sun.appserv.server.LifecycleEvent class defines a server life cycle event. The following methods are associated with the event:
• public java.lang.Object getData()
This method returns the data associated with the event.
• public int getEventType()
This method returns the event type, which is INIT_EVENT, STARTUP_EVENT, READY_EVENT, SHUTDOWN_EVENT, or TERMINATION_EVENT.
• public com.sun.appserv.server.LifecycleEventContext
getLifecycleEventContext()
This method returns the lifecycle event context, described next.
A LifecycleEvent instance is passed to the LifecycleListener.handleEvent method.
The Server Lifecycle Event ContextThe com.sun.appserv.server.LifecycleEventContext interface exposes runtime information about the server. The lifecycle event context is created when the LifecycleEvent class is instantiated at server initialization. The LifecycleEventContext interface defines these methods:
• public java.lang.String[] getCmdLineArgs()
This method returns the server startup command-line arguments.
• public java.lang.String getInstallRoot()

Assembling and Deploying a Lifecycle Module
Chapter 10 Developing Lifecycle Listeners 351
This method returns the server installation root directory.
• public java.lang.String getInstanceName()
This method returns the server instance name.
• public javax.naming.InitialContext getInitialContext()
This method returns the initial JNDI naming context. The naming environment for lifecycle modules is installed during the STARTUP_EVENT. A lifecycle module can look up any resource defined in the domain.xml file by its jndi-name attribute after the STARTUP_EVENT is complete.
If a lifecycle module needs to look up resources, it can do so in the READY_EVENT. It can use the getInitialContext() method to get the initial context to which all the resources are bound.
• public void log(java.lang.String message)
This method writes the specified message to the server log file. The message parameter is a String specifying the text to be written to the log file.
• public void log(java.lang.String message, java.lang.Throwable
throwable)
This method writes an explanatory message and a stack trace for a given Throwable exception to the server log file. The message parameter is a String that describes the error or exception. The throwable parameter is the Throwable error or exception.
Assembling and Deploying a Lifecycle ModuleYou assemble a lifecycle module as described in “Assembling a Lifecycle Module” on page 98. You deploy a lifecycle module as described in “Deploying a Lifecycle Module” on page 111.
During lifecycle module deployment, a lifecycle-module element is created in the domain.xml file. You can edit this file to change its configuration. The property subelement allows you to specify input parameters. For example:
NOTE To avoid collisions with names of other enterprise resources in JNDI, and to avoid portability problems, all names in a Sun Java System Application Server lifecycle module should begin with the string java:comp/env.

Considerations for Lifecycle Modules
352 Application Server 8 • Developer’s Guide
<lifecycle-module name="customStartup" enabled="true" class-name="com.acme.CustomStartup" classpath="/apps/customStartup" load-order="200" is-failure-fatal="true">
<description>custom startup module to do my tasks</description> <property name="rmiServer" value="acme1:7070" /> <property name="timeout" value="30" />
</lifecycle-module>
Note that if is-failure-fatal is set to true (the default is false), lifecycle module failure prevents server initialization or startup, but not shutdown or termination.
For more information about the domain.xml file, see the Sun Java System Application Server Reference.
After you deploy a lifecycle module, you must restart the server to activate it. The server instantiates it and registers it as a lifecycle event listener at server initialization.
Considerations for Lifecycle ModulesThe resources allocated during initialization or startup should be freed during shutdown or termination. The lifecycle module classes are called synchronously from the main server thread, therefore it is important to ensure that these classes don’t block the server. Lifecycle modules may create threads if appropriate, but these threads must be stopped in the shutdown and termination phases.
The LifeCycleModule Classloader is the parent classloader for lifecycle modules. Each lifecycle module’s classpath in domain.xml is used to construct its classloader. All the support classes needed by a lifecycle module must be available to the LifeCycleModule Classloader or its parent, the Connector Classloader.
You must ensure that the server.policy file is appropriately set up, or a lifecycle module trying to perform a System.exec() may cause a security access violation. For details, see “The server.policy File” on page 60.
The configured properties for a lifecycle module are passed as properties in the INIT_EVENT. The JNDI naming context is not available in the INIT_EVENT. If a lifecycle module requires the naming context, it can get this in the STARTUP_EVENT, READY_EVENT, or SHUTDOWN_EVENT.

Part III
Using Services and APIs
Chapter 11, “Using the JDBC API for Database Access”
Chapter 12, “Using the Transaction Service”
Chapter 13, “Using the Java Naming and Directory Interface”
Chapter 14, “Using the Java Message Service”
Chapter 15, “Using the JavaMail API”


355
Chapter 11
Using the JDBC API for DatabaseAccess
This chapter describes how to use the Java™ Database Connectivity (JDBC™) API for database access with the Sun Java™ System Application Server. This chapter also provides high level JDBC implementation instructions for servlets and EJB™ components using the Sun Java System Application Server. The Sun Java System Application Server supports the JDBC 3.0 API, which encompasses the JDBC 2.0 Optional Package API.
• General Steps for Creating a JDBC Resource
• Configurations for Specific JDBC Drivers
• Creating Applications That Use the JDBC API
The JDBC specifications are available here:
http://java.sun.com/products/jdbc/download.html
A useful JDBC tutorial is located here:
http://java.sun.com/docs/books/tutorial/jdbc/index.html
For explanations of two-tier and three-tier database access models, see the Sun Java System Application Server Administration Guide.
NOTE Sun Java System Application Server does not support connection pooling or transactions for an application’s database access if it does not use standard J2EE™ DataSource objects.

General Steps for Creating a JDBC Resource
356 Application Server 8 • Developer’s Guide
General Steps for Creating a JDBC ResourceTo prepare a JDBC resource for use in J2EE applications deployed to the Sun Java System Application Server, perform the following tasks:
• Integrating the JDBC Driver
• Creating a Connection Pool
• Testing a Connection Pool
• Creating a JDBC Resource
For information about how to configure some specific JDBC drivers, see “Configurations for Specific JDBC Drivers” on page 364.
Integrating the JDBC DriverTo use JDBC features, you must choose a JDBC driver to work with the Sun Java System Application Server, then you must set up the driver. This section covers these topics:
• Supported Database Drivers
• Making the JDBC Driver JAR Files Accessible
Supported Database Drivers Supported JDBC drivers are those that have been fully tested by Sun. For a list of the JDBC drivers currently supported by the Sun Java System Application Server, see the Sun Java System Application Server Platform Edition 8 Release Notes.
For configurations of supported and other drivers, see “Configurations for Specific JDBC Drivers” on page 364.
NOTE Because the drivers and databases supported by the Sun Java System Application Server are constantly being updated, and because database vendors continue to upgrade their products, always check with Sun technical support for the latest database support information.

General Steps for Creating a JDBC Resource
Chapter 11 Using the JDBC API for Database Access 357
Making the JDBC Driver JAR Files AccessibleTo integrate the JDBC driver into a Sun Java System Application Server domain, copy the JAR files into the domain_dir/lib/ext directory, then restart the server. This makes classes accessible to any application or module across the domain. For more information about Sun Java System Application Server classloaders, see “Classloaders” on page 85.
Creating a Connection PoolWhen you create a connection pool that uses JDBC technology (“JDBC connection pool”) in the Sun Java System Application Server, you can define many of the characteristics of your database connections.
You can create a connection pool in one of these ways:
• Using the Administration Console
• Using the Command Line Interface
The “Using the Administration Console” section describes each connection pool setting. The “Using the Command Line Interface” section merely lists syntax and default values.
For additional information about connection pools, including connection pool monitoring, see the Sun Java System Application Server Administration Guide.
Using the Administration ConsoleTo create a JDBC connection pool using the Administration Console, perform these tasks:
1. Login to the Administration Console by going to the following URL in your web browser:
http://host:port/asadmin
For example:
http://localhost:4848/asadmin
2. Open the JDBC component.
3. Click Connection Pools.
4. Click the New button.
5. Enter the following information:
❍ Name (required) - Enter a name (or ID) for the connection pool.

General Steps for Creating a JDBC Resource
358 Application Server 8 • Developer’s Guide
❍ Resource Type - Select the JDBC driver’s DataSource interface name if the DataSource class implements more than one DataSource type (DataSource, XADataSource, or ConnectionPoolDataSource). Leave blank if the class implements only one interface.
❍ Database Vendor - Select the database vendor from the drop-down list.
6. Click the Next button.
7. Enter the following information:
❍ Datasource Classname (required) - Enter the vendor-supplied DataSource class name.
8. Click the Next button.
9. Enter a text Description if desired.
10. You can change the pool settings listed in the following table.
11. You can change the connection validation settings listed in the following table. All of these settings are optional.
Table 11-1 Pool SettingsSetting Default Description
Steady Pool Size 8 Specifies the initial and minimum number of connections maintained in the pool.
Max Pool Size 32 Specifies the maximum number of connections that can be created to satisfy client requests.
Pool Resize Quantity 2 Specifies the number of connections to be destroyed if the existing number of connections is above the Steady Pool Size (subject to the Max Pool Size limit). This is enforced periodically at the Idle Timeout interval. An idle connection is one that has not been used for a period specified by Idle Timeout.
Idle Timeout (secs) 300 Specifies the minimum time that a connection can remain idle in the free pool. After this amount of time, the pool can close this connection.
Max Wait Time 60000 Specifies the amount of time, in milliseconds, that the caller is willing to wait to acquire a connection. If 0, the caller is blocked indefinitely until a resource is available or an error occurs.

General Steps for Creating a JDBC Resource
Chapter 11 Using the JDBC API for Database Access 359
12. You can change the transaction isolation settings listed in the following table. All of these settings are optional.
Table 11-2 Connection Validation SettingsSetting Default Description
Connection Validation Required
Unchecked Specifies whether connections have to be validated before being given to the application. If a resource’s validation fails, it is destroyed, and a new resource is created and returned.
connectionPool Validation Method
auto-commit Specifies the method used to validate connections if Connection Validation Required is selected. Legal values are as follows:
• auto-commit (default), which uses Connection.setAutoCommit()
• meta-data, which uses Connection.getMetaData()
• table, which performs a query on the table specified in the Table Name setting
Table Name none Specifies the table name to be used to perform a query to validate a connection. This setting is mandatory if and only if the Validation Method is set to table.
On Any Failure Close All Connections
Unchecked If checked, closes all connections in the pool if a single validation check fails. Recovery of a minimum number of connections (specified by the Steady Pool Size setting) is attempted.
This setting is mandatory if and only if Connection Validation Required is checked. If Connection Validation Required is unchecked, this setting is ignored.
Table 11-3 Transaction Isolation SettingsSetting Default Description
Transaction Isolation default JDBC driver isolation level
Specifies the transaction isolation level on the pooled database connections. Allowed values are read-uncommitted, read-committed, repeatable-read, or serializable. Not all databases support all these values.
Applications that change the isolation level on a pooled connection programmatically risk polluting the pool, which can lead to errors. See Guarantee Isolation Level for more details.
Isolation Level Guaranteed
Checked Applicable only when the Transaction Isolation level is explicitly set. If checked, every connection obtained from the pool is guaranteed to have the desired isolation level. This may impact performance on some JDBC drivers. You can uncheck this setting if you are certain that the hosted applications do not return connections with altered isolation levels.

General Steps for Creating a JDBC Resource
360 Application Server 8 • Developer’s Guide
13. To add a property, click the Add Property button and enter the property name and value. To delete properties, check the properties you want to delete, then click the Delete Properties button.
Specify values for any properties your JDBC driver requires. The following table lists some standard and commonly used properties. For information about the specific properties your database requires, see your database vendor’s documentation.
14. Click the Finish button.
Using the Command Line InterfaceTo create a JDBC connection pool using the command line, use the asadmin create-jdbc-connection-pool command. The syntax is as follows, with defaults shown for optional parameters that have them:
asadmin create-jdbc-connection-pool --user user --datasourceclassname class_name [--restype javax.sql.DataSource] [--steadypoolsize=8] [--maxpoolsize=32] [--maxwait=60000] [--poolresize=2] [--idletimeout=300] [--isolationlevel isolation_level] [--isisolationguaranteed=true] [--isconnectvalidatereq=false] [--validationmethod=auto-commit] [--validationtable table_name] [--failconnection=false] [--description text] [--property (name=value)[:name=value]*] connection_pool_id
Table 11-4 Common Connection Pool PropertiesProperty Description
User Specifies the user name for this connection pool.
Password Specifies the password for this connection pool.
databaseName Specifies the database for this connection pool.
serverName Specifies the database server for this connection pool.
port Specifies the port on which the database server listens for requests.
networkProtocol Specifies the communication protocol.
roleName Specifies the initial SQL role name.
datasourceName Specifies an underlying XADataSource, or a ConnectionPoolDataSource if connection pooling is done.
description Specifies a text description.

General Steps for Creating a JDBC Resource
Chapter 11 Using the JDBC API for Database Access 361
For more information about the parameters specific to asadmin create-jdbc-connection-pool, see “Using the Administration Console” on page 357. For more information about the optional general asadmin parameters (--password, --passwordfile, --host, --port, --secure, --terse, --echo, and --interactive), see the Sun Java System Application Server Administration Guide.
For example:
asadmin create-jdbc-connection-pool --user joeuser --datasourceclassname oracle.jdbc.pool.OracleDataSource --failconnection=true --isconnectvalidatereq=true --property url=jdbc\\:oracle\\:thin\\:@myhost\\:1521\\:V8i:user=staging_lookup_app:password=staging_lookup_app OraclePoollookup
Note that the colon characters (:) within property values must be escaped with double backslashes (\\) on Solaris™ platforms as shown, because otherwise they are interpreted as property delimiters. On Windows platforms, colon characters (:) must be escaped with single backslashes (\). For details about using escape characters, see the Sun Java System Application Server Administration Guide.
To delete a JDBC connection pool, use the following command:
asadmin delete-jdbc-connection-pool --user user [--cascade=false] connection_pool_id
For example:
asadmin delete-jdbc-connection-pool --user joeuser OraclePoollookup
To list JDBC connection pools, use the following command:
asadmin list-jdbc-connection-pools --user user [config_name]
For example:
asadmin list-jdbc-connection-pools --user joeuser
Testing a Connection PoolTo test a JDBC connection pool for usability, use the following command:
asadmin ping-connection-pool --user user connection_pool_id
For more information about the optional general asadmin parameters (--password, --passwordfile, --host, --port, --secure, --terse, --echo, and --interactive), see the Sun Java System Application Server Administration Guide.
For example:
asadmin ping-connection-pool --user joeuser OraclePoollookup

General Steps for Creating a JDBC Resource
362 Application Server 8 • Developer’s Guide
This command fails and displays an error message unless it successfully connects to the connection pool.
Creating a JDBC ResourceA JDBC resource, also called a data source, lets you make connections to a database using getConnection(). Create a JDBC resource in one of these ways:
• Using the Administration Console
• Using the Command Line Interface
The “Using the Administration Console” section describes each JDBC resource setting. The “Using the Command Line Interface” section merely lists syntax and default values.
For general information about JDBC resources, see the Sun Java System Application Server Administration Guide.
Using the Administration ConsoleTo create a JDBC resource using the Administration Console, perform these tasks:
1. Login to the Administration Console by going to the following URL in your web browser:
http://host:port/asadmin
For example:
http://localhost:4848/asadmin
2. Open the JDBC component.
3. Click JDBC Resources.
4. Click the New button.
5. Enter the following information:
❍ JNDI Name (required) - Enter the JNDI name that application components must use to access the JDBC resource.
❍ Pool Name (required) - Select from the list the name (or ID) of the connection pool used by this JDBC resource. For more information, see “Creating a Connection Pool” on page 357.
❍ Description (optional) - You can enter a text description of the JDBC resource.

General Steps for Creating a JDBC Resource
Chapter 11 Using the JDBC API for Database Access 363
❍ Status - Check the Enabled box to enable the JDBC resource.
If a JDBC resource is disabled, no application component can connect to it, but its configuration remains in the domain.
6. Click the OK button.
Using the Command Line InterfaceTo create a JDBC resource using the command line, use the asadmin create-jdbc-resource command. The syntax is as follows, with defaults shown for optional parameters that have them:
asadmin create-jdbc-resource --user user --connectionpoolid connection_pool_id [--enabled=true] [--description text] [--property (name=value)[:name=value]*] jndi_name
For more information about the parameters specific to asadmin create-jdbc-resource, see “Using the Administration Console” on page 362.
For more information about the optional general asadmin parameters (--password, --passwordfile, --host, --port, --secure, --terse, --echo, and --interactive), see the Sun Java System Application Server Administration Guide.
For example:
asadmin create-jdbc-resource --user joeuser --connectionpoolid OraclePoollookup OracleDSlookup
To delete a JDBC resource, use the following command:
asadmin delete-jdbc-resource --user user jndi_name
For example:
asadmin delete-jdbc-resource --user joeuser OracleDSlookup
To list JDBC resources, use the following command:
asadmin list-jdbc-resources --user user [config_name]
For example:
asadmin list-jdbc-resources --user joeuser

Configurations for Specific JDBC Drivers
364 Application Server 8 • Developer’s Guide
Configurations for Specific JDBC DriversSun Java System Application Server Platform Edition 8 is designed to support connectivity to any database management system with a corresponding JDBC driver. The following JDBC driver and database combinations are supported. These combinations have been tested with Sun Java System Application Server Platform Edition 8 and are found to be J2EE compatible. They are also supported for CMP.
• PointBase Type4 Driver
• IBM DB2 8.1 Type2 Driver
• Inet Oraxo JDBC Driver for Oracle 8.1.7 and 9.x Databases
• Inet Merlia JDBC Driver for Microsoft SQL Server Databases
• Inet Sybelux JDBC Driver for Sybase Databases
For an up to date list of currently supported JDBC drivers, see the Sun Java System Application Server Platform Edition 8 Release Notes.
Other JDBC drivers can be used with Sun Java System Application Server Platform Edition 8, but J2EE compliance tests have not been completed with these drivers. Although Sun offers no product support for these drivers, Sun offers limited support of the use of these drivers with the Sun Java System Application Server.
• Data Direct Connect JDBC3.0/ Type4 Driver for IBM DB2 Databases
• Oracle Thin/Type4 Driver for Oracle 8.1.7 and 9.x Databases
• OCI Oracle Type2 Driver for Oracle 8.1.7 and 9.x Databases
• Data Direct Connect JDBC3.0/ Type4 Driver for Oracle 8.1.7 and 9.x Databases
• Data Direct Connect JDBC3.0/ Type4 Driver for Microsoft SQL Server Databases
• Sybase JConnect/Type4 Driver
• Data Direct Connect JDBC3.0/ Type4 Driver for Sybase Databases
• Data Direct Connect JDBC3.0/ Type4 Driver for Informix Databases
• IBM Informix Type4 Driver
• MM MySQL Type4 Driver
• CloudScape 5.1 Type4 Driver
For details about how to integrate a JDBC driver and how to use the Administration Console or the command line interface to implement the configuration, see “General Steps for Creating a JDBC Resource” on page 356.

Configurations for Specific JDBC Drivers
Chapter 11 Using the JDBC API for Database Access 365
PointBase Type4 DriverThe PointBase JDBC driver is included with the Sun Java System Application Server by default, except for the Solaris bundled installation, which does not include PointBase. Therefore, unless you have the Solaris bundled installation, you do not need to integrate this JDBC driver with the Sun Java System Application Server. This driver is verified J2EE compatible and supported.
The JAR file for the PointBase driver is pbclient.jar.
Configure the connection pool using the following settings:
• Name: You will use this name when you configure the JDBC resource later.
• Resource Type: Specify the appropriate value.
• Database Vendor: PointBase
• Datasource Classname: one of the following:
com.pointbase.jdbc.jdbcDataSource
com.pointbase.xa.xaDataSource
• Properties:
❍ user - Specify the database user.
❍ password - Specify the database password.
❍ databaseName - Specify the URL of the database. The syntax is as follows:
jdbc:pointbase:server://server:port/dbname,new
NOTE An Oracle database user running the capture-schema command needs ANALYZE ANY TABLE privileges if that user does not own the schema. These privileges are granted to the user by the database administrator. For information about capture-schema, see “Using the capture-schema Utility” on page 316.

Configurations for Specific JDBC Drivers
366 Application Server 8 • Developer’s Guide
IBM DB2 8.1 Type2 DriverThis driver is verified J2EE compatible and supported. The JAR files for the DB2 driver are db2jcc.jar, db2jcc_license_cu.jar, and db2java.zip. Set environment variables as follows:
LD_LIBRARY_PATH=/usr/db2user/sqllib/lib:${j2ee.home}/lib
DB2DIR=/opt/IBM/db2/V8.1
DB2INSTANCE=db2user
INSTHOME=/usr/db2user
VWSPATH=/usr/db2user/sqllib
THREADS_FLAG=native
Configure the connection pool using the following settings:
• Name: You will use this name when you configure the JDBC resource later.
• Resource Type: Specify the appropriate value.
• Database Vendor: DB2
• Datasource Classname: com.ibm.db2.jcc.DB2SimpleDataSource
• Properties:
❍ user - Set as appropriate.
❍ password - Set as appropriate.
❍ databaseName - Set as appropriate.
❍ driverType - Set to 2.
❍ deferPrepares - Set to false.
Inet Oraxo JDBC Driver for Oracle 8.1.7 and 9.x DatabasesThis driver is verified J2EE compatible and supported. The JAR file for the Inet Oracle driver is Oranxo.jar. Configure the connection pool using the following settings:
• Name: You will use this name when you configure the JDBC resource later.
• Resource Type: Specify the appropriate value.

Configurations for Specific JDBC Drivers
Chapter 11 Using the JDBC API for Database Access 367
• Database Vendor: Oracle
• Datasource Classname: com.inet.ora.OraDataSource
• Properties:
❍ user - Specify the database user.
❍ password - Specify the database password.
❍ serviceName - Specify the URL of the database. The syntax is as follows:
jdbc:inetora:server:port:dbname
For example:
jdbc:inetora:localhost:1521:payrolldb
In this example,localhost is the host name of the machine running the Oracle server, 1521 is the Oracle server’s port number, and payrolldb is the SID of the database. For more information about the syntax of the database URL, see the Oracle documentation.
❍ serverName - Specify the host name or IP address of the database server.
❍ port - Specify the port number of the database server.
❍ streamstolob - If the size of BLOB or CLOB datatypes exceeds 4 KB and this driver is used for CMP, this property must be set to true.
❍ xa-driver-does-not-support-non-tx-operations - Set to the value true. Optional: only needed if both non-XA and XA connections are retrieved from the same connection pool. May degrade performance.
As an alternative to setting this property, you can create two connection pools, one for non-XA connections and one for XA connections.
Inet Merlia JDBC Driver for Microsoft SQL Server DatabasesThis driver is verified J2EE compatible and supported. The JAR file for the Inet Microsoft SQL Server driver is Merlia.jar. Configure the connection pool using the following settings:
• Name: You will use this name when you configure the JDBC resource later.
• Resource Type: Specify the appropriate value.
• Database Vendor: mssql

Configurations for Specific JDBC Drivers
368 Application Server 8 • Developer’s Guide
• Datasource Classname: com.inet.tds.TdsDataSource
• Properties:
❍ serverName - Specify the host name or IP address and the port of the database server.
❍ port - Specify the port number of the database server.
❍ user - Set as appropriate.
❍ password - Set as appropriate.
Inet Sybelux JDBC Driver for Sybase DatabasesThis driver is verified J2EE compatible and supported. The JAR file for the Inet Sybase driver is Sybelux.jar. Configure the connection pool using the following settings:
• Name: You will use this name when you configure the JDBC resource later.
• Resource Type: Specify the appropriate value.
• Database Vendor: Sybase
• Datasource Classname: com.inet.syb.SybDataSource
• Properties:
❍ serverName - Specify the host name or IP address of the database server.
❍ portNumber - Specify the port number of the database server.
❍ user - Set as appropriate.
❍ password - Set as appropriate.
❍ databaseName - Set as appropriate. Do not specify the complete URL, only the database name.

Configurations for Specific JDBC Drivers
Chapter 11 Using the JDBC API for Database Access 369
Data Direct Connect JDBC3.0/ Type4 Driver for IBM DB2 Databases This driver is not verified J2EE compatible and not fully supported. Configure the connection pool using the following settings:
• Name: You will use this name when you configure the JDBC resource later.
• Resource Type: Specify the appropriate value.
• Database Vendor: DB2
• Datasource Classname: com.ddtek.jdbcx.db2.DB2DataSource
• Properties:
❍ serverName - Specify the host name or IP address of the database server.
❍ portNumber - Specify the port number of the database server.
❍ user - Set as appropriate.
❍ password - Set as appropriate.
Oracle Thin/Type4 Driver for Oracle 8.1.7 and 9.x DatabasesThis driver is not verified J2EE compatible and not fully supported. The JAR file for the Oracle driver is ojdbc14.jar. Configure the connection pool using the following settings:
• Name: You will use this name when you configure the JDBC resource later.
• Resource Type: Specify the appropriate value.
• Database Vendor: Oracle
• Datasource Classname: one of the following:
oracle.jdbc.pool.OracleDataSource
oracle.jdbc.xa.client.OracleXADataSource
• Properties:
❍ user - Set as appropriate.
❍ password - Set as appropriate.

Configurations for Specific JDBC Drivers
370 Application Server 8 • Developer’s Guide
❍ URL - Specify the complete database URL using the following syntax:
jdbc:oracle:thin:[user/password]@//host[:port]/service
For example:
jdbc:oracle:thin:@//localhost:1521:customer_db
❍ xa-driver-does-not-support-non-tx-operations - Set to the value true. Optional: only needed if both non-XA and XA connections are retrieved from the same connection pool. May degrade performance.
As an alternative to setting this property, you can create two connection pools, one for non-XA connections and one for XA connections.
OCI Oracle Type2 Driver for Oracle 8.1.7 and 9.x DatabasesThis driver is not verified J2EE compatible and not fully supported. The JAR file for the OCI Oracle driver is ojdbc14.jar. Make sure that the shared library is available through LD_LIBRARY_PATH and that the ORACLE_HOME property is set. Configure the connection pool using the following settings:
• Name: You will use this name when you configure the JDBC resource later.
• Resource Type: Specify the appropriate value.
• Database Vendor: Oracle
• Datasource Classname: one of the following:
oracle.jdbc.pool.OracleDataSource
oracle.jdbc.xa.client.OracleXADataSource
• Properties:
❍ user - Set as appropriate.
NOTE You must set the oracle-xa-recovery-workaround property in the Transaction Service for recovery of global transactions to work correctly. For details, see Chapter 12, “Using the Transaction Service.”
When using this driver, it is not possible to insert more than 2000 bytes of data into a column. To circumvent this problem, use the OCI driver (JDBC type 2).

Configurations for Specific JDBC Drivers
Chapter 11 Using the JDBC API for Database Access 371
❍ password - Set as appropriate.
❍ URL - Specify the complete database URL using the following syntax:
jdbc:oracle:oci:[user/password]@//host[:port]/service
For example:
jdbc:oracle:oci:@//localhost:1521:customer_db
❍ xa-driver-does-not-support-non-tx-operations - Set to the value true. Optional: only needed if both non-XA and XA connections are retrieved from the same connection pool. May degrade performance.
As an alternative to setting this property, you can create two connection pools, one for non-XA connections and one for XA connections.
Data Direct Connect JDBC3.0/ Type4 Driver for Oracle 8.1.7 and 9.x DatabasesThis driver is not verified J2EE compatible and not fully supported. The JAR files for the Oracle driver are base.jar, oracle.jar, and util.jar. Configure the connection pool using the following settings:
• Name: You will use this name when you configure the JDBC resource later.
• Resource Type: Specify the appropriate value.
• Database Vendor: Oracle
• Datasource Classname: com.ddtek.jdbcx.oracle.OracleDataSource
• Properties:
❍ serverName - Specify the host name or IP address of the database server.
❍ portNumber - Specify the port number of the database server.
❍ user - Set as appropriate.
❍ password - Set as appropriate.
❍ SID - Set as appropriate.

Configurations for Specific JDBC Drivers
372 Application Server 8 • Developer’s Guide
Data Direct Connect JDBC3.0/ Type4 Driver for Microsoft SQL Server DatabasesThis driver is not verified J2EE compatible and not fully supported. The JAR files for the Microsoft SQL Server driver are util.jar, sqlserver.jar, and base.jar. Configure the connection pool using the following settings:
• Name: You will use this name when you configure the JDBC resource later.
• Resource Type: Specify the appropriate value.
• Database Vendor: mssql
• Datasource Classname: com.ddtek.jdbcx.sqlserver.SQLServerDataSource
• Properties:
❍ serverName - Specify the host name or IP address and the port of the database server.
❍ user - Set as appropriate.
❍ password - Set as appropriate.
❍ selectMethod - Set to cursor.
Sybase JConnect/Type4 Driver This driver is not verified J2EE compatible and not fully supported. The JAR file for the Sybase driver is jconn2.jar. Configure the connection pool using the following settings:
• Name: You will use this name when you configure the JDBC resource later.
• Resource Type: Specify the appropriate value.
• Database Vendor: Sybase
• Datasource Classname: one of the following:
com.sybase.jdbc2.jdbc.SybDataSource
com.sybase.jdbc2.jdbc.SybXADataSource
• Properties:
❍ serverName - Specify the host name or IP address of the database server.
❍ portNumber - Specify the port number of the database server.

Configurations for Specific JDBC Drivers
Chapter 11 Using the JDBC API for Database Access 373
❍ user - Set as appropriate.
❍ password - Set as appropriate.
❍ databaseName - Set as appropriate. Do not specify the complete URL, only the database name.
❍ BE_AS_JDBC_COMPLIANT_AS_POSSIBLE - Set to true.
❍ FAKE_METADATA - Set to true.
Data Direct Connect JDBC3.0/ Type4 Driver for Sybase Databases This driver is not verified J2EE compatible and not fully supported. Configure the connection pool using the following settings:
• Name: You will use this name when you configure the JDBC resource later.
• Resource Type: Specify the appropriate value.
• Database Vendor: Sybase
• Datasource Classname: com.ddtek.jdbcx.sybase.SybaseDataSource
• Properties:
❍ serverName - Specify the host name or IP address of the database server.
❍ portNumber - Specify the port number of the database server.
❍ user - Set as appropriate.
❍ password - Set as appropriate.
❍ databaseName - Set as appropriate. This is optional.
Data Direct Connect JDBC3.0/ Type4 Driver for Informix Databases This driver is not verified J2EE compatible and not fully supported. Configure the connection pool using the following settings:
• Name: You will use this name when you configure the JDBC resource later.
• Resource Type: Specify the appropriate value.

Configurations for Specific JDBC Drivers
374 Application Server 8 • Developer’s Guide
• Database Vendor: Informix
• Datasource Classname: com.ddtek.jdbcx.informix.InformixDataSource
• Properties:
❍ serverName - Specify the host name or IP address of the database server.
❍ portNumber - Specify the port number of the database server.
❍ user - Set as appropriate.
❍ password - Set as appropriate.
❍ InformixServer - Set as appropriate.
IBM Informix Type4 DriverThis driver is not verified J2EE compatible and not fully supported. Configure the connection pool using the following settings:
• Name: You will use this name when you configure the JDBC resource later.
• Resource Type: Specify the appropriate value.
• Database Vendor: Informix
• Datasource Classname: one of the following:
com.informix.jdbcx.IfxDataSource
com.informix.jdbcx.IfxXADataSource
• Properties:
❍ serverName - Specify the Informix database server name.
❍ portNumber - Specify the port number of the database server.
❍ user - Set as appropriate.
❍ password - Set as appropriate.
❍ databaseName - Set as appropriate. This is optional.
❍ IfxIFXHost - Specify the host name or IP address of the database server.

Configurations for Specific JDBC Drivers
Chapter 11 Using the JDBC API for Database Access 375
MM MySQL Type4 DriverThis driver is not verified J2EE compatible and not fully supported. Configure the connection pool using the following settings:
• Name: You will use this name when you configure the JDBC resource later.
• Resource Type: Specify the appropriate value.
• Database Vendor: mysql
• Datasource Classname: one of the following:
com.mysql.jdbc.jdbc2.optional.MysqlConnectionPoolDataSource
com.mysql.jdbc.jdbc2.optional.MysqlXaConnectionPoolDataSource
• Properties:
❍ serverName - Specify the host name or IP address of the database server.
❍ port - Specify the port number of the database server.
❍ user - Set as appropriate.
❍ password - Set as appropriate.
❍ databaseName - Set as appropriate.
❍ URL - If you are using global transactions, you can set this property instead of serverName, port, and databaseName. The MM MySQL Type4 driver does not provide a method to set the required relaxAutoCommit property, so you must set it indirectly by setting the URL property as in:
jdbc:mysql://host:port/database?relaxAutoCommit="true"
CloudScape 5.1 Type4 DriverThis driver is not verified J2EE compatible and not fully supported. The JAR files for the CloudScape driver are db2j.jar, db2jtools.jar, db2jcview.jar, jh.jar, db2jcc.jar, and db2jnet.jar. Configure the connection pool using the following settings:
• Name: You will use this name when you configure the JDBC resource later.
• Resource Type: Specify the appropriate value.
• Database Vendor: Cloudscape
• Datasource Classname: com.ibm.db2.jcc.DB2DataSource

Creating Applications That Use the JDBC API
376 Application Server 8 • Developer’s Guide
• Properties:
❍ user - Set as appropriate.
❍ password - Set as appropriate.
❍ databaseName - Set as appropriate.
Creating Applications That Use the JDBC APIAn application that uses the JDBC API is an application that looks up and connects to one or more databases. This section covers these topics:
• Sharing Connections
• Using JDBC Transaction Isolation Levels
Sharing ConnectionsWhen multiple connections acquired by an application use the same JDBC resource, the connection pool provides connection sharing within the same transaction scope. For example, suppose Bean_A starts a transaction and obtains a connection, then calls a method in Bean_B. If Bean_B acquires a connection to the same JDBC resource with the same sign-on information, and if Bean_A completes the transaction, the connection can be shared.
Connections obtained through a resource are shared only if the resource reference declared by the J2EE component allows it to be shareable. This is specified in a component’s deployment descriptor by setting the res-sharing-scope element to Shareable for the particular resource reference. To turn off connection sharing, set res-sharing-scope to Unshareable.
For general information about connections and JDBC URLs, see the Sun Java System Application Server Administration Guide.

Creating Applications That Use the JDBC API
Chapter 11 Using the JDBC API for Database Access 377
Using JDBC Transaction Isolation LevelsFor general information about transactions, see Chapter 12, “Using the Transaction Service,” and the Sun Java System Application Server Administration Guide.
Not all database vendors support all transaction isolation levels available in the JDBC API. The Sun Java System Application Server permits specifying any isolation level your database supports, but throws an exception against values your database does not support.
The following table defines transaction isolation levels.
Specify or examine the transaction isolation level for a connection using the Connection.setTransactionIsolation() and Connection.getTransactionIsolation() methods, respectively. Note that you cannot call setTransactionIsolation() during a transaction.
You can set the default transaction isolation level for a JDBC connection pool. For details, see “Creating a Connection Pool” on page 357.
To verify that a level is supported by your database management system, test your database programmatically using the supportsTransactionIsolationLevel() method in java.sql.DatabaseMetaData, as shown in the following example:
java.sql.DatabaseMetaData db;if (db.supportsTransactionIsolationLevel(TRANSACTION_SERIALIZABLE)
{ Connection.setTransactionIsolation(TRANSACTION_SERIALIZABLE); }
For more information about these isolation levels and what they mean, see the JDBC 3.0 API specification.
Table 11-5 Transaction Isolation LevelsTransaction Isolation Level Description
TRANSACTION_READ_UNCOMMITTED Dirty reads, non-repeatable reads and phantom reads can occur.
TRANSACTION_READ_COMMITTED Dirty reads are prevented; non-repeatable reads and phantom reads can occur.
TRANSACTION_REPEATABLE_READ Dirty reads and non-repeatable reads are prevented; phantom reads can occur.
TRANSACTION_SERIALIZABLE Dirty reads, non-repeatable reads and phantom reads are prevented.
NOTE Applications that change the isolation level on a pooled connection programmatically risk polluting the pool, which can lead to errors.

Creating Applications That Use the JDBC API
378 Application Server 8 • Developer’s Guide

379
Chapter 12
Using the Transaction Service
The J2EE™ platform provides several abstractions that simplify development of dependable transaction processing for applications. This chapter discusses J2EE transactions and transaction support in the Sun Java ™ System Application Server.
This chapter contains the following sections:
• Transaction Resource Managers
• Transaction Scope
• Configuring the Transaction Service
• Transaction Logging
For more information about the Java™ Transaction API (JTA) and Java™ Transaction Service (JTS), see the Sun Java System Application Server Administration Guide and the following sites:
http://java.sun.com/products/jta/
http://java.sun.com/products/jts/
You may also want to read the chapter on transactions in the J2EE tutorial:
http://java.sun.com/j2ee/tutorial/1_3-fcs/index.html

Transaction Resource Managers
380 Application Server 8 • Developer’s Guide
Transaction Resource ManagersThere are three types of transaction resource managers:
• Databases - Use of transactions prevents databases from being left in inconsistent states due to incomplete updates. Sun Java System Application Server supports a variety of JDBC™ XA drivers, listed in “Configurations for Specific JDBC Drivers” on page 364. For information about JDBC transaction isolation levels, see “Using JDBC Transaction Isolation Levels” on page 377.
• Java™ Message Service (JMS) Providers - Use of transactions ensures that messages are reliably delivered. Sun Java System Application Server is integrated with Sun Java System Message Queue, a fully capable JMS provider. For more information about transactions and the JMS API, see Chapter 14, “Using the Java Message Service.”
• J2EE™ Connector Architecture (CA) components - Use of transactions prevents legacy EIS systems from being left in inconsistent states due to incomplete updates.
For details about how transaction resource managers, the transaction service, and applications interact, see the Sun Java System Application Server Administration Guide.
Transaction ScopeA local transaction involves only one non-XA resource and requires that all participating application components execute within one process. Local transaction optimization is specific to the resource manager and is transparent to the J2EE application.
In Sun Java System Application Server, a JDBC resource is non-XA if it meets any of the following criteria:
• In the JDBC connection pool configuration, the datasource class does not implement the javax.sql.XADataSource interface.
• The Global Transaction Support box is not checked, or the res-type attribute in domain.xml does not exist or is not set to javax.sql.XADataSource.
NOTE In the Sun Java System Application Server, the transaction manager is a privileged interface. However, applications can access UserTransaction. For more information, see “Naming Environment for J2EE Application Components” on page 388.

Transaction Scope
Chapter 12 Using the Transaction Service 381
A transaction remains local if the following conditions remain true:
• One and only one non-XA resource is used. If any additional non-XA or XA resource is used, the transaction is aborted.
• No transaction importing or exporting occurs.
Transactions that involve multiple resources (which must all be XA), or multiple participant processes, are distributed or global transactions.
If only one XA resource is used in a transaction, one-phase commit occurs, otherwise the transaction is coordinated with a two-phase commit protocol.
A two-phase commit protocol between the transaction manager and all the resources enlisted for a transaction ensures that either all the resource managers commit the transaction or they all abort. When the application requests the commitment of a transaction, the transaction manager issues a PREPARE_TO_COMMIT request to all the resource managers involved. Each of these resources may in turn send a reply indicating whether it is ready for commit (PREPARED) or not (NO). Only when all the resource managers are ready for a commit does the transaction manager issue a commit request (COMMIT) to all the resource managers. Otherwise, the transaction manager issues a rollback request (ABORT) and the transaction is rolled back.
Sun Java System Application Server provides workarounds for some known issues with the recovery implementations of the following JDBC drivers. These workarounds are not used unless explicitly set.
• Oracle thin driver - The XAResource.recover method repeatedly returns the same set of in-doubt Xids regardless of the input flag. According to the XA specifications, the Transaction Manager should initially call this method with TMSTARTSCAN and then with TMNOFLAGS repeatedly until no Xids are returned. The XAResource.commit method also has some issues.
To enable the Sun Java System Application Server workaround, set the oracle-xa-recovery-workaround property value to true. For details about how to set this property, see “Configuring the Transaction Service” on page 382.
NOTE These workarounds do not imply support for any particular JDBC driver.

Configuring the Transaction Service
382 Application Server 8 • Developer’s Guide
Configuring the Transaction ServiceYou can configure the transaction service in Sun Java System Application Server in the following ways:
• Using the Administration Console
• Using the Command Line Interface
The “Using The Administration Console” section describes each transaction service setting. The “Using The Command Line Interface” section merely lists syntax and default values.
This section covers basic configuration. For details about monitoring and other administration topics, see the Sun Java System Application Server Administration Guide.
Using the Administration ConsoleTo configure the transaction service using the Administration Console, perform the following tasks:
1. Login to the Administration Console by going to the following URL in your web browser:
http://host:port/asadmin
For example:
http://localhost:4848/asadmin
2. Open the Transaction Service.
3. Edit the following information if desired. All of these settings are optional.
❍ Recover on Restart - Check this box if you want the server to attempt transaction recovery during startup. By default, recovery is not attempted.
❍ Transaction Timeout - Specifies the amount of time after which the transaction is aborted. If set to 0 (the default), the transaction never times out.
This is the domain-level timeout. To set the XAResource timeout, use the xaresource-txn-timeout property, described in Step 4.
You can override the Transaction Timeout setting for an individual enterprise bean. See “Bean-Level Container-Managed Transaction Timeouts” on page 288.

Configuring the Transaction Service
Chapter 12 Using the Transaction Service 383
❍ Retry Timeout - Specifies the retry timeout in the following scenarios:
• If a transaction is being recovered.
• If transient exceptions occur in the second phase of two-phase commit protocol.
A negative value indicates continuous retries. A value of zero indicates no retries. A positive value indicates the number of seconds between retries. The default is 600 (10 minutes), which may be appropriate for a database being restarted.
❍ Transaction Log Location - Sets the location of the transaction log directory. The directory in which the transaction logs are kept must be writable by whatever user account the server runs as. The default location is domain_dir/logs.
❍ Heuristic Decision - During recovery, if the outcome of a transaction cannot be determined from the logs, this property determines the outcome. The default is rollback. The other choice is commit.
❍ Keypoint Interval - Specifies the number of transactions between keypoint operations in the log. Keypoint operations reduce the size of the transaction log file by compressing it. A larger value for this attribute (for example, 4096) results in a larger transaction log file, but fewer keypoint operations and potentially better performance. A smaller value (for example, 100) results in smaller log files, but slightly reduced performance due to the greater frequency of keypoint operations.
4. To add a property, click the Add Property button and enter the property name and value. To delete properties, check the properties you want to delete, then click the Delete Properties button. The following table lists the transaction service properties for Sun Java System Application Server.
Table 12-1 Transaction Service PropertiesProperty Default Description
oracle-xa-recovery-workaround false If true, the Oracle XA Resource workaround is used in transaction recovery. For details, see “Transaction Scope” on page 380.
disable-distributed-transaction-logging
false If true, disables transaction logging, which may improve performance. If false, the transaction service writes transactional activity into transaction logs so that transactions can be recovered. If Recover on Restart is checked, this property is ignored.
Use only if performance is more important than transaction recovery.

Configuring the Transaction Service
384 Application Server 8 • Developer’s Guide
5. Click the Save button.
Using the Command Line InterfaceTo configure the transaction service using the command line interface, use the asadmin set command. The syntax is as follows, with defaults shown for optional parameters that have them:
asadmin set --user user attribute_name=value [attribute_name=value] *
For more information about the optional general asadmin parameters (--password, --passwordfile, --host, --port, --secure, --terse, --echo, and --interactive), see the Sun Java System Application Server Administration Guide.
The attribute_name is a hierarchical name that looks like this:
server.transaction-service.ts_attribute_name
The ts_attribute_name is the transaction service attribute that needs to be configured. For example:
server.transaction-service.timeout-in-seconds
To view the list of transaction service attribute names that can be configured using the asadmin set command, use the asadmin get command with a wildcard. The asadmin get command has the same syntax as the asadmin set command. For example:
asadmin get --user joeuser "server.transaction-service.*"
xaresource-txn-timeout specific to the XAResource used
Changes the XAResource timeout. In some cases, the XAResource default timeout causes transactions to be aborted, so it is desirable to change it.
To set the application level timeout, use the Transaction Timeout setting, described in Step 3.
Table 12-1 Transaction Service Properties (Continued)Property Default Description

Transaction Logging
Chapter 12 Using the Transaction Service 385
A list of attribute names for configuring the transaction service of the server1 application server instance is displayed. The transaction service attributes are as follows:
server.transaction-service.automatic-recovery = falseserver.transaction-service.heuristic-decision = rollbackserver.transaction-service.keypoint-interval = 2048server.transaction-service.retry-timeout-in-seconds = 600server.transaction-service.timeout-in-seconds = 0server.transaction-service.tx-log-dir = domain_dir/logs
Here is an example of running the asadmin set command:
asadmin set --user joeuser server.transaction-service.timeout-in-seconds=0
The attribute_name for a transaction service property is a hierarchical name that looks like this:
server.transaction-service.property.ts_property_name
The instance is the application server instance name. The ts_property_name is the transaction service property that needs to be configured. Here is an example of running the asadmin set command to set a transaction service property:
asadmin set --user joeuser server.transaction-service.property.xaresource-txn-timeout=30
Transaction LoggingThe transaction service writes transactional activity into transaction logs so that transactions can be recovered. You can control transaction logging in these ways:
• Set the location of the transaction log files using the Transaction Log Location setting in the Administration Console or the transactionLogFile attribute in the command line interface.
• Turn off transaction logging by setting the disable-distributed-transaction-logging property to true. Do this only if performance is more important than transaction recovery.

Transaction Logging
386 Application Server 8 • Developer’s Guide

387
Chapter 13
Using the Java Naming and DirectoryInterface
A naming service maintains a set of bindings, which relate names to objects. The J2EE™ naming service is based on the Java Naming and Directory Interface™ (JNDI) API. The JNDI API allows application components and clients to look up distributed resources, services, and EJB™ components. For general information about the JNDI API, see:
http://java.sun.com/products/jndi/
You can also see the JNDI tutorial at:
http://java.sun.com/products/jndi/tutorial/
This chapter contains the following sections:
• Accessing the Naming Context
• Configuring Resources
• Mapping References
Accessing the Naming Context Sun Java ™ System Application Server provides a naming environment, or context, which is compliant with standard J2EE 1.4 requirements. A Context object provides the methods for binding names to objects, unbinding names from objects, renaming objects, and listing the bindings. The InitialContext is the handle to the J2EE naming service that application components and clients use for lookups.
The JNDI API also provides subcontext functionality. Much like a directory in a file system, a subcontext is a context within a context. This hierarchical structure permits better organization of information. For naming services that support subcontexts, the Context class also provides methods for creating and destroying subcontexts.

Accessing the Naming Context
388 Application Server 8 • Developer’s Guide
The rest of this section covers these topics:
• Naming Environment for J2EE Application Components
• Accessing EJB Components Using the CosNaming Naming Context
• Accessing EJB Components in a Remote Application Server
• Naming Environment for Lifecycle Modules
Naming Environment for J2EE Application ComponentsThe namespace for objects looked up in a J2EE environment is organized into different subcontexts, with the standard prefix java:comp/env.
The following table describes standard JNDI subcontexts for connection factories in the Sun Java System Application Server.
NOTE Each resource within a server instance must have a unique name. However, two resources in different server instances or different domains may have the same name.
Table 13-1 Standard JNDI Subcontexts for Connection FactoriesResource Manager
Connection Factory Type JNDI Subcontext
JDBC™ javax.sql.DataSource java:comp/env/jdbc
Transaction Service javax.transaction.UserTransaction java:comp/UserTransaction
JMS javax.jms.TopicConnectionFactory
javax.jms.QueueConnectionFactory
java:comp/env/jms
JavaMail™ javax.mail.Session java:comp/env/mail
URL java.net.URL java:comp/env/url
Connector javax.resource.cci.ConnectionFactory java:comp/env/eis

Accessing the Naming Context
Chapter 13 Using the Java Naming and Directory Interface 389
Accessing EJB Components Using the CosNaming Naming ContextThe preferred way of accessing the naming service, even in code that runs outside of a J2EE container, is to use the no-argument InitialContext constructor. However, if EJB client code explicitly instantiates an InitialContext that points to the CosNaming naming service, it is necessary to set three properties in the client JVM when accessing EJB components:
-Djavax.rmi.CORBA.UtilClass=com.sun.corba.ee.impl.javax.rmi.CORBA.Util
-Dorg.omg.CORBA.ORBClass=com.sun.corba.ee.impl.orb.ORBImpl
-Dorg.omg.CORBA.ORBSingletonClass=com.sun.corba.ee.impl.orb.ORBSingleton
Accessing EJB Components in a Remote Application ServerThe recommended approach for looking up an EJB component in a remote Application Server from a client that is a servlet or EJB component is to use the Interoperable Naming Service syntax. Host and port information is prepended to any global JNDI names and is automatically resolved during the lookup. The syntax for an interoperable global name is as follows:
corbaname:iiop:host:port#a/b/name
This makes the programming model for accessing EJB components in another Application Server exactly the same as accessing them in the same server. The deployer can change the way the EJB components are physically distributed without having to change the code.
For J2EE components, the code still performs a java:comp/env lookup on an EJB reference. The only difference is that the deployer maps the ejb-reference element to an interoperable name in an Application Server deployment descriptor file instead of a simple global JNDI name.
For example, suppose a servlet looks up an EJB reference using java:comp/env/ejb/Foo, and the target EJB component has a global JNDI name of a/b/Foo.
The ejb-ref element in sun-web.xml would look like this:
<ejb-ref><ejb-ref-name>ejb/Foo</ejb-ref-name><jndi-name>corbaname:iiop:host:port#a/b/Foo</jndi-name>
<ejb-ref>

Configuring Resources
390 Application Server 8 • Developer’s Guide
The code would look like this:
Context ic = new InitialContext();Object o = ic.lookup("java:comp/env/ejbFoo");
For a client that doesn’t run within a J2EE container, the code just uses the interoperable global name instead of the simple global JNDI name. For example:
Context ic = new InitialContext();Object o = ic.lookup("corbaname:iiop:host:port#a/b/Foo");
Objects stored in the interoperable naming context and component-specific (java:comp/env) naming contexts are transient. On each server startup or application reloading, all relevant objects are re-bound to the namespace.
Naming Environment for Lifecycle ModulesLifecycle listener modules provide a means of running short or long duration Java-based tasks within the application server environment, such as instantiation of singletons or RMI servers. These modules are automatically initiated at server startup and are notified at various phases of the server life cycle. For details about lifecycle modules, see Chapter 10, “Developing Lifecycle Listeners.”
The configured properties for a lifecycle module are passed as properties during server initialization (the INIT_EVENT). The initial JNDI naming context is not available until server initialization is complete. A lifecycle module can get the InitialContext for lookups using the method LifecycleEventContext.getInitialContext() during, and only during, the STARTUP_EVENT, READY_EVENT, or SHUTDOWN_EVENT server life cycle events.
Configuring Resources Sun Java System Application Server exposes the following special resources in the naming environment. Full administration details are provided in the following sections:
• External JNDI Resources
• Custom Resources

Configuring Resources
Chapter 13 Using the Java Naming and Directory Interface 391
External JNDI ResourcesAn external JNDI resource defines custom JNDI contexts and implements the javax.naming.spi.InitialContextFactory interface. There is no specific JNDI parent context for external JNDI resources, except for the standard java:comp/env/.
Create an external JNDI resource in one of these ways:
• Using the Administration Console
• Using the Command Line Interface
The “Using The Administration Console” section describes each connection pool setting. The “Using The Command Line Interface” section merely lists syntax and default values.
Using the Administration ConsoleTo create an external JNDI resource using the Administration Console, perform the following tasks:
1. Login to the Administration Console by going to the following URL in your web browser:
http://host:port/asadmin
For example:
http://localhost:4848/asadmin
2. Open the JNDI component.
3. Click External Resources.
4. Click the New button.
5. Enter the following information:
❍ JNDI Name (required) - Enter the JNDI name for the resource.
❍ Resource Type (required) - Enter the fully qualified type of the resource.
❍ JNDI Lookup (required) - Enter the JNDI value to look up in the external repository. For example, for a bean class, your JNDI Lookup might be cn=mybean.
❍ Factory Class (required) - Enter the fully qualified name of the factory class.
❍ Description (optional) - You can enter a text description of the external JNDI resource.

Configuring Resources
392 Application Server 8 • Developer’s Guide
6. Check the Status Enabled box to enable the external JNDI resource. If an external JNDI resource is disabled, no application component can connect to it, but its configuration remains in the domain.
7. To add a property, click the Add Property button and enter the property name and value. To delete properties, check the properties you want to delete, then click the Delete Properties button.
8. Click the OK button.
Using the Command Line InterfaceTo create an external JNDI resource using the command line, use the asadmin create-jndi-resource command. The syntax is as follows, with defaults shown for optional parameters that have them:
asadmin create-jndi-resource --user user --jndilookupname lookup_name --restype resource_type --factoryclass class_name [--enabled=true] [--description text] [--property (name=value)[:name=value]*] jndi_name
For more information about the parameters specific to asadmin create-jndi-resource, see “Using the Administration Console” on page 391.
For more information about the optional general asadmin parameters (--password, --passwordfile, --host, --port, --secure, --terse, --echo, and --interactive), see the Sun Java System Application Server Administration Guide.
For example:
asadmin create-jndi-resource --user joeuser --jndilookupname cn=myBean --restype test.myBean --factoryclass com.sun.jndi.ldap.LdapCtxFactory test/myBean
To delete an external JNDI resource, use the following command:
asadmin delete-jndi-resource --user user jndi_name
For example:
asadmin delete-jndi-resource --user joeuser test/myBean
To list external JNDI resources, use the following command:
asadmin list-jndi-resources --user user
For example:
asadmin list-jndi-resources --user joeuser

Configuring Resources
Chapter 13 Using the Java Naming and Directory Interface 393
Custom ResourcesA custom resource specifies a custom server-wide resource object factory that implements the javax.naming.spi.ObjectFactory interface. There is no specific JNDI parent context for external JNDI resources, except for the standard java:comp/env/.
Create a custom resource in one of these ways:
• Using the Administration Console
• Using the Command Line Interface
The “Using The Administration Console” section describes each connection pool setting. The “Using The Command Line Interface” section merely lists syntax and default values.
Using the Administration ConsoleTo create a custom resource using the Administration Console, perform the following tasks:
1. Login to the Administration Console by going to the following URL in your web browser:
http://host:port/asadmin
For example:
http://localhost:4848/asadmin
2. Open the JNDI component.
3. Click Custom Resources.
4. Click the New button.
5. Enter the following information:
❍ JNDI Name (required) - Enter the JNDI name for the resource.
❍ Resource Type (required) - Enter the fully qualified type of the resource.
❍ Factory Class (required) - Enter the fully qualified name of the factory class.
❍ Description (optional) - You can enter a text description of the custom resource.
6. Check the Custom Resource Enabled box to enable the custom resource. If a custom resource is disabled, no application component can connect to it, but its configuration remains in the domain.
7. To add a property, click the Add Property button and enter the property name and value. To delete properties, check the properties you want to delete, then click the Delete Properties button.

Configuring Resources
394 Application Server 8 • Developer’s Guide
8. Click the OK button.
Using the Command Line InterfaceTo create a custom resource using the command line, use the asadmin create-custom-resource command. The syntax is as follows, with defaults shown for optional parameters that have them:
asadmin create-custom-resource --user user --restype resource_type --factoryclass class_name [--enabled=true] [--description text] [--property (name=value)[:name=value]*] jndi_name
For more information about the parameters specific to asadmin create-custom-resource, see “Using the Administration Console” on page 391.
For more information about the optional general asadmin parameters (--password, --passwordfile, --host, --port, --secure, --terse, --echo, and --interactive), see the Sun Java System Application Server Administration Guide.
For example:
asadmin create-custom-resource --user joeuser --restype test.MyBean --factoryclass test.MyBeanFactory test/myBean
To delete a custom resource, use the following command:
asadmin delete-custom-resource --user user jndi_name
For example:
asadmin delete-custom-resource --user joeuser test/myBean
To list custom resources, use the following command:
asadmin list-custom-resources --user user
For example:
asadmin list-custom-resources--user joeuser

Mapping References
Chapter 13 Using the Java Naming and Directory Interface 395
Mapping ReferencesThe following XML elements map JNDI names configured in the Sun Java System Application Server to resource references in application client, EJB, and web application components:
• resource-env-ref - Maps the resource-env-ref element in the corresponding J2EE XML file to the absolute JNDI name configured in Sun Java System Application Server.
• resource-ref - Maps the resource-ref element in the corresponding J2EE XML file to the absolute JNDI name configured in Sun Java System Application Server.
• ejb-ref - Maps the ejb-ref element in the corresponding J2EE XML file to the absolute JNDI name configured in Sun Java System Application Server.
JNDI names for EJB components must be unique. For example, appending the application name and the module name to the EJB name would be one way to guarantee unique names. In this case, mycompany.pkging.pkgingEJB.MyEJB would be the JNDI name for an EJB in the module pkgingEJB.jar, which is packaged in the pkging.ear application.
These elements are part of the sun-web-app.xml, sun-ejb-ref.xml, and sun-application-client.xml deployment descriptor files. For more information about how these elements behave in each of the deployment descriptor files, see Chapter 5, “Deployment Descriptor Files.”
The rest of this section uses an example of a JDBC resource lookup to describe how to reference resource factories. The same principle is applicable to all resources (such as JMS destinations, JavaMail sessions, and so on).
The resource-ref element in the sun-web-app.xml deployment descriptor file maps the JNDI name of a resource reference to the resource-ref element in the web-app.xml J2EE deployment descriptor file.
The resource lookup in the application code looks like this:
InitialContext ic = new InitialContext();String dsName = "java:comp/env/jdbc/HelloDbDs";DataSource ds = (javax.sql.DataSource)ic.lookup(dsName);Connection connection = ds.getConnection();

Mapping References
396 Application Server 8 • Developer’s Guide
The resource being queried is listed in the res-ref-name element of the web.xml file as follows:
<resource-ref><description>DataSource Reference</description><res-ref-name>jdbc/HelloDbDs</res-ref-name><res-type>javax.sql.DataSource</res-type><res-auth>Container</res-auth>
</resource-ref>
The resource-ref section in a Sun Java System specific deployment descriptor, for example sun-web.xml, maps the res-ref-name (the name being queried in the application code) to the JNDI name of the JDBC resource. The JNDI name is the same as the name of the JDBC resource as defined in the resource file when the resource is created.
<resource-ref><res-ref-name>jdbc/HelloDbDs</res-ref-name><jndi-name>jdbc/HelloDbDataSource</jndi-name>
</resource-ref>
The JNDI name in the Sun Java System specific deployment descriptor must match the JNDI name you assigned to the resource when you created and configured it.

397
Chapter 14
Using the Java Message Service
This chapter describes how to use the Java™ Message Service (JMS) API. The Sun Java™ System Application Server has a fully integrated JMS provider: the Sun Java™ System Message Queue software.
For general information about the JMS API, see the J2EE tutorial:
http://java.sun.com/j2ee/1.4/docs/tutorial/doc/JMS.html#wp84181
For detailed information about JMS concepts and JMS support in Sun Java System Application Server, see the Sun Java System Application Server Administration Guide.
This chapter contains the following sections:
• The JMS Provider
• Administration of the JMS Service
• Message Queue Resource Adapter
• ConnectionFactory Authentication
• Message Queue varhome Directory
• Delivering SOAP Messages Using the JMS API
The JMS ProviderSun Java System Application Server support for JMS messaging, in general, and for message-driven beans, in particular, requires messaging middleware that implements the JMS specification: a JMS provider. Sun Java System Application Server uses the Sun Java System Message Queue software as its native JMS provider. The Sun Java System Message Queue software is tightly integrated into Sun Java System Application Server, providing transparent JMS messaging support. This support (known within Sun Java System Application Server as the JMS Service) requires only minimal administration.

Administration of the JMS Service
398 Application Server 8 • Developer’s Guide
For more information about the Sun Java System Message Queue, refer to the following documentation:
http://docs.sun.com/db/prod/s1.s1msgqu#hic
For general information about the JMS API, see the JMS web page at:
http://java.sun.com/products/jms/index.html
Administration of the JMS ServiceTo configure the JMS Service and prepare JMS resources for use in applications deployed to the Sun Java System Application Server, you must perform these tasks:
• Configuring the JMS Service
• Checking Whether the JMS Provider Is Running
• Creating Physical Destinations
• Creating JMS Resources: Destinations and Connection Factories
For information about other JMS administration tasks, see the Sun Java System Application Server Administration Guide and the Sun Java System Message Queue documentation at:
http://docs.sun.com/db/prod/s1.s1msgqu#hic
Configuring the JMS Service You can edit or check the JMS Service configuration in the following ways:
• Using the Administration Console
• Using the Command Line Interface
The “Using The Administration Console” section describes each JMS Service setting. The “Using The Command Line Interface” section merely lists syntax and default values.
NOTE Sun Java System Application Server should be restarted after configuration of the JMS Service.

Administration of the JMS Service
Chapter 14 Using the Java Message Service 399
Using the Administration ConsoleTo edit the JMS Service configuration using the Administration Console, perform the following tasks:
1. Login to the Administration Console by going to the following URL in your web browser:
http://host:port/asadmin
For example:
http://localhost:4848/asadmin
2. Click on the Java Message Service component.
3. You can edit the following information. Defaults are displayed.
❍ Start Timeout (secs) - Specifies the amount of time the server waits at startup for the corresponding JMS instance to respond. If there is no response, startup is aborted. If set to 0, the server waits indefinitely. The default is 30 seconds.
❍ Type - A value of LOCAL means the JMS provider is started along with the application server. A value of REMOTE means the JMS host is remote and is not started by the application server. A value of NONE means no JMS service is used.
❍ Start Arguments - Specifies the string of arguments supplied for startup of the corresponding JMS instance. By default, there are no arguments.
4. To add a property, click the Add Property button and enter the property name and value. To delete properties, check the properties you want to delete, then click the Delete Properties button. The following table lists the standard JMS Service properties.
Table 14-1 JMS Service PropertiesProperty Default Description
instance-name imqbroker Specifies the full Sun Java System Message Queue broker instance name.
instance-name-suffix none Specifies a suffix to add to the full Sun Java System Message Queue broker instance name. The suffix is separated from the instance name by an underscore character (_). For example, if the instance name is imqbroker, appending the suffix xyz changes the instance name to imqbroker_xyz.
append-version false If true, appends the major and minor version numbers, preceded by underscore characters (_), to the full Sun Java System Message Queue broker instance name. For example, if the instance name is imqbroker, appending the version numbers changes the instance name to imqbroker_8_0.

Administration of the JMS Service
400 Application Server 8 • Developer’s Guide
5. Open on the Java Message Service component.
6. Open the JMS Hosts component and click on default_JMS_host.
7. You can edit the following information. Defaults are displayed.
❍ Host - Specifies the host name of the JMS provider. The default is localhost.
❍ Port - Specifies the port number used by the JMS provider. The default is 7676.
❍ Admin Username - Specifies the administrator user name for the JMS provider. The default is admin.
❍ Admin Password - Specifies the administrator password for the JMS provider. The default is admin.
8. Click the Save button.
Using the Command Line InterfaceTo configure the JMS service using the command line interface, use the asadmin set command. The syntax is as follows, with defaults shown for optional parameters that have them:
asadmin set --user user attribute_name=value [attribute_name=value] *
For more information about the optional general asadmin parameters (--password, --passwordfile, --host, --port, --secure, --terse, --echo, and --interactive), see the Sun Java System Application Server Administration Guide.
The attribute_name is a hierarchical name that looks like this:
server.jms-service.jms_attribute_name
or like this:
server.jms-service.jms-host.default_JMS_host.jms_attribute_name
The jms_attribute_name is the JMS service attribute that needs to be configured. For example:
server.jms-service.jms-host.default_JMS_host.port
To view the list of JMS service attribute names that can be configured using the asadmin set command, use the asadmin get command with a wildcard. The asadmin get command has the same syntax as the asadmin set command. For example:
asadmin get --user joeuser "server.jms-service.*"

Administration of the JMS Service
Chapter 14 Using the Java Message Service 401
A list of attribute names for configuring the JMS service of the server1 application server instance is displayed as follows:
server.jms-service.init-timeout-in-seconds = 60server.jms-service.start-args = <null>server.jms-service.type = LOCAL
Here are two examples of running the asadmin set command:
asadmin set --user joeuser server.jms-service.type=REMOTE
asadmin set --user joeuser server.jms-service.jms-host.default_JMS_host.port=7677
The attribute_name for a JMS property is a hierarchical name that looks like this:
server.jms-service.property.jms_property_name
The jms_property_name is the JMS service property that needs to be configured. Here is an example of running the asadmin set command to set a JMS property:
asadmin set --user joeuser server.jms-service.property.instance-name-suffix=xyz
Checking Whether the JMS Provider Is RunningYou can use the asadmin jms-ping command to check whether a Sun Java System Message Queue instance is running. The syntax is as follows, with defaults shown for optional parameters that have them:
asadmin jms-ping --user user
For more information about the optional general asadmin parameters (--password, --passwordfile, --host, --port, --secure, --terse, --echo, and --interactive), see the Sun Java System Application Server Administration Guide.
For example:
asadmin jms-ping --user joeuser
Creating Physical DestinationsProduced messages are delivered for routing and subsequent delivery to consumers using physical destinations in the JMS provider. A physical destination is identified and encapsulated by an administered object (a Topic or Queue destination resource) that an application component uses to specify the destination of messages it is producing and the source of messages it is consuming.

Administration of the JMS Service
402 Application Server 8 • Developer’s Guide
This section describes how to create a physical destination. To create a destination resource, see “Creating JMS Resources: Destinations and Connection Factories” on page 403.
You can create a JMS physical destination in the following ways:
• Using the Administration Console
• Using the Command Line Interface
The “Using The Administration Console” section describes each physical destination setting. The “Using The Command Line Interface” section merely lists syntax and default values.
Using the Administration ConsoleTo create a JMS physical destination using the Administration Console, perform the following tasks:
1. Login to the Administration Console by going to the following URL in your web browser:
http://host:port/asadmin
For example:
http://localhost:4848/asadmin
2. Open the Java Message Service component.
3. Click Service, then click Physical Destinations.
4. Click the New button.
5. Enter the following information:
❍ Destination Name (required) - Specify the name of the physical destination.
❍ Type (required) - Select queue or topic from the list.
6. Click the OK button.
Using the Command Line InterfaceTo create a JMS physical destination using the command line, use the asadmin create-jmsdest command. The syntax is as follows, with defaults shown for optional parameters that have them:
asadmin create-jmsdest --user user --desttype dest_type [--property (name=value)[:name=value]*] dest_name

Administration of the JMS Service
Chapter 14 Using the Java Message Service 403
For more information about the parameters specific to asadmin create-jmsdest, see “Using the Administration Console” on page 402.
For more information about the optional general asadmin parameters (--password, --passwordfile, --host, --port, --secure, --terse, --echo, and --interactive), see the Sun Java System Application Server Administration Guide.
For example:
asadmin create-jmsdest --user joeuser --desttype topic MyDest
To delete a JMS physical destination, use the following command:
asadmin delete-jmsdest --user user --desttype dest_type dest_name
For example:
asadmin delete-jmsdest --user joeuser --desttype topic MyDest
To list JMS physical destinations, use the following command:
asadmin list-jmsdest --user user [-desttype dest_type]
For example:
asadmin list-jmsdest --user joeuser --desttype topic
Creating JMS Resources: Destinations and Connection FactoriesYou can create two kinds of JMS resources in Sun Java System Application Server:
• Connection Factories: administered objects that implement the QueueConnectionFactory or TopicConnectionFactory interfaces.
• Destination Resources: administered objects that implement the Queue or Topic interfaces.
In either case, the steps for creating a JMS resource are the same. You can create a JMS resource in the following ways:
• Using the Administration Console
• Using the Command Line Interface
The “Using The Administration Console” section describes each JMS resource setting. The “Using The Command Line Interface” section merely lists syntax and default values.

Administration of the JMS Service
404 Application Server 8 • Developer’s Guide
Using the Administration ConsoleTo create a JMS resource using the Administration Console, perform the following tasks:
1. Login to the Administration Console by going to the following URL in your web browser:
http://host:port/asadmin
For example:
http://localhost:4848/asadmin
2. Open the Java Message Service component.
3. Click Connection Factories to create a connection factory, or click Destination Resources to create a queue or topic.
4. Click the New button.
5. Enter the following information:
❍ JNDI Name (required) - Enter the JNDI name that application components must use to access the JMS resource.
❍ Type (required) - Select the type of the JMS resource.
• If you are on the Connection Factories page, the types are:
javax.jms.TopicConnectionFactoryjavax.jms.QueueConnectionFactory
• If you are on the Destination Resources page, the types are:
javax.jms.Topicjavax.jms.Queue
❍ Description (optional) - You can enter a text description of the JMS resource.
6. Check the Resource Enabled box to enable the JMS resource.
If a JMS resource is disabled, no application component can connect to it, but its configuration remains in the domain.
7. Click the OK button.
8. To add a property, click the Add Property button and enter the property name and value. To delete properties, check the properties you want to delete, then click the Delete Properties button.

Administration of the JMS Service
Chapter 14 Using the Java Message Service 405
The following table lists the most commonly used JMS resource properties. For a complete list of the available properties (called administered object attributes in Sun Java System Message Queue), see the Sun Java System Message Queue Administration Guide.
9. Click the OK button.
Table 14-2 JMS Resource PropertiesProperty Default Description
Name none Specifies the JMS physical destination name associated with this JMS resource. You must specify this property for JMS resources of the Type javax.jms.Topic or javax.jms.Queue.
Description none Specifies a text description of the JMS resource.
MessageServiceAddressList none Specifies a list of host/port combinations of the Sun Java System Message Queue. For JMS resources of the Typejavax.jms.TopicConnectionFactory or javax.jms.QueueConnectionFactory.
ClientID none Specifies the JMS Client Identifier to be associated with a Connection created using the createQueueConnection and createTopicConnection methods of the QueueConnectionFactory and TopicConnectionFactory classes, respectively.
For JMS resources of the Typejavax.jms.TopicConnectionFactory or javax.jms.QueueConnectionFactory.
Durable subscription names are unique and only valid within the scope of a client identifier. To create or reactivate a durable subscriber, the connection must have a valid client identifier. The JMS specification ensures that client identifiers are unique and that a given client identifier is allowed to be used by only one active connection at a time.
UserName guest Specifies the username for connecting to the Sun Java System Message Queue. For JMS resources of the Typejavax.jms.TopicConnectionFactory or javax.jms.QueueConnectionFactory.
Password guest Specifies the password for connecting to the Sun Java System Message Queue. For JMS resources of the Typejavax.jms.TopicConnectionFactory or javax.jms.QueueConnectionFactory.
NOTE All JMS resource properties that used to work with version 7 of the Application Server are supported for backward compatibility.

Message Queue Resource Adapter
406 Application Server 8 • Developer’s Guide
Using the Command Line InterfaceTo create a JMS resource using the command line, use the asadmin create-jms-resource command. The syntax is as follows, with defaults shown for optional parameters that have them:
asadmin create-jms-resource --user user --restype resource_type [--enabled=true] [--description text] [--property (name=value)[:name=value]*] jndi_name
For more information about the parameters specific to asadmin create-jms-resource, see “Using the Administration Console” on page 404.
For more information about the optional general asadmin parameters (--password, --passwordfile, --host, --port, --secure, --terse, --echo, and --interactive), see the Sun Java System Application Server Administration Guide.
For example:
asadmin create-jms-resource --user joeuser --restype javax.jms.Topic --property imqDestinationName=testTopic MyTopic
To delete a JMS resource, use the following command:
asadmin delete-jms-resource --user user jndi_name
For example:
asadmin delete-jms-resource --user joeuser MyTopic
To list JMS resources, use the following command:
asadmin list-jms-resources --user user [--restype resource_type]
For example:
asadmin list-jms-resources --user joeuser --restype Topic
Message Queue Resource AdapterThe Sun Java System Message Queue is integrated into the Sun Java System Application Server using a resource adapter that is compliant with the Connector 1.5 specification. The module name of this system resource adapter is jmsra. Every JMS resource is converted to a corresponding connector resource of this resource adapter as follows:
• Connection Factory: A connector connection pool with a max-pool-size of 250 and a corresponding connector resource.
• Destination (Topic or Queue): A connector administered object.

ConnectionFactory Authentication
Chapter 14 Using the Java Message Service 407
You can use connector configuration tools to manage JMS resources. For more information, see:
http://developers.sun.com/prodtech/appserver/reference/techart/as8_connectors
ConnectionFactory AuthenticationIf your web, EJB, or client module has res-auth set to Container, but you use the ConnectionFactory.createConnection("user","password") method to get a connection, the Sun Java System Application Server searches the container for authentication information before using the supplied user and password. Version 7 of the Application Server threw an exception in this situation.
Message Queue varhome DirectorySun Java System Message Queue uses a default directory for storing data such as persistent messages and its log file. This directory is called varhome. Sun Java System Application server uses domain_dir/imq as the varhome directory. Thus for the default Application Server domain, Message Queue data is stored in the following location:
install_dir/domains/domain1/imq/var/instances/imqbroker
Version 7 of the Application Server stored this data in the following location:
install_dir/imq/var/instances/domain1_server
When you execute Sun Java System Message Queue scripts such as install_dir/imq/bin/imqusermgr, you should use the -varhome option. For example:
imqusermgr -varhome $AS_INSTALL/domains/domain1/imq add -u testuser -p testpassword
Delivering SOAP Messages Using the JMS APIWeb service clients use the Simple Object Access Protocol (SOAP) to communicate with web services. SOAP uses a combination of XML-based data structuring and Hyper Text Transfer Protocol (HTTP) to define a standardized way of invoking methods in objects distributed in diverse operating environments across the Internet.
For more information about SOAP, see the Apache SOAP web site:
http://xml.apache.org/soap/index.html

Delivering SOAP Messages Using the JMS API
408 Application Server 8 • Developer’s Guide
You can take advantage of the JMS provider’s reliable messaging when delivering SOAP messages. You can convert a SOAP message into a JMS message, send the JMS message, then convert the JMS message back into a SOAP message. The following sections explain how to do these conversions:
• Sending SOAP Messages Using the JMS API
• Receiving SOAP Messages Using the JMS API
Sending SOAP Messages Using the JMS APIYou use the MessageTransformer utility to convert a SOAP message into a JMS message. You then send the JMS message containing the SOAP payload as you would a normal JMS message.
1. Import the library com.sun.messaging.xml.MessageTransformer. This is the utility whose methods you use to convert SOAP messages to JMS messages and the reverse.
import com.sun.messaging.xml.MessageTransformer;
2. Initialize the TopicConnectionFactory, TopicConnection, TopicSession, and publisher.
tcf = new TopicConnectionFactory();tc = tcf.createTopicConnection();session = tc.createTopicSession(false,Session.AUTO_ACKNOWLEDGE);topic = session.createTopic(topicName); publisher = session.createPublisher(topic);
3. Construct a SOAP message using the SOAP with Attachments API for Java (SAAJ). For more information on constructing a SOAP message, see the Sun Java System Message Queue Developer’s Guide.
*construct a default soap MessageFactory */MessageFactory mf = MessageFactory.newInstance();
* Create a SOAP message object.*/SOAPMessage soapMessage = mf.createMessage();
/** Get SOAP part.*/SOAPPart soapPart = soapMessage.getSOAPPart();
/* Get SOAP envelope. */SOAPEnvelope soapEnvelope = soapPart.getEnvelope();
/* Get SOAP body.*/SOAPBody soapBody = soapEnvelope.getBody();

Delivering SOAP Messages Using the JMS API
Chapter 14 Using the Java Message Service 409
/* Create a name object. with name space *//* http://www.sun.com/imq. */Name name = soapEnvelope.createName("HelloWorld", "hw",
"http://www.sun.com/imq");
* Add child element with the above name. */ SOAPElement element = soapBody.addChildElement(name)
/* Add another child element.*/element.addTextNode( "Welcome to Sun Java System Web Services." );
/* Create an atachment with activation API.*/URL url = new URL ("http://java.sun.com/webservices/"); DataHandler dh = new DataHandler (url);AttachmentPart ap = soapMessage.createAttachmentPart(dh);
/*set content type/ID. */ap.setContentType("text/html");ap.setContentId("cid-001");
/** add the attachment to the SOAP message.*/soapMessage.addAttachmentPart(ap);soapMessage.saveChanges();
4. Convert the SOAP message to a JMS message by calling the MessageTransformer.SOAPMessageintoJMSMessage() method.
Message m = MessageTransformer.SOAPMessageIntoJMSMessage (soapMessage, session );
5. Publish the JMS message.
publisher.publish(m);
6. Close the JMS connection.
tc.close();
Receiving SOAP Messages Using the JMS APIYou receive the JMS message containing the SOAP payload as you would a normal JMS message. You then use the MessageTransformer utility to convert the JMS message back into a SOAP message.
1. Import the library com.sun.messaging.xml.MessageTransformer. This is the utility whose methods you use to convert SOAP messages to JMS messages and the reverse.
import com.sun.messaging.xml.MessageTransformer;

Delivering SOAP Messages Using the JMS API
410 Application Server 8 • Developer’s Guide
2. Initialize the TopicConnectionFactory, TopicConnection, TopicSession, TopicSubscriber, and Topic.
messageFactory = MessageFactory.newInstance();tcf = new com.sun.messaging.TopicConnectionFactory();tc = tcf.createTopicConnection();
session = tc.createTopicSession(false, Session.AUTO_ACKNOWLEDGE);
topic = session.createTopic(topicName);subscriber = session.createSubscriber(topic);subscriber.setMessageListener(this);tc.start();
3. Use the OnMessage method to receive the message. Use the SOAPMessageFromJMSMessage method to convert the JMS message to a SOAP message.
public void onMessage (Message message) {SOAPMessage soapMessage = MessageTransformer.SOAPMessageFromJMSMessage( message, messageFactory ); }
4. Retrieve the content of the SOAP message.

411
Chapter 15
Using the JavaMail API
This chapter describes how to use the JavaMail™ API, which provides a set of abstract classes defining objects that comprise a mail system.
This chapter contains the following sections:
• Introducing JavaMail
• Creating a JavaMail Session
• JavaMail Session Properties
• Looking Up a JavaMail Session
• Sending Messages Using JavaMail
• Reading Messages Using JavaMail
Introducing JavaMailThe JavaMail API defines classes such as Message, Store, and Transport. The API can be extended and can be subclassed to provide new protocols and to add functionality when necessary. In addition, the API provides concrete subclasses of the abstract classes. These subclasses, including MimeMessage and MimeBodyPart, implement widely used Internet mail protocols and conform to the RFC822 and RFC2045 specifications. The JavaMail API includes support for the IMAP4, POP3, and SMTP protocols.
The JavaMail architectural components are as follows:
• The abstract layer declares classes, interfaces, and abstract methods intended to support mail handling functions that all mail systems support.
• The internet implementation layer implements part of the abstract layer using the RFC822 and MIME internet standards.

Creating a JavaMail Session
412 Application Server 8 • Developer’s Guide
• JavaMail uses the JavaBeans Activation Framework (JAF) to encapsulate message data and to handle commands intended to interact with that data.
For more information, see the Sun Java System Application Server Administration Guide and the JavaMail specification at:
http://java.sun.com/products/javamail/
Creating a JavaMail SessionYou can create a JavaMail session in the following ways:
• Using the Administration Console
• Using the Command Line Interface
The “Using The Administration Console” section describes each JavaMail session setting. The “Using The Command Line Interface” section merely lists syntax and default values.
Using the Administration ConsoleTo create a JavaMail session using the Administration Console, perform these steps:
1. Login to the Administration Console by going to the following URL in your web browser:
http://host:port/asadmin
For example:
http://localhost:4848/asadmin
2. Click on the Java Mail Sessions component.
3. Click the New button.
4. Enter the following information:
❍ JNDI Name (required) - Enter the JNDI name that application components must use to access the JavaMail session. For more information, see “Looking Up a JavaMail Session” on page 415.
❍ Mail Host (required) - The mail server host name.
❍ Default User (required) - The mail server user name.

Creating a JavaMail Session
Chapter 15 Using the JavaMail API 413
❍ Default Return Address (required) - The e-mail address the mail server uses to indicate the message sender.
❍ Description (optional) - You can enter a text description of the JavaMail session.
5. Check the Session Enabled box to enable the JavaMail session. If a JavaMail session is disabled, it is unavailable for lookups, but its configuration remains in the domain.
6. You can also edit the following Advanced settings:
❍ Store Protocol - Specifies the storage protocol service, which connects to a mail server, retrieves messages, and saves messages in folder(s). Example values are imap (the default) and pop3.
❍ Store Protocol Class - Specifies the service provider implementation class for storage. The default is com.sun.mail.imap.IMAPStore.
❍ Transport Protocol - Specifies the transport protocol service, which sends messages. The default is smtp.
❍ Transport Protocol Class - Specifies the service provider implementation class for transport. The default is com.sun.mail.smtp.SMTPTransport.
❍ Debug Enabled - Enables debugging for this JavaMail session.
7. To add a property, click the Add Property button and enter the property name and value. To delete properties, check the properties you want to delete, then click the Delete Properties button. For details about JavaMail session properties, see “JavaMail Session Properties” on page 414.
8. Click the OK button.
Using the Command Line InterfaceTo create a JavaMail session using the command line, use the asadmin create-javamail-resource command. The syntax is as follows, with defaults shown for optional parameters that have them:
asadmin create-javamail-resource --user user --mailhost mail_host --mailuser mail_user --fromaddress address [--storeprotocol=imap] [--storeprotocolclass=com.sun.mail.imap.IMAPStore] [--transprotocol=smtp] [--transprotocolclass=com.sun.mail.smtp.SMTPTransport] [--debug=false] [--enabled=true] [--description text] [--property (name=value)[:name=value]*] jndi_name
For more information about the parameters specific to asadmin create-javamail-resource, see “Using the Administration Console” on page 412.

JavaMail Session Properties
414 Application Server 8 • Developer’s Guide
For more information about the optional general asadmin parameters (--password, --passwordfile, --host, --port, --secure, --terse, --echo, and --interactive), see the Sun Java System Application Server Administration Guide.
For example:
asadmin create-javamail-resource --user joeuser --mailhost MailServer --mailuser MailUser --fromaddress [email protected] MailSession
To delete a JavaMail session, use the following command:
asadmin delete-javamail-resource --user user jndi_name
For example:
asadmin delete-javamail-resource --user joeuser MailSession
To list JavaMail sessions, use the following command:
asadmin list-javamail-resources --user user
For example:
asadmin list-javamail-resources --user joeuser
JavaMail Session PropertiesYou can set properties for a JavaMail Session object. Every property name must start with a mail- prefix. Sun Java System Application Server changes the dash (-) character to a period (.) in the name of the property and saves the property to the MailConfiguration and JavaMail Session objects. If the name of the property doesn’t start with mail-, the property is ignored.
For example, if you want to define the property mail.from in a JavaMail Session object, first define the property as follows:
• Name - mail-from
• Value - [email protected]
After you get the JavaMail Session object, you can get the mail.from property to retrieve the value as follows:
String password = session.getProperty("mail.from");

Looking Up a JavaMail Session
Chapter 15 Using the JavaMail API 415
Looking Up a JavaMail SessionThe standard Java Naming and Directory Interface™ (JNDI) subcontext for JavaMail sessions is java:comp/env/mail.
Registering JavaMail sessions in the mail naming subcontext of a JNDI namespace, or in one of its child subcontexts, is standard. The JNDI namespace is hierarchical, like a file system’s directory structure, so it is easy to find and nest references. A JavaMail session is bound to a logical JNDI name. The name identifies a subcontext, mail, of the root context, and a logical name. To change the JavaMail session, you can change its entry in the JNDI namespace without having to modify the application.
The resource lookup in the application code looks like this:
InitialContext ic = new InitialContext();String snName = "java:comp/env/mail/MyMailSession";Session session = (Session)ic.lookup(snName);
For more information about the JNDI API, see Chapter 13, “Using the Java Naming and Directory Interface.”
Sending Messages Using JavaMail To send a message using JavaMail, perform the following tasks:
1. Import the packages that you need:
import java.util.*; import javax.activation.*;import javax.mail.*;import javax.mail.internet.*;import javax.naming.*;
2. Look up the JavaMail session, as described in “Looking Up a JavaMail Session” on page 415:
InitialContext ic = new InitialContext();String snName = "java:comp/env/mail/MyMailSession";Session session = (Session)ic.lookup(snName);
3. Override the JavaMail session properties if necessary. For example:
Properties props = session.getProperties();props.put("mail.from", "[email protected]");
4. Create a MimeMessage. The msgRecipient, msgSubject, and msgTxt variables in the following example contain input from the user:

Reading Messages Using JavaMail
416 Application Server 8 • Developer’s Guide
Message msg = new MimeMessage(session);msg.setSubject(msgSubject);msg.setSentDate(new Date());msg.setFrom();msg.setRecipients(Message.RecipientType.TO, InternetAddress.parse(msgRecipient, false));msg.setText(msgTxt);
5. Send the message:
Transport.send(msg);
Reading Messages Using JavaMail To read a message using JavaMail, perform the following tasks:
1. Import the packages that you need:
import java.util.*; import javax.activation.*;import javax.mail.*;import javax.mail.internet.*;import javax.naming.*;
2. Look up the JavaMail session, as described in “Looking Up a JavaMail Session” on page 415:
InitialContext ic = new InitialContext();String snName = "java:comp/env/mail/MyMailSession";Session session = (javax.mail.Session)ic.lookup(snName);
3. Override the JavaMail session properties if necessary. For example:
Properties props = session.getProperties();props.put("mail.from", "[email protected]");
4. Get a Store object from the Session, then connect to the mail server using the Store object’s connect() method. You must supply a mail server name, a mail user name, and a password.
Store store = session.getStore();store.connect("MailServer", "MailUser", "secret");
5. Get the default folder, then get the INBOX folder:
Folder folder = store.getFolder("INBOX");
6. It is efficient to read the Message objects (which represent messages on the server) into an array:
Message[] messages = folder.getMessages();

417
Index
AACC
naming 326security 325
acc 325ACC clients
assembling 100deploying 113module definition 76preparing the client machine 114security 38
acc packageasenv configuration settings 331editing sun-acc.xml 332modifying appclient script 332using package-appclient script 333
action attribute 122activation-config element 199activation-config-property element 200activation-config-property-name element 200activation-config-property-value element 200address attribute 243Admin Password setting 400Admin Username setting 400administering message-driven beans 297administering transactions 304Administration Console
about 31changing servlet output 268configuring a default web module 264configuring the web container 265
setting the default locale 262using for autodeployment 104using for deployment 109using for dynamic reloading 103using for HPROF configuration 140using for lifecycle module deployment 112using for Optimizeit configuration 142using for SSL configuration 52using to add file realm users 48using to add to the server classpath 53, 89using to change logging settings 138using to configure Orbix 343using to configure realms 45using to configure the JMS Service 399using to configure the transaction service 382using to create a connection pool 357using to create a custom resource 393using to create a JavaMail session 412using to create a JDBC resource 362using to create an external JNDI resource 391using to create JMS resources 404using to create physical destinations 402using to disable modules and applications 102using to enable debugging 132using to set up audit module 57using to set up JACC 55
agent attribute 182allow-concurrent-access element 295ANT_HOME environment variable 115Apache Ant
and deployment descriptor verification 92, 94overview 115

Section A
418 Application Server 8 • Developer’s Guide
Sun Java System Application Server specific tasks 115
using for deployment 116using for JSP precompilation 125using for server administration 123
API referenceJavaBeans 276JSP 275servlets 265
appclient script 113appclient.jar file 333
contents 334append-version property 399application client
appclient script 330invoking a JMS resource 328, 336invoking an EJB component 326, 335making a remote call 328, 336running 330using SSL with CA 332
application client container 325application client container package
client.policy file 334application clients
authenticating using JAAS 67, 330security 67, 330
application.xml file 79application-client.xml file 79applications
assembling 99definition 77directories deployed to 84directory structure 81disabling 102, 121examples 33naming 81runtime environment 84security 35, 42
appserv-tags.jar file 276appserv-tags.tld file 276asadmin command 30, 107asadmin create-audit-module command 58asadmin create-auth-realm command 45asadmin create-custom-resource command 394asadmin create-file-user command 49
asadmin create-javamail-resource command 413asadmin create-jdbc-connection-pool command 360asadmin create-jdbc-resource command 363asadmin create-jmsdest command 402asadmin create-jms-resource command 406asadmin create-jndi-resource command 392asadmin create-lifecycle-module command 111asadmin delete-audit-module command 58asadmin delete-auth-realm command 46asadmin delete-custom-resource command 394asadmin delete-file-user command 49asadmin delete-javamail-resource command 414asadmin delete-jdbc-connection-pool command 361asadmin delete-jdbc-resource command 363asadmin delete-jmsdest command 403asadmin delete-jms-resource command 406asadmin delete-jndi-resource command 392asadmin delete-lifecycle-module command 112asadmin deploy command 107, 280
--force option 102--precompilejsp option 110
asadmin deploydir command 108asadmin get command 384, 400asadmin get-client-stubs command 111, 113, 327, 335asadmin jms-ping command 401asadmin list-audit-modules command 58asadmin list-auth-realms command 46asadmin list-custom-resources command 394asadmin list-file-groups command 50asadmin list-file-users command 49asadmin list-javamail-resources command 414asadmin list-jdbc-connection-pools command 361asadmin list-jdbc-resources command 363asadmin list-jmsdest command 403asadmin list-jms-resources command 406asadmin list-jndi-resources command 392asadmin list-lifecycle-modules command 112asadmin ping-connection-pool command 361asadmin set command 384, 400asadmin undeploy command 108asadmin update-file-user command 49asant script 115

Section B
Index 419
as-context element 202asenv.conf file 114assembly
of ACC clients 100of applications 99of connectors 100of EJB components 98of lifecycle modules 98of web applications 97overview 75
authenticationdefinition 40for web applications 37single sign-on 64
authentication realm 247auth-method element 203authorization
definition 40for EJB components 38for web applications 37roles 66
auth-realm element 247auto reconnection feature 298autodeployment 104
BBaseCache cacheClassName value 170bean-cache element 216bean-pool element 217beans
message-driven 137bin directory 115BLOB support 314Bootstrap Classloader 87BoundedMultiLruCache cacheClassName value 170build.xml file 33, 115
Ccache 168, 268
default configuration 270example configuration 270for JSPs 276helper class 269, 273
cache element 168cache management 287cache tag 277cacheClassName property 169, 170cache-helper element 170CacheHelper interface 170, 271, 273cache-helper-ref element 173cacheKeyGeneratorAttrName property 172, 273cache-mapping element 172cache-on-match attribute 176, 177cache-on-match-failure attribute 176, 177caching elements for the DTD 215caller-propagation element 203cert-db element 247certificate realm 51cert-nickname attribute 246charset attribute 182check-all-at-commit element 226checkInterval property 180check-modified-at-commit element 226class elements for the DTD 222classdebuginfo attribute 179classloader delegation model 178class-loader element 87, 177classloaders 85
delegation hierarchy 86isolation 88isolation, circumventing 89
class-name attribute 171classname attribute 248classpath attribute 125classpath property 180classpath, server, changing 87classpathref attribute 125classpath-suffix attribute 87client 242

Section D
420 Application Server 8 • Developer’s Guide
client-container element 242client-credential element 244ClientID property 405clients
ACC clients 76JAR file for 90, 113
client-side load balancing 340CLOB support 315CloudScape Type4 JDBC driver 375cmp element 207cmp-field-mapping element 226cmp-resource 318cmp-resource element 208cmr-field-mapping element 227cmr-field-name element 227cmt-timeout-in-seconds element 218column-name element 227column-pair element 227command attribute 124commandfile attribute 124command-line server configuration see asadmin commandcommit options 303commit-option element 218Common Classloader 87
using to circumvent isolation 90common.xml file 33compiler property 180compiler, FastJavac 106compiling JSPs 280component subelement 127confidentiality element 203configure to use orbix 342configuring
for 1.1 finders (CMP) 319resource manager (CMP) 318
configuring built-in ORB 340connection factories, JNDI subcontexts for 388connection factory 296, 299connection pool
creating 357properties 360
Connection Validation Required setting 359
connectionPool.ValidationMethod setting 359connections, JDBC
sharing 376Connector Classloader 87, 352connectors
and transactions 380assembling 100deploying 114JNDI subcontext for 388module definition 76
consistency element 228constraint-field element 176container
session beans 290container-managed persistence 305
assembly and deployment 307configuring 1.1 finders 319data type for mapping 312deployment 318mapping 308resource manager 318support 305
container-managed transactionsfor message-driven beans 298
context, for JNDI naming 387contextroot attribute 117, 128context-root element 148, 155cookieComment property 163cookieDomain property 163cookieMaxAgeSeconds property 163cookiePath property 163cookie-properties element 162create-tables-at-deploy element 208crossContextAllowed property 153custom resource 393Custom Resource Enabled setting 393
Ddata types for mapping 312database schema, capturing 316Database Vendor setting 358

Section D
Index 421
databaseName property 360databases
as transaction resource managers 380supported 306, 313, 356, 364
database-vendor-name element 209Datasource Classname setting 358datasourceName property 360.dbschema file 98Debug Enabled setting 413debug-enabled attribute 133debugging
enabling 131generating a stack trace 133Sun Java System Message Queue 137using Sun ONE Studio 134
debug-options attribute 133Default Return Address setting 413Default User setting 412default virtual server 263default web module 265, 267default-charset attribute 183default-helper element 171default-locale attribute 181default-realm attribute 46default-resource-principal element 165, 203delegate attribute 178delegation, classloader 87Deployment
JSR 88 81, 106deployment
container-managed persistence 318directory deployment 108disabling deployed applications and modules 102, 121dynamic 102errors during 101module vs. application based 110of ACC clients 113of connectors 114of EJB components 111of lifecycle modules 111of web applications 110overview 75read-only beans 295redeployment 102
standard J2EE descriptors 79Sun Java System Application Server descriptors 80,
145tools for 106undeploying an application or module 108, 109, 119using Apache Ant 116using the Administration Console 109verifying descriptor correctness 92
deployment descriptor files 395deployment descriptors
application client container 241description element 155, 185, 244Description property 405description property 360Description setting 358, 362, 391, 393, 404, 413destdir attribute 125Destination Name setting 402destinations
destination resources 403physical 401
destroy method 274destroying servlets 274development environment, creating 29
tools for developers 30development property 180directory deployment 108directory property 161disable-distributed-transaction-logging property 383doGet method 275domain attribute 127domain.xml file 298, 318
and JNDI names 168application configuration 85changing servlet output 268configuring a default web module 264configuring single sign-on 65configuring the web container 265default realm 46disabling modules and applications 102dynamic reloading 104, 105enabling debugging 133HPROF profiler 141JACC provider 56, 59keeping stubs 111lifecycle module configuration 351

Section E
422 Application Server 8 • Developer’s Guide
logging 139module configuration 84Optimizeit profiler 143setting the default locale 262stack trace generation 134System Classloader 87, 89
doPost method 275drop-tables-at-undeploy element 209DTD file
caching elements 215class elements 222general elements 185messaging elements 199persistence elements 206pooling elements 215reference elements 193role mapping elements 191security elements 202
DTD fileslocation of 80structure of 145
dumpSmap property 180dynamic
deployment 102reloading 103
EEAR file, creating 99EJB 2.0 summary of changes 286EJB Classloader 87EJB components
assembling 98calling from a different application 90deploying 111generated source code 111module definition 76security 38, 42transaction isolation level in 377
ejb element 185EJB QL 319ejb-jar.xml file 79, 300ejb-name element 188, 228
ejbPassivate 293EJB-QL 306ejb-ref element 166, 193, 395ejb-ref mapping, using JNDI name instead 91ejb-ref-name element 167, 194EJBs
elements 188elements in XML files 188enableCookies property 162enabled attribute 169enablePooling property 180enableURLRewriting property 162encoding
of JSPs 179of servlets 262
enterprise-beans element 188entity beans
read-only beans 292entity-mapping 229env-classpath-ignored attribute 87errorOnUseBeanInvalidClassAttribute property 180errors during deployment 101escape characters 361establish-trust-in-client element 204establish-trust-in-target element 204events, server life cycle 347example applications 33exceptions, sending to the client 138, 139explicitcommand attribute 124external JNDI resource 391extra-class-path attribute 177
FFactory Class setting 391, 393failonerror attribute 126FastJavac compiler 106fetched-with element 229field-name element 230file attribute 116, 120, 122, 127, 128

Section G
Index 423
file realm 48adding users 48
fileset subelement 129finder element 209finder methods 319flat transactions 302flush tag 279force attribute 117, 128forcing deployment 102fork property 180form-hint-field attribute 183
Ggeneral elements in DTD file 185genStrAsCharArray property 180getCmdLineArgs method 350getData method 350getEventType method 350getInitialContext method 351getInitialContext() method 390getInstallRoot method 350getInstanceName method 351getLifecycleEventContext method 350getParameter method 183getReader method 183group-name element 151, 157, 191groups
and roles 41creating for file realm users 49listing for file realm users 50
groups in realms 156
HhandleEvent method 348handling requests 274Heuristic Decision setting 383host attribute 118, 120, 122
Host setting 400HPROF profiler 140http-method element 175HttpServletRequest 270
IIBM DB2 JDBC driver 366, 369Idle Timeout setting 358idLengthBytes property 162ieClassId property 179IIOP/SSL configuration 245IMAP4 protocol 411Inet MSSQL JDBC driver 367Inet Oracle JDBC driver 366Inet Sybase JDBC driver 368Informix Data Direct JDBC driver 373Informix Type4 JDBC driver 374init method 274INIT_EVENT 347InitialContext naming service handle 387instance-name property 399instance-name-suffix property 399instantiating servlets 274integrity element 204internationalization 181, 262Intuitive Systems web site 142ior-security-config element 204is-failure-fatal attribute 352isolation
of classloaders 88, 89Isolation Level Guaranteed setting 359is-one-one-cmp element 210is-read-only-bean element 189, 295
JJ2EE
security model 36

Section J
424 Application Server 8 • Developer’s Guide
standard deployment descriptors 79J2EE 1.3.1 Reference Implementation, migrating from 32J2EE application client 325J2EE tutorial 261J2SE policy file 334JAAS module 67, 330
LoginModule 67JACC 55JAR Extension Mechanism Architecture 98JAR file
client, for a deployed application 90, 113creating 98creating for an ACC client 100
Java Authentication and Authorization Service (JAAS) 54
Java Database Connectivity see JDBCJava Message Service see JMSJava Naming and Directory Interface see JNDIJava optional package mechanism 90Java Platform Debugger Architecture see JPDAJava Servlet API 265Java Transaction API (JTA) 379Java Transaction Service (JTS) 379JavaBeans 276java-config element 87, 111javaEncoding attribute 179JavaMail
and JNDI lookups 415architecture 411creating sessions 412defined 411JNDI subcontext for 388session properties 413, 414specification 412
JBoss 3.0, migrating from 32JDBC
creating resources 362integrating driver JAR files 357JNDI subcontext for 388specification 355supported drivers 306, 313, 356, 364transaction isolation levels 377tutorial 355
jdbc-resource 318
JDOQL 319JMS 165, 296, 298
and transactions 380checking if provider is running 401creating resources 403debugging 137JMS Service administration 398JNDI subcontext for 388provider 397resource properties 405
JMS Serviceconfiguring 398properties 399
jms-durable-subscription-name element 200jms-max-messages-load 200JNDI
and EJB components 395and JavaMail 415and lifecycle modules 351, 352, 390custom resource 393defined 387external JNDI resources 391for message-driven beans 297mapping references 395name for container-managed persistence 318subcontexts for connection factories 388tutorial 387using instead of ejb-ref mapping 91
JNDI Lookup setting 391JNDI Name setting 362, 391, 393, 404, 412jndi-name 318jndi-name element 168, 194JPDA debugging options 133JSP 1.2 specification 275JSP Engine Classloader 88jspc command 280jsp-config element 110, 178JSPs
API reference 275caching 276command-line compiler 280configuring 178encoding of 179generated source code 110precompiling 110, 117, 125, 128, 280

Section K
Index 425
tag libraries 276JSR 88 deployment 81, 106JVM arguments in domain.xml 344
K-keepgenerated flag 110, 111keepgenerated property 180key attribute
of cache tag 277of flush tag 279
key-field element 175Keypoint Interval setting 383
Llaunching acc 330ldap realm 50level attribute 245level element 230lib directory
and ACC clients 114and Apache Ant 115and the Common Classloader 87DTD file location 80for a web application 90
libraries 89, 114lifecycle modules 347, 390
allocating and freeing resources 352and classloaders 352and the server.policy file 352assembling 98configuration 351deploying 111
LifecycleEvent class 350LifecycleEventContext interface 350LifecycleListener interface 348LifecycleListenerImpl.java file 348LifeCycleModule Classloader 87, 352load balancing 148, 155, 340
locale attributedomain.xml file 262sun-web.xml file 182
locale-charset-info element 181locale-charset-map element 182lock-when-loaded element 230lock-when-modified element 231log method 351log-file attribute 245logging 139logging in the web container 265logging messages 332login method 63login, programmatic 62LoginModule
CallBackHandler 68commit() method 68integrate 69login() method 68logout() method 69
log-service element 139, 245LruCache cacheClassName value 170
MMail Host setting 412manager-properties element 159mappedfile property 180mapping
data types 312elements in DTD file 225features 308
mapping resource references 395mapping-properties element 210match-expr attribute 177Max Pool Size setting 358Max Wait Time setting 358max-cache-size element 218max-entries attribute 169max-pool-size element 219maxSessions property 160

Section N
426 Application Server 8 • Developer’s Guide
MaxSize property 170MDB file samples 300mdb-connection-factory 296, 299mdb-connection-factory element 201mdb-container 298mdb-resource-adapter element 201message-destination element 167, 198, 241message-destination-name element 167, 198, 241message-driven bean
pooling 297message-driven beans 137, 296
connection factory 296DTD elements 199monitoring 297onMessage runtime exception 299pool monitoring 298sample XML files 300
messages, JavaMailreading 416sending 415
messages, JMSSOAP 407
MessageServiceAddressList property 405MessageTransformer utility 408, 409messaging elements 199method-name element 210migration tools 31MM MySQL Type4 JDBC driver 375modules
definition 76directories deployed to 83directory structure 81disabling 102, 121individual deployment of 110naming 81runtime environment 83see also applications
monitoring transactions 304MSSQL Inet JDBC driver 367MSSQL/SQL Server2000 Data Direct JDBC driver 372MultiLruCache cacheClassName value 170MultiLRUSegmentSize property 170
Nname attribute 117, 120, 122, 128, 155, 171, 174, 175,
176, 243, 248name element 166, 189, 205Name property 405Name setting 357named-group element 231naming service 387native library path
configuring for hprof 140configuring for OptimizeIt 142
nested transactions 302NetDynamics servers, migrating from 32Netscape Application Servers, migrating from 32networkProtocol property 360nocache attribute of cache tag 278none element 231
OOn Any Failure Close All Connections setting 359one-one-finders element 210onMessage 299Optimizeit profiler 142Oracle Data Direct JDBC driver 371Oracle Inet JDBC driver 366Oracle OCI JDBC driver 370Oracle Thin/Type4 Driver
workaround for 381Oracle Thin/Type4 JDBC driver 369oracle-xa-recovery-workaround property 383ORB architecture 339output from servlets 267overriding built-in ORB 343
approaches 343ORB.init properties approach 343ORB.init() properties 343orb.properties 344orb.properties approach 344provide JVM start-up arguments 344providing JVM arguments 344

Section P
Index 427
Ppackage attribute 126package-appclient script 114packaging see assemblyPAM infrastructure 53parameter-encoding element 183param-name element 191, 192, 194, 196, 197, 238pass-by-reference element 149, 195, 287pass-by-value semantics 149, 195password attribute 117, 120, 122, 244, 247password element 166, 205Password property 360, 405path attribute 247permissions
changing in server.policy 61default in server.policy 60
persistence elements for the DTD file 206persistence manager 318persistence-manager-factory-resource 318persistence-type attribute 159physical destinations 401plugin tag 179pm-class-generator element 211pm-config element 211pm-descriptor element 211pm-descriptors element 212pm-identifier element 212pm-inuse element 212pm-mapping-factory element 213pm-version element 213PointBase JDBC driver 365pool monitoring for MDBs 298Pool Name setting 362Pool Resize Quantity setting 358pool-idle-timeout-in-seconds 219, 220pooling 287, 290, 293, 297
of servlets 275pooling elements for the DTD 215POP3 protocol 411port attribute 118, 120, 122, 243port property 360
Port setting 400precompilejsp attribute 117, 128--precompilejsp option 110precompiling JSPs 280primary key class 305principal element 192principal-name element 150, 157, 192profilers 139programmatic login 62ProgrammaticLogin class 63ProgrammaticLoginPermission 63properties, about 154property element 154, 190, 248
Qquery-filter element 213query-ordering element 213query-params element 214query-variables element 214Queue interface 403QueueConnectionFactory interface 403
Rra.xml file 79RAR file, creating 101read-only beans 286, 292
deploying 295refreshing 294
read-only element 231ReadOnlyBeanNotifier 294READY_EVENT 347realm attribute 244realm element 151, 205realms
and role mapping 41certificate realm 51configuring 44

Section S
428 Application Server 8 • Developer’s Guide
custom 54default 45, 46definition 40file realm 48ldap realm 50mapping groups and users to 156solaris realm 53supported 47user information in 43
reapIntervalSeconds property 160Recover on Restart setting 382redeployment 102reference elements in the DTD file 193Reference Implementation, migrating from 32refresh attribute of cache tag 278refresh-field element 174refresh-period-in-seconds 190, 293.reload file 104reloading property 180reloading, dynamic 103removal-timeout-in-seconds element 219removing servlets 274request object 274required element 205resize-quantity element 220resource adapters see connectorsresource allocation 275Resource Enabled setting 404resource managers 380resource references, mapping 395Resource Type setting 358, 391, 393resource-adapter-mid element 201resource-env-ref element 164, 196, 395resource-env-ref-name element 164, 197resource-ref element 164, 197, 395res-ref-name element 165, 196res-sharing-scope deployment descriptor setting 376restrictions
message-driven beans 298on container-managed persistence 323on session bean transactions 292
retrievestubs attribute 117, 128Retry Timeout setting 383
rmic-options attribute 111Role Based Access Control (RBAC) 53role mapping elements for DTD 191role-name element 150, 157, 192roleName property 360roles 66
creating 43mapping 40
rpm 26
SS1ASCtxFactory class 341sample applications 33sample XML files 300sas-context element 205schema capture 233schema element 231schema-generator-properties element 214scope attribute 174, 175, 176scratchdir property 180secondary table 226, 307security 35
ACC clients 38applications 42authentication data 325declarative 41DTD elements 202EJB components 38, 42goals 36J2EE model 36JAAS module 325of containers 41programmatic 41programmatic login 62responsibilities overview 38role mapping 40server.policy file 60Sun Java System Application Server features 36Sun Java System Application Server model 37terminology 39user information 43using SSL with CA 332

Section S
Index 429
web applications 37, 42security element 245security policy domains see realmssecurity-role-mapping element 150, 156, 192security-service element 46, 56, 59send-password attribute 243server
changing the classpath of 87lib directory of 80, 87, 114, 115life cycle events 347optimizing for development 30security model 37Sun Java System Application Server deployment
descriptors 80, 145using Ant scripts to control 123
server.policy file 60and lifecycle modules 352changing permissions 61default permissions 60Optimizeit profiler options 143ProgrammaticLoginPermission 63
server-classpath attribute 87ServerLifecycleException 348server-name element 193serverName property 360service method 275Servlet 2.3 specification 265servlet element 156servlet-name element 157servlets
API reference 265caching 268character encoding 262destroying 274engine 274, 275instantiating 274invoking using a URL 266output 267pooling 275removing 274request handling 274specification 265thread safety 266
session beans 290container 290
developing 291restrictions 292
Session Enabled setting 413session-config element 158sessionFilename property 160session-manager element 158session-properties element 161sessions
about 282and dynamic redeployment 102and dynamic reloading 103cookies 282session managers 282URL rewriting 282
sessions, JavaMail, creating 412session-timeout element 162setCharacterEncoding method 263setContentType method 263setLocale method 263setting the ORB port 332showrev 25SHUTDOWN_EVENT 347Simple Object Access Protocol see SOAPsingle sign-on 64singleThreadedServletPoolSize property 154, 266, 275SingleThreadModel class 266singleton approach 344SMTP protocol 411SOAP messages 407SOAP with Attachments API for Java (SAAJ) 408solaris realm 53srcdir attribute 125SSL 326
authentication configuration 52ssl element 246SSL processing parameters 246ssl2-ciphers attribute 246ssl2-enabled attribute 246ssl3-enabled attribute 246ssl3-tls-ciphers attribute 246stack trace, generating 133stand-alone client
running 336, 337

Section S
430 Application Server 8 • Developer’s Guide
stand-alone CORBA clientcreating 335
Start Arguments setting 399Start Timeout setting 399STARTUP_EVENT 347, 351Status Enabled setting 392Steady Pool Size setting 358steady-pool-size 220steady-pool-size element 221Store Protocol Class setting 413Store Protocol setting 413store-properties element 160stubs
directory for 83, 84keeping 111, 117, 128retrieving after deployment 111
Sun customer support 25Sun Java System Application Server
value-added features 285Sun Java System Message Queue 137, 165, 397, 399
checking to see if running 401installation of 29
Sun ONE Application Server, migrating from 32Sun ONE Studio
debugging 134Sun ONE Web Server, migrating from 32sun-acc.xml elements
description 244target-server 243
sun-acc.xml file 80, 114, 146, 241elements in 241
sun-application element 147sun-application.xml file 80, 146
elements in 147example of 151schema for 145
sun-application_1_4-0.dtd file 80, 146sun-application-client.xml elements
default-resource-principal 239ejb-ref 239ejb-ref-name 240jndi-name 241name 239password 239
resource-env-ref 240resource-env-ref-name 240resource-ref 238resource-ref-name 238sun-application-client 237
sun-application-client.xml file 80, 146elements in 237
sun-application-client_1_4-0.dtd file 80, 146sun-application-client-container_1_0.dtd file 80, 146sun-appserv-admin task 123sun-appserv-component task 121sun-appserv-deploy task 116sun-appserv-jspc Ant task 280sun-appserv-jspc task 125sun-appserv-undeploy task 119sun-appserv-update task 126sun-cmp-mapping element 232sun-cmp-mapping_1_1.dtd file 80, 146sun-cmp-mappings 233sun-cmp-mappings.xml 225, 234, 307sun-cmp-mappings.xml file 80, 146sun-ejb-jar element 190sun-ejb-jar.xml file 80, 146
sample 301sun-ejb-jar_2_1-0.dtd file 80, 146sunhome attribute 118, 120, 122, 126sun-web.xml file 80, 110, 146
and classloaders 87elements in 151example of 183
sun-web-app element 152sun-web-app_2_4-0.dtd file 80, 146suppressSmap property 180Sybase Data Direct JDBC driver 373Sybase Inet JDBC driver 368Sybase JConnect/Type4 JDBC driver 372System Classloader 87
using to circumvent isolation 89

Section T
Index 431
TTable Name setting 359table-name element 232, 233tag libraries 276tags
for JSP caching 276target-server element 243tasks, Apache Ant 115tempdir property 154TERMINATION_EVENT 348third party ORB 342
accessing backend 342configure Orbix ORB 342
thread safety 266timeout
for JMS connections 399for transactions 382, 384
timeout attribute of cache tag 278timeout element 174timeout-in-seconds attribute 169timeoutSeconds property 162tls-enabled attribute 246tls-rollback-enabled attribute 246Tomcat Web Server, migrating from 32tools
for deployment 106for developers, general 30
Topic interface 403TopicConnectionFactory interface 403Transaction Isolation setting 359transaction log file 383Transaction Log Location setting 383transaction service
configuring 382properties 383
Transaction Timeout setting 382transactions 302
administration and monitoring 304commit options 303disabling logging 383flat 302global 302in the J2EE tutorial 379
JDBC isolation levels 377JNDI subcontext for 388local 302local or global scope of 380logging for recovery 385nested 302resource managers 380
Transport Protocol Class setting 413Transport Protocol setting 413transport-config element 206trimSpaces property 180type attribute 117, 120, 122, 128Type setting 399, 402, 404
Uunique-id element 150, 191upload attribute 117URI, configuring for an application 148uribase attribute 125uriroot attribute 125URL rewriting 282URL, JNDI subcontext for 388url-pattern element 173user attribute 117, 120, 122User property 360user-name attribute 244UserName property 405users
adding to the file realm 48and roles 41security information 43
users in realms 156utility classes 89, 98, 114
VValidationMethod setting 359value added features 285value additions for product 286

Section W
432 Application Server 8 • Developer’s Guide
value attribute 155value element 176, 191verbose attribute 125verifier tool 92verify attribute 117, 128victim-selection-policy element 221virtual servers 263
default 263virtualservers attribute 117
WWAR file, creating 97web applications
assembling 97deploying 110module definition 76security 37, 42
Web Classloader 88changing delegation in 87
web container, configuring 265web element 148web module, default 265, 267web service
sample applications 33web service elements
auth-method 258call-property 254endpoint-address-uri 257localpart 253login-config 257name 254namespaceURI 253port-component-name 256port-info 252service-endpoint-interface 252service-impl-class 255service-qname 255service-ref 251service-ref-name 251servlet-impl-class 258stub-property 253tie-class 258
transport-guarantee 258value 255webservice-description 250webservice-description-name 250webservice-endpoint 256wsdl-override 255wsdl-port 252wsdl-publish-location 250
web.xml file 79and certificate configuration 52session-timeout element 162
webapp attribute 125WebLogic Server, migrating from 31Websphere Application Server, migrating from 31web-uri element 148
XXA resource 380xaresource-txn-timeout property 384XML
specification 146syntax verifier 92
XML filessample 300
xpoweredBy property 180-Xrs option and debugging 134, 141