Stealthwatch System Proxy Log Configuration 6.9.x - Cisco
29
Stealthwatch ® System Proxy Log Configuration (for Stealthwatch System v6.9.x)
-
Upload
khangminh22 -
Category
Documents
-
view
0 -
download
0
Transcript of Stealthwatch System Proxy Log Configuration 6.9.x - Cisco
Stealthwatch® System
Proxy Log Configuration(for Stealthwatch System v6.9.x)
Copyrights and Trademarks© 2017 Cisco Systems, Inc. All rights reserved.
NOTICE
THE SPECIFICATIONS AND INFORMATION REGARDING THE PRODUCTS INTHIS MANUAL ARE SUBJECT TO CHANGE WITHOUT NOTICE. ALLSTATEMENTS, INFORMATION, AND RECOMMENDATIONS IN THIS MANUALARE BELIEVED TO BE ACCURATE BUT ARE PRESENTED WITHOUTWARRANTY OF ANY KIND, EXPRESS OR IMPLIED. USERS MUST TAKE FULLRESPONSIBILITY FOR THEIR APPLICATION OF ANY PRODUCTS.
THE SOFTWARE LICENSE AND LIMITED WARRANTY FOR THEACCOMPANYING PRODUCT ARE SET FORTH IN THE INFORMATION PACKETTHAT SHIPPED WITH THE PRODUCT AND ARE INCORPORATED HEREIN BYTHIS REFERENCE. IF YOU ARE UNABLE TO LOCATE THE SOFTWARELICENSE OR LIMITED WARRANTY, CONTACT YOUR CISCOREPRESENTATIVE FOR A COPY.
The Cisco implementation of TCP header compression is an adaptation of a programdeveloped by the University of California, Berkeley (UCB) as part of UCB's publicdomain version of the UNIX operating system. All rights reserved. Copyright © 1981,Regents of the University of California.
NOTWITHSTANDING ANY OTHER WARRANTY HEREIN, ALL DOCUMENTFILES AND SOFTWARE OF THESE SUPPLIERS ARE PROVIDED "AS IS" WITHALL FAULTS. CISCO AND THE ABOVE-NAMED SUPPLIERS DISCLAIM ALLWARRANTIES, EXPRESSED OR IMPLIED, INCLUDING, WITHOUTLIMITATION, THOSE OF MERCHANTABILITY, FITNESS FOR A PARTICULARPURPOSE AND NONINFRINGEMENT OR ARISING FROM A COURSE OFDEALING, USAGE, OR TRADE PRACTICE.
IN NO EVENT SHALL CISCO OR ITS SUPPLIERS BE LIABLE FOR ANYINDIRECT, SPECIAL, CONSEQUENTIAL, OR INCIDENTAL DAMAGES,INCLUDING, WITHOUT LIMITATION, LOST PROFITS OR LOSS OR DAMAGETO DATA ARISING OUT OF THE USE OR INABILITY TO USE THIS MANUAL,EVEN IF CISCO OR ITS SUPPLIERS HAVE BEEN ADVISED OF THEPOSSIBILITY OF SUCH DAMAGES.
Any Internet Protocol (IP) addresses and phone numbers used in this document arenot intended to be actual addresses and phone numbers. Any examples, commanddisplay output, network topology diagrams, and other figures included in thedocument are shown for illustrative purposes only. Any use of actual IP addresses orphone numbers in illustrative content is unintentional and coincidental.
All printed copies and duplicate soft copies are considered un-Controlled copies andthe original on-line version should be referred to for latest version.

Cisco has more than 200 offices worldwide. Addresses, phone numbers, and faxnumbers are listed on the Cisco website at www.cisco.com/go/offices.
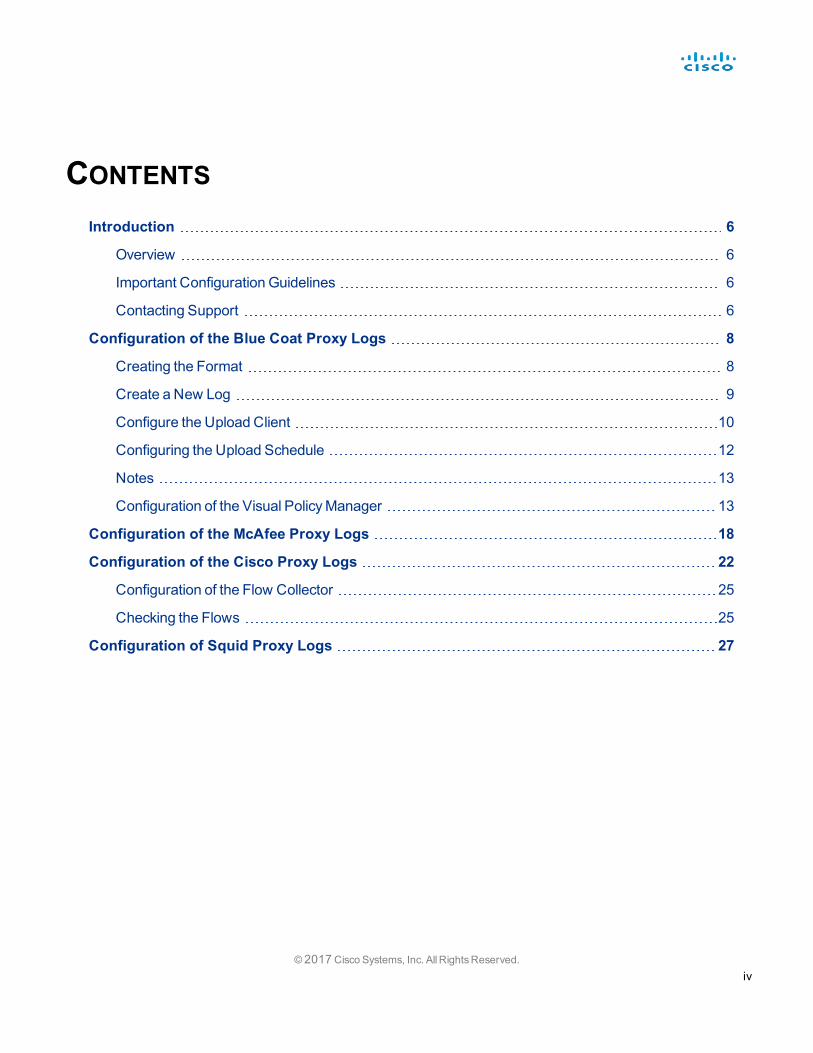
CONTENTSIntroduction 6
Overview 6
Important Configuration Guidelines 6
Contacting Support 6
Configuration of the Blue Coat Proxy Logs 8
Creating the Format 8
Create a New Log 9
Configure the Upload Client 10
Configuring the Upload Schedule 12
Notes 13
Configuration of the Visual PolicyManager 13
Configuration of the McAfee Proxy Logs 18
Configuration of the Cisco Proxy Logs 22
Configuration of the Flow Collector 25
Checking the Flows 25
Configuration of Squid Proxy Logs 27
© 2017 Cisco Systems, Inc. AllRightsReserved.iv

© 2017 Cisco Systems, Inc. AllRightsReserved.v
INTRODUCTIONOverviewIn order to gather user information from your network proxy servers for the StealthwatchSystem ProxyWatch you need to configure the proxy servers logs so that the Flow Collector canreceive the information and the SMC will display the information on the Flow Proxy Recordspage. This page provides URLs and application names of the traffic inside a network goingthrough the proxy server.
This document describes the various procedures needed to configure the logs for different proxyservers. These servers are Blue Coat, McAfee, Cisco, and Squid. This document assumes thatyou already have the proxy server running as part of your network. The procedures describehow to configure the proxy's logs so that the files necessary for the Flow Collector are given andthe information is provided.
Important Configuration GuidelinesWhen configuring the logs for any of the proxies, you must make certain to adhere to theseguidelines:
l The Flow Collector and the proxy must use the same NTP server or receive time from acommon source for flow and proxy records to be matched.
l When setting the IP address for Flow Collector, select the Flow Collector that collectsdata from the exporters and end points that you want to investigate in the proxy logs.
Contacting SupportIf you need technical support, please do one of the following:
l Contact your local Cisco Partnerl Contact Cisco Stealthwatch Support
o To open a case by web: http://www.cisco.com/c/en/us/support/index.htmlo To open a case by email: [email protected] For phone support: 1-800-553-2447 (U.S.)o For worldwide support numbers: www.cisco.com/en/US/partner/support/tsd_cisco_worldwide_contacts.html
© 2017 Cisco Systems, Inc. All Rights Reserved. 6

Introduction
7 2017 Cisco Systems, Inc. All Rights Reserved

CONFIGURATION OF THE BLUE COAT PROXY LOGSThis chapter describes the procedure for configuring the Blue Coat proxy logs to deliver to theStealthwatch System.
Note: The Blue Coat proxy version used for testing was SGV100, SGOS 6.5.5.7 SWGEdition.
Creating the FormatTo create a new log format, complete the following steps:
1. In your browser, access your Blue Coat proxy server.2. Click the Configuration tab.
3. In the Main Menu of the Management Console, click Access Logging > Formats.
4. Click the New button at the bottom of the page. The Create Format page opens.
© 2017 Cisco Systems, Inc. All Rights Reserved. 8
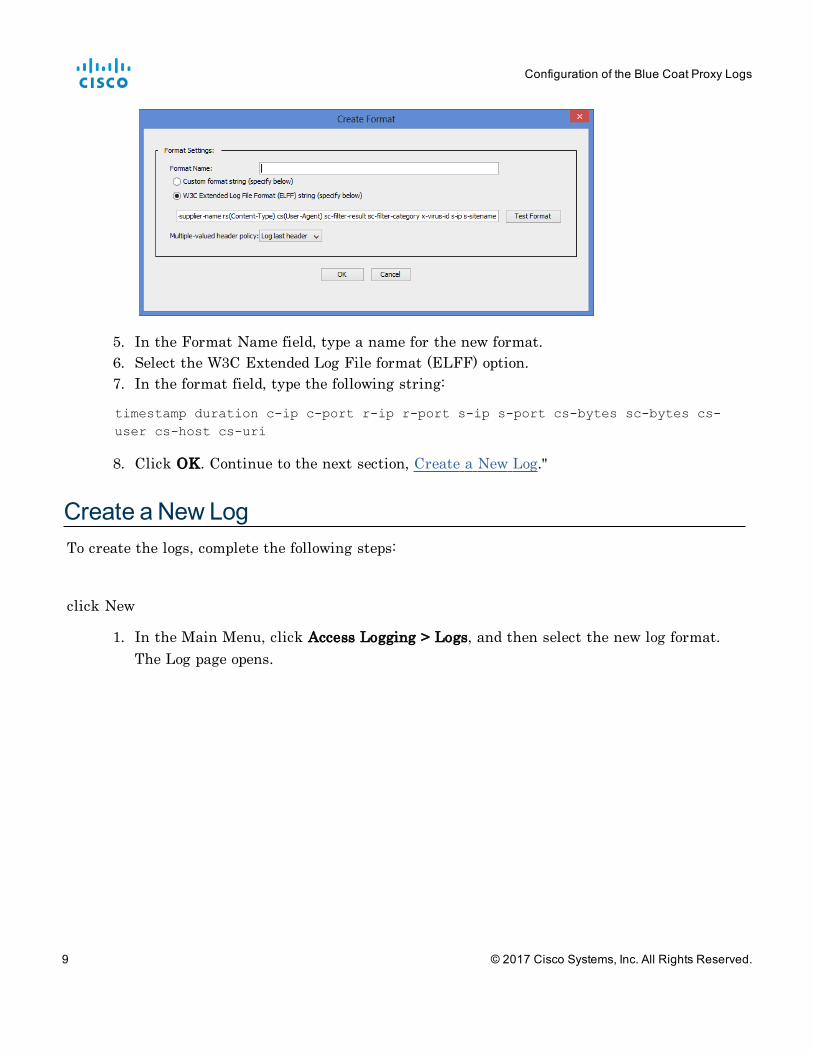
5. In the Format Name field, type a name for the new format.6. Select the W3C Extended Log File format (ELFF) option.7. In the format field, type the following string:
timestamp duration c-ip c-port r-ip r-port s-ip s-port cs-bytes sc-bytes cs-user cs-host cs-uri
8. Click OK. Continue to the next section, Create a New Log."
Create a New LogTo create the logs, complete the following steps:
click New
1. In the Main Menu, click Access Logging > Logs, and then select the new log format.The Log page opens.
Configuration of the Blue Coat Proxy Logs
9 © 2017 Cisco Systems, Inc. All Rights Reserved.
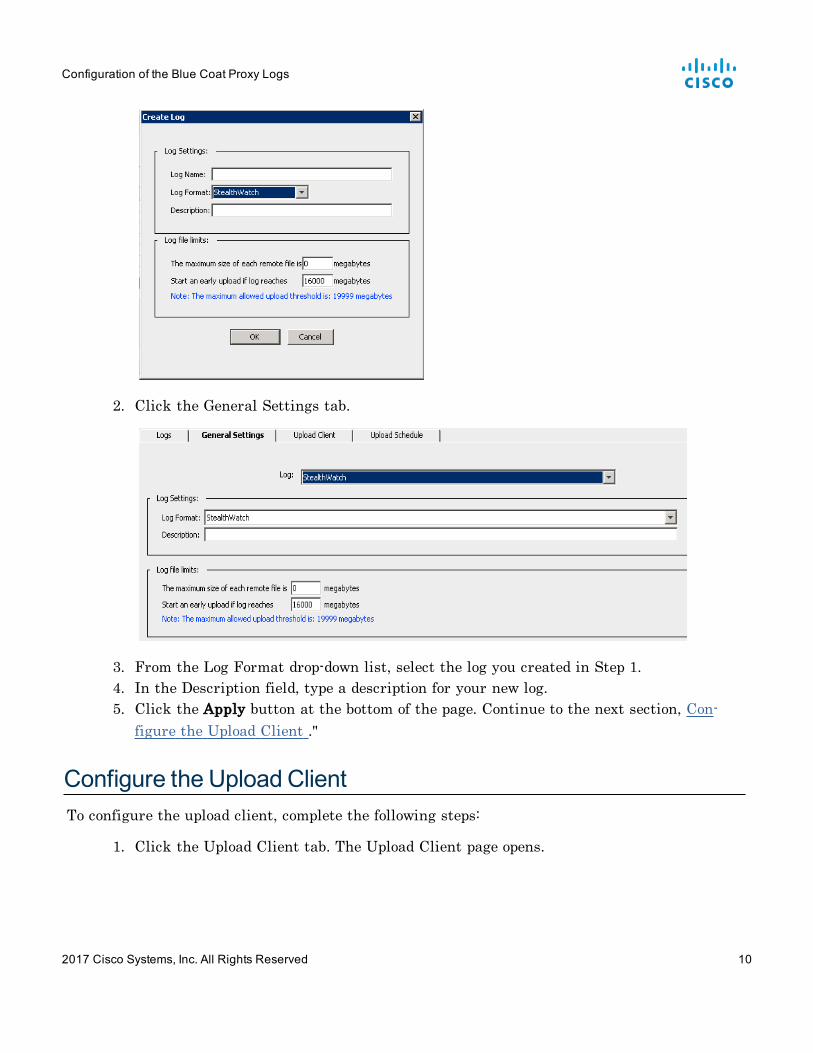
2. Click the General Settings tab.
3. From the Log Format drop-down list, select the log you created in Step 1.4. In the Description field, type a description for your new log.5. Click the Apply button at the bottom of the page. Continue to the next section, Con-
figure the Upload Client ."
Configure the Upload ClientTo configure the upload client, complete the following steps:
1. Click the Upload Client tab. The Upload Client page opens.
Configuration of the Blue Coat Proxy Logs
2017 Cisco Systems, Inc. All Rights Reserved 10
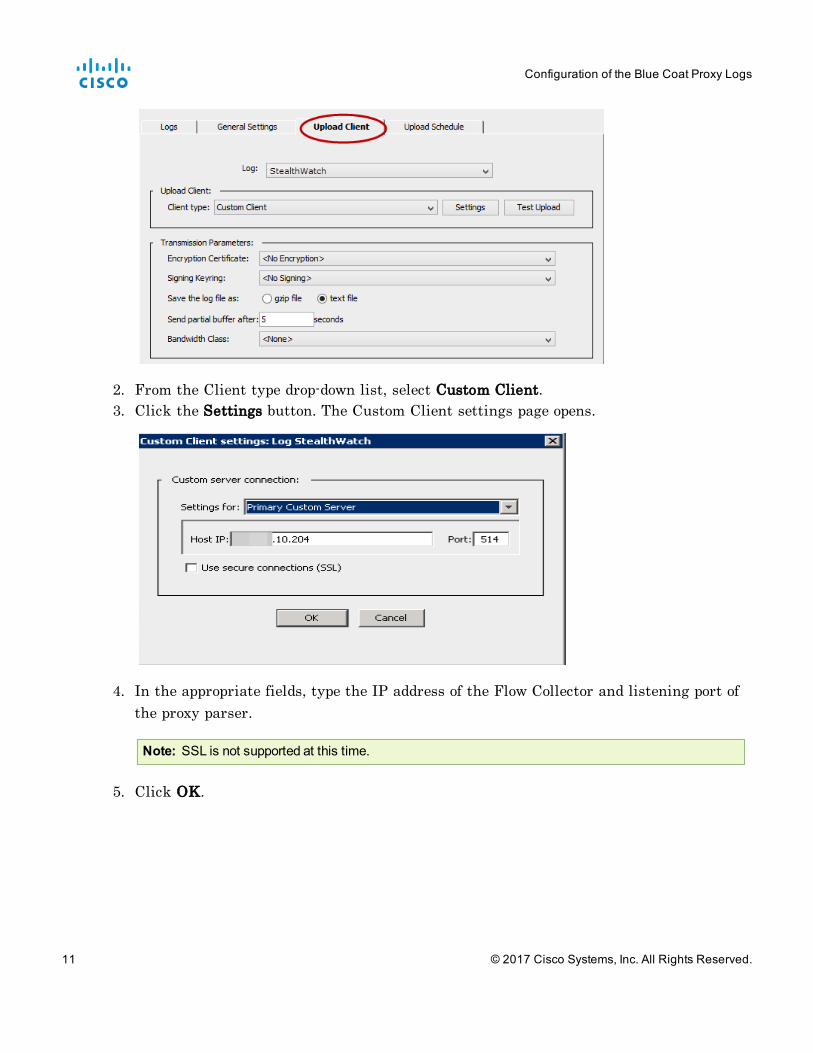
2. From the Client type drop-down list, select Custom Client.3. Click the Settings button. The Custom Client settings page opens.
4. In the appropriate fields, type the IP address of the Flow Collector and listening port ofthe proxy parser.
Note: SSL is not supported at this time.
5. Click OK.
Configuration of the Blue Coat Proxy Logs
11 © 2017 Cisco Systems, Inc. All Rights Reserved.
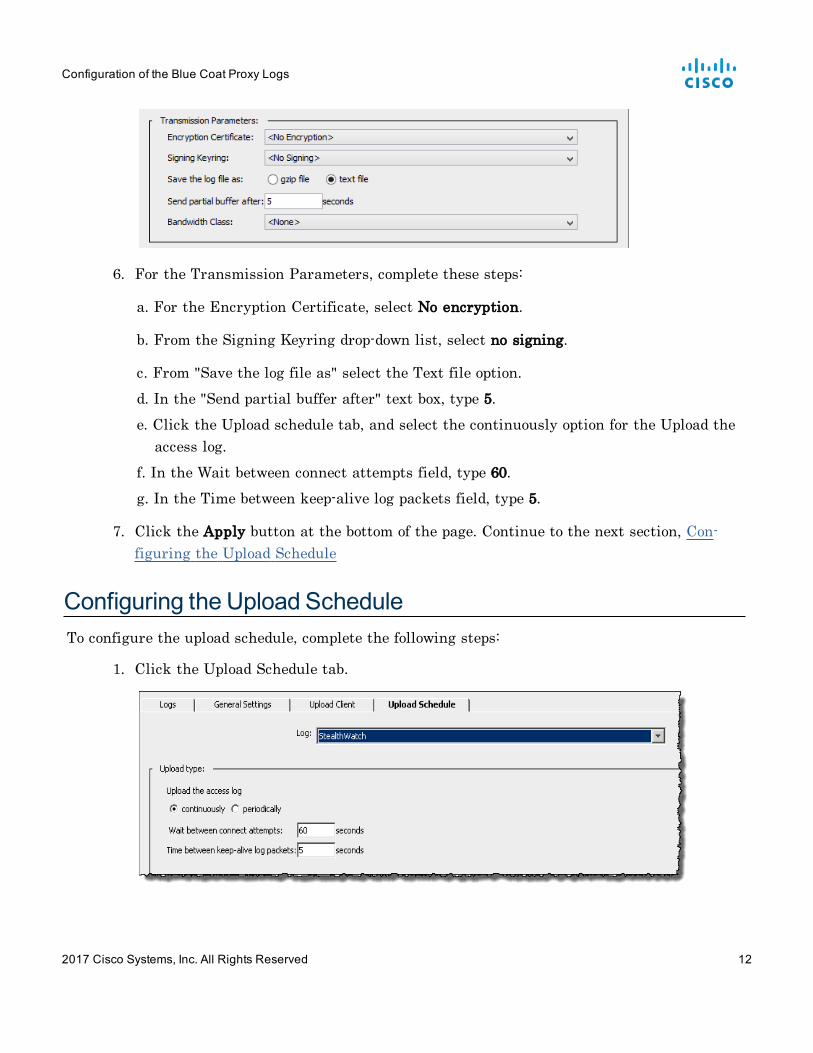
6. For the Transmission Parameters, complete these steps:
a. For the Encryption Certificate, select No encryption.
b. From the Signing Keyring drop-down list, select no signing.
c. From "Save the log file as" select the Text file option.
d. In the "Send partial buffer after" text box, type 5.
e. Click the Upload schedule tab, and select the continuously option for the Upload theaccess log.
f. In the Wait between connect attempts field, type 60.
g. In the Time between keep-alive log packets field, type 5.
7. Click the Apply button at the bottom of the page. Continue to the next section, Con-figuring the Upload Schedule
Configuring the Upload ScheduleTo configure the upload schedule, complete the following steps:
1. Click the Upload Schedule tab.
Configuration of the Blue Coat Proxy Logs
2017 Cisco Systems, Inc. All Rights Reserved 12
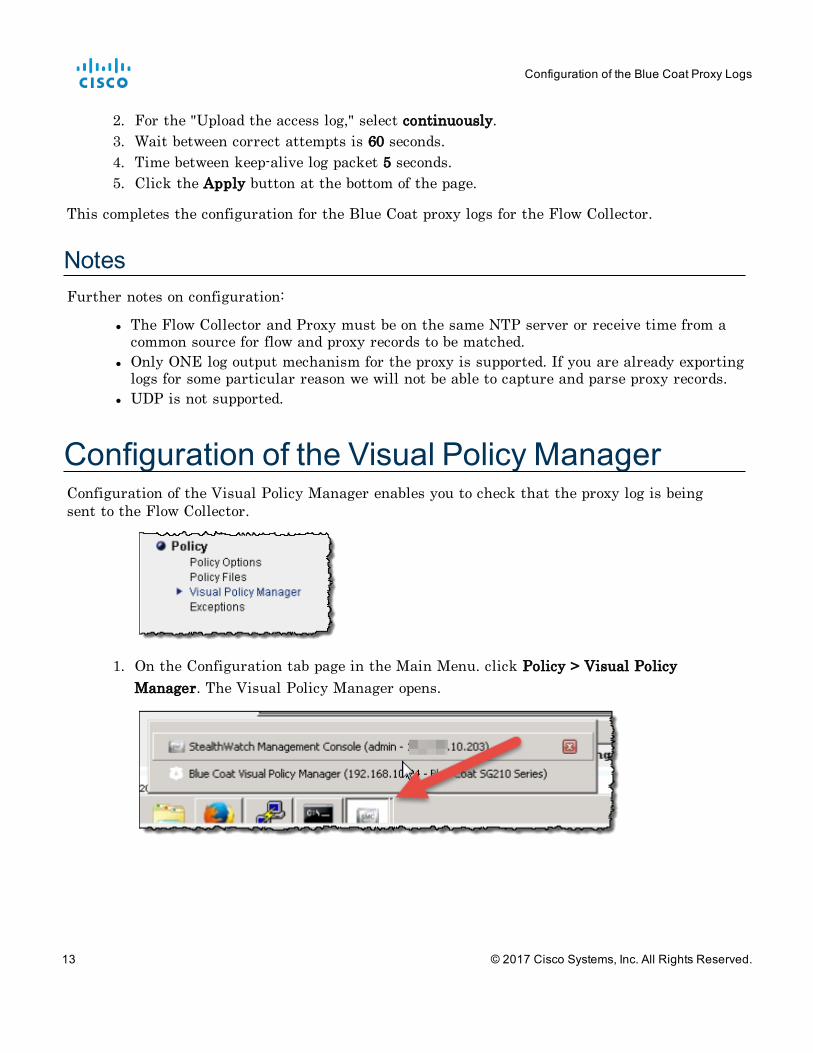
2. For the "Upload the access log," select continuously.3. Wait between correct attempts is 60 seconds.4. Time between keep-alive log packet 5 seconds.5. Click the Apply button at the bottom of the page.
This completes the configuration for the Blue Coat proxy logs for the Flow Collector.
NotesFurther notes on configuration:
l The Flow Collector and Proxy must be on the same NTP server or receive time from acommon source for flow and proxy records to be matched.
l Only ONE log output mechanism for the proxy is supported. If you are already exportinglogs for some particular reason we will not be able to capture and parse proxy records.
l UDP is not supported.
Configuration of the Visual Policy ManagerConfiguration of the Visual Policy Manager enables you to check that the proxy log is beingsent to the Flow Collector.
1. On the Configuration tab page in the Main Menu. click Policy > Visual PolicyManager. The Visual Policy Manager opens.
Configuration of the Blue Coat Proxy Logs
13 © 2017 Cisco Systems, Inc. All Rights Reserved.

2. Click the Launch button at the bottom for your configured log. The Visual Policy Man-ager for the log window opens.
3. Click Policy > Add Web Access Layer. The Add New layer screen opens.
4. Type a name for the new layer, and then click OK.
5. Right-click Deny in the Action column and then click Set. The Set Action Object dia-logue opens.
Configuration of the Blue Coat Proxy Logs
2017 Cisco Systems, Inc. All Rights Reserved 14
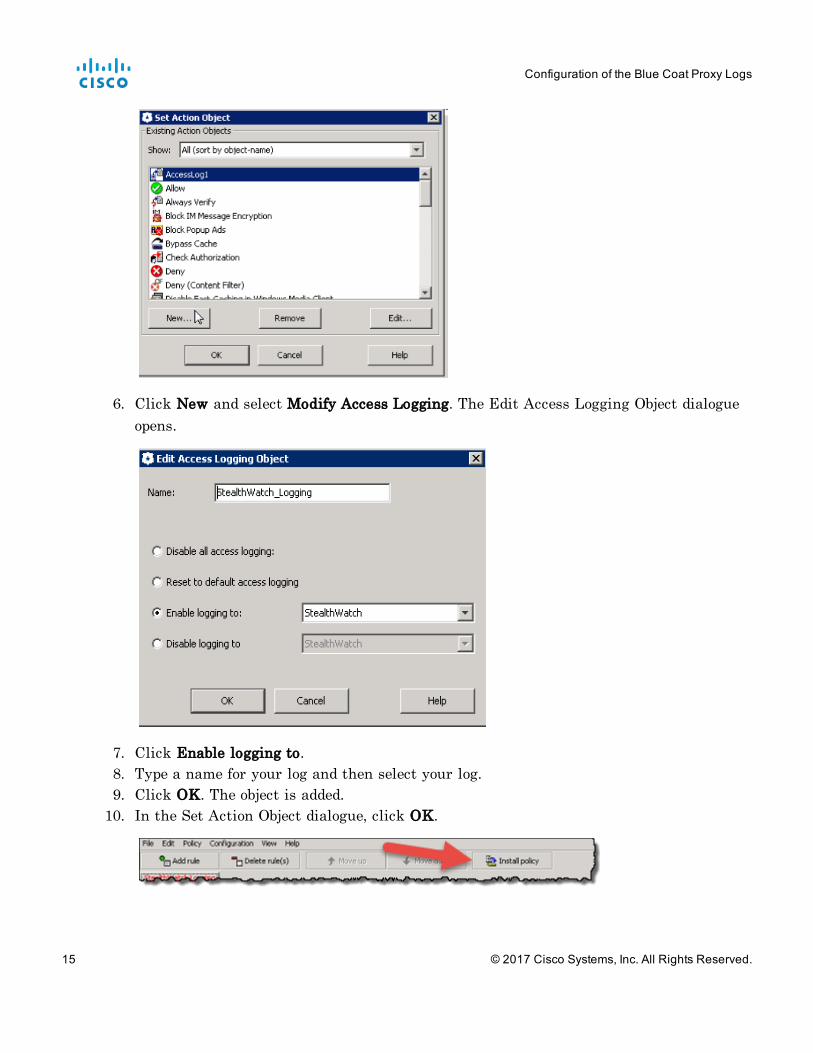
6. Click New and select Modify Access Logging. The Edit Access Logging Object dialogueopens.
7. Click Enable logging to.8. Type a name for your log and then select your log.9. Click OK. The object is added.10. In the Set Action Object dialogue, click OK.
Configuration of the Blue Coat Proxy Logs
15 © 2017 Cisco Systems, Inc. All Rights Reserved.
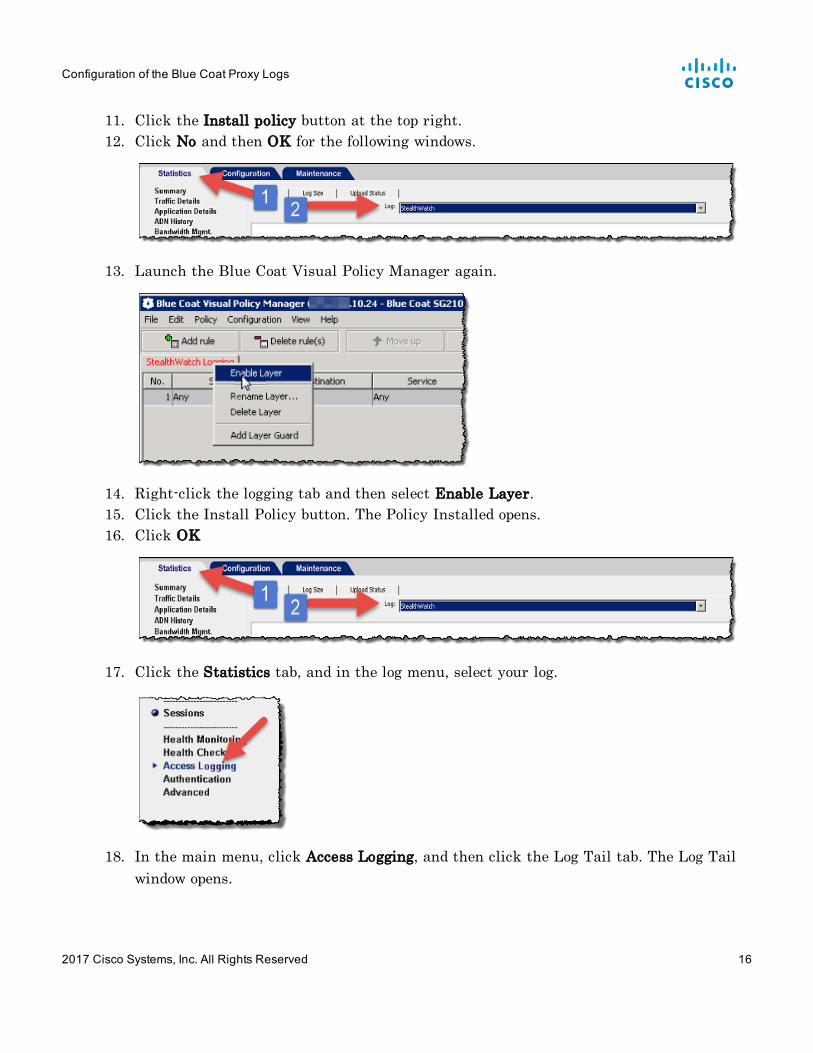
11. Click the Install policy button at the top right.12. Click No and then OK for the following windows.
13. Launch the Blue Coat Visual Policy Manager again.
14. Right-click the logging tab and then select Enable Layer.15. Click the Install Policy button. The Policy Installed opens.16. Click OK
17. Click the Statistics tab, and in the log menu, select your log.
18. In the main menu, click Access Logging, and then click the Log Tail tab. The Log Tailwindow opens.
Configuration of the Blue Coat Proxy Logs
2017 Cisco Systems, Inc. All Rights Reserved 16

19. Click Start Tail button at the bottom of the page.20. On the Statistics main menu, click System > Event Logging.
This page will show if the log file is uploaded to the Flow Collector and the changesmade. It shows whether the proxy is connected to the Flow Collector.
Configuration of the Blue Coat Proxy Logs
17 © 2017 Cisco Systems, Inc. All Rights Reserved.
CONFIGURATION OF THE MCAFEE PROXY LOGSThis chapter describes the procedure for configuring the McAfee proxy logs from the McAfeeWeb Gateway to deliver to the Stealthwatch System.
Important: Be sure that you have downloaded the XML configuration file for theMcAfee proxy. Goto the Stealthwatch Download and License Center (https://lancope.flexnetoperations.com), to obtainthe file and readme, ProxyWatch XMLConfiguration File.
Note: TheMcAfee proxy version used for testing was 7.4.2.6.0 - 18721.
To set up the McAfee proxy log, complete the following steps:
1. Download the XML file, FlowCollector_[date]_McAfee_Log_XML_Config_[v].xml, andthen save it to your preferred location.
Note: "Date" indicates the date of the XML file, and "v" indicates the version of theMcAfee proxyversion. Be sure to select the XML file with the same version number as your McAfee proxy.
Follow these steps to acquire it:
a. Go to https://lancope.flexnetoperations.com, the Stealthwatch Download and LicenseCenter. The Login page opens.
b. Enter your Login ID and Password in the appropriate fields, and then click Login.The Product Home page opens.
c. Click Downloads.
d. Select the link, "vX.X Updates for the FlowCollector NetFlow Series."
e. Download and save the XML file.
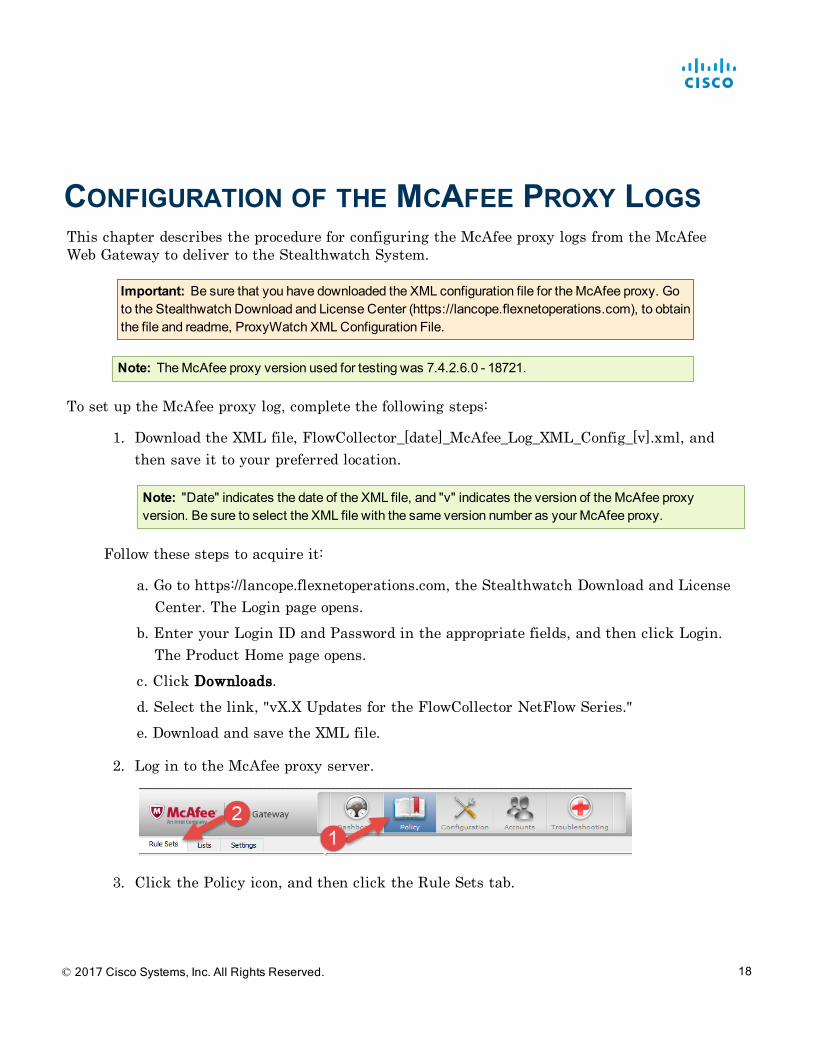
2. Log in to the McAfee proxy server.
3. Click the Policy icon, and then click the Rule Sets tab.
© 2017 Cisco Systems, Inc. All Rights Reserved. 18
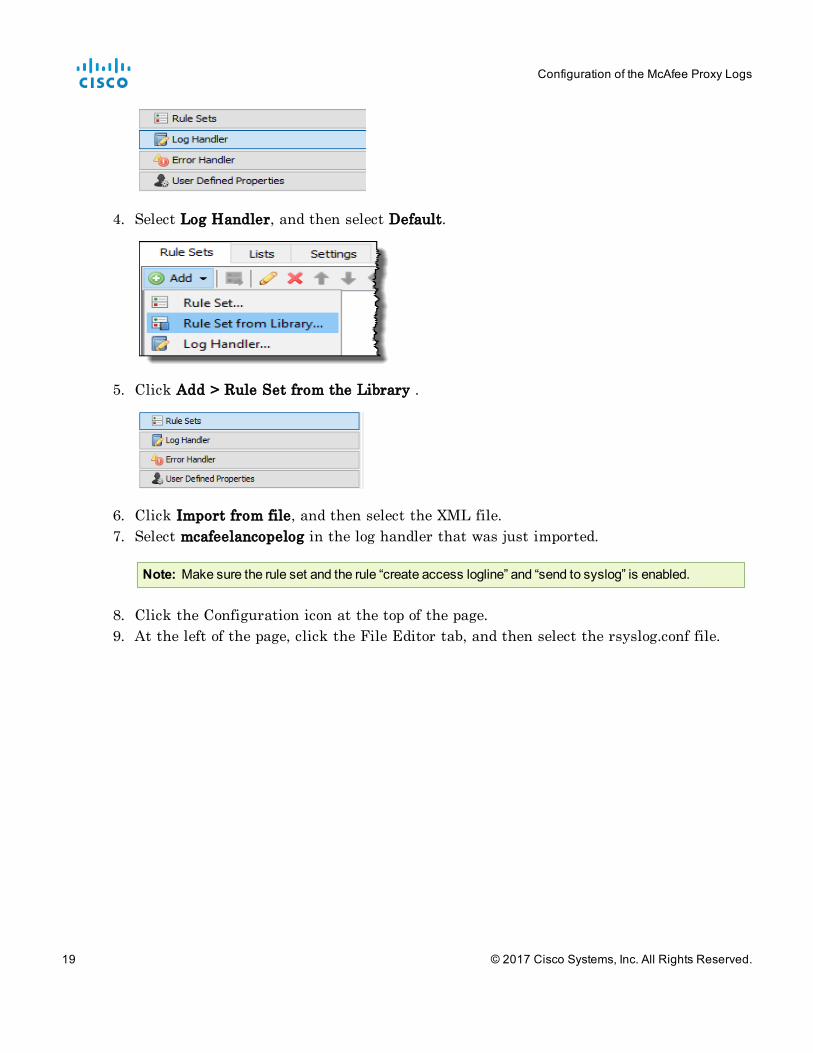
4. Select Log Handler, and then select Default.
5. Click Add > Rule Set from the Library .
6. Click Import from file, and then select the XML file.7. Select mcafeelancopelog in the log handler that was just imported.
Note: Make sure the rule set and the rule “create access logline” and “send to syslog” is enabled.
8. Click the Configuration icon at the top of the page.9. At the left of the page, click the File Editor tab, and then select the rsyslog.conf file.
Configuration of the McAfee Proxy Logs
19 © 2017 Cisco Systems, Inc. All Rights Reserved.
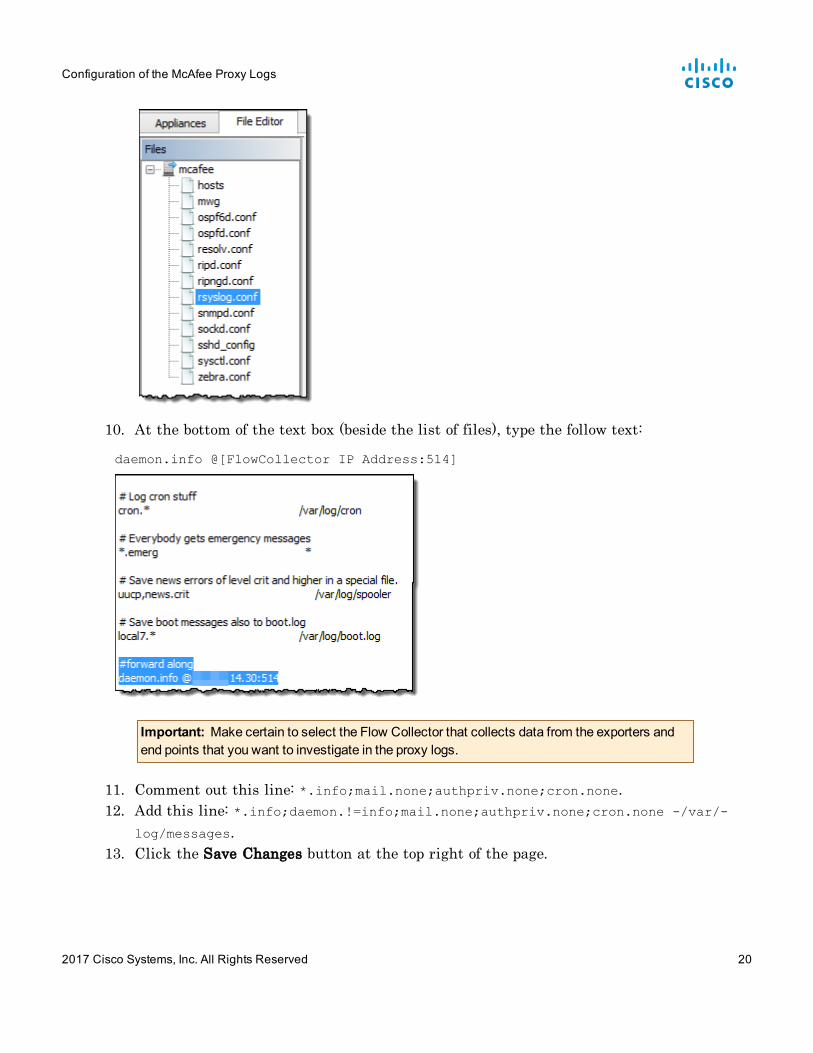
10. At the bottom of the text box (beside the list of files), type the follow text:
daemon.info @[FlowCollector IP Address:514]
Important: Make certain to select the Flow Collector that collects data from the exporters andend points that you want to investigate in the proxy logs.
11. Comment out this line: *.info;mail.none;authpriv.none;cron.none.12. Add this line: *.info;daemon.!=info;mail.none;authpriv.none;cron.none -/var/-
log/messages.13. Click the Save Changes button at the top right of the page.
Configuration of the McAfee Proxy Logs
2017 Cisco Systems, Inc. All Rights Reserved 20

Configuration of the McAfee Proxy Logs
21 2017 Cisco Systems, Inc. All Rights Reserved

CONFIGURATION OF THE CISCO PROXY LOGSThis chapter describes the procedure for configuring the Cisco proxy logs to deliver to theStealthwatch System.
To set up the Cisco proxy log, complete the following steps:
1. Log in to the Cisco proxy server.
2. On the main menu, click System Administration > Log Subscriptions. The Log Sub-scriptions page opens.
3. Click the Add Log Subscriptions button. The New Log Subscriptions pages opens.
© 2017 Cisco Systems, Inc. All Rights Reserved. 22
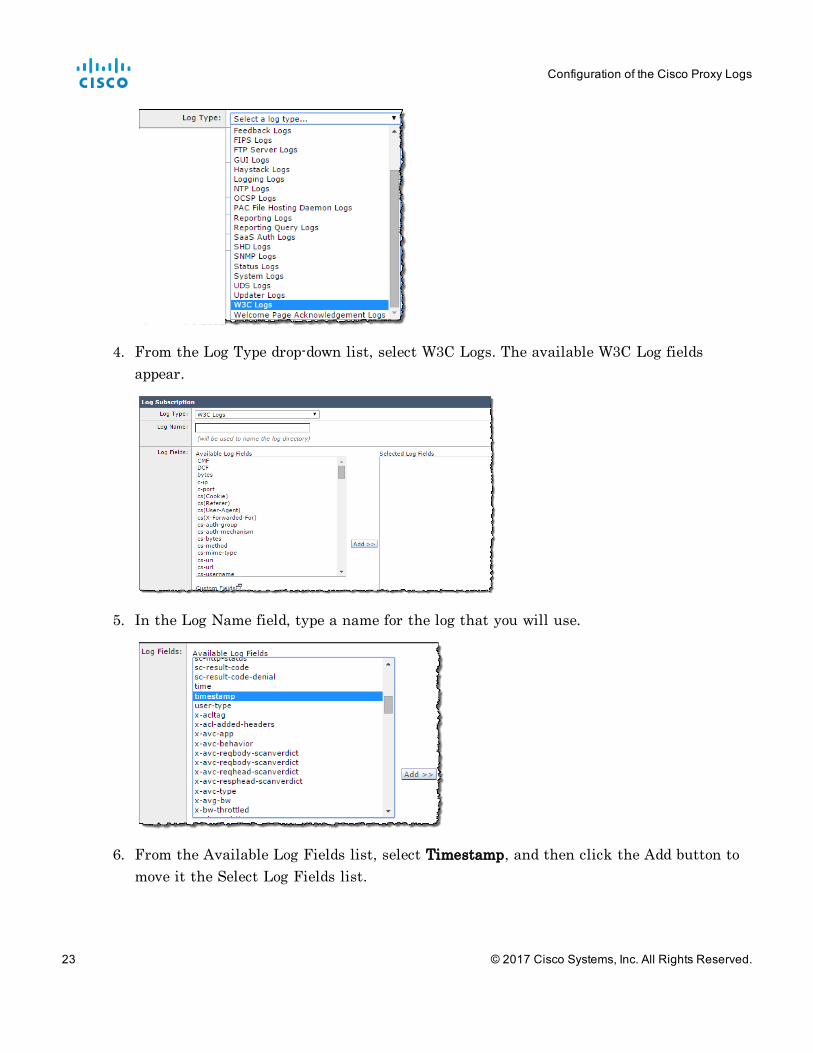
4. From the Log Type drop-down list, select W3C Logs. The available W3C Log fieldsappear.
5. In the Log Name field, type a name for the log that you will use.
6. From the Available Log Fields list, select Timestamp, and then click the Add button tomove it the Select Log Fields list.
Configuration of the Cisco Proxy Logs
23 © 2017 Cisco Systems, Inc. All Rights Reserved.
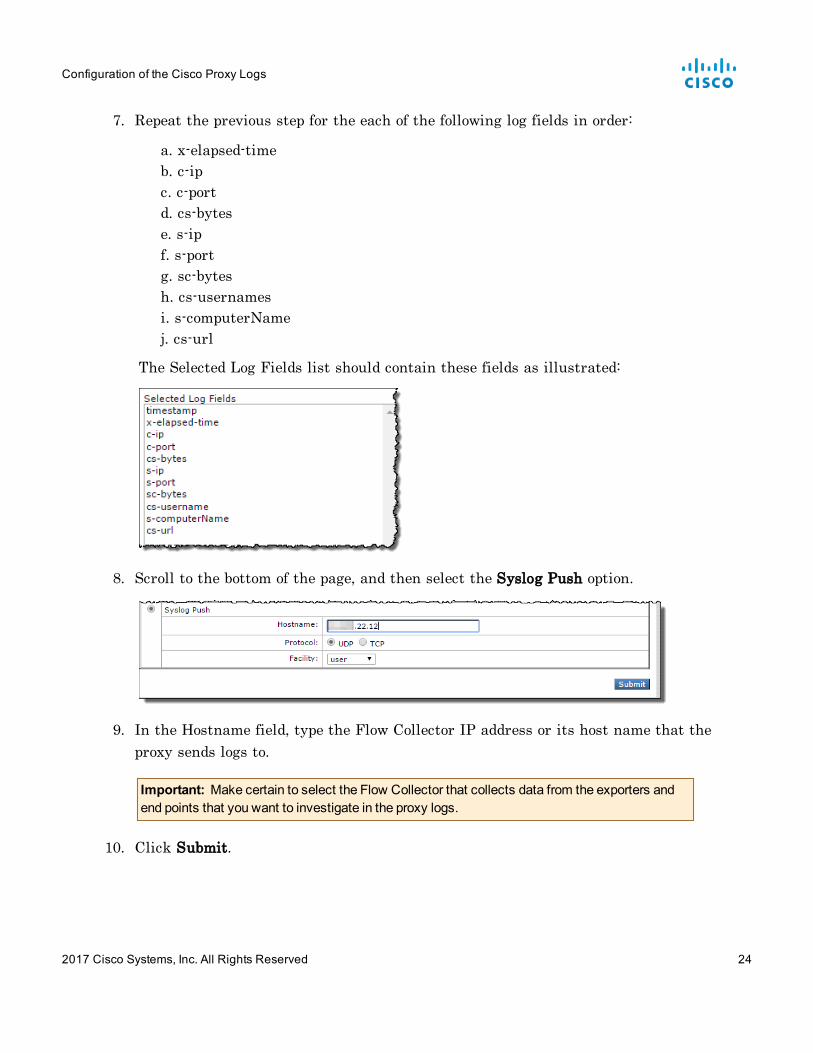
7. Repeat the previous step for the each of the following log fields in order:
a. x-elapsed-timeb. c-ipc. c-portd. cs-bytese. s-ipf. s-portg. sc-bytesh. cs-usernamesi. s-computerNamej. cs-url
The Selected Log Fields list should contain these fields as illustrated:
8. Scroll to the bottom of the page, and then select the Syslog Push option.
9. In the Hostname field, type the Flow Collector IP address or its host name that theproxy sends logs to.
Important: Make certain to select the Flow Collector that collects data from the exporters andend points that you want to investigate in the proxy logs.
10. Click Submit.
Configuration of the Cisco Proxy Logs
2017 Cisco Systems, Inc. All Rights Reserved 24
The new log is added to the Log Subscription list and logs from the proxy will be collected bythe Flow Collector.
Configuration of the FlowCollectorAfter you have configured the Cisco proxy to send syslog information, you now need to configurethe Flow Collector to accept the data.
To configure the Flow Collector to receive syslog information, complete the following steps:
1. Log in to the Flow Collector Admin interface.2. On the main menu, click Configuration > Proxy Ingest. The Proxy Servers page opens.3. Type the IP address of proxy server4. From the Proxy Type drop-down list, select Cisco.
Note: If your type of proxy server is not listed, you will not be able to use ProxyWatch at this time.
5. In the Proxy ID field, type the IP address of the proxy server.6. In the Proxy Service Port field, type the port number of the proxy server.7. If you want the proxy server to trigger alarms, clear the Exclude from Alarming check
box.8. Click Add.9. Click Apply. The proxy server appears in the Proxy Ingest table at the top of the page.
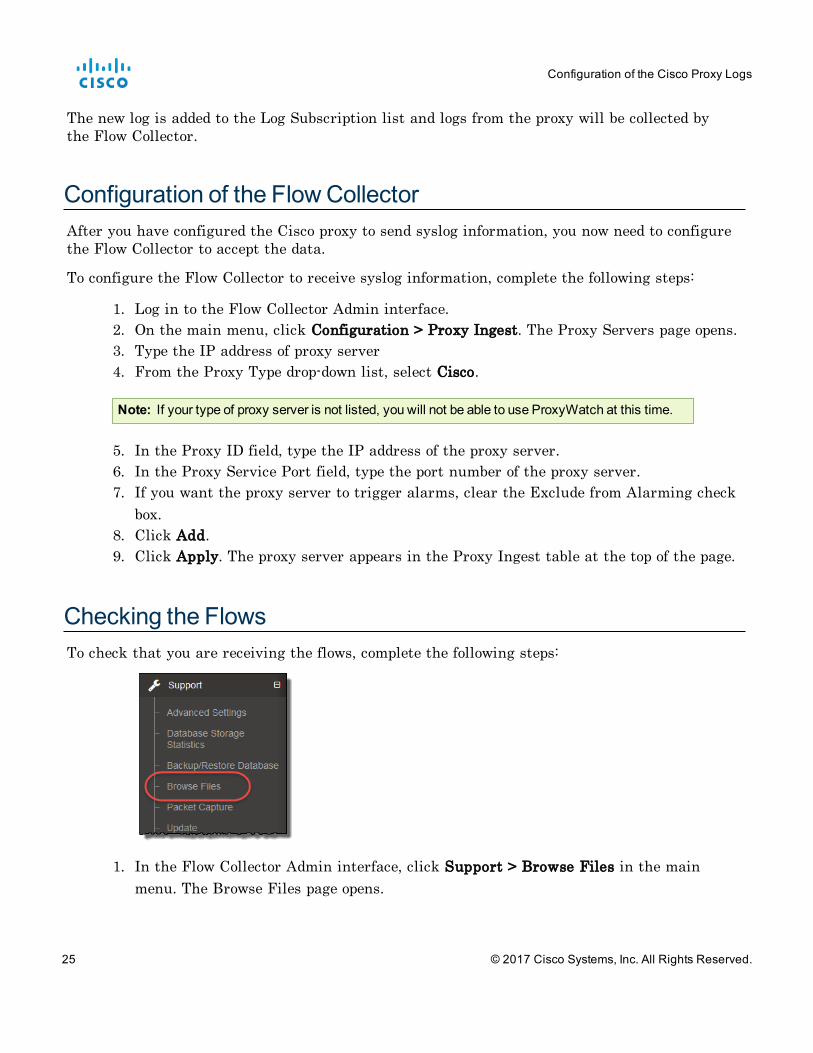
Checking the FlowsTo check that you are receiving the flows, complete the following steps:
1. In the Flow Collector Admin interface, click Support > Browse Files in the mainmenu. The Browse Files page opens.
Configuration of the Cisco Proxy Logs
25 © 2017 Cisco Systems, Inc. All Rights Reserved.
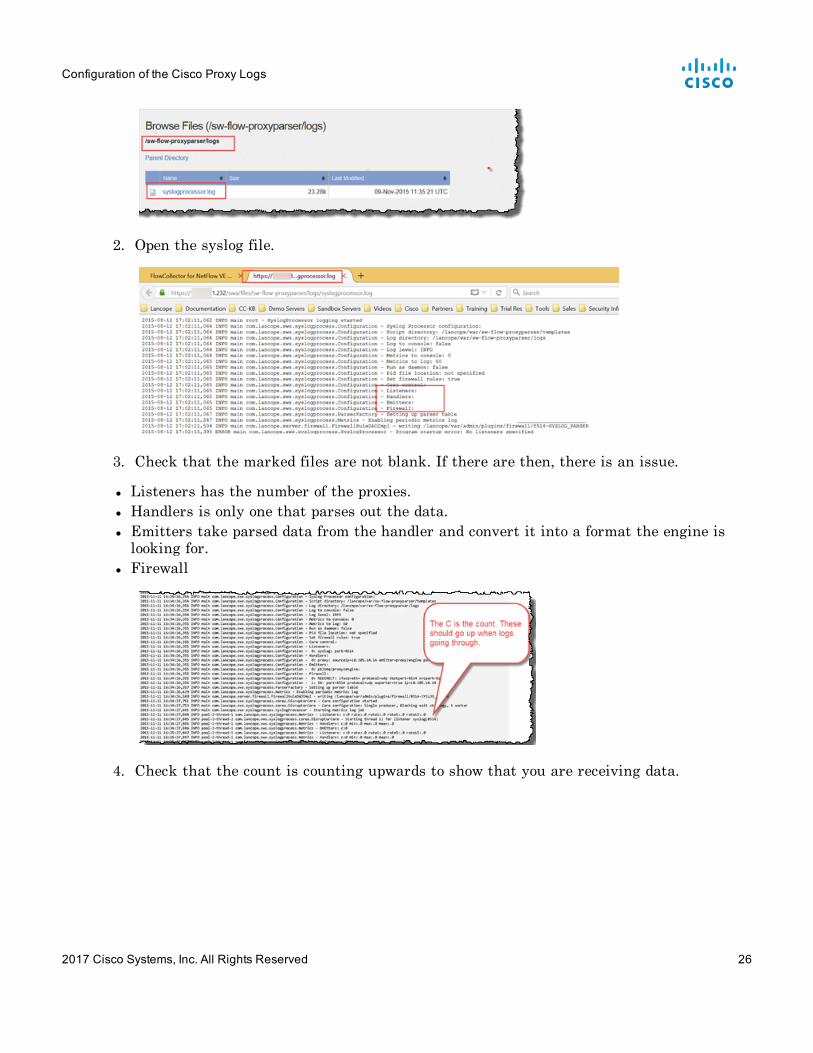
2. Open the syslog file.
3. Check that the marked files are not blank. If there are then, there is an issue.
l Listeners has the number of the proxies.l Handlers is only one that parses out the data.l Emitters take parsed data from the handler and convert it into a format the engine islooking for.
l Firewall
4. Check that the count is counting upwards to show that you are receiving data.
Configuration of the Cisco Proxy Logs
2017 Cisco Systems, Inc. All Rights Reserved 26
CONFIGURATION OF SQUID PROXY LOGSThis chapter describes the procedure for configuring the Squid proxy logs to deliver to theStealthwatch System. To configure the logs requires using SSH to edit files on the proxy server.
To configure the Squid proxy logs, complete the following steps:
1. Log into a shell for the machine running Squid2. Go to the directory containing squid.conf (typically /etc/squid) and open it in an editor3. Add the following lines to squid.conf to configure logging:
logformat access_format %ts%03tu %<tt %>a %>p %>st %<A %<st %<la %<lp %la %lp%un %ru
access_log syslog:user.6 access_format
4. Restart squid using the following:
/etc/init.d/squid3 restart
5. Configure the syslog service on the Squid server to forward logs to the Flow Collector.This is dependent on the Linux distribution, but for syslog-ng you would add the fol-lowing to /etc/syslog-ng:
# Audit Log Facility BEGIN
filter bs_filter { filter(f_user) and level(info) };
destination udp_proxy { udp("10.205.14.15" port(514)); };
log {
source(s_all);
filter(bs_filter);
destination(udp_proxy);
};
# Audit Log Facility END
Important: Make certain to select the Flow Collector that collects data from the exporters andend points that you want to investigate in the proxy logs.
6. Then restart syslog-ng with /etc/init.d/syslog-ng restart.
Configuration of Squid Proxy Logs
27 © 2017 Cisco Systems, Inc. All Rights Reserved.


2017 Cisco Systems, Inc. AllRightsReserved SW_6_9_x_Proxy_Log_Configuration_DV_1_1