Start Making! - Maker Camp
210
Maker Camp 2016 Start Making! A Guide to Engaging Young People in Maker Activities Danielle Martin Alisha Panjwani FROM THE Clubhouse Community Edited by Natalie Rusk Afterword by Mitchel Resnick
-
Upload
khangminh22 -
Category
Documents
-
view
2 -
download
0
Transcript of Start Making! - Maker Camp

Maker Camp 2016
Start Making!
A Guide to Engaging Young People in Maker ActivitiesDanielle MartinAlisha Panjwani
Start Making! is a program developed by The Clubhouse Network to engage young people all over the world in Maker-inspired activities. With this guide, you will discover how to plan and coordinate Start Making! projects in your home, school, library, community center, after-school club, or Makerspace. You’ll learn strategies for engaging young people in creative thinking, developing individual and team projects, and sharing and reflecting on their creations.
Each session includes a list of supplies you’ll need, step-by-step instructions for completing the projects, and prompts for stimulating discussion, curiosity, and confidence. These fun, do-it-yourself (and do-it-together) projects teach fundamental STEAM concepts—science, technology, engineering, art, and math—while introducing young people to the basics of circuitry, design, coding, crafting, and construction.
Learn to
N Make paper cards and creations that light up
N Play music using a MaKey MaKey keyboard and Scratch programming
N Join together to make paintings with light
N Design and construct 3D sculptures
N Build a vibrating art-making bot that makes drawings
N Sew fabric creations with wearable circuits
Dip into the activities once a week, run them as a week-long summer activity, or go through the guide in any way that works for you. By offering your own Start Making! program, you can inspire young people in your community to develop creative ideas, learn new skills, and share their creations.
The Clubhouse Network is a global network of community-based centers led by Boston’s Museum of Science in collaboration with the MIT Media Lab.
Technology & Engineering/Electronics
Start Making!
Martin | Panjw
ani
US $19.99 CAN $22.99
ISBN: 978-1-4571-8791-9
makezine.com
From the
Clubhouse
Community
Edited by Natalie Rusk Afterword by Mitchel Resnick

Maker Camp 2016

Maker Camp 2016
Start Making!A Guide to Engaging Young People in Maker Activities
By Danielle Martin anD alisha Panjwani
natali e rusk, editor

Maker Camp 2016
Start Making!A Guide to Engaging Young People in Maker Activities
By Danielle Martin and Alisha PanjwaniNatalie Rusk, Editor
Copyright © 2016 Museum of Science and MIT. All rights reserved.Printed in Canada.
Published by Maker Media, Inc., 1160 Battery Street East, Suite 125, San Francisco, California 94111.
Maker Media books may be purchased for educational, business, or sales promotional use. Online editions are also available for most titles (safaribooksonline.com/). For more information, contact our corporate/institu-tional sales department: 800-998-9938 or [email protected].
Publisher: Roger StewartEditor: Roger StewartCopy Editor and Proofreader: Rebecca Rider, Happenstance Type-O-RamaInterior and Cover Designer: Maureen Forys, Happenstance Type-O-RamaIndexer: Valerie Perry, Happenstance Type-O-Rama
April 2016: First EditionRevision History for the First Edition2016-04-05: First Release
See oreilly.com/catalog/errata.csp?isbn= 9781457187919 for release details.
Make:, Maker Shed, and Maker Faire are registered trademarks of Maker Media, Inc. The Maker Media logo is a trademark of Maker Media, Inc.
Many of the designations used by manufacturers and sellers to distinguish their products are claimed as trademarks. Where those designations appear in this book, and Maker Media, Inc. was aware of a trademark claim, the designations have been printed in caps or initial caps.
While the publisher and the author have used good faith efforts to ensure that the information and instructions contained in this work are accurate, the publisher and the author disclaim all responsibility for errors or omissions, including without limitation responsibility for damages resulting from the use of or reliance on this work. Use of the information and instructions contained in this work is at your own risk. If any code samples or other technology this work contains or describes is subject to open source licenses or the intellectual property rights of others, it is your responsibility to ensure that your use thereof complies with such licenses and/or rights.
978-1-457-18791-9
Safari® Books OnlineSafari Books Online is an on-demand digital library that delivers expert content in both book and video form from the world’s leading authors in technology and business.
Technology professionals, software developers, web designers, and business and creative professionals use Safari Books Online as their primary resource for research, problem solving, learning, and certification training.
Safari Books Online offers a range of plans and pricing for enterprise, government, education, and individuals. Members have access to thousands of books, training videos, and prepublication manuscripts in one fully searchable database from publishers like O’Reilly Media, Prentice Hall Professional, Addison- Wesley Professional, Microsoft Press, Sams, Que, Peachpit Press, Focal Press, Cisco Press, John Wiley & Sons, Syngress, Morgan Kaufmann, IBM Redbooks, Packt, Adobe Press, FT Press, Apress, Manning, New Riders, McGraw-Hill, Jones & Bartlett, Course Tech-nology, and hundreds more. For more information about Safari Books Online, please visit us online.
How to Contact UsPlease address comments and questions concerning this book to the publisher:
Make:1160 Battery Street East, Suite 125San Francisco, CA 94111877-306-6253 (in the United States or Canada)707-639-1355 (international or local)
Make: unites, inspires, informs, and entertains a growing community of resourceful people who under-take amazing projects in their backyards, basements, and garages. Make: celebrates your right to tweak, hack, and bend any technology to your will. The Make: audience continues to be a growing culture and community that believes in bettering ourselves, our environment, our educational system—our entire world. This is much more than an audience, it’s a worldwide movement that Make is leading we call it the Maker Movement.
For more information about Make:, visit us online:
• Make: magazine makezine.com/magazine• Maker Faire makerfaire.com• Makezine.com makezine.com• Maker Shed makershed.com
To comment or ask technical questions about this book, send email to [email protected].

Maker Camp 2016
iii
Contents
Foreword v
Acknowledgments x
Part i get ready to Start Making!
WElcoME to StArt MAkinG! 3
Part ii Start Making! Sessions
StArt MAkinG! SESSion FloW 19
SESSion 1: Light It Up: Paper Circuits 35
SESSion 2: Make It Sing: Programmable Musical Creations 57
SESSion 3: Paint with Light: Illuminated Wands and Photography 79
SESSion 4: Give It Form: 3D Forms 99
SESSion 5: Change the Move: Art-Making Bots 117
SESSion 6: Sew the Circuits: E-Textiles 135
SESSion 7: Final Open Make: Personalized Projects 155
SESSion 8: Show and Share: Community Showcase 167

Maker Camp 2016
iv
Part iii keep Making
EncourAGinG Youth to kEEP MAkinG 178
afterword: a Message to all Makers 181
About the Clubhouse Community 185
About the Authors 189
Index 193
Contents

Maker Camp 2016
v
foreword
A few years ago a small team of us at Intel developed an outreach program drawing on the skills and passions of our resident makers, which we called “Start Making!”
Our aims were to complement Intel’s ongoing efforts to inspire students in science, technology, engineering, and math (STEM) fields and to attract a more diverse population of youth to consider educational and career pathways in technology.
Start Making! workshop (HEnnEPIn COUnTy LIBrAry BEST BUy TEEn TECH CEnTEr, MInnEAPOLIS, Mn)
Maker Camp 2016
vi foreword
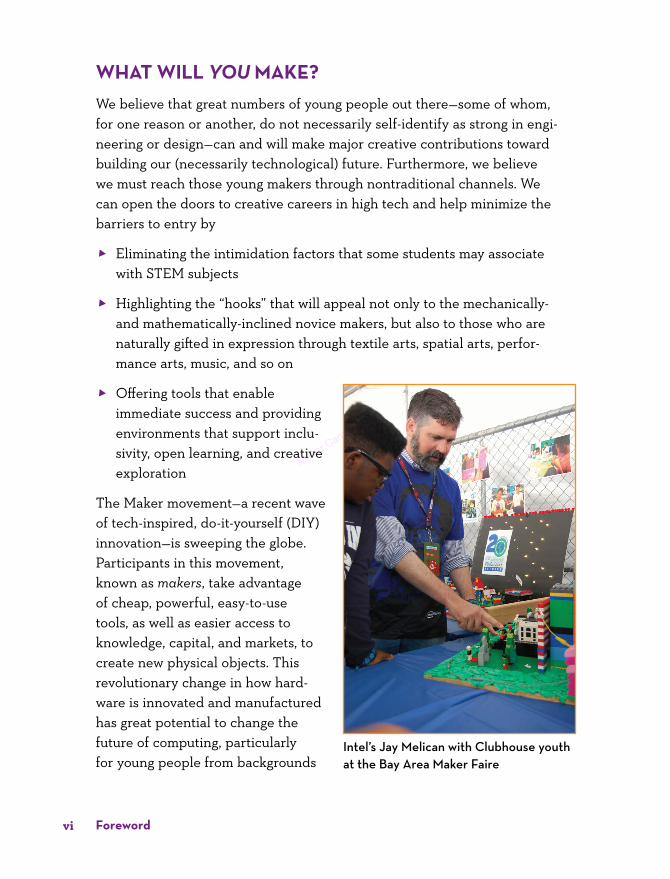
what will You Make?We believe that great numbers of young people out there—some of whom, for one reason or another, do not necessarily self-identify as strong in engi-neering or design—can and will make major creative contributions toward building our (necessarily technological) future. Furthermore, we believe we must reach those young makers through nontraditional channels. We can open the doors to creative careers in high tech and help minimize the barriers to entry by
8 Eliminating the intimidation factors that some students may associate with STEM subjects
8 Highlighting the “hooks” that will appeal not only to the mechanically- and mathematically-inclined novice makers, but also to those who are naturally gifted in expression through textile arts, spatial arts, perfor-mance arts, music, and so on
8 Offering tools that enable immediate success and providing environments that support inclu-sivity, open learning, and creative exploration
The Maker movement—a recent wave of tech-inspired, do-it-yourself (DIY) innovation—is sweeping the globe. Participants in this movement, known as makers, take advantage of cheap, powerful, easy-to-use tools, as well as easier access to knowledge, capital, and markets, to create new physical objects. This revolutionary change in how hard-ware is innovated and manufactured has great potential to change the future of computing, particularly for young people from backgrounds
Intel’s Jay Melican with Clubhouse youth at the Bay Area Maker Faire

Maker Camp 2016
viiforeword
traditionally underrepresented in STEM fields: females, racial and ethnic minority groups, and people with disabilities.
By empowering girls and young people from other underrepresented groups to just “Start Making!” we can open the doors to technological innovation (and to the recognition of potential career opportunities in high tech) for a large and extraordinarily talented crowd of young makers who may otherwise be locked out by traditional STEM education programs.
Four years after we started down this path at Intel, we are thrilled to see that Start Making! has grown, matured, and evolved under the expert guidance of The Clubhouse Network team, in collaboration with the Lifelong Kinder-garten group at the MIT Media Lab. The original spirit behind the effort to educate a generation of makers has been amplified as more and more creative, talented, local facilitators have customized the program to engage youth from their communities. Through a knowledge-sharing network of almost 100 Clubhouses, The Clubhouse Network is enabling thousands of young people to practice “making” in their daily lives. This book aims to
Start Making! Clubhouse Coordinator workshop, Denver, CO

Maker Camp 2016
viii foreword
expand that reach and broaden the community of young makers even further by sharing these ideas and approaches.
The Start Making! activities described in this book are undeniably fun; they also present young learners and makers with some of the foundational building blocks for understanding electronics and computing, such as how a circuit works or what it means for a material to be conductive. More impor-tantly, these activities set the stage for beginner makers to do something creative and original with that knowledge. The activities come from the maker community and capture the wonderful spirit of open collaboration, self-directed learning, and fun.
Intel volunteers learning soft circuits side by side with Clubhouse youth (BOyS & GIrLS
CLUBS OF EAST VALLEy, CHAnDLEr, AZ)
As the name suggests, Start Making! is just the beginning. We now see easy-to-use coding environments and physical computing platforms made widely available, empowering makers of all skill levels to design interactive objects that sense and control the physical world around them.
Maker Camp 2016
ixforeword
It is our hope that Start Making! will inspire young learners to keep making—to pick up new tools because they have gained confidence through these activities and know that technology can be a powerful means of creative expression, and that technological devices are not just things you can buy, but things you can learn to build yourself to create a better world.
—Carlos Contreras (Public Affairs Director, Intel)
—Anne McGrath (Program Manager, Intel Foundation)
—Jay Melican (Maker Czar, Intel)
Maker Camp 2016
x
acknowledgments
This guide builds on the curriculum developed by Karen Tanenbaum during her work at Intel. The guide also builds on activities and ideas from Leah Buechley, Mike Petrich, Jie Qi, Jay Silver, and Karen Wilkinson.
Other contributors include Mitchel Resnick, Jackie Gonzalez, and Clubhouse staff and mentors around the world. A special thank you to all of the Club-house youth throughout the Network who tested these activities and helped to make them even more engaging, meaningful, and fun.
Thanks also to Gail Breslow, Director of the Clubhouse Network, for supporting and guiding the development of this book and the Start Making! initiative.
Roger Stewart at Maker Media expertly guided the book from draft to completion, and Michelle Hlubinka of Maker Media provided valuable feed-back along the way.
We are grateful for support from Intel, the LEGO Foundation, and the Lemann Foundation.

Maker Camp 2016
get ready to Start Making!
Part
I

Maker Camp 2016
Maker Camp 2016
3welcome to Start Making!
welcome to Start Making!
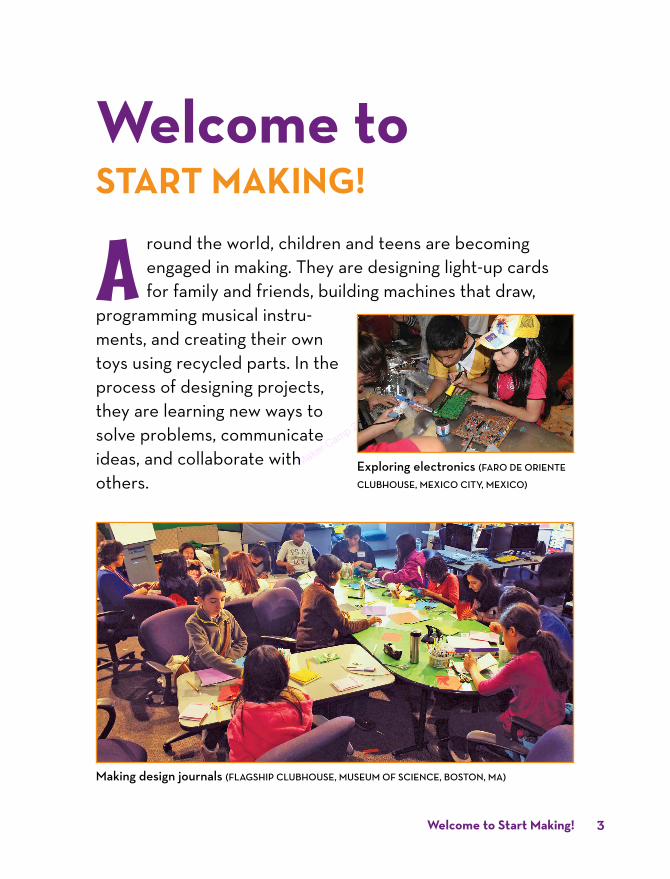
A round the world, children and teens are becoming engaged in making. They are designing light-up cards for family and friends, building machines that draw,
programming musical instru-ments, and creating their own toys using recycled parts. In the process of designing projects, they are learning new ways to solve problems, communicate ideas, and collaborate with others.
Making design journals (FLAGSHIP CLUBHOUSE, MUSEUM OF SCIEnCE, BOSTOn, MA)
Exploring electronics (FArO DE OrIEnTE
CLUBHOUSE, MExICO CITy, MExICO)

Maker Camp 2016
START Making!4
This guide provides ideas and activities that you can use to help young people start making. In this guide, we share Start Making!—a program that has engaged hundreds of youth in the process of designing their own projects.
This Start Making! guide offers a series of creative do-it-yourself (DIY) pro-jects that introduce young people to the basics of circuitry, coding, crafting, and engineering. Starter project activities lead into Open Make sessions during which young people work on personalized projects, both on their own and in small groups. Through the process of designing and making projects, young people build confidence, camaraderie, and curiosity about science, technology, art, engineering, and math concepts.
Start Making! consists of a series of activity sessions that you can adapt to your situation. You can offer your own version of Start Making! activities in your home, at the library, at an after-school club, at the local community center, or anywhere else young people can gather to work on projects together. You can dip into the activities once a week, run them as a week-long summer activity, or go through them in any way that works for you and your group.
We developed the Start Making! program within The Clubhouse Network, a global network of community-based centers where youth create projects based on their interests using a variety of tools and technologies. Facilitators provide support and model the process of making projects. Throughout this guide, we share examples of Start Making! projects and experiences from Clubhouse youth (ages 10 to 15) and facilitators around the world. You can learn more about Clubhouses on pages 185–187.
We encourage you to take these ideas and make them your own. We hope this guide will help you create more opportunities for young people to start making projects together. By offering your own Start Making! program, you can inspire young people in your community to develop creative ideas, learn new skills, and share their creations.
what iS Making?We define making as the process of creating projects based on your ideas and interests. We encourage a playful and curious approach to the process.

Maker Camp 2016
5welcome to Start Making!
The making activities we share in this book bridge concepts and tech-niques from art, crafts, music, and design with science, technology, engi-neering, and math—an integration of ideas referred to by some educators as STEAM (science, technology, engineering, art, and math), suggesting the power of this integration for motivating learning. The projects mix familiar materials (such as paper, fabric, and recycled materials) with new conductive and program-mable materials (such as LEDs, conductive thread, and microcon-trollers). We have found that more young people become interested in science and technology concepts when the concepts are applied to making projects that integrate art, music, and design.
Testing a circuit (TECnOCEnTrO SOMOS
PACíFICO CLUBHOUSE, CALI, COLOMBIA)

Maker Camp 2016
START Making!6
who iS a Maker?We believe everyone has the potential to be a maker: to be inspired to imagine, create, and share personally meaningful projects. The Start Making! program is designed to help young people begin to identify themselves as makers. We recognize that young people are much more likely to see them-selves as makers when they feel part of a creative community.
Making a light-up circuit with support from a facilitator (FLAGSHIP CLUBHOUSE)

Maker Camp 2016
I th
ink,
I cr
eate
not
ju
st co
nsum
e.
I fe
el
and
I m
ake
with
my
hand
s.
I sh
are
my
crea
tions
and
pr
oces
ses
with
ot
her
peop
le.
I am
com
fort
able
not
know
ing.
I ob
serv
e an
d dr
aw
inspi
ratio
n fr
om
thing
s ar
ound
me.
I fi
nd a
nd b
uild
com
mun
ities
whe
re
ever
yone
is w
elcom
e.
I pa
use
to d
ocum
ent
and
refle
ct o
n m
y pr
oces
s.
I k
eep
imag
ining
, won
derin
g, an
d as
king
ques
tions
.
I le
arn
by
mak
ing t
hing
s.
I ex
plore
, cus
tom
ize, a
nd
com
bine
thi
ngs.
I ta
ke r
isks
and
lear
n fr
om fa
iled
atte
mpt
s.
I un
ders
tand
tha
t th
ings
can
get
mes
sy
when
you
're t
inker
ing.
I ke
ep t
rying
eve
n wh
en I
get
stu
ck.
I ta
ke m
y wo
rk s
erio
usly
with
out
takin
g m
yself
se
rious
ly.I
mak
e
from
one
top
ic to
ano
ther
.
co
nnec
tions
I Am
a M
aker
by A
lisha
Panjw
ani
welcome to Start Making! 7

Maker Camp 2016
START Making!8
guiding PrinCiPleSStart Making! is based on four guiding principles. These principles grew out of research by the Lifelong Kindergarten group at the MIT Media Lab, and they form the core of the Clubhouse learning model.
Principle 2
InterestsYour
Following
Principle 1Learning by
Designing
Principle 3Building a
Community
Principle 4Fostering
Respect and Trust
Principle 1: Support learning through design experiences. The Start Making! program is based on the idea that people learn best when they are engaged in creating personally meaningful products. As young people work on projects, they can be seen as engaging in a design process, which we call a “creative learning spiral” (see the following image). In this process, they imagine what they want to do, create a project based on their ideas, play with alternatives, share their ideas and creations with others, and reflect on their experiences—all of which lead them to imagine new ideas and new projects. As youth engage in these experiences, they learn valuable technical skills while also learning about the process of design and invention.
Principle 2: Help youth build their interests. When young people care about what they are working on, they are willing to work longer and harder, and they learn more in the process. In Start Making! facilitators help young people gain experience with self-directed learning, providing support for youth to recognize, trust, develop,
The creative learning spiral (CrEDIT:
MITCHEL rESnICk AnD nATALIE rUSk, LIFELOnG
kInDErGArTEn GrOUP)

Maker Camp 2016
welcome to Start Making! 9
and deepen their own interests and talents. Many youth begin by mimicking a sample project, then work on variations on the theme, and soon develop their own personal path, stemming from their personal interests.
Principle 3: Develop a sense of community. Start Making! is also designed to develop a learning community in which youth share ideas and work together on projects. Facilitators play an important role not just in supporting youth, but also by modeling the process of making and learning themselves.
Principle 4: Foster an environment of respect and trust. In Start Making! programs, young people are treated with trust and respect—and are expected to treat others the same way. Start Making! facilitators strive to create an envi-ronment in which participants feel safe to experiment, explore, and innovate.
goalS of Start Making!Start Making! is designed to encourage young people to develop their own ideas, to experiment, and to innovate. Teaching young people the activities themselves is not the primary goal. Rather, the goal is to enable young people to develop their own projects and to foster motivation and confidence in their ability to learn.
By offering Start Making! you can help young people develop creative competencies. Here are the five key competencies that we identified as outcomes for young people who participate in Start Making!
Identify as a creator or maker. Young people develop positive attitudes toward creating hands-on projects.
Develop confidence in creative expression. Young people feel capable of bringing their ideas to life by designing, experimenting, iterating, and persisting through failures.
Acquire technical tool literacy. Young people become familiar with a variety of tools and technologies that they can use to make projects.
Become aware of STEAM. Young people become aware of ideas and concepts that bridge science, technology, engineering, art, and math and demonstrate curiosity to learn more.
Learn collaboration and networking skills. Young people actively engage in collaborating and helping others.

Maker Camp 2016
START Making!10
by A
lisha
Pan
jwan
i
1.Id
entif
y as
a
crea
tor
or
make
r
2.De
velop
co
nfide
nce
in cr
eativ
eex
pres
sion
3.Ac
quire
te
chnic
alto
ollit
erac
y
4.Be
come
aw
are
of
STEA
Mco
ncep
ts
5.Le
arn
colla
bora
tion
and
netw
orkin
g sk
ills
Star
t Ma
king!
Crea
tive
Comp
eten
cies

Maker Camp 2016
welcome to Start Making! 11
Making a project with a motor (TECnOCEnTrO SOMOS PACíFICO CLUBHOUSE)
An evaluation of the Start Making! program in Clubhouses showed that young people gained confidence and experience in each of these five areas. (To learn more, see the evaluation report by Julie Remold of SRI Interna-tional at bit.ly/start-making-evaluation-report).
how do i deSign My own Start Making! PrograM?The Start Making! program consists of a series of sessions that you can adapt to your local context. For example, you can offer it as a full-day camp over the course of a week, or as an after-school program that meets for two to three hours each session.
The first six sessions introduce new tools and techniques through starter pro-jects. Each of these sessions includes Open Make time, during which young people apply what they’ve learned to create personalized projects. These core sessions lead into a final Open Make session in which the makers spend time preparing a final project. The program culminates in a showcase where they share their projects with family, friends, and other community members.
The projects and activities in the first six sessions help makers understand simple concepts and then dive deeper into more complex ideas. Over the course of multiple sessions, young makers learn to develop new ideas, persist through setbacks, collaborate with others, and make meaningful projects.

Maker Camp 2016
START Making!12
Here’s a brief description of each session:
Session 1. Light It Up: Paper Circuits Introduces basic circuits through making light-up cards and other creations using LEDs and copper tape applied to paper.
Session 2. Make It Sing: Programmable Musical Creations Introduces phys-ical computing and programming through the process of making interactive musical instruments using Scratch and the MaKey MaKey invention kit.
Session 3. Paint with Light: Illuminated Wands and Photography Intro-duces light painting using LEDs and delayed-exposure photography.
Session 4. Give It Form: 3D Forms Introduces three-dimensional spatial design through the process of creating a digital sculpted character.
Session 5. Change the Move: Art-Making Bots Introduces reverse engi-neering and remixing by deconstructing a toothbrush or other simple device to build art-making robots.
Start Making! Program
Show and
Share
FinalOpenMake
Make It
Sing
LightIt Up
Paintwith Light
GiveIt
Form
Changethe
Move
Sewthe
Circuits

Maker Camp 2016
13welcome to Start Making!
Session 6. Sew the Circuits: E-Textiles Introduces e-textiles by designing a sewable project, such as a bracelet, pin, or flag, using a preprogrammed LilyTiny board.
Session 7. Final Open Make: Personalized Projects Encourages young people to develop projects, individually or in groups, based on their personal interests, applying techniques explored in earlier sessions.
Session 8. Show and Share: Community Showcase Provides a showcase in which young people can share their projects and process, celebrating their accomplishments with family and friends.
You can offer all of the six core sessions or choose the ones you think will work best for your group. After the core sessions, provide Open Make time for preparing final projects. Then, collaborate with young people to organize a community event for project sharing.
your role aS a faCilitatorAs a facilitator, your role is to create a welcoming environment in which people feel encouraged to imagine new ideas and bring them to life through creative hands-on explorations. Rather than directly instructing, your focus as a facilitator is on providing a safe and inviting space in which makers can experiment and learn from their own explorations.
We suggest finding others who can join you to help facilitate your Start Making! program as volunteers or staff. We’ve found the most important qualities for facilitators are an interest in working with young people and a passion for making and learning themselves.

Maker Camp 2016
START Making!14
I re
flect
and
re
fine
how
I fa
cilita
te.
from
fa
ilure
s.learn
ingand
takin
gfor
risks
I do
cum
ent
and
shar
e m
y cr
eativ
e pr
oces
s.
I en
cour
age
colla
bora
tion
and
help
peop
le lea
rn
from
eac
h ot
her.
I ad
apt
to n
ew
situ
atio
ns a
nd a
m o
pen
to ch
angin
g pla
ns w
hen
need
ed.
I
crea
te a
res
pect
ful a
nd in
viting
en
viron
men
t.
I am
curio
us a
bout
oth
ers’
inter
ests
.
.I we
lcom
e ev
eryo
ne’s
ideas
.sa
fe s
pace
mak
e aI
I
try
mak
ing
proj
ects
mys
elf.
I am
frien
dly a
nd
appr
oach
able.
I ta
ke t
ime
to li
sten
.
I as
k qu
estio
ns
to h
elp
othe
rs a
rticu
late
th
eir id
eas.
I am
pat
ient
and
enco
urag
e pe
rsis
tenc
e.Being
a F
acilit
ator
by A
lisha
Panjw
ani
Maker Camp 2016
My Start Making! session wishlist…
15welcome to Start Making!

Maker Camp 2016

Maker Camp 2016
Start Making! Sessions
Part
I I

Maker Camp 2016
Maker Camp 2016
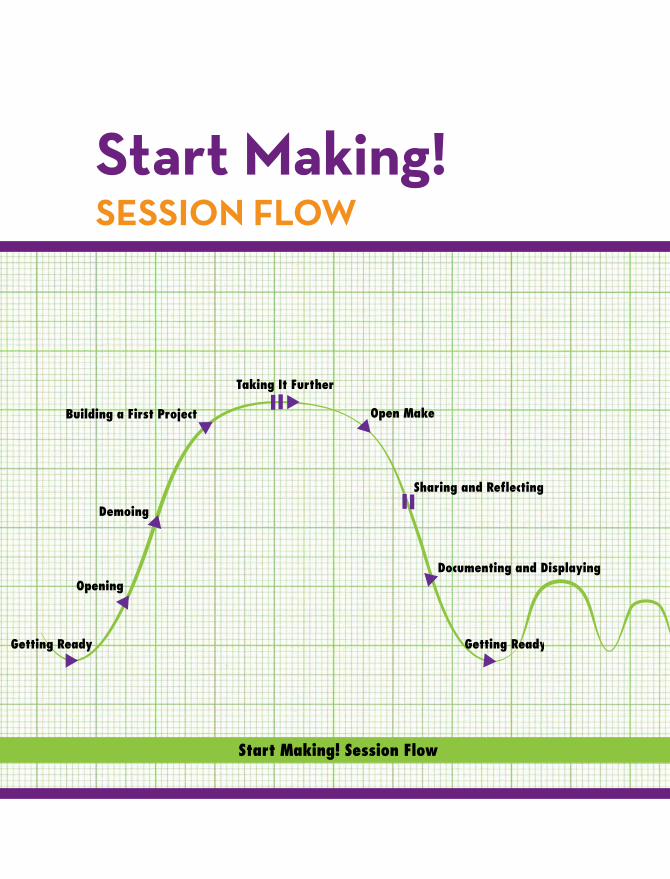
Start Making! SeSSion flow
Getting Ready
Opening
Building a First Project
Taking It Further
Open Make
Sharing and Reflecting
Getting Ready
Start Making! Session Flow
Demoing
Documenting and Displaying

Maker Camp 2016
START Making!20
In this chapter we provide an over-view of how each Start Making! session typically flows. We describe
each aspect of the session flow—from getting ready for the session to docu-menting and displaying projects at the end. We encourage you to adapt this flow to meet the needs and interests of your makers.
SeSSion goalSFor each session, we provide a list of goals. The goals include gaining experience with new tools, exploring new concepts, and developing a range of skills.
◊ getting readyBefore each session, you will gather materials and set up the space. We provide a list of suggested materials for each session.
We also recommend that you create one or more projects of your own before the session. This will help you get to know the activity and create examples that you can share during the demo.

Maker Camp 2016
Start Making! Session flow 21
77 Facilitation Tiporganize the Space for Creative explorationHere are some tips for setting up a safe and inviting environment:
8 Set up stations where makers can use tools that might get messy or that need facilitator support. For example, you can set up stations to help makers with hot gluing, soldering, or cutting with sharp instruments.
8 Check to make sure that all the materials for the session are available and visible throughout the session.
8 Create a box or bin for each of the Start Making! sessions. keep the materials specific to each session together so that you can easily organize and find them when they are needed.
8 Place sample projects on display to spark interest and ideas.
oPeningGreet the youth and initiate an icebreaker or a warm-up activity to build rela-tionships among the youth as well as the facilitators.
Opening activity (CASA DE LA JUVEnTUD CLUBHOUSE, MOrA, COSTA rICA)

Maker Camp 2016
START Making!22
deMoingGather the youth into a circle around a table containing only the neces-sary materials. Share one or two example projects. Then, demonstrate how the project works and the basic steps makers need to take to get started designing their own project.
Introducing how to make a paper circuit (FLAGSHIP CLUBHOUSE, MUSEUM OF SCIEnCE,
BOSTOn, MA)
Introducing an activity (CLT CLUBHOUSE, BAnGALOrE, InDIA)

Maker Camp 2016
Start Making! Session flow 23
77 Facilitation TipBe a Maker firstClubhouse Coordinator yarelis Garcia was interested in offering Start Making! for the youth in her Clubhouse at the Boys & Girls Club of Metro West in Framingham, Massachusetts. She didn’t have any experience with hands-on DIy (do-it-yourself) engineering projects. She decided to embrace becoming a maker herself before she tried out the activities with her young members and volunteer mentors.
She built her own projects as described in the Start Making! sessions, and then she displayed them on a shelf to spark interest before her Start Making! weekly program began. The signups for her program were overflowing. The youth appreciated yarelis’s enthusiastic embrace of learning and her willing-ness to present her first attempts proudly to everyone!
Building a firSt ProjeCtGet hands-on! Prompt makers to build their first version of the project by following the demonstrated steps and adding their own personal flair.

Maker Camp 2016
START Making!24
Making an initial project (yOUTH COnnECTIOnS CLUBHOUSE, LISMOrE, AUSTrALIA)
taking it furtherAdd new elements to the first basic activity, or prompt the makers to come up with their own versions to work on. Here you’ll share more examples and help makers generate even more ideas.
77 Facilitation Tiptake a Break and have a Snack!Food and a break from the sometimes intense work of making are often necessary, and they provide a chance for everyone to relax, chat, and form bonds.

Maker Camp 2016
Start Making! Session flow 25
Experimenting with an activity (yOUTH COnnECTIOnS CLUBHOUSE)
oPen MakeHelp the makers imagine, design, and make final projects, either individually or in small groups. Build on earlier activities and sessions to incorporate new interests, media, or tools.

Maker Camp 2016
START Making!26
Working on a project during Open Make time (CASA DE LA JUVEnTUD CLUBHOUSE)
Open Make BOxIn addition to the basic materials list for each activity, we also recommend you create an Open Make box that includes a broader range of materials and tools. These boxes can be used during the Open Make times to expand creative possibilities for making a variety of projects.
how to Build your open Make BoxThese are our suggestions. You can replace or add your own items to the list.
8 Butcher paper
8 Foam sheets and boards
8 Cardboard
8 Felt sheets
8 Mini hot glue gun and glue sticks
8 Tacky glue
8 Electrical tape and/or duct tape
8 Scissors
8 Precision knives and cardboard cutters
8 Markers
8 Glitter pens
8 Ping-Pong balls
8 Necklace cords

Maker Camp 2016
Start Making! Session flow 27
8 Pin backs
8 Ribbon
8 Googly eyes, sequins, beads
8 Embroidery thread
8 Wooden craft sticks
8 Other craft materials
Your Open Make box can also include leftovers or scraps from earlier sessions. Save packaging from other materials, including snacks, and encourage youth to scavenge around their homes for items such as egg cartons, plastic or foam food containers, empty plastic bottles and caps, and boxes.
taking the open Make Box furtherDepending on the technical skills of your makers and facilitators, you may also want to create a box with more complex or advanced tools. Here are just a few items you could collect in this box:
8 Soldering irons
8 Other conductive materials, such as conductive paint and/or pens
8 Bandage scissors (perfect for cutting cardboard)

Maker Camp 2016
START Making!28
8 Power drills
8 Basic hand tools like hammers, saws, and box cutters
8 A multimeter, to test your circuits; especially helpful for e-textile circuits
8 Electronic prototyping tools, such as Arduino, Raspberry Pi, LilyPad, Chibitronics circuit stickers, or BBC micro:bit
8 Safety goggles
77 Facilitation Tipgathering tools and Materialsyou can improvise to pull together your own set of materials, depending on what is available in your area. Engage young makers, family members, and/or other community members to help you gather materials.
It may be difficult to find some of the electronic materials—such as copper tape, LilyTiny boards, and conductive thread—in local craft or hardware stores. you can find and order these materials online (see the Additional resources list). Also, you can save money if you order in bulk and in advance.

Maker Camp 2016
Start Making! Session flow 29
A Note on SafetyProvide support and coaching for new makers to use the tools successfully. Many facilitators in Clubhouses and other youth maker spaces advise devel-oping your own safety procedures, using language and images that your young makers will quickly understand. It’s not that they aren’t capable; you just want to make sure they use the tools safely and efficiently and that they have fun!
We recommend safety goggles to protect against anything that might hit the eye. These are especially important when makers are taking apart devices, soldering, or working with electronics parts. Adults should wear safety goggles while doing these activities too, not just to keep themselves safe, but also to model safe practices for the youth.
We also recommend setting up specific stations for sharp instruments, glue guns, or other tools that may require adult supervision when they are being used.
Sharing and refleCtingAfter the Open Make, encourage makers to come back together as a group to reflect on what they made together (or to spend some time reflecting in their journals), to share their work with others, and then to clean up together.
Maker Camp 2016
START Making!30
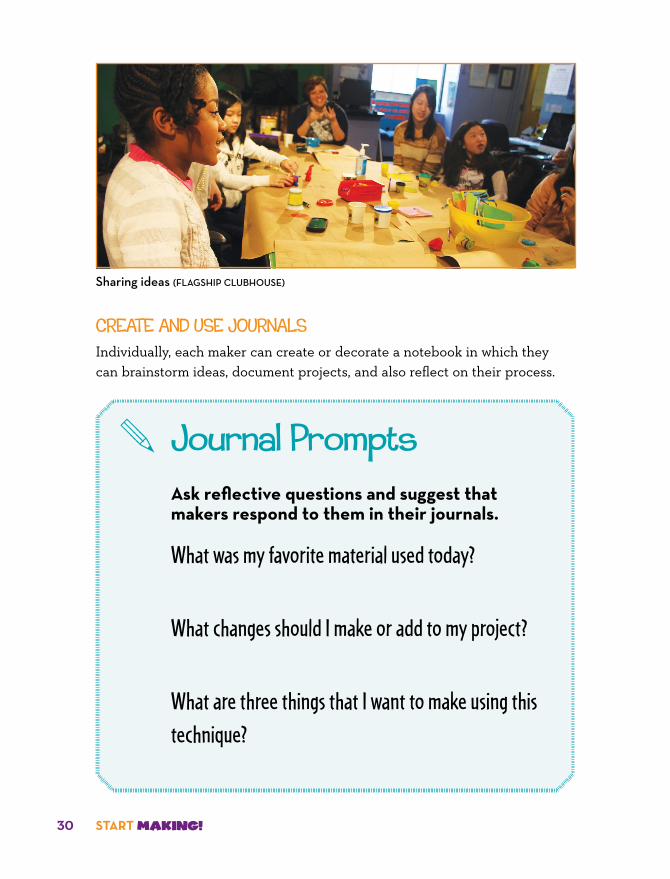
Sharing ideas (FLAGSHIP CLUBHOUSE)
Create and Use JOUrnalsIndividually, each maker can create or decorate a notebook in which they can brainstorm ideas, document projects, and also reflect on their process.
Journal promptsask reflective questions and suggest that makers respond to them in their journals.
What was my favorite material used today?
What changes should I make or add to my project?
What are three things that I want to make using this technique?

Maker Camp 2016
Start Making! Session flow 31
77 Facilitation TipMake your own journalyou can use loose sheets of paper, a hole punch, a rubber band, and a paper-clip to make your own journal. Here are steps to make a quick and easy DIy journal:
1. Stack sheets of paper on top of each other.
2. Add construction or other thick paper on the top and bottom of the stack to form a cover.
3. Make two holes on the edge using a hole punch.
4. Loop a rubber band through the holes from the back of the paper.
5. Use a paperclip to hold the two ends of the rubber band together.
6. Add your name and decorate the cover!
The process of creating a journal is a great icebreaker and a way to encourage makers to document their own design process. you can encourage your makers to decorate their journal covers to make them their own!
Journals made by makers (FLAGSHIP CLUBHOUSE)

Maker Camp 2016
START Making!32
Idea WallSet aside an area where makers can post ideas in a common place, such as on a whiteboard or a wall of the room, which they can draw from later. These ideas can include thoughts on materials, tools, techniques, stories, questions, or problems they want to solve.
doCuMenting and diSPlayingEncourage and help youth to document their process. They can draw sketches, take photos, and record video describing what they are making. Set up a physical space in which to display their creations. Make sure the display space is visible to everyone. You may also want to provide them with opportunities to post and share their projects and stories online.
Project display area (AWA CITy CLUBHOUSE, WHAnGAnUI,
nEW ZEALAnD)
ChooSing aCtivitieS and adaPting SeSSionS You can choose how many sessions and which parts of the suggested Session Flow to include in your own version of the Start Making! design, depending on how much time you have.
Maker Camp 2016
Start Making! Session flow 33
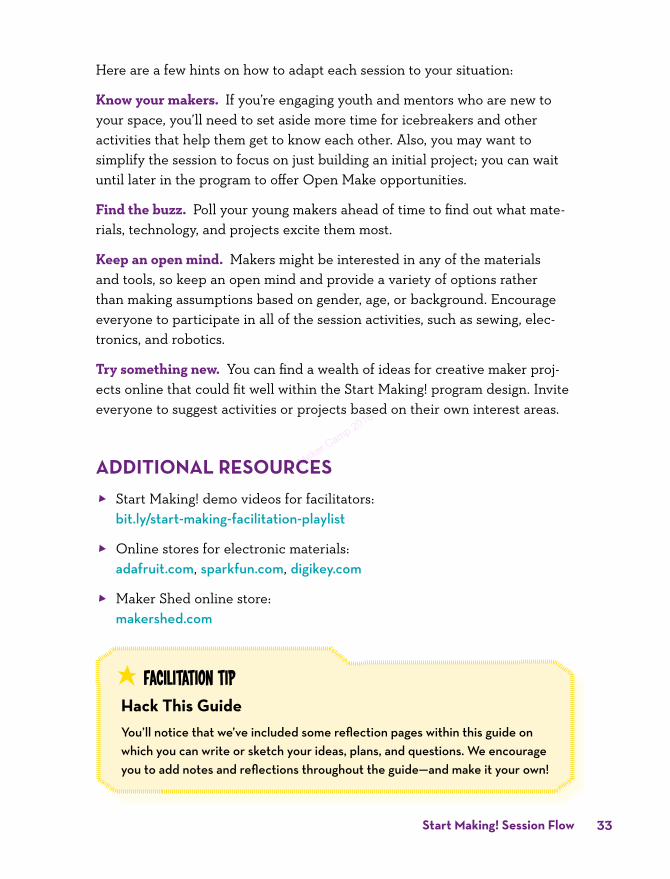
Here are a few hints on how to adapt each session to your situation:
Know your makers. If you’re engaging youth and mentors who are new to your space, you’ll need to set aside more time for icebreakers and other activities that help them get to know each other. Also, you may want to simplify the session to focus on just building an initial project; you can wait until later in the program to offer Open Make opportunities.
Find the buzz. Poll your young makers ahead of time to find out what mate-rials, technology, and projects excite them most.
Keep an open mind. Makers might be interested in any of the materials and tools, so keep an open mind and provide a variety of options rather than making assumptions based on gender, age, or background. Encourage everyone to participate in all of the session activities, such as sewing, elec-tronics, and robotics.
Try something new. You can find a wealth of ideas for creative maker proj-ects online that could fit well within the Start Making! program design. Invite everyone to suggest activities or projects based on their own interest areas.
additional reSourCeS 8 Start Making! demo videos for facilitators:
bit.ly/start-making-facilitation-playlist
8 Online stores for electronic materials: adafruit.com, sparkfun.com, digikey.com
8 Maker Shed online store: makershed.com
77 Facilitation Tiphack this guideyou’ll notice that we’ve included some reflection pages within this guide on which you can write or sketch your ideas, plans, and questions. We encourage you to add notes and reflections throughout the guide—and make it your own!

Maker Camp 2016
34 Start Making!
What will I add to my Open Make box?

Maker Camp 2016
light it up: PaPer CirCuitS
SeSSion
1

Maker Camp 2016
START Making!36
n ew makers will make paper creations that light up in interesting and surprising ways.
In the process, they will learn how to make electrical circuits.
SeSSion goalSIn this session, makers will
8 Build a circuit on paper using conductive tape, LEDs (light-emitting diodes), and coin cell batteries.
8 Design a light-up project, such as a greeting card.
8 Learn about basic electrical circuits and explore ways to create projects with circuits.
◊ getting readyYou’re about to begin your group’s journey with Start Making! As a first step, work with others to set up your space so it is welcoming and interesting. Arrange materials and tools so they’re organized and accessible, while keeping safety in mind.
Before the session, make your own paper circuit project using the materials and instruc-tions that follow. We recommend making at least two examples to help participants imagine a range of possibilities. If you have other facilitators working with you, you can each work on making an example to share.

Maker Camp 2016
light it up: Paper Circuits 37
Example of a paper circuit
MaterIals 8 LED lights (one or more
colors)
8 3V coin cell batteries (such as the CR2032)
8 Copper tape (conductive foil)
8 Paper (note cards, cardstock, construction paper, paper cups, or other paper)
8 Scissors
8 Clear tape
8 Binder clips (small, about 3/4-inch wide)
8 Colored pens, pencils, or markers

Maker Camp 2016
START Making!38
spaCe and tOOls setUpLay out the materials on a table that will be easy for everyone to reach. Group the tools, such as scissors, together. Make sure there is enough open table space for participants to work on their projects.
Circuits All electronics—from computers and phones to the lights in your home— use circuits to conduct electricity. All circuits include a power source (such as a battery) connected by wires to something that requires power (like a light bulb). In this activity, you’ll use copper tape for the wires, a round coin battery to supply the power, and a small LED to function as a light bulb.
oPeningTo begin your first session, start with an icebreaker to help everyone get to know each other. Gather in a group and have each person share their name, where they’re from, and something they like to make (or their favorite activity).
deMoingShare two or three different examples of paper circuits with the group. Pass around the examples and briefly describe your process. Encourage members of the group to imagine what kind of project they might want to make.
Facilitator sharing how she made a light-up paper circuit

Maker Camp 2016
light it up: Paper Circuits 39
Building a firSt ProjeCtFor their first project, makers explore how to make a simple circuit that lights up an LED on a piece of paper. This can provide the foundation for many related projects.
Make the LED light up. Give one LED light and a battery to each maker. Encourage them to explore the look and feel of these materials and share what they notice. Then, ask them to try to make the LED light up.
77 Facilitation Tipencourage experimentationyou may want to try starting with very little instruction. Allow the makers to jump in and try to make it work. Moments of “failure”—when things aren’t working as expected—can present you with opportunities to encourage persistence and allow makers to practice problem solving.
Lighting up an LED with a battery (SCI-BOnO CLUBHOUSE, JOHAnnESBUrG, SOUTH AFrICA)
Maker Camp 2016
START Making!40
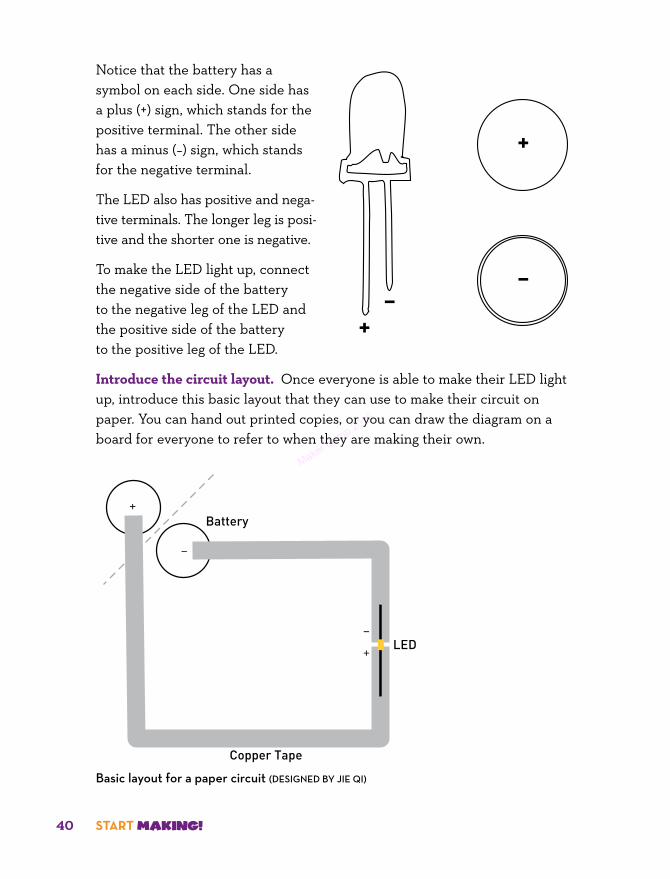
Notice that the battery has a symbol on each side. One side has a plus (+) sign, which stands for the positive terminal. The other side has a minus (–) sign, which stands for the negative terminal.
The LED also has positive and nega-tive terminals. The longer leg is posi-tive and the shorter one is negative.
To make the LED light up, connect the negative side of the battery to the negative leg of the LED and the positive side of the battery to the positive leg of the LED.
Introduce the circuit layout. Once everyone is able to make their LED light up, introduce this basic layout that they can use to make their circuit on paper. You can hand out printed copies, or you can draw the diagram on a board for everyone to refer to when they are making their own.
+
–
–+ LED
Copper Tape
Battery
Basic layout for a paper circuit (DESIGnED By JIE QI)
+–
+
–

Maker Camp 2016
light it up: Paper Circuits 41
7f SafeTy TipThe edges of the copper tape are sharp, so be careful not to cut your fingers!
Below are the steps for making the paper circuits, which you can use to help guide the makers.
1. Add copper tape.
Take a piece of paper and on it, place copper tape so it follows the lines in the diagram.
To make turns, tape until you reach the corner where you want to turn. Then, fold the tape to turn the corner.
Folding the copper tape to turn corners
77 Facilitation TipThe sticky side of copper tape is usually not as conductive as the shiny side. To make a circuit, it works best if you fold the tape around corners instead of cutting it to fit.
Start placing the copper tape in the center of the battery circle to make sure that it will make contact with the battery.

Maker Camp 2016
START Making!42
Basic Circuit StructureAn electrical circuit is a path on which electricity flows.
your circuit has several basic parts:
8 A battery, which stores electrical energy
8 The copper tape, which conducts electricity from the battery to the light
8 An led light, which turns on when electricity flows through it
2. Attach the LED.
Take the LED and spread the legs so that they are sticking out to each side. Place the LED on top of the copper tape, so the legs touch the tape. Then secure them in place with clear tape.

Maker Camp 2016
light it up: Paper Circuits 43
3. Add the battery.
Place the battery negative (–) side down, where the circle with the (–) sign is. It should touch the copper tape. Next, fold over the corner of the paper so that the tape going to the positive (+) circle touches the battery. Your light should turn on.
4. Complete the circuit.
Use a binder clip to hold the circuit in place. If the light doesn’t turn on, check that the copper tape is running to both sides of the battery and the LED with no breaks, and that the two tape lines don’t touch each other.

Maker Camp 2016
START Making!44
Troubleshooting Tips 8 The circuit needs to be complete to turn the light on; make sure there are
no breaks in the copper tape.
8 Check to make sure that the top of the copper tape is connected, even at the corners.
8 Check the direction of the LED light; make sure that the negative end is connected to the negative side of the battery and that the positive end is connected to the positive side.
8 Check for any loose connections.
77 Facilitation TipCreate opportunities for Peer Mentoringyou can encourage new makers to learn from each other. Point out when you notice someone trying a new technique and ask ques-tions to help others learn from their process. When someone has figured out how to solve a problem, you can suggest that they offer to help others. Encourage them to help the other person learn the process, rather than do the work for them.
Peer mentor helping to make a circuit (HEnnEPIn COUnTy LIBrAry BEST BUy TEEn
TECH CEnTEr, MInnEAPOLIS, Mn)
taking it furtherYou can show examples of other types of circuits, such as a circuit with a switch or more than one light.

Maker Camp 2016
light it up: Paper Circuits 45
sharIng MOre exaMplesTo add a switch, make a break in the circuit by removing a piece of the copper tape. Then, add a way to connect the two parts with something conductive, such as by putting a piece of foil on your finger or by adding a flap of paper with copper tape on it. (For more instructions, see the paper circuit basics tutorial in the list of resources at the end of this chapter.)
Adding a switch to a circuit
If you want to add more lights to a circuit, you can connect them in two different ways:
Parallel circuit To make a parallel circuit, add the lights so that each has its own row. Make sure to connect the positive ends of all the LEDs to the posi-tive side of the battery.
you can make a parallel circuit to add more than one light.
Maker Camp 2016
START Making!46
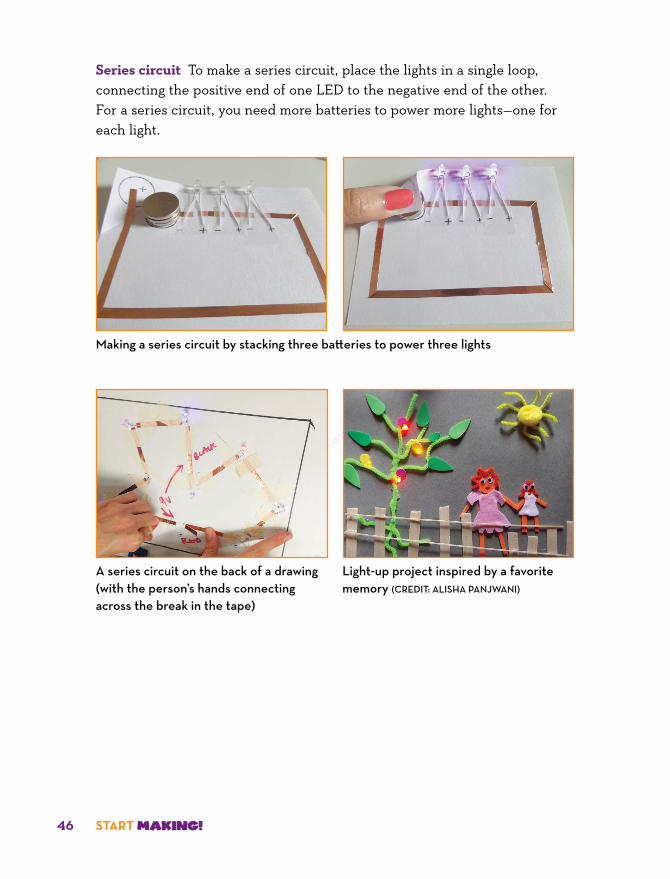
Series circuit To make a series circuit, place the lights in a single loop, connecting the positive end of one LED to the negative end of the other. For a series circuit, you need more batteries to power more lights—one for each light.
Making a series circuit by stacking three batteries to power three lights
A series circuit on the back of a drawing (with the person’s hands connecting across the break in the tape)
Light-up project inspired by a favorite memory (CrEDIT: ALISHA PAnJWAnI)

Maker Camp 2016
light it up: Paper Circuits 47
generatIng IdeasAfter making a simple circuit, gather the group to discuss what they noticed and to brainstorm ideas for what they might want to make with paper circuits using what they’ve learned so far. Have them jot down their ideas and post them on the idea wall.
Ideas for light-up projects shared by new makers
oPen MakeProvide time for the makers to experiment and design their own projects. They can pursue ideas they’ve shared on the idea wall or try some of the following ideas.
Make a draWIngMake a drawing that lights up. Poke a small hole in the paper where you want the LED light. Push the top of the LED through the hole and bend the legs. Connect the tape and battery on the back side of the paper.

Maker Camp 2016
START Making!48
A drawing with lights added
lIght-Up OrIgaMIMake an origami sculpture and add a paper circuit to make it light up. (See the paper lantern tutorial in the resource list at the end of the chapter for ideas.)
Light-up origami examples (yOUTH COnnECTIOnS CLUBHOUSE, LISMOrE, AUSTrALIA [LEFT];
nEVE yOSEF CLUBHOUSE, HAIFA, ISrAEL [rIGHT])

Maker Camp 2016
light it up: Paper Circuits 49
IllUMInate YOUr JOUrnalAdd paper circuits to your journal. Make a light-up portrait of yourself or your favorite activity.
Sharing and refleCtingGive the makers time to reflect and note their thoughts and ideas in their journals. Then gather everyone together and have them share their projects and experiences with the group.
Journal promptsyou can ask the following:
What was my favorite material from today's activity?
What are some things that I want to change or add to my paper circuit?
What are three more things that I want to make using this technique?

Maker Camp 2016
START Making!50
doCuMenting and diSPlayingInvite makers to display their projects on a shelf, wall, or online gallery. Encourage them to take photos and document their experiences to share the process with other makers. They can also include drawings of the circuits they created so that they remember how to build circuits for future projects.
A shelf displaying light-up creations by new makers (FLAGSHIP CLUBHOUSE, MUSEUM OF
SCIEnCE, BOSTOn, MA)
stOrY frOM the ClUBhOUse netWOrk: an exaMple Of a fIrst sessIOn Of start MakIng! To give you a sense of what a Start Making! session is like, here’s a descrip-tion of the first session at one of the Clubhouses.
A group of 11 girls showed up for the first day of the Start Making! program, which was being offered on Saturday mornings. During the opening icebreaker, the girls introduced themselves and shared something they liked to do. A couple of the girls were shy and reluctant to talk, whereas several others were lively and talkative. The facilitators strived to make everyone feel welcome and comfortable. Some of the girls expressed

Maker Camp 2016
light it up: Paper Circuits 51
interest in learning to make things; others mentioned that they came to spend time with their friends.
The facilitators shared a few examples of light-up cards, which they had made before the new makers had arrived. They passed the examples around the table, and the girls looked carefully at the cards and seemed curious about how they could make their own.
The facilitators gave each girl a battery and an LED and encouraged them to figure out how to make it light up. Some of the girls figured out how to make it work on their own, while others needed help. Getting their lights glowing gener-ated excitement among the girls and heightened their interest in doing more.
The facilitators then suggested that the girls make personalized maker jour-nals to document what they were making. They provided precut construction and printer paper, paper clips, pens, and other materials. The process of making and personalizing the journals gave the facilitators and new makers a chance to talk and get to know each other.
Examples of handmade journals created by new makers (FLAGSHIP CLUBHOUSE)

Maker Camp 2016
START Making!52
The facilitators then brought out the copper tape and other materials so the girls could start making paper circuits. The facilitators shared the basic template for a circuit, which one of the facilitators had posted on the wall. The girls drew the circuit on a piece of paper and started using copper tape to make their circuits.
The facilitators encouraged those who had their circuits working to help the others who were encountering difficulties. The most common problem was that the connections from the copper tape to the battery or LED were loose. Also, some had cut the copper tape instead of folding it at the corner, so the circuits were not fully connected. In the end, everyone was happy to get their circuits working.
During the open make time, the girls made a range of personalized light-up projects. Several made flowers or hearts with LEDs in the center. Some made projects that reflected activities they liked to do. For example, one girl made a guitar that lit up. Other projects included a person with bright eyes, a clown with a light-up nose, and a glowing jellyfish.
For the closing, everyone came together in a circle to share their projects. The facilitators asked the girls questions about their experiences, using the reflec-tion prompts, and then encouraged the girls to write or draw their reflections in their journals. Those who had been reluctant to speak at the beginning of the session expressed themselves in other ways, by sharing their projects or by writing their reflections in their journals.
After the girls headed home, the facilitators reflected on how the first session went, sharing what went well, what they had questions about, and what they thought could be improved.
They knew that the first session sets the tone for the rest of program, so they felt it was worth all the planning and preparation to help the new makers feel welcome to start making together.

Maker Camp 2016
light it up: Paper Circuits 53
Describing Circuits electricity flows in a circuit.
electricity is the flow of particles called electrons.
The circuit is a path that allows electrons to flow in a loop: from the battery, through the LED, and back to the battery.
This stream or flow of electrons is called current. The current causes the LED light to turn on. The current will not flow if the circuit is not complete.
An led (light-emitting diode) is a type of light that allows the current to flow only in one direction. This is the reason why the positive leg of the LED needs to connect to the positive side of the battery, and the negative leg of the LED to the negative side of the battery. Otherwise, the LED will not light up.
A material that allows the current to flow easily is called a conductor. All metals are good conductors of electricity. We used copper tape with sticky adhesive on the back to conduct electricity from the battery to the LED light.
insulators are materials that do not allow the current to flow easily. Paper or clear tape can act as a good insulator to prevent pieces of wire or conductive tape from touching each other.
A switch is used to complete a circuit or break a circuit and hence can be used to make the lights turn on and off.
There is only one path for the current to flow in a series circuit. The current will go through one LED, then through the next LED, and so on.
There are two or more paths for the current to flow in a parallel circuit. The current flowing through one LED is separate from the current flowing through the other LEDs.
stOrY frOM the ClUBhOUse netWOrk: MakIng lIght-Up Badges and BUttOns Facilitators who led Start Making! at their Clubhouses found that new makers enjoyed the paper circuit activity and often applied the skills they’d learned to make other light-up projects. For example, Cindy Priester, Clubhouse

Maker Camp 2016
START Making!54
Coordinator at the Southeast & Armed Services YMCA in Colorado Springs, CO, suggested that the new makers in her Clubhouse create name badges to introduce themselves when new people joined their program. They made light-up name badges using note cards with a pin on the back. They expressed their personality through their designs, adding LEDs to light up their names and images of themselves.
She explained how they later built on this idea:
Makers at our Clubhouse had the idea to take their first paper circuit name badges further to create buttons with words of encouragement (such as “Keep trying!”) or to describe a maker “superpower” (such as “creativity”). Later, when the circuit-based projects got more challenging, I would some-times suggest that they make a quick paper circuit note card or badge so that they could practice their understanding of basic electronics and get a quick success to remind them they could do it. Later, they demoed their persever-ance when they participated in Maker Media’s Maker Camp and posted their light-up button innovations to the online community.
additional reSourCeS 8 Paper circuit basics:
hlt.media.mit.edu/?p=2505
8 Flapping origami crane: hlt.media.mit.edu/?p=1448
8 Paper lantern tutorial: evilmadscientist.com/2008/paper-circuitry-at-home-electric-origami/

Maker Camp 2016
Start Making! makes mecurious about…
55light it up: Paper Circuits

Maker Camp 2016

Maker Camp 2016
Make it Sing: PrograMMaBle MuSiCal CreationS
SeSSion
2

Maker Camp 2016
START Making!58
n ew makers will create musical projects using everyday materials connected to a computer with
a MaKey MaKey board. In the process, they will experiment to figure out which materials are conductive and learn to code a simple computer program using the Scratch programming environment.
SeSSion goalSIn this session, makers will
8 Build music-making projects using a pencil sketch and other conductive materials connected to a Makey Makey board.
8 Get started with computer coding by remixing a Scratch musical project.
8 Explore and become curious about the electrical properties of everyday materials.
◊ getting readyGet ready for a playful session experimenting with sounds and music!
For this session, you’ll need the MaKey MaKey invention kit. You’ll also need a computer running Scratch, a free creative programming environment. Watch the introductory videos for MaKey MaKey and Scratch, and try exploring the “getting started” guides for each of the tools.
Build your own musical drawing using the steps described for the first project.
Looking at a Makey Makey (CASA DE LA
JUVEnTUD CLUBHOUSE, MOrA, COSTA rICA)
Making arrows to connect to a Makey Makey (BOyS & GIrLS CLUBS OF METrO WEST
CLUBHOUSE, FrAMInGHAM, MA)

Maker Camp 2016
Make it Sing: Programmable Musical Creations 59
MaKey MaKey Invention KitWith Makey Makey, you can use everyday objects to create your own phys-ical interfaces to the computer. For example, you can make a piano keyboard out of pieces of fruit or use Play-Doh to create a controller for a game. you plug the Makey Makey board into a computer and then attach a banana (or other conductive object) to the Makey Makey. When you touch the banana and complete a circuit on the Makey Makey, the computer responds as if a key has been pressed. To see the introductory video and find out more, visit makeymakey.com.
Pressing a key using a Makey Makey board with Scratch
A Scratch piano project to play with the Makey Makey

Maker Camp 2016
START Making!60
ScratchScratch is a programming environment designed for young people (ages 8 and up) to create animations, games, stories, and other interactive projects. To code in Scratch, you snap together colorful blocks on the screen and combine them to program images, text, music, and sounds. you can also share and remix projects in the Scratch online community. Scratch is available free of charge and has been translated into more than 40 languages. Scratch is developed by the Lifelong kindergarten group at the MIT Media Lab. To start creating, visit scratch.mit.edu.
MaterIals
8 MaKey MaKey kits, which include a circuit board, alligator clips, and a USB cable, are available at makeymakey.com.
8 Computers with Scratch. You can use the online version of Scratch at scratch.mit.edu or download and install the offline editor from scratch.mit.edu/scratch2download.
8 Scratch piano project: scratch.mit.edu/makeypiano
8 Clipboards with metal clips
8 Pencils, #2 or softer (graphite, not color)
8 Blank paper
8 Conductive materials, such as bananas, apple slices, gum drops, or other moist foods; Play-Doh or other water-based clays; aluminum foil, spoons, copper tape, or other metal objects
8 Non-conductive materials, such as plastic, electrical tape, and cardboard

Maker Camp 2016
Make it Sing: Programmable Musical Creations 61
spaCe and tOOls setUpArrange the materials. Lay out paper, pencils, and clipboards on a table for the first activity. In addition, for the Open Make time, set up a side table with a variety of conductive and nonconductive materials.
Set up the computer stations. Plug the MaKey MaKey board into each computer using the USB cable.
Open Scratch with the MaKey MaKey piano project running: scratch.mit.edu/makeypiano. (If you plan to use the offline version of Scratch, download the project and open a copy on each computer.)
For the demo computer, attach alligator clips to each of the MaKey MaKey arrow key ports (up, down, left, right) and one to the Space key port. In addition, attach one alligator clip to one of the ports labeled Earth. (You may want to use the black wire for Earth so that you can remember which wire is ground.)
oPeningYou may want to begin with an icebreaker or a group activity to help makers get to know each other better. For example, in the spirit of this session’s focus on music, you could have each person in the circle act out playing a musical instrument, and have the others guess what instrument it is and then pretend to play it themselves.

Maker Camp 2016
START Making!62
deMoingIntroduce the MaKey MaKey to spark interest and show the makers how they can make their own musical drawings.
Show a musical drawing. Demonstrate a simple musical drawing project connected to MaKey MaKey and Scratch. Show how you can play it, and ask one of the makers to try playing it, too.
Point out how you need to ground yourself by touching the metal clip that attaches to the Earth port on the MaKey MaKey. Then touch the thick pencil lines in order to complete the circuit and make it play.
Complete the circuit with just your body. Show how you can create a circuit with the MaKey MaKey by using your body to conduct electricity. Hold the metal part of the clip attached to Earth on the MaKey MaKey board in one hand. With your other hand, touch the metal part of another clip. You should hear a different piano note each time you complete the circuit with your body depending on which clip you touch: up arrow, down arrow, left arrow, right arrow, and Space key.
Complete the circuit with more than one person. You can also have the makers try activating the MaKey MaKey together by holding hands. Ask one person to touch the Earth port and another person to touch the Space key port. When they touch hands the circuit should play.
Ask the makers these questions: Why does this work when I just use my hands? Am I conductive? What other objects are conductive? What makes them conductive?
You may want to raise these questions now, and then discuss them at the end of the session, after the makers get a chance to experiment and explore different materials.
Completing a circuit by holding alligator clips

Maker Camp 2016
Make it Sing: Programmable Musical Creations 63
Building a firSt ProjeCtFor their first project, makers can sketch and then play a musical drawing.
This activity was developed by Jay Silver, one of the creators of the MaKey MaKey, and was featured in Intel’s Sketch It, Play It guide. For inspiration, you can show a video of the activity, available at start-making.org.
How to make a simple musical drawing to attach to a Makey Makey

Maker Camp 2016
START Making!64
Here are steps for making a musical drawing that connects to the Scratch piano project.
1. Draw.
a. Insert a piece of paper into the clipboard.
b. Use a pencil to draw a star or other solid shape on the paper.
c. Draw a thick, dark line from the shape to the paper’s edge.
2. Connect.
a. Attach a wire from Earth on the MaKey MaKey to the metal clip on the clipboard.
b. Clip one of the wires from a MaKey MaKey port, such as the up arrow, to the end of the line you drew.
Touching the metal clip to play the musical drawing
3. Test.
a. Touch the metal clip with one hand, then touch the shape to hear the note play.
If the note doesn’t play, see the Troubleshooting Tips on page 66.

Maker Camp 2016
Make it Sing: Programmable Musical Creations 65
4. Add more.
a. Now draw more shapes so that you can attach each shape to one of the MaKey MaKey ports (the up, down, left, and right, arrows and Space).
Open and Closed Circuitsyou can use the Makey Makey to demonstrate the difference between open and closed circuits. To activate a key on the Makey Makey, you need to make a closed circuit.
open Circuit A circuit with a path that has a break in it so that electricity does not flow
Closed Circuit A circuit with a path that is connected, allowing electricity to flow
If you only touch a wire going to Earth on the Makey Makey, you have an open circuit.
If you also touch a wire going to a Makey Makey key port, you have a closed circuit, with the electricity flowing through you. The computer will think you pressed a key!

Maker Camp 2016
START Making!66
5. Play.Now you can play your musical drawing.
Troubleshooting Tips 8 If a circuit isn’t working, first check that the connections are strong. Check
the alligators clips on the Makey Makey to make sure they are securely attached and that they are not touching each other.
8 Make sure one alligator clip is attached to a thick graphite line on your drawing and that the alligator clip from Earth on the Makey Makey board is attached to the metal clip on the clipboard.
8 Make sure the lines you draw are bold, solid, and thick.
8 Make sure the lines don’t overlap. If you see any areas where the graphite from one line touches another, you can remove it with an eraser.
8 Test the Scratch piano (or other program you are using) by pressing a key on the computer keyboard to make sure it works.
8 For more troubleshooting tips, see makeymakey.com/howto.

Maker Camp 2016
Make it Sing: Programmable Musical Creations 67
taking it furtherIntroduce the concept of conductive materials by demonstrating how a banana, a foil pan, or modeling clay can be connected to the MaKey MaKey board; then touch the conductive object (while also touching the Earth port) to trigger a sound in the Scratch program.
Table laid out with conductive and nonconductive materials (FLAGSHIP CLUBHOUSE,
MUSEUM OF SCIEnCE, BOSTOn, MA)
Terms to KnowConductivity Conductivity refers to the flow of electrons in a material.
Conductors Some metals, such as copper, conduct electricity better than others. Pencils have enough graphite (a semimetal) in them to work as a conductor, so you can “draw” a conductive path that allows electrons to flow to the Makey Makey. Examples of materials that also have conductive properties include moist fruit, modeling clay, and even the human body.
insulators On the other hand, some materials keep their electrons close and tight. Plastic, rubber, fabric, glass, and wood don’t conduct electricity. These materials make good insulators.

Maker Camp 2016
START Making!68
Suggest that makers work in pairs to experiment with using conductive (and nonconductive) materials. They can disconnect their musical drawings and experiment with using other materials to trigger the sounds on the Scratch piano.
Bananas and a flower interface to a Scratch piano project
oPen MakeNow makers can expand their musical projects.
To spark ideas, play with other materials that can trigger keys on the computer. Make a bigger instru-ment out of a foam board and other materials, such as spoons! For inspira-tion, watch the MaKey MaKey Music Examples video created by Eric Rosenbaum (bit.ly/makeymusicvideo).
Using conductive materials to connect to a Makey Makey (yOUTH COnnECTIOnS
CLUBHOUSE, LISMOrE, AUSTrALIA)

Maker Camp 2016
Make it Sing: Programmable Musical Creations 69
Circulate among the groups and prompt the makers to keep experimenting, building, and taking their play in new directions. Encourage ways for more than one person to interact with the musical project.
77 Facilitation Tipfind Conductive Materials Playing with Makey Makey boards is a fun way to test the conductivity of materials in the world around you. Try funny or unexpected objects, materials, and foods to use as conductors.
Mentors from the Flagship Clubhouse at the Museum of Science in Boston encouraged their makers to test the conductivity of canned spray cheese. They created a circuit conducting electricity all the way around the table!

Maker Camp 2016
START Making!70
haCk YOUr MUsICal InstrUMent prOgraM Suggest editing and remixing the Scratch piano to play different sounds. Or, try using the Scratch MaKey MaKey drum project: scratch.mit.edu/makeydrum.
A MaKey MaKey board can control anything on the computer that is trig-gered by the keyboard. What other software programs move or make noise on the computer when you press a key?
Making a Computer ProgramA computer program is a set of instructions that tells the computer what to do. you can write your own computer program using a programming language, such as Scratch. To program, you think about what you want to happen and then break it into smaller steps in a language the computer can understand. In this session, you create or remix a program that tells the computer what note to play whenever a key is pressed.
An example of a Scratch program that plays different sounds when keys are pressed
Using Play-Doh to connect to a Makey Makey (FLAGSHIP CLUBHOUSE)

Maker Camp 2016
Make it Sing: Programmable Musical Creations 71
Experimenting with conductive materials (SCI-BOnO CLUBHOUSE, JOHAnnESBUrG, SOUTH
AFrICA)
Here are some of the Open Make projects created by Clubhouse makers. Do you see anything you want to try?
Arrow key interface made with copper tape (yOUTH COnnECTIOnS CLUBHOUSE)

Maker Camp 2016
START Making!72
Learn How to Play Piano project (BOyS &
GIrLS CLUBS OF METrO WEST CLUBHOUSE)
Ice-Cube keyboard (SOrEnSOn UnITy
CEnTEr CLUBHOUSE, SALT LAkE CITy, UT)
Playing a dance game made using a Makey Makey (CEDES CLUBHOUSE In
ALAJUELITA, SAn JOSé, COSTA rICA)
Interface made with spoons (yOUTH
COnnECTIOnS CLUBHOUSE)

Maker Camp 2016
Make it Sing: Programmable Musical Creations 73
Sharing and refleCtingProvide time for the makers to share what they noticed and made during their explorations. Ask them to jot down their reflections in their journals.
Journal promptsyou can ask the following:
What was the most surprising conductive material you hooked up to your MaKey MaKey board? What else would you like to try?
How would you explain how your project works? Draw a diagram to show how it connects.
Who helped you with your project? What did they do to help?
Sketch of ideas for connecting to Makey Makey

Maker Camp 2016
START Making!74
doCuMenting and diSPlayingDon’t forget to document these projects as you go along! Some projects may literally get eaten or dry up, but reflections can live on through photos or videos, online posts, or journal entries.
What name do you want to give to your musical project? What instructions will you provide for playing it?
You can also help the makers save and present their musical projects during the final Show & Share sessions. Friends and family members love playing with MaKey MaKey projects!
stOrY frOM the ClUBhOUse netWOrk: the CItY that speaksThe makers at the East Palo Alto Boys & Girls Club Clubhouse in California used their MaKey MaKey boards not only to learn about conductivity and play with musical interfaces and coding, but to use them as tools for storytelling and community-building.
They started by creating a LEGO model of the White House and other famous places around Washington, D.C. The Clubhouse members then embedded a MaKey MaKey board in the city diorama to make parts of it interactive. They used Scratch to record and import sounds. The sounds included their own voices, lines from President Obama’s speeches, police sirens, and even Sunny, the White House puppy, barking. They called the project The City That Speaks.
Interactive display board of Make It Sing projects for Clubhouse community show-case (EAST PALO ALTO BOyS & GIrLS CLUB CLUB-
HOUSE, EAST PALO ALTO, CA)

Maker Camp 2016
Make it Sing: Programmable Musical Creations 75
The City That Speaks made its way to Maker Faires in the San Francisco Bay Area and Washington, D.C., where Faire goers were encouraged to help build more of the city.
The City That Speaks model (EAST PALO ALTO BOyS & GIrLS CLUB CLUBHOUSE)
Adding on to the city model at the Bay Area Maker Faire

Maker Camp 2016
START Making!76
additional reSourCeS 8 MaKey MaKey group activity guides:
makeymakey.com/guides/
8 MaKey MaKey video gallery: makeymakey.com/gallery
8 Scratch learning resources and support: scratch.mit.edu/help

Maker Camp 2016
77Make it Sing: Programmable Musical Creations
Three things that I found the mostsurprising in this session are…

Maker Camp 2016

Maker Camp 2016
Paint with light: illuMinated wandS and PhotograPhy
SeSSion
3

Maker Camp 2016
START Making!80
M akers will create simple LED wands and then use them to make light paintings, capturing
images with a digital camera (with a long-exposure setting). In the process, they will learn about simple circuits and long-exposure photography.
◊ getting readyThis session has two parts: 1) building light wands and 2) creating light paintings.
Experimenting with LED lights and a coin battery (yOUTH COnnECTIOnS CLUBHOUSE, LISMOrE, AUSTrALIA)
SeSSion goalSBy the end of the session, makers will
8 Build different types of glowing wands with LEDs (light- emitting diodes).
8 Tinker with materials and circuit designs to change the size, shape, and effects of the light sources.
8 Team up to create light paint-ings and stories.

Maker Camp 2016
Paint with light: illuminated wands and Photography 81
Waving LED lights to create a pattern (FLAGSHIP CLUBHOUSE, MUSEUM OF SCIEnCE,
BOSTOn, MA)
To prepare for the session, try light painting yourself, ideally with at least one other person participating and helping with the camera. Save the photos from your light experiments, and make a slideshow of the images you create to share with your makers as examples during the demonstration.
This session is inspired by the Exploratorium’s The Art of Tinkering by Karen Wilkinson and Mike Petrich (2014) and the work of the staff and mentors of the Flagship Clubhouse at the Museum of Science in Boston, MA.

Maker Camp 2016
START Making!82
MaterIals 8 Digital cameras with long-
exposure settings, or smart phones with an app installed that allows for long-exposure photography (such as Slow Shutter Cam or LongExpo)
8 Tripod (if available)
8 Single-color LED lights
8 Blinking RGB (tricolor) LED lights
8 CR2032 (coin) batteries
8 Pipe cleaners
8 Clear tape
8 Straws or craft sticks
8 Translucent materials, such as wax paper, glass jars, ping-pong balls, drinking cups, and glue sticks
8 Conductive materials to extend the circuit, such as copper tape or wire
8 Additional light sources such as flashlights, toys with moving lights, cell phone screens, or electroluminescent (EL) wire (optional)
spaCe and tOOls setUpSet up a light and a dark space. Ideally, this activity uses two rooms or spaces: 1) a well-lit space for building light wands, and 2) a darkened room for taking photos of the lights in motion.

Maker Camp 2016
Paint with light: illuminated wands and Photography 83
If you don’t have two separate spaces, you can start by making the wands and then darken the room to take photos.
In the well-lit room, arrange the craft and electronic supplies for building wands.
In the darkened room, set up one or more digital cameras on a tripod or table.
Adjust the camera settings. Adjust the camera settings so that the exposure remains open. The camera should remain steady and not move, so you will need to set the long exposure setting (sometimes labeled “shutter priority” or “bulb”) to longer settings (between 2 and 10 seconds).
Start by turning off the flash. Later, you can get some interesting effects if you turn the flash on again to get a pop of light to capture images of people.
Troubleshooting Tips 8 Take a few experimental shots and then adjust settings as needed.
8 To keep the camera steady, use a tripod and a remote trigger or a self-timer.
8 Explore advanced camera settings (such as high aperture, low ISO, manual focus, rAW format, no image stabilizer, and bulb mode).
oPeningYou can start the session with a group icebreaker. For example, during such a session at the Flagship Clubhouse at the Museum of Science in Boston, volunteer mentor Lauren led the creative activity called “Exquisite Corpse.”
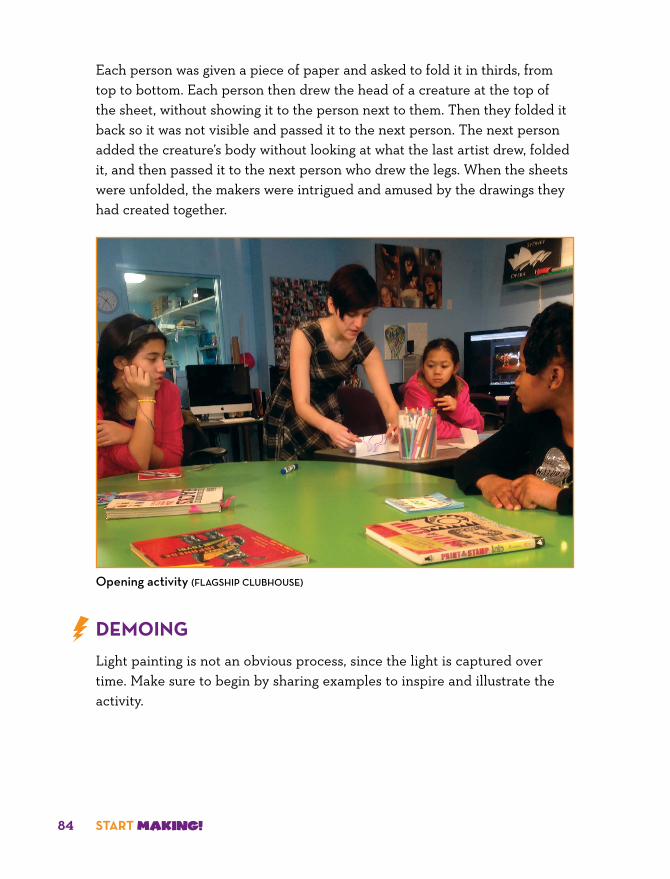
Maker Camp 2016
START Making!84
Each person was given a piece of paper and asked to fold it in thirds, from top to bottom. Each person then drew the head of a creature at the top of the sheet, without showing it to the person next to them. Then they folded it back so it was not visible and passed it to the next person. The next person added the creature’s body without looking at what the last artist drew, folded it, and then passed it to the next person who drew the legs. When the sheets were unfolded, the makers were intrigued and amused by the drawings they had created together.
Opening activity (FLAGSHIP CLUBHOUSE)
deMoingLight painting is not an obvious process, since the light is captured over time. Make sure to begin by sharing examples to inspire and illustrate the activity.

Maker Camp 2016
Paint with light: illuminated wands and Photography 85
1. Show examples of light painting photos.
Introduce the idea of making light paintings. Show examples of light painting photos that you have made or found online. Ask the group what they notice about the different photos.
Introducing light painting activity (nEVE yOSEFy CLUBHOUSE)
2. Share examples of light wands.
Show the makers examples of light wands that they will be able to make using LED lights and batteries.
Long-Exposure PhotographyTo make a light painting, you leave the camera’s shutter open for a few seconds or more. This is known as long-exposure photography. By leaving the shutter open, you can capture the movement of light over time.
Exposure refers to the amount of light that comes into the camera for a photograph. The exposure is determined by how long the shutter is open, how wide the lens opening (aperture) is, and how much light is in the space.

Maker Camp 2016
START Making!86
3. Demonstrate how to capture light painting images.
You may also want to demonstrate the technique for light painting in the darkened room, including how to use the cameras for long-exposure photos.
Looking through a camera lens (nEVE
yOSEF CLUBHOUSE, HAIFA, ISrAEL)
Building a firSt ProjeCtBegin by building simple LED light wands.
1. Make a simple LED wand.
Choose an LED. Use clear tape to attach the LED to a coin battery. Attach the longer leg of the LED to the positive side of the battery, and the shorter leg to the negative side.
Making light wands (FLAGSHIP CLUBHOUSE)
Introducing light painting activity (nEVE
yOSEF CLUBHOUSE)

Maker Camp 2016
Paint with light: illuminated wands and Photography 87
The LED should light up. (If the battery is flipped, it won’t light up.)
Wrap the battery and legs in tape so that they are secure and none of the metal is exposed.
+–
+
–
Add a pipe cleaner as a handle for your light wand. Wrap the pipe cleaner around the battery, and extend it so you have a long wand to hold the light.
(Because pipe cleaners have metal inside, make sure that the pipe cleaner only touches the tape and not the metal battery or LED legs.)
Wrap the pipe cleaner firmly so the light doesn’t fly off when you wave it. You can add tape to make it more secure.

Maker Camp 2016
START Making!88
You can also use other materials to make wands, such as craft sticks, pencils, or straws.
You can also decorate your wand with craft materials.
2. Try light painting.
After making the light wands, work in teams to experiment with light painting in the dark space.
Arrange for someone to manage the camera and take the photos.
Take turns creating light paintings individually or in small groups.
Have the photographer press the shutter release button while the painter draws simple shapes in front of the camera.
Makers can alternate between building light wands and painting with light.
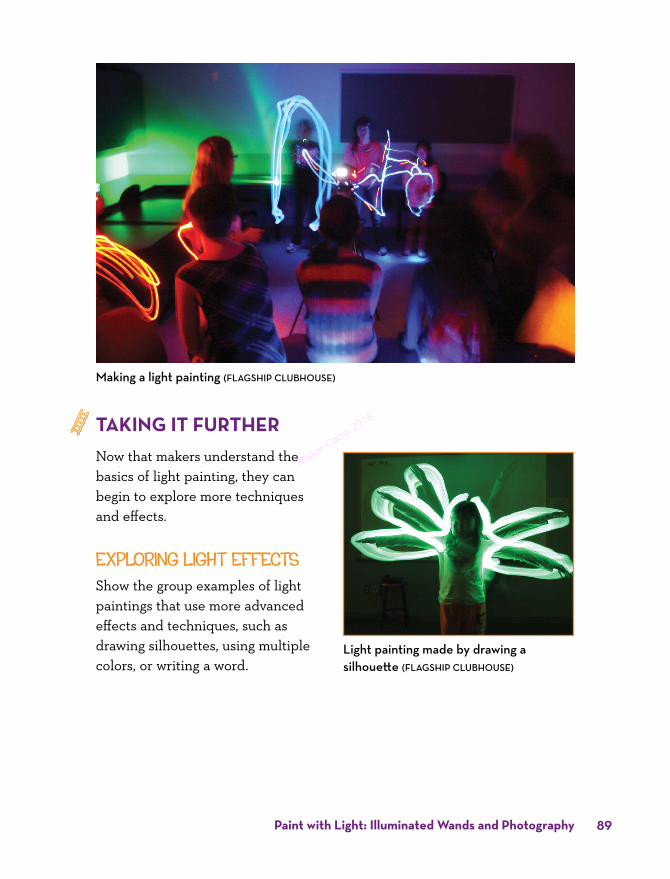
Maker Camp 2016
Paint with light: illuminated wands and Photography 89
Making a light painting (FLAGSHIP CLUBHOUSE)
taking it furtherNow that makers understand the basics of light painting, they can begin to explore more techniques and effects.
explOrIng lIght effeCtsShow the group examples of light paintings that use more advanced effects and techniques, such as drawing silhouettes, using multiple colors, or writing a word.
Light painting made by drawing a silhouette (FLAGSHIP CLUBHOUSE)

Maker Camp 2016
START Making!90
Light painting made with a multicolored light source (FLAGSHIP CLUBHOUSE)
generatIng IdeasAsk makers to brainstorm ideas for light paintings that they want to create and techniques that they would like to try.
Brainstorming ideas for light paintings (FLAGSHIP CLUBHOUSE)

Maker Camp 2016
Paint with light: illuminated wands and Photography 91
oPen MakeDuring the Open Make time, encourage makers to experiment with new techniques.
For example, they can make wands with multiple lights. They can use blinking LEDs to make a dotted line. They can make thicker lines using materials that diffuse the light (such as clear straws, glue sticks, ping pong balls, and cotton balls).
Or they can paint the silhouette of an object by moving the light behind it.
Using a ping-pong ball to make a wand with diffused light (FLAGSHIP CLUBHOUSE)
Light painting using two different colors (PUErTA 18 CLUBHOUSE, BUEnOS AIrES, ArGEnTInA)

Maker Camp 2016
START Making!92
Here are some additional ideas for light paintings:
8 Draw sketches, words, or symbols.
8 Trace objects or add to items already in the frame, such as by drawing hats or wings on a person who is standing still.
8 Make group projects where each person draws a part of the drawing.
8 Create an animation by taking a series of photos.
Light painting created by tracing around a person (FLAGSHIP CLUBHOUSE)
A small group light painting together (FLAGSHIP CLUBHOUSE)
LED lights in a jar (FLAGSHIP CLUBHOUSE)
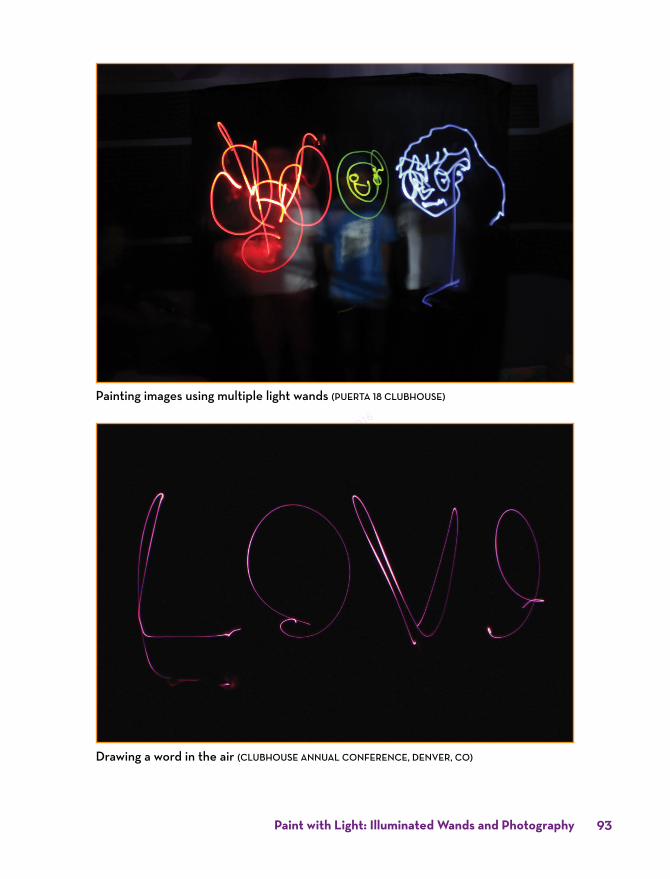
Maker Camp 2016
Paint with light: illuminated wands and Photography 93
Painting images using multiple light wands (PUErTA 18 CLUBHOUSE)
Drawing a word in the air (CLUBHOUSE AnnUAL COnFErEnCE, DEnVEr, CO)
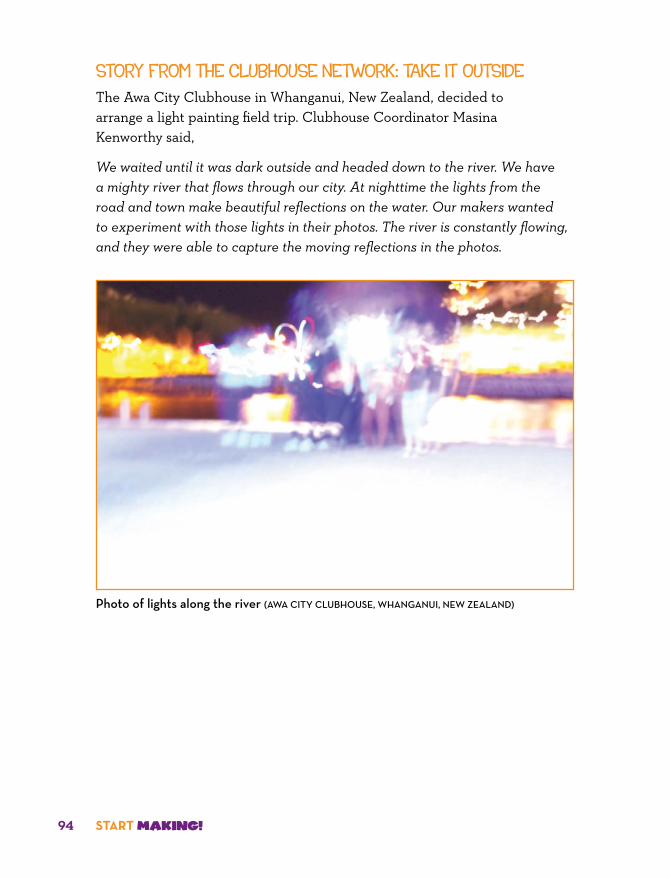
Maker Camp 2016
START Making!94
stOrY frOM the ClUBhOUse netWOrk: take It OUtsIdeThe Awa City Clubhouse in Whanganui, New Zealand, decided to arrange a light painting field trip. Clubhouse Coordinator Masina Kenworthy said,
We waited until it was dark outside and headed down to the river. We have a mighty river that flows through our city. At nighttime the lights from the road and town make beautiful reflections on the water. Our makers wanted to experiment with those lights in their photos. The river is constantly flowing, and they were able to capture the moving reflections in the photos.
Photo of lights along the river (AWA CITy CLUBHOUSE, WHAnGAnUI, nEW ZEALAnD)

Maker Camp 2016
Paint with light: illuminated wands and Photography 95
Sharing and refleCtingWe recommend making time to gather everyone into one group so they can reflect together and make notes in their journals. You can ask the makers to share how they tinkered with their light wands, how they achieved different effects, and how they were influenced by each other’s ideas.
Journal promptsyou can ask the following:
Did anything surprise you as you were working on this?
Did anyone help you with your project? What did you learn from them?
What would you do if you had more time?

Maker Camp 2016
96 Start Making!
doCuMenting and diSPlayingYou can help makers document their process while building light wands and taking photos.
Work with the makers to put together a slideshow of all the finished photos, and then watch it as a group. You can also print out the light paintings and display them on the wall.
Light painting collage (yOUTH COnnECTIOnS CLUBHOUSE)
stOrY frOM the ClUBhOUse netWOrk: glOWIng JUMp rOpesJanette Nelson, at the Sorenson Unity Center Clubhouse in Salt Lake City, UT, extended the activity by introducing electroluminescent (EL) wire.
Two of the girls participating in the activity jumped rope for ten seconds, creating ghostly effects with blue and green patterns. One of the girls had a red light in her hand, which added a splash of red.
They discovered that light painting was fun and easy to do. It was a good opportunity for all the participants to have creative freedom. Each maker was
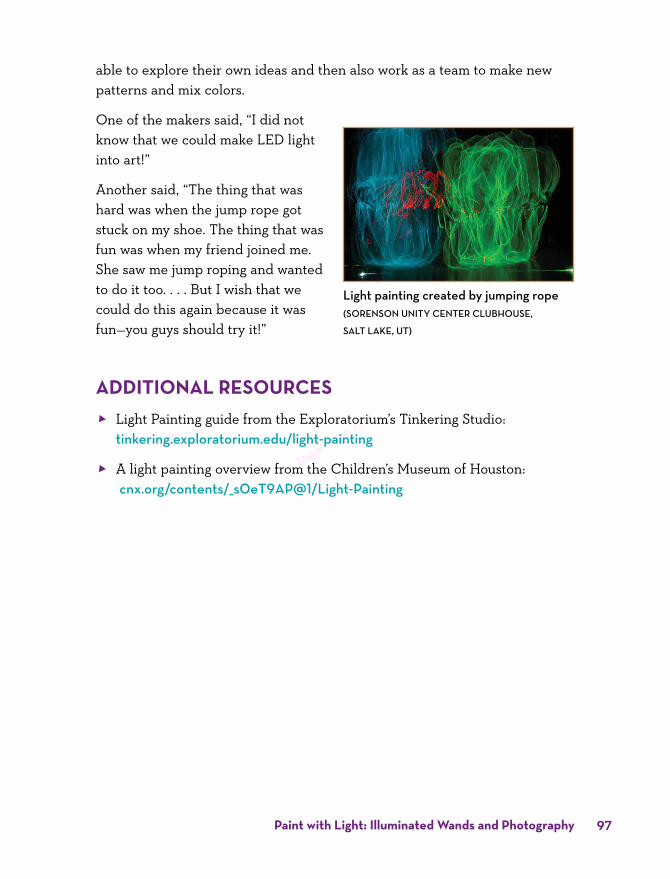
Maker Camp 2016
Paint with light: illuminated wands and Photography 97
able to explore their own ideas and then also work as a team to make new patterns and mix colors.
One of the makers said, “I did not know that we could make LED light into art!”
Another said, “The thing that was hard was when the jump rope got stuck on my shoe. The thing that was fun was when my friend joined me. She saw me jump roping and wanted to do it too. . . . But I wish that we could do this again because it was fun—you guys should try it!”
additional reSourCeS 8 Light Painting guide from the Exploratorium’s Tinkering Studio:
tinkering.exploratorium.edu/light-painting
8 A light painting overview from the Children’s Museum of Houston: cnx.org/contents/_s0eT9AP@1/Light-Painting
Light painting created by jumping rope (SOrEnSOn UnITy CEnTEr CLUBHOUSE,
SALT LAkE, UT)

Maker Camp 2016
Ideas for light painting projects…
98 Start Making!

Maker Camp 2016
give it form: 3d forMS
SeSSion
4

Maker Camp 2016
START Making!100
In this session, makers will design and build three-dimensional (3D) sculptures out of paper or clay.
In the process, they will learn about transforming two-dimensional (2D) shapes into 3D forms. As an extension, you can introduce 3D modeling using Pixologic’s Sculptris digital sculpting software.
SeSSion goalSIn this session, makers will
8 Collaboratively design and create 3D sculptures using images as visual prompts.
8 Engage in digital sculpting using Sculptris and design a model for 3D printing.
8 Learn about transforming two-dimensional shapes into three-dimensional forms.
◊ getting readyIn this session you can introduce 3D design in two different ways: by paper modeling and by digital sculpting.
Make your own 3D projects as examples to help spark interest.

Maker Camp 2016
give it form: 3d forms 101
Design for a 3D paper toy (MUSEO DE LOS nIñOS, BOGOTÁ, COLOMBIA)
MaterIals 8 Printouts of templates to make
3D forms:
8 Cube: bit.ly/start-making-cube
8 Pyramid: bit.ly/start-making-pyramid
8 Cylinder: bit.ly/start-making-cylinder
8 Paper (plain, cardstock, grid, or graph)
8 Modeling clay, such as Play-Doh
8 Glue, clear tape or double-sided tape
8 Rulers
8 Crayons, pencils, and markers
8 Sculptris 3D modeling software; download from pixologic.com/sculptris/

Maker Camp 2016
START Making!102
SculptrisSculptris is a free digital sculpting interface from Pixologic that allows you to get started with 3D modeling. you can also export your sculpted model from Sculptris and print out your design using a 3D printer. Sculptris is based on the concept of modeling clay. Just as with modeling clay, you can pull, push, pinch, and twist a sphere of virtual clay and shape it into your desired form.
spaCe and tOOls setUpLay out the basic materials for the session. You can also include other drawing tools and grid paper.
Install Sculptris software on each computer. If you plan to introduce digital sculpting, you’ll need Sculptris software installed on each computer. If possible, arrange one computer for every two to three makers.
oPeningWe recommend beginning the session with two introductory activities to help makers start thinking about 2D shapes and 3D forms.
1. Draw your own creature.
8 Distribute scratch paper and ask makers to take five minutes to draw their own monster, animal, or cartoon character.
8 Prompt makers to give the creature a name and to list three adjectives to describe it.
8 Have makers introduce them-selves and their creature to the group.
Character sketches (FLAGSHIP CLUBHOUSE,
MUSEUM OF SCIEnCE, BOSTOn, MA)

Maker Camp 2016
give it form: 3d forms 103
2. Use 2D nets to make 3D forms.
In this starter activity, makers take a flat pattern (called a 2D net) and make a pyramid, a cube, or a cylinder.
1. Ask the makers to get into groups of three. Give each group a template for a pyramid, a cube, and a cylinder (see Materials list).
2. Allow time for makers to cut out and fold each 2D shape into a 3D form.
3. Tape each of the 3D forms so that they hold together.
4. Ask the makers to think about the three forms. For example, “What does the pyramid remind you of?” “Where have you seen pyramids?” “Can you spot an object that is a pyramid in this room?”
2D NetA 2D net is a two-dimensional pattern that can be folded to create a three- dimensional form.
Taping together a pyramid

Maker Camp 2016
START Making!104
5. Then give the groups another short period of time (five minutes) to combine the three forms into a collab-orative form, based on fun prompts such as “build the friendliest robot” or “form a spaceship.”
6. Finally, give makers another short period of time to try to flatten the form back into a 2D net.
deMoingShare an example that shows how a 2D drawing can lead to a 3D sculpture.
Sharing examples (FLAGSHIP CLUBHOUSE)
Cylinder, pyramid, and cube models made from their 2D net templates

Maker Camp 2016
give it form: 3d forms 105
For example, you can show
8 A drawing of a fantasy creature or other character
8 A clay model of the character
8 A digital 3D model of the character
8 A 3D printed version of the character (optional)
Making a creature from clay (FLAGSHIP CLUBHOUSE)
3D model based on 2D sketch

Maker Camp 2016
START Making!106
Building a firSt ProjeCtFor the first project, you can make either a paper sculpture or a clay sculpture.
Printed images of animals
paper sCUlptUresBegin by having each maker choose what type of animal or character they would like to make. You can provide pictures of animals or creatures (such as a cat face or a fish). Give the makers the choice of using one of those charac-ters or one of their own drawings.
Encourage them to identify and break down their image into basic shapes. For example, a cube or an octagon can be used for a head, a cylinder can be used for an arm, and pyramids can be used for ears or noses.
Ask the makers to design a 2D net based on their image.
Marking shapes on the image Designing a 2D net to make a 3D form

Maker Camp 2016
give it form: 3d forms 107
The makers can later cut out, fold, and tape the 2D net to make a 3D form.
Making a 3D form of a cat face
3D form of a cat face made from an octagon and two pyramids
ClaY sCUlptUresIf you are planning to engage the makers in digital sculpting, start by using modeling clay.
1. In pairs, have the makers decide on a character that they would like to design out of clay. For example, they can make a hybrid animal, such as an “owl-bear,” a “zebra-duck,” or a “shark-elephant.”
2. Pass out the modeling clay to the makers and encourage them to start sculpting their character.

Maker Camp 2016
START Making!108
A character sculpted from clay (FLAGSHIP
CLUBHOUSE)
3. Encourage them to experiment with sculpting tools using clay.
4. Ask the makers to identify basic forms in their clay model, such as cones, cylinders, pyramids, spheres, and cubes.
Beginning to sculpt (FLAGSHIP CLUBHOUSE)
Sculpting an animal from clay (FLAGSHIP
CLUBHOUSE)

Maker Camp 2016
give it form: 3d forms 109
taking it furtherNow that the makers have experience designing 3D forms using physical materials, they are ready to explore the design of 3D models on computers.
dIgItal sCUlptIngAn inviting way to get started with 3D modeling is through digital sculpting—that is, forming a 3D shape by modeling it like clay.
Introduce Sculptris SoftwareHave all the makers gather near a computer screen and introduce Sculptris software. First, show an example project. Then, start a new, blank Sculptris file. Show how you can shape the virtual clay using different tools. Point out the key features (primary brush tools like “pull” and “pinch”). Pick up a clay form and show how surfaces change when you pinch and pull the clay.
Make Makers can look at their paper or clay models for inspiration. Ask them to think about the key shapes that make up the parts of their charac-ters. They then can start making figures using the Sculptris tools to draw or shape features.
View After makers have had some time to experiment, show them how to zoom in and toggle the wireframe on and off; point out all the triangles that fit together to make the features they just pulled and pinched. It’s geometry at work!
Introducing Sculptris software (FLAGSHIP CLUBHOUSE)

Maker Camp 2016
START Making!110
Digital sculpting with Sculptris (FLAGSHIP CLUBHOUSE)
Enhance Show makers how to manipulate the forms using other Sculptris tools, including selecting, moving, rotating, and scaling.
3D Print If you have access to a 3D printer, you can walk makers through the steps to convert their 3D models into printed form. If you do not have access to 3D printers, 3D printing services, such as Shapeways (shapeways.com), allow you to upload 3D files and get them printed.
Sculptris imports and exports .OBJ files. You’ll need to convert to other formats, such as .STL files, to output to a 3D printer. To convert your Sculptris file, use a plug-in or conversion software, such as Meshmixer (meshmixer.com), to make it compatible with the make and model of the 3D printer. Make sure everything is connected and the model has no holes in it. You can make multiple prints of your design in different sizes and using different printing materials. 3D prints from Sculptris designs (FLAGSHIP
CLUBHOUSE)

Maker Camp 2016
give it form: 3d forms 111
generatIng IdeasNow that the makers have a basic understanding of how to create 3D forms, they can brainstorm other projects they can create.
To brainstorm ideas, ask makers the following questions:
8 What are some things that you would like to change or add to the 3D sculpture you made?
8 What is your next step? Sketch three ideas that you want to make using this process.
8 Can you make your character friendly? Scary? How does the shape of the features communicate personality traits like this?
oPen MakeHere are some ideas to explore for 3D design during Open Make time:
8 Design a character or avatar for a game.
8 Create a self-portrait.
8 Design your own origami or paper toys.
Sketching an avatar for Minecraft (THUnDErBIrDS BrAnCH BOyS & GIrLS CLUB,
GUADALUPE, AZ)
Designing a self-portrait to build into a 3D sculpture (PUErTA 18 CLUBHOUSE, BUEnOS AIrES,
ArGEnTInA)

Maker Camp 2016
START Making!112
Cutting out designs for 3D sculptures (PUErTA 18 CLUBHOUSE)
stOrY frOM the ClUBhOUse netWOrk: sCUlptIng JaCk-O’-lanternsInspired by the approach of Halloween, the Gold Crown Club-house in Denver, CO, decided to use 3D-modeling tools to design jack-o’-lanterns. Clubhouse facilitator Victor Escobedo created a simple pumpkin template in Sculptris. The young people in the Clubhouse used the Sculptris digital sculpting tools to remix the file and make their own jack-o’-lantern designs. They then were able to 3D-print their projects. They were so thrilled by the results that they were motivated to make more 3D designs based on other holidays and personal interests.
A 3D model of a jack-o'-lantern designed in Sculptris (GOLD CrOWn CLUBHOUSE,
DEnVEr, CO)
Maker Camp 2016
give it form: 3d forms 113
Sharing and refleCtingEncourage makers to take time to reflect on the process of creating 3D projects from 2D paper.
Journal promptsyou can ask the following:
What process did you use to make your character?
What challenges did you have going from 2D to 3D?
What else could you build with these tools and techniques?
doCuMenting and diSPlayingMake a slideshow of the 2D shapes and 3D models, including photos or screenshots of the creations.
Create a stage for exhibiting the projects. You can also encourage makers to light up their 3D creations.

Maker Camp 2016
START Making!114
Screenshot of a 3D model in progress made using Sculptris
Lighting a 3D cube (yOUTH COnnECTIOnS
CLUBHOUSE, LISMOrE, AUSTrALIA)

Maker Camp 2016
give it form: 3d forms 115
additional reSourCeS 8 Scultpris features:
pixologic.com/sculptris/features/
8 Shapeways 3D printing services: shapeways.com
8 Designing paper toys: bit.ly/papertoydesign

Maker Camp 2016
116 Start Making!
Sketches of my 3D creations

Maker Camp 2016
Change the Move: art-Making BotS
SeSSion
5

Maker Camp 2016
START Making!118
M akers will build an art-making “bot” that draws as it moves. They’ll use parts from an elec-
tric toothbrush or other small device. Once they have built their bot, they can observe and then change its movements to draw interesting patterns on paper.
SeSSion goalSIn this session, makers will
8 Deconstruct a small household device to see how it works and then repurpose its parts.
8 Build a vibrating art bot that makes drawings.
8 Investigate physical proper-ties of motion, exploring how attaching different weights to a motor shaft changes the way a bot moves and draws.
◊ getting readyFor this session, makers will take apart an electric toothbrush or another small motor-ized device and give it a new purpose—reusing the electrical components to make an art-making bot.
To prepare for the session, it is important to try building a bot first. By trying it yourself, you can make sure that the materials you choose will work well for the activity.
Is It a Robot?Although your art-making bot will have a motor and move, it isn’t technically a real robot, because it isn’t controlled by a computer program and doesn’t have sensors. However, it may keep moving on its own—even when it hits a wall!

Maker Camp 2016
Change the Move: art-Making Bots 119
MaterIals 8 A small toy or household device that contains a circuit with a motor,
battery power, and a switch (such as a disposable electric toothbrush, a mini-handheld electric fan, or a toy car)
8 A plastic cup or bowl
8 Drawing tools, such as markers, crayons, or chalk (avoid permanent markers)
8 Fasteners (such as masking or electrical tape, double-sided foam tape, pipe cleaners, or rubber bands)
8 Cork or old eraser
8 Art supplies such as googly eyes or pipe cleaners
8 Wires or copper tape and a wire cutter/stripper
8 Butcher paper or large sheets of art paper
8 Tools for deconstructing machines safely, such as pliers, screwdrivers, scissors, and safety goggles

Maker Camp 2016
START Making!120
77 Facilitation Tipwork with locally available MaterialsIn some areas, it may not be easy to find inexpensive electric toothbrushes or hand-held fans. you can look in local shops for other small items to decon-struct, or purchase small motors and battery holders from an online elec-tronics store.
Masina kenworthy from the Awa City Clubhouse in Whanganui, new Zealand, described her experience looking for materials:
We don’t have inexpensive toothbrushes in New Zealand, so we used a little hand fan, because they came with on/off switches. The members had to be really creative to come up with ways to get the bot to move, as the motor didn’t vibrate or have as much power as the toothbrushes would.
Small handheld fan
spaCe and tOOls setUpYou will need a lot of room on work tables for building the art-making bots. You will also need a wide space on a table or the floor to test your art creations. Keep in mind that your bots’ drawings will be more interesting if there are obstacles or walls that they can bump into, causing them to change

Maker Camp 2016
Change the Move: art-Making Bots 121
direction. Cover the space with a few layers of butcher or art paper. If you are going to use markers, make sure the ink doesn’t bleed through the paper onto your floor or table.
Building art-making bots (TECnOCEnTrO SOMOS PACíFICO CLUBHOUSE,
CALI, COLOMBIA)
oPeningFor this session, makers will need to lean on each other for brainstorming, collaboration, experimentation, and remixing. You could set the tone for teamwork by opening this session with a classic Clubhouse group brain-storm known as a LEGO Doodle. The process of LEGO Doodling encourages makers to tinker, remix, experiment together, and dive in with a spirit of playful inquiry and collaboration.
legO dOOdleIntroduce the activity by asking whether any of the makers ever doodle on paper. Then, explain that in this activity, everyone will try doodling using LEGO.
1. Invite everyone to sit in a circle around a table, and dump a big, messy pile of LEGO blocks (or other materials) in the center, so that everyone can reach the pile.

Maker Camp 2016
START Making!122
2. Ask the makers to pick up a few LEGO pieces that attract their attention. Tell them not to worry about what they are building. They can just fit the pieces together however they would like.
3. After a timed period, such as one minute, prompt the makers to pass their LEGO Doodle creation to the person to their right in the circle. That person then will add several more pieces to the object.
4. Repeat the process all the way around the circle. Return each creation back to the original Doodler.
5. Invite everyone to look at their object to see if a title comes to mind. Ask them to share their title with the group.
6. Reflect on how the Doodle experience made them feel as creators, which aspects made them feel motivated, and which made them feel challenged or “stuck.” How did working at a fast pace, receiving a Doodle from their neighbor, or seeing their original creation evolve help or interfere with their creative process?
LEGO Doodle activity (HEnnEPIn COUnTy LIBrAry BEST BUy TEEn TECH CEnTEr,
MInnEAPOLIS, Mn)
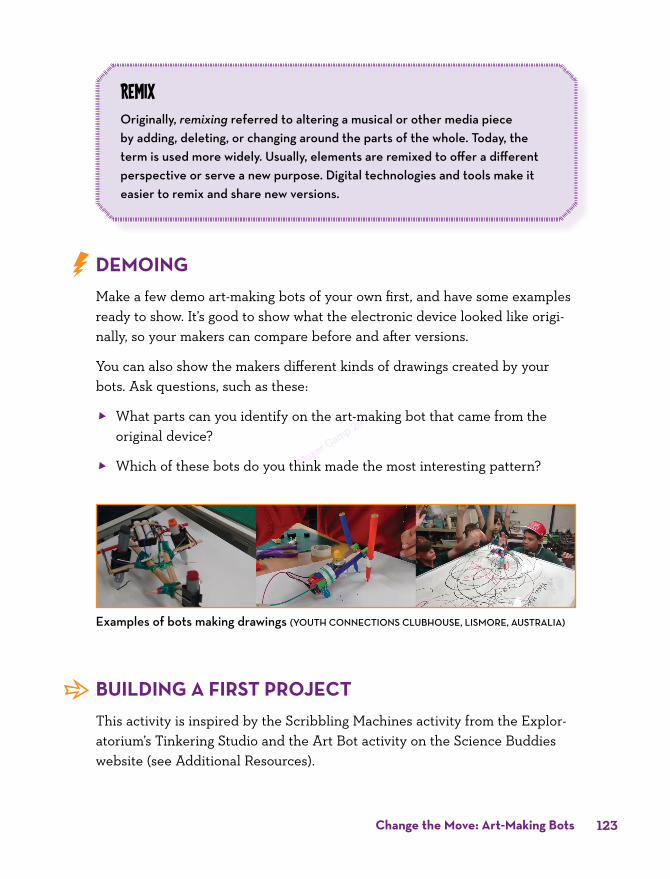
Maker Camp 2016
Change the Move: art-Making Bots 123
RemixOriginally, remixing referred to altering a musical or other media piece by adding, deleting, or changing around the parts of the whole. Today, the term is used more widely. Usually, elements are remixed to offer a different perspective or serve a new purpose. Digital technologies and tools make it easier to remix and share new versions.
deMoingMake a few demo art-making bots of your own first, and have some examples ready to show. It’s good to show what the electronic device looked like origi-nally, so your makers can compare before and after versions.
You can also show the makers different kinds of drawings created by your bots. Ask questions, such as these:
8 What parts can you identify on the art-making bot that came from the original device?
8 Which of these bots do you think made the most interesting pattern?
Examples of bots making drawings (yOUTH COnnECTIOnS CLUBHOUSE, LISMOrE, AUSTrALIA)
Building a firSt ProjeCtThis activity is inspired by the Scribbling Machines activity from the Explor-atorium’s Tinkering Studio and the Art Bot activity on the Science Buddies website (see Additional Resources).

Maker Camp 2016
START Making!124
Open the device and find the circuit. Ask the makers to pair up or get in groups, and give each group a device and a set of tools for taking it apart (such as scissors, wire cutters, and pliers). Also provide them with safety goggles to use when taking the device apart.
Encourage them to take the devices apart carefully so that they avoid damaging the parts, because they will need to use them to build the bots.
Once the casings (usually plastic) are off, prompt makers to document in photos or sketches how the device is wired. They can lay out the parts on the table. You may want to suggest that they label the parts on the paper underneath, so they can remember the names of the parts and what they do.
Taking apart a small hand fan with a motor and battery
A disposable electric toothbrush, deconstructed

Maker Camp 2016
Change the Move: art-Making Bots 125
Reconnect the circuit. Ask the makers to try to reconnect the circuit and make the motor spin once it is out of the casing.
reconnecting the circuit inside a disposable electric toothbrush using copper tape
Now makers are ready to design and build their art bots. You can help guide them through the following steps.
1. Gather materials.
Gather and lay out the basic parts for an art bot: a body (such as a plastic cup), legs (markers or other drawing tools), and joints (fasteners).
2. Add the motor and battery.
If you’re using a cup as the body for your bot, turn it over so the flat part is on top. Then fasten the circuit with the motor and a battery to the top.
Tape or attach the power source (usually a battery or battery pack) to the bot’s body somewhere near the motor. Make sure connections are tight and parts are stable on the base. If the battery doesn’t have a holder, wrap a rubber band around the ends to keep the wires in place.
Motor powered with a battery placed on the base of a plastic cup

Maker Camp 2016
START Making!126
3. Add a wobble.
If you want your bot to move around, you’ll need to throw its movements off center. Adding a weight to the rotating motor makes it vibrate, which will help it wobble or wiggle, and thus move in interesting patterns. The motor inside a disposable electric tooth-brush already has some weight on the shaft that makes it vibrate. If your motor does not have additional weight, you can press a cork, eraser, popsicle stick, or glue stick onto the rotating shaft of the motor. You can also add leftover craft supplies (such as beads) onto your weight—an off-center weight swinging from the shaft will make the bot shake and hop even more.
4. Give your bot some legs to stand on.
To add some legs, tape at least three markers around the rim of the cup, pointing down. You can also use crayons, chalk, pens, or dry erase markers.
77 Facilitation TipMake observations, then tinkerEncourage the makers to take notes on how things are working (or not!) and to try something new. Model the act of tinkering and the process of scientific inquiry: after everyone creates their first bot, invite them to observe how it moves and ask questions about why. Then, suggest that they change the size or location of the weight and notice how this affects the way the bot moves or wobbles and how it draws.
Motor with cork attached to its shaft
Motor powered with a battery placed on the base of a plastic cup

Maker Camp 2016
Change the Move: art-Making Bots 127
5. Add an on/off switch.
Check the wire connections of your battery to your motor. If you just tape these wires permanently to the battery, you won’t be able to turn off the motion. Stop and think about how to make a simple or triggered switch using parts left over from the original device.
Using a metal paper clip as an on and off switch
6. Create a persona for the bot.
Add some personality to your art-making bot by adding eyes, pipe cleaners, and bells. Set your creation loose to move around.
A complete art-making bot
Maker Camp 2016
START Making!128
Troubleshooting TipsHere are some tips shared by Start Making! facilitators at various Clubhouses:
“ Too much glue causes motor problems sometimes—it’s a small fix to remove excess dry glue and try again.”
Andy Derilus, yWCA Clubhouse, Miami, FL
“ Get the proper amount of counterweight to keep the bots from moving too fast.”
Shanice Johnson, Thunderbirds Branch Boys & Girls Club,
Guadalupe, AZ
“ Rewiring the battery to the motor doesn’t always work on the first try, especially when we realized the wire was too thick so it was making it hard to get electrical current to the battery. We just had to go purchase thinner wire and it made it much easier.”
Adriana Flowers, La Alameda Plaza Clubhouse, Walnut Park, CA
taking it furtherOnce the makers have successfully created their art-making bots, encourage them to bring all the bots to a common place, such as the community table or a bot “ring” on the floor, and get them to start drawing together. Step back and encourage the makers to observe the movements of the bots.
As everyone watches their bots together, ask questions such as these:
8 How are the designs of the bots different? For example, do they differ in the placement of the motor, the materials used, and how parts are attached?
8 How does the design of the bot affect the patterns it draws?
8 What might you change to draw different kinds of patterns?

Maker Camp 2016
Change the Move: art-Making Bots 129
generatIng IdeasExplore how individual bots can interact to make collaborative designs. Prompt makers to create interactions between their bots to make more complex and interesting drawings together.
oPen MakeDuring Open Make time, encourage makers to keep tinkering and refining their bots.
77 Facilitation Tipencourage Problem Solvingyou can support makers in troubleshooting their art bots by sitting down with them and asking questions.
8 If the bot keeps falling over, ask: What happens if you spread the markers out further?
8 If the bot keeps going in only one direction, ask: What happens if you change the direction the motor is facing?
8 If the bot keeps falling apart, ask: How can you make it more robust?
Experimental design for an art bot

Maker Camp 2016
START Making!130
Here are a few suggestions you could make:
8 Attach another motor and observe the new drawing patterns.
8 Add more markers or other drawing instruments.
8 Add a sensor to turn the motor on (such as a photoresistor or reed switch).
8 Add other design features (such as making the bot look like a fictional character).
Sharing and refleCtingGather for a reflection circle. You can prompt makers to document what they learned in their journals.
Journal promptsyou can ask the following:
What did you like best about this activity?
What is something that you noticed or learned?
How might you apply what you learned somewhere else?
An art bot with six markers for legs (AWA
CITy CLUBHOUSE, WHAnGAnUI, nEW ZEALAnD)

Maker Camp 2016
Change the Move: art-Making Bots 131
doCuMenting and diSPlayingEncourage makers to stop and document the steps along the way as they build each version of their bots. Invite them to take digital photos or to make sketches in their notebooks or journals.
Showcasing an art-making bot in action
Ask makers to take turns building the bot and capturing their progress with photos. Invite them to take notes about which changes worked or failed, and about which materials worked best. Later, they can use these in-process photos to tell a story of the “birth” of their art-making bot.
Makers can look at the artwork that the bots created and choose their favorite drawings to display.

Maker Camp 2016
START Making!132
stOrY frOM the COMpUter netWOrk: art BOt fashIOn shOWMembers from the Sacramento Food Bank & Family Services Clubhouse in Sacramento, California, drew on their love of fashion to put together an “art bot” showcase with a fashion runway theme.
Clubhouse Coordinator Kelly Ann Adams and the other facilitators discov-ered that many of their makers were especially interested in fashion. So, during the open make time, they encouraged the makers to design a costume for their bots. The makers then tinkered with the bot movement so the bots could “walk” down a ramp covered in paper. They chose their favorite art-bot drawings and put them on display.
At their final showcase, the makers hosted a fashion show, where each art-making bot walked down the runway drawing unique patterns. The makers then showed their family and friends how their bots worked. The makers auctioned off the art-bot drawings as a fundraiser for future Start Making! activities.
additional reSourCeS 8 Exploratorium’s Scribbling Machines:
tinkering.exploratorium.edu/scribbling-machines
8 Science Buddies—Art Bot: bit.ly/science-buddies-art-bot
8 Switch Basics- Sparkfun: learn.sparkfun.com/tutorials/switch-basics

Maker Camp 2016
What’s next for my art-making bot?
Change the Move: art-Making Bots 133

Maker Camp 2016

Maker Camp 2016
Sew the Circuits: e-textileS
SeSSion
6

Maker Camp 2016
START Making!136
M akers will create a bracelet or bookmark with programmed light effects. In the process,
they will learn how to sew circuits with sewable LED lights, conductive thread, and the LilyTiny microcontroller, which can turn the LED lights on and off in surprising and interesting ways.
SeSSion goalSIn this session, makers will
8 Make an electronic circuit with interesting light effects using sewable LED lights and a preprogrammed board called a LilyTiny.
8 Design a light-up project such as a bracelet or a bookmark.
8 Explore what they can create by combining sewing and elec-tronics, as an introduction to a new area known as soft circuits or e-textiles.
◊ getting readyYou and your makers are about to explore e-textiles, which can inspire makers to learn both sewing and electronic skills. The projects make use of new materials, such as conduc-tive thread and the LilyTiny board, which is designed for sewing patterns of lights onto fabrics.
To prepare for the session, gather the materials. Then, try making a bracelet and a bookmark yourself to share as examples.

Maker Camp 2016
Sew the Circuits: e-textiles 137
Display of craft and electronic materials put together by facilitators before the session
MaterIals 8 Felt
8 Needles
8 Conductive thread
8 Regular thread
8 LilyPad sewable LEDs
8 LilyTiny
8 LilyPad sewable battery holder
8 Coin batteries, 3V (such as the CR2032)
8 Alligator clips (optional)
To find out how to order LilyPad parts, see lilypadarduino.org or order directly from sparkfun.com/products/10899.
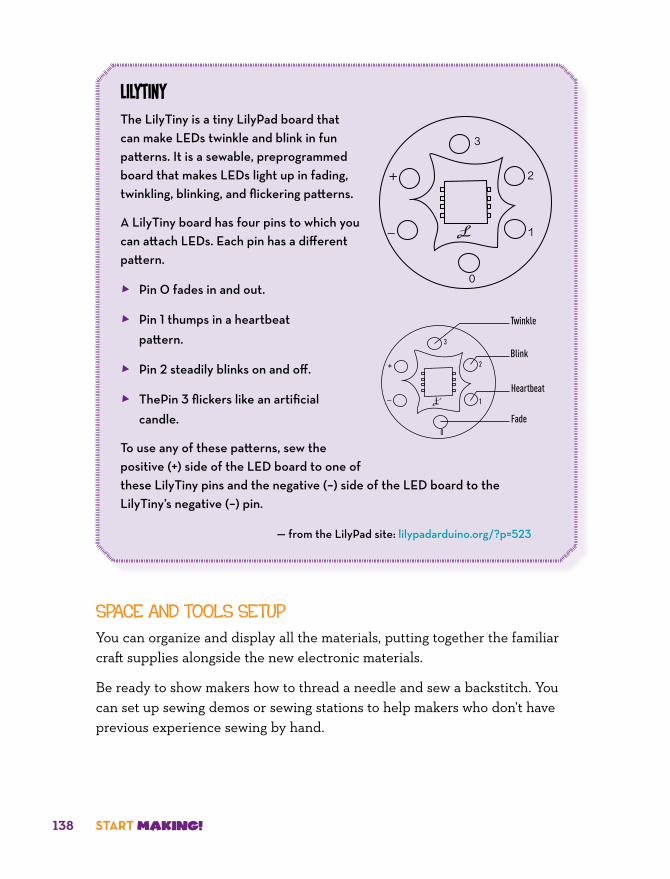
Maker Camp 2016
START Making!138
LilyTinyThe LilyTiny is a tiny LilyPad board that can make LEDs twinkle and blink in fun patterns. It is a sewable, preprogrammed board that makes LEDs light up in fading, twinkling, blinking, and flickering patterns.
A LilyTiny board has four pins to which you can attach LEDs. Each pin has a different pattern.
8 Pin 0 fades in and out.
8 Pin 1 thumps in a heartbeat pattern.
8 Pin 2 steadily blinks on and off.
8 ThePin 3 flickers like an artificial candle.
To use any of these patterns, sew the positive (+) side of the LED board to one of these LilyTiny pins and the negative (–) side of the LED board to the LilyTiny’s negative (–) pin.
— from the LilyPad site: lilypadarduino.org/?p=523
L
+
_
0
1
2
3
L
+
_
0
1
2
3
Twinkle
Blink
Heartbeat
Fade
spaCe and tOOls setUpYou can organize and display all the materials, putting together the familiar craft supplies alongside the new electronic materials.
Be ready to show makers how to thread a needle and sew a backstitch. You can set up sewing demos or sewing stations to help makers who don’t have previous experience sewing by hand.

Maker Camp 2016
Sew the Circuits: e-textiles 139
oPeningAs makers arrive, you can invite them to walk around and touch the different objects that they are going to explore in the session. Ask them to make mental notes of what is surprising or interesting to them.
If your group does not have much previous experience with sewing, start with a short sewing activity or “sewing circle.” Show how to do a basic stitch using regular thread before you introduce the conductive thread. Conductive thread is expensive and can be a bit difficult to work with for first-timers.
Start Making! facilitator demonstrating how to sew (CEDES CLUBHOUSE In ALAJUELITA, SAn
JOSé, COSTA rICA)
For sewing electrical connections with conductive thread, the back-stitch works the best. This stitch takes time, but it makes a solid connection. You can find many tutorials for how to do a backstitch online or in any introductory sewing book. Check the “Additional Resources” section later in this chapter for a recommended backstitch video tutorial.
Sewing a backstitch
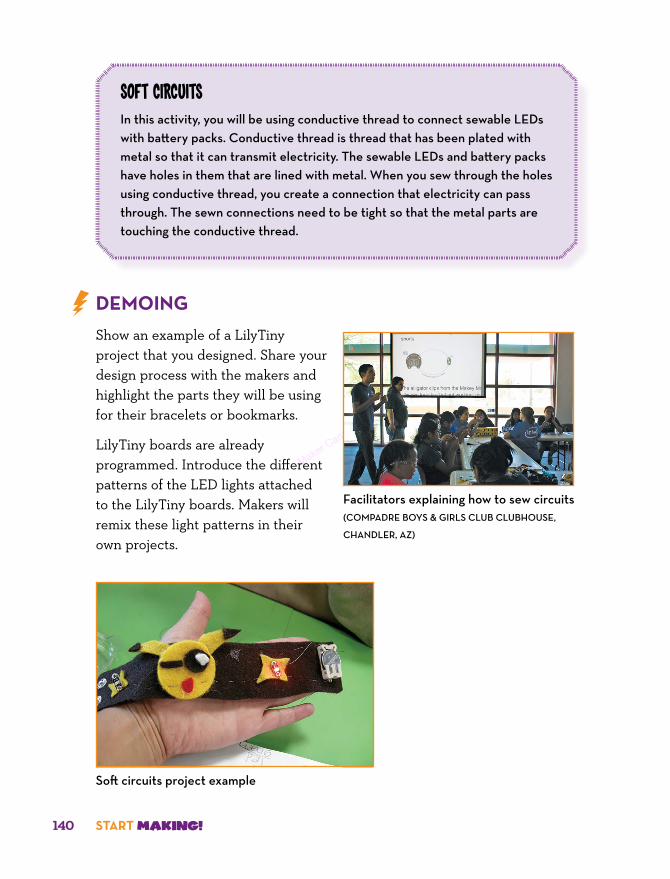
Maker Camp 2016
START Making!140
Soft CircuitsIn this activity, you will be using conductive thread to connect sewable LEDs with battery packs. Conductive thread is thread that has been plated with metal so that it can transmit electricity. The sewable LEDs and battery packs have holes in them that are lined with metal. When you sew through the holes using conductive thread, you create a connection that electricity can pass through. The sewn connections need to be tight so that the metal parts are touching the conductive thread.
deMoingShow an example of a LilyTiny project that you designed. Share your design process with the makers and highlight the parts they will be using for their bracelets or bookmarks.
LilyTiny boards are already programmed. Introduce the different patterns of the LED lights attached to the LilyTiny boards. Makers will remix these light patterns in their own projects.
Soft circuits project example
Facilitators explaining how to sew circuits (COMPADrE BOyS & GIrLS CLUB CLUBHOUSE,
CHAnDLEr, AZ)
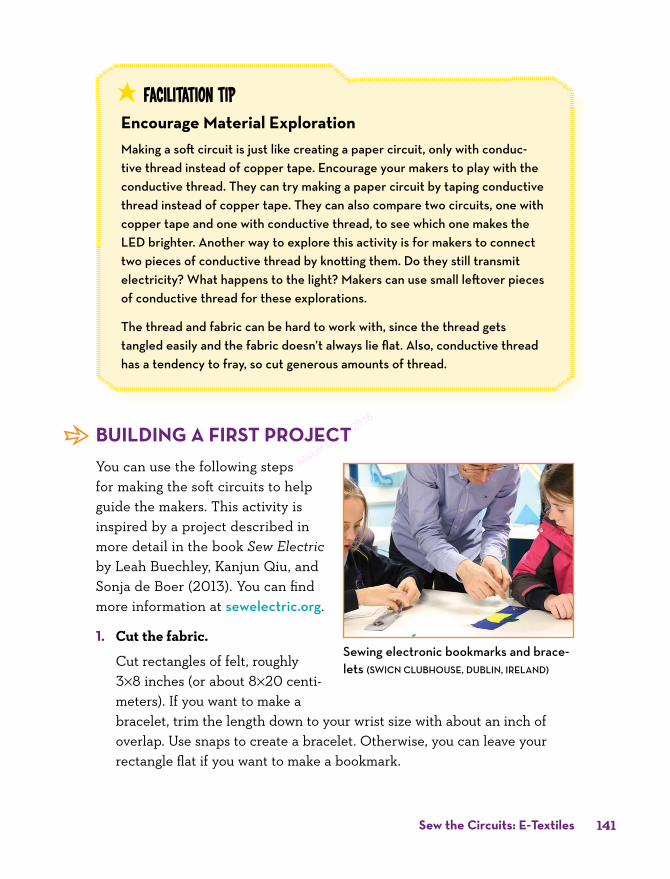
Maker Camp 2016
Sew the Circuits: e-textiles 141
77 Facilitation Tipencourage Material explorationMaking a soft circuit is just like creating a paper circuit, only with conduc-tive thread instead of copper tape. Encourage your makers to play with the conductive thread. They can try making a paper circuit by taping conductive thread instead of copper tape. They can also compare two circuits, one with copper tape and one with conductive thread, to see which one makes the LED brighter. Another way to explore this activity is for makers to connect two pieces of conductive thread by knotting them. Do they still transmit electricity? What happens to the light? Makers can use small leftover pieces of conductive thread for these explorations.
The thread and fabric can be hard to work with, since the thread gets tangled easily and the fabric doesn’t always lie flat. Also, conductive thread has a tendency to fray, so cut generous amounts of thread.
Building a firSt ProjeCtYou can use the following steps for making the soft circuits to help guide the makers. This activity is inspired by a project described in more detail in the book Sew Electric by Leah Buechley, Kanjun Qiu, and Sonja de Boer (2013). You can find more information at sewelectric.org.
1. Cut the fabric.
Cut rectangles of felt, roughly 3n8 inches (or about 8n20 centi-meters). If you want to make a bracelet, trim the length down to your wrist size with about an inch of overlap. Use snaps to create a bracelet. Otherwise, you can leave your rectangle flat if you want to make a bookmark.
Sewing electronic bookmarks and brace-lets (SWICn CLUBHOUSE, DUBLIn, IrELAnD)

Maker Camp 2016
START Making!142
2. Sketch a project design.
Make a sketch of your design for the bracelet/bookmark. You can decide how many LEDs you want to use for your design and mark the positions of the LEDs in your drawing.
Sketch of a light-up bracelet with LEDs placed on top to plan which parts will light up
3. Choose the light pattern.
As mentioned earlier, LilyTiny has four pins with different patterns programmed into each one. Pin 0 makes an LED fade in and out, pin 1 makes the LED light up in a heartbeat pattern, and pins 2 and 3 make the light steadily blink and twinkle, respectively.

Maker Camp 2016
Sew the Circuits: e-textiles 143
77 Facilitation Tipkeep it SimpleTry to keep the first soft circuit project with your makers small and simple! you might want to create a template for the felt fabric they will cut for the project. Providing constraints can help the makers, especially those new to sewing, but you can still give them a choice of creating either a bookmark or a bracelet out of the same-sized piece of felt.
Choose the LED pattern that you want to add to your bracelet/bookmark. You can have all the LEDs light up in the same style by connecting them all to one pin, or you can attach each light to a different pin for multiple light patterns.
4. Mark the position of the battery holder and LilyTiny in your design drawing.
In your drawing, mark the posi-tions of the battery holder and the LilyTiny microcontroller. Sketch the connections between the battery negative (–) terminal and the LilyTiny negative (–) terminal. You can use different color pens to distinguish the connections to the positive and negative terminals.
5. Draw the circuit connections on top of the project design drawing.
Now, draw the connections between the positive (+) sides of
(+)
(-)
(+)
(–)
Circuit layout showing connections between battery holder and LilyTiny
Sketch of a light-up project, with the battery holder and LilyTiny placed on top of the drawing

Maker Camp 2016
START Making!144
your LEDs and the LilyTiny pins. The following diagram shows connec-tions from pins 1 and 2 to the LEDs.
Connect the negative (–) sides of both the LEDs to the negative (–) pin of the LilyTiny board or the negative (–) side of the battery, as shown in the figure.
(+)
(–)
(+)
(–)
(+)
(+)
(2)
(1)
(+)
(–)
(+)
(–)
(+)
(+)
(2)
(1)
(–)
(–)

Maker Camp 2016
Sew the Circuits: e-textiles 145
77 Facilitation TipMake observations, then tinkerIf you want all the LEDs to have the same effect, connect all the positive terminals of the LEDs to the pin that you chose and all the negative termi-nals of the LED to the negative terminal of the battery.
(+)
(–)
(+)
(–)
(+)
(+)(1)
(–)
(–)
6. Sew the circuit.
Once you have marked the electrical connections on the bracelet/book-mark design, cut out your smaller elements. Then place the components on the fabric and start sewing.
To make it a little easier, you can glue the battery holder, LilyTiny board, and LEDs to the fabric before sewing with the conductive thread. Just make sure that there is no glue on the metal coating.
Stitch your circuit with the conductive thread. Attach the battery to the LilyTiny first, and then make the connections to the LEDs.
Sewing the circuit

Maker Camp 2016
START Making!146
7. Test the circuit.
Add a 3V battery. Then turn on the switch on the LilyTiny board.
Circuit sewn on felt
Troubleshooting TipsIf the circuit is all sewn together but is not working, use an alligator clip to try and test the connections. Attach one end of the clip to the battery terminal, and the other end to the LED. If it lights up, you can figure out which thread segment is causing the problem. you can some-times even diagnose it along the whole thread line by running the metal nose of the clip along the thread until you get the LED to light.
Testing the circuit
8. Embellish your project.
Refer to your initial drawing and complete your bookmark or bracelet design with craft materials. You might also want to try some appliqué embroidery. Felt fabric diffuses the light very well. You might also use pom-pom balls and googly eyes to decorate.
A blinking light-up bracelet

Maker Camp 2016
Sew the Circuits: e-textiles 147
stOrY frOM the ClUBhOUse netWOrk: hIgh-teCh + lOW teCh Sewing might not be the first technical skill you associate with a STEM or engineering activity, but there are many reasons why it should be! Part of the fun of Maker culture is that it embraces design and crafting as much as science and engineering skills. This is especially true of projects that incor-porate low-tech materials such as thread, cloth, and sequins combined with high-tech wearable components such as conductive thread, programmable microcontrollers, and LEDs.
In the Start Making! program, we embrace both of these aspects, espe-cially when they present an opportunity to engage youth and adults who may be reluctant to participate in a technology-based program. When facilitated well, sewn-circuit activities disrupt stereotypes based on gender, age, and expertise. The activity can motivate anyone interested in crafting, art, or fashion to become excited about materials science and coding.
rodrigo Castellon sewing electrical circuits (GILA rIVEr BOyS & GIrLS CLUB, SACATOn, AZ)

Maker Camp 2016
START Making!148
Clubhouse Coordinator Rodrigo Castellon at the Gila River Boys & Girls Club in Sacaton, AZ, expressed his newfound interest in sewing by designing his own tie as a soft circuit project. The youth in his Start Making! program were inspired by his enthusiasm and ingenuity, and many also made light-up wearables as a result!
taking it furtherYou can encourage the makers to try using all the pins on the LilyTiny in the next iteration of their soft circuit projects.
generatIng IdeasEncourage the makers to share their ideas for projects using LilyTiny boards.
To brainstorm ideas, ask makers the following questions:
8 What would you change in your design if you were to make something like this again?
8 Brainstorm ideas for designing more light behaviors or patterns.
8 What would you do if you got a chance to change the pattern of lights?
A facilitator and a young maker discussing ideas while sewing together (FLAG-
SHIP CLUBHOUSE, MUSEUM OF
SCIEnCE, BOSTOn, MA)

Maker Camp 2016
Sew the Circuits: e-textiles 149
oPen MakeExplore these ideas in the Open Make time.
Express something personal. Make an e-textile project that shares some-thing special about you. It could present your hobbies, things that you like, or the place where you come from.
E-textile projects made using LilyTiny boards, each project representing something special about the creator (CLUBHOUSE nETWOrk TEEn SUMMIT, BOSTOn, MA)
Remix this circuit. Brainstorm ways to create a collaborative project combining two or more LilyTiny boards.
Project prototype with two LilyTiny boards powered by a single 3V battery

Maker Camp 2016
START Making!150
Make a 3D soft circuit. Make your own stuffed toy and add lights to your creation using conductive thread.
Stuffed toys with lights (JOrDAn BOyS & GIrLS CLUB CLUBHOUSE, CHELSEA, MA [LEFT];
CLUBHOUSE AnnUAL COnFErEnCE, DEnVEr, CO [rIGHT])
Sharing and refleCtingShare everyone’s projects with the group. Encourage the makers to write their session reflections in their journals.
Maker Camp 2016
Sew the Circuits: e-textiles 151
Journal promptsyou can ask the following:
What problems did you need to solve?
What did you like best about this activity?
What do you want to learn more about?
doCuMenting and diSPlayingEncourage your makers to share the design process behind their soft circuit projects. Ask them to create a display board for their project with their bracelet/bookmark drawings and circuit sketches. If possible, include some photos of your makers wearing their bracelets or with their light-up book-marks inside a book. Encourage them to make notes on their display board to capture their moments of joy and frustration while working on this project and the ideas they have for taking it further.
All the annotated display boards can be posted on a wall or table.
Makers can also use media tools like photo slideshows or videos.

Maker Camp 2016
START Making!152
Soft circuit bookmarks and bracelets (SOrEnSOn UnITy CEnTEr CLUBHOUSE, SALT LAkE
CITy, UT)
Makers at the Sorenson Unity Center Clubhouse in Salt Lake City, UT, docu-mented their process of creating soft circuit projects, including photos. They also shared reflections about their experiences:
“ It was hard because I was running out of thread. It was fun because I learned and had new experiences. I would like to light up a car.”
“ I liked sewing my project. It was fun. I would like to make a star that lights up.”
“ I liked the project. I would like to make a haunted house.”
“ I did not like it because I don’t like sewing. I would like to do a car with a solar panel.”

Maker Camp 2016
Sew the Circuits: e-textiles 153
“It’s beautiful art. I would like to make a video game controller.”
“ The part that I thought was hard was the conducting wire—making sure that it wasn’t touching the other and things like that—but it was fun because later the work would be all cool and creative.”
Shared by Janette nelson, Clubhouse Coordinator, Sorensen Unity Center
additional reSourCeS 8 Sew Electric:
sewelectric.org
8 LilyTiny: lilypadarduino.org/?p=523
8 Mary Corbet’s Needle ’n Thread channel about the backstitch: http://bit.ly/backstitch-demo-tutorial

Maker Camp 2016
154 Start Making!
Three things I found the mostchallenging in this session are…

Maker Camp 2016
final open Make: PerSonalized ProjeCtS
SeSSion
7

Maker Camp 2016
START Making!156
n ow that the makers have completed all the activity sessions, we recommend offering
one or more Open Make sessions, dedicated to working on final projects. During these Open Make sessions, support makers as they imagine, design, and build personalized projects.
SeSSion goalSIn this session, makers will
8 Plan and create a culminating personal project, either indi-vidually or in small groups.
8 Build on learning and ideas from earlier sessions, applying STEM concepts and techniques in a new medium or context.
8 Dive deeper into earlier interests or incorporate new interests, media, or tools.
◊ getting readySet up the space so that your makers will be able to brainstorm and then build personal projects. Arrange the materials and tools so they are accessible and organized to help makers easily find and utilize everything safely.
Lay out materials from the previous sessions in addition to the Open Make box. You may want to add additional materials and tools, such as those listed in the “Session Flow” chapter in the section called “Open Make Box.”
77 Facilitation TipCreating a respectful environmentBefore makers dive into Open Make work, you may want to remind them to show respect for the space, materials, shared tools, and each other. you can refer back to the “I Am a Maker” diagram from Part I and facilitate a group discussion on ways to support each other while brainstorming, making, and sharing projects.

Maker Camp 2016
final open Make: Personalized Projects 157
Working on Open Make projects (yOUTH COnnECTIOnS CLUBHOUSE, LISMOrE, AUSTrALIA)
generating ideaSStart by brainstorming what projects the makers would like to work on, either individually, in pairs, or in small groups. They may choose to build on a project idea they worked on in a previous session or start something new.
Suggest that makers look at ideas they generated during previous sessions, which they documented in their design journals and on the idea wall. They can look through previous journal entries to consider the materials, tools, and projects they enjoyed making and that they might want to explore further.
Idea wall (AWA CITy CLUBHOUSE, WHAnGAnUI,
nEW ZEALAnD)

Maker Camp 2016
START Making!158
Give them sticky notes to write down the ideas they would like to pursue for their final projects. In addition to brainstorming what they want to make, they can also write notes about how they will make it—by listing different tools and techniques and any ques-tions they have about the process. They can also write notes about why they want to make something, for example, to solve a problem, for fun, or to help someone. Makers can help each other in this process, adding notes and suggestions.
Project ideas with notes about process
Building oPen Make ProjeCtSRemember that Open Make is designated time when makers create their own projects, building on starter activities and pursuing a personal interest, question, or design challenge. Help your makers progress from a basic project they each have done in the previous sessions to a more complex and advanced project.
Sample project ideas
Developing an Open Make project (GILA
rIVEr BOyS & GIrLS CLUB, SACATOn, AZ)

Maker Camp 2016
final open Make: Personalized Projects 159
You can suggest that they build on one of their previous projects or combine several types of projects (for example, making a musical project that lights up, or combining paper circuits with a MaKey MaKey and Scratch). Encourage makers to sketch out their project ideas and then take photos and videos to docu-ment their process as they work on their projects.
77 Facilitation TipStart with imagination, then Build PrototypesOver the course of the Start Making! program at the Thunderbirds Branch Boys & Girls Club, in Guadalupe, AZ, everyone was able to create and take part in fun, interactive making activities. The Open Make session was the highlight of the program, as it allowed the youth to create and facilitate their own projects.
Clubhouse Coordinator Shanice Johnson reflected on their Open Make session:
The importance of the Open Make is to give youth a grounding in creativity—to allow makers to think for themselves and to tap into their ingenuity.
We started the facilitation by having each of the youth brainstorm their ideas. The initial question was, “What do you see yourself making? Imagine your creation.”
Then the youth started utilizing any supplies to build and create their own works. I encouraged each of them to see and begin the frame-works for each of their projects, for example, drawing out an outline, or using pipe cleaners or big sheets of paper to begin and build prototypes.
Experimenting with a motor (TECnO-
CEnTrO SOMOS PACíFICO CLUBHOUSE, CALI,
COLOMBIA)

Maker Camp 2016
START Making!160
Sharing and refleCtingAlthough your makers might want to keep building, be sure to make time for everyone to pause and document their Open Make projects in their Start Making! journals.
You can also organize group reflec-tions such as a group critique, a mini-showcase, or an internal Maker Faire as a dress rehearsal for a final Show and Share commu-nity showcase. Makers can share versions of their personal projects, along with their prototypes and the materials they used, and get feedback from each other.
Group critique (FLAGSHIP CLUBHOUSE, MUSEUM OF SCIEnCE, BOSTOn, MA)
Light box paper circuit project (GUM
SPrInGS COMMUnITy CEnTEr CLUBHOUSE,
ALExAnDrIA, VA)

Maker Camp 2016
final open Make: Personalized Projects 161
Journal promptsyou can ask the following:
What was your project idea?
What inspired you to pick this project?
What was your process for creating the project?
What was the hardest part?
What problems did you solve?
What is your favorite aspect of your project?
What are you most proud of?
What might you want to do in the future?

Maker Camp 2016
START Making!162
doCuMenting and diSPlayingConsider both low-tech and high-tech ways for makers to document and show off their work, including placing projects on shelves, bulletin boards, and poster boards, and documenting online.
Encourage makers to be persistent in building and remixing, to find new solutions, and to overcome roadblocks.
Give reminders so makers are aware of how much time they have to work on their projects. Reserve time for them to document their projects (as well as help clean up!). See Session 8 for ideas on how to plan and get ready to share their projects at a Community Showcase.
stOrIes frOM the ClUBhOUse netWOrk: tWO Open Make experIenCesOpen Make projects can lead in many different directions based on makers’ interests. Here are two examples of projects created during Open Make sessions.
alien autopsy gameWhen makers were invited to explore any activity or tool during Open Make time, one girl immediately chose MaKey MaKey. She started by playing around with Play-Doh, making tiny aliens. Then a sample project on the shelf caught her eye: a Valentine candy box version of the board game Operation. The goal of the game was to pick up a piece of candy from the candy box without touching the edge. The makers of that game had used a MaKey MaKey board and programmed a project in Scratch, so that it would buzz if the player touched the edge of the box.
Documenting a project (HEnnEPIn COUnTy
LIBrAry BEST BUy TEEn TECH CEnTEr,
MInnEAPOLIS, Mn)

Maker Camp 2016
final open Make: Personalized Projects 163
Meanwhile, one of the staff members had brought in a large refrigerator- sized cardboard box. Inspired by the Valentine candy box, everyone brainstormed the idea of making a life-sized version of one of the tiny Play-Doh aliens. Mentors helped the young maker sketch the body of the alien on the box and think about how she could use the materials and tools provided to create her own game. Eventually she created a MaKey MaKey interface with keys at different parts of the alien’s body, and she used Scratch to program her game. When touched, each body part emitted a different sound, like a pumping heart or a stomach growl.
Maze for a PetDuring the Open Make session at the Youth Connections Clubhouse in Lismore, Australia, one young maker wanted to design a maze for his pet rat, Beauty. Because he had a special bond with his rat, he was motivated to spend time and attention working out the details of the project. With support from mentors, he drew a maze on paper, and then built the floor, walls, and
Sharing the final project (FLAGSHIP
CLUBHOUSE)
Building a maze (yOUTH COnnECTIOnS CLUBHOUSE)

Maker Camp 2016
START Making!164
ceiling of the maze using corrugated cardboard. He added a box for Beauty to nest in. Then he wired up some colored LEDs to 3V batteries and made a lighted passage through the maze. He was excited to let his rat explore the maze and was proud of the project he had created.
refleCtionS froM Start Making! faCilitatorSHere are a few reflections from Clubhouse Coordinators on facilitating Open Make sessions.
trY It and seeTo me, Open Make time is about igniting the curiosity for experimentation within our youth so that their interest in figuring out how is stronger than their aversion to failure or not knowing. Yes, we need to show them what can be done and how to use tools they’ve never seen, but I think our goal should be eventually to be unnecessary to their exploration. Makers don’t need to know the way to do something; they just need the curiosity to figure out a way, so I think our job is to instill that mindset more than specific skills.
—Anna Fleming, Gold Crown Clubhouse, Denver, CO
Facilitator helping during an Open Make session (CASA DE LA JUVEnTUD CLUBHOUSE, MOrA,
COSTA rICA)

Maker Camp 2016
final open Make: Personalized Projects 165
COnneCtIng the dOtsBy engaging in conversations with one of our Clubhouse members, I was able to figure out her interests and connect her to making activities. She loved video games, so I challenged her to create her own. She took an interest in physical computing and began creating projects on her own. She likes being in charge when working in groups, so I gave her the title of Project Manager. . . . Taking the time to learn about her interests allowed me to help her identify her strengths and build confidence so that she can proudly call herself a maker.
—Jaleesa Trapp, Tacoma Clubhouse, Tacoma, WA
CreatIvItY Is the MaIn IngredIentMaking is taking any project and finding ways to expand on it. An example of this is taking something like a water bottle and making a beautiful flower out of it. A maker will also find ways to do more with that water bottle by finding a different object to make, like a plastic dress for a character made from scrap materials. I’m a huge fan of creating things out of recycled goods. Being a maker doesn’t mean you have to go out and spend a bunch of money on high-tech electronics. Being a maker means taking what you have, like trash, and viewing it differently—think of it as material that you get to reinvent. A great example of this is plastic. Plastic is strong and very versatile, meaning it can have many uses. I challenge all makers to reinvent a piece of plastic material and see what you come up with!
—Audrey Maestas, Compadre Boys & Girls Club Clubhouse, Chandler, AZ
additional reSourCeS 8 Tinkering Studio project ideas:
tinkering.exploratorium.edu/projects
8 Instructables DIY projects website: instructables.com
8 Mentoring tips: youngmakers.org/mentoring-tips/
8 Spin turntable to photograph creations: spin.media.mit.edu

Maker Camp 2016
166 Start Making!
Final project ideas…

Maker Camp 2016
Show and Share: CoMMunity ShowCaSe
SeSSion
8

Maker Camp 2016
START Making!168
In this final session, makers will share their projects with family, friends, and others in a community showcase
event. They will have an opportunity to reflect on their process and celebrate their accomplishments.
◊ getting readyPlan for the community showcase well before the event. Engage your makers in planning the showcase, creating invitations, and deco-rating for the event.
Schedule this session so that your makers have some time to set up, make labels, and finish anything before presenting their pro-jects. You’ll also want to make sure there is
Community showcase (SCI-BOnO
CLUBHOUSE, JOHAnnESBUrG, SOUTH AFrICA)
Presenting a project at a Maker Faire (SAn rAFAEL CLUBHOUSE, SAn rAFAEL, CA)
SeSSion goalSIn this session, makers will
8 Exhibit their work for others to see, try, and appreciate.
8 reflect on their projects, process, and progress.
8 Imagine new possibilities for future projects based on the skills they have learned.

Maker Camp 2016
Show and Share: Community Showcase 169
dedicated time for everyone to document their work and share what they plan to present with each other before any guests arrive. Encourage makers to focus on their process of making, not just the end result. Invite friends and family members to come for the final hour of the session.
Poster for community showcase (FLAGSHIP
CLUBHOUSE, MUSEUM OF SCIEnCE, BOSTOn, MA)
Completing a project (FLAGSHIP CLUBHOUSE)
Preparing a display of projects ( SACrAMEnTO FOOD BAnk & FAMILy SErVICES
CLUBHOUSE, SACrAMEnTO, CA)

Maker Camp 2016
START Making!170
77 Facilitation Tiplooking Back, looking aheadyou can help your makers prepare for their Community Showcase by inviting them to reflect on their experiences through a series of questions about their idea, process, and what they learned.
idea
8 What did you make?
8 What was the idea you started with?
8 What made your idea change over time?
Process
8 What was the hardest part?
8 Did anything surprise you as you were working on this?
8 Did you work with others on the project or help others? How?
learning
8 What is something you learned?
8 How might you use what you learned?
8 What is something you might like to try next?
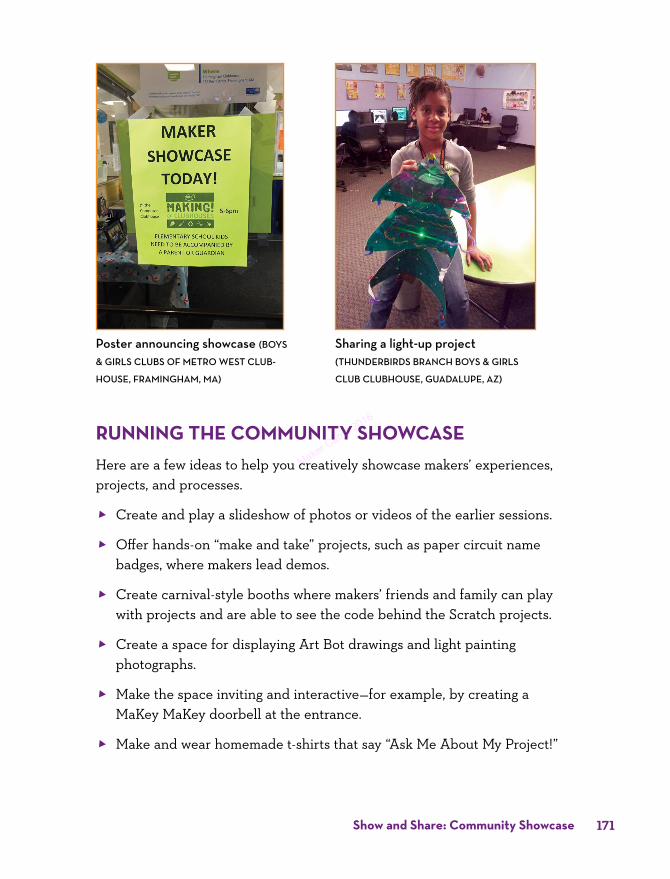
Maker Camp 2016
Show and Share: Community Showcase 171
Poster announcing showcase (BOyS
& GIrLS CLUBS OF METrO WEST CLUB-
HOUSE, FrAMInGHAM, MA)
running the CoMMunity ShowCaSeHere are a few ideas to help you creatively showcase makers’ experiences, projects, and processes.
8 Create and play a slideshow of photos or videos of the earlier sessions.
8 Offer hands-on “make and take” projects, such as paper circuit name badges, where makers lead demos.
8 Create carnival-style booths where makers’ friends and family can play with projects and are able to see the code behind the Scratch projects.
8 Create a space for displaying Art Bot drawings and light painting photographs.
8 Make the space inviting and interactive—for example, by creating a MaKey MaKey doorbell at the entrance.
8 Make and wear homemade t-shirts that say “Ask Me About My Project!”
Sharing a light-up project (THUnDErBIrDS BrAnCH BOyS & GIrLS
CLUB CLUBHOUSE, GUADALUPE, AZ)

Maker Camp 2016
START Making!172
Community Showcase (FLAGSHIP CLUBHOUSE)
stOrY frOM the ClUBhOUse netWOrk: a start MakIng! COMMUnItY shOWCaseThe Clubhouse at the Boys & Girls Clubs of Metro West in Framingham, Massachusetts organized a final showcase for makers, friends, families, and other Clubhouse supporters. The makers prepared presentations of their final Open Make projects using poster boards to explain the materials they used, the challenges they faced, and what they hoped to make next.
For example, some of the young people shared musical projects made with the MaKey MaKey and Scratch. Here is a description from Clubhouse Coordinator Yarelis Garcia:
These two friends got together and worked on amazing hands-on MaKey MaKey projects incorporating copper tape, cardboard, brass fasteners, wires, construction paper, and magazine cutouts.
The purpose of their project was to re-create Guitar Hero using these materials and MaKey MaKey to create the physical instrument. They then

Maker Camp 2016
Show and Share: Community Showcase 173
worked with Scratch to create music. They also created an interface inspired by Dance Dance Revolution so that they can dance and play the guitar at the same time.
These girls have encountered many challenges and difficulties, but they have overcome many of them by taking their time researching and using creative methods.
Others at the Clubhouse have been inspired by their projects. Their Open Make project has impressed many of our guests and visitors. These girls now want to do making projects every day!
Building a guitar project
Building a dance project interface

Maker Camp 2016
START Making!174
Project display boards
additional reSourCeS 8 Start Making! video from the
Clubhouse Casa de la Juventud: youtu.be/Lkk5F0sbhs4
8 Creating in the Clubhouse: Tools for Conversations and Portfolio Development developed by the Education Development Center’s Center for Children and Technology: bit.ly/cct-clubhouse-toolkit
Poster for showcase (CASA DE LA JUVEnTUD
CLUBHOUSE, MOrA, COSTA rICA)

Maker Camp 2016
Show and Share: Community Showcase 175
Feedback I received when I shared my project…

Maker Camp 2016
Maker Camp 2016
keep Making
I I IPart

Maker Camp 2016
START Making!178
encouraging youth to keeP Making!
By facilitating Start Making! activities you can help young people develop a variety of creative competencies. In the process of making meaningful projects, young
people learn new concepts and design skills. They become comfortable using a variety of tools and technologies to make projects. They gain confidence in their ability to bring their ideas to life and to persist through setbacks. In addition, they develop positive relationships through collaborating and helping others. Through this experience, they begin to see themselves as makers: as individuals who enjoy coming up with new ideas, creating personal projects, experimenting with new materials, and sharing their skills with others.

Maker Camp 2016
encouraging youth to keep Making! 179
How can you inspire young people to continue making projects, trying new things, and going deeper into areas that they find interesting and mean-ingful? Here are some ways we’ve found to open up further opportuni-ties for making and learning:
Host an idea potluck. Organize a workshop where everyone brings an idea, shares the idea, and then works with others to make all the ideas come to life.
Find extraordinary uses for ordinary things. Encourage young makers to look for inspiration for further projects in things they see around them in their everyday environment.
Applying ideas from Start Making! to make new projects (yOUTH COnnECTIOnS
CLUBHOUSE, LISMOrE, AUSTrALIA)
youth encouraging others to Start Making! (PArrOQUIA DE FÁTIMA CLUBHOUSE,
PAnAMA CITy, PAnAMA)

Maker Camp 2016
START Making!180
Engage families. Invite families to participate in creative exploration with young makers.
Celebrate by making. Celebrate holidays or special occasions (such as birth-days) by making projects in the spirit of the occasion.
Make new connections. Combine ideas and techniques from different Start Making! sessions to make new creations, such as soft circuits that make music.
Reverse roles. Dedicate a day in which young makers take ownership in planning and leading creative hands-on activities for others.
Go outside for a maker adventure. Pack up your Open Make box and take it outside for a maker field trip or picnic; create projects based on what you see around you.
Seek inspiration at events. Connect makers to broader maker events—such as Maker Faires, science festivals, and art performances and exhibitions—where they can find new inspiration and ideas.

Maker Camp 2016
181
afterword: a MeSSage to all MakerS
— From Mitchel resnick, professor and director of the Lifelong kindergarten group, MIT Media Lab, and co-founder of the Clubhouse
Flagship Clubhouse, Museum of Science, Boston, MA

Maker Camp 2016
START Making!182
welCoMe to the Maker CoMMunity!I hope you’ll enjoy building projects using the ideas, tools, and materials described in this book. In the process, you’ll learn many important things. For example, you’ll learn math, science, and engineering concepts related to electrical circuits, conductivity, light diffusion, and computer program-ming. These concepts are important and valuable. But that’s not the most important thing that you’ll learn.
What’s most important is that you’ll learn how to think like a maker—and to think of yourself as a maker.
what doeS it Mean to think like a Maker?It means that you know to start with a spark of an idea and turn it into a meaningful project.
It means that you know how to break down complex challenges into simpler parts.
It means that you know how to iden-tify problems as they arise, to keep trying when things get difficult, and to come up with new strategies and approaches.
It means that you know how to collaborate with others, to build on the work of others, and to share your ideas with others.
Learning to think like a maker is more important now than ever before. To thrive in today’s rapidly changing world, you’ll need to think creatively, reason systematically, and work collaboratively. And that’s exactly what you learn as you work through the activities in this book.
But the activities in this book are just the beginning. The book is called Start Making! for a reason. Even when you’ve completed all the activities, you’re still at the start of your journey as a maker. The challenge is to keep making!
Collaborating on a project (SCI-BOnO CLUB-
HOUSE, JOHAnnESBUrG, SOUTH AFrICA)

Maker Camp 2016
afterword: a Message to all Makers 183
what are the next StePS?You might want to work on variations of the activities and projects in this book. What if you make one of your projects bigger? Or smaller? What if you combine two of your projects into one? Or what if you add some new mate-rials to an existing project? How about modifying one of your projects to turn it into a gift for a friend?
Or you might try making a totally new type of project. For inspiration, take a look at other books, magazines, and websites featuring maker projects (like makezine.com). Or imagine a new project that connects with one of your favorite hobbies or interests.
It’s often helpful to make and learn with others. There are a growing number of Makerspaces and Maker Faires where you can meet other makers. And there are online maker communities (like diy.org and scratch.mit.edu) where you can share your creations and see what others are making.
Learning to think like a maker is a lifelong process. You need to keep exper-imenting, taking risks, and trying new things. There are always new ideas to explore, new tools to use, new techniques to learn, and new projects to share. Let your curiosity be your guide.
The LEGO Group has a slogan that I love: “Joy of Building, Pride of Creation.”
You’ll make your best projects, and you’ll learn the most in the process, when you embrace the joy of making, and when you share your projects (and your joy) with others.
Congratulations on joining the worldwide maker community! Keep making!

Maker Camp 2016

Maker Camp 2016
about the Clubhouse Community
t he Clubhouse provides a creative and safe out-of-school learning environment where young people from under-served communities work with mentors to explore their
own ideas, to develop skills, and to build confidence in them-selves by using technology. The program was founded in 1993 as a collaboration between the Museum of Science, in Boston, Massachusetts, and the MIT Media Lab. To learn more, visit theclubhousenetwork.org.
185

Maker Camp 2016
186
Walk into a Clubhouse and you will find groups of young people producing and editing films, building robots, creating graphics and websites, making 3D models and animations, designing computer games, writing and recording music, and much more. In the process, they become excited about learning and about their own future.
Today, The Clubhouse Network is a global community comprised of 100 Clubhouses in 20 countries, which provide more than 25,000 youth per year with access to resources, skills, and experiences to help them succeed in their careers, contribute to their communities, and lead outstanding lives.
Based at Boston’s Museum of Science, The Network supports community- based Clubhouses around the world by providing start-up support, professional development, new technology innovations, evaluation and assessment, access to an online community for youth, mentors, and staff, and more.
Start Making!

Maker Camp 2016
187about the Clubhouse Community
Core valueSThe success of the Clubhouse community depends on five core values:
Equal opportunity Empowering youth by granting full access to resources
Relationships Fostering healthy, respectful, and consistent relationships
Creative process Nurturing a community of lifelong learners and producers
Diversity Encouraging an inclusive environment that embraces the rich diversity of our communities
Hard fun Engaging in digital media, art, and STEM (science, technology, engineering, and math) tools to express, invent, and collaborate
For more than 20 years we have seen firsthand the impact of a safe, creative place that empowers young people to become more capable, creative, and confident learners. That is what makes us passionate about sharing the Clubhouse approach and the activities and projects in this book with others. We hope you too will see young people unleash their creative talents, build confidence in their own learning, and discover a unique voice of their own with which to express themselves creatively.

Maker Camp 2016

Maker Camp 2016
189
about the authors
Danielle Martin Danielle served as knowl-edge manager and led the Start Making! program across the global Clubhouse Network. She started her Clubhouse career as a coordi-nator at the Boys & Girls Club in Charlestown, MA, and previously served as an AmeriCorps VISTA, supporting community-based media and technology programs. After obtaining a master’s degree in City Planning from the Massachusetts Institute of Technology (MIT), she co-created a research group within MIT’s Center for Future Civic Media, the Depart-ment of Play, which mapped mobile technol-ogies and youth activism methodologies. Now she manages programs for Team4Tech.org, which is focused on advancing 21st century education in underserved communities by engaging U.S.-based technology volunteers and IT solutions in collaboration with local nongovern-mental organizations.
She started making by collaging on paper, then digitally in Photoshop, and by hacking Polaroid prints, but now she enjoys mashing up photos on Instagram or baking collages of treats for anyone who will eat them.
Danielle mentoring at a Makers’ Studio session (BOyS
& GIrLS CLUB OF METrO WEST
CLUBHOUSE, FrAMInGHAM, MA)

Maker Camp 2016
190
Alisha Panjwani Alisha is a designer and educator interested in exploring experiential and experimental ways of integrating story-telling, craft, wellness, play, and interactive technologies to create participatory learning practices. Her practice centers on nurturing children’s creative confidence with new tech-nologies and encouraging their involvement in creative acts within their communities. She completed her master’s degree in Media Arts and Sciences at MIT and worked as a research assistant in the Lifelong Kindergarten group at the MIT Media Lab. Before coming to the MIT Media Lab, she worked as a design and research associate at Project Vision, an international research initiative based in India that focuses on developing appropriate instructional strategies and technology-related tools that foster creative cognitive architectures in young children from urban poor communities.
She started making art projects even before her mother let her use a pair of scissors, but now she makes her own fashionable outfits for fun.
Danielle Martin and Alisha Panjwani
Alisha mentoring during a Start Making! session (FLAGSHIP
CLUBHOUSE, MUSEUM OF SCIEnCE,
BOSTOn, MA)
Start Making!

Maker Camp 2016
191about the authors
Natalie Rusk Natalie is a research scientist in the Lifelong Kindergarten group at the MIT Media Lab who develops programs that enable young people to build on their ideas and inter-ests. She is one of the creators of the Scratch programming language and is co-founder of the Clubhouse program. She also researches the role of motivation and emotions in learning. She earned a master’s degree at the Harvard Graduate School of Education and a PhD in child development from Tufts Univer-sity. She enjoys making projects with others in workshops that combine recycled materials, LEGO bricks and motors, colored lights, and coding with Scratch.
natalie introducing Scratch (PHOTO By JOI ITO)

Maker Camp 2016

Maker Camp 2016
193
index
nuMBerS2D nets, using for 3D forms, 1033D cube, lighting, 1143D forms, 12
2D nets, 103building first project, 106–108clay sculptures, 107–108cube model, 104cylinder model, 104demoing, 104–105digital sculpting, 109–110documenting and displaying,
113–114drawing creatures, 102generating ideas, 111getting ready for, 100–102Journal Prompts, 113materials, 101Open Make session, 111–112opening activity, 102–104paper sculptures, 106–107paper toy, 101pyramid model, 104resources, 115sharing and reflecting, 113space and tools setup, 102taking further, 109–111taping together
pyramid, 1033D model, basing on 2D
sketch, 1053D printing services, 1153D sculptures, cutting out designs
for, 112
aactivities
choosing, 32–33experimenting with, 25introducing, 22
Adams, Kelly Ann, 132alien autopsy game, 162–163alligator clips, using with
circuits, 62
aperture, defined, 85arrow key interface, making with
copper tape, 71art-making bots, 12
adding legs, 126adding motor and battery, 125adding on/off switch, 127adding wobble, 126building first project, 123–127creating persona for, 127demoing, 123documenting and displaying,
131–132fashion show, 132gathering materials, 125generating ideas, 129getting ready for, 118–121hand fan, 120, 124Journal Prompts, 130LEGO Doodle, 121–122materials, 119Open Make session, 129–130opening activity, 121–122resources, 132sharing and reflecting, 130space and tools setup, 120–121taking further, 128–129troubleshooting, 128
AWA City Clubhouseidea wall, 157photo of lights, 94project display area, 32
Bbackstitches, sewing, 139, 153badges and buttons, lighting up,
53–54bananas, using in Scratch piano
project, 68battery, attaching for paper
circuit, 43bookmarks, sewing, 141bots. See art-making botsBoys & Girls Clubs, 23
arrows for MaKey MaKey, 58
avatar for Minecraft, 111community showcase,
171–174developing Open Make
project, 158imagination and
prototypes, 159Learn How to Play Piano
project, 72light-up project, 171Make It Sing projects, 74–75sewing circuits, 140sewing electrical circuits, 147
bracelets, sewing, 141, 146Build in Progress
documentation, 165buttons and badges, lighting up,
53–54buzz, finding, 33
Ccamera, using for light
paintings, 85camera lens, looking
through, 86Casa de la Juventud
Clubhouse, 21MaKey MaKey, 58Open Make sessions, 26, 164poster for community
showcase, 174Start Making! video, 174
Castellon, Rodrigo, 147–148cat face, 3D form of, 107CEDES Clubhouse
dance game, 72sewing demonstration, 139
Change the Move session. See art-making bots
circuits. See also electrical circuits; paper circuits; Sew the Circuits session; soft circuitsdescribing, 53elements of, 38flow of current in, 53

Maker Camp 2016
START Making!194
making, 6open and closed, 64sewing, 140, 145structure, 42testing, 5using alligator clips with, 62
The City That Speaks, 74–75clay sculptures, 107–108closed and open circuits, 64CLT Clubhouse, introducing
activities, 22Clubhouse Annual
Conference, 93Clubhouse community, 185–187.
See also community showcaseThe Clubhouse Network, 4
art bot fashion show, 132The City That Speaks, 74–75community showcase, 172–174e-textiles, 147–149example of first session, 50–52glowing jump ropes, 96–97high-tech + low-tech, 147light painting field trip, 94light-up badges and buttons,
53–54Open Make experiences,
162–164sculpting jack-o’-lanterns, 112website, 185
collaboration skills, learning, 9–10community showcase, 13. See also
Clubhouse communitydeveloping, 9getting ready for, 168–169poster, 169resources, 174running, 171–174
computer program, making, 70conductive materials
experimenting with, 71finding, 69
conductivity, explained, 67conductor, explained, 53, 67confidence, developing, 9–10connecting dots, 165copper tape
adding for paper circuits, 41arrow key interface, 71
Corbet, Mary, 153create in learning spiral, 8creative competencies, 10creative learning spiral, 8creativity, importance of, 165
creator, identifying as, 9–10creature, drawing for 3D
form, 102cutting fabric, 141
ddance game, playing, 72dance project interface,
building, 173demo videos for facilitators, 33Derilus, Andy, 128design journals, 3digital sculpting, 109–110documenting and displaying,
32, 165drawing creature for 3D form, 102drawings, made by bots, 123drum project, 70
eelectrical circuits, sewing, 147.
See also circuitselectricity, explained, 53electronic materials, 28, 33electronics, 3encouraging making, 178–180environment, setting up, 21e-textiles. See also Sew the
Circuits sessionbattery holder and Lily
Tiny, 143building first project, 141–148choosing light pattern, 142demoing, 140documenting and displaying,
151–153drawing circuit connections,
143–144embellishing, 146generating ideas, 148getting ready for, 136–138Journal Prompts, 151Lily Tiny board, 138materials, 137Open Make session, 149–150opening activity, 139resources, 153sewing circuits, 145sharing and reflecting, 150sketching project design, 142soft circuits, 140space and tools setup, 138
taking further, 148testing circuits, 146troubleshooting, 146
evaluation report, 11experimentation, encouraging,
39, 164exposure, defined, 85
ffabric, cutting, 141Facilitation Tips
Be a Maker First, 23copper tape, 41Create Opportunities for Peer
Mentoring, 44Creating a Respectful
Environment, 156Encourage
Experimentation, 39Encourage Material
Exploration, 141Encourage Problem
Solving, 129Find Conductive Materials, 69Gathering Tools and
Materials, 28Hack This Guide, 33ideas, 170Keep It Simple, 143learning, 170Looking Back, Looking
Ahead, 170Make Observations, Then
Tinker, 126, 145Make Your Own Journal, 31processes, 170Start with Imagination, Then
Build Prototypes, 159Take a Break and Have a
Snack! 24Work with Locally Available
Materials, 120facilitators
demo videos for, 33demoing paper circuits, 38Fleming, Anna, 164Maestas, Audrey, 165role of, 13–14Trapp, Jaleesa, 165
“failure,” allowing for, 39families, engaging, 179fan, handheld, 120, 124

Maker Camp 2016
195
FARO de Oriente Clubhouse, exploring electronics, 3
feedback, getting, 160, 175Final Open Make session, 13first project, building, 23–24,
39–44first session, example of, 50–52Flagship Clubhouse, 6, 181
3D forms, 1043D prints from Sculptris, 110alien autopsy game, 163character sketches for 3D
form, 102clay sculpture, 108community showcase, 172completing a project, 169conductive and nonconductive
materials, 67conductive materials, 69creature made from clay, 105group critique, 160handmade journals, 51ideas for sewing, 148introducing paper circuits, 22journals, 31LED lights in jar, 92light paintings, 89, 92light wands, 86light-up creations, 50making design journals, 3making light-up circuit, 5Play-Doh and MaKey
MaKey, 70poster for community
showcase, 169Sculptris 3D modeling
software, 109–110sharing ideas, 30wand with ping-pong ball, 91waving LED lights, 81
flapping origami crane, 54Fleming, Anna, 164Flowers, Adriana, 128flowers, using in Scratch piano
project, 68forms. See 3D forms
gGarcia, Yarelis, 23, 172–173Give It Form session. See 3D
formsglowing jump ropes, 96–97
goals, 9group critique, 160guitar project, building, 173Gum Springs Community Center
Clubhouse, light box paper circuit, 160
hhacking, musical instrument
program, 70–72Hennepin County Library Best
Buy Teen Tech Centerdocumenting projects, 162LEGO Doodle activity, 122
iice-cube keyboard, 72idea potluck, hosting, 178idea wall, creating, 32, 157ideas
sharing, 30writing on sticky notes, 158
imagination and prototypes, 159imagine in learning spiral, 8inspiration
seeking at events, 180sources of, 183
Instructables DIY projects, 165insulator, explained, 53, 67interests, building, 8Internet. See resources;
websitesintroducing activities, 22
jjack-o’-lantern, sculpting, 112Johnson, Shanice, 128, 159Journal Prompts
3D forms, 113art-making bots, 130e-textiles, 151LED wands, 95musical creations, 73paper circuits, 49personalized projects, 161
journalscreating and using, 30illuminating, 49making by hand, 51
jump ropes, glowing, 96–97
kKenworthy, Masina, 94, 120keyboard, making from ice
cubes, 72
llearning, supporting, 8, 170LED (light-emitting diode)
attaching for paper circuit, 42explained, 53lighting up for paper circuit,
39–40LED lights
experimenting with, 80in jar, 92waving, 81
LED wandsadjusting camera settings, 83building first project, 86–89demoing, 84–86documenting and displaying,
96–97exploring light effects, 89–90getting ready for, 80–83Journal Prompts, 95materials, 82Open Make session, 91–93opening activity, 83–84resources, 97sharing and reflecting, 95space and tools setup, 82–83troubleshooting, 83
LEGO Doodle, 121–122Lifelong Kindergarten
Group, 8light box paper circuit, 160light effects, exploring, 89–90Light It Up session, 12light paintings
capturing images, 86drawing words, 93examples, 91–93generating ideas, 90low-exposure photography, 85resources, 97showing examples of, 85tracing around people, 92trying, 88
light wands. See LED wandslights, photographing, 94light-up badges and buttons,
53–54

Maker Camp 2016
START Making!196
light-up circuit, 6light-up origami, 48LiliPad parts, ordering, 137Lily Tiny board
marking position of, 143project prototype, 149website, 153
low-exposure photography, 85
MMaestas, Audrey, 165Make It Sing, projects. See
musical creationsmaker adventures, going outside
for, 180maker projects, resources, 183Maker Shed online store, 33makers
being, 23defining, 6–7identifying as, 9–10knowing, 33supporting and coaching, 29thinking like, 182–183
MaKey MaKey boardattaching musical drawing
to, 63dance game, 72drum project, 70features, 58kits, 60open and closed circuits, 64resources, 76Scratch piano project, 59sketch of ideas, 73using Play-Doh with, 70
makingencouraging, 178–180explained, 4–5principles, 8–9
Martin, Danielle, 189–190material exploration,
encouraging, 141materials
3D forms, 101art-making bots, 119e-textiles, 137LED wands, 82musical creations, 60paper circuits, 37
materials and tools, gathering, 28maze for a pet, 163–164
MeshMixer plug-in, using with Sculptris, 110
Minecraft, sketching avatar for, 111MIT Media Lab, 8, 190–191motor
experimenting with, 159making project with, 11
Museo de los Niños, 3D paper toy, 101
musical creations, 12adding to, 64arranging materials, 61asking questions, 62building first project, 63–66completing circuits, 62conductors and
conductivity, 67connecting, 63demoing, 62documenting and displaying,
74–75drawing, 63ice-cube keyboard, 72insulators, 67Journal Prompts, 73materials, 60Open Make session, 68–72opening activity, 61resources, 76setting up computer
stations, 61sharing and reflecting, 73space and tools setup, 61taking further, 67–68testing, 63video of activity, 63
musical drawingsplaying, 66showing, 62troubleshooting, 66
musical instrument program, hacking, 70–72
nNelson, Janette, 96, 152–153networking skills, learning, 9–10Neve Yosef Clubhouse
camera lens, 86light painting activity, 86light-up origami, 48
notes pages3D creations, 116
art-making bots, 133e-textiles, 154feedback, 175final project ideas, 166light paintings, 98musical creations, 77Open Make box, 33session wishlist, 15Start Making! makes me
curious about, 55
oonline stores, 33. See also
resources; websiteson/off switch, adding to bot, 127open and closed circuits, 64Open Make box, 33
building, 26–27enhancing, 27–28
Open Make projects, building, 158–159
Open Make session, 11, 13, 25musical creations, 68–72paper circuits, 47–49
open mind, keeping, 33opening activity, 21organizing space, 21origami, 48, 54
PPaint with Light session. See LED
wandsPanjwani, Alisha
Being a Facilitator, 14bio, 190light-up project, 46Start Making! Creative
Competencies, 10paper circuits, 12, 22, 160. See
also circuitsadding copper tape, 41adding switches to, 45attaching battery, 43attaching LED, 42completing, 43demoing, 38documenting and displaying,
50–51examples, 37, 45generating ideas, 47getting ready for, 36

Maker Camp 2016
197
layout for, 40–41light-up origami, 48making drawings, 47–48making LED light up, 39–40materials, 37Open Make session, 47–49opening session, 38parallel circuit, 45resources, 54Safety Tip, 41series circuit, 46sharing and reflecting, 49space and tools setup, 38structure, 42troubleshooting, 44
paper lantern tutorial, 54paper sculptures, 106–107paper toys, designing, 115parallel circuit
flow of current in, 53making, 45
Parroquia de Fátima Clubhouse, 178–180
peer mentoring, creating opportunities for, 44
personalized projects, 13alien autopsy game, 162–163building Open Make projects,
158–159documenting and displaying,
162–164generating ideas, 157–158getting ready for, 156idea wall, 157Journal Prompts, 161maze for a pet, 163–164resources, 165sharing and reflecting, 160
pet maze, 163–164photography, 12, 85piano project, 72play in learning spiral, 8Play-Doh, using with MaKey
MaKey, 70Priester, Cindy, 53–54principles, 8–9program, designing, 11–13projects. See also first project
adding elements, 24building for first time, 23–24
prototypes and imagination, 159Puerta 18 Clubhouse
designs for 3D sculptures, 112light painting, 91
light paintings, 93self-portrait for 3D
sculpture, 111pyramid, taping together, 103
QQi, Jie, 40–41
rreflect in learning spiral, 8reflecting and sharing, 29–32remixing, 123, 149Remold, Julie, 11Resnick, Mitchel, 8, 181resources. See also online stores;
websites3D forms, 101art-making bots, 132community showcase, 174e-textiles, 153LED wands, 97maker projects, 183Maker Shed online store, 33musical creations, 76online stores for electronic
materials, 33paper circuits, 54personalized projects, 165Start Making! demo videos for
facilitators, 33respect and trust, 9robots. See art-making botsRosenbaum, Eric, 68Rusk, Natalie, 8, 191
SSacramento Food Bank & Family
Services Clubhouse, 169safety, 29safety goggles, wearing, 29Safety Tips, paper circuits, 41San Rafael Clubhouse, project for
Maker Faire, 168Sci-Bono Clubhouse
collaborating on project, 182community showcase, 168conductive materials, 71lighting up LED with
battery, 39Science Buddies—Art Bot, 132Scratch piano project, 59–60, 68
Scratch programming environment, 58, 60downloading, 60MaKey MaKey drum
project, 70opening and running, 61resources and support, 76, 115sample program, 70
Scribbling Machines, 132sculpting. See 3D forms; digital
sculptingSculptris 3D modeling software,
101–102, 109–110self-portrait, designing for 3D
sculpture, 111series circuit, 46session flow diagram, 19session goals, 20sessions
adapting, 32–33adding elements, 24building first project, 23choosing activities, 32–33demoing, 22descriptions, 12–13documenting and
displaying, 32Open Make, 25–28opening activity, 21preparing for, 20resources, 33sharing and reflecting, 29–30wishlist, 15
Sew Electric, 141, 153Sew the Circuits session, 13. See
also circuits; e-textilessewing
backstitches, 139, 153circuits, 140, 145electrical circuits, 147electronic materials, 141
Shapeways 3D printing services, 115
share in learning spiral, 8sharing and reflecting, 29–32Show and Share session, 13Silver, Jay, 63soft circuits, 140. See also circuitsSorenson Unity Center Clubhouse
bookmarks and bracelets, 152ice-cube keyboard, 72light painting of jumping
rope, 97sounds. See musical creations

Maker Camp 2016
START Making!198
space, organizing, 21spin turntable to photograph
creations, 165spoons, interface made with, 72SRI International, 11Start Making!
demo videos for facilitators, 33
program, design, 11–13STEAM (science, technology,
engineering, art, and math), 5, 9–10
sticky notes, writing ideas on, 158stores, finding online, 33SWICN Clubhouse, sewing
electronic materials, 141Switch Basics—Sparkfun, 132switches
adding to circuits, 45explained, 53
ttechnical tool literacy, acquiring,
9–10Tecnocentro Somos Pacífico
Clubhouseart-making bots, 121experimenting with
motors, 159
project with motor, 11testing a circuit, 5
terms to know, 67testing
circuits, 5musical creations, 63
Tinkering Studio project ideas, 165
tools and materials, gathering, 28Trapp, Jaleesa, 165troubleshooting
art-making bots, 128e-textiles, 146LED wands, 83musical drawings, 66paper circuits, 44
trust and respect, 9trying something new, 33
vvideos, 174
wwands. See LED wandswebsites. See also online stores;
resourcesThe Clubhouse Network, 185evaluation report, 11
LiliPad parts, 137–138maker communities, 183MaKey MaKey kits, 60MeshMixer plug-in, 110musical creations, 66Scratch programming
environment, 60Scribbling Machines, 132Sew Electric, 141
wobble, adding to bot, 126words, drawing with lights, 93
yYouth Connections Clubhouse
arrow key interface, 71bots making drawings, 123experimenting with
activities, 25ideas for projects, 179initial project, 24interface made with
spoons, 72LED lights, 80light painting collage, 96lighting 3D cube, 114light-up origami, 48MaKey MaKey, 68maze for a pet, 163–164Open Make projects, 157