Software Tool for Research in Social Sciences
15
1 Gautam Hegde Software Tool for Research in Social Sciences Any man can make history but only a great man can write it - is an assertion which just underlines the magnitude of the task of writing history. History being both a science and an art, and given the nature of historical facts, the methods used to write history would be different from those of other disciplines. The objective would be to reconstruct the past as nearly as it happened knowing fully well that complete objectivity is impossible to achieve. The technique of writing history is undertaken by historical method - a procedure developed since the time of German historians Niebuhr and Ranke in the 19 th century, to present past events in their correct perspective. This basically necessitates that the material be collected diligently from all relevant sources and sifted with the greatest care to begin with, after which a critical examination into the literal and real meaning of the text, a thorough inquiry into the motives and intentions of the author in making his observation are followed by a penetrating scrutiny to eliminate all possible errors 1 . Therefore the starting point of any research would be the collection, classification and arrangement of the material. The researcher needs to take down notes from the materials surveyed and then adopt a method to classify and arrange them. The scientific method is the index card system. Usually a scholar would be required to keep a good stock of cards, which are preferable of the same size. Cards are helpful for arrangement and preservation, although they are expensive. They are easy to shift and rearrange according to any scheme, chronological, geographical, biographical or topical. The procedure would be the same as adopted in a library where there are as many cards as the books in the shelves. The scholar would have as may cards as there are relevant ideas to put down on cards. Each single idea is treated as a single unit, as if a separate book, and 1 B Sheik Ali – History: Its Theory and Methods, 2 nd edition, Macmillan, 1981, page 91
-
Upload
mangaloreuniversity -
Category
Documents
-
view
1 -
download
0
Transcript of Software Tool for Research in Social Sciences

1
Gautam Hegde
Software Tool for Research in Social Sciences
Any man can make history but only a great man can write it - is an assertion which
just underlines the magnitude of the task of writing history. History being both a science
and an art, and given the nature of historical facts, the methods used to write history
would be different from those of other disciplines. The objective would be to reconstruct
the past as nearly as it happened knowing fully well that complete objectivity is
impossible to achieve. The technique of writing history is undertaken by historical
method - a procedure developed since the time of German historians Niebuhr and Ranke
in the 19th century, to present past events in their correct perspective. This basically
necessitates that the material be collected diligently from all relevant sources and sifted
with the greatest care to begin with, after which a critical examination into the literal and
real meaning of the text, a thorough inquiry into the motives and intentions of the author
in making his observation are followed by a penetrating scrutiny to eliminate all possible
errors1.
Therefore the starting point of any research would be the collection, classification
and arrangement of the material. The researcher needs to take down notes from the
materials surveyed and then adopt a method to classify and arrange them. The scientific
method is the index card system. Usually a scholar would be required to keep a good
stock of cards, which are preferable of the same size. Cards are helpful for arrangement
and preservation, although they are expensive. They are easy to shift and rearrange
according to any scheme, chronological, geographical, biographical or topical. The
procedure would be the same as adopted in a library where there are as many cards as the
books in the shelves. The scholar would have as may cards as there are relevant ideas to
put down on cards. Each single idea is treated as a single unit, as if a separate book, and
1 B Sheik Ali – History: Its Theory and Methods, 2nd edition, Macmillan, 1981, page 91
2
is never clubbed with another idea. A single document may hold several ideas, each of
which is put down on a separate card. Supposing a researcher on the event of 1857 wants
to collect material and comes across a private letter of an important actor in the drama,
the parts – political, social, economic, or religious cause for the event - each of these
ideas are put on separate cards. Thus a single letter may have as many as ten, twelve or
twenty cards depending upon the nature and value of the document2.
Fig 1: Showing a typical index card using manual method3
Advent of information technology has greatly increase the productivity of data
processing and consequently the researchers have greatly benefitted from the word
processing software tools. However they still need to transfer the handwritten notes on
the index cards or notebooks to the computer. Also in case of photographic materials the
researchers would have to meticulously name and date the images captured, transfer them
to the computer and reference them to the written materials separately. A mobile app,
which is a software tool leveraging the capabilities of the smartphone, could effectively
address these issues.
This paper outlines the mobile app developed by the undersigned specifically for
the purpose of aiding the researchers in their preliminary operations of material collection
2 B Sheik Ali – History: Its Theory and Methods, 2nd edition, Macmillan, 1981, page100 3 Ibid. page 103
3
in the form of notes and photographs, its arrangement and organization as well as
seamless transfer in electronic form to MS-Word.
Making Notes
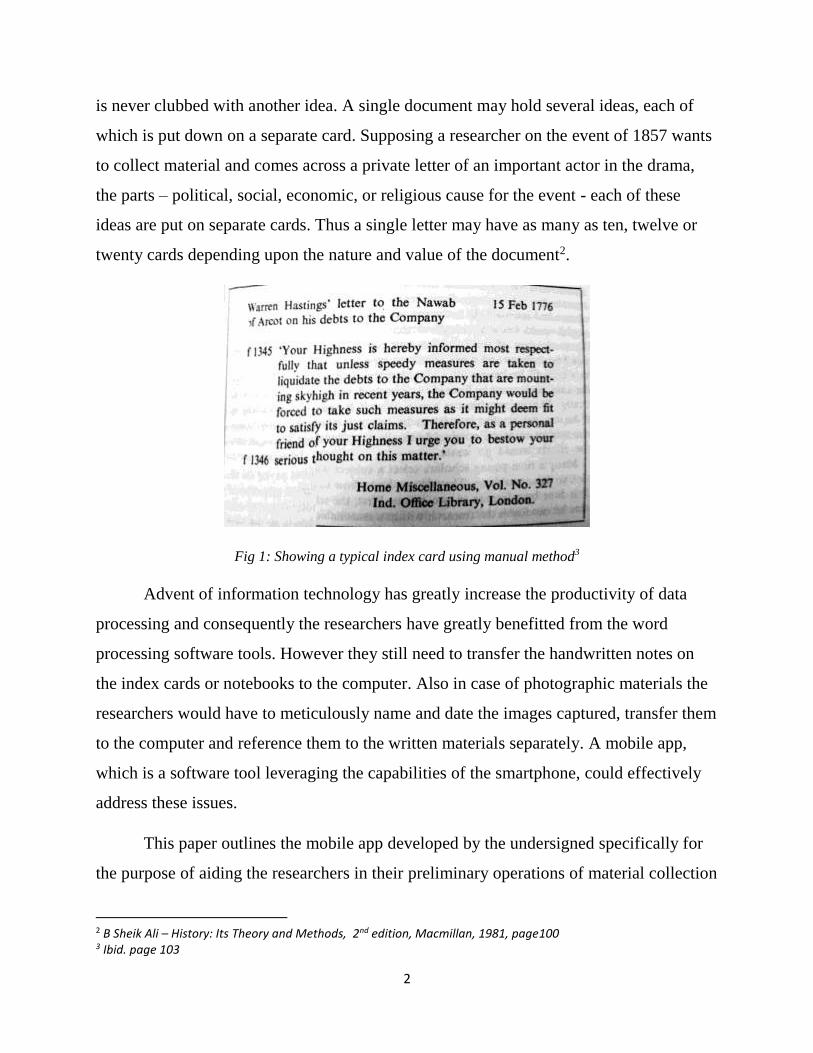
The mobile app, myResearchNotes, presents the scholar with some definite and rigid
procedure in taking down notes as on the index cards except that the index card is now
electronic and it is on the smartphone. The procedure is fixed, the same details needs to
be filled upon every card without fail. Every card contains –
A heading to the information furnished in the card; showing up on top left of the
card
A precise indication of the date of the document – in case the exact date is not
known at least the approximate date, or month, or year; showing up on top right of
the card
The page or folio number of the document from which the information is
collected, showing up on the left below the content of the note
At the bottom of the card the fullest reference about the document including the
name of the author, the title of the work, the number of the volume, the number of
the page and the year of publication.

4
Fig 2: Showing the index card with photos related to the content of the note on mobile app
myResearchNotes
Saved notes can be edited at a later date. Swiping left or right allows one to
navigate to the previous or next note.
Fig 3a: Showing the screen for creating a note on mobile app myResearchNotes
Fig 3b: Showing the screen for creating a note on mobile app myResearchNotes

5
Fig 3a and fig 3b show the screen adding content to a new note or editing the
contents of an existing note.
In addition to the textual content photographic content can also be added to a note.
Photographs can be taken when necessary from the mobile app itself as shown in fig 4
below. Any number of photographs can be attached to a single note.
Fig 4: Showing the attaching of a photograph to a note on mobile app myResearchNotes
If multiple notes are to be made from the same source, the mobile app gives the
option to add new note from the same source as can be seen from fig 5 below. By
selecting this option the scholar needs to type in only the heading and content of the note
while the details of the source are retained from before. This feature saves the scholar
from the monotony of typing the details of the source all over again.

6
Fig 5: Saving a note on mobile app myResearchNotes
Classifying and Arranging
Four generic types of classifications are possible namely chronological,
geographical, topical or biographical depending on date, place, species or form. In
addition any number of user defined classification tags can be appended to the note
allowing for unlimited ways of sorting and arranging the notes.
Fig 6: List of notes showing sorting tags on mobile app myResearchNotes
Fig 6 shows the list of notes. This is the screen which comes up when the
application is started. The title of the note is followed by sorting tags defined by the user.
Tapping on the tags will sort the list according to the tag selected.
7
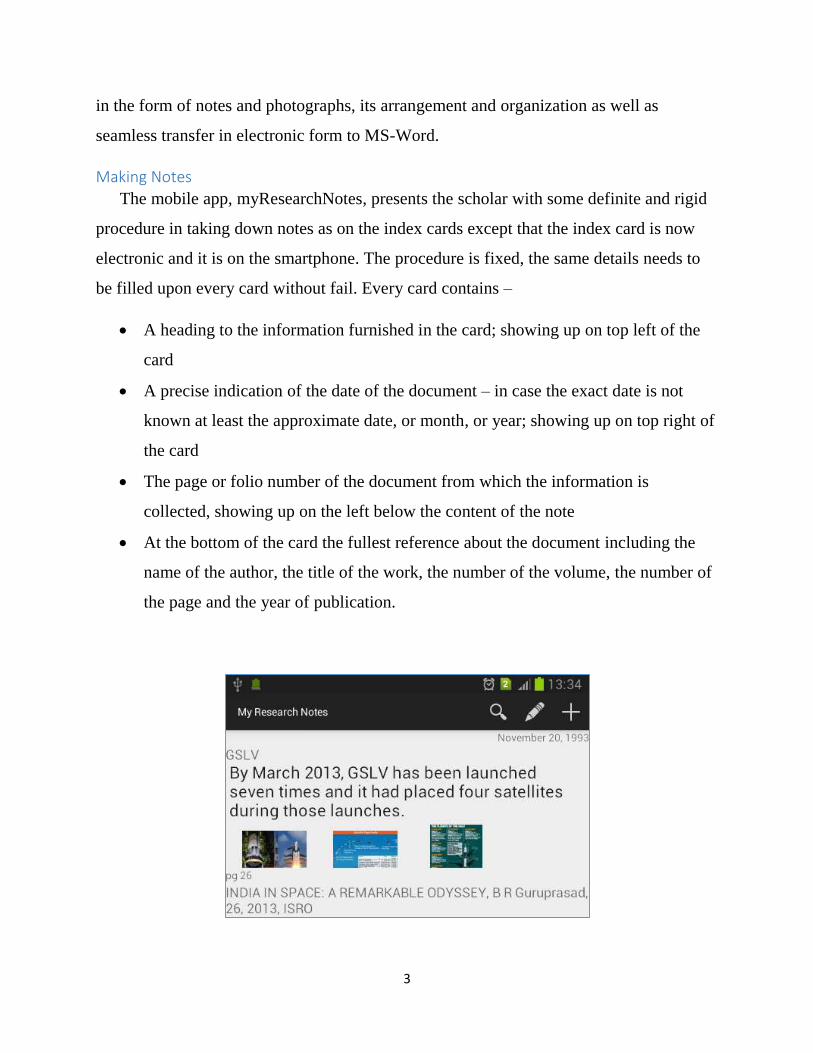
Fig 7: Showing filtering and sorting options on mobile app myResearchNotes
Fig 7 shows the filtering and sorting options. There are options available to filter
by tags given by the user, or by the author of the source document, or by the year of
publication.
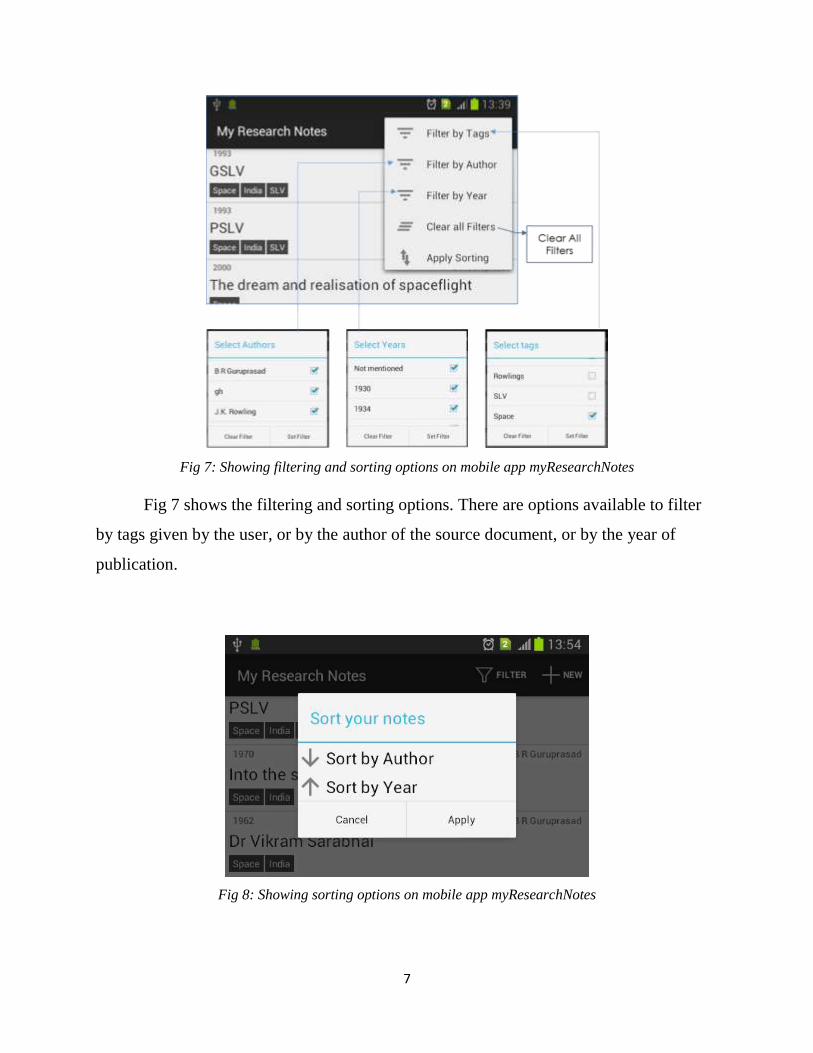
Fig 8: Showing sorting options on mobile app myResearchNotes

8
Fig 8 shows the sorting options which can be arranging in ascending or
descending order by choosing apply for the selected the option.
Fig 9: Showing tagging options defined by user on mobile app myResearchNotes
Fig 9 shows the option wherein the user can define the tag for a note. Any number
of tags can be appended to a single note.
Exporting the contents
The notes saved on the mobile phone can be exported to Microsoft Word. A file
containing all the notes as on date will be saved in the .docx format which can be
opened in MS-Word. There is also the option to save the file onto Google drive for
which an account needs to exist in the user’s name. Importing from SD card or the
internal storage option is available for use in case of application reinstallation or
upgrade and when the data needs to be restored, as can be seen from fig 10.

9
Fig 10: Showing the Import/Export options on mobile app myResearchNotes
Conclusion
The mobile app myResearchNotes greatly enhances the productivity of the
researcher. It helps to organize material in a scientific way. It also takes away the
monotony of repeating the same details over and over again on every card. It enables us
to group the notes at will in a host of different combinations. It is easy to bring texts of
the same kind together, to incorporate additions and to classify and arrange them. A note
can be augmented with photographs taken using the mobile app. These notes and the
photos can be transferred to MS-Word. It is easy to carry wherever we go. The mobile
app will work even when there is no phone connectivity as in case of remote excavation
locations or basement archives, making it an invaluable tool in streamlining the
preliminary operations for undertaking research.

10
My Research Notes
Launch the application
Tap on the Icon to launch “My Research Note” App
After the welcome screen the List screen appears
My Research Notes
List of NotesThe screen appears immediately after launching the
application.
• Tap New note icon to add new note
• Filter icon is used to filter the notes based on category tags
• On tapping menu button on device or menu icon
Import/Export option appears
• Note Headings (along with tags) are shown as list which is
scrollable swipe up/swipe down
• Tap on the note heading to view details
• Long Tap on the note will take to edit note screen directly
• Tap on category tag to apply quick filter
New Note IconFilter Icon
Heading of the
informationCategory Tags
Import/Export
Menu
Year Author

11
My Research Notes
Filter Option• Tap on Filter Icon on List of Note Screen, there are
several filter options appears as menu
• Select your choice of filter which opens respective filter dialog
• Select multiple options and tap Set Filter button to apply
• The list will be updated with the note belonging to selected filters
• Filter can also be applied by tapping on tags in Note List
• To clear selected filter, tap on filter icon then tap Clear Filter button
• By tapping on Author name on Note List, Author filter is applied
• Tap on the year of the note list to view all the note in the year.
• To clear all filters, tap on filter icon then Select Clear All Filter from menu option.
Clear All
Filters
My Research Notes
Sorting Option
• Tap on Filter Icon on List of Note Screen, select
“Apply Sorting” option
• “Sort your notes” dialog appears with 2 option
• Notes can be sorted by Author name or year part of date
of referred document ascending or descending order
• Tap on the items to change direction of sort
• Ascending order
• Descending order
• Tap “Apply”

12
My Research Notes
View Details• On tapping on the heading in the Note List the details
appears
• Text size can be long. Supporting photo thumbnails are
listed after the content
• Tap on the thumbnails to view original photo
• Tap on Edit icon (or double tap on the note) to Edit the
current note
• To go back to list of notes tap on Search Icon
• To view next or previous note one can use menu option
• Swipe left or swipe right will also allow to navigate previous
and next note
• To delete the note, tap menu button and select delete
option
Edit IconSearch Icon
Date of referred
document
Heading to the
information
collected
Text of the
information
collected
Full details of
referred documentEdit Icon
My Research Notes
Add/Edit Note• To edit a note, one can long tap on Note in list or tap edit
icon/double tap in details
• To add New note tap new note icon in the list screen or menu option
• Following data can be entered
• Heading to information collected
• Date of referred document
• Date/Month/Year [optional]
• Page or Folio Numbers of referred document
• Text of information collected
• Full details of referred document
• Author
• Title of the work
• Volume number
• Page number
• Year of publication
• Publisher
• Tap Save icon to complete
Continued …
Cancel Icon
Save Icon

13
My Research Notes
Add/Edit Note - Tagging• To categorize (Tagging) the Note, tap menu button and
select Tag
• A dialog will appear with existing categories
• Select applicable tags
• A new category can be created by entering a tag name in
New Tag box
• Tap OK button to add the tags in Note
• Tap Save icon to complete
Continued …
My Research Notes
Add/Edit Note – Attach Photo• Multiple photos can be attached in a Note
• To attach a photo, tap on menu button and select Attach
Photo option
• Camera on the phone will be enabled and after photo is
captured, the same will be appear as thumbnail at the end
of the Note
• To delete the attached photo tap on the photo thumbnail,
a dialog appears with option to delete
• Tap Save icon to complete
Continued …

14
My Research Notes
Add/Edit Note – Save options• On tapping Save button the entered details of the note will
be stored on device
• After successful saving a dialog appear with four options
• First option takes user to detail note screen
• Second option allowed user to add new note with reference, tags of just saved note. Which helps user to add same kind of note more efficiently
• Third option is to be selected when the next note does not relate to just saved note
• Forth option leaves user in the same note for further editing
My Research Notes
Import/Export• My research note application enables user to safe guard
data from any loss caused due to various reasons
• Import from device storage
• Notes are stored in SD card or Internal Storage of the device (In MyResearchNotes folder). If the application is uninstalled, this option helps to import back to the list
• The option helps user to upload or download the notes to user’s Google Drive storage. So that data can be recovered if the device is damaged.
• Export to MS-Word option generates a document (in Open Document Format), which can be opened using users favorite word processor software

15
***