Sheet Music Unbound - CORE
191
http://researchcommons.waikato.ac.nz/ Research Commons at the University of Waikato Copyright Statement: The digital copy of this thesis is protected by the Copyright Act 1994 (New Zealand). The thesis may be consulted by you, provided you comply with the provisions of the Act and the following conditions of use: Any use you make of these documents or images must be for research or private study purposes only, and you may not make them available to any other person. Authors control the copyright of their thesis. You will recognise the author’s right to be identified as the author of the thesis, and due acknowledgement will be made to the author where appropriate. You will obtain the author’s permission before publishing any material from the thesis.
-
Upload
khangminh22 -
Category
Documents
-
view
0 -
download
0
Transcript of Sheet Music Unbound - CORE

http://researchcommons.waikato.ac.nz/
Research Commons at the University of Waikato Copyright Statement:
The digital copy of this thesis is protected by the Copyright Act 1994 (New Zealand).
The thesis may be consulted by you, provided you comply with the provisions of the
Act and the following conditions of use:
Any use you make of these documents or images must be for research or private
study purposes only, and you may not make them available to any other person.
Authors control the copyright of their thesis. You will recognise the author’s right
to be identified as the author of the thesis, and due acknowledgement will be
made to the author where appropriate.
You will obtain the author’s permission before publishing any material from the thesis.
This thesis is submitted in partial fulfillment of the requirements for the Degree of Master of Science at the University of Waikato.
July 2011
© 2011 Beverley Laundry
Sheet Music Unbound A fluid approach to sheet music display
and annotation on a multi-touch screen
Beverley Alice Laundry


i
Abstract
In this thesis we present the design and prototype implementation of a Digital
Music Stand that focuses on fluid music layout management and free-form
digital ink annotation. An analysis of user constraints and available technology
lead us to select a 21.5‖ multi-touch monitor as the preferred input and display
device. This comfortably displays two A4 pages of music side by side with
space for a control panel. The analysis also identified single handed input as a
viable choice for musicians. Finger input was chosen to avoid the need for any
additional input equipment.
To support layout reflow and zooming we develop a vector based music
representation, based around the bar structure. This representation supports
animation of transitions, in such a way as to give responsive dynamic
interaction with multi-touch gesture input. In developing the prototype,
particular attention was paid to the problem of drawing small, intricate
annotation accurately located on the music using a fingertip. The zoomable
nature of the music structure was leveraged to accomplish this, and an
evaluation carried out to establish the best level of magnification.
The thesis demonstrates, in the context of music, that annotation and layout
management (typically treated as two distinct tasks) can be integrated into a
single task yielding fluid and natural interaction.

ii

iii
Dedication
To my friends and family who convinced me that this was possible, and to
Oscar who stayed put long enough to prove them right.

iv

v
Table of Contents
Abstract ....................................................................................................................... i
Dedication ................................................................................................................. iii
Table of Contents ..................................................................................................... v
List of Figures ........................................................................................................... ix
Chapter 1 - Introduction ........................................................................................ 1
Chapter 2 - Related Work ...................................................................................... 3
2.1 Digital Music Stand Development ................................................................... 3
What is a Digital Music Stand?................................................................................. 3
Muse ............................................................................................................................... 3
Page Turning ................................................................................................................ 4
Commercial Products ................................................................................................. 6
Research Systems ...................................................................................................... 10
2.2 Annotation systems ........................................................................................... 13
Digital Ink ..................................................................................................................... 13
Sketching Music ......................................................................................................... 17
Annotating Sheet Music .......................................................................................... 18
2.3 Summary .............................................................................................................. 21
Chapter 3 - Design Considerations.................................................................... 23
3.1 Physical restraints on Musicians ..................................................................... 23
Introduction ................................................................................................................ 23
Physical Restraints by Instrument .......................................................................... 23
Table 1 – Physical restraints on musicians (Part 1 of 2) .................................. 26
Table 1 – Physical restraints on musicians (Part 2 of 2) .................................. 28

vi
Observations .............................................................................................................. 30
3.2 Hardware Considerations ................................................................................ 33
3.3 Device Options ................................................................................................... 39
3.4 Software Environment – WPF with .NET ..................................................... 42
Chapter 4 - Sheet Music Unbound .................................................................... 45
4.1 Breaking the boundary of the page ............................................................. 45
4.2 How to store/represent a bar......................................................................... 47
PDF ................................................................................................................................ 48
XAML ............................................................................................................................ 49
4.3 Breaking music into bars ................................................................................. 52
Where does a bar begin? ....................................................................................... 52
Where does a bar end? ........................................................................................... 54
Aligning bars vertically ............................................................................................. 57
Handling multiple parts ........................................................................................... 61
The XAML bar creation process ............................................................................ 68
Automation of the XAML bar creation process ................................................ 79
4.4 Fluid Layout ......................................................................................................... 80
4.5 Score Personalization ....................................................................................... 86
Choosing display size ............................................................................................... 86
Moving and hiding sections of music .................................................................. 90
Adding cues or display complete score .............................................................. 92
4.6 Some ideas on page turning .......................................................................... 94
Visualisation options ................................................................................................. 94
Initiating a page turn ................................................................................................ 99

vii
Animation speed ....................................................................................................... 99
Chapter 5 - Supporting Annotation ................................................................101
5.1 Digital Ink ...........................................................................................................101
5.2 Storing annotations across bars...................................................................101
WPF Ink Canvas .......................................................................................................103
Custom Ink Control .................................................................................................107
5.3 Creating space for annotations ....................................................................110
Corner Drag ..............................................................................................................113
Tab Style ....................................................................................................................115
Roller Blinds ..............................................................................................................117
5.4 Annotation Input Scale ...................................................................................121
Zoom to Annotate ..................................................................................................122
Zoom in Place ..........................................................................................................122
Zoom Overlay ..........................................................................................................128
Stamps ........................................................................................................................131
5.5 Finger Annotation User Test .........................................................................132
Experiment Goals.....................................................................................................132
Experimental Setup .................................................................................................132
Background Questionnaire ...................................................................................136
Tested Annotations .................................................................................................138
5.6 Finger Annotation User Test Results ...........................................................142
Participant Demographic ......................................................................................142
Software Issues Uncovered ...................................................................................142
Annotation Test Results .........................................................................................143

viii
Observations on hardware ................................................................................... 152
Summary of user test results ................................................................................ 155
Chapter 6 - Conclusions ..................................................................................... 157
Appendix A - Device Comparison ................................................................... 161
Table 2 – Device Comparison (Part 1 of 3) ..................................................... 161
Table 2 – Device Comparison (Part 2 of 3) ..................................................... 162
Table 2 – Device Comparison (Part 3 of 3) ..................................................... 163
Appendix B - Finger Annotation Test, Post-test Questionnaire .............. 165
Appendix C - Finger Annotation Test, Participant Information Form .... 167
Appendix D - Finger Annotation Test, Consent Form ................................ 171
Bibliography .......................................................................................................... 173
ix
List of Figures
Figure 1 Annotations made with the MusicReader software. From 2008 UI
evaluation (Leoné, van Dijk and van Beijnum 2008) ................................................... 9
Figure 2 Annotations drawn by finger with MusicReader 4.0 (2011) on Dell
21.5" multi-touch monitor (Actual Size) ......................................................................... 9
Figure 3 Preset annotations in MusicReader 4.0 ........................................................ 10
Figure 4 Drawing preset annotation in MusicReader 4.0 by defining bounding
box .......................................................................................................................................... 10
Figure 5 Musical alphabet for MusicMan, pen-based musical score editor. ...... 17
Figure 6 Physical restraints on musicians, observation 8. ........................................ 30
Figure 7 Physical restraints on musicians, observations 1 and 4 combined. In
answer to 1 is Never or answer two 4 is Never, then Yes. ...................................... 31
Figure 8 Physical restraints on musicians, observation 7. ........................................ 32
Figure 9 A bar of music at native resolution ............................................................... 47
Figure 10 A bar of music at 2 x native resolution ...................................................... 47
Figure 11 A XAML DrawingBrush at native size ......................................................... 51
Figure 12 A XAML DrawingBrush at 8 x native size .................................................. 51
Figure 13 Excerpt from String Quartet KV.458 (nr. 17) "Hunt" for 2 violins, viola
and cello - W. A. Mozart. Source: Mutopia -
http://www.mutopiaproject.org/cgibin/piece-info.cgi?id=277 .............................. 53
Figure 14 Bar clipping boundaries ................................................................................. 55
Figure 15 Bar 1 - stored components ........................................................................... 55
Figure 16 Bar 8 - stored components ........................................................................... 56
Figure 17 Bars 13 and 14 musical content bounds ................................................... 57
Figure 18 Bars 13 and 14 with extended ViewBoxes ................................................ 60
Figure 19 Sample full score layout ................................................................................. 62
Figure 20 Structure of a score block with three parts............................................... 66

x
Figure 21 Two lines of full score. Final bar block bounds (ViewBoxes) for each
part are indicated in orange ........................................................................................... 67
Figure 22 One page of a score imported into Microsoft Expression Design ..... 69
Figure 23 Copy the content of each bar into its own separate document ........ 70
Figure 24 Violin 1 layer content selected..................................................................... 71
Figure 25 Exporting bar as a XAML WPF Resource Dictionary grouped by
Layers .................................................................................................................................... 72
Figure 26 Music reflows to fill page width ................................................................... 80
Figure 27 Original score PDF justified by LilyPond ................................................... 81
Figure 28 Violin 1 part displayed in experimental software system with
application window width set to approx A4 size ....................................................... 82
Figure 29 Music reflowed to fit page with each line scaled to fill all remaining
space ..................................................................................................................................... 84
Figure 30 Section of music magnified .......................................................................... 87
Figure 31 Start Pinch Gesture - Touch bar with two fingers .................................. 88
Figure 32 Pinch out gesture - Move fingers apart .................................................... 88
Figure 33 When pinch distance reaches threshold, bar is scaled up ................... 88
Figure 34 Consecutive bars at slightly different magnifications ............................ 89
Figure 35 Section of Violin 2 part with Violin 1 part displayed over three bars 93
Figure 36 Page turning, Booklet visualisation ............................................................. 95
Figure 37 Page turning, Paper Stack visualisation ..................................................... 96
Figure 38 Page turning, Paper Strip visualisation ...................................................... 98
Figure 39 Annotations created on InkCanvas overlays .......................................... 103
Figure 40 Annotation Clipping 1 .................................................................................. 104
Figure 41 Annotation on an InkCanvas with ClipToBounds off ........................... 104
Figure 42 Reflowed annotation on an InkCanvas .................................................... 105
Figure 43 Annotations created across tileable custom ink control ..................... 110
Figure 44 Test application for line spacing techniques .......................................... 111

xi
Figure 45 Line spacing demonstration application with Corner Drag controls
...............................................................................................................................................113
Figure 46 Touch and drag action controls the margin size ..................................114
Figure 47 Line spacing demonstration application with Tab Style controls .....115
Figure 48 Tab Style controls close up .........................................................................115
Figure 49 Sample application with Roller Blinds controls for line spacing ........117
Figure 50 Expanding the top margin with Roller Blind controls ..........................118
Figure 51 Expanding the bottom margin with Roller Blind controls...................118
Figure 52 Annotatable space created by expanding margins .............................119
Figure 53 Annotation created on bar zoomed in place ........................................123
Figure 54 Annotation created on zoomed bar, scaled back into place ............123
Figure 55 Auto zoom of neighbouring bars when annotation reaches boundary
...............................................................................................................................................125
Figure 56 Auto zoom of left hand neighbour pushes entire line to the left ....126
Figure 57 Magnified last bar of a line is clipped at the boundary of the
application window ..........................................................................................................126
Figure 58 Zoomed music clipped off bottom right corner of page ...................127
Figure 59 Zoomed overlay ready for annotation ....................................................128
Figure 60 Annotations created on the overlaid view ..............................................129
Figure 61 Annotations copied to the underlying music after the overlay is
dismissed ............................................................................................................................129
Figure 62 Annotations drawn over a page break ....................................................130
Figure 63 Stamp creation overlay ................................................................................131
Figure 64 Inserting a stamp by touch and drag from the list of available stamps
...............................................................................................................................................131
Figure 65 Finger annotation user test application screenshot .............................133
Figure 66 Finger annotation user test - result rating ..............................................135
Figure 67 Typeset bowing mark annotations sample .............................................139
Figure 68 Typeset hairpin crescendo and decrescendo annotations sample ..139

xii
Figure 69 Typeset slur and tie annotations sample ................................................ 139
Figure 70 Typeset textual annotations sample ......................................................... 140
Figure 71 Rendered glasses annotation sample ...................................................... 140
Figure 72 Typeset musical notes annotation sample ............................................. 141
Figure 73 Annotation sample with visible scroll bar error. A users‘ attempt at
‗Text and Dynamics‘ annotation at zoom level 8. ................................................... 143
Figure 74 Users' satisfaction with their final annotations at each zoom level .. 145
Figure 75 Users' rating of ease of drawing at each zoom level .......................... 147
Figure 76 Average number of attempts made at annotation copying for each
zoom level .......................................................................................................................... 148
Figure 77 Percentage of satisfactory annotations for each zoom level. Grouped
by users' finger width ...................................................................................................... 149
Figure 78 Percentage of final annotations rated as satisfactory, grouped by
sheet music experience for each zoom level. ........................................................... 150
Figure 79 Percentage of final annotations rated as satisfactory, grouped by
previous experience annotating physical sheet music. .......................................... 151
Figure 80 Percentage of final annotations rated as satisfactory, grouped by
previous experience annotating on a tablet or touch screen. ............................. 151
Figure 81 Phantom touch detected when hand gets close to the screen. A
users‘ attempt at ‗Text and Dynamics‘ annotation at zoom level 1 (actual size).
.............................................................................................................................................. 152
Figure 82 'Serif' like irregularities on annotation strokes. A users' attempt at
'Bowing Marks' at zoom level 1 (Actual Size) ........................................................... 153
1
Chapter 1 - Introduction
In many practice and performance situations physical sheet music can be
difficult to use. Imagine a musician standing on an open air stage with wind
blowing. How do they cope?
It is not uncommon to see musicians struggling with loose pages, maybe using
clothes pegs to keep pieces of music on their stand or using tape to combine
pages together into elaborate structures with flaps and fold-outs carefully
arranged to reduce the number of page turns they have to make.
Printed music is also expensive. Orchestras must purchase and store their
music, or rent it at significant expense. In either case great care must be taken
to keep track of all the separate instrumental parts. Musicians‘ annotations and
notes must be drawn in pencil and all trace erased before returning their
music.
Just as in other domains of document management, digital technology has the
potential to alleviate much of the difficulty experienced using sheet music.
Researchers have coined the phrase Digital Music Stand for a device that
provides this enriched digital capability to musicians. Commercial systems are
now also available. In this project we develop a Digital Music Stand with a focus
on fluid display of music layout and annotation support.
We start this thesis with a survey of commercial and research systems. The
survey identifies annotation support as an area that is underdeveloped. In
contrast, annotation of electronic text documents has received significant
attention but resulting advances have not been applied to annotation of
musical documents. This is because music annotations present specific
challenges of their own—such as the need to flow the music to make space for

2
an annotation, and the dependence of musical annotations on fine detail and
placement. These are issues we seek to address in this work.
Technology options are rapidly changing. In Chapter 3 we look at the physical
constraints imposed on musicians by their instruments, and explore available
technology options with respect to their appropriateness to a musician‘s
working environment. From this, touch screens that are medium to large in size
and high resolution are identified as a technology that is well aligned for use as
a Digital Music Stand that supports annotations. Touch screens are now
available at reasonable cost. Many people are already familiar with the use of
touch technology in the form of smart phones, so there is good reason to be
optimistic that musicians would be willing to try it in new contexts.
Chapter 4 details our work on reflowing music. It presents the development of
a flexible software architecture for representing music, such that it can be
scaled and reflowed smoothly. This provides a platform on which we can
experiment with annotation, the details of which are given in Chapter 5. This
chapter presents the design and implementation of a touch based annotation
system tailored to musicians‘ needs, grounded by the data reported in the
literature on musicians‘ annotation behaviour when working with physical sheet
music.
While there are many advantages to using touch screen technology, the low
precision of touch input and the difficulty of precise placement could
significantly impact a musician‘s ability to annotate through this medium. We
use a zoomed annotation input mechanism to compensate for this issue, which
we evaluate through user testing, also presented in Chapter 5.
The thesis concludes in Chapter 6 with a summary of our findings and details
of future work.
3
Chapter 2 - Related Work
Digital sheet music display and creation is a wide and varied area of research.
This chapter provides some background in two key areas that form the
foundation for this research project: digital music stand development, and
annotation systems.
2.1 Digital Music Stand Development
What is a Digital Music Stand?
At its most basic, a Digital Music Stand is a system which displays digital sheet
music files. It is a tool for musicians to manage and access their music
collection without the need for bulky paper manuscripts. Features of the Digital
Music Stand can include: repertoire management (through an underlying
database or digital library), composition and editing tools, automatic score
following, hands free page turning, networking for group playing, audio
recording and playback, annotation facilities, and automatic accompaniment.
Though the individual features may vary, the core idea remains the same – a
digital music stand is a tool to help musicians view and interact with their music
collection. It should provide all the affordances traditionally provided by
physical printed scores and enhance the musician‘s experience in ways that
only digital media can.
Muse
The first exploration of the concept of the Digital Music Stand came in 1996
with Muse (Graefe, et al. 1996). This design project, though never actually
implemented in hardware, resulted in a detailed description of a digital music
stand to support musicians rehearsing and performing as part of a symphony
orchestra. The design and feature set was created in collaboration with

4
members of the Pittsburgh Symphony Orchestra through an iterative process
of research, observation and interviews.
The Muse work investigated the sort of features that orchestral musicians‘
desire in a digital music stand, and resulted in some key interface guidelines
that would make moving to a digital system acceptable and natural for them.
The final Muse design was a battery powered, wireless device with two 9‖ x 12‖
high resolution LCD touch screens and a support stand. The software features
were:
- A music library
- Manual or automatic page turning with indexing
- Inter-symphony communication capabilities
- Stylus-based onscreen annotation
- Ability to view any other instruments‘ part in a given score
- A pitch generating tuner
- A Metronome with audio and visual feedback
- Notes space (for personal notes, rehearsal announcements etc.)
As the Muse was never fully implemented, the practicality and usability of the
interface was never fully tested. The Muse design does however provide an
overall picture of what musicians think that they would like out of a digital
music stand and has inspired further research and development in the area.
Page Turning
Some of the ideas in Muse are common to a variety of digital document
management problems (library management and onscreen annotation for
example) although specialist editing and display software is required for music
content. A task that is specific to the music stand, however, is page turning.
This has been addressed by a number of researchers.

5
Working with digital sheet music, the phrase page turning is often used in a
wide scope. Digital sheet music comes in many different formats. These digital
representations of sheet music need not be restricted to the page-based
structure of a printed score. On the digital music stand, the amount of music
displayed at any given time is limited by screen size. In most cases, there is
more sheet music in a full score than will fit on the display. For the purposes of
this report, page turning is used to describe any method of navigating through
a piece to reveal off-screen music.
Page turning is one area where digital sheet music has a clear advantage over
traditional paper scores. Orchestral musicians in particular note that page turns
with printed scores are a nuisance. They are noisy and force musicians to stop
playing momentarily, sometimes causing audible gaps in the music (Graefe, et
al. 1996). Digital page turns can be silent and rapid. With digital sheet music
there is potential for automation of page turns (Bellini, Nesi and Spinu 2002) or
at least simplifying the physical action required by a musician to consistently
and clearly navigate from page to page. This could be as simple as adding a
foot pedal to give musicians hands free control of page turns.
A feature of the digital music stand requested by orchestral musicians –
particularly conductors – is some form of networked page turning where, for
example, the conductor could indicate a place in the score and draw the
orchestral players‘ attention to that point by forcing each players‘ music to turn
to that place (Graefe, et al. 1996), (MacLeod, et al. 2010). It is important for the
musicians to understand the context of the pages of music currently displayed
on their stand in relation to the whole piece. Instantaneous jumps from page to
page may break this understanding and so careful animations or visualisations
are a necessary addition to page turns of this nature (Bell, et al. 2005)
(McPherson 1999).

6
Commercial Products
As computer and screen technology has improved, several commercial digital
music stands, similar in features to those outlined in the Muse design, have
appeared. These include complete systems, with custom hardware preinstalled
with sheet music management software, as well as software only systems
designed to run on existing tablet PCs or other touch capable computers.
eStand
The eStandi offers software only, or complete packages for musicians and
educators. The eStand software can be purchased in four different
configurations. The simplest option is a sheet music reader that displays one
page of music at a time, with manual page turning operated via foot pedal,
keyboard or on-screen touch controls. The software maintains a library of ESF
files (eStand format files – this is a custom format developed for use with
eStand).
The most complete eStand software will display up to three pages of music
side-by-side. It has added network support and an annotation system, allowing
groups of musicians to collaborate on annotations and synchronise page turns.
The music library has enhanced browsing and management features and
supports music imported in different formats, including PDF, BMP, TIFF and
JPEG files. It also has a software metronome and tuning system.
The eStand software can be purchased alone (for use on Tablet PCs or with
other existing touch screens) or preinstalled on a choice of touch screen all-in-
one computers ranging in size from 15‖ to 20‖. The all-in-one computers listed
all have resistive touch screens allowing users to interact with the eStand
system with either finger or stylus.

7
MusicPad Pro
MusicPad Pro is a complete hardware and software system created by
FreeHand Systems.ii The MusicPad Pro is a 12.1‖, 1024 x 768, TFT LCD backlit
display capable of displaying one page of sheet music at a time. The battery
powered display comes with a support stand, and an external foot pedal is
available for hands free page turns.
Like the eStand, the MusicPad Pro stores and manages the user‘s sheet music
collection. Users can scan and import their existing sheet music or purchase
digital sheet music from the FreeHandMusic store. Music bought from the
FreeHandMusic store has embedded MIDI information that gives users
additional features: score transposition and play-back with highlighted score
following. It also has an annotation system and notes system.
SamePage Performance Station
The SamePage performance station,iii developed by Corevalus Systems, is part
of a three stage event planning system for worship services, events and other
performances. The complete system starts with an online planning system with
calendar and music library management. During an event, each musician has
their own SamePage performance station which displays their music and keeps
them informed of programme order and progression. When used in
conjunction with SamePage audio mixing equipment, the performance station
also gives selected users a full audio mixing interface.
Each SamePage performance station maintains a sheet music library locally as
well as accessing an online music database (this database is usually maintained
by the overall event organisers). The performance station has a 19‖ NEC touch-
screen LCD monitor mounted on a heavy duty, collapsible stand. The large
screen allows up to two pages of sheet music to be displayed side-by-side
while still leaving space for an event programme and onscreen controls to be
displayed at the side.

8
Features of the sheet music display function of the performance station are
similar to those of the eStand and MusicPad Pro. The performance station
supports annotation and note taking. Users can annotate by finger, draw
standard shapes or type text. Theses annotations can be shared with other
musicians through the networked performance stations. Page turns are
facilitated via the touch screen or using an external three button foot pedal.
MusicReader
MusicReaderiv is a software package developed by Leoné MusicReader in The
Netherlands. The MusicReader system has similar features to the eStand and
MusicPad Pro. The software is available for both Windows and Mac computers.
It is designed for use with pen or touch screens and has recently been released
as an iPad application.v
First released in 2008, MusicReader is the result of ongoing research and
development. A user evaluation of the MusicReader interface was published in
2008(Leoné, van Dijk and van Beijnum 2008), giving some insight into the
design decisions, benefits and limitations of the software.
One limitation uncovered during the evaluation, that is particularly relevant to
this research project, was that musicians found it difficult to produce readable
annotations on some of the screens used in the test. The problem was not as
prevalent on screens that accepted both finger touch and stylus input (those
with a digitizer pen).
Since the 2008 publication, some improvements have been made to the
annotation system. Figure 1 is taken from the 2008 publication and shows
annotations made with the MusicReader software on touch screen hardware
available at that time. Running the most recent version of MusicReader (4.0)
with a modern Dell 21.5‖ multi-touch monitor yields a slightly better result, as
shown in Figure 2. With the improvement of screen technology, the ease of

9
drawing freehand annotations by finger has increased, but annotations are still
harder to draw consistently on screen than with pencil on paper.
Figure 1 Annotations made with the MusicReader software. From 2008 UI evaluation (Leoné, van Dijk and van Beijnum 2008)
Figure 2 Annotations drawn by finger with MusicReader 4.0 (2011) on Dell 21.5" multi-touch monitor (Actual Size)
A solution suggested by Leoné et al. was to use predefined symbols in place of
freehand annotations and as of MusicReader 4.0, a collection of predefined
annotations is also available (The set of available predefined annotations is
shown in Figure 3). These are positioned on the displayed sheet music by
touching and dragging to create a bounding rectangle, as shown in Figure 4.

10
Figure 3 Preset annotations in MusicReader 4.0
Figure 4 Drawing preset annotation in MusicReader 4.0 by defining bounding box
Research Systems
Espresso Digital Music Stand
Espresso Digital Music Standvi is the result of the collaborative research of a
group of musician/programmers from the US, UK, France and New Zealand.
Several research projects out of the University of Canterbury have focused on
developing and testing elements of the user interface.

11
Two honours projects from the University of Canterbury, Blinov (2007) and
Pagwiwoko (2008) focus on page turning systems for Espresso, following on
from an earlier study by McPherson (1999). These projects look specifically at
animation systems for single-page and multi-page transitions. Introduction of
some animation or visualisation into the digital page turn is necessary to make
it clear to the musician when the action has taken place. This is particularly
important if a page turn is triggered by an external source rather than the
musician themselves.
A common choice for navigation though a document in traditional GUI editing
systems and document readers is scrolling. Bell et al. (2005) and McPherson
(1999) trialled both horizontal and vertical scrolling systems to display sheet
music to musicians during a short sight-reading exercise and found that
automatic scrolling of music during playing was not favoured. This seemed to
be because the constant movement of the music made it difficult for the
musician to keep track of their current position in the score. This problem
would be intensified in an orchestra as musicians are required to glance back
and forth between their music and the conductor. In this situation, it is
important that they can consistently and quickly return to their place in the
music. Constant movement of their music, by a source outside their control,
would make that very difficult.
The more usable systems in the trial had the distinction that once each line of
music was displayed on screen, it stayed in the same place. As the musician
progressed through the music, rather than scrolling the old music out of the
way, the next portion of music is rendered over the top of the old. Some
visualisation techniques were necessary to make it clear to the player what was
old and what was new music, but the consistency of music position made it
easier to use the system.

12
Hitachi Engineering Co., Ltd.
Hitachi Engineering Co., Ltd. began to research and develop a performer-
friendly electronic music stand in 2000 (Kosakaya, et al. 2005). Their system is
built using a 14‖ tablet PC mounted on a support stand, with an attached foot
pedal for page turning.
Seven feature concepts were identified for their music stand that warranted
further development and evaluation.
1. Page-turning schemes using foot switch, hand switch or touch switch
2. Support for writing, storage and reading of sheet music
3. Using a backlit display to allow performances to be made in the dark
4. A Page-turning scheme based on time delays and variable page refresh
ratios
5. Easier management of sheet music content
6. The ability to send page turning commands and conductor‘s comments
to multiple performers simultaneously
7. A scheme for splitting sheet music content. i.e. starting with a score and
producing parts for individual performers
Their 2005 publication (Kosakaya, et al. 2005) covers development and
evaluation of Concepts 1-5.
Due to the limited screen size of the tablet PC used in the Hitachi Engineering
System (14‖), it was decided to limit sheet music display to one page at a time.
To allow the performer to move smoothly from reading the bottom of one
page to the top of the next (as would be the case in a two page display),
Kosakaya et al. implemented a split page turn scheme. It their system, when a
page turn is triggered, the top portion of the screen updates to show the first
portion of the next page, while the bottom portion remains unchanged. After a
time delay, the bottom portion of the screen updates to show the rest of the

13
new page. This allows the performer to trigger a page turn slightly before they
reach the end of a page.
The Hitachi system was evaluated and tuned with help of the Hitachi Group
Symphony Orchestra and specialist musicians. The system gives the user
control of two parameters: the portion of the page initially updated (between
50-100%), and time for which the system should delay before updating the
remaining portion (between 0-5 seconds). It was found that more professional
musicians preferred a large initial turn ratio and a short delay time, where as
more amateur musicians favoured the opposite. This was interpreted to
indicate that the more professional musicians tend to read further ahead in the
music.
The Hitachi Engineering System has also been tested in live performances.
Musicians used the electronic music stand successfully for a classical concert
(Kosakaya, et al. 2005). Due to the backlit displays, they were able to complete
the concert in the dark, allowing for dramatic lighting effects to be used during
the performance without affecting the musicians‘ ability to read their music.
2.2 Annotation systems
Annotation is simply defined as ―a critical or explanatory note or body of notes
added to a text‖,vii or more generally, ―extra information associated with a
particular point in a document.‖ Musicians typically enhance their printed music
with pencil annotations. This section covers two aspects of annotation systems
relevant to this research: the technology for drawing free-form annotations on
digital documents; and the nature, form and purpose of annotations made by
musicians.
Digital Ink
Digital annotations can take different forms, including typed notes, highlighting
and more relevant to this research, digital ink. Digital ink refers to free-form
14
sketches or handwritten text generally input through a pen-based interface. In
fact, published research around systems using digital ink covers almost
exclusively pen-based systems. Pen-based systems are those that accept input
via stylus on tablet or touch screen (as opposed to those that are touch
operated).
Benefits of free-form digital ink
Schilit et al. (1998) explored the use of free-form digital ink input as a tool for
active reading of text documents. In this context, digital ink annotations
commonly include highlighting, underlining and hand written notes. The
benefits of pen/stylus input free-form digital ink over typed annotations and
mouse based actions for this type of interaction were reported as:
- Picking up a pen/stylus to make an annotation is a natural action that
requires less forethought than selecting text with a mouse and issuing a
command.
- Writing with a stylus on a tablet or screen is natural to those used to
writing with pen on paper.
- Ink annotations are visually separate from the underlying document,
where as typed annotations tend to blend in.
- ―An essential aspect of ink on paper is its lack of modality: you can write
anything you want, anywhere on a page in any order.‖
(Schilit, Golovchinsky and Price 1998)
Digital documents with digital annotations have advantages over physical
documents with pen annotations. One key advantage of digital annotations, in
general, is that they can be logged, categorised and indexed making them
searchable, where physical annotations tend to get lost in piles of paper. Many
research projects explore ways of tagging and storing digital annotations. This
process is difficult for free-form digital ink annotations specifically for two
reasons: firstly, each ink annotation is created as a set of one or more pen

15
strokes, requiring a system to recognise which strokes belong together
(Shilman and Wei 2004); secondly, due to the freedom of placement attained
through this medium, the point in a document with which an ink annotation is
associated with is not always clear. This can become a problem—particularly if
a document is reflowed—as annotations can become disconnected from their
intended target (Bargeron and Moscovich 2003).
Cattelan et al. (2008) make the observation that a digital ink annotation
contains more data than just its stroke shapes. Attributes such as colour, line
thickness, stroke ordering, position, creation time and author can be logged
and stored with each annotation. In their work Cattelan et al. developed a
system to store this extra information and a variety of display mechanisms to
allow review and playback of sets of annotations based on their recorded
characteristics.
Limitations of digital ink annotation systems
The goal of digital ink input systems is to mimic the action of writing with pen
on paper. However, current pen and touch input hardware is not yet capable
of making this a reality. Argawala and Shilman (2005) identify five features of
current touch hardware that contribute to this:
- Digital screens are smooth and slippery compared with paper.
- The visual resolution of screens is less than that of paper and the input
resolution of pen and touch is usually smaller again.
- Digital touch devices often have screens that are smaller than an A4
page.
- Protective layers of glass or plastic on touch screens create a parallax
between the tip of the pen/stylus and the ink created.
- Pen/Touch computing devices are often too large and heavy to be
positioned in the same way a piece of paper can be.

16
These factors combined make it difficult to interact with a pen-based system
with the same accuracy and finesse that is achieved with physical pen and
paper.
―Digital ink annotations are usually larger and sloppier than real ink
annotations on paper‖ (Agrawala and Shilman 2005)
Agrawala and Shilman developed a software system to combat the problem of
input resolution for pen-based ink annotation on documents. With their
system, users select the area of a document that they wish to annotate, and an
overlaid input box containing a magnified version of that region is displayed.
The user draws their annotation in the magnified overlay which is subsequently
shrunk back into the underlying document. Agrawala and Shilman found that
magnifying the input region to twice normal size was sufficient for users to
successfully create tidier annotations in a text document using a stylus.
Informal trials of their system found this interface most useful when writing text
or edit marks on a document. Annotations that involved larger strokes, such as
underlining and circling portions of text, were just as easy to create at actual
size.
The problem of input resolution is compounded when using finger instead of
stylus or pen input. Fingers are blunt instruments when compared to styli. They
occlude more of the screens surface, making accurate placement difficult. This
is referred to by Voida et al. as the ―fat fingers‖ problem (Voida, et al. 2009).
Special care must be taken when designing interfaces that are to be operated
by finger to create controls that are large enough for users to see and interact
with. Annotation and digital ink creation by finger tends to be even ‗larger and
sloppier‘ than that input by stylus as the natural control gained by the
familiarity of a pen-like input device is lost.

17
As remarked by Isenberg et al. (2006), even on large, high resolution displays
annotations made by finger look clumsy and out of place if displayed at their
input resolution. To increase the appearance quality of finger written
annotation in their tabletop display software, annotations are created on sticky
notes which are then shrunk dramatically for final display.
Sketching Music
Sketched input has also been used in music creation software. Drawing musical
symbols is particularly difficult at the low resolutions afforded by pen-based
input hardware, as musical symbols by nature are small and depend heavily on
accurate placement. Two systems addressed the problem of low resolution
input by creating their own collections of simplified symbols and gestures for
users to sketch in place of the standard Western notation symbols.
In the Music Notepad system developed by Forsberg et al. (1998), notes are
input as one stroke gestures. This removes the need to connect multiple
strokes or draw small closed shapes.
The MusicMan system of Poláček et al. (2009) which was developed for use on
a PDA develops this idea further. Their system has its own alphabet of easily
drawn symbols, shown in Figure 5.
Figure 5 Musical alphabet for MusicMan, pen-based musical score editor.
18
Whilst these systems show a viable mechanism for coping with the clumsiness
of the available input devices, they have the disadvantage of requiring users to
learn their symbol sets and of limiting input to notation for which symbols have
been defined. This approach is therefore not suitable for entering freeform
annotations.
Annotating Sheet Music
The annotations commonly created on sheet music are different to those for
text documents. In order to build a system to support annotation of sheet
music specifically, it is important to understand the characteristics of these
annotations.
In 2006, Winget carried out a qualitative research study into annotation
behaviours of musicians (Winget 2006). As part of this study, Winget collected,
analysed and categorised annotations drawn on musical scores by classical
musicians across different skill levels, in several different groups and orchestras.
Interviews with musicians from the groups involved were also carried out to
gain insight into the reasoning behind the annotations created. Three key
questions answered by her study were:
Why do musicians annotate?
A musical score defines the notes and timing of a piece of music as well as
some of the composer‘s intentions as to the dynamics and flow of the piece.
When a group plays, they introduce nuances in the time, dynamics and feeling
of the music, which they must all understand and remember. Annotating their
music records some of these elements, or at least provides reminders, to
ensure that the group as a whole can consistently reproduce their
performance.
As the semi-professional concertmaster put it, ―the whole point of making
annotations is to ensure consistency. You want everyone to know what

19
everyone else is doing during performance, so you have to do the same
thing every time you perform. Annotations help ensure that consistency.‖
(Winget 2006)
When do musicians annotate?
Winget‘s study explored annotation behaviour over the entire process of
preparing a piece of music for performance, from when the sheet music is first
received, through to just before it is performed. This process was divided, and
annotation behaviour assessed, across three phases:
- Early rehearsal
This is the time that individual musicians spend learning the
technicalities of a piece and become familiar with its mechanics. It
generally occurs in private, before the group comes together to
practice. Musicians reported in interviews that they did not annotate
heavily during this phase, and that any annotation that did occur was
generally limited to basic technical notes such as breathing marks or
fingering instructions. Some amateur musicians skip this phase all
together.
- Mid rehearsal
In this phase, musicians meet as a group and begin to bring the piece
together. This was observed as the phase in which the most annotations
occurred. This is likely because it was the time where musicians first
collaborate with other group members. During this phase, annotations
are made to remind musicians of decisions that the group has made as
to how the piece will be played. Rehearsals at this stage stop and start
as things are tried out and decisions are made. This leaves time to make
annotations.
- Pre performance

20
This is the last phase of preparation, where the group is comfortable
with the technicalities of the piece and has generally learned to work
together consistently. Rehearsals during this phase mainly involve
playing the piece all the way through. During this phase, little or no
annotation was reported to take place.
What annotations do musicians create?
In her study, Winget categorises annotations in two ways: by purpose and by
mode.
- Purpose
An annotation‘s purpose is said to be technical, technical-conceptual or
conceptual. This categorisation roughly corresponds to the ambiguity of
the annotation or how dependent it is on personal interpretation by the
musician. A technical annotation is one whose meaning is certain, such
as a bowing or articulation mark, whereas a conceptual annotation is a
more personal representation of a concept, such as phrasing or
emotive marks. Technical-conceptual annotations lie somewhere in
between. Annotations in this category include dynamic markings and
similar annotations that convey information as to how the music should
be played, without giving the specific technical instructions on how to
do so. Winget found that the vast majority (70-81%) of annotations
created could be classed as technical and that the majority of those
technical annotations were related to bowing (this is partly due to the
large number of string players included in the research).
- Mode
An annotation‘s mode is its physical representation, classed as textual,
symbolic or numeric. Winget found here that 72% of annotations were
symbolic, 16% numeric, and the remaining 12% textual.

21
Annotations are then further classified by type or specific purpose. Some
examples of type classification are: bowing, articulation, attentive and
navigation.
Winget‘s study gives a good overall picture of how and why classical musicians
interact with their music through annotation. The insights gained lead well into
the development of a digital annotation system specifically targeted to musical
annotations.
2.3 Summary
Since its first appearance as a design concept in the Muse project, research
and development of the Digital Music Stand concept has lead to a number of
experimental and commercial systems tailored to the needs of musicians.
Features identified as useful in these systems include:
- Music library management and part distribution.
- Page turning both manual and networked.
- Score personalisation through display size and layout management.
- Annotation creation and sharing.
Some features apply to digital document management in general. Two that are
highly specific to music are page turning and layout management. Studies of
page turning identify the importance of speed, musician control and
maintaining the spatial location of music elements.
Research into annotation of text documents has identified the appropriateness
of free-form sketch input. But this form of input has not been studied in the
digital music stand context. Annotation of music has much in common with
annotation of other types of documents but also has special features. Winget‘s
analysis of the annotation behaviour of musicians gives us a picture of the
range and nature of annotation used. In particular, it shows that the majority of
musical annotations are symbolic, small and need to be placed accurately on

22
music scores. These kinds of annotations are not well supported by current
digital music stand systems.

23
Chapter 3 - Design Considerations
The physical circumstances in which musicians work impose strong constraints
on the screen displays and input mechanisms they can use. In this chapter,
physical constraints on musicians imposed by their instruments are analysed;
requirements for a music display hardware system are developed and options
for a hardware and software development environment are explored.
3.1 Physical restraints on Musicians
Introduction
Musicians‘ movements are physically restricted by their instruments. In most
situations where they would be interacting with sheet music (when practicing,
performing or annotating their scores) they are also holding or balancing their
instrument. In an orchestral setting musicians may be sitting close together
with little spare space around them in which they might safely place their
instrument. Musical instruments are fragile, expensive items and may have
sentimental value as well. Just bumping an instrument may cause it to go out
of tune even if it is not damaged. Taking care of them is important.
When developing an interactive digital music stand for musicians, it is
important to consider the physical limitations caused by their instruments. It is
no use developing a system that requires users to perform complex multi-
handed touch gestures if that endangers the safety of their musical instrument.
Physical Restraints by Instrument
The following table outlines key physical constraints placed on musicians by
their instruments. The table covers 37 orchestral instrumentsviii as well as six
other common musical instruments (the conductor has been included as an
‗instrument‘ because their movements are restricted by the need to use their
hands or baton to conduct). The instruments are sorted by orchestral section.

24
For each instrument, eight observations are made as follows:
1. Needs two hands to be played (Never/Sometimes/Always)
Does the instrument require both of the musician‘s hands to be on the
instrument to play?
2. Possibility of a spare hand while playing (Yes/No)
Restatement of 1. If answer is Never or Sometimes, then there is a
possibility that the player could play their instrument with only one
hand (perhaps only for a portion of a piece of music), leaving a spare
hand.
3. Instrument Self-supporting (Yes/No/Balanceable)
Is the instrument free standing, or does it have a stand such that it
partially balances on the ground, or on the players lap while being
played.
Some examples of balanceable instruments are: Cello (Has a spike
resting on the ground and leans against the player‘s legs), Guitar (Can
sit on the players lap, or be supported by a neck strap when the player
is standing). An example of a fully self supporting instrument is the
Piano.
4. Player’s feet are in use (Yes/No/Sometimes)
Does the player use his/her feet to play the instrument? If the
instrument has optional accessories that players use with their feet, then
Sometimes is used. An example of this is a whammy pedal for an
electric guitar.
5. Played Standing (Yes/No)
Can the instrument be played from a standing position?
6. Played Sitting (Yes/No)
Can the instrument be played from a sitting position?
7. How many hands available while not playing (1/2/1 or 2)
How many spare hands does the player have when they are not playing

25
music? If the player requires one hand to hold the inactive instrument,
then they have one hand available. If the instrument is classed as
‗balanceable‘ (from 3) then it is possible for the player to support their
instrument without using either hand, but they may prefer to keep one
hand on their instrument for safety. In this case the answer to 7 is
‗1 or 2‘.
8. Must stop playing to turn a page (Yes/No/Maybe)
Assuming that the player is using a standard music stand with a physical
printed score, and is playing alone (does not have another person
available to turn pages for them), does the player have to stop playing
their instrument in order to physically turn the page of their music?
The answer is Maybe if it is possible that the page turn in the music is
placed such that at that point in the score the player needs only one
hand on their instrument to play all their required notes. (This does not
include instances where the player has rests over the page turn and so
isn‘t playing at all).

26
Table 1 – Physical restraints on musicians (Part 1 of 2)
Instrument
1.
Needs
two hands
to be
played
2.
Possibility
of a spare
hand while
playing
3.
Instrument
self-
supporting
4.
Player’s
feet are in
use
(Never,
Sometimes,
Always)
(Yes , No) (Yes, No,
Balanceable)
(Yes, No,
Sometimes)
Conductor Sometimes Yes Yes No
Vocalist Never Yes Yes No
Woodwind
Piccolo Always No No No
Flute Always No No No
Oboe Always No No No
English Horn Always No No No
Clarinet Always No No No
Bass Clarinet Always No Balanceable No
Bassoon Always No No No
Contrabassoon Always No Balanceable No
Brass
Horn Sometimes Yes No No
Trumpet Sometimes Yes No No
Cornet Sometimes Yes No No
Trombone Always No No No
Tuba Sometimes Yes No No
Euphonium Sometimes Yes No No
Percussion
Timpani Sometimes Yes Yes No
Snare Drum Sometimes Yes Yes No
Base Drum Sometimes Yes Yes No
Cymbals Always No No No
Triangle Always No No No
Tambourine Always No No No
Glockenspiel Sometimes Yes Yes No
Tam-tam Sometimes Yes Yes No
Xylophone Sometimes Yes Yes No

27
Chimes Sometimes Yes Yes No
Instrument
1.
Needs
two hands
to be
played
2.
Possibility
of a spare
hand while
playing
3.
Instrument
self-
supporting
4.
Player’s
feet are in
use
(Never,
Sometimes,
Always)
(Yes , No) (Yes, No,
Balanceable)
(Yes, No,
Sometimes)
Vibraphone Sometimes Yes Yes No
Tubular bells Sometimes Yes Yes No
Drum Kit Sometimes Yes Yes Yes
Keyboards
Celesta Sometimes Yes Yes Sometimes
Organ Sometimes Yes Yes Yes
Piano Sometimes Yes Yes Yes
Strings
Harp Sometimes Yes Yes No
Violin Always No No No
Viola Always No No No
Cello Always No Balanceable No
Double bass Always No Balanceable No
Other
Guitar Always No Balanceable No
Mandolin Always No Balanceable No
Ukulele Always No Balanceable No
Recorder Always No No No
Electric Guitar Always No Balanceable Sometimes
Keyboard Sometimes Yes Yes Sometimes

28
Table 1 – Physical restraints on musicians (Part 2 of 2)
Instrument
5.
Played
Standin
g
6.
Played
Sitting
7.
How many
hands
available while
not playing
8.
Must stop
playing to
page turn
(Yes, No) (Yes, No) (1, 2, 1 or 2) (Yes, No, Maybe)
Conductor Yes No 2 No
Vocalist Yes Yes 2 No
Woodwind
Piccolo Yes Yes 1 Yes
Flute Yes Yes 1 Yes
Oboe Yes Yes 1 Yes
English Horn Yes Yes 1 Yes
Clarinet Yes Yes 1 Yes
Bass Clarinet Yes Yes 1 Yes
Bassoon Yes Yes 1 Yes
Contrabassoon Yes Yes 1 Yes
Brass
Horn Yes Yes 1 Maybe
Trumpet Yes Yes 1 Maybe
Cornet Yes Yes 1 Maybe
Trombone Yes Yes 1 Yes
Tuba Yes Yes 1 Maybe
Euphonium Yes Yes 1 Maybe
Percussion
Timpani Yes Yes 2 Maybe
Snare Drum Yes Yes 2 Maybe
Base Drum Yes Yes 2 Maybe
Cymbals Yes Yes 2 Yes
Triangle Yes Yes 2 Yes
Tambourine Yes Yes 2 Yes
Glockenspiel Yes Yes 2 Maybe
Tam-tam Yes Yes 2 Maybe
Xylophone Yes Yes 2 Maybe
Chimes Yes Yes 2 Maybe
Vibraphone Yes Yes 2 Maybe

29
Instrument
5.
Played
Standin
g
6.
Played
Sitting
7.
How many
hands
available while
not playing
8.
Must stop
playing to
page turn
(Yes, No) (Yes, No) (1, 2, 1 or 2) (Yes, No,
Maybe)
Tubular bells Yes Yes 2 Maybe
Drum Kit No Yes 2 Maybe
Keyboards
Celesta No Yes 2 Maybe
Organ No Yes 2 Maybe
Piano No Yes 2 Maybe
Strings
Harp Yes Yes 1 or 2 Maybe
Violin Yes Yes 1 Yes
Viola Yes Yes 1 Yes
Cello No Yes 1 Yes
Double bass Yes Yes 1 Yes
Other
Guitar Yes Yes 1 or 2 Yes
Mandolin Yes Yes 1 or 2 Yes
Ukulele Yes Yes 1 or 2 Yes
Recorder Yes Yes 1 Yes
Electric Guitar Yes Yes 1 or 2 Yes
Keyboard Yes Yes 2 Maybe

30
Observations
- The only musicians (of those listed) who can reliably perform a standard
page turn without stopping playing are conductors and vocalists. For all
other instruments, being able to turn a page without disruption to the
music, requires the page turn to be placed somewhere in the score
where they have either rests, or notes that require only one hand to
play.
Figure 6 Physical restraints on musicians, observation 8.
Yes
49%
No
5%
Maybe
46%
(8) Must stop playing to turn a page

31
- If musicians were given the option of triggering page turns by foot
pedal, the percentage of players able to consistently perform the action
increases from 5% to 86%. The instruments that still restrict users‘ hands
and feet are: Drum Kit, Celesta, Organ, Piano, Electric guitar (when used
with pedal), Keyboard (when used with pedal).
Figure 7 Physical restraints on musicians, observations 1 and 4 combined. In answer to 1 is Never or answer two 4 is Never, then Yes.
Yes
86%
No
14%
(1 & 4) Instrument leaves one foot or hand
available while playing

32
- Only 44% of the instruments surveyed leave players with two spare
hands while they are holding their instrument but not playing (e.g.
when an orchestral player is sitting with their instrument, waiting to
begin a performance or rehearsal). This is often the state a musician is
in when they are annotating their music. It is therefore not advisable to
develop an annotation system that requires the player to interact with
two hands as most musicians will not be able to do so. However, all
instruments allow the musician free use of one hand. So it would
appear that an annotation system that can be operated with a single
hand would be usable.
Figure 8 Physical restraints on musicians, observation 7.
1
44%
2
44%
1 or 2
12%
(7) How many hands available while not playing

33
3.2 Hardware Considerations
Screen size and resolution
For viewing and interacting with sheet music, screen size and resolution is key.
Traditional sheet music is generally printed at A4 size or bigger. The more
music that is displayed on one page, the fewer page turns are required for the
whole piece. Musicians also sit quite far back from their music, compared to
someone reading a novel for example. This is because their instrument
generally sits between them and their music stand. To ensure that their music
is easily readable from this distance (between 0.5 and 1.0 metre), it must be
displayed at a reasonable size. Printed sheet music gives us a good guideline
as to the appropriate display size, achieving an acceptable balance between
quantity of music per page and legibility.
Tests conducted by Bell et al. determined that though musicians can cope with
reading small music quite well, they prefer ―normal‖ size or larger (Bell, et al.
2005). For the test, musicians were asked to find errors in unfamiliar music
presented at three different sizes. With this task, much concentration was
required, as it was necessary to study the music in great detail. Bell et al.
suggest that as musicians become more familiar with a piece of music, they
may prefer to display it at a smaller size so that more music can fit on their
display at a time, therefore reducing the number of page turns. Having a
display with a large screen size and high resolution would make this practical,
as well as facilitating music display at ―normal‖ or large size when required.
McPherson, when testing page turning techniques with a small group of
musicians (McPherson 1999), observed that a 17‖ monitor was too small for
evaluating a page turning system that displayed two pages of music side by
side. Several of the musicians taking part in the trial commented that the size
of the music made it difficult to read with this method and that their rating of
the page turning method was influenced by this.

34
From this we conclude that a digital sheet music display should ideally have a
large enough physical screen size to display each page of music at full A4 size
or bigger. The screen resolution should also be as high as possible to ensure
that music rendered on screen at full size is crisp and legible and also to allow
for more music to be displayed at a smaller size if required.
Viewing angle
In an orchestral situation particularly, musicians often share music stands with
other players. The music stand is then placed even further away from the
musician, both to make room for their instrument, and to assure that it is in
view of all players that need to read from it. It can also be placed quite low in
relation to the musicians‘ eye-line so that it does not block their view of the
conductor (or other players in the group). It is therefore important for any
digital music stand to be viewable from a distance and from a moderate angle
(up to 40° from the normal) to the left, right or above.
Input mechanism (stylus/finger)
Touch screen technology exists in several different forms. The three most
common technologies used in commercial touch screens are:
- Resistive touch: Touch is detected through physical pressure on the
screen‘s surface. Devices with resistive touch screens can be operated
by fingertip or using any hard pointing device, like a plastic stylus. A
significant amount of pressure is required when using a fingertip.
- Capacitive touch: the surface is composed of an insulator layer, e.g.
glass, and coated with a transparent conductor. Touching the surface
with an electrical conductor, creates a distortion in the surface‘s
electrostatic field. This distortion is tracked and a touch is detected in
that place. The human body is an electrical conductor, so touching the
surface with a naked fingertip will trigger a touch action to be detected.
A plastic stylus will not work on a capacitive touch screen. Capacitive

35
styli are available, though they tend to have a wider surface area than a
standard stylus. (A typical device has a blunt tip approximately 5-8mm
across.)
- Optical Touch: These screens have cameras embedded in their frames.
An infrared back light is placed in the field of view of each camera.
When the screen is touched, a shadow is created in the view of each
camera as the touch device blocks the infrared backlight. These
shadows are tracked and the size and location of the touch is
calculated. Depending on the screen, touches may be detected using
this method without the user physically coming into contact with the
screen‘s surface. Hovering a finger just above the surface (1-2mm away)
will have the same effect as a touch. Strictly speaking, therefore, these
optical ‗touch screens‘ are not really touch devices as contact with the
screen surface is not measured. However, they are normally marketed
as touch screens as they provide similar affordances. Seeing as physical
contact is not even necessary, these devices can be operated with a
very light ‗touch‘. Optical touch screens can be used with any pointing
device. The camera resolution is sufficient to pick up a fine pen tip.
Using a stylus gives greater accuracy than using a fingertip. This is due the size
of the tip of the stylus being generally much smaller than a fingertip. This
smaller touch surface can be tracked more accurately on the screen. Using a
fingertip to interact also has the disadvantage over a stylus of bringing the
user‘s hand closer to the screen. The user‘s hand can then easily block
important pieces of an interface from view, making it difficult to accurately
interact. On a capacitive or optical touch screen, the hand can also trigger
unintended touch events; without even a warning from the sensation of touch,
in the case of the optical touch screen. When it comes to writing on a touch
screen, the stylus has the clear advantage that it feels and acts like a pen or
pencil. We are much more used to writing with a pen than with the tip of a

36
finger and this familiarity leads to greater accuracy. Again though, on a
capacitive or optical touch screen, the user must hold their hand clear of the
surface. This loses some of the familiar experience of using a pen on paper,
where accuracy is easily achieved because the hand can be braced against the
paper.
Fingertip interaction has the major advantage that no extra equipment is
needed. A user can instantly interact with the screen without searching for a
stylus. Finger touches are also silent, where a hard stylus can make a disruptive
clicking noise on each contact.
Given that both fingertip and stylus interaction have advantages and
disadvantages, for the purposes of experimenting with annotation on sheet
music, a screen that accepts both fingertip and stylus interaction seems
appropriate.
Single vs Multi-Touch
Screens that handle multiple simultaneous touch points are becoming more
common. Many smart phones for example now have multi-touch screens that
allow users to interact with applications through multi-finger gestures. Using a
two-finger pinch gesture to zoom is a common UI control in applications
designed for these and other touch screen devices, for example.
A system relying solely on single touch interaction is limiting in the number of
distinct actions that can be detected. A multi-touch screen would increase the
number of simple gestures available for experimentation.
As discussed, musicians are limited in their ability to free their hands to interact
with their music display. Big gestures, requiring two handed operation would
not be easy for a musician to perform. Simple multi-finger gestures like pinch
however, may be possible, assuming the musician was able to free one hand
for interaction. It is reasonable to assume that this is the case when making
37
annotations at least, as when annotating a traditional paper score, they need
one hand to hold and use a pencil. This is something that orchestral musicians
in particular do regularly during rehearsal (Winget 2006).
Power supply and battery life
When using a digital music display during a performance particularly, a reliable
power source is important. Running out of battery power half way through a
performance and losing access to one‘s music is not an option. A performance
may last several hours, and a rehearsal may last all day. Even with the advances
in battery technology, it may be necessary to use a device connected to an
external power source for safety‘s sake. This need for external power will
impact on the portability of the device. In cases where an external power
source is not available, e.g. playing an outdoor gig, a reliable battery would be
required.
Connectivity
In a group situation, communication between players‘ music display systems
may be a desired feature. Such communication could allow a group to share
notes/annotations or network page turns.
Communication from each music stand back to a server would be useful for
the distribution and management of large collections of music. The benefits of
a networked system such as this are described in some detail by Bellini et al., as
part of the design considerations for their system: the Music Object-Oriented
Distributed System or MOODS (Bellini, Fioravanti and Nesi 1999).
Hardware with Wi-Fi or Bluetooth capability would make building a connected
system feasible. A wired network would also do the job, but the cabling
required to network an entire orchestra would be cumbersome and possibly
impractical in most cases. In groups or orchestras that are regularly wired with
microphones and lighting (such as bands or recording orchestras), the addition
of networking cables may not be so much of a hindrance.
38
Noise
A digital music stand must be as quiet as possible, particularly in a
performance situation, so as not to disrupt or detract from the music being
played. Excessive fan or hard drive noise would be a nuisance.
Portability
The ideal digital music display would be as portable as a traditional music
stand with paper sheet music; for practicing at home, a display unit need not
be portable.
If the unit is to be taken from venue to venue for rehearsals and performances
however, a light system that does not require external cabling or attachments
would be preferred. Systems should be designed so that they are not a safety
hazard on stage, or in a rehearsal space.
Screen Refresh Rate
A system used for displaying sheet music must be capable of performing page
turns quickly (certainly no greater than 0.5 seconds) to avoid disrupting a
musical performance. But, beyond purely the speed of displaying a page of
music, developing a highly interactive user interface requires a screen refresh
rate of at least 24 frames per second to ensure that any transition animations
appear fluid to the human eye.
Also, drawing on a screen requires high input sampling rates (about 100
samples per second are recommended for pen input) to produce smooth lines,
and again, a refresh rate of at least 24 frames per second to interactively
display the result.

39
3.3 Device Options
In choosing a development environment for the experimental software, four
categories of devices were considered. To give the best freedom of
development, we wanted a device with as many of the features described
previously as well as a useful programming environment. For a full table of
devices considered and comparison criteria, see Appendix A.
Tablet PC
Touch screen laptop computers or Tablet PCs offer portability and computing
power. Available running a range of operating systems, Tablet PCs are a
practical option when it comes to freedom of development environment. The
devices considered for this research project run Windows 7. This gives a full
Windows programming environment.
There are Tablet PCs available that support multi-touch through both stylus
and fingertip interaction. This is an ideal situation as it gives the most freedom
in terms of experimenting with touch gesture controls for the software system
interface.
Being designed for portability however, screen size is limited. Of the tablet PC
devices considered for this project, most common screen size was 12.1‖ with
resolution 1280 x 800. A 12.1‖ screen is just capable of displaying the contents
of one A4 page of music, if white space and margins are reduced.
iPad / Slate Device
With the introduction of the iPadix in April 2010 came the arrival of a new sub-
category of tablet computers, the slate. These devices generally run specialised
cut down operating systems, often focused around providing web browsing
tools and music or photo library management. They are built without hardware
keyboards and are designed for use with touch controls.

40
Slate devices again have the benefit of extreme portability, making them ideal
for perching on a stand in front of a musician without the need for extensive
cabling and support hardware. They also boast good battery life compared to
traditional Tablet PCs.
Again though, screen size is an issue. Current slate devices range from 7‖ to
12.1‖, with the Apple iPad coming in at 9.7‖ and a comparatively high
resolution for its size of 1024 x 768. This is significantly smaller than an A4
page of music, however.
Several slate devices were considered for this project, the forerunner being the
Apple iPad as it was the most readily available. There are several sheet music
display applications available on the iPad and their popularity indicates that
some musicians do not mind working with the small display, at least for
personal use. This may not be the case in an orchestral situation however,
where musical scores are often very large.
The iPad has a capacitive touch screen, responding to finger touch. Though it
is possible to purchase specialised styli to work on the iPad, they have a large
surface area compared to a traditional pen style stylus. This makes drawing fine
annotations difficult.
After talking with some iPad users and experimenting with drawing annotations
on the device it was decided that the iPad an impractical choice for
development. This was mainly due to the screen size restricting user interface
layout and design options. Only being able to display one small page of music,
with even that being of questionable usefulness to a musician, would
excessively limit experimentation from the outset.
eInk Display
Devices with eInk displays in the form of personal e-book readers are
becoming widespread. These displays are based on electronic paper

41
technology, that is, displays that are designed to emulate the appearance of
ink on paper. In contrast to traditional back lit displays, eInk is reportedly easy
on the eyes for extended periods of reading and can be read in direct sunlight.
The primary benefit of an eInk Display is battery life. Once an image is
displayed on an eInk screen, very little power is required to keep it there. The
main disadvantage of this technology is the slow refresh rate compared to an
LCD screen (between 0.7 and 1.0 seconds as observed on an Amazon Kindlex
device). They are not well suited for the development of interactive
applications, especially those with fluid animated menu systems or controls.
Another limiting factor with the eInk devices currently available is screen size.
Of the consumer eInk devices available at start of this research project, the
largest screen was 10.2‖ with a resolution of 1024 x 1280. This is approximately
A5 size. As a sheet music is traditionally printed in A4 size or larger, this is too
small to be practical.
The current eInk devices are also limited in touch input capability. The devices
considered did not support multi touch and were limited to stylus input only. It
was concluded that the consumer eInk devices available today are not well
suited to development of interactive, touch based user interfaces.
Multi-Touch Monitor
Setting aside the issue of portability, a multi-touch monitor connected to
desktop PC offers the best capability in terms of screen real-estate.
Commercially available touch screen monitors now come at 21.5‖ providing
HD resolution of 1920 x 1080. A 21.5‖ screen is wide enough to display the
contents of two A4 pages of sheet music side by side, with about 2‖ to spare
for user interface controls. The screen height is insufficient for a full A4 page
but will fit the musical content if the top and bottom margins are trimmed.

42
For slightly better portability, all-in-one touch screen computers are also
available. Though, not as light and portable as a tablet or slate, these devices
at least require less cabling and support hardware than a traditional desktop
with monitor. Unfortunately, the all-in-one computers available at the
beginning of this research project had surprisingly low resolution screens
compared to the stand alone touch screen monitors and so were not
considered further.
As with the tablet PCs considered, the desktop PC powering the multi-touch
monitor would be running Windows 7, providing access to a rich set of
development tools and a convenient development environment.
The decision as to which device to use for development came down to either a
Tablet PC, or a desktop computer with multi-touch monitor. The development
options for both are the same, so any application written for one would only
require minimal modification to work on the other. It was therefore decided to
work with a desktop and multi-touch monitor as the larger screen size
increases options for user interface design and development.
3.4 Software Environment – WPF with .NET
Choosing to work with a multi-touch monitor and desktop computer running
Windows 7 directed us towards utilising Microsoft‘s .Net framework with
Windows Presentation Foundation for developing the experimental software.
Windows Presentation Foundation (WPF) is a system for building sophisticated
user interfaces for Windows client applications, built into the Microsoft .Net
framework. WPF takes advantage of modern graphics hardware through
Microsoft‘s DirectX graphics library, providing a high speed, resolution
independent, vector-based rendering engine.
43
Developing for Windows 7 through .NET with WPF provides several benefits
that make it a good choice for the type of software application developed as
part of this research.
- Development tools for applications supporting pen interaction and ink
rendering, originally released in 2002 with Windows XP Tablet Edition,
are now included in the WPF framework. This provides high quality ‗ink‘
rendering, showing ink strokes as variable thickness, smoothed Bézier
curves, rendered with a variety of brushes. Quality of line rendering is
important in sketch applications to mimic the fluidity of real ink on
paper. This helps to create a distinction between the underlying typeset
music and the annotations, without making the annotations look to
have ‗poor quality.‘
- With Windows 7 comes multi-touch support at three levels.
1) Legacy Support – Some existing applications will automatically
respond to some basic touch gestures (panning, zooming and flick
gestures), in place of mouse interaction, when run with a multi-
touch screen.
2) Basic Multi-Touch Support – Applications can add gesture
support by responding to predefined gesture events provided by
the system. The available gestures are: zoom, single finger and two
finger pan, rotation, two finger tap and press and tap. The
developer has full control over how an application responds to each
of these gesture events.
3) Optimised Multi-Touch – Applications access raw touch events.
Every time the screen is touched or a touch point is moved, the
application receives a notification. Notifications are sent for as many
simultaneous touch points as the touch screen hardware supports.

44
These touch notifications, at all levels, can be accessed through WPF.
Combining touch support with ink rendering gives all the necessary
support to build an interactive multi-touch application with an
annotation system.
- WPF provides separation between user interface development and the
underlying program logic. User interfaces are defined using Extensible
Application Markup Language (XAML – pronounced ‗zammel‘) which is
a derivative of XML. XAML is used to define and position user interface
controls, create animations and styles, define 2D and 3D graphics and
connect data to display with WPF‘s data binding system. Underlying
program logic is created in C# or VB.NET (Visual Basic).
This is an ideal situation for development of our digital sheet music
display. Once the underlying music data structure is defined,
experimenting with user interface and specifically touch controls can be
done efficiently and iteratively over the top.

45
Chapter 4 - Sheet Music Unbound
Digital sheet music display (as opposed to digital music stand development) is
an area of work that has seen much research activity of the last five decades.
Research into the computerisation of the musical score creation process began
as early as 1961 with ―The DARMS project‖ (Erickson 1975). Commercial
software has been available for over two decades for typesetting and
composition of music and this has been embraced by the musical community
and sheet music publishing industry. The advantages of digitally produced and
printed sheet music are obvious over traditional handwritten manuscripts.
The destination of music produced through these packages has remained
generally unchanged however. Music is created and laid out in pages as it
would be in a printed manuscript. Music typesetting software decides on
optimal note spacing to lay bars in such a way that they make musical sense
and fill the width of each page tidily (Blostein and Haken 1991). Once the
music reaches the consumer (in digital, or hard copy) this page structure is
fixed. Bars x – y are on page 1, (y + 1) – z on page 2 and so on.
Storing sheet music in a digital format gives us an opportunity to change the
way sheet music is presented to the consumer.
4.1 Breaking the boundary of the page
A piece of sheet music is an ordered list of symbolic instructions describing
what rhythms and pitches to play to replicate a piece of music. In modern
notation, this takes the form of notes and symbols placed on a five-line staff
system, read from left to right. A piece is divided into groups of beats,
determined by the time signature. These groups of beats are called measures,
or bars. The ordering of these bars is (with the exception of some modern

46
compositions) fixed. So, a piece of music is an ordered list of bars. Changing
the order of the bars would change the piece of music.
Compare this to the structure of an English text document. A text document at
its most basic is an ordered list of words. Changing the order of the words in a
text document would alter its meaning.
What if we treat the bars of a piece of music like the words of a text
document?
With word processing software, we can control the formatting of a text
document without changing its underlying structure or meaning. By changing
the font size and colour and inserting (or removing) line or page breaks, we
can personalise the appearance of a document making it easier to read.
If digital sheet music is stored as an ordered list of bars, rather than a series of
static pages, we could give musicians similar control of how their music is
formatted. By allowing them to choose display size or zoom at the bar level
and to control where line breaks and page breaks occur, individual musicians
could optimise their music‘s layout to suit their personal performance style.
For example, musicians could scale down portions of a piece that they were
very familiar with and felt that they did not need to read the music very closely
for anymore. This would allow more music to fit onto each page, reducing the
number of page turns in the piece.
Alternatively, a musician may break a page of music by inserting a page turn
where they have a natural rest in the music. Though this may increase the total
number of page turns in the piece, the page turns are easier to perform and so
minimise disruption to the flow of the music. Traditionally this level of control is
only available to the music publisher.

47
4.2 How to store/represent a bar
For the purposes of experimenting with sheet music layout and formatting at
the bar level, it was decided in this project that the simplest way of storing each
bar would be each as a static image. As the music is not to be manipulated at
the note level, the software system need not necessarily understand the
musical content of each bar. All the software needs to know is the native size
of a bar and its placement within the piece overall piece. The layout system is
then dealing with an ordered list of blocks which can be reflowed and
formatted like the words of a sentence in word processer.
The down side of using standard image formats like PNG or JPG to represent
each bar is that if a bar is scaled up from its native size, it not only becomes
highly pixellated, it is also hard to read. Figure 9 and Figure 10 demonstrate
the loss of image quality when a bar is zoomed to 2x native size.
Figure 9 A bar of music at native resolution
Figure 10 A bar of music at 2 x native resolution
If we instead store each bar in a vector format then the music becomes
scalable without this quality loss.

48
The nice thing about a vast majority of modern digitally produced sheet music
is that it is available in PDF form. Within a digital sheet music PDF file
(excluding manuscripts scanned in as full page images, and then saved in PDF
format) the musical symbols and notation are stored as vector graphics. This
means that each note or symbol is stored as a collection of paths which are
usually defined as lines and cubic Bézier curves. These paths can be scaled
smoothly which means the music can be scaled smoothly without the image
quality loss of non-vector graphics.
A solution to the bar scaling within a sheet music display system, therefore
would be to store each bar as a small PDF file. The system could then render a
piece of music from this series of PDF blocks.
This is not really the way that PDFs are designed to be handled, however. A
PDF file is usually considered to be a complete document in its own right.
Though it is possible to render a PDF document with Windows Presentation
Foundation (WPF), this involves passing control of an application frame to to a
3rd party UI control. Such controls handle the parsing and rendering of the PDF
content as well as providing their own UI functionality. It was not immediately
apparent whether it would be possible to tile a display with these types of
controls. It is also likely that attempting to tile many of these components into
a display window would have not only caused considerable performance
issues, but may have taken over crucial touch and interaction events, making it
difficult to experiment with the user interface of the experimental software
developed in this project.
It seemed impractical to continue trying to find a way to force PDF renderers
into behaving as required given that there was viable alternative vector format
built in to WPF.

49
XAML
Windows Presentation Foundation (WPF – the chosen environment for this
experimental development) comes with built in support for Microsoft‘s own
vector graphics format, XAML (pronounced ‗zammel‘).
XAML is in fact the user interface markup language used in WPF. In WPF,
XAML can be used to define UI elements, data binding and events as well as
2D and 3D objects, style definitions, animations and transformations for use in
visually rich user interfaces. XAML files can be created and edited though text
editors or code editors or through visual design tools provided in Microsoft
Expression Blend and Microsoft Visual Studio.
XAML can also be used to define resources for WPF applications. Resources
are small pieces of XAML that define things like styles, brushes, images and 2D
and 3D objects that are then utilised from within the application.
Microsoft Expression Designxi is a vector and raster design tool created by
Microsoft as part of the Microsoft Expression Suite.xii It is principally designed
for creating and editing XAML assets and resources for use in WPF and
Silverlight applications, with a heavy focus on vector drawing. Once assets are
created, using the extensive vector illustration tools, they can be exported in
standard formats (JPG, PNG, TIFF, PDF etc.) as or as XAML resources. We
concentrate on the latter. The exported XAML can be copied directly into an
application‘s UI definition code or stored in separate resource dictionary files
that can be loaded and parsed by a WPF application at runtime.
The following sample XAML resource file contains a definition for a
DrawingBrush object.

50
Sample XAML Resource File
<?xml version="1.0" encoding="utf-8"?> <ResourceDictionary xmlns="http://schemas.microsoft.com/winfx/2006/xaml/presentation" xmlns:x="http://schemas.microsoft.com/winfx/2006/xaml"> <DrawingBrush x:Key="Violin" Stretch="Uniform">
<DrawingBrush.Drawing> <DrawingGroup> <DrawingGroup.Children> <GeometryDrawing Geometry="F1 M 2.14019e-005,38.293L 38.0002,38.293"> <GeometryDrawing.Pen> <Pen Thickness="0.664176" LineJoin="Round" Brush="#FF000000"/> </GeometryDrawing.Pen> </GeometryDrawing> <GeometryDrawing Geometry="F1 M 2.14019e-005,31.645L 38.0002,31.645"> <GeometryDrawing.Pen> <Pen Thickness="0.664176" LineJoin="Round" Brush="#FF000000"/> </GeometryDrawing.Pen> </GeometryDrawing> <GeometryDrawing Geometry="F1 M 2.14019e-005,25.005L 38.0002,25.005"> <GeometryDrawing.Pen> <Pen Thickness="0.664176" LineJoin="Round" Brush="#FF000000"/> </GeometryDrawing.Pen> </GeometryDrawing> <GeometryDrawing Geometry="F1 M 2.14019e-005,18.3651L 38.0002,18.3651"> <GeometryDrawing.Pen> <Pen Thickness="0.664176" LineJoin="Round" Brush="#FF000000"/> </GeometryDrawing.Pen> </GeometryDrawing> <GeometryDrawing Geometry="F1 M 2.14019e-005,11.7251L 38.0002,11.7251"> <GeometryDrawing.Pen> <Pen Thickness="0.664176" LineJoin="Round" Brush="#FF000000"/> </GeometryDrawing.Pen> </GeometryDrawing> <GeometryDrawing Brush="#FF000000" Geometry="F1 M 21.1487,31.7292C
... [Code excluded here – Further Geometry] 12.1071,5.22917 14.5237,3.6875 Z "/>
<GeometryDrawing Brush="#FF000000" Geometry="F1 M 33.7073,19.6167L ... [Code excluded here – Further Geometry] 30.6656,10.075L 32.7698,9.3042 Z "/>
</DrawingGroup.Children> </DrawingGroup> </DrawingBrush.Drawing> </DrawingBrush> </ResourceDictionary>

51
In WPF Brush objects are used to fill or paint areas of an interface. Brushes
can be solid colours, gradients, images, drawings or visuals. In this case, our
desired Brush content is a drawing (a collection of geometrically defined 2D
paths and content) so we use a DrawingBrush. Once the DrawingBrush is
defined, it can be used by the application to paint or fill any area by either
tiling or stretching the Brush‘s content to cover that area. In our case, each
bar of music is rendered by stretching it over a defined rectangular space. As
the drawing is defined in vector form, stretching is done smoothly. This gives
an image block representation of each bar that can be laid out, scaled and
manipulated as desired by the WPF application without image quality loss. As
long as the aspect ratio of the bar is kept the same, it will look good at any
size, as Figure 11 and Figure 12 demonstrate.
Figure 11 A XAML DrawingBrush at native size
Figure 12 A XAML DrawingBrush at 8 x native size

52
4.3 Breaking music into bars
For the purposes of this study, the creation of the XAML representations of
each bar of music is done manually using Microsoft Expression Design. The
process for doing so is outlined in this section. This process is prohibitively long
and labour intensive and would not be suitable as the only method of
importing music into a commercial piece of software, but was sufficient for this
investigation. Automation of this process would be necessary for a complete
system but lay outside the scope of this project. Converting music manually in
this way, though cumbersome, allowed the focus of the project to remain
around experimentation with the user interface and feature development.
There is a brief discussion of a possible path toward automation at the end of
this section.
Sample music was sourced from The Mutopia Project.xiii The Mutopia Project
offers a freely downloadable collection of classical music that has been typeset
by volunteers using the LilyPondxiv software. The music available is based on
editions that are in the public domain so copyright is not an issue. Most sheet
music in The Mutopia Project is downloadable in PDF format as well as in
LilyPond format. For this study, music was downloaded in PDF format and
broken into bars manually using vector image processing software, in this case
Microsoft Expression Design.
Where does a bar begin?
Each bar of music has an associated clef, key signature and time signature.
When music is laid out on a page, the clef and key signature are drawn at the
beginning of each horizontal line of music. A key signature will also be drawn
in place in the music if/where a key change occurs. The time signature for a
piece is drawn at the beginning of the piece, or where a change in time
signature occurs. The time signature at the beginning of the piece is placed
after the clef and key signature at the beginning of the first line.

53
Figure 13 Excerpt from String Quartet KV.458 (nr. 17) "Hunt" for 2 violins, viola and cello - W. A. Mozart. Source: Mutopia - http://www.mutopiaproject.org/cgibin/piece-info.cgi?id=277
As mentioned previously, a feature of the software designed as part of this
research was to give the musician control of the scaling of bars. As bars are
scaled up or down, the number of bars that will fit across a page/screen will
change. This causes line breaks to occur in different places in the music than
when originally typeset. The technique is akin to word wrapping in word
processing software as the font size is changed. As line breaks change, the bars
rendered at the beginning of each line will change. The requirement that the
clef and key signature are rendered at the beginning of each line means that
as line wrapping changes, so to do the bars in which the clef and key signature
are drawn. The exception for this is when there is a key change in a piece of
music. The key change always happens in the same place musically and so the
new key signature is always rendered as part of the same bar.
The developed software handled these cases thusly: each stored bar contains
two separate DrawingBrush objects, one for the clef and key signature and
one for the musical content of the bar. When the music is laid out, the system
decides for each bar whether the clef and key signature should be rendered. If
the bar being rendered is placed at the beginning of a line, or is the first bar in
the piece using the attached key signature, then the key signature is drawn as
well as the musical content.

54
As the time signature is rendered only once, at the beginning of the first bar
for which it applies, it will always be drawn in the same bar regardless of
whether the music is reflowed. Even with line reflowing, it is safe to include the
time signature as part of the musical content DrawingBrush for the first bar it is
associated with. The preceding and proceeding bars of the piece need not
store this piece of information.
Where does a bar end?
In a piece of sheet music written in modern notation, bars are divided by
vertical lines called bar lines. There are three different types of bar line:
Bar line
Separates bars (or
measures)
Double bar line
Separates two sections
of music. Used where a
key signature or time
signature changes
Bold Double bar line
Used at the end of a
movement or entire
piece.
The end of each bar of music is marked by one of the above bar lines. To split
the music into individual bars, these lines determine the right hand edge (or
end) of each bar.

55
Where bars are separated - Illustrative example
Figure 14, Figure 15 and Figure 16 illustrate how the boundaries of bars are
chosen for two bars from the excerpt of music shown previously. The example
bars shown are bar 1 and bar 8. The selections highlighted in dotted boxes
(orange) represent the musical content portion of the stored bar. This musical
content is stored along with the key signature, highlighted in a solid box
(green), as the representation on one full bar.
Figure 14 Bar clipping boundaries
Bar 1
Bar 1 is the first bar of this movement. As it is
the first bar, the time signature for the start of
the movement is indicated at the beginning
of this bar. The time signature must then be
stored as part of the musical content of the bar for use in the developmental
display system. The musical content of the bar is therefore created beginning
from just before the time signature, and ending after the following bar line.
Figure 15 Bar 1 - stored components

56
The key signature for the bar is stored as a separate DrawingBrush object
within the bar object. The system can then decide whether or not to render the
key signature before the bar. In this case, as the bar is at the beginning of a
line, the key signature will be rendered.
Bar 8
Bar 8 shares the same time signature as
all the previous bars in the piece. It is not
necessary to render the time signature
again at the beginning of bar 8 as the
time signature in bar 1 is automatically applied to all following bars unless a
time signature change occurs and is drawn. The musical content of bar 8 has
no special information to include at the start, so the left hand boundary is
taken as just following the end bar line of the previous bar (bar 7).
The right hand boundary illustrates another possible variation in bar line. In this
case, the bar ends with a repeat sign. This tells the musician that at the end of
this bar, they should jump back to an earlier point in the music and play to this
point again. The end of the musical content of bar 8 is directly after the repeat
sign.
Again, the key signature is stored as a separate DrawingBrush within the bar
object. If the system was to display the piece of music laid out as in the excerpt
shown previously, it would not be necessary to render the key signature as part
of bar 8. If the music was reflowed though, to a point where bar 8 was at the
beginning of a line, the key signature would be drawn.
Figure 16 Bar 8 - stored components

57
Vertical Boundaries
The heights of bars within a piece of music can vary significantly. Though the
height of the staff system is fixed, the vertical space required for a bar depends
on what notes it includes and where any phrasing marks, dynamics or other
symbols are placed. These may extend both above and below the staff lines
(See Figure 17)Figure 17.
Figure 17 Bars 13 and 14 musical content bounds
When breaking the music into bars, the vertical boundaries are defined so as
to make the shortest possible block that contains all the symbols associated
with that bar.
Aligning bars vertically
Breaking the music into bars as described, creates bar blocks of all different
heights. These blocks need to be aligned by the display system so that the staff
lines match up. This is important for the readability of the final sheet music
displayed. With modern sheet music notation, the vertical position of notes in
relation to the staff line defines the pitch that the note represents. If the staff
lines themselves change vertical position between bars, then it becomes very
difficult to read the music, as the height difference between notes in different
bars across a page is no longer a consistent indicator of pitch change.
One solution to this alignment problem would be to force each bar block in
the music to be the same fixed height, and to centre the staff lines within the
created space. But how do you choose the height to use?

58
To ensure that the symbolic content of each bar will fit in the chosen bounds,
the chosen height must fit the bar with the greatest extension above the staff
lines and the bar with the greatest extension below the staff lines. The height of
bars within a line of music dictates how much space must be left between
consecutive lines on a page. If the bar height of every bar is maximized as
described, the space between lines is also maximized. This may cause
excessive white space between lines, reducing the number of lines of music
that fit on screen at a time and increasing the number of page turns required
when playing the piece.
The software developed as part of this research instead ensures that each line
of music displayed uses the minimum amount of vertical space required to fit
the bars of music that it contains. Rather than fixing the height of each bar to a
predefined value calculated over the whole piece, each bar is created with the
minimum possible bounding box that it can have with the staff lines centred
vertically.
To do this some additional information is stored in the XAML representation of
the bar. Recall that the XAML DrawingBrush representation is a scalable block
representation of the bar content. It is just a series of paths defining the
symbols (including the staff lines) that define a visual representation of the bar.
To alter this block representation to centre the staff lines, we need to know
what height within the block the staff lines actually are. This is done by locating
and tagging the path within the XAML DrawingBrush that represents the
centre line of the staff system. When each bar is loaded by the software (by
opening and parsing the associated XAML file), this centre line path is located
by searching the XAML for its assigned name. The y-position of this centre line
gives the necessary information to create the right sized bounding box for the
bar and centring the content.

59
To centre the bar content within the DrawingBrush object, we change the
ViewBox for the DrawingBrush. The ViewBox property of the
DrawingBrush defines what portion of the brush‘s content is used.
Original ViewBox
The ViewBox is defined as a Rectangle and its default size is the full size of
the drawing.
Bar Information
Using the information stored with each bar, we change the ViewBox to centre
the middle staff line.
topY = 0
midY = midLineHeight (Height of the middle staff line that was manually
tagged in the XAML)
bottomY = brush.Drawing.Bounds.Height

60
Extended ViewBox
In this case, as the topHalfHeight of the bar was larger than the
bottomHalfHeight, the ViewBox is simply extended by increasing its height
to double the topHalfHeight. This centres the middle staff line within the bar
block.
(If bottomHalfHeight was larger, the ViewBox would be extended upwards
by setting y = topHalfHeight – bottomHalfHeight, and increasing the
overall height of the view box to twice the bottomHalfHeight)
Bar blocks can then simply be centred vertically within each line of music and
the staff lines for each bar will be aligned.
Figure 18 Bars 13 and 14 with extended ViewBoxes

61
Handling multiple parts
The vertical alignment technique described above is only suitable when the
sheet music requires only one set of 5 staff lines. This is not always the case.
Piano sheet music, for example, uses two five line staffs connected together.
Another special case is the sheet music for a full score. A full score has one or
more five line staves for each instrument or part in the piece. These parts are
arranged vertically in a fixed order and are connected together through
extended bar lines. The staff lines for each part need to line up across the page
and simultaneous bars across different parts are stacked vertically. (See Figure
19)
We must therefore extend our concept of a bar to enable the storage and
display of multiple parts on multiple sets of staff lines. Within the bar block,
parts should be spaced so that each part aligns vertically across neighbouring
bar blocks. Each neighbouring block as a whole should also line up with its
neighbours. Spacing between lines of a full score should still be minimised so
that the maximum amount of music can be displayed on screen at a time.

62
Figure 19 Sample full score layout

63
Existing bar information
- One DrawingBrush for each part
with default ViewBox (Shown in
blue)
- MidLineHeight for each part is
known
- Order of parts is known
Desired result

64
In order to achieve the desired spacing between parts, the experimental
software system uses a fixed value for spacing. This spacing is hard coded to
60 pixels for the piece of music below. This spacing may not be suitable for
every piece of music, but works well for the sample chosen. Future
development of this software should include creating a test to determine the
best spacing between parts in any given score.
Once the desired spacing is determined, the current system works through the
part DrawingBrushes from the top down, setting their ViewBoxes to fill the
required space. Between parts, the part above is allocated as much space
below its staff system as it requires. The part below is the allocated any
remaining space to ensure that the total space from mid-staff line to mid-staff
line is equal to the chosen spacing. This again is not an ideal solution as the
topHalfHeight of the part below may require more space than it is
allocated.
Spacing set between parts
Below, the original ViewBoxes for the DrawingBrushes for each part are
shown in blue. The new ViewBox boundaries are indicated by the dotted
orange boxes.

65
Centre the complete score bar block
The entire score bar block is then centred within the line by extending either
the top margin of the top part‘s ViewBox, or the bottom margin of the bottom
part‘s ViewBox. This is similar to the centring of a single part bar described
earlier except that instead of centring the mid-staff line, we centre all the
content between the mid-line of the first part and the mid-line of the last part.
In this case, the bottom margin of the last part in the score is extended to
match the larger top margin of the first part.
The score bar can then be rendered by the software centred vertically as part
of a horizontal line of music and each part within it will align nicely with its
neighbours. The spacing between lines of music is again minimised. Figure 21
shows two complete lines of a four part score. The final ViewBox bounds for
each bar are shown in orange.

66
Even if the lines of music were to be reflowed, the careful centring of each
score bars‘ content ensures that the staff lines of each part would still align
correctly.
Key signatures
Each bar of each part has an associated key signature. As previously
mentioned, this key signature is stored as a separate DrawingBrush
alongside the musical content DrawingBrush for the bar. Each time the music
is reflowed, each bar block decides whether or not it needs to render its key
signature.
When multiple parts are being displayed simultaneously and a key signature
needs to be displayed, for each part, the Key DrawingBrush and Musical
Content DrawingBrush are first aligned with each other to become a
singlePartBlock. Then the blocks for each part are stacked together as
described previously into the complete score block.
The result of this is that where key signatures are rendered, they are included
in the score block of the following bar of musical content. They are not created
as a separate vertical score block. (See the first bar of each line in Figure 21 for
examples of score blocks containing key signatures.
The structure of a score bar block
Figure 20 Structure of a score block with three parts
Score Bar
Block
Single
Part Block
Key
Signature
Musical
Content
Single
Part Block
Key
Signature
Musical
Content
Single
Part Block
Key
Signature
Musical
Content

67
Score blocks laid out in lines
Figure 21 Two lines of full score. Final bar block bounds (ViewBoxes) for each part are indicated in orange

68
The XAML bar creation process
The XAML bar creation process can be summarized in the following 10 steps:
1. Original musical score is taken in PDF format
The sheet music is loaded from the score rather than individual parts to
ensure that if multiple parts are to be displayed simultaneously by the
system, simultaneous bars are the same width for each part. In
individual printed parts (as opposed to full score representation), note
spacing within bars is optimised to fit the maximum amount of music
across a page for that part. This means that the width of any one bar in
a piece of music varies from part to part.
2. Each page of the musical score is converted to AI format.
AI is the format used by Adobe Illustrator,xv a vector drawing
application created by Adobe. It is a variation of the PDF format.
Microsoft Expression Design is able to import AI files but not PDF,
though the actual data representation is very similar, and converting a
PDF file to an AI file can, in most cases, be done by simply renaming a
PDF file with the .ai extension.
3. AI file is imported into Microsoft Expression Design.

69
Figure 22 One page of a score imported into Microsoft Expression Design

70
1. The individual bar‘s image content clipped from the score.
Bar content is decided on (as described previously) and cut and pasted
into its own Expression Design File (.design extension). The image size
at this point is the minimum possible to fit the content of the bar.
Figure 23 Copy the content of each bar into its own separate document

71
1. Parts are separated.
Each part within the score is cut and pasted into its own layer within the
document. Each layer is named with its associated part name from
within Expression Design.
Figure 24 Violin 1 layer content selected
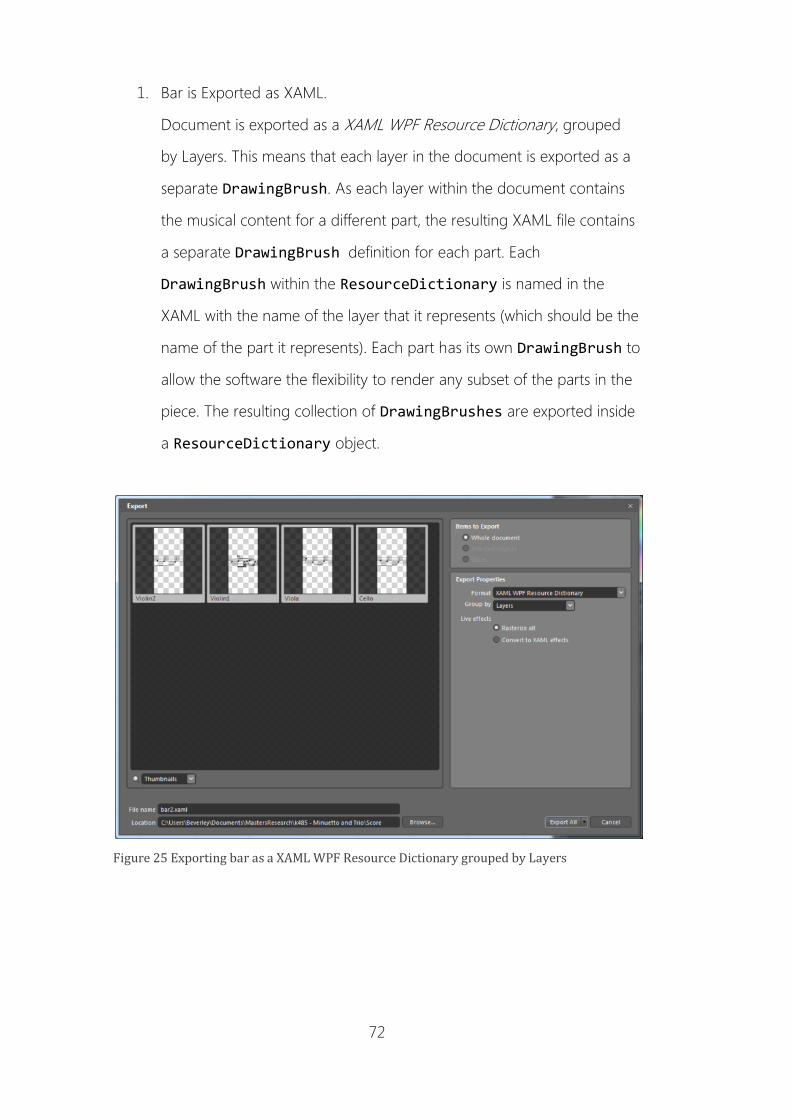
72
1. Bar is Exported as XAML.
Document is exported as a XAML WPF Resource Dictionary, grouped
by Layers. This means that each layer in the document is exported as a
separate DrawingBrush. As each layer within the document contains
the musical content for a different part, the resulting XAML file contains
a separate DrawingBrush definition for each part. Each
DrawingBrush within the ResourceDictionary is named in the
XAML with the name of the layer that it represents (which should be the
name of the part it represents). Each part has its own DrawingBrush to
allow the software the flexibility to render any subset of the parts in the
piece. The resulting collection of DrawingBrushes are exported inside
a ResourceDictionary object.
Figure 25 Exporting bar as a XAML WPF Resource Dictionary grouped by Layers

73
The resulting XAML file:
<?xml version="1.0" encoding="utf-8"?> <ResourceDictionary xmlns="http://schemas.microsoft.com/winfx/2006/xaml/presentation" xmlns:x="http://schemas.microsoft.com/winfx/2006/xaml"> <DrawingBrush x:Key="Cello" Stretch="Uniform"> <DrawingBrush.Drawing>
... [Code excluded here – Geometry of the Cello part for the bar] </DrawingBrush.Drawing> </DrawingBrush> <DrawingBrush x:Key="Viola" Stretch="Uniform"> <DrawingBrush.Drawing>
... [Code excluded here – Geometry of the Viola part for the bar] </DrawingBrush.Drawing> </DrawingBrush> <DrawingBrush x:Key="Violin2" Stretch="Uniform"> <DrawingBrush.Drawing>
... [Code excluded here – Geometry of the Violin 2 part for the bar] </DrawingBrush.Drawing> </DrawingBrush> <DrawingBrush x:Key="Violin1" Stretch="Uniform"> <DrawingBrush.Drawing>
... [Code excluded here – Geometry of the Violin 1 part for the bar] </DrawingBrush.Drawing> </DrawingBrush> </ResourceDictionary>

74
1. Mid-staff line is identified and labelled.
The XAML file is edited to identify the middle staff line in each
DrawingBrush. This involves manually searching through the
geometry of each drawing and finding the GeometryDrawing
component for the middle line. The staff lines are usually easy to spot
within the XAML as their geometrical information is very simple
compared to the note heads and other pieces of the music in the bar.
Once the correct GeometryDrawing component is located, it is given a
name so that it can be searched for and found by the application when
the XAML file is parsed. The following is the portion of the previous
XAML file representing the Cello part layer alone. The middle staff line is
labelled by adding the property x:Name="CellomidLine" to the
GeometryDrawing object.

75
4. Final adjustments made to XAML file so that is can be loaded and
parsed at runtime within the WPF application.
It turns out that loading a ResourceDictionary from a file at runtime
within a WPF application does not work as nicely as expected. In order
to make loading and parsing work, this ResourceDictionary needs
to be contained within a WPF Window object.
Loading and parsing XAML in a WPF application uses the built in
XamlReader object. The XamlReader takes a XAML file, reads it,
parses it and builds the appropriate object graph. When the root object
of the XAML file is a Window object , the XamlReader returns a
<DrawingBrush x:Key="Cello" Stretch="Uniform"> <DrawingBrush.Drawing> <DrawingGroup> <DrawingGroup.Children> <GeometryDrawing Brush="#FF000000"
Geometry="F1 M 2.55963e-005,244.037L 113,244.037L 113,243.497L 2.55963e-005,243.497L 2.55963e-005,244.037 Z "/>
<GeometryDrawing Brush="#FF000000" Geometry="F1 M 2.55963e-005,238.704L 113,238.704L 113,238.164L 2.55963e-005,238.164L 2.55963e-005,238.704 Z "/> <GeometryDrawing x:Name="CellomidLine" Brush="#FF000000" Geometry="F1 M 2.55963e-005,233.37L 113,233.37L 113,232.83L
2.55963e-005,232.83L 2.55963e-005,233.37 Z "/> <GeometryDrawing Brush="#FF000000" Geometry="F1 M 2.55963e-005,228.17L 113,228.17L 113,227.63L 2.55963e-005,227.63L 2.55963e-005,228.17 Z "/> <GeometryDrawing Brush="#FF000000" Geometry="F1 M 2.55963e-005,222.837L 113,222.837L 113,222.297L 2.55963e-005,222.297L 2.55963e-005,222.837 Z "/>
... [Code excluded here – Geometry for the remaining music content] <GeometryDrawing.Pen> <Pen Thickness="0.63761" LineJoin="Round" Brush="#FF000000"/> </GeometryDrawing.Pen> </GeometryDrawing> </DrawingGroup.Children> </DrawingGroup> </DrawingBrush.Drawing> </DrawingBrush>

76
Window object. In WPF, each Window has a local
ResourceDictionary called Resources. Wrapping our exported
ResourceDictionary in a Window object means we can access it
easily and search for items within it using two helpful methods:
object FindResource(string key);
This method searches for a resource with a given key. This is used to
find the individual DrawingBrushes within the XAML file. The
DrawingBrush objects are labelled using the property:
x:Key="[_PartName_]"
In this case, the method will return a DrawingBrush object
object FindName(string name);
This method searches through an object‘s XAML definition to find
any sub-element with the passed name. This is used in to find the
GeometryDrawing (or path) within each DrawingBrush that
represents the middle line of the staff for that bar. The middle line of
each staff is labelled using the property:
x:Name="[_PartName_]midLine"
In this case, the method will return a GeometryDrawing object,
from which the line‘s height within the bar block can be determined.

77
The completed XAML file for one bar of music (... represents excluded
geometry content):
<?xml version="1.0" encoding="utf-8"?> <Window xmlns="http://schemas.microsoft.com/winfx/2006/xaml/presentation" xmlns:x="http://schemas.microsoft.com/winfx/2006/xaml">
<Window.Resources> <DrawingBrush x:Key="Cello" Stretch="Uniform"> <DrawingBrush.Drawing> ...
<GeometryDrawing x:Name="CellomidLine" Brush="#FF000000" Geometry="F1 M 2.55963e-005,233.37L 113,233.37L 113,232.83L 2.55963e-005,232.83L 2.55963e-005,233.37 Z "/>
... </DrawingBrush.Drawing> </DrawingBrush> <DrawingBrush x:Key="Viola" Stretch="Uniform"> <DrawingBrush.Drawing>
... <GeometryDrawing x:Name="ViolamidLine"
Brush="#FF000000" Geometry="F1 M 2.55963e-005,164.97L 113,164.97L 113,164.43L 2.55963e-005,164.43L 2.55963e-005,164.97 Z "/>
... </DrawingBrush.Drawing> </DrawingBrush> <DrawingBrush x:Key="Violin2" Stretch="Uniform"> <DrawingBrush.Drawing>
... <GeometryDrawing x:Name="Violin2midLine"
Brush="#FF000000" Geometry="F1 M 2.55963e-005,98.9704L 113,98.9704L 113,98.4304L 2.55963e-005,98.4304L 2.55963e-005,98.9704 Z "/>
... </DrawingBrush.Drawing> </DrawingBrush> <DrawingBrush x:Key="Violin1" Stretch="Uniform"> <DrawingBrush.Drawing>
... <GeometryDrawing x:Name="Violin1midLine"
Brush="#FF000000" Geometry="F1 M 2.55963e-005,30.5704L 113,30.5704L 113,30.0304L 2.55963e-005,30.0304L 2.55963e-005,30.5704 Z "/>
... </DrawingBrush.Drawing>
</DrawingBrush> </Window.Resources>
</Window>
78
5. Final XAML file named and saved.
The complete XAML file is then named barx.XAML where x is its bar
number (position within the piece) and is ready to be loaded by the
software.
6. Software system loads the finished XAML bars.
Each bar is loaded, ordered by bar number, into the software and the
vertical spacing is performed as described previously to ensure that
each bar lines up properly.
Key signatures
Every key signature in the piece of music must also be created and
saved to a XAML file. The process for clipping out and saving a key
signature is the same as that for the musical content of the bar.
As with the bars‘ musical content XAML files, the file for each key will
contain a separate DrawingBrush definition for each part within the
score.
To attach each key signature to each bar that it applies to, the key
should store two additional pieces of information: the bar numbers of the first
and last bars that it applies to. This information should be added to the XAML
file for the key, however the current experimental system has this information
hard coded for the chosen sample of music.

79
Automation of the XAML bar creation process
Taking a preformatted piece of music and breaking it into bars with image
processing software is a labour intensive way of getting XAML bars. It would be
much better if there was a way of exporting music from a composition or
typesetting application like Sibeliusxvi, Finalexvii or LilyPond (Nienhuys and
Nieuwenhuizen 2003). This would greatly reduce the overhead in importing
music into the system.
Applications like these already know where individual bars begin and end as
they have full understanding of the musical content as it is entered.
Perhaps the most interesting option here, for experimental and development
purposes, is to investigate creating a XAML exporter for LilyPond. LilyPond is
free, open source music engraving program that creates high quality,
aesthetically pleasing sheet music (LilyPond Development Team 2011).
LilyPond is primarily a text based sheet music creator, but since its conception
development of several visual and more user friendly score editing tools has
taken place.xviii
LilyPond creates music in PDF format. The PDFs created contain a vector based
representation of the typeset music. It should be possible to programmatically
extract the geometric path information that defines the final music and mould
it into XAML for use with a WPF sheet music display as developed here. The
existing LilyPond system would do all the hard work of laying out the music, a
XAML exporter would just need to reformat the final exported paths into
DrawingBrush objects for use with WPF.
An added benefit to linking in with LilyPond is that LilyPond is the format used
to typeset all the sheet music contributed to the The Mutopia Project. Since
there is already a wide collection of public domain sheet music that is already
in LilyPond format, this could be instantly converted for use in a WPF system.

80
4.4 Fluid Layout
Once all the bars of music are loaded by the software, they are laid out in
order onto the screen. The system creates lines of music, fitting as many bars
across the page as possible and then stacking these lines in order down the
screen. As the display window is resized, lines reflow to fit the available space.
Figure 26 Music reflows to fill page width
As shown in Figure 26, each line fits as many bars as music as possible based
on the width of the application window. The music is tidily aligned along the
left hand edge but not at the right hand edge. The uneven lengths of the lines
of music is due to the fact that the bars are all different sizes.

81
The original piece of music, from which the individual bars above were cut and
exported, was typeset by LilyPond to fit cleanly on an A4 page. The LilyPond
system decided on the size of each bar and spacing of the notes within to
justify the music perfectly on the page. Figure 27 shows the tidy justification of
the original score PDF.
Figure 27 Original score PDF justified by LilyPond
Figure 28 demonstrates the best alignment possible in the experimental
software system. In this example, only the Violin 1 part is displayed rather than
the complete score. By showing only one part, more lines of music fit vertically
on the page, demonstrating the line justification more clearly.

82
Figure 28 Violin 1 part displayed in experimental software system with application window width set to approx A4 size
As shown, by resizing the application window to fit the same number of bars
per line as the original score, the lines of music align more evenly. There is still
some variation in line width due to inaccuracies of the bar importing
procedure. The part names down the left hand side of the original score are
also missing from this representation, meaning that the indentation of the first
line of music is different.
This untidy justification of the sheet music may be distracting to musicians as it
is differs from what they are used to:
―Sheet music is performance material: everything is done to aid the musician
in letting her perform better, and anything that is unclear or unpleasant to
read is a hindrance.‖ (LilyPond Development Team 2011)
The prime novelty in the display system developed as part of this research is
the idea that music displayed at any scale could be reflowed to make use of
the available screen size. Ideally the system should be capable of aligning the
music nicely no matter what the width of the application window is, or the
magnification of the music. It was therefore necessary to investigate some

83
possible ways of improving the line justification in the developed software
system.
Force each bar to be the same width
If each bar was always a fixed width then line alignment would work
automatically. There are several problems with this approach; firstly, the music
created would have a regular, mechanical feel that is not necessarily desirable.
If the spacing of the music is so regular, the lines of music may begin to look
very similar. This can make it difficult for the musician to keep track of their
place when glancing to and from the music.(LilyPond Development Team
2011)
Secondly, in order to control the widths of bars of music, the system would
need to understand the musical content of each bar. Deciding on the
horizontal positioning of notes and symbols within bars of music is a
complicated process (Blostein and Haken 1991), and lies outside the scope of
this research project.
The LilyPond software has already done the hard work of typesetting and
aligning the notes and symbols within each bar of music. A large amount of
research and development has gone into the LilyPond system to ensure that
the music output is aesthetically pleasing, and mimics the finest hand-engraved
scores. Re-structuring this carefully laid out music would, we argue, be a step
backwards.

84
Magnify complete lines of music to fill any leftover space
Another approach to removing the jagged line alignment at the right hand
edge of the page is to force each line to fill the entire width of the page by
scaling. Figure 29 below shows the result of scaling up each line to fit the width
of the application window.
As shown again, some window sizes produce tidier results than others. With
this particular music sample the difference in magnification levels between lines
in the wide window is almost unnoticeable. In the narrow window example,
however, there is a clear difference between lines 1 and 2. Line 2 is heavily
magnified compared to line 1 and the resulting page of music looks unusual
and ―bulgy‖.
Figure 29 Music reflowed to fit page with each line scaled to fill all remaining space

85
This variation in zoom levels between lines may or may not be an issue to
musicians trying to read the sheet music displayed. Some user testing is
necessary to determine whether musicians could cope with the magnification
changes present here or would prefer to read un-justified music.
The visibility of line magnification differences is widely variable between
different window sizes. It may turn out that when the window width is set to
that preferred by the musician for reading purposes; the differences are barely
noticeable at all.
It is interesting to note that during development of the software system, during
demonstrations of other features of the software to colleagues in the lab
environment, the magnification levels of the lines was not often commented
on. People did not seem to notice the variation until it was pointed out.

86
4.5 Score Personalization
An important goal of this research was to experiment with a touch screen
interface to determine whether the implementation of the desired features of a
digital music stand were practical in that technology.
Once the underlying data structure and music loading procedure was in place,
it was possible to experiment with a number of interesting controls and
features that would not be possible with a printed score. Using some or all of
these tools, musicians should be able to personalize their view of a piece of
music in a whole new way.
This section describes the features and controls that become possible due to
the way that the musical data is divided and stored. Some of these features
were fully implemented in the sample application, while others were only
discussed or partially implemented.
Choosing display size
Storing sheet music in vector format gives the freedom to play with display
scale. Musicians could not only set the overall display size of their music, but
also change the magnification on a bar by bar basis. For example, a musician
could enlarge a section of music with which they have particular trouble, to
make it easier to read, or simply draw their attention to the fact that they need
to practice that part.

87
Figure 30 Section of music magnified
Scale gesture
In the sample application shown in Figure 30, individual bars were scaled up
using a two fingered pinch gesture as illustrated below in Figures 31, 32 and
33. To shrink a bar back to normal size, this pinch gesture is reversed.
The implementation illustrated in these figures scales the manipulated bar to a
preset magnification level. The user could be given more control of this final
magnification level by changing the way the application responds to the pinch
gesture as follows:
In the pictured example, the distance the user drags their fingers apart is tested
until it reaches a certain threshold. Once it passes that threshold the system
scales the bar to a fixed magnification. Alternatively, the distance between the
users fingers could be used to determine the magnification level; i.e. the
further apart the user drags their fingers, the more the bar is zoomed.

88
Figure 31 Start Pinch Gesture - Touch bar with two fingers
Figure 32 Pinch out gesture - Move fingers apart
Figure 33 When pinch distance reaches threshold, bar is scaled up
The problem with this approach is that when it comes to zooming multiple
bars, it is difficult to zoom each by the same amount. If zoomed bars are next
to each other, small differences in magnification level cause the staff lines to
look misaligned. Figure 34 illustrates the problem; though the middle staff line
still lines up between bars, the other staff lines do not.

89
Figure 34 Consecutive bars at slightly different magnifications
This problem could be solved in part, by allowing multiple bars to be
magnified at the same time with the same pinch gesture. Users would have to
first select all the bars that they wanted to manipulate and then change the
magnification of all of these bars with a pinch gesture or something similar.
That way, all the magnified bars would be zoomed to exactly the extent and
their staff lies would align.
Another option would be to have a discrete set of magnification levels that the
bar snapped between, rather than smoothly scaling up. This would make it
easier to manually match each bar with its neighbours.
Reflowing around scaled bars
As bars are scaled up and down, the number of bars that fit across the page
changes. This makes it necessary to reflow the music to ensure that no music is
lost off the edge of the page, or that any extra space gained at the end of each
line is filled.
There are two options to use when this reflow occurs: music can be reflowed
live, while the user is still interacting with the screen and changing the
magnification level, or it can be done after the zoom action is completed.
If the music is reflowed live, the user gains instant feedback on how their
modification affects the layout of the entire page. Though this ties in nicely with
the intended ―fluidity‖ of the interface, in practice it is distracting. As the user
changes the magnification of one bar, all the music that follows it is constantly
in motion as bars jump from line to line and complete lines scale slightly to

90
justify themselves on the page. In the worst case, the bar being manipulated
may even move under the users fingers.
With the second option, the user still receives instant feedback on their
manipulation: the bar they are manipulating zooms live beneath their fingers
and the rest of the bars in the same line are pushed sideways to make room.
They just do not get to see the affect that their changes have on the remaining
lines of the music until they finish their zoom action. It is at this point, when
they have finished zooming and removed their fingers from the screen, that
the music reflows around the newly scaled bar.
After experimenting with both options, it was decided that reflowing after the
user had finished their zoom gesture was preferable. Restricting movement to
the line of the bar being manipulated makes the interface feel responsive,
without distracting the users‘ with too much movement far away from the
active manipulation area.
Moving and hiding sections of music
Changing where page turns occur
As described, music in the developed system is stored as an ordered list of
bars. This structure is analogous to that of a text document, which can be
thought of as an ordered list of words. Word processor software provides tools
to change the layout of a text document without changing the ordering of the
words, and therefore not changing the overall meaning, by allowing
adjustment of white space (indenting and spacing), line breaks and page
breaks. Adding similar tools to the developed sheet music display software
would give musicians control of how many bars are displayed on each page
and therefore control of where page turns occur in a piece of music. This was
not implemented.
91
Marking cuts and compiling arrangements
Sometimes individual musicians or groups of musicians cut or rearrange
sections of pieces to better suit performance constraints. In an orchestral
situation, if the conductor decides to restructure a piece, for example by
cutting a section, this information must be then passed on to each individual
musician. Small changes can be written in by the musicians themselves, but
more complex restructuring is often completed in advance by an orchestras‘
music archivist team before the individual parts are distributed to the orchestral
players. Such complex tasks often involve copying, cutting and pasting
together of portions of sheet music and even handwriting long passages. This
can take many hours or even weeks to complete (Bellini, Fioravanti and Nesi
1999).
In the developed system music is stored bar by bar for every part. Tools could
be developed to allow construction or arrangement of a piece of music by
reordering or removing bars or combining portions of different parts. This
could help to speed up the music archivist teams‘ processes, cutting down
delays in getting parts to musicians to begin practicing.
Physical scores that have been cut and pasted together by hand, as described
above, may lose some of the formatting niceties that were present in the
original sheet music. Music typesetters make effort, when laying out music for
printing, to position page turns in appropriate places and to justify music
pleasingly on the page. When bits and pieces of parts are moved around, this
careful formatting is altered. The music layout and reflow systems in the
software developed here could produce a tidier final product than manually
manipulating pieces of printed music. With the addition of the other score
personalisation features described in this section, the musician that received
the final arranged part to play also has control over the final layout and so can
manipulate it to best suit them.

92
One limitation of the current system in this area is that it cannot support
transposition of portions of music, as the system has no musical understanding.
Rearrangement would be limited to that which could be done with the bars of
each part in their original keys.
Adding cues or display complete score
When playing music in a group or ensemble, it is often helpful to know when
and what the other members of the group are playing. This information can be
found by looking at the complete score of a piece, rather than the individual
parts. Reading from a full score is not always practical, however. As the score
contains all the music for all the parts in the ensemble, less music fits on each
page and hence the music is spread over more pages, requiring more page
turns.
The full score may hold a lot more information than the musician wishes to see.
They may only be interested in how one specific part interacts with their own.
Or it may be that for the majority of a piece, the musician is mainly interested
in their own part and only wants the additional information from others part
over a short section of the music. For example, orchestral musicians often
handwrite cues onto their music (Winget 2006) reminding them what another
part is playing leading into, or alongside some section of their music.
Using the software system developed as part of this research, choosing to
display any subset of the parts in a piece is simple. As described in the previous
chapter, each bar of music is cut and exported from a copy of the full score.
The DrawingBrush data for each part for that bar of music is exported as a
layer inside the same XAML file. This means that each XAML bar file contains all
the information required to display the music for any or all parts. The system
need just be told which parts to display. This can be done on piece wide or
individual bar level.

93
In the current system the subset of parts displayed is chosen for the entire
piece when the application starts up. This could be modified to be set bar by
bar, though some more work around vertical alignment of the bars would
need to be done to ensure that staff alignment worked between bars showing
different collections of parts.
Figure 35 is a mock up screenshot of the system displaying an extra part above
only three consecutive bars rather than the whole piece. In this case, The Violin
2 part is shown for the whole section and the Violin 1 part is added over bars
9, 10 and 11. It is important that the staff lines for the main part (in this case
Violin 2) remain aligned through the whole piece so the musician knows which
music to play for any given bar. It may also help to display the extra part in a
lighter colour to indicate that it is a cue.
Figure 35 Section of Violin 2 part with Violin 1 part displayed over three bars
Adding this feature to the system would remove the need for musicians to add
handwritten cues to their music. Using the data already stored in the system
ensures that cues are created in the correct place and the horizontal alignment
of the cued notes against the main part is accurate. This could make the digital,
printed cues more helpful in understanding the relationship between the parts
than handwritten ones.

94
4.6 Some ideas on page turning
Any digital music stand system needs to support page turning in some way. As
previous research has shown, simply providing musicians with a scrolling
interface is not satisfactory (Bell, et al. 2005).
In this research, no attempt was made to experiment with automatic page
turning triggers or systems. Instead, it was decided to take advantage of the
graphics and animation features available in WPF to create visualisations of
page turning actions. Visualisations and animations are important in letting the
musician know when and how they have moved through their musical score,
particularly if page turns are to be triggered remotely.
Visualisation options
In the developed system all page turn visualisations are triggered manually by
touching and dragging on screen. An external source, such as a foot pedal or
networked command, could be setup to trigger the page turn action, but the
focus of this research was on creating the visualisations themselves.
The visualisations created take advantage of the large, 21.5‖ monitor used in
the experimental setup. The monitor used was roughly the same size as an
orchestral music stand. This meant that it was possible to comfortably display
two, approximately A4 sized, digital pages of music side by side. The sheet
music displayed was structured as a digital representation of a physical score.
Music is flowed across digital pages which are arranged on screen to mimic the
way that printed pages of music would sit on a physical music stand.
Three visualisations were created. The underlying WPF controls for these
visualisations are based on the open source WPF Book Control by Furuta
(Furuta 2008). For each, the digital pages of music were arranged in a way that
a printed score could be set up on a physical music stand.

95
Booklet
This technique handles the musical score as though it were printed and bound
into a booklet. Each digital page has music printed on both sides. Two pages
of music are displayed at a time. Turning a page causes both old pages to be
covered with the next two pages in the booklet. (See Figure 36)
Figure 36 Page turning, Booklet visualisation

96
Paper Stack
In the Paper Stack scenario the pages of the score are arranged in two side by
side stacks on the screen. To start with, all the digital pages are on the right
hand stack. Each page has music on one side only. When the user wants to
reveal more music, they drag the top page off the right hand stack and slide it
across on top of the left hand stack.
Figure 37 Page turning, Paper Stack visualisation

97
Each time a page is turned (shifted between stacks), the old left hand page of
music is covered by the old right hand page of music, and one new page is
revealed from underneath the old right hand page. (See Figure 37)
With this system, while playing a piece, users could perform a page turn before
they have reached the end of the right hand page, as the old right hand page
is still visible on the left stack after the page turn has occurred. This may make
it possible to choose a point to turn the page that is less disruptive to playing
the music.

98
Paper Strip
The Paper Strip page turn is very similar to the Paper Stack. The only difference
is that instead of the new page being revealed from beneath the old right
hand page, it is instead animated in from the right hand side. It is as if the left
edge of the new page is connected to the right edge of the page being
dragged. (See Figure 38)
Figure 38 Page turning, Paper Strip visualisation

99
The benefit of animating the new page in like this is that if the user was
performing a quick page turn as they reached the end of the right hand page,
while the page turn is taking place, the beginning of the new page is at no
stage partially covered by the page being dragged out of the way. This means
that the musician can see the next bar of music to play next as quickly as
possible.
Initiating a page turn
For all three visualisations, page turns are triggered by touching and dragging
on a portion of the page to be turned (or slid aside). Once the moving page is
dragged across the screen by more than 30% of the width of a page, the user
can remove their finger from the screen and the page turn animation will
complete automatically.
If the user removes their finger before reaching the 15% threshold then the
page turn is cancelled and the turning page will animate back into its original
place.
Turning back pages works similarly but in reverse. Users touch the left hand
page and drag it back across to the right.
Animation speed
The speed of the page turn animation is controlled by the speed of the drag
motion made by the user. This enables the user to flick a page over quickly or
slowly drag it into place depending on how time sensitive the page turn is in
the music.
If the page turns were to be triggered by an external source, such as foot pedal
or networked command, a suitable default speed would be used.

100

101
Chapter 5 - Supporting Annotation
A major part of this research project was to develop and integrate an
annotation system with which musicians can satisfactorily create all of the
annotations that they do on standard paper scores. This chapter discusses the
underlying tools used to support annotation in the software as well as interface
features developed to make it easier for the user to create quality musical
annotations.
5.1 Digital Ink
Supporting touch input in the form of freeform sketches or handwritten text is
the underlying functionality of an annotation system. Input of this form is
known as Digital Ink. Digital Ink can be run through handwriting recognition
algorithms and converted to text, or can be stored as sets of strokes which are
in turn stored as collections of points.
Microsoft has offered .NET development tools for applications using pen input
in the form of digital ink since the 2002 release of Windows XP Tablet Edition
the associated Software Development Kit.xix The tools for creating, storing and
manipulating digital ink now come built in to WPF. These, combined with touch
support, give WPF all the necessary tools for creating a touch-based
annotation system over our experimental sheet music display software system.
5.2 Storing annotations across bars
As explained in the previous chapter, sheet music displayed in the experimental
software system is broken up into bar sized blocks. These bar blocks are
designed to be resized and reflowed on screen at the whim of the user.
Annotations made on music in this format must also be free to resize and
reflow so that it remains attached to the content that it was initially drawn on. It

102
is therefore necessary to store annotations on a bar by bar basis, the same as
the underlying music.
To do this with WPF a control layer was added on top of each bar object, this
became the annotation layer. This annotation layer is responsible for accepting
touch input, and creating and storing digital ink.
Annotatable Music Structure
With the addition of annotatable overlays on each score block, the final music
has this underlying structure:
Score
Line Line Line
Annotatable
Block
Annotatable
Block
Annotatable
Block
Score BlockAnnotation
Overlay
Annotatable
Block
Score Block
Single Part
Block
Single Part
Block
Single Part
Block
Key
Signature
Musical
Content
Annotation
Overlay

103
WPF Ink Canvas
The simplest way to add digital ink support to a WPF application is to use the
built in InkCanvas control. An InkCanvas is a user interface control that
creates a space that can be drawn on using mouse, stylus or touch input. From
this input, ink Strokes are created and stored. Creating an InkCanvas on top
of each score bar in the music then allows users to draw on each bar as shown
in Error! Reference source not found.
Figure 39 Annotations created on InkCanvas overlays
The blue annotations have been sketched on top of the music using the touch
screen. The highlighted bars are those that have registered touch events. Each
annotation is stored within the InkCanvas overlay associated with the bar that
it was sketched on top of.
There is one issue with this approach: the InkCanvas control does not allow
annotations to be drawn continuously across multiple bars. Figure 40 shows
two examples where annotations are prevented from running between bars. In
both cases the InkCanvas layer on bar 11 registers the user‘s touch and
creates annotation strokes appropriately. Once the user crosses the boundary
into bar 12, however, bar 11 remains in control of all touch events, preventing
bar 12 from receiving notification that the user it now trying to draw on its
InkCanvas.

104
Figure 40 Annotation Clipping 1
This clipping is not appropriate for a music annotation system. Annotations like
slurs, crescendos and phrasing marks often cover multiple bars. With the above
system, musicians would have to draw such annotations in multiple pieces.
One option to remedy this situation is to set the ClipToBounds property of
each InkCanvas object to false. The InkCanvas will then allow sketched
strokes to continue past its boundaries. This means musicians could start an
annotation in one bar and sketch continuous strokes into neighbouring bars.
The complete annotation would be stored entirely in the InkCanvas of the
bar in which the touch event was initiated.
Figure 41 Annotation on an InkCanvas with ClipToBounds off
Figure 41 shows a crescendo annotation drawn starting in bar 19, moving over
the left hand boundary into bar 18 and back into bar 19 again. As the green
highlighting shows, only bar 19 registered any touch events during the drawing
of the annotation. The final appearance of the annotation is what was desired,
and the action required to draw it is the same as if it were drawn with pencil on
paper. The issue here comes when the window is resized and the music is
reflowed.

105
Figure 42 Reflowed annotation on an InkCanvas
When the music is reflowed, bar 19 moves onto a new line. The entire
crescendo annotation moves with bar 19 as it is stored on the InkCanvas
belonging to bar 19. The crescendo hairpin annotation was originally placed to
indicate a crescendo beginning in bar 18. That information is now lost. In this
particular example, the result is not too bad, but if the hairpin crescendo
annotation had covered three or more bars for example, having the entire
annotation attached to bar 19 would be even more destructive when the music
reflowed. Ideally, when the music is reflowed, any annotation that spans a line
break should break into pieces along the bar boundaries and each piece
should stay attached to the bar that it was drawn over.
What is needed here is a tileable InkCanvas control. Once an area is covered
with such tiles, users should be able to sketch over the entire area creating
continuous curves, without clipping occurring between tiles. The sketched
curves should then be stored broken into pieces across the underlying
boundaries. This could, in principle, be achieved by modifying the way the
InkCanvas control responds to touch events. Forcing the InkCanvas to
release touch focus when the user‘s finger leaves its boundaries, and grab
focus again when the user‘s finger re-enters its boundaries should allow touch
events to pass between neighbouring InkCanvas controls, creating and
breaking stokes as desired.

106
The InkCanvas object itself if complex, however, with multiple layers
responsible for different things. The InkCanvas supports drawing strokes and
erasing complete or partial strokes as well as applying styling and formatting
the strokes themselves. The components of the InkCanvas object that are
responsible for ink rendering are:
The underlying layers of the InkCanvas object manipulate and respond to
touch events and focus. Simply forcing changes to touch focus on the
InkCanvas control on touch enter and touch exit events did not generate the
expected behaviour. Touch focus seems to be handled too deeply within the
InkCanvas control to make it easily customisable to the desired use. It was
therefore necessary to develop a completely custom ink control layer to use in
the experimental software system.
InkCanvas
-WPF control that sits in the application UI
- Maintains a list of input strokes recieved from the DynamicRenderer
- Passes stroke information to the InkPresenter
- Responds to initial touch events
DynamicRenderer
-Handles live rendering of current input strokes
(before it is sent to the InkPresenter)
InkPresenter
- Displays complete strokes
- Applies appropriate styles to each stroke

107
Custom Ink Control
The custom Ink Control created for the developed software system is a much
cut down version of the built in InkControl. The custom ink control created
maintains a list of Stroke objects which are rendered using an
InkPresenter object. The complication of the DynamicRender is removed
as well as most of the Stroke erasing and styling functionality of the original
InkControl.
Each control maintains a list of complete Stroke objects as well as a collection
of TouchPoints representing the stroke that is currently being drawn. A
TouchPoint object stores the 2D location within the current control at which a
touch occurred, as well as information about the TouchDevice involved. The
TouchDevice information makes it possible to track multiple touches on the
screen simultaneously.
The custom tileable ink control works by responding to four of the WPF touch
events as follows:
TouchEnter
This is when a new Stroke should be created. It is triggered when the current
touch point is moved into the control, i.e. a touch started outside the control is
dragged across a boundary into the control. This event is also triggered when
the user initiates a touch within the boundaries of the control.
- Start collecting touch points for a new stroke
- Get the latest TouchPoint and store it in the current Stroke‘s
TouchPointCollection
- Create a new stroke in the InkPresenter using this
TouchPointCollection
- Grab Control of all events associated with this TouchDevice.

108
TouchMove
This is where the current Stroke is updated with any new TouchPoints that
have been registered. This event is triggered when a touch point within the
control is moved.
At this point it is also necessary to test if the current Stroke has hit the
boundary of the control. This is because the order in which touch events are
called between consecutive controls is not reliable. If the TouchEntered event
of the neighbouring control is triggered before the TouchLeave event of this
control, capture of the TouchDevice will not yet have been released, meaning
the passing of touch capture between these neighbouring controls will not
occur as expected. By testing on each TouchMove event for a touch nearing or
crossing the boundary of the control, we can pre-emptively release touch
capture, preventing the above situation from occurring.
- Check that there is a current Stroke being created
- Add any new TouchPoints to the current Stroke by adding them to
the current TouchPointCollection
- Remove the old version of this Stroke from the InkPresenter.
- Tell the InkPresenter to store the new version of the Stroke. This
creates a new Stroke in the InkPresenter from the current
TouchPointCollection.
- Check if the latest TouchPoint has reached the controls‘ boundaries.
If it has:
o Finish off and store the current Stroke in the InkPresenter
o Release control of all touch events associated with this
TouchDevice

109
TouchUp
This represents the completion of a Stroke object. It is triggered when the
user removes their finger from the screen within the boundaries of the control.
- Check that there is a current Stroke being created
- Add any new TouchPoints to the current Stroke by adding them to
the TouchPointCollection
- Remove the old version of this Stroke from the InkPresenter.
- Tell the InkPresenter to store the complete Stroke. This creates a
new Stroke from the current TouchPointCollection.
- Release control of all touch events associated with this TouchDevice
to let surrounding controls take over.
TouchLeave
This also represents the completion of a Stroke. Triggered when a current
touch point is moved outside the boundaries of the control.
- Check that there is a current Stroke being created
- Add any new TouchPoints to the current Stroke by adding them to
the TouchPointCollection
- Remove the old version of this Stroke from the InkPresenter.
- Tell the InkPresenter to store the complete Stroke. This creates a
new Stroke from the current TouchPointCollection.
- Release control of all touch events associated with this TouchDevice
to let surrounding controls take over.

110
Replacing the InkCanvas layer on each bar of music with this custom Ink
control gives the desired result as shown in Figure 43.
For the purpose of elucidation, each new Stroke is created in a different
colour to show how they are broken across bar boundaries.
Figure 43 Annotations created across tileable custom ink control
With this custom control, annotations can created smoothly across bar
boundaries yet are broken up on a bar by bar basis meaning that when the
lines of music are reflowed, any annotations will remain in the correct place in
relation to the music.
5.3 Creating space for annotations
On a printed piece of sheet music, there is a fixed amount of empty space
around the music in which annotations can be drawn. Musicians must fit all
their annotations into the existing margins and spaces between lines on the
page.
Moving to a digital sheet music display, we now have the freedom to change
the spacing of the musical lines on the page to make more room when it is
required. In the experimental system developed as part of this research,
annotation space around lines is controlled by changing the size of the
margins above and below each line of music.

111
Figure 44 demonstrates the structure of annotatable lines of music displayed in
the experimental software. This sample application displays simple boxes in
place of the musical content.
Figure 44 Test application for line spacing techniques
- Purple boxes represent bars of music
- Grey areas are the annotatable areas of the display.
The annotatable areas cover the musical content of each bar and
extend to fill the height of the line.
- The total annotatable area on the screen is broken vertically between
lines and horizontally between bars. The grey dotted lines show the
boundaries between the annotation areas.
- For demonstrative purposes, the annotations for each bar are rendered
in different colours showing how they are broken up horizontally across
the line.
112
- Annotations drawn in the space outlined in orange belong to the bars
in line 2.
- The top margin of line 2 has been extended to create more annotation
space.
- The bottom margin of line 1 has also been extended.
Once an annotation is created in the margin space of a bar, that bar‘s margins
cannot be collapsed back over the annotation. If the line structure of the music
is reflowed at any stage, annotations move with their associated bar. Each new
line of music sets its initial margins to the minimum required size to fit all the
annotated bars of music that it contains.
Creating more space for annotations will reduce the amount of music that fits
on the screen, possibly affecting the number of page turns required. It is up to
the musician to decide on the balance between annotation space and number
of page turns.
Three experimental control systems for creating annotation space were tried
out during development: Corner Drag, Tab Style and Roller blinds. The first two
systems work on the concept of moving the boundaries of a line of music to
stretch the surrounding white space. The third option, Roller Blinds, works
differently in that the user creates white space by grabbing the musical content
of a line and pushing or pulling it out of the way, leaving clear space behind.
These three controls were created as a proof of concept and were not subject
to full usability testing. This section explains how each control works and some
observations on the usability of each as became apparent during development.

113
Corner Drag
Figure 45 Line spacing demonstration application with Corner Drag controls
The Corner Drag control was designed to act in a similar way to the controls in
Microsoft Windows for expanding or shrinking an application window. Clicking
and dragging the bottom corner of a window allows that window to be
resized.
In this test implementation (shown in Figure 45), large touchable controls were
placed in each corner of the space assigned for each line of music. Touching
and dragging any one of these controls stretches the allocated space for that
line by expanding its top or bottom margin. This creates more space around
the musical content of the line in which the user can draw annotations.
The musical content for the line remains in the same place on screen and the
surrounding lines are pushed out of the way as the margin expands. The
margins of the previous and following lines remain the same.

114
Figure 46 Touch and drag action controls the margin size
Touching the top left corner control (as shown in Figure 46) and dragging up
or down expands or contracts the top margin of the musical line.
This control turned out to be confusing to use. The problem being that the top
controls of one line appear to control the same space as the bottom controls
of the line above. Both controls do control the overall space between the two
lines, but the distinction between expanding the bottom margin of the top line
or expanding the top margin of the bottom line is difficult to grasp. The
boundary between the two lines defines which bar any drawn annotations will
belong to.
Even after gaining some experience with the use of this control, accidentally
grabbing and manipulating the control for the previous or following line was a
regular occurrence. This meant that it was easy to expand the margins of the
neighbouring line of music. Creating annotations in this new space would
cause them to be stored with the wrong bars of music and become misplaced
if reflow was to occur.

115
Tab Style
Figure 47 Line spacing demonstration application with Tab Style controls
In an effort to make it more clear which white space is controlled by which
touch control, corner controls are replaced here with overlapping tab-like
controls. Dragging the left tab controls the top margin of the line below, while
dragging the right tab controls the bottom margin of the line above. The idea
is that the positioning of the tag controls shows more clearly which space each
will act upon.
The tabs are positioned such that they extend
from the line they control onto the neighbouring
line in the direction that the lines‘ space would be
extended if the tab were dragged. The Tabs
themselves cast a slight shadow on the
neighbouring line to show that they are
overlapping (see Figure 48).
Figure 48 Tab Style controls close up

116
The functionality of the tabs was the same as the previously described corner
controls. Users drag up and down to expand and contract the associated line
margins. Again, the musical content of the affected line remains in the same
place on screen and the surrounding lines are pushed and pulled to make
space for the expanding/contracting margins.
Using the tabs turned out to be slightly more intuitive than the corner drag
method. There was less of a tendency to accidentally change the neighbouring
lines‘ margins by initially grabbing the wrong control.
The feeling was however, that perhaps creating space by stretching existing
space didn‘t feel too natural. This forced the user to see the ―white space‖ of
the page as a tangible object that could be manipulated. Perhaps it would be
more natural to, if you needed more space, grab the actual page content, and
shift it out of the way. The third control works on this idea.

117
Roller Blinds
With the Roller Blinds contol, to create annotation space around a line of
music, users grab the musical content of the line and drag it out of the way,
leaving clear white space in its wake. To avoid confusion with annotation
gestures, rather than touching and dragging on the musical content of the line
to move it, a control is created in the left hand margin of the page, as shown in
Figure 49).
Figure 49 Sample application with Roller Blinds controls for line spacing
Unlike the corner and tag controls, in this implementation there is only one
control attached to each line. This control is responsible for all four actions
associated with its line:
- Expanding the top margin
- Shrinking the top margin
- Expanding the bottom margin
- Shrinking the bottom margin
The system works on the assumption that the most common task would be to
expand the margins around a line to create space for annotations. This is
therefore the simplest task to achieve.

118
Expanding the top margin
To expand the top margin, the user touches and drags the line control down.
This action is shown in Figure 50. The selected line moves with the control
under the user‘s finger. The preceding lines of music stay in place and the
following lines are pushed further down the page. The purple highlighting
shows the complete annotatable area surrounding the manipulated line.
Figure 50 Expanding the top margin with Roller Blind controls
Expanding the bottom margin
To expand the bottom margin, the user touches and drags the line control
upward, as shown in Figure 51. The preceding lines of music are pushed up
out of the way. The following lines stay in place as the bottom margin of the
line extends, creating more annotation space.
Figure 51 Expanding the bottom margin with Roller Blind controls

119
As the preceding lines are pushed upward, some of the music will disappear
off the top of the page. This is necessary to ensure that the line being dragged
by the user remains under their finger on the screen. After the user releases
the control by taking their finger off the screen, the whole page of music will
scroll back down onto the page, assuring that there is no musical content lost
off the top of the page.
Figure 52 Annotatable space created by expanding margins
The final page of music now has plenty of annotatable space surrounding the
second line, as shown in Figure 52 above .
Shrinking a margin
Shrinking the margins of a line requires a two motion gesture. The user must
first tell the system which margin to change by beginning to expand that
margin. This is done by touching and dragging up or down. Dragging up will
‗activate‘ the bottom margin, while dragging down will ‗activate‘ the top
margin. Once a margin is ‗active‘, moving the selected line of music up and
down will affect only that margin. As soon as the user releases the control, by
taking their finger off the screen, the activation is lost.

120
This motion mimics the behaviour of roller blinds on a window, which lead to
the control being named Roller Blinds. Blinds are unrolled over a window by
pulling them downward. To roll them back up, a short downward motion is
required to release the catch, then, as the blinds are released, they roll back
up.
To shrink the top margin
- First drag down to expand the
top margin slightly
- Then drag the line of music
back upward to collapse the
white space above
The gesture to shrink the bottom margin is the same but starting with an
upward drag motion.

121
5.4 Annotation Input Scale
Drawing annotations by hand on a touch screen is quite different to drawing
them with a pencil onto paper. Touch interfaces, where finger input is involved,
do not provide high enough input resolution for direct drawing of all
annotations onto a digital document. Large sweeping annotations such as
circling a paragraph or crossing out a portion of text are possible, but smaller
handwritten notes cannot be sketched legibly by finger at the same size as
printed text.
The sorts of annotations that are drawn on sheet music are often small and
need to be carefully aligned with the music that they correspond to, so this
problem with touch input is particularly apparent.
There are several issues that arise when writing or drawing on a touch screen
with a finger:
- Finger tips can occlude areas of the screen, making it difficult to know
exactly what part of the screen is being touched.
- The contact area between finger tip and screen is large (compared to
that of a pen on paper). This makes it difficult to make or detect fine
movements.
- Fingertips can be sticky. When fingers stick to the screen, smooth
sketching motions are difficult.
- Conversely, fingertips can sometimes slip too easily over a screens‘
surface. This again can make fine movements and drawing difficult.
The situation can be helped slightly by allowing users the use of a pointing
device or stylus in place of a finger. Drawing with a stylus more closely mimics
the physical action of drawing with a pen on paper. This familiarity leads to
slightly better fine control. Some of the fine control that is attained using a pen
on paper is dependent on the ability to brace ones‘ hand against the papers

122
surface while writing. This is not possible on optical or capacitive touch screens
as extra contact points would be detected where the hand touched (or neared
in the case of optical touch) the screens surface.
The disadvantage of relying on a stylus to interact with a system is that it
introduces an extra piece of hardware that must be managed by the user.
Fingers are always there when needed, whereas a stylus is easily lost. For this
reason it was decided to try to build a finger operated annotation system that
alleviated the main complaints against finger based interaction, and made it
possible to draw fine musical annotations simply and comfortably.
The software solution posed was to increase the size at which annotations are
drawn, a system similar to that explored by Agrawala and Shilman (2005). The
premise being that drawing complex annotations requiring multiple precise
strokes is easier when they are drawn on a large scale, as each individual stroke
then involves a bigger movement on the touch screen. The main complaints
against finger based interaction are most prevalent when making small
movements.
Zoom to Annotate
To increase the input size for annotations while maintaining the display size of
standard sheet music, the zoomable nature of the bars of music in the sample
system is leveraged. Users‘ can zoom in on a bar they wish to annotate, draw
the desired annotation in place on the music, then resize the bar back into
place. The zoom action is triggered using the pinch gesture described in
Chapter 4 (Section 4.6 Score Personalisation, Scale Gesture).
Zoom in Place
Initial implementations of the Zoom to Annotate feature aimed to keep the
zoomed bar in place in the overall piece of music while it was being annotated.

123
Figures 53 and 54 illustrate annotating on a zoomed bar then shrinking it back
into place.
Figure 53 Annotation created on bar zoomed in place
Figure 54 Annotation created on zoomed bar, scaled back into place
The advantage of zooming in place is that the position of the zoomed bar in
relation to the rest of the piece is always clear. This is important when dealing
with sheet music as there are often multiple bars and sections within a piece
that look similar or are in fact identical. Understanding the context of each bar
is therefore important to make sure that annotations are not mistakenly
created in the wrong place in the music. Bar numbers are also helpful in this
regard.
There were two major complications in the implementation of the Zoom in
Place feature: how to handle annotations across multiple bars; and fitting

124
zoomed content on the screen. Descriptions of the problems encountered and
possible solutions follow.
Annotating over bar boundaries
Musical annotations often cover multiple bars. To draw a multi-bar annotation
with the system, users could use the pinch gesture to first zoom each bar that
the annotation will cross, then draw the annotation, then shrink each bar back
down to size.
This is cumbersome and requires planning before drawing can take place. For
some annotations it is more suitable than for others. If the user were drawing a
hairpin crescendo across a couple of bars, this approach works well, since users
know in advance how long the crescendo mark needs to be and so can
prepare the appropriate bars. If however, the user is writing a long textual
annotation, they may not know how much horizontal space will be required. If
they begin drawing their annotation across zoomed bars and run out of space,
they must stop mid annotation, scale the next bar, and then continue drawing.
As an alternative to the above, in the developed software, automatic bar
zooming was implemented. As the user approaches the edge of a zoomed bar
while drawing, the neighbouring bar is pre-emptively zoomed ready to take
over annotation collection.
The images in Figure 55 show the process of creating a multi-bar annotation
aided by the automatic zooming of the neighbouring bar. The annotation is
started in a pre-magnified bar then, as the user draws into the bar on the right,
the next bar is zoomed and takes over the annotation capture. As indicated by
the different colouring of the annotation strokes in each bar, the annotation is
broken at the boundary and each half is stored with the bar that it was drawn
over (this is to enable reflow of the music as described previously).

125
Figure 55 Auto zoom of neighbouring bars when annotation reaches boundary
When annotations are drawn from left to right (as in the example in Figure 55),
as the neighbouring bar to the right is scaled, any more music on the same line
is pushed further to the right hand side of the screen. This causes some
musical content to be clipped off the edge of the screen. This is only
temporary however, and once the annotation is complete and the zoomed
bars are returned to normal size, the clipped music slides back onto the page.
If annotations are drawn from right to left, when the user reaches the left hand
boundary of a bar, the preceding bar in the line is automatically zoomed. If this
is left to happen naturally, as the left hand bar gets bigger, it will push the bar
the user is currently annotating to the right, along with the rest of the line of
music. This means that the bar being annotated moves beneath the users
finger, changing their finger placement in relation to the current annotation
stroke. This will ruin the annotation, by creating an extra horizontal line as the
bar slides beneath their finger.

126
To stop this from happening, as the left hand neighbouring bar scales up, the
whole line of music is offset to the left hand side of the screen. This process is
illustrated in Figure 56. Note in the second image, the content of the line
before the first zoomed bar has been pushed to the left. When the annotated
bars are scaled back to normal size, the line of music slides back in from the
left.
Figure 56 Auto zoom of left hand neighbour pushes entire line to the left
Fitting zoomed content on the screen
Issues arise when the bars are zoomed near to the edges of the application
frame. Zoomed content is forced off the screen and clipped. This makes it
impossible to draw on a large portion of the bar. (See Figure 57)
Figure 57 Magnified last bar of a line is clipped at the boundary of the application window

127
Zoomed bars can be clipped both horizontally and vertically. In the sample
shown in Figure 58, zooming any bar of the second line of music leaves the
bottom part clipped off the bottom of the page, making it impossible to draw
annotations relating to that part.
Figure 58 Zoomed music clipped off bottom right corner of page
One possible way to prevent this clipping from occurring is to force the music
to reflow after each zoom (as described in Chapter 4). Zooming to annotate
however, is different from the zooming mentioned in Chapter 4 in that it is
designed to be temporary. Bars are only magnified to allow annotation to
occur, and reflowing the whole piece of music for this short period of time
seemed unnecessary. Also, the act of reflowing could separate bars that the
user was intending to annotate between.

128
What is needed here is a way of panning the zoomed content to bring it back
into view. This would involve making each line of music scrollable both
vertically and horizontally once any of its bars were magnified. This could be
done either with the addition of scroll bars, or by defining a multi-finger
gesture to indicate scrolling.
It was decided to avoid scroll bars to prevent the interface from becoming
cluttered. Introducing a new touch gesture to be performed over the musical
content of a line of music was also not a good option as it may interfere with
the annotation controls on the music. It was instead decided to come up with
an alternative to zooming in place.
Zoom Overlay
The chosen alternative to zooming bars in place was to create an overlay in the
centre of the screen in which selected bars are displayed at a magnified level,
ready to be annotated. With this approach, when a user wants to annotate a
bar, they use the pinch gesture as before to trigger the zoomed overlay
(shown in Figure 59. The bar that they ‗pinched‘ appears in the overlay along
with the bar before and the bar after. The ‗pinched‘ bar is highlighted in the
music behind.
Figure 59 Zoomed overlay ready for annotation
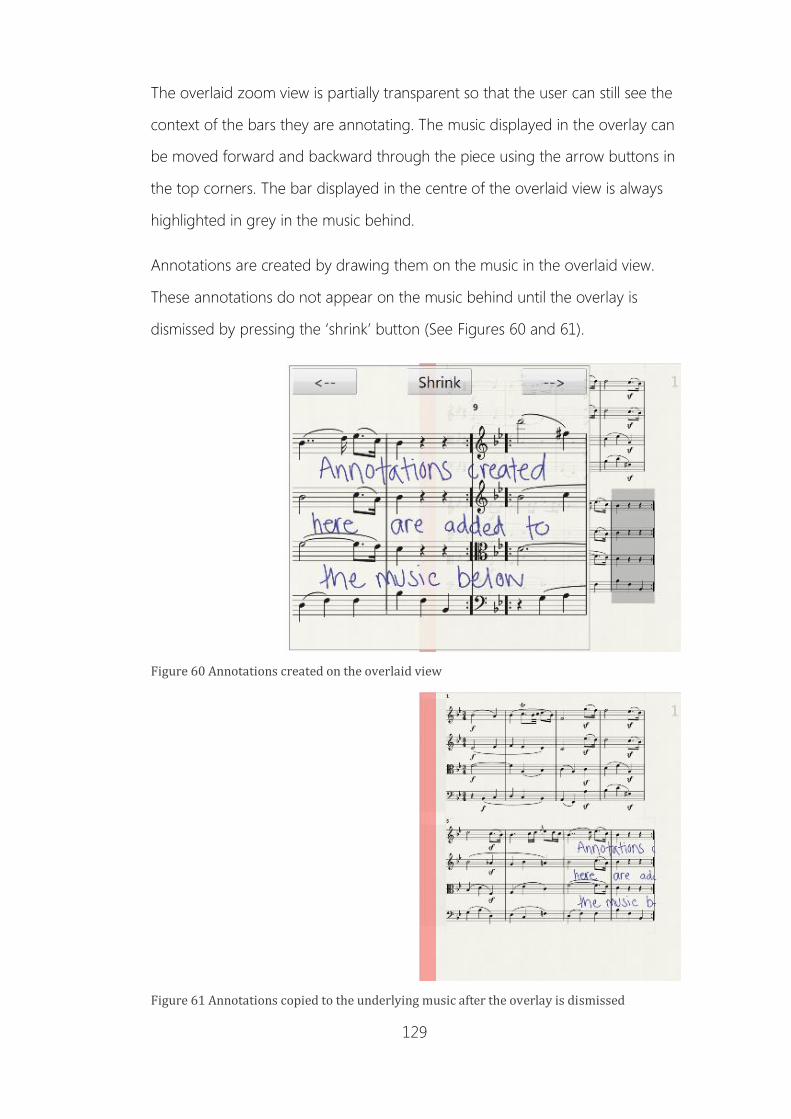
129
The overlaid zoom view is partially transparent so that the user can still see the
context of the bars they are annotating. The music displayed in the overlay can
be moved forward and backward through the piece using the arrow buttons in
the top corners. The bar displayed in the centre of the overlaid view is always
highlighted in grey in the music behind.
Annotations are created by drawing them on the music in the overlaid view.
These annotations do not appear on the music behind until the overlay is
dismissed by pressing the ‗shrink‘ button (See Figures 60 and 61).
Figure 60 Annotations created on the overlaid view
Figure 61 Annotations copied to the underlying music after the overlay is dismissed

130
The sample annotations drawn in Figure 60 appear to be clipped down the
right hand edge when they are copied onto the real sized sheet music shown
in Figure 61. This is because the sample annotations are created between bars
that are separated by a page turn. As shown in Figure 62, the remainder of the
annotations are displayed on the next page of music. This demonstrates a
benefit that the overlay system has over the ‗zoom in place‘ alternative,
annotations can be created smoothly between bars that are separated by a
line or page break.
Figure 62 Annotations drawn over a page break
The overlay view is limited to displaying three bars at a time. This means that
annotations that cover more than three bars would have to be drawn in pieces
if using the overlay view. Users can however, draw annotations without using
the zoomed overlay by simply drawing them directly onto the music at actual
size. This makes it possible to draw large annotations that cross more than
three bars. These types of annotations generally involve larger strokes and so
should be able to be drawn readily by finger on the actual size music.

131
Stamps
For the drawing of complicated annotations that are likely to be used multiple
times, a stamp system was also implemented. Users are able to create (Figure
63) and store a collection of ‗stamps‘ that can be used and reused by touching
and dragging them from a menu at the right of the screen (Figure 64). Once
the stamp is placed, it is treated the same as annotation strokes drawn directly
onto the music. It is saved with the bar it is placed on so that it will reflow with
the music. Stamps are drawn at 8 times actual size.
Figure 63 Stamp creation overlay
Figure 64 Inserting a stamp by touch and drag from the list of available stamps

132
5.5 Finger Annotation User Test
Experimenting with the developed software system in the lab environment it
became apparent that some musical annotations are easier to create than
others. Larger annotations, e.g. large slurs or hairpin crescendos could
sometimes be drawn without zooming first, where writing text or complex
small symbols was found to be difficult at real size.
Some structured testing was required at this stage to determine whether
allowing users to input annotations at a large scale, and then shrink them back
to size, was sufficient to make drawing real world musical annotations by finger
on a touch-screen viable. A formal user test was carried out to try to determine
whether the idea was valid and to try to find a magnification level for the input
area that allowed for the majority of real world sheet music annotations to be
drawn consistently and to a satisfactory quality.
Experiment Goals
The user test was designed to determine what level of zoom is required to
make the drawing of common musical annotations comfortable and accurate
using finger input on a touch-screen.
In addition, optical touch screen technology has some issues around what
triggers ‗contact‘ with the screen surface. Hovering one‘s finger too close to
the screen without actually ‗touching‘ it is sometimes detected as a touch. A
second goal of the experiment is to see if drawing bigger, on a zoomed input
area, causes people to lift their fingers further off the screens surface between
strokes, avoiding this hardware flaw.
Experimental Setup
Subjects were presented with a test application running on a multi-touch
screen (shown in Figure 65) and asked to complete a set of tasks involving
copying musical annotations onto a short section of digital sheet music. For

133
each task, they were presented with an excerpt of sheet music with some
typeset annotations overlaid. They were asked to copy the typeset annotations
in ‗sketched form‘, onto the same place on an un-annotated copy of the same
excerpt of music by drawing them on the screen using their finger.
The experiment was designed so that the user need not understand the
meaning of the presented music or annotations; they were simply asked to
copy the symbols. The finished annotations were not expected to look perfect;
they should be a ‗sketched‘ version of the printed sample.
Figure 65 Finger annotation user test application screenshot
There were six different annotations to copy. They range in complexity from
three curves (slurs) to a collection of seven English characters. Users were
asked to copy each annotation five times, each time the annotation input area
was presented at a different scale, starting very large and getting smaller each
time. (The scale of the sample was not changed – only the un-annotated input
area was scaled.) The magnification levels tested were: 8 x, 6 x, 4 x, 2 x and 1 x

134
actual size. At actual size, the staff system was 8 mm or 33 pixels high. This size
was chosen to be approximately the same size as the staff system of a printed
PDF created with LilyPond, using the default staff size setting of 20 points.xx
Concerned about the sample size, a statistician‘s expert advice sought in
relation to randomising the order in which experimental conditions were
applied. The opinion given was that randomisation would complicate the
experiment excessively. The order in which the sample annotations were
presented to the users was therefore fixed, starting with a simple annotation
and moving through to the more complex annotations requiring finer drawing
control. It was noted that there would be some learning effect, but that this
was most likely to affect the time taken to complete each task, rather than the
quality of the final result. Users were not timed. It was known from informal
experimentation that drawing on a large scale was easier than at a small scale.
By asking the users to draw at large scale first, any bias caused by learning
would favour the small scale. If users still could not draw quality annotations at
the small scale, then the experiment would provide good evidence that the
small scale was impractical.
Users could take multiple attempts at each drawing by pressing the ―clear‖
button and starting the current annotation again at any time. Once a user
finished copying an annotation at the given scale, they were presented with
their annotation at actual size and asked to say whether they were satisfied
with the final result. The reason for asking the user to rate their own
annotations, rather than have the experimenter or a music expert do the
rating, was to avoid bias resulting from a user‘s music knowledge. So long as
the user produced an annotation that satisfied them, it seemed reasonable to
assume that the system had worked satisfactorily. For the same reason,
participants were not timed at each task. Musicians familiar with the
annotations could be expected to copy them more rapidly. This may have the

135
disadvantage that users might be satisfied with very inaccurate annotation,
particularly missing the nuances in positioning that a musician would notice. A
check by the experimenter was therefore included to assure that this was not
the case, once the results were available.
Users were also asked to rate the ease at which they were able to draw the
annotation at the given scale (Rated on a five point scale ranging from ‗very
easy‘ to ‗very difficult‘). Figure 66 shows the rating screen presented to the user
after each annotation copying task.
Figure 66 Finger annotation user test - result rating
All drawn annotations and satisfaction ratings were recorded. A record was
also taken of the number of attempts the user took at each task. This was
stored by saving a copy of the input drawing‘s state, before clearing it, each
time the user pressed the ‗clear‘ button to start again. This gave a record of
any mistakes made in the drawing process to give a better understanding of

136
any problems users had using the touch-screen hardware or the software
interface.
In total, users were asked to copy 30 annotations. The software was designed
to allow them to move quickly from task to task, with the complete experiment
estimated to take around 10 minutes.
After the experiment, users were asked to complete a brief (one page)
questionnaire.
Background Questionnaire
The questionnaire given to users after the finger annotation test gathered
information about their existing experience with music and annotations, some
physical information, and asked for some feedback on the system tested. (The
questionnaire presented to participants is included as 0.)
Experience questions
- How much experience do you have with sheet music?
(none/a little/a lot)
- Have you ever written annotations on a printed piece of sheet music?
(Yes/No)
- Before this test, had you ever annotated a digital document using a
tablet or touch interface? (Yes/No)
These questions aimed to identify participants that had experience with sheet
music and/or touch screens. Users with an understanding of the annotations
that they are asked to copy and the underlying sheet music may very well have
different expectations of the final quality of the annotations produced
compared with those that are simply duplicating curves over an image without
understanding the context. The third question sought to find out if participants
that had used a touch-screen or tablet device for annotation before, had

137
developed skills that make the creation of these specialised musical
annotations easier.
Physical characteristics
- Please circle the option that best describes you:
Left Handed, Right Handed, Ambidextrous
- Which of the following outlines best fits the fingertip you used to draw
during the experiment?
Choose the smallest outline that your fingertip fits inside. You should
just be able to see the outline around your finger.
In designing this experiment, it was conjectured that the above two physical
characteristics may have interesting consequences when interacting on a touch
screen. Finger size may have an impact on the user‘s ability to draw fine
annotations, or even their ability to interact with a touch screen interface at all
as larger fingers block more of the screen from view. There is surprisingly little
published literature about how these attributes affect annotation specifically,
though finger size is often mentioned as an issue for general interaction with
touch interfaces. Voida et al. refer to this as the ―fat fingers‖ problem (Voida, et
al. 2009). We also wish to establish whether the touch-screen hardware and
software interface are easier to use with the right or left hand.
Feedback on the system
- During the test, did you have an issue with:
Stickiness (Never/Sometimes/Usually/Always)
Slipperiness (Never/Sometimes/Usually/Always)

138
- Do you have any other comments about your experience with the
software used today?
These questions covered basic feedback on the use of the touch-screen
hardware system itself and gave the user a chance to make note of any issues
that they had with the test software.
Tested Annotations
Six varieties of annotation were chosen for the user test. These annotations
were selected to cover the physical characteristics of the annotations identified
as most commonly used in Winget‘s study into the annotation behaviours of
performing musicians. As more fully described in Chapter 2, Winget
categorises annotations in two ways: by purpose and by mode. (Winget 2006).
An annotation‘s ‗purpose‘ is classified as technical, technical-conceptual or
conceptual. In Winget‘s sample, between 70% and 81% of annotations were
classed as technical and that the majority of those technical annotations were
related to bowing.
An annotation‘s ‗mode‘ is its physical representation, classed as textual,
symbolic or numeric. In Winget‘s sample 72% of annotations were symbolic,
16% numeric, and the remaining 12% textual. This categorisation was used to
decide which annotations to include in our user test as it describes the physical
form of the annotations. The user test is focused on whether it is physically
possible to draw real musical annotations using a finger on a touch screen.
The six annotations used to test the practicality of musical annotation via finger
input were the following (Annotations are listed in the order that they were
presented to participants):

139
Bowing Marks
Figure 67 Typeset bowing mark annotations sample
Bowing marks are classed as technical and symbolic. They were the most
common technical annotation uncovered in Winget‘s study. Each symbol
corresponds directly to one note, so placement of each symbol is very
important. This annotation provides a good test for accurate placement of
small symbols with the software.
Crescendo and Decrescendo
Figure 68 Typeset hairpin crescendo and decrescendo annotations sample
Crescendo and Decrescendo are classed as technical-conceptual annotations.
They are another example of the most common mode of annotation, the
symbolic annotation. These hairpin crescendo and decrescendo marks are
again carefully aligned with the notes in the music. This annotation again tests
accuracy of placement, but this time of a larger symbol that corresponds to
multiple notes in the music.
Slurs and Ties
Figure 69 Typeset slur and tie annotations sample
These slurs are again technical and symbolic. They represent articulation
instructions. Though articulation instructions made up only 2% of the technical
annotations uncovered in Winget‘s study, slurs are interesting in this test as

140
they are smooth directed curves that again require careful placement against
the note heads of the underlying music. They are a good test of accuracy as
well as fluidity of drawing.
Text and Dynamics
Figure 70 Typeset textual annotations sample
In this particular example, the text annotations shown relate to dynamics and
would be classed as technical-conceptual, textual annotations. Textual
annotations account for only 12% of the total annotations. We argue that the
physical act of writing text like that above, and writing numerical values (which
represented a further 16% of annotations in Winget‘s study) is so similar that
by testing this annotation we can essentially test the practicality of both
numeric and textual annotation. We test here the ability to create legible and
properly placed alpha-numeric annotations.
Glasses
Figure 71 Rendered glasses annotation sample
The glasses symbol, though not a true musical symbol, is widely used by
musicians to remind themselves to be attentive at some point in the music.
Winget classes the glasses symbol as a technical, symbolic annotation (again
the most common categorization). In testing the software, the glasses drawing
is a good example of a single annotation symbol that is made up of multiple
sketched lines. In order to draw a satisfactory set of glasses, users must have
enough control and accuracy to properly align each sketched curve with those

141
that preceded it. It is also quite a small annotation, and so is a good test of fine
drawing with the finger tip.
Musical Notes
Figure 72 Typeset musical notes annotation sample
Drawing notes is another example of a symbolic annotation. The specific
example above is technical and slightly contrived, as it is not likely that a piece
of music will require the musician to hand write notes that have been excluded
from an existing bar. It is more common, as in an example mentioned (and
classed as technical-conceptual) in Winget‘s report, that a musician may copy
some notes from a previous page, to alleviate a difficult page turn, or that they
may write in cues from another part to help with coordinating a musical entry.
This example tests whether it is possible in the developed, finger operated,
software to draw finely and accurately enough to position notes on a staff
system correctly. The physical action is similar to the real world examples in
found Winget‘s study. This information could also be interesting for any future
development where composition or sheet music creation via sketched input
directly onto a staff system was required.
The six annotations selected follow roughly the same distribution over Winget‘s
defined categories as the actual annotations made by musicians (being mainly
examples of symbolic, technical annotations). They are also chosen as a set of
annotations that cover a range of the specific features of musical annotations,
such as dependence on specific placement in relation to notes, and necessity
of fine drawing control. Testing the practicality of creating these six annotations
gives a good overall picture of the practicality of real musicians using the
developed annotation software in a real situation.

142
5.6 Finger Annotation User Test Results
Participant Demographic
The user test was run with 23 year 11 students (aged 15 – 16) from a local co-
ed high school. The group was visiting the university to tour the usability
laboratory and learn about Human Computer Interaction. As part of their high
school computing curriculum, they were required to take part in a formal user
test and so were willing participants for this experiment. Their performance in
the user test had no bearing on their school grade. They were, however,
required to document their experiences of the process after the event.
As noted in the experiment design, participants were not required to have any
existing knowledge of sheet music or annotation in order to complete the test.
This did leave the concern that there might be a marked difference in the
quality of annotations made by those with and without musical knowledge.
Thirteen of the participants (approximately half) reported having a little (6) or a
lot (7) of experience with sheet music. The experimenter checked the
annotations created by all participants and concluded that there was no
notable difference in quality between these participant and those that reported
no experience.
All participants reported being right handed except for one who said they were
ambidextrous. This means, unfortunately, that no conclusions can be drawn
about whether dominant hand plays a role in interaction with the touch screen.
Software Issues Uncovered
When the zoom level of the input area is 8x or 6x actual size, the input area
itself no longer fits within the application window. It was therefore necessary to
add scroll bars to allow users to pan around the input area. This affected 276
of the 690 trials being reported.

143
Unfortunately, the scrollbar implementation in WPF had a flaw in that it did not
capture touch focus. If the user was scrolling the input area and happened to
move their finger slightly off the scroll bar itself, the system registered this as a
drawing action and added lines to their annotation. This resulted in a
noticeable horizontal line across the music (see Figure 73). This was observed
to happen 16 times in the captured data. On each occasion the participant
decided to clear their annotation and make another attempt to draw it
accurately.
Figure 73 Annotation sample with visible scroll bar error. A users’ attempt at ‘Text and Dynamics’ annotation at zoom level 8.
No special action was taken to remove these data points. In no case did they
affect a participant‘s ability to achieve a final successful result. This could lead
to an overstatement of the number of attempts required to get annotations
correct for input at 8x and 6x zoom, however, this bias in the results is small,
and removing erroneous data seemed to be an inappropriate procedure when
looking for evidence in favour of the annotation scheme.
Annotation Test Results
The main objective of the user test was to determine the level of zoom
required to make drawing of musical annotations accurate and easy. The way
chosen to assess accuracy was to allow participants to report their perceived

144
success by rating each of their final annotations as either satisfactory or not.
The results of this assessment are shown in the graphs of Figure 74.
It is clear that users were more successful at copying annotations when the
input area was magnified. In fact, there was a near 100% success rate when the
input area was zoomed to 6 or 8 times actual size. As magnifying the input
area reduces the amount that can be displayed on screen, it is desirable to
choose the smallest zoom level that gives a good success rate. On that basis, it
appears that a magnification level of 6 is most appropriate for the complete
range of annotations tested.
There is some variation in success rate at different zoom levels between the
annotations tested. For annotations requiring larger curves — Crescendos,
Slurs and Ties — most users were successful at zoom level 2. Bowing Marks
required zoom level 4. Users had some difficulty with Text and Dynamics at all
zoom levels. Glasses and Notes required zoom level 6. All three of the difficult
cases are characterised by having to draw small closed shapes. One user
commented on the difficulty of this task, ―glasses/circles difficult to draw.‖
In the sheet music display and annotation software (as opposed to the finger
annotation test program) developed in this project, users have the option of
creating a ‗stamp‘ for a commonly used annotation. This may be the better
mechanism for them to use for the Glasses annotation, or any other small
icons.
The Notes annotation is not likely to be commonly drawn and was included in
this user test for completeness. It is more of interest if composition or music
editing was to be a feature of the software.
It is concluded that for the majority of common musical annotations, an input
zoom level of 4 is sufficient.
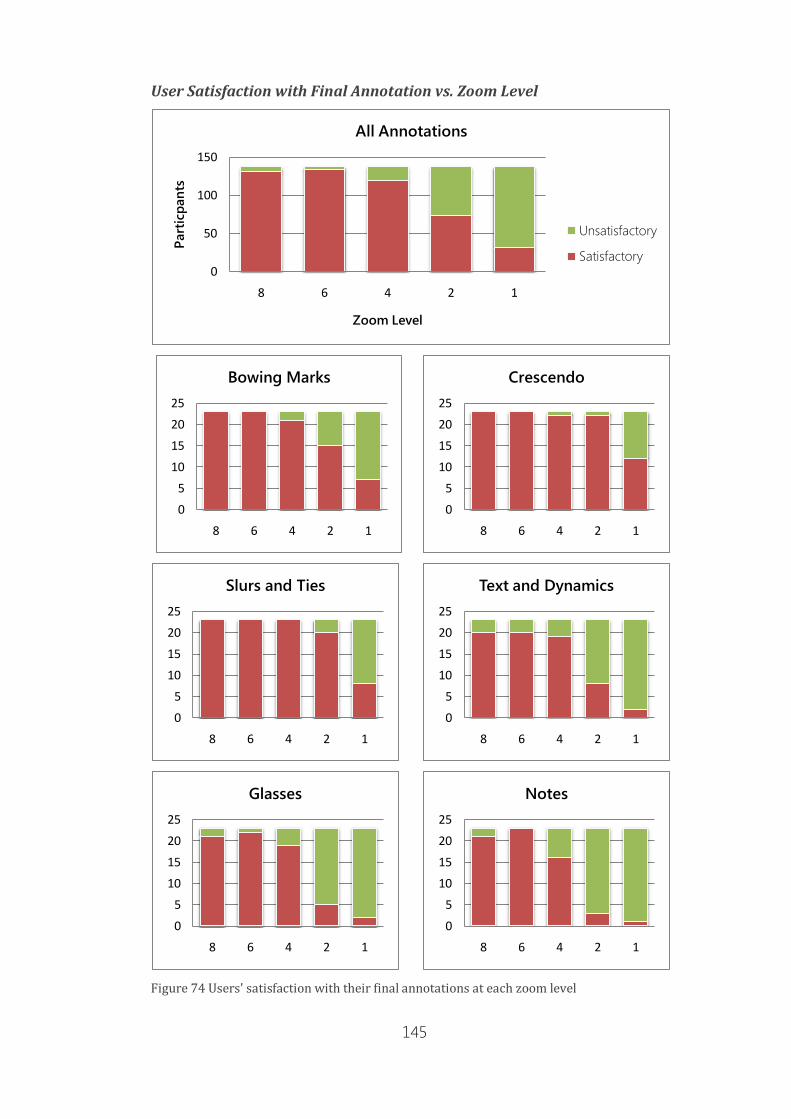
145
User Satisfaction with Final Annotation vs. Zoom Level
Figure 74 Users' satisfaction with their final annotations at each zoom level
0
50
100
150
8 6 4 2 1
Part
icp
an
ts
Zoom Level
All Annotations
Unsatisfactory
Satisfactory
0
5
10
15
20
25
8 6 4 2 1
Bowing Marks
0
5
10
15
20
25
8 6 4 2 1
Crescendo
0
5
10
15
20
25
8 6 4 2 1
Slurs and Ties
0
5
10
15
20
25
8 6 4 2 1
Text and Dynamics
0
5
10
15
20
25
8 6 4 2 1
Glasses
0
5
10
15
20
25
8 6 4 2 1
Notes

146
Participants were also asked to rate their ease of drawing for each annotation
copying task. Their ratings (Figure 75) show that though success rates were
similar on the three simpler annotations between zoom levels 4, 6, and 8,
perceived difficulty levels were not. Most users rated annotation at zoom levels
6 and 8 Easy or Very Easy. However, a significant number rated ease of
drawing at zoom level 4 as only Moderate. This shows that users would be
more comfortable annotating at a zoom level of 6.
The three more difficult annotations are rated Moderate by a significant
number of users even at zoom level 6. They were not rated as Difficult,
however, and the success rates were acceptable.
The graphs in Figure 76 show the average number of attempts participants
made at each annotation. These results are consistent with the previous
measures of success and ease of use, in that more attempts were required at
the smaller zoom levels. It is interesting to note though, that even at the large
zoom levels, where high success levels were achieved, some participants took
more than one attempt before submitting their final annotation.
Figure 77 shows the percentage of users able to produce satisfactory
annotations at each zoom level, grouped by their finger width. These results
give some substance to the claim that users with larger fingers had more
difficulty in producing a satisfactory result at the lower zoom levels, particularly
with the more intricate annotations. It might be expected that creating the
closed curves necessary for these annotations would be more difficult with a
wider finger covering up more of the screen. The small number of users with
wider fingers, however, (only 2 at 18mm) means that no strong conclusions
can be drawn.
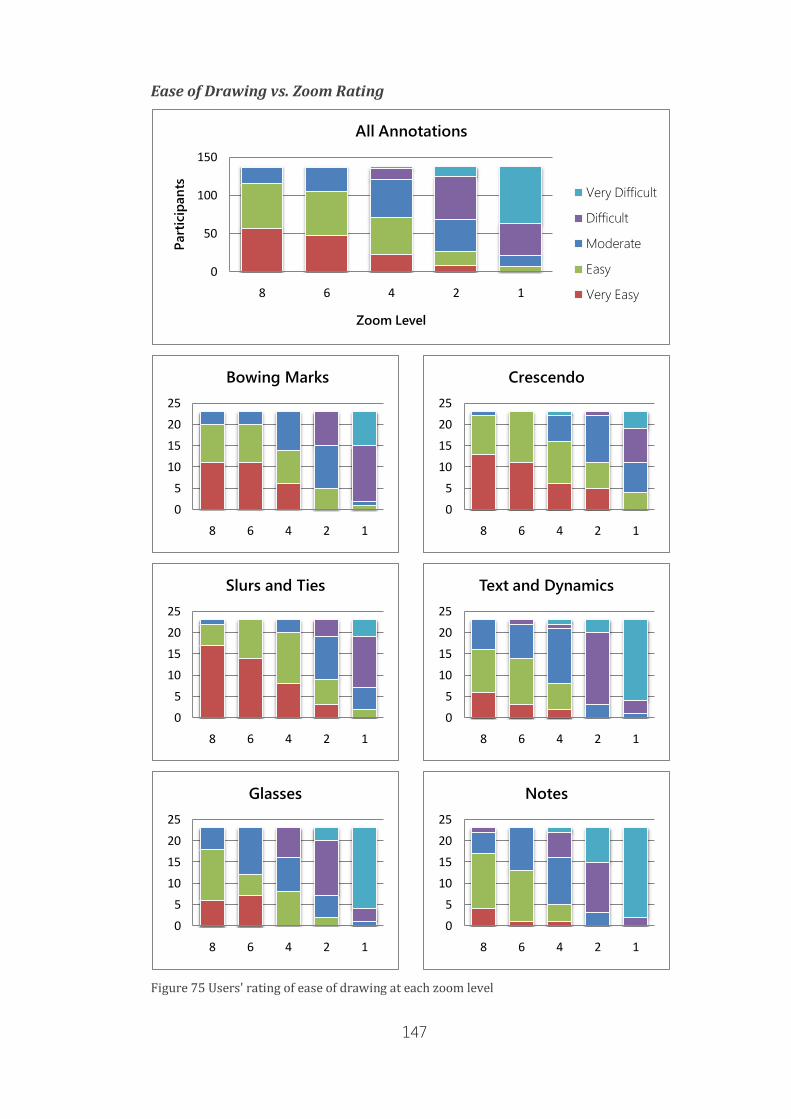
147
Ease of Drawing vs. Zoom Rating
Figure 75 Users' rating of ease of drawing at each zoom level
0
50
100
150
8 6 4 2 1
Part
icip
an
ts
Zoom Level
All Annotations
Very Difficult
Difficult
Moderate
Easy
Very Easy
0
5
10
15
20
25
8 6 4 2 1
Bowing Marks
0
5
10
15
20
25
8 6 4 2 1
Crescendo
0
5
10
15
20
25
8 6 4 2 1
Slurs and Ties
0
5
10
15
20
25
8 6 4 2 1
Text and Dynamics
0
5
10
15
20
25
8 6 4 2 1
Glasses
0
5
10
15
20
25
8 6 4 2 1
Notes

148
Average Number of Attempts vs. Zoom Level
Figure 76 Average number of attempts made at annotation copying for each zoom level
0
1
2
3
8 6 4 2 1Avera
ge #
of
att
em
pts
Zoom Level
All Annotations
0
1
2
3
8 6 4 2 1
Bowing Marks
0
1
2
3
8 6 4 2 1
Crescendo
0
1
2
3
8 6 4 2 1
Slurs and Ties
0
1
2
3
8 6 4 2 1
Text and Dynamics
0
1
2
3
8 6 4 2 1
Glasses
0
1
2
3
8 6 4 2 1
Notes
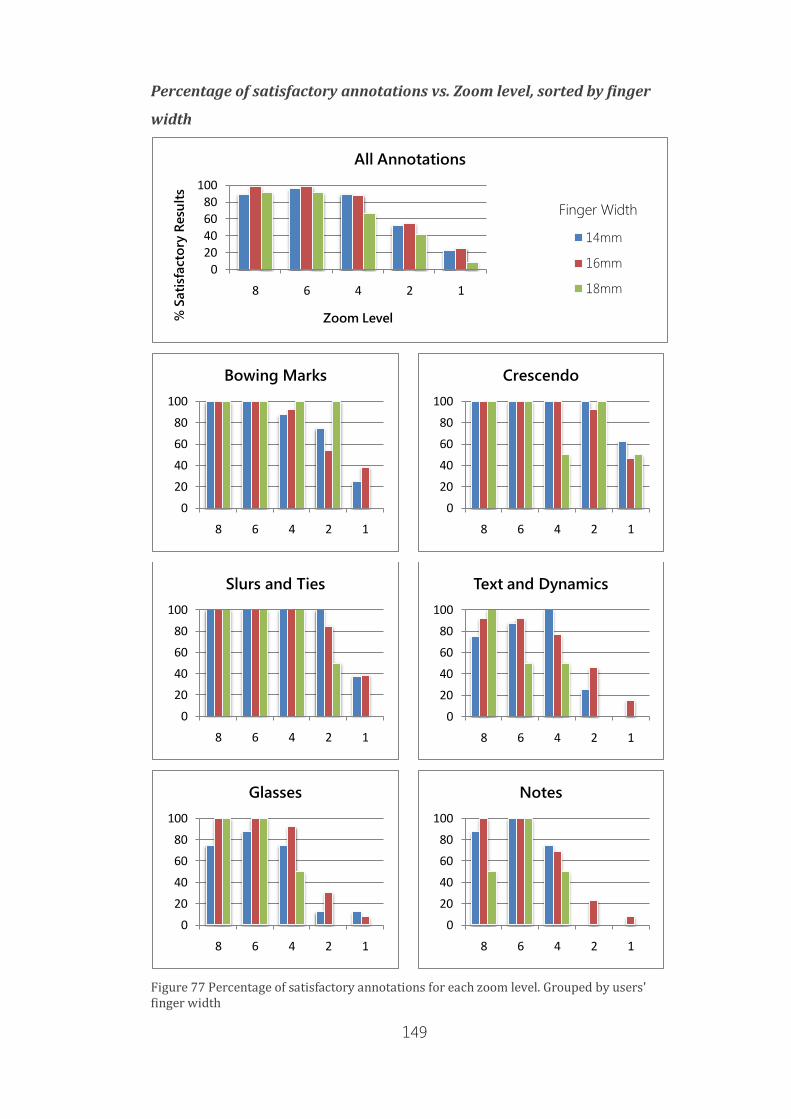
149
Percentage of satisfactory annotations vs. Zoom level, sorted by finger
width
Figure 77 Percentage of satisfactory annotations for each zoom level. Grouped by users' finger width
0
20
40
60
80
100
8 6 4 2 1
% S
ati
sfacto
ry R
esu
lts
Zoom Level
All Annotations
14mm
16mm
18mm
Finger Width
0
20
40
60
80
100
8 6 4 2 1
Bowing Marks
0
20
40
60
80
100
8 6 4 2 1
Crescendo
0
20
40
60
80
100
8 6 4 2 1
Slurs and Ties
0
20
40
60
80
100
8 6 4 2 1
Text and Dynamics
0
20
40
60
80
100
8 6 4 2 1
Glasses
0
20
40
60
80
100
8 6 4 2 1
Notes

150
Although the experiment was designed so as not to require participants to
understand the sheet music or annotations presented for copying, participants
were asked to state their level of experience with sheet music. 7 reported A Lot
of experience, 6 A Little and 13 None. Figure 78 shows percentage satisfaction
with annotation drawing against zoom level, grouped by sheet music
experience. Figure 79 shows the same but divided into those who have had
experience writing annotations on physical sheet music and those that have
not.
These two graphs show that experience with sheet music did help participants
to cope with drawing at the lower zoom levels, but only to a small extent in
situations where the overall satisfaction rate was very low anyway. At the higher
zoom levels, sheet music experience made no difference at all. Overall, it
appears that the experimental design worked as expected.
Figure 78 Percentage of final annotations rated as satisfactory, grouped by sheet music experience for each zoom level.
0
20
40
60
80
100
120
8 6 4 2 1
% S
ati
sfacto
ry R
esu
lts
Zoom Level
Satisfaction grouped by sheet music experience
None
A Little
A Lot
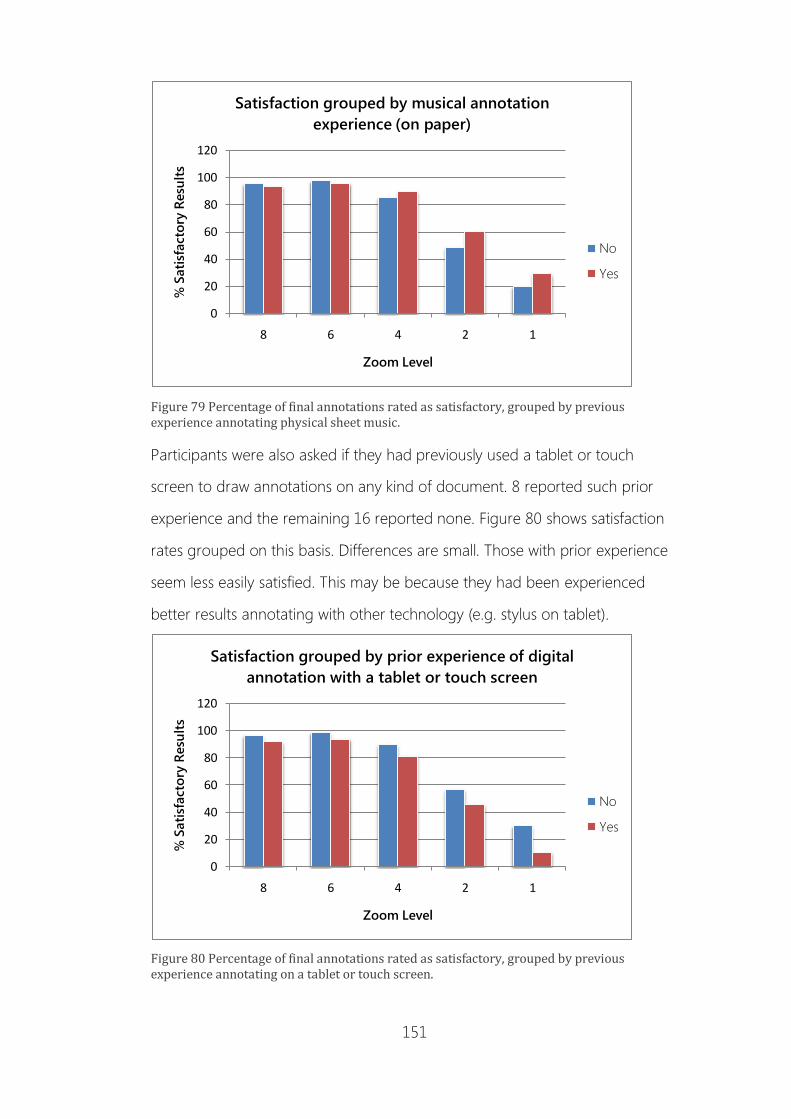
151
Figure 79 Percentage of final annotations rated as satisfactory, grouped by previous experience annotating physical sheet music.
Participants were also asked if they had previously used a tablet or touch
screen to draw annotations on any kind of document. 8 reported such prior
experience and the remaining 16 reported none. Figure 80 shows satisfaction
rates grouped on this basis. Differences are small. Those with prior experience
seem less easily satisfied. This may be because they had been experienced
better results annotating with other technology (e.g. stylus on tablet).
Figure 80 Percentage of final annotations rated as satisfactory, grouped by previous experience annotating on a tablet or touch screen.
0
20
40
60
80
100
120
8 6 4 2 1
% S
ati
sfacto
ry R
esu
lts
Zoom Level
Satisfaction grouped by musical annotation
experience (on paper)
No
Yes
0
20
40
60
80
100
120
8 6 4 2 1
% S
ati
sfacto
ry R
esu
lts
Zoom Level
Satisfaction grouped by prior experience of digital
annotation with a tablet or touch screen
No
Yes

152
Observations on hardware
Drawing Anomalies
Due to the way the optical touch screen hardware works, users must be careful
to keep all but their active finger away from the screen. Coming within 2mm of
the screen with another part of their hand or arm will often result in a phantom
touch being registered. These phantom touch points are added to the current
stroke, resulting in jagged lines similar to that in Figure 81. Similarly, users must
be careful to pull their active finger far enough away from the screen between
strokes to break ‗contact‘, to prevent their strokes being unintentionally
connected.
Figure 81 Phantom touch detected when hand gets close to the screen. A users’ attempt at ‘Text and Dynamics’ annotation at zoom level 1 (actual size).
During informal testing of the system in the lab environment, it was noted that
phantom touches such as these occurred most frequently when drawing
annotations at smaller magnification levels. It was hypothesised that this was a
consequence of the fact that, when trying to draw annotations on a finer scale,
users tend to keep more of their hand closer to the screen. This might occur
for two reasons: firstly, as when drawing on paper, fine movements are most
easily achieved with the hand braced on the paper‘s surface. Secondly, when
making a small movement on the screen‘s surface, it seems unnatural to move

153
a finger higher off the surface than it is moving across the surface. When
moving a greater distance between strokes, as is required when the input is
heavily magnified, raising the finger a good distance above the screen could
happen without the user having to be consciously careful to do so.
The results from the user test support this hypothesis. Screen anomalies as
described above (pictured in Figure 81), did occur, but only when the input
was zoom level 1, actual size. The number of obvious anomalies, like that in
Figure 81 was only four, but many annotations created at zoom level 1 have
small ‗serif‘ like irregularities that look to be caused by strokes starting early or
ending late (See Figure 82).
Figure 82 'Serif' like irregularities on annotation strokes. A users' attempt at 'Bowing Marks' at zoom level 1 (Actual Size)
Users that encountered this issue with the screen commented on it in the
follow up questionnaire:
- ―Heat sensor makes random drawings without you actually touching the
surface first‖
- ―On occasion I noticed that the screen was quite touch sensitive, which
resulted in me mistakenly entering a command.‖
- ―I think that the screen was too sensitive―

154
- ―The only other problem was that it was sensing my fingers when they
were not touching it‖
- ―Sometimes my hand hit the screen making what I put go all funny with
lines I didn't want to put in. ―
- ―The program detects your finger if it is suspended above the screen
and has no contact‖
We conclude that increasing the input scale overcomes this issue with the
screen hardware. Not a great deal of magnification is needed.
Screen Stickiness
A noted issue with operating touch screens by finger is that finger tips can
sometimes be sticky, making it difficult to make fine movements while drawing
an annotation. During the user test, 96% of participants noted that they
experienced some trouble with their fingers sticking to the touch-screen.
Screen Slipperiness
Another expected problem with finger input on a touch-screen was that users‘
fingers might slip unexpectedly over the screen‘s surface. This turned out to be
35%
57%
4%4%
Had Trouble with Screen Stickiness
Never
Sometimes
Usually
Always

155
an uncommon complaint. 95% of participants in the user test mentioned little
or no issue with screen slipperiness.
Summary of user test results
User tests show that, using a finger to draw on an optical touch screen,
annotating on magnified sheet music is significantly easier than annotating at
actual print size. Specifically, 6 times real size is identified as being a sufficient
and appropriate zoom level to allow users to consistently draw common
musical annotations on sheet music. This zoom level also succeeds in
minimising issues with close proximity to the screen‘s surface being detected as
touch, probably by encouraging the user to lift their finger higher off the
surface when drawing multiple strokes.
Collated data showed that users had a broad level of satisfaction annotating at
4 times actual size also. This may be a suitable input magnification for systems
with limited screen size, as even in our test setup where only three bars of
music were displayed on a 21.5‖ screen, magnifying beyond 6 times real size
introduced a need for scroll bars to explore the annotatable area.
61%
35%
4%
0%
Had Trouble with Screen Slipperiness
Never
Sometimes
Usually
Always

156

157
Chapter 6 - Conclusions
The Digital Music Stand is intended to do for musicians what electronic
document management does in other domains. The music stand, however, is
special in that it must be possible to use it in constrained situations, both in
terms of its input and physical surroundings.
This work presented in this thesis explored the potential of the touch screen to
satisfy the requirements that musicians have of Digital Music Stands. In
particular it sought to achieve, in this context, the kind of fluid and natural
interaction that has been pioneered by touch screen phone technology.
Building upon the analysis of musicians‘ annotation behaviour with printed
scores from Winget‘s study, we identified the specific challenges that must be
addressed by a digital annotation system tailored toward sheet music. This was
combined with our study on the physical constraints placed on musicians by
their instruments and their working environments. It was observed that only
44% of instruments surveyed allow their players the use of both hands to
interact with their music, even when they are not playing. This lead to the
conclusion that developing a Digital Music Stand and annotation system that
required two handed interaction would be impractical for most musicians to
use. Fortunately the analysis also showed that all instruments leave at least one
hand free for interaction while not being played.
A survey of current hardware options and features was carried out with focus
on their appropriateness for use under the physical constraints uncovered, and
their potential for supporting musical annotation. This led us to choose finger
operated, medium to large multi-touch display technology as the interaction
mechanism for our experimental sheet music display and annotation system.

158
Software design for our system explored two main concepts: sheet music flow
and layout, and musical annotation support. A XAML based data structure for
storing and displaying music was developed which provides fluid reflowing and
layout management for score personalisation through zooming and
manipulation at the bar level.
Using this data structure, a system for annotation was developed. The
annotation system takes advantage of the strong dependency of musical
annotation on placement within the music. Individual bars of music take
ownership of the annotations drawn on them which can then reflow with the
music, maintaining the overall fluidity of layout without information loss. The
nature of the layout system also made it possible to experiment with tools to
give more space for annotation by moving lines of music out of the way.
Careful attention was given to overcoming the known issues of finger based
annotation caused by touch systems‘ limited resolution and accuracy. The
approach taken was to support annotation input on a magnified view of the
music. Two different zooming systems were implemented: one zoomed
individual bars of music in place in the musical score, the other presented an
overlaid modal window containing a magnified version of a portion of music. It
was found by informal testing that the overlay was easier to use as it eliminated
problems with zoomed content being clipped off the edge of the screen
To determine the ideal magnification level of the zoomed input panel, a formal
user test was carried out. Results of this test found that 6 times actual size was
ideal for drawing common musical annotations by finger. 4 times actual size
gave broadly satisfactory results, but some more complex musical annotations
were difficult to draw at this scale. As magnifying the input region by 6 times or
more introduces a need for scrollbars to navigate the annotatable area, it may
be more appropriate to zoom to just 4 times size for regular annotation input
159
and rely on a reusable stamp system (as was implemented in the sample
application) for common complex annotations that difficult to draw at this level.
Time constraints meant that the combination stamp library and modal
zooming was not formally tested. In fact, at this stage, the software developed
is largely a demonstration of principle. All the ideas have been implemented
and informally trialled, but the system as a whole needs more complete
integration and testing.
As described, the method for preparing sheet music for this system is currently
mainly manual. Automation of this process would be a necessity in any final
system. This could be done by modifying the output system of LilyPond to
directly export XAML. The XAML format is well documented in this work and
the task should be straightforward.
Finally, through the developed software we have demonstrated that a multi-
touch, gesture based application can be used to both support layout and
annotation of music. The software developed demonstrates, in the context of
music, annotation need not be thought of as a separate process merely drawn
over the top of static content (as it often is in text based systems). Rather,
careful integration between layout and annotation gives a feasible system with
fluid and natural interaction.

160

161
Appendix A - Device Comparison
Table 2 – Device Comparison (Part 1 of 3) Device OS Price Screen Size Resolution View Angle
Tablet PC
HP EliteBook
2740p Tablet
PC
Win 7 $3,819 12.1‖ 1280 x 800 Ultra Wide
Lenovo
ThinkPad X201
Tablet
Win 7 $2,999 12.1‖
Widescreen
1280 x 800 Wide
Dell Latitude
XT2
Tablet PC
Touch
Win 7 $4,614 12.1‖
Widescreen
1280 x 800 Wide
Eee
PCT101MT
Win 7 10.1‖ 1024 x 600 Poor
Slate Device
Apple iPad iOS 9.7‖ 1024 x 768
Scribbler 4100 Win 7 12.1‖ 1024 x 768
Motion J3500
Tablet PC
Win 7 12.1‖ 1280 x 800 Ultra Wide
Archos 9 PC
tablet
Win 7 8.9‖ 1024 x 600
Sahara Slate
PC i440D
Win 7 12.1‖ 1024 x 768 Wide
Camangi Web
Station
Android 7‖ 800 x 480
Fujitsu Stylistic
ST6012
Win
Vista
12.1‖ 1280 x 800 Wide (178°)
Fusion Garage
joojoo
N/A Just
a
Browser
$499
(USD)
12.1‖
Widescreen
1366 x 768
eInk
Irex Digital
Reader 1000
series
10.2‖ 1024 x 1280
Irex iLiad 8.1‖ 768 x 1024
Multi-touch monitors
HP Compaq
L2105TM
$399 21.5‖ 1920 x 1080 170° Horizontal
160° Vertical
Dell SX2210T $399 21.5‖ 1920 x 1080 160° Horizontal
160° Vertical

162
Table 2 – Device Comparison (Part 2 of 3) Device Weight
(KG)
Battery
Life
Multi
Touch
Finger
Input Stylus Input
Tablet PC
HP EliteBook
2740p Tablet
PC
1.72 Poor Yes Yes Yes
Lenovo
ThinkPad X201
Tablet
1.6 Good Yes Yes Yes
Dell Latitude
XT2
Tablet PC
Touch
1.6
Poor Yes Yes Yes
Eee
PCT101MT
1.6 Good Yes Yes Yes
Slate Device
Apple iPad 0.68 Good 10 hours
Yes Yes No
Scribbler 4100 1.56 Poor No Yes Yes
Motion J3500
Tablet PC
1.9 Good Yes Yes Yes
Archos 9 PC
tablet
0.8 OK 5 hours
No Yes Yes
Sahara Slate
PC i440D
1.62 Poor No Yes Yes
Camangi Web
Station
0.39 OK 5 hours
No Yes Yes
Fujitsu Stylistic
ST6012
1.6 OK 5 hours
No No Yes
Fusion Garage
joojoo
1.1 OK 5 hours
Yes Yes No
eInk
Irex Digital
Reader 1000
series
OK
5 hours No No Yes
Irex iLiad Poor 3 hours
No No Yes
Multi-touch monitors
HP Compaq
L2105TM
6.4 - Yes Yes Yes
Dell SX2210T 7.68 - Yes Yes Yes

163
Table 2 – Device Comparison (Part 3 of 3) Device Speakers Mic Webcam Bluetooth Wifi
Tablet PC
HP EliteBook
2740p Tablet
PC
Yes N (port
avail) 2.0MP No Yes
Lenovo
ThinkPad X201
Tablet
Yes Dual array
digital
microphones Optional No Yes
Dell Latitude
XT2
Tablet PC
Touch
Yes No No No Yes
Eee
PCT101MT Yes
High
Quality Mic 0.3MP Optional Yes
Slate Device
Apple iPad Yes Yes N Yes Yes
Scribbler 4100 Yes Integrated
Array Mic 1.3MP Yes Yes
Motion J3500
Tablet PC N (port
avail) N (port
avail) 3.0MP Yes Yes
Archos 9 PC
tablet Yes Yes No Yes Yes
Sahara Slate
PC i440D Yes
Dual
Digital Mic
Array No Yes Yes
Camangi Web
Station Yes Yes No No Yes
Fujitsu Stylistic
ST6012 Yes Yes 1.3MP Yes Yes
Fusion Garage
joojoo Yes Yes Yes Yes Yes
eInk
Irex Digital
Reader 1000
series
No No No No No
Irex iLiad Yes No No No Yes
Multi-touch monitors
HP Compaq
L2105TM - - N - -
Dell SX2210T - - 2.0MP - -

164

165
Appendix B - Finger Annotation
Test, Post-test Questionnaire

166

167
Appendix C - Finger Annotation
Test, Participant Information Form

168

169

170

171
Appendix D - Finger Annotation
Test, Consent Form

172

173
Bibliography
Agrawala, Maneesh, and Micheal Shilman. ―DIZI: A Digital Ink Zooming
Interface for Document Annotation.‖ Human-Computer Interaction - Interact
2005, 2005: 69-79.
Bargeron, David, and Tomer Moscovich. ―Reflowing digital ink annotations.‖
CHI '03 Proceedings of the SIGCHI conference on Human Factors in computing
systems. 2003.
Bell, Tim, Annabel Church, John McPherson, and David Bainbridge. ―Page
turning and image size in a digital music stand.‖ PROC. INTERNATIONAL
COMPUTER MUSIC CONFERENCE. 2005.
Bellini, P., P. Nesi, and M. B. Spinu. ―Cooperative visual manipulation of music
notation.‖ ACM Transactions on Computer-Human Interaction, 2002.
Bellini, Pierfrancesco, Fabrizio Fioravanti, and Paolo Nesi. ―Managing Music in
Orchestras.‖ Computer, September 1999: 26-34.
Blinov, Alexey. An interaction study of a digital music stand. Honours Report,
University of Canterbury, 2007.
Blostein, Dorothea, and Lippold Haken. ―Justification of printed music.‖
Communications of the ACM, March 1991.
Cattelan, Renan G., Cesar Teixeira, Hélder Ribas, Ethan Munson, and Maria
Pimentel. ―Inkteractors: interacting with digital ink.‖ SAC '08 Proceedings of the
2008 ACM symposium on Applied computing. 2008.
Erickson, Raymond F. ―"The Darms Project": A status report.‖ Computers and
the Humanities, 1975: 291-298.

174
Forsberg, Andrew, Mark Dieterich, and Robert Zeleznik. ―The music notepad.‖
UIST '98 Proceedings of the 11th annual ACM symposium on User interface
software and technology. 1998.
Furuta, Mitsu. WPF and Silverlight BookControls. 2008.
http://wpfbookcontrol.codeplex.com/.
Graefe, Christopher, Derek Wahila, Justin Maguire, and Orya Dasna. ―Designing
the muse: a digital music stand for the symphony musician.‖ CHI '96. 1996.
Isenberg, Tobias, Petra Neumann, Sheelagh Carpendale, Simon Nix, and Saul
Greenberg. ―Interactive annotation on large, high resolution information
displays.‖ In Conference Compendium of IEEE Vis, InfoVis, and VAST, 124-125.
2006.
Kosakaya, Juichi, Yumiko Takii, Masumi Kizaki, Atsushi Esashi, and Takahisa
Kiryu. ―Research and evaluation of a performer-friendly electronic music stand.‖
Proceedings of the 2005 International Conference on Active Media
Technology. 2005. 11-15.
Leoné, Marco, Betsy van Dijk, and Bert-Jan van Beijnum. ―Design and trial
evaluation of the user interface for MusicReader.‖ MindTrek '08. 2008.
LilyPond Development Team, The. ―LilyPond - Essay on automated music
engraving.‖ LilyPond.org. 2011.
http://lilypond.org/doc/v2.14/Documentation/essay.pdf.
MacLeod, Gareth, Joe Metzger, Brendon Robinson, and Andrew Song. Stand
For Change. University of Waterloo, 2010.
McPherson, John R. Page Turning - Score Automation for Musicians. Honours
Report, University of Canterbury, 1999.

175
Nienhuys, Han-Wen, and Jan Nieuwenhuizen. ―LilyPond, A System for
Automated Music Engraving.‖ Proceedings of the XIV Colloquium on Musical
Informatics (XIV CIM). Firenze, 2003.
Pagwiwoko, Johannes. Improvements To A Digital Music Stand. Honours
Report, University of Canterbury, 2008.
Poláček, Ondřej, Adam J. Sporka, and Pavel Salvik. ―Music alphabet for low-
resolution touch displays.‖ ACE '09 Proceedings of the International
Conference on Advances in Computer Entertainment Technology. New York,
2009.
Schilit, Bill N., Gene Golovchinsky, and Morgan N. Price. ―Beyond paper:
supporting active reading with free form digital ink annotations.‖ CHI '98
Proceedings of the SIGCHI conference on Human factors in computing
systems. 1998.
Shilman, Micheal, and Zile Wei. ―Recognizing Freeform Digital Ink Annotation.‖
Document Analysis Systems VI, 2004: 107-110.
Voida, Stephen, Matthew Tobiasz, Julie Stromer, Petra Isenberg, and Sheelagh
Carpendale. ―Getting practical with interactive tabletop displays: designing for
dense data, "fat fingers", diverse interaction, and face-to-face collaboration.‖
ITS '09 Proceedings of the ACM International Conference on Interactive
Tabletops and Surfaces. 2009.
Winget, Megan Alicia. Annotation of Musical Scores: Interaction and Use
Behaviours of Performing Musicians. PhD Thesis, University of North Carolina
at Chapel Hill, 2006.

176
End Notes i http://www.estandmusic.com/ ii http://www.freehandmusic.com/
iii http://www.samepagemusic.com/Play/
iv http://www.musicreader.net/
v http://itunes.apple.com/us/app/musicreader-pdf/id409101273?mt=8&ls=1
vi http://www.cosc.canterbury.ac.nz/tim.bell/espresso/about.html
vii http://dictionary.reference.com/browse/annotation
viii http://en.wikipedia.org/wiki/Orchestra#Instrumentation ix http://www.apple.com/ipad/
x https://kindle.amazon.com/
xi http://www.microsoft.com/expression/products/Design_Overview.aspx
xii http://www.microsoft.com/expression/
xiii http://www.mutopiaproject.org/
xiv http://lilypond.org/
xv http://www.adobe.com/products/illustrator.html
xvi http://www.sibelius.com/home/index_flash.html
xvii http://www.finalemusic.com/default.aspx
xviii http://lilypond.org/easier-editing.html
xix http://www.microsoft.com/download/en/details.aspx?id=20039
xx http://lilypond.org/doc/v2.12/Documentation/user/lilypond/Setting-the-staff-size