
SharpeningAStraightKnife.pdf - Spoon Club
12
We define sharpening as, creating a shape, and polishing it - all of which is done with abrasives. We tend not to use the following words, although they are in common use: Removing lots of material using a machine. Not using a machine. Using finer abrasives. Flattening a hollow grind, or putting on a secondary bevel. The last stage in the process, using the finest abrasive. © Copyright - The Green Wood Guild 2016 What is sharpening? The sharpening process carving knife glass honing compound permanent marker bench stone MDF strop wet and dry paper Grinding Honing Stropping Sharpening Knife A Straight
-
Upload
khangminh22 -
Category
Documents
-
view
0 -
download
0
Transcript of SharpeningAStraightKnife.pdf - Spoon Club

We define sharpening as, creating a shape, and polishing it - all of which is done with abrasives. We tend not to use the following words, although they are in common use:
Removing lots of material using a machine.
Not using a machine. Using finer abrasives. Flattening a hollow grind, or putting on a secondary bevel.
The last stage in the process, using the finest abrasive.
© Copyright - The Green Wood Guild 2016
What is sharpening? The sharpening process
carving knife
glass
honing compound
permanentmarker
benchstone
MDF strop
wet and dry paper
Grinding
Honing
Stropping
Sharpening
KnifeA Straight

Most commonly used
The bevel needs to be long enough to guide the edge on a flat planing cut, but short enough to make tight concave cuts. A long bevel will dig into a tight curve.
Bevel length varies along the blade. A long bevel towards the handle is good for long flat cuts. Short bevel at the tip is better for tight corners.
Importance of the correct bevel length
Benefits of a tapering blade
© Copyright - The Green Wood Guild 2016
Whittlers Anonymous / Sharpening a Straight Knife
Bevel length and angle
fatter obtuseangle
25° 6.5 mmbevel
short bevel
fine acuteangle
very acuteangle
longbevel
weak edge
Theory of Edge Geometry
tight concave cuts
long flat cuts

e.g Kitchen knife
Not good for wood carving
When sharpening, a hollow ground surface makes creating a flat bevel easier and quicker.
Nice to have, but not essential.
Not to be confused with a secondary bevel, micro bevels are a good thing. Micro bevels are often talked about in knife sharpening (more on this later).
Harder =Holds sharp edge longer, but brittle
Softer = Strong blade that does not snap
© Copyright - The Green Wood Guild 2016
Whittlers Anonymous / Sharpening a Straight Knife
Other types of bevel
Secondary bevel Micro bevel
Laminated blades
Hollow grind
less control
tears fibres
primary bevel
secondary bevel
25°
ground concave
sharpening wheel
softershell
hardercore

© Copyright - The Green Wood Guild 2016
Whittlers Anonymous / Sharpening a Straight Knife
Theory of Abrasives
Every part of sharpening is done with abrasives - particles of harder material that scratch away the metal.
A good abrasive has:›
›
Very uniform particle size, leaving a nice even surface.Sharp particles, removing material faster. (Stays sharper longer).
What is an abrasive?
cross section
lower the numberthe coarser the abrasive
higher the numberthe finer the abrasive
Different abrasives
Bench stones tend to be laid flat on a bench so you can move the tool across them, rather than being held in the hand. They’re good because they reveal new sharp particles as they wear.
Bench stones are lubricated to remove particles of metal that clog up the abbrasive.
Particles of diamonds stuck onto a flat metal surface. They’re good because they stay flat.
You need a good quality product however because if the diamonds wear away, that part of the stone becomes redundant.
Wide variety of standardised grits available. Easily applied to different flat surfaces, eg. glass.
Bench stones Diamond stones Abrasive paper
Oil
Water
Harder stones
Softer stones
Lubrication

How to know if your knife is blunt
The temptation to round the tip
© Copyright - The Green Wood Guild 2016
Whittlers Anonymous / Sharpening a Straight Knife
Notice how far you have to lift the knife before it ‘bites’ into the wood. It should cut well on the flat.
If you have to lift the knife from the bevel to slice cleanly the blade tip may be rounded.
Avoid the temptation to sharpen the edge only as this alters the blade geometry
having to tilt the blade to slice
no ‘bite’on the flat
blunt edge
remove materialparallel to the bevel to sharpeneffectively
Abrasive not heldflat against the bevel

© Copyright - The Green Wood Guild 2016
Whittlers Anonymous / Sharpening a Straight Knife
Move the flat bevel, in a flat action, on a flat abbrasive
Flat abrasive
Flat bevel
Create a Flat Bevel
Either use wet and dry on glass, or, use a bench stone previously flattened with wet and dry on glass.
Draw a pencil wiggle on the stone to highlight where you’re removing material.Flatten the benchstone with the wet and dry.
Check if you have a convex bevel on your blade by holding it against a straight edge, eg. a metal ruler. If so, correct this by flattening the bevel.
wet and dry paper spray glued to glass
rub the wet and dry across the bench stone
draw pencil acrossbench stonesurface
is the bevelflat?
remove material to flatten the bevel
colour bevel with marker
flattentheconvexsurface

Flat bevel Sharpening with a bench stone
© Copyright - The Green Wood Guild 2016
Whittlers Anonymous / Sharpening a Straight Knife
Alternatively use a hollow ground bevel. A hollow ground bevel lies flat more readily.
ground concave
tilt until blade makes flat contact with the surfacelay knife on
back of the blade
bench stone
The feel of the bevel being flat to the surface is all important
Maintaining symmetry
The action needs to be the same on both sides of the knife to maintain an even grind. Two methods for keeping this even are shown below:
A B
position fingers on back of blade
position fingers on back of blade

The action
Direction of motion?
© Copyright - The Green Wood Guild 2016
Whittlers Anonymous / Sharpening a Straight Knife
Dragging the knife diagonally so as much of the bevel is in contact with the stone as possible, helps keep it flat.
Continue the sweep to the tip of the knife (by lifting the handle ever so slightly) to keep the bevel in constant contact with the stone.
Finally, place the knife at right angles to the stone to sharpen the area closest to the hilt
Some people like to abrade towards the cutting edge. They say it reduces the size of the bur. Some say this leaves swarf in the edge. There is some argument that the edge biting helps maintain a flat bevel.
We just rub it back and forth.
Never push towards the cutting edge on abrasive paper.

© Copyright - The Green Wood Guild 2016
Whittlers Anonymous / Sharpening a Straight Knife
Sharpening with a ‘Slip Stone’
The motion
This could be:
› Diamond stone
› Japanese Waterstone
› Small piece of glass wrapped in wet & dry.
Finger aligns with the middle of the bevel to feel if the abrasive is flat
Knuckles move safely against the bench, NOT the blade
© Copyright - The Green Wood Guild 2016
Whittlers Anonymous / Sharpening a Straight Knife
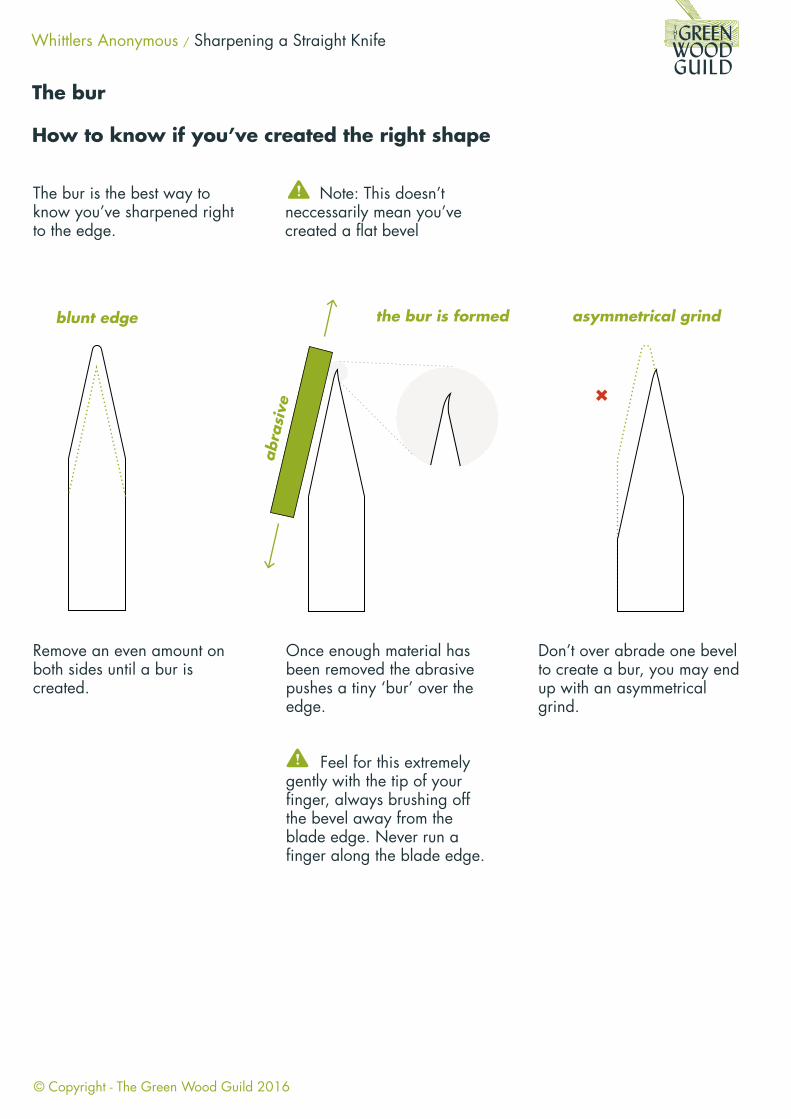
The bur
How to know if you’ve created the right shape
The bur is the best way to know you’ve sharpened right to the edge.
Remove an even amount on both sides until a bur is created.
Once enough material has been removed the abrasive pushes a tiny ‘bur’ over the edge.
Feel for this extremely gently with the tip of your finger, always brushing off the bevel away from the blade edge. Never run a finger along the blade edge.
Don’t over abrade one bevel to create a bur, you may end up with an asymmetrical grind.
Note: This doesn’t neccessarily mean you’ve created a flat bevel
blunt edge the bur is formed asymmetrical grind
abra
sive

© Copyright - The Green Wood Guild 2016
Whittlers Anonymous / Sharpening a Straight Knife
How to refine the surface
What grit to start with?
Progressing through finer grits
Avoid skipping gritsTips
Polishing
You’re achieving the right shape but the edge is still rough. Once pristine the edge will be more durable and will produce a polished finish on the wood.
Polishing is achieved by working through a series of different grits. Start with the roughest you need to create a bur quickly. Work through progressively finer grits until the suraface is polished.
It’s important to maintain the correct edge geometry.
If it’s taking a while to create a bur choose a rougher grit.
As you work through each progessive grit you must make sure you remove all scratches from previous grit.
knife surface
Rough grit
Medium grit
Fine grit
= weak edge that blunts quicker
Chip in edge
Normal wear and tear
Pretty sharp
Approx 400
800 - 1500
2000 - 3000
Rough
Fine
Super fine

© Copyright - The Green Wood Guild 2016
Whittlers Anonymous / Sharpening a Straight Knife
The final stage
Stropping
Stropping is the final process of polishing. Use polishing compound on a flat surface eg MDF or a flat piece of wood. This removes the last remenants of the bur and creates a ‘micro bevel’.
Use a similar motion to sharpening on a benchstone.
You’re ready to carve!
Micro bevel
MDF strop and honing compound
25°