Shadow z/SQL to VSAM Installation Guide - Rocket Software
32
Shadow z/SQL to VSAM Installation Guide Version 7.4 March 2013
-
Upload
khangminh22 -
Category
Documents
-
view
3 -
download
0
Transcript of Shadow z/SQL to VSAM Installation Guide - Rocket Software
Shadow z/SQL to VSAM
Installation Guide
Version 7.4
March 2013

Notices
Edition
Publication date: March 2013
Book number:
Product version: Shadow VSAM z/SQL Installation Guide
Copyright
© Rocket Software, Inc. 1999–2013. All Rights Reserved.
© Rocket International CV 1999–2013. All Rights Reserved.
Trademarks
Rocket is a registered trademark of Rocket Software, Inc. For a list of Rocket registered trademarks go to:
www.rocketsoftware.com/about/legal. All other products or services mentioned in this document may be covered by the
trademarks, service marks, or product names of their respective owners.
Examples
This information might contain examples of data and reports. The examples include the names of individuals, companies,
brands, and products. All of these names are fictitious and any similarity to the names and addresses used by an actual
business enterprise is entirely coincidental.
License agreement
This software and the associated documentation are proprietary and confidential to Rocket Software, Inc., are furnished
under license, and may be used and copied only in accordance with the terms of such license.
Note
This product may contain encryption technology. Many countries prohibit or restrict the use, import, or export of encryption technologies,
and current use, import, and export regulations should be followed when exporting this product.
Contact information
Website: www.rocketsoftware.com Rocket Software, Inc. Headquarters 77 4th Avenue, Suite 100 Waltham, MA 02451–1468 USA Tel: +1 781 577 4321 Fax: +1 617 630 7100
Contacting Global Technical Support
If you have current support and maintenance agreements with Rocket Software, you can access the Rocket Customer Portal and report a problem, download an update, or read answers to FAQs. The Rocket Customer Portal is the primary method of obtaining support. To log in to the Rocket Customer Portal, go to: www.rocketsoftware.com/support If you do not already have a Rocket Customer Portal account, you can request one by clicking “Need an account?” on the Rocket Customer Portal login page.

1 Rocket Shadow Product Overview
Shadow provides a real-time integration solution that utilizes bi-directional Events, Data, and
Services to solve business challenges. In supporting Real-Time Enterprise (RTE), this product
is able to offer interoperability between distributed .NET and J2EE environments and legacy
systems. Shadow’s mainframe integration products include:
• Shadow z/Direct – direct data/program access
• Shadow z/Events – real-time events
• Shadow z/Services – Web services
o z/Services Distributed
o z/Services CICS
o z/Services Consumption
• Shadow z/Components – Java and .NET components
• Shadow z/Presentation – Web-enablement of mainframe assets
• Shadow Studio – GUI interface
• Rocket Shadow Drivers for ODBC, JDBC, and ADO.NET
Shadow is a multi-threaded, native runtime product, that supports the integration of Web
services for Service-Oriented Architecture (SOA), real-time events for Event-Driven
Architecture (EDA), SQL access for direct data and transactional access, as well as automatic
presentation layer generation for extending screen-based applications to the Web. With
Shadow, organizations have a mainframe integration infrastructure that at its core delivers a
secure, reliable, and scalable framework for all mainframe integration.
Figure 2-1. Shadow Server
Shadow z/SQL
Shadow z/SQL provides developers with direct SQL access to mainframe data and applications
(business logic and screens) utilizing industry standard ODBC, JDBC or ADO.net. As a
mainframe integration solution, Shadow z/SQL utilizes a
multi-threaded, mainframe server component to enable performance and scalability
capabilities, while also providing monitoring and diagnostics.
Shadow ANSI SQL 92 support
Shadow SQL 92 engine provides ANSI 92 SQL support for IBM CICS VSAM and IBM Information
Management System (IMS) DB data sources, using either the Shadow for ODBC or JDBC driver with
the Shadow Server.
Shadow Studio
Shadow Studio is a graphical interface tool and comprehensive integrated development environment
(IDE) built on the Eclipse framework. It provides integration within the IDE to expose mainframe
applications and data as Web services, real-time business events or as direct SQL calls. This allows one
development environment to handle any integration requirement without any detailed knowledge of the
mainframe or distributed technologies.
Shadow Drivers
The Rocket Shadow Drivers for ODBC, JDBC, and ADO.NET are on the client side of the
Rocket Shadow product set. They are multi-threaded, high-performance components that
provide applications with transparent access to z/OS data, programs, and screens via
ODBC, JDBC, and ADO.NET. The Rocket Shadow Drivers perform data and SQL dialect
conversations, dynamic-to-static SQL conversions, data compression, and network
optimization in conjunction with the Shadow Server.
2 Download Following artifacts are included in your download:
• Studio installation
• Documentation
• JDBC and ODBC Drivers
• readme.txt. This file contains information that helps you install. It also contains the JCL for the
first job of the install
• ShadowPac.bin ShadowPac server install file.
• Shadow maintenance files: please see ptf$read.txt for installation instructions
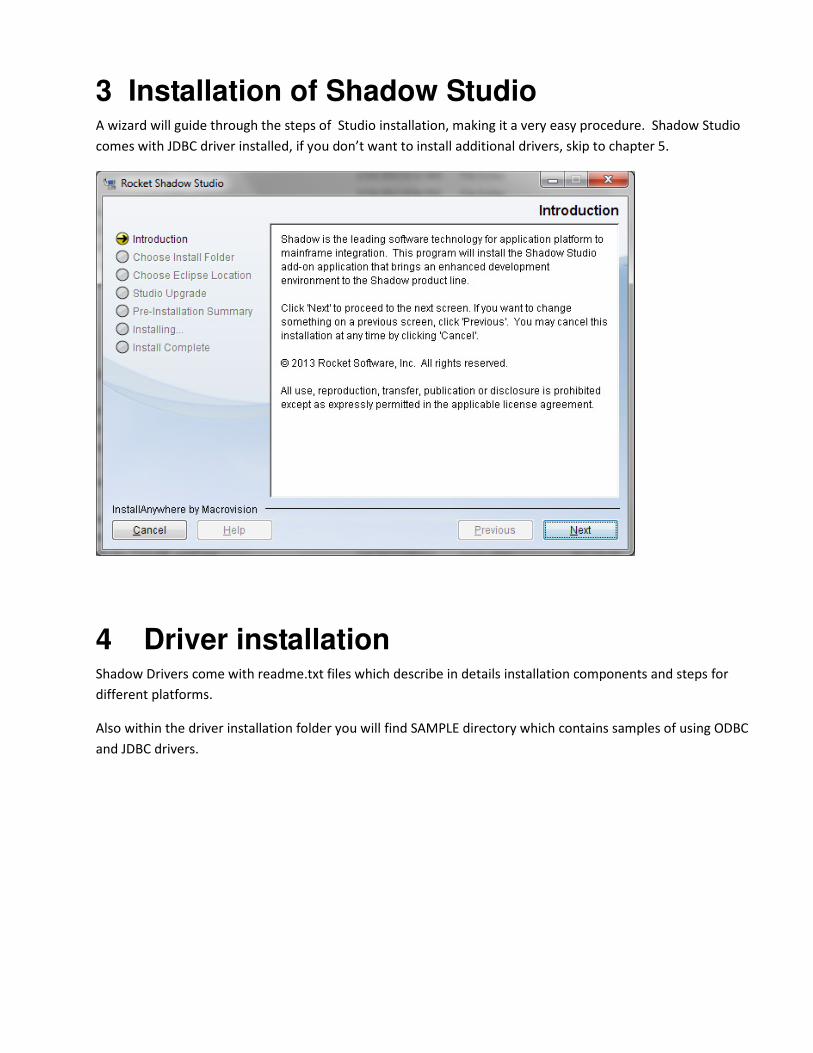
3 Installation of Shadow Studio A wizard will guide through the steps of Studio installation, making it a very easy procedure. Shadow Studio
comes with JDBC driver installed, if you don’t want to install additional drivers, skip to chapter 5.
4 Driver installation Shadow Drivers come with readme.txt files which describe in details installation components and steps for
different platforms.
Also within the driver installation folder you will find SAMPLE directory which contains samples of using ODBC
and JDBC drivers.

5 Installing Shadow Server
This chapter provides the required and optional steps for installing the Shadow Server. The
Shadow Server is the server component of Rocket Shadow and is required for Shadow z/SQL.
.
Before You Begin Installation
Installation Files
You have downloaded following files: ■ readme.txt. This file contains information that helps you decide which install method to use. It
also contains the JCL for the first job of both install methods. ■ ShadowPac install file. (ShadowPac.bin)
ShadowPac Install File The ShadowPac install file is an MVS sequential data set in EBCDIC format. It contains a PDS that
was compressed using the IBM AMATERSE program. The z/OS data set attributes for the file are: ■ Organization = PS ■ Record Format = FB ■ Record Length = 1024 ■ Block Size = 27648 ■ First Extent Cylinders = 220 ■ Second Extent Cylinders = 20 The file must be downloaded as a binary file.
After You Install
Because the libraries created by the install are maintained by SMP/E, we recommend that you make a
copy of the target libraries to use in your production environment when you have completed the
Shadow installation. Member COPYTGT in the HLQ.INSTALL library contains a job that can be used
to create the production libraries.
This allows you to install maintenance without disrupting the production environment. After installing
maintenance using SMP/E, refresh the production libraries from the target libraries.

Customizing Variables for the Install Jobs
You must customize all jobs before they are submitted, using the variables described in the following table:
Variable Description
?pkgpath? The directory name where ShadowPac.bin and the product's SMP/E
package archive files are stored.
?pkgname? The name of the file in the pkgpath directory where the ShadowPac.bin file is stored.
?PACDSN? The name of the MVS data set that contains the downloaded
ShadowPac.bin file.
?MGMTCLAS? Specifies a 1 to 8-character SMS data management class name.
This parameter is required only in an installation that uses
DFSMS. Otherwise it should not be specified.
?STORCLAS? Specifies a 1 to 8-character SMS data storage class name. This parameter is
required only in an installation that uses DFSMS. Otherwise it should not be
specified.
?HLQ? Specifies the 1 to 26-character data set name high-level qualifier(s) used for
Shadow product target and distribution libraries.
?HLQREL? Specifies the 1 to 26-character data set name high-level qualifier(s) used for the
libraries created by the SMP/E package extract process.
?HLQSMP? Specifies the 1 to 26-character data set name high-level qualifier(s) used for the
SMP/E control libraries, such as the CSI and SMPPTS.
?DLBZONE? Specifies the 1 to 7-character name for the SMP/E distribution zone name.
?TGTZONE? Specifies the 1 to 7-character name for the SMP/E target zone name.
NOTE: The values of ?HLQ?, ?HLQREL?, and ?HLQSMP? can be the same.
Required Installation Steps
Make sure that you have followed the instructions in "Before You Begin Installation.
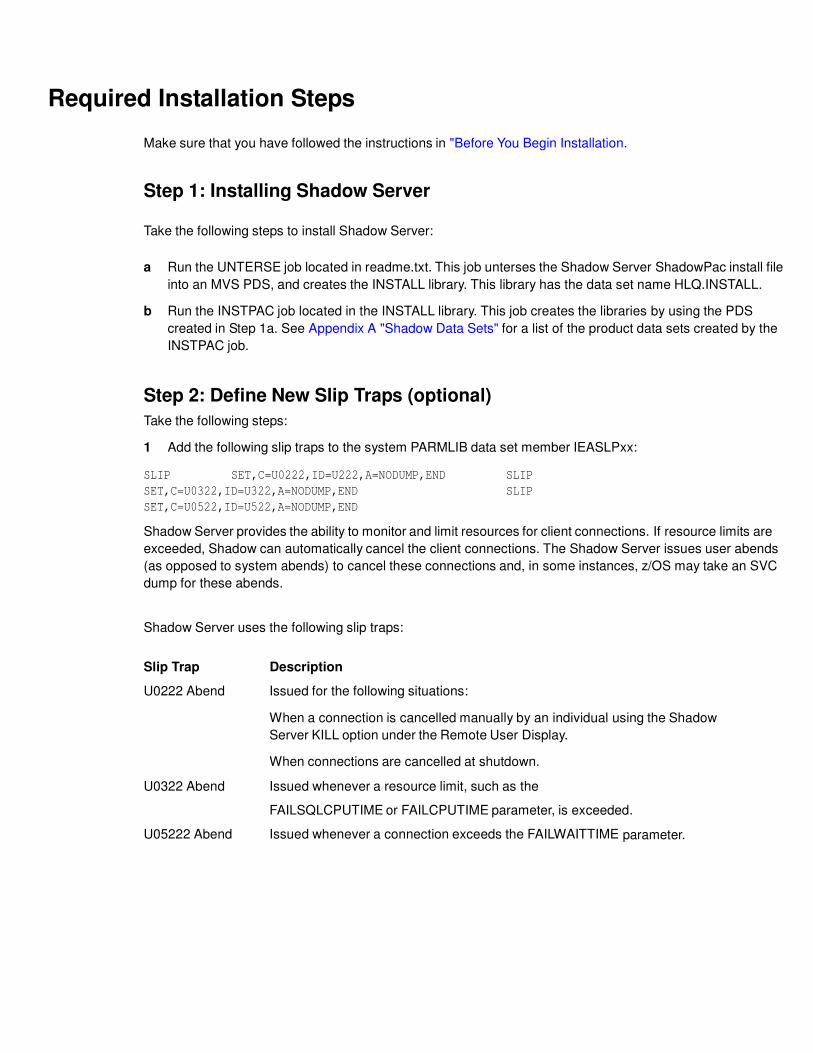
Step 1: Installing Shadow Server
Take the following steps to install Shadow Server:
a Run the UNTERSE job located in readme.txt. This job unterses the Shadow Server ShadowPac install file
into an MVS PDS, and creates the INSTALL library. This library has the data set name HLQ.INSTALL.
b Run the INSTPAC job located in the INSTALL library. This job creates the libraries by using the PDS
created in Step 1a. See Appendix A "Shadow Data Sets" for a list of the product data sets created by the
INSTPAC job.
Step 2: Define New Slip Traps (optional)
Take the following steps:
1 Add the following slip traps to the system PARMLIB data set member IEASLPxx: SLIP SET,C=U0222,ID=U222,A=NODUMP,END SLIP
SET,C=U0322,ID=U322,A=NODUMP,END SLIP
SET,C=U0522,ID=U522,A=NODUMP,END
Shadow Server provides the ability to monitor and limit resources for client connections. If resource limits are
exceeded, Shadow can automatically cancel the client connections. The Shadow Server issues user abends
(as opposed to system abends) to cancel these connections and, in some instances, z/OS may take an SVC
dump for these abends.
Shadow Server uses the following slip traps:
Slip Trap Description
U0222 Abend Issued for the following situations:
When a connection is cancelled manually by an individual using the Shadow
Server KILL option under the Remote User Display.
When connections are cancelled at shutdown.
U0322 Abend Issued whenever a resource limit, such as the
FAILSQLCPUTIME or FAILCPUTIME parameter, is exceeded.
U05222 Abend Issued whenever a connection exceeds the FAILWAITTIME parameter.

Step 3: Modify the DEFDIV job in the HLQ.CNTL data set.
This job creates the data sets for the Trace Browse, the global variable checkpoint, and the DMF
cache.
a Refer to the DEFDIV job in HLQ.CNTL and modify it per the instructions in the job.
b Define the name for the VSAM data sets to the SDBTRACE DDNAME to create the
Trace Browse. Use the following DEFINE CLUSTER statement: DEFINE CLUSTER ( NAME('HLQ.SDBB.TRACE' ) - CYLINDERS(525,50)
- SHAREOPTIONS(2,3) - LINEAR) -
DATA ( NAME('HLQ.SDBB.TRACE.DATA' ) )
NOTES for step b: You should anticipate 175 cylinders per 100,000 lines of trace, so set the
CYLINDER parameter accordingly. Since there is only one Trace Browse for each Server, the trace
data set must be large enough to contain the number of messages specified. This is done using the
BROWSEMAX parameter. BROWSEMAX defaults to 300000 messages in the sample IN00 shipped at
installation time. Exactly 720 messages fit in a 3390 cylinder. Each message is 1024 bytes long.
Change the SYSCHKx names to the name you are using for global variable support. Use the following
DEFINE CLUSTER statement:
DEFINE CLUSTER ( NAME('HLQ.SDBB.SYSCHK1') - CYLINDERS(5,1) -
SHAREOPTIONS(2,3) -
LINEAR ) -
DATA ( NAME('HLQ.SDBB.SYSCHK1.DATA') )
DEFINE CLUSTER ( NAME('HLQ.SDBB.SYSCHK2') - CYLINDERS(5,1) -
SHAREOPTIONS(2,3) -
LINEAR ) -
DATA ( NAME('HLQ.SDBB.SYSCHK2.DATA') )
NOTE: The global variable checkpoint data sets must each be large enough to hold the number of variables
specified in the GLOBALMAX parameter. GLOBALMAX defaults to 5000 variables, and approximately 1180
variables can be in a 3380 cylinder.
c If you are using data mapping caching data sets, define a caching facility. The cache name
should be the name you use for the data map cache file, and should be large enough to hold all data map
binary images. Use the following DEFINE CLUSTER statement.
DEFINE CLUSTER ( NAME('HLQ.SDBB.MAP.CACHE') - MEGABYTES(10,10) -
SHAREOPTIONS(2,3) -
LINEAR ) -
DATA ( NAME('HLQ.SDBB.MAP.CACHE.DATA') )
NOTE: It is recommended that allocations for this cluster be expressed in megabyte units. Each data map
varies in size, depending on the number of individual fields defined in the map. The required size (in bytes) for
storing each map is equal to:
(number of defined fields) + 1 x 1024
Each map takes up a minimum storage of 2 KB, with an additional 1 KB for each column in the map. To
determine the estimated required storage, multiply the average number of columns by the number of maps.
To allow room for new maps, increase the resulting number accordingly.
To determine the number of columns in a map, browse the map data set via the ISPF Browse panel. The Size
column in the Browse member list indicates the number of columns in a map Use this to determine the size of
the data map cache data set. The default of 10 megabytes for primary and 10 for secondary should be
sufficient for most sites.
d After you have made all required modifications, run the DEFDIV job.
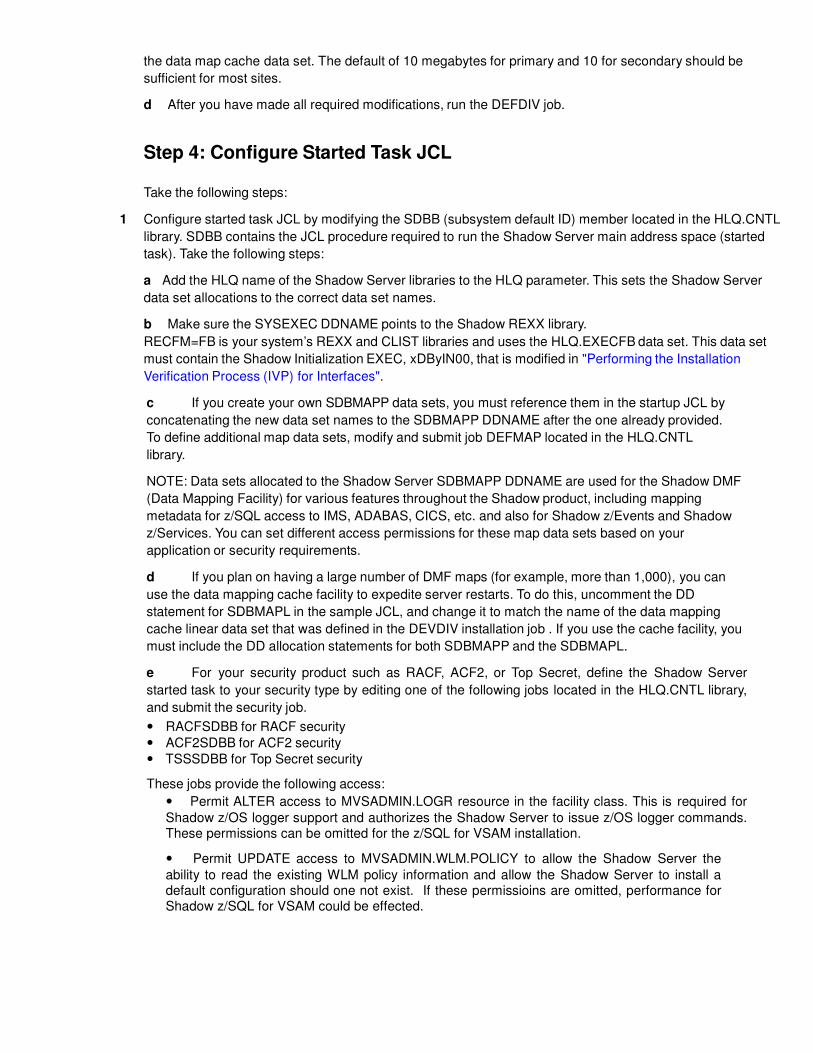
Step 4: Configure Started Task JCL
Take the following steps:
1 Configure started task JCL by modifying the SDBB (subsystem default ID) member located in the HLQ.CNTL
library. SDBB contains the JCL procedure required to run the Shadow Server main address space (started
task). Take the following steps:
a Add the HLQ name of the Shadow Server libraries to the HLQ parameter. This sets the Shadow Server
data set allocations to the correct data set names.
b Make sure the SYSEXEC DDNAME points to the Shadow REXX library.
RECFM=FB is your system’s REXX and CLIST libraries and uses the HLQ.EXECFB data set. This data set
must contain the Shadow Initialization EXEC, xDByIN00, that is modified in "Performing the Installation
Verification Process (IVP) for Interfaces".
c If you create your own SDBMAPP data sets, you must reference them in the startup JCL by
concatenating the new data set names to the SDBMAPP DDNAME after the one already provided.
To define additional map data sets, modify and submit job DEFMAP located in the HLQ.CNTL
library.
NOTE: Data sets allocated to the Shadow Server SDBMAPP DDNAME are used for the Shadow DMF
(Data Mapping Facility) for various features throughout the Shadow product, including mapping
metadata for z/SQL access to IMS, ADABAS, CICS, etc. and also for Shadow z/Events and Shadow
z/Services. You can set different access permissions for these map data sets based on your
application or security requirements.
d If you plan on having a large number of DMF maps (for example, more than 1,000), you can
use the data mapping cache facility to expedite server restarts. To do this, uncomment the DD
statement for SDBMAPL in the sample JCL, and change it to match the name of the data mapping
cache linear data set that was defined in the DEVDIV installation job . If you use the cache facility, you
must include the DD allocation statements for both SDBMAPP and the SDBMAPL.
e For your security product such as RACF, ACF2, or Top Secret, define the Shadow Server
started task to your security type by editing one of the following jobs located in the HLQ.CNTL library,
and submit the security job.
• RACFSDBB for RACF security • ACF2SDBB for ACF2 security • TSSSDBB for Top Secret security
These jobs provide the following access:
• Permit ALTER access to MVSADMIN.LOGR resource in the facility class. This is required for Shadow z/OS logger support and authorizes the Shadow Server to issue z/OS logger commands. These permissions can be omitted for the z/SQL for VSAM installation.
• Permit UPDATE access to MVSADMIN.WLM.POLICY to allow the Shadow Server the ability to read the existing WLM policy information and allow the Shadow Server to install a default configuration should one not exist. If these permissioins are omitted, performance for Shadow z/SQL for VSAM could be effected.

Step 5: APF-authorize Shadow LOAD
Take the following steps:
APF-authorize your Shadow LOAD library using one of the following methods:
• Make the statement permanent for the next IPL. • Immediately add the statement to your APF list.
To make the statement permanent for the next IPL, add the following data set names to your
permanent PROGxx member in your logical PARMLIB concatenation:
APF ADD DSNAME(HLQ.LOAD) VOLUME(VOLSER)
Where HLQ and VOLSER are values specific to your installation.
To immediately add the statement to your APF list, issue the following z/OS console command, if the data
set is SMS-managed:
/SETPROG APF,ADD,DSNAME=XXXX,SMS
Where XXXX is the Shadow load library data set name.
If the data set is not SMS-managed, use the following console command, replacing
SMS with VOLUME=volume: /SETPROG APF,ADD,DSNAME=XXXX,SMS
Where volume is the identifier for the volume containing the library specified on the
DSNAME parameter, which is one of the following:
• The volume serial number
• Six asterisks (******), indicating that the system is to use the volume serial number of the current system residence (SYSRES) volume.
NOTES FOR THIS STEP:
Performing both of these methods will result in making the statement permanent for the next IPL and adding it
immediately to the APF list.
It is not necessary that the Shadow Library be in either the LNKLIST or LPALST; however, if it is, the DB2
LOAD library must be ahead of the Shadow Library in any LNKLIST, LPALST or STEPLIB concatenation.

Step 6: Define access requirements for Shadow Server If you are running a security product such as RACF, ACF2, or Top Secret, you will need to define the
Shadow Server started task name to the security product, as well as provide the required data set
access (see Step 4.1.g). Table 3-8 summarizes the access
requirements for Shadow Server by DDNAME.
Table 3-8. Access Requirements for Shadow Server by DDNAME
DDNAME Access
STEPLIB READ, EXECUTE
SDBRPCLB READ, EXECUTE
SYSEXEC READ
SDBTRACE READ, WRITE
SDBCHK1, SDBCHK2 READ, WRITE
SDBMQSLB READ, EXECUTE
SDBMAPP READ, WRITE
SDBHTXLB READ, WRITE
SDBMAPL READ, WRITE
QWREFDD READ
QWREFLL READ
All data sets can be shared between different Shadow Servers with the exception of SDBTRACE, SYSCHK1,
and SYSCHK2. These data sets must be unique to each copy of Shadow Server, even if the two Shadow
Servers are on the same z/OS system. The SDBMAPP data set can also be shared, although it is not
recommended.
Make sure that your z/OS Security Administrator reviews these security definitions. You may need to
change some of them depending on your site’s requirements.
Step 7: Customizing the Shadow Initialization EXEC
1 Input the license code using the MODIFY PARM command located in the Shadow
Initialization EXEC, xDByIN00: “MODIFY PARM NAME(LICENSECODE)”,
“VALUE(XXXXXXXXXXXXXXXXXXXXXXXXXXXXXXXXXXXXXXXXXXXXX” ||,
“XXXXXXXXXXXXXXXXXXXXXXXXXXXXXXXXXXXXXXXXXXXXX” ||,
“XXXXXXXXXXXXXXXXXXXXXXXXXXXXXXXXXXXXXXXX)”

13
The Shadow z/SQL for VSAM license code will be provided to you via email. By default, Shadow uses
the last LICENSECODE parameter value. You can repeat this parameter statement to run more than
one license code, such as a permanent code and a temporary code for testing new features, by
modifying an IF statement to “IF 1=1”.
2 Define Shadow ISPF dialog data sets in the Shadow Initialization EXEC. To do this, update
the DEFINE ISPFCONCAT statements provided in the following sample. The EXEC data set can
either be RECFM VB or RECFM FB. This makes the data sets accessible to anyone invoking the
Shadow/REXX command as long as the Shadow started task is active.
“DEFINE ISPFCONCAT”,
“LIBTYPE(ISPLLIB)”,
“DSNLIST(HLQ.LOAD)”
“DEFINE ISPFCONCAT”, “LIBTYPE(ISPMLIB)”,
“DSNLIST(HLQ.SHDWMLIB)”
“DEFINE ISPFCONCAT”, “LIBTYPE(ISPPLIB)”,
“DSNLIST(HLQ.SHDWPLIB)”
“DEFINE ISPFCONCAT”, “LIBTYPE(ISPTLIB)”,
“DSNLIST(HLQ.SHDWTLIB)”
“DEFINE ISPFCONCAT”,
“LIBTYPE(ISPSLIB)”,
“DSNLIST(HLQ.SHDWSLIB)”
“DEFINE ISPFCONCAT”,
“LIBTYPE(REXXEXEC)”,
“DSNLIST(HLQ.EXECFB)”
Where:
LIBTYPE specifies the ISPF library being defined. The valid LIBTYPE values are:
• ISPLLIB: Shadow Server LOAD libraries
• ISPMLIB: Shadow Server ISPF message libraries • ISPPLIB: Shadow Server ISPF panel libraries • ISPTLIB: Shadow Server ISPF table library • ISPSLIB: Shadow Server ISPF skeleton library • REXXEXEC: Shadow Server REXX EXEC library
DSNLIST can specify from one to five data set names. The data sets are concatenated in the order
specified in the list. For example, the following DEFINE ISPFCONCAT statement demonstrates how
to specify three libraries for the ISPF LOAD library LIBDEF:
“DEFINE ISPFCONCAT”, “LIBTYPE(ISLLLIB)”,
“DSNLIST(USER.LOAD.LIBRARY1”,
“HLQ.LOAD”, “CICS410.SDFHEXCI)”
NOTE: Although the Shadow LOAD library is allocated to Shadow Server, an ISPF LIBDEF is still
required for the Shadow Server LOAD library before invoking the Shadow/REXX EXEC that brings up
the ISPF dialogs (see "Performing the Installation Verification Process (IVP) "). You can avoid this by
copying the Shadow Server LOAD modules to a linklist data set or to a data set allocated to the user's
ISPLLIB allocation.
3 Issue a DEFINE RULESET statement for each SEF ruleset. During initial installation, you must
change each DSNAME operand to match the data set names actually installed with the product.
“DEFINE RULESET NAME(ATH)” , “RULETYPE(ATH)” ,
“DSNAME('HLQ.ATH.EXECFB')”

14
“DEFINE RULESET NAME(CMD)” , “RULETYPE(CMD)” ,
“DSNAME('HLQ.CMD.EXECFB')”
“DEFINE RULESET NAME(EXC)” , “RULETYPE(EXC)” ,
“DSNAME('HLQ.EXC.EXECFB')”
“DEFINE RULESET NAME(PUB)” , “RULETYPE(PUB)” ,
“DSNAME('HLQ.PUB.EXECFB')”
“DEFINE RULESET NAME(RPC)” , “RULETYPE(RPC)” ,
“DSNAME('HLQ.RPC.EXECFB')”
“DEFINE RULESET NAME(SQL)” , “RULETYPE(SQL)” ,
“DSNAME('HLQ.SQL.EXECFB')”
“DEFINE RULESET NAME(TOD)” , “RULETYPE(TOD)” ,
“DSNAME('HLQ.TOD.EXECFB')”
4 If you want to use the GLV SEF (Global Variables) event processing, you must enable and add
the following MODIFY PARM command and DEFINE statements to the Shadow Initialization EXEC,
xDByIN00:
“MODIFY PARM NAME(SEFGLVEVENTS) VALUE(YES)” “DEFINE RULESET
NAME(GLV)” ,
“RULETYPE(GLV)” , “DSNAME('HLQ.GLV.EXECFB')”
IMPORTANT: Do not enable these statements unless you are using GLV events.
5 TCP/IP
a Review the default values for the following Shadow TCP/IP parameters, and change any values needed to
support your environment. Use the MODIFY PARM command located in the Shadow Initialization EXEC,
xDByIN00. The values shown are the default values.
JDBC/ODB Clinet:
“MODIFY PARM NAME(OEPORTNUMBER) VALUE(1200)”
Keep the tcp connection open:
“MODIFY PARM NAME(OEKEEPALIVETIME) VALUE(30)”
b Modify your logical PARMLIB concatenation member BPXPRMxx that configures
Open Edition, and ensure that the following IBM UNIX parameters are set:
• MAXFILEPROC specifies the maximum number of file descriptors that a single user is allowed to
have concurrently active or allocated. Set this parameter to the maximum number of users you plan to have connected to a single Shadow Server.
• MAXSOCKETS controls the maximum number of sockets per address space. Set this to the maximum number of users you plan to have connected to a single Shadow Server. This parameter is located under the FILESYSTYPE TYPE(INIT) definition.
• MAXPROCSYS specifies the maximum number of processes that z/OS UNIX allows to be
concurrently active. Set this parameter to the maximum number of Shadow Server connections you expect to have open at one time for your combined total of Shadow Servers.
c (Optional) Reserve the port numbers defined via the OEPORTNUMBER parameters in the
TCP/IP profile data set. This ensures that other tasks cannot access this port. The IBM TCP/IP port
number is reserved in the TCPIP.PROFILE data set. The PROFILE DDNAME in the TCP/IP started
task points to this data set. To reserve the port numbers, use the Shadow Server subsystem name and
the port number in the PORT section of the TCP/IP profile data set. Do not use the PROC name for the
Shadow Server if it is different than the Shadow Server's subsystem name.
Example:

15
PORT
1200 TCP SDBB ; Shadow OEPORTNUMBER
Step 8: Configuring ISPF Dialogs
To configure ISPF dialogs, take the following steps:
1 Edit the Shadow member of HLQ.EXECFB and replace the data set name in the following
statement with the data set name you chose for the Shadow load library, HLQ.LOAD:
llib=’HLQ.LOAD
2 Copy Shadow member of HLQ.EXECFB to a data set allocated to all TSO users’ SYSPROC
allocation.
If the Shadow ISPF data sets were defined in the Shadow Initialization EXEC, all required ISPF data set
allocations are dynamically allocated when the Shadow Initialization EXEC is invoked, as long as the
Shadow Server is up and running.
3 Invoke the Shadow ISPF application by issuing the following Shadow ISPF startup
command:
‘HLQ.EXECFB(SHADOW)’ ‘SUB(xDBy) TBSSID(xDBy)’
Where:
• SUB specifies the four-character subsystem name of the copy of Shadow Server to be used. All
ISPF applications communicate with the specified subsystem. The format is xDBy, where x can be any
alphabetic letter, and y can be any alphanumeric character. The second and third characters must be
“DB”.
• TBSSID specifies the four-character subsystem name of the copy of Shadow Server to be used
for SIS. This is the subsystem in which the SIS Trace Browse takes place. The format is xDBy, which is
explained in the previous definition of SUB.
The SDF application is run under the ISPF applid of SDB, permitting the user to customize
options, such as PF keys, for the SDF application.
NOTES for Step 3: ■ The Shadow ISPF application can be used with or without the Shadow Instrumentation
Server (SIS). SIS is a management environment that traces and integrates activity from all
mainframe nodes in a sysplex and then graphically displays the information via the Shadow Studio. ■ While you are in the ISPF application, you can modify the subsystem name using the Shadow
Server ISPF Session Parameters application.
Step 9: Configuring Shadow WLM (optional)
Note: If you don’t perform step required for WLM , Shadow will default to LOW WLM priority class (STCLO) which
may have an effect on performance.
Shadow WLM support provides a method for making the best use of server resources, while achieving
the best possible response times. This support is available for Shadow z/Direct, Shadow z/Events, and

16
Shadow z/Services.
You can use WLM support with the Shadow Server to define performance goals and assign a level of
importance to each goal in business terms. The system then matches its resources to the work, as well
as monitors the goals and makes necessary processing adaptions accordingly. This section explains several ways you can configure Shadow WLM support and provides the
definitions required to use the support.
Shadow WLM Definitions A service definition is the name given to the combination of service policies, workloads, service
classes, resource groups, classification rules, and application environments. It is based on the
performance objectives in your service level agreement (SLA). The following is a list of WLM
definitions: ■ Workloads: A named collection of work to be reported as a unit. Logically, a workload is a
collection of service classes. ■ Service Classes: A named group of work with similar performance goals, resource
requirements, or business importance. In the service class, you assign the goals of the work and their
relative importance, and then relate the service class to a particular workload and resource group. The
following service classes are required by the Shadow Server.
• SDB_SCHI ZIIPCLASS=SDB Shadow high priority. This service class is for
Shadow critical work. Assign this class goals as close to SYSSTC as possible.
• SDB_SCNM ZIIPCLASS=SDB Shadow normal work. This class is for Shadow administrative
work. Assign this class the same goals as those used for DB2 master or the IMS control region.
• SDB_SCTX ZIIPCLASS=SDB Shadow client work. This service class is for Shadow client
requests. Assign this class the same goals as those supporting the data source. This would
most likely be the CICS, IMS/TM, or DB2 WLM address space. ■ Classification Rules: Rules used to map work coming into the system to a specific service class and
report class. This classification is based on the WLM subsystem type and work qualifiers in the
subsystem type. The work qualifiers define and associate service classes to that type of work. ■ Report Classes: A named group of work that is used for reporting purposes only. Report classes can
be used to distinguish between different types of work executing in the same service class.
Table 3-10 lists the WLM service definition elements required by the Shadow Server.
Table 3-10. Recommended WLM Elements
WLM Element Type
Shadow Server Parameter
Default Value
Workload WLMWORKLOAD SDB_WKLD
Subsystem WLMSUBSYSTEM SDB
Service Class WLMSERVICECLASS SDB_SCNM
Service Class WLMHISERVICECLASS SDB_SCHI
Service Class WLMTXSERVICECLASS SDB_SCTX
Classification Rule WLMTRANSACTION SDB_TXNM
Classification Rule WLMHITRANSACTION SDB_TXHI

17
Classification Rule WLMTXTRANSACTION SDB_TXTX
Report Class WLMP1REPORTCLASS SDB_RCP1
Report Class WLMP2REPORTCLASS SDB_RCP2
Report Class WLMP3REPORTCLASS SDB_RCP3
Providing WLM Definitions
There are several ways to provide WLM definitions: ■ (Recommended) Providing definitions via the Shadow Server. Take the steps provided in
"(Recommended) Providing Definitions via the Shadow Server". ■ Providing the definitions manually. Take the steps provided in the section "Providing
Definitions Manually". ■ Using WLM Classifications. Take the steps provided in the section "Using WLM
Classifications".
NOTE: It is recommended that you have a backup of your existing WLM policy definitions.

18
(Recommended) Providing Definitions via the Shadow Server
Before you start this procedure, it is important to understand the following requirements: ■ Shadow Server must have proper access to the MVSADMIN.WLM.POLICY resource or
errors occur and the Shadow Server shuts down. ■ Your user ID must have UPDATE access or the following error occurs:
*SDx0038S INSTALL OF WLM SERVICE DEFINITION FAILED, RC=X'0000000C',
REASON=X'0A3E0C0E', DETECTED AT OPINWM+X'FFC3BF06' ■ Your user ID for starting the server must have READ access or the following error
occurs:
SDx3269I WLM administration userid xxxxxxxx logged on to system
SDx0037E WLM EXTRACT SERVICE DEFINITION FAILED, RC=X'00000004', DETECTED AT
OPINWM+X'00000B02'
To provide WLM definitions via the Shadow Server, take the following steps:
1 Set the value of the WLMFORCEPOLICY parameter to YES in the Shadow Initialization
EXEC, xDByIN00, using the MODIFY PARM command. Optionally, you can change the
values of the WLMUSERID and WLMTRANNAME parameters.
“MODIFY PARM NAME(WLMUSERID) VALUE(xDBy)”
“MODIFY PARM NAME(WLMFORCEPOLICY) VALUE(YES)”
“MODIFY PARM NAME(WLMTRANNAME) VALUE(APPLNAME)”
For a description and valid values for these parameters, see Table 3-6.
2 Enter WLM from the ISPF/PDF option 6 panel to log on to the IBM TSO/ISPF WLM
administration tool.
3 Extract and save a copy of the current service definition. This is for backup purposes
only.
4 Update the Server IN00 parameter file with the correct WLMUSERID.
5 Start the Shadow Server (see "Starting and Stopping the Shadow Server").
Upon start up, the Server takes the following actions: ■ Examines the current WLM service policy for the Shadow required elements. If they
are found in the active policy, Server initialization continues. If they are not found in
the active service policy, the Server issues message xDy0706I, and then xDy0707I for
each missing element, as follows:
xDy0706I SHADOW SERVER xDBy requires the following elements missing from
WLM Service Policy active_policy_name
xDy0707I Type: WORKLOAD, Shadow Parameter: WLMWORKLOAD, Value: SDB_WKLD
xDy0707I Type: SUBSYSTEM, Shadow Parameter: WLMSUBSYSTEM, Value: SDB
xDy0707I Type: SERVICE CLASS, Shadow Parameter: WLMSERVICECLASS, Value:
SDB_SCNM
xDy0707I Type: SERVICE CLASS, Shadow Parameter: WLMHISERVICECLASS,
Value: SDB_SCHI
xDy0707I Type: SERVICE CLASS, Shadow Parameter: WLMTXSERVICECLASS,

19
Value: SDB_SCTX
xDy0707I Type: REPORT CLASS, Shadow Parameter: WLMP1REPORTCLASS, Value: SDB_RCP1
xDy0707I Type: REPORT CLASS, Shadow Parameter: WLMP2REPORTCLASS Value:
SDB_RCP2
xDy0707I Type: REPORT CLASS, Shadow Parameter: WLMP3REPORTCLASS, Value:
SDB_RCP3
xDy0707I Type: CLASSIFICATION RULE, Shadow Parameter: WLMTRANSACTION, Value:
SDB_TNNM
xDy0707I Type: CLASSIFICATION RULE, Shadow Parameter: WLMHITRANSACTION, Value:
SDB_TNHI
xDy0707I Type: CLASSIFICATION RULE, Shadow Parameter: WLMTXTRANSACTION, Value:
SDB_TNTX ■ The Server then examines the WLM service definition for the required elements. If
WLMFORCEPOLICY is set to NO, the following actions are skipped. If WLMFORCEPOLICY is
set to YES, the following actions are enforced. The default is NO.
Action 1: If the required elements are found in the service definition, a WTOR is issued,
requesting permission to activate the current service policy. If the current policy is no longer
in the service definition, the user is asked to select one of the policies in the service definition
for activation.
*nn xDy0719R Reply 'GO' to activate Policy
service_policy_name, or 'CANCEL' to terminate Server
initialization
If you reply with CANCEL, the Shadow Server shuts down.
If you reply with GO, the Shadow Server automatically activates your WLM Policy
service_policy_name, and you should see the following message in the system log:
IWM001I WORKLOAD MANAGEMENT POLICY service_policy_name NOW IN EFFECT
Action 2: If the required elements are not found in the service definition, the Server issues
message xDy0706I, and then message xDy0707I for each missing element.
xDy0706I SHADOW SERVER xDBy requires the following elements missing from
WLM Service Definition service_definition_name.
xDy0707I Type: WORKLOAD, Shadow Parameter: WLMWORKLOAD, Value: SDB_WKLD xDy0707I
Type: SUBSYSTEM, Shadow Parameter: WLMSUBSYSTEM, Value: SDB xDy0707I Type: SERVICE
CLASS, Shadow Parameter: WLMSERVICECLASS, Value:
SDB_SCNM
xDy0707I Type: SERVICE CLASS, Shadow Parameter: WLMHISERVICECLASS, Value:
SDB_SCHI
xDy0707I Type: SERVICE CLASS, Shadow Parameter: WLMTXSERVICECLASS, Value:
SDB_SCTX
20
xDy0707I Type: REPORT CLASS, Shadow Parameter: WLMP1REPORTCLASS, Value:
SDB_RCP1
xDy0707I Type: REPORT CLASS, Shadow Parameter: WLMP2REPORTCLASS, Value:
SDB_RCP2
xDy0707I Type: REPORT CLASS, Shadow Parameter: WLMP3REPORTCLASS, Value:
SDB_RCP3
xDy0707I Type: CLASSIFICATION RULE, Shadow Parameter: WLMTRANSACTION,
Value: SDB_TNNM
xDy0707I Type: CLASSIFICATION RULE, Shadow Parameter: WLMHITRANSACTION,
Value: SDB_TNHI
xDy0707I Type: CLASSIFICATION RULE, Shadow Parameter: WLMTXTRANSACTION,
Value: SDB_TNTX
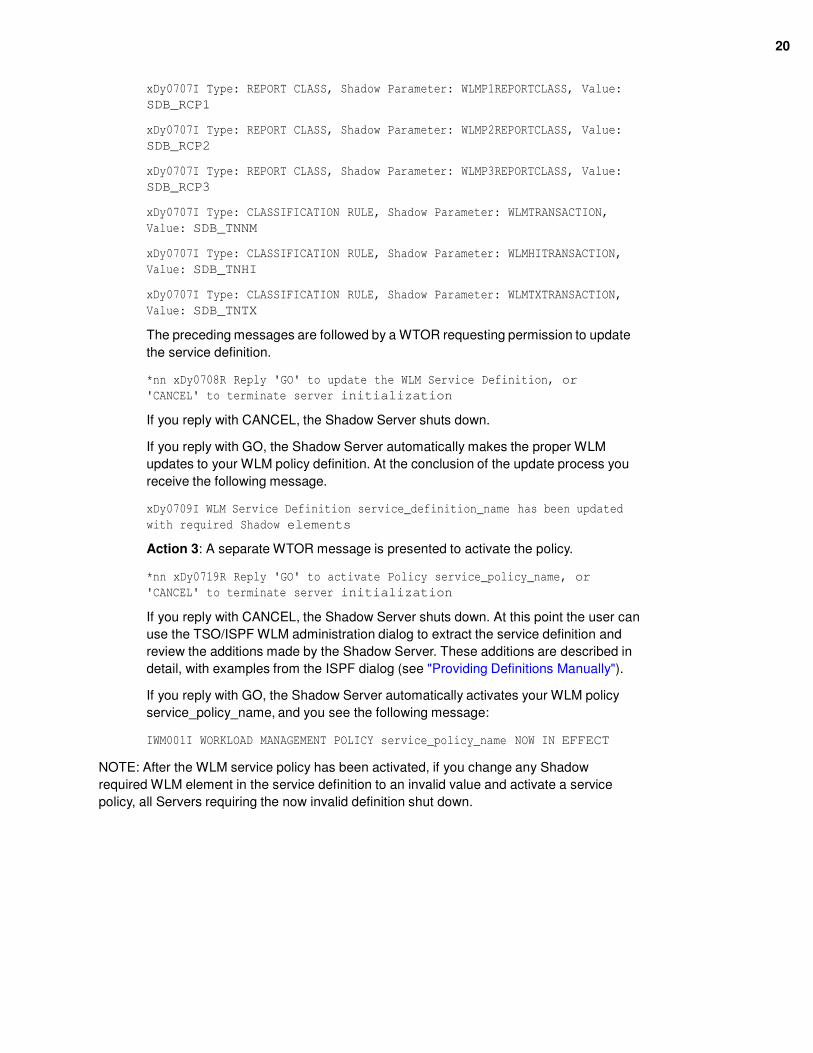
The preceding messages are followed by a WTOR requesting permission to update
the service definition.
*nn xDy0708R Reply 'GO' to update the WLM Service Definition, or
'CANCEL' to terminate server initialization
If you reply with CANCEL, the Shadow Server shuts down.
If you reply with GO, the Shadow Server automatically makes the proper WLM
updates to your WLM policy definition. At the conclusion of the update process you
receive the following message.
xDy0709I WLM Service Definition service_definition_name has been updated
with required Shadow elements
Action 3: A separate WTOR message is presented to activate the policy.
*nn xDy0719R Reply 'GO' to activate Policy service_policy_name, or
'CANCEL' to terminate server initialization
If you reply with CANCEL, the Shadow Server shuts down. At this point the user can
use the TSO/ISPF WLM administration dialog to extract the service definition and
review the additions made by the Shadow Server. These additions are described in
detail, with examples from the ISPF dialog (see "Providing Definitions Manually").
If you reply with GO, the Shadow Server automatically activates your WLM policy
service_policy_name, and you see the following message:
IWM001I WORKLOAD MANAGEMENT POLICY service_policy_name NOW IN EFFECT
NOTE: After the WLM service policy has been activated, if you change any Shadow
required WLM element in the service definition to an invalid value and activate a service
policy, all Servers requiring the now invalid definition shut down.

21
Providing Definitions Manually
If you want to manually define the required WLM definitions rather than have the Shadow
Server automatically install them at startup time, take the following steps:
1 Start the WLM administration tool. The IBM TSO/ISPF WLM administration tool is used in the
following examples. Other administrative tools can also be used.
a Enter WLM from the ISPF/PDF option 6 panel to log on to the IBM TSO/ISPF WLM
administration tool.
b Select option 2 Extract Definition from WLM Couple Data Set from the Choose
Service Definition box. The following panel appears. Follow the remainder of the steps from
this panel:

22
Figure 3-1. WLM Options
File Utilities Notes Options Help
--------------------------------------------------------------------------
Functionality LEVEL006 Definition Menu WLM Appl LEVEL017
Command ===>
Definition data set . . : none
S
e
l
e
c
t
o
n
e
o
f
t
h
e
f
o
l
l
o
w
i
n
g
o
p
t
i
o
n
s
.
.
.
.
.
1. Policies
2. Workloads
3. Resource Groups
4. Service Classes
5. Classification Groups
6. Classification Rules
7. Report Classes
8. Service Coefficients/Options
9. Application Environments

23
2 Define the workloads.
a Select Option 2 Workloads from the panel shown in Figure 3-1.
b Press ENTER. WLM displays the Workload Selection List panel.
c Create workload SDB_WKLD. The following panel shows what
this rule should look like:
Figure 3-2. Workload SDB_WKLD
Workload Xref Notes Options Help
------------------------------------------------------------------
-------- Modify a Workload
Command ===>
Enter or change the following information:
Workload Name . . . . . . . :
SDB_WKLD Description . . . . . . . .
. Shadow Workload
3 Define the service
classes.
a Select Option 4 Service Classes from the panel shown in Figure 3-1.
b Press ENTER. WLM displays the “Service Class Selection List” panel.
c Here you create the following service classes:
• SDB_SCHI ZIIPCLASS=SDB Shadow hi priority
• SDB_SCNM ZIIPCLASS=SDB Shadow normal work • SDB_SCTX ZIIPCLASS=SDB Shadow
client work
NOTES FOR STEP 3:
• Do not change service class names.
• ZIIPCLASS=SDB is a required keyword in the description.
• The values shown for service class goals are default values that you can modify.

24
The following three figures show you what each of these service classes should look like:
Figure 3-3. Service Class SDB_SCHI ZIIPCLASS=SDB Shadow hi priority
Service-Class Xref Notes Options Help
---------------------------------------------------------------------------
Modify a Service Class Row 1 to 2 of 2
Command ===>
SDB_SC
ZIIPCLAS
SDB_WKLD
NO
(YES or
Specify BASE GOAL information. Action Codes: I=Insert new period, E=Edit
period, D=Delete period.
---------------------
Imp. Description
1 1 Execution velocity of 90
Figure 3-4. SDB_SCNM ZIIPCLASS=SDB Shadow normal work
Service-Class Xref Notes Options Help
-------------------------------------------------------------------
Modify a Service Class Row 1 to 2 of 2
Command ===>
SDB_SCNM ZIIPCLASS=
SDB_WKLD
NO
(YES or
Specify BASE GOAL information. Action Codes: I=Insert new period, E=Edit
period, D=Delete period.
---------------------
Imp. Description
1 2 Execution velocity of 70

25
Figure 3-5. SDB_SCNM ZIIPCLASS=SDB Shadow client work
Service-Class Xref Notes Options Help
---------------------------------------------------------------------
------ Modify a Service Class
Row 1 to 4 of 4
Command ===>
Service Class Name . . . . . : SDB_SCTX Description . . . . . . . . . ZIIPCLASS=SDB Shadow client work Workload Name . . . . . . . . SDB_WKLD (name or ?) Base Resource Group . . . . . (name or ?) Cpu Critical . . . . . . . . . NO (YES or NO)
Specify BASE GOAL information. Action Codes: I=Insert
new period, E=Edit period, D=Delete period.
Action
---Period---
# Duration ---------------------Goal---------------------
Imp. Description
1 1000 1 90% complete within 00:00:00.500 2 1500 2 95% complete within 00:00:01.000 3 3 Execution velocity of 70
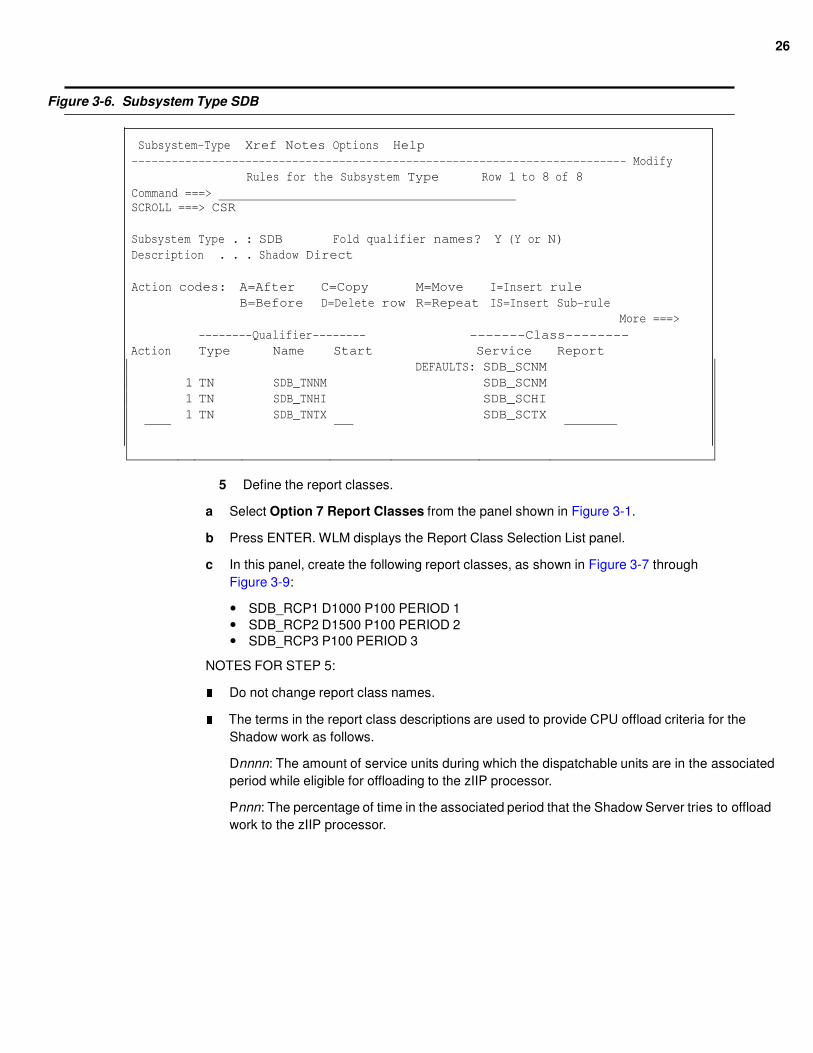
4 Define subsystem type SDB and its classification rules.
a Select Option 6 Classification Rules from the panel shown in Figure 3-1.
b Press ENTER. WLM displays the Subsystem Type Selection List for Rules panel.
c Define subsystem type SDB and associated classification rules. The
following panel shows what these rules should look like:
26
Figure 3-6. Subsystem Type SDB
Subsystem-Type Xref Notes Options Help
-------------------------------------------------------------------------- Modify
Rules for the Subsystem Type Row 1 to 8 of 8
Command ===>
SCROLL ===> CSR
Subsystem Type . : SDB Fold qualifier names? Y (Y or N)
Description . . . Shadow Direct
Action codes: A=After C=Copy M=Move I=Insert rule B=Before D=Delete row R=Repeat IS=Insert Sub-rule
More ===>
--------Qualifier-------- -------Class-------- Action Type Name Start Service Report
DEFAULTS: SDB_SCNM 1 TN SDB_TNNM SDB_SCNM 1 TN SDB_TNHI SDB_SCHI 1 TN SDB_TNTX SDB_SCTX
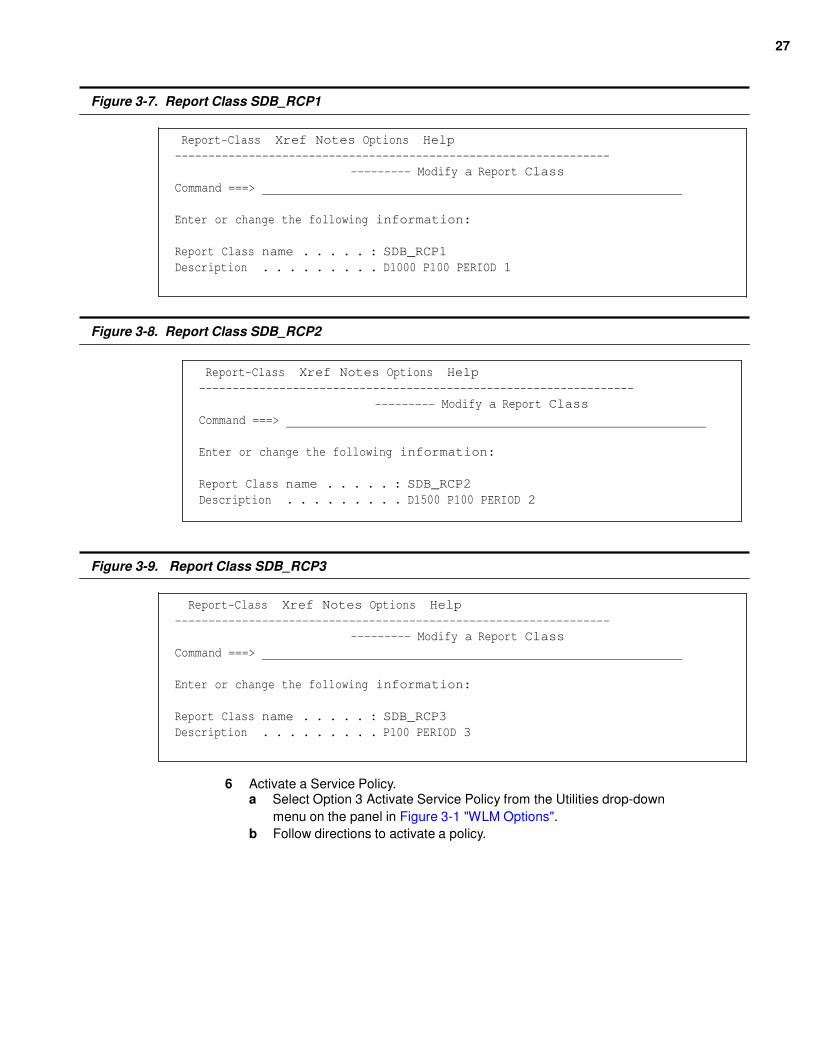
5 Define the report classes.
a Select Option 7 Report Classes from the panel shown in Figure 3-1.
b Press ENTER. WLM displays the Report Class Selection List panel.
c In this panel, create the following report classes, as shown in Figure 3-7 through
Figure 3-9:
• SDB_RCP1 D1000 P100 PERIOD 1
• SDB_RCP2 D1500 P100 PERIOD 2 • SDB_RCP3 P100 PERIOD 3
NOTES FOR STEP 5: ■ Do not change report class names. ■ The terms in the report class descriptions are used to provide CPU offload criteria for the
Shadow work as follows.
Dnnnn: The amount of service units during which the dispatchable units are in the associated
period while eligible for offloading to the zIIP processor.
Pnnn: The percentage of time in the associated period that the Shadow Server tries to offload
work to the zIIP processor.
27
Figure 3-7. Report Class SDB_RCP1
Report-Class Xref Notes Options Help
-----------------------------------------------------------------
--------- Modify a Report Class
Command ===>
Enter or change the following information:
Report Class name . . . . . : SDB_RCP1
Description . . . . . . . . . D1000 P100 PERIOD 1
Figure 3-8. Report Class SDB_RCP2
Report-Class Xref Notes Options Help
-----------------------------------------------------------------
--------- Modify a Report Class
Command ===>
Enter or change the following information:
Report Class name . . . . . : SDB_RCP2
Description . . . . . . . . . D1500 P100 PERIOD 2
Figure 3-9. Report Class SDB_RCP3
Report-Class Xref Notes Options Help
-----------------------------------------------------------------
--------- Modify a Report Class
Command ===>
Enter or change the following information:
Report Class name . . . . . : SDB_RCP3
Description . . . . . . . . . P100 PERIOD 3
6 Activate a Service Policy. a Select Option 3 Activate Service Policy from the Utilities drop-down
menu on the panel in Figure 3-1 "WLM Options".
b Follow directions to activate a policy.

Using WLM Classifications You can also allow WLM to use their existing service and report classes instead of using the hard-coded
Shadow definitions.
1 Use the MODIFY PARM command in the Shadow Initialization EXEC, xDByIN00 to set the values of
the WLMUSERID and WLMTRANNAME parameters to names already in your policy so that
Shadow work is correctly classified. “MODIFY PARM NAME(WLMUSERID) VALUE(xDBy)” “MODIFY PARM
NAME(WLMTRANNAME) VALUE(APPLNAME)”
For a description and valid values for these parameters, see Table 3-6.
2 If your Shadow Initialization EXEC, xDByIN00, does not match your existing WLM definitions, add
the following parameter to your xDByIN00 and keep the default value NO:
“MODIFY PARM NAME(WLMFORCEPOLICY) VALUE(NO)”
For a description and valid values for this parameter, see Table 3-6.
NOTE: If you set WLMFORCEPOLICY to NO, and the service class and report class descriptions are
not correct, the zIIP offload criteria is unavailable and the default of 100% is used for all Shadow
enclaves. The service and report classes to which reference is made are those set (or defaulted) in the
Shadow Initialization EXEC, xDByIN00, for the WLMPnREPORTCLASS and WLM*SERVICECLASS
parameters.

Starting and Stopping the Shadow Server Shadow Server is a z/OS started task and can be started with the START command and stopped with the
STOP command. In normal circumstances, Shadow Server is started at system start-up (IPL) and stopped
just before the system is shut down. It is designed for continuous operation.
Starting Shadow Server
Use the z/OS START command as follows: S xDBy
If you are using an automation package to start your system, you should associate the START command for
Shadow Server with either the VTAM initialization complete message (IST020I), the TCP/IP initialization
complete message (EZB6473I), or both.
Stopping Shadow Server
Use the z/OS STOP command as follows:
P xDBy
If you issue a CANCEL, all active conversations/connections are terminated with an abend, and the
product should shut down immediately.

5 Installation Verification Processes (IVP) VSAM (Read Only)
The IVP takes place in two parts:
■ "On the Shadow Server Side" ■ "On the Rocket Shadow Driver and Studio Side"
On the Shadow Server Side
1 Create the sample VSAM file. Run the job DEFSTAFF in the HLQ.CNTL data set to allocate and load
the sample staff VSAM file. The job should complete with a condition code of
0.
2 Create data map for VSAM file.
a Run the IZDIVSA1 job in the HLQ.CNTL data set to do the following:
• Perform a batch extract of the sample VSAM file listing
• Create a data map used for formatting the result set returned from the VSAM file.
b Follow the modification steps in the JCL and submit the job.
Both steps of job should complete with a condition code of 0.
On the Rocket Shadow Driver and Studio Side
Please refer to second part of this documentation “Shadow z/SQL to VSAM Tutorial” for detailed steps.

Appendix A: Shadow Data Sets
This appendix lists the product data sets created by the installation jobs INSTPAC and BUILDCSI.
Table H-1. Shadow Data Sets
DSName
Suffix
SMP/E
Data Type
DDEF
Data Set
ORG
RECFM
LRECL
BLKSIZE
TRKS
ASDBBPEL PRODXML ASDBBPEL PO FB 255 6120 15
ASDBCNTL USER2 ASDBCNTL PO-E FB 80 32720 180
ASDBDBRM USER1 ASDBDBRM PO-E FB 80 32720 300
ASDBEXEC EXEC ASDBEXEC PO-E FB 80 32720 450
ASDBHTML TEXT ASDBHTML PO-E VB 32765 32760 15
ASDBHTX PRODXML ASDBHTX PO-E VB 19036 19040 15
ASDBJLOD PROGRAM ASDBJLOD PO-E U 0 6000 15
ASDBLIST UTOUT ASDBLIST PO-E FBA 133 32718 45
ASDBMAP DATA ASDBMAP PO-E FB 1024 31744 15
ASDBMLIB MSG ASDBMLIB PO-E FB 80 32720 15
ASDBMOD MOD ASDBMOD PO-E U 0 6144 1800
ASDBOBJ USER3 ASDBOBJ PO-E FB 80 32720 1275
ASDBPLIB PNL ASDBPLIB PO-E FB 80 32720 105
ASDBRPC PROGRAM ASDBRPC PO-E U 0 6000 750
ASDBSAMP SAMP ASDBSAMP PO-E FB 80 32720 270
ASDBSLIB SKL ASDBSLIB PO-E FB 80 32720 15
ASDBSWI DATA ASDBSWI PO-E FB 80 32720 30
ASDBTLIB TBL ASDBTLIB PO-E FB 80 32720 15
ASDBXATH EXEC ASDBXATH PO-E FB 80 32720 15
ASDBXCMD EXEC ASDBXCMD PO-E FB 80 32720 15
ASDBXEXC EXEC ASDBXEXC PO-E FB 80 32720 15
ASDBXGLV EXEC ASDBXGLV PO-E FB 80 32720 15
ASDBXPUB EXEC ASDBXPUB PO-E FB 80 32720 15
ASDBXRPC EXEC ASDBXRPC PO-E FB 80 32720 15
ASDBXSQL EXEC ASDBXSQL PO-E FB 80 32720 15
ASDBXTOD EXEC ASDBXTOD PO-E FB 80 32720 15
ATH.EXEC EXEC SSDBXATH PO-E FB 80 32720 15
BPELDEMO PRODXML SSDBBPEL PO-E FB 255 6120 15
CICSLOAD MOD SSDBCLOD PO-E U 0 6000 270
CMD.EXEC EXEC SSDBXCMD PO-E FB 80 32720 15

Table H-1. Shadow Data Sets (cont.)
DSName
Suffix
SMP/E
Data Type
DDEF
Data Set
ORG
RECFM
LRECL
BLKSIZE
TRKS
CNTL USER2 SSDBCNTL PO-E FB 80 32720 180
DBRMLIB USER1 SSDBDBRM PO-E FB 80 32720 150
EXC.EXEC EXEC SSDBXEXC PO-E FB 80 32720 15
EXECFB EXEC SSDBEXEC PO-E FB 80 32720 450
GLV.EXEC EXEC SSDBXGLV PO-E FB 80 32720 15
HTML TEXT SSDBHTML PO-E VB 32756 32760 15
HTXLIB PRODXML SSDBHTX PO-E VB 19036 19040 15
INSTALL (See Note 1) PO-E FB 80 32720 18
JAVALOAD PROGRAM SSDBJLOD PO-E U 0 6000 15
LIST UTOUT SSDBLIST PO-E FBA 133 32718 45
LOAD MOD SSDBLOAD PO U 0 6000 4500
MAP DATA SSDBMAP PO-E FB 1024 31744 15
OBJ USER3 SSDBOBJ PO-E FB 80 32720 1125
PUB.EXEC EXEC SSDBXPUB PO-E FB 80 32720 15
RPC.EXEC EXEC SSDBXRPC PO-E FB 80 32720 15
RPCLIB PROGRAM SSDBRPC PO-E U 0 6000 375
SAMP SAMP SSDBSAMP PO-E FB 80 32720 300
SDBLMOD (See Note 1) SDBLMOD PO-E U 0 6000 18
SDBLMOD2 (See Note 1) SDBLMOD2 PO-E U 0 6000 18
SHDWMLIB MSG SHDWMLIB PO-E FB 80 32720 15
SHDWPLIB PNL SHDWPLIB PO-E FB 80 32720 210
SHDWSLIB SKL SHDWSLIB PO-E FB 80 32720 15
SHDWTLIB TBL SHDWTLIB PO-E FB 80 32720 15
SQL.EXEC EXEC SSDBXSQL PO-E FB 80 32720 15
SSDBSWI DATA SSDBSWI PO-E FB 80 32720 30
SWI.OBJ1 (See Note 1) PO-E VB 4092 12288 30
TOD.EXEC EXEC SSDBXTOD PO-E FB 80 32720 15
1. This data set is not maintained using SMP/E