Service Manual Liberty City/Kids - Camp Mobility
54
Service Manual Liberty City/Kids This manual gives guidelines for maintenance service to be performed at the dealers after the sale. Please refer to it together with the Owner´s Manual.
-
Upload
khangminh22 -
Category
Documents
-
view
1 -
download
0
Transcript of Service Manual Liberty City/Kids - Camp Mobility

Service Manual Liberty City/Kids
This manual gives guidelines for maintenance service to be performed at the dealers after the sale.
Please refer to it together with the Owner´s Manual.
Service Manual Liberty City/Kids EN Revision 3 __________________________________________________________________________________
2
Index 1. Maintenance........................................................................................................................................ 3
1.1 Tire and hose ................................................................................................................................. 3
1.2 Motor ............................................................................................................................................. 4
1.3 Powermodule ................................................................................................................................ 7
1.4 Brake system ............................................................................................................................... 12
1.4.1 Assemble/Reassemble of brake caliper ............................................................................... 12
1.4.2 Disc brake pad ...................................................................................................................... 14
1.4.3 Brake disc.............................................................................................................................. 17
1.4.4 Bleed and change of brake fluid ........................................................................................... 17
1.4.5 Brake lever adjustment ........................................................................................................ 27
1.5 Maintenance and recond ............................................................................................................ 28
2. Software and settings ........................................................................................................................ 29
2.1 Settings service technician .......................................................................................................... 29
Login .............................................................................................................................................. 29
Settings .......................................................................................................................................... 30
Motor calibration.......................................................................................................................... 32
Status ............................................................................................................................................. 32
Battery status ................................................................................................................................ 33
Fault messages ............................................................................................................................. 34
PIN code......................................................................................................................................... 34
Throttle .......................................................................................................................................... 34
2.2 Software update .......................................................................................................................... 35
3. Battery ............................................................................................................................................... 42
4. Fault detection chart ......................................................................................................................... 43
5. Fault codes......................................................................................................................................... 44
6. System overview................................................................................................................................ 47
Service Manual Liberty City/Kids EN Revision 3 __________________________________________________________________________________
3
1. Maintenance
1.1 Tire and hose
To change tire or/and hose the same tools as for a regular bike are used. To be able to make the
change the complete wheel has to be removed from the Liberty unit in the following manner:
1. Loosen the screws holding the brake caliper against the
brake adaptor.
2. Loosen and remove the screws that hold the brake adaptors
against the frame so that the brake caliper together with the
adaptor can be removed from the disc brake.
3. Loosen and remove the wheel nuts and the screw that holds the
locking plates.
Service Manual Liberty City/Kids EN Revision 3 __________________________________________________________________________________
4
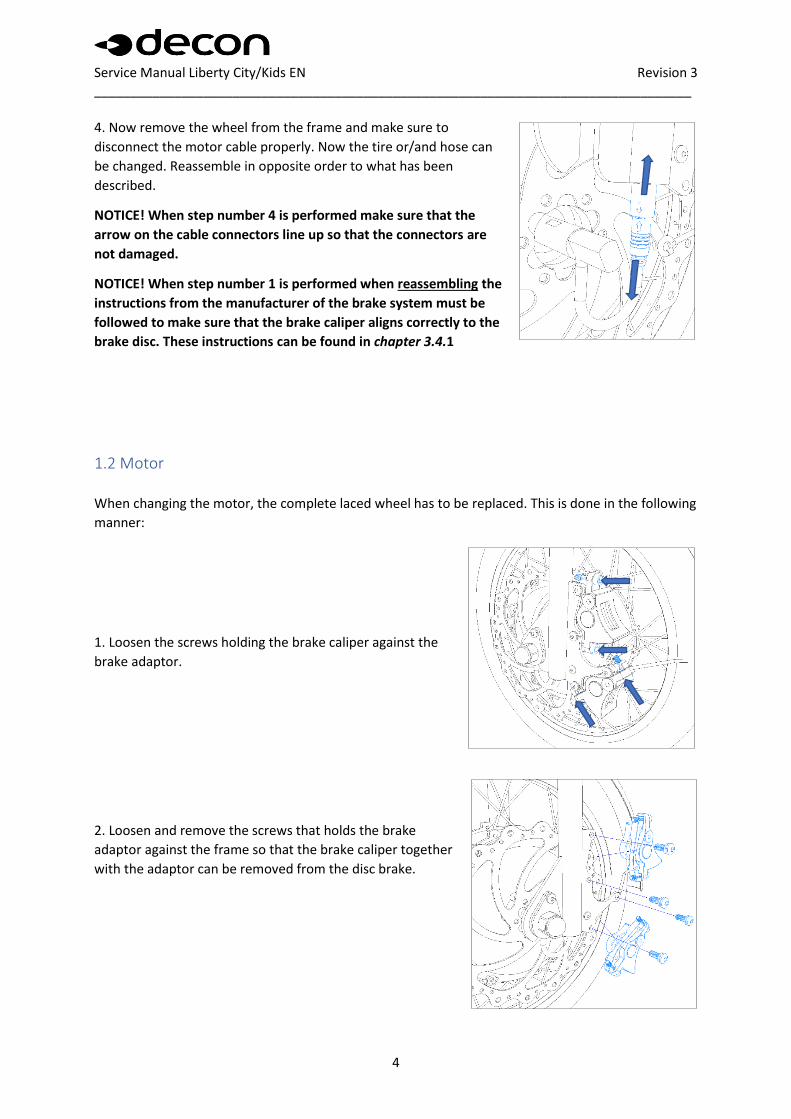
4. Now remove the wheel from the frame and make sure to
disconnect the motor cable properly. Now the tire or/and hose can
be changed. Reassemble in opposite order to what has been
described.
NOTICE! When step number 4 is performed make sure that the
arrow on the cable connectors line up so that the connectors are
not damaged.
NOTICE! When step number 1 is performed when reassembling the
instructions from the manufacturer of the brake system must be
followed to make sure that the brake caliper aligns correctly to the
brake disc. These instructions can be found in chapter 3.4.1
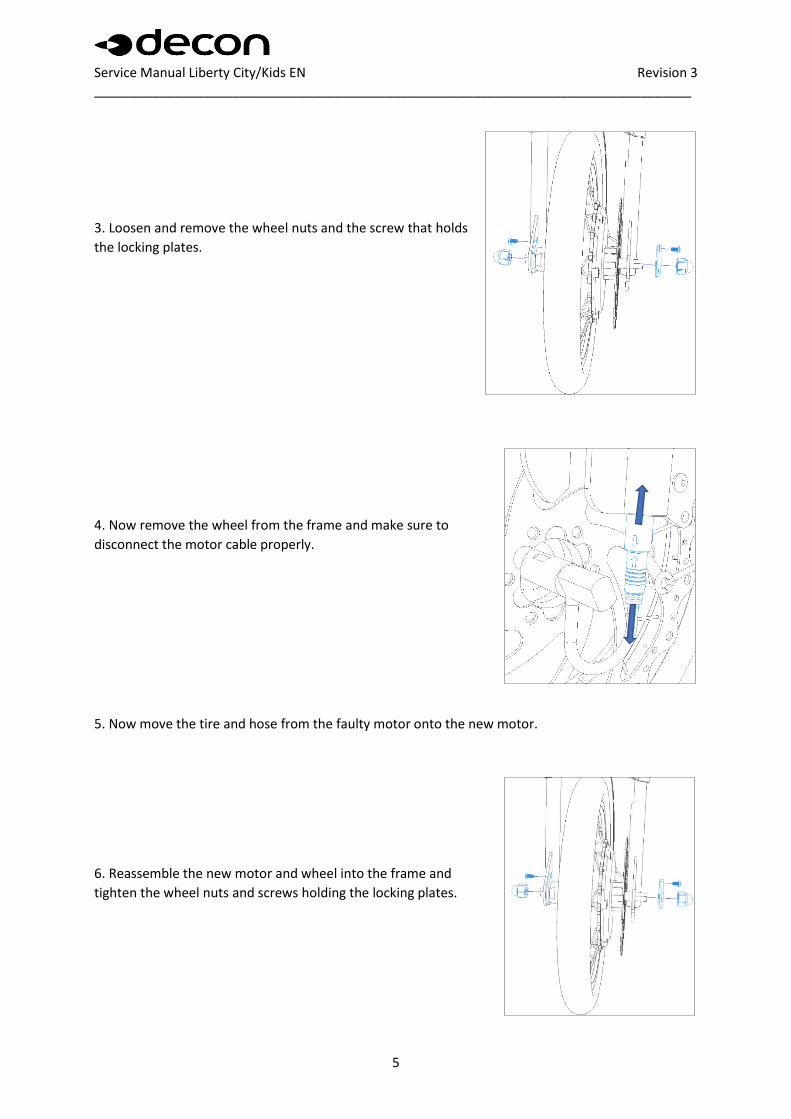
1.2 Motor
When changing the motor, the complete laced wheel has to be replaced. This is done in the following
manner:
1. Loosen the screws holding the brake caliper against the
brake adaptor.
2. Loosen and remove the screws that holds the brake
adaptor against the frame so that the brake caliper together
with the adaptor can be removed from the disc brake.
Service Manual Liberty City/Kids EN Revision 3 __________________________________________________________________________________
5
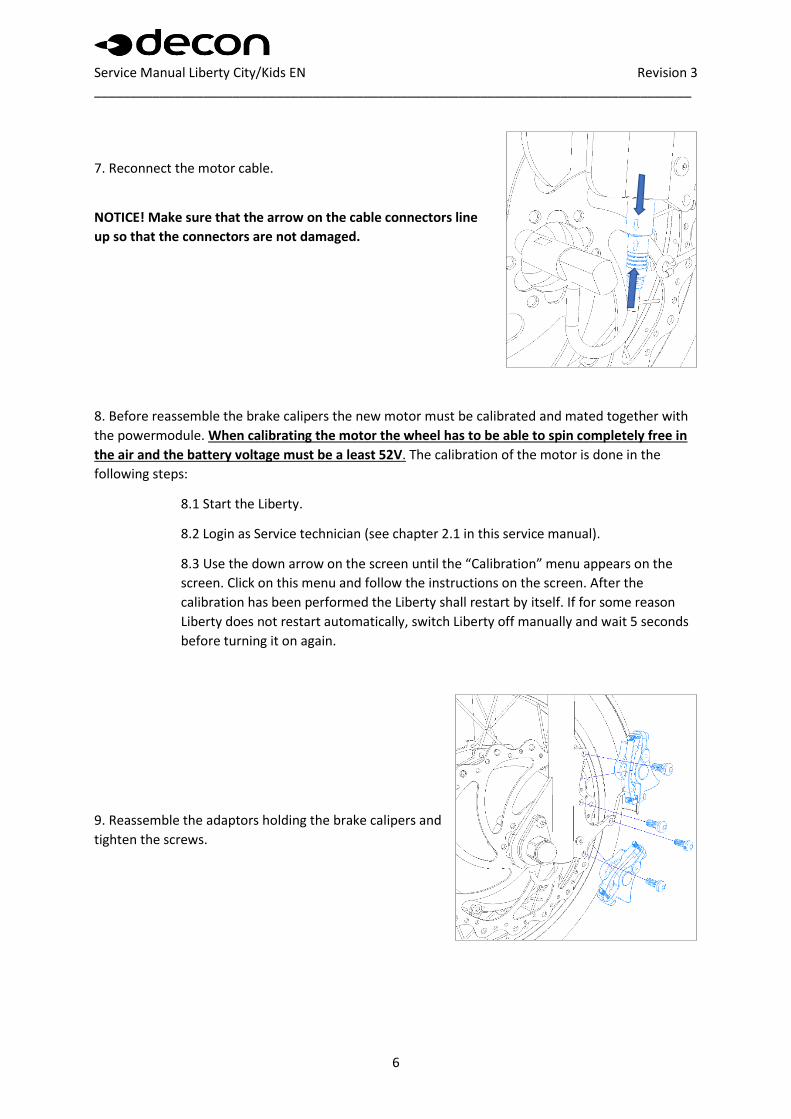
3. Loosen and remove the wheel nuts and the screw that holds
the locking plates.
4. Now remove the wheel from the frame and make sure to
disconnect the motor cable properly.
5. Now move the tire and hose from the faulty motor onto the new motor.
6. Reassemble the new motor and wheel into the frame and
tighten the wheel nuts and screws holding the locking plates.
Service Manual Liberty City/Kids EN Revision 3 __________________________________________________________________________________
6
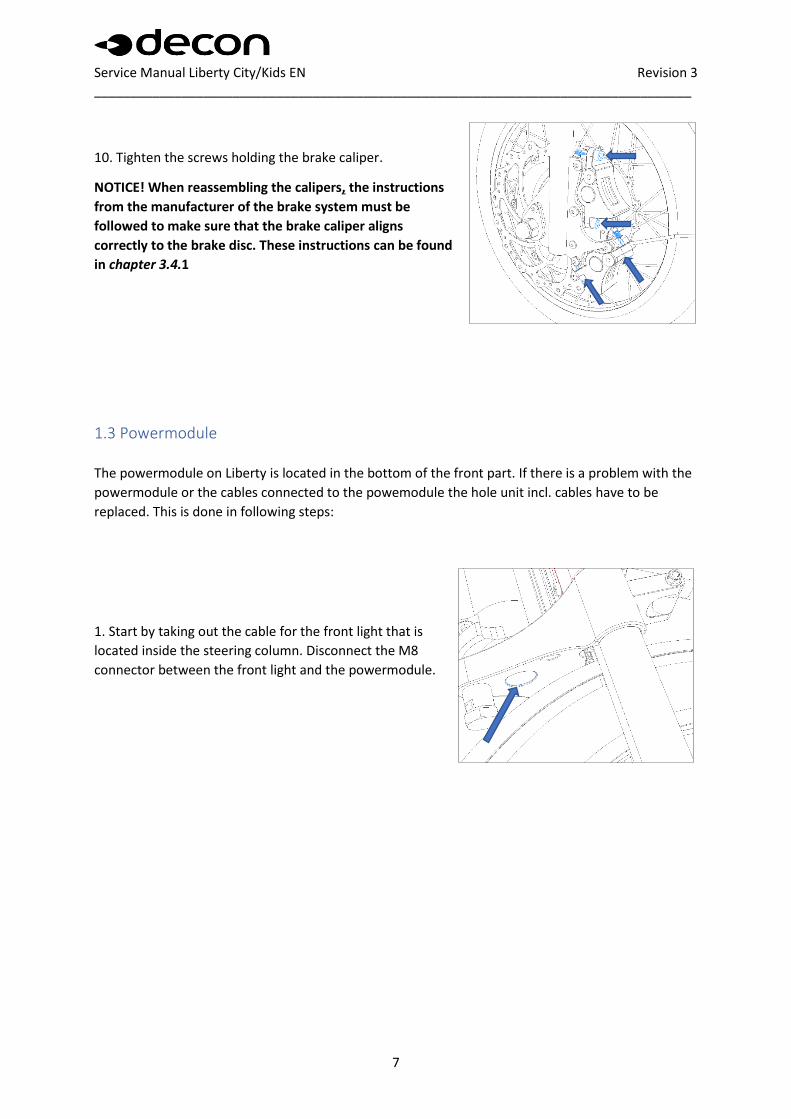
7. Reconnect the motor cable.
NOTICE! Make sure that the arrow on the cable connectors line
up so that the connectors are not damaged.
8. Before reassemble the brake calipers the new motor must be calibrated and mated together with
the powermodule. When calibrating the motor the wheel has to be able to spin completely free in
the air and the battery voltage must be a least 52V. The calibration of the motor is done in the
following steps:
8.1 Start the Liberty.
8.2 Login as Service technician (see chapter 2.1 in this service manual).
8.3 Use the down arrow on the screen until the “Calibration” menu appears on the
screen. Click on this menu and follow the instructions on the screen. After the
calibration has been performed the Liberty shall restart by itself. If for some reason
Liberty does not restart automatically, switch Liberty off manually and wait 5 seconds
before turning it on again.
9. Reassemble the adaptors holding the brake calipers and
tighten the screws.
Service Manual Liberty City/Kids EN Revision 3 __________________________________________________________________________________
7
10. Tighten the screws holding the brake caliper.
NOTICE! When reassembling the calipers, the instructions
from the manufacturer of the brake system must be
followed to make sure that the brake caliper aligns
correctly to the brake disc. These instructions can be found
in chapter 3.4.1
1.3 Powermodule
The powermodule on Liberty is located in the bottom of the front part. If there is a problem with the
powermodule or the cables connected to the powemodule the hole unit incl. cables have to be
replaced. This is done in following steps:
1. Start by taking out the cable for the front light that is
located inside the steering column. Disconnect the M8
connector between the front light and the powermodule.
Service Manual Liberty City/Kids EN Revision 3 __________________________________________________________________________________
8
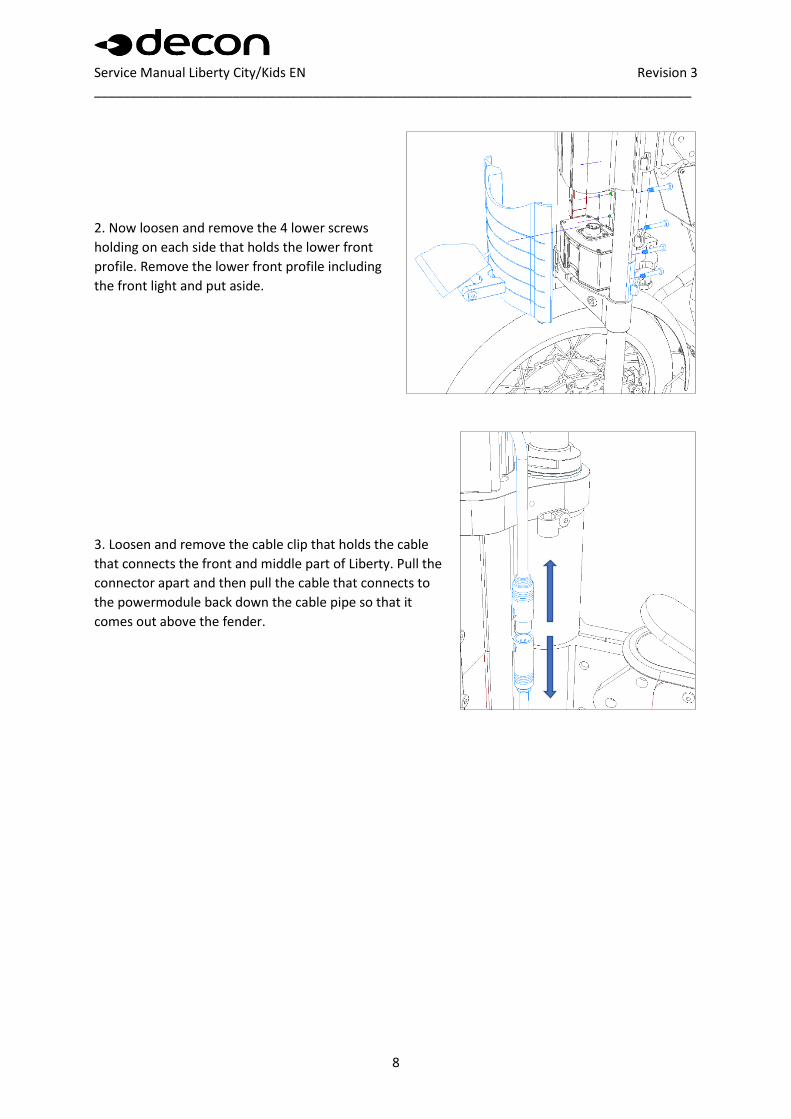
2. Now loosen and remove the 4 lower screws
holding on each side that holds the lower front
profile. Remove the lower front profile including
the front light and put aside.
3. Loosen and remove the cable clip that holds the cable
that connects the front and middle part of Liberty. Pull the
connector apart and then pull the cable that connects to
the powermodule back down the cable pipe so that it
comes out above the fender.
Service Manual Liberty City/Kids EN Revision 3 __________________________________________________________________________________
9
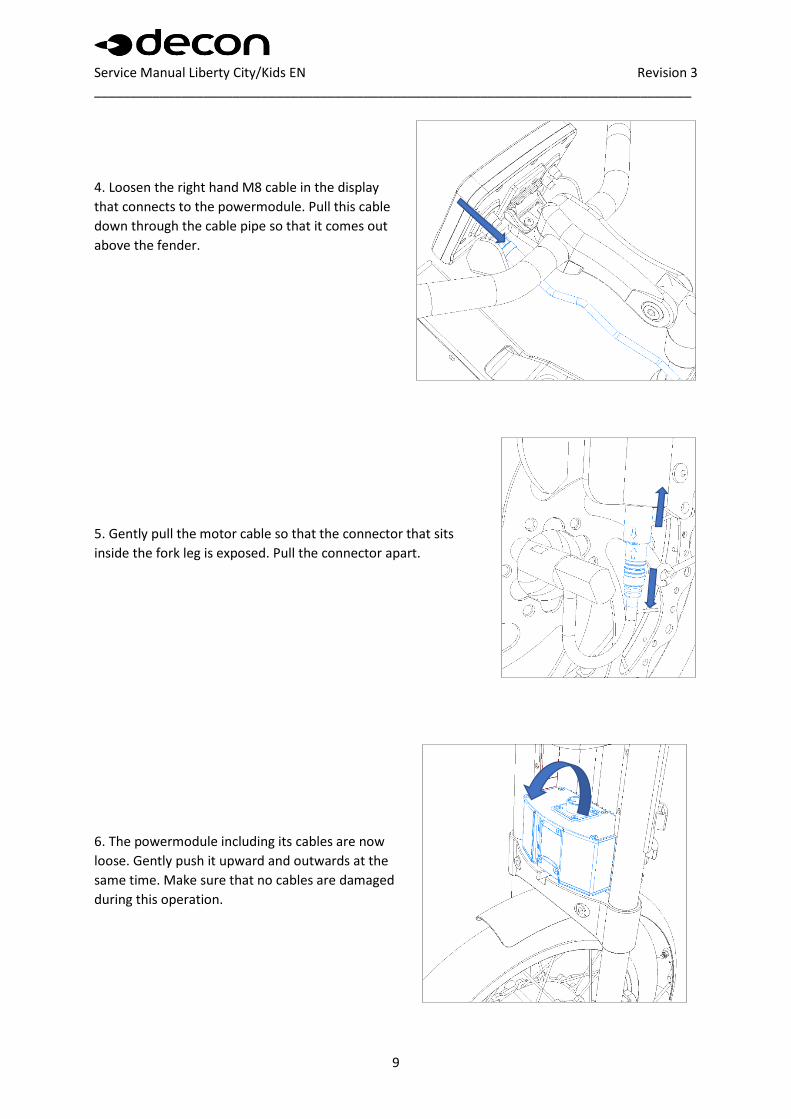
4. Loosen the right hand M8 cable in the display
that connects to the powermodule. Pull this cable
down through the cable pipe so that it comes out
above the fender.
5. Gently pull the motor cable so that the connector that sits
inside the fork leg is exposed. Pull the connector apart.
6. The powermodule including its cables are now
loose. Gently push it upward and outwards at the
same time. Make sure that no cables are damaged
during this operation.
Service Manual Liberty City/Kids EN Revision 3 __________________________________________________________________________________
10
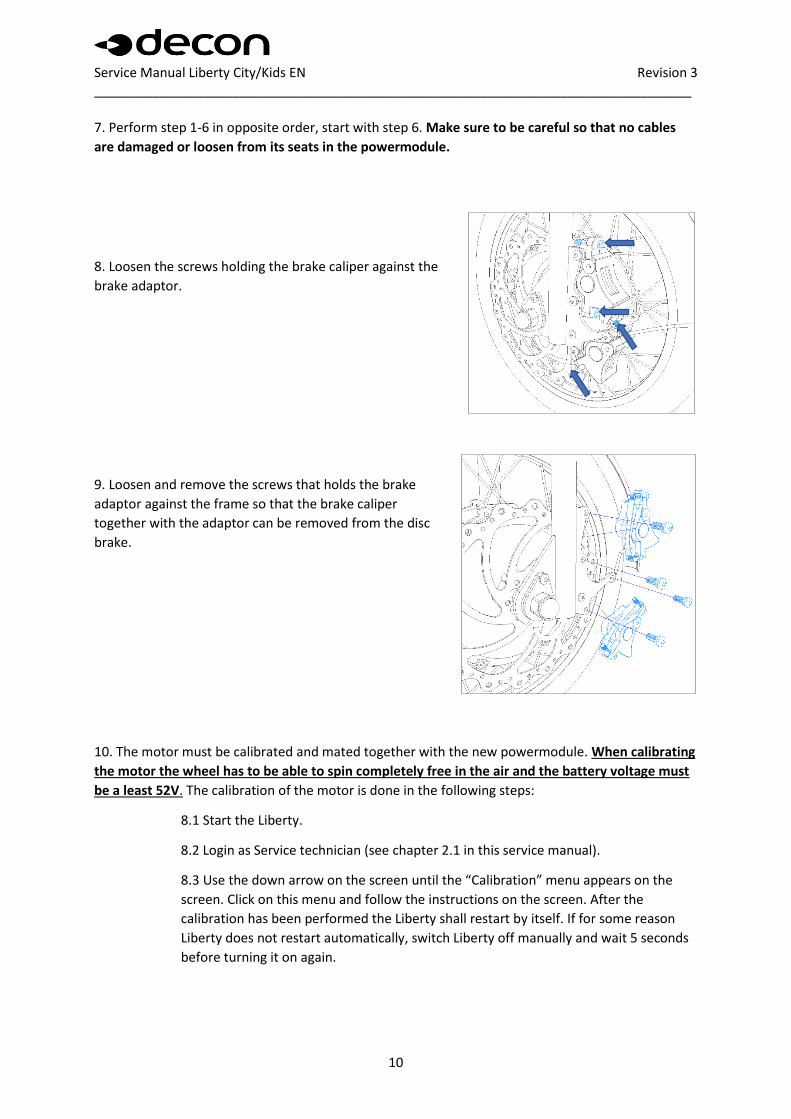
7. Perform step 1-6 in opposite order, start with step 6. Make sure to be careful so that no cables
are damaged or loosen from its seats in the powermodule.
8. Loosen the screws holding the brake caliper against the
brake adaptor.
9. Loosen and remove the screws that holds the brake
adaptor against the frame so that the brake caliper
together with the adaptor can be removed from the disc
brake.
10. The motor must be calibrated and mated together with the new powermodule. When calibrating
the motor the wheel has to be able to spin completely free in the air and the battery voltage must
be a least 52V. The calibration of the motor is done in the following steps:
8.1 Start the Liberty.
8.2 Login as Service technician (see chapter 2.1 in this service manual).
8.3 Use the down arrow on the screen until the “Calibration” menu appears on the
screen. Click on this menu and follow the instructions on the screen. After the
calibration has been performed the Liberty shall restart by itself. If for some reason
Liberty does not restart automatically, switch Liberty off manually and wait 5 seconds
before turning it on again.
Service Manual Liberty City/Kids EN Revision 3 __________________________________________________________________________________
11
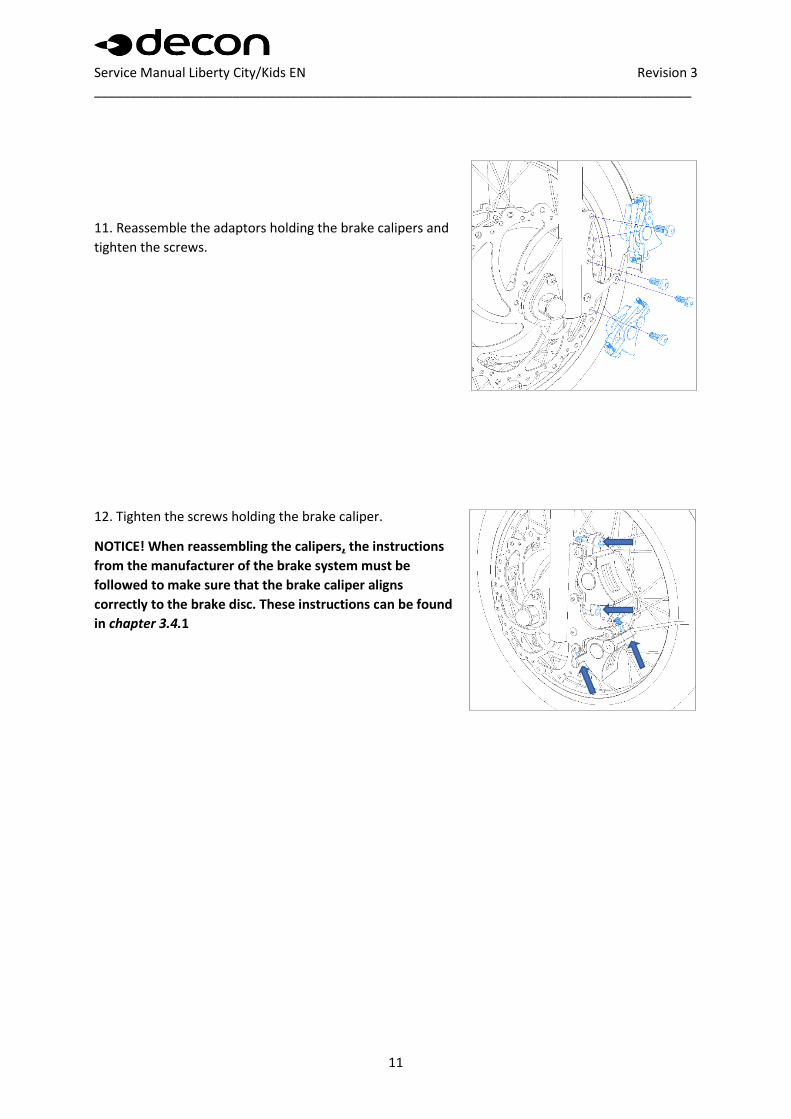
11. Reassemble the adaptors holding the brake calipers and
tighten the screws.
12. Tighten the screws holding the brake caliper.
NOTICE! When reassembling the calipers, the instructions
from the manufacturer of the brake system must be
followed to make sure that the brake caliper aligns
correctly to the brake disc. These instructions can be found
in chapter 3.4.1
Service Manual Liberty City/Kids EN Revision 3 __________________________________________________________________________________
12
1.4 Brake system
Liberty City/Kids is equipped with a hydraulic brake system from SRAM called Level T. In this brake
system DOT brake fluid is used. The manufacturer of the brake system recommends that the brake
fluid is changed once a year.
Below instructions show the most common service actions.
Also visit SRAM´s homepage for more information about the brake system:
https://www.sram.com/sram/mountain/products/level-t
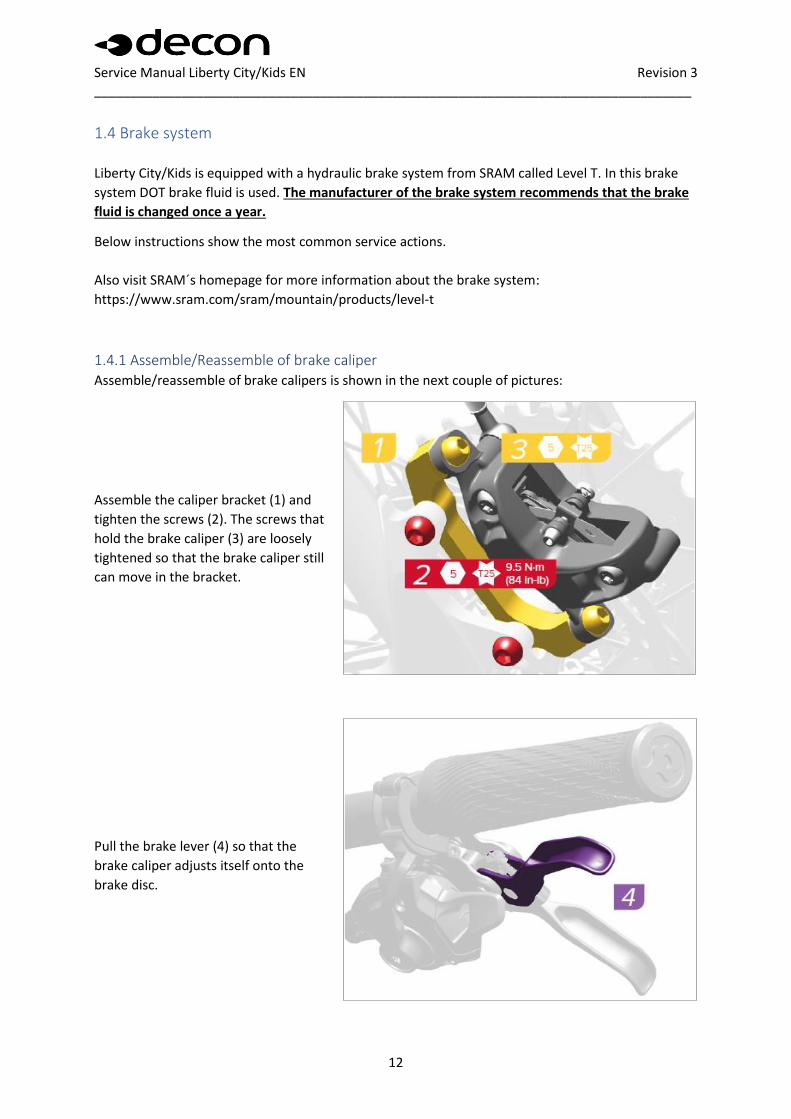
1.4.1 Assemble/Reassemble of brake caliper Assemble/reassemble of brake calipers is shown in the next couple of pictures:
Assemble the caliper bracket (1) and
tighten the screws (2). The screws that
hold the brake caliper (3) are loosely
tightened so that the brake caliper still
can move in the bracket.
Pull the brake lever (4) so that the
brake caliper adjusts itself onto the
brake disc.
Service Manual Liberty City/Kids EN Revision 3 __________________________________________________________________________________
13
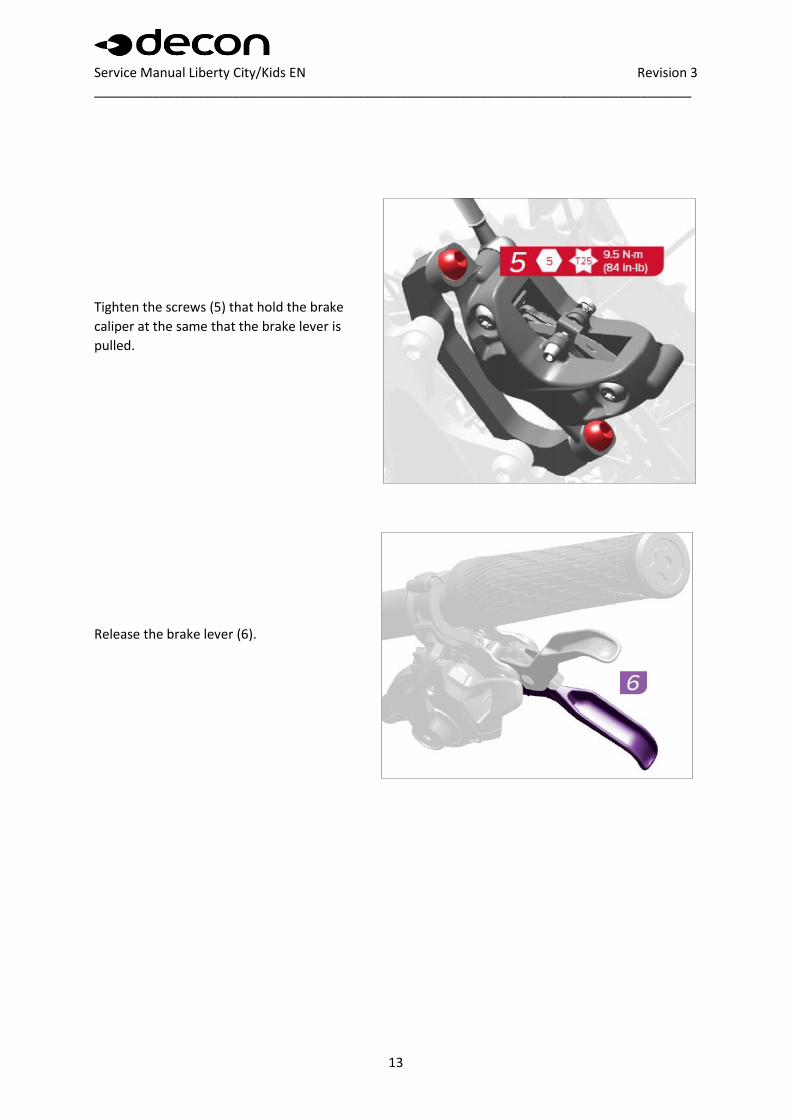
Tighten the screws (5) that hold the brake
caliper at the same that the brake lever is
pulled.
Release the brake lever (6).
Service Manual Liberty City/Kids EN Revision 3 __________________________________________________________________________________
14
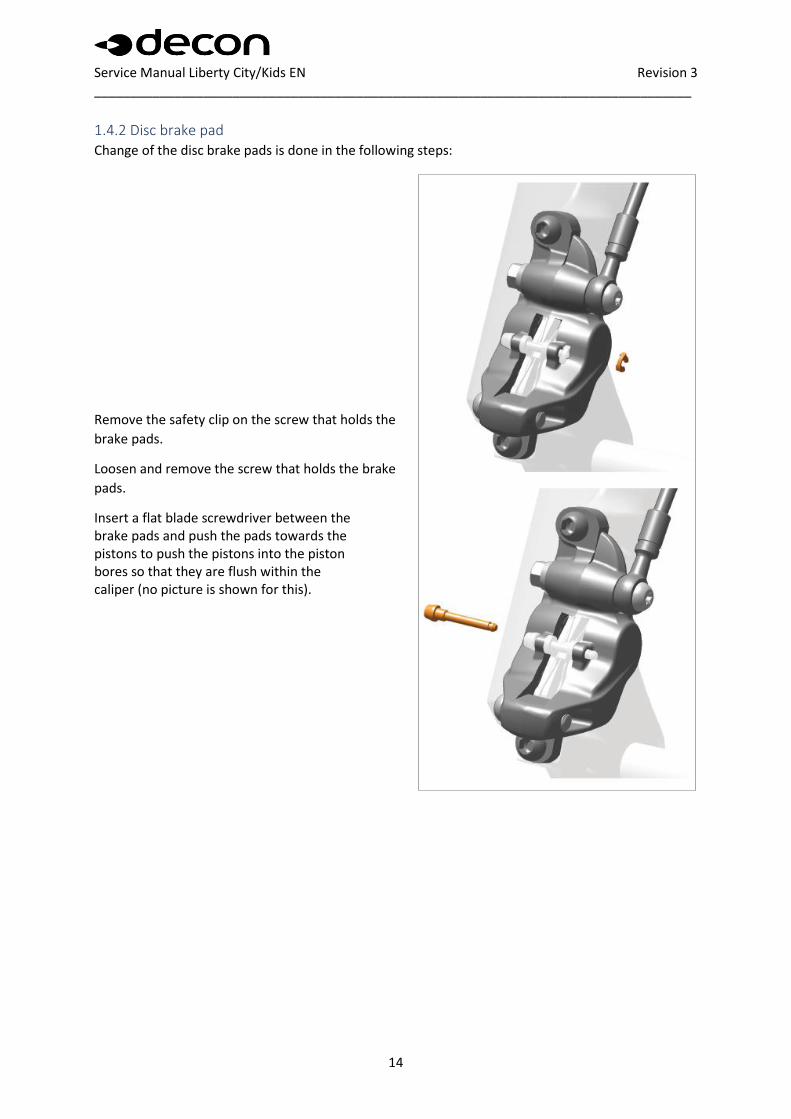
1.4.2 Disc brake pad Change of the disc brake pads is done in the following steps:
Remove the safety clip on the screw that holds the
brake pads.
Loosen and remove the screw that holds the brake
pads.
Insert a flat blade screwdriver between the brake pads and push the pads towards the pistons to push the pistons into the piston bores so that they are flush within the caliper (no picture is shown for this).
Service Manual Liberty City/Kids EN Revision 3 __________________________________________________________________________________
15
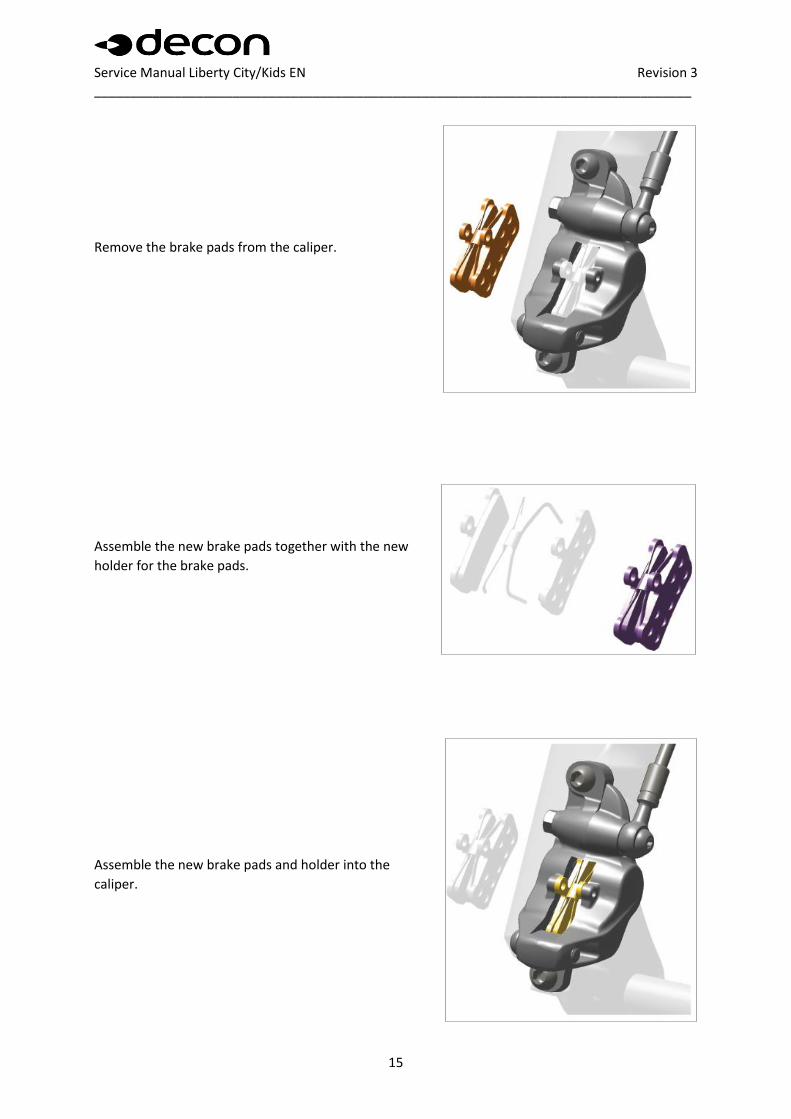
Remove the brake pads from the caliper.
Assemble the new brake pads together with the new
holder for the brake pads.
Assemble the new brake pads and holder into the
caliper.
Service Manual Liberty City/Kids EN Revision 3 __________________________________________________________________________________
16
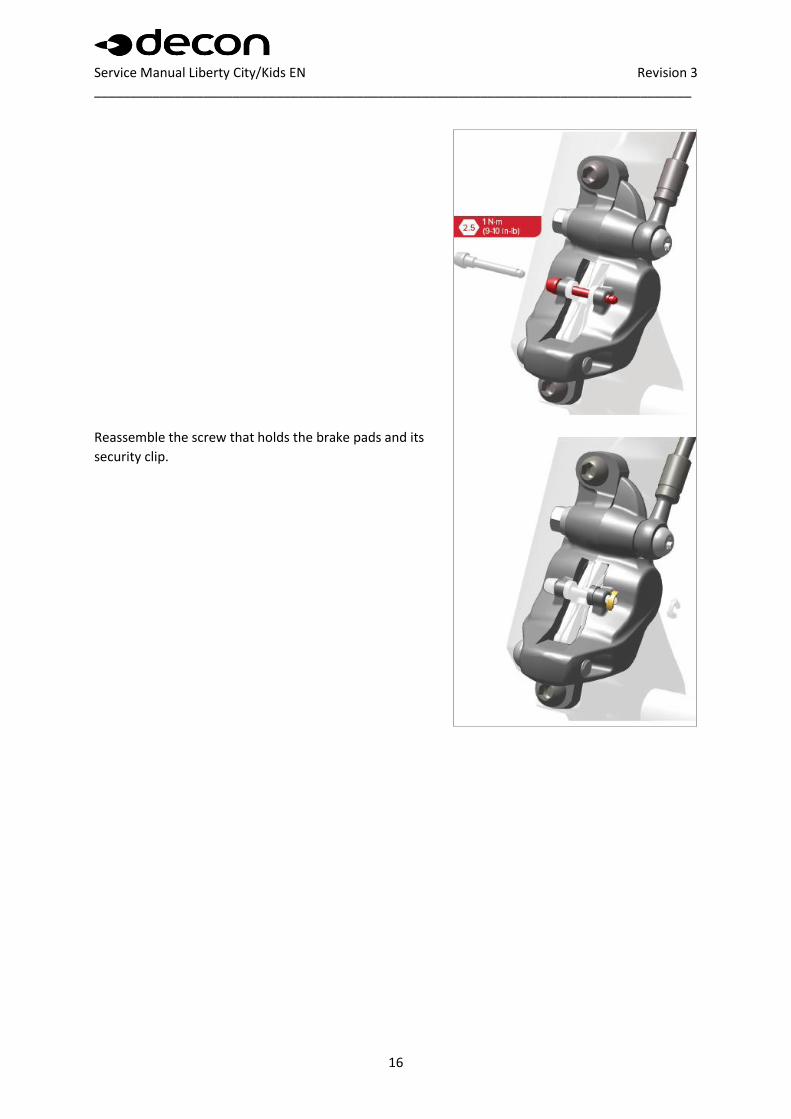
Reassemble the screw that holds the brake pads and its
security clip.
Service Manual Liberty City/Kids EN Revision 3 __________________________________________________________________________________
17
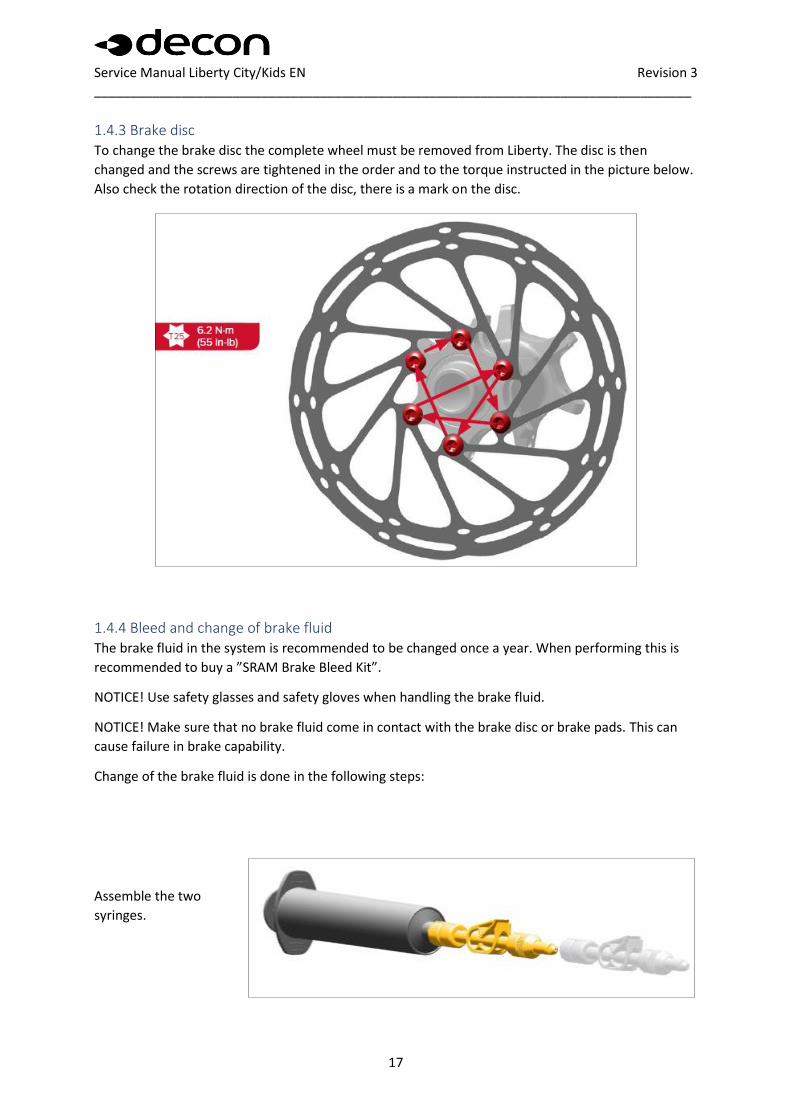
1.4.3 Brake disc To change the brake disc the complete wheel must be removed from Liberty. The disc is then
changed and the screws are tightened in the order and to the torque instructed in the picture below.
Also check the rotation direction of the disc, there is a mark on the disc.
1.4.4 Bleed and change of brake fluid The brake fluid in the system is recommended to be changed once a year. When performing this is
recommended to buy a ”SRAM Brake Bleed Kit”.
NOTICE! Use safety glasses and safety gloves when handling the brake fluid.
NOTICE! Make sure that no brake fluid come in contact with the brake disc or brake pads. This can
cause failure in brake capability.
Change of the brake fluid is done in the following steps:
Assemble the two
syringes.
Service Manual Liberty City/Kids EN Revision 3 __________________________________________________________________________________
18
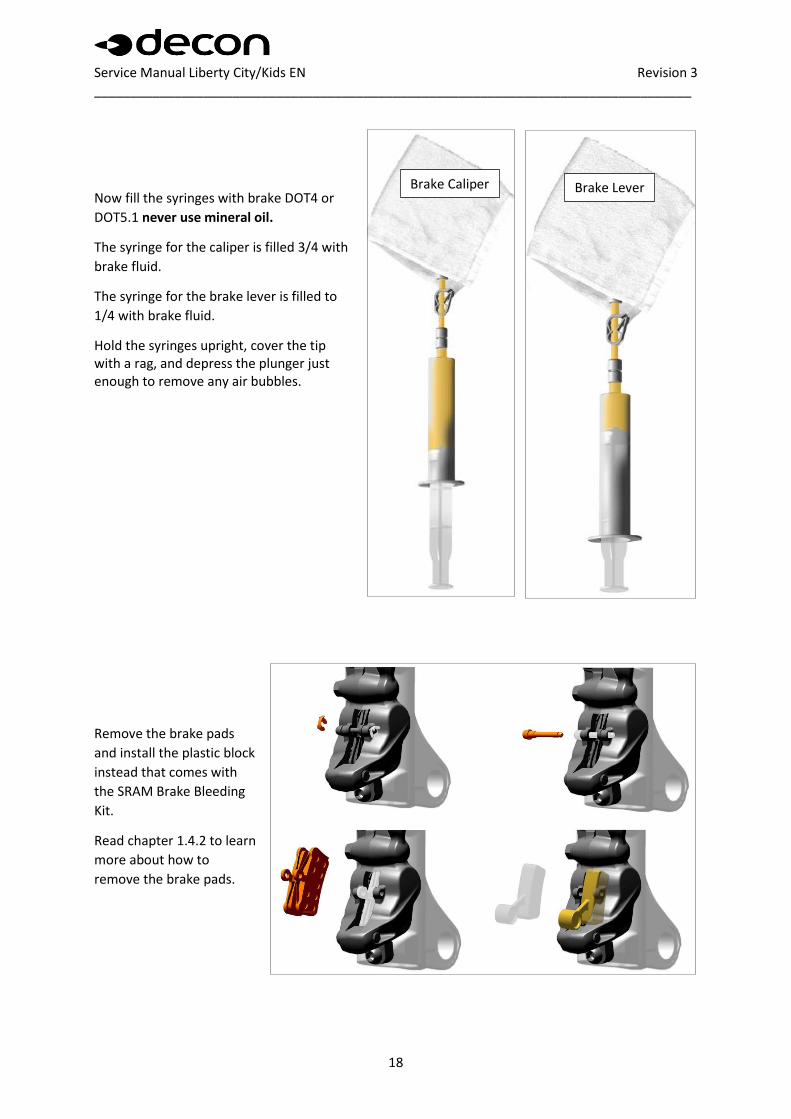
Now fill the syringes with brake DOT4 or
DOT5.1 never use mineral oil.
The syringe for the caliper is filled 3/4 with
brake fluid.
The syringe for the brake lever is filled to
1/4 with brake fluid.
Hold the syringes upright, cover the tip with a rag, and depress the plunger just enough to remove any air bubbles.
Remove the brake pads
and install the plastic block
instead that comes with
the SRAM Brake Bleeding
Kit.
Read chapter 1.4.2 to learn
more about how to
remove the brake pads.
Brake Caliper Brake Lever
Service Manual Liberty City/Kids EN Revision 3 __________________________________________________________________________________
19
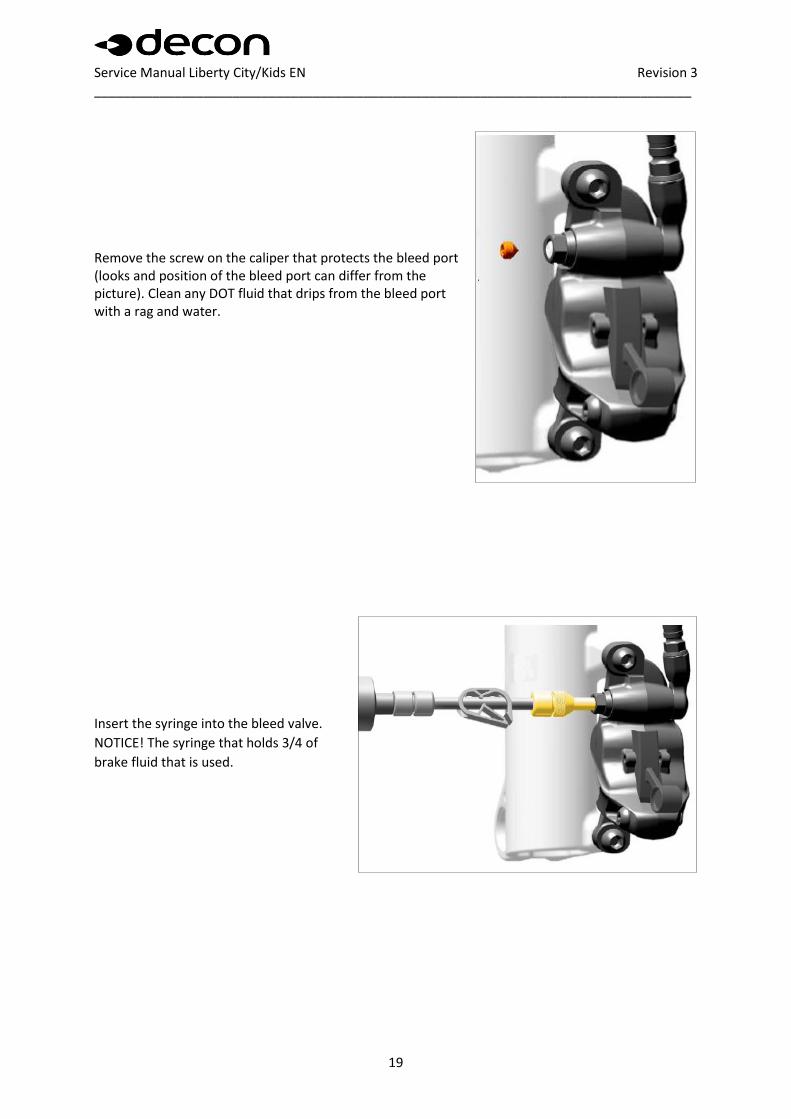
Remove the screw on the caliper that protects the bleed port (looks and position of the bleed port can differ from the picture). Clean any DOT fluid that drips from the bleed port with a rag and water.
Insert the syringe into the bleed valve.
NOTICE! The syringe that holds 3/4 of
brake fluid that is used.
Service Manual Liberty City/Kids EN Revision 3 __________________________________________________________________________________
20
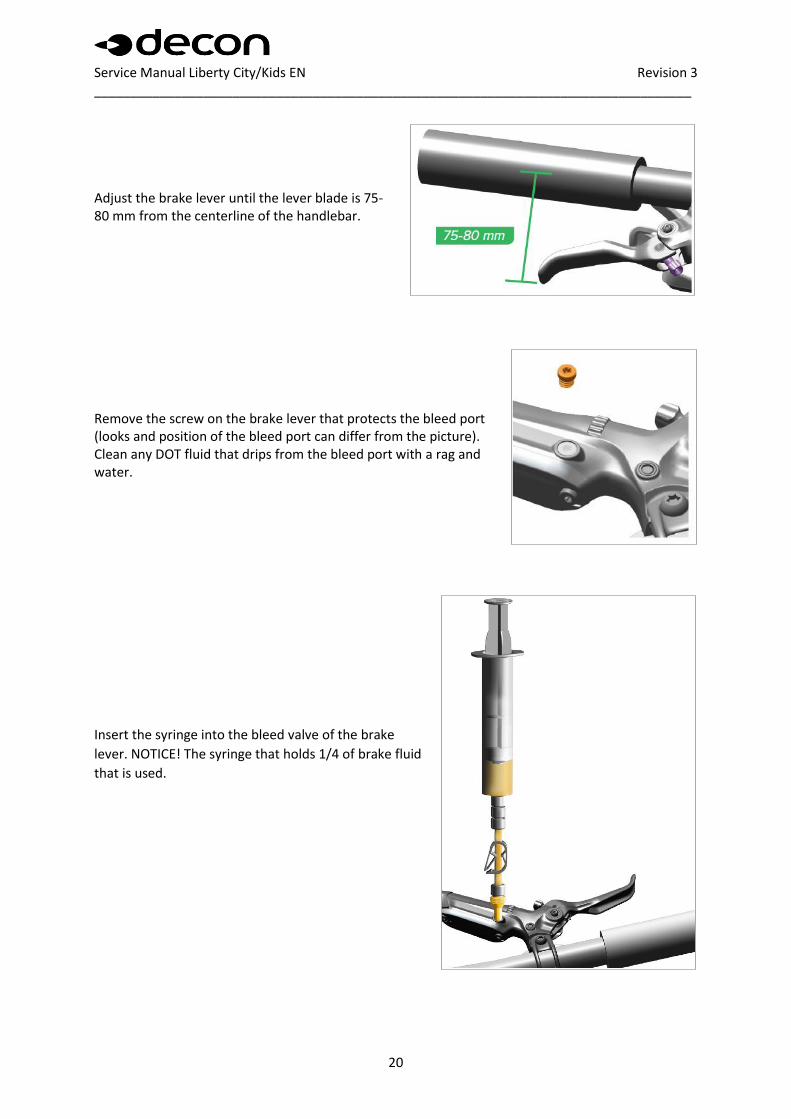
Adjust the brake lever until the lever blade is 75-80 mm from the centerline of the handlebar.
Remove the screw on the brake lever that protects the bleed port (looks and position of the bleed port can differ from the picture). Clean any DOT fluid that drips from the bleed port with a rag and water.
Insert the syringe into the bleed valve of the brake
lever. NOTICE! The syringe that holds 1/4 of brake fluid
that is used.
Service Manual Liberty City/Kids EN Revision 3 __________________________________________________________________________________
21
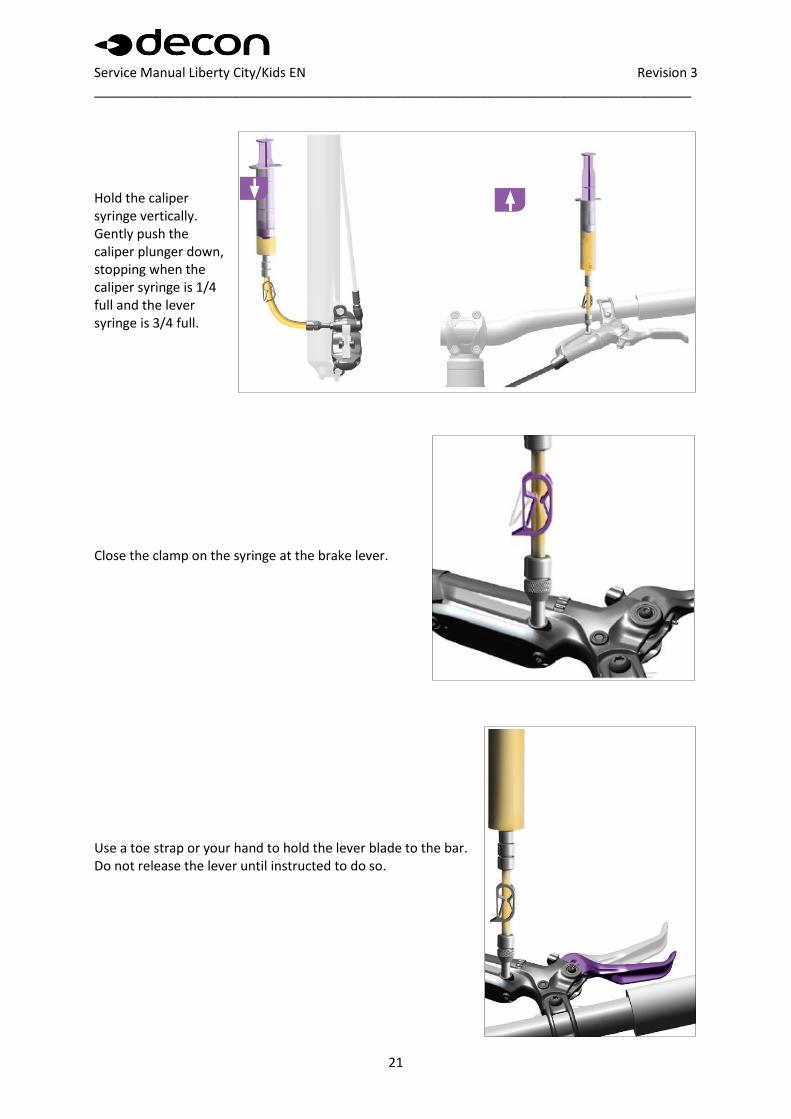
Hold the caliper syringe vertically. Gently push the caliper plunger down, stopping when the caliper syringe is 1/4 full and the lever syringe is 3/4 full.
Close the clamp on the syringe at the brake lever.
Use a toe strap or your hand to hold the lever blade to the bar. Do not release the lever until instructed to do so.

Service Manual Liberty City/Kids EN Revision 3 __________________________________________________________________________________
22
Hold the syringe at the caliper vertically. Firmly pull on the plunger to create a vacuum, then compress the plunger to pressurize the system. Repeat this process several times or until only a small amount of bubbles exit the system.
While holding the lever blade to the bar, compress the plunger at the caliper and let the pressure move the lever blade to the fully extended position.
Service Manual Liberty City/Kids EN Revision 3 __________________________________________________________________________________
23
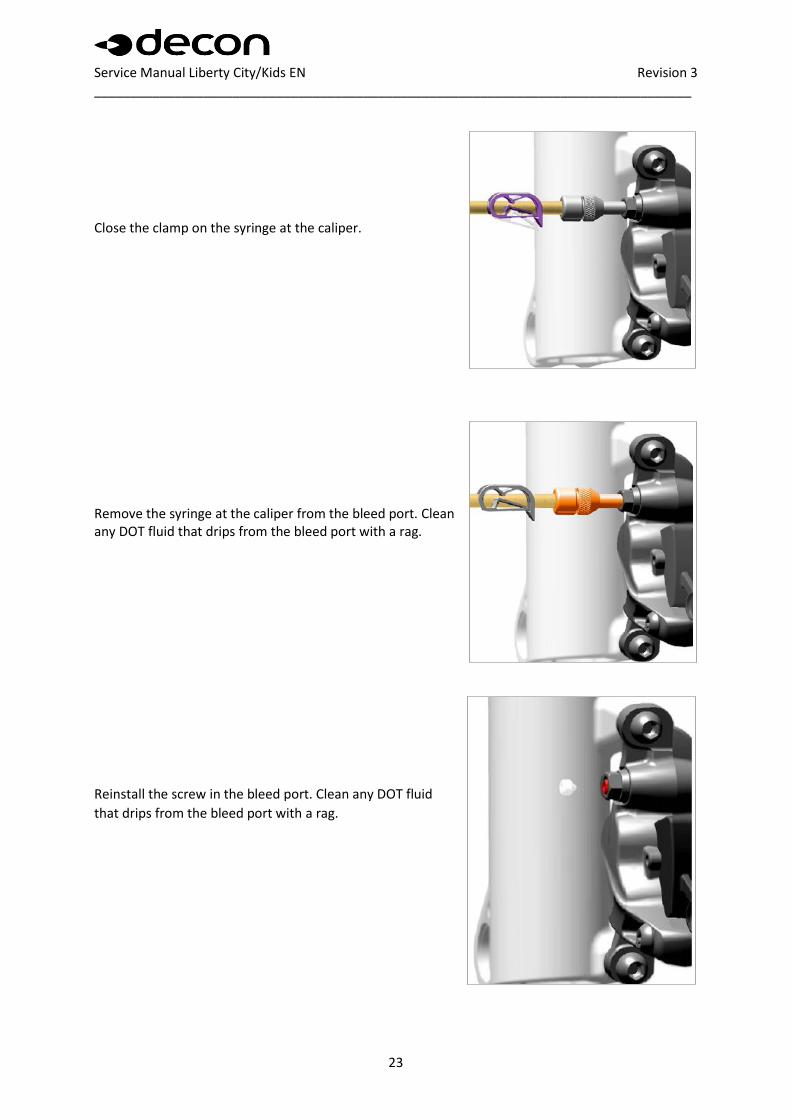
Close the clamp on the syringe at the caliper.
Remove the syringe at the caliper from the bleed port. Clean any DOT fluid that drips from the bleed port with a rag.
Reinstall the screw in the bleed port. Clean any DOT fluid
that drips from the bleed port with a rag.
Service Manual Liberty City/Kids EN Revision 3 __________________________________________________________________________________
24
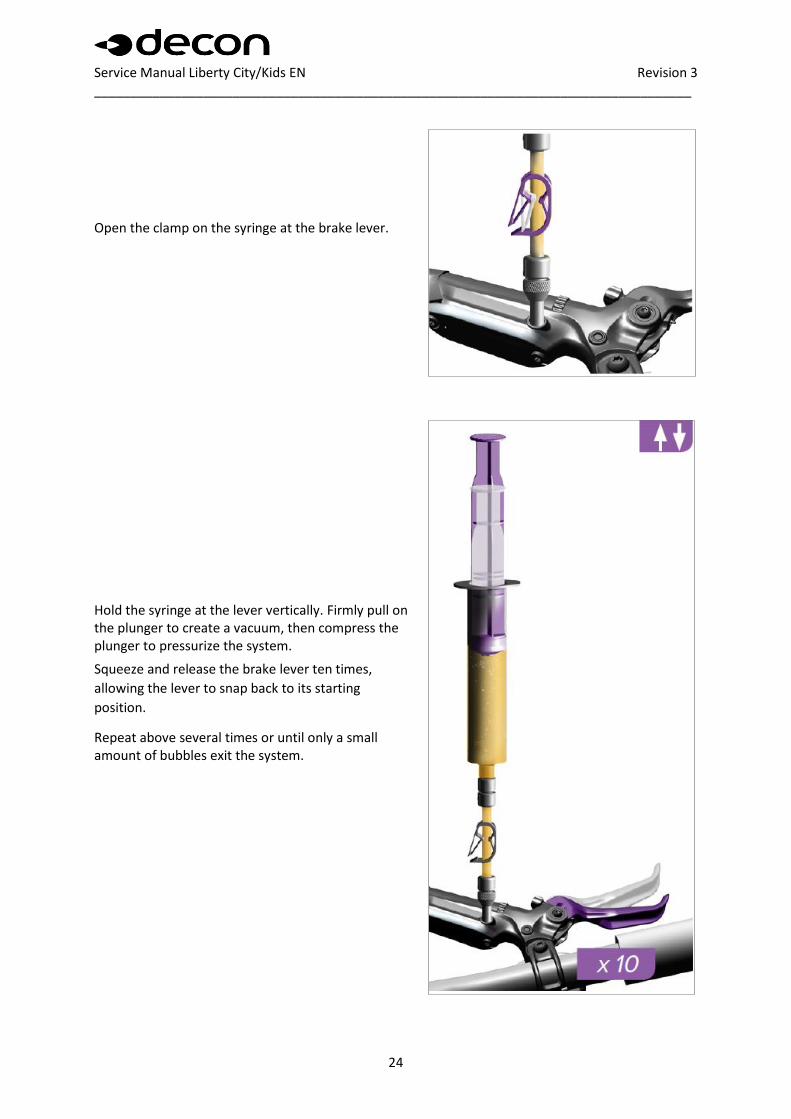
Open the clamp on the syringe at the brake lever.
Hold the syringe at the lever vertically. Firmly pull on the plunger to create a vacuum, then compress the plunger to pressurize the system.
Squeeze and release the brake lever ten times,
allowing the lever to snap back to its starting
position.
Repeat above several times or until only a small amount of bubbles exit the system.
Service Manual Liberty City/Kids EN Revision 3 __________________________________________________________________________________
25
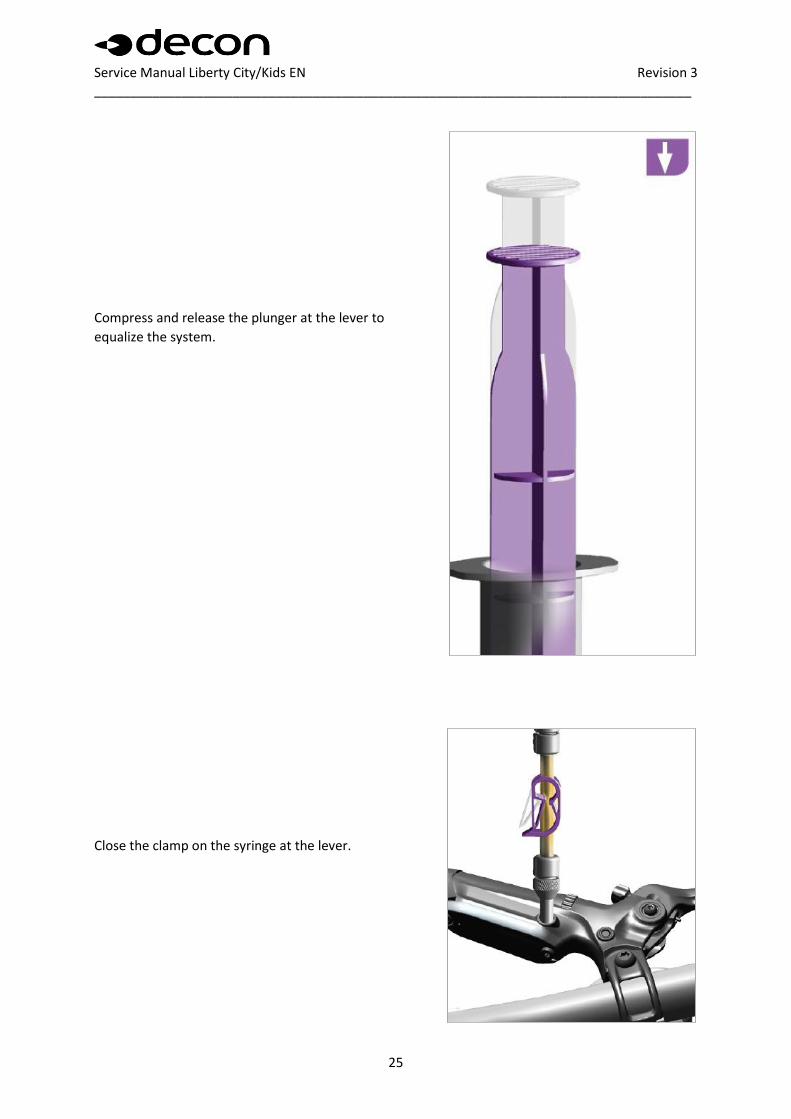
Compress and release the plunger at the lever to
equalize the system.
Close the clamp on the syringe at the lever.
Service Manual Liberty City/Kids EN Revision 3 __________________________________________________________________________________
26
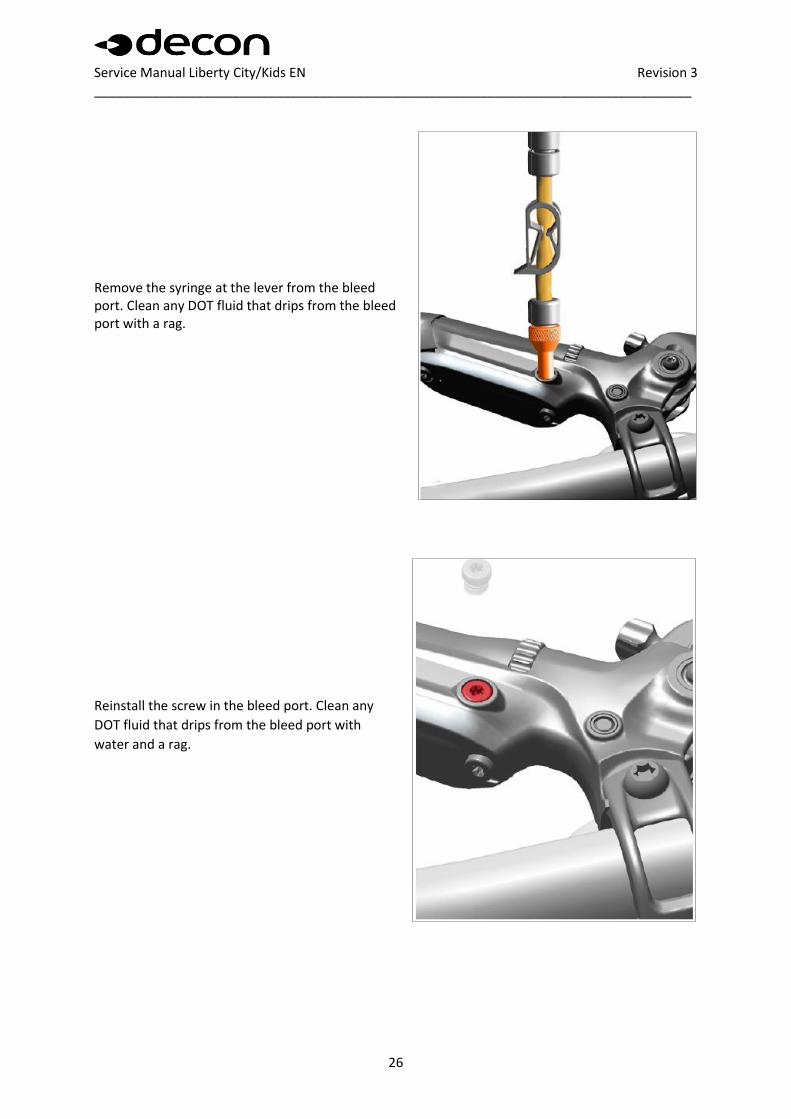
Remove the syringe at the lever from the bleed port. Clean any DOT fluid that drips from the bleed port with a rag.
Reinstall the screw in the bleed port. Clean any
DOT fluid that drips from the bleed port with
water and a rag.
Service Manual Liberty City/Kids EN Revision 3 __________________________________________________________________________________
27
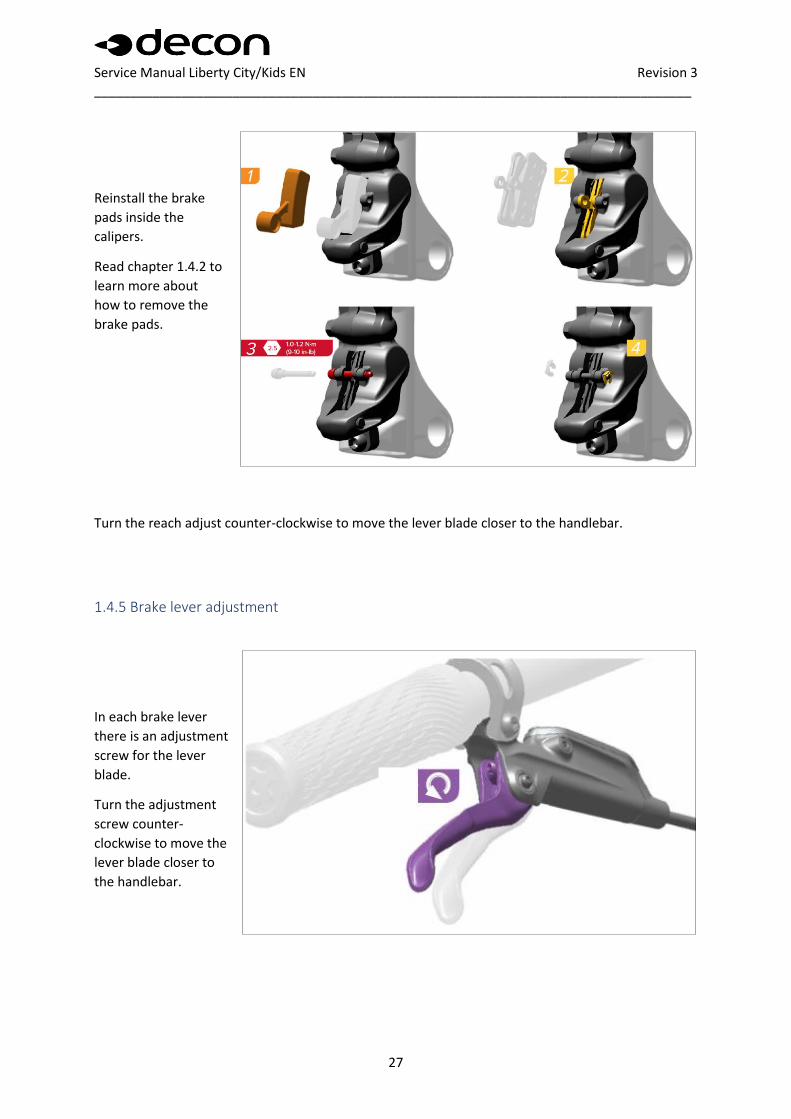
Reinstall the brake
pads inside the
calipers.
Read chapter 1.4.2 to
learn more about
how to remove the
brake pads.
Turn the reach adjust counter-clockwise to move the lever blade closer to the handlebar.
1.4.5 Brake lever adjustment
In each brake lever
there is an adjustment
screw for the lever
blade.
Turn the adjustment
screw counter-
clockwise to move the
lever blade closer to
the handlebar.
Service Manual Liberty City/Kids EN Revision 3 __________________________________________________________________________________
28
1.5 Maintenance and recond
Cleaning
Clean the product when necessary
• Shut off the unit and disconnect from wheelchair.
• Use a lightly damp cloth or compressed air when cleaning the unit.
• Do not clean with solvent such as gasoline or paint thinner. This may damage the painting and plastic parts.
• Use a neutral detergent when cleaning the unit.
• When disinfecting the unit use a towel and alcohol.
• After cleaning some part may have to be lubricated.
Recommended Maintenance
Period Check Point User Technician Daily/Weekly Charge the battery after each use X Once a week Tire pressure X Once a month Tire wear (if damaged get in contact with a technician) X Once a year Drive wheel (screws and nuts) X Once a year Screws and nuts in general X Once a year Function check docking mechanism X Once a year Brake system (wear and function check) X Once a year Brake system (bleed and change of brake fluid) X Once a year Battery status (cell information, charge cycles) X Once a year Cables, connectors and peripheral X Once a year Lubrication of the support leg holder X Once a year Function check
- Throttle - Front light - Rear light - Locking handle - Release handle
X
• NOTICE!
Do not wash by directly hosing it down with water. Also, do not wash using steam.
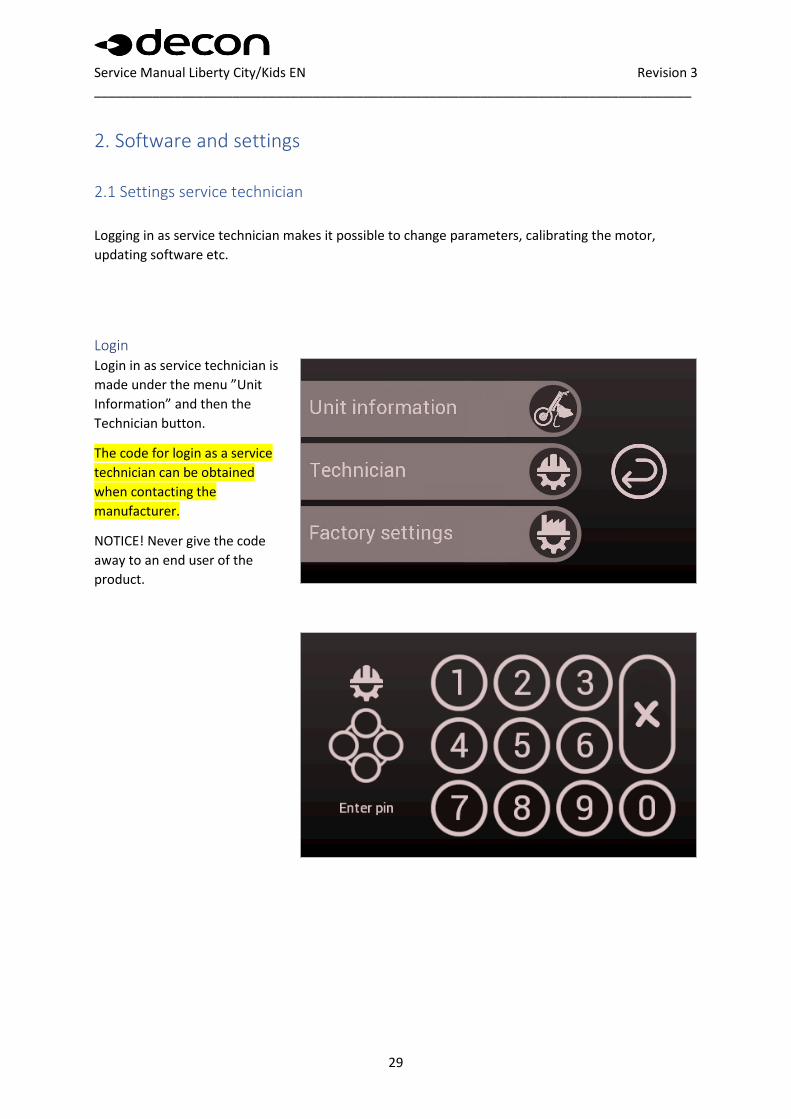
The electronic devices can get damaged, which may lead to malfunction.
Service Manual Liberty City/Kids EN Revision 3 __________________________________________________________________________________
29
2. Software and settings
2.1 Settings service technician
Logging in as service technician makes it possible to change parameters, calibrating the motor,
updating software etc.
Login Login in as service technician is
made under the menu ”Unit
Information” and then the
Technician button.
The code for login as a service
technician can be obtained
when contacting the
manufacturer.
NOTICE! Never give the code
away to an end user of the
product.
Service Manual Liberty City/Kids EN Revision 3 __________________________________________________________________________________
30
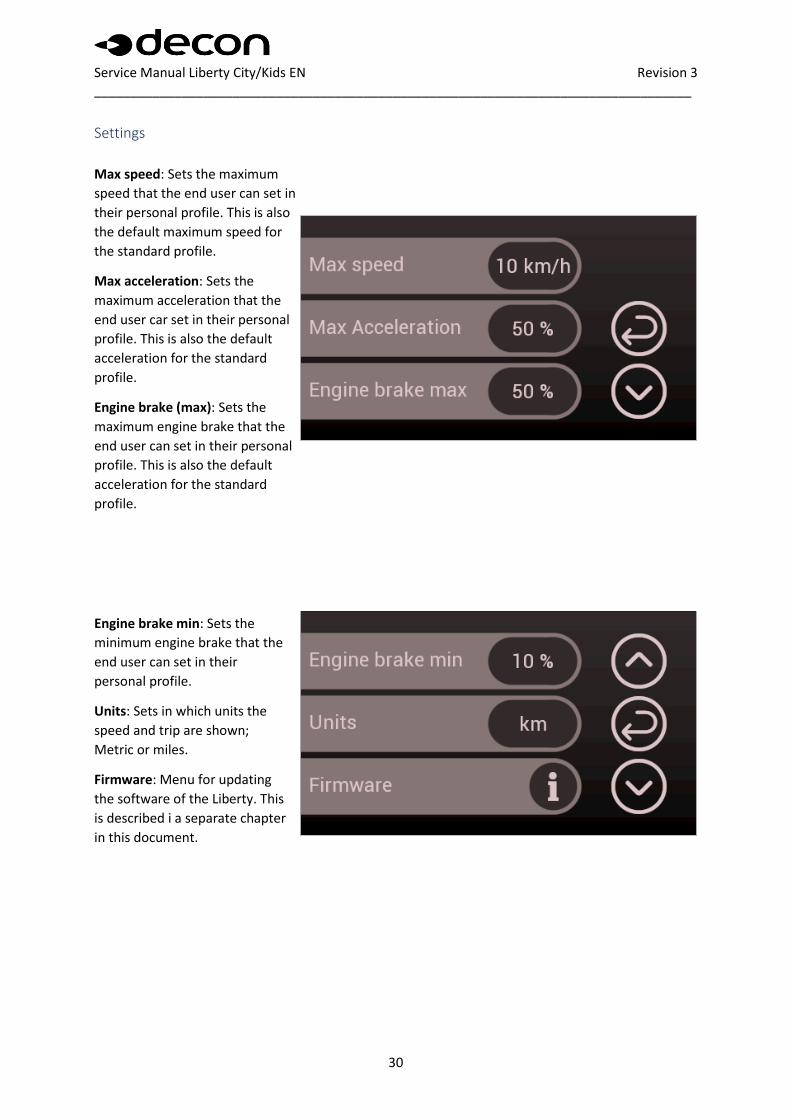
Settings
Max speed: Sets the maximum
speed that the end user can set in
their personal profile. This is also
the default maximum speed for
the standard profile.
Max acceleration: Sets the
maximum acceleration that the
end user car set in their personal
profile. This is also the default
acceleration for the standard
profile.
Engine brake (max): Sets the
maximum engine brake that the
end user can set in their personal
profile. This is also the default
acceleration for the standard
profile.
Engine brake min: Sets the
minimum engine brake that the
end user can set in their
personal profile.
Units: Sets in which units the
speed and trip are shown;
Metric or miles.
Firmware: Menu for updating
the software of the Liberty. This
is described i a separate chapter
in this document.
Service Manual Liberty City/Kids EN Revision 3 __________________________________________________________________________________
31
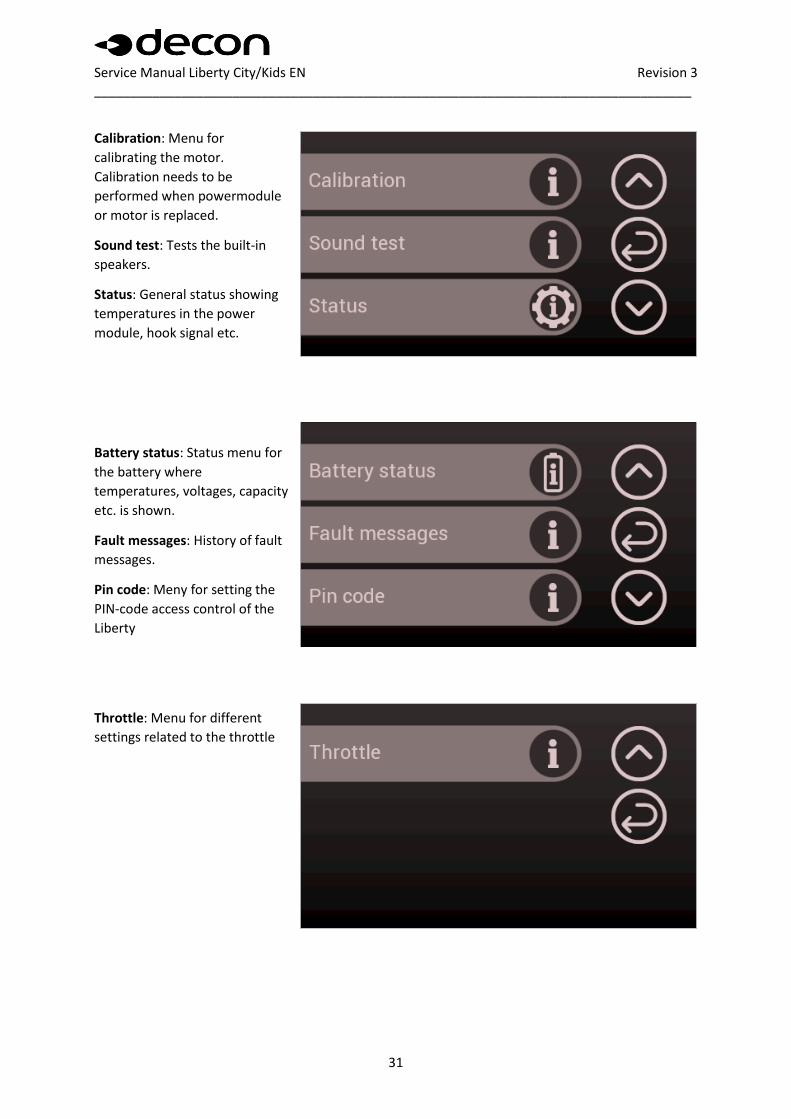
Calibration: Menu for
calibrating the motor.
Calibration needs to be
performed when powermodule
or motor is replaced.
Sound test: Tests the built-in
speakers.
Status: General status showing
temperatures in the power
module, hook signal etc.
Battery status: Status menu for
the battery where
temperatures, voltages, capacity
etc. is shown.
Fault messages: History of fault
messages.
Pin code: Meny for setting the
PIN-code access control of the
Liberty
Throttle: Menu for different
settings related to the throttle
Service Manual Liberty City/Kids EN Revision 3 __________________________________________________________________________________
32
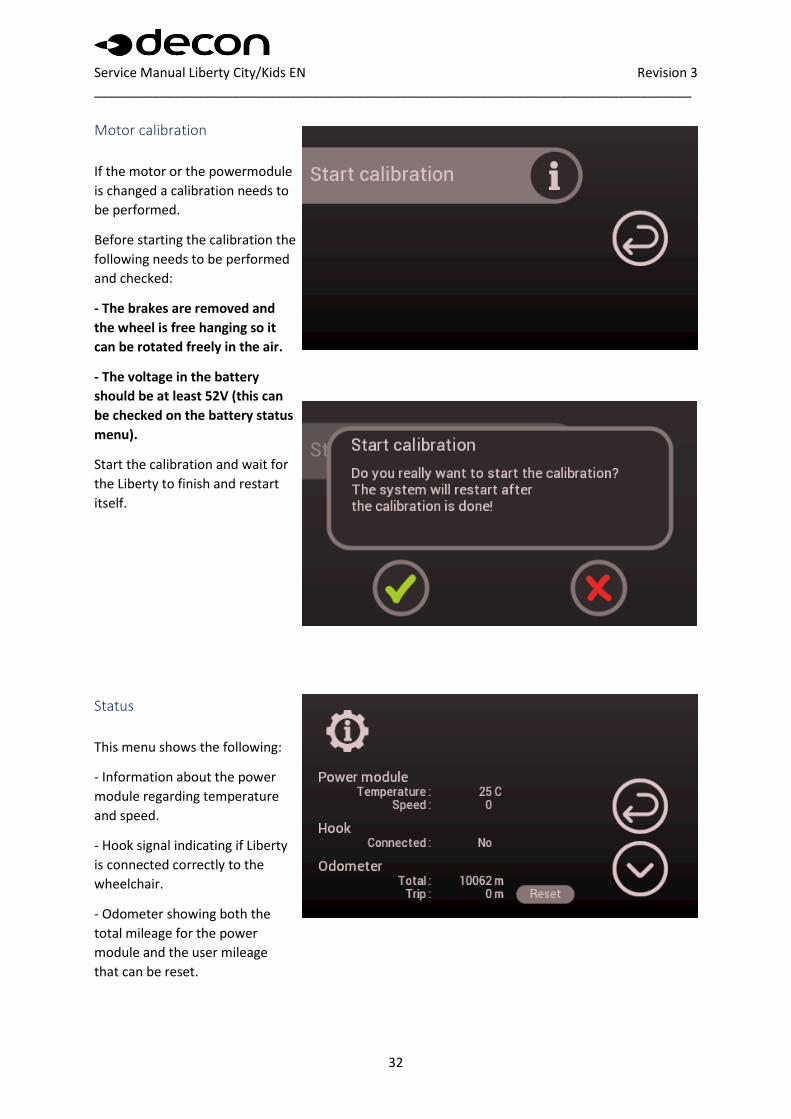
Motor calibration
If the motor or the powermodule
is changed a calibration needs to
be performed.
Before starting the calibration the
following needs to be performed
and checked:
- The brakes are removed and
the wheel is free hanging so it
can be rotated freely in the air.
- The voltage in the battery
should be at least 52V (this can
be checked on the battery status
menu).
Start the calibration and wait for
the Liberty to finish and restart
itself.
Status
This menu shows the following:
- Information about the power
module regarding temperature
and speed.
- Hook signal indicating if Liberty
is connected correctly to the
wheelchair.
- Odometer showing both the
total mileage for the power
module and the user mileage
that can be reset.
Service Manual Liberty City/Kids EN Revision 3 __________________________________________________________________________________
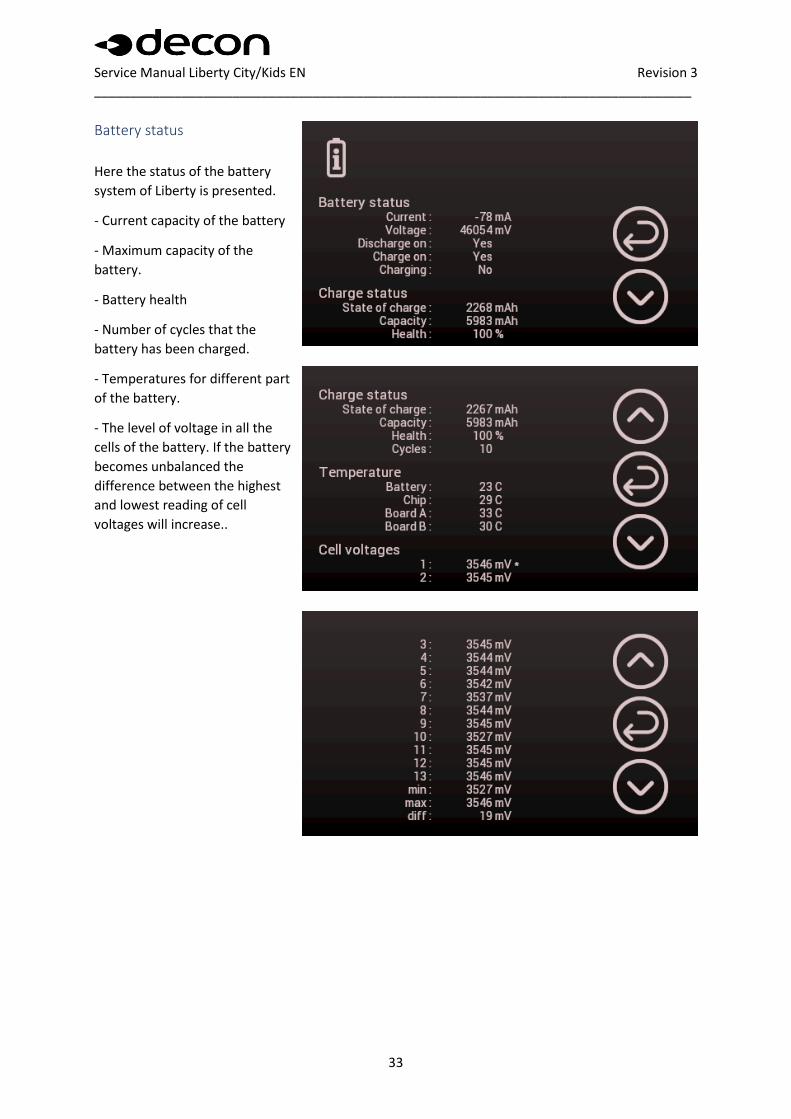
33
Battery status
Here the status of the battery
system of Liberty is presented.
- Current capacity of the battery
- Maximum capacity of the
battery.
- Battery health
- Number of cycles that the
battery has been charged.
- Temperatures for different part
of the battery.
- The level of voltage in all the
cells of the battery. If the battery
becomes unbalanced the
difference between the highest
and lowest reading of cell
voltages will increase..
Service Manual Liberty City/Kids EN Revision 3 __________________________________________________________________________________
34
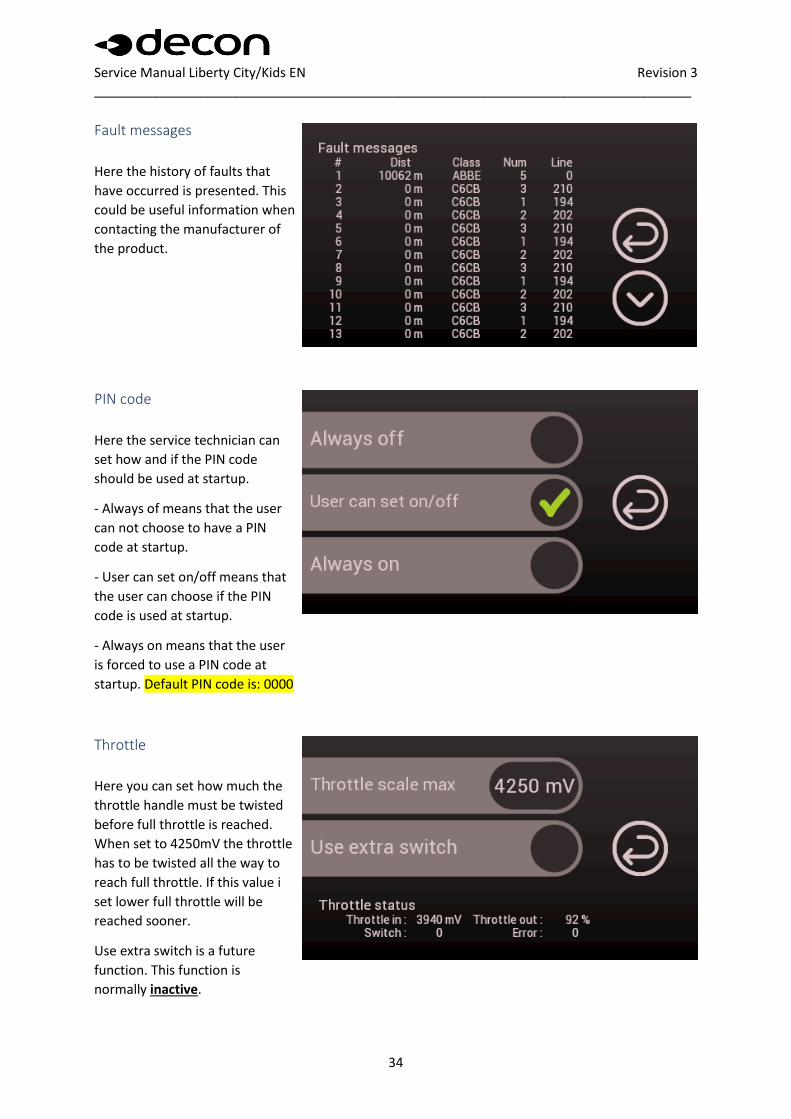
Fault messages
Here the history of faults that
have occurred is presented. This
could be useful information when
contacting the manufacturer of
the product.
PIN code
Here the service technician can
set how and if the PIN code
should be used at startup.
- Always of means that the user
can not choose to have a PIN
code at startup.
- User can set on/off means that
the user can choose if the PIN
code is used at startup.
- Always on means that the user
is forced to use a PIN code at
startup. Default PIN code is: 0000
Throttle
Here you can set how much the
throttle handle must be twisted
before full throttle is reached.
When set to 4250mV the throttle
has to be twisted all the way to
reach full throttle. If this value i
set lower full throttle will be
reached sooner.
Use extra switch is a future
function. This function is
normally inactive.
Service Manual Liberty City/Kids EN Revision 3 __________________________________________________________________________________
35
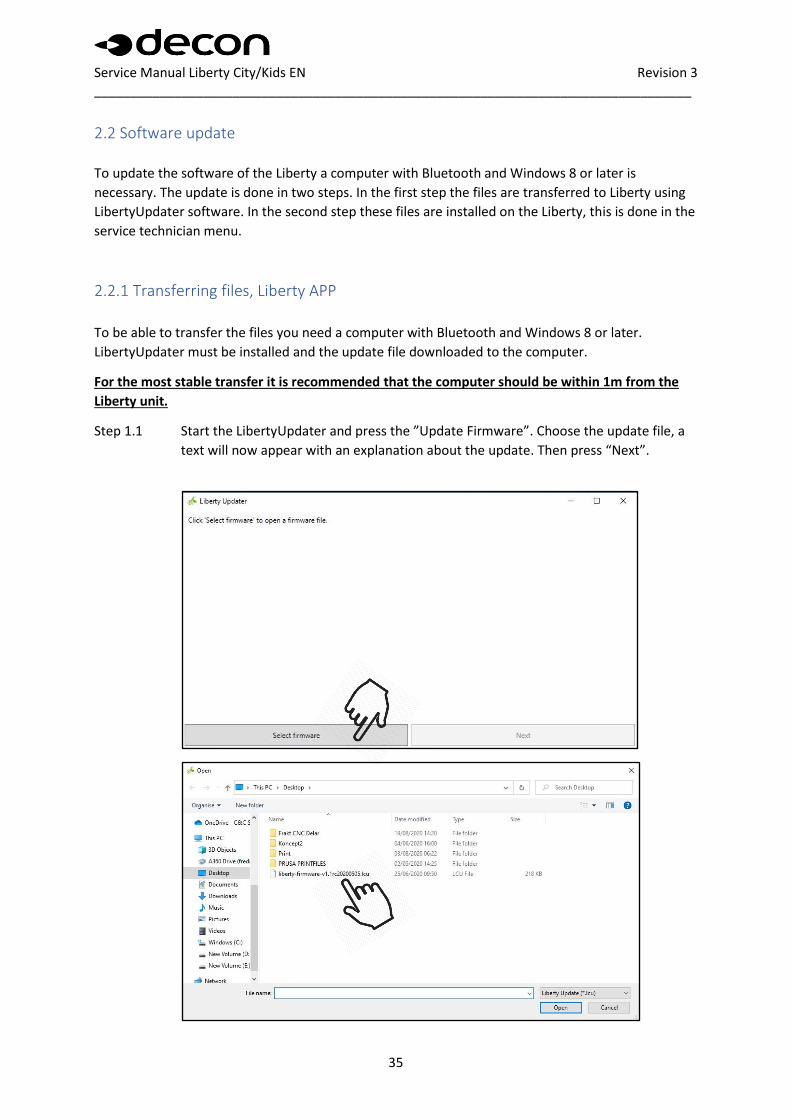
2.2 Software update
To update the software of the Liberty a computer with Bluetooth and Windows 8 or later is
necessary. The update is done in two steps. In the first step the files are transferred to Liberty using
LibertyUpdater software. In the second step these files are installed on the Liberty, this is done in the
service technician menu.
2.2.1 Transferring files, Liberty APP
To be able to transfer the files you need a computer with Bluetooth and Windows 8 or later.
LibertyUpdater must be installed and the update file downloaded to the computer.
For the most stable transfer it is recommended that the computer should be within 1m from the
Liberty unit.
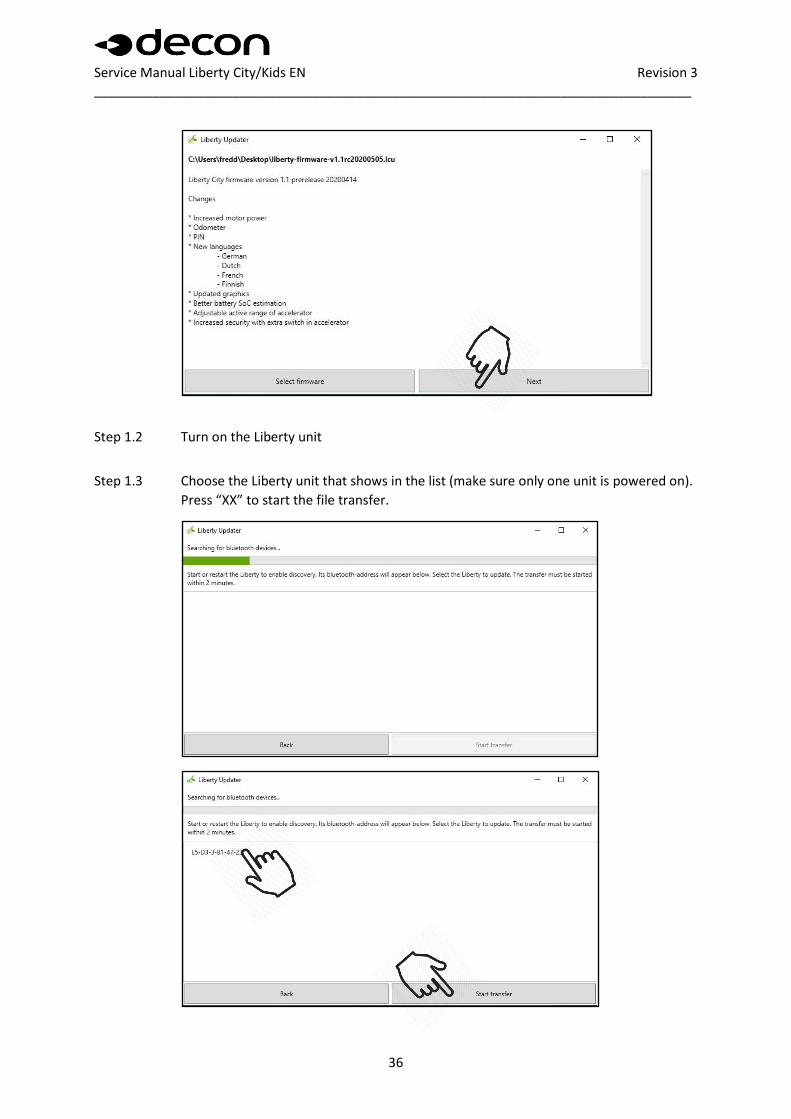
Step 1.1 Start the LibertyUpdater and press the ”Update Firmware”. Choose the update file, a
text will now appear with an explanation about the update. Then press “Next”.
Service Manual Liberty City/Kids EN Revision 3 __________________________________________________________________________________
36
Step 1.2 Turn on the Liberty unit
Step 1.3 Choose the Liberty unit that shows in the list (make sure only one unit is powered on).
Press “XX” to start the file transfer.
Service Manual Liberty City/Kids EN Revision 3 __________________________________________________________________________________
37
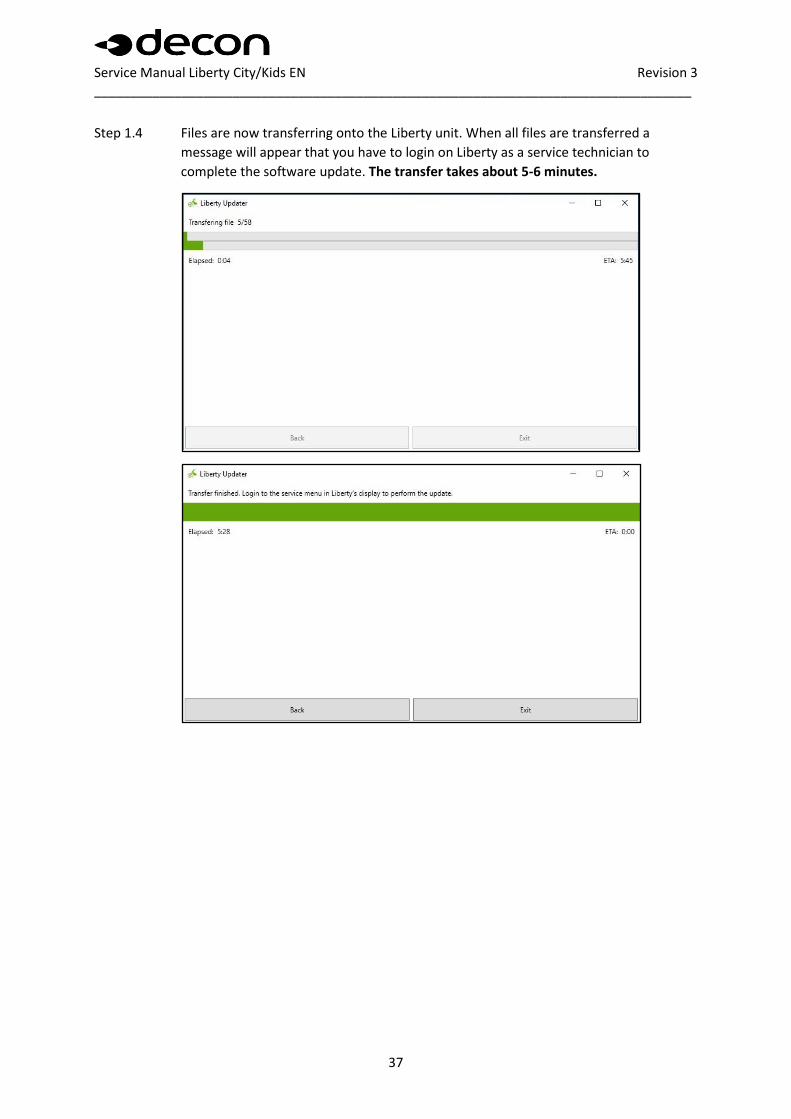
Step 1.4 Files are now transferring onto the Liberty unit. When all files are transferred a
message will appear that you have to login on Liberty as a service technician to
complete the software update. The transfer takes about 5-6 minutes.
Service Manual Liberty City/Kids EN Revision 3 __________________________________________________________________________________
38
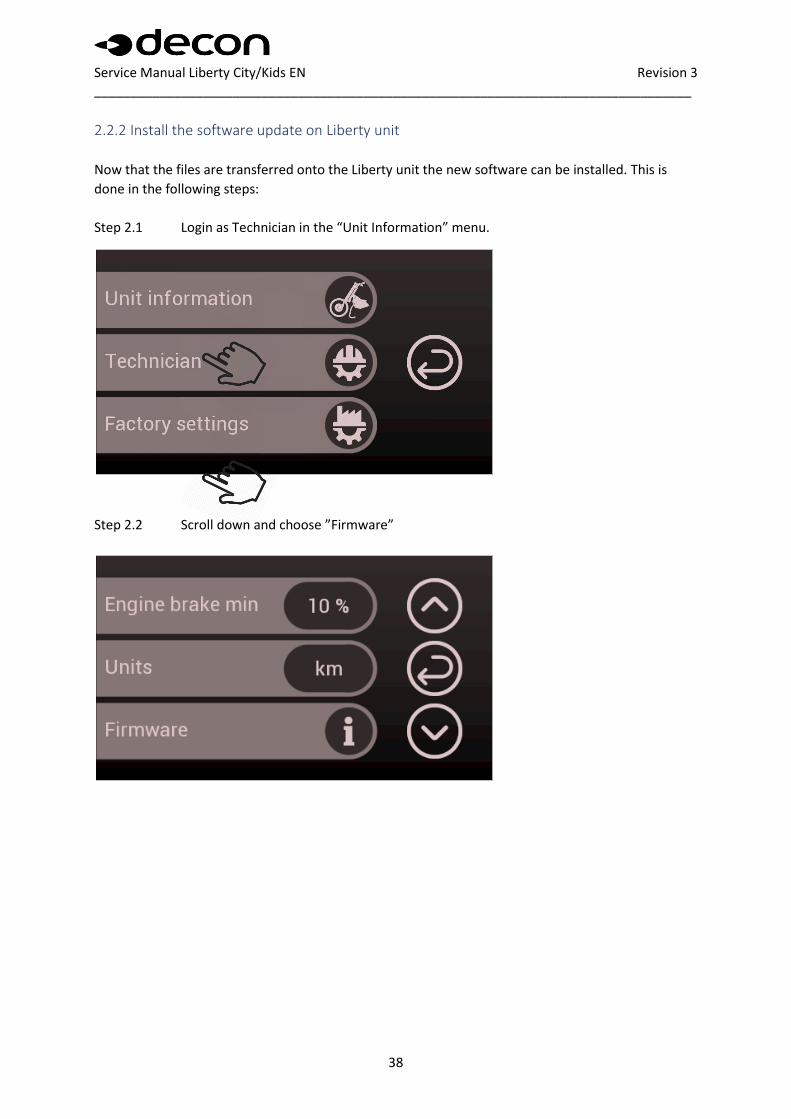
2.2.2 Install the software update on Liberty unit
Now that the files are transferred onto the Liberty unit the new software can be installed. This is
done in the following steps:
Step 2.1 Login as Technician in the “Unit Information” menu.
Step 2.2 Scroll down and choose ”Firmware”
Service Manual Liberty City/Kids EN Revision 3 __________________________________________________________________________________
39
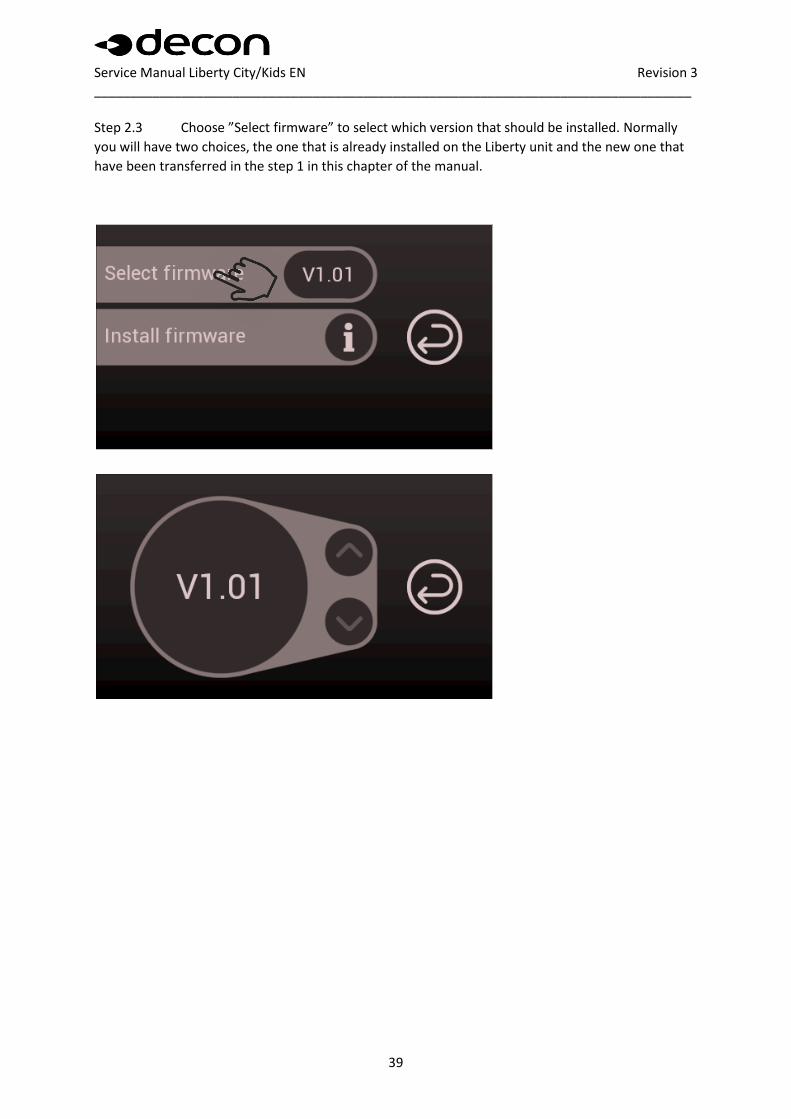
Step 2.3 Choose ”Select firmware” to select which version that should be installed. Normally
you will have two choices, the one that is already installed on the Liberty unit and the new one that
have been transferred in the step 1 in this chapter of the manual.
Service Manual Liberty City/Kids EN Revision 3 __________________________________________________________________________________
40
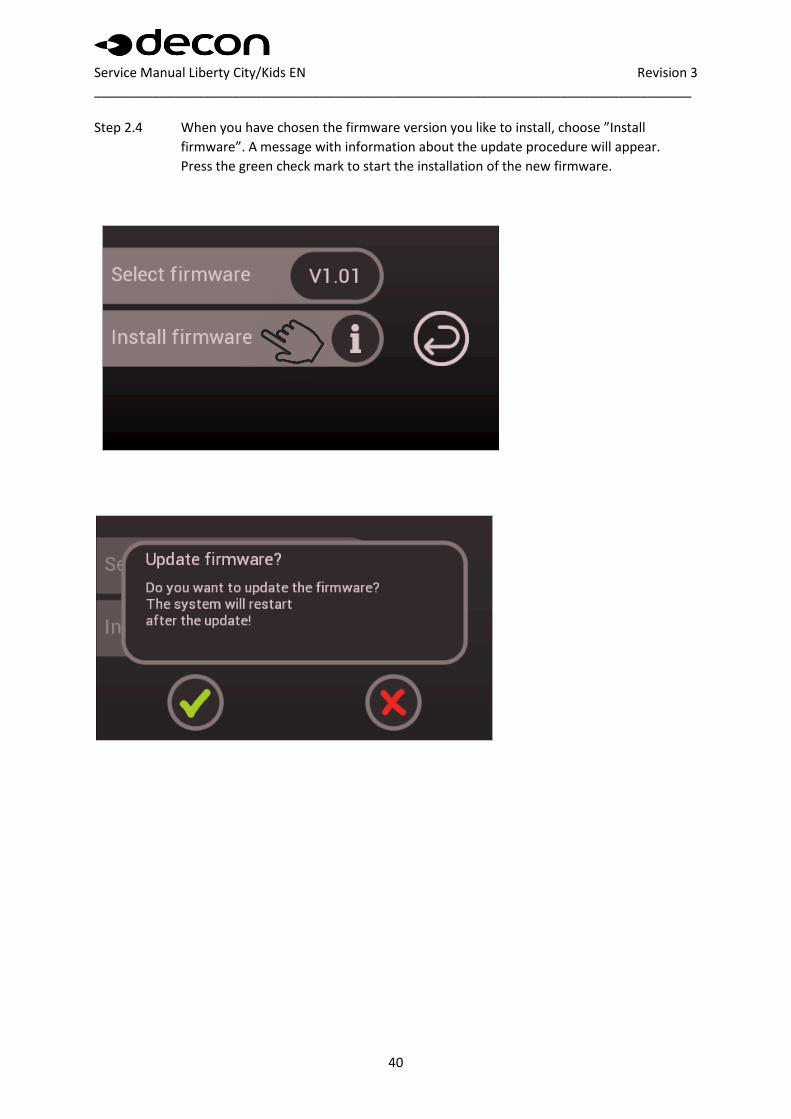
Step 2.4 When you have chosen the firmware version you like to install, choose ”Install
firmware”. A message with information about the update procedure will appear.
Press the green check mark to start the installation of the new firmware.
Service Manual Liberty City/Kids EN Revision 3 __________________________________________________________________________________
41
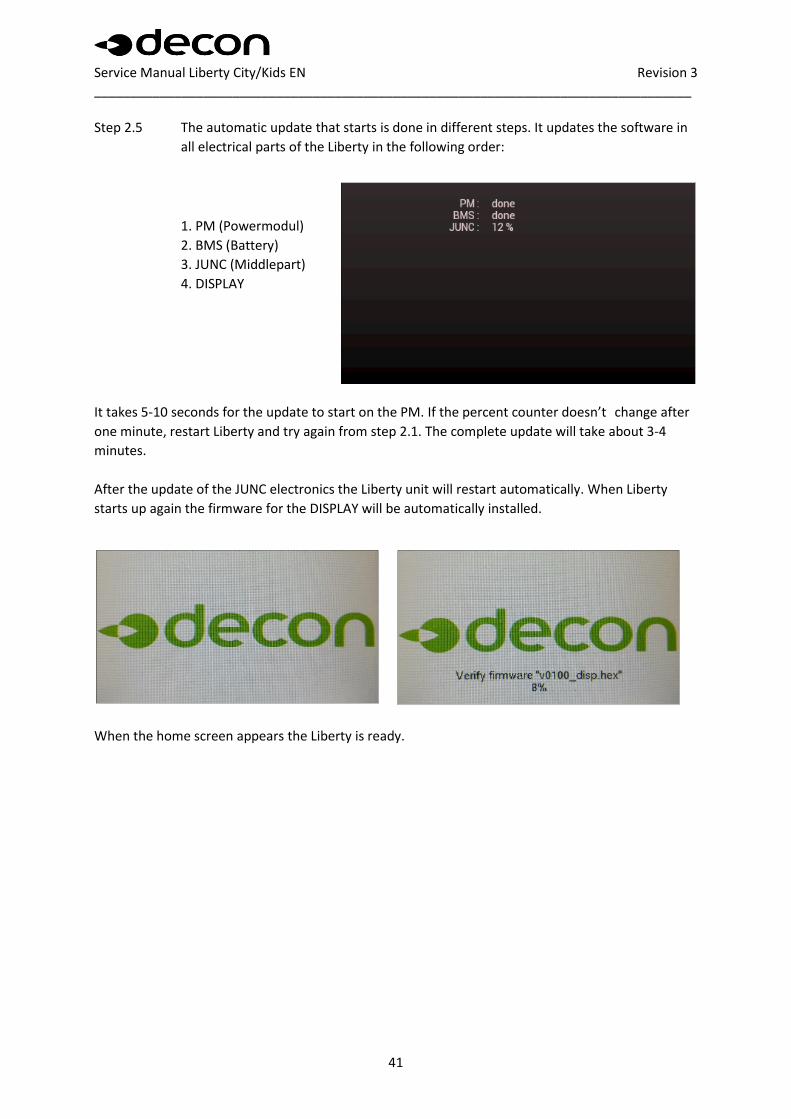
Step 2.5 The automatic update that starts is done in different steps. It updates the software in
all electrical parts of the Liberty in the following order:
1. PM (Powermodul)
2. BMS (Battery)
3. JUNC (Middlepart)
4. DISPLAY
It takes 5-10 seconds for the update to start on the PM. If the percent counter doesn’t change after
one minute, restart Liberty and try again from step 2.1. The complete update will take about 3-4
minutes.
After the update of the JUNC electronics the Liberty unit will restart automatically. When Liberty
starts up again the firmware for the DISPLAY will be automatically installed.
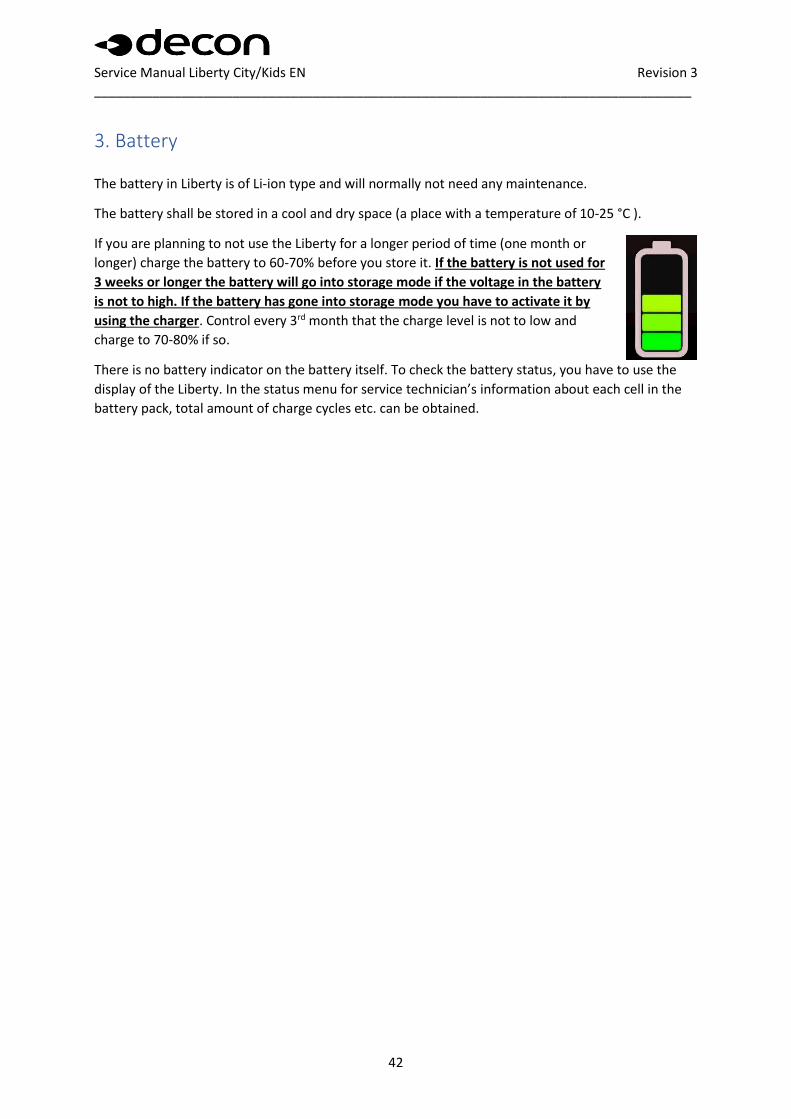
When the home screen appears the Liberty is ready.
Service Manual Liberty City/Kids EN Revision 3 __________________________________________________________________________________
42
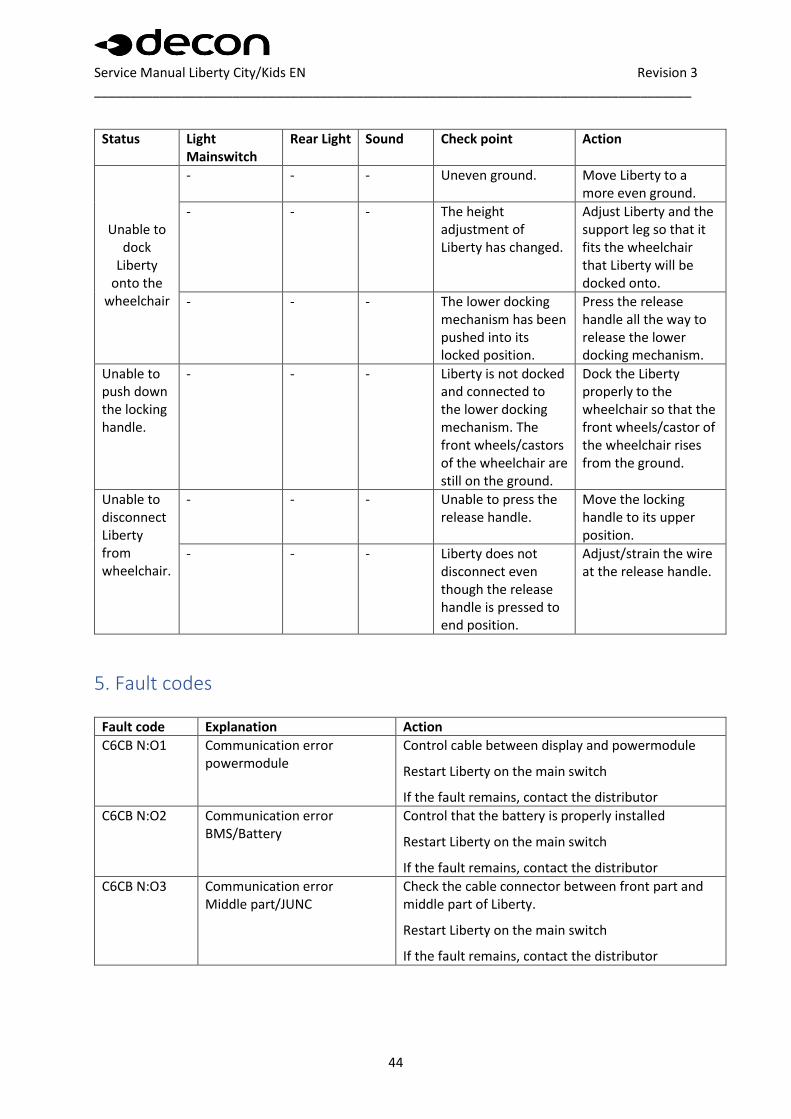
3. Battery
The battery in Liberty is of Li-ion type and will normally not need any maintenance.
The battery shall be stored in a cool and dry space (a place with a temperature of 10-25 °C ).
If you are planning to not use the Liberty for a longer period of time (one month or
longer) charge the battery to 60-70% before you store it. If the battery is not used for
3 weeks or longer the battery will go into storage mode if the voltage in the battery
is not to high. If the battery has gone into storage mode you have to activate it by
using the charger. Control every 3rd month that the charge level is not to low and
charge to 70-80% if so.
There is no battery indicator on the battery itself. To check the battery status, you have to use the
display of the Liberty. In the status menu for service technician’s information about each cell in the
battery pack, total amount of charge cycles etc. can be obtained.

Service Manual Liberty City/Kids EN Revision 3 __________________________________________________________________________________
43
4. Fault detection chart
Status Light Mainswitch
Rear Light Sound Check point Action
Screen does not light up when
pressing the main switch.
Off
- No Is the battery charged?
Charge the battery
Off - No Is the battery properly installed in Liberty?
Check that the battery is properly installed.
Off - No Electrical connection between front and middle part of Liberty.
Connect cable connectors with the arrows lined up.
One flash One flash No Control that he cables are properly attached on the backside of the display.
Connect the cables properly on the backside of the display.
Does not respond
when engaging throttle
even though
Liberty is connected
to wheelchair and docked in its upper
position.
On - No Is the locking handle in its lower position?
Press the locking handle to its lower position.
On - No No indication on the display that Liberty is locked against the wheelchair.
Press the locking handle to its lower position.
On - No No indication on the display that Liberty is locked against the wheelchair even though the locking handle is in its lower position.
Repeat pressing the locking handle to its lower position multiple times in a resolute action.
On - No Check that the throttle is properly attached to the backside of the display.
Connect the cable properly on the backside of the display.
On - No Check the connector between the powermodule and motor.
Connect cable connectors with the arrows lined up.
Service Manual Liberty City/Kids EN Revision 3 __________________________________________________________________________________
44
Status Light Mainswitch
Rear Light Sound Check point Action
Unable to dock
Liberty onto the
wheelchair
- - - Uneven ground. Move Liberty to a more even ground.
- - - The height adjustment of Liberty has changed.
Adjust Liberty and the support leg so that it fits the wheelchair that Liberty will be docked onto.
- - - The lower docking mechanism has been pushed into its locked position.
Press the release handle all the way to release the lower docking mechanism.
Unable to push down the locking handle.
- - - Liberty is not docked and connected to the lower docking mechanism. The front wheels/castors of the wheelchair are still on the ground.
Dock the Liberty properly to the wheelchair so that the front wheels/castor of the wheelchair rises from the ground.
Unable to disconnect Liberty from wheelchair.
- - - Unable to press the release handle.
Move the locking handle to its upper position.
- - - Liberty does not disconnect even though the release handle is pressed to end position.
Adjust/strain the wire at the release handle.
5. Fault codes
Fault code Explanation Action
C6CB N:O1 Communication error powermodule
Control cable between display and powermodule
Restart Liberty on the main switch
If the fault remains, contact the distributor
C6CB N:O2 Communication error BMS/Battery
Control that the battery is properly installed
Restart Liberty on the main switch
If the fault remains, contact the distributor
C6CB N:O3 Communication error Middle part/JUNC
Check the cable connector between front part and middle part of Liberty.
Restart Liberty on the main switch
If the fault remains, contact the distributor
Service Manual Liberty City/Kids EN Revision 3 __________________________________________________________________________________
45
Fault code Explanation Action
ABBE N:03 Over voltage protection Powermodule
Restart Liberty on the main switch
If the fault remains, contact the distributor
ABBE N:04 General fault Restart Liberty on the main switch.
If the fault remains, contact the distributor
ABBE N:05 Communication with display was lost but recovered automatically
Restart Liberty on the main switch
If the fault remains, contact the distributor
ABBE N:06 Powermodule overheated Shut of Liberty and wait for 2 minutes
Start Liberty
If the fault remains, contact the distributor
ABBE N:07 Faulty signals from motor Check that motorcable is not damaged and correctly connected
Restart Liberty on the main switch
If the fault remains, contact the distributor
ABBE N:08 Possible short circuit inside motor detected
Check that motorcable is not damaged
Restart Liberty on the main switch
If the fault remains, contact the distributor
7F42 N:01 Internal fault BMS Restart Liberty on the main switch
If the fault remains, contact the distributor
7F42 N:02 Internal fault BMS Restart Liberty on the main switch
If the fault remains, contact the distributor
7F42 N:03 Internal fault BMS Restart Liberty on the main switch
If the fault remains, contact the distributor
7F42 N:04 Internal fault BMS Restart Liberty on the main switch
If the fault remains, contact the distributor
Service Manual Liberty City/Kids EN Revision 3 __________________________________________________________________________________
46
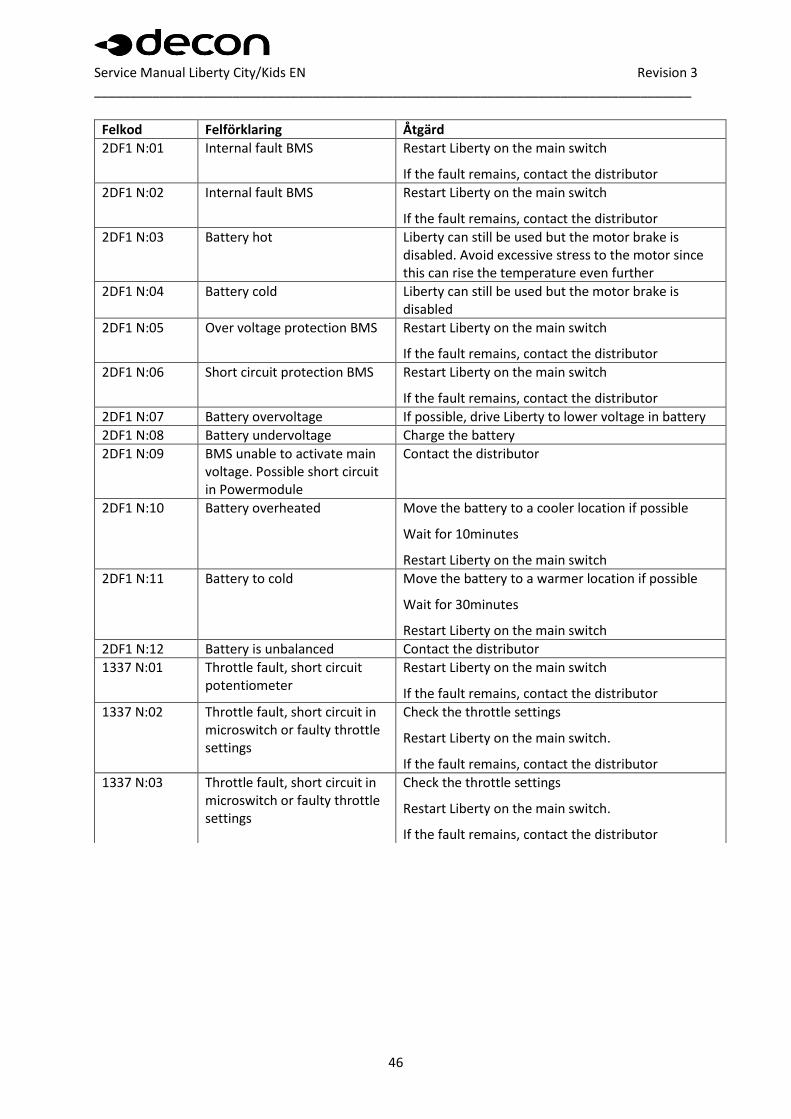
Felkod Felförklaring Åtgärd
2DF1 N:01 Internal fault BMS Restart Liberty on the main switch
If the fault remains, contact the distributor
2DF1 N:02 Internal fault BMS Restart Liberty on the main switch
If the fault remains, contact the distributor
2DF1 N:03 Battery hot Liberty can still be used but the motor brake is disabled. Avoid excessive stress to the motor since this can rise the temperature even further
2DF1 N:04 Battery cold Liberty can still be used but the motor brake is disabled
2DF1 N:05 Over voltage protection BMS Restart Liberty on the main switch
If the fault remains, contact the distributor
2DF1 N:06 Short circuit protection BMS Restart Liberty on the main switch
If the fault remains, contact the distributor
2DF1 N:07 Battery overvoltage If possible, drive Liberty to lower voltage in battery
2DF1 N:08 Battery undervoltage Charge the battery
2DF1 N:09 BMS unable to activate main voltage. Possible short circuit in Powermodule
Contact the distributor
2DF1 N:10 Battery overheated Move the battery to a cooler location if possible
Wait for 10minutes
Restart Liberty on the main switch
2DF1 N:11 Battery to cold Move the battery to a warmer location if possible
Wait for 30minutes
Restart Liberty on the main switch
2DF1 N:12 Battery is unbalanced Contact the distributor
1337 N:01 Throttle fault, short circuit potentiometer
Restart Liberty on the main switch
If the fault remains, contact the distributor
1337 N:02 Throttle fault, short circuit in microswitch or faulty throttle settings
Check the throttle settings
Restart Liberty on the main switch.
If the fault remains, contact the distributor
1337 N:03 Throttle fault, short circuit in microswitch or faulty throttle settings
Check the throttle settings
Restart Liberty on the main switch.
If the fault remains, contact the distributor
Service Manual Liberty City/Kids EN Revision 3 __________________________________________________________________________________
47
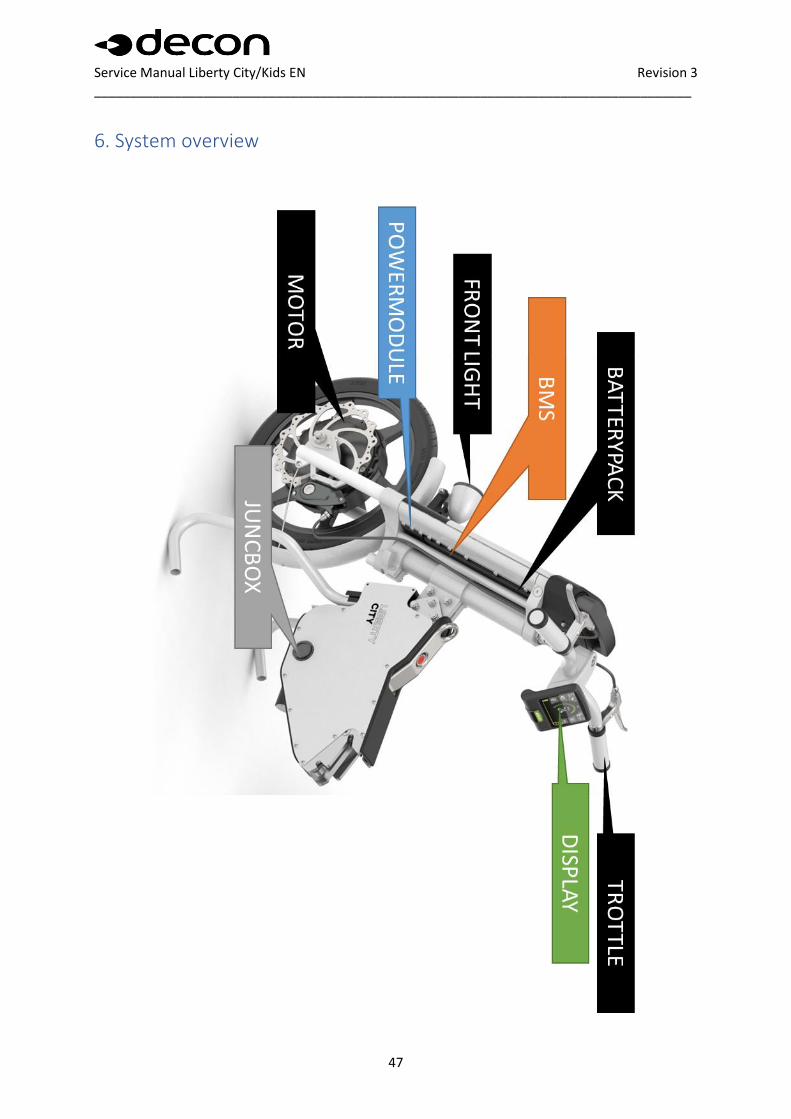
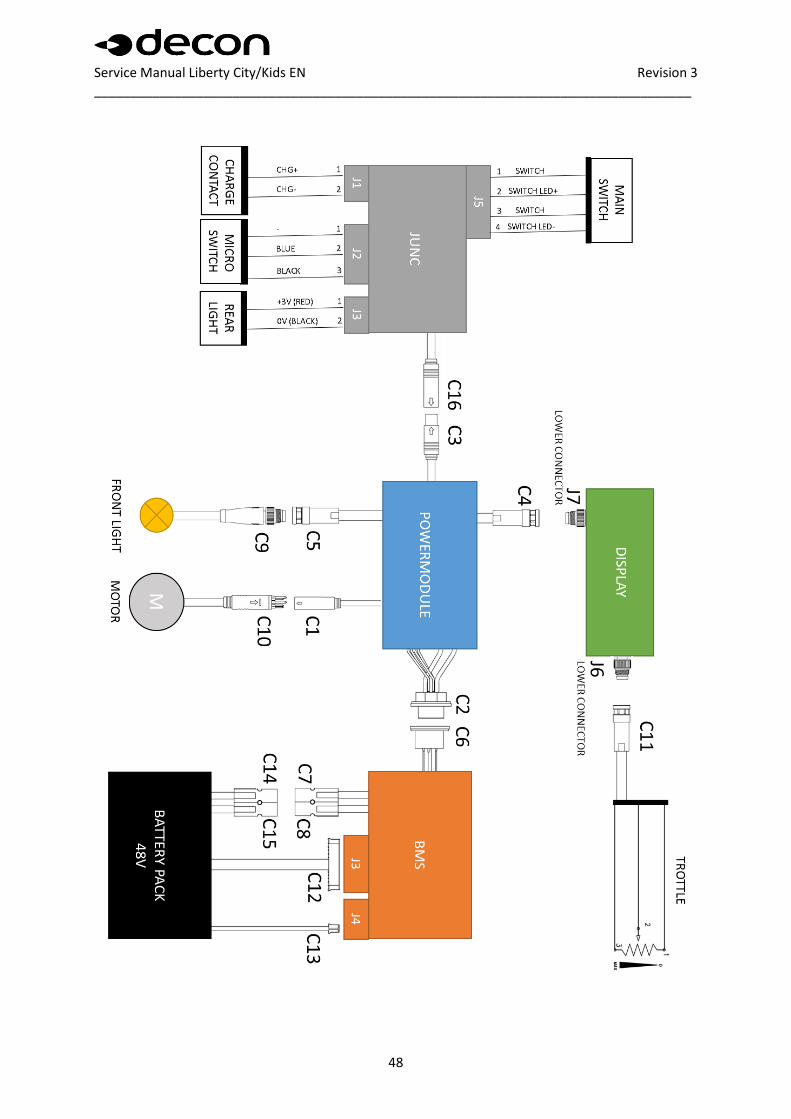
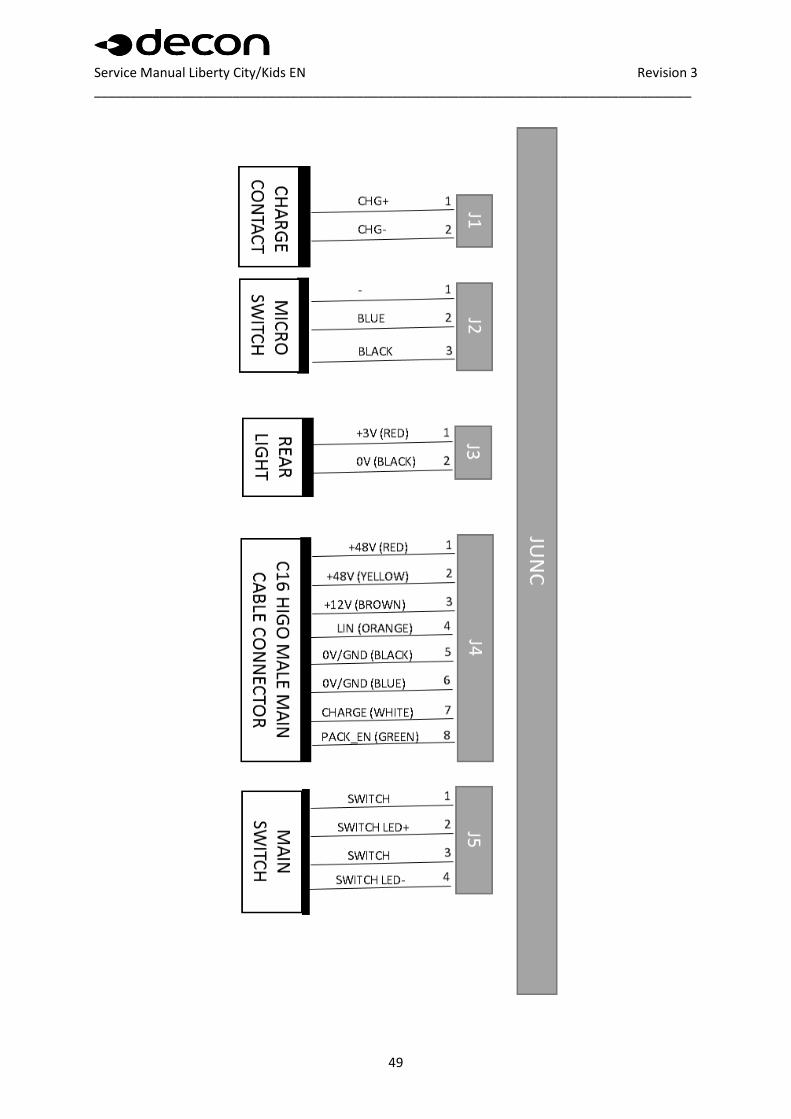
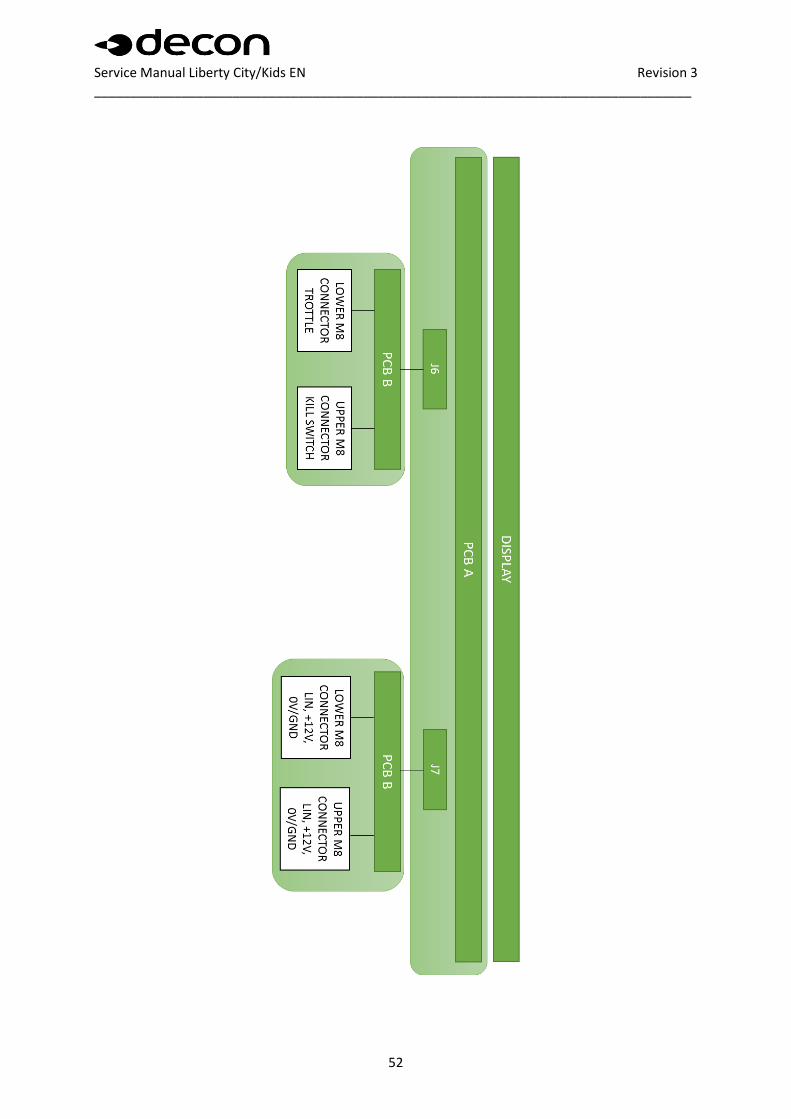
6. System overview
Service Manual Liberty City/Kids EN Revision 3 __________________________________________________________________________________
48
Service Manual Liberty City/Kids EN Revision 3 __________________________________________________________________________________
49
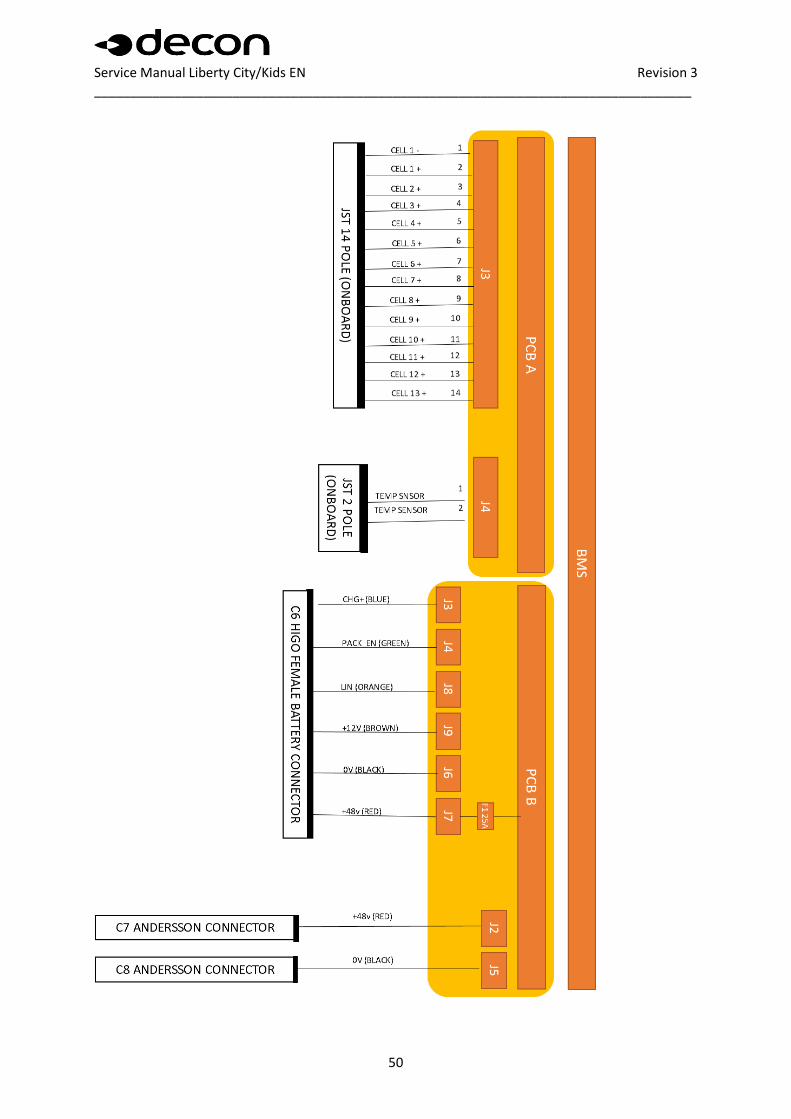
Service Manual Liberty City/Kids EN Revision 3 __________________________________________________________________________________
50

Service Manual Liberty City/Kids EN Revision 3 __________________________________________________________________________________
51
Service Manual Liberty City/Kids EN Revision 3 __________________________________________________________________________________
52
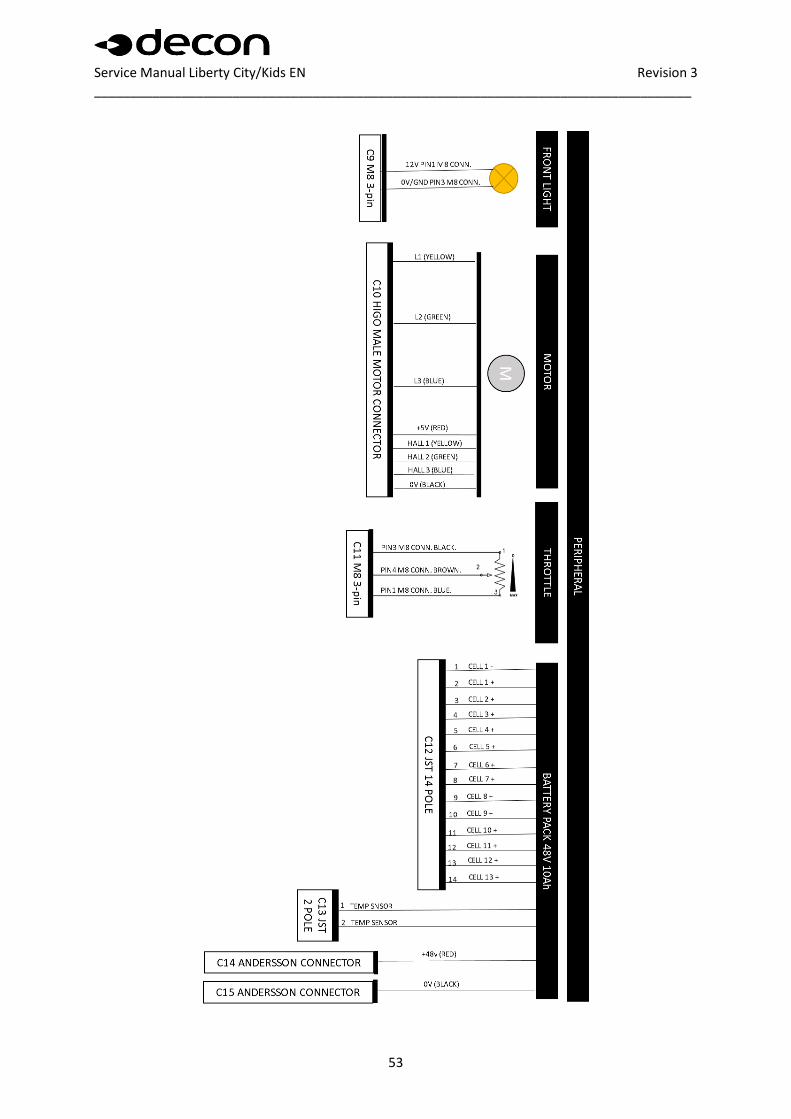
Service Manual Liberty City/Kids EN Revision 3 __________________________________________________________________________________
53
Service Manual Liberty City/Kids EN Revision 3 __________________________________________________________________________________
54
DeconWheel AB
Södra Ekeryd 115
31493 HYLTEBRUK
Tfn: 0345-40880
Mejl: [email protected]