Instructions for registrars on completing the 'Encounter Form'
Upload
khangminh22Category
view
2download
0
PUBLIC2022-05
Searching, completing tasks, and other common user actionsSAP Ariba ContractsSAP Ariba SourcingSAP Ariba Strategic Sourcing SuiteSAP Ariba Supplier Information and Performance ManagementAriba Spend Visibility
© 2
022
SAP
SE o
r an
SAP affi
liate
com
pany
. All r
ight
s re
serv
ed.
THE BEST RUN
Content
Searching, completing tasks, and other common user actions. . . . . . . . . . . . . . . . . . . . . . . . . . . . . 6
Using and customizing the dashboard. . . . . . . . . . . . . . . . . . . . . . . . . . . . . . . . . . . . . . . . . . . . . . . 7About the dashboard. . . . . . . . . . . . . . . . . . . . . . . . . . . . . . . . . . . . . . . . . . . . . . . . . . . . . . . . . . . . . 7Managing dashboard action tiles. . . . . . . . . . . . . . . . . . . . . . . . . . . . . . . . . . . . . . . . . . . . . . . . . . . . . 8
How to add an action tile strip to a dashboard tab. . . . . . . . . . . . . . . . . . . . . . . . . . . . . . . . . . . . . . .9How to manage action tiles on a dashboard tab. . . . . . . . . . . . . . . . . . . . . . . . . . . . . . . . . . . . . . . . 9How to remove the action tile strip from a dashboard tab. . . . . . . . . . . . . . . . . . . . . . . . . . . . . . . . . 10How to change action tile settings. . . . . . . . . . . . . . . . . . . . . . . . . . . . . . . . . . . . . . . . . . . . . . . . . 11Dashboard action tile reference. . . . . . . . . . . . . . . . . . . . . . . . . . . . . . . . . . . . . . . . . . . . . . . . . . . 12Dashboard action tile visibility reference. . . . . . . . . . . . . . . . . . . . . . . . . . . . . . . . . . . . . . . . . . . . .16
Managing dashboard content items. . . . . . . . . . . . . . . . . . . . . . . . . . . . . . . . . . . . . . . . . . . . . . . . . . 19How to add, arrange, format, or remove content items. . . . . . . . . . . . . . . . . . . . . . . . . . . . . . . . . . .19How to rearrange content items on a dashboard tab. . . . . . . . . . . . . . . . . . . . . . . . . . . . . . . . . . . . 21Dashboard content item reference. . . . . . . . . . . . . . . . . . . . . . . . . . . . . . . . . . . . . . . . . . . . . . . . .21
Managing dashboard tabs. . . . . . . . . . . . . . . . . . . . . . . . . . . . . . . . . . . . . . . . . . . . . . . . . . . . . . . . . 22How to add a new dashboard tab. . . . . . . . . . . . . . . . . . . . . . . . . . . . . . . . . . . . . . . . . . . . . . . . . .23How to change the title of a dashboard tab. . . . . . . . . . . . . . . . . . . . . . . . . . . . . . . . . . . . . . . . . . . 24How to change the documents shown in a dashboard. . . . . . . . . . . . . . . . . . . . . . . . . . . . . . . . . . . 24How to delete a tab from the dashboard. . . . . . . . . . . . . . . . . . . . . . . . . . . . . . . . . . . . . . . . . . . . .25
How to add the current report to a dashboard tab. . . . . . . . . . . . . . . . . . . . . . . . . . . . . . . . . . . . . . . . 25Working with templated dashboards. . . . . . . . . . . . . . . . . . . . . . . . . . . . . . . . . . . . . . . . . . . . . . . . . .26
How to reset your dashboard to the template settings. . . . . . . . . . . . . . . . . . . . . . . . . . . . . . . . . . . 27How to compare and reset your dashboard to default settings. . . . . . . . . . . . . . . . . . . . . . . . . . . . . 27
How to switch between light, dark, and black themes. . . . . . . . . . . . . . . . . . . . . . . . . . . . . . . . . . . . . . 28
Managing your user profile and preferences. . . . . . . . . . . . . . . . . . . . . . . . . . . . . . . . . . . . . . . . . .30
Setting up multifactor authentication. . . . . . . . . . . . . . . . . . . . . . . . . . . . . . . . . . . . . . . . . . . . . . 32How to set up multifactor authentication. . . . . . . . . . . . . . . . . . . . . . . . . . . . . . . . . . . . . . . . . . . . . . 32How to set up multifactor authentication from the user preference menu. . . . . . . . . . . . . . . . . . . . . . . .33How to set up multifactor authentication using a new device. . . . . . . . . . . . . . . . . . . . . . . . . . . . . . . . .34
How to download information about your user record. . . . . . . . . . . . . . . . . . . . . . . . . . . . . . . . . . 35
Enabling Desktop File Sync. . . . . . . . . . . . . . . . . . . . . . . . . . . . . . . . . . . . . . . . . . . . . . . . . . . . . . .37About enabling Desktop File Sync. . . . . . . . . . . . . . . . . . . . . . . . . . . . . . . . . . . . . . . . . . . . . . . . . . . .37Desktop File Sync requirements. . . . . . . . . . . . . . . . . . . . . . . . . . . . . . . . . . . . . . . . . . . . . . . . . . . . .38
2 PUBLICSearching, completing tasks, and other common user actions
Content
DFS operating system requirements. . . . . . . . . . . . . . . . . . . . . . . . . . . . . . . . . . . . . . . . . . . . . . . 38DFS Microsoft Windows user requirement. . . . . . . . . . . . . . . . . . . . . . . . . . . . . . . . . . . . . . . . . . . 39DFS web browser requirement. . . . . . . . . . . . . . . . . . . . . . . . . . . . . . . . . . . . . . . . . . . . . . . . . . . 39
How to enable DFS. . . . . . . . . . . . . . . . . . . . . . . . . . . . . . . . . . . . . . . . . . . . . . . . . . . . . . . . . . . . . . 39How to retain DFS settings when accessing SAP Ariba from a saved URL link. . . . . . . . . . . . . . . . . . . . . 40
Searching for projects, documents, or project templates. . . . . . . . . . . . . . . . . . . . . . . . . . . . . . . . 41How to search for projects or documents from the dashboard search bar. . . . . . . . . . . . . . . . . . . . . . . . 41How to search for projects or documents using the Search page. . . . . . . . . . . . . . . . . . . . . . . . . . . . . . 44Stemming in text searches. . . . . . . . . . . . . . . . . . . . . . . . . . . . . . . . . . . . . . . . . . . . . . . . . . . . . . . . .47Proper noun searches. . . . . . . . . . . . . . . . . . . . . . . . . . . . . . . . . . . . . . . . . . . . . . . . . . . . . . . . . . . . 48Partial-match and exact-match searches for ID fields. . . . . . . . . . . . . . . . . . . . . . . . . . . . . . . . . . . . . . 49Partial-match searches for custom fields. . . . . . . . . . . . . . . . . . . . . . . . . . . . . . . . . . . . . . . . . . . . . . .51Boolean operators for searches. . . . . . . . . . . . . . . . . . . . . . . . . . . . . . . . . . . . . . . . . . . . . . . . . . . . . 51Stop words in searches. . . . . . . . . . . . . . . . . . . . . . . . . . . . . . . . . . . . . . . . . . . . . . . . . . . . . . . . . . . 52Refining searches for projects, documents, and project templates. . . . . . . . . . . . . . . . . . . . . . . . . . . . .52
How to search for project templates. . . . . . . . . . . . . . . . . . . . . . . . . . . . . . . . . . . . . . . . . . . . . . . 53How to limit search results by permissions. . . . . . . . . . . . . . . . . . . . . . . . . . . . . . . . . . . . . . . . . . . 53How to search for projects or documents by owner. . . . . . . . . . . . . . . . . . . . . . . . . . . . . . . . . . . . . 54How to enable or disable hierarchical match options for project and document searches. . . . . . . . . . 55How to search for deleted documents and projects. . . . . . . . . . . . . . . . . . . . . . . . . . . . . . . . . . . . . 56How to search for empty fields. . . . . . . . . . . . . . . . . . . . . . . . . . . . . . . . . . . . . . . . . . . . . . . . . . . 56
View options for search results. . . . . . . . . . . . . . . . . . . . . . . . . . . . . . . . . . . . . . . . . . . . . . . . . . . . . .57How to view more than 50 results for project or document searches. . . . . . . . . . . . . . . . . . . . . . . . . 57How to sort and select search result columns. . . . . . . . . . . . . . . . . . . . . . . . . . . . . . . . . . . . . . . . . 58How to view project or document descriptions and details in search results. . . . . . . . . . . . . . . . . . . .58How to view contract project tree hierarchies in search results. . . . . . . . . . . . . . . . . . . . . . . . . . . . . 59
How to save a project or document search. . . . . . . . . . . . . . . . . . . . . . . . . . . . . . . . . . . . . . . . . . . . . 59How to modify a saved project or document search. . . . . . . . . . . . . . . . . . . . . . . . . . . . . . . . . . . . . . . 60Supported search document types. . . . . . . . . . . . . . . . . . . . . . . . . . . . . . . . . . . . . . . . . . . . . . . . . . . 61
Completing tasks. . . . . . . . . . . . . . . . . . . . . . . . . . . . . . . . . . . . . . . . . . . . . . . . . . . . . . . . . . . . . . 62About completing tasks. . . . . . . . . . . . . . . . . . . . . . . . . . . . . . . . . . . . . . . . . . . . . . . . . . . . . . . . . . 62
Additional task documentation. . . . . . . . . . . . . . . . . . . . . . . . . . . . . . . . . . . . . . . . . . . . . . . . . . . 63My Tasks page actions. . . . . . . . . . . . . . . . . . . . . . . . . . . . . . . . . . . . . . . . . . . . . . . . . . . . . . . . . . . 63How to view tasks assigned to you (My Tasks page). . . . . . . . . . . . . . . . . . . . . . . . . . . . . . . . . . . . . . . 64How to mark a to do task started or completed. . . . . . . . . . . . . . . . . . . . . . . . . . . . . . . . . . . . . . . . . . 65How to review documents without edit access. . . . . . . . . . . . . . . . . . . . . . . . . . . . . . . . . . . . . . . . . . .65How to review documents with edit access. . . . . . . . . . . . . . . . . . . . . . . . . . . . . . . . . . . . . . . . . . . . . 66How to review contract line items documents. . . . . . . . . . . . . . . . . . . . . . . . . . . . . . . . . . . . . . . . . . . 67How to view draft changes for events (Approval For Publish tasks). . . . . . . . . . . . . . . . . . . . . . . . . . . . 68How to approve or deny approval tasks. . . . . . . . . . . . . . . . . . . . . . . . . . . . . . . . . . . . . . . . . . . . . . . . 70
Searching, completing tasks, and other common user actionsContent PUBLIC 3
How to accept or counter negotiation documents. . . . . . . . . . . . . . . . . . . . . . . . . . . . . . . . . . . . . . . . .71About reviewing and approving documents as an email approver. . . . . . . . . . . . . . . . . . . . . . . . . . . . . .72
About forwarding email approval notifications. . . . . . . . . . . . . . . . . . . . . . . . . . . . . . . . . . . . . . . . 72Configuring mail filters for inbound email approval requests. . . . . . . . . . . . . . . . . . . . . . . . . . . . . . . . . 73How to respond to an HTML approval notification in non-compact format. . . . . . . . . . . . . . . . . . . . . . . 73How to respond to an HTML approval notification in compact format. . . . . . . . . . . . . . . . . . . . . . . . . . . 74How to respond to a plain text approval notification in non-compact format. . . . . . . . . . . . . . . . . . . . . . 75How to respond to a plain text request in compact format. . . . . . . . . . . . . . . . . . . . . . . . . . . . . . . . . . .76How to delegate an email approval task. . . . . . . . . . . . . . . . . . . . . . . . . . . . . . . . . . . . . . . . . . . . . . . .76
Signing documents. . . . . . . . . . . . . . . . . . . . . . . . . . . . . . . . . . . . . . . . . . . . . . . . . . . . . . . . . . . . .78How to complete a signature task. . . . . . . . . . . . . . . . . . . . . . . . . . . . . . . . . . . . . . . . . . . . . . . . . . . .78
Using project message boards. . . . . . . . . . . . . . . . . . . . . . . . . . . . . . . . . . . . . . . . . . . . . . . . . . . . 80About using project message boards. . . . . . . . . . . . . . . . . . . . . . . . . . . . . . . . . . . . . . . . . . . . . . . . . 80
Supported workspace types. . . . . . . . . . . . . . . . . . . . . . . . . . . . . . . . . . . . . . . . . . . . . . . . . . . . . 82About message board labels. . . . . . . . . . . . . . . . . . . . . . . . . . . . . . . . . . . . . . . . . . . . . . . . . . . . .83
How to open a project message board. . . . . . . . . . . . . . . . . . . . . . . . . . . . . . . . . . . . . . . . . . . . . . . . 83How to view the messages in a message board topic. . . . . . . . . . . . . . . . . . . . . . . . . . . . . . . . . . . . . . 84How to create a new topic from the message board tab. . . . . . . . . . . . . . . . . . . . . . . . . . . . . . . . . . . . 84How to reply to a message using the message board. . . . . . . . . . . . . . . . . . . . . . . . . . . . . . . . . . . . . . 85How to post a reply to a reply using the message board. . . . . . . . . . . . . . . . . . . . . . . . . . . . . . . . . . . . 86How to post a message board topic or reply using email. . . . . . . . . . . . . . . . . . . . . . . . . . . . . . . . . . . . 86How to copy a message board attachment to the project documents area. . . . . . . . . . . . . . . . . . . . . . . 88How to change the topic order in a message board. . . . . . . . . . . . . . . . . . . . . . . . . . . . . . . . . . . . . . . .89How to search for message board topics. . . . . . . . . . . . . . . . . . . . . . . . . . . . . . . . . . . . . . . . . . . . . . . 89How to include message board content when searching for projects and documents. . . . . . . . . . . . . . . 90How to navigate to additional pages on the message board. . . . . . . . . . . . . . . . . . . . . . . . . . . . . . . . . . 91How to create a new message board label. . . . . . . . . . . . . . . . . . . . . . . . . . . . . . . . . . . . . . . . . . . . . . 91How to associate a message board topic with a label when viewing the message board. . . . . . . . . . . . . . 92How to associate a message board topic with a label when viewing the topic. . . . . . . . . . . . . . . . . . . . . 93How to filter message board topics by label. . . . . . . . . . . . . . . . . . . . . . . . . . . . . . . . . . . . . . . . . . . . . 93How to remove a message board label. . . . . . . . . . . . . . . . . . . . . . . . . . . . . . . . . . . . . . . . . . . . . . . . 94How to delete message board topics. . . . . . . . . . . . . . . . . . . . . . . . . . . . . . . . . . . . . . . . . . . . . . . . . 95How to delete message board replies. . . . . . . . . . . . . . . . . . . . . . . . . . . . . . . . . . . . . . . . . . . . . . . . . 95
Setting email notification preferences. . . . . . . . . . . . . . . . . . . . . . . . . . . . . . . . . . . . . . . . . . . . . . 97About setting email notification preferences. . . . . . . . . . . . . . . . . . . . . . . . . . . . . . . . . . . . . . . . . . . . 97
Offline email approval format preferences. . . . . . . . . . . . . . . . . . . . . . . . . . . . . . . . . . . . . . . . . . . 98How to set individual email notification preferences. . . . . . . . . . . . . . . . . . . . . . . . . . . . . . . . . . . . . . . 99
Completing tasks as an external reviewer. . . . . . . . . . . . . . . . . . . . . . . . . . . . . . . . . . . . . . . . . . .100How to review documents as an external reviewer. . . . . . . . . . . . . . . . . . . . . . . . . . . . . . . . . . . . . . . 100
4 PUBLICSearching, completing tasks, and other common user actions
Content
Viewing in-product alerts. . . . . . . . . . . . . . . . . . . . . . . . . . . . . . . . . . . . . . . . . . . . . . . . . . . . . . . 101
The Feedback button. . . . . . . . . . . . . . . . . . . . . . . . . . . . . . . . . . . . . . . . . . . . . . . . . . . . . . . . . . 102
Site configuration options for SAP Ariba Strategic Sourcing solutions. . . . . . . . . . . . . . . . . . . . . 103Site configuration options for message boards. . . . . . . . . . . . . . . . . . . . . . . . . . . . . . . . . . . . . . . . . .103
Application.ACM.MessageBoard.Enabled. . . . . . . . . . . . . . . . . . . . . . . . . . . . . . . . . . . . . . . . . . . 103Application.ACM.MessageBoard.EmailToWorkspaceEnabled. . . . . . . . . . . . . . . . . . . . . . . . . . . . . 103Application.ACM.MessageBoard.MessageDeleteEnabled. . . . . . . . . . . . . . . . . . . . . . . . . . . . . . . . 103
Site configuration options for email notifications. . . . . . . . . . . . . . . . . . . . . . . . . . . . . . . . . . . . . . . . 104
Revision history. . . . . . . . . . . . . . . . . . . . . . . . . . . . . . . . . . . . . . . . . . . . . . . . . . . . . . . . . . . . . . 108
Searching, completing tasks, and other common user actionsContent PUBLIC 5

Searching, completing tasks, and other common user actions
This guide is for SAP Ariba users and administrators seeking a general understanding about completing basic tasks in the SAP Ariba Strategic Sourcing solutions dashboard, such as reviewing and approving documents of a project.
Users can customize the dashboard, search for projects, documents, and templates in the dashboard, and configure email notification preferences in the dashboard.
This guide applies to:
● SAP Ariba Sourcing● SAP Ariba Contracts● SAP Ariba Strategic Sourcing Suite
Related guides
Managing projects, teams, documents, and tasks
Common data import and administration guide for SAP Ariba Strategic Sourcing and Supplier Management solutions
Project template guide
For SAP Ariba Strategic Sourcing solutions, see Managing your user information.
6 PUBLICSearching, completing tasks, and other common user actions
Searching, completing tasks, and other common user actions
Using and customizing the dashboard
The dashboard organizes the tasks and information you use frequently in the SAP Ariba solutions packages.
About the dashboard [page 7]
Managing dashboard action tiles [page 8]
Managing dashboard content items [page 19]
Managing dashboard tabs [page 22]
How to add the current report to a dashboard tab [page 25]
Working with templated dashboards [page 26]
How to switch between light, dark, and black themes [page 28]
About the dashboardThe dashboard contains information and links you can use to perform tasks.
The SAP Ariba solutions packages that make use of the dashboard include the SAP Ariba Contracts solution package (SAP Ariba Contracts), the SAP Ariba Sourcing solution package (SAP Ariba Sourcing), the SAP Ariba Spend Analysis solution package (SAP Ariba Spend Analysis), and the Ariba Supplier Information Management and SAP Ariba Supplier Information and Performance Management solution packages. Your dashboard might be based on the default dashboard template, or it might be based on a template created by someone in your organization.
Dashboard templates typically include a set of tabs for displaying action tiles and organizing content items such as calendars, to do lists, searches, documents and folders, and reports by functional area. You can customize the content and layout of your dashboard tabs. You can also set preferences from the dashboard command bar.
Searching, completing tasks, and other common user actionsUsing and customizing the dashboard PUBLIC 7
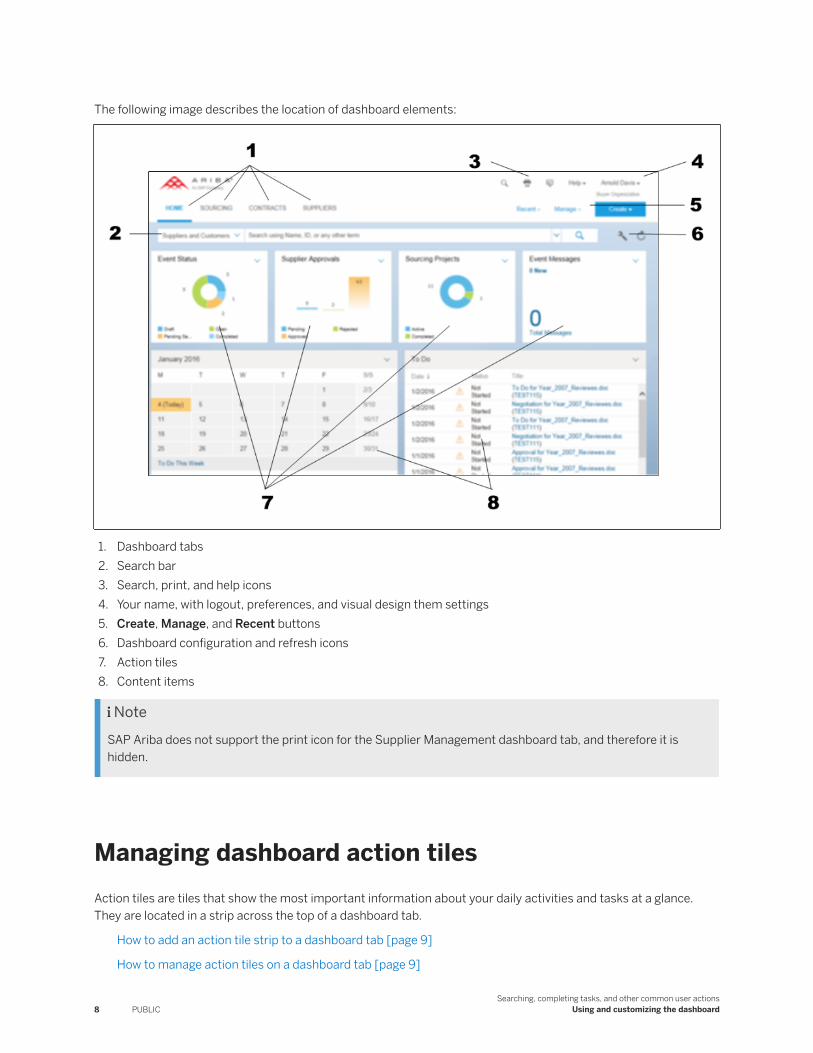
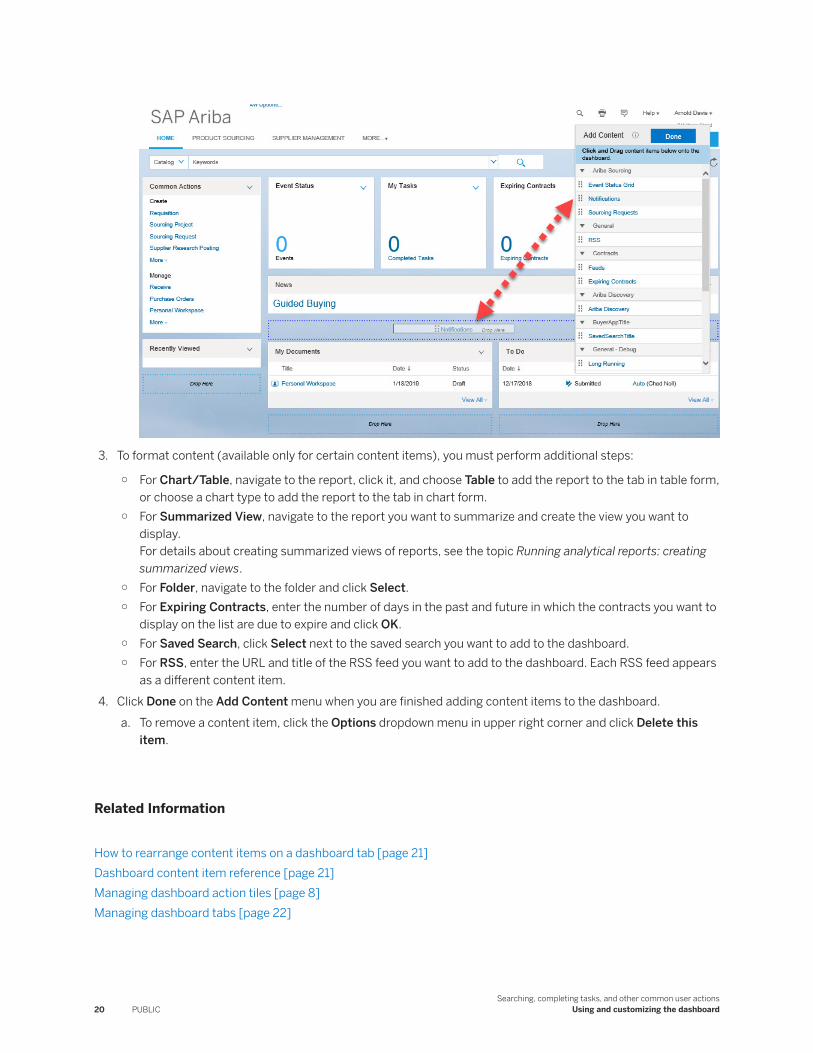
The following image describes the location of dashboard elements:
1. Dashboard tabs2. Search bar3. Search, print, and help icons4. Your name, with logout, preferences, and visual design them settings5. Create, Manage, and Recent buttons6. Dashboard configuration and refresh icons7. Action tiles8. Content items
NoteSAP Ariba does not support the print icon for the Supplier Management dashboard tab, and therefore it is hidden.
Managing dashboard action tilesAction tiles are tiles that show the most important information about your daily activities and tasks at a glance. They are located in a strip across the top of a dashboard tab.
How to add an action tile strip to a dashboard tab [page 9]
How to manage action tiles on a dashboard tab [page 9]
8 PUBLICSearching, completing tasks, and other common user actions
Using and customizing the dashboard
How to remove the action tile strip from a dashboard tab [page 10]
How to change action tile settings [page 11]
Dashboard action tile reference [page 12]
Dashboard action tile visibility reference [page 16]
How to add an action tile strip to a dashboard tab
Context
The action tile strip is always displayed at the top of a dashboard tab.
The action tiles that are available to you depend on the solutions your company has purchased, the dashboard tabs that are available to you, and your user permissions.
Procedure
1. Click the dashboard tab to which you want to add action tiles.
2. Click the dashboard configuration icon and select Add Content.3. Click the Add button to the right of Action Tiles.4. Click Done.
Related Information
How to manage action tiles on a dashboard tab [page 9]How to remove the action tile strip from a dashboard tab [page 10]How to change action tile settings [page 11]How to add, arrange, format, or remove content items [page 19]
How to manage action tiles on a dashboard tab
Prerequisites
This task assumes that the dashboard tab already includes an action tile strip.
The action tiles that are available to you depend on the solutions your company has purchased, the dashboard tabs that are available to you, and your user permissions.
Searching, completing tasks, and other common user actionsUsing and customizing the dashboard PUBLIC 9
Context
Action tiles are displayed in a strip along the top of a dashboard tab. You can change which tiles are displayed on a tab by selecting from a specific set of tiles available for that tab. You can add up to 5 action tiles to a dashboard. If your company uses dashboard templates, you can add action tiles to a template dashboard independently of the template.
You can also change the order in which tiles display from left to right on the strip.
Procedure
1. Click the dashboard tab for which you want to manage action tiles.2. Click the menu arrow in the upper right corner of any tile and select Manage All Tiles.3. Perform one of the following actions:
○ To remove one or more individual tiles from the action tile strip, in the Selected Tiles list, click Remove for those tiles.
○ To add one or more individual tiles from the action file strip, in the Available Tiles list, click Select for those tiles.
○ To change the position of an action tile on the strip, in the Selected Tiles list, drag it up to move it left or down to move it right.
○ To restore the default set of tiles for the current dashboard tab, click Restore Defaults.4. Slick OK.
Related Information
How to add an action tile strip to a dashboard tab [page 9]How to remove the action tile strip from a dashboard tab [page 10]How to change action tile settings [page 11]
How to remove the action tile strip from a dashboard tab
Procedure
1. Click the dashboard tab from which you want to remove the action tile strip.2. Click the menu arrow in the upper right corner of any tile and select Remove All Tiles.
10 PUBLICSearching, completing tasks, and other common user actions
Using and customizing the dashboard

Related Information
How to add an action tile strip to a dashboard tab [page 9]How to manage action tiles on a dashboard tab [page 9]How to change action tile settings [page 11]
How to change action tile settings
Prerequisites
This task assumes that the dashboard tab already includes an action tile strip.
The action tiles that are available to you depend on the solutions your company has purchased, the dashboard tabs that are available to you, and your user permissions.
Context
Some action tiles have settings that allow you to control the amount of data they show.
Procedure
1. Click the dashboard tab on which you want to change action tile settings.2. Click the menu arrow in the upper right corner of the tile whose settings you want to change and select Edit
Tile Settings.3. Edit the tile settings and click OK.
Related Information
How to add an action tile strip to a dashboard tab [page 9]How to manage action tiles on a dashboard tab [page 9]How to remove the action tile strip from a dashboard tab [page 10]
Searching, completing tasks, and other common user actionsUsing and customizing the dashboard PUBLIC 11
Dashboard action tile reference
The action tiles that you can add to your dashboard depend on the solutions your company has enabled, the dashboard tab you are on, and your user permissions.
Tile Applicable SAP Ariba Solutions Description
Event Status SAP Ariba Sourcing A stacked bar of active, open, and paused events by status (RFI, RFP, auction, forward auction, survey). The tile shows events that were created in the past number of days specified in the tile settings and which you own or are a team member of or have permission to view. The maximum number is 360 and the default is 30 days.
Click parts of the stacked bar to see the event types by status. Click Back to return to the original chart.
Event Messages SAP Ariba Contracts A pie chart of event message titles and count of new or total messages.
The tile displays the titles of new or total messages that were received within the number of days specified in the tile settings and which you own or are a team member of or have permission to view. The counts only include event messages sent by other users; they do not include system-generated messages.
Click a pie wedge to view the corresponding event message board.
12 PUBLICSearching, completing tasks, and other common user actions
Using and customizing the dashboard
Tile Applicable SAP Ariba Solutions Description
Expiring Contracts SAP Ariba Contracts A bar chart of expiring contracts over time.
NoteThe Expiring Contracts content item displays only expiring contracts owned by you. The Expiring Contracts action tile displays all expiring contracts for which you are on the team, even if you are not the project owner.
The tile shows the number of contracts that have expired in the past number of days specified in the tile settings, with a maximum of 90 days, and the number of contracts that will expire in the future number of days specified in the tile settings, with a maximum of 6 months.
Click a bar to filter the list of contracts by contracts that you can view, you own or can manage, you directly own, or you are a team member of.
Expiring Certificates SAP Ariba Contracts, SAP Ariba Sourcing, Ariba Supplier Information Management, and SAP Ariba Supplier Information and Performance Management
All supplier certificates (such as Green or Woman-Owned
that have expired in the 7, 30, 60, and 90 days for all suppliers in the site.
Sourcing Projects SAP Ariba Sourcing Donut of sourcing projects in Active, Completed, Canceled, Planned, and On Hold status. The chart includes all sourcing projects for which you are the owner, team member, or both.
You can filter the list of sourcing projects by projects that commenced on a specified date, were completed or will be completed by a specified date, and for which you are the owner, team member, or both.
Click the chart to see a list of the sourcing projects that fit your criteria (for example, Planned projects for the Owner).
Searching, completing tasks, and other common user actionsUsing and customizing the dashboard PUBLIC 13
Tile Applicable SAP Ariba Solutions Description
Sourcing Requests SAP Ariba Contracts, SAP Ariba Sourcing, and SAP Ariba Spend Analysis
Donut of sourcing requests in Approved and Needs Approval status. The number of sourcing requests with no process status are also displayed.
The chart includes all sourcing requests for which you are the owner, team member, or both.
You can filter the sourcing requests by requests that commenced on a specified date and for which you are the owner, team member, or both. You can also choose to include or exclude approved sourcing requests.
Click the chart to see a list of the sourcing requests that fit your criteria.
Supplier Approvals Ariba Supplier Information Management and SAP Ariba Supplier Information and Performance Management
A chart showing the number of approved and unapproved suppliers in the site.
My Tasks SAP Ariba Contracts, SAP Ariba Sourcing, Ariba Supplier Information Management, and SAP Ariba Supplier Information and Performance Management
A chart showing overdue and due (up to one year) project tasks whose due task status is "all" or "started only" and for which you are one or more of owner, approver, reviewer, watcher, or recipient.
Click the chart to see a list of the tasks.
My Closing Events SAP Ariba Sourcing A bar chart showing the number of active and paused events that will close in the specified time period.
You can filter the list of closing events by events that close up to the following 60 to 360 days and which you can view, you own, or you are a team member of.
Click a bar to see a list of the events.
14 PUBLICSearching, completing tasks, and other common user actions
Using and customizing the dashboard
Tile Applicable SAP Ariba Solutions Description
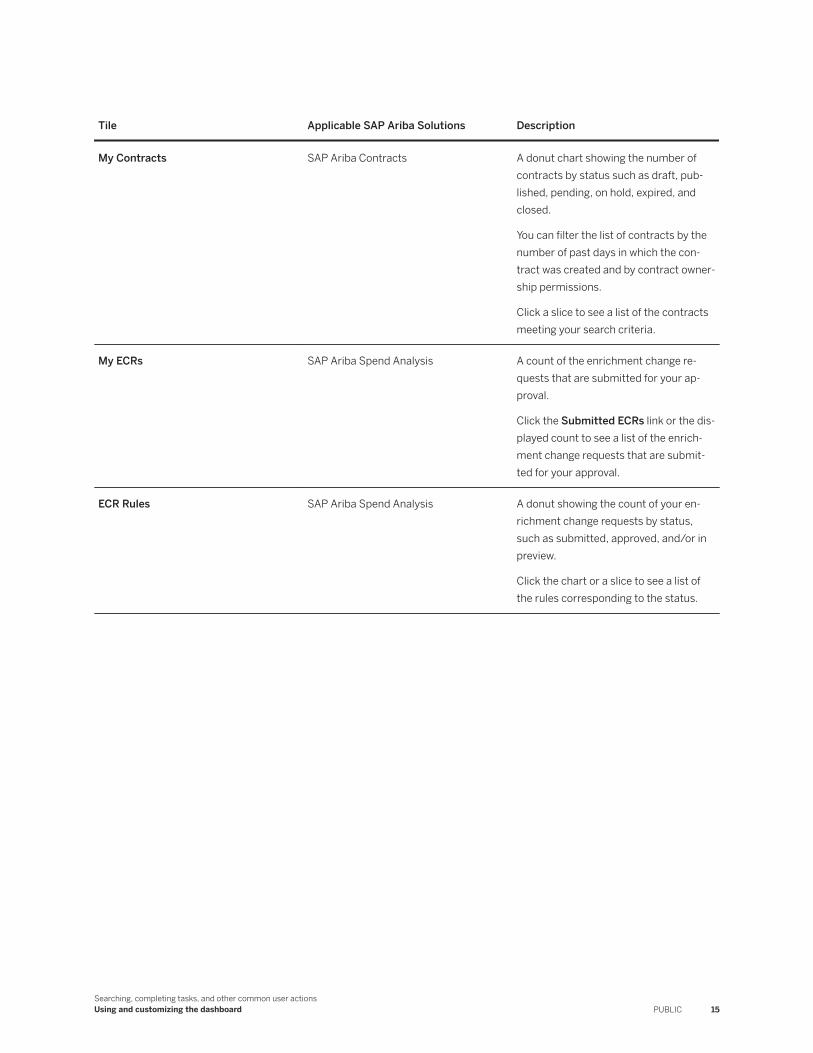
My Contracts SAP Ariba Contracts A donut chart showing the number of contracts by status such as draft, published, pending, on hold, expired, and closed.
You can filter the list of contracts by the number of past days in which the contract was created and by contract ownership permissions.
Click a slice to see a list of the contracts meeting your search criteria.
My ECRs SAP Ariba Spend Analysis A count of the enrichment change requests that are submitted for your approval.
Click the Submitted ECRs link or the displayed count to see a list of the enrichment change requests that are submitted for your approval.
ECR Rules SAP Ariba Spend Analysis A donut showing the count of your enrichment change requests by status, such as submitted, approved, and/or in preview.
Click the chart or a slice to see a list of the rules corresponding to the status.
Searching, completing tasks, and other common user actionsUsing and customizing the dashboard PUBLIC 15
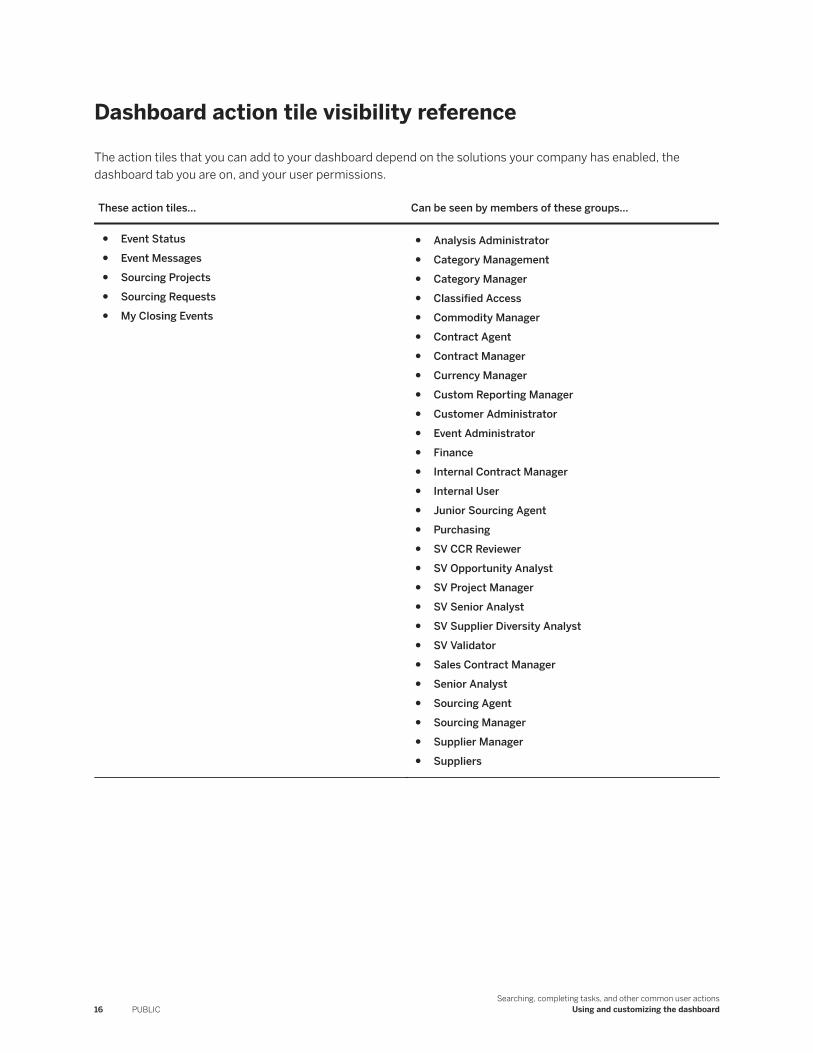
Dashboard action tile visibility reference
The action tiles that you can add to your dashboard depend on the solutions your company has enabled, the dashboard tab you are on, and your user permissions.
These action tiles... Can be seen by members of these groups...
● Event Status● Event Messages● Sourcing Projects● Sourcing Requests● My Closing Events
● Analysis Administrator● Category Management● Category Manager● Classified Access● Commodity Manager● Contract Agent● Contract Manager● Currency Manager● Custom Reporting Manager● Customer Administrator● Event Administrator● Finance● Internal Contract Manager● Internal User● Junior Sourcing Agent ● Purchasing● SV CCR Reviewer● SV Opportunity Analyst ● SV Project Manager● SV Senior Analyst● SV Supplier Diversity Analyst● SV Validator● Sales Contract Manager● Senior Analyst● Sourcing Agent● Sourcing Manager● Supplier Manager● Suppliers
16 PUBLICSearching, completing tasks, and other common user actions
Using and customizing the dashboard

These action tiles... Can be seen by members of these groups...
● Expiring Contracts● My Contracts
● Category Manager● Classified Access● Commodity Manager● Contract Administrator● Contract Agent● Contract Manager● Currency Manager● Customer Administrator● Internal Contract Administrator● Internal Contract Agent● Internal Contract Authorized● Internal Contract Manager● Internal User● Junior Sourcing Agent● Sales Contract Administrator● Sales Contract Agent● Sales Contract Authorized● Sales Contract Manager● Sales Contract Request Agent● Sourcing Agent● Suppliers
Searching, completing tasks, and other common user actionsUsing and customizing the dashboard PUBLIC 17
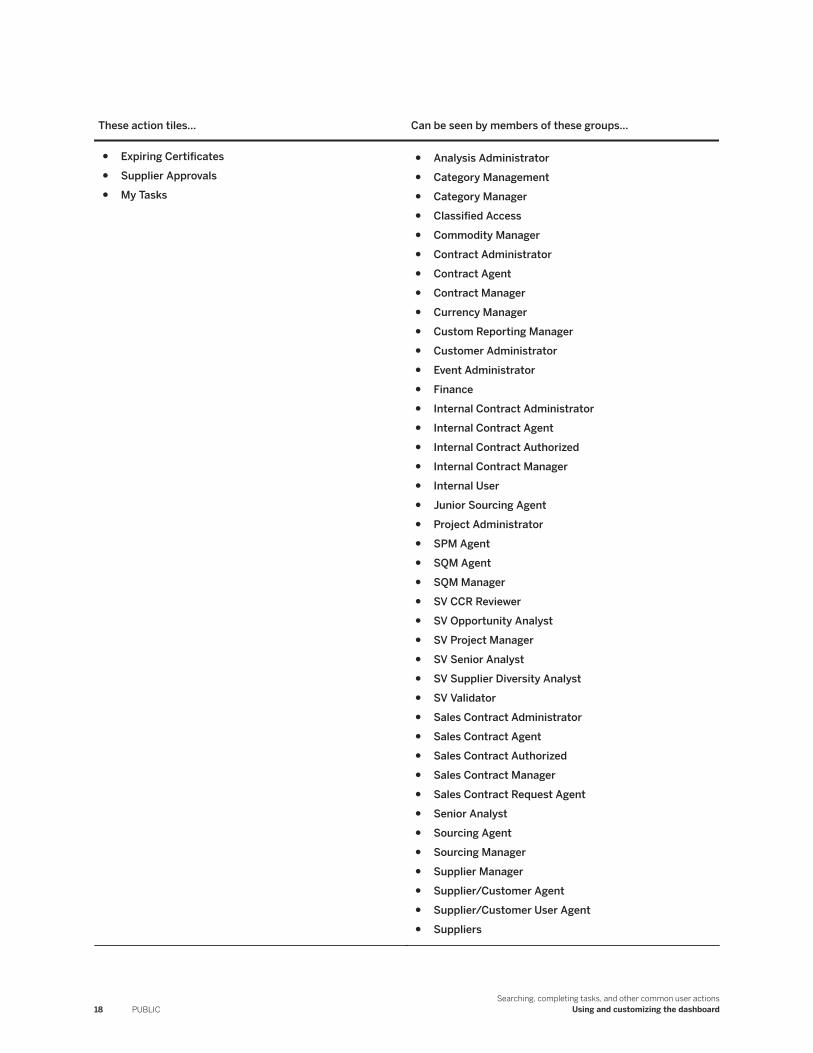
These action tiles... Can be seen by members of these groups...
● Expiring Certificates● Supplier Approvals● My Tasks
● Analysis Administrator● Category Management● Category Manager● Classified Access● Commodity Manager● Contract Administrator● Contract Agent● Contract Manager● Currency Manager● Custom Reporting Manager● Customer Administrator● Event Administrator● Finance● Internal Contract Administrator● Internal Contract Agent● Internal Contract Authorized● Internal Contract Manager● Internal User● Junior Sourcing Agent● Project Administrator● SPM Agent● SQM Agent● SQM Manager● SV CCR Reviewer● SV Opportunity Analyst● SV Project Manager● SV Senior Analyst● SV Supplier Diversity Analyst● SV Validator● Sales Contract Administrator● Sales Contract Agent● Sales Contract Authorized● Sales Contract Manager ● Sales Contract Request Agent● Senior Analyst● Sourcing Agent● Sourcing Manager● Supplier Manager● Supplier/Customer Agent ● Supplier/Customer User Agent● Suppliers
18 PUBLICSearching, completing tasks, and other common user actions
Using and customizing the dashboard
These action tiles... Can be seen by members of these groups...
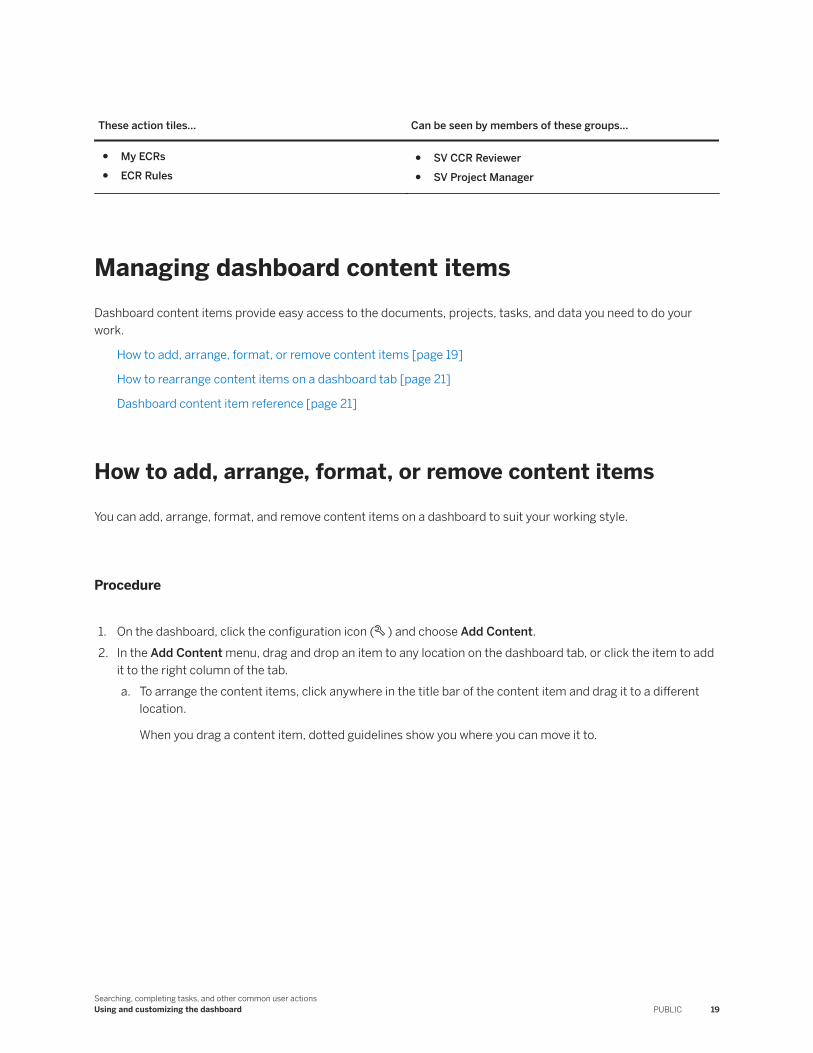
● My ECRs● ECR Rules
● SV CCR Reviewer● SV Project Manager
Managing dashboard content itemsDashboard content items provide easy access to the documents, projects, tasks, and data you need to do your work.
How to add, arrange, format, or remove content items [page 19]
How to rearrange content items on a dashboard tab [page 21]
Dashboard content item reference [page 21]
How to add, arrange, format, or remove content items
You can add, arrange, format, and remove content items on a dashboard to suit your working style.
Procedure
1. On the dashboard, click the configuration icon ( ) and choose Add Content.2. In the Add Content menu, drag and drop an item to any location on the dashboard tab, or click the item to add
it to the right column of the tab.a. To arrange the content items, click anywhere in the title bar of the content item and drag it to a different
location.
When you drag a content item, dotted guidelines show you where you can move it to.
Searching, completing tasks, and other common user actionsUsing and customizing the dashboard PUBLIC 19
3. To format content (available only for certain content items), you must perform additional steps:
○ For Chart/Table, navigate to the report, click it, and choose Table to add the report to the tab in table form, or choose a chart type to add the report to the tab in chart form.
○ For Summarized View, navigate to the report you want to summarize and create the view you want to display.For details about creating summarized views of reports, see the topic Running analytical reports: creating summarized views.
○ For Folder, navigate to the folder and click Select.○ For Expiring Contracts, enter the number of days in the past and future in which the contracts you want to
display on the list are due to expire and click OK.○ For Saved Search, click Select next to the saved search you want to add to the dashboard.○ For RSS, enter the URL and title of the RSS feed you want to add to the dashboard. Each RSS feed appears
as a different content item.4. Click Done on the Add Content menu when you are finished adding content items to the dashboard.
a. To remove a content item, click the Options dropdown menu in upper right corner and click Delete this item.
Related Information
How to rearrange content items on a dashboard tab [page 21]Dashboard content item reference [page 21]Managing dashboard action tiles [page 8]Managing dashboard tabs [page 22]
20 PUBLICSearching, completing tasks, and other common user actions
Using and customizing the dashboard
How to rearrange content items on a dashboard tab
You can reposition content items on dashboard tabs as desired.
Context
When you drag a content item on a tab, dotted guidelines show you where to drop it to move it to the right column, the left column, or an area that spans both columns.
Action tiles are always displayed at the top of the dashboard and cannot be moved to other locations. For more information about action tiles, see Managing dashboard action tiles [page 8].
Procedure
● Click the handle in the upper left-hand corner to the left of the content item name and drag the content item to a different location on the current tab, or drag it to a different tab name to move it to that tab.
Dashboard content item reference
The content you can add to your dashboard varies depending on the SAP Ariba solution your company has purchased and on your assigned user groups.
The following table describes all of the content items that are available:
Type of Content Available In Content Items and Descriptions
Common SAP Ariba Contracts, SAP Ariba Sourcing, SAP Ariba Spend Analysis
● Watched Projects—Lists any projects you have designated as watched projects. Clicking a project on the list opens it from the dashboard.
● Announcements—Lists project announcements for all of your projects.
● Calendar—Displays a calendar of the current month and lists all of your To Do tasks that are overdue, due in the current week, need review, or are submitted for review, as well as all tasks with alerts. Clicking a task on the list opens it from the dashboard.
Searching, completing tasks, and other common user actionsUsing and customizing the dashboard PUBLIC 21
Type of Content Available In Content Items and Descriptions
General SAP Ariba Contracts, SAP Ariba Sourcing, SAP Ariba Spend Analysis
● News—Displays the News content item, which your administrator configures to display news or announcements from your company.
● To Do—Lists open tasks on which you must perform some action. Clicking a task on the list opens the task from the dashboard, while
choosing View List My Tasks opens the My Tasks page.● Search—Displays a content item where you can search for projects
and documents or open saved searches.● My Documents—Lists the documents and projects to which you have
access, as well as your Personal Workspace folder. Clicking a document, project, or folder on the list opens it from the dashboard.
Contracts ● Expiring Contracts—Lists the contract workspaces that are set to expire in the specified time period. The time period is defined as a number of previous and future days relative to the current date. Clicking a contract on the list opens it from the dashboard.
Sourcing SAP Ariba Sourcing ● Event Status Grid—Lists the number of events in the past 12 months by status and type.
● Notifications—Lists recent event notification messages.
SAP Ariba Discovery SAP Ariba Contracts, SAP Ariba Sourcing, and SAP Ariba Supplier Management solutions
● SAP Ariba Discovery—Lists the recent SAP Ariba Discovery postings with end dates, number of responses, and number of questions.
Reports SAP Ariba Contracts, SAP Ariba Sourcing, SAP Ariba Spend Analysis, and SAP Ariba Supplier Management solutions
● Chart/Table—Displays a report chart or table; clicking the chart or table opens the report from the dashboard. Table reports on dashboards only display the first row field.
● Folder—Displays a report folder. Clicking the folder allows you to run any report in the folder from the dashboard.
● Summarized View—Displays a summarized view of a report.
NoteSome dashboard templates limit the types of content you can add to specific tabs.
Managing dashboard tabs
SAP Ariba solutions include default dashboard tabs. You can customize your dashboard by adding, removing, and editing the properties of dashboard tabs.
How to add a new dashboard tab [page 23]
How to change the title of a dashboard tab [page 24]
How to change the documents shown in a dashboard [page 24]
How to delete a tab from the dashboard [page 25]
22 PUBLICSearching, completing tasks, and other common user actions
Using and customizing the dashboard
How to add a new dashboard tab
You can add a new dashboard tab and choose which types of documents are displayed on that tab.
Procedure
1. On the dashboard, click the dashboard configuration icon ( ) and choose Tab Set Options Add New Tab .
2. Enter a title for the new dashboard tab in the Tab Name field.3. In the Document Types field, select one of the following:
○ Select Restrict the type of documents displayed on this tab to choose which types of documents are displayed on the dashboard tab.
○ Select Display all document types on this tab to display all document types on the dashboard tab.4. If you selected Restrict the type of documents displayed on this tab, choose one of the following to specify
the document types displayed on the dashboard:
○ Choose Display to make a document type visible on the dashboard tab.○ Choose Primary to make the current dashboard tab the main tab for documents of that type.
5. Click OK to save your settings.
The new dashboard tab appears on the command bar and the Add Content menu opens.
Results
The new dashboard tab appears on the command bar, and the Add Content menu opens so you can add content items to the tab.
Related Information
How to add, arrange, format, or remove content items [page 19]How to change the documents shown in a dashboard [page 24]How to change the title of a dashboard tab [page 24]Managing dashboard action tiles [page 8]
Searching, completing tasks, and other common user actionsUsing and customizing the dashboard PUBLIC 23
How to change the title of a dashboard tab
You can quickly change the titles of the tabs on the dashboard.
Procedure
1. Click the tab with the title you want to change.
2. Click the dashboard configuration icon ( ) and choose Current Tab Edit Properties .
The Edit Dashboard Tab Properties popup opens.3. Enter a new title in the Tab Name field, and click OK to save.
The dashboard displays the new name of the tab.
Related Information
Managing dashboard tabs [page 22]
How to change the documents shown in a dashboard
You can change which types of documents are shown on each dashboard tab.
Procedure
1. Click the tab to open the dashboard you want to work with.
2. Click the dashboard configuration icon ( ) in the upper right corner and choose Current Tab Edit Properties .
The Edit Dashboard Tab Properties popup opens.
The Tab Name field displays the name of the dashboard you're working in.
NoteTo change the name of the dashboard, retype the name in the Tab Name field and click OK.
3. In the Document Types field, select one of the following:
○ Click Display all document types on this tab to display all document types on the dashboard tab.○ Click Restrict the type of documents displayed on this tab to choose which types of documents are
displayed on the dashboard tab.
24 PUBLICSearching, completing tasks, and other common user actions
Using and customizing the dashboard
4. If you selected Restrict the type of documents displayed on this tab, choose one of the following to specify the document types displayed on the dashboard:
○ Check Display to view that document type on the selected dashboard.○ Check Primary to make the selected dashboard tab the main tab for viewing that document type.
5. Click OK to save your settings.
Related Information
Modifying your dashboardHow to add, arrange, format, or remove content items [page 19]How to change which saved search is displayed in a content item
How to delete a tab from the dashboard
You can remove tabs from the dashboard. If a tab you want to delete has content items associated with it, you may be prompted for confirmation to remove that content.
Procedure
1. Click the tab you want to delete.
2. Click the dashboard configuration icon and select Current Tab Delete Tab .3. If prompted, confirm that you want to delete the selected content.
How to add the current report to a dashboard tab
After you run a report, you can add it to a dashboard tab so that you have quick access to it without running it again.
Prerequisites
You can add reports to a dashboard tab only if your SAP Ariba solution includes the ability to save reports.
Searching, completing tasks, and other common user actionsUsing and customizing the dashboard PUBLIC 25
Context
When you add a report to the dashboard, initially, the report is added to the current dashboard tab. You can then move it to a different tab.
Procedure
1. Run the report.2. Click the report’s Dashboard tab, which displays the report as both a chart and a table, and click Add to
Dashboard next to the form of the report you want to add to the current dashboard tab.3. Save the current version of the report if prompted.
If you are saving the report for the first time, click Update dashboard to use this version so that when you make changes to the report in the future, your dashboard is updated with the latest version.
4. On the Change Layout page, use the arrow buttons to move the report to the location where you want it to be placed on the dashboard tab.
By default, it is placed in the left column of the dashboard tab.5. Click Done.
The report is added to the current dashboard tab.
Next Steps
You can move a report to another dashboard tab by dragging to that tab after you add it to the current tab.
Working with templated dashboardsSAP Ariba's out-of-the-box dashboard tabs have default settings. In addition, your company might provide custom dashboard templates to its users.
How to reset your dashboard to the template settings [page 27]
How to compare and reset your dashboard to default settings [page 27]
26 PUBLICSearching, completing tasks, and other common user actions
Using and customizing the dashboard
How to reset your dashboard to the template settings
You can reset all your dashboard tab settings to the settings defined in the dashboard template for your user group. When you reset your entire dashboard tab set to template settings, all of your dashboard customizations will be lost, including any new tabs you have added.
Context
For more information on dashboard templates, see the SAP Ariba Common Data Import and Administration Guide.
Procedure
1. Click the dashboard configuration icon and select Tab Set Options Revert Tab Set to Default Settings .
2. Click OK to confirm that you want to revert your entire dashboard.
How to compare and reset your dashboard to default settings
You can view differences between your personalized dashboard tabs and the default template. You can reset part or all of your dashboard tab set to the template settings.
Context
The initial content on dashboard tabs is determined by the dashboard template configured for your user group.
Resetting the entire dashboard resets all your dashboard tab settings to the settings defined in the dashboard template for your user group. All of your dashboard changes will be lost, including any new tabs you have added.
Procedure
1. Click the configuration icon ( ) and choose Compare Your Tabs to Default Settings.2. In the page that opens, click a tab to compare it to the default template settings.
If there are no differences between your configuration and the default template, the tab displays the following message: No changes. Your content for this tab matches the default.
Searching, completing tasks, and other common user actionsUsing and customizing the dashboard PUBLIC 27
3. To reset any part of your current dashboard to template settings, perform one of the following actions:
○ To reset specific content items to template settings, select the items and click Reset.○ To reset your entire dashboard tab set to template settings, click Reset All Dashboard Tabs, then click Yes
to confirm that you want to revert your entire dashboard. All of your dashboard customizations will be lost, including any new tabs you have added.
4. Click Done.
Results
The comparison between your current dashboard and the template settings displays the places where your current dashboard differs from the template. It does not list content items that are both in the template and on your current dashboard.
Related Information
Modifying your dashboardHow to add a new dashboard tab [page 23]How to delete a tab from the dashboard
How to switch between light, dark, and black themesThe visual design of SAP Ariba solutions includes light, dark, and black themes. You can switch between themes at any time.
Procedure
Click your name in the upper right corner of the page and under Theme choose Light Theme, Dark Theme, or Black Theme.
The dashboard will refresh and display the chosen theme.
Related Information
How to change the documents shown in a dashboard [page 24]How to change the title of a dashboard tab [page 24]
28 PUBLICSearching, completing tasks, and other common user actions
Using and customizing the dashboard
How to delete a tab from the dashboard
Searching, completing tasks, and other common user actionsUsing and customizing the dashboard PUBLIC 29
Managing your user profile and preferences
The preferences that are available to you depend on the SAP Ariba solution your company has purchased.
You can view and edit preferences by clicking your name in the upper right corner of the page and selecting one of the following preferences:
Preferences Description
Change reporting preferences View and edit the following reporting preferences:
● Default Currency: The default currency you see in reports, which can be any reporting currency configured in your site.
● Use data load schema: In sites that include SAP Ariba Spend Analysis, users with advanced permissions can view report data in the data load schema rather than the default production schema. See the SAP Ariba Reporting and Analysis Data Load and Administration Guide for more information about the data load and presentation schemas.
Change password Change your current password.
Change secret question Change the secret question and answer you use to get help with a forgotten password.
Delegate authority Give a selected user your permissions for a specific period of time, such as the time you are out of the office or on vacation. When you delegate authority, the assigned delegatee can act on tasks such as approval and review tasks on your behalf.
Update profile View and edit your user profile, which includes your email address and time zone.
Change default locale and currency View and edit your default locale, which includes language and currency settings, and view your default currency. Changes to locale settings take effect after you log out and log back in.
Change notification preferences View and edit your email notification settings for specific actions on projects, documents, tasks, and some other actions; specify the email format (HTML or text) for offline approval notifications.
Change Desktop File Sync Enable or disable DFS for SAP Ariba Contracts, SAP Ariba Sourcing, and SAP Ariba Supplier Information and Performance Management.
Change dashboard preferences View and edit settings for displaying confirmation pages when you delete dashboard tabs and content items.
Download sourcing user info Downloads information about your user record in SAP Ariba Strategic Sourcing and Supplier Management solutions.
Guided sourcing user preferences View and edit your guided sourcing preferences. This includes adding commodities from sourcing events to your preferred commodities and setting default filter values for supplier searches.
Related Information
How to download information about your user record [page 35]
30 PUBLICSearching, completing tasks, and other common user actions
Managing your user profile and preferences

Enabling Desktop File Sync [page 37]
Searching, completing tasks, and other common user actionsManaging your user profile and preferences PUBLIC 31
Setting up multifactor authentication
If you use application authentication, you can set up multifactor authentication to authenticate your login using a time-based verification code in addition to your password.
Customer administrators enable multifactor authentication for user accounts. If it has been enabled for your account, you must set up multifactor authentication immediately after it is enabled. The first time you log in to your SAP Ariba solution after multifactor authentication is enabled, you will be prompted to set it up. You have the option to skip the set up for a predefined period, which your administrator sets.
After you set up multifactor authentication, you can log in securely to your SAP Ariba solution by providing the verification code from your mobile device after entering your user name and password. You can choose to be remembered on a specific device by checking Remember Me on the multifactor authentication page. This will be valid for a limited time period, which your administrator sets.
If you skipped the multifactor authentication setup during login, you can use the Multi-Factor Authentication option in the user preferences menu to set up multifactor authentication later. You can also use this option to reset your multifactor authentication. When setting up multifactor authentication on a new or replacement mobile device, you reset your multifactor authentication by providing the verification code from your old device.
Related Information
How to set up multifactor authentication [page 32]How to set up multifactor authentication from the user preference menu [page 33]How to set up multifactor authentication using a new device [page 34]
How to set up multifactor authentication
Context
If a customer administrator enables multifactor authentication on your account, you must set up multifactor authentication the next time you sign on to your SAP Ariba solution.
Procedure
1. Log in to your SAP Ariba solution using your username and password.
The Multi-Factor Authentication setup page opens. To defer the setup, click Remind me later on this page.
32 PUBLICSearching, completing tasks, and other common user actions
Setting up multifactor authentication
2. Download and install an authenticator application on your mobile device. We recommend the SAP Authenticator app available for both iOS and Android.
3. Open the authenticator app and scan the QR code shown on the Multi-Factor Authentication setup page. Alternatively, click Show secure key to view the secure key, and then enter the secure key on your mobile device.
The authenticator application generates a time-based verification code.4. Enter the 6-digit verification code in the field on the Multi-Factor Authentication setup page.
Results
Multifactor authentication is now set up on your account. The next time you sign on using your username and password you will see the Multi-Factor Authentication page. You can enter the verification code generated by the authenticator application on this page to complete the log in.
How to set up multifactor authentication from the user preference menuContext
You can initiate the setup of multifactor authentication from your user preferences menu. This option is useful when you have skipped the setup during the initial sign on after multifactor authentication is enabled on your account.
Procedure
1. Click your profile icon or username and choose Multi-Factor Authentication from the Preferences menu.
The Multi-Factor Authentication set up page opens.2. Perform steps 2 through 4 in the procedure to set up multifactor authentication [page 32].
Searching, completing tasks, and other common user actionsSetting up multifactor authentication PUBLIC 33

How to set up multifactor authentication using a new deviceContext
When you change your mobile device, you can reset the multifactor authentication that had been configured using your old device. Using the verification code from the old device, you can set up multifactor authentication on your new device .
Procedure
1. Sign on to your SAP Ariba solution using multifactor authentication.2. Click your profile icon or username and choose Multi-Factor Authentication from the Preferences menu3. Enter the verification code from your old mobile device.4. Set up multifactor authentication again, using a new QR code on your new mobile device.
34 PUBLICSearching, completing tasks, and other common user actions
Setting up multifactor authentication
How to download information about your user record
The Preferences menu includes an option for downloading a TXT file of information about your user record.
Prerequisites
You can download this information only when logged in to the SAP Ariba solution as yourself. Delegatees and administrators can't perform this task on behalf of another user.
Context
The TXT file includes the following information:
● Date and time of the download● User name● Name● Business email address● Business address● Supervisor● Accepted privacy statement version (Depending on how your site is configured, this is the most recent version
of either the Ariba Privacy Statement or your oranization's privacy policy that you accepted at login, if your site requires you to accept a privacy policy at all.)
● When the user record was created● When the user record was last updated
● Email notification preferences (the user's settings from Preferences Change email notification preferences
Procedure
1. In the upper right corner of the dashboard, click your name and choose one of the following options:
○ For user info in SAP Ariba Procurement solutions, choose Download procurement user info○ For user info in SAP Ariba Strategic Sourcing and Supplier Management solutions, choose Download
sourcing user info
The Download user info to file page appears.2. Click Download.
Searching, completing tasks, and other common user actionsHow to download information about your user record PUBLIC 35
3. Open or save the file.
36 PUBLICSearching, completing tasks, and other common user actions
How to download information about your user record
Enabling Desktop File Sync
SAP Ariba strongly recommends that you enable Desktop File Sync (DFS) before working with documents in projects. DFS automates the uploading and downloading of files from and to SAP Ariba Strategic Sourcing solutions and allows you to check document version compatibility.
About enabling Desktop File Sync [page 37]
Desktop File Sync requirements [page 38]
How to enable DFS [page 39]
How to retain DFS settings when accessing SAP Ariba from a saved URL link [page 40]
About enabling Desktop File SyncDesktop File Sync (DFS) is required for some features and SAP Ariba strongly recommends that you enable DFS before working with documents in projects. DFS automates the uploading and downloading of files from and to SAP Ariba Strategic Sourcing solutions and allows you to check document version compatibility.
You must enable DFS to use any of the following features:
● Exporting tasks to Microsoft Outlook● Comparing versions of documents in Microsoft Word● Automatic downloading of project documents from SAP Ariba Strategic Sourcing solutions to your local file
system when you open them in the SAP Ariba solution● Automatic uploading of project documents to SAP Ariba Strategic Sourcing solutions after you save a new
version on your local file system● Comparing versions of Microsoft Word documents that are maintained by SAP Ariba Strategic Sourcing
solutions● Automatic uploading of your changes when reviewing a document with edit access for reviewers enabled● SAP Ariba Contracts Professional features, including:
○ the ability to create assembled contract documents (Main Agreement and Contract Addendum documents)
○ the Clause Library○ parsing contract documents to upload clauses and sections○ parsing contract documents with bookmarks○ automatically populating document properties fields in contract documents from field values in a contract
workspace
If you have DFS enabled, the system also enables the Microsoft Track Changes feature for assembled contract documents by default.
NoteYou do not have to enable DFS to export project information to Microsoft Project or Microsoft Excel.
Searching, completing tasks, and other common user actionsEnabling Desktop File Sync PUBLIC 37
When you create a contract workspace or open a project for which you are a member of the project owner group, the Desktop File Sync reminder warns you if you do not have DFS enabled.
The DFS reminder gives you the option of enabling DFS, ignoring the reminder for your current session in SAP Ariba Strategic Sourcing solutions, or disabling it permanently. You will only see the reminder if you do not have DFS enabled and have not disabled the reminder.
Desktop File Sync requirementsTo use Desktop File Sync (DFS), you must meet operating system, and web browser requirements.
DFS operating system requirements
DFS is supported on specific Microsoft Windows versions.
● Microsoft Windows 2000● Microsoft Windows XP● Microsoft Windows Vista● Microsoft Windows 7
38 PUBLICSearching, completing tasks, and other common user actions
Enabling Desktop File Sync
DFS Microsoft Windows user requirement
Your Windows user account must be a member of the Windows Administrator group to install the ActiveX control. You user account does not have to be a member of the Windows Administrator group after the ActiveX control is installed.
DFS web browser requirement
You must use Microsoft Internet Explorer version 6 or later with ActiveX controls allowed to run. Web browsers from other vendors do not provide the infrastructure needed for DFS.
Specific requirements for Internet Explorer version 6 or 7
When using Internet Explorer version 6 or 7, the security settings must be set for the zone that contains the SAP Ariba server, such as the local intranet zone.
The following security settings must be set as shown:
● Download signed ActiveX controls: Prompt● Run ActiveX controls and plug-ins: Enable● Script ActiveX controls marked safe for scripting: Enable
Specific requirements for Internet Explorer version 8 or later
When using Internet Explorer version 8 or later, the SAP Ariba server must be added to the Trusted sites zone under the Security tab. In addition, the default settings for the Trusted sites zone (Medium security level) must be selected.
See your Microsoft Internet Explorer documentation for more information.
How to enable DFSTo take advantage of Desktop File Sync, you must enable it on your system.
Prerequisites
See Desktop File Sync Requirements [page 38].
Searching, completing tasks, and other common user actionsEnabling Desktop File Sync PUBLIC 39
Procedure
1. Navigate to Desktop File Sync Preferences by doing one of the following:
○ In the Desktop File Sync reminder dialog box, click Enable DFS.○ On the dashboard, click your name in the upper right corner of the page and select Change Desktop File
Sync.2. On the Desktop File Sync Preferences page, click Enable.3. Click Next to install the ActiveX controls required for DFS.4. Click Browse and navigate to the folder you want to use as the Desktop Directory.
The Desktop Directory is the local file directory in which SAP Ariba synchronizes files. It is the only directory in which DFS looks for or places files. The My Documents directory is the default choice.
5. Click Done.6. To disable the DFS reminder, click the Disable Desktop File Sync check check box.7. Click Done to apply your DFS settings.
How to retain DFS settings when accessing SAP Ariba from a saved URL linkThe browser cookie that stores your DFS settings is associated with the main SAP Ariba login page. To use a saved URL link (a link saved in your browser favorites or bookmarks) to access SAP Ariba, you must use a URL that logs into the main login page for SAP Ariba.
Procedure
Save the SAP Ariba login URL without any subpaths or query strings. For example,
https://mycompany.ariba.com
40 PUBLICSearching, completing tasks, and other common user actions
Enabling Desktop File Sync
Searching for projects, documents, or project templates
How to search for projects or documents from the dashboard search bar [page 41]
How to search for projects or documents using the Search page [page 44]
Stemming in text searches [page 47]
Proper noun searches [page 48]
Partial-match and exact-match searches for ID fields [page 49]
Partial-match searches for custom fields [page 51]
Boolean operators for searches [page 51]
Stop words in searches [page 52]
Refining searches for projects, documents, and project templates [page 52]
View options for search results [page 57]
How to save a project or document search [page 59]
How to modify a saved project or document search [page 60]
Supported search document types [page 61]
How to search for projects or documents from the dashboard search barYou can search for various types of projects and documents, including knowledge projects, analytical reports, savings forms, contract workspaces, events, supplier and customer organizations, and SAP Ariba projects. You can also search for project templates.
Context
All project documents with searchable text are searched. See Supported search document types [page 61] for a list of searchable document types.
RestrictionThere can be a delay between the time a project or event is created and the time the project or event and project contents appear in search results and on the dashboard. Similarly, there can be a delay between the time data (project fields, event fields, or documents) is modified, added, or deleted and the time the modifications are reflected in search results and on the dashboard.
Searching, completing tasks, and other common user actionsSearching for projects, documents, or project templates PUBLIC 41
To enable users to search for projects using a custom project field as a filter, your SAP Ariba customer support representative must select the Search box in the Show in Views options for the field.
Procedure
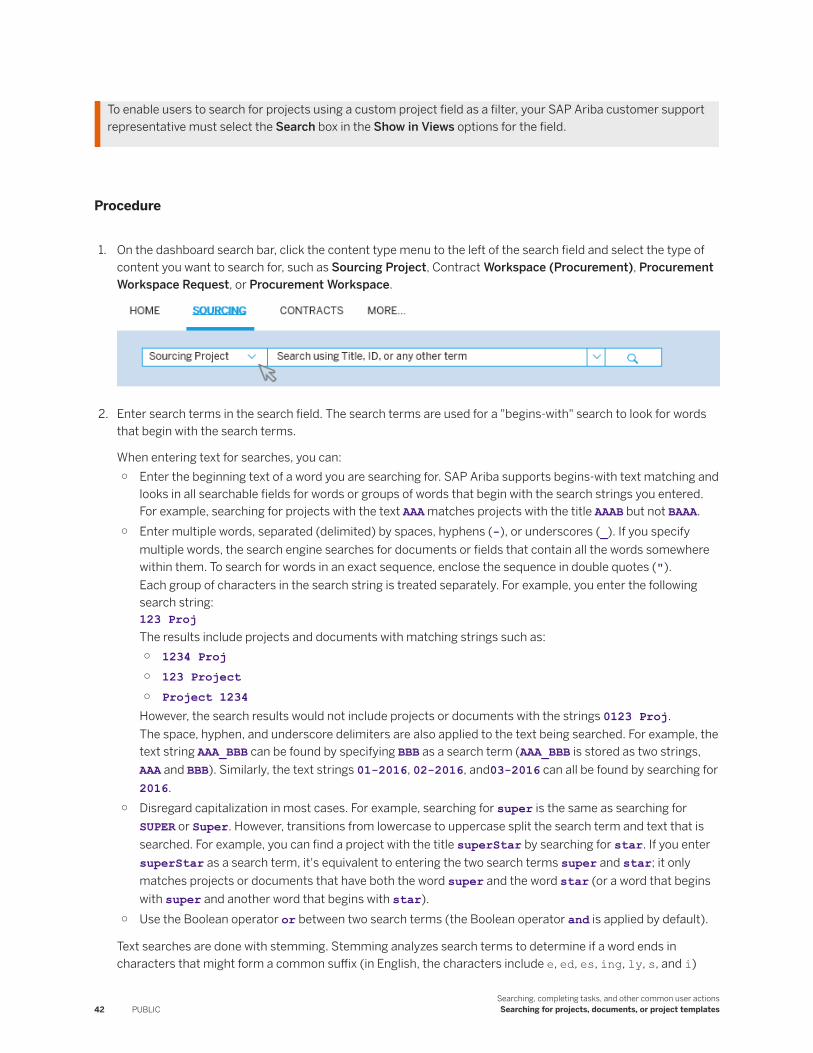
1. On the dashboard search bar, click the content type menu to the left of the search field and select the type of content you want to search for, such as Sourcing Project, Contract Workspace (Procurement), Procurement Workspace Request, or Procurement Workspace.
2. Enter search terms in the search field. The search terms are used for a "begins-with" search to look for words that begin with the search terms.
When entering text for searches, you can:○ Enter the beginning text of a word you are searching for. SAP Ariba supports begins-with text matching and
looks in all searchable fields for words or groups of words that begin with the search strings you entered. For example, searching for projects with the text AAA matches projects with the title AAAB but not BAAA.
○ Enter multiple words, separated (delimited) by spaces, hyphens (-), or underscores (_). If you specify multiple words, the search engine searches for documents or fields that contain all the words somewhere within them. To search for words in an exact sequence, enclose the sequence in double quotes (").Each group of characters in the search string is treated separately. For example, you enter the following search string:123 ProjThe results include projects and documents with matching strings such as:○ 1234 Proj○ 123 Project○ Project 1234
However, the search results would not include projects or documents with the strings 0123 Proj.The space, hyphen, and underscore delimiters are also applied to the text being searched. For example, the text string AAA_BBB can be found by specifying BBB as a search term (AAA_BBB is stored as two strings, AAA and BBB). Similarly, the text strings 01-2016, 02-2016, and03-2016 can all be found by searching for 2016.
○ Disregard capitalization in most cases. For example, searching for super is the same as searching for SUPER or Super. However, transitions from lowercase to uppercase split the search term and text that is searched. For example, you can find a project with the title superStar by searching for star. If you enter superStar as a search term, it's equivalent to entering the two search terms super and star; it only matches projects or documents that have both the word super and the word star (or a word that begins with super and another word that begins with star).
○ Use the Boolean operator or between two search terms (the Boolean operator and is applied by default).
Text searches are done with stemming. Stemming analyzes search terms to determine if a word ends in characters that might form a common suffix (in English, the characters include e, ed, es, ing, ly, s, and i)
42 PUBLICSearching, completing tasks, and other common user actionsSearching for projects, documents, or project templates
and then strips those letters out of the search term before running the search. For example, in English, if you enter the search term suppliers, the search engine strips the s and finds strings that start with supplier.
Searching using quotation marks does not prevent stemming. However, stemming is bypassed in English locales for the following search methods:○ Searching with the Title field filter for any object○ Searching with the Organization Name○ Searching by Contact Name when inviting participants to an event
The search engine assumes that Title, Organization Name, and Contact Name fields contain proper nouns and the search terms should not be altered. For more information about proper noun searches, see Proper noun searches [page 48].
For additional information about stemming, see Stemming in text searches [page 47].3. Perform one of the following actions:
○ Press Enter or click the search icon ( ) to start the search.○ Select a search filter or a saved search filter from the filter menu to the right of the search field. The search
starts automatically.
Next Steps
To search for matches in specific project or document fields, or to select search options (such as searching for project templates), use the Search page as described in How to search for projects or documents using the Search page [page 44].
Related Information
Stemming in text searches [page 47]Stop words in searches [page 52]How to search for projects or documents using the Search page [page 44]How to save a project or document search [page 59]How to modify a saved project or document search [page 60]Refining searches for projects, documents, and project templates [page 52]View options for search results [page 57]Supported search document types [page 61]
Searching, completing tasks, and other common user actionsSearching for projects, documents, or project templates PUBLIC 43
How to search for projects or documents using the Search pageYou can search using specific fields and criteria or perform a global search on all fields and document contents.
Context
You open the Search page by navigating to the dashboard bar, selecting the type of project or document you want to search for, and clicking the search icon ( ), or by clicking the search icon in the upper right corner of many workflow task pages.
By default, the Search page opens with search results if you navigated to the page from a saved search or if you entered data in the search field in the search bar. Otherwise, the system displays a list of the projects and templates you have most recently viewed and does not perform a search until you click Search. (SAP Ariba Customer Support can modify this behavior by setting system parameters.)
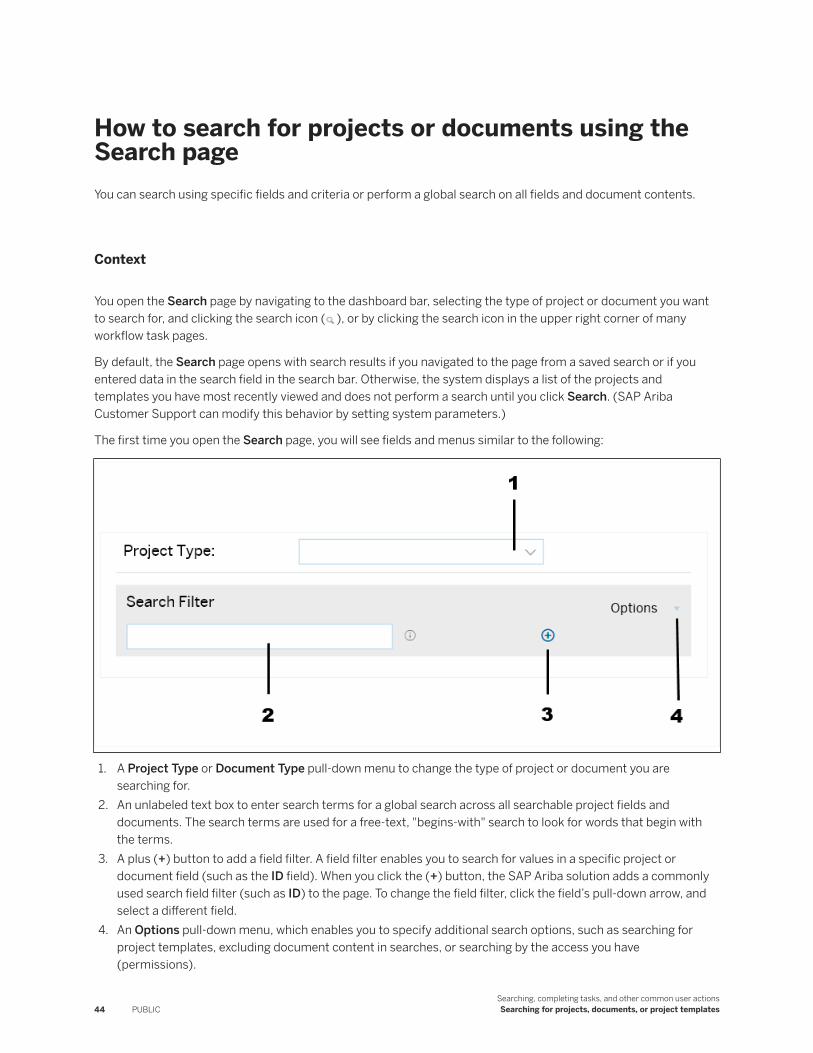
The first time you open the Search page, you will see fields and menus similar to the following:
1. A Project Type or Document Type pull-down menu to change the type of project or document you are searching for.
2. An unlabeled text box to enter search terms for a global search across all searchable project fields and documents. The search terms are used for a free-text, "begins-with" search to look for words that begin with the terms.
3. A plus (+) button to add a field filter. A field filter enables you to search for values in a specific project or document field (such as the ID field). When you click the (+) button, the SAP Ariba solution adds a commonly used search field filter (such as ID) to the page. To change the field filter, click the field’s pull-down arrow, and select a different field.
4. An Options pull-down menu, which enables you to specify additional search options, such as searching for project templates, excluding document content in searches, or searching by the access you have (permissions).
44 PUBLICSearching, completing tasks, and other common user actionsSearching for projects, documents, or project templates
Procedure
1. Optional: To change the type of project or document you are searching for, select an item from the Project Type or Document Type pull-down menu (the type of menu is dependent on the item type selected when you opened the Search page).
2. Optional: Select an item from the Options menu to change the type or scope of the search. For example, you can select Display Only Templates .
Tip
To exclude document contents from the search, clear the option Advanced Include Document Contents in Free-Text Search (it is enabled by default).
3. To search for matching text in text-based project fields (such as the Title, Description, and Owner fields) and project documents with searchable text, enter text in the unlabeled text box.
When entering text for searches, you can:○ Enter the beginning text of a word you are searching for. SAP Ariba supports begins-with text matching and
looks in all searchable fields for words or groups of words that begin with the search strings you entered. For example, searching for projects with the text AAA matches projects with the title AAAB but not BAAA.
○ Enter multiple words, separated (delimited) by spaces, hyphens (-), or underscores (_). If you specify multiple words, the search engine searches for documents or fields that contain all the words somewhere within them. To search for words in an exact sequence, enclose the sequence in double quotes (").Each group of characters in the search string is treated separately. For example, you enter the following search string:123 ProjThe results include projects and documents with matching strings such as:○ 1234 Proj○ 123 Project○ Project 1234
However, the search results would not include projects or documents with the strings 0123 Proj.The space, hyphen, and underscore delimiters are also applied to the text being searched. For example, the text string AAA_BBB can be found by specifying BBB as a search term (AAA_BBB is stored as two strings, AAA and BBB). Similarly, the text strings 01-2016, 02-2016, and03-2016 can all be found by searching for 2016.
○ Disregard capitalization in most cases. For example, searching for super is the same as searching for SUPER or Super. However, transitions from lowercase to uppercase split the search term and text that is searched. For example, you can find a project with the title superStar by searching for star. If you enter superStar as a search term, it's equivalent to entering the two search terms super and star; it only matches projects or documents that have both the word super and the word star (or a word that begins with super and another word that begins with star).
○ Use the Boolean operator or between two search terms (the Boolean operator and is applied by default).
Text searches are done with stemming. Stemming analyzes search terms to determine if a word ends in characters that might form a common suffix (in English, the characters include e, ed, es, ing, ly, s, and i) and then strips those letters out of the search term before running the search. For example, in English, if you enter the search term suppliers, the search engine strips the s and finds strings that start with supplier.
Searching using quotation marks does not prevent stemming. However, stemming is bypassed in English locales for the following search methods:
Searching, completing tasks, and other common user actionsSearching for projects, documents, or project templates PUBLIC 45
○ Searching with the Title field filter for any object○ Searching with the Organization Name○ Searching by Contact Name when inviting participants to an event
The search engine assumes that Title, Organization Name, and Contact Name fields contain proper nouns and the search terms should not be altered. For more information about proper noun searches, see Proper noun searches [page 48].
For additional information about stemming, see Stemming in text searches [page 47].4. To search for matches in specific project fields, click the + button to add a field filter.
A field filter is added to the search page. By default, the first time you add criteria, the SAP Ariba solution adds the most commonly used field filter.
a. If you want to search using a different field, click the field’s pull-down arrow, and select a different field.
The fields are listed according to the frequency with which they are used as filters. The most frequently used filters appear at the top of the list. (The order changes over time to reflect the filters you typically select.).
At the bottom of the search filter list is an Others option, which you can use to select multiple field filters at one time. The Others option opens a dialog box that lists all the available fields in alphabetical order.
If you have previously entered values in search filter fields for the same project or document type in your current login session, the system displays these values but does not perform a search until you click the Search button. To clear the filter values, click Reset.
b. Specify search criteria for the field.○ If the field can contain only values from a set of specific values, such as the Commodities or Owner
field, you will see a pull-down menu with values or a select link you click to open a chooser. Choose a value.When specifying search values for fields with a hierarchical structure (such as the Region or Commodity), you can include parent matches, as described in How to enable or disable hierarchical match options for project and document searches [page 55].
○ If the field can contain any string, such as the Description field, enter search text. Matching is done using begins-with text matching and stemming [page 47], except for the following field filters:○ Title and Organization Name. These fields are searched without stemming and using using logic
optimized for proper noun matches, as described in Proper noun searches [page 48].○ ID (internal ID), Contract ID, and Related ID. These fields are searched using partial-match
searches [page 49] (matching text in any part of the ID) and without stemming.○ ID (Exact Match) (internal ID) and Contract ID (Exact Match). These fields are searched using
exact-match searches [page 49] (exactly matching the ID) and without stemming.○ By default, a field filter with no value specified matches any value in that field (like a wildcard). To to
match empty values in a field, choose Options Match Empty Values from the upper-right corner of the search page. The Match Empty Values option is valid for all field data types except Boolean. For more information, see How to search for empty fields [page 56].
c. To add another field filter, click a + button. If you use multiple field filters, only projects or documents that satisfy all field filters are shown in the search results.
Clicking the + button at the top of the page adds a new field filter to the bottom. Clicking the + button in one of the criteria rows adds the new field filter below that row.
d. To remove a field filter, click the - button in the row for that filter.5. After entering all the criteria you want, click Search to run the search.
46 PUBLICSearching, completing tasks, and other common user actionsSearching for projects, documents, or project templates
Next Steps
You can refine your search and search within the results by entering new filter data and clicking Search again.
If you cannot find the item you are looking for, it is possible you do not have the appropriate permission to view it. Search results only display items you have permission to view.
To clear the results and start a new search, click Reset.
By default, the maximum time allowed for a search is 60 seconds. This time limit is controlled by the Application.ACM.Search.TimeoutSeconds parameter. The maximum value for this parameter is 300 seconds (5 minutes). If you would like to change the value of this parameter, please have your Designated Support Contact log a service request. An SAP Ariba Customer Support representative will follow up to complete the request.
Related Information
Stemming in text searches [page 47]Proper noun searches [page 48]Partial-match and exact-match searches for ID fields [page 49]Partial-match searches for custom fields [page 51]Boolean operators for searches [page 51]Stop words in searches [page 52]How to search for projects or documents from the dashboard search bar [page 41]How to save a project or document search [page 59]How to modify a saved project or document search [page 60]Refining searches for projects, documents, and project templates [page 52]View options for search results [page 57]Supported search document types [page 61]
Stemming in text searchesWhen you enter a search term in the unlabeled (global) search field and in most text search filter fields, the search engine stems the word by analyzing whether it ends in letters that might form a common suffix, and then stripping those letters out of the search term before running the search.
For example, in English, if you enter the search term bats, the search engine strips the s and finds strings that start with bat. The purpose of stemming is to perform the search using the root of the word in order to return a more complete list of results.
In English, stemming strips the following characters from the end of a search term:
● e● ed
Searching, completing tasks, and other common user actionsSearching for projects, documents, or project templates PUBLIC 47
● es● ing● ly● s● y (replaced with i).
Stemming is also applied to text that is stored for searching. For example, the English word Pony in a description is stored with the root word poni. A stemmed search in English for pony matches this description because the search term pony is replaced with the root word poni. In addition, a stemmed search in English for ponies matches this description because the search term ponies is replaced with poni. However, a stemmed search in English for poly will not match the word polyester in a description. The search term poly is replaced with poli, but the y in polyester is not replaced because it is not at the end of the word polyester.
Sometimes, the characters that are stripped or replaced do not form a suffix. For example, in English, if you enter the search term apple, the e is stripped (even though the e is not a suffix), so the results include not only apple but also apply and application.
Searching using quotation marks does not prevent stemming. However, stemming is bypassed in English locales for the following search methods:
● Searching with the Title field filter for any object● Searching with the Organization Name● Searching by Contact Name when inviting participants to an event
The search engine assumes that Title, Organization Name, and Contact Name fields contain proper nouns and the search terms should not be altered. For more information about proper noun searches, see Proper noun searches [page 48].
Stemming is also bypassed when using the following field filters:
● Project ID● Contract ID● Related ID● Project ID (Exact Match)● Contract ID (Exact Match)
Searches using these field filters use search methods described in Partial-match and exact-match searches for ID fields [page 49].
Proper noun searchesProper noun searches are used for the following search methods in English locales:
● Searching with the Title field filter for any object● Searching with the Organization Name field filter for suppliers● Searching by Contact Name when inviting participants to an event
48 PUBLICSearching, completing tasks, and other common user actionsSearching for projects, documents, or project templates

Search text entered for proper noun field searches is processed similar to free-text searches with the following differences:
● Stemming is not applied. Common word endings (such as s and es) are not stripped or replaced.● Transitions between numbers and letters are recognized as delimiters. For example, SD500 can be found by
searching for 500.
Proper noun searches support all other features supported for free-text searches, including begins-with text matching, and Boolean operators. Proper noun searches are not case sensitive, but transitions from lowercase to uppercase letters split search terms and text in search items. For example, you can find a project with the title superStar by searching for star. If you enter superStar as a search term, it's equivalent to entering the 2 search terms super and star.
NoteYou can also search for text in the Title or Organization Name by entering search terms in the unlabeled (global) search box on the Search page or in the dashboard Search bar instead of using field filters. If you do not use a field filter, a text search without the proper-noun search feature is done.
Related Information
How to search for projects or documents from the dashboard search bar [page 41]How to search for projects or documents using the Search page [page 44]How to search for projects or documents using the Search page [page 44]
Partial-match and exact-match searches for ID fieldsYou can use the following field filters to search for projects, contract workspaces, and documents by ID:
● ID (the internal ID of a project or document)● Contract ID● Related ID● ID (Exact Match)● Contract ID (Exact Match)
Searches using an ID, Contract ID, or Related ID field filter are performed using partial matches (matching text in any part of the ID).
Searches using an ID (Exact Match) or Contract ID (Exact Match) are performed using exact matches.
NoteYou can include supplier IDs in the supplier selection list, and you can search by supplier ID. For more information, see Including the supplier ID in supplier selection lists and Searching suppliers by ID in the Event management guide.
Searching, completing tasks, and other common user actionsSearching for projects, documents, or project templates PUBLIC 49
Partial-match ID searches
Partial-match searches for IDs are processed similar to free-text searches with the following differences:
● You must enter at least 4 characters. You cannot enter more than 20 characters.● The search text does not need to match the beginning of the ID. A partial-match search is used instead of a
begins-with search, so an ID field filter with the search text 1234 finds projects with the string 1234 anywhere in the ID, such as the IDs WS1234 and WS0001234.
● Stemming is not applied. Common word endings (such as s and es) are not stripped or replaced.● Partial-match ID searches are not case sensitive. The search term ws1234 matches the ID WS1234.● You can enter multiple IDs, but they must be separated by spaces. Hyphens (-) are not recognized as
delimiters. Each search term is handled as a separate ID specification and returns the projects that match any of the ID specifications.
Exact-match ID searches
Searches using an ID (Exact Match) or Contract ID (Exact Match) field filter are not optimized to allow partial ID specifications. You must:
● Enter complete IDs● Match the case. If you want to find your project with ID WS1234, you must enter WS1234 for the search term;
the search term ws1234 will not match your project.
Multiple-ID searches
You can specifiy multiple IDs for the following search field filters:
● Contract ID● Contract ID (Exact Match)● ID● ID (Exact Match)
Use spaces to separate the IDs. For example:
SYS100 SYS222 SYS999
TipIf you have a list of specific project or contract IDs, use the ID (Exact Match) or Contract ID (Exact Match) filter. The ID and Contract ID filters use a partial-match search, so searching for SYS100 matches all IDs that start with SYS100, such as SYS1001 and SYS1002.
Users can also click the pop-up icon ( ) to open a pop-up that accepts multiple IDs separated by line breaks or spaces. Special characters (such as commas, periods, dashes, underscores, or ampersands) are not recognized as delimiters.
50 PUBLICSearching, completing tasks, and other common user actionsSearching for projects, documents, or project templates

Limitations
The maximum number of IDs you can specify in a search filter is 10,000.
Related Information
How to search for projects or documents using the Search page [page 44]About Text Searches
Partial-match searches for custom fields
Partial-match searches are performed for a custom project field if the field is configured to use the Supports Limited Partial Match Search option.
Partial-match searches for custom fields are processed similar to free-text searches with the following differences:
● You must enter at least 4 characters. You cannot enter more than 20 characters.● The search text does not need to match the beginning of the field value. A partial-match search is used instead
of a begins-with search, so a custom field filter with the search text 1234 matches fields with the string 1234 anywhere in the field, including strings such as AA1234.
● Stemming is not applied. Common word endings (such as s and es) are not stripped or replaced.● Partial-match searches are not case sensitive. The search term aa1234 matches the field value AA1234.● You can enter multiple search terms, but they must be separated by spaces. Hyphens (-) are not recognized as
delimiters. If you enter multiple search terms, only the items that match all terms in the field are returned by default. You can use the Boolean OR operator between terms to find items that match any of the terms.
Related Information
How to search for projects or documents using the Search page [page 44]
Boolean operators for searchesBoolean operators allows you to create searches involving more than one word.
Searches support the following boolean operators:
● or● and
Searching, completing tasks, and other common user actionsSearching for projects, documents, or project templates PUBLIC 51
When you enter these operators between two search terms in the global search field or a text field filter such as Title or Description, the search does not treat these operators as literal words. Instead, it recognizes them as special operators that you can use to create complex search queries. For example:
● building or construction returns results that contain either building or construction● building and construction returns only results that contain both building and construction
By default, the search utility applies the and operator between all search terms, so the query building and construction returns the same results as building and construction.
Enclose a multi-word phrase in quotation marks to search for the search terms in exactly the specified order. For example: “building construction”.
Related Information
How to search for projects or documents using the Search page [page 44]
Stop words in searches
Stop words are deliberately removed from search terms, because they do not contribute to document matching.
The search process takes more time the more search terms are used, so ignoring certain words can decrease search times. These ignored search terms are called stop words.
Words such as "I" and "about" are not very valuable to the pattern matching process used to select search results. For example, if you search using a phrase like "I want documents about buying computers," the first four words don't contribute much. You would get the same results, faster, searching on "buying computers." By filtering stop words out of your search term before processing, our search system saves you time.
Refining searches for projects, documents, and project templates
Related Information
How to search for projects or documents from the dashboard search bar [page 41]How to search for projects or documents using the Search page [page 44]
52 PUBLICSearching, completing tasks, and other common user actionsSearching for projects, documents, or project templates
How to search for project templates
Procedure
1. On the dashboard search bar, select the type of project or document you want to search for and click the search icon ( ).
2. On the Search page, select the template’s project type from the Project Type pull-down menu.
3. Select Options Display Only Templates .4. Enter search terms in the unlabeled (global) search box or select field filters and filter values.5. Click Search.
How to limit search results by permissions
You can limit search results by the permission or role you have in a project.
Procedure
1. On the dashboard search bar, select the type of project or document you want to search for and click the search icon ( ).
2. On the Search page, select Options Permissions and one of the following permissions:
○ Projects I can view: All projects you can view, including projects for which you are a team member, projects you own or manage, or projects with no access control limits.
○ Projects I own or can manage: All projects for which you are the owner or for which you have Project Owner capabilities. For more information, see About Searching for Projects or Documents by Owner [page 54].
○ Projects I directly own: All projects for which you are the owner. For more information, see About Searching for Projects or Documents by Owner [page 54].
○ Projects I am a team member of: All projects for which you are a team member.3. Enter search terms in the unlabeled (global) search box or select field filters and filter values.4. Click Search.
Searching, completing tasks, and other common user actionsSearching for projects, documents, or project templates PUBLIC 53
How to search for projects or documents by owner
You can search for projects or documents by owner.
Procedure
1. On the dashboard search bar, select the type of project or document you want to search for and click the search icon ( ).
2. On the Search page, complete one of the following actions:
○ Click + and add an Owner filter field. Click select to open a chooser and select users.
○ Click the Options menu and select Permissions Projects I Directly Own .
○ Click the Options menu and select Permissions Projects I own or can manage .
Results
Searches for Owner show projects or documents if either of the following statements are true:
● The user specified is in the Owner field for the project.● The user specified is a member of a group specified in the Owner field.
Searches Permissions Projects I Directly Own show projects or documents if either of the following statements are true:
● The user performing the search is in the Owner field for the project.● The user performing the search is a member of a group specified in the Owner field.
Searches for Owner or Permissions Projects I Directly Own show projects or documents if either of the following statements are true:
● The user is specified in the Owner field for the project.● The user is a member of a group specified in the Owner field.
Searches for Permissions Projects I own or can manage show projects or all documents within projects for which the user performing the search is:
● The owner. The user is the document owner or is specified in the Owner field for the project. The owner is always a single, named user; it cannot be a global user group.
● A member of the Project Owner or Administrators group for the project.● A member of any other project group with a role that has the Project Owner role assigned to it.● A member of the project team (as a member of any project group) if the user is also a member of a global
group that has the ability to manage projects, which is usually inherited from membership in a powerful administrative group.
54 PUBLICSearching, completing tasks, and other common user actionsSearching for projects, documents, or project templates
Next Steps
You can further refine your search and restrict the results to projects you have permission to view and that are owned by specific users or with specific users as team members by using the Owner (Direct), and Team Member filter fields to the Search page.
How to enable or disable hierarchical match options for project and document searches
By default, hierarchical searches are enabled and the search utility includes all matches in a hierarchical path when you use field filters for fields that are organized in a hierarchical structure, such as Commodity, Region, or Department.
Prerequisites
Open a Search page as described in How to search for projects or documents using the Search page [page 44].
Procedure
To disable or enable hierarchical searches, click the Options menu in the upper-right corner and click or clear the Hierarchical Search and Hierarchical Search Includes Parents options.
Results
In the following example, which illustrates hierarchical structure, the Region hierarchical structure is as follows:
● Asia Pacific● China
(Asia Pacific is the parent region for China.)
The user has the following projects:
Project 1, with Region = Asia Pacific
Project 2, with Region = China
The Hierarchical Search option includes results with field values that match the search value and those with field values below the search value in the hierarchy. For example, if the Hierarchical Search option is enabled, the search for Region = Asia Pacific matches Project 1 and Project 2. If the Hierarchical Search option is disabled, the same search only returns Project 1.
Searching, completing tasks, and other common user actionsSearching for projects, documents, or project templates PUBLIC 55
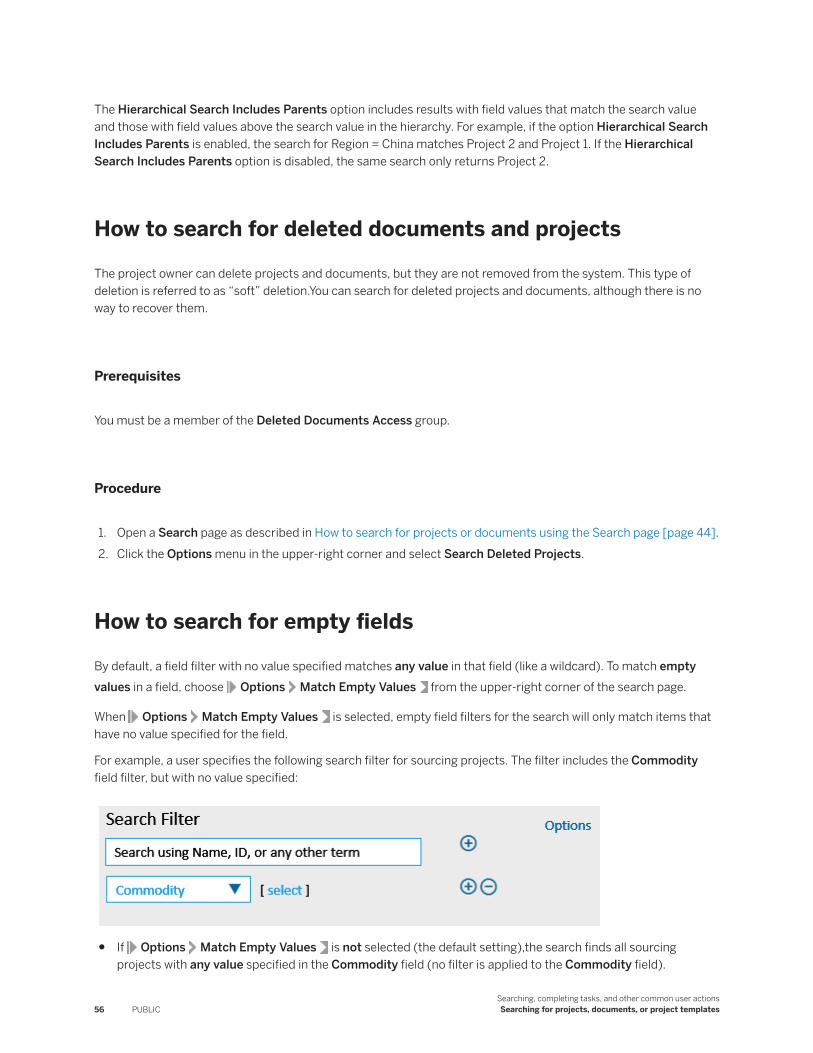
The Hierarchical Search Includes Parents option includes results with field values that match the search value and those with field values above the search value in the hierarchy. For example, if the option Hierarchical Search Includes Parents is enabled, the search for Region = China matches Project 2 and Project 1. If the Hierarchical Search Includes Parents option is disabled, the same search only returns Project 2.
How to search for deleted documents and projects
The project owner can delete projects and documents, but they are not removed from the system. This type of deletion is referred to as “soft” deletion.You can search for deleted projects and documents, although there is no way to recover them.
Prerequisites
You must be a member of the Deleted Documents Access group.
Procedure
1. Open a Search page as described in How to search for projects or documents using the Search page [page 44].2. Click the Options menu in the upper-right corner and select Search Deleted Projects.
How to search for empty fields
By default, a field filter with no value specified matches any value in that field (like a wildcard). To match empty values in a field, choose Options Match Empty Values from the upper-right corner of the search page.
When Options Match Empty Values is selected, empty field filters for the search will only match items that have no value specified for the field.
For example, a user specifies the following search filter for sourcing projects. The filter includes the Commodity field filter, but with no value specified:
● If Options Match Empty Values is not selected (the default setting),the search finds all sourcing projects with any value specified in the Commodity field (no filter is applied to the Commodity field).
56 PUBLICSearching, completing tasks, and other common user actionsSearching for projects, documents, or project templates
● If Options Match Empty Values is selected, the search finds only sourcing projects that have an empty value (no value) specified in the Commodity field.
The Options Match Empty Values menu choice is applicable to search field filters for standard and custom fields for documents, projects, and reponses for Supplier Profile Questionnaires with any data type except Boolean. This includes fields and responses that are text, decimal numbers, whole numbers, integers and dates (single values or ranges), and lists of choices.
The setting for Options Match Empty Values is not retained if the user navigates away from the search page.
Limitations
The Match Empty Values option is ignored for:
● The Title search field filter.● Search field filters with Boolean type values.
View options for search results
Related Information
How to search for projects or documents from the dashboard search bar [page 41]How to search for projects or documents using the Search page [page 44]
How to view more than 50 results for project or document searches
By default, you see a maximum of 50 search results when you search for a project or document, but you can override that limit to see more results.
Procedure
1. On the dashboard search bar, select the type of project or document you want to search for and click the search icon ( ).
2. On the Search page, select Options Ignore Max Results Limit .
Selecting the Ignore Max Results Limit option can cause a delay when showing the search results.
The Ignore Max Results Limit option is not saved. To use it, you must set it in each search you run.
Searching, completing tasks, and other common user actionsSearching for projects, documents, or project templates PUBLIC 57
How to sort and select search result columns
You can sort results by the different columns that show up in the search results, and you can choose which columns in the search results to hide or show.
Procedure
1. In the Search Result table on the Search page, click the Table Options icon in the upper right corner of the table to display the Table Options menu.
2. Choose View List to change the results display.3. To sort by column, click a column heading and toggle the sort order arrow that appears.4. To select which columns appear in the list use the Show/Hide toggles in the Table Options menu.
NoteYou can also use the Group by Column options to group together all the results with a particular name, owner, commodity, or status.
How to view project or document descriptions and details in search results
You can view the project or document descriptions and details in search results.
Procedure
● In the Search Result table on the Search page, click the Table Options icon and select View Detailsdisplay to view details, such as the Description text, about the projects or documents in the search results.
58 PUBLICSearching, completing tasks, and other common user actionsSearching for projects, documents, or project templates
How to view contract project tree hierarchies in search resultsFor SAP Ariba Contracts contract projects only, you can view the search results in a hierarchical tree display to show the hierarchical relationships between parent Master Agreement contracts and the child subagreement contracts.
Procedure
1. Click the display link (the link text will be List or Details) and select View Tree .2. Click the triangle next to a project name to display the hierarchy of agreements below a particular contract.
You can also select Tree Outline Expansion Expand All to display all lower levels of agreements, or select Collapse All to display only the highest level of agreements.
Results
Hierarchical search results display the full tree structure. Those parts of the structure that do not match search criteria are grayed out and cannot be opened from the Search page. For example, if a contract has two subagreements, but only one of them matches the search criteria, the hierarchical search will display the matching agreement and subagreement as links, but the non-matching subagreement is grayed out.
If a contract workspace has a subproject (a project created under a project) that has a subagreement with no association based on the hierarchical type, then that project is not displayed in the hierarchy.
How to save a project or document searchThe Search page retains your searches and search settings so that when you return to it, your last search is displayed. In addition, you can save the searches you use frequently as saved searches.
Context
Once you have saved a search, you can access it in the dashboard search bar (on the filter menu to the right of the search field), in your personal workspace, and on the Search page. You cannot share saved searches with other users.
NoteThe Ignore Max Results Limit advanced search option is never saved. To use it, you must set it in each search you run.
Searching, completing tasks, and other common user actionsSearching for projects, documents, or project templates PUBLIC 59
Procedure
1. Perform your search.2. Click Save Search.3. Enter a name for the saved search.
Give the saved search a name that reflects the search criteria to help you locate it easily the next time you want to use it.
4. Click OK.
Related Information
How to search for projects or documents using the Search page [page 44]How to modify a saved project or document search [page 60]
How to modify a saved project or document search
You can open a saved search to add or remove search criteria. When you edit a saved search, you can then run it, save it as a new search, or update the existing search with the changes.
Procedure
1. Open the saved search using one of the following methods:
○ On the dashboard search bar, click the filter menu to the right of the search field and select the saved search.
○ On the Search page, click the name of the search in the left navigation panel to open it.○ Open your personal workspace, navigate to the saved search, click it, and choose Open.
2. Modify the search criteria as desired.3. Perform one of the following actions:
○ To perform the search using the modified search criteria, click Search.○ To save the search using the same name, overwriting the original saved search, click Save Current Search.
Review the details of the search, and click OK.○ To save the criteria as a new search, click Save as New Search. Enter a name for the new search, and click
OK. When you save modified search criteria as a new search, the original saved search remains unchanged.
60 PUBLICSearching, completing tasks, and other common user actionsSearching for projects, documents, or project templates
Related Information
How to search for projects or documents using the Search page [page 44]How to save a project or document search [page 59]
Supported search document typesYou can search for text in project documents that are in a supported format.
Text search is supported for files that have the following formats:
● Microsoft Word.● Microsoft Excel.● Microsoft PowerPoint.● Adobe Portable Document Format (PDF) with text-searchable content. This includes most PDF files generated
from a text or word processing file, such as a Microsoft Word document, with exceptions such as:○ Encrypted content.○ Content encoded using embedded fonts without character mapping included.
● Text files. Plain text files (UTF-8 encoded Unicode) using plain text format in their body (no images, or scanned images). File extension types for plain text files include:○ .msg○ .txt○ .csv○ .html○ .htm○ .xml
You can also search for text in project documents that have been converted using Optical Character Recognition (OCR) to create output with searchable text. This includes paper documents that have been scanned and converted to full-text OCR output, converted TIFF files, and PDF files created and converted from non-text input.
Searching, completing tasks, and other common user actionsSearching for projects, documents, or project templates PUBLIC 61
Completing tasks
A task is an action assigned to a user to be completed, such as completing a form or reviewing or approving a document.
About completing tasks [page 62]
My Tasks page actions [page 63]
How to view tasks assigned to you (My Tasks page) [page 64]
How to mark a to do task started or completed [page 65]
How to review documents without edit access [page 65]
How to review documents with edit access [page 66]
How to review contract line items documents [page 67]
How to view draft changes for events (Approval For Publish tasks) [page 68]
How to approve or deny approval tasks [page 70]
How to accept or counter negotiation documents [page 71]
About reviewing and approving documents as an email approver [page 72]
Configuring mail filters for inbound email approval requests [page 73]
How to respond to an HTML approval notification in non-compact format [page 73]
How to respond to an HTML approval notification in compact format [page 74]
How to respond to a plain text approval notification in non-compact format [page 75]
How to respond to a plain text request in compact format [page 76]
How to delegate an email approval task [page 76]
About completing tasksYou might be assigned tasks, or actions to complete, such as completing a form or reviewing or approving a document.
When you are assigned a task, the SAP Ariba solution:
● Adds the task to the your My Tasks page● Adds the task to the your calendar. The task status can indicate a required action.● Sends you an email notification.● Adds the task in the To Do content item if the task has a due date or end date specified. After you complete the
task, it remains in the To Do content item for seven days by default.
62 PUBLICSearching, completing tasks, and other common user actions
Completing tasks
Additional task documentation
Project and task owners can create and manage tasks, template authors can create tasks in templates, external users (someone not a member of a project team) can be asked to complete a task, and some tasks require a signature for completion.
If you have received an email notification asking you to sign a document, see Signing Documents [page 62].
If you are an external user who is not a member of a project team and have received an email asking you to review a document, see Completing Tasks as an External Reviewer [page 62].
If you are a project owner or task owner, see the Creating and Managing Tasks guide for information about creating and managing tasks. The Creating and Managing Tasks guide also describes how to add other users to a review or approval flow.
If you are a template author, see the SAP Ariba Project Template Guide for information about creating tasks in templates.
My Tasks page actions
You can complete many actions from the My Tasks page.
Action Method
View a project Locate the project and click its title. This takes you to the project itself.
Control task display Click the Table Options Menu icon and select Group by Column to change the task listing (by owner, or status, for example), or select Show / Hide Columns to show or hide columns.
Expand all collapsed phases, or collapse them
Click the Table Options Menu icon and select Grouping Expansion Expand All or Collapse All. (In most cases, it is more useful to use the expand and collapse arrow for an individual phase.)
Export a list of tasks to Microsoft Excel
Click the Table Options Menu icon and select Export to Excel Export all Rows or Export Current Page. For more information, see the SAP Ariba Project Management topics.
Export a list of tasks to Microsoft Project
Click the Table Options Menu icon and select Export to Outlook Export all Rowsor Export Current Page. For more information, see the SAP Ariba Project Management topics.
View task details Click the task name and select View Task Details. You can view the task status, owner, whether it is a milestone, due date, start date, the observers, whether it is required, and the predecessor tasks.
Edit the task Click the task name and select Edit Task. You can edit the task title, owner, whether it is a milestone, due date, start date, the observers, whether it is required, and the predecessor tasks.
Mark a To Do task as complete Click the task name and select Mark Complete. The task status changes to Complete.
Mark a To Do task as started Click the task name and select Mark Started. The task status changes to In Progress.
Searching, completing tasks, and other common user actionsCompleting tasks PUBLIC 63
Action Method
Reactivate a completed To Do task Click the task name and select Reactivate. This changes the status of the task from Complete to Not Started.
Associate documents with a task, or change the document associated with a task
Click the task name and select Associate Document. This enables you to either change the document associated with the task or change the task type. For example, if you associate a document with a To Do task, you can then change the task type to Review Task. For more information, see the SAP Ariba Project Management topics.
Approve a task Click the task name and select Approve Task. This enables you to approve an approval task assigned to you without viewing task details.
Deny a task Click the task name and select Deny Task. This enables you to deny an approval task without viewing task details.
Complete the review of a task Click the task name and select Complete Review to finish the review of a document associated with a task. This action is available only if you are a reviewer for the document. This action only completes your portion of the review, and might not complete the task.
Dismiss a task Select Action Dismiss Tasks where Dismiss is the only possible action to dismiss tasks you did not own but were completed by the owner before you could mark them complete.
Or select Dismiss Tasks where I am a watcher, not an approver to dismiss tasks that you are not required to complete, reverse, approve, or deny.
Dismissing tasks removes tasks from your My Tasks area, which enables you to view only the tasks you are required to complete.
How to view tasks assigned to you (My Tasks page)The My Tasks page lists all tasks assigned to you in all projects. If you are a task owner, it also lists all tasks that you own by default.
Context
If you are an SAP Ariba Contracts user and were assigned an optional task in a contract workspace that is later published, you will no longer see the task on your My Tasks page.
If you are an Ariba Supplier Information Management or SAP Ariba Supplier Information and Performance Management user and were assigned a task related to supplier workspace for a supplier that is later deactivated, you will still see the task on your My Tasks page, but you will not be able to act on them.
Procedure
1. Use any of the following methods to access the My Tasks page from the dashboard:
64 PUBLICSearching, completing tasks, and other common user actions
Completing tasks
○ On the dashboard, click Manage My Tasks .○ Click the My Tasks content item.○ Click View List in the To Do content item, then choose My Tasks.
2. In the Show area, you can use the drop-down menus to filter tasks by the following attributes:
○ Type of the project that contains the tasks○ Task state, such as incomplete tasks○ Due date or overdue tasks○ Tasks that require your action or tasks that might not need your action (optional tasks that have not
started or are complete)○ Your role in the task (task owner, approver, reviewer, watcher, or recipient)
How to mark a to do task started or completedYou can indicate to others on a project that you have started or completed a task assigned to you.
Procedure
1. Perform one of the following actions:
○ If you are the task owner, navigate to the My Tasks section of the project.○ If you are the project owner, navigate to the Tasks section of the project.
2. Click the task name and select Action Mark Started or Action Mark Completed .
How to review documents without edit accessYou might need to review a document for which the owner did not assign you edit access.
Procedure
1. From the Tasks area, click the task name and select Action View Task Details .
On the Review Task page that opens, the left pane contains links to read or download the document you need to review. The right pane contains buttons to complete the task.
If you also see a document icon and document name in the right pane, the task owner has given you the ability to edit the document. See Reviewing Documents with Edit Access [page 66] for information about completing the review.
Searching, completing tasks, and other common user actionsCompleting tasks PUBLIC 65
2. Click the document name in the left pane.
If you have DFS enabled, select Action Open For Reading to open the document in a temporary workspace. The file is not linked to the SAP Ariba server; if you modify the file, you must save it and attach the file to the review task in a later step.
If you do not have DFS enabled, choose Action Download . Specify a location for the downloaded file and save the file. Use Microsoft Word or the appropriate application to open the downloaded document.
If you are using Microsoft Word, use the Microsoft Word Track Changes feature to help the task owner view and incorporate your changes. For information about the Track Changes feature, see the Microsoft Word product documentation.
Make changes as needed.3. Save the document.4. Return to the Review Task page.5. Click the appropriate button (such as Complete Review) in the right pane to open a new page where you can
enter information about the task.6. Enter a message to the task owner.7. If you revised the document, select the revised document (enter the pathname for the revised document in the
Attach Revised Document field, use the Browse button to find it, or drop a file icon in the drag-and-drop box).8. Click Add Attachment to include any additional files.9. Click OK.
How to review documents with edit accessWhen you are assigned the task of reviewing a document, you may be given edit access to the document, allowing you to make changes directly to the document.
Procedure
1. From the Tasks section of a project, click the task name and select Action View Task Details .
On the Review Task page that opens, the left pane contains links to read or download the document you need to review. The right pane contains buttons to edit the document and complete the task.
2. To edit the document and upload a new version to the SAP Ariba server, click the document name in the Awaiting Response(s) pane (in the right pane) and choose Open.
If the document icon does not appear in the right pane, another reviewer might have the document open for review or a new version of the document was created after the task was assigned to you. In that case, the document name in the left pane is followed by version information and you can click the document name to download a copy of the document version that was active when the task was assigned to you.
You can also click the document name in the Awaiting Response(s) pane (on the right) and choose Replace Document to replace the document. (If you do not have DFS enabled, you will see a separate Replace Document button instead.)
66 PUBLICSearching, completing tasks, and other common user actions
Completing tasks
NoteClicking the document icon or name in the left pane downloads and opens the document in a temporary workspace on your local system for read access independent of the document on the SAP Ariba server. Your changes will not be uploaded to the SAP Ariba server and will not be visible to other users. You can save your changes in the downloaded file and include the modified file as an attachment when you complete the review.
The SAP Ariba server opens the document in Microsoft Word or the appropriate application.3. Make changes as needed and save the document.
A Document Update window opens.4. Click Update Now to update the SAP Ariba server with your changed document.
A window opens to allow you to create a new version of the document.5. Click Yes, save as vn (where n is the next version number for the document).6. Enter a description of your changes and click Save.
The SAP Ariba server returns to the Review Task page.7. Click Complete Review.8. Enter review comments and click OK.
How to review contract line items documentsContext
A contract line items document, or line items document, specifies the goods or services acquired by the contract. Each line item includes pricing information and terms, such as price and quantity. Contract line items document contents can be standard capacity or large capacity. Standard-capacity line items documents can be viewed and edited using a form interface with labeled fields. However, if you are reviewing a large-capacity line items document or the task owner did not grant you edit access, the line items document is presented to you as an Excel file.
Procedure
1. Use one of the following methods to view the contents of the document:
○ Click the Click here link to open the task on the SAP Ariba server. Click the document name in the left panel and select Action Open .
○ Open the Excel file attached to the notification email.2. If you are reviewing a standard-capacity line items document and the task owner has given you edit access, the
document opens and shows the items with editable fields. You can enter or modify field values, or click the Add button to add items. Click Save as Draft when you are done.
3. If you do not have edit access to the document or this is a large-capacity line items document, you can submit a modified copy of the Excel file.
Searching, completing tasks, and other common user actionsCompleting tasks PUBLIC 67
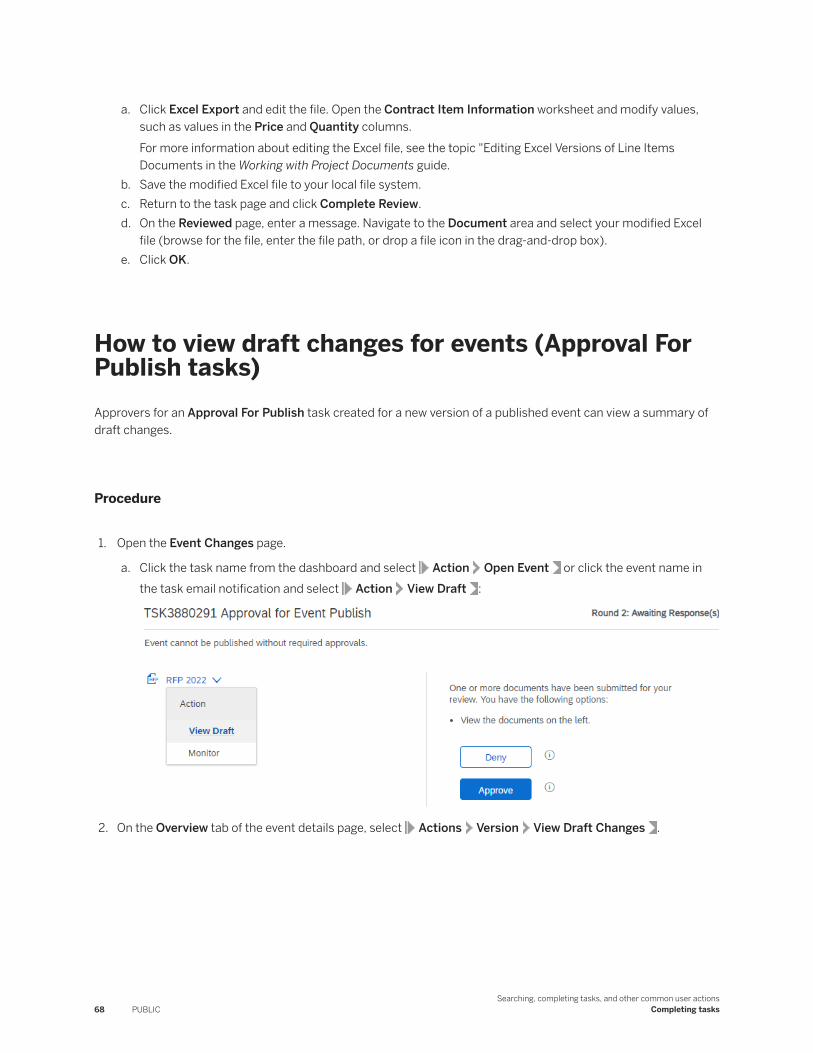
a. Click Excel Export and edit the file. Open the Contract Item Information worksheet and modify values, such as values in the Price and Quantity columns.For more information about editing the Excel file, see the topic "Editing Excel Versions of Line Items Documents in the Working with Project Documents guide.
b. Save the modified Excel file to your local file system.c. Return to the task page and click Complete Review.d. On the Reviewed page, enter a message. Navigate to the Document area and select your modified Excel
file (browse for the file, enter the file path, or drop a file icon in the drag-and-drop box).e. Click OK.
How to view draft changes for events (Approval For Publish tasks)Approvers for an Approval For Publish task created for a new version of a published event can view a summary of draft changes.
Procedure
1. Open the Event Changes page.
a. Click the task name from the dashboard and select Action Open Event or click the event name in the task email notification and select Action View Draft :
2. On the Overview tab of the event details page, select Actions Version View Draft Changes .
68 PUBLICSearching, completing tasks, and other common user actions
Completing tasks
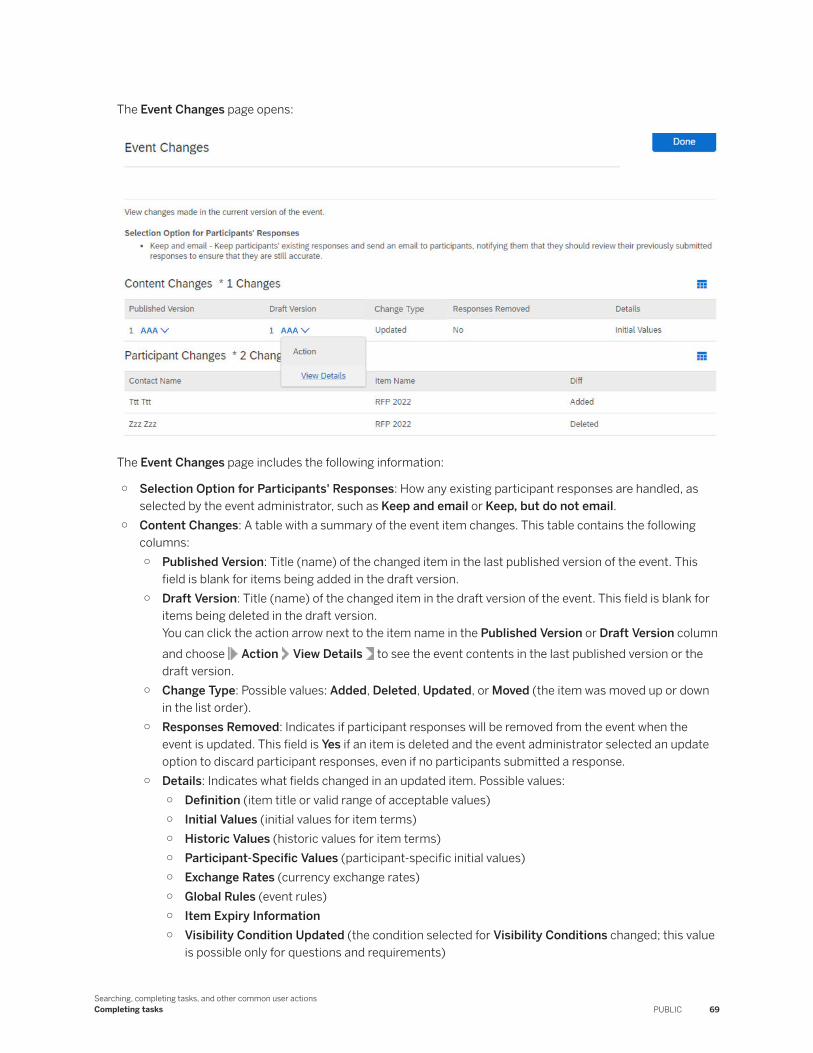
The Event Changes page opens:
The Event Changes page includes the following information:
○ Selection Option for Participants' Responses: How any existing participant responses are handled, as selected by the event administrator, such as Keep and email or Keep, but do not email.
○ Content Changes: A table with a summary of the event item changes. This table contains the following columns:○ Published Version: Title (name) of the changed item in the last published version of the event. This
field is blank for items being added in the draft version.○ Draft Version: Title (name) of the changed item in the draft version of the event. This field is blank for
items being deleted in the draft version.You can click the action arrow next to the item name in the Published Version or Draft Version column and choose Action View Details to see the event contents in the last published version or the draft version.
○ Change Type: Possible values: Added, Deleted, Updated, or Moved (the item was moved up or down in the list order).
○ Responses Removed: Indicates if participant responses will be removed from the event when the event is updated. This field is Yes if an item is deleted and the event administrator selected an update option to discard participant responses, even if no participants submitted a response.
○ Details: Indicates what fields changed in an updated item. Possible values:○ Definition (item title or valid range of acceptable values)○ Initial Values (initial values for item terms)○ Historic Values (historic values for item terms)○ Participant-Specific Values (participant-specific initial values)○ Exchange Rates (currency exchange rates)○ Global Rules (event rules)○ Item Expiry Information○ Visibility Condition Updated (the condition selected for Visibility Conditions changed; this value
is possible only for questions and requirements)
Searching, completing tasks, and other common user actionsCompleting tasks PUBLIC 69
○ Validity Condition Updated (evaluation for valid responses changed)○ Grades and comments will be deleted (grades and comments assigned to participant responses
are removed)○ Bonus/Penalty values and comments will be deleted
○ Participant Changes: A table listing the participants added to or removed from the event or items in the event. This table contains the following columns:○ Contact Name: Name of the participant.○ Item Name: Name of the item for which the participant will be added or removed. If the participant will
be added or removed from the entire event, this is the event name.○ Diff: Type of change. Possible values: Added or Deleted.
How to approve or deny approval tasksIf you are assigned an approval task, you can review the task document and approve it or deny it.
Context
If your site is configured to allow email approvals, you can approve or deny a task without logging in to the SAP Ariba solution by replying to the email notification. For more information, see About Reviewing and Approving Documents as an Email Approver [page 72].
Procedure
1. From the My Tasks area, click the task name and choose Action View Task Details .
Alternatively, you can select Action Approve or Action Deny to approve or deny the task without viewing the task details and document.
An Approval Task page opens. The left pane contains links to read or download the document you need to approve. The right pane contains buttons to complete the task.
2. To open the document, click the document icon in the left pane.
If you have DFS enabled, choose Action Open to open the document in a temporary workspace. The file is not linked to the file on the SAP Ariba server. If you modify the file, you must save it and attach the file to the approval response in a later step.
If you do not have DFS enabled, choose Action Download . Specify a location for the downloaded file and save the file. Use Microsoft Word or the appropriate application to open the downloaded document.
If you are using Microsoft Word, use the Microsoft Word Track Changes feature to help the task owner view and incorporate your changes. For information about the Track Changes feature, see the Microsoft Word product documentation.
70 PUBLICSearching, completing tasks, and other common user actions
Completing tasks
3. Make changes as needed.4. Save the document.5. Return to the Approval Task page.6. Click Deny or Approve.
If you clicked Deny, the Denied page opens, which enables you to attach the revised document. If you clicked Approve, a similar window opens, without the Attach Revised Document field.
7. Perform one of the following actions:
○ If you clicked Deny in the previous step, enter a message to the task owner. If you revised the document, select it by entering the pathname in the Attach Revised Document field, using the Browse button to find it, or dropping a file icon in the drag-and-drop box. Attach any additional files.
○ If you clicked Approve in the previous step, enter a message, attach any additional files and click OK.
How to accept or counter negotiation documentsIf you are assigned a negotiation task, you can review the task document and choose to accept or counter the document.
Procedure
1. From the My Tasks section of a project, click the task name and select Action View Task Details .
A Negotiation Task page opens. The left pane contains links to read or download the document you need to review. The right pane contains buttons to complete the task.
2. To open the document, click the document icon in the left pane.
If you have DFS enabled, select Action Open to open the document in a temporary workspace. The file is not linked to the file on the SAP Ariba server. If you modify the file, you must save it and attach the file to the negotiation response in a later step.
If you do not have DFS enabled, select Action Download . Specify a location for the downloaded file and save the file. Use the appropriate application to open the downloaded document.
If you are using Microsoft Word, use the Microsoft Word Track Changes feature to help the task owner view and incorporate your changes. For information about the Track Changes feature, see the Microsoft Word product documentation.
Make changes as needed.3. Save the document.4. Return to the Negotiation Task window.5. Click Create Counter Proposal or Accept Proposal.
○ If you click Create Counter Proposal, a page opens that enables you to attach the revised document. Specify the revised document name or use the Browse button to find the file.
Searching, completing tasks, and other common user actionsCompleting tasks PUBLIC 71
Enter a message. If you revised the document, select the revised document by entering the pathname in the Attach Revised Document field, using the Browse button to find it, or dropping a file icon in the drag-and-drop box. Attach any additional files. Attach any additional files and click OK.
○ If you click Accept Proposal, a similar window opens. However, it does not have the Attach Revised Document field. Enter a message, attach any additional files and click OK.
About reviewing and approving documents as an email approverIf your site has enabled email approvals, you can complete a review or approval tasks without logging in to the SAP Ariba solution by replying to the task email notification message.
The methods available to complete the task depend on the format of the notification. If you receive email notifications on a mobile device, you can to set your personal email approval preferences so you can complete review or approval tasks by sending simple text messages.
The email approval notification format can be:
● HTML or plain text.● Compact or non-compact. Compact messages enable you to complete the task by sending a reply that
includes the original message and a one-line message. Non-compact messages enable you to complete the task by sending a reply with the original message and an X marked in a check box.
For information on setting your personal email approval preferences, see Setting email notification preferences [page 97].
About forwarding email approval notifications
You can forward an email approval notification to delegate the approval task.
To respond, the new approver must correct the To field in the email message to ensure the reply goes to the SAP Ariba server mailbox for automatic processing, and not the user who forwarded the message.
If you forward an email approval notification, the approval flow diagram still shows the original approver, not the delegated approver. The email approval feature does not allow approvers to add users to the approval flow.
72 PUBLICSearching, completing tasks, and other common user actions
Completing tasks
Configuring mail filters for inbound email approval requests
If you are assigned as an email approver, you need to configure your mail filters to receive inbound requests for email approvals before you can review and approve documents this way.
The email filters must accept mail with the following specifications:
● Display names of the From address: Email Approval and Email Review.● Address portion of the From address: A hostname from the ariba.com domain. It is based on your SAP Ariba
account, such as [email protected].
How to respond to an HTML approval notification in non-compact format
If your organization’s notification settings are set to the default values (you have not selected the plain text or compact option for email approvals), and email approvals are configured to be sent in HTML format, you receive messages with links you can click to complete the task.
Context
The email message also includes the document to be reviewed as an attachment.
Procedure
1. To complete the task, perform one of the following actions:
○ To complete the task without logging in to the Ariba solution, click the Click Here link on the Action line. This creates a pre-addressed, pre-formatted reply email message with an area for comments.
○ To complete the task by logging in to the Ariba solution, click the Click Here link on the System Reference line.
2. Add your comments.3. Mail back the reply.
Searching, completing tasks, and other common user actionsCompleting tasks PUBLIC 73
How to respond to an HTML approval notification in compact formatIf your organization’s notification settings are set to receive email approvals in compact format and email approvals are configured to be sent in HTML format, you receive messages with a section that includes instructions for how to approve or deny the request without logging in to the SAP Ariba solution.
Context
The instructions start out as follows:
On the first line of your reply, type...
You can also log in to the SAP Ariba solution to complete the task by clicking the Click Here link on the System Reference line of the notification.
Procedure
1. To complete the task without logging in to the SAP Ariba solution, use your email client to create a reply to the message that includes the original message.
2. Enter the action you want to take on the first line of the reply, as follows:
○ If this is an approval task and you want to approve the task, type approve on the first line.○ If this is an approval task and you want to deny the task, type deny on the first line.○ If this is a review task, type review on the first line.
3. On the second line, enter comments or justification.4. Mail back your reply.
74 PUBLICSearching, completing tasks, and other common user actions
Completing tasks
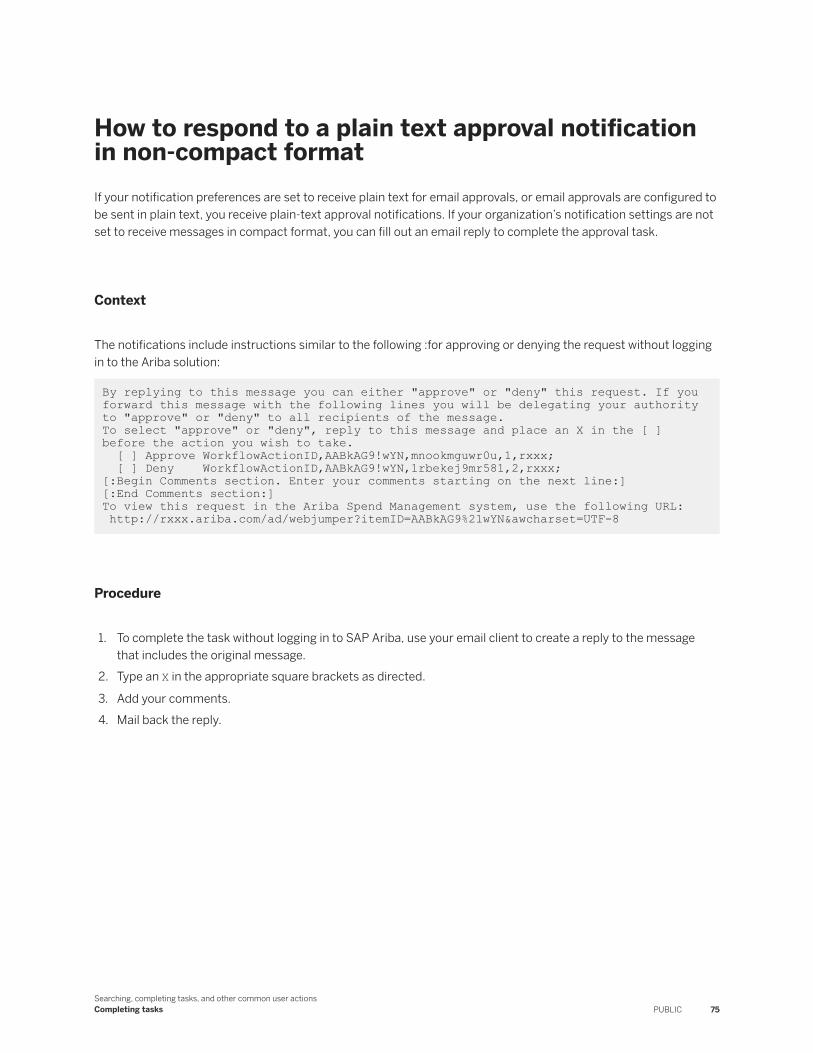
How to respond to a plain text approval notification in non-compact formatIf your notification preferences are set to receive plain text for email approvals, or email approvals are configured to be sent in plain text, you receive plain-text approval notifications. If your organization’s notification settings are not set to receive messages in compact format, you can fill out an email reply to complete the approval task.
Context
The notifications include instructions similar to the following :for approving or denying the request without logging in to the Ariba solution:
By replying to this message you can either "approve" or "deny" this request. If you forward this message with the following lines you will be delegating your authority to "approve" or "deny" to all recipients of the message. To select "approve" or "deny", reply to this message and place an X in the [ ] before the action you wish to take. [ ] Approve WorkflowActionID,AABkAG9!wYN,mnookmguwr0u,1,rxxx; [ ] Deny WorkflowActionID,AABkAG9!wYN,1rbekej9mr581,2,rxxx;[:Begin Comments section. Enter your comments starting on the next line:][:End Comments section:]To view this request in the Ariba Spend Management system, use the following URL: http://rxxx.ariba.com/ad/webjumper?itemID=AABkAG9%21wYN&awcharset=UTF-8
Procedure
1. To complete the task without logging in to SAP Ariba, use your email client to create a reply to the message that includes the original message.
2. Type an X in the appropriate square brackets as directed.
3. Add your comments.4. Mail back the reply.
Searching, completing tasks, and other common user actionsCompleting tasks PUBLIC 75
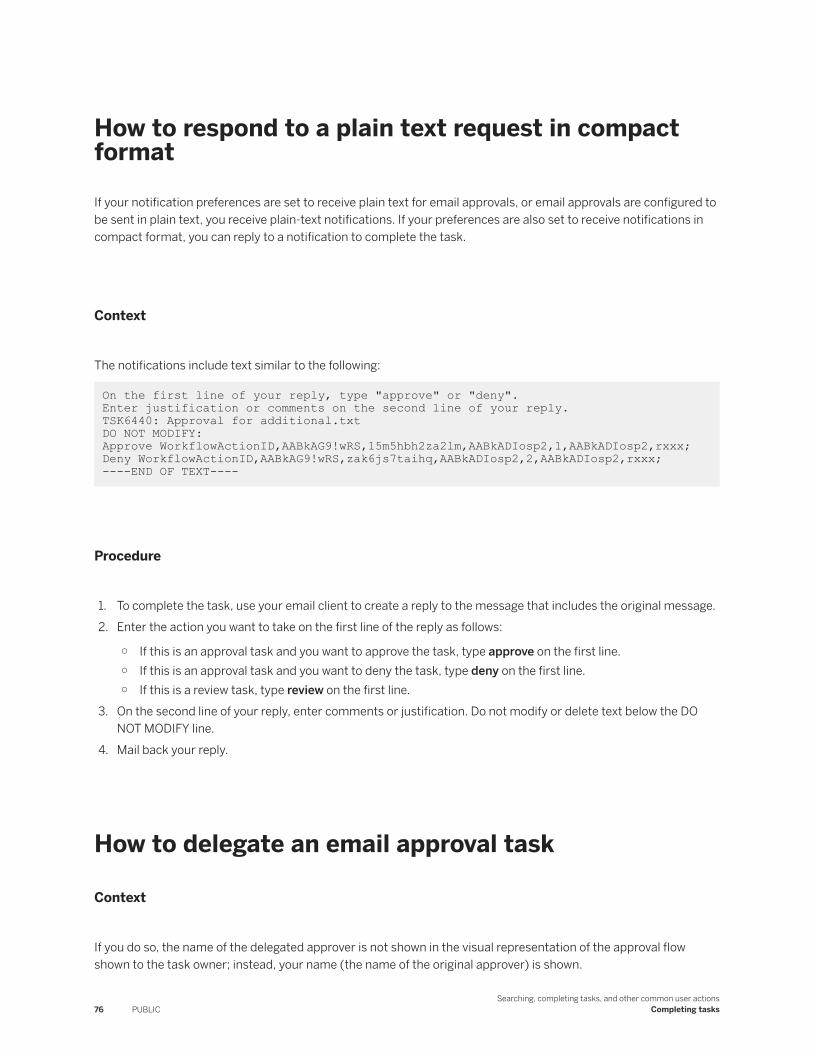
How to respond to a plain text request in compact format
If your notification preferences are set to receive plain text for email approvals, or email approvals are configured to be sent in plain text, you receive plain-text notifications. If your preferences are also set to receive notifications in compact format, you can reply to a notification to complete the task.
Context
The notifications include text similar to the following:
On the first line of your reply, type "approve" or "deny". Enter justification or comments on the second line of your reply.TSK6440: Approval for additional.txtDO NOT MODIFY:Approve WorkflowActionID,AABkAG9!wRS,15m5hbh2za2lm,AABkADIosp2,1,AABkADIosp2,rxxx;Deny WorkflowActionID,AABkAG9!wRS,zak6js7taihq,AABkADIosp2,2,AABkADIosp2,rxxx; ----END OF TEXT----
Procedure
1. To complete the task, use your email client to create a reply to the message that includes the original message.2. Enter the action you want to take on the first line of the reply as follows:
○ If this is an approval task and you want to approve the task, type approve on the first line.○ If this is an approval task and you want to deny the task, type deny on the first line.○ If this is a review task, type review on the first line.
3. On the second line of your reply, enter comments or justification. Do not modify or delete text below the DO NOT MODIFY line.
4. Mail back your reply.
How to delegate an email approval task
Context
If you do so, the name of the delegated approver is not shown in the visual representation of the approval flow shown to the task owner; instead, your name (the name of the original approver) is shown.
76 PUBLICSearching, completing tasks, and other common user actions
Completing tasks
Procedure
1. Forward the email approval notification to another user (the delegated approver).2. To complete the approval task, the delegated approver creates an email response, replacing the To field in the
message with the address in the From field in the original message, which has the display name Email Approval or Email Review.
This causes the reply to go to the SAP Ariba mailbox for automatic processing and not the user who forwarded the message.
Searching, completing tasks, and other common user actionsCompleting tasks PUBLIC 77
Signing documents
A signature task requires you to provide an electronic signature on a document. You can sign the document as requested, or you can decline to sign it.
How to complete a signature task
If someone assigns you a signature task in SAP Ariba Strategic Sourcing solutions, you receive an email notification from the third-party electronic signature website. The notification includes a link that directs you to the electronic signature provider website where you can view the document.
Procedure
1. Open the email notification and click the link to the electronic signature provider's website.
If you do not already have a signature format configured with the electronic signature provider, you might be prompted to selected a format. Complete the selection process.
2. Review the document in the electronic signature provider’s website.3. Take the appropriate action available to you. Available actions depend on the signature provider and can
include:
○ Signing the document by clicking on the provided signature icon. Click the icon (Adobe Sign or DocuSign) to insert your electronic signature on the document.
○ Initialing the document (DocuSign). There are two types of DocuSign initial icons: Required and Optional.You can click the Required icon to place your initials in the document to complete the signature process with a signed status. Alternatively, you can choose to reject the document by clicking Cancel and Decline to Sign.The Optional tags enable you to accept and sign the document but not initial (or to reject) items in the document. Click the green check box to accept the item and place your initials at the tag’s location, or click the red X-sign to reject the item and leave the tag’s location uninitialed. If you click the red X-sign, you can still complete the signature process, but your initials are not placed at the tag’s location.
○ Filling out data fields, such as a date or text field.Data fields are defined by the task owner. If you are not sure what data to enter, contact the task owner for clarification.
○ Declining to sign or canceling the document.○ Changing the signer (re-assigning the signer).○ Forwarding the document to another signer.
78 PUBLICSearching, completing tasks, and other common user actions
Signing documents
Results
After all the signers sign the document the task owner receives an email indicating that the signature task is complete.
Searching, completing tasks, and other common user actionsSigning documents PUBLIC 79
Using project message boards
A project message board enables users to create and view messages for a project.
About using project message boards [page 80]
How to open a project message board [page 83]
How to view the messages in a message board topic [page 84]
How to create a new topic from the message board tab [page 84]
How to reply to a message using the message board [page 85]
How to post a reply to a reply using the message board [page 86]
How to post a message board topic or reply using email [page 86]
How to copy a message board attachment to the project documents area [page 88]
How to change the topic order in a message board [page 89]
How to search for message board topics [page 89]
How to include message board content when searching for projects and documents [page 90]
How to navigate to additional pages on the message board [page 91]
How to create a new message board label [page 91]
How to associate a message board topic with a label when viewing the message board [page 92]
How to associate a message board topic with a label when viewing the topic [page 93]
How to filter message board topics by label [page 93]
How to remove a message board label [page 94]
How to delete message board topics [page 95]
How to delete message board replies [page 95]
About using project message boards
A project message board enables users to create and view messages for a project. Messages are grouped into topics.
Users can:
● Open an existing topic.● Create a new topic and the initial message for the topic.● Post a reply to a message.● Tag a topic with one or more labels and filter topics by label.● Search topics and message contents.
80 PUBLICSearching, completing tasks, and other common user actions
Using project message boards
● Create message board topics and post replies using email. This feature enables internal and external users (such as suppliers and external collaborators) to post messages and replies.The SAP Ariba solution creates a unique email address for each project message board. Internal and external users who know the address can send messages to the project message board’s email address; the SAP Ariba solution posts the email messages to the message board. The SAP Ariba solution uses the email subject field to create a new topic or add the message to an existing topic. The SAP Ariba solution also recognizes the reply prefixes used by most mailers and can link reply email messages to the appropriate topic.Each project message board email address is unique and includes text based on a random number to prevent unauthorized users from predicting email addresses. Project team members can view the email address for a project message board in the information box for the message board and provide the address to external users.
NoteAlthough users can reply to posts in the message board using email, the message board does not send emails.
● Include file attachments in messages and replies. Project team members can add these file attachments to the project Documents area using the Copy to Workspace feature described in Copying a Message Board Attachment to the Project Documents Area [page 88].
● Create project announcements using the message board. The Announcements section of a project is linked to the message board. If you tag a topic in the message board with the reserved label Announcement, all messages in that topic appear in the Announcements section.The link between the Announcements section and the message board also adds announcements created using the Announcements section to the message board.
The following illustration shows a sample message board:
1. Enter search terms to search for messages2. Filter messages by label3. Create or delete labels4. Click check boxes to select topics
Searching, completing tasks, and other common user actionsUsing project message boards PUBLIC 81
5. Click a topic title to open the topic6. Add selected topics to a label7. Remove selected topics from a label8. Delete selected topics9. Create a new topic10. Display the project email address
Supported workspace types
Message boards are supported in most knowledge projects, certain SAP Ariba Contracts workspaces, and two SAP Ariba Supplier Information and Performance Management and Ariba Supplier Information Management workspace types.
Specifically, supported workspace types include:
● Knowledge projects (except the SAP Ariba Contracts Clause Library, which is a type of knowledge project)● The following SAP Ariba Contracts workspaces:
○ Procurement contract requests○ Procurement contract workspaces○ Internal contract workspaces○ Sales contract requests○ Sales contract workspaces
● SAP Ariba Sourcing projects● The following SAP Ariba Supplier Information and Performance Management and Ariba Supplier Information
Management workspaces:○ Supplier Performance Management projects○ Supplier workspaces
Message boards are not supported in project templates.
82 PUBLICSearching, completing tasks, and other common user actions
Using project message boards
About message board labels
You can use labels to identify related and filter topics. By default, the SAP Ariba solution displays all messages. You can click on a label name in the Labels section in the upper left of the message board to display only the topics tagged with the specified label.
Announcement, High Priority and Email to Project labels
By default, all project message boards contain the Announcement, High Priority, and Email to Project labels. These labels are reserved and cannot be deleted.
Announcement Labels
The Announcements area in a project page is linked to message board topics that are tagged with the Announcement label. The Announcements section of a project displays all message board topics tagged with the Announcement label.
Similarly, all announcements created from the Announcements section of a project appear in the message board as topics and are tagged with the Announcement label.
For more information about messages tagged with the label Announcement, see Deleting Message Board Topics [page 95].
How to open a project message board
Procedure
Use one of the following methods:
○ If the project is open in full view, click the Message Board tab.○ If the project is open in compact view, navigate to the Overview section of the projec and select
Actions View Message Board .
Related Information
About using project message boards [page 80]
Searching, completing tasks, and other common user actionsUsing project message boards PUBLIC 83
How to view the messages in a message board topicYou can view the messages in a message board topic by clicking the topic title.
Prerequisites
Display the message board. For instructions, see How to open a project message board [page 83].
Procedure
1. On the message board, click a topic title.The View Message Board Topic dialog box opens, displaying the original post and any replies.
2. When you finish viewing the topic, click OK to close the dialog box and return to the message board.
Related Information
About using project message boards [page 80]
How to create a new topic from the message board tabYou can create new topics from the message board.
Prerequisites
Display the message board. For instructions, see How to open a project message board [page 83].
Procedure
1. At the bottom of the message board, click New Topic to open the Create New Topic pane.2. Enter a title for the topic.
84 PUBLICSearching, completing tasks, and other common user actions
Using project message boards
3. (Optional) Enter text for the message.4. (Optional) To add a file attachment, click Attach a file, and specify a file name in the Add Attachment window,
and click OK.5. (Optional) Select a label for the topic by clicking select in the Labels field and selecting the label from the pull-
down menu.6. Click OK.
Related Information
About using project message boards [page 80]
How to reply to a message using the message boardWhen viewing a message, you can respond to it.
Prerequisites
Display the message board. For instructions, see How to open a project message board [page 83].
Procedure
1. On the message board, click the message for which you want to post a reply.
The View Message Board Topic page opens.2. Click Post Reply.
The Create New Post dialog box opens.3. (Optional) Enter text for the reply message.4. (Optional) To add a file attachment, click Attach a file, and specify a file name in the Add Attachment window,
and click OK.5. Click OK.
Related Information
About using project message boards [page 80]
Searching, completing tasks, and other common user actionsUsing project message boards PUBLIC 85
How to post a reply to a reply using the message boardJust as you can reply to a message on the message board, you can reply to previous replies, too.
Prerequisites
Display the message board. For instructions, see How to open a project message board [page 83].
Procedure
1. If necessary, open the topic by clicking the topic name in the message board.
The View Message Board Topic page opens.
2. Navigate to the reply, click the reply title, and select Action Reply .
The Create New Post page opens.3. (Optional) Enter text for the reply message.4. (Optional) To add a file attachment, click Attach a file, and specify a file name in the Add Attachment window,
and click OK.5. Click OK.
Related Information
About using project message boards [page 80]
How to post a message board topic or reply using emailYou can post message board topics and replies by sending email to the address for a project’s message board. The SAP Ariba solution posts the contents and any attachments from the email messages to the message board.
Prerequisites
Display the message board. For instructions, see How to open a project message board [page 83].
86 PUBLICSearching, completing tasks, and other common user actions
Using project message boards

Context
The subject field of the email message is used as the topic title. If the email message has no topic, the text (no title) is used as the topic title. If the topic already exists in the message board, the SAP Ariba solution posts the contents and any attachments as replies to the topic.
The message board recognizes the prefixes most mailers add to a subject to indicate replies (RE:, Re: or re:, followed by a space) and adds replies to messages to the original topic in the message board. For example, the SAP Ariba solution adds a message with the subject RE: New Contact to the topic New Contact.
Note● The message board rejects email messages larger than 10 megabytes.● Although users can reply to posts in the message board using email, the message board does not send
emails.
Procedure
1. To view the email address for the project message board, in the top right corner of the Topics section of the message board, click Post via Email.
The Post via Email dialog box opens.2. If you want the supplier to include attachments in the email response, check the Check for attachments
checkbox.
All emails sent to the listed email address will be checked for attachments. SAP Ariba Sourcing sends an email notification for each email sent to the listed email address that does not contain an attachment.
NoteThe message board rejects email messages larger than 10 megabytes.
3. Click the email address to open the email utility configured for your internet browser.4. To post a reply to an existing topic in the message board, specify the topic name in the email subject field.
To create a new topic, specify the new topic name in the subject field.
To send a ZIP file attachment that is automatically unzipped in the project, specify the following keyword in the subject field (including the square brackets):
[Unzip]
When a message with a ZIP file attachment is received with [Unzip] as the subject, the contents of the ZIP file are extracted and saved directly below the Documents area of the project. Any subfolders in the ZIP file paths are re-created. For additional information about extracting ZIP files in projects, see the Working with Project Documents topic.
5. (Optional) Attach a file.6. Send the email message.
Searching, completing tasks, and other common user actionsUsing project message boards PUBLIC 87
Related Information
About using project message boards [page 80]
How to copy a message board attachment to the project documents area
If a message on the message board includes an attached file, project team members can copy the attachment to the Documents section of the project using the Copy to Workspace feature.
Prerequisites
Display the message board. For instructions, see How to open a project message board [page 83].
Procedure
1. On the message board, click the name of the topic.
The View Message Board Topic page opens.2. Click the name of the attached file and select Copy to Project from the pull-down menu.
The Copy attachment to Project dialog box opens.3. Add an optional description and select additional options as appropriate.4. Select a destination folder for the document.
The SAP Ariba solution displays the project name and any folders that are in the Documents section of the project. If you select the project name, the SAP Ariba solution places the document at the top level of the Documents section.
5. Click OK.
Related Information
About using project message boards [page 80]
88 PUBLICSearching, completing tasks, and other common user actions
Using project message boards
How to change the topic order in a message boardBy default, the message board displays the topics with the most recent messages or replies first. The messages are sorted in descending order according to the value of the Last Post Date field.
Prerequisites
Display the message board. For instructions, see How to open a project message board [page 83].
Context
In the Topics section of the message board, an arrow marks the column currently used for sorting the topics. An up arrow means the column is sorted in ascending order. A down arrow means the column is sorted in descending order.
Procedure
● In the Topics section of the message board, click a column header to sort the topics based on the values in that column.
To switch between ascending order and descending order, click the column header again.
Related Information
About using project message boards [page 80]
How to search for message board topicsThe message board includes a Search Filter section where you can specify criteria to search for a particular message or messages.
Prerequisites
Display the message board. For instructions, see How to open a project message board [page 83].
Searching, completing tasks, and other common user actionsUsing project message boards PUBLIC 89
Procedure
1. In the Search Filter section of the message board, enter search criteria. You can search for topics using the following fields:
○ Title: All or part of the title.○ Keywords: Search for keywords (complete words) in the title, contents, attachment file names, or creator
name. The keyword must be an exact match; for example, a keyword search for car does not match the word cars.
○ If you click Options, you can also use the following search filter fields:Creation Date: The creation date, specified in units relative to the current date. You can also specify a date range by selecting Custom from the pull-down menu.Created By: The name of the author. Use the chooser to select the name of a user.
2. Click Search.
Related Information
About using project message boards [page 80]
How to include message board content when searching for projects and documentsYou can opt to include message board content in a search when searching for projects and documents by keyword.
Procedure
1. On the dashboard search bar, select the type of project or document you want to search for and click the search icon ( ).
2. In the Search Filter section of the Search page, select Options Advanced Include Message Board in Keyword Search .
3. Enter the appropriate search text (as one or more complete words) in the Keywords field that matches the title, contents, attachment file names, or creator name of the message board topics and messages you want to find.
4. Click Search.
Related Information
About using project message boards [page 80]
90 PUBLICSearching, completing tasks, and other common user actions
Using project message boards
How to navigate to additional pages on the message boardIf the message board cannot display all topics on a single page, it adds a page navigator in the upper-right corner of the message board that you can use to view the additional pages.
Procedure
● Perform one of the following actions using the page navigator in the upper-right corner of the Topics table on the message board:
○ Select a page number from the pull-down menu.○ Click the right or left arrow icon to navigate to the next or previous page.
Related Information
About using project message boards [page 80]
How to create a new message board labelYou can add your own labels to a message board in addition to the system-level labels displayed in the Labels section of the message board.
Prerequisites
Display the message board. For instructions, see How to open a project message board [page 83].
Procedure
1. In the Labels section of the message board, click Manage Labels.
The Label Editor dialog box opens.2. At the bottom of the Label Name column, click Add a new label to add a row to the table.3. Enter a name and description for the new label.4. On the right side of the row you added, click the Done link.
Searching, completing tasks, and other common user actionsUsing project message boards PUBLIC 91
5. Click Save Changes.
Related Information
About using project message boards [page 80]
How to associate a message board topic with a label when viewing the message board
You can associate a message board topic with a label when you are viewing the message board. Associating a topic with a label ensures that when a user clicks a label the appropriate topic is displayed.
Prerequisites
Display the message board. For instructions, see How to open a project message board [page 83].
Procedure
1. On the message board, select the check box to the left of the topic name.2. Click Add to.3. Select the appropriate label from the pull-down menu.4. (Optional) To associate the topic with another label, click Add to again, and select the label.
Related Information
About using project message boards [page 80]
92 PUBLICSearching, completing tasks, and other common user actions
Using project message boards
How to associate a message board topic with a label when viewing the topic
You can associate a message board topic with one or more labels while you are viewing the topic. Associating a topic with a label ensures that when a user clicks a label the appropriate topic is displayed.
Prerequisites
Display the message board. For instructions, see How to open a project message board [page 83].
Procedure
1. On the message board, click a topic to open it.
The View Message Board Topic page opens.2. In the Labels field, click the select link, and select the label to associate with the topic.3. (Optional) To associate the topic with another label, click select again, and select the label.
Related Information
About using project message boards [page 80]
How to filter message board topics by label
If message board topics are associated with labels, you can click a label to display only the topics associated with that label.
Prerequisites
Display the message board. For instructions, see How to open a project message board [page 83].
Searching, completing tasks, and other common user actionsUsing project message boards PUBLIC 93
Procedure
● In the Labels section of the message board, click a label.
To display all topics, click the All label.
The Topics section displays the topics associated with the selected label.
Related Information
About using project message boards [page 80]
How to remove a message board labelYou can delete message board labels you created.
Prerequisites
Display the message board. For instructions, see How to open a project message board [page 83].
Context
The Announcement. High Priority, and Email to Project labels are reserved and cannot be removed from project message boards.
Procedure
1. In the Labels section of the message board, click Manage Labels.
The Label Editor dialog box opens, displaying the labels in a table.2. In the row containing the label you want to remove, click the delete icon (X).
The label is removed from the table.3. Click Save Changes.
94 PUBLICSearching, completing tasks, and other common user actions
Using project message boards
Related Information
About using project message boards [page 80]
How to delete message board topicsThere are two ways to delete message board topics. The ways available to you depend on whether you are the project owner or the creator of the topic.
Prerequisites
You must be a project owner to delete message board topics directly from the message board.
You must be a project owner or topic creator to delete topics from the View Message Board Topic page.
Display the message board. For instructions, see How to open a project message board [page 83].
Procedure
● Perform one of the following actions:
○ On the message board, click the check box for the topics you want to delete, and click Delete.○ On the message board, click a topic title to open the topic, and click Delete Topic.
Related Information
About using project message boards [page 80]
How to delete message board repliesYou can delete replies to topics on the message board.
Prerequisites
You must be the project owner or the creator of the reply to delete a reply.
Searching, completing tasks, and other common user actionsUsing project message boards PUBLIC 95
Display the message board. For instructions, see How to open a project message board [page 83].
Context
When a user deletes a reply, the message board retains an entry for the reply under the topic with the title Deleted message and records the user who deleted the reply and the deletion time and date.
Procedure
1. On the message board, click a topic to open it.
The View Message Board Topic page opens.
2. In the Replies section, click the reply title, select Action Delete from the pull-down menu, and click OK to confirm the deletion.
Related Information
About using project message boards [page 80]
96 PUBLICSearching, completing tasks, and other common user actions
Using project message boards
Setting email notification preferences
About setting email notification preferences [page 97]
How to set individual email notification preferences [page 99]
About setting email notification preferencesSAP Ariba sends email notifications for events that occur in projects and for tasks. You can set email notification preferences to specify the events for which you receive notifications and the format of the notifications. For example, if you receive email notifications on a mobile device, you might choose to receive notifications in a compact format.
Email notification preferences can be customized by individual users and, globally, by administrators. Individual users can control whether they receive specific notifications by setting their preferences appropriately. Task owners and template authors can specify schedules and recipients for some notifications on a per task basis using notification profiles, but these settings do not override individual notification preferences.
For more information about creating site-wide and template notification profiles, see the SAP Ariba Project Template Guide.
Disabling email notifications to large groups
You can limit the number of people who receive group-based task notification emails. Generally, if a group is included in a task all members of the group receive task notifications. However, the Application.ACM.TaskEmailGroupLimit parameter allows you to control whether task notification emails are sent to a group.
NoteFor notification tasks, if, due to the parameter setting, no emails will be sent, an error is displayed on the user interface to indicate that all the groups associated with the task are too large for notifications to be sent to at the time of saving. For other task types, such as To Do tasks, when there is a group that is too large, it is logged in the system that the email will not be sent to the group due to the parameter value.
For more information, see Site configuration options for email notifications [page 104].
Searching, completing tasks, and other common user actionsSetting email notification preferences PUBLIC 97

Offline email approval format preferences
If your site has enabled offline email approvals, users can complete review or approval tasks using the email notifications sent when they are assigned a task. With offline email approval, there is no need to log in to the SAP Ariba solution to complete review and approval tasks.
The format of the email notification and the methods available to complete the task depend on the format of the notification. If you receive email notifications on a mobile device, you can to set your offline email approval preferences so you can complete review or approval tasks by sending simple text messages.
The offline email approval notification format can be:
● HTML or plain text.● Compact or non-compact.
Compact messages enable you to complete the task by sending a reply that includes the original message and a one-line message. This format is useful if the mailer used to send the reply does not allow you to modify the original message.Non-compact messages enable you to complete the task by sending a reply with the original message and an X marked in a check box. To use this format, the mailer used to send the reply must allow you to modify the original message.
By default, the system uses HTML format when sending email notifications. For more information, see Site configuration options for email notifications [page 104].
In addition, the following email notification preferences determine the offline email approval notification format:
● Receive offline email approval notifications in plain text formatIf selected, the system sends the notifications in plain text. If the default system format is HTML, this overrides the system default. If the default system format is plain text, this parameter has no effect.
● Receive offline email approval notifications in compact text formatIf selected, the system sends the notifications in compact format.
For examples of notifications sent in these formats and information about completing review and approval tasks using these notifications, see About Reviewing and Approving Documents as an Email Approver [page 72].
Specify the file size limit for attachments to approval emails
You can specify the maximum allowed file size, in MB, for attachments to approval emails by configuring the Application.ACM.FileSizeLimitForEmailAttachments parameter. If the size of an attachment exceeds the value configured for this parameter, the attachment is replaced with a link, which the approvers can click to log in and view the file.
By default this parameter is set to 15. For more information, see Site configuration options for email notifications [page 104].
98 PUBLICSearching, completing tasks, and other common user actions
Setting email notification preferences
How to set individual email notification preferencesYou can specify the kinds of email notifications you want to receive. For example, you can choose to receive email notifications informing you that a task has been assigned to you or that an approval task you own is approved or denied.
Context
Individual email notifications override task notification profiles.
NoteNotification preferences are considered to be personal user data and are included when you download your user preferences using the Download sourcing user info or Download procurement user info option.
Procedure
1. On the dashboard, click your name in the upper right corner of the page and select Preferences Change notification preferences .
The Email Notification Preferences page opens.2. Select the email notifications you want to receive.3. If your site has enabled offline email approvals (which enables you to complete review and approval tasks by
replying to email notifications for these tasks), select your preferences for offline email approval formats in the Offline Approvals section.
If the mailer you use to send replies for approvals does not allow you to modify the original message, select plain text format (Receive offline email approval notifications in plain text format).
For more information about offline email approval formats, see About Offline Email Approval Format Preferences [page 98].
4. Click OK.
Searching, completing tasks, and other common user actionsSetting email notification preferences PUBLIC 99
Completing tasks as an external reviewer
An external reviewer (business contact) can be assigned to review a document. You need to provide information to your external viewers about their roles and how they can conduct their reviews.
If you have received an email notification asking you to sign a document, see Signing Documents [page 100].
If you are a project team member, see About Completing Tasks [page 100].
If you are a project owner or task owner, see the topic Creating and Managing Tasks for information about creating and managing tasks. The topic Creating and Managing Tasks also describes how to add other users to a review or approval flow.
If you are a template author, see the SAP Ariba Project Template Guide for information about creating tasks in templates.
How to review documents as an external reviewerIf you are an external reviewer, you receive an email with an attachment that contains the document for you to review.
Context
By default, SAP Ariba includes a System Reference link to the task at the bottom of the email sent to external reviewers. As an external reviewer, you do not have access to the SAP Ariba solution and nothing happens if you click the link. However, the task owner can use this link in your reply to access the system.
Procedure
1. Use Microsoft Word or the appropriate application to open the document attached to the email from the task owner.
If you are using Microsoft Word, use the Microsoft Word Track Changes feature to help the task owner view and incorporate your changes. For information about the Track Changes feature, see the Microsoft Word product documentation..
2. Save your changes and close the document.3. Send an email reply back to the task owner and attach your modified document and any supporting
documents.
100 PUBLICSearching, completing tasks, and other common user actions
Completing tasks as an external reviewer
Viewing in-product alerts
When critical system events occur, or when there is a system-wide technical issue within the SAP Ariba solution, SAP Ariba displays alerts in the user interface in addition to sending email notifications to Designated Support Contacts (DSCs). Alerts are localized and displayed in the end user’s language, ensuring that all affected end users are alerted directly and in real time.
Alerts are also targeted, so end users only see alerts when they access an area of the application that is currently affected by a system issue.
When a system issue or critical system event occurs, an in-product alert appears at the top of the affected page. Each alert appears with a title, which summarizes the issue or system event. When the system issue or critical system event is resolved, the alert disappears.
NoteIf you see an alert and the system issue or critical system event is resolved before you log out of the SAP Ariba solution, SAP Ariba changes the status of the alert to Resolved. If an issue is resolved while you are logged out of the system, SAP Ariba does not display a Resolved alert for the issue when you log back in to the system.
You can click the close icon (X) in the top right corner of the alert pop-up to close the window. The alert window reappears when you log out and log back in for as long as the system issue or critical system event occurs.
If there is additional information available about the issue, a Details link appears next to the alert title. When you click Details, a pop-up window displays the additional information about the system issue, including details about potential symptoms.
NoteSAP Ariba displays in-product alerts only for critical issues that impact all users. Issues with limited scope are communicated only through email notifications sent to DSCs.
Searching, completing tasks, and other common user actionsViewing in-product alerts PUBLIC 101
The Feedback button
You can use the feedback button to rate your experience and submit comments. If your organization opted for the Feedback button, it will be available on every page of your SAP Ariba solution after you log in.
When you click the Feedback button, a 2-question survey opens. You can rate your experience with your SAP Ariba solution and submit comments. We use the feedback to improve the solutions we offer.
We don't keep track of the names of users who submit feedback, and the feedback is never used for marketing purposes.
NoteThe Feedback button isn't for technical support. We won't reply directly to you regarding the feedback you submit.
If you have questions about the Feedback button, have your Designated Support Contact log a service request. An SAP Ariba Customer Support representative will follow up to complete the request.
Related Information
About SAP Ariba session timeoutsNavigating your dashboardUsing the search bar
102 PUBLICSearching, completing tasks, and other common user actions
The Feedback button
Site configuration options for SAP Ariba Strategic Sourcing solutions
Site configuration options can affect the appearance and behavior of SAP Ariba solutions. Site configuration options are set for you by SAP Ariba.
Site configuration options for message boards [page 103]
Site configuration options for email notifications [page 104]
Site configuration options for message boardsSome of the functionality for the message board feature is controlled by configuration options, which SAP Ariba sets for you. SAP Ariba controls the default values for the parameters, and you cannot modify or increase the configuration values.
Application.ACM.MessageBoard.Enabled
The message board feature is enabled by the Application.ACM.MessageBoard.Enabled site parameter. Setting the value of this parameter to No disables the message board feature.
In the default configuration, this parameter is set to Yes.
Application.ACM.MessageBoard.EmailToWorkspaceEnabled
The project email feature is enabled by the Application.ACM.MessageBoard.EmailToWorkspaceEnabled site parameter. Setting the value of this parameter to No disables the project email feature.
In the default configuration, this parameter is set to Yes.
Application.ACM.MessageBoard.MessageDeleteEnabled
The delete message operation enables project owners and message authors to delete messages (and replies) from the message board. This feature is enabled by the Application.ACM.MessageBoard.MessageDeleteEnabled site parameter.
To disable the delete message feature, set the value of this parameter to No.
Searching, completing tasks, and other common user actionsSite configuration options for SAP Ariba Strategic Sourcing solutions PUBLIC 103
In the default configuration, this parameter is set to Yes.
For more information, see How to delete message board replies [page 95].
Site configuration options for email notificationsSome of the functionality related to notifications is controlled though site configuration parameters. Self-service parameters can be changed by your site's customer administrator. Parameters that are not shown as self-service are set or modified by SAP Ariba.Application.ACM.DefaultNotificationPreferencesUser (set by SAP Ariba Support)
Specifies the ID of a user whose notification preferences are used as the default settings for new users and users who have been created but have not yet logged in. After users log in, they can set the notifications preferences for themselves.
If this parameter is not set, the default setting for new users is to receive all notifications.
Application.ACM.EnableUnapprovedSupplierUserEmailNotification (set by SAP Ariba Support)
Determines whether the SAP Ariba solution sends email notifications to supplier managers about new, unapproved supplier users that are added after data synchronization with the Ariba Network for Suppliers.
If set to Yes, email notifications are sent to supplier managers, and when set to No, email notifications are not sent to supplier managers.
The default value is No.
Application.Base.PreferredEmailFormat (set by SAP Ariba Support)Specifies the preferred format for email notifications sent by the application. Valid values are HTML and TEXT. When this parameter is set to HTML, the application sends email notifications in which the body includes both text-formatted and HTML-formatted versions of the content. By default, users receive these notifications in HTML format, but they can set a preference to receive the notifications in plain text or compact text format instead.
When set to TEXT, the application sends only text-formatted email notifications.
The default value is HTML.
Application.Base.CompanyHolidays (enabled for self-service)Specifies holiday dates for your organization. Holiday dates are excluded when calculating how many working days have passed. The parameter Application.Base.SkipWeekendsAndHolidays uses this parameter when determining which days to skip when sending reminder messages to users. Enter a colon-separated list of dates, for example, Jan-2-2017:May-1-2017:Dec-26-2017. To define no holidays, set this parameter to an empty string.
NoteBecause company holidays typically do not occur on the same day each year, and the date format used by this parameter includes the year, you must update this parameter annually.
104 PUBLICSearching, completing tasks, and other common user actions
Site configuration options for SAP Ariba Strategic Sourcing solutions

Application.Base.SkipWeekendsAndHolidays (enabled for self-service)To prevent the application from sending notifications to users on weekends and holidays, set this parameter to Yes. The parameter determines whether the internal, scheduled batch tasks that send notifications skip weekends and holidays when counting days. The parameter Application.Base.CompanyHolidays specifies the holiday dates for your organization.
The default value is Yes.
Application.Base.EmailApprovalEnabled (enabled for self-service)Determines whether users can approve or deny approval requests via email, through the approval request notification, rather than having to log in to the SAP Ariba solution for approval-related tasks.
● If set to Yes, email notifications for approval requests include a way to approve or deny requests and add comments. Users can act on approval requests using email on a personal computer or a smartphone or personal digital assistant (PDA) device.
● If set to No, email approval is disabled. When users receive an approval request notification, they can view information about the request, but they cannot approve or deny the request without logging into the SAP Ariba application.
The default value is No.
NoteIf you enable the email approval feature, and if the parameter Application.Base.PreferredEmailFormat is set to HTML (the default), set a default user preference for users to receive notifications in compact text or plain text format.
Application.ACM.FileSizeLimitForEmailAttachments (enabled for self-service)
An integer value that specifies the maximum allowed file size, in MB, for attachments to approval emails. If the size of an attachment exceeds the value configured for this parameter, the attachment is replaced with a link, which the approvers can click to log in and view the file.
Approvers who do not have the permissions to log in and download the file may contact the review requester to receive the file through an appropriate file-sharing channel before they approve the review.
The maximum allowed value for this parameter is 25, which indicates a maximum file size of 25 MB. The default value is 15. This parameter is applicable when the parameter Application.Base.EmailApprovalEnabled is set to Yes.
Application.Base.EmailApprovalAutoRejectNotification (enabled for self-service)Determines whether approvers are notified of email approvals that were rejected based on a check of the sender's email address. Notifying approvers of email approval rejections helps approvers take the appropriate action, making the approval process flow more smoothly. This parameter is applicable only if the parameters Application.Base.EmailApprovalEnabled and Application.Base.EmailApprovalAutoReject are set to Yes.
Searching, completing tasks, and other common user actionsSite configuration options for SAP Ariba Strategic Sourcing solutions PUBLIC 105
If set to Yes, whenever an email approval is automatically rejected, the application sends a notification to the approver via the email address on the original email approval notification. The notification informs the approver of the rejection.
The default value is No.
Application.Base.EmailApprovalAudit (enabled for self-service)If this parameter is set to Yes, the SAP Ariba application keeps a record of each incoming email approval, including the email address from which it was sent, the name of the approver, the approvable involved, and the content of the message. SAP Ariba representatives can access the audit information. This parameter is applicable when the parameter Application.Base.EmailApprovalEnabled is set to Yes.
The default value is No.
Application.Base.EmailApprovalAutoReject (enabled for self-service)If this parameter is set to Yes, the SAP Ariba application keeps a record of each incoming email approval, including the email address from which it was sent, the name of the approver, the approvable involved, and the content of the message. SAP Ariba representatives can access the audit information. This parameter is applicable when the parameter Application.Base.EmailApprovalEnabled is set to Yes.
The default value is No.
Application.Base.EmailApprovalAutoRejectAudit (enabled for self-service)If this parameter is set to Yes, the application keeps a record of all email approvals that were rejected based on a check of the sender's email address. Each record includes the email address from which it was sent, the name of the approver, the approvable involved, and the content of the message. SAP Ariba representatives can access the audit information. This parameter is applicable only if the parameters Application.Base.EmailApprovalEnabled and Application.Base.EmailApprovalAutoReject are set to Yes.
The default value is No.
Application.Base.EmailApprovalAutoRejectNotification (enabled for self-service)Determines whether approvers are notified of email approvals that were rejected based on a check of the sender's email address. Notifying approvers of email approval rejections helps approvers take the appropriate action, making the approval process flow more smoothly. This parameter is applicable only if the parameters Application.Base.EmailApprovalEnabled and Application.Base.EmailApprovalAutoReject are set to Yes.
If set to Yes, whenever an email approval is automatically rejected, the application sends a notification to the approver via the email address on the original email approval notification. The notification informs the approver of the rejection.
The default value is No.
Application.ACM.TaskEmailGroupLimit (set by SAP Ariba Support)
106 PUBLICSearching, completing tasks, and other common user actions
Site configuration options for SAP Ariba Strategic Sourcing solutions
Allows you to control whether task notification emails are sent to a group based on the following criteria:
● If the parameter value is set to 500 (meaning the total size of the group, including its subgroups) and there are 1000 individual people added to a task as an observer, all of them would receive an email notification.
● If the value is set to 500 and there is one group added to a task with 1000 people in it, they would not receive a notification.
● If the value is set to 500 and there are two groups added to a task with 400 unique users in each, all 800 users would receive a notification.
● If the value is set to 500 and there is one group added to a task with 1000 people in it and one group with 400 people in it, the group with 400 people would receive the notification.
The default value is -1, meaning the feature is turned off.
The figures used above are examples. The parameter can be set to any value.
Searching, completing tasks, and other common user actionsSite configuration options for SAP Ariba Strategic Sourcing solutions PUBLIC 107
Revision history
The following table provides a brief history of the updates to this guide. SAP Ariba updates the technical documentation for its cloud solutions if:
● Software changes delivered in service packs or hot fixes require a documentation update to correctly reflect the new or changed functionality
● The existing content is incorrect or user feedback indicated that important content is missing
SAP Ariba reserves the right to update its technical documentation without prior notification. Most documentation updates will be made available in the same week as the software service packs are released, but critical documentation updates may be released at any time.
Month/year of update Updated topic Short description of change
August 2019 ● How to search for projects or documents from the dashboard search bar
● How to search for projects or documents using the Search page
● Proper noun searches
Transitions from lowercase to uppercase split search terms and text being searched.
May 2019 About the dashboard Added note about print icon under image key.
November 2018 How to add, arrange, format, or remove content items
How to add a new dashboard tab
How to compare and reset your dashboard to default settings
How to compare and reset your dashboard to default settings
These topics from ARIBA_PLATFORM replaced the existing topics.
108 PUBLICSearching, completing tasks, and other common user actions
Revision history
Month/year of update Updated topic Short description of change
September 2018 How to download information about your user record
Managing your user profile and preferences
How to set individual email notification preferences
The Download preferences option is now called Download procurement user info in SAP Ariba Procurement solutions. It's called Download sourcing user info in SAP Ariba Strategic Sourcing and Supplier Management solutions.
April 2018 Site configuration options for email notifica-tions
Added Application.ACM.TaskEmailGroupLimit parameter.
About setting email notification preferences
Added new section "Disabling email notifications to large groups".
How to download information about your user record
Updated information about the accepted privacy statement version.
March 2018 Managing your user profile and preferences
How to set individual email notification preferences
Added information about the Download preferences option.
February 2018 How to switch between light and dark themes
Added the new black theme to the themes users can select.
Searching, completing tasks, and other common user actionsRevision history PUBLIC 109
Important Disclaimers and Legal Information
HyperlinksSome links are classified by an icon and/or a mouseover text. These links provide additional information.About the icons:
● Links with the icon : You are entering a Web site that is not hosted by SAP. By using such links, you agree (unless expressly stated otherwise in your agreements with SAP) to this:
● The content of the linked-to site is not SAP documentation. You may not infer any product claims against SAP based on this information.● SAP does not agree or disagree with the content on the linked-to site, nor does SAP warrant the availability and correctness. SAP shall not be liable for any
damages caused by the use of such content unless damages have been caused by SAP's gross negligence or willful misconduct.
● Links with the icon : You are leaving the documentation for that particular SAP product or service and are entering a SAP-hosted Web site. By using such links, you agree that (unless expressly stated otherwise in your agreements with SAP) you may not infer any product claims against SAP based on this information.
Videos Hosted on External PlatformsSome videos may point to third-party video hosting platforms. SAP cannot guarantee the future availability of videos stored on these platforms. Furthermore, any advertisements or other content hosted on these platforms (for example, suggested videos or by navigating to other videos hosted on the same site), are not within the control or responsibility of SAP.
Beta and Other Experimental FeaturesExperimental features are not part of the officially delivered scope that SAP guarantees for future releases. This means that experimental features may be changed by SAP at any time for any reason without notice. Experimental features are not for productive use. You may not demonstrate, test, examine, evaluate or otherwise use the experimental features in a live operating environment or with data that has not been sufficiently backed up.The purpose of experimental features is to get feedback early on, allowing customers and partners to influence the future product accordingly. By providing your feedback (e.g. in the SAP Community), you accept that intellectual property rights of the contributions or derivative works shall remain the exclusive property of SAP.
Example CodeAny software coding and/or code snippets are examples. They are not for productive use. The example code is only intended to better explain and visualize the syntax and phrasing rules. SAP does not warrant the correctness and completeness of the example code. SAP shall not be liable for errors or damages caused by the use of example code unless damages have been caused by SAP's gross negligence or willful misconduct.
Bias-Free LanguageSAP supports a culture of diversity and inclusion. Whenever possible, we use unbiased language in our documentation to refer to people of all cultures, ethnicities, genders, and abilities.
110 PUBLICSearching, completing tasks, and other common user actions
Important Disclaimers and Legal Information

Searching, completing tasks, and other common user actionsImportant Disclaimers and Legal Information PUBLIC 111
www.ariba.com
© 2022 SAP SE or an SAP affiliate company. All rights reserved.
No part of this publication may be reproduced or transmitted in any form or for any purpose without the express permission of SAP SE or an SAP affiliate company. The information contained herein may be changed without prior notice.
Some software products marketed by SAP SE and its distributors contain proprietary software components of other software vendors. National product specifications may vary.
These materials are provided by SAP SE or an SAP affiliate company for informational purposes only, without representation or warranty of any kind, and SAP or its affiliated companies shall not be liable for errors or omissions with respect to the materials. The only warranties for SAP or SAP affiliate company products and services are those that are set forth in the express warranty statements accompanying such products and services, if any. Nothing herein should be construed as constituting an additional warranty.
SAP and other SAP products and services mentioned herein as well as their respective logos are trademarks or registered trademarks of SAP SE (or an SAP affiliate company) in Germany and other countries. All other product and service names mentioned are the trademarks of their respective companies.
Please see https://www.sap.com/about/legal/trademark.html for additional trademark information and notices.
THE BEST RUN
Copyright © 2022 FDOKUMEN