Science and Technology of Weft and Warp Knitting
16
Science and Technology of Weft and Warp Knitting Prof. Dr. Bipin Kumar Department of Textile Technology Indian Institute of Technology - Delhi Module - 10 Lecture - 42 Single Bar Warp Knit Constructions Welcome participants, to lecture number 2. This particular lecture is just the extension of lecture number 1. In lecture number 1, I give you the design principle for creating different types of warp knitted constructions. In this particular lecture, I will be focusing on mainly the commercial used single warp knitted structures; what are their properties; how they are designed. So, just a quick recap. If you want to engineer different types of warp knitted structure; so, they are 3 principles. (Refer Slide Time: 00:54) Either you can go for single bar or multi-bar structure. In this particular lecture, I will be focusing only on single bar structure. So, once you have chosen whether you are using single bar or multi-bar structure on the machine, you can either go for single bed machine or double bed machine. So, here the bed actually represent how many needle beds you are using. Once single bar and the choice of the beds are okay, then you can go for overlap and underlap variations. And in the last class, I already discussed you different possibilities of creating overlap and underlap. (Refer Slide Time: 01:36)
-
Upload
khangminh22 -
Category
Documents
-
view
0 -
download
0
Transcript of Science and Technology of Weft and Warp Knitting

Science and Technology of Weft and Warp Knitting
Prof. Dr. Bipin Kumar
Department of Textile Technology
Indian Institute of Technology - Delhi
Module - 10
Lecture - 42
Single Bar Warp Knit Constructions
Welcome participants, to lecture number 2. This particular lecture is just the extension of
lecture number 1. In lecture number 1, I give you the design principle for creating different
types of warp knitted constructions. In this particular lecture, I will be focusing on mainly the
commercial used single warp knitted structures; what are their properties; how they are
designed. So, just a quick recap. If you want to engineer different types of warp knitted
structure; so, they are 3 principles.
(Refer Slide Time: 00:54)
Either you can go for single bar or multi-bar structure. In this particular lecture, I will be
focusing only on single bar structure. So, once you have chosen whether you are using single
bar or multi-bar structure on the machine, you can either go for single bed machine or double
bed machine. So, here the bed actually represent how many needle beds you are using. Once
single bar and the choice of the beds are okay, then you can go for overlap and underlap
variations. And in the last class, I already discussed you different possibilities of creating
overlap and underlap.
(Refer Slide Time: 01:36)

So, this is the single bar and multi-bar construction. So, single bar, where only 1 set of guide
bar having similar movements is providing yarn to the needles. So, 1 guide bar is actually
associated with 1 particular needle. So, that is a single bar fabrics. And once 2 guide bar is
there with a particular needle, 2 guides per needle, then you create different type of structure,
which is called multi-bar structure, 2 bar structure. So, this particular lecture is just to
characterize single bar structure; what are different combinations which is used in the market
and what is their role.
(Refer Slide Time: 02:16)
The other possibilities is single needle bed and 2 needle beds. I discussed in the last class.
You can go for one set of bed. And you can also go for 2 set of bed. But if you are creating
single bar structure definitely, then you do not need 2 beds. It because obviously, only 1
guide is available with 1 particular needle. So, there is no need for extra bed in those type of

fabric structure. So, single guide bar structures, you can create with tricot machine having
one set of needle; one set of sinker; and one set of guides. Okay.
(Refer Slide Time: 03:00)
And once that is done, then you can go for overlap and underlap variations. In the last class, I
explained in very detail, how you can go for overlap and underlap in opposite directions. So,
this is the sequence of lapping diagram where overlap and underlap in is in opposite
direction. Overlap and underlap in the same direction. So, here you can see, the overlap and
underlap are in the same directions, in a same course.
So, that’s for the same direction. The other possibility is only overlap and no underlaps.
Okay. So, this is only overlap. So, you can see the yarn is only on the front side of the needle;
on the backside, the yarn is not floating. So, this is only overlap and no underlaps. The other
possibility is only underlaps and no overlaps. This is the possibility is only underlap, where
you can see, on the front side no yarn has been provided.
The next option is, neither underlaps nor overlaps. This is the situation where the yarn is just
in the straight form, where no overlap and underlaps has been provided. And the other
possibility is the combining of all of these together. You can choose any 2 possibilities of
overlap and underlap and you can create design pattern.
(Refer Slide Time: 04:20)

Now, let’s move to single bar construction. So, this lecture is all about focusing on single bar
construction and changing the overlap and underlap movement; and what type of different
type of fabric structure which is feasible on a single bar construction. So, the first
construction which is very easy to make is the pillar stitch. So, in the last week also, I give
you the denotation for lapping diagram and lapping plan for these type of pillar stitch.
(Refer Slide Time: 04:49)
So here, 1 to 0 is overlap on the front side. Then, 0 to 1 is underlap. So, 0 to 1 is underlap on
the backside of the needle. Then, after that, again 1 to 0 is overlap. And then it is repeating.
So, if you see this type of fabric structure which is shown here. So, if all the guides are doing
exactly the same fashion, unfortunately, it will be difficult to create a fabric structure.
Because, if you follow the movement of yarn, none of the loops is connecting with the loops
of other column or other courses.

So, if the loops of one needle is not connecting with the loops of other needle, practically, the
fabric cannot be feasible. Because, if you see, the loops are of the same needle is just it being
made with the same needle. So, they are not connecting with the loops of other needles. So
this, with this, each of the individual wales are separate. And if they are separate, then it
cannot provide you a fabric.
So, to make a fabric, these wales has to be connect together. Unfortunately, when you give
pillar stitch, you cannot create fabric. You need some other mechanism to hold some of these
wales. And these mechanism are: You can use floating yarns in the weft direction. So, each
floating weft will be carrying each wales. Each floating weft; so, this is weft inlays. So, each
floating wefts is actually connecting all the wales of the fabric.
And in this way, the fabric will be stable. Otherwise, practically, pillar stitch; if you are just
using pillar type of loops in the fabric structure, fabric cannot be created. You need other
mechanism or other guide; other overlaps and underlaps movement to connect these loops
with the other column. So, weft inlays is one of the possibilities. Here is a simple animations.
(Refer Slide Time: 00:00)
Thanks to school of textiles, from NC State. (Video Starts: 07:13) They used very beautiful
animation. So, here you can see the, this is the weft inlays which is being used. So, this weft
is actually going through the entire loops of the same course. And in this way, all the wales
are connected. (Video Ends: 07:32) So, this is pillar stitch.
(Refer Slide Time: 07:37)

The other type of pillar stitch is like this. I already denoted its fabric notations. So, 0 to 1 is
overlap. And 1 to 1 is underlap. And, it means, practically there is no underlap. So, 1 to 1 is
underlap. And 1 to 0 is again overlap. So, here the overlap is 0 to 1 and 1 to 0. So, there is no
underlap. So, this comes under the category of only overlaps, no underlaps. So, if you see
this, you will get this type of loops in the fabric.
And unfortunately, again you cannot connect the wales created by this type of pillar stitch.
So, if you want to get the fabric, you need another mechanism to hold some of these wales.
Again, you can use weft inlays. Otherwise, you need to use 2 bar structure, where one will be
making pillar stitch and the other guide bar should be connecting those pillars. So, I have one
fabric where you will about to at least guess how these pillars which is creating by each
guides are connected with the help of other guide bar.
So, let me show you this fabric. (Video Starts: 08:57) So, if you see this fabric. So, this is
actually, the black one, if you see the black one, they are the pillar stitch. So, each black
column or the column which is made by the black yarn, is not connected with the different
columns. So, how these columns are secured in the fabric, it is with the help of green yarn.
So, what green yarn is doing; it is shifting from one column to other column.
So, this is how you create the fabric. So, here, actually the green yarn which is provided by
another guide bar is actually shifting from one column to other column. So, one guide bar is
actually; (Video Ends: 09:51)

(Refer Slide Time: 09:52)
So, each guide of the same guide bar is making pillars. And there must be another guide or
guide bar in this fabric which will be connecting each of these pillars. So, so this is how this
each individual columns might have secured in this particular fabric. So, this is a classic
example of how pillars are used in a warp knitted structure.
(Refer Slide Time: 11:04)
So, if you summarize these 2 types of pillar combination; so here, one pillar is looking like
this, where the loops are somehow open; and the other pillar, where loops are somehow
closed. So, this is how the pillar stitch has been used. So, in this particular open pillar stitch,
underlap is missing. In closed pillar stitch, both overlap and underlap are there. And they are
in opposite direction. Okay.
(Refer Slide Time: 11:42)

Now, let’s come to other category of single guide bar construction. It is called tricot. So,
tricot is the most commonly used warp knitted structure you will find in agriculture nets or
mosquito nets. Or many other similar types of net fabrics or mesh fabrics, you will find tricot
structure. Even in medical application also, some of the guide bar is set in the tricot setting.
And tricot setting is the most classic example where the guide bar sifting from one needle to
other needle.
So, you can see it here. And this is what we have been doing so far. So, I am not going in
detail. So, 1 to 2 is the overlap. And then, 2 to 1 is the underlap. And again, 1 to 0 is the
overlap. So, if you see this particular tricot structure, it is repeating in 2 courses. And overlap
and underlap are same; and they are in exactly opposite direction. So here, the overlap is
from left to right; and the underlap at the backside is from right to left.
So, 1 to 2 overlap, left to right; 2 to 1, underlap from right to left. So, they are in opposite
direction. So, this is the classic example of tricot. You will find in most 2 bar structures,
somehow one of the tricot constructions must be used. So here, again if you see the loops are
closed. So, here the loops are closed. Okay.
(Refer Slide Time: 13:25)

Now, let’s go for open type of tricot lap. So here again, if you see this particular lapping
diagram, 0 to 1 is overlap on the front side. Then, 1 to 2 is underlap. And 2 to 1 is again
overlap. So, this is what the pattern of 1 cross 1 tricot lap is there. Again, it is 1 cross 1, but
the loops are in open condition. And how is that possible? Because both overlap and underlap
are in the same direction. So, this is how the fabric will look like. So, here the loops looks
more open.
(Refer Slide Time: 14:05)
So, open loop and closed loop is very, very common. Especially in open loop, if you see, the
direction of sinkers, sinker loops are; and the direction of its head loop is almost in the same
direction. So, overlap and underlap are in the same direction in case of open loop. And in
closed loop, overlap and underlap are in opposite directions. Although, the amount of pitch; it
means overlap is happening between one needle; and underlap is also happening between one
needle, one shift needle.
So, 1 pitch is the lateral displacement of each guide, in open loop construction and closed
loop construction in 1 cross 1 tricot. And the only difference here is the direction of overlap
and underlap. Because of this, the 2 fabrics looks different. In one fabric, loops looks more
open; that’s why it is called open loops. In other fabrics, loops look more closed, that’s why it
is called closed loop.
(Refer Slide Time: 15:21)
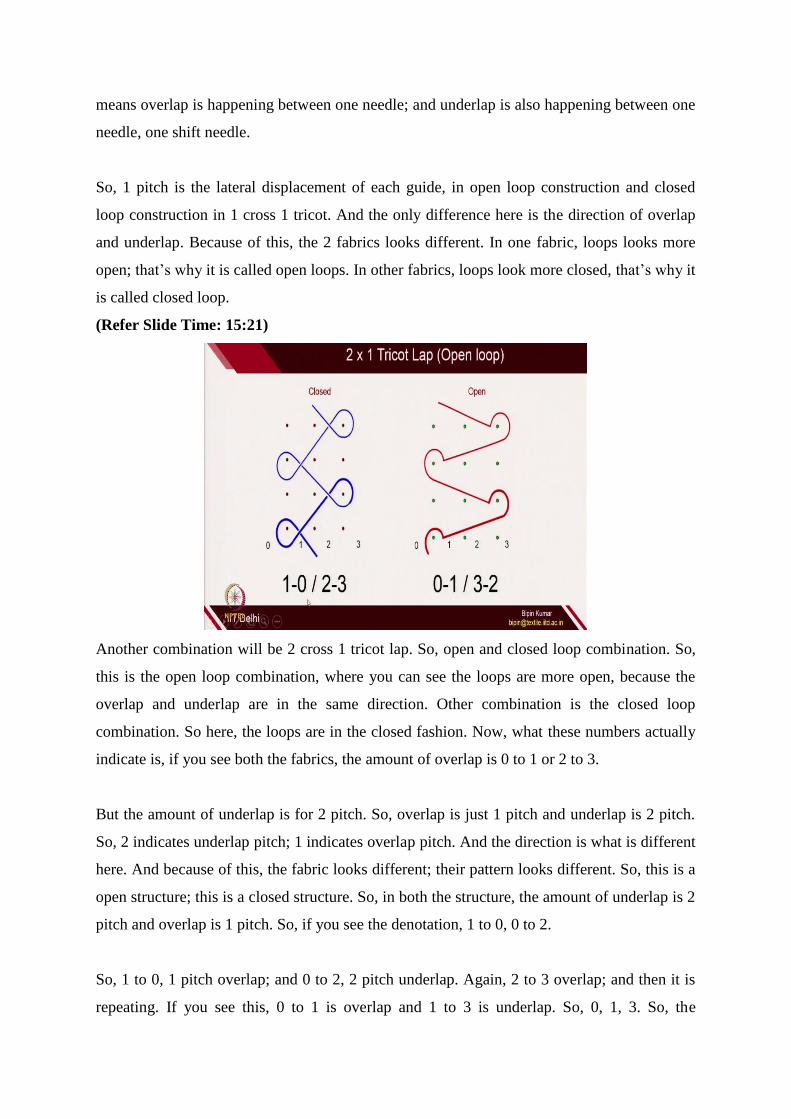
Another combination will be 2 cross 1 tricot lap. So, open and closed loop combination. So,
this is the open loop combination, where you can see the loops are more open, because the
overlap and underlap are in the same direction. Other combination is the closed loop
combination. So here, the loops are in the closed fashion. Now, what these numbers actually
indicate is, if you see both the fabrics, the amount of overlap is 0 to 1 or 2 to 3.
But the amount of underlap is for 2 pitch. So, overlap is just 1 pitch and underlap is 2 pitch.
So, 2 indicates underlap pitch; 1 indicates overlap pitch. And the direction is what is different
here. And because of this, the fabric looks different; their pattern looks different. So, this is a
open structure; this is a closed structure. So, in both the structure, the amount of underlap is 2
pitch and overlap is 1 pitch. So, if you see the denotation, 1 to 0, 0 to 2.
So, 1 to 0, 1 pitch overlap; and 0 to 2, 2 pitch underlap. Again, 2 to 3 overlap; and then it is
repeating. If you see this, 0 to 1 is overlap and 1 to 3 is underlap. So, 0, 1, 3. So, the

directions are same. Here, 1, 0, 2. So, 1 to 0; so, going from right to left. And then from 0 to
2, going from left to right. So, this is how these 2 fabric structure are different. And the
quantity of overlap and underlap are same, only directions are different.
(Refer Slide Time: 17:25)
Similarly, other tricot possibilities are 3 cross 1, where underlap is 3 pitch, overlap is 1 pitch.
And this tricot can also have open loop construction and closed loop constructions. So, if
underlap and overlap in the same direction, then it is a open loop construction. If overlap and
underlap are in opposite direction, it is a closed loop construction. Similarly, you can go for 4
cross 1, where underlap is 4 pitch; overlap is 1 pitch.
And we can again design the fabric with open loop construction and closed loop construction.
If overlap and underlap are in the same direction, it’s an open loop construction. If underlap
and overlap for each course is in opposite direction, it is a closed loop construction. So, this is
how tricot comes in the picture. Even if you are using multi-bar machine, one of the guide bar
will be set in the tricot position. So, each of the individual guide bar, most of the time in warp
knitted structure are set in tricot. So, what are the features of tricot in case of open loops and
closed loops?
(Refer Slide Time: 18:36)
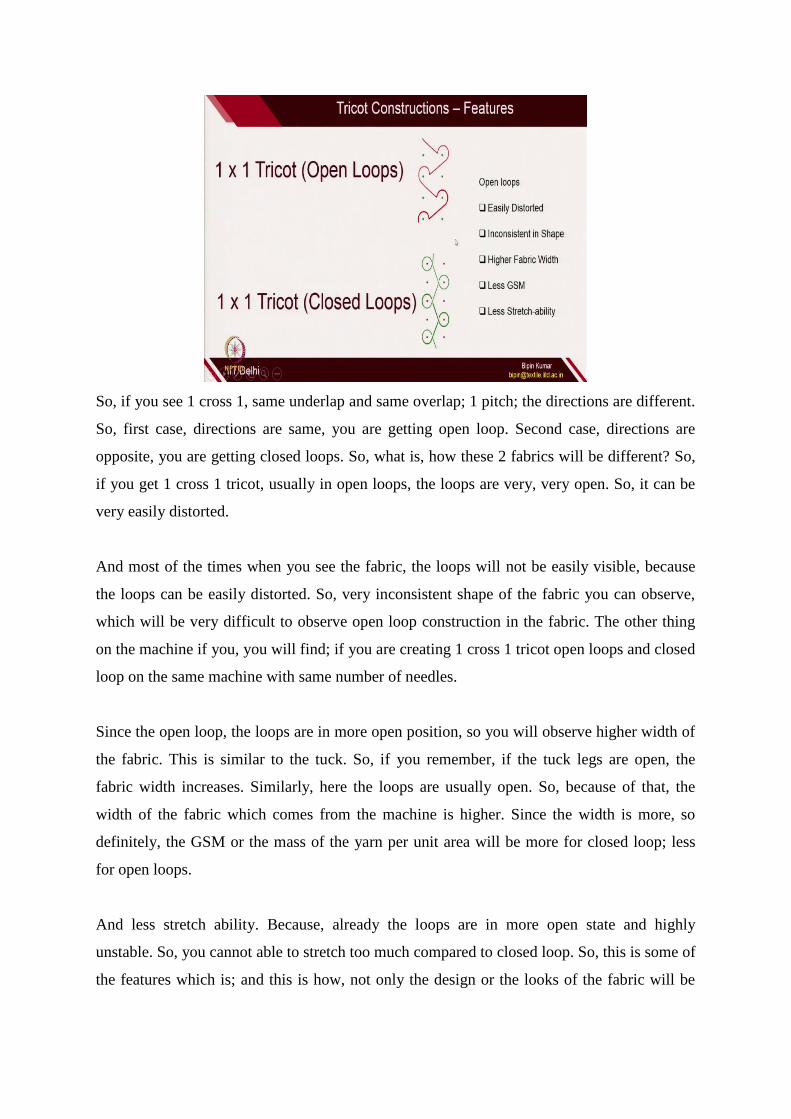
So, if you see 1 cross 1, same underlap and same overlap; 1 pitch; the directions are different.
So, first case, directions are same, you are getting open loop. Second case, directions are
opposite, you are getting closed loops. So, what is, how these 2 fabrics will be different? So,
if you get 1 cross 1 tricot, usually in open loops, the loops are very, very open. So, it can be
very easily distorted.
And most of the times when you see the fabric, the loops will not be easily visible, because
the loops can be easily distorted. So, very inconsistent shape of the fabric you can observe,
which will be very difficult to observe open loop construction in the fabric. The other thing
on the machine if you, you will find; if you are creating 1 cross 1 tricot open loops and closed
loop on the same machine with same number of needles.
Since the open loop, the loops are in more open position, so you will observe higher width of
the fabric. This is similar to the tuck. So, if you remember, if the tuck legs are open, the
fabric width increases. Similarly, here the loops are usually open. So, because of that, the
width of the fabric which comes from the machine is higher. Since the width is more, so
definitely, the GSM or the mass of the yarn per unit area will be more for closed loop; less
for open loops.
And less stretch ability. Because, already the loops are in more open state and highly
unstable. So, you cannot able to stretch too much compared to closed loop. So, this is some of
the features which is; and this is how, not only the design or the looks of the fabric will be
different, but also their some of the basic properties, physical or mechanical properties of
these 2 constructions will be completely different.
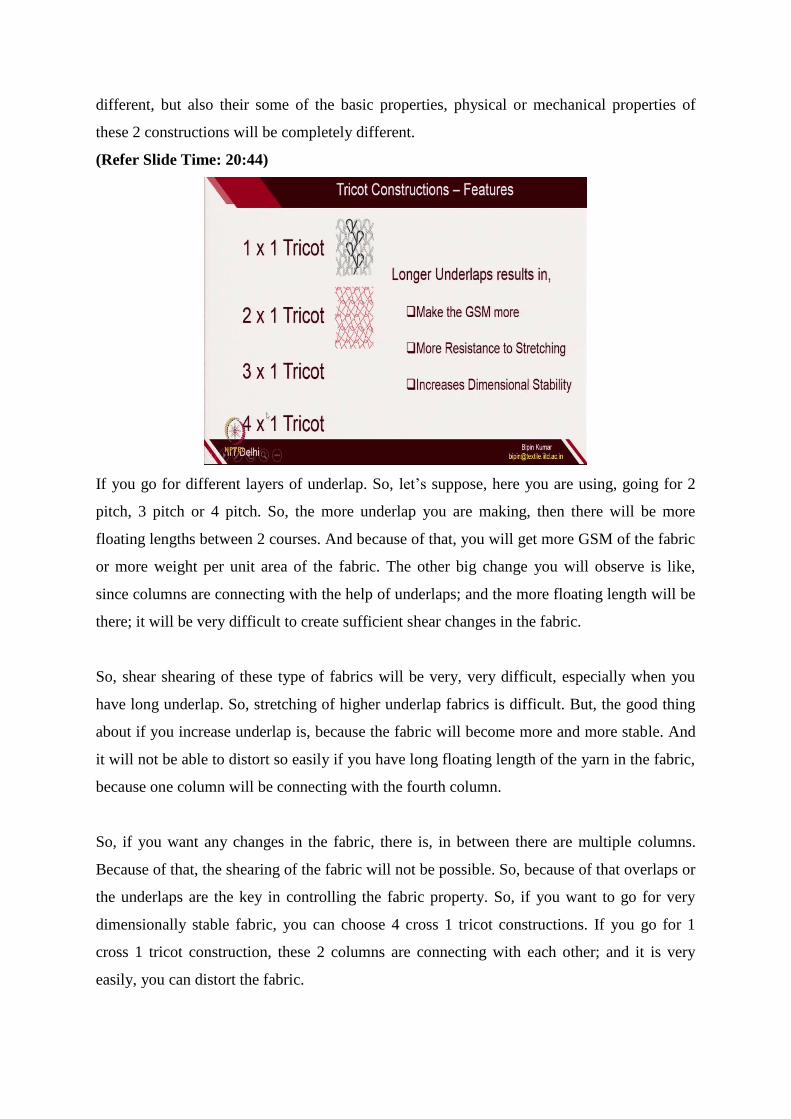
(Refer Slide Time: 20:44)
If you go for different layers of underlap. So, let’s suppose, here you are using, going for 2
pitch, 3 pitch or 4 pitch. So, the more underlap you are making, then there will be more
floating lengths between 2 courses. And because of that, you will get more GSM of the fabric
or more weight per unit area of the fabric. The other big change you will observe is like,
since columns are connecting with the help of underlaps; and the more floating length will be
there; it will be very difficult to create sufficient shear changes in the fabric.
So, shear shearing of these type of fabrics will be very, very difficult, especially when you
have long underlap. So, stretching of higher underlap fabrics is difficult. But, the good thing
about if you increase underlap is, because the fabric will become more and more stable. And
it will not be able to distort so easily if you have long floating length of the yarn in the fabric,
because one column will be connecting with the fourth column.
So, if you want any changes in the fabric, there is, in between there are multiple columns.
Because of that, the shearing of the fabric will not be possible. So, because of that overlaps or
the underlaps are the key in controlling the fabric property. So, if you want to go for very
dimensionally stable fabric, you can choose 4 cross 1 tricot constructions. If you go for 1
cross 1 tricot construction, these 2 columns are connecting with each other; and it is very
easily, you can distort the fabric.

But if the underlaps are longer, it is very difficult to distort the fabric. So, tricot is the widely
used warp knitted construction or design in the market. Now, the next construction which is
used in single bar warp knitted construction is atlas construction.
(Refer Slide Time: 23:01)
So, atlas is nothing but, it is a combination of open and closed loop. The structure looks little
bit confusing. But if you carefully follow each of these loops inside the fabric structure,
following one individual yarn, you can get how you combine different types of overlap and
underlaps. And you created these type of fabrics. So, this looks very complicated. But if we
follow carefully, it looks very simple.
So, if you follow my cursor; So, I am following the yarn from here. So, you can see, this is
the first loop; then, this is the second loop; then, this is the third loop; then, this is the fourth
loop; and then, this is the fifth loop. Then, this is again closed loop; then, this is closed loop;
then, this is closed loop; and then, this is open loop. Okay. So, following one individual yarn,
this is how it is moving.
So, we start from here. So, let’s suppose I start from open loop. So, this is the open loop; then
closed loop; then closed loop; then closed loop; then open loop; again 3 closed loop. So, 1
open loop; 3 closed loop; again 1 open loop; 3 closed loop. So, this atlas construction is
created by combining 3 closed loop following with 1 open loop in different directions. So,
this particular fabric is repeating after 4 plus 4, 8 courses.

And in this 8 courses, 6 loops are closed loops and 2 loops are open loops. So, this particular
construction is comparatively much more stable because more closed loops are there, much
more compact. And it will have this kind of lapping plan. So, if you want to create lapping
plan, 0 to 1 is the overlap; then 1 to 2 is underlap. So, 1 to 2. Then 2 to 1 is again overlap.
And then, from 1 to 3 is underlap.
Then 3 to 2. So, this is 3 to 2 is overlap. Then again from 2 to 4 is overlap. Then 4 to 3. So, 4
to 3 is again overlap. And then 3 to 5 is overlap. This is how 3 closed loops is being formed.
Then, this is the open loop, because overlap and underlap in the same direction. And again, 3
closed loop; then open loop. So, we started from this position and we reach to this position.
So, you need to created 8 courses in the repeat design for making this particular fabric.
Another fabric will be; you can have the opposite of what we have seen in the previous slide.
(Refer Slide Time: 26:13)
So, 1 closed and 3 open. So, if you follow this yarn, which is shown in the arrow, connecting
all the loops with the same yarn. So, this is closed loop; then this is open; this is open; this is
open; again this is closed; then this is open; this is open; this is open; and then this is closed.
So, this is how it is here. So, 1 closed loop; 3 open loops; again 1 closed loop; 3 open loops.
This will be again repeating with 8 courses.
And it’s again the combination of, same underlap and overlap in the same direction; and
overlap and underlap in opposite directions. So, with this; this is the permutation and
combinations which you can go in single guide bar warp knitted constructions; and playing
with overlap and underlap direction; and the pitch. So, with this, I am ending this particular

lecture. In the next class, I will be focusing on 2 guide bar structure, which is where you will
be having 2 guides per needle. So, thank you very much. Catch you in the next class.