SANWatch - Thomas-Krenn.AG
337
SANWatch ® Effortless RAID Management and Data Protection Storage Management Suite for Infortrend RAID Subsystems User’s Manual Software Revision: 1.3 and later Document Revision: 2.2e (Apr., 2009)
-
Upload
khangminh22 -
Category
Documents
-
view
2 -
download
0
Transcript of SANWatch - Thomas-Krenn.AG

SANWatch® Effortless RAID Management and Data Protection
Storage Management Suite for Infortrend RAID Subsystems
User’s Manual
Software Revision: 1.3 and later
Document Revision: 2.2e (Apr., 2009)

SANWatch User’s Manual
Contact Information
Asia Pacific (International Headquarters) Infortrend Technology, Inc. 8F, No. 102 Chung-Shan Rd., Sec. 3 Chung-Ho City, Taipei Hsien, Taiwan Tel: +886-2-2226-0126 Fax: +886-2-2226-0020 [email protected] [email protected] http://esupport.infortrend.com.tw http://www.infortrend.com.tw
Americas Infortrend Corporation 2200 Zanker Road, Unit D, San Jose, CA. 95131 USA Tel: +1-408-988-5088 Fax: +1-408-988-6288 [email protected] http://esupport.infortrend.com http://www.infortrend.com
China Infortrend Technology, Limited Room 1210, West Wing, Tower One, Junefield Plaza, No. 6 Xuanwumen Street, Xuanwu District, Beijing, China Post code: 100052 Tel: +86-10-6310-6168 Fax: +86-10-6310-6188 [email protected] [email protected] http://esupport.infortrend.com.tw http://www.infortrend.com.cn
Europe (EMEA) Infortrend Europe Limited 1 Cherrywood, Stag Oak Lane Chineham Business Park Basingstoke, Hampshire RG24 8WF, UK Tel: +44-1256-707-700 Fax: +44-1256-707-889 [email protected] [email protected] http://esupport.infortrend-europe.com/ http://www.infortrend.com
Japan Infortrend Japan, Inc. 6F, Okayasu Bldg., 1-7-14 Shibaura Minato-ku, Tokyo, 105-0023 Japan Tel: +81-3-5730-6551 Fax: +81-3-5730-6552 [email protected] [email protected] http://esupport.infortrend.com.tw http://www.infortrend.co.jp
Germany Infortrend Deutschland GmbH Werner-Eckert-Str.8 81829 Munich Germany Tel: +49 (0) 89 45 15 18 7 - 0 Fax: +49 (0) 89 45 15 18 7 - 65 [email protected] [email protected] http://www.infortrend.com/germany
ii
SANWatch User’s Manual
Copyright 2008 First Edition Published 2008
All rights reserved. This publication may not be reproduced, trans-mitted, transcribed, stored in a retrieval system, or translated into any language or computer language, in any form or by any means, elec-tronic, mechanical, magnetic, optical, chemical, manual or otherwise, without the prior written consent of Infortrend Technology, Inc.
Disclaimer
Infortrend Technology makes no representations or warranties with respect to the contents hereof and specifically disclaims any implied warranties of merchantability or fitness for any particular purpose. Furthermore, Infortrend Technology reserves the right to revise this publication and to make changes from time to time in the content hereof without obligation to notify any person of such revisions or changes. Product specifications are also subject to change without prior notice.
Trademarks
Infortrend, Infortrend logo, SANWatch, EonStor, and EonPath are all registered trademarks of Infortrend Technology, Inc. Other names prefixed with “IFT” and “ES” are trademarks of Infortrend Technology, Inc.
Microsoft, Windows, Windows 2000, Windows XP, and Windows Server 2003, Vista, and Windows Storage Server 2003 are registered trademarks of Microsoft Corporation in the U.S. and other countries.
LINUX is a trademark of Linus Torvalds. RED HAT is a registered trademark of Red Hat, Inc.
Solaris and Java are trademarks of Sun Microsystems, Inc.
All other names, brands, products or services are trademarks or registered trademarks of their respective owners.
iii

SANWatch User’s Manual
Table of Contents
CONTACT INFORMATION............................................................................................... II COPYRIGHT 2008 ........................................................................................................III
First Edition Published 2008 .............................................................................................. iii Disclaimer .......................................................................................................................... iii Trademarks........................................................................................................................ iii
TABLE OF CONTENTS.................................................................................................. IV LIST OF TABLES ......................................................................................................... IX LIST OF FIGURES ........................................................................................................ IX USER’S MANUAL OVERVIEW ........................................................................................ X USER’S MANUAL STRUCTURE AND CHAPTER OVERVIEW............................................... X
Appendices ....................................................................................................................... xii USAGE CONVENTIONS ...............................................................................................XIII SOFTWARE AND FIRMWARE UPDATES ....................................................................... XIV REVISION HISTORY .................................................................................................... XV
CHAPTER 1 INTRODUCTION 1.1 SANWATCH OVERVIEW.................................................................................1-2
1.1.1 Product Description..........................................................................................1-2 1.1.2 Feature Summary ............................................................................................1-3
1.2 FEATURED HIGHLIGHTS .................................................................................1-4 1.2.1 Graphical User Interface (GUI) ........................................................................1-4 1.2.2 SANWatch Initial Portal Window ......................................................................1-4 1.2.3 Enclosure View ................................................................................................1-6 1.2.4 Powerful Event Notification (Notification Manager) ..........................................1-6 1.2.5 Connection Methods ........................................................................................1-7 1.2.6 Management Access & Installation Modes ......................................................1-8 • The Full Mode Installation......................................................................................1-11 • The Custom Mode Installation ...............................................................................1-12 • Other Concerns:.....................................................................................................1-14 1.2.7 Multi-Language Support.................................................................................1-15 1.2.8 Password Protection ......................................................................................1-15
CHAPTER 2 INSTALLATION 2.1 SYSTEM REQUIREMENTS................................................................................2-2
2.1.1 Servers Running SANWatch for RAID Management .......................................2-2 2.1.2 SANWatch Connection Concerns ....................................................................2-4
2.2 RAID CHART ................................................................................................2-6 2.3 SOFTWARE SETUP.........................................................................................2-7
2.3.1 Before You Start ..............................................................................................2-7 2.3.2 Installing SANWatch on a Windows Platform...................................................2-7 2.3.3 Installing SANWatch on a Linux Platform.........................................................2-8 2.3.4 Installing SANWatch on a Solaris Platform ......................................................2-9 2.3.5 Installing SANWatch on a Mac OS Running Safari Browser..........................2-10 2.3.6 Installing SANWatch Main Program (for all platforms) ...................................2-15 2.3.7 Redundant SANWatch Instances...................................................................2-19
2.4 VSS HARDWARE PROVIDER ........................................................................2-22 2.5 PROGRAM UPDATES ....................................................................................2-25 2.6 IN-BAND SCSI .............................................................................................2-26
2.6.1 Overview........................................................................................................2-26 2.6.2 Related Configuration on Controller/Subsystem ............................................2-26
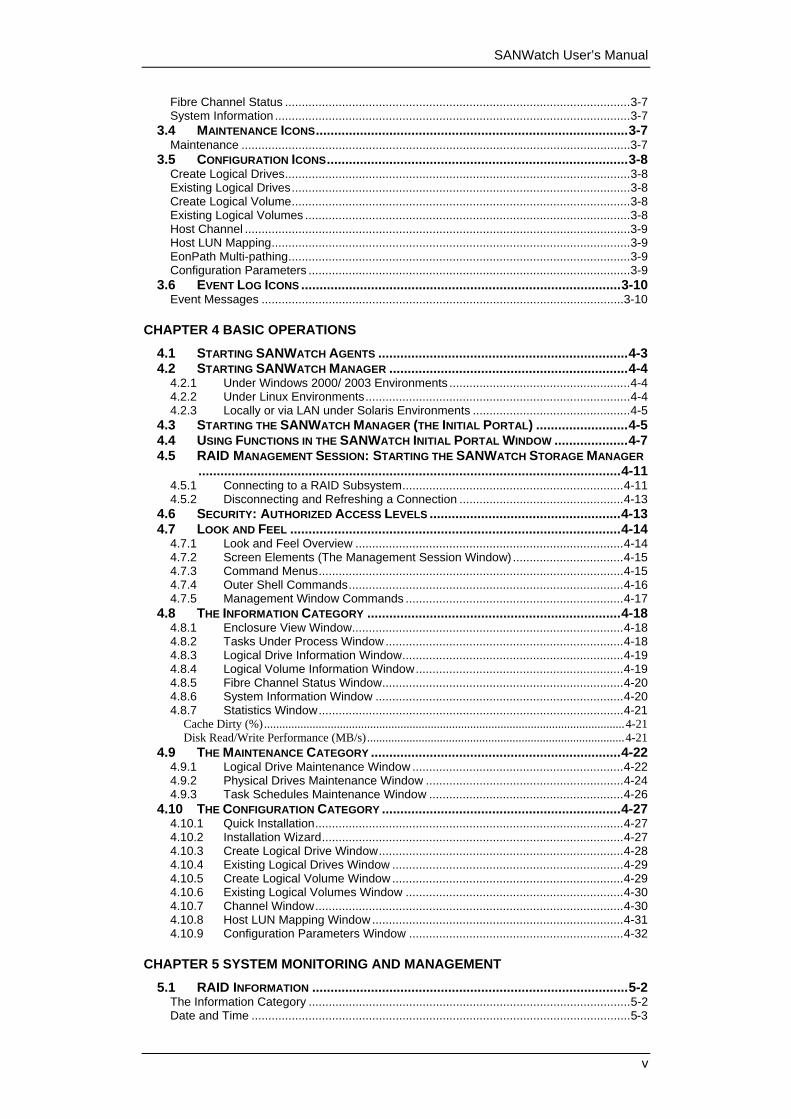
CHAPTER 3 SANWATCH ICONS 3.1 ACCESS PORTAL WINDOW.............................................................................3-1 3.2 NAVIGATION TREE ICONS (ARRAY MANAGEMENT WINDOW) ............................3-3 3.3 ARRAY INFORMATION ICONS ..........................................................................3-5
Enclosure View ................................................................................................................3-5 Tasks Under Process.......................................................................................................3-6 Logical Drive Information .................................................................................................3-6 Logical Volume Information .............................................................................................3-6
iv
SANWatch User’s Manual
Fibre Channel Status .......................................................................................................3-7 System Information ..........................................................................................................3-7
3.4 MAINTENANCE ICONS.....................................................................................3-7 Maintenance ....................................................................................................................3-7
3.5 CONFIGURATION ICONS..................................................................................3-8 Create Logical Drives.......................................................................................................3-8 Existing Logical Drives.....................................................................................................3-8 Create Logical Volume.....................................................................................................3-8 Existing Logical Volumes .................................................................................................3-8 Host Channel ...................................................................................................................3-9 Host LUN Mapping...........................................................................................................3-9 EonPath Multi-pathing......................................................................................................3-9 Configuration Parameters ................................................................................................3-9
3.6 EVENT LOG ICONS .......................................................................................3-10 Event Messages ............................................................................................................3-10
CHAPTER 4 BASIC OPERATIONS 4.1 STARTING SANWATCH AGENTS ....................................................................4-3 4.2 STARTING SANWATCH MANAGER .................................................................4-4
4.2.1 Under Windows 2000/ 2003 Environments ......................................................4-4 4.2.2 Under Linux Environments...............................................................................4-4 4.2.3 Locally or via LAN under Solaris Environments ...............................................4-5
4.3 STARTING THE SANWATCH MANAGER (THE INITIAL PORTAL) .........................4-5 4.4 USING FUNCTIONS IN THE SANWATCH INITIAL PORTAL WINDOW ....................4-7 4.5 RAID MANAGEMENT SESSION: STARTING THE SANWATCH STORAGE MANAGER ...................................................................................................................4-11
4.5.1 Connecting to a RAID Subsystem..................................................................4-11 4.5.2 Disconnecting and Refreshing a Connection .................................................4-13
4.6 SECURITY: AUTHORIZED ACCESS LEVELS ....................................................4-13 4.7 LOOK AND FEEL ..........................................................................................4-14
4.7.1 Look and Feel Overview ................................................................................4-14 4.7.2 Screen Elements (The Management Session Window) .................................4-15 4.7.3 Command Menus...........................................................................................4-15 4.7.4 Outer Shell Commands..................................................................................4-16 4.7.5 Management Window Commands .................................................................4-17
4.8 THE INFORMATION CATEGORY .....................................................................4-18 4.8.1 Enclosure View Window.................................................................................4-18 4.8.2 Tasks Under Process Window .......................................................................4-18 4.8.3 Logical Drive Information Window..................................................................4-19 4.8.4 Logical Volume Information Window..............................................................4-19 4.8.5 Fibre Channel Status Window........................................................................4-20 4.8.6 System Information Window ..........................................................................4-20 4.8.7 Statistics Window...........................................................................................4-21
Cache Dirty (%).......................................................................................................................4-21 Disk Read/Write Performance (MB/s).....................................................................................4-21
4.9 THE MAINTENANCE CATEGORY ....................................................................4-22 4.9.1 Logical Drive Maintenance Window ...............................................................4-22 4.9.2 Physical Drives Maintenance Window ...........................................................4-24 4.9.3 Task Schedules Maintenance Window ..........................................................4-26
4.10 THE CONFIGURATION CATEGORY .................................................................4-27 4.10.1 Quick Installation............................................................................................4-27 4.10.2 Installation Wizard..........................................................................................4-27 4.10.3 Create Logical Drive Window.........................................................................4-28 4.10.4 Existing Logical Drives Window .....................................................................4-29 4.10.5 Create Logical Volume Window .....................................................................4-29 4.10.6 Existing Logical Volumes Window .................................................................4-30 4.10.7 Channel Window............................................................................................4-30 4.10.8 Host LUN Mapping Window...........................................................................4-31 4.10.9 Configuration Parameters Window ................................................................4-32
CHAPTER 5 SYSTEM MONITORING AND MANAGEMENT 5.1 RAID INFORMATION ......................................................................................5-2
The Information Category ................................................................................................5-2 Date and Time .................................................................................................................5-3
v

SANWatch User’s Manual
5.2 ENCLOSURE VIEW..........................................................................................5-4 5.3 TASK UNDER PROCESS .................................................................................5-4 5.4 EVENT LOG LIST/CONFIGURATION LIST WINDOW............................................5-5 5.5 LOGICAL DRIVE INFORMATION........................................................................5-8
Accessing Logical Drive Information ................................................................................5-9 5.6 LOGICAL VOLUME INFORMATION ..................................................................5-10
Accessing Logical Volume Information ..........................................................................5-10 5.7 FIBRE CHANNEL STATUS .............................................................................5-11 5.8 SYSTEM INFORMATION .................................................................................5-11 5.9 STATISTICS .................................................................................................5-13
CHAPTER 6 ENCLOSURE DISPLAY 6.1 ABOUT THE ENCLOSURE VIEW WINDOW.........................................................6-2 6.2 ACCESSING THE ENCLOSURE VIEW ................................................................6-2
6.2.1 Connecting to the RAID Agent .........................................................................6-2 6.2.2 Opening the Enclosure View Window ..............................................................6-2 6.2.3 Component Information....................................................................................6-3
6.3 LED REPRESENTATIONS ...............................................................................6-4 6.3.1 Service LED (on Models that Come with an LED panel)..................................6-4
6.4 ENCLOSURE VIEW MESSAGES........................................................................6-6 6.5 INFORMATION SUMMARY ................................................................................6-7
CHAPTER 7 CREATING VOLUMES & DRIVE MANAGEMENT 7.1. LOCATING DRIVES .........................................................................................7-1 7.2. LOGICAL DRIVE MANAGEMENT.......................................................................7-2
7.2.1 Accessing the Create Logical Drive Window....................................................7-2 7.2.2 Creating Logical Drives ....................................................................................7-4
7.2.2.1. Logical Drive Creation Process................................................................................7-4 7.2.2.2. Selecting Drives .......................................................................................................7-4 7.2.2.3. Setting RAID Parameters .........................................................................................7-4
Drive Size.............................................................................................................................7-4 Selecting Stripe Size ..........................................................................................................7-5 Initialization Options ...........................................................................................................7-5 Select RAID Level...............................................................................................................7-5 Write Policy..........................................................................................................................7-5
7.2.2.4. Click OK to Create an LD........................................................................................7-6 7.2.3 Accessing the Existing Logical Drive Window..................................................7-6
7.2.3.1. Modifying LD Configurations..................................................................................7-7 7.2.3.2. Expanding LD by Adding Disks ..............................................................................7-8 7.2.3.3. Accessing the Expand Command page ....................................................................7-9
Available Expansion Size (MB).........................................................................................7-9 Set Expansion Size ............................................................................................................7-9 Execute Expand ................................................................................................................7-10
7.2.3.4. Click Expand to Initiate LD Expansion..................................................................7-10 7.2.3.5. Accessing the Migrate LD Command page............................................................7-10
Select a RAID Level .........................................................................................................7-11 Select a Stripe Size ..........................................................................................................7-11 Set a Drive Size ................................................................................................................7-12
7.2.3.6. Migration Process...................................................................................................7-12 7.2.4 Dynamic Logical Drive Expansion..................................................................7-12
7.2.4.1. What Is It and How Does It Work? ........................................................................7-12 7.2.4.2. Two Expansion Modes...........................................................................................7-12
Mode 1: Add Drive ............................................................................................................7-12 Mode 2: Copy & Replace.................................................................................................7-13
7.2.5 Adding Spare Drives ......................................................................................7-15 7.2.5.1. Accessing the Spare Drive Management Screen ....................................................7-16
7.2.6 Rebuilding Logical Drives...............................................................................7-17 7.2.7 Deleting an LD ...............................................................................................7-17 7.2.8 Power Saving.................................................................................................7-18 7.2.9 Undelete Logical Drive ...................................................................................7-20 7.2.10 Logical Drive Roaming...................................................................................7-21
7.3. LOGICAL VOLUME MANAGEMENT .................................................................7-25 7.3.1 Accessing the Create Logical Volume Window..............................................7-25
vi

SANWatch User’s Manual
7.3.2 Creating Logical Volumes ..............................................................................7-26 7.3.2.1. LV Creation............................................................................................................7-26 7.3.2.2. Selecting LDs.........................................................................................................7-26 7.3.2.3. Setting Logical Volume Parameters .......................................................................7-27
Logical Volume Assignment ............................................................................................7-27 Select Write Policy............................................................................................................7-27
7.3.2.4. Click OK to Create a Logical Volume ...................................................................7-27 7.3.3 Accessing the Existing Logical Volumes Window ..........................................7-27
7.3.3.1. Modifying Logical Volume Configurations ...........................................................7-29 7.3.3.2. Expanding a Logical Volume.................................................................................7-29 7.3.3.3. Accessing the Expand Logical Volume Page .........................................................7-30
7.3.4 Deleting a Logical Volume .............................................................................7-31 7.4. PARTITIONING A LOGICAL CONFIGURATION...................................................7-32
7.4.1 Overview........................................................................................................7-32 7.4.2 Partitioning a Logical Drive ............................................................................7-32 7.4.3 Partitioning a Logical Volume.........................................................................7-34
7.5. PHYSICAL DRIVE MAINTENANCE...................................................................7-36 7.5.1 Read/Write Test .............................................................................................0-36
CHAPTER 8 CHANNEL CONFIGURATION 8.1 CHANNEL CONFIGURATION WINDOW ..............................................................8-2 8.2 USER-CONFIGURABLE CHANNEL PARAMETERS ..............................................8-3
8.2.1. Channel Mode ................................................................................................8-3 8.2.2. LIP ...................................................................................................................8-4 8.2.3. ID Pool / AID / BID ..........................................................................................8-5 8.2.4. Transfer Rate ..................................................................................................8-7
CHAPTER 9 LUN MAPPING AND ISCSI HOST-SIDE SETTINGS 9.1. ISCSI-RELATED OPTIONS ..............................................................................9-2
9.1.1. Trunking (Link Aggregation).............................................................................9-2 9.1.2. Grouping (MC/S, Multiple Connections per Session) .......................................9-7
9.2. HOST LUN MAPPING...................................................................................9-11 9.3. ACCESSING THE LUN MAP TABLE ...............................................................9-13 9.4. LUN MAPPING ............................................................................................9-15
9.4.1. Mapping a Complete Logical Drive or Logical Volume...................................9-15 9.4.2. Map a Logical Drive or Volume Partition to a Host LUN.................................9-16 9.4.3. Deleting a Host LUN Mapping........................................................................9-16 9.4.4. LUN Mapping Access Control over iSCSI Initiator Settings ...........................9-17
CHAPTER 10 CONFIGURATION PARAMETERS 10.1 ACCESSING THE CONFIGURATION PARAMETERS OPTIONS.............................10-2 10.2 COMMUNICATIONS .......................................................................................10-3 10.3 NETWORK PROTOCOLS................................................................................10-6 10.4 CONTROLLER ..............................................................................................10-6 10.5 SYSTEM ......................................................................................................10-8 10.6 PASSWORD ...............................................................................................10-12 10.7 THRESHOLD ..............................................................................................10-13 10.8 REDUNDANT CONTROLLER SETTINGS.........................................................10-14 10.9 EVENT TRIGGERED OPERATIONS................................................................10-17 10.10 HOST-SIDE, DRIVE-SIDE, AND DISK ARRAY PARAMETERS ...........................10-18
CHAPTER 11 EONPATH® MULTI-PATHING CONFIGURATION 11.1. DESIGN CONCERNS FOR THE EONPATH MULTI-PATHING CONFIGURATION......11-2 11.2. SETTING UP ................................................................................................11-3 11.3. CONFIGURABLE OPTIONS...........................................................................11-12
CHAPTER 12 NOTIFICATION MANAGER OPTIONS 12.1 THE NOTIFICATION MANAGER UTILITY ..........................................................12-2
12.1.1 Starting the Utility...........................................................................................12-2 12.1.2 Functional Buttons .........................................................................................12-3
vii

SANWatch User’s Manual
12.1.3 Administrator Settings (Setting & Log Windows)............................................12-3 12.2 EVENT NOTIFICATION SETTINGS ...................................................................12-6
12.2.1 Notification Methods ......................................................................................12-6 12.2.2 Event Severity Levels.....................................................................................12-6 12.2.3 SNMP Traps Settings.....................................................................................12-7 12.2.4 Email Settings ................................................................................................12-8 12.2.5 LAN Broadcast Settings ...............................................................................12-10 12.2.6 Fax Settings .................................................................................................12-11 12.2.7 MSN Settings ...............................................................................................12-16 12.2.8 SMS Settings ...............................................................................................12-17 12.2.9 Create Plug-ins with Event Notification ........................................................12-18 Step 1. Before you begin..........................................................................................12-18 Step 2. The Configuration Process...........................................................................12-19
APPENDICES APPENDIX A. COMMAND SUMMARY ..................................................................... A-2
A.1. Menu Commands................................................................................................ A-2 A.2. SANWatch Program Commands ........................................................................ A-2
Initial Portal Window................................................................................................................A-2 APPENDIX B. GLOSSARY..................................................................................... A-6 APPENDIX C. RAID LEVELS.............................................................................. A-13
C.1. RAID Description .............................................................................................. A-13 C.2. Non-RAID Storage ............................................................................................ A-13 C.3. RAID 0 .............................................................................................................. A-14 C.4. RAID 1 .............................................................................................................. A-15 C.5. RAID 1(0+1)...................................................................................................... A-16 C.6. RAID 3 .............................................................................................................. A-16 C.7. RAID 5 .............................................................................................................. A-17 C.8. RAID 6 .............................................................................................................. A-18 C.9. RAID 10, 30, 50 and 60 .................................................................................... A-18
APPENDIX D. ADDITIONAL REFERENCES............................................................ A-20 D.1. Java Runtime Environment ............................................................................... A-20 D.2. SANWatch Update Downloads & Upgrading .................................................... A-20 D.3. Uninstalling SANWatch..................................................................................... A-20
APPENDIX E CONFIGURATION MANAGER E-1. HOW TO OPEN A MANAGEMENT CONSOLE AND USE THE SCRIPT EDITOR ....... E-2
Compose a Script ........................................................................................................... E-3 Using Templates ............................................................................................................. E-5 Getting Help for Script Commands ................................................................................. E-6 Running a Script ............................................................................................................. E-6 Debug E-7 Saving Script or Execution Results ................................................................................. E-7
E-2. CONCEPTS ................................................................................................... E-8 The Command Helper..................................................................................................... E-8 Description of Major Functionality ................................................................................... E-9 Top Menu Commands .................................................................................................... E-9 Tool Bar: E-10 Configuration Manager Settings:................................................................................... E-12
E-3. FUNCTION WINDOWS .................................................................................. E-13 Functions on the Device Screen: .................................................................................. E-13 Functions on the Maintenance Screen:......................................................................... E-14 Time Synchronization Functions: .................................................................................. E-14
E-4. SCRIPT COMMANDS IN DETAILS................................................................... E-16 Script Command Types - Basic Commands.....................................................E-16 Script Command Types - Network Commands ................................................E-18 Script Command Type - Component Commands.............................................E-19 Script Command Types - Configuration Commands ........................................E-19 Script Command Types - Log and Event Commands ......................................E-21 Script Command Types - Controller Commands..............................................E-22 Script Command Types - Disk Commands ......................................................E-28 Script Command Types - Channel Commands ................................................E-32 Script Command Types - Logical Drive Commands.........................................E-35
viii

SANWatch User’s Manual
Script Command Types - Logical Volume Commands.....................................E-41 Script Command Types - Partition Commands ................................................E-43 Script Command Types - iSCSI-related Commands ........................................E-46 Script Command Types - Firmware Download-related Commands .................E-49
APPENDIX F DISK PERFORMANCE MONITOR
List of Tables Table 2-1: Supported OSes ..........................................................................................3 Table 2-2: TCP/IP Port Assignments ............................................................................5 Table 3-3: RAID Charting Table....................................................................................6 Table 5-1: Array Information Icons................................................................................3 Table 5-2: Severity Level Icons.....................................................................................6 Table 5-3: Device Icon ................................................................................................12 Table 8-1: Redundant-Controller Channel Modes ........................................................4 Table 8-2: Dual-Single Controller Channel Modes .......................................................4 Table 9-1: iSCSI Initiator CHAP Configuration Entries ...............................................19 Table 10-1: IPv6 Subset Example ................................................................................5 Table 10-2: Power-Saving Features ...........................................................................21 Table 10-3: Peripheral Device Type Parameters........................................................23 Table 10-4: Peripheral Device Type Settings .............................................................24 Table 10-5: Cylinder/Head/Sector Mapping under Sun Solaris..................................24 Table 10-6: Cylinder/Head/Sector Mapping under Sun Solaris..................................24 Table 14-1: Levels of Notification Severity....................................................................6
List of Figures Figure 1-1: SANWatch Interfaces and Utilities..............................................................2 Figure 1-2: In-band Management .................................................................................7 Figure 1-3: Data Host Agent on a DAS Server which Is Also a SANWatch Station.....7 Figure 1-4: Management through a Data Host Agent on a DAS Server.......................7 Figure 1-5: Out-of-band Management ..........................................................................8 Figure 1-6: Out-of-band Connection Directly with RAID System..................................8 Figure 1-7: Installation Modes.......................................................................................9 Figure 1-8:Array Monitoring via Management Host Agents (Management Centers)
and across Installation Sites ................................................................................11 Figure 1-9: One-to-Many Management in a Tiered Management Scenario ...............12 Figure 1-10: A SANWatch Console, Management Center, and Independent Agents 13 Figure 1-11:Data Host Agent as the Bridging Element between SANWatch and RAID
firmware ...............................................................................................................14 Figure 4-1: SANWatch Shortcuts on Windows Startup Menu ......................................4 Figure 4-2: SANWatch Shortcut on Windows Desktop.................................................4 Figure 4-4: GUI Screen Elements...............................................................................15 Figure 6-1: EonRAID 2510FS Enclosure View .............................................................2 Figure 6-2: EonStor F16F Series Enclosure View ........................................................2 Figure 6-3: Enclosure Tabbed Panel and Component LED Display ............................4 Figure 6-4: Service LEDs..............................................................................................5 Figure 6-5: Drive Failure Occurred and an Administrator is Notified ............................5 Figure 6-6: An Administrator Activates the Service LED ..............................................6 Figure 6-7: Locating the Failed Drive............................................................................6 Figure 6-8: Component Information Message Tags .....................................................7 Figure 6-9: Information Summary .................................................................................8 Figure 7-1: Access to the Create Logical Drive Window ..............................................3 Figure 7-2: Accessing the Existing Logical Drives Window..........................................7
ix

SANWatch User’s Manual
Figure 7-3: RAID Expansion Mode 1 ..........................................................................13 Figure 7-4: RAID Expansion Mode 2 (1/3)..................................................................13 Figure 7-5: RAID Expansion Mode 2 (2/3)..................................................................13 Figure 7-6: RAID Expansion Mode 2 (3/3)..................................................................14 Figure 7-7: Expansion Affecting the Last Partition......................................................15 Figure 7-8: Drive Tray Bezel .......................................................................................23 Figure 7-9: Accessing the Create Logical Volume Window........................................25 Figure 7-10: Accessing Existing Logical Volume Window..........................................28 Figure 9-1: Supported and Unsupported Trunk Group Configurations.........................4 Figure 9-2: Trunked Ports Included in an MC/S Group ................................................5 Figure 9-3: Trunk and MC/S on Protocol Stack ............................................................7 Figure 9-4: MC/S Group over Multiple Host Ports ........................................................7 Figure 9-5: iSCSI Ports in an MC/S Group as Target Portals.......................................8 Figure 9-6: LUN Presence on Grouped and Individual Host Channels ........................9 Figure 9-7: MC/S Groups on Redundant Controllers....................................................9 Figure 9-8: LUN Presence over Controller A and Controller B Host Ports .................10 Figure 9-9: LUN Presence over Controller A and Controller B Host Ports .................11 Figure 10-1: Converting 48-bit MAC Address into IPv6 Interface ID ............................4 Figure 10-2: Firmware Upgrade Flowchart .................................................................10 Figure 10-2: The Host-side Parameters Page for iSCSI Models................................25 Figure C-1: Non-RAID Storage ...................................................................................14 Figure C-2: RAID0 Storage.........................................................................................15 Figure C-3: RAID1 Storage.........................................................................................15 Figure C-4: RAID 1(0+1) Storage ...............................................................................16 Figure C-5: RAID 3 Storage........................................................................................17 Figure C-6: RAID 5 Storage........................................................................................18 Figure C-7: RAID 6 Storage........................................................................................18 Figure D-1: SANWatch Uninstallation Program..........................................................20
User’s Manual Overview The SANWatch management program provides you access to control and monitor disk array subsystems from a local host, a remote station connected through a local area network (LAN), In-band host links, or the Internet. In addition to the management interface, SANWatch comes with data protection functionality such as multi-pathing configuration, snapshot, and snapshot scheduler.
This manual discusses how to install and use SANWatch to manage disk array systems incorporating Infortrend’s Fibre-to-Fibre, Fibre-to-SATA/SAS, SCSI-to-SATA, SAS-to-SAS/SATA, and iSCSI-to-SATA RAID systems or controller heads.
In addition to SANWatch, you can also use the serial COM port or LCD keypad panel to manage the EonStor subsystems. For more information about these management interfaces, see the documentation that came with your hardware.
User’s Manual Structure and Chapter Overview
Chapter 1: Introduction
x

SANWatch User’s Manual
Provides information about SANWatch, including conceptual basics, a product description, feature summary and highlights. Sample uses are displayed in accordance with the different installation modes.
Chapter 2: Installation
Discusses how to install SANWatch in your systems. Discussions include system requirements, setting up hardware, software installation, and how to update your software by downloading updates from Infortrend’s websites.
Chapter 3: SANWatch Icons
Describes the icons used in the SANWatch GUI.
Chapter 4: Basic Operations
Discusses basic operations at system startup. These include starting SANWatch, connecting and disconnecting from a disk array system, setting up system security, displaying controls, working with various disk array windows, and exiting the program.
Chapter 5: System Monitoring & Management
Discusses how to obtain the current status of devices monitored through SAF-TE, I2C, and S.E.S. interfaces and get updates on the status of storage system components. Descriptions on how to access these different monitoring devices are given and the type of information that is offered by these devices is shown.
Chapter 6: Enclosure Display
The Enclosure View customization is discussed fully in this chapter. Detailed instructions on how to access and use the Enclosure View are given. Examples of status messages are shown and explanations of the status messages are provided.
Chapter 7: Drive Management
This chapter describes the creation, expansion and deletion of both logical drives (LD) and logical volumes (LV). Different LD and LV options are explained and steps to setting the different options are described in detail. A discussion on partitioning LDs and LVs is also found in this chapter.
Chapter 8: Channel Configuration
Discusses how to access the I/O channel-related configuration options and describes in detail the user-configurable channel options. Instructions on setting the configuration of a channel and how to configure host channel IDs are also discussed.
Chapter 9: LUN Mapping
xi

SANWatch User’s Manual
Discusses how to map complete LDs or separate partitions within LDs and LVs to different LUNs. Detailed description of the mapping procedure is given. A discussion on how to delete LUN mappings and a description of the LUN Mapping Table are provided. All the associated options are also described.
Chapter 10: Configuration Parameters
Discusses how to access the controller/subsystem configuration options and the different RAID configuration options that are available. A detailed description of how to set these options is given as well as brief explanations of the different parameters.
Chapter 11: EonPath Multi-pathing Configurations
Describes the configuration options with the EonPath multi-pathing drivers.
Chapter 12: Notification Manager Options
Describes how to configure the SANWatch’s Notification Manager utility and event notification over faxes, e-mail, LAN broadcast, and so on. Other functionalities of the utility are also described in full. Information about the supported notification levels is also provided to aid in explaining these functions.
Appendices
Appendix A: Command Summary
Summarizes the available commands and command buttons within SANWatch.
Appendix B: Glossary
Provides information on definitions of key technology terms used in this manual.
Appendix C: RAID Levels
Provides information about the various RAID levels.
Appendix D: Additional References
Provides information about Java Runtime environment, software download, and uninstallation.
Appendix E: Configuration Manager
Describes the functions of this independent utility. Multiple systems can be configured simultaneously, and a system profile can be easily duplicated to multiple arrays. The command line commands are also provided.
xii

SANWatch User’s Manual
Appendix F: Disk Performance Monitor
Shows how to review individual drive performance using the performance monitoring utility.
Usage Conventions Throughout this document, the following terminology usage rules apply:
“Controller” always refers to Infotrend RAID array controllers.
“Subsystem” refers to Infortrend EonStor 8-, 12-, 16-, or 24-bay RAID subsystems.
“SANWatch” refers to the entire program with all of its subsidiary utilities.
“SANWatch Manager” or “SANWatch program” refers only to the management interface, not to any other parts of the software.
“Management Host Agent,” previously known as the “root agent,” is an independent TCP/IP agent of the software, which permits one management station to monitor and collect the operating statuses from multiple RAID systems. The Management Host Agent acquires information from one or multiple RAID arrays, and handles the event notification functions.
“Data Host Agent,” previously known as the “RAID agent,” is the part of the software which allows the RAID system firmware to talk to the SANWatch Manager or the Management Host Agent. A Data Host Agent communicates with the RAID array via a SAS link, iSCSI or Fibre channels (using the In-band protocols). Data Host Agents are the intermediaries between RAID systems and the SANWatch program.
“Notification Manager” refers to the function group utility that provides event notification methods for an administrator to be notified of system events occurring at any of the RAID systems being managed.
The “Access Portal” provides a portal interface with a collective view of multiple arrays using a single workstation. Arrays are listed by the types of management access.
Important information that users should be aware of is indicated using the following icons:
NOTE: These messages inform the reader of essential but non-critical
xiii

SANWatch User’s Manual
information. These messages should be read carefully as any directions or instructions contained therein can help you avoid making mistakes.
CAUTION! Cautionary messages should also be heeded to help you reduce the chance of losing data or damaging the system.
IMPORTANT! The Important messages contain information that might otherwise be overlooked or configuration details that can cause negative results.
WARNING! Warnings appear where overlooked details may cause damage to the equipment or result in personal injury. Warnings should be taken seriously.
Software and Firmware Updates Please contact your system vendor or visit Infortrend’s esupport or VIProom websites for the latest software or firmware updates.
Problems that occur during the updating process may cause irrecoverable errors and system down time. Always consult technical personnel before proceeding with any firmware upgrade.
NOTE: The firmware version installed on your system should provide the complete functionalities listed in the specification sheet/user’s manual. We provide special revisions for various application purposes. Therefore, DO NOT upgrade your firmware unless you fully understand what a firmware revision will do.
xiv

SANWatch User’s Manual
Revision History Rev. 1.0: May 30, 2007, initial release.
Rev. 1.1: August 30, 2007,
1. Changed the order of chapters and updated SANWatch installation details and topologies with remade drawings.
2. Added EonPath license application in the description of the license application wizard.
Rev. 1.2: October 30, 2007,
1. Added description of VSS support in Chapter 13, including coordination support for CA ARCserve Backup r11.5 and Symantec Backup Exec 11d for Microsoft Windows Servers.
2. Made changes to the list of supported OSes.
3. Removed description of Java Runtime requirements and installation concerns. The latest SANWatch revision runs on a dedicated Java Runtime Environment that is installed along with the manager to eliminate compatibility issues with OS Java Runtime.
4. Added Chapter13: Snapshot Use Cases.
5. Added the configuration options for the EonPath Multi-pathing driver.
6. Removed the “Applet mode” installation option.
7. Simplified some drawings.
8. Changed utility names:
Centralized Management Central View From
Configuration Client to
Notification Manager
These utilities were independent Java modules. In this software revision, they are accessed through SANWatch’s outer-shell window.
Rev. 2.0: January 15, 2008
1. This revision of SANWatch features an access portal part of the management GUI with a collective view of the statuses of multiple RAID arrays. The management session with a specific RAID system is invoked as a specific console window.
Revised the description for making management access.
2. Changed utility names:
Root Agent Management Host Agent
xv
SANWatch User’s Manual
xvi
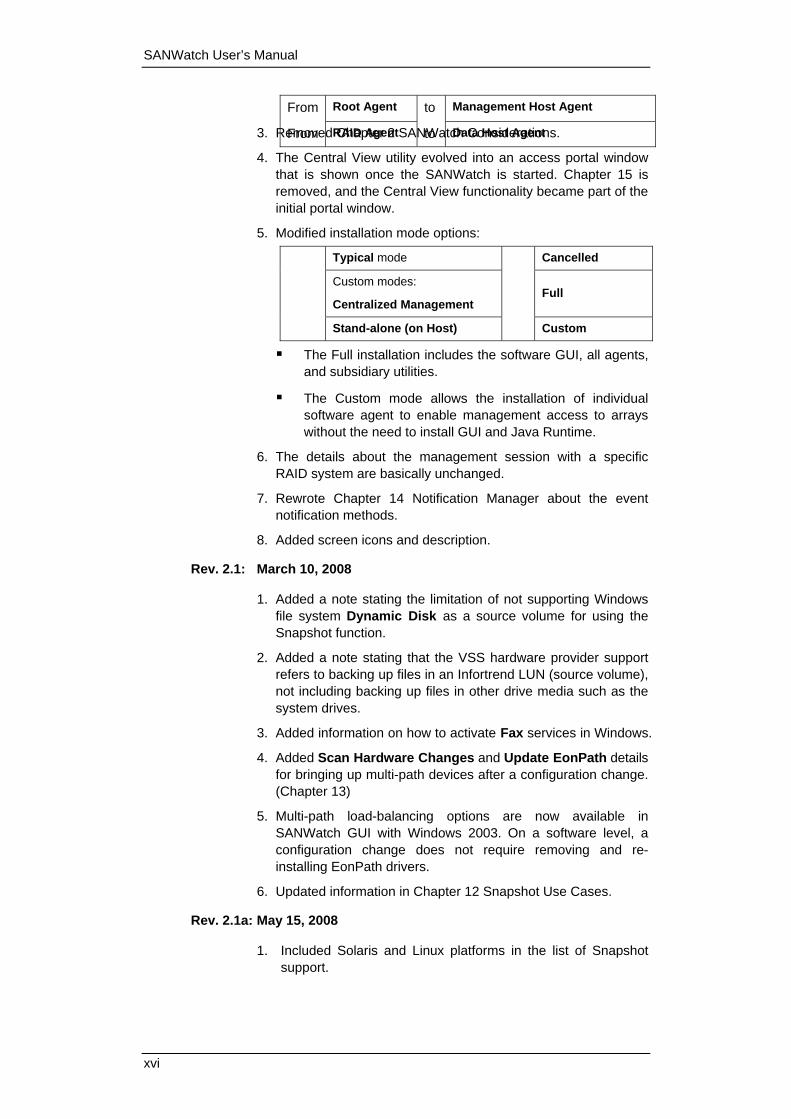
From Root Agent to Management Host Agent
From RAID Agent to Data Host Agent 3. Removed Chapter 2 SANWatch Considerations.
4. The Central View utility evolved into an access portal window that is shown once the SANWatch is started. Chapter 15 is removed, and the Central View functionality became part of the initial portal window.
5. Modified installation mode options:
Typical mode Cancelled
Custom modes:
Centralized Management Full
Stand-alone (on Host) Custom
The Full installation includes the software GUI, all agents, and subsidiary utilities.
The Custom mode allows the installation of individual software agent to enable management access to arrays without the need to install GUI and Java Runtime.
6. The details about the management session with a specific RAID system are basically unchanged.
7. Rewrote Chapter 14 Notification Manager about the event notification methods.
8. Added screen icons and description.
Rev. 2.1: March 10, 2008
1. Added a note stating the limitation of not supporting Windows file system Dynamic Disk as a source volume for using the Snapshot function.
2. Added a note stating that the VSS hardware provider support refers to backing up files in an Infortrend LUN (source volume), not including backing up files in other drive media such as the system drives.
3. Added information on how to activate Fax services in Windows.
4. Added Scan Hardware Changes and Update EonPath details for bringing up multi-path devices after a configuration change. (Chapter 13)
5. Multi-path load-balancing options are now available in SANWatch GUI with Windows 2003. On a software level, a configuration change does not require removing and re-installing EonPath drivers.
6. Updated information in Chapter 12 Snapshot Use Cases.
Rev. 2.1a: May 15, 2008
1. Included Solaris and Linux platforms in the list of Snapshot support.
SANWatch User’s Manual
xvii
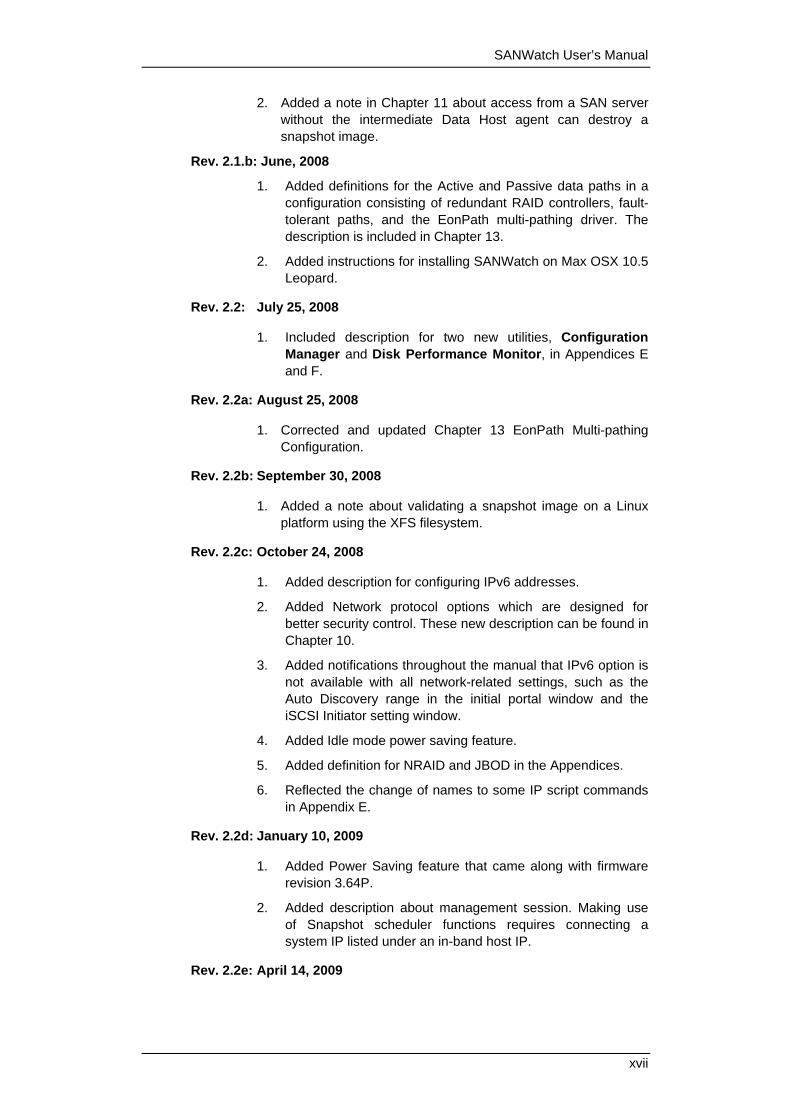
2. Added a note in Chapter 11 about access from a SAN server without the intermediate Data Host agent can destroy a snapshot image.
Rev. 2.1.b: June, 2008
1. Added definitions for the Active and Passive data paths in a configuration consisting of redundant RAID controllers, fault-tolerant paths, and the EonPath multi-pathing driver. The description is included in Chapter 13.
2. Added instructions for installing SANWatch on Max OSX 10.5 Leopard.
Rev. 2.2: July 25, 2008
1. Included description for two new utilities, Configuration Manager and Disk Performance Monitor, in Appendices E and F.
Rev. 2.2a: August 25, 2008
1. Corrected and updated Chapter 13 EonPath Multi-pathing Configuration.
Rev. 2.2b: September 30, 2008
1. Added a note about validating a snapshot image on a Linux platform using the XFS filesystem.
Rev. 2.2c: October 24, 2008
1. Added description for configuring IPv6 addresses.
2. Added Network protocol options which are designed for better security control. These new description can be found in Chapter 10.
3. Added notifications throughout the manual that IPv6 option is not available with all network-related settings, such as the Auto Discovery range in the initial portal window and the iSCSI Initiator setting window.
4. Added Idle mode power saving feature.
5. Added definition for NRAID and JBOD in the Appendices.
6. Reflected the change of names to some IP script commands in Appendix E.
Rev. 2.2d: January 10, 2009
1. Added Power Saving feature that came along with firmware revision 3.64P.
2. Added description about management session. Making use of Snapshot scheduler functions requires connecting a system IP listed under an in-band host IP.
Rev. 2.2e: April 14, 2009

SANWatch User’s Manual
xviii
1. Removed Chapters 11 and 12. SANWatch rev. 1.3 does not support Snapshot functions. Snapshot and other data protection functions are now available in VSA (Virtualized Storage Architecture) products.
2. Added iSCSI Trunking options to Chapter 9.
3. Added Logical Drive Roaming.
4. Added Undelete Logical Drive feature as a means to salvage an accidentally deleted LD.
5. Added a flowchart as the firmware update procedure.

Chapter 1
Introduction
This chapter provides information about the SANWatch management program and its components. The following topics are discussed in this chapter:
♦ SANWatch Overview – Section 1.1, page 1-2
1.1.1 Product Description
1.1.2 Error! Reference source not found.
♦ Featured Highlights – Section 1.2, page 1-3
1.2.1 Graphical User Interface
1.2.2 SANWatch Initial Portal Window
1.2.3 Enclosure View
1.2.4 Powerful Event Notification
1.2.5 Connection Methods
1.2.6 Management Access & Installation Modes
The Full Mode Installation
The Custom Mode Installation
1.2.7 Multi-language Support
1.2.8 Password Protection
SANWatch Overview 1-1
SANWatch User’s Manual
1.1 SANWatch Overview 1.1.1 Product Description
Infortrend’s innovated RAID manager, SANWatch, is a Java-based program specifically designed for managing Infortrend’s RAID systems.
SANWatch provides a user-friendly interface that graphically represents disk array elements and simplifies the normally complicated process of array configuration. SANWatch also provides real-time representation of array statuses, thus making the task of monitoring disk arrays virtually effortless.
SANWatch complements the on-board console interface found on Infortrend’s RAID controllers and the text-mode configuration utility that provides the same functionality, but with greater ease of use. The following sections describe SANWatch’s outstanding features and introduce its conceptual framework.
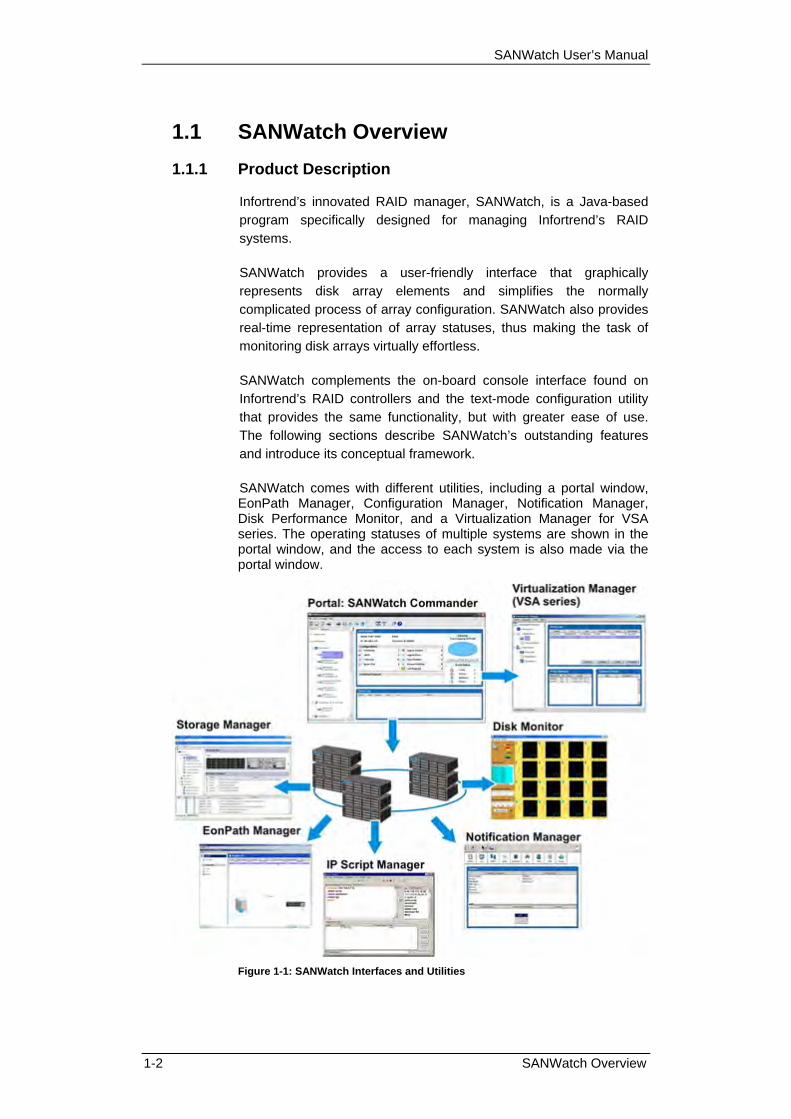
SANWatch comes with different utilities, including a portal window, EonPath Manager, Configuration Manager, Notification Manager, Disk Performance Monitor, and a Virtualization Manager for VSA series. The operating statuses of multiple systems are shown in the portal window, and the access to each system is also made via the portal window.
Figure 1-1: SANWatch Interfaces and Utilities
1-2 SANWatch Overview

Chapter 1: Introduction
1.1.2 Feature Summary
The list below summarizes SANWatch features:
On the Virtualization Manager: Supports Data Service: point-in-time snapshot backup, automated scheduler, OS flush agent, Volume Copy, Remote Replication, Storage Virtualization, Thin Provisioning, etc.
Supports Microsoft Windows VSS (Volume Shadow Copy Service), providing a VSS hardware provider that is included in the SANWatch package (in a “VSS” sub-folder).
Supports the display and configuration of data path connectivity using the EonPath multi-pathing software.
SANWatch initial portal window with a collective view of multiple disk arrays, providing access to individual disk arrays, multi-pathing configuration and event notification settings.
RAID level migration on a per logical drive basis.
Access to all RAID array configuration options.
User-friendly graphical interface displays multiple information windows for physical components and logical configurations of disk drives.
Standard TCP/IP connections to an Internet agent for full-featured, worldwide management over the network.
Communicates with RAID systems over a LAN (out-of-band) and the Internet, and over the existing host busses (SAS, iSCSI, or Fibre links) using the in-band command protocols.
Severity levels and display sequences are configurable for event notification.
Provides password protection to guard against unauthorized modification of disk array configuration; passwords are set for the Maintenance (user) and Configuration (administrator) login access levels.
A Notification Manager utility that provides event notification via Email, Fax, MSN Messenger, SMS Short Message, LAN Broadcast, and SNMP Traps
The RAID management GUI is compatible with most popular computer working environments: Windows, Linux, and Solaris operating systems. The software GUI runs on Java Run-time Environment.
SANWatch Overview 1-3

SANWatch User’s Manual
1.2 Featured Highlights 1.2.1 Graphical User Interface (GUI)
SANWatch manager is designed for ease-of-use. It is designed with symbolic icons and graphical elements to represent configuration levels, physical and logical components of RAID systems, and to identify the current configuration of a disk array system. Pull-down, right-click, and pop-up menus are used with all command options.
You need only point-and-click a mouse button to select an icon or command. The program also displays the current status of various disk drives or enclosure components by changing the color of their respective LED icons.
With an easy-to-use interface, complicated disk array operations such as logical drive and logical volume creation, drive partitioning, and LUN mapping to host channels/LUNs can be completed with just a few mouse clicks.
The initial portal window, SANWatch Commander, an entrance portal to RAID arrays managed through a Management Host agent, provides convenient access to RAID systems across storage networks. The utility also produces an instant event log, which can be exported to a text file.
1.2.2 SANWatch Initial Portal Window
The initial screen displays once you start SANWatch and enter a range of IP addresses. SANWatch scans the IP range within the local network and displays all detected RAID systems. A single click on a
1-4 Featured Highlights

Chapter 1: Introduction
connected RAID system displays a summary page of array statuses and an event list on the right hand side of the screen.
The menu bar on the top of the screen consists of the following functional buttons:
Connect: connects to a management host (on which the Management Host agent runs, often the machine where you installed and run SANWatch).
Disconnect: ends the session with a management host.
Auto Discovery: initiates the IP scan over a subnet again.
Add IP Address: manually adds a RAID system to the list on Connection View.
Manage Subsystem: establishes a management session with a specific RAID system.
Launch EonPath: establishes a multi-pathing configuration session with a specific data server.
Notification Management: opens the Notification Manager utility screen.
Help Cursor: changes your mouse cursor into a help cursor and brings out the related information for a screen element by another mouse click.
Help: brings out the Java help contents window.
Featured Highlights 1-5

SANWatch User’s Manual
1.2.3 Enclosure View
Once you open a management session with a storage system, the Storage Manager defaults to the enclosure view. The enclosure window provides real-time reporting of the status of enclosure components, including components that can be accessed through the front or the rear side of an enclosure. When a drive fails, the system highlights the corresponding LED icon of the failed drive by changing its display color. When you remove a drive, its icon is removed from the enclosure window. This feature is particularly useful when a drive fails, and you need to identify its exact location for subsequent replacement.
The enclosure view also appears in other configuration windows showing the logical relationship of the member drives in a logical configuration. Drives belonging to the same logical drive will be displayed in the same color. This allows you to easily identify members of different RAID configurations (logical drives or logical volumes). Multiple expansion enclosures managed by a RAID system can be accessed through a tabbed menu.
1.2.4 Powerful Event Notification (Notification Manager)
SANWatch automatically notifies system administrators of event occurrences and status changes. Event Notification is managed by a
1-6 Featured Highlights

Chapter 1: Introduction
SANWatch’s utility, Notification Manager, that is accessed through the portal window. Notifications can be sent via the network as Email messages, via a local network as a broadcast message, SNMP traps, MSN messenger, SMS short message, or via fax/modem as fax messages without location constraints. To setup the event notification options, please refer to Chapter 12 in this manual.
1.2.5 Connection Methods 1. In-band: using a Data Host agent that communicates with RAID
firmware over the Fibre, SAS, or iSCSI data paths.
Figure 1-2: In-band Management
The In-band methodology relies on a Data Host agent that receives communications from the SANWatch program and passes it to the RAID firmware.
Figure 1-3: Data Host Agent on a DAS Server which Is Also a SANWatch Station
Figure 1-4: Management through a Data Host Agent on a DAS Server
In-band has the following advantages:
1. Ethernet network connections are not required.
2. Network configuration on RAID is not required.
Featured Highlights 1-7

SANWatch User’s Manual
3. Allows communications with host-side applications so that OS/application cache can be flushed and applications held inactive temporarily for data consistency.
2. Out-of-band: using Ethernet network connections.
Figure 1-5: Out-of-band Management
A RAID array is managed over the network locally or remotely through the Ethernet connection to each RAID controller. The advantages of using the Out-of-band management include: 1. You can access a RAID array connected to a host running
unsupported OS.
2. Remote access.
3. Direct communication with RAID system firmware without agents on servers.
Figure 1-6: Out-of-band Connection Directly with RAID System
1.2.6 Management Access & Installation Modes
SANWatch supports local or remote management of Infortrend EonStor systems using the TCP/IP over a LAN/WAN or in-band protocols over the existing host links. SANWatch can be highly flexible in terms of its access routes to a RAID system.
1-8 Featured Highlights
Chapter 1: Introduction
An Overview
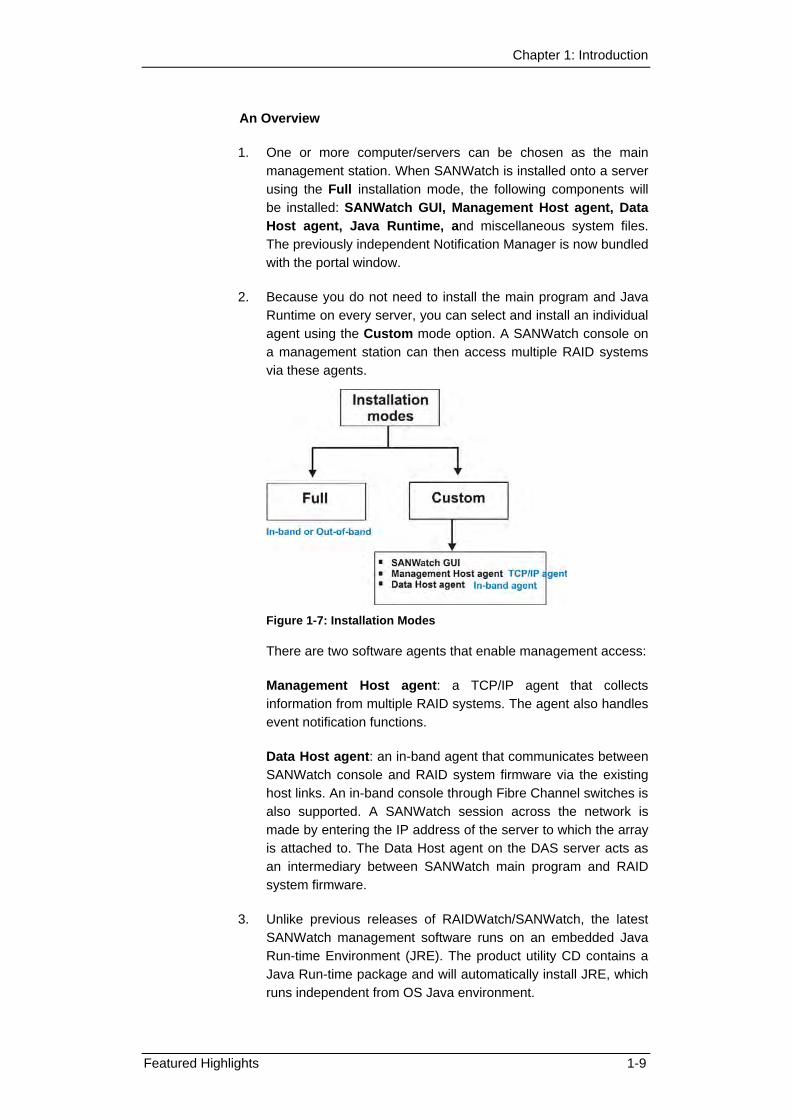
1. One or more computer/servers can be chosen as the main management station. When SANWatch is installed onto a server using the Full installation mode, the following components will be installed: SANWatch GUI, Management Host agent, Data Host agent, Java Runtime, and miscellaneous system files. The previously independent Notification Manager is now bundled with the portal window.
2. Because you do not need to install the main program and Java Runtime on every server, you can select and install an individual agent using the Custom mode option. A SANWatch console on a management station can then access multiple RAID systems via these agents.
Figure 1-7: Installation Modes
There are two software agents that enable management access:
Management Host agent: a TCP/IP agent that collects information from multiple RAID systems. The agent also handles event notification functions.
Data Host agent: an in-band agent that communicates between SANWatch console and RAID system firmware via the existing host links. An in-band console through Fibre Channel switches is also supported. A SANWatch session across the network is made by entering the IP address of the server to which the array is attached to. The Data Host agent on the DAS server acts as an intermediary between SANWatch main program and RAID system firmware.
3. Unlike previous releases of RAIDWatch/SANWatch, the latest SANWatch management software runs on an embedded Java Run-time Environment (JRE). The product utility CD contains a Java Run-time package and will automatically install JRE, which runs independent from OS Java environment.
Featured Highlights 1-9

SANWatch User’s Manual
4. Different SANWatch agents can be installed in accordance with the different connectivity by selecting them in the Custom mode during the setup process. For more information about specific platform requirements, see Section 2.3 Platform Requirements.
The Full mode installs all agents and software modules for in-band or out-of-band connections to RAID arrays.
The Custom mode allows you to install an individual agent to a server without installing the whole package. See Chapter 2 for the complete installation process.
1-10 Featured Highlights

Chapter 1: Introduction
• The Full Mode Installation
Using the full installation, SANWatch can be installed on one or more management computers depending on RAID array topology. Notification options, such as Email or SNMP traps, can be arranged so that an administrator is always informed of the latest array status.
Figure 1-8: Array Monitoring via Management Host Agents (Management
Centers) and across Installation Sites
In a multi-array configuration, SANWatch can be installed onto multiple computers using the Full installation mode. Independent agents can be installed to subordinate data servers using the Custom mode to develop a tree-like, tiered structure. Each of the management computers receives event messages from a group of RAID arrays and the effort of polling array statuses is thus shared by these stations.
A RAID administrator can access a RAID array from a remote computer (provided that the secure access is allowed using methods like VPN) first by connecting a management center, and then selecting the array from a list of IP addresses managed by a Management Host agent.
Featured Highlights 1-11

SANWatch User’s Manual
Figure 1-9: One-to-Many Management in a Tiered Management Scenario
• The Custom Mode Installation
The Custom mode installation allows you to select individual SANWatch elements for different servers. Listed below are the elements installed on different machines shown in the below drawing:
SANWatch main program (GUI):
- A computer selected as a management center.
- A laptop making local/remote console. (Console is made by entering the management center IP)
Management Host Agent:
- A management center (also manages the event notification for multiple arrays)
Data Host Agent:
- Direct-attached servers
- SAN servers
1-12 Featured Highlights

Chapter 1: Introduction
Figure 1-10: A SANWatch Console, Management Center, and
Independent Agents
NOTE: The Data Host agent coordinates with host applications
(writers) and backup software (requestors) on Windows 2003 servers through VSS (Volume Shadow Copy) service. VSS hardware provider is separately installed.
A remote console to a DAS array is available by connecting to the DAS/SAN server’s IP address, provided that the Data Host agent is installed on that server. See below drawing for the idea.
Featured Highlights 1-13
SANWatch User’s Manual
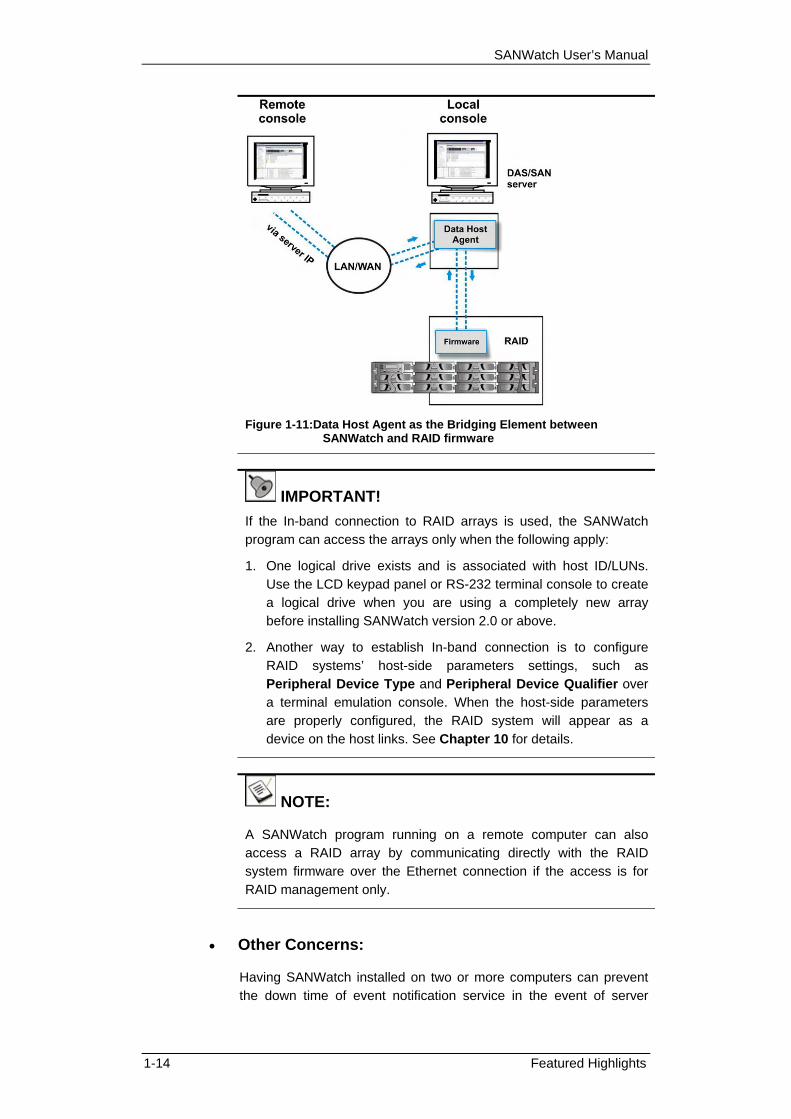
Figure 1-11:Data Host Agent as the Bridging Element between
SANWatch and RAID firmware
IMPORTANT! If the In-band connection to RAID arrays is used, the SANWatch program can access the arrays only when the following apply:
1. One logical drive exists and is associated with host ID/LUNs. Use the LCD keypad panel or RS-232 terminal console to create a logical drive when you are using a completely new array before installing SANWatch version 2.0 or above.
2. Another way to establish In-band connection is to configure RAID systems’ host-side parameters settings, such as Peripheral Device Type and Peripheral Device Qualifier over a terminal emulation console. When the host-side parameters are properly configured, the RAID system will appear as a device on the host links. See Chapter 10 for details.
NOTE:
A SANWatch program running on a remote computer can also access a RAID array by communicating directly with the RAID system firmware over the Ethernet connection if the access is for RAID management only.
• Other Concerns:
Having SANWatch installed on two or more computers can prevent the down time of event notification service in the event of server
1-14 Featured Highlights

Chapter 1: Introduction
shutdown or failure. During the failure of event notification service, important system events may not reach the administrator.
1.2.7 Multi-Language Support
SANWatch is a RAID management tool widely applied all over the world. The software is currently available in four (4) languages: English, Deutsch, Spanish and Japanese. The language used in GUI is easily changed using the language selection on the main program’s menu bar. As soon as a language is selected, the user interface and wizards display the chosen language.
1.2.8 Password Protection
SANWatch Manager comes with password protection to prevent unauthorized users from changing the RAID configurations. With the password security, you have control over array settings knowing that the currently managed disk array is safe from unauthorized modifications because the correct password must be entered for each access level.
SANWatch comes with a default password, “root,” for login with the connection to a Management Host agent.
The Storage Manager screen (management session with an individual RAID system) has a navigation tree panel that provides access to the functional windows under three major categories:
Information: An Information login can only access the first level of view-only information.
Maintenance: A Maintenance (user) login can access the first and second levels, the Information and the Maintenance tasks.
Configuration: The Configuration (administrator) login has access rights to all three levels, Configuration, Maintenance, and Information.
NOTE: The default password for Information (View Only) access is “1234.”
Passwords for access levels can be set in the Configuration category under the “Configuration Parameters” -> “Password”
Featured Highlights 1-15

SANWatch User’s Manual
window.
1-16 Featured Highlights

Chapter 1: Introduction
This page is intentionally left blank.
Featured Highlights 1-17

System Requirements 3-1
Chapter 2 Installation
This chapter describes SANWatch requirements and the installation procedure. The following sections are covered in this chapter:
♦ System Requirements – Section 2.1, page 2-2
2.1.1 Servers Running SANWatch for RAID Management
Error! Reference source not found. Error! Reference source not found.
2.1.2 SANWatch Connection Concerns
♦ RAID Chart – Section 2.2, page 2-6
♦ Software Setup – Section 2.3, page 2-7
2.3.1 Before You Start
2.3.2 Installing SANWatch on a Windows Platform
2.3.3 Installing SANWatch on a Linux Platform
2.3.4 Installing SANWatch on a Solaris Platform
2.3.5 Installing SANWatch on a Mac OS running Safari Browser
2.3.6 Installing SANWatch
2.3.7 Redundant SANWatch Instances
♦ Applying for a Licensed Use of Snapshot (Data Service) – Section Error! Reference source not found., page 2-Error! Bookmark not defined.
♦ VSS Hardware Provider – Section 2.4
♦ Program Updates – Section 2.5, page 2-22
♦ In-band SCSI – Section 2.6, page 2-26
SANWatch User’s Manual
2.6.1 Overview
2.6.2 Related Configuration on Controller/Subsystem
2.1 System Requirements The minimum hardware and software requirements for SANWatch are listed below.
2.1.1 Servers Running SANWatch for RAID Management
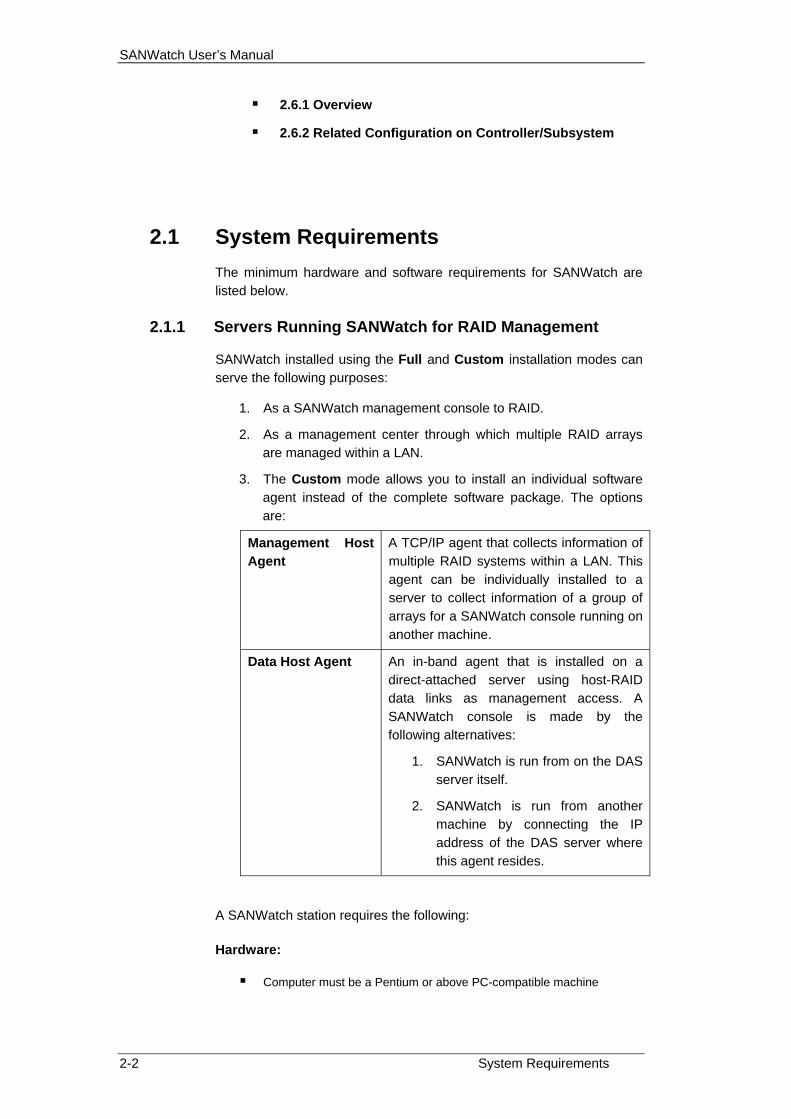
SANWatch installed using the Full and Custom installation modes can serve the following purposes:
1. As a SANWatch management console to RAID.
2. As a management center through which multiple RAID arrays are managed within a LAN.
3. The Custom mode allows you to install an individual software agent instead of the complete software package. The options are:
Management Host Agent
A TCP/IP agent that collects information of multiple RAID systems within a LAN. This agent can be individually installed to a server to collect information of a group of arrays for a SANWatch console running on another machine.
Data Host Agent An in-band agent that is installed on a direct-attached server using host-RAID data links as management access. A SANWatch console is made by the following alternatives:
1. SANWatch is run from on the DAS server itself.
2. SANWatch is run from another machine by connecting the IP address of the DAS server where this agent resides.
A SANWatch station requires the following:
Hardware:
Computer must be a Pentium or above PC-compatible machine
2-2 System Requirements

Chapter 2: Installation
16K or higher mode monitor. Recommended screen resolution is 1024 x 768 pixels.
At least one available Ethernet port (over TCP/IP).
A fax modem that supports Hayes AT command protocol is required (if using the Fax event notification function.) (Fax command class 2.0 and above.)
A GSM modem is required (if using the SMS short message event notification function). SANWatch currently supports two GSM modem models:
o Siemens TC35
o WAVECOM Fast Rack M1206
Software:
SANWatch Management
OS * Out-of-
band * In-band
Data Service:
Snapshot
EonPath
Support
Win 2003 (32) R2 SP2 Yes Yes Yes Yes Server
Win 2003 (64) R2 SP2 Yes Yes Yes Yes
Win XP SP2 Yes - - - Microsoft
Client Vista Ultimate Yes - - -
RedHat AS 4 U4 (32), 2.6.9-42
Yes Yes Yes Yes RedHat
RedHat AS 4 U4 (64), 2.6.9-42
Yes Yes Yes Yes
Linux SuSE SLES v9.1 SP3 (64), 2.6.5-7.97
Yes Yes Yes Yes
Linux SuSE SLES v10 (32), 2.6.16.21-0.8
Yes Yes Yes Yes
** Linux
SuSE
Linux SuSE SLES v10 (64), 2.6.16.21-0.8
Yes Yes Yes Yes
Sun Solaris Solaris 10 Sparc Yes Yes Yes Yes
Mac OS X 10.4.x Yes - - - Apple Mac OS
Max OS X 10..5 Yes - - -
* Out-of-band includes Ethernet access to a RAID system firmware directly via its Ethernet port or the access via the “Data Host agent” on a DAS/SAN data server and then to the RAID firmware.
** Linux in-band connection requires executing the “modeprobe –v sg” command.
NOTE: For the latest OS and agent support, please visit our product web page or contact technical support. Latest options are constantly reviewed and included into our verification test plan.
Table 2-1: Supported OSes
System Requirements 2-3

SANWatch User’s Manual
2.1.2 SANWatch Connection Concerns
** On Linux, use the “modeprobe –v sg” command to start SCSI generic service to facilitate in-band connection.
Windows Messaging (MAPI) for Windows 2003/XP if fax notification support is needed.
TCP/IP with a valid IP assigned to each controller/subsystem. Consult your network administrator for configuration of network IPs. A public IP or the use of VPN will be necessary if you prefer a remote session with the arrays located within a private network.
Some network security measures may prevent you from querying array statuses. For example, your Windows Firewall can disable the access from your Management Host agent to individual arrays.
You can configure exceptional access in your firewall utility using exception rules to allow Java agent negotiation.
Below are the port numbers for use if you need to manually configure secure access. Also contact your network administrators if the management access needs to span across protected networks.
TCP/IP Port Assignments
Software
58630 SSL port for connecting RAID.
58632 Non-SSL port for connecting RAID.
2-4 System Requirements
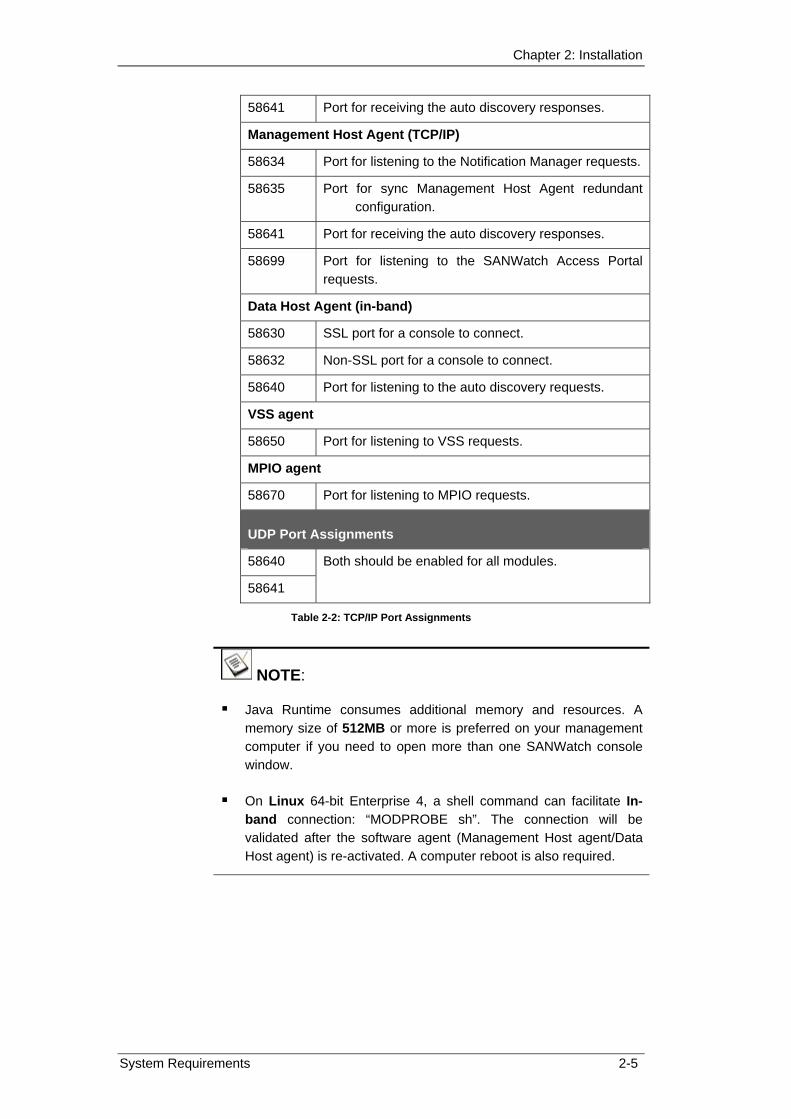
Chapter 2: Installation
58641 Port for receiving the auto discovery responses.
Management Host Agent (TCP/IP)
58634 Port for listening to the Notification Manager requests.
58635 Port for sync Management Host Agent redundant configuration.
58641 Port for receiving the auto discovery responses.
58699 Port for listening to the SANWatch Access Portal requests.
Data Host Agent (in-band)
58630 SSL port for a console to connect.
58632 Non-SSL port for a console to connect.
58640 Port for listening to the auto discovery requests.
VSS agent
58650 Port for listening to VSS requests.
MPIO agent
58670 Port for listening to MPIO requests.
UDP Port Assignments
58640
58641
Both should be enabled for all modules.
Table 2-2: TCP/IP Port Assignments
NOTE:
Java Runtime consumes additional memory and resources. A memory size of 512MB or more is preferred on your management computer if you need to open more than one SANWatch console window.
On Linux 64-bit Enterprise 4, a shell command can facilitate In-band connection: “MODPROBE sh”. The connection will be validated after the software agent (Management Host agent/Data Host agent) is re-activated. A computer reboot is also required.
System Requirements 2-5
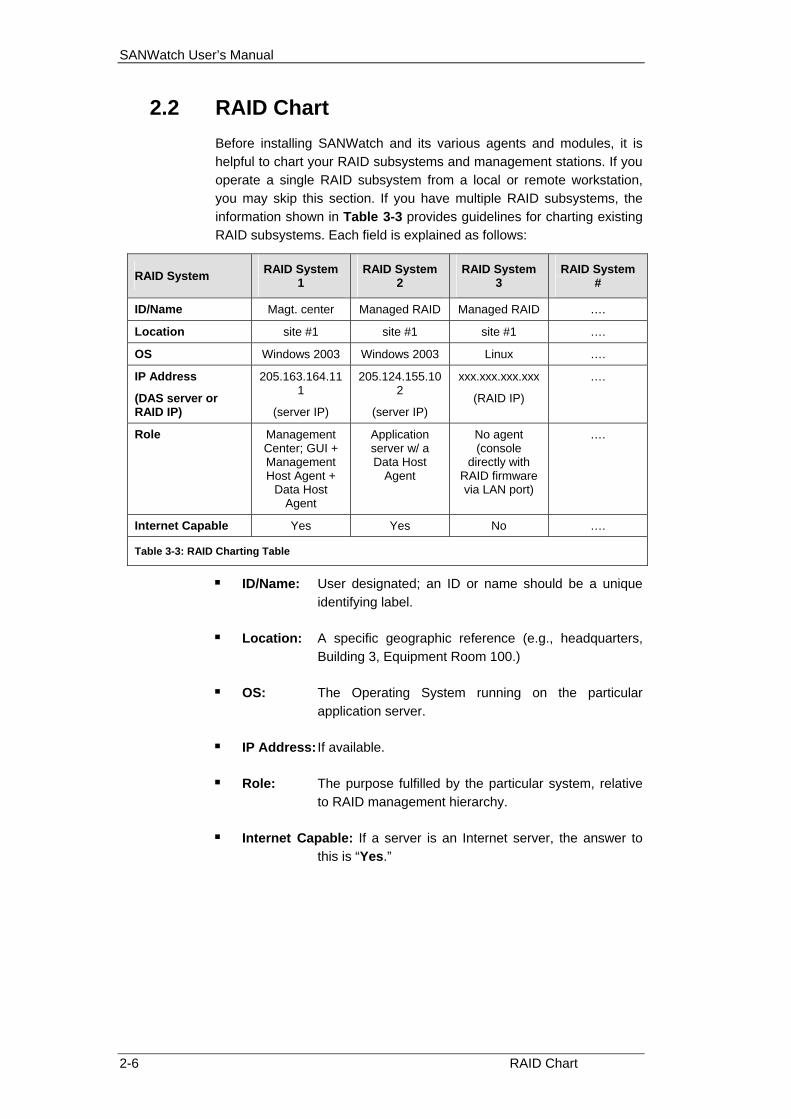
SANWatch User’s Manual
2.2 RAID Chart Before installing SANWatch and its various agents and modules, it is helpful to chart your RAID subsystems and management stations. If you operate a single RAID subsystem from a local or remote workstation, you may skip this section. If you have multiple RAID subsystems, the information shown in Table 3-3 provides guidelines for charting existing RAID subsystems. Each field is explained as follows:
RAID System RAID System 1
RAID System 2
RAID System 3
RAID System #
ID/Name Magt. center Managed RAID Managed RAID ….
Location site #1 site #1 site #1 ….
OS Windows 2003 Windows 2003 Linux ….
IP Address
(DAS server or RAID IP)
205.163.164.111
(server IP)
205.124.155.102
(server IP)
xxx.xxx.xxx.xxx
(RAID IP)
….
Role Management Center; GUI + Management Host Agent +
Data Host Agent
Application server w/ a Data Host
Agent
No agent (console
directly with RAID firmware via LAN port)
….
Internet Capable Yes Yes No ….
Table 3-3: RAID Charting Table
ID/Name: User designated; an ID or name should be a unique identifying label.
Location: A specific geographic reference (e.g., headquarters, Building 3, Equipment Room 100.)
OS: The Operating System running on the particular application server.
IP Address: If available.
Role: The purpose fulfilled by the particular system, relative to RAID management hierarchy.
Internet Capable: If a server is an Internet server, the answer to this is “Yes.”
2-6 RAID Chart

Chapter 2: Installation
2.3 Software Setup This section discusses how to install SANWatch in your system. Before proceeding with the setup procedure, read through the Before You Start section below. The sections follow will explain how to install SANWatch in different operation systems.
2.3.1 Before You Start
Before starting the installation, read through the notes below:
TCP/IP must be installed and running with a valid IP address assigned to a server. The server can either be used as a management center or a station console with a directly-attached RAID system using the in-band management protocols.
A SANWatch console can directly access a RAID system configured with a DHCP or manually assigned IP for its Ethernet port.
Your system display must be running in 16K colors or higher mode otherwise some configuration items may not be visible.
Be certain that your system meets the minimum hardware and software requirements listed in Section 2.1 System Requirements.
Check to confirm that the RAID arrays and controllers are installed properly. For the installation procedure, see the documentation that came with the controller/subsystems.
This SANWatch revision runs on its own Java engine, and hence the requirements on the Java Runtime environments in the previous revisions are no longer relevant.
2.3.2 Installing SANWatch on a Windows Platform
If you are running a Windows platform on the server, follow these steps to install SANWatch:
Step 1. Insert the Infortrend Product Utility CD or SANWatch installation CD into the system’s optical drive.
Step 2. If you are currently running other applications, close them before proceeding with the setup process. This will minimize the possibility of encountering system errors during setup.
Software Setup 2-7

SANWatch User’s Manual
Step 3. The SANWatch installer program is included on the CD-ROM that came with your RAID system. An auto-run screen provides a hot link to the Windows installer program. Click on “Windows Platform.”
Step 4. Click the supported platform to start the installation
process.
Step 5. To install the Java-based GUI SANWatch main program, see Section 2.3.6 for detailed procedures.
2.3.3 Installing SANWatch on a Linux Platform
If you are running a Linux platform on the server computer follow these steps to install SANWatch on your server(s):
Step 1. Insert the Infortrend Product Utility CD or SANWatch installation CD into the system’s optical drive.
Step 2. If you are currently running other applications, close them before proceeding with the setup process. This will minimize the possibility of encountering system errors during setup.
Step 3. Open the file manager and change the directory to /mnt/cdrom.
Step 4. Locate and execute ./linux.sh to start the software installation.
Step 5. Install the Java-based GUI SANWatch manager main program. An installshield will prompt on the screen.
2-8 Software Setup

Chapter 2: Installation
Please refer to Section 2.3.6 for step-by-step installation procedures.
2.3.4 Installing SANWatch on a Solaris Platform
Follow these steps to install SANWatch on your server(s) and RAID subsystems:
Step 1. Insert the Infortrend Product Utility CD or SANWatch installation CD into the systems CD-ROM drive.
Step 2. If you are currently running other applications, close them before proceeding with the setup process. This will minimize the possibility of encountering system errors during setup.
Step 3. When the File Manager window pops up on the screen, double-click and execute the “unix.sh” file.
Step 4. A Run window prompt will display. To install the Java-
based GUI SANWatch manager main program, type YES and then press Enter. This will launch the SANWatch manager install shield. Please refer to Section 2.3.6 for step-by-step installation procedures.
Software Setup 2-9

SANWatch User’s Manual
2.3.5 Installing SANWatch on a Mac OS Running Safari Browser
Enabling Root Access
SANWatch installation onto a Macintosh machine running Safari browser requires you to enable the root account first. The Mac OS is defaulted with the disabled root account as an intentional security feature in order to avoid problems that could arise from casual use of root access.
Enabling/Disabling the root access requires administrative privileges. You will need to know the password for the “Admin” account first. If the Admin password is not available, you may reboot from an installation CD and find the menu item for “Password Reset.”
NOTE: You may temporarily disconnect your Mac machine from the network during the time you use the root account to complete specific configuration task. Unauthorized access during the time can cause problems to your OS.
Remember to re-connect the cabling after SANWatch installation.
To enable the root access on OSX 10.4:
Step 1. Log in using the Admin account.
Step 2. Locate the GO menu from Mac OS X’s finder menu bar, access the “Utilities“ folder to start the “NetInfo Manager” application.
2-10 Software Setup

Chapter 2: Installation
Step 3. Click on the “Lock” icon on the lower left of the screen
before you make configuration changes.
Step 4 Locate the “Security” item from the top menu bar.
Select “Enable root user.” You will have to enter the administrator’s password to authenticate yourself.
Step 5. From this screen you can also enter a new password for root access. Select “users” in the middle column (as
Software Setup 2-11
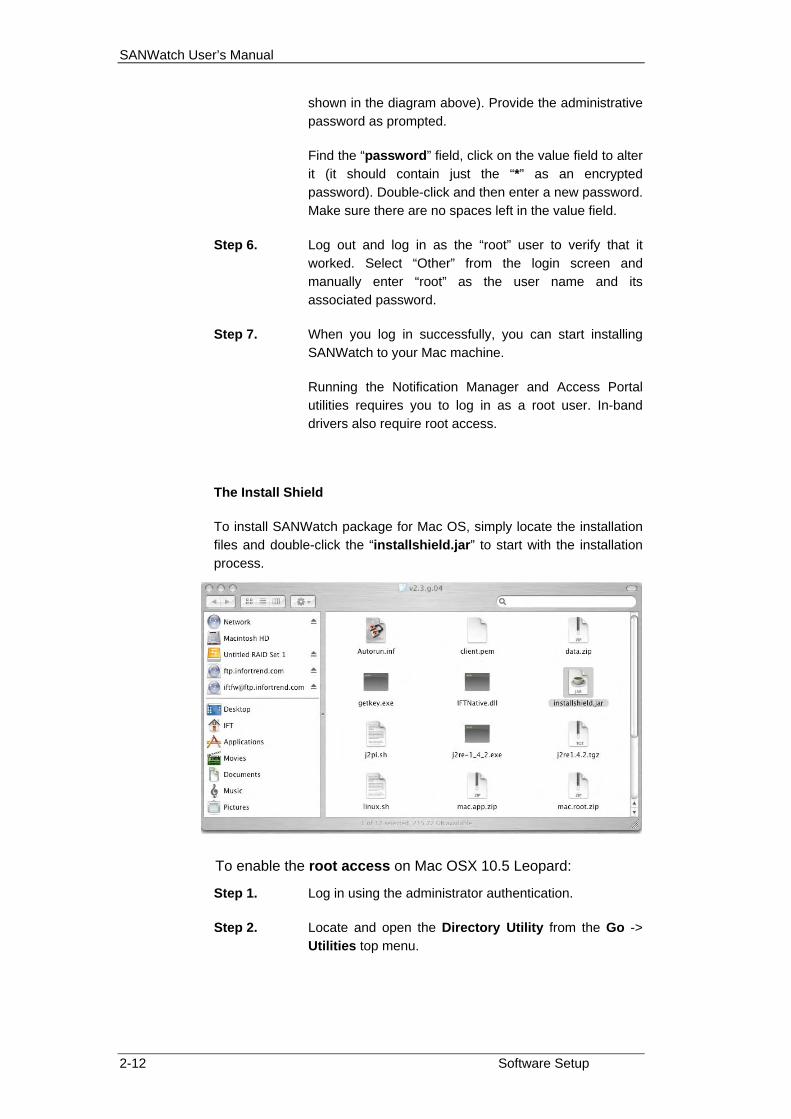
SANWatch User’s Manual
shown in the diagram above). Provide the administrative password as prompted.
Find the “password” field, click on the value field to alter it (it should contain just the “*” as an encrypted password). Double-click and then enter a new password. Make sure there are no spaces left in the value field.
Step 6. Log out and log in as the “root” user to verify that it worked. Select “Other” from the login screen and manually enter “root” as the user name and its associated password.
Step 7. When you log in successfully, you can start installing SANWatch to your Mac machine.
Running the Notification Manager and Access Portal utilities requires you to log in as a root user. In-band drivers also require root access.
The Install Shield
To install SANWatch package for Mac OS, simply locate the installation files and double-click the “installshield.jar” to start with the installation process.
To enable the root access on Mac OSX 10.5 Leopard:
Step 1. Log in using the administrator authentication.
Step 2. Locate and open the Directory Utility from the Go -> Utilities top menu.
2-12 Software Setup

Chapter 2: Installation
Step 2. Unlock the advanced setting by a single-click on the lock icon and by providing the administrator password.
Step 3. Once unlocked, click on the Directory Utility’s display area and then select the Enable Root User option from the Edit menu.
Software Setup 2-13

SANWatch User’s Manual
Step 4. Key in and verify a password to the root user.
Step 5. Run the installshield.jar to begin installation.
2-14 Software Setup

Chapter 2: Installation
2.3.6 Installing SANWatch Main Program (for all platforms)
When the SANWatch Java-based install shield is launched, follow the steps below to complete the installation.
IMPORTANT!
1. It is recommended to uninstall previous Infortrend software, e.g., RAIDWatch, before installing SANWatch.
2. It is also necessary to reboot your system to complete the uninstallation process.
3. Before installing SANWatch, it is also a good practice to check if the previous versions of SANWatch agents are still evoked. For example, on a Windows platform you can check in the Computer Management utility -> Services and Applications -> Services. You should then disable the previous versions of SANWatch agents.
Step 1. To install SANWatch, click the Next button at the bottom of the install shield window. If you do not wish to continue with the installation process, select the Cancel button.
Software Setup 2-15

SANWatch User’s Manual
Step 2. If you selected the Next button, the License Agreement
window shown below will appear. First read through the License Agreement. If you are in agreement with the specified terms and wish to continue installing the SANWatch program, select Accept. If you do not wish to continue with the installation process then select the Decline button.
Step 3. If you accepted the License Agreement, a new window with two installation options will appear. These options are Full and Custom. The default is set to Full. If you want to install SANWatch in a different folder, select a new location using the Browse button. If you follow the default selection and click the Next button, the install shield will install the SANWatch software, subordinate agents, and system files to the default folder.
2-16 Software Setup

Chapter 2: Installation
Step 4. If you choose the Custom installation mode on the previous screen, you will be able to select to install an individual agent as shown below.
Sample topologies are described about these three modes in Chapter 1.
SANWatch – SANWatch GUI main program. You may not need to run the GUI on every application server, but you need the intermediate agents for either local or remote management access.
Data Host Agent – This agent enables in-band management. Configuration commands are packaged
Software Setup 2-17

SANWatch User’s Manual
into host interface commands and passed down to the RAID system.
In a Fibre Channel storage network, in-band also works with connections made via FC switches.
This agent is a must for using the Snapshot functionality.
Management Host Agent – This is a TCP/IP agent that is able to collect information from multiple, adjacent arrays within a LAN. You can install this agent individually on a server and connect this agent from another machine by entering the agent host IP. This applies when you need to access groups of RAID arrays in different installation sites from a single console.
System Files – This option is not selectable.
IMPORTANT!
There is no need to configure the Peripheral Device setting if you are trying to manage a RAID system from a SANWatch station through an Ethernet connection (to the EonStor subsystem’s Ethernet port). An Ethernet connection to RAID uses TCP/IP as the communication protocol.
Only the direct-attached, in-band access to a new array requires Peripheral Device setting. Please refer to Section 2.6 In-band SCSI for details.
2-18 Software Setup
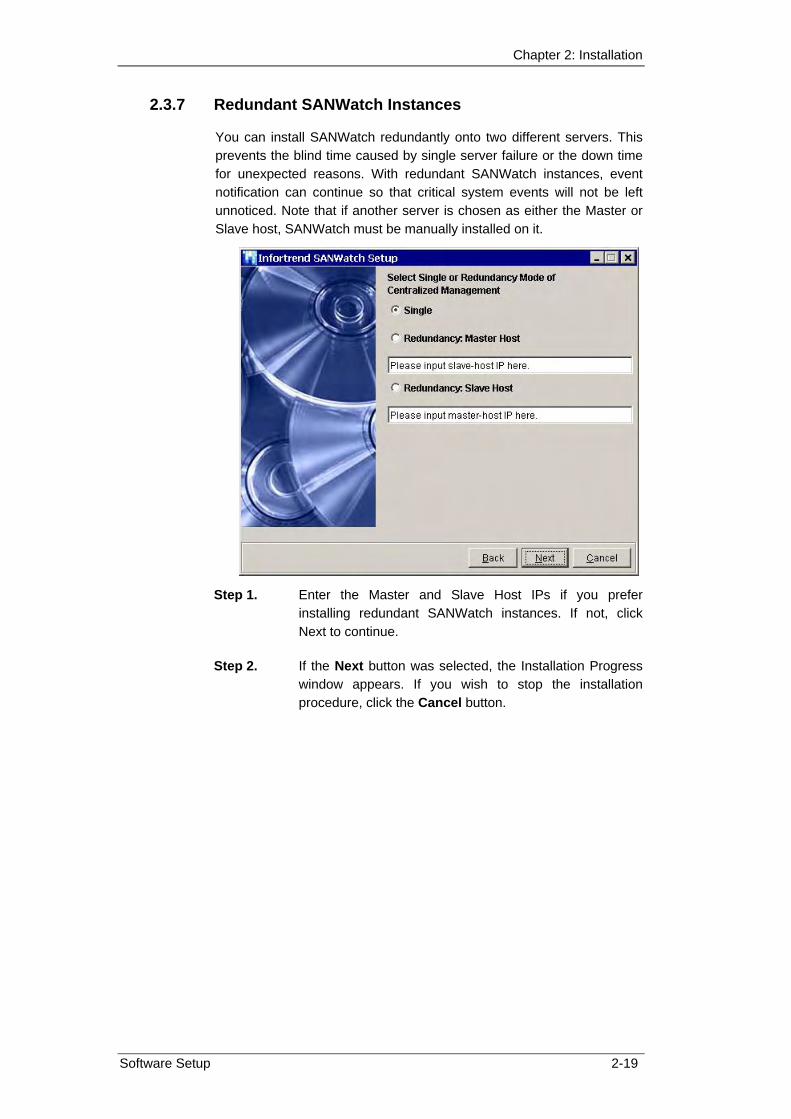
Chapter 2: Installation
2.3.7 Redundant SANWatch Instances
You can install SANWatch redundantly onto two different servers. This prevents the blind time caused by single server failure or the down time for unexpected reasons. With redundant SANWatch instances, event notification can continue so that critical system events will not be left unnoticed. Note that if another server is chosen as either the Master or Slave host, SANWatch must be manually installed on it.
Step 1. Enter the Master and Slave Host IPs if you prefer installing redundant SANWatch instances. If not, click Next to continue.
Step 2. If the Next button was selected, the Installation Progress window appears. If you wish to stop the installation procedure, click the Cancel button.
Software Setup 2-19

SANWatch User’s Manual
Step 3. Once the software has been successfully installed, a window indicating the successful installation will appear. To complete the process and exit the window, click on the Finish button.
Another Windows message will prompt reminding you to reboot your system to complete the installation process. You should click No, locate and click on the Finish button on SANWatch’s installer screen, and then reboot your system later.
2-20 Software Setup

Chapter 2: Installation
NOTE: The Applet mode (the third installation scheme of the custom modes) was cancelled from this release of SANWatch because Infortrend provides a similar Embedded RAIDWatch interface as an easy tool to access firmware configuration options. The Embedded RAIDWatch is invoked by keying a RAID controller IP in a web browser’s URL field. Use IE7 browser and square brackets in the URL field if you configured an IPv6 address for an array.
NOTE: Snapshot is removed from SANWatch’s main program and is now available with the Virtualized storage, the VSA series systems. The license key window and information is also removed.
Software Setup 2-21

SANWatch User’s Manual
2.4 VSS Hardware Provider The VSS hardware provider for Infortrend’s RAID arrays comes with an installer program. The hardware provider facilitates the coordination of Shadow Copy creation among requestors (e.g., 3rd-party backup software), writer (e.g., database applications), and RAID hardware. To install the provider, locate the installer, “IFT_VSS.1.0.xxx,” in a “VSS” sub-folder.
Step 1. Double-click on the VSS installer icon to begin installation.
Step 2. The Setup Wizard Welcome screen will prompt. Click Next to proceed.
Step 3. If you prefer a different file location, click on the Browse
button to proceed. The Disk Cost.. button provides you a view of available disk spaces.
2-22 VSS Hardware Provider

Chapter 2: Installation
Step 4. Confirm the installation by clicking Next.
VSS Hardware Provider 2-23

SANWatch User’s Manual
Step 5. The progress is indicated by a percentage bar.
Step 6. Click Close to end the installation process.
2-24 VSS Hardware Provider

Chapter 2: Installation
Step 7. You can check the presence of hardware provider service
in the Computer Management utility as shown below.
2.5 Program Updates As Infortrend’s valued customer, you are entitled to free program updates (within the licensed period). You can download the latest version of SANWatch from Infortrend’s FTP sites at ftp.infortrend.com.tw or the esupport websites. For customers granted authorized access, the update files can also be found in the VIP section of Infortrend’s website. For more information about this service, contact Infortrend support or an Infortrend distributor in your area.
Program Updates 2-25

SANWatch User’s Manual
2.6 In-band SCSI 2.6.1 Overview
For the purposes of device monitoring and administration, external devices require communication with the host computers. Out-of-band connections such as an Ethernet or serial port can be used for management access.
An alternative way of communication is in-band SCSI, which transfers configuration commands into supported SCSI commands and uses them to communicate with RAID arrays over the existing SCSI, SAS, iSCSI, or Fibre host connections. One benefit of using the in-band commands is that no additional management link is required.
There are limitations on the use of in-band protocols. For example, in order for a host to “see” the RAID controller/subsystem, at least one (1) logical drive must exist and be associated with host ID/LUNs. Otherwise, the RAID controller/subsystem itself must be configured to appear as a peripheral device to the host computers.
See the examples below for the procedures on configuring RAID controller/subsystems into a peripheral device.
2.6.2 Related Configuration on Controller/Subsystem
The RAID controller or subsystem must make some adjustments as well as the host computer's SNMP settings before the two can communicate using SCSI commands. You can use the RS-232 terminal utility to change the RAID controller settings.
Step 1. From the Main Menu, press the Up or Down buttons to select “View and Edit Configuration Parameters.”
Step 2. Press Enter; and then use the Up or Down keys to select “Host-side SCSI Parameters.” Then press Enter.
The Peripheral Device Type Parameters submenu also needs to be adjusted. Refer to the instructions below to set the proper settings for the in-band protocol to work.
Step 1. First select the “Peripheral Device Type” submenu and then select “Enclosure Services Devices <Type=0xd>.”
2-26 In-band SCSI

Chapter 2: Installation
Step 2. Select “LUN Applicability - Undefined LUN-0’s Only” option.
Step 3. Leave other options at their defaults. In-band should work fine by setting these two options.
NOTE: 1. Be sure to change the Peripheral Device Type to suit your
operating system after the in-band host links have been properly connected.
2. Operating Infortrend RAID systems does not require OS driver. If you select All Undefined LUNs in the LUN Applicability menu, every mapped volume will cause a message prompt in the OS asking for the support driver.
In-band SCSI 2-27

SANWatch User’s Manual
This page is intentionally left blank.
2-28 In-band SCSI

Chapter 3
SANWatch Icons
This chapter introduces icons used in the main configuration access categories:
Access Portal Window - Section 3.1
Navigation Tree Icons – Section 3.2
Information Icons – Section 3.3
Maintenance Icons – Section 3.4
Configuration Icons – Section 3.5
Event Log Icons – Section 3.6
3.1 Access Portal Window
Access Portal Menu Bar
Connects a management host (default is the computer where SANWatch is invoked)
Disconnects a management host
Auto Discovery (automatically scans a configurable IP range)
Add IP address (manually adds an IP to the list of connection view)
Manage Subsystem (starts the management console with a specific RAID system)
Launch EonPath (opens the EonPath management window via a “data host agent” on a direct-attached server)
Launch the Configuration Manager utility
Access Portal Window 3-1

SANWatch User’s Manual
Launch the Disk Performance Monitor utility
Password manager
Notification Management (opens the event notification window for a particular RAID system)
Help Cursor (single-click on this button and then places the help cursor over the screen element of your interest to find out the related help contents)
Help (brings out the Java help window)
Connection View (Navigation Tree)
Out-of-band (lists arrays accessed through out-of-band Ethernet)
In-band host (lists arrays accessed through host-RAID data links, e.g., FC or SAS)
Disconnected (lists arrays that are currently disconnected)
RAID system
A RAID system once was here, but is now disconnected, will be brought online once the connection is repaired and the access portal is restarted.
A RAID system that reports system events
A RAID system tagged with a question mark icon is one that holds unchecked events. The fault condition that triggered the event had vanished. Please check the event log on that system. A mouse click on an event message indicates you have read the message.
NOTE that the question mark only appears with unread messages of the “warning“ and “critical” levels.
3-2 Access Portal Window

Chapter 3: SANWatch Icons
- Array Status Summary (activated by a single-click on a connected array)
Controller (no. of RAID controllers managing the subsystem)
JBOD (no. of JBOD attached to the RAID system)
Total Disk (no. of disk drives in the RAID system)
Spare Disk (no. of spare disks)
Logical Volumes (no. of logical volumes)
Logical Drive (no. of logical drives)
Total Partition (no. of RAID partitions)
Unused Partition (no. of unused partitions)
LUN Mapping (no. of host LUN mapping entries)
EonPath (EonPath multi-pathing is working on this machine)
3.2 Navigation Tree Icons (Array Management Window)
Connected RAID Array
Information
Enclosure View
Tasks Under Process
Logical Drive Information
Logical Volume Information
Fibre Channel Status
Navigation Tree Icons (Array Management Window) 3-3

SANWatch User’s Manual
System Information
Statistics
Maintenance
Logical Drive
Physical Drive
Task Scheduler
Configuration
Quick Installation
Installation Wizard
Create Logical Drive
Existing Logical Drives
Create Logical Volume
Existing Logical Volumes
Host Channel
Host LUN Mapping
Configuration Parameters
3-4 Navigation Tree Icons (Array Management Window)

Chapter 3: SANWatch Icons
3.3 Array Information Icons
Enclosure View
Drive in good condition
Drive missing or failed
Global Spare
Any drive icon showing a color other than black represents a member of a logical drive or a dedicated spare. Black is the default color of a new or used drive. A used drive is a drive that had been used as a member of a logical drive.
An empty tray; disk drive not installed
This graphic represents a rotation button. Each mouse-click on it turns the enclosure graphic 90 degrees clockwise.
SANWatch recognizes each subsystem by its board serial number, and displays an exact replica of it in the panel view.
LEDs shown on the enclosure view correspond to the real LEDs on the subsystem.
If an LED corresponding to a failed component is lit red as shown above, move your mouse cursor to the enclosure panel. Let the cursor stay on the graphic for one second and an enclosure status summary will be displayed.
Array Information Icons 3-5

SANWatch User’s Manual
Tasks Under Process
Type of tasks being processed by the subsystem. The Task status window displays icons representing specific configurations.
Progress indicator
Logical Drive Information
A logical drive
A partitioned logical drive volume is represented as a color bar that can be split into many segments. Each color segment indicates a partition of a configured array.
Logical Volume Information
A logical volume
A partitioned logical volume is represented as a color bar that can be split into many segments. Each color segment indicates a partition of a configured volume.
3-6 Array Information Icons

Chapter 3: SANWatch Icons
A member of a logical volume, representing a logical drive. Different logical drives are presented using icons of different colors.
Fibre Channel Status
A Fibre host channel
System Information
A battery module
A RAID controller unit
A current sensor
A cooling module
An enclosure device connected through an I2C bus
A power supply
An enclosure device connected through SAF-TE (SCSI bus)
An enclosure device connected through SES (Fibre link)
A drive tray slot
A temperature sensor
An UPS device
A voltage sensor
3.4 Maintenance Icons
Maintenance
This category uses the same icons as in the Logical Drive Information window. See Logical Drive Information section.
Maintenance Icons 3-7

SANWatch User’s Manual
3.5 Configuration Icons
Create Logical Drives
This window uses the same icons as in the Logical Drive Information window. See Logical Drive Information section.
Existing Logical Drives
A configured array (logical drive)
Create Logical Volume
A member of a logical volume, representing a logical drive. Different logical drives are presented using icons of different colors.
Existing Logical Volumes
A logical volume
A partitioned logical volume is represented as a color bar that can be split into many segments. Each color segment indicates a partition of a configured array.
A member of a logical volume, representing a logical drive. Different logical drives are presented using icons of different colors.
A logical volume
3-8 Configuration Icons

Chapter 3: SANWatch Icons
Host Channel
A host channel.
Host LUN Mapping
A logical drive. Different logical drives are presented using icons of different colors.
A logical volume.
A partitioned array volume is represented as a color bar that can be split into many segments. Each color segment indicates a partition of a configured array.
EonPath Multi-pathing
A multi-pathing device.
Multi-pathing device information.
Multi-pathing device information.
Multi-pathing device throughput statistics.
Multi-pathing configuration.
Create a multi-pathing configuration.
Configuration Parameters
No icons are used in this window.
Configuration Icons 3-9

SANWatch User’s Manual
3.6 Event Log Icons
Event Messages
Severity Levels
An informational message: Command-processed message sent from the firmware
A warning message: System faults or configuration mistakes
An alert message: Errors that need immediate attention
Snapshot-related events
A snapshot image is created.
A snapshot image is deleted.
Event Type
Type of messages detected by the subsystem. The event view panel displays icons representing specific categories using the same icons as those used in the System Information window.
3-10 Event Log Icons

Starting SANWatch Agents 4-1
Chapter 4
Basic Operations
This chapter describes the SANWatch screen elements and basic operations.
♦ Starting SANWatch Agents – Section 4.1, page 4-3
♦ Starting SANWatch Manager – Section 4.2, page 4-4
4.2.1 Under Windows 2000/ 2003 Environments
4.2.2 Under Linux Environments
4.2.3 Locally or via LAN under Solaris Environments
♦ Starting SANWatch (Initial Portal) – Section 4.3, page 4-5
♦ Using Functions in the SANWatch Initial Portal Window – Section 4.4, page 4-5
♦ RAID Management Session: Starting the SANWatch Storage Manager – Section 4.5, page 4-11
13
♦ Look and Feel – Section 4.7, page 4-14
iew
Error! Reference source not found. Error! Reference source not found.
4.5.1 Connecting to a RAID Subsystem
4.5.2 Disconnecting and Refreshing a Connection
♦ Security: Authorized Access Levels – Section 4.6, page 4-
4.7.1 Look and Feel Overv
4.7.2 Screen Elements
4.7.3 Command Menus
4.7.4 Outer Shell Commands
SANWatch User’s Manual
4-2 Starting SANWatch Agents
4.7.5 Management Window Commands
♦ The Array Information Category – Section 4.8, page 4-18
ndow
Window
-22
ection 4.10, page 4-27
olumes Window
4.10.9 Configuration Parameters Window
4.8.1 Enclosure View
4.8.2 Tasks Under Process Window
4.8.3 Logical Drive Information Window
4.8.4 Logical Volume Information Wi
4.8.5 Fibre Channel Status Window
4.8.6 System Information
4.8.7Statistics Window
♦ The Maintenance Category – Section 4.9, page 4
4.9.1 Logical Drive Maintenance Window
4.9.2 Physical Drives Maintenance Window
4.9.3 Task Schedules Maintenance Window
♦ The Configuration Category – S
4.10.1Quick Installation
4.10.2 Installation Wizard
4.10.3 Create Logical Drive Window
4.10.4 Existing Logical Drives Window
4.10.5 Create Logical Volume Window
4.10.6 Existing Logical V
4.10.7 Channel Window
4.10.8 Host LUN Mapping Window
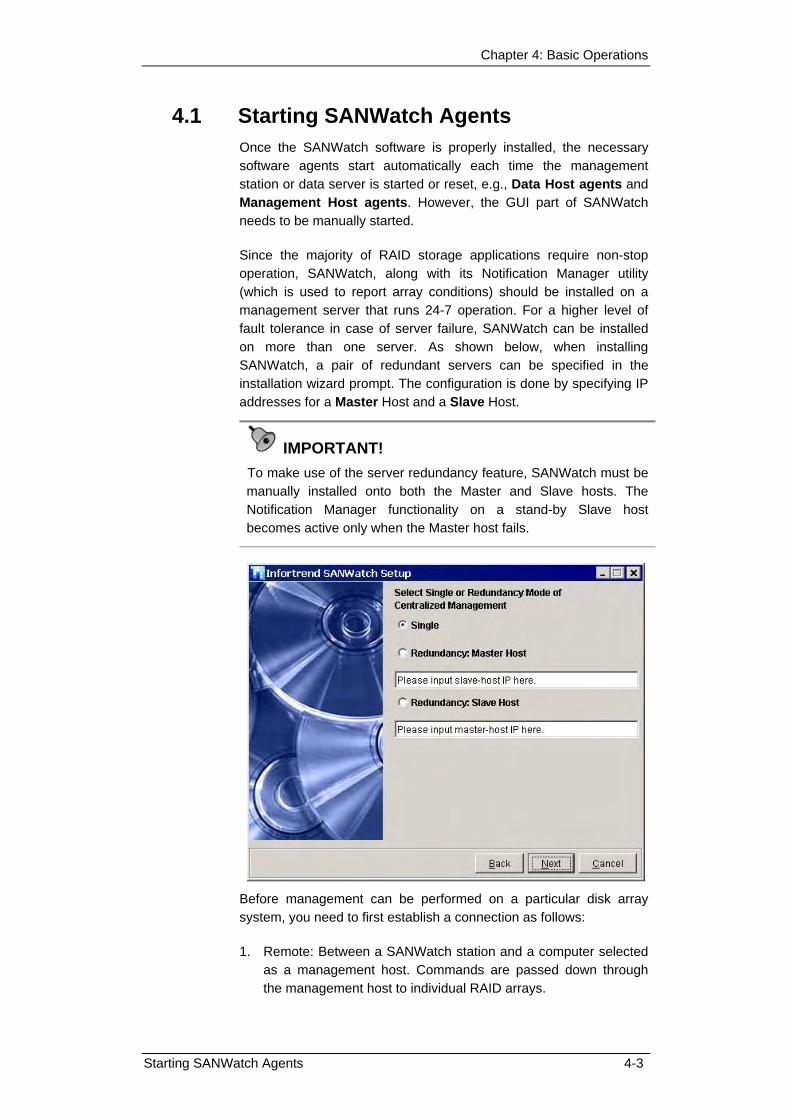
Chapter 4: Basic Operations
4.1 Starting SANWatch Agents Once the SANWatch software is properly installed, the necessary software agents start automatically each time the management station or data server is started or reset, e.g., Data Host agents and Management Host agents. However, the GUI part of SANWatch needs to be manually started.
Since the majority of RAID storage applications require non-stop operation, SANWatch, along with its Notification Manager utility (which is used to report array conditions) should be installed on a management server that runs 24-7 operation. For a higher level of fault tolerance in case of server failure, SANWatch can be installed on more than one server. As shown below, when installing SANWatch, a pair of redundant servers can be specified in the installation wizard prompt. The configuration is done by specifying IP addresses for a Master Host and a Slave Host.
IMPORTANT! To make use of the server redundancy feature, SANWatch must be manually installed onto both the Master and Slave hosts. The Notification Manager functionality on a stand-by Slave host becomes active only when the Master host fails.
Before management can be performed on a particular disk array system, you need to first establish a connection as follows:
1. Remote: Between a SANWatch station and a computer selected as a management host. Commands are passed down through the management host to individual RAID arrays.
Starting SANWatch Agents 4-3

SANWatch User’s Manual
2. Local: One-to-one SANWatch console is run on a management host or a DAS server via in-band or out-of-band connections.
The following discusses how to connect to a management host and its subordinate disk arrays. Information on disconnection is provided at the end of this section.
4.2 Starting SANWatch Manager Depending on your setup, you can start SANWatch Manager in various ways.
For both local and remote management, and under various OSes, starting the program is simple. Please refer to the appropriate sub-sections below for information.
4.2.1 Under Windows 2000/ 2003 Environments From the Startup menu, select Programs Infortrend Inc. SANWatch Manager. (See Figure 4-1) Click on the SANWatch Manager icon.
Figure 4-1: SANWatch Shortcuts on Windows Startup Menu
- OR -
Double-click the SANWatch Manager icon from the desktop (see Figure 4-2) if a shortcut was added during the installation process.
Figure 4-2: SANWatch Shortcut on Windows Desktop
4.2.2 Under Linux Environments To start SANWatch manager under Linux environments, follow the steps below:
Step 1. Locate the SANWatch program files. The default location is: /usr/local/Infortrend Inc/RAID GUI Tools.
4-4 Starting SANWatch Manager

Chapter 4: Basic Operations
Step 2. To execute SANWatch manager, type: ./sanwatch.sh in the terminal screen.
4.2.3 Locally or via LAN under Solaris Environments To start SANWatch manager under Solaris environments, follow the steps below:
Step 1. Locate the SANWatch program files. The default location is: /usr/local/Infortrend Inc/RAID GUI Tools.
Step 2. Type ./sanwatch.sh to launch SANWatch program.
4.3 Starting the SANWatch Manager (the Initial Portal)
Step 1. Start SANWatch using the methods described above.
Step 2. The Management Host Login wizard starts. The IP address field defaults to that of the computer where you run SANWatch. If you want to connect another management host (e.g., a management center at another installation site that manages a group of RAID arrays), enter its IP.
The default password is “root.” You can change the password later using the Notification Manager utility.
Step 3. Click OK to start the session.
Step 4. For the first time login, you will be required to assign a range of IP addresses. The Auto Discovery function scans the local network for every connected RAID arrays.
NOTE: Currently the Auto Discovery tool does not support IPv6 addresses.
Starting the SANWatch Manager (the Initial Portal) 4-5

SANWatch User’s Manual
Step 4-1. Specify the “from” and “to” addresses in
the IP range fields.
Step 4-2. Click the Configure button. The specified range will appear in a drop-down list.
Step 4-3. Click Start to scan the network.
Step 5. Once the scan is finished, you will prompted by a message. Click OK to proceed.
Step 6. A list of connected arrays will appear on the
Connection View portion (left-hand-side) of the SANWatch GUI.
You can now start viewing or configuring by a left- or
right-click on a disk array icon.
NOTE: See Chapter 2, SANWatch Connection Concerns if you encounter scan failures. Network security measures, such as firewall, can fail the IP scan.
4-6 Starting the SANWatch Manager (the Initial Portal)
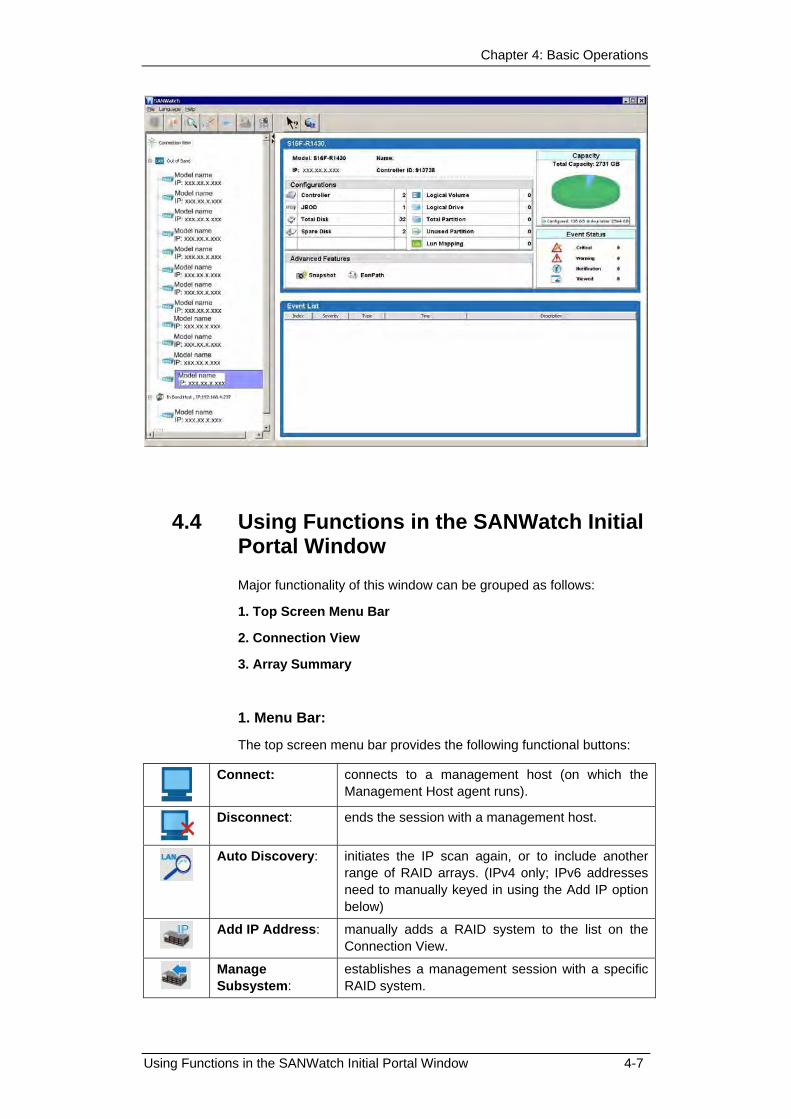
Chapter 4: Basic Operations
4.4 Using Functions in the SANWatch Initial Portal Window Major functionality of this window can be grouped as follows:
1. Top Screen Menu Bar
2. Connection View
3. Array Summary
1. Menu Bar:
The top screen menu bar provides the following functional buttons:
Connect: connects to a management host (on which the Management Host agent runs).
Disconnect: ends the session with a management host.
Auto Discovery: initiates the IP scan again, or to include another
range of RAID arrays. (IPv4 only; IPv6 addresses need to manually keyed in using the Add IP option below)
Add IP Address: manually adds a RAID system to the list on the
Connection View.
Manage Subsystem:
establishes a management session with a specific RAID system.
Using Functions in the SANWatch Initial Portal Window 4-7

SANWatch User’s Manual
Launch EonPath: establishes a multi-pathing configuration session with a specific data server. (Applies only to an array shown with a DAS server, and the EonPath has already been installed on it.)
Notification Management:
Opens the Notification Manager utility screen. (For more details, see Chapter 14)
Help Cursor: Changes your mouse cursor into a help cursor and
to bring out the related information for a screen element by another mouse click.
Help: Brings out the Java help contents window.
2. Connection View
Left-click: a left-click on an array icon brings out its summary page and an event list. From this summary page you can find the basic information of current configuration ranging from the number of RAID controller(s), number of logical drives, to the used and unused capacity, etc.
Right-click:
2-1. Right-click on a RAID System Icon
A right-click on a RAID system icon brings out the following commands:
2-1-1. Remove Controller – this command removes a RAID array from the list on the Connection View.
2-1-2. Manage Subsystem – this command starts the management session (the Storage Manager) with a RAID system.
4-8 Using Functions in the SANWatch Initial Portal Window
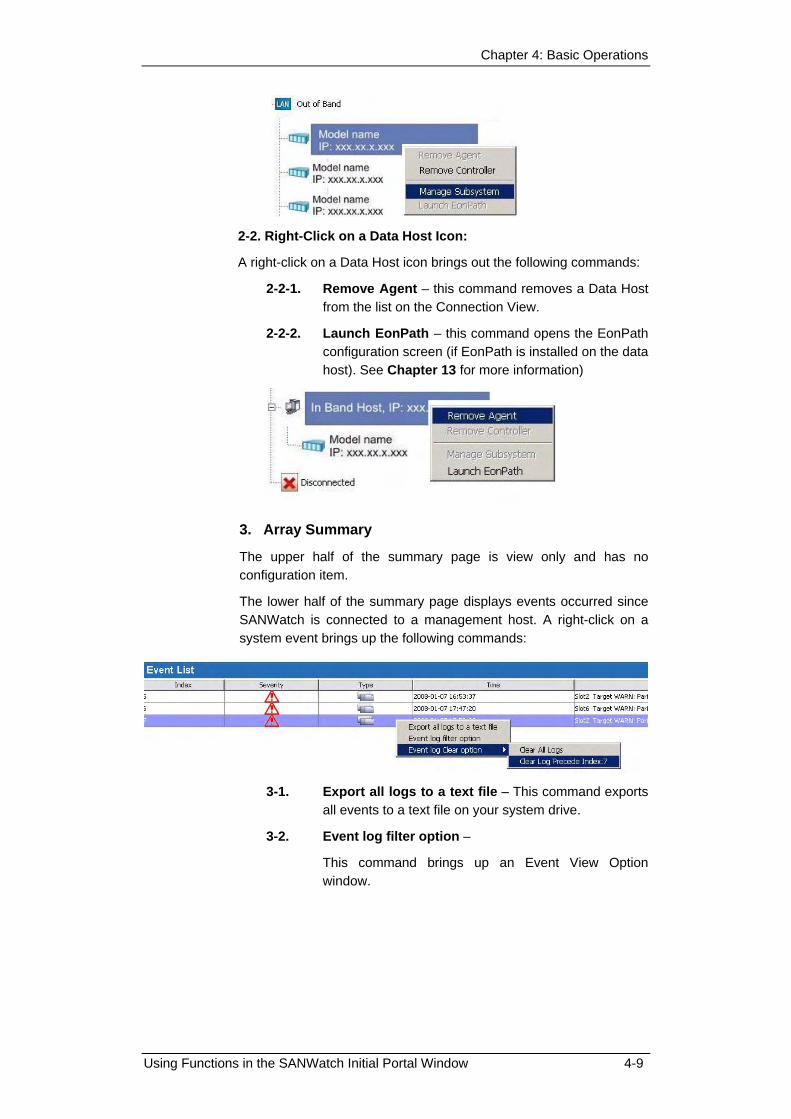
Chapter 4: Basic Operations
2-2. Right-Click on a Data Host Icon:
A right-click on a Data Host icon brings out the following commands:
2-2-1. Remove Agent – this command removes a Data Host from the list on the Connection View.
2-2-2. Launch EonPath – this command opens the EonPath configuration screen (if EonPath is installed on the data host). See Chapter 13 for more information)
3. Array Summary
The upper half of the summary page is view only and has no configuration item.
The lower half of the summary page displays events occurred since SANWatch is connected to a management host. A right-click on a system event brings up the following commands:
3-1. Export all logs to a text file – This command exports all events to a text file on your system drive.
3-2. Event log filter option –
This command brings up an Event View Option window.
Using Functions in the SANWatch Initial Portal Window 4-9

SANWatch User’s Manual
In the Event View Option window, the tabbed panel on the top of the window allows you to switch between the Filter and the Column pages.
You may set the event sorting criteria, the type of events you like to export, the severity of the event and the time occurrence range in the Filter page of the Event View Option window. The Column page allows you to select the related display items when showing the events. Click Apply for the changes to take effect. The Event Log List window will immediately display the event list following the new criteria. Click OK to exit the window, or click Default to return to the system default settings.
3-3. Event log Clear option - This option allows you to clear the event logs in the Event Log List window. All event logs will be erased when you select the Clear All Logs option. The Clear Log Precede Index: X option will erase the events starting from the oldest to the event you selected.
4-10 Using Functions in the SANWatch Initial Portal Window

Chapter 4: Basic Operations
4.5 RAID Management Session: Starting the SANWatch Storage Manager A Storage Manager is a management session between a SANWatch consol and a specific RAID system. When the Storage Manager is launched by a right-click on the array icon and a left-click on the Manage Subsystem command, a connection window will prompt on the screen.
During the time the management session is initializing, a SANWatch initialization page displays.
A single click on the initial screen brings out a Connection Abort confirm box. You can end a connection before the management session is established.
4.5.1 Connecting to a RAID Subsystem The following steps will explain how to connect to a RAID Subsystem through a network connection.
RAID Management Session: Starting the SANWatch Storage Manager 4-11
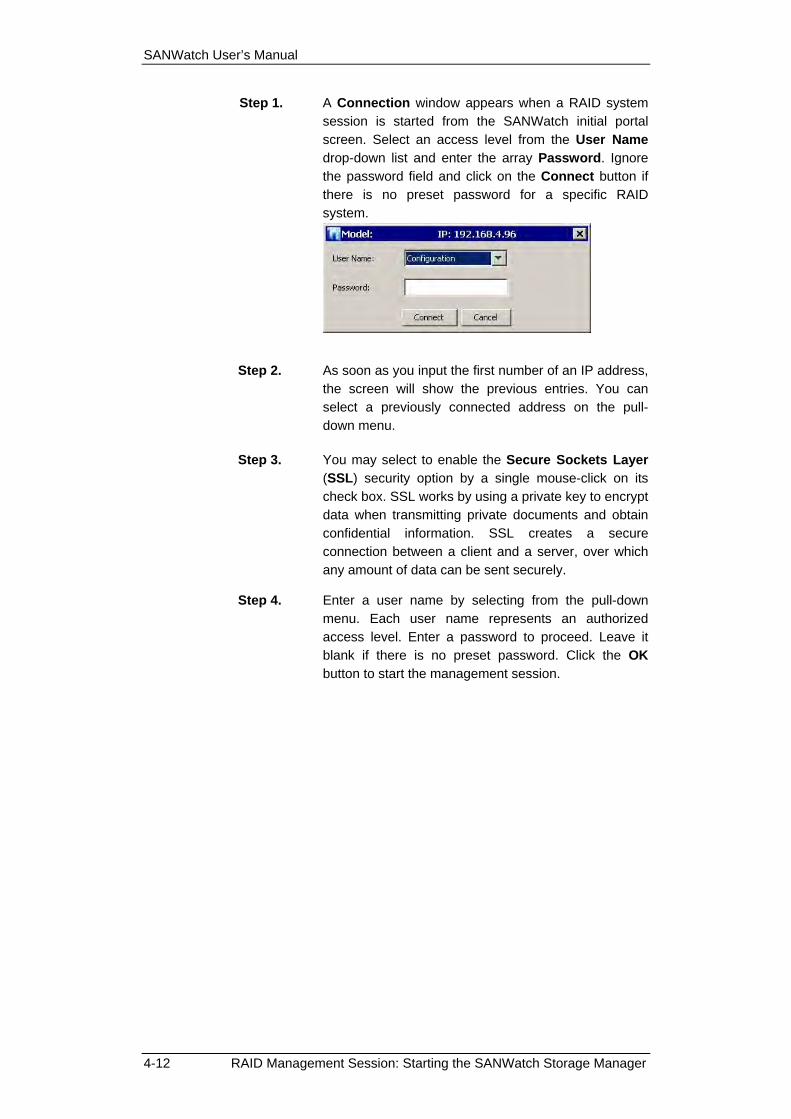
SANWatch User’s Manual
Step 1. A Connection window appears when a RAID system session is started from the SANWatch initial portal screen. Select an access level from the User Name drop-down list and enter the array Password. Ignore the password field and click on the Connect button if there is no preset password for a specific RAID system.
Step 2. As soon as you input the first number of an IP address, the screen will show the previous entries. You can select a previously connected address on the pull-down menu.
Step 3. You may select to enable the Secure Sockets Layer (SSL) security option by a single mouse-click on its check box. SSL works by using a private key to encrypt data when transmitting private documents and obtain confidential information. SSL creates a secure connection between a client and a server, over which any amount of data can be sent securely.
Step 4. Enter a user name by selecting from the pull-down menu. Each user name represents an authorized access level. Enter a password to proceed. Leave it blank if there is no preset password. Click the OK button to start the management session.
4-12 RAID Management Session: Starting the SANWatch Storage Manager

Chapter 4: Basic Operations
4.5.2 Disconnecting and Refreshing a Connection From the System menu, select Logout.
Select Logout will close the current management session and return to the Outer Shell window. If you wish to connect to another RAID array, enter its IP address and then click OK to proceed. Click Cancel to close the connection prompt and return to the Outer Shell window.
Selecting the Refresh button allows you to re-connect with an array if a RAID system has been temporarily disconnected; e.g., the RAID system is being reset or the host links were disconnected for maintenance reasons.
4.6 Security: Authorized Access Levels Password protection is implemented with the Connection wizard to prevent unauthorized access to configured arrays. This protection, which is implemented along with the security access levels, prompts a user for the station password the first time he or she attempts to connect to a RAID system.
By default, no password is required to access a RAID system using the first two protection levels, “Configuration” (Administrator) and “Maintenance” (User). A default password is required for the Information login.
Security: Authorized Access Levels 4-13

SANWatch User’s Manual
Default Passwords
Configuration Password previously set for the controller/ subsystem; press Enter for none. The password can be changed in “Configuration Parameters” window in SANWatch’s main program.
Maintenance You can configure a password for this level login in “Configuration Parameters” window in SANWatch’s main program.
Information Default password is “1234.”
It is recommended to configure passwords for the first two access levels at the first time you successfully connect to an array. Information users can monitor array status and see event messages. A user logging for Maintenance access can perform maintenance jobs onto configured arrays, and a user logging in using the Configuration login has full access to create, modify, or delete all related array configurations.
Note that some RAID subsystem/controllers may have been configured with a password using terminal or LCD keypad utilities. This preset password can be used for a “Configuration” login. However, the password can be changed using “Configuration Parameters” window in SANWatch’s main program. See Chapter 10 for the description of password setup.
4.7 Look and Feel
4.7.1 Look and Feel Overview Because SANWatch Manager is a Java-based GUI program, it accommodates the “look-and-feel” standards of various Operating Systems. At present, the Windows interface appearance is adopted.
SANWatch Manager automatically detects and configures to match the OS where it is currently running.
In the event of a compatibility problem or under an unknown OS or OS versions, the program will default to the Java look and feel.
Just like other GUI-based applications, the SANWatch Manager works entirely with windows, buttons, and menus to facilitate various disk array operations. These windows follow the standard Windows look-and-feel specifications, so that manipulating elements and windows within any SANWatch Manager window generally conforms
4-14 Look and Feel

Chapter 4: Basic Operations
to standard procedures. The management sessions are best displayed with 1024x768 screen resolution.
NOTE: Screen captures throughout this document show the Microsoft Windows look and feel.
4.7.2 Screen Elements (The Management Session Window)
Figure 4-3: GUI Screen Elements
The GUI screen can be divided mainly into three (3) separate windows: a tree-structure Navigation Panel, the Information/Configuration window, and the Event Log/Configuration View window at the bottom.
Each information or configuration window can also be accessed through the command menus on the upper left corner of the management interface. At the bottom of the Event Log window, tab buttons allow you to switch the view to the Configuration View display.
4.7.3 Command Menus The menu bar displays the available menus on the Outer Shell window. The Outer Shell window contains multiple management windows each providing access to a connected array.
Look and Feel 4-15

SANWatch User’s Manual
Command Menu Bar
All menus provide a list of commands for invoking various disk array and display-related operations.
For a summary of commands, see Appendix A, Command Summary.
NOTE: Although not recommended, up to 5 simultaneous SANWatch sessions with one RAID subsystem is allowed.
4.7.4 Outer Shell Commands
Outer Shell Commands
♦ The Language menu allows you to display the on-screen GUI, instructions, commands, messages, and explanatory legends in a different languages. The current supporting languages are English, Deutsch, Spanish and Japanese.
♦ Under the Help menu, the About command displays a window that provides SANWatch version and copyright information.
The Help Topic commands displays the online help contents, which are implemented in Java Help format.
4-16 Look and Feel
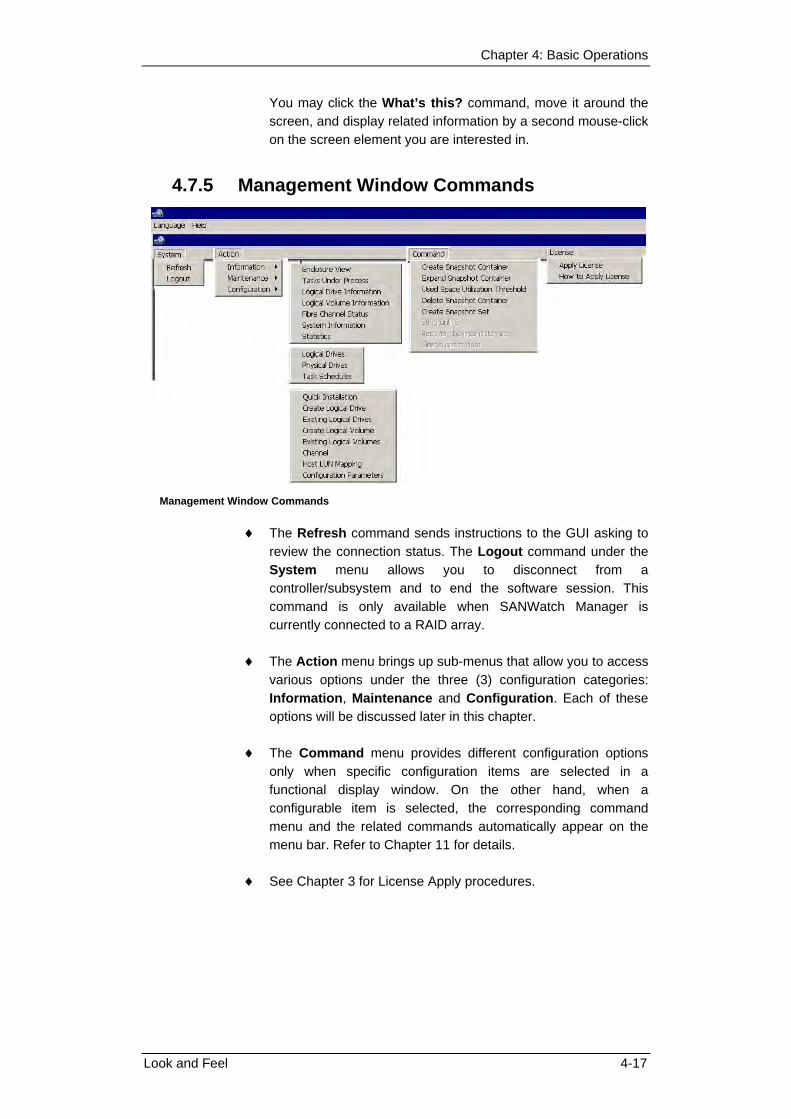
Chapter 4: Basic Operations
You may click the What’s this? command, move it around the screen, and display related information by a second mouse-click on the screen element you are interested in.
4.7.5 Management Window Commands
Management Window Commands
♦ The Refresh command sends instructions to the GUI asking to review the connection status. The Logout command under the System menu allows you to disconnect from a controller/subsystem and to end the software session. This command is only available when SANWatch Manager is currently connected to a RAID array.
♦ The Action menu brings up sub-menus that allow you to access various options under the three (3) configuration categories: Information, Maintenance and Configuration. Each of these options will be discussed later in this chapter.
♦ The Command menu provides different configuration options only when specific configuration items are selected in a functional display window. On the other hand, when a configurable item is selected, the corresponding command menu and the related commands automatically appear on the menu bar. Refer to Chapter 11 for details.
♦ See Chapter 3 for License Apply procedures.
Look and Feel 4-17

SANWatch User’s Manual
4.8 The Information Category The Information category allows you to access to information about every aspect of system operation.
To access the information category, either select the icon from the navigation tree or go to the Action Command menus and then select Information on the top of the screen.
4.8.1 Enclosure View Window The Enclosure View window displays the physical view of all major components, including drive slots and enclosure components. When the Enclosure View window is opened, the screen below should appear. Use the Enclosure View window to monitor multiple enclosures from the computer screen. For details of using the Enclosure View window, please refer to Chapter 7.
Enclosure View Window
4.8.2 Tasks Under Process Window The Tasks Under Process window reminds you of unfinished tasks being processed by a subsystem. The start time and percentage of progress are also displayed on screen.
Task Status Window
4-18 The Information Category

Chapter 4: Basic Operations
4.8.3 Logical Drive Information Window The Logical Drive Information window provides the configuration, management, and monitoring functions available in SANWatch. The Logical Drive View window includes three (3) sub-windows: Logical Drive Status, Front View, and Logical Drive Message.
Logical Drive information
Logical Drive Status: This sub-window displays information on configured arrays (logical drives) showing a unique array ID, RAID level, capacity, array status and a name that can be manually assigned.
Front View: This sub-window helps you to quickly identify configured arrays by the physical locations of their members. Different arrays are distinguished by different colors. When any member drive is selected by a mouse click the rest of the array’s members will be highlighted by bright blue lines, indicating they are members of the selected array.
Formation of logical partitions is displayed next to the Front View window.
Logical Drive Message: Messages related to a selected array are automatically listed at the bottom of the screen.
4.8.4 Logical Volume Information Window The Logical Volume Information window provides the configuration of a configured volume. The Logical Volume Information window includes three sub-windows: Logical Volume Status, Member Logical Drive(s), and Related Information.
The Information Category 4-19

SANWatch User’s Manual
4.8.5 Fibre Channel Status Window The Fibre Channel Status window displays information on the Fibre host channel ID, connection speed, host-side connection protocols (topology), link status, WWPN port name and WWNN node name, loop IDs, and Fibre Channel address. The corresponding icon turns gray and is disabled if SANWatch operates with a SCSI or iSCSI host subsystem. This information is useful when configuring a subsystem for a heterogeneous environment such as a storage network operating with multiple hosts and applications.
4.8.6 System Information Window The System Information window provides key information about the RAID subsystem and the RAID controller unit that powers the subsystem. Enclosure information includes the operating status of power supply, temperature sensors, and cooling fan units. Controller information includes CPU, firmware/boot record version, serial number, CPU and board temperature, voltage, and status of the battery backup module. This window has no configuration options.
4-20 The Information Category
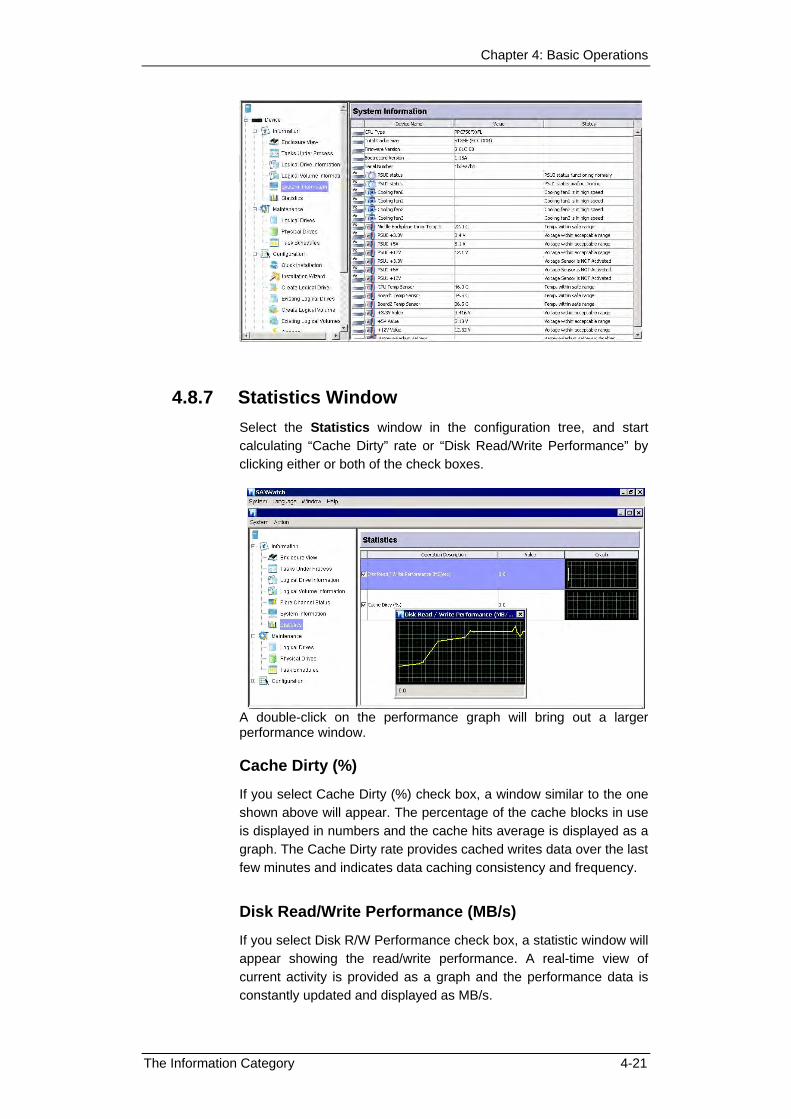
Chapter 4: Basic Operations
4.8.7 Statistics Window Select the Statistics window in the configuration tree, and start calculating “Cache Dirty” rate or “Disk Read/Write Performance” by clicking either or both of the check boxes.
A double-click on the performance graph will bring out a larger performance window.
Cache Dirty (%)
If you select Cache Dirty (%) check box, a window similar to the one shown above will appear. The percentage of the cache blocks in use is displayed in numbers and the cache hits average is displayed as a graph. The Cache Dirty rate provides cached writes data over the last few minutes and indicates data caching consistency and frequency.
Disk Read/Write Performance (MB/s)
If you select Disk R/W Performance check box, a statistic window will appear showing the read/write performance. A real-time view of current activity is provided as a graph and the performance data is constantly updated and displayed as MB/s.
The Information Category 4-21

SANWatch User’s Manual
4.9 The Maintenance Category The Maintenance category provides access to logical and physical drives and performs maintenance functions that help ensure the integrity of the configured arrays. The operation of the Maintenance window also includes access through the Navigation Panel and a functional window.
To access the maintenance category, either select the icon from the navigation tree or go to the Action command menus and then select Maintenance on the top of the screen.
4.9.1 Logical Drive Maintenance Window When the Logical Drives maintenance window is opened, the screen shown below will appear.
Maintenance - Logical Drives
There are three (3) sub-windows in the Logical Drives maintenance mode window:
♦ The Logical Drives window provides a list of all configured arrays. Use a single mouse-click to select the logical drive you wish to perform the maintenance tasks on.
♦ The Front View window allows you to see the locations of the members of logical drives. Note that a logical drive is selected
4-22 The Maintenance Category

Chapter 4: Basic Operations
by a single mouse-click from the list of configured arrays on the upper half of the screen.
♦ The Functions window provides configuration options for maintenance tasks and buttons, which start a maintenance task.
Media Scan - Media Scan examines drives and detects the presence of bad blocks. If any data blocks have not been properly committed and defects are found during the scanning process, data from those blocks are automatically recalculated, retrieved and stored onto undamaged sectors. If bad blocks are encountered on yet another drive during the rebuild process, the block LBA (Logical Block Address) of those bad blocks will be shown. If rebuild is carried out under this situation, rebuild will continue with the unaffected sectors, salvaging the majority of the stored data.
There are two options with performing the Media Scan:
Operation Priority: determines how much of the system resources will be used for the drive scanning and recalculating process.
Operation Mode: determines how many times the scan is performed. If set to “continuous,” the scan will run in the background continuously until it is stopped by a user.
The system can automatically perform a Media Scan according to a preset task schedule. For more details, please refer to the following discussion.
Regenerate Parity - If no verifying method is applied to data writes, this function can often be performed to verify parity blocks of a selected array. This function compares and recalculates parity data to correct parity errors.
NOTE: The function is available for logical drive with parity protection, one that is configured to RAID level 1, 3, 5 and 6.
Rebuild – To manually rebuild a logical drive. When this feature is applied, the controller will first examine whether there is any Local Spare assigned to the logical drive. If yes, it will automatically start to rebuild.
If there is no Local Spare available, the controller will search for a Global or Enclosure Spare. If there is a
The Maintenance Category 4-23

SANWatch User’s Manual
Global Spare, logical drive rebuild will be automatically conducted.
4.9.2 Physical Drives Maintenance Window When the Physical Drives maintenance window is opened, the below screen will appear.
Maintenance - Physical Drives
There are two (2) sub-windows in the Physical Drives maintenance window:
♦ The Front View window allows you to select a hard drive to perform maintenance tasks on. A selected drive is highlighted by bright blue lines, and its slot number is shown in the Functions window in the Selected Drive Slot field.
♦ The Functions window provides configuration options with maintenance tasks and an APPLY or Next button to apply the configuration.
Media Scan – You can perform the Media Scan function to a specific physical drive. To start a media scan, select a disk drive from the Front View window then select one of the tabbed menus in the Functions window and click the Apply button.
Maintain Spare – You can add a spare drive from the list of the unused disk drives. The spare chosen here can be selected as a Global or Local spare drive. If you choose to create a Local spare drive, select a logical drive from the enclosure view on the left. Click Next to move to the next screen. Click Finish to complete the configuration process. A manual rebuild function is also available here if a failed drive has just been replaced.
NOTE: A logical drive composed in a non-redundancy RAID level
4-24 The Maintenance Category

Chapter 4: Basic Operations
(NRAID or RAID 0) does not support spare drive rebuild.
Copy and Replace – Logical drives can be expanded by copying and replacing the member drives with drives of higher capacity. The data blocks or parity data on an array member is copied onto a new drive, and then the original member can be removed. Once all members are replaced by larger drives, the added capacity will appear as a new logical partition.
NOTE that to perform the Copy and Replace function, you must have an unused drive slot for the replacement drive, e.g., by temporarily disabling a Spare drive.
Clone – a system administrator can also choose to manually perform the “Clone Failing Drive” function on an individual disk drive.
Reserved Space – The 256MB reserved space can be removed from a disk drive once a drive member is excluded from a logical drive. The reserved space, a space formatted with a micro-file system, can be manually removed from a “used drive.”
Identify Drive – Use this function to identify a drive on the subsystem. Administrations can identify an individual drive in a configuration consisting of multiple arrays by forcing its LEDs to flash. Select a disk drive from the Front View window, select one of the flash drive options, and then click on the Apply button in the Functions window.
Scan/Add/Clear Drive – The Scan drive function allows users to scan in a newly added disk drive from a channel bus. The Add and Clear function only appears when you click on an empty drive slot on a Fibre and SCSI drive channel RAID subsystem. The feature enables users to manually add a drive entry when the drive slot is empty. The created entry can be deleted by applying the Clear Drive Status option.
Low Level Format – This function only appears with a new disk drive which has not been configured into a RAID array. This function allows you to perform a low-level format on a new disk drive.
Read/Write Test – You can perform a read/write test onto a single disk drive. Click on the disk drive that you wish to test in the Front View window and then set the test conditions, such as Error Occurrence and
The Maintenance Category 4-25

SANWatch User’s Manual
Recovery Process, in the Functions window. Click Apply to start the action.
4.9.3 Task Schedules Maintenance Window The Physical Drives maintenance window is shown below:
To begin using the Task Schedule functionality, right-click to display the Add a New Scheduled Task command.
There are two (2) sub-windows in the Task Schedules window:
The Task Schedules window displays previously configured schedules that are now being held in NVRAM.
The Add a New Task Schedule window allows you to select a hard drive or logical drive to perform a scheduled task on. Before you make the selection by mouse-clicks, select a scan target from the Media Scan destination type pull-down list.
A selected disk drive or a logical drive is highlighted by a bright blue square and its related options are displayed in check boxes, dropdown list, or vertical scroll bars.
The Add button at the bottom of the screen allows you to complete the process and add the task schedule.
4-26 The Maintenance Category

Chapter 4: Basic Operations
4.10 The Configuration Category The Configuration category contains functional windows that allow you to create logical configurations and set appropriate configuration settings for system operations. This category is available only when logging in using the Configuration access with the correct password.
To access the Configuration category, either select the respective icon from the navigation tree or go to the Action command menus and then select the Configuration functions from the menu bar.
4.10.1 Quick Installation When you first connect SANWatch to a new RAID system without any previous configurations, select Quick Installation and let SANWatch guide you through a simple logical drive creation process. When created, the logical drive is automatically mapped to the first available host ID/LUN.
NOTE: The Quick Installation function includes all disk drives into ONE BIG logical drive and makes it available through one host ID/LUN, which may not be the best choice for all RAID applications especially for large enclosures with multiple host ports and those consisting of many disk drives.
If you already have at least one logical drive in the RAID subsystem, this function will automatically be disabled. You will be prompted by a message saying a logical drive already exists.
4.10.2 Installation Wizard The installation wizard comes with step by step instructions and choices that help you quickly configure your RAID systems.
The Configuration Category 4-27

SANWatch User’s Manual
4.10.3 Create Logical Drive Window The basic rules for using the functional elements in the Create Logical Drive window are:
This window uses a parallel display principle. To create a logical drive, select its members from the Front View window each by a single mouse-click. The Selected Members window then displays the disk drives’ slot IDs and sizes.
The creation screen also employs an up-then-down pattern with the configuration process. Important logical drive characteristics are set using the dropdown lists at the lower part of the configuration screen. The creation procedure is completed by clicking the OK button at the bottom of the screen.
A selected physical drive is highlighted by a bright blue square; a second mouse-click on it deselects the disk drive.
For details on creating a logical drive, please refer to Chapter 8 of this document.
4-28 The Configuration Category

Chapter 4: Basic Operations
4.10.4 Existing Logical Drives Window The basic rules for using the functional elements in the Existing Logical Drives window are:
This window also uses a parallel display and the up-then-down principle. To start configuring an existing array, select a configured array from the LD list above. Locations of its members are automatically highlighted, and then the available functions are displayed in the Functions window.
This window contains three or four edit commands that can be triggered by a right-click on a configured array.
4.10.5 Create Logical Volume Window This window uses the same operation flow as that applied in the Create Logical Drive window. A Logical Volume contains one or more Logical Drives, and these members are striped together.
To create a Logical Volume, first select its members from the Logical Drives Available column, selected members will appear on the right. Note that because members are striped together, it is recommended that all members included in a Logical Volume contain the same drive size. You may then select the Write Policy specific to this volume and click OK to finish the process or click Reset to restart the configuration process.
The Configuration Category 4-29
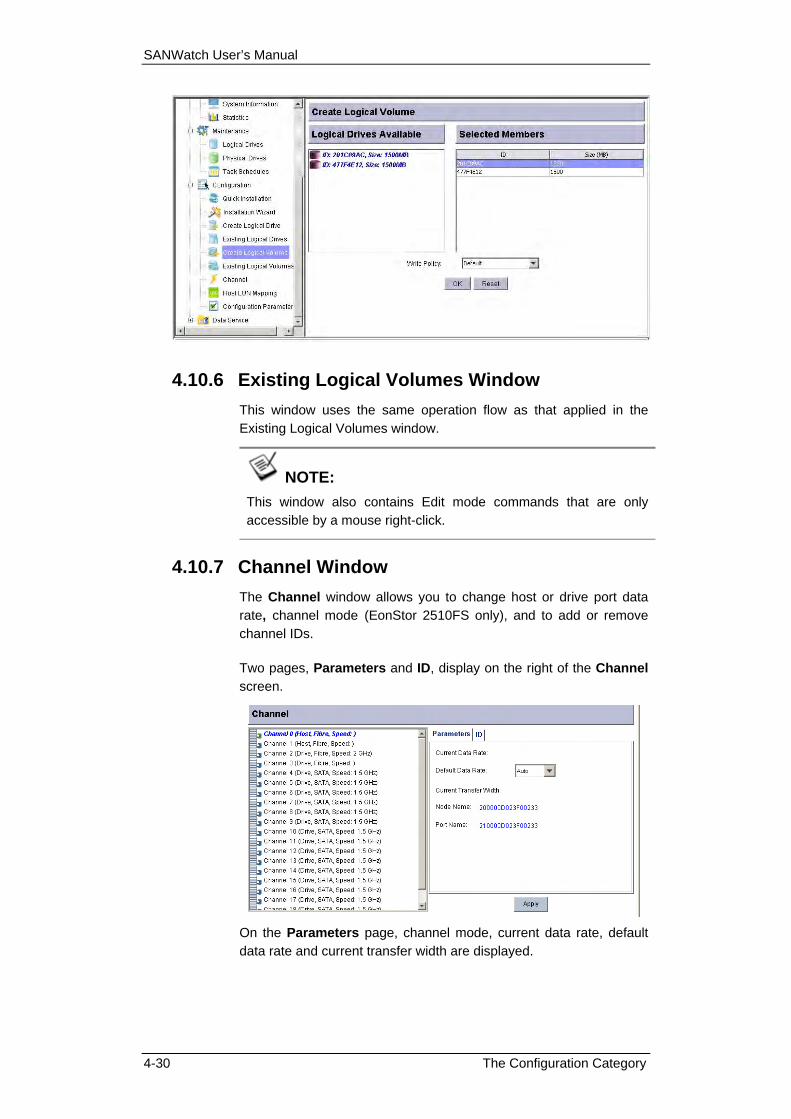
SANWatch User’s Manual
4.10.6 Existing Logical Volumes Window This window uses the same operation flow as that applied in the Existing Logical Volumes window.
NOTE: This window also contains Edit mode commands that are only accessible by a mouse right-click.
4.10.7 Channel Window The Channel window allows you to change host or drive port data rate, channel mode (EonStor 2510FS only), and to add or remove channel IDs.
Two pages, Parameters and ID, display on the right of the Channel screen.
On the Parameters page, channel mode, current data rate, default data rate and current transfer width are displayed.
4-30 The Configuration Category

Chapter 4: Basic Operations
Channel Mode: Only applicable on the EonStor 2510FS series. This option allows you to change the I/O channel operating mode. The channel mode selections can be: host, drive, RCC, drive +RCC.
Default Data Rate: Should only be applied with limitations on current configuration, e.g., when network devices (optical cables and adapters) are running on different speeds.
The ID page allows you to add or remove IDs by selecting or deselecting ID boxes.
Be sure to click Apply for the configuration to take effect. For details of how to configure channel-related settings, please refer to Chapter 9 of this document.
NOTE: Changing the channel mode or adding/removing IDs requires resetting the controller/subsystem.
4.10.8 Host LUN Mapping Window The Host LUN Mapping window allows you to associate configured arrays with host channel IDs or LUN numbers.
♦ The Host LUN Mapping window contains four sub-windows: Host LUN(s), WWN Names(s), and Logical Drive(s) or Volume(s).
♦ This window also contains a right-click menu that creates association with either a Primary Controller (Slot A) ID or a Secondary Controller (Slot B) ID.
The Configuration Category 4-31
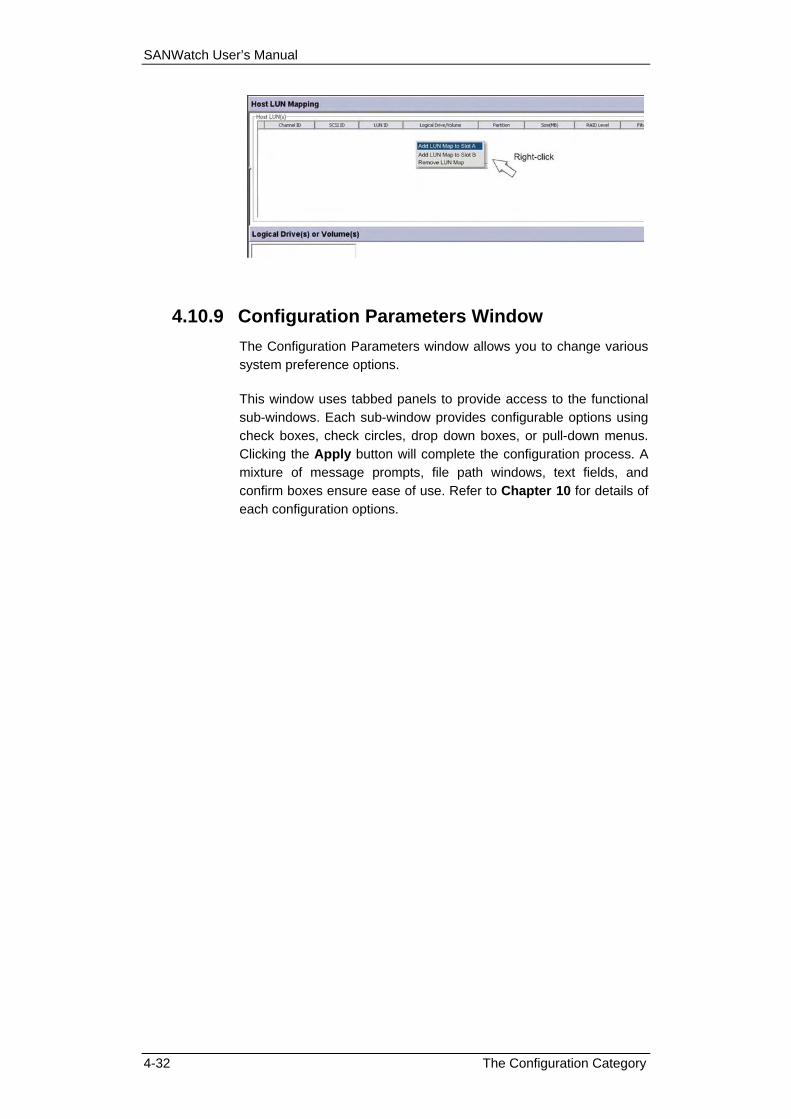
SANWatch User’s Manual
4.10.9 Configuration Parameters Window The Configuration Parameters window allows you to change various system preference options.
This window uses tabbed panels to provide access to the functional sub-windows. Each sub-window provides configurable options using check boxes, check circles, drop down boxes, or pull-down menus. Clicking the Apply button will complete the configuration process. A mixture of message prompts, file path windows, text fields, and confirm boxes ensure ease of use. Refer to Chapter 10 for details of each configuration options.
4-32 The Configuration Category
Chapter 4: Basic Operations
This page is intentionally left blank.
The Configuration Category 4-33

Chapter 5
System Monitoring and Management
♦ RAID Information – Section 5.1
The Information Category
Date and Time
♦ Enclosure View – Section 5.2
Task Under Process
Event Log List/Configuration List Window
♦ Task Schedule Window – Section 5.3
♦ Event Log Window – Section 5.4
♦ Logical Drive Information – Section 55.5
Accessing Logical Drive Information
♦ Logical Volume Information – Section 5.6
Accessing Logical Volume Information
♦ Fibre Channel Status – Section 55.7
♦ System Information – Section 55.8
♦ Statistics – Section 5.9
Chapter 5: System Monitoring and Management 5-1

SANWatch User’s Manual
5.1 RAID Information Unlike its predecessor, SANWatch presents access to all information services under one Array Status category. Users logged in using the Information authorization will be allowed to access the information windows while being excluded from other configuration options.
Device monitoring is made via SAF-TE, SES, and I2C serial links. However, SANWatch now uses a more object-oriented approach by showing the enclosure graphics, which are identical to your EonRAID or EonStor enclosures. SANWatch reads identification data from connected arrays and presents a correct display as an enclosure graphic. This process is automatically completed without user’s configuration.
The Information Category Once properly set up and connected with a RAID array, a navigation panel displays on the upper left of the screen. SANWatch defaults to the Enclosure View window at startup.
To access each informational window, single-click a display icon on the navigation panel. You may also access each window by selecting from the Action menu on the menu bar at the top of the screen. See below for access routes.
RAID Information 5-2
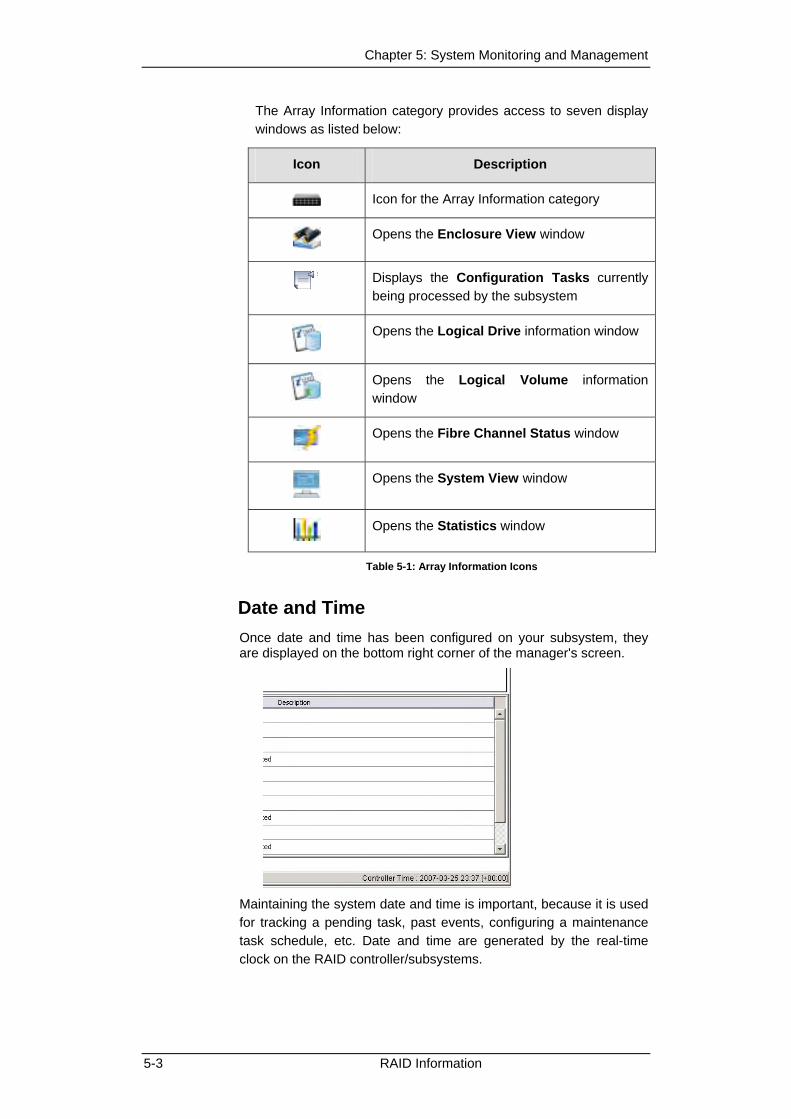
Chapter 5: System Monitoring and Management
The Array Information category provides access to seven display windows as listed below:
Icon Description
Icon for the Array Information category
Opens the Enclosure View window
Displays the Configuration Tasks currently being processed by the subsystem
Opens the Logical Drive information window
Opens the Logical Volume information window
Opens the Fibre Channel Status window
Opens the System View window
Opens the Statistics window
Table 5-1: Array Information Icons
Date and Time Once date and time has been configured on your subsystem, they are displayed on the bottom right corner of the manager's screen.
Maintaining the system date and time is important, because it is used for tracking a pending task, past events, configuring a maintenance task schedule, etc. Date and time are generated by the real-time clock on the RAID controller/subsystems.
5-3 RAID Information

SANWatch User’s Manual
5.2 Enclosure View The Enclosure View window displays both the front and the rear views of connected enclosures. For the EonStor subsystems, SANWatch displays drive trays in the front view, and system modules (power supplies, cooling modules, etc.) in the rear view. For the EonRAID controllers, SANWatch displays FC port modules and LEDs in the front view; powers supplies, cooling modules, and controller modules display in the rear view.
If multiple enclosures are cascaded and managed by a RAID subsystem, SANWatch defaults to the display of RAID enclosures and the graphics of the cascaded JBODs, which can be accessed by clicking the tab buttons.
SANWatch is capable of displaying any information provided by an SES, SAF-TE or I2C data bus. Various kinds of information is typically provided including the status of:
Power supplies
Fans
Ambient temperature
Voltage
UPS
Disk drives
System module LEDs
To read more information about enclosure devices, place your cursor either over the front view or rear view graphic. An information text field displays as shown below.
More information about each enclosure device can also be found in the System Information window.
5.3 Task Under Process Access the Task Under Process window by clicking on the display icon in the SANWatch navigation panel.
Enclosure View 5-4

Chapter 5: System Monitoring and Management
5-5 Event Log List/Configuration List Window
This window shows the unfinished tasks currently being processed by the subsystem. The Task Status display includes disk drive maintenance tasks such as Media Scan or Regenerate Parity, and array configuration processes such as logical drive initialization and capacity expansion.
If you find that you have made the wrong configuration choice, you may also left-click and then right-click on the task information to display the Abort command.
A brief task description, start time, and a percentage indicator are available with each processing task.
5.4 Event Log List/Configuration List Window In the bottom of SANWatch program shows Event Log List and Configuration List windows. You can switch between the two windows by clicking on the tabbed panel on the bottom left of SANWatch screen.
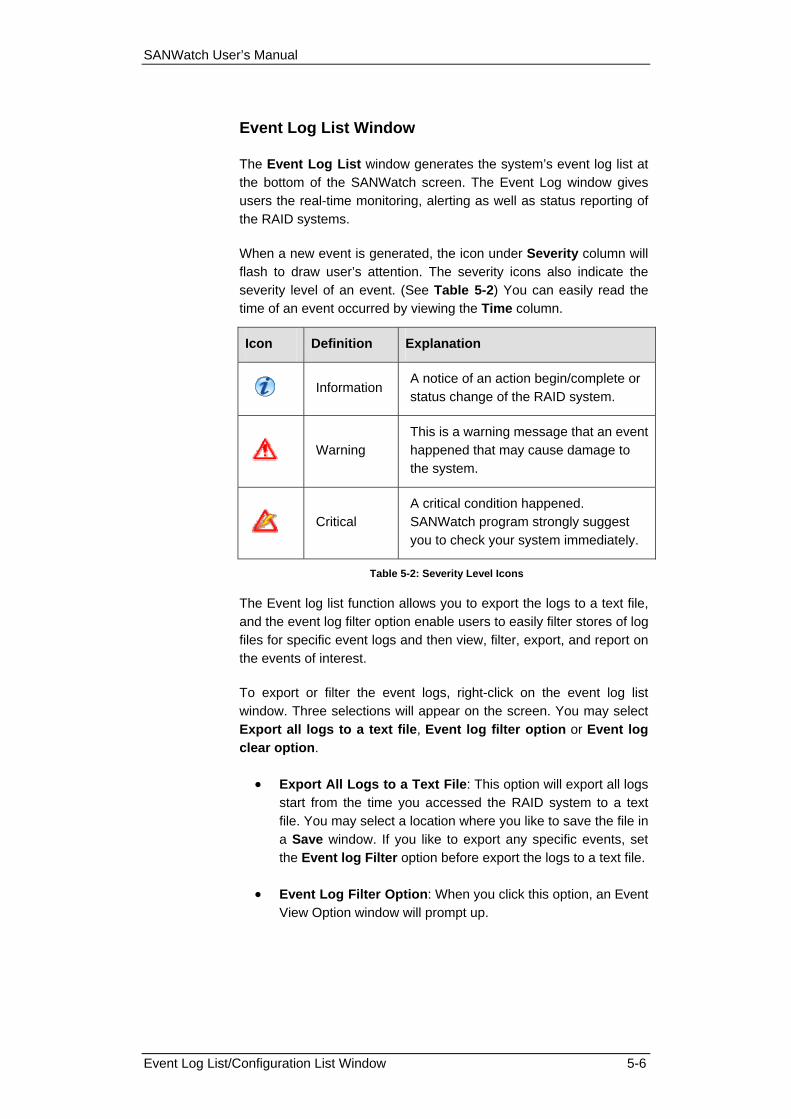
SANWatch User’s Manual
Event Log List Window
The Event Log List window generates the system’s event log list at the bottom of the SANWatch screen. The Event Log window gives users the real-time monitoring, alerting as well as status reporting of the RAID systems.
When a new event is generated, the icon under Severity column will flash to draw user’s attention. The severity icons also indicate the severity level of an event. (See Table 5-2) You can easily read the time of an event occurred by viewing the Time column.
Icon Definition Explanation
Information A notice of an action begin/complete or status change of the RAID system.
Warning This is a warning message that an event happened that may cause damage to the system.
Critical A critical condition happened. SANWatch program strongly suggest you to check your system immediately.
Table 5-2: Severity Level Icons
The Event log list function allows you to export the logs to a text file, and the event log filter option enable users to easily filter stores of log files for specific event logs and then view, filter, export, and report on the events of interest.
To export or filter the event logs, right-click on the event log list window. Three selections will appear on the screen. You may select Export all logs to a text file, Event log filter option or Event log clear option.
• Export All Logs to a Text File: This option will export all logs start from the time you accessed the RAID system to a text file. You may select a location where you like to save the file in a Save window. If you like to export any specific events, set the Event log Filter option before export the logs to a text file.
• Event Log Filter Option: When you click this option, an Event View Option window will prompt up.
Event Log List/Configuration List Window 5-6
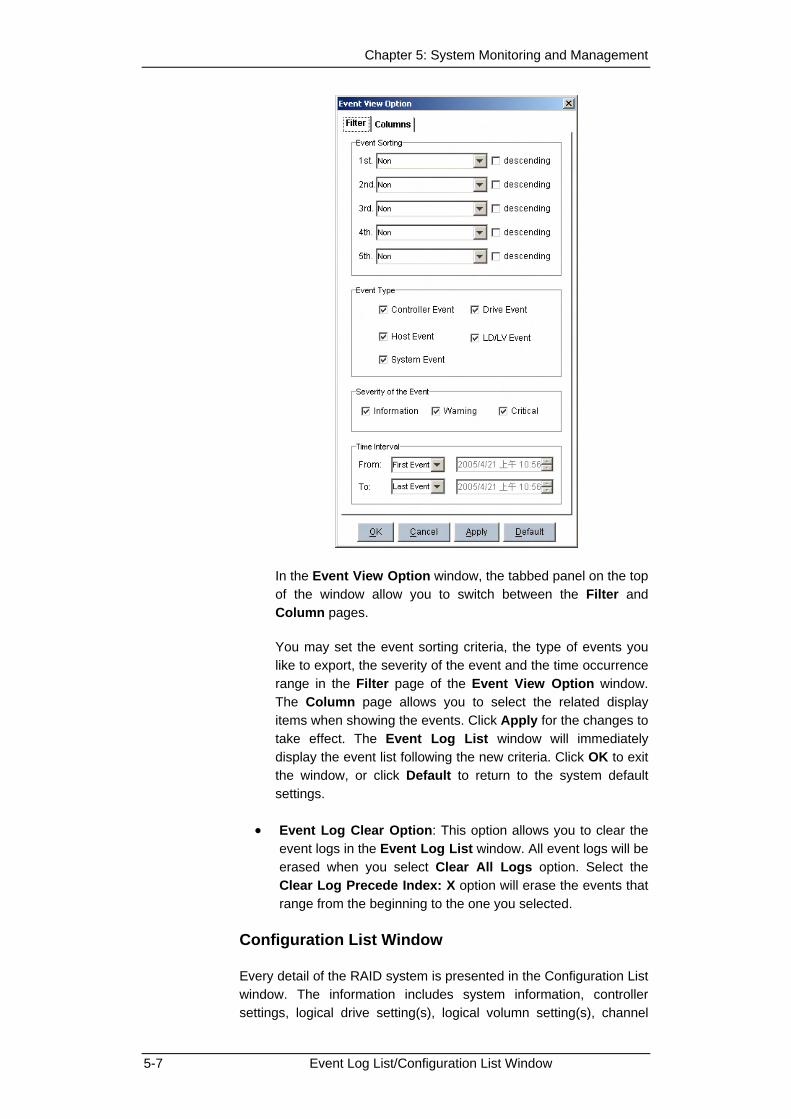
Chapter 5: System Monitoring and Management
In the Event View Option window, the tabbed panel on the top of the window allow you to switch between the Filter and Column pages.
You may set the event sorting criteria, the type of events you like to export, the severity of the event and the time occurrence range in the Filter page of the Event View Option window. The Column page allows you to select the related display items when showing the events. Click Apply for the changes to take effect. The Event Log List window will immediately display the event list following the new criteria. Click OK to exit the window, or click Default to return to the system default settings.
• Event Log Clear Option: This option allows you to clear the event logs in the Event Log List window. All event logs will be erased when you select Clear All Logs option. Select the Clear Log Precede Index: X option will erase the events that range from the beginning to the one you selected.
Configuration List Window
Every detail of the RAID system is presented in the Configuration List window. The information includes system information, controller settings, logical drive setting(s), logical volumn setting(s), channel
5-7 Event Log List/Configuration List Window

SANWatch User’s Manual
setting(s), host LUN list, drive-side parameters, caching parameters, and communication information.
Right-click on the Configuration List window will allow you to select four (4) options and they are explained as follow:
Export Configuration Data as Text File: When you select this option, the program will save the system’s configuration data to a text file. You may select a file destination in a prompt up Save window.
Export Configuration Data as XML File: Select a file location where you like to save the system’s configuration data as an XML file in a prompt up Save window when you select this option.
Export Host LUN List as XML File: This option will only export Host LUN list to an XML file. You may select a file destination in a Save window.
Restore Configuration from XML File: You may retrieve the configuration data that you exported earlier to the system. Select a file you previously saved from the Open window.
5.5 Logical Drive Information Logical Drive Information helps you to identify the physical locations and logical relationship among disk drive members. In a massive storage application, a logical array may consist of disk drives installed in different drive enclosures.
The Logical Drive information is designed for today’s complicated configurations of RAID arrays. The information window helps to achieve the following:
Logical Drive Information 5-8

Chapter 5: System Monitoring and Management
Having a clear idea of the logical relationship can help avoid removing the wrong drive in the event of drive failure. A logical drive (RAID) configuration of disk drives cannot afford two failed disk drives.
A logical drive may include members that reside on different enclosures or different drive channels. Doing so can help reduce the chance of downtime if a hardware failure should occur.
With operations such as manual rebuild or capacity expansion using the “Copy and Replace” methodology, it is crucial to correctly identify an original member (source drive) and a replacement drive.
Accessing Logical Drive Information Step 1. To access the Logical Drive Information, single-click
its display icon on the GUI navigation panel or select the command from the Action command menu. After opening the information window, select the logical drive with a single mouse-click. A display window as shown below will appear.
Step 2. As shown above, once a configured array is selected,
its members will be displayed as highlighted drive trays in the Front View window. The array’s logical partition is displayed on the right. Each logical configuration of drives is displayed in a different color. If a selected array includes members on different enclosures, click the JBOD tab button on top of the enclosure graphic to locate their positions.
5-9 Logical Drive Information
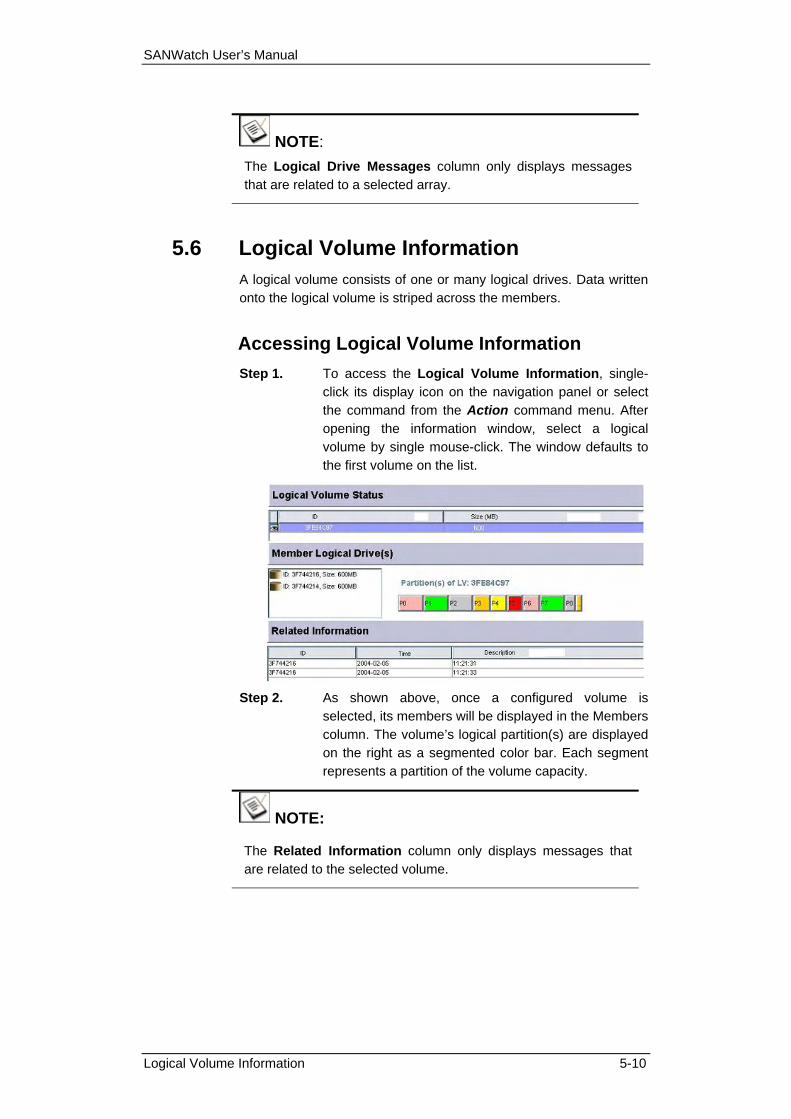
SANWatch User’s Manual
NOTE: The Logical Drive Messages column only displays messages that are related to a selected array.
5.6 Logical Volume Information A logical volume consists of one or many logical drives. Data written onto the logical volume is striped across the members.
Accessing Logical Volume Information Step 1. To access the Logical Volume Information, single-
click its display icon on the navigation panel or select the command from the Action command menu. After opening the information window, select a logical volume by single mouse-click. The window defaults to the first volume on the list.
Step 2. As shown above, once a configured volume is
selected, its members will be displayed in the Members column. The volume’s logical partition(s) are displayed on the right as a segmented color bar. Each segment represents a partition of the volume capacity.
NOTE:
The Related Information column only displays messages that are related to the selected volume.
Logical Volume Information 5-10

Chapter 5: System Monitoring and Management
5.7 Fibre Channel Status This window is automatically grayed out on subsystems featuring SCSI or iSCSI host channels. The Fibre Channel Status window displays information such as WWN port name and node name. This information is necessary in storage applications managed by SAN management software or failover drivers.
Step 1. To access the window, click on the Fibre Channel Status icon on the GUI navigation panel or select the command from the Action command menu.
The events in the window are listed according to the date and time they occurred with the most recent event at the bottom. A description of each event is provided.
Step 2. A Refresh button allows you to renew the information in cases when loop IDs are changed or an LIP has been issued.
5.8 System Information This is a view-only window. This window contains information about the operating status of major components including CPU, board temperature, and enclosure modules like cooling fan and power supply units.
If the application includes multiple cascaded enclosures, you may also refer to the Enclosure View window where a faulty unit is indicated by the lit red LED. The color display of the LEDs shown on enclosure graphics corresponds to the real situation on the enclosure modules.
5-11 Fibre Channel Status

SANWatch User’s Manual
Step 1. To access the window, click on the System Information icon on the GUI navigation panel or select the command from the Action command menu.
Step 2. Carefully check the display icons in front of the Device Name. Devices are categorized by the data bus by which they are connected. See the icon list below for more information:
Icon Description
RAID controller status
Status of I2C bus devices
Status of SAF-TE devices
Status of SES devices
Temperature sensors
Table 5-3: Device Icon
A Refresh button on the System top menu allows you to renew the information in cases such as the change of loop IDs or when a Fibre Channel LIP has been issued.
NOTE:
Place your cursor on a specific item to display its device category.
System Information 5-12

Chapter 5: System Monitoring and Management
Component status is constantly refreshed, yet the refresh time depends on the value set for device bus polling intervals, e.g., polling period set for SAF-TE or SES devices.
The EonStor subsystem series supports auto-polling of cascaded enclosures, meaning the status of a connected enclosure is automatically added to the System Information window without the user’s intervention.
5.9 Statistics SANWatch Manager includes a statistics-monitoring feature to report the overall performance of the disk array system. This feature provides a continually updated real-time report on the current throughput of the system, displaying the number of bytes being read and written per second, and the percentage of data access being cached in memory. These values are displayed by numeric value and as a graph.
To access the Statistics window, click on the Statistics icon on the GUI navigation panel or select the Statistics command from the Action menu. Then choose either Cache Dirty (%) or Disk Read/Write Performance (MB/s) by checking the respective select box.
The Cache Dirty statistics window displays what percentage of data is being accessed via cache memory.
The Read/Write Performance window displays the amount of data being read from or written to the disk array system, in MB per second.
5-13 Statistics

SANWatch User’s Manual
This page is intentionally left blank.
Statistics 5-14

Chapter 6
Enclosure Display
This chapter introduces the enclosure display using the Enclosure View window in the SANWatch’s main program.
♦ About The Enclosure View – Section 6.1
♦ Accessing the Enclosure View – Section 6.3
6.2.1 Connecting to the RAID Agent
6.2.2 Opening the Enclosure View Window
6.2.3 Component Information
♦ LED Representations – Section 6.3
♦ Enclosure View Messages – Section 6.4
♦ Information Summary – Section 6.5
Enclosure Display 6-1
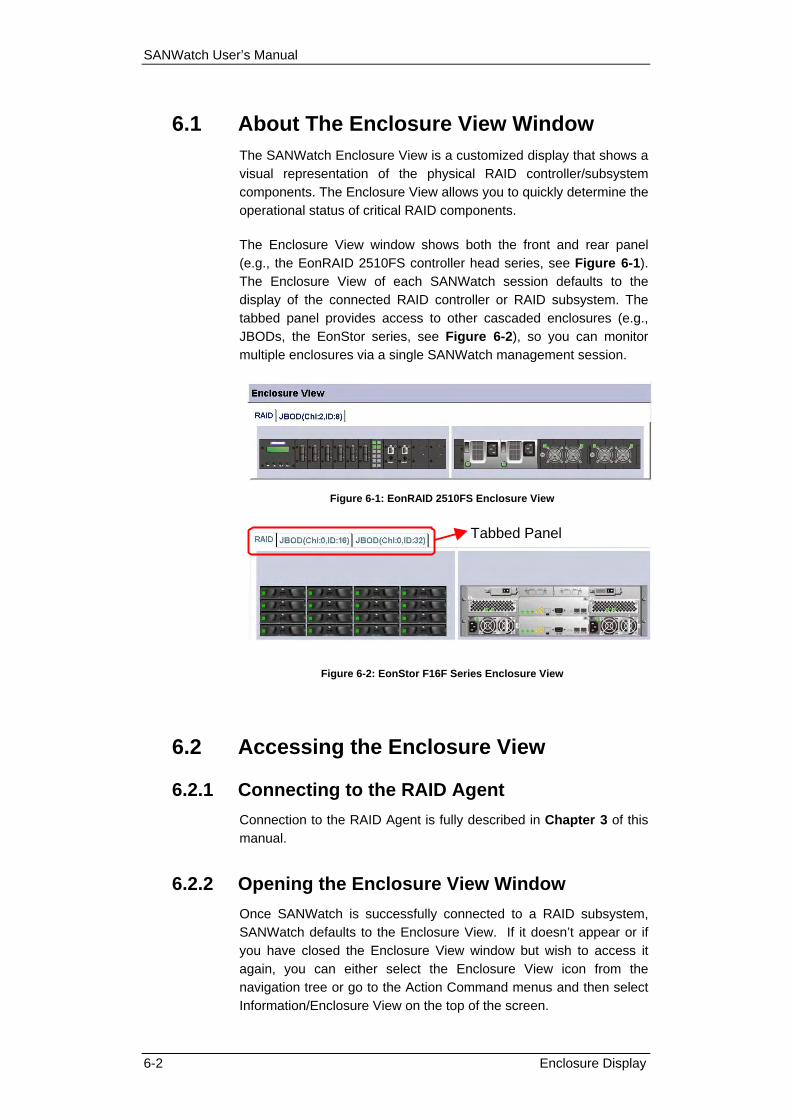
SANWatch User’s Manual
6-2 Enclosure Display
6.1 About The Enclosure View Window The SANWatch Enclosure View is a customized display that shows a visual representation of the physical RAID controller/subsystem components. The Enclosure View allows you to quickly determine the operational status of critical RAID components.
The Enclosure View window shows both the front and rear panel (e.g., the EonRAID 2510FS controller head series, see Figure 6-1). The Enclosure View of each SANWatch session defaults to the display of the connected RAID controller or RAID subsystem. The tabbed panel provides access to other cascaded enclosures (e.g., JBODs, the EonStor series, see Figure 6-2), so you can monitor multiple enclosures via a single SANWatch management session.
Figure 6-1: EonRAID 2510FS Enclosure View
Tabbed Panel
Figure 6-2: EonStor F16F Series Enclosure View
6.2 Accessing the Enclosure View
6.2.1 Connecting to the RAID Agent Connection to the RAID Agent is fully described in Chapter 3 of this manual.
6.2.2 Opening the Enclosure View Window Once SANWatch is successfully connected to a RAID subsystem, SANWatch defaults to the Enclosure View. If it doesn’t appear or if you have closed the Enclosure View window but wish to access it again, you can either select the Enclosure View icon from the navigation tree or go to the Action Command menus and then select Information/Enclosure View on the top of the screen.

Chapter 6: Enclosure Display
6.2.3 Component Information The front and rear views of a RAID subsystem in the Enclosure View window are the exact representations of physical components. This window is particularly useful in monitoring the status of the physical drives. It provides a real-time report on the drive status, using LED colors to represent various operating statuses.
The Enclosure View displays information about the following RAID components:
RAID Controller – The RAID controller is the heart of any RAID enclosure and controls the flow of data to and from the storage devices.
I/O Channels – An I/O channel is the channel through which data flows to and from the RAID controller.
Battery Backup Unit (BBU) – The BBU provides power to the memory cache when power outage occurs or the power supply units fail.
NOTE:
The BBU is an optional item for some subsystem models.
Power Supply Unit (PSU) – All RAID devices should come with at least one PSU that provides power to the RAID device from the main power source.
Enclosure Display 6-3

SANWatch User’s Manual
Cooling Module – All RAID devices should come with at least one cooling module.
6.3 LED Representations As described earlier (see Section 6.1), the Enclosure View is a direct representation of the physical devices. Almost every major component has its status-indicating LEDs. When a component fails (or some other event occurs), the related LEDs will flash or change the display color. The physical status of the LEDs will be reflected by the LEDs shown in the Enclosure View window. That is, if an LED on the physical device changes its display color, then the display color of the corresponding LED in the Enclosure View window will also change.
Figure 6-3: Enclosure Tabbed Panel and Component LED Display
The definition for each LED has been completely described in the Installation and Hardware Reference Manual that came with your RAID controller/subsystem. Please refer to the manual to determine what the different LEDs represent.
6.3.1 Service LED (on Models that Come with an LED panel) Service LED for RAID/JBOD subsystems:
The service LED can be enabled by a single click on the SANWatch screen icon from a remote site to identify which subsystem is being serviced. For example, an administrator receives component failure event, and turns on the enclosure service LED from the SANWatch GUI, so that an engineer on the installation site can easily locate the faulty component. When turned on, the corresponding subsystem LED will also be lighted in the SANWatch GUI screen.
6-4 Enclosure Display

Chapter 6: Enclosure Display
Pressing the service button on the subsystem can also enable the service LED.
Figure 6-4: Service LEDs
The Services LED helps you locate a specific enclosure in a configuration consisting of multiple enclosures.
A RAID administrator can be notified by component failure event via a variety of notification methods.
Figure 6-5: Drive Failure Occurred and an Administrator is Notified
An administrator may initiate the Service ID by clicking on the LED icon in SANWatch’s Enclosure View so that he can easily locate the faulty drive later.
Enclosure Display 6-5

SANWatch User’s Manual
Figure 6-6: An Administrator Activates the Service LED
An engineer can then locate and replace the failed drive on the installation site.
Figure 6-7: Locating the Failed Drive
After servicing the subsystem, the administrator should turn off this service LED by manually pressing the service button on the chassis or remotely using the SANWatch management software.
6.4 Enclosure View Messages The messages shown in the Enclosure View window provide easy access to information about components of a RAID enclosure that is being monitored. The message tag reports the status of major devices.
6-6 Enclosure Display

Chapter 6: Enclosure Display
Enclosure Display 6-7
Figure 6-8: Component Information Message Tags
To generate the message tags, move the mouse cursor onto the relevant RAID device component. For example, if you wish to determine the operational status of a RAID subsystem, move the cursor onto the enclosure graphic and the corresponding message tag will appear.
The enclosure front view message tag displays the current configuration of the drive, including the channel number of the drive slot on the subsystem to which the drives are connected, the drive’s capacity, transfer rate, and current status.
The enclosure components function as a summary of module operating status. The operating status of each module is shown either as operating normally or failed.
NOTE: Messages do not always appear instantaneously. After the cursor has been moved onto the component, there is usually a delay of a second before the message tag appears.
NOTE: More device-dependent information is provided in the System Information window. To access the System Information window, please refer to Chapter 6.
6.5 Information Summary The Information Summary window displays key information on the subsystem currently selected, including the RAID controller(s), I/O

SANWatch User’s Manual
channels, connection speeds, logical drive status, LUN mapping status…etc.
Figure 6-9: Information Summary
6-8 Enclosure Display

Chapter 7
Creating Volumes & Drive Management
This chapter focuses on how to create or delete Logical Drives (LDs). This chapter also includes drive management features. 7.1. Locating Drives...............................................................................1 7.2. Logical Drive Management.............................................................2
7.2.1 Accessing the Create Logical Drive Window ............................2 7.2.2 Creating Logical Drives .............................................................4 7.2.3 Accessing the Existing Logical Drive Window...........................6 7.2.4 Dynamic Logical Drive Expansion...........................................12 7.2.5 Adding Spare Drives ...............................................................15 7.2.6 Rebuilding Logical Drives........................................................17 7.2.7 Deleting an LD.........................................................................17 7.2.8 Power Saving ..........................................................................18
7.3. Logical Volume Management.......................................................25 7.3.1 Accessing the Create Logical Volume Window ......................25 7.3.2 Creating Logical Volumes .......................................................26 7.3.3 Accessing the Existing Logical Volumes Window...................27 7.3.4 Deleting a Logical Volume ......................................................31
7.4. Partitioning a Logical Configuration..............................................32 7.5. Physical Drive Maintenance .........................................................36
7.5.1 Read/Write Test ......................................................................36
7.1. Locating Drives SANWatch uses icons to represent subsystem drive trays. In many configuration windows, a single click on a drive tray icon selects a hard drive. Drive status is indicated and automatically refreshed by displaying icons of different colors. The drive tray icons used in the Front View window to instantly display drive status are shown below. By referring to the drive status in the Front View window, you can start to create or configure a logical array.
Drive Conditions Graphical Identification
New or healthy Used drive
Chapter 8: Drive Management 8-1

SANWatch User’s Manual
7-2 Logical Drive Management
Bad or Missing drive
Spare Drive (Local/Global/Enclosure)
Before you start configuring a logical array, please read the following:
All members in a logical configuration are displayed in the same unique color.
Whenever a disk drive is selected by a single mouse click on its icon, the drive’s status is displayed on the associated configuration window. For example, when a drive is selected by a single mouse click, it automatically appears in the Selected Members column. In this way, mistakes can be avoided by double-checking the information related to a specific disk drive.
7.2. Logical Drive Management This section describes how to:
Access the Logical Drive (LD) Creation and Management Windows
Create LDs
Expand LDs
Migrate LDs
Delete LDs
NOTE: When you delete a logical drive, all physical drives assigned to the logical drive will be released, making them available for regroup or other uses.
enu or SANWatch’s navigation panel on the left of the GUI screen.
7.2.1 Accessing the Create Logical Drive Window LDs are created in the Create Logical Drive window and managed in the Existing Logical Drives window. These functional windows are accessed from the command from the Action m
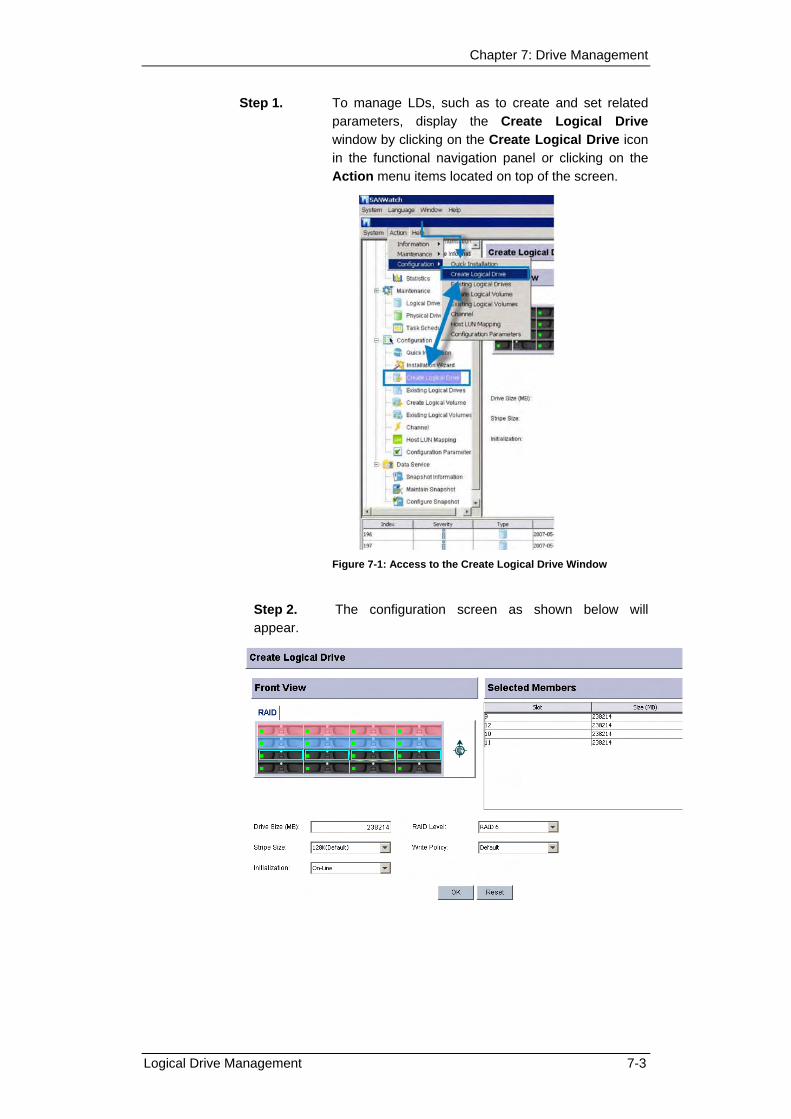
Chapter 7: Drive Management
Step 1. To manage LDs, such as to create and set related parameters, display the Create Logical Drive window by clicking on the Create Logical Drive icon in the functional navigation panel or clicking on the Action menu items located on top of the screen.
Figure 7-1: Access to the Create Logical Drive Window
Step 2. The configuration screen as shown below will appear.
Logical Drive Management 7-3

SANWatch User’s Manual
7.2.2 Creating Logical Drives
7.2.2.1. Logical Drive Creation Process
To create a logical drive:
Step 1. Select the physical drives that will be included in the LD. (See Section 7.2.2.2)
Step 2. Select the following RAID array parameters. (See Section 7.2.2.3)
Drive Size (the maximum drive capacity used in each member drive – often the size of the smallest member)
Stripe Size
Initialization Mode
RAID Level
Write Policy
Step 3. Click the OK button. (See Section 7.2.2.4) The Reset button allows you to cancel previous selections.
7.2.2.2. Selecting Drives
Step 1. Select members for the new logical drive by clicking drive icons in the Front View window. Bad drives or drives belonging to another logical drive will not be available for the mouse-click selection.
Step 2. Disk drives selected for a new logical drive will be listed in the Selected Members sub-window on the right-hand side of the screen.
Step 3. Continue to set appropriate RAID parameters using the dropdown lists at the lower half of the configuration screen.
7.2.2.3. Setting RAID Parameters
Drive Size The value entered in the Drive Size field determines how much capacity from each drive will be used in the logical drive. It is always preferred to include disk drives of the same capacity in a logical configuration.
NOTE:
7-4 Logical Drive Management

Chapter 7: Drive Management
Logical Drive Management 7-5
Enter a smaller number if you do not want to use up all of the capacity at this time. This also applies if you suspect your disk drives may be featuring different block numbers. The unused capacity can be utilized later using the Expand Logical Drive function.
Selecting Stripe Size
The stripe size used when the LD is created can be selected from the Stripe Size pull-down menu. The stripe sizes ranging from 4K to 1024K are available. A default stripe size is available and is indicated by bracketed information.
d by the subsystem Optimization mode and the RAID level selected.
lization process can be automatically completed in the background.
wn menu shown, select the RAID level you wish to apply to the LD.
ameters section of the onfiguration Parameters sub-window.
Select a stripe size, but note that stripe size arrangement has a tremendous effect on RAID subsystem performance. Changing stripe size is only recommended for experienced users. Stripe size defaulted to this menu is determine
Initialization Options
If set to the Online mode, you can have immediate access to the array. "Online" means the logical drive is immediately available for I/Os and the initia
Select RAID Level
From the RAID Level pull-do
Write Policy Define the write policy that will be applied to this array. "Default" is actually an option that is automatically coordinated with the system’s general setting. The general caching mode setting can be accessed through the Controller -> Caching ParC
NOTE: The Default option should be considered as “Not-Specified.” If a logical drive’s write policy is set to Default, the logical drive’s caching behavior will be automatically controlled by firmware. In the event of component failure or violated temperature threshold, Write-back caching will be disabled and changed to a conservative “Write-through” mode.
will be automatically adjusted as part of the event triggered responses. When set to “Default,” the caching mode

SANWatch User’s Manual
7.2.2.4. Click OK to Create an LD
Step 1. Click the OK button.
Step 2. A confirm message will appear showing the LD is successfully created.
When the initialization process begins, you can check the Tasks Under Process window to view its progress.
7.2.3 Accessing the Existing Logical Drive Window Various functions can be performed on configured arrays in the Existing Logical Drives window. The window is accessible from the Action menu or SANWatch’s navigation panel on the GUI screen.
7-6 Logical Drive Management
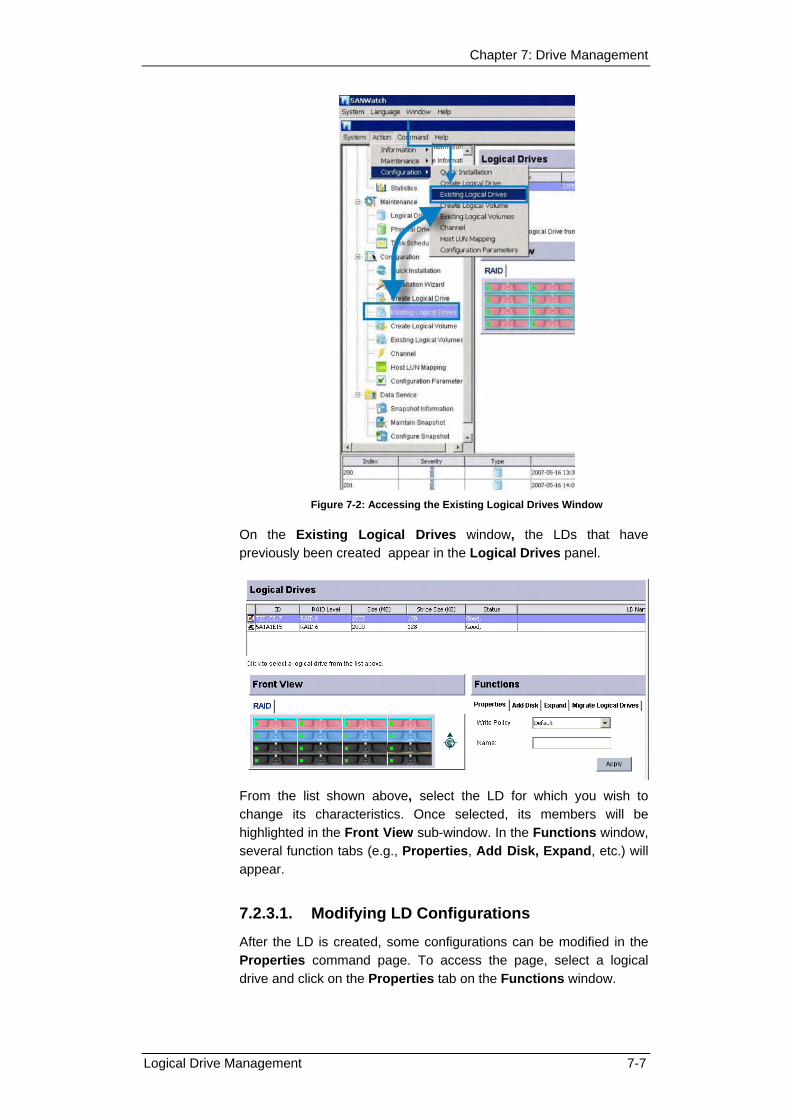
Chapter 7: Drive Management
Figure 7-2: Accessing the Existing Logical Drives Window
On the Existing Logical Drives window, the LDs that have previously been created appear in the Logical Drives panel.
From the list shown above, select the LD for which you wish to change its characteristics. Once selected, its members will be highlighted in the Front View sub-window. In the Functions window, several function tabs (e.g., Properties, Add Disk, Expand, etc.) will appear.
7.2.3.1. Modifying LD Configurations
After the LD is created, some configurations can be modified in the Properties command page. To access the page, select a logical drive and click on the Properties tab on the Functions window.
Logical Drive Management 7-7

SANWatch User’s Manual
Each option is executed by a two-step procedure. Click to select a desired value from the pull-down menu or input a name, and then click Apply for the configuration to take effect.
Write Policy: Write policy can be adjusted on a per logical drive basis. This option allows you to set a write policy for the specific logical drive you selected. “Default” is a neutral value that is coordinated with the controller’s caching mode setting. Other choices are “Write-back” and “Write-through.”
Name: You can name a logical drive for ease of identification.
LD Assignment: both controllers can access a logical drive. In traditional LD management, one LD can only be accessed either by a primary or a secondary controller. In system running later firmware releases, LD assignment is referred to controller locations, Slot A or Slot controller.
7.2.3.2. Expanding LD by Adding Disks
To access the Add Disk command page, select a logical drive and click on the Add Disk tab under Functions window.
Step 1. Select the logical drive you wish to expand from the LD
list on top of the GUI screen.
Step 2. Select the Add Disk tab to display the content panel.
Step 3. Select one or more drives you wish to add to the logical drive by a single mouse-click from the Front
7-8 Logical Drive Management

Chapter 7: Drive Management
View window. When a drive is selected, its status is displayed in the Add Disk content panel.
Step 4. The Add Disk panel has two functional buttons: Add Disk and Add Local Spare Disk. Click on the Add Disk button to include new members into the array.
Step 5. The Add Disk process should immediately begin. You may check the add drive progress in the Tasks Under Process window.
7.2.3.3. Accessing the Expand Command page
To access the Expand command page, select a logical drive and click on the Expand tab under the Functions window.
Available Expansion Size (MB)
If there is an amount of unused capacity in a logical drive, the LD can be expanded. If there is no amount present in the text box, then the LD cannot be expanded.
Set Expansion Size
A value can be entered in this text box if an amount is shown in the Expand Size text box. The value entered into the Expansion Size text box cannot exceed the amount shown in the text box above. The value entered here specifies the size of expansion capacity that will be added to the array.
Logical Drive Management 7-9

SANWatch User’s Manual
Execute Expand
The Execute Expand list determines whether the expansion will be processed in an online or an offline manner. With an online expansion, the expansion process will begin once the subsystem finds I/O requests from the host become comparatively low. If an offline expansion is preferred, then the expansion process will immediately begin.
7.2.3.4. Click Expand to Initiate LD Expansion
To initiate the LD expansion, follow these steps:
Step 1. Once the LD expansion parameters have been selected, click the Expand button at the bottom of the Expand page.
Step 2. The expand process begins and you may check the progress in the Tasks Under Process window.
Step 3. The expansion capacity will appear as a new partition. You may right-click a logical drive listed above to display the Edit Partition command to verify the expansion size.
7.2.3.5. Accessing the Migrate LD Command page
To access the Migrate LD command page, first select a logical drive on the list and then click on the Migrate Logical Drives tab under the Functions window.
NOTE:
Currently firmware only supports the migration between RAID levels 5 and 6. This function is disabled when an LD is configured in other RAID levels.
This function is only applicable on RAID subsystems running Firmware revision 3.47 or above.
7-10 Logical Drive Management

Chapter 7: Drive Management
Select a RAID Level
There are numerous RAID levels, each level is a different way to spread data across multiple disk drives. Selecting a RAID level that is most appropriate for your application with a balance among usable capacity, performance, and fault tolerance. Currently SANWatch supports RAID migration between RAID5 and RAID6. For more information about RAID levels, please refer to Appendix C of this manual.
You need a minimum of three (3) drives for RAID 5 and four (4) drives for RAID 6. The RAID level dropdown list displays applicable RAID levels according to your current selection. If you need to add a disk drive for more capacity, (for example, when migrating from RAID5 to RAID6) you can select an unused drive from the Front View window. A selected drive is displayed in the same color as the logical drive to which it will be added. To deselect a drive, click again on the selected drive. The slot number and drive size information will also be reflected accordingly through a drive list on the right.
Select a Stripe Size
Choose different stripe size may affect the performance of RAID subsystem. Base on the applications, users should choose a best-fit stripe size to achieve the best data transfer rate. The following stripe sizes are available: 16KB, 32KB, 64KB, 128KB, 256KB, 512KB, or 1024KB. A default stripe size is pre-selected.
Select a stripe size, but note that stripe size arrangement has a tremendous effect on RAID subsystem performance. Changing stripe size is only recommended for experienced users. Stripe size defaulted to this menu is determined by the subsystem Optimization mode and the RAID level selected.
Logical Drive Management 7-11

SANWatch User’s Manual
Set a Drive Size
In the Drive Size (MB) input box displays the maximum drive size of the smallest member. Decreasing this value can create a smaller logical drive. The remainder can be used later by expanding the logical drive (as explained in Section 7.2.3.3.)
7.2.3.6. Migration Process
To initiate the LD expansion, follow these steps:
Step 1. Once the LD migration parameters have been set to the desired values, click the Migrate LD button at the bottom of the Migrate Logical Drives page.
Step 2. The migration process begins and you may check the progress in the Tasks Under Process window.
7.2.4 Dynamic Logical Drive Expansion
7.2.4.1. What Is It and How Does It Work?
Before Dynamic Logical Drive Expansion, increasing the capacity of a RAID system using traditional methods meant backing up, re-creating, and then restoring data. Dynamic Logical Drive Expansion allows you to expand an existing logical array without powering down the system and without adding a storage enclosure.
7.2.4.2. Two Expansion Modes
There are two expansion modes.
Mode 1: Add Drive
Mode 1 Expansion is illustrated in Figure 7-3 and involves adding more hard disk drives to a logical drive, which may require purchasing an enclosure with more drive bays. The data will be re-striped onto the original and newly added disks.
7-12 Logical Drive Management

Chapter 7: Drive Management
Figure 7-3: RAID Expansion Mode 1
As shown above, new drives are added to increase the capacity of a 4-Gigabyte (GB) RAID5 logical drive. The two new drives increase the capacity to 8GB.
Mode 2: Copy & Replace
Mode 2 Expansion requires each of the array members to be replaced by higher-capacity hard disk drives.
Figure 7-4: RAID Expansion Mode 2 (1/3)
The diagram above illustrates expansion of the same 4GB RAID 5 logical drive using Mode 2 Expansion. Member drives are copied and replaced, one by one, onto three higher-capacity disk drives.
RAID Expansion - Mode 2 (2/3)
2
Copy and Replace the other member drives one by one until all the member drives have been replaced
4 GB
New Drive
2 GB
RAID 5 (4GB)
2 GB 4 GB
In use Unused
Copy and Replace each member drive. After all themember drives have been replaced, execute the“RAID Expansion” to use the additional capacity.
Figure 7-5: RAID Expansion Mode 2 (2/3)
This results in a new 4GB, RAID 5 logical drive composed of three physical drives. The 4GB increased capacity (2G from each new member; parity drive’s capacity is discounted) appears as a new partition.
Logical Drive Management 7-13
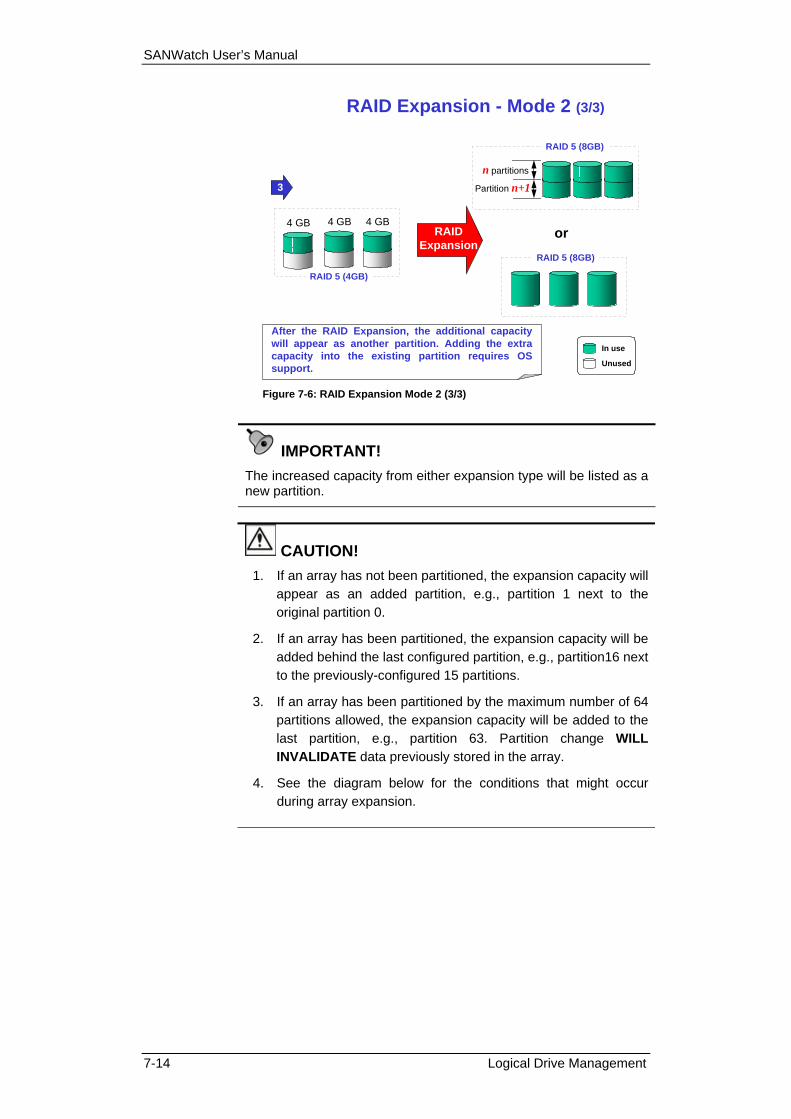
SANWatch User’s Manual
7-14 Logical Drive Management
RAID Expansion - Mode 2 (3/3)
3
RAID 5 (4GB)
4 GB4 GB 4 GBRAID
Expansion
RAID 5 (8GB)
orRAID 5 (8GB)
n
n+1partitions
Partition
In use
Unused
After the RAID Expansion, the additional capacitywill appear as another partition. Adding the extracapacity into the existing partition requires OSsupport.
Figure 7-6: RAID Expansion Mode 2 (3/3)
IMPORTANT! The increased capacity from either expansion type will be listed as a new partition.
CAUTION! 1. If an array has not been partitioned, the expansion capacity will
appear as an added partition, e.g., partition 1 next to the original partition 0.
2. If an array has been partitioned, the expansion capacity will be added behind the last configured partition, e.g., partition16 next to the previously-configured 15 partitions.
3. If an array has been partitioned by the maximum number of 64 partitions allowed, the expansion capacity will be added to the last partition, e.g., partition 63. Partition change WILL INVALIDATE data previously stored in the array.
4. See the diagram below for the conditions that might occur during array expansion.
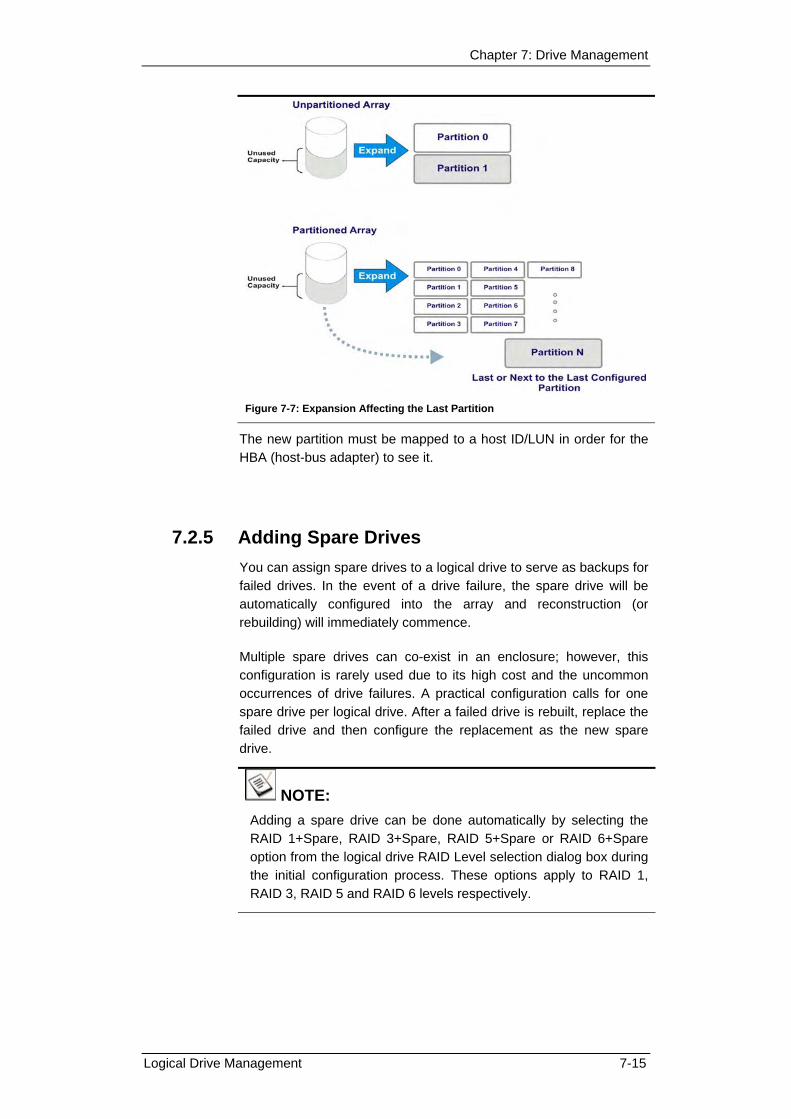
Chapter 7: Drive Management
Figure 7-7: Expansion Affecting the Last Partition
The new partition must be mapped to a host ID/LUN in order for the HBA (host-bus adapter) to see it.
7.2.5 Adding Spare Drives You can assign spare drives to a logical drive to serve as backups for failed drives. In the event of a drive failure, the spare drive will be automatically configured into the array and reconstruction (or rebuilding) will immediately commence.
Multiple spare drives can co-exist in an enclosure; however, this configuration is rarely used due to its high cost and the uncommon occurrences of drive failures. A practical configuration calls for one spare drive per logical drive. After a failed drive is rebuilt, replace the failed drive and then configure the replacement as the new spare drive.
NOTE: Adding a spare drive can be done automatically by selecting the RAID 1+Spare, RAID 3+Spare, RAID 5+Spare or RAID 6+Spare option from the logical drive RAID Level selection dialog box during the initial configuration process. These options apply to RAID 1, RAID 3, RAID 5 and RAID 6 levels respectively.
Logical Drive Management 7-15
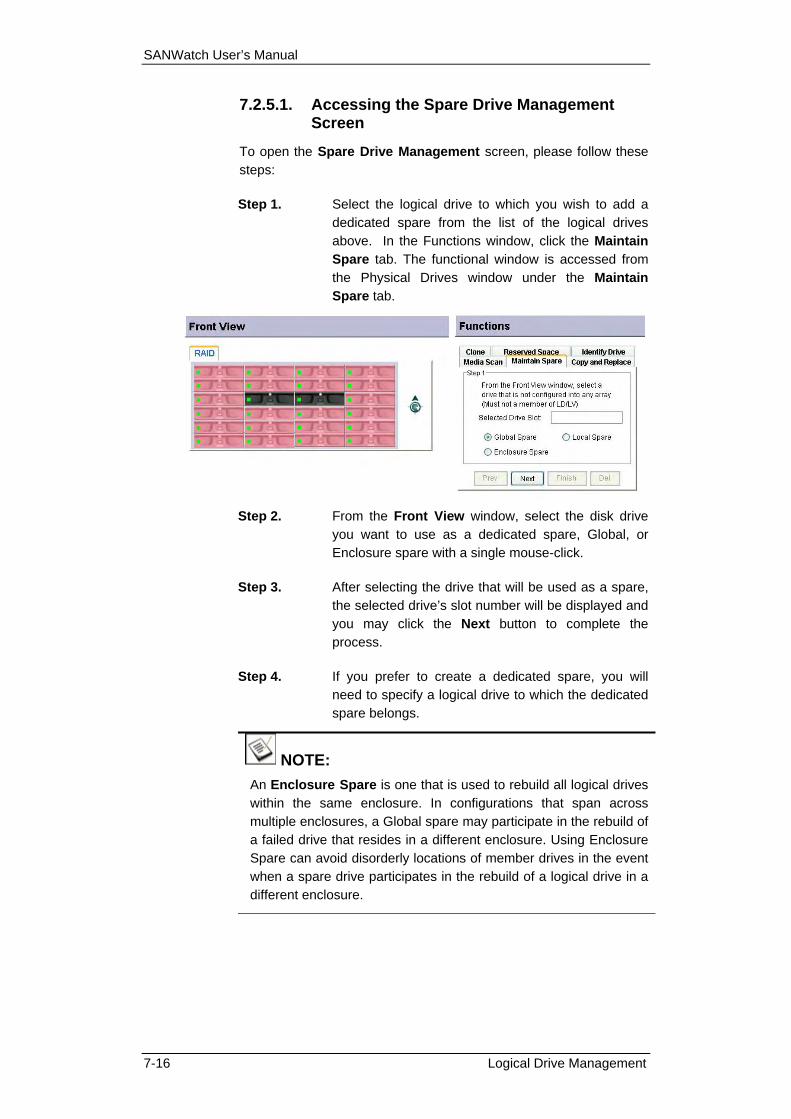
SANWatch User’s Manual
7.2.5.1. Accessing the Spare Drive Management Screen
To open the Spare Drive Management screen, please follow these steps:
Step 1. Select the logical drive to which you wish to add a dedicated spare from the list of the logical drives above. In the Functions window, click the Maintain Spare tab. The functional window is accessed from the Physical Drives window under the Maintain Spare tab.
Step 2. From the Front View window, select the disk drive you want to use as a dedicated spare, Global, or Enclosure spare with a single mouse-click.
Step 3. After selecting the drive that will be used as a spare, the selected drive’s slot number will be displayed and you may click the Next button to complete the process.
Step 4. If you prefer to create a dedicated spare, you will need to specify a logical drive to which the dedicated spare belongs.
NOTE: An Enclosure Spare is one that is used to rebuild all logical drives within the same enclosure. In configurations that span across multiple enclosures, a Global spare may participate in the rebuild of a failed drive that resides in a different enclosure. Using Enclosure Spare can avoid disorderly locations of member drives in the event when a spare drive participates in the rebuild of a logical drive in a different enclosure.
7-16 Logical Drive Management
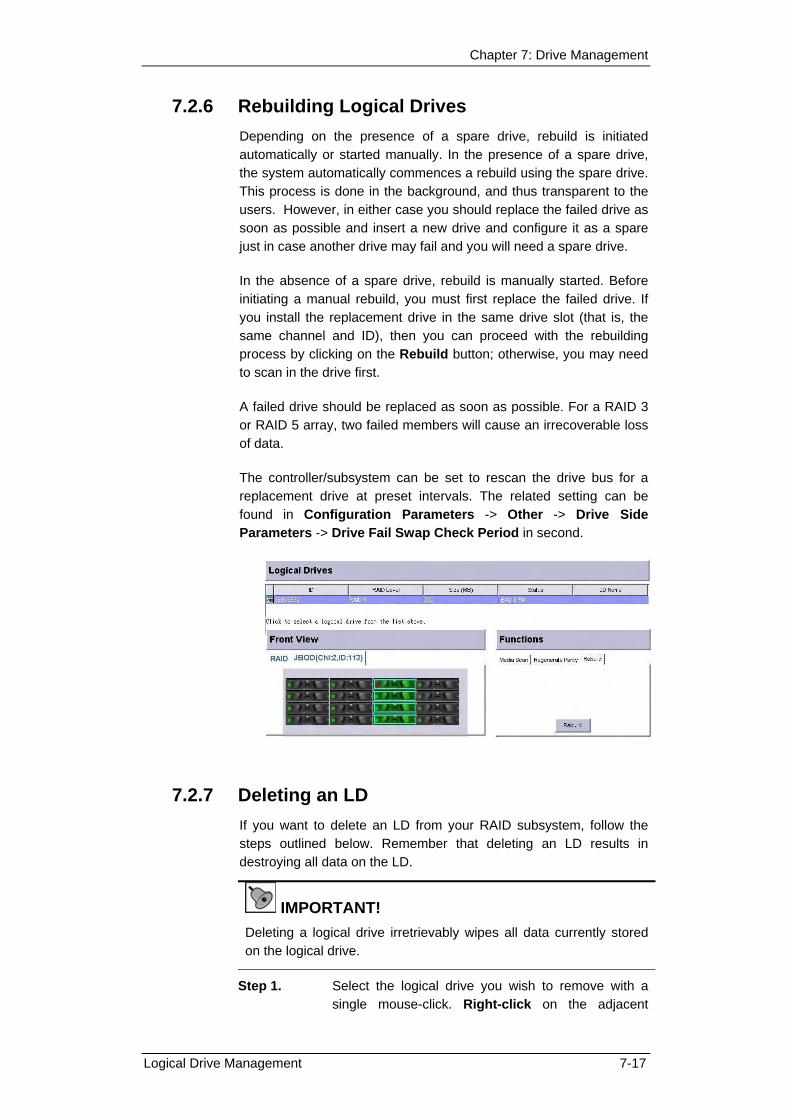
Chapter 7: Drive Management
7.2.6 Rebuilding Logical Drives Depending on the presence of a spare drive, rebuild is initiated automatically or started manually. In the presence of a spare drive, the system automatically commences a rebuild using the spare drive. This process is done in the background, and thus transparent to the users. However, in either case you should replace the failed drive as soon as possible and insert a new drive and configure it as a spare just in case another drive may fail and you will need a spare drive.
In the absence of a spare drive, rebuild is manually started. Before initiating a manual rebuild, you must first replace the failed drive. If you install the replacement drive in the same drive slot (that is, the same channel and ID), then you can proceed with the rebuilding process by clicking on the Rebuild button; otherwise, you may need to scan in the drive first.
A failed drive should be replaced as soon as possible. For a RAID 3 or RAID 5 array, two failed members will cause an irrecoverable loss of data.
The controller/subsystem can be set to rescan the drive bus for a replacement drive at preset intervals. The related setting can be found in Configuration Parameters -> Other -> Drive Side Parameters -> Drive Fail Swap Check Period in second.
7.2.7 Deleting an LD If you want to delete an LD from your RAID subsystem, follow the steps outlined below. Remember that deleting an LD results in destroying all data on the LD.
IMPORTANT! Deleting a logical drive irretrievably wipes all data currently stored on the logical drive.
Step 1. Select the logical drive you wish to remove with a single mouse-click. Right-click on the adjacent
Logical Drive Management 7-17

SANWatch User’s Manual
screen area. A command menu will prompt as shown below.
Step 2. Select the Delete Logical Drive command. The delete process is completed almost immediately.
Step 3. Once the Delete command has been selected, a confirm box will prompt asking you whether to proceed or not.
Step 4. If you are certain that you wish to delete the LD, press the OK button. If you are not sure, click the Cancel button.
7.2.8 Power Saving This feature supplements the disk spin-down function, and supports power-saving on specific logical drives or un-used disk disks (such as the standby hot-spare) with an idle state and the 2-stage power-down settings. Advantages: see the power saving features below. Applicable Disk Drives: Logical drives and non-member disks [including spare drives and un-used drives (new or formatted drives)]. The power-saving policy set to an individual logical drive (from the View and Edit Logical Drive menu) has priority over the general Drive-side Parameter setting.
Power-saving Levels:
Level Power Saving Ratio
Recovery Time ATA command
SCSI command
Level 1 (Idle) * 19% to 22% ** 1 second Idle Idle Level 2 (Spin-down) * 80% 30 to 45 seconds Standby Stop
NOTE:
1. The Idle and Spin-down modes are defined as Level 1 and Level 2 power saving modes on Infortrend’s user interfaces.
7-18 Logical Drive Management

Chapter 7: Drive Management
2. The power saving ratio is deducted by comparing the consumption in idle mode against the consumption when heavily stressed.
1. Hard drives can be configured to enter the Level 1 idle state for
a configurable period of time before entering the Level 2 spin-down state.
2. Four power-saving modes are available:
2-1. Disable,
2-2. Level 1 only,
2-3. Level 1 and then Level 2,
2-4. Level 2 only. (Level 2 is equivalent to legacy spin-down)
3. The Factory defaults is “Disabled” for all drives. The default for logical drives is also Disabled.
4. The preset waiting period before entering the power-saving state:
4-1. Level 1: 5 minutes with no I/O requests.
4-2. Level 2: 10 minutes (10 minutes from being in the level 1).
5. If a logical drive is physically relocated to another enclosure (drive roaming), all related power-saving feature is cancelled.
Limitation:
Firmware revision 3.64P_ & above
Applicable Hardware:
1. All EonStor series running the compatible firmware version.
2. The supported drive types are SATA and SAS (especially 7200RPM models). Models are listed in the AVL document (Approved Vendor List) separately.
NOTE: The legacy Spin-down configuration will remain unchanged when a system firmware is upgraded to rev. 3.64P from the previous revision.
Logical Drive Management 7-19

SANWatch User’s Manual
7.2.9 Undelete Logical Drive If users accidentally delete a logical drive, the result is catastrophic. Since firmware rev. 3.71, a Restore option is added to salvage an accidentally deleted LD. As long as the original member drives are not removed or configured into other logical drives, you can restore a deleted logical drive and bring it back online.
IMPPORTANT!
If any of the original members is missing (not including a previously-failed member), you will not be able to restore a logical drive.
The members of a deleted LD will be indicated as “FRMT (formatted) drives” with array information still intact in its 256MB reserved space. These drives will not be converted into auto-hot-spares (if Auto Hot-spare is enabled) unless users manually put them into other uses.
The undelete function will not be available if you have used members of a deleted logical drive to create another logical drive or manually erased their reserved space.
Restore Procedure:
Step 1. A recently deleted logical drive is found in the Configuration -> Deleted Logical Drives window.
Step 2. Left-click to select a recently deleted logical drive, and
then right-click on it to display the Restore command.
7-20 Logical Drive Management

Chapter 7: Drive Management
Step 3. When prompted by the confirm box, choose Yes.
Step 4. When restored, the recovered logical drive should appear in the list of existing logical drives, and an event message showing the change of state.
7.2.10 Logical Drive Roaming
Overview
The Online Roaming capability allows users to physically move the member disks of a configured LD to another EonStor storage system without disruptions to service. This applies when duplicating a test/research environment or physically moving a configured array to start an application on another installation site.
Concerns & Things to Know
1. Drive roaming is convenient for moving members of a logical drive. However, it is very important not to remove the
Logical Drive Management 7-21
SANWatch User’s Manual
wrong drives. Removing the wrong drives can destroy data in adjacent logical drives.
2. When an LD is shutdown, the status of its members changes to “OFFLINED.”
3. When an LD is shutdown, and its members removed, there will not be an event such as “Unexpected Select Timeout.” The “Drive Removed” event will prompt instead. The status of the removed drives is “MISSING,” instead of “FAILED.”
4. When all members of a shutdown LD are removed, an “All Member Drive Removed” message will prompt.
5. Roaming is not allowed on an LD performing a cloning job.
6. When an LD is shutdown, its associated LUN mapping and logical partition information is also disabled. When restarted, LUN mapping and partition information is also restored.
7. An Incomplete array (LD with missing members) will not be restarted.
8. Restart with a Fatally-failed LD:
8-1. Fatal failure, such as using two wrong drives (not the correct members) in a RAID5 array during roaming, can disable an LD. When this happens, there is no need to reset a system. Once you insert the correct disk drives, firmware will recognize their presence after scanning drive channels, and the LD can be restarted.
8-2. If you already have a faulty drive in a RAID5 LD and an incorrect drive, system will also consider it as fatally failed. The LD status will return to the “one-drive-failed” state after you insert the correct member. Then you can proceed with rebuilding the LD.
8-3. If the roaming LD is indicated as “Fatal Failed,” shutdown the LD and find out drives that are marked as “MISSING.” When all correct members are present and their status highlighted as “GOOD,” the Restart command will become available.
9. When inserting member drives from another RAID system, it is not necessary to follow the original slot locations. Logical configuration is stored on each member drive’s 256MB reserved space.
10. An “All Member Drives Restored” event will prompt when all members are present.
Shutting Down and Restarting
Step 1. The LD Roaming feature is found in Configuration -> Existing Logical Drives window. Left-click to select a logical drive and right-click to display the related commands, Shutdown or Restart Logical Drive.
7-22 Logical Drive Management

Chapter 7: Drive Management
Step 2. The Shutdown Logical Drive command puts a logical
drive into a non-responsive state and also flushes controller cache segmented for this logical drive.
Step 3. An event message will prompt and the LD status will turn to SHUTDOWN.
Step 4. Now you can remove the members of the logical drive. It is recommended you use the Front View enclosure display to locate the slot numbers of all members. You may put sticky notes on drive bezels to avoid removing the wrong drive.
All EonStor series has a drive tray numbering sequence that goes from left to right, and then top to bottom. Below is an example of a 3U-profile chassis.
Slot1 Slot2 Slot3 Slot4
Slot5 Slot6 Slot7 Slot8
Slot9 Slot10 Slot11 Slot12
Slot13 Slot14 Slot15 Slot16
Step 5. Use a small-sized flathead screwdriver to unlock the bezel lock.
Figure 7-8: Drive Tray Bezel
Step 6. Push the release button to open the drive bezel.
Step 7. Pull a drive tray away from drive bay only 1 inch away. Wait 1 minute for the drive motor to spin down before removing it completely away from chassis.
Logical Drive Management 7-23

SANWatch User’s Manual
If you handle HDDs while motors are still spinning, HDDs can be damaged.
NOTE: Do not leave drive bays open when drives are removed. If you
have additional, empty drive trays, install them into the chassis in order to maintain regular airflow within the chassis. If not, disassemble HDDs from the drive trays, and transport them using drive transport cases.
If you have spare drive trays, you can use the original foam blocks and shipping boxes in EonStor’s package. These foam blocks can contain drive trays along with the HDDs fixed within. Additional packaging protection should be provided if you need to ship HDDs.
Step 8. Install these members to another EonStor system. Close the drive bezels and lock the rotary bezel locks.
Step 9. Open a management console with the target system. The logical drive should be listed in the Existing Logical Drives window as a SHUTDOWN LD. Right-click on it to reveal the Restart command.
Step 10. Select Yes on the confirm box. After a short while, an event message will prompt indicating the LD has turned online.
Step 11. Create LUN mapping for this logical drive to put it to use.
7-24 Logical Drive Management

Chapter 7: Drive Management
7.3. Logical Volume Management Combining logical drives together creates logical volumes. You can combine logical drives with different capacities and RAID levels into a single logical volume.
NOTE: When you delete a logical volume, all logical drives assigned to it will be released, making them available for new logical volume creation.
7.3.1 Accessing the Create Logical Volume Window Logical Volumes are created in the Create Logical View window, which can be accessed either from the navigation panel icon or the command menu on the software menu bar.
Step 1. To create Logical Volumes; display the Create Logical Volume window by clicking on the associated icon in the GUI’s navigation panel or the command in the Action menu bar.
Figure 7-9: Accessing the Create Logical Volume Window
Step 2. The Create Logical Volume window will appear.
Logical Volume Management 7-25
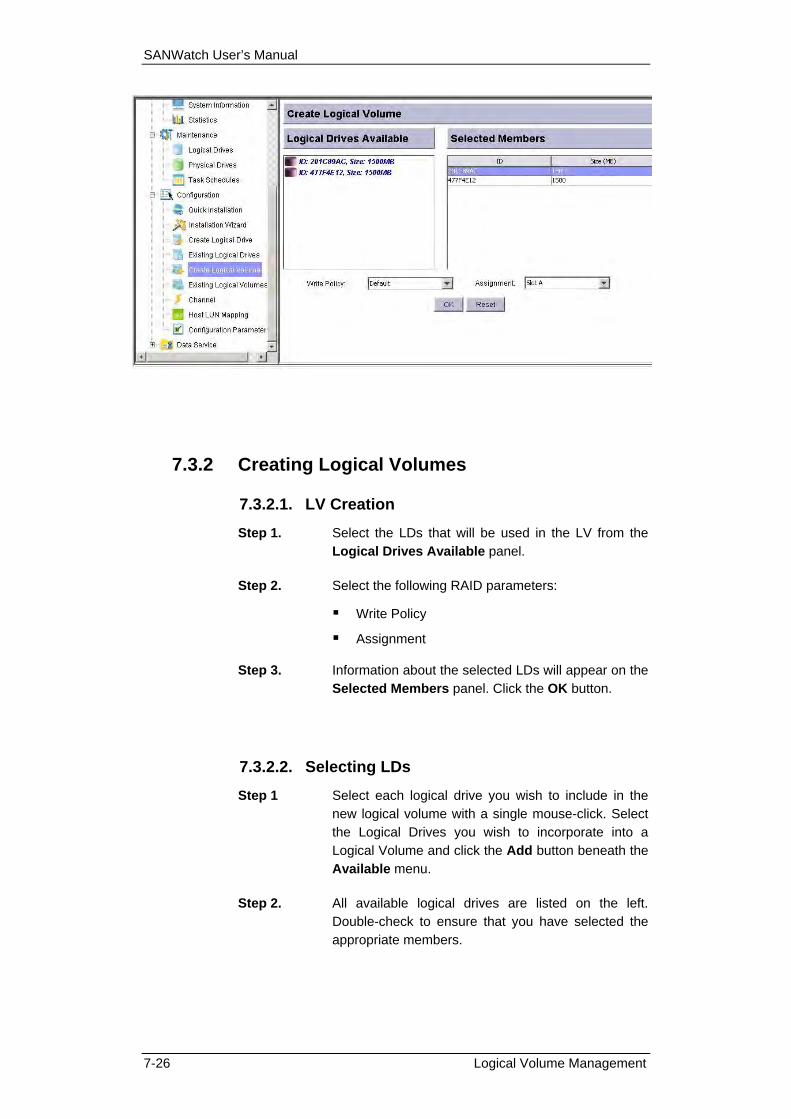
SANWatch User’s Manual
7.3.2 Creating Logical Volumes
7.3.2.1. LV Creation
Step 1. Select the LDs that will be used in the LV from the Logical Drives Available panel.
Step 2. Select the following RAID parameters:
Write Policy
Assignment
Step 3. Information about the selected LDs will appear on the Selected Members panel. Click the OK button.
7.3.2.2. Selecting LDs
Step 1 Select each logical drive you wish to include in the new logical volume with a single mouse-click. Select the Logical Drives you wish to incorporate into a Logical Volume and click the Add button beneath the Available menu.
Step 2. All available logical drives are listed on the left. Double-check to ensure that you have selected the appropriate members.
7-26 Logical Volume Management

Chapter 7: Drive Management
7.3.2.3. Setting Logical Volume Parameters
Logical Volume parameter options can be accessed at the lower half of the Create Logical Volume window.
Logical Volume Assignment Select Slot A controller or Slot B controller from the Logical Volume Assignment menu.
NOTE: In a single-controller configuration or the BIDs (Slot B controller IDs) are not assigned on host channels, the LD/LV Assignment menu will not be available!
Select Write Policy
Use the Write Policy menu to select Default (Global Setting), Write Through, or Write Back. The same policy will automatically apply to all logical drives (members) included in the logical volume.
NOTE: The Default option should be considered as “Not-Specified.” If set to Default, the logical drive’s caching behavior will be automatically controlled by firmware. In the event of component failure or violated temperature threshold, the Write-back caching will be disabled and changed to a more conservative “Write-through” mode.
7.3.2.4. Click OK to Create a Logical Volume
Once the logical drives that will be used in the Logical Volume have been selected and all the desired Logical Volume parameters have been selected:
Step 1. Click the OK button at the bottom of the Create Logical Volume window.
Step 2. The creation is completed almost immediately.
7.3.3 Accessing the Existing Logical Volumes Window The Existing Logical Volumes window allows you to perform Logical Volume expansion and change related configuration options. As shown below, the configuration window can be accessed either from the functional navigation panel or the command menu on the top of the GUI screen.
Logical Volume Management 7-27

SANWatch User’s Manual
Figure 7-10: Accessing Existing Logical Volume Window
7-28 Logical Volume Management

Chapter 7: Drive Management
7.3.3.1. Modifying Logical Volume Configurations
Some configurations can be modified in the Properties command page. To access the page, select a Logical Volume and click on the Properties tab under the Functions window.
Each option is executed by a two-step procedure. Click to select a desired value from the pull-down menu, and then click Apply for the configuration to take effect.
LV Assignment: both controllers can access a logical volume. Assignment is made by the locations of RAID controllers, i.e., Slot A or Slot B controller.
Write Policy: Write policy can be adjusted on a per logical volume basis. This option allows you to set a write policy for the specific logical volume. “Default” is a neutral value that is coordinated with the controller’s general caching mode setting. Other choices are “Write-back” and “Write-through.”
7.3.3.2. Expanding a Logical Volume
When members of a logical volume have free and unused capacity, the additional capacity can be added to existing logical volumes. The unused capacity can come from the following configuration:
Certain amount of capacity was intentionally left unused when the logical drives were created (configurable with maximum array capacity).
Some or all of the members of a logical volume have been expanded, either by adding new drives or copying and replacing original drives with drives of larger capacity.
Logical Volume Management 7-29
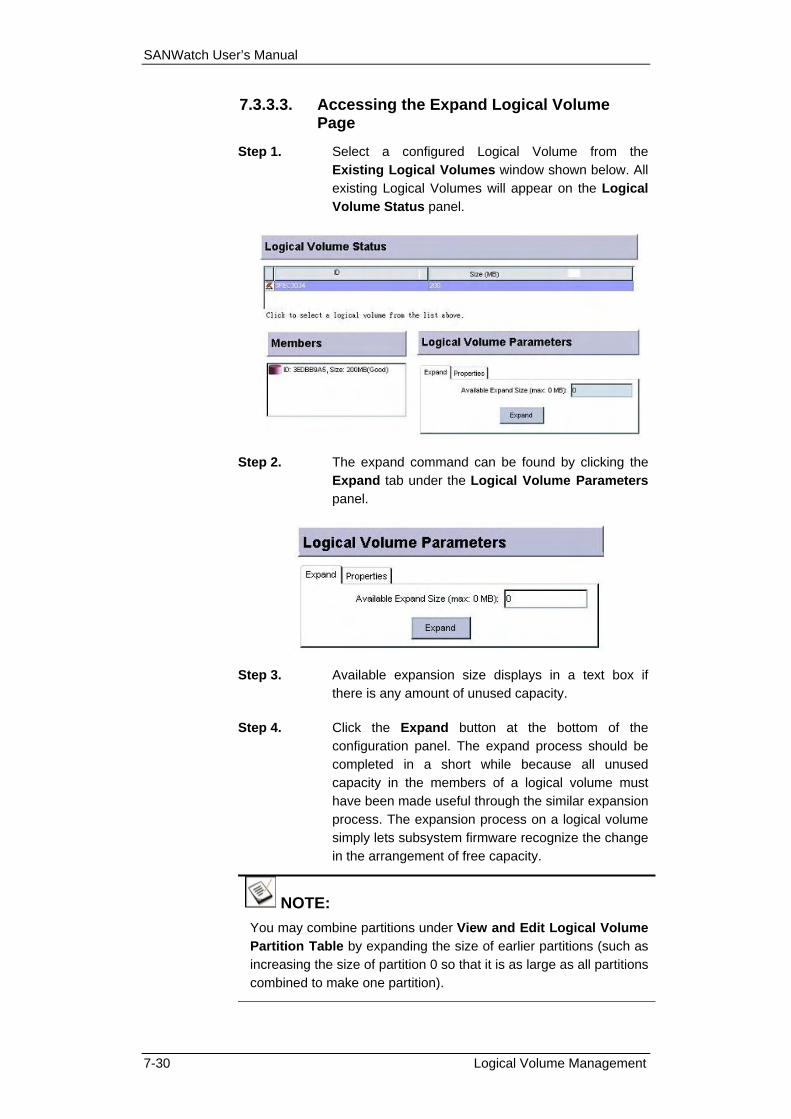
SANWatch User’s Manual
7.3.3.3. Accessing the Expand Logical Volume Page
Step 1. Select a configured Logical Volume from the Existing Logical Volumes window shown below. All existing Logical Volumes will appear on the Logical Volume Status panel.
Step 2. The expand command can be found by clicking the Expand tab under the Logical Volume Parameters panel.
Step 3. Available expansion size displays in a text box if there is any amount of unused capacity.
Step 4. Click the Expand button at the bottom of the configuration panel. The expand process should be completed in a short while because all unused capacity in the members of a logical volume must have been made useful through the similar expansion process. The expansion process on a logical volume simply lets subsystem firmware recognize the change in the arrangement of free capacity.
NOTE: You may combine partitions under View and Edit Logical Volume Partition Table by expanding the size of earlier partitions (such as increasing the size of partition 0 so that it is as large as all partitions combined to make one partition).
7-30 Logical Volume Management
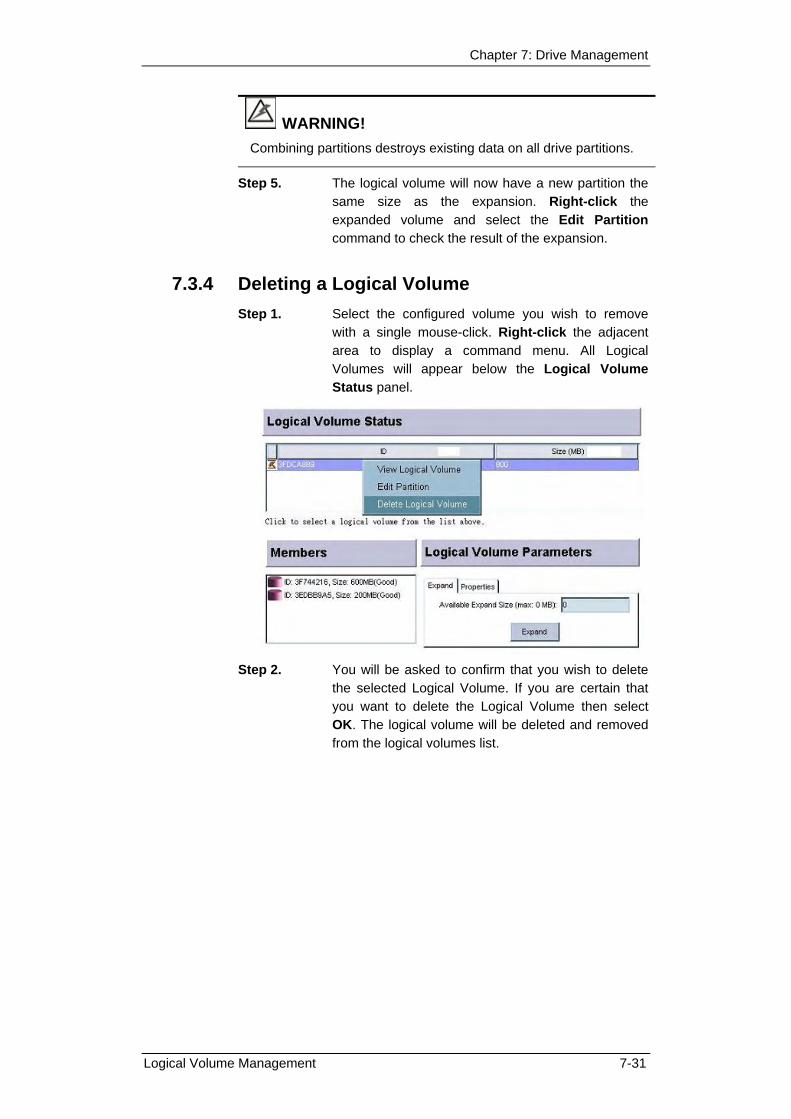
Chapter 7: Drive Management
WARNING! Combining partitions destroys existing data on all drive partitions.
Step 5. The logical volume will now have a new partition the same size as the expansion. Right-click the expanded volume and select the Edit Partition command to check the result of the expansion.
7.3.4 Deleting a Logical Volume Step 1. Select the configured volume you wish to remove
with a single mouse-click. Right-click the adjacent area to display a command menu. All Logical Volumes will appear below the Logical Volume Status panel.
Step 2. You will be asked to confirm that you wish to delete the selected Logical Volume. If you are certain that you want to delete the Logical Volume then select OK. The logical volume will be deleted and removed from the logical volumes list.
Logical Volume Management 7-31

SANWatch User’s Manual
7.4. Partitioning a Logical Configuration
7.4.1 Overview Partitions can be created in both logical drives and logical volumes. Depending on your specific needs, you can partition a logical drive or logical volume into two or more smaller-size partitions or just leave it at its default size (that is, one large partition covering the entire logical drive or logical volume).
If you intend to map an entire logical drive or logical volume to a single host LUN, then partitioning becomes irrelevant. Partitioning can be helpful when dealing with arrays of massive capacities and when rearranging capacities for applications that need to be accessed by many application servers running heterogeneous OSes.
NOTE: You can create a maximum of eight partitions per logical drive or logical volume. Also, partitioned logical drives cannot be included in a logical volume.
7.4.2 Partitioning a Logical Drive
WARNING! Partitioning a configured array destroys the data already stored on it. Partitioning is recommended during the initial setup of your subsystem. You have to move your data elsewhere if you want to partition an array in use.
Step 1. Select the logical drive you want to partition. Move your cursor to the Logical Drives window. Right-click to display the Edit Partition command menu.
7-32 Partitioning a Logical Configuration

Chapter 7: Drive Management
Step 2. Select Edit Partition from the menu.
Step 3. The Edit Partition window displays. Use the arrow keys on the button on the lower right to switch between partitions.
Step 4. If the array has not been partitioned, all of its capacity appears as one single partition. Single-click to select the partition (the color bar).
Step 5. Right-click or select the Edit command to display the Add Partition command. Click to proceed.
Step 6. The Partition Size window displays. Enter the desired capacity and press OK to proceed.
Step 7. Shown below is a capacity partitioned into two. Each partition is displayed in a different color. Repeat the above process to create more partitions or click to view its information. A new partition is created from the existing partition.
Partitioning a Logical Configuration 7-33

SANWatch User’s Manual
The arrow buttons help you travel from one partition to another.
7.4.3 Partitioning a Logical Volume Step 1. Select the logical volume you wish to partition. Move
your cursor onto the Logical Volume Status window. Right-click to display the Edit Partition command menu.
Step 2. Select Edit Partition from the menu.
Step 3. The Edit Partition mode window displays as shown below.
Step 4. If the volume has not been partitioned, all of the array capacity appears as one single partition. Single-click to select a partition from the color bar.
Step 5. Right-click or select the Edit command to display the Add Partition command. Click to proceed.
7-34 Partitioning a Logical Configuration

Chapter 7: Drive Management
Step 6. The Partition Size window displays. Enter the desired capacity (1/2 or 1/3 of the original volume capacity, for example) and press OK to proceed.
Step 7. Shown below is a capacity partitioned into two. Each partition is displayed in a different color. Repeat the above process to create more partitions or click to view its information.
The arrow buttons help you travel from one partition to another.
Partitioning a Logical Configuration 7-35

SANWatch User’s Manual
7.5. Physical Drive Maintenance
7.5.1 Read/Write Test
The Read/Write test only applies to new or unused FC drives.
Step 1. To access the Read/Write Test maintenance option, select the Physical Drives icon from the functional navigation panel on the left of the SANWatch screen.
Step 2. Select a new drive from the Front View window. A used drive (one that previously included in a logical configuration) can also be tested with the precondition that its reserved space needs to be manually removed.
Step 3. Select Read/Write Test from the tabbed menus in the Functions window.
Step 4. Verify the listed drive slot number. Select the Test type as either Read-only or Read/Write test.
Step 5. There are two configurable parameters related to the Read/Write test: Error Occurrence and Recovery Process.
Use the pull-down menu to configure a preferable test condition. The configurable options are listed below:
Error Occurrence: This item specifies firmware’s reactions if any errors should be found during the Read/Write test. Options are: No Action, Abort on Any Error, Abort on Hardware Errors.
Note that the definitions of drive errors are determined by the interface type. For SATA disk drives, errors are interpreted according to SATA 8-bit error encoding.
7-36 Physical Drive Maintenance

Chapter 7: Drive Management
Recovery Process: Firmware might attempt to correct some of the errors discovered on drives. The configurable options are:
No Recovery, Marking Bad Block, Auto Reassignment, and Attempting Reassign First.
If selected, the last option will attempt to reassign bad blocks, and if the reassignment fails, mark those drive sectors as BAD.
Physical Drive Maintenance 7-37
SANWatch User’s Manual
This page is intentionally left blank.
7-38 Physical Drive Maintenance

Chapter 8
Channel Configuration
Using SANWatch Manager, you can modify the configuration of I/O channels on the RAID system. On specific RAID systems, you can change the channel operation mode to host or drive, add/delete channel IDs, and set the transfer rate for specific host channels.
IMPORTANT!
Although some RAID models come with hardware DIP switches that allow you to change transfer rate, it is best you come here to double-check and synchronize the firmware and hardware settings.
Channel configuration settings are available under the Configuration function group on the navigation panel. This chapter describes the following Channel Configuration features:
♦ Channel Configuration Window – Section 8.1, page 8-2
♦ User-Configurable Channel Parameters – Section 8.2, page 8-3
8.2.1 Channel Mode
8.2.2 LIP
8.2.3 ID Pool / AID / BID
8.2.4 Transfer Rate
Channel Configuration Window 8-1

SANWatch User’s Manual
8.1 Channel Configuration Window I/O Channel configuration options are available under the Configuration category, which is found in the lower section of the navigation panel.
To access the Channel window, use either the command from the Action menu or select the Channel icon from the navigation panel.
Once the Channel window has been opened and channel items have appeared, click on the channel that needs to be configured and its configuration window will appear on the right.
The following sections describe user-configurable channel parameters.
8-2 Channel Configuration Window

Chapter 8: Channel Configuration
8.2 User-Configurable Channel Parameters Once the channel has been selected, the screen shown below will appear in the content window. The different options are discussed below.
NOTE: Some information on the Channel screen are for display only. For example, the Current Data Rate, Transfer Width, Node Name, and Port Name are available only a host channel is successfully connected with a host adapter or networking device.
8.2.1. Channel Mode This configuration option is exclusively available with the EonStor 1U controller head and Fibre-to-Fibre RAID subsystems.
The EonStor series controller head allows flexible reconfigurations of its I/O channels. An I/O channel can be assigned as Host, Drive, dedicated RCC (RCCOM), or Drive+RCCOM channels. For example, the combination of I/O channels may look like the following:
Dual-Redundant Controller Models EonStor 2510FS-4RH
2 hosts and 2 drive+RCCOMs; a total of 4 I/O channels
EonStor 2510FS-6RH
2 hosts, 2 dedicated RCCOMs, and 2 drives; a total of 6 I/O channels
User-Configurable Channel Parameters 8-3

SANWatch User’s Manual
Table 8-1: Redundant-Controller Channel Modes
Dual-Single Controller Models
EonStor 2510FS-4D
2 hosts and 2 drives per controller; a total of 8 I/O channels
EonStor 2510FS-6D
2 hosts and 4 drives or 4 hosts and 2 drives per controller; a total of 12 I/O channels
Table 8-2: Dual-Single Controller Channel Modes
For more information about all possible combinations, please refer to the Installation and Hardware Reference Manual that came with your RAID system.
For the latest ASIC400 series, there are preset, dedicated SATA channels for RCC communications and there is no need to configure specific host/drive channels for RCC communications.
NOTE: If you manually change a Fibre host channel into “Drive” channel, you should manually “add” a “BID” to that channel because the chip processors on the partner RAID controllers both need a channel ID.
8.2.2. LIP
On some older EonStor models, a LIP command option is available in the Parameters window. This command takes effect when re-connecting a drive-side device, e.g., cable links with a drive expansion enclosure (JBOD) was lost and is now physically restored. With later EonStor models (those built around the ASIC400 engine) and firmware revisions, Fibre loop LIP will be automatically issued across drive loops and this command will not be available.
8-4 User-Configurable Channel Parameters

Chapter 8: Channel Configuration
8.2.3. ID Pool / AID / BID The selection with AID (Slot A controller ID) and BID (Slot B controller ID) only appears with controller/subsystems that are equipped with redundant RAID controllers.
This parameter sets the IDs to appear on the host channels. Each channel must have a unique ID in order to work properly. For an iSCSI-host subsystem, IDs range from 0 to 3. For a Fibre-host controller/subsystem, IDs range from 0 to 125. ID 0 is the default value assigned for host channels on iSCSI-host subsystems and ID 112/113 is the default value assigned to Fibre-host controller/subsystems. Preset IDs are available with drive channels and it is recommended to keep the defaults.
For more information on host channel and drive channel IDs, please refer to the sample configurations in the hardware documentation that came with your controller/subsystems.
Step 1. Single-click under the Channel window to select a host or drive channel. Channel icons are displayed in the left-side panel of the configuration window. The related options will then appear in a tabbed panel providing access to channel Parameters, ID, and Chip Information.
Step 2. From the Parameters panel, specify a preferred value with configurable items either by clicking on one of the options in the dropdown list of the Default Transfer Rate option. Be sure to click the Apply button for the changes to take effect.
Step 3. If you want to assign a different ID to the selected channel, click on the ID tab. An ID pool scroll menu will appear as shown below.
User-Configurable Channel Parameters 8-5

SANWatch User’s Manual
When selecting an ID, be sure that it does not conflict with the other devices on the channel. Preset IDs should have been grayed out and excluded from selection. IDs assigned to an alternate RAID controller will also be excluded. The ID pool lists all available IDs for the current selection. Highlight the IDs you want to apply by selecting their check boxes and click Apply to create either the AIDs (Slot A controller ID, which is the default Primary controller) or BIDs (Slot B controller ID) for the channel.
A system reset is necessary for the configuration change to take effect.
Drive Channel IDs
Shown below is the screen showing the preset IDs for a Fibre drive-side channel. These IDs should usually be kept as the default. There is one possibility you need to manually configure an ID for a processor chip: you upgrade a single-controller configuration by adding a partner RAID controller. Then you may need to assign a channel ID (BID) for the chip on the Secondary controller.
8-6 User-Configurable Channel Parameters

Chapter 8: Channel Configuration
8.2.4. Transfer Rate The transfer rate needs only be changed when compatibility issues occur, e.g., such as the presence of slower 2Gbps devices in a 4Gbps Fibre Channel network.
Changing the transfer rate of a drive channel is usually not necessary unless under rare circumstances you need to tune down to get around some compatibility issue. However, Infortrend’s ASIC400 RAID systems only support 3Gbps SATA-II disk drives. Tuning down drive channel speed does not avail 1.5Gbps drives for these models.
IMPORTANT!
Every time you change the transfer rate, you must reset the controller for the changes to take effect.
User-Configurable Channel Parameters 8-7

SANWatch User’s Manual
This page is intentionally left blank.
8-8 User-Configurable Channel Parameters
Chapter 9
LUN Mapping and
iSCSI Host-side Settings
After creating a logical drive (LD) or logical volume (LV), you can map it as is to a host LUN; or, if the array is divided into smaller partitions, you can map each partition to a specific host LUN. SANWatch supports many LUNs per host channel, each of which appears as a single drive letter to the host if mapped to an LD, LV, or a partition of either. In cases where certain mappings are found to be useless, or the disk array needs to be reconfigured, you can delete unwanted mappings in your system.
This chapter explains the following features:
9.1. iSCSI-related Options...................................................................2 9.1.1. Trunking (Link Aggregation) ......................................................2 9.1.2. Grouping 7(MC/S, Multiple Connections per Session) .............7 9.2. Host LUN Mapping .....................................................................11 9.3. Accessing the LUN Map Table...................................................13 9.4. LUN Mapping .............................................................................15 9.4.1. Mapping a Complete Logical Drive or Logical Volume ...........15 9.4.2. Map a Logical Drive or Volume Partition to a Host LUN .........16 9.4.3. Deleting a Host LUN Mapping.................................................16 9.4.4. LUN Mapping Access Control over iSCSI Initiator Settings....17
iSCSI-related Options 9-1

SANWatch User’s Manual
9.1. iSCSI-related Options
9.1.1. Trunking (Link Aggregation)
Trunking is implemented following IEEE standard 802.3.
Concerns:
1. The “Trunk Group” function is available since firmware revision 3.71.
2. Use Limitations:
a. Correspondence with Channel MC/S group (see Section 9.1.2 Grouping):
Because of the order in protocol layer implementation,
a-1. You cannot configure MC/S grouped channels into trunks.
a-2. Yet you can configure trunked ports into MC/S groups.
b. Channel IDs:
If multiple host ports are trunked, IDs will be available as on one channel.
c. IP Address Setting:
Trunked ports will have one IP address. Trunked ports reside in the same subnet.
d. LUN Mapping:
LUN mapping to a trunked group of ports is performed as if mapping to a single host port.
e. Switch Setting:
The corresponding trunk setting on switch ports should also be configured, and it is recommended to configure switch setting before changing system setting. Sample pages of switch trunk port settings (3COM 2924-SFP Plus) are shown below:
9-2 iSCSI-related Options

Chapter 9: LUN Mapping
Configuration is done via Port -> Link Aggregation -> Aggregation group ID.
Port selection is done via LACP -> Select port.
iSCSI-related Options 9-3

SANWatch User’s Manual
Refer to the documentation that came with your Ethernet switches for instructions on trunk port configuration. Make sure you have appropriate configurations both on your iSCSI storage system and Ethernet switches. Otherwise, networking failures will occur.
Figure 9-1: Supported and Unsupported Trunk Group Configurations
Limitations [Conditions and/or limitations]
1. Aggregation interfaces must be connected in the same network, often the same Ethernet switch, limiting the physical isolation of the multiple paths.
2. Trunking implementation is dependent on having aggregation-capable devices and switches.
3. All ports can be trunked into a single IP, or several IPs. For example, there are 4 GbE ports in iSCSI storage system and user can configure those 4 ports into a single IP, or two IPs each by trunking two physical ports. Taking the 8-ported S16E as an example, trunked ports combinations can be 4, 2+2, or 3+1.
4. If a trunk configuration is not valid, firmware will report a trunk failure event. For example, with 4 GbE ports into a trunk on an iSCSI storage system, while the corresponding ports on GbE switch are not trunked. If so, the trunking configuration is not completed and another event will prompt. Users should configure switch settings and reboot iSCSI storage system again.
5. Requirements on system reset after making changes to trunk configuration: a. Create new trunk groups or change member ports.
b. Change trunk group ID.
c. Change IP address: as usual, both on iSCSI host ports and the 10/100BaseT management port.
6. Trunking and iSCSI MC/S (Multiple Connections per Session):
6-1. Configure port trunking before MC/S configuration.
9-4 iSCSI-related Options

Chapter 9: LUN Mapping
6-2. If there are any configured MC/S groups when creating IP trunking, disband those MC/S groups.
Figure 9-2: Trunked Ports Included in an MC/S Group
7. Link Aggregation, according to IEEE 802.3, does not support the following:
Multipoint Aggregations
The mechanisms specified in this clause do not support aggregations among more than two systems.
Dissimilar MACs
Link Aggregation is supported only on links using the IEEE 802.3 MAC (Gigabit Ethernet and FDDI are not supported in parallel but dissimilar PHYs such as copper and fiber are supported)
Half duplex operation
Link Aggregation is supported only on point-to-point links with MACs operating in full duplex mode.
Operation across multiple data rates
All links in a Link Aggregation Group operate at the same data rate (e.g. 10 Mb/s, 100 Mb/s, or 1000 Mb/s).
8. Users cannot remove a master trunk port from a trunk
configuration, for example, CH0 within a trunk group that consists of channels 0, 1, 2, and 3. The first port (having a smallest index number) within a trunk group is considered a master port member. To break a master port from a trunk group, you should delete the whole trunk group.
iSCSI-related Options 9-5

SANWatch User’s Manual
Configuration Procedure:
The Trunk Group setting is found under System Settings -> Communication tabbed panel. Click on the Trunk Groups check circle to open the configuration window.
Use the Create button to open a port selection window. Select Channels by clicking their check boxes.
Following are details on creating a trunk group: If there is no available host ports for trunk setting, or MC/S
groups have been created, you will receive an error message saying “No available channel!”.
There are channels that CANNOT be selected:
1. Channels that have LUN mappings on them.
2. Channels that have already been trunked.
3. Channels that have already been included in MC/S groups.
You can remove a port from a trunk group. Note that you cannot
remove a member if you have LUN mapping on the trunked ports.
Reset your iSCSI system for trunk setting to take effect.
If your switch ports have not been configured, you will receive an error message saying trunk port configuration failure.
Once iSCSI ports are configured into trunk groups, corresponding MC/S groups are also created. For examples, if ports 0 and 1 are configured into a trunk group, you can see ports 0 and 1 automatically configured into a MC/S group.
9-6 iSCSI-related Options

Chapter 9: LUN Mapping
9.1.2. Grouping (MC/S, Multiple Connections per Session)
Grouping is different from Trunking. Trunking binds multiple physical interfaces so they are treated as one, and is accomplished in the TCP/IP stack. MC/S on the other hand allows the initiator portals and target portals to communicate in a coordinated manner. MC/S provides sophisticated error handling such that a failed link is recovered quickly by other good connections in the same session. MC/S is part of the iSCSI protocol that is implemented underneath SCSI and on top of TCP/IP.
Figure 9-3: Trunk and MC/S on Protocol Stack
Grouping (MC/S) combines multiple host ports into a logical initiator-target session. MC/S can improve the throughput and transfer efficiency over a TCP session. Besides, MC/S saves you the effort of mapping a logical drive to channel IDs on multiple host ports. The below drawings show 4 channels configured into an MC/S group.
Figure 9-4: MC/S Group over Multiple Host Ports
iSCSI-related Options 9-7

SANWatch User’s Manual
Figure 9-5: iSCSI Ports in an MC/S Group as Target Portals
NOTE: If you prefer grouping (MC/S) using iSCSI TOE HBA cards, your HBAs must also support MC/S. Host initiators determine how I/O traffic is distributed through multiple target portals. Theoretically, I/Os are evenly distributed across physical paths.
Configuration:
The MC/S Grouping function is found on the Channel window with a single-click to select an iSCSI host port and another click on the MCS Group tab. Repeat the selection by choosing other host ports and put them into the same logical group.
NOTE: Changing group configuration requires resetting your system. With logical grouping, a logical drive mapped to a channel group will appear as one device on multiple data paths. This is very similar to the use of multi-pathing drivers.
9-8 iSCSI-related Options

Chapter 9: LUN Mapping
Host ports on different RAID controllers (a redundant-controller system) ARE NOT grouped together. Namely, in the event of a single controller failure, the IPs do not failover to the surviving controller.
W/O grouping W/ grouping
Figure 9-6: LUN Presence on Grouped and Individual Host Channels
Grouping allows a consistent look of a storage volume to be seen over multiple connections, in a way very similar to the use of multi-pathing software. Without grouping, a storage volume will appear as two devices on two data paths.
NOTE: For a redundant-controller system, you still need the EonPath multi-pathing driver to manage the data paths from different RAID controllers.
Appropriate configuration on software initiator is also necessary with grouping. The configuration process will be discussed later.
Figure 9-7: MC/S Groups on Redundant Controllers
A parallel configuration logic is applied in Infortrend’s firmware utility. On the configuration screen of a redundant-controller system, you see the channel settings for a single controller, yet they are automatically applied to the partner controller. If you configure “channel groups,” you actually create juxtaposed groups on partner controllers. (see drawing on the left)
One volume mapped to both an AID and a BID will appear as two devices both on the A links and on the B links. You will then need the EonPath multi-pathing driver to manage the fault-tolerant paths.
iSCSI-related Options 9-9

SANWatch User’s Manual
Here is a sample of 1 logical drive appearing as 2 devices across 8 data links (on 2 channel groups). With the help of EonPath, mapping to both controllers’ IDs can ensure continuous access to data in the event of cabling or controller failure.
Figure 9-8: LUN Presence over Controller A and Controller B Host Ports
NOTE: Once channels are grouped, the channel group will behave as one logical channel, and the attributes of individual host channels will disappear. For example, if 4 channels are grouped together, only the IDs on the first channel remain.
Before Grouping After Grouping
Channel 0 Channel 1 Channel 2 Channel 3
ID 0 ID 0 ID 0 ID 0
Channel 0 Channel 1 Channel 2 Channel 3
ID 0 - - -
NOTE: Although the individual channel information is not available, you still need to take care of the TCP/IP connections. For example, you will need to consult your network administrator and configure a static port IP for your iSCSI host ports. If you already configured trunk groups, you can omit this part of the configuration.
9-10 iSCSI-related Options

Chapter 9: LUN Mapping
9.2. Host LUN Mapping Once your network and RAID volume settings are done, install and enable initiators on your application servers. You can now power on networking devices, storage system, and servers, and map your storage volumes to host LUNs so that network connectivity can be verified.
Figure 9-9: LUN Presence over Controller A and Controller B Host Ports
The above drawing shows a basic fault-tolerant configuration where service can continue with any single point of cabling or RAID controller failure. For simplicity reasons, only 1 server and 4 host links from it are shown. More logical drives, HBAs, or servers can attach to the configuration.
Host LUN Mapping 9-11

SANWatch User’s Manual
Create Initiator List
When your application servers are powered on, you should be able to see initiators from the firmware screen. Use the initiator list to organize your iSCSI connections. In the initiator’s attribute window, you can configure the following: 1. Enter a nickname for an initiator.
2-1. Manually key in an initiator’s IQN.
2-2. Select an initiator from a list of IQNs that have already been detected over network.
2. Configure either the One-way or Mutual CHAP authentication. User Name and User Password are the inbound CHAP name and password; while the Target Name and Target Password are the outbound CHAP name and password.
3. Apply IP Address and NetMask settings (if necessary). Multiple initiator ports on an application server can sometimes share the same IQN.
Having a list of initiators memorized in system firmware can facilitate the process for configuring host LUN mapping and LUN Masking control. The initiator list also contains input entries for CHAP settings. See the following section for details.
9-12 Host LUN Mapping
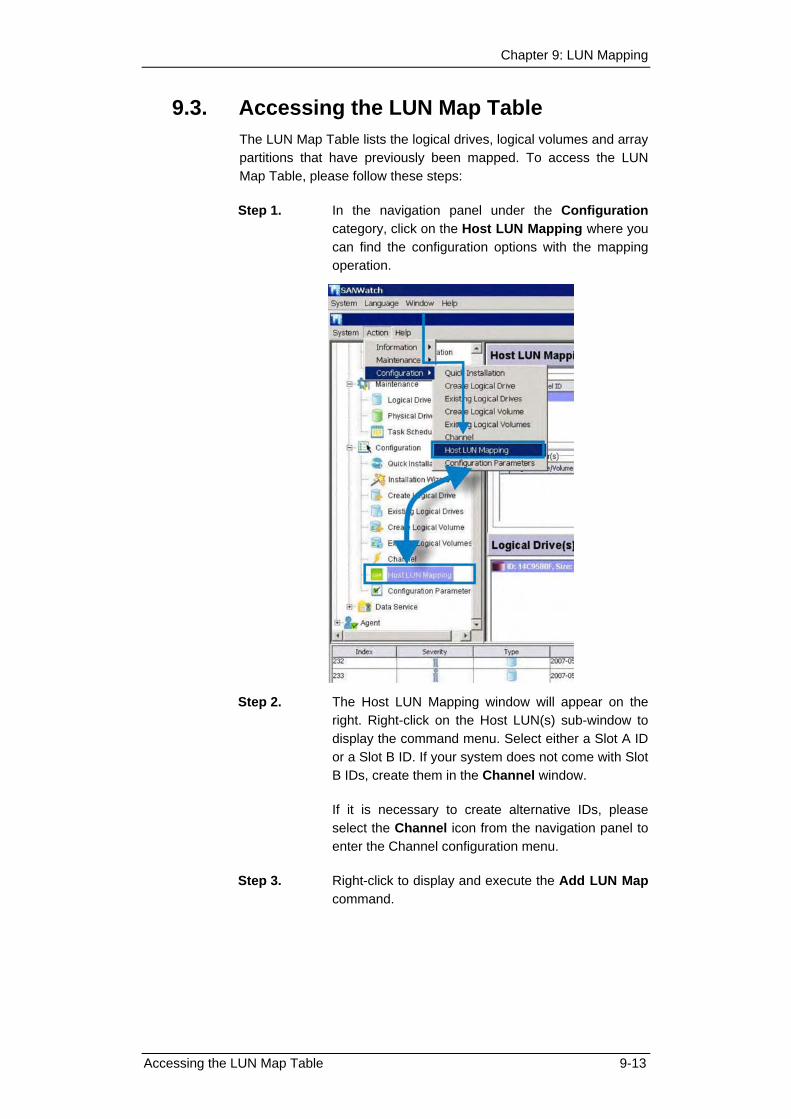
Chapter 9: LUN Mapping
9.3. Accessing the LUN Map Table The LUN Map Table lists the logical drives, logical volumes and array partitions that have previously been mapped. To access the LUN Map Table, please follow these steps:
Step 1. In the navigation panel under the Configuration category, click on the Host LUN Mapping where you can find the configuration options with the mapping operation.
Step 2. The Host LUN Mapping window will appear on the right. Right-click on the Host LUN(s) sub-window to display the command menu. Select either a Slot A ID or a Slot B ID. If your system does not come with Slot B IDs, create them in the Channel window.
If it is necessary to create alternative IDs, please select the Channel icon from the navigation panel to enter the Channel configuration menu.
Step 3. Right-click to display and execute the Add LUN Map command.
Accessing the LUN Map Table 9-13

SANWatch User’s Manual
In a redundant-controller configuration, you will be prompted to select either a Slot A controller or a Slot B controller. When RAID arrays are equally assigned to the partner controllers, workload can be shared by the partner controllers.
Options with Controller A or Controller B ID
The Channel Window: where you manually add or remove a channel ID.
Step 4. After selecting a RAID controller whose host ID will be used in the following process, the LUN Map Setting window appears as shown below.
9-14 Accessing the LUN Map Table

Chapter 9: LUN Mapping
9.4. LUN Mapping
9.4.1. Mapping a Complete Logical Drive or Logical Volume
Step 1. Follow the steps listed in Section 9.1 above to access the Host LUN Mapping window..
Step 2. Select the appropriate Channel, Host ID, and LUN numbers from the separate pull-down lists.
Step 3. Select a Logical Drive or Logical Volume and then select a partition from the Partition color bar by a single mouse-click. The partition bar appears on the right-hand side of the screen. Carefully check the partition’s index number before making the host LUN mapping.
Step 4. Click on the Map LUN button to complete the process.
LUN Mapping 9-15
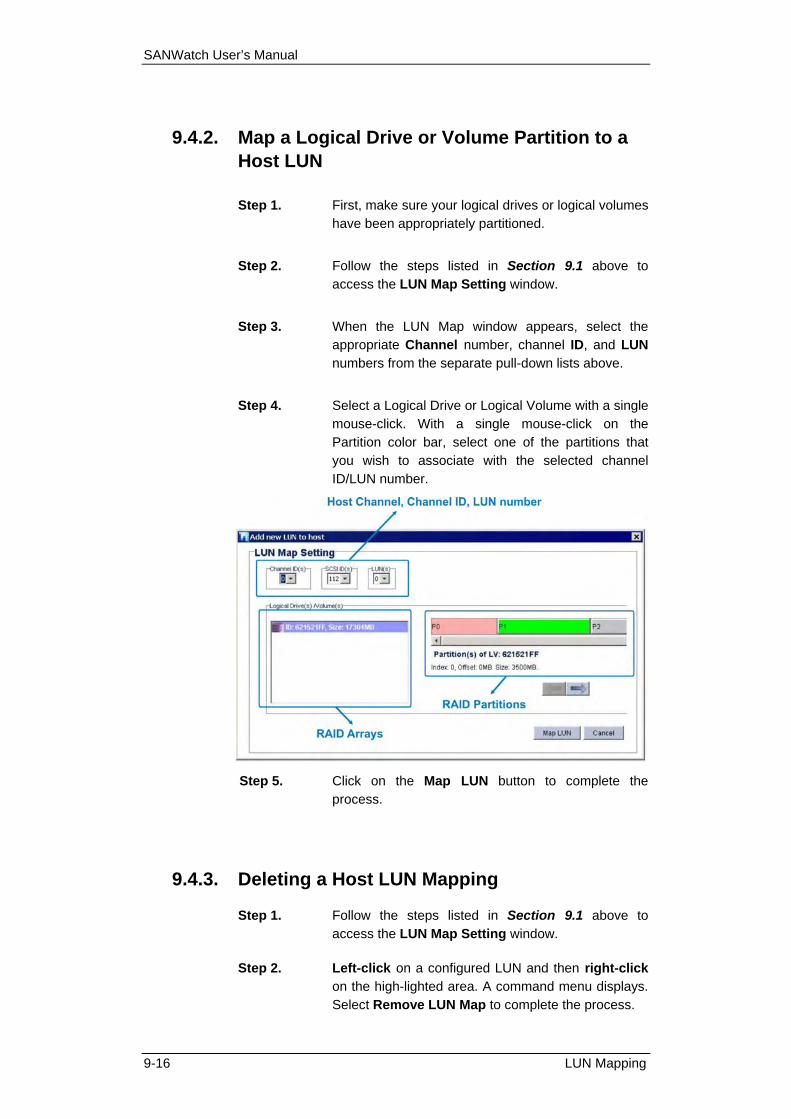
SANWatch User’s Manual
9.4.2. Map a Logical Drive or Volume Partition to a Host LUN
Step 1. First, make sure your logical drives or logical volumes have been appropriately partitioned.
Step 2. Follow the steps listed in Section 9.1 above to access the LUN Map Setting window.
Step 3. When the LUN Map window appears, select the appropriate Channel number, channel ID, and LUN numbers from the separate pull-down lists above.
Step 4. Select a Logical Drive or Logical Volume with a single mouse-click. With a single mouse-click on the Partition color bar, select one of the partitions that you wish to associate with the selected channel ID/LUN number.
Step 5. Click on the Map LUN button to complete the process.
9.4.3. Deleting a Host LUN Mapping
Step 1. Follow the steps listed in Section 9.1 above to access the LUN Map Setting window.
Step 2. Left-click on a configured LUN and then right-click on the high-lighted area. A command menu displays. Select Remove LUN Map to complete the process.
9-16 LUN Mapping

Chapter 9: LUN Mapping
Step 3. When prompted for a password or an answer, enter it and click OK. The LUN mapping should no longer be listed in the LUN Map table. After deleting the LUN mapping it no longer appears in the host LUN(s).
Step 4. To remove additional LUN mappings, repeat the above procedure.
9.4.4. LUN Mapping Access Control over iSCSI Initiator Settings
For subsystems featuring iSCSI host interfaces, an access control list will be available with the host LUN mapping screen. The iSCSI Initiator settings allow you to associate or disassociate a specific initiator with specific RAID volumes. Two-way (Mutual) CHAP can also be implemented here. With the associated settings, you can apply access control over iSCSI network for ensuring data security.
NOTE: Before configuring One-way and Two-way CHAP, you need to enable the CHAP option in the “Configuration Parameters” “Host-side” Parameters window.
LUN Mapping 9-17
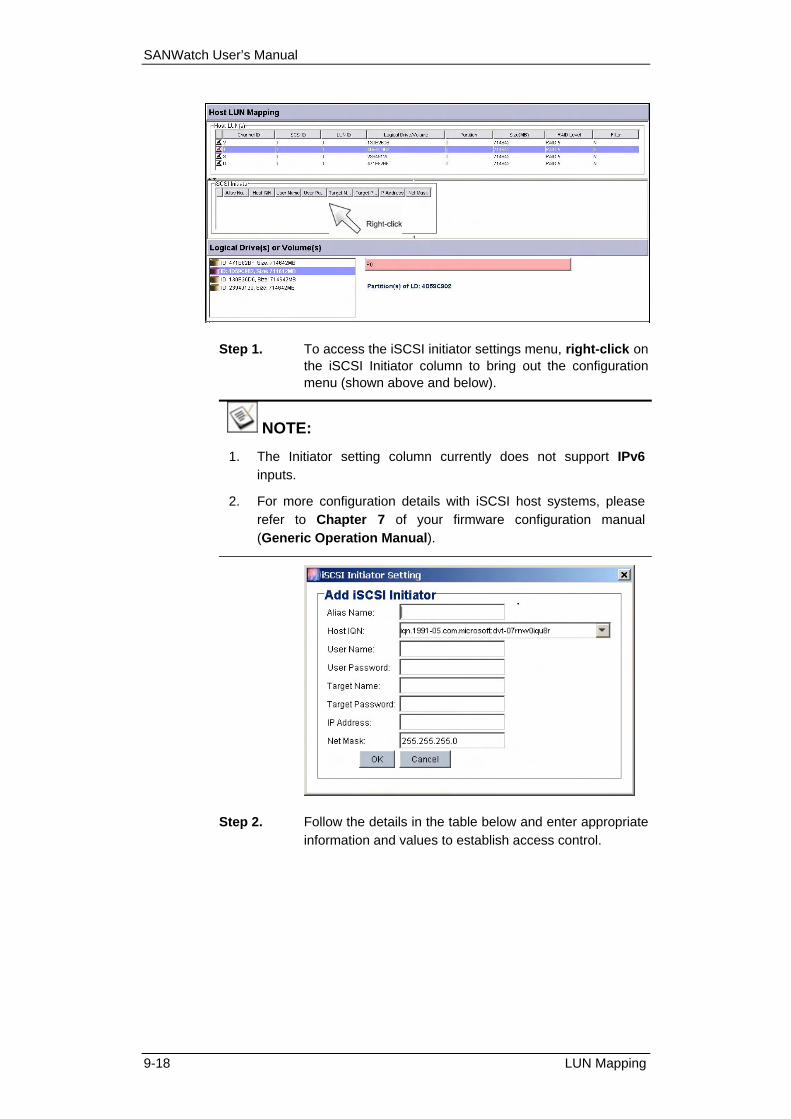
SANWatch User’s Manual
Step 1. To access the iSCSI initiator settings menu, right-click on
the iSCSI Initiator column to bring out the configuration menu (shown above and below).
NOTE: 1. The Initiator setting column currently does not support IPv6
inputs.
2. For more configuration details with iSCSI host systems, please refer to Chapter 7 of your firmware configuration manual (Generic Operation Manual).
Step 2. Follow the details in the table below and enter appropriate
information and values to establish access control.
9-18 LUN Mapping

Chapter 9: LUN Mapping
Table 9-1 iSCSI Initiator CHAP Configuration Entries
Host Alias Name Enter a host alias name to specify a CHAP association with a specific software/hardware initiator. This Alias name facilitates ease of recognition because iSCSI initiator IQN consists of many characters and is often too long to remember.
Host IQN In here you can manually enter an initiator’s IQN (iSCSI Qualified Name); - or – Select from the list of connected initiators by clicking on the pull-down button to display the currently connected initiators.
User Name The user name here applies to a one-way CHAP configuration. Identical name and password must be configured on the initiator software or HBA configuration utility.
User/target name and password are used for the inbound authentication processes between the called and calling parties. Names and passwords are identical here and at the initiator side.
User Password The user password here applies to a one-way CHAP configuration for inbound authentication. Note that some CHAP configuration utilities may use “secret” instead of “password.”
Target Name The target name here applies to a two-way (mutual) CHAP configuration. Identical target name and password must be configured on the initiator software or HBA configuration utility.
Target Password The target password here applies to a two-way CHAP
configuration for outbound authentication.
IP Address Enter the IP address of an iSCSI initiator.
NetMask Enter an appropriate NetMask value here.
NOTE: Some login authentication utilities provided with iSCSI HBAs on Windows operating systems require a CHAP password of the length of at least 12 characters.
LUN Mapping 9-19

SANWatch User’s Manual
NOTE: 3. Infortrend supports one-way or two-way (mutual) CHAP
authentication. With two-way CHAP, a separate three-way handshake is initiated between an iSCSI initiator and storage host port.
On the initiator side (for example, Microsoft initiator software), CHAP logon is designated as an option with selectable initiator IQN name and that of the target secret (to which the CHAP authentication call will be issued; namely, the host port on your subsystem).
2. Microsoft iSCSI initiator uses IQN as the default User name for CHAP setting. A different User name can be specified here instead of the default.
3. For more information on CHAP-related settings, please refer to
the documentation that came with your initiator hardware or software drivers.
9-20 LUN Mapping

Chapter 9: LUN Mapping
This page is intentionally left blank.
LUN Mapping 9-21

Chapter 10
Configuration Parameters
SANWatch Manager enables you to modify the configuration of the disk array controller from your manager console. This chapter describes the following configuration features:
Accessing Configuration Parameters Options - Section 10.1
Communications – Section 10.2
Network Protocols – Section 10.3
Controller – Section 10.4
System – Section 10.5
Password – Section 10.6
Threshold – Section 10.7
Redundant Controller Settings - Section 10.8
Event Triggered Operations – Section 10.9
Others - Section 10.10
Chapter 10: Configuration Parameters 10-1

SANWatch User’s Manual
10.1 Accessing the Configuration Parameters Options To access controller configuration options, either use the Configuration category icons on the Navigation Tree or select the Configuration Parameters command from the command menu to open the Configuration Parameters. The configuration window contains many options that are directly related to array performance, and should be configured before creating logical arrays.
The following is a complete list of configuration controls and optional menus that you will have available once the Configuration Parameters option has been selected.
More information about many of these variables is available in the controller hardware and firmware documentation.
10-2 Accessing the Configuration Parameters Options
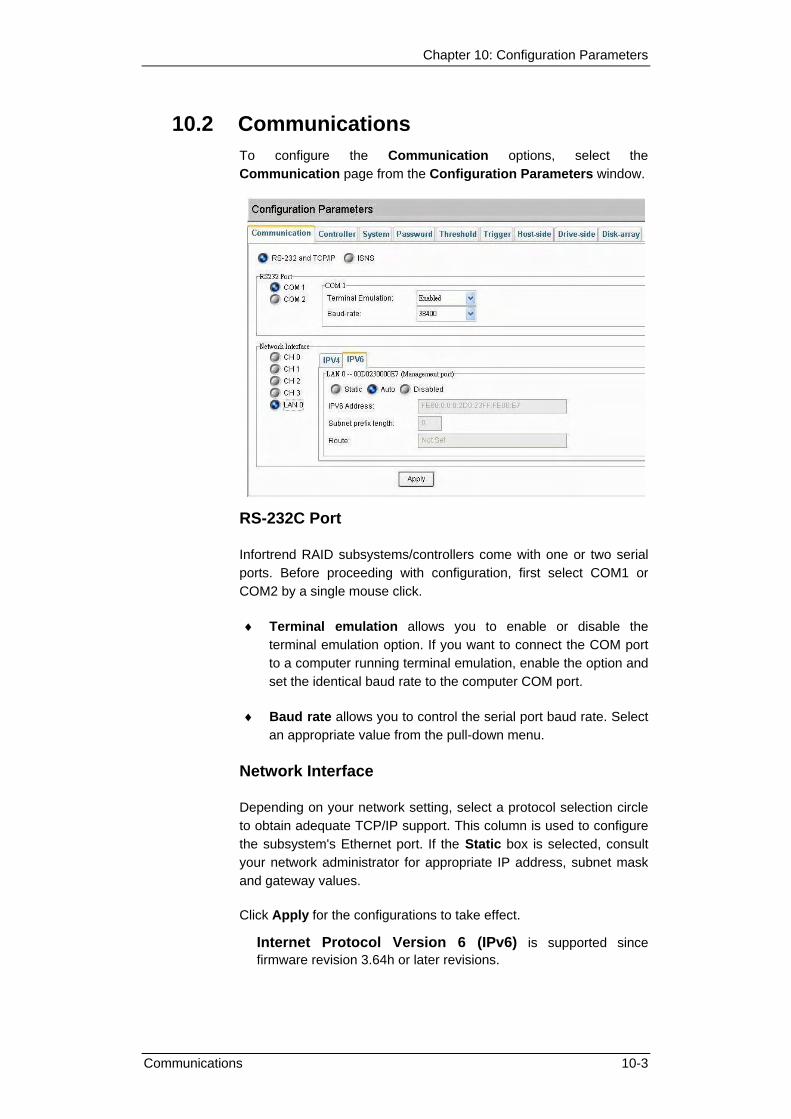
Chapter 10: Configuration Parameters
10.2 Communications To configure the Communication options, select the Communication page from the Configuration Parameters window.
RS-232C Port
Infortrend RAID subsystems/controllers come with one or two serial ports. Before proceeding with configuration, first select COM1 or COM2 by a single mouse click.
♦ Terminal emulation allows you to enable or disable the terminal emulation option. If you want to connect the COM port to a computer running terminal emulation, enable the option and set the identical baud rate to the computer COM port.
♦ Baud rate allows you to control the serial port baud rate. Select an appropriate value from the pull-down menu.
Network Interface
Depending on your network setting, select a protocol selection circle to obtain adequate TCP/IP support. This column is used to configure the subsystem's Ethernet port. If the Static box is selected, consult your network administrator for appropriate IP address, subnet mask and gateway values.
Click Apply for the configurations to take effect.
Internet Protocol Version 6 (IPv6) is supported since firmware revision 3.64h or later revisions.
Communications 10-3

SANWatch User’s Manual Since IPv6 comes with a more autonomous support for automatic addressing, automatic network configuration is applied in most deployments. An automatic local name resolution is available with or without a local Domain Name Server (DNS).
Key in “AUTO” in the IPv6 address field, and the address will be available after a system reset.
IPv6 addresses can be acquired through the following ways:
• A link-local address is automatically configured by entering AUTO in the IPv6 address field. With a point-to-point connection without router, addresses will be generated using port MAC addresses starting with “fe80::.” Link-locals are addresses within the same subnet.
• If addresses are automatically acquired, the “Subnet prefix length” and the “Route” fields can be left blank.
• If an IPv6 router is present, keying in AUTO in the address field and let a router’s advertisement mechanism determine network addresses.
• You can also manually enter IPv6 addresses by generating the last 64 hexadecimal bits from the 48-bit MAC addresses of Ethernet ports in EUI-64 format, and then use the combination of fe08 prefix and prefix length to signify a subnet.
A sample process is shown below: 1. Insert FFFE between company ID and node ID, as the fourth and fifth octets (16 bits). 2. Set the Universal/Local (U/L) bit, the 7th of the first octet, to a value of 0 or 1. “0” indicates a locally administered identity, while “1” indicates a globally unique IPv6 interface ID.
Figure 10-1: Converting 48-bit MAC Address into IPv6 Interface ID
Infortrend supports a variety of IPv6 mechanisms including Neighbor Unreachability Detection, stateful and stateless address autoconfiguraion, ICMPv6, Aggregatable Global Unicast Address, Neighbor Discovery, etc.
10-4 Communications

Chapter 10: Configuration Parameters
The Prefix Length field
The prefix length is part of the manual setting. An IPv6 network is a contiguous group of IPv6 addresses. The size of this field must be a power of 2. The Prefix Length designates the number of bits for the first 64 bits of the Ipv6 addresses, which are identical for all hosts in a given network, are called the network's address prefix.
Such consecutive bits in IPv6 addresses are written using the same notation previously developed for IPv4 Classless Inter-Domain Routing (CIDR). CIDR notation designates a leading set of bits by appending the size (in decimal) of that bit block (prefix) to the address, separated by a forward slash character (/), e.g., 2001:0db8:1034::5678:90AB:CDEF:5432/48. (In firmware screen, slash is not necessary. The prefix number is entered in the length field.)
The architecture of IPv6 address is shown below:
The first 48 bits contain the site prefix, while the next 16 bits provide subnet information. An IPv6 address prefix is a combination of an IPv6 prefix (address) and a prefix length. The prefix takes the form of “ipv6-prefix/prefix-length” and represents a block of address space (or a network). The ipv6-prefix variable follows general IPv6 addressing rules (see RFC 2373 for details).
For example, an IPv6 network can be denoted by the first address in the network and the number of bits of the prefix, such as 2001:0db8:1234::/48. With the /48 prefix, the network starts at address 2001:0db8:1234:0000:0000:0000:0000:0000 and ends at 2001:0db8:1234:ffff:ffff:ffff:ffff:ffff.
Individual addresses are often also written in CIDR notation to indicate the routing behavior of the network they belong to. For example, the address 2001:db8:a::123/128 indicates a single interface route for this address, whereas 2001:db8:a::123/32 may indicate a different routing environment.
IPv6 Prefix Description 2001:410:0:1::45FF/128 A subnet with only one Ipv6 address
2001:410:0:1::/64 A subnet that contains 264 nodes. Often the default prefix length for a
subnet.
2001:410:0::/48 A subnet that contains 216 nodes. Often the default prefix length for a
site.
Table 10-1: IPv6 Subset Example
Communications 10-5

SANWatch User’s Manual 10.3 Network Protocols
You may select to disable one or multiple TCP ports for a better security control and reduce overhead of your local network. You may not need to use all types of management interfaces.
10.4 Controller “Controller” here refers to the RAID controller unit, which is the main processing unit of a RAID subsystem. The configuration window contains two sub-windows: “Caching” and “Controller Parameters.” To configure the controller’s caching behaviors, select an appropriate value from each of the pull-down menus.
The data cache can be configured for optimal I/O performance using the following variables:
Caching Parameters
♦ Write-Back Cache
10-6 Network Protocols

Chapter 10: Configuration Parameters
Enabled, Host Writes are cached before being distributed to hard drives. This improves write performance but requires battery backup support to protect data integrity in case of a power outage.
Disabled, Cache Write-Through. Used primarily if no cache battery backup is installed and if there is increased likelihood of a power failure.
Default. This value is considered as a “Not-specified” option. If set to default, the subsystem’s caching mode will be automatically adjusted especially when the event triggered operation has been configured. For example, if a cooling module fails, the subsystem firmware automatically switches caching mode to the conservative Write-through.
♦ Periodic Cache Flush Time
This option allows you to select the desired interval for the subsystem to flush cached data. This applies especially with subsystems that come without BBU support.
Controller Parameters
♦ Controller Name
A manually entered nickname for the RAID controller. This name can also be used to recognize a RAID subsystem in an environment where multiple RAID subsystems reside.
♦ Unique Identifier (HEX)
This is a MUST for subsystem configuration, especially for those with dual-controllers or Fibre host ports. The unique ID is integrated as unique Fibre Channel node name and port names. In the event of controller failover and failback, this ID helps host-side initiators to identify a RAID subsystem.
♦ Time Zone(GMT)
GMT (Greenwich Mean Time) is used with a 24-hour clock. To change the clock to your local time zone, select a time from the drop-down menu. Choose the hour later than the Greenwich Mean Time following a plus (+) sign. For example, enter “+9” for Japan’s time zone.
♦ Date/Time
Enter time and date in their numeric representatives in the following order: month, day, hour, minute, and the year.
Controller 10-7

SANWatch User’s Manual When preferences have been set with the configurations above, click Apply to make the changes.
10.5 System To access the System-specific functions, select the System page, as shown in below, from the Configuration Parameters window.
Each function is executed by a two-step procedure. Click the select button of the function you wish to perform and click the “Apply” button for the configuration to take effect.
Select only one option each time from the System page. You may repeat the steps if you like to proceed with more than one option.
System Functions
♦ Mute Beeper. Turns the beeper off temporarily for the current event. The beeper will still be activated by the next event. Be sure that you have checked carefully to determine the cause of the event.
♦ Reset Controller. Resets the subsystem without powering off.
♦ Shutdown Controller. This prepares the subsystem to be powered off. This function flushes the unfinished writes still cached in controller memory making it safe to turn off the subsystem.
10-8 System

Chapter 10: Configuration Parameters
♦ Restore Factory Default. When you apply this function, any settings that you have made in SANWatch program will be formated and the original factory default configuration will be restored.
WARNING!
Restoring the Factory Default will erase all your array preferences, including host ID/LUN mappings. Although the configured arrays remain intact, all other caching or performance-specific options will be erased.
If configured arrays cannot be properly associated with host ID/LUNs, data inconsistency might occur.
It is best to save your configuration details before using this function.
System 10-9

SANWatch User’s Manual
Download/Upload
Figure 10-2: Firmware Upgrade Flowchart
NOTE: 1. Restore Default is necessary when migrating firmware
between major revisions, e.g., rev. 3.48 to 3.61. Restore Default can erase the existing LUN mappings. Please consult technical support if you need to apply a very new firmware.
2. Saving NVRAM (firmware configuration) to a system drive preserves all configuration details including host LUN mappings.
3. Whenever host channel IDs are added or removed, you need to reset the system for the configuration to take effect. That is why you have to import your previous configuration and reset again to bring back the host LUN mappings if you have host IDs different from system defaults.
♦ Download FW. Subsystem firmware can be upgraded using the existing management connection (whether Ethernet or in-
10-10 System
Chapter 10: Configuration Parameters
band). Provide the firmware filename using the file location prompt. SANWatch will start to download the firmware. Find an appropriate time to temporarily stop the access from host systems, then reset the controller in order to use the new downloaded firmware.
NOTE:
Do not use this command to download license key for the advanced Data Service functionality. The license key download is accessed through the license key pop-up window.
♦ Download FW+BR: This allows you to download the firmware and boot record together. It may not be necessary to upgrade the boot record each time you update your firmware binaries. Please refer to the readme text file that came with each firmware version.
♦ Download NVRAM from Host Disk: The subsystem configuration is saved in NVRAM and can be saved to a system drive. This function allows you to retrieve a previously saved configuration profile from a system disk.
NOTE:
1. The Save NVRAM function can be used to duplicate system configurations to multiple RAID systems or to preserve your system settings. However, the logical drive mapping will not be duplicated when downloading the NVRAM contents of one RAID system to another. LUN mapping adheres to specific “name tags” of logical drives, and therefore you have to manually repeat the LUN mapping process. All of the download functions will prompt for a file source from the current workstation.
2. Except LUN mapping, the NVRAM contents include all configuration data in firmware including host-side, drive-side, logical drive, and controller-related preferences.
3. The Data Service configurations, such as snapshot set settings, will not be preserved by the function.
♦ Upload NVRAM to Host Disk: This allows you to backup your controller-dependent configuration information to a system drive. We strongly recommend using this function to save the configuration profile whenever a configuration change is made.
System 10-11

SANWatch User’s Manual
10-12 Password
♦ Save NVRAM to Disk: The configuration profile can also be saved to array hard drives. Each array hard drive will have a replica of the NVRAM backup in its reserved space so that when a drive fails or is being regrouped, the backup remains
ecide whether to restore previous configuration using the original
.
A question window will prompt showing the options.
intact.
♦ Restore NVRAM from Disk: If an administrator wishes to retrieve the previously saved NVRAM backup from subsystem hard drives, all settings including system password will also be restored. With these option, an administrator can d
password just in case you forget the original password
NOTE:
Upload NVRAM will prompt for a file destination at the current
This option is only available in Firmware revision 3.47 or above.
console.
10.6 ure different levels of the Access authorization Password,
select the Password page from the Configuration Parameter window.
Password To config
Maintenance Password

Chapter 10: Configuration Parameters
Threshold 10-13
Users logging in using the Maintainance Password will be able to access the first two configuration categories: Information and Maintenance. You may set the Maintenace Password here and click
nfiguration categories on the navigation tree. You may set the Configuration Password here and click OK for the change to take effect.
10.7 To access the event threshold options, click the Threshold page in
ID controller. Adjusting the default thresholds can coordinate the controller status monitoring with that of the system
It is not recommended to change the threshold values unless extreme conditions are expected on the installation site.
OK for the change to take effect.
Configuration Password
Users logging in using the Configuration Password have full access to all configuration options. A super-user has the right to access all three co
Threshold
the Configuration Parameters window.
This window allows you to change the preset values on thresholds used to monitor the condition of the RAID controller unit(s) in your subsystem. For example, these threshold values can be changed if the controller operates in a system enclosure where the upper or lower limit on ambient temperature is much higher or lower than that on the RA
enclosure.
To change the threshold values on a specific monitored item, for example, the CPU Temp Sensor, right-click on the item. The Configuration button will prompt. Left-click on the Configuration button window. to bring up the threshold
WARNING! The upper or lower thresholds can also be disabled by entering “-1” in the threshold field. However, users who disable the thresholds do this at their own risk. The controller(s) will not report condition warning when the original thresholds are exceeded.

SANWatch User’s Manual
10-14 Redundant Controller Settings
You may then enter a value in either the lower or upper threshold field.
NOTE: If a value exceeding the safety range is entered, an error message will prompt and the new parameter will be ignored.
Click Apply for the configuration change to take effect.
Click Default to restore the default values for both thresholds.
ck to the Threshold page in the Configuration Parameters window.
10.8 Redundant Controller Settings
ontroller/subsystem comes with dual-redundant RAID controllers.
Click Cancel to cancel this action and go ba
This sub-window contains configuration options related to redundant controller configurations. This Redundant page only displays if your c
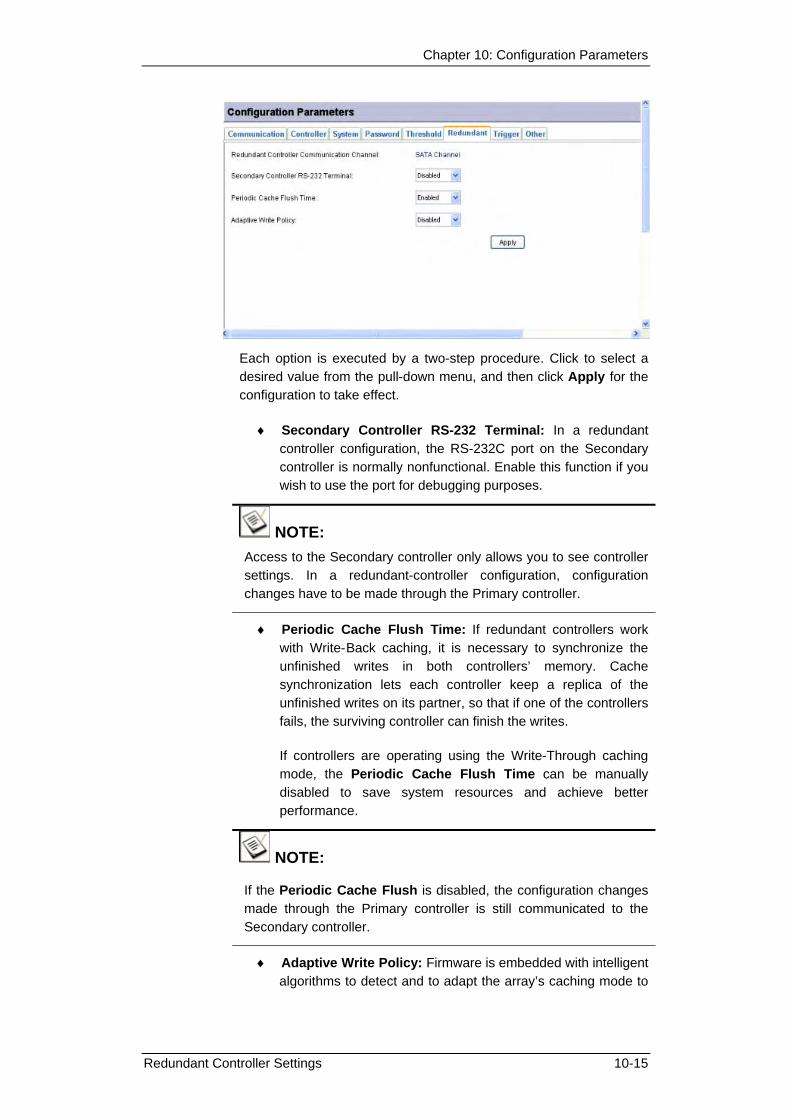
Chapter 10: Configuration Parameters
Each option is executed by a two-step procedure. Click to select a desired value from the pull-down menu, and then click Apply for the configuration to take effect.
♦ Secondary Controller RS-232 Terminal: In a redundant controller configuration, the RS-232C port on the Secondary controller is normally nonfunctional. Enable this function if you wish to use the port for debugging purposes.
NOTE: Access to the Secondary controller only allows you to see controller settings. In a redundant-controller configuration, configuration changes have to be made through the Primary controller.
♦ Periodic Cache Flush Time: If redundant controllers work with Write-TBack caching, it is necessary to synchronize the unfinished writes in both controllers’ memory. Cache synchronization lets each controller keep a replica of the unfinished writes on its partner, so that if one of the controllers fails, the surviving controller can finish the writes.
If controllers are operating using the Write-Through caching mode, the Periodic Cache Flush Time can be manually disabled to save system resources and achieve better performance.
NOTE:
If the Periodic Cache Flush is disabled, the configuration changes made through the Primary controller is still communicated to the Secondary controller.
♦ Adaptive Write Policy: Firmware is embedded with intelligent algorithms to detect and to adapt the array’s caching mode to
Redundant Controller Settings 10-15

SANWatch User’s Manual the I/O requests characteristics. The capability is described as follows:
1. When enabled, the adaptive write policy optimizes array performance for sequential writes.
2. The adaptive policy temporarily disables an array’s write-caching algorithm when handling sequential writes. Write-caching can be unnecessary with sequential writes so that write requests can be more efficiently fulfilled by writing data onto disk drives in the order in which they are received.
3. The adaptive policy changes the preset write policy of an array when handling I/Os with heterogeneous characteristics. If the firmware determines it is receiving write requests in a sequential order, the write-back caching algorithm is disabled on the target logical drives.
If subsequent I/Os are fragmented and received randomly, the firmware automatically restores the original write-cache policy of the target logical drives.
Adaptation for Redundant Controller Operation
4. If arrays managed by a redundant-controller configuration are configured to operate with write-back caching, cached data will be constantly synchronized between the partner controllers. Synchronization consumes system resources. By disabling synchronization and write-back caching, the direct writes to system drives can be more efficient. Upon receiving sequential writes, the firmware disables write-back caching on target arrays and also the synchronized cache operation.
IMPORTANT!
The Adaptive Write Policy is applicable to subsystems working under normal conditions. In the degraded conditions, e.g., if a drive fails in an array, the firmware automatically restores the array’s original write policy.
10-16 Redundant Controller Settings

Chapter 10: Configuration Parameters
10.9 Event Triggered Operations
To reduce the chance of data loss caused by hardware failure, the controller/subsystem can automatically commence an auto cache flush upon the detection of the following conditions. When cache contents are forced to be distributed to hard drives, the Write-Back caching mode is also switched to the Write-Through mode.
1. Controller Failure
2. BBU Lower or Failure
3. UPS Auxiliary Power Loss
4. Power Supply Failed (single PSU failure)
5. Fan Failure
6. Temperature Exceeds Threshold
Each option is executed by a two-step procedure. Select the check box of the event type for which you wish the controller/subsystem to commence the cache flush, and then click Apply for the configuration to take effect.
NOTE:
The thresholds on temperatures refer to the defaults set for “RAID controller board temperature.”
Event Triggered Operations 10-17

SANWatch User’s Manual
10.10 Host-side, Drive-side, and Disk Array Parameters I/O channel host-side, drive-side, and rebuild priority options are included in its specific sub-window. To configure these configuration options, select each configuration page from the Configuration Parameters window.
Each option is executed by a two-step procedure. Click to select a desired value from the pull-down menu, and then click Apply for the configuration to take effect. Some configuration changes may only take effect after resetting the subsystem.
10-18 Host-side, Drive-side, and Disk Array Parameters

Chapter 10: Configuration Parameters
Drive-side Parameters
Disk Access Delay Time (Sec): Sets the delay time before the subsystem tries to access the hard drives after power-on. Default can vary in different RAID subsystems.
Drive Check Period (Sec): This is the time interval for the controller to check all disk drives that were on the drive buses at controller startup. The default value is “Disabled.” Disabled means that if a drive is removed from the bus, the controller will not know it is missing as long as no host accesses that drive. Changing the check time to any other value allows the controller to check all array hard drives at the selected time interval. If any drive is then removed, the controller will be able to know – even if no host accesses that drive.
This option may not appear with drive channels that come with auto-detection, e.g., Fibre Channel.
Auto-assign Global Spare Drive: Enable this function to allow the system to auto-assign one or more unused drives as the Global Spare drives. This can prevent the lack of spare drive when a spare has previously been spent rebuilding a logical drive, and yet a user forgets to configure another spare.
SMART: This allows you to configure SMART-related functionality. SMART is short for “Self-Monitoring, Analysis and Reporting Technology.” Options provided in the pull-down menu are the actions to be taken if the SMART function detects an unstable drive.
Spindown Idle Delay Period (Sec): Subsystem firmware stops supplying 12V power source to hard drives when hard
Host-side, Drive-side, and Disk Array Parameters 10-19

SANWatch User’s Manual drives have not received I/Os for a period of time. When enabled, this feature helps reduce power consumption.
Drive Delayed Write: This option applies to SATA disk drives which may come with embedded buffers. When enabled, write performance may improve. However, this option should be disabled for mission-critical applications. In the event of power outage or drive failures, data cached in drive buffers may be lost, and data inconsistency will occur. The default setting is “Disabled.”
NOTE:
This function is only applicable on RAID subsystems running Firmware 3.47 or above using SATA hard drives.
Disk I/O Timeout (Sec): This is the time interval for the subsystem to wait for a drive to respond to I/O requests. Selectable intervals range from 1 to 10 seconds.
SAF-TE/SES Device Check Period (Sec): If enclosure devices in your RAID enclosure are being monitored via SAF-TE/SES enclosure service, use this function to decide at what interval the subsystem will check the status of these devices.
Auto Rebuild on Drive Swap (Sec): The subsystem scans drive buses at this interval to check if a failed drive has been replaced. Once a failed drive is replaced, firmware automatically commence a rebuild on the logical drive. The Default drive bus check time is 1 second, which is different from this option, Auto Rebuild check time.
Maximum Tag Count: The subsystem supports tag command queuing with an adjustable maximum tag count from 1 to 128. The default setting is “Enabled” with a maximum tag count of 32.
Power Saving:
This feature supplements the disk spin-down function, and supports power-saving on specific logical drives or un-used disk disks with an idle state and the 2-stage power-down settings. Advantages: see the power saving features below. Applicable Disk Drives: Logical drives and non-member disks [including spare drives and un-used drives (new or formatted drives)]. The power-saving policy set to an individual logical drive (from the View and Edit Logical Drive menu) has priority over the general Drive-side Parameter setting.
10-20 Host-side, Drive-side, and Disk Array Parameters

Chapter 10: Configuration Parameters
Power-saving Levels:
Table 10-2: Power-Saving Features
Level Power Saving Ratio
Recovery Time ATA command SCSI command
Level 1 (Idle) * 19% to 22% **
1 second Idle Idle
Level 2 (Spin-down) *
80% 30 to 45 seconds Standby Stop
NOTE:
1. The Idle and Spin-down modes are defined as Level 1 and Level 2 power saving modes on Infortrend’s user interfaces.
2. The power saving ratio is deducted by comparing the consumption in idle mode against the consumption when heavily stressed.
1. Hard drives can be configured to enter the Level 1 idle
state for a configurable period of time before entering the Level 2 spin-down state.
2. Four power-saving modes are available:
2-1. Disable,
2-2. Level 1 only,
2-3. Level 1 and then Level 2,
2-4. Level 2 only. (Level 2 is equivalent to legacy spin-down)
3. The Factory defaults is “Disabled” for all drives. The default for logical drives is also Disabled.
4. The preset waiting period before entering the power-saving state:
4-1. Level 1: 5 minutes
4-2. Level 2: 10 minutes (10 minutes from being in the level 1)
5. If a logical drive is physically relocated to another enclosure (drive roaming), all related power-saving feature is cancelled.
Limitation:
Firmware revision 3.64P_ & above Applicable Hardware:
1. All EonStor series running the compatible firmware version.
2. The supported drive types are SATA and SAS (especially 7200RPM models). Models are listed in AVL document (Approved Vendor List) separately.
NOTE: The legacy Spin-down configuration will remain unchanged when a system firmware is upgraded to rev. 3.64P from the previous revision.
Host-side, Drive-side, and Disk Array Parameters 10-21

SANWatch User’s Manual
Host-side Parameters
Maximum Queued I/O Count: This is the arrangement of the controller internal resources for use with a number of the current host nexus. It is a "concurrent" nexus, so when the cache is cleared up, it will accept a different nexus again. Many I/Os can be accessed via the same nexus.
This function allows you to configure the maximum number of I/O queues the controller can accept from the host computer.
LUNs per Host ID: Each SCSI ID can have up to 32 LUNs (Logical Unit Numbers). A logical configuration of array capacity can be presented through one of the LUNs under each host channel ID. Most SCSI host adapters treat a LUN like another SCSI device.
Max. Concurrent Host-LUN: The configuration option adjusts the internal resources for use with a number of current host nexus. If there are four host computers (A, B, C, and D) accessing the array through four host IDs/LUNs (ID 0, 1, 2 and 3), host A through ID 0 (one nexus), host B through ID 1 (one nexus), host C through ID 2 (one nexus) and host D through ID 3 (one nexus) - all queued in the cache - that is called 4 nexus. If there are I/Os in the cache through four different nexus, and another host I/O comes down with a nexus different than the four in the cache (for example, host A access ID 3), the controller will return "busy.” Note that it is "concurrent" nexus; if the cache is cleared up, it will accept four different nexus again. Many I/Os can be accessed via the same nexus.
Tag Reserved Per Host-LUN Connection: Each nexus has 32 (the default setting) tags reserved. When the host computer sends 8 I/O tags to the controller, and the controller is too busy to process them all, the host might start to send less than 8 tags during every certain period of time since then. This setting ensures that the controller will accept at least 32 tags per nexus. The controller will be able to accept more than that as long as the controller internal resources allow - if the controller does not have enough resources, at least 32 tags can be accepted per nexus.
Peripheral Device Type / Peripheral Device Qualifier / Device Supports Removable Media / LUN applicability: If no logical drive has been created and mapped to a host LUN, and the RAID controller is the only device connected to the host SCSI card, usually the operating system will not load the driver for the host adapter. If the driver is not loaded, the host
10-22 Host-side, Drive-side, and Disk Array Parameters

Chapter 10: Configuration Parameters
computer will not be able to use the in-band utility to communicate with the RAID controller. This is often the case when users want to start configuring a RAID using management software from the host. It will be necessary to configure the "Peripheral Device Type" setting for the host to communicate with the controller. If the "LUN-0's only" is selected; only LUN-0 of the host ID will appear as a device with the user-defined peripheral device type. If "all undefined LUNs" is selected, each LUN in that host ID will appear as a device with the user-defined peripheral device type.
For connection without a pre-configured logical unit and Ethernet link to a host, the in-band SCSI protocol can be used in order for the host to “see” the RAID subsystem. Please refer to the reference table below. You will need to make adjustments in those pull-down menus: Peripheral Device Type, Peripheral Device Qualifier, Device Support for Removable Media, and LUN Application.
Operation System
Peripheral Device Type
Peripheral Device Qualifier
Device Support for Removable Media
LUN Applicability
Windows 2000/2003
0xd Connected Either is okay
LUN-0’s
Solaris™
8/9 (x86 and SPARC)
0xd Connected Either is okay
LUN-0’s
Linux RedHat 8/9; SuSE 8/9
0xd Connected Either is okay
LUN-0’s
Table 10-3: Peripheral Device Type Parameters
Device Type Settings
Enclosure Service Device 0xd
No Device Present 0x7f
Direct Access Device 0
Sequential-access Device 1
Processor Device 3
CD-ROM Device 5
Scanner Device 6
MO Device 7
Storage Array Controller Device
0xC
Host-side, Drive-side, and Disk Array Parameters 10-23

SANWatch User’s Manual Unknown Device 0x1f
Table 10-4: Peripheral Device Type Settings
Cylinder/Head/Sector: Drive capacity is decided by the number of blocks. For some operating systems (Sun Solaris, for example) the capacity of a drive is determined by the cylinder/head/sector count. For Sun Solaris, the cylinder cannot exceed 65535; choose "cylinder<65535,” then the controller will automatically adjust the head/sector count for your OS to read the correct drive capacity. Please refer to the related documents provided with your operating system for more information.
Cylinder, Head, and Sector counts are selectable from the configuration menus shown below. To avoid any difficulties with a Sun Solaris configuration, the values listed below can be applied.
Capacity Cylinder Head Sector
<64 GB Variable 64 32
64 - 128 GB Variable 64 64
128 - 256 GB Variable 127 64
256 - 512 GB Variable 127 127
512 - 1 TB Variable 255 127
Table 10-5: Cylinder/Head/Sector Mapping under Sun Solaris
Older Solaris versions do not support drive capacities larger than 1 terabyte. Solaris 10 now supports array capacity larger than 1TB. Set the values to the values listed in the table below:
Capacity Cylinder Head Sector
255 Variable > 1 TB < 65536
Variable 255
Table 10-6: Cylinder/Head/Sector Mapping under Sun Solaris
The values shown above are for reference only and may not apply to all applications.
Login Authentication with CHAP: This option allows you to enable or disable the login authentication with the Challenge Handshake Authentication Protocol (CHAP) function. CHAP enables the username and password to be encrypted against eavesdroppers.
10-24 Host-side, Drive-side, and Disk Array Parameters

Chapter 10: Configuration Parameters
Host-side, Drive-side, and Disk Array Parameters 10-25
Both One-way and Two-way (Mutual) CHAP approaches are available through the “iSCSI Initiator” menu under the “Host LUN mapping” window.
NOTE: The CHAP configuration option here enables the CHAP
configuration menu in the host LUN mapping window.
Unlike previous SANWatch and firmware revisions, controller name and password are no longer used for CHAP authentication.
Figure 10-3: The Host-side Parameters Page for iSCSI Models
data
et the subsystem for the configuration hange to take effect.
Jumbo Frames: Jumbo Frames, as specified by the IEEE 802.3 standard, improve network performance for more can be transmitted in one frame reducing interrupt load.
The system default for this option is “disabled.” If you want to enable this option, resc
CAUTION! The default and supported frame size is 9014 bytes. All
devices on the network path must be configured with the same jumbo frame size.
subsystem must also be configured to accept Jumbo frames.
Configuration changes must be made in the Network Interface
Card (NIC), through the configuration interface and tools provided by the NIC manufacturer. Check with your manufacturer to verify that this feature is supported. The network equipment (Ethernet switches, routers, and so forth) between the host and the

SANWatch User’s Manual
10-26 Host-side, Drive-side, and Disk Array Parameters

Chapter 10: Configuration Parameters
Host-side, Drive-side, and Disk Array Parameters 10-27
Disk-Array Parameters
Rebuild Priority: The rebuild priority determines how much of
The higher priority takes up more system resources and the
evitably lower due to the resources consumed.
writes data. In order to avoid write errors, the controller can
Performs Verify-after-Write during normal I/O requests.
3. Verification on LD Initialization Writes:
ile initializing the logical drive.
for having a maximum response time on hard drives is to
the system resources are applied when rebuilding a logical drive. Available options are Low, Normal, Improved, and High.
rebuild process completes more rapidly. However, I/O performance in the meantime is in
Write-Verify Options: Errors may occur when a hard drive
force the hard drives to verify the written data. There are three selectable methods:
1. Verification on LD Normal Access:
2. Verification on LD Rebuild Writes:
Performs Verify-after-Write during the rebuilding process.
Performs Verify-after-Write wh
Maximum Drive Response Timeout (ms): The main purpose

SANWatch User’s Manual
10-28 Host-side, Drive-side, and Disk Array Parameters
ensure delays caused by media errors or drive erratic behaviors do not result in host I/O timeouts. Doing so can avoid the unnecessary efforts dealing with delays especially
Battery shall be present and functioning properly. ite-Back policy is enabled.
when drives showing problems are often the failing drives. Below are some operation limitations:
•
• Wr• Only available for RAID level 1, 3, 5 and 6.
Failures of a hard drive to return I/Os before the Response Timeout will force the firmware to retrieve requested I/Os from the other members of the logical drive.
NOTE:
This function is only applicable on RAID subsystems running Firmware 3.42 or above version.
AV Optimization Mode: The AV optimization is applied for the emerging Audio/Video or non-drop frame applications such as the VOD/MOD, NLE (Non-Linear Editing), and multi-streaming environments.
Fewer Steams: (for applications featuring sequential I/Os and large block sizes; e.g., Video Editing)
1. The Maximum Drive Response Timeout will be automatically set to 160ms.
2. The drive cache-flush threshold is set to a value lower than Infortrend’s traditional Write-back Flush threshold.
3. A minimum read-ahead size is determined by the Stripe size.
4. Enhance performance using LMDD test in the sequential reads.
5. The Synchronized Cache Communications between RAID controllers is disabled.
Multiple Steams: (for applications featuring smaller I/Os and more outstanding I/Os, e.g., Media Broadcasting)
1. The Maximum Drive Response Timeout will be automatically set to 960ms.
2. The Write-back Flush threshold is set to a value lower than Infortrend’s traditional Write-back Flush threshold.

Chapter 10: Configuration Parameters
Host-side, Drive-side, and Disk Array Parameters 10-29
3. Enhance performance using LMDD test in the sequential reads.
4. The Synchronized Cache Communications between RAID controllers is disabled.
NOTE: Some parameters related to AV Optimization will be implemented as system defaults in the append file for specific ODM/OEM models. Please also find description in your firmware operation manual. Stripe size and other parameters will need to be tuned for specific AV applications. It is best consult our technical support for making use of this function.

SANWatch User’s Manual
10-30 Host-side, Drive-side, and Disk Array Parameters
This page is intentionally left blank.

Design Concerns for the EonPath Multi-pathing Configuration 11-1
Chapter 11
EonPath® Multi-pathing Configuration
This chapter introduces the configuration related to the EonPath multi-pathing driver and configurations. SANWatch provides a configuration window for viewing and setting fault-tolerant paths. The following topics are discussed:
♦ Design Concerns for the EonPath Multi-pathing Configuration - Section 11.1, page 11-2
♦ Setting Up - Section 11.2, page 11-3
♦ Configurable Options - Section 11.3, page 11-12

SANWatch User’s Manual
11.1. Design Concerns for the EonPath Multi-pathing Configuration The following should be considered when designing a multi-pathing configuration:
If your EonPath driver is enabled through a paid license and the license is expired, the multi-pathing function will be invalidated after a server reset.
TPGS (Target Port Group Support) concern: Infortrend’s multi-pathing service supports TPGS and is able to designate specific data paths as Active and the non-optimal paths as Passive. With TPGS, most I/Os will be directed through the Active paths instead of the Passive paths. The passive paths only receive data flow in the event of Active path failures.
The diagram below shows a dual-controller RAID system with multi-pathing cabling:
1. There are 4 data paths between RAID system and host. 2 from controller A and 2 from controller B.
2. A RAID volume is managed by controller A and associated with both controller A and controller B IDs.
3. TPGS recognizes data links from controller A as Active paths and those from controller B as Passive paths.
Figure 11-1: Active and Passive Paths in a Multi-pathing,
Dual-controller Configuration
When designing a configuration with fault-tolerant data paths, load-balancing can be an option, but please note that load-
11-2 Design Concerns for the EonPath Multi-pathing Configuration

Chapter 11: EonPath Multi-pathing Configuration
balancing between an Active path and a Passive path will not bring you performance gains. If you have 2 or more active paths, load-balancing can help optimizing the throughput across these active paths.
NOTE: The logical drive assignment (to either the Controller A or Controller B) is determined during the array creation process, or through the LD Assignment menu in the “Existing Logical Drives” window.
The EonPath driver is separately installed onto servers with fault-tolerant cabling. To see how to install the EonPath driver, please refer to EonPath User’s Manual for more information.
Setting load balance policy is not recommended if your I/Os can not fully stress a single data path. Without sufficient I/O load that can span across multiple data paths, performance drag can occur because host needs spend extra effort to dispatch I/Os between I/O paths.
11.2. Setting Up The EonPath configuration screen is accessed by a right-click on an in-band host icon in SANWatch’s initial portal window. Below is the process for configuring multi-path devices.
Install Driver on the Application Server (Taking Windows as an Example)
Step 1. Select and execute the appropriate EonPath driver for your OS by a double-click. EonPath is included in your product CD, and the driver revisions can be acquired via technical support.
Setting Up 11-3
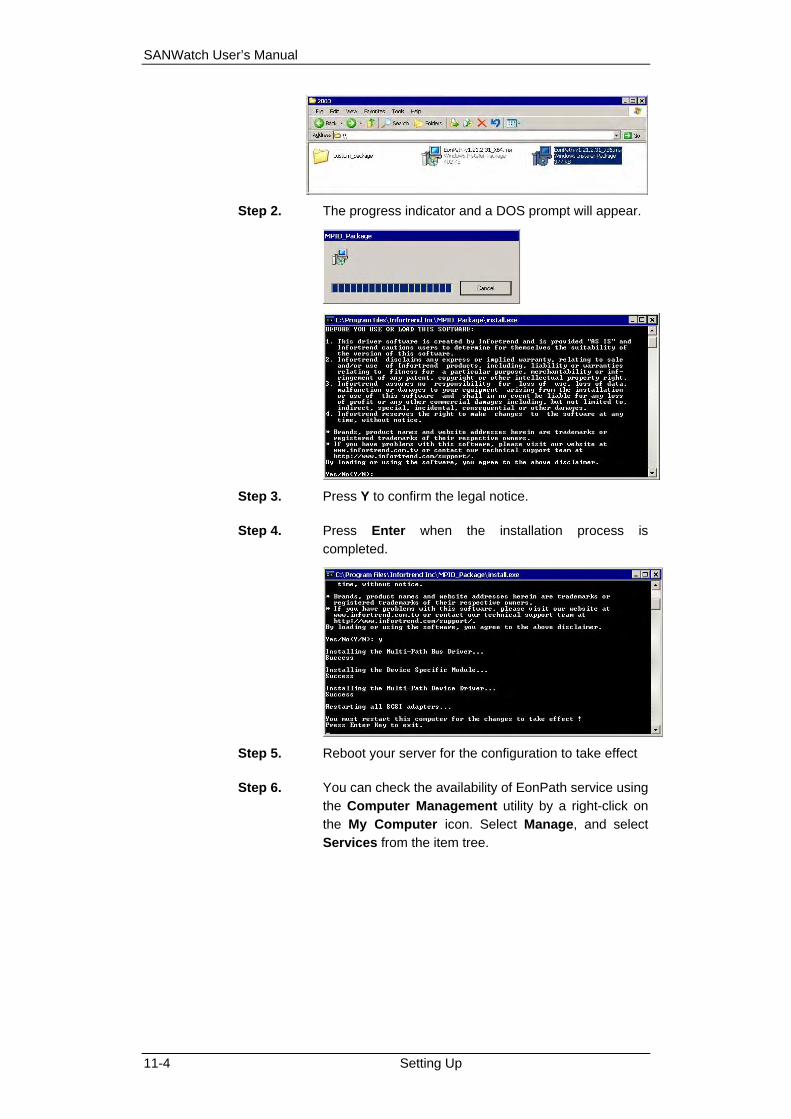
SANWatch User’s Manual
Step 2. The progress indicator and a DOS prompt will appear.
Step 3. Press Y to confirm the legal notice.
Step 4. Press Enter when the installation process is completed.
Step 5. Reboot your server for the configuration to take effect
Step 6. You can check the availability of EonPath service using the Computer Management utility by a right-click on the My Computer icon. Select Manage, and select Services from the item tree.
11-4 Setting Up
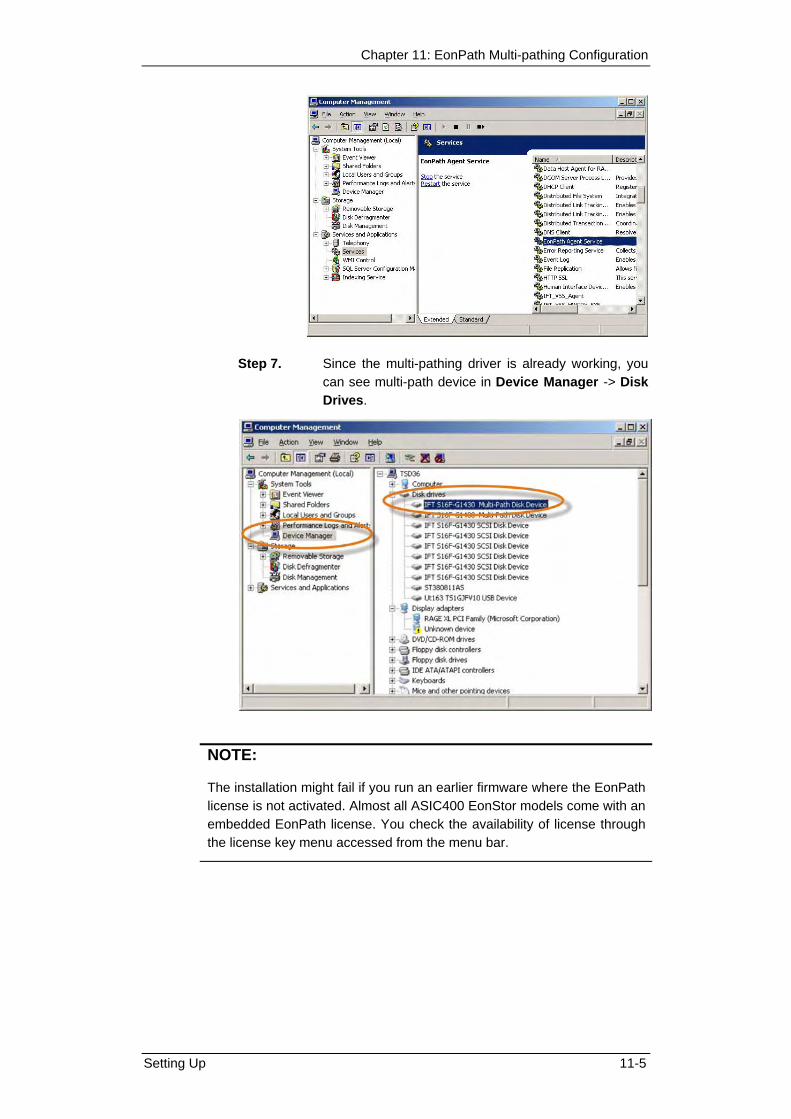
Chapter 11: EonPath Multi-pathing Configuration
Step 7. Since the multi-pathing driver is already working, you can see multi-path device in Device Manager -> Disk Drives.
NOTE:
The installation might fail if you run an earlier firmware where the EonPath license is not activated. Almost all ASIC400 EonStor models come with an embedded EonPath license. You check the availability of license through the license key menu accessed from the menu bar.
Setting Up 11-5

SANWatch User’s Manual
If your license key for EonPath is not enabled, contact technical support.
View and Manage Multi-pathing from SANWatch
Step 1. Right-click on an in-band Host to display the Launch
EonPath command. You may also use the EonPath button on the tool bar.
Step 2. Enter the server IP address where the EonPath driver
is installed.
11-6 Setting Up
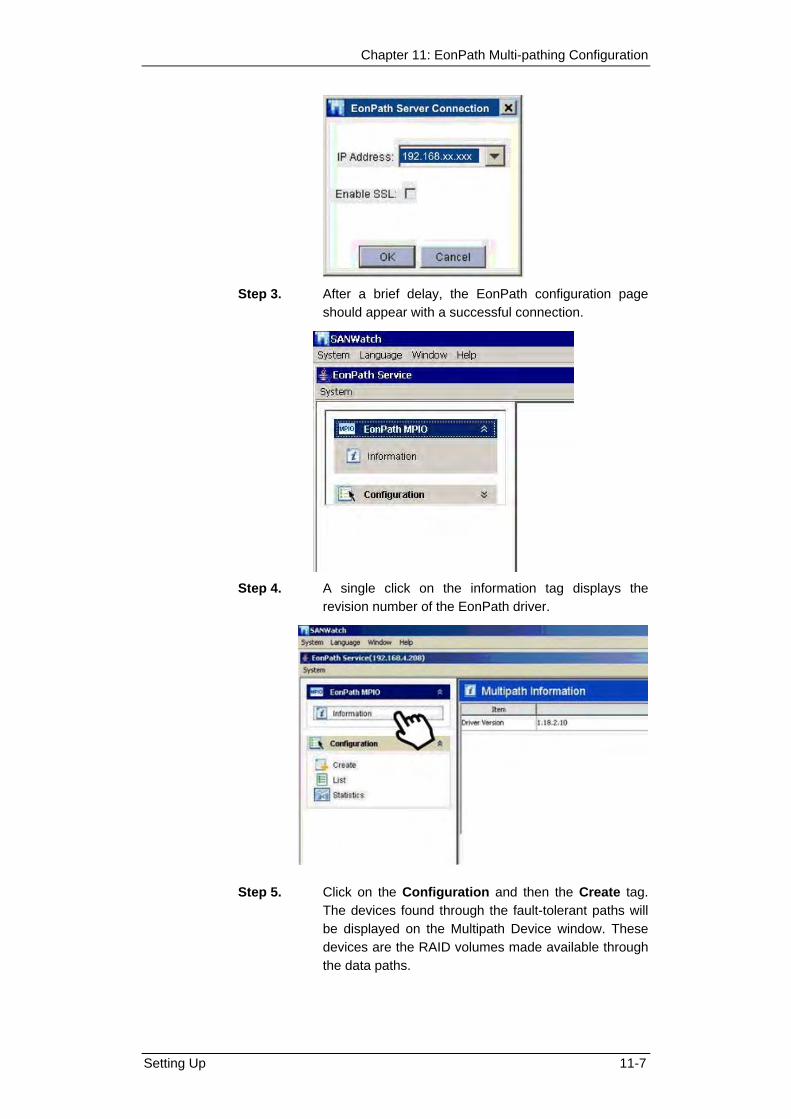
Chapter 11: EonPath Multi-pathing Configuration
Step 3. After a brief delay, the EonPath configuration page
should appear with a successful connection.
Step 4. A single click on the information tag displays the
revision number of the EonPath driver.
Step 5. Click on the Configuration and then the Create tag. The devices found through the fault-tolerant paths will be displayed on the Multipath Device window. These devices are the RAID volumes made available through the data paths.
Setting Up 11-7

SANWatch User’s Manual
For example, a RAID volume mapped to 2 different IDs on 2 different data paths will appear as 2 devices.
Note that information on this page is view only. Once you successfully installed EonPath, the multi-pathing service should have been working. If you added new storage volumes or new data paths after the initial configuration, you can configure them on this page.
Adding New Devices to the Configuration
Step 1. Use the combination of the Ctrl key and mouse click to select the data paths connecting to the new devices. You can identify logical drives by its Device S/N. Then click the Create button on the lower right corner of the configuration screen to define them as the alternate data paths to a RAID volume.
Step 2. The RAID volume(s) that appear through the fault-
tolerant links will be listed by its logical drive ID. Select a volume by a single mouse click, then click Next to continue.
11-8 Setting Up

Chapter 11: EonPath Multi-pathing Configuration
Step 3. The Load Balance screen will appear. Select one of the load-balance policies by clicking its check box. The available options are:
Failover: This option features the failover and failback capability and no balancing algorithms. If one data path fails (cabling or HBA failure), I/Os will be automatically directed through the remaining path(s).
Mini Queue: I/Os are equally shared by dynamically distributing I/Os by paths’ job queue depth.
Round Robin: I/Os are equally distributed in a round-robin fashion.
NOTE that the load-balancing policies only apply to active paths. If you have only one active and one passive path, load-balance will not bring you performance benefits. The default policy is Mini-Queue.
Click Next to continue.
Setting Up 11-9

SANWatch User’s Manual
Step 4. Click Exit to finish the configuration process.
Step 5. Once the multi-path device is properly configured, you can click the List tag on the left-side navigation panel to see the topology view of the multi-pathing configuration.
1. An Active path is shown in Green.
2. A Passive path is shown in blue.
3. A Not Used path is shown in black. (A Not Used path is one of the fault-tolerant paths that is manually disabled.)
4. A Failed path is shown in red.
11-10 Setting Up
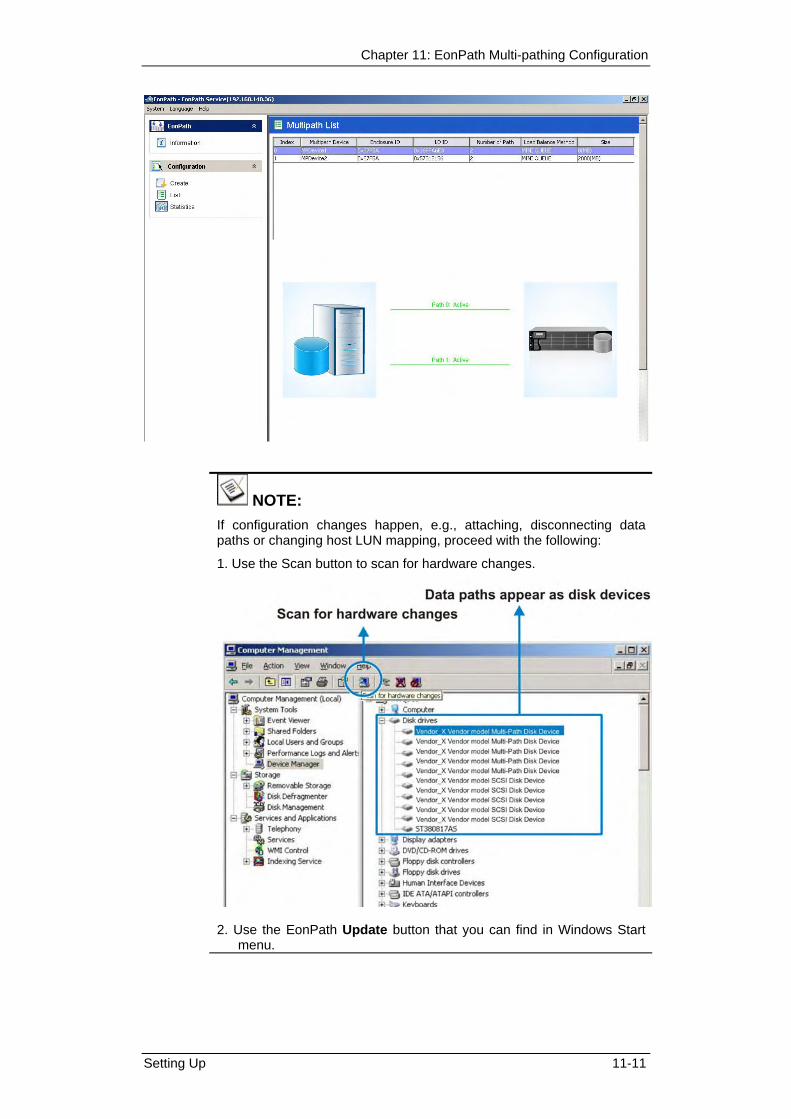
Chapter 11: EonPath Multi-pathing Configuration
NOTE: If configuration changes happen, e.g., attaching, disconnecting data paths or changing host LUN mapping, proceed with the following:
1. Use the Scan button to scan for hardware changes.
2. Use the EonPath Update button that you can find in Windows Start
menu.
Setting Up 11-11
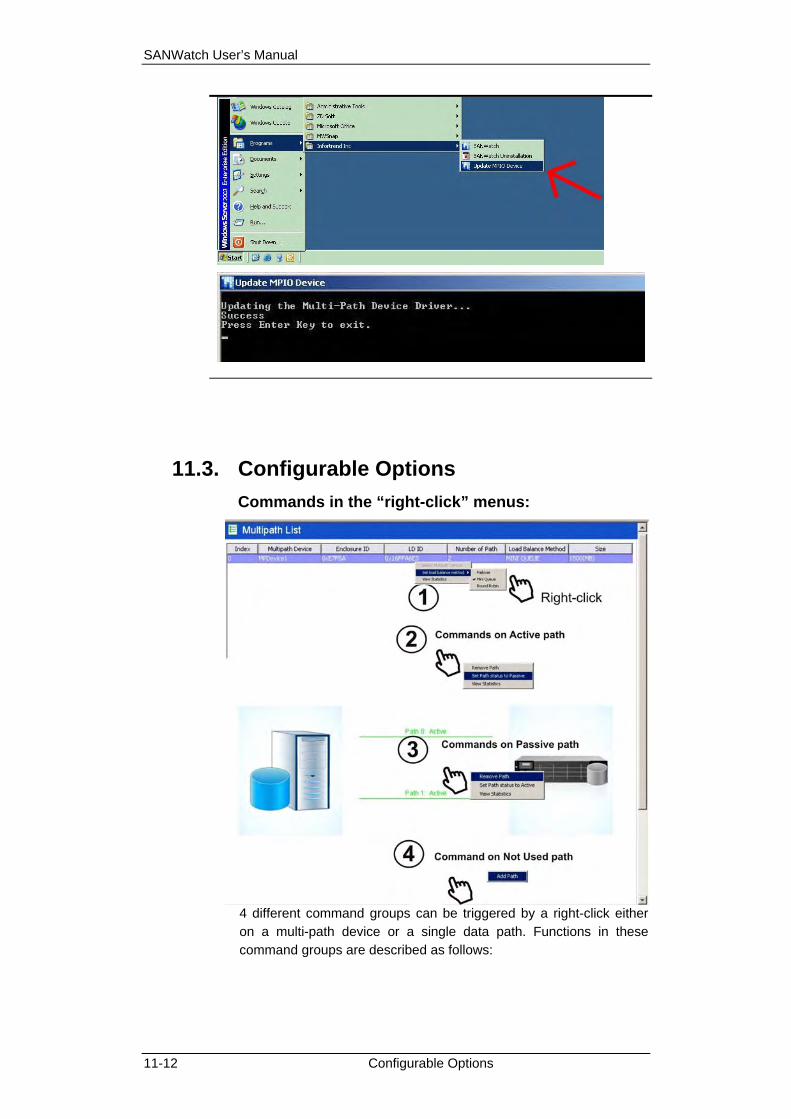
SANWatch User’s Manual
11.3. Configurable Options Commands in the “right-click” menus:
4 different command groups can be triggered by a right-click either on a multi-path device or a single data path. Functions in these command groups are described as follows:
11-12 Configurable Options
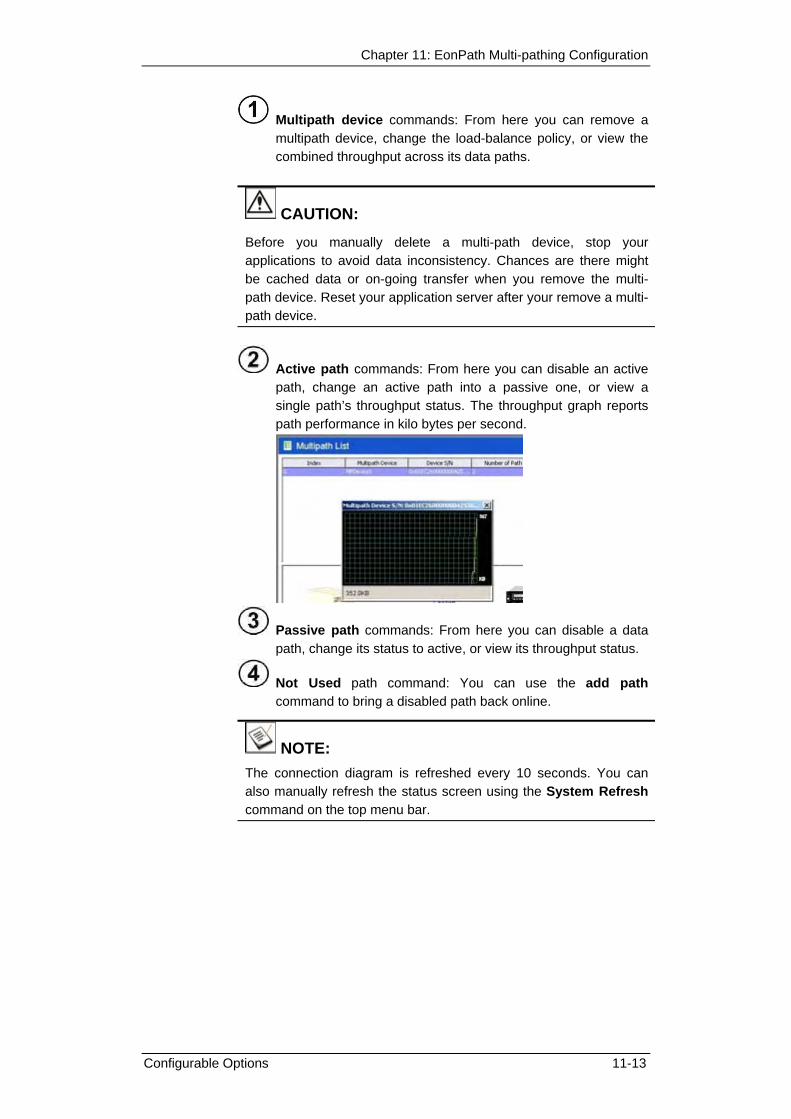
Chapter 11: EonPath Multi-pathing Configuration
Multipath device commands: From here you can remove a multipath device, change the load-balance policy, or view the combined throughput across its data paths.
CAUTION: Before you manually delete a multi-path device, stop your applications to avoid data inconsistency. Chances are there might be cached data or on-going transfer when you remove the multi-path device. Reset your application server after your remove a multi-path device.
Active path commands: From here you can disable an active path, change an active path into a passive one, or view a single path’s throughput status. The throughput graph reports path performance in kilo bytes per second.
Passive path commands: From here you can disable a data path, change its status to active, or view its throughput status.
Not Used path command: You can use the add path command to bring a disabled path back online.
NOTE: The connection diagram is refreshed every 10 seconds. You can also manually refresh the status screen using the System Refresh command on the top menu bar.
Configurable Options 11-13

SANWatch User’s Manual
The Statistics Graph
To monitor the performance across fault-tolerant paths, first select the Statistics tag, and then select the related check box in the graph window. There can be more than one multi-path device. The throughput displayed is the combined number of the performance metric across multiple data paths. The throughput is displayed in kilo bytes per second.
11-14 Configurable Options

Chapter 11: EonPath Multi-pathing Configuration
This page is intentionally left blank.
Configurable Options 11-15

Chapter 12
Notification Manager Options
This chapter describes the Notification Manager options. There are a number of different items that users can configure. These include the Root Agent and RAID Agents relationship and the configuration options concerning event notification. The following sections are covered in this chapter:
♦ The Notification Manager Utility – Section 12.1, page 12-2
12.1.1 Starting the Utility
12.1.2 Functional Buttons
12.1.3 Administrator Settings (Setting & Log Windows)
♦ Event Notification Settings, Section 12.2, page 12-6
12.2.1 Notification Methods
12.2.2 Event Severity Levels
12.2.3 SNMP Traps Settings
12.2.4 Email Settings
12.2.5 LAN Broadcast Settings
12.2.6 Fax Settings
12.2.7 MSN Settings
12.2.8 SMS Settings
12.2.9 Create Plug-ins with Event Notification
The Notification Manager Utility 12-1
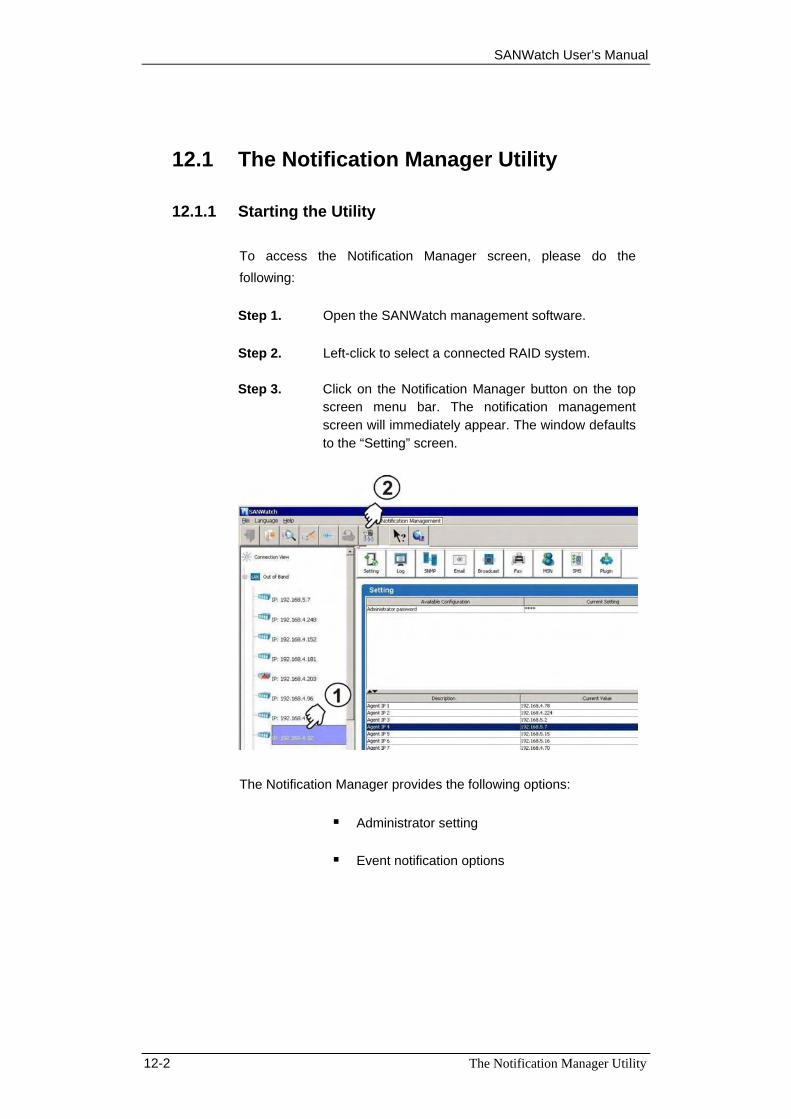
SANWatch User’s Manual
12.1 The Notification Manager Utility
12.1.1 Starting the Utility
To access the Notification Manager screen, please do the following:
Step 1. Open the SANWatch management software.
Step 2. Left-click to select a connected RAID system.
Step 3. Click on the Notification Manager button on the top screen menu bar. The notification management screen will immediately appear. The window defaults to the “Setting” screen.
The Notification Manager provides the following options:
Administrator setting
Event notification options
12-2 The Notification Manager Utility

Chapter 12: Configuration Client Options
12.1.2 Functional Buttons
The functional buttons are described as follows:
Setting: Administrator password and subordinate RAID/server IP setting.
Log: Provides configuration options for sending collected events from all subordinate RAID systems.
SNMP: Provides configuration options for event notification using SNMP traps.
Email: Provides configuration options for event notification via Email.
Broadcast: Provides configuration options for event notification via LAN broadcast.
Fax: Provides configuration options for event notification via Fax.
MSN: Provides configuration options for event notification via MSN messenger.
SMS: Provides configuration options for event notification using SMS short messages to cell phones.
Plugin: Provides configuration options for customers to develop Java plugins for use with, e.g., dialing out to a GSM modem, etc.
12.1.3 Administrator Settings (Setting & Log Windows)
The Setting Window:
On the initial Setting page, you can change the following:
1. The administrator password for login to a management center (the password for connecting to a Management Host agent).
The Notification Manager Utility 12-3

SANWatch User’s Manual
2. IP addresses of the subordinate RAID systems or data servers if configuration changes occur.
To change password or IP addresses, simply double-click on the Current Value fields to display an independent input window. The default administrator password is “root.”
Making changes to an IP is only necessary if the IP address of the managed RAID or server has been changed.
NOTE: The Management Host IP is usually the computer IP where
another instance of SANWatch is installed (a computer chosen as the management center at an installation site).
This password is independent from the password set for the “Configuration” login to start the SANWatch management session with a particular RAID system.
When login as an administrator, enter "root" as the
authentication. The authentication code can be changed later in the utility. Only an administrator who has the password can access the notification settings.
The Log Window:
Using options in this window, you may send a collective summary of all events occurring on a group of RAID systems to a recipient.
12-4 The Notification Manager Utility

Chapter 12: Configuration Client Options
The group of RAID systems are those managed under the Management Host agent.
To configure the collective event email notification:
Step 1. Enable the function by double-clicking the Current Value field in the Status row. The collective event notification will be activated whenever the Management Host agent is started.
Step 2. Enter an SMTP server address in the SMTP server field by which the event log emails will be delivered.
Step 3. Enter the Account for using your SMTP email service.
Step 4. Enter the Password for using your SMTP email service.
Step 5. Set a valid mail address in the Sender Email field.
Step 6. Enter a receiver address in the Recipient Email field.
Step 7. The Notification period (in hour) determines how often an administrator receives event log notifications.
The Notification Manager Utility 12-5

SANWatch User’s Manual
12.2 Event Notification Settings
12.2.1 Notification Methods
The manager provides the following methods for sending notifications: SNMP traps, Email, LAN broadcast, Fax, SMS, and MSN Messenger. Some notification methods, such as the connection to a fax machine, require Windows MAPI or messaging support on the servers used as the management center station.
Along with the six different means of informing RAID managers that an event has occurred (Fax, LAN broadcast, Email, SNMP traps, SMS, and MSN messenger), the severity level of events to be sent via these notification methods can also be configured.
NOTE: There is an ON/OFF button on every event notification page. Use this button to enable/disable each notification method.
Service is enabled
Service is disabled
The On/Off switch should be configured to the ON position before you turn off the server or close the utility. Otherwise, you will have to manually enable the function whenever you reboot the server.
12.2.2 Event Severity Levels
You may select a severity level for every notification method using the Event Severity Level setting. Each level determines events of what severity level(s) are to be sent to a receiver. See the table below for severity level descriptions.
Level Description
Notification Events of all severity levels
Warning Events of the Warning and Critical levels
Critical Events of the most serious level, Critical
Table 14-1: Levels of Notification Severity
You can find the severity level option with each notification method.
12-6 Event Notification Settings
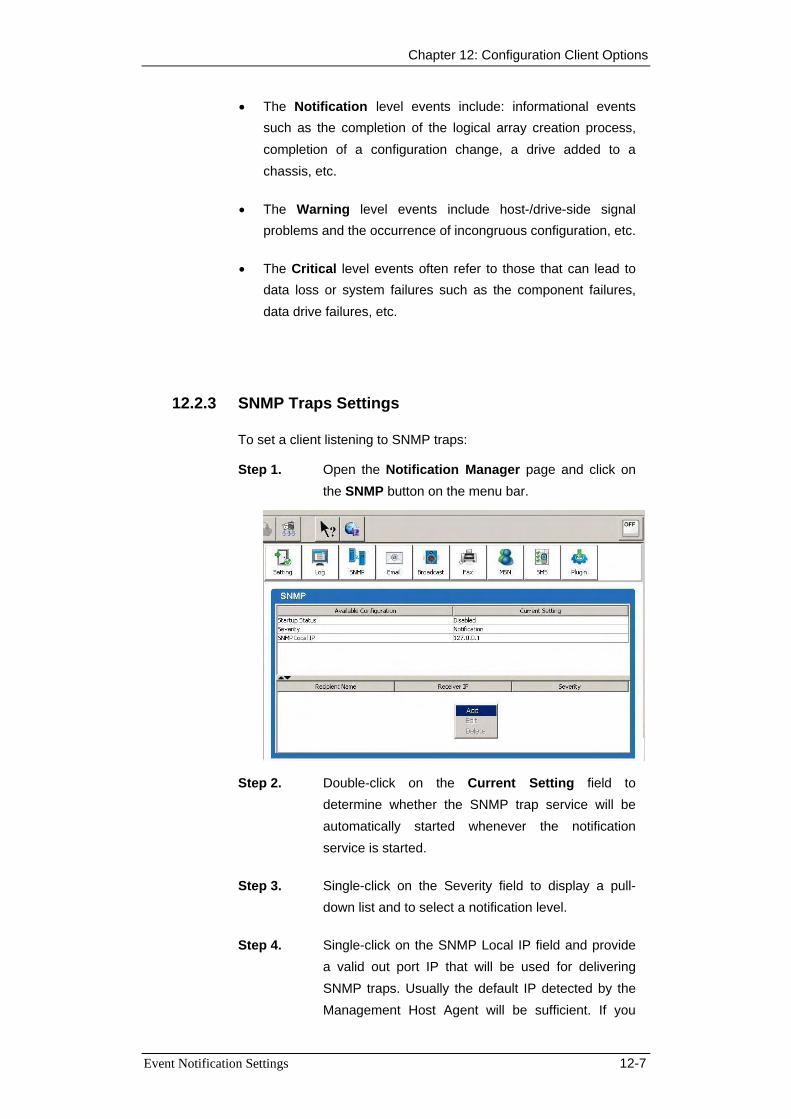
Chapter 12: Configuration Client Options
• The Notification level events include: informational events such as the completion of the logical array creation process, completion of a configuration change, a drive added to a chassis, etc.
• The Warning level events include host-/drive-side signal problems and the occurrence of incongruous configuration, etc.
• The Critical level events often refer to those that can lead to data loss or system failures such as the component failures, data drive failures, etc.
12.2.3 SNMP Traps Settings
To set a client listening to SNMP traps:
Step 1. Open the Notification Manager page and click on the SNMP button on the menu bar.
Step 2. Double-click on the Current Setting field to determine whether the SNMP trap service will be automatically started whenever the notification service is started.
Step 3. Single-click on the Severity field to display a pull-down list and to select a notification level.
Step 4. Single-click on the SNMP Local IP field and provide a valid out port IP that will be used for delivering SNMP traps. Usually the default IP detected by the Management Host Agent will be sufficient. If you
Event Notification Settings 12-7

SANWatch User’s Manual
have more than one Ethernet port, you can provide a different IP.
Step 5. Right-click on the recipient field (lower half of the screen) to display the add button. Enter the IP addresses of the SNMP agents that will be listening for trap notification in the Add SNMP Receiver dialog box
Step 6. Select the severity level of events that will be sent to the SNMP agent from the drop-down list.
Step 5. Double-click on the ON/OFF button at the upper-right corner of the configuration screen to enable/disable the notification function.
Service is enabled Service is disabled
12.2.4 Email Settings
NOTE:
SASL authentication is supported with this revision.
12-8 Event Notification Settings
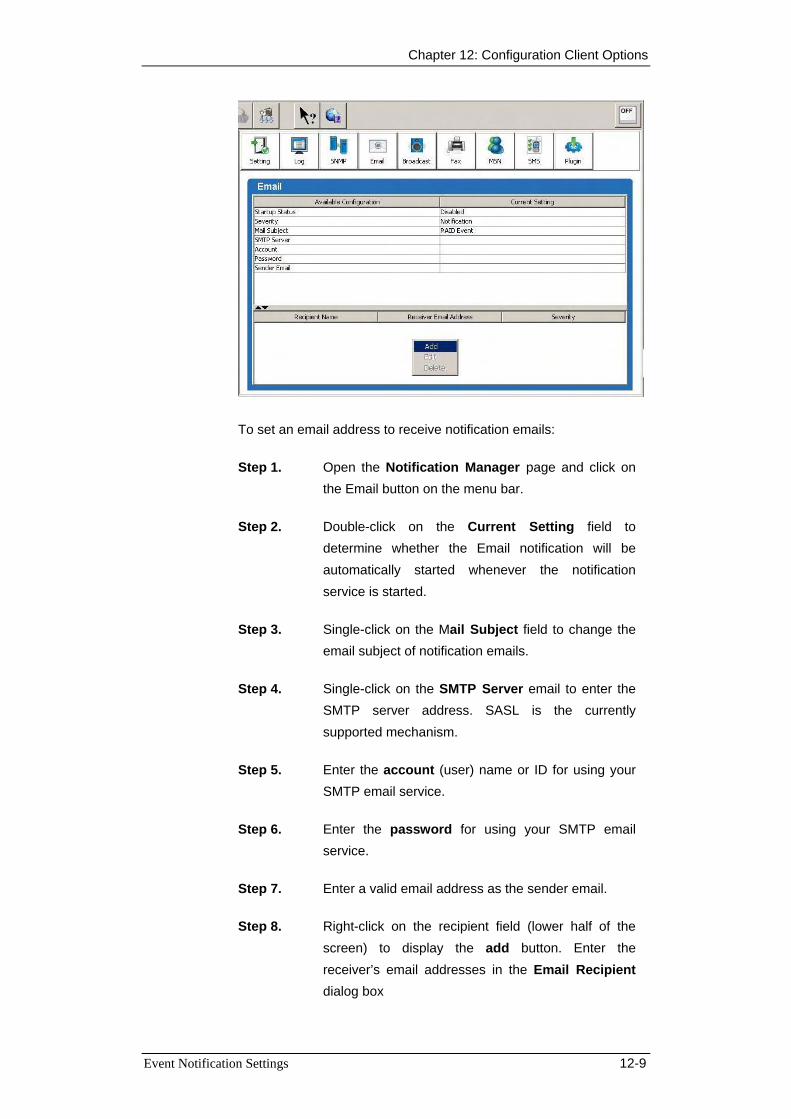
Chapter 12: Configuration Client Options
To set an email address to receive notification emails:
Step 1. Open the Notification Manager page and click on the Email button on the menu bar.
Step 2. Double-click on the Current Setting field to determine whether the Email notification will be automatically started whenever the notification service is started.
Step 3. Single-click on the Mail Subject field to change the email subject of notification emails.
Step 4. Single-click on the SMTP Server email to enter the SMTP server address. SASL is the currently supported mechanism.
Step 5. Enter the account (user) name or ID for using your SMTP email service.
Step 6. Enter the password for using your SMTP email service.
Step 7. Enter a valid email address as the sender email.
Step 8. Right-click on the recipient field (lower half of the screen) to display the add button. Enter the receiver’s email addresses in the Email Recipient dialog box
Event Notification Settings 12-9

SANWatch User’s Manual
Step 9. Select the severity level of events that will be sent to the email receiver from the drop-down list.
Step 5. Double-click on the ON/OFF button at the upper-right corner of the configuration screen to enable/disable the notification function.
Service is enabled Service is disabled
12.2.5 LAN Broadcast Settings
To set a computer to receive broadcast messages:
Step 1. Open the Notification Manager window and click on the Broadcast button on the menu bar.
Step 2. Double-click on the Current Setting field of the Startup Status row to determine whether the LAN broadcast notification will be automatically started whenever the notification service is started.
12-10 Event Notification Settings

Chapter 12: Configuration Client Options
Step 3. Double-click on the severity field to display a drop-down list. Select an event severity level.
Step 4. An Add Broadcast Receiver dialog box appears. Simply enter the IP addresses of a station configured on a network.
Step 5. Select the severity level of the events to be sent to the receiver station.
Step 6. Repeat this process to add more receivers.
NOTE:
TCP/IP should be active services on your Centralized Management station for message broadcasting.
Step 7. Click on the On/Off button on the upper-right corner of the screen to enable or disable the function.
Service is enabled
Service is disabled
12.2.6 Fax Settings
In order to use fax notification, a fax modem is required and its parameters must be properly set on the management center station. Widows MAPI services, modem, and fax service must be ready and running for the notification methods to work.
NOTE: The physical connection and fax service with Windows MAPI/messaging should be ready before configuring this function.
Event Notification Settings 12-11
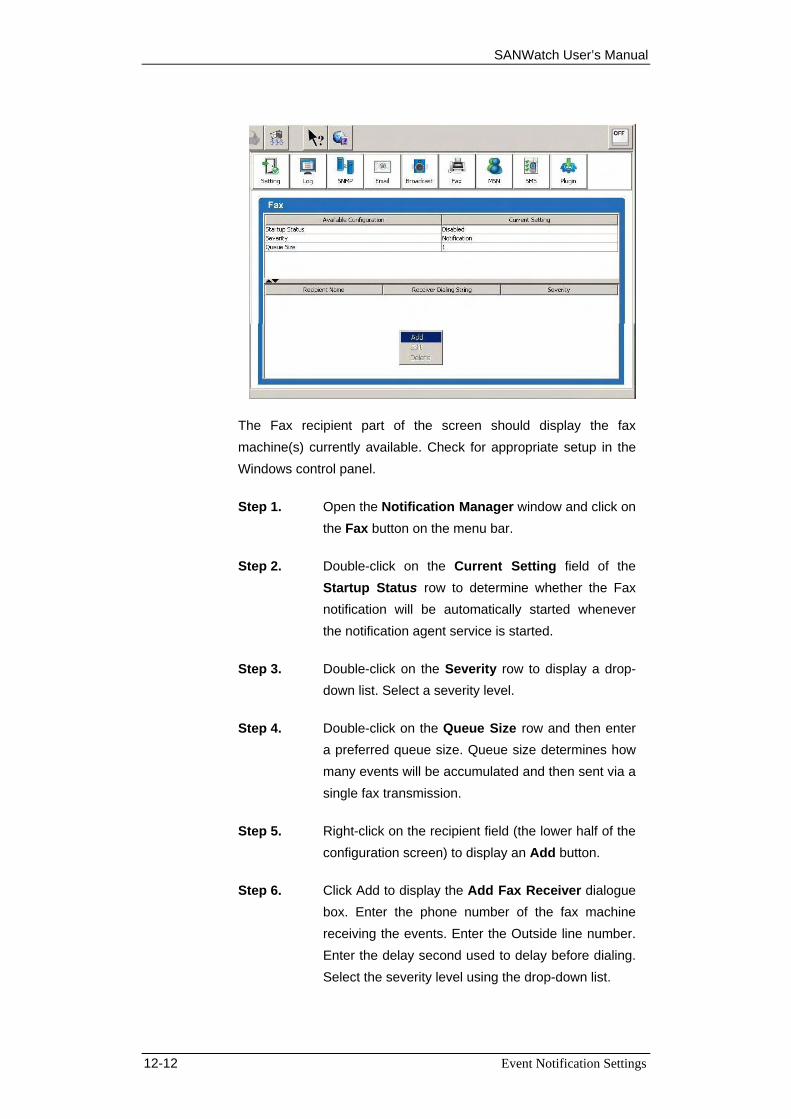
SANWatch User’s Manual
The Fax recipient part of the screen should display the fax machine(s) currently available. Check for appropriate setup in the Windows control panel.
Step 1. Open the Notification Manager window and click on the Fax button on the menu bar.
Step 2. Double-click on the Current Setting field of the Startup Status row to determine whether the Fax notification will be automatically started whenever the notification agent service is started.
Step 3. Double-click on the Severity row to display a drop-down list. Select a severity level.
Step 4. Double-click on the Queue Size row and then enter a preferred queue size. Queue size determines how many events will be accumulated and then sent via a single fax transmission.
Step 5. Right-click on the recipient field (the lower half of the configuration screen) to display an Add button.
Step 6. Click Add to display the Add Fax Receiver dialogue box. Enter the phone number of the fax machine receiving the events. Enter the Outside line number. Enter the delay second used to delay before dialing. Select the severity level using the drop-down list.
12-12 Event Notification Settings

Chapter 12: Configuration Client Options
Step 7. Repeat this process to add more receivers.
Step 8. Click on the On/Off button on the upper-right corner of the screen to enable or disable the function.
Service is enabled
Service is disabled
Note that the On/Off switch should also be in the ON position before you turn off the server or close the utility. Otherwise, you will have to manually enable the function whenever you reboot the server.
Event Notification Settings 12-13
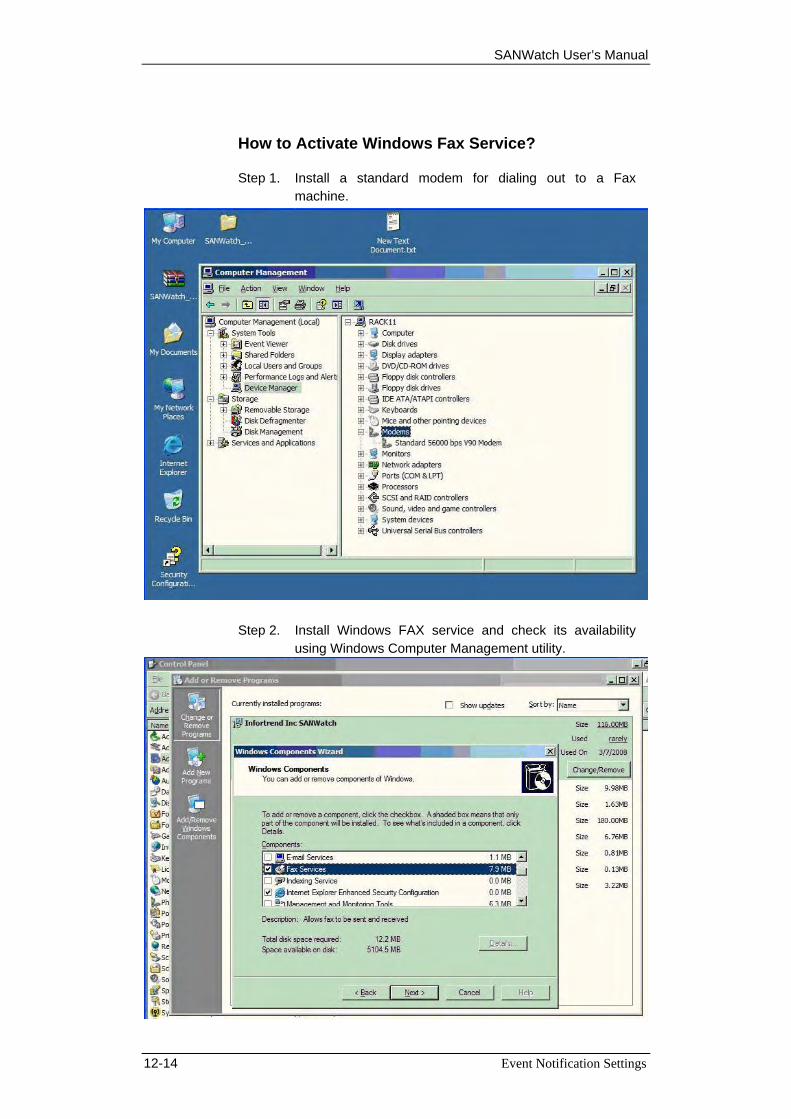
SANWatch User’s Manual
How to Activate Windows Fax Service?
Step 1. Install a standard modem for dialing out to a Fax machine.
Step 2. Install Windows FAX service and check its availability
using Windows Computer Management utility.
12-14 Event Notification Settings

Chapter 12: Configuration Client Options
Step 3. Check Printers and Faxes in Windows Control Panel. You should be able to find a validated fax machine.
Event Notification Settings 12-15

SANWatch User’s Manual
12.2.7 MSN Settings
Step 1. Open the Notification Manager window and click on the MSN button.
Step 2. Double-click on the Current Setting field of the Startup Status row to determine whether the MSN notification will be automatically started whenever the notification agent service is started.
Step 3. Double-click on the Severity field to display a drop-down list. Select a severity level.
Step 4. Enter a valid MSN contact and its associated password.
Step 5. Right-click on the recipient field (the lower half of the configuration screen) to display the Add button. Click on the Add button to display the receiver dialogue.
Step 6. Enter a receiver’s account address.
Step 7. Select a severity level from the drop-down list.
Step 8. Repeat this process to add more receivers.
12-16 Event Notification Settings

Chapter 12: Configuration Client Options
Step 9. Click on the On/Off button on the upper-right corner of the screen to enable or disable the function.
Service is enabled
Service is disabled
12.2.8 SMS Settings
SMS is a short for “Short Message Service.” Using this notification method requires a GSM modem. SANWatch currently supports two GSM modem models:
♦ Siemens TC35
♦ WAVECOM Fast Rack M1206
Please contact Infortrend for the complete list of compatible GSM modems.
Step 1. Open the Notification Manager window and click on the SMS button.
Step 2. Double-click on the Current Setting field of the Startup Status row to determine whether the SMS notification will be automatically started whenever the notification agent service is started.
Event Notification Settings 12-17
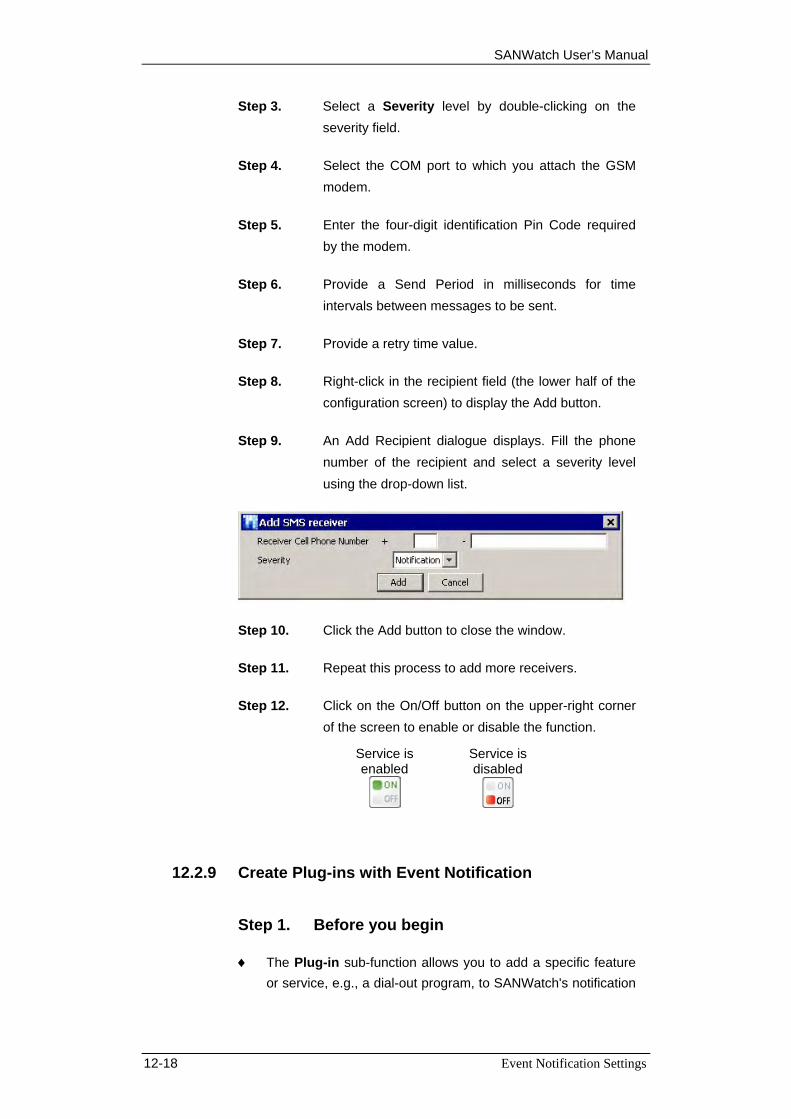
SANWatch User’s Manual
Step 3. Select a Severity level by double-clicking on the severity field.
Step 4. Select the COM port to which you attach the GSM modem.
Step 5. Enter the four-digit identification Pin Code required by the modem.
Step 6. Provide a Send Period in milliseconds for time intervals between messages to be sent.
Step 7. Provide a retry time value.
Step 8. Right-click in the recipient field (the lower half of the configuration screen) to display the Add button.
Step 9. An Add Recipient dialogue displays. Fill the phone number of the recipient and select a severity level using the drop-down list.
Step 10. Click the Add button to close the window.
Step 11. Repeat this process to add more receivers.
Step 12. Click on the On/Off button on the upper-right corner of the screen to enable or disable the function.
Service is enabled
Service is disabled
12.2.9 Create Plug-ins with Event Notification
Step 1. Before you begin
♦ The Plug-in sub-function allows you to add a specific feature or service, e.g., a dial-out program, to SANWatch's notification
12-18 Event Notification Settings

Chapter 12: Configuration Client Options
methods. Please contact our technical support for necessary information.
♦ The add-ins can be used to process the events received from
the Notification Manager utility and/or to extend its functionality. Prepare your execution file, and place it under the plug-in sub-folder under the directory where you installed the SANWatch program. If the default installation path has not been altered, the plug-in folder should be similar to the following:
Program Files -> Infortrend Inc -> RAID GUI Tools -> bin -> plug-in.
Place the execution file that will be implemented as a plug-in in this folder.
The plug-in capability provides advanced users the flexibility to customize and present the event messages received from the Notification Manager utility.
Step 2. The Configuration Process
Step 1. Click the Create Plug-in button.
Step 2. Make sure you have placed the execution file in the plug-in folder as described earlier.
Step 3. Enter the appropriate data in the Plug-in Description and Plug-in Label fields, and then select an execution file from the Application Program field (if there is more than one).
Step 4. Click Create to complete the process.
Event Notification Settings 12-19
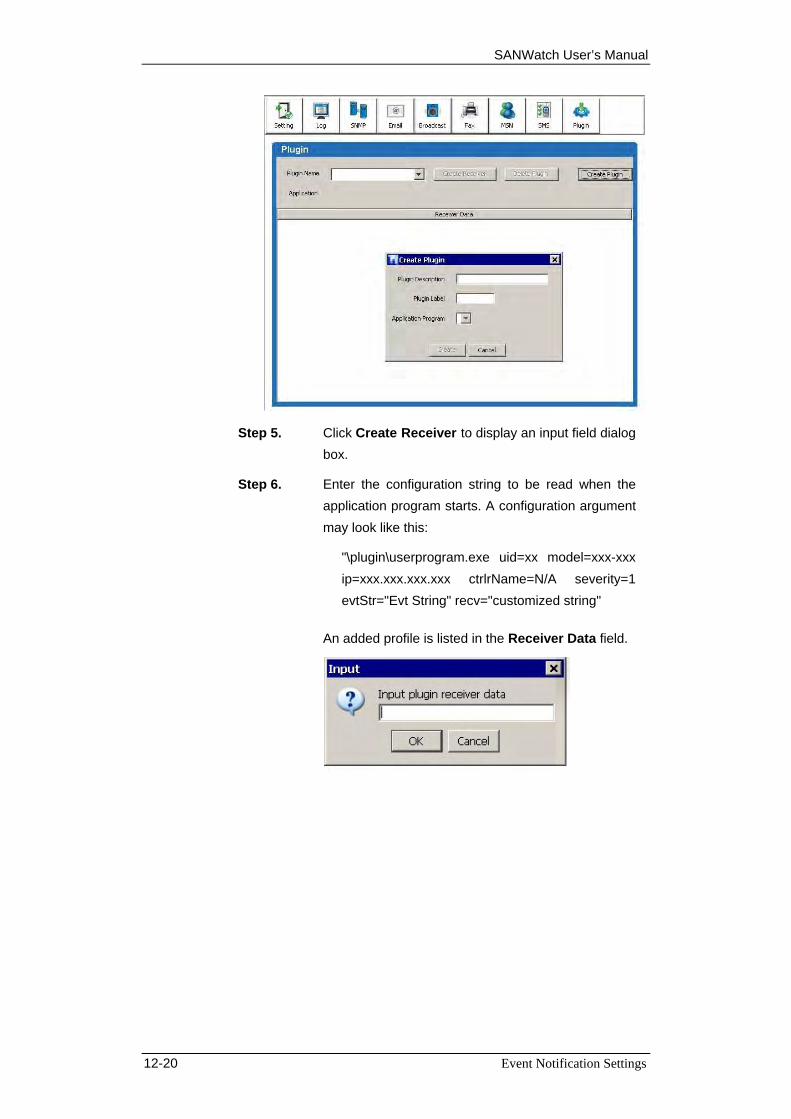
SANWatch User’s Manual
Step 5. Click Create Receiver to display an input field dialog box.
Step 6. Enter the configuration string to be read when the application program starts. A configuration argument may look like this:
"\plugin\userprogram.exe uid=xx model=xxx-xxx ip=xxx.xxx.xxx.xxx ctrlrName=N/A severity=1 evtStr="Evt String" recv="customized string"
An added profile is listed in the Receiver Data field.
12-20 Event Notification Settings

Chapter 12: Configuration Client Options
This page is intentionally left blank.
Event Notification Settings 12-21

Appendices App-1
Appendices
This chapter details the following:
♦ Command Summary – Appendix A, page App-2
A.1 Menu Commands
A.2 SANWatch Program Commands
♦ Glossary - Appendix B, page App-6
♦ RAID Levels - Appendix C, page App-13
C.1 RAID Description
C.2 Non-RAID Storage
C.3 RAID 0
C.4 RAID 1
C.5 RAID 1(0+1)
C.6 RAID 3
C.7 RAID 5
C.8 RAID 6
C.9 RAID 10, 30, 50
♦ Additional References - Appendix D, page App-20
D.1 Java Runtime Environment
D.2 SANWatch Update Downloads & Upgrading
D.3 Uninstalling SANWatch
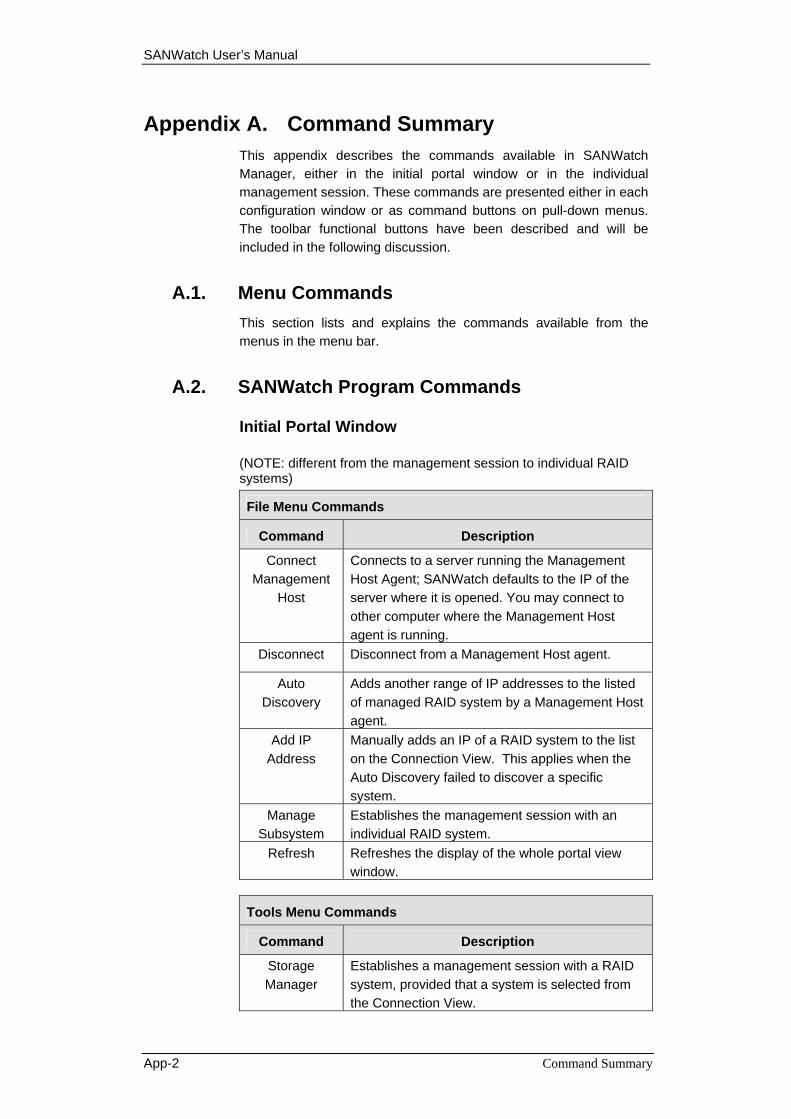
SANWatch User’s Manual
Appendix A. Command Summary This appendix describes the commands available in SANWatch Manager, either in the initial portal window or in the individual management session. These commands are presented either in each configuration window or as command buttons on pull-down menus. The toolbar functional buttons have been described and will be included in the following discussion.
A.1. Menu Commands This section lists and explains the commands available from the menus in the menu bar.
A.2. SANWatch Program Commands
Initial Portal Window
(NOTE: different from the management session to individual RAID systems)
File Menu Commands
Command Description
Connect Management
Host
Connects to a server running the Management Host Agent; SANWatch defaults to the IP of the server where it is opened. You may connect to other computer where the Management Host agent is running.
Disconnect Disconnect from a Management Host agent.
Auto Discovery
Adds another range of IP addresses to the listed of managed RAID system by a Management Host agent.
Add IP Address
Manually adds an IP of a RAID system to the list on the Connection View. This applies when the Auto Discovery failed to discover a specific system.
Manage Subsystem
Establishes the management session with an individual RAID system.
Refresh Refreshes the display of the whole portal view window.
Tools Menu Commands
Command Description
Storage Manager
Establishes a management session with a RAID system, provided that a system is selected from the Connection View.
App-2 Command Summary

Appendices
EonPath Opens the EonPath management window.
Configuration Manager
Opens the Configuration Manager windows for editing and sending IP scripts.
Disk Performance
Monitor
Opens the Disk Performance Monitor.
Notification Management
Provides access to the various notification methods.
Access to individual utilities can also be made through buttons on the tool bar.
Language Menu Commands
Command Description
English Opens English version of the online help.
Deutsch Opens the Deutsch version of the online help.
Opens the Japanese version of the online help.
French Opens the French version of the online help.
Help Menu Commands
Command Description
About <A> Displays information about the SANWatch Manager program.
Help Cursor? Produces an interactive arrow mark. By placing the arrow mark over and clicking on a functional menu or push button, the related help content page displays.
Help Displays the manager’s online help.
Storage Management Session Window
File Menu Commands
Command Description
Refresh Refreshes the status display of the current connection in cases when configuration changes are made through a different interface, e.g., via a terminal connection to the same array.
Exit Closes the currently open window and ends the current session.
Command Summary App-3

SANWatch User’s Manual
Action Menu Commands: Information
Command Description
Enclosure View Displays the graphical representation of enclosure elements and a summary of array statuses
Tasks Under Process
Displays a list of on-going processes including array initialization, Media Scan, or rebuild, etc.
Logical Drive Information
Displays information about logical drives, logical drive members, etc.
Logical Volume Information
Displays information about logical volumes, logical volume members, etc.
System Information
Displays system information such as firmware revision number, cache size, etc.
Statistics Shows interactive graphs for on-going I/O traffic for performance monitoring.
Action Menu Commands: Maintenance
Command Description
Logical Drives Opens the maintenance functions related to logical drives, such as RAID migration, rebuild, assignment, etc.
Physical Drives Displays configuration options related to individual disk drives, such as spare drive, clone, copy & replace expansion, etc.
Task Schedules Provides automated scheduling functions for performance Media Scan
Action Menu Commands: Configuration
Command Description
Quick Installation
Includes all drives in the chassis into one logical drives and maps it to the first Channel ID and LUN number.
Installation Wizard
A step-by-step guidance providing RAID configurable options.
Create Logical Drive
Options for creating a logical drive.
Existing Logical Drives
Functions or configurable options with the existing logical drives.
Create Logical Volume
Options for creating a logical volume.
Existing Logical Volumes
Functions or configurable options with the existing logical volumes.
Channel Host channel-related functions.
Host LUN Mapping
Graphical tools for mapping logical drives/volumes to host LUNs.
App-4 Command Summary

Appendices
System Settings Advanced options with host-side, drive-side system parameters, etc.
Command Summary App-5

SANWatch User’s Manual
Appendix B. Glossary Array
An array created in Infortrend’s RAID subsystems may refer to a logical drive or a logical volume. A logical drive is a group of disk drives logically combined into a contiguous storage volume. A logical volume is a group of logical drives that are striped together.
BBU Battery backup unit. A BBU protects cached data in the event of power outage.
CBM Cache Backup Module for the sixth-generation ASIC667 EonStor systems. A CBM contains a flash module, charger board, and a battery backup. In the event of power outage, the battery supports the transfer of cached data from controller memory to the flash module.
Clone
Clone usually refers to Infortrend firmware’s “manual clone” function for copying data blocks on a disk drive to another. Clone can be implemented with other mechanisms such as “Copy + Replace” or “Perpetual Clone.” Perpetual Clone produces a replica of specific data drive without replacing the source drive. Clone can take place either with a faulty drive or a healthy data drive.
Connection View
The Connection View utility provides entrance portals to multiple RAID systems that are managed through a Management Host Agent. A Management Host agent runs on a computer chosen as a management center. Via the Management Host agent, you can collect a summary from multiple RAID systems within a private network that may correspond to their locations in different installation sites.
Data Host Agent
An in-band agent that enables the communication between host and a RAID system. The Data Host agent is required for flushing host data cache and putting host applications in a quiescent state for snapshot operation.
Dual-active
App-6 Glossary
Appendices
Dual-active means each controller in a Redundant Controller configuration manages at least “one” RAID array. If one controller has no RAID array to manage, then the controller will stay idle and the configuration becomes active-standby.
EonPath
EonPath is the trade name for Infortrend’s multi-pathing drivers that manage I/O route failover/failback for multiple, fault-tolerant data paths and provide load-balancing algorithms over them.
Fibre (Also known as “Fibre Channel”) A device protocol (in the case of RAID, a data storage device) capable of high data transfer rates. Fibre Channel simplifies data bus sharing and supports greater speed and more devices on the same bus. Fibre Channel can be used over both copper wire and optical cables.
Fiber An optical network data transmission type of cable, whose initial letter is only capitalized when put at the beginning of a sentence.
HBA Host-Bus Adapter – an HBA is a device that permits a PC bus to pass data to and receive data from a storage bus (such as SCSI or Fibre Channel).
Host A computer, typically a server, which uses a RAID system (internal or external) for data storage.
Host LUN (See Host and LUN). “Host LUN” is another term for a LUN. Host LUNs often apply to the combinations of host channel IDs and the subordinate LUN numbers.
Host LUN Mapping The process which logically associates logical configurations of disk drives (e.g., a logical drive) with Host IDs or LUN numbers.
I2C
Inter-Integrated Circuit – a type of bus designed by Philips Semiconductors, which is used to connect integrated circuits. I2C is a multi-master bus, which means that multiple chips/devices can be connected to the same bus and each
Glossary App-7

SANWatch User’s Manual
one can act as a master by initiating a data transfer. I2C connect device presence detection circuitry and temperature sensors within EonStor enclosures.
In-Band SCSI (Also known as “in-band” or “In-band”.) A means whereby RAID management software can access a RAID array via the existing host links and SCSI protocols. (Note: the in-band SCSI is typically used in places with no network connections.)
In-band is also implemented with a Fibre Channel or iSCSI host connection.
iSCSI
iSCSI is Internet SCSI (Small Computer System Interface), an Internet Protocol (IP)-based storage networking standard for linking data storage facilities, developed by the Internet Engineering Task Force (IETF).
ISEMS Infortrend Simple Enclosure Management System – an I2C-based enclosure monitoring standard developed by Infortrend Technologies, Inc.
JBOD
Just a Bunch of Disk – non-RAID use of single or multiple hard disks for data storage. JBOD can refer to a drive expansion enclosure or an optional RAID level defined by some RAID vendors. The NRAID option in Infortrend’s firmware is equal to the JBOD option by some other RAID vendors. In special occasions, such as NVR recording where drives for recording can be swapped frequently, you may configure individual disk drives into NRAID and use them as individual drives.
JRE Java Runtime Environment – the Solaris Java program used to run .JAR applications locally, over a network, or the Internet.
Logical Drive Typically, a group of hard disks logically combined to form a single large storage volume. Often abbreviated as “LD.”
Logical Volume
App-8 Glossary

Appendices
A group of logical drives logically combined to form a single large storage unit. The logical drives contained within a logical volumes are striped together. Often abbreviated as “LV.”
LUN
Logical Unit Number – A 3-bit identifier used on a channel bus to distinguish between up to multiple devices (logical units) with the same host ID.
Management Host Agent
A TCP/IP agent for managing multiple RAID systems within a private network. See Chapter 1 and Connection View above.
Mapping The assignment of a protocol or logical ID to a device for the purposes of presenting a RAID storage volume to an application server and/or device management.
Mirroring A form of RAID technology where two or more identical copies of data are kept on separate disks or disk groups. Used in RAID 1.
Notification Manager A subordinate utility application included with SANWatch, which provides event notification functions including e-mail, MSN, fax, etc.
NRAID
Non-RAID. The capacities of all selected drives are combined to become one logical drive (no block striping). In other words, the capacity of the logical drive is the total capacity of the physical drives. NRAID does not provide data redundancy. NRAID is equal to the use of “JBOD” option as defined by some RAID vendors.
Parity
Parity checking is used to detect errors in binary-coded data. The fact that all numbers have parity is commonly used in data communications to ensure the validity of data. This is called parity checking.
Parity in RAID enables fault tolerance by creating a sum of data and saving it across member drives or on a dedicated parity drive.
Glossary App-9
SANWatch User’s Manual
Port Name
An eight byte hexadecimal number uniquely identifying a device port within a Fibre Channel network. Node names and Port names incorporate the World Wide Name and bytes for the name format and also the port number.
Specific node names and port names can be found in “Channel”” -> “Host-ID/WWN”.
RAID
Redundant Arrays of Independent Disks (Originally “Redundant Arrays of Inexpensive Disks”). The use of two or more disk drives instead of one disk, which provides better disk performance, error recovery, and fault tolerance, and includes interleaved storage techniques and mirroring of important data.
SANWatch Manager The initial portal window of the SANWatch management software, which is different from Storage Manager. Storage Manager refers to the individual management session with a RAID system.
SANWatch Manager provides a collective view of subordinate RAID systems, with a status summary of each RAID system, and the access to the Notification Manager and EonPath utility windows.
SAF-TE SCSI Accessed Fault-Tolerant Enclosures – an enclosure monitoring device type used as a simple real-time check on the go/no-go status of enclosure UPS, fans, and other items.
SAN
Storage Area Network – is a high-speed subnetwork of shared storage devices. A storage device is a machine that contains nothing but a disk or disks for storing data. A SAN's architecture works in a way that makes all storage devices available to all servers on a LAN or WAN. Because stored data does not reside directly on the network’s servers, server power is utilized for applications rather than for passing data.
SASL
SASL is the Simple Authentication and Security Layer, a mechanism for identifying and authenticating a user login to a server and for providing negotiating protection with protocol interactions.
SBOD
App-10 Glossary

Appendices
Switched Bunch of Disk – refers to an expansion enclosure with disk drives strung across Fibre loops and managed through a loop switch architecture.
SCSI
Small Computer Systems Interface (pronounced “scuzzy”) – a high-speed interface for mass storage that can connect computer devices such as hard drives, CD-ROM drives, floppy drives, and tape drives. A SCSI bus can connect up to sixteen devices.
S.E.S. SCSI Enclosure Services is a protocol used to manage and sense the state of the power supplies, cooling devices, temperature sensors, individual drives, and other non-SCSI elements installed in a Fibre Channel JBOD enclosure.
S.M.A.R.T.
Self-Monitoring, Analysis and Reporting Technology – an open standard for developing disk drives and software systems that automatically monitor a disk drive’s health and report potential problems. Ideally, this should allow users to take proactive actions to prevent impending disk crashes.
SMS
The Short Message Service (SMS) is the ability to send and receive text messages to and from mobile telephones. SMS was created and incorporated into the Global System for Mobiles (GSM) digital standard.
Storage Manager
The RAID management session part of the SANWatch manager. This window provides all configuration options, functions, and snapshot functions with the connection to an individual RAID system.
Spare Spares are defined as dedicated (Local), Global, or Enclosure- specific. A Spare is a drive designation used in RAID systems for drives that are not used but are instead “hot-ready” and used to automatically replace a failed drive. RAIDs generally support two types of spare, Local and Global. Local Spares only replace drives that fail in the same logical drive. Global Spares replace any faulty drive in the RAID configuration. An Enclosure spare replaces only a faulty drive within the same enclosure.
Stripe
Glossary App-11

SANWatch User’s Manual
A contiguous region of disk space. Stripes may be as small as one sector or may be composed of many contiguous sectors.
Striping Also called RAID 0. A method of distributing data evenly across all drives in an array by concatenating interleaved stripes from each drive.
Stripe Size
(A.k.a. “chunk size.”) The smallest block of data read from or written to a physical drive. Modern hardware implementations let users tune this block to the typical access patterns of the most common system applications.
Stripe Width
The number of physical drives used for a stripe. As a rule, the wider the stripe, the better the performance. However, a large logical drive containing many members can take a long time to rebuild. It is recommended you calculate host channel bandwidth against the combined performance from individual drives. For example, a fast 15k rpm FC drive can deliver a peak throughput of up to 100MB/s.
VSA Virtualized Storage Architecture. VSA models can be concatenated with combined performance. Storage volumes in the VSA series is managed by the Virtualization Manager into virtual pools and virtual volumes. Traditional logical drives and related information is not seen in the storage manager session with a VSA model.
Write-back Cache
Many modern disk controllers have several gigabytes of cache on board. The onboard cache gives the controller greater freedom in scheduling reads and writes to disks attached to the RAID controller. In the write-back mode, the controller reports a write operation as complete as soon as the data is in the cache. This sequence improves write performance at the expense of reliability. Power failures or system crashes on a system without cache protection, e.g., a BBU or UPS, can result in lost data in the cache, possibly corrupting the file system.
Write-through Cache
The opposite of write-back. When running in a write-through mode, the controller will not report a write as complete until it is written to the disk drives. This sequence reduces
App-12 Glossary
Appendices
read/write performance by forcing the controller to suspend an operation while it satisfies the write request.
Appendix C. RAID Levels
This appendix provides a functional description of Redundant Array of Independent Disks (RAID). This includes information about RAID and available RAID levels.
C.1. RAID Description Redundant Array of Independent Disks (RAID) is a storage technology used to improve the processing capability of storage systems. This technology is designed to provide reliability in disk array systems and to take advantage of the performance gains multiple disks can offer.
RAID comes with a redundancy feature that ensures fault-tolerant, uninterrupted disk storage operations. In the event of a disk failure, disk access will still continue normally with the failure transparent to the host system.
RAID has several different levels and can be configured into multi-levels, such as RAID 10, 30, and 50. RAID levels 1, 3 and 5 are the most commonly used levels, while RAID levels 2 and 4 are rarely implemented. The following sections described in detail each of the commonly used RAID levels.
RAID offers the advantages of Availability, Capacity, and Performance. Choosing the right RAID level and drive failure management can increase data Availability, subsequently increasing system Performance and storage Capacity. Infortrend external RAID controllers provide complete RAID functionality and enhance drive failure management.
C.2. Non-RAID Storage One common option for expanding disk storage capacity is simply to install multiple disk drives into the system and then combine them end-to-end. This method is called disk spanning.
In disk spanning, the total disk capacity is equivalent to the sum of the capacities of all SCSI drives in the combination. This combination appears to the system as a single logical drive. For example, combining four 1GB drives in this way would create a single logical drive with a total disk capacity of 4GB.
RAID Levels App-13

SANWatch User’s Manual
Disk spanning is considered non-RAID due to the fact that it provides neither redundancy nor improved performance. Disk spanning is inexpensive, flexible, and easy to implement; however, it does not improve the performance of the drives and any single disk failure will result in total data loss.
Figure C-1: Non-RAID Storage
C.3. RAID 0 RAID 0 implements block striping where data is broken into logical blocks and striped across several drives. Although called RAID 0, this is not a true implementation of RAID because there is no facility for redundancy. In the event of a disk failure, data is lost.
In block striping, the total disk capacity is equivalent to the sum of the capacities of all drives in the array. This combination of drives appears to the system as a single logical drive.
RAID 0 provides the highest performance without redundancy. It is fast because data can be simultaneously transferred to/from multiple disks. Furthermore, read/writes to different drives can be processed concurrently.
App-14 RAID Levels

Appendices
Figure C-2: RAID0 Storage
C.4. RAID 1 RAID 1 implements disk mirroring where a copy of the same data is recorded onto two sets of striped drives. By keeping two copies of data on separate disks or arrays, data is protected against a disk failure. If a disk on either side fails at any time, the good disks can provide all of the data needed, thus preventing downtime.
In disk mirroring, the total disk capacity is equivalent to half the sum of the capacities of all drives in the combination. For example, combining four 1GB drives would create a single logical drive with a total disk capacity of 2GB. This combination of drives appears to the system as a single logical drive.
RAID 1 is simple and easy to implement; however, it is more expensive as it doubles the investment required for a non-redundant disk array implementation.
Figure C-3: RAID1 Storage
RAID Levels App-15

SANWatch User’s Manual
In addition to the data protection RAID 1 provides, this RAID level also improves performance. In cases where multiple concurrent I/Os are occurring, these I/Os can be distributed between two disk copies, thus reducing total effective data access time.
C.5. RAID 1(0+1) RAID 1(0+1) combines RAID 0 and RAID 1 – mirroring and disk striping. RAID (0+1) allows multiple drive failure because of the full redundancy of the hard disk drives. If more than two hard disk drives are chosen for RAID 1, RAID (0+1) will be performed automatically.
IMPORTANT!
RAID (0+1) will not appear in the list of RAID levels supported by the controller. RAID (0+1) automatically applies when configuring a RAID1 volume consisting of more than two member drives.
Figure C-4: RAID 1(0+1) Storage
C.6. RAID 3 RAID 3 implements block striping with dedicated parity. This RAID level breaks data into logical blocks into the size of a disk block, and then stripes these blocks across several drives. One drive is dedicated to parity. In the event a disk fails, the original data can be reconstructed by XOR calculation from the parity information.
In RAID 3, the total disk capacity is equivalent to the sum of the capacities of all drives in the combination, excluding the parity drive.
App-16 RAID Levels

Appendices
For example, combining four 1GB drives would create a single logical drive with a total disk capacity of 3GB. This combination appears to the system as a single logical drive.
RAID 3 provides increased data transfer rates when data is being accessed in large chunks or sequentially.
However, in write operations that do not span multiple drives, performance is reduced since the information stored in the parity drive needs to be recalculated and rewritten every time new data is written to any of the data disks.
Figure C-5: RAID 3 Storage
C.7. RAID 5 RAID 5 implements multiple-block striping with distributed parity. This RAID level offers the same redundancy available in RAID 3, though the parity information is distributed across all disks in the array. Data and relative parity are never stored on the same disk. In the event a disk fails, original data can be reconstructed using the available parity information.
For small I/Os, as few as one disk may be activated for improved access speed.
RAID 5 offers both increased data transfer rates when data is being accessed in large chunks or sequentially and reduced total effective data access time for multiple concurrent I/Os that do not span multiple drives.
RAID Levels App-17

SANWatch User’s Manual
Figure C-6: RAID 5 Storage
C.8. RAID 6 A RAID 6 array is essentially an extension of a RAID 5 array with a second independent distributed parity scheme. Data and parity are striped on a block level across multiple array members, just like in RAID 5, and a second set of parity is calculated and written across all the drives.
The goal of this duplication is solely to improve fault tolerance; RAID 6 can handle the failure of any two drives in the array while other single RAID levels can handle at most one fault. This is a perfect solution when data is mission-critical.
Figure C-7: RAID 6 Storage
C.9. RAID 10, 30, 50 and 60 Infortrend implements RAID 10, 30, 50 and 60 in the form of logical volumes. Each logical volume consists of one or more logical drives. Each member logical drive can be composed of a different RAID level. Members of a logical volume are striped together (RAID 0); therefore, if all members are RAID 3 logical drives, the logical volume can be called a RAID 30 storage configuration.
App-18 RAID Levels

Appendices
Using logical volumes to contain multiple logical drives can help manage arrays of large capacity. It is, however, difficult to define the RAID level of a logical volume when it includes members composed of different RAID levels.
RAID Levels App-19
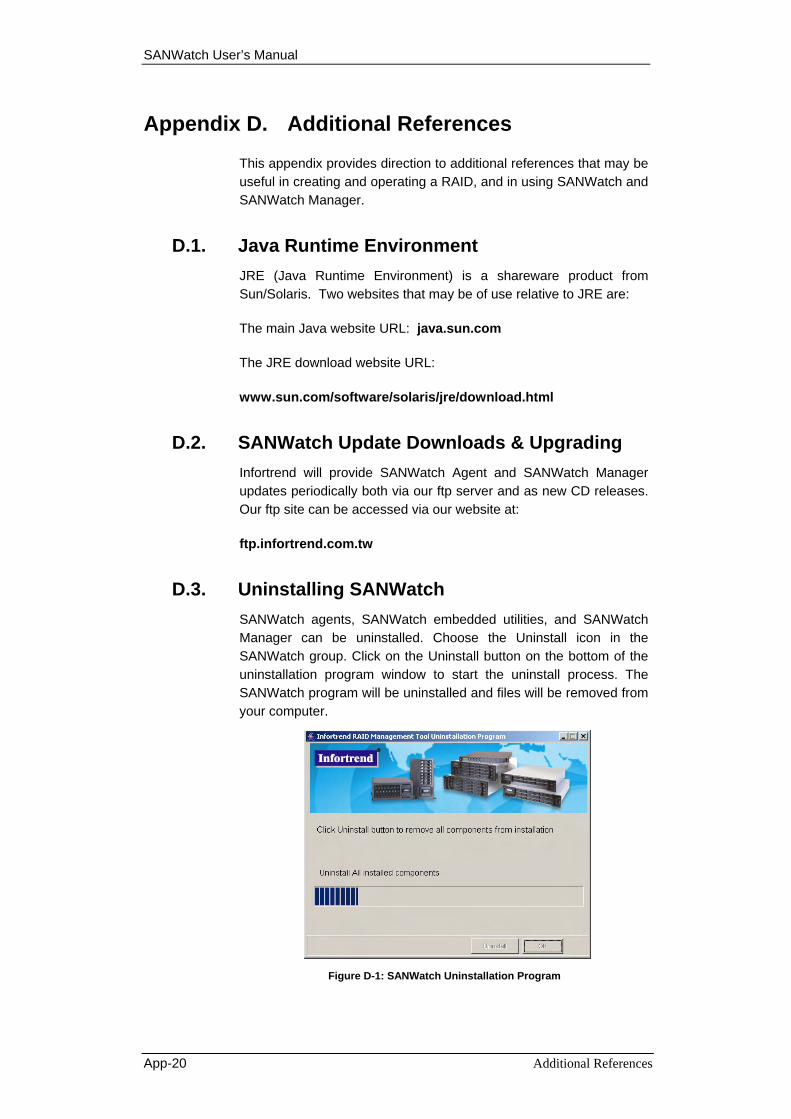
SANWatch User’s Manual
Appendix D. Additional References
This appendix provides direction to additional references that may be useful in creating and operating a RAID, and in using SANWatch and SANWatch Manager.
D.1. Java Runtime Environment JRE (Java Runtime Environment) is a shareware product from Sun/Solaris. Two websites that may be of use relative to JRE are:
The main Java website URL: java.sun.com
The JRE download website URL:
www.sun.com/software/solaris/jre/download.html
D.2. SANWatch Update Downloads & Upgrading Infortrend will provide SANWatch Agent and SANWatch Manager updates periodically both via our ftp server and as new CD releases. Our ftp site can be accessed via our website at:
ftp.infortrend.com.tw
D.3. Uninstalling SANWatch SANWatch agents, SANWatch embedded utilities, and SANWatch Manager can be uninstalled. Choose the Uninstall icon in the SANWatch group. Click on the Uninstall button on the bottom of the uninstallation program window to start the uninstall process. The SANWatch program will be uninstalled and files will be removed from your computer.
Figure D-1: SANWatch Uninstallation Program
App-20 Additional References

Appendices
This page is intentionally left blank.
Additional References App-21

Appendix E
Configuration Manager
This chapter is organized in the following order:
How to Open a Management Console and Use the Script Editor
Open a Configuration Manager console
Open a configuration console with multiple arrays
Compose a script
- Command Syntax
- See all script commands through types
- Use templates
- Getting help with script commands
- Run script commands
- Debug
- Save a configuration script or execution results
Concepts
Getting Help from the screen
Functions provided by the Configuration Manager
Screen Elements
- Top Menu
- Tool Bar
- Configuration Manager Settings
Function Windows (the Script Editor details are described in the How to
part)
The Device Screen
- Functions on the Device screen
The Maintenance View
- Functions on the Maintenance screen
The Synchronize View
- Time Synchronization functions
Configuration Manager

SANWatch User’s Manual
E-1. How To Open a Management Console and Use the
Script Editor
Opening a Management Console Step 1. Open the SANWatch portal program.
Step 2. Select the Configuration Manager button from the
program's tool bar.
Step 3. You will first be prompted by a selection box containing all
storage systems in your local network.
Step 4. Select one or multiple systems by clicking their checkboxes.
Step 5. Click the Connect button to open a Configuration Manager
console.
Opening a Management Console with Multiple Systems Step 1. Open the SANWatch portal program.
Step 2. Select the Configuration Manager button from the program's
tool bar.
Step 3. You will first be prompted by a selection box containing all
storage systems in your local network.
Step 4. Select multiple systems by clicking their checkboxes. The
selected systems will appear in the Configuration Manager's
Device View.
Step 5. Click the Connect button to open a Configuration Manager
console.
Configuration Manager E-2

SANWatch User’s Manual
Compose a Script
Script Commands Syntax
Command Syntax
1. A simple command line looks like this:
Command [parameter] [parameter]
For example, a "connect" command can be executed along with
password protection:
connect [IP | hostname] [index] [-p new-password [old password]]
NOTE: The utility's default uses the "device" command. The device
command allows simultaneous connections with mulitple
arrays. Separate each array's IP address using a comma.
The "connect" command allows only one array to be
connected.
2. The second example shows a partitioning command:
create part [ld | lv] [index] [size] [part={index}]
Configuration Manager E-3
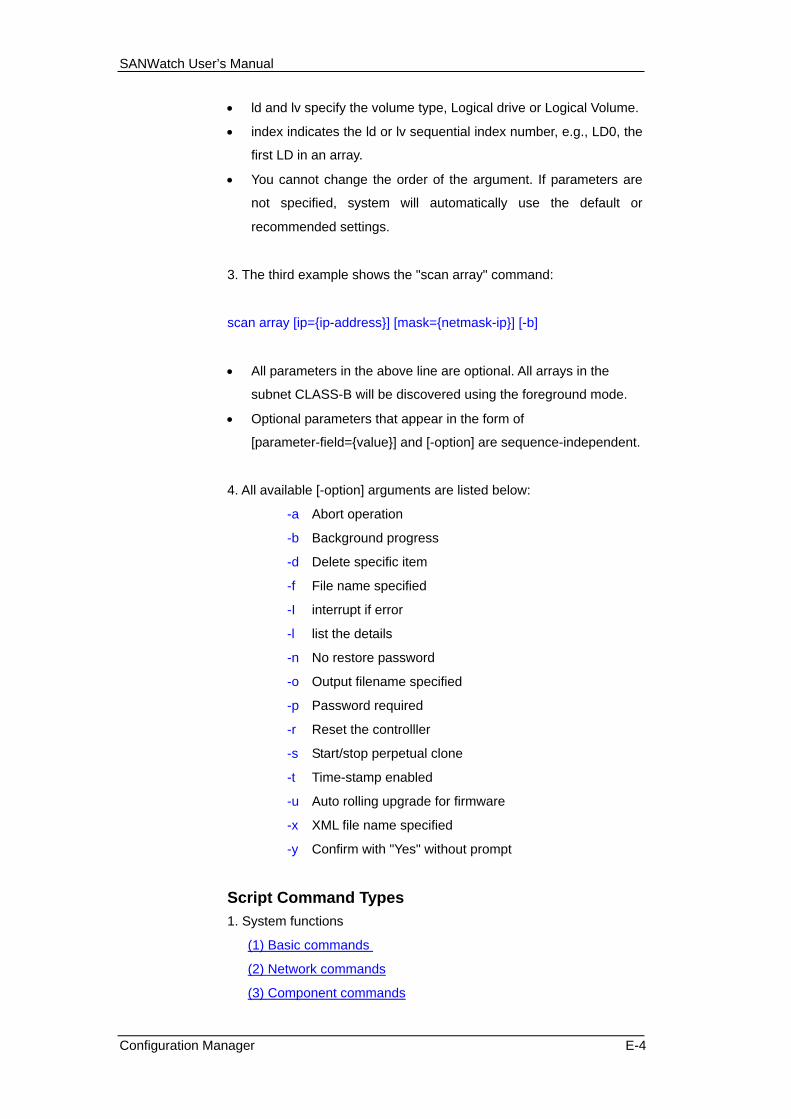
SANWatch User’s Manual
• ld and lv specify the volume type, Logical drive or Logical Volume.
• index indicates the ld or lv sequential index number, e.g., LD0, the
first LD in an array.
• You cannot change the order of the argument. If parameters are
not specified, system will automatically use the default or
recommended settings.
3. The third example shows the "scan array" command:
scan array [ip={ip-address}] [mask={netmask-ip}] [-b]
• All parameters in the above line are optional. All arrays in the
subnet CLASS-B will be discovered using the foreground mode.
• Optional parameters that appear in the form of
[parameter-field={value}] and [-option] are sequence-independent.
4. All available [-option] arguments are listed below:
-a Abort operation
-b Background progress
-d Delete specific item
-f File name specified
-I interrupt if error
-l list the details
-n No restore password
-o Output filename specified
-p Password required
-r Reset the controlller
-s Start/stop perpetual clone
-t Time-stamp enabled
-u Auto rolling upgrade for firmware
-x XML file name specified
-y Confirm with "Yes" without prompt
Script Command Types 1. System functions
(1) Basic commands
(2) Network commands
(3) Component commands
Configuration Manager E-4

SANWatch User’s Manual
(4) Configuration commands
(5) Log and event commands
2. Controller and Disk commands
(1) Controller commands
(2) Disk commands
3. Channel commands
4. Logical Drive, Volume, and Partition commands
(1) Logical Drive commands
(2) Logical Volume commands
(3) Partition commands
5. iSCSI-related commands
6. Firmware download related commands
7. Application-related commands
(1) Snapshot commands
To see details about all commands, please check the last section, E-4
Script Commands in Details, of this Appendix.
Using Templates
If you do not have a previously configured template, you may check the
included templates by clicking on the Template menu from the top
menu bar.
Using a template:
A template tab and its contents will appear on the right-hand side of the
Script Editor screen. Drag your mouse cursor to select all text in the
field, and click on the input button to import them into the editing field.
Now you can start editing your command script.
You may also acquire sample templates from Infortrend's technical
support.
Use the included sample templates to develop your storage
configuration.
Configuration Manager E-5
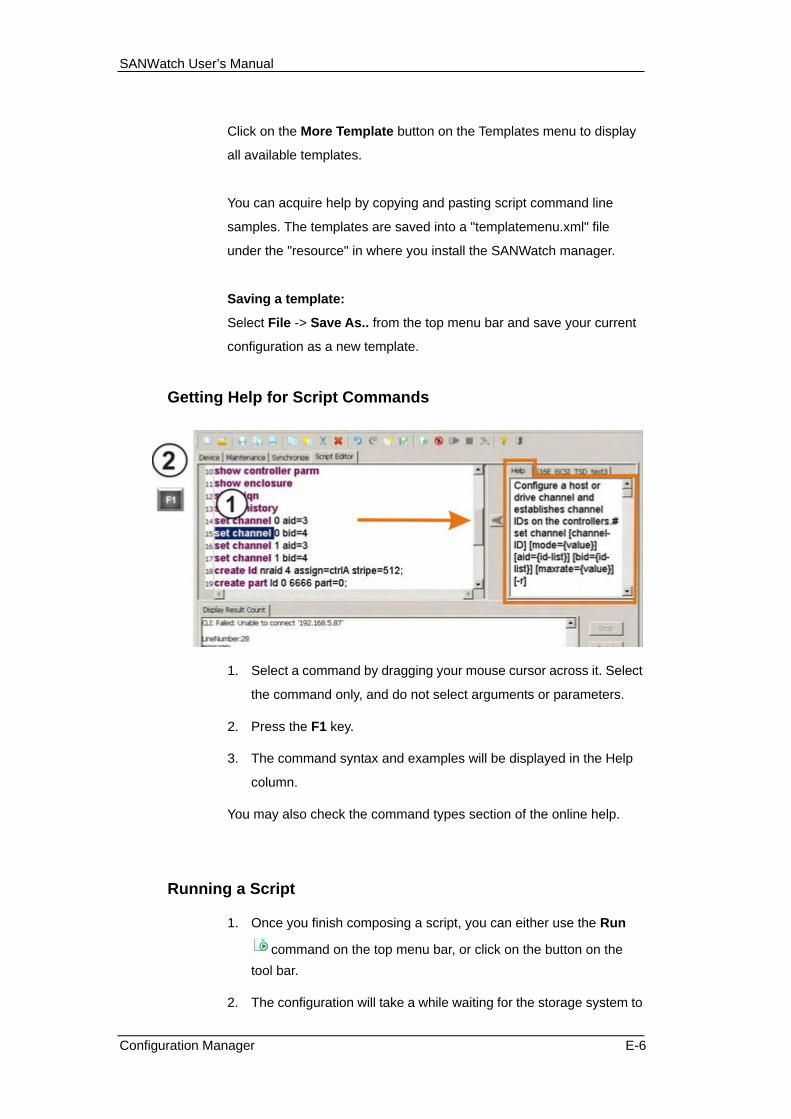
SANWatch User’s Manual
Click on the More Template button on the Templates menu to display
all available templates.
You can acquire help by copying and pasting script command line
samples. The templates are saved into a "templatemenu.xml" file
under the "resource" in where you install the SANWatch manager.
Saving a template:
Select File -> Save As.. from the top menu bar and save your current
configuration as a new template.
Getting Help for Script Commands
1. Select a command by dragging your mouse cursor across it. Select
the command only, and do not select arguments or parameters.
2. Press the F1 key.
3. The command syntax and examples will be displayed in the Help
column.
You may also check the command types section of the online help.
Running a Script
1. Once you finish composing a script, you can either use the Run
command on the top menu bar, or click on the button on the tool bar.
2. The configuration will take a while waiting for the storage system to
Configuration Manager E-6

SANWatch User’s Manual
complete all configuration tasks. The run status and progress will
be shown at the bottom of the screen. When the task is completed,
use the Detail button to check the execution results.
If you are exerting script commands to multiple systems, they will
be listed in the Display Result Count field.
3. You may then verify the configuration in the tabbed window at the
lower part of the screen, save the execution details, and then close
the results window.
Debug
1. Before you complete a successful configuration, you may need to
test and debug your commands. Use the debug command on the
top menu bar or click on the button from the utility's tool bar..
Setting interrupts:
Double-click on the vertical color bar before the command line
number where you want to insert an interrupt. If interrupts are set,
you can execute your commands each at a time by selecting the
Step_by_Step command. Use the Continue button to continue your debug process. Round dots will indicates the
interrupts.
2. The debug function can help find out the incongruity within your
command lines. Test results will be shown in the result field at the
lower part of the configuration screen.
Saving Script or Execution Results
1. Saving IP script: You can either save the script you compose as a
Configuration Manager E-7

SANWatch User’s Manual
template or an independent script file (*.cli)
2. The Save commands can be found in the File or Template menus
or on the tool bar.
NOTE: use the Add template button on the Device screen to save
your templates as macros. This avail your templates for future use.
3. Once you have executed a configuration script, click on the Detail
button, and the result will be shown in another tabbed window.
Move to the tabbed window, and use the Save button on the lower
right corner of the screen to save the execution results.
E-2. Concepts
The Command Helper
Most script commands start with "set," "create," "show," etc. A
command helper prompt automatically appears whenever you type a
matching alphabet. For example, if you type "c" on the editor field, all
commands that begins with c will be listed.
Configuration Manager E-8

SANWatch User’s Manual
Description of Major Functionality
1. Script Editor
1). Provides an interface to coordinate RAID system operations.
2). Configure and apply the same configuration profile to multiple
storage systems, facilitating the configuration process.
3). Simultaneous configuration and monitoring of multiple storage
systems.
4). Easily replicate storage configuration by the script templates.
2. Synchronize (with time server)
Synchronize storage systems' RTC with a time server, local host, or
set a clock for multiple arrays.
3. Maintenance
1). Upgrade firmware and boot record for a single or multiple
arrays.
2). Save the storage configuration profile to a system drive for
future reference.
4. Device
1). Add or Remove templates from the Macros list
2). Apply Macros to selected arrays directly
3). At-a-glance view of connected arrays
4). Summary of execution results
Top Menu Commands
Top Menu:
The top menu consists of 7 command groups: File, Edit,
Configuration, Template, Run, Options, and Help.
Configuration Manager E-9

SANWatch User’s Manual
Except the Configuration, Options, and Help menus, all other
commands are related to the Script Editor.
The Configuration commands open the 4 major configuration windows
(Device, Maintenance, Synchronize, Script Editor) in the center of
the utility screen.
You may also click on the tabs below the tool bar to access the major
configuration windows.
NOTE: All editing commands will be grayed-out unless you open the
Script Editor window.
Tool Bar:
Start a new script editing task
Open a previously saved script (*.cli files)
Save the script
Save as another script
Print the script in simple text format
Copy the selected content
Paste the selected content
Cut the selected content
Delete the selected content
Configuration Manager E-10

SANWatch User’s Manual
Undo
Redo the previous act
Clear all command text in the field
Select all
Run
Debug
Continue the step-by-step debug process (only appears when
debugging)
Stop run script of debug process
Step_by_step: execute the debug process one command line at a
time (only appears when debugging)
Help
Exit the program
Configuration Manager E-11
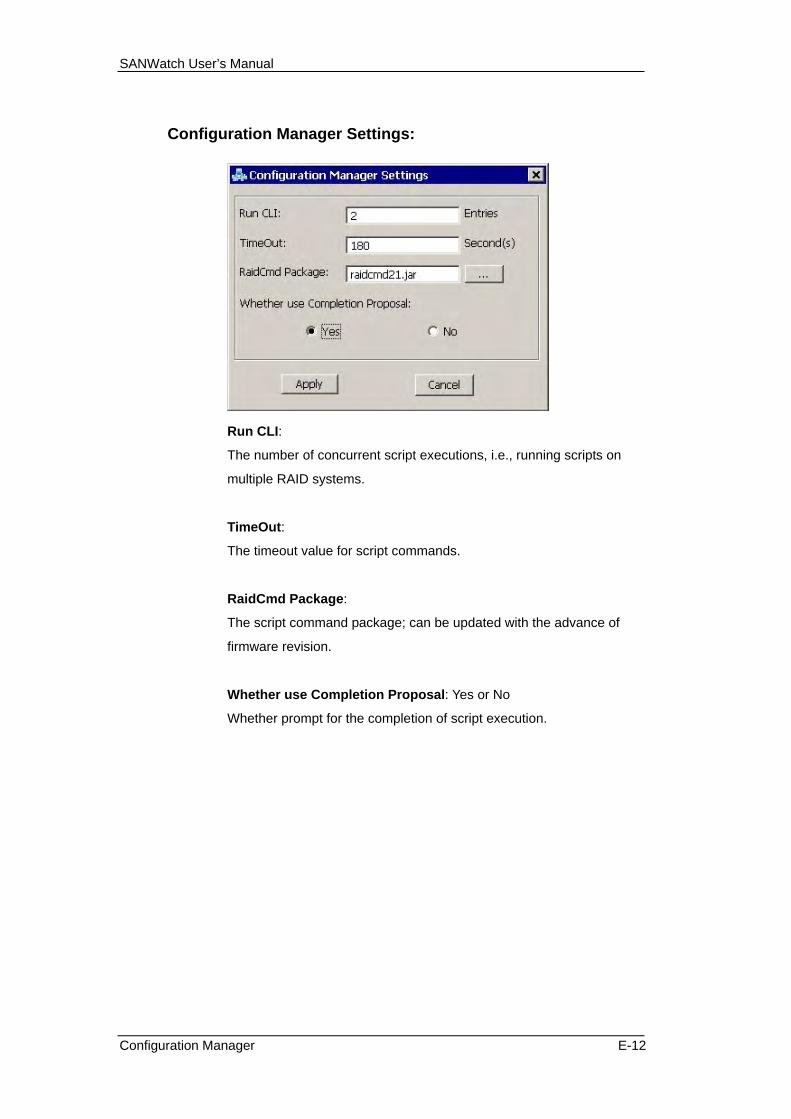
SANWatch User’s Manual
Configuration Manager Settings:
Run CLI:
The number of concurrent script executions, i.e., running scripts on
multiple RAID systems.
TimeOut:
The timeout value for script commands.
RaidCmd Package:
The script command package; can be updated with the advance of
firmware revision.
Whether use Completion Proposal: Yes or No
Whether prompt for the completion of script execution.
Configuration Manager E-12

SANWatch User’s Manual
E-3. Function Windows
Functions on the Device Screen:
This screen is divided into 3 sections: Device, Macro, and Result
Selected Device List:
The Device list shows all arrays currently connected.
Available Macros:
The Macros field shows all embedded templates. You can manually
"Add" templates you previously edited into this field.
You can directly apply a macro to a connected array by selecting a
macro/template and one or multiple arrays by mouse clicks, and then
click the Apply button.
You can also remove an existing macro using the Delete button.
Display Result Count:
The script execution results will be listed in this field. You can use the
Configuration Manager E-13
SANWatch User’s Manual
Detail button to find the execution details while running a macro.
When all macro commands are executed, you can also use the Save
button to save your execution details.
Functions on the Maintenance Screen:
Firmware Upgrade: Before updating firmware, the target systems
must have been connected; otherwise, the Apply button will be
disabled. You may select to update firmware only or firmware +
bootrecord by the check circle. Please contact Infortrend support and
read the message in firmware release note.
Configuration Extract: You can either save a storage system's
configuration profile as a binary text file or an xml file. Use the Select
button to specify where you want the configuration profile will be
located.
Click the Apply button to save your configuration.
Time Synchronization Functions:
NTP server:
Click on the check circle and specify the network address of where the
NTP (Network Time Protocol) service is available. There are network
servers that provide this service. You can use this function to
synchronize the time settings on multiple storage systems.
Set Time: This column allows you to manually set time to the
connected storage systems.
Configuration Manager E-14

SANWatch User’s Manual
A mouse click on the pull down tab displays a calendar. A default time
will be added. You may then manually change the time on Date/Time
field to set up time on your storage system.
Configuration Manager E-15

SANWatch User’s Manual
Synchronize with Local Host: Synchronizes storage RTC with the
time settings on the computer you are currently running the
Configuration Manager.
E-4. Script Commands in Details
Script Command Types - Basic Commands 1. scan array
scan array [ip={ip-address}] [mask={netmask-ip}] [-b]
Specify the IP domain for scanning. For arrays connected
through the in-band method, this command will enumerate
the IPs of all host computers with arrays attached using the
in-band connections. CLI will also scan arrays using the
out-of-band Ethernet connections. Once scanned, users can
connect specific arrays with an extended “connect”
command. The mask={netmask-ip} argument specifies the
net-mask for scanning. If not specified, the default net-mask
255.255.255.0 is applied. The "-b" parameter specifies the
discovery job to be run in the background. The list of
discovered arrays will be updated dynamically and displayed
with another command, "show array.”
Example: scan array ip=192.168.1.1 mask=255.255.255.255 (scan
arrays connected to 192.168.1.1 or find the array through IP
192.168.1.1); Example: scan array ip=192.168.1.1 -b (class
C for scanning 255 nodes in background); Example: scan
array ip=192.168.1.1 mask=255.255.0.0 (class B for
scanning 65535 nodes)
2. disconnect
disconnect [IP | hostname]
The parameter is the IP address of the array's management
port or the host computer IP to which the array is attached.
Configuration Manager E-16

SANWatch User’s Manual
3. show array
This command displays the results using the "scan array"
command. If the scan array command is executed the
second time, the buffered results will be replaced by the new
discovery.
4. help or ?
The help command displays a shor summary of all available
commands. You can add the command type after this
command in order to display a specific group of commands,
e.g., "help show" and "help set."
5. man
This command displays a detailed summary (including
parameter usage) of the available commands. You can add
the command type after this command in order to display a
specific group of commands, e.g., "man show" and "man
set."
6. select
select [index] [-p password]
If multiple arrays are attached to a host computer, and the
management access is made via in-band agent, use this
command to select one of them. If no index is specified, the
command will display all arrays. If only one array is attached,
this command will not avail. If password is set, the password
prompt will not display.
7. show cli
This command displays the revision number of the
command line interface, including name, copyright
information, revision number and build number.
8. runscript
runscript [filename] [-i]
Configuration Manager E-17
SANWatch User’s Manual
Filename specifies the name of a batch file. -1: interrupts the
script file execution if any command returns errors.
Script Command Types - Network Commands 1. show net
This command shows the IP address, netmask, gateway,
MAC address and addressing mode of a target array.
2. set net
This command configures the parameters related to the
Ethernet management port of a RAID system.
set net [ID] [dhcp] [-r]
The "-r" parameter tells a controller to reset so that the
specified changed can take effect immediately. Examples:
set net 0 dhcp; set net 1 ip=192.168.1.1
mask=255.255.255.0 gw=192.168.1.254
3. show rs232
displays the RS-232 serial port connection details
4. set rs232
This command configures the system serial port-related
parameters.
set rs232 [port] [baud={value}] [term={switch}]
"port" specifies whether it is COM1 or COM2. The baud rate
values range from 2400, 4800, 9600, 19200, to 38400.
"term" specifies whether to enable or disable terminal
emulation service on a COM port.
Example: set rs232 com1 baud=38400;. set rs232 com2 term=enable
5. show wwn
Displays all registered WWNs on connected HBAs, host
Configuration Manager E-18

SANWatch User’s Manual
channels, and user-defined alias of a RAID system.
6. create wwn
Associate a symbolic name with a host HBA port WWPN.
Names that contain special characters, such as spaces,
must be enclosed using double quotation marks.
7. delete wwn
Deletes a host/WWN name entry.
8. show access mode
Displays whether the management access is using the
in-band or out-of-band connectivity.
Script Command Type - Component Commands 1. show enclosure
This command displays enclosure information acquired
through SAF-TE or SES (SCSI Enclosure Services) in RAID
enclosures or JBODs. The information includes battery
status, fan, power supply, temperature sensor and readings,
and drive status, etc.
Script Command Types - Configuration Commands 1. export config
Saves system configuration from system NVRAM to disk
reserved space or a file.
export config [parameter] [filename]
Use the "-h" parameter if you want to save configuration to
disk reserved space. Use the "-f" parameter to save
configuration as a file. If not specified, the default file name
will be nvram.bin -x as an XML file.
2. import config
Restores system configuration from a previously save
profile.
Configuration Manager E-19

SANWatch User’s Manual
import config [parameter] [filename] [-y] [-r]
Use parameter to distinguish the source of the saved
configuration profile. Valid values are: -h: Restore from
hidden disk reserved space. This is the default if no
parameter is specified. -f: Restore from a file. -x: Restore
from XML format file, the default file name is: config.xml. -n:
Restore from disk reserved space, but no restoring the
previously set password in NVRAM. filename: The name of
the configuration profile. -y: Execute this command without
prompt. If this parameter not specified, a prompt will appear
showing a warning message asking users to confirm. (‘y’ or
‘n’) -r: Ask controller to reset immediately so that the
specified changes take effect. If not specified, a prompt
message will notify users to reset. Examples: import config
(same as “import config -h, restore configuration from disk
reserved space.); import config -f \usr\config.dat; import
config -x (Restore from config.xml)
3. export file
This command tells a controller or host-side agent to export
a user-specified file to system drive.
export file [source-filename] [destination-filename]
Examples: export file config.bin; export file config.bin backup.bin
4. import file
This command tells a controller or host-side agent to
download and restore configuration profile from a file on
system drive.
import file [source-filename] [destination-filename] [-y]
source-filename: Specify the source file in local for
downloading. destination-filename: Specify the name of
destination file which will be restore to system or host. If not
Configuration Manager E-20

SANWatch User’s Manual
specified, it would use same name with source. -y: Execute
this command without prompt. If this parameter not specified,
it would prompt a warning message and asking users to
confirm. (‘y’ or ‘n’)
Examples: import file backup.bin -y; import file backup.bin config.bin
Script Command Types - Log and Event Commands 1. !
Executes the last or specific historical command.
! [index]
The index parameter specifies the index number of a
historical command. If not specified, the latest command will
be executed. A history of executed commands will be shown
using the "show history" command.
2. show history
Displays all or specific historical commands.
show history [command-filter]
the "command filter" is used to show commands that match
the filtering conditions. If not specified, all historical records
will be shown.
Examples: show hitory set (show all commands that start with "set")
3. set history
Sets the size of the command history buffer.
set history [size]
the size parameter ranges from 0 to 255.
4. delete history
Configuration Manager E-21

SANWatch User’s Manual
Deletes all historical command records.
5. set log
Enable/disable logging commands and output related
information into a specific log file.
set log [option] [filename] [-t]
The "option" can be: enable, append, and disable. The
default for the output log file is "output.log." The "-t" toggles
the execution date and time for each command.
Examples: set log append; set log disable
6. show event
Displays the contents related to a specified RAID controller.
show event [n]
"n" is the number of events to be shown. If not specified, the
command will display all events.
7. delete event
Clears the entire controller event log.
Script Command Types - Controller Commands 1. show controller
Displays controller-related information including controller
name, model, CPU type, cache size, firmware version, serial
number, etc.
2. show controller date
Displays the boot time and date, current time and date
settings, time zone.
3. show controller trigger
Displays the controller event-triggered settings, such as the
Configuration Manager E-22

SANWatch User’s Manual
automatic cache flush invoked by a single component
failure.
4. show controller parm
Dislays disk array parameters such as rebuild priority, write
verify mode, etc.
5. show controller uid
Displays the controller unique ID, which defaults to the
enclosure serial number.
6. show controller redundancy
Displays whether the partner controllers are operating
correctly. Related information will also be shown.
7. set controller name
Designates a name for the array.
set controller name [name]
The max. length of the name is 31 characters.
8. set controller date
Sets controller date, time, and time zone.
set controller date [yyyyMMdd] [hhmmss] [gmt={value}]
The time setting is using a 24-hour system. gmt={value}:
Specify the time zone based on Greenwich Mean Time
(GMT) followed by a plus (+) or minus (-) sign and the
number of hours earlier or later your location is from the
Greenwich mean time. If not specify the time zone, it is
automatically set to the time zone set in the RAID firmware.
Example: set controller date 20050101 180000 gmt=+8; set controller
date 083030
9. set controller trigger
Configuration Manager E-23

SANWatch User’s Manual
The event-trigger mechanism dynamically change the
caching mode in order to reduce the chance of losing data. A
component failure or abnormal condition can change the
caching mode or force the controller to enter a shutdown
state.
set controller trigger [controller-fail={switch}]
[battery-fail={switch}] [power-loss={switch}]
[power-fail={switch}] [fan-fail={switch}]
[temp-exceed-delay={value}]
{switch} can be enable or disable. The temp-exceed {value}s
(in minute) can be: 0 (disable), 2, 5, 10, 20, 30, 45, 60
Examples: set controller trigger controller-fail=enable
power-fail=enable; set controller trigger fan-fail=enable
temp-exceed-delay=10
10. set controller parm
Various controller parameters can be tuned using the related
arguments.
set controller parm [norm-verify={switch}][ init-verify={switch}]
[rebuild-verify={switch}] [priority={level}]
[max-response={timeout}] [av-optimization={category}]
The first 3 arguments are related to the Verify-after-Write
operation. The {switch} values can be enable or disable. the
priority {level} can be low, normal, or improved. The {timeout}
value can be 0(deault for disabled), 160, 320, or 960ms. The
AV optimization argument can be disabled, fewer (fewer
streams), or multiple (for multiple-stream playback).
Examples: set controller parm normal-verify=enable priority=normal;
set controller parm init-verify=disable rebuild-verify=enable
priority=high; set controller parm av-optimization = multiple
11. set controller uid
Configuration Manager E-24

SANWatch User’s Manual
Specifies the unique identifier for an array as a 6-digit
hexidecimal number ranging from 0 to 0xfffff.
set controller uid [number] [-y] [-r]
The "-y" argument executes the command wihtout a confirm
prompt. The "-r" argument resets the system immdediately.
12. set controller default
Restore the controller NVRAM defaults.
set controller default [-y] [-r]
The "-y" argument executes the command wihtout a confirm
prompt. The "-r" argument resets the system immdediately.
13. set password
Sets controller password
set password [-p new-password [old-password]]
If no parameter is specified, users will be prompted to enter
the new password twice (enter once and then to confirm). To
remove an existing password, specify a zero-length string
with a pair of double quote characters.If there is an existing
password, the old password needs to be specified.
14. show cache
Displays the write policy of a RAID system.
15. set cache
Specifies the write-back operation mode.
set cache [write={write-policy}] [access={access-mode}]
[sync-period={value}] [-r]
The {write-policy} values can be: write-back or write-through.
The access-mode value is currently disabled. The
Configuration Manager E-25

SANWatch User’s Manual
{sync-period} values can be: 0 (continuous synncing), 30, 60,
120, 300, 600 (in seconds), or disabled(default). The "-r"
argument resets the controller immediately.
Examples: set cache write=write-through -r; set cache write=write-back
sync-period=30
16. mute
Silence the currently sounded alarm. The next faulty
condition will trigger the alarm again.
17. shutdown controller
Starts cache flush and stops I/O processing. The system can
then be powered down or reset.
shutdown controller [-y]
If parameter is not set, a confirm box will prompt.
18. reset controller
reset also perform cache flush.
reset controller [flush={switch}] [-y]
The {flush} argument can be enable(default) or disable. If
parameter is not set, a confirm box will prompt.
19. show task
Displays a list of tasks in progress (such as rebuild,
initialization, etc.)
20. set task
Can be used to stop an ongoing process.
set task [task-IDs] [-a]
-a aborts an operation.
Configuration Manager E-26

SANWatch User’s Manual
21. show schedule
Lists all scheduled tasks. Each task has its own job ID.
22. create schedule
The task schedule starts an operation by the specified date
and time.
create schedule [schedule-policy] [“command”]
The schedule-policy values can be: {once [yyyyMMdd]
[hhmmss]}: Runs once at specific time; {daily [hhmmss]}:
Runs everyday at a specific time; {weekly [week-day]
[hhmmss]}: Runs weekly at a specific date and time;
{monthly [day] [hhmmss]}: Runs monthly at a specific date
and time.
NOTE: the monthly policy is not supported yet. yyyyMMdd: Specify
the controller date. yyyy: Specify the 4 digit year, MM:
Specify the month, valid value: 1-12, dd: Specify the day of
the month, valid value: 1-31. hhmmss: Specify the controller
time based on a 24-hour system. hh: Specify the hour, valid
values: 0–23. mm: Specify the minute, valid values: 0–59. ss:
Specify the seconds, valid values: 0–59. week-day: Specify
the day of a week, valid values: 1-7. day: Also specify the
day of the month, valid value: 1-31.
The “command” argument can be: “set disk scan
[parameters]”, “set ld scan [parameters]”, the parameters are
referenced to the media scan commands like "set disk scan"
and "set ld scan".
Examples: create schedule once 20050110 080000 “set disk scan 0,1
mode=continues priority=normal” (performs scan on physical
drive 0 and 1 in the continues mode and normal priority);
create schedule weekly 7 235900 “set ld scan 2 priority=low”
(perform scan on logical drive #2 in the default one-pass
mode and low priority on every Sunday.)
Configuration Manager E-27

SANWatch User’s Manual
23. delete schedule
Removes a specific scheduled task by its schedule ID.
delete schedule [job-ID]
Script Command Types - Disk Commands 1. show disk
Displays information about the installed disk drives including
all in the RAID or expansion JBODs.
show disk [disk-list | channel={ch}]
The "disk-list" argument shows specific disk drive
information in a comma-separated list of drive index. If drive
index number is shown, detailed information is displayed.
The channel={ch} argument shws all disks on specific
channel. if no channel parameter is set, all disks will be
displayed.
Examples: show disk; show disk 0,1,2; show disk channel=1
2. show disk parm
Displays drive-related parameters such as drive motor
spin-up, SMART, etc.
3. set disk parm
Sets drive parameters that might have influence on drive
operation.
set disk parm [spin={switch}] [smart={value}]
[autospare={switch}] [delay={time}] [tag={value}]
[io={timeout}] [check={period}] [poll={period}] [swap={period}]
[autodown={time}] [cache={switch}]
The "spin" parameter refers to Drive Motor Spin up, the valid
values are enable and disable. The "smart" parameter refer
to drive failure prediction mode, and its valide values are:
Configuration Manager E-28

SANWatch User’s Manual
disable, detect-only, detect-perpetual-clone,
detect-clone-replace. The "autospare" refers to Auto Assign
Global Spare Drive, and its valid values are enable and
disable. The"delay" parameter refers to the time to delay
prior to first disk access for slow-initiating drives. Its valide
values are: 0 (No delay), 5, 10, 15, 20, 25, 30, 35, 40, 45, 50,
55, 60, 65, 70, 75 sec. The "tag" parameter refers to the
Maximum drive-side SCSI tags per drive. Its valid values are:
0 (Tagged queuing disabled), 1, 2, 4, 8, 16, 32, 64, 128. The
"check" parameter refers to Drive-side SCSI drive check
period. Its valid values are: 0 (disable), 0.5 (500ms), 1, 2, 5,
10, 30 secs. The"io" parameter refers to Drive-side SCSI I/O
timeout. Its valide values are: 0 (default), 0.5,1, 2, 4, 6, 8, 10,
15, 20, 30 secs. The "poll" parameter refers to SAF-TE or
SES device polling period. Its valid values are: 0 (disable),
0.05 (50ms), 0.1 (100ms), 0.2 (200ms), 0.5 (500ms), 1, 2, 5,
10, 20, 30, 60 secs. The"swap" parameter refers to
Auto-detect drive swapped check period. its valid values are:
0 (disable), 5, 10, 15, 30, 60 secs. The "autodown"
parameter refers to the Automatic Spin Down feature. Its
valid values are: 0 (disable, default), 60, 300, 600 secs. The
"cache" parameter refers to HDD write-caching. Its valid
values are: enable or disable.
Example: set disk parm spin=enable smart=detect-perpetual-clone
poll=5; set disk parm autospare=disable delay=0 tag=8; set
disk parm io=0.5 check=0.5 swap=10; set disk parm
autodown=60 cache=enable
4. show disk spare
Displays all spare drives.
5. set disk gspare
Specifies a unused disk drive as a global spare
set disk gspare [disk-index] [-d]
The "-d" argument deletes a global spare.
Configuration Manager E-29

SANWatch User’s Manual
6. set disk spare
Designate a hard disk as a local (dedicated) spare to a
specific logical drive.
set disk spare [disk-index] [logical-drive-index |
logical-drive-ID]
Examples: set disk spare 7 0 (Assign physical disk # 7 as a local spare
to logical drive 0 [ld0].); set disk spare 7 4040665 (Assign
physical disk #7 as the local spare to logical drive with ID:
4040665.); set disk spare 7 -d (Release the disk of the spare
duty)
7. set disk clone
Uses a spare drive to clone a drive that is suspected of
failing. The clone can sustain as a perpetural clone, or
simply replace the target.
set disk clone [source-disk] [-s] [-a]
[source] is a member of a logical drive suspected or faults. -s
replces the source as a member of a logical drive. -a aborts
a disk clone. -l lists all cloning tasks in progress.
8. set disk copy
Copies and replaces a member of a logical drive for the
purpose of capacity expansion.
set disk copy [source-disk] [destination-disk] [priority={level}]
The priority levels can be low, normal, improved, or high. -a
aborts disk copy task.
9. set disk scan
Checks each block in a physical drive for bad sectors.
set disk scan [index-list] [mode={value}] [priority={level}]
Configuration Manager E-30

SANWatch User’s Manual
set disk scan [index-list] [-a]
If the scan mode parameters are not set, disk scan will be
performed only once. The scan mode can be: continues and
one-pass (default). Priority levels can be: low, normal,
improved, or high. -a aborts the current scan.
Examples: set disk scan 0,1 mode=continues priority=normal (scan
runs on physical drives 0 and 1 repeatedly with normal
priority.); set disk scan 3 -a (Abort the media-scan on
physical disk #3.)
NOTE: This command can only applied to “global spare disk” in CLI
2.0 spec. And the customer can use “ld scan” to check the
drives in a logical drive. We will discuss the limitation in the
next version to support scan to any single drive.
10. set disk rwtest
Tests the specific disk drive (performing read-write test
set disk rwtest [index-list] [mode={value}] [error={value}]
[recovery={value}] [-a}
rwtest can only be performed on the new or unused drives
which does not belong to a logical drive, and are not
assigned as spare drives.
The test mode values are: read-write (default), read-only, or
reset (re-set previous rwtest error status), force (reset and
exec read-write test again) The error-reaction values are:
none (no action, default), abort (abort on any error) and
critical (abort only when critical errors occur). The recovery
values are: none (no action, default), mark (marking the bad
block), auto (reserved block auto reassignment), and
attempt (attempt to re-assign first). -a aborts the current
read-write test.
Examples: set disk rwtest 1,2 mode=read-only recovery=auto; set disk
Configuration Manager E-31

SANWatch User’s Manual
rwtest 2 -a; set disk rwtest 2 mode=reset; set disk rwtest 3
mode=force error=abort
NOTE: Read-write test can't be take place with existing errors. The
error status could be viewed using the "show disk" command.
The error status can be reset using the "set disk rwtest
[disk-index] mode=reset", or the "mode=force" argument to
re-start read-write test forcifully (reset status before
read-write test start).
11. set disk format
Formats the entire disk.
set disk format [index-list]
Format can only be performed on the new or unused drives
which does not belong to a logical drive, and are not
assigned as spare drives.
NOTE: This command is now supported for SCSI, FC and SAS
drives, and the disk format abort command is not supported
yet because aborting can cause disk failure.
Examples: set disk format 2,3
12. set disk clear
Remove the 256MB reserved space on a specific disk drive.
set disk clear [index-list]
The clear command can only be performed on the new or
unused drives which does not belong to a logical drive, and
are not assigned as spare drives.
Script Command Types - Channel Commands 1. show channel
Configuration Manager E-32

SANWatch User’s Manual
Displays information about all host and drive channels
2. set channel
Configures a host or drive channel and creates channel IDs.
set channel [channel-ID] [mode={value}] [aid={id-list}]
[bid={id-list}] [maxrate={value}] [-r]
Channel mode can be either host or drive. This option is
applicable mostly on the 1U FC-to-FC controller head.
The valid values for setting the MaxRate depend on the host
interface: For SATA/SAS host or drive channel, valid values:
auto, 330MHz, 440MHz, 660MHz, 1GHz, 1.33GHz, 1.5GHz
and 3GHz. For FC host or drive channel, valid values: auto,
1GHz, 2GHz, 4GHz. For SCSI host or drive channel, valid
values: 2.5MHz, 2.8MHz, 3.3MHz, 4MHz,5MHz, 5.8MHz,
6.7MHz, 8MHz, 10MHz, 160MHz, 160MHz, 13.8MHz,
16.6MHz, 20MHz, 33MHz, 40MHz, 80MHz, 160MHz,
320MHz
"-r" resets the controller for configuration to take effect
immediately.
Examples: set channel 1 mode=host -r (Set the channel mode as host
and resets the controller immediately.); set channel 1
aid=delete (Delete all indexes specified for controller A on
channel 1.); set channel 0 aid=1 bid=100,101,102; set
channel 2 maxrate=4GHz (Set the max data transfer rate for
FC)
3. show host
Displays the host-side configuration parameters, including
maximum queued I/O count per LUN, number of LUNs per
ID, and peripheral device settings
show host [chs]
Configuration Manager E-33
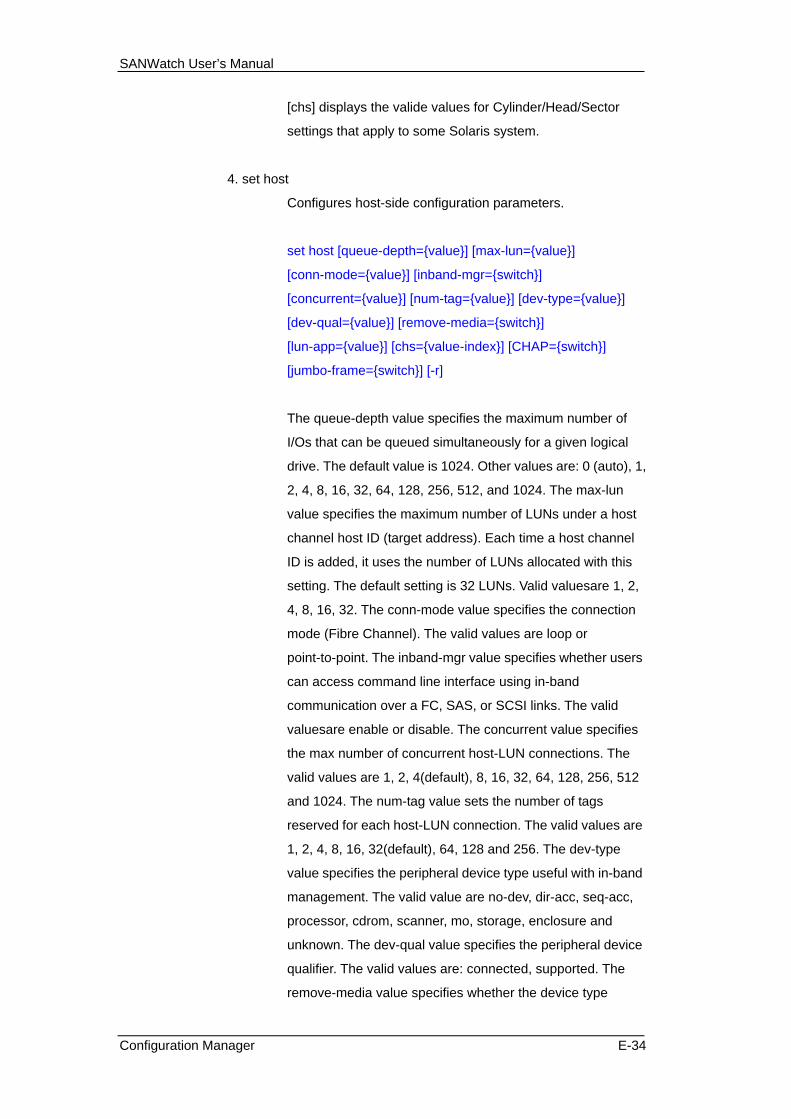
SANWatch User’s Manual
[chs] displays the valide values for Cylinder/Head/Sector
settings that apply to some Solaris system.
4. set host
Configures host-side configuration parameters.
set host [queue-depth={value}] [max-lun={value}]
[conn-mode={value}] [inband-mgr={switch}]
[concurrent={value}] [num-tag={value}] [dev-type={value}]
[dev-qual={value}] [remove-media={switch}]
[lun-app={value}] [chs={value-index}] [CHAP={switch}]
[jumbo-frame={switch}] [-r]
The queue-depth value specifies the maximum number of
I/Os that can be queued simultaneously for a given logical
drive. The default value is 1024. Other values are: 0 (auto), 1,
2, 4, 8, 16, 32, 64, 128, 256, 512, and 1024. The max-lun
value specifies the maximum number of LUNs under a host
channel host ID (target address). Each time a host channel
ID is added, it uses the number of LUNs allocated with this
setting. The default setting is 32 LUNs. Valid valuesare 1, 2,
4, 8, 16, 32. The conn-mode value specifies the connection
mode (Fibre Channel). The valid values are loop or
point-to-point. The inband-mgr value specifies whether users
can access command line interface using in-band
communication over a FC, SAS, or SCSI links. The valid
valuesare enable or disable. The concurrent value specifies
the max number of concurrent host-LUN connections. The
valid values are 1, 2, 4(default), 8, 16, 32, 64, 128, 256, 512
and 1024. The num-tag value sets the number of tags
reserved for each host-LUN connection. The valid values are
1, 2, 4, 8, 16, 32(default), 64, 128 and 256. The dev-type
value specifies the peripheral device type useful with in-band
management. The valid value are no-dev, dir-acc, seq-acc,
processor, cdrom, scanner, mo, storage, enclosure and
unknown. The dev-qual value specifies the peripheral device
qualifier. The valid values are: connected, supported. The
remove-media value specifies whether the device type
Configuration Manager E-34

SANWatch User’s Manual
supports removable media. The valid values are: disable,
enable. The lun-app value sets the LUN applicability. The
valid values are: all-lun, lun-0. The chs value sets the values
of Cylinder / Head / Sector manually. Use the "show host
chs" command to view the valid values. The CHAP value
toggles the CHAP authentication support between targets
and initiators. The default CHAP password is the same with
array controller password. The configurable values are
enable or disable. (CHAP applies to iSCSI systems only).
The jumbo-frame value toggles the support for jumbo frame
for iSCSI initiators. Valid values are enable and disable. (For
iSCSI only)
"-r" resets immediately so that the specified changes can
take effect. If not specified, firmware will prompt message to
notify user to reset later.
Examples: set host queue-depth=0 max-lun=16 conn-mode=loop; set
host queue-depth=1024 inband-mgr=disable; set host
CHAP=enable jumbo-frame=enable -r
Script Command Types - Logical Drive Commands 1. show ld
Displays information about all or a specific list of logical
drives.
# show ld [index-list]
If not specified, show all the logical drive
information.</command>
2. create ld
Creates a logical drive with a RAID level and a group of disk
drives, and assigns the logical drive to a RAID controller A or
B. Other parameters can also be specified using this
command.
Configuration Manager E-35
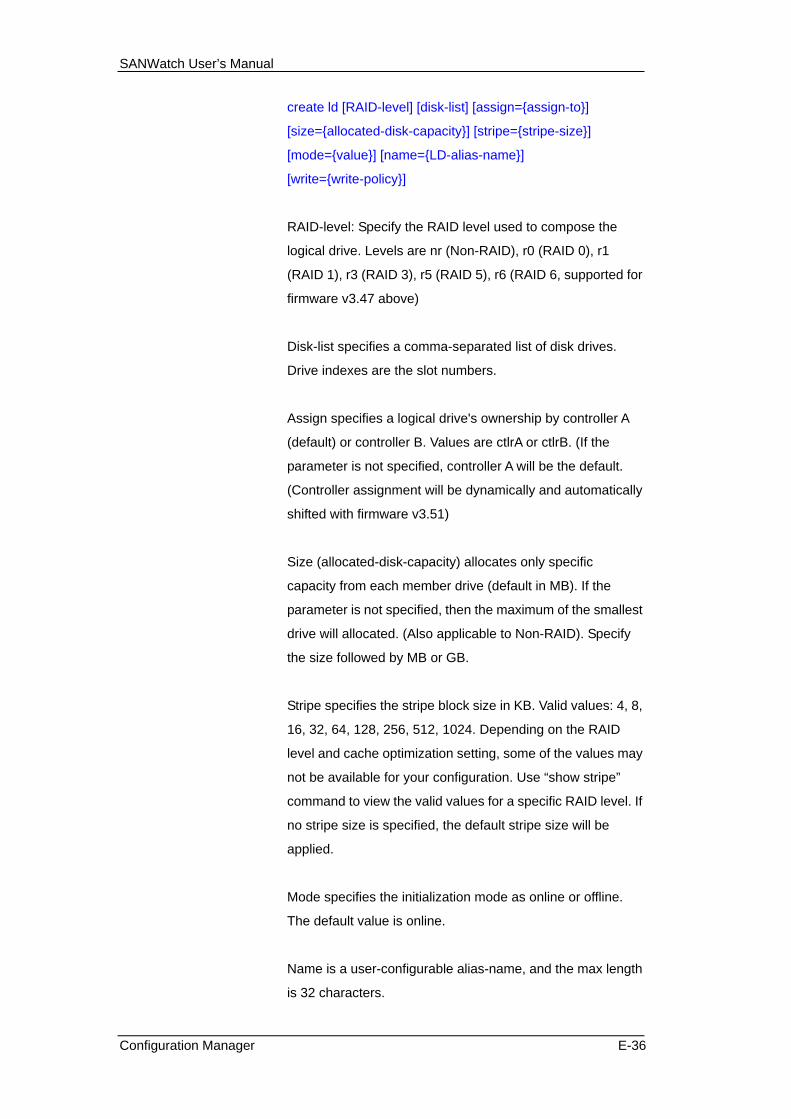
SANWatch User’s Manual
create ld [RAID-level] [disk-list] [assign={assign-to}]
[size={allocated-disk-capacity}] [stripe={stripe-size}]
[mode={value}] [name={LD-alias-name}]
[write={write-policy}]
RAID-level: Specify the RAID level used to compose the
logical drive. Levels are nr (Non-RAID), r0 (RAID 0), r1
(RAID 1), r3 (RAID 3), r5 (RAID 5), r6 (RAID 6, supported for
firmware v3.47 above)
Disk-list specifies a comma-separated list of disk drives.
Drive indexes are the slot numbers.
Assign specifies a logical drive's ownership by controller A
(default) or controller B. Values are ctlrA or ctlrB. (If the
parameter is not specified, controller A will be the default.
(Controller assignment will be dynamically and automatically
shifted with firmware v3.51)
Size (allocated-disk-capacity) allocates only specific
capacity from each member drive (default in MB). If the
parameter is not specified, then the maximum of the smallest
drive will allocated. (Also applicable to Non-RAID). Specify
the size followed by MB or GB.
Stripe specifies the stripe block size in KB. Valid values: 4, 8,
16, 32, 64, 128, 256, 512, 1024. Depending on the RAID
level and cache optimization setting, some of the values may
not be available for your configuration. Use “show stripe”
command to view the valid values for a specific RAID level. If
no stripe size is specified, the default stripe size will be
applied.
Mode specifies the initialization mode as online or offline.
The default value is online.
Name is a user-configurable alias-name, and the max length
is 32 characters.
Configuration Manager E-36

SANWatch User’s Manual
Write specifies the caching policy for the logical drive. Valid
values: default (apply the system's overall policy), write-back,
write-through.
Examples: create ld r5 0,1,2 (Create a logical drive of RAID level 5
suing physical disks #0-2. The LD is assigned to controller A
by default and all disk space allocated.); create ld r0
assign=ctlrA 0,1 size=10000 stripe=128 mode=online
(Create a logical drive of RAID level 0 using physical drives
#0 and 1 using online mode. LD is assigned to controller A,
allocated 10GB [10000MB] per disk.); create ld r5 2,3,4
assign=ctlrB size=36GB (Create a logical drive of RAID level
5 using physical disks #2, 3, 4. Assigned to controller B, and
allocated 36GB from each drive.); create ld r1 2,3 size=100
name=Test-LD write=write-back (Create a logical drive of
RAID level 1 using physical disks #2 and 3, allocated 100MB
from each drive, specified the name and write policy)
3. delete ld
Deletes specific logical drives.
delete ld [index-list] [-y]
-y: execute this command without a comfirm prompt.
4. set ld
Modifies the settings of specific logical drives.
set ld [ld-index] [assign={assign-to}] [name={LD-alias-name}]
[write={write-policy}]
The assign parameter can be used to change the ownership
of a logical drive by a RAID controller. Valid values are: ctlrA
or ctlrB. (default is ctIrA) The name parameter specifies a
name for a logical drive, and the max length is 32 characters.
The write parameter sets the caching policy for the logical
drive. Valid values: default (apply the system's overall default
Configuration Manager E-37

SANWatch User’s Manual
policy), write-back, write-through.
Examples: set ld 0 assign=ctlrB name=”” write=default
5. set ld expand
Expands a logical drive's expanded or unused capacity to
the specified size.
set ld expand [index-list] [expand-size] [mode={value}]
expand-size: Specify the expansion size followed by MB or
GB (default is MB, size on each member drive) If the
parameter is not specified, then use all unallocated size.
mode={value}: Specify the initialization mode. Valid values:
online or offline. The default value is online.
Examples: set ld expand 0 36GB mode=offline (Expand 36GB on each
member drive of the logical drive [ld0] with offline mode.)
6. set ld add
Adds one disk or a list of disk drives to the specified logical
drive
set ld add [ld-index] [disk-list]
disk-list: Add specific physical disks using comma to
separate drive slot number.
Examples: set ld add 0 3,4 (Add physical disk 3 and 4 to the logical
drive [ld0].)
7. set ld scan
Checks each block in a specified logical drive for bad
sectors.
set ld scan [index-list] [mode={value}] [priority={level}]
index-list: Specify the logical drive indexes to check.
Configuration Manager E-38

SANWatch User’s Manual
mode={value}: Scan modes. If the parameter is not specified,
use the one-pass mode to scan. Valid values: continues,
one-pass (default). priority={level}]: Set the priority of the
disk scan. Valid values: low, normal, improved, high. -a:
Abort the LD scan process
Examples: set ld scan 0,1 mode=continues priority=normal (performs
scan on logical drive 0 and 1 repeatedly with normal priority.);
set ld scan 3 -a (Aborts the media-scan on logical disk #3.)
8. set ld parity
Checks the integrity or regenerates parity data for
fault-tolerant logical drives.
set ld parity [ld-index-list] [mode={value}]
set ld parity [ld-index-list] [-a]
ld-index-list: Specify the comma-separated logical drive
index list. mode={value}: Parity check mode. If the
parameter is not specified, use the check-only mode. Valid
values: check (default), regenerate -a: Abort the LD parity
check process
Examples: set ld parity 0 (Perform the parity check on logical drive 0
[ld0].); set ld parity 1 mode=regenerate; set ld parity 1 -a
(aborts parity check on logical drive #1)
9. set ld rebuild
Rebuilds the specified logical drive.
set ld rebuild [ld-index] [-y] [-a]
ld-index: Specify the logical drive index for manual rebuild. -y:
Execute this command without prompt. If this parameter not
specified, it would prompt a confirm message (‘y’ or ‘n’). -a:
Abort logical drive rebuilding process
Examples: set ld rebuild 0 -y; set ld rebuild 0 -a
Configuration Manager E-39
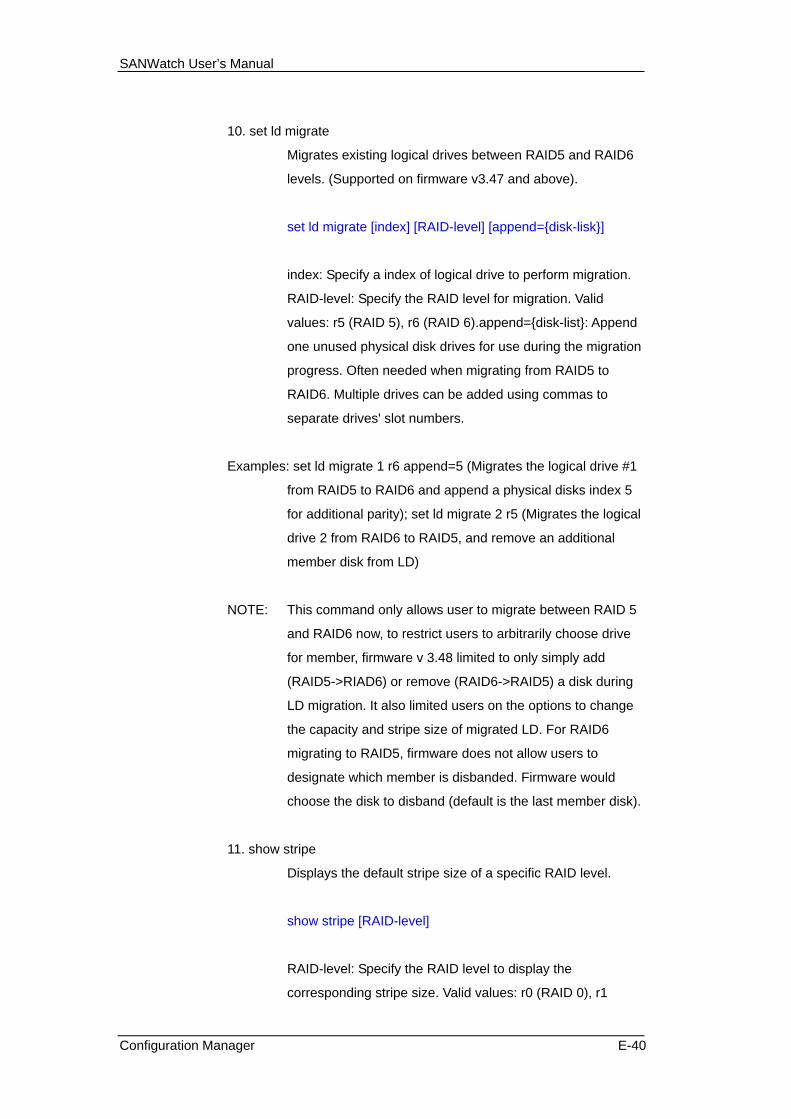
SANWatch User’s Manual
10. set ld migrate
Migrates existing logical drives between RAID5 and RAID6
levels. (Supported on firmware v3.47 and above).
set ld migrate [index] [RAID-level] [append={disk-lisk}]
index: Specify a index of logical drive to perform migration.
RAID-level: Specify the RAID level for migration. Valid
values: r5 (RAID 5), r6 (RAID 6).append={disk-list}: Append
one unused physical disk drives for use during the migration
progress. Often needed when migrating from RAID5 to
RAID6. Multiple drives can be added using commas to
separate drives' slot numbers.
Examples: set ld migrate 1 r6 append=5 (Migrates the logical drive #1
from RAID5 to RAID6 and append a physical disks index 5
for additional parity); set ld migrate 2 r5 (Migrates the logical
drive 2 from RAID6 to RAID5, and remove an additional
member disk from LD)
NOTE: This command only allows user to migrate between RAID 5
and RAID6 now, to restrict users to arbitrarily choose drive
for member, firmware v 3.48 limited to only simply add
(RAID5->RIAD6) or remove (RAID6->RAID5) a disk during
LD migration. It also limited users on the options to change
the capacity and stripe size of migrated LD. For RAID6
migrating to RAID5, firmware does not allow users to
designate which member is disbanded. Firmware would
choose the disk to disband (default is the last member disk).
11. show stripe
Displays the default stripe size of a specific RAID level.
show stripe [RAID-level]
RAID-level: Specify the RAID level to display the
corresponding stripe size. Valid values: r0 (RAID 0), r1
Configuration Manager E-40

SANWatch User’s Manual
(RAID 1), r3 (RAID 3), r5 (RAID 5), r6 (RAID 6). If not
specified, show all the stripe size information.
Script Command Types - Logical Volume Commands 1. show lv
Displays information about logical volumes.
show lv [lv-index-list]
lv-index-list: Specify the logical volumes to show. If not
specified, show all logical volumes.
2. create lv
Creates a logical volume consistings of a group of logical
drives, and assign the ownership to a specific controller.
create lv [ld-index-list] [assign={assign-to}]
[write={write-policy}] [raid={RAID-level}]
ld-index-list: A comma-separated list of logical drive indexes.
assign={assign-to}: Specify the ownership of the logical
volume to a controller. Valid values: ctlrA or ctlrB. (If the
parameter not specified, it would default to controller A with
firmware v3.47, and will assign to specific controller
dynamically and automatically with firmware v3.51)
write={write-policy}: Specify the caching policy for the logical
volume. Valid values: default (complies with the system's
overall policy), write-back, write-through. raid={RAID-level}:
Specify the RAID level to assign to the logical volume. Valid
values: r0 (RAID 0, default)
Example: create lv 0,1 assign=ctlrB policy=default raid=r0
3. delete lv
Deletes the specified logical volume.
delete lv [lv-index-list] [-y]
Configuration Manager E-41

SANWatch User’s Manual
lv-index-list: Specify the logical volumes to be deleted. -y:
Executes this command without prompt. If this parameter is
not specified, it will prompt a warning message and ask user
to confirm. (‘y’ or ‘n’)
4. set lv
Modifies the setting of specific logical volumes.
set lv [lv-index] [assign={assign-to}] [write={write-policy}]
lv-index: Specify the logical volume to make configuration
chanages. assign={assign-to}: changes the ownership of the
logical volume to a different controller. (default is controller
A). Valid values: ctlrA or ctlrB.This feature will dynamically
and automatically shift ownership between controllers in
firmware v3.51. write={write-policy}: Specify the caching
policy of a logical volume. Valid values: default (apply the
system's overall policy), write-back, write-through.
Examples: set lv 0 assign=ctlrB write=write-back
5. set lv expand
Expands a logical volume to the specified size. The logical
drive members underneath the logical volume should be
expanded first.
set lv expand [index-list] [expand-size]
index-list: Specify a comma-separated list of logical volume
indexes. expand-size: Specify the expansion size (default in
MB) that will be allocated on each physical drive within the
logical volume. If the parameter is not specified, then the
maximum size will be used.
Examples: set lv expand 1 74GB (Expand each physical disk 74GB to
the logical volume [lv1].)
Configuration Manager E-42

SANWatch User’s Manual
Script Command Types - Partition Commands 1. show part
Displays information about all disk partitions, or just those
partitions allocated from the specified logical volumes or
logical drives.
show part [ld | lv] [index-list]
[ld | lv]: Specify to show the partitions of logical drive or
logical volume. index-list: Specify logical drive or logical
volume indexes. If no parameter is specified, then show all
the partition information.
2. create part
Creates partitions on specific logical drives, volumes, or
existing partitions.
create part [ld | lv] [index] [size] [part={index}]
[ld | lv]: Specify a logical drive or logical volume from which
partitions will be created. index: Specify a index of logical
drive or logical volume. size: Specify the partition size in MB.
The parameter is required. part={index}: Specify the existing
partition index of a specific LD or LV to separate its capacity.
If the parameter is not specified, the new partition would be
divided from the whole LD, LV or partition index 0.
Examples: create part lv 0 36GB (Divide the logical volume 0 [lv0] and
create a new partition sized 36GB, the remaining space will
be allocated to another partition.); create part ld 1 5GB
part=2 (Separate the existing partition 2 of logical drive 1 [ld1]
into two partitions, one 5GB partition and another allocated
with the remaining capacity.)
3. delete part
Deletes specific partition or the partitions on a specific logical
drive or volume. The deleted partition would be merged with
Configuration Manager E-43
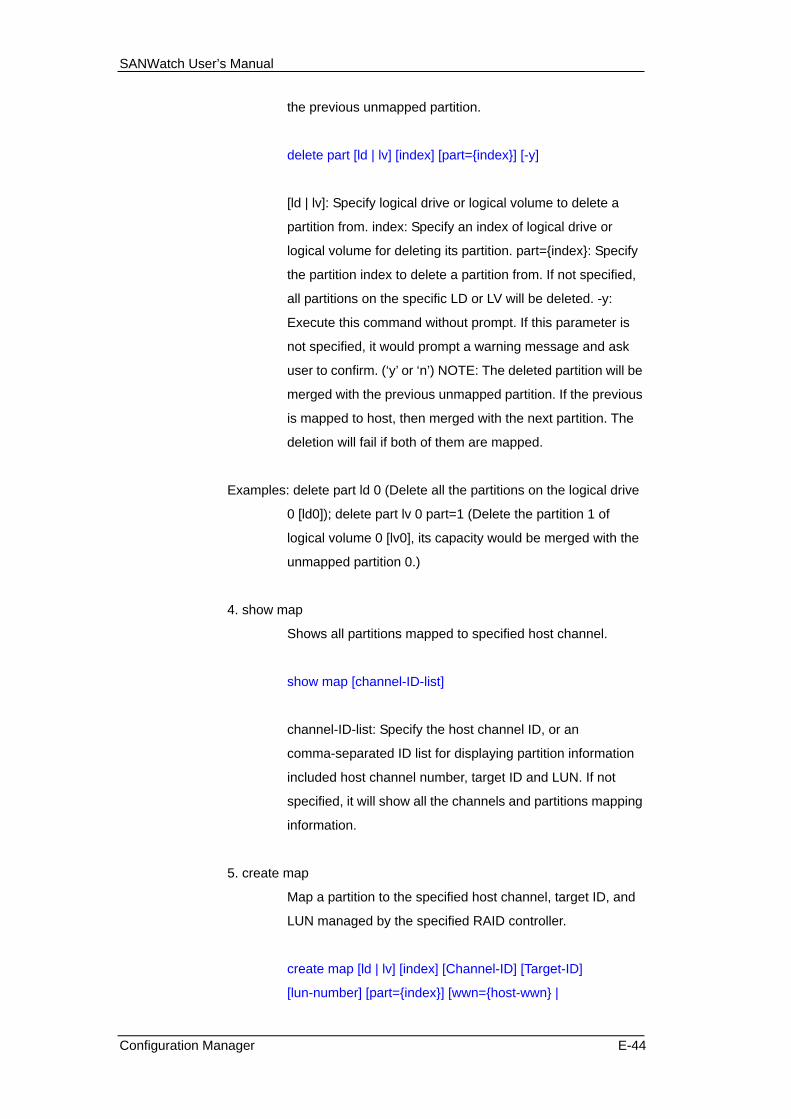
SANWatch User’s Manual
the previous unmapped partition.
delete part [ld | lv] [index] [part={index}] [-y]
[ld | lv]: Specify logical drive or logical volume to delete a
partition from. index: Specify an index of logical drive or
logical volume for deleting its partition. part={index}: Specify
the partition index to delete a partition from. If not specified,
all partitions on the specific LD or LV will be deleted. -y:
Execute this command without prompt. If this parameter is
not specified, it would prompt a warning message and ask
user to confirm. (‘y’ or ‘n’) NOTE: The deleted partition will be
merged with the previous unmapped partition. If the previous
is mapped to host, then merged with the next partition. The
deletion will fail if both of them are mapped.
Examples: delete part ld 0 (Delete all the partitions on the logical drive
0 [ld0]); delete part lv 0 part=1 (Delete the partition 1 of
logical volume 0 [lv0], its capacity would be merged with the
unmapped partition 0.)
4. show map
Shows all partitions mapped to specified host channel.
show map [channel-ID-list]
channel-ID-list: Specify the host channel ID, or an
comma-separated ID list for displaying partition information
included host channel number, target ID and LUN. If not
specified, it will show all the channels and partitions mapping
information.
5. create map
Map a partition to the specified host channel, target ID, and
LUN managed by the specified RAID controller.
create map [ld | lv] [index] [Channel-ID] [Target-ID]
[lun-number] [part={index}] [wwn={host-wwn} |
Configuration Manager E-44

SANWatch User’s Manual
iqn={initiator-iqn} | host={alias-name}] [mask={wwn-mask}]
[type={filter-type}] [mode={access-mode}]
[name={filter-name}]
[ld | lv]: Specify to map a logical drive or a logical volume.
index: Specify a index of logical drive or logical volume.
Channel-ID: Specify a host channel ID Target-ID: Specify a
host channel target number (SCSI ID) between 0 and 126.
lun-number: Specify a host channel LUN number for LUN
mapping. part={index}: Index of partition of a specific LD or
LV for mapping. If not specified, the command will map the
first partition. (part=0) wwn={host-wwn}: Specify the host port
WWN in hex string, ex. 210000E08B0AADE1, for FC only.
iqn={initiator-iqn}: Specify the IQN of specific initiator for
mapping, for iSCSI only. host={alias-name}: Specify the host
alias name if previously set for a host HBA/NIC.
mask={wwn-mask}: Specify the host WWN mask in hex
string, default is FFFFFFFFFFFFFFFF, for FC only.
type={filter-type}: Specify the filter type, valid values:
include(default), exclude. Include allows access through this
route, exclude prevents access through this route.
mode={access-mode}: Specify the access mode of mapped
LUN, valid values: read-write(default), read-only.
name={filter-name}: Specify the filter name for description,
for FC only.
Examples: create map ld 0 0 112 0 part=1; create map lv 1 1 113 0
wwn=210000E08B0AADE1 type=include mode=read-only;
create map lv 1 1 113 0
iqn=iqn.2006-05.com.Infortrend.storage:hba1
mode=read-only
6. delete map
Un-map a partition from host ID/LUN.
delete map [Channel-ID] [Target-ID] [lun-number]
[wwn={host-wwn} | iqn={initiator-iqn} | host={alias-name}] [-y]
Configuration Manager E-45

SANWatch User’s Manual
Channel-ID: Specify a host channel physical ID. Target-ID:
Specify a host channel target number (SCSI ID) between 0
and 126. lun-number: Specify a host channel LUN number.
wwn={host-wwn}: Specify the host WWN in hex string for
deletion, ex. 210000E08B0AADE1, for FC only.
iqn={initiator-iqn}: Specify the IQN of specific initiator for
mapping deletion, for iSCSI only. host={alias-name}: Specify
the host alias name for an HBA/NIC. -y: Execute this
command without prompt. If this parameter not specified, a
confirm box will prompt. (‘y’ or ‘n’)
Examples: delete map 0 0 3(Un-map all mappings assigned to host
channel 0, target 0, LUN 3); delete map 0 0 3
wwn=1234567890123456 (Un-map all mappings assigned
to host channel 0, target 0, LUN 3 and
wwn=1234567890123456)
7. show configuration
Displays all the configurations of a selected array.This
command is comprised of the results from executing the
following commands: "show controller", "show controller
trigger", "show controller parm", "show controller date",
"show controller redundancy", "show cache", "show net",
"show access-mode", "show rs232", "show host", "show
wwn", "show iqn", "show channel", "show disk parm", "show
disk", "show ld", "show lv", "show part", "show map",and
"show enclosure". This command is used gathering all
configuration of specific array.
Script Command Types - iSCSI-related Commands 1. show iqn
shows all available iSCSI initiator IQNs, either discovered
over net or manually assigned. IQN related information such
as alias name and configuration will also be displayed.
2. create iqn
Appends an iSCSI initiator with related configuration
manually for ease of configuration.
Configuration Manager E-46

SANWatch User’s Manual
create iqn [IQN] [IQN-alias-name] [user={username}]
[password={secret}] [target={name}]
[target-password={secret}] [ip={ip-address}]
[mask={netmask-ip}]
If no parameter is specified, this command will enter the
interactive mode and ask users to input eight parameters
above sequentially. Users can bypass specific parameter by
pressing “Enter” except the parameter IQN and
IQN-alias-name. IQN: Specify the IQN (iSCSI-Qualified
Names) of specific iSCSI initiator for manual append.
IQN-alias-name: Specify the user-defined alias name for an
initiator. user={username}: Specify the user name for
one-way CHAP authentication. password={secret}: Specify
the password (secret string) for CHAP. If you had set the
password for CHAP that means you chose the CHAP as the
method for iSCSI access authentication. If you want to
disable CHAP authentication, you have to set CHAP with
empty string. target={username}: Specify the target user
name for mutual CHAP authentication.
target-password={secret}: Specify the password for mutual
CHAP. If you had set the password for mutual CHAP that
means you enable the mutual CHAP as the method for
iSCSI access authentication. ip={ip-address}: Specify the IP
address of iSCSI initiator. mask={netmask-ip}: Specify the
net mask of initiator.
NOTE: remember to enable CHAP option using the set host
command.
Examples: create iqn; create iqn
iqn.2006-05.com.Infortrend.storage:hba1 host1; create iqn
iqn.2006-05.com.Infortrend.storage:hba1 host1
user=account password=password; create iqn
iqn.2006-05.com.Infortrend.storage:hba1 host1
user=account passowrd=password target=target_account
target-password=password ip=192.168.1.1
Configuration Manager E-47

SANWatch User’s Manual
mask=255.255.255.0
3. set iqn
Modifies the existing iSCSI initiator configuration.
set iqn [IQN | alias={exist-alias-name}]
[iqn={IQN}][name={IQN-alias-name}] [user={username}]
[password={secret}] [target={name}]
[target-password={secret}] [ip={ip-address}]
[mask={netmask-ip}]
If you only specified an IQN or alias name, this command will
enter the interactive mode, show current setting and allow
user to edit each parameters above in a sequential order.
Users can bypass specific parameter by pressing “Enter”.
IQN | alias={exist-alias-name}: Specify the IQN or alias
name of specific iSCSI initiator for modification. iqn={IQN}:
Specify the IQN of specific iSCSI initiator for update.
name={IQN-alias-name}: Specify the user-defined alias
name for initiator for update. user={username}: Modify the
user name for CHAP authentication. password={secret}:
Change the password (secret string) for CHAP.
target={username}: Modify the target user name for mutual
CHAP authentication. target-password={secret}: Change the
password for mutual CHAP. ip={ip-address}: Modify the IP
address of iSCSI initiator mask={netmask-ip}: Modify the net
mask of initiator
Examples: set iqn alias=Host1; set iqn alias=Host1 iqn=
iqn.2006-05.com.Infortrend.storage:hba1 name=Host2
user=user password=password; set iqn
iqn.2006-05.com.Infortrend.storage:hba1
target=target_account target-password=password
ip=192.168.1.1 mask=255.255.255.0
4. delete iqn
Removes all configuration of specific iSCSI initiator.
Configuration Manager E-48

SANWatch User’s Manual
# delete iqn [IQN | alias={exist-alias-name}]
IQN | alias={exist-alias-name}: Specify the IQN or alias
name of specific iSCSI initiator.
Examples: delete iqn iqn.2006-05.com.Infortrend.storage:hba1; delete
iqn alias=host-name
Script Command Types - Firmware Download-related Commands 1. update fwbr
Downloads firmware and boot record to the RAID controller
with specified file.
update fwbr [fw_filename] [br_filename] [-y] [-u | -r]
fw_filename: The file name of firmware for loading.
br_filename: The file name of boot record for loading. -y:
Execute this command without prompt. If this parameter not
specified, it would prompt a warning message and ask users
to confirm. (‘y’ or ‘n’) -u: Auto rolling the firmware upgrade
between redundant controllers. Now firmware auto rolling is
disabled by default and require users to confirm. -r: Ask
controller to reset immediately so that the specified changes
take effect. If not specified, it would prompt message to
notify user to reset.
2. update fw
Update firmware to the RAID controller.
update fw [filename] [-y] [-u | -r]
filename: The name of firmware file for loading. -y: Execute
this command without prompt. If this parameter not specified,
it would prompt a warning message and require user's
confirm. (‘y’ or ‘n’) -u: Auto rolling the firmware upgrade
between redundant controllers. Now firmware auto rolling is
disable by default and users are required to confirm. -r: Ask
Configuration Manager E-49

SANWatch User’s Manual
controller to reset immediately so that the specified changes
take effect. If not specified, it would prompt message to
notify user to reset.
Configuration Manager E-50

SANWatch User’s Manual
This page is intentionally left blank.
Configuration Manager E-51

Appendix F
Disk Performance Monitor
The Disk Performance Monitor provides access to the performance of
individual disk drives during active I/Os. The monitor utility is especially
useful in the event when faulty drives impact the array’s overall
performance. By detecting drives showing an abnormal latency,
administrators can replace the faulty drives and restore system
performance.
Step 1. Open the drive monitoring utility by clicking a subsystem
on the device list and the DPM button (Disk
Performance Monitor) on SANWatch’s top menu.
Step 2. Upon successful connection, the DiskWatch GUI screen
should look like the following.
Disk Performance Monitor

SANWatch User’s Manual
Each mini-screen indicates an individual disk drive status.
The Red line indicates Read latency time.
The Yellow line indicates Write latency time.
This figure shows all disk drives within an enclosure. Different colors
indicate different logical drives the disk drives belong to. Note that this
utility only shows individual drive status, the logical drives are not
clickable.
This slide bar allows you to select an interval within which an average
disk drive latency value will be generated. Latency is calculated by
every interval.
This slide bar allows you to select the span of the latency monitoring
and determine how the performance graph is displayed. If set to 150,
the performance graphs on the right-hand side of the window will
Disk Performance Monitor F-2

SANWatch User’s Manual
display the performance curves within the past 150 seconds.
This button saves the latency monitoring record to log files.
Use the below procedure to retrieve a log file.
Step 1. Use the Open Log command in the File menu.
Step 2. Select a previously saved log file.
Disk Performance Monitor F-3

SANWatch User’s Manual
Step 3. An opened log file should look like the following. You can
compare the performance of individual disk drives and find out
abnormal drive latency. Please note that drive buffer, logical
drive stripe size, stripe width, and various aspects of I/O
characteristics should also be considered.
Disk Performance Monitor F-4