बिहार सरकार - ग्रामीण कार्य विभाग पत्रांक- brrda(hq)-pmgsy-227 ...
Upload
khangminh22Category
view
0download
0
1
Rule Book
COLLECTOR’S EDITION
© 2017, Australian Design GroupMade in Czechia

2
Dedicated to the memory of:
Nanette Rowland
15 April 1929 ~ 13 April 2009
Lover of life, love and friendship
* * * * * *
1. Introduction......................................................................31.1 Rules.............................................................................61.2 Scale.............................................................................61.3 Markers........................................................................6
2. General Concepts.............................................................62.1 Terrain..........................................................................62.2 Zones of control...........................................................82.3 Stacking........................................................................82.4 Supply...........................................................................82.5 Control........................................................................102.6 Fractions.....................................................................112.7 Dice, re-rolls & breaking ties..................................................112.8 Range..........................................................................12
3. The Turn.........................................................................123.1 Sequence of play........................................................12
4. Reinforcement Stage.....................................................124.1 Force pool changes.....................................................124.2 Reinforcements..........................................................124.3 Destroying and scrapping units..................................................13
5. Lending Stage.................................................................135.1 Trade agreements.......................................................14
6. Initiative Stage................................................................156.1 Determining initiative................................................156.2 Effect of Initiative......................................................15
7. The Action Stage.................................................... . .......158. Weather...........................................................................15
8.1 Weather zones............................................................158.2 Weather effects...........................................................15
9. Declaring War................................................................169.1 Neutral major powers.................................................169.2 Neutrality pacts..........................................................169.3 How to declare war....................................................179.4 US entry.....................................................................179.5 Allocating minors......................................................179.6 Aligning minors.........................................................179.7 Calling out the reserves..............................................189.8 Multiple states of war................................................18
10. Choosing Actions............................................................1810.1 Action types...............................................................1810.2 Activity limits.............................................................1810.3 Oil (TiF option 30).....................................................1910.4 Destroying saved oil & build points (TiF opts30 & 31) .. 19
11. Implementing Actions....................................................1911.1 Passing........................................................................1911.2 Port attack...................................................................2011.3 Naval air missions......................................................2011.4 Naval movement........................................................2111.5 Naval combat.............................................................2411.6 Opponent’s naval combat...........................................2911.7 Strategic bombardment..............................................3011.8 Ground strike..............................................................30
11.9 Rail movement......................................................3111.10 Land movement......................................................3111.11 Air transport...........................................................3311.12 Debarking land units at sea......................................3311.13 Invasions.................................................................3311.14 Paradrops................................................................3411.15 Land combat...........................................................3411.16 Aircraft rebases......................................................3911.17 Reorganisation........................................................39
12. Last Impulse Test.....................................................4013. End of Turn Stage.....................................................40
13.1 Partisans.................................................................4013.2 Entry markers.........................................................4113.3 US entry..................................................................4113.4 Return to base........................................................4513.5 Final reorganisation................................................4613.6 Production..............................................................4613.7 Peace......................................................................5913.8 Facility, factory & oil voluntary destruction (opt. 32 & 33)..6213.9 Victory check.........................................................62
14. Aircraft......................................................................6214.1 Aircraft movement.................................................6214.2 Aircraft missions....................................................6314.3 Air-to-air combat....................................................6314.4 CVs........................................................................6514.5 Terrain....................................................................6714.6 Pilots (PiF option 46).............................................6714.7 Flying bombs (PiF option 47)....................................6714.8 Kamikazes (option 48)..........................................67
15. Surprise.....................................................................6815.1 Surprise effects.......................................................68
16. Offensive Points (option 49)....................................6816.1 Spending offensive points......................................6816.2 Multiple actions......................................................6816.3 HQ benefits.............................................................6916.4 Reorganise HQs.....................................................6916.5 Extra actions...........................................................69
17. Vichy...........................................................................6917.1 Creation..................................................................6917.2 Determine control..................................................7017.3 Units.......................................................................7017.4 Running Vichy........................................................7117.5 Combat with Vichy.................................................7217.6 Running Free France..............................................72
18. Co-operation.............................................................7218.1 Who can co-operate...............................................7218.2 Not co-operating....................................................7218.3 Co-operating...........................................................73
19. Minor countries........................................................7319.1 Neutral minor countries.........................................7319.2 Entering the war.....................................................73
World in Flames (“WiF”) and all its components and kits, in both its electronic and printed forms, is Copyright © 1985 ~ 2017, Australian Design Group. Permission is hereby granted to copy these rules electronically for your personal use only, provided that they are copied in their entirety (including this message). Any deletion or alteration or on-selling, without the express written permission of Australian Design Group, is a violation of domestic and international copyright law.
Table of Contents

3
19.3 Who can enter the minor........................................7319.4 Minor country units...............................................7319.5 The Nazi-Soviet pact.............................................7419.6 Soviet border rectification......................................7419.7 Axis minor countries.............................................7519.8 Allied minor countries...........................................7619.9 Netherlands East Indies.........................................7619.10 Austria & East Prussia...........................................7619.11 French African minors (AfA option 1)........................7619.12 Ukraine (TiF option 50)..... . ..................................76
20. Chinese Communists...................................................7721. Stilwell..........................................................................7722. Optional units & markers...................................... . . ..77
22.1 Divisions (DiF option 2).......................................77 22.2 Artillery (DiF option 3).........................................79 22.3 Supply units (DiF option 14).....................................80 22.4 Guards Banner armies (DiF option 52).................80 22.5 Siberians (TiF option 53).......................................81 22.6 Warlords (TiF option 59).......................................81 22.7 Territorials (TiF option 54)......................................81 22.8 City based volunteers (AiF & TiF opt. 55)............82 22.9 Fortifications (TiF option 32).....................................82 22.10 Frogmen (SiF option 51).......................................83 22.11 Heavy weapons (AiF, PatiF & PoliF opt 56)................83 22.12 Air Cav (AiF, PatiF & PoliF option 57)................84 22.13 Service Squadrons (SiF option 58)..........................84 22.14 Light Cruisers (CliF option 6)......................................84 22.15 Partisan HQs (option 60).......................................84 22.16 Convoys in Flames (CoiF option 7).......................85 22.17 V-weapons and A-bombs (PiF option 24)................... 86
23. Index & Glossary.........................................................87Sequence of Play chart.........................................................94Optional Rules Manifest......................................................952 die 10 Land CRT (option 27)...............................................96
Europe & the Middle East, Asia, and the Pacific);• One 297 x 420 mm full-colour hard-mounted map of The
Americas; and• One 297 x 420 mm full-colour hard-mounted Turn record chart.The World in Flames Classic Counters set consists of 1600 (12.7 x 12.7 mm) counters representing the armies, navies and air forces of World War II (countersheets 1-6, 24 & 46); The World in Flames Collector’s Edition Classic game consists of the:• World in Flames Rules set;• World in Flames map set;• World in Flames Classic counters set;• Box & two 10-sided dice.Everything you need to play the game.Planes in Flames adds 600 counters representing all the combat aircraft that fought before during and after WW II including many new and late-war aircraft and capabilities that fully integrates Planes in Flames with all World in Flames games (AiF, DoD, PatiF & WiF, countersheets 7-9); Ships in Flames comprises:• 1800 full-colour (12.7 x 12.7mm) counters representing all the
aircraft carriers, battleships, cruisers, subs, transports, amphibs and carrier planes before, during and after WW II (CS 18-22 & 51-54); and
• One 297 x 420 mm full-colour hard-mounted Task Force display.Divisions in Flames adds 400 full-colour (12.7 x 12.7mm) counters representing all the independent divisions that fought during WW II (including special forces and elite divisions as well as Guards Banner Armies and their divisions, countersheets 49 and 50); Territories in Flames adds 400 full-colour (12.7 x 12.7mm) counters representing all the special corps and armies created during WWII from Territorials to Siberians, to city based volunteers, warlords and even the potential creation of Ukraine (countersheets 47 and 48). The World in Flames Collector’s Edition Deluxe game consists of:• The World in Flames Classic Collector’s game;• Planes in Flames;• Ships in Flames;• Divisions in Flames; and• Territories in Flames;for a total of 5 hard-mounted maps, 2 hard-mounted displays, 2 rule and campaign booklets, 5 combat charts and 4800 counters. The World in Flames Collector’s Edition Super Deluxe game set consists of the:• World in Flames Collector’s Edition Deluxe game;• America in Flames game (CS 26-28);• Days of Decision III game (2 x CS 13 & 3 x CS17);• Patton in Flames game (CS 31-35);• Africa map (full-colour 514 x 534 mm paper map); • Scandinavian map (full-colour 330 x 197 mm paper map); • Khaki in Flames (CS 40-45) kit; • most recent 2 Annuals ~ currently Millennium WiF Annual (incl.
CS 30, Politics in Flames) & 2008 WiF Annual (incl. CS 39, Factories in Flames);
for a total of 2 magazines, 4 games, 7 expansions, 15 maps and 9240 counters (and a couple of pages of rules and the odd chart)!
“We may be destroyed but, if we are, we shall drag a world with us - A World in Flames”
Adolf Hitler, 1932
“The past is never dead. It's not even past.”William Faulkner, 1951
1. IntroductionWorld in Flames: the Collector’s edition (“WiF”) is Australian Design Group’s international award winning strategic level game of the Second World War. Up to 6 players manage the economies and conduct the mil-itary operations of the major powers involved in that conflict, either as a member on the Axis side (Germany, Italy and Japan) or as one or more of the Allies (China, the Commonwealth, France, the USA and the USSR).The World in Flames Collector’s edition world comes in one of ten flavours:• World in Flames Rules Set;• World in Flames Map Set;• World in Flames Classic Counters Set;• World in Flames Collector’s Edition Classic game;• Planes in Flames expansion;• Ships in Flames expansion;• Divisions in Flames expansion;• Territories in Flames expansion;• World in Flames Collector’s Edition Deluxe game; and• World in Flames Collector’s Edition Super Deluxe game set.The World in Flames Rules set consists of:• This rule book;• The Campaign & Players’ Guide (sections 24-30 of the rules
including campaign set ups); and• 5 x A3 full-colour game charts.The World in Flames Map set consists of:• 4 large (574 x 820mm) full-colour hard-mounted maps
covering most of the world (West Europe & Africa, East

48
35
46
4/4 6
3/5 6
3/4 5
2/4 5
3/4 4
2/1 3
2/3 32/4 3
19(Mavis)H6K4
2 3
1 2
1938
1944
1943
1936
1920
1929
1933
1942
1940
46
1942
35
1944
46
1943
46
1938
19281937
12 Nov ’44
5 Jun ’42
29 Mar ’41
5
4
5
4
6
2
6
5
5
2
5
4
0
3 3
04
4
Bismarck Tirpitz
Akagi
Zara
Ajax Type VIIC
4
10 5
FacetowardEnemy
FacetowardEnemy
FacetowardEnemy
FacetowardEnemy
OPTotal FacetowardEnemy
FacetowardEnemy
FacetowardEnemy
FacetowardEnemy
OP+25
FacetowardEnemy
FacetowardEnemy
FacetowardEnemy
FacetowardEnemy
10 FacetowardEnemy
FacetowardEnemy
FacetowardEnemy
FacetowardEnemy
5
7 2
4 4
1 5
1
4 5
4 2
3 7
3 1
0 7
2 0
3 8
0 0
0 10
0 0
0 10
0 0
5
Me-262A-2a
P MS
10 2
3 *
9Liber-ator
B-24H
43
4 1
3 6
18
Catalina
PBY-6A
43
2 5
2 38Mk.IF
Beau-fighter
P D Paul
5 *
* *9Liber-
atorB-24H
44
4 1
3 6
0 6
0 0
HQ
HQ
USED
CP
?51943
Initiative
Axis
XII
III
VI
IX
IMPULSE
ALLIEDXII
III
VI
IX
IMPULSE
AXIS
Initiative
Allied
XII
III
VI
IX
YEAR
XII
III
VI
IX
TURN
8(5)48(5)4
5(2)2
xxx
17L. 631
(1) *
* *
XXXXX
XXXXX
XXX
Zhuk
ov
8 - 68 - 6
GdPo
Bla
mey
Snow Blizzard
4
P
It
A
AircraftCarrier
(CV)
Battleship(BB)
TransportUnit
(TRS)
AmphibiousUnit
(AMPH)
Submarine(SUB)
ConvoyPoints(CP)
HeavyCruiser
(CA)
Light Cruiser
(CL)
Damage/CP Used/No Planes
Initiative
Impulse
Entry
Factory
SavedOffensive
Points (OP)
Weather
OffensiveChit (OC)
Turn &Year
ARM Head-Quarters(HQ-A)
ArmouredCorps(ARM)
INF Head-Quarters(HQ-I)
AirTransport
(ATR)
NavalBomber(NAV)
LandBomber(LND)
Fighter(FTR)
No. of points
Land Unit Size:XXXXX ~ Army GroupXXXX ~ Army XXX ~ Corps (all are corps sized units)XX ~ Division (DiF & PiF options 2, 3, 14 & 24)
P
~ Mechanised (MECH)
~ Motorised (MOT)
~ Infantry (INF)
~ Militia (MIL)
~ Garrison (GAR)
~ India (I)
~ UK
~ Australia (A)
~ Canada (C)
~ Mountain (MTN)
~ Marine (MAR)
~ Paratroop (PARA)
~ Cavalry (CAV)
~ Partisan (PART)PM
~ China
~ Common- wealth~ France
~ USA
~ USSR
~ Germany
~ Italy
~ Japan
destroyedno. of stacks
Name
Name
CW homecountry
Size
MovementallowanceLand
combat factors
MovementallowanceLand
combat factors
Turns tobuild
Buildcost
Non white-print unit
Reorg-anisation
value
Availability year(year placed
in force pool)
White-print unit
Country
Attackfactors
Defencefactors
Anti-aircraftfactors
Shorebombardment
factors2nd BB’s
name
Cost of 1stcycle &
repair cost Cost of 2nd cycle
Movementallowance
Range Air component
Name
No. of turnseach cycleto produceDate sunk (in
red or white)
Availability year
1939 Set up
Entryvalue
Availability year
No. ofpoints
Orange air-to-air rating Amphibian (blue & green vertical bar)
Black circled ~ night fighter
Air-to-air rating(Green ~ Jet) High altitude
Same as land units
Range (yellow or white circle)
Strategic bomb-ardment factors
Possible lend lease recipientsKnown as
Designation
Air-to-sea factors (red ~ also sub hunter)
Extended range(orange arrow)
Tactical factors(red circled ~ Tank buster)
Air transportcapable (rangein white circle)
Flying Boat (light blue vertical bar)
Unarmed (bracketedair-to-air rating)
Large AirTransport
* ~ May not perform mission
May not paradrop
Foreign Sourced (horizontal bar)Low altitude
© 2017 AUSTRALIAN DESIGN GROUP
Classic Unit DescriptionLand Units
Facilities & other Markers
Naval Units
Other Naval Units (values are the same as a BB)
COLLECTOR’S EDITION
Major Power Colours
Front
Front Back
Allies Axis
Front BackFront Back
Front ofCounter
Back ofCounter
UNIT TYPE
Front ofCounter
Back ofCounter
UNIT TYPE
Other Classic land unit symbols
CW HQs
Aircraft Units
Other Aircraft Characteristics (front)
RH-001
40
4

Arromanches
4
5
0 8
1 1
2/1 6
2/2 6
1935
1942
28 Mar '45
28 Jul ’45
Carl
6
3
4
4
Scharnhorst
Ise1
6 3
2 2
5 4
2
E S
S
Colossus
4
5 1
0 8
0
19421/2 6
S
1/2 61942
ex Colossus
S
S
2/5 319435
4
0 4
2 0 +20
S
W7
7Type XXVI
5 5
1 3
72
24 10
0 0
0
3
0 10
0 03 No
6D1
5
F6F-5
7 2
1 * 4
4445
47
C
Pacific
1940
High Night
12
7 6
34
T
4 -5
2-4
5 -3
2 -4
3-2
2-4
XX
1 Sk
i
W
XX
XX
XX
XXXX
XXX
XXXX
XX
155
mm
6 pd
r.JS
U 1
22
5 - 35 - 3
7 - 47 - 4
Alg
eria
Sw
FF
/2
4
3
Pl
R
R
R
0
Ohka(Baka)
MXY-7
(9) 6
4 2
A-Bomb
* *
* 25(0)-0
XX
3V-2* *
* 4(0)-4
XX
Pilots inTraining
3Pl
21
1945 Pl
11
1945 Pl
Pekin
g
5 Si
b
5-3T
XXX
Tang
anyik
a
Algiers
×1/10 saved oil
1
4
Ran
gers
2 -2
2 -3
6 -1
4 -5
3 -3
1
XX
XX
XX
XX XX
XX
XX
XXXX
105
mm
Gus
tav/D
ora
Tu
37 m
m
800
mm
88 m
m
XX
AAA
122
mm
Kat
yush
a
1
5-0
4 -3
(0)-3
Ansa
ldo 9
0
12 - 512 - 5
Ukraine1
E1835
56R
(+3)
RÉPUBLIQUEFRANCAISE
PILOTS
AircraftCarrier
(CV)
LightAircraftCarrier(CVL)
ForeignSourced
Unit
SurfaceCombat
ship(SCS)
ServiceSquadron
(SSq)
Frog-men
TaskForce
Marker
Sub-marine(Sub)
CVE(ASW)
Tanker(TP)
DE(ASW)
Pilots inTraining
HighAltitude
NightMission
Pilots
V-Weapon(VW)
A-Bomb(AB)
RailwayGuns (RG)
FieldArtillery
(Art)
MotorisedField
Artillery(MArt)
RocketArtillery
(RA)
Anti-Tank(AT)
TankDestroyer
(TD)
Self-Propelled
Gun (SPG)
Flak(AAA)
LightAnti-Air
(AA)
Anti-Air(AA)
Supply(Sup)
SkiDivision
(Ski)
SpecialForces
Division
GuardsBannerArmySiberians
(Sib)Warlords
MajorPower
Synth Oil
HexSpecific
Resource
Territorials(Terr)
City BasedVolunteers
(CBV)Saved
Oil
CoastalFort
SavedBuildPoints
Rails Roadsx1/10Saved
Oil
Dest-royed
Oil
Fort
CarrierPlane (CVP)
4
03
4
2 10
2
3
03
2 10
1 0
Availability year (bone box ~ original unit)
Availability year (gold box ~ replacement unit)
A CV with a first cycle cost of 1
Source country
Possible lend lease recipient
Game/Expansion
Original name
TF name
Port stacking bonus
Special ability (see 22.16)
MissilesAir
component
Country
Tanker points
Frogmen attack factors(red or white)
ASW (only) attack factors (red or white)
Sea-boxsection
Tacticalfactors
Desig-nation
Strategicbombardment
factors
Air-to-airrating
Initial classHighaltitude
Air-to-seafactors
Range
Cost (PiF option 46: (pilots) -2)
Year CVP first changes
class
Year CVP last changes class
Year placedin force pool
Movementallowance
Country
Caliberor name
Land combat/bombardment
factors
Unit size (division)
(pink-doubled defendingagainst ARM & MECH)
(red-doubled attacking & defending against ARM & MECH)
Brackets (may not attack)
Land combatfactors AA/land
combat factors
Land combatfactors
Movementallowance
Movementallowance
Unit size(corps)
Homecity
Homecity
Country/Region
Major Power
Country
Expansion/game
Remaining resources
Fortified hexsides
Affectedattackers halved
Extra landcombat factors
No. ofresources
No. ofbuild points
1939 controller
Hex
Availabilityyear
No. ofResources
Country
Air-to-air rating SizeSame as land units
Game/Expansion
Strategic bombardment
factors
Known asAir-to-sea factors
Range
Tactical factors
Land combat factors (brackets,may not attack)
Movementallowance
Death’s head (black or grey)
AA factors(only)
A ~ America in Flames gameC ~ Carrier Planes in FlamesCl ~ Cruisers in FlamesCo ~ Convoys in FlamesD ~ Divisions in FlamesF ~ Factories in Flames
K ~ Khaki in FlamesP ~ Politics in FlamesPl ~ Planes in FlamesR ~ Territories in FlamesS ~ Ships in FlamesT ~ Patton in Flames game
Game & Expansion codes
Front BackUNITSFront Back
Front (units)
Ships in Flames
Front Back
ARTILLERY OTHERUNITS
MARKERS
UNITS
UNITS
MARKERS
© 2017 AUSTRALIAN DESIGN GROUP
Territories in Flames
* ~ where different from Classic unit description
Deluxe Unit Description*COLLECTOR’S EDITION
Planes in Flames
Other aircraft Characteristics
Front Front
Front
Front
Back
Front Back
Front
Back TYPE MARKERS
Front Front
Front
TYPE
TYPE
TYPE
Divisions in Flames
5

6
1.1 RulesWe have arranged these rules in sequence of play order. They consist of standard rules required to play the game and optional rules you may add if you like. If you have any queries about any terms in the rules (even simple words like ‘you’) we strongly advise you go to 23 Index & Glossary. It might save a lot of angst.Optional rules are generally in the same place as the standard rule they modify. They are separated from the standard rules by being framed in colour. All optional rules are exactly that and each option may be played in part or full provided all players agree. If an option is prefixed by a kit name (e.g. FiF) this means that the units, markers, maps and/or charts required to play this option can be found in that kit.Mech in Flames (CS 23) originally appeared in the 1994/95 WiF Annual; Leaders in Flames (CS 25) originally appeared in the 1998 WiF Annual; Politics in Flames (CS 30) originally appeared in the Millennium WiF Annual; and Factories in Flames (CS 39) originally appeared in the 2008 WiF Annual. Territories in Flames replaces the Africa Aflame counters; Divisions in Flames replaces the Asia Aflame & Mech in Flames counters; and Carrier Planes in Flames, Convoys in Flames and Cruisers in Flames are now part of Ships in Flames.In the examples there are 8 players playing World in Flames, Anna (USSR), Heinz (Germany), Jay (USA), Jeremy (Commonwealth), Ju-Ming (China), Kasigi (Japan), Maria (Italy) & Pierre (France). All rules references to section 24 or higher can be found in the World in Flames Campaign & Players’ Guide.To play World in Flames, choose a campaign (see 24) and follow the set-up instructions there.
1.2 Scale1.2.1. UnitsIn World in Flames each land unit represents a corps (XXX), army (XXXX) or army group (the HQs, XXXXX). These are all corps sized units.
DiF options 2, 3 & 14 and PiF option 24: These options include divisions (see 22.1), artillery (see 22.2), supply units (see 22.3) and A-bombs & V-weapons (see 22.17). These are all division (XX) sized units.
An aircraft unit represents 250 aircraft in 1939 gradually increasing to 500 aircraft by 1945. Each counter consists of a variety of types, but with the predominant aircraft being that depicted on the counter.
PiF option 4: Planes in Flames includes more and varied aircraft to add to your game.
A surface naval unit represents a squadron of 4 to 6 destroyers attached to either 1 aircraft carrier, 2 battleships or battle cruisers, or 4 heavy or light cruisers.
SiF option 5: each surface naval unit represents only 1 aircraft carrier, battleship, or heavy cruiser in addition to 2 to 4 destroyers.CliF option 6: each light cruiser is also represented in the game.CVPiF option 45: each carrier plane class represents between 18 and 24 carrier planes.
Each SUB represents 50-60 (SiF option 5: 25-30) submarines. Each convoy point represents about 200,000 tonnes of merchant shipping. Each naval transport represents about 200,000 tonnes of troop transports and another 200,000 tonnes of support merchant ships while each AMPH represents an equivalent tonnage of specialist invasion craft and support ships.
CoiF option 7: Escort carriers, destroyer escorts, specialist subs and merchant raiders are also all represented in the game.
You are limited by the number of units included in the game except for convoy points (CPs). If you run out of these just use any numbered marker to show CPs.1.2.2. TimeEach game turn is 2 months. Each impulse varies depending on the season but is usually 2 to 4 weeks.
1.2.3. MapThree map scales are used in World in Flames. Each hex is approximately 80km on the West and East Europe maps, 200km on the Asian, (AfA, AiF & AsA option 1: African, North and South American, Scandinavian) and Pacific maps, and 650km on the America mini-map (and other off-map areas). These are respectively referred to in the rules as European, Pacific and off-map scale hexes. Where the rules reference individual hexes, the hex numbers are preceded by a letter to indicate the map they are on. W = West Europe, E = East Europe, A = Asia, P = Pacific and M = America (e.g. London is in hex W1536).
1.3 MarkersThere are 3 sorts of markers in the game. General play markers are: No planes, CP used, damage, initiative, impulse, entry, (PiF option 8: night/high, SiF option 19: task force, FiF option 40: bomb, production, TiF option 41: Intelligence & Bletchley park, PiF option 46: pilots, pilots-in-training, option 49: offensive points), year and turn. There are also facility markers that are placed on-map when built (see 13.6.6). If playing WiF Classic the only facilities are factories.
FiF & TiF option 32: Facilities also include oil, resource, forts, coastal forts, roads, rails, shipyards and factory specialisation markers.Finally, there are saved oil (TiF option 30), and build point (TiF option 31) markers available to all players if playing with these options that are also placed on the map. Each saved oil represents approximately 400,000 tonnes of refined POL. Each saved build point represents approximately 100,000 to 200,000 tonnes of finished goods.
Like units, you are limited by the counter mix in the number of markers in play except for: No planes, CP used, damage (PiF option 8: night /high, TiF option 30: saved oil, TiF option 31: saved build points, FiF option 40: production, bomb, PiF option 46: pilots-in-training) and factory markers. If you run out of these make up more.
2. General ConceptsThis section lumps together general gaming terms that may already be familiar to you. However, as the Collector’s edition of World in Flames has many new concepts it’s still worthwhile to read them.
2.1 TerrainTerrain and its effects are summarised on the bottom of the Asian map. The rule here explains some more general concepts.
2.1.1. Hexes & hexdotsAs in many games, the land portions of the maps are divided into hexagons (called “hexes”). Hexes regulate unit location and movement.A “coastal hex” is a hex which contains both land and sea. We have printed the sea portion of coastal hexes in a lighter shade of blue to distinguish them.Each hex has 6 sides (“hexsides”). Certain terrain features (e.g. rivers) conform to hexsides and affect combat, and sometimes movement, across that hexside. An all-sea hexside is a hexside with no land at all. Note that the hexside between Amsterdam and W1038 is a canal (not all-sea) hexside.On-map hexes are contained within the grey map borders. Off-map hexes are printed in the border area itself. All hexes on the American mini-map are also off-map hexes.Two hexes are adjacent if:• they share a common hexside;• they are on either side of the join between the East Europe map
and the Asian map and share the same number. They are actually connected via the hexside on the Asian map bearing the same number as the hex on the East Europe map.AsA option 1: The same applies if you are using the Scandinavian map (letters differentiate the hexes/hexsides). AfA option 1: The same applies to the northern border of the African map. Use the African map for the rest of Africa apart from the hexes containing a letter in a box and all hexes eastwards (British & Italian Somaliland). Note that the boxed letters I and J on the African map are Ethiopian hexes (A2924 & A2923 respectively).

7
Any map-edge hexdot on the Africa map connects to any other in the same sea-area on the American, Asian or Pacific maps.
• they are off-map hexes connected to each other by a rail, road or grey communication line; or
• one is an off-map hex and the other is either:(a) an on-map edge hex connected to it by rail, road or grey
communication line or;(b) an on-map edge hex adjacent to (a).
Example 1:
Tabriz (A3039) is adjacent to E0117, E0118 & E0119.Example 2:
Spanish Sahara is adjacent to the 5 Moroccan hexes with one of the letters ‘s’ through ‘w’, printed on them.A unit in a hex that contains both mainland and an island occupies both the island and the mainland.Example 3:
4Spar-viero
SM 79
36
3 1
2 2
7 MP
Unlike other games, the hexes stop at the coastlines. Hexes at sea are replaced by hexdots - each hexdot is at the centre of what would otherwise be a hex. When moving an aircraft across hexdots, or when counting hexes, just imagine you are moving from hex to hex.The use of hexdots is partly aesthetic but also serves to show that the presence of land units is not permitted (except when being transported, see 11.4.5 & 11.11).Whenever land or aircraft units move from a hex or hexdot on one map to another (or to or from an off-map area) the movement cost is the greater of the two (e.g. an aircraft moving from Asyut (E1201) to Cairo
would pay 6 movement points (mps) not 1, see 14.1.1).
2.1.2. Sea areasThe seas are divided into areas by dark blue lines (called sea area borders). Each sea area is individually named (e.g. ‘RED SEA’). Each sea area contains a sea-box which regulates movement and combat at sea.Two sea areas are adjacent if they (a) share a common sea area border; or (b) are directly connected by a blue communication line; or(c) have an arrow at the end of a blue communication line stating which sea area it connects to. Example: Cape St. Vincent is adjacent to the Bay of Biscay, Western Mediterranean, Cape Verde Basin and the North and Central Atlantic sea areas.
The Red Sea and Mozambique Channel are the only sea areas that are on two maps. The sea-box is on the East Europe and Asian maps (use either) for the Red Sea, and the Asian map for the Mozambique Channel, but the hexdots on the other maps are still part of the same sea area.
2.1.3. Off-map areasThe maps incorporate the main areas of conflict in World War II. However, other areas saw combat and World in Flames provides off-map areas to deal with them. Off-map areas contain:• one or more off-map hexes and hexdots; and/or• a sea area with a sea-box.These are shown around the edges of each map (and the America mini-map). We have depicted off-map hexes with thicker purple hexsides (as opposed to grey) and off-map hexdots as larger than European or Pacific hexdots.Off-map areas may be connected to each other and to the map by grey and blue communication lines. They may also be directly connected to the map (e.g. Durban (A3104) on the Asian map). Grey communication linesOnly land and aircraft units may move along grey communication lines. Some grey communication lines are shown as railways; you may move along these lines normally as well as by rail. Blue communication linesOnly aircraft and naval units (and their cargoes) may move along blue communication lines.A naval unit moves along a blue communication line from sea area to sea area.An aircraft moves along a blue communication line from the adjacent orange hexdot in the first sea area to the adjacent orange hexdot in the second sea area. Some sea areas have red hexdots. They connect to the red hexdot in the connected sea area on the Americas mini-map Example:
The orange hexdots in the Faeroes Gap and Bay of Biscay (West Europe map), connected to the North Atlantic Sea area on the Americas mini-map, are adjacent to the orange hexdot in that sea area. The red hexdot in Cape St Vincent (and the Azores, W3215) is adjacent to the red hexdot in the North Atlantic.It costs no extra movement points to move along a communication line (see Terrain Effects Chart on Asia map).
AiF option 1: It costs aircraft 4 movement points to move either way along a blue communication line connecting to the America map. Blue communication lines connect to any map-edge hexdot in that America in Flames sea area.
2.1.4. The Americas mini-mapAll hexes and hexdots on the American mini-map are off-map sized.When aircraft are moving along a blue communication to or from the Americas mini-map they may move to and from any orange hex-dot in the appropriate sea area. Example: An aircraft in Anchorage wants to fly to the Pacific map. It first moves to any orange hexdot in the Gulf of Alaska and then to any of the 3 northernmost orange hexdots in the Bering Sea.Puerto Barrios is a port on the Caribbean sea area. Panama and San José are ports on the Gulf of Panama sea area. The Azores (W3215) is a port on both the Cape St. Vincent and North Atlantic sea areas.
AiF option 1: If playing with the America in Flames maps use them instead of the American mini-map. Colón is a port on the Caribbean sea area. The Azores is on both the North American (N0152) and West Europe maps as the one Pacific scale hex (see 1.2.3) for all purposes.

Aircraft StackingTerrain No.Major port or city hex 3Minor port hex 2Mountain, desert mountain or swamp hex 0Any other hex 1Each HQ in hex +1 Each engineer in hex (DiF option 2) +1
8
2.2 Zones of controlA zone of control (“ZoC”) is the effect a land unit has on the hex it occupies and adjacent hexes. A ZoC affects supply (see 2.4), the placement of reinforcements (see 4.2), garrison values (see 9.2), rail movement (see 11.9), land movement (see 11.10), notional units (see 11.15.1), retreat after combat (see 11.15.5), reorganisation (see 11.17.2), partisan effects (see 13.1.3), transporting resources & build points (see 13.6.1), breaking down (see 22.1) and forts (see 22.9).Most land units have a ZoC into their own hex and into all adjacent hexes. Partisans only have a ZoC into their own hex. Units that invade (see 11.13) or paradrop (see 11.14) temporarily lose their ZoC.
DiF options 2, 3 & 14: Divisions, artillery and supply units only have a ZoC into their own hex.PiF options 24: A-bombs and V-weapons only have a ZoC into their own hex.
Naval and aircraft units don’t have a ZoC (even in their own hex).
ZoCs don’t extend:• into or out of off-map hexes;• into the notional hexes represented by hexdots;• across alpine hexsides; • across all-sea hexsides; • across straits or unfrozen lake hexsides; • into an opponent’s (a major power or minor country on the other
side) hex that the unit is not at war with; or• Option 10: from a surprised minor country unit.Example:
XXX
5 - 45 - 4
Alp
Tu
XXX
6 - 56 - 5
ITu
I Turkish MECH does not exert a ZoC across a straits or all-sea hexside. Alp MTN does not exert across an alpine hexside and only across a lake hexside during snow or blizzard.
Option 9: (Pacific & Asian ZoCs) You need either an HQ or 2 other (non-PART) corps sized units in a hex to exert a ZoC into an adjacent Pacific scale hex.
2.3 StackingThere is a limit on the number of units that may occupy each hex. This is called the stacking limit of the hex.
2.3.1. LimitsUnits that can’t co-operate (see 18.1) can’t stack together in the same hex. They may stack together in the same sea-box.Stacking applies at the end of every step and advance after combat (see 11.15.5). If any units are overstacked then, the player controlling the hex must destroy enough of the overstacked units (PiF option 46: including the pilot) to comply with the stacking limits. You must destroy face-up units before face-down units.Land unit limitsUp to 2 land units may stack in a hex. Stacking limits are doubled in an off-map hex.
DiF options 2, 3 & 14: You may stack 3 land units in a hex if the 3rd unit is division sized (see 1.2.1). You may stack 5 land units in an off-map hex if the 5th unit is division sized.
Units invading (see 11.13) and paradropping (see 11.14) have a stacking limit in addition to the defending units’ limit. This limit is applied to the combined number of invading and paradropping units.
Example: 2 US corps invade Cherbourg (W1833) supported by the paradropping of a US PARA corps and PARA division. This is 1 corps more than is allowed so at the end of the paradrop step (prior to land combat resolution) Heinz (who controls Cherbourg) destroys any 1 US corps of his choice.There is no limit to how many land units being naval transported (see 11.4.5) may stack in a sea-box.Aircraft limitsThe stacking limits for aircraft not flying a mission are:
If several limits apply (e.g. a city in a mountain hex), the highest is used and all modifiers are cumulative (e.g. up to 6 aircraft could stack in Leningrad (E2050) if you had 2 HQs and an engineer there).Aircraft stacking limits are doubled in an off-map hex. Apply the HQ (DiF option 2: and engineer) benefit after doubling.
Option 8: Flying boats have a vertical blue stripe on their counter. They may only stack in a coastal hex (even a mountain coastal hex). You may only ever stack 1 flying boat in a hex, but this is in addition to any other aircraft there. For example, you could stack a flying boat plus 3 other aircraft in a major port. Flying boats may fly missions into, or rail move through, non-coastal hexes.Option 8: Amphibians are flying boats that can also stack like other aircraft. They have a vertical blue and green stripe on their counter. You may stack an amphibian with a flying boat (even another amphibian) but only as a normal (not flying boat) aircraft (e.g. while active, Jay could stack the US PBY-6A and PBM-3 in Pembroke (W2037) provided the PBY-6A is 1 of the 2 aircraft allowed to stack in Pembroke port).
Naval unit limitsUp to 2 (SiF option 5: 4) naval units may stack together in a friendly minor port. Every 5 (SiF option 5: 3, or part thereof) convoy points is 1 naval unit.There is no limit to the number of naval units that can occupy a friendly major port (exception: see 18.2, foreign troop commitments) or a sea-box.Both sides’ naval units can occupy the same sea-box, even in the same section.CombinationsStacking limits for land, aircraft and naval units are independent (e.g. you could stack an HQ and INF corps, any number of naval units and up to 4 aircraft in a major port).
2.4 SupplyUnits need to be in supply to operate effectively.2.4.1. When to check supplyYou need to check the supply status of a unit before it moves, flies or sails. You also check the supply status of land units immediately before you overrun (both sides), during combat declaration (attacking units) and at the moment of combat (both sides).Example:
XXXXX
7(4)4Rund
stedt
XXX
8-6XLV
II MXXXX
2-3
Kaza
n
XXXX
2-1
17
XXX
8 - 68 - 6
XLVI

9
It is fine weather in May/Jun 1941. The German XLVII ARM and XLVI MECH corps are out of supply (maximum range is 4, see 2.4.2 below) and will turn face down if they move. So Heinz first moves Rundstedt to E2033. Now the units are in supply and race eastwards. They could overrun the Soviet MIL but not the GAR as the adjacent hexes (E1631 and E1730) are both 5 hexes from Rundstedt. Units at sea are always in supply. The Italian Red Sea Flotilla is always in supply in any Italian controlled port
2.4.2. Tracing supplyTo be in supply, a unit must be able to trace a supply path back to a primary supply source.A primary supply source for a unit is:• any friendly city in the unit’s unconquered home country; or• for a Commonwealth (CW) unit, any friendly city in another
unconquered CW home country; or• any friendly city in an unconquered home country of a major
power (UK’s home country in the case of the Commonwealth) the unit co-operates with (see 18.1).
Example: Germany declares war on Poland. Polish units that can trace a supply path to a friendly controlled city in Poland are in supply. They are also in supply if they can trace a path to any British city (because Poland co-operates with the Commonwealth).
DiF option 14: (Supply units) An HQ is a primary supply source for the rest of the turn if you expend a face-up supply unit (see 22.3) it is stacked with. You may do this anytime during the action stage, even during your opponents’ impulse.Alternatively, during each of your impulses (not your opponents’), each of your face-up supply units is a primary supply source for one non-HQ unit it is stacked with until the end of your impulse. This does not expend or turn face-down the supply unit. You may do this each impulse (to the same or a different unit).TiF option 54: (Territorials) Any friendly city in their home country is a primary supply source for its territorials irrespective of whether the territorial’s home country is conquered or not.
A city controlled by the Communist Chinese is not friendly to the Nationalist Chinese (and vice versa), even though both are (nominally) on the same side.If the unit can’t trace a supply path directly to a primary supply source, it may trace it via one or more secondary supply sources instead.A secondary supply source for a unit is:• an HQ the unit co-operates with (see 18.1); or• any friendly city in an unconquered Commonwealth major
power’s home country (apart from the UK’s home country, see primary supply source) the unit co-operates with; or
• the capital of a co-operating (see 18) minor country aligned (see 9.6) with your major power; or
• the capital of a major power or minor country conquered by the unit’s major power or a major power the unit co-operates with.
A secondary supply source of the tracing unit must be able to trace a supply path either to a primary supply source or via another secondary supply source. That other secondary source must also be able to trace a supply path either to a primary source or via another secondary source, and so on. There can be any number of secondary supply sources in this chain but it must end up at a primary supply source of the unit tracing the path. Example: Poland’s controlling major power is the Commonwealth. Warsaw (E2737) is a secondary supply source for CW units, in addition to being a primary source for Polish units.A secondary supply source doesn’t need to be in supply itself to allow supply to be traced through it.A city can only be a supply source for a unit if it has not been controlled by the other side at any time in the turn.A supply source may supply any number of units.Supply pathsYou trace a supply path from a unit to a primary supply source.If you are tracing a path from a secondary supply source to a primary supply source, it is a railway supply path.
If you are tracing any other supply path, it is a basic supply path. A supply path, basic or railway, can be up to 4 hexes long if the hex you are tracing from has fine weather, up to 3 hexes if it is in snow and up to 2 hexes in rain, storm or blizzard. Each Pacific scale hex you trace into counts as 2 hexes. Each off-map hex counts as 4 hexes.Example: A Russian unit in hex A2848 during snow may not trace supply to Chkalov (A2648). However, it could trace supply to Kuybyshev (E0143). In rain it is out of supply.Each desert or desert mountain hex your supply path enters counts as 1 extra hex (i.e. counts 2 in Europe, 3 on the Pacific scale and 5 into off-map hexes).Example: A Japanese unit in Denver (M1018) may only trace a basic supply path 1 hex in fine weather, and even then, not to Phoenix (M1117).Railway supply pathsA hex a railway supply path enters by moving along a railway or road does not count against the hex limit. A hex it enters across a straits hexside also does not count against the limit, so long as the hexes on either side of the straits are railway hexes.The non-rail hexes can occur anywhere along the path. Although you will mostly use them to trace supply from an HQ to a friendly rail hex, they can be handy for re-routing around an enemy unit that’s blocking a vital rail link.Example:
XXXXX
7(4)4Rund
stedt
XXX
10 - 510 - 5
XX
X
XXXXX
8(5)58(5)5Man
stein
XXX
7-6
DA
K
All hexes in Syria except for Damascus are Axis controlled. During fine weather, the DAK is able to trace a supply path of 4 hexes to Rundstedt (remember, for the purposes of supply, deserts count as 2 hexes on the European maps). That is a basic supply path.Rundstedt can’t trace a railway supply path to a primary supply source because he is at least 5 hexes from a primary supply source (4 ‘supply’ hexes to the rail line free along the rail to Tripoli and 1 more for using overseas supply ~ see below). However, he can trace a 4-hex path to Manstein. That’s a basic supply path too because it’s not going to a primary supply source.Overseas supply pathsAny part of a basic or railway supply path may be traced overseas. You may only trace supply overseas once for each unit attempting to trace supply, regardless of how many secondary supply sources are used between the tracing unit and the primary supply source.The sea portion of a supply path does not count against the maximum number of hexes permitted in the path. The port hex you trace the overseas supply path into does count against your 4 hex limit. However, it always counts as only 1 hex, regardless of what map it is on or what terrain it contains.To trace a basic supply path overseas, the unit (not any secondary supply source) must be in a coastal hex or trace the path via a port.

10
A secondary supply source may only trace a basic supply path overseas via a port. To trace a railway path overseas, the secondary supply source must be in a coastal hex or trace the path via a port.
Option 11: (limited overseas supply) You may only trace a supply path overseas if each sea area you trace it through contains at least one of your or a co-operating (see 18) major power’s (including its aligned minor countries) CP, TRS or AMPH.Example: The Netherlands and Belgium are Commonwealth controlled minor countries, and the US is at war with Germany. Even though Belgium itself doesn’t co-operate with the Netherlands or the USA, Belgian units may still trace overseas via US, Dutch or CW (not Soviet) convoy points as the CW co-operates with the USA but not the USSR.
An HQ tracing a railway supply path overseas not via a port may only supply a number of units up to its reorganisation value (not counting the HQ). The units supplied may change each step and may be specified any time(s) during the step. The HQ may still function normally and is not turned face-down when using this ability.Example:
XXX
10 - 510 - 5
XX
X
XXX
8 - 38 - 3
I
9 - 59 - 5
XV
XXX
6(4)36(4)3Eise
nhow
er XXXXX
7-5
XX
XXX
8 - 58 - 5
V
XXX
9 - 59 - 5
XIX
XXX
6 - 36 - 3
XVIII
XXXXXX
8 - 18 - 1LXXX
IV
XXX
6 - 16 - 1LXXI
V
XXX
7 - 47 - 4
XXV XXX
8-6XLV
II XXX
7 - 4
XII
XXX
12 - 5
I
XXX
5-1LXXX
II
XXX
7 - 17 - 1LXXX
I
XXX
4-3
II Para
9 - 59 - 5
VII XXX
9 - 69 - 6
III
XXX
D-Day, May/Jun 1944 has (Ike) Eisenhower on Omaha beach (W1632) During the movement step Ike puts the VII corps into supply to move from W1731 to W1732 and moves the US III Arm from W1632 to W1731. During land combat Ike orders the 4 units in W1731 and W1631 to attack the XLVII PZ corps. The VII corps attacks Cherbourg without requiring Ike as it is now on a coastal hex and can trace supply directly overseas.From the coastal hex or port, you trace the supply path via any number of consecutive sea areas to a friendly port which is a supply source itself or from which you can continue the supply path overland to a supply source.You cannot trace a supply path into a sea area that contains:• an enemy CV, SCS or, in fine, rain and snow only, an aircraft with
an air-to-sea factor;• unless it also contains a surface naval unit (option 11: CP, TRS, or
AMPH only) controlled by you or a co-operating major power at war with that enemy unit.
Example: Continuing the example in Railway supply paths, Manstein traces supply overseas from Alexandretta through the Eastern Mediterranean and Italian Coast sea areas to Ancona (counting as the 4th non-railway hex) and then any distance along railways to any friendly German or Italian city.The Eastern Mediterranean Sea contains the Commonwealth BB Warspite. Italy (which is also at war with the Commonwealth) moves the CA Zara into the sea area to provide supply. You can’t trace a supply path between sea areas if one of your SCS couldn’t move between them (see 11.4.4). For example, Axis units can’t
trace supply between the Western Mediterranean and Cape St.Vincent unless Gibraltar (W2513) is Axis controlled.You cannot trace an overseas supply path via an iced-in port (see 8.2.1) if the weather in that port’s hex is snow or blizzard.Limits on supply pathsYou can’t trace any supply path:• into an opponent’s ZoC unless the hex contains a friendly land
unit; • into a hex controlled by another major power if you are neutral or
it doesn’t agree; • into a hex controlled by a neutral country other than yours
(exception: Vichy territory ~ see 17.4.3 and Sweden ~ see 19.7); • across a hexside or into a hex an INF couldn’t cross or enter (e.g.
alpine, unfrozen lake or (non-strait) all-sea hexside) except as part of an overseas supply path; or
• for any Soviet controlled unit, into a hex (or minor country) controlled by any other Allied major power (and vice versa) unless the USSR is at war with Germany, or the major power with units in that country.
Example: Japan declares war on Iran while the USSR is neutral. The Commonwealth aligns Iran. Soviet units can’t trace supply through Iran until the USSR is at war with Germany or Japan.
Option 12: (limited access across straits) A unit may only trace supply across a straits hexside if any adjacent sea area contains no enemy units capable of blocking supply, or you can trace supply through any adjacent sea area.
2.4.3. Out of supplyLand unitsA land unit that is out of supply:• can’t attack;• is turned face-down if it moves (even by naval or air transport);• and face-down, defends with 3 combat factors if it is a white-print
corps sized unit or 1 if not (face-up units defend with their normal strength); and
• option 13: can’t provide HQ support (see 11.15.3).Out of supply land units still have their normal movement allowance and still exert a ZoC.Aircraft unitsAircraft that are out of supply may only fly rebase missions (see 11.16).Naval unitsIf you move a naval unit that is out of supply, subtract 1 from its movement allowance (not range) and turn it face-down (or put a CP used marker on it if it is a convoy point) when you finish its move (even at sea).
Emergency HQ supply (option 13)A face-up HQ may provide emergency supply to non-HQ units it co-operates with for this impulse only (even if later in the impulse the HQ is turned face-down). Each HQ may provide this benefit to as many units (including notionals) as the HQ’s reorganisation value. These units must be able to trace a basic supply path to the HQ providing supply. You may announce it any time (even in your opponents’ impulse) prior to the end of land combat (see 11.15) but must announce the HQ providing emergency supply before any unit can gain this benefit. Turn the HQ face-down at the end of the land combat step (if not already). An HQ may not provide emergency HQ supply during the impulse(s) it is surprised (see 15).
2.5 Control2.5.1. EntitiesThere are two national entities in the game ~ home countries and territories. Home countries have capital cities, territories do not.A home country or territory consists of every hex that a MAR could reach from the capital of that home country or name of the territory without crossing a red political boundary or entering a hex controlled by another territory or country.

11
Example 1: all of mainland China including Japanese occupied China is part of the Chinese home nation, but Hainan and Formosa are not.Example 2: Port Moresby (P2317) is part of Papua, not Australia but Kangaroo Is (P2704) is part of Australia as it is not a territory (its name is not in bold, see Terrain Effects Chart on Asian map). Example 3: All islands adjacent to Greece are part of the Greek home country. Crete is a separate Greek controlled territory.Example 4: The Marshall Islands territory contains hexes P1324-1326, 1424, 1425, 1526 & 1627.Germany’s home country includes Austria in campaigns starting between 1938 and 1945, and East Prussia. Italy’s home country includes Sicily. Multi-island territories (e.g. Fiji, P1113) are outlined by green hexsides.
2.5.2. Initial controlThe World in Flames maps show the 1939 political boundaries. They also show the necessary start lines for the other campaigns.Major powers and minor countries consist of a home country except for the Commonwealth which has 6 (the UK, Canada, India, South Africa, Australia and New Zealand). All references to major power home countries include all 6 Commonwealth home countries unless otherwise stated. At the start of a game, each country controls all hexes within its borders except any hexes on the enemy’s side of a relevant start line. Some major powers and minor countries also control (either aligned, see 9.6, or conquered, see 13.7.1) other minor countries and territories. Minor countries aligned to a country in 1939 are marked with the controlling major power’s initials on the map after each country’s name.Example: At the start of the Global War campaign (see 24.4.7) Albania, Eritrea, Ethiopia, Italian Somaliland and Libya are all aligned to Italy; while Egypt is aligned to all 6 Commonwealth major power home countries.All territories are controlled by a country and, just like minor countries, usually have their controlling country’s initials after their name. To avoid a blizzard of initials we have marked most of the sea areas as being ‘controlled’ by a country. This means that in 1939, most of the island territories in that sea area were controlled by that country. Similarly, island territories are controlled by a country if they lie astride a sea border between sea areas that are all marked as controlled by that country (e.g. Socotra Is (A2627) is controlled by the Commonwealth). Any exceptions have their controlling country after their name (e.g. Guam (P2328) is aligned to the USA in 1939). The Netherlands East Indies has a number of named territories (Java (A0719), Sumatra, Borneo etc.). This is for historical purposes only. All NEI controlled hexes are NEI minor country hexes. Note that even though major powers may control minor countries and territories (see 9.5, 9.6 & 13.7.1), it is the minor countries and territories themselves that control hexes in that minor country or territory (unless enemy controlled).The campaign information (see 24) for your campaign will provide more detail and explain any exceptions.
2.5.3. Changing controlControl of a hex changes when:• an enemy land unit (except for partisans ~ see 13.1.3, and supply
units ~ see 22.3) enters it and clears it of all enemy units, if any, during land movement or combat (see 11.10.1, 11.10.6 & 11.15.5);
• a hex, territory, minor country or major power is conquered (see 13.7.1), liberated or reverted (see 13.7.5), or as a term of a mutual peace (see 13.7.3);
• France is declared Vichy (see 17);• Polish (see 19.5.1), Ukrainian (see 19.12), Finnish, Rumanian,
Hungarian and Bulgarian border changes (see 19.6); or• a Chinese faction occupies a city controlled by the other faction at
the start of the conquest step (see 20). Recaptured enemy controlled hexes in a territory or home country aligned to you or a friendly country become controlled by that territory or home country.Example: if the USA recaptures Balikpapan (A0321) from the Japanese in the Commonwealth aligned Netherlands (which itself controls an un-
conquered Netherlands East Indies), then the hex is again immediately controlled by the NEI.All other enemy hexes occupied by a minor country land unit are in-stead controlled by its controlling major power provided both are at war with that enemy. If a minor country controls enemy hexes and the minor’s controlling major power comes to war with that enemy, then those hexes immediately become controlled by the minor’s controlling major power.Example: The USSR declares war on Finland in 1939. Germany and the USSR are not at war. Finland aligns to Germany. During the war Finland takes Murmansk (E1653) and liberates a Soviet controlled Estonia. In 1941 Germany declares war on the USSR. Immediately Murmansk becomes German controlled and Estonia becomes a German aligned minor country, rather than Finnish.All other enemy hexes become controlled by the country controlling the first land unit entering the hex. If more than one country is entering the same enemy hex, the major power with the most land combat factors moving into the hex gains control. If they have equal factors they must agree which of them will gain control or neither can enter the hex.Example: The Netherlands East Indies is conquered by the Japanese. Later the CW II and US X corps successfully attack Japanese held Balikpapan with no loss. Both corps move in but the US controls the hex (as its corps has more land combat factors). Control of a home country or territory changes when:• it is allocated (see 9.5) or aligned (see 9.6);• the US occupies Greenland & Iceland, the Azores or Northern
Ireland (see 13.3.2, US entry options 7, 18 & 44);• Japan occupies Indo-China or Madagascar (see 13.3.3, entry
actions 1 & 5);• it is conquered (or re-conquered, see 13.7.1), transferred due to
mutual peace (see 13.7.3), liberated or reverted (see 13.7.5);• France is declared Vichy (see 17.); or• as a result of the Nazi-Soviet pact (see 19.5.2).
2.5.4. Units in hexes changing controlWhenever a hex changing control leaves a unit illegally stacked (see 9.2, 13.3.2 US entry options 7, 18 & 44; 13.7.1, 13.7.3, 13.7.5, 17.4.5, 19.5.1 & 20), it (PiF option 46: and its pilot, if any) is removed from the map and placed on the production circle (see turn record chart) to arrive as a reinforcement (see 4) in 2 turns.Example: In the May/Jun 1942 liberation step (see 13.7.5), Japan liberates a Commonwealth conquered Iran. Japan is not at war with the USSR. All Soviet units in Iran are placed on the production circle to arrive as reinforcements in Sep/Oct 1942.
2.6 FractionsThese rules frequently require a calculation that produces a fraction. When you have to do this, and after all modifications, round to the nearest whole number, half rounding up.Rounding a negative number up moves you closer to 0 (e.g. if the fraction is -1.5, it rounds to -1).Example 1: A Bf-109 E3 FTR with a range of 3 flies an interception mission. Its range is reduced to 1.5 rounding up to 2.Example 2: Germany has 21 production points. Her production multiple in 1943 is 1.25, so she has 26.25 build points which rounds to 26 points. In 1944 her production multiple increases to 1.5, so she has 31.5 build points rounding to 32.The only exceptions are garrison values (see 9.2) and land combat factors (see 11.15.5) which are retained, and land odds ratios (see 11.15.5 & 11.15.6) which are rounded down to the next lower (option 26: fractional) ratio.
2.7 Dice, re-rolls & breaking tiesWorld in Flames uses 10-sided dice. A roll of 0 is a 10.Whenever more than one player on the same side is eligible to perform an action or take a loss and they can’t agree, they each roll a die, highest roll’s choice.Re-rollsSome rules allow dice to be re-rolled (see 6.1, 13.6.11 & 16.3.1) and/

12
or modified (see 13.6.11). You may re-roll modified dice (which would again be modified) and modify re-rolled dice (if not already). You may not re-roll re-rolled dice (KiF option 41: except by intelligence, see 13.6.11) nor modify modified dice.
2.8 RangeWhen counting the distance from one hex to another, you count the final hex but not the starting hex. For example, it is 5 hexes from Berlin (W0437) to Nuremberg (W0532).
3. The TurnAfter you have set up your game (see 24.1), you play a series of 2-month turns (see turn record chart) until the campaign is over (this will be from 1 to 49 turns, depending on the campaign).Both sides perform a series of activities in every turn. There are 3 stages at the start of the turn that everyone takes part in. Then there is a sequence of impulses that each side performs alternately. After those impulses are over, there are a few more steps for everyone. Then the turn is over and you start a new turn (easy, isn’t it?!?).
3.1 Sequence of playThe sequence of play in a turn is:A. REINFORCEMENT STAGEB. LENDING RESOURCES STAGEC. INITIATIVE STAGED. ACTION STAGE Repeat D1 through D3 until the action stage ends.
D1 Determine weatherD2 First side’s impulse
Every major power on the first side performs these steps:D2.1 Declare warD2.2 Choose action Choose either a pass, naval, air, land or
combined action.D2.3 Perform actions
The major powers that didn’t pass perform these steps in this order (their action choice will limit what they can do ~ see action limits table):(a) Port attacks(b) Naval air missions(c) Naval movement(d) Your naval combat(e) Opponent’s naval combat(f) Strategic bombardment(g) Ground strike missions(h) Rail movement(i) Land movement(j) Air transport(k) Debark land units at sea(l) Invasions(m) Paradrops(n) Land combat(o) Air rebases(p) Reorganisation
D2.4 End of actionRoll to end the action stage. If it doesn’t end, advance the impulse marker the number of spaces shown on the weather chart for the current weather roll. If it ends, move on to stage E - the end of turn.
D3 Second side’s impulseIf the action stage didn’t end, repeat the steps in D2 for the second side. If the action stage doesn’t end after the second side’s impulse, go back to D1.
E. END OF TURN STAGEBoth sides perform these steps in this order:E1 PartisansE2 Entry markers and US entryE3 Return to baseE4 Final reorganisationE5 Production
E6 Intelligence (KiF option 41)E7 Peace E7.1 Create Ukraine (TiF option 50) E7.2 Conquest E7.3 Allied minor support E7.4 Mutual peace E7.5 Vichy declaration E7.6 Liberation E7.7 SurrenderE8 Facility, factory & oil destruction (option 32 & 33) E9 Victory check
4. Reinforcement StageThis is the stage when new units and markers you built in earlier game turns (see 13.6) will arrive on the map.
4.1 Force pool changesYou will see when you read the set-up rules (see 24.1) that you have to place your units into separate force pools. You build units from your force pools. Having force pools for each of your unit types lets you select the type of unit you want to build. You usually return units that are destroyed to your force pools.You will add units to your force pools as the game goes on, or as certain events occur.
4.1.1. Annual additionsAdd all new units to your force pools in the January/February reinforcement stage each year.Also add all new entry markers to the common entry marker force pool and new partisans (see 13.1) to the partisan force pool at this time. The units and markers you add are those with this year marked on their counter. For example, in Jan/Feb 1942, you would add all units with “1942” on their back and all markers with “1942” on their front (this is their availability year, see Unit description chart).
CVPiF option 45: Only the last 2 digits of the availability year are shown on the back of carrier planes (e.g. 42 means 1942).
4.1.2. Special additionsNeutral major powers can’t have MIL units. When you go to war your reserve MIL may be placed on the map (see 9.7) while the remainder are added to your force pool.
AiF & TiF option 55: (City based volunteers) Some units have a city name on their back rather than an availability year (see 22.8).
4.1.3. Replacement naval units (SiF option 5)A few naval units have a bone coloured box around their availability year. In a later year, replacement units will turn up for these units. Their availability year will be shown in a gold box.If the original unit has been scrapped (see 13.6.5) when the replacement unit arrives, it is scrapped too.Otherwise, during any reinforcement stage you may scrap the original unit and add its replacement.Put the replacement in the force pool if the original unit is either in the force pool or face-down on the production circle; orPut the replacement in the construction pool if the original unit is in:• the repair pool,• the construction pool, or• face-up on the production circle.Put the replacement in the repair pool if the original unit is on the map.The 2 Japanese battleships Shinano and Karyu may be replaced by 1 of the 2 replacement CVs provided in Ships in Flames (these had 2 designs). The other replacement for that BB is then scrapped.
4.2 ReinforcementsThe production circle has 6 slices, one for each turn in a year. Your units and markers in the current turn’s slice now arrive as reinforcements. The side with the initiative from last turn places its reinforcements first.

13
4.2.1. Where do reinforcements go?Put face-down naval units face-up into the construction pool. Put all your other reinforcing units face-up on the map in hexes you control.Put your on-map naval reinforcements into a port in the unit’s home country.
SiF option 5: The Commonwealth may place 1 CP in one of its home countries outside the United Kingdom (UK) each turn.
If not playing CoiF option 7 (see 22.16), each major power may also place 1 of its convoy points (in total) a turn in any one of its aligned minor countries each turn (see 13.6.5, Which units).
PiF option 46: (pilots) Increase your pilots on the markers track (see turn record chart) by the number of pilots you built (see 14.6.2). Then return the pilots in training marker(s) to the force pool for future builds.Option 49: (offensive points) Increase your saved offensive point total on the markers track (up to a maximum of 49) by the value of each reinforcing offensive chit you receive this turn (see 16). Then return the offensive chit to the force pool for future builds.
MIL must be placed in the city named on the counter. If you lose control of the city, then whenever the unit is in the force pool or production circle, remove it from the game instead. If you retake the city, put the unit back in your force pool.
TiF option 54: Territorials belonging to a territory (e.g. British Somaliland) may be placed in any city or port in that territory.AiF & TiF option 55: City based volunteers are placed in their city.
All remaining reinforcements must now go into a city in the unit’s home country.Chinese Communist units may only arrive as reinforcements in a city controlled by the Communist Chinese. Similarly, Nationalist Chinese units may only arrive in a city controlled by the Nationalist Chinese. Chinese MIL may be removed from the force pool when the other faction controls their city. You can’t put a reinforcement on the map if it would violate the stacking rules (see 2.3). You may put a unit in a port or city that is in a ZoC.
CVPiF option 45: You may place reinforcement carrier planes directly onto CVs in their home country cities (UK in the case of British CVs and Canada for the CV Canada) if the CVs can accommodate them.
If you can’t place an aircraft or land (not naval) unit reinforcement anywhere without breaking the stacking rules, you may put it in a hex you control (not in an enemy ZoC) in the unit’s home country next to a city where you could have placed it except for the stacking rules (e.g. if Kiev is fully stacked you may place a reinforcement Kiev MIL in an adjacent hex provided it’s not in an enemy ZoC). Only 1 unit per city may be placed in this fashion each turn.If you can’t place a reinforcement in any city (or adjacent hex), put it back on the production circle to arrive next turn.
PiF option 46: (Pilots) An aircraft may only be placed on the map if there is at least one of your pilots available on the markers track (see 14.6.3). If the availability year of the aircraft is later than the current year, 2 pilots are required to place it on the map.
4.2.2. Facilities (option 32)TiF option 32: Each fortification, road and rail line may be placed in any hex you control (and, in the case of forts, oriented any way you like) provided it is not placed in an enemy ZoC or built in locations where you can’t move land or aircraft units (e.g. a CW territory in the Pacific before 13.3.2 US entry option 36 is chosen). Furthermore, forts and coastal forts may not be placed in off-map hexes. Finally, coastal forts may only be placed on a hex that has at least one all-sea hexside. Forts that aren’t in an enemy ZoC may be upgraded by adding fort hexsides to an already existing fort (e.g. you could have a 1-hexside fort covering Paris and then increase it to a 3-hexside fort by building a 2-hexside fort and placing it in Paris). When upgraded, the original fort hexsides must still be retained in the final orientation of the upgraded fort.You may only place a road on a hex, or upgrade a road to a rail, if that hex’s motorised movement cost is less than the cost of the road or rail you built (e.g. if you paid 7 for a road, you could place it in any hex you control on the European maps except swamp).
Once built, rails and roads are treated the same as printed rail and road hexes. They connect to all roads and rails in adjacent hexes (except across all-sea and alpine hexsides), thus you may even build one in a hex already containing a road or rail to connect 2 unconnected existing road or rail lines. TiF option 32: (oil and resource facilities) Place a hex specific oil or resource facility (see 13.6.6) in its hex even if it was a different major power who built it.Option 32: All other facilities may only be placed in a city or major port you control (even in ZoCs) in your current home country (the UK’s current home country only in the case of the Commonwealth unless otherwise specified on the counter).Only one of each type of facility may be placed in each hex except factories. You may have a total of up to 2 blue factories in any one hex (including printed factories). Built factories are considered blue factories for all purposes.Once placed facilities may not be moved nor, in the case of forts, rotated. They may be destroyed (see 11.7, 11.10.6 and 13.8).
4.3 Destroying and scrapping unitsAfter you have placed reinforcements, each active (and in the case of Vichy, see 17, hostile) major power may destroy any isolated land or aircraft units it controls. PiF option 46: You may destroy aircraft without the pilot (increase your pilot total on the markers track by 1).When a unit is destroyed, or old enough, you may scrap it (permanently remove it from the game, see 13.6.5).
TiF Option 31: (disbanding) Every turn each active major power (not its controlled minors) may also disband one of its (FiF option 40: completely built and undamaged) naval or aircraft units that is in a home country factory hex. If you do, place in that hex 1 build point if the unit disbanded cost 2 or more to build (2nd cycle cost only in the case of a naval unit). Disbanded aircraft are scrapped (PiF option 46: and add 1 pilot to your markers track, see 14.6.3). Disbanded naval units are placed in the construction pool. Example: At the end of the reinforcement stage Jeremy disbands the CA Australia in Melbourne (P2303) putting 1 build point there and placing the Australia in the Construction pool. The CL Dido is also in Melbourne but it can’t be disbanded there as it is not in the United Kingdom.
5. Lending StageIn this stage you announce (in whole numbers) how many of your (not those you are getting by trade agreements, see below) resources and/or build points (see 13.6.4), if any, you will give to another major power on your side this turn.
TiF option 30: (Oil) You must also announce how many of the resources given are oil (see 13.6.9).
You may only give and/or receive resources (or build points) if you are an active major power (exceptions: Trade agreements ~ see 5.1 & US entry options ~ see 13.3.2). Vichy must also be hostile to give to other major powers (see 17.4.4). You may not announce you are giving more than 1 resource and 1 build point in total (apart from trade agreements, see 5.1) if any city in your current home country (the UK’s current home country in the case of the Commonwealth) is currently enemy controlled.Some Allied major powers need US entry options to be chosen before resources or build points can be lent or given to them (see 13.3.2).You cannot give resources to a major power in the same turn as it is giving resources to you. However, you may give resources to a major power in the same turn as another major power gives resources to you. The same restrictions apply to lend leasing build points. You may however give build points to a major power in the same turn you receive resources from that major power or vice versa.How you transport resources is described later (see 13.6.1).If during production (see 13.6) it is possible for you to deliver the promised resources or build points then they must be delivered. If you cannot meet the promise you made (e.g. because the convoy points were not set up, were destroyed, or a railway line was cut), you still cannot use them yourself this turn.

Reduction of USSR resources to Germany (all cumulative) Mod Reason (-1 each occurrence)-1 Finland allows Soviet claim to Finnish Borderlands (see 19.6.1)
-1 Rumania allows Soviet claim to Bessarabia (see 19.6.2)-1 Germany aligns Bulgaria, Finland or Hungary (see 9.6) *-1 Germany aligns or declares war on Rumania or Yugoslavia
before France is conquered or Vichied *-1 Germany aligns Rumania after allowing Bulgarian & Hungarian
claims (see 19.6.2)-1 Germany declares war on Bulgaria, Estonia, Finland, Hungary,
Latvia, Lithuania, or Turkey (see 9.3)* no effect if the Axis alignment is due to an Allied declaration of
war on the minor country
TiF option 30: Reduce general resources before reducing any oil.
14
5.1 Trade agreementsTrade agreements are agreements automatically in place between countries at the start of each game or triggered by certain events. They continue until either country involved in the trade agreement is completely conquered or as specified below.Germany-USSRUSSR and Germany start the 1939 campaign with a trade agreement in place to exchange German build points for Soviet resources.In each turn, Germany must lend lease 2 build points to the USSR while the USSR must supply Germany with 7 resources (TiF option 30: 2 of them must be oil). The total per turn changes as circumstances vary (minimum 0).
The USSR and Germany stop supplying these resources and build points once the Nazi-Soviet pact (see 19.5) is broken.In all cases where the resources or build points are reduced (or stopped) during the turn, the owner keeps them for themselves.Example: In May/June 1940 the USSR demands Bessarabia. Rumania allows the claim. Next impulse Germany denies Bulgarian & Hungarian claims on Rumania. Later in the turn Germany aligns Rumania and declares war on Yugoslavia while France remains unconquered. Playing TiF option 30 the USSR only provides Germany with 2 oil and 2 general resources per turn from this turn on and can keep the other 3 general resources for her own builds.
For each of Denmark, Greece, Hungary, Norway, Sweden, Turkey or Yugoslavia that the Soviet Union declares war on, or a Soviet controlled unit enters, Germany may choose to either keep one of the build points it would normally send to the Soviet Union, or receive an extra (TiF option 30: oil) resource from the Soviet Union, each turn. This choice cannot be changed later.
GreeceA neutral Greece supplies the Allied major power that controls all hexes of the Dodecanese islands (E1813) 1 resource each turn.
HungaryA neutral Hungary supplies Germany with its resource each turn (exception: see 19.6.2).
IranA neutral Iran supplies the Commonwealth with one of its resources each turn.
IraqA neutral Iraq must supply France with one of its resources each turn. If France is conquered or a Vichy government has been installed (see 17.1), Iraq instead provides the resource to whichever country controls Syria. A Vichy controlled Syria will pass it on to the major power that installed a Vichy Government.
Italy-USAThe USA and Italy start the game with an agreement in place to lend lease 1 Italian build point to the USA for 3 US resources (TiF option 30: 1 of them must be oil) to Italy, each turn.This trade agreement ends immediately when either:(a) the USA or Italy become active (see 9.1), or
(b) US entry option 34 (see 13.3.2) has been chosen.From that moment on, both the USA and Italy may use their resources or build point themselves.While this agreement is in effect, and to avoid any penalty, the USA must have enough convoy points in the sea areas from the USA to a sea area adjacent to the Western Mediterranean sea area to transport the resources and build point. Similarly, Italy may have enough convoy points in the Western Mediterranean and the Italian coast sea areas to transport the resources and build point. If during production (see 13.6), Italy has met her obligation and the US has not met its then:• the USA loses the 3 resources, and does not get its promised build point
that turn, which Italy may use herself; and• Italy must randomly remove 1 entry marker from the Ge/It entry pool
(returning it to the common entry pool). See 13.3.3 if there aren’t any US entry markers to remove.
If Italy does not meet her obligation then both sides may use their promised resources or build point themselves this turn.
Japan-USAThe USA and Japan start the game with an agreement in place to lend lease 1 Japanese build point to the USA, for 4 US resources (TiF option 30: 2 of them must be oil) to Japan, each turn. These amounts may be reduced or voided entirely by US entry options 13, 23 & 31 (see 13.3.2) in which case the owner may use the excess resources or build point themselves from that turn on.Until US entry option 31 is chosen, and to avoid any penalty, the USA must have enough convoy points in the sea areas from the USA (and the Philippines if they desire) to a sea area adjacent to the Japanese Coast sea area, to transport the resources and build point. Similarly, Japan must have enough convoy points in the Japanese Coast sea area to transport the resources and build point. If during production (see 13.6) either side has not met this obligation:• that side loses the resources and the build point that turn, and the other
side may use their promised resources or build point themselves;• if Japan was in default, the USA may add 2 entry markers to the Japanese
entry pool (from the common entry pool); and• if the USA was in default, Japan must randomly remove 2 entry markers
from the Japanese entry pool (returning them to the common entry pool). See 13.3.3 if there aren’t enough US entry markers to remove.
NetherlandsThe Netherlands must supply Japan with 2 Netherlands East Indies (NEI) resources per turn until: • Japan is at war with either the Netherlands or the Commonwealth, or • the US embargo oil sales to Japan (see 13.3.2, US entry option 31).A neutral Netherlands must supply the CW with all its remaining NEI resources.
PortugalA neutral Portugal supplies the Allied major power that controls Madrid its resource each turn.
RumaniaWhile neutral, Rumania supplies Germany with 2 resources and Italy with 1 resource each turn.
SpainFor each of Paris and Rabat that is controlled by Germany or Italy, a neutral Spain supplies it with 1 resource a turn (2 if both are controlled by the same major power).
SwedenA neutral Sweden supplies Germany with 3 resources each turn (exception, see 13.3.3, US entry action 39).Whichever major power controls Narvik receives the 4th Swedish resource each turn.
TurkeyUntil Italy is conquered, a neutral Turkey supplies 1 resource per turn to Germany and a second to the Axis major power that controls Cairo.

AxiAA s
IInitiativII evv
A ii
i
Allied
Initiative
Arctic zoneNorth temperate zoneMediterranean zoneNorth monsoon zo neSouth monsoon zoneSouth temperate zone
15
VenezuelaWhile Allied controlled or neutral, Venezuela gives the CW half its resources, and the USA its remaining resources, each turn.
Shipment and ReceiptWhere an event triggers a trade agreement, you only need satisfy the condition(s) during the production step (see 13.6).Example: Portugal would supply the US with a resource even if Madrid was only occupied by the USA during the last impulse of the turn. Where possible, these resources (or build points) are transported by rail (see 13.6.1). If this isn’t possible, the recipient must provide the convoys required to receive them (exception: the joint Japan-USA and Italian-USA convoys, see above) where the giver can’t or won’t. If neither the giver nor the recipient can provide the convoys, then the recipient does not receive the resources (or build points).
6. Initiative StageIn this stage you work out which side has the initiative. This affects who has the first impulse and who goes first in various other activities. Once you have the initiative, you keep it until this stage of next turn.
6.1 Determining initiativeEach side rolls a die. The space the marker occupies on the initiative track (see turn record chart) will give one side or the other a modifier (except in the middle space).The side with the higher modified roll wins the initiative. If tied, the side that has the initiative from the previous turn loses.The initiative track will indicate if you can demand a re-roll. If any active major power on a side demands a re-roll, move the marker 1 space towards the other side’s end of the track. Both sides now re-roll (with the new modifiers). You can’t re-roll a re-roll (KiF option 41: except by intelligence, see 13.6.11).Turn the marker to the side that has won the initiative.Example:
You check the initiative track and see that the marker is in the left most column, indicating that the Axis side gets a +2 modifier and that they can re-roll. The Allied die roll is not modified and they won’t be able to re-roll.The Allies roll a 5. The Axis rolls a 3, which is modified to 5. The rolls are tied but, because the Axis has the initiative at the moment (the marker is Axis-side up), the Allies win. Desperate to move first, the Axis demands a re-roll. They move the marker 1 space towards the Allied end (into the Axis +1 space). Both sides re-roll with the Axis now only adding 1 to their die. The Allies roll a 6, the Axis a 5 (+1), again a tie. The Allies wrest the initiative from the Axis and you turn the marker Allied-side up in the space it occupies.
6.2 Effect of InitiativeThe side that won the initiative now decides which side has the first impulse of this turn. That side is called ‘the first side’. Note: who goes first doesn’t affect who has the initiative.Usually, you will want to go first because there is always something you ‘just have to do immediately’. However, you might let the other side go first if you want to move the initiative marker toward your end of the track ~ if they go first and last in the turn, it moves towards you. This can be important if you want to secure the first move in a later turn (e.g. Germany’s first turn of war with the USSR).If all players on the side winning initiative can’t agree who goes first, the active major power from that side with the highest production (in build points including bonus build points and cadres, see 13.6.3) last turn decides.In all situations where major powers from both sides can perform the same action and unless otherwise specified, the side with the initiative does it first (e.g. surrender, see 13.7.6).
7. The Action StageThe action stage forms the core of the game and will occupy you for most of each turn. There will be a series of impulses, alternating between the 2 sides. After each impulse, you roll a die to see if it was the last impulse. If it was, you move on to the end of turn stage. If it wasn’t, the other side has an impulse. The side whose impulse it is, is called the ‘active side’.
8. WeatherIf you are taking the first impulse in each pair of impulses, you roll a die to determine the weather for that pair. If the result from the last roll (even if it was from the previous turn), was asterisked, add 1, 2 or 3 to the roll, depending on the number of asterisks.Cross reference the modified roll with the turn on the weather chart. This gives you the weather in each weather zone.Example: In the 1st impulse of a July/Aug turn, you roll an 8. The weather roll in the last impulse of the May/Jun turn was 1, which has 2 asterisks. Therefore, you add 2 to your die roll, for a modified result of 10. The weather in the northern monsoon zone is storm. The weather is fine in all the other zones. This weather will apply to your and your opponents’ impulse. This result also includes an asterisk, which will modify the next weather roll by +1.
8.1 Weather zonesThe weather zones are marked on the map. They are:
A hex is in the weather zone it lies in. A sea area is in the weather zone its sea-box name lies in.Each off-map sea area lists the weather zone it is in. The sea area and all off-map hexes in that off-map area are in that weather zone. The off-map hexes on the Asian map are in the weather zone of their adjacent sea area.If the weather is other than fine, we have provided some weather markers you may place on the appropriate zone on the Americas Map as a mnemonic to record its current weather.
8.2 Weather effects8.2.1. Terrain modifications
Deserts and desert mountainsDesert and desert mountain hexes in a weather zone in blizzard suffer the effects of snow instead. In a weather zone in storm, these hexes suffer the effects of rain instead. In a weather zone in rain or snow, they have fine weather instead.
SwampsSwamp hexes are treated as forest in snow or blizzard.
LakesLake hexes are frozen in snow or blizzard. Treat a frozen lake hex as clear. Units on a lake hex when it unfreezes are placed on the production circle to arrive as reinforcements in 2 turns.
Option 8: Flying boats (see 2.3.1, option 46: and their pilots) on a lake hex when it freezes are placed on the production circle to arrive as reinforcements in 2 turns.
Lake hexsides are frozen if the hex on each side of the hexside is in snow or blizzard. Treat a frozen lake hexside as a river hexside. Note that the hexside between W1037 and W1137 is a lake hexside.
Iced-in Ports
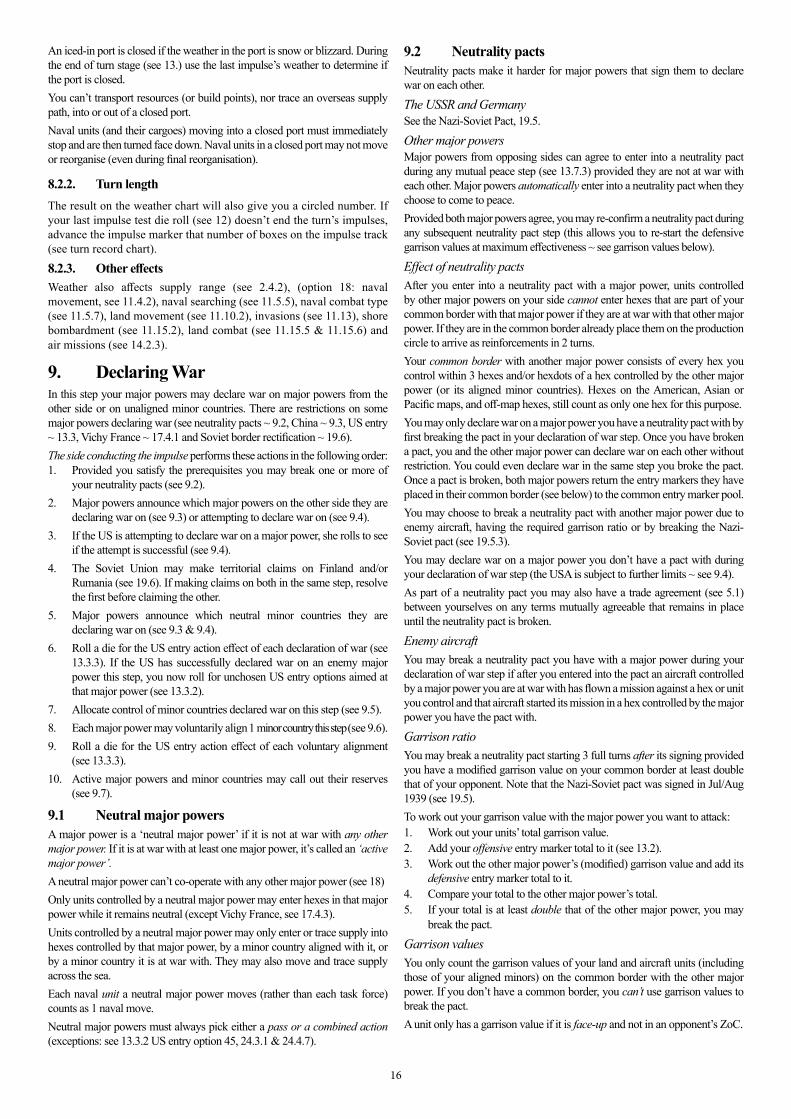
16
An iced-in port is closed if the weather in the port is snow or blizzard. During the end of turn stage (see 13.) use the last impulse’s weather to determine if the port is closed.You can’t transport resources (or build points), nor trace an overseas supply path, into or out of a closed port.Naval units (and their cargoes) moving into a closed port must immediately stop and are then turned face down. Naval units in a closed port may not move or reorganise (even during final reorganisation).
8.2.2. Turn lengthThe result on the weather chart will also give you a circled number. If your last impulse test die roll (see 12) doesn’t end the turn’s impulses, advance the impulse marker that number of boxes on the impulse track (see turn record chart).
8.2.3. Other effectsWeather also affects supply range (see 2.4.2), (option 18: naval movement, see 11.4.2), naval searching (see 11.5.5), naval combat type (see 11.5.7), land movement (see 11.10.2), invasions (see 11.13), shore bombardment (see 11.15.2), land combat (see 11.15.5 & 11.15.6) and air missions (see 14.2.3).
9. Declaring WarIn this step your major powers may declare war on major powers from the other side or on unaligned minor countries. There are restrictions on some major powers declaring war (see neutrality pacts ~ 9.2, China ~ 9.3, US entry ~ 13.3, Vichy France ~ 17.4.1 and Soviet border rectification ~ 19.6). The side conducting the impulse performs these actions in the following order:1. Provided you satisfy the prerequisites you may break one or more of
your neutrality pacts (see 9.2).2. Major powers announce which major powers on the other side they are
declaring war on (see 9.3) or attempting to declare war on (see 9.4).3. If the US is attempting to declare war on a major power, she rolls to see
if the attempt is successful (see 9.4).4. The Soviet Union may make territorial claims on Finland and/or
Rumania (see 19.6). If making claims on both in the same step, resolve the first before claiming the other.
5. Major powers announce which neutral minor countries they are declaring war on (see 9.3 & 9.4).
6. Roll a die for the US entry action effect of each declaration of war (see 13.3.3). If the US has successfully declared war on an enemy major power this step, you now roll for unchosen US entry options aimed at that major power (see 13.3.2).
7. Allocate control of minor countries declared war on this step (see 9.5). 8. Each major power may voluntarily align 1 minor country this step (see 9.6).9. Roll a die for the US entry action effect of each voluntary alignment
(see 13.3.3).10. Active major powers and minor countries may call out their reserves
(see 9.7).
9.1 Neutral major powersA major power is a ‘neutral major power’ if it is not at war with any other major power. If it is at war with at least one major power, it’s called an ‘active major power’.A neutral major power can’t co-operate with any other major power (see 18)Only units controlled by a neutral major power may enter hexes in that major power while it remains neutral (except Vichy France, see 17.4.3). Units controlled by a neutral major power may only enter or trace supply into hexes controlled by that major power, by a minor country aligned with it, or by a minor country it is at war with. They may also move and trace supply across the sea.Each naval unit a neutral major power moves (rather than each task force) counts as 1 naval move.Neutral major powers must always pick either a pass or a combined action (exceptions: see 13.3.2 US entry option 45, 24.3.1 & 24.4.7).
9.2 Neutrality pactsNeutrality pacts make it harder for major powers that sign them to declare war on each other.
The USSR and GermanySee the Nazi-Soviet Pact, 19.5.
Other major powersMajor powers from opposing sides can agree to enter into a neutrality pact during any mutual peace step (see 13.7.3) provided they are not at war with each other. Major powers automatically enter into a neutrality pact when they choose to come to peace.Provided both major powers agree, you may re-confirm a neutrality pact during any subsequent neutrality pact step (this allows you to re-start the defensive garrison values at maximum effectiveness ~ see garrison values below).
Effect of neutrality pactsAfter you enter into a neutrality pact with a major power, units controlled by other major powers on your side cannot enter hexes that are part of your common border with that major power if they are at war with that other major power. If they are in the common border already place them on the production circle to arrive as reinforcements in 2 turns.Your common border with another major power consists of every hex you control within 3 hexes and/or hexdots of a hex controlled by the other major power (or its aligned minor countries). Hexes on the American, Asian or Pacific maps, and off-map hexes, still count as only one hex for this purpose.You may only declare war on a major power you have a neutrality pact with by first breaking the pact in your declaration of war step. Once you have broken a pact, you and the other major power can declare war on each other without restriction. You could even declare war in the same step you broke the pact. Once a pact is broken, both major powers return the entry markers they have placed in their common border (see below) to the common entry marker pool. You may choose to break a neutrality pact with another major power due to enemy aircraft, having the required garrison ratio or by breaking the Nazi-Soviet pact (see 19.5.3).You may declare war on a major power you don’t have a pact with during your declaration of war step (the USA is subject to further limits ~ see 9.4).As part of a neutrality pact you may also have a trade agreement (see 5.1) between yourselves on any terms mutually agreeable that remains in place until the neutrality pact is broken.
Enemy aircraftYou may break a neutrality pact you have with a major power during your declaration of war step if after you entered into the pact an aircraft controlled by a major power you are at war with has flown a mission against a hex or unit you control and that aircraft started its mission in a hex controlled by the major power you have the pact with.
Garrison ratioYou may break a neutrality pact starting 3 full turns after its signing provided you have a modified garrison value on your common border at least double that of your opponent. Note that the Nazi-Soviet pact was signed in Jul/Aug 1939 (see 19.5).To work out your garrison value with the major power you want to attack:1. Work out your units’ total garrison value.2. Add your offensive entry marker total to it (see 13.2).3. Work out the other major power’s (modified) garrison value and add its
defensive entry marker total to it.4. Compare your total to the other major power’s total.5. If your total is at least double that of the other major power, you may
break the pact.
Garrison valuesYou only count the garrison values of your land and aircraft units (including those of your aligned minors) on the common border with the other major power. If you don’t have a common border, you can’t use garrison values to break the pact.A unit only has a garrison value if it is face-up and not in an opponent’s ZoC.

Garrison Value
Unit Value
DiF options 2 & 3: any division or artillery 0.5other HQ-A, ARM, MECH, MTN or SS unit 2Partisan or CVPiF option 45: carrier plane 0other land or aircraft unit 1
17
Each unit’s garrison value is:
Double the defensive value of your units from the 4th to the 9th turn after the neutrality pact was made. The defensive garrison value is unmodified in the next 6 turns, halved in the 6 turns after that and quartered in all later turns. These modifiers are not rounded.Example: The USSR and Japan make a pact in Sep/Oct 1939. Neither may declare war on the other until the start of May/Jun 1940. Japan has an HQ-I, an ARM, 2 INF corps and a CAV division face-up on their common border. From May/Jun 1940 to Mar/Apr 1941 her garrison value is 11 ((1+2+2+0.5) x 2), from May/Jun 1941 to Mar/Apr 1942 its 5.5, from May/Jun 1942 to Mar/Apr 1943 its 2.75 and so on.
Entry marker totals
7 ?1943
Your entry markers (see 13.2) on the common border with their numbers face-up are your defensive entry markers. Your markers with their numbers face-down are your offensive entry markers. Their values are never modified.When you want to break a neutrality pact, you increase your garrison value by the value of your offensive entry markers but you can’t more than double your garrison value. For example, if your garrison value is 11.25 and your offensive entry markers total 16, you can increase your garrison value to 22.5, not to 27.25.Similarly, you increase your defensive garrison value by the total of your defensive entry markers on the common border. Again, you can’t more than double your (modified) defensive garrison value.
Example: Continuing the above example, from May/Jun 1940 to Mar/Apr 1941 Japan may add up to 11 points of defensive entry markers for a maximum defensive garrison total of 22. From May/Jun 1941 to Mar/Apr 1942 she may add 5.5 points of defensive entry markers to increase the total to 11 and so on.
9.3 How to declare warAll major powers on this side announce which major powers on the other side they are declaring war on this impulse. They then all announce which neutral minor countries they are declaring war on this impulse. You can’t declare war on • any country on your side; or• a country you are already at war with; or• a controlled minor country or territory (e.g. France can’t declare war on
Truk, Ethiopia or the Netherlands East Indies, she would instead need to declare war on Japan, Italy or (provided it’s neutral) the Netherlands respectively).
Each declaration of war on a major power or neutral minor country could trigger a US entry effect (see 13.3.3). There is no US entry roll if you declare war on a major power that has (its own, or its controlled minor country’s) units in your major power’s home country (e.g. France could declare war on Italy without a US entry roll if Italian controlled units were in German controlled hexes in France). China may not declare war (unless playing with Days of Decision or Patton in Flames).While at war with a major power, you are also at war with every minor country aligned to that major power.
9.4 US entryThe USA can’t declare war on a minor country unless it has played US entry option 48 (see 13.3.2).
The USA may attempt to declare war on Germany and Italy in the same step, but it can’t attempt to declare war on Japan in the same step as it attempts to declare war on either of the others.If it attempts declarations of war against both Germany and Italy in the same step, resolve it as one attempt, rather than one for each. If the attempt succeeds, it would count as 2 declarations for US entry purposes, see 13.3.2, last option (US declares war on a major power). The USA may declare war on Vichy (see 17) in any declaration of war step provided the USA is at war with all other active Axis major powers or with the major power that installed Vichy. This is automatically successful (but does have a US entry cost, see entry action 32 on the US entry action chart). The entry and tension poolsThe USA has a Japanese entry pool and a Germany/Italy entry pool. Your entry level against an Axis major power equals 1.5 times the value of the markers you’ve put in its entry pool plus half the value of the markers in the other pool.Example: Jay has markers totalling 17 in the Germany/Italy entry pool and markers totalling 8 in the Japan entry pool. Jay’s entry level against Germany or Italy is (17 x 1.5) + (8 x 0.5) = 29.5, rounding to 30. His entry level against Japan is (17 x 0.5) + (8 x 1.5) = 20.5, rounding to 21.Similarly, you have 2 tension pools - a Japanese tension pool and a Germany/Italy tension pool. Your tension level against a major power equals 1.5 times the value of the markers you have in its tension pool plus half the value of the markers in the other tension pool.Attempting to declare warAnnounce your attempt to declare war on a major power. Then on the “It’s War” table, cross index your entry level against that major power with your tension level against it to find the war number. Now, roll a die:• If it is less than or equal to the war number, your declaration has succeeded.
Turn all your entry and tension markers over so your opponent can verify your result, then turn them back. After all declarations of war, roll the US declares war on a major power entry option (see 13.3.2, last option).
• If it exceeds the war number your attempt to declare war fails. You don’t have to turn any markers over but you have to return 1 entry marker and 1 tension marker to the common marker pool (even if the US is attempting to declare war on both Germany and Italy as the one attempt, see above). Choose them randomly from the pools of the major power you attempted to declare war on. If you have no marker in the entry or tension pool to remove, you may never attempt to declare war on this major power for the rest of the game.
There are modifications to the die roll. All modifiers are cumulative:
When attempting to declare war on Germany and/or Italy;-2 if the UK has been conquered. When attempting to declare war on Japan;-2 if China has been conquered. -1 if China hasn’t been conquered but a Japanese unit is in China. +2 if the US fleet is not in Pearl Harbor (see 13.3.2, US entry option 26). When attempting to declare war on any Axis major power;+3 if you have not yet chosen US entry option 34 - Pass War Appropriations
Bill (see 13.3.2).-1 if the USA is at war with any major power.Example: The US entry level against Japan is 38 and the tension level is 18, so the war number is 3. China is unconquered but there are Japanese units in China (-1). The US is not at war with any major power, the US fleet is in Pearl Harbor and the war appropriations bill has passed, so Jay will have to roll 4 or less to declare war on Japan.
9.5 Allocating minorsYou now allocate control of minor countries declared war on this step to a major power on the other side, in order of declaration (see 19.2). The minor country is now aligned with that major power (see 9.6) who immediately sets up their units (see 19.4).
9.6 Aligning minorsSome major powers may also voluntarily align minor countries under certain circumstances (see 13.3.3 US entry actions 1 & 5, 19.6, 19.7, 19.8 and 19.12). Each major power may only voluntarily align 1 minor country in each of its

18
declaration of war steps. When you align a minor country (regardless of whether it was declared war on or you aligned it voluntarily) you set up and run its units (see 19.4). The minor country is at war with everyone its controlling major power is at war with (as well as the major power that declared war on it, if any).
9.7 Calling out the reservesEach major power and many minor countries have reserve units that may now be called out provided they are at war with a major power.During your impulse you may call out reserves of such major powers and minor countries you control that have ‘Res’ on the back of their counter. If a reserve unit has a particular major power named on its back, you may only call it out while you are at war with that major power.Example: It’s Anna’s impulse. She may now call out her Moscow MIL provided the USSR and Germany (‘Ge’) are at war.You don’t have to call out all eligible reserves at your first opportunity. Any you don’t call out are available while you are at war with a major power.When you call out your reserves put your eligible reserve (and any MIL, see 13.7.7) units that have previously been removed from the game back into your force pools. Then move your eligible reserve units (and any MIL there) from the reserve pool to the map (DiF option 52: except Guards Banner units, see 22.4). in the same manner as reinforcements (see 4.2) except that they are set up face-down. From now on treat these reserves just like any other units.In many campaigns some countries have already called out their reserves at the start. This is stated in the campaign information (see 24).
9.8 Multiple states of warBecause you can be at war with some major powers but not others, you will encounter cases where you are opposed by some units at war with you and others that aren’t. This rule deals with those cases.A unit may not enter or attack a hex (or units therein) controlled by a country on the other side that it isn’t at war with. However, it may enter or attack an enemy controlled hex (or units therein) even if the hex contains units it is not at war with.If you strategically bombard a hex (see 11.7), you may only be intercepted by aircraft (DiF option 3: or shot at by AA and/or flak) that you are at war with.If you air supply (see 11.17.1) units in a hex you may only be intercepted by aircraft (DiF option 3: or shot at by AA and/or Flak) that you are at war with or that are at war with the hex being air supplied.If you overrun (see 11.10.6) or attack land units (see 11.15) in a hex you must fight all land units there even if you are not at war with all of them.You may only attempt to intercept naval units (see 11.4.6) you are at war with. If several major powers’ or minor countrys’ units attempt to intercept a task force containing units from the other side, you don’t all have to be at war with every moving unit to intercept. However, naval units not at war with any intercepting country may continue moving (at the cost of another naval move of course, see 11.4.1) and are ignored in any subsequent naval combat if they stay.During port attack (see 11.2) and naval combat (see 11.5), a unit can’t fight against units from the other side unless it is at war with at least one of them (and being at war with an enemy unit the naval unit is transporting is not enough). You may only support a combat with aircraft or bombarding artillery if the supporting units are:(a) the same nationality as a unit or hex being attacked,(b) at war with at least one country attacking those units or hexes, (c) at war with the defending hex (irrespective of whether you are at war with
any units in it), or(d) in naval combat, at war with any of the committed units. In all cases you resolve as one combat any combat that includes units that are not at war with each other, so long as each unit included is either at war with the major power controlling the hex, or at least 1 enemy unit in the combat.Example 1: There are 2 US corps and a face-down US LND in London (W1536). Germany and Italy are both at war with the Commonwealth but not the USA, and Germany wants to attack London. Italian aircraft ground strike the units there. They may be intercepted by both US and CW fighters and Italian and German aircraft may intercept Allied aircraft even if only US aircraft are involved.
Similarly, during land combat US, CW, German and Italian aircraft may all fly ground support, CAP, escort and interceptors and the combat is resolved as if they are all at war with each other. If Germany wins the combat and advances into London, the face-down US LND will be destroyed. US units will not be able to counterattack London (unless they declare war on Germany) because they can’t attack a hex controlled by a country they aren’t at war with.Example 2: Germany and Italy are at war with the Commonwealth, and Germany is at war with the USA. German and Italian bombers fly a strategic bombardment mission against London. US FTRs may intercept the German bombers because they are at war with Germany. They can’t intercept the Italian bombers because they are not at war with Italy, so the Italian bombers automatically clear through to the target (but by the same token, Italian fighters can’t intercept the US FTRs either). If a Commonwealth FTR had also intercepted, you would fight the whole thing as one combat (including any intercepting Italian fighters) because the Commonwealth is at war with both Germany and Italy. If the Commonwealth FTR were shot down, the Italian bombers would then be cleared through (and any Italian fighters returned to base).Example 3: The USSR is launching a land attack against German controlled Finnish units in Helsinki (E2450), before Germany and the USSR are at war. The Germans could fly Finnish aircraft in support, but could not fly German aircraft nor provide German shore bombardment unless a German land unit was also in Helsinki.Later in the turn, the Germans fly an air supply mission (see 11.17.1) to reorganise a face-down German INF in Helsinki. The USSR can intercept with fighters as she is at war with the Finnish hex even though she is not at war with Germany. Example 4: A naval combat includes a US and a Commonwealth naval unit against a Japanese and a German naval unit. The US is at war with Japan and the Commonwealth is at war with Germany. You fight this as one combat even though US units can’t fight Germans and Japanese units can’t fight the Commonwealth. The Japanese unit is sunk. In the next round the US unit isn’t included because it can’t fight German units. Example 5: A French fleet and a Commonwealth CV are in the 0 sea-box section of the Eastern Mediterranean sea area. German subs and Italian cruisers are in the 3 section. France is at war with Italy and Germany while the Commonwealth is only at war with Germany. Germany decides not to commit her subs. Only the French and Italians roll to search for combat.US units escorting Allied convoys (see 13.3.2, US entry options 11, 20, 29 & 38) and all US aircraft and naval units after unrestricted naval warfare is chosen (US entry option 50) may participate in combat even while neutral.
SurpriseUnits are only surprised (see 15.) if you have just declared war on them - not if you are fighting them without being at war.
10. Choosing ActionsYou must choose an action for each major power on your side. Each type of action will affect what that major power can do in the rest of the action stage. You may choose one action type in one impulse and a different type in the next impulse of the same turn.
10.1 Action typesThe actions you may choose from are:• pass (good for ending the turn faster);• naval (good for moving and fighting with naval units); • air (good for flying aircraft missions); • land (good for moving land units and fighting land combats); or• combined (lets you do a bit of everything).If you are a neutral major power, you must choose either a pass or a combined action (exceptions: see 24.3.1 and 24.4.7).
10.2 Activity limitsWhat your major power can do in an impulse depends on what action you chose for it. If you picked a pass action, it does no further activities this impulse.If you chose a land, air, naval or combined action, you can do a number of

19
activities depending on the action type. The allowable activities table tells you what activities can be done for each action type.A tick in a box on the table means you may do an unlimited number of those activities. An empty box means you can’t do that activity with the action type you chose.A letter in the box cross-references to a column on the major power activities limits table. This tells you how many moves, missions and combats you can do. From Jan/Feb 1943 onwards some of these numbers increase (e.g. during combined actions the USA may fly 7 air missions per impulse up to Nov/Dec 1942, 8 during 1943 and 1944 and 9 from Jan/Feb 1945). No matter what action you choose, each unit may only move once each step.
What counts against a limitEach land unit moved during the land movement (see 11.10), air transport (see 11.11), debarking at sea (see 11.12), invasion (see 11.13) or paradrop (see 11.14) step counts as 1 land move. Each factory, aircraft or land unit that moves by rail counts as 1 or more rail moves (see 11.9). Each land attack (including invasion/paradrop) against a hex, even against a 0-strength defender, counts as 1 land attack. Each neutral naval unit moved counts as 1 naval move. Each task force of active surface naval units, or all active subs, that moves counts as 1 naval move (see 11.4.1). Each aircraft unit that flies counts as 1 air mission (see 14.2). The limits on air missions if you choose a land, naval or combined action is a limit on the total number of air missions you can fly in the impulse. Which missions you fly is up to you. However, naval air interception, ground support, combat air patrol, escort and intercept missions don’t count against your mission limits (there is a tick in those boxes).Example: Italy picks a naval action, so Maria can fly 2 air missions. Her first mission is a naval air mission into the Eastern Mediterranean. During naval combat she flies some more bombers and FTRs into the sea area but they don’t count against her limit because they are naval air interceptions. With her last air mission, she flies a bomber and strategically bombards Lyon. She sends a FTR as escort and another to intercept when the French fly against it. The escort and intercept missions don’t count against Italy’s limit.Minor country actions count against their controlling major power’s limits.
10.3 Oil (TiF option 30)You may only move (see 11.4 & 11.10), fly missions (see 14.2) and/or initiate combat (see 11.5.2 & 11.15.1) with oil dependent units (see 28.) in your impulse without restriction (after the first unit , see below, and within activity limits of course, see 10.2) if you pay for their oil.
The numbers in the table are the tenths of oil required to move or attack with all your oil dependent units this impulse. If there are 2 numbers, the first is up to the end of 1942, while the second is used from the start of 1943. Example: Each impulse up to Nov/Dec 1942 it costs the US 15/10ths or 1.5 oil to perform a naval action that would allow Jay to move all his naval units. To pay your oil, remove enough of your (and/or a co-operating major power’s) saved oil (see 13.6.9) to cover the cost. Double the cost if the oil comes from the map but outside your major power’s current home country (the UK’s current home country for the
Commonwealth). The cost is doubled again if oil is used from a co-operating major power (see 18.1) outside its home country.If a fraction of oil remains unused, put your ‘x 1/10 saved oil’ marker on the markers to record the tenths saved (e.g. a marker on the 3 space shows 3/10ths saved oil). Alternately if your oil cost is less than the tenths you already have saved on the track, simply decrement the marker. If the fraction of oil being saved comes from the map but outside your current home country, it is halved prior to saving.Example: Jeremy does a naval action that costs 12/10ths oil. There is only 1 oil in the UK and not the 4/10ths elsewhere (costing double if outside the UK) to pay for the remainder. As the USA is active, Jeremy asks Jay if he can help out. Jeremy removes the 1 oil in the UK. Mexico is aligned to the USA and there is 1 oil in Mexico City. Jay removes it and moves the US saved oil marker up 1 space on the markers track (the 2/10ths cost being doubled for co-operating major power and doubled again for coming from outside the USA for a total of 8/10ths oil, with the remaining 2/10ths halved before saving).You can’t save more than 9/10ths oil on the markers track at any one time.If you can’t, or don’t, pay oil for your impulse you may only move, fly and/or initiate combat with 1 oil dependent unit this impulse. TiF option 30: Alternatively, you may instead pay 1/10th oil for each oil dependent unit you move, fly and/or initiate combat with in your impulse (option 49: including by the use of offensive points, see 16.5). If you do, the first unit is still always free.Example: Jeremy chooses a Combined action in 1941. He moves 1 CV with its carrier plane and a TRS transporting a MECH (costing 2/10ths oil), during naval movement. The carrier plane ground strikes (1/10th). Jeremy then moves 2 ARM and an INF (2/10ths) during land movement. He would only pay 4/10ths oil (2+1+2-1 free), not 8/10ths If Jeremy initiates naval combat with the CV or TRS that moved he wouldn’t pay any more oil. If he initiates naval combat with any other unit, that unit (not other units involved in the combat) would. Similarly, if the ARM that moved launches a land attack they wouldn’t pay any more oil, but if any other oil dependent units attacked, they would.Units don’t need oil to fight naval combat (except to initiate it, see 11.5.1), rail (see 11.9), shore bombard (see 11.15.2), rebase (see 11.16), reorganise (see 11.17), return to base (see 13.4, even if during the naval movement step, see 11.4) or be transported or debarked (see 11.4.5 & 11.11 to 11.14). You don’t need oil during your opponents’ impulse, and non-oil dependent units never need oil.Option 49 (offensive points): If you spend offensive points on multiple actions (see 16.2), the oil required is that for all actions chosen this impulse.Example: Kasigi chooses a Naval-Land action. This costs Japan 1.5 (15/10ths) oil.If you spend offensive points on extra actions (see 16.5), each oil dependent unit that performs those extra actions costs 1/10th oil.
10.4 Destroying saved oil & build points (TiF options 30 & 31)At this time you may destroy any of your saved oil and build point markers (usually to deny them to the enemy).
11. Implementing ActionsMajor powers that didn’t pass perform the various activities listed at D2.3 in the sequence of play. The order your side does these activities is important, so please follow it carefully.
11.1 PassingIf you pass, you can’t do anything else during the rest of the impulse except that your units will fight in any naval combat, see 11.5 (but you can’t initiate

20
naval combat nor fly naval air interception missions) and co-operating major powers transporting your units (see 11.4.5) may still return to base, see 13.4 (your units may not embark).Example: Jeremy passes. The Commonwealth has naval units in the Western Mediterranean along with an Italian and US fleet. The Commonwealth can’t initiate combat but they would participate if included in a combat the USA or Italy initiates this impulse and could return to base during that combat (not otherwise).
11.2 Port attackYou use port attack missions to attack enemy naval units in port. You may not port attack a hex in storm or blizzard.To make port attacks:1. your opponent flies combat air patrol to potential target hexes;2. you fly all your selected attacking bombers and escorting fighters to their
target port hexes;3. your opponent flies intercepting fighters to the target hexes;4. you fly intercepting fighters to the target hexes;5. you resolve each port attack in any order. In each attack:
(a) your opponent may include their SUBs;(b) both sides make search rolls;(c) you fight any air-to-air combats;(d) surviving bombers suffer anti-aircraft fire from the target naval units
(DiF option 3: and AA and flak ~ see 22.2);(e) surviving air-to-sea factors attack the naval units and implement the
results; and then(f) return all surviving aircraft to base and turn them face-down.
You resolve each port attack just like a naval air combat (see 11.5.9) with the exceptions that:(a) SUBs in a minor port are automatically included (major ports are assumed to have bomb-proof pens and the owner may choose whether to include them in combat or not, see 11.5.4);(b) search rolls don’t determine which units take part (see Search Rolls below);(c) surprise points are determined differently to 11.5.6 (see Surprise points below);(d) each successful ‘A’ (abort) result (see 11.5.8) allows you to turn a face-up target unit face-down; and(e) there is only one combat round in each port attack.
Search rollsThe search rolls determine how many surprise points each side will have. This is similar to normal naval combats (see 11.5.5). Unlike normal naval combats, they do not determine which units take part unless someone (usually the defender) spends enough surprise points to avoid the combat.
Surprise pointsYou get surprise points equal to:• the highest modified search number (see 11.5.5) of the units included in
the combat (including escorts); and• your opponent’s unmodified search roll.Attacking land based bombers are treated as being in the 3 section. The defender is in the 3 section if the port is a minor port, and the 5 section if it is a major port. Carrier planes are in the section their CV is in (whose search numbers may be modified by the carrier plane’s range ~ see 11.5.5). CVs in port do not modify the search number.If a country was surprised in this impulse (see 15.), it gets a total of 0 surprise points.The side with the greater number of surprise points can spend the difference in the same ways as in normal naval combats (see 11.5.6) except that you cannot change the combat type (from naval air combat).If the combat is avoided (by spending 4 surprise points ~ see 11.5.6), all aircraft are still treated as having flown a mission, and must return to base face-down.
11.3 Naval air missionsNaval air missions allow aircraft to patrol a sea area or to return from patrolling a sea area. Unlike most other air missions, you don’t fly a naval air mission against an enemy target. You may fly it into a sea area whether there is an enemy unit
there or not. You may also use a naval air mission to move an aircraft already at sea into a lower section of the sea-box or to return it to base.Only a face-up aircraft can fly a naval air mission. It must be either a FTR or an aircraft with an air-to-sea factor instead of an asterisk.Although carrier planes are still included in naval air combats in their sea area, they don’t fly naval air missions.You may not fly a naval air mission into a sea-box section in storm or blizzard.
How to fly a naval air missionTo fly a naval air mission into a sea area, fly the aircraft from its base to any hexdot in that sea area. If the hexdot last entered is off-map it costs only 2 movement points (not 6).Then put the aircraft into a sea-box section in that sea area. If it has no movement points left after flying to the hexdot, it can only go into the 0 section. If it has 1 or 2 unused points, it may go into either the 0 or the 1 section. If it has 3-5 movement points left it can go into the 0, 1 or 2 section. If it has 6-9 points left it can go into the 0, 1, 2 or 3 section. If it has 10 or more points left it can go into any sectionExample:
15
Mariner
PBM-3
2 4
1 2
This PBM-3 in Key West (M0715) wants to fly into the East Coast sea area. It costs 6 of its 15 range to move to the hexdot east of Charleston. It would normally cost another 6 to move to the East coast sea area hexdot east of Washington but as the PBM-3 is flying into this sea area it only costs 2 range leaving 7 range left, enough to get into the 3 box (or less if desired). If the PBM-3 had only wanted to fly into the Caribbean it could have made the 4 box (2 mps to enter either adjacent hexdot + 10 to be placed into the 4 box).To use a naval air mission to move an aircraft into a lower section of the same sea-box, simply put it into any lower numbered section. This does not cost movement points. The unit will be able to return to base further (either in a later mission or in the return to base step) because it starts from a lower section.To fly a naval air mission from a sea area, take the aircraft from its section of the sea-box and put it on any hexdot in the sea area. Fly it back to any friendly hex within range (even if it flew into the sea area during naval air interception, see 11.5.3) and turn it face-down. Reduce its range by the same number it would have cost to enter the section it came from (i.e. 10 from the 4 section, 6 from the 3 section, and so on). When flying a naval air mission from a sea area the maximum cost for the first hex (rather than hexdot) entered is 2.Example: continuing the previous example, the PBM-3 wants to fly a naval air mission back to base. It costs the same 6 of its range to be removed from the sea-box section and placed in any hexdot in the sea area. Retracing its flight to Key West would normally cost 12 mps but when flying from a sea area the first hex only costs a maximum of 2 so the PBM-3 could return to Key West for its last 8 range (amazingly enough the same cost as flying out). Unlike all other air missions:(a) your opponents can’t fly any aircraft in response to your naval air mission;(b) naval air missions don’t result in an immediate combat (although naval combat could occur during the naval combat step ~ see 11.5 and 11.6); and(c) at the end of the mission, you don’t return the unit to base. Instead, it stays at sea until you abort it in combat, or return it to base in another naval air mission or during the return to base step (see 13.4).

21
11.4 Naval movementNaval moves allow naval units to move through or patrol sea areas and to enter or leave ports. Only naval units can make naval moves.
11.4.1. Definition of ‘naval move’Each group of units you move is called a task force. A task force may contain any number of surface naval units or any number of SUBs. You can’t have surface naval units and SUBs in the same task force.You make one naval move with surface naval units every time you:(a) move a task force of face-up surface naval units (plus, of course, any units
they are transporting) from one port to any one destination (either to one port or the same section of a sea-box);
(b) move a task force of face-up surface naval units from one section directly to any one lower section of the same sea-box; or
(c) return a task force of face-up surface naval units from one section of a sea-box to one port (see 13.4).
Example: It would count as 1 naval move if you moved 6 naval units from the same port in the USA to the 0 section of the Caribbean Sea but as 2 moves if instead you put 3 of them into the 0 section and 3 into the 1 section.Subs move in exactly the same manner as surface ships except that you may move any number of your subs from any number of ports and/or sea-boxes to any number of ports and/or sea-boxes for 1 naval move.If the moving units belong to a neutral major power, each unit (including subs) you move (not each task force) counts as 1 naval move.
11.4.2. Moving naval unitsYou may move your naval units through a series of adjacent sea areas and ports. Each naval unit may only make 1 naval move in an impulse.
SiF option 5: You may move fewer than 3 convoy points as 1 naval unit if you wish.
Each naval unit has a range and a movement allowance. The range determines how far the unit can move; the movement allowance determines how effective it will be when it patrols a sea area.
How do units move?You may move your naval units individually or in a task force. To move naval units in a task force, they must all start the step face-up in the same port or sea-box section. Co-operating (see 18) major powers and/or minor country units stacked together may move together (provided the owning players agree of course).Example: 2 Commonwealth SCS sail with a US TRS from London (W1536) to the 2 sea-box section of the North Sea. This would count as 1 naval move for each major power.You may split a moving task force in any sea area or port it passes through. Each time you split naval units off from the task force you use a separate naval move (exception: SUB task forces ~ see 11.4.1). The naval units you split off can’t move any further.Example: The CLs Dido and Royalist sail together from Alexandria (E1505) to the Eastern Mediterranean. It is not possible for one to move into the Red Sea while the other enters the Western Mediterranean. Jeremy places the Dido in the 4 box of the Eastern Mediterranean while the Royalist continues on to the Red Sea (and also placed in the 4 box). This counts as 2 naval moves. Alternatively, Jeremy could move them as two separate task forces from Alexandria to the Red Sea and the Western Mediterranean which would also cost 2 naval moves.
Into and out of portWhen you move a unit out of a port, you must spend its first point to move it into a surrounding sea area (e.g. naval units in Amsterdam (W1137) must move directly into the North Sea). Where a sea area border enters a port hex, naval units may enter any surrounding sea area (e.g. naval units in Guadalcanal (P1717) can move into The Solomons or Coral Sea).There are three special cases:• although Kiel (W0610) is a port on the Baltic Sea, you may move naval
units directly to Kiel from the North Sea and vice versa. • although Suez (E1203) is a port on the Red Sea, you may move naval
units directly to Suez from the Eastern Mediterranean and vice versa. • although Panama (M0712) is a port on the Gulf of Panama, you may
move naval units directly to Panama from the Caribbean, and vice versa
provided the Panama Canal is not closed to you (see 11.4.4). Similarly, a naval unit can only move into a port via the surrounding sea area. It could continue moving but, if it ends the naval move in port, turn it face-down (for convoy points, use a “CP used” marker instead).
Option 16: (Dynamic Naval Movement) If a naval unit that is not transporting (see 11.4.5) any unit (CVPiF option 45: except carrier planes on CVs) starts and ends its move in a port and uses half or less of its movement points then it is not turned face-down at the end of its naval move (e.g. you would turn the 5 movement point Hood face down sailing from London to Bordeaux, but not if moving to Brest).
Sea areasWhen a moving unit or task force enters a sea area, it can either stop there and patrol or, if it has enough movement points and range, it may continue moving into an adjacent port or sea area.
How far can units move?Naval units must stop moving when they reach the limit of their range (not movement allowance).You spend 1 point of a unit’s movement allowance:• for each point of the (unmodified) search number of the section you put
the unit into.You spend 1 point of a unit’s movement allowance and range:• for each sea area and port it moves into.You spend 1 point of a unit’s movement allowance or range if it has insufficient remaining movement allowance:• if it starts the movement out of supply;• if it starts its move in a port with naval units controlled by another major
power; and• option 17: in the presence of the enemy.
Option 17: (In the presence of the enemy) It costs a surface naval unit 1 extra point of its movement allowance (or range if none remaining) to enter a sea area that contains a CV, SCS or aircraft unit controlled by an unsurprised (see 15.) major power it is at war with.This does not apply (i.e. you pay normal costs) when returning to base nor if, at the start of the impulse, the sea area also contained a friendly CV, SCS or aircraft unit. Exception: aircraft neither slow enemy ships nor negate enemy presence during blizzard and storm.Option 18: (Rough Seas) Each CL, TRS, AMPH, (CoiF option 7: ASW, tanker) or convoy point that moves into one or more sea areas in blizzard or storm has its movement allowance and range reduced by 1 this step (note that this may prevent the unit from entering its final sea area). Example:
3
05
0 10
0 0
DeutschlandREX
5
8
5 7
3 3
3/4 51929
4 May ’45
E
1928
1 Mar '42
1/1 5A S
1927
5 Apr '42
1/2 5P S
19341/1 5
E S
Playing option 17, Heinz and Maria both take a combined action. Their combined fleet in St Nazaire (W1930) is out of supply. If Maria moves first, she couldn’t even move the 5 CPs as it only has 3 range (no movement allowance) and it costs 1 to move into the Bay of Biscay, +3 for being out of supply, stacked with another major power and moving in the presence of the enemy, which is more than its range.

22
So Heinz moves the CA Deutschland first taking 4 off her move (same as the CP) and 1 off her range to enter the Bay of Biscay. She could patrol in the 0 or 1 box (see below), but decides to keep moving and spends an extra range and 2 movement points to enter (due to in the presence of the enemy) The Faeroes Gap sea area. As she only has 1 movement point left, it costs 1 mp and 2 range to enter the sea area, for a total of all 5 mps and 3 range. Heinz could place the Deutschland in the 0 box but continues moving into the North Sea which costs another 2 range (again due to enemy presence) and spends its final range to move to Kiel where it turns face down.Now Maria’s 5 CPs can move into the Bay of Biscay which costs all 3 of her range (1 to enter the sea area +1 for being out of supply +1 for presence of the enemy) and she places the unit in the 0 box.
How does a unit patrol?When a naval unit stops in a sea area, it is patrolling. To show this, you must put it into that area’s sea-box. You may put it in any section of the sea-box which has an unmodified search number less than or equal to the unit’s unused movement allowance (minimum 0). [This is different from the system used for naval air missions.]A unit can only be in one section of a sea-box at a time. Other units could be in the same or different sections of the sea-box.Example:
5
2Dunkerque
5 4
2 3
The Dunkerque (with a movement allowance of 5 and a range of 2) starts its move in Brest (W2032). It moves 2 sea areas through the Bay of Biscay into the Cape St. Vincent sea area. This costs 2 movement points and 2 range (1 for each sea area). Because its range is used up, it can’t move any further even though it still has 3 points of its movement allowance unused. It can use its remaining movement allowance to go into the 0, 1, 2 or3 sections.
Units with no movement points (like convoy points and tankers) can only ever ‘patrol’ in the 0 section of the sea-box.If a unit started its naval move out of supply (see 2.4.2), turn it face-down when it reaches a sea-box section.
11.4.3. Task force markers (SiF option 19)Instead of moving all your units on the map, you can just move a task force marker. You keep the units in the task force on the task force display that comes with Ships in Flames. Only naval units (and their cargoes and carrier planes) may be placed on the task force display.A task force has the movement allowance of its slowest unit and the range of the shortest ranged unit in the force. If you drop off the slowest, or shortest ranged, unit, the force has as many movement points remaining as the new slowest unit and the range of the new shortest ranged unit.Example:
5
6South Dakota
8 2
2 5
5
6South Dakota
8 2
2 5
4
3Texas
5 5
2 4
4
3Texas
5 5
2 4
6
4San Diego
3 7
3 1
6
4San Diego
3 7
3 1
TF-58S
Your task force contains the BB Texas with 4 movement points and 3 range, the BB South Dakota with 5 mps and 5 range and the CL San Diego with 6 mps and 4 range. You move them out of Pearl Harbor (P0131) and drop off the BB Texas in the Hawaiian Islands sea area. You move the battleship from the task force display to the map.The task force now has 5 movement points with 4 unused, and 4 areas left in its range. It proceeds to the Central Pacific where you drop off the South Dakota. The task force now has 6 mps with 4
unused. Its range is now 4 with two area left. It moves on to the Japanese Coast where, with 3 unused movement points, it can go into the 0, 1, 2 or 3 section. All of this would count as 3 naval moves. You may create a task force before any naval movement. Simply move the units to the task force display and replace them with a task force marker. You may transfer units out of an existing task force into a new task force in the same place.Before any naval move, you may reorganise 2 or more task forces in the same port or sea-box section into one or more task forces.Creating or reorganising task forces does not count against your activity limits, the units’ movement allowance or range.
Hidden task forcesAs a further option, you may keep your task force marker face-down so that your opponent doesn’t know which force is which. You may examine your opponent’s task force display at any time.Each task force must contain at least 1 naval unit.During step 4 of combat (determining type of combat), or when you are trying to force your way through an interception, you must reveal the task force’s identity.If your opponent moves a task force further than some units would be allowed to move, those units (and any cargo they are carrying) are destroyed.
11.4.4. Naval movement restrictions1. You can’t move naval units between Kiel (W0640) and the North
Sea if an enemy major power controls any of the hexes adjacent to the Kiel Canal.
2. You can’t mo ve naval units between the Eastern Mediterranean and the Red Sea, or between Suez (E1203) and the Eastern Mediterranean if:• the units are Axis controlled, the Allies have played US entry
action 38 (see 13.3.3) and the Allies control Suez; or• a major power you are at war with controls any of the hexes
adjacent to the Suez Canal.3. You can’t move naval units between the Eastern Mediterranean
and the Black Sea (even via Panderma) unless Istanbul (E1820) is friendly controlled.
4. You can’t move naval units between the Baltic Sea and the North Sea (even via Frederikshavn or Kristiansand) if:• no major power on your side controls any of Oslo (W0549),
Copenhagen (W0442) or Kiel, or• one or more major powers you are at war with control the
other 2.5. You can’t move surface naval units (SUBs aren’t restricted)
between the Western Mediterranean and Cape St. Vincent (even via Tangier) if a major power you are at war with controls Gibraltar (W2513).
6. You can’t move naval units between the North Sea and the Bay of Biscay (even via Brest or Plymouth) if a major power you are at war with controls London (W1536).
7. You may only move naval units between the Gulf of Panama and the Caribbean Sea if • Panama’s (M0612) controlling major power has conquered
(see 13.7.1) or is at war with the USA and lets you; or, if none,• The USA has not closed the Panama Canal (see 13.3.2, US
entry option 33), or it lets you.8. Allied major powers may only enter the Sea of Japan with surface
naval units if a major power on your side is at war with Japan and controls at least one port in the Sea of Japan.
The “even via” clauses apply only when attempting to move between sea areas through the port in a single naval move. A unit can move into the port from a sea area in one step and then move out to sea in the other sea area in a later step.

23
11.4.5. Naval transportTransport capacityA face-up TRS may transport aircraft or land units when it moves (including returning to base, see 13.4). The transport capacity of a TRS is 1 corps sized, (DiF option 14: supply, PiF option 24: V-Weapon or A-bomb, SiF option 51: Frogman) or aircraft unit.Alternatively, a TRS may carry (in total) any 2 divisions (DiF option 2), artillery (DiF option 3) and/or carrier planes (CVPiF option 45).Example: A TRS could transport an artillery and a carrier plane together. It could not carry 3 divisions, or a division and a supply unit, in one lift.AMPHs have the same transport capacity as TRSs except that they may only transport GAR, TERR, MIL and units that may invade (see 28). They may do so even when not invading.The ‘Queens’ unit represents 2 converted passenger liners (Queen Mary and Queen Elizabeth) that were justly famous for their speed. It may only transport units an AMPH may transport but in all other respects is treated like a TRS (e.g. a MOT corps can’t invade from The Queens).Embarking and transporting land or aircraft units does not count against limits on the activities of land or aircraft units (debarking at sea does, see 11.12).
DiF option 20: (SCS transport) You may transport 1 non-motorised infantry class division (DiF option 2: except GARR, see 22.1) on each SCS as if it were an AMPH. An SCS cannot shore bombard while transporting a unit.
EmbarkingYou may only embark a unit if it is face-up. Embarkation does not count as a land move (see 11.10) or rebase mission (see 11.16).MAR, infantry class divisions, and units embarking on AMPHs may embark from any coastal hex in that sea area. Other units may only embark from a:(a) friendly port that isn’t closed (see 8.2.1); or(b) a coastal hex containing a co-operating HQ in that sea area.A TRS or AMPH may embark units it starts the step stacked with, or it may embark them when it moves through the port they’re in. Alternatively, a TRS or AMPH with unused transport capacity may end its move in a sea area and immediately embark (after any interception attempts ~ see 11.4.6) units in a port or coastal hex in that sea area (subject to the above restrictions). Note that some hexes like Brest (hex W2032) are in 2 areas; a unit could be picked up from Brest by a TRS or AMPH in either the North Sea or Bay of Biscay.If a unit you embark is out of supply, immediately turn it face-down. This means it can’t debark at sea or invade (see 11.12 and 11.13).
Debarking in portIf a TRS or AMPH ends its move in a port, any cargo debarks automatically at the end of its naval movement. This does not count as a land move (see 11.10) or rebase mission (see 11.16). The cargo debarks face-down if:• it is already face-down; or• its transport is returning to base (see 13.4).All other cargo debarks face-up.
The TRS or AMPH is then turned face-down.
Debarking at seaFace-up land units may debark from a face-up TRS/AMPH at sea during the debark land units (see 11.12) or invasion step (see 11.13). Face-up aircraft may debark from a face-up TRS at sea during the aircraft rebase step (see 11.16). The TRS or AMPH is turned face-down at the end of the step if any unit disembarks.
11.4.6. InterceptionInterception is a way of bringing enemy naval units to combat before they end their move. You may try to intercept enemy naval units as soon as they enter a sea area containing at least one of your face-up naval or aircraft units. However, aircraft may not attempt to intercept in a sea area in storm or blizzard.
You can’t try to intercept:• a SUB task force (CoiF opt. 7: except sub-hunters, see 22.16);• aircraft units flying into or through the sea area; • units moving from one section into a lower-numbered section of
the same sea-box; or• a task force only containing naval units you are not at war with.
How to interceptIf you want to try to intercept, announce whether you are committing your SUBs to the attempt. This is an all or nothing choice - you commit all your SUBs or none at all. Your aircraft and surface naval units are always committed to every interception you attempt.You must now turn a unit (except an aircraft in storm or blizzard, or a convoy or carrier plane) face-down. If you can’t turn a unit face-down, you can’t intercept. You may turn a SUB face-down even if you don’t intend to commit your SUBs.As long as that face-down unit remains in the sea-box, you may make further interception attempts in that sea area against other task forces during the same impulse without having to turn over another unit. If that unit is in the sea-box during naval combat, it also allows you to attempt to start a naval combat there without having to turn another unit face-down (see 11.6). If the face-down unit aborts or is destroyed, you would have to turn over another unit to make another interception attempt or to start a combat in that sea area.To find out if the interception succeeds, roll a die. You succeed if you roll the modified search number (see 11.5.5), or less, of the highest section that contains one of your committed units at war with at least one moving unit. If your roll is higher than that modified search number, your interception attempt fails. Some weather will modify the search numbers, as will the presence of carrier planes and NAVs (see 11.5.5).
Interception attempt failsIf the interception attempt fails, the moving force continues as if nothing had happened.
Successful interceptionIf the interception attempt succeeds, the moving player has 2 choices:(a) stop the move in that sea area; or(b) try to fight through.Any units which stop, go into the sea-box like any other naval move (see 11.4.2). There is no interception combat, but there may be naval combat in that sea area in the naval combat (see 11.5) or opponent’s naval combat (see 11.6) step. If you are returning to base (see 11.4.1 (c) and 13.4) you cannot stop in the sea area. Instead you must try to fight your way through.
Fighting your way throughIf you want to fight your way through, put your task force into one section of the sea-box (as if it was ending a move there).Now start the normal combat sequence (see 11.5.1). The only differences are in the first round:• your opponent’s interception roll counts as his/her search roll; • your opponent has already announced whether his/her SUBs were
committed; and• although you determine which of your units take part by making a
search roll as usual, the units in the moving task force are always included (even if there are other units in their sea-box section which aren’t).
After the first round, the combat continues exactly like any other combat. It is quite possible for your moving task force to be excluded from later combat rounds.
End of interceptionThe interception combat ends as soon as either side has no units at war with any units of the other side in any section of the sea-box, or the search rolls fail to produce a combat.You may then either leave the task force where it is, or move it, or part of it (splitting it would be an extra naval move ~ see 11.4.1) with its remaining range and movement allowance.
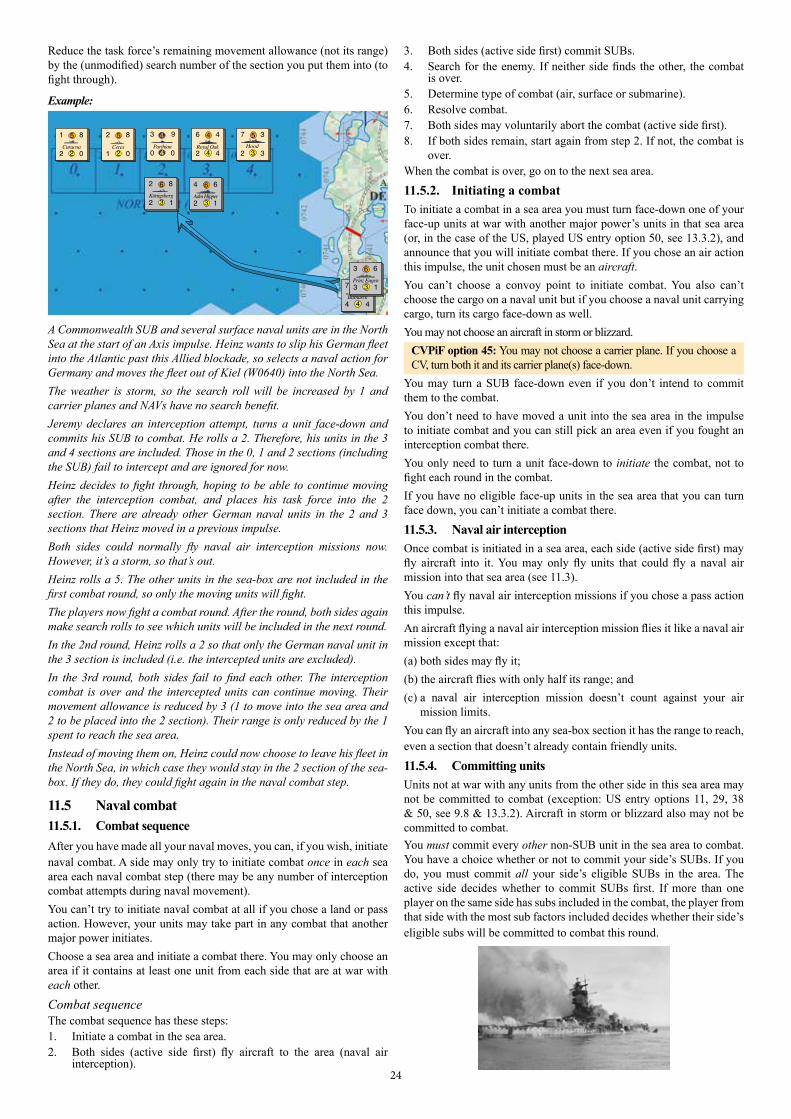
24
Reduce the task force’s remaining movement allowance (not its range) by the (unmodified) search number of the section you put them into (to fight through).
Example:
Parthian
4
4
3 9
0 0Ceres
5
2
2 8
1 0Curacoa
5
2
1 8
2 0Hood
Rick
3
57 3
2 3Royal Oak
4
46 4
2 4
BismarckEric Schultz
5
4
7 2
4 4
Adm HipperHolger Schulz
6
3
4 6
2 1
Prinz EugenTaplerach
6
3
3 6
3 1
Königsberg
6
3
2 8
2 1
A Commonwealth SUB and several surface naval units are in the North Sea at the start of an Axis impulse. Heinz wants to slip his German fleet into the Atlantic past this Allied blockade, so selects a naval action for Germany and moves the fleet out of Kiel (W0640) into the North Sea.The weather is storm, so the search roll will be increased by 1 and carrier planes and NAVs have no search benefit.Jeremy declares an interception attempt, turns a unit face-down and commits his SUB to combat. He rolls a 2. Therefore, his units in the 3 and 4 sections are included. Those in the 0, 1 and 2 sections (including the SUB) fail to intercept and are ignored for now.Heinz decides to fight through, hoping to be able to continue moving after the interception combat, and places his task force into the 2 section. There are already other German naval units in the 2 and 3 sections that Heinz moved in a previous impulse.Both sides could normally fly naval air interception missions now. However, it’s a storm, so that’s out.Heinz rolls a 5. The other units in the sea-box are not included in the first combat round, so only the moving units will fight.The players now fight a combat round. After the round, both sides again make search rolls to see which units will be included in the next round.In the 2nd round, Heinz rolls a 2 so that only the German naval unit in the 3 section is included (i.e. the intercepted units are excluded).In the 3rd round, both sides fail to find each other. The interception combat is over and the intercepted units can continue moving. Their movement allowance is reduced by 3 (1 to move into the sea area and 2 to be placed into the 2 section). Their range is only reduced by the 1 spent to reach the sea area.Instead of moving them on, Heinz could now choose to leave his fleet in the North Sea, in which case they would stay in the 2 section of the sea-box. If they do, they could fight again in the naval combat step.
11.5 Naval combat11.5.1. Combat sequenceAfter you have made all your naval moves, you can, if you wish, initiate naval combat. A side may only try to initiate combat once in each sea area each naval combat step (there may be any number of interception combat attempts during naval movement).You can’t try to initiate naval combat at all if you chose a land or pass action. However, your units may take part in any combat that another major power initiates.Choose a sea area and initiate a combat there. You may only choose an area if it contains at least one unit from each side that are at war with each other.
Combat sequenceThe combat sequence has these steps:1. Initiate a combat in the sea area.2. Both sides (active side first) fly aircraft to the area (naval air
interception).
3. Both sides (active side first) commit SUBs.4. Search for the enemy. If neither side finds the other, the combat
is over.5. Determine type of combat (air, surface or submarine).6. Resolve combat.7. Both sides may voluntarily abort the combat (active side first).8. If both sides remain, start again from step 2. If not, the combat is
over.When the combat is over, go on to the next sea area.
11.5.2. Initiating a combatTo initiate a combat in a sea area you must turn face-down one of your face-up units at war with another major power’s units in that sea area (or, in the case of the US, played US entry option 50, see 13.3.2), and announce that you will initiate combat there. If you chose an air action this impulse, the unit chosen must be an aircraft. You can’t choose a convoy point to initiate combat. You also can’t choose the cargo on a naval unit but if you choose a naval unit carrying cargo, turn its cargo face-down as well. You may not choose an aircraft in storm or blizzard.
CVPiF option 45: You may not choose a carrier plane. If you choose a CV, turn both it and its carrier plane(s) face-down.
You may turn a SUB face-down even if you don’t intend to commit them to the combat.You don’t need to have moved a unit into the sea area in the impulse to initiate combat and you can still pick an area even if you fought an interception combat there.You only need to turn a unit face-down to initiate the combat, not to fight each round in the combat.If you have no eligible face-up units in the sea area that you can turn face down, you can’t initiate a combat there.
11.5.3. Naval air interceptionOnce combat is initiated in a sea area, each side (active side first) may fly aircraft into it. You may only fly units that could fly a naval air mission into that sea area (see 11.3).You can’t fly naval air interception missions if you chose a pass action this impulse.An aircraft flying a naval air interception mission flies it like a naval air mission except that:(a) both sides may fly it; (b) the aircraft flies with only half its range; and(c) a naval air interception mission doesn’t count against your air
mission limits.You can fly an aircraft into any sea-box section it has the range to reach, even a section that doesn’t already contain friendly units.
11.5.4. Committing unitsUnits not at war with any units from the other side in this sea area may not be committed to combat (exception: US entry options 11, 29, 38 & 50, see 9.8 & 13.3.2). Aircraft in storm or blizzard also may not be committed to combat. You must commit every other non-SUB unit in the sea area to combat. You have a choice whether or not to commit your side’s SUBs. If you do, you must commit all your side’s eligible SUBs in the area. The active side decides whether to commit SUBs first. If more than one player on the same side has subs included in the combat, the player from that side with the most sub factors included decides whether their side’s eligible subs will be committed to combat this round.
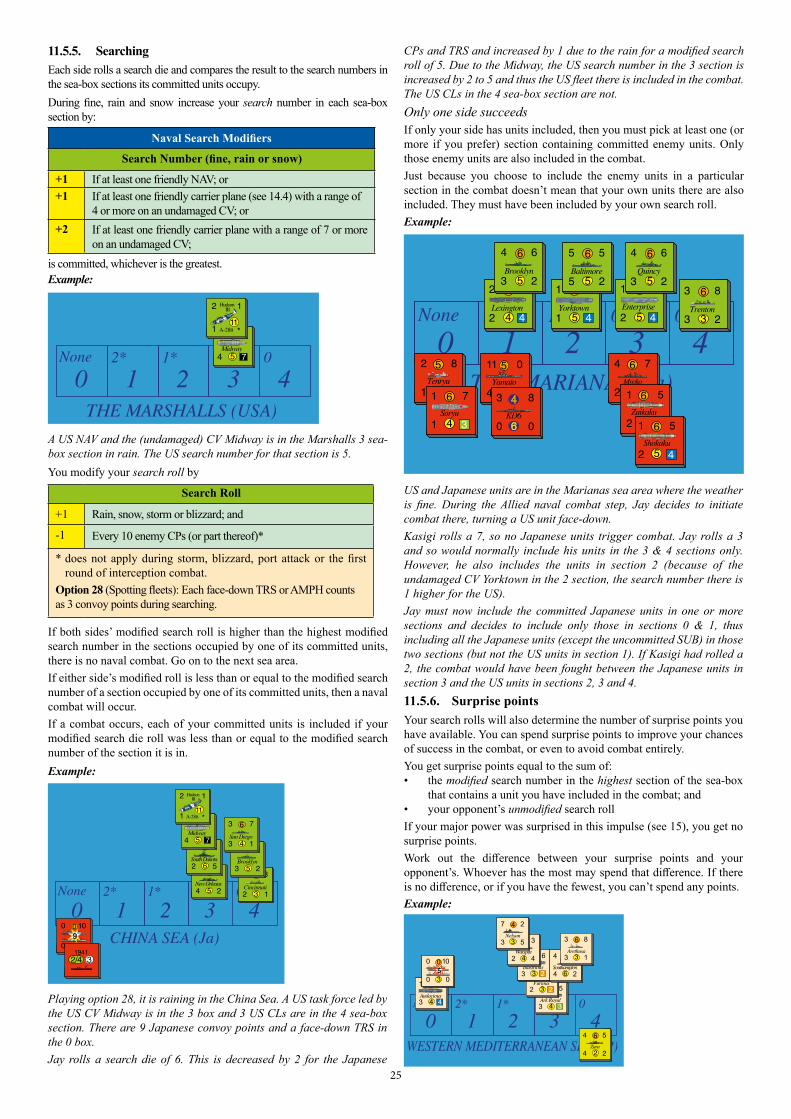
Naval Search Modifiers
Search Number (fine, rain or snow)
+1 If at least one friendly NAV; or+1 If at least one friendly carrier plane (see 14.4) with a range of
4 or more on an undamaged CV; or+2 If at least one friendly carrier plane with a range of 7 or more
on an undamaged CV;
Search Roll
+1 Rain, snow, storm or blizzard; and
-1 Every 10 enemy CPs (or part thereof)*
* does not apply during storm, blizzard, port attack or the first round of interception combat.
Option 28 (Spotting fleets): Each face-down TRS or AMPH counts as 3 convoy points during searching.
25
CPs and TRS and increased by 1 due to the rain for a modified search roll of 5. Due to the Midway, the US search number in the 3 section is increased by 2 to 5 and thus the US fleet there is included in the combat. The US CLs in the 4 sea-box section are not.Only one side succeedsIf only your side has units included, then you must pick at least one (or more if you prefer) section containing committed enemy units. Only those enemy units are also included in the combat.Just because you choose to include the enemy units in a particular section in the combat doesn’t mean that your own units there are also included. They must have been included by your own search roll.Example:
2* 1* 0* 040 1 2 3
THE MARIANAS (Ja)
None 4
6
4Lexington
2 5
2 �
6
5 4Yorktown
1 6
1 � 4
6
5Enterprise
1 6
2 �
6
5Quincy
4 6
3 2
6
5Baltimore
5 5
5 26
3Trenton
3 8
3 2
6
5Brooklyn
4 6
3 2
5
3Yamato
GPO1
11 0
4 6
5
3Tenryu
2 8
1 0 4
6KD6
3 8
0 0
Myoko
6
4
4 7
2 1
4
6Soryu
1 7
1 �3
6
5Zuikaku
1 5
2 �4
5
6Shokaku
1 5
2 �4
US and Japanese units are in the Marianas sea area where the weather is fine. During the Allied naval combat step, Jay decides to initiate combat there, turning a US unit face-down.Kasigi rolls a 7, so no Japanese units trigger combat. Jay rolls a 3 and so would normally include his units in the 3 & 4 sections only. However, he also includes the units in section 2 (because of the undamaged CV Yorktown in the 2 section, the search number there is 1 higher for the US).Jay must now include the committed Japanese units in one or more sections and decides to include only those in sections 0 & 1, thus including all the Japanese units (except the uncommitted SUB) in those two sections (but not the US units in section 1). If Kasigi had rolled a 2, the combat would have been fought between the Japanese units in section 3 and the US units in sections 2, 3 and 4.11.5.6. Surprise pointsYour search rolls will also determine the number of surprise points you have available. You can spend surprise points to improve your chances of success in the combat, or even to avoid combat entirely.You get surprise points equal to the sum of:• the modified search number in the highest section of the sea-box
that contains a unit you have included in the combat; and• your opponent’s unmodified search rollIf your major power was surprised in this impulse (see 15), you get no surprise points.Work out the difference between your surprise points and your opponent’s. Whoever has the most may spend that difference. If there is no difference, or if you have the fewest, you can’t spend any points.Example:
2* 1* 0* 040 1 2 3
WESTERN MEDITERRANEAN SEA (SP)
None44
6Audacious
1 4
3
5
34Ark Royal
1 5
3
3
05
0 10
0 0
6
2Zara
4 5
4 2
5
23Furious
1 7
2
23
5Illustrious
1 6
3
4
4Warspite
6 3
2 4
3
4Nelson
7 2
3 5
6Southampton
4 6
4 26
6
3Arethusa
3 8
3 1
11.5.5. SearchingEach side rolls a search die and compares the result to the search numbers in the sea-box sections its committed units occupy.During fine, rain and snow increase your search number in each sea-box section by:
is committed, whichever is the greatest.Example:
A US NAV and the (undamaged) CV Midway is in the Marshalls 3 sea-box section in rain. The US search number for that section is 5.You modify your search roll by
If both sides’ modified search roll is higher than the highest modified search number in the sections occupied by one of its committed units, there is no naval combat. Go on to the next sea area.If either side’s modified roll is less than or equal to the modified search number of a section occupied by one of its committed units, then a naval combat will occur.If a combat occurs, each of your committed units is included if your modified search die roll was less than or equal to the modified search number of the section it is in.Example:
2* 1* 0* 040 1 2 3
CHINA SEA (Ja)
None6
5New Orleans
4 6
4 2
5
6South Dakota
8 2
2 5
0
39
0 10
0 0
7
6
5Midway
2 4
4 �
6
3Cincinnati
3 8
2 1
6
5Brooklyn
4 6
3 2
6
4San Diego
3 7
3 1
1139
Hudson III
A-28B
2 1
1 *
2/4 31941
Playing option 28, it is raining in the China Sea. A US task force led by the US CV Midway is in the 3 box and 3 US CLs are in the 4 sea-box section. There are 9 Japanese convoy points and a face-down TRS in the 0 box.Jay rolls a search die of 6. This is decreased by 2 for the Japanese
2* 1* 0* 040 1 2 3
THE MARSHALLS (USA)
None 7
6
5Midway
2 4
4 �
1139
Hudson III
A-28B
2 1
1 *
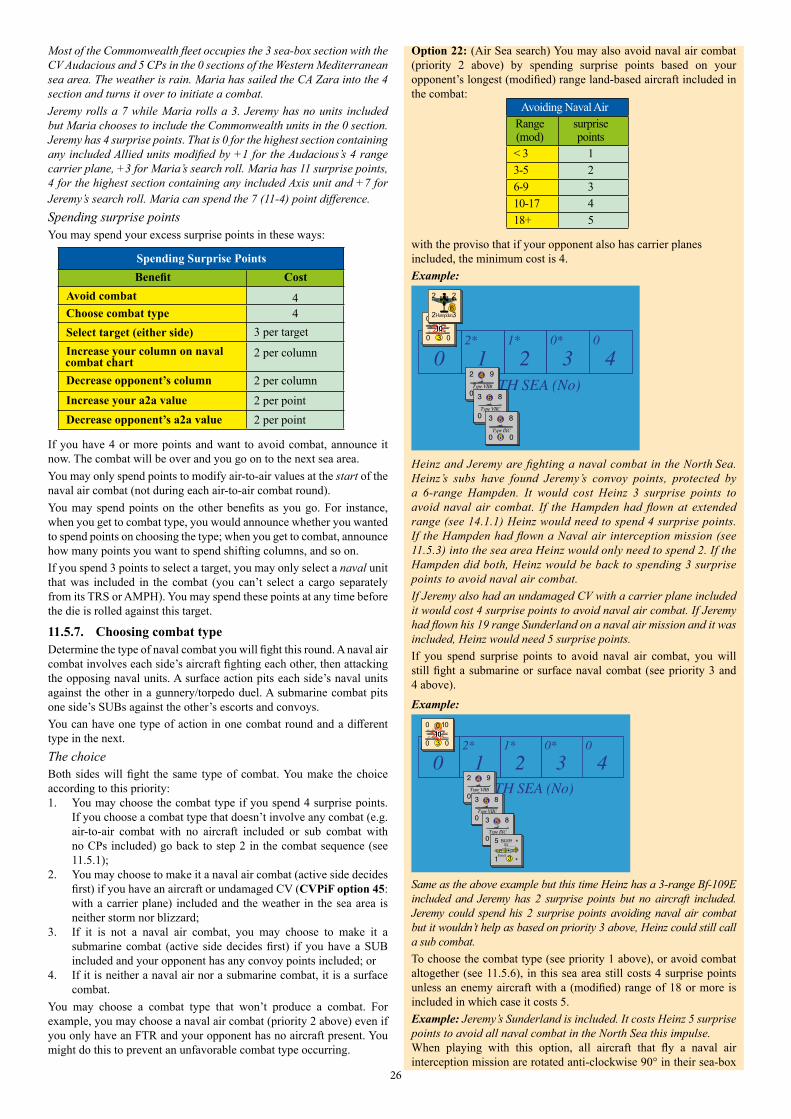
Avoiding Naval AirRange(mod)
surprise points
< 3 13-5 26-9 310-17 418+ 5
Spending Surprise PointsBenefit Cost
Avoid combat 4Choose combat type 4Select target (either side) 3 per targetIncrease your column on naval combat chart
2 per column
Decrease opponent’s column 2 per columnIncrease your a2a value 2 per pointDecrease opponent’s a2a value 2 per point
26
Most of the Commonwealth fleet occupies the 3 sea-box section with the CV Audacious and 5 CPs in the 0 sections of the Western Mediterranean sea area. The weather is rain. Maria has sailed the CA Zara into the 4 section and turns it over to initiate a combat. Jeremy rolls a 7 while Maria rolls a 3. Jeremy has no units included but Maria chooses to include the Commonwealth units in the 0 section. Jeremy has 4 surprise points. That is 0 for the highest section containing any included Allied units modified by +1 for the Audacious’s 4 range carrier plane, +3 for Maria’s search roll. Maria has 11 surprise points, 4 for the highest section containing any included Axis unit and +7 for Jeremy’s search roll. Maria can spend the 7 (11-4) point difference.Spending surprise pointsYou may spend your excess surprise points in these ways:
If you have 4 or more points and want to avoid combat, announce it now. The combat will be over and you go on to the next sea area.You may only spend points to modify air-to-air values at the start of the naval air combat (not during each air-to-air combat round).You may spend points on the other benefits as you go. For instance, when you get to combat type, you would announce whether you wanted to spend points on choosing the type; when you get to combat, announce how many points you want to spend shifting columns, and so on.If you spend 3 points to select a target, you may only select a naval unit that was included in the combat (you can’t select a cargo separately from its TRS or AMPH). You may spend these points at any time before the die is rolled against this target.
11.5.7. Choosing combat typeDetermine the type of naval combat you will fight this round. A naval air combat involves each side’s aircraft fighting each other, then attacking the opposing naval units. A surface action pits each side’s naval units against the other in a gunnery/torpedo duel. A submarine combat pits one side’s SUBs against the other’s escorts and convoys.You can have one type of action in one combat round and a different type in the next.The choiceBoth sides will fight the same type of combat. You make the choice according to this priority:1. You may choose the combat type if you spend 4 surprise points.
If you choose a combat type that doesn’t involve any combat (e.g. air-to-air combat with no aircraft included or sub combat with no CPs included) go back to step 2 in the combat sequence (see 11.5.1);
2. You may choose to make it a naval air combat (active side decides first) if you have an aircraft or undamaged CV (CVPiF option 45: with a carrier plane) included and the weather in the sea area is neither storm nor blizzard;
3. If it is not a naval air combat, you may choose to make it a submarine combat (active side decides first) if you have a SUB included and your opponent has any convoy points included; or
4. If it is neither a naval air nor a submarine combat, it is a surface combat.
You may choose a combat type that won’t produce a combat. For example, you may choose a naval air combat (priority 2 above) even if you only have an FTR and your opponent has no aircraft present. You might do this to prevent an unfavorable combat type occurring.
Option 22: (Air Sea search) You may also avoid naval air combat (priority 2 above) by spending surprise points based on your opponent’s longest (modified) range land-based aircraft included in the combat:
with the proviso that if your opponent also has carrier planes included, the minimum cost is 4.Example:
2* 1* 0* 040 1 2 3
NORTH SEA (No)
None
4
3Type VIIB
2 9
0 0
3
010
0 10
0 0
5
4Type VIIC
3 8
0 05
6Type IXC
3 8
0 0
6Hampden
382 2
2 3
Heinz and Jeremy are fighting a naval combat in the North Sea. Heinz’s subs have found Jeremy’s convoy points, protected by a 6-range Hampden. It would cost Heinz 3 surprise points to avoid naval air combat. If the Hampden had flown at extended range (see 14.1.1) Heinz would need to spend 4 surprise points. If the Hampden had flown a Naval air interception mission (see 11.5.3) into the sea area Heinz would only need to spend 2. If the Hampden did both, Heinz would be back to spending 3 surprise points to avoid naval air combat. If Jeremy also had an undamaged CV with a carrier plane included it would cost 4 surprise points to avoid naval air combat. If Jeremy had flown his 19 range Sunderland on a naval air mission and it was included, Heinz would need 5 surprise points.If you spend surprise points to avoid naval air combat, you will still fight a submarine or surface naval combat (see priority 3 and 4 above).Example:
2* 1* 0* 040 1 2 3
NORTH SEA (No)
None
4
3Type VIIB
2 9
0 0
3
010
0 10
0 0
5
4Type VIIC
3 8
0 05
6Type IXC
3 8
0 0
3
Bf-109E1
Emil39
5 *
1 *
Same as the above example but this time Heinz has a 3-range Bf-109E included and Jeremy has 2 surprise points but no aircraft included. Jeremy could spend his 2 surprise points avoiding naval air combat but it wouldn’t help as based on priority 3 above, Heinz could still call a sub combat.To choose the combat type (see priority 1 above), or avoid combat altogether (see 11.5.6), in this sea area still costs 4 surprise points unless an enemy aircraft with a (modified) range of 18 or more is included in which case it costs 5. Example: Jeremy’s Sunderland is included. It costs Heinz 5 surprise points to avoid all naval combat in the North Sea this impulse.When playing with this option, all aircraft that fly a naval air interception mission are rotated anti-clockwise 90° in their sea-box

Naval Combat ResultsResult Effect
X The unit (and any cargo) is destroyed.D The unit is damaged. Put a damage marker on the
unit. If the unit is already damaged it (and any cargo) is destroyed.A damaged unit only has half its printed attack, AA and ASW factors. Its defence factor is 1 higher. Its range and speed are not affected. A damaged CV may not fly carrier planes (see 14.4).At the end of combat in this sea area (not each round), all damaged units must abort.
A Your unit aborts. At the end of the combat round turn the unit (and any cargo) face-down and then return it to base according to the return to base rules (see 13.4).
1/2 A No effect unless the same unit suffers two ‘1/2 A’ results in one round of combat. Two ‘1/2 A’ results become an ‘A’ result.
Movement allowance
Defence value
3 84 65 56 4
27
section to show their modified range is halved. If they also fly at extended range rotate the unit 180°.
11.5.8. Surface naval combatTo determine the combat results, work out the total attack factors of each side’s surface naval units and SUBs included in the round.
CliF option 6: for each enemy SUB included in the combat, the attack factors of one of your naval units (your choice) is equal to its surface or ASW factor (see 11.5.10), whichever is the greater.Example
Playing CliF option 6 in 1943 a German Type IXB SUB and the Bismarck are included in surface combat against the CW Coventry and Curacoa. The Germans have 10 attack factors and the CW 4 (3+1).
Find your own total in the surface row of the naval combat chart. That will determine the column where you find the results you inflict on your opponent.You may increase your column by spending 2 surprise points per column. You may decrease your opponent’s column by spending 2 surprise points per column. You can’t move off the right-hand end of the naval combat chart. If you are moved off the left-hand end, you inflict no result on your opponent.To obtain your combat results, cross reference the final column with the row containing the number of ‘Enemy Ships’ your opponent has taking part this round. A ship is a naval unit, or 5 (SiF option 5: 3 or part thereof) convoy points included in the combat. Combat is simultaneous - both sides should work out the results they inflict before anyone implements them. However, the active player rolls for the damage of the defending player’s naval units first.Combat resultsThe combat results are:
You must implement all ‘X’ results first, then all ‘D’ results and, finally, all ‘A’ results.For each combat result you inflict, the owner selects a target to suffer that result (exception: option 23, see Screening below). If the owners can’t agree, their opponent with the most units involved in the combat decides. Finally, for every 3 surprise points you spend, you may select the target instead of your opponent (see 11.5.6).
You may choose the same unit to suffer more than one result, unless it is already destroyed or has suffered an ‘A’ result.Roll a die for each target. If you roll the target’s defence value or less, it suffers the result. If you roll more than its defence value, it suffers the next worse result - an ‘X’ becomes a ‘D’; a ‘D’ becomes an ‘A’ and an ‘A’ becomes a ‘1/2 A’.
AiF & PatiF option 21: (Transport defence) The defence value of each TRS and AMPH is not a standard 10; instead it’s based on the unit’s movement allowance:
Damage results carry over from round to round (use the damage markers to indicate the affected units). All ‘1/2 A’ results lapse at the end of each round (damage control parties have fixed the problem).‘X’ and ‘D’ results happen immediately.However, you only implement ‘A’ results (including unsuccessful ‘D’ results and double ‘1/2A’ results) at the end of this round of combat. All units aborting to the same port can abort together or in separate groups as you wish. If an aborting unit was damaged, put it into the repair pool after it successfully aborts. Put any cargo (PiF option 46: and its pilot if any) on a damaged and successfully aborted naval unit onto the production circle to arrive as a reinforcement next turn.
CVPiF option 45: Put any carrier plane (PiF option 46: and pilot) on a damaged and successfully aborted CV onto the production circle to arrive as a reinforcement next turn.
Example:It’s a surface naval combat in the Baltic. Anna has 2 Soviet BBs, S Byelorussia and Marat & the CV Marx included in the combat totalling 15 attack factors. Heinz has the BB Gneisenau and the CL Königsberg totalling 7 factors, with 5 convoy points.
2* 1* 0* 040 1 2 3
BALTIC SEA (De)
None 3
5Marx
1 8
2 � 2
0
35
0 10
0 06
3Gneisenau
5 3
3 36
3Königsberg
2 8
2 1
2
4Marat
5 5
2 3
S Byelorussiya
5
2
9 0
4 5
Anna inflicts 1 ‘X’ and 1 ‘A’ result (15 surface attack factors vs 3 enemy ships). Heinz applies the ‘X’ result to the Gneisenau - good choice as he rolls a 5, above its defence factor, and the ‘X’ becomes a ‘D’. He puts a damage marker on it. Heinz then decides to apply the A result on the Gneisenau as well. He rolls a 4 which normally would miss but as the Gneisenau is damaged its printed defence factor of 3 is currently 4. Thus the Gneisenau suffers the ‘A’ result and hightails it for Kiel, and is then placed in the repair pool.In reply, Heinz inflicts 1 ‘D’ and 2 ‘A’ results (7 surface attack factors vs 3 enemy ships). Anna applies the ‘D’ result to the Marat and rolls a 5 which equals the battleship’s defence factor. Anna puts a damage marker on the Marat. She applies an ‘A’ result against the S Byelorussia and rolls above its defence factor too (not hard when your defence factor is '0'), so its ‘A’ result becomes a ‘½ A’. Anna applies the last ‘A’ result against the CV Marx, rolling a 2. The Marx is aborted by Anna to Leningrad, then turned face down.The Marat remains damaged in the sea area. The ‘1/2 A’ result on the S Byelorussia lapses - it will be untouched for the next round.
The next round’s search rolls produce no combat and that combat ends. The damaged Marat must abort. Anna returns it to Leningrad and then puts it into the repair pool. The German convoy points are now
2* 1* 0* 040 1 2 3
NORTH SEA (De)
None BismarckKVK
5
4
7 2
2 3
Type IXB
5
5
3 8
0 0
Curacoa2
51 8
1 0
CoventryWA
2
51 8
1 0

28
protected only by the Konigsberg, just waiting for the next Soviet sortie to finish them off.
ConvoysEvery 5 (SiF option 5: 3 or part thereof) convoy points counts as a ship for resolving combat. An ‘X’ result destroys 5 (SiF option 5: 3) convoy points, a ‘D’ result damages 5 (SiF option 5: 3) points and an ‘A’ result aborts 5 (SiF option 5: 3) points. (Note: Convoy point markers can be broken down into change at any time).
SiF option 5: If there are fewer than 3 convoy points to suffer the result, it affects all remaining convoy points in the combat (e.g. a US and 4 CW convoy points suffer an ‘X’ and ‘D’ result; 3 CPs are sunk by the ‘X’ result and the remaining 2 CPs damaged by the ‘D’ result). Furthermore, in naval air and surface naval combat if there are fewer than 3 convoy points remaining, the owning player may not choose convoy points as a target if any other valid target remains to take the loss (their opponents may if it’s their choice). Example: 4 convoy points in a sea area suffer a 2’D’ result in surface naval combat. All 4 convoy points are damaged. If a CL was escorting the CPs, then it and 3 CPs would be damaged instead.Screening (option 23)At the start of each surface naval combat round both sides secretly decide how many of their committed naval units they are screening from combat this round. Convoy points must always be screened. When both sides have decided, their choices are revealed simultaneously. Screened units do not add their attack factors to that side’s total this round. Screened units may not be chosen as targets this round (except by spending surprise points, see 11.5.6) until every non-screened unit on that side has been destroyed, damaged or aborted. Screened ships do still count towards the total number of ‘Enemy Ships’.If playing this option, whenever units suffer damage in surface naval combat, both sides alternate picking targets to suffer a result. The owning player has first pick. Example: Same situation as the Baltic Sea example. Heinz screens his convoy points while Anna screens the flagship of her navy the Marx from enemy surface combat. This means that Anna is only on the 10-14 surface row and thus only inflicts 2 ‘D’ results and 1 ‘A’ result (still against 3 ‘Enemy Ships’ even though one is screened). Heinz applies the first ‘D’ result on the Gneisenau and this time rolls a 3 meaning the Gneisenau is damaged. It’s Anna’s turn to apply the 2nd ‘D’ result and applies this on the Gneisenau as well, rolling a 4 sinking it (the damage result increases the Gneisenau’s defence factor by 1 and a ‘D’ result on a damaged naval unit sinks it)! Blub, blub, blub.Heinz inflicts the same result as before (1 ‘D’ and 2 ‘A’) and Anna again picks the Marat as the first target which is damaged. Heinz picks the second target and applies the first abort against the S Byelorussia which again must fail and become a ‘½ A’. Anna now applies the last result but cannot pick the Marx this time as not every non-screened naval unit is sunk, damaged or aborted, so she chooses the S Byelorussia again, and doesn’t bother to roll just aborting her to Leningrad (even if she misses, two ½ A’s become an abort).The next round search rolls again produce no combat and the combat ends. The damaged Marat again aborts and then is placed in the repair pool leaving the CV Marx solely sailing the Soviet flag in the Baltic while proclaiming victory for the sinking of the Gneisenau.
11.5.9. Naval air combatIn blizzard or storm there is no naval air combat. If you have spent surprise points to choose a naval air combat (see 11.5.7) in blizzard or storm go directly to step 7 of the naval combat sequence (voluntary aborts ~ see 11.5.1).In other weather, the first step in a naval air combat is to decide (secretly) which of your included FTRs and carrier planes will be flying as bombers and which as fighters during this naval combat round (CVPiF option 45: Carrier planes on damaged CVs do not participate in naval air combats).Then you resolve air-to-air combat (see 14.3). For every 2 surprise
points you spend, increase your air-to-air value by 1 or decrease your opponent’s by 1. This modification lasts for the whole naval-air combat.Example:
4
I-16 (
10)
3
*
*
*
3
LaGG
-3F1
4
*
1
*
7M
BR-2b
is
33
2
3
1
*
4G
ustav
Bf-109G2
JWW
ood
7 *
1 *
Heinz and Anna are fighting an air-to-air combat. Heinz air-to-air strength is 7 and Anna’s is 4.3. Heinz’s air-to-air value is +3 and Anna’s -3 (see 14.3.2). Heinz has 4 surprise points. For 2 of them, he could increase his air-to-air value to +4, or decrease Anna’s to -4. To increase Heinz’s as well as decreasing Anna’s value would cost all 4 surprise points. Heinz spends only 2 surprise points to increase his air-to-air value by 1. He shoots down Anna’s front fighter and Anna’s misses. Anna’s new air-to-air strength is only 3, so Heinz’s modified air-to-air value is now +5, which gives no extra benefit. Heinz can’t spend more surprise points now to modify either side’s air-to-air value, so must hope that he will again benefit from his +1 modifier in a future air-to-air combat round in this naval-air combat.After any air-to-air combat, bombers which get cleared through resolve the air-to-sea combat. This consists of anti-aircraft fire first and then an air-to-sea attack.
Anti-aircraft (AA) fireYou only resolve anti-aircraft fire during port attacks and naval air combats.
DiF option 3: AA and flak (unless being transported, see 11.4.5) can fire at any air mission (see 22.2).
Total the target units’ anti-aircraft factors. Locate this total on the anti-air row of the naval combat chart. This determines a column. You may increase or decrease this column by 1 for each 2 surprise points you spend.Cross-index the final column with the number of enemy bombers that were cleared through. The result will be in the form “+X/Y”. Y is the number of dice you roll. X is the number of dice that count. If X is positive, you count the highest of the dice. If X is negative, you count the lowest. Example: Kasigi has 4 Japanese land based bombers and 2 carrier planes cleared through against Jay’s fleet. Jay has 48 anti-aircraft factors included and decides to apply 4 surprise points to anti-aircraft fire, giving 2 right shifts. This moves it to the 65-80 column. Cross-referencing that column with the 6-7 bombers row, Jay gets a “2/3” result. So, he rolls 3 dice and adds up the best 2 of them. If there was only 1 shift the result would have been “-3/5” in the 81-98 column. He would then roll 5 dice and total the lowest 3.For every 10 points in the total, the player firing anti-aircraft must choose to:(a) destroy 1 enemy land-based bomber; or (b) destroy 2 enemy carrier planes; or(c) destroy 1 carrier plane and abort 1 land-based bomber.If there are 5 points left, the player firing anti-aircraft must choose to:(a) abort 1 enemy land-based bomber; or (b) destroy 1 enemy carrier plane.For every remaining point in the total, 1 further air-to-sea factor does not press the attack.Even though the player firing anti-aircraft chooses the type of loss, in all cases the actual unit (or factor) lost or aborted within that type is chosen by the owning player.Example: Continuing the previous example, Jay rolls 3 dice and picks the best 2. He rolls 2, 6 and 10. The best 2 totals 16 points. Jay decides to destroy one of Kasigi’s land based bombers with the first 10 points but Kasigi chooses the actual bomber lost. With the next 5 points, Jay asks Kasigi to abort another land based bomber. The last point simply stops 1 of the remaining factors (Kasigi’s choice) from pressing the attack.For every 3 surprise points spent (see 11.5.6), a player may select the (legal) target instead of the opponent.Example: Continuing the previous example, Kasigi spends 3 surprise

ASW FactorsUnit type (per) <41 41- 42 43+
BB 0 0 0CV WiF
SiF option 5CliF option 6
121
121
121
CA WiFSiF option 5CliF option 6
121
231
344
CL WiFCliF option 6
21
32
43
every (full) 5 CPs 1 1 1each (mod.) a2s factor (incl. on undamaged CVs) included during fine, rain or snow
1 1 1
29
points to pick a carrier plane as the first Japanese aircraft to be destroyed. Thus Jay must now either abort 1 of Kasigi’s bombers or destroy another carrier plane to satisfy the first 10 points of losses.If a carrier plane is destroyed, put a “No planes” marker on the CV and return it face-down to its sea-box section, see 14.4, Shot down carrier planes (exception: CVPiF option 45, see 14.4.1).AA factors are affected by surprise (see 15.1) but not terrain (see 14.5) or weather (see 14.2.3).Example:
23
5Illustrious
1 6
3
6
2Duca D’Aosta
2 6
3 1
3
05
0 10
0 05
23Furious
1 7
2
5
34Ark Royal
1 5
3
5
2Giulio Cesare
5 4
1 36
2Zara
4 5
4 2
6
2Giussano
3 8
3 1
6
2Trento
4 6
3 2
Const Ciano
6
2
3 6
3 1
5
2Caio Duilio
5 5
2 3
6
2Garibaldi
3 6
3 1
In May/June 1940 the Commonwealth declares war on Italy and port attacks (see 11.2) La Spezia (W0823) during rain. 3 CW carrier planes with 7 air-to-sea factors attack eight Italian ships with 21 AA factors halved to 10.5 due to surprise. Cross-indexing 3 enemy bombers vs 10-14 AA factors is worst of 2 dice, which is a 2. Five CW air-to-sea factors would press the attack (which will then be halved due to the rain, see below).
The air-to-sea attackThe air-to-sea factors that survive anti-aircraft fire press the attack using the air-to-sea row of the naval combat chart (modified by weather, see 14.5). With this change, you then determine the outcome in the same way as you do for surface combat (see 11.5.8).In the air-to-sea attack, both sides alternate picking targets to suffer a result. The attacking player has first pick. For every 3 surprise points you spend, you may select the target instead of your opponent (see 11.5.6).After the naval-air combat all surviving aircraft remain in their sea-box section (CVPiF option 45: carrier planes must return to a CV there that can fit them, see 14.1.1) and keep their current facing.
11.5.10. Submarine combatSubmarine combat allows you to attack enemy convoy points. If each side has both SUBs and CPs included, there will be 2 separate combats (active side’s SUBs resolving their combat round first). For each submarine combat, add up the non-SUB side’s ASW factors (see also West Europe map):
The non-SUB side uses these factors to attack the SUBs. You do this in the same way as a surface naval combat except that you use the ASW row of the naval combat chart and only count the SUBs as ‘Enemy Ships’.
CoiF option 7: (ASW) From Jan/Feb 1943 onwards all units still use the 41-42 column. [Designer’s note: The late game merchant war may require you building your ASW units (see 22.16)].
The SUBs also attack in the same way as a surface naval combat except that they use the SUB row of the naval combat chart and only enemy naval units in the 0 sea-box section count as ‘Enemy Ships’.Losses inflicted by the non-SUB side can only be taken on the SUBs that attacked them (owner’s choice). For every 3 surprise points you spend, you may select the target SUB instead of the owner (see 11.5.6).Losses inflicted by the SUB side may be any included naval unit if the SUB player spends 3 surprise points. Otherwise every odd (1st, 3rd, 5th etc.) loss must be convoy points (CoiF option 7: including ASW, see 22.16); and every even loss must be either convoy points (CoiF option 7: including ASW), a CV or an SCS in the 0 sea-box section (owner’s choice). Once there are no further convoys to suffer losses, all remaining losses inflicted by the subs are ignored.Example:
2* 1* 0* 040 1 2 3
THE FAROES GAP (CW)
None
4
3Type VIIB
2 9
0 05
4Type VIIC
3 8
0 05
6Type IXC
3 8
0 03
010
0 10
0 0
4
4Pennsylvania
6 4
3 4
6
5Los Angeles
5 5
6 2
844
Shrike
A-25A
4 3
4 1
Playing with no options, it’s fine weather in 1942 and Heinz has gained 11 surprise points in a naval combat. He has spent 4 of them to choose a submarine combat. He has 3 SUBs included, totalling 8 attack factors. Jay has 10 convoy points,
1 BB, 1 CA and a 3 air-to-sea factor A-25A NAV included. Jay attacks with his 7 ASW factors (0 for the BB, 2 for the CA, 3 for the NAV and 2 for the convoys) against 3 enemy ships. He gets 2 ‘D’ results and 1 ‘A’ result. Heinz rolls against his SUBs’ defence factors to determine the outcome.Heinz then attacks the convoys with 8 SUB attack factors against 4 enemy ships. He spends another 4 surprise points to increase his attack by two columns (up to the 15-19 column). This gives him 1 ‘X’, 1 ‘D’ and 3 ‘A’ results. The ‘X’ result sinks 5 convoy points (it would only be 3 if playing SiF option 5). Jay could take the ‘D’ result against his CL rolling for damage. However, Heinz spends his last 3 surprise points to damage the second convoy instead. The third loss is an ‘A’ result which must be applied against the damaged convoy. The remaining 2 ‘A’ results are ignored as there are no convoy points remaining to take any losses.
11.5.11. Multiple naval combat roundsAfter each round of naval combat, any major power who had a unit(s) committed to that combat may abort. If you do, all major powers on your side who had a unit(s) committed to the combat must abort all their units in that sea area other than their uncommitted subs (the active side deciding first). Do this just like the units are returning to base (see 13.4) and then place any damaged naval units (and their cargoes) that successfully return to base, into the repair pool as if they had aborted during combat (see 11.5.8, Combat results).Example: Heinz launches his surface and submarine fleet against the Commonwealth co nvoys and escorts in the North Atlantic. Jay has played US entry option 29 (see 13.3.2) and has naval units in the 3 box there. Both sides commit all their units to the naval combat. Heinz finds Jeremy’s fleet. After the combat if Heinz wants to abort, all his units must (as he committed his subs) and if the Allies want to abort both must even though the US fleet wasn’t included in the combat (they were committed). If any units at war with each other remain in this sea area, go back to step 2 in the combat sequence (see 11.5.1) and run through the sequence again. This continues until one side has no units at war with any units on the other side in this sea area, or until the search rolls don’t produce another combat.
11.6 Opponent’s naval combatAfter your side has resolved combat in all their selected sea areas, any major power on the other side can try to initiate combat (see 11.5.2) in any other sea areas your side moved a non-SUB unit into or within (but not through) in your naval air missions step or your naval movement step, provided that unit is at war with at least one other unit in the sea area. Your opponents can’t pick an area that has already been selected

30
this impulse.Your opponent simply points to areas, one by one, and, in each of them, turns a unit face-down and follows the sequence in 11.5.1. If a unit your opponent turned face-down during the naval movement step in an interception attempt (see 11.4.6) is still in the sea area, he or she may attempt to start a naval combat th ere without turning another unit over.Example: Jeremy has finished all the naval combats he wanted to start. He didn’t try to start a combat in the Eastern Mediterranean where Maria’s Italian fleet is at an advantage against an escorted TRS Jeremy moved there during his naval movement step. Maria turns the Vittorio Veneto face-down in an attempt to exploit her advantage. Triumphantly, she rolls a 1 and starts the combat.
11.7 Strategic bombardmentStrategic bombardment missions allow aircraft to attack enemy production and resources.To strategically bombard:1. your opponent flies combat air patrol to potential target hexes;2. you fly all your selected attacking bombers and escorting fighters
to the target hexes (PiF option 8: announcing altitude and time of day, see below);
3. your opponent flies intercepting fighters to the target hexes;4. you fly intercepting fighters to the target hexes;5. fight any air-to-air combats;6. DiF option 3: surviving bombers suffer anti-aircraft fire from AA
and flak (see 22.2);7. surviving bombers attack the target hexes;8. return all remaining aircraft to base and turn them face-down.
Target hexesA target hex can be any enemy controlled hex that contains a printed oil or useable (see 13.6.2) factory (TiF option 30: or saved oil, TiF option 31: saved build points, option 32: facility, or TiF option 33: printed rail line). You can’t target a hex that only contains general resources or printed forts and roads.
PiF option 8: (Altitude) When flying a strategic bombardment mission (only) you must also announce whether it is a high or low (which includes medium) altitude mission (low altitude if not announced). Use the markers included with Planes in Flames to show high altitude strategic bombardment missions.Only bombers with a white cloud may fly high altitude missions and you may not fly a low and high altitude mission into the same hex in the same step.Fighters with a black cloud (low altitude fighters) may not fly, escort or intercept high altitude missions. Fighters with a white cloud (high altitude fighters) may do so without penalty. Fighters with no cloud may fly, escort or intercept high altitude missions but with a penalty (see 14.3.2, Combat values). [Designer’s note: even though many aircraft were capable of flying at high altitude, their performance at height was poor]. CAP must be included in the combat if it is able to, and ignored if not.PiF option 8: (Night) When flying a strategic bombardment mission (only) you must also announce whether it is day or night (daytime if not announced). Use the markers included with Planes in Flames to show night strategic bombardment missions.Your side may not fly a day and a night mission into the same hex in the same step. CAP must respond to either. Fighters may fly, escort or intercept day or night missions but see 14.3.2, Combat values for the combat effect of flying at night.
The bombingAfter any air-to-air combat, see 14.3 (DiF option 3: and anti-aircraft fire. see 22.2), total the strategic factors of all surviving bombers. Halve these factors attacking a hex in rain or snow (PiF option 8: and/or flying at night, cumulative).Locate the total on the strategic bombardment table and roll a die. Add 1 to the die roll if it is a low altitude day mission that did not fight any air-to-air (DiF option 3: or anti-aircraft) combat this impulse.
PiF option 8: (Altitude) Subtract 1 if it is a high altitude mission.
Cross-reference the (modified) roll with the (modified) strategic factors. If the target is an oil hex, that number of oil resources is lost from the hex for the turn.If the target is a factory hex, that number of production points will be lost from the factory owner’s production point total (see 13.6.3) for the turn (FiF option 40: or target units being built at that factory, see 13.6.10).However, you can’t lose more production points from a hex in a turn than could be produced in that hex, or more oil than there are oil resources there.Ignore asterisks ‘*’ in WiF Classic.Example: 4 Commonwealth bombers with 20 strategic factors attack Lille which is functioning as a German factory. The Germans do not fly any aircraft to oppose them. The die roll is an 8 modified to 9. On the 19-24 column of the strategic bombardment table, this produces a result of 4*. So, 4 points are lost, which in this case is 1 production point (since the hex has only 1 functional factory). The spare points are lost unless there are any other targets in the hex.
Option 32 (facility destruction): After implementing the above result, each asterisk ‘*’ in the result destroys 1 facility (see order of loss below). Destroyed facilities may not be repaired. Option 33 (factory, rail and oil destruction): Alternatively, each asterisk ‘*’ in the result destroys 1 printed factory, rail or oil resource (see order of loss below). Destroyed printed factories, rail lines and oil resources may be repaired (see 13.6.7). Use the factory markers to show reduced factories. In the example, the red factory in Lille is destroyed in addition to the production point loss.TiF option 32: (rail facility destruction) Destroyed rail hexes become roads. Destroyed built roads are placed back in the force pool (you can’t destroy printed roads and you can’t repair built ones). Use the “no-rail” side of the counter to show damaged (printed) rail hexes.
Where there is more than 1 target in the hex the order you apply the numbered results are: production points (see 13.6.2), printed oil resources (13.6.1), (TiF option 32: oil or resource facility), (TiF option 30: saved oil), (TiF option 31: and finally saved build points).Where there is more than 1 target in the hex the order you apply asterisk ‘*’ results are (option 33: printed blue factories, red factories, oil resources), (option 32: built factories, oil or resource facility, rail, road, factory specialisation, shipyard facilities), (option 33: then finally printed rail hexes).
11.8 Ground strikeGround strike missions allow bombers to attack enemy land and aircraft units on the ground. If you are successful, the enemy units will be more vulnerable to attack by land units.To ground strike:1. your opponent flies combat air patrol to potential target h exes;2. you fly all your selected attacking bombers and escorting fighters
to the target hexes (DiF option 3: and also announce any of your ART ground striking adjacent hexes, see 22.2);
3. your opponent flies intercepting fighters to the target hexes;4. you fly intercepting fighters to the target hexes;5. fight any air-to-air combats;6. DiF option 3: surviving bombers suffer anti-aircraft fire from AA
and flak (see 22.2);7. surviving bombers attack the target units.8. return all remaining aircraft to base and turn them face-down.
The strikeAfter any air-to-air combat (see 14.3), each bomber attacks each face-up enemy land or aircraft unit in the hex.Roll 1 die for each attack. If the result is less than or equal to the aircraft’s modified tactical factors, the ground strike is successful. Turn the target unit face-down. Weather (see 14.2.3) and terrain (see 14.5) may affect an aircraft’s tactical factors.

Rail Movement Cost
move where? unit factorySame or 1 map away 1 22 maps away 2 33 maps away 3 4
31
Example:
4
6Soryu
1 7
1 �3
5
5Ryujo
0 8
1 �2
AXXX
7 - 37 - 3II A
us
XXXXX
4(3)2M’tb
atte
n
2 of Kasigi’s Japanese CVs, the Ryujo and Soryu, launch a ground strike against a Commonwealth corps and HQ in Singapore (A0822). The weather is rain. The carrier planes have 1 and 2 tactical factors respectively (see 14.4). These are halved for rain and halved again for jungle, leaving 1/4 and 2/4 factors. The Ryujo carrier plane rounds to 0, so can’t succeed, while the Soryu rounds to 1. Kasigi rolls 1 die against each unit and rolls a 3 against the INF corps and a 1 against the HQ. The HQ is turned face-down.When the defending units are surprised (see 15.1) roll an extra die against each target. If any roll is less than or equal to the aircraft’s modified tactical factor, the ground strike succeeds.
Option 8: (Tank busters) Tank busters have their tactical factor printed in a red circle. Add an extra die if the aircraft is a tank buster and the target unit is MECH, ARM or HQ-A.Option 49: If offensive points are spent on an HQ within range of the aircraft during an air action (see 16.3.2) or ART during a land action (see 16.3.3) you also roll an extra die.These rolls are all cumulative.Example: during a surprise impulse, a tank buster ground striking a MECH with the benefit of offensive points would roll 4 dice.
11.9 Rail movementRail movement lets you move land and aircraft units and blue printed factories over long distances.How to rail moveYou may rail move a unit or factory if it is at a station. A station is any city hex, port hex or hex with an HQ. Every rail hex is a station when railing an HQ.You may move the unit or factory from one station to any other station, over any distance. However, you may only move along a railway line. Your side must control each hex you enter and you must remain on your line (e.g. if moving by rail from Gibraltar (W2513) to W2514, you could only continue into W2414, not Cadiz or Seville). You may only change lines at junctions (e.g. W2415 is connected by rail to every adjacent hex bar W2316).Your rail move can only enter or leave a hex in an opponent’s ZoC if it is a station containing a friendly land unit both before and after the rail move. Its move must stop when it enters an opponent’s ZoC.Example:
XXX
6-4XXXI
II
XXX
6-4
XII
XXXX
7-3
29
XXXX
6-3
51
XXXXX
8(5)48(5)4Zhuk
ov
Anna wants to rail move Zhukov adjacent to German occupied Kharkov (E1235). She can’t move Zhukov to E1135 due to the ZoC from the German corps in E1033. She can’t move him to (Soviet controlled) E1335 as there are no Soviet units there before the rail move, so she moves (via Kursk) to E1336 (which already contains a Soviet INF).
A unit can rail move across a straits hexside if there is a rail line in the hex on either side of the straits. Only one unit a side can rail move across each straits hexside each impulse.
Option 12: (limited access across straits) A unit may only rail move across a straits hexside if any adjacent sea area contains no enemy units capable of blocking supply, or you can trace supply through any adjacent sea area.
UnitsYou may only rail move a unit if it is face-up. After ending its rail move, turn the unit face-down.FactoriesYou may rail move any blue factory you control in your home country if:(a) an enemy in-supply land unit is currently in this home country and
on the same map as the factory; or(b) a factory in this home country was destroyed by strategic
bombardment during this or the previous turn.Factories must always end their rail move at a city hex in their home country and only at one that currently has fewer than 2 blue factories already. Use the factory markers to show the removal of factories at one place and their arrival at the other.The railed factory is not available for production until the second turn after it finishes its move. For example, if you move it in Jan/Feb, it starts producing again in May/Jun.LimitsIf you chose an air action, you may only rail move aircraft. If you chose a land action, you may only rail move land units (SiF option 51: Frogmen) and factories. If you chose a combined action you may rail move factories, land units and/or aircraft.How long the move is determines how many rail moves it counts as:
Example: To rail move an aircraft from the Western Europe map to the Pacific map would cost 3 rail moves. It would take 4 rail moves to rail a factory this far.To work out how many maps away the destination is, use the furthest map away (e.g. railing a land unit from Baku (A2841) to Vladivostok (P2942) counts as 2 maps away, not 1). Similarly, if you are railing to or from a hex that is on two maps (e.g. Mukden, A0141), you count as railing to or from the map further away.Rail moves do not also count as a land move or an air mission.
11.10 Land movementLand movement is the normal way land units move around the maps. Only face-up land units can make a land move.You may only move a unit once in each land movement step.
11.10.1. How to move land unitsYou may move your land units one by one, or stack by stack, as you choose. You must finish moving the unit(s) you are moving before you may start moving another unit. Co-operating (see 18) major powers and/or minor country units stacked together may move together (provided their owners agree of course).If you move a stack of land units together, each unit in the stack uses up 1 land move. You may drop units off from the stack in any hex it enters but you can’t pick up other units as you go.A unit making a land move moves from its starting hex to an adjacent hex. Then it may move to another adjacent hex, and so on until it runs out of movement points.Each unit has its movement points printed on its counter. Each hex it enters will use up one or more of those points depending on which map it is on, the terrain in the hex (and sometimes the hexside crossed to enter it), the weather in the hex and whether the unit is motorised or not (see 11.10.2). Sometimes a unit will have unused movement points but not enough to enter

32
the next hex. You may always move the unit into that next hex but you must then turn it face-down.You may move a unit which starts its move out of supply but you must turn it face-down when you finish moving it.A unit must always end its move when it enters an opponent’s ZoC (exception: it can continue moving if it then overruns a land unit in the next hex ~ see 11.10.6). You may move a unit which starts its move in an opponent’s ZoC directly into another (even a ZoC of the same unit).Whenever a land units enters an enemy hex and clears that hex of enemy units if any (whether by movement, overrun ~ see 11.10.6, invasion ~ see 11.13, paradrop ~ see 11.14 or advance after combat ~ see 11.15.5), the hex changes control (see 2.5.3).
11.10.2. Terrain & weatherTerrain effectsThe movement point cost for a land unit to enter a hex and cross certain hexsides is listed on the terrain effects chart (TEC, see Asia map) based on terrain and map scale. Note that the hexdots continue under the TEC and the shortest distance from Australia to the mainland of Africa is 26 hexes/hexdots from A0405 to Lourenzo Marques (A3005). HQ-A, ARM, MECH, (DiF option 2: armoured and motorised engineers, DiF option 3: self-propelled and motorised artillery, DiF option 14: supply units) and MOT use the motorised cost on the terrain effects chart to enter each hex. All other land units use leg movement costs. The move type for each unit is specified on the Unit costs & characteristics chart (see 28.)WeatherDouble the movement cost of land units moving into a hex in rain, storm or blizzard.
Option 15: (winterised movement) During each land movement step (only) it costs an extra movement point for a non-winterised unit to enter the first hex in snow. Winterised units are MTN, (DiF option 2: ski divisions), Swedish, Finnish, Norwegian, and white print Soviet units.
All terrain and weather effects are cumulative.Special hexes and hexsidesMoving into an opponent’s fort hex permanently destroys the fort. A fort hex is a hex containing a printed fort symbol.Land units (except MTN) may not cross an alpine hexside. MTN units may cross an alpine hexside at the cost of +1 movement point, but may not trace supply across them.Land units (except MAR) may not move across an all-sea hexside (except at a strait). They may only cross a lake hexside if it is frozen (see 8.2.1). MAR units may cross an all-sea or unfrozen lake hexside at the cost of +1 movement point, but may not trace supply across them. Units may move and trace supply across straits hexsides (exception: see option 12: limited access across straits).MTN units pay 1 less movement point to enter mountain hexes on the Asian, Pacific and American maps.Japanese infantry class units pay 1 less movement point to enter a jungle hex.
Option 25: (Railway movement bonus) A land unit pays 1 less movement point (minimum 1 on the Europe maps in Fine and Snow, 2 otherwise, and 2 or 3 respectively on all other maps) to enter a hex when it moves or advances after combat along a railway (but not a road or straits). This reduction occurs after you apply any overrun movement modifier (see 11.10.6).
All these modifiers are cumulative and occur after you apply any weather effects.Example: In rain it costs 3 movement points to move from E1027 to E1127 (even if playing option 25).
11.10.3. Enemy unitsYou may only move a land unit into a hex containing a unit from the other side if you do so by paradrop (see 11.14), invasion (see 11.13), or overrun (see 11.10.6).
11.10.4. Neutral major powersYou can only move a land unit of a neutral major power into any hex controlled by:• that major power and its controlled minor countries; or• a minor country it is at war with.
The only exception is the US (see 13.3.2, US entry options 7 & 44).
11.10.5. Active major powersYou may move a land unit controlled by an active major power into any hex controlled by:• that major power and its controlled minor countries; or• another active major power on the same side (or its controlled minor
countries); or• a major power or minor country it is at war with.There are some exceptions:• land units can’t move into the home country of a non co-operating country
on the same side unless they satisfy the foreign troop commitment limit (see 18.2) on entry; and
• no unit (land, air or sea) can enter a country controlled by another major power on their side without their permission.
11.10.6. OverrunLand units can sometimes destroy (or capture) enemy units and markers during movement. They do this by declaring an overrun and then entering the enemy hex. Only enemy controlled hexes or enemy partisans (see 13.1) may be overrun.You may only conduct an overrun with a single unit, or with a single stack of units that started the land movement (or Advancing after combat, see 11.15.5) step together. Overrunning land unitsA unit may only overrun a land unit if it is in supply both when it starts moving and in the hex just before it overruns.You may only overrun land units that are in a clear or desert hex that is not a city hex (non-city ports are OK). Overrunning across a river, canal or straits hexside halves the overrunning units’ attack factors as normal (exception: engineers, see 22.1.1. You can’t overrun a land unit in a fort hex (TiF option 32: or hex containing a fort marker) across a fort hexside. At least one of the overrunning units must be an ARM, MECH or HQ-A unit.If the defending units include an ARM or HQ-A unit (DiF option 3: or AA or AT), you can only overrun them if you have more ARM or HQ-A (DiF option 2: divisions counting half). If the defending units do not include an ARM or HQ-A unit (DiF option 3: or AA or AT) but do include a MECH unit, you can only overrun them if you have either:• an ARM or HQ-A unit; or• more MECH units.You can only overrun if you have odds of at least 7:1 in one adjacent hex at the moment of overrun. These odds can be affected by supply (see 2.4.3), weather (see 11.15.5), hex and hexside terrain (see 11.15.1) and offensive points (see 16.3.3) like any standard (1die10) land combat (see 11.15). Your final odds are always 7:1 if you are overrunning units with a total of 0 factors (e.g. partisans).Overrun odds are not affected by aircraft (they may not fly ground support in an overrun).Units overrunning enemy land units which total more than 0 combat factors pay double the normal terrain cost to enter the hex being overrun (after weather effects). Turn them face-down if they exceed their movement allowance.You may continue moving the units after they overrun but if they are in an opponent’s ZoC they can only do so by further overrunning.Example:
XXXXX
7(4)4Rund
stedt
XXX
8 - 48 - 4
XX
XXX
7 - 47 - 4
XXV
XXX
10 - 610 - 6
LVII
XXXXX
5(2)2 Tim
oshe
nko
46
1936

33
The German LVII ARM & XX INF corps want to overrun the face-down Soviet 1 ARM army in snow. The Soviet unit is black print and to put it out of supply at the moment of overrun, Heinz moves the stack to E1533 via E1632. and announces an overrun. Being out of supply the Soviet army’s combat factor is only 1, but because it’s behind a river, the German units are halved to 9. The overrun odds are 7:1 (9:1, down 2 odds because of snow). The Soviet army is destroyed and the German units move into its hex which costs 2 movement points (1 doubled for the overrun} bringing the total to 5 (3+2) so the XX INF is turned face down but the LVII corps spends its last movement point moving to E1534.Overrunning aircraft unitsIf an opponent’s land unit moves or advances after combat into a hex containing your aircraft• destroy all your face-down aircraft (PiF option 46: and their pilots);
and• rebase your face-up aircraft (see 11.16) and turn them face-down.
Exception: even face-up aircraft (PiF option 46: and pilots) are destroyed if the units overrun are surprised (see 15.1)
Overrunning naval unitsIf an opponent’s land unit moves or advances after combat into a port containing your naval units, they must rebase. Before they do, roll for each face-down or surprised naval unit there. If you roll 5 or higher you keep control of the unit. If you roll a 1 (FiF option 40: or less, see 13.6.10 Overrunning production locations), the overrunning major power (the UK in the case of the Commonwealth) takes control of it until destroyed (except partisans which destroy naval units they overrun). Place it in the Repair pool. On a roll of 2 ~ 4, it is destroyed.
SiF option 5: If a naval unit is captured, its replacement naval unit(s) (if any, see 4.1.3) is also captured. CVPiF option 45: If a CV is captured or destroyed its carrier plane (PiF option 46: and pilot), if any, is destroyed.
The owner then immediately returns to base (see 13.4) all naval units surviving the overrun that they kept control of, and then turns them face-down. They may not embark units during this move. They may be intercepted as they rebase and must attempt to fight through from the 0 sea-box section if intercepted. If they can’t reach such a base within double their range (ignoring their movement allowance), destroy them instead.Example: Germany occupies Leningrad (E2050) while controlling Copenhagen (W0442) and Kiel (W0640). The Allies control no ports in the Baltic Sea so all surviving Soviet naval units in Leningrad are destroyed.You only pay the normal terrain cost to overrun a hex containing only naval and/or aircraft units.
Overrunning saved oil & build points (TiF options 30 & 31)You gain control of all saved oil and build points you overrun. If overrun by a partisan they are instead destroyed (see 13.1.3).Overrunning facilities (option 32)All opponents’ facilities that are overrun are destroyed except oil and resource facilities. They produce oil or general resources for whoever controls them (see 13.6.6). You may only destroy an oil facility during strategic bombardment (see 11.7) or facility destruction (see 13.8).
11.11 Air transportAir transport missions allow you to transport some land units to a friendly hex (or a hex occupied by a partisan you co-operate with), by air. Only face-up units may be air transported.To fly an air transport mission:1. your opponent flies combat air patrol to potential target hexes;2. you fly your selected ATRs (with or without their cargo) and escorting
fighters to a target hex or hexdot;3. if the target hex is one where the ATRs may stack and the ATRs are not
yet fully loaded you may pick up (more) cargo;4. your opponent flies intercepting fighters to the target hexes;5. you fly intercepting fighters to the target hexes;6. fight any air-to-air combats;7. DiF option 3: surviving ATRs suffer anti-aircraft fire from AA and
flak (see 22.2);8. surviving ATRs may unload some or all of their cargo provided
they are in a friendly hex where the ATRs and cargo may (prior to
debarkation) legally stack;9. return all remaining aircraft to base (except any CAP not yet involved
in air-to-air combat this step) and turn them face-down;10. your opponent flies intercepting fighters to the hexes where your
ATRs returned to base;11. you move intercepting fighters to the return-to-base hexes;12. fight any air-to-air combats;13. DiF option 3: surviving ATRs suffer anti-aircraft fire from AA and
flak (see 22.2);14. any cargo still on the ATRs now unloads;15. return all remaining fighters to base and turn them face-down.Aircraft that return to base at step 9 can only take part in step 12 air-to-air combat if they are ATRs.The transportAn ATR may carry any one of:• a PARA or MTN unit (of any size); or• DiF option 2: an INF, GAR or ski division (see 22.1); or• SiF option 51: 1 frogman (see 22.10).
DiF option 14: 2 ATRs stacked together may air transport 1 supply unit (see 22.3). You complete the transport provided at least 1 ATR survives.
You may unload the cargo either at the target hex, or keep it with the ATR and unload it when the ATR returns to base.Turn the ATR face-down after completing the mission. However, only turn the cargo face-down if it commenced the impulse out of supply or the ATR was aborted in either air combat.Example: Ju-Ming’s Nationalist Chinese have launched an offensive and cut supply to a Japanese MTN corps in Wuhan (A0436). In the Axis air transport step, Kasigi tries to extricate his unit by flying his L2D 6 movement points to Wuhan, to pick up the MTN. Ju-Ming flies an I-16 to intercept it and Kasigi then flies in his Ki-27 as an intercepting fighter. The ATR is aborted by the air-to-air combat and Kasigi returns it (and the MTN unit) to base at Nanking (A0336) and turns both of them face-down.
Option 8: (Air transport) Any aircraft with a white range circle can fly an air transport mission, even if it is not an ATR.Option 8: (Large ATRs) Large ATRs were capable of transporting heavier equipment. They are marked with a white INF corps symbol. A large ATR may transport:• up to 2 of any units an ATR can carry; or• 1 infantry class corps sized unit (except HQ, MAR, MOT or
PART), or• DiF option 14: 1 supply unit.
A large ATR pays twice normal movement costs while transporting anything more than a normal ATR can carry. Example: The US C-54 air transports a MTN corps and INF division from Manila (A0228) to Taihoku (A0133) using all its 20 mps. After unloading the units, it returns to base to Saigon (A0726).
11.12 Debarking land units at seaYou may only debark from a face-up TRS or AMPH.
DiF option 20: (SCS transport) Divisions may debark from an SCS as if it were an AMPH.
Each face-up land unit in a sea area (being naval transported ~ see 11.4.5) may only debark into a friendly controlled coastal hex (subject to co-operation, see 18), or a coastal hex occupied by a co-operating partisan, in that sea area. HQs, MAR and units landing from AMPHs may debark into any coastal hex. Any other unit may only debark into an open port (see 8.2.1) or a hex containing a co-operating HQ. An HQ may debark first allowing other units to debark on top of it this step.Each land unit which debarks in this step counts as 1 land move. A debarking unit must end its move in the hex it debarks in. If that hex costs it more movement points than it has, turn the unit face-down. Otherwise, it debarks face-up. Debarking units are always in supply in the impulse they debark. Turn the transporting naval unit face-down at the end of the step that a unit debarks from it.
11.13 InvasionsInvasions allow land units to attack enemy controlled or enemy partisan

34
occupied coastal hexes from an adjacent sea area. You may not invade an enemy controlled hex that contains a friendly partisan (you may be able to debark there however, see 13.1.3).The Unit costs & characteristics chart (see 28. in the Campaigns’ Booklet) shows which units may invade. MAR (DiF option 2: and eligible divisions) may invade from a TRS or AMPH. All other eligible units may only invade from an AMPH.
DiF option 20: (SCS transport) Eligible divisions may invade from an SCS as if it were an AMPH.DiF option 2: ARM & MECH divisions (see 22.1) with a marine symbol may also invade from a TRS (not an AMPH or SCS).
You may only invade an enemy controlled or enemy partisan occupied coastal hex that has at least one all-sea hexside touching upon the sea area where the TRS/AMPH is located and the coast to be invaded must also touch upon that sea area.Example: Liverpool (W1839) may be invaded from either the Faeroes Gap and/or Bay of Biscay but A0619 may only be invaded from the South China Sea, not the East Indian Ocean sea area. You may only invade with face-up units. Their TRS or AMPH must be in the 2, 3 or 4 sea-box section and must be controlled by a country at war with the owner of the hex or partisan being invaded.You may not invade a hex in storm, snow or blizzard. To invade, move your land units from their TRS/AMPH onto the target hex. Put part of each invading unit over the all-sea hexside it is attacking across (this matters for forts and fort hexsides, see 11.15.1).Invading units are in supply for the rest of the impulse.Invading units have no ZoC into the invaded hex until it is empty of enemy (including notional, see 11.15.1) units. They have no ZoC into adjacent hexes for the impulse of invasion. Thereafter, they have a normal ZoC.Turn the transporting naval unit face-down at the end of the step that a unit invades from it. Invading units must attack the invasion hex in the land combat step (see 11.15). Non-invading units adjacent to that hex may also be included in the combat.
11.14 ParadropsPARAs are land units that have the additional ability of being able to fly into an enemy controlled, or enemy partisan occupied, hex without moving by land through the intervening hexes. You may not paradrop into an enemy controlled hex that contains a friendly partisan (you may be able to air transport there however, see 13.1.3).PARAs may only fly a paradrop mission if they start the mission face-up, in supply and stacked with an ATR. An ATR cannot fly a paradrop mission if it isn’t carrying a PARA.
DiF option 2: The Commonwealth 51st air-landing and German 5th mountain divisions may also paradrop if accompanying a PARA in a second ATR (see 22.1.1).Option 8: (Bomber ATRs) Any aircraft with a white range circle can fly a paradrop mission, even if it is not an ATR provided it doesn’t have a ‘no paradrop’ symbol:
To fly a paradrop mission:1. your opponent flies combat air patrol to any hexes.2. you fly all your selected ATRs, the PARAs they start with, (AiF, PatiF
& PoliF opt. 57: Air Cav) and escorting fighters to the target hex;3. your opponent flies intercepting fighters to the target hexes;4. you fly intercepting fighters to the target hexes;5. fight any air-to-air combats;6. DiF option 3: surviving ATRs suffer anti-aircraft fire from AA and
flak (see 22.2);7. surviving PARAs (AiF, PatiF & PoliF option 57: and Air Cav)
drop into the target hex.8. return all remaining aircraft to base and turn them face-down.You can’t paradrop into a lake hex (unless frozen ~ see 8.2.1).Paradropping units are in supply for the rest of the impulse.After any air-to-air combat (see 14.3), surviving paradropping units drop into the target hexes. They have no ZoC into the target hex until it is empty of enemy units (including notional units). They have no ZoC into adjacent hexes for the rest of the impulse. Thereafter, they have a normal ZoC. Paradropping units must attack the target hex in the land combat step (see 11.15). Non-paradropping units adjacent to that hex may also be included.
11.15 Land combatAfter you have finished any paradrops, your land units may attack enemy land units they are adjacent to. Combat is not compulsory (unless you are invading or paradropping).The land combat sequence is:1. declare all attacks, 2. defender announces which notional units are to be ignored (if any);3. add offensive shore bombardment;4. add defensive shore bombardment;5. announce offensive HQ support (option 13);6. announce defensive HQ support (option 13);7. fly and resolve ground support missions;8. the land combats are then resolved one by one (attacker choosing
the order of resolution).Each land attack allows you to attack 1 stack of enemy land units. There is no limit on the number of units that may take part in each attack. Overruns are not land attacks.If you attack a hex with units from several major powers, each of those major powers has made a land attack.
11.15.1. Declaring combatsYou declare all your attacks now. To declare an attack, point to the defending hex and identify every land unit that will attack it (option 49: and which of these units will receive HQ benefits, see 16.3.3). The target hex must be enemy controlled and contain a land unit (even if only notional, see below) - you can’t attack aircraft and naval units in land combat (they may be overrun ~ see 11.10.6).Eligible land unitsYou may only attack a hex with face-up land units. To attack, you must either be adjacent to the target hex, or invading and/or paradropping units into it. Each land unit may only attack once per impulse (in addition to any number of overruns, see 11.10.6). A land unit may not attack if its combat factors are in brackets.You may attack with some units that are eligible and not with others - it’s up to you. One land unit in a hex could attack one hex, while the second unit in the hex attacks a different hex.Non co-operating units may not declare an attack of the same hex in the same step (see 18.2). If more than one non co-operating country wishes to attack the same hex in the same step, the major power controlling the most adjacent (modified, including paradrops and invasions) land factors that could attack may declare an attack first. If they do not, the major power controlling the second most factors that could similarly attack may declare an attack next and so on.SupplyUnits can’t attack if they are out of supply when you declare or resolve the combat.Defending units that are out of supply when resolving combat defend with their full combat factors if they are face-up. If they are out of supply and face-down, they have (before modifications):• 3 combat factors if they are white print corps sized units; or • only 1 factor if they aren’t.TerrainHalve the combat factors of a MTN unit that attacks across an alpine hexside. No other land unit may attack across an alpine hexside.MAR units are halved attacking across a lake or all-sea hexside. No other land units may attack across a lake or all-sea hexside (except at straits).

Notional Unit Combat FactorValue Reason
1 Notional unmodified combat factor
+1 defending in a city hex;+1 defending in the home country of the major power
(not minor country or territory) controlling the hex;+1 if it is not stacked with a land unit, but is in the ZoC
of a friendly unit(s);
+sbm the shore bombardment modifier (see 11.15.2) of the sea-box section of each invading unit (modified by the weather in the defending hex);
-1 if it cannot trace a basic supply path of any length (see 2.4.2); and
-1 if surprised (see 15.).
35
All land units are halved attacking across a river or canal (exception: engineers, see 22.1.1). All land units except MAR are halved attacking across a straits hexside or when invading. All MAR are halved if they are invading from a TRS.Third the combat factors of a unit that attacks into a fort hex across a printed fort hexside (exception: engineers).
TiF option 32: Fort markers only halve, not third, the attacker.There is no effect when you attack out of a fort hex (TiF option 32: or a hex containing a fort). A PARA that drops into a hex is not attacking across any hexside. Therefore, you don’t halve or third its factors due to a river, canal or fort.Triple the combat factors of MTN units defending in mountain hexes. Double the combat factors of other units defending in mountains.Double the combat factors of units defending in swamp hexes.Invasion & Paradrop combats (and notional units)Each hex defends against an invasion and/or a paradrop with 1 notional land unit, in addition to any actual land unit(s) in the hex. The notional unit is the same nationality as any country with a real unit in the hex (owner’s choice if more than one). If there are no real units, it is the same nationality as the country that controls the hex.The notional unit’s (modified) combat factor is:
These modifications are cumulative but the notional unit can never have fewer than 0 combat factors. Add the notional unit’s (modified) combat factor to those of any land units in the hex.The notional unit is treated like a normal unit for all purposes dur-ing combat except that it only has a ZoC into its own hex and is always face-down.Example:
Japan declares war on the Commonwealth and Kasigi attempts to invade Lae (P2318) with the SNLF MAR from the 2 section and the Kwantung MOT from the 3 section of the Bismarck sea. The 1 PARA DIV (from Divisions in Flames) paradrops on the hex. Only the Commonwealth notional unit is defending, but Port Moresby is occupied by the Sydney MIL. The weather in the Bismarck Sea is fine while in the South Monsoon it's rain.The notional unit is usually worth 1, but you add 1 for the adjacent CW corps, 2 because a land unit is invading from the 2 section (the 1* shore bombardment modifier becomes 2 due to rain) and 1 because a land unit is invading from the 3 section. You subtract 1 because it is a surprise impulse. This total of 4 doubles to 8 due to the mountains.Kasigi regrets not invading from a closer port, allowing an invasion from a higher sea-box section (if they had both invaded from the 4 section, the notional unit would have only been worth 1 factor doubled to 2. At the end of the attack declaration step, you can state that your notional unit is to be ignored (you might do this to avoid the combat modifier, see 11.15.5, or to prevent breakthroughs by units attacking in conjunction with the invasion/paradrop). If you do, and there are no other friendly land units in the hex, there is no attack and the attacker occupies the hex as if debarking onto a friendly controlled hex (see 11.12).Chinese attack weaknessCommunist Chinese units fought well during World War II. Nationalist Chinese units also fought well when defending their homes but were too factionalised to co-ordinate effectively on the offense. Thus halve the combat factors of Nationalist Chinese land units that are attacking (DiF option 3: not bombarding, see 22.2). ModifiersAll modifiers are cumulative.Example:
XXX
8 - 68 - 6
XLVI
XXX
7-4
X
XXX
8 - 48 - 4
XIX
XXX
5-4
XVII
XXX
4-3
II Para
The German XLVI MECH, XIX MOT and X INF are attacking the French XVII INF corps across both the Maginot line and the Rhine river. Therefore, you divide their total factors by 6. Their 23 factor total reduces to 3.87. The II PARA dropping into the hex adds 4 factors for a total of 7.87.
11.15.2. Shore bombardmentShore bombardment lets you support a land attack or defence with your SCS. You may shore bombard a coastal hex with any face-up SCS in the sea area (DiF option 20: except for those carrying cargo ~ see 11.4.5). Shore bombarding SCS add their bombardment factors to an attack or defence, attacker committing units first. Reduce the bombardment factor of each SCS by the bombardment modifier in its section of the sea-box (see Terrain effects chart). Add 1 to a sea-box section’s asterisked shore bombardment modifier for units in that section bombarding a hex in rain or snow.Example: Continuing Kasigi’s attack on Lae (see 11.15.1), Kasigi shore bombards Lae with the BB Fuso in the 2 section. As its rain, the ‘1*’ shore bombardment modifier increases to 2 which is subtracted from the Fuso’s shore bombardment factor to give it a modified bombardment of 3.You can’t bombard with SCS in the 0 section (note the ‘none’ there).You can’t bombard a hex in storm or blizzard.Halve the (reduced) bombardment factors if the hex is a forest, jungle or swamp hex.
2* 1* 0* 040 1 2 3
BISMARCK SEA (Ja)
None5
3Yamato
GPO1
11 0
4 6
5
6Kongo
6 4
3 3
4
4Fuso
7 3
2 5
MXXX
5 - 35 - 3Syd
ney
4
3
0 8
1 0
4
3
0 8
1 0
1
XX
1-3
XXXX
7 - 47 - 4Kwan
tung
XXX
4-4SNLF

36
Only 1 SCS may be added to the combat for each co-operating friendly unit (including notional) involved in the combat. Furthermore, you ignore any shore bombardment factors that exceed the total (modified) combat factors of the land units they are supporting. After taking part in shore bombardment, turn the bombarding units face-down. Example: Continuing the previous example, since 3 land units are attacking, up to 3 Japanese SCS can also shore bombard the hex. The BBs Yamato and Kongo in the 3 sea-box section are also added to the attack. Including the Fuso, 10 (5+2+3) points of shore bombardment are available from the 3 ships. However, since the invading MOT's factors are halved, Japan’s total land combat factors attacking are 3.5+4+1=8.5. Thus only 8.5 factors of shore bombardment can be added to the attack, the remaining 1.5 are ignored.
11.15.3. HQ support (option 13)HQ support allows you to modify the combat die roll, both attacking and defending, at the cost of turning an HQ face-down. HQ support cannot be used in overruns nor during an impulse that the HQ is surprised.SupportAfter all land attacks are declared, the active side may allocate 1 face-up HQ to support each hex. The HQ must be one of the units attacking that hex.Then the inactive side may allocate 1 face-up HQ to support each target hex. It must be in or adjacent to the target hex and must be in supply. It can’t provide support to a unit it does not co-operate with, to an adjacent hex if it is separated from it by a hexside impassable to both units, or if its own hex is also being attacked.If either or both sides have committed an HQ to provide support to the same combat, subtract the smaller (0 if none) reorganisation value from the larger and divide the result by 4 (option 27: for 2d10 land combats, divide by 2 instead). Add the result to the attacker’s roll if the attacker’s reorganisation value is larger, otherwise subtract it.Turn all HQs that provided HQ support face-down at the end of Advancing after combat (see 11.15.5), regardless of the result.Example: V. Leeb is attacking Soviet units in Tula (E1241). Zhukov is adjacent in E1242. Heinz declares that V. Leeb is providing HQ support. This would increase the combat roll by +1 (2/4ths rounded to +1). As Tula is vital to the defence of Moscow, Anna decides to commit Zhukov in defence, turning +1 into -1 ((5-2)/4 rounded to -1).
11.15.4. Ground supportGround support permits you to support a land attack with bombers. Both sides may fly ground support into the same combat.To fly ground support:1. your opponent flies combat air patrol to potential target hexes;2. you fly your selected attacking bombers, escorting fighters and
combat air patrol to potential target hexes (DiF option 3: and also announce any of your ART providing ground support, see 22.2);
3. your opponent flies intercepting fighters or both bombers and escorting fighters to the target hexes (DiF option 3: and also announce any of their ART providing ground support);
4. you fly intercepting fighters to the target hexes;5. fight any air-to-air combats;6. DiF option 3: surviving bombers suffer anti-aircraft fire from AA
and flak (see 22.2);7. add the modified tactical factors of surviving bombers to their
side’s combat value in the land attack;8. return all remaining aircraft to base and turn them face-down.SupportAn aircraft’s tactical factors may be reduced by the weather (see 14.2.3) and terrain (see 14.5) in the target hex. They may be increased by (option 49: HQ benefits, see 16.3.2, and) surprise (see 15.1).You ignore any tactical factors (after modification) flown by the attacking side that exceed the total (modified) combat factors of the attacking land units. Similarly, you ignore any (modified) tactical factors on the defending side that exceed the total (modified) combat
factors of the defending land units.Return all aircraft to their bases before you resolve the land attack.
Option 8: (Tank busters) Double the tactical factors (DiF option 3: after anti-aircraft fire) of an aircraft flying a ground support mission if it is a tank buster and any of the enemy units in the combat is a MECH, ARM or HQ-A unit. Tank busters have their tactical factor printed in a red circle.
11.15.5. Resolving attacksAdd up the attacking units’ (modified) combat factors, including shore bombardment and ground support. Total the defending units’ factors in the same way.Choosing combat tableYou must now select one of the 2 land combat results tables ~ blitzkrieg or assault (see the combat charts). The blitzkrieg table allows retreats and leaves the attacker face-up more often. The assault table will generally increase the casualties for both sides.Provided the defender is in a non-city hex that is clear, forest or desert, then the attacker has the choice of combat table if they either have: (a) more HQ-A and/or ARM than the defender; or(b) more MECH than the defender and the defender has no HQ-A or ARM; otherwise the defender chooses. HQ-A, ARM and MECH attacking across a fort hexside don’t count for combat table choice.
DiF option 2: Divisions count as 1/2 a unit (not rounded).DiF option 3: Every defending AA and AT counts as an ARM corps for combat table choice.
Example:
XXX
5-4XV
II
XXX
7-6
VIII
XXX
8-5
XLIM
XXX
3-3
Metz
3 -2
XX
75 m
mXXX
6-6
XIV XXX
8-6XLV
II
XXX
8 - 48 - 4
XX
2-6
XX
3
In May/Jun 1940 Heinz has grabbed a bridgehead across the Rhine at W1029 and wants to attack the French XIV MECH corps at W0930. Even though Heinz has 2 ARM corps attacking, both are attacking across fort hexsides and aren’t counted for table choice. Heinz only has the German VIII MECH corps across the Rhine but they are playing DiF options 2 & 3 so during his movement step Heinz moves the 3rd MECH division across the Rhine to gain the choice of combat table in the subsequent combat step. Pierre kicks himself that he didn’t move the French 47mm AT into W0930 in his impulse, rather than his MECH. Odds ratiosDivide the attacker’s total by the defender’s total to work out the basic ratio between them. Locate the nearest column on the Land Combat Results table, rounding in favour of the defender (e.g. 19.5:5 = 3.9:1 which rounds to 3:1, not 4:1).Reduce the odds against a hex in rain by 1 (e.g. 12:1 becomes 11:1, and 3:2 becomes 1:1). Reduce the odds against a hex in storm or snow by 2 (e.g. 11:1 becomes 9:1 and 3:1 becomes 3:2). Reduce the odds against a hex in blizzard by 3. If at least half of your attacking land units are winterised (see 11.10.2, Weather) you lessen the odds reduction in snow or blizzard by 2 (i.e. snow has no effect and blizzard becomes a -1 shift).Example: Continuing Kasigi’s attack on Lae, Kasigi adds 4 factors of ground support (doubled for surprise and halved for rain). Thus 21 factors in total are attacking the hex (8.5+8.5+4).

* if any attacking: - HQ-A or ARM gets a die roll modifier, § - winterised unit gains an odds ratio benefit, or - ENG gains any engineering benefit (see 22.1.1);the first loss (if any) mus t be a unit gaining the benefit. If more than one applies, an ENG must take the first loss. § If required to lose an HQ-A or ARM, you may instead lose any MECH or MOT attacking the same hex (DiF opt. 2: even a division).
Land Combat Modifiers (cumulative)Mod Reason+1 Each face-down land unit (including notional)+1* In blitz combat, more attacking HQ-A and/or ARM than
defending HQ-A, ARM, (DiF option 3: AT, AA) and/or MECH during fine weather in a non-city, clear or desert hex
+1 One or more PARA (AiF, PatiF & PoliF option 57: or ACV) paradropping into the hex (see 11.14)
+1* DiF option 2: One or more engineers attacking a printed factory hex, even if it is destroyed or railed away
+1 TiF option 54: All defending land units (apart from notionals, DiF option 3: Flak, DiF option 14: supply and PiF option 24: A-bombs & V-weapons) are territorials outside their home country
+/-? Option 13: HQ support (see 11.15.3) -1 More defending HQ-A and/or ARM than attacking HQ-A and/
or ARM in fine weather in a non-city clear or desert hex-1 Defenders in a printed factory hex-1 2 or more major powers are adding combat factors to the attack-1 Defenders in jungle and less than half the attacking land units
are both white print and Australian, Japanese or Marine-1 DiF option 2: One or more engineers defending a printed
factory hex even if it is destroyed or railed away -1 TiF option 54: All attacking land units are territorials attacking
a hex outside their home country-1 Each odds ratio below 1:2
* if any attacking: - HQ-A or ARM gets a die roll modifier, § - winterised unit gains an odds ratio benefit, or - ENG gains any engineering benefit (see 22.1.1);the first loss (if any) mus t be a unit gaining the benefit. If more than one applies, an ENG must take the first loss. § If required to lose an HQ-A or ARM, you may instead lose any MECH or MOT attacking the same hex (DiF opt. 2: even a division).
37
The notional unit is worth 8 factors so the odds are 2:1 (21:8) reduced to 3:2 because of rain.
Option 26: (Fractional odds) Round the ratio in favour of the defender as usual. Then work out how far to the next odds ratio you are. Round this in favour of the defender to the next 10%. Roll a die just before rolling the combat die (you could roll it with the combat die if you want), to see if you find the result on the lower odds or the higher odds. If you roll the percentage or less, you resolve it on the next higher odds, otherwise on the lower odds.Example 1: 53:9 is 5.89:1 which rounds down to 5:1 but with an 80% chance (i.e. a roll of 1-8) of resolving the combat at 6:1.Example 2: 11:6 rounds to 3:2. But you have a spare 2 factors. This is 67% of the way to 2:1 (i.e. 2/3). So you have a 60% chance of resolving the combat at 2:1. If its storm, the odds ratio would go down to 1:2 with a 60% chance of 1:1.
If after all modifications there are 0 attack factors, all attacking land units are destroyed. If not, and after all modifications you are attacking 0 defending combat factors, the combat result is an automatic "*/2B" result in a blitzkrieg attack or an "*/2S" if it is an assault.Rolling the dieThe attacker now rolls a die and applies the following modifiers (option 27: (2die10) use the modifiers on the back of the rule book instead):
Example: The US are attacking Bangkok (A0927) with 1 INF. The odds are 1:5 but both defending Japanese INF (one white print) are face-down. Jay adds +2 for the face-down units but subtracts -3 for the odds ratio difference and -1 for the jungle. The net modifier is -2 on the 1:2 column. If the Japanese were attacking at 1:5 the modifier would only be -1 (as half the attackers are Japanese white print and ignore the Jungle).
A modified roll of less than 1 is a 1.
ResultsCross-reference the (modified) roll with the final odds column. For odds less
than 1-2, use the 1-2 column. For final odds of more than 7-1 (blitzkrieg) or 10-1 (assault), use the right-most column.The result is expressed as ‘X/Y’. If X is a number, the owner destroys that number of attacking land units. Then, if Y is a number, the owner destroys that number of defending land units. Destroyed units may generate build points (see 13.6.3).Any combat result other than ‘-’ destroys any notional defending unit. A notional doesn’t count as a loss towards satisfying the combat result.Example: Continuing Kasigi’s attack on Lae, Kasigi is rolling on the 3.2 table +2 (+1 due to the notional unit being automatically face-down +1 for paradropping on the hex). Jeremy chooses the Assault table. If Kasigi rolls a 4 (modified to a 6), or higher, the notional unit will be destroyed.
RetreatsIf the result includes an ‘R’, the attacker then retreats all surviving defending land units one hex (even if face-down). Land units with 0 movement factors are destroyed instead. You retreat units individually and you can retreat them into different hexes. You can’t retreat a unit into a hex it couldn’t move into.If a unit could retreat into several hexes, you must retreat it according to these priorities:1. a hex not in an opponent’s ZoC and not causing over-stacking.2. a hex not in an opponent’s ZoC and causing over-stacking.3. a hex in an opponent’s ZoC containing a friendly land unit and not
causing over stacking.4. a hex in an opponent’s ZoC containing a friendly land unit and
causing over-stacking.AiF, PatiF & PoliF option 57: Air Cav (see 22.12) instead retreat as if returning to base (see 14.2.4).
Destroy a unit if it can’t retreat under any of these priorities.If the unit ends in a hex which is still to be attacked, over-stacked, where it started, or in a hex with a unit it can’t co-operate with, continue retreating the unit according to the same priorities (or destroy it if this is not possible).When defending in an off-map hex you do not have to retreat face-up land units that suffer an ‘R’ result. They will still be turned face-down (see Facing below).
ShatterIf the result includes an ‘S’ (shatter) or a ‘B’ (breakthrough), put each surviving defending land unit on the production circle if it could have retreated. These units will arrive as reinforcements next turn. Destroy any units that could not have retreated.The attacker can choose to treat an ‘S’ or a ‘B’ result as a retreat result (‘R’) instead. You decide this after losses are applied (but before the next combat).
Advancing after combatIf the combat leaves the target hex empty of enemy land (including notional) units, you may advance any of your surviving attacking units into the hex. The first hex of the advance must be the defending hex. Turn advancing units face-down if the modified terrain cost of the defender’s hex exceeds their movement allowance.Paradropping and invading units must now stop their advance. For all other units, if the result includes a ‘B’ result (which you haven’t downgraded to an ‘R’) and the defender’s hex only cost 1 movement point (modified for weather) to enter, you may advance attacking HQ-A, ARM and MECH unit a second hex. You may also advance MOT and CAV units a second hex if they start and end the advance stacked with the same HQ-A, ARM or MECH unit (DiF option 2: even a division, see 22.1). Turn an advancing unit face-down if the modified cost of the second hex is 2 or more movement points.Ignore all ZoCs (but not enemy land units) when advancing after combat. All units, facilities and saved oil and build points in hexes you advance into may be overrun, even land units if you satisfy the prerequisites (see 11.10.6).

38
Example:
XXX
6 - 46 - 4
LIV
XXXX
5-3
3
XXXX
7-6
1XXX
2-44
XXX
8-6XLV
II
XXX
6 - 46 - 4
LIV
XXX
7-5
LIII
XXX
8-6XLV
II
XXX
7-5
LIII
XXX
7-6
VIII
XXXX
7-6
1
XXX
6 - 46 - 4
LIV
XXX
7-6
VIII
XXX
7-6
VIII
46
1939
34
1940
Heinz attacks the Soviets in E1833, rolls a ‘B’ and shatters the defenders. Heinz advances the LIV INF corps into E1833. He advances the VIII MECH corps into E1833 and then on to E1834 ignoring all enemy ZOCs.He also advances the XLVII ARM 2 hexes, this time to E1733 accompanied by the LIII MOT corps, and together they overrun the 4th CAV corps there (ignoring the Soviet’s 1st MECH army’s ZOC). The advance into E1833 costs 1 movement point but E1733 costs 2 (1 for clear terrain doubled for the overrun). Therefore, Heinz has to turn the ARM and MOT face-down. The VIII MECH stays face-up because E1834 only costs 1 movement point.Defending units can never advance.
FacingIf the result includes an ‘†’, half the attacking land units that are still face-up remain face-up. If the result includes an ‘*’, all remaining attacking land units remain face-up. All other attacking land units are turned face-down.Turn all the defending land units face-down if they suffered an ‘R’ result or if they lost more land units in the combat than the attacker.
Paradrops and invasionsIf any defending land units (even notional ones) now remain in the hex, all surviving paradropping and/or invading units are destroyed.
Combat example
2* 1* 0* 040 1 2 3
OKHOTSK SEA (USSR)
5
3Yamato
GPO1
11 0
4 6
35
1937
46
1939
4
4Fuso
7 3
2 55
6Kongo
6 4
3 3
XXX
6-6V A
rm
MXXXX
5 - 35 - 3
Osak
a
0
35
0 10
0 0
XXXX
6 - 46 - 4
6
In snow, the Japanese 5th MECH corps, 6th INF corps and Osaka MIL totalling 17 combat factors attack the Soviet 3rd MECH army (6 factors) in Nikolayevsk. A successful ground strike earlier in the impulse turned the Soviet 2nd ARM and 3rd MECH face-down. They are being kept in supply by the 5 Soviet CPs in the Okhotsk Sea.The Japanese have 8.5 factors after halving for the river and straits.The BBs Yamato, Fuso and Kongo with modified shore bombardment factors of 5, 4 and 2 are also available to Kasigi. He chooses to use only the first two. Of their 9 shore bombardment factors, only 8.5 can be included. The Yamato and Fuso are turned face-down so they can’t be used for shore bombardment for the rest of the turn. The remaining SCS is still available for shore bombardment.The Ki-51, Ki-32 and Ki-21-I bombers with tactical factors of 3, 2 and 2 are also available to the Japanese. Their total halves to 3.5 because of the snow. The attack factors are thus 8.5+8.5+3.5=20.5. The odds ratio is 20.5:6 rounding down to 3:1. This reduces to 3:2 for the snow.The attacker and defender only have 1 MECH in the combat each, so Anna has choice of table. Trying to save her MECH, Anna picks the blitzkrieg table. The die roll is a 9, +1 because of the face-down defending unit, giving a modified 10. This is a result of ‘†/B’. Anna moves the MECH (which could have retreated) onto the production circle to arrive as a reinforcement next turn.Kasigi takes no losses and, as the result was †, he only has to turn 1 unit face down. The remainder can continue moving and fighting in future impulses. Kasigi’s MECH can’t advance 2 hexes (even though it was a breakthrough result) because the first hex costs 2 movement points (all hexes on the Pacific
maps cost at least 2 points). He advances the Osaka MIL into Nikolayevsk and turns it face down to satisfy the combat result.Anna smiles - she made the right decision. If she’d picked the assault table, she’d have lost her MECH. Kasigi smiles too. If Anna had picked the assault table all the Japanese units would’ve been turned face-down. Now they will be able to isolate and destroy the face down Soviet ARM next impulse (after the Imperial navy has dispatched the Soviet convoy points of course).
11.15.6. 2 die 10 land CRT (option 27)On the back page of this rule book is the 2 die 10 Land Combat Results Table. This table replaces the standard land combat tables included in the combat charts. If you play with the 2 die 10 table, instead of rolling 1 die for land combat, you now roll 2 and add up their values. You then apply the modifiers next to the table, and cross-index the modified total with the column being used (Assault or Blitzkrieg) to find the result. The 2 die 10 table includes one new result, the extra loss to the attacker in bad weather, terrain or attacking HQ-A, ARM or MECH.
2die10 with Fractional Odds (option 26)If you play fractional odds with the 2die10 table you retain all modifiers until you consult the 2die10 table to ascertain the final dice roll modifiers.Example:
XXX
5 - 35 - 3
XXX
XXX
8-5
XLI
6-5XX
I XXX
XXXXX
6(3)2 Mod
el
3St
uka Ju-87
B239
1
1
5
1
Heinz is attacking Jay’s solitary XXI MOT corps across the Loire with the XLI ARM corps, XXX INF corps and Model HQ for a total of 9.5 factors ((8+5+6)/2). These units are supported by a Ju-87B’s 5 tactical factors for a total of 14.5 factors. Heinz decides to use HQ support and launches a blitz combat. Thus the total dice roll modifiers for the attack are (14.5/6) x 2 (all modifiers for odds 1:1 and better being twice the odds) +0.5 (for the ARM halved across a river) +1.5 (for Model’s HQ support) = 6.83 ((2.416 x 2) + 0.5 + 1.5) final modification which is rounded down to 6.8. Heinz rolls 12 on 2 dice and a 5 on the fractional die to give a final modified dice roll of 19 (6+12+1) which is a result of “†1/B”. Note that for odds lower than 1:1, you can’t take the shortcut of just multiplying the odds x2 to work out the dice roll modifiers but must instead work out the fraction based on the odds level in the same manner as example 2 of option 26 (see 11.15.5).
11.15.7. Spotting fleets (option 28)After each land combat, all naval units that shore bombarded or transported invading land units in the combat must be moved into the 0 sea-box section if demanded by their opponent (the active major power deciding first if both sides have naval units involved). If invading and/or shore bombarding a hex from 2 sea areas (e.g. Brest from the North Sea and the Bay of Biscay), the active major power with the most modified attacking factors decides which sea area to resolve first.The opponent is the major power (or its controlled minor country) controlling the hex being shore bombarded or invaded. For defensive shore bombardment the opponent is the major power with the most modified land combat factors attacking. If tied those major powers must all agree for the defending shore bombarding naval units to be moved to the 0 sea-box section.

39
If you demand any enemy shore bombarding and/or invading naval units involved in this combat move into the 0 sea-box section, all must move, you can’t split them. If so demanded, the owning major power (only) may also move any other of their face-up (prior to this land combat) surface naval units and/or aircraft in the same sea-box section (CVPiF option 45: even if their carrier plane is face-down) as the transporting and/or shore bombarding naval units, to the 0 sea-box section as well. They too are then turned face-down.Example:
2* 1* 0* 040 1 2 3
NORTH SEA (No)6
3Prinz Eugen
3 6
3 1
5
4Bismarck
Scheiss BvB
7 2
4 4 6
6London
4 6
3 23
4Nelson
7 2
3 55
2
0 6
1 03
5K George V
7 2
3 4
6
6Norfolk
3 6
2 1
6
5St. Louis
4 6
2 2
8 - 58 - 5
V
XXX6
4San Diego
3 7
3 14
2
0 8
1 0CXXX
7 - 47 - 4
I Can
The Allies are invading Cherbourg (W1833) with the V US MOT corps transported by a US AMPH in the 4 sea-box section of the North Sea escorted by the CAs London and St Louis, and the I Canadian MOT corps from a US AMPH supported by shore bombardment from the BBs Nelson and King George V and escorted by the CA Norfolk and the US CL San Diego in the 3 sea-box section.The Germans have the Bismarck and the Prinz Eugen in the 2 sea-box section and Heinz decides to add the Bismarck’s shore bombardment factors to the LXXXI GAR corps defending Cherbourg. After the land combat is resolved, all naval units shore bombarding and transporting invading land units are turned face down. Since the Allies are the active major powers they decide first whether to move the Bismarck to the 0 sea-box section of the North Sea. Since the US contributed the majority of the modified land combat factors (4 compared to the Commonwealth’s 3.5 after halving) its Jay’s choice and he demands the Bismarck move down to the 0 sea-box section (remaining face-down). Heinz decides to accompany it with the Prinz Eugen which is also turned face-down. Now it’s Heinz’s turn. As he has little opportunity to counterstrike the Allied fleet and doesn’t want to give them the flexibility to return to base far away, he decides to leave the Allied naval units where they are. If Heinz had demanded the Allied invading and bombarding units be moved to the 0 sea-box section, the Allies could have decided to accompany them with some or all of the face-up US naval units in the 3 and 4 sea-box section, but only the CA Norfolk could accompany them, not the CA London as no Commonwealth naval units transported invading units or shore bombarded from the 4 box this impulse.
11.16 Aircraft rebasesYou use rebase missions to move aircraft from place to place. Each aircraft rebase costs 1 air mission.To fly a rebase mission, simply move the rebasing aircraft up to double its printed range to any controlled hex. You may rebase bombers with extended range (see 14.1.1) up to quadruple their printed range.An aircraft can rebase up to triple its printed range (or 6 times its printed range if it has extended range), if it only flies over friendly hexes and sea-dots in sea areas that don’t contain an enemy aircraft, undamaged CV with carrier plane, or SCS unit.Aircraft flying a rebase mission can’t be intercepted.Rebasing units stay face-up after completing their mission even if they started their move out of supply.An aircraft (with a range greater than 0) on a TRS at sea may ‘fly’ a rebase mission into any friendly controlled coastal hex in the sea area containing an open port (see 8.2.1), or a co-operating HQ, and end its rebase there.
11.17 ReorganisationIn the reorganisation step, you can turn some face-down units face-up. This will permit them to move and attack again in later impulses of the turn.
11.17.1. Air supplyAn air supply mission allows you to turn a unit face-up in any land hex by flying an ATR to that hex.
Option 8: (Bomber ATRs) Any aircraft with a white range circle can fly an air supply mission, even if it is not an ATR.
To fly air supply:1. your opponent flies combat air patrol to potential target hexes;2. you fly all your selected ATRs and escorting fighters to the target hexes;3. your opponent flies intercepting fighters to the target hexes;4. you fly intercepting fighters to the target hexes;5. fight any air-to-air combats;6. DiF option 3: surviving bombers suffer anti-aircraft fire from AA and
flak (see 22.2);7. surviving ATRs provide air supply;8. return all remaining aircraft to base and turn them face-down.
Air supply benefitsEach surviving ATR gives you 1 reorganisation point (see 11.17.4).
Option 8: (Large ATRs) Large ATRs give you 2 reorganisation points if the ATR has not flown over half its range to the target hex.
11.17.2. HQ reorganisationA face-up HQ can reorganise units within range of the HQ. The HQ’s reorganisation range is equal to its reorganisation value in motorised movement points. The path from the unit to the HQ is limited in the same way as supply paths (see 2.4.2, Limits on supply paths), and it may not be traced overseas. You may always trace one hex provided the intervening hexside is not alpine, all-sea or unfrozen lake. Lack of supply does not stop an HQ from reorganising units, or a unit from being reorganised.Example: Manstein is in Kerch (E1127) during rain. He can reorganise units in E0927 but not Krasnodar (E0828). If it were fine weather Manstein could reorganise units in both hexes.An HQ has as many reorganisation points as its reorganisation value.Turn the HQ face-down after it reorganises.
11.17.3. TRS supplyA face-up TRS or AMPH at sea has 1 reorganisation point it can use for units on a coastal hex in the sea area. The TRS or AMPH can’t be carrying any cargo.Turn the TRS or AMPH face-down after it reorganises.
11.17.4. ReorganisingYou may only reorganise a unit that started the step face-down. This means you can’t reorganise an ATR that flew an air supply mission in this step.It costs 1 reorganisation point to reorganise a land unit in a land action, an aircraft unit in an air action, or a naval unit in a naval action. In all other cases it costs 2 points to reorganise each unit. You may use a variety of sources to provide the reorganisation points needed (e.g. you could use an ATR and a TRS to reorganise a land unit in a naval action).
Option 8: (Large ATRs) Large ATRs cost 2 reorganisation points to reorganise in an air action, 4 in any other action type.CVPiF option 45: If you reorganise a CV, you can always reorganise its carrier plane free.
You may reorganise units using reorganisation points from units of co-operating major powers and minor countries. However, you double the reorganisation cost of a unit if any reorganisation point came from a co-operating country. If you do, the number of reorganisation points required to reorganise a unit is based on the action taken by the major power controlling that unit, not the action taken by the major power controlling the units providing the points.You may only reorganise an HQ during final reorganisation, see 13.5

40
(option 49: or by the expenditure of offensive points, see 16.4)You may never reorganise aircraft or naval units at sea (exception: option 49 (offensive points), see 16.3.1).
Variable reorganisation cost (option 29)Double the cost to reorganise a LND, NAV or ATR (option 8: except large ATRs) that has a production time of 3 or more turns.Double the reorganisation cost for ARM and MECH units unless at least 1 of the reorganisation points comes from an HQ-A.Doublings are cumulative (e.g. playing with option 29 it would cost 8 points to reorganise a Rumanian ARM in an air action with German reorganisation points if none came from an HQ-A).
12. Last Impulse TestAfter you have finished your impulse, roll a die.
Option 34: (Minimum impulses) Do not start rolling for end of turn until both sides have had at least 2 impulses.
If every major power on your side (neutral and active) chose a pass action, subtract 2 from your die roll. You only subtract 1 if you are playing a 1 or 2 map game.If every major power on your side chose a pass action, except one, subtract 1 from your die roll to end impulses. This does not apply to 1 or 2 map games.
Option 34: (Maximum impulses) If your side has conducted 6 or more impulses and any active major power on your side chose a pass action, subtract 1 from your die roll (cumulative with the above).
If the modified die roll is less than or equal to the current impulse end number on the impulse track, impulses are over and you go on to the end-of-turn stage.If not, advance the impulse marker the number of spaces determined by current weather ~ see 8.2.2 (unless the impulse marker is already in the last box). Your opponents now have their impulse. If they are the second side, they repeat stage D2 of the sequence of play (see 3.1), If they are the first side, they repeat stages D1 & D2 of the sequence of play.If impulses end and your side had both the first and last impulse in the turn, move the initiative marker 1 space towards your opponent’s end of the initiative track.Example: The initiative marker is in the Axis ‘+1’ space. The Axis went first in the turn. After their 3rd impulse, they have to roll a 3 or less to end the action stage. They roll a 2. You move the impulse marker to the 0 space because the Axis has taken the first and last impulses in the turn.
13. End of Turn StageThe end of turn stage involves a little bit of tidying up before you start the next turn. More importantly, this is the stage where you build more units as reinforcements for later turns.When you have completed this stage, the turn is over and you proceed to the next turn.
13.1 PartisansPartisans are units that can appear in countries you have conquered (and in some you are still fighting). Some countries can have partisans no matter who controls them.
13.1.1. Getting partisansAt the start of this step, roll a die and locate the result on the partisan table. This will specify 9 countries or regions (e.g. Siberia and S. America) eligible for partisan activity this turn. Where a region consists of more than one country (or vice versa), every country in that region is eligible (and vice versa). The only exception is Africa where whichever of Germany or the CW has the initiative this turn selects one African minor country to be eligible for partisan activity this turn. For partisan purposes all references to countries also applies to regions.Each country named on the chart on a green background is eligible if it is conquered or any of its hexes are enemy controlled (note: “France” on the chart means Occupied France if a Vichy government (see 17.1) exists). Each country named on a red background is eligible if it is controlled by any active major power.
From Jan/Feb 1943 on you roll 2 dice each turn to determine which countries are eligible for partisan activity. If a country is selected twice, halve the garrison value in that country.Example: In May/Jun 1943 a 3 and a 5 are rolled. The garrison values in Byelorussia, Russia, Ukraine and Yugoslavia are all halved this step. Roll another die for each eligible country and compare it to its partisan number (in the fist symbol on the map, 1 if none). If an eligible ‘green’ country was neutral at any time in the calendar year, halve its partisan number. If there is more than 1 eligible country this turn, the side with the initiative decides the order that each eligible country rolls for partisans. A partisan is placed in an eligible country if the result is less than or equal to that country’s (modified) partisan number. For each 10 less, place an extra partisan in the country. If the roll exceeds the partisan number, there is no effect.There are 2 modifiers to the die roll:• -1 for each partisan unit already in the country; and• + the total (modified) garrison value in the country.Each unit’s garrison value is the same as its neutrality pact garrison value (see 9.2) provided it is on the other side to the major power that will control the partisan (otherwise it is 0). Unlike neutrality pacts, anti-partisan garrison values are never doubled, halved, or modified by entry markers.Example:
XXX
6-3
XLV
XXX
5-4LI
24
1941
PXXX
2-4
EAM
9He-115B
37
1 2
1 2
In Nov/Dec 1943, Heinz has 2 German INF, a NAV and a face-down FTR in Greece which he attacked and conquered in Mar/Apr 1943. There is already a partisan unit in Greece. The partisan rolls are a 1 and a 6 (both of which include Greece), so Heinz’s garrison value in Greece (2+1+0) is halved to 1.5. The partisan number for Greece is 6, halved to 3 because it is the same calendar year that Greece was declared war on. So to get a partisan, Jeremy has to roll less than or equal to 3. He adds 1.5 to the roll for the Axis garrison value and subtracts 1 because of the partisan already there. The net modifier is +0.5, so Jeremy has to roll a 1 or 2 to succeed in gaining a partisan (a die roll of 3 is modified to 3.5 rounded up to 4).
13.1.2. Setting up and controlling partisansPartisans in ‘green’ countries are set up and controlled by the major power that controlled their country before it was conquered (or still control it if it isn’t yet conquered). Chinese controlled partisans are always Communist controlled. French partisans are controlled by the Free French unless it is completely conquered, after which they are controlled by the USSR.Partisans in ‘red’ countries are set up and controlled by the nearest major power currently at war with the major power that controls the country. The nearest is the major power whose capital (even if enemy controlled) is closest to the minor’s as if flying between the two (see 14.1.1). If no major powers are at war with the controlling major power, then the nearest major power on the other side controls the partisans. If control of a ‘red’ country changes, control of its partisans may immediately change too.
Example: A partisan is set up in French controlled Indo-China. Germany and Italy are at war with France but Japan is not. The partisan is controlled by Italy (Hanoi (A0731) to Rome (W0520) is 97 range, Berlin (W0437) is 103). Germany installs a Vichy government (see 17) and Indo-China goes Vichy. Vichy is neutral so the partisan becomes Communist Chinese controlled (Chungking, A0635, is closer to Hanoi than Delhi, A1834). The player controlling the partisan draws it randomly from the force pool and must place it in any enemy controlled hex in its country that is not in an enemy ZoC. If there are no such hexes, put the partisan back

41
into the force pool. If no partisans are left in the force pool, you may choose to remove any partisan from the map (even if only just set up)
13.1.3. Partisan effectsPartisans don’t control hexes. However, they can interrupt the benefits of controlling a hex they occupy. If a partisan is in a hex:• enemy major powers can’t reinforce or move units (except by
overrun ~ see 11.10.6, or invasion see 11.13 or paradrop, 11.14), facilities or resources into the hex;
• enemy major powers can’t use any resources or factories in the hex; • enemy major powers can’t trace supply into the hex; • land units (not their transports) of a ‘green’ partisan’s nationality
(only) may debark from air (see 11.11) or sea (see 11.12) transport into the hex as if they did control it, without fighting a notional unit. They may not invade (see 11.13), nor paradrop, see (11.14);
• enemy facilities (other than oil), aircraft and naval units in the hex are overrun (see 11.10.6); and
• saved oil (TiF option 30) and build points (TiF option 31) may be destroyed.Example:
35
1940
XXX
6 - 46 - 4
1 G
D 1135RN
TB-3
311 *
3 5
11Li-2
41
1 *
* *
3
Bf-109F241
6 *
2 *
PXXX
3-4
Zoya
Germany is deep inside the USSR when a Ukrainian partisan is placed in German controlled Odessa (E1728). The face down Ju-88A4 is destroyed and the face -up Bf-109F2 must return to base. During production, resources can’t be traced through Odessa.Next turn the Allies get the first impulse and the USSR wants to air transport the I GD MTN corps based in Kursk (E1337) into Odessa. Her Li-2 in Moscow (1344) can’t do it as you can’t return to base both the MTN and the transport to the hex at the same time (11.11 sub-step 14). However, the TB-3 stacked with the MTN in Kursk can unload the MTN during sub-step 8 of 11.11 and then return to base wherever she can reach (including Odessa as it is now in the firm control of I GD MTN).
Partisans may move anywhere within their home country (even moving into other regions) but may never leave it. They are always in supply but they only have a ZoC in the hex they occupy.‘Green’ partisans only co-operate with other units from their own country. ‘Red’ partisans only co-operate with other partisans.Add 1 to each partisan unit’s combat factor if it is defending in a forest or jungle hex. Partisans suffering an ‘S’ or ‘B’ result are destroyed instead.‘Green’ partisans are always at war with all major powers (and their aligned minors) on the other side even if the partisan’s controlling major power is not. ‘Red’ partisans are always at war with the major power (and all countries on its side) that controls their country, even if the partisan’s controlling major power is not.Partisans are not removed from the map when their country or controlling major power is conquered (see 13.7.1) or Vichied (see 17.). If their controlling major power has been completely conquered, partisans may still move and fight every turn as if their controlling major power had chosen a land action.
13.2 Entry markersIn this step, major powers with neutrality pacts that have a common border (see 9.2) may pick an entry marker (the side with the initiative choosing first). Entry markers either increase your offensive garrison values, to see if you can break a neutrality pact, or increase your defensive garrison values, to resist a pact being broken. Germany may pick 2 markers. Any other major power in one or more pacts may pick one except Japan which may only pick a marker if she did not pick one last turn.You put the markers on your common border with the major power you have the neutrality pact with. If you have more than one neutrality pact, you have to choose which border to put your marker on. You may then
look at the marker.Next, you must decide whether the marker will be offensive or defensive. If you place it as an offensive marker, place it with its number face-down. If you place it as a defensive marker, place it with its number face-up. After you place your marker(s), you may either:• move 1 marker from one border to another; or• turn over 1 marker (converting it from offensive to defensive or
vice versa).
Example: The USSR has pacts with Germany and Japan. Anna places 1 marker face-up on the German border. She then moves a face-down marker from the Japanese border to the German border. It will require another turn for Anna to turn that marker face-up so that it can play a part in defending the USSR against the German hordes. You may always look at your own offensive markers but can’t show them to anyone else (even on your own side).If you run out of markers, add the next available year’s markers to the pool. When these are all used, every major power randomly returns half its offensive and half its defensive markers to the force pool. Record the value of the markers you return and show them to the other players to verify their value. The recorded values still modify your garrison values. If you want to turn over a marker but have none left on-map, you can turn over one of those you removed. Randomly draw a marker from the pool - show the other players that it doesn’t exceed your recorded total, then put it on the map. If it exceeds your recorded total, you can’t turn over a marker after all - put it back into the pool.There are some new markers to add to the marker pool at the start of each year.
13.3 US entryThe US will begin some campaigns as a neutral major power. Although not involved in a neutrality pact, the USA still requires entry markers to be able to go to war.Its progress towards war is governed by the number of markers it has in 4 pools, the US entry pools and the US tension pools. By manipulating the markers in these pools, the US will be able to go to war with the Axis powers once it has judiciously applied pressure to control war-like Axis tendencies.There are 2 US entry pools and 2 US tension pools - a Japan version, and a Germany/Italy version, of each.The campaign set up (see 24) tells you how many markers start in each pool.
13.3.1. Entry markersThe US entry level is changed by the entry markers you draw. You will have an entry level against Japan and another against Germany and Italy. This is explained in 9.4.Only you will know your entry levels, although your opponents will make guesses based on the US entry options you choose.You can look at your own markers after you have committed them to a particular pool but you can’t show them to anyone else (even on your own side).
Regular entry markersEach turn randomly choose 1 entry marker from the common entry marker pool. From Jan/Feb 1942 onwards, draw an extra marker. Each marker you pick may go into either the Japan entry pool or the Germany/Italy entry pool (your choice).Some US entry actions give the US an extra marker draw. These are noted on the US entry actions chart. Draw 1 extra marker a turn for each of these that applies. The extra marker must go into the entry pool marked for that action (e.g. the extra marker for the Axis conquering the United Kingdom must go into the Germany/Italy pool).Once you are at war with Germany, Japan and Italy, you stop drawing markers and you return all markers in the US entry and tension pools to the common entry marker pool.
Action entry markersYou will also add entry markers during a turn if major powers take certain actions (see 13.3.3).

42
13.3.2. US entry optionsThe US entry options chart lists political choices available to you. Each option is targeted against Japan (Ja), Germany/Italy (Ge/It), or all 3 (if neither is specified).If you want to choose a US entry option, you must be at a high enough entry level to pick it. The entry level is marked on the left-hand side of the entry options.During this step each turn you may always pick 1 option against Japan and/or 1 against Germany/Italy. You may choose a second option against either or both Japan and Germany/Italy if the first option chosen against that major power did not move a marker to the tension pool. If the first option is directed against all three, you may only pick a second option against Germany/Italy and/or Japan if the first option didn’t move a marker to any tension pool. When picking an option, you must turn over enough markers to prove that you have reached the required entry level. In the cases of US entry options 22 (Gear up production) and 34 (Pass war appropriations), you must also show that you have enough tension to play the option. After showing your opponent, turn the markers face-down again.Options with an ‘*’ have a prerequisite option(s) which must have been chosen in a prior turn.Also to the right of the entry option is a number in parentheses. This is the tension cost of that entry option. It may be modified by certain US entry options (see entry options 14, 26 and 35 below). For each 10 tension points the US entry option costs, randomly choose a marker from a US entry pool and move it to the corresponding tension pool. If there are any remaining tension points, roll a die. If the roll is less than or equal to the remaining points, move another random marker from an entry pool to the tension pool.If the entry option is aimed at a particular major power (including US declarations of war), you must move a marker from its entry pool to its tension pool. If there are no markers in the entry pool, the USA may never declare war on that pool’s major power(s).If the entry option is not aimed at any particular major power, you must move a randomly chosen marker from an entry pool of your choice to its corresponding tension pool.Example: The US entry level against Japan is 34 and against Germany/Italy is 35. The US cannot select fireside chat as Jay doesn’t have an entry level of 35 against all three Axis major powers.However, in a previous turn the US froze Japanese assets (US entry option 23) and may now select oil embargo (US entry option 31). Jay rolls a 10. No marker is moved from the Ja entry pool to its tension pool and the US may pick another option against the Japanese.The US has a tension of 17 against Germany/Italy and 18 against Japan, sufficient against all three major powers for Jay to pass war appropriations (US entry option 34). Jay rolls a 3 which requires him to move 2 entry markers from the Ge/It and/or Ja entry pool into its corresponding tension pool. He could pick 1 marker from each entry pool but decides to pick 2 markers (randomly) from the Ja entry pool and moves them to the Ja tension pool, only looking at the markers after both have been placed there. Jay cannot pick another option as 2 options have been chosen against Japan and the first option chosen against Germany/Italy resulted in a marker moving from any entry pool to a tension pool.You may only choose each entry option once. Record the entry options you choose on your builds chart.Immediately the US is at war with Japan it is treated as having chosen every available unchosen entry option aimed solely at Japan (e.g. in the case of war with Japan, if the Burma Road is not closed, ‘Re-open Burma Road’ is not available to be chosen). You still roll for each of these options but don’t have to move a marker to the tension pool when called for unless you want to (except for the US declaration of war if the US declared war on that major power ~ see 9.4). You do this on an option by option basis. The same applies to all Ge/It options when the US is at war with Germany and Italy. If either Germany or Italy is conquered the US only needs to be at war with the other to gain this benefit.When the US is at war with every unconquered Axis major power (other than Vichy), you are treated as having chosen every available entry option (except US entry options 37 and 44).
The entry optionsThe US entry options (directed at (if specified) and tension) are:1. Chinese build aircraft (Ja 3) - You must choose this option before
China can build any aircraft.4. Intern French CV (6) - You may only choose this option if the
CV Bearn is Vichy controlled (see 17). It is now Free French. If it is not in the force pool, immediately place it in the construction pool (CVPiF option 45: destroying any carrier plane, PiF option 46: and pilot, that it’s carrying). However, it may only be built (see 13.6.5) after Vichy collapse (see 17.4.5).
7. Occupy Greenland & Iceland (Ge/It 9) - You immediately declare control of Greenland and Iceland. When you do, move any other Allied units in Greenland or Iceland to the production circle to arrive as reinforcements in 2 turns. You may only choose this option if an Axis major power has declared war on Denmark, and no Axis land unit is in Greenland or Iceland.
9. Resources to China (Ja 4) - Allied major powers can’t give resources to China until you choose this option. In future turns, each major power may give up to 5 resources a turn (no limit once that major power is at war with Japan). The US may use its convoy points to transport anyone’s resources to China. Before this option is chosen the Burma Road may only be used to transport Chinese resources and build points to and from her factories. After it is chosen, the Burma Road may also be used to move resources and build points (not rail movement) into China (not out).
11. US east coast escorts (Ge/It 7) - After you choose this option and while neutral, up to 5 US CVs and/or SCS in the 0 section of the US East Coast sea area may take part in any combat round in which Allied convoys are included, while still remaining neutral. There is no US entry effect for the naval combat itself.
12. Selective Service Act (4) – Until you choose this option the only land unit you may start building each turn is 1 infantry or cavalry class unit. From now on you may start building up to 2 infantry class units or 1 other land unit per turn. There is no restriction on the number or class of units you may build while active.
13. Embargo on strategic materials (Ja 5) - The US only convoys 3 resources (TiF option 30: 2 of which are oil) to Japan per turn instead of 4. Japan no longer needs to supply the USA with a build point.
14. Edward R. Murrow reports from London (Ge/It 3) - Before rolling for all future US entry options aimed at Ge/It, the US may change the tension value of the option by +/- 1.
15. Resources to western Allies (Ge/It 6) – The US can’t give resources to the Commonwealth or France until you choose this option. In future turns the US can give up to 5 resources per turn each to the CW and France (unlimited while the USA is at war with Germany). US convoy points can’t be used to transport these resources unless US entry option 38 is chosen.
16. Gift of destroyers to CW (7) - The next 10 SCS the Commonwealth starts, completes or repairs while the USA is neutral costs 1 less build point each. An SCS that is started and completed would count as 2 of the 10 SCSs.
17. Lend lease to China (Ja 5)* - Allied major powers can’t give build points (see 13.6.4) to China until you choose this option. In future each Allied major power may give up to 5 build points a turn to China (unlimited while at war with Japan). The US may use its convoy points to transport its build points to China from the USA.
Prerequisite: US entry option 9.18. Occupy Azores (Ge/It 8) - In any future turn that Gibraltar or
Madrid is Axis controlled, or if the year is 1943 or later, the USA may declare control of the Azores during its declaration of war step (see 9.6, in addition to any minor country it may align this step) even if Portugal is neutral, provided no Axis unit is in the Azores. If you do, move any non-US units in the Azores to the production circle to arrive as reinforcements in 2 turns.
19. Resources to USSR (Ge/It 8) - The Allies can’t give or receive resources to or from the USSR until you choose this option. In

43
30. Lend lease to USSR (Ge/It 11)* - The Allies can’t give or receive build points to or from the USSR until you choose this option. In future turns the US, CW and/or France may give or receive 1 build point each per turn to or from the USSR while the USSR is at war with any Axis major power. This increases to 5 each per turn while Germany and the USSR are at war and unlimited while the US is also at war with Germany. US convoy points can’t be used to transport these build points while the US is neutral.
Prerequisite: US entry option 19.31. Oil embargo (Ja 9)* - Japan no longer receives any resources from the US
nor from the Netherlands East Indies while it is neutral or Allied controlled. You need no longer maintain a convoy chain to Japan.
Prerequisite: US entry option 23.32. US refutes naval war zones (9) - The USA may use its own convoy points
to ship any resources and/or builds points that the USA is lend-leasing to any Allied major power. Any US convoy points that could be carrying resources to an Allied major power may be attacked by any active Axis units even if they are not at war with the USA.
33. Close Panama Canal (8) - naval movement through the Panama Canal is now restricted (see 11.4.4).
34. Pass War Appropriations Bill (13)* - The US production multiple increases by 0.25. The Italy-US trade agreement (see 5.1) ceases.
Prerequisite: US entry option 22 and a tension level of at least 17 against Germany, Italy and Japan.
35. Fireside chat (5) - For all future US entry options, before rolling for tension the USA may change the tension value by up to +/- 2. This is cumulative with US entry options 14 and 26.
36. CW reinforces Pacific (Ja 15)* - Allied land and aircraft units (TiF option 32: and fortifications) can’t set up in or enter Malaya (A0923), Hong Kong (A0331, TiF option 54: apart from its TERR, see 22.7) or any Commonwealth controlled territory on the Pacific map until:• you have chosen this option; or• Japan is at war with the Commonwealth; or• an Axis land unit (other than a partisan) has entered Malaya, Singapore,
Hong Kong or any CW Pacific map territory. Prerequisite: US entry option 26.37. Atlantic islands transferred to USA (Ge/It 12)* - the
Commonwealth immediately transfers control of Bermuda, Jamaica and St Johns to the USA as US aligned territories.
AiF option 1: Furthermore, British Guyana becomes a US aligned minor country and Antigua, Barbados, the Bahamas, Cayman Is, Newfoundland, Port of Spain, and St. Vincent all become US aligned territories.
Prerequisite: US entry options 16 & 27.38. Arm merchantmen (9)* - After you choose this option and while
neutral, up to 5 US CVs and/or SCS in the 0 section of any sea area may take part in any combat round in which Allied convoys are included, while still remaining neutral. There is no US entry effect for the naval combat itself.
Prerequisite: US entry option 29.39. Call up the National Guard (15) - US reserve units (see 9.7) may
be set up in any future reinforcement stage even while neutral.40. US reinforces Guam (Ja 12) - Allied land and aircraft units can’t
set up in or enter Guam until either you have chosen this option or an Axis land unit has entered Guam or the Marshalls (see 13.3.3) first. Thereafter, there is no restriction.
41. US reinforces the Philippines (Ja 13) – Apart from Philippines units, Allied land and aircraft units can’t enter the Philippines until either you have chosen this option or an Axis land unit has entered the Philippines. Thereafter, there is no restriction.
42. US guarantees the Pacific (Ja 19) – After picking this option, each time the Japanese declare war on the Commonwealth, France, the Netherlands or Portugal, the USA must attempt to declare war on Japan in the US’s next declaration of war step. The US subtracts 4 (minimum one) from this roll (only) in addition to any other modifiers for this declaration of war attempt.
future turns, the US, CW and/or France may each give or receive 1 resource per turn to or from the USSR while the USSR is at war with any Axis major power. This increases to 5 each per turn while Germany and the USSR are at war and unlimited while the US is also at war with Germany. US convoy points can’t be used to transport these resources while the US is neutral.
20. US land-based air escort (Ge/It 6) - The USA may commit land-based air units to escort Allied convoy points in the 0 sea-box section in any sea area where the USA is allowed to escort convoy points.
21. Reflag merchant ships (6) - USA may now (not later) lend lease up to 15 US on-map convoy points to active Allied major powers. These points may be given to one or more Allies, but the total can’t exceed 15. Return the 15 US convoy points to the force pool, and add the same number of recipient convoy points on the production circle to arrive as reinforcements next turn.
22. Gear up production (9) - US production multiple increases by 0.25. US AMPHs may not be built until this option is chosen. You may only choose this option if you have a tension level of at least 11 against Germany, Italy and Japan.
23. Freeze Japanese assets (Ja 7)* - The US only needs to supply Japan with 2 (TiF option 30: oil) resources a turn in this and later turns.
Prerequisite: US entry option 13.24. Re-open Burma Road (Ja 4) - If the Burma Road was closed by
political pressure (not military control), it is re-opened when you choose this option.
25. Repair western Allies’ ships (5) - After you choose this option the US may repair Commonwealth and French naval units.
Option 39: repairs count against US gearing limits. FiF option 40: (Factories in Flames) they may only be
repaired in the unit’s home country.26. Relocate fleet to Pearl Harbor (Ja 6) - Until you choose this option
the only Allied naval units that may base at Honolulu or Pago Pago are TRSs and CONVs.
To avoid the +2 modifier for declaring war on Japan you need to base a fleet in Honolulu, at the moment of declaration, of at least
(a) 2 US CVs, each with an air component (see 14.4) of at least 4 (CVPiF option 45: and each carrying a carrier plane), and
(b) 4 (SiF option 5: 8) US BBs. While you have at least such a fleet located at Pearl Harbor and the entry
option is aimed only at Japan, you may increase or decrease the tension cost by up to 3 before rolling the die.
Example: Jay picks US entry option 9, Resources to China. This has a tension cost of 4. Because the option is aimed at Japan and there is a sufficient US fleet in Pearl Harbor, Jay can modify that tension cost by up to 3 before rolling. So he could increase it to a maximum of 7 or decrease it to 1. Jay (strangely) chooses to increase the tension cost to 5, then rolls his die.
27. Lend lease to western Allies (Ge/It 9)* - The US can’t give build points (see 13.6.4) to the Commonwealth or France until you choose this option. In future turns the US may give up to 5 build points a turn to each of the CW and France (unlimited while the USA is at war with Germany). US convoy points can’t be used to transport these build points while the US is a neutral major power.
Prerequisite: US entry option 15.28. Truman committee formed (5)* - The US can’t produce 4-turn LNDs
while neutral until this option is chosen. The US is no longer restricted in the number or class of any units she builds (see 13.6) each turn. The US may now destroy (TiF option 31: and disband) units (see 4.3) while neutral.
Prerequisite: US entry options 12 & 22.29. North Atlantic escorts (Ge/It 8)* - After you choose this option and while
neutral, up to 5 US CVs and/or SCS in the 0 section of the North Atlantic sea area may take part in any combat round in which Allied convoys are included, while still remaining neutral. There is no US entry effect for the naval combat itself.
Prerequisite: US entry option 11.

44
may never claim any territory (see 19.6), give or receive any build points or resources from the US (see 5), or co-operate (see 18) with her, for the rest of the game.
Example: In Sep/Oct 1939, Germany declines Soviet claims on Bessarabia. The USSR declares war on Rumania and rolls a 6 requiring 2 markers to be removed from an empty Ge/It entry pool. The USSR may never claim the Finnish borderlands nor receive any US lend lease for the rest of the game. The US will not get any regular US entry markers in Sep/Oct and Nov/Dec 1939. France then declares war on Italy and needs to remove another marker from the Ge/It pool. The US would now not get any regular US entry markers in Jan/Feb 1940. France (and Free France) suffers the same effects as the USSR and also cannot co-operate with the USA for the rest of the game.
The entry actionsThe actions on the chart are mostly self-explanatory. Those that aren’t are:1. Japan aligns Indo-China (Ja) - Japan aligns (see 9.6) French Indo-
China provided it is Vichy controlled (see 17.2) and there are no Allied non-partisan units there. Japan does this by announcing it during an Axis declaration of war step. Move any Vichy units in French Indo-China to the Free French force pool (TiF option 54: except its TERR which is removed from the game and replaced by the Japanese Indo-China TERR). All hexes in French Indo-China are Japanese controlled.
3. Japan militarizes Marshalls (Ja) – No Japanese unit may set up in any hex on the border of the Marshalls sea area unless this has already been rolled for (see 24.4.3). If not, you roll for this action as soon as Japan moves a unit (TiF option 32: or builds a fortification) there.
5. Japan aligns Madagascar (Ja) - Japan aligns Madagascar provided it is Vichy controlled (see 17.2) and there are no Allied non-partisan units there. Japan does this by announcing it during an Axis declaration of war step. Japan must have aligned French Indo-China (see US entry action 1) in a previous turn. Move any Vichy units in Madagascar to the Free French force pool (TiF option 54: except its TERR which is removed from the game and replaced by the Japanese Madagascar TERR). All hexes in Madagascar are Japanese controlled.
6. Japan forces closure of Burma Road (Ja) - the Burma Road is one way that the Allies can transport resources (see 13.3.2, US entry option 9) and build points (US entry option 17) to China. The Axis may close it by physical occupation but Japan may also close it by diplomatic pressure during any step.If Japan does this, an Allied major power can’t transport resources or build points to China via the Burma Road or French Indo-China until it is at war with Japan or the USA chooses US entry option 24. China may still use the road to transport its own resources.You only roll a die for diplomatic not physical closure of the road and when controlled by any other major power it may be used by them irrespective of whether it is closed or not.
10. Japan occupies Chinese city (Ja) - each time a Japanese controlled land unit occupies (or reoccupies) a Chinese controlled city in China there is the possibility of US outrage (e.g. the occupation of Nanking). You also roll for each Chinese city gained by Japan when it conquers China (see 13.7.1), but not those gained through Chinese surrender (see 13.7.6).
12 , 13, 22, 24 & 25. Multiple major power declarations of war – If both major powers declare war on the same major power in the same impulse you only roll once, otherwise roll for each declaration of war. The second roll only costs half if the other major power is already at war with that major power (e.g. if Italy and France are already at war, the Commonwealth could declare war on Italy for only -9, not -18).
15. Axis invades the United Kingdom (Ge/It) - the Axis has invaded the UK as soon as any Axis land unit occupies any hex of the United Kingdom at the end of any Axis land combat step.
18. Axis controls Gibraltar (Ge/It), Singapore (Ja) or Suez Canal – the Suez Canal is considered occupied immediately that the Axis control any hex adjacent to the Suez Canal.
19 & 30. Minor aligned - this occurs when the minor country voluntarily aligns with a major power (see 9.6). A minor country that joins a side
This option may only be chosen if at least one of the CW, France, the Netherlands or Portugal is not at war with Japan.
43. Allies access the Netherlands East Indies (Ja 17)* - You may only choose this option if:• US entry option 31 has been chosen; and • Germany or Italy have declared war on the Netherlands and • the NEI (see 19.9) is Allied controlled.
44. US occupies Northern Ireland (Ge/It 13) - You may declare control of Northern Ireland during any future Allied declaration of war step that the Commonwealth controls every hex in Northern Ireland provided the Commonwealth agrees. Northern Ireland becomes a US aligned territory. Move any other Allied units there to the production circle to arrive as reinforcements in 2 turns. From now on the US may use the Belfast factory and Belfast becomes a primary supply source for the US. FiF option 40: (Factories in Flames) All CW units on the Belfast track may only be completed by the USA, no new CW units may be placed there (except naval repairs, see 13.6.10 Damaged and incomplete naval units, and units in Belfast’s construction pool) and no US units may be started in Belfast (apart from naval repairs) while any CW units are in a box higher than the 2 box.
45. Military manoeuvers (15) - while neutral the USA may choose any action type (see 10) each impulse (not just combined).
46. US may build ahead its units (12) - The USA may build ahead its units (see 13.6.5) while neutral.
48. US may declare war on any minor country (22) - The US may declare war on any minor country.
50. Unrestricted naval warfare (25)* - US naval and aircraft units at sea may freely attack (including initiating combat), and be attacked by, any active Axis naval and aircraft units. You still can’t port attack, shore bombard, ground strike, strategically bombard, or fly ground support.You may escort Allied convoys in any sea area with any number of SCS or CVs.You may now move any number of naval units together as 1 naval move, instead of counting each unit as a naval move.Prerequisite: US entry option 38.
? US declares war on a major power (25) - Rolled immediately each time the US successfully declares war on a major power (see 9.4). The chits must come from the entry pool of the major power declared war on (and placed in its tension pool).
13.3.3. US entry actionsActions both sides take before the US is at war with every Axis major power can hasten or delay its entry.Prior to the US being at war with Germany, Japan and Italy, whenever a major power takes any action specified on the US entry actions chart, you should check the US entry cost of that action. If the cost is positive, you may have to randomly choose 1 or more markers from the common marker pool and put it in one of your entry pools. If the cost is negative, you may have to randomly choose 1 or more markers from an entry pool and return it to the common marker pool.If the action has “(Ge/It)” after it, place or remove the marker into/from the German/Italian entry pool. If the action has “(Ja)” after it, place or remove the marker into/from the Japanese entry pool. In all other cases, the US player may choose either entry pool.For every 10 US entry points the action costs, randomly select 1 marker. If there are any remaining points, roll a die. If the roll is less than or equal to the remaining points, select another marker.
Example: Japan occupies Indo-China. This has a US entry cost of 12. So, you add 1 marker from the common marker pool to the Japan entry pool. Roll a die and compare it to the remaining 2 points. If you roll a 1 or 2, you put a further marker into the Japan entry pool.
You may only pick markers for each action once, regardless of the number of times that the action occurs, unless the chart notes otherwise.Whenever the US can’t take a marker from an entry pool when required, the US loses 1 turn’s regular entry markers (see 13.3.1) for each marker not removed. Furthermore, if an Allied major power triggered the removal, it

Norway Reaction table
roll* Political impact10 Norway immediately becomes a German aligned minor country
(see 9.6) with no US entry penalty (ignore US entry action 19).
9 Same as a roll of 0-2 but with Germany gaining all the benefits, not the Commonwealth. Furthermore, if an in-supply German land unit occupies London or Moscow during any declaration of war step she may align Norway.
7-8 While neutral, Norway has a trade agreement (see 5.1) with Germany supplying her with its resource each turn. Furthermore, if an in-supply German land unit occupies London during any declaration of war step she may align Norway.
3-6 Norway is undermined for not taking decisive action to counter this insult to her sovereignty. When next aligned, Norway sets up 1 less INF corps than normal. Place the unit not set up on the production circle to arrive as a reinforcement next turn.
0-2 Place 10 Commonwealth (CoiF option 7: 5 of them tanker) CPs on the production circle to arrive as reinforcements next turn. If Norway is later aligned to any major power her units are set up (see 19.4.1) less 10 (CoiF option 7: 5 of them tanker) CPs.While Norway is neutral:(a) she has a trade agreement with the Commonwealth supplying her with its resource each turn; and(b) Oslo is considered CW controlled solely in regards to naval movement into and out of the Baltic (see 11.4.4).
* -1 to die roll if a face-up undamaged CW CV (CVPiF option 45: with a carrier plane) is in the 4 section of the North Sea sea area and no face-up German SCS or CV is in any section of the North Sea or Norwegian Sea.
45
European maps +12
Americas map(s) +24
because a major power declares war on it (see 9.5) doesn’t count.20, 31 & 32. Major Power declares war on neutral minor - roll once for
each major power declaring war on this minor this impulse.21. Allies support attacked minor (Ge/It) - the Allies have supported an
attacked minor country if there are at least 4 in-supply Allied corps-sized units in the minor’s original unconquered home country during the Allied minor support step of the same turn an Axis major power declared war on it. Soviet units in east Poland don’t count and neither do the minor’s own units.
26. USSR controls East Poland (Ge/It) - see 19.5.1.27. USSR controls Nazi-Soviet Pact areas (Ge/It) - see 19.5.2. 34, 35 & 36. Search and seizure - see 13.6.137. Japanese unit first enters any hex or sea area on (Ja) -
Roll once per map when first entered but only if Japan is not currently at war with the Commonwealth, France, the Netherlands or the US.
38. Closing Suez Canal - During any naval movement step that theycontrol Suez, the Commonwealth may announce that they are closing the Suez Canal (see 11.4.4).
39. Mining Norwegian coast (Ge/It) – Once per game, provided the USA and Norway are both neutral and Paris is Allied controlled, then at the start of any Commonwealth naval action (see 10.1) the CW may turn face-down any face-up CW SCS in the 4 section of the Norwegian Sea sea area (this does not count as a naval move or combat) and announce that they are mining the Norwegian Coast.
The Commonwealth player rolls a die:
Regardless of the roll the Norwegian coast is mined. From now on if the last impulse of any turn is blizzard or snow in the Arctic weather zone, Germany may only ship Swedish resources (see 5.1) through the Baltic Sea that turn if Oslo is Axis controlled or there are equal to or more face-up Axis SCS in the North Sea than Allied. [Designer’s Note: this represents that the iron ore transported through neutral Norwegian waters during winter would cease given a heavy British naval presence
unless German minesweeping was given a substantial escort].
13.4 Return to baseUnits at sea can return to base during this step. If they do they will be available to move again during the next turn. Those that stay at sea will only be able to stay in the sea area next turn or move back to a port.Units may return to base during naval movement, after aborting from combat, and during this step. You return units to base like a normal naval move (or naval air or naval air interception mission) except in reverse.Each unit returning to base is limited by its movement allowance (reduced for the sea-box section it is occupying) and by its range.A unit must return to base during this step if it is:• any unit (except convoy points) of a neutral major power; or• a TRS or AMPH (DiF option 20: or SCS) with a cargo on board; or• any unit (except CPs (CoiF option 7: and ASW)) in the 0 section.Any other of your units may return to base if you like. Convoy points (CoiF option 7: ASW and Milchows) are the only units in 0 sea-box sections that may stay at sea. If they do return to base, they won’t be able to convoy resources during this turn’s production step.Both sides (side with initiative first) must decide which units to return to base and which to keep at sea.If you decide to keep a unit at sea you must immediately move it into the next lower section of the sea-box (except CPs which stay in the 0 section). If you instead decide to return a unit to base, move it into the surrounding sea area next to its sea-box section.After both sides make these decisions, units return to base (side with initiative first). Naval units returning to base can be intercepted (see 11.4.6) but only by units staying at sea. Only the intercepted units, units staying at sea, and aircraft that fly naval interception may take part in an interception combat.If intercepted you must attempt to fight through from the 0 sea-box section (see 11.4.6).13.4.1. AircraftTo return an aircraft at sea to base, put it into any hexdot in the sea area and then fly it from there to any hex within range (even if it flew into the sea area during naval air interception, see 11.5.3) it can base at (remembering to reduce its range by the cumulative movement cost of the sea-box section it came from and that the maximum cost for the first hex (rather than hexdot) entered is 2 ~ see 11.3)Aircraft flying extended range (see 14.1.1) may return to base up to double their range. All other aircraft returning to base must return to a base within range.13.4.2. Where do units return to base?A neutral unit can only return to a base controlled by its country or by its controlling major power. In the case of a neutral major power unit, you may also return it to a minor country base controlled by that major power.Subject to foreign troop commitments (see 18.2), a naval unit of an active major power (or a minor aligned to an active major power) can return to any base controlled by an active major power (or by a minor aligned to an active major power) on its side.A base for naval units is any port where the naval unit can stack and for aircraft it’s any hex the aircraft can stack (see 2.3.1). If there is none the unit (PiF option 46: and its pilot) is destroyed. Turn units (and their cargoes) face-down when they return to base.13.4.3. Units remaining at seaAfter all desired units have returned to base, units remaining at sea are destroyed if there is no base available that they could return to if required. Where some units could return to base the owner of the base decides which.Example: At the end of the return to base step an Italian G50 and German FW-190 D9 (both range 4) are in the Eastern Mediterranean’s 2 sea-box section. The only friendly base within range is Italian controlled W0311 (Syracuse and W0312 are enemy controlled). Maria destroys the FW-190.You are not destroyed if you have a base available to return to but could not return now to the base due to non-co-operating units currently occupying the hex.

46
Example: Germany declares war on Denmark. 5 French SCS respond by moving into the Baltic’s 3 sea-box section. Later in the turn Germany occupies Copenhagen (W0442) and Aarhus (W0643) while the II British INF corps debarks into Frederikshavn (W0645).
2* 1* 0* 040 1 2 3
BALTIC SEA (De)
5
2Jeanne d’Arc
2 9
2 05
3Foch
3 7
3 26
2Primaguet
2 8
2 1
XXX
7 - 37 - 3
II
XXX
6 - 46 - 4
XLIX
XXX
5-4
XXXI
5
3Marseillaise
2 7
3 16
3Tourville
3 8
2 2
At the start of the return to base step, the SCS move down to the 2 sea-box section. At the end of the step units remaining at sea are checked for base availability. Alas the French SCS can no longer return to base via the North Sea (due to German control of Kiel (W0640) and Copenhagen) and cannot currently base in Frederikshavn (as they do not co-operate with the Commonwealth).
However, 2 of the SCS (Jeremy’s choice) could still stay at sea. The other 3 are destroyed (unless playing SiF option 5 in which case only 1 SCS would be destroyed). If the SCS started the step in the 0 sea-box section they would all be destroyed.
13.5 Final reorganisationTurn all face-down units face-up (including units out of supply, and those that have stayed at sea).
Option 35: (Isolated reorganisation) Neutral units and units at sea (DiF option 14: and supply units along with 1 unit each supply unit is stacked with) are now turned face-up. Turn each other unit face-up unless it is out of supply and it cannot trace a basic supply path (including overseas, see 2.4.2) of any length back to a primary supply source for that unit.
13.6 ProductionProduction allows you to build new units and to repair damaged naval units. How much you can build depends on the resources and factories your major power controls.Each factory that receives a resource makes 1 production point. You multiply this by your production multiple to give you build points. Build points are what you spend to buy new units.13.6.1. ResourcesResources are printed on the map. The total resources in each country are recorded on the factory and resources table. There are 2 types of resources - general resources and oil resources. Oil and general resources are the same, except for strategic bombardment, see 11.7 (TiF option 30: and moving oil dependent units, see 10.3).
TiF option 32: (oil facilities) Each major power has oil facilities that represent its actual and potential synthetic oil industries (turning coal into fuel oil). There are also hex-specific oil facilities that represent known reserves of natural resources yet to be developed that anyone can build (see 13.6.6). Once built, each oil facility point (synthetic and hex-specific) produces 1 oil per turn for whoever controls the hex (e.g. if Jay built the Houston 2-point oil facility (M0916), Houston would produce 8 (6+2) oil per turn!).TiF option 32: (resource facilities) Hex-specific resource facilities are treated exactly like oil facilities except that they only produce 1 general resource each turn (rather than oil).
You may use any resource you control in the production step (you don’t need to have controlled it at the start of the turn) if you are able to transport it to a useable factory in that step.You may only use 1 resource for each factory in the hex you transport it to (TiF option 30: but unused oil may be saved there, see 13.6.9).
Example:
Dnepropetrovsk, Krivoy Rog and E1430 have been isolated from the rest of the Soviet Union. Anna could only use 2 of Krivoy Rog’s 3 resources in Dnepropetrovsk’s 2 factories this turn (or only 1 if its blue factory is railed out); the other resource is lost.You can’t use an oil resource that was lost to strategic bombardment during the turn (see 11.7).Transporting resources by rail and roadYou transport a resource to a factory in the production step by railing it from its hex to a useable factory. It must move along railway lines (roads count as railways for this purpose). It may also cross a straits hexside from one railway hex to another. Each resource cannot cross more than 1 straits hexsides.This move does not count as a rail move and the resource does not have to start its move at a station.The move can only pass through:• hexes you control;• hexes in neutral minor countries; and• hexes controlled by another major power, but only if it allows you.Allied major powers (except the USSR) may only trace resources through Soviet controlled hexes while the USSR is at war with Germany.The resource’s move can only enter or leave a hex in an enemy’s ZoC if there is a friendly land unit in the hex. Its move must stop when it enters an enemy’s ZoC. If the resource is in the same hex as the destination factory, it can be used there regardless of enemy ZoCs.
Option 12: (limited access across straits) A resource may rail move across a straits hexside if any adjacent sea area contains no enemy units capable of blocking supply, or you can trace supply through any adjacent sea area.TiF option 32: (roads) No more than 5 resources (oil and/or other) and/or build points in total may travel along any 1 road hex per turn. Example:
Anna builds a road in A1841 while Ju-Ming builds roads in A1543 & A1643. This allows the USSR to lend-lease resources and build points to China via Kashgar (A1841) or Urumchi (A1343) but only 5 in total can go to Lanchow (A0838) and factories further away.
Transporting resources by seaIf you can’t rail a resource to a useable factory, you may be able to rail it to a port and then ship it overseas through a chain of sea areas, each containing convoy points. If that chain of sea areas extends to a port, you may then be able to rail the resource from that port to a useable factory.You can rail a resource point both before and after shipping it overseas but you may not ship it overseas, then rail it, then ship it overseas again.

WORLD IN FLAMES Collector's edition © 2017. Australian Design GroupCountry: BUILDS CHART * BUILDS www.a-d-g.com.au
Fac- PMOwn Lent Rec'd Saved Total tories Own Lent Rec'd Saved Total I C A T Sp OC F AC P VW AB S U
Sep/Oct '39
Nov/Dec
Jan/Feb '40
Mar/Apr
May/Jun
Jul/Aug
Sep/Oct
Nov/Dec
Jan/Feb '41
Mar/Apr
May/Jun
Jul/Aug
Sep/Oct
Nov/Dec
Jan/Feb '42
Mar/Apr
May/Jun
Jul/Aug
Sep/Oct
Nov/Dec
Jan/Feb '43
Mar/Apr
May/Jun
Jul/Aug
Sep/Oct
Nov/Dec
Jan/Feb '44
Mar/Apr
May/Jun
Jul/Aug
Sep/Oct
Nov/Dec
Jan/Feb '45
Mar/Apr
May/Jun
Jul/AugBuild class: Infantry (I), Cavalry (C), Armour (A), Artillery (T), Supply (Sp), Offensive chits (OC), Facilities (F), Aircraft (AC),
Pilots (P), V-Weapons (VW), A-Bombs (AB), Ships (S), Subs (U) * ~ May Photocopy
ShipsResources Build Points Land Marker Aircraft
47

WORLD IN FLAMES Collector's edition © 2017. Australian Design GroupCountry: BUILDS CHART * BUILDS www.a-d-g.com.au
Fac- PMOwn Lent Rec'd Saved Total tories Own Lent Rec'd Saved Total I C A T Sp OC F AC P VW AB S U
Sep/Oct '39
Nov/Dec
Jan/Feb '40
Mar/Apr
May/Jun
Jul/Aug
Sep/Oct
Nov/Dec
Jan/Feb '41
Mar/Apr
May/Jun
Jul/Aug
Sep/Oct
Nov/Dec
Jan/Feb '42
Mar/Apr
May/Jun
Jul/Aug
Sep/Oct
Nov/Dec
Jan/Feb '43
Mar/Apr
May/Jun
Jul/Aug
Sep/Oct
Nov/Dec
Jan/Feb '44
Mar/Apr
May/Jun
Jul/Aug
Sep/Oct
Nov/Dec
Jan/Feb '45
Mar/Apr
May/Jun
Jul/AugBuild class: Infantry (I), Cavalry (C), Armour (A), Artillery (T), Supply (Sp), Offensive chits (OC), Facilities (F), Aircraft (AC),
Pilots (P), V-Weapons (VW), A-Bombs (AB), Ships (S), Subs (U) * ~ May Photocopy
ShipsResources Build Points Land Marker Aircraft
48

WORLD IN FLAMES Collector's edition © 2017. Australian Design GroupCountry: BUILDS CHART * BUILDS www.a-d-g.com.au
Fac- PMOwn Lent Rec'd Saved Total tories Own Lent Rec'd Saved Total I C A T Sp OC F AC P VW AB S U
Sep/Oct '39
Nov/Dec
Jan/Feb '40
Mar/Apr
May/Jun
Jul/Aug
Sep/Oct
Nov/Dec
Jan/Feb '41
Mar/Apr
May/Jun
Jul/Aug
Sep/Oct
Nov/Dec
Jan/Feb '42
Mar/Apr
May/Jun
Jul/Aug
Sep/Oct
Nov/Dec
Jan/Feb '43
Mar/Apr
May/Jun
Jul/Aug
Sep/Oct
Nov/Dec
Jan/Feb '44
Mar/Apr
May/Jun
Jul/Aug
Sep/Oct
Nov/Dec
Jan/Feb '45
Mar/Apr
May/Jun
Jul/AugBuild class: Infantry (I), Cavalry (C), Armour (A), Artillery (T), Supply (Sp), Offensive chits (OC), Facilities (F), Aircraft (AC),
Pilots (P), V-Weapons (VW), A-Bombs (AB), Ships (S), Subs (U) * ~ May Photocopy
ShipsResources Build Points Land Marker Aircraft
49

WORLD IN FLAMES Collector's edition © 2017. Australian Design GroupCountry: BUILDS CHART * BUILDS www.a-d-g.com.au
Fac- PMOwn Lent Rec'd Saved Total tories Own Lent Rec'd Saved Total I C A T Sp OC F AC P VW AB S U
Sep/Oct '39
Nov/Dec
Jan/Feb '40
Mar/Apr
May/Jun
Jul/Aug
Sep/Oct
Nov/Dec
Jan/Feb '41
Mar/Apr
May/Jun
Jul/Aug
Sep/Oct
Nov/Dec
Jan/Feb '42
Mar/Apr
May/Jun
Jul/Aug
Sep/Oct
Nov/Dec
Jan/Feb '43
Mar/Apr
May/Jun
Jul/Aug
Sep/Oct
Nov/Dec
Jan/Feb '44
Mar/Apr
May/Jun
Jul/Aug
Sep/Oct
Nov/Dec
Jan/Feb '45
Mar/Apr
May/Jun
Jul/AugBuild class: Infantry (I), Cavalry (C), Armour (A), Artillery (T), Supply (Sp), Offensive chits (OC), Facilities (F), Aircraft (AC),
Pilots (P), V-Weapons (VW), A-Bombs (AB), Ships (S), Subs (U) * ~ May Photocopy
ShipsResources Build Points Land Marker Aircraft
50

51
Example: You could rail a resource from the east coast of the USA to the west coast and ship it to the USSR via Vladivostok (P2942). You could then rail it to Moscow (E1344) to become a production point. Since it has already moved overseas, you couldn’t then rail it to Murmansk (E1653) and on by sea to the United Kingdom.Some resources are in coastal hexes that are not ports. You may pick these resources up directly from the coast as if they were at a minor port.A side may only ship 5 resources a turn into, and/or out of, each minor port. There is no limit for major ports.Resources must be transported in whole numbers and you can’t ship more resources through a sea area than the number of convoy points you have in that area. Example:
0
3100
100
0
0
350
10
0 0
Japan is convoying 6 resources from Malaya, the Netherlands East Indies and Hainan (A0630) to Japan through the South China Sea and the China Sea. Because of US submarine attacks in the China Sea, there are only 5 convoy points there. Therefore, only 5 resources get through, even though there are still 10 convoy points in the South China Sea.A chain of convoy points across one or more sea areas doesn’t all have to be from the same major power.Naval movement restrictions apply to resource transportation. You may only ship resources from one sea area to an adjacent sea area if one of your SCS could have made the same move in the last impulse of the turn.You may always transport your own resources and build points. Active major powers may also transport resources and build points for, and/or contribute to the convoy chain of, any other active major power on the same side. Neutral major powers may only transport resources and build points for, and/or contribute to the convoy chain of, another major power if the rules specifically allow it (see 5.1, and 13.3.2, US entry options 9, 17, 27 and 30).Any number of major powers from both sides could have convoy points passing through the same sea area.Search and seizureYou can stop major powers on the other side that you are not at war with from transporting resources (and build points ~ see 13.6.4) overseas to major powers you are at war with. To do this:• you must have an SCS, CV or SUB in the sea area during the
production step;• the major power you are not at war with must have convoy points
there that are transporting resources (or build points) to a major power you are at war with; and
• there must not be an SCS, CV or aircraft unit with an air-to-sea factor, controlled by a major power you are at war with, in the sea area (or a US unit that can escort there because of US entry options 11, 20, 29, 38 or 50 ~ see 13.3.2).
You may then execute a search and seizure in that sea area. If you do, those resources (or build points) are lost. Each search and seizure you execute is a US entry action (see 13.3.3) if it is conducted against a major power not at war with the USA. You only roll once per sea area regardless of how many major powers’ resources and build points are seized in that sea area.
Convoy pointsConvoy point units are worth 5 (back of counter) or 10 (front) convoy points (SiF option 5: one-to-10) each. You may make change with them whenever you like.
CoiF option 7: Only tankers may transport oil overseas and only convoys may transport other resources or build points overseas (see 22.16).
13.6.2. FactoriesEach hex can contain up to 3 factories. Some of those factories will be red factories but most will be blue (TiF option 32: including built) factories. The total red and blue factories in each country are recorded on the factory and resources table.An undestroyed red factory is useable if you control it in the production step. An undestroyed blue factory is useable if you control it in the production step and it is either in your (current and/or 1939) major power’s home country or in an aligned (not conquered) minor country. Destroyed factories are unuseable until repaired (see 13.6.7).Each resource you transport to a useable factory produces 1 production point. Only 1 resource may be sent to each factory.Example: Dortmund (W0836) has 2 factories (1 blue and 1 red). If 3 resources are transported to it, it produces 2 production points.13.6.3. Production multiples & build pointsTotal your production points and then subtract the number you lost to strategic bombardment (see 11.7). Multiply the net total by your production multiple. The result is your major power’s build points.You may also have build points lend leased from other major powers (see 13.6.4).
TiF option 31: You may also have saved build points from previous turns (see 13.6.9).
Each major power has an initial production multiple that rises progressively during the game. Essentially, this reflects an increasing national industrial output and an increasing share of that output being devoted to military use. Production multiples are listed on the Production Multiples chart.Increase the USSR’s production multiple by +0.25 from Jan/Feb 1942 or the turn Germany declares war on the USSR, whichever comes first.Increase the USA’s production multiple by:(a) +0.25 when the US chooses US entry option 22 (see 13.3.2);(b) +0.25 when the US chooses US entry option 34;(c) +0.25 when the US is at war with any Axis major power; and(d) +0.25 when the US is at war with every active Axis major power. Example: Japan declares war on the US in Nov/Dec 1941.US entry option 22 and 34 have already been chosen. The US’s production multiple will increase to 1 this turn.The US declares war on Germany in Jan/Feb 1942. In Mar/Apr 1942 the Commonwealth completely conquers Italy. Vichy is not active. The US is now at war with every active Axis major power so her production multiple increases to 1.25 from this turn, to 1.5 from Jan/Feb 1943, to 1.75 from Jan/Feb 1944 and so on (even if Vichy became active in the meantime and the US did not declare war on her).Bonus build pointsAdd 1 build point to your total for each of your in supply major power (not minor country) corps-sized units (excluding partisans and partisan HQs, see 13.1) destroyed during the land combat step (see 11.15) in its home country this turn.If claimed, East Poland and the Baltic States also count as USSR home country for this purpose but only if, at the start of this combat, the USSR controls at least one city in the region where the unit is destroyed.Example 1:
OOSM
XXXX
7 - 27 - 2Mos
cow
XXXX
5-1
40
XXXX
4-1
54
6
XX
1-44 2
1937
XXXX
4-1
30
XXXX
3-1
23 XXXXX
5(2)2 Tim
oshe
nko

10Mustang III
P-51CDETROIT M ISS 41
8 *
2 1 24
1943
10
DETROIT M ISS 43
Mustang III
P-51C8 *
2 1
52
It is May/Jun 1941 and Germany has invaded the USSR. 2 Soviet GAR are destroyed out of supply in Vilna (E2341), then another 2 GAR in E2342 and finally a MIL, HQ-I, INF division and face down FTR in Minsk (E2140). During production Anna gets 2 build points for the 2 corps-sized units destroyed in Minsk but nothing for the out of supply units in Vilna nor for those lost in E2342 as, at the time, Anna didn’t control any cities in East Poland (even though she did control cities in the Baltic States). A Commonwealth unit was also destroyed in the USSR but Jeremy gains nothing as only Soviet land units destroyed in the USSR count. An in-supply Rumanian corps destroyed in a Soviet counterattack in Rumania doesn’t give Germany a build point either as only major power units count.Example 2: An in-supply Indian corps is destroyed in Australia. In that turn’s production Jeremy gets 1 bonus build point. If the Indian corps had been destroyed in Burma, he would not as only major power home countries count.
Option 36: (Cadre) If not eligible for a bonus build point (because the unit was destroyed outside its home country) you may still add 1 bonus build point to your total for each of your in supply major power (not minor country) corps sized units (excluding partisans and partisan HQs) destroyed during the land combat step provided it is: (a) a (prior to this land combat) face-up HQ;(b) stacked with such an HQ; or(c) adjacent to such an HQ and the motorised movement point
cost to the HQ from the unit is less than or equal to the HQ’s reorganisation value.
Examples: 1) An in-supply Rumanian corps destroyed in the USSR adjacent to Antonescu would not give Germany a bonus build point as neither is a major power unit. 2) An in-supply German corps destroyed in the USSR is stacked with Antonescu (and not adjacent to a German HQ). Germany won’t get a bonus build point because Antonescu is not German. 3) An in-supply German corps is destroyed invading E0624 adjacent to a face-up Manstein in Sukumi. This will give Germany a build point in fine weather but not rain as the motorised cost to enter a European mountain hex in rain is 6 movement points which is greater than Manstein’s reorganisation value.
Place destroyed units eligible to give you a bonus build point in the Cadre Pool on the West Europe or Pacific map. After adding up all your bonus build points place them in your force pool and/or scrap them (see 13.6.5) prior to building new units. 13.6.4. Lend leaseLend lease was a device President F.D. Roosevelt invented to circumvent US neutrality laws concerning non-involvement in the war. US military goods were “leased” to the other Allies on a deferred payment or return basis (preferably without too many holes in them).To lend lease, you must announce how many build points (in whole numbers) you are giving during the lending stage (see 5.). You may lend lease build points and receive them in the same turn (but not to the same major power).There are restrictions on the number of build points major powers may give to others (see 5, and for China and the USA, see 13.3.2).TransportDuring the production step, you transport the promised build points from the factories that produced them (TiF option 31: or ports and cities where saved) to any city or major port in the recipient’s home country (UK’s current home country only in the case of the Commonwealth unless playing FiF option 40: Separate country production, see 13.6.10). You do this in exactly the same way as you transport resources to factories (see 13.6.1) except that you may also transport up to an additional 2 build points to the capital and 1 to each other city and major port cumulative, each turn (e.g. you could transport a maximum of 6 build points to London each turn; 2 for being the capital, 3 for the factories and 1 for the major port). Promised build points that can’t be transported are lost.Convoy points that you use to transport resources can’t be used again
to transport build points. So, for example, if you have 5 convoy points in a sea area and you transport 3 resources through it, you could only transport up to 2 build points through that sea area. Similarly, resources you ship into or out of a minor port will limit how many build points you can ship into and out of that port (see 13.6.1).Foreign aircraft and naval unitsSome aircraft and naval units have coloured horizontal stripes matching another major power’s colour (the source major power).Don’t add these units to your force pools when they enter the game. Put them into the lend-lease pool instead.During set up or this step, you may move a striped unit from the lend-lease pool to your force pool if:• the source major power agrees; and• a unit with the same designation (and whose silhouette on its back
is in your colour) is currently in the source major power’s force pool (PiF option 46: or reserve pool).
Move that other unit to the lend-lease pool.The source major power may reverse this process during this step if the striped unit is removed from the game or in the force pool (PiF option 46: or reserve pool). Move it back to the lend lease pool (unless scrapped, 13.6.5) and move the source unit to its force pool (even if the striped unit was scrapped). Example:
At the start of 1943, the Commonwealth is eligible to receive a P-51C Mustang. Because it is striped, Jeremy must put it into the lend-lease pool. He asks Jay if he can add it to the Commonwealth force pool. Jay, worried about German pressure, declines arguing that he needs it himself. In Jul/Aug Jay realises that Jeremy probably needs the Mustang more than he does. Noting that the P-51C is still in his force pool he tells Jeremy he can have it if he still wants it. Eagerly Jeremy moves the British P-51C from the lend-lease pool to his FTR force pool. The US P-51C goes into the lend-lease pool.China may not place US sourced aircraft in its force pools until US entry option 1 (build Chinese aircraft, see 13.3.2) has been chosen.
Building foreign aircraft and naval units (option 37)In addition to the above, you may lend lease foreign-sourced units directly to another major power. Only active major powers may lend or receive units (exception: the US may also lend lease units provided the US has played the appropriate Lend Lease option (see 13.3.2, US entry options 17, 27 & 30) for that recipient and the recipient is at war with any Axis major power). To transfer an aircraft to another major power, the lending major power must debark from sea (see 11.4.5), or rebase (see 11.16) the unit to any home country hex controlled by the recipient. Immediately when entering such a hex, the producing major power announces that they are transferring control of the unit (ignore co-operation, see 18, for this). The recipient then replaces the unit with their foreign-sourced version of the aircraft while the giving major power’s unit is placed into the Lend Lease Pool. PiF option 46: The pilot may not be transferred to the recipient. Instead, increase the giving player’s pilots on the markers track by 1 and reduce the recipient’s by 1. If the recipient doesn’t have a pilot available on the track, the unit received is placed in the Reserve Pool.To transfer a naval unit to another major power, the lending major power returns it to base (see 13.4) to any home country port controlled by the recipient (ignore co-operation for this). It is immediately placed in the lend lease pool and the recipient’s unit is placed in the port in its place.CVPiF option 45: Any CVP (PiF option 46: and its pilot) on the CV is placed on the production circle to arrive as a reinforcement next turn.
53
Example: Playing CVPiF option 45 and PiF option 46, the US decides to lend lease the CV Belleau Wood to France. It returns to base to a liberated Brest and is immediately placed in the lend lease pool, and its CVP and pilot placed onto the production spiral to arrive next turn. Pierre places the CV Bois Belleau in Brest.
13.6.5. Building unitsForce PoolsTo play World in Flames, you have to sort your units into force pools. Which units go into which force pools is explained in the set-up rule (see 24.1.5 in the Campaign & Players’ Guide). Before you build new units, you may scrap your units from the force pools if they have a date on their back and it is at least 4 years ago (e.g. in Jan/Feb 1940, you could scrap any units from your force pools with a date of 1936 or earlier). Active major powers may scrap units from their force pool if the date on the back is at least 3 years ago.When you want to build a new unit, you can nominate the force pool it comes from but not the unit itself. Instead, you draw the unit randomly from the pool.There are annual additions to your force pools (see 4.1.1). Certain special events can also add units to your pools. But the main reason why you put a unit into your force pool is that it has been destroyed.Scrapping unitsEvery time one of your units is destroyed you don’t have to put it back into your force pools; you may permanently remove it from the game instead (you ‘scrap’ the unit). Once scrapped, a unit never returns to the game, so be careful. The main reason for scrapping units is to improve the average quality of your force pools. It’s particularly useful if the pool has (or will have) a lot of units (e.g. aircraft in Planes in Flames) or if you know you won’t ever build all the units in the pool (e.g. some battleships in Ships in Flames).You can’t scrap partisans (see 13.1); they must always go back into their force pool when destroyed. Buying UnitsYou may spend your build points on buying new units, facilities, (option 49: offensive chits) and/or repairing damaged naval units and printed factories and oil.Minor countries do not spend build points. Their controlling major power uses their resources and factories instead.Your major power can build new units and markers (and repair damaged naval units) whose total cost is less than or equal to its total build points. The costs and turns for all units and markers are listed on the Unit costs & characteristics chart (see 28) and on the back of most counters. If you don’t have enough build points, you can’t build anything.Air units
CVPiF option 45: Each carrier plane (see 14.4.1) takes 4 turns to build.PiF option 46 (Pilots): Each aircraft (CVPiF option 45: and carrier plane) costs 2 less to build. The time remains unchanged. Example: Playing pilots, the US P-35 would only cost 2 build points to build and the 1933 TBD carrier plane would cost 0.
Naval unitsThe production cost of convoys is not shown on the counter. They take only 1 cycle to build, cost 1 build point per convoy point and take 4 turns to build, but must be built in multiples of 5 (e.g. 5 CPs cost 5 bps).
SiF option 5: you may build convoy points in any denomination.All other naval units have 2 costs shown on their back. The first number is the build points it costs to put the unit on its first production cycle. It is also the cost to repair the unit or, in the case of CVs, the cost to remove a “No planes” marker (see 14.3.3). The second number is the cost to put the unit on its second production cycle.
SiF option 5: if not playing CVPiF option 45 (see 14.4.1), each CV’s (CoiF option 7: and I-400 and CVE’s) first and 2nd cycle cost, as well as its cost of repair is +1 (e.g. the SiF CV Essex would cost 3/4 and the CV Independence 2/4). SiF option 5: SUBs from World in Flames, America in Flames and Patton in Flames (a first cycle cost of 2) cost half for each cycle (e.g. a German type XXI sub would have a first cycle cost of
1 and a second cycle cost of 2).When you build a naval unit on its first cycle, put it on the production circle face-down. When it arrives as a reinforcement, put it into the construction pool. The naval unit has been launched but not yet fitted out.You may only build a unit on its 2nd cycle if it is in the construction pool. You put these units face-up on the production circle. You also put naval units face-up on the production circle if you are repairing them from the repair pool, or removing a “No planes” marker from a CV in the repair pool or a home country port. These units go onto the map when they arrive as reinforcements (see 4.2).All naval units take 2 turns to repair and/or remove a “No planes” marker. A damaged CV with a “No planes” marker costs double to repair but still only takes 2 turns (e.g. it costs the Graf Zeppelin 6 bps and takes 2 turns to fix both). Repairing 5 (SiF option 5: 3 to 5) convoy points costs 2 build points.
SiF option 5: Repairing 1 or 2 convoy points costs 1 build point.Whenever you don’t control any ports in your or an aligned home country, all its naval units on the production circle, construction pool and repair pool are destroyed.LimitationsYou may only build some Chinese and US units after you have chosen US entry options that let you build those units (see 13.3.2, entry options 1, 12, 22 and 28).Which units
CoiF option 7: Each minor country you control may build or repair up to 1 of its own convoy points per turn. All other convoy points being built this turn must belong to the major power itself.
For all other units you build from the force pools you nominate the type and cost of the unit you want to build (e.g. you may choose a 2-point SCS rather than a 3 because they are in separate force pools, see 24.1.5), but within those parameters, the choice is random.When you build a unit from the repair or construction pools, you may select the exact unit you want.
Building ahead (option 38)If a particular type of unit (e.g., INF, NAV, CV etc.) is not available in any of your force pools, you may build one or more randomly of that type from the following year’s additions (see 4.1.1). Each unit built in this fashion costs double its usual amount (minimum 2), and takes 1 extra turn to build. If none of that type is available in the next year’s additions, you may build one from the additions for the year after that for triple its normal cost (minimum 3), the next year after that for 4 times the cost (minimum 4) and so on. Each additional year that you build the unit ahead increases by 1 turn the time to build the unit. When building ahead naval units that take 2 cycles to build, only the first cycle costs more and takes longer than usual. However, the additional first cycle cost is based on the total cost of the unit (i.e., first and 2nd cycles combined). Example:
4
3
0 7
2 03/4 41940
The USA builds ahead an AMPH from next year’s force pool. The unit costs 3 for the first cycle and 4 for the second, and takes 4 turns. The build ahead increases the first cycle cost to 10 (3 + 7), and it takes 5 turns instead of 4. When the AMPH reaches the construction pool, it may be completed for the usual 4 build points and 4 turns, even if the year of arrival of the unit has not yet occurred.You can’t build ahead just because the cost of unit you want is not available. All pools of the type must be empty. For example, if you want to build a 4 cost FTR and none are available, you can’t build ahead if there is a 5 cost FTR available.When you build ahead, pick a unit randomly of the type and cost that you want (e.g. when you have run out of all FTRs in your force

54
pools, you may choose whether to randomly pick a 4 or a 5 cost FTR from next year’s units). If you find you have insufficient points to pay for the unit, you may not build ahead this turn.You may not build ahead markers. You may not build ahead a foreign sourced aircraft (see 13.6.4, Foreign aircraft); re-pick until the unit chosen isn’t.SiF option 5: You may not build ahead a replacement naval unit (see 4.1.3); re-pick until the unit chosen isn’t. PiF option 24: You may not build ahead V-weapons or A-bombs.Neutral major powers may not build ahead anything (exception: US entry option 46 ~ see 13.3.2).
Production CircleWhen you build a unit, you must place it on a future turn’s slice of the Production Circle (see turn record chart).The number of turns ahead is shown on the back of the counter in most cases (the number inside the little clock) and on the Unit cost & characteristics chart (see 28.) for the rest. Count that many turns ahead and put the unit in that space.Example:
Jan/Feb (1)Nov/Dec (6)
Sep/
Oct
(5)
Jul/Aug (4) May/Jun (3)M
ar/Apr (2)
1
2
3
4
5
6
9 - 69 - 6
III
XXX
You produce an ARM in Sep/Oct of 1941. The number in the clock on the back of the unit is a 4, so you put the unit 4 spaces ahead, on the May/Jun 1942 slice of the production circle.Place naval units you build from the force pool (apart from convoy points, Coif option 7: and tankers) face-down. Place all other units face-up (including naval units you build from the construction and repair pools).Each turn of the production circle is also divided into 6 sectors. If you want to, you can place the units you build on the sector equal to the time it takes to build the unit. Example: Continuing the previous example, you would place the ARM on the 4 sector of the May/Jun 1942 slice.Builds chartsYou may record what you produce on the builds charts provided.
13.6.6. Building Facilities (option 32)At the risk of stating the bleeding obvious, printed rail, road, factory and oil hexes, and fort hexsides are terrain features, not facilities, and may not be built. You build facilities in the same manner as units except as stated below.Every major power may build factories. Each factory costs 8 build points and takes 4 turns to arrive. TiF option 32: (Roads and Rails) Every major power may also build roads and rails. The number of turns to build a road, or upgrade a
road to a rail, is 1 + the (fine weather) motorised movement point cost to enter the hex. The cost is half that (e.g. to build a road in Bushehr (A2834) costs 4 bps and takes 7 turns to build).TiF option 32 (oil and resource facilities): Hex specific oil and resource facilities may be built by any country that controls that hex.
Libya1
E2703
6 6R
Example: Maria may build the E2703 oil facility only in hex 2703 on the East Europe map and only if it is Italian (or Italian aligned Libyan) controlled at the moment of building. If Jeremy occupies the hex later, he would be the proud owner of a brand new oil facility when it arrives as a reinforcement (see 4.2.2).
All other facilities are placed in the major power force pools. Their cost and turns taken to arrive are stated on the back of each facility (they may vary even within type). Unlike units (chosen randomly), you choose which available facility to build.When destroyed, facilities may be rebuilt but not repaired.13.6.7. Printed factory, rail and oil repair (option 33)If a printed factory, rail or oil resource is destroyed, you may repair it. Each rail hex costs 2 build points and takes 1 turn to repair. Each factory or oil resource costs 4 build points and takes 2 turns to repair. You may only repair factories destroyed by Strategic Bombardment (see 11.7) or enemy occupation (see 13.8), not those railed out (see 11.9).13.6.8. Gearing limits (option 39)In a turn, your major power can build (and upgrade and repair) as many units or markers of a particular class (e.g. infantry, armour, aircraft, ship, sub etc., see 28, Unit costs & characteristics chart) as it built (and repaired) in the previous turn plus 1. This is a gearing limit.Each 5 (SiF option 5: 3 or part thereof) convoy points counts as 1 ‘ship’.Naval units count as being built whether they come from a force pool, the repair pool or the construction pool.Example: If the USA put 2 CVs on their first production cycle last turn, completed a BB and repaired 3 CLs, its ‘ship’ gearing limit for this turn is (2+1+3)+1=7.Option 32: Facilities form a new gearing class (see 28). Facility gearing is based on total markers built per turn (not fort hexsides or individual facilities).Option 49: Each 5 offensive points counts as 1 chit.ExceptionsOn the first turn of any campaign there are no gearing limits.Major powers are not subject to gearing limits on the turn that a major power declares war on it.FiF option 40: When first constructing units (see 13.6.10, Starting new units) gearing limits apply. There are still no gearing limits on continuing a unit’s production once it’s on the production track.
13.6.9. Saving oil and build points (TiF options 30 & 31) You may save oil and build points you didn’t use in production. Active major powers may save any amount of each, every turn. Neutral major powers may save any amount of build points but only 1 oil (in addition to their previously saved oil), the remainder being destroyed (your choice which). You can’t save general resources.You may transport oil and build points you are saving, and saved oil and build points, as you do resources (see 13.6.1) except that they may be transported to cities and ports that do not have a factory. You may save up to 4 oil and 4 build points in each city or port (cumulative) you control (even outside your home country), and double this limit in your major power’s capital (e.g. the Commonwealth can save up to 16 oil and 16 build points in Wellington, P1302). Put a saved oil or build point marker on that city or port to indicate how many oil and/or build points you are

55
saving there.Saved oil and build points may be used like any other oil or build point (i.e. lending ~ see 5.1, (TiF option 30: oil ~ see 10.3) and production ~ see 13.6.1) and may be destroyed (see 10.4 and 11.7). You may make change if you don’t use all of a saved build point marker. If you gain control of a hex containing saved oil and/or build points, they become yours.
13.6.10. Factories in Flames (FiF option 40)Factories in Flames (FiF) introduces variety and greater detail in the construction and repair of units at little cost in time or effort. It includes countersheet 39 that has all the units and markers required to play FiF.Production chartsThe centre of the 2008 World in Flames Annual contains production charts. Each chart contains a number of tracks listing cities and ports marked with the number of (starting) factories in that city and type of port (major or minor). Each city and port on the track corresponds to the same location on the World in Flames maps. Tracks with ports also have construction and repair pools. There are numbered production boxes (2 through 6) and ‘Deploy’ boxes. The numbers represent the number of turns required to complete a unit (including this one).Several production boxes are shared by multiple locations. These are treated independently in all respects (e.g. Chinese units in Nanking have no effect on French units in Lille and ships in Kiel have no effect on land or air units in Stuttgart).Minor country factories have their own tracks and there is one common track for all minor capitals.There are also tracks for MIL (TiF option 54: TERR, PiF option 46: pilots), and GAR, but these aren’t constructed at a particular location. AiF & TiF option 55: Use these tracks for city based volunteers.If you need to make new production locations because you railed factories (see 11.9), (option 32: built new ones, see 13.6.6), or a specific one does not exist (such as for ports that don’t have a marked location), use tracks that are currently not in use. Mark the number of factories (if any) in the name box, put any units into their appropriate boxes, and then mark the location on the map and in the name box with the same numbered production markers. Example 1: Anna is railing the Kiev (E1735) factory in May/June to Omsk (A2050) which doesn’t have a production track. She railed the Odessa factory (E1728) in a previous impulse, and its track is currently empty. She places a 9 marker in Omsk and in the Odessa name box, and will place the factory in the name box when it arrives in Sep/Oct. Note there is no port in Omsk even though there is one on the Odessa track.Example 2: Playing CVPiF option 45 (carrier planes, see 14.4.1) and PiF option 46 (pilots, see 14.6) after a disastrous battle, Kasigi returns a damaged CV Akagi with its CVP to Truk (P2025). The Akagi is placed in Truk’s (virtual) production track’s repair pool, and its CVP and pilot placed in the 2 box. Next reinforcement stage the CVP is available to be deployed in Truk if a pilot is available (the Akagi still needs to be repaired).[Designer’s Note: Factories in Flames is much more than just factories, it also limits the teleporting of units around the map that in the interests of simplicity sometimes occurs in World in Flames. If you have units in Truk, you must get them out, you can’t rely on the game to do it for you.]All references to the production circle in the rules also refer to production tracks except as specified in Factories in Flames. Where the rules say a unit is to be placed on the production circle not specific to any track (e.g. when its illegally stacked, see 2.5.4), the owner may place it on any (non-virtual) track that major power controls that it can legally stack.Building and repairing unitsUnits are no longer built in their entirety in a single turn (unless they only take 1 turn to build, e.g. MIL). Instead, you begin to build a unit on one turn and then continue its construction on future turns until it
is complete. Repairing a naval unit is treated the same as building it, and the cost and time are the same as in 13.6.5 Units start in a production box with a number equal to their time to build. As you continue their construction, they will move down 1 box per turn until they reach the ‘Deploy’ box when they may be placed on the maps as reinforcements.Just because a unit is on the production track doesn’t mean you have to keep building it. You may elect to leave units there for future
construction, ignoring them this turn. You may also choose to destroy them at the start of the production step. Each Production step, calculate your total build points as normal (see 13.6). You then spend your build points on the continuing construction of units, and then starting new units, in that order. Minor countries do not spend build points; their controlling major power uses their resources and factories instead.You can’t spend build points constructing a unit in a particular location if you can’t trace a basic supply path of any length from those build points to the unit being built. This does not inhibit the placement of GAR or MIL (TiF option 54: or TERR) reinforcements in isolated cities (as they are not built in a particular location).Continuing constructionUnits whose build time exceeds their total cost will be fully paid for before their construction is complete (when they reach a box with a number 1 higher than their build time minus their cost). Mark these with a Free marker (or rotate them 180°) once their cost has been paid.It costs 1 build point to continue construction on any unit that doesn’t have a Free marker, or 0 if it does (exception bomb markers, see Removing bomb markers below). After paying the cost, move the unit down 1 box on the production track. When it reaches the ‘Deploy’ box, it is complete, and will arrive as a reinforcement next turn (see 4.2). You cannot continue construction on a unit if it would cause overstacking in a box (see Stacking limits below).Example: Jay has just moved an ENG (5 turns, 3 build point cost) into the 3 box in the May/Jun production step for 1 build point. Since its total cost has already been paid, Jay marks it with a ‘Free’ maker. Jay will move it to the 2 box in Jul/Aug, and the ‘Deploy’ box in Sep/Oct for free.Any active major power may rush the construction or repair of any units (not markers), on the production tracks moving them down 1

Stacking per production box
Hex No.
Capital +1 unit
Each factory +1 unitMajor Port +1 (SiF option 5: +2) naval unit
56
extra box. You may not rush construction of a unit the turn it begins production (see Starting new units below) nor naval units on their first cycle (see 13.6.5). The cost to rush construction for each unit is 1 build point more than it would normally cost to advance the unit on the track. Exception: it costs 2 extra build points to rush construction of an HQ. Example: Anna’s Koniev HQ-I is destroyed in battle. Willing to pay any price to return him to active duty quickly, Anna begins construction on the HQ during the production step, paying 3 build points (the usual maximum) and placing it in the 3 box. In the following production step she pays another 4 build points (2 normal to move 2 spaces plus 2 extra) to rush construction and moves Koniev down to the ‘Deploy’ box. He will be able to arrive as a reinforcement in the next reinforcement stage.Starting new unitsAfter continuing construction of all units you desire, you may now start building new units and/or repairing naval units with any remaining build points.Where units are builtLand and air units (other than MIL, GAR and TiF option 54: TERR) must be built at a capital or factory location in the unit’s home country. Germany may also build units in German controlled Prague in any campaign starting after 1938 provided the Czech Republic is aligned to Germany. Naval units must be built at home country ports. It doesn’t matter if the port has no factories. MIL and GAR (PiF option 46: pilots, option 49: offensive chits and TiF option 54: TERR) are built on their own track, not at a particular location.Build cost and placementWhen you begin construction on a new unit (first or 2nd cycle for naval units) or repairs, you must spend at least 1 build point on the unit, unless it has a total cost of 0 (e.g. some pitiful carrier planes). You may spend more, up to the unit’s cost minus the time to build plus 1 (if that is a positive number). If you spent the maximum number of build points possible for that unit, then place it in a production box whose number is the same as the clock on the back of the unit. If this is a 1 (e.g. for MIL), place it in the ‘Deploy’ box. If you spent fewer than the maximum number of build points allowed, then for each build point short of the maximum, place it in 1 higher box.Example: Heinz decides to produce an ARM corps. He chooses it randomly from the German force pool. He could spend up to 3 (6 – 4 + 1) build points on the ARM, or just 1 or 2. If he spends 3 build points, he’ll place the ARM into Essen’s 4 production box; if he spends just 1 build point, then the ARM would be placed into Essen’s 6 box. Heinz also begins building an ENG. Its maximum is -1 (3 – 5 + 1), so no additional build points above the required 1 may be spent. Heinz places the ARM in the Essen 4 box and the ENG into Berlin’s 5 box for a total cost of 4 build points (3+1).If you need to place a unit into a box higher than a 6, add a production (number) marker to represent additional build points that must be spent before you can move it down a box.Example: Anna is starting a new HQ-A and decides to only spend 1 build point on it, leaving 7 build points required to finish it. She places it in a 6 box with a 2 marker on it.After spending the required build points you may look at the unit being built before deciding in which location to build it. This means that in Factories in Flames you build units one after another in the production step giving you more flexibility in what and where you build units.Building facilities (option 32)Facilities are built on the map (not on the production charts) and cannot be relocated (except Factories by railing, see 11.9). Facilities are built exactly like units except that they are marked with a numbered production marker representing how close to completion the facility is.
Example: Heinz wants to start a 3-sided fort in Kiel (W0640). He spends 1 build point and places it in Kiel with a 5 marker on it.Stacking limitsStacking limits of units on the production charts do not count against the on-map hex stacking limits (see 2.3).There is no limit to the number of units you can start at any location. However, at any one time, only 1 unit being produced (not on-map units placed on the production circle to arrive as reinforcements in following turns, e.g. units on lakes that unfreeze, see 8.2.1) may occupy each numbered production box (not track) for each of the following in the hex:
Example: London has 3 factories and a major port. Jeremy decides on a major naval and air push and places 3 CVs and 2 BBs in London’s 6 production box but can place no more than 1 FTR in its 2 box because 2 LND and an ARM already occupy it. He could have placed 6 naval units in the 6 box if he were playing SiF option 5.There is no limit to the number of units in the ‘Construction Pool’, ‘Deploy’ or ‘Repair’ boxes or anywhere on the Open production track (where GAR (PiF option 46: pilots, opt. 49: Off. chits, TiF opt. 54: TERR, AiF & TiF opt. 55: CBV) and MIL are built). For a port location without a production track, 1 naval unit (maximum) may occupy any numbered box. Naval units in construction and repair pools do count against minor port construction stacking limits.Example: Heinz builds a Rumanian CA in Constanta. While it is in a (virtual) numbered box or Construction pool, no other naval unit may start being built there. If when randomly selecting new units to build, you pick one that you cannot place (e.g. a Canadian unit when all factories in Canada are full), randomly pick another (in this case, non-Canadian) unit instead.If you exceed a box’s stacking limit (e.g. by strategic bombing, see 11.7, railing factories away, see 11.9 or destroying them, see 13.8), no units are destroyed – you just can’t move any more units into that box by starting new units or continuing construction on units in higher boxes until the units again conform to stacking. Damaged and incomplete naval unitsNaval units are no longer required to return to the repair pool when damaged. Instead, they stay on the map with a ‘damage’ marker. You may transfer them at any time to and from the repair pool on the production chart at their current location (to reduce map clutter) at no movement cost or activity limit. You may also repair them on the map, but they must satisfy stacking restrictions while on the map.Each turn you may start or continue repairs of one (only) of your naval units in each major port outside your home country. Example: After a disastrous naval battle Jay returns 4 damaged CVs to Pearl Harbor (P0131). Jay can only repair one of them there at a time. The others can wait their turn or sail back to the USA for repairs.You may also repair naval units of co-operating major powers in your ports, but you must pay the cost. Damaged naval units, naval units in the construction or repair pools, and face-up naval units on the production track may perform a naval move with up to double their range and movement points, provided the move ends in another port where they are eligible to retain their status (i.e., in the construction pool, repair pool, or face-up in a production box of the same number). Such units must attempt to fight through from the 0 box if intercepted. Naval units in the construction and repair pools (but not those in production boxes or under repair) are included in any port attack (see 11.2). Damaged units in the construction pool require an extra build point to advance on the production track until repaired.

57
Example: Playing SiF the CV Audacious is damaged by port attack while in London’s construction pool. During production Jeremy places it in London’s 6 box face-up for 2 build points. Next turn’s production he moves the Audacious down to the 5 box for another 2 build points and removes the damage marker. Units face-up on the production track, and those from the construction pool have zero attack, AA and ASW factors and their defence factors are 2 higher. Damaged naval units have the factors specified in 11.5.8. A TRS that is damaged or under construction may not embark units (see 11.4.5).Building ahead (option 38)During any production you may pay the entire remaining cost to build a unit (or cycle in the case of naval units). If you do, place a Free marker on the unit (or if you prefer, rotate it 180°) to show its cost has been paid in full. This does not lessen the time taken to build the unit.Example: The CV Essex is face-down in the 5 box at the start of the production step, Jay would normally spend 1 build point and move the Essex down to the 4 box. However, Jay decides to complete the first cycle cost and spends 2 build points on the Essex (which has a first cycle cost of 3 build points when playing WiF Classic), placing a Free marker on her. It would still only move down to the 4 box. If a particular type of unit (e.g., INF, NAV, CV etc.) is not available in any of your force pools, and all units of that type being produced have Free markers on them (first cycle only required in the case of naval units) then you may build ahead as normal (see 13.6.5).Example: Continuing the above example, its 1941 and there are no US CVs left in the force pool. All the US CVs being built on their first cycle have Free markers on them except for the Bunker Hill. Before Jay can build ahead 1942 CVs he would have to finish the first cycle cost of the Bunker Hill.Shipyards (FiF option 40)
F 1942
4 4
Some major powers have shipyard facilities available. Each shipyard has the silhouette of a certain kind of naval unit on it: SUB, SCS, CV, (Coif option 7: ASW) or shipping (TRS, AMPH, and convoys). Each turn if you spend at least 1 build point on units of the type the shipyard produces at its location, you may spend 1 additional build point on the shipyard’s units for free.Example: Japan has an SCS shipyard in Tokyo (P2638). Kasigi wants to begin building a BB while continuing the construction of a second (that is not yet paid off). Normally this would cost 2 build points but due to the shipyard only costs 1.Factory specialisation (FiF option 40)
Arm Spc. F 1940
1 3
Certain major powers may specialise production sites in their home country to build a particular kind of unit (by class, see 28). When you build the type of unit at a location that has that specialisation, you may choose which of that type of unit you wish to build from those available in your force pool (rather than drawing randomly). You may only specialise 1 unit in each specialisation hex per turn.Strategic bombingStrategic bombing (see 11.7) no longer affects how many production points you produce this turn. Instead, it now targets units in production boxes (including in the ‘Deploy’ box, but not in the Construction or Repair Pools) in the target hex. After any air-to-air-combat and anti-aircraft fire, you must specify which of your surviving bombers are attacking the land and aircraft
unit in the target hex and which are attacking the naval units. The attacker and defender alternate assigning points of strategic damage, with the defender selecting the target first. For each point of damage, move a unit up to 1 higher numbered box. If it has a Free marker, add a bomb marker to the unit for each point of damage.A unit may not be moved up to a box higher than its printed clock number. If it reaches this box (or began in a higher box), mark the unit with a bomb marker for each remaining point of damage. When any unit accumulates enough damage that it would cost more to complete than start over (both cycles for naval units), it is immediately destroyed.Example: Jeremy is strategically bombing Kiel (W0640), where the CL Bremen (cost 2/3) is under construction face-up in the 4 box (meaning 4 of the 5 build points required to build it have already been spent; 2 on the first cycle and 2 on the second). The result of the bombing is 4 points damage and the Bremen is destroyed. If there had been 3 points of damage, the Bremen would have been moved up to the 5 box with a 2 bomb marker stacked on it.Any damage you can’t assign is lost. Option 32: (Facility destruction) You may still bomb facilities as usual (see 11.7). If you are strategically bombing a port without any facilities (option 33: or printed factories), each ‘*’ result destroys a naval unit in a numbered box (defender’s choice).Option 33: (Factory, rail and oil destruction) You may still bomb printed factories (even those not producing units), rail and oil hexes as usual (see 11.7). Removing bomb markersBomb markers must be removed from units before construction can continue on that unit. To remove bomb markers, you pay 1 build point for each. You may then continue construction on the unit as usual (even advancing a box on the same turn). Example: Heinz is building an ENG and ARM in Hannover (1 factory) where 3 points of damage have been assigned by Jeremy’s bombing raid. The ENG was started 3 turns ago and is in the 3 box now with a ‘Free’ marker on it, as its total cost of 3 build points has been paid. The ARM is in the 4 box, having been started last turn. Heinz assigns the first point of damage to the ENG, moving it to the 4 box, keeping the ‘Free’ marker and adding a bomb marker to it. Jeremy assigns the second point to the ARM adding a bomb marker. Heinz then assigns the 3rd point of damage to the ARM, adding a second bomb marker. One more point of damage would destroy the ARM. During production, as the ARM and ENG both occupy the 4 box and Hannover only has 1 factory, Heinz must decide which to continue construction on next turn (because he can only move one to the 3 box as Hanover is a 1 stack factory).Railing unitsDuring any rail movement step (see 11.9), a land or aircraft unit on a production track may rail move to the same production box on another track within the same home country for the same rail move cost as an on-map unit making the move (e.g. it costs 2 rail moves for a Soviet ARM to rail move from the Kiev 4 production box to the Vladivostok 4 box), provided this would not result in overstacking on that production box. Units railing between production tracks are turned face-down after movement as usual (and reorganised as usual at the end of the turn, see 13.5). Overrunning production locationsWhen you capture an enemy production location where land or air units are under construction, they are destroyed.When you overrun an enemy port (even due to conquest, see 13.7.1), all face-down naval units in numbered production boxes are destroyed. Treat each naval unit that is face-up in a numbered production box, or in the construction or repair pool (including damaged on the map) as if were overrun while surprised (see 11.10.6), but subtract 1 from the die roll. Surviving ships that escape must immediately rebase (see Damaged and Incomplete Naval units above). If they cannot, they are destroyed. Captured ships are placed in the construction pool if they started there, or if they are in a 3 box or higher. Otherwise, they are placed in the repair pool.
IntelligenceAction Intel cost
Re-roll any search or combat roll 3*Re-roll any other die 5+/- 1 to any search or combat roll 1*+/- 1 to any other roll 2* ~ +1 to the cost if the sea area being searched, or
the combat, does not include any of your units
58
ReinforcementsDuring each reinforcement stage, face-down naval units are placed face-down in their production track’s construction pool. All other units in each ‘Deploy’ box arrive as reinforcements on-map in their build location, except:• MIL (AiF & TiF option 55: and city based volunteers) arrive
in their city;• GAR arrive in any city in their home country; and• PiF option 46: aircraft reinforcing from the reserve pool may
arrive at any controlled factory in their home country. Aircraft arriving without a pilot remain in the ‘Deploy box’.
If a unit cannot arrive as a reinforcement without causing overstacking, or you choose not to place a unit on the map at this time, keep the unit in the ‘Deploy’ box.
Reinforcing facilities arrive in their build location even if it is in an enemy ZOC (you still can’t commence its construction in an enemy ZOC).Minor country activationWhen declared war on (see 19.2), place units with this year’s date on the back face-up on the minor country’s ‘deploy’ box.Shattered unitsWhen shattered (see 11.15.5), a unit must be placed face-up in any controlled home country city ‘Deploy’ box of the owner’s choice.Factories in Flames WiF set-upsFor any units listed in any World in Flames campaign to be set-up on the production track, you may place that unit into any build location that it could be completed in, placing the unit into the numbered box corresponding to the number of turns from the campaign’s first turn. For example, if you are setting up a May/June 1941 campaign, a unit due to arrive in September/October 1941 would be placed into a 3 box. For all such units, place a ‘Free’ marker on them, to indicate that their cost has already been paid in full. Separate country production (FiF option 40)Every aligned minor country and Commonwealth home country produces units separately (option 36: including cadres, see 13.6.3) using the base production multiple of its controlling major power. Each country will produce its own units using its own production; it may save, lend, and receive build points; its units form its own force pools; and so forth. Any resources controlled by your major power can be transported to any country you control without having to announce this during the lending stage. Any country may build convoys (PiF option 46: pilots, TiF option 32: fortifications, roads, rails) and offensive chits.Example 1: Jeremy is producing units in India. With 2 factories and access to 2 Commonwealth resources, India has 2 production points. The CW production multiple is 1.25, so India produces 3 (2 x 1.25) build points this turn. With no units left in his Indian force pool, Jeremy decides to build a pilot and a convoy point.Example 2: During production Kasigi could lend Manchukuo’s build points to Japan provided he has the CPs to transport them there.KiF option 41: Intelligence points (AiF, PatiF & PoliF: and political points) may only be built by major powers (the UK’s current home country in the case of the Commonwealth).
13.6.11. Intelligence (KiF option 41)Intelligence represents the benefits some major powers gained over their enemies at crucial points during the war.Intelligence effortFirst all remaining intelligence points are lost. Next the active major power from each side with the most build points this turn available for production (after lending and cadres, roll die to resolve ties) receives 1 free intelligence roll. Each active major power may pay 3 build points for each additional roll they would like to buy (this is decided in secret and revealed simultaneously).KiF option 41 (Bletchley Park): Anytime in 1940 the Commonwealth gains 1 free intelligence roll. In 1941 she gains 2 free rolls, in 1942 three free rolls and so on, up to a maximum of 6 per year. These may be used at any time during the year, and more than one in the same
turn. Place the ‘Bletchley Park’ marker on the markers track to show how many intelligence rolls the Commonwealth has. Any left over at the end of the year are lost.Gaining IntelligenceEach major power rolls their intelligence roll(s). If you roll higher than every major power on the other side you win valuable intelligence equal to the difference between your roll and the highest roll of any major power on the other side.If major powers from opposite sides tie with the highest roll, the major power with the most build points gets 1 intelligence point (none if equal).Example: It is July/August 1940. Japan is at war with China, and Germany and Italy are at war with the Commonwealth and France. The USSR and USA are neutral. The Commonwealth is the active major power with the most build points on the Allies side while Germany is the active major power with the most build points on the Axis side so they both get 1 free intelligence roll. Italy, Japan and the Commonwealth each pay 3 build points to get another roll. Germany rolls a 9, Italy a 7 and Japan a 1. The Commonwealth rolls a 4 and a 3. Germany gets 5 intelligence points, Italy gets 3, and everyone else 0.If you gain intelligence points, place your Intel marker on the markers track to record them.Spending intelligenceThe cost for each intelligence action is as follows:
Any time a die is rolled that you don’t like (even your opponents’), and you have sufficient intelligence points remaining, you may immediately demand a re-roll. If 2 dice were rolled (e.g. air-to-air combat), both must be re-rolled but this only counts as 1 re-roll. When you demand a re-roll you also state whether you expect the re-roll to be higher or lower. If you are wrong the enemy major power affected by the re-roll gains 1 intelligence point (your intelligence ring has been compromised). Where the re-roll is directed at 2 or more enemy major powers (e.g. the Commonwealth demanding Germany and Italy (or themselves) re-roll an air-to-air combat they are all participating in), they all gain 1 intelligence point. Where the re-roll is not directed at any particular enemy major power (e.g. a weather or initiative re-roll) every active major power on the other side gains an intelligence point.Example: Continuing the above, both sides roll for initiative. The marker is +1 to the Axis but the Allies win ties. The Allies roll a 3 and the Axis roll a 2, modified to 3 but with the Allies still winning the initiative. Heinz decides this is intolerable and demands a re-roll expending all 5 of his intelligence points. He confidently states that his re-roll will be higher, but rolls another 2, meaning the three active Allied major powers, Commonwealth, China and Free France each gain 1 intelligence point and win the initiative. They chortle with glee as they plan their blows.As well as demanding a re-roll you may spend intelligence points on modifying a die (or dice if more than one is being rolled, e.g. in air-to-air combat) roll by + or -1. You must announce whether you are adding or subtracting 1 before the die (or dice) are rolled. Any dice may be modified, even those of your opponents. The side rolling the die decides first if they want to modify the roll. Only if they don’t may the other side then modify it. Example: 2 German land units are attacking French controlled Marseille (W1222) supported by Italian shore bombardment. Italy pays 1 intel point to increase the land combat roll by 1. If the Italian ships were not included it would cost Italy 2 intel points.

59
13.7 PeaceDuring this step you check to see if the political status of any country or territory has changed and determine the impact of these changes.13.7.1. ConquestConquest allows you to change control of home countries or territories you are at war with. After you conquer a country or territory, you control it.A minor country cannot conquer another country or territory. The country or territory is instead conquered by the minor’s controlling major power (even if it was not at war with the conquered territory or country).All conquest in a turn occurs simultaneously.TerritoriesYou conquer a territory if:(a) you control every city and port in that territory;(b) you control every port and coastal city in every sea area the territory
has a coastal hex in; or(c) control every hex,whichever comes first.If more than one major power from the conquering side controls hexes in a territory, the major power with the greatest influence is the conqueror. Using the following priority, whoever1. controls the most ports and cities,2. has the highest garrison value (see 9.2),3. has the most total land combat factors,4. last occupied a city or port, or5. last occupied a hexin the territory gains its control.ItalyItaly is conquered when any 3 of these are true during this step:1. The Allies control Rome (W0520).2. The Allies control Tripoli (W0505).3. The Allies control any printed factory hex in Italy (apart from Rome).4. The Allied garrison value (see 9.2) in Italy (including Sicily) is
greater than the Italian garrison value there.Use the priority above to ascertain which Allied major power is the conqueror (e.g. the USA controls Rome and the Commonwealth controls Tripoli, the USA is Italy’s conqueror). Other home countriesYou conquer any other home country if you control its capital plus every printed factory hex in that home country (even if the factory itself has been railed away). The conqueror is the major power controlling the capital.Effect of conquestFirst, destroy all printed fort hexsides in the country. Next, remove from the game all the conquered home country’s land (AiF & TiF option 55: except its CBVs, see 22.8) and aircraft units in the conquered home country. Remove from the game all of its land and aircraft units (TiF option 32: and facilities) not on the map.
PiF option 46: You also lose the pilots in those aircraft, on the markers track and on the production circle.
Remove any naval units in its force pools (except convoy points) from the game. All other units remain where they are.All units from the conquered side in that country that aren’t at war with the conqueror, are now placed on the production circle to arrive as reinforcements in 2 turns.If this is the first time the country or territory has been conquered: (a) it loses control of every hex in its home country or territory;(b) every one of its hexes occupied by a land or aircraft unit, or in their
uncontested (by any other major power) ZoCs becomes controlled by that unit’s controlling major power; unless already controlled by another major power on the same side. If more than one major power’s land and/or aircraft units occupy the same hex, then the major power with the most land combat factors in the hex will control it; and
(c) all of its other hexes become controlled by the conquering major power unless already controlled by another major power on the same side.
Example:
8 - 48 - 4
VI
XXX XXX
6-4
FEC
Mr
CXXX
7 - 47 - 4
I Can
XXX
4-3
II Para
24
1943
6
FW-190A2
BP 41
7 *
1 *
XXX
9 - 69 - 6
XIV
35
1942HQ
5
2Roma
8 2
3 4
6
2Garibaldi
3 6
3 1
The US conquers Italy in Sep/Oct 1943. Germany, France and the Commonwealth control every hex in Italy containing one of their land or aircraft units. They also gain control of all hexes in Italy exclusively in their ZoCs not already controlled by another major power on their side.The USA gets all the other hexes in Italy including La Spezia (W0823) which contains the Italian fleet only and is not in the ZoC of any land unit. She also gets control of several empty hexes in the ZoC of any 2 (or more) of the US, Commonwealth, France or Germany. Germany only has a tenuous supply line in Northern Italy and desperately needs to move first next turn to restore control.All naval units (TiF option 30: and saved oil, TiF option 31: saved build points, option 32: and facilities) now in hexes controlled by the other side are treated as if they had been overrun (but not surprised, see 11.10.6).Incomplete conquestIf a conquered major power or minor country still controls at least one aligned minor country that was aligned to it (or to France in the case of Vichy and Free France) prior to 1939 (i.e. has its initials printed after the minor country’s name on the map) then that major power or minor country is only incompletely conquered, and fights on with its remaining units. It now chooses one of these aligned minor countries as a new home country for the units of its conquered home country.Example: During the game Italy aligns Yugoslavia. Later Italy is incompletely conquered while still controlling Albania and Yugoslavia. She could choose Albania as her new home country but not Yugoslavia.Conquered Commonwealth major power home countries may instead pick another CW major power home country (e.g. if Australia is conquered, you could pick Canada as the new home country for Australian units). Conquered minor countries may pick either their controlling major power’s (current) home country or any home country that the minor country itself controls.
Example: Germany controls Brussels (W1134) and Liege (W1034) during the conquest step. Belgium (a Commonwealth aligned minor country) is conquered. She is not completely conquered because the Belgian Congo is still aligned with Belgium. Belgium must pick a new home country. This can be the Belgian Congo or any one of the 6 Commonwealth major power home countries.If the conquered country is not a Commonwealth major power home country that has just chosen another as its new home country, you now roll a die. All of the conquered country’s land and aircraft units (apart from partisans, see 13.1) that are more hexes (and/or hexdots) away from any hex they (or their controlling major power) control in their new home country than the die roll, are removed from the game. When counting hexes only distance matters (not terrain, units, ZoCs etc.). Off-map hexes and hexdots cost 2 each. Units at sea survive if any hex in the sea area is within range. Example: Japan is incompletely conquered. She chooses Manchukuo as her new home country and rolls a 5 on 1 die. She controls every hex in Manchukuo. The Japanese land unit in Changsha (A0434, 6 hexes from Port Arthur, A0240) is removed from the game but aircraft in the

60
Sea of Japan (2 hexes from Manchukuo) remain in the sea area. Her partisans in Japan and on-map navy are unaffected.[Design Note: CW major power units were wholly integrated and not subject to the same disruption as other major powers which did not have a world-wide empire to call on in time of need.]Now roll a die for each of its naval units on the production circle, in the construction pool or repair pool. On a 1 or 2 it becomes controlled by any major power the conquered major power chooses (including itself). On a 3 through 5 it is destroyed. On a 6 or higher it becomes controlled by any major power the conqueror chooses. If the Commonwealth is chosen to control the unit, it becomes British.From now on, if a unit’s original home country is conquered and not yet liberated, remove it from the game if it is destroyed while out of supply. Immediately roll a die if it is destroyed in supply ~ remove it from the game on a 5 or less; otherwise return it to the force pools.Units from incompletely conquered home countries may still be built with whatever production the major power retains.Incompletely conquered major powers (only the UK in the case of the Commonwealth) have only half their normal activity limits (see 10.2) until liberated. Incompletely conquered countries still receive annual additions to their force pools (see 4.1.1) as normal.Complete conquestWhen any major power or minor country no longer controls its own or any home country aligned prior to 1939, it has been completely conquered. A completely conquered country is at peace with everyone it was at war with. Remove its naval units in the force pools, and all its land (AiF & TiF option 55: except its CBVs, see 22.8) and aircraft units, from the game. It no longer receives any annual additions to their force pools (see 4.1.1).A completely conquered country’s naval units on the production circle and construction, transfer, reserve and repair pools become controlled by whoever conquered its last home country.All on-map naval units of a completely conquered minor country become units of their aligned major power (the UK in the case of the Commonwealth).Example: A Commonwealth aligned Netherlands is completely conquered when their last aligned home country, the Netherlands East Indies, is conquered by the Japanese. All Netherlands naval units on the map are now British and all those on the turn record chart are Japanese. Until the country is liberated, all on-map naval units of a completely conquered major power become units (for all purposes) of one active major power on its side (conquered major power’s choice). If none, they are removed from the game. Each hex it controls in a territory or home country controlled by another country reverts to the control of that other country.Change the control of the last home country conquered as per the effects of conquest rules (exception, Poland ~ see 19.5.1).Each remaining home country it controls becomes controlled by the major power controlling that home country’s capital. If none, and for each remaining territory it controls, control is determined by the major power with the greatest influence in that country or territory (using the same order to decide control as 13.7.1 Territories above). If the home country or territory is now controlled by another major power from the same side as the completely conquered major power, the territory or home country’s status remains unchanged (aligned remains aligned, conquered remains conquered). Otherwise the territory or home country’s status is reversed (conquered becomes aligned and aligned becomes conquered). Example: Italy is completely conquered while Yugoslavia is aligned to Italy. No major power controls any city in Yugoslavia and Germany is the only major power with face-up corps there so Yugoslavia becomes a German aligned minor country. If the USA had a division in a Yugoslav city, Yugoslavia would instead become a conquered US minor country. If no-one has any influence in the home country or territory it becomes neutral. Each neutral territory may subsequently be declared war on as if it were a minor country.All naval units now in neutral or enemy controlled hexes are treated as
if they had been overrun (but not surprised, see 11.10.6). Example: Germany is conquered while she still controls a conquered Norway and an aligned Lithuania. Because Germany controls no aligned home countries it controlled prior to 1939, Germany has been completely conquered. All German land and aircraft units are removed from the game. Norway reverts to neutrality because no major power has any influence there. There is 1 Soviet unit in Lithuania so it becomes a Soviet conquered minor country. All German naval units become controlled by Japan. You roll for any face-down German naval units that are now in Allied controlled hexes. All remaining German naval units must rebase. Unless there are Japanese controlled ports within double the range of these units, they will be destroyed.Re-conquestA conquered home country or territory is re-conquered in the same manner that it was conquered provided the major power satisfying the conditions of conquest is from the other side to that which conquered it. Countries and territories may be conquered and re-conquered any number of times during the game.Example: Germany declares war on Belgium and occupies Brussels (W1134) and Liege (W1034). Belgium is incompletely conquered (as it still controls the Belgian Congo). France retakes Brussels and Liege in a later turn. During that turn’s peace step the Belgian home country is re-conquered by France. Germany later recaptures Brussels and Liege and the Belgian home country is again conquered. Instead of conquering a home country or territory you may liberate it (see 13.7.5).13.7.2. Allied supportThe Allies support an unconquered minor country an Axis major power has declared war on by having 4 or more Allied major power (not minor country) corps sized units in it during this step. A minor country can only ever be supported once.The only consequence of supporting a minor country is the US entry effect (see 13.3.3).13.7.3. Mutual peace and neutralityTwo major powers at war can agree to come to peace on any terms mutually acceptable (except for transferring units). If the terms include the transferring of hex control, these hexes must be contiguous to hexes already under the control of the major power gaining control of the hex.Example: Kasigi could only transfer P2045 to the USSR as part of a mutual peace if Kasigi also hands over control of P2046 and P1947 at the same time (the latter contiguous with Soviet controlled P1948). If transferring control of aligned minors, they may only be transferred as conquered minor countries. If transferring control of a conquered minor country, it is transferred as conquered or aligned, new owner’s choice. Example: Germany and the Soviet Union agree to come to peace if Germany transfers control of conquered Latvia, Lithuania and Estonia to Anna. Anna decides to align Estonia and conquer Latvia and Lithuania. Players can also agree to reach a peace between a major power and a minor country. In th at case, they return to their pre-war borders (exception: see Soviet border rectification 19.6).
Option 42: (USSR-Japan compulsory peace) If Japan controls Vladivostok (P2942) during the first war between Japan and the USSR, the Japanese player must agree to a peace if the Soviet player wants one. Similarly, if the USSR controls 3 or more resources that were Japanese controlled at the start of Sep/Oct 1939, the Soviet player must agree to a peace if the Japanese player wants one.In either case the new Russo-Japanese border is established by the hexes each controls. Any hex that (now they are at peace) cannot trace a supply line of any length to any home nation supply source becomes controlled by the major power whose hex control blocks supply (owner’s choice if more than one). Option 11: When tracing supply in this case assume you have a convoy point in every intervening sea area (if any).

61
Example:
Hexes P2845, P2945 and P2944 are Japanese controlled even though they are wholly surrounded by Soviet controlled hexes. If the USSR and Japan reach a peace, these hexes will become Soviet controlled.Alternatively, the USSR may compel a peace any turn during its first war with Japan. In addition to hexes given up as stated above, all Soviet controlled hexes (and half-hexes) in Manchukuo, the Pacific map, and in Japanese controlled home countries (anywhere) become controlled by Japan. Japan too may compel a peace any turn during its first war with the USSR. In addition to Japanese hexes given up as stated above, all Japanese controlled hexes (and half-hexes) in Manchukuo and in Soviet controlled home countries (anywhere) become controlled by the USSR.Japan and the USSR cannot compel a peace in their second or any subsequent war (except by conquest).
If a peace is reached, remove all forces now in each other’s hexes. Put them on the production circle to arrive as reinforcements in 2 turns. A neutrality pact is now in place between the parties.If a minor country makes peace and is now not at war with anyone, remove all its units from the game until it is next at war, when all its units are again set up as normal (see 19.4.1) except for its destroyed naval units (if any) which remain destroyed.
13.7.4. Vichy declarationYou may be able to declare a Vichy government during this step (see 17.1).
13.7.5. LiberationInstead of being re-conquered (see 13.7.1), conquered home countries and territories may be liberated provided the major power re-conquering it is from the other side to that which first conquered it (exceptions: Czechoslovakia and Ethiopia, see 19.8).Furthermore, to liberate Italy you must currently control Rome and all Italy’s home country factories. For all other countries (and unlike reconquest) you only need currently control the conquered capital to liberate it. You may choose not to liberate a country or territory that could be liberated. If you do that, it suffers the effects of partisans (see 13.1) as if it were marked in red on the Partisan table until it is liberated.A completely conquered country is back in the game when its home country is liberated (any of its 6 home countries in the case of the Commonwealth). It is at war with every major power its liberator is at war with.Liberation of a Commonwealth major power home countryWhen any of the 6 Commonwealth major power home countries is liberated it must immediately revert to Commonwealth control.Liberation of FranceIf the Allies conquer or liberate a minor country or territory that was aligned to France in 1939, they may instead liberate it to France or Free France. If neither exist then Free France is liberated if Vichy still exists, otherwise France is liberated. Example: Vichy France has been created and Free France completely conquered. The US occupy Vichy aligned Dakar (W2301). During the peace step they liberate Senegal to Free France with Dakar as its capital. The Commonwealth then liberates conquered Martinique to Free France. If the Allies liberate Occupied France (regardless of whether it was
created by Axis conquest or Vichy creation), Vichy, if it exists, collapses (see 17.4.5) and France is liberated.France, when liberated, succeeds Free France and all major powers that co-operate with Free France also co-operate with liberated France unless they fail to revert control of liberated French hexes (see below). All countries at war with Free France are now at war with France.Liberation of ChinaWhen China is liberated, each liberated Chinese city reverts to Nationalist or Communist Chinese control, liberator’s choice (all other reverted hexes belonging to both, see 20), on a city by city basis. If this leaves one faction with no cities under its control, all that faction’s units are scrapped (see 13.6.5).Liberation effectsReturn half of the liberated country’s (unscrapped) units not in the game (chosen randomly within each type, rounding fractions up) to its force pools (except France’s if Vichy and Free France were both installed ~ see 17, and territorials ~ see 22.7). Liberated minors’ units join the force pools of their liberating major power.A liberated country or territory gets back control of all hexes it controlled at the start of the 1939 campaign game that are now controlled by the liberating major power. Other major powers on its side can also give back all such hexes that they control. All major powers that give back all such hexes to a liberated major power may co-operate with it for the rest of the game. All those that don’t may never co-operate with the liberated major power even if they return the hexes in a later turn. Unlike conquest, no other hexes change control.If you liberate the original home country of a conquered country, it again becomes the home country for its units, replacing any alternative home country.You may only liberate a territory or minor country that was aligned with a neutral minor country or an allied major power in 1939 to that country. All other liberated minor countries and territories are aligned with the liberating major power.Example: Germany declares war on Belgium who aligns with the Commonwealth. Germany incompletely conquers Belgium. Later the USA liberates her. Belgium is immediately aligned with the USA (rather than the Commonwealth). Belgian Congo, on the other hand, may only be liberated to, and aligned with, Belgium (and only if she is currently still in the game).If your units are now illegally stacked you must place enough of them on the Production circle to arrive as reinforcements in 2 turns, until the remainder are legally stacked.Example: Continuing the previous example, a Belgian and CW unit are stacked together when Belgium is liberated. They no longer co-operate so either the CW or now US controlled Belgian unit must be placed on the production circle to arrive in 2 turns. If Jay and Jeremy can’t agree, they both get placed there.ReversionYou may return a hex, territory or minor country you control to the country that controlled it in 1939 (or any hex in China to China) during any liberation step with the same status it had in 1939 (either aligned or conquered), provided the country you revert it to is not currently completely conquered. Chinese cities revert to Nationalist or Communist control, your choice. Hexes or minor countries controlled by France in 1939 may be reverted to Free France if she currently exists.
13.7.6. SurrenderDuring any peace step, you may surrender the current home country of your major power if your capital is enemy controlled or you have no in-supply land units inside the home country but your enemy does.Surrendering a home country is treated the same as conquest (see 13.7.1) in all respects (except for rolling for Occupation of Chinese cities, see 13.3.3, US entry action 10, and the USA gaining a US entry chit a turn, see note 3 in the Combat Chart’s US Entry Action table).Example: Germany controls Paris (W1431) during the peace step but doesn’t declare Vichy. Pierre surrenders. France is incompletely conquered.

62
13.7.7. Reserve & militia removalWhen the USSR comes to peace with Germany, move any reserve units with “Ge” on their back that are either on the map or the production circle to the reserve pool. Remove from the game all such reserve units in the force pools.When you come to peace with every major power (i.e. you are neutral again), move all your reserve and militia units that are either on the map or the production circle to the reserve pool. Remove all reserve and militia units in your force pools from the game.If you go to war again, eligible reserve and militia units may be called out again (see 9.7).
13.8 Facility, factory & oil voluntary destruction (opt. 32 & 33)You may destroy facilities, printed oil or printed blue (not red) factories voluntarily. You may only destroy a printed factory or oil if an enemy non-partisan land unit occupies a hex in the country. You may not voluntarily destroy printed rail, road or fort hexes.The only facilities on the production circle you may destroy are hex-specific oil and resource facilities. To destroy these or any on-map facility, or printed oil or factory, one of your (non-partisan) land units must be in supply in the hex now. Each (non-partisan) land unit may only destroy 1 target a turn. Example: Germany has invaded America. In a desperate scorched earth strategy Jay decides to destroy Houston’s (M0916) infrastructure. Jay has 2 corps in Houston so in the first impulse destroys the blue factory and the M0916 oil facility on the production circle. It will take another 3 turns to destroy Houston’s 6 printed oil.You may not destroy oil that you are providing to another major power as part of a trade agreement (see 5.1).
13.9 Victory checkAutomatic victoryYou now check to see if you have won an automatic victory. Your side can win an automatic victory if the major powers on your side control all of the following cities on the maps you are playing with:Berlin, Canberra, Chungking, Delhi, London, Moscow, Paris, Cape Town, Rome, Taihoku & Tokyo.If your side wins an automatic victory, each major power on the other side gains 0 objectives. Add up the objectives controlled by the major powers on your side. You do this normally (see Final victory below) treating all objectives controlled by the other side as neutral (i.e. the closest victorious major power counts those objectives).Believe it or not, the current turn is over. If no one has won an automatic victory and this isn’t the last turn of the game, you are ready to go on to the next turn. Return the impulse marker to the first box on the impulse track and advance the game turn marker 1 turn (altering the year marker if necessary).At the end of the game, you work out who has won by counting the objectives each major power controls. Final victoryThere are 70 objective cities and ports on the map. They represent the major strategic, cultural, economic and political centres of the world. Objectives have their names printed in red on the map:Aden, Amsterdam, Antwerp, Athens, Baghdad, Batavia, Belgrade, Berlin, Bucharest, Budapest, Buenos Aires, Calcutta, Canberra, Cape Town, Chungking, Colombo, Dakar, Delhi, Diego Suarez, Dutch Harbor, Edinburgh, Gibraltar, Helsinki, Hong Kong, Istanbul, Jerusalem, Kiel, Kiev, Kuybyshev, Kwajalein, Lanchow, Leningrad, London, Los Angeles, Madrid, Manila, Marseille, Mecca, Mexico City, Milan, Moscow, Munich, Oslo, Ottawa, Pago Pago, Panama, Paris, Pearl Harbor, Port Arthur, Prague, Rabaul, Rome, Saigon, Sao Paulo, Seoul, Shanghai, Singapore, Stalingrad, Stockholm, Suez, Taihoku, Tehran, Tokyo, Truk, Vancouver, Vienna, Vladivostok, Warsaw, Washington and Wellington.At the end of the game, add up the objectives controlled by each major power (Vichy controlled objectives being added to the major power that installed Vichy). Add objectives in neutral minor countries to the total of the major power with the closest major power’s current home
country capital (even if occupied by an enemy unit). Count each off-map hex or large hexdot as 6 hexes, and each other non-European hex or hexdot as 2. If an objective is equidistant from 2 capitals, count it as half an objective for each of them.Subtract your modified bid (see ~ 23.1.2) from your total. Subtract 1 from an Allied major power’s total for each minor country on the American map that it declared war on. Subtract 1 from the USA’s total if the USA has declared that both Mexico and Brazil are aligned with it (see 19.8).The major power with the largest final total wins.Example: It is the end of the Jul/Aug 1945 game turn and a game of the Global War campaign has just finished. The Allied noose had tightened around Germany, but the heart of the Reich (Berlin, Kiel, Munich and Oslo) is still German controlled. Stockholm (E2949), though neutral, is also counted as a German objective, as it is closer to Berlin (W0437) than to any other major power capital. All other objectives on the map are Allied controlled. Heinz’s modified bid to play Germany was 16 (10+6). Thus his net victory point total is -11 (5-16). Kasigi got Japan and Italy for -8 (0-8), so his net victory point total is 8. The best of the Allies is Jay who, with perfect play, ends with 32 US and Nationalist Chinese objectives. This gives Jay a net victory point of 9 (32 minus his modified bid of 23). If you are running more than one major power, add up the objectives controlled by all your major powers before subtracting your bid.
14. AircraftFace-up aircraft can perform a variety of missions. The missions themselves are explained in the relevant parts of the rules. Here we explain the general rules that relate to all air missions.
14.1 Aircraft movementYou may move aircraft by naval transport (see 11.4.5) and rail movement (see 11.9). Mostly though you will move them by flying a mission. The weather can affect which missions you can fly (see 14.2.3).
14.1.1. RangeThe range of each aircraft unit is presented in the yellow or white circle on the front of the counter.Each hex or normal hexdot an aircraft enters uses up 1 point of its range in Europe, 2 points on the Pacific scale and 6 points in off-map hexes and large hexdots, regardless of weather, terrain, stacking limits, enemy units or their zones of control.When an aircraft has used all its range (or can’t enter the next hex or hexdot because it has insufficient points left) it must stop movin g.An aircraft may fly a mission to any hex it can reach within its range. If it is flying a naval air or naval air interception mission, it must fly to any hexdot in the target sea area. Then it goes into a section of the area’s sea-box depending on how many movement points it has left (see 11.3).An aircraft that is out of supply (see 2.4) may only fly a rebase mission (see 11.16).Reduced rangeAny aircraft flying a naval air interception mission (see 11.5.3) or any fighter flying an interception mission flies with only half its printed range flying towards the target hex or sea-box section. They all have their normal range when returning to base. FTRs flying as bombers also fly with half their range. You may rebase them only half their range after the mission. You should turn them sideways in the target hex to mark the bomber role. FTRs flying into a sea area keep their full range (except in naval air interception missions) even if you want to use them as bombers.Extended rangeBombers with extended range may double their printed range (both to the target and when returning to base). If they do, rotate them clockwise 90° in the target hex or sea area to mark the fact.A bomber using extended range has only half its naval, tactical and strategic factors (PiF option 24: except A-bombs, see 22.17).

Air MissionsMission Who can fly it
air re-supply ATRs (option 8: any aircraft with a white range circle)
air transport ATRs (option 8: any aircraft with a white range circle)
combat air patrol FTRs and carrier planesescort FTRs and carrier planesground strike aircraft with a tactical factorground support aircraft with a tactical factorinterception FTRs and carrier planesnaval air aircraft (other than carrier planes)
with a naval air factor and FTRsnaval air interception
aircraft (other than carrier planes) with a naval air factor, and FTRs
paradrop ATRs (option 8: any aircraft with a white range circle that doesn’t have a ‘no paradrop’ symbol)
port attack aircraft with a naval air factorrebase aircraft with a range greater than 0strategic bombardment
aircraft with a strategic factor
63
Example:
842
FlyingFort.
B-17F
5 1
3 5 6 MP
6 MP
6 MP2 MP
18 MP6 MP
A US B-17F wants to fly a rebase mission (see 11.16) from Fortaleza in Brazil (Americas mini-map) to Marrakech (W2907). This costs 6 movement points to move into the adjacent large orange hexdot in the Mouths of the Amazon, then another 6 to the orange hexdot adjacent to Liberia in the Cape Verde Basin, another 18 mps (3 hexdots) to the orange hexdot adjacent to the Spanish Sahara, 6 more to the large orange hexdot in the Cape St Vincent sea area, 6 more to Mogador (see 2.1.1) and finally 2 mps to Marrakech, a total of 44 mps.A B-17F has a range of 8, extended to 16. Rebase is normally double this, but as there are no Axis units in the sea areas entered and all the hexes friendly controlled, its range is tripled to 48. The B-17 makes it with petrol to spare. Note that she could instead have rebased via the Central Atlantic (the distance is the same).
14.2 Aircraft missions14.2.1. LimitsEvery major power (even an inactive one) that did not choose a pass action can fly any number of escort, interception, combat air patrol, ground support and naval air interception missions. If you chose an air action, you can fly an unlimited number of all other air missions.If you chose a naval, land, or combined action, you can fly onlwy a limited number of those other missions, although which ones you fly is up to you. The limits for each major power are set out on the activities limits table (see Combat charts).14.2.2. Mission eligibilityAircraft may only fly a mission if they are face-up. Face-down units in a sea area can still take part in naval air combats. Out of supply aircraft may only fly rebase missions. This table explains which aircraft may fly which mission:
14.2.3. WeatherThe only missions you may fly to a hex or sea area suffering storm or blizzard is a rebase or naval air (or naval air interception) return to base mission.Halve the air-to-sea, tactical and strategic factors of aircraft in a sea area, or attacking a hex, in rain or snow. If the aircraft is suffering anti-aircraft fire, apply this halving after the AA results are applied.
14.2.4. Return to baseAfter the mission is completed, return surviving aircraft to any friendly hex within their range (doubled if they were flying at extended range). Carrier planes return to the sea-box section they flew from. Turn all units that return from a mission face-down.Naval air and naval air interception missions are different - each aircraft stays in the sea-box section and keeps its current facing.Rebase missions are also different - you do not turn the rebasing aircraft face-down after the mission is over.
14.2.5. FightersA FTR or carrier plane that flies a combat air patrol, interception or escort mission is called a ‘fighter’.Combat air patrol (CAP)A fighter can fly a combat air patrol mission at the point specified in the rules about the mission type.A fighter flying CAP is attempting to anticipate an attack on a threatened location. Generally, you should only use it if the target hex is likely to need fighter protection and your fighter could not fly interception to the hex. Of course, you may also want to use it as a short range (albeit face-down) rebase.A fighter flying CAP uses its printed range.EscortingA fighter can fly an escort mission at the point specified in the rules about the mission type.An escorting fighter uses its printed range.An escorting fighter only has to reach the target hex of the aircraft it is accompanying. It does not need to start or end the impulse stacked with it and does not have to ‘pick it up’ along the way.InterceptingA fighter can fly an interception mission at the point specified in the rules about the mission type. A fighter flying interception has only half its printed range flying to the target hex but can use its full range to return to base after the mission.
Option 43: (En-route aircraft interception) Instead of only being able to intercept a bomber at its target hex, this option lets you intercept it along the way. Announce your target hex. If your opponent wants to intercept you en-route, move your bomber up to 4 movement points (i.e. 1, 2, 3 or 4). Then move it up to another 4 points. Keep repeating this until you reach the target hex.After you reach one of these way stations, you may fly escorting fighters there. Your opponent may then fly interceptors. You may then fly interceptors to the way station. Then you fight a normal air-to-air combat.After the air-to-air combat, surviving bombers can continue on to the next station. Surviving escorting fighters can continue on with them but only if their range is sufficient to reach that station. Escorting fighters that don’t continue, and all intercepting fighters, must return to base. Bombers don’t need to continue - they can choose to return to base after each combat.After the mission is over you return to base normally, there are no way stations on the way back.
14.2.6. BombersAn aircraft that flies any mission except combat air patrol, interception or escort, is called a ‘bomber’ (even if it is an ATR, carrier plane or FTR).The relevant section of the rules explains how you conduct each bombing mission.
14.3 Air-to-air combatThe mission rules will tell you when to fight any air-to-air combat. You

Air Combat ResultsResult Effect
AX The dice roller chooses whether to destroy the opposing front bomber or front fighter. Any unit being air transported by the destroyed unit is also destroyed. If the chosen unit is a carrier plane and you aren’t playing CVPiF option 45, put a “No planes” marker on the CV and return it face-down to its sea-box section (see 14.4, Shot down carrier planes).
DX As “AX” except that the side that didn’t roll the dice chooses whether to destroy their own front fighter or front bomber.
AA The dice roller chooses whether to abort the opposing front bomber or front fighter. If the aborted aircraft is a carrier plane the owner must return it to its sea-box section. Otherwise the owner returns the unit to any friendly hex within range (exception: an ATR already returned to base must abort to that hex, see 11.11)Turn an aborted aircraft (and any unit being transported by it) face-down.
DA As “AA” except that the side that didn’t roll the dice chooses whether to abort their own front fighter or front bomber.
AC The dice roller chooses any one opposing bomber to clear through to the target. It need not be the front bomber. Remove it from the line-up and place it on the target. If there are no enemy bombers, ignore the result.
DC As “AC” except that the side that didn’t roll the dice chooses which of their own bombers to clear through.
— no effect.
64
only fight one if both sides have aircraft present and either has a fighter amongst them.14.3.1. ArrangementResolve air-to-air combats one at a time.For each combat, divide your aircraft into 2 groups - bombers and fighters.The mission sequence will usually separate units into fighters and bombers for you but in naval air combats (see 11.5.9) you may be able to choose whether a particular unit will be a bomber or a fighter. In those cases, both sides must decide simultaneously (and secretly) which of their FTRs and carrier planes will fly as bombers and which as fighters. You may change these roles from one naval combat round to the next but not during a naval combat round.Arrange each group into a line from front to back. Usually it is better to place your best air-to-air rated fighter unit at the front of your fighter group and your best bombers (in terms of bomb factors) at the back of your bomber line. The front unit in each group is the only unit that can be adversely affected by combat (unless playing with Bounce combat, see 14.3.3), until it is destroyed, aborted or cleared through, thus exposing the 2nd unit in the next round.
14.3.2. CombatYou fight each air-to-air combat in a series of rounds. This series continues until every aircraft on one side is either destroyed, aborted or cleared through.If a side starts a round with no fighters, all opposing bombers are immediately cleared through to the target.After air-to-air combat (if any) is over, all bombers that have been cleared through to the target carry out the bombing mission.Combat valuesYour air-to-air combat value for each round = your air-to-air strength - your opponent’s air-to-air strength.You calculate your air-to-air strength at the start of each round. It is equal to the air-to-air rating (see Unit Description chart) of your front fighter, plus 1/10th the air-to-air rating of each other fighter (you ignore bombers’ air-to-air ratings).If you have no fighter group, your air-to-air strength equals the air-to-air rating of your front bomber only.A bomber with a bracketed air-to-air rating is unarmed. If an unarmed bomber is your front bomber and is being used to determine your air-to-air strength, you don’t roll dice. You only use its rating to reduce your opponent’s air-to-air value. Such bombers just have to hope they get cleared through.
Option 8: (Fighter bombers) If your front bomber is a FTR, reduce its air-to-air rating by 1.Option 8: (Twin-engined fighters) In day missions if your front fighter has an orange air-to-air rating, it achieves one result worse than normal when engaged in combat against the front enemy fighter that itself does not have an orange air-to-air rating. In these cases an AX result becomes a DX, a DX becomes an AA, an AA becomes a DA and so on. A DC result is unaffected. PiF option 8: (Night) In night missions (see 11.7), if your front fighter is not a night fighter (those aircraft with a black circle around its air-to-air rating) it achieves one result worse than normal. Thus an AX result becomes a DX, a DX becomes an AA, an AA becomes a DA and so on. A DC result is unaffected. Fighters other than the front fighter contribute nothing to their side’s air-to-air strength during night missions unless they are night fighters.PiF option 8: (Altitude) In high altitude missions (see 11.7), if your front fighter doesn’t have a white cloud reduce its air-to-air rating by 1.
All modifiers are cumulative. Resolving the combatConsult the Air combat table. The air-to-air combat sequence is:1. The inactive side rolls 2 dice and adds them together.2. Cross-index the dice roll with the column containing the inactive
side’s air-to-air combat value, and implement the result.3. The active side rolls 2 dice and adds them together.4. Cross-index the dice roll with the column containing the active
side’s combat value, and implement the result.
5. The active side can voluntarily abort the air-to-air combat.6. The inactive side can voluntarily abort the air-to-air combat.Losses from the inactive side’s roll do not affect the combat value the active side uses. However, the active player must suffer any result before knowing what their own roll is.If you decide to voluntarily abort the air-to-air combat, apply an abort result (see 14.3.3, AA result) to every aircraft you have remaining (exception: in naval air combat, aircraft that voluntarily abort return (face-down) to their sea-box section). It is possible for both sides to voluntarily abort the same combat.
14.3.3. Combat resultsThe combat results are:
Note: Your units never suffer an effect when you roll dice in an air-to-air combat - any result you get only applies to opposing units.Example:
2* 1* 0* 040 1 2 3
EASTERN MEDITERRANEAN (GR)
None
446
Auda
cious
1
4
3
3
5K George V
7 2
3 4
6
3Dido
2 8
3 1
9
Sparviero
SM 79II 42
3 3
1 *
5
2Roma
8 2
3 4
6
2Garibaldi
3 6
3 1
4Freccia G.50
40
4 *
* *
11M
k VIII
Beau
fort
3
4
2
*
AUS
6
57
Gibr
altar
1
5
3
6
10M
k.21Be
au-
fight
er
44
6
3
4
1
AUS
7Ca 314B
39
2 2
2 1
Jeremy moves Commonwealth naval and aircraft units into the Eastern Mediterranean which already contains Italian naval and aircraft units. After the search dice rolls, a naval air combat occurs. Jeremy and Maria secretly sort their aircraft into fighter and bomber groups. Jeremy decides to use his best carrier plane (CV Gibraltar) as a fighter and his other carrier plane (CV Audacious) as a bomber. He places his Aus Beaufighter in front of the CV Gibraltar. He places the CV Audacious as the front bomber with his Aus Beaufort behind it (once

65
again, Aussies save the day!).Maria only has one FTR (the G.50) and therefore makes it her front fighter. She decides to protect her NAV and so places her Ca-314B TAC as the front bomber and her SM-79II NAV behind it.They calculate their air-to-air combat values. Jeremy has an air-to-air strength of 6.5 (6 + 5/10ths for the carrier plane) while Maria has an air-to-air strength of 4. Therefore, Jeremy has a combat value of “+3” (6.5-4, rounding up) and Maria has “-2” (4-6.5, rounding up). There are no shifts to apply due to surprise (see 11.5.6) and they are not playing with any optional rules.Maria (being the inactive player) rolls first on the -2 column of the air-to-air combat table. She rolls a 6 with 2 dice, giving a result of ‘DA’. Jeremy must immediately decide whether to abort his front fighter or bomber. He aborts his front bomber (CV Audacious) which returns to the 3 sea-box section, and turns face-down. He then replies on the +2,3 column and rolls an 18, giving an ‘AX’ result. He chooses to destroy the Italian G-50 fighter.Neither player voluntarily aborts thus a new round of combat is fought. Maria has no fighters left so Jeremy’s remaining bomber (the Beaufort) is cleared through to attack the enemy naval units. Jeremy’s air-to-air strength is unchanged. Maria however only has the SM-79’s (the front Italian bomber) air-to-air rating of 2 (bombers behind the front bomber never count towards the air-to-air strength). Therefore, the Jeremy’s combat value is “+5” (6.5-2) and the Italian combat value is “-4” (2-6.5). Maria rolls a 16 on the -3,4 column giving a result of ‘AA’ which can only affect the front fighter (the Beaufighter) as the Beaufort is already cleared through. The Beaufighter returns to Malta (W0410) and turns face down. Jeremy replies on the +4,5 column with a 10 giving a result of ‘AC’ allowing him to choose one enemy bomber that is cleared through to attack the Commonwealth naval units. He decides to clear through the front (weakest) bomber, the Ca-314B.Neither player voluntarily aborts, so a new round of combat is fought. The CV Gibraltar’s carrier plane is now the front fighter. The Commonwealth air-to-air strength is reduced to 5 while the Axis air-to-air strength is 3 (the SM-79II NAV being the new front bomber). The Commonwealth thus has a combat value of “+2” (5-3) and Italy has a combat value of “-2” (3-5). Maria rolls a 4 on the -2 column which is a result of ‘DX’. As the CW unit is a CV, place a no planes marker on it, return it to the 3 sea-box section and turn the Gibraltar face-down (see 14.4, Shot down carrier planes). Jeremy returns fire on the +2,3 column and rolls a 9 which is no effect (‘-’).As there are no CW fighters left, the last Italian bomber is cleared through to attack Jeremy’s naval units. Since no one has fighters left, the air-to-air combat is over. The air-to-sea part of the combat commences (see 11.5.9).
Option 8: (Jets) Aircraft with a green air-to-air rating are jets. In each round of air-to-air combat, if your opponent’s front fighter isn’t a jet and your front bomber is, then if it survives the round you may immediately clear it through (in addition to and after any other aircraft cleared through this round). If both sides are eligible, the active side decides whether to clear through its jet bomber first. Bounce Combat (option 44)When the (modified) result of any air-to-air combat is “DC”, the defender may implement it normally or may instead convert the result into a “bounce” combat.If the defender chooses a bounce combat, you interrupt the air-to-air combat sequence to immediately fight a bounce combat. To fight a bounce combat, the defender selects any one of their remaining fighters and any one opposing aircraft (fighter or bomber) that remains in the combat. These 2 aircraft fight one round of air-to-air combat. For this combat, you calculate the air-to-air values normally except(a) you gain no benefit from any other fighters you have; (b) the bouncing fighter gains +1 to its air-to-air rating; and(c) only the air-to-air rating of the 2 planes involved is used (ignore
all back-up fighters). The results of the bounce combat are applied as per the air combat table, but can only affect the 2 planes involved. After this combat, if the bouncing fighter is not aborted or destroyed it must be placed at the rear of the line of fighters from which it came. If the bounced
plane is a fighter and is either cleared through or not affected, it returns to its prior place in the fighter lineup. If the bounced plane is a bomber and the result is no effect, it returns to its prior place in the bomber lineup. After the bounce combat, as long as both sides still have aircraft remaining, you resume the air-to-air sequence of play but without recalculating your combat value for this round.When a side only has bombers at the start of a round of combat, all “AC” results that it rolls that round become “DC” results instead (allowing a normal bounce combat). Example:
4StukaJu-87D1 40
2 2
6 2
6Ju- 88A4
4 1
4 44
Gustav
Bf-109G2
42
7 *
1
6 FW- 190
A2BP 41
7 *
1 *
*
4
Bf-109E7
Emil
40
6 *
1 *
7A-
20G
5
2
5
2
4
Yak-
9M J8
6
*
2
*
3
La-5
FN V2
7
*
2
*
3Stu
rm-
ovik
Il-2 M
3K2
5
2
5
1 3
Sturm
-ov
ikIl-
3MM6
4
1
3
*
Heinz flies 2 bombers escorted by 3 fighters in a massive aerial assault on Kursk (E1337) in support of Operation Zitadelle. Anna responds with 3 bombers in ground support escorted by 2 FTRs. Anna fires first. Her air-to-air value is -1 (7.6-8.3) and rolls an 11, a ‘DC’. Heinz decides not to clear through a bomber, but instead bounces Anna’s La-5FN with his FW-190A2. Both have an air-to-air strength of 7 but the bouncing aircraft gets +1 so Heinz’s air-to-air value is +1, and Anna’s -1.Anna rolls another 11 clearing the FW190A2 through (which has no effect), while Heinz rolls a 2, destroying the La-5FN. The FW-190A2 now returns to the rear of the German lineup of fighters, and Heinz rolls his normal air-to-air value using his original +1 (8.3-7.6) value for this round. Following the implementation of Heinz’s roll, the first round of air-to-air combat is concluded. Each player now decides whether they will abort the combat or continue this air-to-air combat.If the (modified) result of any air to air combat is ‘AC’ and the attacker has a fighter, the defender may conduct a bounce combat as usual but only against an opposing fighter (option 8 (Jets): unless the defender’s front fighter is a jet and the attacker’s isn’t, in which case the defender may bounce any opponent’s aircraft).Option 8 (Jets): If you are bounced when your front fighter is a jet and your opponent’s isn’t, you may fight the bounce combat with your front fighter rather than the aircraft chosen by them. If your fighter survives the bounce combat you must immediately place it at the rear of your line of fighters.
14.4 CVsCVs are naval units and move and take part in naval combats in accordance with the naval rules (see 11.4 and 11.5). However, a CV’s air component is an aircraft (called a ‘carrier plane’) for all purposes unless otherwise specified in the rules.Carrier PlanesCarrier planes may fly air missions in the same manner as other aircraft and, like FTRs, may fly each mission as a fighter or bomber. Each mission (or round of naval air combat) you fly you must allocate its air component between its air-to-air rating and its air-to-sea factors. Its tactical factors are half, and its strategic factors 1/10th, of its air-to-sea factors. Example:
6
6 5Essex
1 5
1 �

Carrier Plane ClassClass Colour1 Light blue2 Orange3 Green4 Royal blue5 Red6 Violet7 Black
66
Jay flies a ground support mission in the Philippines. He flies the CV Essex allocating its 5 air component as 2 air-to-air rating and 3 air-to sea factors giving it 1.5 tactical factors for this mission.The range of Japanese carrier planes is 2+ their CV’s air component. All other carrier planes’ range equal their CV’s air component (e.g. in 1939 the CV Essex and Soryu both have a range of 5). From Jan/Feb 1942 onwards add 1, and from Jan/Feb 1944 add 2, to the air component of every CV (exception: CVPiF option 45, see 14.4.1).Carrier planes may fly all missions except air supply, air transport, paradrop, rebase, naval air or naval air interception.A carrier plane may only fly air missions from a sea-box and only if its CV is undamaged and face-up. It can never fly missions from a port (not even to intercept enemy aircraft attacking its CV). A carrier plane does not fly naval air missions but it can take part in naval air combats in its sea area, even if its CV is face-down.A carrier plane may fly a mission to any hex in range. Measure the range from any hexdot in the CV’s sea area (it’s usually best to pick the hexdot closest to your target). A carrier plane may fly, and return, from any mission in the Port attack step (see 11.2), even if it is out of range, provided the port is in the carrier plane’s sea area.After a carrier plane has completed its mission, or aborted from combat (see 14.3.2 & 14.3.3), it returns to its sea-box section (see 14.2.4). Turn the CV face-down (exception: CVPiF option 45, see 14.4.1).Shot down carrier planesIf a carrier plane is destroyed place a “No planes” marker on the CV and return it face-down to its sea-box section. The CV itself is not damaged and operates normally for all purposes except it can’t fly until the “No planes” marker is removed (see 13.6.5, Naval units).
CVPiF option 45: CVs are not affected by carrier plane losses, they have their own units (see 14.4.1, Damage to CVs).14.4.1. Carrier plane units (CVPiF option 45)Each CV’s (CoiF option 7: and I-400 & CVE’s) carrier plane is now represented by a separate unit.
2
34 C
335
1
D1A2
0 2
* *ValuesA carrier plane has the values shown on the counter, not those calculated from the CV’s air component. The CV’s air component does not increase over time as in the standard game.StackingA carrier plane does not count as a separate unit for stacking purposes when it is on a CV (e.g. for foreign troop commitment (see 18.2) a CV with a carrier plane only counts as 1 unit). You show that a carrier plane is on a CV by stacking it directly above the CV. A carrier plane can only stack on one of its own CVs (not another major power’s).The CV’s air component determines which carrier planes can be on the CV. Only 1 carrier plane may stack on a CV at any one time, and only if the plane’s class is the same size as or smaller than the CV’s air component.Most carrier planes will list 2 or 3 years inside coloured boxes on the back of their counter. The coloured boxes determine the plane’s class in those and later years. The seven classes are:
The top box on the back of the counter is the carrier plane’s initial class. It’s the same as the class shown on the front of the counter. It also specifies the year the plane enters your force pool. The other boxes determine the plane’s later classes and the years that it switches to them. When its class drops, the carrier plane can fit onto a smaller CV.Example: In Jan/Feb 1939 Kasigi adds a class 4 D3A1 carrier plane into the Japanese force pool (because of the 39 printed in the blue square on the back of the counter). In 1939 the D3A1 can only fly from 4 air component or bigger CVs (e.g. the Kaga). From the start of 1940, the D3A1 could fit on the Hiryu (due to the 40 inside the D3A1’s green square). From the start of 1942 onwards it could fit on the Junyo.Carrier planes may be embarked and debarked from CVs in the same manner as TRSs (see 11.4.5) except that it must be a CVP from that major power and the owner chooses whether a CV in port debarks its carrier plane at the end of its move (or return to base, see 13.4).Example: the CV Canada in New York stacked with a British, Canadian and US CVP could load the British or Canadian, but not the US CVP.CVPiF option 45: A CV may carry 1 carrier plane of any size but if its class is greater than the CV’s air component then the carrier plane may not fly any mission nor fight naval air combat, and the CV may only embark or debark the carrier plane while the CV is in a port.CVPiF option 45: You may stack up to 2 carrier planes on each CV, provided that the sum of the classes of all carrier planes stacked on a single CV is no more than that CV’s air component. Each carrier plane may conduct missions separately from the other carrier plane based on the same CV, and each carrier plane counts separately against air mission activity limits.CVPiF option 45: A carrier plane’s class becomes one less 2 years after its last coloured box (e.g. continuing the previous example, the D3A1 could fit on any Japanese CV from Jan/Feb 1944 onwards).Naval combatsA face-down carrier plane can take part in a naval air combat but only if it is flying from an undamaged CV in that sea area. Carrier planes can never fly a naval air mission from a CV into another sea area.LandingWhen a carrier plane that flew from a CV returns to base, it must return to one of its CVs it can fit on in the same sea-box section it flew from. If there is no available CV it can return to, it (PiF option 46: and its pilot) is destroyed.A carrier plane that aborts from an air-to-air combat returns immediately to a CV. All other carrier planes that flew from a CV must return to base after all results against naval units are implemented but before aborting naval units return to base (see 11.5.8).Like other aircraft, carrier planes that abort from combat (see 14.3.2 & 14.3.3) or return from any mission (see 14.2.4) are turned face down. However, you never turn the CV face-down because its carrier plane flew a mission or as a result of air-to-air or anti-air combat.Land-based carrier planesWhen not stacked on a CV, carrier planes may only ever fly rebase missions. Damage to CVsIf the carrier plane gets shot down, the CV is unaffected, it merely has no planes any more.If a carrier plane is on a CV that aborts, the carrier plane aborts with it. You then turn them both face-down.If a CV is damaged, carrier planes can still land on it but can no longer fly from it. When a damaged CV is placed into the repair pool, put its carrier plane (PiF option 46: and pilot), if any, onto the production circle to arrive as a reinforcement next turn.A carrier plane (PiF option 46: and the pilot) on a CV which is destroyed, is destroyed too.RebasingDuring the rebase aircraft step of each turn you may rebase a face-up carrier plane up to double (or triple, see 11.16) its range from its CV to a hex or another CV, or vice versa like any other aircraft.

67
If the CV is at sea, include the cost to move into or out of the sea-box section (counted as though flying a Naval Air mission, see 11.3) unless you are rebasing the carrier plane between 2 CV’s in the same sea-box section (e.g. to rebase between 2 of your CVs in the 3 section would cost 0 movement points but to rebase to your CV in the 2 section would cost 9 movement points (6 to leave the 3 section and 3 to enter the 2 section).Moving into portWhen a CV ends its move in port, it turns face-down (see 11.4.2). Turn its carrier plane face-down if the CV moved into the port during the action segment and started the step at sea.
14.5 TerrainHalve an aircraft’s tactical factors when ground striking or ground supporting into a forest, jungle or swamp hex. Halve each side for ground support; halve each unit for ground strikes.Terrain and weather (see 14.2.3) effects are cumulative and are calculated after AA (see 22.2) fire is resolved.
14.6 Pilots (PiF option 46)In World in Flames, each aircraft unit comes with inherent air and ground crews (we just call them ‘pilots’). In Planes in Flames, pilots are separate from their machines and must be trained separately. The number of pilots limits the number of aircraft allowed on the map. CVs are not affected by the pilot rules, unless you are playing with CVPiF option 45 as well (see 14.4.1).14.6.1. The reserve poolInstead of putting reinforcing aircraft onto the map, you put them into the reserve pool. For each pilot in your total on the markers track (see 14.6.3), you may select 1 aircraft and put it on the map, as a normal reinforcement. You don’t have to do this, you may keep aircraft in the pool and pilots on the track as you see fit. After you have finished putting on new reinforcements, you may remove face-up aircraft from the map and put them into the reserve pool. They must be on a city in their home country to do this. For each aircraft you move to the pool, increase your pilots on the track by 1.Example:
14.6.3 MARKERS TRACK
0(+25)
13
2
8
6
4
9
7
5
10
11
12
13
14
19
18
17
16
15
20
21
22
23
24PILOTSPILOTS
Heinz has 2 pilots on the markers track at the start of the reinforcement stage. He takes 2 aircraft from the reserve pool and puts them on the map, reducing his pilots on the track to 0. Then he removes the obsolete He-51 from Berlin (W0437) and moves it to the reserve pool, increasing his pilots on the track to 1, ready for next turn.
14.6.2. Pilot trainingPilots cost 2 build points and take 3 turns to train (PiF option 46: alternatively you may spend 3 build points to build a pilot in which case it only takes 2 turns to train). Use the “pilots in training” markers to show how many pilots you are training.In the reinforcement stage add the number of your reinforcing pilots to your major power’s total on the markers track.
14.6.3. Markers trackThe markers track (see turn record chart) records the number of unallocated pilots on the map.
Add a pilot to your total:• for each aircraft you move from the map to the production circle
(see 13.6.5) or reserve pool (see 14.6.1);• for each ‘pilot in training’ who arrives as a reinforcement (see
14.6.2); • for each pilot who doesn’t die when their aircraft is destroyed
(see 14.6.4); and• TiF option 31: for each aircraft disbanded (see 4.3).Subtract 2 pilots from your total whenever you place on the map an aircraft which has an availability year later than the current year. Subtract 1 pilot from your total whenever you put any other aircraft onto the map (except minor aircraft you are setting up, see 19.4.1) or when you retrain a pilot (see 14.6.5).14.6.4. Pilot deathsIf an aircraft unit is destroyed, the pilot can die with it. This happens if the aircraft was destroyed:• in a sea area where that side has neither a naval unit nor a port;• by an orange air-to-air combat result and the combat was over
any sea area or enemy controlled hex;• by a red air-to-air combat result;• due to overstacking;• by anti-aircraft fire (see 11.5.9 & 22.2);• by being overrun (see 11.10.6);• by being in its home country when it is conquered (see 13.7.1
& 19.5.1);• and it is a minor country aircraft not added to its controlling
major power’s force pools (see 19.4.2);• because it cannot return to base (see 13.4.2);• CVPiF option 45: because the CV it’s stacked on is destroyed
(see 14.4.1);• PiF option 47: if it is marked with a black death’s head (see
14.7); or• option 48: while flying a kamikaze mission (see 14.8).If an aircraft is destroyed but the pilot survives, increase your pilots on the markers track by 1.
14.6.5. Retraining pilotsIn a production step, you may convert pilots to build points. Simply give yourself 1 extra build point for each pilot you subtract from your total on the markers track.
14.7 Flying bombs (PiF option 47)Some aircraft were specifically designed to be flown once only. In effect, they were flying bombs. These units are marked with a death’s head symbol. Add these units to the game only if playing this option.You may rail move your flying bombs and they may be transported by TRS. However, they never return to base from any mission except a rebase. They are always destroyed instead.If the death’s head symbol is printed in black, the pilot automatically dies with the aircraft. If the symbol is white, the pilot survives if a pilot would normally have survived.The Japanese MXY-7 Ohka can’t fly any missions by itself. Instead, it can only fly a mission if it is stacked with any G4M or G8M aircraft. Both of them fly the mission, using the G4M or G8M’s range (and only counts as one mission, see 14.2). Once you reach the target hex (or sea-box section), you must return the G4M or G8M to base and turn it face-down immediately (i.e. before you resolve any air-to-air combat).
14.8 Kamikazes (option 48)The Japanese player may declare a kamikaze attack in any naval air combat (see 11.5.9) after air-to-air combat but before anti-aircraft fire. You can nominate any or all of your bombers as kamikazes (even those with a death’s head ~ see 14.7).Double the surviving air-to-sea factors of kamikaze bombers after anti-aircraft fire.After the air-to-sea attack is resolved, destroy all kamikazes and their pilots. Put a damage marker on a kamikaze CV (unless playing CVPiF option 45).

Multiple Action Cost
Major Power Air Naval * Land
Germany 5 3 6
Italy 4 4 3Japan 4 5 4China 3 2 3CW 5 5 5France 4 4 4USA 5 6 5USSR 5 3 6* ~ Naval cost is 1 if the only naval units that move (see 11.4), and/or initiate naval combat (see 11.5.2) are subs, (CoiF option 7: ASW) and/or convoy points. In this case it costs 2 to reorganise (see 11.17) any other type of naval unit.
68
15. SurpriseMajor powers and minor countries are surprised when a major power declares war on them, even if they are already at war with someone else. However, they are not surprised by a country they are currently at war with even if they attack in conjunction with units from a major power that has just declared war on them.Example: Germany declares war on the USSR in May/Jun 1941. Italy declares war on the USSR in Jul/Aug 1941. A German unit is included in an Italian attack on Soviet units. Those Soviet units are not surprised.Furthermore, they are not surprised by units flying over, or starting this impulse in, a hex controlled by a country at war with them last impulse.Example: Continuing the previous example, Soviet units are not surprised by Italian units that begin the impulse in (German controlled) Rumania. Finally they are not surprised by units being transported by units controlled by a major power at war with them.Example: The Commonwealth and Germany are at war prior to the impulse the USA declares war on Germany. German units are not surprised by a US MAR invading from a CW TRS nor a US PARA paradropping from a CW ATR.The effects of being surprised last only for that impulse (the “surprise impulse”).
15.1 Surprise effectsAircraft unitsSurprised aircraft units cannot fly any mission that is exclusively against units controlled by major powers declaring war. Therefore, in the surprise impulse they can’t:• fly a ground support mission to a hex being attacked only by units
controlled by those enemy major powers;• fly an interception mission against aircraft only controlled by those
enemy major powers; or• fly into a sea area if the only enemy units there are those enemy
major powers’.Surprised aircraft units that flew combat air patrol cannot fight if the only units that fly a mission to their hex are those controlled by a major power on the other side declaring war.Surprised aircraft units already at sea suffer the same effects as surprised naval units.If a land unit controlled by a major power declaring war on you enters a hex containing one of your face-up aircraft, it (PiF option 46: and its pilot) is destroyed, not rebased.Aircraft controlled by a major power declaring war ignore enemy combat air patrol and cannot be intercepted if they (solely) are flying a mission exclusively against a surprised hex or unit(s).Example: Germany is already at war with France when Italy declares war on her. Italy is already at war with the Commonwealth. Italy launches a paradrop against a French hex. They ignore all CAP and can’t be intercepted provided no German units are involved in the paradrop. If the paradrop is against unsurprised CW units in France, Italy will have to face Commonwealth CAP and interception.Bombers controlled by a major power declaring war, roll an extra die against each surprised unit they ground strike (see 11.8). A success with either die turns the surprised unit face-down. Bombers controlled by a major power declaring war double their ground support factors (see 11.15.4) if the only land units in the target hex are surprised units.Aircraft (from any major power) can’t:(a) fly a defensive ground support mission to a hex where the only land
units there are surprised; or (b) fly a naval air interception mission to a sea area where the only
friendly units there are either neutral or surprised.Anti-aircraft factors from surprised units are halved if directed exclusively against bombers controlled by a major power that declared war on it.Land unitsLand units are not halved when attacking a surprised land unit across a river or canal hexside (even if some other unit in the hex is not surprised). They still suffer the adverse effects of invasions and attacks across straits hexsides.Surprised HQs cannot provide emergency HQ supply (see 2.4.3) or HQ support (see 11.15.3).
DiF option 3: Artillery (see 22.2) can’t bombard while surprised.Option 10: Surprised minor country land units only have a ZoC (see 2.2) into their own hex.
Naval unitsIf a port attack or a naval combat at sea only involves units controlled by major powers declaring war, and the major powers they are declaring war on, the surprised units always get 0 surprise points. The attacking major powers get the normal number (this will increase the number of net surprise points the attacker can spend, if there is any combat).Overrun naval units are more likely to be captured or destroyed when surprised (see 11.10.6).Surprised naval units can’t provide defensive shore bombardment nor can naval units provide defensive shore bombardment to a hex containing only surprised units.
16. Offensive Points (option 49)Offensive points represent the assembly of large quantities of supplies and replacements for a major offensive. Offensive points are built in multiples of 5 called offensive chits (OC). Each OC costs build points equal to the chit’s points (e.g. a 5 point offensive chit costs 5 bps, a 10 point chit costs 10 bps and so on) and takes 2 turns to build. Alternatively, you may pay double the chit’s value (e.g. 30 bps to build a 15 point OC) to receive an OC next turn. Place purchased OCs on the production circle (see 13.6.5) to arrive as reinforcing offensive points when built (see 4.2.1).
16.1 Spending offensive pointsEach major power may spend offensive points to: a) call multiple impulses types at once;b) provide benefits to one of your HQs;c) reorganise one or more of your HQs; and/ord) purchase extra actions during any impulse other than Pass.You may spend any number of offensive points in a turn as you have available.
16.2 Multiple actions If you spend offensive points at the start of the impulse, your major power may choose more than one action this impulse. When you do you get the cumulative total of any action limits (see 10.2) still in force.Example: In a Sep/Oct 1942 impulse Jay chooses a naval land action. The US can perform unlimited land and naval actions and a total of 7 air actions (3 from the naval action and 4 from the land action). If Jay had made it a land, naval and air action he could perform unlimited land, naval and air actions and up to 4 land unit/factory and 4 aircraft rail moves. Unit reorganisation cost (11.17.4) is based on the most favourable of all impulses called.Example: Continuing the above example it would cost the US 1 to reorganise each naval and land unit and 2 to reorganise each air unit.To call multiple actions you must spend a number of offensive points equal to each of the type of actions you have selected:

69
Example: Continuing the above example this naval land action would cost the US 11 offensive points (6+5).TiF option 30: (Oil) the cost in oil is the total of all actions chosen this impulse (see 10.3).
16.3 HQ benefits Your HQs can provide combat benefits. Only 1 HQ may be chosen to provide benefits, and only to one action type (naval, air or land), this impulse even if you have chosen multiple actions (see 16.2). The cost is 5 plus twice the chosen HQ’s reorganisation value (e.g. HQ-A Zhukov would cost 15 offensive points, while CW HQ-I Gort would cost 9). If the HQ is Chinese it may only benefit its faction’s units (Nationalist or Communist).An HQ may only provide benefits to units while the HQ is face-up, in-supply, and not on a TRS or AMPH.An HQ may move, fight and/or reorganise units normally during the impulse it provides benefits.At the end of your impulse, turn the chosen HQ face-down (if it isn’t already).If you use offensive points in an air or land action, you can apply some benefits within “range” of the chosen HQ. A hex is within range if it is no further away in hexes and or hexdots than the chosen HQ’s reorganisation value (ignoring terrain, weather, neutral countries, enemy units and ZoCs). Each Asian and Pacific map hex or hexdot counts as 2 hexes for this purpose and each off-map hex counts as 4 hexes.
16.3.1. Naval actionAfter paying the appropriate offensive point cost at the start of a naval action, specify one of your face-up HQs that is in a port. After naval movement but before any combats, place numbered production markers in each sea area containing one or more units that started stacked with the HQ. The total value of markers placed may not exceed the HQ’s reorganisation value, and the number in each sea area may not exceed the number of units in that sea area that started stacked with the HQ. In each round of naval combat, immediately after any roll (search, air-to-air, anti-aircraft, or defence) by either side is made, the player conducting the naval offensive may reduce a marker’s value by 1 to demand a re-roll. After all naval combat destroy any remaining markers.Example:
2* 1* 0* 040 1 2 3
HAWAIIAN ISLANDS (US)
None
6
4San Diego
3 7
3 1
6
5Brooklyn
4 6
3 2
6
5St. Louis
4 6
2 2
13Lightning
P-38L8 2
4 *4(4)24(4)2N
imitz
XXXXX
6
4Yura
4 8
2 1
6
4Sendai
2 8
2 1
Nimitz is in Pearl Harbor (P0131) stacked with 3 CLs and a P-38L FTR. Jay plays a naval offensive on Nimitz at the start of his naval action. Jay flies the P38-L into the 4 sea-box section of the Hawaiian Islands, and moves the 3 SCSs into the 4 sea-box section of the Marshalls sea area. At the end of naval movement, Jay places a 1 marker in the Hawaiian Is. and a 3 marker in the Marshalls (He’d prefer to place 2 in each sea area but he can only place one in the Hawaiian Islands as only one unit in that sea area started its turn stacked with Nimitz). During naval combat Jay initiates a search in the Marshalls. Jay rolls a 4 and decides to keep it. Kasigi then rolls a 2. Jay reduces his marker by 1 and demands a re-roll and Kasigi rolls a 9. Jay decides to save his remaining point for a subsequent search, but the remaining Japanese ships abort after the first round of combat. The remaining marker is destroyed.Finally, every naval unit reorganised by that HQ only costs half the usual reorganisation point cost (see 11.17.4), and the HQ may reorganise naval units in the sea area adjacent to it.Example: Yamamoto is in Truk (P2025). He may reorganise up to 8 naval units in total anywhere in Truk, and/or the Bismarck, Marianas or Solomons sea areas.
16.3.2. Air actionAfter paying the appropriate offensive point cost at the start of an
air action, specify one of your face-up HQs. You gain the following benefits:• all aircraft controlled by your major power roll an extra die in
any ground strike mission (see 11.8) they conduct within range of the HQ; and
• all aircraft controlled by your major power double their bombing factors in any other air mission (except naval-air or naval-air interception) they conduct within range of the HQ (DiF option 3: after anti-aircraft fire); and
• every aircraft unit reorganised by that HQ only costs half the usual reorganisation point cost (see 11.17.4).
16.3.3. Land actionAfter paying the appropriate offensive point cost at the start of a land action, specify one of your face-up HQs. You may: • double the land combat (DiF option 3: or bombard) factors
of co-operating land units within range of the HQ when you declare an overrun (see 11.10.6) or land combat (see 11.15.1); and/or
• DiF option 3: have each bombarding ART (see 22.2) roll an extra die during the ground strike step (see 11.8).
You may do this (in total) to as many of your, and/or co-operating units in the impulse as twice the HQ’s reorganisation value. You may enhance the same unit in a land attack and one or more overruns but it counts against the total each time. You may only enhance each unit once per ground strike, overrun or land combat.Furthermore, every land unit reorganised by that HQ only costs half the usual reorganisation point cost (see 11.17.4).
16.4 Reorganise HQsImmediately after declaring which HQs will receive benefits this impulse you may spend offensive points to turn your in-supply HQs face-up now. Each HQ costs 2 plus the reorganisation value of the HQ to turn face-up (e.g. HQ-A Zhukov costs 7 offensive points to reorganise while HQ-Gort would only cost 4).Alternatively, you may reorganise all your in-supply HQs. This costs 20 offensive points for the Commonwealth, Germany, USA, and the USSR and 15 offensive points for all other major powers.
16.5 Extra actionsFinally, you may also expend offensive points to move individual units or perform extra actions even in impulses that would not normally allow them (apart from a Pass impulse) It costs 2 offensive points to perform each extra air mission, land move, or to move each naval unit. It costs 3 offensive points to initiate 1 extra naval search (in a sea area not already searched for this impulse) or land attack.Example: It costs 7 offensive points for 2 INF to invade 1 hex in a Naval impulse.You may perform as many extra actions as you pay for and you pay for them as you use them (pay as you go).
17. VichyHistorically France was never completely conquered (in WIF terms); but split in two, Free France and Vichy France. These rules cover this unique situation.
17.1 CreationAn Axis major power may choose to install a Vichy government during any peace step if • it occupies Paris with more land combat factors than any other
Axis major power;• it is not at war with the USA; and• France is not conquered.If you install a Vichy government, the French home country is divided into 2 home countries; Vichy France (south of the border marked on the map) and Occupied France (north). The capital of Vichy France is the city of Vichy. Paris remains the capital of

Free French Chart*Administration groups DieCorsica, Morocco, Algeria & Tunisia 10French West Africa 9-10Syria 9-10Indo-China 9-10Madagascar 8-10All Asian map minors** & territories 7-10French Equatorial Africa 3-10All Pacific map minors** & territories 2-10Marquesas Is (M1509) & French Polynesia 7-10All other minors** & territories 9-10
* ~ Subtract 2 from each die roll if any on-map French CV or BB is not in a French (occupied or Vichy) home country port unless all such ports are already fully stacked with naval units or no such port exists
** ~ based on the location of the original minor country’s home nation capital
70
Occupied France.Occupied France is a conquered major power home country controlled by the Axis major power that installed the Vichy government. Control of occupied France is as per 13.7.1 except that all hexes controlled by French units become controlled by the Axis major power installing the Vichy government.Vichy France is the home country of a new neutral major power, Vichy run by the Axis major power that installed it. All hexes in Vichy France are now controlled by Vichy.Free France is an alternative government also established at this time. Free France is considered an incompletely conquered major power from now on unless otherwise specified. It is run by the French player and unless otherwise stated all references to France include Free France. Free France starts at war with all countries France was at war with, and at peace with all others (including Vichy). French territories and minor countries already conquered by the Axis remain conquered by them. All other French controlled territories and minor countries may become controlled by either Vichy or Free France.
17.2 Determine controlRoll a die on the Free French chart for each of the administration groups to determine who controls it. A group becomes controlled by the Free French player if the roll is within the range shown on this chart. Otherwise, it remains controlled by Vichy:
Each hex France controls in a territory or home country controlled by another country reverts to the control of:(a) the major power occupying the hex (if any); or if none(b) that other country.
All Axis controlled hexes in Vichy controlled minor countries and territories immediately revert (see 13.7.5) to Vichy control. Axis controlled hexes in Free French controlled minor countries and territories remain under Axis control.All Allied controlled hexes in Free French controlled minor countries and territories immediately revert to Free French control. All Allied controlled hexes in Vichy controlled minor countries and territories may now be immediately reverted to Vichy control. Vichy is hostile (see 17.4 & 17.5) to all Allied major powers that do not immediately revert all such hexes to Vichy control.Finally all Vichy controlled minor countries France has gained control of since the start of the game immediately become controlled by any active Axis major power nominated by the major power installing Vichy. The minor country is conquered if it was aligned to France, and aligned if it was conquered by France. If more than one minor country is available to be allocated they may be allocated to different major powers.Example: Heinz declares war on the Netherlands in May/Jun 1940 which aligns to France. In the conquest step the Netherlands is incompletely conquered. Pierre nominates the Netherlands East Indies as the Netherlands new home country. During the same turn France
declares war on, and completely conquers, Greece. In Jul/Aug German units occupy Paris (W1431) and Heinz installs Vichy. All French BBs and CVs are in French home country ports. Pierre rolls for each administrative group on the Free French chart. The Netherlands is rolled for on the “All other minors** & territories” row (as the original home country capital of the Netherlands, Amsterdam, W1137, is located on the West Europe map). Pierre rolls an 8, just not enough to sway the Netherlands to join the Free French. As the Netherlands was aligned to France after the start of the game then after all rolls on the Free French chart Heinz gives the (what would otherwise be Vichy) Netherlands East Indies (and its aligned minor, Dutch Guyana) to Japan as a conquered minor country. All Dutch naval units in the NEI and Dutch Guyana are treated as if overrun (see 13.7.1) and, if still Allied controlled, become Free French and must rebase to a friendly port where they can stack. Greece is affected by the same roll as the Netherlands and Heinz allocates Greece to Germany as an aligned minor country.Free France must now choose one of its remaining aligned minor countries that it controlled in 1939 as its new home nation. If Free France controls no such minor country, all Free French territories become Vichy controlled (aligned if Free French aligned, otherwise conquered).
17.3 Units17.3.1. Non-French unitsEvery non-French controlled land (except partisans) and aircraft unit (PiF option 46: including its pilot) in a Vichy controlled hex, country or territory is now placed on the production circle to arrive as a reinforcement in 2 turns.The owner then rebases every non-French controlled naval unit in these territories or minor countries to the nearest friendly port within double the range of the rebasing naval units. If there is no friendly base it can stack in within double the naval unit’s range, it is destroyed instead.
17.3.2. French units & markersEach Allied major power may destroy every French controlled unit in every hex that major power controls. If it does so Vichy is hostile to that major power (see 17.4 & 17.5).All remaining French controlled land and aircraft units in a hex Free or Vichy France doesn’t control are placed anywhere on the production circle. On-map French minor country units are also placed there if they are not in their minor country. All remaining French controlled naval units in a port Free or Vichy France doesn’t control are moved by Vichy’s controlling major power to the nearest (in sea areas) Vichy- or Free–French- controlled port(s) where they may stack within double their range (their choice if more than one eligible port). If no such port exists the unit is destroyed instead.The same major power now returns to base (see 13.4) every French controlled unit at sea (even those face-down) to the nearest Vichy or Free French hexes (port(s) for naval units and their cargoes) within range in which they may stack (controller’s choice if more than one). If no such hex exists the unit is destroyed instead.
TiF options 30 & 31: (Saved oil and build points) The major power controlling Vichy receives half the saved oil (including any 1/10ths) and build points (by type, rounding up) in France. That player moves them immediately to any home country city that can store them (see 13.6.9). The remainder belongs to Vichy. These points are immediately moved to an eligible city in Vichy France if not already there. In all cases ignore terrain, ZoCs and neutral countries when moving the markers.FiF option 40: (Factories in Flames) All French controlled non-naval units on the production tracks not fully paid for are destroyed.
The major power controlling Vichy now places all remaining French controlled non-naval units on the production circle to any hex in their home country in which they can stack.
PiF option 46: (pilots) You may only place 1 aircraft on map for each French controlled pilot anywhere on the production circle or the markers track (Vichy player’s choice). Any unpiloted aircraft on the production circle and reserve pool, or unused pilots on the production circle or markers track, are destroyed.

71
All remaining French controlled markers on the production circle and markers track are destroyed.All units controlled by France that are still in Vichy controlled hexes are now controlled by Vichy. All other French controlled units are Free French.Now remove from the game all French controlled MIL whose city is not controlled by Vichy. Half the remaining French controlled MIL and ‘Res’ units on the map (rounded up) are destroyed and the rest placed in the reserve pool. Similarly, half Vichy’s other land and aircraft (PiF option 46: and their pilots) units are destroyed (taken together rounded up). In all cases, the player running Vichy chooses which units are destroyed. However, the player controlling Free France decides whether destroyed units are scrapped (see 13.6.5) or not. French controlled naval units on the production circle, in the repair pool or in the construction pool remain there as Vichy units. They may be built using whatever production Vichy retains and when they arrive as reinforcements are placed in Vichy France. French controlled units in the reserve pool are also Vichy controlled and may be called out when at war with a major power (see 9.7). Randomly remove half the units now in each French force pool (TiF Option 54: except territorials) from the game.
TiF option 54: All territorials belonging to a minor country or territory controlled by Vichy are removed from the French force pools and placed in a separate Vichy force pool.
All units left in the force pools or that enter them from now on (except CPs which may be built by both sides and TiF option 54: territorial units), are Free French units (including those Vichy units destroyed).If the French HQ-A ‘De Gaulle’ is neither in a hex controlled by Free France nor in the Free French force pool, move it to the Free French force pool.
17.4 Running Vichy17.4.1. Vichy’s role and declaring warVichy may only declare war on major powers it is hostile to. There is no US entry effect for this act. Vichy may not declare war on minor countries.Axis major powers can’t declare war on Vichy. Allied major powers at war with the installing major power may declare war on Vichy. The declaration of war does not make Vichy hostile to that Allied major power. However, if an Allied unit enters Vichy France, Vichy becomes hostile to that unit’s controlling major power.Vichy may be conquered just like any other major power (see 13.7.1).
17.4.2. Using Vichy unitsVichy does not choose an action type. Instead, she may only pass or take the same action type as the major power that installed the Vichy government (even if Vichy is neutral). Further, activities of Vichy units (TiF option 30: and their oil cost) count against the installing major power’s activity limits.Vichy units may only enter a hex if it is enemy controlled or controlled by Vichy or one of her controlled minors. Vichy units may move into hexdots and sea-boxes without penalty.If Vichy is not hostile to any Allied major power then each Vichy naval unit you move (not each task force) counts as 1 naval move and all its naval units (except for convoy points) must return to base during the return to base step (see 13.4).Example: Heinz chooses a combined action for Germany. This gives Germany 1 naval move which he uses to move 1 Vichy naval unit. If Vichy were hostile to the Commonwealth, he could have moved a task force of Vichy naval units instead. If he had chosen a naval action he could have moved all the Vichy and German naval units (even if not hostile). Germany also has 6 air missions. Heinz moves 5 German and 1 Vichy aircraft.
17.4.3. Access to VichyWhile Vichy is neutral no Axis major power may enter any Vichy controlled hex, country or territory except for those hexes adjacent to units controlled by a major power at war with the Axis major power installing Vichy. Even then only units controlled by the major power installing Vichy may enter, they may only trace supply into and out of
hexes they can move into, and these hexes are still subject to Allied ZoCs.Example:
XXX
8 - 38 - 3
I
XXX
8-6XLV
II
A Commonwealth unit is in Bordeaux (W1825) after Germany has installed a Vichy government. Even though Vichy is neutral, German (and her controlled minor) units may enter (and trace supply into) hexes W1725, W1724 and/or W1824. After the CW leaves Bordeaux all German controlled units inside Vichy France, when next they move, may only enter a hex outside Vichy control.While Vichy is active, and in addition to the above, only units controlled by the major power which installed Vichy may enter Vichy controlled administration groups (not Vichy France), and even then must satisfy the foreign troop commitment rules (see 18.2) to enter each administration group.If Vichy is active and hostile to any major power, units controlled by the major power that installed Vichy may enter any Vichy controlled hex, country or territory without having to satisfy the foreign troop commitment limits.
17.4.4. Vichy productionVichy may use its resources and factories to produce Vichy units. Vichy’s basic production multiple is the same as France’s.Vichy can only give resources and build points to an Axis major power if she is hostile to any Allied major power.
17.4.5. Vichy collapseIf:(a) Occupied France is liberated (see 13.7.5), or(b) the major power that installed Vichy announces it at the end of the
declaration of war step;then Vichy collapses.If Vichy collapses, it ceases to exist. All Vichy controlled hexes in Vichy France become controlled by Occupied France (see 17.1) if it still exists, or French home country hexes if it doesn’t. Each other home country or territory controlled by Vichy is immediately conquered by any Axis major power that has a land unit in it. All other Vichy controlled home countries and territories become aligned to the major power that controlled it in 1939. If none, they are aligned to Free France (or become Free France with a new home country if it is currently completely conquered,). If Free France is completely conquered (see 13.7.5) when Vichy collapses she is back in the game and must choose one of her aligned minor countries in 1939 as her new home country. She is at war with the major power that collapsed Vichy and every major power that co-operates with it (but neither side is surprised, see 15)Example: Corsica, Algeria, Tunisia and Yugoslavia are aligned to Vichy which has also conquered Egypt. There are German units in Tunisia. Heinz (who installed the Vichy Government) announces he is collapsing Vichy. All hexes in Vichy France become conquered German

72
hexes. Tunisia becomes a German conquered minor country. Egypt becomes an aligned Commonwealth minor country. Corsica, Algeria and Yugoslavia become aligned to Free France. Free France chooses Algeria as her new home country and is at war with Germany and Italy. All Vichy land and aircraft units now in Axis controlled hexes are moved to the Free French force pools. All Vichy land and aircraft units on the turn record chart are also moved to the Free French force pool if Vichy France was Axis controlled at the moment of collapse. All other Vichy land and aircraft units are Free French.If no Axis major power controls Vichy France at the moment of Vichy collapse, all Vichy markers and naval units on the turn record chart become Free French. Otherwise Vichy pilots on the markers track are destroyed and all other naval units and markers on the turn record chart are controlled by that Axis major power. All on-map Vichy naval units are now Free French. Those in a hex controlled by an Axis major power (or one of its controlled countries or territories) are treated as if surprised during overrun (see 11.10.6).Each on-map Vichy marker becomes controlled by the major power that controls its hex (or controls that hex’s country or territory).If an Allied unit enters Vichy France before Vichy has collapsed:• Vichy France becomes hostile to that Allied major power; and• Vichy units no longer test their loyalty prior to land combat
resolution (see 17.5).
17.5 Combat with VichyIf Vichy controlled land units are involved in a land combat or are overrun solely by units controlled by an Allied major power they are not hostile to, they may defect before combat.Roll a die immediately before resolving the attack (see 11.15.5) or overrun (see 11.10.6) for each Vichy unit (including notional units) involved. Subtract 1 from the roll for each Free French or US land unit in the combat or overrun and add 1 for each Commonwealth land unit. On a modified 4 or less, the Vichy unit is destroyed (e.g. 2 US and a British corps attack a Vichy corps, it would be destroyed before combat on a roll of 5 or less). If no Axis land units remain, attacking Allied major powers treat the combat as if it were a ‘*/2B’ result while defending Allied units are simply not attacked. In both cases, shore bombarding units (option 13: HQs providing HQ support) and ground supporting bombers still turn face down. If it’s an overrun, you just pay the normal terrain cost, not double.If any Vichy unit stays loyal, the combat or overrun proceeds as usual.
17.6 Running Free FranceAll Free French home countries, units and partisans are controlled by the Free French player. Until France is liberated (see 13.7.5), Free French action limits are half those of France. Its production multiple (see 13.6.3) and ability to give and receive resources and build points (see 13.3.2 US entry options 9, 15, 17, 19, 25, 27 & 30) are the same as France’s.Free France may be conquered just like any other major power (see 13.7.1).
18. Co-operationUnits must be able to co-operate to do certain things together. These rules will tell you who can co-operate, what they can’t do together even though they can co-operate, and what they can’t do together if they don’t co-operate.
18.1 Who can co-operateUnits of a liberated major power never co-operate with units of a major power that refused to return hexes on liberation (see 13.7.5). With that proviso, the following may co-operate with each other:1. Units from the same major power (apart from China, see 20
below) co-operate with each other (even if they are from different countries - e.g. Australian and Indian units).
2. Units from the same minor country co-operate with each other.3. Units from a minor country co-operate with units from its
controlling major power or minor country.4. Units from one minor country only co-operate with units from
another if both were aligned with the same major power in 1939
(have that major power’s initials in bracket after their name) and are still aligned to that major power (or Free or Vichy France in the case of France’s minors, see 17).
5. Units from a liberated major power co-operate with units from the major power that liberated it.
6. US and Commonwealth units co-operate provided neither is neutral.
7. Commonwealth and Free French units co-operate provided neither is neutral.
8. US and French (or Free French) units co-operate provided both are at war with Germany.
9. German and Italian units co-operate provided neither is neutral.10. Green partisans co-operate with units from their own country only
(Communist China in the case of Chinese partisans). Red partisans only co-operate with other partisans.
No other units co-operate (e.g. units from a major power don’t co-operate with units from a minor country aligned with another major power).
18.2 Not co-operatingUnits that don’t co-operate cannot:1. stack in the same hex at any time that stacking limits apply; or2. transport each other’s units; or3. draw supply from a source controlled by the other; or4. reorganise each other; or5. be committed to any combat or mission that the other unit is or will
be involved in this step. This doesn’t apply to naval air or naval air interception missions.
Example: Commonwealth land units are in French controlled Liege (W1034). Jeremy cannot fly combat air patrol or interception with his FTRs over Liege during the strategic bombardment step because the factory is French. French aircraft could fly those missions to that hex during that step.However, Commonwealth aircraft could fly ground support, combat air patrol, escort or interception missions to Liege during the Axis land combat step. French aircraft could not fly those missions because CW land units are involved.Foreign troop commitmentsA unit that ends any step in the unconquered home country of a friendly major power that it doesn’t co-operate with is destroyed unless:• it started the step there; or• it started the step elsewhere and the unit satisfies the foreign troop
commitment limit; or• it is an Axis unit in Vichy France adjacent to an enemy major
power land unit (see 17.4.3).Example: Jeremy successfully invades a German controlled Brest (W2032) with a Commonwealth INF while France is unconquered and no Commonwealth HQs are in France. At the end of the combat step the INF is destroyed.An Axis unit that ends any step in an active but not hostile Vichy administration group (see 17.2), is destroyed unless:• it started the step there; or• it started the step elsewhere and the unit satisfies the foreign troop
commitment limit.A minor country unit that ends any step in the unconquered home country of a non co-operating aligned minor country on the same side is destroyed unless:• it started the step there; or• it started the step elsewhere and the unit satisfies the foreign troop
commitment limit.You satisfy the foreign troop commitment limit if there is at least 1 HQ from the unit’s original home country there (any Commonwealth HQ for Commonwealth units) and the total number of that country’s non-HQ units there is less than or equal to the total printed reorganisation values of the HQs.

73
Example:
XXX
6-3XXXV
II
XXX
5-4
LII
XXX
5 - 35 - 3XX
X
XXX
7-5XLVI
II
XXXXX
5(2)3
Gort 3
HurricaneI
LG Õ96 I 0406
4 *
* *
23
Res 34
1939
Heinz retreats 2 Commonwealth land units into France (even though there was a hex in Belgium (W1335) that Heinz could have retreated them to). Unfortunately for the CW, HQ-I Gort and a CW fighter are already in France. As Gort only has a reorganisation value of 2, at the end of the Retreat step Jeremy must destroy one of the retreating land units. He decides to destroy the more expensive MOT corps as II INF is more powerful and will be needed in the evacuation. But you can do thisUnits that don’t co-operate are not otherwise limited. In particular, they can:1. occupy the same section of a sea-box;2. take part in the same naval combat;3. take part in the same convoy chains (unless neutral);4. lend resources to each other;5. trace supply through hexes controlled by each other; and6. enter hexes controlled by each other outside their major power
home countries (if the owner agrees of course, see 11.10.5).
18.3 Co-operatingHQ, ATR, TRS and AMPH units may reorganise units they co-operate with. However, you double the reorganisation cost of a unit if any reorganisation point came from a unit of a co-operating country.Apart from control of hexes (see 2.5), reinforcement (see 4), activities limits (see 10.2) and reorganisation (see 11.17), units which co-operate act as if they were from the same country (they may move and fight together, etc.). Note however that there is a combat penalty when co-operating major powers add combat factors to the same attack (see 11.15.5 & 11.15.6)
19. Minor countriesThe world is divided into several types of political entity. At the top of the heap is the major power - independent and powerful. Then there are minor countries - still independent but not in the same military league as a major power. In World in Flames, every major power home country and every minor country has a capital.In previous years, most major powers valued their importance by how many other territories, sometimes called “colonies”, they controlled. We don’t have a special status for colonies - they are either a minor country aligned with, or conquered by, a major power. The campaign information (see 24) lists which minor countries start the game conquered or aligned.All other minor countries are independent and neutral until they enter the war which occurs when someone declares war on them or they align themselves with a major power. In either case you will select a major power to run their affairs.
19.1 Neutral minor countriesYou may transport resources and build points through hexes controlled by neutral minor countries. Your units may not enter hexes controlled by a neutral minor country nor may you trace supply through them (exceptions: US entry option 3,
see 13.3.2, Sweden, see 19.7 and PiF option 46, see 19.4.3).
19.2 Entering the warA neutral minor country aligns with an active major power when:• a major power declares war on it (see 9.5); or• it voluntarily aligns with a major power (see 9.6).If a minor country aligns with a major power, it is controlled by that major power.If an Axis major power declares war on a minor country on the American map, it may only align with the USA.China may not align any minor country (exceptions: DoD and PatiF).In every other case, when one or more major powers declare war on a minor country, choose an active major power on the other side to align with it. If there is more than one eligible major power, offer the minor to the major power whose capital (even enemy controlled) is closest to the minor’s capital as if flying between the two (see 14.1.1). If it declines, offer it to the next closest, and so on. Example: Germany is at war with the Commonwealth and USSR when she declares war on Iraq. Baghdad (A3136) is 28 air range from Delhi (1834) and 34 from Moscow E1344). Iraq offers to align with the Commonwealth. If every eligible major power declines, the minor (and all its controlled minors and territories) is immediately conquered by the attacking major power (see 13.7.1).
19.3 Who can enter the minorYour units can enter hexes controlled by a minor country if:• you are at war with it or with the major power that controls it; or• it is aligned with any active major power on your side and the
unit entering is controlled by an active major power (subject to the foreign troop commitment rules ~ see 18.2); or
• it is aligned with a neutral major power on your side and the unit entering is one of that major power’s units.
Note that US entry options 43 & 45 restrict access to Pacific minor countries (see 13.3.2).
19.4 Minor country units19.4.1. Setting upWhen a minor country not currently aligned to any major power aligns with you, set up its initial units immediately. You must set up in hexes controlled by that minor. At least half a minor country’s initial units must set up in its home country.Set up each of the minor’s land and aircraft units (PiF option 4: including any Planes in Flames units) that has an earlier year on its back. If it has the current year on its back put it (PiF option 46: and its pilot) on the production circle to arrive as a reinforcement next turn. For setting up reserves see 9.7.Only set up units from America in Flames or Patton in Flames if playing that game.
AiF option 1: The Central American INF is Guatemalan and the MIL and convoy points are Panamanian.
Set up on the map each of the minor’s naval units (SiF option 5: including any Ships in Flames units) that has an availability year at least 2 years prior, except those sunk before the start of the campaign. Example: If your opponent declares war on Spain in 1940 you would set up all the Spanish naval units that have 1938 or earlier on the back of their counter except for the BB España.If the date is one year earlier, put the unit into the construction pool. If it is the current year, the units may be added to your force pool (see 19.4.2).Set up this many convoy points (use the controlling major power’s convoy points, which are treated as units of the minor power for the rest of this impulse):

Minor Country convoy point set-upCountry WiF SiF CoiF
TankersArgentina 0 1 0Belgium 0 2 0Brazil 0 2 0Central America 5 5 1Chile 0 1 0Denmark 5 6 2Estonia 0 1 0Finland 5 3 1Greece 10 10 4Latvia 0 1 0Netherlands 10 10 6Norway 15 15 8Poland 0 1 0Portugal 0 1 0Rumania 0 1 0Sweden 5 6 4Turkey 0 1 0Yugoslavia 0 1 0
74
SiF option 5: CPs must be set up as ships, i.e. in groups of 3 with any left over as one more ship.CoiF option 7: Set up the minor country’s own tankers and convoy points (rather than its controlling major power’s). The CoiF column in the above table is the number of tankers these minor countries start with. Reduce that number of SiF convoy points set up (e.g. Finland sets up with 1 tanker and 2 convoy points).TiF option 54: Also set up all a minor country’s territorials (see 22.7). These go into the territorial’s home country, not their controlling minor country (e.g. the NEI territorial goes into the Netherlands East Indies, not the Netherlands).
In all cases you may add to your force pools units not set up ~ see Production below).
19.4.2. ProductionImmediately after you have set up a minor country’s units you must declare whether those units not set up are to be added to your force pool. If you do, its units must always go into your force pools as they are destroyed (unless scrapped, see 13.6.5) and/or become available (see 4.1). If not, they are removed from the game, as are units available in future years and the set-up units when they are destroyed. All these units are still eligible to be added to the force pool of the major power that liberates it (see 13.7.5).
19.4.3. Restrictions on useMinor country units can move and fight outside their home country. However, you may only move a minor country land or aircraft unit (naval units are not restricted) outside the minor unit’s (current) home country or to the reserve pool if half or more of its on-map land and aircraft units are currently inside its home country (exception: Rumania becomes a full Axis ally ~ see 19.6.2).Example: The Netherlands is incompletely conquered (see 13.7.1) and the Netherlands East Indies is the Netherlands current home country. The Netherlands has 2 land units and 2 aircraft on the map. 3 of them may be outside the NEI. If playing with Territories in Flames the NEI territorial may also leave the NEI (as the NEI limit is separate from the Netherlands limit).
PiF option 46: (pilots) any minor country aircraft may rebase (see 11.16) into a neutral minor country. If it does it is destroyed, but its pilot survives and is placed on the production spiral to arrive as a reinforcement for its controlling major power in 2 turns.
19.5 The Nazi-Soviet pactIn all World in Flames campaigns that start after Jul/Aug 1939 and before Jul/Aug 1941, the USSR and Germany have a Nazi-Soviet pact
in place that regulates their spheres of influence. They signed their pact on the 23rd of August 1939 and Germany broke some of its clauses on the 22nd of June 1941.
19.5.1. East PolandWhile the Nazi-Soviet pact is in effect, the USSR may occupy East Poland during any Allied land movement step (without declaring war) provided Poland has not been conquered.You do this by moving a land unit into any hex (regardless of who controls it) of East Poland (even if it is occupied by another unit). When you do, that part of Poland east of the partition line is immediately conquered by the USSR. The owner moves any Axis units there to the production circle to arrive as reinforcements in 2 turns. Any Allied (except Soviet) units there are removed from the game (PiF option 46: including any pilots) until Germany and the USSR are at war, at which point the Commonwealth may choose to add some or all of them to their force pools if desired (even if Poland is currently conquered).At any time, the Commonwealth may add one or more Polish MOT, MECH and/or ARM to its force pools if:• the USSR has occupied East Poland; • Poland has been conquered by the Axis; • the availability year on the Polish unit is this year or earlier; and• the USSR and Germany are at war.All the Polish units covered by this rule are treated as British for all purposes.
19.5.2. Baltic StatesAfter it has occupied East Poland, the USSR may occupy the Baltic states (Latvia, Lithuania and Estonia) during any Allied land movement step provided the Nazi-Soviet pact is still in effect.Instead of declaring war, you do this by simply moving a land unit into any hex of one of the Baltic States that is still neutral. Once you do, all neutral Baltic States are immediately conquered by the Soviet Union (without those states being aligned or its units set up).Example: Lithuania is German controlled but Latvia and Estonia are both neutral. The Nazi-Soviet pact is still in effect. A Soviet INF enters Latvia. Latvia and Estonia are immediately conquered by the Soviets.After the Nazi-Soviet pact is broken, the USSR may only enter a neutral Baltic state by declaring war on it.
19.5.3. Breaking the Nazi-Soviet pactAs well as the usual method of breaking a neutrality pact (superior garrison ratio, see 9.2), if a German controlled unit from outside Estonia, Latvia, Lithuania or Turkey enters any hex in or declares war on any of these countries, then the Soviet player may break the Nazi-Soviet pact during any Allied declaration of war step. Similarly, if a Soviet controlled unit from outside Denmark, Greece, Hungary, Norway, Sweden or Yugoslavia enters any hex in these countries, then the German player may break the Nazi-Soviet pact during any Axis declaration of war step.Once broken there is no longer a trade agreement (see 5.1) nor a neutrality pact (see 9.2) between Germany and the USSR.
19.6 Soviet border rectificationAs well as signing the Nazi-Soviet pact, the Soviet Union laid claim to territory held by several of its neighbours. This rule covers Soviet claims over Rumania and Finland and their impact on Bulgaria and Hungary.
19.6.1. FinlandThe USSR doesn’t claim the Finnish border landsIf the USSR doesn’t claim the Finnish border lands, it may not declare war on Finland. A neutral Finland may align with Germany after Germany has declared war on the USSR (not if the USSR declares war on Germany).The USSR claims the Finnish borderlandsOnce per game during any Allied declaration of war step after the first, while Finland is neutral, the USSR may claim the Finnish borderlands. The German player (acting as Finland) must either allow the claim or deny it.
75
If Finland allows the claim it stays neutral and the Finnish border lands become part of the USSR for all purposes until the USSR controls no hex in the Finnish border lands, at which time the Finnish border lands again become part of Finland. The USSR may not declare war on Finland for the rest of the game. Germany may align a neutral Finland during any later Axis declaration of war step.Allowing the claim immediately reduces the resources the USSR supplies to Germany by 1 (see 5.1).
If Finland denies the claim the USSR must declare war on Finland this step.Germany can enforce a peace between Finland and the USSR during any peace step if:• no hex of Finland outside the Finnish border lands contains any
in-supply Soviet corps-sized land units; and• Germany and the USSR are not at war.• If Germany enforces a peace between Finland and the USSR:• Finland reverts to neutrality (see 13.7.3); • the USSR gains control of all hexes the USSR controlled at the
start of the war that are currently Finnish controlled (place all Axis units in those hexes on the production circle to arrive as reinforcements in 2 turns);
• the USSR gains control of the border lands exactly as if Finland had allowed the claim provided there is at least one Soviet land unit in the border lands;
• Germany may align Finland during any later Axis declaration of war step; and
• the USSR may not declare war on Finland again.
19.6.2. RumaniaThe USSR doesn’t claim BessarabiaIf the USSR hasn’t claimed Bessarabia:• no Allied major power may declare war on Rumania;• a neutral Hungary and/or Rumania may align with Germany if
Germany controls at least one hex in Yugoslavia, or has declared war on the USSR (not if the USSR has declared war on Germany); and
• a neutral Bulgaria may align with Germany if Germany controls at least one hex in Greece or Yugoslavia.
The USSR claims BessarabiaOnce per game during any Allied declaration of war step after the first, while Rumania is neutral, the USSR may claim Bessarabia. The German player (acting as Rumania) must either allow the claim or deny it.
Rumania allows the claimIf Rumania allows the claim, it stays neutral and Bessarabia becomes part of the USSR for all purposes until the USSR controls no hex in Bessarabia. At that point, Bessarabia again becomes part of Rumania. No Allied major power may declare war on Rumania until the USSR is at war with Germany.Allowing the claim immediately reduces the resources the USSR supplies to Germany by 1 (see 5.1).In the next Axis declaration of war step, Hungary and Bulgaria make demands on Rumania for Transylvania and South Dobruja respectively. Germany, as mediator, must either allow or deny both claims.If Germany allows their claims:• Transylvania becomes part of the Hungarian home country.
Germany may align a neutral Hungary during any later Axis declaration of war step;
• South Dobruja becomes part of the Bulgaria home country. Germany may align a neutral Bulgaria during any later Axis declaration of war step;
• Germany may align a neutral Rumania during any Axis declaration of war step in which France is currently conquered or Vichy France exists (even this step); and
• The USSR may align a neutral Rumania during any Allied declaration of war step provided the USSR has declared war on Germany (even if this step).
If Germany denies their claims:• Hungary stops supplying its resource to Germany until Hungary
aligns with Germany. Germany may align a neutral Hungary during any Axis declaration of war step after Germany has declared war on the USSR (not if the USSR declares war on Germany). No more than 1 Hungarian unit can ever be outside Hungary from now on (immediately place any excess (owner’s choice) on the production spiral to arrive as reinforcements in 2 turns);
• Germany may align a neutral Bulgaria during any Axis declaration of war step after Germany has declared war on the USSR (not if the USSR declares war on Germany). No more than 1 Bulgarian unit may ever be outside Bulgaria from now on (immediately place any excess (owner’s choice) on the production spiral to arrive as reinforcements in 2 turns);
• The USSR may align a neutral Bulgaria during any Allied declaration of war step after the USSR has declared war on Germany (not if Germany declares war on the USSR); and
• Germany may align a neutral Rumania during any Axis declaration of war step. It need no longer keep half of its units inside Rumania - they may all leave.
Rumania denies the claimIf Rumania denies the USSR’s claim, the USSR must declare war on Rumania this step.Germany can enforce a peace between Rumania and the USSR during any peace step if:• no hex of Rumania outside Bessarabia contains any in-supply
Soviet corps-sized land units; and• Germany and the USSR are not at war.If Germany enforces a peace between Rumania and the USSR:• Rumania reverts to neutrality (see 13.7.3);• the USSR gains control of all hexes the USSR controlled at the
start of the war that are currently Rumanian controlled (place all Axis units in those hexes on the production circle to arrive as reinforcements in 2 turns);
• the USSR gains control of Bessarabia provided there is a Soviet land unit anywhere in Bessarabia;
• Provided they are neutral, Germany may align Rumania, Hungary and/or Bulgaria during any later Axis declaration of war steps; and
• the USSR may not declare war on Rumania again. If the USSR conquers Rumania:• Germany may align a neutral Hungary during any later Axis
declaration of war step; and• Bulgaria can never align with Germany but the USSR may align
a neutral Bulgaria during any later Allied declaration of war step.While Rumania and the USSR are at war:• Germany may align a neutral Hungary during any Axis declaration
of war step; and• Bulgaria cannot align with either Germany or the USSR.
19.7 Axis minor countriesSome minor countries are potential Axis minor countries. They start as neutral (unless the campaign information says otherwise, see 24). They enter the war either when someone declares war on them (see 9.5) or when they align with an Axis major power (see 9.6). A country must be neutral to be aligned and only one minor can align with each major power per Axis declaration of war step.Afghanistan, Iran and IraqGermany or Italy may align Afghanistan, Iran or Iraq if there are in total at least 4 in-supply corps of that major power (not its controlled minors) in any countries adjacent (excluding the USSR and Turkey) to the minor being aligned.All 3 countries may end up being controlled by the same major power.Argentina, Chile and ParaguayGermany may align Argentina, Chile and/or Paraguay if an Allied major power has declared war on any minor whose home country is on the America map(s).Alternatively, any Axis major power may align them if at least 4 corps of that Axis major power (not its controlled minors) are in any countries adjacent to the minor being aligned.Baltic States

76
Once per game, and only while Germany and the USSR are at war, Germany may align any or all three of Latvia, Lithuania and Estonia in one declaration of war step (using up her one alignment per impulse, see 9.6) provided all the countries aligned are neutral. This only requires 1 US entry roll (see 13.3.3, US entry action 19) regardless of how many Baltic states are aligned.Bulgaria, Finland, Hungary and RumaniaThe Soviet border rectification rule (see 19.6) explains when Germany can declare Bulgaria, Finland, Hungary and Rumania aligned with it.Indo-China and MadagascarIf she satisfies the prerequisites, Japan may align French Indo-China and Madagascar (see 13.3.3, US entry actions 1 & 5).NorwayMining the Norwegian coast may result in Germany aligning Norway (see 13.3.3 US entry action 39).SiamJapan may align Siam any turn.SpainWhile an Axis major power controls Gibraltar it may declare that Spain is aligning with it. Once aligned Gibraltar becomes part of the Spanish home country.Sweden German units may move (see 11.9 and 11.10), and trace supply (see 2.4), into and through Sweden if Sweden is neutral and there is at least one other German unit in both Finland and Norway. If Sweden is neutral, no German unit may end a step in Sweden. TurkeyGermany may declare that Turkey is aligning with it if at least 4 in-supply German corps in the USSR are in hexes adjacent to the Turkish border.YugoslaviaThe Axis major power that controls Athens may align Yugoslavia if Italy, Hungary, Rumania, Bulgaria, Greece and Albania are all Axis controlled.
19.8 Allied minor countriesSome minor countries are potential Allied minor countries. They start as neutral (unless the campaign information says otherwise, see 24). They enter the war either when someone declares war on them (see 9.5) or when they align with an Allied major power (see 9.6). A country must be neutral (apart from a conquered Czechoslovakia) to be aligned and only one minor can align with each major power per Allied declaration of war step.Brazil The USA may align Brazil if the USA is at war with Germany, Italy and Japan.BulgariaThe Soviet border rectification rule (see 19.6) explains when the USSR may align Bulgaria.Central America, Cuba and HaitiThe USA may align Central America (AiF option 1: Costa Rica, El Salvador, Guatemala, Honduras, Nicaragua and Panama), Cuba and/or Haiti if the USA is at war with Germany, Italy or Japan.CzechoslovakiaIn 1938 Czechoslovakia was partitioned and the Sudetenland given to Germany in a deal between Britain, France and Germany. In March 1939 the country itself split into the Czech Republic and Slovakia. Thus Czechoslovakia only exists as a country in Days of Decision III and Patton in Flames. However, any liberation step after the Allies conquer both the Czech Republic and Slovakia they may liberate (see 13.7.5) Czechoslovakia as one combined aligned minor country.EthiopiaEthiopian units may not be added to Axis force pools, and the Allied major power that conquers Ethiopia may liberate it instead.[Designer’s note: Although Czechoslovakia and Ethiopia were both integrated into the Axis war effort and considered aligned (rather than
conquered) in WiF terms, they had both only recently been conquered and would fight for the Allies, not the Axis] MexicoThe USA may align Mexico if the USA is at war with Germany, Italy and Japan.SpainThe Allied major power that completely conquers (see 13.7.1) Spain may liberate it as the Spanish Republic. If it does so, all Spanish Republican naval units with an availability year earlier than the year of liberation, are scrapped (see 13.6.5). YugoslaviaThe Commonwealth may align Yugoslavia if there are in total 4 or more Commonwealth corps in any adjacent countries.France may align Yugoslavia if there are in total 4 or more French corps in any adjacent countries.
19.9 Netherlands East IndiesThe Netherlands East Indies (NEI) is a minor country consisting of all the 1939 NEI controlled hexes in the Bay of Bengal, Bismarck Sea, East Indian Ocean, South China Sea and Timor Sea. Its capital is Batavia. In 1939 the NEI is aligned to the Netherlands.You can’t set up, reinforce or move Allied (except Netherlands and/or NEI) units to the NEI until:• the US has chosen US entry option 43 (see 13.3.2); or• Japan is at war with the Commonwealth and the NEI is not neutral;
or• an Axis land unit (other than a partisan or Netherlands/NEI unit)
has entered the NEI. Thereafter, there is no restriction.
19.10 Austria & East PrussiaAustria (in campaigns starting after 1938) and East Prussia are part of the German home country. You can’t conquer them separately from the rest of Germany.
19.11 French African minors (AfA option 1)Mauretania, French Sudan, Senegal, French Guinea, Ivory Coast, Upper Volta, Togo & Dahomey and Niger Colony are French West African minor countries controlled by France. Cameroons, French Somaliland, Gabon, Middle Congo, Ubangi-Shari and Chad are French Equatorial African minor countries controlled by France.
19.12 Ukraine (TiF option 50)The Ukrainian army represents the forces that could have been raised by both sides if a more tolerant attitude had been displayed towards the Ukrainians. At the start of the game, all Ukrainian units are removed from the game. During any production step, the major power controlling Kiev may expend 15 build points. After this expenditure, in any future minor country alignment step (see 9.6) that major power may announce that she is creating (and aligning) Ukraine.If an Axis major power is creating Ukraine, Germany must destroy one of each type (MIL, GAR, INF, MOT, etc.) of SS corps on the map or the production circle (owner’s choice), as well. If a corps of a type isn’t on the map or production circle, one of that type from the force pool, if any (and owner’s choice if more than one), must be scrapped (see 13.6.5) instead. If the German player won’t do this, Ukraine is not created. When Ukraine is created:(a) all hexes in Ukraine controlled by the creating side become Ukrainian home country hexes;(b) all other hexes in Ukraine remain under the other side’s control
as conquered Ukrainian home country hexes; (c) all printed factories not yet railed out of Ukraine become red;(d) all partisans in Ukraine are destroyed; and(e) all future partisans in Ukraine are controlled by Ukraine’s creator PoliF option 50: Rumania goes 4 levels (modified by barriers as necessary) towards the other side.Immediately that Ukraine is created, the Ukrainian MIL is placed

77
on the production circle to arrive as a reinforcement next turn. The remaining available Ukrainian units are added to the force pools and may be purchased from now on. In future years, as more units become available, these units too are added to the force pools (see 4.1.1). Soviet MIL from cities in Ukraine are removed from the game whenever they are no longer on-map.Once created, Ukraine is treated as a separate minor country with Kiev as its capital aligned with the installing major power. It can be conquered and liberated in the same manner as any other minor country. Example: The Soviets control Kiev (E1735) in May/Jun 1944. At the start of the production step, they expend 15 build points and in the Jul/Aug alignment step create the Ukrainian state. All partisans in Ukraine are removed. During the next partisan step, the Partisan table calls for partisans to be rolled for in the Soviet Union. Ukrainian partisans would appear behind German lines.If an Axis major power declares war on or one of its units enter Ukraine, the USSR may break the Nazi-Soviet pact (see 19.5.3) during any Allied declaration of war step.
20. Chinese CommunistsChina is one major power that consists of two factions, Communist and Nationalist Chinese, that do not co-operate (see 18) with each other (except that both may enter any hex in China without the requirements of foreign troop commitment, see 18.2).Chinese controlled cities are controlled by either the Communists or Nationalists, not both. They only provide supply (see 2.4) and allow reinforcement (see 4) to the faction that controls them. Chinese aircraft and naval units may not stack in a city controlled by the other faction. If a land unit of one faction occupies a city controlled by the other, it doesn’t provide supply to either. If a land unit of one faction is in a city controlled by the other at the start of the conquest step (see 13.7.1), the city changes control to the occupying faction.When an enemy city is entered by Communist Chinese land units then it becomes Communist controlled. In all other cases where China gains control of another major power’s city (e.g. liberation or Nationalist occupation of an enemy controlled city) it becomes controlled by the Nationalist faction.All other (non-city) Chinese controlled hexes are controlled by both and may be freely entered by either (within the co-operation limits of course).Nationalist and Communist Chinese units go into the same force pools and the Chinese player has no choice whether to produce Nationalist or Communist units.
SiF option 5: when building naval units (see 13.6.5), if you choose a unit from a faction that controls no Chinese home country ports, you may return it to the force pool and re-choose until you pick one controlled by the other faction. TiF options 32, 54, 55 & 59: facilities, territorials, city based volunteers and Chinese warlords are controlled by the faction that controls its hex or city (e.g. in Sep/Oct 1939 the Nationalists control the Chungking (A0635) warlord while the Communists control the Lanchow (A0838) warlord). PiF option 46: Each pilot (see 14.6) the Chinese build is either Nationalist or Communist, their choice, and the total is kept track of separately on the markers track (see 14.6.3). Each faction’s aircraft may only be piloted by one of that faction’s pilots (e.g. it requires a Nationalist pilot to place an I-15bis fighter on the map and, when later placed in reserve, the Nationalist pilot total will increase by one).
Chinese action limits apply to all Chinese units (e.g. in a combined action the Chinese could move 2 Nationalist land units or 2 Communists or 1 of each, but not 2 of each).If at the end of the conquest step (i.e. after faction control of Chinese cities has been changed, see above) a faction has no controlled cities in China, all units belonging to that faction are removed from the game.Example: During Sep/Oct 1939, Japan occupies Sian (A0537) and the Nationalists occupy Lanchow. The Communists now control no cities and all their units are out of supply. If the Communists can’t move a land unit into a
Chinese city (or the Nationalists don’t leave Lanchow) by the conquest step, all the Communist Chinese units would be removed from the game.For all other purposes, China is considered the one major power, e.g. Chinese action limits, see 10.2 (TiF option 30: oil, and option 49: offensive points), apply to all Chinese units.If playing Days of Decision, Chinese Communist action limits (TiF option 30: oil, and option 49: offensive points) are provided by the USSR, not Nationalist China (e.g. if the Soviets choose a naval action, no Chinese Communist land units could move).If playing Patton in Flames, Communist China has its own activity limits (use the China row). TiF option 30: it spends oil using the China row (see 10.3) but the USSR pays for it and may only be spent if the USSR agrees. Option 49: Similarly the Soviets must pay for Chinese Communist offensives (see 16).
21. Stilwell
XXXXX
4(2)34(2)3Stilw
ell
Stilwell is a Nationalist Chinese HQ. However, he is also treated as a US HQ for some purposes. His HQ symbol has a US flag to mark this.Stilwell counts as a US HQ-I for foreign troop commitment (see 18.2). Also, while US units are in China, they may co-operate with, be reorganised by and trace supply through Stilwell (to a Nationalist Chinese primary supply source) as if he were a US HQ-I.
Option 49: (Offensive points) Stilwell may be reorganised (see 16.4) by China and/or the USA. Example: Stilwell is in Nanking (A0336). A US INF and B-29 land on Shanghai (A0236) supplied by Stilwell. During the Japanese impulse, all 3 units are ground struck and turned face-down. In their impulse, the US takes an air, and China a land, action. They are playing option 49. Jay offers to pay 3 of the 4 offensive points it costs to reorganise Stilwell. Ju-Ming gratefully accepts (and pays the 4th). During the reorganisation step Stilwell reorganises a Chinese INF and the B-29 for 1 reorganisation point each, and then turns Stilwell face down again.
22. Optional units & markersThe following units and markers from our WiF kits add some more variety and realism to the game. If your opponents agree, feel free to add any or all of the following units to your next game.
22.1 Divisions (DiF option 2)Divisions in Flames includes divisions (amazingly enough!). Each division type goes into a new force pool. Divisions only have a ZoC (see 2.2) into their own hex. For division stacking see 2.3.1ARM and MECH divisions count as only half an ARM or MECH corps sized unit for deciding who has the choice of combat table. A face-down division is only worth 1 combat factor if attacked while out of supply.Divisions are not restricted from being built ahead (see 13.6.5) if their equivalent corps type is still available in the force pools, and vice versa.In all other respects, divisions have the abilities and restrictions of their equivalent corps or armies.Breaking downYou build divisions in the usual way (see 13.6.5). Alternatively, at the start of the production step you may break down an on-map face-up corps or army that is not in an opponent’s ZoC into 1 division of that nationality and a 2nd division that is either:(a) the same faction (if Chinese, see 20), (b) the same nationality (if any other country), (c) the nationality of its controlling major power, or

78
(d) in the case of the Commonwealth, controlled by another CW major power home country.
Example: You can’t break down a Nationalist Chinese corps into any Communist divisions, nor break down a Hungarian corps into 2 German divisions. Once German aligned, you could break down a Hungarian (not German) corps into a Hungarian and German division.
XXX
3-3
IIHu
1-5
XX
29
1-2
XX
1Hu= +
Each corps or army (except GAR, see Garrison Divisions below) breaks down into 1 division of the same type and 1 INF, MOT or GAR division (your choice). These may not be SS unless the unit breaking down is SS. SS corps break down into 1 equivalent SS division and 1 other INF, MOT or GAR division (SS or not, your choice). You choose which divisions replace the broken down corps or army with the proviso that:(a) you may not choose an elite (see 22.1.1) division; and (b) the divisions’ total combat factors may not exceed half (rounding
up) those of the corps or army you broke down.Place the broken down corps/army back into your force pool. It is not considered destroyed (i.e. it can’t be scrapped, see 13.6.5), nor do you get a refund of a build point, see 13.6.3).ReformingDivisions can also reform into a corps or army in a similar manner to breaking down. If 2 of your face-up divisions are stacked together at the end of the production step, and one of them is a MOT division, you may reform a corps or army of the same type (and faction and nationality) as the other division provided they are not in an opponent’s ZoC and such a corps or army is available in the force pool.Put the divisions back into your force pool and replace them on the map with a corps or army from your force pool (your choice) provided it has combat factors less than twice those of the 2 divisions.Example 1:
=+4-5
XX
1
2-5
XX
2
XXX
11 - 5
II
The German 1st SS ARM division (4 factors) and the 1st MOT division (2 factors) are stacked together at the start of the production step and not in an opponent’s ZOC. You may replace them with II SS Pz corps.
Example 2: Two MOT divisions, 1 German and 1 Italian are stacked face-up together not in an opponent’s ZOC. Neither could reform. If instead of the Italian MOT, a German aligned Hungarian 1-factor INF division is in the hex. The 2 divisions could be replaced by the II Hungarian INF corps (reverse of the breakdown example above).
When breaking down or reforming Commonwealth divisions, at least one of the divisions must be a unit of that nationality, while the second may be any CW nationality. When reforming CW divisions, the unit reformed must be British unless in a CW home country in which case it must be that nationality Example:
= +CXXX
9 - 59 - 5II C
an 1
XX
3-5C
1 C
an
XX
2-5
The 2nd Canadian ARM corps may only be broken down into the 1st British ARM division and the 1st Canadian MOT division. They would reform into a Canadian ARM if the unit is being reformed in Canada, or British elsewhere (either way, of 9 or fewer combat factors).
Garrison divisions
76
XX
2-1
These are divisional versions of GAR corps and armies. These are treated as INF divisions for all purposes (transport, combat, supply etc.) except that they may not invade (see 11.13), nor transported by SCS (see 11.4.5), and you may only break down or reform a GAR corps or army into or from 2 GAR divisions.Example: The Commonwealth wants to break down the Australian 5-1 GAR corps. The first division must be the Aus 1-1 GAR division while the second is any CW GAR division with 2 or fewer combat factors.
22.1.1. Elite divisionsSome divisions have special abilities. They are treated as any other division of their type except that they may not break down or reform.
79
XX
2-6 2-6
XX
6
2-4
XX
Sch
wim
Some ARM and MECH divisions have a marine symbol on their front. They have all the benefits of MAR (i.e. they may invade and may cross all sea-hexsides) except that they may only ever be transported in or invade from a TRS (not an AMPH or SCS).
-51
XX
1-4 1-4-XX
5
The Commonwealth 51st air landing and German 5th mountain divisions are MTN units that can paradrop, but only into the same hex as a co-operating PARA. If the PARA is destroyed or aborted by air-to-air combat (or anti-aircraft fire ~ see 22.2), but the air landing division survives, it must return to base.
IC
hind
its
Ind
LRD
G XXXX
1-5 1-5
Jite
nsha
Yoko
SN
LFXX XX
2-31-5
2-4
XX
Bran
den.
2-4
XX
Ran
gers
Spe
tsna
z XX
1-5
These 7 units represent the division-sized special forces units (or bicycle units in the case of the Japanese Jitensha unit) that played a significant role in the war. The Commonwealth LRDG, USSR Spetsnatz, and Japanese Jitensha are all INF divisions. The Brandenburgers, Chindits and Yoko SNLF are PARA divisions. The US Rangers is a MTN division. Both the Yoko SNLF and US Rangers also have all the benefits of a MAR.These units can trace supply through ZoCs but not through hexes occupied by an opponent’s land unit. Additionally, these units don’t have to stop moving during the land movement step (see 11.10.1) if they enter a ZoC in a non-clear or non-desert hex (and even desert in the case of the LRDG).
Mtn
Cav XX
1-5The Russian 1st MTN CAV is a CAV division that has all the benefits of a MTN (except that is not air transportable ~ see 11.11 and may not invade ~ see 11.13).

79
NKVD1XX
1-3When defending a hex in land combat (see 11.15), a stack containing an NKVD division may nullify an ‘R’ or ‘S’ (but not ‘B’) result by taking an extra defender loss. Ski divisions
1 S
ki
XX
2-3Ski divisions (SKI) are winterised (see 11.10.2).During snow and blizzard, SKI, (a) treat swamp and forest hexes as clear for movement purposes;(b) don’t have to stop moving if they enter an enemy ZoC during the
land movement step (see 11.10.1); and(c) can trace supply through ZoCs (but not through hexes occupied
by your opponent’s land units).
Engineer divisions
E
6
XX
2-4
Engineers (ENGs) give die roll modifiers attacking and defending factories (see 11.15.5). Furthermore, face-up ENG are not halved or thirded when attacking or overrunning across a river, canal or fort hexside (the defender still has all other combat benefits if behind a fort hexside). They also provide this benefit to as many land units they are stacked with as the ENG unit’s unmodified combat factor. ENG attacking across both a river and a fort hexside ignore only the fort hexside. If an ENG is providing any of these benefits in an attack, it always suffers the first loss.Some engineers are motorised and receive the benefits of being motorised. The Commonwealth 6 ARM, German 27 Pz, Soviet ARM ENG and US 14 ARM all have the movement and combat abilities of an ARM and ENG division.
2-3
EXX
ES
B
The Commonwealth Mar ENG and the US ESB have the movement and combat abilities of a MAR and ENG division. Furthermore, when invading (see 11.13) a number of land units in the same sea box section up to the ENG’s (unmodified) combat factor may upgrade their transport from a TRS to an AMPH for this invasion combat only or, if already on an AMPH, not be halved (see 11.15.1 Terrain), but only while invading stacked with the ENG. Example: It’s May/Jun 1944 and the Allies want to invade Europe. The US has a fleet in the ‘4’ section of the North Sea while the CW has a fleet in the ‘3’ section. The US force includes the US V corps and the CW MAR ENG on TRSs & the US VII corps on an AMPH. The CW force includes the I corps and I Can corps but the CW MAR ENG can only support units in its own section. Its 1 factor allows its own, or the US V or VII corps transport to be upgraded if invading with the MAR ENG. If Jeremy upgraded VII corps AMPH the attack would be 8.5 factors (8+0.5) but he wants all 3 units to invade so upgrades V corps TRS to an AMPH and invades with 8 factors (4+3.5+0.5).
22.2 Artillery (DiF option 3)There are 4 types of artillery - anti-tank (AT), anti-aircraft (AA) field artillery (ART) and flak (including surface-to-air missiles). They form 4 new force pools and, like other units, you should sub-divide each of these on the basis of cost.ART and AT come in towed, motorised and self-propelled types (SPGs and TDs respectively). AA only have towed and motorised varieties, while flak are all towed.SPGs and TDs may make breakthrough moves when advancing after combat (see 11.15.5) but are not considered ARM for any other purpose. Motorised artillery may also make breakthrough moves but only if they start and end the advance stacked with the same ARM, HQ-A or MECH. Flak have 0 land combat factors. Their combat factors are purely anti-aircraft. All other towed and motorised artillery have only 1 land (not AA or bombardment) combat factor (before modification) if they are:(a) face-down and out of supply; or(b) not stacked with a land unit other than artillery or notional.
Anti-tank (AT) units
3 -5
XX
M-1
8
Each defending anti-tank unit counts as an ARM corps for choice of land combat tables (see 11.15.5).If an AT unit has a combat factor circled in red (rather than pink), double its combat factors if it is attacking an enemy ARM, HQ-A or MECH unit. If an AT unit has a combat factor circled in red or pink, double its combat factors if it is being attacked by an enemy ARM, HQ-A or MECH unit. Anti-aircraft (AA) units
3 -3
XX
88 m
m
Face-up in-supply anti-aircraft units can shoot at enemy aircraft flying a mission to the AA unit’s hex or to any adjacent (except off-map) hex (this represents the AA units being spread over a wider area).Each AA unit may fire up to 4 times a step. It may fire 4 times at one hex, 3 times at one hex and once at another, etc. If you fire twice at one hex, double the unit’s AA factors. If you fire 3 times at a hex, triple the unit’s AA factors. If you fire 4 times at a hex, quadruple the unit’s AA factors. You may add several AA units’ factors together.
2 -3
XX
37 m
m
PiF option 8: (altitude) Light AA may not fire at a high altitude mission (see 11.7).

80
Example:
7Mk.III
Lancaster
43
3 2
4 8
943
FlyingFort.
B-17G
6 1
3 6
High
Pl
2 -4
XX
Flak
vierlin
g
3 -3
XX
88 m
m
Playing PiF option 8, Heinz’s 2-factor Flakvierling AA in Essen (W0935) can’t fire at a high altitude strategic bombardment of Dortmund (W0836) and so fires all 4 times on a low altitude bombardment of Essen. His 3-factor 88 AA in Dortmund fires 3 times on the Dortmund, and once on the Essen, attack. Thus Heinz fires 9 (3x3) AA factors on the Dortmund attack and 11 (8+3) on the Essen attack.You resolve anti-aircraft fire after air-to-air combat and before the cleared through bombers attack their target. Resolve anti-aircraft fire against the cleared through bombers (only) exactly like naval anti-aircraft fire (see 11.5.9), reducing tactical, strategic or air-to-sea factors as appropriate.In a port attack mission, you add the AA units’ factors to those of any naval units in the port.If an AA unit uses anti-aircraft fire, turn it face-down at the end of the step. If firing against aircraft providing ground support, turn the AA unit face-down after Advancing after combat (see 11.15.5).Each defending AA counts as an ARM corps for choice of land combat tables (see 11.15.5). If an AA has a combat factor circled in red, double its combat factors if it is attacking an enemy ARM, HQ-A or MECH unit. If an AA has a combat factor circled in red or pink, double its combat factors if it is being attacked by an enemy ARM, HQ-A or MECH unit. Field artillery (ART) units
Field artillery may attack and defend normally like any other land unit. However, a face-up in-supply ART may instead bombard (its combat factors are circled in grey). Bombardment does not count against any activity limit (see 10.2).An ART bombards an adjacent hex as if its printed combat factor were an aircraft’s tactical factor. Thus it can execute a ground strike or a ground support (offensive or defensive) mission into that hex. While bombarding, its factors are affected by weather (see 14.2.3), terrain (see 14.5), surprise (see 15.1), offensive points in a land action (see 16.3.3) and co-operation (see 18.2) exactly like an aircraft’s tactical factors (e.g. it can’t bombard a hex in storm or while surprised), but it does not count against air action limits (see 10.2). An ART unit may not use its combat factors to bombard if its own hex is being attacked.If you use an ART’s combat factors to bombard, its factors are not reduced to 1 due to it being the only land unit in the hex.ART that bombard across all-sea, river, canal, fort or straits hexsides do not halve or third their factors. They can’t bombard across alpine hexsides. If they take part in normal combat, they are halved or thirded as usual by such terrain.An ART that bombards during Ground Strike (see 11.8) is turned face-down at the end of that step. An ART that bombards during
Ground Support (see 11.15.4) is turned face-down after Retreat (see 11.15.5) regardless of the combat result. An ART that bombards (rather than attacking normally) cannot advance after combat.
Kat
yush
a XX
5 -33 -4
XX
Neb
elw
erf.
Rockets (RA) are motorised ART. Ground striking rockets fire, and implement the results, anytime during Ground strike (see 11.8) even against hexes already ground struck this step. Example: After ground strikes by Anna’s aircraft and other artillery, Kiev’s (E1735) German defenders survived unscathed. So at the end of the step Anna strikes them again with her face-up Katyusha.The German railway gun (RG) is a towed ART. However, it may only move along rail lines (by land, see 11.10, or rail movement, see 11.9) unless being transported. When moving by rail it may move like an HQ.Flak
XX
AAA
122
mm
5-0Flak have 0 land combat factors, and cannot participate in land attacks. Their combat factors are AA factors only. Flak fires its AA factors in the same manner as an AA unit except that it halves its factors against any mission other than strategic bombardment. Turn the flak face-down after firing.Each ‘*’ result on the strategic bombing table destroys 1 flak unit which fired against this bombing mission, in addition to the usual effects of an ‘*’ result. Surface to Air Missiles (SAM)
XX
SAM
Sto
oge
7-1SAM are flak with one additional benefit. If they fire all their AA factors at 1 target hex (even in conjunction with other units), then they choose not only the type of loss but also the actual unit lost or aborted (see 11.5.9).
22.3 Supply units (DiF option 14)Supply units are division-sized land units (DiF option 2: even if you aren’t playing with divisions, see 22.1) that form a new force pool. They move like a motorized unit, and may move by rail, or be transported by sea (see 11.4.5) or ATR (see 11.11). They are always in supply.If you overrun (see 11.10.6) a supply unit with a partisan (see 13.), the supply unit is destroyed. If any other land unit overruns it, you may either destroy it or replace it with one of your own (chosen randomly).See 2.4.2 (option 35: and 13.5) for the benefits of supply units.
22.4 Guards Banner armies (DiF option 52)
1
XXXX
12 - 512 - 5The 12 Soviet armies included in Divisions in Flames are Guards Banner Armies (GBA). They are reserve units (see 9.7) but unlike other reserves, when you go to war with another major power they
3 -3
XX
105
mm

Guards Banner PromotionResult Value *
Destroyed +3Shattered +2Retreated +1 * Double the value of each HQ & halve
the value of each division sized unit
81
are placed in the reserve pool, not the map. Units marked Ge+1 or Ge+2 on their back are only placed in the reserve pool in the Jan/Feb reinforcement stage of the calendar year following you going to war with Germany, or the year after that (respectively). Example: The Soviet Union is neutral when Germany declares war in May/Jun 1941. All GBA marked “Ge” and “Res” are immediately placed in the reserve pool. All GBA marked “Ge+1” are placed there in the Jan/Feb 1942 reinforcement stage. All GBA marked “Ge+2” are placed there in the Jan/Feb 1943 reinforcement stage.DoD and PatiF option 52: GBA marked Ge, Ge+1 or Ge+2, that aren’t already on map are placed in the reserve pool at the appropriate time when the USA and USSR are at war.PatiF option 52: All GBA are available for (random) setup. GBA not setup are placed in the reserve pool.GBA PromotionUnless attacking solely partisans or notional units, whenever Soviet land units are in land combat (see 11.15) the Soviets may be able to “promote” one of their units to a Guards Banner unit of the same type as that involved in the battle (e.g. ARM for ARM or MOT for MOT etc.) provided it is in the reserve boxIn each land combat including Soviet units add up every enemy unit destroyed, shattered or retreated as follows:
Subtract any losses you suffered using the same method. If the result is still positive you may (after Advancing after combat) promote 1 on-map land unit (even a Guards Banner unit) that survived this combat. Add this result to the combat factor of the unit you wish to promote. You may replace the unit with a Guards Banner unit of the same type if the total is equal to or more than the combat factor of the Guards Banner unit. The replacing Guards Banner unit maintains the same facing as the unit it replaces. Put the replaced unit back in its force pool. Example:
XXX
4-4
IIIRu
MXXX
2-3 Cern
auti
Ru
XXX
4-3
IRu
XXX
5-5
IVRu
MXXX
3-2 Buch
arest
Ru
XXXX
5-6
4
XXXX
6-3
51
XXX
4-3
Alp
Ru
9
XXXX
8 - 48 - 4
[to force pool]
2 Soviet armies are defending Krivoy Rog (hex E1431). A massive Rumanian attack against it fails dismally rolling a 5 on 2-1 assault (2/1). The Rumanians lose 2 armies, while the Soviets lose 1. Thus for the purposes of promotion, the Soviets get +3 (6-3). They decide to lose the MECH corps, because adding 3 to the 5-6 MECH army only totals 8, well short of the 10 required to gain the weakest MECH GBA.3 is added to the 6-factor 51st INF army to total 9. Unfortunately, the 9-4 (8th) INF GBA is already on the map, so Anna puts her 6-3 in the force pool and places the 8-4 INF 9th GBA in Krivoy Rog. Note that if the Rumanians had contributed a division to the attack and taken this as a loss, then even though the net total would only have been 2 points (4.5-3), this would have still been enough points
to replace the 6-3 with the 8-4 INF.When destroyed or replaced, GBA are placed back in the Reserve pool and are again available for other promotions. Unlike normal reserves, when the Soviet Union comes to peace with Germany (DoD & PatiF: or the USA), on-map GBA (DiF option 2: including divisions) are not moved back to the reserve pool.Guards Banner divisions (DiF option 2)Guards Banner divisions are the only units that may breakdown Guards Banner Armies. They do so in the same manner as ordinary divisions (see 22.1). They may also enter play by promotion but not by normal production (see 13.6). You may only promote a division into a GBA division (not corps or army).When destroyed, they are placed back into their force pool and are again available to breakdown GBA, or be promoted, in the future.
22.5 Siberians (TiF option 53)Unless otherwise stated in the campaign notes (see 24), each available Siberian unit (including the Res if the Soviet Union isn’t neutral) may replace a Soviet INF unit from the start of a campaign. In 1939 games, they must start on the Asian or Pacific map. In other games, they may start anywhere. You decide after set up which units, if any, you wish to replace. Put all replaced units, and any available Siberians you don’t start on the map, into the Soviet INF force pool. If the Soviet Union is neutral, place the Siberian Res unit into your reserve pool.
22.6 Warlords (TiF option 59)The Chinese warlord units represent forces loyal to a particular warlord in China rather than the central Government. Each warlord has a city stated on the front of the counter. This is the warlord’s home city. All warlords set up in every game on their home city and are controlled by the major power controlling the city. Warlords whose home city is controlled by Communist China are Communist units, if Nationalist controlled, they are Nationalist and if Japanese controlled are Japanese.Warlords are treated like any other unit for all purposes except that no warlord may move or advance after combat more than 2 hexes from its home city. They can attack from that 2nd hex to a hex where they could not move into, but could not advance after combat. Example: The Lanchow warlord starts the game in Lanchow (A0838) and is Communist controlled. It moves to A0637 and participates in a Communist attack to recapture a Japanese held Sian (A0537). The attack is successful but the warlord unit cannot advance into Sian, as that would put it further than 2 hexes from Lanchow.If forced to retreat from combat, the attacker must attempt to retreat them in such a way that they remain within 2 hexes of their city. However, if this is not possible, the unit is destroyed instead.When a warlord’s home city is conquered (or becomes controlled by the other Chinese faction), the warlord is removed from the game at the end of that step (and if this is the land combat step, see 11.15, it may still be attacked during the step if an attack has been declared on it).Warlord units not currently in the game may be added to the force pools of the major power that controls their home city during any production step and may be built from this turn onwards. Use Japanese warlords when Japan controls them.
22.7 Territorials (TiF option 54)Some major powers and minor countries have territorial units (TERR) available from the start of the game. They form a new force pool and may be built even before the territorial’s minor country is allowed to be reinforced (e.g. the Philippines ~ see 13.3.2, US entry option 41).TiF option 54: During production (see 13.6) you may choose one country and randomly pick a TERR from your force pool controlled by that country. If you do, the TERR takes 2 turns (not one) to build.MovementIn addition to the restrictions on minor units leaving their home

82
country (see 19.4.3), territorials may only leave if they are controlled by an active major power.During movement territorials treat all hexes (except lakes) in their home country as clear. They pay normal costs elsewhere.Conquest, liberation & reversionWhen a home country is aligned (see 9.6), conquered (see 13.7.1), liberated and/or reverted (see 13.7.5), all its territorials on the map, on the production circle and in the force pool are removed from the game.If the country’s new owner has a territorial available for that country (even if currently removed from the game) with fewer combat factors than one removed from the map or production circle (owner’s choice if more than one), then it may be placed on the production circle to arrive as a reinforcement in the following turn. All other territorials for this country’s new owner are added to its force pool.Example: Germany conquers South Africa while the Commonwealth South African 5-2 TERR is in London (W1536). Both CW South African TERRs are removed from the game, the German South African 4-3 TERR is placed on the production circle to arrive as a reinforcement in the following turn and its 6-2 TERR placed in the German force pool.TERRs from countries controlled by another major power in 1939 are differentiated by the colour inside the NATO symbol on the back of the counter (e.g. the back of the German Egyptian TERR has a Commonwealth khaki coloured NATO symbol). Friendly controlled cities in conquered home countries are still primary supply sources (see 2.4.2) for its territorials.PatiF option 54: French Indo-China TERR may be built in Vietnam, NEI TERR may be built in Indonesia, Palestinian TERR may be built in Israel, and Korean TERR may be built in North or South Korea.
22.8 City based volunteers (AiF & TiF opt. 55)All units with the name of a city printed on their back are city based volunteers (CBV). These units represent volunteers who fought or potentially would have fought for the major power whose background colour the counters share. As examples, Vlassov was a successful Soviet general who defected to the Germans after his capture, the SS recruited personnel from the occupied areas, and Japan employed Chinese and Indian soldiers from prisoner of war camps.These units become available to the respective major power when their home city is controlled by that major power (or one of its controlled minor countries or territories). During any production step while this city remains under your control you may place that unit onto the production circle as if built this turn. They are free the first time they are purchased (option 39: and do not count for gearing limits).In addition, Free French (FF) CBVs are only available for France or Free France after:(a) Vichy is declared,(b) France is incompletely conquered, or(c) Nov/Dec 1942;whichever comes first.CBVs whose city is in an aligned minor country are units of that country. All other CBVs are major power units (and in China’s case controlled by the faction that control’s the CBV’s city). Note this means their status may change if their home country is conquered or liberated. If they are destroyed they are returned to the controlling major power’s force pool and may be built again later, but you have to build them normally (see 13.6.5) from then on. Whenever their city is controlled by another major power they are removed from the game if in the force pool or on the production circle. If on the map they remain under your control until destroyed. Note that as their home city may be controlled, lost and then re controlled during the game, CBVs can enter and leave the game many times. They are free only once nonetheless.At the start of each campaign no CBVs are in the game yet.
22.9 Fortifications (TiF option 32)
Fortifications are facilities (see 1.3) that form 2 new force pools, one for forts and the second for coastal forts.Fortifications do not prevent enemy units entering their hex (exception: see coastal forts below). Fortifications have no intrinsic combat value and cannot attack. Their combat benefits are not affected by lack of supply. Ground striking and artillery bombardment have no effect on them. They cannot be used to satisfy losses in combat and are destroyed as soon as an enemy land unit enters their hex.The following are the rules specific to each type of fortification.FortsYou may not overrun a land unit (even with 0 factors) in a fort through a fort hexside (see 11.10.6).Land units attacking through fortified hexsides into the hex containing the fort halve their combat value (in addition to any other modifiers, see 11.15.1). A unit landing on the stack by paradrop is never halved by a fort. If every land unit attacks through a fortified hexside, the defender has the choice of combat table, see 11.15.5.A fort has no further effect on an already fortified hexside (the effect of printed fortified hexsides supersedes that of forts).The orientation of the counter determines which hexsides are fortified. Coastal FortsCoastal forts prevent enemy land units from moving (see 11.10, they may advance after combat, see 11.15.5) into the hex across an all-sea hexside (even across a strait). If land units are attacking your coastal fort across an all-sea hexside, you may defend with a notional unit, even if not otherwise allowed (as no unit is paradropping or invading).Coastal forts increase the combat factors (see 11.15.5) of 1 defending land unit (even the notional) in the hex (after modification due to surprise, supply and terrain) by the coastal fort’s printed value provided at least one of the attacking units is invading, or is a MAR attacking across an all-sea hexside, or is a land unit attacking across a strait. Example:
2* 1* 0* 040 1 2 3
SOLOMONS (CW)
5
6Washington
8 2
3 4
545
Mit-
chell
B-25
J
5
2
5
3
6 - 46 - 4
I Mar
XXX
(+3)
The US I Marines are in P1924. Japanese controlled Truk (P2025) has no land units but does have a +3 coastal fort. During land movement the I Marines move to P2024. Normally they could just continue movement into Truk but due to the coastal fort, they must attack it instead. During land combat Jay declares an attack on Truk. His 6 factors are halved for attacking across an all-sea hexside. He adds 3 factors of shore bombardment and 3 more of ground support (the remainder are lost as each can’t exceed their land combat factors) for a total of 9 factors vs Kasigi’s 4 (1 for the notional +3 for the coastal fort). 9:4 rounds down to 2:1 +1 (as notionals are always face down). If Truk is out of supply and/or surprised it would be 9:3 (4-1 for surprise or lack of supply, but not -2 for both as a notional can’t be worth less than 0), which rounds to 3:1 +1. If Kasigi declines the notional there would be 0 defending factors in the combat. TiF option 32 (Naval guns): After advance after combat (see 11.15.5) roll a die for each enemy naval unit that provided shore bombardment against a coastal fort’s hex. If you roll less than the coastal fort’s defensive value you implement an ‘X’ result against the bombarding unit exactly as if it had suffered that result in naval combat (see 11.5.8) If the roll is equal to the coastal fort’s defensive value you implement a ‘D’ result on the bombarding unit. If you roll higher than the coastal fort’s defensive value there is no effect on that unit.Example: Continuing the previous example, after advance after combat, Kasigi rolls a die to see if the Washington (which provided the shore bombardment) is affected by the coastal fort. Kasigi rolls

83
a 2, which results in a potential ‘X’ result for the Washington. Jay rolls against the Washington’s defence factor of 2 and rolls a 5. The Washington is damaged. In all other cases coastal forts are ignored (e.g. US land units in Lorient (W2031) could move into or overrun Brest (W2032), ignoring any coastal fort there, and would destroy it when they occupy the hex).
22.10 Frogmen (SiF option 51)
62
2
3 10
0 0
1/1 31936
Frogmen
S
The Italian frogmen, US PT Boats and Japanese and Commonwealth minisub units are the same unit type for all purposes. We call them all “frogmen”.Frogmen form a new force pool. They are surface naval units for all purposes except as stated below.Frogmen movementYou may rail move (see 11.9) and air transport (see 11.11) frogmen like a land unit except that it must end its move in a friendly controlled port. Frogmen may be transported by a TRS (see 11.4.5) or an ATR (see 11.11). They may also move (see 11.4) and fight (see 11.5) like any other surface naval unit except that during surface naval combat (see 11.5.8) they have 0 attack factors. Unlike other surface naval units frogmen may attack before naval combat and they may move into an enemy port to conduct a frogmen attack.Frogmen attackFrogmen’s special ability is to attack enemy naval units during naval movement (see 11.4) immediately the frogmen ceases its naval move. Only 1 frogman may attack the same port or sea area each impulse. After the attack, the frogmen are destroyed. Frogmen may only attack units in a sea-area if it is adjacent to the port the frogmen started their move.Frogmen attack in this way:1. Both sides roll search dice (as in port attacks ~ see 11.2). The
frogmen’s sea-box section is the number in the violet circle on its counter, even when attacking at sea;
2. The attack fails (and the frogmen destroyed) if: (a) the frogmen’s search roll is higher than its section; (b) the defender spends 4 surprise points; or(c) the frogmen are attacking a sea area (not port) that contains
an enemy aircraft (carrier planes only count if on an undamaged CV) during fine, rain or snow, and the frogmen don’t spend 4 surprise points to execute the attack;
3. If the frogmen survive you execute the attack using the frogmen’s attack factor (in red or white) on the air-to-sea row (see 11.5.9) of the naval combat chart. However, the owner chooses the first target, the frogman the second etc. (of course, like other naval combats, you can spend surprise points to modify this).
Example:
Guissano
6
2
2 8
1 1
AjaxDAK
6
5
2 7
1 1
4
4Q Elizabeth
6 3
3 3
5
2Carlisle
1 8
1 0
6
3Dido
2 8
3 1
3
05
0 10
0 0
Cadorna
6
2
2 8
1 1
62
2
3 10
0 0
In Nov/Dec 1941 Maria declares a naval impulse. She moves an Italian surface naval task force consisting of the CLs Cadorna & Guissano and a frogman from Syracuse (W0212) into the Eastern Mediterranean Sea which contains the British CL Ajax in the 4 sea-box section. The Ajax successfully intercepts the Italian task force. Maria could cease their movement and the frogmen attack the Ajax (prior to normal naval combat), but Maria has bigger fish to fry in Alexandria (E1505) and decides to fight her way through the interception combat, placing her units in the 0 section. The interception combat aborts the Cadorna and Ajax. Maria leaves the Guissano in the 0 box and continues moving the frogmen into Alexandria (costing a 2nd naval move, not that it matters in this case as it’s a naval impulse) where she declares a frogmen attack.The frogmen’s sea-box section is 6. Alexandria contains the BB Q Elizabeth, the CLs Carlisle & Dido and 5 CPs. Maria’s search roll is a 4 while Jeremy rolls a 9. Maria’s roll is not more than the frogmen’s sea-box section so she may execute the attack. She gets 15 surprise points (6+9) while Jeremy gets 9 (5+4). Maria spends the difference on increasing the frogmen’s attack column from 3 to 6-7 on the air-to-sea row against 3-4 enemy ships for an X, a D and an A result. Jeremy applies the first result on the BB hoping to roll higher than a 4 and lucks out only damaging her. Maria, going in for the kill, applies the D against the same target (needing 5 or less now) and again Jeremy is lucky as the Q Elizabeth is only aborted and placed in the repair pool. Jeremy applies the abort result against the CPs. The frogmen are then destroyed. Although the attack was successful it could have been devastating.
22.11 Heavy weapons (AiF, PatiF & PoliF opt 56)During the war most countries upgraded their units with heavier weapons. Heavy weapons units (HW) are differentiated from normal units by the thick black bar on the left-hand side of the NATO symbol. Heavy weapons units replace the World in Flames units that have the same designation. If you have more than 1 heavy weapons unit with the same designation, PatiF supercedes PoliF which supercedes AiF.Once a heavy weapons unit becomes available, you may scrap (see 13.6.5) its WiF unit in any production step and replace it with its equivalent heavy weapons unit. If you have more than 1 heavy weapons unit available you choose which ones you want to replace.If the heavy weapon’s equivalent WiF unit is in the force pool or on the production circle, simply replace one with the other. If the unit is on the map, you may upgrade the WiF unit in the field provided that it is in supply back to its home country and not in an opponent’s ZoC. Each unit upgraded on-map or on the production circle costs 2 build points and takes place immediately during the Production step. The corresponding heavy weapons unit replaces the unit in its current location. If the unit is not in its home country, turn it face down.Option 39 (gearing limits): Upgrading a unit on-map or the production circle does count against gearing (e.g. upgrading an ARM to its heavy weapons equivalent counts against your armour gearing limits, see 13.6.8). Upgrading a unit in the force pool does not.You may build heavy weapons units ahead in the same manner as other units (see 13.6.5). If you cannot build ahead the heavy weapons unit you randomly chose (either due to its cost or location) then you cannot build ahead any more heavy weapons units this turn and the heavy weapons unit is returned to the pool of units not yet available. Example: The Soviets have no Soviet heavy weapons MOT in their force pools during a production step of 1942. They decide to build one ahead from 1943. They pick a heavy weapons MOT randomly from those in 1943 and find that its equivalent non-heavy weapons type is currently on the map and in a location which allows it to be upgraded in the field. This unit is scrapped and its equivalent heavy weapons type is placed on the map in the same hex. This unit costs 5 to build (2 + 2.5). If its equivalent non-heavy weapons unit was not on the map it would have cost 8 (5 + 2.5) to build and taken 3 turns to arrive as a reinforcement. If a heavy weapons MOT had been picked that could not be upgraded, it would be returned to the pool of units not yet available and the Soviets could not build ahead any further heavy weapons units this turn.

84
DiF option 52 (Guards Banner armies): All active major powers may promote their units to an available HW unit with the same designation in the same manner as Guards Banner armies (see 22.4) except that the original unit is scrapped and the HW unit when destroyed is placed in your force pool. The Soviets must choose which unit (HW or GBA) they wish to promote to.The US, Commonwealth, Russia and Germany may only promote to HW units in combats against at least one of these major power’s (not their controlled minors) land units. France, Italy and Japan may only promote to HW units when in combat against any major power’s units (not their controlled minors) except China. China and minor countries may promote to them in combat against any major power or minor country unit.Example:
XXXX
6-6
3
XXXX
9-6
3
In 1941, the Soviet 3rd Armoured army launches a successful attack against a German corps. Anna may upgrade it to either the 3rd HW Armoured army or an ARM GBA. Anna upgrades it to the 3rd HW Armoured army and scraps the 3rd Armoured.
22.12 Air Cav (AiF, PatiF & PoliF option 57)Air Cav (ACV) units are a new unit type. Except as specified below they are cavalry class land units (e.g. stacking). ACVs may not move during the land movement step (see 11.10). Instead, they move like aircraft (see 14.1). In particular:• they fly like aircraft (but must end their move in a hex a CAV
can stack in) and pay aircraft movement costs; • if they start their move out of supply, or the hex they end their
move in is storm or blizzard, they may only end their move in a friendly controlled hex;
• they may move into or through hexes containing enemy units or ZoCs;
• fighters may CAP, intercept and/or escort (see 14.2.5) them; and• they do not change control of the hexes they move through.However, there are some exceptions:• they may only move during the air transport (see 11.11),
paradrop (11.14), retreat (see 11.15.5) and/or rebase (see 11.16) steps;
• only paradrops count as an aircraft mission against activities limits (see 10.2); and
• they do not return to base (see 14.2.4), nor turn face-down, after these missions (except as a result of combat).
They may also make rail moves and may be transported by a TRS. They may not be transported by AMPHs or by any ATR.In air-to-air combat ACVs have an air-to-air rating of ‘(0)’.ACV’s may only attack by Paradrop mission (see 11.14). During the paradrop step if they end their move in an enemy controlled hex they must attack it, just like a paradrop into an enemy hex. This counts as a land attack (see 11.15) against activity limits.Their ZoCs after moving to an enemy controlled hex are affected exactly like a PARA’s when it paradrops. If the only defending unit is notional (see 11.15.1), the combat result is an automatic */2S if assault or */2B if blitz (even if attacking with other units) without having to turn face down. If it survives the land combat, the ACV takes control of the hex. ACV defend like CAV but if forced to retreat from combat they must retreat as if returning to base (see 14.2.4).Example: Playing Patton in Flames, Anna decides to launch a lightning strike across the Italian Alps. In her air transport step she flies her Guard ACV from Stuttgart (W0831) to Trieste (W0426). Then in the paradrop step (using an air mission) she flies again to enemy controlled W1026 ignoring the ZoC of the French unit in Turin (W1025). As there is only a notional unit in W1026, after surviving air-to-air combat, the Guard ACV controls the hex putting the French corps in Turin out of supply.
X
7 - 37 - 3
XXX
VII
6 - 36 - 3
XXX
6-4
XVII
XXX
XXX
6-6Gd. C
av
XXX
6-6Gd. C
av
XXXX
5-3
5
XXXX
4-4
12
XXXX
5-3
33
6-3
XIII
XXX
7-4
V
XXX
In Pierre’s impulse, he decides to counterattack the Gd Cav ACV and gets an ‘R’ result. The ACV returns to base over the Alps to Soviet occupied W0926 and turns face-down.
22.13 Service Squadrons (SiF option 58)Service squadrons (SSq) are normal TRS units in all respects. If you are not playing with this option, treat them as just another TRS unit.At the start of the naval movement step you may upgrade a minor port provided there is a face-up SSq there, which is then turned face down. While upgraded, increase the stacking value of a minor port by the squadron’s SSq value. While upgraded ignore the SSq in port attacks (see 11.2) and for stacking purposes. Example:
2/5 31943
+20
S
Playing SiF option 5, Jay’s 1943 SSq is in friendly controlled Midway (P0934). At the start of naval movement he turns it face down. Midway can now stack the SSq and 24 other naval units!If an SSq is overrun, it must rebase in the same manner as all other face-down naval units in the port (see 11.10.6, Overrunning naval units).At the start of the naval movement step you may announce that you are downgrading an upgraded port. Turn the SSq face-up and move it back into the port. Stacking at that port is now normal. You may only downgrade a port if it would not be overstacked after downgrading.Upgrading or downgrading a port counts as 1 naval move.
22.14 Light Cruisers (CliF option 6)The light cruisers in Cruisers in Flames replace those provided in World in Flames and depict every CL and CLAA of WWII. They are treated the same as WiF light cruisers (apart from the difference in ASW value, see 11.5.10).
22.15 Partisan HQs (option 60)Zoya K. cannot be built nor randomly placed like other partisans. Instead, whenever 2 partisans are stacked in a hex in the Soviet Union at the start of any partisan step, the Soviet player may destroy them and place Zoya K in that hex instead. If Zoya is one of the partisans, only the Zoya partisan is destroyed to get the Zoya K. HQ.

85
PXXXXX
5(2)35(2)3
TitoYu
PXXX
1-2ZO
W PXXX
1-2
ZOW
PXXX
4-2
Tito
Zoya K. is treated as a normal HQ-I for all purposes. However, she is counted like a partisan for partisan rolls (see 13.1) while in her home country. She is also always in supply in her home country (but units tracing to her must still trace back to a primary supply source). When destroyed, Zoya K. is again available in the same manner as above. When arriving as a reinforcement (only possible if shattered in combat), she may only be placed in a home country hex containing a friendly partisan.Tito is also a partisan HQ and follows the same rules as Zoya K. except he is a Yugoslav (rather than Soviet) unit, he may be built only in Yugoslavia, and only requires the Tito partisan to be destroyed if Tito is one of the 2 partisans.
22.16 Convoys in Flames (CoiF option 7)This Ships in Flames option introduces several units that represent in greater detail the naval battles conducted against merchant marine shipping, especially battles by and against submarines.
ASW unitsASW units represent the corvettes, destroyers, sub chasers and escort carriers that were used to guard convoys. They are placed into 2 new force pools, one for DEs (destroyer escorts) and the other for CVEs. (escort aircraft carriers).ASW units are attached to 3 convoy points. Their build (and repair) cost (first and 2nd cycle) and time to build is printed on the back of each unit (see 13.6.5, Naval units). ASW units with an air component are CVs (see 14.4), all other ASW are SCSs. ASW attack factors (in red or white) only count in surface naval combat (see 11.5.8) if the combat includes any enemy submarines. In all submarine combats (see 11.5.10) ASW attack factors count as ASW factors. This is in addition to their air component (if any) and inherent 1 ASW factor per 5 convoy points.In all surface and submarine combats that includes any committed enemy SUBs, some or all of your ASW (your choice) included in the combat may fire first at those SUBs as if it were submarine combat. All results are inflicted on the SUBs before the normal submarine or surface combat takes place. Any ASW that fires first does not get to include those factors during the normal combat, but still retains its 1 ASW factor per 5 CPs (see 11.5.10), and may be chosen as a target.In all other respects ASW are treated as convoy points (e.g. they must end any move at sea in the 0 box, they do not need to return to base at the end of the turn, they may not attempt to intercept nor initiate a search, they help opponent’s searches etc.).Example: In fine weather, 4 German SUBs with 2 SCS find the 9 Commonwealth CPs attached to the DEs Huron and Wessex, and the CVE Attacker. The Axis use 4 surprise points to call a round of surface combat so that their SCS can fight (if they did not spend the surprise points the CVE could have required the round to be naval air).The ASW units fire first at the enemy subs, adding up their ASW factors, 7 (2+3+2 air to sea factors). Heinz spends another 2 surprise points to reduce the attack to the 4-5 ASW column resulting in 1 ‘D’ and 2’A’ against the 4 German SUBs. After implementing these results, the remaining units fight a normal surface naval combat. Having fired first, the ASW may not fire again. If not playing with ASW units, just treat them as additional CPs.
SUB-hunting aircraft
545
Mit-chell
B-25J
5 22
5 3
Aircraft with a red or white naval factor, in addition to all their other wonderful attributes, are SUB-hunters. Face-up SUB-hunters may attempt to intercept (see 11.4.6) SUBs by turning a Sub-hunter face-down. If successfully intercepted by any sub hunter, the SUBs must stop their move in that sea area or fight their way through as normal (see 11.4.6) except that they must all be committed each round of the interception combat against all enemy units included in the combat.Example:
4
3Type VIIB
2 9
0 0
Type VIIABig Guy
4
2
2 9
0 0
Type IXC/40Frederick
5
6
4 7
0 0
5
6Type IXC
3 8
0 0
5
4Type VIIC
3 8
0 0
944
Liber-ator
B-24M
6 22
4 8Curacoa
5
2
1 8
2 0 19Mk III
Sun-derland
M KH
3 2
2 1
DidoVingilot
6
3
2 8
3 1
A face-up CW Mk III Sunderland and 2 CLs, and a US B-24M are face-up in the North Sea during fine weather. 2 German SUBs attempt to move through the sea area but the SUB-hunter successfully intercepts with a search roll of 2. The SUBs must either cease movement or attempt to fight their way through against all Allied units. The SUBs elect to cease movement and place themselves into the 3 sea-box section. If the Allies had rolled a 4, only the B-24M would have found the subs but they still would have had to fight their way through against it.The Sunderland could again try to initiate combat against the SUBs during the naval combat step, but the SUBs as usual would have the option of not committing to combat.During the return to base step, the B-24M elects to stay at sea in the North Sea moving down 1 space. It successfully intercepts 3 German SUBs returning to base at Kiel (W0640) via the North Sea. The SUBs must fight from the 0 sea-box section, they cannot avoid interception combat and are all committed to the combat. 1 sub is sunk in the first round. The other 2 abort at the end of the round and return safely to Kiel.Auxiliary Cruisers (CX)
German and Japanese auxiliary cruisers (commonly referred to as surface raiders) are treated as SCS in all respects except that:(a) you add 2 to all interception (see 11.4.6) and search rolls (see 11.5.5)
when searching for a committed force solely containing auxiliary cruisers;
(b) DiF option 20: they may not transport any units (see 11.4.5); and(c) they are always in supply. During each combined impulse a major power may naval move 1 CX in addition to her normal naval move (see 11.4.1). CXs may also sail from and return to base to a neutral minor country port. While any face-up CX’s are in such ports, each naval move by the owner may only be used to move them to sea. If they are ever in a neutral port
KormoranAlfred R
7
9
2 10
0 0

86
when the port is enemy controlled, they are immediately destroyed.Example: The German CX Orion is in a neutral Rio de Janeiro (M0207). Heinz does a combined. As his additional naval move he sails the Orion into the South Atlantic Ocean. As his normal naval move he moves all his face-up subs. If 2 CXs were in Rio, Heinz’s would have required both naval moves to move them both out of Rio.TankersOil-carrying tankers are a special kind of convoy. They are treated as convoy points for all purposes (e.g. they are added together during combat and losses can be taken from either or both) unless otherwise indicated below. Only tankers may transport oil overseas and only convoys may transport other resources or build points overseas (see 13.6.1).Each tanker costs 1 build point and takes 5 turns to build.At the start of any reinforcement stage, you may convert any of your face-up convoy points in a home country port (UK’s current home country only in the case of the Commonwealth) into tanker points, or vice versa. It takes 2 convoy points to convert into 1 tanker point, or 2 tanker points to convert into 1 convoy point. Furthermore, the Japanese may instead convert 3 convoy points into 2 tanker points. [Designer’s note: Japanese freighters (not tankers) were designed as dual purpose].Example: Desperate for more tankers, Kasigi converts 6 convoys in Tokyo into 4 tanker points at the beginning of his reinforcement stage.If not playing CoiF option 7, tankers are just more convoy points.I-400The Japanese I-400 is both a submarine and a CV and has all benefits of both unit types. It moves like a SUB, see 11.4.2 (option 17: but exerts presence like a CV) and can fight as either. The only exception is that it must be committed to naval combat (see 11.5.4) if it (CVPiF option 45: or its CVP) is face down.
Milchcow (M) SUBsMilchcow SUBs are treated as SUBs in all respects except that they need not return to base at the end of the turn (even if it is in the 0 sea-box section) and have the special capability to act as a floating port as follows. During a combined or naval impulse or during the return to base step (see 13.4), if a milchcow is face-up up in the 0 sea-box section of a sea area, any CX or other SUB from the same country also in the 0 box may stack on the milchcow and the milchcow turned face-down (this does not count as a naval move). While face-down, the milchcow acts as a port to that unit.The unit basing on the milchcow is always in supply. When the unit based on the milchcow moves, immediately turn the milchcow face-up again. The unit itself pays 1 movement point and 1 range to leave the milchcow and move into its sea area.While acting as a port, the milchcow is included in all sub combat involving its sea-box section (even if wasn’t committed to combat).Example: The German Type VIIC milchcow and Type IXA SUBs are both face-up in the 0 box of the Cape St Vincent sea area. Heinz calls a combined impulse, turns the VIIC face-down and stacks the IXA on top. As the naval move, Heinz moves all his subs including the IXA which moves into the 2-box of the Gulf of Guinea sea area and the milchcow turns back face-up.During the return to base step, the IXA could just move down a box (it may remain at sea as it does have a base, the VIIC, it could return to) but Heinz returns it to base at the VIIC milchcow which is turned face-down to allow this. The IXA is reorganized but the VIIC remains face-down.The Allies move first at the start of the next turn. The USA sends a cruiser squadron into the 4 sea-box section of the Central Atlantic. Heinz doesn’t commit any subs to combat. Jay’s search roll is a 3 meaning his squadron is included in combat while Heinz rolls a 9. Jay chooses the 0 sea-box section to fight committed Axis units there. As there are no subs and convoy points included, Jay must spend 4 surprise points to call a sub combat which automatically includes the milchcow as the sole Axis unit in the combat.Schnorkel (S) SUBsSchnorkel SUBs are treated as SUBs in all respects except that they:1) are not included in the special pre-fire combat by ASW units unless at
least one of the included ASW units is a CVE; and2) may not be intercepted by SUB-hunting aircraft. Walther (W) SUBsWalther SUBs are treated as SUBs in all respects except that they 1) are never included in the special pre-fire combat by ASW units;2) may not be intercepted by SUB-hunting aircraft; and3) may voluntarily return to base (see 13.4) during any naval combat round, immediately after search dice (see 11.5.5) have been rolled.Example: a German schnorkel and a Walther SUB attack Allied convoy lines in the North Atlantic. There are 3 ASW units plus several convoys for the Allies. The SUBs successfully search and elect to fight a submarine round of combat. The Walther is not affected by the ASW pre-fire attack. However, since one of the ASW units is a CVE, the schnorkel can be affected, is aborted and must immediately return to base. The Walther stays at sea and another naval search is conducted. This time an Allied NAV in the 3 sea-box section successfully searches while the Walther does not. The Walther decides to immediately returns to base at a nearby face-up milchcow.Missile SUBs (MS) Some SUBs have missile capability (shore bombardment factor in red). They are SUBs in all respects except that when face-up they may fire their missiles against any hex within 6 aircraft movement points of any sea dot in the sea area. The missile attack is a strategic bombardment attack (see 11.7). This attack counts against aircraft mission limits for the controlling major power and is subject to weather and terrain limitations and modifications as if it were a LND, but it may not be intercepted. After conducting the attack, turn the SUB face-down. Example: A face-up German SUB with 2 missile factors is located in the US East Coast sea area. During a Fine weather impulse, the SUB conducts a strategic bombardment attack against Boston (M0619) with its 2 strategic factors. This costs Germany an air mission, and the SUB is turned face-down after the attack.If, not playing CoiF option 7, just treat these SUBS like all other SUBS (ignore their special abilities).
22.17 V-weapons and A-bombs (PiF option 24)V-weapons and A-bombs form a new force pool. They are both land units except as specified below. They stack and move as a division (see 22.1) even if not playing that option. They can be rail moved (see 11.9) or naval transported (see 11.4.5). V-weaponsOnly Germany can build V-weapons. Face-up V-weapons fly strategic bombardment missions like aircraft (see 11.7) except:(a) V-2s & A-10s cannot be intercepted and are immune to AA fire; and(b) V-weapons must return to the same base they started the mission (the
V-weapons represent the launchers, not the rockets themselves).V-weapons can’t fly a mission in the same impulse that they move.Face-down V-weapons that are successfully ground struck (see 11.8) are destroyed (the launchers were very vulnerable to air attack).A-bombsOnly the USA can build an atom bomb. If playing America in Flames or Patton in Flames there is no counter limit to A-bombs and, subject to research, any major power may build them.Any of the owner’s bombers with 6 or more printed strategic factors may air transport (see 11.11), launch a port attack with (see 11.2), or strategically bombard with a face-up A-bomb in the appropriate step of each impulse. A-bomb strategic factors are not reduced if its bomber flies at extended range (see 14.1.1).During port attack or strategic bombardment, if the bomber survives any air-to-air combat and/or anti-aircraft fire without being aborted or destroyed, the A-bomb may be dropped on the target.An A-bomb attacks with 25 factors instead of the bomber’s own factors. It may be included with other bombers attacking the target. A-bomb factors are modified for weather, anti-aircraft fire and night missions like all other bombers. The A-bomb is destroyed after it attacks its target. If its bomber is destroyed, the A-bomb is destroyed as well.

87
23. Index & Glossary1D10 land CRT 11.15.52D10 land CRT 11.15.6A-bombs 22.17a2a [air-to-air]a2s [air-to-sea]AA [Anti-aircraft units, see Unit Description chart] 22.2
fire 11.5.9pilot deaths 14.6.4surprise 15.1
Abortsair-to-air combat 14.3.2naval combat 11.5.8, 11.5.11, 13.4
Action types 10.air missions 14.2Germany in 1939 9.1multiple 16.2naval combat, initiating 11.5.2, 11.6neutral major powers 9.1oil cost 10.3.pass action 11.1, 12.activity limits 10.2rail movement 11.9reorganisation 11.17.4
Active major power [a major power at war with another major power] 9.1, 11.10.5Active side [the side whose impulse it is] 7Activity limits 10.2
air missions 14.2artillery bombardment 22.2debarking
at sea 11.12in port 11.4.5
naval transport 11.4.5offensive points 16.2, 16.5port attacks, unsuccessful 11.2rail movement 11.9
ACV [Air Cav] 22.12Administration groups [group of French minor countries or territories which can be either Vichy or Free French] 17.2Advance after combat 11.15.5
artillery 22.2AfA [Africa Aflame, replaced by Territories in Flames]Afghanistan
alignment 19.7Africa [continent west and south of the Suez Canal including Madagascar, Farquhar Group, Zanzibar, Comoros & Canary Is] African map 2.1.1, 24.1.3AiF [America in Flames] 1Air Cav [ACV] 22.12Air component 14.4Air landing division 22.1.1Air sea search 11.5.7Air supply 11.17.1
carrier planes 14.4Air transport 11.11
carrier planes 14.4co-operation 18.2frogmen 22.10
Air-to-air combat 14.3altitude 11.7, 14.3.2multiple states of war 9.8naval air 11.5.9
voluntary abort 14.3.2night missions 11.7, 14.3.2pilots 14.6.4value 14.3.2
Air-to-air rating [aircraft’s air-to-air combat ability, see Unit Description chart] 14.3.2Air-to-air strength [the air-to-air rating of your front fighter plus 1/10th the air-to-air rating of each other fighter in this combat. If you have no fighters, it is your front bomber’s air-to-air rating] 14.3.2Air-to-air value [your air-to-air strength - your opponent’s air-to-air strength] 14.3.2Aircraft 14.
air sea search 11.5.7air supply 11.17.1
air transport 11.11anti-aircraft fire 11.5.9Chinese 13.3.2factors
terrain 14.5weather 14.2.3
foreign sourced 13.6.4ground strike 11.8ground support 11.15.4home country conquered 13.7.1jets 14.3.3lend lease 13.6.4missions 14.2movement 14.1.1naval air combat 11.5.9naval air interception 11.5.3, 13.4.1naval air mission 11.3, 13.4.1overruns 11.10.6range, extended 14.1.1rebasing 11.16reorganisation 11.17.1, 11.17.4reserve pool 14.6.1return to base 13.4.1, 14.2.4strategic bombardment 11.7strategic bombers, US 13.3.2surprised 15.1tank busters 11.8, 11.15.4
Aircraft missions [see also particular missions] 14.2
co-operation 18.2terrain 14.5weather 14.2.3
Aircraft movement 14.1activity limits 10.2, 14.2.1CAP 14.2.5communication lines, 2.1.3escorting 14.2.5hexdots 2.1.1interception 14.2.5naval air missions 11.3neutral major powers 9.1range 14.1.1rebase missions 11.16supply 2.4.3
Aligned [minor countries on your side] 9.5, 9.6, 19.21939 [major power’s initials in brackets after minor’s name] 13.7.1, 18.1control 2.5.2production 13.6.2units 19.4
All sea hexsides [see Hexsides]Allied [see Allies]allied [see allies]allied friction 11.15.5Allied support 13.7.2Allies [China, Commonwealth, France, USA, USSR and their controlled minor countries]allies [major powers on your side]Alpine hexsides [see Hexsides]Altitude 11.7, 14.3.2, 22.2America in Flames [AiF] 1AMPH [Amphibious transport, see Unit Description chart] 11.4.5, 11.13
invasion 11.13limited overseas supply 2.4.2naval transport 11.4.5reorganisation 11.17.3
Amphibian aircraft 2.3.1Anti-aircraft fire 11.5.9, 22.2
pilot deaths 14.6.4surprise 15.1
Anti-aircraft units 22.2Anti-tank units 22.2
land combat 11.15.5overrun 11.10.6
ARM [Armour, see Unit Description chart]CW special 11.13, 22.1.1land combat 11.15.5overrun 11.10.6variable reorganisation 11.17.4
Army [XXXX, see also corps size] 1.2.1Army group [XXXXX, see also corps size] 1.2.1ART [Field artillery] 22.2Artillery [see also Anti-aircraft, Anti-tank, Field artillery, FLAK, Rocket artillery and SAM] 22.2
ground strike 11.8ground support 11.15.4invasions 11.13movement, motorised 11.10.2naval transport 11.4.5stacking 2.3.1ZoCs 2.2
AsA [Asia Aflame, replaced by Divisions in Flames]Assault [see Land combat]ASW 11.5.10, 22.16AT [Anti-tank units, see Unit Description chart] 22.2ATR [Air transport unit, see Unit Description chart] 11.11ATR units, large
reorganisation 11.17.1Auxiliary Cruiser 22.16Available [see Availability year]Availability year [year that a unit becomes available to be built] 4.1.1, 24.1.5aircraft 4.2.1, 14.6.3replacement naval units 4.1.3Axis [Germany, Italy, Japan & Vichy; and their controlled minor countries]Azores 2.1.3, 2.1.4Baltic sea
resource transport 5.1Baltic states [Estonia, Latvia and Lithuania]
German occupation 5.1Soviet occupation 19.5.2
BB [Battleship, see Unit Description chart]Bessarabia 19.6.2Blitzkrieg [see Land combat]Bombardment [Field artillery] 22.2Bomb markers 13.6.10Bomber [An aircraft flying any mission except combat air patrol, interception or escort]
strategic, US 13.3.2unarmed 14.3.2
Bomber transportsparadrops 11.14reorganisation 11.17.1, 11.17.4
Bounce combat 14.3.3Bps [see build points]Brazil
alignment 19.8Breaking down 22.1Breakthroughs 11.15.5
invasions 11.13Britain [see UK]Build points [your production points multiplied by your production multiple]
calculating 13.6.3lend lease 5., 13.6.4 saved 13.6.9
destroy 10.4search & seizure 13.6.1spending 13.6.5, 13.6.6, 13.6.10, 13.6.11transporting 8.2.1, 13.6.4
Building ahead 13.6.5Factories in Flames 13.6.10
Bulgaria 5.1alignment 19.6.2
Burma Road 13.3.2, 13.3.3closing 13.3.3opening 13.3.2resources 13.3.2, 13.6.1
CA [Heavy Cruiser, see Unit Description chart]Cadre 13.6.3Canal hexsides [see Hexsides]CAP [Combat air patrol] 14.2.5Capital [each country’s governing city] 2.5.1
conquest 13.7.1FiF production 13.6.10

88
lend lease 13.6.4liberation 13.7.5minor countries 19.partisans 13.1.2saving oil and build points 13.6.9Ukraine 19.12Vichy 17.victory 13.9
Carrier planes 14.4anti-aircraft fire 11.5.9CV damaged 11.5.8, 11.5.11, 14.4, 14.4.1fighters, as 14.3.2garrison values 9.2, 13.1naval air combat 11.5.9naval air missions 11.3rebasing 14.4.1reorganisation 11.17.4searching 11.5.5shot down 14.4strategic bombardment 11.7units, separate 14.4.1
Carrier Planes in Flames [CVPiF, included in Ships in Flames]CAV [Cavalry unit, see Unit Description chart]
advance after combat 11.15.5Air Cav 22.12mechanised 22.5Vlassov 22.8
Central America [AiF option 1: Costa Rica, El Salvador, Guatemala, Honduras, Nicaragua and Panama]
alignment 19.8China
aircraft 13.3.2attack weakness 11.15.1co-operation, internal 18.1Communists 20.Nationalist attack weakness 11.15.5offensive points 16.3partisans 13.1.2, 20.production 20.reinforcements 20.reserves 9.7, 13.7.7resources 13.3.2Stilwell 21.supply sources 2.4.2US entry 9.4Warlords 22.6
Choice 2.7City based volunteers 22.8CL [Light Cruiser, see Unit Description chart] 22.14CLiF [Light Cruisers in Flames, included in Ships in Flames] 1Class, unit 13.6.8, 28.Clearing through, bombers 14.3.2Closed port [Iced-in port during snow and blizzard] 8.2.1Clouds 11.7, 14.3.2, 22.2Coastal forts 1.3, 4.2.2, 13.6.6, 22.9Coastal hexes [see Hexes]CoiF [Convoys in Flames, included in Ships in Flames] 22.16Combat
activity limits 10.2, 14.2.1air 14.3land 11.15naval 11.5
Combat air patrol 14.2.5Combat value, aircraft [your air-to-air strength - your opponent’s air-to-air strength]Common border [any hex you control within 3 hexes of a hex controlled by another major power is part of your common border with that major power] 9.2, 13.2Commonwealth [see also UK] 2.5.2
co-operation 18.1conquered home countries 13.7.1
Commonwealth Home Country [Australia, Canada, India, New Zealand, South Africa and the United Kingdom] 2.5.2
Communication linesblue 2.1.2, 2.1.3grey 2.1.1, 2.1.3
Conquest [complete and incomplete] 13.7.1control 2.5.3liberation 13.7.5pilots 14.6.4stacking 2.5.4surrender 13.7.6
Construction pool 13.6.5Factories in Flames 13.6.10reinforcements 4.2.1
Control 2.5alignment 19.1conquest 13.7.1liberation 13.7.5partisans 13.1.2production 13.6.2Vichy territories 17.2
Controlled hex [a hex controlled by a country or territory] 2.5.3Controlled minor country/territory [a minor country or territory either aligned with, or conquered by, a major power or another minor country] 2.5Convoy chain [a chain of convoy points in one or more adjacent sea areas connecting 2 ports to facilitate the movement of resources and build points] 13.6.1Convoys 1.2.1, 13.6.1
ASW 11.5.10co-operation 18.2limited overseas supply 2.4.2minor country 19.4.1naval combat 11.5.8, 11.5.10patrolling 11.4.2repair 13.6.5stacking 2.3.1trade agreements 5.1transporting build points 13.6.4transporting resources 13.6.1US escorts 13.3.2
Convoys in Flames [CoiF] 22.16Co-operation 18.
land movement 11.10.5liberation 13.7.5neutral major powers 9.1oil 10.3partisans 13.1.3reorganisation 11.17.4stacking 2.3.1supply 2.4.2
Copenhagen 11.4.4 Corps sized [corps (XXX), army (XXXX) or army group (XXXXX) unit] 1.2.1Country [home country of a major power or minor country] 2.5.1CP [Convoy point, see Unit Description chart]CP used 2.4.3, 11.4.2CRT [Combat Results Table] 11.5, 11.15.5, 14.3.2Cruisers
Auxiliary 22.16Light 1.2.1, 22.14
CV [Aircraft Carrier, see also Carrier planes]air component increases 14.4air sea search 11.5.7aircraft, as 14.4Bearn 13.3.2French, interned 13.3.2naval air combat 11.5.9pilots 14.6port attacks 11.2searching 11.5.5shot down 14.4
CVE [Escort Carrier] 22.16CVL [Light Carrier, CV with 1st cycle cost of 1] 30CVP [see Carrier Planes]CVPiF [Carrier Planes in Flames, included in Ships in Flames]CW [see Commonwealth]
CX [Auxiliary Cruiser] 22.16Czechoslovakia 19.8Damaging
naval units 11.5.8, 13.6.10rail lines 13.6.6
Days of Decision [DoD] 1De Gaulle 17.3.2Debarking [see also Naval transport]
at sea 11.12in port 11.4.5
Declaring war 9.Finland 19.6.1minor countries, on 19.2Rumania 19.6.2surprise 15.US entry 13.3.3USA 13.3.2Vichy 17.4.1
Denmark 13.3.2Desert hexes [see Hexes]Desert mountain hexes [see Hexes]Destroyed units [units scrapped or placed in the force pool] 4.3
city control 4.1.2force pools 4.1, 13.6.5 lakes melting 8.2.1reserves 9.7, 13.7.7retreats 11.15.5return to base 13.4.2scrapping 4.3, 13.6.5set up 24.1.5
Destroyers 13.3.2Dice 2.7
re-rolls 6.1, 13.6.11, 16.3.1DiF [Divisions in Flames, replaces Asia Aflame & Mech in Flames] 1Disbanding 4.3Division 22.1
air landing 22.1.1air transport 11.11ARM, CW special 11.13, 22.1.1breaking down 22.1land combat 11.15.1, 11.15.5naval transport 11.4.5reforming 22.1set up 24.1.6stacking 2.3.1supply 2.4.3ZoCs 2.2
Division sized [XX] 1.2.1Divisions in Flames [DiF, supercedes Asia Aflame & Mech in Flames] 1DoD [Days of Decision] 1Dynamic Naval Movement 11.4.2East Prussia 19.10Embarking [see Naval transport]Emergency HQ supply 2.4.3Enemy [a major power or minor country you are at war with]Engineer units 22.1.1
stacking, aircraft 2.3.1Entity [major power home country, minor country, territory or hex] 2.5, 19Entry markers 13.2
additions, annual 4.1.1neutrality pacts 9.2US entry 13.3
Entry pool [see US entry]Escort, air mission 14.2.5
activity limits 10.2, 14.2.1Escorts [see also ASW]
US 13.3.2Estonia [see also Baltic states] 5.1European scale [hexes on the East and West Europe maps] 1.2.3Estonia [see also Baltic states] 5.1Ethiopia 19.8Facilities [factory, fort, coastal fort, rail, road, shipyard, factory specialisation & oil markers] 1.3, 4.2.2, 13.6.10

89
Conquest 13.7.1construction 13.6.6destruction
overrun 11.10.6strategic bombardment 11.7voluntary 13.8
reinforcement 4.2.2Factories (both printed and facilities) 13.6.2
build points, lending 5.build points, saved 13.6.9destruction
strategic bombardment 11.7voluntary 13.8
partisans 13.1.3rail movement 11.9repair 13.6.7resources, lending 5.specialisation 13.6.10useable 13.6.2
Factories in Flames [FiF] 13.6.10Factory hex [hex containing one or more printed, built or railed factories]Factory specialisation 4.2, 13.6.6, 13.6.10Field artillery units 22.2FiF [Factories in Flames] 13.6.10Fighter [a FTR or carrier plane patrolling, or flying a combat air patrol, interception or escort mission]
fighter bombers 14.3.2twin-engined 14.3.2
Fighter bombers 14.3.2Final reorganisation 13.5Finland 19.6.1
resources 5.1winterised 11.10.2
FLAK 22.2Flying boats 2.3.1Flying bombs 14.7
pilots 14.6.4Force pools 13.6.5, 24.1.5
changes 4.1empty 13.6.5entry markers 13.2production 13.6reserves 9.7, 13.7.7set up 24.1.5Vichy 17.3.2
Foreign sourced aircraft 13.6.4Foreign troop commitment 18.2
Stilwell 21.Territorials 22.7
Forest hexes [see Hexes]Fort hex [a hex containing a printed fort symbol]
combat 11.15.1, 11.15.5conquest 13.7.1occupied 11.10.2overrun 11.10.6
Forts 22.9building 13.6.6coastal 22.9reinforcements 4.2.2set up 24.1.6stacking 2.3.1
Fortified hexsides [see Hexsides]Fractional odds 11.15.5Fractions 2.6, 11.15.5France, occupied [conquered or Vichy France] 17.1
administration group 17.2liberation 13.7.5partisans 13.1Vichy collapse 17.4.5
Free France 17.1, 17.6administration group 17.2co-operation 18.1control 17.2
French Equatorial Africa [Cameroons, French Somaliland, Gabon, Middle Congo, Ubangi-Shari, and Chad] 17.2French Indo-China [see Indo-China] 17.2French West Africa [Mauritania, French Sudan,
Senegal, French Guinea, Ivory Coast, Upper Volta, Togo & Dahomey, and Niger Colony] 17.2Friendly [controlled by a country or player on your side]Frogmen 22.10FTR [Fighter, see Unit Description chart]range as bombers 14.1.1GAR [Garrison unit, see Unit Description chart]Garrison ratio 9.2Garrison value 9.2
conquest, tied 13.7.1entry markers 13.2neutrality pacts 9.2partisans 13.1
GBA [Guards Banner Armies] 22.4Gearing limits 13.6.8
City based volunteers 22.8US entry 13.3.2
Germany1939 land action 9.1co-operation 18.1entry markers 13.2Ukraine 19.12US entry 13.3USSR, neutrality pact with 9.2, 13.7.1, 19.5
Gibraltar 11.4.4, 13.3.3Greece
resource 5.1Greenland 13.3.2Ground strike 11.8
artillery 22.2surprise 15.1
Ground support 11.15.4activity limits 10.2, 14.2.1artillery 22.2surprise 15.1Vichy units 17.5
Guam 13.3.2Guards Banner Armies 22.4Heavy weapons 22.11Hexdots
aircraft movement 2.1.1, 11.3large 2.1.1, 2.1.4
Hexesadjacent 2.1.1coastal [a hex which contains both land, and sea or lake]
conquest, islands of 13.7.1debarking 11.12invasions 11.13Kiel 11.4.2resources 13.6.1shore bombardment 11.15.2Suez 11.4.2, 13.9TRS supply 11.17.3
desertland combat 11.15.5supply 2.4.2weather 8.2.1
desert mountainsupply 2.4.2weather 8.2.1
European scale 1.2.3forest
aircraft factors 14.5land combat 11.15.5, 13.1.3overrun 11.10.6partisans 13.1.3shore bombardment 11.15.2ski divisions 22.1.1territorial units 22.7
jungleaircraft factors 14.5land combat 11.15.5land movement 11.10.2shore bombardment 11.15.2territorial units 22.7
lakemelting 8.2.1paradrops 11.14
weather 8.2.1mountain
land combat 11.15.1land movement 11.10.2shore bombardment 11.15.2territorial units 22.7
off-map 1.2.3, 2.1.3stacking 2.3.1USA 2.1.4
Pacific scale 1.2.3swamp
aircraft factors 14.5land combat 11.15.1shore bombardment 11.15.2ski divisions 22.1.1weather 8.2.1
Hexsidesall sea
land combat 11.15.1land movement 11.10.2supply paths 2.4.2, 11.10.2ZoCs 2.2
alpineART units 22.2land combat 11.15.1land movement 11.10.2supply paths 2.4.2, 11.10.2ZoCs 2.2
canalART units 22.2engineer units 22.1.1Kiel 11.4.4land combat 11.15.1naval movement 11.4.4overrun 11.10.6Panama 11.4.2, 11.4.4, 13.3.2Suez 11.4.4surprise 15.1
fortifiedART units 22.2engineer units 22.1.1land combat 11.15.1, 11.15.5overrun 11.10.6
lakeland combat 11.15.1land movement 11.10.2supply paths 2.4.2weather 8.2.1ZoCs 2.2
riverART units 22.2engineer units 22.1.1land combat 11.15.1overrun 11.10.6surprise 15.1
straitsART units 22.2land combat 11.15.1land movement 11.10.2overrun 11.10.6rail movement 11.9resource transport 13.6.1supply paths 2.4.2weather 8.2.1ZoCs 2.2
Hidden task forces [see Task forces]Home country [every hex a MAR could reach from the capital without crossing a red political boundary] 2.5.1
new home countries 13.7.1amending home countries 17.1, 19.6.1, 19.6.2, 19.7
Home territory 2.5.1Hong Kong 13.3.2Hostile [see also Vichy]
combat 17.5declaring war 17.4.1destroying French units 17.3.2entering Vichy France 17.4.3, 17.4.5lending resources 5, 17.4.4not reverting control 17.2

90
unit limitations 17.4.2HQ [Headquarters, see Unit Description chart]
emergency supply 2.4.3offensive points 16.3, 16.4Partisan 22.15rail movement 11.9, 11.10.2reorganisation 11.17.2, 11.17.4stacking, aircraft 2.3.1Stilwell 21.supply sources 2.4.2, 2.4.3supply units 22.3support 11.15.3
Hungaryalignment 19.6.2resources 5.1
HW [Heavy Weapons] 22.11I-400 13.6.5, 22.16Iced-in port 8.2.1
debarking 11.4.5, 11.12, 11.16embarking 11.4.5supply 2.4.2
Iceland 13.3.2Impulses 7.
first 6.2last 12.
passing 11.1weather 8.2.2
maximum & minimum 12resetting impulse track 13.9surprise 15
In the presence of the enemy 11.4.2Indo-China 17.2
Japanese occupation 13.3.3, 19.7INF [Infantry, see Unit Description chart]Initiative 6.
breaking ties 6.2partisans 13.1reinforcements 4.2
Intelligence 13.6.11Interception, aircraft
En-route 14.2.5range, effect on 14.1.1
Interception, air mission 14.2.5activity limits 10.2, 14.2.1
Interception, naval air [see Naval air interception]Interception, naval 11.4.6Invasions 11.13, 11.15.7
stacking 2.3.1supply 2.4.3
Iranalignment 19.7resources 5.1
Iraqalignment 19.7resources 5.1
Islandsconquest of 13.7.1control 2.5.2
Isolated factory [cannot trace a resource to it] 13.7.6unit [cannot trace a basic supply path of any length to a primary supply source] 4.3, 13.5, 13.6.10
Istanbul 11.4.4Italy [includes Sicily]
co-operation 18.1conquest of 13.7.1territorial units 22.7
Japanassets frozen 13.3.2carrier plane range 14.4Commonwealth, war with 13.3.1Embargo, US 13.3.2Indo-China 13.3.3, 19.7land movement 11.10.2Madagascar 13.3.3, 19.7Marshalls 13.3.3Netherlands, war with 13.3.1oil 13.3.2reserves 9.7, 13.7.7resources 13.3.2
trade agreements 5.1US entry 13.3USSR, peace with 13.7.3
Jets 14.3.3Jungle hexes [see Hexes]Kamikazes 14.8
pilots 14.6.4Kiel 11.4.2, 11.4.4KiF [Khaki in Flames] 1Lake hexes [see Hexes]Lake hexsides [see Hexsides]Land combat [see also Overrun] 11.6
activity limits 10.2co-operation 18.2forts 22.9invasions 11.13multiple states of war 9.8offensive points 16.3.3paradrops 11.14supply 2.4.2, 2.4.3territorial units 22.7Vichy units 17.5weather 11.15.5
Land movement 11.10activity limits 10.2debarking at sea 11.12invasions 11.13neutral major powers 9.1rail movement bonus 11.10.2supply 2.4.3weather 11.10.2
Land-based aircraft [all aircraft except carrier planes]Latvia [see also Baltic states] 5.1Leg unit type 28Lend lease 5, 13.6.4
US Entry 13.3.2Lending resources 5, 13.3.2, 13.6.1Leningrad
naval movement 8.2.1Liberation 13.7.5
stacking 2.5.4LiF [Leaders in Flames] 1.1Light Cruiser [CL] 22.14Limited overseas supply 2.4.2Lithuania [see also Baltic states] 5.1LND [Land bomber, see Unit Description chart]
set up 24.1.6London 11.4.4Madagascar 17.2
Japanese occupation 13.3.3, 19.7Major powers [China, Commonwealth, France, Germany, Italy, Japan, USA and USSR] 1, 2.5.2
conquest of 13.7.1Manchukuo 13.7.3Manchuria [see Manchukuo]Map set up 24.1.3MAR [marine unit, see Unit Description chart]
invasions 11.13land combat 11.15.1land movement 11.10.2
Markers 1.3Markers track [see turn record chart] 14.6.3
intelligence points 13.6.11offensive points 16oil 10.3
Marshalls 13.3.3Maximum Impulses 12MECH [Mechanised unit, see Unit Description chart]
cavalry 22.5land combat 11.15.5overrun 11.10.6variable reorganisation 11.17.4
Mexicoalignment 19.8
MiF [Mech in Flames, replaced by Divisions in Flames]MIL [Militia, see Unit Description chart]
Calling out 9.7
force pools 4.1.2neutral 13.7.7reinforcements 4.2
Minimum Impulses 12Minor countries 19
activity limits of 10.2aligning 9.6allocating 9.5Allied support 13.3.3, 13.7.2conquest of 13.7.1control of hexes 2.5.3convoy points 19.4.1co-operation 18.1production by 13.6.5resource transport 13.6.1US entry 13.3.3war declared on 9.3
Minor country units 19.4production 19.4.2restrictions 19.4.3setting up 19.4.1
Missions [see Aircraft missions] 14.2Mongolia
alignment 19.8MOT [Motorised unit, see Unit Description chart]advance after combat 11.15.5Motorised movement 11.10.2
type 28.Mountain hexes [see Hexes]Movement
activity limits 10.2, 14.2.1aircraft 14.1between maps 2.1.1, 2.1.3land 11.10, 11.12naval 11.4rail 11.9
Mp [movement point]MTN [Mountain unit, see Unit Description chart]
land combat 11.15.1land movement 11.10.2
Multiple states of war 9.8Mutual peace 13.7.3Nanking 13.3.3Narvik 5.1Nationality [home countries and territories] 2.5.1
divisions 22.1notional units 11.15.1partisans 13.1.3
NAV [Naval bomber, see Unit Description chart] carrier planes operating as 14.4.1searching 11.5.5
Naval air combat 11.5.9air combat results 14.3.3FTRs and carrier planes as bombers 14.3.1voluntary abort 14.3.2
Naval air interception 11.5.3activity limits 10.2, 14.2.1carrier planes 14.4range 14.1.1return to base 13.4.1
Naval air missions 11.3carrier planes 14.4return to base 13.4.1
Naval combat [surface, submarine & naval air combat] 11.5
co-operation 18.2frogmen22.10interception 11.4.6multiple states of war 9.8opponent’s 11.6pass action 11.1
Naval movement 11.4activity limits 10.2communication lines, blue 2.1.3free after set up 24.1.6frogmen 22.10interception 11.4.6neutral major powers 9.1returning to base 13.4supply 2.4.3

91
weather 8.2.1Naval transport 11.4.5
co-operation 18.2debarking at sea 11.12
partisans 13.1.3supply 2.4.3
frogmen 22.10Nazi-Soviet pact [see also Neutrality pacts] 19.5NEI [see Netherlands East Indies]Netherlands
convoy point set up 19.4.1US guarantee 13.3.2, US entry option 42
Netherlands East Indies [the 1939 “NEI” controlled hexes in the Bay of Bengal, Bismarck Sea, East Indian Ocean, South China Sea and Timor Sea] 19.9
Allied access 13.3.2, US entry option 43resources 5.1
Neutral major power [a major power not at war with any major power] 9.1, 13.7.3
building ahead 13.6.5co-operation 9.1, 18.1convoys 13.4, 13.6.1land movement 11.10.4limits on 9.1MIL units 4.1.2, 13.7.7multiple states of war 9.8mutual peace 13.7.3naval movement 11.4.1resources, lending 5.return to base 13.4set up 24.1.6supply paths 2.4.2, 9.1ZoCs 2.2
Neutral minor country [a minor country not controlled by any major power] 13.9, 19.1
aligning 9.5, 9.6, 19.2, 19.6, 19.7, 19.8auxiliary cruisers 22.16declaring war on 9.3, 13.3.2, 13.3.3, 19.2trade agreements 5.1
Neutrality pacts 9.2entry markers 13.2mutual peace 13.7.3
Night fighters 11.7, 14.3.2Night missions 11.7, 14.3.2NKVD 22.1.1No planes marker 14.3.3, 14.4
removal 13.6.5Northern Ireland [see also UK] 13.3.2Norway [see Narvik and Oslo]
winterised 11.10.2Notional units 11.15.1
ground strike 11.8invasions 11.13paradrops 11.14, 13.1.3Vichy 17.5
Occupied France [conquered or Vichied France] 17.1
liberation 13.7.5partisans 13.1Vichy collapse 17.4.5
Odds ratio [attacker’s factors:defender’s factors] 11.15.5Off-map scale [hexes on the America mini-map and other off-map areas, see also hexes] 1.2.3, 2.1.3Offensive chits 16.
gearing limits 13.6.8reinforcements 4.2.1
Offensive points 16.ground strike 11.8spending 16.1
Ohka 14.7Oil 1.3, 10.3
destroying 10.4facilities 13.6.1production 13.6.1saved 13.6.9
Oil dependent 10.3, 28.Oil facility 1.3, 13.6.1
building 13.6.6reinforcements 4.2.2
Oil resources 10.3, 13.6.9action cost 10.3destroying 13.8embargo 13.3.2facility 4.2.2, 13.6.1, 13.6.6printed
repair 13.6.7reorganisation 13.5saved 13.6.9
destroying 10.4strategic bombardment 11.7trade agreements 5.1transport 13.6.1
Opponent [major power or minor country on the other side]Optional units 22Oslo 11.4.4Overrun 11.10.6
advance after combat 11.15.5control changed by 2.5.3Factories in Flames 13.6.10invasions 11.13multiple states of war 9.8offensive points 16.3.3paradrops 11.14partisans 13.1.3pilots 14.6.4saved build points 13.6.9supply 2.4.1Vichy units 17.5
Pacific scale [hexes on the Asian, Pacific, African, Scandinavian, and Nth and Sth American maps] 1.2.3Panama 2.1.4, 13.9
canal closed 11.4.2, 11.4.4, 13.3.2PARA [Paratroops, see Unit Description chart]Paradrops 11.14
land combat 11.15.1no para 14.2.2partisans 13.1.3supply 2.4.3
ParisBearn interned 13.3.2Vichy 17.1
PART [Partisan, see Unit Description chart] 13.1HQs 22.15Chinese 20.co-operation 18.1control 2.5.3debarking on 11.12land combat 11.15.1scrapping 4.3, 13.6.5ZoCs 2.2
Partition line 19.5.1Pass action [see Action types]PatiF [Patton in Flames] 1 Patrolling [ending a naval move at sea] 11.4.2Peace 13.7
Bessarabia 19.6.2Finnish border lands 19.6.1
Pearl HarborUS entry 9.4, 13.3.2
Philippines 13.3.2territorial units 22.7
PiF [Planes in Flames] 1 Pilots 14.6
CV damaged 11.5.8, 11.5.11, 14.4.1deaths 14.6.4home country conquered 13.7.1overrun 11.10.6TRS damaged 11.5.8, 11.5.11Vichy 17.3.2
POL [Petrol, oil & lubricants] 1.3Poland
CW units 19.5.1Nazi-Soviet pact 13.7.1, 19.5.1
PoliF [Politics in Flames]Port attack 11.2
frogmen 22.10surprise 15.1
Portsbuild points 13.6.4closed 8.2.1debarking 11.4.5embarking 11.4.5iced-in 8.2.1naval movement 11.4.2port attack 11.2resources 13.6.1
Portugalresources 5.1
Production 13.6Chinese 20.
aircraft 13.3.2engineer units 22.1.1factories 13.6.6home countries, conquered 13.7.1minor countries 19.3offensive chits 16.pilots, retrained 14.6.5separate country 13.6.10
Production chart 13.6.10Production circle [see turn record chart] 13.6.5
reinforcements 4.2Production multiples 13.6.3
US 13.3.2Production point [1 resource transported to 1 useable factory] 13.6.2Queens 11.4.5Rail
activity limits 10.2building 13.6.6communication lines, grey 2.1.1, 2.1.3damaging 11.7, 13.8movement 11.9
Factories in Flames 13.6.10reinforcement 4.2.2repair 13.6.7resource transport 13.6.1station 11.9supply paths 2.4.2
Railway gun (RG) 22.2Railway supply path 2.4.2Range [distance between 2 hexes] 2.8
aircraft movement 14.1.1, 14.2.4carrier planes 11.5.5, 14.4naval air combat 11.5.7naval air interception 11.5.3naval air missions 11.3naval movement 11.4.2, 11.4.3offensive points 16.3rebasing 11.16, 13.4.1, 14.4.1reorganisation 11.17supply 2.4.2
Re-rolls 2.7, 6.1, 13.6.11, 16.3.1Rebase, aircraft 11.16
carrier planes 14.4.1 mission 14.2.2overrun 11.10.6
Red Sea Flotilla 2.4.1Reforming 22.1Reinforcements 4.
aircraft with pilots 14.6.1Chinese 20.facilities 4.2.2Factories in Flames 13.6.10
Reorganisation 11.17co-operation 18.2, 18.3final 13.5offensive points 16.3, 16.4
Repair factories 13.6.7naval units 13.6.5gearing limits 13.6.8oil 13.6.7rail 13.6.7US entry option 13.3.2
Replacement naval units 4.1.3Reserve pool 14.6.1Reserves

92
calling out 9.7MIL units 13.6.5removal 13.7.7
Resources 13.6.1Chinese 13.3.2embargo 13.3.2facilities 13.6.1lending 5., 13.3.2
co-operation 18.2oil 10.3, 13.6.9partisans 13.1.3Soviet 13.3.2strategic bombardment 11.7transporting 5.1, 13.6.1
Baltic weather 5.1Burma Road 13.3.3
Western Allied 13.3.2Restrictions, naval movement 11.4.2, 11.4.4
Panama Canal 13.3.2resource transportation 13.6.1
Retreat 11.15.5Return to base 13.4
aircraft missions, from 14.2.4Reversion 13.7.5River hexsides [see Hexsides]Roads [see also Burma Road]
building 13.6.6reinforcement 4.2.2supply 2.4.2transporting resources 13.6.1
Rocket artillery (RA) 22.2Rough Seas 11.4.2Rounding 2.6Rumania 19.6.2
resources 5.1Rushed construction 13.6.10SAM [Surface to Air Missile] 22.2Saved build points 13.6.9
destroying 10.4Saved oil 13.6.9
actions 10.3destroying 10.4
Scale 1.2Scandinavian map 24.1.3Campaign Booklet 1.1, 24~30Scrapping [permanently removing from the game] 4.3, 13.6.5Screening 11.5.8SCS [see surface combat ship] Sea areas
adjacent 2.1.2control 2.5.2patrolling 11.4.2Red sea 2.1.2sea-box 2.1.2supply paths 2.4.2USA minimap connections 2.1.2weather
search die roll 11.5.5search number 11.2, 11.4.2, 11.4.6, 11.5.5, 11.5.6
Sea-boxesnaval air missions 11.3naval movement 11.4port attack 11.2return to base 13.4shore bombardment 11.15.2stacking 2.3.1
Search and seizure 13.3.3, 13.6.1Search number [large number in each sea-box section]
interception 11.4.6naval combat 11.5.5naval movement 11.4.2port attack 11.2surprise points 11.5.6
Searching 11.5.5interception 11.4.6port attack 11.2
Separate country production 3.1
Sequence of play 3.1Service Squadrons 22.13Set up 24.1
minor countries 19.4.1Shatter 11.15.5Shipyards 4.2.2, 13.6.6, 13.6.10Shore bombardment 11.15.2, 11.15.7
surprise 15.1Vichy units 17.5
Siamalignment 19.7
Siberia [all hexes in the USSR on the Asian and Pacific maps] 13.1Siberian units 22.5Side [there are 2 sides in World in Flames, the Axis and the Allies] 1 Sides, choosing 24.1.2SiF [Ships in Flames] 1 Singapore 13.3.3SKI [Ski division] 22.1.1
winterised 11.10.2Slovakia [see also Czechoslovakia] 19.8South Dobruja 19.6.2Soviet, Soviet Union [see USSR]Soviet border rectification 19.6Spain
alignment 19.7, 19.8resources 5.1
Specialisation, Factory 13.6.10SSq [Service Squadron] 22.13Stacking 2.3
carrier planes 14.4.1co-operation 18.2Factories in Flames 13.6.10reinforcements 2.5.4, 4.2retreats 11.15.5set up 24.1.6
Stage [a portion of a turn. Each stage is divided into a number of steps]Sequence of Play 3.1Start lines 24.1.6Station, railway 11.9Step [the smallest segment of a turn where actions occur. Several steps constitute a stage]Sequence of Play 3.1
Stilwell 21.Straits hexsides [see Hexsides]Strategic bombardment 11.7, 13.6.10
carrier planes 14.4high altitude anti-aircraft fire 22.2oil resources 13.6.9saved build points 13.6.9
Sub hunters 22.16SUB [Submarines, see Unit Description chart]
building 13.6.5interception 11.4.6Milchcow 22.16Missile 22.16naval combat 11.5.8, 11.5.10, 22.16naval movement 11.4.1port attack 11.2Schnorkel 22.16supply 22.16Walther 22.16
Submarine combat 11.5.10, 22.16Suez 11.4.2, 11.4.4, 13.9
closure 13.3.3Supply 2.4
aircraft movement 14.1.1co-operation 18.2debarking at sea 11.12embarking 11.4.5emergency HQ supply 2.4.3invasions 11.13land combat 11.15.1land movement 11.10.1limited overseas 2.4.2naval movement 11.4.2partisans 13.1.3range 2.4.2
reorganisation 11.17, 13.5ski divisions 22.1.1sources 2.4.2Stilwell 21.supply units 22.3terrain 11.10.2weather 2.4.2
Supply paths 2.4.2Supply Sources 2.4.2Supply units 22.3
air transport 11.11debarking 11.4.5rail movement 11.9reorganisation 11.17, 13.5stacking 2.3.1supply source 2.4.2
Surface combat ship [SCS: ASW with no air component, BB, CA or CL]
debarking 11.12invasions 11.13shore bombardment 11.15.2submarine combat 11.5.10transport 11.4.5
Surface naval combat 11.5.8Surface naval unit [any naval unit except sub or frogmen]building 13.6.5Surface to Air Missile [SAM] 22.2Surprise impulse 15.
ground strike 11.8multiple states of war 9.8naval combat 11.5.6port attack 11.2
Surprise points 11.5.6, 15.1port attack 11.2
Surrender 13.7.6Swamp hexes [see Hexes]Sweden
Axis rail movement and supply 19.7resources 5.1winterised 11.10.2
Synthetic oil 13.6.1Syria 17.2Tank busters 11.8, 11.15.4Tankers 22.16Task force [each group of moving naval units] 11.4.1Task force markers 11.4.3TEC [Terrain Effects Chart, see Asia map]Tension pool [see US entry]Terrain Effects Chart [see Asia map] 11.10.2Territorial units 22.7
land combat 11.15.5, 11.15.6reinforcements 4.2minor country set up 19.4.1supply sources 2.4.2
Territory 2.5.1conquest 13.7.1control 2.5.2, 2.5.3liberation 13.7.5reinforcement 4.2Vichy 17.
TiF [Territories in Flames, supercedes Africa Aflame] 1 Tito 22.15Total war [at war with all active major powers on the other side]Trade agreements 5.1Transylvania 19.6.2TRS supply 11.17.3TRS [Transports, see Unit Description chart] 11.4.5
limited overseas supply 2.4.2naval transport 11.4.5Queens 11.4.5reorganisation 11.17.3
Turkeyalignment 19.7resources 5.1
Turn 3end of 13.

93
last impulse test 12passing 11.1
Turn Record Chart [hard-mounted A3 World in Flames board containing the turn, impulse, initiative & markers tracks and production chart] Twin-engined fighters 14.3.2Two-dice combat 11.15.6UK [The United Kingdom of Great Britain and Nth. Ireland, see also Commonwealth]
conquest 9.4, 13.7.1enemy units in 13.6.3facilities 4.2.2factories 13.6.3invaded 13.3.3Northern Ireland 13.3.2
Ukraine 19.12Unarmed bombers 14.3.2United Kingdom [see UK]Units [see also particular types] 1.2.1
building ahead 13.6.5class 13.6.8, 28damaged 11.5.8, 13.6.10described 24.1.4disbanding 4.3optional 22scrapping 4.3, 13.6.5stacking 2.3.1, 2.5.4type 24.1.5, 28.
Unrestricted naval warfare 13.3.2US entry 13.3
declaring war 9.4entry actions 13.3.3entry options 13.3.2entry pools 9.4, 13.3lending 5.tension pools 9.4, 13.3
USAco-operation 18.1minimap 2.1.4
maps, connection to 2.1.2set up 24.1.3
production multiples 13.6.3trade agreements 5.1
USSRBaltic states 13.6.3, 19.5.2border rectification 19.6factories, rail restriction 11.9gearing limits 13.6.8Germany, neutrality pact with 9.2, 13.7.1, 19.5
Baltic states 19.5.2Poland 13.7.3, 19.5.1
Guards Banner Armies (GBA) 22.4Japan, peace with 13.7.3Poland 13.6.3, 19.5.1production multiples 13.6.3Siberia 13.6.3Siberians 22.5Ukraine 19.12
V-weapons 22.17Variable reorganisation cost 11.17.4Venezuelaresources 5.1
Vichy [Axis major power] 17.administration group 17.2co-operation 18.1declaring war 17.4.1hostile 17.2, 17.3.2, 17.4, 17.5Indo-China 13.3.3Madagascar 13.3.3stacking 2.5.4
Vichy, city of [capital of Vichy France] 17.1Vichy France [Vichy home country] 17.1Victory 13.9Vladivostok 13.7.3Vlassov 22.8
co-operation 18.1Volunteers, city based 22.8 Warlords 22.6Weather 8.
air effect 14.2.3blizzard
ski divisions 22.1.1
deserts 8.2.1invasions 11.13land combat 11.5.5land movement 11.10.2ports 8.2.1searching 11.2, 11.4.6, 11.5.5shore bombardment 11.15.2snow
ski divisions 22.1.1 22.1supply paths 2.4.2terrain 8.2.1turn length 8.2.2
White print unitssupply 2.4.3winterised 11.10.2
WiF [World in Flames]Winterised unit [MTN, SKI, Swedish, Finnish, Norwegian or white print Soviet unit] 11.10.2, 11.15.5You or Your [your major power and its controlled minor countries]Yugoslavia
alignment 19.7, 19.8ZoC [Zone of Control] 2.2
advance after combat 11.15.5garrison values 9.2, 13.1invasions 11.13land movement 11.10.1overrun 11.10.6paradrop 11.14partisans 13.1, 13.1.3rail movement 11.9reinforcements 4.2reorganisation 11.17.2resource transport 13.6.1retreats 11.15.5ski divisions 22.1.1supply paths 2.4.2surprised minor country 15.1
Zoya 22.15

© 2017 AUSTRALIAN DESIGN GROUP
The sequence of play in a turn is:A. REINFORCEMENT STAGEB. LENDING RESOURCES STAGEC. INITIATIVE STAGED. ACTION STAGERepeat D1 through D3 until the action stage ends.D1 Determine weatherD2 First side’s impulseEvery major power on the first side performs these steps:D2.1 Declare warD2.2 Choose actionChoose either a pass, a naval, an air, a land or a combined action.D2.3 Perform actionsThe major powers that didn’t pass perform these steps in this order (their action choice will limit what they can do ~ see action limits table):(a) Port attacks(b) Naval air missions(c) Naval movement(d) Your naval combat(e) Opponent’s naval combat(f) Strategic bombardment(g) Ground strike missions(h) Rail movement(i) Land movement(j) Air transport(k) Debark land units at sea(l) Invasions(m) Paradrops
(n) Land combat(o) Air rebases(p) ReorganisationD2.4 End of actionRoll to end the action stage. If it doesn’t end, advance the impulse marker the number of spaces shown on the weather chart for the current weather roll. If it ends, move on to stage E - the end of turn.D3 Second side’s impulseIf the action stage didn’t end, repeat the steps in D2 for the second side. If the action stage doesn’t end after the second side’s impulse, go back to D1.E. END OF TURN STAGEBoth sides perform these steps in this order:E1 PartisansE2 US entryE3 Return to baseE4 Final reorganisationE5 ProductionE6 Intelligence (option 41)E7 Peace E7.1 ConquestE7.2 Allied minor supportE7.3 Mutual peaceE7.4 Vichy declarationE7.5 LiberationE7.6 SurrenderE8 Facility, factory & oil destruction
(options 32 & 33)E9 Victory check
3.1 SEQUENCE OF PLAY
COLLECTOR’S EDITION
94

© 2017 AUSTRALIAN DESIGN GROUP May photocopy
OPTIONAL RULES MANIFEST
~ we always play ~ we often play ~ we sometimes play
COLLECTOR’S EDITION
1. African, American & Scandinavian maps (AfA, AiF & AsA) ~ 1.2.3, 2.1.1, 2.1.3, 2.1.4, 13.3.2, 19.8, 22.7
2. Divisions (DiF) ~ 1.2.1, 2.2, 2.3.1, 9.2, 9.5, 11.4.5, 11.11, 11.13, 11.14, 11.15.5, 22.1, 24.1.6
3. Artillery (DiF) ~ 1.2.1, 2.2, 2.3.1, 11.2, 11.4, 11.8, 22.2
4. Planes in Flames units (PiF) ~ 1.2.1, 13.6.5
5. Ships in Flames units (SiF) ~ 1.2.1, 2.3.1, 4.1.3, 9.1, 11.3, 11.5.8, 13.5.1, 13.6.1, 13.6.5, 14.4.1
6. Cruisers in Flames units (CLiF) ~ 1.2.1, 11.5.10, 22.14
7. Convoys in Flames units (CoiF) ~ 1.2.1, 22.16
8. Aircraft abilities ~ 2.3.1, 8.2.1, 11.8, 11.11, 11.14, 11.15.4, 11.17, 14.2, 14.3.2
9. Pacific & Asian ZOCs ~ 2.2
10. Surprised ZoCs ~ 2.2
11. Limited overseas supply ~ 2.4.2
12. Limited access across straits ~ 2.4.2, 11.9, 13.6.1
13. HQ supply and support ~ 2.4.3, 11.15, 11.15.3, 11.15.5
14. Supply units (DiF) ~ 2.2, 2.3.1, 11.4.5, 11.11, 13.5, 22.3
15. Winterised movement ~ 11.10.2
16. Dynamic naval movement ~ 11.4.2
17. In the presence of the enemy ~ 11.4.2
18. Rough seas ~ 11.4.2
19. Task force markers (SiF) ~ 11.4.3
20. SCS transport (DiF) ~ 11.4.5
21. Transport defence (AiF & PatiF) ~ 11.5.8
22. Air-sea search ~ 11.5.7
23. Screening ~ 11.5.8
24. V-weapons and A-bombs (PiF) ~ 11.4.5, 22.17
25. Railway movement bonus ~ 11.10.2
26. Fractional Odds ~ 11.15.5, 11.15.6
27. 2die10 Land combat results table ~ 11.15.6, 13.6.12
28. Spotting fleets ~ 11.5.5, 11.15.7
29. Variable reorganisation costs ~ 11.17.4
30. Saving & spending oil (TiF) ~ 5, 10.3, 10.4, 11.10, 13.5, 13.6.2, 13.6.9, 16.2, 17.3.2
31. Saving build points & disbanding units (TiF) ~ 4.3, 10.4, 11.10, 13.6.10
32. Building and destroying facilities (factory (WiF), synth oil, rail, road, fort & coastal fort (all TiF), shipyard & factory specialisation (both FiF) markers) ~ 1.3, 4.2.2, 11.7, 11.10.6, 13.5, 13.6.1, 13.6.6, 13.6.11, 13.8, 22.9
33. Printed factory, rail & oil destruction and repair ~ 11.7, 13.6.7, 13.8
34. Minimum and maximum impulses ~ 12
35. Isolated reorganisation ~ 13.5
36. Cadre ~ 13.6.3
37. Building foreign aircraft ~ 13.6.4
38. Building ahead ~ 13.6.5, 13.6.11
39. Gearing limits ~ 13.6.6, 13.6.8, 16, 22.8, 22.11
40. Factories in Flames (FiF) ~ 13.6.11
41. Intelligence (KiF) ~ 13.6.12, 24.1.6
42. USSR-Japan compulsory peace ~ 13.7.3
43. En-route aircraft interception ~ 14.2.5
44. Bounce Combat ~ 14.3.3
45. Carrier plane units (CVPiF) ~ 14.4.1
46. Pilots (PiF) ~ 13.6.5, 14.6
47. Flying bombs (PiF) ~ 14.7
48. Kamikazes ~ 14.8
49. Offensive points ~ 16.
50. The Ukraine (TiF) ~ 19.12
51. Frogmen (SiF) ~ 11.4.5, 22.10
52. Guards Banner Armies (DiF) ~ 22.4
53. Siberians (TiF) ~ 22.5
54. Territorials (TiF) ~ 22.7
55. City based volunteers (AiF & TiF) ~ 22.8
56. Heavy Weapons units (AiF, PatiF & PoliF) ~ 22.11
57. Air Cav (AiF, PatiF & PoliF) ~ 22.12
58. Service Squadrons (SiF) ~ 22.13
59. Warlords (TiF) ~ 22.6
60. Partisan HQs ~ 22.15
95

OddsModifiers 3OddsLevel DRM
≤1:61:61:51:41:31:22:31:13:22:13:14:15:16:17:18:19:1
10:1
-10-8-6-4-20
+1+2+3+4+6+8+10+12+14+16+18+20
Other Modifiers(all are cumulative and replace the equivalent 1d10 modifiers)
© 2017 Australian Design Group
OPTION 27: 2 DIE 10 LAND COMBAT RESULTS TABLE (11.15.6) 1
Notes1. The same procedure for land combat is followed as normal (see 11.15) except that: (a) 2 ten-sided dice (2d10) are rolled for each combat rather than 1, and (b) the final odds are converted to a die-roll modifier (DRM) before rolling on the 2d10 Land CRT
(Combat Results Table), rather than cross referencing an odds column on one of the 1d10 tables.2. All losses expressed as attacker/defender. Furthermore:
- ~ no loss† ~ half the remaining attacking land units stay face-up* ~ remaining attacking land units stay face-upx ~ the attacker takes one extra loss (in total) when their units are either attacking:
(a) a city, mountain, forest, jungle or swamp hex; or all the land units are attacking across a river, crossing arrow, fort hexside and/or invading;
(b) a clear or desert hex containing any defending HQ-A, ARM and/or MECH;(c) a hex in rain or storm; and/or(d) a hex in snow or blizzard and fewer than half the attacking land units are winterised
R ~ retreat remaining defending land units. Destroy land units that cannot retreatS ~ destroy land units that cannot retreat. Place remaining defending land units on the production
circle to arrive as reinforcements next turn B ~ 'S' result plus breakthrough
Attacker may convert an ‘S’ or ‘B’ to an ‘R’ result.3. For odds over 10:1 the odds modifier is double the odds (e.g. 15.74:1 gives you 31 dice roll modifers).
Option 26: (fractional odds, see 11.15.5) For odds of 1:1 and higher the odds modifiers are linear (e.g. 3.65:1 gives you 7.3 die roll modifiers, while 3.64:1 gives you 7.2).
4. DiF options 2, 3, 14 & 24: halve division sized and notional units’ modifiers (e.g. a face-down defending AT is only +1 not +2). This is cumulative with note 5 below.
5. Reduce the modifier proportionally when a unit’s (modified) combat factors are reduced due to terrain (e.g. a winterised corps attacking across a printed fort hexside in snow has a 1/3rd modifier).
6. Winterised: MTN, SKI, Finnish, Norwegian, Swedish and white print Soviet units.7. If any attacking: (a) HQ-A, ARM, MECH or winterised unit gets a die roll modifier, and/or (b) ENG gains any engineering benefit (see 22.1);
the first loss (if any) must be a unit gaining the benefit. If more than one, an ENG must take the first loss. 8. If you are required to lose an HQ-A, ARM or MECH (see note 7), you may instead lose any MOT
attacking the same hex (DiF option 2: even a division).9. Even if the factory itself has been railed out or destroyed.
per HQ-A, ARM and/or MECH defending a (non-city) clear, or desert hex during fine weather 4
per defending AT or AA, if attacked by HQ-A, ARM or MECH (DiF option 3)per face-down defending land unit 4
reorganisation value of one attacking HQ (option 13) reorganisation value of one defending HQ (option 13)per (co-operating) major power adding factors to the attack (after the first)per white print unit that is also Australian, Japanese or Marine, attacking a jungle hex 5
per PARA (opt. 57: & ACV) paradropping (after a2a & AA fire, if any) 4
per TERR defending outside its home country (TiF option 54)per TERR attacking a hex outside its home country (TiF option 54)
JungleRainStorm and snowBlizzardper winterised unit attacking a hex in snow or blizzard 4, 5, 6, 7
per winterised unit defending a hex in snow or blizzard 4, 6
per printed factory in the hex attacked 9per ENG unit attacking a printed factory (DiF option 2) 5, 7, 9
per ENG unit defending a printed factory (DiF option 2) 9
per ARM, MECH and/or HQ-A unit attacking a (non-city) clear or desert hex not across a fort hexside 4, 5, 7, 8
-2
-1
+2+half-half
-1+1
+1+1-1
-4-2-4-6+1-2
-1+1-1
+1
Unit modifiers
Terrain and weather modifiers
Factory modifiers (maximum +0)
Blitz column (only) modifier (fine weather only)
5/-
x4/-
4/-
4/-
x3/-
3/-
3/-
x2/-
2/-
2/-
x1/-
1/-
1/-x/-
-/-
x2/1
2/1
x1/1
1/1
-/1
†x1/2
†1/2S
†/1S
†x/2S
*/2S
x4/-
4/-
4/-
x3/-
3/-
3/-
x2/-
2/-
2/-
x1/-
1/-
1/-
x/--/-
x1/1
1/1
x/1
1/R
†/R
†/R
†1/B
†x/B
*/B
*/1B
*/2B
-1
0
1
2
3
4
5
6
7
8
9
10
11
12
13
14
15
16
17
18
19
20
21
22
23
DiceRoll Assault Blitz
2d10 Land CRT 2
Choosing Combat ColumnProvided the defender is in a non-city hex that is clear, forest or desert, then the attacker has the choice of column (Assault or Blitz) if they either have:(a) more HQ-A and/or ARM than
the defender, or (b) more MECH than the defender
and the defender has no HQ-A or ARM.
Otherwise, defender’s choice. HQ-A, ARM & MECH attacking across a fort hexside don’t count for column choice.DiF option 2: divisions count 1/2 (not rounded) for column choice.DiF option 3: every defending AA and AT counts as an ARM corps for column choice.
Copyright © 2022 FDOKUMEN