Designing with Custom Railing Panels in Revit - Autodesk ...
Upload
khangminh22Category
view
0download
0
Quality
Introduction
Autodesk BIM 360
BIM 360 improves the process of construction by supporting informed decision making throughout the project lifecycle It does this by centralizing all project data in a single data repository and connecting project stakeholders and workflows mdashfrom design to construction to operations from the field to the office and back
Visit BIM 360 Site
Please note that the capabilities outlined in this guide are reflective as of September 2018 and will continue to undergo improvements Additionally some capabilities are only available in certain countries For more information on product updates and capabilities please visit the BIM 360 Product Release Notes
In todayrsquos digital age quality assurance and control is faster more effective and better at mitigating risk Quality control no longer needs to be reactive Get critical information into the hands of those in the field by combining mobile technology on the jobsite with cloud-based collaboration and reporting With standardized quality workflows you can gain visibility into all project issues and quickly assign and resolve those issues reducing unnecessary rework
The following guide introduces the BIM 360 suggested quality workflow and gives context to the different capabilities built into the product including step-by-step starter guides
bull Quality Controlbull Punchlistbull Submittal
1 Suggested Workflows
bull Quality Checklistsbull Issue Managementbull RFI Managementbull Submittal Managementbull Daily Logs
2 Quality Capabilities
bull Insight amp Reportingbull Project Homebull Mobile Accessbull Account Adminbull Integration Partners
3 Additional Capabilities
Table of Contents
Suggested Workflows
CONTRACTOR
SUBCONTRACTOR
Quality Control WorkflowEnsure best practices on and off the jobsite by controlling quality through a streamlined workflow The graphic below outlines the suggested quality control workflow using BIM 360
Why follow this workflowbull Easily track and review issues in a centralized
locationbull Utilize templates or create custom checklists
bull Maintain a consistent quality control process
BIM 360 capabilities usedbull Quality checklists bull Issue management
Initiate Issue Assign Issue
Complete Checklist Items Submit Checklist Run Report
Close Issue
ISSUE WORKFLOW
Were deficiencies
noted
Was the issue addressed
Notify Company of Open Issue
Rectify Issue And Change Status
Complete all Checklist Sections
NO
YES
NO
YES
Start Initiate Checklist
Review Individual Checklist Items
ARCHITECTDESIGN TEAM
OWNER
CONTRACTOR
SUBCONTRACTOR
Punchlist WorkflowSuccessfully utilizing a streamlined punchlist process will increase efficiency and reduce errors The graphic below outlines the suggested document management workflow using BIM 360
Why follow this workflowbull Easily initiate a punchlist review processbull Set appropriate review and approve privilegesbull Track punchlists and improve visibility to project
progress
BIM 360 capabilities usedbull Quality checklists bull Issue management
Rectify Issue And Change Status
Review And Forward To
Subcontractor
Notify Company Of Open Issue Notify ArchitectWas the issue
addressed
Close Punchlist Item
Was the issue addressed
NO
NO YES
YES
StartInitiate Punchlist
Item Within Checklist
Initiate Punchlist Item Within
Checklist
Initiate Punchlist Item Within
Checklist
SUBCONTRACTOR
Upload Submittal Item Attachment
ARCHITECTDESIGN TEAM
CONTRACTOR
xxxxxx
Why Follow This Workflowbull xxxbull xxx
bull xxx
BIM 360 Capabilitiesbull xxx
Close And Distribute
Are all itemsapproved
NO
YESStart
Start
Submittal WorkflowCreate submittals packages track the flow of approval processes and manage all information in a single document library The graphic below outlines the suggested submittal workflow using BIM 360
Why follow this workflowbull Easily package all submittal items into a single
submittal packagebull Track and review the status of submittals
bull Distribute and control reviewer privileges
BIM 360 capabilities usedbull Submittal management
Create A Revision Package
Designate Official Response Per Item
Submit To Manager
Markup And Respond To
Submittal Items
Distribute Submittal Package
For Review
Create Submittal Item
Assign To Responsible Contractor
Review Items For Compliance
Add Submittal Items To Package
Submit To Manager
Quality Capabilities
Activate the Field Management module bull A project admin needs to activate the Field Management
module
bull In the Project Admin module select the Services tab then ldquoOverviewrdquo on the left sidebar
bull In the BIM 360 Field row select ldquoFiled Managementrdquo and click ldquoActivaterdquo Designate at least one project admin
Quality Checklists Quality problems that cost the most are the ones you miss The checklist workflow makes sure your entire team is proactively managing quality standards from any device anywhere With the easy-to-use checklist builder you can create quality checklists punchlists and commissioning templates assign them to team members and track status Use Project Home to see your assigned checklists for the day tomorrow and the future During the inspection use your mobile app to add notes attach photos andor create issues for any nonconforming items With the filters and reporting feature you can identify trends and areas for improvement
1
PRO TIP The Document Management module needs to be activated first
Quality Checklists
2 Designating issue permissions bull In the Project Admin module select the Services tab
bull On the left sidebar click ldquoField Managementrdquo
bull Here you can designate user- role- or company-based permissions using the drop-down list
3 Creating checklistsCreating a checklist template Project admins and users designated with ldquoCreaterdquo permission can use the template builder to quickly add sections and items to create a new template
bull In the Field Management module select the Templates tab and click ldquoCreate New Templaterdquo
bull Select the template type (eg Quality) using the ldquoTyperdquo drop-down list then click next
bull Here you will start building out the template Add in section names such as ldquogeneralrdquo and click ldquoAdd new itemrdquo to start populating questions related to that section
bull For each question click the drop-down list to select the response type and fill in necessary fields Select (hellip) to add a description set as optional or delete
bull When done click ldquoPublishrdquo Now the template can be used to create new checklists
Import a template from classic BIM 360 Field
bull In classic BIM 360 Field export from the admin space the checklist template that you want to import Save it to your computer
bull In the Templates tab select ldquoImportrdquo
bull Check ldquoImport Template from Classic Fieldrdquo and click ldquonextrdquo
bull Specify the template type click ldquoBrowserdquo to select the file then ldquoImportrdquo
bull Once it is imported you can edit the template as needed
Quality Checklists
Import a template from excel
bull In the Templates tab select ldquoImportrdquo
bull Check ldquoImport Templatesrdquo and click ldquonextrdquo
bull If you donrsquot have a properly formatted spreadsheet click ldquoDownload a samplerdquo and enter your information in the spreadsheet Rename and save the file
bull If you have a properly formatted spreadsheet select ldquoBrowserdquo to choose the file then ldquoImportrdquo
Creating Checklist Templates
Quality Checklists
4 Adding checklists to a projectbull In the Templates tab use the search bar or filter by type
to find the checklist you need
bull Click ldquoCreate Checklistrdquo in the list view or open the checklist and click ldquoCreate Checklistrdquo to add it to the project
bull Once the checklist has been added a new window will pop up where you will see a details box Complete all necessary fields
5 Completing checklistsbull Complete your checklist in the field with the BIM 360
mobile app
bull Tap ldquoChecklistsrdquo and select a checklist from the list
bull As you perform your inspection review the criteria for each item and enter the appropriate response
bull (Optional) Add a note or photo by tapping the icon under each item Use the photo markup tools to refer to specific areas in the photo
bull (Optional) For noncompliant items you can create issues Tap the issue icon and fill in the necessary fields You can snap a photo and add markups The issue is added to the project issue list
bull Tap ldquoSaverdquo when complete Working with Checklists
PRO TIP Add a checklist to the project with the BIM 360 mobile app by tapping ldquo+rdquo in the checklist to select your template
Quality Checklists
6 Filtersortexportbull On a mobile device you can filter by status assignee or
schedule date
bull On a computer select the Field Management module then the Checklists tab to filter with the drop-down lists or sort by clicking the column headers
bull To export a report of all clicklists click ldquoExport Reportrdquo add a title and click ldquocreate Reportrdquo
bull To export individual checklist reports select the checklist the folder icon in the top right corner
Creating issues
bull On your mobile device navigate to Filed Issues and tap the plus icon Or on your computer in the Field Management module select the Issue tab and click ldquoCreate New Issuerdquo
bull Identify the issue type and complete all necessary fields making sure to assign the issue and due date
bull When creating an issue on your mobile device add more context by including a photo Click the camera icon to snap a photo or select from your photo library mark it up and attach it to the issue
Issue ManagementDonrsquot let problems slow you down The ability to create assign track and respond to issues on any device is a critical workflow With the Field Issue Management functionality you can easily track work to complete problems to fix areas to inspect and more Add context around the issue resolution by adding photos and collaborating on comment threads With a central view of all project issues tracking status and analyzing root causes has never been easier
1
Creating FieldIssues
PRO TIP Use Field Issues to communicate issues that occur during construction Document Issues available in the Document Management module can be used to communicate issues associated to a drawing or 3D model during design reviews
Issue Management
2 Review amp respond to issues
bull If yoursquore the assignee open the email notification and select ldquoView the Issuerdquo to be directed to the issue
bull On your mobile device navigate to the list of all field issues Scrollfilter and tap the issue to open Or on your desktop in the Field Management module select the Issues tab and search for the issue
bull Once the issue window is open tapselect ldquoActivityrdquo
bull Use the comment box to write a comment On your mobile device you can click the camera to attach a photo
3 Changing issue status
bull On your mobile device navigate to the list of all field issues
bull Scrollfilter and tap the issue to open Or on your desktop in the Field Management module select the Issues tab and search for the issue
bull Once the issue window is open tapselect the status drop-down list in the top-right corner to select a new status
bull Only the issue owner or project admin can set the issue to closed
Issue Management
4 Filtersortexport
bull On your mobile device tap ldquoIssuerdquo then use the filter options to filter by status assignee or due date
bull On your desktop you can filter sort and export field issues in the Field Management module
bull Select the Issues tab to display a list of all field issues
bull Use select one or more criteria via the drop-down list to filter
bull To sort click the column headers
bull To export a report of all project issues click the ldquoExportrdquo drop-down
bull To export a single issue report select the issue from the list and click the icon in the export top-right corner
PRO TIP You can open a sheet or model to view associated field issues using the issues viewer on the left panel
Activate the Project Management module bull A project admin needs to activate the Project
Management module
bull Click the module selector for Project Admin select the Services tab and click ldquoOverviewrdquo in the left sidebar
bull In the Project Management row select ldquoActivaterdquo and designate at least one project admin
RFI ManagementEnhance your RFI workflow by automatically posting RFIs to 2D documents and 3D models Create accountability by designating ldquorolesrdquo to keep the process moving Initiate requests and manage reviews and approvals from any device And by publishing and storing this information in a single cloud-based repository you can maintain a full audit trail
1
RFI Management
2 Setting up the RFI workflowbull In the Project Admin module select the Services tab
bull On the left sidebar click ldquoProject Managementrdquo then ldquoRFIsrdquo
bull Click ldquoChange Workflowrdquo to select an RFI workflow The workflow determines the RFI actions for individual project users
bull Click the drop-down list to assign userrolecompany for each workflow role in order to start using RFIs
3 Creating RFIs associated with a document or modelbull In the Document Management module click to open a 2D
document or 3D model
bull In the RFI panel select ldquoCreate RFIrdquo Click where you want to place the RFI and an RFI pushpin will appear
bull Enter a title and complete all necessary fields By default the RFI status will be set to Draft When ready to assign set to Open
bull Note Any members selected as a co-reviewer can add comments markups and attachments Those chosen for the distribution list will be aware of the RFI but are not expected to comment
Set Up the RFI Workflow
Creating RFIs
RFI Management
4 Creating project-level RFIsbull Project-level RFIs are RFIs not associated with a
document or model
bull In the Project Management module select the RFIs tab and click ldquoCreate RFIrdquo
bull Once the ldquoAdd New RFIrdquo box opens enter a title and complete all necessary fields By default the RFI status will be set to Draft When ready to assign set to Open
bull Note A member selected as a co-reviewer can add comments markups and attachments Those chosen for the distribution list will be aware of the RFI but are not expected to comment
5 Vieweditsubmit RFIsbull View all project-level RFIs in the RFIs tab Click to open
the RFI and use the pencil icon to edit any necessary fields
bull For document or model-based RFIs under ldquoDetailsrdquo click the document hyperlinks to open the associated document Or when viewing a document or model use the RFI panel to navigate to the RFIs
PRO TIP You can create a project-level RFI and then associate it to a document or model by using the ldquoLinked Documentsrdquo option
RFI Management
6 Review amp respond to RFIsbull Depending on where you are in the RFI workflow the
relevant assignee will receive an email notification
bull Open the email and select ldquoView the RFIrdquo You will be directed to the RFI and associated documents
bull The reviewer can add additional co-reviewers comment attach documents and submit the official response
bull You can also review and respond to RFIs using the RFIs tab within the Project Management module
bull The RFI manager will review the response and set it to closed
7 Filtersort export
bull Filer sort and export using the RFIs tab to display a list of all project RFIs
bull To filter click the ldquoFilterrdquo drop down list and select one or more criteria
bull To sort click the column headers
bull To export click the ldquoExportrdquo drop down list
bull You can also filter sort and export directly from a document or model-based RFI via the RFI panel
Export RFI Reports
Submittal Management Submittals are an essential part of any construction project and effectively organizing and managing your submittals is vital With the Submittal workflow you can efficiently create coordinate and manage all submittals in a single document library anytime Initiate requests manage reviews and approvals and sync critical information to mobile devices for offline use
1 Identifying submittal manager bull To identify a submittal manager the Project Management
module needs to be activated
bull In the Project Admin module select the Services tab
bull On the left sidebar click ldquoProject Managementrdquo then ldquoSubmittalsrdquo
bull Enter member company or role to act as manager
Add a Submittal Manager
Submittal Management
2 Creating submittal items (submittal manager)
bull In the Project Management module select the Submittals tab
bull You can import submittal items using the import button or select ldquoCreate new itemrdquo
bull Enter all necessary information includingbull Spec Section Select a spec section or create a new one
For example furnishings equipment finishes bull Title Enter a descriptive title to identify the item bull Type Select a type for example samples or product data bull Assign to Responsible Contractor Select the responsible
subcontractor
3 Creating submittal packages (submittal manager)bull You can create a submittal package from an open
submittal item or in the ldquoSubmittalsrdquo tab under ldquoPackagesrdquo
bull Select ldquoCreate new packagerdquo Complete the required fields and select one or more reviewers (architect) and co-reviewersdistribution list (engineers consultants stakeholders etc)
Creating Submittal Items
Importing Submittal Items
Creating Submittal Packages
Submittal Management
5 Creating spec sections (Submittal manager)
bull In the Submittals tab select ldquoSpec Sectionrdquo then ldquoCreate spec sectionrdquo
bull Enter the spec number and title then click ldquoCreaterdquo
bull Note you can create a spec section when entering a new submittal item by clicking ldquoCreate Newrdquo above the ldquoSpec Sectionrdquo drop-down list
6 Submitting packages for review (submittal manager)
bull Open the package you want to submit and select ldquoSubmit to Reviewerrdquo
bull Select the reviewer add co-reviewers due date and notes if needed
4 Adding submittal items to package (submittal manager)
bull In the Submittals tab under Item select a submittal then ldquoAdd to packagerdquo
bull Select an existing package or choose ldquoCreate submittal packagerdquo to create a new package
Submittal Management
7 Reviewing submittal items (reviewer) bull Click to open the item(s) for review within ldquoAttachmentsrdquo
bull Designate office response using the drop-down list next to ldquoYour response is requiredrdquo
bull Upload any official response attachments and submit back to the manager
8 Creating a revision package (submittal manager)
bull If a reviewer responds to a submittal item with ldquoRevise and Resubmitrdquo or ldquoRejectedrdquo the manager needs to create a revision
bull Open the submittal package and select ldquoCreate new revisionrdquo
bull Include the responsible contractor due date and notes
bull Note Creating a new revision will only affect items with responses of ldquoRevise amp Resubmitrdquo and ldquoRejectedrdquo All other items will be closed
Submittal Management
9 Responding to a revision package (responsible contractor)
bull The contractor will be notified of the revision
bull Open the submittal item and in ldquoAttachmentsrdquo upload the revised documents
bull Once attached the document will appear with the ldquoFor reviewrdquo box checked
bull Close and select ldquoSubmit to Managerrdquo
bull The manager can now send the revised item(s) to the reviewer
10 Closing submittal packages (submittal manager)
bull Once the package is approved by the reviewer the submittal manager needs to close it and distribute it to the responsible contractor
bull In the Submittals tab under ldquoPackagesrdquo open the package and select ldquoClose and Distributerdquo
bull Include the responsible contractor and in the distribution list identify team members who should be aware of the closed submittal package
Submittal Management
11 Filtersortexportbull You can filter sort and export in the Submittals tab
bull Select either ldquoItemsrdquo ldquoPackagesrdquo or ldquoSpec Sectionrdquo
bull To filter ldquoItemsrdquo and ldquoPackagesrdquo use the drop-down lists associated with each criteria For ldquoSpec Sectionrdquo you canrsquot filter but you can search using the search field
bull To sort select the column headers
bull Select ldquoExportrdquo for a list and detailed summary report of all packages If you want a report of a specific package open the package and click ldquoExportrdquo
Creating daily logs
bull In the Field Management module select the Daily Logs tab
bull Click the calendar icon to select a month and day
bull To add in the daily weather click the location box to set your location and select ldquoGet Weatherrdquo Edit any necessary fields using the pencil icon
bull For Labor click ldquoAdd labor itemrdquo and populate the fields Repeat to add another labor line The daily labor total will calculate
bull General notes can be added to the notes box
bull When done click ldquoPublishrdquo
Daily Logs Log daily site activities to keep track of your project progress and performance With the Daily Log workflow track daily weather conditions to shed light on any delays caused on unforeseen circumstances track manpower by logging detailed labor information per company and document any issues or successes that may have occurred throughout the day
1
Working with Daily Logs
PRO TIP Published logs are visible to the team and canrsquot be edited
Additional Capabilities
Insight module
bull Click on the Insight module from the module picker
bull On the various cards get a high-level view of what is happening with the project including
bull Issue activity bull Issue root causebull Total issues to datebull Quality checklist conformance
bull Use the settings gear icon to change the date range of the view
bull Use the expand arrows to get a more detailed view and metrics
Insight amp ReportingHaving the right information at your fingertips is key to making better business decisions With the Insight module teams have visibility into high-level issues that might be holding up project schedules and driving up costs By quickly seeing where issues are happening and putting the right steps in place to solve problems teams can prioritize next steps and drive quality control needs to help ensure projects are successful
1
Insights Setup
Insights amp Reporting
2 Account analytics
bull Click the Account Admin module in the module selector tool
bull This option will only appear if you have admin privileges
bull Click ldquoAnalyticsrdquo to see insights on member activations linked companies and account information
bull Click the Members tab to see insights member usage and status
Account Admin
Dashboard cards
bull There are several cards that default into the Project Home view
bull Project Addressbull Weatherbull Field Issuesbull Checklistsbull RFIsbull Submittal Itemsbull Document Issuesbull Design Packages
bull Click any of the links to drill down and get more information on a specific item
bull Use the expand arrows to open the card to full screen and minimize it
Project HomeProject Home is a new way of interacting with BIM 360 that gives users a single view into their entire project with access to important relevant and actionable information from across BIM 360 and even some third-party services It provides a unified experience with at-a-glance insights about the entire project all in one place This enables teams to quickly evaluate areas that require attention and put the necessary action in place
1
Project Home Overview
Project Home
2 Setup amp permissions
bull The information presented in Project Home depends on your permission levels set up in the Project Admin module
bull Project member As a project member you can view issues relevant to you It will help you answer the question ldquoWhat do I need to do todayrdquo
bull Project leader As a project leader you can still see details that help you understand the most pressing needs for the day but you also see outstanding items at the project level
bull Each user can configure Project Home to their liking by adding removing or rearrange the cards
Download the BIM 360 app
bull Go to the App store or Google Play store on your mobile device to download the BIM 360 app
bull There are two BIM 360 mobile appsbull BIM 360 (available on Android and iOS)
bull The BIM 360 mobile app works with all other modules including Document Management
bull BIM 360 Docs (available on iOS)bull The BIM 360 Docs mobile app works with the
Document Management module only
Mobile AccessConstruction doesnrsquot happen behind a desk Teams need access to project documents and project management tools anytime anywhere With the BIM 360 mobile app teams can execute construction quality and safety workflows including creating or editing checklists viewing RFIs adding or tracking issues and managing or creating drawing markups directly from an Android or iOS device
1
PRO TIP For the next several months the BIM 360 mobile app and BIM 360 Docs mobile app will coexist and may share some functionality Stay up to date on mobile capabilities through the Autodesk Knowledge Network
Get the Android AppGet the iOS App
Mobile Access
2 Mobile workflows
bull Several workflow capabilities can be accomplished using the BIM 360 mobile apps including Checklists Issue Management RFI Tracking Daily Logs and Markups
bull To see the differences in workflow capabilities for the BIM 360 and BIM 360 Docs apps click the ldquoBIM 360 Mobile Capabilitiesrdquo link below
3 Offline sync
bull Teams are able to work on-site without Internet access
bull Teams can also download individual documents and add markups and comments when working offline Once back online all changes will be synced back to the cloud
About the Android App
BIM 360 Mobile Capabilities
About the iOS App
1
Getting Started Guide
Create a project
bull In the Account Admin module select the Projects tab and click ldquoAddrdquo
bull Enter project information and click ldquoSave amp Continuerdquo
Account AdminWith the project administration tools in BIM 360 you can rest assured that your project information is in the right hands Project admins can easily invite team members to the project and define their access levels on a project-by-project basis with a simple click BIM 360 has two levels of administration to ensure security and control across your projects Account admins and project admins Only account admins can create new projects and assign additional account admins and project admins Project admins can add and remove members set permissions and adjust project details
Create a Project
Account Admin
2 Activating modules
bull Click ldquoActivaterdquo for the desired BIM 360 service
bull Assign a project admin for each service You can add multiple admins
bull (Optional) For Document Management and Field you can copy existing project settings
bull An email invitation will be sent to the assigned project admin(s) They will need to click the link to join the project
bull Click ldquoFinishrdquo
3 Add members to directory
bull In the Account Admin module select the Members tab and click ldquoAddrdquo
bull To add an individual member select ldquoAdd People to the Member Directoryrdquo
bull To add an account admin select ldquoInvite Account Adminsrdquo
bull To import members from a list select ldquoImport Members by Spreadsheetrdquo For a first-time import download and complete the member list template
PRO TIP You have to activate Document Management first before you can activate other next-gen services
PRO TIP You can change the default company and role later if necessary
Account Admin
4 Adding members to a project amp assigning access levels
bull In the Project Admin module select the Members tab
bull Click ldquoAddrdquo and use the search bar to search the member directory
bull When you find the member select them and click ldquoSelectrdquo
bull Add their company and role Note Role determines their access level to all BIM 360 services
bull Click the icon(s) to overwrite the access level granted by their project role
bull Click ldquoAdd to Projectrdquo
bull Update existing access levels by clicking the grayed out icon(s)
Members amp Access Levels
Integration PartnersGet the most out of construction technology by integrating the software you already use with BIM 360 Built on an open and secure API platform BIM 360 enables users to easily integrate with various other construction softwares including drone technology estimating and bid management as well as safety management tools
Reality Capture
Estimating
Cost Management
Construction Management
Field Management
Bid Management
Layout
Scheduling
Design CheckingTakeoff
Accounting Data Transfer
Learn More
bim360autodeskcom
Autodesk the Autodesk logo and BIM 360 are registered trademarks or trademarks of Autodesk Inc andor its subsidiaries andor affiliates in the USA andor other countries All other brand names product names or trademarks belong to their respective holders Autodesk reserves the right to alter product and services offerings and specifications and pricing at any time without notice and is not responsible for typographical or graphical errors that may appear in this document copy 2018 Autodesk Inc
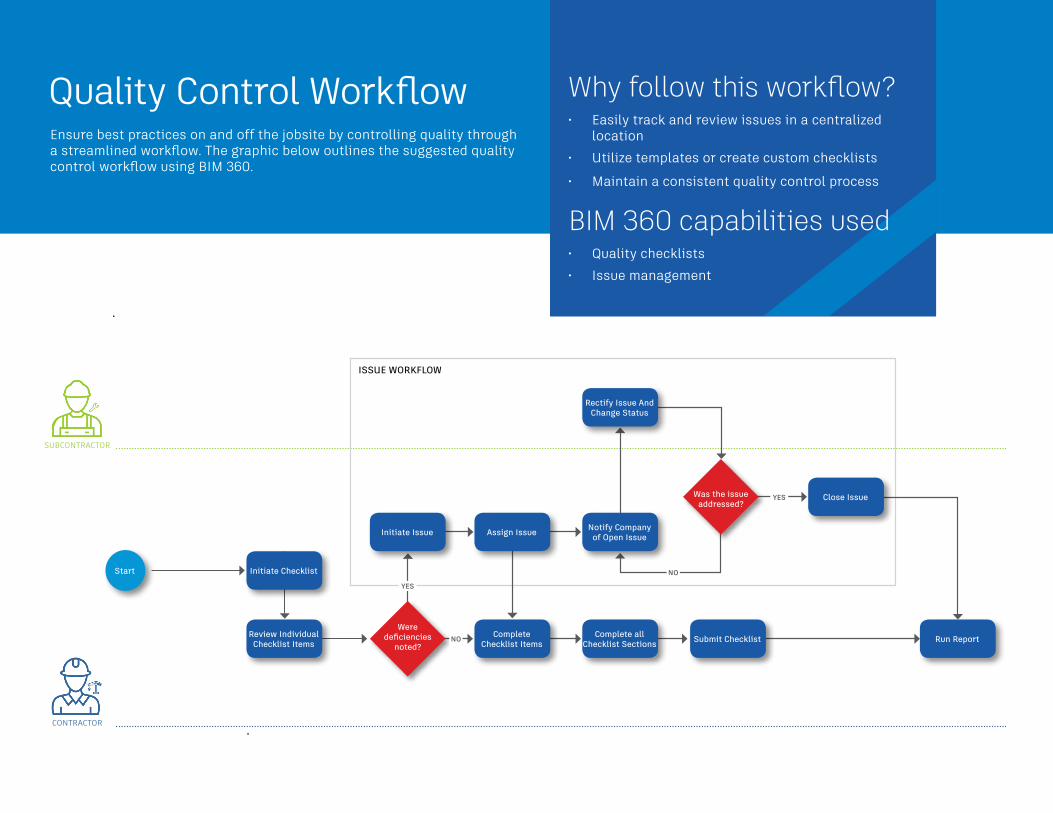
CONTRACTOR
SUBCONTRACTOR
Quality Control WorkflowEnsure best practices on and off the jobsite by controlling quality through a streamlined workflow The graphic below outlines the suggested quality control workflow using BIM 360
Why follow this workflowbull Easily track and review issues in a centralized
locationbull Utilize templates or create custom checklists
bull Maintain a consistent quality control process
BIM 360 capabilities usedbull Quality checklists bull Issue management
Initiate Issue Assign Issue
Complete Checklist Items Submit Checklist Run Report
Close Issue
ISSUE WORKFLOW
Were deficiencies
noted
Was the issue addressed
Notify Company of Open Issue
Rectify Issue And Change Status
Complete all Checklist Sections
NO
YES
NO
YES
Start Initiate Checklist
Review Individual Checklist Items
ARCHITECTDESIGN TEAM
OWNER
CONTRACTOR
SUBCONTRACTOR
Punchlist WorkflowSuccessfully utilizing a streamlined punchlist process will increase efficiency and reduce errors The graphic below outlines the suggested document management workflow using BIM 360
Why follow this workflowbull Easily initiate a punchlist review processbull Set appropriate review and approve privilegesbull Track punchlists and improve visibility to project
progress
BIM 360 capabilities usedbull Quality checklists bull Issue management
Rectify Issue And Change Status
Review And Forward To
Subcontractor
Notify Company Of Open Issue Notify ArchitectWas the issue
addressed
Close Punchlist Item
Was the issue addressed
NO
NO YES
YES
StartInitiate Punchlist
Item Within Checklist
Initiate Punchlist Item Within
Checklist
Initiate Punchlist Item Within
Checklist
SUBCONTRACTOR
Upload Submittal Item Attachment
ARCHITECTDESIGN TEAM
CONTRACTOR
xxxxxx
Why Follow This Workflowbull xxxbull xxx
bull xxx
BIM 360 Capabilitiesbull xxx
Close And Distribute
Are all itemsapproved
NO
YESStart
Start
Submittal WorkflowCreate submittals packages track the flow of approval processes and manage all information in a single document library The graphic below outlines the suggested submittal workflow using BIM 360
Why follow this workflowbull Easily package all submittal items into a single
submittal packagebull Track and review the status of submittals
bull Distribute and control reviewer privileges
BIM 360 capabilities usedbull Submittal management
Create A Revision Package
Designate Official Response Per Item
Submit To Manager
Markup And Respond To
Submittal Items
Distribute Submittal Package
For Review
Create Submittal Item
Assign To Responsible Contractor
Review Items For Compliance
Add Submittal Items To Package
Submit To Manager
Quality Capabilities
Activate the Field Management module bull A project admin needs to activate the Field Management
module
bull In the Project Admin module select the Services tab then ldquoOverviewrdquo on the left sidebar
bull In the BIM 360 Field row select ldquoFiled Managementrdquo and click ldquoActivaterdquo Designate at least one project admin
Quality Checklists Quality problems that cost the most are the ones you miss The checklist workflow makes sure your entire team is proactively managing quality standards from any device anywhere With the easy-to-use checklist builder you can create quality checklists punchlists and commissioning templates assign them to team members and track status Use Project Home to see your assigned checklists for the day tomorrow and the future During the inspection use your mobile app to add notes attach photos andor create issues for any nonconforming items With the filters and reporting feature you can identify trends and areas for improvement
1
PRO TIP The Document Management module needs to be activated first
Quality Checklists
2 Designating issue permissions bull In the Project Admin module select the Services tab
bull On the left sidebar click ldquoField Managementrdquo
bull Here you can designate user- role- or company-based permissions using the drop-down list
3 Creating checklistsCreating a checklist template Project admins and users designated with ldquoCreaterdquo permission can use the template builder to quickly add sections and items to create a new template
bull In the Field Management module select the Templates tab and click ldquoCreate New Templaterdquo
bull Select the template type (eg Quality) using the ldquoTyperdquo drop-down list then click next
bull Here you will start building out the template Add in section names such as ldquogeneralrdquo and click ldquoAdd new itemrdquo to start populating questions related to that section
bull For each question click the drop-down list to select the response type and fill in necessary fields Select (hellip) to add a description set as optional or delete
bull When done click ldquoPublishrdquo Now the template can be used to create new checklists
Import a template from classic BIM 360 Field
bull In classic BIM 360 Field export from the admin space the checklist template that you want to import Save it to your computer
bull In the Templates tab select ldquoImportrdquo
bull Check ldquoImport Template from Classic Fieldrdquo and click ldquonextrdquo
bull Specify the template type click ldquoBrowserdquo to select the file then ldquoImportrdquo
bull Once it is imported you can edit the template as needed
Quality Checklists
Import a template from excel
bull In the Templates tab select ldquoImportrdquo
bull Check ldquoImport Templatesrdquo and click ldquonextrdquo
bull If you donrsquot have a properly formatted spreadsheet click ldquoDownload a samplerdquo and enter your information in the spreadsheet Rename and save the file
bull If you have a properly formatted spreadsheet select ldquoBrowserdquo to choose the file then ldquoImportrdquo
Creating Checklist Templates
Quality Checklists
4 Adding checklists to a projectbull In the Templates tab use the search bar or filter by type
to find the checklist you need
bull Click ldquoCreate Checklistrdquo in the list view or open the checklist and click ldquoCreate Checklistrdquo to add it to the project
bull Once the checklist has been added a new window will pop up where you will see a details box Complete all necessary fields
5 Completing checklistsbull Complete your checklist in the field with the BIM 360
mobile app
bull Tap ldquoChecklistsrdquo and select a checklist from the list
bull As you perform your inspection review the criteria for each item and enter the appropriate response
bull (Optional) Add a note or photo by tapping the icon under each item Use the photo markup tools to refer to specific areas in the photo
bull (Optional) For noncompliant items you can create issues Tap the issue icon and fill in the necessary fields You can snap a photo and add markups The issue is added to the project issue list
bull Tap ldquoSaverdquo when complete Working with Checklists
PRO TIP Add a checklist to the project with the BIM 360 mobile app by tapping ldquo+rdquo in the checklist to select your template
Quality Checklists
6 Filtersortexportbull On a mobile device you can filter by status assignee or
schedule date
bull On a computer select the Field Management module then the Checklists tab to filter with the drop-down lists or sort by clicking the column headers
bull To export a report of all clicklists click ldquoExport Reportrdquo add a title and click ldquocreate Reportrdquo
bull To export individual checklist reports select the checklist the folder icon in the top right corner
Creating issues
bull On your mobile device navigate to Filed Issues and tap the plus icon Or on your computer in the Field Management module select the Issue tab and click ldquoCreate New Issuerdquo
bull Identify the issue type and complete all necessary fields making sure to assign the issue and due date
bull When creating an issue on your mobile device add more context by including a photo Click the camera icon to snap a photo or select from your photo library mark it up and attach it to the issue
Issue ManagementDonrsquot let problems slow you down The ability to create assign track and respond to issues on any device is a critical workflow With the Field Issue Management functionality you can easily track work to complete problems to fix areas to inspect and more Add context around the issue resolution by adding photos and collaborating on comment threads With a central view of all project issues tracking status and analyzing root causes has never been easier
1
Creating FieldIssues
PRO TIP Use Field Issues to communicate issues that occur during construction Document Issues available in the Document Management module can be used to communicate issues associated to a drawing or 3D model during design reviews
Issue Management
2 Review amp respond to issues
bull If yoursquore the assignee open the email notification and select ldquoView the Issuerdquo to be directed to the issue
bull On your mobile device navigate to the list of all field issues Scrollfilter and tap the issue to open Or on your desktop in the Field Management module select the Issues tab and search for the issue
bull Once the issue window is open tapselect ldquoActivityrdquo
bull Use the comment box to write a comment On your mobile device you can click the camera to attach a photo
3 Changing issue status
bull On your mobile device navigate to the list of all field issues
bull Scrollfilter and tap the issue to open Or on your desktop in the Field Management module select the Issues tab and search for the issue
bull Once the issue window is open tapselect the status drop-down list in the top-right corner to select a new status
bull Only the issue owner or project admin can set the issue to closed
Issue Management
4 Filtersortexport
bull On your mobile device tap ldquoIssuerdquo then use the filter options to filter by status assignee or due date
bull On your desktop you can filter sort and export field issues in the Field Management module
bull Select the Issues tab to display a list of all field issues
bull Use select one or more criteria via the drop-down list to filter
bull To sort click the column headers
bull To export a report of all project issues click the ldquoExportrdquo drop-down
bull To export a single issue report select the issue from the list and click the icon in the export top-right corner
PRO TIP You can open a sheet or model to view associated field issues using the issues viewer on the left panel
Activate the Project Management module bull A project admin needs to activate the Project
Management module
bull Click the module selector for Project Admin select the Services tab and click ldquoOverviewrdquo in the left sidebar
bull In the Project Management row select ldquoActivaterdquo and designate at least one project admin
RFI ManagementEnhance your RFI workflow by automatically posting RFIs to 2D documents and 3D models Create accountability by designating ldquorolesrdquo to keep the process moving Initiate requests and manage reviews and approvals from any device And by publishing and storing this information in a single cloud-based repository you can maintain a full audit trail
1
RFI Management
2 Setting up the RFI workflowbull In the Project Admin module select the Services tab
bull On the left sidebar click ldquoProject Managementrdquo then ldquoRFIsrdquo
bull Click ldquoChange Workflowrdquo to select an RFI workflow The workflow determines the RFI actions for individual project users
bull Click the drop-down list to assign userrolecompany for each workflow role in order to start using RFIs
3 Creating RFIs associated with a document or modelbull In the Document Management module click to open a 2D
document or 3D model
bull In the RFI panel select ldquoCreate RFIrdquo Click where you want to place the RFI and an RFI pushpin will appear
bull Enter a title and complete all necessary fields By default the RFI status will be set to Draft When ready to assign set to Open
bull Note Any members selected as a co-reviewer can add comments markups and attachments Those chosen for the distribution list will be aware of the RFI but are not expected to comment
Set Up the RFI Workflow
Creating RFIs
RFI Management
4 Creating project-level RFIsbull Project-level RFIs are RFIs not associated with a
document or model
bull In the Project Management module select the RFIs tab and click ldquoCreate RFIrdquo
bull Once the ldquoAdd New RFIrdquo box opens enter a title and complete all necessary fields By default the RFI status will be set to Draft When ready to assign set to Open
bull Note A member selected as a co-reviewer can add comments markups and attachments Those chosen for the distribution list will be aware of the RFI but are not expected to comment
5 Vieweditsubmit RFIsbull View all project-level RFIs in the RFIs tab Click to open
the RFI and use the pencil icon to edit any necessary fields
bull For document or model-based RFIs under ldquoDetailsrdquo click the document hyperlinks to open the associated document Or when viewing a document or model use the RFI panel to navigate to the RFIs
PRO TIP You can create a project-level RFI and then associate it to a document or model by using the ldquoLinked Documentsrdquo option
RFI Management
6 Review amp respond to RFIsbull Depending on where you are in the RFI workflow the
relevant assignee will receive an email notification
bull Open the email and select ldquoView the RFIrdquo You will be directed to the RFI and associated documents
bull The reviewer can add additional co-reviewers comment attach documents and submit the official response
bull You can also review and respond to RFIs using the RFIs tab within the Project Management module
bull The RFI manager will review the response and set it to closed
7 Filtersort export
bull Filer sort and export using the RFIs tab to display a list of all project RFIs
bull To filter click the ldquoFilterrdquo drop down list and select one or more criteria
bull To sort click the column headers
bull To export click the ldquoExportrdquo drop down list
bull You can also filter sort and export directly from a document or model-based RFI via the RFI panel
Export RFI Reports
Submittal Management Submittals are an essential part of any construction project and effectively organizing and managing your submittals is vital With the Submittal workflow you can efficiently create coordinate and manage all submittals in a single document library anytime Initiate requests manage reviews and approvals and sync critical information to mobile devices for offline use
1 Identifying submittal manager bull To identify a submittal manager the Project Management
module needs to be activated
bull In the Project Admin module select the Services tab
bull On the left sidebar click ldquoProject Managementrdquo then ldquoSubmittalsrdquo
bull Enter member company or role to act as manager
Add a Submittal Manager
Submittal Management
2 Creating submittal items (submittal manager)
bull In the Project Management module select the Submittals tab
bull You can import submittal items using the import button or select ldquoCreate new itemrdquo
bull Enter all necessary information includingbull Spec Section Select a spec section or create a new one
For example furnishings equipment finishes bull Title Enter a descriptive title to identify the item bull Type Select a type for example samples or product data bull Assign to Responsible Contractor Select the responsible
subcontractor
3 Creating submittal packages (submittal manager)bull You can create a submittal package from an open
submittal item or in the ldquoSubmittalsrdquo tab under ldquoPackagesrdquo
bull Select ldquoCreate new packagerdquo Complete the required fields and select one or more reviewers (architect) and co-reviewersdistribution list (engineers consultants stakeholders etc)
Creating Submittal Items
Importing Submittal Items
Creating Submittal Packages
Submittal Management
5 Creating spec sections (Submittal manager)
bull In the Submittals tab select ldquoSpec Sectionrdquo then ldquoCreate spec sectionrdquo
bull Enter the spec number and title then click ldquoCreaterdquo
bull Note you can create a spec section when entering a new submittal item by clicking ldquoCreate Newrdquo above the ldquoSpec Sectionrdquo drop-down list
6 Submitting packages for review (submittal manager)
bull Open the package you want to submit and select ldquoSubmit to Reviewerrdquo
bull Select the reviewer add co-reviewers due date and notes if needed
4 Adding submittal items to package (submittal manager)
bull In the Submittals tab under Item select a submittal then ldquoAdd to packagerdquo
bull Select an existing package or choose ldquoCreate submittal packagerdquo to create a new package
Submittal Management
7 Reviewing submittal items (reviewer) bull Click to open the item(s) for review within ldquoAttachmentsrdquo
bull Designate office response using the drop-down list next to ldquoYour response is requiredrdquo
bull Upload any official response attachments and submit back to the manager
8 Creating a revision package (submittal manager)
bull If a reviewer responds to a submittal item with ldquoRevise and Resubmitrdquo or ldquoRejectedrdquo the manager needs to create a revision
bull Open the submittal package and select ldquoCreate new revisionrdquo
bull Include the responsible contractor due date and notes
bull Note Creating a new revision will only affect items with responses of ldquoRevise amp Resubmitrdquo and ldquoRejectedrdquo All other items will be closed
Submittal Management
9 Responding to a revision package (responsible contractor)
bull The contractor will be notified of the revision
bull Open the submittal item and in ldquoAttachmentsrdquo upload the revised documents
bull Once attached the document will appear with the ldquoFor reviewrdquo box checked
bull Close and select ldquoSubmit to Managerrdquo
bull The manager can now send the revised item(s) to the reviewer
10 Closing submittal packages (submittal manager)
bull Once the package is approved by the reviewer the submittal manager needs to close it and distribute it to the responsible contractor
bull In the Submittals tab under ldquoPackagesrdquo open the package and select ldquoClose and Distributerdquo
bull Include the responsible contractor and in the distribution list identify team members who should be aware of the closed submittal package
Submittal Management
11 Filtersortexportbull You can filter sort and export in the Submittals tab
bull Select either ldquoItemsrdquo ldquoPackagesrdquo or ldquoSpec Sectionrdquo
bull To filter ldquoItemsrdquo and ldquoPackagesrdquo use the drop-down lists associated with each criteria For ldquoSpec Sectionrdquo you canrsquot filter but you can search using the search field
bull To sort select the column headers
bull Select ldquoExportrdquo for a list and detailed summary report of all packages If you want a report of a specific package open the package and click ldquoExportrdquo
Creating daily logs
bull In the Field Management module select the Daily Logs tab
bull Click the calendar icon to select a month and day
bull To add in the daily weather click the location box to set your location and select ldquoGet Weatherrdquo Edit any necessary fields using the pencil icon
bull For Labor click ldquoAdd labor itemrdquo and populate the fields Repeat to add another labor line The daily labor total will calculate
bull General notes can be added to the notes box
bull When done click ldquoPublishrdquo
Daily Logs Log daily site activities to keep track of your project progress and performance With the Daily Log workflow track daily weather conditions to shed light on any delays caused on unforeseen circumstances track manpower by logging detailed labor information per company and document any issues or successes that may have occurred throughout the day
1
Working with Daily Logs
PRO TIP Published logs are visible to the team and canrsquot be edited
Additional Capabilities
Insight module
bull Click on the Insight module from the module picker
bull On the various cards get a high-level view of what is happening with the project including
bull Issue activity bull Issue root causebull Total issues to datebull Quality checklist conformance
bull Use the settings gear icon to change the date range of the view
bull Use the expand arrows to get a more detailed view and metrics
Insight amp ReportingHaving the right information at your fingertips is key to making better business decisions With the Insight module teams have visibility into high-level issues that might be holding up project schedules and driving up costs By quickly seeing where issues are happening and putting the right steps in place to solve problems teams can prioritize next steps and drive quality control needs to help ensure projects are successful
1
Insights Setup
Insights amp Reporting
2 Account analytics
bull Click the Account Admin module in the module selector tool
bull This option will only appear if you have admin privileges
bull Click ldquoAnalyticsrdquo to see insights on member activations linked companies and account information
bull Click the Members tab to see insights member usage and status
Account Admin
Dashboard cards
bull There are several cards that default into the Project Home view
bull Project Addressbull Weatherbull Field Issuesbull Checklistsbull RFIsbull Submittal Itemsbull Document Issuesbull Design Packages
bull Click any of the links to drill down and get more information on a specific item
bull Use the expand arrows to open the card to full screen and minimize it
Project HomeProject Home is a new way of interacting with BIM 360 that gives users a single view into their entire project with access to important relevant and actionable information from across BIM 360 and even some third-party services It provides a unified experience with at-a-glance insights about the entire project all in one place This enables teams to quickly evaluate areas that require attention and put the necessary action in place
1
Project Home Overview
Project Home
2 Setup amp permissions
bull The information presented in Project Home depends on your permission levels set up in the Project Admin module
bull Project member As a project member you can view issues relevant to you It will help you answer the question ldquoWhat do I need to do todayrdquo
bull Project leader As a project leader you can still see details that help you understand the most pressing needs for the day but you also see outstanding items at the project level
bull Each user can configure Project Home to their liking by adding removing or rearrange the cards
Download the BIM 360 app
bull Go to the App store or Google Play store on your mobile device to download the BIM 360 app
bull There are two BIM 360 mobile appsbull BIM 360 (available on Android and iOS)
bull The BIM 360 mobile app works with all other modules including Document Management
bull BIM 360 Docs (available on iOS)bull The BIM 360 Docs mobile app works with the
Document Management module only
Mobile AccessConstruction doesnrsquot happen behind a desk Teams need access to project documents and project management tools anytime anywhere With the BIM 360 mobile app teams can execute construction quality and safety workflows including creating or editing checklists viewing RFIs adding or tracking issues and managing or creating drawing markups directly from an Android or iOS device
1
PRO TIP For the next several months the BIM 360 mobile app and BIM 360 Docs mobile app will coexist and may share some functionality Stay up to date on mobile capabilities through the Autodesk Knowledge Network
Get the Android AppGet the iOS App
Mobile Access
2 Mobile workflows
bull Several workflow capabilities can be accomplished using the BIM 360 mobile apps including Checklists Issue Management RFI Tracking Daily Logs and Markups
bull To see the differences in workflow capabilities for the BIM 360 and BIM 360 Docs apps click the ldquoBIM 360 Mobile Capabilitiesrdquo link below
3 Offline sync
bull Teams are able to work on-site without Internet access
bull Teams can also download individual documents and add markups and comments when working offline Once back online all changes will be synced back to the cloud
About the Android App
BIM 360 Mobile Capabilities
About the iOS App
1
Getting Started Guide
Create a project
bull In the Account Admin module select the Projects tab and click ldquoAddrdquo
bull Enter project information and click ldquoSave amp Continuerdquo
Account AdminWith the project administration tools in BIM 360 you can rest assured that your project information is in the right hands Project admins can easily invite team members to the project and define their access levels on a project-by-project basis with a simple click BIM 360 has two levels of administration to ensure security and control across your projects Account admins and project admins Only account admins can create new projects and assign additional account admins and project admins Project admins can add and remove members set permissions and adjust project details
Create a Project
Account Admin
2 Activating modules
bull Click ldquoActivaterdquo for the desired BIM 360 service
bull Assign a project admin for each service You can add multiple admins
bull (Optional) For Document Management and Field you can copy existing project settings
bull An email invitation will be sent to the assigned project admin(s) They will need to click the link to join the project
bull Click ldquoFinishrdquo
3 Add members to directory
bull In the Account Admin module select the Members tab and click ldquoAddrdquo
bull To add an individual member select ldquoAdd People to the Member Directoryrdquo
bull To add an account admin select ldquoInvite Account Adminsrdquo
bull To import members from a list select ldquoImport Members by Spreadsheetrdquo For a first-time import download and complete the member list template
PRO TIP You have to activate Document Management first before you can activate other next-gen services
PRO TIP You can change the default company and role later if necessary
Account Admin
4 Adding members to a project amp assigning access levels
bull In the Project Admin module select the Members tab
bull Click ldquoAddrdquo and use the search bar to search the member directory
bull When you find the member select them and click ldquoSelectrdquo
bull Add their company and role Note Role determines their access level to all BIM 360 services
bull Click the icon(s) to overwrite the access level granted by their project role
bull Click ldquoAdd to Projectrdquo
bull Update existing access levels by clicking the grayed out icon(s)
Members amp Access Levels
Integration PartnersGet the most out of construction technology by integrating the software you already use with BIM 360 Built on an open and secure API platform BIM 360 enables users to easily integrate with various other construction softwares including drone technology estimating and bid management as well as safety management tools
Reality Capture
Estimating
Cost Management
Construction Management
Field Management
Bid Management
Layout
Scheduling
Design CheckingTakeoff
Accounting Data Transfer
Learn More
bim360autodeskcom
Autodesk the Autodesk logo and BIM 360 are registered trademarks or trademarks of Autodesk Inc andor its subsidiaries andor affiliates in the USA andor other countries All other brand names product names or trademarks belong to their respective holders Autodesk reserves the right to alter product and services offerings and specifications and pricing at any time without notice and is not responsible for typographical or graphical errors that may appear in this document copy 2018 Autodesk Inc
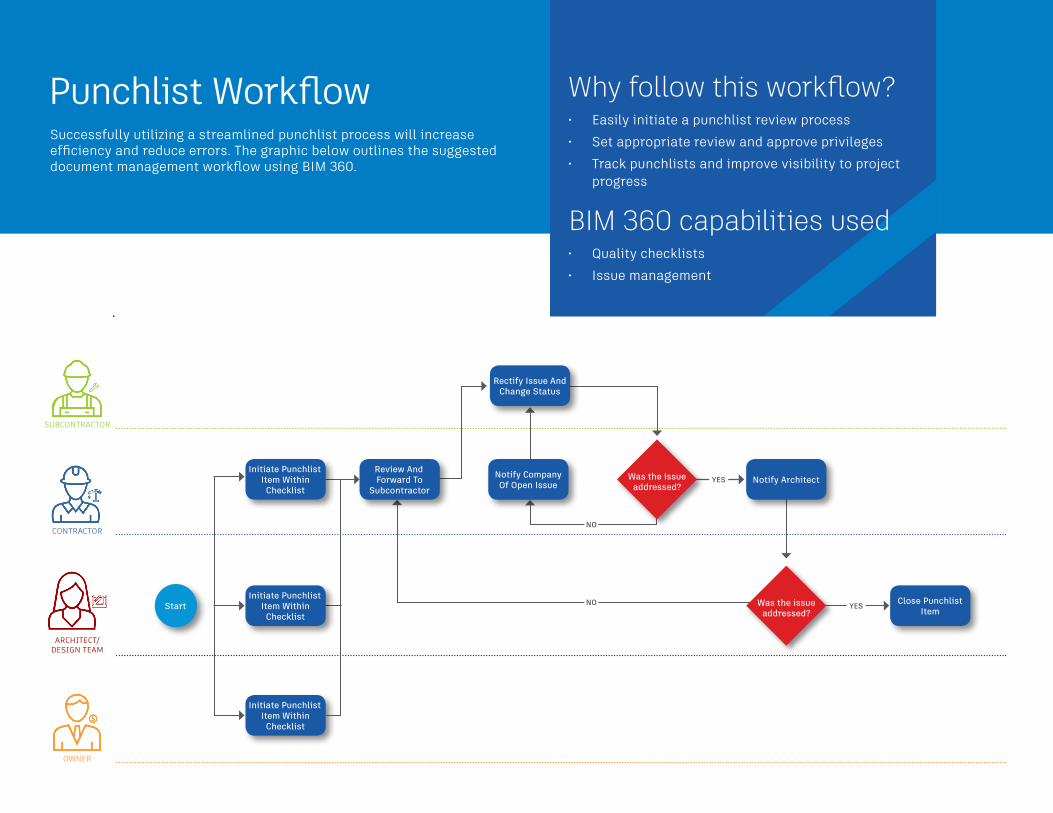
ARCHITECTDESIGN TEAM
OWNER
CONTRACTOR
SUBCONTRACTOR
Punchlist WorkflowSuccessfully utilizing a streamlined punchlist process will increase efficiency and reduce errors The graphic below outlines the suggested document management workflow using BIM 360
Why follow this workflowbull Easily initiate a punchlist review processbull Set appropriate review and approve privilegesbull Track punchlists and improve visibility to project
progress
BIM 360 capabilities usedbull Quality checklists bull Issue management
Rectify Issue And Change Status
Review And Forward To
Subcontractor
Notify Company Of Open Issue Notify ArchitectWas the issue
addressed
Close Punchlist Item
Was the issue addressed
NO
NO YES
YES
StartInitiate Punchlist
Item Within Checklist
Initiate Punchlist Item Within
Checklist
Initiate Punchlist Item Within
Checklist
SUBCONTRACTOR
Upload Submittal Item Attachment
ARCHITECTDESIGN TEAM
CONTRACTOR
xxxxxx
Why Follow This Workflowbull xxxbull xxx
bull xxx
BIM 360 Capabilitiesbull xxx
Close And Distribute
Are all itemsapproved
NO
YESStart
Start
Submittal WorkflowCreate submittals packages track the flow of approval processes and manage all information in a single document library The graphic below outlines the suggested submittal workflow using BIM 360
Why follow this workflowbull Easily package all submittal items into a single
submittal packagebull Track and review the status of submittals
bull Distribute and control reviewer privileges
BIM 360 capabilities usedbull Submittal management
Create A Revision Package
Designate Official Response Per Item
Submit To Manager
Markup And Respond To
Submittal Items
Distribute Submittal Package
For Review
Create Submittal Item
Assign To Responsible Contractor
Review Items For Compliance
Add Submittal Items To Package
Submit To Manager
Quality Capabilities
Activate the Field Management module bull A project admin needs to activate the Field Management
module
bull In the Project Admin module select the Services tab then ldquoOverviewrdquo on the left sidebar
bull In the BIM 360 Field row select ldquoFiled Managementrdquo and click ldquoActivaterdquo Designate at least one project admin
Quality Checklists Quality problems that cost the most are the ones you miss The checklist workflow makes sure your entire team is proactively managing quality standards from any device anywhere With the easy-to-use checklist builder you can create quality checklists punchlists and commissioning templates assign them to team members and track status Use Project Home to see your assigned checklists for the day tomorrow and the future During the inspection use your mobile app to add notes attach photos andor create issues for any nonconforming items With the filters and reporting feature you can identify trends and areas for improvement
1
PRO TIP The Document Management module needs to be activated first
Quality Checklists
2 Designating issue permissions bull In the Project Admin module select the Services tab
bull On the left sidebar click ldquoField Managementrdquo
bull Here you can designate user- role- or company-based permissions using the drop-down list
3 Creating checklistsCreating a checklist template Project admins and users designated with ldquoCreaterdquo permission can use the template builder to quickly add sections and items to create a new template
bull In the Field Management module select the Templates tab and click ldquoCreate New Templaterdquo
bull Select the template type (eg Quality) using the ldquoTyperdquo drop-down list then click next
bull Here you will start building out the template Add in section names such as ldquogeneralrdquo and click ldquoAdd new itemrdquo to start populating questions related to that section
bull For each question click the drop-down list to select the response type and fill in necessary fields Select (hellip) to add a description set as optional or delete
bull When done click ldquoPublishrdquo Now the template can be used to create new checklists
Import a template from classic BIM 360 Field
bull In classic BIM 360 Field export from the admin space the checklist template that you want to import Save it to your computer
bull In the Templates tab select ldquoImportrdquo
bull Check ldquoImport Template from Classic Fieldrdquo and click ldquonextrdquo
bull Specify the template type click ldquoBrowserdquo to select the file then ldquoImportrdquo
bull Once it is imported you can edit the template as needed
Quality Checklists
Import a template from excel
bull In the Templates tab select ldquoImportrdquo
bull Check ldquoImport Templatesrdquo and click ldquonextrdquo
bull If you donrsquot have a properly formatted spreadsheet click ldquoDownload a samplerdquo and enter your information in the spreadsheet Rename and save the file
bull If you have a properly formatted spreadsheet select ldquoBrowserdquo to choose the file then ldquoImportrdquo
Creating Checklist Templates
Quality Checklists
4 Adding checklists to a projectbull In the Templates tab use the search bar or filter by type
to find the checklist you need
bull Click ldquoCreate Checklistrdquo in the list view or open the checklist and click ldquoCreate Checklistrdquo to add it to the project
bull Once the checklist has been added a new window will pop up where you will see a details box Complete all necessary fields
5 Completing checklistsbull Complete your checklist in the field with the BIM 360
mobile app
bull Tap ldquoChecklistsrdquo and select a checklist from the list
bull As you perform your inspection review the criteria for each item and enter the appropriate response
bull (Optional) Add a note or photo by tapping the icon under each item Use the photo markup tools to refer to specific areas in the photo
bull (Optional) For noncompliant items you can create issues Tap the issue icon and fill in the necessary fields You can snap a photo and add markups The issue is added to the project issue list
bull Tap ldquoSaverdquo when complete Working with Checklists
PRO TIP Add a checklist to the project with the BIM 360 mobile app by tapping ldquo+rdquo in the checklist to select your template
Quality Checklists
6 Filtersortexportbull On a mobile device you can filter by status assignee or
schedule date
bull On a computer select the Field Management module then the Checklists tab to filter with the drop-down lists or sort by clicking the column headers
bull To export a report of all clicklists click ldquoExport Reportrdquo add a title and click ldquocreate Reportrdquo
bull To export individual checklist reports select the checklist the folder icon in the top right corner
Creating issues
bull On your mobile device navigate to Filed Issues and tap the plus icon Or on your computer in the Field Management module select the Issue tab and click ldquoCreate New Issuerdquo
bull Identify the issue type and complete all necessary fields making sure to assign the issue and due date
bull When creating an issue on your mobile device add more context by including a photo Click the camera icon to snap a photo or select from your photo library mark it up and attach it to the issue
Issue ManagementDonrsquot let problems slow you down The ability to create assign track and respond to issues on any device is a critical workflow With the Field Issue Management functionality you can easily track work to complete problems to fix areas to inspect and more Add context around the issue resolution by adding photos and collaborating on comment threads With a central view of all project issues tracking status and analyzing root causes has never been easier
1
Creating FieldIssues
PRO TIP Use Field Issues to communicate issues that occur during construction Document Issues available in the Document Management module can be used to communicate issues associated to a drawing or 3D model during design reviews
Issue Management
2 Review amp respond to issues
bull If yoursquore the assignee open the email notification and select ldquoView the Issuerdquo to be directed to the issue
bull On your mobile device navigate to the list of all field issues Scrollfilter and tap the issue to open Or on your desktop in the Field Management module select the Issues tab and search for the issue
bull Once the issue window is open tapselect ldquoActivityrdquo
bull Use the comment box to write a comment On your mobile device you can click the camera to attach a photo
3 Changing issue status
bull On your mobile device navigate to the list of all field issues
bull Scrollfilter and tap the issue to open Or on your desktop in the Field Management module select the Issues tab and search for the issue
bull Once the issue window is open tapselect the status drop-down list in the top-right corner to select a new status
bull Only the issue owner or project admin can set the issue to closed
Issue Management
4 Filtersortexport
bull On your mobile device tap ldquoIssuerdquo then use the filter options to filter by status assignee or due date
bull On your desktop you can filter sort and export field issues in the Field Management module
bull Select the Issues tab to display a list of all field issues
bull Use select one or more criteria via the drop-down list to filter
bull To sort click the column headers
bull To export a report of all project issues click the ldquoExportrdquo drop-down
bull To export a single issue report select the issue from the list and click the icon in the export top-right corner
PRO TIP You can open a sheet or model to view associated field issues using the issues viewer on the left panel
Activate the Project Management module bull A project admin needs to activate the Project
Management module
bull Click the module selector for Project Admin select the Services tab and click ldquoOverviewrdquo in the left sidebar
bull In the Project Management row select ldquoActivaterdquo and designate at least one project admin
RFI ManagementEnhance your RFI workflow by automatically posting RFIs to 2D documents and 3D models Create accountability by designating ldquorolesrdquo to keep the process moving Initiate requests and manage reviews and approvals from any device And by publishing and storing this information in a single cloud-based repository you can maintain a full audit trail
1
RFI Management
2 Setting up the RFI workflowbull In the Project Admin module select the Services tab
bull On the left sidebar click ldquoProject Managementrdquo then ldquoRFIsrdquo
bull Click ldquoChange Workflowrdquo to select an RFI workflow The workflow determines the RFI actions for individual project users
bull Click the drop-down list to assign userrolecompany for each workflow role in order to start using RFIs
3 Creating RFIs associated with a document or modelbull In the Document Management module click to open a 2D
document or 3D model
bull In the RFI panel select ldquoCreate RFIrdquo Click where you want to place the RFI and an RFI pushpin will appear
bull Enter a title and complete all necessary fields By default the RFI status will be set to Draft When ready to assign set to Open
bull Note Any members selected as a co-reviewer can add comments markups and attachments Those chosen for the distribution list will be aware of the RFI but are not expected to comment
Set Up the RFI Workflow
Creating RFIs
RFI Management
4 Creating project-level RFIsbull Project-level RFIs are RFIs not associated with a
document or model
bull In the Project Management module select the RFIs tab and click ldquoCreate RFIrdquo
bull Once the ldquoAdd New RFIrdquo box opens enter a title and complete all necessary fields By default the RFI status will be set to Draft When ready to assign set to Open
bull Note A member selected as a co-reviewer can add comments markups and attachments Those chosen for the distribution list will be aware of the RFI but are not expected to comment
5 Vieweditsubmit RFIsbull View all project-level RFIs in the RFIs tab Click to open
the RFI and use the pencil icon to edit any necessary fields
bull For document or model-based RFIs under ldquoDetailsrdquo click the document hyperlinks to open the associated document Or when viewing a document or model use the RFI panel to navigate to the RFIs
PRO TIP You can create a project-level RFI and then associate it to a document or model by using the ldquoLinked Documentsrdquo option
RFI Management
6 Review amp respond to RFIsbull Depending on where you are in the RFI workflow the
relevant assignee will receive an email notification
bull Open the email and select ldquoView the RFIrdquo You will be directed to the RFI and associated documents
bull The reviewer can add additional co-reviewers comment attach documents and submit the official response
bull You can also review and respond to RFIs using the RFIs tab within the Project Management module
bull The RFI manager will review the response and set it to closed
7 Filtersort export
bull Filer sort and export using the RFIs tab to display a list of all project RFIs
bull To filter click the ldquoFilterrdquo drop down list and select one or more criteria
bull To sort click the column headers
bull To export click the ldquoExportrdquo drop down list
bull You can also filter sort and export directly from a document or model-based RFI via the RFI panel
Export RFI Reports
Submittal Management Submittals are an essential part of any construction project and effectively organizing and managing your submittals is vital With the Submittal workflow you can efficiently create coordinate and manage all submittals in a single document library anytime Initiate requests manage reviews and approvals and sync critical information to mobile devices for offline use
1 Identifying submittal manager bull To identify a submittal manager the Project Management
module needs to be activated
bull In the Project Admin module select the Services tab
bull On the left sidebar click ldquoProject Managementrdquo then ldquoSubmittalsrdquo
bull Enter member company or role to act as manager
Add a Submittal Manager
Submittal Management
2 Creating submittal items (submittal manager)
bull In the Project Management module select the Submittals tab
bull You can import submittal items using the import button or select ldquoCreate new itemrdquo
bull Enter all necessary information includingbull Spec Section Select a spec section or create a new one
For example furnishings equipment finishes bull Title Enter a descriptive title to identify the item bull Type Select a type for example samples or product data bull Assign to Responsible Contractor Select the responsible
subcontractor
3 Creating submittal packages (submittal manager)bull You can create a submittal package from an open
submittal item or in the ldquoSubmittalsrdquo tab under ldquoPackagesrdquo
bull Select ldquoCreate new packagerdquo Complete the required fields and select one or more reviewers (architect) and co-reviewersdistribution list (engineers consultants stakeholders etc)
Creating Submittal Items
Importing Submittal Items
Creating Submittal Packages
Submittal Management
5 Creating spec sections (Submittal manager)
bull In the Submittals tab select ldquoSpec Sectionrdquo then ldquoCreate spec sectionrdquo
bull Enter the spec number and title then click ldquoCreaterdquo
bull Note you can create a spec section when entering a new submittal item by clicking ldquoCreate Newrdquo above the ldquoSpec Sectionrdquo drop-down list
6 Submitting packages for review (submittal manager)
bull Open the package you want to submit and select ldquoSubmit to Reviewerrdquo
bull Select the reviewer add co-reviewers due date and notes if needed
4 Adding submittal items to package (submittal manager)
bull In the Submittals tab under Item select a submittal then ldquoAdd to packagerdquo
bull Select an existing package or choose ldquoCreate submittal packagerdquo to create a new package
Submittal Management
7 Reviewing submittal items (reviewer) bull Click to open the item(s) for review within ldquoAttachmentsrdquo
bull Designate office response using the drop-down list next to ldquoYour response is requiredrdquo
bull Upload any official response attachments and submit back to the manager
8 Creating a revision package (submittal manager)
bull If a reviewer responds to a submittal item with ldquoRevise and Resubmitrdquo or ldquoRejectedrdquo the manager needs to create a revision
bull Open the submittal package and select ldquoCreate new revisionrdquo
bull Include the responsible contractor due date and notes
bull Note Creating a new revision will only affect items with responses of ldquoRevise amp Resubmitrdquo and ldquoRejectedrdquo All other items will be closed
Submittal Management
9 Responding to a revision package (responsible contractor)
bull The contractor will be notified of the revision
bull Open the submittal item and in ldquoAttachmentsrdquo upload the revised documents
bull Once attached the document will appear with the ldquoFor reviewrdquo box checked
bull Close and select ldquoSubmit to Managerrdquo
bull The manager can now send the revised item(s) to the reviewer
10 Closing submittal packages (submittal manager)
bull Once the package is approved by the reviewer the submittal manager needs to close it and distribute it to the responsible contractor
bull In the Submittals tab under ldquoPackagesrdquo open the package and select ldquoClose and Distributerdquo
bull Include the responsible contractor and in the distribution list identify team members who should be aware of the closed submittal package
Submittal Management
11 Filtersortexportbull You can filter sort and export in the Submittals tab
bull Select either ldquoItemsrdquo ldquoPackagesrdquo or ldquoSpec Sectionrdquo
bull To filter ldquoItemsrdquo and ldquoPackagesrdquo use the drop-down lists associated with each criteria For ldquoSpec Sectionrdquo you canrsquot filter but you can search using the search field
bull To sort select the column headers
bull Select ldquoExportrdquo for a list and detailed summary report of all packages If you want a report of a specific package open the package and click ldquoExportrdquo
Creating daily logs
bull In the Field Management module select the Daily Logs tab
bull Click the calendar icon to select a month and day
bull To add in the daily weather click the location box to set your location and select ldquoGet Weatherrdquo Edit any necessary fields using the pencil icon
bull For Labor click ldquoAdd labor itemrdquo and populate the fields Repeat to add another labor line The daily labor total will calculate
bull General notes can be added to the notes box
bull When done click ldquoPublishrdquo
Daily Logs Log daily site activities to keep track of your project progress and performance With the Daily Log workflow track daily weather conditions to shed light on any delays caused on unforeseen circumstances track manpower by logging detailed labor information per company and document any issues or successes that may have occurred throughout the day
1
Working with Daily Logs
PRO TIP Published logs are visible to the team and canrsquot be edited
Additional Capabilities
Insight module
bull Click on the Insight module from the module picker
bull On the various cards get a high-level view of what is happening with the project including
bull Issue activity bull Issue root causebull Total issues to datebull Quality checklist conformance
bull Use the settings gear icon to change the date range of the view
bull Use the expand arrows to get a more detailed view and metrics
Insight amp ReportingHaving the right information at your fingertips is key to making better business decisions With the Insight module teams have visibility into high-level issues that might be holding up project schedules and driving up costs By quickly seeing where issues are happening and putting the right steps in place to solve problems teams can prioritize next steps and drive quality control needs to help ensure projects are successful
1
Insights Setup
Insights amp Reporting
2 Account analytics
bull Click the Account Admin module in the module selector tool
bull This option will only appear if you have admin privileges
bull Click ldquoAnalyticsrdquo to see insights on member activations linked companies and account information
bull Click the Members tab to see insights member usage and status
Account Admin
Dashboard cards
bull There are several cards that default into the Project Home view
bull Project Addressbull Weatherbull Field Issuesbull Checklistsbull RFIsbull Submittal Itemsbull Document Issuesbull Design Packages
bull Click any of the links to drill down and get more information on a specific item
bull Use the expand arrows to open the card to full screen and minimize it
Project HomeProject Home is a new way of interacting with BIM 360 that gives users a single view into their entire project with access to important relevant and actionable information from across BIM 360 and even some third-party services It provides a unified experience with at-a-glance insights about the entire project all in one place This enables teams to quickly evaluate areas that require attention and put the necessary action in place
1
Project Home Overview
Project Home
2 Setup amp permissions
bull The information presented in Project Home depends on your permission levels set up in the Project Admin module
bull Project member As a project member you can view issues relevant to you It will help you answer the question ldquoWhat do I need to do todayrdquo
bull Project leader As a project leader you can still see details that help you understand the most pressing needs for the day but you also see outstanding items at the project level
bull Each user can configure Project Home to their liking by adding removing or rearrange the cards
Download the BIM 360 app
bull Go to the App store or Google Play store on your mobile device to download the BIM 360 app
bull There are two BIM 360 mobile appsbull BIM 360 (available on Android and iOS)
bull The BIM 360 mobile app works with all other modules including Document Management
bull BIM 360 Docs (available on iOS)bull The BIM 360 Docs mobile app works with the
Document Management module only
Mobile AccessConstruction doesnrsquot happen behind a desk Teams need access to project documents and project management tools anytime anywhere With the BIM 360 mobile app teams can execute construction quality and safety workflows including creating or editing checklists viewing RFIs adding or tracking issues and managing or creating drawing markups directly from an Android or iOS device
1
PRO TIP For the next several months the BIM 360 mobile app and BIM 360 Docs mobile app will coexist and may share some functionality Stay up to date on mobile capabilities through the Autodesk Knowledge Network
Get the Android AppGet the iOS App
Mobile Access
2 Mobile workflows
bull Several workflow capabilities can be accomplished using the BIM 360 mobile apps including Checklists Issue Management RFI Tracking Daily Logs and Markups
bull To see the differences in workflow capabilities for the BIM 360 and BIM 360 Docs apps click the ldquoBIM 360 Mobile Capabilitiesrdquo link below
3 Offline sync
bull Teams are able to work on-site without Internet access
bull Teams can also download individual documents and add markups and comments when working offline Once back online all changes will be synced back to the cloud
About the Android App
BIM 360 Mobile Capabilities
About the iOS App
1
Getting Started Guide
Create a project
bull In the Account Admin module select the Projects tab and click ldquoAddrdquo
bull Enter project information and click ldquoSave amp Continuerdquo
Account AdminWith the project administration tools in BIM 360 you can rest assured that your project information is in the right hands Project admins can easily invite team members to the project and define their access levels on a project-by-project basis with a simple click BIM 360 has two levels of administration to ensure security and control across your projects Account admins and project admins Only account admins can create new projects and assign additional account admins and project admins Project admins can add and remove members set permissions and adjust project details
Create a Project
Account Admin
2 Activating modules
bull Click ldquoActivaterdquo for the desired BIM 360 service
bull Assign a project admin for each service You can add multiple admins
bull (Optional) For Document Management and Field you can copy existing project settings
bull An email invitation will be sent to the assigned project admin(s) They will need to click the link to join the project
bull Click ldquoFinishrdquo
3 Add members to directory
bull In the Account Admin module select the Members tab and click ldquoAddrdquo
bull To add an individual member select ldquoAdd People to the Member Directoryrdquo
bull To add an account admin select ldquoInvite Account Adminsrdquo
bull To import members from a list select ldquoImport Members by Spreadsheetrdquo For a first-time import download and complete the member list template
PRO TIP You have to activate Document Management first before you can activate other next-gen services
PRO TIP You can change the default company and role later if necessary
Account Admin
4 Adding members to a project amp assigning access levels
bull In the Project Admin module select the Members tab
bull Click ldquoAddrdquo and use the search bar to search the member directory
bull When you find the member select them and click ldquoSelectrdquo
bull Add their company and role Note Role determines their access level to all BIM 360 services
bull Click the icon(s) to overwrite the access level granted by their project role
bull Click ldquoAdd to Projectrdquo
bull Update existing access levels by clicking the grayed out icon(s)
Members amp Access Levels
Integration PartnersGet the most out of construction technology by integrating the software you already use with BIM 360 Built on an open and secure API platform BIM 360 enables users to easily integrate with various other construction softwares including drone technology estimating and bid management as well as safety management tools
Reality Capture
Estimating
Cost Management
Construction Management
Field Management
Bid Management
Layout
Scheduling
Design CheckingTakeoff
Accounting Data Transfer
Learn More
bim360autodeskcom
Autodesk the Autodesk logo and BIM 360 are registered trademarks or trademarks of Autodesk Inc andor its subsidiaries andor affiliates in the USA andor other countries All other brand names product names or trademarks belong to their respective holders Autodesk reserves the right to alter product and services offerings and specifications and pricing at any time without notice and is not responsible for typographical or graphical errors that may appear in this document copy 2018 Autodesk Inc
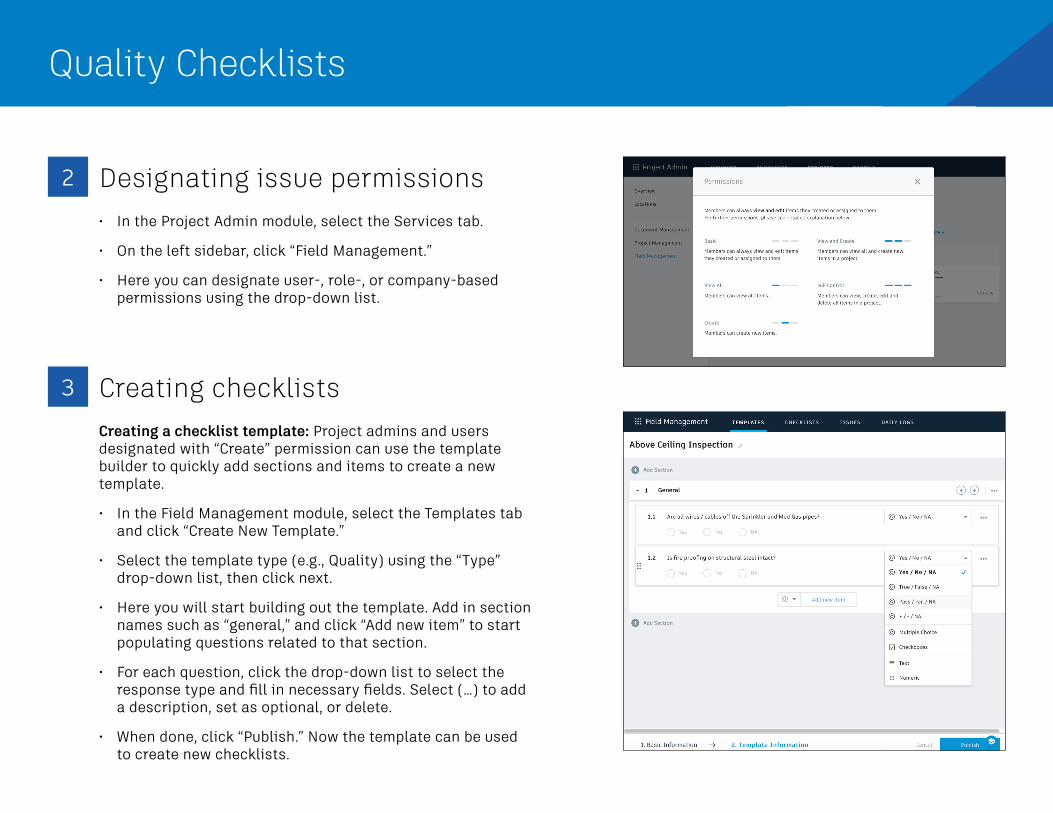
Quality Checklists
2 Designating issue permissions bull In the Project Admin module select the Services tab
bull On the left sidebar click ldquoField Managementrdquo
bull Here you can designate user- role- or company-based permissions using the drop-down list
3 Creating checklistsCreating a checklist template Project admins and users designated with ldquoCreaterdquo permission can use the template builder to quickly add sections and items to create a new template
bull In the Field Management module select the Templates tab and click ldquoCreate New Templaterdquo
bull Select the template type (eg Quality) using the ldquoTyperdquo drop-down list then click next
bull Here you will start building out the template Add in section names such as ldquogeneralrdquo and click ldquoAdd new itemrdquo to start populating questions related to that section
bull For each question click the drop-down list to select the response type and fill in necessary fields Select (hellip) to add a description set as optional or delete
bull When done click ldquoPublishrdquo Now the template can be used to create new checklists
Import a template from classic BIM 360 Field
bull In classic BIM 360 Field export from the admin space the checklist template that you want to import Save it to your computer
bull In the Templates tab select ldquoImportrdquo
bull Check ldquoImport Template from Classic Fieldrdquo and click ldquonextrdquo
bull Specify the template type click ldquoBrowserdquo to select the file then ldquoImportrdquo
bull Once it is imported you can edit the template as needed
Quality Checklists
Import a template from excel
bull In the Templates tab select ldquoImportrdquo
bull Check ldquoImport Templatesrdquo and click ldquonextrdquo
bull If you donrsquot have a properly formatted spreadsheet click ldquoDownload a samplerdquo and enter your information in the spreadsheet Rename and save the file
bull If you have a properly formatted spreadsheet select ldquoBrowserdquo to choose the file then ldquoImportrdquo
Creating Checklist Templates
Quality Checklists
4 Adding checklists to a projectbull In the Templates tab use the search bar or filter by type
to find the checklist you need
bull Click ldquoCreate Checklistrdquo in the list view or open the checklist and click ldquoCreate Checklistrdquo to add it to the project
bull Once the checklist has been added a new window will pop up where you will see a details box Complete all necessary fields
5 Completing checklistsbull Complete your checklist in the field with the BIM 360
mobile app
bull Tap ldquoChecklistsrdquo and select a checklist from the list
bull As you perform your inspection review the criteria for each item and enter the appropriate response
bull (Optional) Add a note or photo by tapping the icon under each item Use the photo markup tools to refer to specific areas in the photo
bull (Optional) For noncompliant items you can create issues Tap the issue icon and fill in the necessary fields You can snap a photo and add markups The issue is added to the project issue list
bull Tap ldquoSaverdquo when complete Working with Checklists
PRO TIP Add a checklist to the project with the BIM 360 mobile app by tapping ldquo+rdquo in the checklist to select your template
Quality Checklists
6 Filtersortexportbull On a mobile device you can filter by status assignee or
schedule date
bull On a computer select the Field Management module then the Checklists tab to filter with the drop-down lists or sort by clicking the column headers
bull To export a report of all clicklists click ldquoExport Reportrdquo add a title and click ldquocreate Reportrdquo
bull To export individual checklist reports select the checklist the folder icon in the top right corner
Creating issues
bull On your mobile device navigate to Filed Issues and tap the plus icon Or on your computer in the Field Management module select the Issue tab and click ldquoCreate New Issuerdquo
bull Identify the issue type and complete all necessary fields making sure to assign the issue and due date
bull When creating an issue on your mobile device add more context by including a photo Click the camera icon to snap a photo or select from your photo library mark it up and attach it to the issue
Issue ManagementDonrsquot let problems slow you down The ability to create assign track and respond to issues on any device is a critical workflow With the Field Issue Management functionality you can easily track work to complete problems to fix areas to inspect and more Add context around the issue resolution by adding photos and collaborating on comment threads With a central view of all project issues tracking status and analyzing root causes has never been easier
1
Creating FieldIssues
PRO TIP Use Field Issues to communicate issues that occur during construction Document Issues available in the Document Management module can be used to communicate issues associated to a drawing or 3D model during design reviews
Issue Management
2 Review amp respond to issues
bull If yoursquore the assignee open the email notification and select ldquoView the Issuerdquo to be directed to the issue
bull On your mobile device navigate to the list of all field issues Scrollfilter and tap the issue to open Or on your desktop in the Field Management module select the Issues tab and search for the issue
bull Once the issue window is open tapselect ldquoActivityrdquo
bull Use the comment box to write a comment On your mobile device you can click the camera to attach a photo
3 Changing issue status
bull On your mobile device navigate to the list of all field issues
bull Scrollfilter and tap the issue to open Or on your desktop in the Field Management module select the Issues tab and search for the issue
bull Once the issue window is open tapselect the status drop-down list in the top-right corner to select a new status
bull Only the issue owner or project admin can set the issue to closed
Issue Management
4 Filtersortexport
bull On your mobile device tap ldquoIssuerdquo then use the filter options to filter by status assignee or due date
bull On your desktop you can filter sort and export field issues in the Field Management module
bull Select the Issues tab to display a list of all field issues
bull Use select one or more criteria via the drop-down list to filter
bull To sort click the column headers
bull To export a report of all project issues click the ldquoExportrdquo drop-down
bull To export a single issue report select the issue from the list and click the icon in the export top-right corner
PRO TIP You can open a sheet or model to view associated field issues using the issues viewer on the left panel
Activate the Project Management module bull A project admin needs to activate the Project
Management module
bull Click the module selector for Project Admin select the Services tab and click ldquoOverviewrdquo in the left sidebar
bull In the Project Management row select ldquoActivaterdquo and designate at least one project admin
RFI ManagementEnhance your RFI workflow by automatically posting RFIs to 2D documents and 3D models Create accountability by designating ldquorolesrdquo to keep the process moving Initiate requests and manage reviews and approvals from any device And by publishing and storing this information in a single cloud-based repository you can maintain a full audit trail
1
RFI Management
2 Setting up the RFI workflowbull In the Project Admin module select the Services tab
bull On the left sidebar click ldquoProject Managementrdquo then ldquoRFIsrdquo
bull Click ldquoChange Workflowrdquo to select an RFI workflow The workflow determines the RFI actions for individual project users
bull Click the drop-down list to assign userrolecompany for each workflow role in order to start using RFIs
3 Creating RFIs associated with a document or modelbull In the Document Management module click to open a 2D
document or 3D model
bull In the RFI panel select ldquoCreate RFIrdquo Click where you want to place the RFI and an RFI pushpin will appear
bull Enter a title and complete all necessary fields By default the RFI status will be set to Draft When ready to assign set to Open
bull Note Any members selected as a co-reviewer can add comments markups and attachments Those chosen for the distribution list will be aware of the RFI but are not expected to comment
Set Up the RFI Workflow
Creating RFIs
RFI Management
4 Creating project-level RFIsbull Project-level RFIs are RFIs not associated with a
document or model
bull In the Project Management module select the RFIs tab and click ldquoCreate RFIrdquo
bull Once the ldquoAdd New RFIrdquo box opens enter a title and complete all necessary fields By default the RFI status will be set to Draft When ready to assign set to Open
bull Note A member selected as a co-reviewer can add comments markups and attachments Those chosen for the distribution list will be aware of the RFI but are not expected to comment
5 Vieweditsubmit RFIsbull View all project-level RFIs in the RFIs tab Click to open
the RFI and use the pencil icon to edit any necessary fields
bull For document or model-based RFIs under ldquoDetailsrdquo click the document hyperlinks to open the associated document Or when viewing a document or model use the RFI panel to navigate to the RFIs
PRO TIP You can create a project-level RFI and then associate it to a document or model by using the ldquoLinked Documentsrdquo option
RFI Management
6 Review amp respond to RFIsbull Depending on where you are in the RFI workflow the
relevant assignee will receive an email notification
bull Open the email and select ldquoView the RFIrdquo You will be directed to the RFI and associated documents
bull The reviewer can add additional co-reviewers comment attach documents and submit the official response
bull You can also review and respond to RFIs using the RFIs tab within the Project Management module
bull The RFI manager will review the response and set it to closed
7 Filtersort export
bull Filer sort and export using the RFIs tab to display a list of all project RFIs
bull To filter click the ldquoFilterrdquo drop down list and select one or more criteria
bull To sort click the column headers
bull To export click the ldquoExportrdquo drop down list
bull You can also filter sort and export directly from a document or model-based RFI via the RFI panel
Export RFI Reports
Submittal Management Submittals are an essential part of any construction project and effectively organizing and managing your submittals is vital With the Submittal workflow you can efficiently create coordinate and manage all submittals in a single document library anytime Initiate requests manage reviews and approvals and sync critical information to mobile devices for offline use
1 Identifying submittal manager bull To identify a submittal manager the Project Management
module needs to be activated
bull In the Project Admin module select the Services tab
bull On the left sidebar click ldquoProject Managementrdquo then ldquoSubmittalsrdquo
bull Enter member company or role to act as manager
Add a Submittal Manager
Submittal Management
2 Creating submittal items (submittal manager)
bull In the Project Management module select the Submittals tab
bull You can import submittal items using the import button or select ldquoCreate new itemrdquo
bull Enter all necessary information includingbull Spec Section Select a spec section or create a new one
For example furnishings equipment finishes bull Title Enter a descriptive title to identify the item bull Type Select a type for example samples or product data bull Assign to Responsible Contractor Select the responsible
subcontractor
3 Creating submittal packages (submittal manager)bull You can create a submittal package from an open
submittal item or in the ldquoSubmittalsrdquo tab under ldquoPackagesrdquo
bull Select ldquoCreate new packagerdquo Complete the required fields and select one or more reviewers (architect) and co-reviewersdistribution list (engineers consultants stakeholders etc)
Creating Submittal Items
Importing Submittal Items
Creating Submittal Packages
Submittal Management
5 Creating spec sections (Submittal manager)
bull In the Submittals tab select ldquoSpec Sectionrdquo then ldquoCreate spec sectionrdquo
bull Enter the spec number and title then click ldquoCreaterdquo
bull Note you can create a spec section when entering a new submittal item by clicking ldquoCreate Newrdquo above the ldquoSpec Sectionrdquo drop-down list
6 Submitting packages for review (submittal manager)
bull Open the package you want to submit and select ldquoSubmit to Reviewerrdquo
bull Select the reviewer add co-reviewers due date and notes if needed
4 Adding submittal items to package (submittal manager)
bull In the Submittals tab under Item select a submittal then ldquoAdd to packagerdquo
bull Select an existing package or choose ldquoCreate submittal packagerdquo to create a new package
Submittal Management
7 Reviewing submittal items (reviewer) bull Click to open the item(s) for review within ldquoAttachmentsrdquo
bull Designate office response using the drop-down list next to ldquoYour response is requiredrdquo
bull Upload any official response attachments and submit back to the manager
8 Creating a revision package (submittal manager)
bull If a reviewer responds to a submittal item with ldquoRevise and Resubmitrdquo or ldquoRejectedrdquo the manager needs to create a revision
bull Open the submittal package and select ldquoCreate new revisionrdquo
bull Include the responsible contractor due date and notes
bull Note Creating a new revision will only affect items with responses of ldquoRevise amp Resubmitrdquo and ldquoRejectedrdquo All other items will be closed
Submittal Management
9 Responding to a revision package (responsible contractor)
bull The contractor will be notified of the revision
bull Open the submittal item and in ldquoAttachmentsrdquo upload the revised documents
bull Once attached the document will appear with the ldquoFor reviewrdquo box checked
bull Close and select ldquoSubmit to Managerrdquo
bull The manager can now send the revised item(s) to the reviewer
10 Closing submittal packages (submittal manager)
bull Once the package is approved by the reviewer the submittal manager needs to close it and distribute it to the responsible contractor
bull In the Submittals tab under ldquoPackagesrdquo open the package and select ldquoClose and Distributerdquo
bull Include the responsible contractor and in the distribution list identify team members who should be aware of the closed submittal package
Submittal Management
11 Filtersortexportbull You can filter sort and export in the Submittals tab
bull Select either ldquoItemsrdquo ldquoPackagesrdquo or ldquoSpec Sectionrdquo
bull To filter ldquoItemsrdquo and ldquoPackagesrdquo use the drop-down lists associated with each criteria For ldquoSpec Sectionrdquo you canrsquot filter but you can search using the search field
bull To sort select the column headers
bull Select ldquoExportrdquo for a list and detailed summary report of all packages If you want a report of a specific package open the package and click ldquoExportrdquo
Creating daily logs
bull In the Field Management module select the Daily Logs tab
bull Click the calendar icon to select a month and day
bull To add in the daily weather click the location box to set your location and select ldquoGet Weatherrdquo Edit any necessary fields using the pencil icon
bull For Labor click ldquoAdd labor itemrdquo and populate the fields Repeat to add another labor line The daily labor total will calculate
bull General notes can be added to the notes box
bull When done click ldquoPublishrdquo
Daily Logs Log daily site activities to keep track of your project progress and performance With the Daily Log workflow track daily weather conditions to shed light on any delays caused on unforeseen circumstances track manpower by logging detailed labor information per company and document any issues or successes that may have occurred throughout the day
1
Working with Daily Logs
PRO TIP Published logs are visible to the team and canrsquot be edited
Additional Capabilities
Insight module
bull Click on the Insight module from the module picker
bull On the various cards get a high-level view of what is happening with the project including
bull Issue activity bull Issue root causebull Total issues to datebull Quality checklist conformance
bull Use the settings gear icon to change the date range of the view
bull Use the expand arrows to get a more detailed view and metrics
Insight amp ReportingHaving the right information at your fingertips is key to making better business decisions With the Insight module teams have visibility into high-level issues that might be holding up project schedules and driving up costs By quickly seeing where issues are happening and putting the right steps in place to solve problems teams can prioritize next steps and drive quality control needs to help ensure projects are successful
1
Insights Setup
Insights amp Reporting
2 Account analytics
bull Click the Account Admin module in the module selector tool
bull This option will only appear if you have admin privileges
bull Click ldquoAnalyticsrdquo to see insights on member activations linked companies and account information
bull Click the Members tab to see insights member usage and status
Account Admin
Dashboard cards
bull There are several cards that default into the Project Home view
bull Project Addressbull Weatherbull Field Issuesbull Checklistsbull RFIsbull Submittal Itemsbull Document Issuesbull Design Packages
bull Click any of the links to drill down and get more information on a specific item
bull Use the expand arrows to open the card to full screen and minimize it
Project HomeProject Home is a new way of interacting with BIM 360 that gives users a single view into their entire project with access to important relevant and actionable information from across BIM 360 and even some third-party services It provides a unified experience with at-a-glance insights about the entire project all in one place This enables teams to quickly evaluate areas that require attention and put the necessary action in place
1
Project Home Overview
Project Home
2 Setup amp permissions
bull The information presented in Project Home depends on your permission levels set up in the Project Admin module
bull Project member As a project member you can view issues relevant to you It will help you answer the question ldquoWhat do I need to do todayrdquo
bull Project leader As a project leader you can still see details that help you understand the most pressing needs for the day but you also see outstanding items at the project level
bull Each user can configure Project Home to their liking by adding removing or rearrange the cards
Download the BIM 360 app
bull Go to the App store or Google Play store on your mobile device to download the BIM 360 app
bull There are two BIM 360 mobile appsbull BIM 360 (available on Android and iOS)
bull The BIM 360 mobile app works with all other modules including Document Management
bull BIM 360 Docs (available on iOS)bull The BIM 360 Docs mobile app works with the
Document Management module only
Mobile AccessConstruction doesnrsquot happen behind a desk Teams need access to project documents and project management tools anytime anywhere With the BIM 360 mobile app teams can execute construction quality and safety workflows including creating or editing checklists viewing RFIs adding or tracking issues and managing or creating drawing markups directly from an Android or iOS device
1
PRO TIP For the next several months the BIM 360 mobile app and BIM 360 Docs mobile app will coexist and may share some functionality Stay up to date on mobile capabilities through the Autodesk Knowledge Network
Get the Android AppGet the iOS App
Mobile Access
2 Mobile workflows
bull Several workflow capabilities can be accomplished using the BIM 360 mobile apps including Checklists Issue Management RFI Tracking Daily Logs and Markups
bull To see the differences in workflow capabilities for the BIM 360 and BIM 360 Docs apps click the ldquoBIM 360 Mobile Capabilitiesrdquo link below
3 Offline sync
bull Teams are able to work on-site without Internet access
bull Teams can also download individual documents and add markups and comments when working offline Once back online all changes will be synced back to the cloud
About the Android App
BIM 360 Mobile Capabilities
About the iOS App
1
Getting Started Guide
Create a project
bull In the Account Admin module select the Projects tab and click ldquoAddrdquo
bull Enter project information and click ldquoSave amp Continuerdquo
Account AdminWith the project administration tools in BIM 360 you can rest assured that your project information is in the right hands Project admins can easily invite team members to the project and define their access levels on a project-by-project basis with a simple click BIM 360 has two levels of administration to ensure security and control across your projects Account admins and project admins Only account admins can create new projects and assign additional account admins and project admins Project admins can add and remove members set permissions and adjust project details
Create a Project
Account Admin
2 Activating modules
bull Click ldquoActivaterdquo for the desired BIM 360 service
bull Assign a project admin for each service You can add multiple admins
bull (Optional) For Document Management and Field you can copy existing project settings
bull An email invitation will be sent to the assigned project admin(s) They will need to click the link to join the project
bull Click ldquoFinishrdquo
3 Add members to directory
bull In the Account Admin module select the Members tab and click ldquoAddrdquo
bull To add an individual member select ldquoAdd People to the Member Directoryrdquo
bull To add an account admin select ldquoInvite Account Adminsrdquo
bull To import members from a list select ldquoImport Members by Spreadsheetrdquo For a first-time import download and complete the member list template
PRO TIP You have to activate Document Management first before you can activate other next-gen services
PRO TIP You can change the default company and role later if necessary
Account Admin
4 Adding members to a project amp assigning access levels
bull In the Project Admin module select the Members tab
bull Click ldquoAddrdquo and use the search bar to search the member directory
bull When you find the member select them and click ldquoSelectrdquo
bull Add their company and role Note Role determines their access level to all BIM 360 services
bull Click the icon(s) to overwrite the access level granted by their project role
bull Click ldquoAdd to Projectrdquo
bull Update existing access levels by clicking the grayed out icon(s)
Members amp Access Levels
Integration PartnersGet the most out of construction technology by integrating the software you already use with BIM 360 Built on an open and secure API platform BIM 360 enables users to easily integrate with various other construction softwares including drone technology estimating and bid management as well as safety management tools
Reality Capture
Estimating
Cost Management
Construction Management
Field Management
Bid Management
Layout
Scheduling
Design CheckingTakeoff
Accounting Data Transfer
Learn More
bim360autodeskcom
Autodesk the Autodesk logo and BIM 360 are registered trademarks or trademarks of Autodesk Inc andor its subsidiaries andor affiliates in the USA andor other countries All other brand names product names or trademarks belong to their respective holders Autodesk reserves the right to alter product and services offerings and specifications and pricing at any time without notice and is not responsible for typographical or graphical errors that may appear in this document copy 2018 Autodesk Inc
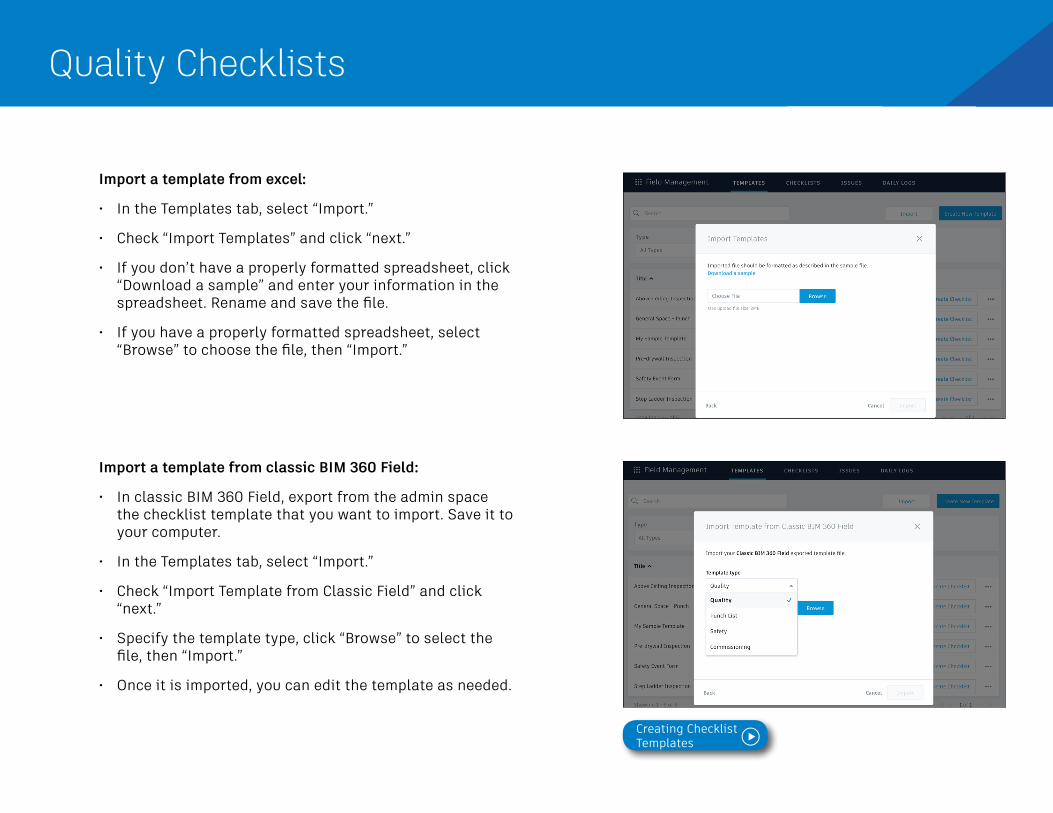
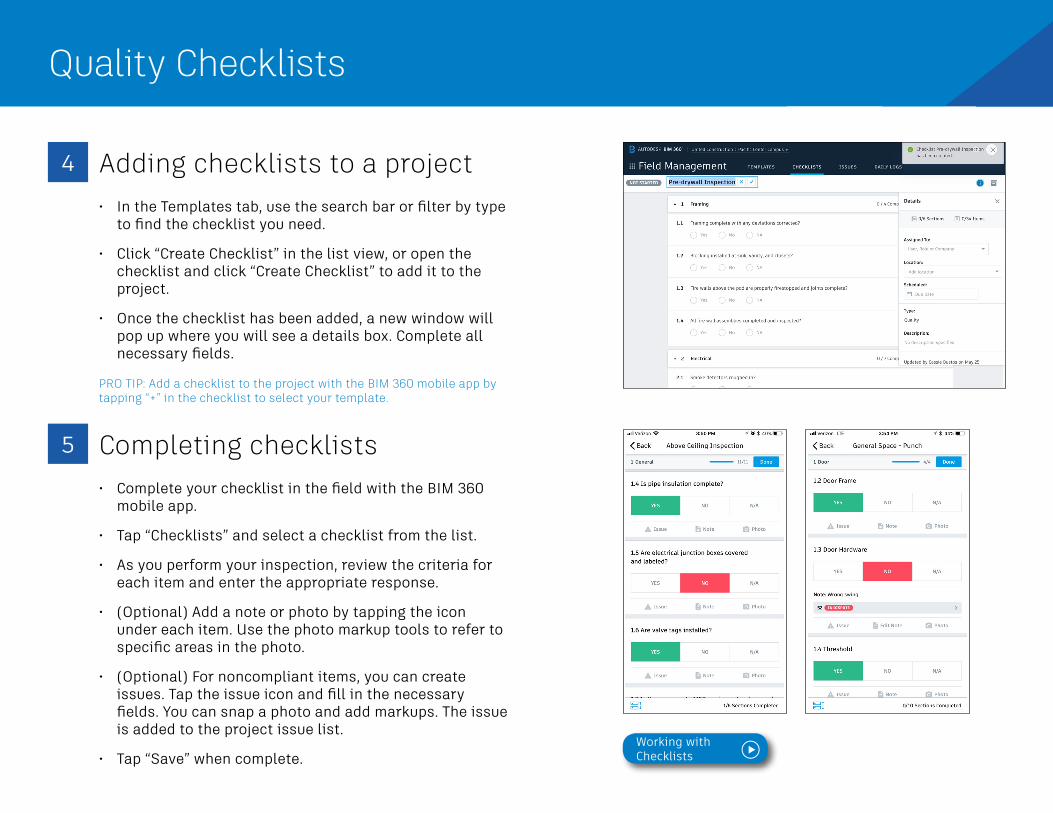
Quality Checklists
6 Filtersortexportbull On a mobile device you can filter by status assignee or
schedule date
bull On a computer select the Field Management module then the Checklists tab to filter with the drop-down lists or sort by clicking the column headers
bull To export a report of all clicklists click ldquoExport Reportrdquo add a title and click ldquocreate Reportrdquo
bull To export individual checklist reports select the checklist the folder icon in the top right corner
Creating issues
bull On your mobile device navigate to Filed Issues and tap the plus icon Or on your computer in the Field Management module select the Issue tab and click ldquoCreate New Issuerdquo
bull Identify the issue type and complete all necessary fields making sure to assign the issue and due date
bull When creating an issue on your mobile device add more context by including a photo Click the camera icon to snap a photo or select from your photo library mark it up and attach it to the issue
Issue ManagementDonrsquot let problems slow you down The ability to create assign track and respond to issues on any device is a critical workflow With the Field Issue Management functionality you can easily track work to complete problems to fix areas to inspect and more Add context around the issue resolution by adding photos and collaborating on comment threads With a central view of all project issues tracking status and analyzing root causes has never been easier
1
Creating FieldIssues
PRO TIP Use Field Issues to communicate issues that occur during construction Document Issues available in the Document Management module can be used to communicate issues associated to a drawing or 3D model during design reviews
Issue Management
2 Review amp respond to issues
bull If yoursquore the assignee open the email notification and select ldquoView the Issuerdquo to be directed to the issue
bull On your mobile device navigate to the list of all field issues Scrollfilter and tap the issue to open Or on your desktop in the Field Management module select the Issues tab and search for the issue
bull Once the issue window is open tapselect ldquoActivityrdquo
bull Use the comment box to write a comment On your mobile device you can click the camera to attach a photo
3 Changing issue status
bull On your mobile device navigate to the list of all field issues
bull Scrollfilter and tap the issue to open Or on your desktop in the Field Management module select the Issues tab and search for the issue
bull Once the issue window is open tapselect the status drop-down list in the top-right corner to select a new status
bull Only the issue owner or project admin can set the issue to closed
Issue Management
4 Filtersortexport
bull On your mobile device tap ldquoIssuerdquo then use the filter options to filter by status assignee or due date
bull On your desktop you can filter sort and export field issues in the Field Management module
bull Select the Issues tab to display a list of all field issues
bull Use select one or more criteria via the drop-down list to filter
bull To sort click the column headers
bull To export a report of all project issues click the ldquoExportrdquo drop-down
bull To export a single issue report select the issue from the list and click the icon in the export top-right corner
PRO TIP You can open a sheet or model to view associated field issues using the issues viewer on the left panel
Activate the Project Management module bull A project admin needs to activate the Project
Management module
bull Click the module selector for Project Admin select the Services tab and click ldquoOverviewrdquo in the left sidebar
bull In the Project Management row select ldquoActivaterdquo and designate at least one project admin
RFI ManagementEnhance your RFI workflow by automatically posting RFIs to 2D documents and 3D models Create accountability by designating ldquorolesrdquo to keep the process moving Initiate requests and manage reviews and approvals from any device And by publishing and storing this information in a single cloud-based repository you can maintain a full audit trail
1
RFI Management
2 Setting up the RFI workflowbull In the Project Admin module select the Services tab
bull On the left sidebar click ldquoProject Managementrdquo then ldquoRFIsrdquo
bull Click ldquoChange Workflowrdquo to select an RFI workflow The workflow determines the RFI actions for individual project users
bull Click the drop-down list to assign userrolecompany for each workflow role in order to start using RFIs
3 Creating RFIs associated with a document or modelbull In the Document Management module click to open a 2D
document or 3D model
bull In the RFI panel select ldquoCreate RFIrdquo Click where you want to place the RFI and an RFI pushpin will appear
bull Enter a title and complete all necessary fields By default the RFI status will be set to Draft When ready to assign set to Open
bull Note Any members selected as a co-reviewer can add comments markups and attachments Those chosen for the distribution list will be aware of the RFI but are not expected to comment
Set Up the RFI Workflow
Creating RFIs
RFI Management
4 Creating project-level RFIsbull Project-level RFIs are RFIs not associated with a
document or model
bull In the Project Management module select the RFIs tab and click ldquoCreate RFIrdquo
bull Once the ldquoAdd New RFIrdquo box opens enter a title and complete all necessary fields By default the RFI status will be set to Draft When ready to assign set to Open
bull Note A member selected as a co-reviewer can add comments markups and attachments Those chosen for the distribution list will be aware of the RFI but are not expected to comment
5 Vieweditsubmit RFIsbull View all project-level RFIs in the RFIs tab Click to open
the RFI and use the pencil icon to edit any necessary fields
bull For document or model-based RFIs under ldquoDetailsrdquo click the document hyperlinks to open the associated document Or when viewing a document or model use the RFI panel to navigate to the RFIs
PRO TIP You can create a project-level RFI and then associate it to a document or model by using the ldquoLinked Documentsrdquo option
RFI Management
6 Review amp respond to RFIsbull Depending on where you are in the RFI workflow the
relevant assignee will receive an email notification
bull Open the email and select ldquoView the RFIrdquo You will be directed to the RFI and associated documents
bull The reviewer can add additional co-reviewers comment attach documents and submit the official response
bull You can also review and respond to RFIs using the RFIs tab within the Project Management module
bull The RFI manager will review the response and set it to closed
7 Filtersort export
bull Filer sort and export using the RFIs tab to display a list of all project RFIs
bull To filter click the ldquoFilterrdquo drop down list and select one or more criteria
bull To sort click the column headers
bull To export click the ldquoExportrdquo drop down list
bull You can also filter sort and export directly from a document or model-based RFI via the RFI panel
Export RFI Reports
Submittal Management Submittals are an essential part of any construction project and effectively organizing and managing your submittals is vital With the Submittal workflow you can efficiently create coordinate and manage all submittals in a single document library anytime Initiate requests manage reviews and approvals and sync critical information to mobile devices for offline use
1 Identifying submittal manager bull To identify a submittal manager the Project Management
module needs to be activated
bull In the Project Admin module select the Services tab
bull On the left sidebar click ldquoProject Managementrdquo then ldquoSubmittalsrdquo
bull Enter member company or role to act as manager
Add a Submittal Manager
Submittal Management
2 Creating submittal items (submittal manager)
bull In the Project Management module select the Submittals tab
bull You can import submittal items using the import button or select ldquoCreate new itemrdquo
bull Enter all necessary information includingbull Spec Section Select a spec section or create a new one
For example furnishings equipment finishes bull Title Enter a descriptive title to identify the item bull Type Select a type for example samples or product data bull Assign to Responsible Contractor Select the responsible
subcontractor
3 Creating submittal packages (submittal manager)bull You can create a submittal package from an open
submittal item or in the ldquoSubmittalsrdquo tab under ldquoPackagesrdquo
bull Select ldquoCreate new packagerdquo Complete the required fields and select one or more reviewers (architect) and co-reviewersdistribution list (engineers consultants stakeholders etc)
Creating Submittal Items
Importing Submittal Items
Creating Submittal Packages
Submittal Management
5 Creating spec sections (Submittal manager)
bull In the Submittals tab select ldquoSpec Sectionrdquo then ldquoCreate spec sectionrdquo
bull Enter the spec number and title then click ldquoCreaterdquo
bull Note you can create a spec section when entering a new submittal item by clicking ldquoCreate Newrdquo above the ldquoSpec Sectionrdquo drop-down list
6 Submitting packages for review (submittal manager)
bull Open the package you want to submit and select ldquoSubmit to Reviewerrdquo
bull Select the reviewer add co-reviewers due date and notes if needed
4 Adding submittal items to package (submittal manager)
bull In the Submittals tab under Item select a submittal then ldquoAdd to packagerdquo
bull Select an existing package or choose ldquoCreate submittal packagerdquo to create a new package
Submittal Management
7 Reviewing submittal items (reviewer) bull Click to open the item(s) for review within ldquoAttachmentsrdquo
bull Designate office response using the drop-down list next to ldquoYour response is requiredrdquo
bull Upload any official response attachments and submit back to the manager
8 Creating a revision package (submittal manager)
bull If a reviewer responds to a submittal item with ldquoRevise and Resubmitrdquo or ldquoRejectedrdquo the manager needs to create a revision
bull Open the submittal package and select ldquoCreate new revisionrdquo
bull Include the responsible contractor due date and notes
bull Note Creating a new revision will only affect items with responses of ldquoRevise amp Resubmitrdquo and ldquoRejectedrdquo All other items will be closed
Submittal Management
9 Responding to a revision package (responsible contractor)
bull The contractor will be notified of the revision
bull Open the submittal item and in ldquoAttachmentsrdquo upload the revised documents
bull Once attached the document will appear with the ldquoFor reviewrdquo box checked
bull Close and select ldquoSubmit to Managerrdquo
bull The manager can now send the revised item(s) to the reviewer
10 Closing submittal packages (submittal manager)
bull Once the package is approved by the reviewer the submittal manager needs to close it and distribute it to the responsible contractor
bull In the Submittals tab under ldquoPackagesrdquo open the package and select ldquoClose and Distributerdquo
bull Include the responsible contractor and in the distribution list identify team members who should be aware of the closed submittal package
Submittal Management
11 Filtersortexportbull You can filter sort and export in the Submittals tab
bull Select either ldquoItemsrdquo ldquoPackagesrdquo or ldquoSpec Sectionrdquo
bull To filter ldquoItemsrdquo and ldquoPackagesrdquo use the drop-down lists associated with each criteria For ldquoSpec Sectionrdquo you canrsquot filter but you can search using the search field
bull To sort select the column headers
bull Select ldquoExportrdquo for a list and detailed summary report of all packages If you want a report of a specific package open the package and click ldquoExportrdquo
Creating daily logs
bull In the Field Management module select the Daily Logs tab
bull Click the calendar icon to select a month and day
bull To add in the daily weather click the location box to set your location and select ldquoGet Weatherrdquo Edit any necessary fields using the pencil icon
bull For Labor click ldquoAdd labor itemrdquo and populate the fields Repeat to add another labor line The daily labor total will calculate
bull General notes can be added to the notes box
bull When done click ldquoPublishrdquo
Daily Logs Log daily site activities to keep track of your project progress and performance With the Daily Log workflow track daily weather conditions to shed light on any delays caused on unforeseen circumstances track manpower by logging detailed labor information per company and document any issues or successes that may have occurred throughout the day
1
Working with Daily Logs
PRO TIP Published logs are visible to the team and canrsquot be edited
Additional Capabilities
Insight module
bull Click on the Insight module from the module picker
bull On the various cards get a high-level view of what is happening with the project including
bull Issue activity bull Issue root causebull Total issues to datebull Quality checklist conformance
bull Use the settings gear icon to change the date range of the view
bull Use the expand arrows to get a more detailed view and metrics
Insight amp ReportingHaving the right information at your fingertips is key to making better business decisions With the Insight module teams have visibility into high-level issues that might be holding up project schedules and driving up costs By quickly seeing where issues are happening and putting the right steps in place to solve problems teams can prioritize next steps and drive quality control needs to help ensure projects are successful
1
Insights Setup
Insights amp Reporting
2 Account analytics
bull Click the Account Admin module in the module selector tool
bull This option will only appear if you have admin privileges
bull Click ldquoAnalyticsrdquo to see insights on member activations linked companies and account information
bull Click the Members tab to see insights member usage and status
Account Admin
Dashboard cards
bull There are several cards that default into the Project Home view
bull Project Addressbull Weatherbull Field Issuesbull Checklistsbull RFIsbull Submittal Itemsbull Document Issuesbull Design Packages
bull Click any of the links to drill down and get more information on a specific item
bull Use the expand arrows to open the card to full screen and minimize it
Project HomeProject Home is a new way of interacting with BIM 360 that gives users a single view into their entire project with access to important relevant and actionable information from across BIM 360 and even some third-party services It provides a unified experience with at-a-glance insights about the entire project all in one place This enables teams to quickly evaluate areas that require attention and put the necessary action in place
1
Project Home Overview
Project Home
2 Setup amp permissions
bull The information presented in Project Home depends on your permission levels set up in the Project Admin module
bull Project member As a project member you can view issues relevant to you It will help you answer the question ldquoWhat do I need to do todayrdquo
bull Project leader As a project leader you can still see details that help you understand the most pressing needs for the day but you also see outstanding items at the project level
bull Each user can configure Project Home to their liking by adding removing or rearrange the cards
Download the BIM 360 app
bull Go to the App store or Google Play store on your mobile device to download the BIM 360 app
bull There are two BIM 360 mobile appsbull BIM 360 (available on Android and iOS)
bull The BIM 360 mobile app works with all other modules including Document Management
bull BIM 360 Docs (available on iOS)bull The BIM 360 Docs mobile app works with the
Document Management module only
Mobile AccessConstruction doesnrsquot happen behind a desk Teams need access to project documents and project management tools anytime anywhere With the BIM 360 mobile app teams can execute construction quality and safety workflows including creating or editing checklists viewing RFIs adding or tracking issues and managing or creating drawing markups directly from an Android or iOS device
1
PRO TIP For the next several months the BIM 360 mobile app and BIM 360 Docs mobile app will coexist and may share some functionality Stay up to date on mobile capabilities through the Autodesk Knowledge Network
Get the Android AppGet the iOS App
Mobile Access
2 Mobile workflows
bull Several workflow capabilities can be accomplished using the BIM 360 mobile apps including Checklists Issue Management RFI Tracking Daily Logs and Markups
bull To see the differences in workflow capabilities for the BIM 360 and BIM 360 Docs apps click the ldquoBIM 360 Mobile Capabilitiesrdquo link below
3 Offline sync
bull Teams are able to work on-site without Internet access
bull Teams can also download individual documents and add markups and comments when working offline Once back online all changes will be synced back to the cloud
About the Android App
BIM 360 Mobile Capabilities
About the iOS App
1
Getting Started Guide
Create a project
bull In the Account Admin module select the Projects tab and click ldquoAddrdquo
bull Enter project information and click ldquoSave amp Continuerdquo
Account AdminWith the project administration tools in BIM 360 you can rest assured that your project information is in the right hands Project admins can easily invite team members to the project and define their access levels on a project-by-project basis with a simple click BIM 360 has two levels of administration to ensure security and control across your projects Account admins and project admins Only account admins can create new projects and assign additional account admins and project admins Project admins can add and remove members set permissions and adjust project details
Create a Project
Account Admin
2 Activating modules
bull Click ldquoActivaterdquo for the desired BIM 360 service
bull Assign a project admin for each service You can add multiple admins
bull (Optional) For Document Management and Field you can copy existing project settings
bull An email invitation will be sent to the assigned project admin(s) They will need to click the link to join the project
bull Click ldquoFinishrdquo
3 Add members to directory
bull In the Account Admin module select the Members tab and click ldquoAddrdquo
bull To add an individual member select ldquoAdd People to the Member Directoryrdquo
bull To add an account admin select ldquoInvite Account Adminsrdquo
bull To import members from a list select ldquoImport Members by Spreadsheetrdquo For a first-time import download and complete the member list template
PRO TIP You have to activate Document Management first before you can activate other next-gen services
PRO TIP You can change the default company and role later if necessary
Account Admin
4 Adding members to a project amp assigning access levels
bull In the Project Admin module select the Members tab
bull Click ldquoAddrdquo and use the search bar to search the member directory
bull When you find the member select them and click ldquoSelectrdquo
bull Add their company and role Note Role determines their access level to all BIM 360 services
bull Click the icon(s) to overwrite the access level granted by their project role
bull Click ldquoAdd to Projectrdquo
bull Update existing access levels by clicking the grayed out icon(s)
Members amp Access Levels
Integration PartnersGet the most out of construction technology by integrating the software you already use with BIM 360 Built on an open and secure API platform BIM 360 enables users to easily integrate with various other construction softwares including drone technology estimating and bid management as well as safety management tools
Reality Capture
Estimating
Cost Management
Construction Management
Field Management
Bid Management
Layout
Scheduling
Design CheckingTakeoff
Accounting Data Transfer
Learn More
bim360autodeskcom
Autodesk the Autodesk logo and BIM 360 are registered trademarks or trademarks of Autodesk Inc andor its subsidiaries andor affiliates in the USA andor other countries All other brand names product names or trademarks belong to their respective holders Autodesk reserves the right to alter product and services offerings and specifications and pricing at any time without notice and is not responsible for typographical or graphical errors that may appear in this document copy 2018 Autodesk Inc
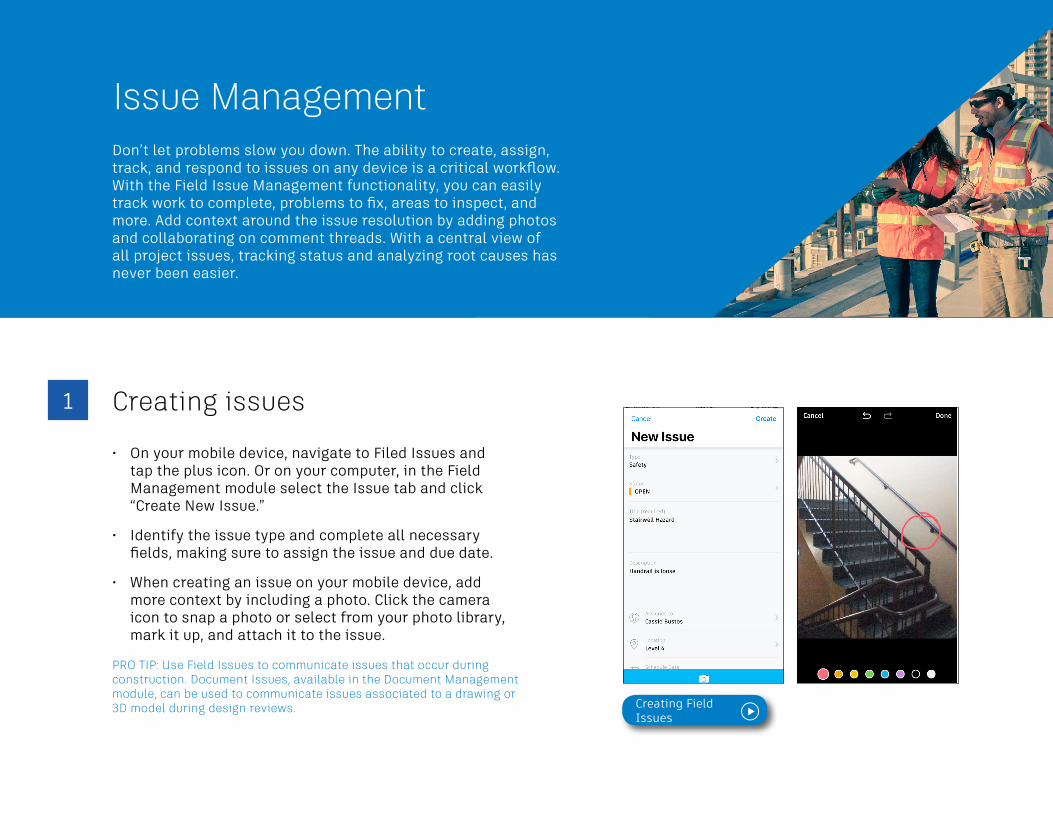
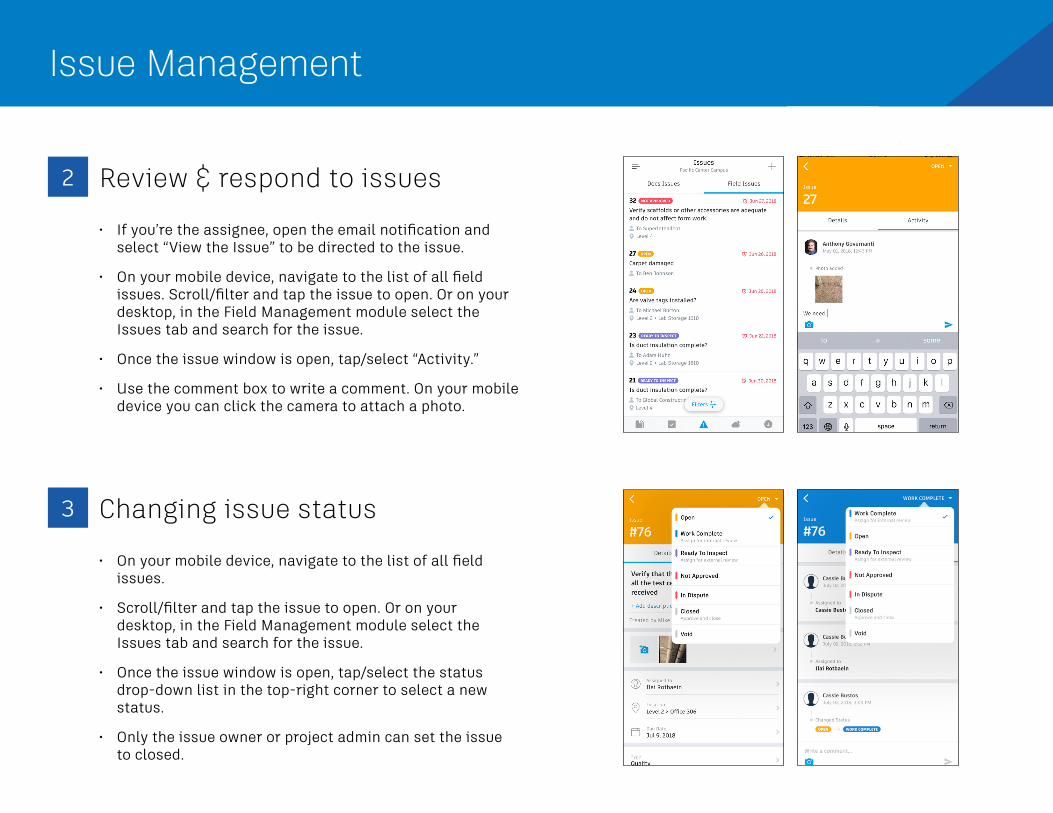
Issue Management
2 Review amp respond to issues
bull If yoursquore the assignee open the email notification and select ldquoView the Issuerdquo to be directed to the issue
bull On your mobile device navigate to the list of all field issues Scrollfilter and tap the issue to open Or on your desktop in the Field Management module select the Issues tab and search for the issue
bull Once the issue window is open tapselect ldquoActivityrdquo
bull Use the comment box to write a comment On your mobile device you can click the camera to attach a photo
3 Changing issue status
bull On your mobile device navigate to the list of all field issues
bull Scrollfilter and tap the issue to open Or on your desktop in the Field Management module select the Issues tab and search for the issue
bull Once the issue window is open tapselect the status drop-down list in the top-right corner to select a new status
bull Only the issue owner or project admin can set the issue to closed
Issue Management
4 Filtersortexport
bull On your mobile device tap ldquoIssuerdquo then use the filter options to filter by status assignee or due date
bull On your desktop you can filter sort and export field issues in the Field Management module
bull Select the Issues tab to display a list of all field issues
bull Use select one or more criteria via the drop-down list to filter
bull To sort click the column headers
bull To export a report of all project issues click the ldquoExportrdquo drop-down
bull To export a single issue report select the issue from the list and click the icon in the export top-right corner
PRO TIP You can open a sheet or model to view associated field issues using the issues viewer on the left panel
Activate the Project Management module bull A project admin needs to activate the Project
Management module
bull Click the module selector for Project Admin select the Services tab and click ldquoOverviewrdquo in the left sidebar
bull In the Project Management row select ldquoActivaterdquo and designate at least one project admin
RFI ManagementEnhance your RFI workflow by automatically posting RFIs to 2D documents and 3D models Create accountability by designating ldquorolesrdquo to keep the process moving Initiate requests and manage reviews and approvals from any device And by publishing and storing this information in a single cloud-based repository you can maintain a full audit trail
1
RFI Management
2 Setting up the RFI workflowbull In the Project Admin module select the Services tab
bull On the left sidebar click ldquoProject Managementrdquo then ldquoRFIsrdquo
bull Click ldquoChange Workflowrdquo to select an RFI workflow The workflow determines the RFI actions for individual project users
bull Click the drop-down list to assign userrolecompany for each workflow role in order to start using RFIs
3 Creating RFIs associated with a document or modelbull In the Document Management module click to open a 2D
document or 3D model
bull In the RFI panel select ldquoCreate RFIrdquo Click where you want to place the RFI and an RFI pushpin will appear
bull Enter a title and complete all necessary fields By default the RFI status will be set to Draft When ready to assign set to Open
bull Note Any members selected as a co-reviewer can add comments markups and attachments Those chosen for the distribution list will be aware of the RFI but are not expected to comment
Set Up the RFI Workflow
Creating RFIs
RFI Management
4 Creating project-level RFIsbull Project-level RFIs are RFIs not associated with a
document or model
bull In the Project Management module select the RFIs tab and click ldquoCreate RFIrdquo
bull Once the ldquoAdd New RFIrdquo box opens enter a title and complete all necessary fields By default the RFI status will be set to Draft When ready to assign set to Open
bull Note A member selected as a co-reviewer can add comments markups and attachments Those chosen for the distribution list will be aware of the RFI but are not expected to comment
5 Vieweditsubmit RFIsbull View all project-level RFIs in the RFIs tab Click to open
the RFI and use the pencil icon to edit any necessary fields
bull For document or model-based RFIs under ldquoDetailsrdquo click the document hyperlinks to open the associated document Or when viewing a document or model use the RFI panel to navigate to the RFIs
PRO TIP You can create a project-level RFI and then associate it to a document or model by using the ldquoLinked Documentsrdquo option
RFI Management
6 Review amp respond to RFIsbull Depending on where you are in the RFI workflow the
relevant assignee will receive an email notification
bull Open the email and select ldquoView the RFIrdquo You will be directed to the RFI and associated documents
bull The reviewer can add additional co-reviewers comment attach documents and submit the official response
bull You can also review and respond to RFIs using the RFIs tab within the Project Management module
bull The RFI manager will review the response and set it to closed
7 Filtersort export
bull Filer sort and export using the RFIs tab to display a list of all project RFIs
bull To filter click the ldquoFilterrdquo drop down list and select one or more criteria
bull To sort click the column headers
bull To export click the ldquoExportrdquo drop down list
bull You can also filter sort and export directly from a document or model-based RFI via the RFI panel
Export RFI Reports
Submittal Management Submittals are an essential part of any construction project and effectively organizing and managing your submittals is vital With the Submittal workflow you can efficiently create coordinate and manage all submittals in a single document library anytime Initiate requests manage reviews and approvals and sync critical information to mobile devices for offline use
1 Identifying submittal manager bull To identify a submittal manager the Project Management
module needs to be activated
bull In the Project Admin module select the Services tab
bull On the left sidebar click ldquoProject Managementrdquo then ldquoSubmittalsrdquo
bull Enter member company or role to act as manager
Add a Submittal Manager
Submittal Management
2 Creating submittal items (submittal manager)
bull In the Project Management module select the Submittals tab
bull You can import submittal items using the import button or select ldquoCreate new itemrdquo
bull Enter all necessary information includingbull Spec Section Select a spec section or create a new one
For example furnishings equipment finishes bull Title Enter a descriptive title to identify the item bull Type Select a type for example samples or product data bull Assign to Responsible Contractor Select the responsible
subcontractor
3 Creating submittal packages (submittal manager)bull You can create a submittal package from an open
submittal item or in the ldquoSubmittalsrdquo tab under ldquoPackagesrdquo
bull Select ldquoCreate new packagerdquo Complete the required fields and select one or more reviewers (architect) and co-reviewersdistribution list (engineers consultants stakeholders etc)
Creating Submittal Items
Importing Submittal Items
Creating Submittal Packages
Submittal Management
5 Creating spec sections (Submittal manager)
bull In the Submittals tab select ldquoSpec Sectionrdquo then ldquoCreate spec sectionrdquo
bull Enter the spec number and title then click ldquoCreaterdquo
bull Note you can create a spec section when entering a new submittal item by clicking ldquoCreate Newrdquo above the ldquoSpec Sectionrdquo drop-down list
6 Submitting packages for review (submittal manager)
bull Open the package you want to submit and select ldquoSubmit to Reviewerrdquo
bull Select the reviewer add co-reviewers due date and notes if needed
4 Adding submittal items to package (submittal manager)
bull In the Submittals tab under Item select a submittal then ldquoAdd to packagerdquo
bull Select an existing package or choose ldquoCreate submittal packagerdquo to create a new package
Submittal Management
7 Reviewing submittal items (reviewer) bull Click to open the item(s) for review within ldquoAttachmentsrdquo
bull Designate office response using the drop-down list next to ldquoYour response is requiredrdquo
bull Upload any official response attachments and submit back to the manager
8 Creating a revision package (submittal manager)
bull If a reviewer responds to a submittal item with ldquoRevise and Resubmitrdquo or ldquoRejectedrdquo the manager needs to create a revision
bull Open the submittal package and select ldquoCreate new revisionrdquo
bull Include the responsible contractor due date and notes
bull Note Creating a new revision will only affect items with responses of ldquoRevise amp Resubmitrdquo and ldquoRejectedrdquo All other items will be closed
Submittal Management
9 Responding to a revision package (responsible contractor)
bull The contractor will be notified of the revision
bull Open the submittal item and in ldquoAttachmentsrdquo upload the revised documents
bull Once attached the document will appear with the ldquoFor reviewrdquo box checked
bull Close and select ldquoSubmit to Managerrdquo
bull The manager can now send the revised item(s) to the reviewer
10 Closing submittal packages (submittal manager)
bull Once the package is approved by the reviewer the submittal manager needs to close it and distribute it to the responsible contractor
bull In the Submittals tab under ldquoPackagesrdquo open the package and select ldquoClose and Distributerdquo
bull Include the responsible contractor and in the distribution list identify team members who should be aware of the closed submittal package
Submittal Management
11 Filtersortexportbull You can filter sort and export in the Submittals tab
bull Select either ldquoItemsrdquo ldquoPackagesrdquo or ldquoSpec Sectionrdquo
bull To filter ldquoItemsrdquo and ldquoPackagesrdquo use the drop-down lists associated with each criteria For ldquoSpec Sectionrdquo you canrsquot filter but you can search using the search field
bull To sort select the column headers
bull Select ldquoExportrdquo for a list and detailed summary report of all packages If you want a report of a specific package open the package and click ldquoExportrdquo
Creating daily logs
bull In the Field Management module select the Daily Logs tab
bull Click the calendar icon to select a month and day
bull To add in the daily weather click the location box to set your location and select ldquoGet Weatherrdquo Edit any necessary fields using the pencil icon
bull For Labor click ldquoAdd labor itemrdquo and populate the fields Repeat to add another labor line The daily labor total will calculate
bull General notes can be added to the notes box
bull When done click ldquoPublishrdquo
Daily Logs Log daily site activities to keep track of your project progress and performance With the Daily Log workflow track daily weather conditions to shed light on any delays caused on unforeseen circumstances track manpower by logging detailed labor information per company and document any issues or successes that may have occurred throughout the day
1
Working with Daily Logs
PRO TIP Published logs are visible to the team and canrsquot be edited
Additional Capabilities
Insight module
bull Click on the Insight module from the module picker
bull On the various cards get a high-level view of what is happening with the project including
bull Issue activity bull Issue root causebull Total issues to datebull Quality checklist conformance
bull Use the settings gear icon to change the date range of the view
bull Use the expand arrows to get a more detailed view and metrics
Insight amp ReportingHaving the right information at your fingertips is key to making better business decisions With the Insight module teams have visibility into high-level issues that might be holding up project schedules and driving up costs By quickly seeing where issues are happening and putting the right steps in place to solve problems teams can prioritize next steps and drive quality control needs to help ensure projects are successful
1
Insights Setup
Insights amp Reporting
2 Account analytics
bull Click the Account Admin module in the module selector tool
bull This option will only appear if you have admin privileges
bull Click ldquoAnalyticsrdquo to see insights on member activations linked companies and account information
bull Click the Members tab to see insights member usage and status
Account Admin
Dashboard cards
bull There are several cards that default into the Project Home view
bull Project Addressbull Weatherbull Field Issuesbull Checklistsbull RFIsbull Submittal Itemsbull Document Issuesbull Design Packages
bull Click any of the links to drill down and get more information on a specific item
bull Use the expand arrows to open the card to full screen and minimize it
Project HomeProject Home is a new way of interacting with BIM 360 that gives users a single view into their entire project with access to important relevant and actionable information from across BIM 360 and even some third-party services It provides a unified experience with at-a-glance insights about the entire project all in one place This enables teams to quickly evaluate areas that require attention and put the necessary action in place
1
Project Home Overview
Project Home
2 Setup amp permissions
bull The information presented in Project Home depends on your permission levels set up in the Project Admin module
bull Project member As a project member you can view issues relevant to you It will help you answer the question ldquoWhat do I need to do todayrdquo
bull Project leader As a project leader you can still see details that help you understand the most pressing needs for the day but you also see outstanding items at the project level
bull Each user can configure Project Home to their liking by adding removing or rearrange the cards
Download the BIM 360 app
bull Go to the App store or Google Play store on your mobile device to download the BIM 360 app
bull There are two BIM 360 mobile appsbull BIM 360 (available on Android and iOS)
bull The BIM 360 mobile app works with all other modules including Document Management
bull BIM 360 Docs (available on iOS)bull The BIM 360 Docs mobile app works with the
Document Management module only
Mobile AccessConstruction doesnrsquot happen behind a desk Teams need access to project documents and project management tools anytime anywhere With the BIM 360 mobile app teams can execute construction quality and safety workflows including creating or editing checklists viewing RFIs adding or tracking issues and managing or creating drawing markups directly from an Android or iOS device
1
PRO TIP For the next several months the BIM 360 mobile app and BIM 360 Docs mobile app will coexist and may share some functionality Stay up to date on mobile capabilities through the Autodesk Knowledge Network
Get the Android AppGet the iOS App
Mobile Access
2 Mobile workflows
bull Several workflow capabilities can be accomplished using the BIM 360 mobile apps including Checklists Issue Management RFI Tracking Daily Logs and Markups
bull To see the differences in workflow capabilities for the BIM 360 and BIM 360 Docs apps click the ldquoBIM 360 Mobile Capabilitiesrdquo link below
3 Offline sync
bull Teams are able to work on-site without Internet access
bull Teams can also download individual documents and add markups and comments when working offline Once back online all changes will be synced back to the cloud
About the Android App
BIM 360 Mobile Capabilities
About the iOS App
1
Getting Started Guide
Create a project
bull In the Account Admin module select the Projects tab and click ldquoAddrdquo
bull Enter project information and click ldquoSave amp Continuerdquo
Account AdminWith the project administration tools in BIM 360 you can rest assured that your project information is in the right hands Project admins can easily invite team members to the project and define their access levels on a project-by-project basis with a simple click BIM 360 has two levels of administration to ensure security and control across your projects Account admins and project admins Only account admins can create new projects and assign additional account admins and project admins Project admins can add and remove members set permissions and adjust project details
Create a Project
Account Admin
2 Activating modules
bull Click ldquoActivaterdquo for the desired BIM 360 service
bull Assign a project admin for each service You can add multiple admins
bull (Optional) For Document Management and Field you can copy existing project settings
bull An email invitation will be sent to the assigned project admin(s) They will need to click the link to join the project
bull Click ldquoFinishrdquo
3 Add members to directory
bull In the Account Admin module select the Members tab and click ldquoAddrdquo
bull To add an individual member select ldquoAdd People to the Member Directoryrdquo
bull To add an account admin select ldquoInvite Account Adminsrdquo
bull To import members from a list select ldquoImport Members by Spreadsheetrdquo For a first-time import download and complete the member list template
PRO TIP You have to activate Document Management first before you can activate other next-gen services
PRO TIP You can change the default company and role later if necessary
Account Admin
4 Adding members to a project amp assigning access levels
bull In the Project Admin module select the Members tab
bull Click ldquoAddrdquo and use the search bar to search the member directory
bull When you find the member select them and click ldquoSelectrdquo
bull Add their company and role Note Role determines their access level to all BIM 360 services
bull Click the icon(s) to overwrite the access level granted by their project role
bull Click ldquoAdd to Projectrdquo
bull Update existing access levels by clicking the grayed out icon(s)
Members amp Access Levels
Integration PartnersGet the most out of construction technology by integrating the software you already use with BIM 360 Built on an open and secure API platform BIM 360 enables users to easily integrate with various other construction softwares including drone technology estimating and bid management as well as safety management tools
Reality Capture
Estimating
Cost Management
Construction Management
Field Management
Bid Management
Layout
Scheduling
Design CheckingTakeoff
Accounting Data Transfer
Learn More
bim360autodeskcom
Autodesk the Autodesk logo and BIM 360 are registered trademarks or trademarks of Autodesk Inc andor its subsidiaries andor affiliates in the USA andor other countries All other brand names product names or trademarks belong to their respective holders Autodesk reserves the right to alter product and services offerings and specifications and pricing at any time without notice and is not responsible for typographical or graphical errors that may appear in this document copy 2018 Autodesk Inc
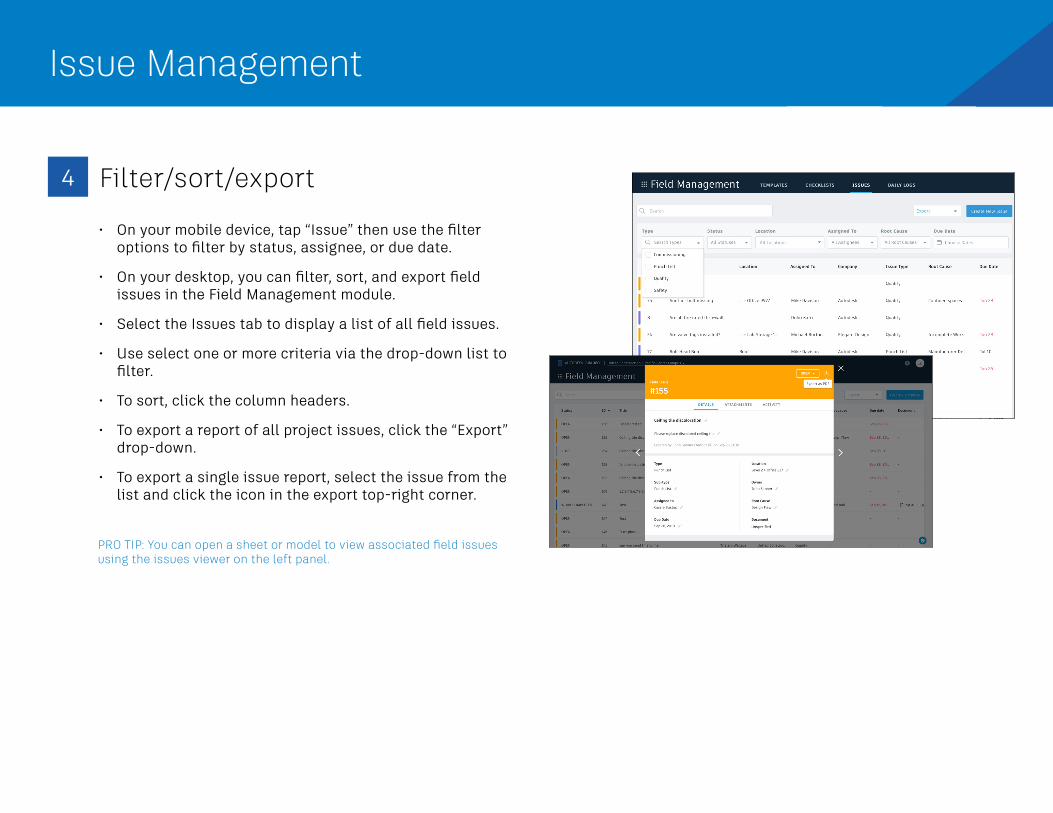
Issue Management
4 Filtersortexport
bull On your mobile device tap ldquoIssuerdquo then use the filter options to filter by status assignee or due date
bull On your desktop you can filter sort and export field issues in the Field Management module
bull Select the Issues tab to display a list of all field issues
bull Use select one or more criteria via the drop-down list to filter
bull To sort click the column headers
bull To export a report of all project issues click the ldquoExportrdquo drop-down
bull To export a single issue report select the issue from the list and click the icon in the export top-right corner
PRO TIP You can open a sheet or model to view associated field issues using the issues viewer on the left panel
Activate the Project Management module bull A project admin needs to activate the Project
Management module
bull Click the module selector for Project Admin select the Services tab and click ldquoOverviewrdquo in the left sidebar
bull In the Project Management row select ldquoActivaterdquo and designate at least one project admin
RFI ManagementEnhance your RFI workflow by automatically posting RFIs to 2D documents and 3D models Create accountability by designating ldquorolesrdquo to keep the process moving Initiate requests and manage reviews and approvals from any device And by publishing and storing this information in a single cloud-based repository you can maintain a full audit trail
1
RFI Management
2 Setting up the RFI workflowbull In the Project Admin module select the Services tab
bull On the left sidebar click ldquoProject Managementrdquo then ldquoRFIsrdquo
bull Click ldquoChange Workflowrdquo to select an RFI workflow The workflow determines the RFI actions for individual project users
bull Click the drop-down list to assign userrolecompany for each workflow role in order to start using RFIs
3 Creating RFIs associated with a document or modelbull In the Document Management module click to open a 2D
document or 3D model
bull In the RFI panel select ldquoCreate RFIrdquo Click where you want to place the RFI and an RFI pushpin will appear
bull Enter a title and complete all necessary fields By default the RFI status will be set to Draft When ready to assign set to Open
bull Note Any members selected as a co-reviewer can add comments markups and attachments Those chosen for the distribution list will be aware of the RFI but are not expected to comment
Set Up the RFI Workflow
Creating RFIs
RFI Management
4 Creating project-level RFIsbull Project-level RFIs are RFIs not associated with a
document or model
bull In the Project Management module select the RFIs tab and click ldquoCreate RFIrdquo
bull Once the ldquoAdd New RFIrdquo box opens enter a title and complete all necessary fields By default the RFI status will be set to Draft When ready to assign set to Open
bull Note A member selected as a co-reviewer can add comments markups and attachments Those chosen for the distribution list will be aware of the RFI but are not expected to comment
5 Vieweditsubmit RFIsbull View all project-level RFIs in the RFIs tab Click to open
the RFI and use the pencil icon to edit any necessary fields
bull For document or model-based RFIs under ldquoDetailsrdquo click the document hyperlinks to open the associated document Or when viewing a document or model use the RFI panel to navigate to the RFIs
PRO TIP You can create a project-level RFI and then associate it to a document or model by using the ldquoLinked Documentsrdquo option
RFI Management
6 Review amp respond to RFIsbull Depending on where you are in the RFI workflow the
relevant assignee will receive an email notification
bull Open the email and select ldquoView the RFIrdquo You will be directed to the RFI and associated documents
bull The reviewer can add additional co-reviewers comment attach documents and submit the official response
bull You can also review and respond to RFIs using the RFIs tab within the Project Management module
bull The RFI manager will review the response and set it to closed
7 Filtersort export
bull Filer sort and export using the RFIs tab to display a list of all project RFIs
bull To filter click the ldquoFilterrdquo drop down list and select one or more criteria
bull To sort click the column headers
bull To export click the ldquoExportrdquo drop down list
bull You can also filter sort and export directly from a document or model-based RFI via the RFI panel
Export RFI Reports
Submittal Management Submittals are an essential part of any construction project and effectively organizing and managing your submittals is vital With the Submittal workflow you can efficiently create coordinate and manage all submittals in a single document library anytime Initiate requests manage reviews and approvals and sync critical information to mobile devices for offline use
1 Identifying submittal manager bull To identify a submittal manager the Project Management
module needs to be activated
bull In the Project Admin module select the Services tab
bull On the left sidebar click ldquoProject Managementrdquo then ldquoSubmittalsrdquo
bull Enter member company or role to act as manager
Add a Submittal Manager
Submittal Management
2 Creating submittal items (submittal manager)
bull In the Project Management module select the Submittals tab
bull You can import submittal items using the import button or select ldquoCreate new itemrdquo
bull Enter all necessary information includingbull Spec Section Select a spec section or create a new one
For example furnishings equipment finishes bull Title Enter a descriptive title to identify the item bull Type Select a type for example samples or product data bull Assign to Responsible Contractor Select the responsible
subcontractor
3 Creating submittal packages (submittal manager)bull You can create a submittal package from an open
submittal item or in the ldquoSubmittalsrdquo tab under ldquoPackagesrdquo
bull Select ldquoCreate new packagerdquo Complete the required fields and select one or more reviewers (architect) and co-reviewersdistribution list (engineers consultants stakeholders etc)
Creating Submittal Items
Importing Submittal Items
Creating Submittal Packages
Submittal Management
5 Creating spec sections (Submittal manager)
bull In the Submittals tab select ldquoSpec Sectionrdquo then ldquoCreate spec sectionrdquo
bull Enter the spec number and title then click ldquoCreaterdquo
bull Note you can create a spec section when entering a new submittal item by clicking ldquoCreate Newrdquo above the ldquoSpec Sectionrdquo drop-down list
6 Submitting packages for review (submittal manager)
bull Open the package you want to submit and select ldquoSubmit to Reviewerrdquo
bull Select the reviewer add co-reviewers due date and notes if needed
4 Adding submittal items to package (submittal manager)
bull In the Submittals tab under Item select a submittal then ldquoAdd to packagerdquo
bull Select an existing package or choose ldquoCreate submittal packagerdquo to create a new package
Submittal Management
7 Reviewing submittal items (reviewer) bull Click to open the item(s) for review within ldquoAttachmentsrdquo
bull Designate office response using the drop-down list next to ldquoYour response is requiredrdquo
bull Upload any official response attachments and submit back to the manager
8 Creating a revision package (submittal manager)
bull If a reviewer responds to a submittal item with ldquoRevise and Resubmitrdquo or ldquoRejectedrdquo the manager needs to create a revision
bull Open the submittal package and select ldquoCreate new revisionrdquo
bull Include the responsible contractor due date and notes
bull Note Creating a new revision will only affect items with responses of ldquoRevise amp Resubmitrdquo and ldquoRejectedrdquo All other items will be closed
Submittal Management
9 Responding to a revision package (responsible contractor)
bull The contractor will be notified of the revision
bull Open the submittal item and in ldquoAttachmentsrdquo upload the revised documents
bull Once attached the document will appear with the ldquoFor reviewrdquo box checked
bull Close and select ldquoSubmit to Managerrdquo
bull The manager can now send the revised item(s) to the reviewer
10 Closing submittal packages (submittal manager)
bull Once the package is approved by the reviewer the submittal manager needs to close it and distribute it to the responsible contractor
bull In the Submittals tab under ldquoPackagesrdquo open the package and select ldquoClose and Distributerdquo
bull Include the responsible contractor and in the distribution list identify team members who should be aware of the closed submittal package
Submittal Management
11 Filtersortexportbull You can filter sort and export in the Submittals tab
bull Select either ldquoItemsrdquo ldquoPackagesrdquo or ldquoSpec Sectionrdquo
bull To filter ldquoItemsrdquo and ldquoPackagesrdquo use the drop-down lists associated with each criteria For ldquoSpec Sectionrdquo you canrsquot filter but you can search using the search field
bull To sort select the column headers
bull Select ldquoExportrdquo for a list and detailed summary report of all packages If you want a report of a specific package open the package and click ldquoExportrdquo
Creating daily logs
bull In the Field Management module select the Daily Logs tab
bull Click the calendar icon to select a month and day
bull To add in the daily weather click the location box to set your location and select ldquoGet Weatherrdquo Edit any necessary fields using the pencil icon
bull For Labor click ldquoAdd labor itemrdquo and populate the fields Repeat to add another labor line The daily labor total will calculate
bull General notes can be added to the notes box
bull When done click ldquoPublishrdquo
Daily Logs Log daily site activities to keep track of your project progress and performance With the Daily Log workflow track daily weather conditions to shed light on any delays caused on unforeseen circumstances track manpower by logging detailed labor information per company and document any issues or successes that may have occurred throughout the day
1
Working with Daily Logs
PRO TIP Published logs are visible to the team and canrsquot be edited
Additional Capabilities
Insight module
bull Click on the Insight module from the module picker
bull On the various cards get a high-level view of what is happening with the project including
bull Issue activity bull Issue root causebull Total issues to datebull Quality checklist conformance
bull Use the settings gear icon to change the date range of the view
bull Use the expand arrows to get a more detailed view and metrics
Insight amp ReportingHaving the right information at your fingertips is key to making better business decisions With the Insight module teams have visibility into high-level issues that might be holding up project schedules and driving up costs By quickly seeing where issues are happening and putting the right steps in place to solve problems teams can prioritize next steps and drive quality control needs to help ensure projects are successful
1
Insights Setup
Insights amp Reporting
2 Account analytics
bull Click the Account Admin module in the module selector tool
bull This option will only appear if you have admin privileges
bull Click ldquoAnalyticsrdquo to see insights on member activations linked companies and account information
bull Click the Members tab to see insights member usage and status
Account Admin
Dashboard cards
bull There are several cards that default into the Project Home view
bull Project Addressbull Weatherbull Field Issuesbull Checklistsbull RFIsbull Submittal Itemsbull Document Issuesbull Design Packages
bull Click any of the links to drill down and get more information on a specific item
bull Use the expand arrows to open the card to full screen and minimize it
Project HomeProject Home is a new way of interacting with BIM 360 that gives users a single view into their entire project with access to important relevant and actionable information from across BIM 360 and even some third-party services It provides a unified experience with at-a-glance insights about the entire project all in one place This enables teams to quickly evaluate areas that require attention and put the necessary action in place
1
Project Home Overview
Project Home
2 Setup amp permissions
bull The information presented in Project Home depends on your permission levels set up in the Project Admin module
bull Project member As a project member you can view issues relevant to you It will help you answer the question ldquoWhat do I need to do todayrdquo
bull Project leader As a project leader you can still see details that help you understand the most pressing needs for the day but you also see outstanding items at the project level
bull Each user can configure Project Home to their liking by adding removing or rearrange the cards
Download the BIM 360 app
bull Go to the App store or Google Play store on your mobile device to download the BIM 360 app
bull There are two BIM 360 mobile appsbull BIM 360 (available on Android and iOS)
bull The BIM 360 mobile app works with all other modules including Document Management
bull BIM 360 Docs (available on iOS)bull The BIM 360 Docs mobile app works with the
Document Management module only
Mobile AccessConstruction doesnrsquot happen behind a desk Teams need access to project documents and project management tools anytime anywhere With the BIM 360 mobile app teams can execute construction quality and safety workflows including creating or editing checklists viewing RFIs adding or tracking issues and managing or creating drawing markups directly from an Android or iOS device
1
PRO TIP For the next several months the BIM 360 mobile app and BIM 360 Docs mobile app will coexist and may share some functionality Stay up to date on mobile capabilities through the Autodesk Knowledge Network
Get the Android AppGet the iOS App
Mobile Access
2 Mobile workflows
bull Several workflow capabilities can be accomplished using the BIM 360 mobile apps including Checklists Issue Management RFI Tracking Daily Logs and Markups
bull To see the differences in workflow capabilities for the BIM 360 and BIM 360 Docs apps click the ldquoBIM 360 Mobile Capabilitiesrdquo link below
3 Offline sync
bull Teams are able to work on-site without Internet access
bull Teams can also download individual documents and add markups and comments when working offline Once back online all changes will be synced back to the cloud
About the Android App
BIM 360 Mobile Capabilities
About the iOS App
1
Getting Started Guide
Create a project
bull In the Account Admin module select the Projects tab and click ldquoAddrdquo
bull Enter project information and click ldquoSave amp Continuerdquo
Account AdminWith the project administration tools in BIM 360 you can rest assured that your project information is in the right hands Project admins can easily invite team members to the project and define their access levels on a project-by-project basis with a simple click BIM 360 has two levels of administration to ensure security and control across your projects Account admins and project admins Only account admins can create new projects and assign additional account admins and project admins Project admins can add and remove members set permissions and adjust project details
Create a Project
Account Admin
2 Activating modules
bull Click ldquoActivaterdquo for the desired BIM 360 service
bull Assign a project admin for each service You can add multiple admins
bull (Optional) For Document Management and Field you can copy existing project settings
bull An email invitation will be sent to the assigned project admin(s) They will need to click the link to join the project
bull Click ldquoFinishrdquo
3 Add members to directory
bull In the Account Admin module select the Members tab and click ldquoAddrdquo
bull To add an individual member select ldquoAdd People to the Member Directoryrdquo
bull To add an account admin select ldquoInvite Account Adminsrdquo
bull To import members from a list select ldquoImport Members by Spreadsheetrdquo For a first-time import download and complete the member list template
PRO TIP You have to activate Document Management first before you can activate other next-gen services
PRO TIP You can change the default company and role later if necessary
Account Admin
4 Adding members to a project amp assigning access levels
bull In the Project Admin module select the Members tab
bull Click ldquoAddrdquo and use the search bar to search the member directory
bull When you find the member select them and click ldquoSelectrdquo
bull Add their company and role Note Role determines their access level to all BIM 360 services
bull Click the icon(s) to overwrite the access level granted by their project role
bull Click ldquoAdd to Projectrdquo
bull Update existing access levels by clicking the grayed out icon(s)
Members amp Access Levels
Integration PartnersGet the most out of construction technology by integrating the software you already use with BIM 360 Built on an open and secure API platform BIM 360 enables users to easily integrate with various other construction softwares including drone technology estimating and bid management as well as safety management tools
Reality Capture
Estimating
Cost Management
Construction Management
Field Management
Bid Management
Layout
Scheduling
Design CheckingTakeoff
Accounting Data Transfer
Learn More
bim360autodeskcom
Autodesk the Autodesk logo and BIM 360 are registered trademarks or trademarks of Autodesk Inc andor its subsidiaries andor affiliates in the USA andor other countries All other brand names product names or trademarks belong to their respective holders Autodesk reserves the right to alter product and services offerings and specifications and pricing at any time without notice and is not responsible for typographical or graphical errors that may appear in this document copy 2018 Autodesk Inc
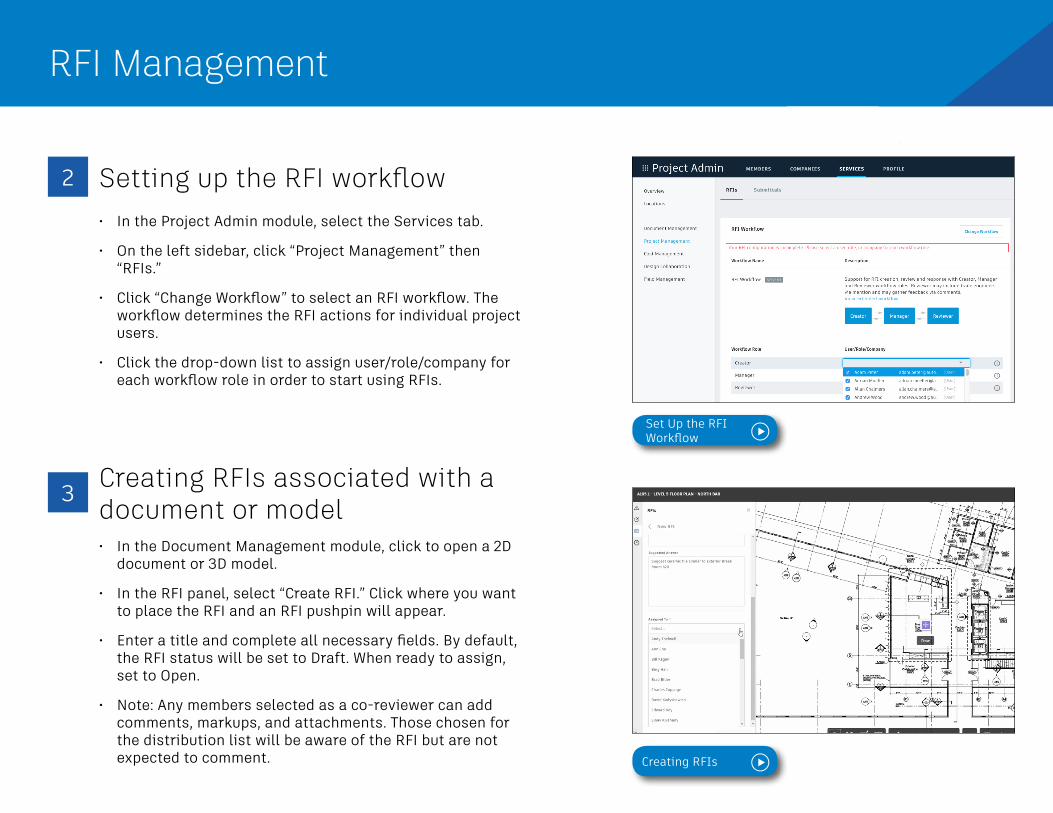
RFI Management
2 Setting up the RFI workflowbull In the Project Admin module select the Services tab
bull On the left sidebar click ldquoProject Managementrdquo then ldquoRFIsrdquo
bull Click ldquoChange Workflowrdquo to select an RFI workflow The workflow determines the RFI actions for individual project users
bull Click the drop-down list to assign userrolecompany for each workflow role in order to start using RFIs
3 Creating RFIs associated with a document or modelbull In the Document Management module click to open a 2D
document or 3D model
bull In the RFI panel select ldquoCreate RFIrdquo Click where you want to place the RFI and an RFI pushpin will appear
bull Enter a title and complete all necessary fields By default the RFI status will be set to Draft When ready to assign set to Open
bull Note Any members selected as a co-reviewer can add comments markups and attachments Those chosen for the distribution list will be aware of the RFI but are not expected to comment
Set Up the RFI Workflow
Creating RFIs
RFI Management
4 Creating project-level RFIsbull Project-level RFIs are RFIs not associated with a
document or model
bull In the Project Management module select the RFIs tab and click ldquoCreate RFIrdquo
bull Once the ldquoAdd New RFIrdquo box opens enter a title and complete all necessary fields By default the RFI status will be set to Draft When ready to assign set to Open
bull Note A member selected as a co-reviewer can add comments markups and attachments Those chosen for the distribution list will be aware of the RFI but are not expected to comment
5 Vieweditsubmit RFIsbull View all project-level RFIs in the RFIs tab Click to open
the RFI and use the pencil icon to edit any necessary fields
bull For document or model-based RFIs under ldquoDetailsrdquo click the document hyperlinks to open the associated document Or when viewing a document or model use the RFI panel to navigate to the RFIs
PRO TIP You can create a project-level RFI and then associate it to a document or model by using the ldquoLinked Documentsrdquo option
RFI Management
6 Review amp respond to RFIsbull Depending on where you are in the RFI workflow the
relevant assignee will receive an email notification
bull Open the email and select ldquoView the RFIrdquo You will be directed to the RFI and associated documents
bull The reviewer can add additional co-reviewers comment attach documents and submit the official response
bull You can also review and respond to RFIs using the RFIs tab within the Project Management module
bull The RFI manager will review the response and set it to closed
7 Filtersort export
bull Filer sort and export using the RFIs tab to display a list of all project RFIs
bull To filter click the ldquoFilterrdquo drop down list and select one or more criteria
bull To sort click the column headers
bull To export click the ldquoExportrdquo drop down list
bull You can also filter sort and export directly from a document or model-based RFI via the RFI panel
Export RFI Reports
Submittal Management Submittals are an essential part of any construction project and effectively organizing and managing your submittals is vital With the Submittal workflow you can efficiently create coordinate and manage all submittals in a single document library anytime Initiate requests manage reviews and approvals and sync critical information to mobile devices for offline use
1 Identifying submittal manager bull To identify a submittal manager the Project Management
module needs to be activated
bull In the Project Admin module select the Services tab
bull On the left sidebar click ldquoProject Managementrdquo then ldquoSubmittalsrdquo
bull Enter member company or role to act as manager
Add a Submittal Manager
Submittal Management
2 Creating submittal items (submittal manager)
bull In the Project Management module select the Submittals tab
bull You can import submittal items using the import button or select ldquoCreate new itemrdquo
bull Enter all necessary information includingbull Spec Section Select a spec section or create a new one
For example furnishings equipment finishes bull Title Enter a descriptive title to identify the item bull Type Select a type for example samples or product data bull Assign to Responsible Contractor Select the responsible
subcontractor
3 Creating submittal packages (submittal manager)bull You can create a submittal package from an open
submittal item or in the ldquoSubmittalsrdquo tab under ldquoPackagesrdquo
bull Select ldquoCreate new packagerdquo Complete the required fields and select one or more reviewers (architect) and co-reviewersdistribution list (engineers consultants stakeholders etc)
Creating Submittal Items
Importing Submittal Items
Creating Submittal Packages
Submittal Management
5 Creating spec sections (Submittal manager)
bull In the Submittals tab select ldquoSpec Sectionrdquo then ldquoCreate spec sectionrdquo
bull Enter the spec number and title then click ldquoCreaterdquo
bull Note you can create a spec section when entering a new submittal item by clicking ldquoCreate Newrdquo above the ldquoSpec Sectionrdquo drop-down list
6 Submitting packages for review (submittal manager)
bull Open the package you want to submit and select ldquoSubmit to Reviewerrdquo
bull Select the reviewer add co-reviewers due date and notes if needed
4 Adding submittal items to package (submittal manager)
bull In the Submittals tab under Item select a submittal then ldquoAdd to packagerdquo
bull Select an existing package or choose ldquoCreate submittal packagerdquo to create a new package
Submittal Management
7 Reviewing submittal items (reviewer) bull Click to open the item(s) for review within ldquoAttachmentsrdquo
bull Designate office response using the drop-down list next to ldquoYour response is requiredrdquo
bull Upload any official response attachments and submit back to the manager
8 Creating a revision package (submittal manager)
bull If a reviewer responds to a submittal item with ldquoRevise and Resubmitrdquo or ldquoRejectedrdquo the manager needs to create a revision
bull Open the submittal package and select ldquoCreate new revisionrdquo
bull Include the responsible contractor due date and notes
bull Note Creating a new revision will only affect items with responses of ldquoRevise amp Resubmitrdquo and ldquoRejectedrdquo All other items will be closed
Submittal Management
9 Responding to a revision package (responsible contractor)
bull The contractor will be notified of the revision
bull Open the submittal item and in ldquoAttachmentsrdquo upload the revised documents
bull Once attached the document will appear with the ldquoFor reviewrdquo box checked
bull Close and select ldquoSubmit to Managerrdquo
bull The manager can now send the revised item(s) to the reviewer
10 Closing submittal packages (submittal manager)
bull Once the package is approved by the reviewer the submittal manager needs to close it and distribute it to the responsible contractor
bull In the Submittals tab under ldquoPackagesrdquo open the package and select ldquoClose and Distributerdquo
bull Include the responsible contractor and in the distribution list identify team members who should be aware of the closed submittal package
Submittal Management
11 Filtersortexportbull You can filter sort and export in the Submittals tab
bull Select either ldquoItemsrdquo ldquoPackagesrdquo or ldquoSpec Sectionrdquo
bull To filter ldquoItemsrdquo and ldquoPackagesrdquo use the drop-down lists associated with each criteria For ldquoSpec Sectionrdquo you canrsquot filter but you can search using the search field
bull To sort select the column headers
bull Select ldquoExportrdquo for a list and detailed summary report of all packages If you want a report of a specific package open the package and click ldquoExportrdquo
Creating daily logs
bull In the Field Management module select the Daily Logs tab
bull Click the calendar icon to select a month and day
bull To add in the daily weather click the location box to set your location and select ldquoGet Weatherrdquo Edit any necessary fields using the pencil icon
bull For Labor click ldquoAdd labor itemrdquo and populate the fields Repeat to add another labor line The daily labor total will calculate
bull General notes can be added to the notes box
bull When done click ldquoPublishrdquo
Daily Logs Log daily site activities to keep track of your project progress and performance With the Daily Log workflow track daily weather conditions to shed light on any delays caused on unforeseen circumstances track manpower by logging detailed labor information per company and document any issues or successes that may have occurred throughout the day
1
Working with Daily Logs
PRO TIP Published logs are visible to the team and canrsquot be edited
Additional Capabilities
Insight module
bull Click on the Insight module from the module picker
bull On the various cards get a high-level view of what is happening with the project including
bull Issue activity bull Issue root causebull Total issues to datebull Quality checklist conformance
bull Use the settings gear icon to change the date range of the view
bull Use the expand arrows to get a more detailed view and metrics
Insight amp ReportingHaving the right information at your fingertips is key to making better business decisions With the Insight module teams have visibility into high-level issues that might be holding up project schedules and driving up costs By quickly seeing where issues are happening and putting the right steps in place to solve problems teams can prioritize next steps and drive quality control needs to help ensure projects are successful
1
Insights Setup
Insights amp Reporting
2 Account analytics
bull Click the Account Admin module in the module selector tool
bull This option will only appear if you have admin privileges
bull Click ldquoAnalyticsrdquo to see insights on member activations linked companies and account information
bull Click the Members tab to see insights member usage and status
Account Admin
Dashboard cards
bull There are several cards that default into the Project Home view
bull Project Addressbull Weatherbull Field Issuesbull Checklistsbull RFIsbull Submittal Itemsbull Document Issuesbull Design Packages
bull Click any of the links to drill down and get more information on a specific item
bull Use the expand arrows to open the card to full screen and minimize it
Project HomeProject Home is a new way of interacting with BIM 360 that gives users a single view into their entire project with access to important relevant and actionable information from across BIM 360 and even some third-party services It provides a unified experience with at-a-glance insights about the entire project all in one place This enables teams to quickly evaluate areas that require attention and put the necessary action in place
1
Project Home Overview
Project Home
2 Setup amp permissions
bull The information presented in Project Home depends on your permission levels set up in the Project Admin module
bull Project member As a project member you can view issues relevant to you It will help you answer the question ldquoWhat do I need to do todayrdquo
bull Project leader As a project leader you can still see details that help you understand the most pressing needs for the day but you also see outstanding items at the project level
bull Each user can configure Project Home to their liking by adding removing or rearrange the cards
Download the BIM 360 app
bull Go to the App store or Google Play store on your mobile device to download the BIM 360 app
bull There are two BIM 360 mobile appsbull BIM 360 (available on Android and iOS)
bull The BIM 360 mobile app works with all other modules including Document Management
bull BIM 360 Docs (available on iOS)bull The BIM 360 Docs mobile app works with the
Document Management module only
Mobile AccessConstruction doesnrsquot happen behind a desk Teams need access to project documents and project management tools anytime anywhere With the BIM 360 mobile app teams can execute construction quality and safety workflows including creating or editing checklists viewing RFIs adding or tracking issues and managing or creating drawing markups directly from an Android or iOS device
1
PRO TIP For the next several months the BIM 360 mobile app and BIM 360 Docs mobile app will coexist and may share some functionality Stay up to date on mobile capabilities through the Autodesk Knowledge Network
Get the Android AppGet the iOS App
Mobile Access
2 Mobile workflows
bull Several workflow capabilities can be accomplished using the BIM 360 mobile apps including Checklists Issue Management RFI Tracking Daily Logs and Markups
bull To see the differences in workflow capabilities for the BIM 360 and BIM 360 Docs apps click the ldquoBIM 360 Mobile Capabilitiesrdquo link below
3 Offline sync
bull Teams are able to work on-site without Internet access
bull Teams can also download individual documents and add markups and comments when working offline Once back online all changes will be synced back to the cloud
About the Android App
BIM 360 Mobile Capabilities
About the iOS App
1
Getting Started Guide
Create a project
bull In the Account Admin module select the Projects tab and click ldquoAddrdquo
bull Enter project information and click ldquoSave amp Continuerdquo
Account AdminWith the project administration tools in BIM 360 you can rest assured that your project information is in the right hands Project admins can easily invite team members to the project and define their access levels on a project-by-project basis with a simple click BIM 360 has two levels of administration to ensure security and control across your projects Account admins and project admins Only account admins can create new projects and assign additional account admins and project admins Project admins can add and remove members set permissions and adjust project details
Create a Project
Account Admin
2 Activating modules
bull Click ldquoActivaterdquo for the desired BIM 360 service
bull Assign a project admin for each service You can add multiple admins
bull (Optional) For Document Management and Field you can copy existing project settings
bull An email invitation will be sent to the assigned project admin(s) They will need to click the link to join the project
bull Click ldquoFinishrdquo
3 Add members to directory
bull In the Account Admin module select the Members tab and click ldquoAddrdquo
bull To add an individual member select ldquoAdd People to the Member Directoryrdquo
bull To add an account admin select ldquoInvite Account Adminsrdquo
bull To import members from a list select ldquoImport Members by Spreadsheetrdquo For a first-time import download and complete the member list template
PRO TIP You have to activate Document Management first before you can activate other next-gen services
PRO TIP You can change the default company and role later if necessary
Account Admin
4 Adding members to a project amp assigning access levels
bull In the Project Admin module select the Members tab
bull Click ldquoAddrdquo and use the search bar to search the member directory
bull When you find the member select them and click ldquoSelectrdquo
bull Add their company and role Note Role determines their access level to all BIM 360 services
bull Click the icon(s) to overwrite the access level granted by their project role
bull Click ldquoAdd to Projectrdquo
bull Update existing access levels by clicking the grayed out icon(s)
Members amp Access Levels
Integration PartnersGet the most out of construction technology by integrating the software you already use with BIM 360 Built on an open and secure API platform BIM 360 enables users to easily integrate with various other construction softwares including drone technology estimating and bid management as well as safety management tools
Reality Capture
Estimating
Cost Management
Construction Management
Field Management
Bid Management
Layout
Scheduling
Design CheckingTakeoff
Accounting Data Transfer
Learn More
bim360autodeskcom
Autodesk the Autodesk logo and BIM 360 are registered trademarks or trademarks of Autodesk Inc andor its subsidiaries andor affiliates in the USA andor other countries All other brand names product names or trademarks belong to their respective holders Autodesk reserves the right to alter product and services offerings and specifications and pricing at any time without notice and is not responsible for typographical or graphical errors that may appear in this document copy 2018 Autodesk Inc
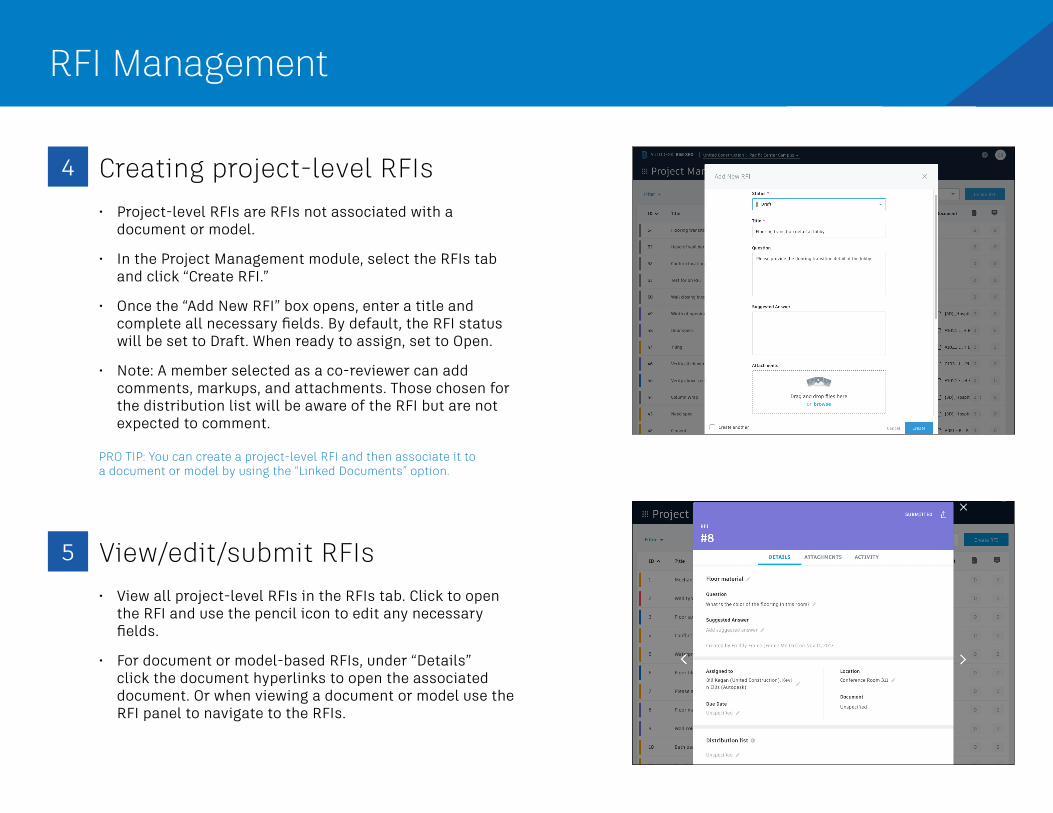
RFI Management
4 Creating project-level RFIsbull Project-level RFIs are RFIs not associated with a
document or model
bull In the Project Management module select the RFIs tab and click ldquoCreate RFIrdquo
bull Once the ldquoAdd New RFIrdquo box opens enter a title and complete all necessary fields By default the RFI status will be set to Draft When ready to assign set to Open
bull Note A member selected as a co-reviewer can add comments markups and attachments Those chosen for the distribution list will be aware of the RFI but are not expected to comment
5 Vieweditsubmit RFIsbull View all project-level RFIs in the RFIs tab Click to open
the RFI and use the pencil icon to edit any necessary fields
bull For document or model-based RFIs under ldquoDetailsrdquo click the document hyperlinks to open the associated document Or when viewing a document or model use the RFI panel to navigate to the RFIs
PRO TIP You can create a project-level RFI and then associate it to a document or model by using the ldquoLinked Documentsrdquo option
RFI Management
6 Review amp respond to RFIsbull Depending on where you are in the RFI workflow the
relevant assignee will receive an email notification
bull Open the email and select ldquoView the RFIrdquo You will be directed to the RFI and associated documents
bull The reviewer can add additional co-reviewers comment attach documents and submit the official response
bull You can also review and respond to RFIs using the RFIs tab within the Project Management module
bull The RFI manager will review the response and set it to closed
7 Filtersort export
bull Filer sort and export using the RFIs tab to display a list of all project RFIs
bull To filter click the ldquoFilterrdquo drop down list and select one or more criteria
bull To sort click the column headers
bull To export click the ldquoExportrdquo drop down list
bull You can also filter sort and export directly from a document or model-based RFI via the RFI panel
Export RFI Reports
Submittal Management Submittals are an essential part of any construction project and effectively organizing and managing your submittals is vital With the Submittal workflow you can efficiently create coordinate and manage all submittals in a single document library anytime Initiate requests manage reviews and approvals and sync critical information to mobile devices for offline use
1 Identifying submittal manager bull To identify a submittal manager the Project Management
module needs to be activated
bull In the Project Admin module select the Services tab
bull On the left sidebar click ldquoProject Managementrdquo then ldquoSubmittalsrdquo
bull Enter member company or role to act as manager
Add a Submittal Manager
Submittal Management
2 Creating submittal items (submittal manager)
bull In the Project Management module select the Submittals tab
bull You can import submittal items using the import button or select ldquoCreate new itemrdquo
bull Enter all necessary information includingbull Spec Section Select a spec section or create a new one
For example furnishings equipment finishes bull Title Enter a descriptive title to identify the item bull Type Select a type for example samples or product data bull Assign to Responsible Contractor Select the responsible
subcontractor
3 Creating submittal packages (submittal manager)bull You can create a submittal package from an open
submittal item or in the ldquoSubmittalsrdquo tab under ldquoPackagesrdquo
bull Select ldquoCreate new packagerdquo Complete the required fields and select one or more reviewers (architect) and co-reviewersdistribution list (engineers consultants stakeholders etc)
Creating Submittal Items
Importing Submittal Items
Creating Submittal Packages
Submittal Management
5 Creating spec sections (Submittal manager)
bull In the Submittals tab select ldquoSpec Sectionrdquo then ldquoCreate spec sectionrdquo
bull Enter the spec number and title then click ldquoCreaterdquo
bull Note you can create a spec section when entering a new submittal item by clicking ldquoCreate Newrdquo above the ldquoSpec Sectionrdquo drop-down list
6 Submitting packages for review (submittal manager)
bull Open the package you want to submit and select ldquoSubmit to Reviewerrdquo
bull Select the reviewer add co-reviewers due date and notes if needed
4 Adding submittal items to package (submittal manager)
bull In the Submittals tab under Item select a submittal then ldquoAdd to packagerdquo
bull Select an existing package or choose ldquoCreate submittal packagerdquo to create a new package
Submittal Management
7 Reviewing submittal items (reviewer) bull Click to open the item(s) for review within ldquoAttachmentsrdquo
bull Designate office response using the drop-down list next to ldquoYour response is requiredrdquo
bull Upload any official response attachments and submit back to the manager
8 Creating a revision package (submittal manager)
bull If a reviewer responds to a submittal item with ldquoRevise and Resubmitrdquo or ldquoRejectedrdquo the manager needs to create a revision
bull Open the submittal package and select ldquoCreate new revisionrdquo
bull Include the responsible contractor due date and notes
bull Note Creating a new revision will only affect items with responses of ldquoRevise amp Resubmitrdquo and ldquoRejectedrdquo All other items will be closed
Submittal Management
9 Responding to a revision package (responsible contractor)
bull The contractor will be notified of the revision
bull Open the submittal item and in ldquoAttachmentsrdquo upload the revised documents
bull Once attached the document will appear with the ldquoFor reviewrdquo box checked
bull Close and select ldquoSubmit to Managerrdquo
bull The manager can now send the revised item(s) to the reviewer
10 Closing submittal packages (submittal manager)
bull Once the package is approved by the reviewer the submittal manager needs to close it and distribute it to the responsible contractor
bull In the Submittals tab under ldquoPackagesrdquo open the package and select ldquoClose and Distributerdquo
bull Include the responsible contractor and in the distribution list identify team members who should be aware of the closed submittal package
Submittal Management
11 Filtersortexportbull You can filter sort and export in the Submittals tab
bull Select either ldquoItemsrdquo ldquoPackagesrdquo or ldquoSpec Sectionrdquo
bull To filter ldquoItemsrdquo and ldquoPackagesrdquo use the drop-down lists associated with each criteria For ldquoSpec Sectionrdquo you canrsquot filter but you can search using the search field
bull To sort select the column headers
bull Select ldquoExportrdquo for a list and detailed summary report of all packages If you want a report of a specific package open the package and click ldquoExportrdquo
Creating daily logs
bull In the Field Management module select the Daily Logs tab
bull Click the calendar icon to select a month and day
bull To add in the daily weather click the location box to set your location and select ldquoGet Weatherrdquo Edit any necessary fields using the pencil icon
bull For Labor click ldquoAdd labor itemrdquo and populate the fields Repeat to add another labor line The daily labor total will calculate
bull General notes can be added to the notes box
bull When done click ldquoPublishrdquo
Daily Logs Log daily site activities to keep track of your project progress and performance With the Daily Log workflow track daily weather conditions to shed light on any delays caused on unforeseen circumstances track manpower by logging detailed labor information per company and document any issues or successes that may have occurred throughout the day
1
Working with Daily Logs
PRO TIP Published logs are visible to the team and canrsquot be edited
Additional Capabilities
Insight module
bull Click on the Insight module from the module picker
bull On the various cards get a high-level view of what is happening with the project including
bull Issue activity bull Issue root causebull Total issues to datebull Quality checklist conformance
bull Use the settings gear icon to change the date range of the view
bull Use the expand arrows to get a more detailed view and metrics
Insight amp ReportingHaving the right information at your fingertips is key to making better business decisions With the Insight module teams have visibility into high-level issues that might be holding up project schedules and driving up costs By quickly seeing where issues are happening and putting the right steps in place to solve problems teams can prioritize next steps and drive quality control needs to help ensure projects are successful
1
Insights Setup
Insights amp Reporting
2 Account analytics
bull Click the Account Admin module in the module selector tool
bull This option will only appear if you have admin privileges
bull Click ldquoAnalyticsrdquo to see insights on member activations linked companies and account information
bull Click the Members tab to see insights member usage and status
Account Admin
Dashboard cards
bull There are several cards that default into the Project Home view
bull Project Addressbull Weatherbull Field Issuesbull Checklistsbull RFIsbull Submittal Itemsbull Document Issuesbull Design Packages
bull Click any of the links to drill down and get more information on a specific item
bull Use the expand arrows to open the card to full screen and minimize it
Project HomeProject Home is a new way of interacting with BIM 360 that gives users a single view into their entire project with access to important relevant and actionable information from across BIM 360 and even some third-party services It provides a unified experience with at-a-glance insights about the entire project all in one place This enables teams to quickly evaluate areas that require attention and put the necessary action in place
1
Project Home Overview
Project Home
2 Setup amp permissions
bull The information presented in Project Home depends on your permission levels set up in the Project Admin module
bull Project member As a project member you can view issues relevant to you It will help you answer the question ldquoWhat do I need to do todayrdquo
bull Project leader As a project leader you can still see details that help you understand the most pressing needs for the day but you also see outstanding items at the project level
bull Each user can configure Project Home to their liking by adding removing or rearrange the cards
Download the BIM 360 app
bull Go to the App store or Google Play store on your mobile device to download the BIM 360 app
bull There are two BIM 360 mobile appsbull BIM 360 (available on Android and iOS)
bull The BIM 360 mobile app works with all other modules including Document Management
bull BIM 360 Docs (available on iOS)bull The BIM 360 Docs mobile app works with the
Document Management module only
Mobile AccessConstruction doesnrsquot happen behind a desk Teams need access to project documents and project management tools anytime anywhere With the BIM 360 mobile app teams can execute construction quality and safety workflows including creating or editing checklists viewing RFIs adding or tracking issues and managing or creating drawing markups directly from an Android or iOS device
1
PRO TIP For the next several months the BIM 360 mobile app and BIM 360 Docs mobile app will coexist and may share some functionality Stay up to date on mobile capabilities through the Autodesk Knowledge Network
Get the Android AppGet the iOS App
Mobile Access
2 Mobile workflows
bull Several workflow capabilities can be accomplished using the BIM 360 mobile apps including Checklists Issue Management RFI Tracking Daily Logs and Markups
bull To see the differences in workflow capabilities for the BIM 360 and BIM 360 Docs apps click the ldquoBIM 360 Mobile Capabilitiesrdquo link below
3 Offline sync
bull Teams are able to work on-site without Internet access
bull Teams can also download individual documents and add markups and comments when working offline Once back online all changes will be synced back to the cloud
About the Android App
BIM 360 Mobile Capabilities
About the iOS App
1
Getting Started Guide
Create a project
bull In the Account Admin module select the Projects tab and click ldquoAddrdquo
bull Enter project information and click ldquoSave amp Continuerdquo
Account AdminWith the project administration tools in BIM 360 you can rest assured that your project information is in the right hands Project admins can easily invite team members to the project and define their access levels on a project-by-project basis with a simple click BIM 360 has two levels of administration to ensure security and control across your projects Account admins and project admins Only account admins can create new projects and assign additional account admins and project admins Project admins can add and remove members set permissions and adjust project details
Create a Project
Account Admin
2 Activating modules
bull Click ldquoActivaterdquo for the desired BIM 360 service
bull Assign a project admin for each service You can add multiple admins
bull (Optional) For Document Management and Field you can copy existing project settings
bull An email invitation will be sent to the assigned project admin(s) They will need to click the link to join the project
bull Click ldquoFinishrdquo
3 Add members to directory
bull In the Account Admin module select the Members tab and click ldquoAddrdquo
bull To add an individual member select ldquoAdd People to the Member Directoryrdquo
bull To add an account admin select ldquoInvite Account Adminsrdquo
bull To import members from a list select ldquoImport Members by Spreadsheetrdquo For a first-time import download and complete the member list template
PRO TIP You have to activate Document Management first before you can activate other next-gen services
PRO TIP You can change the default company and role later if necessary
Account Admin
4 Adding members to a project amp assigning access levels
bull In the Project Admin module select the Members tab
bull Click ldquoAddrdquo and use the search bar to search the member directory
bull When you find the member select them and click ldquoSelectrdquo
bull Add their company and role Note Role determines their access level to all BIM 360 services
bull Click the icon(s) to overwrite the access level granted by their project role
bull Click ldquoAdd to Projectrdquo
bull Update existing access levels by clicking the grayed out icon(s)
Members amp Access Levels
Integration PartnersGet the most out of construction technology by integrating the software you already use with BIM 360 Built on an open and secure API platform BIM 360 enables users to easily integrate with various other construction softwares including drone technology estimating and bid management as well as safety management tools
Reality Capture
Estimating
Cost Management
Construction Management
Field Management
Bid Management
Layout
Scheduling
Design CheckingTakeoff
Accounting Data Transfer
Learn More
bim360autodeskcom
Autodesk the Autodesk logo and BIM 360 are registered trademarks or trademarks of Autodesk Inc andor its subsidiaries andor affiliates in the USA andor other countries All other brand names product names or trademarks belong to their respective holders Autodesk reserves the right to alter product and services offerings and specifications and pricing at any time without notice and is not responsible for typographical or graphical errors that may appear in this document copy 2018 Autodesk Inc
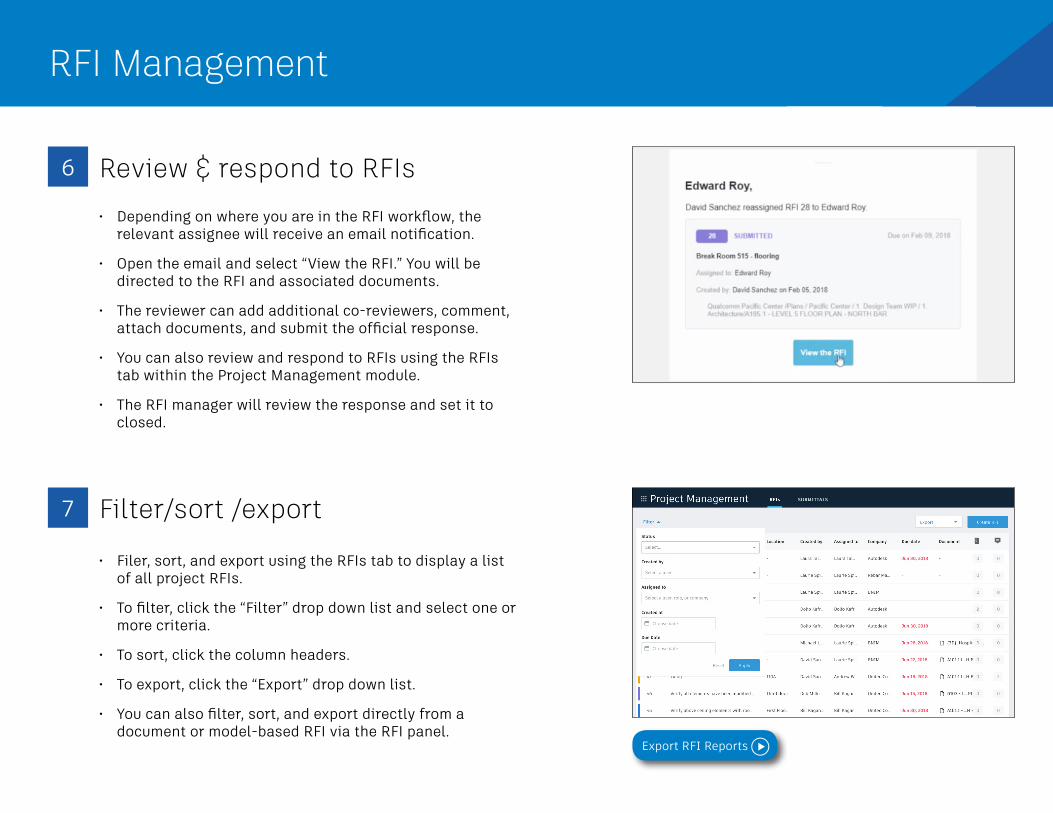
RFI Management
6 Review amp respond to RFIsbull Depending on where you are in the RFI workflow the
relevant assignee will receive an email notification
bull Open the email and select ldquoView the RFIrdquo You will be directed to the RFI and associated documents
bull The reviewer can add additional co-reviewers comment attach documents and submit the official response
bull You can also review and respond to RFIs using the RFIs tab within the Project Management module
bull The RFI manager will review the response and set it to closed
7 Filtersort export
bull Filer sort and export using the RFIs tab to display a list of all project RFIs
bull To filter click the ldquoFilterrdquo drop down list and select one or more criteria
bull To sort click the column headers
bull To export click the ldquoExportrdquo drop down list
bull You can also filter sort and export directly from a document or model-based RFI via the RFI panel
Export RFI Reports
Submittal Management Submittals are an essential part of any construction project and effectively organizing and managing your submittals is vital With the Submittal workflow you can efficiently create coordinate and manage all submittals in a single document library anytime Initiate requests manage reviews and approvals and sync critical information to mobile devices for offline use
1 Identifying submittal manager bull To identify a submittal manager the Project Management
module needs to be activated
bull In the Project Admin module select the Services tab
bull On the left sidebar click ldquoProject Managementrdquo then ldquoSubmittalsrdquo
bull Enter member company or role to act as manager
Add a Submittal Manager
Submittal Management
2 Creating submittal items (submittal manager)
bull In the Project Management module select the Submittals tab
bull You can import submittal items using the import button or select ldquoCreate new itemrdquo
bull Enter all necessary information includingbull Spec Section Select a spec section or create a new one
For example furnishings equipment finishes bull Title Enter a descriptive title to identify the item bull Type Select a type for example samples or product data bull Assign to Responsible Contractor Select the responsible
subcontractor
3 Creating submittal packages (submittal manager)bull You can create a submittal package from an open
submittal item or in the ldquoSubmittalsrdquo tab under ldquoPackagesrdquo
bull Select ldquoCreate new packagerdquo Complete the required fields and select one or more reviewers (architect) and co-reviewersdistribution list (engineers consultants stakeholders etc)
Creating Submittal Items
Importing Submittal Items
Creating Submittal Packages
Submittal Management
5 Creating spec sections (Submittal manager)
bull In the Submittals tab select ldquoSpec Sectionrdquo then ldquoCreate spec sectionrdquo
bull Enter the spec number and title then click ldquoCreaterdquo
bull Note you can create a spec section when entering a new submittal item by clicking ldquoCreate Newrdquo above the ldquoSpec Sectionrdquo drop-down list
6 Submitting packages for review (submittal manager)
bull Open the package you want to submit and select ldquoSubmit to Reviewerrdquo
bull Select the reviewer add co-reviewers due date and notes if needed
4 Adding submittal items to package (submittal manager)
bull In the Submittals tab under Item select a submittal then ldquoAdd to packagerdquo
bull Select an existing package or choose ldquoCreate submittal packagerdquo to create a new package
Submittal Management
7 Reviewing submittal items (reviewer) bull Click to open the item(s) for review within ldquoAttachmentsrdquo
bull Designate office response using the drop-down list next to ldquoYour response is requiredrdquo
bull Upload any official response attachments and submit back to the manager
8 Creating a revision package (submittal manager)
bull If a reviewer responds to a submittal item with ldquoRevise and Resubmitrdquo or ldquoRejectedrdquo the manager needs to create a revision
bull Open the submittal package and select ldquoCreate new revisionrdquo
bull Include the responsible contractor due date and notes
bull Note Creating a new revision will only affect items with responses of ldquoRevise amp Resubmitrdquo and ldquoRejectedrdquo All other items will be closed
Submittal Management
9 Responding to a revision package (responsible contractor)
bull The contractor will be notified of the revision
bull Open the submittal item and in ldquoAttachmentsrdquo upload the revised documents
bull Once attached the document will appear with the ldquoFor reviewrdquo box checked
bull Close and select ldquoSubmit to Managerrdquo
bull The manager can now send the revised item(s) to the reviewer
10 Closing submittal packages (submittal manager)
bull Once the package is approved by the reviewer the submittal manager needs to close it and distribute it to the responsible contractor
bull In the Submittals tab under ldquoPackagesrdquo open the package and select ldquoClose and Distributerdquo
bull Include the responsible contractor and in the distribution list identify team members who should be aware of the closed submittal package
Submittal Management
11 Filtersortexportbull You can filter sort and export in the Submittals tab
bull Select either ldquoItemsrdquo ldquoPackagesrdquo or ldquoSpec Sectionrdquo
bull To filter ldquoItemsrdquo and ldquoPackagesrdquo use the drop-down lists associated with each criteria For ldquoSpec Sectionrdquo you canrsquot filter but you can search using the search field
bull To sort select the column headers
bull Select ldquoExportrdquo for a list and detailed summary report of all packages If you want a report of a specific package open the package and click ldquoExportrdquo
Creating daily logs
bull In the Field Management module select the Daily Logs tab
bull Click the calendar icon to select a month and day
bull To add in the daily weather click the location box to set your location and select ldquoGet Weatherrdquo Edit any necessary fields using the pencil icon
bull For Labor click ldquoAdd labor itemrdquo and populate the fields Repeat to add another labor line The daily labor total will calculate
bull General notes can be added to the notes box
bull When done click ldquoPublishrdquo
Daily Logs Log daily site activities to keep track of your project progress and performance With the Daily Log workflow track daily weather conditions to shed light on any delays caused on unforeseen circumstances track manpower by logging detailed labor information per company and document any issues or successes that may have occurred throughout the day
1
Working with Daily Logs
PRO TIP Published logs are visible to the team and canrsquot be edited
Additional Capabilities
Insight module
bull Click on the Insight module from the module picker
bull On the various cards get a high-level view of what is happening with the project including
bull Issue activity bull Issue root causebull Total issues to datebull Quality checklist conformance
bull Use the settings gear icon to change the date range of the view
bull Use the expand arrows to get a more detailed view and metrics
Insight amp ReportingHaving the right information at your fingertips is key to making better business decisions With the Insight module teams have visibility into high-level issues that might be holding up project schedules and driving up costs By quickly seeing where issues are happening and putting the right steps in place to solve problems teams can prioritize next steps and drive quality control needs to help ensure projects are successful
1
Insights Setup
Insights amp Reporting
2 Account analytics
bull Click the Account Admin module in the module selector tool
bull This option will only appear if you have admin privileges
bull Click ldquoAnalyticsrdquo to see insights on member activations linked companies and account information
bull Click the Members tab to see insights member usage and status
Account Admin
Dashboard cards
bull There are several cards that default into the Project Home view
bull Project Addressbull Weatherbull Field Issuesbull Checklistsbull RFIsbull Submittal Itemsbull Document Issuesbull Design Packages
bull Click any of the links to drill down and get more information on a specific item
bull Use the expand arrows to open the card to full screen and minimize it
Project HomeProject Home is a new way of interacting with BIM 360 that gives users a single view into their entire project with access to important relevant and actionable information from across BIM 360 and even some third-party services It provides a unified experience with at-a-glance insights about the entire project all in one place This enables teams to quickly evaluate areas that require attention and put the necessary action in place
1
Project Home Overview
Project Home
2 Setup amp permissions
bull The information presented in Project Home depends on your permission levels set up in the Project Admin module
bull Project member As a project member you can view issues relevant to you It will help you answer the question ldquoWhat do I need to do todayrdquo
bull Project leader As a project leader you can still see details that help you understand the most pressing needs for the day but you also see outstanding items at the project level
bull Each user can configure Project Home to their liking by adding removing or rearrange the cards
Download the BIM 360 app
bull Go to the App store or Google Play store on your mobile device to download the BIM 360 app
bull There are two BIM 360 mobile appsbull BIM 360 (available on Android and iOS)
bull The BIM 360 mobile app works with all other modules including Document Management
bull BIM 360 Docs (available on iOS)bull The BIM 360 Docs mobile app works with the
Document Management module only
Mobile AccessConstruction doesnrsquot happen behind a desk Teams need access to project documents and project management tools anytime anywhere With the BIM 360 mobile app teams can execute construction quality and safety workflows including creating or editing checklists viewing RFIs adding or tracking issues and managing or creating drawing markups directly from an Android or iOS device
1
PRO TIP For the next several months the BIM 360 mobile app and BIM 360 Docs mobile app will coexist and may share some functionality Stay up to date on mobile capabilities through the Autodesk Knowledge Network
Get the Android AppGet the iOS App
Mobile Access
2 Mobile workflows
bull Several workflow capabilities can be accomplished using the BIM 360 mobile apps including Checklists Issue Management RFI Tracking Daily Logs and Markups
bull To see the differences in workflow capabilities for the BIM 360 and BIM 360 Docs apps click the ldquoBIM 360 Mobile Capabilitiesrdquo link below
3 Offline sync
bull Teams are able to work on-site without Internet access
bull Teams can also download individual documents and add markups and comments when working offline Once back online all changes will be synced back to the cloud
About the Android App
BIM 360 Mobile Capabilities
About the iOS App
1
Getting Started Guide
Create a project
bull In the Account Admin module select the Projects tab and click ldquoAddrdquo
bull Enter project information and click ldquoSave amp Continuerdquo
Account AdminWith the project administration tools in BIM 360 you can rest assured that your project information is in the right hands Project admins can easily invite team members to the project and define their access levels on a project-by-project basis with a simple click BIM 360 has two levels of administration to ensure security and control across your projects Account admins and project admins Only account admins can create new projects and assign additional account admins and project admins Project admins can add and remove members set permissions and adjust project details
Create a Project
Account Admin
2 Activating modules
bull Click ldquoActivaterdquo for the desired BIM 360 service
bull Assign a project admin for each service You can add multiple admins
bull (Optional) For Document Management and Field you can copy existing project settings
bull An email invitation will be sent to the assigned project admin(s) They will need to click the link to join the project
bull Click ldquoFinishrdquo
3 Add members to directory
bull In the Account Admin module select the Members tab and click ldquoAddrdquo
bull To add an individual member select ldquoAdd People to the Member Directoryrdquo
bull To add an account admin select ldquoInvite Account Adminsrdquo
bull To import members from a list select ldquoImport Members by Spreadsheetrdquo For a first-time import download and complete the member list template
PRO TIP You have to activate Document Management first before you can activate other next-gen services
PRO TIP You can change the default company and role later if necessary
Account Admin
4 Adding members to a project amp assigning access levels
bull In the Project Admin module select the Members tab
bull Click ldquoAddrdquo and use the search bar to search the member directory
bull When you find the member select them and click ldquoSelectrdquo
bull Add their company and role Note Role determines their access level to all BIM 360 services
bull Click the icon(s) to overwrite the access level granted by their project role
bull Click ldquoAdd to Projectrdquo
bull Update existing access levels by clicking the grayed out icon(s)
Members amp Access Levels
Integration PartnersGet the most out of construction technology by integrating the software you already use with BIM 360 Built on an open and secure API platform BIM 360 enables users to easily integrate with various other construction softwares including drone technology estimating and bid management as well as safety management tools
Reality Capture
Estimating
Cost Management
Construction Management
Field Management
Bid Management
Layout
Scheduling
Design CheckingTakeoff
Accounting Data Transfer
Learn More
bim360autodeskcom
Autodesk the Autodesk logo and BIM 360 are registered trademarks or trademarks of Autodesk Inc andor its subsidiaries andor affiliates in the USA andor other countries All other brand names product names or trademarks belong to their respective holders Autodesk reserves the right to alter product and services offerings and specifications and pricing at any time without notice and is not responsible for typographical or graphical errors that may appear in this document copy 2018 Autodesk Inc
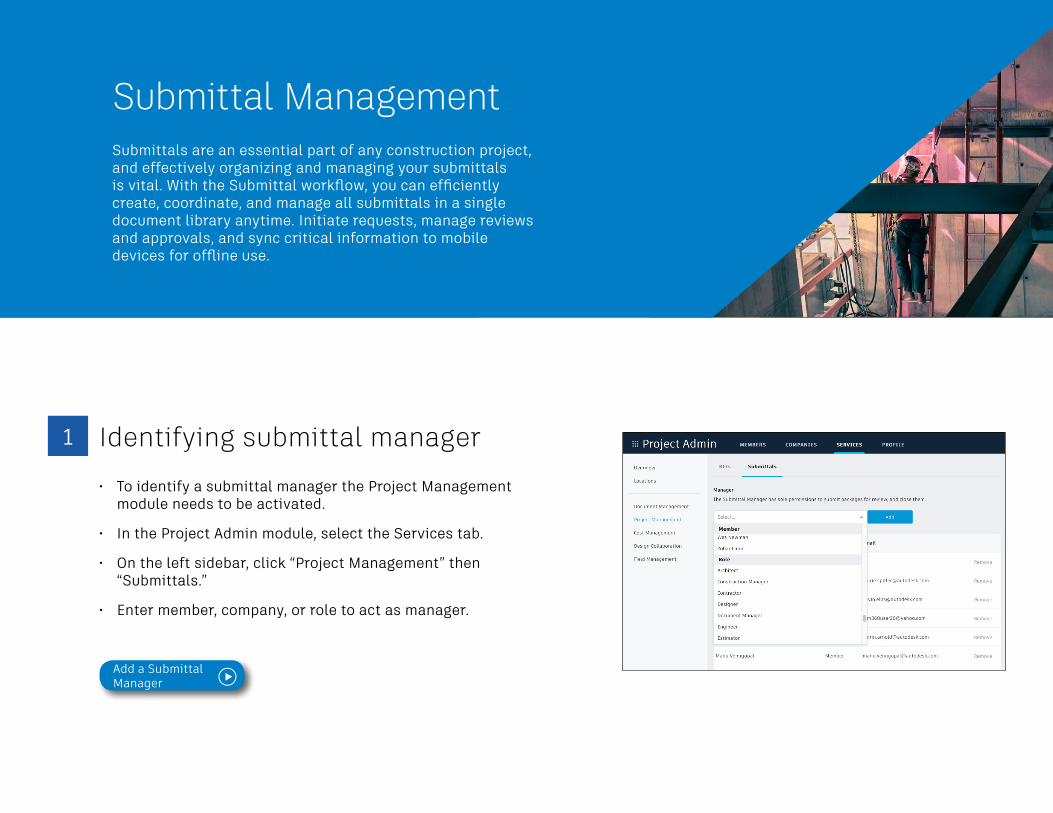
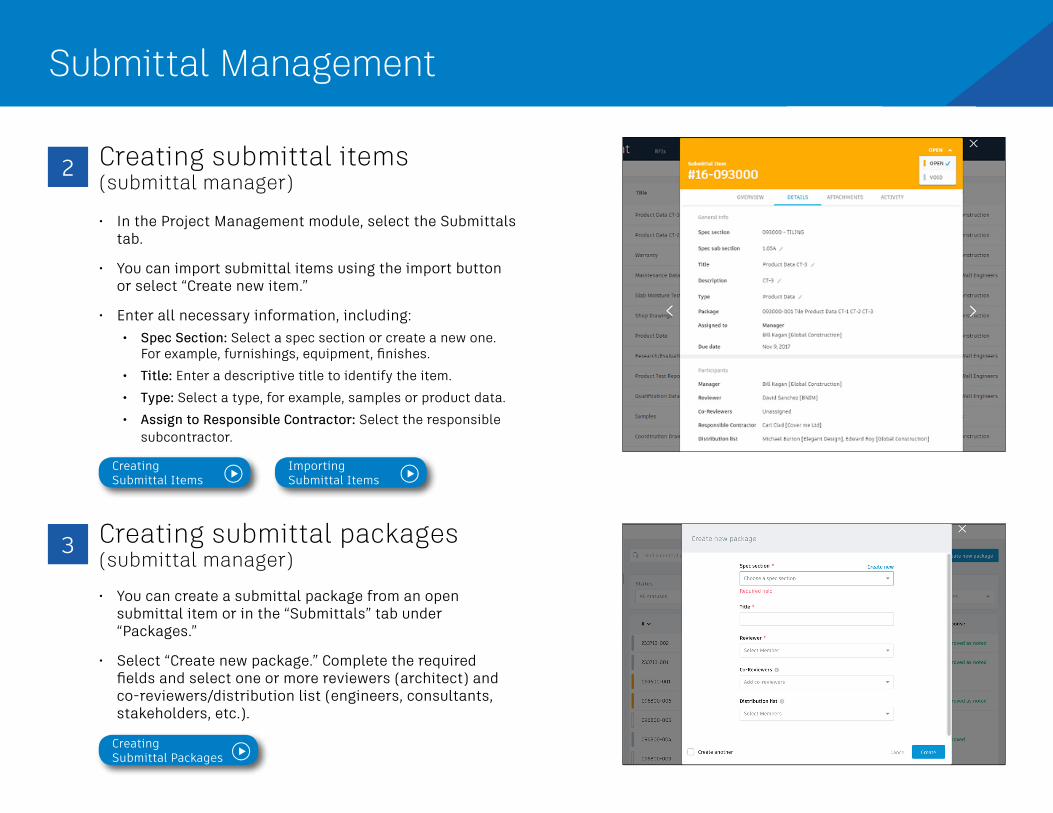
Submittal Management
2 Creating submittal items (submittal manager)
bull In the Project Management module select the Submittals tab
bull You can import submittal items using the import button or select ldquoCreate new itemrdquo
bull Enter all necessary information includingbull Spec Section Select a spec section or create a new one
For example furnishings equipment finishes bull Title Enter a descriptive title to identify the item bull Type Select a type for example samples or product data bull Assign to Responsible Contractor Select the responsible
subcontractor
3 Creating submittal packages (submittal manager)bull You can create a submittal package from an open
submittal item or in the ldquoSubmittalsrdquo tab under ldquoPackagesrdquo
bull Select ldquoCreate new packagerdquo Complete the required fields and select one or more reviewers (architect) and co-reviewersdistribution list (engineers consultants stakeholders etc)
Creating Submittal Items
Importing Submittal Items
Creating Submittal Packages
Submittal Management
5 Creating spec sections (Submittal manager)
bull In the Submittals tab select ldquoSpec Sectionrdquo then ldquoCreate spec sectionrdquo
bull Enter the spec number and title then click ldquoCreaterdquo
bull Note you can create a spec section when entering a new submittal item by clicking ldquoCreate Newrdquo above the ldquoSpec Sectionrdquo drop-down list
6 Submitting packages for review (submittal manager)
bull Open the package you want to submit and select ldquoSubmit to Reviewerrdquo
bull Select the reviewer add co-reviewers due date and notes if needed
4 Adding submittal items to package (submittal manager)
bull In the Submittals tab under Item select a submittal then ldquoAdd to packagerdquo
bull Select an existing package or choose ldquoCreate submittal packagerdquo to create a new package
Submittal Management
7 Reviewing submittal items (reviewer) bull Click to open the item(s) for review within ldquoAttachmentsrdquo
bull Designate office response using the drop-down list next to ldquoYour response is requiredrdquo
bull Upload any official response attachments and submit back to the manager
8 Creating a revision package (submittal manager)
bull If a reviewer responds to a submittal item with ldquoRevise and Resubmitrdquo or ldquoRejectedrdquo the manager needs to create a revision
bull Open the submittal package and select ldquoCreate new revisionrdquo
bull Include the responsible contractor due date and notes
bull Note Creating a new revision will only affect items with responses of ldquoRevise amp Resubmitrdquo and ldquoRejectedrdquo All other items will be closed
Submittal Management
9 Responding to a revision package (responsible contractor)
bull The contractor will be notified of the revision
bull Open the submittal item and in ldquoAttachmentsrdquo upload the revised documents
bull Once attached the document will appear with the ldquoFor reviewrdquo box checked
bull Close and select ldquoSubmit to Managerrdquo
bull The manager can now send the revised item(s) to the reviewer
10 Closing submittal packages (submittal manager)
bull Once the package is approved by the reviewer the submittal manager needs to close it and distribute it to the responsible contractor
bull In the Submittals tab under ldquoPackagesrdquo open the package and select ldquoClose and Distributerdquo
bull Include the responsible contractor and in the distribution list identify team members who should be aware of the closed submittal package
Submittal Management
11 Filtersortexportbull You can filter sort and export in the Submittals tab
bull Select either ldquoItemsrdquo ldquoPackagesrdquo or ldquoSpec Sectionrdquo
bull To filter ldquoItemsrdquo and ldquoPackagesrdquo use the drop-down lists associated with each criteria For ldquoSpec Sectionrdquo you canrsquot filter but you can search using the search field
bull To sort select the column headers
bull Select ldquoExportrdquo for a list and detailed summary report of all packages If you want a report of a specific package open the package and click ldquoExportrdquo
Creating daily logs
bull In the Field Management module select the Daily Logs tab
bull Click the calendar icon to select a month and day
bull To add in the daily weather click the location box to set your location and select ldquoGet Weatherrdquo Edit any necessary fields using the pencil icon
bull For Labor click ldquoAdd labor itemrdquo and populate the fields Repeat to add another labor line The daily labor total will calculate
bull General notes can be added to the notes box
bull When done click ldquoPublishrdquo
Daily Logs Log daily site activities to keep track of your project progress and performance With the Daily Log workflow track daily weather conditions to shed light on any delays caused on unforeseen circumstances track manpower by logging detailed labor information per company and document any issues or successes that may have occurred throughout the day
1
Working with Daily Logs
PRO TIP Published logs are visible to the team and canrsquot be edited
Additional Capabilities
Insight module
bull Click on the Insight module from the module picker
bull On the various cards get a high-level view of what is happening with the project including
bull Issue activity bull Issue root causebull Total issues to datebull Quality checklist conformance
bull Use the settings gear icon to change the date range of the view
bull Use the expand arrows to get a more detailed view and metrics
Insight amp ReportingHaving the right information at your fingertips is key to making better business decisions With the Insight module teams have visibility into high-level issues that might be holding up project schedules and driving up costs By quickly seeing where issues are happening and putting the right steps in place to solve problems teams can prioritize next steps and drive quality control needs to help ensure projects are successful
1
Insights Setup
Insights amp Reporting
2 Account analytics
bull Click the Account Admin module in the module selector tool
bull This option will only appear if you have admin privileges
bull Click ldquoAnalyticsrdquo to see insights on member activations linked companies and account information
bull Click the Members tab to see insights member usage and status
Account Admin
Dashboard cards
bull There are several cards that default into the Project Home view
bull Project Addressbull Weatherbull Field Issuesbull Checklistsbull RFIsbull Submittal Itemsbull Document Issuesbull Design Packages
bull Click any of the links to drill down and get more information on a specific item
bull Use the expand arrows to open the card to full screen and minimize it
Project HomeProject Home is a new way of interacting with BIM 360 that gives users a single view into their entire project with access to important relevant and actionable information from across BIM 360 and even some third-party services It provides a unified experience with at-a-glance insights about the entire project all in one place This enables teams to quickly evaluate areas that require attention and put the necessary action in place
1
Project Home Overview
Project Home
2 Setup amp permissions
bull The information presented in Project Home depends on your permission levels set up in the Project Admin module
bull Project member As a project member you can view issues relevant to you It will help you answer the question ldquoWhat do I need to do todayrdquo
bull Project leader As a project leader you can still see details that help you understand the most pressing needs for the day but you also see outstanding items at the project level
bull Each user can configure Project Home to their liking by adding removing or rearrange the cards
Download the BIM 360 app
bull Go to the App store or Google Play store on your mobile device to download the BIM 360 app
bull There are two BIM 360 mobile appsbull BIM 360 (available on Android and iOS)
bull The BIM 360 mobile app works with all other modules including Document Management
bull BIM 360 Docs (available on iOS)bull The BIM 360 Docs mobile app works with the
Document Management module only
Mobile AccessConstruction doesnrsquot happen behind a desk Teams need access to project documents and project management tools anytime anywhere With the BIM 360 mobile app teams can execute construction quality and safety workflows including creating or editing checklists viewing RFIs adding or tracking issues and managing or creating drawing markups directly from an Android or iOS device
1
PRO TIP For the next several months the BIM 360 mobile app and BIM 360 Docs mobile app will coexist and may share some functionality Stay up to date on mobile capabilities through the Autodesk Knowledge Network
Get the Android AppGet the iOS App
Mobile Access
2 Mobile workflows
bull Several workflow capabilities can be accomplished using the BIM 360 mobile apps including Checklists Issue Management RFI Tracking Daily Logs and Markups
bull To see the differences in workflow capabilities for the BIM 360 and BIM 360 Docs apps click the ldquoBIM 360 Mobile Capabilitiesrdquo link below
3 Offline sync
bull Teams are able to work on-site without Internet access
bull Teams can also download individual documents and add markups and comments when working offline Once back online all changes will be synced back to the cloud
About the Android App
BIM 360 Mobile Capabilities
About the iOS App
1
Getting Started Guide
Create a project
bull In the Account Admin module select the Projects tab and click ldquoAddrdquo
bull Enter project information and click ldquoSave amp Continuerdquo
Account AdminWith the project administration tools in BIM 360 you can rest assured that your project information is in the right hands Project admins can easily invite team members to the project and define their access levels on a project-by-project basis with a simple click BIM 360 has two levels of administration to ensure security and control across your projects Account admins and project admins Only account admins can create new projects and assign additional account admins and project admins Project admins can add and remove members set permissions and adjust project details
Create a Project
Account Admin
2 Activating modules
bull Click ldquoActivaterdquo for the desired BIM 360 service
bull Assign a project admin for each service You can add multiple admins
bull (Optional) For Document Management and Field you can copy existing project settings
bull An email invitation will be sent to the assigned project admin(s) They will need to click the link to join the project
bull Click ldquoFinishrdquo
3 Add members to directory
bull In the Account Admin module select the Members tab and click ldquoAddrdquo
bull To add an individual member select ldquoAdd People to the Member Directoryrdquo
bull To add an account admin select ldquoInvite Account Adminsrdquo
bull To import members from a list select ldquoImport Members by Spreadsheetrdquo For a first-time import download and complete the member list template
PRO TIP You have to activate Document Management first before you can activate other next-gen services
PRO TIP You can change the default company and role later if necessary
Account Admin
4 Adding members to a project amp assigning access levels
bull In the Project Admin module select the Members tab
bull Click ldquoAddrdquo and use the search bar to search the member directory
bull When you find the member select them and click ldquoSelectrdquo
bull Add their company and role Note Role determines their access level to all BIM 360 services
bull Click the icon(s) to overwrite the access level granted by their project role
bull Click ldquoAdd to Projectrdquo
bull Update existing access levels by clicking the grayed out icon(s)
Members amp Access Levels
Integration PartnersGet the most out of construction technology by integrating the software you already use with BIM 360 Built on an open and secure API platform BIM 360 enables users to easily integrate with various other construction softwares including drone technology estimating and bid management as well as safety management tools
Reality Capture
Estimating
Cost Management
Construction Management
Field Management
Bid Management
Layout
Scheduling
Design CheckingTakeoff
Accounting Data Transfer
Learn More
bim360autodeskcom
Autodesk the Autodesk logo and BIM 360 are registered trademarks or trademarks of Autodesk Inc andor its subsidiaries andor affiliates in the USA andor other countries All other brand names product names or trademarks belong to their respective holders Autodesk reserves the right to alter product and services offerings and specifications and pricing at any time without notice and is not responsible for typographical or graphical errors that may appear in this document copy 2018 Autodesk Inc
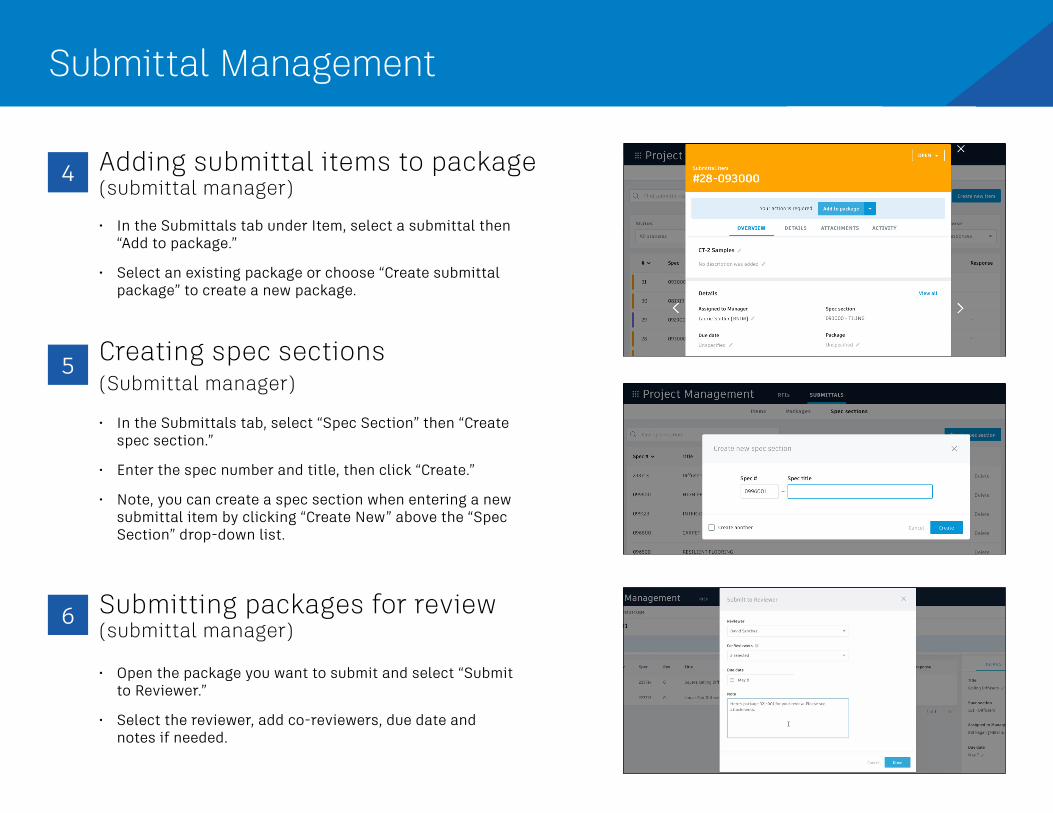
Submittal Management
5 Creating spec sections (Submittal manager)
bull In the Submittals tab select ldquoSpec Sectionrdquo then ldquoCreate spec sectionrdquo
bull Enter the spec number and title then click ldquoCreaterdquo
bull Note you can create a spec section when entering a new submittal item by clicking ldquoCreate Newrdquo above the ldquoSpec Sectionrdquo drop-down list
6 Submitting packages for review (submittal manager)
bull Open the package you want to submit and select ldquoSubmit to Reviewerrdquo
bull Select the reviewer add co-reviewers due date and notes if needed
4 Adding submittal items to package (submittal manager)
bull In the Submittals tab under Item select a submittal then ldquoAdd to packagerdquo
bull Select an existing package or choose ldquoCreate submittal packagerdquo to create a new package
Submittal Management
7 Reviewing submittal items (reviewer) bull Click to open the item(s) for review within ldquoAttachmentsrdquo
bull Designate office response using the drop-down list next to ldquoYour response is requiredrdquo
bull Upload any official response attachments and submit back to the manager
8 Creating a revision package (submittal manager)
bull If a reviewer responds to a submittal item with ldquoRevise and Resubmitrdquo or ldquoRejectedrdquo the manager needs to create a revision
bull Open the submittal package and select ldquoCreate new revisionrdquo
bull Include the responsible contractor due date and notes
bull Note Creating a new revision will only affect items with responses of ldquoRevise amp Resubmitrdquo and ldquoRejectedrdquo All other items will be closed
Submittal Management
9 Responding to a revision package (responsible contractor)
bull The contractor will be notified of the revision
bull Open the submittal item and in ldquoAttachmentsrdquo upload the revised documents
bull Once attached the document will appear with the ldquoFor reviewrdquo box checked
bull Close and select ldquoSubmit to Managerrdquo
bull The manager can now send the revised item(s) to the reviewer
10 Closing submittal packages (submittal manager)
bull Once the package is approved by the reviewer the submittal manager needs to close it and distribute it to the responsible contractor
bull In the Submittals tab under ldquoPackagesrdquo open the package and select ldquoClose and Distributerdquo
bull Include the responsible contractor and in the distribution list identify team members who should be aware of the closed submittal package
Submittal Management
11 Filtersortexportbull You can filter sort and export in the Submittals tab
bull Select either ldquoItemsrdquo ldquoPackagesrdquo or ldquoSpec Sectionrdquo
bull To filter ldquoItemsrdquo and ldquoPackagesrdquo use the drop-down lists associated with each criteria For ldquoSpec Sectionrdquo you canrsquot filter but you can search using the search field
bull To sort select the column headers
bull Select ldquoExportrdquo for a list and detailed summary report of all packages If you want a report of a specific package open the package and click ldquoExportrdquo
Creating daily logs
bull In the Field Management module select the Daily Logs tab
bull Click the calendar icon to select a month and day
bull To add in the daily weather click the location box to set your location and select ldquoGet Weatherrdquo Edit any necessary fields using the pencil icon
bull For Labor click ldquoAdd labor itemrdquo and populate the fields Repeat to add another labor line The daily labor total will calculate
bull General notes can be added to the notes box
bull When done click ldquoPublishrdquo
Daily Logs Log daily site activities to keep track of your project progress and performance With the Daily Log workflow track daily weather conditions to shed light on any delays caused on unforeseen circumstances track manpower by logging detailed labor information per company and document any issues or successes that may have occurred throughout the day
1
Working with Daily Logs
PRO TIP Published logs are visible to the team and canrsquot be edited
Additional Capabilities
Insight module
bull Click on the Insight module from the module picker
bull On the various cards get a high-level view of what is happening with the project including
bull Issue activity bull Issue root causebull Total issues to datebull Quality checklist conformance
bull Use the settings gear icon to change the date range of the view
bull Use the expand arrows to get a more detailed view and metrics
Insight amp ReportingHaving the right information at your fingertips is key to making better business decisions With the Insight module teams have visibility into high-level issues that might be holding up project schedules and driving up costs By quickly seeing where issues are happening and putting the right steps in place to solve problems teams can prioritize next steps and drive quality control needs to help ensure projects are successful
1
Insights Setup
Insights amp Reporting
2 Account analytics
bull Click the Account Admin module in the module selector tool
bull This option will only appear if you have admin privileges
bull Click ldquoAnalyticsrdquo to see insights on member activations linked companies and account information
bull Click the Members tab to see insights member usage and status
Account Admin
Dashboard cards
bull There are several cards that default into the Project Home view
bull Project Addressbull Weatherbull Field Issuesbull Checklistsbull RFIsbull Submittal Itemsbull Document Issuesbull Design Packages
bull Click any of the links to drill down and get more information on a specific item
bull Use the expand arrows to open the card to full screen and minimize it
Project HomeProject Home is a new way of interacting with BIM 360 that gives users a single view into their entire project with access to important relevant and actionable information from across BIM 360 and even some third-party services It provides a unified experience with at-a-glance insights about the entire project all in one place This enables teams to quickly evaluate areas that require attention and put the necessary action in place
1
Project Home Overview
Project Home
2 Setup amp permissions
bull The information presented in Project Home depends on your permission levels set up in the Project Admin module
bull Project member As a project member you can view issues relevant to you It will help you answer the question ldquoWhat do I need to do todayrdquo
bull Project leader As a project leader you can still see details that help you understand the most pressing needs for the day but you also see outstanding items at the project level
bull Each user can configure Project Home to their liking by adding removing or rearrange the cards
Download the BIM 360 app
bull Go to the App store or Google Play store on your mobile device to download the BIM 360 app
bull There are two BIM 360 mobile appsbull BIM 360 (available on Android and iOS)
bull The BIM 360 mobile app works with all other modules including Document Management
bull BIM 360 Docs (available on iOS)bull The BIM 360 Docs mobile app works with the
Document Management module only
Mobile AccessConstruction doesnrsquot happen behind a desk Teams need access to project documents and project management tools anytime anywhere With the BIM 360 mobile app teams can execute construction quality and safety workflows including creating or editing checklists viewing RFIs adding or tracking issues and managing or creating drawing markups directly from an Android or iOS device
1
PRO TIP For the next several months the BIM 360 mobile app and BIM 360 Docs mobile app will coexist and may share some functionality Stay up to date on mobile capabilities through the Autodesk Knowledge Network
Get the Android AppGet the iOS App
Mobile Access
2 Mobile workflows
bull Several workflow capabilities can be accomplished using the BIM 360 mobile apps including Checklists Issue Management RFI Tracking Daily Logs and Markups
bull To see the differences in workflow capabilities for the BIM 360 and BIM 360 Docs apps click the ldquoBIM 360 Mobile Capabilitiesrdquo link below
3 Offline sync
bull Teams are able to work on-site without Internet access
bull Teams can also download individual documents and add markups and comments when working offline Once back online all changes will be synced back to the cloud
About the Android App
BIM 360 Mobile Capabilities
About the iOS App
1
Getting Started Guide
Create a project
bull In the Account Admin module select the Projects tab and click ldquoAddrdquo
bull Enter project information and click ldquoSave amp Continuerdquo
Account AdminWith the project administration tools in BIM 360 you can rest assured that your project information is in the right hands Project admins can easily invite team members to the project and define their access levels on a project-by-project basis with a simple click BIM 360 has two levels of administration to ensure security and control across your projects Account admins and project admins Only account admins can create new projects and assign additional account admins and project admins Project admins can add and remove members set permissions and adjust project details
Create a Project
Account Admin
2 Activating modules
bull Click ldquoActivaterdquo for the desired BIM 360 service
bull Assign a project admin for each service You can add multiple admins
bull (Optional) For Document Management and Field you can copy existing project settings
bull An email invitation will be sent to the assigned project admin(s) They will need to click the link to join the project
bull Click ldquoFinishrdquo
3 Add members to directory
bull In the Account Admin module select the Members tab and click ldquoAddrdquo
bull To add an individual member select ldquoAdd People to the Member Directoryrdquo
bull To add an account admin select ldquoInvite Account Adminsrdquo
bull To import members from a list select ldquoImport Members by Spreadsheetrdquo For a first-time import download and complete the member list template
PRO TIP You have to activate Document Management first before you can activate other next-gen services
PRO TIP You can change the default company and role later if necessary
Account Admin
4 Adding members to a project amp assigning access levels
bull In the Project Admin module select the Members tab
bull Click ldquoAddrdquo and use the search bar to search the member directory
bull When you find the member select them and click ldquoSelectrdquo
bull Add their company and role Note Role determines their access level to all BIM 360 services
bull Click the icon(s) to overwrite the access level granted by their project role
bull Click ldquoAdd to Projectrdquo
bull Update existing access levels by clicking the grayed out icon(s)
Members amp Access Levels
Integration PartnersGet the most out of construction technology by integrating the software you already use with BIM 360 Built on an open and secure API platform BIM 360 enables users to easily integrate with various other construction softwares including drone technology estimating and bid management as well as safety management tools
Reality Capture
Estimating
Cost Management
Construction Management
Field Management
Bid Management
Layout
Scheduling
Design CheckingTakeoff
Accounting Data Transfer
Learn More
bim360autodeskcom
Autodesk the Autodesk logo and BIM 360 are registered trademarks or trademarks of Autodesk Inc andor its subsidiaries andor affiliates in the USA andor other countries All other brand names product names or trademarks belong to their respective holders Autodesk reserves the right to alter product and services offerings and specifications and pricing at any time without notice and is not responsible for typographical or graphical errors that may appear in this document copy 2018 Autodesk Inc
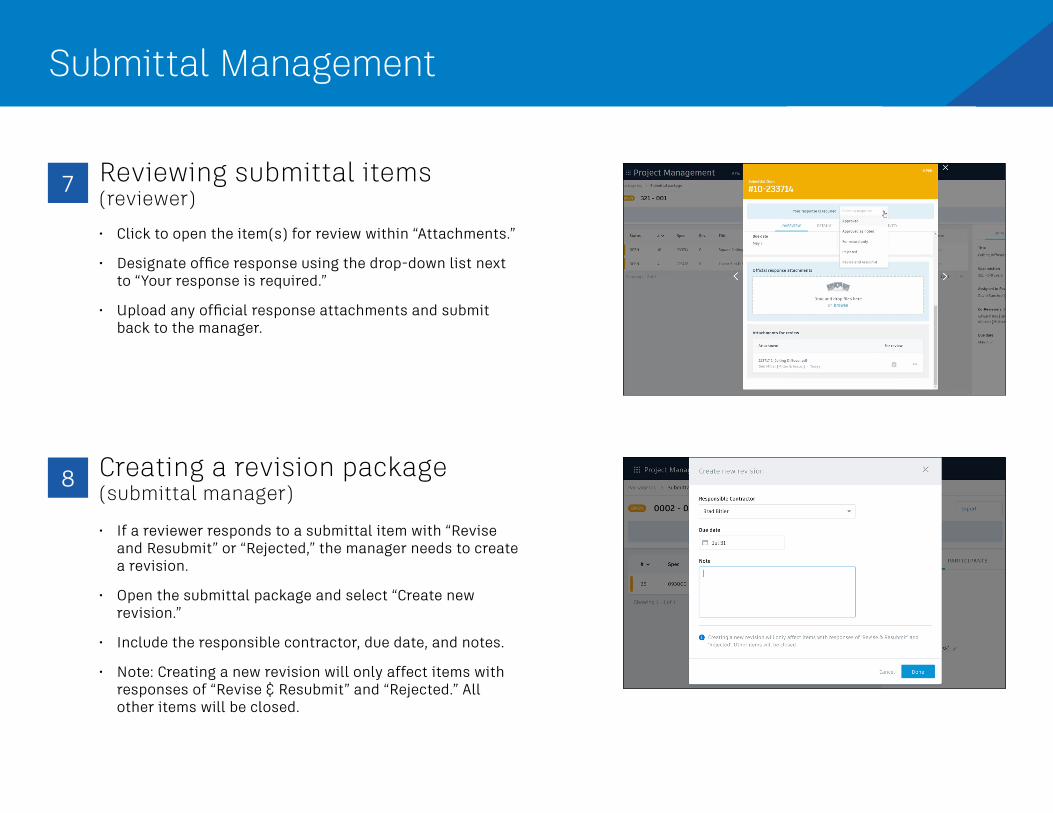
Submittal Management
7 Reviewing submittal items (reviewer) bull Click to open the item(s) for review within ldquoAttachmentsrdquo
bull Designate office response using the drop-down list next to ldquoYour response is requiredrdquo
bull Upload any official response attachments and submit back to the manager
8 Creating a revision package (submittal manager)
bull If a reviewer responds to a submittal item with ldquoRevise and Resubmitrdquo or ldquoRejectedrdquo the manager needs to create a revision
bull Open the submittal package and select ldquoCreate new revisionrdquo
bull Include the responsible contractor due date and notes
bull Note Creating a new revision will only affect items with responses of ldquoRevise amp Resubmitrdquo and ldquoRejectedrdquo All other items will be closed
Submittal Management
9 Responding to a revision package (responsible contractor)
bull The contractor will be notified of the revision
bull Open the submittal item and in ldquoAttachmentsrdquo upload the revised documents
bull Once attached the document will appear with the ldquoFor reviewrdquo box checked
bull Close and select ldquoSubmit to Managerrdquo
bull The manager can now send the revised item(s) to the reviewer
10 Closing submittal packages (submittal manager)
bull Once the package is approved by the reviewer the submittal manager needs to close it and distribute it to the responsible contractor
bull In the Submittals tab under ldquoPackagesrdquo open the package and select ldquoClose and Distributerdquo
bull Include the responsible contractor and in the distribution list identify team members who should be aware of the closed submittal package
Submittal Management
11 Filtersortexportbull You can filter sort and export in the Submittals tab
bull Select either ldquoItemsrdquo ldquoPackagesrdquo or ldquoSpec Sectionrdquo
bull To filter ldquoItemsrdquo and ldquoPackagesrdquo use the drop-down lists associated with each criteria For ldquoSpec Sectionrdquo you canrsquot filter but you can search using the search field
bull To sort select the column headers
bull Select ldquoExportrdquo for a list and detailed summary report of all packages If you want a report of a specific package open the package and click ldquoExportrdquo
Creating daily logs
bull In the Field Management module select the Daily Logs tab
bull Click the calendar icon to select a month and day
bull To add in the daily weather click the location box to set your location and select ldquoGet Weatherrdquo Edit any necessary fields using the pencil icon
bull For Labor click ldquoAdd labor itemrdquo and populate the fields Repeat to add another labor line The daily labor total will calculate
bull General notes can be added to the notes box
bull When done click ldquoPublishrdquo
Daily Logs Log daily site activities to keep track of your project progress and performance With the Daily Log workflow track daily weather conditions to shed light on any delays caused on unforeseen circumstances track manpower by logging detailed labor information per company and document any issues or successes that may have occurred throughout the day
1
Working with Daily Logs
PRO TIP Published logs are visible to the team and canrsquot be edited
Additional Capabilities
Insight module
bull Click on the Insight module from the module picker
bull On the various cards get a high-level view of what is happening with the project including
bull Issue activity bull Issue root causebull Total issues to datebull Quality checklist conformance
bull Use the settings gear icon to change the date range of the view
bull Use the expand arrows to get a more detailed view and metrics
Insight amp ReportingHaving the right information at your fingertips is key to making better business decisions With the Insight module teams have visibility into high-level issues that might be holding up project schedules and driving up costs By quickly seeing where issues are happening and putting the right steps in place to solve problems teams can prioritize next steps and drive quality control needs to help ensure projects are successful
1
Insights Setup
Insights amp Reporting
2 Account analytics
bull Click the Account Admin module in the module selector tool
bull This option will only appear if you have admin privileges
bull Click ldquoAnalyticsrdquo to see insights on member activations linked companies and account information
bull Click the Members tab to see insights member usage and status
Account Admin
Dashboard cards
bull There are several cards that default into the Project Home view
bull Project Addressbull Weatherbull Field Issuesbull Checklistsbull RFIsbull Submittal Itemsbull Document Issuesbull Design Packages
bull Click any of the links to drill down and get more information on a specific item
bull Use the expand arrows to open the card to full screen and minimize it
Project HomeProject Home is a new way of interacting with BIM 360 that gives users a single view into their entire project with access to important relevant and actionable information from across BIM 360 and even some third-party services It provides a unified experience with at-a-glance insights about the entire project all in one place This enables teams to quickly evaluate areas that require attention and put the necessary action in place
1
Project Home Overview
Project Home
2 Setup amp permissions
bull The information presented in Project Home depends on your permission levels set up in the Project Admin module
bull Project member As a project member you can view issues relevant to you It will help you answer the question ldquoWhat do I need to do todayrdquo
bull Project leader As a project leader you can still see details that help you understand the most pressing needs for the day but you also see outstanding items at the project level
bull Each user can configure Project Home to their liking by adding removing or rearrange the cards
Download the BIM 360 app
bull Go to the App store or Google Play store on your mobile device to download the BIM 360 app
bull There are two BIM 360 mobile appsbull BIM 360 (available on Android and iOS)
bull The BIM 360 mobile app works with all other modules including Document Management
bull BIM 360 Docs (available on iOS)bull The BIM 360 Docs mobile app works with the
Document Management module only
Mobile AccessConstruction doesnrsquot happen behind a desk Teams need access to project documents and project management tools anytime anywhere With the BIM 360 mobile app teams can execute construction quality and safety workflows including creating or editing checklists viewing RFIs adding or tracking issues and managing or creating drawing markups directly from an Android or iOS device
1
PRO TIP For the next several months the BIM 360 mobile app and BIM 360 Docs mobile app will coexist and may share some functionality Stay up to date on mobile capabilities through the Autodesk Knowledge Network
Get the Android AppGet the iOS App
Mobile Access
2 Mobile workflows
bull Several workflow capabilities can be accomplished using the BIM 360 mobile apps including Checklists Issue Management RFI Tracking Daily Logs and Markups
bull To see the differences in workflow capabilities for the BIM 360 and BIM 360 Docs apps click the ldquoBIM 360 Mobile Capabilitiesrdquo link below
3 Offline sync
bull Teams are able to work on-site without Internet access
bull Teams can also download individual documents and add markups and comments when working offline Once back online all changes will be synced back to the cloud
About the Android App
BIM 360 Mobile Capabilities
About the iOS App
1
Getting Started Guide
Create a project
bull In the Account Admin module select the Projects tab and click ldquoAddrdquo
bull Enter project information and click ldquoSave amp Continuerdquo
Account AdminWith the project administration tools in BIM 360 you can rest assured that your project information is in the right hands Project admins can easily invite team members to the project and define their access levels on a project-by-project basis with a simple click BIM 360 has two levels of administration to ensure security and control across your projects Account admins and project admins Only account admins can create new projects and assign additional account admins and project admins Project admins can add and remove members set permissions and adjust project details
Create a Project
Account Admin
2 Activating modules
bull Click ldquoActivaterdquo for the desired BIM 360 service
bull Assign a project admin for each service You can add multiple admins
bull (Optional) For Document Management and Field you can copy existing project settings
bull An email invitation will be sent to the assigned project admin(s) They will need to click the link to join the project
bull Click ldquoFinishrdquo
3 Add members to directory
bull In the Account Admin module select the Members tab and click ldquoAddrdquo
bull To add an individual member select ldquoAdd People to the Member Directoryrdquo
bull To add an account admin select ldquoInvite Account Adminsrdquo
bull To import members from a list select ldquoImport Members by Spreadsheetrdquo For a first-time import download and complete the member list template
PRO TIP You have to activate Document Management first before you can activate other next-gen services
PRO TIP You can change the default company and role later if necessary
Account Admin
4 Adding members to a project amp assigning access levels
bull In the Project Admin module select the Members tab
bull Click ldquoAddrdquo and use the search bar to search the member directory
bull When you find the member select them and click ldquoSelectrdquo
bull Add their company and role Note Role determines their access level to all BIM 360 services
bull Click the icon(s) to overwrite the access level granted by their project role
bull Click ldquoAdd to Projectrdquo
bull Update existing access levels by clicking the grayed out icon(s)
Members amp Access Levels
Integration PartnersGet the most out of construction technology by integrating the software you already use with BIM 360 Built on an open and secure API platform BIM 360 enables users to easily integrate with various other construction softwares including drone technology estimating and bid management as well as safety management tools
Reality Capture
Estimating
Cost Management
Construction Management
Field Management
Bid Management
Layout
Scheduling
Design CheckingTakeoff
Accounting Data Transfer
Learn More
bim360autodeskcom
Autodesk the Autodesk logo and BIM 360 are registered trademarks or trademarks of Autodesk Inc andor its subsidiaries andor affiliates in the USA andor other countries All other brand names product names or trademarks belong to their respective holders Autodesk reserves the right to alter product and services offerings and specifications and pricing at any time without notice and is not responsible for typographical or graphical errors that may appear in this document copy 2018 Autodesk Inc
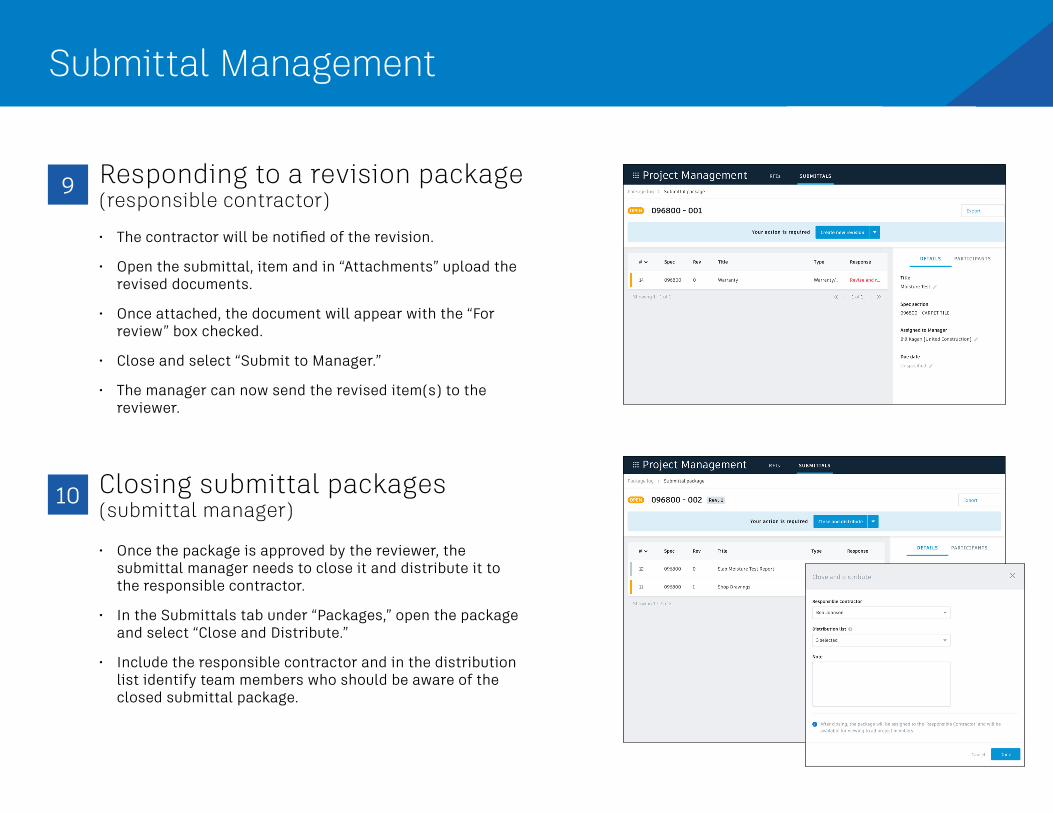
Submittal Management
9 Responding to a revision package (responsible contractor)
bull The contractor will be notified of the revision
bull Open the submittal item and in ldquoAttachmentsrdquo upload the revised documents
bull Once attached the document will appear with the ldquoFor reviewrdquo box checked
bull Close and select ldquoSubmit to Managerrdquo
bull The manager can now send the revised item(s) to the reviewer
10 Closing submittal packages (submittal manager)
bull Once the package is approved by the reviewer the submittal manager needs to close it and distribute it to the responsible contractor
bull In the Submittals tab under ldquoPackagesrdquo open the package and select ldquoClose and Distributerdquo
bull Include the responsible contractor and in the distribution list identify team members who should be aware of the closed submittal package
Submittal Management
11 Filtersortexportbull You can filter sort and export in the Submittals tab
bull Select either ldquoItemsrdquo ldquoPackagesrdquo or ldquoSpec Sectionrdquo
bull To filter ldquoItemsrdquo and ldquoPackagesrdquo use the drop-down lists associated with each criteria For ldquoSpec Sectionrdquo you canrsquot filter but you can search using the search field
bull To sort select the column headers
bull Select ldquoExportrdquo for a list and detailed summary report of all packages If you want a report of a specific package open the package and click ldquoExportrdquo
Creating daily logs
bull In the Field Management module select the Daily Logs tab
bull Click the calendar icon to select a month and day
bull To add in the daily weather click the location box to set your location and select ldquoGet Weatherrdquo Edit any necessary fields using the pencil icon
bull For Labor click ldquoAdd labor itemrdquo and populate the fields Repeat to add another labor line The daily labor total will calculate
bull General notes can be added to the notes box
bull When done click ldquoPublishrdquo
Daily Logs Log daily site activities to keep track of your project progress and performance With the Daily Log workflow track daily weather conditions to shed light on any delays caused on unforeseen circumstances track manpower by logging detailed labor information per company and document any issues or successes that may have occurred throughout the day
1
Working with Daily Logs
PRO TIP Published logs are visible to the team and canrsquot be edited
Additional Capabilities
Insight module
bull Click on the Insight module from the module picker
bull On the various cards get a high-level view of what is happening with the project including
bull Issue activity bull Issue root causebull Total issues to datebull Quality checklist conformance
bull Use the settings gear icon to change the date range of the view
bull Use the expand arrows to get a more detailed view and metrics
Insight amp ReportingHaving the right information at your fingertips is key to making better business decisions With the Insight module teams have visibility into high-level issues that might be holding up project schedules and driving up costs By quickly seeing where issues are happening and putting the right steps in place to solve problems teams can prioritize next steps and drive quality control needs to help ensure projects are successful
1
Insights Setup
Insights amp Reporting
2 Account analytics
bull Click the Account Admin module in the module selector tool
bull This option will only appear if you have admin privileges
bull Click ldquoAnalyticsrdquo to see insights on member activations linked companies and account information
bull Click the Members tab to see insights member usage and status
Account Admin
Dashboard cards
bull There are several cards that default into the Project Home view
bull Project Addressbull Weatherbull Field Issuesbull Checklistsbull RFIsbull Submittal Itemsbull Document Issuesbull Design Packages
bull Click any of the links to drill down and get more information on a specific item
bull Use the expand arrows to open the card to full screen and minimize it
Project HomeProject Home is a new way of interacting with BIM 360 that gives users a single view into their entire project with access to important relevant and actionable information from across BIM 360 and even some third-party services It provides a unified experience with at-a-glance insights about the entire project all in one place This enables teams to quickly evaluate areas that require attention and put the necessary action in place
1
Project Home Overview
Project Home
2 Setup amp permissions
bull The information presented in Project Home depends on your permission levels set up in the Project Admin module
bull Project member As a project member you can view issues relevant to you It will help you answer the question ldquoWhat do I need to do todayrdquo
bull Project leader As a project leader you can still see details that help you understand the most pressing needs for the day but you also see outstanding items at the project level
bull Each user can configure Project Home to their liking by adding removing or rearrange the cards
Download the BIM 360 app
bull Go to the App store or Google Play store on your mobile device to download the BIM 360 app
bull There are two BIM 360 mobile appsbull BIM 360 (available on Android and iOS)
bull The BIM 360 mobile app works with all other modules including Document Management
bull BIM 360 Docs (available on iOS)bull The BIM 360 Docs mobile app works with the
Document Management module only
Mobile AccessConstruction doesnrsquot happen behind a desk Teams need access to project documents and project management tools anytime anywhere With the BIM 360 mobile app teams can execute construction quality and safety workflows including creating or editing checklists viewing RFIs adding or tracking issues and managing or creating drawing markups directly from an Android or iOS device
1
PRO TIP For the next several months the BIM 360 mobile app and BIM 360 Docs mobile app will coexist and may share some functionality Stay up to date on mobile capabilities through the Autodesk Knowledge Network
Get the Android AppGet the iOS App
Mobile Access
2 Mobile workflows
bull Several workflow capabilities can be accomplished using the BIM 360 mobile apps including Checklists Issue Management RFI Tracking Daily Logs and Markups
bull To see the differences in workflow capabilities for the BIM 360 and BIM 360 Docs apps click the ldquoBIM 360 Mobile Capabilitiesrdquo link below
3 Offline sync
bull Teams are able to work on-site without Internet access
bull Teams can also download individual documents and add markups and comments when working offline Once back online all changes will be synced back to the cloud
About the Android App
BIM 360 Mobile Capabilities
About the iOS App
1
Getting Started Guide
Create a project
bull In the Account Admin module select the Projects tab and click ldquoAddrdquo
bull Enter project information and click ldquoSave amp Continuerdquo
Account AdminWith the project administration tools in BIM 360 you can rest assured that your project information is in the right hands Project admins can easily invite team members to the project and define their access levels on a project-by-project basis with a simple click BIM 360 has two levels of administration to ensure security and control across your projects Account admins and project admins Only account admins can create new projects and assign additional account admins and project admins Project admins can add and remove members set permissions and adjust project details
Create a Project
Account Admin
2 Activating modules
bull Click ldquoActivaterdquo for the desired BIM 360 service
bull Assign a project admin for each service You can add multiple admins
bull (Optional) For Document Management and Field you can copy existing project settings
bull An email invitation will be sent to the assigned project admin(s) They will need to click the link to join the project
bull Click ldquoFinishrdquo
3 Add members to directory
bull In the Account Admin module select the Members tab and click ldquoAddrdquo
bull To add an individual member select ldquoAdd People to the Member Directoryrdquo
bull To add an account admin select ldquoInvite Account Adminsrdquo
bull To import members from a list select ldquoImport Members by Spreadsheetrdquo For a first-time import download and complete the member list template
PRO TIP You have to activate Document Management first before you can activate other next-gen services
PRO TIP You can change the default company and role later if necessary
Account Admin
4 Adding members to a project amp assigning access levels
bull In the Project Admin module select the Members tab
bull Click ldquoAddrdquo and use the search bar to search the member directory
bull When you find the member select them and click ldquoSelectrdquo
bull Add their company and role Note Role determines their access level to all BIM 360 services
bull Click the icon(s) to overwrite the access level granted by their project role
bull Click ldquoAdd to Projectrdquo
bull Update existing access levels by clicking the grayed out icon(s)
Members amp Access Levels
Integration PartnersGet the most out of construction technology by integrating the software you already use with BIM 360 Built on an open and secure API platform BIM 360 enables users to easily integrate with various other construction softwares including drone technology estimating and bid management as well as safety management tools
Reality Capture
Estimating
Cost Management
Construction Management
Field Management
Bid Management
Layout
Scheduling
Design CheckingTakeoff
Accounting Data Transfer
Learn More
bim360autodeskcom
Autodesk the Autodesk logo and BIM 360 are registered trademarks or trademarks of Autodesk Inc andor its subsidiaries andor affiliates in the USA andor other countries All other brand names product names or trademarks belong to their respective holders Autodesk reserves the right to alter product and services offerings and specifications and pricing at any time without notice and is not responsible for typographical or graphical errors that may appear in this document copy 2018 Autodesk Inc
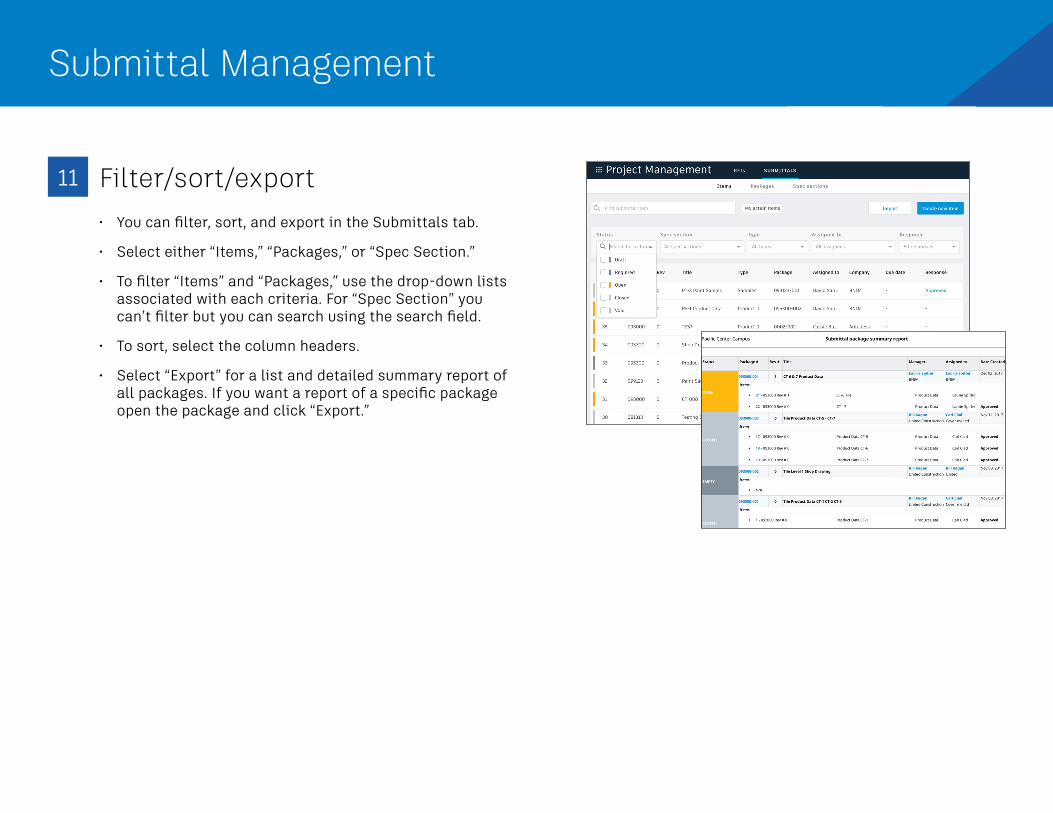
Submittal Management
11 Filtersortexportbull You can filter sort and export in the Submittals tab
bull Select either ldquoItemsrdquo ldquoPackagesrdquo or ldquoSpec Sectionrdquo
bull To filter ldquoItemsrdquo and ldquoPackagesrdquo use the drop-down lists associated with each criteria For ldquoSpec Sectionrdquo you canrsquot filter but you can search using the search field
bull To sort select the column headers
bull Select ldquoExportrdquo for a list and detailed summary report of all packages If you want a report of a specific package open the package and click ldquoExportrdquo
Creating daily logs
bull In the Field Management module select the Daily Logs tab
bull Click the calendar icon to select a month and day
bull To add in the daily weather click the location box to set your location and select ldquoGet Weatherrdquo Edit any necessary fields using the pencil icon
bull For Labor click ldquoAdd labor itemrdquo and populate the fields Repeat to add another labor line The daily labor total will calculate
bull General notes can be added to the notes box
bull When done click ldquoPublishrdquo
Daily Logs Log daily site activities to keep track of your project progress and performance With the Daily Log workflow track daily weather conditions to shed light on any delays caused on unforeseen circumstances track manpower by logging detailed labor information per company and document any issues or successes that may have occurred throughout the day
1
Working with Daily Logs
PRO TIP Published logs are visible to the team and canrsquot be edited
Additional Capabilities
Insight module
bull Click on the Insight module from the module picker
bull On the various cards get a high-level view of what is happening with the project including
bull Issue activity bull Issue root causebull Total issues to datebull Quality checklist conformance
bull Use the settings gear icon to change the date range of the view
bull Use the expand arrows to get a more detailed view and metrics
Insight amp ReportingHaving the right information at your fingertips is key to making better business decisions With the Insight module teams have visibility into high-level issues that might be holding up project schedules and driving up costs By quickly seeing where issues are happening and putting the right steps in place to solve problems teams can prioritize next steps and drive quality control needs to help ensure projects are successful
1
Insights Setup
Insights amp Reporting
2 Account analytics
bull Click the Account Admin module in the module selector tool
bull This option will only appear if you have admin privileges
bull Click ldquoAnalyticsrdquo to see insights on member activations linked companies and account information
bull Click the Members tab to see insights member usage and status
Account Admin
Dashboard cards
bull There are several cards that default into the Project Home view
bull Project Addressbull Weatherbull Field Issuesbull Checklistsbull RFIsbull Submittal Itemsbull Document Issuesbull Design Packages
bull Click any of the links to drill down and get more information on a specific item
bull Use the expand arrows to open the card to full screen and minimize it
Project HomeProject Home is a new way of interacting with BIM 360 that gives users a single view into their entire project with access to important relevant and actionable information from across BIM 360 and even some third-party services It provides a unified experience with at-a-glance insights about the entire project all in one place This enables teams to quickly evaluate areas that require attention and put the necessary action in place
1
Project Home Overview
Project Home
2 Setup amp permissions
bull The information presented in Project Home depends on your permission levels set up in the Project Admin module
bull Project member As a project member you can view issues relevant to you It will help you answer the question ldquoWhat do I need to do todayrdquo
bull Project leader As a project leader you can still see details that help you understand the most pressing needs for the day but you also see outstanding items at the project level
bull Each user can configure Project Home to their liking by adding removing or rearrange the cards
Download the BIM 360 app
bull Go to the App store or Google Play store on your mobile device to download the BIM 360 app
bull There are two BIM 360 mobile appsbull BIM 360 (available on Android and iOS)
bull The BIM 360 mobile app works with all other modules including Document Management
bull BIM 360 Docs (available on iOS)bull The BIM 360 Docs mobile app works with the
Document Management module only
Mobile AccessConstruction doesnrsquot happen behind a desk Teams need access to project documents and project management tools anytime anywhere With the BIM 360 mobile app teams can execute construction quality and safety workflows including creating or editing checklists viewing RFIs adding or tracking issues and managing or creating drawing markups directly from an Android or iOS device
1
PRO TIP For the next several months the BIM 360 mobile app and BIM 360 Docs mobile app will coexist and may share some functionality Stay up to date on mobile capabilities through the Autodesk Knowledge Network
Get the Android AppGet the iOS App
Mobile Access
2 Mobile workflows
bull Several workflow capabilities can be accomplished using the BIM 360 mobile apps including Checklists Issue Management RFI Tracking Daily Logs and Markups
bull To see the differences in workflow capabilities for the BIM 360 and BIM 360 Docs apps click the ldquoBIM 360 Mobile Capabilitiesrdquo link below
3 Offline sync
bull Teams are able to work on-site without Internet access
bull Teams can also download individual documents and add markups and comments when working offline Once back online all changes will be synced back to the cloud
About the Android App
BIM 360 Mobile Capabilities
About the iOS App
1
Getting Started Guide
Create a project
bull In the Account Admin module select the Projects tab and click ldquoAddrdquo
bull Enter project information and click ldquoSave amp Continuerdquo
Account AdminWith the project administration tools in BIM 360 you can rest assured that your project information is in the right hands Project admins can easily invite team members to the project and define their access levels on a project-by-project basis with a simple click BIM 360 has two levels of administration to ensure security and control across your projects Account admins and project admins Only account admins can create new projects and assign additional account admins and project admins Project admins can add and remove members set permissions and adjust project details
Create a Project
Account Admin
2 Activating modules
bull Click ldquoActivaterdquo for the desired BIM 360 service
bull Assign a project admin for each service You can add multiple admins
bull (Optional) For Document Management and Field you can copy existing project settings
bull An email invitation will be sent to the assigned project admin(s) They will need to click the link to join the project
bull Click ldquoFinishrdquo
3 Add members to directory
bull In the Account Admin module select the Members tab and click ldquoAddrdquo
bull To add an individual member select ldquoAdd People to the Member Directoryrdquo
bull To add an account admin select ldquoInvite Account Adminsrdquo
bull To import members from a list select ldquoImport Members by Spreadsheetrdquo For a first-time import download and complete the member list template
PRO TIP You have to activate Document Management first before you can activate other next-gen services
PRO TIP You can change the default company and role later if necessary
Account Admin
4 Adding members to a project amp assigning access levels
bull In the Project Admin module select the Members tab
bull Click ldquoAddrdquo and use the search bar to search the member directory
bull When you find the member select them and click ldquoSelectrdquo
bull Add their company and role Note Role determines their access level to all BIM 360 services
bull Click the icon(s) to overwrite the access level granted by their project role
bull Click ldquoAdd to Projectrdquo
bull Update existing access levels by clicking the grayed out icon(s)
Members amp Access Levels
Integration PartnersGet the most out of construction technology by integrating the software you already use with BIM 360 Built on an open and secure API platform BIM 360 enables users to easily integrate with various other construction softwares including drone technology estimating and bid management as well as safety management tools
Reality Capture
Estimating
Cost Management
Construction Management
Field Management
Bid Management
Layout
Scheduling
Design CheckingTakeoff
Accounting Data Transfer
Learn More
bim360autodeskcom
Autodesk the Autodesk logo and BIM 360 are registered trademarks or trademarks of Autodesk Inc andor its subsidiaries andor affiliates in the USA andor other countries All other brand names product names or trademarks belong to their respective holders Autodesk reserves the right to alter product and services offerings and specifications and pricing at any time without notice and is not responsible for typographical or graphical errors that may appear in this document copy 2018 Autodesk Inc
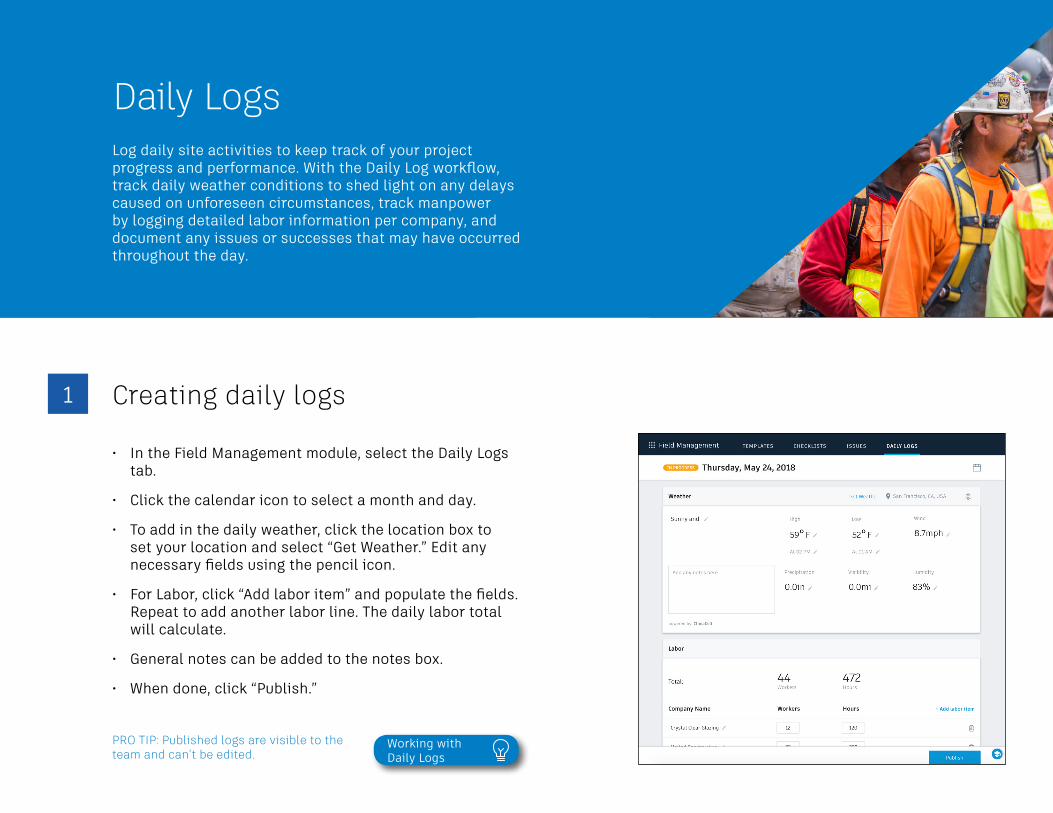
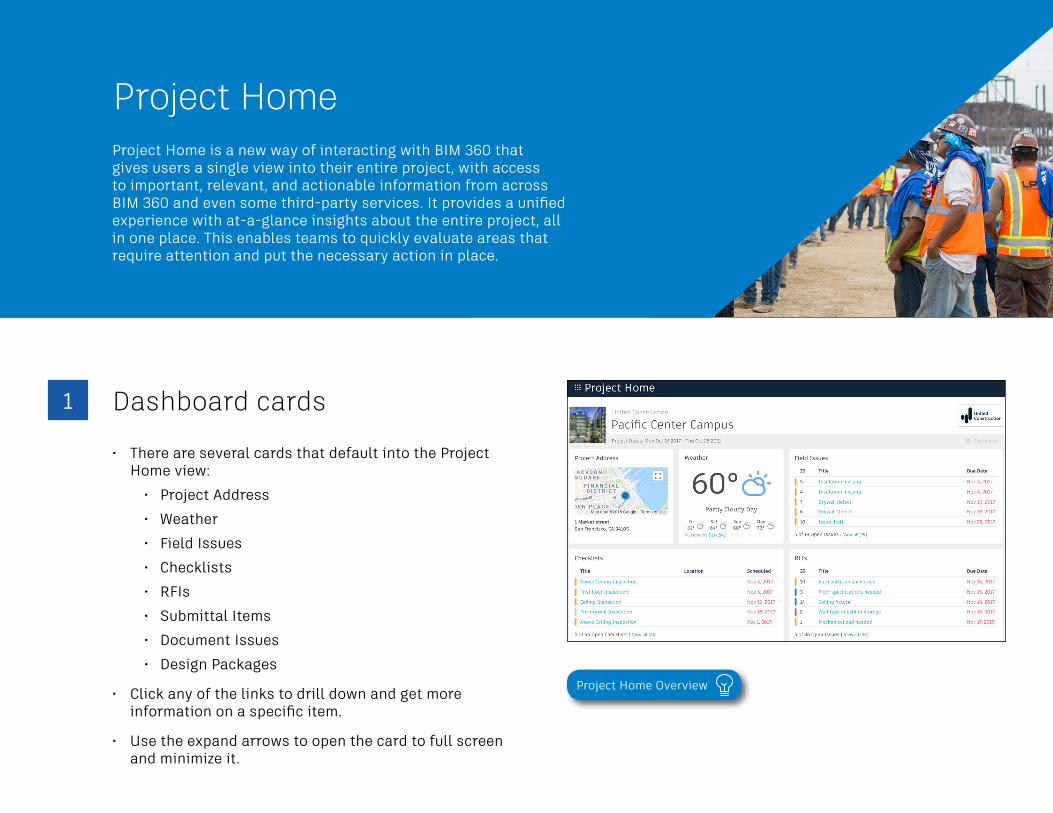
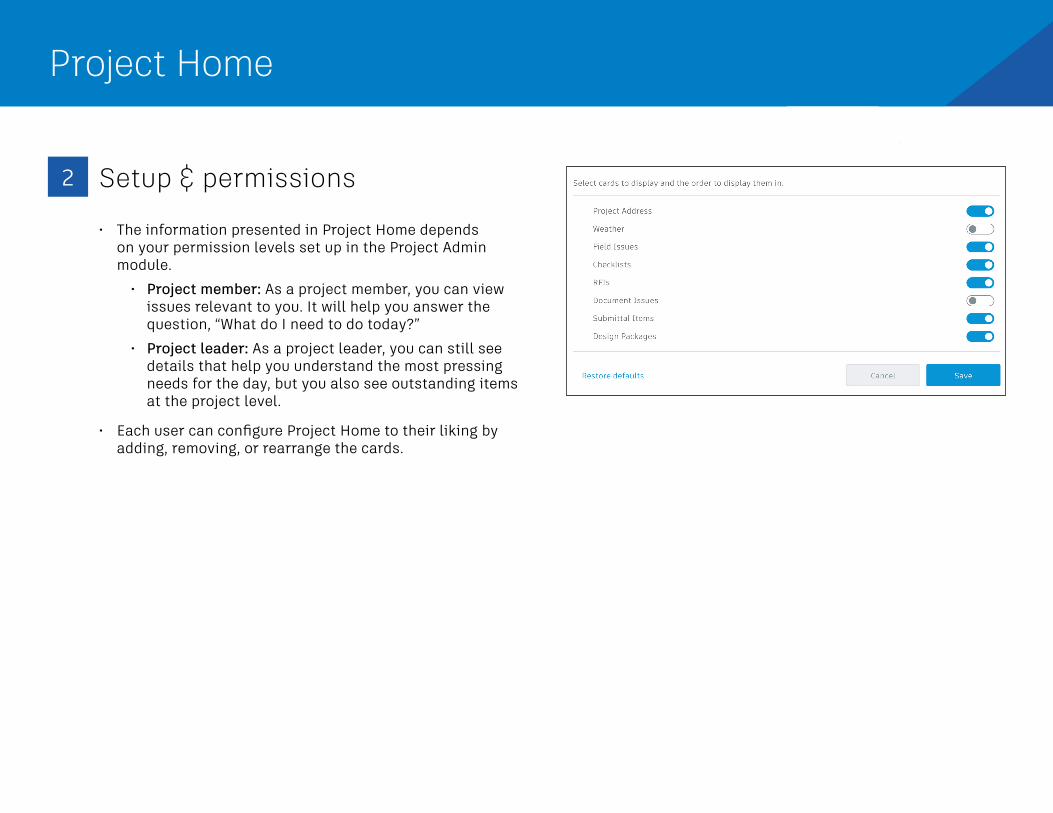
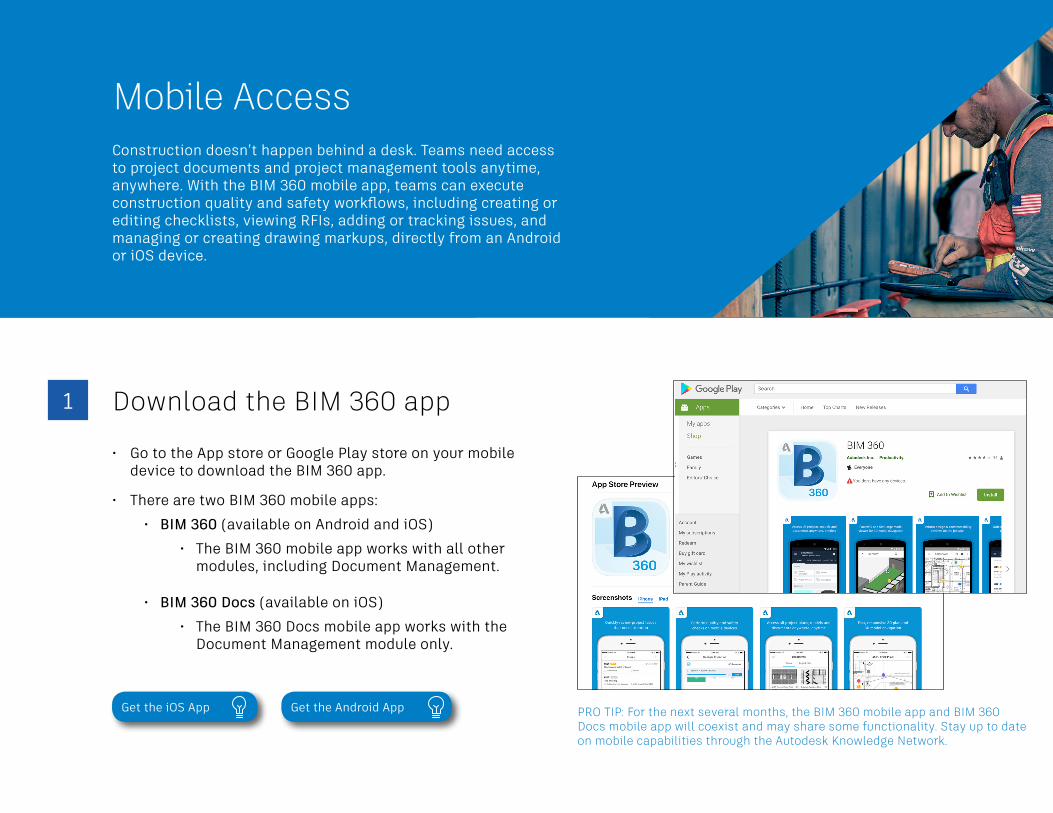
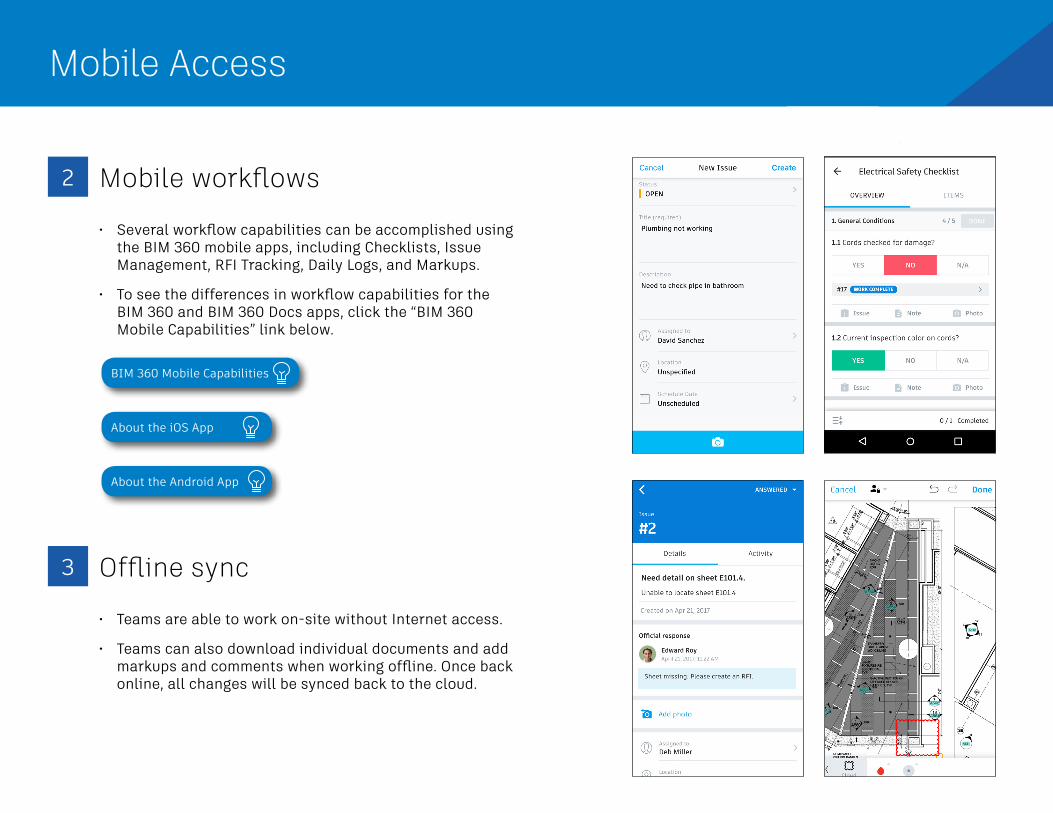
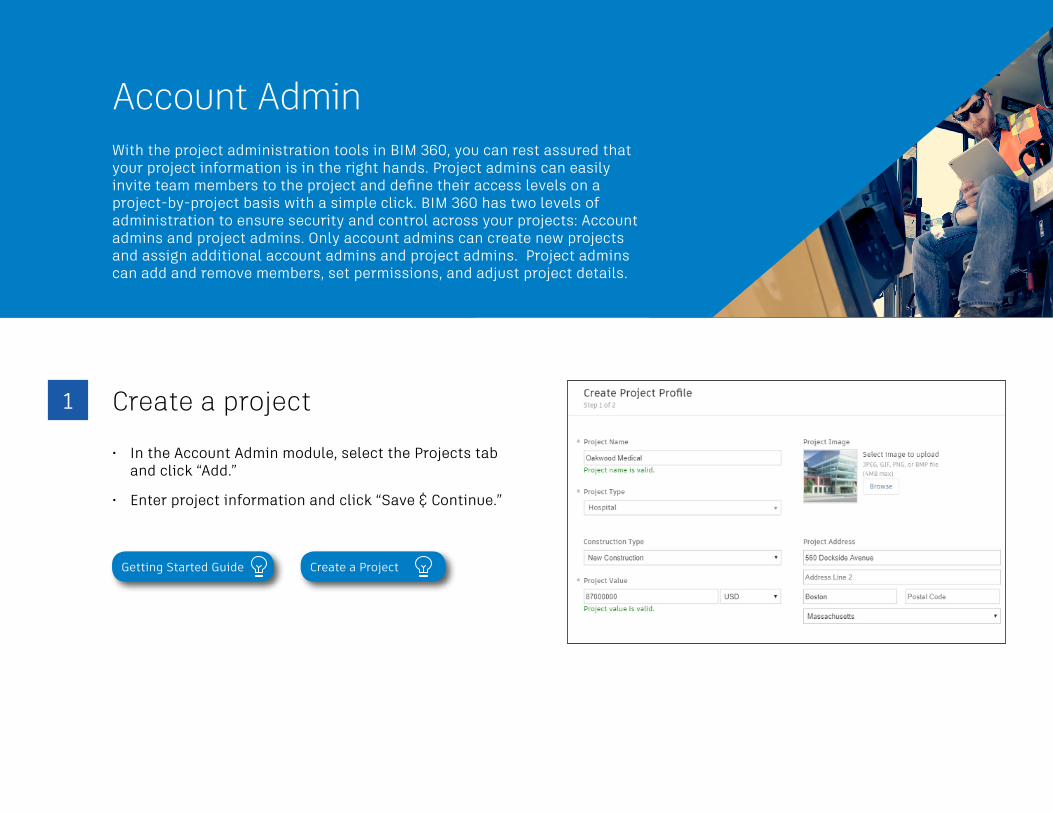

Account Admin
4 Adding members to a project amp assigning access levels
bull In the Project Admin module select the Members tab
bull Click ldquoAddrdquo and use the search bar to search the member directory
bull When you find the member select them and click ldquoSelectrdquo
bull Add their company and role Note Role determines their access level to all BIM 360 services
bull Click the icon(s) to overwrite the access level granted by their project role
bull Click ldquoAdd to Projectrdquo
bull Update existing access levels by clicking the grayed out icon(s)
Members amp Access Levels
Integration PartnersGet the most out of construction technology by integrating the software you already use with BIM 360 Built on an open and secure API platform BIM 360 enables users to easily integrate with various other construction softwares including drone technology estimating and bid management as well as safety management tools
Reality Capture
Estimating
Cost Management
Construction Management
Field Management
Bid Management
Layout
Scheduling
Design CheckingTakeoff
Accounting Data Transfer
Learn More
bim360autodeskcom
Autodesk the Autodesk logo and BIM 360 are registered trademarks or trademarks of Autodesk Inc andor its subsidiaries andor affiliates in the USA andor other countries All other brand names product names or trademarks belong to their respective holders Autodesk reserves the right to alter product and services offerings and specifications and pricing at any time without notice and is not responsible for typographical or graphical errors that may appear in this document copy 2018 Autodesk Inc
Copyright © 2022 FDOKUMEN