Q4 wk 4 | Due: May 8 Underground Railroad Freedom Quilt
38
Art, 8 th | Q4 wk 4 | Due: May 8 Underground Railroad Freedom Quilt Underground Railroad background information Prior to 1860, Americans captured and enslaved about four million black people from Africa. Slavery came about because Americans needed workers to do the difficult labor on the sprawling plantations that stretched across the south, and because slave-traders saw an opportunity to make a great deal of money buying and selling slaves. From the beginning, slaves tried to escape from owners. But attempting an escape, or helping someone else to escape, was dangerous and could result in severe punishment or death. The underground railroad is the name for the secret route fugitives took to escape to freedom. It was so named because fugitives who traveled on it just seemed to vanish as if traveling underground. It was, of course, not a real railroad, but rather a series of safe hiding places called “stations”. Researchers recently learned that an underground railroad quilt code existed to guide fugitives to freedom. Because it was illegal in slave-holding states to teach slaves to read, slaves could not communicate with each other in writing. But, because slaves of all backgrounds shared a verbal history of storytelling along with a knowledge of material weaving, they discovered that they were able to communicate messages in the stitches, patterns, designs, colors and fabrics of quilts. To memorize the code, researchers believe that fugitives used a sampler quilt, with blocks arranged in order of the code. The patterns told slaves how to get ready to escape, what to do on the trip, and where to go. Once stitched, the coded quilts were put on porches of slave cabins, acting as secret maps for slaves. Your Assignment: Design a Underground Railroad Freedom Quilt . How you will do this: Step 1. Read the background information about the Underground Railroad above. Step 2. Look at the different quilt pattern designs and meanings on the next page. Step 3: Decide on which code patterns you will use and write down the directions for the slave runner to follow. You will write this out in paragraph form. Use between 4 and 9 different patterns. Step 4. On a blank sheet of paper, divide the paper into 9 equal squares that are at least 2 in x 2 in square. In each square draw one of the quilt designs- you can repeat designs. (See next page for example) Step 5. Remember to color your quilt pieces. Step 6: Turn in your quilt photo and paragraph of the instructions for the slave runner. If you have material at home and would like to cut it and glue it on the paper, that is great (optional) What’s the BIG IDEA?/Why am I learning this: Art Standards: (grade 5-8 ) Anchor Standard 10: Synthesize and relate knowledge and personal experiences to make art. Act on creative ideas to connect personal experiences and knowledge to visually represent what people see, know, feel and imagine. Anchor Standard 11: Relate artistic ideas and works with societal, cultural, and historical context to deepen understanding. Reason effectively to understand the role of art as an essential aspect of history, society, culture and human experience. PROJECT: Underground Railroad Freedom Quilt (Examples below) Materials: Quilt block pattern sheet, paper, pencil, coloring tools, (material in place of coloring-optional) Pg 1 of 9 How to turn in: Take a photograph of your artwork and turn in via Google Classroom OR if you don’t have access to Google Classroom, email it to Mrs. McCormick: [email protected]
-
Upload
khangminh22 -
Category
Documents
-
view
3 -
download
0
Transcript of Q4 wk 4 | Due: May 8 Underground Railroad Freedom Quilt
Art, 8th | Q4 wk 4 | Due: May 8 Underground Railroad Freedom Quilt
Underground Railroad background informationPrior to 1860, Americans captured and enslaved about four million black people from Africa. Slavery came about because Americans needed workers to do the difficult labor on the sprawling plantations that stretched across the south, and because slave-traders saw an opportunity to make a great deal of money buying and selling slaves. From the beginning, slaves tried to escape from owners. But attempting an escape, or helping someone else to escape, was dangerous and could result in severe punishment or death. The underground railroad is the name for the secret route fugitives took to escape to freedom. It was so named because fugitives who traveled on it just seemed to vanish as if traveling underground. It was, of course, not a real railroad, but rather a series of safe hiding places called “stations”.
Researchers recently learned that an underground railroad quilt code existed to guide fugitives to freedom. Because it was illegal in slave-holding states to teach slaves to read, slaves could not communicate with each other in writing. But, because slaves of all backgrounds shared a verbal history of storytelling along with a knowledge of material weaving, they discovered that they were able to communicate messages in the stitches, patterns, designs, colors and fabrics of quilts. To memorize the code, researchers believe that fugitives used a sampler quilt, with blocks arranged in order of the code. The patterns told slaves how to get ready to escape, what to do on the trip, and where to go. Once stitched, the coded quilts were put on porches of slave cabins, acting as secret maps for slaves.
Your Assignment: Design a Underground Railroad Freedom Quilt. How you will do this:
Step 1. Read the background information about the Underground Railroad above.Step 2. Look at the different quilt pattern designs and meanings on the next page.Step 3: Decide on which code patterns you will use and write down the directions for the slave runner to follow. You will write this out in paragraph form. Use between 4 and 9 different patterns.Step 4. On a blank sheet of paper, divide the paper into 9 equal squares that are at least 2 in x 2 in square. In each square draw one of the quilt designs- you can repeat designs. (See next page for example)Step 5. Remember to color your quilt pieces. Step 6: Turn in your quilt photo and paragraph of the instructions for the slave runner.If you have material at home and would like to cut it and glue it on the paper, that is great (optional)
What’s the BIG IDEA?/Why am I learning this: Art Standards: (grade 5-8 ) Anchor Standard 10: Synthesize and relate knowledge and personal experiences to make art. Act on creative ideas to connect personal experiences and knowledge to visually represent what people see, know, feel and imagine. Anchor Standard 11: Relate artistic ideas and works with societal, cultural, and historical context to deepen understanding. Reason effectively to understand the role of art as an essential aspect of history, society, culture and human experience.
PROJECT: Underground Railroad Freedom Quilt (Examples below)
Materials: Quilt block pattern sheet, paper, pencil, coloring tools, (material in place of coloring-optional)
Pg 1 of 9
How to turn in: Take a photograph of your artwork and turn in via Google Classroom OR if you don’t have access to Google Classroom, email it to Mrs. McCormick: [email protected]

3. After reading together the information about each quilt block: • Offer children art supplies (crayons, markers, assorted
paper, wrapping paper, fabric scraps and scissors). • Have them trim the squares along the lines, then fill in the
squares with color, patterns and textures.• Tell children to create quilt squares with hidden meanings.
Remind them that colors, patterns, textures, “stitches”and “knots” (drawn on with a fine line marker), can eachindicate a coded symbol.
• Children can create individual squares which may be tapedor quilted together as a class quilt, or they may createindividual quilts by gluing a number of completed squaresto lengths of craft paper which can then be displayed onwalls and hallways.
4. Invite children to write essays describing the symbolismpresent in their quilt square(s).
QUILT PATTERNS & THEIR MEANINGSMonkey WrenchThis meant the slaves were to gather all thetools they might need on the journey tofreedom. Tools meant: something with whichto build shelters, compasses fordetermining direction, or tools to serve asweapons for defending themselves.
Wagon WheelThis was the second pattern to bedisplayed, which signaled the slaves to packall the things that would go in a wagon orthat would be used during their journey. Thiswas a signal for the slaves to think aboutwhat essentials they needed to survivethe trip.
Carpenter’s Wheel(Wagon Wheel variation)This pattern would have particularsignificance to slaves skilled in a craft—such as carpentry. (Other such patternsmight be: an Anvil, Circular Saw, Square andCompass.) It was also a symbol to “stealaway”—a visual equivalent to the popularspiritual “Steal Away”, which many slavesknew and sang. The pattern told slaves to “run with faith” to the west—northwest territories.
Bear’s Paw It’s believed that this pattern wassometimes used to help fugitives follow thepath of the bear, and to identify landmarkson the edge of the plantation.
CrossroadsOnce through the mountains, slaves were totravel to the crossroads. The main crossroadwas Cleveland, Ohio. Any quilt hung beforethis one would have given directions to Ohio.
Log CabinThis pattern was used to let the slaves knowwhere safe houses were. People who helpedthe Underground Railroad may have identifiedthemselves as friends to slaves on the run bytracing this pattern in dirt as a signal. Thisquilt told slaves to look for this symbol ontheir journey to freedom. It was also asymbol to set up a “home” in a free state.
ShooflyLittle is known about this pattern. It isbelieved that Shoofly refers to an actualperson who might have aided escaping slaves.
Bow TiesSlaves’ clothes were often tattered and easyto spot. This pattern meant that someonewould bring the slave nice clothes to helpthem blend in with the free blacks.
Flying GeeseThis pattern told the slaves to followmigrating geese north towards Canada andto freedom. This pattern was used asdirections as well as the best season forslaves to escape. Geese fly north in thespring and summer. Flying geese pointed tothe direction, north, for the slaves to move.Also, geese would have to stop at waterwaysalong their journey in order to rest and eat.Slaves were to take their cues on direction,timing and behavior from the migrating geese.
Drunkard’s PathThis was a clear warning for the slaves tomove in a staggering fashion so as to eludeany following slave hunters. It was suggestedthat slaves even double back to elude their pursuers.
North Star (Evening Star/Star)This instructed the slaves to follow theNorth Star to Canada and to freedom.
Tumbling Blocks (Boxes)This signaled to the slaves—by the numberof boxes and knots—the time to “box up” allone’s belongings in preparation to escape.
Really Good Stuff® Activity GuideUnderground Railroad Quilt Guide
Helping Teachers Make A Difference® ©2005 Really Good Stuff® 1-800-366-1920 www.reallygoodstuff.com #154227 Helping Teachers Make A Difference® ©2005 Really Good Stuff® 1-800-366-1920 www.reallygoodstuff.com #154227
Pg 2 of 9
What your blank quilt will look like
Art, 8th | Q4 wk 4 | Due: May 8 Underground Railroad Freedom Quilt cont.
Art, 8th| Q4 wk 5| Due: May 15 Drawing Tutorial
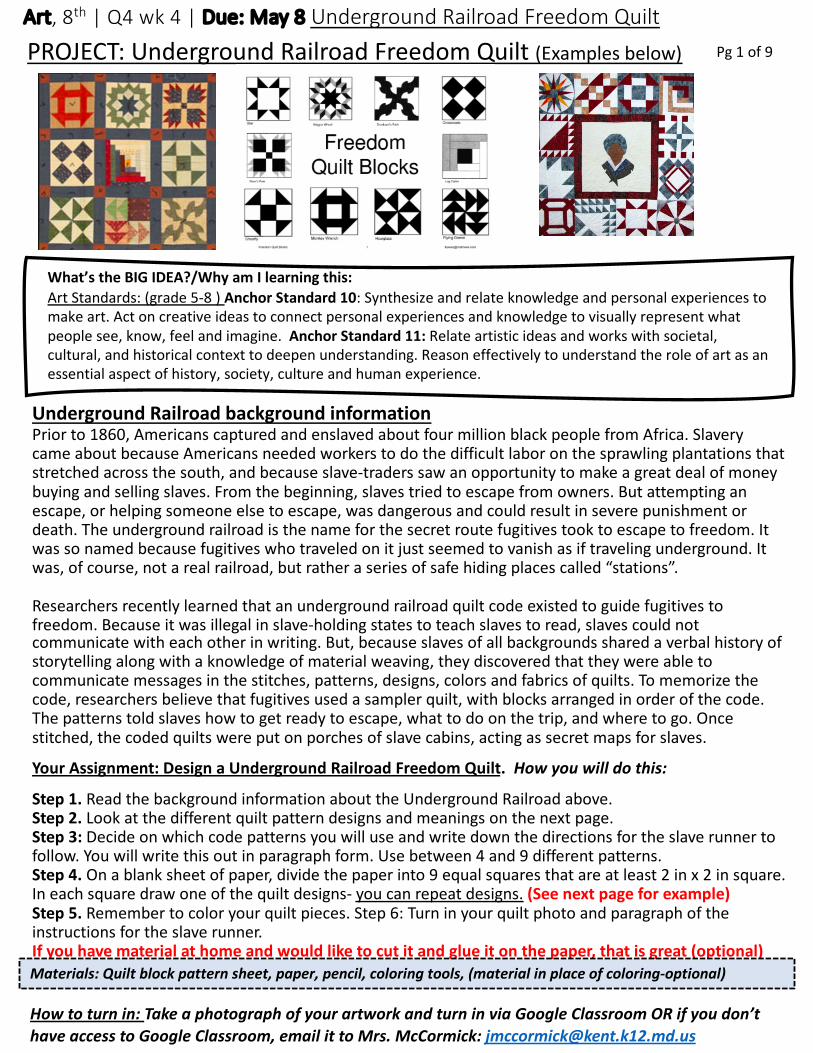
Harriet Tubman backgroundWho Was Harriet Tubman? Born into slavery in Maryland, Harriet Tubman escaped to freedom in the North in 1849 to become the most famous "conductor" on the Underground Railroad. Tubman risked her life to lead hundreds of family members and other slaves from the plantation system to freedom on this elaborate secret network of safe houses. A leading abolitionist before the American Civil War, Tubman also helped the Union Army during the war, working as a spy among other roles. After the Civil War ended, Tubman dedicated her life to helping impoverished former slaves and the elderly.
Your Assignment: Draw Harriet Tubman in a step by step tutorial Since you have been learning about Abolitionists like Frederick Douglass and Harriet Tubman in Social Studies, I thought it would be a fun project to draw one of them and practice drawing a portrait. We don’t usually draw from tutorials with step by step instructions because everyone draws differently and adds features as they are comfortable. This is what makes your art unique and truly YOU.
Step by step instructions are fun though sometimes because as long as you are looking closely at the example, you’ll have a really successful drawing. Drawing the lines and erasing are a very normal part of the process when following step by step instructions. You may make a lot of mistakes before you are happy with the outcome. That’s just part of the drawing process. Please take a look at the following 3 tutorial pages OR look at this link of the same thing. https://drive.google.com/file/d/1R4gWsdvT_KfeaBqGa7Mfl1QeoN8tpcB/view?usp=sharing
How you will do this: Step 1: Get a piece of paper to draw on and follow the step by step instructions.
This will most likely take you 60 minutes to complete it well.Step 2: Add some color or value to your drawing to make it look even more real and 3-D.Step 3: Take a photo and send in to Google Classroom.
What’s the BIG IDEA?/Why am I learning this: Art Standards: (grade 5-8 ) Anchor Standard 2: Organize and develop artistic ideas and work. Develop and experiment in the creation and design of artworks. Anchor Standard 4: Analyze, interpret, and select artistic work for presentation. Make judgments and decisions to justify which works of art express ideas about self, other people, places and events that will be meaningful in presentations.
PROJECT: Harriet Tubman Drawing Tutorial
Materials: paper, pencil, eraser, step by step pages or link to step by step document, coloring tools (optional)
Pg 3 of 9
How to turn in: Take a photograph of your artwork and turn in via Google Classroom OR if you don’t have access to Google Classroom, email it to Mrs. McCormick: [email protected]

Step 1: Sketch a circle for the head. Add the jaw line to the bottom of the circle.
Step 2: Draw a horizontal line and a vertical line on the head. These will be guides for the
eyes and nose. Add the bottoms of the ears and the “V” shape for
the neck.
Step 3: Draw the eyes, eye brows and nose. Notice the eyes are on the horizontal line and the vertical line passes through the center of the nose. Add some small lines below the eyes for wrinkles.
Step 4: Draw the mouth, lips and the head wrap. Add little boxes to the head wrap to make a design. Add lines on the forehead for wrinkles, a line on the right for the cheek and a line below the lower lip to define the chin.
Tip: Sketch lightly in
pencil so it is easy to erase later.
Pg 4 of 9
Art, 8th | Q4 wk 5 | Due: May 15 Drawing Tutorial

Step 5: Draw the buttons on the collar and the lines of the clothing.
Step 6: Ink the eyes, eye brows and nose. Add
lines around the eyes for the eyelids and wrinkles.
Step 7: Add the mouth, lips, jaw line and neck line. Draw the cheek line and lines on the sides of the nose extending downward for smile lines. Darken the area below the lower lip for shadow.
Step 8: Draw the head wrap and the little blocks design. Draw the ears and the details inside the right ear. Draw the wrinkles on the forehead.
Tip: Take your time
inking. You can no longer erase
mistakes!
Pg 5 of 9
Art, 8th | Q4 wk 5 | Due: May 15 Drawing Tutorial
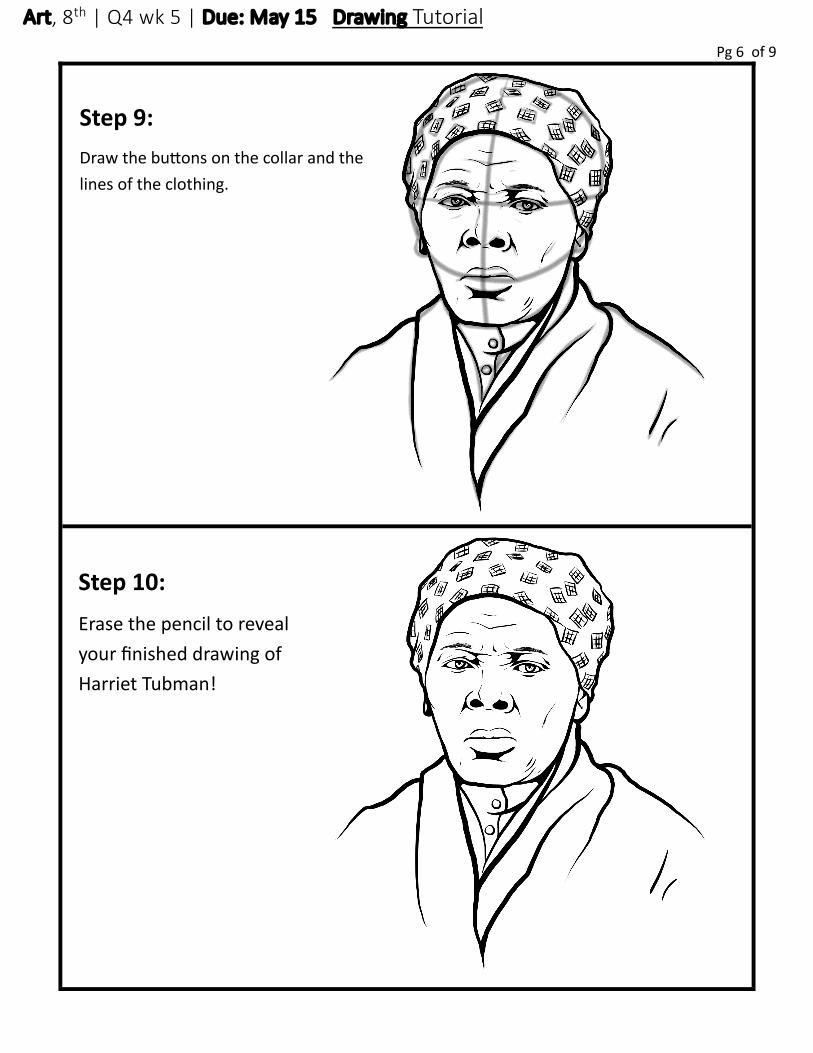
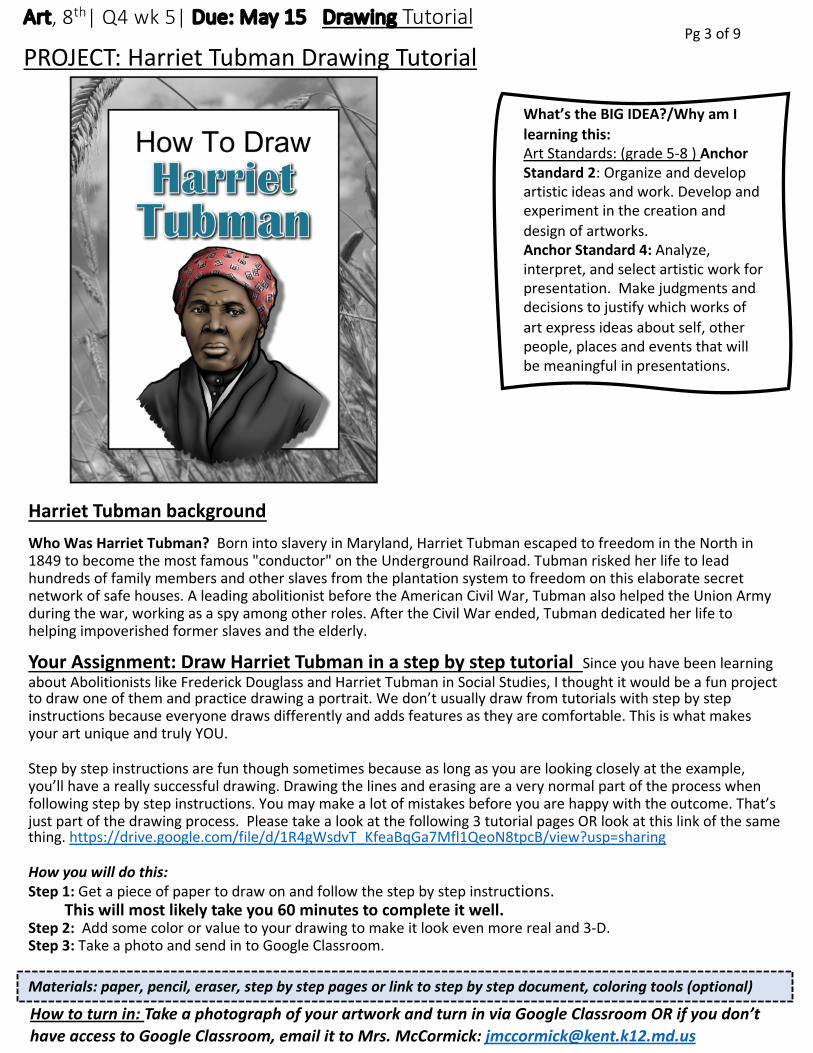
Step 9: Draw the buttons on the collar and the lines of the clothing.
Step 10: Erase the pencil to reveal your finished drawing of Harriet Tubman!
Pg 6 of 9
Art, 8th | Q4 wk 5 | Due: May 15 Drawing Tutorial

Pg 7 of 9Art, 8th | Q4 wk 6| Due: May 22 Mystery Grid Drawing
Your Assignment: Draw the Mystery Drawing from the secret gridThis is a mystery drawing and I’m super excited for you to try it. You will not know what the final outcome will be unless you follow the directions. Usually when you are drawing on a grid you look at a picture with a grid on it and then look at each square and then draw what’s in each square on a separate piece of grid paper.
For the mystery drawing you have a page that has grid coordinates and images with labels that have numbers and letters. You also have a separate piece of labeled grid paper that you will need to print out and do the drawing on.
How will I do this: Step 1: Print out the blank grid piece of paper. If you don’t have a printer, use a piece of paper and a ruler to make your own grid on copy paper. Step 2: Look at the mystery grid page with the black/white images on them. Draw each of the images in the boxes on the blank piece of grid paper. Follow the order from the top left of the mystery grid page to the bottom right in order to keep the drawing a mystery. See the above photo if you are having trouble understanding these directions. Step 3: Take a photo of your completed mystery grid drawing when you are done with your name at the top.
What’s the BIG IDEA?/Why am I learning this: Art Standards: (grade 5-8 ) Anchor Standard 7: Perceive and analyze artistic artwork. Analyze components in visual imagery that convey messages and compare personal interpretations.
Materials: paper, pencil, printer (ruler (optional)
How to turn in: Take a photograph of your artwork and turn in via Google Classroom OR if you don’t have access to Google Classroom, email it to Mrs. McCormick: [email protected]

Pg 8 of 9Art, 8th | Q4 wk 6 | Due: May 22 Mystery Grid Drawing

Pg 9 of 9
Art, 8th | Grade Q4 wk 6 Mystery Grid Drawing NAME:________________
Please use the grid from the following page and match the letter and number coordinates.

Com put er Sk il ls Work for Weeks 4/27, 5/4, & 5/11(Must have Com put er w it h Int ernet Access!!!!!- Week of 4/27: We will be starting Photoshop this week! We will be using their free online version which can be found at www.photopea.com. For this first week, we will be learnign the basics of importing a picture, and using the Clone St am p Tool. At which point we will save our work and upload it to our classroom. From here on out we shouldn't be sending emails to Mr. King. A tutorial video on how to do this will be uploaded on Monday, no later then noon. I will be discussing how to do certain things while I demo photopea. Also, if you get stuck, during my office hours Tuesdays and Thursdays from 1pm-2pm, I can help you live using Zoom!
- Week of 5/4: This week we will be doing a black and white and color blend on Photopea! It 's a neat affect that offers more control than your regular phone apps! Same as before, I will upload a tutorial that Monday, and be available to help during Open Office Hours.- Week of 5/4: This week we will be making our own money It requires taking parts from 2 pictures and blending. Same as before, I will upload a tutorial that Monday, and be available to help during Open Office Hours.

Simp
les Mach
ines
&M
echan
ical A
dvan
tage
An
Exp
loratio
n o
f the d
ifferent Sim
ple m
achin
es●
Ho
w th
ey Wo
rk●
Ho
w to
Calcu
late M.A
Learnin
g O
bjectives
1)
Iden
tify the d
ifferent typ
es of Sim
ple M
achin
es
2)
Pre C
alculate a Sim
ple M
achin
e’s Ideal M
echan
ical Ad
vantage (IM
A)
3)
Follo
w P
lans to
create mo
dels o
f Simp
le Mach
ines to
test Actu
al Mech
anical A
dvan
tage
4)
Create a C
om
plex M
achin
e that u
ses 3 Sim
ple M
achin
es to M
ove a Large Load
Day 1 Starts H
ere
Th
e Lever Co
nten
ts:
●E
xplo
ring th
e Lever○
Classes 1
, 2, &
3
●U
nd
erstand
ing Lo
ad, E
ffort, &
Fulcru
m
●Id
entifyin
g the Lo
ad D
istance an
d E
ffort D
istance
●C
alculatin
g Ideal M
echan
ical Ad
vantage
●C
alculatin
g Actu
al Mech
anical A
dvan
tage
Wh
at is a Lever?
●A
lever simp
ly pu
t, is a way o
f movin
g a load
utilizin
g effort an
d a p
ivot p
oin
t called th
e
Fulcru
m.
●T
he p
lacemen
t of th
e fulcru
m d
ecides yo
ur m
echan
ical advan
tage
●A
n easy w
ay to th
ink ab
ou
t this, is th
e teeter-totter o
n th
e playgro
un
d.
Fulcru
m
Load
Effo
rt

Differen
t Classes of Levers
●W
hat can
chan
ge abo
ut a Lever is th
e Ord
er of th
e com
po
nen
ts.
●T
he easiest w
ay to fi
gure o
ut w
hat class o
f Lever you
’re usin
g is to see w
hich
com
po
nen
t is
in th
e mid
dle.
●D
epen
din
g on
the O
rder, yo
u are alw
ays tradin
g betw
een D
istance o
f Po
wer, yo
u can’t get
energy fo
r free!
Class 1 Lever
●C
lass 1 Levers alw
ays have th
e Fulcru
m in
the M
idd
le.
●Yo
u can
chan
ge wh
ere it is betw
een th
e load
and
the effo
rt to ch
ange yo
ur m
echan
ical
advan
tage
Load
Fulcru
m
Effo
rt
Class 2 Lever
●A
Class 2
Lever has yo
ur Lo
ad in
the m
idd
le
●A
n easy E
xamp
le of th
is, is a garden
wh
eelbarro
w.
Fulcru
m
Load
Effo
rt
Class 3 Lever
●A
Class 3
Lever has th
e Effo
rt in th
e mid
dle
●A
n easy exam
ple o
f a Class 3
Lever is the Stap
ler
Fulcru
mLo
ad
Effo
rt

Ideal M
echan
ical Ad
vantag
e (IMA
) Vs.
Actu
al Mech
anical A
dvan
tage (A
MA
)
●Id
eal Mech
anical A
dvan
tage is the B
on
us M
ultip
lier that a sim
ple m
achin
e gives to yo
ur
effort, b
ased o
n P
ER
FE
CT
con
ditio
ns
○Id
eal Mech
anical A
dvan
tage is Calcu
lated u
sing D
ISTAN
CE
S
●A
ctual M
echan
ical Ad
vantage is th
e determ
ined
Bo
nu
s Mu
ltiplier after a Sim
ple m
achin
e
has b
een tested
in R
EA
L WO
RLD
con
ditio
ns.
○A
ctual M
echan
ical Ad
vantage is C
alculated
usin
g WE
IGH
TS
●A
ctual M
echan
ical Ad
vantage can
on
ly be eq
ual to
or less th
an Id
eal, bu
t never greater.
Calcu
lating
AM
A
●T
he fo
rmu
la for A
MA
is you
r Load
weigh
t divid
ed by yo
ur E
ffort W
eight.
●T
he A
MA
Form
ula is th
e same fo
r EV
ER
Y sim
ple m
achin
e!
AM
A =
Load
Effort
Let’s Do O
ne Tog
ether… W
hat M
echan
ical A
dvan
tage is b
eing
disp
layed in
the P
icture?1
00
lbs
50
lbs
Step 1: W
rite Formu
la
AM
A =
Load
Effort
Step 2: Su
bstitu
te
10
0 lb
s
50
lbs
Step 3: C
ancel Like
Terms
Step 4
: Solve!
2
Wh
at this m
eans, is for every 1
pou
nd
of effort you g
ive, you w
ill g
et 2 pou
nd
s back
Calcu
lating
IMA
●IM
A is calcu
lated u
sing d
ata gathered
by measu
ring th
e DISTA
NC
E fro
m Fu
lcrum
to Lo
ad
and
Fulcru
m to
Effo
rt
●T
he Fo
rmu
la for IM
A is D
istance fro
m Fu
lcrum
to E
ffort D
ivided
by Distan
ce from
Fulcru
m to
Load
Fulcrum to E
ffort
●Fulcrum
to Load
IMA
= Fu
lcrum
to E
ffort
Fulcru
m to
Load

This m
eans th
at for every 1 p
oun
d you
pu
t into effort, you
g
et 3 pou
nd
s in you
r load!!!
Fulcrum
Load
Effort
6 Ft
●2
Ft
Step 1
: Write th
e Form
ula
IMA
= Fu
lcrum
to E
ffort
Fulcru
m to
Load
Step 2
: Sub
stitute
6 ft
2 ft
Step 3
: Can
cel Like Terms
Step 4
: Solve!
3 Let’s Calcu
late the IM
A of a class 2 Lever
Togeth
er based
off the p
icture!
Day 1 Stop
Co
ngrats o
n fi
nish
ing th
e slides fo
r Day 1
of Sim
ple M
achin
es!
At th
is po
int yo
u w
ill start wo
rking o
n th
e activity sheet fo
r Levers, alon
g with
wo
rking o
n
bu
ildin
g the M
od
els usin
g the Sim
ple M
achin
es Kit.
Day 2 Starts H
ere:R
amp
s
Ram
p C
on
tents:
●Id
entifyin
g the P
arts of th
e Ram
p
●E
xplain
ing ram
ps in
Society
●C
alculatin
g IMA
of a R
amp
●C
alculatin
g the A
MA
of a ram
p (R
eview)
Parts of a R
amp
Th
e Ram
p h
as 3 m
ajor p
arts to th
em
1)
Slop
e: Th
is is the in
clined
plan
e part o
f the ram
p.
In m
ath it is w
hat is called
“Th
e Hyp
oten
use”. It is
ALW
AY
S the lo
ngest sid
e of a ram
p an
d a righ
t
triangle!
2)
Heigh
t: Th
is is ho
w h
igh th
e ramp
will go
on
ce
you
r load
reaches th
e end
of th
e slop
e.
3)
Base: T
his is h
ow
mu
ch ro
om
the ram
p takes u
p
on
the gro
un
d.
Base
Slope
Height
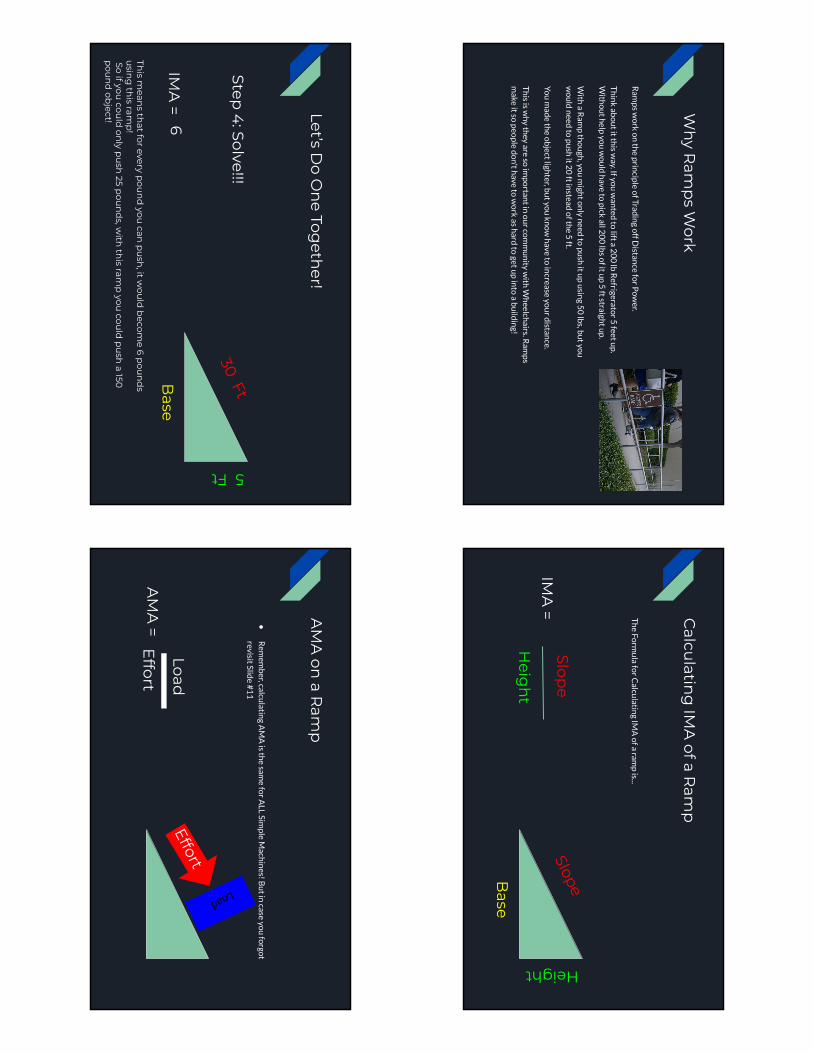
Wh
y Ram
ps W
ork
Ram
ps w
ork o
n th
e prin
ciple o
f Tradin
g off D
istance fo
r Po
wer.
Th
ink ab
ou
t it this w
ay. If you
wan
ted to
lift a 20
0 lb
Refrigerato
r 5 feet u
p.
With
ou
t help
you
wo
uld
have to
pick all 2
00
lbs o
f it up
5 ft straigh
t up
.
With
a Ram
p th
ou
gh, yo
u m
ight o
nly n
eed to
pu
sh it u
p u
sing 5
0 lb
s, bu
t you
wo
uld
need
to p
ush
it 20
ft instead
of th
e 5 ft.
You
mad
e the o
bject ligh
ter, bu
t you
kno
w h
ave to in
crease you
r distan
ce.
Th
is is why th
ey are so im
po
rtant in
ou
r com
mu
nity w
ith W
heelch
airs. Ram
ps
make it so
peo
ple d
on't h
ave to w
ork as h
ard to
get up
into
a bu
ildin
g!
Calcu
lating
IMA
of a Ram
p
Th
e Form
ula fo
r Calcu
lating IM
A o
f a ramp
is...
IMA
=
Base
Slope
Height
Slope
Heig
ht
Let’s Do O
ne Tog
ether!
Base
30 Ft5 Ft
Step 1: W
rite the Form
ula
IMA
= Slop
e
Heig
ht
Step 2: Su
bstitu
te
30 Ft
5 Ft
Step 3: C
ancel Like Term
sStep
4: Solve!!!
6
This m
eans th
at for every pou
nd
you can
pu
sh, it w
ould
becom
e 6 pou
nd
s u
sing
this ram
p!
So if you cou
ld on
ly pu
sh 25 p
oun
ds, w
ith th
is ramp
you cou
ld p
ush
a 150
pou
nd
object!
AM
A on
a Ram
p
●R
emem
ber, calcu
lating A
MA
is the sam
e for A
LL Simp
le Mach
ines! B
ut in
case you
forgo
t
revisit Slide #
11
AM
A =
Load
Effort
Load
Effort

Day 2 Stop
!!!
Co
ngrats o
n fi
nish
ing th
e Slides fo
r Day 2
Ram
ps!
At th
is po
int yo
u m
ay do
the activity an
d Lab
s assigned
for R
amp
s!
Day 3: W
edg
es
Wed
ge Co
nten
t
●E
xplo
ring th
e Relatio
nsh
ip b
etween
wed
ges and
Ram
ps
●W
edges in
Society
●C
alculatin
g IMA
of a W
edge
●A
MA
of a W
edge
Wed
ges an
d R
amp
s are Totes BFF
’s!
●A
wed
ge and
a Ram
p aren’t th
at differen
t
from
each o
ther. C
on
sider th
e Ram
p to
the
right.
●N
ow
turn
the ram
p 9
0 d
egrees...
●N
ow
add
a 2n
d R
amp
...
●N
ow
pu
t them
togeth
er, and
you
’ve mad
e a
Wed
ge!!!
Iden
tifying
the p
arts of a Wed
ge
A W
edge h
as 2 M
ajor P
arts to it.
1)
Slop
e: Th
is is the an
gled ed
ge of th
e Wed
ge
that w
ill be d
riven d
ow
n in
to an
ob
ject
2)
Distan
ce of Sep
aration
: Th
is is the p
art of
the W
edge th
at you
will ap
ply yo
ur effo
rt
to, u
sually by h
itting it w
ith a h
amm
er or
mallet. It is also
the d
istance yo
u w
ant to
split th
e ob
ject apart!
Distan
ce of
Separatio
n
Slope

Wed
ges in
Society
●W
edges are m
aybe th
e mo
st com
mo
n Sim
ple
mach
ine th
at peo
ple u
se everyday, an
d alm
ost n
ever
con
sider it!
●T
hin
k abo
ut w
hen
you
sit do
wn
to eat d
inn
er. You
pro
bab
ly have a fo
rk, spo
on
, and
knife. T
he kn
ife and
Fork b
oth
use W
edges to
help
you
cut an
d p
ierce
foo
d easier.
●E
ven o
n h
um
ans, w
e have 4
teeth called
ou
r Can
ine
Teeth, th
ey are a too
th th
at is wed
ge shap
ed to
help
us rip
and
tear meat. T
hat’s w
hy herb
ivores (P
lant
eating an
imals) d
on’t h
ave K-9
Teeth! C
RA
ZY
!!!
Calcu
lating
the IM
A of a W
edg
e
Th
e form
ula fo
r calculatin
g the IM
A o
f a Wed
ge is...
Distan
ce of
Separatio
n
Slope
IMA
= Slop
e
Distan
ce of Sep
aration
You kn
ow th
e Deal, Let’s D
o one Tog
ether!
5 in
ches
15 inches
Step 1: W
rite the Form
ula
IMA
= Slop
e
Distan
ce of Sep
aration
Step 2: Su
bstitu
te
15 Inch
es
5 Inch
es
Step 3: C
ancel Like Term
sStep
4: Solve!
3
This m
eans if you
hit th
e 5 Inch
Side of th
is Wed
ge w
ith 50
p
oun
ds of force, th
e Poin
t on th
e other en
d w
ould
have 150
P
oun
ds of Force!!!
DA
Y 3 Wed
ge: Stop
An
d th
at’s all she w
rote o
n W
edges!!!!!
At th
is po
int yo
u m
ay start wo
rking o
n th
e activity and
the Lab
!

Day 4
: Rop
e and
Pu
lley
Ro
pe an
d P
ulley C
on
tent:
●R
op
e and
Pu
lley Info
●R
op
e and
Pu
lley in So
ciety
●C
alculatin
g Lift Distan
ce
●C
alculatin
g IMA
Wh
at Makes th
e Rop
e and
Pu
lley Special?
●P
ulleys are u
niq
ue am
on
g Simp
le Mach
ines, b
ecause
of th
eir com
pact d
esign, th
ey are a real space safer
●A
single p
ulley w
ith a ro
pe actu
ally provid
es NO
Mech
anical A
dvan
tage, wh
at it do
es do
is provid
e a
chan
ge in d
irection
al force. T
his m
eans yo
u can
lift
an o
bject u
p, by p
ullin
g you
r end
of th
e rop
e do
wn
.
●T
he P
ulley System
this w
om
an is u
sing gives
NO
Mech
anical A
dvan
tage!
●If sh
e wan
ts to lift h
erself, she w
ill need
to
pu
ll equ
al to h
er full w
eight.
●It D
OE
S make it so
she can
pu
ll do
wn
on
the
rop
e in o
rder to
lift herself u
p. T
his is called
a
Ch
ange o
f Directio
nal Fo
rce
Pu
lleys in Society
●A
s men
tion
ed b
efore P
ulleys are sp
ecial becau
se of th
eir
com
pact d
esign, m
eanin
g wh
en yo
u d
on’t h
ave mu
ch sp
ace
they are yo
ur b
est cho
ice.
●T
his is w
hy they are so
po
pu
lar on
bo
ats and
ship
s. Space is
limited
on
them
, so if yo
u n
eed to
create mech
anical
advan
tage, they are th
e best ch
oice.
●A
Wh
en 2
pu
lleys are used
togeth
er, it beco
mes w
hat’s
called a B
lock an
d Tackle system
Here in
Marylan
d w
here w
e have a large b
oatin
g
com
mu
nity, th
is is a very com
mo
n th
ings to
see
on
a bo
at.
Calcu
lating
a Pu
lley Systems IM
A
●T
here actu
ally is no
“Math” fo
r calculatin
g a pu
lley
systems IM
A. In
stead w
hat yo
u d
o is C
ou
nt th
e nu
mb
er
of ro
p segm
ents u
sed in
the system
.
●H
ow
ever make su
re you
DO
N’T
inclu
de th
e Ro
pe yo
u
pu
ll on
Let’s Co
un
t the ro
pe segm
ents
on
#3
.
Th
ere are 3 R
op
e segmen
ts,
no
tice we d
idn’t in
clud
e the p
art
of th
e rop
we p
ull o
n.
So th
is Pu
lley has an
IMA
of 3
!

Let’s Not Forg
et the R
ope
●A
s you
saw fro
m th
e last slide, in
ord
er to in
crease IMA
, you
need
to w
rap th
e rop
e arou
nd
the P
ulley. So
, you
are goin
g to n
eed a lo
t of ro
pe!
●A
lso, rem
emb
er Simp
le Mach
ines w
ork o
ff of Trad
e Offs, in
Ord
er to lift h
eavy items w
ith
less effort, yo
u w
ill need
to p
ull m
ore ro
pe, an
d th
e ob
ject wo
n’t move as m
uch
.
Effort
Load
Ob
ject Moved
Rop
e Pu
lled
Calcu
lating
Rop
e
Effort
Load
Ob
ject Moved
Rop
e Pu
lled
Rop
e Pu
lled = IM
A x O
bject M
ovedor
Ob
ject Moved
= Rop
e Pu
lled / IM
A
Let’s Do O
ne Tog
ether
Ho
w M
uch
Ro
pe n
eeds to
be P
ulled
to m
ove the o
bject 3
0 F
t?
Effort
Load
30 ft
Rop
e Pu
lled
Step 1: W
rite Formu
laR
ope P
ull = IM
A x O
bject M
ovedStep
2: Cou
nt IM
A
1
2
3
IMA
= 3
Step 3: Su
bstitu
te 3
30 Feet
Step 4
: Solve!90
feet Th
is mean
s you
wo
uld
need
to
Pu
ll 90
feet of R
op
e in
ord
er to lift yo
ur O
bject 3
0
Feet off th
e grou
nd
Let’s try it the oth
er way!
Ho
w far w
ill we o
ur o
bject m
ove, if we p
ulled
15
0 feet o
f Ro
pe
Effort
Load
Ob
ject Moved
150 feet
Step 1: W
rite Formu
laO
bject M
oved =
Rop
e Pu
lled
IMA
Step 2: C
oun
t IMA
1
2
3
IMA
= 3
Step 3: Su
bstitu
te150
Feet
3
Step 4
: Solve50
Feet
Th
is mean
s that if w
e pu
lled 1
50
feet
of ro
pe o
n th
is Pu
lley system, o
ur
ob
ject wo
uld
be lifted
up
50
feet!

Day 4
: Pu
lleys Finish
ed
If you
have any q
uestio
ns o
n P
ulleys Still, Let m
e kno
w. O
therw
ise, you
may start w
orkin
g on
the
activity and
lab!
Day 5: W
heel &
Axle
Wh
eel & A
xle Co
nten
t
●W
heel &
Axle in
Society
●Id
entifyin
g the P
arts of th
e Wh
eel and
Axle
●Sp
ecial Vo
cab fo
r Wh
eel and
Axle
●C
alculatin
g IMA
Wh
eel and
Axle in
Society
●Like th
e Wed
ge, the W
heel an
d A
xle (WaA
) is so co
mm
on
,
you
migh
t no
t even realize h
ow
many yo
u u
se in a d
ay
●T
he b
asic idea is th
at a large wh
eel is attached
to a sm
all
axle. You
turn
the b
ig wh
eel (wh
ich is easy) b
ut in
return
you
have to
travel a lon
ger distan
ce.
●T
hin
k abo
ut rid
ing a b
ike, wh
en yo
u go
up
hill an
d yo
u
wan
t it easier to p
edd
le, you
use a larger sized
gear. Bu
t
on
Flat areas yo
u m
ove to a h
arder sm
aller gear.
Parts of th
e WaA
●W
heel: T
he p
art of th
e System w
hich
you
app
ly you
r
effort to
wh
en yo
u w
ant to
use th
is simp
le mach
ine
●A
xel: Th
e part o
f the system
that yo
ur lo
ad is attach
ed to
.

Imp
ortant Vocab
to Kn
ow!
Wh
en D
ealing w
ith W
heels an
d A
xles, you
need
to
kno
w th
ese com
mo
n term
s…
●D
iameter: T
he D
istance fro
m o
ne ed
ge of a circle
to th
e oth
er, wh
ile passin
g thro
ugh
the cen
ter○
Th
e bigger th
e differen
ce betw
een th
e Wh
eels D
iameter an
d th
e Axles D
iameter, th
e greater the
IMA
●R
adiu
s: Th
e Distan
ce From
the C
enter o
f a circle
to th
e Ed
ge
●C
ircum
ference: T
he d
istance to
travel arou
nd
the ed
ge of a C
ircle
Diam
eter
Rad
ius
Circu
mferen
ce
IMA
for a Wh
eel and
Axle
Th
e Form
ula fo
r WaA
is...
IMA
= D
iameter of W
heel
Diam
eter of Axle
Let’s Do O
ne Tog
ether
Diam
eter = 15 in
Diam
eter = 5 in
Step 1: W
rite Formu
la
IMA
= D
iameter of W
heel
Diam
eter of Axle
Step 2: Su
bstitu
te
15 Inch
es
5 Inch
es
Step 3: C
ancel Like Term
sStep
4: Solve
3
This m
eans w
ith 10
pou
nd
s of effort tu
rnin
g th
e wh
eel, you
could
lift a 30 p
oun
d
object attach
ed to th
e axle!
Day 5 W
aA D
one!
Co
ngrats o
n F
inish
ing 5
Differen
t Simp
le Mach
ines. Yo
u w
ay no
w start w
orkin
g on
you
r Lab an
d
activity! Be read
y for To
mo
rrow
! You
will b
e bu
ildin
g a Co
mp
lex Mach
ine th
at uses m
ultip
le
Simp
le Mach
ines tied
togeth
er. Th
is is ho
w w
e achieve am
azing feats o
f strength
!

4/27/2020 Levers Homework
https://docs.google.com/forms/d/1VRg1fqHmGQVQnBdZFDBOjnTX3dtIyp0rMdeQgrD8V9A/edit 1/4
1. Email address *
2.
3. 3 points
4. 2 points
5. 2 points
Levers HomeworkAnswer each question to the best of your ability. Feel free to use calculators, scrap paper, and slides to help you.* Required
Name: *
What are the 3 sub classes of Levers, and briefly describe how they aredifferent then each other *
What does IMA stand for, and what information does it use to solve for it *
What does AMA stand for, and what information does it use to solve for it *
4/27/2020 Levers Homework
https://docs.google.com/forms/d/1VRg1fqHmGQVQnBdZFDBOjnTX3dtIyp0rMdeQgrD8V9A/edit 2/4
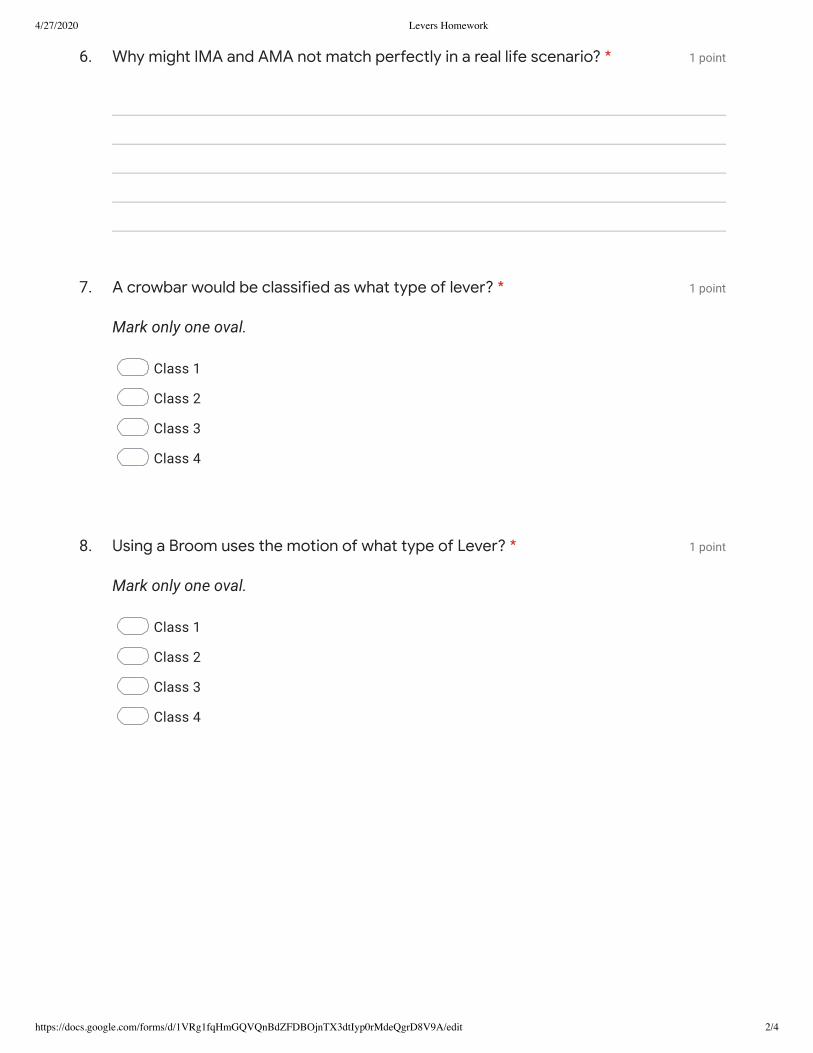
6. 1 point
7. 1 point
Mark only one oval.
Class 1
Class 2
Class 3
Class 4
8. 1 point
Mark only one oval.
Class 1
Class 2
Class 3
Class 4
Why might IMA and AMA not match perfectly in a real life scenario? *
A crowbar would be classified as what type of lever? *
Using a Broom uses the motion of what type of Lever? *

4/27/2020 Levers Homework
https://docs.google.com/forms/d/1VRg1fqHmGQVQnBdZFDBOjnTX3dtIyp0rMdeQgrD8V9A/edit 3/4
9. 1 point
Mark only one oval.
Class 1
Class 2
Class 3
Class 4
10. 1 point
11. 1 point
12. 1 point
13. 1 point
This content is neither created nor endorsed by Google.
A wheelbarrow is an example of what type of Lever?
Brad wants wants to lift a rock out of his lawn that weighs 600 lbs., he canpush with 150 lbs worth of effort. What is the AMA that Brad needs toproduce to lift the rock? *
Now that Brad knows his AMA needed, he goes and gets a 25 Foot metal barto help him. Where should he place the fulcrum to produce the needed AMA?(Hint: use 2 numbers, example 10 ft, fulcrum, 15 ft *
Natalie is bringing in Firewood in a 5 ft wheelbarrow. She can only lift 40 lbsthough. What is the heavies load of wood she can bring in? *
Ace is going fishing with his 8 foot rod. When he holds his rod, he has 1 handat the bottom and the other 12 inches above it. He just caught a fish this ispulling with 20 pounds of force. How hard does Ace have to lift to pull thisfish in, so he can eat this fish. *

4/27/2020 Ramps Homework
https://docs.google.com/forms/d/13U7W4n9evDP_3_iwnK2Ko9Y58M9TZq7K04HrHVBg40I/edit 1/2
1. Email address *
2.
3. 2 points
4. 1 point
5. 1 point
6. 1 point
Ramps Homework* Required
Name *
What 2 parts of a ramp dictate the the Mechanical Advantage? *
What math formula would we use if you need to find slope, and only knew yourheight and ground distance? *
If you needed to push a 1,250 lbs object using only 125 lbs worth of effort, howmuch MA would you need? *
Declan built a ramp that has a slope length of 23 feet, and it is 6 feet tall. WhatMA does his ramp offer him? *

4/27/2020 Ramps Homework
https://docs.google.com/forms/d/13U7W4n9evDP_3_iwnK2Ko9Y58M9TZq7K04HrHVBg40I/edit 2/2
7. 2 points
8. 3 points
9. 2 points
10. 3 points
This content is neither created nor endorsed by Google.
Megan has to push a stage prop up on to the stage that is 5 feet of theground. The prop weighs 675 lbs, and she can push for 100 lbs. How long isthe slope of the ramp she needs *
Shields is building a ramp at the VA hospital. She wants it to be possible topush 750 lbs using only 75 lbs of effort. The front door to the VA is 7 feet fromthe sidewalk. How much room is she going to need ON THE GROUND? *
Light has built a ramp that has a slope 7 feet and is 4 feet tall, How muchspace does it take up on the ground? *
How much Effort would Ellie need to push a 2,000 lb object up a ramp thathas a 19 foot base and is 7 feet tall? *
Forms

4/27/2020 Wedge HW
https://docs.google.com/forms/d/1pFgK5vRtRDZd1OvVL1Eb7SJQqH5F6bHVl5gw3buHc8Y/edit 1/3
1. Email address *
2.
3. 2 points
4. 2 points
5. 1 point
Mark only one oval.
Obtuse Angle
Acute Angle
Right Angle
Equilateral Angle
Wedge HWAnswer each question to the best of your knowledge. Note these are reviewed by me so don't trust the score you get back!* Required
Name *
To calculate the Mechanical Advantage of a wedge, what 2 pieces ofinformation do you need? *
What are 2 everyday items you use that utilize the Mechanical Advantage of aWedge? *
Which type of angle increases your mechanical advantage of a wedge *

4/27/2020 Wedge HW
https://docs.google.com/forms/d/1pFgK5vRtRDZd1OvVL1Eb7SJQqH5F6bHVl5gw3buHc8Y/edit 2/3
6. 1 point
7. 2 points
8. 2 points
9.
10. 2 points
11. 3 points
This content is neither created nor endorsed by Google.
A wedge has Slope length of 5 inches and a back end of 3. What is its MA? *
Jared owns 2 wedges. the 1st has a slope of 9in and a back end of 4in. The2nd has a slope length of 15in and a back end of 5in. Which one would Jareduse to get the most return on his Effort? *
Brooke has a Wedge that has a slope Length of 22 inches, and a back end of 7inches. She can swing with the force of 85 lbs. What's the hardest resistanceobject she can cut? *
Cody is cutting wood that has a splinting resistance of 800 lbs, he can hitwith 180 lbs worth of force. However, Cody's aim isn't so awesome, so hehas a back end on his wedge that is 11 inches. What is his wedges slopelength? *
Tae has a wedge that has a slope of 11 inches and a back end of 3. Tae canalso swing for 75 lbs. Jack has a Wedge that is 9 inches of slope, and 5inches on the back. He can swing for 145 lbs. Who can split the harderobject? *

KCMS Band St udent sPlease cont inue t o pract ice in your books and use your logs t o keep t rack of your progress.Please send an audio recording of you playing one oft he pieces each week. You can upload it t o Googleclassroom or e-m ail t o m e @ lf r ison@kent .k12.m d.us
Please disregard t he previous direct ions for Sm ar t Music. This w il l
be m uch m ore ef f icient .Google Classroom Codes for Band6t h Grade ? 5st t t w7i7t h Grade ? fpzvpf f8t h Grade - ckuxqir


HEALTH EDUCATION 4/27 Q4- WEEKS 4,5,6 A day, B day, C day MR. ISEMAN DUE DATE: MAY 22 Habit 3- Put First Things First Habit three reminds us about priorities. Sometimes, our priorities can get a little out of whack with the hustle and bustle of daily life. A pandemic like Covid-19 can sometimes remind us what is most important in life. With more time at home, your priorities may have changed recently. Please answer the following 3 questions in complete sentences.
1 How is your daily routine different than normal? 2 How have the routines of your family members changed? 3 What have you had more time to do that you really enjoy?
Habit 4-Think Win-Win
This unique situation may provide opportunities to work together or help others in ways you never thought of. There are always people who are willing to help. Please choose ONE of the following options below and complete. Option One- Share your personal story of how you have experienced people working together, sharing and supporting one another in recent days/weeks. . Option Two- Find social media stories in which other people have shared how they are caring for and supporting one another. Retell what you read/heard in your own words. Be sure to tell me the source of your story,

Name: PE Teacher(CIRCLE): Farragher or Miller DUE DATE: 5/15
Create your own Fitness Routine Directions: Create your own Fitness routine workout using the chart below. Once you’ve created it, do! If you’re up for a challenge complete your Fitness Routine 3 days a week. A Fitness Routine is a work out incorporating different exercises strengthening different muscles. Google: Fitness Routine for middle schoolers (for a hint, or two ☺) Here is an example of a partial workout to try:
1. Push-Ups- 20 reps- 3 Sets 2. Curl-Ups- 20 reps- 3 Sets 3. Jumping Jacks- 50 reps- 3 Sets 4. Bicep Curls- 10 reps- 3 Sets
Pick eight exercises and list below: Document how many Sets/Reps
you did for the exercise
1
2
3
4
5
6
7
8
What did you think? Choose all that apply
o This was fun! o I think I could improve. o I think I did a good job. o It was challenging
Reflect on the day: (on the back of this paper is great, DO NOT ANSWER HERE). 1. How are you feeling about being out of school because of the coronavirus? Be sure to
explain why you are feeling a certain way. 2. Why is exercise so important during this time? What are the benefits besides the
physical changes it does to your body?
Name: Due: Friday, May 22nd, 2020. Date:
Research: Illusions are present in many areas of our life. Research the three main types of illusions. List the three types and give an example of each. After, complete your Tabata exercise sequence from last week's work packet. Explain: How can graphing be used in sports? Explain in a paragraph. Do 10 or more push-ups after. Detail: What is the difference between rational and irrational numbers? Define each term and describe the difference. Do 10-20 bicep curls or modified bicep curls with an object of your choice. Investigate: Think about a popular Native American speech you may be learning about in social studies. Write a short summary about the author's purpose and summarize the speech. Get some fresh air! Walk/run/jog for 20 or minutes a day. Reflection: Did you like this assignment? Why or why not? How would you change this assignment to make it better?

Nam
e:D
ue: Friday, May 8th, 2020.
Instructions: For one w
eek, each student must keep a log of his/her daily physical activity.
The student must engage in at least 45 m
inutes of physical activity for a minim
um of five days.
Students can use the exercises posted on google classroom by M
r. Miller & M
rs. Farragher - check around 1:30 each day!! *Students m
ust answer reflection questions to receive full credit*
Each daily log should include the follow
ing: 1.
Date, tim
e and length of activities 2.
A brief description of the activity.
Schedule D
ate A
ctivity 1 A
ctivity 2 Total Tim
e Spent
Monday
Tuesday
Wednesday
Thursday
Friday
Reflection Q
uestions: 1.
Which w
as your most active day and w
hy? 2.
How
do you feel after exercising/moving your body? M
entally and Physically? 3.
If we w
ere back in OU
R G
YM w
hat would your activity of choice be and w
hy? 4.
What do you m
iss most about our gym
after exercising on your own this w
eek?