
ProActive DBA Installation Guide - White Sands Technology
12
ProActive DBA FAQ: ProActive DBA Installation Guide proactive dba installation guide.doc Last Updated: 2013-06-11 Page 1 of 12 ProActive DBA Installation Guide Products: All Operating Systems: Microsoft Windows UNIX RDBMS: Sybase ASE Sybase IQ Sybase RepServer Microsoft SQL Server ProActive DBA This guide will step you through the initial installation and configuration of the fully functional, evaluation version of the ProActive DBA software. Table of Contents ( clicking on a TOC line‐item will take you to that section ) ProActive DBA Framework 2 Pre‐Installation Requirements 2 Installation Procedures 3 ProActive DBA Repository Creation 8 Registering A Database Server 10 Turbo Agent Installation Wizard 10 Alternate, Manual Installation of the Turbo Agent 11 Contact Us 11
-
Upload
khangminh22 -
Category
Documents
-
view
1 -
download
0
Transcript of ProActive DBA Installation Guide - White Sands Technology

ProActive DBA FAQ: ProActive DBA Installation Guide
proactive dba installation guide.doc
Last Updated: 2013-06-11 Page 1 of 12
ProActive DBA Installation Guide Products: All Operating Systems: Microsoft Windows
UNIX RDBMS: Sybase ASE Sybase IQ Sybase RepServer
Microsoft SQL Server
ProActive DBA
This guide will step you through the initial installation and configuration of the fully
functional, evaluation version of the ProActive DBA software.
Table of Contents
( clicking on a TOC line‐item will take you to that section )
ProActive DBA Framework 2
Pre‐Installation Requirements 2
Installation Procedures 3
ProActive DBA Repository Creation 8
Registering A Database Server 10
Turbo Agent Installation Wizard 10
Alternate, Manual Installation of the Turbo Agent 11
Contact Us 11

ProActive DBA FAQ: ProActive DBA Installation Guide
proactive dba installation guide.doc
Last Updated: 2013-06-11 Page 2 of 12
Back to TOC
ProActive DBA Framework
ProActive DBA is a framework consisting of a Console, ProActive Agent, Turbo Agent and
Repository. There are six products that are built atop this framework, thus providing a
consistent interface and integration between all of the products.
The ProActive DBA Framework is comprised of four main components:
The Console is a single integrated Windows‐based graphical interface for all six
products since they are built on top of the framework.
The ProActive Agent runs on a Windows workstation/server and manages server
registration and scheduled task information for the framework.
The Turbo Agent, which usually runs on the database server’s host machine, provides
access to Sybase ASE, Microsoft SQL Server and operating system resources for
monitoring, etc. for the framework.
The Repository is a database to which ProActive DBA framework writes the
information it collects.
Back to TOC
Pre-Installation Requirements
Prior to the installation of ProActive DBA the following are required:
For Unix, access to the “root” account on each database server you plan on
monitoring. This is required for the installation of the Turbo Agent only and only if
you are planning on evaluating SQL Capture, Database Auditor or Diagnostic
Monitor. Some Unix platforms such as later versions of Solaris and Compaq Tru64
can be configured so that you don’t need root access.
For Microsoft Windows, “Administrator” rights are required for the installation of the
Console and/or the ProActive Agent.
ProActive DBA requires a repository database to store its analysis data. If you need to
create a Repository Database, you will need access to the “sa” account on the database
server (or an account that has “sa” privileges). After that, “sa” access is no longer
required.
On Sybase, ProActive DBA can create the Repository Database for you using the
database server device(s) you specify. These device files will have to be created if
existing devices aren’t available. For Microsoft database servers, you don’t have to
specify device files—simply ensure that there is sufficient disk space. Typically, a
repository database only requires an initial 200MB ** of data space plus an additional
20MB for logs. For busy production environments, it is a good idea to allocate more
space, though this is not required for a successful installation and a functional
repository.
For Sybase dataservers, ProActive DBA functions best with the Sybase Open Client
Run Time software installed on a local hard drive and not on a networked drive. If

ProActive DBA FAQ: ProActive DBA Installation Guide
proactive dba installation guide.doc
Last Updated: 2013-06-11 Page 3 of 12
your client software is located on a network path, we strongly recommend moving it
to a local hard drive to avoid setup problems in ProActive DBA.
** This assumes a moderately busy test environment. Use your own judgment and size
the Repository according to the volume of information you expect to capture.
Back to TOC
Installation Procedures
Download and Run the Installation File
from
http://proactivedba.com/evals.
Complete the form and Submit it.
This starts the download of the self‐extracting
installation file with a file name similar to
pdba800‐1859.exe. The “800” indicates the
version (8.00) and the “1859” indicates the build
number of the software.
When the download completes, Run it.
Select the “I want to evaluate ProActive
DBA…” option to install the Evaluation
version of ProActive DBA.

ProActive DBA FAQ: ProActive DBA Installation Guide
proactive dba installation guide.doc
Last Updated: 2013-06-11 Page 4 of 12
Next, select the “I need to request an
Activation Key” to request a new product
evaluation activation key
Select either the Web‐based or the Email‐
based method to submit your request.
Complete the form and click Submit
Request. If you selected the Web‐based
method, you will be redirected to the White
Sands web site to complete a form. Click
Submit.
If you selected the Email‐based method, your
email client should launch with the activation
request information already filled in for you
to send. If, for some reason, your email client
does not launch as expected, you can simply
copy/paste the information into a new email,
and send it to: mailto:[email protected].
We generally process Activation Key
requests the same day that we receive them.
We’ll return an Activation Key to the email
address you entered.

ProActive DBA FAQ: ProActive DBA Installation Guide
proactive dba installation guide.doc
Last Updated: 2013-06-11 Page 5 of 12
NOTE: A valid, corporate email account is
required. Accounts from hotmail, yahoo,
gmail, etc will be notified of an “invalid
email address” and required to register with
a valid corporate email account.
Once you receive your Activation Key, re‐
launch the ProActive DBA setup program as
you did initially.
Select the “I want to evaluate ProActive
DBA...” button again.

ProActive DBA FAQ: ProActive DBA Installation Guide
proactive dba installation guide.doc
Last Updated: 2013-06-11 Page 6 of 12
This time, select the bottom radio‐button “I
already received an Activation Key” and
copy/paste the Activation Key into the box
provided. Click Next to continue. The
packager will begin extracting.
The Setup screen will display. Select Next to
continue and then click Yes to accept the
Software License Agreement.
Select the Express setup option.
Enter your Name and the Company Name.
A confirmation screen will display once this
phase of the installation is complete.
ProActive DBA FAQ: ProActive DBA Installation Guide
proactive dba installation guide.doc
Last Updated: 2013-06-11 Page 7 of 12
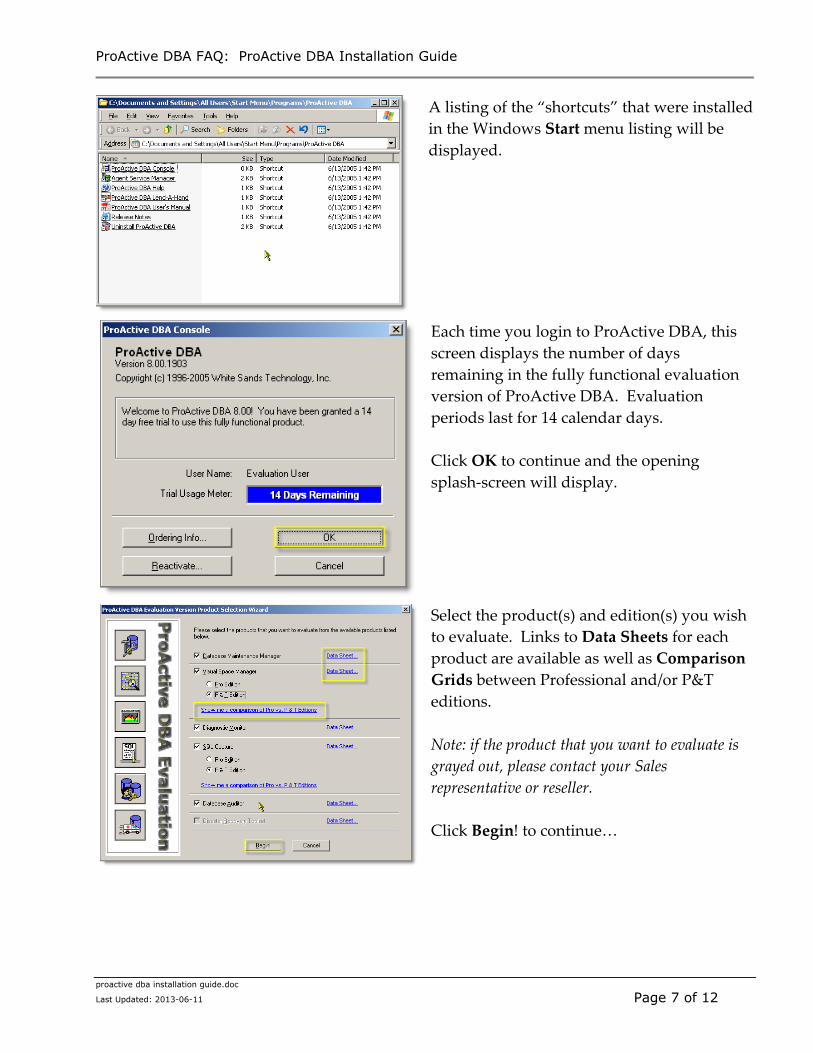
A listing of the “shortcuts” that were installed
in the Windows Start menu listing will be
displayed.
Each time you login to ProActive DBA, this
screen displays the number of days
remaining in the fully functional evaluation
version of ProActive DBA. Evaluation
periods last for 14 calendar days.
Click OK to continue and the opening
splash‐screen will display.
Select the product(s) and edition(s) you wish
to evaluate. Links to Data Sheets for each
product are available as well as Comparison
Grids between Professional and/or P&T
editions.
Note: if the product that you want to evaluate is
grayed out, please contact your Sales
representative or reseller.
Click Begin! to continue…

ProActive DBA FAQ: ProActive DBA Installation Guide
proactive dba installation guide.doc
Last Updated: 2013-06-11 Page 8 of 12
Enter, verify, and remember a Password of
your choosing for the ProActive DBA
Console. Passwords are case sensitive. This
password is required for login and is shared
among all users of the Console.
Click OK to continue.
NOTE: This password should only be
shared with other Database Administrators.
You’ll be informed that a ProActive Agent
and Repository Database must be
configured.
Back to TOC
ProActive DBA Repository Creation
First, select the Repository Server Type
(Sybase or Microsoft SQL Server) and the
Repository Server Name.
Second, enter the Repository User Name and
Password. This user should have privileged
access to the Repository database.
Click Activate to continue.

ProActive DBA FAQ: ProActive DBA Installation Guide
proactive dba installation guide.doc
Last Updated: 2013-06-11 Page 9 of 12
For Sybase ASE database servers, you’ll be
prompted to select the Data and Log devices
and the amount of space to allocate.
Selecting device files is not necessary with
Microsoft SQL Server. Just ensure that there
is sufficient disk space to create the
repository database.
Select the devices from the drop‐down lists.
Both the data and logs can be placed on the
same device if only the data device is
defined. Logs are truncated at checkpoint by
default and generally don’t need to be sized
very large.
Allocation sizes larger/smaller than the
default 420 and 100 MB sizes can be entered
despite the warning. Adjust this according to
the products you have chosen to evaluate
and volume of data you expect to capture.
Click Yes to continue.
The Execute SQL Script will appear next.
This is the script that will create the
Repository database tables, indexes, etc.
A confirmation will be displayed when the
Repository is successfully created.

ProActive DBA FAQ: ProActive DBA Installation Guide
proactive dba installation guide.doc
Last Updated: 2013-06-11 Page 10 of 12
Back to TOC
Registering A Database Server
After the appropriate Agent/s have been
installed, you’ll be prompted to register
the servers you wish to monitor.
Select the Server Type (Sybase or
Microsoft) and the Server Name. Sybase
derives the server listing from the sql.ini
file on the local workstation.
Enter a User Name and Password for a
user of the database.
Click the Register button.
Back to TOC
Turbo Agent Installation Wizard
Registering a server that is not on the same
host as the Console will prompt the
installation of a Turbo Agent. Typically,
this agent is installed on the same machine
that hosts the database server.
Enter the path where the Turbo Agent will
be installed. The default path is:
$SYBASE_HOME/pdba.
Enter the password for the Sybase user.
Click Next to continue…

ProActive DBA FAQ: ProActive DBA Installation Guide
proactive dba installation guide.doc
Last Updated: 2013-06-11 Page 11 of 12
The installation wizard will transfer the
Turbo Agent files to the database server
host machine using FTP/SFTP. It will then
launch the Turbo Agent using
TELNET/SSH .
Note: if you would like to manually install the
Turbo Agent, please refer to the section titled
“Alternate, Manual Installation of the Turbo Agent” in this Installation Guide.
Upon the successful installation of the
Turbo Agent, the Wizard Navigator will
be displayed and the newly registered
database server will be listed in the Server
Manager window.
At this point, the basic product installation
is complete.
Before continuing, please refer to the
Evaluation Guide(s) for the products that
you plan to evaluate for further installation
procedures and quick training:
http://proactivedba.com/faq
Back to TOC
Alternate, Manual Installation of the Turbo Agent
Occasionally, the default, wizard‐driven method of installing a Turbo Agent isn’t possible.
In those situations, the agent must be installed manually. The following FAQ explains this
process:http://proactivedba.com/faq/faq.htm#_manually_install_turbo.
Contact Us

ProActive DBA FAQ: ProActive DBA Installation Guide
proactive dba installation guide.doc
Last Updated: 2013-06-11 Page 12 of 12
White Sands Technical Support is available to assist with questions related to the installation,
configuration and daily use of ProActive DBA tools.
White Sands Technology, Inc. Technical Support:
Phone: 1‐818‐702‐9200
Fax: 1‐818‐702‐9100
Email: [email protected]
www: http://proactivedba.com
FAQ: http://proactivedba.com/faq Back to TOC