
PRAISE FOR A PRACTICAL GUIDE TO UbUNTU LINUX
1190
-
Upload
khangminh22 -
Category
Documents
-
view
0 -
download
0
Transcript of PRAISE FOR A PRACTICAL GUIDE TO UbUNTU LINUX


Praise for A Practical Guide to Ubuntu Linux
“I am so impressed by how Mark Sobell can approach a complex topicin such an understandable manner. His command examples are espe-cially useful in providing a novice (or even advanced) administratorwith a cookbook on how to accomplish real-world tasks on Linux. Heis truly an inspired technical writer!”
—George Vish IISenior Education ConsultantHewlett-Packard Company
“Overall, I think it’s a great, comprehensive Ubuntu book that’ll be avaluable resource for people of all technical levels.”
—John DongUbuntu Forum Council MemberBackports Team Leader
“The JumpStart sections really offer a quick way to get things up andrunning, allowing you to dig into the details of his books later.”
—Scott MannAztek Networks
“Ubuntu is gaining popularity at the rate alcohol did during prohibition,and it’s great to see a well-known author write a book on the latest andgreatest version. Not only does it contain Ubuntu-specific information,but it also touches on general computer-related topics, which will helpthe average computer user to better understand what’s going on in thebackground. Great work, Mark!”
—Daniel R. ArfstenPro/ENGINEER Drafter/Designer
“I read a lot of Linux technical information every day, but I’m rarelyimpressed by tech books. I usually prefer online information sourcesinstead. Mark Sobell’s books are a notable exception. They’re clearlywritten, technically accurate, comprehensive-and actually enjoyableto read.”
—Matthew MillerSenior Systems Analyst/AdministratorBU Linux ProjectBoston University Officeof Information Technology
®

“I would so love to be able to use this book to teach a class about notjust Ubuntu or Linux but about computers in general. It is thoroughand well written with good illustrations that explain important con-cepts for computer usage.”
—Nathan EckenrodeNew York Local Community Team
Praise for Other Books by Mark Sobell
“I currently own one of your books, A Practical Guide to Linux®. Ibelieve this book is one of the most comprehensive and, as the titlesays, practical guides to Linux I have ever read. I consider myself anovice and I come back to this book over and over again.”
—Albert J. Nguyen
“Thank you for writing a book to help me get away from Windows XPand to never touch Windows Vista. The book is great; I am learning alot of new concepts and commands. Linux is definitely getting easierto use.”
—James Moritz
“I have been wanting to make the jump to Linux but did not have theguts to do so-until I saw your familiarly titled A Practical Guide to RedHat® Linux® at the bookstore. I picked up a copy and am eagerly look-ing forward to regaining my freedom.”
—Carmine StoffoMachine and Process Designerto pharmaceutical industry
“I am currently reading A Practical Guide to Red Hat® Linux® and amfinally understanding the true power of the command line. I am new toLinux and your book is a treasure.”
—Juan Gonzalez

A Practical Guide to Ubuntu Linux®

This page intentionally left blank

A Practical Guide to Ubuntu Linux
Mark G. Sobell
Upper Saddle River, NJ • Boston • Indianapolis • San FranciscoNew York • Toronto • Montreal • London • Munich • Paris • MadridCapetown • Sydney • Tokyo • Singapore • Mexico City
®

Many of the designations used by manufacturers and sellers to distinguish their products are claimed as trademarks. Where those designations appear in this book, and the publisher was aware of a trademark claim, the designations have been printed with initial capital letters or in all capitals.
Ubuntu is a registered trademark of Canonical Ltd.
The author and publisher have taken care in the preparation of this book, but make no expressed or implied warranty of any kind and assume no responsibility for errors or omissions. No liability is assumed for incidental or consequential damages in connection with or arising out of the use of the information or programs contained herein.
The publisher offers excellent discounts on this book when ordered in quantity for bulk purchases or special sales, which may include electronic versions and/or custom covers and content particular to your business, training goals, marketing focus, and branding interests. For more information, please contact:
U.S. Corporate and Government Sales(800) [email protected]
For sales outside the United States, please contact:
International [email protected]
Visit us on the Web: www.prenhallprofessional.com
Library of Congress Cataloging-in-Publication DataSobell, Mark G. A practical guide Ubuntu Linux / Mark G. Sobell. p. cm. Includes index. ISBN-13: 978-0-13-236039-5 (pbk. : alk. paper) 1. Linux. 2. Operating systems (Computers) I. Title. QA76.76.O63S59497 2008 005.4'32—dc22 2007043244Copyright © 2008 Mark G. Sobell
All rights reserved. Printed in the United States of America. This publication is protected by copyright, and permission must beobtained from the publisher prior to any prohibited reproduction, storage in a retrieval system, or transmission in any form orby any means, electronic, mechanical, photocopying, recording, or likewise. For information regarding permissions, write to:
Pearson Education, Inc.Rights and Permissions501 Boylston Street, Suite 900Boston, MA 02116Fax (617) 671-3447
ISBN-13: 978-0-13-236039-5ISBN-10: 0-13-236039-X
Text printed in the United States on recycled paper at Courier in Stoughton, Massachusetts.First printing, December 2007

For my dad,Morton Sobell,
who taught me to examine the world very carefully.

This page intentionally left blank

ixix
Brief Contents
Contents xiPreface xxxv
1 Welcome to Linux 1
PART I Installing Ubuntu Linux 21
2 Installation Overview 23
3 Step-by-Step Installation 45
PART II Getting Started with Ubuntu Linux 85
4 Introduction to Ubuntu Linux 87
5 The Linux Utilities 145
6 The Linux Filesystem 183
7 The Shell 219
PART III Digging into Ubuntu Linux 249
8 Linux GUIs: X and GNOME 251
9 The Bourne Again Shell 275
10 Networking and the Internet 353
11 Programming the Bourne Again Shell 395

x Brief Contents
PART IV System Administration 483
12 System Administration: Core Concepts 485
13 Files, Directories, and Filesystems 553
14 Downloading and Installing Software 583
15 Printing with CUPS 611
16 Building a Linux Kernel 635
17 Administration Tasks 657
18 Configuring a LAN 693
PART V Using Clients and Setting Up Servers 705
19 OpenSSH: Secure Network Communication 707
20 FTP: Transferring Files Across a Network 729
21 exim4: Setting Up Mail Servers, Clients, and More 755
22 NIS: Network Information Service 781
23 NFS: Sharing Filesystems 799
24 Samba: Linux and Windows File and Printer Sharing 823
25 DNS/BIND: Tracking Domain Names and Addresses 845
26 firestarter and iptables: Setting Up a Firewall 885
27 Apache: Setting Up a Web Server 915
PART VI Appendixes 969
A Regular Expressions 971
B Help 981
C Security 991
D The Free Software Definition 1011
E The Linux 2.6 Kernel 1015
Glossary 1021
Index 1071

xixi
Contents
Preface xxxvi
Chapter 1: Welcome to Linux 1
The GNU–Linux Connection 2The History of GNU–Linux 2The Code Is Free 4Have Fun! 5
The Linux 2.6 Kernel 5
The Heritage of Linux: UNIX 5
What Is So Good About Linux? 6Why Linux Is Popular with Hardware Companies and Developers 7Linux Is Portable 8Standards 9The C Programming Language 9Ubuntu Linux 10
Overview of Linux 10Linux Has a Kernel Programming Interface 10Linux Can Support Many Users 11Linux Can Run Many Tasks 11Linux Provides a Secure Hierarchical Filesystem 12The Shell: Command Interpreter and Programming Language 12A Large Collection of Useful Utilities 14Interprocess Communication 14System Administration 15

xii Contents
Additional Features of Linux 15GUIs: Graphical User Interfaces 15(Inter)Networking Utilities 16Software Development 17
Conventions Used in This Book 17Chapter Summary 20Exercises 20
PART I Installing Ubuntu Linux 21
Chapter 2: Installation Overview 23
The Live/Install Desktop CD/DVD 24More Information 24Planning the Installation 25
Considerations 25Requirements 25Processor Architecture 26Interfaces: Installer and Installed System 27Ubuntu Releases 28Ubuntu Editions 28Installing a Fresh Copy or Upgrading an Existing Ubuntu System? 29Setting Up the Hard Disk 30RAID 34LVM: Logical Volume Manager 35
The Installation Process 36Downloading and Burning a CD/DVD 37
The Easy Way to Download a CD ISO Image File 37Other Ways to Download a CD/DVD ISO Image File 37Verifying an ISO Image File 40Burning the CD/DVD 40
Gathering Information About the System 41Chapter Summary 42Exercises 43Advanced Exercises 43
Chapter 3: Step-by-Step Installation 45
Basic Installation from the Live/Install Desktop CD/DVD 46Booting the System 46Checking the CD/DVD for Defects 47Live Session 47

Contents xiii
Graphical Partitioners 53gparted: the GNOME Partition Editor 53ubiquity: Setting Up Partitions 56
Upgrading to a New Release 59Installing KDE 60Setting Up a Dual-Boot System 61
Creating Free Space on a Windows System 61Installing Ubuntu Linux as the Second Operating System 61
Advanced Installation 62The Live/Install Desktop CD: The Initial Install Screen 62The Alternate CD Initial Install Screen Menu 65The Server CD Initial Install Screen Menu 66The DVD 67The Ubuntu Textual Installer 67
The X Window System 74displayconfig-gtk: Configures the Display 75The xorg.conf File 77gdm: Displays a Graphical Login 82
Chapter Summary 83Exercises 83Advanced Exercises 84
PART II Getting Started with Ubuntu Linux 85
Chapter 4: Introduction to Ubuntu Linux 87
Curbing Your Power: root Privileges/sudo 88A Tour of the Ubuntu Linux Desktop 89
Logging In on the System 89Introduction 90Launching Programs from the Desktop 91Switching Workspaces 93Setting Personal Preferences 94Mouse Preferences 95Working with Windows 96Using Nautilus to Work with Files 96The Update Notifier 100Changing Appearances (Themes) 102Session Management 104Getting Help 104Feel Free to Experiment 105Logging Out 105

xiv Contents
Getting the Most out of the Desktop 105GNOME Desktop Terminology 105Opening Files 106Panels 107The Main Menu 110Windows 111The Object Context Menu 115
Updating, Installing, and Removing Software Packages 119Software Sources Window 119Add/Remove Applications 120Synaptic: Finds, Installs, and Removes Software 121
Where to Find Documentation 124Ubuntu Help Center 124man: Displays the System Manual 124info: Displays Information About Utilities 126The ––help Option 129HOWTOs: Finding Out How Things Work 129Getting Help with the System 130
More About Logging In 132The Login Screen 132What to Do if You Cannot Log In 133Logging In Remotely: Terminal Emulators, ssh, and Dial-Up Connections 133Logging In from a Terminal (Emulator) 134Changing Your Password 135Using Virtual Consoles 136
Working from the Command Line 136Correcting Mistakes 137Repeating/Editing Command Lines 139
Controlling Windows: Advanced Operations 139Changing the Input Focus 139Changing the Resolution of the Display 140The Window Manager 141
Chapter Summary 142Exercises 143Advanced Exercises 144
Chapter 5: The Linux Utilities 145
Special Characters 146Basic Utilities 147
ls: Lists the Names of Files 147cat: Displays a Text File 147rm: Deletes a File 148less Is more: Display a Text File One Screen at a Time 148hostname: Displays the System Name 149

Contents xv
Working with Files 149cp: Copies a File 149mv: Changes the Name of a File 150lpr: Prints a File 151grep: Searches for a String 151head: Displays the Beginning of a File 152tail: Displays the End of a File 152sort: Displays a File in Order 153uniq: Removes Duplicate Lines from a File 154diff: Compares Two Files 154file: Tests the Contents of a File 155
| (Pipe): Communicates Between Processes 156Four More Utilities 157
echo: Displays Text 157date: Displays the Time and Date 157script: Records a Shell Session 158unix2dos: Converts Linux and Macintosh Files to Windows Format 159
Compressing and Archiving Files 159bzip2: Compresses a File 160bunzip2 and bzcat: Decompress a File 160gzip: Compresses a File 161tar: Packs and Unpacks Archives 161
Locating Commands 164which and whereis: Locate a Utility 164apropos: Searches for a Keyword 165slocate: Searches for a File 166
Obtaining User and System Information 166who: Lists Users on the System 167finger: Lists Users on the System 167w: Lists Users on the System 169
Communicating with Other Users 170write: Sends a Message 170mesg: Denies or Accepts Messages 171
Email 171Tutorial: Creating and Editing a File with vim 172
Starting vim 172Command and Input Modes 174Entering Text 175Getting Help 176Ending the Editing Session 178The compatible Parameter 179
Chapter Summary 179Exercises 181Advanced Exercises 182

xvi Contents
Chapter 6: The Linux Filesystem 183
The Hierarchical Filesystem 184Directory Files and Ordinary Files 184
Filenames 185The Working Directory 188Your Home Directory 188
Pathnames 189Absolute Pathnames 189Relative Pathnames 190
Directory Commands 191mkdir: Creates a Directory 191Important Standard Directories and Files 194
Working with Directories 196rmdir: Deletes a Directory 196Using Pathnames 197mv, cp: Move or Copy Files 197mv: Moves a Directory 198
Access Permissions 199ls –l: Displays Permissions 199chmod: Changes Access Permissions 200Setuid and Setgid Permissions 201Directory Access Permissions 202
ACLs: Access Control Lists 203Enabling ACLs 204Working with Access Rules 204Setting Default Rules for a Directory 207
Links 209Hard Links 210Symbolic Links 212rm: Removes a Link 214
Chapter Summary 214Exercises 216Advanced Exercises 218
Chapter 7: The Shell 219
The Command Line 220Syntax 220Processing the Command Line 223Executing the Command Line 225Editing the Command Line 225
Standard Input and Standard Output 226The Screen as a File 226The Keyboard and Screen as Standard Input and Standard Output 227Redirection 228Pipes 234

Contents xvii
Running a Program in the Background 237Filename Generation/Pathname Expansion 239
The ? Special Character 239The * Special Character 240The [ ] Special Characters 241
Builtins 243Chapter Summary 244
Utilities and Builtins Introduced in This Chapter 245Exercises 245Advanced Exercises 247
PART III Digging into Ubuntu Linux 249
Chapter 8: Linux GUIs: X and GNOME 251
X Window System 252Using X 254Window Managers 259
The Nautilus File Browser Window 260The View Pane 261The Side Pane 261Control Bars 262Menubar 263
GNOME Utilities 266Deskbar Applet 266Font Preferences 267Pick a Font Window 268Pick a Color Window 268Run Application Window 269Searching for Files 269GNOME Terminal Emulator/Shell 270
Chapter Summary 271Exercises 272Advanced Exercises 272
Chapter 9: The Bourne Again Shell 275
Background 276Shell Basics 277
Startup Files 277Commands That Are Symbols 280Redirecting Standard Error 280Writing a Simple Shell Script 282Separating and Grouping Commands 286Job Control 290Manipulating the Directory Stack 292

xviii Contents
Parameters and Variables 295User-Created Variables 296Variable Attributes 299Keyword Variables 301
Special Characters 309Processes 310
Process Structure 310Process Identification 310Executing a Command 312
History 312Variables That Control History 312Reexecuting and Editing Commands 314The Readline Library 322
Aliases 328Single Versus Double Quotation Marks in Aliases 329Examples of Aliases 330
Functions 331Controlling bash Features and Options 334
Command Line Options 334Shell Features 334
Processing the Command Line 338History Expansion 338Alias Substitution 338Parsing and Scanning the Command Line 338Command Line Expansion 339
Chapter Summary 347Exercises 349Advanced Exercises 351
Chapter 10: Networking and the Internet 353
Types of Networks and How They Work 355Broadcast Networks 356Point-to-Point Networks 356Switched Networks 356LAN: Local Area Network 357WAN: Wide Area Network 358Internetworking Through Gateways and Routers 358Network Protocols 361Host Address 363CIDR: Classless Inter-Domain Routing 367Hostnames 368
Communicate Over a Network 370finger: Displays Information About Remote Users 370Sending Mail to a Remote User 371Mailing List Servers 372
Contents xix
Network Utilities 372Trusted Hosts 372OpenSSH Tools 373telnet: Logs In on a Remote System 373ftp: Transfers Files Over a Network 375ping: Tests a Network Connection 375traceroute: Traces a Route Over the Internet 376host and dig: Query Internet Nameservers 378jwhois: Looks Up Information About an Internet Site 378
Distributed Computing 379The Client/Server Model 380DNS: Domain Name Service 381Ports 383NIS: Network Information Service 383NFS: Network Filesystem 383Internet Services 384Proxy Servers 387RPC Network Services 387
Usenet 388WWW: World Wide Web 390
URL: Uniform Resource Locator 391Browsers 392Search Engines 392
Chapter Summary 392Exercises 393Advanced Exercises 394
Chapter 11: Programming the Bourne Again Shell 395
Control Structures 396if...then 396if...then...else 400if...then...elif 403for...in 409for 410while 412until 416break and continue 418case 419select 425Here Document 427
File Descriptors 429Parameters and Variables 432
Array Variables 432Locality of Variables 434Special Parameters 436Positional Parameters 438Expanding Null and Unset Variables 443

xx Contents
Builtin Commands 444type: Displays Information About a Command 445read: Accepts User Input 445exec: Executes a Command 448trap: Catches a Signal 451kill: Aborts a Process 454getopts: Parses Options 454A Partial List of Builtins 457
Expressions 458Arithmetic Evaluation 458Logical Evaluation (Conditional Expressions) 459String Pattern Matching 460Operators 461
Shell Programs 466A Recursive Shell Script 467The quiz Shell Script 470
Chapter Summary 476Exercises 478Advanced Exercises 480
PART IV System Administration 483
Chapter 12: System Administration:
Core Concepts 485
Running Commands with root Privileges 487sudo: Running a Command with root Privileges 490sudoers: Configuring sudo 494Unlocking the root Account (Assigning a Password to root) 499su: Gives You Another User’s Privileges 499
The Upstart Event-Based init Daemon 500Software Packages 501Definitions 501Jobs 503SysVinit (rc) Scripts: Start and Stop System Services 507
System Operation 510Runlevels 510Booting the System 511Recovery (Single-User) Mode 512Going to Multiuser Mode 515Logging In 516

Contents xxi
Logging Out 517Bringing the System Down 518Crash 519
Avoiding a Trojan Horse 520Getting Help 522Textual System Administration Utilities 522
kill: Sends a Signal to a Process 522Other Textual Utilities 525
Setting Up a Server 527Standard Rules in Configuration Files 528rpcinfo: Displays Information About portmap 530The inetd and xinetd Superservers 531Securing a Server 532DHCP: Configures Network Interfaces 538
nsswitch.conf: Which Service to Look at First 542How nsswitch.conf Works 542
PAM 545More Information 546Configuration Files, Module Types, and Control Flags 546Example 548Modifying the PAM Configuration 549
Chapter Summary 550Exercises 551Advanced Exercises 551
Chapter 13: Files, Directories, and Filesystems 553
Important Files and Directories 554File Types 566
Ordinary Files, Directories, Links, and Inodes 566Special Files 567
Filesystems 570mount: Mounts a Filesystem 572umount: Unmounts a Filesystem 575fstab: Keeps Track of Filesystems 576fsck: Checks Filesystem Integrity 577tune2fs: Changes Filesystem Parameters 578RAID Filesystem 580
Chapter Summary 580Exercises 580Advanced Exercises 581

xxii Contents
Chapter 14: Downloading and Installing Software 583
JumpStart: Installing and Removing Packages Using aptitude 585
Finding the Package That Holds a File You Need 587APT: Keeps the System Up-to-Date 588
Repositories 588sources.list: Specifies Repositories for APT to Search 589The APT Local Package Indexes and the APT Cache 590The apt cron Script and APT Configuration Files 590aptitude: Works with Packages and the Local Package Index 592apt-cache: Displays Package Information 596apt-get source: Downloads Source Files 598
dpkg: The Debian Package Management System 598deb Files 599dpkg: The Foundation of the Debian Package Management System 600
BitTorrent 604Installing Non-dpkg Software 607
The /opt and /usr/local Directories 607GNU Configure and Build System 607
wget: Downloads Files Noninteractively 609Chapter Summary 610Exercises 610Advanced Exercises 610
Chapter 15: Printing with CUPS 611
Introduction 612Prerequisites 612More Information 613Notes 613
JumpStart I: Configuring a Local Printer 614system-config-printer: Configuring a Printer 614
Configuration Tabs 614Setting Up a Remote Printer 616
JumpStart II: Configuring a Remote Printer Using the CUPS Web Interface 618Traditional UNIX Printing 622Configuring Printers 624
The CUPS Web Interface 624CUPS on the Command Line 626Sharing CUPS Printers 629
Printing from Windows 630Printing Using CUPS 631Printing Using Samba 631

Contents xxiii
Printing to Windows 632Chapter Summary 633Exercises 633Advanced Exercises 633
Chapter 16: Building a Linux Kernel 635
Prerequisites 636Downloading the Kernel Source Code 637
aptitude: Downloading and Installing the Kernel Source Code 637git: Obtaining the Latest Kernel Source Code 637
Read the Documentation 638Configuring and Compiling the Linux Kernel 639
.config: Configures the Kernel 639Customizing a Kernel 640Cleaning the Source Tree 642Compiling a Kernel Image File and Loadable Modules 643Using Loadable Kernel Modules 643
Installing the Kernel, Modules, and Associated Files 646Rebooting 647grub: The Linux Boot Loader 647
menu.lst: Configures grub 648update-grub: Updates the menu.lst file 651grub-install: Installs the MBR and grub Files 653
dmesg: Displays Kernel Messages 654Chapter Summary 655Exercises 656Advanced Exercises 656
Chapter 17: Administration Tasks 657
Configuring User and Group Accounts 658users-admin: Manages User Accounts 658useradd: Adds a User Account 660userdel: Removes a User Account 661usermod: Modifies a User Account 661groupadd: Adds a Group 661groupdel: Removes a Group 661
Backing Up Files 662Choosing a Backup Medium 663Backup Utilities 663Performing a Simple Backup 665dump , restore: Back Up and Restore Filesystems 666

xxiv Contents
Scheduling Tasks 668cron and anacron: Schedule Routine Tasks 668at: Runs Occasional Tasks 671
System Reports 671vmstat: Reports Virtual Memory Statistics 671top: Lists Processes Using the Most Resources 672
parted: Reports on and Partitions a Hard Disk 673Keeping Users Informed 677Creating Problems 678Solving Problems 679
Helping When a User Cannot Log In 679Speeding Up the System 680lsof: Finds Open Files 681Keeping a Machine Log 681Keeping the System Secure 682Log Files and Mail for root 683Monitoring Disk Usage 683logrotate: Manages Log Files 684Removing Unused Space from Directories 686Disk Quota System 687syslogd: Logs System Messages 688
Chapter Summary 690Exercises 690Advanced Exercises 691
Chapter 18: Configuring a LAN 693
Setting Up the Hardware 694Connecting the Computers 694Routers 695NIC: Network Interface Card 695Tools 695
Configuring the Systems 697network-admin: Configures Network Connections 698nm-applet: Configures Network Connections Automatically 700iwconfig: Configures a Wireless NIC 700
Setting Up Servers 702More Information 703Chapter Summary 703Exercises 704Advanced Exercises 704

Contents xxv
PART V Using Clients and Setting Up Servers 705
Chapter 19: OpenSSH: Secure Network
Communication 707
Introduction 708About OpenSSH 708
Files 708How OpenSSH Works 710More Information 711
OpenSSH Clients 711Prerequisites 711JumpStart: Using ssh and scp 711Setup 712ssh: Connects to or Executes Commands on a Remote System 714scp: Copies Files to and from a Remote System 716sftp: A Secure FTP Client 718~/.ssh/config and /etc/ssh/ssh_config Configuration Files 718
sshd: OpenSSH Server 720Prerequisites 720Note 720JumpStart: Starting the sshd Daemon 720Authorized Keys: Automatic Login 721Command Line Options 722/etc/ssh/sshd_config Configuration File 722
Troubleshooting 724Tunneling/Port Forwarding 725Chapter Summary 727Exercises 728Advanced Exercises 728
Chapter 20: FTP: Transferring Files Across a Network 729
Introduction 730More Information 731FTP Client 731
Prerequisites 731JumpStart I: Downloading Files Using ftp 732Notes 735Anonymous FTP 735Automatic Login 735Binary Versus ASCII Transfer Mode 736ftp Specifics 736

xxvi Contents
FTP Server (vsftpd) 740Prerequisites 740Notes 740JumpStart II: Starting a vsftpd Server 741Testing the Setup 741vsftpd.conf: The vsftpd Configuration File 742
Chapter Summary 753Exercises 753Advanced Exercises 754
Chapter 21: exim4: Setting Up Mail Servers,
Clients, and More 755
Introduction to exim4 756Prerequisites 757Notes 757More Information 758
JumpStart I: Configuring exim4 to Use a Smarthost 758JumpStart II: Configuring exim4 to Send and Receive Email 760How exim4 Works 761
Mail Logs 762Working with Messages 763Aliases and Forwarding 763Related Programs 765
Configuring exim4 765Using a Text Editor to Configure exim4 766The update-exim4.conf.conf Configuration File 766dpkg-reconfigure: Configures exim4 768
SpamAssassin 768Prerequisites 769How SpamAssassin Works 769Testing SpamAssassin 770Configuring SpamAssassin 771
Additional Email Tools 772Webmail 772Mailing Lists 774Setting Up an IMAP or POP3 Server 776
Authenticated Relaying 777Alternatives to exim4 779Chapter Summary 779Exercises 780Advanced Exercises 780

Contents xxvii
Chapter 22: NIS: Network Information Service 781
Introduction to NIS 782How NIS Works 782
More Information 784Setting Up an NIS Client 784
Prerequisites 785Notes 785Step-by-Step Setup 786Testing the Setup 787yppasswd: Changes NIS Passwords 788
Setting Up an NIS Server 790Prerequisites 790Notes 791Step-by-Step Setup 791Testing 796yppasswdd: The NIS Password Update Daemon 797
Chapter Summary 798Exercises 798Advanced Exercises 798
Chapter 23: NFS: Sharing Filesystems 799
Introduction 800More Information 802Setting Up an NFS Client 802
Prerequisites 802JumpStart I: Mounting a Remote Directory Hierarchy 803mount: Mounts a Directory Hierarchy 804Improving Performance 806/etc/fstab: Mounts Directory Hierarchies Automatically 807
Setting Up an NFS Server 808Prerequisites 808Notes 808JumpStart II: Configuring an NFS Server Using shares-admin 809Manually Exporting a Directory Hierarchy 811Where the System Keeps NFS Mount Information 815exportfs: Maintains the List of Exported Directory Hierarchies 817Testing the Server Setup 818
automount: Mounts Directory Hierarchies on Demand 818Chapter Summary 821Exercises 822Advanced Exercises 822

xxviii Contents
Chapter 24: Samba: Linux and Windows File
and Printer Sharing 823
Introduction 824About Samba 825
Prerequisites 825More Information 825Notes 825Samba Users, User Maps, and Passwords 826
JumpStart: Configuring a Samba Server Using shares-admin 826swat: Configures a Samba Server 828smb.conf: Manually Configuring a Samba Server 832
Parameters in the smbd.conf File 832The [homes] Share: Sharing Users’ Home Directories 838
Accessing Linux Shares from Windows 838Browsing Shares 838Mapping a Share 839
Accessing Windows Shares from Linux 839smbtree: Displays Windows Shares 839smbclient: Connects to Windows Shares 840Browsing Windows Networks 840Mounting Windows Shares 841
Troubleshooting 841Chapter Summary 844Exercises 844Advanced Exercises 844
Chapter 25: DNS/BIND: Tracking Domain Names
and Addresses 845
Introduction to DNS 846Nodes, Domains, and Subdomains 846Zones 848Queries 849Servers 850Resource Records 851DNS Query and Response 854Reverse Name Resolution 855
About DNS 857How DNS Works 857Prerequisites 857More Information 858Notes 858
Contents xxix
JumpStart I: Setting Up a DNS Cache 858
Setting Up BIND 860named.conf: The named Configuration File 860Zone Files 863A DNS Cache 864DNS Glue Records 868TSIGs: Transaction Signatures 868Running BIND in a chroot Jail 870
Troubleshooting 872
A Full-Functioned Nameserver 873
A Slave Server 877
A Split Horizon Server 878
Chapter Summary 883
Exercises 883
Advanced Exercises 884
Chapter 26: firestarter and iptables: Setting
Up a Firewall 885
About firestarter 886Prerequisites 886Notes 887More Information 888
JumpStart: Building a Firewall Using the firestarter Firewall Wizard 888
firestarter: Maintains a Firewall 890The Status Tab 890The Events Tab 892The Policy Tab 894
How iptables Works 896
About iptables 899More Information 899Prerequisites 899Notes 899
Anatomy of an iptables Command 900
Building a Set of Rules 901Commands 901Packet Match Criteria 903Display Criteria 903Match Extensions 903Targets 906
Copying Rules to and from the Kernel 907

xxx Contents
Sharing an Internet Connection Using NAT 908Connecting Several Clients to a Single Internet Connection 910Connecting Several Servers to a Single Internet Connection 912
Chapter Summary 912Exercises 913Advanced Exercises 913
Chapter 27: Apache: Setting Up a Web Server 915
Introduction 916About Apache 917
Prerequisites 917More Information 918Notes 918
JumpStart: Getting Apache Up and Running 919Modifying the Configuration Files 919Testing Apache 920Putting Your Content in Place 920
Configuring Apache 921Configuration Tools 921Include Directives 922Filesystem Layout 923
Configuration Directives 925Directives I: Directives You May Want to Modify as You Get Started 926Contexts and Containers 931Directives II: Advanced Directives 935
The Ubuntu apache2.conf File 948The Ubuntu default Configuration File 950Redirects 951Content Negotiation 951
Type Maps 951MultiViews 952
Server-Generated Directory Listings (Indexing) 953Virtual Hosts 953
Setting Up a Virtual Host 954Types of Virtual Hosts 954The default Virtual Host 954Examples 954
Troubleshooting 956Modules 957
mod_cgi and CGI Scripts 958mod_ssl 959Authentication Modules and .htaccess 961Scripting Modules 962Multiprocessing Modules (MPMs) 963

Contents xxxi
webalizer: Analyzes Web Traffic 964MRTG: Monitors Traffic Loads 964Error Codes 964Chapter Summary 965Exercises 966Advanced Exercises 966
PART VI Appendixes 969
Appendix A: Regular Expressions 971
Characters 972Delimiters 972Simple Strings 972Special Characters 972
Periods 973Brackets 973Asterisks 974Carets and Dollar Signs 974Quoting Special Characters 975
Rules 975Longest Match Possible 975Empty Regular Expressions 976
Bracketing Expressions 976The Replacement String 976
Ampersand 977Quoted Digit 977
Extended Regular Expressions 977Appendix Summary 979
Appendix B: Help 981
Solving a Problem 982Finding Linux-Related Information 983
Documentation 983Useful Linux Sites 984Linux Newsgroups 985Mailing Lists 985Words 986Software 986Office Suites and Word Processors 988
Specifying a Terminal 988

xxxii Contents
Appendix C: Security 991
Encryption 992Public Key Encryption 993Symmetric Key Encryption 994Encryption Implementation 995GnuPG/PGP 995
File Security 997Email Security 997
MTAs (Mail Transfer Agents) 997MUAs (Mail User Agents) 998
Network Security 998Network Security Solutions 999Network Security Guidelines 999
Host Security 1001Login Security 1002Remote Access Security 1003Viruses and Worms 1004Physical Security 1004
Security Resources 1006Appendix Summary 1009
Appendix D: The Free Software Definition 1011
Appendix E: The Linux 2.6 Kernel 1015
Native Posix Thread Library (NPTL) 1016IPSecurity (IPSec) 1016Asynchronous I/O (AIO) 1016O(1) Scheduler 1017OProfile 1017kksymoops 1017Reverse Map Virtual Memory (rmap VM) 1017HugeTLBFS: Translation Look-Aside Buffer Filesystem 1018remap_file_pages 10182.6 Network Stack Features (IGMPv3, IPv6, and Others) 1018Internet Protocol Virtual Server (IPVS) 1019Access Control Lists (ACLs) 10194GB-4GB Memory Split: Physical Address Extension (PAE) 1019Scheduler Support for HyperThreaded CPUs 1019

Contents xxxiii
Block I/O (BIO) Block Layer 1019Support for Filesystems Larger Than 2 Terabytes 1020New I/O Elevators 1020Interactive Scheduler Response Tuning 1020
Glossary 1021
Index 1071

This page intentionally left blank

xxxvxxxv
M Preface
Preface
The book Whether you are an end user, a system administrator, or a little of both, this bookexplains with step-by-step examples how to get the most out of an Ubuntu Linuxsystem. In 27 chapters, this book takes you from installing an Ubuntu systemthrough understanding its inner workings to setting up secure servers that run onthe system.
The audience This book is designed for a wide range of readers. It does not require you to haveprogramming experience, although having some experience using a general-purposecomputer, such as a Windows, Macintosh, UNIX, or another Linux system is cer-tainly helpful. This book is appropriate for
• Students who are taking a class in which they use Linux
• Home users who want to set up and/or run Linux
• Professionals who use Linux at work
• System administrators who need an understanding of Linux and the tools that are available to them
• Computer science students who are studying the Linux operating system
• Technical executives who want to get a grounding in Linux
Benefits A Practical Guide to Ubuntu Linux® gives you a broad understanding of many fac-ets of Linux, from installing Ubuntu Linux through using and customizing it. Nomatter what your background, this book provides the knowledge you need to geton with your work. You will come away from this book understanding how to useLinux, and this book will remain a valuable reference for years to come.

xxxvi Preface
Overlap If you read A Practical Guide to Linux® Commands, Editors, and Shell Program-ming, you will notice some overlap between that book and the one you are readingnow. The first chapter, the chapters on the utilities and the filesystem, and theappendix on regular expressions are very similar in the two books, as are the threechapters on the Bourne Again Shell (bash). Chapters that appear in this book but donot appear in A Practical Guide to Linux® Commands, Editors, and Shell Program-ming include Chapters 2 and 3 (installation), Chapters 4 and 8 (Ubuntu Linux andthe GUI), Chapter 10 (networking), all of the chapters in Part IV (system adminis-tration) and Part V (servers), and Appendix C (security).
Differences While this book explains how to use Linux from a graphical interface and from thecommand line (a textual interface), A Practical Guide to Linux® Commands, Edi-tors, and Shell Programming works exclusively with the command line. It includesfull chapters on the vi and emacs editors, as well as chapters on the gawk patternprocessing language and the sed stream editor. In addition, it has a command refer-ence section that provides extensive examples of the use of more than 80 of themost important Linux utilities. You can use these utilities to solve problems withoutresorting to programming in C.
This Book Includes Ubuntu Gutsy Gibbon (7.10)
on a Live/Install DVD
This book includes a live/install DVD that holds the Gutsy Gibbon (7.10) release ofUbuntu Linux. You can use this DVD to run a live Ubuntu session that displays theGNOME desktop without making any changes to your computer: Boot from theDVD, run an Ubuntu live session, and log off. Your system remains untouched:When you reboot, it is exactly as it was before you ran the Ubuntu live session.Alternatively, you can install Ubuntu from the live session. Chapter 2 helps you getready to install Ubuntu. Chapter 3 provides step-by-step instructions for installingUbuntu from this DVD. This book guides you through learning about, using, andadministrating an Ubuntu Linux session.
DVD features The included DVD incorporates all the features of the live/install Desktop CD aswell as the Alternate and Server CDs. It also includes all software packages sup-ported by Ubuntu. You can use it to perform a graphical or textual (command line)installation of either a graphical or a textual Ubuntu system. If you do not have anInternet connection, you can use the DVD as a software repository and install anysupported software packages from it.
Features of This Book
This book is designed and organized so you can get the most out of it in the shortestamount of time. You do not have to read this book straight through in page order.Instead, once you are comfortable using Linux, you can use this book as a reference:

Features of This Book xxxvii
Look up a topic of interest in the table of contents or index and read about it. Orthink of the book as a catalog of Linux topics: Flip through the pages until a topiccatches your eye. The book includes many pointers to Web sites where you can getadditional information: Consider the Internet an extension of this book.
A Practical Guide to Ubuntu Linux® is structured with the following features:
• Optional sections enable you to read the book at different levels, returning to more difficult material when you are ready to delve into it.
• Caution boxes highlight procedures that can easily go wrong, giving you guidance before you run into trouble.
• Tip boxes highlight ways you can save time by doing something differently or situations when it may be useful or just interesting to have additional information.
• Security boxes point out places where you can make a system more secure. The security appendix presents a quick background in system security issues.
• Concepts are illustrated by practical examples throughout the book.
• Chapter summaries review the important points covered in each chapter.
• Review exercises are included at the end of each chapter for readers who want to further hone their skills. Answers to even-numbered exercises are available at www.sobell.com.
• The glossary defines more than 500 common terms.
• The chapters that cover servers include JumpStart sections that get you off to a quick start using clients and setting up servers. Once a server is up and running, you can test and modify its configuration as explained in the rest of the chapter.
• This book provides resources for finding software on the Internet. It also explains how to download and install software using Synaptic, aptitude,the GNOME Add/Remove Applications window, and BitTorrent. It details controlling automatic updates using the Update Notifier and the Update Manager window.
• This book describes in detail many important GNU tools, including the GNOME desktop, the Nautilus File Browser, the parted and gparted parti-tion editors, the gzip compression utility, and many command line utilities that come from the GNU project.
• Pointers throughout the text provide help in obtaining online documenta-tion from many sources, including the local system, the Ubuntu Web site, and other locations on the Internet.
• Many useful URLs point to Web sites where you can obtain software, security programs and information, and more.
• The comprehensive index helps you locate topics quickly and easily.

xxxviii Preface
Key Topics Covered in This Book
This book contains a lot of information. This section distills and summarizes itscontents. In addition, “Details” (starting on page xli) describes what each chaptercovers. Finally, the table of contents provides more detail. This book:
Installation • Describes how to download Ubuntu Linux ISO images from the Internet and burn the Ubuntu live/install Desktop CD, the DVD, or the Ubuntu Alternate or Server installation CD.
• Helps you plan the layout of the system’s hard disk. It includes a discus-sion of partitions, partition tables, and mount points, and assists you in using the ubiquity or gparted graphical partitioner or the Ubuntu textual partitioner to partition the hard disk.
• Explains how to set up a dual-boot system so you can install Ubuntu Linux on a Windows system and boot either operating system.
• Describes in detail how to install Ubuntu Linux from a live/install Desktop CD or the live/install DVD using the ubiquity graphical installer. It also explains how to use the textual installer found on the Alternate CD, the Server CD, and the DVD. The graphical installer is fast and easy to use. The textual installer gives you more options and works on systems with less RAM (system memory).
• Covers testing an Ubuntu CD/DVD for defects, setting boot command line parameters (boot options), and creating a RAID array.
• Covers the details of installing and customizing the X.org version of the X Window System either graphically using the Screen and Graphics Preferences window or manually with a text editor.
Working withUbuntu Linux
• Introduces the GNOME desktop (GUI) and explains how to use desktop tools, including the Top and Bottom panels, panel objects, the Main menu, object context menus, the Workspace Switcher, the Nautilus File Browser, and the GNOME Terminal emulator.
• Explains how to use the Appearance Preferences window to add and mod-ify themes to customize your desktop to please your senses and help you work more efficiently.
• Details how to set up 3D desktop visual effects that take advantage of Compiz Fusion.
• Covers the Bourne Again Shell (bash) in three chapters, including an entire chapter on shell programming that includes many sample shell scripts. These chapters provide clear explanations and extensive examples of how bash works both from the command line in day-to-day work and as a pro-gramming language to write shell scripts.

Key Topics Covered in This Book xxxix
• Explains the textual (command line) interface and introduces more than 30 command line utilities.
• Presents a tutorial on the vim textual editor.
• Covers types of networks, network protocols, and network utilities.
• Explains hostnames, IP addresses, and subnets, and explores how to use host and dig to look up domain names and IP addresses on the Internet.
• Covers distributed computing and the client/server model.
• Explains how to use ACLs (Access Control Lists) to fine-tune user access permissions.
Systemadministration
• Explains how to use the Ubuntu graphical and textual (command line) tools to configure the display, DNS, NFS, Samba, Apache, a firewall, a network interface, and more. You can also use these tools to add users and manage local and remote printers.
• Goes into detail about using sudo to allow specific users to work with rootprivileges (become Superuser) and customizing the way sudo works by editing the sudoers configuration file. It also explains how you can unlock the root account if necessary.
• Describes how to use the following tools to download and install software to keep a system up-to-date and to install new software:
◆ The Software Sources window controls which Ubuntu and third-party software repositories Ubuntu downloads software packages from and whether Ubuntu downloads updates automatically. You can also use this window to cause Ubuntu to download and install security updates automatically.
◆ If you do not have an Internet connection, you can use the Software Sources window to set up the DVD included with this book as a soft-ware repository. You can then install any software packages that Ubuntu supports from this repository.
◆ Based on how you set up updates in the Software Sources window, the Update Notifier pops up on the desktop to let you know when soft-ware updates are available. Click the Update Notifier to open the Update Manager window, from which you can download and install updates.
◆ The Add/Remove Applications window provides an easy way to select, download, and install a wide range of software packages.
◆ Synaptic allows you to search for, install, and remove software pack-ages. It gives you more ways to search for packages than does the Add/Remove Applications window.

xl Preface
◆ APT downloads and installs software packages from the Internet (or the included DVD), keeping a system up-to-date and resolving dependencies as it processes the packages. You can use APT from a graphical interface (Synaptic) or from several textual interfaces (e.g., aptitude and apt-get).
◆ BitTorrent is a good choice for distributing large amounts of data such as the Ubuntu installation DVD and CDs. The more people who use BitTorrent to download a file, the faster it works.
• Covers graphical system administration tools, including the many tools available from the GNOME Main menu.
• Explains system operation, including the boot process, init scripts, recov-ery (single-user) and multiuser modes, and steps to take if the system crashes.
• Describes how to use and program the new Upstart init daemon, which replaces the System V init daemon.
• Describes files, directories, and filesystems, including types of files and file-systems, fstab (the filesystem table), and automatically mounted filesystems, and explains how to fine-tune and check the integrity of filesystems.
• Covers backup utilities, including tar, cpio, dump, and restore.
• Describes compression/archive utilities, including gzip, bzip2, compress,and zip.
• Explains how to customize and build a Linux kernel.
Security • Helps you manage basic system security issues using ssh (secure shell), vsftpd (secure FTP server), Apache (Web server), iptables (firewalls), and more.
• Covers using firestarter to share an Internet connection over a LAN, run a DHCP server, and set up a basic firewall to protect the system.
• Provides instructions on using iptables to share an Internet connection over a LAN and to build advanced firewalls.
• Describes how to set up a chroot jail to help protect a server system.
• Explains how to use TCP wrappers to control who can access a server.
Clients and servers • Explains how to set up and use the most popular Linux servers, providing a chapter on each: Apache, Samba, OpenSSH, exim4, DNS, NFS, FTP, firestarterand iptables, and NIS (all of which are supported by Ubuntu Linux).
• Describes how to set up a CUPS printer server.
• Describes how to set up and use a DHCP server either by itself or from firestarter.
Programming • Provides a full chapter covering shell programming using bash, including many examples.
Key Topics Covered in This Book xli
Details
Chapter 1 Chapter 1 presents a brief history of Linux and explains some of the features thatmake it a cutting-edge operating system. The “Conventions Used in This Book”(page 17) section details the typefaces and terminology this book uses.
Part I Part I, “Installing Ubuntu Linux,” discusses how to install Ubuntu Linux. Chapter 2presents an overview of the process of installing Ubuntu Linux, including hardwarerequirements, downloading and burning a CD or DVD, and planning the layout ofthe hard disk. Chapter 3 is a step-by-step guide to installing Ubuntu Linux from aCD or DVD, using the graphical or textual installer. It also shows how to set up theX Window System and customize your desktop (GUI).
Part II Part II, “Getting Started with Ubuntu Linux,” familiarizes you with Ubuntu Linux,covering logging in, the GUI, utilities, the filesystem, and the shell. Chapter 4 intro-duces desktop features, including the Top and Bottom panels and the Main menu;explains how to use the Nautilus File Browser to manage files, run programs, andconnect to FTP and HTTP servers; covers finding documentation, dealing with loginproblems, and using the window manager; and presents some suggestions on whereto find documentation, including manuals, tutorials, software notes, and HOWTOs.Chapter 5 introduces the shell command line interface, describes more than 30 use-ful utilities, and presents a tutorial on the vim text editor. Chapter 6 discusses theLinux hierarchical filesystem, covering files, filenames, pathnames, working withdirectories, access permissions, and hard and symbolic links. Chapter 7 introducesthe Bourne Again Shell (bash) and discusses command line arguments and options,redirecting input to and output from commands, running programs in the back-ground, and using the shell to generate and expand filenames.
Part III Part III, “Digging into Ubuntu Linux,” goes into more detail about working with thesystem. Chapter 8 discusses the GUI (desktop) and includes a section on how to runa graphical program on a remote system and have the display appear locally. Thesection on GNOME describes several GNOME utilities, including the new Deskbarapplet, and goes into more depth about the Nautilus File Browser. Chapter 9 extendsthe bash coverage from Chapter 7, explaining how to redirect error output, avoidoverwriting files, and work with job control, processes, startup files, important shellbuiltin commands, parameters, shell variables, and aliases. Chapter 10 explains net-works, network security, and the Internet and discusses types of networks, subnets,protocols, addresses, hostnames, and various network utilities. The section on dis-tributed computing describes the client/server model and some of the servers you canuse on a network. Chapter 11 goes into greater depth about shell programming
Experienced users may want to skim Part II
tip If you have used a UNIX or Linux system before, you may want to skim or skip some or all of thechapters in Part II. Part I has two sections that all readers should take a look at: “Conventions Usedin This Book” (page 17), which explains the typographic and layout conventions used in this book,and “Where to Find Documentation” (page 124), which points out both local and remote sourcesof Linux and Ubuntu documentation.

xlii Preface
using bash, with the discussion enhanced by extensive examples. Details of setting upand using clients and servers are reserved until Part V.
Part IV Part IV covers system administration. Chapter 12 discusses core concepts such asthe use of sudo, working with root privileges, system operation, chroot jails, TCPwrappers, general information about how to set up a server, DHCP, and PAM.Chapter 13 explains the Linux filesystem, going into detail about types of files,including special and device files; the use of fsck to verify the integrity of and repairfilesystems; and the use of tune2fs to change filesystem parameters. Chapter 14explains how to keep a system up-to-date by downloading software from the Inter-net and installing it, including examples of using APT programs such as aptitude,apt-get, and apt-cache. It also covers the dpkg software packaging system and theuse of some dpkg utilities. Finally, it explains how to use BitTorrent from the com-mand line to download files. Chapter 15 explains how to set up the CUPS printingsystem so you can print on both local and remote systems. Chapter 16 details cus-tomizing and building a Linux kernel. Chapter 17 covers additional administrationtasks, including setting up user accounts, backing up files, scheduling automatedtasks, tracking disk usage, and solving general problems. Chapter 18 explains howto set up a local area network (LAN), including both hardware (including wireless)and software configuration.
Part V Part V goes into detail about setting up and running servers and connecting to themwith clients. Where appropriate, these chapters include JumpStart sections that getyou off to a quick start in using clients and setting up servers. The chapters in Part Vcover the following clients/servers:
• OpenSSH Set up an OpenSSH server and use ssh, scp, and sftp to com-municate securely over the Internet.
• FTP Set up a vsftpd secure FTP server and use any of several FTP clients to exchange files with the server.
• Mail Configure exim4 and use Webmail, POP3, or IMAP to retrieve email; use SpamAssassin to combat spam.
• NIS Set up NIS to facilitate system administration of a LAN.
• NFS Share filesystems between systems on a network.
• Samba Share filesystems and printers between Windows and Linux systems.
• DNS/BIND Set up a domain nameserver to let other systems on the Internet know the names and IP addresses of local systems they may need to contact.
• firestarter and iptables Share a single Internet connection between systems on a LAN, run a DHCP server, and set up a firewall to protect local systems.
• Apache Set up an HTTP server that serves Web pages that browsers can display. This chapter includes many suggestions for increasing Apache security.

Thanks xliii
Part VI Part VI includes appendixes on regular expressions, helpful Web sites, system secu-rity, and free software. This part also includes an extensive glossary with more than500 entries plus a comprehensive index.
Supplements
The author’s home page (www.sobell.com) contains downloadable listings of thelonger programs from this book as well as pointers to many interesting and usefulLinux sites on the World Wide Web, a list of corrections to the book, answers to even-numbered exercises, and a solicitation for corrections, comments, and suggestions.
Thanks
First and foremost, I want to thank Mark L. Taub, Editor-in-Chief, Prentice Hall,who provided encouragement and support through the hard parts of this project.Mark is unique in my 25 years of book writing experience: an editor who workswith the tools I write about. Because Mark runs Ubuntu on his home computer, weshared experiences as I wrote this book. Mark, your comments and direction areinvaluable; this book would not exist without your help. Thank you, Mark T.
Molly Sharp of ContentWorks worked with me day-by-day during production ofthis book providing help, listening to my rants, and keeping everything on track.Thanks to Jill Hobbs, Copyeditor, who made the book readable, understandable,and consistent; and Linda Seifert, Proofreader, who made each page sparkle.
Thanks also to the folks at Prentice Hall who helped bring this book to life, espe-cially Julie Nahil, Full-Service Production Manager, who oversaw production ofthe book; John Fuller, Managing Editor, who kept the large view in check; MarieMcKinley, Marketing Manager; Noreen Regina, Editorial Assistant, who attendedto the many details involved in publishing this book, including keeping the reviewteam on schedule (no small task); Heather Fox, Publicist; Dan Scherf, MediaDeveloper; Sandra Schroeder, Design Manager; Chuti Prasertsith, Cover Designer;and everyone else who worked behind the scenes to make this book come intobeing.
I am also indebted to Denis Howe, Editor of The Free On-line Dictionary of Com-puting (FOLDOC). Denis has graciously permitted me to use entries from hiscompilation. Be sure to look at this dictionary (www.foldoc.org).
A big “thank you” to the folks who read through the drafts of the book andmade comments that caused me to refocus parts of the book where things werenot clear or were left out altogether: David Chisnall, Swansea University; ScottMann, Aztek Networks; Matthew Miller, Senior Systems Analyst/Administrator,BU Linux Project, Boston University Office of Information Technology; George

xliv Preface
Vish II, Senior Education Consultant, Hewlett-Packard; Thomas Achtemichuk,Mansueto Ventures; John Dong, Ubuntu Forum Council Member/BackportsTeam Leader; Scott James Remnant, Ubuntu Development Manager and DesktopTeam Leader; Daniel R. Arfsten, Pro/Engineer Drafter/Designer; Chris Cooper,Senior Education Consultant, Hewlett-Packard Education Services; SameerVerma, Associate Professor of Information Systems, San Francisco State Univer-sity; Valerie Chau, Palomar College and Programmers Guild; James Kratzer; SeanMcAllister; Nathan Eckenrode, New York Ubuntu Local Community Team;Christer Edwards; Nicolas Merline; and Michael Price.
Thanks also to the following people who helped with my previous Linux books,which provided a foundation for this book: Chris Karr, Northwestern University;Jesse Keating, Fedora Project; Carsten Pfeiffer, Software Engineer and KDE Devel-oper; Aaron Weber, Ximian; Cristof Falk, Software Developer at CritterDesign;Steve Elgersma, Computer Science Department, Princeton University; Scott Dier,University of Minnesota; Robert Haskins, Computer Net Works; Lars Kellogg-Stedman, Harvard University; Jim A. Lola, Principal Systems Consultant, Priva-teer Systems; Eric S. Raymond, Cofounder, Open Source Initiative; Scott Mann;Randall Lechlitner, Independent Computer Consultant; Jason Wertz, ComputerScience Instructor, Montgomery County Community College; Justin Howell, SolanoCommunity College; Ed Sawicki, The Accelerated Learning Center; David Mercer;Jeffrey Bianchine, Advocate, Author, Journalist; John Kennedy; and Jim Dennis,Starshine Technical Services.
Thanks also to Dustin Puryear, Puryear Information Technology; Gabor Liptak,Independent Consultant; Bart Schaefer, Chief Technical Officer, iPost; Michael J.Jordan, Web Developer, Linux Online; Steven Gibson, Owner, SuperAnt.com; JohnViega, Founder and Chief Scientist, Secure Software; K. Rachael Treu, InternetSecurity Analyst, Global Crossing; Kara Pritchard, K & S Pritchard Enterprises;Glen Wiley, Capital One Finances; Karel Baloun, Senior Software Engineer, Look-smart; Matthew Whitworth; Dameon D. Welch-Abernathy, Nokia Systems; JoshSimon, Consultant; Stan Isaacs; and Dr. Eric H. Herrin II, Vice President, HerrinSoftware Development. And thanks to Doug Hughes, long-time system designerand administrator, who gave me a big hand with the sections on system administra-tion, networks, the Internet, and programming.
More thanks go to consultants Lorraine Callahan and Steve Wampler; RonaldHiller, Graburn Technology; Charles A. Plater, Wayne State University; BobPalowoda; Tom Bialaski, Sun Microsystems; Roger Hartmuller, TIS Labs at Net-work Associates; Kaowen Liu; Andy Spitzer; Rik Schneider; Jesse St. Laurent; SteveBellenot; Ray W. Hiltbrand; Jennifer Witham; Gert-Jan Hagenaars; and Casper Dik.
A Practical Guide to Ubuntu Linux® is based in part on two of my previous UNIXbooks: UNIX System V: A Practical Guide and A Practical Guide to the UNIX Sys-tem. Many people helped me with those books, and thanks here go to Pat Parseghian;Dr. Kathleen Hemenway; Brian LaRose; Byron A. Jeff, Clark Atlanta University;Charles Stross; Jeff Gitlin, Lucent Technologies; Kurt Hockenbury; Maury Bach, Intel

Thanks xlv
Israel; Peter H. Salus; Rahul Dave, University of Pennsylvania; Sean Walton, IntelligentAlgorithmic Solutions; Tim Segall, Computer Sciences Corporation; Behrouz Forouzan,DeAnza College; Mike Keenan, Virginia Polytechnic Institute and State University;Mike Johnson, Oregon State University; Jandelyn Plane, University of Maryland;Arnold Robbins and Sathis Menon, Georgia Institute of Technology; Cliff Shaffer, Vir-ginia Polytechnic Institute and State University; and Steven Stepanek, California StateUniversity, Northridge, for reviewing the book.
I continue to be grateful to the many people who helped with the early editions ofmy UNIX books. Special thanks are due to Roger Sippl, Laura King, and RoyHarrington for introducing me to the UNIX system. My mother, Dr. Helen Sobell,provided invaluable comments on the original manuscript at several junctures. Also,thanks go to Isaac Rabinovitch, Professor Raphael Finkel, Professor RandolphBentson, Bob Greenberg, Professor Udo Pooch, Judy Ross, Dr. Robert Veroff,Dr. Mike Denny, Joe DiMartino, Dr. John Mashey, Diane Schulz, Robert Jung, CharlesWhitaker, Don Cragun, Brian Dougherty, Dr. Robert Fish, Guy Harris, Ping Liao,Gary Lindgren, Dr. Jarrett Rosenberg, Dr. Peter Smith, Bill Weber, Mike Bianchi,Scooter Morris, Clarke Echols, Oliver Grillmeyer, Dr. David Korn, Dr. ScottWeikart, and Dr. Richard Curtis.
Finally, thanks to Peter and his family for providing nourishment and a very com-fortable place to work. I spent many hours reading the manuscript at JumpStart,Peter’s neighborhood coffee and sandwich shop. If you are in the neighborhood(24th & Guerrero in San Francisco), stop by and say “Hi.”
I take responsibility for any errors and omissions in this book. If you find one orjust have a comment, let me know ([email protected]) and I will fix it in the nextprinting. My home page (www.sobell.com) contains a list of errors and credits thosewho found them. It also offers copies of the longer scripts from the book and point-ers to interesting Linux pages on the Internet.
Mark G. SobellSan Francisco, California

This page intentionally left blank

11
1Chapter1The Linux kernel was developed by Finnish undergraduatestudent Linus Torvalds, who used the Internet to make thesource code immediately available to others for free. Torvaldsreleased Linux version 0.01 in September 1991.
The new operating system came together through a lot of hardwork. Programmers around the world were quick to extend thekernel and develop other tools, adding functionality to matchthat already found in both BSD UNIX and System V UNIX(SVR4) as well as new functionality.
The Linux operating system, which was developed throughthe cooperation of many, many people around the world, is aproduct of the Internet and is a free operating system. In otherwords, all the source code is free. You are free to study it,redistribute it, and modify it. As a result, the code is availablefree of cost—no charge for the software, source, documenta-tion, or support (via newsgroups, mailing lists, and other
In This Chapter
The GNU–Linux Connection . . . . . . . 2
The Linux 2.6 Kernel . . . . . . . . . . . . . 5
The Heritage of Linux: UNIX . . . . . . . 5
What Is So Good About Linux?. . . . . 6
Overview of Linux . . . . . . . . . . . . . . 10
Additional Features of Linux. . . . . . 15
Conventions Used in This Book . . . 17
1
Welcome to Linux
2 Chapter 1 Welcome to Linux
Internet resources). As the GNU Free Software Definition (reproduced in Appendix D)puts it:
Free beer “Free software” is a matter of liberty, not price. To understand theconcept, you should think of “free” as in “free speech,” not as in“free beer.”
The GNU–Linux Connection
An operating system is the low-level software that schedules tasks, allocates storage,and handles the interfaces to peripheral hardware, such as printers, disk drives, thescreen, keyboard, and mouse. An operating system has two main parts: the kerneland the system programs. The kernel allocates machine resources—including mem-ory, disk space, and CPU (page 1031) cycles—to all other programs that run on thecomputer. The system programs perform higher-level housekeeping tasks, often act-ing as servers in a client/server relationship. Linux is the name of the kernel thatLinus Torvalds presented to the world in 1991 and that many others have workedon since then to enhance, stabilize, expand, and make more secure.
The History of GNU–Linux
This section presents some background on the relationship between GNU and Linux.
Fade to 1983
Richard Stallman (www.stallman.org) announced1 the GNU Project for creating anoperating system, both kernel and system programs, and presented the GNU Mani-festo,2 which begins as follows:
GNU, which stands for Gnu’s Not UNIX, is the name for the com-plete UNIX-compatible software system which I am writing so thatI can give it away free to everyone who can use it.
Some years later, Stallman added a footnote to the preceding sentence when he realizedthat it was creating confusion:
The wording here was careless. The intention was that nobodywould have to pay for *permission* to use the GNU system. Butthe words don’t make this clear, and people often interpret them assaying that copies of GNU should always be distributed at little orno charge. That was never the intent; later on, the manifesto men-tions the possibility of companies providing the service of distribu-tion for a profit. Subsequently I have learned to distinguish
1. www.gnu.org/gnu/initial-announcement.html
2. www.gnu.org/gnu/manifesto.html

The GNU–Linux Connection 3
carefully between “free” in the sense of freedom and “free” in thesense of price. Free software is software that users have the free-dom to distribute and change. Some users may obtain copies at nocharge, while others pay to obtain copies—and if the funds helpsupport improving the software, so much the better. The importantthing is that everyone who has a copy has the freedom to cooperatewith others in using it.
In the manifesto, after explaining a little about the project and what has beenaccomplished so far, Stallman continues:
Why I Must Write GNUI consider that the golden rule requires that if I like a program Imust share it with other people who like it. Software sellers wantto divide the users and conquer them, making each user agree notto share with others. I refuse to break solidarity with other users inthis way. I cannot in good conscience sign a nondisclosure agree-ment or a software license agreement. For years I worked withinthe Artificial Intelligence Lab to resist such tendencies and otherinhospitalities, but eventually they had gone too far: I could notremain in an institution where such things are done for me againstmy will.
So that I can continue to use computers without dishonor, I havedecided to put together a sufficient body of free software so that Iwill be able to get along without any software that is not free. Ihave resigned from the AI Lab to deny MIT any legal excuse toprevent me from giving GNU away.
Next Scene, 1991
The GNU Project has moved well along toward its goal. Much of the GNU operat-ing system, except for the kernel, is complete. Richard Stallman later writes:
By the early ’90s we had put together the whole system aside fromthe kernel (and we were also working on a kernel, the GNU Hurd,3
which runs on top of Mach4). Developing this kernel has been a lotharder than we expected, and we are still working on finishing it.5
...[M]any believe that once Linus Torvalds finished writing the ker-nel, his friends looked around for other free software, and for noparticular reason most everything necessary to make a UNIX-likesystem was already available.
3. www.gnu.org/software/hurd/hurd.html
4. www.gnu.org/software/hurd/gnumach.html
5. www.gnu.org/software/hurd/hurd-and-linux.html

4 Chapter 1 Welcome to Linux
What they found was no accident—it was the GNU system. Theavailable free software6 added up to a complete system because theGNU Project had been working since 1984 to make one. The GNUManifesto had set forth the goal of developing a free UNIX-likesystem, called GNU. The Initial Announcement of the GNUProject also outlines some of the original plans for the GNU sys-tem. By the time Linux was written, the [GNU] system was almostfinished.7
Today the GNU “operating system” runs on top of the FreeBSD (www.freebsd.org)and NetBSD (www.netbsd.org) kernels with complete Linux binary compatibilityand on top of Hurd pre-releases and Darwin (developer.apple.com/opensource)without this compatibility.
The Code Is Free
The tradition of free software dates back to the days when UNIX was released touniversities at nominal cost, which contributed to its portability and success. Thistradition died as UNIX was commercialized and manufacturers regarded the sourcecode as proprietary, making it effectively unavailable. Another problem with thecommercial versions of UNIX related to their complexity. As each manufacturertuned UNIX for a specific architecture, it became less portable and too unwieldy forteaching and experimentation.
MINIX Two professors created their own stripped-down UNIX look-alikes for educationalpurposes: Doug Comer created XINU and Andrew Tanenbaum created MINIX.Linus Torvalds created Linux to counteract the shortcomings in MINIX. Every timethere was a choice between code simplicity and efficiency/features, Tanenbaumchose simplicity (to make it easy to teach with MINIX), which meant this systemlacked many features people wanted. Linux goes in the opposite direction.
You can obtain Linux at no cost over the Internet (page 37). You can also obtainthe GNU code via the U.S. mail at a modest cost for materials and shipping. Youcan support the Free Software Foundation (www.fsf.org) by buying the same(GNU) code in higher-priced packages, and you can buy commercial packagedreleases of Linux (called distributions), such as Ubuntu Linux, that include installa-tion instructions, software, and support.
GPL Linux and GNU software are distributed under the terms of the GNU General Pub-lic License (GPL, www.gnu.org/licenses/licenses.html). The GPL says you have theright to copy, modify, and redistribute the code covered by the agreement. Whenyou redistribute the code, however, you must also distribute the same license withthe code, thereby making the code and the license inseparable. If you get sourcecode off the Internet for an accounting program that is under the GPL and then
6. See Appendix D or www.gnu.org/philosophy/free-sw.html.
7. www.gnu.org/gnu/linux-and-gnu.html

The Heritage of Linux: UNIX 5
modify that code and redistribute an executable version of the program, you mustalso distribute the modified source code and the GPL agreement with it. Becausethis arrangement is the reverse of the way a normal copyright works (it gives rightsinstead of limiting them), it has been termed a copyleft. (This paragraph is not alegal interpretation of the GPL; it is intended merely to give you an idea of how itworks. Refer to the GPL itself when you want to make use of it.)
Have Fun!
Two key words for Linux are “Have Fun!” These words pop up in prompts and doc-umentation. The UNIX—now Linux—culture is steeped in humor that can be seenthroughout the system. For example, less is more—GNU has replaced the UNIXpaging utility named more with an improved utility named less. The utility to viewPostScript documents is named ghostscript, and one of several replacements for the vieditor is named elvis. While machines with Intel processors have “Intel Inside” logoson their outside, some Linux machines sport “Linux Inside” logos. And Torvaldshimself has been seen wearing a T-shirt bearing a “Linus Inside” logo.
The Linux 2.6 Kernel
The Linux 2.6 kernel was released on December 17, 2003. This kernel has manyfeatures that offer increased security and speed. Some of these features benefit endusers directly; others help developers produce better code and find problems morequickly. See Appendix E for a description of the features introduced in the Linux2.6 kernel.
The Heritage of Linux: UNIX
The UNIX system was developed by researchers who needed a set of modern com-puting tools to help them with their projects. The system allowed a group of peopleworking together on a project to share selected data and programs while keepingother information private.
Universities and colleges played a major role in furthering the popularity of theUNIX operating system through the “four-year effect.” When the UNIX operatingsystem became widely available in 1975, Bell Labs offered it to educational institu-tions at nominal cost. The schools, in turn, used it in their computer science pro-grams, ensuring that computer science students became familiar with it. BecauseUNIX was such an advanced development system, the students became acclimatedto a sophisticated programming environment. As these students graduated and wentinto industry, they expected to work in a similarly advanced environment. As moreof them worked their way up the ladder in the commercial world, the UNIX operat-ing system found its way into industry.

6 Chapter 1 Welcome to Linux
In addition to introducing students to the UNIX operating system, the ComputerSystems Research Group (CSRG) at the University of California at Berkeley madesignificant additions and changes to it. In fact, it made so many popular changesthat one version of the system is called the Berkeley Software Distribution (BSD) ofthe UNIX system (or just Berkeley UNIX). The other major version is UNIX SystemV (SVR4), which descended from versions developed and maintained by AT&T andUNIX System Laboratories.
What Is So Good About Linux?
In recent years Linux has emerged as a powerful and innovative UNIX work-alike.Its popularity is surpassing that of its UNIX predecessors. Although it mimics UNIXin many ways, the Linux operating system departs from UNIX in several significantways: The Linux kernel is implemented independently of both BSD and System V,the continuing development of Linux is taking place through the combined efforts ofmany capable individuals throughout the world, and Linux puts the power of UNIXwithin easy reach of both business and personal computer users. Using the Internet,today’s skilled programmers submit additions and improvements to the operatingsystem to Linus Torvalds, GNU, or one of the other authors of Linux.
Applications A rich selection of applications is available for Linux—both free and commercial—as well as a wide variety of tools: graphical, word processing, networking, security,administration, Web server, and many others. Large software companies haverecently seen the benefit in supporting Linux and now have on-staff programmerswhose job it is to design and code the Linux kernel, GNU, KDE, or other softwarethat runs on Linux. For example, IBM (www.ibm.com/linux) is a major Linux sup-porter. Linux conforms increasingly more closely to POSIX standards, and somedistributions and parts of others meet this standard. (See “Standards” on page 9.)These developments indicate that Linux is becoming more mainstream and isrespected as an attractive alternative to other popular operating systems.
Peripherals Another aspect of Linux that appeals to users is the amazing range of peripherals that issupported and the speed with which support for new peripherals emerges. Linux oftensupports a peripheral or interface card before any company does. Unfortunatelysome types of peripherals—particularly proprietary graphics cards—lag in theirsupport because the manufacturers do not release specifications or source code fordrivers in a timely manner, if at all.
Software Also important to users is the amount of software that is available—not just sourcecode (which needs to be compiled) but also prebuilt binaries that are easy to installand ready to run. These include more than free software. Netscape, for example,has been available for Linux from the start and included Java support before it wasavailable from many commercial vendors. Now its sibling Mozilla/Thunderbird/Firefox is also a viable browser, mail client, and newsreader, performing many otherfunctions as well.

What Is So Good About Linux? 7
Platforms Linux is not just for Intel-based platforms: It has been ported to and runs on the PowerPC—including Apple computers (ppclinux), Compaq’s (née Digital Equipment Corpo-ration) Alpha-based machines, MIPS-based machines, Motorola’s 68K-based machines,various 64-bit systems, and IBM’s S/390. Nor is Linux just for single-processormachines: As of version 2.0, it runs on multiple-processor machines (SMPs). It alsoincludes an O(1) scheduler, which dramatically increases scalability on SMP systems.
Emulators Linux supports programs, called emulators, that run code intended for other operat-ing systems. By using emulators you can run some DOS, Windows, and Macintoshprograms under Linux. For example, Wine (www.winehq.com) is an open-sourceimplementation of the Windows API on top of the X Window System andUNIX/Linux; QEMU (fabrice.bellard.free.fr/qemu) is a CPU-only emulator thatexecutes x86 Linux binaries on non-x86 Linux systems.
Xen Xen, which was created at the University of Cambridge and is now being developedin the open-source community, is an open-source virtual machine monitor (VMM). AVMM enables several virtual machines (VMs), each running an instance of a separateoperating system, to run on a single computer. Xen isolates the VMs so that if onecrashes it does not affect the others. In addition, Xen introduces minimal performanceoverhead when compared with running each of the operating systems natively.
Using VMs, you can experiment with cutting-edge releases of operating systems andapplications without concern for the base (stable) system, all on a single machine.You can also set up and test networks of systems on a single machine. Xen presentsa sandbox, an area (system) that you can work in without regard for the results ofyour work or for the need to clean up.
The Gutsy release of Ubuntu supports Xen 3.1. This book does not cover theinstallation or use of Xen. See help.ubuntu.com/community/Xen for informationon running Xen under Ubuntu.
For more information on Xen, refer to the wiki at wiki.xensource.com/xenwiki andthe Xen home page at www.cl.cam.ac.uk/research/srg/netos/xen.
KVM and VirtualBox If you want to run a virtual instance of Windows, you may want to investigateKVM (Kernel Virtual Machine, help.ubuntu.com/community/KVM) and VirtualBox(www.virtualbox.org).
Why Linux Is Popular with Hardware Companies
and Developers
Two trends in the computer industry set the stage for the growing popularity ofUNIX and Linux. First, advances in hardware technology created the need for anoperating system that could take advantage of available hardware power. In themid-1970s, minicomputers began challenging the large mainframe computersbecause, in many applications, minicomputers could perform the same functionsless expensively. More recently, powerful 64-bit processor chips, plentiful and inex-pensive memory, and lower-priced hard disk storage have allowed hardware com-panies to install multiuser operating systems on desktop computers.

8 Chapter 1 Welcome to Linux
Proprietaryoperating systems
Second, with the cost of hardware continually dropping, hardware manufacturerscould no longer afford to develop and support proprietary operating systems. Aproprietary operating system is one that is written and owned by the manufacturerof the hardware (for example, DEC/Compaq owns VMS). Today’s manufacturersneed a generic operating system that they can easily adapt to their machines.
Generic operatingsystems
A generic operating system is written outside of the company manufacturing thehardware and is sold (UNIX, Windows) or given (Linux) to the manufacturer.Linux is a generic operating system because it runs on different types of hardwareproduced by different manufacturers. Of course, if manufacturers can pay only fordevelopment and avoid per-unit costs (as they have to pay to Microsoft for eachcopy of Windows they sell), manufacturers are much better off. In turn, softwaredevelopers need to keep the prices of their products down; they cannot afford toconvert their products to run under many different proprietary operating systems.Like hardware manufacturers, software developers need a generic operating system.
Although the UNIX system once met the needs of hardware companies andresearchers for a generic operating system, over time it has become more propri-etary as manufacturers added support for their own specialized features and intro-duced new software libraries and utilities.
Linux emerged to serve both needs: It is a generic operating system that takesadvantage of available hardware power.
Linux Is Portable
A portable operating system is one that can run on many different machines. Morethan 95 percent of the Linux operating system is written in the C programming lan-guage, and C is portable because it is written in a higher-level, machine-independentlanguage. (The C compiler is written in C.)
Because Linux is portable, it can be adapted (ported) to different machines and canmeet special requirements. For example, Linux is used in embedded computers,such as the ones found in cellphones, PDAs, and the cable boxes on top of manyTVs. The file structure takes full advantage of large, fast hard disks. Equally impor-tant, Linux was originally designed as a multiuser operating system—it was notmodified to serve several users as an afterthought. Sharing the computer’s poweramong many users and giving them the ability to share data and programs are cen-tral features of the system.
Because it is adaptable and takes advantage of available hardware, Linux runs onmany different microprocessor-based systems as well as mainframes. The popularityof the microprocessor-based hardware drives Linux; these microcomputers are get-ting faster all the time, at about the same price point. Linux on a fast microcom-puter has become good enough to displace workstations on many desktops. Linuxbenefits both users, who do not like having to learn a new operating system for eachvendor’s hardware, and system administrators, who like having a consistent soft-ware environment.

What Is So Good About Linux? 9
The advent of a standard operating system has aided the development of the soft-ware industry. Now software manufacturers can afford to make one version of aproduct available on machines from different manufacturers.
Standards
Individuals from companies throughout the computer industry have joined togetherto develop the POSIX (Portable Operating System Interface for Computer Environ-ments) standard, which is based largely on the UNIX System V Interface Definition(SVID) and other earlier standardization efforts. These efforts have been spurred bythe U.S. government, which needs a standard computing environment to minimizeits training and procurement costs. Now that these standards are gaining accep-tance, software developers are able to develop applications that run on all conform-ing versions of UNIX, Linux, and other operating systems.
The C Programming Language
Ken Thompson wrote the UNIX operating system in 1969 in PDP-7 assembly lan-guage. Assembly language is machine dependent: Programs written in assemblylanguage work on only one machine or, at best, on one family of machines. Theoriginal UNIX operating system therefore could not easily be transported to run onother machines (it was not portable).
To make UNIX portable, Thompson developed the B programming language, amachine-independent language, from the BCPL language. Dennis Ritchie developedthe C programming language by modifying B and, with Thompson, rewrote UNIXin C in 1973. The revised operating system could be transported more easily to runon other machines.
That development marked the start of C. Its roots reveal some of the reasons why itis such a powerful tool. C can be used to write machine-independent programs. Aprogrammer who designs a program to be portable can easily move it to any com-puter that has a C compiler. C is also designed to compile into very efficient code.With the advent of C, a programmer no longer had to resort to assembly languageto get code that would run well (that is, quickly—although an assembler will alwaysgenerate more efficient code than a high-level language).
C is a good systems language. You can write a compiler or an operating system in C.It is highly structured but is not necessarily a high-level language. C allows a program-mer to manipulate bits and bytes, as is necessary when writing an operating system.But it also has high-level constructs that allow for efficient, modular programming.
In the late 1980s the American National Standards Institute (ANSI) defined a stan-dard version of the C language, commonly referred to as ANSI C or C89 (for theyear the standard was published). Ten years later the C99 standard was published;it is mostly supported by the GNU Project’s C compiler (named gcc). The originalversion of the language is often referred to as Kernighan & Ritchie (or K&R) C,named for the authors of the book that first described the C language.

10 Chapter 1 Welcome to Linux
Another researcher at Bell Labs, Bjarne Stroustrup, created an object-oriented pro-gramming language named C++, which is built on the foundation of C. Becauseobject-oriented programming is desired by many employers today, C++ is preferredover C in many environments. Another language of choice is Objective-C, whichwas used to write the first Web browser. The GNU Project’s C compiler supports C,C++, and Objective-C.
Ubuntu Linux
From its first release in October 2004, Ubuntu has been a community-orientedproject. Ubuntu maintains several structures to keep it functioning effectively, withcommunity members invited to participate in all structures. For more informationabout Ubuntu governance, see www.ubuntu.com/community/processes/governance.
Ubuntu Linux, which is sponsored by Canonical Ltd. (www.canonical.com), isbased on the Debian Linux and focuses on enhancing usability, accessibility, andinternationalization. Although Ubuntu initially targeted the desktop user, recentreleases have put increasing emphasis on the server market. With a new releasescheduled every six months, Ubuntu provides cutting-edge software.
An Ubuntu system uses the GNOME desktop manager (www.gnome.org) andincludes the OpenOffice.org suite of productivity tools, the Firefox Web browser,the Pidgin (formerly Gaim) IM client, and an assortment of tools and games. Tokeep software on a system up-to-date, Ubuntu uses Debian’s deb package formatand various APT-based tools. Ubuntu distributes and supports many versions of itsLinux distribution. For example, Kubuntu (www.kubuntu.org) runs the KDE desk-top manager, Edubuntu (www.edubuntu.org) includes many school-related applica-tions, and Xubuntu (www.xubuntu.org) runs the lightweight Xfce desktop, whichmakes it ideal for older, slower machines. For more information about Ubuntu, seewww.ubuntu.com/aboutus/faq.
Overview of Linux
The Linux operating system has many unique and powerful features. Like otheroperating systems, it is a control program for computers. But like UNIX, it is also awell-thought-out family of utility programs (Figure 1-1) and a set of tools thatallow users to connect and use these utilities to build systems and applications.
Linux Has a Kernel Programming Interface
The Linux kernel—the heart of the Linux operating system—is responsible for allo-cating the computer’s resources and scheduling user jobs so that each one gets itsfair share of system resources, including access to the CPU; peripheral devices, suchas hard disk, DVD, and CD-ROM storage; printers; and tape drives. Programsinteract with the kernel through system calls, special functions with well-knownnames. A programmer can use a single system call to interact with many kinds of
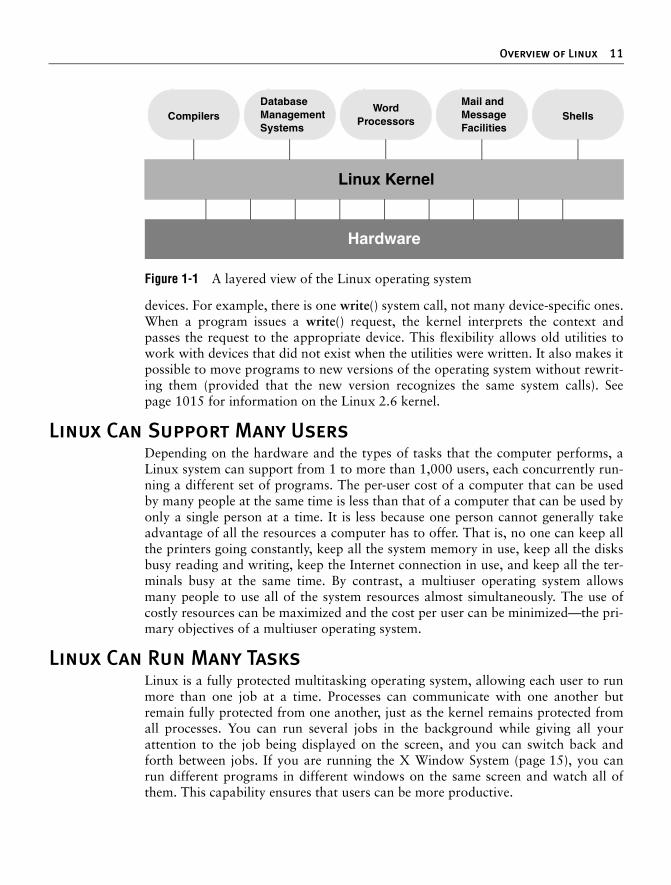
Overview of Linux 11
devices. For example, there is one write() system call, not many device-specific ones.When a program issues a write() request, the kernel interprets the context andpasses the request to the appropriate device. This flexibility allows old utilities towork with devices that did not exist when the utilities were written. It also makes itpossible to move programs to new versions of the operating system without rewrit-ing them (provided that the new version recognizes the same system calls). Seepage 1015 for information on the Linux 2.6 kernel.
Linux Can Support Many Users
Depending on the hardware and the types of tasks that the computer performs, aLinux system can support from 1 to more than 1,000 users, each concurrently run-ning a different set of programs. The per-user cost of a computer that can be usedby many people at the same time is less than that of a computer that can be used byonly a single person at a time. It is less because one person cannot generally takeadvantage of all the resources a computer has to offer. That is, no one can keep allthe printers going constantly, keep all the system memory in use, keep all the disksbusy reading and writing, keep the Internet connection in use, and keep all the ter-minals busy at the same time. By contrast, a multiuser operating system allowsmany people to use all of the system resources almost simultaneously. The use ofcostly resources can be maximized and the cost per user can be minimized—the pri-mary objectives of a multiuser operating system.
Linux Can Run Many Tasks
Linux is a fully protected multitasking operating system, allowing each user to runmore than one job at a time. Processes can communicate with one another butremain fully protected from one another, just as the kernel remains protected fromall processes. You can run several jobs in the background while giving all yourattention to the job being displayed on the screen, and you can switch back andforth between jobs. If you are running the X Window System (page 15), you canrun different programs in different windows on the same screen and watch all ofthem. This capability ensures that users can be more productive.
Figure 1-1 A layered view of the Linux operating system
CompilersDatabaseManagementSystems
WordMail andMessageFacilities
ShellsProcessors
Hardware
Linux Kernel

12 Chapter 1 Welcome to Linux
Linux Provides a Secure Hierarchical Filesystem
A file is a collection of information, such as text for a memo or report, an accumu-lation of sales figures, an image, a song, or an executable program. Each file isstored under a unique identifier on a storage device, such as a hard disk. The Linuxfilesystem provides a structure whereby files are arranged under directories, whichare like folders or boxes. Each directory has a name and can hold other files anddirectories. Directories, in turn, are arranged under other directories, and so forth,in a treelike organization. This structure helps users keep track of large numbers offiles by grouping related files in directories. Each user has one primary directoryand as many subdirectories as required (Figure 1-2).
Standards With the idea of making life easier for system administrators and software develop-ers, a group got together over the Internet and developed the Linux Filesystem Stan-dard (FSSTND), which has since evolved into the Linux Filesystem HierarchyStandard (FHS). Before this standard was adopted, key programs were located indifferent places in different Linux distributions. Today you can sit down at a Linuxsystem and know where to expect to find any given standard program (page 194).
Links A link allows a given file to be accessed by means of two or more names. The alter-native names can be located in the same directory as the original file or in anotherdirectory. Links can make the same file appear in several users’ directories, enablingthose users to share the file easily. Windows uses the term shortcut in place of linkto describe this capability. Macintosh users will be more familiar with the termalias. Under Linux, an alias is different from a link; it is a command macro featureprovided by the shell (page 328).
Security Like most multiuser operating systems, Linux allows users to protect their data fromaccess by other users. It also allows users to share selected data and programs with cer-tain other users by means of a simple but effective protection scheme. This level of secu-rity is provided by file access permissions, which limit which users can read from, writeto, or execute a file. More recently, Linux has implemented Access Control Lists (ACLs),which give users and administrators finer-grained control over file access permissions.
The Shell: Command Interpreter and
Programming Language
In a textual environment, the shell—the command interpreter—acts as an interfacebetween you and the operating system. When you enter a command on the screen,the shell interprets the command and calls the program you want. A number ofshells are available for Linux. The three most popular shells are
• The Bourne Again Shell (bash), an enhanced version of the original Bourne Shell (the original UNIX shell).
• The TC Shell (tcsh), an enhanced version of the C Shell, developed as part of BSD UNIX.
• The Z Shell (zsh), which incorporates features from a number of shells, including the Korn Shell.

Overview of Linux 13
Because different users may prefer different shells, multiuser systems can have sev-eral different shells in use at any given time. The choice of shells demonstrates oneof the advantages of the Linux operating system: the ability to provide a customizedinterface for each user.
Shell scripts Besides performing its function of interpreting commands from a keyboard and send-ing those commands to the operating system, the shell is a high-level programminglanguage. Shell commands can be arranged in a file for later execution (Linux callsthese files shell scripts; Windows calls them batch files). This flexibility allows usersto perform complex operations with relative ease, often with rather short commands,or to build with surprisingly little effort elaborate programs that perform highly com-plex operations.
Filename Generation
Wildcards andambiguous file
references
When you type commands to be processed by the shell, you can construct patternsusing characters that have special meanings to the shell. These characters arecalled wildcard characters. The patterns, which are called ambiguous file refer-ences, are a kind of shorthand: Rather than typing in complete filenames, userscan type patterns; the shell expands these patterns into matching filenames. Anambiguous file reference can save you the effort of typing in a long filename or along series of similar filenames. For example, the shell might expand the patternmak* to make-3.80.tar.gz. Patterns can also be useful when you know only partof a filename or cannot remember the exact spelling.
Device-Independent Input and Output
Redirection Devices (such as a printer or a terminal) and disk files appear as files to Linux pro-grams. When you give a command to the Linux operating system, you can instructit to send the output to any one of several devices or files. This diversion is calledoutput redirection.
Figure 1-2 The Linux filesystem structure
/
etctmphome
hlsjennyalex
notesbin
report log

14 Chapter 1 Welcome to Linux
Deviceindependence
In a similar manner, a program’s input that normally comes from a keyboard can beredirected so that it comes from a disk file instead. Input and output are deviceindependent; that is, they can be redirected to or from any appropriate device.
As an example, the cat utility normally displays the contents of a file on the screen.When you run a cat command, you can easily cause its output to go to a disk fileinstead of the screen.
Shell Functions
One of the most important features of the shell is that users can use it as a programminglanguage. Because the shell is an interpreter, it does not compile programs written for itbut rather interprets programs each time they are loaded from the disk. Loading andinterpreting programs can be time-consuming.
Many shells, including the Bourne Again Shell, include shell functions that the shellholds in memory so it does not have to read them from the disk each time you exe-cute them. The shell also keeps functions in an internal format so that it does nothave to spend as much time interpreting them.
Job Control
Job control is a shell feature that allows users to work on several jobs at once,switching back and forth between them as desired. When you start a job, it is fre-quently run in the foreground so it is connected to the terminal. Using job control,you can move the job you are working with into the background and continue run-ning it there while working on or observing another job in the foreground. If abackground job then needs your attention, you can move it into the foreground sothat it is once again attached to the terminal. The concept of job control originatedwith BSD UNIX, where it appeared in the C Shell.
A Large Collection of Useful Utilities
Linux includes a family of several hundred utility programs, often referred to ascommands. These utilities perform functions that are universally required by users.The sort utility, for example, puts lists (or groups of lists) in alphabetical or numeri-cal order and can be used to sort lists by part number, last name, city, ZIP code, tele-phone number, age, size, cost, and so forth. The sort utility is an importantprogramming tool and is part of the standard Linux system. Other utilities allowusers to create, display, print, copy, search, and delete files as well as to edit, format,and typeset text. The man (for manual) and info utilities provide online documenta-tion for Linux itself.
Interprocess Communication
Pipes and filters Linux allows users to establish both pipes and filters on the command line. A pipesends the output of one program to another program as input. A filter is a special

Additional Features of Linux 15
kind of pipe that processes a stream of input data to yield a stream of output data.A filter processes another program’s output, altering it as a result. The filter’s outputthen becomes input to another program.
Pipes and filters frequently join utilities to perform a specific task. For example, youcan use a pipe to send the output of the cat utility to sort (a filter) and then useanother pipe to send the output of sort to a third utility, lpr, that sends the data to aprinter. Thus, in one command line, you can use three utilities together to sort andprint a file.
System Administration
On a Linux system the system administrator is frequently the owner and only userof the system. This person has many responsibilities. The first responsibility may beto set up the system and install the software. Once the system is up and running, thesystem administrator is responsible for downloading and installing software(including upgrading the operating system), backing up and restoring files, andmanaging such system facilities as printers, terminals, servers, and a local network.The system administrator is also responsible for setting up accounts for new userson a multiuser system, bringing the system up and down as needed, and taking careof any problems that arise.
Additional Features of Linux
The developers of Linux included features from BSD, System V, and Sun Microsys-tems’ Solaris, as well as new features, in their operating system. Although most ofthe tools found on UNIX exist for Linux, in some cases these tools have beenreplaced by more modern counterparts. This section describes some of the populartools and features available under Linux.
GUIs: Graphical User Interfaces
The X Window System (also called X or X11) was developed in part by researchersat MIT (Massachusetts Institute of Technology) and provides the foundation for theGUIs available with Linux. Given a terminal or workstation screen that supports X,a user can interact with the computer through multiple windows on the screen, dis-play graphical information, or use special-purpose applications to draw pictures,monitor processes, or preview formatted output. X is an across-the-network proto-col that allows a user to open a window on a workstation or computer system thatis remote from the CPU generating the window.
Desktop manager Usually two layers run under X: a desktop manager and a window manager. Adesktop manager is a picture-oriented user interface that enables you to interactwith system programs by manipulating icons instead of typing the corresponding

16 Chapter 1 Welcome to Linux
commands to a shell. Ubuntu runs GNOME (Figure 1-3; www.gnome.org) bydefault, but it can also run KDE (www.kde.org) and a number of other desktopmanagers.
Window manager A window manager is a program that runs under the desktop manager and allowsyou to open and close windows, run programs, and set up a mouse so it has differenteffects depending on how and where you click. The window manager also gives thescreen its personality. Whereas Microsoft Windows allows you to change the colorof key elements in a window, a window manager under X allows you to customizethe overall look and feel of the screen: You can change the way a window looks andworks (by giving it different borders, buttons, and scrollbars), set up virtual desk-tops, create menus, and more.
Several popular window managers run under X and Linux. Ubuntu Linux providesboth Metacity (the default under GNOME) and kwin (the default under KDE).Other window managers, such as Sawfish and WindowMaker, are also available.Chapters 4 and 8 present information on GUIs.
(Inter)Networking Utilities
Linux network support includes many utilities that enable you to access remotesystems over a variety of networks. In addition to sending email to users on othersystems, you can access files on disks mounted on other computers as if they werelocated on the local system, make your files available to other systems in a similar
Figure 1-3 A GNOME workspace

Conventions Used in This Book 17
manner, copy files back and forth, run programs on remote systems while display-ing the results on the local system, and perform many other operations across localarea networks (LANs) and wide area networks (WANs), including the Internet.
Layered on top of this network access is a wide range of application programs thatextend the computer’s resources around the globe. You can carry on conversationswith people throughout the world, gather information on a wide variety of subjects,and download new software over the Internet quickly and reliably. Chapter 10 dis-cusses networks, the Internet, and the Linux network facilities.
Software Development
One of Linux’s most impressive strengths is its rich software development environ-ment. You can find compilers and interpreters for many computer languages. BesidesC and C++, languages available for Linux include Ada, Fortran, Java, Lisp, Pascal,Perl, and Python. The bison utility generates parsing code that makes it easier towrite programs to build compilers (tools that parse files containing structured infor-mation). The flex utility generates scanners (code that recognizes lexical patterns intext). The make utility and the GNU Configure and Build System make it easier tomanage complex development projects. Source code management systems, such asCVS, simplify version control. Several debuggers, including ups and gdb, can helptrack down and repair software defects. The GNU C compiler (gcc) works with thegprof profiling utility to help programmers identify potential bottlenecks in a pro-gram’s performance. The C compiler includes options to perform extensive checkingof C code, thereby making the code more portable and reducing debugging time.Table B-4 on page 987 lists some sites you can download software from.
Conventions Used in This Book
This book uses conventions to make its explanations shorter and clearer. The fol-lowing paragraphs describe these conventions.
Widgets A widget is a simple graphical element that a user interacts with, such as a text box,radio button, or combo box. When referring to a widget, this book specifies thetype of widget and its label. The term “tick” refers to the mark you put in a checkbox, sometimes called a check mark. For example, “put a tick in the check boxlabeled Run in terminal (click the box to put a tick in it; click again to remove thetick).” See the glossary for definitions of various widgets.
Tabs and frames Tabs allow windows to display sets of related information, one set at a time. Forexample, Figure 4-11 on page 102 shows the Appearance Preferences window,which has five tabs; the Background tab is highlighted. A frame isolates a set ofinformation within a window. Figure 4-11 shows the Wallpaper frame, whichallows you to select one of several wallpapers.
Menu selection path The menu selection path is the name of the menu or the location of the menu, fol-lowed by a colon, a SPACE, and the menu selections separated by markers. The entire

18 Chapter 1 Welcome to Linux
menu selection path is in bold type. You can read Main menu: System PreferencesAppearance as “From the Main menu, select System; from System, select Preferences;and then select Appearance.”
Text and examples The text is set in this type, whereas examples are shown in a monospaced font (alsocalled a fixed-width font):
$ cat practiceThis is a small file I createdwith a text editor.
Items you enter Everything you enter at the keyboard is shown in a bold typeface. Within the text,this bold typeface is used; within examples and screens, this one is used. In the pre-vious example, the dollar sign ($) on the first line is a prompt that Linux displays, soit is not bold; the remainder of the first line is entered by a user, so it is bold.
Utility names Names of utilities are printed in this bold sans serif typeface. This book references theemacs text editor and the ls utility or ls command (or just ls) but instructs you toenter ls –a on the command line. In this way the text distinguishes between utilities,which are programs, and the instructions you give on the command line to invokethe utilities.
Filenames Filenames appear in a bold typeface. Examples are memo5, letter.1283, and reports.Filenames may include uppercase and lowercase letters; however, Linux is case sen-sitive (page 1027), so memo5, MEMO5, and Memo5 name three different files.
Character strings Within the text, characters and character strings are marked by putting them in abold typeface. This convention avoids the need for quotation marks or other delim-iters before and after a string. An example is the following string, which is displayedby the passwd utility: Sorry, passwords do not match.
Buttons and labels Words appear in a bold typeface in the sections of the book that describe a GUI.This font indicates that you can click a mouse button when the mouse pointer isover these words on the screen or over a button with this name: Click Next.
Keys and characters This book uses SMALL CAPS for three kinds of items:
• Keyboard keys, such as the SPACE bar and the RETURN,8 ESCAPE, and TAB keys.
• The characters that keys generate, such as the SPACEs generated by the SPACE bar.
• Keyboard keys that you press with the CONTROL key, such as CONTROL-D. (Even though D is shown as an uppercase letter, you do not have to press the SHIFT
key; enter CONTROL-D by holding the CONTROL key down and pressing d.)
8. Different keyboards use different keys to move the cursor (page 1032) to the beginning of the next line.This book always refers to the key that ends a line as the RETURN key. Your keyboard may have a RET, NEWLINE,ENTER, RETURN, or other key. Use the corresponding key on your keyboard each time this book asks you topress RETURN.

Conventions Used in This Book 19
Prompts andRETURNs
Most examples include the shell prompt—the signal that Linux is waiting for acommand—as a dollar sign ($), a pound sign (#), or sometimes a percent sign (%).The prompt is not in a bold typeface because you do not enter it. Do not type theprompt on the keyboard when you are experimenting with examples from thisbook. If you do, the examples will not work.
Examples omit the RETURN keystroke that you must use to execute them. An exampleof a command line is
$ vim memo.1204
To use this example as a model for running the vim text editor, give the commandvim memo.1204 and press the RETURN key. (Press ESCAPE ZZ to exit from vim; seepage 172 for a vim tutorial.) This method of entering commands makes the exam-ples in the book correspond to what appears on the screen.
Definitions All glossary entries marked with FOLDOC are courtesy of Denis Howe, editor of the FreeOnline Dictionary of Computing (foldoc.org), and are used with permission. Thissite is an ongoing work containing definitions, anecdotes, and trivia.
optional Optional Information
Passages marked as optional appear in a gray box. This material is not central tothe ideas presented in the chapter but often involves more challenging concepts. Agood strategy when reading a chapter is to skip the optional sections and thenreturn to them when you are comfortable with the main ideas presented in the chap-ter. This is an optional paragraph.
URLs (Webaddresses)
Web addresses, or URLs, have an implicit http:// prefix, unless ftp:// or https:// isshown. You do not normally need to specify a prefix when the prefix is http://, butyou must use a prefix from a browser when you specify an FTP or secure HTTP site.Thus you can specify a URL in a browser exactly as shown in this book.
Tip, caution, andsecurity boxes
The following boxes highlight information that may be helpful while you are usingor administrating a Linux system.
This is a tip box
tip A tip box may help you avoid repeating a common mistake or may point toward additional information.
This box warns you about somethingcaution A caution box warns you about a potential pitfall.
This box marks a security note
security A security box highlights a potential security issue. These notes are usually for system adminis-trators, but some apply to all users.

20 Chapter 1 Welcome to Linux
Chapter Summary
The Linux operating system grew out of the UNIX heritage to become a popularalternative to traditional systems (that is, Windows) available for microcomputer(PC) hardware. UNIX users will find a familiar environment in Linux. Distributionsof Linux contain the expected complement of UNIX utilities, contributed by pro-grammers around the world, including the set of tools developed as part of the GNUProject. The Linux community is committed to the continued development of thissystem. Support for new microcomputer devices and features is added soon after thehardware becomes available, and the tools available on Linux continue to be refined.Given the many commercial software packages available to run on Linux platformsand the many hardware manufacturers offering Linux on their systems, it is clearthat the system has evolved well beyond its origin as an undergraduate project tobecome an operating system of choice for academic, commercial, professional, andpersonal use.
Exercises
1. What is free software? List three characteristics of free software.
2. Why is Linux popular? Why is it popular in academia?
3. What are multiuser systems? Why are they successful?
4. What is the Free Software Foundation/GNU? What is Linux? Which parts of the Linux operating system did each provide? Who else has helped build and refine this operating system?
5. In which language is Linux written? What does the language have to do with the success of Linux?
6. What is a utility program?
7. What is a shell? How does it work with the kernel? With the user?
8. How can you use utility programs and a shell to create your own applications?
9. Why is the Linux filesystem referred to as hierarchical?
10. What is the difference between a multiprocessor and a multiprocessing system?
11. Give an example of when you would want to use a multiprocessing system.
12. Approximately how many people wrote Linux? Why is this project unique?
13. What are the key terms of the GNU General Public License?

21
I
PART I
Installing Ubuntu Linux
CHAPTER 2
Installation Overview 23
CHAPTER 3
Step-by-Step Installation 45

This page intentionally left blank

2323
2Chapter2Installing Ubuntu Linux is the process of copying operating sys-tem files from a CD or DVD to hard drive(s) on a system andsetting up configuration files so that Linux runs properly on thehardware. Several types of installations are possible, includingfresh installations, upgrades from older releases of UbuntuLinux, and dual-boot installations.
This chapter discusses the installation process in general: planning,partitioning the hard disk, obtaining the files for the installation,burning a CD or a DVD, and collecting information about thehardware that may be helpful for installation and administration.Chapter 3 covers the process of installing Ubuntu.
The ubiquity utility is a user-friendly, graphical tool that installsUbuntu. To install Ubuntu Linux on standard hardware, you cantypically insert the live/install Desktop CD or DVD, boot the sys-tem, and double-click Install. After you answer a few questions,you are done. However, you may want to customize the systemor you may be installing on nonstandard hardware: the installergives you choices as the installation process unfolds. Ubuntu alsoprovides a textual installer that gives you more control over the
In This Chapter
More Information . . . . . . . . . . . . . . 24
Planning the Installation . . . . . . . . 25
Setting Up the Hard Disk . . . . . . . . 30
LVM: Logical Volume Manager . . . . 35
The Installation Process . . . . . . . . . 36
Downloading and Burninga CD/DVD . . . . . . . . . . . . . . . . . . . 37
Using BitTorrent . . . . . . . . . . . . . . . 39
Gathering Information Aboutthe System . . . . . . . . . . . . . . . . . . 41
2
Installation
Overview

24 Chapter 2 Installation Overview
installation. Refer to “Basic Installation from the Live/Install Desktop CD/DVD”(page 46) and “Advanced Installation” (page 62) for information about installing andcustomizing Ubuntu Linux.
The Live/Install Desktop CD/DVD
A live/install Desktop CD/DVD runs Ubuntu without installing it on the system.When you boot a live/install Desktop CD/DVD, it brings up a GNOME desktop:You are running a live session. When you exit from the live session, the system is asit was before you booted from the CD/DVD. If the system has a swap partition(most Linux systems have one; see page 32), the live session uses it to improve itsperformance but does not otherwise write to the hard disk. You can also installUbuntu from a live session.
Booting a live/install Desktop CD/DVD is a good way to test hardware and fix asystem that will not boot from the hard disk. A live session is ideal for people whoare new to Ubuntu or Linux and want to experiment with Ubuntu but are not readyto install Ubuntu on their system.
More Information
In addition to the following references, see “Where to Find Documentation” onpage 124 and refer to Appendix B for additional resources.
Web memtest86+ www.memtest.orggparted (GNOME Partition Editor) gparted.sourceforge.netHardware compatibility wiki.ubuntu.com/HardwareSupportSwap space help.ubuntu.com/community/SwapFaqPartition HOWTO tldp.org/HOWTO/PartitionUpgrading www.ubuntu.com/getubuntu/upgradingBoot command line parameters help.ubuntu.com/community/BootOptions and
The Linux BootPrompt-HowToRAID en.wikipedia.org/wiki/RAIDLVM Resource Page (includes many links) sourceware.org/lvm2LVM HOWTO www.tldp.org/HOWTO/LVM-HOWTOBitTorrent help.ubuntu.com/community/BitTorrentBitTorrent azureus.sourceforge.netX.org release information wiki.x.org
Download Ubuntu Easiest download www.ubuntu.com/getubuntuReleased versions releases.ubuntu.comOlder versions old-releases.ubuntu.com/releasesDevelopment images and unsupported releases cdimage.ubuntu.comMac (PowerPC) wiki.ubuntu.com/PowerPCDownloadsBitTorrent torrent files torrent.ubuntu.com/releases

Planning the Installation 25
Planning the Installation
The major decision when planning an installation is determining how to divide thehard disk into partitions or, in the case of a dual-boot system, where to put theLinux partitions. Once you have installed Ubuntu, you can decide which softwarepackages you want to add to the base system (or whether you want to removesome). In addition to these topics, this section discusses hardware requirements forUbuntu Linux and fresh installations versus upgrades.
Considerations
GUI On most systems, except for servers, you probably want to install a graphical userinterface (a desktop). Ubuntu installs GNOME by default. See page 60 for informa-tion about installing KDE.
Software andservices
As you install more software packages on a system, the number of updates and theinteractions between the packages increase. Server packages that listen for networkconnections make the system more vulnerable by increasing the number of ways thesystem can be attacked. Additional services can also slow the system down.
For a system to learn on, or for a development system, additional packages and servicesmay be useful. However, for a more secure production system, it is best to install andmaintain the minimum number of packages required and enable only needed services.See page 507 for information on starting and stopping system services.
Requirements
Hardware This chapter and Chapter 3 cover installing Ubuntu on 32-bit Intel and compatibleprocessor architectures such as AMD as well as 64-bit processor architectures suchas AMD64 processors and Intel processors with Intel EM64T technology. Withinthese processor architectures, Ubuntu Linux runs on much of the available hard-ware. You can view Ubuntu’s list of compatible and supported hardware atwiki.ubuntu.com/HardwareSupport. Many Internet sites discuss Linux hardware;use Google (www.google.com/linux) to search for linux hardware, ubuntu hard-ware, or linux and the specific hardware you want more information on (for exam-ple, linux sata or linux a8n). In addition, many HOWTOs cover specific hardware.There is also a Linux Hardware Compatibility HOWTO, although it becomesdated rather quickly. Ubuntu Linux usually runs on systems that Windows runs on,unless the system includes a very new or unusual component.
The hardware required to run Ubuntu depends on what kind of system you want toset up. A very minimal system that runs a textual (command line) interface and hasvery few software packages installed requires very different hardware from a systemthat runs a GUI, has many installed packages, and supports visual effects (page 103).Use the Alternate CD (page 28) if you are installing Ubuntu on a system with lessthan 320 megabytes of RAM. If you want to run visual effects on the system, seegentoo-wiki.com/HARDWARE_Video_Card_Support_Under_XGL for a list of sup-ported graphics cards.

26 Chapter 2 Installation Overview
A network connection is invaluable for keeping Ubuntu up-to-date. A sound card is niceto have for multimedia applications. If you are installing Ubuntu on old or minimalhardware and want to run a GUI, consider installing Xubuntu (www.xubuntu.org), asit provides a lightweight desktop and uses system resources more efficiently thanUbuntu does.
RAM (memory) An extremely minimal textual (command line) system requires 32 megabytes ofRAM. A standard desktop system requires 320 megabytes, although you may beable to use less if you install Xubuntu. Installing Ubuntu from a live session requires320 megabytes. Use the textual installer (page 67) if the system has less than 320megabytes of RAM.
Linux makes good use of extra memory: The more memory a system has, the fasterit runs. Adding memory is one of the most cost-effective ways you can speed up aLinux system.
CPU Ubuntu Linux requires a minimum of a 200-megahertz Pentium-class processor or theequivalent AMD or other processor for textual mode and at least a 400-megahertzPentium II processor or the equivalent for graphical mode.
Hard disk space The amount of hard disk space Ubuntu requires depends on which edition of UbuntuLinux you install, which packages you install, how many languages you install, andhow much space you need for user data (your files). The operating system typicallyrequires 2–8 gigabytes, although a minimal system can make due with much less space.Installing Ubuntu from a live session requires 4 gigabytes of space on a hard disk.
BIOS setup Modern computers can be set to boot from a CD/DVD or hard disk. The BIOSdetermines the order in which the system tries to boot from each device. You mayneed to change this order: Make sure the BIOS is set up to try booting from theCD/DVD before it tries to boot from the hard disk.
CMOS CMOS is the persistent memory that stores hardware configuration information. Tochange the BIOS setup, you need to edit the information stored in CMOS. When thesystem boots, it displays a brief message about how to enter System Setup or CMOSSetup mode. Usually you need to press Del or F2 while the system is booting. Press thekey that is called for and move the cursor to the screen and line that deal with boot-ing the system. Generally there is a list of three or four devices that the system triesto boot from; if the first attempt fails, the system tries the second device, and so on.Manipulate the list so that the CD/DVD is the first choice, save the list, and reboot.Refer to the hardware/BIOS manual for more information.
Processor Architecture
Ubuntu CDs and DVDs hold programs compiled to run on a specific processorarchitecture (class of processors, or CPUs). The following list describes each of thearchitectures Ubuntu is compiled for. See help.ubuntu.com/community/ProcessorArchfor a detailed list of processors in each architecture. Because Linux source code isavailable to everyone, a knowledgeable user can compile Ubuntu Linux to run onother processor architectures.

Planning the Installation 27
PC (Intel x86) Software on an Ubuntu PC (Intel x86) CD/DVD is compiled to run on Intel x86-compatible processors, including most machines with Intel and AMD processors,almost all machines that run MS Windows, and newer Apple Macintosh machinesthat use Intel processors. If you are not sure which type of processor a machine has,assume it has this type of processor.
64-bit PC (AMD64) Software on an Ubuntu 64-bit PC (AMD64) CD/DVD is compiled to run onAMD64 processors, including the Athlon64, Opteron, and Intel 64-bit processorsthat incorporate EM64T technology, such as the EMT64 Xeon. Because some fea-tures of proprietary third-party applications are not available for 64-bit architec-ture, you may want to run Ubuntu compiled for a 32-bit (Intel x86) processor on asystem with a 64-bit processor.
SPARC Software on an Ubuntu SPARC CD (there is no DVD for this architecture) is com-piled to run on UltraSPARC machines, including those based on the multicoreUltraSPARC T1 (Niagara) processors.
Mac (PowerPC) Ubuntu does not officially support the PowerPC, but there is extensive communitysupport for this processor architecture. See wiki.ubuntu.com/PowerPCFAQ for moreinformation about running Ubuntu on a PowerPC. You can download PowerPC ver-sions of Ubuntu from wiki.ubuntu.com/PowerPCDownloads.
Interfaces: Installer and Installed System
When you install Ubuntu, you have a choice of interfaces to use while you install it (towork with the installer) and a choice of interfaces to use to work with the installedsystem. This section describes the two basic interfaces: textual and graphical.
Textual (CLI) A textual interface, also called a command line interface (CLI) or character-basedinterface, displays characters and some simple graphical symbols. It is line oriented;you give it instructions using a keyboard only.
Graphical (GUI) A graphical user interface (GUI) typically displays a desktop (such as GNOME) andwindows; you give it instructions using a mouse and keyboard. You can run a textualinterface within a GUI by opening a terminal emulator window (page 114). A GUIuses more computer resources (CPU time and memory) than a textual interface does.
Pseudographical A pseudographical interface is a textual interface that takes advantage of graphical ele-ments on a text-based display device such as a terminal. It may also use color. Thisinterface uses text elements, including simple graphical symbols, to draw rudimentaryboxes that emulate GUI windows and buttons. The TAB key frequently moves the cursorfrom one element to the next and the RETURN key selects the element the cursor is on.
Advantages A GUI is user friendly, whereas the textual interface is compact, uses fewer systemresources, and can work on a text-only terminal or over a text-only connection.Because it is more efficient, a textual interface is useful for older, slower systems andsystems with minimal amounts of RAM. Server systems frequently use a textualinterface because it allows the system to dedicate more resources to the job it is setup to do and fewer resources to pleasing the system administrator. Not running aGUI can also improve system security.

28 Chapter 2 Installation Overview
Installer interfaces Ubuntu provides a user-friendly, graphical installer (ubiquity) and an efficient,pseudographical installer that offers more options and gives you greater controlover the installation (Figure 2-1). Both interfaces accomplish the same task: Theyenable you to tell the installer how you want it to configure Ubuntu.
Ubuntu Releases
Ubuntu distributes a new release about every six months. Each release has both anumber and a name. In sequence, recent releases are 6.06 (Dapper Drake), 6.10(Edgy Eft), 7.04 (Feisty Fawn), and 7.10 (Gutsy Gibbon). Ubuntu supports (i.e., pro-vides updates for, including security updates) each release for at least 18 months.
LTS releases Ubuntu supports releases of its operating system marked LTS (long-term support—Dapper is an LTS release) for three years for a desktop system and for five years fora server system. LTS releases are designed for people who are more interested inhaving a stable, unchanging operating system rather than the latest, fastest version.Large and corporate installations frequently fall into this category. You can installand upgrade an LTS release just as you would any other release.
Ubuntu Editions
Desktop CD The Desktop CD is a live/install CD (page 24); you can use it to boot into a live ses-sion. You can install Ubuntu from a live session (page 48). This CD is available forPC and 64-bit PC architectures (page 26), uses the graphical installer, and installs agraphical (desktop) Ubuntu system.
Alternate CD The Alternate Install CD is not a live CD; it is for special installations only. It pre-sents more advanced installation options than the Desktop CD does. This CD isavailable for PC and 64-bit PC architectures (page 26), uses the textual installer,and installs an Ubuntu system that displays either a graphical or a textual interface.You can use this CD to
Figure 2-1 Graphical (left) and textual (pseudographical, right) installers

Planning the Installation 29
• Upgrade from older releases of Ubuntu on systems without an Internet connection.
• Rescue a broken system (page 67).
• Install Ubuntu on systems with less than 256 megabytes of RAM. These systems may work best from a textual interface; they may not be able to run a graphical interface fast enough to be usable.
• Set up RAID (page 34) and/or LVM (page 35) partitions.
• Create preconfigured OEM systems.
• Set up automated deployments (having the installer answer installation questions automatically; also called preseeding).
Server CD The Server CD is not a live CD; it is for installation only. This CD is available forPC, 64-bit PC, and SPARC architectures (page 26). It uses the textual installer andinstalls an Ubuntu system that displays a textual interface (no desktop). Duringinstallation, the Server CD gives you the option of installing DNS and/or LAMP(Linux, Apache, MySQL, and PHP). A system installed using this CD has no openports (page 383) and includes only software essential to a server.
DVD The DVD is a live/install DVD (page 24); you can use it to boot into a live session.You can install Ubuntu from a live session (page 48). The DVD is available for PCand 64-bit PC architectures (page 26), uses the graphical or textual installer, andinstalls an Ubuntu system that displays either a graphical or a textual interface. TheDVD includes all software packages supported by Ubuntu, not just those installedby default. It is an excellent resource for someone with a system that has no Internetconnection.
Installing a Fresh Copy or Upgrading an
Existing Ubuntu System?
Clean install An installation, sometimes referred to as a clean install, writes all fresh data to adisk. The installation program overwrites all system programs and data as well asthe kernel. You can preserve some user data during an installation depending onwhere it is located and how you format/partition the disk. Alternatively, you canperform a clean install on an existing system without overwriting data by setting upa dual-boot system (page 61).
Upgrade An upgrade replaces the Linux kernel and utilities on an installed release of UbuntuLinux with a newer release. During an upgrade, the installation program preservesboth system configuration and user data files. An upgrade brings utilities that arepresent in the old release up-to-date and installs new utilities. Before you upgrade asystem, back up all files on the system.
Because an upgrade preserves the desktop, an upgraded system may not display ortake advantage of new features that a clean install would display. See page 59 forinstructions on upgrading an Ubuntu system to a new release.

30 Chapter 2 Installation Overview
Setting Up the Hard Disk
Formatting andfree space
Hard disks must be prepared in several ways so an operating system can write toand read from them. Low-level formatting is the first step in preparing a disk foruse. Normally you do not need to low-level format a hard disk, as this task is doneat the factory. The next steps in preparing a hard disk for use are to write a partitiontable to it and to create partitions on the disk. The area of the disk not occupied bypartitions is called free space. A new disk has no partition table and no partitions.Under DOS/Windows, the term formatting means creating a filesystem on a parti-tion; see “Filesystems” below.
Partitions A partition, or slice, is a logical section of a hard disk that has a device name, suchas /dev/sda1, so you can address it separately from other sections. From a live ses-sion, and after you install Ubuntu, you can use the GNOME Partition Editor(page 53) to view and resize partitions on an existing system. During installation,you can use the ubiquity partitioner (pages 50 and 56) to create partitions. Afterinstallation, you can use parted (page 673) to manipulate partitions. See /dev onpage 554 for more information on device names.
Partition table A partition table holds information about the partitions on a hard disk. Before thefirst partition can be created on a disk, the program creating the partition must setup an empty partition table on the disk. As partitions are added, removed, andmodified, information about these changes is recorded in the partition table. If youremove a partition table, you can no longer access information on the disk exceptby extraordinary means.
Filesystems Before most programs can write to a partition, a data structure (page 1032), calleda filesystem, needs to be written to the partition. When the Ubuntu installer createsa partition, it writes a filesystem to the partition. You can use the mkfs (make file-system; page 525) utility, which is similar to the DOS/Windows format utility, tomanually create a filesystem on a partition. Table 13-1 on page 570 lists somecommon types of filesystems. Ubuntu Linux typically creates ext3 filesystems fordata, whereas Windows uses FAT16, FAT32, and NTFS filesystems. Apple usesHFS (Hierarchical Filesystem) and HFS+. OS X uses either HFS+ or UFS. UnderLinux, typical filesystem names are / (root), /boot, /var, /home, and /usr. UnderDOS/Windows, filesystems are labeled C:, D: , and so on (sometimes a whole diskis a single partition). Different types of partitions can coexist on the same harddisk, including both Windows and Linux partitions. Under Linux, the fsck (file-system check; page 577) utility checks the integrity of filesystem data structures.
Mount point A partition holds no information about where it will reside in a system’s directorystructure. When you use the installer to create most partitions, you specify the nameof a directory that Ubuntu associates with the partition. For example, you mightcreate a partition and associate it with the /var directory. The location you specify isthe mount point for the partition. As part of the boot process, Ubuntu consults thefstab (filesystem table; page 576) file which associates each partition with its mountpoint. This association, called mounting, enables you to access the filesystem on apartition using the name of the directory it is mounted on.

Planning the Installation 31
For example, the second partition on the first hard disk, with the device name/dev/sda2, might hold the filesystem that normally is mounted on the /home direc-tory. This association is normal, but not mandatory. When you work in recoverymode, you may mount this filesystem on the /target directory so you can repair thefilesystem. A partition is frequently referred to by the name of its normal mountpoint: Thus “the /home partition” refers to the partition that holds the filesystemnormally mounted on the /home directory. See page 572 for more information onmount points.
Filesystemindependence
The state of one filesystem does not affect other filesystems: One filesystem on adrive may be corrupt and unreadable while other filesystems function normally.One filesystem may be full so you cannot write to it while others have plenty ofroom for more data.
Primary, Extended, and Logical Partitions
You can divide an IDE/ATA/SATA disk into a maximum of 63 partitions and a SCSIdisk into a maximum of 15 partitions. You can use each partition independently forswap devices, filesystems, databases, other resources, and even other operating systems.
Unfortunately disk partitions follow the template established for DOS machines along time ago. At most, a disk can hold four primary partitions. You can divide one(and only one) of these primary partitions into multiple logical partitions; thisdivided primary partition is called an extended partition. If you want more thanfour partitions on a drive—and you frequently do—you must set up an extendedpartition.
A typical disk is divided into three primary partitions (frequently numbered 1, 2,and 3) and one extended partition (frequently numbered 4). The three primary par-titions are the sizes you want the final partitions to be. The extended partition occu-pies the rest of the disk. Once you establish the extended partition, you cansubdivide it into additional logical partitions (numbered 5 or greater) that are eachthe size you want. You cannot use the extended partition (number 4, above), onlythe logical partitions it holds. Figure 17-5 on page 674 illustrates the disk describedin this paragraph.
Partitioning a Disk
During installation, the installer calls a partitioner to set up disk partitions. This sec-tion discusses how to plan partition sizes. Although this section uses the term parti-tion, planning and sizing LVs (logical volumes; page 35) works the same way. Formore information refer to pages 53 and 56 and to the Linux Partition HOWTO atwww.tldp.org/HOWTO/Partition.
Planning Partitions
Guided partitioning It can be difficult to plan partition sizes appropriately if you are not familiar withLinux. For this reason Ubuntu provides guided partitioning. Without asking anyquestions, guided partitioning divides the portion of the disk allotted to Ubuntu

32 Chapter 2 Installation Overview
into two partitions. One partition is the swap partition, which can be any size from512 megabytes to 2 or more gigabytes. The other partition is designated as / (root)and contains the remainder of the disk space. Having only two partitions makesmanaging disk space quite easy. But if a program runs amok or if the system is sub-jected to a DoS attack (page 1034), the entire disk can fill up. System accountingand logging information, which may contain data that can tell you what wentwrong, may be lost.
Partition Suggestions
A Linux system must have a / (root) partition. It is advisable to set up a swap par-tition as well. You can create additional partition/mount point pairs; this sectionlists some of the more common ones. Any standard directories you do not createpartitions/mount points for automatically become subdirectories of the / (root)directory and reside on the / (root) partition. For example, if you do not create apartition to hold the /home filesystem, the installer creates home as a subdirectoryof / and the home directory resides on the / (root) partition.
(swap) Linux temporarily stores programs and data on a swap partition when it does nothave enough RAM to hold all the information it is processing. The size of the swappartition should be between one and two times the size of the RAM in the system,with a minimum size of 256 megabytes. For example, a system with 1 gigabyte ofRAM should have a 1- to 2-gigabyte swap partition. Although a swap partition isnot required, most systems perform better with one. A swap partition is notmounted so it is not associated with a mount point. See swap on page 564 for moreinformation.
/boot This partition holds the kernel and other data the system needs when it boots. The/boot partition is typically about 100 megabytes, although the amount of spacerequired depends on how many kernel images you want to keep on hand. Thispartition can be as small as 50 megabytes. Although you can omit the /boot parti-tion, it is useful in many cases. Many administrators put an ext2 filesystem on thispartition because the data on it does not change frequently enough to justify theadded overhead of the ext3 journal. Some older BIOSs require the /boot partition[or the / (root) partition if there is no /boot partition] to appear near the begin-ning of the disk.
Where to put the /boot partition
tip On older systems, the /boot partition must reside completely below cylinder 1023 of the hard disk.When a system has more than one hard disk, the /boot partition must also reside on a drive on:
• Multiple IDE or EIDE drives: the primary controller
• Multiple SCSI drives: ID 0 or ID 1
• Multiple IDE and SCSI drives: the primary IDE controller or SCSI ID 0

Planning the Installation 33
/var The name var is short for variable: The data in this partition changes frequently.Because it holds the bulk of system logs, package information, and accounting data,making /var a separate partition is a good idea. In this way, if a user runs a job thatconsumes all of the user’s disk space, system logs will not be affected. The /var par-tition can occupy from 500 megabytes up to several gigabytes for extremely activesystems with many verbose daemons and a lot of printer activity (files in the printqueue are stored on /var). Systems that are license servers for licensed softwareoften qualify as extremely active systems. By default, Apache content (Web pages itserves) is stored on /var under Ubuntu.
/home It is a common strategy to put user home directories on their own disk or partition.This partition is usually named /home. Having /home in a separate partition allowsyou to perform a clean install without overwriting user files.
/ (root) Some administrators choose to separate the / (root), /boot, and /usr partitions.When you have Ubuntu decide how to partition the disk (guided partitioning), itputs all directories in the root partition. By itself, the root partition usually con-sumes less than 30 megabytes of disk space. However, /lib, which can consumemore than 300 megabytes, is part of the root partition. On occasion, you mayinstall a special program that has many kernel drivers that consume a lot of space inthe root partition. Allot 1 gigabyte to the root partition at a minimum.
/usr Separating the /usr partition can be useful if you plan to export /usr to another sys-tem and want the security that a separate partition can give. Many administrators putan ext2 filesystem on this partition because the data on it does not change frequentlyenough to justify the added overhead of the ext3 journal. The size of /usr depends onthe number of packages you install. On a default system, it is typically 2–4 gigabytes.
/usr/localand /opt
Both /usr/local and /opt are candidates for separation. If you plan to install manypackages in addition to Ubuntu Linux, you may want to keep them on a separatepartition. If you install the additional software in the same partition as the users’home directories, for example, it may encroach on the users’ disk space. Many siteskeep all /usr/local or /opt software on one server and export it to other systems. Ifyou choose to create a /usr/local or /opt partition, its size should be appropriate tothe software you plan to install.
Table 2-1 (next page) gives guidelines for minimum sizes for partitions used by Linux.Set the sizes of other partitions, such as /home, /opt, and /usr/local, according toneed and the size of the hard disk. If you are not sure how you will use additional diskspace, you can create extra partitions using whatever names you like (for example,/b01, /b02, and so on) or wait until later to divide the space into partitions.
Set up partitions to aid in making backups
tip Plan partitions around which data you want to back up and how often you want to back it up. Onevery large partition can be more difficult to back up than several smaller ones.

34 Chapter 2 Installation Overview
RAID
RAID (Redundant Array of Inexpensive/Independent Disks) employs two or morehard disk drives or partitions in combination to improve fault tolerance and/or per-formance. Applications and utilities see these multiple drives/partitions as a singlelogical device. RAID, which can be implemented in hardware or software (Ubuntugives you this option), spreads data across multiple disks. Depending on which levelyou choose, RAID can provide data redundancy to protect data in the case of hard-ware failure. Although it can improve disk performance by increasing read/writespeed, software RAID uses quite a bit of CPU time, which may be a consideration.True hardware RAID requires hardware designed to implement RAID and is notcovered in this book (but see “Fake RAID” on the next page).
RAID can be an effective addition to a backup. Ubuntu offers RAID software thatyou can install either when you install an Ubuntu system or as an afterthought. TheLinux kernel automatically detects RAID arrays (sets of partitions) at boot time ifthe partition ID is set to 0xfd (raid autodetect).
Software RAID, as implemented in the kernel, is much cheaper than hardwareRAID. Not only does this approach avoid the need for specialized RAID disk con-trollers, but it also works with the less expensive ATA disks as well as SCSI disks.
Table 2-1 Example minimum partition sizesa
Partition Example size
/boot 50–100 megabytes
/ (root) 1 gigabyte
(swap) One to two times the amount of RAM in the system with a minimum of 256 megabytes
/home As large as necessary; depends on the number of users and the type of work they do
/tmp Minimum of 500 megabytes
/usr Minimum of 2–16 gigabytes, depending on which and how many software packages you install
/var Minimum of 500 megabytes
a. The sizes in this table assume you create all partitions separately. For example, if you create a 1-gigabyte/ (root) partition and do not create a /usr partition, in most cases you will not have enough room to storeall the system programs.
Do not replace backups with RAID
caution Do not use RAID as a replacement for regular backups. If the system undergoes a catastrophic failure,RAID is useless. Earthquake, fire, theft, and other disasters may leave the entire system inaccessible(if the hard disks are destroyed or missing). RAID also does not take care of the simple case of replac-ing a file when a user deletes it by accident. In these situations, a backup on a removable medium(which has been removed) is the only way you will be able to restore a filesystem.

Planning the Installation 35
Fake RAID Ubuntu provides support for motherboard-based RAID (known as fake RAID)through the dmraid driver set. Linux software RAID is almost always better than fakeRAID. For more information see help.ubuntu.com/community/FakeRaidHowto.
The partitioner on the Alternate CD gives you the choice of implementing RAIDlevel 0, 1, or 5:
• RAID level 0 (striping) Improves performance but offers no redundancy. The storage capacity of the RAID device is equal to that of the member partitions or disks.
• RAID level 1 (mirroring) Provides simple redundancy, improving data reliability, and can improve the performance of read-intensive applications. The storage capacity of the RAID device is equal to one of the member par-titions or disks.
• RAID level 5 (disk striping with parity) Provides redundancy and improves (most notably, read) performance. The storage capacity of the RAID device is equal to that of the member partitions or disks, minus one of the partitions or disks (assuming they are all the same size).
For more information refer to the Software-RAID HOWTO.
LVM: Logical Volume Manager
The Logical Volume Manager (LVM2, which this book refers to as LVM) allowsyou to change the size of logical volumes (LVs, the LVM equivalent of partitions) onthe fly. With LVM, if you make a mistake in setting up LVs or your needs change,you can make LVs smaller or larger without affecting user data. You must choose touse LVM at the time you install the system or add a hard disk; you cannot retroac-tively apply it to a disk full of data. LVM supports IDE and SCSI drives as well asmultiple devices such as those found in RAID arrays.
LVM groups disk components (partitions, hard disks, or storage device arrays), calledphysical volumes (PVs), into a storage pool, or virtual disk, called a volume group(VG). See Figure 2-2. You allocate a portion of a VG to create a logical volume.
Figure 2-2 LVM: Logical Volume Manager
Disk A40 GB
Disk B80 GB
Disk C40 GB
Disk D20 GB
/ (root) home var usr (swap)
boot
40 + 80 + 40 + 20 GB(– boot partition)
Physical volumes (PVs)
Boot partition
Volume group (VG)
Logical volumes (LVs)

36 Chapter 2 Installation Overview
An LV is similar in function to a traditional disk partition in that you can create afilesystem on an LV. It is much easier, however, to change and move LVs than parti-tions: When you run out of space on a filesystem on an LV, you can grow (expand)the LV and its filesystem into empty or new disk space, or you can move the file-system to a larger LV. LVM’s disk space manipulation is transparent to users; serviceis not interrupted.
LVM also eases the burden of storage migration. When you outgrow or need toupgrade PVs, LVM can move data to new PVs. To read more about LVM, refer tothe resources listed on page 24.
The Installation Process
The following steps outline the process of installing Ubuntu Linux from a CD/DVD.See Chapter 3 for installation specifics.
1. Insert the installation CD/DVD in and reset the computer. The computer boots from the CD/DVD and displays the initial install screen (Figure 3-1, page 46).
2. You can press function keys to display options, select an item from the ini-tial install screen menu, and begin bringing up a live session or installing Ubuntu when you are ready. Or you can do nothing. A live/install Desktop CD/DVD starts to bring up the system after 30 seconds; an installation-only CD waits for you to select an item from the menu. One of the menu items checks the installation medium.
3. As part of the process of bringing up a live session or installing Ubuntu, Ubuntu Linux creates RAM disks (page 1056) that it uses in place of a hard disk used for a normal boot operation. The installer copies tools required for the installation or to bring up a system from a live/install Desktop CD/DVD to the RAM disks. The use of RAM disks allows the installation process to run through the specification and design phases without writing to the hard disk and enables you to opt out of the installa-tion at any point before the system warns you it is about to write to the hard disk (or you complete the installation). If you opt out before this point, the system is left in its original state. The RAM disks also allow a system booted from a live/install Desktop CD to leave the hard disk untouched.
4. The installer prompts you with questions about how you want to configure Ubuntu Linux.
5. When the installer is finished collecting information, it displays the Ready to install screen (Figure 3-7, page 53). When you click Install, it writes the operating system files to the hard disk.

Downloading and Burning a CD/DVD 37
6. The installer prompts you to remove the CD/DVD and press RETURN; it then reboots the system.
7. The Ubuntu Linux system is ready for you to log in and use.
Downloading and Burning a CD/DVD
There are several ways to obtain an Ubuntu CD/DVD. Ubuntu makes availablereleases of Linux as CD and DVD ISO image files (named after the ISO9660 standardthat defines the CD filesystem). This section describes how to download one of theseimages and burn a CD/DVD. You can also point a browser at shipit.ubuntu.com todisplay a Web page with links that enable you to request a free CD from Ubuntu orpurchase a CD/DVD from a Web site.
The Easy Way to Download a CD ISO Image File
This section explains the easiest way to download a CD ISO image file. This tech-nique works in most situations; it is straightforward but limited. For example, itdoes not allow you to use BitTorrent to download the file nor does it download aDVD image.
To begin, point a browser at www.ubuntu.com and click Download Now or GetUbuntu. Select the release (page 28) and edition (page 28) you want to download.Then select the type of system you want to install it on (see “Processor Architec-ture” on page 26). Finally select a location from the drop-down list labeled Choosea location near you and click Start Download. If the browser gives you a choice ofwhat to do with the file, save it to the hard disk. The browser saves the ISO imagefile to the hard disk. Continue reading at “Burning the CD/DVD” on page 40.
Other Ways to Download a CD/DVD ISO Image File
This section explains how to download a release that is not listed on the Ubuntudownload page or a DVD image, and how to download a torrent that enables youto use BitTorrent to download the ISO image file. See “Download Ubuntu” onpage 24 for other locations you can download Ubuntu from.
Browser When you use a Web browser to download a file, the browser contacts a Web(HTTP) or FTP server and downloads the file from that server. If too many peopledownload files from a server at the same time, the downloads become slower.
BitTorrent BitTorrent efficiently distributes large amounts of static data, such as ISO image files.Unlike using a browser to download a file from a single server, BitTorrent distributesthe functions of a server over its clients. As each client downloads a file, it becomes aserver for the parts of the file it has downloaded. To use BitTorrent, you must down-load a small file called a torrent (or have a Web browser do it for you). This file,which holds information that allows clients to communicate with one another, has afilename extension of .torrent. As more people use a torrent to download a file at the

38 Chapter 2 Installation Overview
same time, the downloads become faster. Downloading an ISO image file usingBitTorrent is covered later in this section.
Mirrors Many sites mirror (hold copies of) the Ubuntu ISO image files and BitTorrent tor-rents. Some mirrors use HTTP while others use FTP; you can use a browser todownload files from either. FTP and HTTP appear slightly different. Point abrowser at www.ubuntu.com/getubuntu/downloadmirrors to locate a mirror site.Scroll through the list of mirror sites, find a site near you, and click that site’s URL.The browser displays a page similar to the one shown in Figure 2-3.
Click any link on the page that includes the name or release number of the versionof Ubuntu you want to install. The browser displays a page similar to the oneshown in Figure 2-4.
Downloading an ISOimage file
You can click the links at the top of the page, although there is usually a betterselection of versions in the list of files at the bottom of the page. Click the numberor name of the release you want to download (e.g., gutsy or 7.10). At this point,some sites display a page with two links: Parent Directory and release. If thebrowser displays this page, click release. The browser displays a page with the nameand number of the release at the top, followed by a description of the different typesof CDs. At the bottom of the page is a list of files, with each line showing the nameof the file, the date it was created, its size, and a short description. Each filename isa link. The following two lines describe the Intel x86 desktop ISO image file forGutsy (7.10) and the torrent file that enables you to use BitTorrent to download thesame ISO image file. The ISO image file is almost 700 megabytes; the torrent file is27 kilobytes.
ubuntu-7.10-desktop-i386.iso ... 687M Desktop CD for PC (Intel x86) computers (standard download)ubuntu-7.10-desktop-i386.iso.torrent..27k Desktop CD for PC (Intel x86) computers (BitTorrent download)
Figure 2-3 An Ubuntu mirror I

Downloading and Burning a CD/DVD 39
Click the filename/link that specifies the release, edition, and architecture you want.For example, clicking gutsy-desktop-i386.iso downloads the CD ISO image forGutsy (release 7.10) desktop (edition) for the i386 architecture. Save the file to thehard disk. Next, download the file named MD5SUMS.htm (at the top of the list) tothe same directory. An easy way to save a file is to right-click it, select SaveLink/Target As, and save the file to a directory with enough space for the file. Seepage 40 for an explanation of how to use the MD5SUMS.htm file to verify the ISOimage file you download.
Downloading a DVD To download a DVD ISO image file, go to cdimage.ubuntu.com/releases and followthe instructions under “Downloading an ISO image file.” You can identify DVDISO image files by the string dvd in their names. Make sure you have room for thefile on the hard disk: A DVD ISO image file occupies about 4 gigabytes.
Using BitTorrent You can use BitTorrent to obtain an ISO image file. Because BitTorrent is avail-able for both Windows and Mac OS X (www.bittorrent.com), you can downloadand burn the Ubuntu CD/DVD under either of these operating systems. To
Figure 2-4 An Ubuntu mirror II

40 Chapter 2 Installation Overview
download a torrent, point a browser at releases.ubuntu.com and click the file-name of the torrent. You can identify a torrent file by its filename extension of.torrent. A BitTorrent client should start automatically and ask where to put thedownloaded file. You can also download the torrent manually; follow theinstructions under “Downloading an ISO image file” on page 38. You can thenstart downloading the file from the command line (page 604) or by clicking it ina File Browser such as Nautilus (page 96).
Verifying an ISO Image File
This section assumes you have an ISO image file and a MD5SUMS.htm file savedon the hard disk and explains how to verify that the ISO IMAGE file is correct. TheMD5SUMS.htm file contains the MD5 (page 1047) sums for each of the availableISO image files. When you process a file using the md5sum utility, md5sum generatesa number based on the file. If that number matches the corresponding number inthe MD5SUMS.htm file, the downloaded file is correct. You can run the followingcommands from a terminal emulator:
$ grep desktop-i386 MD5SUMS.htm;md5sum gutsy-desktop-i386.iso198fc031e7e482514eb57a2a7890dcac *gutsy-desktop-i386.iso198fc031e7e482514eb57a2a7890dcac gutsy-desktop-i386.iso
Computing an MD5 sum for a large file takes a while. The two long strings that thepreceding command displays must be identical: If they are not, you must downloadthe file again.
Burning the CD/DVD
An ISO image file is an exact image of what needs to be on the CD/DVD. Puttingthat image on a CD/DVD involves a different process than copying files to aCD/DVD. The CD/DVD burning software you use has a special selection for burn-ing an ISO image. It has a label similar to Record CD from CD Image or Burn CDImage. Refer to the instructions for the software you are using for information onhow to burn an ISO image file to a CD/DVD.
You can download and burn the CD/DVD on any operating system
tip You can download and burn the CD/ DVD on any computer that is connected to the Internet, hasa browser, has enough space on the hard disk to hold the ISO image file (about 700 megabytesfor a CD and 4 gigabytes for a DVD), and can burn a CD/DVD. You can frequently use ftp(page 732) or, on a Linux system, Nautilus menubar: File Places Connect to Server(page 263) in place of a browser to download the file.
Make sure the software is set up to burn an ISO imagetip Burning an ISO image is not the same as copying files to a CD/DVD. Make sure the CD/DVD burn-
ing software is set up to burn an ISO image. If you simply copy the ISO file to a CD/DVD, it willnot work when you try to install Ubuntu Linux.

Gathering Information About the System 41
Gathering Information About the System
It is not difficult to install and bring up an Ubuntu Linux system. Nevertheless, themore you know about the process before you start, the easier it will be. The installa-tion software collects information about the system and can help you make deci-sions during the installation process. However, the system will work better whenyou know how you want your disk partitioned rather than letting the installationprogram create partitions without your input. There are many details, and the moredetails you take control of, the more pleased you are likely to be with the finishedproduct. Finding the information that this section asks for will help ensure you endup with a system you understand and know how to change when necessary. To anincreasing extent, the installation software probes the hardware and figures outwhat you have. Newer equipment is more likely to report on itself than older equip-ment is.
It is critical to have certain pieces of information before you start. One thing Linuxcan never figure out is all the relevant names and IP addresses (unless you are usingDHCP, in which case the addresses are set up for you).
Following is a list of items you may need information about. Get as much informa-tion on each item as you can: manufacturer, model number, size (megabytes,gigabytes, and so forth), number of buttons, chipset (for cards), and so on. Someitems, such as the network interface card, may be built into the motherboard.
• Hard disks.
• Memory. You don’t need it for installation, but it is good to know.
• SCSI interface card.
• Network interface card (NIC).
You must use 700-megabyte CD-ROM blanks
tip When you burn an Ubuntu Linux CD from an ISO image, you must use a 700-megabyte blank. A650-megabyte blank will not work because there is too much data to fit on it.
Test the ISO file and test the CD/DVDtip It is a good idea to test the ISO image file and the burned CD/DVD before you use it to install
Ubuntu Linux. When you boot the system from the CD/DVD, Ubuntu gives you the option ofchecking the CD/DVD for defects (page 47). A bad file on a CD may not show up until you finishinstalling Ubuntu Linux and have it running. At that point, it may be difficult and time-consumingto figure out where the problem lies. Testing the file and CD/DVD takes a few minutes, but can saveyou hours of trouble if something is not right. If you want to perform one test only, test theCD/DVD.
42 Chapter 2 Installation Overview
• Video interface card (including the amount of video RAM/memory).
• Sound card and compatibility with standards, such as SoundBlaster.
• Mouse (PS/2, USB, AT, and number of buttons).
• Monitor (size and maximum resolution).
• IP addresses and names, unless you are using DHCP (page 538), in which case the IP addresses are automatically assigned to the system. Most of this information comes from the system administrator or ISP.
◆ System hostname (anything you like).
◆ System address.
◆ Network mask (netmask).
◆ Gateway address (the connecting point to the network or Internet) or a phone number when you use a dial-up connection.
◆ Addresses for nameservers, also called DNS addresses.
◆ Domain name (not required).
Chapter Summary
A live/install Desktop CD runs a live Ubuntu session without installing Ubuntu onthe system. You can install Ubuntu from a live session. Booting a live/install Desk-top CD is a good way to test hardware and fix a system that will not boot from thehard disk.
Before you download or otherwise obtain an Ubuntu CD or DVD, make sure youare using medium that is appropriate to the hardware you are installing it on and towhat the system will be used for. Ubuntu has three editions: Desktop (the most com-mon), Alternate (for special cases), and Server. The Ubuntu live DVD combines fea-tures of all three of these editions.
When you install Ubuntu Linux, you copy operating system files from a CD orDVD to hard disk(s) on a system and set up configuration files so Linux runs prop-erly on the hardware. Operating system files are stored as CD or DVD ISO imagefiles. You can use a Web browser or BitTorrent to download an ISO image file. It isa good idea to test the ISO image file when it is downloaded and the burnedCD/DVD before you use it to install Ubuntu Linux.
When you install Ubuntu, you can let the installer decide how to partition thehard disk (guided partitioning) or you can manually specify how you want to par-tition it.

Advanced Exercises 43
Exercises
1. Briefly, what does the process of installing an operating system such as Ubuntu Linux involve?
2. What is an installer?
3. Would you set up a GUI on a server system? Why or why not?
4. A system boots from the hard disk. To install Linux, you need it to boot from a CD/DVD. How can you make the system boot from a CD/DVD?
5. What is free space on a hard disk? What is a filesystem?
6. What is an ISO image? How do you burn an ISO image to a CD/DVD?
Advanced Exercises
7. List two reasons why RAID cannot replace backups.
8. What are RAM disks? How are they used during installation?
9. What is MD5? How does it work to ensure that an ISO image file you download is correct?

This page intentionally left blank

4545
3Chapter3Chapter 2 covered planning the installation of Ubuntu Linux:determining the requirements; performing an upgrade versus aclean installation; planning the layout of the hard disk;obtaining the files you need for the installation, including howto download and burn CD/DVD ISO images; and collectinginformation about the system. This chapter focuses on install-ing Ubuntu. Frequently the installation is quite simple, espe-cially if you have done a good job of planning. Sometimes youmay run into a problem or have a special circumstance; thischapter gives you tools to use in these cases. Read as much ofthis chapter as you need to; once you have installed Ubuntu,continue with Chapter 4, which covers getting started usingthe Ubuntu desktop. If you install a textual (command line)system, continue with Chapter 5.
In This Chapter
Basic Installation from the Live/Install Desktop CD/DVD . . . 46
The Ubuntu Graphical Installer . . . 48
Graphical Partitioners. . . . . . . . . . . 53
Setting Up a Dual-Boot System . . . 61
The live/Install Desktop CD: The Initial Install Screen . . . . . . . 62
The Alternate CD Initial Install Screen Menu . . . . . . . . . . . . . . . . 65
The Server CD Initial Install Screen Menu . . . . . . . . . . . . . . . . 66
The Ubuntu Textual Installer. . . . . . 67
Manual Partitioning . . . . . . . . . . . . 70
Setting Up a RAID Array . . . . . . . . . 73
The xorg.conf File . . . . . . . . . . . . . . 77
3
Step-by-Step
Installation

46 Chapter 3 Step-by-Step Installation
Basic Installation from the Live/Install
Desktop CD/DVD
To begin installing Ubuntu from a live/install Desktop CD/DVD, insert the disk inthe computer and boot the system. The system displays the initial install screen(Figure 3-1). Refer to “BIOS setup” on page 26 if the system does not boot from theCD/DVD. See “The Function Keys” on page 62 for information about changing thelanguage, keyboard, and accessibility features the live session uses.
The menu on the initial install screen differs depending on which edition of Ubuntu(page 28) you are installing; along the bottom of the screen, the labels for the func-tion keys remain the same. To the left of the menu, the live (desktop) CD/DVD dis-plays a counter that counts down from 30 to 1; when the counter reaches 0, Ubuntuboots the system. When you press a key (other than RETURN) before the counterreaches 0, the counter stops and the system waits for you to make a selection fromthe menu. The installation-only (Alternate and Server) CDs do not have a counter,but rather wait for you to make a selection. This section describes how to boot intoa live session and how to install Ubuntu from that session.
Booting the System
Before Ubuntu can display a desktop from a live/install Desktop CD/DVD or installitself on a hard disk, the Ubuntu operating system must be read into memory
Figure 3-1 The initial install screen for the live/install Desktop CD

Basic Installation from the Live/Install Desktop CD/DVD 47
(booted). This process can take a few minutes on older, slower systems or systemswith minimal RAM (memory). Each of the menu selections on the initial installscreen, except the memory test, boots the system.
Checking the CD/DVD for Defects
Whether you burned your own CD/DVD, purchased it, or are using the oneincluded with this book, it is a good idea to verify that the contents of the CD/DVDis correct. On the initial install screen, use the ARROW keys to highlight Check the CDfor Defects (this selection checks DVDs too) and press RETURN. Checking theCD/DVD takes a few minutes—Ubuntu keeps you apprised of its progress. WhenUbuntu finishes checking the CD/DVD, it displays the result of its testing. PressRETURN to redisplay the initial install screen.
Live Session
In most cases, you can boot Ubuntu to run a live session that displays a desktop with-out doing anything after you boot from the live/install Desktop CD/DVD: Ubuntudisplays the initial install screen, counts down from 30, boots the system, displays theUbuntu logo while an orange cursor moves back and forth on the progress bar, andfinally displays the GNOME desktop (Figure 3-2). To speed up this process, you can
Test the CD/DVD
tip Testing the CD/DVD takes a few minutes but can save you much aggravation if the installation failsor you run into problems after installing Ubuntu owing to bad media.
Figure 3-2 The GNOME desktop displayed by a live session
Install object

48 Chapter 3 Step-by-Step Installation
press RETURN when Ubuntu displays the initial install screen. The first time you use aCD/DVD, it is a good idea to check it for defects (see the previous page).
If you encounter problems with the display while you are bringing up the desktopfrom a live/install Desktop CD/DVD or during installation, reboot the system andselect Start Ubuntu in safe graphics mode (page 62) from the initial install screen. Ifthat does not work, install Ubuntu using the textual installer on the Alternate CD(page 65) or the DVD.
The live/install Desktop CD/DVD gives you a chance to preview Ubuntu withoutinstalling it. Boot the live/install Desktop CD/DVD to begin a live session and workwith Ubuntu as explained in Chapter 4. When you are finished, remove theCD/DVD and reboot the system. The system boots as it did before the live session.
Because a live session does not write to the hard disk (other than using a swap parti-tion if one is available), none of the work you save will be available once you reboot.You can use Webmail or another method to transfer files you want to preserve toanother system.
optional Seeing What Is Going On
If you are curious and want to see what Ubuntu is doing as it boots, remove quietand splash from the boot command line (Figure 3-16, page 64): With the initialinstall screen displayed, press F6 to display the boot command line. Press BACKSPACE orDEL to back up and erase quiet and splash from the boot command line. If you havenot added anything to this line, you can remove the two hyphens at the end of theline. If you have added to this line, use the BACK ARROW key to back up over—but notremove—whatever you added, the hyphens, and the SPACE on each side of them.Then remove quiet and splash. As Ubuntu boots, it displays information aboutwhat it is doing. Text scrolls on the screen, although sometimes too rapidly to read.
The Ubuntu Graphical Installer
ubiquity The ubiquity utility is a graphical installer, written mostly in Python, which installsUbuntu from a live session. You can use the Alternate or Server CD or the DVD toinstall Ubuntu using the textual installer (page 67).
Welcome screen To install Ubuntu from the live/install Desktop CD/DVD, start a live session anddouble-click (use the left mouse button) the object on the desktop labeled Install(Figure 3-2, page 47).
After a few moments Ubuntu displays the Welcome screen of the Install window(Figure 3-3). This screen displays a welcome message and a query about which lan-guage you would like ubiquity to use. The language you choose will be the default
Before you start, see what is on the hard disk
tip Unless you are certain you are working with a new disk, or you are sure the data on the disk is of novalue, it is a good idea to see what is on the disk before you start installing Ubuntu. You can use theGNOME Partition Editor to examine the contents of a hard disk. See page 53 for more information.
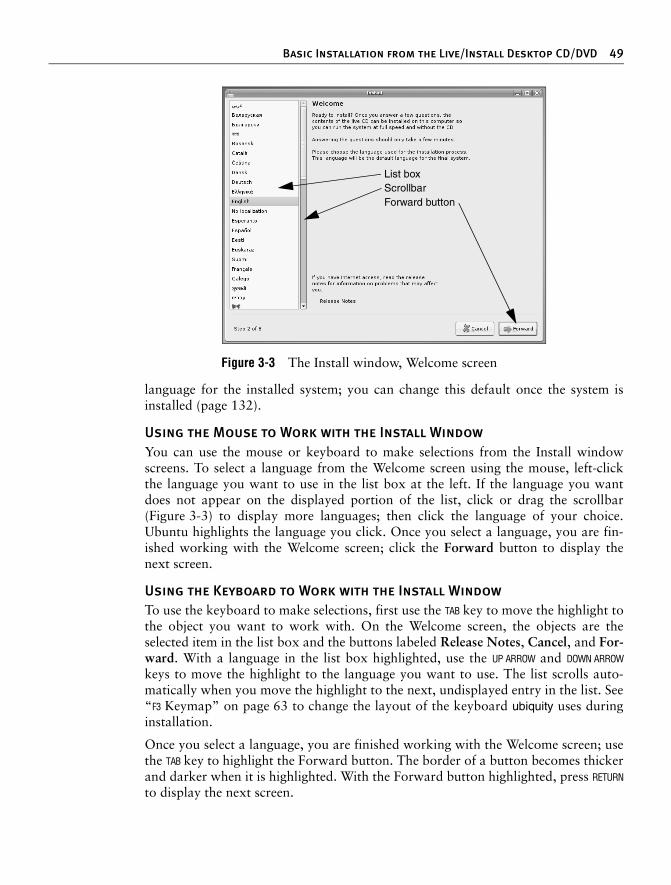
Basic Installation from the Live/Install Desktop CD/DVD 49
language for the installed system; you can change this default once the system isinstalled (page 132).
Using the Mouse to Work with the Install Window
You can use the mouse or keyboard to make selections from the Install windowscreens. To select a language from the Welcome screen using the mouse, left-clickthe language you want to use in the list box at the left. If the language you wantdoes not appear on the displayed portion of the list, click or drag the scrollbar(Figure 3-3) to display more languages; then click the language of your choice.Ubuntu highlights the language you click. Once you select a language, you are fin-ished working with the Welcome screen; click the Forward button to display thenext screen.
Using the Keyboard to Work with the Install Window
To use the keyboard to make selections, first use the TAB key to move the highlight tothe object you want to work with. On the Welcome screen, the objects are theselected item in the list box and the buttons labeled Release Notes, Cancel, and For-ward. With a language in the list box highlighted, use the UP ARROW and DOWN ARROW
keys to move the highlight to the language you want to use. The list scrolls auto-matically when you move the highlight to the next, undisplayed entry in the list. See“F3 Keymap” on page 63 to change the layout of the keyboard ubiquity uses duringinstallation.
Once you select a language, you are finished working with the Welcome screen; usethe TAB key to highlight the Forward button. The border of a button becomes thickerand darker when it is highlighted. With the Forward button highlighted, press RETURN
to display the next screen.
Figure 3-3 The Install window, Welcome screen
ScrollbarForward button
List box

50 Chapter 3 Step-by-Step Installation
This book describes using the mouse to make selections from a graphical interface;you can use the keyboard if you prefer.
Where are you? Next, ubiquity displays the Where are you? screen. This screen allows you to specifythe time zone the computer is in. You can use the map or the drop-down list labeledSelected city to specify the time zone. Initially, when it is over the map, the mousepointer appears a magnifying glass with a plus sign in it. Left-click the map near acity that is in the same time zone as the computer; the map zooms in on that area.Left-click again to choose a city; the name of the city appears in the box labeledSelected city.
To use the drop-down list, click anywhere in the box labeled Selected city; ubiquityexpands the box into a list of cities. Use the mouse or ARROW keys to select a city andthen either click the city or press RETURN. Click Forward.
Keyboard layout The Keyboard layout screen allows you to specify the type of keyboard to be usedby the installed system. (See “F3 Keymap” on page 63 to change the layout of thekeyboard ubiquity uses during installation.) Select the country you are in or the lan-guage you will be using with the installed system from the list box on the left. Thenselect the type of keyboard you will be using from the list box on the right. Click theempty text box near the bottom of the window and enter some characters to testyour selection. Click Forward. The installer displays the Setting up the partitionerwindow while it gets ready for the next step.
Prepare disk space The Prepare disk space screen controls how ubiquity partitions the hard disk. Seepage 31 for a discussion of some of the issues involved in partitioning a hard disk.
With a single, clean hard disk—a hard disk with nothing installed on it, as it comesfrom the factory (i.e., no partition table)—the ubiquity partitioner displays a Preparedisk space screen similar to the one shown in Figure 3-4. In this case, the simplestway to partition the disk is to have ubiquity do it for you. By default, the radio buttonlabeled Guided – use entire disk and the radio button next to the name of the onlyhard disk in the system are selected. If the system has two or more clean hard disks,the ubiquity partitioner displays a line for each hard disk; click the radio button nextto the one you want to install Ubuntu on. Click Forward and ubiquity creates twopartitions on the hard disk: a small swap partition (page 32) and a root partition (/,page 33) that occupies the rest of the disk. The installer displays the Starting Up thePartitioner window while it gets ready for the next step.
If the Prepare disk space screen includes Guided - resize... and Guided - use the larg-est continuous free space selections, there is probably at least one partition on the
Figure 3-4 The ubiquity partitioner showing one empty hard disk

Basic Installation from the Live/Install Desktop CD/DVD 51
hard disk (there could just be an empty partition table). If you are sure you do notwant to keep any of the information on the hard disk, you can select Guided - useentire disk. To find out more about what is on the disk, see the section on the Parti-tion Editor on page 53. For more information on guided partitioning, see page 56.For information on manual partitioning, see page 57.
The ubiquity partitioner displays a warning window (Figure 3-5) if it is going towrite to the hard disk before it displays the Ready to install screen (Figure 3-7,page 53). If it does not display this window, ubiquity will not make changes to thehard disk until you click Install on the Ready to install screen.
Migrate documentsand settings
If you are installing Ubuntu on a system that already has one or more operatingsystems installed on it, and you are not overwriting those operating systems, theMigrate documents and settings screen displays a list of accounts and settingsfrom the existing operating systems. For example, if you are creating a dual-bootsystem on a system that already has Windows installed on it, this screen showsthe accounts from the Windows system and a list of programs and settings. Itmight show your name from the Windows system and, under that, InternetExplorer and My Documents. Put ticks in the check boxes adjacent to the itemsyou want to migrate to the Ubuntu system. On the lower portion of the screen,enter the information necessary to create an Ubuntu user to receive the migratedinformation.
Who are you? The Who are you? screen (Figure 3-6 on the next page) sets up the first Ubuntu user.This user can use sudo (page 88) to administer the system, including setting up addi-tional users (page 658). Enter the full name of the user in the text box labeled Whatis your name?. When you press RETURN, ubiquity enters the first name from the nameyou just entered in the box labeled What name do you want to use to log in?. PressRETURN to accept this name or backspace (page 137) over it and enter a differentname. Enter the same password in the next two (adjacent) boxes. Although ubiquityaccepts any password, it is a good idea to choose a more secure password if the sys-tem is connected to the Internet. See “Changing Your Password” on page 135 for adiscussion of password security.
The final text box specifies the name of the computer. For use on a local networkand to connect to the Internet with a Web browser or other client, you can use asimple name such as tiny. If you are setting up a system that is to function as aserver, see “FQDN” on page 847 for information on names that are valid on theInternet. Click Forward.
Figure 3-5 Write to disk warning window

52 Chapter 3 Step-by-Step Installation
Ready to install The final screen ubiquity displays is the Ready to install screen (Figure 3-7). Unlessubiquity asked your permission to write to the hard disk during the partitioningphase of the installation, it has not written to the disk yet. If you click Cancel at thispoint, the hard disk will remain untouched. This screen summarizes your answersto the questions ubiquity asked in the previous screens. Click Advanced to displaythe Advanced Options window, which allows you to choose whether to install aboot loader (normally you want to) and whether you want the system to participatein an automatic, informal package usage survey. Click OK to close the AdvancedOptions window. If everything looks right in the summary in the Ready to installscreen, click Install. The installer begins installing Ubuntu on the hard disk.
The ubiquity installer displays a series of windows to keep you informed of its progress.When the new system is installed, Ubuntu displays the Installation Complete window,which gives you the choice of continuing the live session or rebooting the system so youcan use the newly installed copy of Ubuntu. Click Restart now to reboot the system.
Ubuntu displays its logo and a progress bar. When it has finished shutting down thesystem, it asks you to remove the disk (so you do not reboot from the live/installDesktop CD/DVD) and press RETURN. When you do so, it reboots the system and dis-plays the Ubuntu GNOME login screen (Figure 4-1, page 90).
Figure 3-6 The Install window, Who are you? screen
This is when ubiquity writes to the hard disk
caution You can abort the installation by clicking the Cancel button at any point up to and including theReady to install screen (Figure 3-7) without making any changes to the system. Once you click Nextin this screen, ubiquity writes to the hard disk. However, if ubiquity displayed the warning windowshown in Figure 3-5 on page 51 and you clicked Continue, it wrote to the hard disk at that time.

Graphical Partitioners 53
Graphical Partitioners
A partitioner displays and can add, delete, and modify partitions on a hard disk.This section describes two graphical partitioners you can use to configure a harddisk so you can install Ubuntu Linux. One partitioner, gparted, is available on thelive/install Desktop CD desktop. The other partitioner is part of the ubiquity installerand is not available by itself. See page 57 for information on using the textual parti-tioner, which is available when you use the textual installer. After you installUbuntu Linux, you can use parted (page 673) to manipulate partitions. If you wanta basic set of partitions, you can allow ubiquity to partition the hard disk automati-cally using guided partitioning.
See “Setting Up the Hard Disk” on page 30 for a discussion of free space, parti-tions, partition tables, and filesystems. “Partition Suggestions” on page 32 discussessome of the filesystems you may want to set up partitions for.
gparted: the GNOME Partition Editor
Unless you know the hard disk you are installing Ubuntu Linux on has nothing on it(it is a new disk) or you are sure the disk holds no information of value, it is a goodidea to examine the contents of the disk before you start the installation. TheGNOME Partition Editor (gparted), which is available from a live session, is a good
Figure 3-7 The Install window, Ready to install screen

54 Chapter 3 Step-by-Step Installation
tool for this job. Open the Partition Editor window by selecting Main menu: Admin-istration Partition Editor as shown in Figure 3-8.
The Partition Editor displays the layout of a hard disk and can resize partitions, suchas when you are setting up a dual-boot system by adding Ubuntu to a Windows sys-tem (page 61). Although you can create partitions using the Partition Editor, youcannot specify the mount point (page 30) for a partition—this step must wait untilyou are installing Ubuntu and using the ubiquity partitioner. You can save time if youuse the Partition Manager to examine a hard disk and the ubiquity partitioner to setup the partitions that you install Ubuntu on.
An Empty Hard Disk
The Partition Editor shows one large unallocated space for a new hard disk (empty,with no partition table). If you have more than one hard disk, use the list box in theupper-right corner of the screen to select which disk the Partition Editor displaysinformation about. Figure 3-9 shows an empty 200-gigabyte hard disk on thedevice named /dev/sda. Figure 3-4 on page 50 shows the ubiquity partitioner readyto partition an empty drive similar to the one shown in Figure 3-9.
Figure 3-8 Selecting the Partition Editor from the Main menu
Figure 3-9 The Partition Editor displaying an empty disk drive

Graphical Partitioners 55
Deleting a Partition
Before deleting a partition, make sure it does not contain any data you need. To usethe Partition Editor to delete a partition, highlight the partition you want to deleteand click Delete and then Apply on the toolbar.
Resizing a Partition
Figure 3-10 shows the Partition Editor displaying information about a hard diskwith a single partition that occupies the entire disk. It shows a single 200-gigabyteNTFS filesystem. The process of resizing a partition is the same regardless of thetype of partition: You can use the following technique to resize Windows, Linux, orother types of partitions.
To install Ubuntu on this system, you must resize (shrink) the partition to make roomfor Ubuntu. Before you resize a Windows partition, you must boot Windows anddefragment the partition using the Windows defragmenter; see the tip on page 61.Although you can resize a partition with the ubiquity partitioner while you are install-ing Ubuntu, it is easier to see what you are doing when you use the Partition Editor
Figure 3-10 The Partition Editor displaying a disk drive holding a Windows system
Always back up the data on a hard diskcaution If you are installing Ubuntu on a disk that holds data that is important to you, always back up the
data before you start the installation. Things can and do go wrong. The power may go out in themiddle of an installation, corrupting the data on the hard disk. There may be a bug in the partition-ing software that destroys a filesystem. Although it is unlikely, you might make a mistake and for-mat a partition holding data you want to keep.

56 Chapter 3 Step-by-Step Installation
for this task. Also, the ubiquity partitioner will not resize a partition on a hard diskwith more than one partition. To resize the partition, right-click to highlight the linethat describes the partition and select Resize/Move on the toolbar. The Partition Edi-tor opens a small Resize/Move window, as shown in Figure 3-10 on page 55.
At the top of the Resize/Move window is a graphical representation of the partition.Initially, the partition occupies the whole disk. The spin box labeled New Size (MiB)shows the number of megabytes occupied by the partition—in this case the wholedisk. The two spin boxes labeled Free Space show no free space.
Back up the partition before you begin resizing. You can specify how you want toresize the partition by (right-clicking and) dragging one of the triangles at the endsof the graphical representation of the partition or by entering the number of mega-bytes you want to shrink the Windows partition to in the spin box labeled NewSize. The value in one of the spin boxes labeled Free Space increases. ClickResize/Move to add the resize operation to the list of pending operations at the bot-tom of the window. Click Apply on the toolbar to resize the partition.
Although you can use the Partition Editor to create partitions to install Ubuntu on,it may be easier to create partitions using ubiquity while you are installing Ubuntu.The ubiquity partitioner allows you to specify mount points for the partitions; thePartition Editor does not.
ubiquity: Setting Up Partitions
While you are installing Ubuntu, ubiquity offers two ways to partition a disk: guidedand manual. Guided partitioning sets up two partitions, one for swap space(page 32) and one for / (root, where the entire Ubuntu filesystem gets mounted;page 33). The amount of space occupied by root depends on which guided optionyou select. Manual partitioning enables you to set up partitions of any type andsize, and to specify the mount point for each partition.
Advanced Guided Partitioning
“Prepare disk space” on page 50 explained how to use guided partitioning to parti-tion an empty disk. This section explains how guided partitioning works on a diskthat is already partitioned.
Installing Ubuntu on a partitioned disk gives you a few options:
• You can install Ubuntu on the entire hard disk; by doing so you delete any information that was on the hard disk.
• If the disk has enough free space, you can install Ubuntu in the free space, typically creating a dual-boot system.
• If one partition has enough unused space, you can resize (shrink) the parti-tion, creating free space in the process. You can then install Ubuntu in the

Graphical Partitioners 57
free space. It it easier to see what you are doing if you use the Partiton Editor to resize a partition before you begin installing Ubuntu. Also, the ubiquitypartitioner will not resize a partition on a hard disk with more than one par-tition. For more information refer to “Resizing a Partition” on page 55.
Figure 3-11 shows the Prepare disk space screen for a hard disk with one partitionand some free space. If the disk had no free space, the partitioner would not displayGuided - use the largest continuous free space. If the disk had two or more parti-tions, the partitioner would not give you the option of resizing a partition—youmust use the Partition Editor to resize a partition on a hard disk with more than onepartition.
Using the whole disk for Ubuntu is easy. Before you start, make certain the diskdoes not contain any information you need. Once you rewrite the partition table,the data is gone for good. If you are not sure what is on the disk, use the NautilusFile Browser to take a look. (See page 96; select Main menu: Places Computer anddouble-click one or more of the Filesystem objects.) To use guided partitioning topartition the whole disk, click the radio button labeled Guided - use entire disk andclick Forward.
To use the free space, select Guided - use the largest continuous free space and clickForward. If you want to use the ubiquity partitioner to resize a partition, click theradio button labeled Guided - resize ... and drag the slider until the numbers aboveit show the size you would like the new partition to be. Click Forward.
Manual Partitioning
This section explains how to use the ubiquity partitioner to create a partition on anempty hard disk. Figure 3-4 on page 50 shows the Prepare disk space screen for anempty hard disk. To create partitions manually, click the radio button labeled Man-ual and click Forward. The ubiquity partitioner displays a Prepare partitions screenthat shows a device without any partitions. Before you can create partitions, you
Figure 3-11 The Prepare disk space screen showing a hard disk with one partition and some free space

58 Chapter 3 Step-by-Step Installation
must set up a partition table (page 30): Highlight the device name (e.g., /dev/sda)and click New partition table. The partitioner asks you to confirm you want to cre-ate a new empty partition table. Click Continue to create a partition table that con-tains only free space. Now ubiquity displays a screen that looks similar to the one inFigure 3-12. The device (hard disk) at /dev/sda has a partition table without anypartitions—it contains only free space.
To create a partition, highlight the line with free space in the Device column andclick New partition. The ubiquity partitioner displays a Create Partition window(Figure 3-13), which asks you to specify whether you want to create a primary or alogical partition (page 31), what size you want to make the partition (in mega-bytes), whether you want the partition to appear at the beginning or end of the freespace, what type you want to make the partition (Use as), and the name of themount point (page 30) for the partition. Because Linux does not mount a swap par-tition, you cannot specify a mount point for a type swap partition. If you are unsureof which type a partition should be, choose ext3 (page 571). Click OK.
After a few moments the Prepare partitions screen displays the new partition(Figure 3-14). To create another partition, highlight free space and repeat the preced-ing steps. Remember to create a swap partition (page 32). When you have finishedcreating partitions, click Forward.
The Prepare partitions screen displays two or three buttons immediately below theframe that lists the disks and partitions. The labels on these buttons change depend-ing on what is highlighted. This screen always displays a button labeled Undo
Figure 3-12 An empty hard disk with a partition table
Figure 3-13 The Create Partition window

Upgrading to a New Release 59
changes to partitions. When the device is highlighted, the Prepare partitions screendisplays a New partition table button. Clicking this button creates a new partitiontable, destroying any existing partition table. Highlighting a partition gives you thechoice of editing or deleting the partition. Editing a partition you just created allowsyou to change only its type and mount point. You must delete and recreate a parti-tion to change any of its other attributes. As mentioned earlier, highlighting freespace allows you to create a new partition.
Upgrading to a New Release
Upgrading a system is the process of installing a new release of Ubuntu over anolder one. All user and configuration files are preserved and all software isupgraded to the most recent version consistent with the new release of Ubuntu.Ubuntu cautions that you must not skip releases when you upgrade; doing so cancause irreparable damage to the system, requiring a clean install and potentially los-ing data. For example, you can upgrade from Feisty Fawn (7.04) to Gutsy Gibbon(7.10), but not from Edgy Eft (6.10) to Gutsy Gibbon. Ubuntu also advises againstupgrading systems that have had packages installed from repositories (page 588)that it does not control. These packages may corrupt the software package data-base, causing the upgrade to fail.
Before you upgrade a system, it is a good idea to back up all user files on the system.The following procedure assumes that you have a desktop system that is connectedto the Internet. Even with a fast Internet connection, this process takes a long time.Follow these steps to upgrade a system:
1. Open the Update Manager window (Figure 4-10, page 101) by selecting Main menu: System Administration Update Manager.
2. Regardless of whether the window says You can install nn updates or not, click Check. This step ensures the software package database is up-to-date.
3. If the window displays You can install nn updates, click Install Updates.This step ensures all software packages on the system are up-to-date.
Figure 3-14 The Prepare partitions screen displays a new partition

60 Chapter 3 Step-by-Step Installation
4. At this point, if a new release is available, the window displays the message New distribution release 'X.XX' is available. Click Upgrade.
5. The utility displays the Release Notes window. Read the release notes and then click Upgrade.
6. The utility downloads the upgrade tool and updates some files.
7. You are asked if you want to start the upgrade. Click Start Upgrade.
8. When the upgrade is complete, reboot the system.
See www.ubuntu.com/getubuntu/upgrading for instructions on upgrading other edi-tions of Ubuntu.
Installing KDE
You can install KDE in one of two ways. The first approach installs KDE only: Followthe instructions in Chapter 2 and this chapter but instead of downloading and burn-ing an Ubuntu CD/DVD, download a Kubuntu CD/DVD from www.kubuntu.org,burn it, and use that disk to install Linux.
The second approach requires the system to be connected to the Internet andinstalls KDE in addition to GNOME. After you install Ubuntu as explained in thischapter, use Synaptic (page 121) or aptitude (page 592) to perform the followingsteps. This process takes a while; you will be downloading and installing more than200 software packages.
1. Ensure the software package database is up-to-date: From Synaptic, click Reload. To use aptitude, give the command sudo aptitude update from a command line, terminal emulator, or Run Application window (ALT-F2).
2. Ensure all software packages on the system are up-to-date: From Synaptic, click Mark All Upgrades and then click Apply. To use aptitude, give the command sudo aptitude safe-upgrade from a command line, terminal emulator, or Run Application window (ALT-F2).
3. Install the KDE software: From Synaptic, search for and install the kubuntu-desktop virtual package (page 592). To use aptitude, give the command sudo aptitude install kubuntu-desktop from a command line, terminal emulator, or Run Application window (ALT-F2).
After the software is downloaded, while it is being installed, debconf asks if youwant to use the gdm (page 82, GNOME) or kdm (KDE) display manager. Either oneworks with either desktop. One way to choose which display manager to use is toselect the one associated with the desktop you will be using most often.
Once KDE is installed, reboot the system. From the Login screen, follow theinstructions on page 132 to display the Action menu and select the session you wantto run (GNOME or KDE).

Setting Up a Dual-Boot System 61
Setting Up a Dual-Boot System
A dual-boot system is one that can boot one of two (or more) operating systems.This section describes how to add Ubuntu to a system that can boot Windows, cre-ating a system that can boot Windows or Linux. You can use the same technique foradding Ubuntu to a system that runs a different version or distribution of Linux.One issue in setting up a dual-boot system is finding disk space for the new Ubuntusystem. The next section discusses several ways to create the needed space.
Creating Free Space on a Windows System
Typically you install Ubuntu Linux in free space on a hard disk. To add Ubuntu Linuxto a Windows system, you must have enough free space on a hard disk that alreadyholds Windows. There are several ways to provide or create this free space. The fol-lowing paragraphs discuss these options in order from easiest to most difficult:
Add a new disk drive Add another disk drive to the system and install Linux on the new disk, which containsonly free space. This technique is very easy and clean but requires a new disk drive.
Use existing freespace
If there is sufficient free space on the Windows disk, you can install Linux there.This technique is the optimal choice, but there is rarely enough free space on aninstalled hard disk.
Resize Windowspartitions
Windows partitions typically occupy the entire disk, making resizing a Windowspartition the most common technique to free up space. Windows systems typicallyuse NTFS, FAT32, and/or FAT16 filesystems. You can use the Ubuntu Partition Edi-tor to examine and resize an existing Windows partition to open up free space inwhich to install Linux (page 55).
Remove a Windowspartition
If you can delete a big enough Windows partition, you can install Linux in its place.To delete a Windows partition, you must have multiple partitions under Windowsand be willing to lose the data in the partition you delete. In many cases, you canmove the data from the partition you will delete to another Windows partition.
Once you are sure a partition contains no useful information, you can use the Parti-tion Editor to delete it (page 55). After deleting the partition, you can installUbuntu Linux in the free space left by the partition you removed.
Installing Ubuntu Linux as the Second Operating System
After creating enough free space on a Windows system (see the previous section),you can install Ubuntu Linux. On the ubiquity Prepare disk space screen, select
Always defragment before resizing
caution You must boot Windows and defragment a Windows partition before you resize it. Sometimes youmay need to run the Windows defragmenter several times to consolidate most file fragments. Notonly will defragmenting give you more space for a Linux partition, but it may also keep the processof setting up a dual-boot system from failing.

62 Chapter 3 Step-by-Step Installation
Guided - use the largest continuous free space. Or, if you are installing Ubuntu onits own hard disk, select Guided - use entire disk and click the radio button next tothe disk you want to install Ubuntu on. Click Forward. When you boot from thehard disk, you will be able to choose which operating system you want to run.
Advanced Installation
This section discusses the live/install Desktop CD initial install screen, using theAlternate and Server CDs as well as the live/install DVD to install Ubuntu, and theUbuntu textual installer.
The Live/Install Desktop CD: The Initial Install Screen
This section covers some of the things you can do from the initial install screen(Figure 3-1, page 46) other than simply booting to a live session.
Menu Selections
Start or installUbuntu
Boots to a live session (page 47).
Start Ubuntu in safegraphics mode
If you encounter problems with the display while you are bringing up a live sessionor during installation, choose this menu selection. It adds xforcevesa to the bootparameters, causing Ubuntu to use the generic vesa driver in place of the driver forthe graphics chip in the system. The vesa driver is slow and does not support highresolutions, but it works with almost any graphics chip.
Install with driverupdate CD
Installs Ubuntu with an updated driver.
OEM install (formanufacturers)
Allows a manufacturer or reseller to preinstall Ubuntu but leave some configurationdetails, such as creating a user account, to the purchaser.
Check CD fordefects
Verifies the contents of the CD/DVD you are booting from (page 47).
Memory test Runs memtest86+, a GPL-licensed, stand-alone memory test utility for x86-basedcomputers. Press C to configure the test; press ESCAPE to exit and reboot. Seewww.memtest.org for more information.
Boot from first harddisk
Boots the system from the first hard disk. This selection frequently has the sameeffect as booting the system without the CD/DVD (depending on how the BIOS[page 26] is set up).
The Function Keys
Along the bottom of the initial install screen is a row of labeled function key names(Figure 3-1, page 46). Pressing these function keys displays information that may behelpful if you are having a problem booting Ubuntu or working in a live session.Some of the keys allow you to change boot parameters.

Advanced Installation 63
F1 Help The F1 key displays the help window shown in Figure 3-15. Pressing a function keywhile this window is displayed displays yet another help window. Pressing a func-tion key when this window is not displayed has the effect described in the followingparagraphs. Press ESCAPE to close the help window.
F2 Language The F2 key displays a menu of languages. Use the ARROW keys to highlight the lan-guage you want the live session to use and then press RETURN. This language is notnecessarily the language the installed system displays.
F3 Keymap The F3 key displays a menu of countries and languages. Use the ARROW keys to high-light the country/language of the keyboard you want the live session to use; pressRETURN. This keyboard is not necessarily the keyboard the installed system uses.
F4 VGA The ubiquity installer normally detects the characteristics of the monitor attached tothe system. The F4 key displays a list of monitor resolutions and color depths(page 1029). For example, 640 x 480 x 16 specifies a resolution of 640 x 480 dotsper inch (dpi) and a color depth of 16. Use the ARROW keys to highlight the resolutionand color depth you want the live session to use and then press RETURN. This selectionis not necessarily the resolution and color depth the installed system uses.
F5 Accessibility The F5 key displays a list of features, such as a high-contrast display and a Brailleterminal, that can make Ubuntu more accessible for some people. Use the ARROW keysto highlight the feature you want the live session to use and then press RETURN.
F6 Other Options The F6 key displays the boot command line (Figure 3-16 on the next page). Type theparameters you want to add to the boot command line (discussed in the next section)after the double hyphen and press RETURN to boot the system. If you remove quiet andsplash from this line, Ubuntu displays what it is doing while it boots (page 48).
Boot Command Line Parameters (Boot Options)
Following are some of the parameters you can add to the boot command line (see“F6 Other Options” above). You can specify multiple parameters separated by SPACEs.
Figure 3-15 Initial install screen, F1 help window

64 Chapter 3 Step-by-Step Installation
See help.ubuntu.com/community/BootOptions and The Linux BootPrompt-HowTofor more information.
noacpi Disables ACPI (Advanced Configuration and Power Interface). Useful for systemsthat do not support ACPI or that have problems with their ACPI implementation.Also acpi=off. The default is to enable ACPI.
noapic Disables APIC (Advanced Programmable Interrupt Controller). The default is toenable APIC.
noapm Disables APM (Advanced Power Management). Also apm=off. The default is toenable APM.
irqpoll Changes the way the kernel handles interrupts.
nolapic Disables local APIC (above). The default is to enable local APIC.
Virtual Consoles
While it is running, ubiquity opens a shell on each of the six virtual consoles (alsocalled virtual terminals; page 136). You can display a virtual console by pressingCONTROL-ALT-Fx, where x is the virtual console number and Fx is the function key thatcorresponds to the virtual console number.
At any time during the installation, you can switch to a virtual console and give shellcommands to display information about processes and files. Do not give commands
Figure 3-16 Initial install screen, F6 boot command line
Boot command line

Advanced Installation 65
that change any part of the installation process. To switch back to the graphicalinstallation screen, press CONTROL-ALT-F7. To switch back to the textual (pseudographi-cal) installation screen, press CONTROL-ALT-F1.
The Alternate CD Initial Install Screen Menu
The Alternate CD uses the textual installer (page 67) to install a system that uses agraphical interface or one that uses a textual interface. It is not a live CD (does notbring up a desktop to install from), does not require as much RAM to installUbuntu, and presents more installation options. The Alternate CD initial installscreen takes advantage of the functions keys described on page 62 and accepts theboot parameters described on page 63. This screen has the following selections thatare not present on the live/install Desktop CD initial install screen (page 62):
Install in text mode Installs a graphical Ubuntu system using the textual installer. For more informationrefer to “The Ubuntu Textual Installer” on page 67.
Install a command-line system
Installs a textual Ubuntu system (no graphical interface, no desktop, only a com-mand line interface) using the textual installer. For more information refer to “TheUbuntu Textual Installer” on page 67.
Rescue a brokensystem
Brings up Ubuntu but does not install it. After detecting the system’s disks and parti-tions, the system enters recovery mode and allows you to select the device you wantto mount as the root filesystem. Once you select a device, recovery mode displays alist of rescue operations (Figure 3-17):
• Execute a shell in /dev/xxx Mounts the device you selected (/dev/xxx) as / (root) and spawns a root shell (e.g., dash or bash; Chapter 7) if a shell is available on the mounted device. You are working with root privileges (page 88) and can make changes to the filesystem on the device you selected. You have access only to the shell and utilities on the mounted file-system. You may be able to mount other filesystems. If the mounted file-system does not include a shell, you must use the next selection. Give an exit command to return to the list of rescue operations.
• Execute a shell in the installer environment Mounts the device you selected as /target and spawns a root dash shell (Chapter 7). You are
Figure 3-17 The list of rescue operations
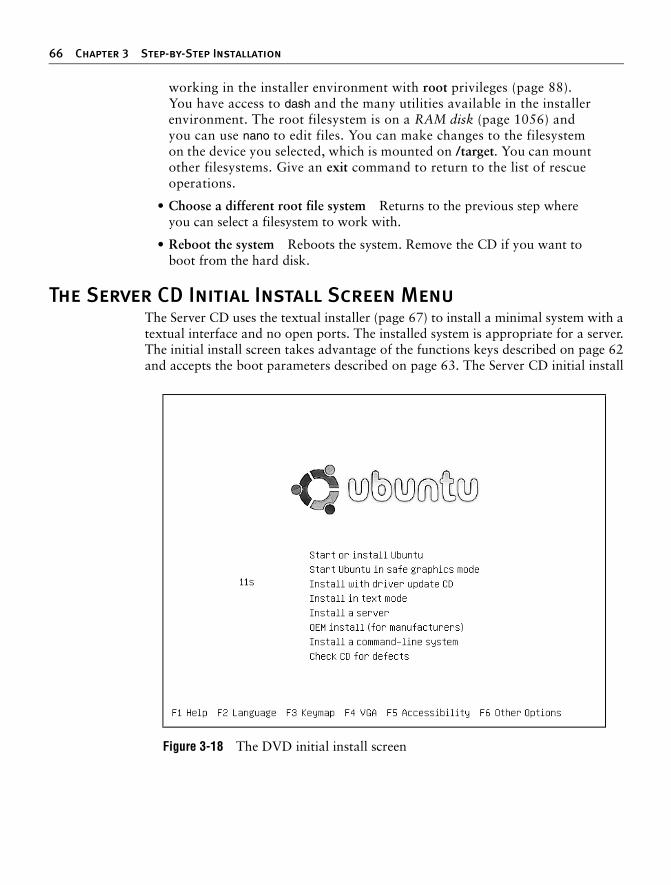
66 Chapter 3 Step-by-Step Installation
working in the installer environment with root privileges (page 88). You have access to dash and the many utilities available in the installer environment. The root filesystem is on a RAM disk (page 1056) and you can use nano to edit files. You can make changes to the filesystem on the device you selected, which is mounted on /target. You can mount other filesystems. Give an exit command to return to the list of rescue operations.
• Choose a different root file system Returns to the previous step where you can select a filesystem to work with.
• Reboot the system Reboots the system. Remove the CD if you want to boot from the hard disk.
The Server CD Initial Install Screen Menu
The Server CD uses the textual installer (page 67) to install a minimal system with atextual interface and no open ports. The installed system is appropriate for a server.The initial install screen takes advantage of the functions keys described on page 62and accepts the boot parameters described on page 63. The Server CD initial install
Figure 3-18 The DVD initial install screen

Advanced Installation 67
screen has the following selections that are not present on the live/install DesktopCD initial install screen (page 62):
Install to the harddisk
Installs a textual Ubuntu server system using the textual installer. For more informa-tion refer to “The Ubuntu Textual Installer” on page 67. At the end of the normalinstallation, the installer displays the Software selection screen, which asks if youwant to install a DNS server (Chapter 25) and/or a LAMP server. LAMP stands forLinux (which you are installing), Apache (Chapter 27), MySQL, and PHP. Use theARROW keys to move the highlight to the space between the brackets ([ ]) and press theSPACE BAR to select either or both of the choices.
Rescue a brokensystem
Brings Ubuntu up in recovery mode (page 65).
The DVD
The Ubuntu DVD does everything each of the CDs does and includes all softwarepackages supported by Ubuntu, not just those installed by default. If the system youare installing is not connected to the Internet, you can install software packagesfrom the DVD but you will have no way to update the system. The initial installscreen takes advantage of the functions keys described on page 62 and accepts theboot parameters described on page 63. Figure 3-18 shows the DVD initial installscreen. See the descriptions of the CD initial install screens on pages 62, 65, and 66for information on the selections on this screen.
The Ubuntu Textual Installer
The Ubuntu textual installer gives you more control over the installation processthan the Ubuntu graphical installer does (page 48). The textual installer displays apseudographical interface and uses fewer system resources, including less RAM thanthe graphical installer does. You can install either a graphical (desktop) or textual(command line) system using the textual installer, depending on which CD/DVD youuse and which selection you make from the initial install screen: Install in text modeinstalls a graphical system; Install a server and Install a command-line system installtextual systems.
Many of the screens that the textual installer displays parallel the screens displayedby the graphical installer. Within the textual installer’s screens, TAB moves betweenitems, ARROW keys move between selections on a list, and RETURN activates the high-lighted selection and causes the installer to display the next screen. A few screensinclude brackets ([ ]) that function similarly to check boxes; they use an asterisk inplace of a tick. Use the ARROW keys to move the highlight to the space between thebrackets and press the SPACE BAR to place an asterisk between the brackets and selectthe adjacent choice. Press the SPACE bar again to remove the asterisk.

68 Chapter 3 Step-by-Step Installation
The Ubuntu installer main menu (the contents of this menu varies—Figure 3-19shows an example) allows you to go directly to any step of the installation processor enter recovery mode (see “Rescue a broken system” on page 65). At the lowerleft of most textual installer screens is <Go Back>. See Figure 3-20 for an example.Use the TAB key to highlight this item and press RETURN to display the Ubuntu installermain menu. You may have to back up through several screens to display this menu.
The first screen the textual installer displays is Choose a language (Figure 3-20). Usethe UP and DOWN arrow keys to select the language you want the installer to use. Youcan type the first letter of the language to move the highlight to the vicinity of thelanguage you want to choose. This language will be the default language for theinstalled system; you can change the default once the system is installed (page 132).Press RETURN to select the highlighted language and display the next screen.
The installer steps through a series of screens, each of which has an explanation andasks a question. Use the ARROW keys and/or TAB key to highlight an answer or selectionand press RETURN on each of the screens. After a few screens, the installer detects andinstalls programs from the CD/DVD, detects the network hardware, and configuresit with DHCP (if available).
As it is configuring the network, the installer asks you for the hostname of the systemyou are installing. For use on a local network and to connect to the Internet with a Webbrowser or other client, you can make up a simple name. If you are setting up a server,see “FQDN” on page 847 for information on names that are valid on the Internet.
Figure 3-19 The Ubuntu installer main menu

Advanced Installation 69
After this step, the installer continues detecting hardware, starts the partitioner, anddisplays the Partitioning method screen (Figure 3-21). Many of the selections avail-able from the textual partitioner parallel those available from the graphical parti-tioner. This section describes how to use the textual partitioner to partition a harddisk manually. See page 56 for a description of guided partitioning.
Figure 3-20 The Choose a language screen
Figure 3-21 The Partitioning method screen

70 Chapter 3 Step-by-Step Installation
Manual Partitioning
When you select Manual from the Partitioning method screen (Figure 3-21), the textualpartitioner displays the Partition overview screen, which lists the hard disks in the sys-tem and partitions on those disks. If a hard disk has no partitions, the partitioner dis-plays only information about the hard disk. Figure 3-22 shows a single 200+-megabytehard disk (highlighted) that has no partition table (and no partitions).
If you want to set up RAID, see page 73 before continuing.
Creating a partitiontable
If the Partition overview screen shows no partitions and no free space on a hard disk, asit does in Figure 3-22, the hard disk does not have a partition table: You need to createone. If this screen shows at least one partition or some free space, the disk has a parti-tion table and you can skip this step and continue with “Creating a partition” below.
To create a partition table, highlight the disk you want to create a partition table onand press RETURN. The installer asks if you want to create a new partition table on thedevice and warns that doing so will destroy all data on the disk. Highlight Yes andpress RETURN. The installer displays the Partition disks screen showing the disk with asingle block of free space as large as the disk (Figure 3-23).
Creating a partition To create a partition, highlight the line with FREE SPACE on it and press RETURN. Thepartitioner asks how you want to use the free space; highlight Create a new partitionand press RETURN. Next the partitioner asks you to specify the size of the new parti-tion. You can enter either a percentage (e.g., 50%) or a number of gigabytes fol-lowed by GB (e.g., 30 GB). Press RETURN. The partitioner then asks you to specify thetype of the new partition (primary or logical; page 31) and asks whether you want tocreate the partition at the beginning or the end of the free space. It does not usuallymatter where you create the partition. After answering each of these questions, pressRETURN. The partitioner then displays the Partition settings screen (Figure 3-24).
To change a setting on the Partition settings screen, use the ARROW keys to move thehighlight to the setting you want to change and press RETURN. The partitioner displaysa screen that allows you to change the setting.
Figure 3-22 The Partition overview screen I

Advanced Installation 71
Specifying apartition type
(Use as)
The first line, labeled Use as, allows you to specify the type of filesystem theinstaller creates on the partition. This setting defaults to ext3, which is a goodchoice for most normal filesystems. If you want to change the filesystem type, movethe highlight to this line and press RETURN; the installer displays the How to use thispartition screen (Figure 3-25 on the next page). You can select swap area (page 32),RAID (next), LVM (page 35), or another type of filesystem. Table 13-1 on page 570lists some common types of filesystems. Move the highlight to the selection youwant and press RETURN. The partitioner returns to the Partition settings screen, whichnow reflects the selection you made. For a swap area, there is nothing else to set up;skip to “Done setting up the partition” on the next page.
Specifying a mountpoint
The mount point defaults to / (root). To change the mount point for the filesystem,highlight the line labeled Mount point and press RETURN. The partitioner displays a
Figure 3-23 The Partition overview screen II
Figure 3-24 The Partitions settings screen

72 Chapter 3 Step-by-Step Installation
screen that allows you to specify a mount point (Figure 3-26). Select a mount point;if the mount point you want to use is not listed, select Enter manually. Press RETURN.
The bootable flag Typically the only other setting you need to change is the bootable flag. Turn this flagon for the /boot partition if the system has one; otherwise, turn it on for the / (root)partition. To change the state of the bootable flag, highlight the line labeled Bootableflag on the Partition settings screen and press RETURN. After a moment, the partitionerredisplays the screen showing the changed state of this flag.
Done setting upthe partition
Once the partition settings are satisfactory, highlight Done setting up the partition andpress RETURN. The partitioner displays the Partition overview screen showing the newpartition setup. To create another partition, repeat the steps starting with “Creating apartition” on page 70. To modify a partition, highlight the partition and press RETURN.
Write the partitionsto disk
When you are satisfied with the design of the partition table(s), highlight Finish par-titioning and write changes to disk and press RETURN. After giving you another chanceto back out, the partitioner writes the partitions to the hard disk.
Figure 3-25 How to use this partition screen
Figure 3-26 Mount point screen

Advanced Installation 73
Time zone, useraccount, and video
modes
The installer continues by asking which time zone the computer is in and if the sys-tem clock is set to UTC (page 1067). It then asks you to set up a user account andcontinues installing the system. Finally the installer asks you to select which videomodes the X server will use. If you leave all entries unmarked, the X server uses thehighest resolution the monitor is capable of displaying.
The installer continues to install software and then finishes the installation. Whenthe installer displays the Installation Complete window, remove the CD/DVD andclick Restart now to reboot the system.
Setting Up a RAID Array
To set up a RAID array (page 34), first create two or more partitions of the samesize. Usually, these partitions will be on different hard disks. You create RAID parti-tions as explained in the preceding section, except instead of making the partitionstype ext3 or swap, you declare each to be a RAID volume. (RAID partitions arereferred to as volumes.) Once you have two or more RAID volumes, the partitionerallows you to combine these volumes into a RAID array that looks and acts like asingle partition.
The following example uses 100 gigabytes from each of two new hard disks to setup a 100-gigabyte RAID 1 array that is mounted on /home. Follow the instructionson page 70 to create a new partition table on each hard disk. Then create two 100-gigabyte partitions, one on each disk. When the partitioner displays the How to usethis partition screen (Figure 3-25, page 72), follow the instructions on page 71 andspecify a partition type of physical volume for RAID.
Figure 3-27 shows the partitioner screen after setting up the RAID volumes. Onceyou have at least two RAID volumes, the partitioner adds the Configure softwareRAID selection as the top line of its menu (highlighted in Figure 3-27).
Figure 3-27 The partitioner ready to set up RAID

74 Chapter 3 Step-by-Step Installation
Highlight Configure software RAID, press RETURN, and confirm you want to writechanges to the hard disk. From the next screen, select Create MD device (MD standsfor multidisk) and press RETURN. Then select RAID 0, 1, or 5 and press RETURN. The dif-ferent types of RAID arrays are described on page 35. The partitioner then asks youto specify the number of active devices (2) and the number of spares (0) in the RAIDarray. The values the partitioner enters in these fields are based on your previousinput and are usually correct. Next select the active devices for the RAID array (usethe SPACE BAR to put an asterisk before each device; Figure 3-28) and press RETURN.
Select Finish from the next screen (the one that asks if you want to create an MDdevice again) and press RETURN. Now you need to tell the installer where to mount theRAID array. Highlight the RAID array. In the example, this line contains #1 100.0GB FREE SPACE (this line is highlighted in Figure 3-29, but shown after the parti-tion is created). Press RETURN. (If the RAID array line does not include the wordsFREE SPACE and does not show a partition, highlight the RAID array line, pressRETURN, highlight Delete the Partition, and press RETURN. The RAID array line shouldnow include FREE SPACE.) Set up this partition as you would any other by follow-ing the instructions under “Creating a partition” on page 70. In the example, thefull 100 gigabytes is used for an ext3 filesystem mounted on /home.
To complete this example, create a bootable / (root) partition using the rest of thefree space on the first drive and a 4-gigabyte swap partition on the second drive.Figure 3-29 shows the Partition overview screen that includes these changes. High-light Finish partitioning and write changes to disk and press RETURN.
The X Window System
If you are installing a graphical desktop environment such as GNOME, you installedthe X.org (x.org and freedesktop.org) implementation of the X Window Systemwhen you installed Ubuntu. The X Window System release X11R7.2 comprisesalmost 50 software packages. The X configuration files are kept in /etc/X11; theconfiguration file that guides the initial setup is /etc/X11/xorg.conf. You can edit
Figure 3-28 Specifying the active devices in the RAID array

The X Window System 75
xorg.conf graphically using the Screen and Graphics Preferences window (discussednext) or you can edit it manually using a text editor (page 77).
displayconfig-gtk: Configures the Display
Once the (graphical) system is installed, the Screen and Graphics Preferences win-dow (Figure 3-30 on the next page) enables you to configure X.org, including spec-ifying a monitor type and video (graphics) card. To display this window, select Mainmenu: System Administration Screens and Graphics or give the commandgksudo displayconfig-gtk from a terminal emulator or Run Application window(ALT-F2). This utility modifies the xorg.conf file.
Specifying monitors The Screen tab of the Screen and Graphics Preferences window allows you to spec-ify the model, resolution, and frequency of one or two monitors. If you specify twomonitors, it enables you to specify one as the primary monitor and to describe thespacial relationship of the two monitors. Click Screen 1 on the left of the window tospecify the characteristics of one monitor; click Screen 2 to specify the other. If thereis only one monitor, click the radio button labeled Disabled for one of the monitors.
Figure 3-29 The finished partition tables
Back up xorg.conftip Before you make any changes to /etc/X11/xorg.conf, whether graphically or manually, make a
backup copy of this file. If you run into problems with the graphical interface, you can bring thesystem up in recovery mode (page 512), copy the backup over the new xorg.conf, and reboot thesystem.

76 Chapter 3 Step-by-Step Installation
Normally the system probes the monitors and fills in the values in this window. Ifthese values are missing, click the box labeled Model. The displayconfig-gtk utility dis-plays the Choose window. Specify the manufacturer and model of the monitor in thiswindow. If an appropriate model is not listed, scroll to the top of the Manufacturerlist and click Generic. From the Model list, select an LCD or conventional monitorwith the maximum resolution of the monitor attached to the system. Click OK. Youcan specify a lower default resolution and the frequency of the monitor from the twospin boxes labeled Resolution and at. No harm is done if you specify a lower resolu-tion than the monitor is capable of displaying, but you can damage an older monitorby specifying a resolution higher than the monitor is capable of displaying.
When you are done, click Test at the bottom of the window to check whether thenew settings work. The displayconfig-gtk utility displays the desktop using the newsettings with a dialog box asking Do you want to keep the current configuration?Click Cancel or wait 15 seconds to keep the old configuration; click Keep configurationto keep the new configuration.
Specifying agraphics card
Next click the Graphics Card tab (Figure 3-31). The system normally probes for themodel of video card and enters an appropriate selection in the box labeled Driver. Youcan manually select a graphics card by clicking the box labeled Driver; displayconfig-gtk opens Choose Graphics Card Driver window (also in Figure 3-31). Near the top ofthis window are two radio buttons that enable you to select a driver by specifying themanufacturer and model of the graphics card in the system or by specifying the nameof the driver you want to use. Click OK. The displayconfig-gtk utility generates anxorg.conf file with the information from the window.
Figure 3-30 The Screen and Graphics Preferences window, Screen tab

The X Window System 77
The xorg.conf File
If you choose to edit /etc/X11/xorg.conf manually, read the notes at the top of thefile. You may also want to refer to the xorg.conf man page. The xorg.conf file com-prises sections that can appear in any order. Each section is formatted as follows:
Section "name"entry
...EndSection
where name is the name of the section. A typical entry occupies multiple physicallines but is one logical line, consisting of multiple sets of a keyword followed by zeroor more integer, real, or string arguments. Keywords in these files are not case sensi-tive; underscores (_) within keywords are ignored. Most strings are not case sensitive,and SPACEs and underscores in most strings are ignored. All strings must appear withindouble quotation marks.
The Option keyword provides free-form data to server components and is followedby the name of the option and optionally a value. All Option values must beenclosed within double quotation marks.
Boolean Options take a value of TRUE (1, on, true, yes) or FALSE (0, off, false,no); no value is the same as TRUE. You can prepend No to the name of a BooleanOption to reverse the sense of the Option.
Figure 3-31 The Screen and Graphics Preferences window, Graphics Card tab

78 Chapter 3 Step-by-Step Installation
The following sections can appear in an xorg.conf file:
ServerFlags Global Options (optional)ServerLayout Binds Screen(s) and InputDevice(s)Files Locations of configuration filesModule Modules to be loaded (optional)InputDevice Keyboard(s) and pointer(s)Monitor Monitor(s)Device Video card(s)Screen Binds device(s) and monitor(s)VideoAdaptor Configures the Xv extension (optional)Modes Video modes (optional)DRI Direct Rendering Infrastructure (optional)Vendor Vendor-specific information (optional)
This chapter covers the sections you most likely need to work with: ServerLayout,InputDevice, Monitor, Device, and Screen.
ServerLayout Section
The ServerLayout section appears first in some xorg.conf files because it summa-rizes the other sections that specify the server. The following ServerLayout sectionnames the server single head configuration and specifies that the server comprisesthe sections named Screen0, Mouse0, Keyboard0, and DevInputMice.
The term core in this file means primary; there must be exactly one CoreKeyboardand one CorePointer. The AlwaysCore argument indicates the device reports coreevents and is used here to allow a non-USB mouse and a USB mouse to work at thesame time. As a result, you can use either type of mouse interchangeably withoutmodifying the xorg.conf file:
Section "ServerLayout" Identifier "single head configuration" Screen 0 "Screen0" 0 0 InputDevice "Mouse0" "CorePointer" InputDevice "Keyboard0" "CoreKeyboard" InputDevice "DevInputMice" "AlwaysCore"EndSection
Refer to the following sections for explanations of the sections specified in ServerLayout.
InputDevice Section
There must be at least two InputDevice sections: one specifying the keyboard and onespecifying the pointer (usually a mouse). An InputDevice section has the following format:
Section "InputDevice" Identifier "id_name" Driver "drv_name" options ...EndSection

The X Window System 79
where id_name is a unique name for the device and drv_name is the driver to usefor the device. The displayconfig-gtk utility typically creates several InputDevicesections.
The following section defines a keyboard device named Keyboard0 that uses thekbd driver. The keyboard model is a 105-key PC keyboard. You can change pc105to microsoft if you are using a U.S. Microsoft Natural keyboard, although the dif-ferences are minimal.
Section "InputDevice" Identifier "Keyboard0" Driver "kbd" Option "XkbModel" "pc105" Option "XkbLayout" "us"EndSection
To change the language supported by the keyboard, change the argument to theXkbLayout Option to, for example, fr for French.
The next InputDevice section defines a mouse named Mouse0 that uses the mousedriver. The Device Option specifies a PS2 device. The ZAxisMapping Option mapsthe Z axis, the mouse wheel, to virtual mouse buttons 4 and 5, which are used toscroll a window. For more information refer to “Remapping Mouse Buttons” onpage 258. When set to YES, the Emulate3Buttons Option enables the user of atwo-button mouse to emulate a three-button mouse by pressing the two buttonssimultaneously.
Section "InputDevice" Identifier "Mouse0" Driver "mouse" Option "Protocol" "IMPS/2" Option "Device" "/dev/psaux" Option "ZAxisMapping" "4 5" Option "Emulate3Buttons" "no"EndSection
The next InputDevice section is similar to the previous one except that the DeviceOption specifies a USB mouse. See “ServerLayout Section” on page 78 for a discus-sion of this option.
Section "InputDevice"# If the normal CorePointer mouse is not a USB mouse then# this input device can be used in AlwaysCore mode to let you# also use USB mice at the same time. Identifier "DevInputMice" Driver "mouse" Option "Protocol" "IMPS/2" Option "Device" "/dev/input/mice" Option "ZAxisMapping" "4 5" Option "Emulate3Buttons" "no"EndSection
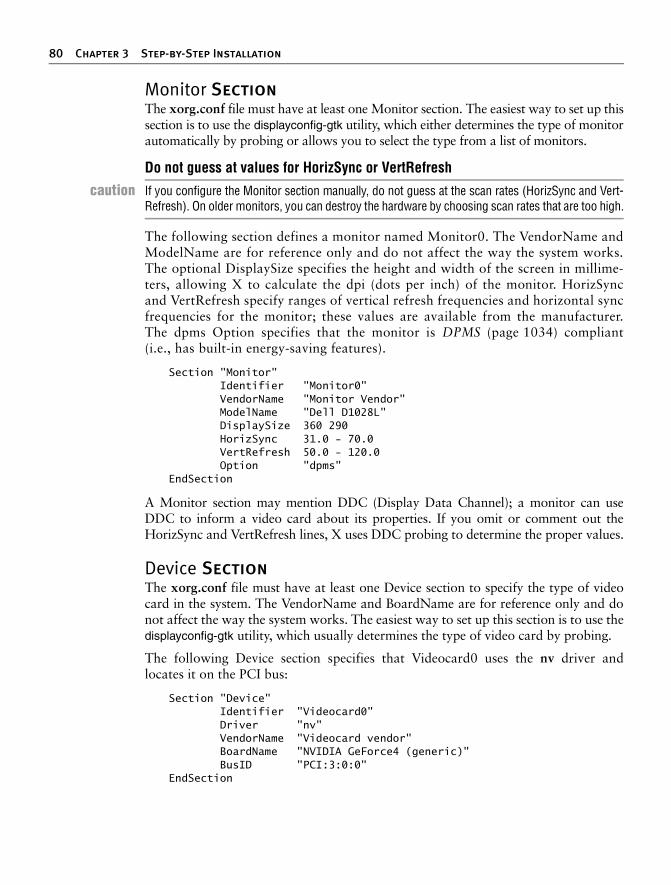
80 Chapter 3 Step-by-Step Installation
Monitor Section
The xorg.conf file must have at least one Monitor section. The easiest way to set up thissection is to use the displayconfig-gtk utility, which either determines the type of monitorautomatically by probing or allows you to select the type from a list of monitors.
The following section defines a monitor named Monitor0. The VendorName andModelName are for reference only and do not affect the way the system works.The optional DisplaySize specifies the height and width of the screen in millime-ters, allowing X to calculate the dpi (dots per inch) of the monitor. HorizSyncand VertRefresh specify ranges of vertical refresh frequencies and horizontal syncfrequencies for the monitor; these values are available from the manufacturer.The dpms Option specifies that the monitor is DPMS (page 1034) compliant(i.e., has built-in energy-saving features).
Section "Monitor" Identifier "Monitor0" VendorName "Monitor Vendor" ModelName "Dell D1028L" DisplaySize 360 290 HorizSync 31.0 - 70.0 VertRefresh 50.0 - 120.0 Option "dpms"EndSection
A Monitor section may mention DDC (Display Data Channel); a monitor can useDDC to inform a video card about its properties. If you omit or comment out theHorizSync and VertRefresh lines, X uses DDC probing to determine the proper values.
Device Section
The xorg.conf file must have at least one Device section to specify the type of videocard in the system. The VendorName and BoardName are for reference only and donot affect the way the system works. The easiest way to set up this section is to use thedisplayconfig-gtk utility, which usually determines the type of video card by probing.
The following Device section specifies that Videocard0 uses the nv driver andlocates it on the PCI bus:
Section "Device" Identifier "Videocard0" Driver "nv" VendorName "Videocard vendor" BoardName "NVIDIA GeForce4 (generic)" BusID "PCI:3:0:0"EndSection
Do not guess at values for HorizSync or VertRefresh
caution If you configure the Monitor section manually, do not guess at the scan rates (HorizSync and Vert-Refresh). On older monitors, you can destroy the hardware by choosing scan rates that are too high.

The X Window System 81
Screen Section
The xorg.conf file must contain at least one Screen section. This section binds avideo card specified in the Device section to a display specified in the Monitorsection.
The following Screen section specifies that Screen0 comprises Videocard0 andMonitor0, both of which are defined elsewhere in the file. The DefaultDepth entryspecifies the default color depth (page 1029), which the Display subsection canoverride.
Each Screen section must have at least one Display subsection. The subsection in thefollowing example specifies a color Depth and three Modes. The Modes specify thescreen resolutions in units of dots per inch (dpi). The first Mode is the default; youcan switch between Modes while X is running by pressing CONTROL-ALT-KEYPAD+ orCONTROL-ALT-KEYPAD–. You must use the plus or minus on the numeric keypad when giv-ing these commands. X ignores invalid Modes.
Section "Screen" Identifier "Screen0" Device "Videocard0" Monitor "Monitor0" DefaultDepth 24 SubSection "Display" Depth 24 Modes "1024x768" "800x600" "640x480" EndSubSectionEndSection
If you omit or comment out the Depth and Modes lines, X uses DDC probing todetermine the optimal values.
Multiple Monitors
X has supported multiple screens for a long time. X.org supports multimonitor con-figurations using either two graphics cards or a dual-head card. Both setups are usu-ally configured the same way because the drivers for dual-head cards provide asecondary virtual device.
Traditionally each screen in X was treated as a single entity. That is, each windowhad to be on one screen or another. More recently the Xinerama extension hasallowed windows to be split across two or more monitors. This extension is sup-ported by X.org and works with most video drivers. When using Xinerama, youmust set all screens to the same color depth.
For each screen, you must define a Device, Monitor, and Screen section in thexorg.conf file. These sections are exactly the same as for a single-screen configura-tion; each screen must have a unique identifier. If you are using a dual-head card,the Device section for the second head is likely to require a BusID value to enablethe driver to determine that you are not referring to the primary display.

82 Chapter 3 Step-by-Step Installation
The following section identifies the two heads on an ATI Radeon 8500 card. Forother dual-head cards, consult the documentation provided with the driver (forexample, give the command man mga to display information on the mga driver).
Section "Device" Identifier "Videocard0" Driver "radeon" VendorName "ATI" BoardName "Radeon 8500"EndSectionSection "Device" Identifier "Videocard1" Driver "radeon" VendorName "ATI" BoardName "Radeon 8500" BusID "PCI:1:5:0"EndSection
Once you have defined the screens, use the ServerLayout section to tell X where thescreens are in relation to each other. Each screen is defined in the following form:
Screen [ScreenNumber] "Identifier" Position
The ScreenNumber is optional. If omitted, X numbers screens in the order they arespecified, starting with 0. The Identifier is the same Identifier used in the Screen sec-tions. The Position can be either absolute or relative. The easiest way to definescreen positions is to give one screen an absolute position, usually with the coordi-nates of the origin, and then use the LeftOf, RightOf, Above, and Below keywordsto indicate the positions of the other screens:
Section "ServerLayout" Identifier "Multihead layout" Screen 0 "Screen0" LeftOf "Screen1" Screen 1 "Screen1" 0 0 InputDevice "Mouse0" "CorePointer" InputDevice "Keyboard0" "CoreKeyboard" InputDevice "DevInputMice" "AlwaysCore" Option "Xinerama" "on" Option "Clone" "off"EndSection
By default, Xinerama causes multiple screens to act as if they were a single screen.Clone causes each of the screens to display the same image.
gdm: Displays a Graphical Login
Traditionally users logged in on a textual terminal and then started the X server. UbuntuLinux uses the GNOME display manager (gdm) to provide a graphical login. The LoginWindow Preferences window enables you to configure the login presented by gdm. Todisplay this window, select Main menu: System Administration Login Window orgive the command gksudo gdmsetup from a terminal emulator or Run Application

Exercises 83
window (ALT-F2). The gdmsetup utility edits /etc/gdm/gdm.conf-custom, which aug-ments the heavily commented /etc/gdm/gdm.conf file.
You can make many changes to the system from the Login Window Preferenceswindow. For example, you can alter the appearance and functionality of the loginscreen, control whether remote logins are allowed (they are not by default), set upan automatic login, and control TCP connections to the X server (they are deniedby default; page 255).
Chapter Summary
Most installations of Ubuntu Linux begin by booting from the live/install DesktopCD/DVD and running a live session that displays a GNOME desktop. To start theinstallation, double-click the object on the desktop labeled Install.
Ubuntu provides a graphical installer (ubiquity) on the live/install Desktop CD/DVD;it offers a textual installer on the Alternate and Server CDs and the DVD. Bothinstallers identify the hardware, build the filesystems, and install the Ubuntu Linuxoperating system. The ubiquity installer does not write to the hard disk until it dis-plays the Ready to install screen or warns you it is about to write to the disk. Untilthat point, you can back out of the installation without making any changes to thehard disk.
A dual-boot system can boot one of two operating systems—frequently either Win-dows or Linux. You can use the GNOME Partition Editor from a live session toexamine the contents of a hard disk and to resize partitions to make room forUbuntu when setting up a dual-boot system. During installation from a live session,you can use the ubiquity partitioner to add, delete, and modify partitions.
Ubuntu uses the X.org X Window System version X11R7.2. The /etc/X11/xorg.conffile configures the X server, setting up the monitor, mouse, and graphics card. Thedisplayconfig-gtk utility is a graphical editor for this file.
The GNOME display manager (gdm) provides a graphical login. The gdmsetup util-ity configures the login presented by gdm by editing /etc/gdm/gdm.conf-custom,which augments the heavily commented /etc/gdm/gdm.conf file.
Exercises
1. How do you start a live session? List two problems you could encounter and explain what you would do to fix them.
2. What should you do before the first time you start a live session or install Ubuntu with a new CD/DVD? How would you do it?

84 Chapter 3 Step-by-Step Installation
3. What is guided partitioning?
4. Without asking any questions, guided partitioning divides the portion of the disk allotted to Ubuntu into two partitions. One partition is the swap partition, which can be any size from 512 megabytes to 2 or more gigabytes. The other partition is designated as / (root) and contains the remainder of the disk space.What is ubiquity?
5. Describe the ubiquity partitioner. How does it differ from the partitioner on the Alternate and Server CDs?
6. When is it beneficial to use an ext2 filesystem instead of an ext3 filesystem?
Advanced Exercises
7. What is a virtual console? During installation, what can you use a virtual console for? If the system is displaying a virtual console, how do you dis-play the graphical installation screen?
8. What would you do to have the system display all the things it is doing as it boots from a live/install Desktop CD/DVD?
9. Assume you have configured four screens, screen0 through screen3. How would you specify in xorg.conf that the screen layout is a T shape with the first screen at the bottom and the other three screens in a row above it?

85
I
PART II
Getting Started with
Ubuntu Linux
CHAPTER 4
Introduction to Ubuntu Linux 87
CHAPTER 5
The Linux Utilities 145
CHAPTER 6
The Linux Filesystem 183
CHAPTER 7
The Shell 219

This page intentionally left blank

8787
4Chapter4One way or another you are sitting in front of a computer thatis running Ubuntu Linux. After describing root privileges, thischapter takes you on a tour of the system to give you someideas about what you can do with it. The tour does not go intodepth about choices, options, menus, and so on; that is left foryou to experiment with and to explore in greater detail inChapter 8 and throughout later chapters. Instead, this chapterpresents a cook’s tour of the Linux kitchen: As you read it, youwill have a chance to sample the dishes that you will enjoymore fully as you read the rest of this book.
Following the tour are sections that describe where to find Linuxdocumentation (page 124) and offer more about logging in onthe system, including information about passwords (page 132).The chapter concludes with a more advanced, optional sectionabout working with Linux windows (page 139).
Be sure to read the warning about the dangers of misusing thepowers of root (sudo) in the next section. Heed that warning,but feel free to experiment with the system: Give commands,create files, click objects, choose items from menus, follow theexamples in this book, and have fun.
In This Chapter
Curbing Your Power: root Privileges/sudo . . . . . . . . . . . . . . 88
A Tour of the Ubuntu Linux Desktop . . . . . . . . . . . . . . . . . . . . 89
The Update Notifier. . . . . . . . . . . . 100
Updating, Installing, andRemoving Software Packages . . 119
Where to Find Documentation . . . 124
More About Logging In . . . . . . . . . 132
What to Do If You Cannot Log In. . 133
Working from the Command Line. . . . . . . . . . . . . . 136
Controlling Windows: Advanced Operations . . . . . . . . . . . . . . . . . 139
4
Introduction to
Ubuntu Linux

88 Chapter 4 Introduction to Ubuntu Linux
Curbing Your Power: root Privileges/sudo
When you enter your password to run a program (not when you log in on thesystem), or when you use sudo from the command line, you are working withroot privileges and have extraordinary systemwide powers. A person workingwith root privileges is sometimes referred to as Superuser or administrator. Whenworking with root privileges, you can read from or write to any file on the sys-tem, execute programs that ordinary users cannot, and more. On a multiusersystem you may not be permitted to run certain programs, but someone—thesystem administrator—can and that person maintains the system. When you arerunning Linux on your own computer, the first user you set up, usually whenyou install Ubuntu, is able to use sudo and its graphical counterpart, gksudo, torun programs with root privileges.
There are two primary ways to gain root privileges. First, when you start a programthat requires root privileges, a dialog box pops up asking you to Enter your pass-word to perform administrative tasks. After you enter your password, the programruns with root privileges. Second, if you use the sudo utility (for textual applica-tions; page 490) or gksudo utility (for graphical applications; page 491) from thecommand line (such as from a terminal emulator; page 114) and provide your pass-word, the command you enter runs with root privileges. In both cases you ceaseworking with root privileges when the command finishes or when you exit from theprogram you started with root privileges. For more information refer to “RunningCommands with root Privileges” on page 487.
root terminology
tip Most Linux systems include an account for a user named root. This user has special privileges andis sometimes referred to as Superuser. On a classic Linux system a user can log in and work asroot by providing the root password.
As installed, Ubuntu has a root account but no password for the account: The root account islocked. The next section explains how you can use sudo and provide your password to run a com-mand with root privileges. This book uses the phrase “working with root privileges” to distinguishthis temporary escalation of privileges from the classic scenario wherein a user can work with rootprivileges for an entire session. See page 487 for more information on root privileges.
Who is allowed to run sudo?
security The first user you set up when you install Ubuntu can administer the system: This user canuse sudo to execute any command. When you add user accounts, you can specify whetherthey are allowed to administer the system. See page 658 and Figure 17-2 on page 659 formore information.
In this chapter and in Chapter 8, when this book says you have to enter your password, it assumesyou have permission to administer the system. If not, you must get an administrator to performthe task.
A Tour of the Ubuntu Linux Desktop 89
A Tour of the Ubuntu Linux Desktop
This section presents new words (for some readers) in a context that explains theterms well enough to get you started with the Ubuntu desktop. If you would likeexact definitions as you read this section, refer to “GNOME Desktop Terminology”on page 105 and to the Glossary. The Glossary also describes the data entry widgets(page 1068), such as the combo box (page 1029), drop-down list (page 1035), listbox (page 1045), and text box (page 1064).
GNOME GNOME (www.gnome.org), a product of the GNU project (page 4), is the user-friendly default desktop manager under Ubuntu Linux. KDE, the K Desktop Envi-ronment, is a powerful desktop manager and complete set of tools you can use inplace of GNOME. The version of Ubuntu that runs KDE is named Kubuntu. Seepage 60 for instructions on installing KDE.
This tour describes GNOME, a full-featured, mature desktop environment thatboasts a rich assortment of configurable tools. After discussing logging in, this sec-tion covers desktop features—including panels, objects, and workspaces—andexplains how to move easily from one workspace to another. It describes severalways to launch objects (run programs) from the desktop, how to set up the desktopto meet your needs and please your senses, and how to manipulate windows. As thetour continues, it explains how to work with files and folders using the NautilusFile Browser window, one of the most important GNOME tools. The tour con-cludes with a discussion of the Update Notifier, the object that allows you to keep asystem up-to-date with the click of a button; getting help; and logging out.
Logging In on the System
When you boot a standard Ubuntu Linux system, it displays a Login screen(Figure 4-1) on the system console. At the lower-left corner of the screen is a small
Do not experiment while you are working with root privileges
caution Feel free to experiment when you are not working with root privileges. When you are working withroot privileges, do only what you have to do and make sure you know exactly what you are doing.After you have completed the task at hand, revert to working as yourself. When working with rootprivileges, you can damage the system to such an extent that you will need to reinstall UbuntuLinux to get it working again.
If you bought your system with Ubuntu installed at the factory
security When a manufacturer installs Ubuntu, it cannot set up an account for you (it does not know yourname). Typically, these systems come with the root account unlocked. Ubuntu suggests you notunlock the root account. To set the system up the way Ubuntu suggests, use users-admin asexplained on page 658 to add a user who will be the system administrator. Make sure to put a tickin the check box labeled Administer the system in the User Privileges tab (page 658). Then relockthe root account (page 499).

90 Chapter 4 Introduction to Ubuntu Linux
object labeled Options. Click this object or press F10 to display the Actions menu.The selections on this menu allow you to work in a different language (Select Lan-guage), specify a desktop manager (Session), log in remotely, reboot the system(Restart), turn the system off (Shut Down), suspend the system, or have the systemhibernate. For more information refer to “The Login Screen” on page 132.
To log in, enter your username in the text box labeled Username and press RETURN.The label changes to Password. Enter your password and press RETURN. If Ubuntu dis-plays an error message, try entering your username and password again. Make surethe CAPS LOCK key is not on (Ubuntu displays a message if it is); the routine that veri-fies your entries is case sensitive. See page 133 if you need help with logging in andpage 135 if you want to change your password. The system takes a moment to setthings up and then displays a workspace (Figure 4-2).
Introduction
You can use the desktop as is or you can customize it until it looks and functionsnothing like the initial desktop. If you have a computer of your own, you may wantto add a user and work as that user while you experiment with the desktop. Whenyou figure out which features you like, you can log in as yourself and implementthose features. That way you need not concern yourself with “ruining” your desk-top and not being able to get it back to a satisfactory configuration.
Panels and objects When you log in, GNOME displays a workspace that includes Top and Bottom panels(bars) that are essential to getting your work done easily and efficiently (Figure 4-2).Each of the bars holds several icons and words called objects. (Buttons, applets, andmenus are all types of objects.) When you click an object, something happens.
Figure 4-1 The Ubuntu GNOME login screen

A Tour of the Ubuntu Linux Desktop 91
A panel does not allow you to do anything you could not do otherwise, but rathercollects objects in one place and makes your work with the system easier. Becausethe panels are easy to configure, you can set them up to hold tools you use fre-quently. You can create additional panels to hold different groups of tools.
Workspaces andthe Desktop
What you see displayed on the screen is a workspace. Initially Ubuntu configuresGNOME with two workspaces. The desktop, which is not displayed all at once, isthe collection of all workspaces. “Switching Workspaces” on page 93 describessome of the things you can do with workspaces.
Launching Programs from the Desktop
This section describes three of the many ways you can start a program running fromthe desktop.
Click an object The effect of clicking an object depends on what the object is designed to do. Click-ing an object may, for example, start a program; display a menu or a folder; or opena file, a window, or a dialog box.
Figure 4-2 The initial workspace
Firefox Web BrowserMain menu
Clock
Log out
Workplace switcherTrash
Tooltip
Do not remove objects or panels yet
caution You can add and remove panels and objects as you please. Until you are comfortable working withthe desktop and have finished reading this section, however, it is best not to remove any panelsor objects from the desktop.
Click and right-clicktip This book uses the term click when you need to click the left mouse button and right-click when
you need to click the right mouse button. See page 95 to adapt the mouse for left-handed use.

92 Chapter 4 Introduction to Ubuntu Linux
For example, to start the Firefox Web browser, (left) click the Firefox object (theblue and orange globe on the Top panel; see Figure 4-2). GNOME opens a windowrunning Firefox. When you are done using Firefox, click the small x at the right endof the titlebar at the top of the window. GNOME closes the window.
When you (left) click the date and time near the right end of the Top panel, theClock applet displays a calendar for the current month. (If you double-click a dateon the calendar, the object opens the Evolution calendar to the date youclicked—but first you have to set up Evolution.) Click the date and time again toclose the calendar.
Select from theMain menu
The second way to start a program is by selecting it from a menu. The Main menuis the object at the left end of the Top panel that includes the words Applications,Places, and System. Click one of these words to display the corresponding menu.Each menu selection that holds a submenu displays a small triangle (pointing tothe right) to the right of the name of the menu (Figure 4-3). When you move themouse pointer over one of these selections and leave it there for a moment (thisaction is called hovering), the menu displays the submenu. When you allow themouse cursor to hover over one of the submenu selections, GNOME displays atooltip (page 106).
Experiment with the Main menu. Start Solitaire (Main menu: Applications GamesFree Cell Solitaire), a terminal emulator (Main menu: Applications AccessoriesTerminal), and other programs from the Applications menu. The Places and Systemmenus are discussed on page 110.
Use the RunApplication window
Finally, you can start a program by pressing ALT-F2 to display the Run Applicationwindow (Figure 4-4). As you start to type firefox in the text box at the top of thewindow, the window recognizes what you are typing and displays the Firefox logoand the rest of the word firefox. Click Run to start Firefox.
Figure 4-3 The Applications menu, Accessories, Terminal

A Tour of the Ubuntu Linux Desktop 93
optionalRunning textual
applicationsYou can run command line utilities, which are textual (not graphical), from the RunApplications window. When you run a textual utility from this window, you must puta tick in the check box labeled Run in terminal (click the box to put a tick in it; clickit again to remove the tick). The tick tells GNOME to run the command in a terminalemulator window. When the utility finishes running, GNOME closes the window.
For example, type vim (a text-based editor) in the text box, put a tick in the boxlabeled Run in terminal, and click Run. GNOME opens a Terminal (emulator) win-dow and runs the vim text editor in that window. When you exit from vim (pressESCAPE:q! sequentially to do so), GNOME closes the Terminal window.
You can run a command line utility that only displays output and then terminates.Because the window closes as soon as the utility is finished running, and becausemost utilities run quickly, you will probably not see the output. Type the followingcommand in the text box to run the df (disk free; page 800) utility and keep the win-dow open until you press RETURN:
bash -c "df -h ; read"
This command starts a bash shell (Chapter 7) that executes the command line fol-lowing the –c option. The command line holds two commands separated by a semi-colon. The second command, read (page 445), waits for you to press RETURN beforeterminating. Thus the output from the df –h command remains on the screen untilyou press RETURN. Replace read with sleep 10 to have the window remain open forten seconds.
Switching Workspaces
Workplace Switcher Each rectangle in the Workplace Switcher applet (or just Switcher)—the group ofrectangles near the right end of the Bottom panel—represents a workspace(Figure 4-2, page 91). When you click a rectangle, the Switcher displays the corre-sponding workspace and highlights the rectangle to indicate which workspace isdisplayed.
Figure 4-4 Run Application window

94 Chapter 4 Introduction to Ubuntu Linux
Click the rightmost rectangle in the Switcher (not the Trash applet to its right).Next, select Main menu: Preferences Mouse. GNOME opens the Mouse Prefer-ences window. The Switcher rectangle that corresponds to the workspace you areworking in displays a small colored rectangle. This small rectangle corresponds insize and location within the Switcher rectangle to the window within the work-space. Click and hold the left mouse button with the mouse pointer on the titlebarat the top of the window and drag the window to the edge of the desktop. Whenyou release the mouse button, the small rectangle within the Switcher moves to thecorresponding location within the Switcher rectangle.
Now click a different rectangle in the Switcher and open another application—forexample, the Ubuntu Help Center (click the blue question mark on the Top panel).With the Ubuntu Help Center window in one workspace and the Mouse Preferenceswindow in another, you can click the corresponding rectangles in the Switcher toswitch back and forth between the workspaces (and applications).
Setting Personal Preferences
You can set preferences for many objects on the desktop, including those on the panels.
Workspace Switcher To display the Workspace Switcher Preferences window (Figure 4-5), first right-clickanywhere on the Switcher to display the Switcher menu and then select Preferences.
Figure 4-5 The Workspace Switcher Preferences window
Right-click to display a Context menu
tip A context menu is one that is appropriate to its context. When you right-click an object, it displaysan Object Context menu. Each object displays its own context menu, although similar objects havesimilar context menus. Most Object Context menus have either a Preferences or Properties selec-tion. See the adjacent section, “Setting Personal Preferences,” and page 115 for more informationon Object Context menus.

A Tour of the Ubuntu Linux Desktop 95
Specify the number of workspaces you want in the spin box labeled Number ofworkspaces or Columns. (The window looks different if you have Visual Effects[page 103] enabled; in this case change the value in the spin box labeled Columns.)The number of workspaces the Switcher displays changes as you change the numberin the spin box—you can see the result of your actions before you close the Prefer-ences window. Four workspaces is typically a good number to start with. Click Close.
Clock applet The Clock applet has an interesting preferences window. Right-click the Clockapplet (Figure 4-2, page 91) and select Preferences. The resulting window enablesyou to customize the date and time the Clock applet displays on the Top panel. Theclock immediately reflects the changes you make in this window.
Different objects display different Preferences windows. Objects that launch pro-grams display Properties windows and do not have Preferences windows. Experi-ment with different Preferences and Properties windows and see what happens.
Mouse Preferences
The Mouse Preferences window (Figure 4-6) enables you to change the characteristicsof the mouse to suit your needs. To display this window, select Main menu: SystemPreferences Mouse or give the command gnome-mouse-properties from a terminalemulator or Run Application window (ALT-F2). The Mouse Preferences window hastwo tabs: Buttons and Motion (and a third, Touchpad, on a laptop).
Left-handed mouse To change the orientation of the mouse buttons for use by a left-handed person, puta tick in the check box labeled Left-handed mouse. If you change the setup of themouse buttons, remember to reinterpret the descriptions in this book accordingly.When this book asks you to click the left button or does not specify a button to click,click the right button, and vice versa. See “Remapping Mouse Buttons” on page 258if you want to change the orientation of the mouse buttons from the command line.
Figure 4-6 The Mouse Preferences window, Buttons tab

96 Chapter 4 Introduction to Ubuntu Linux
Double-clicktimeout
Use the Double-Click Timeout slider in the Buttons tab to change the speed withwhich you must double-click a mouse button to have the system recognize youraction as a double-click rather than as two single clicks.
In the Motion tab you can control the acceleration and sensitivity of the mouse. TheDrag and Drop Threshold specifies how far you must drag an object before the sys-tem considers the action the drag part of a drag and drop.
Working with Windows
To resize a window, move the mouse pointer over an edge of the window; the pointerturns into an arrow. When the pointer is an arrow, you can click and drag the side ofa window. When you position the mouse pointer over a corner of the window, youcan resize both the height and the width of the window at the same time.
To move a window, click and drag the titlebar (the bar across the top of the windowwith the name of the window in it). For fun, try moving the window past either sideof the workspace. What happens? The result depends on how Visual Effects(page 103) is set.
Titlebar At the right of the titlebar are three icons that control the window (Figure 4-16,page 112). Clicking the underscore, usually at the left of the set of icons, minimizes(iconifies) the window so the only indication of the window is the object with thewindow’s name in it on the Bottom panel (a Window List applet; page 109). Clickthis object to toggle the window between visible and minimized. Clicking the boxicon, usually the middle of the three icons, toggles the window between its maxi-mum size (maximizes the window) and its normal size. Double-clicking the titlebardoes the same thing.
Terminating aprogram
Clicking the x terminates the program running in the window and closes the win-dow. In some cases you may need to click several times.
Using Nautilus to Work with Files
Nautilus, the GNOME file manager, is a simple, powerful file manager. You canuse it to create, open, view, move, and copy files and folders as well as to executeprograms and scripts. One of its most basic and important functions is to createand manage the desktop. This section introduces Nautilus and demonstrates thecorrespondence between Nautilus and the desktop. See page 260 for more detailedinformation on Nautilus.
Terms: folder anddirectory
Nautilus displays the File Browser window, which displays the contents of a folder.The terms folder and directory are synonymous; “folder” is frequently used ingraphical contexts whereas “directory” may be used in textual or command linecontexts. This book uses these terms interchangeably.
Term: File Browser This book sometimes uses the terms File Browser window and File Browser whenreferring to the Nautilus File Browser window.
Double-clicking an object in a File Browser window has the same effect as double-clicking an object on the desktop: Nautilus takes an action appropriate to the object.
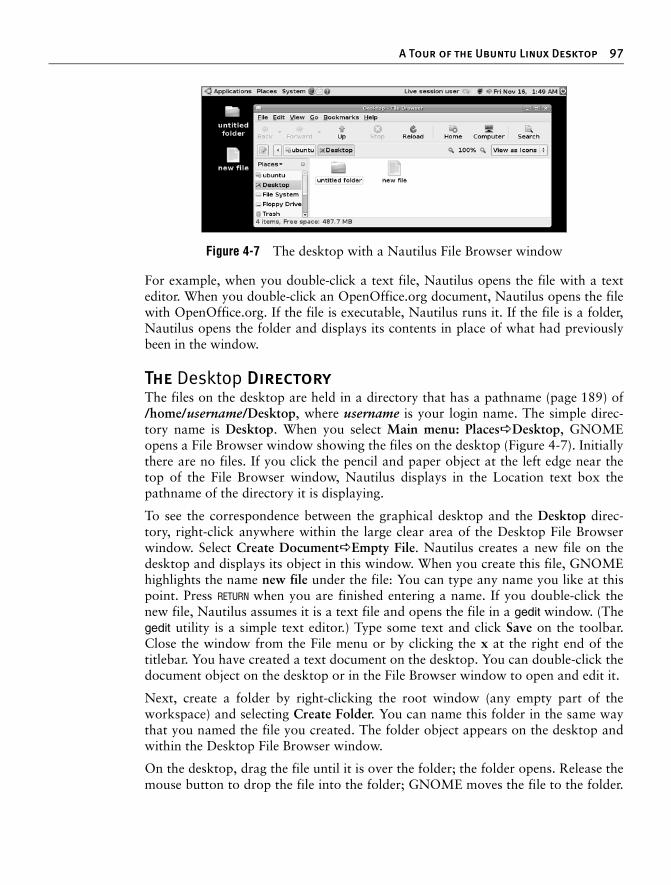
A Tour of the Ubuntu Linux Desktop 97
For example, when you double-click a text file, Nautilus opens the file with a texteditor. When you double-click an OpenOffice.org document, Nautilus opens the filewith OpenOffice.org. If the file is executable, Nautilus runs it. If the file is a folder,Nautilus opens the folder and displays its contents in place of what had previouslybeen in the window.
The Desktop Directory
The files on the desktop are held in a directory that has a pathname (page 189) of/home/username/Desktop, where username is your login name. The simple direc-tory name is Desktop. When you select Main menu: Places Desktop, GNOMEopens a File Browser window showing the files on the desktop (Figure 4-7). Initiallythere are no files. If you click the pencil and paper object at the left edge near thetop of the File Browser window, Nautilus displays in the Location text box thepathname of the directory it is displaying.
To see the correspondence between the graphical desktop and the Desktop direc-tory, right-click anywhere within the large clear area of the Desktop File Browserwindow. Select Create Document Empty File. Nautilus creates a new file on thedesktop and displays its object in this window. When you create this file, GNOMEhighlights the name new file under the file: You can type any name you like at thispoint. Press RETURN when you are finished entering a name. If you double-click thenew file, Nautilus assumes it is a text file and opens the file in a gedit window. (Thegedit utility is a simple text editor.) Type some text and click Save on the toolbar.Close the window from the File menu or by clicking the x at the right end of thetitlebar. You have created a text document on the desktop. You can double-click thedocument object on the desktop or in the File Browser window to open and edit it.
Next, create a folder by right-clicking the root window (any empty part of theworkspace) and selecting Create Folder. You can name this folder in the same waythat you named the file you created. The folder object appears on the desktop andwithin the Desktop File Browser window.
On the desktop, drag the file until it is over the folder; the folder opens. Release themouse button to drop the file into the folder; GNOME moves the file to the folder.
Figure 4-7 The desktop with a Nautilus File Browser window

98 Chapter 4 Introduction to Ubuntu Linux
Again on the desktop, double-click the folder you just moved the file to. GNOMEopens another File Browser window, this one displaying the contents of the folderyou clicked on. The file you moved to the folder appears in the new window. Nowdrag the file from the window to the previously opened Desktop File Browser win-dow. The file is back on the desktop, although it may be hidden by one of the FileBrowser windows.
Next, open a word processing document by selecting Main menu: ApplicationsOffice OpenOffice.org Word Processor. Type some text and click the floppy diskicon or select menubar: File Save to save the document. OpenOffice.org displaysa Save window (Figure 4-8). Type the name you want to save the document as(use memo for now) in the text box labeled Name. You can specify the directoryin which you want to save the document in one of two ways: by using the drop-down list labeled Save in folder or by using the Browse for other folders section ofthe Save window.
Click the triangle to the left of Browse for other folders to open and close this sec-tion of the window. Figure 4-8 shows the Save window with this section closed. Withthe Browse for other folders section closed, you can select a directory from the drop-down list labeled Save in folder. This technique is quick and easy, but presents a lim-ited number of choices of folders. By default, it saves the document in Documents(/home/username/Documents). If you want to save the document to the desktop,click Desktop in this drop-down list and then click Save. OpenOffice.org saves thedocument with a filename extension of .odt, which indicates it is an OpenOffice.orgword processing document. The object for this type of file has some text and a pic-ture in it.
optionalBrowse/Save
windowWith the Browse for other folders section opened, the Save window grays out thedrop-down list labeled Save in folder and expands the Browse for other folders sec-tion, as shown in Figure 4-9. This expanded section holds two large side-by-side listboxes: Places and Name. The list box labeled Places displays directories and loca-tions on the system, including File System. The list box labeled Name lists the fileswithin the directory highlighted in Places.
Figure 4-8 The Save window

A Tour of the Ubuntu Linux Desktop 99
The Browse for other folders section of the Browse/Save window allows you to lookthrough the filesystem and select a directory or file. GNOME utilities and manyapplications use this window, although sometimes applications call it a Browse win-dow. In this example, OpenOffice.org calls it a Save window and uses it to locatethe directory to save a document in.
Assume you want to save a file in the /tmp directory. Click File System in the listbox on the left; the list box on the right displays the files and directories in the rootdirectory (/; see “Absolute Pathnames” on page 189 for more information). Next,double-click tmp in the list box on the right. The button(s) above the list box on theleft change to reflect the directory the list box on the right is displaying. Click Save.
The buttons above the list box on the left represent directories. The list box on theright displays the directories found within the directory named in the highlighted(darker) button. This directory is the one you would save the file to if you clickedSave. Click one of these buttons to display the corresponding directory in the listbox on the right and then click Save to save the file in that directory.
When you have finished editing the document, close the window. If you have madeany changes since you last saved it, OpenOffice.org asks if you want to save thedocument. If you choose to save it, OpenOffice.org saves the revised version over(in the same file as) the version you saved previously. Now the memo.odt objectappears on the desktop and in the Desktop File Browser window. Double-clickeither object to open it in OpenOffice.org.
The Desktopdirectory is special
In summary, the Desktop directory is like any other directory, except that GNOMEdisplays its contents on the desktop (in every workspace). It is as though the desk-top is a large, plain Desktop File Browser window. You can work with the Desktop
Figure 4-9 A Save window with Browse for other folders open

100 Chapter 4 Introduction to Ubuntu Linux
directory because it is always displayed. Within the GUI, you must use a utility, suchas Nautilus, to display and work with the contents of any other directory.
Selecting Objects
The same techniques select one or more objects in a File Browser window or on thedesktop. Select an object by clicking it once; GNOME highlights the object. Selectadditional objects by holding down the CONTROL key while you click each object. Youcan select a group of adjacent objects by highlighting the first object and then, whileholding down the SHIFT key, clicking the last object; GNOME highlights all objectsbetween the two objects you clicked. Or, you can use the mouse pointer to drag abox around a group of objects.
To experiment with these techniques, open a File Browser window displaying yourhome folder. Display the Examples folder by double-clicking it. Select a few objects,right-click, and select Copy. Now move the mouse pointer over an empty part of thedesktop, right-click, and select Paste. You have copied the selected objects from theExamples folder to the desktop. You can drag and drop objects to move them,although you do not have permission to move the objects from the Examples folder.
Emptying the Trash
Selecting File Browser menubar: File Move to Trash moves the selected (high-lighted) object to the .Trash directory. Like the Desktop directory, .Trash is a direc-tory in /home/username. Because its name starts with a period however, it is notusually displayed. Press CONTROL-H or select File Browser menubar: View Show Hid-den Files to display hidden files. For more information refer to “Hidden Filenames”on page 188.
Because files in the trash take up space on the hard disk (just as any files do), it is a goodidea to remove them periodically. All File Browser windows allow you to permanentlydelete all files in the .Trash directory by selecting File Browser menubar: File EmptyTrash. To view the files in the trash, click the Trash applet (Figure 4-2, page 91). Nauti-lus displays the Trash File Browser window. Select Empty Trash from the Trash appletcontext menu to permanently remove all files from the trash. (This selection does notappear if there are no files in the trash.) Or you can open the .Trash directory, right-click an object, and select Delete from Trash to remove only that object (file). You candrag and drop files to and from the trash just as you can with any other folder.
The Update Notifier
On systems connected to the Internet, Ubuntu is initially set up to automaticallysearch for and notify you when software updates are available. GNOME displaysthe message Software updates available in a bright dialog box and places theUpdate Notifier (Figure 4-10) toward the right end of the Top panel when updatesare available. Clicking this object opens the Update Manager window (Figure 4-10).

A Tour of the Ubuntu Linux Desktop 101
You can also open this window by selecting Main menu: System AdministrationUpdate Manager or by giving the command update-manager from a terminal emu-lator or Run Application window (ALT-F2).
Update Managerwindow
When the Update Manager window opens, it displays the message Starting UpdateManager; after a moment it tells you how many updates are available. If no updates areavailable, this window displays the message Your system is up-to-date. If you have rea-son to believe the system is not aware of available updates, click Check. The update-manager asks for your password, reloads its database, and checks for updates again.
If updates are available, click Install Updates. The Update Manager asks for yourpassword, displays the Downloading Package Files window, and counts the pack-ages as it downloads them. Next the Update Manager displays the ApplyingChanges window with the message Installing software and describes the steps it istaking to install the packages. When it is finished, the Update Manager displays theChanges Applied window, which displays the message Update is complete. Afteryou click Close, the Update Manager again checks for updates and usually displaysthe message Your system is up-to-date. Click Close. If the updates require you toreboot the system or restart a program, an object appears on the Top panel. Clickthis object and take the required action as soon as you are ready. For more informa-tion refer to “Updating, Installing, and Removing Software Packages” on page 119.
Figure 4-10 The Update Notifier and the Update Manager window
Update Notifier

102 Chapter 4 Introduction to Ubuntu Linux
Changing Appearances (Themes)
One of the most exciting aspects of a Linux desktop is the ability it gives you tochange its appearance. You can change not only the backgrounds, but also windowborders (including the titlebar), icons, the buttons that applications use, and more.To see some examples of what you can do, visit art.gnome.org.
Themes In a GUI, a theme is a recurring pattern and overall look that (ideally) pleases theeye and is easy to interpret and use. You can work with desktop themes at severallevels. First and easiest is to leave well enough alone. Ubuntu comes with a good-looking theme named Human. If you are not interested in changing the way thedesktop looks, continue with the next section.
The next choice, which is almost as easy, is to select one of the alternative themesthat comes with Ubuntu. You can also modify one of these themes, changing thebackground, fonts, or interface. In addition, you can download themes from manysites on the Internet and change them in the same ways.
The next level is customizing a theme, which changes the way the theme looks—forexample, changing the icons a theme uses. At an even higher level, you can designand code your own theme. For more information see the tutorials at art.gnome.org.
AppearancePreferences window
The key to changing the appearance of your desktop is the Appearance Preferenceswindow. Display this window by choosing Main Menu: Systems PreferencesAppearances or by right-clicking the root window (any empty space on a workspace)
Figure 4-11 The Appearance Preferences window, Theme tab

A Tour of the Ubuntu Linux Desktop 103
and selecting Change Desktop Background. The Appearance Preferences windowhas five tabs:
• The Theme tab (Figure 4-11) enables you to select one of several themes. Click a theme and the workspace immediately reflects the use of that theme. The Human theme is the default Ubuntu theme; select this theme to make the workspace appear as it did when you installed the system. Once you select a theme, you can click Close or you can click the other tabs to modify the theme.
• The Background tab enables you to specify a wallpaper or color for the desktop background. To specify a wallpaper, click one of the samples in the Wallpaper frame or click Add and choose a file—perhaps a picture— you want to use as wallpaper. (Clicking Add displays the Add Wallpaper window; see “Browse/Save window” on page 98 for instructions on select-ing a file using this window.) Then choose the style you want GNOME to use to apply the wallpaper. For example, Zoom makes the picture you chose fit the workspace.
You can also specify a color for the background: either solid or a gradient between two colors. To use a color, you must first select No Wallpaperfrom the Wallpaper frame: Allow the mouse pointer to hover over each of the wallpapers displayed in the Wallpaper frame until you find one that displays the tooltip No Wallpaper. Select that (non)wallpaper. Next, select Solid color from the drop-down list labeled Colors and click the colored box to the right of this list. GNOME displays the Pick a Color window. Click a color you like from the ring and adjust the color by moving the lit-tle circle within the triangle. Click OK when you are done. The color you chose becomes the background color of the desktop. See page 268 for more information on the Pick a Color window.
• The Fonts tab (Figure 8-8, page 267) enables you to specify which fonts you want GNOME to use in different places on the desktop. You can also change how GNOME renders the fonts (page 267).
• The Interface tab enables you to modify the appearance of window menus and toolbars and presents a Preview pane that shows what your choices will look like.
Visual effects • The Visual Effects tab enables you to select one of three levels of visual effects: None, Normal, and Extra. Normal and Extra effects replace the Metacity window manager with Compiz Fusion (compiz.org), which implements 3D desktop visual effects. (Compiz is the name of the core; the plugins are called Compiz Fusion.) When you install Ubuntu, Ubuntu determines what the hardware is capable of running and sets the proper level of effects. One of the most dramatic visual effects is wiggly windows: To see this effect, select Normal or Extra and drag a window around using its titlebar. If you experience problems with the system, select None.

104 Chapter 4 Introduction to Ubuntu Linux
The changes you make in the Background, Fonts, Interface, and Visual Effects tabsare used by any theme you select, including ones you customize. When you arethrough making changes in the Appearance Preferences window tabs, you can clickClose to use the theme as you have modified it or return to the Theme tab to cus-tomize the theme.
Customizing atheme
From the Theme tab of the Appearance Preferences window, select the theme youwant to customize or continue with the theme you modified in the preceding sec-tion. Click Customize to open the Customize Theme window. Go through each tabin this window; choose entries and watch the change each choice makes in theworkspace. Not all tabs work with all themes. When you are satisfied with theresult, click Close.
After you customize a theme, it is named Custom. When you customize anothertheme, those changes overwrite the Custom theme. For this reason it is best to savea customized theme by clicking Save As and specifying a name for the theme. Aftersaving a theme, it appears among the themes in the Theme tab.
Session Management
A session starts when you log in and ends when you log out or reset the session.With fully GNOME-compliant applications, GNOME can manage sessions so thedesktop looks the same when you log in as it did when you saved a session orlogged out: The same windows will be positioned as they were on the same work-spaces and programs will be as you left them.
To save a session, first make sure you have only the windows open that you want toappear the next time you log in. Then select Main Menu: System PreferencesSessions to display the Sessions window. Click the Session Options tab and thenclick Remember currently running applications. The window displays Your sessionhas been saved. Each time you log in, the same windows will appear. If you wantGNOME to remember what you were doing each time you log off, put a tick in thecheck box labeled Automatically remember running applications when logging out.
Getting Help
Ubuntu provides help in many forms. Clicking the question mark object on the Toppanel displays the Ubuntu Help Center window, which provides information on thedesktop. To display other information, click a topic in the list on the left side of thiswindow. You can also enter text to search for in the text box labeled Search andpress RETURN. In addition, most windows provide a Help object or menu. See “Whereto Find Documentation” on page 124 for more resources.
Visual effects can cause problems
caution Setting Visual Effects to Normal or Extra can cause unexpected graphical artifacts, shorten batterylife, and reduce performance in 3D applications and video playback. If you are having problems withan Ubuntu system, try setting Visual Effects to None and see if the problem goes away.

Getting the Most out of the Desktop 105
Feel Free to Experiment
Try selecting different items from the Main menu and see what you discover. Fol-lowing are some applications you may want to explore:
• OpenOffice.org’s Writer is a full-featured word processor that can import and export MS Word documents. Select Main menu: Office Open-Office.org Writer. The Office menu also offers a database, presentation manager, and spreadsheet.
• Firefox is a powerful, full-featured Web browser. Click the blue and orange globe object on the Top panel to start Firefox. You can also select Main menu: Applications Internet Firefox Web Browser.
• Pidgin is a graphical IM (instant messenger) client, formerly called Gaim, that allows you to chat on the Internet with people who are using IM cli-ents such as AOL, MSN, and Yahoo! To start Pidgin, select Main menu: Applications Internet Pidgin Internet Messenger.
The first time you start Pidgin, it opens the Accounts window; click Add to open the Add Account window. In the Add Account window, select a proto-col (such as AIM or MSN), enter your screen name and password, and put a tick in the check box labeled Remember password if you want Pidgin to remember your password. Click Save. Visit pidgin.im for more information, including Pidgin documentation and plugins that add features to Pidgin.
Logging Out
To log out, click the Logout button (Figure 4-2, page 91) at the upper-right cornerof the workspace. GNOME displays the Logout window. This window looks differ-ent from other windows because it has no decorations (page 141). Or, you canselect Main Menu: System Quit and click Logout. You can also choose to shutdown or restart the system, among other options. From a textual environment,press CONTROL-D or give the command exit in response to the shell prompt.
Getting the Most out of the Desktop
The GNOME desktop is a powerful tool with many features. This section coversmany aspects of panels, the Main menu, windows, terminal emulation, and ways toupdate, install, and remove software. Chapter 8 continues where this chapter leavesoff, discussing the X Window System, covering Nautilus in more detail, anddescribing a few of the GNOME utilities.
GNOME Desktop Terminology
The following terminology, from the GNOME Users Guide, establishes a founda-tion for discussing the GNOME desktop. Figure 4-2 on page 91 shows the initialUbuntu GNOME desktop.

106 Chapter 4 Introduction to Ubuntu Linux
Desktop The desktop comprises all aspects of the GNOME GUI. While you are working withGNOME, you are working on the desktop. There is always exactly one desktop.
Panels Panels are bars that appear on the desktop and hold (Panel) objects. Initially thereare two gray panels: one along the top of the screen (the Top Edge panel, or just Toppanel) and one along the bottom (the Bottom Edge panel, or just Bottom panel).You can add and remove panels. You can place panels at the top, bottom, and bothsides of the desktop, and you can stack more than one panel at any of these loca-tions. The desktop can have no panels, one panel, or several panels. See page 107for more information on panels.
Panel objects Panel objects appear as words or icons on panels. You can click these objects to dis-play menus, run applets, or launch programs. The five types of panel objects areapplets, launchers, buttons, menus, and drawers. See page 109 for more informa-tion on Panel objects.
Windows A graphical application typically runs within and displays a window. At the top ofmost windows is a titlebar that you can use to move, resize, and close the window.The root window is the unoccupied area of the workspace and is frequentlyobscured. The desktop can have no windows, one window, or many windows.Most windows have decorations (page 141) but some, such as the Logout window,do not.
Workspaces Workspaces divide the desktop into one or more areas, with one such area fillingthe screen at any given time. Initially there are two workspaces. Because panels andobjects on the desktop are features of the desktop, all workspaces display the samepanels and objects. By default, a window appears in a single workspace. TheSwitcher (page 93) enables you to display any one of several workspaces.
Tooltips Tooltips (Figure 4-2, page 91) is a minicontext help system that you activate bymoving the mouse pointer over a button, icon, window border, or applet (such asthose on a panel) and allowing it to hover there. When the mouse pointer hoversover an object, GNOME displays a brief explanation of the object.
Opening Files
By default, you double-click an object to open it; or you can right-click the objectand select Open from the drop-down menu. When you open a file, GNOME figuresout the appropriate tool to use by determining the file’s MIME (page 1048) type.GNOME associates each filename extension with a MIME type and each MIMEtype with a program. Initially GNOME uses the filename extension to try to deter-mine a file’s MIME type. If GNOME does not recognize the filename extension, itexamines the file’s magic number (page 1046).
For example, when you open a file with a filename extension of ps, GNOME callsthe Evince document viewer, which displays the PostScript file in a readable format.When you open a text file, GNOME uses gedit to display and allow you to edit the

Getting the Most out of the Desktop 107
file. When you open a directory, GNOME displays its contents in a File Browserwindow. When you open an executable file such as Firefox, GNOME runs the exe-cutable. When GNOME uses the wrong tool to open a file, the tool generally issuesan error message. See “Open With” on page 118 for information on how to use atool other than the default tool to open a file.
Panels
As explained earlier, panels are the bars that initially appear at the top and bottomof the desktop. They are part of the desktop and therefore are consistent acrossworkspaces.
The Panel Menu
Right-clicking an empty part of a panel displays the Panel (Context) menu. Asidefrom help and informational selections, this menu has four selections.
Add to Panel Selecting Add to Panel displays the Add to Panel window (Figure 4-12). You candrag an object from this window to a panel, giving you the choice of whichpanel the object appears on. You can also highlight an object and click Add toadd the object to the panel whose menu you used to display this window. Manyobjects in this window are whimsical: Try Geyes and select Bloodshot from itspreferences window, or try Fish. One of the more useful objects is Search forFiles. When you click this object on the panel, it displays the Search for Fileswindow (page 269).
Figure 4-12 The Add to Panel window

108 Chapter 4 Introduction to Ubuntu Linux
Properties Selecting Properties displays the Panel Properties window (Figure 4-13). This win-dow has two tabs: General and Background.
In the General tab, Orientation selects which side of the desktop the panel appearson; Size adjusts the width of the panel. Expand causes the panel to span the width orheight of the workspace; without a tick in this check box the panel is centered andjust wide enough to hold its objects. Autohide causes the panel to disappear untilyou bump the mouse pointer against the side of the workspace. Hide buttons workdifferently from autohide: Show hide buttons displays buttons at each end of thepanel. When you click one of these buttons, the panel slides out of view, leaving onlya button remaining. When you click that button, the panel slides back into place.
The Background tab of the Panel Properties window enables you to specify a colorand transparency or an image for the panel.
If you want to see what stacked panels look like, use the Orientation drop-downlist to change the location of the panel you are working with. If you are workingwith the Top panel, select Bottom and vice versa. As with Preferences windows,Properties windows have no Apply and Cancel buttons; they implement changesimmediately. Use the same procedure to put the panel back where it was.
See “Pick a Color Window” on page 268 for instructions on how to change thecolor of the panel. Once you have changed the color, move the slider labeled Style tomake the color of the panel more or less transparent. If you do not like the effect,click the radio button labeled None (use system scheme) to return the panel to itsdefault appearance. Click Close.
Figure 4-13 The Panel Properties window, General tab

Getting the Most out of the Desktop 109
Delete This Panel Selecting Delete This Panel does what you might expect it. Be careful with this selec-tion: When it removes a panel, it removes all the objects on the panel and you willneed to reconstruct the panel if you want it back as it was.
New Panel Selecting New Panel adds a new panel to the desktop. GNOME decides where itgoes; you can move the panel if you want it somewhere else.
Moving a Panel
You can drag any panel to any of the four sides of the desktop: Left-click any emptyspace on a panel; the mouse pointer turns into a small hand. Drag the panel to theside you want to move it to. Unlike dragging an object across a workspace, thepanel does not move until you have dragged the mouse pointer all the way to thenew location of the panel; it then snaps into place. If you have stacked panels andare having trouble restacking them in the order you want, try dragging a panel firstto an empty side of the workspace and then to its final location.
Panel Objects
The icons and words on a panel, called panel objects, display menus, launch pro-grams, and present information. The panel object with the blue and orange globestarts Firefox. The email button (the open envelope icon) starts Evolution, an emailand calendaring application (www.gnome.org/projects/evolution). You can startalmost any utility or program on the system using a Panel object. This sectiondescribes the different types of Panel objects.
Applets An applet is a small program that displays its user interface on or adjacent to thepanel. You interact with the applet using its Applet Panel object. The Mixer (vol-ume control), Clock (date and time; Figure 4-2, page 91), and Workspace Switcher(Figure 4-2, page 91) are applets.
Window List applet Although not a distinct type of object, the Window List applet is a unique andimportant tool. One Window List applet (Figure 4-14) appears on the Bottom panelfor each open or iconified window on the displayed workspace. Left-clicking thisobject minimizes its window or restores the window if it is minimized. Right-clickto display the Window Operations menu (page 112). If a window is berried underother windows, click its Window List applet to make it visible.
Launchers When you open a launcher, it can execute a command, start an application, displaythe contents of a folder or file, open a URI in a Web browser, and so on. In additionto appearing on panels, launchers can appear on the desktop. The Firefox object is alauncher: It starts the Firefox application. Under Main menu: Applications, you canfind launchers that start applications. Under Main menu: Places, the Home Folder,
Figure 4-14 Window List applets

110 Chapter 4 Introduction to Ubuntu Linux
Documents, Desktop, and Computer objects are launchers that open File Browserwindows to display folders.
Buttons A button performs a single, simple action. The Logout button (Figure 4-2, page 91) dis-plays a window that enables you to log off, shut down, or reboot the system. The ShowDesktop button at the left of the Bottom panel minimizes all windows on the workspace.
Menus A menu displays a list of selections you can choose from. Some of the selections canbe submenus with more selections. All other selections are launchers. The next sec-tion discusses the Main menu.
Drawers A drawer is an extension of a panel. You can put the same objects in a drawer thatyou can put on a panel, including another drawer. When you click a Drawer object,the drawer opens; you can then click an object in the drawer the same way you clickan object on a panel.
The Panel Object Context Menus
Three selections are unique to Panel Object Context menus (right-click a Panelobject). The Remove from Panel selection does just that. The Move selectionallows you to move the object within the panel and to other panels; you can alsomove an object by dragging it with the middle mouse button. The Lock to Panelselection locks the object in position so it cannot be moved. When you move anobject on a panel, it can move through other objects. If the other object is notlocked, it can displace the object if necessary. The Move selection is grayed outwhen the object is locked.
The Main Menu
The Main menu appears at the left of the Top panel and includes Applications,Places, and System. Click one of these words to display the corresponding menu.
Applications The Applications menu holds several submenus, each named for a category of appli-cations (e.g., Games, Graphics, Internet, Office). The last selection, Add/Remove, isdiscussed on page 120. Selections from the submenus launch applications—perusethese selections, hovering over those you are unsure of to display tooltips.
Places The Places menu holds a variety of launchers, most of which open a File Browserwindow. The Home Folder, Documents, and Desktop objects display your directo-ries with corresponding names. The Computer, CD/DVD Creator, and Networkobjects display special locations. Each of these locations enables you to access filemanager functions. A special URI (page 1067) specifies each of these locations. Forexample, the CD/DVD Creator selection displays the burn:///, URI which enablesyou to create a CD or DVD. The Connect to Server selection opens a window thatallows you to connect to various type of servers, including SSH and FTP (see “File”on page 263). Below these selections are mounted filesystems; click one of these to

Getting the Most out of the Desktop 111
display the top-level directory of that filesystem. The Search for Files selectionenables you to search for files (page 269).
System The System menu holds two submenus, selections that can provide support, and theQuit selection. The two submenus are key to configuring your account and settingup and maintaining the system.
The Preferences submenu establishes the characteristics of your account; each usercan establish her own preferences. Click some of these selections to become familiarwith the ways you can customize your account on an Ubuntu system.
The Administration submenu controls the way the system works. For example,Administration Folder Sharing enables Ubuntu to use NFS (Chapter 23) or Samba(Chapter 24) to share folders with other systems. Administration Network config-ures the system’s network connections (page 698). Most of these selections requireyou to be a system administrator and enter your password to make changes. Thesemenu selections are discussed throughout this book.
Copying launchersto a panel
You can copy any launcher from the Main menu to the Top panel or the desktop.Instead of left-clicking the menu selection, right-click it. GNOME displays a smallmenu that can add the launcher to the Top panel or desktop.
Windows
In a workspace, a window is a region that runs, or is controlled by, a particular pro-gram (Figure 4-15). Because you can control the look and feel of windows—eventhe buttons they display—your windows may not look like the ones shown in thisbook. Each window in a workspace has a Window List applet (page 109) on theBottom panel.
Figure 4-15 A typical window
Titlebar
Toolbar
Vertical scrollbar
Menubar
Window contents
Buttons

112 Chapter 4 Introduction to Ubuntu Linux
Titlebar A titlebar (Figures 4-15 and 4-16) appears at the top of most windows and con-trols the window it is attached to. You can change the appearance and function ofa titlebar, but it will usually have at least the functionality of the buttons shown inFigure 4-16.
The minimize (iconify) button collapses the window so that the only indication ofthe window is its Window List applet on the Bottom panel; click this applet torestore the window. Click the maximize button to expand the window so that itoccupies the whole workspace; click the same button on the titlebar of a maximizedwindow to restore the window to its former size. You can also double-click the title-bar to maximize and restore a window. Clicking the maximize button with the mid-dle mouse button expands the window vertically; using the left button expands ithorizontally. Use the same or a different mouse button to click the maximize buttonagain and see what happens. Clicking the close button closes the window and termi-nates the program that is running in it. Left-click the titlebar and drag the windowto reposition it.
Window Operationsmenu
The Window Operations menu contains most common operations you need to per-form on any window. Click the Window Operations menu button or right-clickeither the titlebar or the Window List applet (page 109) to display this menu.
Toolbar A toolbar (Figure 4-15) usually appears near the top of a window and containsicons, text, applets, menus, and more. Many kinds of toolbars exist. The titlebar isnot a toolbar; rather, it is part of the window decorations placed there by the win-dow manager (page 141).
Changing the Input Focus (Window Cycling)
The window with the input focus is the one that receives keyboard characters andcommands you type. In addition to using the Window List applet (page 109), youcan change which window on the current workspace has the input focus by usingthe keyboard; this process is called window cycling. When you press ALT-TAB,GNOME displays in the center of the workspace a box that holds the titlebarinformation from the windows in the workspace. It also shifts the input focus tothe window that was active just before the currently active window, making it easyto switch back and forth between two windows. When you hold ALT and press TAB
multiple times, the focus moves from window to window. Holding ALT and SHIFT and
Figure 4-16 A window titlebar
Minimize
Maximize
Close
Operations menu
Windowtitle
Window

Getting the Most out of the Desktop 113
repeatedly pressing TAB cycles in the other direction. See page 139 for more infor-mation on input focus.
Cutting and Pasting Objects Using the Clipboard
There are two similar ways to cut/copy and paste objects and text on the desktopand both within and between windows. First you can use the clipboard, technicallycalled the copy buffer, to copy or move objects or text: You explicitly copy anobject or text to the buffer and then paste it somewhere else. Applications that fol-low the user interface guidelines use CONTROL-X to cut, CONTROL-C to copy, and CONTROL-V topaste. Application context menus frequently have these same selections.
You may be less familiar with the second method—using the selection or primarybuffer, which always contains the text you most recently selected (highlighted). Youcannot use this method to copy objects. Clicking the middle mouse button (click thescroll wheel on a mouse that has one) pastes the contents of the selection buffer atthe location of the mouse pointer (if you are using a two-button mouse, click bothbuttons at the same time to simulate clicking the middle button).
With both these techniques, start by highlighting the object or text to select it. Youcan drag a box around multiple objects to select them or drag the mouse pointerover text to select it. Double-click to select a word or triple-click to select a line.Next, to use the clipboard, explicitly copy (CONTROL-C) or cut (CONTROL-X) the objects ortext.1 If you want to use the selection buffer, skip this step.
To paste the selected objects or text, position the mouse pointer where you want toput it and then either press CONTROL-V (clipboard method) or press the middle mousebutton (selection buffer method).
Using the clipboard, you can give as many commands as you like between the CONTROL-C
or CONTROL-X and CONTROL-V, as long as you do not press CONTROL-C or CONTROL-X again. Usingthe selection buffer, you can give other commands after selecting text and before past-ing it, as long as you do not select (highlight) other text.
Using the Root Window
The root window is any part of a workspace that is not occupied by a window,panel, or object. It is the part of the workspace where you can see the background.To view the root window when it is obscured, click the Show Desktop button at theleft end of the Bottom panel to minimize the windows in the workspace.
Desktop menu Right-click the root window to display the Desktop menu, which enables you tocreate a folder, launcher, or document. The Change Desktop Background selectionopens the Appearance Preferences window (page 102) to the Background tab.
1. These control characters do not work in a terminal emulator window because the shell running in thewindow intercepts them before the terminal emulator can receive them. You must either use the selectionbuffer in this environment or use copy/paste from the Edit selection on the menubar or from the contextmenu (right-click).

114 Chapter 4 Introduction to Ubuntu Linux
Running Commands from a Terminal Emulator/Shell
A terminal emulator is a window that presents a command line interface (CLI); itfunctions as a textual (character-based) terminal and is displayed in a graphicalenvironment.
To display the GNOME terminal emulator named Terminal (Figure 4-17), selectMain menu: Applications Accessories Terminal or enter the command gnome-terminal from a Run Application window (ALT-F2). Because you are already logged inand are creating a subshell in a desktop environment, you do not need to log inagain. Once you have opened a terminal emulator window, try giving the commandman man to read about the man utility (page 124), which displays Linux manualpages. Chapter 5 describes utilities that you can run from a terminal emulator.
You can run character-based programs that would normally run on a terminal orfrom the console in a terminal emulator window. You can also start graphicalprograms, such as xeyes, from this window. A graphical program opens its ownwindow.
When you are typing in a terminal emulator window, several characters, including
*, ?, |, [, and ], have special meanings. Avoid using these characters until you haveread “Special Characters” on page 146.
The shell Once you open a terminal emulator window, you are communicating with the com-mand interpreter called the shell. The shell plays an important part in much of yourcommunication with Linux. When you enter a command at the keyboard inresponse to the shell prompt on the screen, the shell interprets the command andinitiates the appropriate action—for example, executing a program; calling a com-piler, a Linux utility, or another standard program; or displaying an error messageindicating that you entered a command incorrectly. When you are working on aGUI, you bypass the shell and execute a program by clicking an object or name.Refer to Chapter 7 for more information on the shell.
Figure 4-17 A Terminal terminal emulator window

Getting the Most out of the Desktop 115
The Object Context Menu
When you right-click an object or group of objects either on the desktop or in a FileBrowser window, GNOME displays an Object Context menu. Different types ofobjects display different context menus, but most context menus share common selec-tions. Figure 4-18 shows context menus for a OpenOffice.org spreadsheet file and fora plain text file. Table 4-1 lists some common Object Context menu selections.
Figure 4-18 The Object Context menus for a spreadsheet (left) and a text file (right)
Table 4-1 Common Object Context menu selections
Open Runs an executable file. Opens a file with an appropriate application. Opens a folder in a File Browser window. Same as double-clicking the object.
Open in New Window
(From a File Browser window only.) Opens a folder in a new File Browser win-dow instead of replacing the contents of the current window. Same as holding SHIFT while double-clicking a folder in a Browser window.
Open with "App" Opens the file using the application named App. When this selection appears as the first selection in the menu, App is the default application that GNOME uses to open this type of file. See page 118 for information on changing this default.
Open with ➤ A triangle appearing to the right of a selection indicates the selection is a menu. Allow the mouse pointer to hover over the selection to display the sub-menu. Each submenu selection is an Open with "App" selection (above). The last selection in the submenu is Open with Other Application (below).
Browse Folder (On the desktop only.) Opens a folder in a File Browser window. Same as double-clicking a folder on the desktop.

116 Chapter 4 Introduction to Ubuntu Linux
The Object Properties Window
The Object Properties window displays information about a file, such as who ownsit, permissions, size, location, MIME type, ways to work with it, and so on. Thiswindow is titled filename Properties, where filename is the name of the file youclicked to open the window. Display this window by right-clicking an object andselecting Properties from the drop-down menu. The Properties window initially dis-plays some basic information. Click the tabs at the top of the window to displayadditional information. Different types of files display different sets of tabs. Youcan modify the settings in this window only if you have permission to do so. Thissection describes the five tabs common to most Object Properties windows.
Basic The Basic tab displays information about the file, including its MIME type, andenables you to select a custom icon for the file and change its name. Change thename of the file in the text box labeled Name. If the filename is not listed in a textbox, you do not have permission to change it. An easy way to change the icon is to
Open with Other Application
Displays the Open With menu. This menu allows you to select an application to open this type of file; the next time you use the Object Context menu to open this type of file, the application you selected appears as an Open with "App"selection (above). Does not change the default application for this type of file. See page 118 for information on changing the default application.
Cut Removes the object and places it on the clipboard (page 113).
Copy Copies the object to the clipboard (page 113).
Extract Here Extracts the contents of an archive and some other types of files, such as some documents, to a directory with the same name as the original file plus _FILES.
Make Link Creates a link to the object in the same directory as the object. You can then move the link to different directory where it may be more useful.
Move to Trash Moves the object to the trash (page 100).
Send to Opens a Send To window that allows you to email the object.
Create Archive Opens the Create Archive window which allows you to specify a format and a name for an archive of one or more objects (page 264).
Share folder Opens the Share Folder window, which allows you to share a folder using NFS (Chapter 23) or Samba (Chapter 24), depending on which is installed on the local system. Select Main Menu: System Administration Shared Foldersto display the Shared Folders window, which lists folders that are shared from the local system. Requires root privileges.
Properties Displays the Object Properties window.
Table 4-1 Common Object Context menu selections (continued)

Getting the Most out of the Desktop 117
open a File Browser window at /usr/share/icons. Work your way down through thedirectories until you find an icon you like, and then drag and drop it on the icon tothe left of Name in the Basic tab of the Object Properties window. This techniquedoes not work for files that are links (indicated by the arrow emblem at the upperright of the object).
Emblems The Emblems tab (Figure 4-19, left) allows you to add and remove emblems associ-ated with the file by placing (removing) a tick in the check box next to an emblem.Figure 4-15 on page 111 shows some emblems on file objects. Nautilus displaysemblems in both its Icon and List views, although there may not be room for morethan one emblem in the List view. Emblems are displayed on the desktop as well.You can also place an emblem on an object by dragging the emblem from the Sidepane/Emblems and dropping it on an object in the View pane (page 261) of a FileBrowser window. Drag the Erase emblem to an object to remove most emblemsfrom the object.
Permissions The Permissions tab (Figure 4-19, right) allows the owner of a file to change the file’spermissions (page 199) and to change the group (see /etc/group on page 558) thatthe file is associated with to any group the owner is associated with. When runningwith root privileges, you can also change the owner of the file. The commandgksudo nautilus opens a File Browser window running with root privileges (but readthe caution on page 88). Nautilus grays out items you are not allowed to change.
Using the drop-down lists, you can give the owner (called user elsewhere; see the tipabout chmod on page 201), group, and others read or read and write permission fora file. You can prohibit the group and others from accessing the file by specifyingpermissions as None. Put a tick in the check box labeled Execute to give all userspermission to execute the file. This tab does not give you as fine-grained controlover assigning permissions as chmod (page 200) does.
Figure 4-19 The Object Properties window: Emblems tab (left); Permissions tab (right)

118 Chapter 4 Introduction to Ubuntu Linux
Permissions for a directory work as explained on page 202. Owner, group, andothers can be allowed to list files in a directory, access (read and—with theproper permissions—execute) files, or create and delete files. Group and otherspermissions can be set to None. The tri-state check box labeled Execute does notapply to the directory; it applies to the files in the directory. A tick in this checkbox gives everyone execute access to these files; a hyphen does not change exe-cute permissions of the files; and an empty check box removes execute access foreveryone from these files.
Open With When you ask GNOME to open a file that is not executable (by double-clicking itsicon or right-clicking and selecting the first Open with selection), GNOME deter-mines which application or utility it will use to open the file. GNOME uses severaltechniques to determine the MIME (page 1048) type of a file and selects the defaultapplication based on that determination.
The Open With tab (Figure 4-20) enables you to change which applicationsGNOME can use to open the file and other files of the same MIME type (typicallyfiles with the same filename extension). Click the Add button to add to the list ofapplications. Highlight an application and click Remove to remove an applicationfrom the list. You cannot remove the default application.
When you add an application, GNOME adds that application to the Open Withlist, but does not change the default application it uses to open that type of file.Click the radio button next to an application to cause that application to becomethe default application that GNOME uses to open this type of file.
When a file has fewer than four applications in the Open With tab, the Object Con-text menu displays all applications in that menu. With four or more applications,the Object Context menu uses an Open With submenu (Figure 4-20).
Notes The Notes tab provides a place to keep notes about the file.
Figure 4-20 The Object Properties window, Open With tab, and the Object Context menu, Open With submenu for the same file

Updating, Installing, and Removing Software Packages 119
Updating, Installing, and Removing
Software Packages
Ubuntu software comes in packages that include all necessary files, instructionsso that a program can automatically install and remove the software, and a listof other packages that the package depends on. There are many ways to searchfor and install software packages. The Update Notifier (page 100) prompts youeach time updates are available for software on the system. The SoftwareSources window (discussed next) is an easy way to install popular software.Synaptic (page 121) is more complex and gives you a wider selection of soft-ware. Chapter 14 explains how to work with software packages from the com-mand line.
Software Sources Window
Repositories Repositories hold collections of software packages and related information. TheSoftware Sources window controls which categories of packages Ubuntuinstalls, which repositories it downloads the packages from, how automaticupdating works, and more. Open this window by selecting Main menu: SystemAdministration Software Sources (you will need to supply your password) or bygiving the command gksudo software-properties-gtk from a terminal emulator orRun Application window (ALT-F2). The Software Source window has five tabs,which are discussed next.
Ubuntu Software The Ubuntu Software tab controls which categories of packages (page 588) APT(page 588) and Synaptic install and the Update Manager updates automatically.Typically all categories have ticks in their check boxes except for Source code.Put a tick in this check box if you want to download source code. If the drop-down list labeled Download from does not specify a server near you, use the listto specify one.
If the system does not have an Internet connection, put a tick in one of the checkboxes in the drop-down list labeled Installable from CD-ROM/DVD; APT willthen install software from that source. If you do have an Internet connection,remove the tick from that check box. You can specify a new CD/DVD in the Third-Party Software tab.
Add only repositories you know to be trustworthy
security Adding software from other than the Ubuntu repositories can cause the system to not work prop-erly and cause updates to fail. Even worse, it can make the system vulnerable to attack. Do notadd a third-party repository unless you trust it implicitly.

120 Chapter 4 Introduction to Ubuntu Linux
Third-PartySoftware
You can add, edit, and remove repositories from the Third-Party Software tab. (Seethe adjacent security box concerning adding repositories.) Unless you are workingwith software that is not distributed by Ubuntu, you do not need to add any reposi-tories. To add a CD/DVD as a repository, click Add CD-ROM.
Updates The top part of the Updates tab (Figure 4-21) specifies which types of updates youwant the Update Manager to download. Typically you will want to downloadimportant security updates and recommended updates. In the bottom part of thistab you can specify if and how often the Update Manager will check for updatesand what to do when it finds updates.
Authentication The Authentication tab holds keys for trusted software providers. Ubuntu uses keysto authenticate software, which protects the system against malicious software.Typically Ubuntu provides these keys automatically.
Statistics The Statistics tab allows you to participate in a software popularity contest.
Add/Remove Applications
The Add/Remove Applications window (Figure 4-22) adds and removes applica-tions from the system. It is simpler and has fewer selections than Synaptic(described next). Open this window by selecting Main menu: ApplicationsAdd/Remove or by giving the command gnome-app-install from a terminal emula-tor or Run Application window (ALT-F2). Maximizing this window may make it easierto use.
Figure 4-21 The Software Sources window, Updates tab

Updating, Installing, and Removing Software Packages 121
Enter the name or part of the name of an application in the text box labeled Searchat the top of the window and press RETURN to search for an application. Unless youwant to limit selections, select All available applications in the drop-down listlabeled Show. You can select a category of applications from the list at the left ofthe window.
Scroll through the applications displayed at the right of the window. When youclick/highlight an application, the window displays a summary of the application inthe frame at the lower-right corner of the window. Put a tick in the check box nextto each application you want to install. Remove tick marks from applications youwant to remove. Click Apply Changes to implement the changes you have marked.This utility summarizes the changes you have requested and asks if you want toapply them. Click Apply. Because you need to work with root privileges to installand remove software, the utility may ask for your password. When it is finished ittells you it has been successful. Click Close. Packages you installed should be avail-able on the Main menu.
optional
Synaptic: Finds, Installs, and Removes Software
This section describes how to use Synaptic to find, download, install, and removesoftware packages. Open the Synaptic Package Manager window by selecting
Figure 4-22 The Add/Remove Applications window

122 Chapter 4 Introduction to Ubuntu Linux
System: Administration Synaptic Package Manager from the Main menu or bygiving the command gksudo synaptic from a terminal emulator or Run Applica-tion window (ALT-F2). Figure 4-23 shows the initial window. The first time you runSynaptic, it reminds you to reload package information regularly. You can do soby clicking Reload on the toolbar.
The Synaptic Package Manager window displays a lot of information. Maximizingthis window and widening the left column (by dragging the handle) may make iteasier to use. When the Sections button is highlighted in the left column, the top ofthe left column holds a list box containing categories of software. Initially All isselected in this list box, causing the window to display all software packages in thelist box at the top of the right column.
You can shorten the list of packages in the list box by selecting a category in the cate-gory list box or by searching for a package. To search for a package, display the Findwindow by clicking Search on the toolbar. Enter the name or part of the name of thepackage you are looking for. For example, to display all packages related to exim4,enter exim4 in the text box labeled Search and select Description and Name from the
Figure 4-23 The Synaptic Package Manager window
Figure 4-24 The Find window
Category list box
Handle
Sections button

Updating, Installing, and Removing Software Packages 123
drop-down list labeled Look in (Figure 4-24). Click Search. The Synaptic PackageManager window displays the list of packages meeting the search criteria specified inthe list box at the top of the right column. When you click a package name in this list,Synaptic displays a description of the package in the frame below the list.
The following example explains how to use Synaptic to locate, download, andinstall a chess program. With the Synaptic Package Manager window open, searchfor chess. Synaptic displays a list of chess-related packages in the righthand listbox. Click several packages, one at a time, reading the descriptions in the frame atthe lower right of the window. Assume you decide to install Dream Chess (thedreamchess package, www.dreamchess.org). When you click the check box to theleft of dreamchess, Synaptic displays a list of options. Because this package is notinstalled, all selections except Mark for Installation are grayed out (Figure 4-25).Click this selection. Because the dreamchess package is dependent on other pack-ages that are not installed, Synaptic displays a window asking if you want to markadditional required changes (Figure 4-26 on the next page). This window listsadditional packages Synaptic needs to install so that Dream Chess will run. ClickMark to mark the additional packages. All packages marked for installation arehighlighted in green.
To apply the changes you have marked, click Apply on the toolbar. Synaptic dis-plays a Summary window. If you were installing and/or removing several packages,this summary would be longer. Click Apply. Synaptic keeps you informed of itsprogress. When it is done, it displays the Changes Applied window. Click Close andthen close the Synaptic Package Manager window. Now Dream Chess appears onthe Main menu: Applications Games menu.
Figure 4-25 The Synaptic Package Manager window displaying chess programs

124 Chapter 4 Introduction to Ubuntu Linux
Where to Find Documentation
Distributions of Linux, including Ubuntu, typically do not come with hardcopy referencemanuals. However, its online documentation has always been one of Linux’s strengths.The man (or manual) and info pages have been available via the man and info utilitiessince early releases of the operating system. Ubuntu provides a graphical help center. Notsurprisingly, with the growth of Linux and the Internet, the sources of documentationhave expanded as well. This section discusses some of the places you can look for infor-mation on Linux in general and Ubuntu Linux in particular. See also Appendix B.
Ubuntu Help Center
To display the Ubuntu Help Center window (Figure 4-27), click the blue object witha question mark in it on the Top panel or select Main menu: System Help and Sup-port. Click topics in this window until you find the information you are looking for.You can also search for a topic using the text box labeled Search.
man: Displays the System Manual
In addition to the Graphical Ubuntu Help Center, the textual man utility displays(man) pages from the system documentation. This documentation is helpful whenyou know which utility you want to use but have forgotten exactly how to use it.You can also refer to the man pages to get more information about specific topics orto determine which features are available with Linux. Because the descriptions inthe system documentation are often terse, they are most helpful if you alreadyunderstand the basic functions of a utility.
Because man is a character-based utility, you need to open a terminal emulator win-dow (page 114) to run it. You can also log in on a virtual terminal (page 136) andrun man from there.
Figure 4-26 Mark additional required changes screen

Where to Find Documentation 125
To find out more about a utility, give the command man, followed by the name ofthe utility. Figure 4-28 shows man displaying information about itself; the userentered a man man command.
less (pager) The man utility automatically sends its output through a pager—usually less(page 148), which displays one screen at a time. When you access a manual page inthis manner, less displays a prompt [e.g., Manual page man(1) line 1] at the bottomof the screen after it displays each screen of text and waits for you to request
Figure 4-27 The Ubuntu Help Center window
Figure 4-28 The man utility displaying information about itself

126 Chapter 4 Introduction to Ubuntu Linux
another screen of text by pressing the SPACE bar. Pressing h (help) displays a list ofless commands. Pressing q (quit) stops less and causes the shell to display a prompt.You can search for topics covered by man pages using the apropos utility (page 165).
Based on the FHS (Filesystem Hierarchy Standard, page 194), the Linux systemmanual and the man pages are divided into ten sections, where each sectiondescribes related tools:
1. User Commands2. System Calls3. Subroutines4. Devices5. File Formats6. Games7. Miscellaneous8. System Administration9. Kernel
10. New
This layout closely mimics the way the set of UNIX manuals has always beendivided. Unless you specify a manual section, man displays the earliest occurrence inthe manual of the word you specify on the command line. Most users find the infor-mation they need in sections 1, 6, and 7; programmers and system administratorsfrequently need to consult the other sections.
In some cases the manual contains entries for different tools with the same name.For example, the following command displays the man page for the passwd utilityfrom section 1 of the system manual:
$ man passwd
To see the man page for the passwd file from section 5, enter
$ man 5 passwd
The preceding command instructs man to look only in section 5 for the man page. Indocumentation you may see this man page referred to as passwd(5). Use the –aoption (see the adjacent tip) to view all man pages for a given subject (press qRETURN
to display the next man page). For example, give the command man –a passwd toview all man pages for passwd.
info: Displays Information About Utilities
The textual info utility is a menu-based hypertext system developed by the GNUproject (page 2) and distributed with Ubuntu Linux. The info utility includes a
Options
tip An option modifies the way a utility or command works. Options are usually specified as one ormore letters that are preceded by one or two hyphens. An option typically appears following thename of the utility you are calling and a SPACE. Other arguments (page 1023) to the command fol-low the option and a SPACE. For more information refer to “Options” on page 221.

Where to Find Documentation 127
tutorial on itself (go to www.gnu.org/software/texinfo/manual/info) and documen-tation on many Linux shells, utilities, and programs developed by the GNUproject. Figure 4-29 shows the screen that info displays when you give the com-mand info coreutils (the coreutils software package holds the Linux core utilities).
Because the information on this screen is drawn from an editable file, your displaymay differ from the screens shown in this section. When you see the initial infoscreen, you can press any of the following keys or key combinations:
• h to go through an interactive tutorial on info
• ? to list info commands
• SPACE to scroll through the menu of items for which information is available
• m followed by the name of the menu you want to display or a SPACE to dis-play a list of menus
• q or CONTROL-C to quit
The notation info uses to describe keyboard keys may not be familiar to you. Thenotation C-h is the same as CONTROL-H. Similarly M-x means hold down the META or ALT
key and press x. (On some systems you need to press ESCAPE and then x to duplicatethe function of META-x.)
Figure 4-29 The screen info coreutils displays
man and info display different information
tip The info utility displays more complete and up-to-date information on GNU utilities than doesman. When a man page displays abbreviated information on a utility that is covered by info, theman page refers to info. The man utility frequently displays the only information available onnon-GNU utilities. When info displays information on non-GNU utilities, it is frequently a copy ofthe man page.

128 Chapter 4 Introduction to Ubuntu Linux
After giving the command info, press the SPACE bar a few times to scroll through thedisplay. Figure 4-30 shows the entry for sleep. The asterisk at the left end of the lineindicates that this entry is a menu item. Following the asterisk is the name of themenu item and a description of the item.
Each menu item is a link to the info page that describes the item. To jump to thatpage, use the ARROW keys to move the cursor to the line containing the menu item andpress RETURN. Alternatively, you can type the name of the menu item in a menu com-mand to view the information. To display information on sleep, for example, youcan give the command m sleep, followed by RETURN. When you type m (for menu),the cursor moves to the bottom line of the window and displays Menu item:. Typingsleep displays sleep on that line, and pressing RETURN displays information about themenu item you have chosen.
Figure 4-31 shows the top node of information on sleep. A node groups a set ofinformation you can scroll through with the SPACE bar. To display the next node,press n. Press p to display the previous node.
As you read through this book and learn about new utilities, you can use man or info tofind out more about those utilities. If you can print PostScript documents, you can printa manual page with the man utility using the –t option (for example, man –t cat | lprprints information about the cat utility). You can also use a Web browser to display thedocumentation at www.tldp.org, help.ubuntu.com, help.ubuntu.com/community, oranswers.launchpad.net/ubuntu and print the desired information from the browser.
Figure 4-30 The screen info displays after you type /sleepRETURN
You may find pinfo easier to use than info
tip The pinfo utility is similar to info but is more intuitive if you are not familiar with the emacs editor.This utility runs in a textual environment, as does info. When it is available, pinfo uses color to makeits interface easier to use. Use Synaptic to install the pinfo package if you want to experiment with it.Run pinfo from a terminal emulator or Run Application window (ALT-F2) and select Run in terminal).

Where to Find Documentation 129
The ––help Option
Another tool you can use in a textual environment is the ––help option. Most GNUutilities provide a ––help option that displays information about the utility. Non-GNU utilities may use a –h or –help option to display help information.
$ cat --helpUsage: cat [OPTION] [FILE]...Concatenate FILE(s), or standard input, to standard output.
-A, --show-all equivalent to -vET -b, --number-nonblank number nonblank output lines -e equivalent to -vE -E, --show-ends display $ at end of each line...
If the information that ––help displays runs off the screen, send the output throughthe less pager (page 125) using a pipe (page 156):
$ ls --help | less
HOWTOs: Finding Out How Things Work
A HOWTO document explains in detail how to do something related toLinux—from setting up a specialized piece of hardware to performing a systemadministration task to setting up specific networking software. Mini-HOWTOsoffer shorter explanations. As with Linux software, one person or a few people gen-erally are responsible for writing and maintaining a HOWTO document, but manypeople may contribute to it.
The Linux Documentation Project (LDP, page 131) site houses most HOWTO andmini-HOWTO documents. Use a Web browser to visit www.tldp.org, click HOWTOs,
Figure 4-31 The info page on the sleep utility

130 Chapter 4 Introduction to Ubuntu Linux
and pick the index you want to use to find a HOWTO or mini-HOWTO. You can alsouse the LDP search feature on its home page to find HOWTOs and other documents.
Getting Help with the System
GNOME provides tooltips (page 106), a context-sensitive Help system, and Ubuntuprovides the help center discussed on page 124.
Finding Help Locally
/usr/share/doc The /usr/src/linux/Documentation (present only if you installed the kernel sourcecode as explained in Chapter 16) and /usr/share/doc directories often contain moredetailed and different information about a utility than man or info provides.Frequently this information is meant for people who will be compiling and modify-ing the utility, not just using it. These directories hold thousands of files, each con-taining information on a separate topic.
Using the Internet to Get Help
The Internet provides many helpful sites related to Linux. Aside from sites that carryvarious forms of documentation, you can enter an error message from a programyou are having a problem with in a search engine such as Google (www.google.com,or its Linux-specific version at www.google.com/linux). Enclose the error messagewithin double quotation marks to improve the quality of the results. The search willlikely yield a post concerning your problem and suggestions about how to solve it.See Figure 4-32.
Ubuntu Web sites The Ubuntu Web site is a rich source of information. The following list identifiessome locations that may be of interest:
Figure 4-32 Google reporting on an error message

Where to Find Documentation 131
• Ubuntu documentation is available at help.ubuntu.com.
• Ubuntu community documentation is available at help.ubuntu.com/community.
• You can find answers to many questions at answers.launchpad.net/ubuntu.
• The Ubuntu forums (ubuntuforums.org) is a good place to find answers to questions.
• You can talk with other Ubuntu users using IRC (Internet relay chat). See help.ubuntu.com/community/InternetRelayChat for a list of Ubuntu IRC channels available via the Freenode IRC service.
• You can subscribe to Ubuntu mailing lists. See lists.ubuntu.com.
• You can search for information about packages and find out which pack-age contains a specific file at packages.ubuntu.com.
GNU GNU manuals are available at www.gnu.org/manual. In addition, you can visit theGNU home page (www.gnu.org) for more documentation and other GNU resources.Many of the GNU pages and resources are available in a variety of languages.
The LinuxDocumentation
Project
The Linux Documentation Project (www.tldp.org), which has been around for almostas long as Linux, houses a complete collection of guides, HOWTOs, FAQs, man pages,and Linux magazines. The home page is available in English, Portuguese, Spanish,Italian, Korean, and French. It is easy to use and supports local text searches. It alsoprovides a complete set of links (Figure 4-33) you can use to find almost anything youwant related to Linux (click Links in the Search box or go to www.tldp.org/links). Thelinks page includes sections on general information, events, getting started, usergroups, mailing lists, and newsgroups, with each section containing many subsections.
Figure 4-33 The Linux Documentation Project home page

132 Chapter 4 Introduction to Ubuntu Linux
More About Logging In
Refer to “Logging In on the System” on page 89 for information about logging in.This section covers options you can choose from the Login screen and solutions tocommon login problems. It also describes how to log in from a terminal and from aremote system.
The Login Screen
At the lower-left corner of the Login screen is a small object labeled Options(Figure 4-1, page 90). Click this object or press F10 to display the Actions menu,which has the following selections:
• Select Language Displays a window from which you can select the lan-guage for the session you are about to start. This change affects window titles, prompts, error messages, and other textual items displayed by GNOME and many applications. Just after you log in, the system asks whether you want to make the language you specified the default language or just use it for this session.
• Select Session Displays the Sessions dialog box, which presents several choices concerning the session you are about to start. Choose one of the following, click Change Session, and continue logging in:
◆ Last Session Brings up the same desktop environment you used the last time you logged in. This choice is the default.
◆ Run Xclient script Brings up the default desktop environment.
◆ GNOME Brings up the GNOME desktop environment.
◆ KDE Brings up the KDE desktop environment (if you have installed Kubuntu or KDE, see page 60).
◆ Failsafe GNOME Brings up a default GNOME session without run-ning any startup scripts. Use this choice to fix problems that prevent you from logging in normally.
◆ Failsafe Terminal Brings up an xterm terminal emulator window without a desktop manager and without running any startup scripts. This setup allows you to log in on a minimal desktop when your stan-dard login does not work well enough to allow you to log in to fix a problem. Give the command exit from the xterm window to log out and display the Login screen.
Always use a password
security Unless you are the only user of a system; the system is not connected to any other systems, theInternet, or a modem; and you are the only one with physical access to the system, it is poor prac-tice to maintain a user account without a password.

More About Logging In 133
Just after you log in, the system asks whether to use your selection from the Sessions dialog box just for this session or permanently. The failsafe logins do not ask this question.
• Restart Shuts down and reboots the system.
• Shut Down Shuts down the system and turns off the power.
• Suspend Puts the system in power-saving mode. Exactly what this selec-tion does depends on the hardware.
What to Do If You Cannot Log In
If you enter either your username or password incorrectly, the system displays anerror message after you enter both your username and your password. This messageindicates you have entered either the username or the password incorrectly or theyare not valid. It does not differentiate between an unacceptable username and anunacceptable password—a strategy meant to discourage unauthorized people fromguessing names and passwords to gain access to the system. Following are somecommon reasons why logins fail:
• The username and password are case sensitive. Make sure the CAPS LOCK key is off and enter your username and password exactly as specified or as you set them up.
• You are not logging in on the right machine. The login/password combina-tion may not be valid if you are trying to log in on the wrong machine. On a larger, networked system, you may have to specify the machine you want to connect to before you can log in.
• Your username is not valid. The login/password combination may not be valid if you have not been set up as a user. If you are the system adminis-trator, refer to “Configuring User and Group Accounts” on page 658. Otherwise, check with the system administrator.
• A filesystem is full. When a filesystem critical to the login process is full, it may appear as though you have logged in successfully, but after a moment the login screen reappears. You must log in using one of the failsafe logins and delete some files.
Refer to “Changing Your Password” on page 135 if you want to change your password.
Logging In Remotely: Terminal Emulators, ssh,
and Dial-Up Connections
When you are not using a console, terminal, or other device connected directly tothe Linux system you are logging in on, you are probably connected to the Linuxsystem using terminal emulation software on another system. Running on the localsystem, this software connects to the remote Linux system via a network (Ethernet,asynchronous phone line, PPP, or other type) and allows you to log in.

134 Chapter 4 Introduction to Ubuntu Linux
When you log in via a dial-up line, the connection is straightforward: You instructthe local emulator program to contact the remote Linux system, it dials the phone,and the remote system displays a login prompt. When you log in via a directly con-nected network, you use ssh (secure, page 714) or telnet (not secure, page 373) toconnect to the remote system. The ssh program has been implemented on manyoperating systems, not just Linux. Many user interfaces to ssh include a terminalemulator. From an Apple, PC, or UNIX machine, open the program that runs sshand give it the name or IP address (refer to “Host Address” on page 363) of thesystem you want to log in on. For examples and more details on working with aterminal emulator, refer to “Running Commands from a Terminal Emulator/Shell”on page 114. The next section provides more information about logging in from aterminal emulator.
Logging In from a Terminal (Emulator)
Before you log in on a terminal, terminal emulator, or other textual device, the sys-tem displays a message called issue (stored in the /etc/issue file) that identifies theversion of Ubuntu Linux running on the system. A sample issue message follows:
Ubuntu 7.10 tiny tty1
This message is followed by a prompt to log in. Enter your username and passwordin response to the system prompts. If you are using a terminal (page 1064) and thescreen does not display the login: prompt, check whether the terminal is plugged inand turned on, and then press the RETURN key a few times. If login: still does notappear, try pressing CONTROL-Q. If you are using a workstation (page 1069), run ssh(page 714), telnet (page 373), or whatever communications/emulation software youuse to log in on the system. Log in.
Next the shell prompt (or just prompt) appears, indicating you have successfullylogged in; it indicates the system is ready for you to give a command. The first shellprompt line may be preceded by a short message called the message of the day, ormotd (page 559), which is stored in the /etc/motd file. Ubuntu Linux establishes aprompt of [user@host: directory]$, where user is your username, host is the name of
Make sure TERM is set correctly
tip No matter how you connect, make sure you have the TERM variable set to the type of terminal youremulator is emulating. For more information refer to “Specifying a Terminal” on page 988.
Did you log in last?security As you are logging in to a textual environment, after you enter your username and password, the
system displays information about the last login on this account, showing when it took place andwhere it originated. You can use this information to determine whether anyone else has accessedthe account since you last used it. If someone has, perhaps an unauthorized user has learned yourpassword and logged on as you. In the interest of maintaining security, advise the system admin-istrator of any circumstances that make you suspicious and change your password.

More About Logging In 135
the local system, and directory is the name of the directory you are working in. Atilde (~) represents your home directory. For information on how to change theprompt, refer to page 303.
Changing Your Password
If someone else assigned you a password, it is a good idea to give yourself a new one.For security reasons none of the passwords you enter is displayed by any utility.
To change your password, select Main menu: System Preferences About Me andclick Change Password. From a command line, give the command passwd.
The first item the system asks for is your current (old) password. This password isverified to ensure that an unauthorized user is not trying to alter your password.Then the system requests a new password.
A password should contain a combination of numbers, uppercase and lowercase let-ters, and punctuation characters and meet the following criteria to be relatively secure:
• Must be at least four characters long (or longer if the system administrator sets it up that way). Seven or eight characters is a good compromise between length and security.
• Should not be a word in a dictionary of any language, no matter how seemingly obscure.
• Should not be the name of a person, place, pet, or other thing that might be discovered easily.
• Should contain at least two letters and one digit or punctuation character.
• Should not be your username, the reverse of your username, or your user-name shifted by one or more characters.
Protect your passwordsecurity Do not allow someone to find out your password: Do not put your password in a file that is not
encrypted, allow someone to watch you type your password, or give your password to someoneyou do not know (a system administrator never needs to know your password). You can alwayswrite your password down and keep it in a safe, private place.
Choose a password that is difficult to guess
security Do not use phone numbers, names of pets or kids, birthdays, words from a dictionary (not evena foreign language), and so forth. Do not use permutations of these items or a l33t-speak variationof a word as modern dictionary crackers may also try these permutations.
Differentiate between important and less important passwordssecurity It is a good idea to differentiate between important and less important passwords. For example,
Web site passwords for blogs or download access are not very important; it is acceptable to usethe same password for these types of sites. However, your login, mail server, and bank accountWeb site passwords are critical: Never use these passwords for an unimportant Web site.

136 Chapter 4 Introduction to Ubuntu Linux
Only the first item is mandatory. Avoid using control characters (such as CONTROL-H)because they may have a special meaning to the system, making it impossible foryou to log in. If you are changing your password, the new password should differfrom the old one by at least three characters. Changing the case of a character doesnot make it count as a different character. Refer to “Keeping the System Secure” onpage 682 for more information about choosing a password.
After you enter your new password, the system asks you to retype it to make sureyou did not make a mistake when you entered it the first time. If the new password isthe same both times you enter it, your password is changed. If the passwords differ,you made an error in one of them. In this situation the system displays an error mes-sage or does not allow you to click the OK button. If the password you enter is notlong enough, the system displays a message similar to The password is too short.
When you successfully change your password, you change the way you log in. Ifyou forget your password, a user running with root privileges can change it and tellyou the new password.
Using Virtual Consoles
When running Linux on a personal computer, you frequently work with the displayand keyboard attached to the computer. Using this physical console, you can accessas many as 63 virtual consoles (also called virtual terminals). Some are set up toallow logins; others act as graphical displays. To switch between virtual consoles,hold the CONTROL and ALT keys down and press the function key that corresponds tothe console you want to view. For example, CONTROL-ALT-F5 displays the fifth virtualconsole. This book refers to the console you see when you press CONTROL-ALT-F1 as thesystem console, or just console.
By default, six virtual consoles are active and have textual login sessions running.When you want to use both textual and graphical interfaces, you can set up a tex-tual session on one virtual console and a graphical session on another. No matterwhich virtual console you start a graphical session from, the graphical session runson the first unused virtual console (number seven by default).
Working from the Command Line
Before the introduction of the graphical user interface (GUI), UNIX and then Linuxprovided only a command line (textual) interface (CLI). Today, a CLI is availablewhen you log in from a terminal, a terminal emulator, a textual virtual console, orwhen you use ssh (page 711) or telnet (insecure, page 373) to log in on a system.
This section introduces the Linux CLI. Chapter 5 describes some of the moreimportant utilities you can use from the command line. Most of the examples inParts IV and V of this book use the CLI, adding examples of graphical tools whereavailable.

Working from the Command Line 137
Advantages ofthe CLI
Although the concept may seem antiquated, the CLI has a place in modern comput-ing. In some cases an administrator may use a command line tool either because agraphical equivalent does not exist or because the graphical tool is not as powerfulor flexible as the textual one. Frequently, on a server system, a graphical interfacemay not even be installed. The first reason for this omission is that a GUI consumesa lot of system resources; on a server, those resources are better dedicated to the maintask of the server. Additionally, security mandates that a server system run as fewtasks as possible because each additional task can make the system more vulnerableto attack.
Pseudographicalinterface
Before the introduction of GUIs, resourceful programmers created textual interfacesthat included graphical elements such as boxes, borders outlining rudimentary win-dows, highlights, and, more recently, color. These textual interfaces, called pseudo-graphical interfaces, bridge the gap between textual and graphical interfaces.
One example of a modern utility that uses a pseudographical interface is the dpkg-reconfigure utility, which reconfigures an installed software package.
Correcting Mistakes
This section explains how to correct typographical and other errors you may makewhile you are logged in on a textual display. Because the shell and most other utili-ties do not interpret the command line or other text until after you press RETURN, youcan readily correct typing mistakes before you press RETURN.
You can correct typing mistakes in several ways: erase one character at a time, backup a word at a time, or back up to the beginning of the command line in one step.After you press RETURN, it is too late to correct a mistake: You must either wait for thecommand to run to completion or abort execution of the program (page 138).
Erasing a Character
While entering characters from the keyboard, you can back up and erase a mistakeby pressing the erase key once for each character you want to delete. The erase keybacks over as many characters as you wish. It does not, in general, back up past thebeginning of the line.
The default erase key is BACKSPACE. If this key does not work, try DELETE or CONTROL-H. Ifthese keys do not work, give the following stty2 command to set the erase and linekill (see “Deleting a Line”) keys to their default values:
$ stty ek
Deleting a Word
You can delete a word you entered by pressing CONTROL-W. A word is any sequence ofcharacters that does not contain a SPACE or TAB. When you press CONTROL-W, the cursor
2. The command stty is an abbreviation for set teletypewriter, the first terminal that UNIX was run on.Today stty is commonly thought of as set terminal.

138 Chapter 4 Introduction to Ubuntu Linux
moves left to the beginning of the current word (as you are entering a word) or theprevious word (when you have just entered a SPACE or TAB), removing the word.
Deleting a Line
Any time before you press RETURN, you can delete the line you are entering by press-ing the (line) kill key. When you press this key, the cursor moves to the left, erasingcharacters as it goes, back to the beginning of the line. The default line kill key isCONTROL-U. If this key does not work, try CONTROL-X. If these keys do not work, give thestty command described under “Erasing a Character.”
Aborting Execution
Sometimes you may want to terminate a running program. For example, you maywant to stop a program that is performing a lengthy task such as displaying the con-tents of a file that is several hundred pages long or copying a file that is not the oneyou meant to copy.
To terminate a program from a textual display, press the interrupt key (CONTROL-C orsometimes DELETE or DEL). When you press this key, the Linux operating systemsends a terminal interrupt signal to the program you are running and to the shell.Exactly what effect this signal has depends on the program. Some programs stopexecution immediately, some ignore the signal, and some take other actions.When it receives a terminal interrupt signal, the shell displays a prompt and waitsfor another command.
If these methods do not terminate the program, try stopping the program with thesuspend key (typically CONTROL-Z), giving a jobs command to verify the number of thejob running the program, and using kill to abort the job. The job number is the num-ber within the brackets at the left end of the line that jobs displays ([1]). The killcommand (page 522) uses –TERM to send a termination signal3 to the job specifiedby the job number, which is preceded by a percent sign (%1):
$ bigjob^Z[1]+ Stopped bigjob$ jobs[1]+ Stopped bigjob
CONTROL-Z suspends a program
tip Although it is not a way of correcting a mistake, you may press the suspend key (typically CONTROL-Z)by mistake and wonder what happened (you will see a message containing the word Stopped). Youhave just stopped your job, using job control (page 290). Give the command fg to continue your jobin the foreground, and you should return to where you were before you pressed the suspend key. Formore information refer to “bg: Sends a Job to the Background” on page 291.
3. When the terminal interrupt signal does not work, use the kill (–KILL) signal. A running program can-not ignore a kill signal; it is sure to abort the program (page 522).

Controlling Windows: Advanced Operations 139
$ kill -TERM %1$ RETURN[1]+ Killed bigjob
The kill command returns a prompt; press RETURN again to see the confirmation mes-sage. For more information refer to “Running a Program in the Background” onpage 237.
Repeating/Editing Command Lines
To repeat a previous command, press the UP ARROW key. Each time you press this key,the shell displays an earlier command line. To reexecute the displayed commandline, press RETURN. Press the DOWN ARROW key to browse through the command lines inthe other direction.
The RIGHT and LEFT ARROW keys move the cursor back and forth along the displayedcommand line. At any point along the command line, you can add characters bytyping them. Use the erase key to remove characters from the command line. Forinformation about more complex command line editing, see page 314.
optional
Controlling Windows: Advanced Operations
Refer to “Windows” on page 111 for an introduction to working with windowsunder Ubuntu Linux. This section explores changing the input focus on the work-space, changing the resolution of the display, and understanding more about thewindow manager.
Changing the Input Focus
When you type on the keyboard, the window manager (page 141) directs the char-acters you type somewhere, usually to a window. The active window (the windowaccepting input from the keyboard) is said to have the input focus. Depending onhow you set up your account, you can use the mouse in one of three ways to changethe input focus (you can also use the keyboard; see page 112):
• Click-to-focus (explicit focus) Gives the input focus to a window when you click the window. That window continues to accept input from the keyboard regardless of the location of the mouse pointer. The window loses the focus when you click another window. Although clicking the middle or the right mouse button also activates a window, use only the left mouse button for this purpose; other buttons may have unexpected effects when you use them to activate a window.
• Focus-follows-mouse (sloppy focus, enter-only, or focus-under-mouse)Gives the input focus to a window when you move the mouse pointer onto the window. That window maintains the input focus until you move the

140 Chapter 4 Introduction to Ubuntu Linux
mouse pointer onto another window, at which point the new window gets the focus. Specifically, when you move the mouse pointer off a window and onto the root window, the window that had the input focus does not lose it.
• Focus-strictly-under-mouse (enter-exit) Gives the input focus to a win-dow when you move the mouse pointer onto the window. That window maintains the input focus until you move the mouse pointer off if it, at which point no window has the focus. Specifically, when you move the mouse pointer off a window and onto the root window, the window that had the input focus loses it, and input from the keyboard is lost.
GNOME The Window Preferences window changes the focus policy. To display this window,select Main menu: System Preferences Windows or give the command gnome-window-properties from a terminal emulator or Run Application window (ALT-F2).Put a tick in the check box next to Select windows when the mouse moves overthem to select the focus-follows-mouse policy. When there is no tick in this checkbox, click-to-focus is in effect. Click Close. Focus-strictly-under-mouse is not avail-able from this window.
To determine which window has the input focus, compare the window borders. Theborder color of the active window is different from the others or, on a monochromedisplay, is darker. Another indication that a window is active is that the keyboardcursor is a solid rectangle; in windows that are not active, the cursor is an outline ofa rectangle.
Use the following tests to determine which keyboard focus method you are using. Ifyou position the mouse pointer in a window and that window does not get theinput focus, your window manager is configured to use the click-to-focus method. Ifthe border of the window changes, you are using the focus-follows-mouse or focus-strictly-under-mouse method. To determine which of the latter methods you areusing, start typing something, with the mouse pointer positioned on the active win-dow. Then move the mouse pointer over the root window and continue typing. Ifcharacters continue to appear within the window, you are using focus-follows-mouse. Otherwise, you are using focus-strictly-under-mouse.
Changing the Resolution of the Display
The X server (the basis for the Linux graphical interface; see page 252) starts at aspecific display resolution and color depth (page 1029). Although you can changethe color depth only when you start an X server, you can change the resolutionwhile the X server is running. The number of resolutions available depends both onthe display hardware and on the configuration of the X server (see page 75 fordetails). Many users prefer to do most of their work at a higher resolution butmight want to switch to a lower resolution for some tasks, such as playing games.You can switch between display resolutions by pressing either CONTROL-ALT-KEYPAD-+ orCONTROL-ALT-KEYPAD- –, using the + and – on the keyboard’s numeric keypad. You can

Controlling Windows: Advanced Operations 141
also use the Screen and Graphics Preferences window to change the resolution ofthe display (page 75).
Changing to a lower resolution has the effect of zooming in on the display; as aresult, you may no longer be able to view the entire workspace at once. You canscroll the display by pushing the mouse pointer against the edge of the screen.
The Window Manager
A window manager—the program that controls the look and feel of the basicGUI—runs under a desktop manager (such as GNOME or KDE) and controls allaspects of the windows in the X Window System environment. The window man-ager defines the appearance of the windows on the desktop and controls how youoperate and position them: open, close, move, resize, minimize, and so on. It mayalso handle some session management functions, such as how a session is paused,resumed, restarted, or ended (page 104).
Window decorations A window manager controls window decorations—that is, the titlebar and borderof a window. Aside from the aesthetic aspects of changing window decorations, youcan alter their functionality by modifying the number and placement of buttons onthe titlebar.
The window manager takes care of window manipulation so client programs do notneed to. This setup is very different from that of many other operating systems, andthe way that GNOME deals with window managers is different from how otherdesktop environments work. Window managers do more than simply manage win-dows—they provide a useful, good-looking, graphical shell to work from. Theiropen design allows users to define their own policy down to the fine details.
Theoretically GNOME is not dependent on any particular window manager andcan work with any of several window managers. Because of their flexibility, youwould not see major parts of the desktop environment change if you were to switchfrom one window manager to another. A desktop manager collaborates with thewindow manager to make your work environment intuitive and easy to use.Although the desktop manager does not control window placement, it does getinformation from the window manager about window placement.
Ubuntu Linux Window Managers
Metacity and Compiz—the default window managers for Ubuntu GNOME—providewindow management and start many components through GNOME panel objects.They also communicate with and facilitate access to other components in the environ-ment. The Visual Effects tab of the Appearance Preferences window (page 103)allows you to switch between Metacity and Compiz.
Using the standard X libraries, programmers have created other window managers,including blackbox, fluxbox, and WindowMaker. You can use Synaptic (page 121)to install any of these packages.

142 Chapter 4 Introduction to Ubuntu Linux
Using a Window Manager Without a Desktop Manager
It is interesting to see exactly where the line that separates the window manager andthe desktop manager falls. Toward this end, you can run the Failsafe Terminal fromthe Login screen: Specify Options: Select Session Failsafe Terminal and log in. Youshould see a clean screen with an undecorated window running xterm. You can givecommands from this window to open other windows. Try xeyes, xterm, and xclock.Give the command exit to return to the Login screen.
Chapter Summary
As with many operating systems, your access to a Linux system is authorized whenyou log in. You enter your username and password on the Login screen. You canchange your password at any time while you are logged in. Choose a password thatis difficult to guess and that conforms to the criteria imposed by the utility thatchanges your password.
The system administrator is responsible for maintaining the system. On a single-user system, you are the system administrator. On a small, multiuser system, youor another user may act as the system administrator, or this job may be shared. Ona large, multiuser system or a network of systems, there is frequently a full-timesystem administrator. When extra privileges are required to perform certain systemtasks, the system administrator uses sudo to obtain extra privileges, called rootprivileges. An administrator working with root privileges is sometimes referred toas Superuser.
Do not work with root privileges as a matter of course. When you have to do some-thing that requires root privileges, work with root privileges for only as long asabsolutely necessary; revert to working as yourself as soon as possible.
Understanding the desktop and its components is essential to getting the most outof the Ubuntu GUI. The panels offer a convenient way to launch applications, eitherby clicking objects or by using the Main menu. The Main menu is a multilevel menuyou can use to customize and maintain the system and to start many common appli-cations. A window is the graphical manifestation of an application. You can controlits size, location, and appearance by clicking buttons on the window’s titlebar. Aterminal emulator allows you to use the Linux command line interface from agraphical environment. You can use a terminal emulator to launch both textual andgraphical programs.
Panels and menus enable you to select an object (which can be just about anythingon the system). On a panel, you generally click an object; on a menu, you typicallyclick text in a list.
The GNOME environment provides the casual user, the office worker, the poweruser, and the programmer/system designer a space to work in and a set of tools to

Exercises 143
work with. GNOME also provides off-the-shelf productivity and many ways tocustomize its look, feel, and response.
Nautilus is GNOME’s simple, yet powerful file manager. It can create, open, dis-play, move, and copy files and directories as well as execute programs and scripts.One of its most basic and important functions is to create and manage the desktop.
The man utility provides online documentation for system utilities. This utility ishelpful both to new Linux users and to experienced users who must often delve intosystem documentation for information on the finer points of a utility’s behavior.The info utility also helps the beginner and the expert alike. It provides a tutorial onits use and documentation on many Linux utilities.
The textual or command line interface (CLI) continues to have a place in moderncomputing. For example, sometimes a graphical tool does not exist or may not be aspowerful or flexible as its textual counterpart. Security concerns on a server systemmandate that the system run as few tasks as possible. Because each additional taskcan make a server more vulnerable to attack, frequently these systems do not haveGUIs installed.
Exercises
1. The system displays the following message when you attempt to log in with an incorrect username or an incorrect password:
Incorrect username or password. Letters must be typed in the correct case.
This message does not indicate whether your username, your password, or both are invalid. Why does it not reveal this information?
2. Give three examples of poor password choices. What is wrong with each?
3. Is fido an acceptable password? Give several reasons why or why not.
4. What is a context menu? How does a context menu differ from other menus?
5. What appears when you right-click the root window? How can you use this object?
6. How would you swap the effects of the right and left buttons on a mouse? What is the drag and drop threshold? How would you change it?
7. What are the primary functions of the Main menu?
8. What is the input focus? When no window has the input focus, what hap-pens to the letters you type on the keyboard? Which type of input focus would you prefer to work with? Why?

144 Chapter 4 Introduction to Ubuntu Linux
9. What are the functions of a Window Operations menu? How do you dis-play this menu?
10. What is a panel? Name a few objects on the panels and explain what you can use them for. What do the Workspace Switcher applet and the Win-dow List applets do?
11. What are tooltips? How are they useful?
Advanced Exercises
12. What change does the mouse pointer undergo when you move it to the edge of a window? What happens when you right-click and drag the mouse pointer when it looks like this? Repeat this experiment with the mouse pointer at the corner of a window.
13. Try the experiment described in “Using a Window Manager Without a Desktop Manager” on page 142. What is missing from the screen? Based only on what you see, describe what a window manager does. How does a desktop manager make it easier to work with a GUI?
14. When the characters you type do not appear on the screen, what might be wrong? How can you fix this problem?
15. What happens when you run vim from the Run Command window with-out specifying that it be run in a terminal? Where does the output go?
16. The example on page 126 shows that the man pages for passwd appear in sections 1 and 5 of the system manual. Explain how you can use man to determine which sections of the system manual contain a manual page with a given name.
17. How many man pages are in the Devices subsection of the system manual? (Hint: Devices is a subsection of Special Files.)

145145
5Chapter5When Linus Torvalds introduced Linux and for a long timethereafter, Linux did not have a graphical user interface (GUI): Itran on character-based terminals only. All the tools ran from acommand line. Today the Linux GUI is important but manypeople—especially system administrators—run many commandline programs. Command line utilities are often faster, morepowerful, or more complete than their GUI counterparts. Some-times there is no GUI counterpart to a textual utility; some peo-ple just prefer the hands-on feeling of the command line.
When you work with a command line interface, you are work-ing with a shell (Chapters 7, 9, and 11). Before you startworking with a shell, it is important that you understandsomething about the characters that are special to the shell, sothis chapter starts with a discussion of special characters. Thechapter then describes five basic utilities: ls, cat, rm, less, andhostname. It continues by describing several other file manipu-lation utilities as well as utilities that find out who is loggedin; that communicate with other users; that print, compress,and decompress files; and that pack and unpack archive files.
In This Chapter
Special Characters . . . . . . . . . . . . 146
Basic Utilities . . . . . . . . . . . . . . . . 147
less Is more: Display a Text File One Screen at a Time . . . . . . . . 148
Working with Files. . . . . . . . . . . . . 149
lpr: Prints a File . . . . . . . . . . . . . . . 151
| (Pipe): Communicates Between Processes . . . . . . . . . . . . . . . . . . 156
Compressing and Archiving Files . . . . . . . . . . . . . . . . . . . . . . 159
Obtaining User and System Information . . . . . . . . . . . . . . . . 166
Tutorial: Creating and Editing a File with vim . . . . . . . . . . . . . . . . . . . 172
5
The Linux Utilities

146 Chapter 5 The Linux Utilities
Special Characters
Special characters, which have a special meaning to the shell, are discussed in “File-name Generation/Pathname Expansion” on page 239. These characters are men-tioned here so that you can avoid accidentally using them as regular characters untilyou understand how the shell interprets them. For example, it is best to avoid usingany of the following characters in a filename (even though emacs and some otherprograms do) because they make the file harder to reference on the command line:
& ; | * ? ' " ‘ [ ] ( ) $ < > { } # / \ ! ~
Whitespace Although not considered special characters, RETURN, SPACE, and TAB also have specialmeanings to the shell. RETURN usually ends a command line and initiates execution ofa command. The SPACE and TAB characters separate elements on the command lineand are collectively known as whitespace or blanks.
Quoting specialcharacters
If you need to use a character that has a special meaning to the shell as a regularcharacter, you can quote (or escape) it. When you quote a special character, youkeep the shell from giving it special meaning. The shell treats a quoted special char-acter as a regular character. However, a slash (/) is always a separator in a path-name, even when you quote it.
Backslash To quote a character, precede it with a backslash (\). When two or more specialcharacters appear together, you must precede each with a backslash (for example,you would enter ** as \*\*). You can quote a backslash just as you would quoteany other special character—by preceding it with a backslash (\\).
Single quotationmarks
Another way of quoting special characters is to enclose them between single quota-tion marks: '**'. You can quote many special and regular characters between apair of single quotation marks: 'This is a special character: >'. The regular charac-ters are interpreted as usual, and the shell also interprets the special characters asregular characters.
The only way to quote the erase character (CONTROL-H), the line kill character(CONTROL-U), and other control characters (try CONTROL-M) is by preceding each with aCONTROL-V. Single quotation marks and backslashes do not work. Try the following:
$ echo 'xxxxxxCONTROL-U'$ echo xxxxxxCONTROL-V CONTROL-U
optional Although you cannot see the CONTROL-U displayed by the second of the preceding pairof commands, it is there. The following command sends the output of echo(page 157) through a pipe (page 156) to od (see the od man page) to display CONTROL-U
as octal 25 (025):
Run these utilities from a command line
tip This chapter describes command line, or textual, utilities. You can experiment with these utilitiesfrom a terminal, a terminal emulator within a GUI (page 114), or a virtual console (page 136).

Basic Utilities 147
$ echo xxxxxxCONTROL-V CONTROL-U | od -c0000000 x x x x x x 025 \n0000010
The \n is the NEWLINE character that echo sends at the end of its output.
Basic Utilities
One of the important advantages of Linux is that it comes with thousands of utili-ties that perform myriad functions. You will use utilities whenever you work withLinux, whether you use them directly by name from the command line or indirectlyfrom a menu or icon. The following sections discuss some of the most basic andimportant utilities; these utilities are available from a character-based interface.Some of the more important utilities are also available from a GUI; others are avail-able only from a GUI.
Folder The term directory is used extensively in the next sections. A directory is a resourcethat can hold files. On other operating systems, including Windows and Macintosh,and frequently when speaking about a Linux GUI, a directory is referred to as afolder. That is a good analogy: A traditional manila folder holds files just as a direc-tory does.
ls: Lists the Names of Files
Using the editor of your choice, create a small file named practice. (A tutorial on thevim editor appears on page 172.) After exiting from the editor, you can use the ls(list) utility to display a list of the names of the files in your home directory. In thefirst command in Figure 5-1 (next page), ls lists the name of the practice file. (Youmay also see files the system or a program created automatically.) Subsequent com-mands in Figure 5-1 display the contents of the file and remove the file. These com-mands are described next.
cat: Displays a Text File
The cat utility displays the contents of a text file. The name of the command isderived from catenate, which means to join together, one after the other. (Figure 7-8on page 230 shows how to use cat to string together the contents of three files.)
A convenient way to display the contents of a file to the screen is by giving the com-mand cat, followed by a SPACE and the filename. Figure 5-1 shows cat displaying thecontents of practice. This figure shows the difference between the ls and cat utilities:The ls utility displays the name of a file, whereas cat displays the contents of a file.
In this chapter you work in your home directorytip When you log in on the system, you are working in your home directory. In this chapter that is the
only directory you use: All the files you create in this chapter are in your home directory. Chapter 6goes into more detail about directories.

148 Chapter 5 The Linux Utilities
rm: Deletes a File
The rm (remove) utility deletes a file. Figure 5-1 shows rm deleting the file namedpractice. After rm deletes the file, ls and cat show that practice is no longer in thedirectory. The ls utility does not list its filename, and cat says that no such file exists.Use rm carefully.
less Is more: Display a Text File One Screen at a Time
Pagers When you want to view a file that is longer than one screen, you can use either theless utility or the more utility. Each of these utilities pauses after displaying a screenof text. Because these utilities show one page at a time, they are called pagers.Although less and more are very similar, they have subtle differences. At the end ofthe file, for example, less displays an EOF (end of file) message and waits for you topress q before returning you to the shell. In contrast, more returns you directly tothe shell. In both utilities you can press h to display a Help screen that lists com-mands you can use while paging through a file. Give the commands less practiceand more practice in place of the cat command in Figure 5-1 to see how these com-mands work. Use the command less /etc/termcap instead if you want to experimentwith a longer file. Refer to the less man page for more information.
$ lspractice$ cat practiceThis is a small file that I createdwith a text editor.$ rm practice$ ls$ cat practicecat: practice: No such file or directory$
Figure 5-1 Using ls, cat, and rm on the file named practice
A safer way of removing files
tip You can use the interactive form of rm to make sure that you delete only the file(s) you intend todelete. When you follow rm with the –i option (see page 126 for a tip on options) and the nameof the file you want to delete, rm displays the name of the file and then waits for you to respondwith y (yes) before it deletes the file. It does not delete the file if you respond with a string thatdoes not begin with y.
$ rm -i toollistrm: remove regular file 'toollist'? y
Optional: You can create an alias (page 328) for rm –i and put it in your startup file (page 188) sothat rm always runs in interactive mode.

Working with Files 149
hostname: Displays the System Name
The hostname utility displays the name of the system you are working on. Use thisutility if you are not sure that you are logged in on the right machine.
$ hostnamebravo.example.com
Working with Files
This section describes utilities that copy, move, print, search through, display, sort,and compare files.
cp: Copies a File
The cp (copy) utility (Figure 5-2) makes a copy of a file. This utility can copy anyfile, including text and executable program (binary) files. You can use cp to make abackup copy of a file or a copy to experiment with.
The cp command line uses the following syntax to specify source and destination files:
cp source-file destination-file
The source-file is the name of the file that cp will copy. The destination-file is thename that cp assigns to the resulting (new) copy of the file.
The cp command line in Figure 5-2 copies the file named memo to memo.copy. Theperiod is part of the filename—just another character. The initial ls command showsthat memo is the only file in the directory. After the cp command, a second ls showstwo files in the directory, memo and memo.copy.
Filename completion
tip After you enter one or more letters of a filename (following a command) on a command line, pressTAB and the Bourne Again Shell will complete as much of the filename as it can. When only onefilename starts with the characters you entered, the shell completes the filename and places aSPACE after it. You can keep typing or you can press RETURN to execute the command at this point.When the characters you entered do not uniquely identify a filename, the shell completes what itcan and waits for more input. When pressing TAB does not change the display, press TAB again todisplay a list of possible completions. For more information refer to “Pathname Completion” onpage 324.
$ lsmemo$ cp memo memo.copy$ lsmemo memo.copy
Figure 5-2 cp copies a file

150 Chapter 5 The Linux Utilities
Sometimes it is useful to incorporate the date in the name of a copy of a file. Thefollowing example includes the date January 30 (0130) in the copied file:
$ cp memo memo.0130
Although it has no significance to Linux, the date can help you find a version of afile that you created on a certain date. Including the date can also help you avoidoverwriting existing files by providing a unique filename each day. For more infor-mation refer to “Filenames” on page 185.
Use scp (page 711) or ftp (page 729) when you need to copy a file from one systemto another on a common network.
mv: Changes the Name of a File
The mv (move) utility can rename a file without making a copy of it. The mv com-mand line specifies an existing file and a new filename using the same syntax as cp:
mv existing-filename new-filename
The command line in Figure 5-3 changes the name of the file memo to memo.0130.The initial ls command shows that memo is the only file in the directory. After yougive the mv command, memo.0130 is the only file in the directory. Compare thisresult to that of the earlier cp example.
The mv utility can be used for more than changing the name of a file. Refer to “mv,cp: Move or Copy Files” on page 197. See the mv info page for more information.
cp can destroy a file
caution If the destination-file exists before you give a cp command, cp overwrites it. Because cp over-writes (and destroys the contents of) an existing destination-file without warning, you must takecare not to cause cp to overwrite a file that you still need. The cp –i (interactive) option promptsyou before it overwrites a file. See page 126 for a tip on options.
The following example assumes that the file named orange.2 exists before you give the cp com-mand. The user answers y to overwrite the file:
$ cp –i orange orange.2cp: overwrite 'orange.2'? y
mv can destroy a file
caution Just as cp can destroy a file, so can mv. Also like cp, mv has a –i (interactive) option. See thecaution box labeled “cp can destroy a file.”
$ lsmemo$ mv memo memo.0130$ lsmemo.0130
Figure 5-3 mv renames a file

Working with Files 151
lpr: Prints a File
The lpr (line printer) utility places one or more files in a print queue for printing.Linux provides print queues so that only one job is printed on a given printer at atime. A queue allows several people or jobs to send output simultaneously to a sin-gle printer with the expected results. On systems that have access to more than oneprinter, you can use lpstat –p to display a list of available printers. Use the –P optionto instruct lpr to place the file in the queue for a specific printer—even one that isconnected to another system on the network. The following command prints the filenamed report:
$ lpr report
Because this command does not specify a printer, the output goes to the defaultprinter, which is the printer when you have only one printer.
The next command line prints the same file on the printer named mailroom:
$ lpr -P mailroom report
You can see which jobs are in the print queue by giving an lpstat –o command or byusing the lpq utility:
$ lpqlp is ready and printingRank Owner Job Files Total Sizeactive alex 86 (standard input) 954061 bytes
In this example, Alex has one job that is being printed; no other jobs are in thequeue. You can use the job number (86 in this case) with the lprm utility to removethe job from the print queue and stop it from printing:
$ lprm 86
You can send more than one file to the printer with a single command. The follow-ing command line prints three files on the printer named laser1:
$ lpr -P laser1 05.txt 108.txt 12.txt
Refer to Chapter 15 for information on setting up a printer and defining the defaultprinter.
grep: Searches for a String
The grep1 utility searches through one or more files to see whether any contain aspecified string of characters. This utility does not change the file it searches butsimply displays each line that contains the string.
1. Originally the name grep was a play on an ed—an original UNIX editor, available on UbuntuLinux—command: g/re/p. In this command g stands for global, re is a regular expression delimited byslashes, and p means print.

152 Chapter 5 The Linux Utilities
The grep command in Figure 5-4 searches through the file memo for lines that con-tain the string credit and displays a single line that meets this criterion. If memocontained such words as discredit, creditor, or accreditation, grep would have dis-played those lines as well because they contain the string it was searching for. The–w option causes grep to match only whole words. Although you do not need toenclose the string you are searching for in single quotation marks, doing so allowsyou to put SPACEs and special characters in the search string.
The grep utility can do much more than search for a simple string in a single file.Refer to the grep info page and Appendix A, “Regular Expressions,” for more infor-mation.
head: Displays the Beginning of a File
By default the head utility displays the first ten lines of a file. You can use head tohelp you remember what a particular file contains. For example, if you have a filenamed months that lists the 12 months of the year in calendar order, one to a line,then head displays Jan through Oct (Figure 5-5).
This utility can display any number of lines, so you can use it to look at only thefirst line of a file, at a full screen, or even more. To specify the number of lines dis-played, include a hyphen followed by the number of lines in the head command. Forexample, the following command displays only the first line of months:
$ head -1 monthsJan
The head utility can also display parts of a file based on a count of blocks or charac-ters rather than lines. Refer to the head info page for more information.
tail: Displays the End of a File
The tail utility is similar to head but by default displays the last ten lines of a file.Depending on how you invoke it, this utility can display fewer or more than tenlines, use a count of blocks or characters rather than lines to display parts of a file,
$ cat memo
Helen:
In our meeting on June 6 wediscussed the issue of credit.Have you had any further thoughtsabout it?
Alex$ grep 'credit' memodiscussed the issue of credit.
Figure 5-4 grep searches for a string

Working with Files 153
and display lines being added to a file that is changing. The following commandcauses tail to display the last five lines, Aug through Dec, of the months file shownin Figure 5-5:
$ tail -5 monthsAugSepOctNovDec
You can monitor lines as they are added to the end of the growing file named logfilewith the following command:
$ tail -f logfile
Press the interrupt key (usually CONTROL-C) to stop tail and display the shell prompt.Refer to the tail info page for more information.
sort: Displays a File in Order
The sort utility displays the contents of a file in order by lines but does not changethe original file.
$ cat monthsJanFebMarAprMayJunJulAugSepOctNovDec
$ head monthsJanFebMarAprMayJunJulAugSepOct
Figure 5-5 head displays the first ten lines of a file

154 Chapter 5 The Linux Utilities
For example, if a file named days contains the name of each day of the week in cal-endar order, each on a separate line, then sort displays the file in alphabetical order(Figure 5-6).
The sort utility is useful for putting lists in order. The –u option generates a sortedlist in which each line is unique (no duplicates). The –n option puts a list of numbersin order. Refer to the sort info page for more information.
uniq: Removes Duplicate Lines from a File
The uniq (unique) utility displays a file, skipping adjacent duplicate lines, but doesnot change the original file. If a file contains a list of names and has two successiveentries for the same person, uniq skips the extra line (Figure 5-7).
If a file is sorted before it is processed by uniq, this utility ensures that no two linesin the file are the same. (Of course, sort can do that all by itself with the –u option.)Refer to the uniq info page for more information.
diff: Compares Two Files
The diff (difference) utility compares two files and displays a list of the differencesbetween them. This utility does not change either file, so it is useful when you wantto compare two versions of a letter or a report or two versions of the source codefor a program.
The diff utility with the –u (unified output format) option first displays two linesindicating which of the files you are comparing will be denoted by a plus sign (+)and which by a minus sign (–). In Figure 5-8, a minus sign indicates the colors.1 file;a plus sign indicates the colors.2 file.
The diff –u command breaks long, multiline text into hunks. Each hunk is precededby a line starting and ending with two at signs (@@). This hunk identifier indicatesthe starting line number and the number of lines from each file for this hunk. InFigure 5-8, the hunk covers the section of the colors.1 file (indicated by a minus
$ cat daysMondayTuesdayWednesdayThursdayFridaySaturdaySunday$ sort daysFridayMondaySaturdaySundayThursdayTuesdayWednesday
Figure 5-6 sort displays the lines of a file in order

Working with Files 155
sign) from the first line through the sixth line. The +1,5 then indicates that the hunkcovers colors.2 from the first line through the fifth line.
Following these header lines, diff –u displays each line of text with a leading minussign, a leading plus sign, or nothing. A leading minus sign indicates that the lineoccurs only in the file denoted by the minus sign. A leading plus sign indicates thatthe line comes from the file denoted by the plus sign. A line that begins with neithera plus sign nor a minus sign occurs in both files in the same location. Refer to thediff info page for more information.
file: Tests the Contents of a File
You can use the file utility to learn about the contents of any file on a Linux systemwithout having to open and examine the file yourself. In the following example, filereports that letter_e.bz2 contains data that was compressed by the bzip2 utility(page 160):
$ file letter_e.bz2letter_e.bz2: bzip2 compressed data, block size = 900k
$ cat dupsCathyFredJoeJohnMaryMaryPaula$ uniq dupsCathyFredJoeJohnMaryPaula
Figure 5-7 uniq removes duplicate lines
$ diff -u colors.1 colors.2--- colors.1 Fri Nov 28 15:45:32 2007+++ colors.2 Fri Nov 28 15:24:46 2007@@ -1,6 +1,5 @@ red+blue green yellow-pink-purple orange
Figure 5-8 diff displaying the unified output format

156 Chapter 5 The Linux Utilities
Next file reports on two more files:
$ file memo zach.jpgmemo: ASCII textzach.jpg: JPEG image data, ... resolution (DPI), 72 x 72
Refer to the file man page for more information.
| (Pipe): Communicates Between Processes
Because pipes are integral to the functioning of a Linux system, they are introducedhere for use in examples. Pipes are covered in detail beginning on page 234.
A process is the execution of a command by Linux (page 310). Communicationbetween processes is one of the hallmarks of both UNIX and Linux. A pipe (writtenas a vertical bar, |, on the command line and appearing as a solid or broken verticalline on keyboards) provides the simplest form of this kind of communication. Sim-ply put, a pipe takes the output of one utility and sends that output as input toanother utility. Using UNIX/Linux terminology, a pipe takes standard output of oneprocess and redirects it to become standard input of another process. (For moreinformation refer to “Standard Input and Standard Output” on page 226.) Most ofwhat a process displays on the screen is sent to standard output. If you do not redi-rect it, this output appears on the screen. Using a pipe, you can redirect the outputso that it becomes instead standard input of another utility. For example, a utilitysuch as head can take its input from a file whose name you specify on the commandline following the word head, or it can take its input from standard input. Thus,you can give the command shown in Figure 5-5 on page 153 as follows:
$ cat months | headJanFebMarAprMayJunJulAugSepOct
The next command displays the number of files in a directory. The wc (word count)utility with the –w option displays the number of words in its standard input or in afile you specify on the command line:
$ ls | wc -w14
You can use a pipe to send output of a program to the printer:
$ tail months | lpr

Four More Utilities 157
Four More Utilities
The echo and date utilities are two of the most frequently used members of the largecollection of Linux utilities. The script utility records part of a session in a file, andunix2dos makes a copy of a text file that can be read on either a Windows or aMacintosh machine.
echo: Displays Text
The echo utility copies anything you put on the command line after echo to thescreen. Some examples appear in Figure 5-9. The last example shows what the shelldoes with an unquoted asterisk (*) on the command line: It expands the asteriskinto a list of filenames in the directory.
The echo utility is a good tool for learning about the shell and other Linux pro-grams. Some examples on page 240 use echo to illustrate how special characters,such as the asterisk, work. Throughout Chapters 7, 9, and 11, echo helps explainhow shell variables work and how you can send messages from shell scripts to thescreen. Refer to the echo info page for more information.
date: Displays the Time and Date
The date utility displays the current date and time:
$ dateThu Jan 24 10:24:00 PST 2008
The following example shows how you can choose the format and select the con-tents of the output of date:
$ date +"%A %B %d"Thursday January 24
Refer to the date info page for more information.
$ lsmemo memo.0714 practice$ echo HiHi$ echo This is a sentence.This is a sentence.$ echo star: *star: memo memo.0714 practice$
Figure 5-9 echo copies the command line (but not the word echo) to the screen

158 Chapter 5 The Linux Utilities
script: Records a Shell Session
The script utility records all or part of a login session, including your input and thesystem’s responses. This utility is useful only from character-based devices, such asa terminal or a terminal emulator. It does capture a session with vim; however,because vim uses control characters to position the cursor and display differenttypefaces, such as bold, the output will be difficult to read and may not be useful.When you cat a file that has captured a vim session, the session quickly passesbefore your eyes.
By default script captures the session in a file named typescript. To use a differentfilename, follow the script command with a SPACE and the new filename. To appendto a file, use the –a option after script but before the filename; otherwise script over-writes an existing file. Following is a session being recorded by script:
$ scriptScript started, file is typescriptmark@plum:~$ whoamisam$ ls -l /bin | head -5total 5024-rwxr-xr-x 1 root root 2928 Sep 21 21:42 archdetect-rwxr-xr-x 1 root root 1054 Apr 26 15:37 autopartition-rwxr-xr-x 1 root root 7168 Sep 21 19:18 autopartition-loop-rwxr-xr-x 1 root root 701008 Aug 27 02:41 bash$ exitexitScript done, file is typescript$
Use the exit command to terminate a script session. You can then view the file youcreated with cat, less, more, or an editor. Following is the file that was created bythe preceding script command:
$ cat typescriptScript started on Mon Sep 24 20:54:59 2007$ whoamisam$ ls -l /bin | head -4total 5024-rwxr-xr-x 1 root root 2928 Sep 21 21:42 archdetect-rwxr-xr-x 1 root root 1054 Apr 26 15:37 autopartition-rwxr-xr-x 1 root root 7168 Sep 21 19:18 autopartition-loop$ ls -l /bin | head -5total 5024-rwxr-xr-x 1 root root 2928 Sep 21 21:42 archdetect-rwxr-xr-x 1 root root 1054 Apr 26 15:37 autopartition-rwxr-xr-x 1 root root 7168 Sep 21 19:18 autopartition-loop-rwxr-xr-x 1 root root 701008 Aug 27 02:41 bash$ exitexit
Script done on Mon Sep 24 20:55:29 2007

Compressing and Archiving Files 159
If you will be editing the file with vim, emacs, or another editor, you can usedos2unix (below) to eliminate from the typescript file the ^M characters that appearat the ends of the lines. Refer to the script man page for more information.
unix2dos: Converts Linux and Macintosh Files to
Windows Format
If you want to share a text file that you created on a Linux system with someone ona Windows or Macintosh system, you need to convert the file before the person onthe other system can read it easily. The unix2dos utility converts a Linux text file sothat it can be read on a Windows or Macintosh system. This utility is part of thetofrodos software package; give the command sudo aptitude install tofrodos toinstall this package. Give the following command to convert a file named memo.txt(created with a text editor) to a DOS-format file:
$ unix2dos memo.txt
Without any options unix2dos overwrites the original file. You can now email thefile as an attachment to someone on a Windows or Macintosh system.
dos2unix You can use the dos2unix utility to convert Windows or Macintosh files so they canbe read on a Linux system:
$ dos2unix memo.txt
See the unix2dos and dos2unix man pages for more information.
You can also use tr to change a Windows or Macintosh text file into a Linux textfile. In the following example, the –d option causes tr to remove RETURNs (representedby \r) as it makes a copy of the file:
$ cat memo | tr -d '\r' > memo.txt
The greater than (>) symbol redirects the standard output of tr to the file namedmemo.txt. For more information refer to “Redirecting Standard Output” onpage 228. Converting a file the other way without using unix2dos is not as easy.
Compressing and Archiving Files
Large files use a lot of disk space and take longer than smaller files to transfer fromone system to another over a network. If you do not need to look at the contents of alarge file very often, you may want to save it on a CD, DVD, or another medium andremove it from the hard disk. If you have a continuing need for the file, retrieving acopy from a CD may be inconvenient. To reduce the amount of disk space you usewithout removing the file entirely, you can compress the file without losing any of theinformation it holds. Similarly a single archive of several files packed into a larger fileis easier to manipulate, upload, download, and email than multiple files. You may fre-quently download compressed, archived files from the Internet. The utilities describedin this section compress and decompress files and pack and unpack archives.
160 Chapter 5 The Linux Utilities
bzip2: Compresses a File
The bzip2 utility compresses a file by analyzing it and recoding it more efficiently.The new version of the file looks completely different. In fact, because the new filecontains many nonprinting characters, you cannot view it directly. The bzip2 utilityworks particularly well on files that contain a lot of repeated information, such astext and image data, although most image data is already in a compressed format.
The following example shows a boring file. Each of the 8,000 lines of the letter_efile contains 72 e’s and a NEWLINE character that marks the end of the line. The fileoccupies more than half a megabyte of disk storage.
$ ls -l-rw-rw-r-- 1 sam sam 584000 Mar 1 22:31 letter_e
The –l (long) option causes ls to display more information about a file. Here itshows that letter_e is 584,000 bytes long. The ––verbose (or –v) option causes bzip2to report how much it was able to reduce the size of the file. In this case, it shrankthe file by 99.99 percent:
$ bzip2 -v letter_eletter_e: 11680.00:1, 0.001 bits/byte, 99.99% saved, 584000 in, 50 out.$ ls -l-rw-rw-r-- 1 sam sam 50 Mar 1 22:31 letter_e.bz2
.bz2 filenameextension
Now the file is only 50 bytes long. The bzip2 utility also renamed the file, appending.bz2 to its name. This naming convention reminds you that the file is compressed;you would not want to display or print it, for example, without first decompressingit. The bzip2 utility does not change the modification date associated with the file,even though it completely changes the file’s contents.
In the following, more realistic example, the file zach.jpg contains a computergraphics image:
$ ls -l-rw-r--r-- 1 sam sam 33287 Mar 1 22:40 zach.jpg
The bzip2 utility can reduce the size of the file by only 28 percent because the imageis already in a compressed format:
$ bzip2 -v zach.jpgzach.jpg: 1.391:1, 5.749 bits/byte, 28.13% saved, 33287 in, 23922 out.
$ ls -l-rw-r--r-- 1 sam sam 23922 Mar 1 22:40 zach.jpg.bz2
Refer to the bzip2 man page, www.bzip.org, and the Bzip2 mini-HOWTO (seepage 129) for more information.
bunzip2 and bzcat: Decompress a File
You can use the bunzip2 utility to restore a file that has been compressed with bzip2:
$ bunzip2 letter_e.bz2$ ls -l-rw-rw-r-- 1 sam sam 584000 Mar 1 22:31 letter_e

Compressing and Archiving Files 161
$ bunzip2 zach.jpg.bz2$ ls -l-rw-r--r-- 1 sam sam 33287 Mar 1 22:40 zach.jpg
The bzcat utility displays a file that has been compressed with bzip2. The equivalentof cat for .bz2 files, bzcat decompresses the compressed data and displays the con-tents of the decompressed file. Like cat, bzcat does not change the source file. Thepipe in the following example redirects the output of bzcat so that instead of beingdisplayed on the screen it becomes the input to head, which displays the first twolines of the file:
$ bzcat letter_e.bz2 | head -2eeeeeeeeeeeeeeeeeeeeeeeeeeeeeeeeeeeeeeeeeeeeeeeeeeeeeeeeeeeeeeeeeeeeeeeeeeeeeeeeeeeeeeeeeeeeeeeeeeeeeeeeeeeeeeeeeeeeeeeeeeeeeeeeeeeeeeeeeeeeeeee
After bzcat is run, the contents of letter_e.bz is unchanged; the file is still stored onthe disk in compressed form.
bzip2recover The bzip2recover utility supports limited data recovery from media errors. Give thecommand bzip2recover followed by the name of the compressed, corrupted filefrom which you want to try to recover data.
gzip: Compresses a File
gunzip and zcat The gzip (GNU zip) utility is older and less efficient than bzip2. Its flags and opera-tion are very similar to those of bzip2. A file compressed by gzip is marked by a .gzfilename extension. Linux stores manual pages in gzip format to save disk space;likewise, files you download from the Internet are frequently in gzip format. Usegzip, gunzip, and zcat just as you would use bzip2, bunzip2, and bzcat, respectively.Refer to the gzip info page for more information.
compress The compress utility can also compress files, albeit not as well as gzip. This utilitymarks a file it has compressed by adding .Z to its name.
tar: Packs and Unpacks Archives
The tar utility performs many functions. Its name is short for tape archive, as its origi-nal function was to create and read archive and backup tapes. Today it is used to createa single file (called a tar file, archive, or tarball) from multiple files or directory hierar-chies and to extract files from a tar file. The cpio utility performs a similar function.
In the following example, the first ls shows the existence and sizes of the files g, b,and d. Next tar uses the –c (create), –v (verbose), and –f (write to or read from afile) options to create an archive named all.tar from these files. Each line output dis-plays the name of the file tar is appending to the archive it is creating.
gzip versus ziptip Do not confuse gzip and gunzip with the zip and unzip utilities. These last two are used to pack
and unpack zip archives containing several files compressed into a single file that has beenimported from or is being exported to a system running Windows. The zip utility constructs a ziparchive, whereas unzip unpacks zip archives. The zip and unzip utilities are compatible withPKZIP, a Windows program that compresses and archives files.

162 Chapter 5 The Linux Utilities
The tar utility adds overhead when it creates an archive. The next command showsthat the archive file all.tar occupies about 9,700 bytes, whereas the sum of the sizesof the three files is about 6,000 bytes. This overhead is more appreciable on smallerfiles, such as the ones in this example.
$ ls -l g b d-rw-r--r-- 1 jenny jenny 1302 Aug 20 14:16 g-rw-r--r-- 1 jenny other 1178 Aug 20 14:16 b-rw-r--r-- 1 jenny jenny 3783 Aug 20 14:17 d$ tar -cvf all.tar g b dgbd$ ls -l all.tar-rw-r--r-- 1 jenny jenny 9728 Aug 20 14:17 all.tar$ tar -tvf all.tar-rw-r--r-- jenny/jenny 1302 2007-08-20 14:16 g-rw-r--r-- jenny/other 1178 2007-08-20 14:16 b-rw-r--r-- jenny/jenny 3783 2007-08-20 14:17 d
The final command in the preceding example uses the –t option to display a table ofcontents for the archive. Use –x instead of –t to extract files from a tar archive. Omitthe –v option if you want tar to do its work silently.2
You can use bzip2, compress, or gzip to compress tar files, making them easier tostore and handle. Many files you download from the Internet will already be in oneof these formats. Files that have been processed by tar and compressed by bzip2 fre-quently have a filename extension of .tar.bz2 or .tbz. Those processed by tar andgzip have an extension of .tar.gz or .tz, whereas files processed by tar and compressuse .tar.Z as the extension.
You can unpack a tarred and gzipped file in two steps. (Follow the same procedure ifthe file was compressed by bzip2, but use bunzip2 instead of gunzip.) The next exam-ple shows how to unpack the GNU make utility after it has been downloaded(ftp.gnu.org/pub/gnu/make/make-3.80.tar.gz):
$ ls -l mak*-rw-rw-r-- 1 sam sam 1211924 Jan 20 11:49 make-3.80.tar.gz$ gunzip mak*$ ls -l mak*-rw-rw-r-- 1 sam sam 4823040 Jan 20 11:49 make-3.80.tar$ tar -xvf mak*make-3.80/make-3.80/po/make-3.80/po/Makefile.in.in...make-3.80/tests/run_make_tests.plmake-3.80/tests/test_driver.pl
2. Although the original UNIX tar did not use a leading hyphen to indicate an option on the commandline, it now accepts hyphens. The GNU tar described here will accept tar commands with or without a lead-ing hyphen. This book uses the hyphen for consistency with most other utilities.

Compressing and Archiving Files 163
The first command lists the downloaded tarred and gzipped file: make-3.80.tar.gz(about 1.2 megabytes). The asterisk (*) in the filename matches any characters in anyfilenames (page 240), so you end up with a list of files whose names begin with mak;in this case there is only one. Using an asterisk saves typing and can improve accuracywith long filenames. The gunzip command decompresses the file and yields make-3.80.tar (no .gz extension), which is about 4.8 megabytes. The tar command createsthe make-3.80 directory in the working directory and unpacks the files into it.
$ ls -ld mak*drwxrwxr-x 8 sam sam 4096 Oct 3 2002 make-3.80-rw-rw-r-- 1 sam sam 4823040 Jan 20 11:49 make-3.80.tar$ ls -l make-3.80total 1816-rw-r--r-- 1 sam sam 24687 Oct 3 2002 ABOUT-NLS-rw-r--r-- 1 sam sam 1554 Jul 8 2002 AUTHORS-rw-r--r-- 1 sam sam 18043 Dec 10 1996 COPYING-rw-r--r-- 1 sam sam 32922 Oct 3 2002 ChangeLog...-rw-r--r-- 1 sam sam 16520 Jan 21 2000 vmsify.c-rw-r--r-- 1 sam sam 16409 Aug 9 2002 vpath.cdrwxrwxr-x 5 sam sam 4096 Oct 3 2002 w32
After tar extracts the files from the archive, the working directory contains two fileswhose names start with mak: make-3.80.tar and make-3.80. The –d (directory)option causes ls to display only file and directory names, not the contents of directo-ries as it normally does. The final ls command shows the files and directories in themake-3.80 directory. Refer to the tar info page for more information.
optional You can combine the gunzip and tar commands on one command line with a pipe( |), which redirects the output of gunzip so that it becomes the input to tar:
$ gunzip -c make-3.80.tar.gz | tar -xvf -
The –c option causes gunzip to send its output through the pipe instead of creating afile. Refer to “Pipes” (page 234) and gzip (page 161) for more information abouthow this command line works.
tar: the –x option may extract a lot of files
caution Some tar archives contain many files. To list the files in the archive without unpacking them, runtar with the –t option and the name of the tar file. In some cases you may want to create a newdirectory (mkdir [page 191]), move the tar file into that directory, and expand it there. That waythe unpacked files will not mingle with your existing files, and no confusion will occur. This strat-egy also makes it easier to delete the extracted files. Some tar files automatically create a newdirectory and put the files into it. Refer to the preceding example.
tar: the –x option can overwrite files
caution The –x option to tar overwrites a file that has the same filename as a file you are extracting. Followthe suggestion in the preceding caution box to avoid overwriting files.
164 Chapter 5 The Linux Utilities
A simpler solution is to use the –z option to tar. This option causes tar to call gunzip(or gzip when you are creating an archive) directly and simplifies the preceding com-mand line to
$ tar -xvzf make-3.80.tar.gz
In a similar manner, the –j option calls bzip2 or bunzip2.
Locating Commands
The whereis and apropos utilities can help you find a command whose name youhave forgotten or whose location you do not know. When multiple copies of a util-ity or program are present, which tells you which copy you will run. The locate util-ity searches for files on the local system.
which and whereis: Locate a Utility
When you give Linux a command, the shell searches a list of directories for a pro-gram with that name and runs the first one it finds. This list of directories is called asearch path. For information on how to change the search path, refer to “PATH:Where the Shell Looks for Programs” on page 302. If you do not change the searchpath, the shell searches only a standard set of directories and then stops searching.Other directories on the system may also contain useful utilities, however.
which The which utility locates utilities by displaying the full pathname of the file for theutility. (Chapter 6 contains more information on pathnames and the structure of theLinux filesystem.) The local system may include several commands that have thesame name. When you type the name of a command, the shell searches for the com-mand in your search path and runs the first one it finds. You can find out whichcopy of the program the shell will run by using which. In the following example,which reports the location of the tar command:
$ which tar/bin/tar
The which utility can be helpful when a command seems to be working in unexpectedways. By running which, you may discover that you are running a nonstandard versionof a tool or a different one than you expected. (“Important Standard Directories andFiles” on page 194 provides a list of standard locations for executable files.) For exam-ple, if tar is not working properly and you find that you are running /usr/local/bin/tarinstead of /bin/tar, you might suspect that the local version is broken.
whereis The whereis utility searches for files related to a utility by looking in standard loca-tions instead of using your search path. For example, you can find the locations forfiles related to tar:
$ whereis tartar: /bin/tar /usr/include/tar.h /usr/share/man/man1/tar.1.gz
In this example whereis finds three references to tar: the tar utility file, a tar headerfile, and the tar man page.

Locating Commands 165
apropos: Searches for a Keyword
When you do not know the name of the command you need to carry out a particu-lar task, you can use apropos with a keyword to search for it. This utility searchesfor the keyword in the short description line (the top line) of all man pages and dis-plays those that contain a match. The man utility, when called with the –k (key-word) option, gives you the same output as apropos (it is the same command).
The database apropos uses, named whatis, is not on Ubuntu Linux systems when theyare first installed, but is built automatically by cron (page 668) using mandb. If apro-pos does not produce any output, run the command sudo mandb.
The following example shows the output of apropos when you call it with the whokeyword. The output includes the name of each command, the section of the man-ual that contains it, and the brief description from the top of the man page. This listincludes the utility that you need (who) and identifies other, related tools that youmight find useful:
$ apropos whoat.allow (5) - determine who can submit jobs via at or batchat.deny (5) - determine who can submit jobs via at or batchfrom (1) - print names of those who have sent mailw (1) - Show who is logged on and what they are doing.w.procps (1) - Show who is logged on and what they are doing.who (1) - show who is logged on...
which versus whereis
tip Given the name of a program, which looks through the directories in your search path, in order,and locates the program. If the search path includes more than one program with the specifiedname, which displays the name of only the first one (the one you would run).
The whereis utility looks through a list of standard directories and works independently of yoursearch path. Use whereis to locate a binary (executable) file, any manual pages, and source codefor a program you specify; whereis displays all the files it finds.
which, whereis, and builtin commands
caution Both the which and whereis utilities report only the names for commands as they are found onthe disk; they do not report shell builtins (utilities that are built into a shell; see page 243). Whenyou use whereis to try to find where the echo command (which exists as both a utility programand a shell builtin) is kept, you get the following result:
$ whereis echoecho: /bin/echo /usr/share/man/man1/echo.1.gz
The whereis utility does not display the echo builtin. Even the which utility reports the wronginformation:
$ which echo/bin/echo
Under bash you can use the type builtin (page 445) to determine whether a command is a builtin:$ type echoecho is a shell builtin

166 Chapter 5 The Linux Utilities
whatis The whatis utility is similar to apropos but finds only complete word matches for thename of the utility:
$ whatis whowho (1) - show who is logged on
slocate: Searches for a File
The slocate utility searches for files on the local system:
$ slocate motd/usr/share/app-install/icons/xmotd.xpm/usr/share/app-install/desktop/motd-editor.desktop/usr/share/app-install/desktop/xmotd.desktop/usr/share/base-files/motd.md5sums/usr/share/base-files/motd...
Before you can use slocate the updatedb utility must build or update the slocate data-base. Typically the database is updated once a day by a cron script (page 668).
Obtaining User and System Information
This section covers utilities that provide information about who is using the system,what those users are doing, and how the system is running.
To find out who is using the local system, you can employ one of several utilitiesthat vary in the details they provide and the options they support. The oldest utility,who, produces a list of users who are logged in on the local system, the device eachperson is using, and the time each person logged in.
The w and finger utilities show more detail, such as each user’s full name and thecommand line each user is running. You can use the finger utility to retrieve infor-mation about users on remote systems if your computer is attached to a network.Table 5-1 on page 169 summarizes the output of these utilities.
If you are not on a network, skip the rest of this chapter
tip If you are the only user on a system that is not connected to a network, you may want to skip therest of this chapter. If you are not on a network but are set up to send and receive email, read“Email” on page 171.
$ whosam console Mar 27 05:00alex pts/4 Mar 27 12:23alex pts/5 Mar 27 12:33jenny pts/7 Mar 26 08:45
Figure 5-10 who lists who is logged in

Obtaining User and System Information 167
who: Lists Users on the System
The who utility displays a list of users who are logged in. In Figure 5-10 the first col-umn that who displays shows that Sam, Alex, and Jenny are logged in. (Alex islogged in from two locations.) The second column shows the device that each user’sterminal, workstation, or terminal emulator is connected to. The third columnshows the date and time the user logged in. An optional fourth column shows (inparentheses) the name of the system that a remote user logged in from; this columndoes not appear in Figure 5-10.
The information that who displays is useful when you want to communicate with auser at your installation. When the user is logged in, you can use write (page 170) toestablish communication immediately. If who does not list the user or if you do notneed to communicate immediately, you can send email to that person (page 171).
If the output of who scrolls off the screen, you can redirect the output through apipe (|, page 156) so that it becomes the input to less, which displays the output onepage at a time. You can also use a pipe to redirect the output through grep to lookfor a specific name.
If you need to find out which terminal you are using or what time you logged in,you can use the command who am i:
$ who am ialex pts/5 Mar 27 12:33
finger: Lists Users on the System
You can use finger to display a list of the users who are logged in on the system. Inaddition to usernames, finger supplies each user’s full name along with informationabout which device the user’s terminal is connected to, how recently the user typedsomething on the keyboard, when the user logged in, and what contact informationis available. If the user has logged in over the network, the name of the remote sys-tem is shown as the user’s location. For example, in Figure 5-11 jenny and hls arelogged in from the remote system named bravo. The asterisk (*) in front of thename of Helen’s device (TTY) indicates that she has blocked others from sendingmessages directly to her terminal (refer to “mesg: Denies or Accepts Messages” onpage 171).
$ fingerLogin Name Tty Idle Login Time Office Office Phonesam root 1 1:35 May 24 08:38alex Alex Watson /0 Jun 7 12:46 (:0)alex Alex Watson /1 19 Jun 7 12:47 (:0)jenn Jenny Chen /2 2:24 Jun 2 05:33 (bravo.example.com)hls Helen Simpson */2 2 Jun 2 05:33 (bravo.example.com)
Figure 5-11 finger I: lists who is logged in

168 Chapter 5 The Linux Utilities
You can also use finger to learn more about an individual by specifying the name ofthat user on the command line. In Figure 5-12, finger displays detailed informationabout the user named Alex. Alex is logged in and actively using one of his terminals(pts/1); he has not used his other terminal (pts/0) for 5 minutes and 52 seconds.You also learn from finger that if you want to set up a meeting with Alex, youshould contact Jenny at extension 1693.
.plan and .project Most of the information in Figure 5-12 was collected by finger from system files.The information shown after the heading Plan:, however, was supplied by Alex. Thefinger utility searched for a file named .plan in Alex’s home directory and displayedits contents.
(Filenames that begin with a period, such as .plan, are not normally listed by ls andare called hidden filenames [page 188].) You may find it helpful to create a .plan filefor yourself; it can contain any information you choose, such as your schedule,interests, phone number, or address. In a similar manner, finger displays the contentsof the .project and .pgpkey files in your home directory. If Alex had not been loggedin, finger would have reported only his user information, the last time he logged in,the last time he read his email, and his plan.
$ finger alexLogin: alex Name: Alex WatsonDirectory: /home/alex Shell: /bin/bashOn since Wed Jun 6 12:46 (PDT) on pts/0 from :0 5 minutes 52 seconds idleOn since Wed Jun 6 12:47 (PDT) on pts/1 from bravoLast login Wed Jun 6 12:47 (PDT) on 1 from bravoNew mail received Wed Jun 6 13:16 2007 (PDT) Unread since Fri May 25 15:32 2007 (PDT)Plan:I will be at a conference in Hawaii all next week. If you needto see me, contact Jenny Chen, x1693.
Figure 5-12 finger II: lists details about one user
finger can be a security risk
security On systems where security is a concern, the system administrator may disable finger. This utilitycan reveal information that can help a malicious user break into a system.
$ w 8:20am up 4 days, 2:28, 3 users, load average: 0.04, 0.04, 0.00USER TTY FROM LOGIN@ IDLE JCPU PCPU WHATalex pts/4 :0 5:55am 13:45 0.15s 0.07s walex pts/5 :0 5:55am 27 2:55 1:01 bashjenny pts/7 bravo 5:56am 13:44 0.51s 30s vim 3.txtscott pts/12 bravo 7:17pm 1.00s 0:14s run_bdgt
Figure 5-13 The w utility

Obtaining User and System Information 169
You can also use finger to display a user’s username. For example, on a system witha user named Helen Simpson, you might know that Helen’s last name is Simpsonbut might not guess that her username is hls. The finger utility, which is not casesensitive, can search for information on Helen using her first or last name. The fol-lowing commands find the information you seek as well as information on otherusers whose names are Helen or Simpson:
$ finger HELENLogin: hls Name: Helen Simpson....$ finger simpsonLogin: hls Name: Helen Simpson....
See page 370 for information about using finger over a network.
w: Lists Users on the System
The w utility displays a list of the users who are logged in. As discussed in the sec-tion on who, the information that w displays is useful when you want to communi-cate with someone at your installation.
The first column in Figure 5-13 shows that Alex, Jenny, and Scott are logged in. Thesecond column shows the designation of the device that each user’s terminal is con-nected to. The third column shows the system that a remote user is logged in from.The fourth column shows the time when each user logged in. The fifth column indi-cates how long each user has been idle (how much time has elapsed since the userpressed a key on the keyboard). The next two columns identify how much com-puter processor time each user has used during this login session and on the taskthat is running. The last column shows the command each user is running.
The first line that the w utility displays includes the time of day, the period of timethe computer has been running (in days, hours, and minutes), the number of userslogged in, and the load average (how busy the system is). The three load averagenumbers represent the number of jobs waiting to run, averaged over the past 1, 5,and 15 minutes. Use the uptime utility to display just this line. Table 5-1 comparesthe w, who, and finger utilities.
Table 5-1 Comparison of w, who, and finger
Information displayed w who finger
Username x x x
Terminal-line identification (tty) x x x
Login day and time x
Login date and time x x
Idle time x x

170 Chapter 5 The Linux Utilities
Communicating with Other Users
The utilities discussed in this section exchange messages and files with other userseither interactively or through email.
write: Sends a Message
The write utility sends a message to another user who is logged in. When you andanother user use write to send messages to each other, you establish two-way com-munication. Initially a write command (Figure 5-14) displays a banner on the otheruser’s terminal, saying that you are about to send a message.
The syntax of a write command line is
write username [terminal]
The username is the username of the user you want to communicate with. The ter-minal is an optional device name that is useful if the user is logged in more thanonce. You can display the usernames and device names of all users who are loggedin on the local system by using who, w, or finger.
To establish two-way communication with another user, you and the other usermust each execute write, specifying the other’s username as the username. The writeutility then copies text, line by line, from one keyboard/display to the other(Figure 5-15). Sometimes it helps to establish a convention, such as typing o (for“over”) when you are ready for the other person to type and typing oo (for “overand out”) when you are ready to end the conversation. When you want to stopcommunicating with the other user, press CONTROL-D at the beginning of a line. Press-ing CONTROL-D tells write to quit, displays EOF (end of file) on the other user’s terminal,and returns you to the shell. The other user must do the same.
Information displayed w who finger
Program the user is executing x
Location the user logged in from x
CPU time used x
Full name (or other information from /etc/passwd) x
User-supplied vanity information x
System uptime and load average x
Table 5-1 Comparison of w, who, and finger (continued)
$ write alexHi Alex, are you there? o
Figure 5-14 The write utility I

Email 171
If the Message from banner appears on your screen and obscures something you areworking on, press CONTROL-L or CONTROL-R to refresh the screen and remove the banner.Then you can clean up, exit from your work, and respond to the person who iswriting to you. You have to remember who is writing to you, however, because thebanner will no longer appear on the screen.
mesg: Denies or Accepts Messages
Give the following command when you do not wish to receive messages fromanother user:
$ mesg n
If Alex had given this command before Jenny tried to send him a message, Jennywould have seen the following message:
$ write alexPermission denied
You can allow messages again by entering mesg y. Give the command mesg by itselfto display is y (for “yes, messages are allowed”) or is n (for “no, messages are notallowed”).
Email enables you to communicate with users on the local system and, if the instal-lation is part of a network, with other users on the network. If you are connected tothe Internet, you can communicate electronically with users around the world.
Email utilities differ from write in that email utilities can send a message when therecipient is not logged in. These utilities can also send the same message to morethan one user at a time.
Many email programs are available for Linux, including the original character-basedmail program, Mozilla/Thunderbird, pine, mail through emacs, KMail, and evolution.Another popular graphical email program is sylpheed (sylpheed.good-day.net).
Two programs are available that can make any email program easier to use andmore secure. The procmail program (www.procmail.org) creates and maintainsemail servers and mailing lists; preprocesses email by sorting it into appropriatefiles and directories; starts various programs depending on the characteristics of
$ write alexHi Alex, are you there? o
Message from [email protected] on pts/0 at 16:23 ...Yes Jenny, I'm here. o
Figure 5-15 The write utility II

172 Chapter 5 The Linux Utilities
incoming email; forwards email; and so on. The GNU Privacy Guard (GPG orGNUpg, page 995) encrypts and decrypts email and makes it almost impossible foran unauthorized person to read.
Refer to Chapter 21 for more information on setting email clients and servers.
Network addresses If your system is part of a LAN, you can generally send email to and receive emailfrom users on other systems on the LAN by using their usernames. Someone send-ing Alex email on the Internet would need to specify his domain name (page 1034)along with his username. Use this address to send email to the author of this book:[email protected].
Tutorial: Creating and Editing a File with vim
This section explains how to start vim, enter text, move the cursor, correct text, savethe file to the disk, and exit from vim. The tutorial discusses three of the modes ofoperation of vim and explains how to switch from one mode to another.
vimtutor In addition to working with this tutorial, you may want to try vim’s tutor, namedvimtutor: Give its name as a command to run it.
Specifying aterminal
Because vim takes advantage of features that are specific to various kinds of termi-nals, you must tell it what type of terminal or terminal emulator you are using. Onmany systems, and usually when you work on a terminal emulator, your terminaltype is set automatically. If you need to specify your terminal type explicitly, refer to“Specifying a Terminal” on page 988.
Starting vim
Start vim with the following command line to create and edit a file named practice:
$ vim practice
When you press RETURN, the command line disappears, and the screen looks similar tothe one shown in Figure 5-16.
The tildes (~) at the left of the screen indicate that the file is empty. They disappearas you add lines of text to the file. If your screen looks like a distorted version of theone shown in Figure 5-16, your terminal type is probably not set correctly.
If you start vim with a terminal type that is not in the terminfo database, vim dis-plays an error message and the terminal type defaults to ansi, which works on manyterminals. In the following example, the user mistyped vt100 and set the terminaltype to vg100:
The vi command runs vim
tip On Ubuntu Linux systems the command vi runs vim. See “The compatible Parameter” onpage 179 for information on running vim in vi-compatible mode.

Tutorial: Creating and Editing a File with vim 173
E558: Terminal entry not found in terminfo'vg100' not known. Available builtin terminals are: builtin_riscos builtin_amiga builtin_beos-ansi builtin_ansi builtin_pcansi builtin_win32 builtin_vt320 builtin_vt52 builtin_xterm builtin_debug builtin_dumbdefaulting to 'ansi'
To reset the terminal type, press ESCAPE and then give the following command to exitfrom vim and get the shell prompt back:
:q!
When you enter the colon (:), vim moves the cursor to the bottom line of the screen.The characters q! tell vim to quit without saving your work. (You will not ordinarilyexit from vim this way because you typically want to save your work.) You mustpress RETURN after you give this command. Once you get the shell prompt back, referto “Specifying a Terminal” on page 988, and then start vim again.
If you start this editor without a filename, vim assumes that you are a novice andtells you how to get started (Figure 5-17, next page).
The practice file is new so it does not contain any text. The vim editor displays amessage similar to the one shown in Figure 5-16 on the status (bottom) line of theterminal to indicate that you are creating and editing a new file. When you edit anexisting file, vim displays the first few lines of the file and gives status informationabout the file on the status line.
Figure 5-16 Starting vim

174 Chapter 5 The Linux Utilities
Command and Input Modes
Two of vim’s modes of operation are Command mode (also called Normal mode)and Input mode (Figure 5-18). While vim is in Command mode, you can give vimcommands. For example, you can delete text or exit from vim. You can also com-mand vim to enter Input mode. In Input mode, vim accepts anything you enter astext and displays it on the screen. Press ESCAPE to return vim to Command mode. Bydefault the vim editor keeps you informed about which mode it is in: It displaysINSERT at the lower-left corner of the screen while it is in Insert mode.
The following command causes vim to display line numbers next to the text you areediting:
:set number RETURN
Figure 5-17 Starting vim without a filename
Figure 5-18 Modes in vim
Insert,Append,Open,Replace,Change
RETURN
ESCAPE
Colon (:)
Inputmode
LastLine
mode
Commandmode
Inputmode
LastLine
mode

Tutorial: Creating and Editing a File with vim 175
Last Line mode The colon (:) in the preceding command puts vim into another mode, Last Line mode.While in this mode, vim keeps the cursor on the bottom line of the screen. When youfinish entering the command by pressing RETURN, vim restores the cursor to its place inthe text. Give the command :set nonumber RETURN to turn off line numbers.
vim is casesensitive
When you give vim a command, remember that the editor is case sensitive. In otherwords, vim interprets the same letter as two different commands, depending onwhether you enter an uppercase or lowercase character. Beware of the CAPS LOCK (SHIFT-
LOCK) key. If you set this key to enter uppercase text while you are in Input mode andthen exit to Command mode, vim interprets your commands as uppercase letters. Itcan be confusing when this happens because vim does not appear to be executing thecommands you are entering.
Entering Text
i/a (Input mode) When you start vim, you must put it in Input mode before you can enter text. To putvim in Input mode, press the i key (insert before the cursor) or the a key (appendafter the cursor).
If you are not sure whether vim is currently in Input mode, press the ESCAPE key; vimreturns to Command mode if it was in Input mode or beeps, flashes, or does noth-ing if it is already in Command mode. You can put vim back in Input mode by press-ing the i or a key again.
While vim is in Input mode, you can enter text by typing on the keyboard. If the textdoes not appear on the screen as you type, vim is not in Input mode.
To continue with this tutorial, enter the sample paragraph shown in Figure 5-19,pressing the RETURN key at the end of each line. If you do not press RETURN before thecursor reaches the right side of the screen or window, vim will wrap the text so thatit appears to start a new line. Physical lines will not correspond to programmatic(logical) lines in this situation, so editing will be more difficult. While you are usingvim, you can always correct any typing mistakes you make. If you notice a mistakeon the line you are entering, you can correct it before you continue (page 176). You
Figure 5-19 Entering text with vim

176 Chapter 5 The Linux Utilities
can correct other mistakes later. When you finish entering the paragraph, pressESCAPE to return vim to Command mode.
Getting Help
To get help while you are using vim, give the command :help [feature] followed byRETURN (you must be in Command mode when you give this command). The colonmoves the cursor to the last line of the screen. If you type :help, vim displays anintroduction to vim Help (Figure 5-20). Each dark band near the bottom of thescreen names the file that is displayed above it. (Each area of the screen that dis-plays a file, such as the two areas shown in Figure 5-20, is a vim “window.”) Thehelp.txt file occupies most of the screen (the upper window) in Figure 5-20. The filethat is being edited (practice) occupies a few lines in the lower portion of the screen(the lower window).
Read through the introduction to Help by scrolling the text as you read. Press j orthe DOWN ARROW key to move the cursor down one line at a time; press CONTROL-D orCONTROL-U to scroll the cursor down or up half a window at a time. Give the command:q to close the Help window.
You can get help with the insert commands by giving the command :help insertwhile vim is in Command mode (Figure 5-21).
Correcting Text as You Insert It
The keys that back up and correct a shell command line serve the same functionswhen vim is in Input mode. These keys include the erase, line kill, and word kill keys(usually CONTROL-H, CONTROL-U, and CONTROL-W, respectively). Although vim may notremove deleted text from the screen as you back up over it using one of these keys,the editor does remove it when you type over the text or press RETURN.
Figure 5-20 The main vim Help screen

Tutorial: Creating and Editing a File with vim 177
Moving the Cursor
You need to be able to move the cursor on the screen so that you can delete, insert,and correct text. While vim is in Command mode, you can use the RETURN key, theSPACE bar, and the ARROW keys to move the cursor. If you prefer to keep your handcloser to the center of the keyboard, if your terminal does not have ARROW keys, or ifthe emulator you are using does not support them, you can use the h, j, k, and l(lowercase “l”) keys to move the cursor left, down, up, and right, respectively.
Deleting Text
x (Delete character)dw (Delete word)
dd (Delete line)
You can delete a single character by moving the cursor until it is over the characteryou want to delete and then giving the command x. You can delete a word by posi-tioning the cursor on the first letter of the word and then giving the command dw(Delete word). You can delete a line of text by moving the cursor until it is any-where on the line and then giving the command dd.
Undoing Mistakes
u (Undo) If you delete a character, line, or word by mistake or give any command you wantto reverse, give the command u (Undo) immediately after the command you want toundo. The vim editor will restore the text to the way it was before you gave the lastcommand. If you give the u command again, vim will undo the command you gavebefore the one it just undid. You can use this technique to back up over many ofyour actions. With the compatible parameter (page 179) set, however, vim can undoonly the most recent change.
:redo (Redo) If you undo a command you did not mean to undo, give a Redo command: CONTROL-R
or :redo (followed by a RETURN). The vim editor will redo the undone command. Aswith the Undo command, you can give the Redo command many times in a row.
Figure 5-21 Help with insert commands

178 Chapter 5 The Linux Utilities
Entering Additional Text
i (Insert)a (Append)
When you want to insert new text within existing text, move the cursor so it is onthe character that follows the new text you plan to enter. Then give the i (Insert)command to put vim in Input mode, enter the new text, and press ESCAPE to return vimto Command mode. Alternatively, you can position the cursor on the character thatprecedes the new text and use the a (Append) command.
o/O (Open) To enter one or more lines, position the cursor on the line above where you wantthe new text to go. Give the command o (Open). The vim editor opens a blank line,puts the cursor on it, and goes into Input mode. Enter the new text, ending each linewith a RETURN. When you are finished entering text, press ESCAPE to return vim to Com-mand mode. The O command works in the same way o works, except that it opensa blank line above the line the cursor is on.
Correcting Text
To correct text, use dd, dw, or x to remove the incorrect text. Then use i, a, o, or Oto insert the correct text.
For example, to change the word pressing to hitting in Figure 5-19 on page 175,you might use the ARROW keys to move the cursor until it is on top of the p in press-ing. Then give the command dw to delete the word pressing. Put vim in Input modeby giving an i command, enter the word hitting followed by a SPACE, and press ESCAPE.
The word is changed and vim is in Command mode, waiting for another command.A shorthand for the two commands dw followed by the i command is cw (Changeword). The command cw puts vim into Input mode.
Ending the Editing Session
While you are editing, vim keeps the edited text in an area named the Work buffer.When you finish editing, you must write out the contents of the Work buffer to adisk file so that the edited text is saved and available when you next want it.
Make sure that vim is in Command mode, and then use the ZZ command (you mustuse uppercase Zs) to write your newly entered text to the disk and end the editingsession. After you give the ZZ command, vim returns control to the shell. You canexit with :q! if you do not want to save your work.
Page breaks for the printertip CONTROL-L tells the printer to skip to the top of the next page. You can enter this character anywhere
in a document by pressing CONTROL-L while you are in Input mode. If ^L does not appear, pressCONTROL-V before CONTROL-L.
Do not confuse ZZ with CONTROL-Z
caution When you exit from vim with ZZ, make sure that you type ZZ and not CONTROL-Z (typically the sus-pend key). When you press CONTROL-Z, vim disappears from your screen, almost as though youhad exited from it. In fact, vim will continue running in the background with your work unsaved.Refer to “Job Control” on page 290. If you try to start editing the same file with a new vim com-mand, vim displays a message about a swap file.

Chapter Summary 179
The compatible Parameter
The compatible parameter makes vim more compatible with vi. By default thisparameter is not set. From the command line use the –C option to set the compati-ble parameter and use the –N option to unset it. To get started with vim you canignore this parameter.
Setting the compatible parameter changes many aspects of how vim works. Forexample, when the compatible parameter is set, the Undo command (page 177) canundo only your most recent change; in contrast, with the compatible parameterunset, you can call Undo repeatedly to undo many changes. To obtain more detailson the compatible parameter, give the command :help compatible RETURN. To displaya complete list of vim’s differences from the original vi, use :help vi-diff RETURN. Seepage 176 for a discussion of the help command.
Chapter Summary
The utilities introduced in this chapter are a small but powerful subset of the manyutilities available on an Ubuntu Linux system. Because you will use them frequentlyand because they are integral to the following chapters, it is important that youbecome comfortable using them.
The utilities listed in Table 5-2 manipulate, display, compare, and print files.
Table 5-2 File utilities
Utility Function
cp Copies one or more files (page 149)
diff Displays the differences between two files (page 154)
file Displays information about the contents of a file (page 155)
grep Searches file(s) for a string (page 151)
head Displays the lines at the beginning of a file (page 152)
lpq Displays a list of jobs in the print queue (page 151)
lpr Places file(s) in the print queue (page 151)
lprm Removes a job from the print queue (page 151)
mv Renames a file or moves file(s) to another directory (page 150)
sort Puts a file in order by lines (page 153)
tail Displays the lines at the end of a file (page 152)
uniq Displays the contents of a file, skipping successive duplicate lines (page 154)

180 Chapter 5 The Linux Utilities
To reduce the amount of disk space a file occupies, you can compress it with the bzip2utility. Compression works especially well on files that contain patterns, as do mosttext files, but reduces the size of almost all files. The inverse of bzip2—bunzip2—restores a file to its original, decompressed form. Table 5-3 lists utilities that compressand decompress files. The bzip2 utility is the most efficient of these.
An archive is a file, frequently compressed, that contains a group of files. The tarutility (Table 5-4) packs and unpacks archives. The filename extensions .tar.bz2,.tar.gz, and .tgz identify compressed tar archive files and are often seen on softwarepackages obtained over the Internet.
The utilities listed in Table 5-5 determine the location of a utility on the local sys-tem. For example, they can display the pathname of a utility or a list of C++ compil-ers available on the local system.
Table 5-6 lists utilities that display information about other users. You can easilylearn a user’s full name, the user’s login status, the login shell of the user, and otheritems of information maintained by the system.
Table 5-3 (De)compression utilities
Utility Function
bunzip2 Returns a file compressed with bzip2 to its original size and format (page 160)
bzcat Displays a file compressed with bzip2 (page 160)
bzip2 Compresses a file (page 160)
compress Compresses a file (not as well as gzip) (page 161)
gunzip Returns a file compressed with gzip or compress to its original size and for-mat (page 161)
gzip Compresses a file (page 161)
zcat Displays a file compressed with gzip (page 161)
Table 5-4 Archive utility
Utility Function
tar Creates or extracts files from an archive file (page 161)
Table 5-5 Location utilities
Utility Function
apropos Searches the man page one-line descriptions for a keyword (page 165)
locate Searches for files on the local system (page 166)
whereis Displays the full pathnames of a utility, source code, or man page (page 164)
which Displays the full pathname of a command you can run (page 164)

Exercises 181
The utilities shown in Table 5-7 can help you stay in touch with other users on thelocal network.
Table 5-8 lists miscellaneous utilities.
Exercises
1. Which commands can you use to determine who is logged in on a specific terminal?
2. How can you keep other users from using write to communicate with you? Why would you want to?
3. What happens when you give the following commands if the file named done already exists?
$ cp to_do done$ mv to_do done
4. How can you find out which utilities are available on your system for edit-ing files? Which utilities are available for editing on your system?
5. How can you find the phone number for Ace Electronics in a file named phonethat contains a list of names and phone numbers? Which command can you use to display the entire file in alphabetical order? How can you remove adja-cent duplicate lines from the file? How can you remove all duplicates?
Table 5-6 User and system information utilities
Utility Function
finger Displays detailed information about users, including their full names (page 167)
hostname Displays the name of the local system (page 149)
w Displays detailed information about users who are logged in (page 169)
who Displays information about users who are logged in (page 167)
Table 5-7 User communication utilities
Utility Function
mesg Permits or denies messages sent by write (page 171)
write Sends a message to another user who is logged in (page 170)
Table 5-8 Miscellaneous utilities
Utility Function
date Displays the current date and time (page 157)
echo Copies its arguments (page 1023) to the screen (page 157)

182 Chapter 5 The Linux Utilities
6. What happens when you use diff to compare two binary files that are not identical? (You can use gzip to create the binary files.) Explain why the diffoutput for binary files is different from the diff output for ASCII files.
7. Create a .plan file in your home directory. Does finger display the contents of your .plan file?
8. What is the result of giving the which utility the name of a command that resides in a directory that is not in your search path?
9. Are any of the utilities discussed in this chapter located in more than one directory on your system? If so, which ones?
10. Experiment by calling the file utility with the names of files in /usr/bin.How many different types of files are there?
11. Which command can you use to look at the first few lines of a file named status.report? Which command can you use to look at the end of the file?
Advanced Exercises
12. Re-create the colors.1 and colors.2 files used in Figure 5-8 on page 155. Test your files by running diff –u on them. Do you get the same results as in the figure?
13. Try giving these two commands:
$ echo cat$ cat echo
Explain the differences between them.
14. Repeat exercise 5 using the file phone.gz, a compressed version of the list of names and phone numbers. Consider more than one approach to answer each question, and explain how you made your choices.
15. Find existing files or create files that
a. gzip compresses by more than 80 percent.
b. gzip compresses by less than 10 percent.
c. Get larger when compressed with gzip.
d. Use ls –l to determine the sizes of the files in question. Can you charac-terize the files in a, b, and c?
16. Older email programs were not able to handle binary files. Suppose that you are emailing a file that has been compressed with gzip, which produces a binary file, and the recipient is using an old email program. Refer to the man page on uuencode, which converts a binary file to ASCII. Learn about the utility and how to use it.
a. Convert a compressed file to ASCII using uuencode. Is the encoded file larger or smaller than the compressed file? Explain. (If uuencode is not on the local system, you can install it using aptitude [page 585]; it is part of the sharutils package.)
b. Would it ever make sense to use uuencode on a file before compressing it? Explain.

183183
6Chapter6A filesystem is a set of data structures (page 1032) that usuallyresides on part of a disk and that holds directories of files. File-systems store user and system data that are the basis of users’work on the system and the system’s existence. This chapterdiscusses the organization and terminology of the Linux file-system, defines ordinary and directory files, and explains therules for naming them. It also shows how to create and deletedirectories, move through the filesystem, and use absolute andrelative pathnames to access files in various directories. Itincludes a discussion of important files and directories as wellas file access permissions and Access Control Lists (ACLs),which allow you to share selected files with other users. It con-cludes with a discussion of hard and symbolic links, which canmake a single file appear in more than one directory.
In addition to reading this chapter, you may want to refer to thedf info page and to the fsck, mkfs, and tune2fs man pages formore information on filesystems.
In This Chapter
The Hierarchical Filesystem . . . . . 184
Directory Files and Ordinary Files . . . . . . . . . . . . . . . . . . . . . . 184
The Working Directory. . . . . . . . . . 188
Your Home Directory . . . . . . . . . . . 188
Pathnames . . . . . . . . . . . . . . . . . . 189
Relative Pathnames . . . . . . . . . . . 190
Working with Directories . . . . . . . 196
Access Permissions . . . . . . . . . . . 199
ACLs: Access Control Lists . . . . . . 203
Hard Links . . . . . . . . . . . . . . . . . . . 210
Symbolic Links . . . . . . . . . . . . . . . 212
6
The Linux Filesystem

184 Chapter 6 The Linux Filesystem
The Hierarchical Filesystem
Family tree A hierarchical structure (page 1040) frequently takes the shape of a pyramid. Oneexample of this type of structure is found by tracing a family’s lineage: A couple hasa child, who may in turn have several children, each of whom may have more chil-dren. This hierarchical structure is called a family tree (Figure 6-1).
Directory tree Like the family tree it resembles, the Linux filesystem is called a tree. It consists of aset of connected files. This structure allows you to organize files so you can easilyfind any particular one. On a standard Linux system, each user starts with onedirectory, to which the user can add subdirectories to any desired level. By creatingmultiple levels of subdirectories, a user can expand the structure as needed.
Subdirectories Typically each subdirectory is dedicated to a single subject, such as a person,project, or event. The subject dictates whether a subdirectory should be subdividedfurther. For example, Figure 6-2 shows a secretary’s subdirectory named corre-spond. This directory contains three subdirectories: business, memos, and personal.The business directory contains files that store each letter the secretary types. If youexpect many letters to go to one client, as is the case with milk_co, you can dedicatea subdirectory to that client.
One major strength of the Linux filesystem is its ability to adapt to users’ needs.You can take advantage of this strength by strategically organizing your files so theyare most convenient and useful for you.
Directory Files and Ordinary Files
Like a family tree, the tree representing the filesystem is usually pictured upsidedown, with its root at the top. Figures 6-2 and 6-3 show that the tree “grows”
Figure 6-1 A family tree
Grandparent
UncleMomAunt
SelfBrotherSister
Daughter 2Daughter 1
Grandchild 2Grandchild 1

Directory Files and Ordinary Files 185
downward from the root, with paths connecting the root to each of the other files. Atthe end of each path is either an ordinary file or a directory file. Special files, whichcan also be at the ends of paths, are described on page 567. Ordinary files, or sim-ply files, appear at the ends of paths that cannot support other paths. Directoryfiles, also referred to as directories or folders, are the points that other paths canbranch off from. (Figures 6-2 and 6-3 show some empty directories.) When yourefer to the tree, up is toward the root and down is away from the root. Directoriesdirectly connected by a path are called parents (closer to the root) and children(farther from the root). A pathname is a series of names that trace a path alongbranches from one file to another. More information about pathnames appears onpage 189.
Filenames
Every file has a filename. The maximum length of a filename varies with the type offilesystem; Linux supports several types of filesystems. Although most of today’s filesys-tems allow you to create files with names up to 255 characters long, some filesystems
Figure 6-2 A secretary’s directories
correspond
personal
milk_co
businessmemos
cheese_co
letter_2letter_1
Figure 6-3 Directories and ordinary files
DirectoryDirectory
Ordinary FileOrdinary File
Ordinary File Ordinary File
Ordinary File
Directory
Directory
Directory
Directory

186 Chapter 6 The Linux Filesystem
restrict you to shorter names. While you can use almost any character in a filename, youwill avoid confusion if you choose characters from the following list:
• Uppercase letters (A–Z)
• Lowercase letters (a–z)
• Numbers (0–9)
• Underscore (_)
• Period (.)
• Comma (,)
/ or root The root directory is always named / (slash) and referred to by this single character.No other file can use this name or have a / in its name. However, in a pathname,which is a string of filenames including directory names, the slash separates file-names (page 189).
Like the children of one parent, no two files in the same directory can have the samename. (Parents give their children different names because it makes good sense, butLinux requires it.) Files in different directories, like the children of different parents,can have the same name.
The filenames you choose should mean something. Too often a directory is filledwith important files with such unhelpful names as hold1, wombat, and junk, not tomention foo and foobar. Such names are poor choices because they do not help yourecall what you stored in a file. The following filenames conform to the suggestedsyntax and convey information about the contents of the file:
• correspond
• january
• davis
• reports
• 2001
• acct_payable
Filename length When you share your files with users on other systems, you may need to make longfilenames differ within the first few characters. Systems running DOS or older ver-sions of Windows have an 8-character filename body length and a 3-character file-name extension length limit. Some UNIX systems have a 14-character limit andolder Macintosh systems have a 31-character limit. If you keep the filenames short,they are easy to type; later you can add extensions to them without exceeding theshorter limits imposed by some filesystems. The disadvantage of short filenames isthat they are typically less descriptive than long filenames. See stat on page 526 for away to determine the maximum length of a filename on the local system.

Directory Files and Ordinary Files 187
Long filenames enable you to assign descriptive names to files. To help you selectamong files without typing entire filenames, shells support filename completion. Formore information about this feature, see the “Filename completion” tip on page 149.
Case sensitivity You can use uppercase and/or lowercase letters within filenames. Linux is case sen-sitive, so files named JANUARY, January, and january represent three distinct files.
Filename Extensions
A filename extension is the part of the filename following an embedded period. Inthe filenames listed in Table 6-1, filename extensions help describe the contents ofthe file. Some programs, such as the C programming language compiler, default tospecific filename extensions; in most cases, however, filename extensions areoptional. Use extensions freely to make filenames easy to understand. If you like,you can use several periods within the same filename—for example, notes.4.10.01or files.tar.gz.
Do not use SPACEs within filenames
caution Although you can use SPACEs within filenames, it is a poor idea. Because a SPACE is a special char-acter, you must quote it on a command line. Quoting a character on a command line can be diffi-cult for a novice user and cumbersome for an experienced user. Use periods or underscoresinstead of SPACEs: joe.05.04.26, new_stuff.
If you are working with a filename that includes a SPACE, such as a file from another operating sys-tem, you must quote the SPACE on the command line by preceding it with a backslash or by placingquotation marks on either side of the filename. The two following commands send the file namedmy file to the printer.
$ lpr my\ file$ lpr "my file"
Table 6-1 Filename extensions
Filename with extension Meaning of extension
compute.c A C programming language source file
compute.o The object code for the program
compute The same program as an executable file
memo.0410.txt A text file
memo.pdf A PDF file; view with xpdf under a GUI
memo.ps A PostScript file; view with gs under a GUI
memo.Z A file compressed with compress (page 161); use uncompress or gunzip (page 161) to decompress
memo.tgz or memo.tar.gz A tar (page 161) archive of files compressed with gzip (page 161)

188 Chapter 6 The Linux Filesystem
Hidden Filenames
A filename that begins with a period is called a hidden filename (or a hidden file orsometimes an invisible file) because ls does not normally display it. The commandls –a displays all filenames, even hidden ones. Names of startup files (page 188)usually begin with a period so that they are hidden and do not clutter a directorylisting. The .plan file (page 168) is also hidden. Two special hidden entries—a sin-gle and double period (. and . .)—appear in every directory (page 193).
The Working Directory
pwd While you are logged in on a character-based interface to a Linux system, you arealways associated with a directory. The directory you are associated with is calledthe working directory or current directory. Sometimes this association is referred toin a physical sense: “You are in (or working in) the jenny directory.” The pwd (printworking directory) utility displays the pathname of the working directory.
Your Home Directory
When you first log in on a Linux system or start a terminal emulator window, yourworking directory is your home directory. To display the pathname of your homedirectory, use pwd just after you log in (Figure 6-4).
When used without any arguments, the ls utility displays a list of the files in theworking directory. Because your home directory has been the only working directoryyou have used so far, ls has always displayed a list of files in your home directory.(All the files you have created up to this point were created in your home directory.)
Startup Files
Startup files, which appear in your home directory, give the shell and other pro-grams information about you and your preferences. Frequently one of these filestells the shell what kind of terminal you are using (page 988) and executes the stty(set terminal) utility to establish the erase (page 137) and line kill (page 138) keys.
Either you or the system administrator can put a shell startup file containing shellcommands in your home directory. The shell executes the commands in this fileeach time you log in. Because the startup files have hidden filenames, you must use
memo.gz A file compressed with gzip (page 161); view with zcat or decompress with gunzip (both on page 161)
memo.bz2 A file compressed with bzip2 (page 160); view with bzcat or decompress with bunzip2 (both on page 160)
memo.html A file meant to be viewed using a Web browser, such as Firefox
photo.gif, photo.jpg,photo.jpeg, photo.bmp,photo.tif, or photo.tiff
A file containing graphical information, such as a picture
Table 6-1 Filename extensions (continued)

Pathnames 189
the ls –a command to see whether one is in your home directory. A GUI has manystartup files. Usually you do not need to work with these files directly but can con-trol startup sequences using icons on the desktop. See page 277 for more informa-tion about startup files.
Pathnames
This section discusses absolute and relative pathnames and explains how to usethem to your advantage.
Absolute Pathnames
Every file has a pathname. Figure 6-5 shows the pathnames of directories and ordi-nary files in part of a filesystem hierarchy. An absolute pathname always starts witha slash (/), the name of the root directory. You can then build the absolute pathnameof a file by tracing a path from the root directory through all the intermediate direc-tories to the file. String all the filenames in the path together, separating each fromthe next with a slash (/) and preceding the entire group of filenames with a slash (/).This path of filenames is called an absolute pathname because it locates a file abso-lutely by tracing a path from the root directory to the file. The part of a pathnamefollowing the final slash is called a simple filename, filename, or basename.
login: alexPassword: Last login: Wed Oct 20 11:14:21 from bravo$ pwd/home/alex
Figure 6-4 Logging in and displaying the pathname of your home directory
Figure 6-5 Absolute pathnames
/
etctmphome
hlsjennyalex
notesbin
report log
/home /etc
/home/hls
/home/hls/notes
/home/hls/bin/log
/home/jenny

190 Chapter 6 The Linux Filesystem
~ (Tilde) in Pathnames
In another form of absolute pathname, the shell expands the characters ~/ (a tildefollowed by a slash) at the start of a pathname into the pathname of your homedirectory. Using this shortcut, you can display your .bashrc startup file (page 277)with the following command, no matter which directory is your working directory:
$ less ~/.bashrc
A tilde quickly references paths that start with your or someone else’s home directory.The shell expands a tilde followed by a username at the beginning of a pathname intothe pathname of that user’s home directory. For example, assuming he has permissionto do so, Alex can examine Scott’s .bashrc file with the following command:
$ less ~scott/.bashrc
Refer to “Tilde Expansion” on page 341 for more information.
Relative Pathnames
A relative pathname traces a path from the working directory to a file. The path-name is relative to the working directory. Any pathname that does not begin withthe root directory (/) or a tilde (~) is a relative pathname. Like absolute pathnames,relative pathnames can trace a path through many directories. The simplest relativepathname is a simple filename, which identifies a file in the working directory. Theexamples in the next sections use absolute and relative pathnames.
Significance of the Working Directory
To access any file in the working directory, you need only a simple filename. Toaccess a file in another directory, you must use a pathname. Typing a long pathnameis tedious and increases the chance of making a mistake. This possibility is less likelyunder a GUI, where you click filenames or icons. You can choose a working direc-tory for any particular task to reduce the need for long pathnames. Your choice of aworking directory does not allow you to do anything you could not dootherwise—it just makes some operations easier.
Refer to Figure 6-6 as you read this paragraph. Files that are children of the work-ing directory can be referenced by simple filenames. Grandchildren of the workingdirectory can be referenced by short relative pathnames: two filenames separated bya slash. When you manipulate files in a large directory structure, using short relativepathnames can save you time and aggravation. If you choose a working directorythat contains the files used most often for a particular task, you need to use fewerlong, cumbersome pathnames.
When using a relative pathname, know which directory is the working directorycaution The location of the file that you are accessing with a relative pathname is dependent on (is relative to)
the working directory. Always make sure you know which directory is the working directory beforeyou use a relative pathname. Use pwd to verify the directory. If you are using mkdir and you are notwhere you think you are in the file hierarchy, the new directory will end up in an unexpected location.
It does not matter which directory is the working directory when you use an absolute pathname.

Directory Commands 191
Directory Commands
This section discusses how to create directories (mkdir), switch between directories(cd), remove directories (rmdir), use pathnames to make your work easier, and moveand copy files and directories between directories.
mkdir: Creates a Directory
The mkdir utility creates a directory. The argument (page 1023) to mkdir becomes thepathname of the new directory. The following examples develop the directory struc-ture shown in Figure 6-7. In the figure, the directories that are added appear in alighter shade than the others and are connected by dashes.
Figure 6-6 Relative pathnames
/
etctmphome
hlsjennyalex
notesbin
report log
..
working directory = .
notes
bin/log
../jenny
Figure 6-7 The file structure developed in the examples
/
home
alex
literature
promo
demonames temp

192 Chapter 6 The Linux Filesystem
In Figure 6-8, pwd shows that Alex is working in his home directory(/home/alex) and ls shows the names of the files in his home directory: demo,names, and temp. Using mkdir, Alex creates a directory named literature as a childof his home directory. He uses a relative pathname (a simple filename) becausehe wants the literature directory to be a child of the working directory. Ofcourse, Alex could have used an absolute pathname to create the same directory:mkdir /home/alex/literature.
The second ls in Figure 6-8 verifies the presence of the new directory. The –F optionto ls displays a slash after the name of each directory and an asterisk after each exe-cutable file (shell script, utility, or application). When you call it with an argumentthat is the name of a directory, ls lists the contents of that directory. The final ls doesnot display anything because there are no files in the literature directory.
The following commands show two ways to create the promo directory as a child ofthe newly created literature directory. The first way checks that /home/alex is theworking directory and uses a relative pathname:
$ pwd/home/alex$ mkdir literature/promo
The second way uses an absolute pathname:
$ mkdir /home/alex/literature/promo
Use the –p (parents) option to mkdir to create both the literature and promo directo-ries with one command:
$ pwd/home/alex$ lsdemo names temp$ mkdir -p literature/promo
or
$ mkdir -p /home/alex/literature/promo
$ pwd/home/alex$ lsdemo names temp$ mkdir literature$ lsdemo literature names temp$ ls -Fdemo literature/ names temp$ ls literature$
Figure 6-8 The mkdir utility

Directory Commands 193
cd: Changes to Another Working Directory
The cd (change directory) utility makes another directory the working directory butdoes not change the contents of the working directory. Figure 6-9 shows two waysto make the /home/alex/literature directory the working directory, as verified bypwd. First Alex uses cd with an absolute pathname to make literature his workingdirectory—it does not matter which is your working directory when you give acommand with an absolute pathname.
A pwd command confirms the change made by Alex. When used without an argu-ment, cd makes your home directory the working directory, as it was when youlogged in. The second cd command in Figure 6-9 does not have an argument so itmakes Alex’s home directory the working directory. Finally, knowing that he isworking in his home directory, Alex uses a simple filename to make the literaturedirectory his working directory (cd literature) and confirms the change with pwd.
The . and . . Directory Entries
The mkdir utility automatically puts two entries in each directory you create: a singleperiod (.) and a double period (. .). The . is synonymous with the pathname of theworking directory and can be used in its place; the .. is synonymous with the path-name of the parent of the working directory. These entries are hidden because theirfilenames begin with a period.
With the literature directory as the working directory, the following example uses ..three times: first to list the contents of the parent directory (/home/alex), second to
$ cd /home/alex/literature$ pwd/home/alex/literature$ cd$ pwd/home/alex$ cd literature$ pwd/home/alex/literature
Figure 6-9 cd changes your working directory
The working directory versus your home directorytip The working directory is not the same as your home directory. Your home directory remains the
same for the duration of your session and usually from session to session. Immediately after youlog in, you are always working in the same directory: your home directory.
Unlike your home directory, the working directory can change as often as you like. You have noset working directory, which explains why some people refer to it as the current directory. Whenyou log in and until you change directories by using cd, your home directory is your workingdirectory. If you were to change directories to Scott’s home directory, then Scott’s home directorywould be your working directory.

194 Chapter 6 The Linux Filesystem
copy the memoA file to the parent directory, and third to list the contents of theparent directory again.
$ pwd/home/alex/literature$ ls ..demo literature names temp$ cp memoA ..$ ls ..demo literature memoA names temp
After using cd to make promo (a subdirectory of literature) his working directory,Alex can use a relative pathname to call vim to edit a file in his home directory.
$ cd promo$ vim ../../names
You can use an absolute or relative pathname or a simple filename virtually any-where that a utility or program requires a filename or pathname. This usage holdstrue for ls, vim, mkdir, rm, and most other Linux utilities.
Important Standard Directories and Files
Originally files on a Linux system were not located in standard places. The scat-tered files made it difficult to document and maintain a Linux system and just aboutimpossible for someone to release a software package that would compile and runon all Linux systems. The first standard for the Linux filesystem, the FSSTND(Linux Filesystem Standard), was released on February 14, 1994. In early 1995work was started on a broader standard covering many UNIX-like systems: FHS(Linux Filesystem Hierarchy Standard, www.pathname.com/fhs). More recentlyFHS has been incorporated in LSB (Linux Standard Base, www.linuxbase.org), aworkgroup of FSG (Free Standards Group, www.freestandards.org). Figure 6-10shows the locations of some important directories and files as specified by FHS. Thesignificance of many of these directories will become clear as you continue reading.
The following list describes the directories shown in Figure 6-10, some of the direc-tories specified by FHS, and some other directories. Ubuntu Linux, however, doesnot use all the directories specified by FHS. Be aware that you cannot always deter-mine the function of a directory by its name. For example, although /opt stores add-on software, /etc/opt stores configuration files for the software in /opt. See also“Important Files and Directories” on page 554.
/ Root The root directory, present in all Linux filesystem structures, is the ancestorof all files in the filesystem.
/bin Essential command binaries Holds the files needed to bring the system up and runit when it first comes up in recovery mode (page 512).
/boot Static files of the boot loader Contains all of the files needed to boot the system.
/dev Device files Contains all files that represent peripheral devices, such as disk drives,terminals, and printers. Previously this directory was filled with all possible devices.

Directory Commands 195
The udev utility (page 568) provides a dynamic device directory that enables /dev tocontain only devices that are present on the system.
/etc Machine–local system configuration files Holds administrative, configuration,and other system files. One of the most important is /etc/passwd, which contains alist of all users who have permission to use the system.
/etc/opt Configuration files for add-on software packages kept in /opt
/etc/X11 Machine–local configuration files for the X Window System
/home User home directories Each user’s home directory is typically one of many sub-directories of the /home directory. As an example, assuming that users’ directoriesare under /home, the absolute pathname of Jenny’s home directory is /home/jenny.On some systems the users’ directories may not be found under /home but insteadmight be spread among other directories such as /inhouse and /clients.
/lib Shared libraries
/lib/modules Loadable kernel modules
/mnt Mount point for temporarily mounting filesystems
/opt Add-on software packages (optional packages)
/proc Kernel and process information virtual filesystem
/root Home directory for the root account
/sbin Essential system binaries Utilities used for system administration are stored in/sbin and /usr/sbin. The /sbin directory includes utilities needed during the bootingprocess, and /usr/sbin holds utilities used after the system is up and running. Inolder versions of Linux, many system administration utilities were scatteredthrough several directories that often included other system files (/etc, /usr/bin,/usr/adm, /usr/include).
/sys Device pseudofilesystem See udev on page 568 for more information.
/tmp Temporary files
/usr Second major hierarchy Traditionally includes subdirectories that contain infor-mation used by the system. Files in /usr subdirectories do not change often and maybe shared by several systems.
/usr/bin Most user commands Contains the standard Linux utility programs—that is,binaries that are not needed in recovery mode (page 512).
Figure 6-10 A typical FHS-based Linux filesystem structure
mail spool bin sbin alex jenny hls
sbin var dev usr etc tmp home root
/
bin

196 Chapter 6 The Linux Filesystem
/usr/games Games and educational programs
/usr/include Header files included by C programs
/usr/lib Libraries
/usr/local Local hierarchy Holds locally important files and directories that are added to thesystem. Subdirectories can include bin, games, include, lib, sbin, share, and src.
/usr/man Online manuals
/usr/sbin Nonvital system administration binaries See /sbin.
/usr/share Architecture-independent data Subdirectories can include dict, doc, games, info,locale, man, misc, terminfo, and zoneinfo.
/usr/share/doc Documentation
/usr/share/info GNU info system’s primary directory
/usr/src Source code
/var Variable data Files with contents that vary as the system runs are kept in sub-directories under /var. The most common examples are temporary files, system logfiles, spooled files, and user mailbox files. Subdirectories can include cache, lib,lock, log, opt, run, spool, tmp, and yp. Older versions of Linux scattered such filesthrough several subdirectories of /usr (/usr/adm, /usr/mail, /usr/spool, /usr/tmp).
/var/log Log files Contains lastlog (a record of the last login by each user), messages (sys-tem messages from syslogd), and wtmp (a record of all logins/logouts).
/var/spool Spooled application data Contains anacron, at, cron, lpd, mail, mqueue, samba,and other directories. The file /var/spool/mail typically has a symbolic link in /var.
Working with Directories
This section covers deleting directories, copying and moving files between directo-ries, and moving directories. It also describes how to use pathnames to make yourwork with Linux easier.
rmdir: Deletes a Directory
The rmdir (remove directory) utility deletes a directory. You cannot delete the work-ing directory or a directory that contains files other than the . and .. entries. If youneed to delete a directory that has files in it, first use rm to delete the files and thendelete the directory. You do not have to (nor can you) delete the . and .. entries;rmdir removes them automatically. The following command deletes the promodirectory:
$ rmdir /home/alex/literature/promo
The rm utility has a –r option (rm –r filename) that recursively deletes files, includ-ing directories, within a directory and also deletes the directory itself.

Working with Directories 197
Using Pathnames
touch Use a text editor to create a file named letter if you want to experiment with theexamples that follow. Alternatively you can use touch to create an empty file:
$ cd$ pwd/home/alex$ touch letter
With /home/alex as the working directory, the following example uses cp with a rel-ative pathname to copy the file letter to the /home/alex/literature/promo directory(you will need to create promo again if you deleted it earlier). The copy of the filehas the simple filename letter.0610:
$ cp letter literature/promo/letter.0610
If Alex does not change to another directory, he can use vim as shown to edit thecopy of the file he just made:
$ vim literature/promo/letter.0610
If Alex does not want to use a long pathname to specify the file, he can use cd tomake promo the working directory before using vim:
$ cd literature/promo$ pwd/home/alex/literature/promo$ vim letter.0610
To make the parent of the working directory (named /home/alex/literature) the newworking directory, Alex can give the following command, which takes advantage ofthe .. directory entry:
$ cd ..$ pwd/home/alex/literature
mv, cp: Move or Copy Files
Chapter 5 discussed the use of mv to rename files. However, mv works even moregenerally: You can use this utility to move files from one directory to another(change the pathname of a file) as well as to change a simple filename. When usedto move one or more files to a new directory, the mv command has this syntax:
mv existing-file-list directory
Use rm –r carefully, if at all
caution Although rm –r is a handy command, you must use it carefully. Do not use it with an ambiguousfile reference such as *. It is frighteningly easy to wipe out your entire home directory with a singleshort command.

198 Chapter 6 The Linux Filesystem
If the working directory is /home/alex, Alex can use the following command to movethe files names and temp from the working directory to the literature directory:
$ mv names temp literature
This command changes the absolute pathnames of the names and temp files from/home/alex/names and /home/alex/temp to /home/alex/literature/names and/home/alex/literature/temp, respectively (Figure 6-11). Like most Linux com-mands, mv accepts either absolute or relative pathnames.
As you work with Linux and create more files, you will need to create new directo-ries using mkdir to keep the files organized. The mv utility is a useful tool for movingfiles from one directory to another as you extend your directory hierarchy.
The cp utility works in the same way as mv does, except that it makes copies of theexisting-file-list in the specified directory.
mv: Moves a Directory
Just as it moves ordinary files from one directory to another, so mv can move direc-tories. The syntax is similar except that you specify one or more directories, notordinary files, to move:
mv existing-directory-list new-directory
If new-directory does not exist, the existing-directory-list must contain just onedirectory name, which mv changes to new-directory (mv renames the directory).Although you can rename directories using mv, you cannot copy their contents withcp unless you use the –r option. Refer to the tar and cpio man pages for other waysto copy and move directories.
Figure 6-11 Using mv to move names and temp
home
scottalexjenny
literature
names temp
names temp
/

Access Permissions 199
Access Permissions
Ubuntu Linux supports two methods of controlling who can access a file and howthey can access it: traditional Linux access permissions and Access Control Lists(ACLs, page 203). ACLs provide finer-grained control of access privileges. This sec-tion describes traditional Linux access permissions.
Three types of users can access a file: the owner of the file (owner), a member of agroup that the file is associated with (group; see page 558 for more information ongroups), and everyone else (other). A user can attempt to access an ordinary file inthree ways: by trying to read from, write to, or execute it.
ls –l: Displays Permissions
When you call ls with the –l option and the name of one or more ordinary files, lsdisplays a line of information about the file. The following example displays infor-mation for two files. The file letter.0610 contains the text of a letter, andcheck_spell contains a shell script, a program written in a high-level shell program-ming language:
$ ls -l letter.0610 check_spell-rw-r--r-- 1 alex pubs 3355 May 2 10:52 letter.0610-rwxr-xr-x 2 alex pubs 852 May 5 14:03 check_spell
From left to right, the lines that an ls –l command displays contain the followinginformation (refer to Figure 6-12):
• The type of file (first character)
• The file’s access permissions (the next nine characters)
• The ACL flag (present if the file has an ACL, page 203)
• The number of links to the file (page 209)
• The name of the owner of the file (usually the person who created the file)
• The name of the group that the file is associated with
• The size of the file in characters (bytes)
Figure 6-12 The columns displayed by the ls –l command
-rwxrwxr-x+..3.alex.....pubs.........2048.Aug.12.13:15.memo
Type
offil
eFi
leac
cess
Link
sO
wne
r
Size
ofm
odifi
catio
n
Dat
ean
dtim
e
File
nam
e
Gro
up
ACL
flag
perm
issi
ons
200 Chapter 6 The Linux Filesystem
• The date and time the file was created or last modified
• The name of the file
The type of file (first column) for letter.0610 is a hyphen (–) because it is an ordi-nary file (directory files have a d in this column).
The next three characters specify the access permissions for the owner of the file: rindicates read permission, w indicates write permission, and x indicates execute per-mission. A – in a column indicates that the owner does not have the permission thatwould have appeared in that position.
In a similar manner the next three characters represent permissions for the group,and the final three characters represent permissions for other (everyone else). In thepreceding example, the owner of letter.0610 can read from and write to the file,whereas the group and others can only read from the file and no one is allowed toexecute it. Although execute permission can be allowed for any file, it does notmake sense to assign execute permission to a file that contains a document, such asa letter. The check_spell file is an executable shell script, so execute permission isappropriate for it. (The owner, group, and others have execute access permission.)
chmod: Changes Access Permissions
The owner of a file controls which users have permission to access the file and howthey can access it. When you own a file, you can use the chmod (change mode) util-ity to change access permissions for that file. In the following example, chmod adds(+) read and write permissions (rw) for all (a) users:
$ chmod a+rw letter.0610$ ls -l letter.0610-rw-rw-rw- 1 alex pubs 3355 May 2 10:52 letter.0610
In the next example, chmod removes (–) read (r) and execute (x) permissions forusers other (o) than the owner of the file (alex) and members of the group the file isassociated with (pubs):
$ chmod o-rx check_spell$ ls -l check_spell-rwxr-x--- 2 alex pubs 852 May 5 14:03 check_spell
In addition to a (all) and o (other), you can use g (group) and u (user, although userrefers to the owner of the file who may or may not be the user of the file at anygiven time) in the argument to chmod. You can also use absolute, or numeric, argu-ments with chmod. Refer to page 283 for more information on using chmod to makea file executable and to the chmod man page for information on absolute argumentsand chmod in general. Refer to page 558 for more information on groups.
You must have read permission to execute a shell script
tip Because a shell needs to read a shell script (a text file containing shell commands) before it canexecute the commands within that script, you must have read permission for the file containingthe script to execute it. You also need execute permission to execute a shell script directly on thecommand line. In contrast, binary (program) files do not need to be read; they are executeddirectly. You need only execute permission to run a binary (nonshell) program.

Access Permissions 201
The Linux file access permission scheme lets you give other users access to the filesyou want to share yet keep your private files confidential. You can allow other usersto read from and write to a file (handy if you are one of several people working ona joint project). You can allow others only to read from a file (perhaps a projectspecification you are proposing). Or you can allow others only to write to a file(similar to an inbox or mailbox, where you want others to be able to send you mailbut do not want them to read your mail). Similarly you can protect entire directo-ries from being scanned (covered shortly).
There is an exception to the access permissions just described. Anyone who can gainroot privileges (using sudo (page 490) or su) has full access to all files, regardless ofthe file’s owner or access permissions.
Setuid and Setgid Permissions
When you execute a file that has setuid (set user ID) permission, the process execut-ing the file takes on the privileges of the file’s owner. For example, if you run a set-uid program that removes all files in a directory, you can remove files in any of thefile owner’s directories, even if you do not normally have permission to do so.
In a similar manner, setgid (set group ID) permission means that the process execut-ing the file takes on the privileges of the group the file is associated with. The ls util-ity shows setuid permission by placing an s in the owner’s executable position andsetgid permission by placing an s in the group’s executable position:
$ ls -l program1-rwxr-xr-x 1 alex pubs 15828 Nov 5 06:28 program1$ chmod u+s program1$ ls -l program1-rwsr-xr-x 1 alex pubs 15828 Nov 5 06:28 program1$ chmod g+s program1$ ls -l program1-rwsr-sr-x 1 alex pubs 15828 Nov 5 06:28 program1
chmod: o for other, u for owner
tip When using chmod, many people assume that the o stands for owner; it does not. The o standsfor other, whereas u stands for owner (user). The acronym UGO (user-group-other) can help youremember how permissions are named.
Minimize use of setuid and setgid programs owned by rootsecurity Executable files that are setuid and owned by root have root privileges when they are run, even if
they are not run by root. This type of program is very powerful because it can do anything thatroot can do (and that the program is designed to do). Similarly executable files that are setgid andbelong to the group root have extensive privileges.
Because of the power they hold and their potential for destruction, it is wise to avoid indiscrimi-nately creating and using setuid and setgid programs owned by or belonging to the group root.Because of their inherent dangers, many sites minimize the use of these programs on their sys-tems. One necessary setuid program is passwd. See page 489 for a tip on setuid files owned byroot and page 521 for a command that lists setuid files on the local system.

202 Chapter 6 The Linux Filesystem
The following example shows two ways for a user working with root privileges togive a program setuid privileges:
$ ls -l my*–rwxr–xr–x 1 root other 24152 Apr 29 16:30 myprog–rwxr–xr–x 1 root other 24152 Apr 29 16:31 myprog2$ sudo chmod 4755 myprog$ sudo chmod u+s myprog2$ ls -l my*–rwsr–xr–x 1 root other 24152 Apr 29 16:30 myprog–rwsr–xr–x 1 root other 24152 Apr 29 16:31 myprog2
The s in the owner execute position of the ls –l output (page 199) indicates that thefile has setuid permission.
Directory Access Permissions
Access permissions have slightly different meanings when they are used with direc-tories. Although the three types of users can read from or write to a directory, thedirectory cannot be executed. Execute access permission is redefined for a directory:It means that you can cd into the directory and/or examine files that you have per-mission to read from in the directory. It has nothing to do with executing a file.
When you have only execute permission for a directory, you can use ls to list a filein the directory if you know its name. You cannot use ls without an argument to listthe entire contents of the directory. In the following exchange, Jenny first verifiesthat she is logged in as herself. Then she checks the permissions on Alex’s info direc-tory. You can view the access permissions associated with a directory by running lswith the –d (directory) and –l (long) options:
$ who am ijenny pts/7 Aug 21 10:02$ ls -ld /home/alex/infodrwx-----x 2 alex pubs 512 Aug 21 09:31 /home/alex/info$ ls -l /home/alex/infols: /home/alex/info: Permission denied
The d at the left end of the line that ls displays indicates that /home/alex/info is adirectory. Alex has read, write, and execute permissions; members of the pubsgroup have no access permissions; and other users have execute permission only, asindicated by the x at the right end of the permissions. Because Jenny does not haveread permission for the directory, the ls –l command returns an error.
When Jenny specifies the names of the files she wants information about, she is notreading new directory information but rather searching for specific information,which she is allowed to do with execute access to the directory. She has read permis-sion for notes so she has no problem using cat to display the file. She cannot displayfinancial because she does not have read permission for it:
Do not write setuid shell scripts
security Never give shell scripts setuid permission. Several techniques for subverting them are well known.

ACLs: Access Control Lists 203
$ ls -l /home/alex/info/financial /home/alex/info/notes-rw------- 1 alex pubs 34 Aug 21 09:31 /home/alex/info/financial-rw-r--r-- 1 alex pubs 30 Aug 21 09:32 /home/alex/info/notes
$ cat /home/alex/info/notesThis is the file named notes.$ cat /home/alex/info/financialcat: /home/alex/info/financial: Permission denied
Next Alex gives others read access to his info directory:
$ chmod o+r /home/alex/info
When Jenny checks her access permissions on info, she finds that she has both readand execute access to the directory. Now ls –l works just fine without arguments,but she still cannot read financial. (This restriction is an issue of file permissions,not directory permissions.) Finally, Jenny tries to create a file named newfile byusing touch. If Alex were to give her write permission to the info directory, Jennywould be able to create new files in it:
$ ls -ld /home/alex/infodrwx---r-x 2 alex pubs 512 Aug 21 09:31 /home/alex/info$ ls -l /home/alex/infototal 8-rw------- 1 alex pubs 34 Aug 21 09:31 financial-rw-r--r-- 1 alex pubs 30 Aug 21 09:32 notes$ cat /home/alex/info/financialcat: financial: Permission denied$ touch /home/alex/info/newfiletouch: cannot touch '/home/alex/info/newfile': Permission denied
ACLs: Access Control Lists
Access Control Lists (ACLs) provide finer-grained control over which users canaccess specific directories and files than do traditional Linux permissions (page 199).Using ACLs you can specify the ways in which each of several users can access adirectory or file. Because ACLs can reduce performance, do not enable them on file-systems that hold system files, where the traditional Linux permissions are sufficient.Also be careful when moving, copying, or archiving files: Not all utilities preserveACLs. In addition, you cannot copy ACLs to filesystems that do not support ACLs.
An ACL comprises a set of rules. A rule specifies how a specific user or group canaccess the file that the ACL is associated with. There are two kinds of rules: accessrules and default rules. (The documentation refers to access ACLs and defaultACLs, even though there is only one type of ACL: There is one type of list [ACL]and there are two types of rules that an ACL can contain.)
An access rule specifies access information for a single file or directory. A defaultACL pertains to a directory only; it specifies default access information (an ACL)for any file in the directory that is not given an explicit ACL.

204 Chapter 6 The Linux Filesystem
Enabling ACLs
Before you can use ACLs you must install the acl software package:
$ sudo aptitude install acl
Ubuntu Linux officially supports ACLs on ext2 and ext3 filesystems only, althoughinformal support for ACLs is available on other filesystems. To use ACLs on anext2 or ext3 filesystem, you must mount the device with the acl option (no_acl isthe default). For example, if you want to mount the device represented by /home sothat you can use ACLs on files in /home, you can add acl to its options list in/etc/fstab:
$ grep home /etc/fstabLABEL=/home /home ext3 defaults,acl 1 2
After changing fstab, you need to remount /home before you can use ACLs. If noone else is using the system, you can unmount it and mount it again (working withroot privileges) as long as your working directory is not in the /home hierarchy.Alternatively you can use the remount option to mount to remount /home while thedevice is in use:
# mount -v -o remount /home/dev/hda3 on /home type ext3 (rw,acl)
See page 576 for information on fstab and page 572 for information on mount.
Working with Access Rules
The setfacl utility modifies a file’s ACL and the getfacl utility displays a file’s ACL.When you use getfacl to obtain information about a file that does not have an ACL,it displays the same information as an ls –l command, albeit in a different format:
$ ls -l report-rw-r--r-- 1 max max 9537 Jan 12 23:17 report
$ getfacl report# file: report# owner: max# group: max
Most utilities do not preserve ACLs
caution When used with the –p (preserve) or –a (archive) option, cp preserves ACLs when it copies files.Another utility that is supplied with Ubuntu Linux that preserves ACLs is mv. When you use cpwith the –p or –a option and it is not able to copy ACLs, and in the case where mv is unable topreserve ACLs, the utility performs the operation and issues an error message:
$ mv report /tmpmv: preserving permissions for '/tmp/report': Operation not supported
Other utilities, such as tar, cpio, and dump, do not support ACLs. You can use cp with the –aoption to copy directory hierarchies, including ACLs.
You can never copy ACLs to a filesystem that does not support ACLs or to a filesystem that doesnot have ACL support turned on.

ACLs: Access Control Lists 205
user::rw-group::r--other::r--
The first three lines of the getfacl output are called the header; they specify the nameof the file, the owner of the file, and the group the file is associated with. For moreinformation refer to “ls –l: Displays Permissions” on page 199. The ––omit-header(or just ––omit) option causes getfacl not to display the header:
$ getfacl --omit-header reportuser::rw-group::r--other::r--
In the line that starts with user, the two colons (::) with no name between them indi-cate that the line specifies the permissions for the owner of the file. Similarly, thetwo colons in the group line indicate that the line specifies permissions for the groupthe file is associated with. The two colons following other are there for consistency:No name can be associated with other.
The setfacl ––modify (or –m) option adds or modifies one or more rules in a file’sACL using the following format:
setfacl ––modify ugo:name:permissions file-list
where ugo can be either u, g, or o to indicate that the command sets file permissionsfor a user, a group, or all other users, respectively; name is the name of the user orgroup that permissions are being set for; permissions is the permissions in eithersymbolic or absolute format; and file-list is the list of files that the permissions areto be applied to. You must omit name when you specify permissions for other users(o). Symbolic permissions use letters to represent file permissions (rwx, r–x, and soon), whereas absolute permissions use an octal number. While chmod uses three setsof permissions or three octal numbers (one each for the owner, group, and otherusers), setfacl uses a single set of permissions or a single octal number to representthe permissions being granted to the user or group represented by ugo and name.
For example, both of the following commands add a rule to the ACL for the reportfile that gives Sam read and write permission to that file:
$ setfacl --modify u:sam:rw- report
or
$ setfacl --modify u:sam:6 report
$ getfacl report# file: report# owner: max# group: maxuser::rw-user:sam:rw-group::r--mask::rw-other::r--

206 Chapter 6 The Linux Filesystem
The line containing user:sam:rw– shows that the user named sam has read andwrite access (rw–) to the file. See page 199 for an explanation of how to read sym-bolic access permissions. See the following optional section for a description of theline that starts with mask.
When a file has an ACL, ls –l displays a plus sign (+) following the permissions,even if the ACL is empty:
$ ls -l report-rw-rw-r--+ 1 max max 9537 Jan 12 23:17 report
optional Effective Rights Mask
The line that starts with mask specifies the effective rights mask. This mask limitsthe effective permissions granted to ACL groups and users. It does not affect theowner of the file or the group the file is associated with. In other words, it does notaffect traditional Linux permissions. However, because getfacl always sets the effec-tive rights mask to the least restrictive ACL permissions for the file, the mask has noeffect unless you set it explicitly after you set up an ACL for the file. You can set themask by specifying mask in place of ugo and by not specifying a name in a setfaclcommand.
The following example sets the effective rights mask to read for the report file:
$ setfacl -m mask::r-- report
The mask line in the following getfacl output shows the effective rights mask set toread (r––). The line that displays Sam’s file access permissions shows them still setto read and write. However, the comment at the right end of the line shows that hiseffective permission is read.
$ getfacl report# file: report# owner: max# group: maxuser::rw-user:sam:rw- #effective:r--group::r--mask::r--other::r--
As the next example shows, setfacl can modify ACL rules and can set more than oneACL rule at a time:
$ setfacl -m u:sam:r--,u:zach:rw- report
$ getfacl --omit-header reportuser::rw-user:sam:r--user:zach:rw-group::r--

ACLs: Access Control Lists 207
mask::rw-other::r--
The –x option removes ACL rules for a user or a group. It has no effect on permis-sions for the owner of the file or the group that the file is associated with. The nextexample shows setfacl removing the rule that gives Sam permission to access the file:
$ setfacl -x u:sam report
$ getfacl --omit-header reportuser::rw-user:zach:rw-group::r--mask::rw-other::r--
You must not specify permissions when you use the –x option. Instead, specify onlythe ugo and name. The –b option, followed by a filename only, removes all ACLrules and the ACL itself from the file or directory you specify.
Both setfacl and getfacl have many options. Use the ––help option to display brieflists of options or refer to the man pages for details.
Setting Default Rules for a Directory
The following example shows that the dir directory initially has no ACL. The setfaclcommand uses the –d option to add two default rules to the ACL for dir. These rulesapply to all files in the dir directory that do not have explicit ACLs. The rules givemembers of the pubs group read and execute permissions and give members of theadmin group read, write, and execute permissions.
$ ls -ld dirdrwx------ 2 max max 4096 Feb 12 23:15 dir$ getfacl dir# file: dir# owner: max# group: maxuser::rwxgroup::---other::---
$ setfacl -d -m g:pubs:r-x,g:admin:rwx dir
The following ls command shows that the dir directory now has an ACL, as indi-cated by the + to the right of the permissions. Each of the default rules that getfacldisplays starts with default:. The first two default rules and the last default rule spec-ify the permissions for the owner of the file, the group that the file is associated with,and all other users. These three rules specify the traditional Linux permissions andtake precedence over other ACL rules. The third and fourth rules specify the permis-sions for the pubs and admin groups. Next is the default effective rights mask.

208 Chapter 6 The Linux Filesystem
$ ls -ld dirdrwx------+ 2 max max 4096 Feb 12 23:15 dir$ getfacl dir# file: dir# owner: max# group: maxuser::rwxgroup::---other::---default:user::rwxdefault:group::---default:group:pubs:r-xdefault:group:admin:rwxdefault:mask::rwxdefault:other::---
Remember that the default rules pertain to files held in the directory that are notassigned ACLs explicitly. You can also specify access rules for the directory itself.
When you create a file within a directory that has default rules in its ACL, the effec-tive rights mask for that file is created based on the file’s permissions. In some casesthe mask may override default ACL rules.
In the next example, touch creates a file named new in the dir directory. The ls com-mand shows that this file has an ACL. Based on the value of umask (page 526), boththe owner and the group that the file is associated with have read and write permis-sions for the file. The effective rights mask is set to read and write so that the effec-tive permission for pubs is read and the effective permissions for admin are read andwrite. Neither group has execute permission.
$ cd dir$ touch new$ ls -l new-rw-rw----+ 1 max max 0 Feb 13 00:39 new$ getfacl --omit newuser::rw-group::---group:pubs:r-x #effective:r--group:admin:rwx #effective:rw-mask::rw-other::---
If you change the file’s traditional permissions to read, write, and execute for theowner and the group, the effective rights mask changes to read, write, and executeand the groups specified by the default rules gain execute access to the file.
$ chmod 770 new$ ls -l new-rwxrwx---+ 1 max max 0 Feb 13 00:39 new$ getfacl --omit newuser::rwxgroup::---group:pubs:r-xgroup:admin:rwxmask::rwxother::---

Links 209
Links
A link is a pointer to a file. Every time you create a file by using vim, touch, cp, orany other means, you are putting a pointer in a directory. This pointer associates afilename with a place on the disk. When you specify a filename in a command, youare indirectly pointing to the place on the disk that holds the information you want.
Sharing files can be useful when two or more people are working on the sameproject and need to share some information. You can make it easy for other users toaccess one of your files by creating additional links to the file.
To share a file with another user, first give the user permission to read from andwrite to the file (page 200). You may also have to change the access permissionsof the parent directory of the file to give the user read, write, or execute permis-sion (page 202). Once the permissions are appropriately set, the user can create alink to the file so that each of you can access the file from your separate directoryhierarchies.
A link can also be useful to a single user with a large directory hierarchy. You cancreate links to cross-classify files in your directory hierarchy, using different classifi-cations for different tasks. For example, if you have the file layout depicted inFigure 6-2 on page 185, a file named to_do might appear in each subdirectory ofthe correspond directory—that is, in personal, memos, and business. If you find itdifficult to keep track of everything you need to do, you can create a separate direc-tory named to_do in the correspond directory. You can then link each subdirectory’sto-do list into that directory. For example, you could link the file named to_do inthe memos directory to a file named memos in the to_do directory. This set of linksis shown in Figure 6-13.
Although it may sound complicated, this technique keeps all your to-do lists con-veniently in one place. The appropriate list is easily accessible in the task-relateddirectory when you are busy composing letters, writing memos, or handling per-sonal business.
Figure 6-13 Using links to cross-classify files
correspond
to_do businessmemospersonalto_doto_do
to_dobusinessmemospersonal
Links
business

210 Chapter 6 The Linux Filesystem
optional
Hard Links
A hard link to a file appears as another file. If the file appears in the same directoryas the linked-to file, the links must have different filenames because two files in thesame directory cannot have the same name. You can create a hard link to a file onlyfrom within the filesystem that holds the file.
ln: Creates a Hard Link
The ln (link) utility (without the –s or ––symbolic option) creates a hard link to anexisting file using the following syntax:
ln existing-file new-link
The next command makes the link shown in Figure 6-14 by creating a new linknamed /home/alex/letter to an existing file named draft in Jenny’s home directory:
$ pwd/home/jenny$ ln draft /home/alex/letter
The new link appears in the /home/alex directory with the filename letter. In prac-tice, Alex may need to change the directory and file permissions so that Jenny willbe able to access the file. Even though /home/alex/letter appears in Alex’s directory,Jenny is the owner of the file because she created it.
About the discussion of hard links
tip Two kinds of links exist: hard links and symbolic (soft) links. Hard links are older and becomingoutdated. The section on hard links is marked as optional; you can skip it, although it discussesinodes and gives you insight into the structure of the filesystem.
Figure 6-14 Two links to the same file: /home/alex/letter and /home/jenny/draft
home
/
alex jenny
memo planning
/home/alex/letter and /home/jenny/draft

Links 211
The ln utility creates an additional pointer to an existing file but it does not makeanother copy of the file. Because there is only one file, the file status informa-tion—such as access permissions, owner, and the time the file was last modified—isthe same for all links; only the filenames differ. When Jenny modifies/home/jenny/draft, for example, Alex sees the changes in /home/alex/letter.
cp versus lnThe following commands verify that ln does not make an additional copy of a file.Create a file, use ln to make an additional link to the file, change the contents of thefile through one link, and verify the change through the other link:
$ cat file_aThis is file A.$ ln file_a file_b$ cat file_bThis is file A.$ vim file_b...$ cat file_bThis is file B after the change.$ cat file_aThis is file B after the change.
If you try the same experiment using cp instead of ln and change a copy of the file,the difference between the two utilities will become clearer. Once you change a copyof a file, the two files are different:
$ cat file_cThis is file C.$ cp file_c file_d$ cat file_dThis is file C.$ vim file_d...$ cat file_dThis is file D after the change.$ cat file_cThis is file C.
ls and link counts You can use ls with the –l option, followed by the names of the files you want tocompare, to confirm that the status information is the same for two links to the samefile and is different for files that are not linked. In the following example, the 2 in thelinks field (just to the left of alex) shows there are two links to file_a and file_b:
$ ls -l file_a file_b file_c file_d-rw-r--r-- 2 alex pubs 33 May 24 10:52 file_a-rw-r--r-- 2 alex pubs 33 May 24 10:52 file_b-rw-r--r-- 1 alex pubs 16 May 24 10:55 file_c-rw-r--r-- 1 alex pubs 33 May 24 10:57 file_d
Although it is easy to guess which files are linked to one another in this example, lsdoes not explicitly tell you.

212 Chapter 6 The Linux Filesystem
ls and inodes Use ls with the –i option to determine without a doubt which files are linked. The –ioption lists the inode (page 1041) number for each file. An inode is the controlstructure for a file. If the two filenames have the same inode number, they share thesame control structure and are links to the same file. Conversely, when two file-names have different inode numbers, they are different files. The following exampleshows that file_a and file_b have the same inode number and that file_c and file_dhave different inode numbers:
$ ls -i file_a file_b file_c file_d3534 file_a 3534 file_b 5800 file_c 7328 file_d
All links to a file are of equal value: The operating system cannot distinguish theorder in which multiple links were created. When a file has two links, you canremove either one and still access the file through the remaining link. You can removethe link used to create the file, for example, and, as long as one link remains, stillaccess the file through that link.
Symbolic Links
In addition to hard links, Linux supports symbolic links, also called soft links orsymlinks. A hard link is a pointer to a file (the directory entry points to the inode),whereas a symbolic link is an indirect pointer to a file (the directory entry containsthe pathname of the pointed-to file—a pointer to the hard link to the file).
Advantages ofsymbolic links
Symbolic links were developed because of the limitations inherent in hard links.You cannot create a hard link to a directory, but you can create a symbolic link to adirectory.
In many cases the Linux file hierarchy encompasses several filesystems. Becauseeach filesystem keeps separate control information (that is, separate inode tables orfilesystem structures) for the files it holds, it is not possible to create hard linksbetween files in different filesystems. A symbolic link can point to any file, regard-less of where it is located in the file structure, but a hard link to a file must be in thesame filesystem as the other hard link(s) to the file. When you create links onlyamong files in your home directory, you will not notice this limitation.
A major advantage of a symbolic link is that it can point to a nonexistent file. Thisability is useful if you need a link to a file that is periodically removed and re-created. A hard link keeps pointing to a “removed” file, which the link keeps aliveeven after a new file is created. In contrast, a symbolic link always points to thenewly created file and does not interfere when you delete the old file. For example,a symbolic link could point to a file that gets checked in and out under a sourcecode control system, a .o file that is re-created by the C compiler each time you runmake, or a log file that is repeatedly archived.
Although they are more general than hard links, symbolic links have some disad-vantages. Whereas all hard links to a file have equal status, symbolic links do nothave the same status as hard links. When a file has multiple hard links, it is analo-gous to a person having multiple full legal names, as many married women do. In

Links 213
contrast, symbolic links are analogous to nicknames. Anyone can have one or morenicknames, but these nicknames have a lesser status than legal names. The follow-ing sections describe some of the peculiarities of symbolic links.
ln: Creates a Symbolic Link
You use ln with the ––symbolic (or –s) option to create a symbolic link. The follow-ing example creates a symbolic link /tmp/s3 to the file sum in Alex’s home direc-tory. When you use an ls –l command to look at the symbolic link, ls displays thename of the link and the name of the file it points to. The first character of the list-ing is l (for link).
$ ln --symbolic /home/alex/sum /tmp/s3$ ls -l /home/alex/sum /tmp/s3-rw-rw-r-- 1 alex alex 38 Jun 12 09:51 /home/alex/sumlrwxrwxrwx 1 alex alex 14 Jun 12 09:52 /tmp/s3 -> /home/alex/sum$ cat /tmp/s3This is sum.
The sizes and times of the last modifications of the two files are different. Unlike ahard link, a symbolic link to a file does not have the same status information as thefile itself.
You can also use ln to create a symbolic link to a directory. When you use the––symbolic option, ln does not care whether the file you are creating a link to is anordinary file or a directory.
optional cd and Symbolic Links
When you use a symbolic link as an argument to cd to change directories, the resultscan be confusing, particularly if you did not realize that you were using a symbolic link.
If you use cd to change to a directory that is represented by a symbolic link, the pwdshell builtin lists the name of the symbolic link. The pwd utility (/bin/pwd) lists thename of the linked-to directory, not the link, regardless of how you got there.
Use absolute pathnames with symbolic links
tip Symbolic links are literal and are not aware of directories. A link that points to a relative pathname,which includes simple filenames, assumes that the relative pathname is relative to the directorythat the link was created in (not the directory the link was created from). In the following example,the link points to the file named sum in the /tmp directory. Because no such file exists, cat givesan error message:
$ pwd/home/alex$ ln --symbolic sum /tmp/s4$ ls -l sum /tmp/s4lrwxrwxrwx 1 alex alex 3 Jun 12 10:13 /tmp/s4 -> sum-rw-rw-r-- 1 alex alex 38 Jun 12 09:51 sum$ cat /tmp/s4cat: /tmp/s4: No such file or directory

214 Chapter 6 The Linux Filesystem
$ ln -s /home/alex/grades /tmp/grades.old$ pwd/home/alex$ cd /tmp/grades.old$ pwd/tmp/grades.old$ /bin/pwd/home/alex/grades
When you change directories back to the parent, you end up in the directory hold-ing the symbolic link:
$ cd ..$ pwd/tmp$ /bin/pwd/tmp
rm: Removes a Link
When you create a file, there is one hard link to it. You can then delete the file or,using Linux terminology, remove the link with the rm utility. When you remove thelast hard link to a file, you can no longer access the information stored there and theoperating system releases the space the file occupied on the disk for subsequent useby other files. This space is released even if symbolic links to the file remain. Whenthere is more than one hard link to a file, you can remove a hard link and still accessthe file from any remaining link. Unlike DOS and Windows, Linux does not providean easy way to undelete a file once you have removed it. A skilled hacker, however,can sometimes piece the file together with time and effort.
When you remove all hard links to a file, you will not be able to access the filethrough a symbolic link. In the following example, cat reports that the file totaldoes not exist because it is a symbolic link to a file that has been removed:
$ ls -l sum-rw-r--r-- 1 alex pubs 981 May 24 11:05 sum$ ln -s sum total$ rm sum$ cat totalcat: total: No such file or directory$ ls -l totallrwxrwxrwx 1 alex pubs 6 May 24 11:09 total -> sum
When you remove a file, be sure to remove all symbolic links to it. Remove a sym-bolic link in the same way you remove other files:
$ rm total
Chapter Summary
Linux has a hierarchical, or treelike, file structure that makes it possible to orga-nize files so that you can find them quickly and easily. The file structure contains

Chapter Summary 215
directory files and ordinary files. Directories contain other files, including otherdirectories; ordinary files generally contain text, programs, or images. The ances-tor of all files is the root directory named /.
Most Linux filesystems support 255-character filenames. Nonetheless, it is a goodidea to keep filenames simple and intuitive. Filename extensions can help make file-names more meaningful.
When you are logged in, you are always associated with a working directory. Yourhome directory is your working directory from the time you log in until you use cdto change directories.
An absolute pathname starts with the root directory and contains all the filenames thattrace a path to a given file. The pathname starts with a slash, representing the rootdirectory, and contains additional slashes between the other filenames in the path.
A relative pathname is similar to an absolute pathname but traces the path startingfrom the working directory. A simple filename is the last element of a pathname andis a form of a relative pathname.
A Linux filesystem contains many important directories, including /usr/bin, whichstores most of the Linux utility commands, and /dev, which stores device files, many ofwhich represent physical pieces of hardware. An important standard file is /etc/passwd;it contains information about users, such as each user’s ID and full name.
Among the attributes associated with each file are access permissions. They deter-mine who can access the file and how the file may be accessed. Three groups ofusers can potentially access the file: the owner, the members of a group, and allother users. An ordinary file can be accessed in three ways: read, write, and execute.The ls utility with the –l option displays these permissions. For directories, executeaccess is redefined to mean that the directory can be searched.
The owner of a file or a user working with root privileges can use the chmod utilityto change the access permissions of a file. This utility specifies read, write, and exe-cute permissions for the file’s owner, the group, and all other users on the system.
Access Control Lists (ACLs) provide finer-grained control over which users canaccess specific directories and files than do traditional Linux permissions. UsingACLs you can specify the ways in which each of several users can access a directoryor file. Few utilities preserve ACLs when working with these files.
An ordinary file stores user data, such as textual information, programs, or images.A directory is a standard-format disk file that stores information, including names,about ordinary files and other directory files. An inode is a data structure, stored ondisk, that defines a file’s existence and is identified by an inode number. A directoryrelates each of the filenames it stores to a specific inode.
A link is a pointer to a file. You can have several links to a single file so that you canshare the file with other users or have the file appear in more than one directory.Because only one copy of a file with multiple links exists, changing the file throughany one link causes the changes to appear in all the links. Hard links cannot linkdirectories or span filesystems, whereas symbolic links can.

216 Chapter 6 The Linux Filesystem
Table 6-2 summarizes the utilities introduced in this chapter.
Exercises
1. Is each of the following an absolute pathname, a relative pathname, or a simple filename?
a. milk_co
b. correspond/business/milk_co
c. /home/alex
d. /home/alex/literature/promo
e. . .
f. letter.0610
2. List the commands you can use to perform these operations:
a. Make your home directory the working directory
b. Identify the working directory
3. If your working directory is /home/alex with a subdirectory named litera-ture, give three sets of commands that you can use to create a subdirectory named classics under literature. Also give several sets of commands you can use to remove the classics directory and its contents.
4. The df utility displays all mounted filesystems along with information about each. Use the df utility with the –h (human-readable) option to answer the following questions.
a. How many filesystems are mounted on your Linux system?
b. Which filesystem stores your home directory?
Table 6-2 Utilities introduced in Chapter 6
Utility Function
cd Associates you with another working directory (page 193)
chmod Changes the access permissions on a file (page 200)
getfacl Displays a file’s ACL (page 204)
ln Makes a link to an existing file (page 210)
mkdir Creates a directory (page 191)
pwd Displays the pathname of the working directory (page 188)
rmdir Deletes a directory (page 196)
setfacl Modifies a file’s ACL (page 204)
Exercises 217
c. Assuming that your answer to exercise 4a is two or more, attempt to create a hard link to a file on another filesystem. What error message do you get? What happens when you attempt to create a symbolic link to the file instead?
5. Suppose that you have a file that is linked to a file owned by another user. How can you ensure that changes to the file are no longer shared?
6. You should have read permission for the /etc/passwd file. To answer the following questions, use cat or less to display /etc/passwd. Look at the fields of information in /etc/passwd for the users on your system.
a. Which character is used to separate fields in /etc/passwd?
b. How many fields are used to describe each user?
c. How many users are on your system?
d. How many different login shells are in use on your system? (Hint: Look at the last field.)
e. The second field of /etc/passwd stores user passwords in encoded form. If the password field contains an x, your system uses shadow passwords and stores the encoded passwords elsewhere. Does your system use shadow passwords?
7. If /home/jenny/draft and /home/alex/letter are links to the same file and the following sequence of events occurs, what will be the date in the open-ing of the letter?
a. Alex gives the command vim letter.
b. Jenny gives the command vim draft.
c. Jenny changes the date in the opening of the letter to January 31, 2008, writes the file, and exits from vim.
d. Alex changes the date to February 1, 2008, writes the file, and exits from vim.
8. Suppose that a user belongs to a group that has all permissions on a file named jobs_list, but the user, as the owner of the file, has no permissions. Describe which operations, if any, the user/owner can perform on jobs_list. Which command can the user/owner give that will grant the user/owner all permissions on the file?
9. Does the root directory have any subdirectories that you cannot search as a regular user? Does the root directory have any subdirectories that you cannot read as a regular user? Explain.
10. Assume that you are given the directory structure shown in Figure 6-2 on page 185 and the following directory permissions:
d--x--x--- 3 jenny pubs 512 Mar 10 15:16 businessdrwxr-xr-x 2 jenny pubs 512 Mar 10 15:16 business/milk_co

218 Chapter 6 The Linux Filesystem
For each category of permissions—owner, group, and other—what hap-pens when you run each of the following commands? Assume that the working directory is the parent of correspond and that the file cheese_co is readable by everyone.
a. cd correspond/business/milk_co
b. ls –l correspond/business
c. cat correspond/business/cheese_co
Advanced Exercises
11. What is an inode? What happens to the inode when you move a file within a filesystem?
12. What does the . . entry in a directory point to? What does this entry point to in the root (/) directory?
13. How can you create a file named –i? Which techniques do not work, and why do they not work? How can you remove the file named –i?
14. Suppose that the working directory contains a single file named andor.What error message do you get when you run the following command line?
$ mv andor and\/or
Under what circumstances is it possible to run the command without pro-ducing an error?
15. The ls –i command displays a filename preceded by the inode number of the file (page 212). Write a command to output inode/filename pairs for the files in the working directory, sorted by inode number. (Hint: Use a pipe.)
16. Do you think that the system administrator has access to a program that can decode user passwords? Why or why not? (See exercise 6.)
17. Is it possible to distinguish a file from a hard link to a file? That is, given a filename, can you tell whether it was created using an ln command? Explain.
18. Explain the error messages displayed in the following sequence of commands:
$ ls -ltotal 1drwxrwxr-x 2 alex pubs 1024 Mar 2 17:57 dirtmp$ ls dirtmp$ rmdir dirtmprmdir: dirtmp: Directory not empty$ rm dirtmp/*rm: No match.

219219
7Chapter7This chapter takes a close look at the shell and explains how touse some of its features. For example, it discusses command linesyntax and also describes how the shell processes a commandline and initiates execution of a program. The chapter alsoexplains how to redirect input to and output from a command,construct pipes and filters on the command line, and run a com-mand in the background. The final section covers filenameexpansion and explains how you can use this feature in youreveryday work.
The exact wording of the shell output differs from shell to shell:What your shell displays may differ slightly from what appearsin this book. Refer to Chapter 9 for more information on bashand to Chapter 11 for information on writing and executingbash shell scripts.
In This Chapter
The Command Line . . . . . . . . . . . . 220
Standard Input and Standard Output . . . . . . . . . . . . . . . . . . . . 226
Pipes . . . . . . . . . . . . . . . . . . . . . . . 234
Running a Program in the Background . . . . . . . . . . . . . . . . 237
kill: Aborting a Background Job . . 238
Filename Generation/Pathname Expansion . . . . . . . . . . . . . . . . . 239
Builtins . . . . . . . . . . . . . . . . . . . . . 243
7
The Shell

220 Chapter 7 The Shell
The Command Line
The shell executes a program when you give it a command in response to itsprompt. For example, when you give the ls command, the shell executes the utilityprogram named ls. You can cause the shell to execute other types of programs—such as shell scripts, application programs, and programs you have written—in thesame way. The line that contains the command, including any arguments, is calledthe command line. In this book the term command refers to the characters you typeon the command line as well as to the program that action invokes.
Syntax
Command line syntax dictates the ordering and separation of the elements on acommand line. When you press the RETURN key after entering a command, the shellscans the command line for proper syntax. The syntax for a basic command line is
command [arg1] [arg2] ... [argn] RETURN
One or more SPACEs must separate elements on the command line. The command isthe name of the command, arg1 through argn are arguments, and RETURN is the key-stroke that terminates all command lines. The brackets in the command line syntaxindicate that the arguments they enclose are optional. Not all commands requirearguments: Some commands do not allow arguments; other commands allow avariable number of arguments; and others require a specific number of arguments.Options, a special kind of argument, are usually preceded by one or two hyphens(also called a dash or minus sign: –).
Command Name
Usage message Some useful Linux command lines consist of only the name of the command with-out any arguments. For example, ls by itself lists the contents of the working direc-tory. Most commands accept one or more arguments. Commands that requirearguments typically give a short error message, called a usage message, when youuse them without arguments, with incorrect arguments, or with the wrong numberof arguments.
Arguments
On the command line each sequence of nonblank characters is called a token orword. An argument is a token, such as a filename, string of text, number, or otherobject that a command acts on. For example, the argument to a vim or emacs com-mand is the name of the file you want to edit.
The following command line shows cp copying the file named temp to tempcopy:
$ cp temp tempcopy

The Command Line 221
Arguments are numbered starting with the command itself as argument zero. In thisexample cp is argument zero, temp is argument one, and tempcopy is argumenttwo. The cp utility requires two arguments on the command line. (The utility cantake more arguments but not fewer.) Argument one is the name of an existing file.Argument two is the name of the file that cp is creating or overwriting. Here thearguments are not optional; both arguments must be present for the command towork. When you do not supply the right number or kind of arguments, cp displaysa usage message. Try typing cp and then pressing RETURN.
Options
An option is an argument that modifies the effects of a command. You can fre-quently specify more than one option, modifying the command in several differentways. Options are specific to and interpreted by the program that the command linecalls, not the shell.
By convention options are separate arguments that follow the name of the com-mand and usually precede other arguments, such as filenames. Most utilities requireyou to prefix options with a single hyphen. However, this requirement is specific tothe utility and not the shell. GNU program options are frequently preceded by twohyphens in a row. For example, ––help generates a (sometimes extensive) usagemessage.
Figure 7-1 first shows what happens when you give an ls command without anyoptions. By default ls lists the contents of the working directory in alphabeticalorder, vertically sorted in columns. Next the –r (reverse order; because this is aGNU utility, you can also use ––reverse) option causes the ls utility to display thelist of files in reverse alphabetical order, still sorted in columns. The –x optioncauses ls to display the list of files in horizontally sorted rows.
Combining options When you need to use several options, you can usually group multiple single-letteroptions into one argument that starts with a single hyphen; do not put SPACEsbetween the options. You cannot combine options that are preceded by two
$ lsalex house mark office personal testhold jenny names oldstuff temp$ ls -rtest personal office mark house alextemp oldstuff names jenny hold$ ls -xalex hold house jenny mark namesoffice oldstuff personal temp test$ ls -rxtest temp personal oldstuff office namesmark jenny house hold alex
Figure 7-1 Using options

222 Chapter 7 The Shell
hyphens in this way, however. Specific rules for combining options depend on theprogram you are running. Figure 7-1 shows both the –r and –x options with the lsutility. Together these options generate a list of filenames in horizontally sorted col-umns, in reverse alphabetical order. Most utilities allow you to list options in anyorder; thus ls –xr produces the same results as ls –rx. The command ls –x –r alsogenerates the same list.
Option arguments Some utilities have options that themselves require arguments. For example, the gccutility has a –o option that must be followed by the name you want to give the exe-cutable file that gcc generates. Typically an argument to an option is separated fromits option letter by a SPACE:
$ gcc -o prog prog.c
Arguments that startwith a hyphen
Another convention allows utilities to work with arguments, such as filenames, thatstart with a hyphen. If a file’s name is –l, the following command is ambiguous:
$ ls -l
This command could mean a long listing of all files in the working directory or alisting of the file named –l. It is interpreted as the former. You should avoid creatingfiles whose names begin with hyphens. If you do create them, many utilities followthe convention that a –– argument (two consecutive hyphens) indicates the end ofthe options (and the beginning of the arguments). To disambiguate the command,you can type
$ ls -- -l
You can use an alternative format in which the period refers to the working direc-tory and the slash indicates that the name refers to a file in the working directory:
$ ls ./-l
Assuming that you are working in the /home/alex directory, the preceding com-mand is functionally equivalent to
$ ls /home/alex/-l
You can give the following command to get a long listing of this file:
$ ls -l -- -l
Displaying readable file sizes: the –h option
tip Most utilities that report on file sizes specify the size of a file in bytes. Bytes work well when youare dealing with smaller files, but the numbers can be difficult to read when you are working withfile sizes that are measured in megabytes or gigabytes. Use the –h (or ––human-readable) optionto display file sizes in kilo-, mega-, and gigabytes. Experiment with df –h (disk free) and ls –lhcommands.

The Command Line 223
These are conventions, not hard-and-fast rules, and a number of utilities do not fol-low them (e.g., find). Following such conventions is a good idea; it makes it mucheasier for users to work with your program. When you write shell programs thatrequire options, follow the Linux option conventions.
Processing the Command Line
As you enter a command line, the Linux tty device driver (part of the Linux operatingsystem kernel) examines each character to see whether it must take immediateaction. When you press CONTROL-H (to erase a character) or CONTROL-U (to kill a line), thedevice driver immediately adjusts the command line as required; the shell never seesthe character(s) you erased or the line you killed. Often a similar adjustment occurswhen you press CONTROL-W (to erase a word). When the character you entered does notrequire immediate action, the device driver stores the character in a buffer and waitsfor additional characters. When you press RETURN, the device driver passes the com-mand line to the shell for processing.
Parsing thecommand line
When the shell processes a command line, it looks at the line as a whole and parses(breaks) it into its component parts (Figure 7-2). Next the shell looks for the nameof the command. Usually the name of the command is the first item on the com-mand line after the prompt (argument zero). The shell takes the first characters onthe command line up to the first blank (TAB or SPACE) and then looks for a commandwith that name. The command name (the first token) can be specified on the com-mand line either as a simple filename or as a pathname. For example, you can callthe ls command in either of the following ways:
$ ls
$ /bin/ls
The ––help optiontip Many utilities display a (sometimes extensive) help message when you call them with an argument
of ––help. All utilities developed by the GNU Project (page 2) accept this option. An example follows.$ bzip2 --helpbzip2, a block-sorting file compressor. Version 1.0.2, 30-Dec-2001.
usage: bzip2 [flags and input files in any order]
-h --help print this message -d --decompress force decompression -z --compress force compression -k --keep keep (don't delete) input files -f --force overwrite existing output files -t --test test compressed file integrity -c --stdout output to standard out -q --quiet suppress noncritical error messages -v --verbose be verbose (a 2nd -v gives more)...

224 Chapter 7 The Shell
optional The shell does not require that the name of the program appear first on the com-mand line. Thus you can structure a command line as follows:
$ >bb <aa cat
This command runs cat with standard input coming from the file named aa andstandard output going to the file named bb. When the shell recognizes the redirectsymbols (page 228), it recognizes and processes them and their arguments beforefinding the name of the program that the command line is calling. This is a properlystructured—albeit rarely encountered and possibly confusing—command line.
Absolute versusrelative pathnames
When you give an absolute pathname on the command line or a relative pathnamethat is not a simple filename (i.e., any pathname that includes at least one slash), theshell looks in the specified directory (/bin in the case of the /bin/ls command) for afile that has the name ls and that you have permission to execute. When you give asimple filename, the shell searches through a list of directories for a filename thatmatches the specified name and that you have execute permission for. The shell doesnot look through all directories but only the ones specified by the variable namedPATH. Refer to page 302 for more information on PATH. Also refer to the discus-sion of the which and whereis utilities on page 164.
Figure 7-2 Processing the command line
NEWLINE
Get first word
command nameand save as
Execute program
Get more
command lineof the
Display
Issue prompt
no
noyes not foundDoes
programexist?
The Command Line 225
When it cannot find the executable file, the Bourne Again Shell (bash) displays amessage such as the following:
$ abcbash: abc: command not found
One reason the shell may not be able to find the executable file is that it is not in adirectory in your PATH. Under bash the following command temporarily adds theworking directory (.) to your PATH:
$ PATH=$PATH:.
For security reasons, you may not want to add the working directory to PATH per-manently; see the adjacent tip and the one on page 303.
When the shell finds the program but cannot execute it (you do not have executepermission for the file that contains the program), it displays a message similar to
$ defbash: ./def: Permission denied
See “ls –l: Displays Permissions” on page 199 for information on displaying accesspermissions for a file and “chmod: Changes Access Permissions” on page 200 forinstructions on how to change file access permissions.
Executing the Command Line
Process If it finds an executable file with the same name as the command, the shell starts anew process. A process is the execution of a command by Linux (page 310). The shellmakes each command line argument, including options and the name of the com-mand, available to the called program. While the command is executing, the shellwaits for the process to finish. At this point the shell is in an inactive state called sleep.When the program finishes execution, it passes its exit status (page 438) to the shell.The shell then returns to an active state (wakes up), issues a prompt, and waits foranother command.
The shell does notprocess arguments
Because the shell does not process command line arguments but only hands them tothe called program, the shell has no way of knowing whether a particular option orother argument is valid for a given program. Any error or usage messages aboutoptions or arguments come from the program itself. Some utilities ignore bad options.
Editing the Command Line
You can repeat and edit previous commands and edit the current command line. Seepages 139 and 314 for more information.
Try giving a command as ./commandtip You can always execute an executable file in the working directory by prepending ./ to the name
of the file. For example, if myprog is an executable file in the working directory, you can executeit with the following command, regardless of how PATH is set:
$ ./myprog

226 Chapter 7 The Shell
Standard Input and Standard Output
Standard output is a place that a program can send information, such as text. Theprogram never “knows” where the information it sends to standard output is going(Figure 7-3). The information can go to a printer, an ordinary file, or the screen.The following sections show that by default the shell directs standard output from acommand to the screen1 and describe how you can cause the shell to redirect thisoutput to another file.
Standard input is a place that a program gets information from. As with standardoutput the program never “knows” where the information came from. The follow-ing sections also explain how to redirect standard input to a command so that itcomes from an ordinary file instead of from the keyboard (the default).
In addition to standard input and standard output, a running program normally hasa place to send error messages: standard error. Refer to page 280 for more informa-tion on handling standard error.
The Screen as a File
Chapter 6 introduced ordinary files, directory files, and hard and soft links. Linuxhas an additional type of file: a device file. A device file resides in the Linux filestructure, usually in the /dev directory, and represents a peripheral device, such as aterminal emulator window, screen, printer, or disk drive.
The device name that the who utility displays after your username is the filename ofyour screen. For example, when who displays the device name pts/4, the pathnameof your screen is /dev/pts/4. When you work with multiple windows, each windowhas its own device name. You can also use the tty utility to display the name of thedevice that you give the command from. Although you would not normally haveoccasion to do so, you can read from and write to this file as though it were a textfile. Writing to it displays what you wrote on the screen; reading from it reads whatyou entered on the keyboard.
Figure 7-3 The command does not know where standard input comes from or where standard output and standard error go
CommandStandardinput
Standardoutput
Standarderror
1. The term screen is used throughout this book to mean screen, terminal emulator window, or worksta-tion. Screen refers to the device that you see the prompt and messages displayed on.

Standard Input and Standard Output 227
The Keyboard and Screen as Standard Input
and Standard Output
When you first log in, the shell directs standard output of your commands to thedevice file that represents your screen (Figure 7-4). Directing output in this mannercauses it to appear on your screen. The shell also directs standard input to comefrom the same file, so that your commands receive as input anything you type onthe keyboard.
cat The cat utility provides a good example of the way the keyboard and the screenfunction as standard input and standard output, respectively. When you use cat, itcopies a file to standard output. Because the shell directs standard output to thescreen, cat displays the file on the screen.
chsh: changes your login shell
tip The person who sets up your account determines which shell you will use when you first log inon the system or when you open a terminal emulator window in a GUI environment. You can runany shell you like once you are logged in. Enter the name of the shell you want to use (bash, tcsh,or another shell) and press RETURN; the next prompt will be that of the new shell. Give an exit com-mand to return to the previous shell. Because shells you call in this manner are nested (one runson top of the other), you will be able to log out only from your original shell. When you have nestedseveral shells, keep giving exit commands until you reach your original shell. You will then be ableto log out.
Use the chsh utility when you want to change your login shell permanently. First give the com-mand chsh. Then in response to the prompts enter your password and the absolute pathname ofthe shell you want to use (/bin/bash, /bin/tcsh, or the pathname of another shell). When youchange your login shell in this manner using a terminal emulator (page 114) under a GUI, subse-quent terminal emulator windows will not reflect the change until you log out of the system andlog back in.
Figure 7-4 By default, standard input comes from the keyboard andstandard output goes to the screen
Command
Standardinput
Standardoutput
Sh
ell
Sh
ell

228 Chapter 7 The Shell
Up to this point cat has taken its input from the filename (argument) you specifiedon the command line. When you do not give cat an argument (that is, when yougive the command cat followed immediately by RETURN), cat takes its input from stan-dard input. Thus, when called without an argument, cat copies standard input tostandard output, one line at a time.
To see how cat works, type cat and press RETURN in response to the shell prompt.Nothing happens. Enter a line of text and press RETURN. The same line appears justunder the one you entered. The cat utility is working. Because the shell associatescat’s standard input with the keyboard and cat’s standard output with the screen,when you type a line of text cat copies the text from standard input (the keyboard)to standard output (the screen). This exchange is shown in Figure 7-5.
CONTROL-Dsignals EOF
The cat utility keeps copying text until you enter CONTROL-D on a line by itself. PressingCONTROL-D sends an EOF (end of file) signal to cat to indicate that it has reached theend of standard input and there is no more text for it to copy. The cat utility thenfinishes execution and returns control to the shell, which displays a prompt.
Redirection
The term redirection encompasses the various ways you can cause the shell to alterwhere standard input of a command comes from and where standard output goesto. By default the shell associates standard input and standard output of a com-mand with the keyboard and the screen as mentioned earlier. You can cause theshell to redirect standard input or standard output of any command by associatingthe input or output with a command or file other than the device file representingthe keyboard or the screen. This section demonstrates how to redirect input fromand output to ordinary text files and utilities.
Redirecting Standard Output
The redirect output symbol (>) instructs the shell to redirect the output of a com-mand to the specified file instead of to the screen (Figure 7-6). The format of acommand line that redirects output is
command [arguments] > filename
$ catThis is a line of text.This is a line of text.Cat keeps copying lines of textCat keeps copying lines of textuntil you press CONTROL-D at the beginninguntil you press CONTROL-D at the beginningof a line.of a line.CONTROL-D$
Figure 7-5 The cat utility copies standard input to standard output
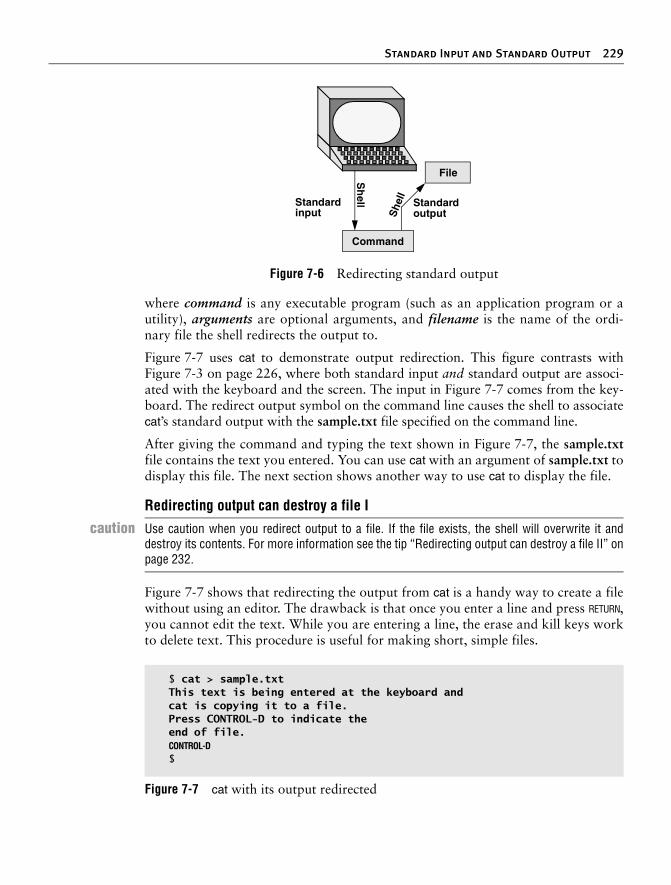
Standard Input and Standard Output 229
where command is any executable program (such as an application program or autility), arguments are optional arguments, and filename is the name of the ordi-nary file the shell redirects the output to.
Figure 7-7 uses cat to demonstrate output redirection. This figure contrasts withFigure 7-3 on page 226, where both standard input and standard output are associ-ated with the keyboard and the screen. The input in Figure 7-7 comes from the key-board. The redirect output symbol on the command line causes the shell to associatecat’s standard output with the sample.txt file specified on the command line.
After giving the command and typing the text shown in Figure 7-7, the sample.txtfile contains the text you entered. You can use cat with an argument of sample.txt todisplay this file. The next section shows another way to use cat to display the file.
Figure 7-7 shows that redirecting the output from cat is a handy way to create a filewithout using an editor. The drawback is that once you enter a line and press RETURN,you cannot edit the text. While you are entering a line, the erase and kill keys workto delete text. This procedure is useful for making short, simple files.
Figure 7-6 Redirecting standard output
Command
Standardinput
Sh
ell StandardoutputS
hell
File
Redirecting output can destroy a file I
caution Use caution when you redirect output to a file. If the file exists, the shell will overwrite it anddestroy its contents. For more information see the tip “Redirecting output can destroy a file II” onpage 232.
$ cat > sample.txtThis text is being entered at the keyboard andcat is copying it to a file.Press CONTROL-D to indicate theend of file.CONTROL-D$
Figure 7-7 cat with its output redirected

230 Chapter 7 The Shell
Figure 7-8 shows how to use cat and the redirect output symbol to catenate (joinone after the other—the derivation of the name of the cat utility) several files intoone larger file. The first three commands display the contents of three files:stationery, tape, and pens. The next command shows cat with three filenames asarguments. When you call it with more than one filename, cat copies the files, one ata time, to standard output. In this case standard output is redirected to the filesupply_orders. The final cat command shows that supply_orders contains the con-tents of all three files.
Redirecting Standard Input
Just as you can redirect standard output, so you can redirect standard input. Theredirect input symbol (<) instructs the shell to redirect a command’s input to comefrom the specified file instead of from the keyboard (Figure 7-9). The format of acommand line that redirects input is
command [arguments] < filename
where command is any executable program (such as an application program or autility), arguments are optional arguments, and filename is the name of the ordi-nary file the shell redirects the input from.
Figure 7-10 shows cat with its input redirected from the supply_orders file that wascreated in Figure 7-8 and standard output going to the screen. This setup causes catto display the sample file on the screen. The system automatically supplies an EOF(end of file) signal at the end of an ordinary file.
Utilities that takeinput from a file or
standard input
Giving a cat command with input redirected from a file yields the same result as giv-ing a cat command with the filename as an argument. The cat utility is a member ofa class of Linux utilities that function in this manner. Other members of this class ofutilities include lpr, sort, and grep. These utilities first examine the command line
$ cat stationery2,000 sheets letterhead ordered: 10/7/05$ cat tape1 box masking tape ordered: 10/14/055 boxes filament tape ordered: 10/28/05$ cat pens12 doz. black pens ordered: 10/4/05
$ cat stationery tape pens > supply_orders
$ cat supply_orders2,000 sheets letterhead ordered: 10/7/051 box masking tape ordered: 10/14/055 boxes filament tape ordered: 10/28/0512 doz. black pens ordered: 10/4/05$
Figure 7-8 Using cat to catenate files

Standard Input and Standard Output 231
that you use to call them. If you include a filename on the command line, the utilitytakes its input from the file you specify. If you do not specify a filename, the utilitytakes its input from standard input. It is the utility or program—not the shell oroperating system—that functions in this manner.
noclobber: Avoids Overwriting Files
The shell provides a feature called noclobber that stops you from inadvertentlyoverwriting an existing file using redirection. When you enable this feature by set-ting the noclobber variable and then attempt to redirect output to an existing file,the shell displays an error message and does not execute the command. If the pre-ceding examples result in one of the following messages, the noclobber feature hasbeen set. The following examples set noclobber, attempt to redirect the output fromecho into an existing file, and then unset noclobber:
$ set -o noclobber$ echo "hi there" > tmpbash: tmp: Cannot overwrite existing file$ set +o noclobber$ echo "hi there" > tmp$
You can override noclobber by putting a pipe symbol after the symbol you use forredirecting output (>|).
In the following example, the user first creates a file named a by redirecting the out-put of date to the file. Next the user sets the noclobber variable and tries redirecting
Figure 7-9 Redirecting standard input
$ cat < supply_orders2,000 sheets letterhead ordered: 10/7/051 box masking tape ordered: 10/14/055 boxes filament tape ordered: 10/28/0512 doz. black pens ordered: 10/4/05
Figure 7-10 cat with its input redirected
Command
StandardoutputS
hel
l
Standardinput
File
Shell

232 Chapter 7 The Shell
output to a again. The shell returns an error message. Then the user tries the samething but using a pipe symbol after the redirect symbol. This time the shell allowsthe user to overwrite the file. Finally, the user unsets noclobber (using a plus sign inplace of the hyphen) and verifies that it is no longer set.
$ date > a$ set -o noclobber$ date > abash: a: Cannot overwrite existing file$ date >| a$ set +o noclobber$ date > a
Appending Standard Output to a File
The append output symbol (>>) causes the shell to add new information to the endof a file, leaving any existing information intact. This symbol provides a convenientway of catenating two files into one. The following commands demonstrate theaction of the append output symbol. The second command accomplishes the cate-nation described in the preceding caution box:
$ cat orangethis is orange$ cat pear >> orange$ cat orangethis is orangethis is pear
Redirecting output can destroy a file II
caution Depending on which shell you are using and how your environment has been set up, a commandsuch as the following may give you undesired results:
$ cat orange pear > orangecat: orange: input file is output file
Although cat displays an error message, the shell goes ahead and destroys the contents of theexisting orange file. The new orange file will have the same contents as pear because the firstaction the shell takes when it sees the redirection symbol (>) is to remove the contents of the orig-inal orange file. If you want to catenate two files into one, use cat to put the two files into a tem-porary file and then use mv to rename this third file:
$ cat orange pear > temp$ mv temp orange
What happens in the next example can be even worse. The user giving the command wants tosearch through files a, b, and c for the word apple and redirect the output from grep (page 151)to the file a.output. Unfortunately the user enters the filename as a output, omitting the period andinserting a SPACE in its place:
$ grep apple a b c > a outputgrep: output: No such file or directory
The shell obediently removes the contents of a and then calls grep. The error message may takea moment to appear, giving you a sense that the command is running correctly. Even after you seethe error message, it may take a while to realize that you destroyed the contents of a.

Standard Input and Standard Output 233
You first see the contents of the orange file. Next the contents of the pear file isadded to the end of (catenated with) the orange file. The final cat shows the result.
The next example shows how to create a file that contains the date and time (theoutput from date), followed by a list of who is logged in (the output from who). Thefirst line in Figure 7-11 redirects the output from date to the file named whoson.Then cat displays the file. Next the example appends the output from who to thewhoson file. Finally cat displays the file containing the output of both utilities.
/dev/null: Making Data Disappear
The /dev/null device is a data sink, commonly referred to as a bit bucket. You canredirect output that you do not want to keep or see to /dev/null. The output disap-pears without a trace:
$ echo "hi there" > /dev/null$
When you read from /dev/null, you get a null string. Give the following cat commandto truncate a file named messages to zero length while preserving the ownership andpermissions of the file:
$ ls -l messages-rw-r--r-- 1 alex pubs 25315 Oct 24 10:55 messages$ cat /dev/null > messages$ ls -l messages-rw-r--r-- 1 alex pubs 0 Oct 24 11:02 messages
Do not trust noclobbercaution Appending output is simpler than the two-step procedure described in the preceding caution box
but you must be careful to include both greater than signs. If you accidentally use only one andthe noclobber feature is not on, you will overwrite the orange file. Even if you have the noclobberfeature turned on, it is a good idea to keep backup copies of files you are manipulating in theseways in case you make a mistake.
Although it protects you from making an erroneous redirection, noclobber does not stop you fromoverwriting an existing file using cp or mv. These utilities include the –i (interactive) option thathelps protect you from this type of mistake by verifying your intentions when you try to overwritea file. For more information see the tip “cp can destroy a file” on page 150.
$ date > whoson$ cat whosonThu Mar 27 14:31:18 PST 2008$ who >> whoson$ cat whosonThu Mar 27 14:31:18 PST 2008sam console Mar 27 05:00(:0)alex pts/4 Mar 27 12:23(:0.0)alex pts/5 Mar 27 12:33(:0.0)jenny pts/7 Mar 26 08:45 (bravo.example.com)
Figure 7-11 Redirecting and appending output

234 Chapter 7 The Shell
Pipes
The shell uses a pipe to connect standard output of one command directly to stan-dard input of another command. A pipe (sometimes referred to as a pipeline) hasthe same effect as redirecting standard output of one command to a file and thenusing that file as standard input to another command. A pipe does away with sepa-rate commands and the intermediate file. The symbol for a pipe is a vertical bar (|).The syntax of a command line using a pipe is
command_a [arguments] | command_b [arguments]
The preceding command line uses a pipe to generate the same result as the followinggroup of command lines:
command_a [arguments] > tempcommand_b [arguments] < temprm temp
In the preceding sequence of commands, the first line redirects standard outputfrom command_a to an intermediate file named temp. The second line redirectsstandard input for command_b to come from temp. The final line deletes temp. Thecommand using a pipe is not only easier to type, but is generally more efficientbecause it does not create a temporary file.
tr You can use a pipe with any of the Linux utilities that accept input either from a filespecified on the command line or from standard input. You can also use pipes withcommands that accept input only from standard input. For example, the tr (trans-late) utility takes its input from standard input only. In its simplest usage tr has thefollowing format:
tr string1 string2
The tr utility accepts input from standard input and looks for characters that matchone of the characters in string1. Upon finding a match, tr translates the matchedcharacter in string1 to the corresponding character in string2. (The first character instring1 translates into the first character in string2, and so forth.) The tr utilitysends its output to standard output. In both of the following examples, tr displaysthe contents of the abstract file with the letters a, b, and c translated into A, B, andC, respectively:
$ cat abstract | tr abc ABC$ tr abc ABC < abstract
$ ls > temp$ lpr temp$ rm temp
or
$ ls | lpr
Figure 7-12 A pipe

Standard Input and Standard Output 235
The tr utility does not change the contents of the original file; it cannot change theoriginal file because it does not “know” the source of its input.
lpr The lpr (line printer) utility also accepts input from either a file or standard input.When you type the name of a file following lpr on the command line, it places thatfile in the print queue. When you do not specify a filename on the command line, lprtakes input from standard input. This feature enables you to use a pipe to redirectinput to lpr. The first set of commands in Figure 7-12 shows how you can use ls andlpr with an intermediate file (temp) to send a list of the files in the working directoryto the printer. If the temp file exists, the first command overwrites its contents. Thesecond set of commands sends the same list (with the exception of temp) to theprinter using a pipe.
The commands in Figure 7-13 redirect the output from the who utility to temp andthen display this file in sorted order. The sort utility (page 153) takes its input fromthe file specified on the command line or, when a file is not specified, from standardinput and sends its output to standard output. The sort command line inFigure 7-13 takes its input from standard input, which is redirected (<) to comefrom temp. The output that sort sends to the screen lists the users in sorted (alpha-betical) order.
Because sort can take its input from standard input or from a filename on the com-mand line, omitting the < symbol from Figure 7-13 yields the same result.
Figure 7-14 achieves the same result without creating the temp file. Using a pipe theshell redirects the output from who to the input of sort. The sort utility takes inputfrom standard input because no filename follows it on the command line.
When many people are using the system and you want information about only one ofthem, you can send the output from who to grep (page 151) using a pipe. The grep util-ity displays the line containing the string you specify—sam in the following example:
$ who | grep 'sam'sam console Mar 24 05:00
$ who > temp$ sort < tempalex pts/4 Mar 24 12:23alex pts/5 Mar 24 12:33jenny pts/7 Mar 23 08:45sam console Mar 24 05:00$ rm temp
Figure 7-13 Using a temporary file to store intermediate results
$ who | sortalex pts/4 Mar 24 12:23alex pts/5 Mar 24 12:33jenny pts/7 Mar 23 08:45sam console Mar 24 05:00
Figure 7-14 A pipe doing the work of a temporary file

236 Chapter 7 The Shell
Another way of handling output that is too long to fit on the screen, such as a list offiles in a crowded directory, is to use a pipe to send the output through less or more(both on page 148).
$ ls | less
The less utility displays text one screen at a time. To view another screen, press theSPACE bar. To view one more line, press RETURN. Press h for help and q to quit.
Some utilities change the format of their output when you redirect it. Compare theoutput of ls by itself and when you send it through a pipe to less.
Filters
A filter is a command that processes an input stream of data to produce an outputstream of data. A command line that includes a filter uses a pipe to connect stan-dard output of one command to the filter’s standard input. Another pipe connectsthe filter’s standard output to standard input of another command. Not all utilitiescan be used as filters.
In the following example, sort is a filter, taking standard input from standard outputof who and using a pipe to redirect standard output to standard input of lpr. Thiscommand line sends the sorted output of who to the printer:
$ who | sort | lpr
The preceding example demonstrates the power of the shell combined with the ver-satility of Linux utilities. The three utilities who, sort, and lpr were not specificallydesigned to work with each other, but they all use standard input and standard out-put in the conventional way. By using the shell to handle input and output, you canpiece standard utilities together on the command line to achieve the results you want.
tee: Sends Output in Two Directions
The tee utility copies its standard input both to a file and to standard output. Theutility is aptly named: It takes a single input and sends the output in two directions.In Figure 7-15 the output of who is sent via a pipe to standard input of tee. The teeutility saves a copy of standard input in a file named who.out and also sends a copyto standard output. Standard output of tee goes via a pipe to standard input of grep,which displays lines containing the string sam.
$ who | tee who.out | grep samsam console Mar 24 05:00$ cat who.outsam console Mar 24 05:00alex pts/4 Mar 24 12:23alex pts/5 Mar 24 12:33jenny pts/7 Mar 23 08:45
Figure 7-15 Using tee

Running a Program in the Background 237
Running a Program in the Background
Foreground In all the examples so far in this book, commands were run in the foreground.When you run a command in the foreground, the shell waits for it to finish beforegiving you another prompt and allowing you to continue. When you run a com-mand in the background, you do not have to wait for the command to finish beforeyou start running another command.
Jobs A job is a series of one or more commands that can be connected by pipes. You canhave only one foreground job in a window or on a screen, but you can have manybackground jobs. By running more than one job at a time, you are using one ofLinux’s important features: multitasking. Running a command in the backgroundcan be useful when the command will run for a long time and does not need super-vision. It leaves the screen free so that you can use it for other work. Of course,when you are using a GUI, you can open another window to run another job.
Job number,PID number
To run a command in the background, type an ampersand (&) just before the RETURN
that ends the command line. The shell assigns a small number to the job and displaysthis job number between brackets. Following the job number, the shell displays theprocess identification (PID) number—a larger number assigned by the operatingsystem. Each of these numbers identifies the command running in the background.Then the shell displays another prompt and you can enter another command. Whenthe background job finishes running, the shell displays a message giving both the jobnumber and the command line used to run the command.
The next example runs in the background and sends its output through a pipe to lpr,which sends it to the printer.
$ ls -l | lpr &[1] 22092$
The [1] following the command line indicates that the shell has assigned job number1 to this job. The 22092 is the PID number of the first command in the job. Whenthis background job completes execution, you see the message
[1]+ Done ls -l | lpr
(In place of ls –l, the shell may display something similar to ls ––color=tty –l. Thisdifference is due to the fact that ls is aliased [page 328] to ls ––color=tty.)
Moving a Job from the Foreground to the Background
CONTROL-Z You can suspend a foreground job (stop it from running) by pressing the suspendkey, usually CONTROL-Z. The shell then stops the process and disconnects standardinput from the keyboard. You can put a suspended job in the background andrestart it by using the bg command followed by the job number. You do not need touse the job number when there is only one stopped job.

238 Chapter 7 The Shell
Only the foreground job can take input from the keyboard. To connect the key-board to a program running in the background, you must bring it into the fore-ground. Type fg without any arguments when only one job is in the background.When more than one job is in the background, type fg, or a percent sign (%), fol-lowed by the number of the job you want to bring into the foreground. The shelldisplays the command you used to start the job (promptme in the following exam-ple), and you can enter any input the program requires to continue:
bash $ fg 1promptme
Redirect the output of a job you run in the background to keep it from interferingwith whatever you are doing on the screen. Refer to “Separating and GroupingCommands” on page 286 for more detail about background tasks.
kill: Aborting a Background Job
The interrupt key (usually CONTROL-C) cannot abort a process you are running in thebackground; you must use kill (page 522) for this purpose. Follow kill on the com-mand line with either the PID number of the process you want to abort or a percentsign (%) followed by the job number.
Determining a PIDnumber with ps
If you forget the PID number, you can use the ps (process status) utility (page 310)to display it. The following example runs a tail –f outfile command (the –f optioncauses tail to watch outfile and display new lines as they are written to the file) as abackground job, uses ps to display the PID number of the process, and aborts thejob with kill:
$ tail -f outfile &[1] 18228$ ps | grep tail18228 pts/4 00:00:00 tail$ kill 18228[1]+ Terminated tail -f outfile$
If you forget the job number, you can use the jobs command to display a list of jobnumbers. The next example is similar to the previous one but uses the job numberinstead of the PID number to kill the job. Sometimes the message saying that the jobis terminated does not appear until you press RETURN after the RETURN that ends the killcommand:
$ tail -f outfile &[1] 18236$ bigjob &[2] 18237$ jobs[1]- Running tail -f outfile &[2]+ Running bigjob &$ kill %1$ RETURN[1]- Terminated tail -f outfile$

Filename Generation/Pathname Expansion 239
Filename Generation/Pathname Expansion
Wildcards, globbing When you give the shell abbreviated filenames that contain special characters, alsocalled metacharacters, the shell can generate filenames that match the names ofexisting files. These special characters are also referred to as wildcards because theyact as the jokers do in a deck of cards. When one of these characters appears in anargument on the command line, the shell expands that argument in sorted orderinto a list of filenames and passes the list to the program that the command linecalls. Filenames that contain these special characters are called ambiguous file refer-ences because they do not refer to any one specific file. The process that the shellperforms on these filenames is called pathname expansion or globbing.
Ambiguous file references refer to a group of files with similar names quickly, sav-ing you the effort of typing the names individually. They can also help you find afile whose name you do not remember in its entirety. If no filename matches theambiguous file reference, the shell generally passes the unexpanded reference—specialcharacters and all—to the command.
The ? Special Character
The question mark (?) is a special character that causes the shell to generate file-names. It matches any single character in the name of an existing file. The followingcommand uses this special character in an argument to the lpr utility:
$ lpr memo?
The shell expands the memo? argument and generates a list of files in the workingdirectory that have names composed of memo followed by any single character. Theshell then passes this list to lpr. The lpr utility never “knows” that the shell generatedthe filenames it was called with. If no filename matches the ambiguous file refer-ence, the shell passes the string itself (memo?) to lpr or, if it is set up to do so, passesa null string (see nullglob on page 337).
The following example uses ls first to display the names of all files in the workingdirectory and then to display the filenames that memo? matches:
$ lsmem memo12 memo9 memoalex newmemo5memo memo5 memoa memos$ ls memo?memo5 memo9 memoa memos
The memo? ambiguous file reference does not match mem, memo, memo12,memoalex, or newmemo5. You can also use a question mark in the middle of anambiguous file reference:
$ ls7may4report may4report mayqreport may_reportmay14report may4report.79 mayreport may.report$ ls may?reportmay.report may4report may_report mayqreport
240 Chapter 7 The Shell
To practice generating filenames, you can use echo and ls. The echo utility displaysthe arguments that the shell passes to it:
$ echo may?reportmay.report may4report may_report mayqreport
The shell first expands the ambiguous file reference into a list of all files in theworking directory that match the string may?report and then passes this list to echo,as though you had entered the list of filenames as arguments to echo. Next echo dis-plays the list of filenames.
A question mark does not match a leading period (one that indicates a hidden file-name; see page 188). When you want to match filenames that begin with a period,you must explicitly include the period in the ambiguous file reference.
The * Special Character
The asterisk (*) performs a function similar to that of the question mark butmatches any number of characters, including zero characters, in a filename. The fol-lowing example shows all of the files in the working directory and then shows threecommands that display all the filenames that begin with the string memo, end withthe string mo, and contain the string alx:
$ lsamemo memo memoalx.0620 memosally user.memomem memo.0612 memoalx.keep sallymemomemalx memoa memorandum typescript$ echo memo*memo memo.0612 memoa memoalx.0620 memoalx.keep memorandum memosally$ echo *moamemo memo sallymemo user.memo$ echo *alx*memalx memoalx.0620 memoalx.keep
The ambiguous file reference memo* does not match amemo, mem, sallymemo, oruser.memo. Like the question mark, an asterisk does not match a leading period in afilename.
The –a option causes ls to display hidden filenames. The command echo * does notdisplay . (the working directory), .. (the parent of the working directory), .aaa, or.profile. In contrast, the command echo .* displays only those four names:
$ lsaaa memo.sally sally.0612 thursmemo.0612 report saturday$ ls -a. .aaa aaa memo.sally sally.0612 thurs.. .profile memo.0612 report saturday$ echo *aaa memo.0612 memo.sally report sally.0612 saturday thurs$ echo .*. .. .aaa .profile

Filename Generation/Pathname Expansion 241
In the following example .p* does not match memo.0612, private, reminder, orreport. Next the ls .* command causes ls to list .private and .profile in addition tothe contents of the . directory (the working directory) and the .. directory (the par-ent of the working directory). When called with the same argument, echo displaysthe names of files (including directories) in the working directory that begin with adot (.), but not the contents of directories.
$ ls -a. .private memo.0612 reminder.. .profile private report$ echo .p*.private .profile$ ls .*.private .profile
.:memo.0612 private reminder report
..:
.
.$ echo .*. .. .private .profile
You can take advantage of ambiguous file references when you establish conven-tions for naming files. For example, when you end all text filenames with .txt, youcan reference that group of files with *.txt. The next command uses this conventionto send all the text files in the working directory to the printer. The ampersandcauses lpr to run in the background.
$ lpr *.txt &
The [ ] Special Characters
A pair of brackets surrounding a list of characters causes the shell to match file-names containing the individual characters. Whereas memo? matches memo fol-lowed by any character, memo[17a] is more restrictive, and matches only memo1,memo7, and memoa. The brackets define a character class that includes all thecharacters within the brackets. (GNU calls this a character list; a GNU characterclass is something different.) The shell expands an argument that includes a charac-ter-class definition, by substituting each member of the character class, one at atime, in place of the brackets and their contents. The shell then passes the list ofmatching filenames to the program it is calling.
Each character-class definition can replace only a single character within a filename.The brackets and their contents are like a question mark that substitutes only themembers of the character class.
The first of the following commands lists the names of all the files in the workingdirectory that begin with a, e, i, o, or u. The second command displays the contentsof the files named page2.txt, page4.txt, page6.txt, and page8.txt.

242 Chapter 7 The Shell
$ echo [aeiou]*...$ less page[2468].txt...
A hyphen within brackets defines a range of characters within a character-class def-inition. For example, [6–9] represents [6789], [a–z] represents all lowercase lettersin English, and [a–zA–Z] represents all letters, both uppercase and lowercase, inEnglish.
The following command lines show three ways to print the files named part0,part1, part2, part3, and part5. Each of these command lines causes the shell to calllpr with five filenames:
$ lpr part0 part1 part2 part3 part5
$ lpr part[01235]
$ lpr part[0-35]
The first command line explicitly specifies the five filenames. The second and thirdcommand lines use ambiguous file references, incorporating character-class defini-tions. The shell expands the argument on the second command line to include allfiles that have names beginning with part and ending with any of the characters inthe character class. The character class is explicitly defined as 0, 1, 2, 3, and 5. Thethird command line also uses a character-class definition but defines the characterclass to be all characters in the range 0–3 plus 5.
The following command line prints 39 files, part0 through part38:
$ lpr part[0-9] part[12][0-9] part3[0-8]
The next two examples list the names of some of the files in the working directory.The first lists the files whose names start with a through m. The second lists fileswhose names end with x, y, or z.
$ echo [a-m]*...$ echo *[x-z]...
optional When an exclamation point (!) or a caret (^) immediately follows the openingbracket ([) that defines a character class, the string enclosed by the brackets matchesany character not between the brackets. Thus [^ab]* matches any filename thatdoes not begin with a or b.
The following examples show that *[^ab] matches filenames that do not end withthe letters a or b and that [b-d]* matches filenames that begin with b, c, or d.
$ lsaa ab ac ad ba bb bc bd cc dd

Builtins 243
$ ls *[^ab]ac ad bc bd cc ddcc dd$ ls [b-d]*ba bb bc bd cc dd
You can match a hyphen (–) or a closing bracket (]) by placing it immediately beforethe final closing bracket.
The next example demonstrates that the ls utility cannot interpret ambiguous filereferences. First ls is called with an argument of ?old. The shell expands ?old into amatching filename, hold, and passes that name to ls. The second command is thesame as the first, except the ? is quoted (refer to “Special Characters” on page 146).The shell does not recognize this question mark as a special character and passes iton to ls. The ls utility generates an error message saying that it cannot find a filenamed ?old (because there is no file named ?old).
$ ls ?oldhold$ ls \?oldls: ?old: No such file or directory
Like most utilities and programs, ls cannot interpret ambiguous file references; thatwork is left to the shell.
Builtins
A builtin is a utility (also called a command) that is built into a shell. Each of theshells has its own set of builtins. When it runs a builtin, the shell does not fork anew process. Consequently builtins run more quickly and can affect the environ-ment of the current shell. Because builtins are used in the same way as utilities, youwill not typically be aware of whether a utility is built into the shell or is a stand-alone utility.
The echo utility is a shell builtin. The shell always executes a shell builtin before try-ing to find a command or utility with the same name. See page 444 for an in-depthdiscussion of builtin commands and page 457 for a list of bash builtins.
Listing bashbuiltins
To get a complete list of bash builtins, give the command info bash builtin. To dis-play a page with more information on each builtin, move the cursor to one of thelines listing a builtin command and press RETURN. Alternatively, after typing info
The shell expands ambiguous file references
tip The shell does the expansion when it processes an ambiguous file reference, not the program thatthe shell runs. In the examples in this section, the utilities (ls, cat, echo, lpr) never see the ambig-uous file references. The shell expands the ambiguous file references and passes a list of ordinaryfilenames to the utility. In the previous examples, echo shows this to be true because it simplydisplays its arguments; it never displays the ambiguous file reference.

244 Chapter 7 The Shell
bash, give the command /builtin to search the bash documentation for the stringbuiltin. The cursor will rest on the word Builtin in a menu; press RETURN to displaythe builtins menu.
Because bash was written by GNU, the info page has better information than doesthe man page. If you want to read about builtins in the man page, give the commandman bash and then search for the section on builtins with the command /^SHELLBUILTIN COMMANDS (search for a line that begins with SHELL . . .).
Chapter Summary
The shell is the Linux command interpreter. It scans the command line for propersyntax, picking out the command name and any arguments. The first argument isargument one, the second is argument two, and so on. The name of the commanditself is argument zero. Many programs use options to modify the effects of a com-mand. Most Linux utilities identify an option by its leading one or two hyphens.
When you give it a command, the shell tries to find an executable program with thesame name as the command. When it does, the shell executes the program. When itdoes not, the shell tells you that it cannot find or execute the program. If the com-mand is a simple filename, the shell searches the directories given in the variablePATH in an attempt to locate the command.
When it executes a command, the shell assigns one file to the command’s standardinput and another file to its standard output. By default the shell causes a com-mand’s standard input to come from the keyboard and its standard output to go tothe screen. You can instruct the shell to redirect a command’s standard input fromor standard output to any file or device. You can also connect standard output ofone command to standard input of another command using a pipe. A filter is acommand that reads its standard input from standard output of one command andwrites its standard output to standard input of another command.
When a command runs in the foreground, the shell waits for it to finish before itdisplays a prompt and allows you to continue. When you put an ampersand (&) atthe end of a command line, the shell executes the command in the background anddisplays another prompt immediately. Run slow commands in the backgroundwhen you want to enter other commands at the shell prompt. The jobs builtin dis-plays a list of jobs and includes the job number of each.
The shell interprets special characters on a command line to generate filenames.A question mark represents any single character, and an asterisk represents zeroor more characters. A single character may also be represented by a characterclass: a list of characters within brackets. A reference that uses special characters(wildcards) to abbreviate a list of one or more filenames is called an ambiguousfile reference.

Exercises 245
A builtin is a utility that is built into a shell. Each shell has its own set of builtins.When it runs a builtin, the shell does not fork a new process. Consequently builtinsrun more quickly and can affect the environment of the current shell.
Utilities and Builtins Introduced in This Chapter
Table 7-1 lists the utilities introduced in this chapter.
Exercises
1. What does the shell ordinarily do while a command is executing? What should you do if you do not want to wait for a command to finish before running another command?
2. Using sort as a filter, rewrite the following sequence of commands:
$ sort list > temp$ lpr temp$ rm temp
3. What is a PID number? Why are these numbers useful when you run pro-cesses in the background? Which utility displays the PID numbers of the commands you are running?
4. Assume that the following files are in the working directory:
$ lsintro notesb ref2 section1 section3 section4bnotesa ref1 ref3 section2 section4a sentrev
Give commands for each of the following, using wildcards to express file-names with as few characters as possible.
a. List all files that begin with section.
b. List the section1, section2, and section3 files only.
Table 7-1 New utilities
Utility Function
tr Maps one string of characters into another (page 234)
tee Sends standard input to both a file and standard output (page 236)
bg Moves a process into the background (page 237)
fg Moves a process into the foreground (page 238)
jobs Displays a list of currently running jobs (page 238)
246 Chapter 7 The Shell
c. List the intro file only.
d. List the section1, section3, ref1, and ref3 files.
5. Refer to the documentation of utilities in the man pages to determine which commands will
a. Output the number of lines in the standard input that contain the worda or A .
b. Output only the names of the files in the working directory that contain the pattern $(.
c. List the files in the working directory in their reverse alphabetical order.
d. Send a list of files in the working directory to the printer, sorted by size.
6. Give a command to
a. Redirect the standard output from a sort command into a file named phone_list. Assume that the input file is named numbers.
b. Translate all occurrences of the characters [ and { to the character ( , and all occurrences of the characters ] and } to the character ) in the file permdemos.c. (Hint: Refer to the tr man page.)
c. Create a file named book that contains the contents of two other files: part1 and part2.
7. The lpr and sort utilities accept input either from a file named on the com-mand line or from standard input.
a. Name two other utilities that function in a similar manner.
b. Name a utility that accepts its input only from standard input.
8. Give an example of a command that uses grep
a. With both input and output redirected.
b. With only input redirected.
c. With only output redirected.
d. Within a pipe.
In which of the preceding is grep used as a filter?
9. Explain the following error message. What filenames would a subsequent ls display?
$ lsabc abd abe abf abg abh$ rm abc ab*rm: cannot remove 'abc': No such file or directory

Advanced Exercises 247
Advanced Exercises
10. When you use the redirect output symbol (>) with a command, the shell creates the output file immediately, before the command is executed. Dem-onstrate that this is true.
11. In experimenting with shell variables, Alex accidentally deletes his PATHvariable. He decides that he does not need the PATH variable. Discuss some of the problems he may soon encounter and explain the reasons for these problems. How could he easily return PATH to its original value?
12. Assume that your permissions allow you to write to a file but not to delete it.
a. Give a command to empty the file without invoking an editor.
b. Explain how you might have permission to modify a file that you can-not delete.
13. If you accidentally create a filename that contains a nonprinting character, such as a CONTROL character, how can you rename the file?
14. Why does the noclobber variable not protect you from overwriting an existing file with cp or mv?
15. Why do command names and filenames usually not have embedded SPACEs? How would you create a filename containing a SPACE? How would you remove it? (This is a thought exercise, not recommended practice. If you want to experiment, create and work in a directory that contains only your experimental file.)
16. Create a file named answer and give the following command:
$ > answers.0102 < answer cat
Explain what the command does and why. What is a more conventional way of expressing this command?

This page intentionally left blank

249
I
PART III
Digging into Ubuntu Linux
CHAPTER 8
Linux GUIs: X and GNOME 251
CHAPTER 9
The Bourne Again Shell 275
CHAPTER 10
Networking and the Internet 353
CHAPTER 11
Programming the Bourne Again Shell 395

This page intentionally left blank

251251
8Chapter8This chapter covers the Linux graphical user interface (GUI).It continues where Chapter 4 left off, going into more detailabout the X Window System, the basis for the Linux GUI. Itpresents a brief history of GNOME and KDE and discussessome of the problems and benefits of having two majorLinux desktop environments. The section on the NautilusFile Browser covers the View and Side panes, the controlbars, and the menubar. The final section explores someGNOME utilities, including the new Deskbar applet andTerminal, the GNOME terminal emulator.
In This Chapter
X Window System . . . . . . . . . . . . . 252
Starting X from a Character-Based Display . . . . . . . . . . . . . . 254
Remote Computing and Local Displays . . . . . . . . . . . . . . . . . . . 254
Window Managers . . . . . . . . . . . . 259
The Nautilus File Browser Window . . . . . . . . . . . . . . . . . . . 260
GNOME Utilities . . . . . . . . . . . . . . 266
Run Application Window . . . . . . . 269
GNOME Terminal Emulator/Shell . . . . . . . . . . . . . 270
8
Linux GUIs: X and
GNOME

252 Chapter 8 Linux GUIs: X and GNOME
X Window System
History of X The X Window System (www.x.org) was created in 1984 at the MassachusettsInstitute of Technology (MIT) by researchers working on a distributed computingproject and a campuswide distributed environment, called Project Athena. This sys-tem was not the first windowing software to run on a UNIX system, but it was thefirst to become widely available and accepted. In 1985, MIT released X (version 9)to the public, for use without a license. Three years later, a group of vendors formedthe X Consortium to support the continued development of X, under the leadershipof MIT. By 1998, the X Consortium had become part of the Open Group. In 2001,the Open Group released X version 11, release 6.6 (X11R6.6).
The X Window System was inspired by the ideas and features found in earlier propri-etary window systems but is written to be portable and flexible. X is designed to run on aworkstation, typically attached to a LAN. The designers built X with the network inmind. If you can communicate with a remote computer over a network, running an Xapplication on that computer and sending the results to a local display is straightforward.
Although the X protocol has remained stable for a long time, additions to it in theform of extensions are quite common. One of the most interesting—albeit one thathas not yet made its way into production—is the Media Application Server, whichaims to provide the same level of network transparency for sound and video that Xdoes for simple windowing applications.
XFree86 and X.org Many distributions of Linux used the XFree86 X server, which inherited its licensefrom the original MIT X server, through release 4.3. In early 2004, just before therelease of XFree86 4.4, the XFree86 license was changed to one that is morerestrictive and not compatible with the GPL (page 4). In the wake of this change, anumber of distributions abandoned XFree86 and replaced it with an X.org Xserver that is based on a pre-release version of XFree86 4.4, which predates thechange in the XFree86 license. Ubuntu uses the X.org X server, named X; it is func-tionally equivalent to the one distributed by XFree86 because most of the code isthe same so modules designed to work with one server work with the other.
The X stack The Linux GUI is built in layers (Figure 8-1). The bottom layer is the kernel, whichprovides the basic interfaces to the hardware. On top of the kernel is the X server,which is responsible for managing windows and drawing basic graphical primitivessuch as lines and bitmaps. Rather than directly generating X commands, most pro-grams use Xlib, the next layer, which is a standard library for interfacing with an Xserver. Xlib is complicated and does not provide high-level abstractions, such asbuttons and text boxes. Rather than using Xlib directly, most programs rely on atoolkit that provides high-level abstractions. Using a library not only makes pro-gramming easier, but also brings consistency to applications.
In recent years, the popularity of X has grown outside the UNIX community andextended beyond the workstation class of computers it was originally conceived for.Today X is available for Macintosh computers as well as for PCs running Windows.

X Window System 253
Client/serverenvironment
Computer networks are central to the design of X. It is possible to run an applicationon one computer and display the results on a screen attached to a different computer;the ease with which this can be done distinguishes X from other window systemsavailable today. Thanks to this capability, a scientist can run and manipulate a pro-gram on a powerful supercomputer in another building or another country and viewthe results on a personal workstation or laptop computer. For more information referto “Remote Computing and Local Displays” on page 254.
When you start an X Window System session, you set up a client/server environ-ment. One process, called the X server, displays a desktop and windows under X.Each application program and utility that makes a request of the X server is a clientof that server. Examples of X clients include xterm, Compiz, xclock, and such generalapplications as word processing and spreadsheet programs. A typical request from aclient is to display an image or open a window.
Events The server also monitors keyboard and mouse actions (events) and passes them tothe appropriate clients. For example, when you click the border of a window, theserver sends this event to the window manager (client). Characters you type into aterminal emulation window are sent to that terminal emulator (client). The clienttakes appropriate action when it receives an event—for example, making a windowactive or displaying the typed character on the server.
Figure 8-1 The X stack
Graphical applications
GTK Tk Motif OtherQt toolkits
Xlib
X server
Linux kernel
The roles of X client and server may be counterintuitive
tip The terms client and server, when referring to X, have the opposite meanings of how you mightthink of them intuitively: The server runs the mouse, keyboard, and display; the application pro-gram is the client.
This disparity becomes even more apparent when you run an application program on a remotesystem. You might think of the system running the program as the server and the system provid-ing the display as the client, but in fact it is the other way around. With X, the system providingthe display is the server, and the system running the program is the client.

254 Chapter 8 Linux GUIs: X and GNOME
Separating the physical control of the display (the server) from the processes need-ing access to the display (the client) makes it possible to run the server on one com-puter and the client on another computer. In general, this book discusses runningthe X server and client applications on a single system. “Remote Computing andLocal Displays” describes using X in a distributed environment.
optional You can run xev (X event) by giving the command xev from a terminal emulatorwindow and then watch the information flow from the client to the server and backagain. This utility opens the Event Tester window, which has a box in it, and asksthe X server to send it events each time anything happens, such as moving themouse pointer, clicking a mouse button, moving the mouse pointer into the box,typing, or resizing the window. The xev utility displays information about eachevent in the window you opened it from. You can use xev as an educational tool:Start it and see how much information is processed each time you move the mouse.Close the Event Tester window to exit from xev.
Using X
This section provides basic information about starting and configuring X from thecommand line. For more information see the Xserver man page and the man pageslisted at the bottom of the Xserver man page.
Starting X from a Character-Based Display
Once you have logged in on a virtual console (page 136), you can start an X Win-dow System server by using startx. See page 506 for information on creating a/etc/inittab file that causes Linux to boot into recovery (single-user) mode, where itdisplays a textual interface. When you run startx, the X server displays an X screen,using the first available virtual console. The following command causes startx to runin the background so you can switch back to this virtual console and give othercommands:
$ startx &
Remote Computing and Local Displays
Typically the X server and the X client run on the same machine. To identify aremote X server (display) an X application (client) is to use, you can either set a glo-bal shell variable or use a command line option. Before you can connect to a remoteX server, you must turn off two security features: You must run xhost on the serverto give the client permission to connect to the X server and you must turn off the X–nolisten tcp option on the server. Unless you have a reason to leave these featuresoff, turn them back on when you finish with the examples in this section—leavingthem off lessens system security. Both of these tasks must be performed on the Xserver because the features protect the server. You do not have to prepare the client.The examples in this section assume a server named tiny and a client named dog.

X Window System 255
The X –nolisten tcp Option
As Ubuntu is installed, the X server starts with the –nolisten tcp option, which pro-tects the X server by preventing TCP connections to the X server. To connect to aremote X server, you must turn this option off on the server. To turn it off, selectMain menu: System Administration Login Window, Security tab, and removethe tick from the check box labeled Deny TCP connections to Xserver.
xhost Grants Access to a Display
As Ubuntu is installed, xhost protects each user’s X server. A user who wants togrant access to his X server needs to run xhost. Assume Max is logged in on the sys-tem named tiny and wants to allow a user on dog to use his display (X server). Maxruns the following command:
max@tiny:~$ xhost +dogdog being added to access control listmax@tiny:~$ xhostaccess control enabled, only authorized clients can connectINET:dog
Without any arguments, xhost describes its state. In the preceding example, INETindicates an IPv4 connection. If Max wants to allow all systems to access his dis-play, he can give the following command:
$ xhost +access control disabled, clients can connect from any host
If you frequently work with other users via a network, you may find it convenientto add an xhost line to your .bash_profile file (page 277), but see the adjacent tipregarding security and xhost. Be selective in granting access to your X display withxhost, however; if another system has access to your display, you may find yourwork frequently interrupted.
Security and the X –nolisten tcp option
security In a production environment, if you need to place an X server and the clients on different systems,it is best to forward (tunnel) X over ssh. This setup provides a secure, encrypted connection. Themethod described in this section is useful on local, secure networks and for understanding howX works. See “X11 forwarding” on page 708 for information on setting up ssh so it forwards X.
Security and xhostsecurity Giving a remote system access to your display using xhost means any user on the remote system
can watch everything you type in a terminal emulation window, including passwords. For this rea-son, some software packages, such as the Tcl/Tk development system (www.tcl.tk), restrict theirown capabilities when xhost permits remote access to the X server. If you are concerned aboutsecurity or want to take full advantage of systems such as Tcl/Tk, you should use a safer meansof granting remote access to your X session. See the xauth man page for information about amore secure replacement for xhost.

256 Chapter 8 Linux GUIs: X and GNOME
The DISPLAY Variable
The most common method of identifying a display is to use the DISPLAY shell envi-ronment variable to hold the X server ID string. This locally unique identificationstring is automatically set up when the X server starts. The DISPLAY variable holdsthe screen number of a display:
$ echo $DISPLAY:0.0
The format of the complete (globally unique) ID string for a display is
[hostname]:display-number[.screen-number]
where hostname is the name of the system running the X server, display-number isthe number of the logical (physical) display (0 unless multiple monitors or graphicalterminals are attached to the system, or if you are running X over ssh), and screen-number is the logical number of the (virtual) terminal (0 unless you are runningmultiple instances of X). When you are working with a single physical screen, youcan shorten the identification string. For example, you can use tiny:0.0 or tiny:0 toidentify the only physical display on the system named tiny. When the X server andthe X clients are running on the same system, you can shorten this identificationstring even further to :0.0 or :0. An ssh connection shows DISPLAY as local-host:10.0. See “X11 forwarding” on page 708 for information on setting up ssh sothat it forwards X.
If DISPLAY is empty or not set, the screen you are working from is not running X.An application (the X client) uses the value of the DISPLAY variable to determinewhich display, keyboard, and mouse (collectively, the X server) to use. One way torun an X application, such as xclock, on the local system but have it use the X dis-play on a remote system is to change the value of the DISPLAY variable on the clientsystem so that it identifies the remote X server.
sam@dog:~$ export DISPLAY=tiny:0.0sam@dog:~$ xclock &
The preceding example shows Sam running xclock with the default X server runningon the system named tiny. After setting the DISPLAY variable to the ID of the tinyserver, all X programs (clients) Sam starts use tiny as their server (i.e., outputappears on tiny’s display and input comes from tiny’s keyboard and mouse). Tryrunning xterm in place of xclock and see which keyboard it accepts input from. If thisexample generates an error, refer back to the two preceding sections, which explainhow to set up the server to allow a remote system to connect to it.
The –display Option
For a single command, you can specify the X server on the command line:
When you change the value of DISPLAYtip When you change the value of the DISPLAY variable, all X programs send their output to the dis-
play named by DISPLAY.

X Window System 257
sam@dog:~$ xclock -display tiny:0.0
Many X programs accept the –display option. Those that do not accept this optionsend their output to the display specified by the DISPLAY variable.
Running Multiple X Servers
You can run multiple X servers on a single system. The most common reason forrunning a second X server is to use a second display that allocates a different numberof bits to each screen pixel (uses a different color depth [page 1029]). The possiblevalues are 8, 16, 24, and 32 bits per pixel. Most X servers available for Linux defaultto 24 or 32 bits per pixel, permitting the use of millions of colors simultaneously.Starting an X server with 8 bits per pixel permits the use of any combination of 256colors at the same time. The maximum number of bits per pixel allowed depends onthe computer graphics hardware and X server. With fewer bits per pixel, the systemhas to transfer less data, possibly making it more responsive. In addition, manygames work with only 256 colors.
When you start multiple X servers, each must have a different ID string. The followingcommand starts a second X server:
$ startx –– :1
The –– option marks the end of the startx options and arguments. The startx scriptuses the arguments to the left of this option and passes arguments to the right of thisoption to the X server. When you give the preceding command in a graphical envi-ronment, such as from a terminal emulator, you must work with root privileges;you will initiate a privileged X session. The following command starts an X serverrunning at 16 bits per pixel:
$ startx -- -depth 16 &
Refer to “Using Virtual Consoles” on page 136 for information on how to switch to a vir-tual console to start a second server where you do not have to work with root privileges.
Switch User When you click the Logout object (Figure 4-2, page 91), select Switch User, and login as a different user, Ubuntu starts a second X server to accommodate that user.When the second user logs off, the original X server displays the first user’s desktop.You can switch between the X servers (and users) by selecting the virtual console(page 136) that displays the X server you want to work with.
X over ssh See “Tunneling/Port Forwarding” on page 725 for information about running Xover an ssh connection.
Stopping the X Server
How you terminate a window manager depends on which window manager you arerunning and how it is configured. If X stops responding, switch to a virtual terminal, login from another terminal or a remote system, or use ssh to access the system. Then kill(page 522) the process running X. You can also press CONTROL-ALT-BACKSPACE to quit the Xserver. This method may not shut down the X session cleanly; use it only as a last resort.

258 Chapter 8 Linux GUIs: X and GNOME
Remapping Mouse Buttons
Throughout this book, each description of a mouse click refers to the button by itsposition (left, middle, or right, with left implied when no button is specified)because the position of a mouse button is more intuitive than an arbitrary name ornumber. X numbers buttons starting at the left and continuing with the mousewheel. The buttons on a three-button mouse are numbered 1 (left), 2 (middle), and3 (right). A mouse wheel, if present, is numbered 4 (rolling it up) and 5 (rolling itdown). Clicking the wheel is equivalent to clicking the middle mouse button. Thebuttons on a two-button mouse are 1 (left) and 2 (right).
If you are right-handed, you can conveniently press the left mouse button with yourindex finger; X programs take advantage of this fact by relying on button 1 for themost common operations. If you are left-handed, your index finger rests most con-veniently on button 2 or 3 (the right button on a two- or three-button mouse).
“Mouse Preferences” on page 95 describes how to use a GUI to change a mousebetween right-handed and left-handed. You can also change how X interprets themouse buttons using xmodmap. If you are left-handed and using a three-buttonmouse with a wheel, the following command causes X to interpret the right buttonas button 1 and the left button as button 3:
$ xmodmap -e 'pointer = 3 2 1 4 5'
Omit the 4 and 5 if the mouse does not have a wheel. The following commandworks for a two-button mouse without a wheel:
$ xmodmap -e 'pointer = 2 1'
If xmodmap displays a message complaining about the number of buttons, use thexmodmap –pp option to display the number of buttons X has defined for the mouse:
$ xmodmap -ppThere are 9 pointer buttons defined.
Physical Button Button Code 1 1 2 2 3 3 4 4 5 5 6 6 7 7 8 8 9 9
Then expand the previous command, adding numbers to complete the list. If the–pp option shows nine buttons, give the following command:
$ xmodmap -e 'pointer = 3 2 1 4 5 6 7 8 9'

X Window System 259
Changing the order of the first three buttons is critical to making the mouse suitablefor a left-handed user. When you remap the mouse buttons, remember to reinterpretthe descriptions in this book accordingly. When this book asks you to click the leftbutton or does not specify which button to click, use the right button, and vice versa.
Window Managers
Conceptually X is very simple and does not provide some of the more common fea-tures found in GUIs, such as the ability to drag windows. The UNIX/Linux philoso-phy is one of modularity: X relies on a window manager, such as Metacity orCompiz, to draw window borders and handle moving and resizing operations.
Unlike a window manager, which has a clearly defined task, a desktop environment(manager) does many things. In general, a desktop environment, such as KDE orGNOME, provides a means of launching applications and utilities, such as a filemanager, that work with a window manager.
KDE and GNOME
The KDE project began in 1996, with the aim of creating a consistent, user-friendlydesktop environment for free UNIX-like operating systems. KDE is based on the Qttoolkit made by Trolltech. When KDE development began, the Qt license was notcompatible with the GPL (page 4). For this reason the Free Software Foundationdecided to support a different project, the GNU Network Object Model Environ-ment (GNOME). More recently Qt has been released under the terms of the GPL,eliminating part of the rationale for GNOME’s existence.
GNOME GNOME is the default desktop environment for Ubuntu Linux. It provides a sim-ple, coherent user interface that is suitable for corporate use. GNOME uses GTKfor drawing widgets. GTK, developed for the GNU Image Manipulation Program(gimp), is written in C, although bindings for C++ and other languages are available.
GNOME does not take much advantage of its component architecture. Instead, itcontinues to support the traditional UNIX philosophy of relying on many smallprograms, each of which is good at doing a specific task.
KDE KDE is written in C++ on top of the Qt framework. KDE tries to use existing tech-nology, if it can be reused, but creates its own if nothing else is available or a supe-rior solution is needed. For example, KDE implemented an HTML rendering enginelong before the Mozilla project was born. Similarly, work on KOffice began a longtime before StarOffice became the open-source OpenOffice.org. In contrast, theGNOME office applications are stand-alone programs that originated outside theGNOME project. KDE’s portability is demonstrated by the use of most of its corecomponents, including Konqueror and KOffice, under Mac OS X.
Interoperability Since version 2, GNOME has focused on simplifying its user interface, removingoptions where they are deemed unnecessary, and aiming for a set of default settingsthat the end user will not wish to change. KDE has moved in the opposite direction,emphasizing configurability.

260 Chapter 8 Linux GUIs: X and GNOME
The freedesktop.org group (freedesktop.org), whose members are drawn from theGNOME and KDE projects, is improving interoperability and aims to producestandards that will allow the two environments to work together. One standardreleased by freedesktop.org allows applications to use the notification area of eitherthe GNOME or KDE panel without being aware of which desktop environmentthey are running in.
GNUStep
The GNUStep project (www.gnustep.org), which began before both the KDE andGNOME projects, is creating an open-source implementation of the OPENSTEPAPI and desktop environment. The result is a very clean and fast user interface.
The default look of WindowMaker, the GNUStep window manager is somewhatdated, but it supports themes so you can customize its appearance. The user inter-face is widely regarded as one of the most intuitive found on a UNIX platform.GNUStep has less overhead than KDE and GNOME, so it runs better on olderhardware. If you are running Linux on hardware that struggles with GNOME andKDE or you would prefer a user interface that does not attempt to mimic Windows,try GNUStep. WindowMaker is provided in the wmaker package.
The Nautilus File Browser Window
“Using Nautilus to Work with Files” on page 96 presented an introduction tousing Nautilus. This section discusses the Nautilus File Browser window in moredepth. Figure 8-2 shows a File Browser window with a Side pane (sometimescalled a sidebar), View pane, menubar, toolbar, location bar, and status bar. To
Figure 8-2 Nautilus File Browser window displaying icons
Menubar
Main toolbar
Location bar
Side pane button
Side pane
View pane
Status bar
Handle

The Nautilus File Browser Window 261
display your home folder in a File Browser window, select Main menu: PlacesHome Folder.
The View Pane
The View pane displays icons or a list of filenames. Select the view you prefer fromthe drop-down list at the right end of the location bar. Figure 8-2 shows View asIcons and Figure 8-3 shows View as List. Objects in the View pane behave exactlyas objects on the desktop do. See the sections starting on page 90 for informationon working with objects.
You can cut/copy and paste objects within a single View pane, between View panes,or between a View pane and the desktop. The Object Context menu (right-click)has cut, copy, and paste selections. Or, you can use the clipboard (page 113) tocut/copy and paste objects.
The Side Pane
The Side pane augments the information Nautilus displays in the View pane. Press F9 orclick the small x at the top of the Side pane to close it. You can display the Side pane bypressing F9 or selecting File Browser menu: View Side Pane. To change the horizontalsize of the Side pane and its contents, drag the handle (Figure 8-2) on its right side.
Figure 8-3 Nautilus File Browser window displaying a List view and a textual location bar
Location bar
Nautilus can open a terminal emulator
tip When you install the nautilus-open-terminal package and reboot the system, Nautilus presentsan Open in Terminal selection in context menus where appropriate. For example, with this packageinstalled, when you right-click a folder (directory) object and select Open in Terminal, Nautilusopens a terminal emulator with that directory as the working directory (page 188).

262 Chapter 8 Linux GUIs: X and GNOME
The Side pane can display six types of information. The button at its top controlswhich type it displays. This button is initially labeled Places; click it to display theSide pane drop-down list, which has the following selections:
Places Places lists folders. Double-click one of these folders to display that folder in theView pane. You can open a directory in a new File Browser window by right-clicking the directory in Places and selecting Open in New Window.
Places contains two parts: The list above the divider is static and holds yourhome directory, your desktop, the filesystem, unmounted filesystems, and thetrash. The list below the divider holds bookmarks. Add a bookmark by display-ing the directory you want to bookmark in the View pane and pressing CONTROL-D orby selecting Browser menu: Bookmarks Add Bookmark. Remove a bookmark byselecting Browser menu: Bookmarks Edit Bookmarks or by right-clicking thebookmark and selecting Remove. You can also use Edit Bookmarks to reorderbookmarks.
Information Information presents information about the folder displayed by the View pane.
Tree Tree presents an expandable tree view of your home folder, and each mounted file-system. Each directory in the tree has a triangle to its left. Click a triangle that pointsright to expand a directory; click a triangle that points down to close a directory.Click a directory in the tree to display that directory in the View pane. Double-clicka directory to expand it in the Side pane and display it in the View pane.
History History displays a chronological list of the folders that have been displayed in theView pane, with the most recently displayed folder at the top. Double-click a folderin this list to display it in the View pane.
Notes Notes provides a place to keep notes about the folder displayed in the View pane.
Emblems Similar to the Emblems tab in the Object Properties window (page 117), Emblemsallows you to drag emblems from the Side pane and drop them on objects in theView pane. Drag and drop the Erase emblem to erase emblems associated with anobject. You cannot erase emblems that Ubuntu places on objects, such as lockedand link emblems.
Control Bars
This section discusses the four control bars that initially appear in a File Browserwindow: the Status bar, menubar, Main toolbar, and location bar (Figure 8-2).From File Browser menubar: View, you can choose which of these bars to display,except for the menubar, which Nautilus always displays.
Menubar The menubar appears at the top of the File Browser window and displays a menuwhen you click one of its selections. Which menu selections Nautilus displaysdepends on what the View pane is displaying and which object(s) are selected. Thenext section describes the menubar in detail.

The Nautilus File Browser Window 263
Main toolbar The Main toolbar appears below the menubar and holds navigation tool icons:Back, Forward, Up, Stop, Reload, Home, Computer, and Search. If the Main tool-bar is too short to hold all icons, Nautilus displays a button with a triangle pointingdown at the right end of the toolbar. Click this button to display a drop-down list ofthe remaining icons.
Location bar Below the Main toolbar is the location bar, which displays the name of the directorythat appears in the View pane. It can display this name in two formats: iconic (usingbuttons) and textual (using a text box). Press CONTROL-L to switch to textual format,click the pencil and paper icon at the left of this bar to switch between iconic andtextual formats.
In iconic format, each button represents a directory in a pathname (page 189). TheView pane displays the directory of the depressed (darker) button. Click one ofthese buttons to display that directory. If the leftmost button holds a triangle thatpoints to the left, Nautilus is not displaying buttons for all the directories in theabsolute (full) pathname; click the button with a triangle in it to display more direc-tory buttons.
In textual format, the text box displays the absolute pathname of the displayeddirectory. To have Nautilus display another directory, enter the pathname of thedirectory and press RETURN.
The location bar also holds the magnification selector and the View as drop-downlist. To change the magnification of the display in the View pane, click the plus orminus sign in a magnifying glass on either side of the magnification percentage.Right-click the magnification percentage itself to return to the default magnification.Left-click the magnification percentage to display a drop-down list of magnifica-tions. Click View as (to the right of the right-hand magnifying glass) to choosewhether to view files as icons or as a list.
Status bar The Status bar, at the bottom of the window, indicates how many items are displayedin the View pane. If the directory you are viewing is on the local system, it also tellsyou how much free space is on the device that holds the directory displayed by theView pane.
Menubar
The Nautilus File Browser menubar controls what information the File Browser dis-plays and how it displays that information. Many of the menu selections duplicatecontrols found elsewhere in the File Browser window. This section highlights someof the selections on the menubar; click Help on the menubar and select Contents orGet Help Online for more information. This section describes the six parts of themenubar.
File The several Open selections and the Property selection of File work with the high-lighted object(s) in the View pane. If no objects are highlighted, these selections are

264 Chapter 8 Linux GUIs: X and GNOME
grayed out. Selecting Connect to Server displays the Connect to Server window(Figure 8-4). This window presents a Service type drop-down list that allows you toselect FTP, SSH, Windows, or other types of servers. Enter the URL of the server inthe text box labeled Server. For an FTP connection, do not enter the ftp:// part ofthe URL. Fill in the optional information as appropriate. Click Connect. If theserver requires authentication, Nautilus displays a window so you can enter yourusername and password. Nautilus does not open a window but instead places anobject, named for the URL you specified, on the desktop. Open the object to con-nect to and display the top-level directory on the server.
Edit Many of the Edit selections work with highlighted object(s) in the View pane; if no objectsare highlighted, these selections are grayed out or not displayed. This section discussesthree selections from Edit: Create Archive, Backgrounds and Emblems, and Preferences.
The Edit Create Archive selection creates a single archive file comprising theselected objects. This selection opens a Create Archive window (Figure 8-5) thatallows you to specify the name and location of the archive. The drop-down list tothe right of the Archive text box allows you to specify a filename extension thatdetermines the type of archive this tool creates. For example, .tar.gz creates a tar(page 161) file compressed by gzip (page 161) and .tar.bz2 creates a tar file com-pressed by bzip2 (page 160).
The Edit Backgrounds and Emblems selection has three buttons on the left: Pat-terns, Colors, and Emblems. Click Patterns to display many pattern objects on theright side of the window. Drag and drop one of these objects on the View pane of a
Figure 8-4 Connect to Server window
Figure 8-5 Create Archive window

The Nautilus File Browser Window 265
File Browser window to change the background of all File Browser View panes. Dragand drop the Reset object to reset the background to its default color and pattern(usually white). The Colors button works the same way as the Patterns button. TheEmblems button works the same way as the Emblems tab in the Side pane (page 262).
The Edit Preferences selection displays the File Management Preferences window(Figure 8-6). This window has five tabs that control the appearance and behavior ofFile Browser windows.
The Edit Preferences Views tab sets several defaults, including which view the FileBrowser displays (Icon or List view), the arrangement of the objects, and the defaultzoom level.
Delete VersusMove to Trash
The Edit Preferences Behavior tab controls how many clicks it takes to open anobject and what Nautilus does when it opens an executable text object (script). Formore confident users, this tab has an option that includes a Delete selection inaddition to the Move to Trash selection on several menus. The Delete selectionimmediately removes the selected object instead of moving it to the Trash folder.
The Edit Preferences Display tab specifies which information Nautilus includesin object (icon) captions. The three drop-down lists specify the order in which Nau-tilus displays information as you increase the zoom level of the View pane. This tabalso specifies the date format Nautilus uses.
The Edit Preferences List Columns tab specifies which columns Nautilus displays,and in what order it displays them, in the View pane when you select View as List.
Figure 8-6 File Management Preferences window, Views tab

266 Chapter 8 Linux GUIs: X and GNOME
The Edit Preferences Preview tab controls when Nautilus displays or plays pre-views of files (local files, all files, no files).
View Click the Main Toolbar, Side Pane, Location Bar, and Statusbar selections in Viewto display or remove these elements from the window. The Show Hidden Files selec-tion displays in the View pane files with hidden filenames (page 188).
Go The Go selections display various folders in the View pane.
Bookmark Bookmarks appear at the bottom of this menu and in the Side pane under Places.The Bookmark selections are explained under “Places” on page 262.
Help The Help selections display local and online information about Nautilus.
GNOME Utilities
GNOME comes with numerous utilities that can make your work with the desktopeasier and more productive. This section covers several tools that are integral to theuse of GNOME.
Deskbar Applet
Clicking the Deskbar applet (Figure 8-7) or pressing ALT-F3 opens the Deskbar Appletwindow (also in Figure 8-7). As you type in the text box labeled Search, this toolsearches for the string you are entering. In Figure 8-7, the user has entered the stringdesk. Below the list box labeled History, the Deskbar Applet window displays matchesit has found for desk. At the top of the list are actions that match or whose descriptionsmatch the string. For example, clicking Launch: Take Screenshot displays a windowthat includes a radio button labeled Grab the whole desktop. Below the actions areplaces: When you click Desktop, the Desktop Applet opens the Nautilus File Browser
Figure 8-7 Deskbar applet and Deskbar Applet window
Deskbar applet
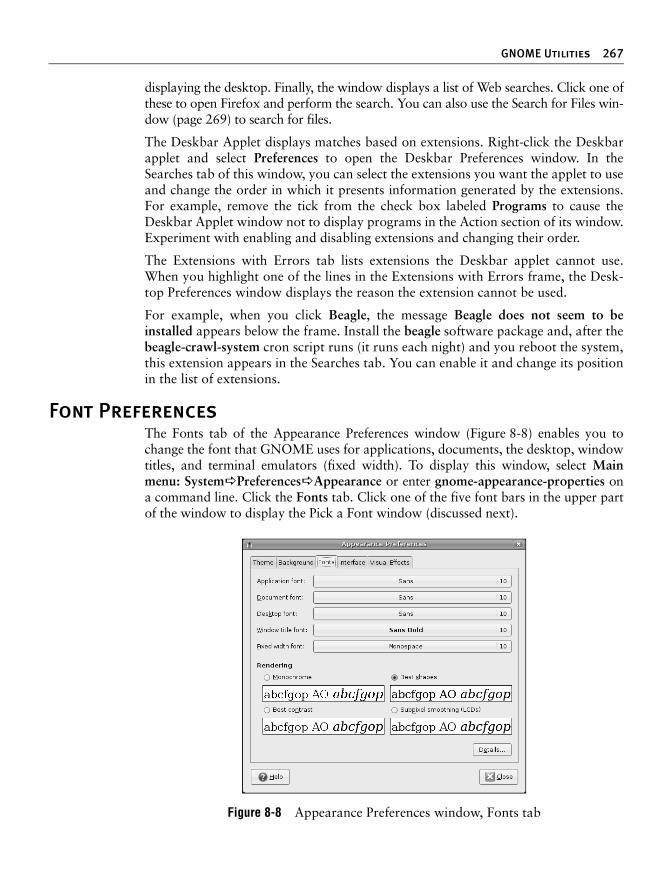
GNOME Utilities 267
displaying the desktop. Finally, the window displays a list of Web searches. Click one ofthese to open Firefox and perform the search. You can also use the Search for Files win-dow (page 269) to search for files.
The Deskbar Applet displays matches based on extensions. Right-click the Deskbarapplet and select Preferences to open the Deskbar Preferences window. In theSearches tab of this window, you can select the extensions you want the applet to useand change the order in which it presents information generated by the extensions.For example, remove the tick from the check box labeled Programs to cause theDeskbar Applet window not to display programs in the Action section of its window.Experiment with enabling and disabling extensions and changing their order.
The Extensions with Errors tab lists extensions the Deskbar applet cannot use.When you highlight one of the lines in the Extensions with Errors frame, the Desk-top Preferences window displays the reason the extension cannot be used.
For example, when you click Beagle, the message Beagle does not seem to beinstalled appears below the frame. Install the beagle software package and, after thebeagle-crawl-system cron script runs (it runs each night) and you reboot the system,this extension appears in the Searches tab. You can enable it and change its positionin the list of extensions.
Font Preferences
The Fonts tab of the Appearance Preferences window (Figure 8-8) enables you tochange the font that GNOME uses for applications, documents, the desktop, windowtitles, and terminal emulators (fixed width). To display this window, select Mainmenu: System Preferences Appearance or enter gnome-appearance-properties ona command line. Click the Fonts tab. Click one of the five font bars in the upper partof the window to display the Pick a Font window (discussed next).
Figure 8-8 Appearance Preferences window, Fonts tab

268 Chapter 8 Linux GUIs: X and GNOME
Examine the four sample boxes in the lower part of the window and select the onein which the letters look the best. Subpixel smoothing is usually best for LCD mon-itors. Click Details to refine the font rendering further, again picking the box in eachframe in which the letters look the best.
Pick a Font Window
The Pick a Font window (Figure 8-9) appears when you need to choose a font (see“Font Preferences” on the previous page). From this window you can select a fontfamily, a style, and a size. A preview of your choice appears in the Preview box inthe lower part of the window. Click OK when you are satisfied with your choice.
Pick a Color Window
The Pick a Color window (Figure 8-10) appears when you need to specify a color,such as when you specify a solid color for the desktop background (page 103) or apanel. To specify a color for a panel, right-click the panel to display its contextmenu, click the Background tab, click the radio button labeled Solid color, and clickwithin the box labeled Color. GNOME displays the Pick a Color window.
When the Pick a Color window opens, the bar below the color circle displays thecurrent color. Click the desired color on the color ring, and click/drag the lightnessof that color in the triangle. As you change the color, the right end of the bar belowthe color circle previews the color you are selecting, while the left end continues todisplay the current color. You can also use the eyedropper to pick up a color fromthe workspace: Click the eyedropper, and then click the resulting eyedropper mousepointer on the color you want to select. The color you choose appears in the bar.Click OK when you are satisfied with the color you have specified.
Figure 8-9 The Pick a Font window

GNOME Utilities 269
Run Application Window
The Run Application window (Figure 4-4, page 93) enables you to run a program asthough you had initiated it from a command line. To display the Run Application win-dow, press Alt-F2. Enter a command in the text box. As soon as GNOME can uniquelyidentify the command you are entering, it completes the command and may display anobject that identifies the application. Keep typing if the displayed command is not theone you want to run. Otherwise, press RETURN to run the command or TAB to accept thecommand in the text box. You can then continue entering information in the window.Click Run with file to specify a file to use as an argument to the command in the textbox. Put a tick in the check box labeled Run in terminal to run a textual application,such as vim, in a terminal emulator window.
Searching for Files
The Search for Files window (Figure 8-11 on the next page) can help you find fileswhose locations or names you do not know or have forgotten. You can also use theDeskbar applet (page 266) to search for files. Open this window by selecting Mainmenu: Places Search for Files or enter gnome-search-tool on a command line froma terminal emulator or Run Application window (ALT-F2). To search by filename orpartial filename, enter the (partial) filename in the combo box labeled Name con-tains and then select the folder you want to search in from the drop-down listlabeled Look in folder. When GNOME searches in a folder, it searches subfolders toany level (it searches the directory hierarchy). To search all directories in allmounted filesystems, select File System from the drop-down list labeled Look infolder. Select Other to search a folder not included in the drop-down list; GNOMEopens the Browse window (page 98). Once you have entered the search criteria,click Find. GNOME displays the list of files matching the criteria in the list boxlabeled Search results. Double-click a file in this list box to open it.
You can refine the search by entering more search criteria. Click the triangle to theleft of Select more options to expand the window and display more search criteria.GNOME initially displays two search criteria and a line for adding criteria as shown
Figure 8-10 Pick a Color window

270 Chapter 8 Linux GUIs: X and GNOME
in Figure 8-12. With this part of the window expanded, GNOME incorporates allvisible search criteria when you click Find.
The first line below Select more options holds a text box labeled Contains the text.Absence of an entry in this text box matches all files. You can leave this text box as isor remove the line by clicking Remove at the right end of the line. To search for a filethat contains a specific string of characters (text), enter the string in this text box.
Add criteria by making a selection from the list box labeled Available options andclicking Add to the right of the drop-down list. Remove criteria by clicking Removeat the right end of the line that holds the criterion you want to remove.
To select files that were modified fewer than a specified number of days ago, selectDate modified less than from the list box and click Add. The Search for Files win-dow adds a line with a spin box labeled Date modified less than. With this spin boxshowing 0 (zero), as it does initially, no file matches the search criteria. Change thisnumber as desired and click Find to begin the search.
GNOME Terminal Emulator/Shell
The GNOME terminal emulator (Figure 4-17, page 114) displays a window thatmimics a character-based terminal (page 114). To display a terminal emulator win-dow, select Main menu: Applications Accessories Terminal or enter gnome-terminal on a command line from a Run Application window (ALT-F2). When theGNOME terminal emulator is already displayed, select Terminal menubar:File Open Terminal or right-click within the Terminal window and select OpenTerminal to display a new terminal emulator window.
To open an additional terminal session within the same Terminal window, right-click the window and select Open Tab from the context menu or select Terminalmenubar: File Open Tab. A row of tabs appears below the menubar as gnome-terminal opens another terminal session on top of the existing one. Add as many ter-minal sessions as you like; click the tabs to switch between sessions.
Figure 8-11 The Search for Files window

Chapter Summary 271
A session you add from the context menu uses the same profile as the session youopen it from. When you use the menubar to open a session, GNOME gives you achoice of profiles, if more than one is available. You can add and modify profiles,including the Default profile, by selecting Terminal menubar: Edit Profiles. High-light the profile you want to modify or click New to design a new profile.
Chapter Summary
The X Window System GUI is portable and flexible and makes it easy to writeapplications that work on many different types of systems without having to knowlow-level details for the individual systems. This GUI can operate in a networkedenvironment, allowing a user to run a program on a remote system and send theresults to a local display. The client/server concept is integral to the operation of theX Window System, in which the X server is responsible for fulfilling requests madeof X Window System applications or clients. Hundreds of clients are available thatcan run under X. Programmers can also write their own clients, using tools such asthe Qt and KDE libraries to write KDE programs and the GTK+ and GTK+2GNOME libraries to write GNOME programs.
The window managers, and virtually all X applications, are designed to help userstailor their work environments in simple or complex ways. You can designate appli-cations that start automatically, set such attributes as colors and fonts, and evenalter the way keyboard strokes and mouse clicks are interpreted.
Built on top of the X Window System, you can use the GNOME desktop manageras is or customize it to better suit your needs. It is a graphical user interface to sys-tem services (commands), the filesystem, applications, and more. Although not partof GNOME, the Metacity and Compiz window managers work closely withGNOME and are the default window managers for GNOME under Ubuntu Linux.
Figure 8-12 The Search for Files window with Select more options expanded

272 Chapter 8 Linux GUIs: X and GNOME
A window manager controls all aspects of the windows, including placement, deco-ration, grouping, minimizing and maximizing, sizing, and moving.
The Nautilus File Browser window is a critical part of GNOME; the desktop is amodified File Browser window. The File Browser View pane displays icons or a listof filenames that you can work with. The Side pane, which can display six types ofinformation, augments the information Nautilus displays in the View pane.
GNOME also provides many graphical utilities you can use to customize and workwith the desktop. It supports MIME types so when you double-click an object,GNOME generally knows which tool to use to display the data represented by theobject. In sum, GNOME is a powerful desktop manager that can make your jobboth easier and more fun.
Exercises
1. a. What is Nautilus?a.
b. List four things you can do with Nautilus.
c. How do you use Nautilus to search for a file?
2. What is a terminal emulator? What does it allow you to do from a GUI that you would not be able to do without one?
3. How would you search the entire filesystem for a file named today.odt?
4. a. List two ways you can open a file using Nautilus.a.
b. How does Nautilus “know” which program to use to open different types of files?
c. Which are the three common Nautilus control bars? What kinds of tools do you find on each?
d. Discuss the use of the Nautilus location bar in textual mode.
Advanced Exercises
5. Assume a mouse with nine pointer buttons defined. How would you reverse the effects of using the mouse wheel?
6. a. How would you use Nautilus to connect to the FTP server at ftp.ubuntu.com?
a.
b. Open the following folders: ubuntu, dists, and gutsy. How would you copy the file named Contents-i386.gz to the desktop? What type of file is Contents-i386.gz?

Advanced Exercises 273
c. How would you open the Contents-i386.gz file on the desktop? How would you open the Contents-i386.gz file on the FTP server? Which file opens more quickly? Why? Which file can you modify?
7. Discuss the client/server environment the X Window System sets up. How does the X server work? List three X clients. Where is the client and where is the server when you log in on a local system? What is an advantage of this setup?
8. Run xwininfo from a terminal emulator window and answer these questions:
a. What does xwininfo do?
b. What does xwininfo give as the name of the window you clicked? Does that agree with the name in the window’s titlebar?
c. What is the size of the window? What units does xwininfo display? What is the depth of a window?
d. How can you get xwininfo to display the same information without hav-ing to click the window?
9. Write an xeyes command to display a window that is 600 pixels wide and 400 pixels tall, is located 200 pixels from the right edge of the screen and 300 pixels from the top of the screen, and contains orange eyes outlined in blue with red pupils. (Hint: Refer to the xeyes man page.)

This page intentionally left blank

275275
9Chapter9This chapter picks up where Chapter 7 left off. Chapter 11expands on this chapter, exploring control flow commands andmore advanced aspects of programming the Bourne AgainShell. The bash home page is www.gnu.org/software/bash. Thebash info page is a complete Bourne Again Shell reference.
The Bourne Again Shell is a command interpreter and high-level programming language. As a command interpreter, it pro-cesses commands you enter on the command line in response toa prompt. When you use the shell as a programming language,it processes commands stored in files called shell scripts. Likeother languages, shells have variables and control flow com-mands (for example, for loops and if statements).
When you use a shell as a command interpreter, you can cus-tomize the environment you work in. You can make yourprompt display the name of the working directory, create afunction or alias for cp that keeps it from overwriting certainkinds of files, take advantage of keyword variables to changeaspects of how the shell works, and so on. You can also writeshell scripts that do your bidding, from a one-line script thatstores a long, complex command to a longer script that runs a
In This Chapter
Startup Files . . . . . . . . . . . . . . . . . 277
Redirecting Standard Error . . . . . . 280
Writing a Simple Shell Script . . . . 282
Job Control. . . . . . . . . . . . . . . . . . . 290
Manipulating the Directory Stack . . . . . . . . . . . . . . . . . . . . . 292
Parameters and Variables . . . . . . 295
Processes . . . . . . . . . . . . . . . . . . . 310
History . . . . . . . . . . . . . . . . . . . . . . 312
Reexecuting and Editing Commands. . . . . . . . . . . . . . . . . 314
Functions . . . . . . . . . . . . . . . . . . . . 331
Controlling bash Features and Options . . . . . . . . . . . . . . . . 334
Processing the Command Line. . . 338
9
The Bourne Again
Shell

276 Chapter 9 The Bourne Again Shell
set of reports, prints them, and mails you a reminder when the job is done. Morecomplex shell scripts are themselves programs; they do not just run other programs.Chapter 11 has some examples of these types of scripts.
Most system shell scripts are written to run under the Bourne Again Shell. If youwill ever work in recovery mode—as when you boot your system or do systemmaintenance, administration, or repair work, for example—it is a good idea tobecome familiar with this shell.
This chapter expands on the interactive features of the shell described in Chapter 7,explains how to create and run simple shell scripts, discusses job control, introducesthe basic aspects of shell programming, talks about history and aliases, anddescribes command line expansion. Chapter 11 presents some more challengingshell programming problems.
Background
The Bourne Again Shell is based on the Bourne Shell (the early UNIX shell; thisbook refers to it as the original Bourne Shell to avoid confusion), which was writtenby Steve Bourne of AT&T’s Bell Laboratories. Over the years the original BourneShell has been expanded but it remains the basic shell provided with many commer-cial versions of UNIX.
sh Shell Because of its long and successful history, the original Bourne Shell has been used towrite many of the shell scripts that help manage UNIX systems. Some of thesescripts appear in Linux as Bourne Again Shell scripts. Although the Bourne AgainShell includes many extensions and features not found in the original Bourne Shell,bash maintains compatibility with the original Bourne Shell so you can run BourneShell scripts under bash. On UNIX systems the original Bourne Shell is named sh.
dash Shell The bash executable file is about 700 kilobytes, has many features, and is wellsuited as a user login shell. The dash shell is about 80 kilobytes, offers Bourne Shellcompatibility for shell scripts (noninteractive use), and because of its size, can loadand execute shell scripts much more quickly than bash. Most system scripts are setup to run sh which, under Ubuntu, is a symbolic link to dash. This setup allows thesystem to boot and run system shell scripts quickly.
On Linux systems sh is a symbolic link to bash ensuring that scripts that require thepresence of the Bourne Shell still run. When called as sh, bash does its best to emu-late the original Bourne Shell.
Korn Shell System V UNIX introduced the Korn Shell (ksh), written by David Korn. This shellextended many features of the original Bourne Shell and added many new features.Some features of the Bourne Again Shell, such as command aliases and commandline editing, are based on similar features from the Korn Shell.
POSIX standards The POSIX (the Portable Operating System Interface) family of related standards isbeing developed by PASC (IEEE’s Portable Application Standards Committee,www.pasc.org). A comprehensive FAQ on POSIX, including many links, appears atwww.opengroup.org/austin/papers/posix_faq.html.

Shell Basics 277
POSIX standard 1003.2 describes shell functionality. The Bourne Again Shell pro-vides the features that match the requirements of this POSIX standard. Efforts areunder way to make the Bourne Again Shell fully comply with the POSIX standard.In the meantime, if you invoke bash with the ––posix option, the behavior of theBourne Again Shell will more closely match the POSIX requirements.
Shell Basics
This section covers writing and using startup files, redirecting standard error, writingand executing simple shell scripts, separating and grouping commands, implement-ing job control, and manipulating the directory stack.
Startup Files
When a shell starts, it runs startup files to initialize itself. Which files the shell runsdepends on whether it is a login shell, an interactive shell that is not a login shell(such as you get by giving the command bash), or a noninteractive shell (one used toexecute a shell script). You must have read access to a startup file to execute thecommands in it. Ubuntu Linux puts appropriate commands in some of these files.This section covers bash startup files.
Login Shells
The files covered in this section are executed by login shells and shells that you startwith the ––login option. Login shells are, by their nature, interactive.
/etc/profile The shell first executes the commands in /etc/profile. A user working with root privi-leges can set up this file to establish systemwide default characteristics for bash users.
.bash_profile.bash_login
.profile
Next the shell looks for ~/.bash_profile, ~/.bash_login, and ~/.profile (~/ is short-hand for your home directory), in that order, executing the commands in the first ofthese files it finds. You can put commands in one of these files to override thedefaults set in /etc/profile. A shell running on a virtual terminal does not executecommands in these files.
.bash_logout When you log out, bash executes commands in the ~/.bash_logout file. Frequentlycommands that clean up after a session, such as those that remove temporary files,go in this file.
Interactive Nonlogin Shells
The commands in the preceding startup files are not executed by interactive, non-login shells. However, these shells inherit from the login shell variables that are setby these startup files.
/etc/bashrc Although not called by bash directly, many ~/.bashrc files call /etc/bashrc. Thissetup allows a user working with root privileges to establish systemwide defaultcharacteristics for nonlogin bash shells.
.bashrc An interactive nonlogin shell executes commands in the ~/.bashrc file. Typically astartup file for a login shell, such as .bash_profile, runs this file, so that both loginand nonlogin shells benefit from the commands in .bashrc.

278 Chapter 9 The Bourne Again Shell
Noninteractive Shells
The commands in the previously described startup files are not executed by nonin-teractive shells, such as those that runs shell scripts. However, these shells inheritfrom the login shell variables that are set by these startup files.
BASH_ENV Noninteractive shells look for the environment variable BASH_ENV (or ENV, if theshell is called as sh) and execute commands in the file named by this variable.
Setting Up Startup Files
Although many startup files and types of shells exist, usually all you need are the.bash_profile and .bashrc files in your home directory. Commands similar to the fol-lowing in .bash_profile run commands from .bashrc for login shells (when .bashrcexists). With this setup, the commands in .bashrc are executed by login and non-login shells.
if [ -f ~/.bashrc ]; then source ~/.bashrc; fi
The [ –f ~/.bashrc ] tests whether the file named .bashrc in your home directoryexists. See pages 397 and 399 for more information on test and its synonym [ ].
Sample .bash_profile and .bashrc files follow. Some of the commands used in thesefiles are not covered until later in this chapter. In any startup file, you must exportvariables and functions that you want to be available to child processes. For moreinformation refer to “Locality of Variables” on page 434.
$ cat ~/.bash_profileif [ -f ~/.bashrc ]; then
source ~/.bashrc # read local startup file if it existsfiPATH=$PATH:. # add the working directory to PATHexport PS1='[\h \W \!]\$ ' # set prompt
The first command in the preceding .bash_profile file executes the commands in theuser’s .bashrc file if it exists. The next command adds to the PATH variable(page 302). Typically PATH is set and exported in /etc/profile so it does not need tobe exported in a user’s startup file. The final command sets and exports PS1(page 303), which controls the user’s prompt.
Use .bash_profile to set PATHtip Because commands in .bashrc may be executed many times, and because subshells inherit
exported variables, it is a good idea to put commands that add to existing variables in the.bash_profile file. For example, the following command adds the bin subdirectory of the homedirectory to PATH (page 302) and should go in .bash_profile:
PATH=$PATH:$HOME/bin
When you put this command in .bash_profile and not in .bashrc, the string is added to the PATHvariable only once, when you log in.
Modifying a variable in .bash_profile allows changes you make in an interactive session to prop-agate to subshells. In contrast, modifying a variable in .bashrc overrides changes inherited froma parent shell.

Shell Basics 279
Next is a sample .bashrc file. The first command executes the commands in the/etc/bashrc file if it exists. Next the LANG (page 308) and VIMINIT (for vim initial-ization) variables are set and exported and several aliases (page 328) are established.The final command defines a function (page 331) that swaps the names of two files.
$ cat ~/.bashrcif [ -f /etc/bashrc ]; then
source /etc/bashrc # read global startup file if it existsfiset -o noclobber # prevent overwriting filesunset MAILCHECK # turn off "you have new mail" noticeexport LANG=C # set LANG variableexport VIMINIT='set ai aw' # set vim optionsalias df='df -h' # set up aliasesalias rm='rm -i' # always do interactive rm'salias lt='ls -ltrh | tail'alias h='history | tail'
function switch() # a function to exchange the names{ # of two files
local tmp=$$switchmv "$1" $tmpmv "$2" "$1"mv $tmp "$2"
}
. (Dot) or source: Runs a Startup File in
the Current Shell
After you edit a startup file such as .bashrc, you do not have to log out and log inagain to put the changes into effect. You can run the startup file using the . (dot) orsource builtin (they are the same command). As with all other commands, the . mustbe followed by a SPACE on the command line. Using the . or source builtin is similarto running a shell script, except that these commands run the script as part of thecurrent process. Consequently, when you use . or source to run a script, changes youmake to variables from within the script affect the shell that you run the scriptfrom. You can use the . or source command to run any shell script—not just astartup file—but undesirable side effects (such as changes in the values of shell vari-ables you rely on) may occur. If you ran a startup file as a regular shell script anddid not use the . or source builtin, the variables created in the startup file wouldremain in effect only in the subshell running the script—not in the shell you ran thescript from. For more information refer to “Locality of Variables” on page 434.
In the following example, .bashrc sets several variables and sets PS1, the prompt, tothe name of the host. The . builtin puts the new values into effect.
$ cat ~/.bashrcexport TERM=vt100 # set the terminal typeexport PS1="$(hostname -f): " # set the prompt stringexport CDPATH=:$HOME # add HOME to CDPATH stringstty kill '^u' # set kill line to control-u$ . ~/.bashrcbravo.example.com:

280 Chapter 9 The Bourne Again Shell
Commands That Are Symbols
The Bourne Again Shell uses the symbols (, ), [, ], and $ in a variety of ways. Tominimize confusion, Table 9-1 lists the most common use of each of these symbols,even though some of them are not introduced until later.
Redirecting Standard Error
Chapter 7 covered the concept of standard output and explained how to redirectstandard output of a command. In addition to standard output, commands can sendoutput to standard error. A command can send error messages to standard error tokeep them from getting mixed up with the information it sends to standard output.
Just as it does with standard output, by default the shell sends a command’s standarderror to the screen. Unless you redirect one or the other, you may not know the differ-ence between the output a command sends to standard output and the output it sendsto standard error. This section covers the syntax used by the Bourne Again Shell.
File descriptors A file descriptor is the place a program sends its output to and gets its input from.When you execute a program, the process running the program opens three filedescriptors: 0 (standard input), 1 (standard output), and 2 (standard error). Theredirect output symbol (> [page 228]) is shorthand for 1>, which tells the shell toredirect standard output. Similarly < (page 230) is short for 0<, which redirectsstandard input. The symbols 2> redirect standard error. For more information referto “File Descriptors” on page 429.
The following examples demonstrate how to redirect standard output and standarderror to different files and to the same file. When you run the cat utility with thename of a file that does not exist and the name of a file that does exist, cat sends anerror message to standard error and copies the file that does exist to standard out-put. Unless you redirect them, both messages appear on the screen.
$ cat yThis is y.$ cat xcat: x: No such file or directory
Table 9-1 Builtin commands that are symbols
Symbol Command
( ) Subshell (page 289)
$( ) Command substitution (page 344)
(( )) Arithmetic evaluation; a synonym for let (use when the enclosed value con-tains an equal sign) (page 458)
$(( )) Arithmetic expansion (not for use with an enclosed equal sign) (page 342)
[ ] The test command (pages 397, 399, and 412)
[[ ]] Conditional expression; similar to [ ] but adds string comparisons (page 459)

Shell Basics 281
$ cat x ycat: x: No such file or directoryThis is y.
When you redirect standard output of a command, output sent to standard error isnot affected and still appears on the screen.
$ cat x y > holdcat: x: No such file or directory$ cat holdThis is y.
Similarly, when you send standard output through a pipe, standard error is notaffected. The following example sends standard output of cat through a pipe to tr,which in this example converts lowercase characters to uppercase. (See the tr infopage for more information.) The text that cat sends to standard error is not trans-lated because it goes directly to the screen rather than through the pipe.
$ cat x y | tr "[a-z]" "[A-Z]"cat: x: No such file or directoryTHIS IS Y.
The following example redirects standard output and standard error to differentfiles. The notation 2> tells the shell where to redirect standard error (file descriptor2). The 1> tells the shell where to redirect standard output (file descriptor 1). Youcan use > in place of 1>.
$ cat x y 1> hold1 2> hold2$ cat hold1This is y.$ cat hold2cat: x: No such file or directory
Duplicating a filedescriptor
In the next example, 1> redirects standard output to hold. Then 2>&1 declares filedescriptor 2 to be a duplicate of file descriptor 1. As a result both standard outputand standard error are redirected to hold.
$ cat x y 1> hold 2>&1$ cat holdcat: x: No such file or directoryThis is y.
In the preceding example, 1> hold precedes 2>&1. If they had been listed in theopposite order, standard error would have been made a duplicate of standard out-put before standard output was redirected to hold. In that case only standardoutput would have been redirected to hold.
The next example declares file descriptor 2 to be a duplicate of file descriptor 1 andsends the output for file descriptor 1 through a pipe to the tr command.
$ cat x y 2>&1 | tr "[a-z]" "[A-Z]"CAT: X: NO SUCH FILE OR DIRECTORYTHIS IS Y.

282 Chapter 9 The Bourne Again Shell
Sending errors tostandard error
You can also use 1>&2 to redirect standard output of a command to standard error.This technique is used in shell scripts to send the output of echo to standard error. Inthe following script, standard output of the first echo is redirected to standard error:
$ cat message_demoecho This is an error message. 1>&2echo This is not an error message.
If you redirect standard output of message_demo, error messages such as the one pro-duced by the first echo will still go to the screen because you have not redirected stan-dard error. Because standard output of a shell script is frequently redirected to anotherfile, you can use this technique to display on the screen error messages generated by thescript. The lnks script (page 404) uses this technique. You can also use the exec builtinto create additional file descriptors and to redirect standard input, standard output,and standard error of a shell script from within the script (page 448).
The Bourne Again Shell supports the redirection operators shown in Table 9-2.
Writing a Simple Shell Script
A shell script is a file that contains commands that the shell can execute. The com-mands in a shell script can be any commands you can enter in response to a shellprompt. For example, a command in a shell script might run a Linux utility, a com-piled program, or another shell script. Like the commands you give on the commandline, a command in a shell script can use ambiguous file references and can have itsinput or output redirected from or to a file or sent through a pipe (page 234). Youcan also use pipes and redirection with the input and output of the script itself.
Table 9-2 Redirection operators
Operator Meaning
< filename Redirects standard input from filename.
> filename Redirects standard output to filename unless filename exists and noclobber(page 231) is set. If noclobber is not set, this redirection creates filename if it does not exist.
>| filename Redirects standard output to filename, even if the file exists and noclobber(page 231) is set.
>> filename Redirects and appends standard output to filename unless filename exists and noclobber (page 231) is set. If noclobber is not set, this redirection creates filename if it does not exist.
<&m Duplicates standard input from file descriptor m (page 430).
[n] >&m Duplicates standard output or file descriptor n if specified from file descriptor m (page 430).
[n]<&– Closes standard input or file descriptor n if specified (page 430).
[n] >&– Closes standard output or file descriptor n if specified.

Shell Basics 283
In addition to the commands you would ordinarily use on the command line, con-trol flow commands (also called control structures) find most of their use in shellscripts. This group of commands enables you to alter the order of execution ofcommands in a script just as you would alter the order of execution of statementsusing a structured programming language. Refer to “Control Structures” onpage 396 for specifics.
The shell interprets and executes the commands in a shell script, one after another.Thus a shell script enables you to simply and quickly initiate a complex series oftasks or a repetitive procedure.
chmod: Makes a File Executable
To execute a shell script by giving its name as a command, you must have permis-sion to read and execute the file that contains the script (refer to “Access Permis-sions” on page 199). Read permission enables you to read the file that holds thescript. Execute permission tells the shell and the system that the owner, group,and/or public has permission to execute the file; it implies that the content of the fileis executable.
When you create a shell script using an editor, the file does not typically have itsexecute permission set. The following example shows a file named whoson thatcontains a shell script:
$ cat whosondateecho "Users Currently Logged In"who
$ whosonbash: ./whoson: Permission denied
You cannot execute whoson by giving its name as a command because you do nothave execute permission for the file. The shell does not recognize whoson as an exe-cutable file and issues an error message when you try to execute it. When you givethe filename as an argument to bash (bash whoson), bash takes the argument to be ashell script and executes it. In this case bash is executable and whoson is an argu-ment that bash executes so you do not need to have permission to execute whoson.
Command not found?
tip If you get the message$ whosonbash: whoson: command not found
the shell is not set up to search for executable files in the working directory. Give this commandinstead:
$ ./whoson
The ./ tells the shell explicitly to look for an executable file in the working directory. To change theenvironment so that the shell searches the working directory automatically, see page 302.

284 Chapter 9 The Bourne Again Shell
The chmod utility changes the access privileges associated with a file. Figure 9-1shows ls with the –l option displaying the access privileges of whoson before andafter chmod gives execute permission to the file’s owner.
The first ls displays a hyphen (–) as the fourth character, indicating that the ownerdoes not have permission to execute the file. Next chmod gives the owner executepermission: The u+x causes chmod to add (+) execute permission (x) for the owner(u). (The u stands for user, although it means the owner of the file who may be theuser of the file at any given time.) The second argument is the name of the file. Thesecond ls shows an x in the fourth position, indicating that the owner now has exe-cute permission.
If other users will execute the file, you must also change group and/or public accesspermissions for the file. Any user must have execute access to use the file’s name asa command. If the file is a shell script, the user trying to execute the file must alsohave read access to the file. You do not need read access to execute a binary execut-able (compiled program).
The final command in Figure 9-1 shows the shell executing the file when its name isgiven as a command. For more information refer to “Access Permissions” onpage 199, ls (page 199), and chmod (page 200).
#! Specifies a Shell
You can put a special sequence of characters on the first line of a file to tell the oper-ating system which shell should execute the file. Because the operating system checksthe initial characters of a program before attempting to exec it, these characters savethe system from making an unsuccessful attempt. If #! are the first two characters ofa script, the system interprets the characters that follow as the absolute pathname ofthe utility that should execute the script. This can be the pathname of any program,not just a shell. The following example specifies that bash should run the script:
Figure 9-1 Using chmod to make a shell script executable
$ ls -l whoson-rw-rw-r-- 1 alex group 40 May 24 11:30 whoson
$ chmod u+x whoson$ ls -l whoson-rwxrw-r-- 1 alex group 40 May 24 11:30 whoson
$ whosonTue May 22 11:40:49 PDT 2007Users Currently Logged Injenny pts/7 May 21 18:17hls pts/1 May 22 09:59scott pts/12 May 22 06:29 (bravo.example.com)alex pts/4 May 22 09:08

Shell Basics 285
$ cat bash_script#!/bin/bashecho "This is a Bourne Again Shell script."
The #! characters are useful if you have a script that you want to run with a shellother than the shell you are running the script from. The following example shows ascript that should be executed by tcsh:
$ cat tcsh_script#!/bin/tcshecho "This is a tcsh script."set person = jennyecho "person is $person"
Because of the #! line, the operating system ensures that tcsh executes the script nomatter which shell you run it from.
You can use ps –f within a shell script to display the name of the shell that is execut-ing the script. The three lines that ps displays in the following example show theprocess running the parent bash shell, the process running the tcsh script, and theprocess running the ps command:
$ cat tcsh_script2#!/bin/tcshps -f
$ tcsh_script2UID PID PPID C STIME TTY TIME CMDalex 3031 3030 0 Nov16 pts/4 00:00:00 -bashalex 9358 3031 0 21:13 pts/4 00:00:00 /bin/tcsh ./tcsh_script2alex 9375 9358 0 21:13 pts/4 00:00:00 ps -f
If you do not follow #! with the name of an executable program, the shell reportsthat it cannot find the command that you asked it to run. You can optionally follow#! with SPACEs. If you omit the #! line and try to run, for example, a tcsh script frombash, the shell may generate error messages or the script may not run properly.
# Begins a Comment
Comments make shell scripts and all code easier to read and maintain by you andothers. If a pound sign (#) in the first character position of the first line of a script isnot immediately followed by an exclamation point (!) or if a pound sign occurs inany other location in a script, the shell interprets it as the beginning of a comment.The shell then ignores everything between the pound sign and the end of the line(the next NEWLINE character).
Running a Shell Script
fork and execsystem calls
A command on the command line causes the shell to fork a new process, creating aduplicate of the shell process (a subshell). The new process attempts to exec (exe-cute) the command. Like fork, the exec routine is executed by the operating system(a system call). If the command is a binary executable program, such as a compiled

286 Chapter 9 The Bourne Again Shell
C program, exec succeeds and the system overlays the newly created subshell withthe executable program. If the command is a shell script, exec fails. When exec fails,the command is assumed to be a shell script, and the subshell runs the commands inthe script. Unlike a login shell, which expects input from the command line, the sub-shell takes its input from a file: the shell script.
As discussed earlier, if you have a shell script in a file that you do not have executepermission for, you can run the commands in the script by using a bash command toexec a shell to run the script directly. In the following example, bash creates a newshell that takes its input from the file named whoson:
$ bash whoson
Because the bash command expects to read a file containing commands, you do notneed execute permission for whoson. (You do need read permission.) Even thoughbash reads and executes the commands in whoson, standard input, standard output,and standard error remain connected to the terminal.
Although you can use bash to execute a shell script, this technique causes the script torun more slowly than giving yourself execute permission and directly invoking thescript. Users typically prefer to make the file executable and run the script by typingits name on the command line. It is also easier to type the name, and this practice isconsistent with the way other kinds of programs are invoked (so you do not need toknow whether you are running a shell script or another kind of program). However, ifbash is not your interactive shell or if you want to see how the script runs with differ-ent shells, you may want to run a script as an argument to bash or tcsh.
Separating and Grouping Commands
Whether you give the shell commands interactively or write a shell script, you mustseparate commands from one another. This section reviews the ways to separatecommands that were covered in Chapter 7 and introduces a few new ones.
; and NEWLINE Separate Commands
The NEWLINE character is a unique command separator because it initiates executionof the command preceding it. You have seen this throughout this book each timeyou press the RETURN key at the end of a command line.
The semicolon ( ;) is a command separator that does not initiate execution of a com-mand and does not change any aspect of how the command functions. You can exe-cute a series of commands sequentially by entering them on a single command lineand separating each from the next with a semicolon (;). You initiate execution of thesequence of commands by pressing RETURN:
sh does not call the original Bourne Shellcaution The original Bourne Shell was invoked with the command sh. Although you can call bash with an
sh command, it is not the original Bourne Shell. The sh command (/bin/sh) is a symbolic link to/bin/bash, so it is simply another name for the bash command. When you call bash using thecommand sh, bash tries to mimic the behavior of the original Bourne Shell as closely as possible.It does not always succeed.

Shell Basics 287
$ x ; y ; z
If x, y, and z are commands, the preceding command line yields the same results asthe next three commands. The difference is that in the next example the shell issuesa prompt after each of the commands (x, y, and z) finishes executing, whereas thepreceding command line causes the shell to issue a prompt only after z is complete:
$ x$ y$ z
Whitespace Although the whitespace around the semicolons in the earlier example makes thecommand line easier to read, it is not necessary. None of the command separatorsneeds to be surrounded by SPACEs or TABs.
\ Continues a Command
When you enter a long command line and the cursor reaches the right side of thescreen, you can use a backslash (\) character to continue the command on the nextline. The backslash quotes, or escapes, the NEWLINE character that follows it so thatthe shell does not treat the NEWLINE as a command terminator. Enclosing a backslashwithin single quotation marks turns off the power of a backslash to quote specialcharacters such as NEWLINE. Enclosing a backslash within double quotation marks hasno effect on the power of the backslash.
Although you can break a line in the middle of a word (token), it is typically easierto break a line just before or after whitespace.
optional You can enter a RETURN in the middle of a quoted string on a command line withoutusing a backslash. The NEWLINE (RETURN) that you enter will then be part of the string:
$ echo "Please enter the three values> required to complete the transaction."Please enter the three valuesrequired to complete the transaction.
In the three examples in this section, the shell does not interpret RETURN as a com-mand terminator because it occurs within a quoted string. The > is a secondaryprompt indicating that the shell is waiting for you to continue the unfinished com-mand. In the next example, the first RETURN is quoted (escaped) so the shell treats it asa separator and does not interpret it literally.
$ echo "Please enter the three values \> required to complete the transaction."Please enter the three values required to complete the transaction.
Single quotation marks cause the shell to interpret a backslash literally:
$ echo 'Please enter the three values \> required to complete the transaction.'Please enter the three values \required to complete the transaction.
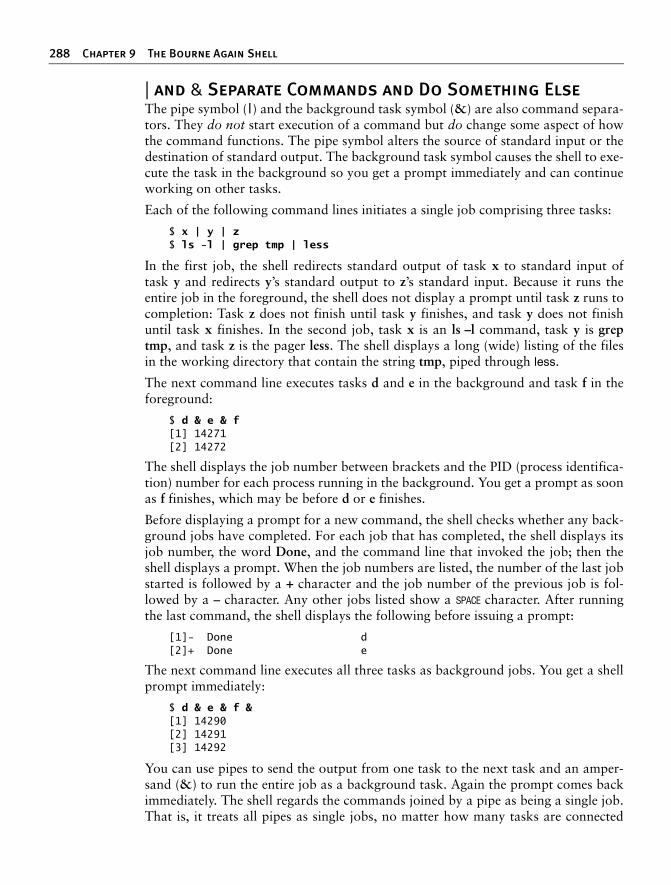
288 Chapter 9 The Bourne Again Shell
| and & Separate Commands and Do Something Else
The pipe symbol ( |) and the background task symbol (&) are also command separa-tors. They do not start execution of a command but do change some aspect of howthe command functions. The pipe symbol alters the source of standard input or thedestination of standard output. The background task symbol causes the shell to exe-cute the task in the background so you get a prompt immediately and can continueworking on other tasks.
Each of the following command lines initiates a single job comprising three tasks:
$ x | y | z$ ls -l | grep tmp | less
In the first job, the shell redirects standard output of task x to standard input oftask y and redirects y’s standard output to z’s standard input. Because it runs theentire job in the foreground, the shell does not display a prompt until task z runs tocompletion: Task z does not finish until task y finishes, and task y does not finishuntil task x finishes. In the second job, task x is an ls –l command, task y is greptmp, and task z is the pager less. The shell displays a long (wide) listing of the filesin the working directory that contain the string tmp, piped through less.
The next command line executes tasks d and e in the background and task f in theforeground:
$ d & e & f[1] 14271[2] 14272
The shell displays the job number between brackets and the PID (process identifica-tion) number for each process running in the background. You get a prompt as soonas f finishes, which may be before d or e finishes.
Before displaying a prompt for a new command, the shell checks whether any back-ground jobs have completed. For each job that has completed, the shell displays itsjob number, the word Done, and the command line that invoked the job; then theshell displays a prompt. When the job numbers are listed, the number of the last jobstarted is followed by a + character and the job number of the previous job is fol-lowed by a – character. Any other jobs listed show a SPACE character. After runningthe last command, the shell displays the following before issuing a prompt:
[1]- Done d[2]+ Done e
The next command line executes all three tasks as background jobs. You get a shellprompt immediately:
$ d & e & f &[1] 14290[2] 14291[3] 14292
You can use pipes to send the output from one task to the next task and an amper-sand (&) to run the entire job as a background task. Again the prompt comes backimmediately. The shell regards the commands joined by a pipe as being a single job.That is, it treats all pipes as single jobs, no matter how many tasks are connected

Shell Basics 289
with the pipe (|) symbol or how complex they are. The Bourne Again Shell showsonly one process placed in the background:
$ d | e | f &[1] 14295
optional ( ) Groups Commands
You can use parentheses to group commands. The shell creates a copy of itself,called a subshell, for each group. It treats each group of commands as a job and cre-ates a new process to execute each command (refer to “Process Structure” onpage 310 for more information on creating subshells). Each subshell (job) has itsown environment, meaning that it has its own set of variables with values that candiffer from those of other subshells.
The following command line executes commands a and b sequentially in the back-ground while executing c in the background. The shell prompt returns immediately.
$ (a ; b) & c &[1] 15520[2] 15521
The preceding example differs from the earlier example d & e & f & in that tasks aand b are initiated sequentially, not concurrently.
Similarly the following command line executes a and b sequentially in the back-ground and, at the same time, executes c and d sequentially in the background. Thesubshell running a and b and the subshell running c and d run concurrently. Theprompt returns immediately.
$ (a ; b) & (c ; d) &[1] 15528[2] 15529
The next script copies one directory to another. The second pair of parentheses cre-ates a subshell to run the commands following the pipe. Because of these parenthe-ses, the output of the first tar command is available for the second tar commanddespite the intervening cd command. Without the parentheses, the output of thefirst tar command would be sent to cd and lost because cd does not process inputfrom standard input. The shell variables $1 and $2 represent the first and secondcommand line arguments (page 439), respectively. The first pair of parentheses,which creates a subshell to run the first two commands, allows users to call cpdirwith relative pathnames. Without them the first cd command would change theworking directory of the script (and consequently the working directory of the sec-ond cd command). With them only the working directory of the subshell is changed.
$ cat cpdir(cd $1 ; tar -cf - . ) | (cd $2 ; tar -xvf - )$ cpdir /home/alex/sources /home/alex/memo/biblio
The cpdir command line copies the files and directories in the /home/alex/sourcesdirectory to the directory named /home/alex/memo/biblio. This shell script isalmost the same as using cp with the –r option. Refer to the cp and tar man pages formore information.

290 Chapter 9 The Bourne Again Shell
Job Control
A job is a command pipeline. You run a simple job whenever you give the shell acommand. For example, type date on the command line and press RETURN: You haverun a job. You can also create several jobs with multiple commands on a singlecommand line:
$ find . -print | sort | lpr & grep -l alex /tmp/* > alexfiles &[1] 18839[2] 18876
The portion of the command line up to the first & is one job consisting of three pro-cesses connected by pipes: find, sort (page 153), and lpr (page 151). The second job isa single process running grep. Both jobs have been put into the background by thetrailing & characters, so bash does not wait for them to complete before displayinga prompt.
Using job control you can move commands from the foreground to the background(and vice versa), stop commands temporarily, and list all the commands that arerunning in the background or stopped.
jobs: Lists Jobs
The jobs builtin lists all background jobs. The following sequence demonstrateswhat happens when you give a jobs command. Here the sleep command runs in thebackground and creates a background job that jobs reports on:
$ sleep 60 &[1] 7809$ jobs[1] + Running sleep 60 &
fg: Brings a Job to the Foreground
The shell assigns job numbers to commands you run in the background (page 288).Several jobs are started in the background in the next example. For each job theshell lists the job number and PID number immediately, just before it issues aprompt.
$ xclock &[1] 1246$ date &[2] 1247$ Sun Dec 2 11:44:40 PST 2007[2]+ Done date$ find /usr -name ace -print > findout &[2] 1269$ jobs[1]- Running xclock &[2]+ Running find /usr -name ace -print > findout &
Job numbers, which are discarded when a job is finished, can be reused. When youstart or put a job in the background, the shell assigns a job number that is one morethan the highest job number in use.

Shell Basics 291
In the preceding example, the jobs command lists the first job, xclock, as job 1. Thedate command does not appear in the jobs list because it finished before jobs wasrun. Because the date command was completed before find was run, the find com-mand became job 2.
To move a background job into the foreground, use the fg builtin followed by the jobnumber. Alternatively, you can give a percent sign (%) followed by the job number asa command. Either of the following commands moves job 2 into the foreground:
$ fg 2
or
$ %2
You can also refer to a job by following the percent sign with a string that uniquelyidentifies the beginning of the command line used to start the job. Instead of thepreceding command, you could have used either fg %find or fg %f because bothuniquely identify job 2. If you follow the percent sign with a question mark and astring, the string can match any part of the command line. In the preceding exam-ple, fg %?ace also brings job 2 into the foreground.
Often the job you wish to bring into the foreground is the only job running in thebackground or is the job that jobs lists with a plus (+). In these cases you can use fgwithout an argument.
bg: Sends a Job to the Background
To move the foreground job to the background, you must first suspend (temporarilystop) the job by pressing the suspend key (usually CONTROL-Z). Pressing the suspendkey immediately suspends the job in the foreground. You can then use the bg builtinto resume execution of the job in the background.
$ bg
If a background job attempts to read from the terminal, the shell stops it and noti-fies you that the job has been stopped and is waiting for input. You must then movethe job into the foreground so that it can read from the terminal. The shell displaysthe command line when it moves the job into the foreground.
$ (sleep 5; cat > mytext) &[1] 1343$ dateSun Dec 2 11:58:20 PST 2007[1]+ Stopped ( sleep 5; cat >mytext )$ fg( sleep 5; cat >mytext )Remember to let the cat out!CONTROL-D$
In the preceding example, the shell displays the job number and PID number of thebackground job as soon as it starts, followed by a prompt. Demonstrating that youcan give a command at this point, the user gives the command date and its output

292 Chapter 9 The Bourne Again Shell
appears on the screen. The shell waits until just before it issues a prompt (after datehas finished) to notify you that job 1 is stopped. When you give an fg command, theshell puts the job in the foreground and you can enter the input that the command iswaiting for. In this case the input needs to be terminated with a CONTROL-D to signifyEOF (end of file). The shell then displays another prompt.
The shell keeps you informed about changes in the status of a job, notifying youwhen a background job starts, completes, or is stopped, perhaps waiting for inputfrom the terminal. The shell also lets you know when a foreground job is sus-pended. Because notices about a job being run in the background can disrupt yourwork, the shell delays displaying these notices until just before it displays aprompt. You can set notify (page 337) to make the shell display these notices with-out delay.
If you try to exit from a shell while jobs are stopped, the shell issues a warning anddoes not allow you to exit. If you then use jobs to review the list of jobs or youimmediately try to leave the shell again, the shell allows you to leave and terminatesthe stopped jobs. Jobs that are running (not stopped) in the background continue torun. In the following example, find (job 1) continues to run after the second exit ter-minates the shell, but cat (job 2) is terminated:
$ find / -size +100k > $HOME/bigfiles 2>&1 &[1] 1426$ cat > mytest &[2] 1428[2]+ Stopped cat >mytest$ exitexitThere are stopped jobs.$ exitexit
login:
Manipulating the Directory Stack
The Bourne Again Shell allows you to store a list of directories you are workingwith, enabling you to move easily among them. This list is referred to as a stack. Itis analogous to a stack of dinner plates: You typically add plates to and removeplates from the top of the stack, creating a last-in first-out, (LIFO) stack.
dirs: Displays the Stack
The dirs builtin displays the contents of the directory stack. If you call dirs when thedirectory stack is empty, it displays the name of the working directory:
$ dirs~/literature

Shell Basics 293
The dirs builtin uses a tilde (~) to represent the name of the home directory. Theexamples in the next several sections assume that you are referring to the directorystructure shown in Figure 9-2.
pushd: Pushes a Directory on the Stack
To change directories and at the same time add a new directory to the top of thestack, use the pushd (push directory) builtin. In addition to changing directories, thepushd builtin displays the contents of the stack. The following example is illustratedin Figure 9-3:
$ pushd ../demo~/demo ~/literature$ pwd/home/sam/demo
$ pushd ../names~/names ~/demo ~/literature$ pwd/home/sam/names
Figure 9-2 The directory structure in the examples
Figure 9-3 Creating a directory stack
home
sam
demo
promo
literaturenames
names
demo
literature
2 pushd
1 pushd
1
2
294 Chapter 9 The Bourne Again Shell
When you use pushd without an argument, it swaps the top two directories on thestack and makes the new top directory (which was the second directory) become thenew working directory (Figure 9-4):
$ pushd~/demo ~/names ~/literature$ pwd/home/sam/demo
Using pushd in this way, you can easily move back and forth between two directo-ries. You can also use cd – to change to the previous directory, whether or not youhave explicitly created a directory stack. To access another directory in the stack,call pushd with a numeric argument preceded by a plus sign. The directories in thestack are numbered starting with the top directory, which is number 0. The follow-ing pushd command continues with the previous example, changing the workingdirectory to literature and moving literature to the top of the stack:
$ pushd +2~/literature ~/demo ~/names$ pwd/home/sam/literature
popd: Pops a Directory Off the Stack
To remove a directory from the stack, use the popd (pop directory) builtin. As the fol-lowing example and Figure 9-5 show, popd used without an argument removes the topdirectory from the stack and changes the working directory to the new top directory:
$ dirs~/literature ~/demo ~/names$ popd~/demo ~/names$ pwd/home/sam/demo
To remove a directory other than the top one from the stack, use popd with anumeric argument preceded by a plus sign. The following example removes direc-tory number 1, demo:
$ dirs~/literature ~/demo ~/names$ popd +1~/literature ~/names
Figure 9-4 Using pushd to change working directories
names demo names
demonamesdemo
literature literature literature
pushd pushdpushd pushd

Parameters and Variables 295
Removing a directory other than directory number 0 does not change the workingdirectory.
Parameters and Variables
Variables Within a shell, a shell parameter is associated with a value that is accessible to theuser. There are several kinds of shell parameters. Parameters whose names consist ofletters, digits, and underscores are often referred to as shell variables, or simplyvariables. A variable name must start with a letter or underscore, not with a num-ber. Thus A76, MY_CAT, and ___X___ are valid variable names, whereas69TH_STREET (starts with a digit) and MY-NAME (contains a hyphen) are not.
User-createdvariables
Shell variables that you name and assign values to are user-created variables. Youcan change the values of user-created variables at any time, or you can make themreadonly so that their values cannot be changed. You can also make user-createdvariables global. A global variable (also called an environment variable) is availableto all shells and other programs you fork from the original shell. One naming con-vention is to use only uppercase letters for global variables and to use mixed-case orlowercase letters for other variables. Refer to “Locality of Variables” on page 434for more information on global variables.
To assign a value to a variable in the Bourne Again Shell, use the following syntax:
VARIABLE=value
There can be no whitespace on either side of the equal sign (=). An example assign-ment follows:
$ myvar=abc
The Bourne Again Shell permits you to put variable assignments on a commandline. These assignments are local to the command shell—that is, they apply to thecommand only. The my_script shell script displays the value of TEMPDIR. The fol-lowing command runs my_script with TEMPDIR set to /home/sam/temp. The echobuiltin shows that the interactive shell has no value for TEMPDIR after runningmy_script. If TEMPDIR had been set in the interactive shell, running my_script inthis manner would have had no effect on its value.
Figure 9-5 Using popd to remove a directory from the stack
literature
demo
names
popd

296 Chapter 9 The Bourne Again Shell
$ cat my_scriptecho $TEMPDIR$ TEMPDIR=/home/sam/temp my_script/home/sam/temp$ echo $TEMPDIR
$
Keyword variables Keyword shell variables (or simply keyword variables) have special meaning to theshell and usually have short, mnemonic names. When you start a shell (by loggingin, for example), the shell inherits several keyword variables from the environment.Among these variables are HOME, which identifies your home directory, andPATH, which determines which directories the shell searches and in what order tolocate commands that you give the shell. The shell creates and initializes (withdefault values) other keyword variables when you start it. Still other variables donot exist until you set them.
You can change the values of most of the keyword shell variables at any time but itis usually not necessary to change the values of keyword variables initialized in the/etc/profile or /etc/csh.cshrc systemwide startup files. If you need to change thevalue of a bash keyword variable, do so in one of your startup files (page 277). Justas you can make user-created variables global, so you can make keyword variablesglobal; this is usually done automatically in the startup files. You can also make akeyword variable readonly.
Positional andspecial parameters
The names of positional and special parameters do not resemble variable names.Most of these parameters have one-character names (for example, 1, ?, and #) andare referenced (as are all variables) by preceding the name with a dollar sign ($1, $?,and $#). The values of these parameters reflect different aspects of your ongoinginteraction with the shell.
Whenever you give a command, each argument on the command line becomes thevalue of a positional parameter. Positional parameters (page 438) enable you toaccess command line arguments, a capability that you will often require when youwrite shell scripts. The set builtin (page 442) enables you to assign values to posi-tional parameters.
Other frequently needed shell script values, such as the name of the last commandexecuted, the number of command line arguments, and the status of the mostrecently executed command, are available as special parameters. You cannot assignvalues to special parameters.
User-Created Variables
The first line in the following example declares the variable named person and ini-tializes it with the value alex:
$ person=alex$ echo personperson$ echo $personalex

Parameters and Variables 297
Because the echo builtin copies its arguments to standard output, you can use it todisplay the values of variables. The second line of the preceding example shows thatperson does not represent alex. Instead, the string person is echoed as person. Theshell substitutes the value of a variable only when you precede the name of the vari-able with a dollar sign ($). The command echo $person displays the value of thevariable person; it does not display $person because the shell does not pass $personto echo as an argument. Because of the leading $, the shell recognizes that $personis the name of a variable, substitutes the value of the variable, and passes that valueto echo. The echo builtin displays the value of the variable—not its name—neverknowing that you called it with a variable.
Quoting the $ You can prevent the shell from substituting the value of a variable by quoting theleading $. Double quotation marks do not prevent the substitution; single quotationmarks or a backslash (\) do.
$ echo $personalex$ echo "$person"alex$ echo '$person'$person$ echo \$person$person
SPACEs Because they do not prevent variable substitution but do turn off the special mean-ings of most other characters, double quotation marks are useful when you assignvalues to variables and when you use those values. To assign a value that containsSPACEs or TABs to a variable, use double quotation marks around the value. Althoughdouble quotation marks are not required in all cases, using them is a good habit.
$ person="alex and jenny"$ echo $personalex and jenny
$ person=alex and jennybash: and: command not found
When you reference a variable that contains TABs or multiple adjacent SPACEs, youneed to use quotation marks to preserve the spacing. If you do not quote the vari-able, the shell collapses each string of blank characters into a single SPACE beforepassing the variable to the utility:
$ person="alex and jenny"$ echo $personalex and jenny$ echo "$person"alex and jenny
When you execute a command with a variable as an argument, the shell replaces thename of the variable with the value of the variable and passes that value to the pro-gram being executed. If the value of the variable contains a special character, suchas * or ?, the shell may expand that variable.

298 Chapter 9 The Bourne Again Shell
Pathnameexpansion inassignments
The first line in the following sequence of commands assigns the string alex* to thevariable memo. The Bourne Again Shell does not expand the string because bashdoes not perform pathname expansion (page 239) when assigning a value to a vari-able. All shells process a command line in a specific order. Within this order bashexpands variables before it interprets commands. In the following echo commandline, the double quotation marks quote the asterisk (*) in the expanded value of$memo and prevent bash from performing pathname expansion on the expandedmemo variable before passing its value to the echo command:
$ memo=alex*$ echo "$memo"alex*
All shells interpret special characters as special when you reference a variable thatcontains an unquoted special character. In the following example, the shell expandsthe value of the memo variable because it is not quoted:
$ lsalex.reportalex.summary$ echo $memoalex.report alex.summary
Here the shell expands the $memo variable to alex*, expands alex* to alex.reportand alex.summary, and passes these two values to echo.
optionalBraces The $VARIABLE syntax is a special case of the more general syntax ${VARIABLE},
in which the variable name is enclosed by ${}. The braces insulate the variablename. Braces are necessary when catenating a variable value with a string:
$ PREF=counter$ WAY=$PREFclockwise$ FAKE=$PREFfeit$ echo $WAY $FAKE
$
The preceding example does not work as planned. Only a blank line is outputbecause, although the symbols PREFclockwise and PREFfeit are valid variablenames, they are not set. By default bash evaluates an unset variable as an empty(null) string and displays this value. To achieve the intent of these statements, referto the PREF variable using braces:
$ PREF=counter$ WAY=${PREF}clockwise$ FAKE=${PREF}feit$ echo $WAY $FAKEcounterclockwise counterfeit
Parameters and Variables 299
The Bourne Again Shell refers to the arguments on its command line by position,using the special variables $1, $2, $3, and so forth up to $9. If you wish to refer toarguments past the ninth argument, you must use braces: ${10}. The name of thecommand is held in $0 (page 439).
unset: Removes a Variable
Unless you remove a variable, it exists as long as the shell in which it was createdexists. To remove the value of a variable but not the variable itself, set the valueto null:
$ person=$ echo $person
$
You can remove a variable with the unset builtin. To remove the variable person,give the following command:
$ unset person
Variable Attributes
This section discusses attributes and explains how to assign them to variables.
readonly: Makes the Value of a Variable Permanent
You can use the readonly builtin to ensure that the value of a variable cannot bechanged. The next example declares the variable person to be readonly. You mustassign a value to a variable before you declare it to be readonly; you cannot changeits value after the declaration. When you attempt to unset or change the value of areadonly variable, the shell displays an error message:
$ person=jenny$ echo $personjenny$ readonly person$ person=helenbash: person: readonly variable
If you use the readonly builtin without an argument, it displays a list of all readonlyshell variables. This list includes keyword variables that are automatically set asreadonly as well as keyword or user-created variables that you have declared asreadonly. See “Listing variable attributes” on page 300 for an example (readonlyand declare –r produce the same output).
declare and typeset: Assign Attributes to Variables
The declare and typeset builtins (two names for the same command) set attributesand values for shell variables. Table 9-3 lists five of these attributes.

300 Chapter 9 The Bourne Again Shell
The following commands declare several variables and set some attributes. The firstline declares person1 and assigns it a value of alex. This command has the sameeffect with or without the word declare.
$ declare person1=alex$ declare -r person2=jenny$ declare -rx person3=helen$ declare -x person4
The readonly and export builtins are synonyms for the commands declare –r anddeclare –x, respectively. It is legal to declare a variable without assigning a value toit, as the preceding declaration of the variable person4 illustrates. This declarationmakes person4 available to all subshells (makes it global). Until an assignment ismade to the variable, it has a null value.
You can list the options to declare separately in any order. The following is equiva-lent to the preceding declaration of person3:
$ declare -x -r person3=helen
Use the + character in place of – when you want to remove an attribute from a vari-able. You cannot remove a readonly attribute however. After the following com-mand is given, the variable person3 is no longer exported but it is still readonly.
$ declare +x person3
You can also use typeset instead of declare.
Listing variableattributes
Without any arguments or options, the declare builtin lists all shell variables. Thesame list is output when you run set (page 442) without any arguments.
If you use a declare builtin with options but no variable names as arguments, thecommand lists all shell variables that have the indicated attributes set. For example,the option –r with declare gives a list of all readonly shell variables. This list is thesame as that produced by a readonly command without any arguments. After thedeclarations in the preceding example have been given, the results are as follows:
$ declare -rdeclare -ar BASH_VERSINFO='([0]="2" [1]="05b" [2]="0" [3]="1" ... )'declare -ir EUID="500"declare -ir PPID="936"
Table 9-3 Variable attributes (typeset or declare)
Attribute Meaning
–a Declares a variable as an array (page 432)
–f Declares a variable to be a function name (page 331)
–i Declares a variable to be of type integer (page 301)
–r Makes a variable readonly; also readonly (page 299)
–x Exports a variable (makes it global); also export (page 434)

Parameters and Variables 301
declare -r SHELLOPTS="braceexpand:emacs:hashall:histexpand:history:..."declare -ir UID="500"declare -r person2="jenny"declare -rx person3="helen"
The first five entries are keyword variables that are automatically declared as read-only. Some of these variables are stored as integers (–i). The –a option indicates thatBASH_VERSINFO is an array variable; the value of each element of the array islisted to the right of an equal sign.
Integer By default the values of variables are stored as strings. When you perform arith-metic on a string variable, the shell converts the variable into a number, manipulatesit, and then converts it back to a string. A variable with the integer attribute isstored as an integer. Assign the integer attribute as follows:
$ typeset -i COUNT
Keyword Variables
Keyword variables either are inherited or are declared and initialized by the shellwhen it starts. You can assign values to these variables from the command line orfrom a startup file. Typically you want these variables to apply to all subshells youstart as well as to your login shell. For those variables not automatically exportedby the shell, you must use export (page 434) to make them available to child shells.
HOME: Your Home Directory
By default your home directory is your working directory when you log in. Yourhome directory is determined when you establish your account; its name is stored inthe /etc/passwd file.
$ grep sam /etc/passwdsam:x:501:501:Sam S. x301:/home/sam:/bin/bash
When you log in, the shell inherits the pathname of your home directory and assignsit to the variable HOME. When you give a cd command without an argument, cdmakes the directory whose name is stored in HOME the working directory:
$ pwd/home/alex/laptop$ echo $HOME/home/alex$ cd$ pwd/home/alex
This example shows the value of the HOME variable and the effect of the cd buil-tin. After you execute cd without an argument, the pathname of the working direc-tory is the same as the value of HOME: your home directory.
Tilde (~) The shell uses the value of HOME to expand pathnames that use the shorthand tilde(~) notation (page 190) to denote a user’s home directory. The following example

302 Chapter 9 The Bourne Again Shell
uses echo to display the value of this shortcut and then uses ls to list the files in Alex’slaptop directory, which is a subdirectory of his home directory:
$ echo ~/home/alex$ ls ~/laptoptester count lineup
PATH: Where the Shell Looks for Programs
When you give the shell an absolute or relative pathname rather than a simple file-name as a command, it looks in the specified directory for an executable file withthe specified filename. If the file with the pathname you specified does not exist, theshell reports command not found. If the file exists as specified but you do not haveexecute permission for it, or in the case of a shell script you do not have read andexecute permission for it, the shell reports Permission denied.
If you give a simple filename as a command, the shell searches through certaindirectories for the program you want to execute. It looks in several directories for afile that has the same name as the command and that you have execute permissionfor (a compiled program) or read and execute permission for (a shell script). ThePATH shell variable controls this search.
The default value of PATH is determined when bash is compiled. It is not set in astartup file, although it may be modified there. Normally the default specifies thatthe shell search several system directories used to hold common commands andthen search the working directory. These system directories include /bin and/usr/bin and other directories appropriate to the local system. When you give acommand, if the shell does not find the executable—and, in the case of a shellscript, readable—file named by the command in any of the directories listed inPATH, the shell generates one of the aforementioned error messages.
Working directory The PATH variable specifies the directories in the order the shell should search them.Each directory must be separated from the next by a colon. The following commandsets PATH so that a search for an executable file starts with the /usr/local/bin direc-tory. If it does not find the file in this directory, the shell first looks in /bin, and thenin /usr/bin. If the search fails in those directories, the shell looks in the bin directory,a subdirectory of the user’s home directory. Finally the shell looks in the workingdirectory. Exporting PATH makes its value accessible to subshells:
$ export PATH=/usr/local/bin:/bin:/usr/bin:~/bin:
A null value in the string indicates the working directory. In the preceding example,a null value (nothing between the colon and the end of the line) appears as the lastelement of the string. The working directory is represented by a leading colon (notrecommended; see the following security tip), a trailing colon (as in the example), ortwo colons next to each other anywhere in the string. You can also represent theworking directory explicitly with a period (.).
Because Linux stores many executable files in directories named bin (binary), userstypically put their own executable files in their own ~/bin directories. If you put

Parameters and Variables 303
your own bin directory at the end of your PATH, as in the preceding example, theshell looks there for any commands that it cannot find in directories listed earlierin PATH.
If you want to add directories to PATH, you can reference the old value of thePATH variable while you are setting PATH to a new value (but see the precedingsecurity tip). The following command adds /usr/local/bin to the beginning of thecurrent PATH and the bin directory in the user’s home directory (~/bin) to the end:
$ PATH=/usr/local/bin:$PATH:~/bin
MAIL: Where Your Mail Is Kept
The MAIL variable contains the pathname of the file that holds your mail (yourmailbox, usually /var/spool/mail/name, where name is your username). If MAIL isset and MAILPATH (next) is not set, the shell informs you when mail arrives in thefile specified by MAIL. In a graphical environment you can unset MAIL so that theshell does not display mail reminders in a terminal emulator window (assuming youare using a graphical mail program).
The MAILPATH variable contains a list of filenames separated by colons. If thisvariable is set, the shell informs you when any one of the files is modified (for exam-ple, when mail arrives). You can follow any of the filenames in the list with a ques-tion mark (?), followed by a message. The message replaces the you have mailmessage when you get mail while you are logged in.
The MAILCHECK variable specifies how often, in seconds, the shell checks for newmail. The default is 60 seconds. If you set this variable to zero, the shell checksbefore each prompt.
PS1: User Prompt (Primary)
The default Bourne Again Shell prompt is a dollar sign ($). When you run bash withroot privileges, you may have a pound sign (#) prompt. The PS1 variable holds theprompt string that the shell uses to let you know that it is waiting for a command.When you change the value of PS1, you change the appearance of your prompt.
PATH and security
security Do not put the working directory first in PATH when security is a concern. If you are working asroot, you should never put the working directory first in PATH. It is common for root’s PATH toomit the working directory entirely. You can always execute a file in the working directory byprepending ./ to the name: ./ls .
Putting the working directory first in PATH can create a security hole. Most people type ls as thefirst command when entering a directory. If the owner of a directory places an executable filenamed ls in the directory, and the working directory appears first in a user’s PATH, the user givingan ls command from the directory executes the ls program in the working directory instead of thesystem ls utility, possibly with undesirable results.

304 Chapter 9 The Bourne Again Shell
You can customize the prompt displayed by PS1. For example, the assignment
$ PS1="[\u@\h \W \!]$ "
displays the following prompt:
[user@host directory event]$
where user is the username, host is the hostname up to the first period, directory isthe basename of the working directory, and event is the event number of the currentcommand.
If you are working on more than one system, it can be helpful to incorporate thesystem name into your prompt. For example, you might change the prompt to thename of the system you are using, followed by a colon and a SPACE (a SPACE at the endof the prompt makes the commands that you enter after the prompt easier to read):
$ PS1="$(hostname): "bravo.example.com: echo testtestbravo.example.com:
The first example that follows changes the prompt to the name of the local host, aSPACE, and a dollar sign (or, if the user is running with root privileges, a pound sign).The second example changes the prompt to the time followed by the name of theuser. The third example changes the prompt to the one used in this book (a poundsign for root and a dollar sign otherwise):
$ PS1='\h \$ 'bravo $
$ PS1='\@ \u $ '09:44 PM alex $
$ PS1='\$ '$
Table 9-4 describes some of the symbols you can use in PS1. For a complete list of spe-cial characters you can use in the prompt strings, open the bash man page and searchfor the second occurrence of PROMPTING (give the command /PROMPTING andthen press n).
Table 9-4 PS1 symbols
Symbol Display in prompt
\$ # if the user is running with root privileges; otherwise, $
\w Pathname of the working directory
\W Basename of the working directory
\! Current event (history) number (page 317)
\d Date in Weekday Month Date format

Parameters and Variables 305
PS2: User Prompt (Secondary)
Prompt String 2 is a secondary prompt that the shell stores in PS2. On the first lineof the next example, an unclosed quoted string follows echo. The shell assumes thatthe command is not finished and, on the second line, gives the default secondaryprompt (>). This prompt indicates that the shell is waiting for the user to continuethe command line. The shell waits until it receives the quotation mark that closesthe string and then executes the command:
$ echo "demonstration of prompt string> 2"demonstration of prompt string2$ PS2="secondary prompt: "$ echo "this demonstratessecondary prompt: prompt string 2"this demonstratesprompt string 2
The second command changes the secondary prompt to secondary prompt: fol-lowed by a SPACE. A multiline echo demonstrates the new prompt.
PS3: Menu Prompt
PS3 holds the menu prompt for the select control structure (page 426).
PS4: Debugging Prompt
PS4 holds the bash debugging symbol (page 408).
IFS: Separates Input Fields (Word Splitting)
The IFS (Internal Field Separator) shell variable specifies the characters that youcan use to separate arguments on a command line and has the default value ofSPACE TAB NEWLINE. Regardless of the value of IFS, you can always use one or moreSPACE or TAB characters to separate arguments on the command line, provided thatthese characters are not quoted or escaped. When you assign IFS character val-ues, these characters can also separate fields but only if they undergo expansion.This type of interpretation of the command line is called word splitting.
\h Machine hostname, without the domain
\H Full machine hostname, including the domain
\u Username of the current user
\@ Current time of day in 12-hour, AM/PM format
\T Current time of day in 12-hour HH:MM:SS format
\A Current time of day in 24-hour HH:MM format
\t Current time of day in 24-hour HH:MM:SS format
Table 9-4 PS1 symbols (continued)

306 Chapter 9 The Bourne Again Shell
The following example demonstrates how setting IFS can affect the interpretationof a command line:
$ a=w:x:y:z$ cat $acat: w:x:y:z: No such file or directory$ IFS=":"$ cat $acat: w: No such file or directorycat: x: No such file or directorycat: y: No such file or directorycat: z: No such file or directory
The first time cat is called, the shell expands the variable a, interpreting the stringw:x:y:z as a single word to be used as the argument to cat. The cat utility cannotfind a file named w:x:y:z and reports an error for that filename. After IFS is set to acolon (:), the shell expands the variable a into four words, each of which is an argu-ment to cat. Now cat reports an error for four separate files: w, x, y, and z. Wordsplitting based on the colon (:) takes place only after the variable a is expanded.
The shell splits all expanded words on a command line according to the separatingcharacters found in IFS. When there is no expansion, there is no splitting. Considerthe following commands:
$ IFS="p"$ export VAR
Although IFS is set to p, the p on the export command line is not expanded so theword export is not split.
The following example uses variable expansion in an attempt to produce an exportcommand:
$ IFS="p"$ aa=export$ echo $aaex ort
This time expansion occurs so that the character p in the token export is interpretedas a separator as the preceding echo command shows. Now when you try to use thevalue of the aa variable to export the VAR variable, the shell parses the $aa VARcommand line as ex ort VAR. The effect is that the command line starts the ex edi-tor with two filenames: ort and VAR.
Be careful when changing IFScaution Changing IFS has a variety of side effects so work cautiously. You may find it useful to first save
the value of IFS before changing it; you can easily then restore the original value if you get unex-pected results. Alternatively, you can fork a new shell with a bash command before experimentingwith IFS; if you get into trouble, you can exit back to the old shell, where IFS is working properly.You can also set IFS to its default value with the following command:
$ IFS=' \t\n'

Parameters and Variables 307
$ $aa VAR2 files to edit"ort" [New File]Entering Ex mode. Type "visual" to go to Normal mode.:qE173: 1 more file to edit:q$
If you unset IFS, only SPACEs and TABs work as field separators.
CDPATH: Broadens the Scope of cdThe CDPATH variable allows you to use a simple filename as an argument to the cdbuiltin to change the working directory to a directory other than a child of theworking directory. If you have several directories you like to work out of, this vari-able can speed things up and save you the tedium of using cd with longer pathnamesto switch among them.
When CDPATH is not set and you specify a simple filename as an argument to cd,cd searches the working directory for a subdirectory with the same name as theargument. If the subdirectory does not exist, cd displays an error message. WhenCDPATH is set, cd searches for an appropriately named subdirectory in the directo-ries in the CDPATH list. If cd finds one, that directory becomes the working direc-tory. With CDPATH set, you can use cd and a simple filename to change theworking directory to a child of any of the directories listed in CDPATH.
The CDPATH variable takes on the value of a colon-separated list of directorypathnames (similar to the PATH variable). It is usually set in the ~/.bash_profilestartup file with a command line such as the following:
export CDPATH=$HOME:$HOME/literature
This command causes cd to search your home directory, the literature directory, andthen the working directory when you give a cd command. If you do not include theworking directory in CDPATH, cd searches the working directory if the search ofall the other directories in CDPATH fails. If you want cd to search the workingdirectory first (which you should never do when you are working with root privi-leges—refer to the tip on page 303), include a null string, represented by two colons(::), as the first entry in CDPATH:
export CDPATH=::$HOME:$HOME/literature
If the argument to the cd builtin is an absolute pathname—one starting with a slash(/)—the shell does not consult CDPATH.
Multiple separator characterstip Although sequences of multiple SPACE or TAB characters are treated as single separators, each
occurrence of another field-separator character acts as a separator.

308 Chapter 9 The Bourne Again Shell
Keyword Variables: A Summary
Table 9-5 lists the bash keyword variables.
Table 9-5 bash keyword variables
Variable Value
BASH_ENV The pathname of the startup file for noninteractive shells (page 278)
CDPATH The cd search path (page 307)
COLUMNS The width of the display used by select (page 425)
FCEDIT The name of the editor that fc uses by default (page 315)
HISTFILE The pathname of the file that holds the history list (default: ~/.bash_history;page 312)
HISTFILESIZE The maximum number of entries saved in HISTFILE (default: 500; page 312)
HISTSIZE The maximum number of entries saved in the history list (default: 500; page 312)
HOME The pathname of the user’s home directory (page 301); used as the default argument for cd and in tilde expansion (page 190)
IFS Internal Field Separator (page 305); used for word splitting (page 345)
INPUTRC The pathname of the Readline startup file (default: ~/.inputrc; page 325)
LANG The locale category when that category is not specifically set with an LC_*variable
LC_* A group of variables that specify locale categories including LC_COLLATE,LC_CTYPE, LC_MESSAGES, and LC_NUMERIC; use the locale builtin to display a complete list with values
LINES The height of the display used by select (page 425)
MAIL The pathname of the file that holds a user’s mail (page 303)
MAILCHECK How often, in seconds, bash checks for mail (page 303)
MAILPATH A colon-separated list of file pathnames that bash checks for mail in (page 303)
PATH A colon-separated list of directory pathnames that bash looks for com-mands in (page 302)
PROMPT_COMMAND A command that bash executes just before it displays the primary prompt
PS1 Prompt String 1; the primary prompt (default: '\s–\v\$ '; page 303)
PS2 Prompt String 2; the secondary prompt (default: '> '; page 305)
PS3 The prompt issued by select (page 425)
PS4 The bash debugging symbol (page 408)
REPLY Holds the line that read accepts (page 446); also used by select (page 425)

Special Characters 309
Special Characters
Table 9-6 lists most of the characters that are special to the bash shell.
Table 9-6 Shell special characters
Character Use
NEWLINE Initiates execution of a command (page 286)
; Separates commands (page 286)
( ) Groups commands (page 289) for execution by a subshell or identifies a func-tion (page 331)
& Executes a command in the background (pages 237 and 288)
| Sends standard output of preceding command to standard input of following command (pipe; page 288)
> Redirects standard output (page 228)
>> Appends standard output (page 232)
< Redirects standard input (page 230)
<< Here document (page 427)
* Any string of zero or more characters in an ambiguous file reference (page 240)
? Any single character in an ambiguous file reference (page 239)
\ Quotes the following character (page 146)
' Quotes a string, preventing all substitution (page 146)
" Quotes a string, allowing only variable and command substitution (pages 146 and 297)
‘...‘ Performs command substitution (page 344)
[ ] Character class in an ambiguous file reference (page 241)
$ References a variable (page 295)
. (dot builtin) Executes a command (only at the beginning of a line, page 279)
# Begins a comment (page 285)
{ } Used to surround the contents of a function (page 331)
: (null builtin) Returns true (page 453)
&&(Boolean AND)
Executes command on right only if command on left succeeds (returns a zero exit status, page 464)
| | (Boolean OR) Executes command on right only if command on left fails (returns a nonzero exit status; page 464)
! (Boolean NOT) Reverses exit status of a command
$() Performs command substitution (preferred form; page 344)
[ ] Evaluates an arithmetic expression (page 342)

310 Chapter 9 The Bourne Again Shell
Processes
A process is the execution of a command by Linux. The shell that starts when youlog in is a command, or a process, like any other. When you give the name of aLinux utility on the command line, you initiate a process. When you run a shellscript, another shell process is started and additional processes are created for eachcommand in the script. Depending on how you invoke the shell script, the script isrun either by the current shell or, more typically, by a subshell (child) of the currentshell. A process is not started when you run a shell builtin, such as cd.
Process Structure
fork system call Like the file structure, the process structure is hierarchical, with parents, children,and even a root. A parent process forks a child process, which in turn can fork otherprocesses. (The term fork indicates that, as with a fork in the road, one processturns into two. Initially the two forks are identical except that one is identified asthe parent and one as the child. You can also use the term spawn; the words areinterchangeable.) The operating system routine, or system call, that creates a newprocess is named fork.
When Linux begins execution when a system is started, it starts init, a single processcalled a spontaneous process, with PID number 1. This process holds the same posi-tion in the process structure as the root directory does in the file structure: It is theancestor of all processes that the system and users work with. When the system is inmultiuser mode, init runs getty or mingetty processes, which display login: promptson terminals and virtual consoles. When someone responds to the prompt andpresses RETURN, getty hands control over to a utility named login, which checks theusername and password combination. After the user logs in, the login processbecomes the user’s shell process.
Process Identification
PID number Linux assigns a unique PID (process identification) number at the inception of eachprocess. As long as a process exists, it keeps the same PID number. During one ses-sion the same process is always executing the login shell. When you fork a new pro-cess—for example, when you use an editor—the PID number of the new (child)process is different from that of its parent process. When you return to the loginshell, it is still being executed by the same process and has the same PID number aswhen you logged in.
The following example shows that the process running the shell forked (is the parentof) the process running ps (page 238). When you call it with the –f option, ps dis-plays a full listing of information about each process. The line of the ps display withbash in the CMD column refers to the process running the shell. The column headedby PID identifies the PID number. The column headed PPID identifies the PID num-ber of the parent of the process. From the PID and PPID columns you can see thatthe process running the shell (PID 21341) is the parent of the process running sleep

Processes 311
(PID 22789). The parent PID number of sleep is the same as the PID number of theshell (21341).
$ sleep 10 &[1] 22789$ ps -fUID PID PPID C STIME TTY TIME CMDalex 21341 21340 0 10:42 pts/16 00:00:00 bashalex 22789 21341 0 17:30 pts/16 00:00:00 sleep 10alex 22790 21341 0 17:30 pts/16 00:00:00 ps -f
Refer to the ps man page for more information on ps and the columns it displayswith the –f option. A second pair of sleep and ps –f commands shows that the shellis still being run by the same process but that it forked another process to run sleep:
$ sleep 10 &[1] 22791$ ps -fUID PID PPID C STIME TTY TIME CMDalex 21341 21340 0 10:42 pts/16 00:00:00 bashalex 22791 21341 0 17:31 pts/16 00:00:00 sleep 10alex 22792 21341 0 17:31 pts/16 00:00:00 ps -f
You can also use pstree (or ps ––forest, with or without the –e option) to see theparent–child relationship of processes. The next example shows the –p option topstree, which causes it to display PID numbers:
$ pstree -pinit(1)-+-acpid(1395) |-atd(1758) |-crond(1702) ... |-kdeinit(2223)-+-firefox(8914)---run-mozilla.sh(8920)---firefox-bin(8925) | |-gaim(2306) | |-gqview(14062) | |-kdeinit(2228) | |-kdeinit(2294) | |-kdeinit(2314)-+-bash(2329)---ssh(2561) | | |-bash(2339) | | '-bash(15821)---bash(16778) | |-kdeinit(16448) | |-kdeinit(20888) | |-oclock(2317) | '-pam-panel-icon(2305)---pam_timestamp_c(2307) ... |-login(1823)---bash(20986)-+-pstree(21028) | '-sleep(21026) ...
The preceding output is abbreviated. The line that starts with –kdeinit shows agraphical user running many processes, including firefox, gaim, and oclock. Theline that starts with –login shows a textual user running sleep in the backgroundwhile running pstree in the foreground. Refer to “$$: PID Number” on page 437for a description of how to instruct the shell to report on PID numbers.
312 Chapter 9 The Bourne Again Shell
Executing a Command
fork and sleep When you give the shell a command, it usually forks (spawns) a child process toexecute the command. While the child process is executing the command, the par-ent process sleeps. While a process is sleeping, it does not use any computer timebut remains inactive, waiting to wake up. When the child process finishes executingthe command, it tells its parent of its success or failure via its exit status and thendies. The parent process (which is running the shell) wakes up and prompts foranother command.
Background process When you run a process in the background by ending a command with an amper-sand (&), the shell forks a child process without going to sleep and without waitingfor the child process to run to completion. The parent process, which is executing theshell, reports the job number and PID number of the child and prompts for anothercommand. The child process runs in the background, independent of its parent.
Builtins Although the shell forks a process to run most of the commands you give it, somecommands are built into the shell. The shell does not need to fork a process to runbuiltins. For more information refer to “Builtins” on page 243.
Variables Within a given process, such as your login shell or a subshell, you can declare, initial-ize, read, and change variables. By default however, a variable is local to a process.When a process forks a child process, the parent does not pass the value of a variableto the child. You can make the value of a variable available to child processes (global)by using the export builtin (page 434).
History
The history mechanism, a feature adapted from the C Shell, maintains a list ofrecently issued command lines, also called events, providing a quick way to reexe-cute any of the events in the list. This mechanism also enables you to execute varia-tions of previous commands and to reuse arguments from them. You can replicatecomplicated commands and arguments that you used earlier in this login session orin a previous one and enter a series of commands that differ from one another inminor ways. The history list also serves as a record of what you have done. It canprove helpful when you have made a mistake and are not sure what you did orwhen you want to keep a record of a procedure that involved a series of commands.
The history builtin displays the history list. If it does not, read on—you need to setsome variables.
Variables That Control History
The value of the HISTSIZE variable determines the number of events preserved inthe history list during a session. A value in the range of 100 to 1,000 is normal.
When you exit from the shell, the most recently executed commands are saved in thefile given by the HISTFILE variable (the default is ~/.bash_history). The next timeyou start the shell, this file initializes the history list. The value of the HISTFILESIZE

History 313
variable determines the number of lines of history saved in HISTFILE (not necessar-ily the same as HISTSIZE). HISTSIZE holds the number of events remembered dur-ing a session, HISTFILESIZE holds the number remembered between sessions, andthe file designated by HISTFILE holds the history list. See Table 9-7.
Event number The Bourne Again Shell assigns a sequential event number to each command line.You can display this event number as part of the bash prompt by including \! in PS1(page 303). Examples in this section show numbered prompts when they help toillustrate the behavior of a command.
Give the following command manually or place it in ~/.bash_profile (to affectfuture sessions) to establish a history list of the 100 most recent events:
$ HISTSIZE=100
The following command causes bash to save the 100 most recent events across loginsessions:
$ HISTFILESIZE=100
After you set HISTFILESIZE, you can log out and log in again, and the 100 mostrecent events from the previous login session will appear in your history list.
Give the command history to display the events in the history list. The list of eventsis ordered with oldest events at the top of the list. The following history list includesa command to modify the bash prompt so that it displays the history event number.The last event in the history list is the history command that displayed the list.
32 $ history | tail 23 PS1="\! bash$ " 24 ls -l 25 cat temp 26 rm temp 27 vim memo 28 lpr memo 29 vim memo 30 lpr memo 31 rm memo 32 history | tail
Table 9-7 History variables
Variable Default Function
HISTSIZE 500 events Maximum number of events saved during a session
HISTFILE ~/.bash_history Location of the history file
HISTFILESIZE 500 events Maximum number of events saved between sessions
history can help track down mistakes
tip When you have made a command line mistake (not an error within a script or program) and arenot sure what you did wrong, look at the history list to review your recent commands. Sometimesthis list can help you figure out what went wrong and how to fix things.

314 Chapter 9 The Bourne Again Shell
As you run commands and your history list becomes longer, it may run off the topof the screen when you use the history builtin. Pipe the output of history through lessto browse through it, or give the command history 10 to look at the ten most recentcommands.
Reexecuting and Editing Commands
You can reexecute any event in the history list. This feature can save you time,effort, and aggravation. Not having to reenter long command lines allows you toreexecute events more easily, quickly, and accurately than you could if you had toretype the entire command line. You can recall, modify, and reexecute previouslyexecuted events in three ways: You can use the fc builtin (covered next); the excla-mation point commands (page 316); or the Readline Library, which uses a one-linevi- or emacs-like editor to edit and execute events (page 322).
fc: Displays, Edits, and Reexecutes Commands
The fc (fix command) builtin enables you to display the history list and to edit andreexecute previous commands. It provides many of the same capabilities as the com-mand line editors.
Viewing the History List
When you call fc with the –l option, it displays commands from the history list.Without any arguments, fc –l lists the 16 most recent commands in a numbered list,with the oldest appearing first:
$ fc -l1024 cd1025 view calendar1026 vim letter.adams011027 aspell -c letter.adams011028 vim letter.adams011029 lpr letter.adams011030 cd ../memos1031 ls1032 rm *04051033 fc -l1034 cd1035 whereis aspell1036 man aspell1037 cd /usr/share/doc/*aspell*1038 pwd1039 ls1040 ls man-html
Which method to use?
tip If you are more familiar with vi or emacs and less familiar with the C or TC Shell, use fc or theReadline Library. If you are more familiar with the C or TC Shell and less familiar with vi andemacs, use the exclamation point commands. If it is a toss-up, try the Readline Library; it willbenefit you in other areas of Linux more than learning the exclamation point commands will.

History 315
The fc builtin can take zero, one, or two arguments with the –l option. The argu-ments specify the part of the history list to be displayed:
fc –l [first [last]]
The fc builtin lists commands beginning with the most recent event that matchesfirst. The argument can be an event number, the first few characters of the com-mand line, or a negative number, which is taken to be the nth previous command. Ifyou provide last, fc displays commands from the most recent event that matchesfirst through the most recent event that matches last. The next command displaysthe history list from event 1030 through event 1035:
$ fc -l 1030 10351030 cd ../memos1031 ls1032 rm *04051033 fc -l1034 cd1035 whereis aspell
The following command lists the most recent event that begins with view throughthe most recent command line that begins with whereis:
$ fc -l view whereis1025 view calendar1026 vim letter.adams011027 aspell -c letter.adams011028 vim letter.adams011029 lpr letter.adams011030 cd ../memos1031 ls1032 rm *04051033 fc -l1034 cd1035 whereis aspell
To list a single command from the history list, use the same identifier for the firstand second arguments. The following command lists event 1027:
$ fc -l 1027 10271027 aspell -c letter.adams01
Editing and Reexecuting Previous Commands
You can use fc to edit and reexecute previous commands.
fc [–e editor] [first [last]]
When you call fc with the –e option followed by the name of an editor, fc calls theeditor with event(s) in the Work buffer. Without first and last, fc defaults to themost recent command. The next example invokes the vi(m) editor to edit the mostrecent command:
$ fc -e vi

316 Chapter 9 The Bourne Again Shell
The fc builtin uses the stand-alone vi(m) editor. If you set the FCEDIT variable, youdo not need to use the –e option to specify an editor on the command line. Becausethe value of FCEDIT has been changed to /usr/bin/emacs and fc has no arguments,the following command edits the most recent command with the emacs editor:
$ export FCEDIT=/usr/bin/emacs$ fc
If you call it with a single argument, fc invokes the editor on the specified command.The following example starts the editor with event 21 in the Work buffer. When youexit from the editor, the shell executes the command:
$ fc 21
Again you can identify commands with numbers or by specifying the first fewcharacters of the command name. The following example calls the editor to workon events from the most recent event that begins with the letters vim throughevent 206:
$ fc vim 206
Reexecuting Commands Without Calling the Editor
You can reexecute previous commands without going into an editor. If you call fcwith the –s option, it skips the editing phase and reexecutes the command. The fol-lowing example reexecutes event 1029:
$ fc -s 1029lpr letter.adams01
The next example reexecutes the previous command:
$ fc -s
When you reexecute a command you can tell fc to substitute one string for another.The next example substitutes the string john for the string adams in event 1029 andexecutes the modified event:
$ fc -s adams=john 1029lpr letter.john01
Using an Exclamation Point (!) to Reference Events
The C Shell history mechanism uses an exclamation point to reference events and isavailable under bash. It is frequently more cumbersome to use than fc but nevertheless
Clean up the fc buffercaution When you execute an fc command, the shell executes whatever you leave in the editor buffer,
possibly with unwanted results. If you decide you do not want to execute a command, deleteeverything from the buffer before you exit from the editor.

History 317
has some useful features. For example, the !! command reexecutes the previous event,and the !$ token represents the last word on the previous command line.
You can reference an event by using its absolute event number, its relative eventnumber, or the text it contains. All references to events, called event designators,begin with an exclamation point (!). One or more characters follow the exclama-tion point to specify an event.
You can put history events anywhere on a command line. To escape an exclamationpoint so that it is treated literally instead of as the start of a history event, precede itwith a backslash (\) or enclose it within single quotation marks.
Event Designators
An event designator specifies a command in the history list. See Table 9-8 onpage 318 for a list of event designators.
!! reexecutes theprevious event
You can always reexecute the previous event by giving a !! command. In the follow-ing example, event 45 reexecutes event 44:
44 $ ls -l text-rw-rw-r-- 1 alex group 45 Apr 30 14:53 text45 $ !!ls -l text-rw-rw-r-- 1 alex group 45 Apr 30 14:53 text
The !! command works whether or not your prompt displays an event number. Asthis example shows, when you use the history mechanism to reexecute an event, theshell displays the command it is reexecuting.
!n event number A number following an exclamation point refers to an event. If that event is in thehistory list, the shell executes it. Otherwise, the shell displays an error message. Anegative number following an exclamation point references an event relative to thecurrent event. For example, the command !–3 refers to the third preceding event.After you issue a command, the relative event number of a given event changes(event –3 becomes event –4). Both of the following commands reexecute event 44:
51 $ !44ls -l text-rw-rw-r-- 1 alex group 45 Nov 30 14:53 text52 $ !-8ls -l text-rw-rw-r-- 1 alex group 45 Nov 30 14:53 text
!string event text When a string of text follows an exclamation point, the shell searches for andexecutes the most recent event that began with that string. If you enclose thestring between question marks, the shell executes the most recent event that con-tained that string. The final question mark is optional if a RETURN would immedi-ately follow it.

318 Chapter 9 The Bourne Again Shell
68 $ history 10 59 ls -l text* 60 tail text5 61 cat text1 text5 > letter 62 vim letter 63 cat letter 64 cat memo 65 lpr memo 66 pine jenny 67 ls -l 68 history69 $ !lls -l...70 $ !lprlpr memo71 $ !?letter?cat letter...
optional Word Designators
A word designator specifies a word or series of words from an event. Table 9-9 onpage 320 lists word designators.
The words are numbered starting with 0 (the first word on the line—usually thecommand), continuing with 1 (the first word following the command), and goingthrough n (the last word on the line).
To specify a particular word from a previous event, follow the event designator(such as !14) with a colon and the number of the word in the previous event. For
Table 9-8 Event designators
Designator Meaning
! Starts a history event unless followed immediately by SPACE, NEWLINE, =, or ( .
!! The previous command.
!n Command number n in the history list.
!–n The n th preceding command.
!string The most recent command line that started with string.
!?string[?] The most recent command that contained string. The last ? is optional.
!# The current command (as you have it typed so far).
!{event } The event is an event designator. The braces isolate event from the surrounding text. For example, !{–3}3 is the third most recently executed command followed by a 3.

History 319
example, !14:3 specifies the third word following the command from event 14. Youcan specify the first word following the command (word number 1) by using a caret(^) and the last word by using a dollar sign ($). You can specify a range of words byseparating two word designators with a hyphen.
72 $ echo apple grape orange pearapple grape orange pear73 $ echo !72:2echo grapegrape74 $ echo !72:^echo appleapple75 $ !72:0 !72:$echo pearpear76 $ echo !72:2-4echo grape orange peargrape orange pear77 $ !72:0-$echo apple grape orange pearapple grape orange pear
As the next example shows, !$ refers to the last word of the previous event. You canuse this shorthand to edit, for example, a file you just displayed with cat:
$ cat report.718...
$ vim !$vim report.718...
If an event contains a single command, the word numbers correspond to the argu-ment numbers. If an event contains more than one command, this correspondencedoes not hold true for commands after the first. In the following example event 78contains two commands separated by a semicolon so that the shell executes themsequentially; the semicolon is word number 5.
78 $ !72 ; echo helen jenny barbaraecho apple grape orange pear ; echo helen jenny barbaraapple grape orange pearhelen jenny barbara79 $ echo !78:7echo helenhelen80 $ echo !78:4-7echo pear ; echo helenpearhelen

320 Chapter 9 The Bourne Again Shell
Modifiers
On occasion you may want to change an aspect of an event you are reexecuting.Perhaps you entered a complex command line with a typo or incorrect pathname oryou want to specify a different argument. You can modify an event or a word of anevent by putting one or more modifiers after the word designator, or after the eventdesignator if there is no word designator. Each modifier must be preceded by acolon (:).
Substitute modifier The substitute modifier is more complex than the other modifiers. The followingexample shows the substitute modifier correcting a typo in the previous event:
$ car /home/jenny/memo.0507 /home/alex/letter.0507bash: car: command not found$ !!:s/car/catcat /home/jenny/memo.0507 /home/alex/letter.0507...
The substitute modifier has the following syntax:
[g]s/old/new /
where old is the original string (not a regular expression), and new is the string thatreplaces old. The substitute modifier substitutes the first occurrence of old withnew. Placing a g before the s (as in gs/old/new/) causes a global substitution, replac-ing all occurrences of old. The / is the delimiter in the examples but you can use anycharacter that is not in either old or new. The final delimiter is optional if a RETURN
would immediately follow it. As with the vim Substitute command, the historymechanism replaces an ampersand (&) in new with old. The shell replaces a nullold string (s//new/) with the previous old string or string within a command thatyou searched for with ?string?.
Table 9-9 Word designators
Designator Meaning
n The nth word. Word 0 is normally the command name.
^ The first word (after the command name).
$ The last word.
m–n All words from word number m through word number n; m defaults to 0 if you omit it (0–n).
n* All words from word number n through the last word.
* All words except the command name. The same as 1*.
% The word matched by the most recent ?string ? search.

History 321
Quick substitution An abbreviated form of the substitute modifier is quick substitution. Use it to reexe-cute the most recent event while changing some of the event text. The quick substi-tution character is the caret (^). For example, the command
$ ^old^new^
produces the same results as
$ !!:s/old/new/
Thus substituting cat for car in the previous event could have been entered as
$ ^car^catcat /home/jenny/memo.0507 /home/alex/letter.0507...
You can omit the final caret if it would be followed immediately by a RETURN. As withother command line substitutions, the shell displays the command line as it appearsafter the substitution.
Other modifiers Modifiers (other than the substitute modifier) perform simple edits on the part ofthe event that has been selected by the event designator and the optional word des-ignators. You can use multiple modifiers, each preceded by a colon (:).
The following series of commands uses ls to list the name of a file, repeats the com-mand without executing it (p modifier), and repeats the last command, removingthe last part of the pathname (h modifier) again without executing it:
$ ls /etc/sysconfig/harddisks/etc/sysconfig/harddisks$ !!:pls /etc/sysconfig/harddisks$ !!:h:pls /etc/sysconfig$
Table 9-10 lists event modifiers other than the substitute modifier.
Table 9-10 Modifiers
Modifier Function
e (extension) Removes all but the filename extension
h (head) Removes the last part of a pathname
p (print-not) Displays the command, but does not execute it
q (quote) Quotes the substitution to prevent further substitutions on it
r (root) Removes the filename extension
t (tail) Removes all elements of a pathname except the last
x Like q but quotes each word in the substitution individually

322 Chapter 9 The Bourne Again Shell
The Readline Library
Command line editing under the Bourne Again Shell is implemented through theReadline Library, which is available to any application written in C. Any applica-tion that uses the Readline Library supports line editing that is consistent with thatprovided by bash. Programs that use the Readline Library, including bash, read~/.inputrc (page 325) for key binding information and configuration settings. The––noediting command line option turns off command line editing in bash.
vi mode You can choose one of two editing modes when using the Readline Library in bash:emacs or vi(m). Both modes provide many of the commands available in the stand-alone versions of the vi(m) and emacs editors. You can also use the ARROW keys tomove around. Up and down movements move you backward and forward throughthe history list. In addition, Readline provides several types of interactive wordcompletion (page 324). The default mode is emacs; you can switch to vi mode withthe following command:
$ set -o vi
emacs mode The next command switches back to emacs mode:
$ set -o emacs
vi Editing Mode
Before you start make sure you are in vi mode.
When you enter bash commands while in vi editing mode, you are in Input mode(page 174). As you enter a command, if you discover an error before you pressRETURN, you can press ESCAPE to switch to vi Command mode. This setup is differentfrom the stand-alone vi(m) editor’s initial mode. While in Command mode you canuse many vi(m) commands to edit the command line. It is as though you were usingvi(m) to edit a copy of the history file with a screen that has room for only one com-mand. When you use the k command or the UP ARROW to move up a line, you accessthe previous command. If you then use the j command or the DOWN ARROW to movedown a line, you will return to the original command. To use the k and j keys tomove between commands you must be in Command mode; you can use the ARROW
keys in both Command and Input modes.
In addition to cursor-positioning commands, you can use the search-backward (?)command followed by a search string to look back through your history list for themost recent command containing that string. If you have moved back in your historylist, use a forward slash (/) to search forward toward your most recent command.Unlike the search strings in the stand-alone vi(m) editor, these search strings cannot
The stand-alone editor starts in Command mode
tip The stand-alone vim editor starts in Command mode, whereas the command line vi(m) editorstarts in Input mode. If commands display characters and do not work properly, you are in Inputmode. Press ESCAPE and enter the command again.

History 323
contain regular expressions. You can, however, start the search string with a caret (^)to force the shell to locate commands that start with the search string. As in vi(m),pressing n after a successful search looks for the next occurrence of the same string.
You can also access events in the history list by using event numbers. While you arein Command mode (press ESCAPE), enter the event number followed by a G to go tothe command with that event number.
When you use /, ?, or G to move to a command line, you are in Command mode, notInput mode. Now you can edit the command as you like or press RETURN to execute it.
Once the command you want to edit is displayed, you can modify the command lineusing vi(m) Command mode editing commands such as x (delete character), r(replace character), ~ (change case), and . (repeat last change). To change to Inputmode, use an Insert (i, I), Append (a, A), Replace (R), or Change (c, C) command.You do not have to return to Command mode to run a command; simply pressRETURN, even if the cursor is in the middle of the command line.
emacs Editing Mode
Unlike the vi(m) editor, emacs is modeless. You need not switch between Commandmode and Input mode because most emacs commands are control characters,allowing emacs to distinguish between input and commands. Like vi(m), the emacscommand line editor provides commands for moving the cursor on the commandline and through the command history list and for modifying part or all of a com-mand. The emacs command line editor commands differ in a few cases from thecommands in the stand-alone emacs editor.
In emacs you perform cursor movement by using both CONTROL and ESCAPE commands.To move the cursor one character backward on the command line, press CONTROL-B.Press CONTROL-F to move one character forward. As in vi, you may precede these move-ments with counts. To use a count you must first press ESCAPE; otherwise, the num-bers you type will appear on the command line.
Like vi(m), emacs provides word and line movement commands. To move backwardor forward one word on the command line, press ESCAPE b or ESCAPE f. To move severalwords by using a count, press ESCAPE followed by the number and the appropriateescape sequence. To get to the beginning of the line, press CONTROL-A; to the end of theline, press CONTROL-E; and to the next instance of the character c, press CONTROL-X CONTROL-F
followed by c.
You can add text to the command line by moving the cursor to the correct place andtyping the desired text. To delete text, move the cursor just to the right of the char-acters that you want to delete and press the erase key (page 137) once for each char-acter you want to delete.
CONTROL-D can terminate your screen session
tip If you want to delete the character directly under the cursor, press CONTROL-D. If you enter CONTROL-Dat the beginning of the line, it may terminate your shell session.

324 Chapter 9 The Bourne Again Shell
If you want to delete the entire command line, type the line kill character(page 138). You can type this character while the cursor is anywhere in the com-mand line. If you want to delete from the cursor to the end of the line, use CONTROL-K.
Readline Completion Commands
You can use the TAB key to complete words you are entering on the command line.This facility, called completion, works in both vi and emacs editing modes. Severaltypes of completion are possible, and which one you use depends on which part of acommand line you are typing when you press TAB.
Command Completion
If you are typing the name of a command (the first word on the command line),pressing TAB results in command completion. That is, bash looks for a commandwhose name starts with the part of the word you have typed. If no command startswith what you have entered, bash beeps. If there is one such command, bash com-pletes the command name for you. If there is more than one choice, bash does noth-ing in vi mode and beeps in emacs mode. Pressing TAB a second time causes bash todisplay a list of commands whose names start with the prefix you typed and allowsyou to finish typing the command name.
In the following example, the user types bz and presses TAB. The shell beeps (the useris in emacs mode) to indicate that several commands start with the letters bz. Theuser enters another TAB to cause the shell to display a list of commands that startwith bz followed by the command line as the user had entered it so far:
$ bz → TAB (beep) → TABbzcat bzdiff bzip2 bzlessbzcmp bzgrep bzip2recover bzmore$ bz■
Next the user types c and presses TAB twice. The shell displays the two commandsthat start with bzc. The user types a followed by TAB and the shell then completes thecommand because only one command starts with bzca.
$ bzc → TAB (beep) → TABbzcat bzcmp$ bzca → TAB → t ■
Pathname Completion
Pathname completion, which also uses TABs, allows you to type a portion of a path-name and have bash supply the rest. If the portion of the pathname that you havetyped is sufficient to determine a unique pathname, bash displays that pathname. Ifmore than one pathname would match it, bash completes the pathname up to thepoint where there are choices so that you can type more.
When you are entering a pathname, including a simple filename, and press TAB, theshell beeps (if the shell is in emacs mode—in vi mode there is no beep). It thenextends the command line as far as it can.

History 325
$ cat films/dar → TAB (beep) cat films/dark_■
In the films directory every file that starts with dar has k_ as the next characters, sobash cannot extend the line further without making a choice among files. You areleft with the cursor just past the _ character. At this point you can continue typingthe pathname or press TAB twice. In the latter case bash beeps, displays your choices,redisplays the command line, and again leaves the cursor just after the _ character.
$ cat films/dark_ → TAB (beep) → TABdark_passage dark_victory$ cat films/dark_■
When you add enough information to distinguish between the two possible files andpress TAB, bash displays the unique pathname. If you enter p followed by TAB after the_ character, the shell completes the command line:
$ cat films/dark_p → TAB → assage
Because there is no further ambiguity, the shell appends a SPACE so you can finish typ-ing the command line or just press RETURN to execute the command. If the completepathname is that of a directory, bash appends a slash (/) in place of a SPACE.
Variable Completion
When typing a variable name, pressing TAB results in variable completion, wherebash tries to complete the name of the variable. In case of an ambiguity, pressing TAB
twice displays a list of choices:
$ echo $HO → TAB → TAB$HOME $HOSTNAME $HOSTTYPE$ echo $HOM → TAB → E
.inputrc: Configuring Readline
The Bourne Again Shell and other programs that use the Readline Library read thefile specified by the INPUTRC environment variable to obtain initialization infor-mation. If INPUTRC is not set, these programs read the ~/.inputrc file. They ignorelines of .inputrc that are blank or that start with a pound sign (#).
Variables
You can set variables in .inputrc to control the behavior of the Readline Libraryusing the following syntax:
set variable value
Table 9-11 lists some variables and values you can use. See Readline Variables in thebash man or info page for a complete list.
Pressing RETURN executes the command
caution Pressing RETURN causes the shell to execute the command regardless of where the cursor is onthe command line.

326 Chapter 9 The Bourne Again Shell
Key Bindings
You can specify bindings that map keystroke sequences to Readline commands,allowing you to change or extend the default bindings. As in emacs, the ReadlineLibrary includes many commands that are not bound to a keystroke sequence. Touse an unbound command, you must map it using one of the following forms:
keyname: command_name"keystroke_sequence": command_name
In the first form, you spell out the name for a single key. For example, CONTROL-U wouldbe written as control-u. This form is useful for binding commands to single keys.
In the second form, you specify a string that describes a sequence of keys that willbe bound to the command. You can use the emacs-style backslash escape sequencesto represent the special keys CONTROL (\C), META (\M), and ESCAPE (\e). Specify a back-slash by escaping it with another backslash: \\. Similarly, a double or single quota-tion mark can be escaped with a backslash: \" or \'.
The kill-whole-line command, available in emacs mode only, deletes the currentline. Put the following command in .inputrc to bind the kill-whole-line command(which is unbound by default) to the keystroke sequence CONTROL-R.
control-r: kill-whole-line
bind Give the command bind –P to display a list of all Readline commands. If a com-mand is bound to a key sequence, that sequence is shown. Commands you can usein vi mode start with vi. For example, vi-next-word and vi-prev-word move the cur-sor to the beginning of the next and previous words, respectively. Commands thatdo not begin with vi are generally available in emacs mode.
Use bind –q to determine which key sequence is bound to a command:
Table 9-11 Readline variables
Variable Effect
editing-mode Set to vi to start Readline in vi mode. Set to emacs to startReadline in emacs mode (the default). Similar to the set –o viand set –o emacs shell commands (page 322).
horizontal-scroll-mode Set to on to cause long lines to extend off the right edge of thedisplay area. Moving the cursor to the right when it is at theright edge of the display area shifts the line to the left so you cansee more of the line. You can shift the line back by moving thecursor back past the left edge. The default value is off, whichcauses long lines to wrap onto multiple lines of the display.
mark-directories Set to off to cause Readline not to place a slash (/) at the end ofdirectory names it completes. Normally it is on.
mark-modified-lines Set to on to cause Readline to precede modified history lineswith an asterisk. The default value is off.

History 327
$ bind -q kill-whole-linekill-whole-line can be invoked via "\C-r".
You can also bind text by enclosing it within double quotation marks (emacsmode only):
"QQ": "The Linux Operating System"
This command causes bash to insert the string The Linux Operating System whenyou type QQ.
Conditional Constructs
You can conditionally select parts of the .inputrc file using the $if directive. Thesyntax of the conditional construct is
$if test[=value]commands
[$elsecommands]
$endif
where test is mode, term, or bash. If test equals value or if test is true, this structureexecutes the first set of commands. If test does not equal value or if test is false, itexecutes the second set of commands if they are present or exits from the structureif they are not present.
The power of the $if directive lies in the three types of tests it can perform.
1. You can test to see which mode is currently set.
$if mode=vi
The preceding test is true if the current Readline mode is vi and false other-wise. You can test for vi or emacs.
2. You can test the type of terminal.
$if term=xterm
The preceding test is true if the TERM variable is set to xterm. You can test for any value of TERM.
3. You can test the application name.
$if bash
The preceding test is true when you are running bash and not another pro-gram that uses the Readline Library. You can test for any application name.
These tests can customize the Readline Library based on the current mode, the typeof terminal, and the application you are using. They give you a great deal of powerand flexibility when using the Readline Library with bash and other programs.

328 Chapter 9 The Bourne Again Shell
The following commands in .inputrc cause CONTROL-Y to move the cursor to the begin-ning of the next word regardless of whether bash is in vi or emacs mode:
$ cat ~/.inputrcset editing-mode vi$if mode=vi "\C-y": vi-next-word $else "\C-y": forward-word$endif
Because bash reads the preceding conditional construct when it is started, you mustset the editing mode in .inputrc. Changing modes interactively using set will notchange the binding of CONTROL-Y.
For more information on the Readline Library, open the bash man page and give thecommand /^READLINE, which searches for the word READLINE at the beginningof a line.
Aliases
An alias is a (usually short) name that the shell translates into another (usuallylonger) name or (complex) command. Aliases allow you to define new commandsby substituting a string for the first token of a simple command. They are typicallyplaced in the ~/.bashrc startup files so that they are available to interactive sub-shells.
The syntax of the alias builtin is
alias [name[=value]]
No SPACEs are permitted around the equal sign. If value contains SPACEs or TABs, youmust enclose value between quotation marks. An alias does not accept an argumentfrom the command line in value. Use a function (page 331) when you need to usean argument.
An alias does not replace itself, which avoids the possibility of infinite recursion inhandling an alias such as the following:
$ alias ls='ls -F'
You can nest aliases. Aliases are disabled for noninteractive shells (that is, shellscripts). To see a list of the current aliases, give the command alias. To view the aliasfor a particular name, use alias followed by the name and nothing else. You can usethe unalias builtin to remove an alias.
If Readline commands do not work, log out and log in again
tip The Bourne Again Shell reads ~/.inputrc when you log in. After you make changes to this file, youmust log out and log in again before the changes take effect.

Aliases 329
When you give an alias builtin command without any arguments, the shell displaysa list of all defined aliases:
$ aliasalias ll='ls -l'alias l='ls -ltr'alias ls='ls -F'alias zap='rm -i'
Ubuntu Linux defines some aliases. Give an alias command to see which aliasesare in effect. You can delete the aliases you do not want from the appropriatestartup file.
Single Versus Double Quotation Marks in Aliases
The choice of single or double quotation marks is significant in the alias syntaxwhen the alias includes variables. If you enclose value within double quotationmarks, any variables that appear in value are expanded when the alias is created. Ifyou enclose value within single quotation marks, variables are not expanded untilthe alias is used. The following example illustrates the difference.
The PWD keyword variable holds the pathname of the working directory. Alex cre-ates two aliases while he is working in his home directory. Because he uses doublequotation marks when he creates the dirA alias, the shell substitutes the value of theworking directory when he creates this alias. The alias dirA command displays thedirA alias and shows that the substitution has already taken place:
$ echo $PWD/home/alex$ alias dirA="echo Working directory is $PWD"$ alias dirAalias dirA='echo Working directory is /home/alex'
When Alex creates the dirB alias, he uses single quotation marks, which prevent theshell from expanding the $PWD variable. The alias dirB command shows that thedirB alias still holds the unexpanded $PWD variable:
$ alias dirB='echo Working directory is $PWD'$ alias dirBalias dirB='echo Working directory is $PWD'
After creating the dirA and dirB aliases, Alex uses cd to make cars his workingdirectory and gives each of the aliases as commands. The alias that he created withdouble quotation marks displays the name of the directory that he created the aliasin as the working directory (which is wrong) and the dirB alias displays the propername of the working directory:
$ cd cars$ dirAWorking directory is /home/alex$ dirBWorking directory is /home/alex/cars

330 Chapter 9 The Bourne Again Shell
Examples of Aliases
The following alias allows you to type r to repeat the previous command or r abc torepeat the last command line that began with abc:
$ alias r='fc -s'
If you use the command ls –ltr frequently, you can create an alias that substitutes ls–ltr when you give the command l:
$ alias l='ls -ltr'$ ltotal 41-rw-r--r-- 1 alex group 30015 Mar 1 2007 flute.ps-rw-r----- 1 alex group 3089 Feb 11 2008 XTerm.ad-rw-r--r-- 1 alex group 641 Apr 1 2008 fixtax.icn-rw-r--r-- 1 alex group 484 Apr 9 2008 maptax.icndrwxrwxr-x 2 alex group 1024 Aug 9 17:41 Tigerdrwxrwxr-x 2 alex group 1024 Sep 10 11:32 testdir-rwxr-xr-x 1 alex group 485 Oct 21 08:03 floordrwxrwxr-x 2 alex group 1024 Oct 27 20:19 Test_Emacs
Another common use of aliases is to protect yourself from mistakes. The following exam-ple substitutes the interactive version of the rm utility when you give the command zap:
$ alias zap='rm -i'$ zap f*rm: remove 'fixtax.icn'? nrm: remove 'flute.ps'? nrm: remove 'floor'? n
The –i option causes rm to ask you to verify each file that would be deleted, to helpyou avoid accidentally deleting the wrong file. You can also alias rm with the rm –icommand: alias rm='rm –i'.
The aliases in the next example cause the shell to substitute ls –l each time you givean ll command and ls –F when you use ls:
$ alias ls='ls -F'$ alias ll='ls -l'$ lltotal 41drwxrwxr-x 2 alex group 1024 Oct 27 20:19 Test_Emacs/drwxrwxr-x 2 alex group 1024 Aug 9 17:41 Tiger/-rw-r----- 1 alex group 3089 Feb 11 2008 XTerm.ad-rw-r--r-- 1 alex group 641 Apr 1 2008 fixtax.icn-rw-r--r-- 1 alex group 30015 Mar 1 2007 flute.ps-rwxr-xr-x 1 alex group 485 Oct 21 08:03 floor*-rw-r--r-- 1 alex group 484 Apr 9 2008 maptax.icndrwxrwxr-x 2 alex group 1024 Sep 10 11:32 testdir/
How to prevent the shell from invoking an alias
tip The shell checks only simple, unquoted commands to see if they are aliases. Commands given asrelative or absolute pathnames and quoted commands are not checked. When you want to give acommand that has an alias but do not want to use the alias, precede the command with a back-slash, specify the command’s absolute pathname, or give the command as ./command.

Functions 331
The –F option causes ls to print a slash (/) at the end of directory names and anasterisk (*) at the end of the names of executable files. In this example, the stringthat replaces the alias ll (ls –l) itself contains an alias (ls). When it replaces an aliaswith its value, the shell looks at the first word of the replacement string to seewhether it is an alias. In the preceding example, the replacement string contains thealias ls, so a second substitution occurs to produce the final command ls –F –l. (Toavoid a recursive plunge, the ls in the replacement text, although an alias, is notexpanded a second time.)
When given a list of aliases without the =value or value field, the alias builtinresponds by displaying the value of each defined alias. The alias builtin reports anerror if an alias has not been defined:
$ alias ll l ls zap wxalias ll='ls -l'alias l='ls -ltr'alias ls='ls -F'alias zap='rm -i'bash: alias: wx: not found
You can avoid alias substitution by preceding the aliased command with a backslash (\):
$ \lsTest_Emacs XTerm.ad flute.ps maptax.icnTiger fixtax.icn floor testdir
Because the replacement of an alias name with the alias value does not change the rest ofthe command line, any arguments are still received by the command that gets executed:
$ ll f*-rw-r--r-- 1 alex group 641 Apr 1 2008 fixtax.icn-rw-r--r-- 1 alex group 30015 Mar 1 2007 flute.ps-rwxr-xr-x 1 alex group 485 Oct 21 08:03 floor*
You can remove an alias with the unalias builtin. When the zap alias is removed, it is nolonger displayed with the alias builtin and its subsequent use results in an error message:
$ unalias zap$ aliasalias ll='ls -l'alias l='ls -ltr'alias ls='ls -F'$ zap maptax.icnbash: zap: command not found
Functions
A shell function is similar to a shell script in that it stores a series of commands forexecution at a later time. However, because the shell stores a function in the com-puter’s main memory (RAM) instead of in a file on the disk, the shell can access itmore quickly than the shell can access a script. The shell also preprocesses (parses) afunction so that it starts up more quickly than a script. Finally the shell executes a

332 Chapter 9 The Bourne Again Shell
shell function in the same shell that called it. If you define too many functions, theoverhead of starting a subshell (as when you run a script) can become unacceptable.
You can declare a shell function in the ~/.bash_profile startup file, in the script thatuses it, or directly from the command line. You can remove functions with the unsetbuiltin. The shell does not keep functions once you log out.
The syntax that declares a shell function is
[function] function-name (){
commands}
where the word function is optional, function-name is the name you use to call thefunction, and commands comprise the list of commands the function executes whenyou call it. The commands can be anything you would include in a shell script,including calls to other functions.
The first brace ({) can appear on the same line as the function name. Aliases andvariables are expanded when a function is read, not when it is executed. You canuse the break statement (page 418) within a function to terminate its execution.
Shell functions are useful as a shorthand as well as to define special commands. Thefollowing function starts a process named process in the background, with the out-put normally displayed by process being saved in .process.out:
start_process() {process > .process.out 2>&1 &}
The next example shows how to create a simple function that displays the date, aheader, and a list of the people who are using the system. This function runs thesame commands as the whoson script described on page 283. In this example thefunction is being entered from the keyboard. The greater-than (>) signs are second-ary shell prompts (PS2); do not enter them.
$ function whoson ()> {> date> echo "Users Currently Logged On"> who> }
$ whosonSun Aug 5 15:44:58 PDT 2007Users Currently Logged Onhls console Aug 4 08:59 (:0)alex pts/4 Aug 4 09:33 (0.0)jenny pts/7 Aug 4 09:23 (bravo.example.com)
Removing variables and functionstip If you have a shell variable and a function with the same name, using unset removes the shell
variable. If you then use unset again with the same name, it removes the function.

Functions 333
Functions instartup files
If you want to have the whoson function always be available without having toenter it each time you log in, put its definition in ~/.bash_profile. Then run.bash_profile, using the . (dot) command to put the changes into effect immediately:
$ cat ~/.bash_profileexport TERM=vt100stty kill '^u'whoson (){
dateecho "Users Currently Logged On"who
}$ . ~/.bash_profile
You can specify arguments when you call a function. Within the function thesearguments are available as positional parameters (page 438). The following exam-ple shows the arg1 function entered from the keyboard.
$ arg1 ( ) {> echo "$1"> }
$ arg1 first_argfirst_arg
See the function switch () on page 279 for another example of a function. “Func-tions” on page 435 discusses the use of local and global variables within a function.
optional The following function allows you to export variables using tcsh syntax. The envbuiltin lists all environment variables and their values and verifies that setenvworked correctly:
$ cat .bash_profile...# setenv - keep tcsh users happyfunction setenv(){
if [ $# -eq 2 ]then
eval $1=$2export $1
elseecho "Usage: setenv NAME VALUE" 1>&2
fi}$ . ~/.bash_profile$ setenv TCL_LIBRARY /usr/local/lib/tcl$ env | grep TCL_LIBRARYTCL_LIBRARY=/usr/local/lib/tcl
eval The $# special parameter (page 439) takes on the value of the number of commandline arguments. This function uses the eval builtin to force bash to scan the com-mand $1=$2 twice. Because $1=$2 begins with a dollar sign ($), the shell treats the

334 Chapter 9 The Bourne Again Shell
entire string as a single token—a command. With variable substitution performed,the command name becomes TCL_LIBRARY=/usr/local/lib/tcl, which results in anerror. Using eval, a second scanning splits the string into the three desired tokens,and the correct assignment occurs.
Controlling bash Features and Options
This section explains how to control bash features and options using command lineoptions and the set and shopt builtins.
Command Line Options
Two kinds of command line options are available: short and long. Short optionsconsist of a hyphen followed by a letter; long options have two hyphens followed bymultiple characters. Long options must appear before short options on a commandline that calls bash. Table 9-12 lists some commonly used command line options.
Shell Features
You can control the behavior of the Bourne Again Shell by turning features on andoff. Different features use different methods to turn features on and off. The set
Table 9-12 Command line options
Option Explanation Syntax
Help Displays a usage message. ––help
No edit Prevents users from using the Readline Library (page 322) to edit command lines in an interactive shell.
––noediting
No profile Prevents reading these startup files (page 277): /etc/profile, ~/.bash_profile, ~/.bash_login, and ~/.profile.
––noprofile
No rc Prevents reading the ~/.bashrc startup file (page 277). This option is on by default if the shell is called as sh.
––norc
POSIX Runs bash in POSIX mode. ––posix
Version Displays bash version information and exits. ––version
Login Causes bash to run as though it were a login shell. –l (lowercase “l”)
shopt Runs a shell with the opt shopt option (page 335). A –O (uppercase “O”) sets the option; +O unsets it.
[±]O [opt]
End of options On the command line, signals the end of options. Subsequent tokens are treated as arguments even if they begin with a hyphen (–).
––

Controlling bash Features and Options 335
builtin controls one group of features, while the shopt builtin controls another group.You can also control many features from the command line you use to call bash.
set ±o: Turns Shell Features On and Off
The set builtin, when used with the –o or +o option, enables, disables, and lists cer-tain bash features. For example, the following command turns on the noclobber fea-ture (page 231):
$ set -o noclobber
You can turn this feature off (the default) by giving the command
$ set +o noclobber
The command set –o without an option lists each of the features controlled by set fol-lowed by its state (on or off). The command set +o without an option lists the samefeatures in a form that you can use as input to the shell. Table 9-13 lists bash features.
shopt: Turns Shell Features On and Off
The shopt (shell option) builtin enables, disables, and lists certain bash features thatcontrol the behavior of the shell. For example, the following command causes bashto include filenames that begin with a period (.) when it expands ambiguous file ref-erences (the –s stands for set):
$ shopt -s dotglob
You can turn this feature off (the default) by giving the command (the –u stands for unset)
$ shopt -u dotglob
The shell displays how a feature is set if you give the name of the feature as the onlyargument to shopt:
$ shopt dotglobdotglob off
The command shopt without any options or arguments lists the features controlledby shopt and their state. The command shopt –s without an argument lists the fea-tures controlled by shopt that are set or on. The command shopt –u lists the featuresthat are unset or off. Table 9-13 lists bash features.
Features, options, variables?tip To avoid confusing terminology, this book refers to the various shell behaviors that you can control
as features. The bash info page refers to them as “options” and “values of variables controllingoptional shell behavior.”
Setting set ±o features using shopt
tip You can use shopt to set/unset features that are otherwise controlled by set ±o. Use the regularshopt syntax with –s or –u and include the –o option. For example, the following command turnson the noclobber feature:
$ shopt -o -s noclobber

336 Chapter 9 The Bourne Again Shell
Table 9-13 bash features
Feature Description Syntax Alternate syntax
allexport Automatically exports all variables and functions that you create or modify after giving this command.
set –o allexport set –a
braceexpand Causes bash to perform brace expansion (the default; page 340).
set –o braceexpand set –B
cdspell Corrects minor spelling errors in directory names used as arguments to cd.
shopt –s cdspell
cmdhist Saves all lines of a multiline command in the same history entry, adding semicolons as needed.
shopt –s cmdhist
dotglob Causes shell special characters (wildcards; page 239) in an ambiguous file reference to match a leading period in a filename. By default special characters do not to match a leading period. You must always specify the filenames . and .. explicitly because no pattern ever matches them.
shopt –s dotglob
emacs Specifies emacs editing mode for com-mand line editing (the default; page 323).
set –o emacs
errexit Causes bash to exit when a simple com-mand (not a control structure) fails.
set –o errexit set –e
execfail Causes a shell script to continue running when it cannot find the file that is given as an argument to exec. By default a script terminates when exec cannot find the file that is given as its argument.
shopt –s execfail
expand_aliases Causes aliases (page 328) to be expanded (by default it is on for interactive shells and off for noninteractive shells).
shopt –s expand_alias
hashall Causes bash to remember where com-mands it has found using PATH (page 302) are located (default).
set –o hashall set –h
histappend Causes bash to append the history list to the file named by HISTFILE (page 312) when the shell exits. By default bash over-writes this file.
shopt –s histappend
histexpand Causes the history mechanism (which uses exclamation points; page 316) to work (default). Turn this feature off to turn off history expansion.
set –o histexpand set –H

Controlling bash Features and Options 337
history Enable command history (on by default; page 312).
set –o history
ignoreeof Specifies that bash must receive ten EOF characters before it exits. Useful on noisy dial-up lines.
set –o ignoreeof
monitor Enables job control (on by default, page 290).
set –o monitor set –m
nocaseglob Causes ambiguous file references (page 239) to match filenames without regard to case (off by default).
shopt –s nocaseglob
noclobber Helps prevent overwriting files (off by default; page 231).
set –o noclobber set –C
noglob Disables pathname expansion (off by default; page 239).
set –o noglob set –f
notify With job control (page 290) enabled, reports the termination status of back-ground jobs immediately. The default behavior is to display the status just before the next prompt.
set –o notify set –b
nounset Displays an error and exits from a shell script when you use an unset variable in an interactive shell. The default is to display a null value for an unset variable.
set –o nounset set –u
nullglob Causes bash to expand ambiguous file references (page 239) that do not match a filename to a null string. By default bashpasses these file references without expanding them.
shopt –s nullglob
posix Runs bash in POSIX mode. set –o posix
verbose Displays command lines as bash reads them.
set –o verbose set –v
vi Specifies vi editing mode for command line editing (page 322).
set –o vi
xpg_echo Causes the echo builtin to expand back-slash escape sequences without the need for the –e option (page 422).
shopt –s xpg_echo
xtrace Turns on shell debugging (page 408). set –o xtrace set –x
Table 9-13 bash features (continued)

338 Chapter 9 The Bourne Again Shell
Processing the Command Line
Whether you are working interactively or running a shell script, bash needs to reada command line before it can start processing it—bash always reads at least one linebefore processing a command. Some bash builtins, such as if and case, as well asfunctions and quoted strings, span multiple lines. When bash recognizes a commandthat covers more than one line, it reads the entire command before processing it. Ininteractive sessions bash prompts you with the secondary prompt (PS2, > by default;page 305) as you type each line of a multiline command until it recognizes the endof the command:
$ echo 'hi> end'hiend$ function hello () {> echo hello there> }$
After reading a command line, bash applies history expansion and alias substitutionto the line.
History Expansion
“Reexecuting and Editing Commands” on page 314 discusses the commands youcan give to modify and reexecute command lines from the history list. Historyexpansion is the process that bash uses to turn a history command into an execut-able command line. For example, when you give the command !!, history expansionchanges that command line so it is the same as the previous one. History expansionis turned on by default for interactive shells; set +o histexpand turns it off. Historyexpansion does not apply to noninteractive shells (shell scripts).
Alias Substitution
Aliases (page 328) substitute a string for the first word of a simple command. Bydefault aliases are turned on for interactive shells and off for noninteractive shells.Give the command shopt –u expand_aliases to turn aliases off.
Parsing and Scanning the Command Line
After processing history commands and aliases, bash does not execute the commandimmediately. One of the first things the shell does is to parse (isolate strings of charac-ters in) the command line into tokens or words. The shell then scans each token forspecial characters and patterns that instruct the shell to take certain actions. Theseactions can involve substituting one word or words for another. When the shell parsesthe following command line, it breaks it into three tokens (cp, ~/letter, and .):
$ cp ~/letter .

Processing the Command Line 339
After separating tokens and before executing the command, the shell scans thetokens and performs command line expansion.
Command Line Expansion
In both interactive and noninteractive use, the shell transforms the command lineusing command line expansion before passing the command line to the programbeing called. You can use a shell without knowing much about command lineexpansion, but you can use what a shell has to offer to a better advantage with anunderstanding of this topic. This section covers Bourne Again Shell command lineexpansion.
The Bourne Again Shell scans each token for the various types of expansion andsubstitution in the following order. Most of these processes expand a word into asingle word. Only brace expansion, word splitting, and pathname expansion canchange the number of words in a command (except for the expansion of the vari-able "$@"—page 440).
1. Brace expansion (page 340)
2. Tilde expansion (page 341)
3. Parameter and variable expansion (page 342)
4. Arithmetic expansion (page 342)
5. Command substitution (page 344)
6. Word splitting (page 345)
7. Pathname expansion (page 345)
8. Process substitution (page 347)
Quote removal After bash finishes with the preceding list, it removes from the command line singlequotation marks, double quotation marks, and backslashes that are not a result ofan expansion. This process is called quote removal.
Order of Expansion
The order in which bash carries out these steps affects the interpretation of com-mands. For example, if you set a variable to a value that looks like the instructionfor output redirection and then enter a command that uses the variable’s value toperform redirection, you might expect bash to redirect the output.
$ SENDIT="> /tmp/saveit"$ echo xxx $SENDITxxx > /tmp/saveit$ cat /tmp/saveitcat: /tmp/saveit: No such file or directory
In fact, the shell does not redirect the output—it recognizes input and output redi-rection before it evaluates variables. When it executes the command line, the shellchecks for redirection and, finding none, evaluates the SENDIT variable. After

340 Chapter 9 The Bourne Again Shell
replacing the variable with > /tmp/saveit, bash passes the arguments to echo, whichdutifully copies its arguments to standard output. No /tmp/saveit file is created.
The following sections provide more detailed descriptions of the steps involved incommand processing. Keep in mind that double and single quotation marks causethe shell to behave differently when performing expansions. Double quotationmarks permit parameter and variable expansion but suppress other types of expan-sion. Single quotation marks suppress all types of expansion.
Brace Expansion
Brace expansion, which originated in the C Shell, provides a convenient way tospecify filenames when pathname expansion does not apply. Although brace expan-sion is almost always used to specify filenames, the mechanism can be used to gen-erate arbitrary strings; the shell does not attempt to match the brace notation withthe names of existing files.
Brace expansion is turned on in interactive and noninteractive shells by default; youcan turn it off with set +o braceexpand. The shell also uses braces to isolate variablenames (page 298).
The following example illustrates how brace expansion works. The ls commanddoes not display any output because there are no files in the working directory. Theecho builtin displays the strings that the shell generates with brace expansion. In thiscase the strings do not match filenames (there are no files in the working directory.)
$ ls$ echo chap_{one,two,three}.txtchap_one.txt chap_two.txt chap_three.txt
The shell expands the comma-separated strings inside the braces in the echo com-mand into a SPACE-separated list of strings. Each string from the list is prependedwith the string chap_, called the preamble, and appended with the string .txt, calledthe postscript. Both the preamble and the postscript are optional. The left-to-rightorder of the strings within the braces is preserved in the expansion. For the shell totreat the left and right braces specially and for brace expansion to occur, at least onecomma and no unquoted whitespace characters must be inside the braces. You cannest brace expansions.
Brace expansion is useful when there is a long preamble or postscript. The follow-ing example copies the four files main.c, f1.c, f2.c, and tmp.c located in the/usr/local/src/C directory to the working directory:
$ cp /usr/local/src/C/{main,f1,f2,tmp}.c .
You can also use brace expansion to create directories with related names:
$ ls -Ffile1 file2 file3$ mkdir vrs{A,B,C,D,E}$ ls -Ffile1 file2 file3 vrsA/ vrsB/ vrsC/ vrsD/ vrsE/

Processing the Command Line 341
The –F option causes ls to display a slash (/) after a directory and an asterisk (*)after an executable file.
If you tried to use an ambiguous file reference instead of braces to specify the direc-tories, the result would be different (and not what you wanted):
$ rmdir vrs*$ mkdir vrs[A-E]$ ls -Ffile1 file2 file3 vrs[A-E]/
An ambiguous file reference matches the names of existing files. Because it found nofilenames matching vrs[A–E], bash passed the ambiguous file reference to mkdir,which created a directory with that name. Page 241 has a discussion of brackets inambiguous file references.
Tilde Expansion
Chapter 6 showed a shorthand notation to specify your home directory or the homedirectory of another user. This section provides a more detailed explanation of tildeexpansion.
The tilde (~) is a special character when it appears at the start of a token on a com-mand line. When it sees a tilde in this position, bash looks at the following string ofcharacters—up to the first slash (/) or to the end of the word if there is no slash—asa possible username. If this possible username is null (that is, if the tilde appears asa word by itself or if it is immediately followed by a slash), the shell substitutes thevalue of the HOME variable for the tilde. The following example demonstrates thisexpansion, where the last command copies the file named letter from Alex’s homedirectory to the working directory:
$ echo $HOME/home/alex$ echo ~/home/alex$ echo ~/letter/home/alex/letter$ cp ~/letter .
If the string of characters following the tilde forms a valid username, the shell sub-stitutes the path of the home directory associated with that username for the tildeand name. If it is not null and not a valid username, the shell does not make anysubstitution:
$ echo ~jenny/home/jenny$ echo ~root/root$ echo ~xx~xx

342 Chapter 9 The Bourne Again Shell
Tildes are also used in directory stack manipulation (page 292). In addition, ~+ is asynonym for PWD (the name of the working directory), and ~– is a synonym forOLDPWD (the name of the previous working directory).
Parameter and Variable Expansion
On a command line a dollar sign ($) that is not followed by an open parenthesisintroduces parameter or variable expansion. Parameters include command line, orpositional, parameters (page 438) and special parameters (page 436). Variablesinclude user-created variables (page 296) and keyword variables (page 301). Thebash man and info pages do not make this distinction, however.
Parameters and variables are not expanded if they are enclosed within single quotationmarks or if the leading dollar sign is escaped (preceded with a backslash). If they areenclosed within double quotation marks, the shell expands parameters and variables.
Arithmetic Expansion
The shell performs arithmetic expansion by evaluating an arithmetic expression andreplacing it with the result. Under bash the syntax for arithmetic expansion is
$((expression))
The shell evaluates expression and replaces $((expression)) with the result of theevaluation. This syntax is similar to the syntax used for command substitution[$(...)] and performs a parallel function. You can use $((expression)) as an argumentto a command or in place of any numeric value on a command line.
The rules for forming expression are the same as those found in the C programminglanguage; all standard C arithmetic operators are available (see Table 11-8 onpage 461). Arithmetic in bash is done using integers. Unless you use variables oftype integer (page 301) or actual integers, however, the shell must convert string-valued variables to integers for the purpose of the arithmetic evaluation.
You do not need to precede variable names within expression with a dollar sign ($).In the following example, an arithmetic expression determines how many years areleft until age 60:
$ cat age_check#!/bin/bashecho -n "How old are you? "read ageecho "Wow, in $((60-age)) years, you'll be 60!"
$ age_checkHow old are you? 55Wow, in 5 years, you'll be 60!
You do not need to enclose the expression within quotation marks because bashdoes not perform filename expansion on it. This feature makes it easier for you touse an asterisk (*) for multiplication, as the following example shows:

Processing the Command Line 343
$ echo There are $((60*60*24*365)) seconds in a non-leap year.There are 31536000 seconds in a non-leap year.
The next example uses wc, cut, arithmetic expansion, and command substitution toestimate the number of pages required to print the contents of the file letter.txt. Theoutput of the wc (word count) utility used with the –l option is the number of linesin the file, in columns 1 through 4, followed by a SPACE and the name of the file (thefirst command following). The cut utility with the –c1–4 option extracts the firstfour columns.
$ wc -l letter.txt351 letter.txt$ wc -l letter.txt | cut -c1-4351
The dollar sign and single parenthesis instruct the shell to perform command substi-tution; the dollar sign and double parentheses indicate arithmetic expansion:
$ echo $(( $(wc -l letter.txt | cut -c1-4)/66 + 1))6
The preceding example sends standard output from wc to standard input of cut viaa pipe. Because of command substitution, the output of both commands replacesthe commands between the $( and the matching ) on the command line. Arith-metic expansion then divides this number by 66, the number of lines on a page. A1 is added at the end because the integer division results in any remainder beingdiscarded.
Another way to get the same result without using cut is to redirect the input to wcinstead of having wc get its input from a file you name on the command line. Whenyou redirect its input, wc does not display the name of the file:
$ wc -l < letter.txt 351
It is common practice to assign the result of arithmetic expansion to a variable:
$ numpages=$(( $(wc -l < letter.txt)/66 + 1))
let builtin The let builtin evaluates arithmetic expressions just as the $(( )) syntax does. Thefollowing command is equivalent to the preceding one:
$ let "numpages=$(wc -l < letter.txt)/66 + 1"
Fewer dollar signs ($)
tip When you use variables within $(( and )), the dollar signs that precede individual variable refer-ences are optional:
$ x=23 y=37$ echo $((2*$x + 3*$y))157$ echo $((2*x + 3*y))157

344 Chapter 9 The Bourne Again Shell
The double quotation marks keep the SPACEs (both those you can see and those thatresult from the command substitution) from separating the expression into separatearguments to let. The value of the last expression determines the exit status of let. Ifthe value of the last expression is 0, the exit status of let is 1; otherwise, the exit sta-tus is 0.
You can give multiple arguments to let on a single command line:
$ let a=5+3 b=7+2$ echo $a $b8 9
When you refer to variables when doing arithmetic expansion with let or $(( )), theshell does not require you to begin the variable name with a dollar sign ($). Never-theless, it is a good practice to do so, as in most places you must include this symbol.
Command Substitution
Command substitution replaces a command with the output of that command. Thepreferred syntax for command substitution under bash follows:
$(command)
Under bash you can also use the following syntax:
‘command‘
The shell executes command within a subshell and replaces command, along withthe surrounding punctuation, with standard output of command.
In the following example, the shell executes pwd and substitutes the output of thecommand for the command and surrounding punctuation. Then the shell passes theoutput of the command, which is now an argument, to echo, which displays it.
$ echo $(pwd)/home/alex
The next script assigns the output of the pwd builtin to the variable where and dis-plays a message containing the value of this variable:
$ cat wherewhere=$(pwd)echo "You are using the $where directory."$ whereYou are using the /home/jenny directory.
Although it illustrates how to assign the output of a command to a variable, thisexample is not realistic. You can more directly display the output of pwd withoutusing a variable:
$ cat where2echo "You are using the $(pwd) directory."$ where2You are using the /home/jenny directory.

Processing the Command Line 345
The following command uses find to locate files with the name README in thedirectory tree with its root at the working directory. This list of files is standard out-put of find and becomes the list of arguments to ls.
$ ls -l $(find . -name README -print)
The next command line shows the older ‘command‘ syntax:
$ ls -l ‘find . -name README -print‘
One advantage of the newer syntax is that it avoids the rather arcane rules for tokenhandling, quotation mark handling, and escaped back ticks within the old syntax.Another advantage of the new syntax is that it can be nested, unlike the old syntax.For example, you can produce a long listing of all README files whose sizeexceeds the size of ./README with the following command:
$ ls -l $(find . -name README -size +$(echo $(cat ./README | wc -c)c ) -print )
Try giving this command after giving a set –x command (page 408) to see how bashexpands it. If there is no README file, you just get the output of ls –l.
For additional scripts that use command substitution, see pages 404, 423, and 453.
Word Splitting
The results of parameter and variable expansion, command substitution, and arith-metic expansion are candidates for word splitting. Using each character of IFS(page 305) as a possible delimiter, bash splits these candidates into words or tokens.If IFS is unset, bash uses its default value (SPACE-TAB-NEWLINE). If IFS is null, bash doesnot split words.
Pathname Expansion
Pathname expansion (page 239), also called filename generation or globbing, is theprocess of interpreting ambiguous file references and substituting the appropriatelist of filenames. Unless noglob (page 337) is set, the shell performs this functionwhen it encounters an ambiguous file reference—a token containing any of theunquoted characters *, ?, [, or ]. If bash cannot locate any files that match the spec-ified pattern, the token with the ambiguous file reference is left alone. The shell doesnot delete the token or replace it with a null string but rather passes it to the pro-gram as is (except see nullglob on page 337).
In the first echo command in the following example, the shell expands the ambigu-ous file reference tmp* and passes three tokens (tmp1, tmp2, and tmp3) to echo.The echo builtin displays the three filenames it was passed by the shell. After rm
$(( Versus $(tip The symbols $(( constitute a separate token. They introduce an arithmetic expression, not a com-
mand substitution. Thus, if you want to use a parenthesized subshell (page 289) within $(), youmust insert a SPACE between the $( and the next (.

346 Chapter 9 The Bourne Again Shell
removes the three tmp* files, the shell finds no filenames that match tmp* when ittries to expand it. Thus it passes the unexpanded string to the echo builtin, whichdisplays the string it was passed.
$ lstmp1 tmp2 tmp3$ echo tmp*tmp1 tmp2 tmp3$ rm tmp*$ echo tmp*tmp*
A period that either starts a pathname or follows a slash (/) in a pathname must bematched explicitly unless you have set dotglob (page 336). The option nocaseglob(page 337) causes ambiguous file references to match filenames without regard to case.
Quotation marks Putting double quotation marks around an argument causes the shell to suppresspathname and all other expansion except parameter and variable expansion. Put-ting single quotation marks around an argument suppresses all types of expansion.The second echo command in the following example shows the variable $alexbetween double quotation marks, which allow variable expansion. As a result theshell expands the variable to its value: sonar. This expansion does not occur in thethird echo command, which uses single quotation marks. Because neither single nordouble quotation marks allow pathname expansion, the last two commands displaythe unexpanded argument tmp* .
$ echo tmp* $alextmp1 tmp2 tmp3 sonar$ echo "tmp* $alex"tmp* sonar$ echo 'tmp* $alex'tmp* $alex
The shell distinguishes between the value of a variable and a reference to the vari-able and does not expand ambiguous file references if they occur in the value of avariable. As a consequence you can assign to a variable a value that includes specialcharacters, such as an asterisk (*).
Levels of expansion In the next example, the working directory has three files whose names begin withletter. When you assign the value letter* to the variable var, the shell does notexpand the ambiguous file reference because it occurs in the value of a variable (inthe assignment statement for the variable). No quotation marks surround the stringletter*; context alone prevents the expansion. After the assignment the set builtin(with the help of grep) shows the value of var to be letter*.
The three echo commands demonstrate three levels of expansion. When $var isquoted with single quotation marks, the shell performs no expansion and passes thecharacter string $var to echo, which displays it. When you use double quotationmarks, the shell performs variable expansion only and substitutes the value of the varvariable for its name, preceded by a dollar sign. No pathname expansion is performed

Chapter Summary 347
on this command because double quotation marks suppress it. In the final command,the shell, without the limitations of quotation marks, performs variable substitutionand then pathname expansion before passing the arguments to echo.
$ ls letter*letter1 letter2 letter3$ var=letter*$ set | grep varvar='letter*'$ echo '$var'$var$ echo "$var"letter*$ echo $varletter1 letter2 letter3
Process Substitution
A special feature of the Bourne Again Shell is the ability to replace filename argu-ments with processes. An argument with the syntax <(command) causes commandto be executed and the output written to a named pipe (FIFO). The shell replacesthat argument with the name of the pipe. If that argument is then used as the nameof an input file during processing, the output of command is read. Similarly anargument with the syntax >(command) is replaced by the name of a pipe that com-mand reads as standard input.
The following example uses sort (page 153) with the –m (merge, which works cor-rectly only if the input files are already sorted) option to combine two word listsinto a single list. Each word list is generated by a pipe that extracts words matchinga pattern from a file and sorts the words in that list.
$ sort -m -f <(grep "[^A-Z]..$" memo1 | sort) <(grep ".*aba.*" memo2 |sort)
Chapter Summary
The shell is both a command interpreter and a programming language. As a com-mand interpreter, the shell executes commands you enter in response to its prompt.As a programming language, the shell executes commands from files called shellscripts. When you start a shell, it typically runs one or more startup files.
Running a shellscript
Assuming that the file holding a shell script is in the working directory, there arethree basic ways to execute the shell script from the command line.
1. Type the simple filename of the file that holds the script.
2. Type a relative pathname, including the simple filename preceded by ./.
3. Type bash followed by the name of the file.

348 Chapter 9 The Bourne Again Shell
Technique 1 requires that the working directory be in the PATH variable. Tech-niques 1 and 2 require that you have execute and read permission for the file hold-ing the script. Technique 3 requires that you have read permission for the fileholding the script.
Job control A job is one or more commands connected by pipes. You can bring a job running inthe background into the foreground by using the fg builtin. You can put a fore-ground job into the background by using the bg builtin, provided that you first sus-pend the job by pressing the suspend key (typically CONTROL-Z). Use the jobs builtin tosee which jobs are running or suspended.
Variables The shell allows you to define variables. You can declare and initialize a variable byassigning a value to it; you can remove a variable declaration by using unset. Vari-ables are local to a process unless they are exported using the export builtin to makethem available to child processes. Variables you declare are called user-created vari-ables. The shell also defines called keyword variables. Within a shell script you canwork with the command line (positional) parameters the script was called with.
Process Each process has a unique identification (PID) number and is the execution of a singleLinux command. When you give it a command, the shell forks a new (child) processto execute the command, unless the command is built into the shell (page 243). Whilethe child process is running, the shell is in a state called sleep. By ending a commandline with an ampersand (&), you can run a child process in the background andbypass the sleep state so that the shell prompt returns immediately after you pressRETURN. Each command in a shell script forks a separate process, each of which may inturn fork other processes. When a process terminates, it returns its exit status to itsparent process. An exit status of zero signifies success and nonzero signifies failure.
History The history mechanism, a feature adapted from the C Shell, maintains a list ofrecently issued command lines, also called events, that provides a way to reexecuteprevious commands quickly. There are several ways to work with the history list;one of the easiest is to use a command line editor.
Command lineeditors
When using an interactive Bourne Again Shell, you can edit your command line andcommands from the history file, using either of the Bourne Again Shell’s commandline editors (vi[m] or emacs). When you use the vi(m) command line editor, you startin Input mode, unlike the way you normally enter vi(m). You can switch betweenCommand and Input modes. The emacs editor is modeless and distinguishes com-mands from editor input by recognizing control characters as commands.
Aliases An alias is a name that the shell translates into another name or (complex) com-mand. Aliases allow you to define new commands by substituting a string for thefirst token of a simple command.
Functions A shell function is a series of commands that, unlike a shell script, are parsed priorto being stored in memory so that they run faster than shell scripts. Shell scripts areparsed at runtime and are stored on disk. A function can be defined on the com-mand line or within a shell script. If you want the function definition to remain ineffect across login sessions, you can define it in a startup file. Like the functions of aprogramming language, a shell function is called by giving its name followed by anyarguments.

Exercises 349
Shell features There are several ways to customize the shell’s behavior. You can use options on thecommand line when you call bash and you can use the bash set and shopt builtins toturn features on and off.
Command lineexpansion
When it processes a command line, the Bourne Again Shell may replace some wordswith expanded text. Most types of command line expansion are invoked by theappearance of a special character within a word (for example, a leading dollar signdenotes a variable). See Table 9-6 on page 309 for a list of special characters. Theexpansions take place in a specific order. Following the history and alias expan-sions, the common expansions are parameter and variable expansion, commandsubstitution, and pathname expansion. Surrounding a word with double quotationmarks suppresses all types of expansion except parameter and variable expansion.Single quotation marks suppress all types of expansion, as does quoting (escaping) aspecial character by preceding it with a backslash.
Exercises
1. Explain the following unexpected result:
$ whereis datedate: /bin/date ...$ echo $PATH.:/usr/local/bin:/usr/bin:/bin$ cat > dateecho "This is my own version of date."$ dateTue May 22 11:45:49 PDT 2007
2. What are two ways you can execute a shell script when you do not have execute access permission for the file containing the script? Can you exe-cute a shell script if you do not have read access permission for the file containing the script?
3. What is the purpose of the PATH variable?
a. Set the PATH variable so that it causes the shell to search the following directories in order:
• /usr/local/bin
• /usr/bin
• /bin
• /usr/kerberos/bin
• The bin directory in your home directory
• The working directory
b. If there is a file named doit in /usr/bin and another file with the same name in your ~/bin, which one will be executed? (Assume that you have execute permission for both files.)

350 Chapter 9 The Bourne Again Shell
c. If your PATH variable is not set to search the working directory, how can you execute a program located there?
d. Which command can you use to add the directory /usr/games to the end of the list of directories in PATH?
4. Assume that you have made the following assignment:
$ person=jenny
Give the output of each of the following commands:
a. echo $person
b. echo '$person'
c. echo "$person"
5. The following shell script adds entries to a file named journal-file in your home directory. This script helps you keep track of phone conversations and meetings.
$ cat journal# journal: add journal entries to the file# $HOME/journal-file
file=$HOME/journal-filedate >> $fileecho -n "Enter name of person or group: " read nameecho "$name" >> $fileecho >> $filecat >> $fileecho "----------------------------------------------------" >> $fileecho >> $file
a. What do you have to do to the script to be able to execute it?
b. Why does the script use the read builtin (page 445) the first time it accepts input from the terminal and the cat utility the second time?
6. Assume that the /home/jenny/grants/biblios and /home/jenny/bibliosdirectories exist. Give Jenny’s working directory after she executes each sequence of commands given. Explain what happens in each case.
a.
$ pwd/home/jenny/grants$ CDPATH=$(pwd)$ cd$ cd biblios
b.
$ pwd/home/jenny/grants$ CDPATH=$(pwd)$ cd $HOME/biblios

Advanced Exercises 351
7. Name two ways you can identify the PID number of your login shell.
8. Give the following command:
$ sleep 30 | cat /etc/inittab
Is there any output from sleep? Where does cat get its input from? What has to happen before the shell displays another prompt?
Advanced Exercises
9. Write a sequence of commands or a script that demonstrates that variable expansion occurs before pathname expansion.
10. Write a shell script that outputs the name of the shell that is executing it.
11. Explain the behavior of the following shell script:
$ cat quote_demotwoliner="This is line 1.This is line 2."echo "$twoliner"echo $twoliner
a. How many arguments does each echo command see in this script? Explain.
b. Redefine the IFS shell variable so that the output of the second echo is the same as the first.
12. Add the exit status of the previous command to your prompt so that it behaves similarly to the following:
$ [0] ls xxxls: xxx: No such file or directory$ [1]
13. The dirname utility treats its argument as a pathname and writes to stan-dard output the path prefix—that is, everything up to but not including the last component:
$ dirname a/b/c/da/b/c
If you give dirname a simple filename (no / characters) as an argument, dirname writes a . to standard output:
$ dirname simple.
Implement dirname as a bash function. Make sure that it behaves sensibly when given such arguments as /.

352 Chapter 9 The Bourne Again Shell
14. Implement the basename utility, which writes the last component of its pathname argument to standard output, as a bash function. For example, given the pathname a/b/c/d, basename writes d to standard output:
$ basename a/b/c/dd
15. The Linux basename utility has an optional second argument. If you give the command basename path suffix, basename removes the suffix and the prefix from path:
$ basename src/shellfiles/prog.bash .bashprog$ basename src/shellfiles/prog.bash .cprog.bash
Add this feature to the function you wrote for exercise 14.

353353
10Chapter10The communications facilities linking computers are continuallyimproving, allowing faster and more economical connections.The earliest computers were unconnected stand-alone systems.To transfer information from one system to another, you had tostore it in some form (usually magnetic tape, paper tape, orpunch cards—called IBM or Hollerith cards), carry it to a com-patible system, and read it back in. A notable advance occurredwhen computers began to exchange data over serial lines,although the transfer rate was slow (hundreds of bits per sec-ond). People quickly invented new ways to take advantage ofthis computing power, such as email, news retrieval, and bulletinboard services. With the speed of today’s networks, a piece ofemail can cross the country or even travel halfway around theworld in a few seconds.
Today it would be difficult to find a computer facility that doesnot include a LAN to link its systems. Linux systems are typi-cally attached to an Ethernet (page 1035) network. Wirelessnetworks are also prevalent. Large computer facilities usuallymaintain several networks, often of different types, and almostcertainly have connections to larger networks (companywide orcampuswide and beyond).
In This Chapter
Types of Networks and How They Work. . . . . . . . . . . . . . . . . . 355
Network Protocols. . . . . . . . . . . . . 361
Network Utilities . . . . . . . . . . . . . . 372
ping: Tests a Network Connection. . . . . . . . . . . . . . . . . 375
traceroute: Traces a Route Over the Internet . . . . . . . . . . . . . . . . 376
host and dig: Query Internet Nameservers . . . . . . . . . . . . . . . 378
Distributed Computing . . . . . . . . . 379
Usenet . . . . . . . . . . . . . . . . . . . . . . 388
WWW: World Wide Web . . . . . . . . 390
10
Networking and the
Internet

354 Chapter 10 Networking and the Internet
Internet The Internet is a loosely administered network of networks (an internetwork) thatlinks computers on diverse LANs around the globe. An internet (small i) is a genericnetwork of networks that may share some parts in common with the public Internet.It is the Internet that makes it possible to send an email message to a colleague thou-sands of miles away and receive a reply within minutes. A related term, intranet,refers to the networking infrastructure within a company or other institution. Intra-nets are usually private; access to them from external networks may be limited andcarefully controlled, typically using firewalls (page 359).
Network services Over the past decade many network services have emerged and become standard-ized. On Linux and UNIX systems, special processes called daemons (page 1032)support such services by exchanging specialized messages with other systems overthe network. Several software systems have been created to allow computers toshare filesystems with one another, making it appear as though remote files arestored on local disks. Sharing remote filesystems allows users to share informationwithout knowing where the files physically reside, without making unnecessarycopies, and without learning a new set of utilities to manipulate them. Because thefiles appear to be stored locally, you can use standard utilities (such as cat, vim, lpr,mv, or their graphical counterparts) to work with them.
Developers have created new tools and extended existing ones to take advantage ofhigher network speeds and to work within more crowded networks. The rlogin, rsh,and telnet utilities, which were designed long ago, have largely been supplanted byssh (secure shell, page 707) in recent years. The ssh utility allows a user to log in onor execute commands securely on a remote computer. Users rely on such utilities asscp and ftp to transfer files from one system to another across the network. Commu-nication utilities, including email utilities and chat programs (e.g., talk, Internet RelayChat [IRC], ICQ, and instant messenger [IM] programs, such as AOL’s AIM andgaim) have become so prevalent that many people with very little computer expertiseuse them on a daily basis to keep in touch with friends, family, and colleagues.
Intranet An intranet is a network that connects computing resources at a school, company,or other organization but, unlike the Internet, typically restricts access to internalusers. An intranet is very similar to a LAN (local area network) but is based onInternet technology. An intranet can provide database, email, and Web page accessto a limited group of people, regardless of their geographic location.
The ability of an intranet to connect dissimilar machines is one of its strengths.Think of all the machines you can find on the Internet: Macintosh systems, PCs run-ning different versions of Windows, machines running UNIX and Linux, and so on.Each of these machines can communicate via IP (page 361), a common protocol. Soit is with an intranet: Dissimilar machines can all talk to one another.
Another key difference between the Internet and an intranet is that the Internet trans-mits only one protocol suite: IP. In contrast, an intranet can be set up to use a numberof protocols, such as IP, IPX, AppleTalk, DECnet, XNS, or other protocols developedby vendors over the years. Although these protocols cannot be transmitted directlyover the Internet, you can set up special gateway boxes at remote sites that tunnel orencapsulate these protocols into IP packets and then use the Internet to pass them.

Types of Networks and How They Work 355
You can use an extranet (also called a partner net) or a virtual private network(VPN) to improve security. These terms describe ways to connect remote sitessecurely to a local site, typically by using the public Internet as a carrier andemploying encryption as a means of protecting data in transit.
Following are some terms you may want to become familiar with before you readthe rest of this chapter:
ASP (page 1024) hub (page 1041) packet (page 1051)bridge (page 1026) internet (page 1042) router (page 1058)extranet (page 1036) Internet (page 1042) sneakernet (page 1060)firewall (page 1037) intranet (page 1042) switch (page 1063)gateway (page 1038) ISP (page 1043) VPN (page 1068)
Types of Networks and How They Work
Computers communicate over networks using unique addresses assigned by systemsoftware. A computer message, called a packet, frame, or datagram, includes theaddress of the destination computer and the sender’s return address. The three mostcommon types of networks are broadcast, point-to-point, and switched. Once pop-ular, token-based networks (such as FDDI and token ring) are rarely seen anymore.
Speed is critical to the proper functioning of the Internet. Newer specifications (cat 6and cat 7) are being standardized for 1000BaseT (1 gigabit per second, called gigabitEthernet, or GIG-E) and faster networking. Some of the networks that form thebackbone of the Internet run at speeds of almost 10 gigabits per second (OC192) toaccommodate the ever-increasing demand for network services. Table 10-1 lists someof the specifications in use today.
Table 10-1 Network specifications
Specification Speed
DS0 64 kilobits per second
ISDN Two DS0 lines plus signaling (16 kilobits per second) or 128 kilobits per second
T-1 1.544 megabits per second (24 DS0 lines)
T-3 43.232 megabits per second (28 T-1s)
OC3 155 megabits per second (100 T-1s)
OC12 622 megabits per second (4 OC3s)
OC48 2.5 gigabits per seconds (4 OC12s)
OC192 9.6 gigabits per second (4 OC48s)

356 Chapter 10 Networking and the Internet
Broadcast Networks
On a broadcast network, such as Ethernet, any of the many systems attached to thenetwork cable can send a message at any time; each system examines the address ineach message and responds only to messages addressed to it. A problem occurs on abroadcast network when multiple systems send data at the same time, resulting in acollision of the messages on the cable. When messages collide, they can become gar-bled. The sending system notices the garbled message and resends it after waiting ashort but random amount of time. Waiting a random amount of time helps preventthose same systems from resending the data at the same moment and experiencingyet another collision. The extra traffic that results from collisions can strain the net-work; if the collision rate gets too high, retransmissions may result in more colli-sions. Ultimately the network may become unusable.
Point-to-Point Networks
A point-to-point link does not seem like much of a network because only two end-points are involved. However, most connections to WANs (wide area networks) gothrough point-to-point links, using wire cable, radio, or satellite links. The advan-tage of a point-to-point link is its simplicity: Because only two systems are involved,the traffic on the link is limited and well understood. A disadvantage is that each sys-tem can typically be equipped for only a small number of such links; it is impracticaland costly to establish point-to-point links that connect each computer to all the rest.
Point-to-point links often use serial lines and modems. The combination of amodem with a point-to-point link allows an isolated system to connect inexpen-sively to a larger network.
The most common types of point-to-point links are the ones used to connect to theInternet. When you use DSL1 (digital subscriber line), you are using a point-to-pointlink to connect to the Internet. Serial lines, such as T-1, T-3, ATM links, and ISDN,are all point-to-point. Although it might seem like a point-to-point link, a cablemodem is based on broadcast technology and in that way is similar to Ethernet.
Switched Networks
A switch is a device that establishes a virtual path between source and destinationhosts in such a way that each path appears to be a point-to-point link, much like arailroad roundhouse. The switch creates and tears down virtual paths as hosts seek tocommunicate with each other. Each host thinks it has a direct point-to-point path tothe host it is talking to. Contrast this approach with a broadcast network, where eachhost also sees traffic bound for other hosts. The advantage of a switched networkover a pure point-to-point network is that each host requires only one connection: theconnection to the switch. Using pure point-to-point connections, each host must havea connection to every other host. Scalability is provided by further linking switches.
1. The term DSL incorporates the xDSL suite of technologies, which includes ADSL, XDSL, SDSL, and HDSL.

Types of Networks and How They Work 357
LAN: Local Area Network
Local area networks (LANs) are confined to a relatively small area—a single com-puter facility, building, or campus. Today most LANs run over copper or fiberoptic(glass or plastic) cable, but other wireless technologies, such as infrared (similar tomost television remote control devices) and radio wave (wireless, or Wi-Fi), arebecoming more popular.
If its destination address is not on the local network, a packet must be passed on toanother network by a router (page 358). A router may be a general-purpose com-puter or a special-purpose device attached to multiple networks to act as a gatewayamong them.
Ethernet
A Linux system connected to a LAN usually connects to a network using Ethernet.A typical Ethernet connection can support data transfer rates from 10 megabits persecond to 1 gigabit per second, with further speed enhancements planned for thefuture. As a result of computer load, competing network traffic, and network over-head, file transfer rates on an Ethernet are always slower than the maximum, theo-retical transfer rate.
Cables An Ethernet network transfers data using copper or fiberoptic cable or wireless trans-mitters and receivers. Originally, each computer was attached to a thick coaxial cable(called thicknet) at tap points spaced at six-foot intervals along the cable. The thickcable was awkward to deal with, so other solutions, including a thinner coaxial cablecalled thinnet, or 10Base2,2 were developed. Today most Ethernet connections areeither wireless or made over unshielded twisted pair (referred to as UTP, Category 5[cat 5], Category 5e [cat 5e], Category 6 [cat 6], 10BaseT, or 100BaseT) wire—similarto the type of wire used for telephone lines and serial data communications.
Segment A network segment is a part of a network in which all systems communicate usingthe same physical layer (layer 1) of the IP and OSI models (page 361).
Duplex In half-duplex mode, packets travel in one direction at a time over the cable. In full-duplex mode, packets travel in both directions.
Hub A hub (sometimes called a concentrator) is a device that connects systems so theyare all part of one network segment and share the network bandwidth. Hubs workat the physical layer of the IP and OSI models (layer 1, page 361).
Switch A switch connects network segments. A switch inspects each data packet and learnswhich devices are connected to which of its ports. The switch sorts packets andsends each packet only to the device it is intended for. Because a switch sends pack-ets only to their destination devices, it can conserve network bandwidth and per-form better than a hub. A switch may have buffers for holding and queuing packets.Switches work at the data link layer of the IP and OSI models (layer 2, page 362).
2. Versions of Ethernet are classified as XBaseY, where X is the data rate in megabits per second, Basemeans baseband (as opposed to radio frequency), and Y is the category of cabling.

358 Chapter 10 Networking and the Internet
Some Ethernet switches have enough bandwidth to communicate simultaneously, infull-duplex mode, with all connected devices. A nonswitched (hub-based) broadcastnetwork can run in only half-duplex mode. Full-duplex Ethernet further improvesthings by eliminating collisions. Theoretically, each host on a switched network cantransmit and receive simultaneously at speed of the network (e.g., 100 megabits persecond) for an effective bandwidth between hosts of twice the speed of the network(e.g., 200 megabits per second), depending on the capacity of the switch.
Router A router connects networks. For example, a router can connect a LAN to a WAN(such as the Internet). A router determines which path packets should take to travel toa different network and forwards the packets. Routers work at the network layer ofthe IP and OSI models (layer 3, page 362). The next page covers routers in more depth.
Wireless
Wireless networks are becoming increasingly common. They are found in offices,homes, and public places, such as universities, coffee shops, and airports. Wirelessaccess points provide functionality similar to an Ethernet hub. They allow multipleusers to interact via a common radio frequency spectrum. A wireless, point-to-pointconnection allows you to wander about your home or office with a laptop, using anantenna to link to a LAN or to the Internet via an in-house base station. Linuxincludes drivers for many of the common wireless boards. A wireless access point,or base station, connects a wireless network to a wired network so that no specialprotocol is required for a wireless connection. Refer to page 700 and to the LinuxWireless LAN HOWTO at www.hpl.hp.com/personal/Jean_Tourrilhes/Linux.
WAN: Wide Area Network
A wide area network (WAN) covers a large geographic area. In contrast, the technol-ogies (such as Ethernet) used for LANs were designed to work over limited distancesand for a certain number of host connections. A WAN may span long distances overdedicated data lines (leased from a telephone company) or radio or satellite links.Such networks are often used to interconnect LANs. Major Internet service providersrely on WANs to connect to their customers within a country and around the globe.
MAN Some networks do not fit into either the LAN or the WAN designation. A metropol-itan area network (MAN) is a network that is contained in a smaller geographicarea, such as a city. Like WANs, MANs are typically used to interconnect LANs.
Internetworking Through Gateways and Routers
Gateway A LAN connects to a WAN through a gateway, a generic term for a computer or aspecial device with multiple network connections that passes data from one networkto another. A gateway converts the data traffic from the format used on the LAN tothat used on the WAN. Data that crosses the country from one Ethernet to anotherover a WAN, for example, is repackaged from the Ethernet format to a different for-mat that can be processed by the communications equipment that makes up theWAN backbone. When it reaches the end of its journey over the WAN, the data isconverted by another gateway to a format appropriate for the receiving network. Forthe most part, these details are of concern only to the network administrators; theend user does not need to know anything about how the data transfer takes place.

Types of Networks and How They Work 359
Router A router (page 1058) is the most popular form of gateway. Routers play an impor-tant role in internetworking. Just as you might study a map to plan your route whenyou need to drive to an unfamiliar place, so a computer needs to know how todeliver a message to a system attached to a distant network by passing throughintermediary systems and networks along the way. Although you might envisionusing a giant network road map to choose the route that your data should follow, astatic map of computer routes is usually a poor choice for a large network. Comput-ers and networks along the route you choose may be overloaded or down, withoutproviding a detour for your message.
Routers instead communicate dynamically, keeping each other informed aboutwhich routes are open for use. To extend the analogy, this situation would be likeheading out on a car trip without consulting a map to find a route to your destina-tion; instead you head for a nearby gas station and ask directions. Throughout thejourney you continue to stop at one gas station after another, getting directions ateach to find the next one. Although it would take a while to make the stops, theowner of each gas station would advise you of bad traffic, closed roads, alternativeroutes, and shortcuts.
The stops made by the data are much quicker than those you would make in yourcar, but each message leaves each router on a path chosen based on the most currentinformation. Think of this system as a GPS (global positioning system) setup thatautomatically gets updates at each intersection and tells you where to go next,based on traffic and highway conditions.
Figure 10-1 (next page) shows an example of how LANs might be set up at threesites interconnected by a WAN (the Internet). In this type of network diagram,Ethernet LANs are drawn as straight lines, with devices attached at right angles;WANs are represented as clouds, indicating that the details have been left out; andwireless connections are drawn as zigzag lines with breaks, indicating that the con-nection may be intermittent.
In Figure 10-1, a gateway or a router relays messages between each LAN and theInternet. Three of the routers in the Internet are shown (for example, the one closestto each site). Site A has a server, a workstation, a network computer, and a PC shar-ing a single Ethernet LAN. Site B has an Ethernet LAN that serves a printer andfour Linux workstations. A firewall permits only certain traffic to pass between theInternet router and the site’s local router. Site C has three LANs linked by a singlerouter, perhaps to reduce the traffic load that would result if the LANs were com-bined or to keep workgroups or locations on separate networks. Site C also includesa wireless access point that enables wireless communication with nearby computers.
Firewall
A firewall in a car separates the engine compartment from the passenger compartment,protecting the driver and passengers from engine fires, noise, and fumes. In much thesame way, computer firewalls separate computers from malicious and unwanted users.
A firewall prevents certain types of traffic from entering or leaving a network. Forexample, a firewall might prevent traffic from your IP address from leaving the network

36
0C
ha
pter
10
Netw
or
kin
g a
nd
th
e I
nter
net
Figure 10-1A Slice of the Internet
NC
Network Linux
PC
Personal
W
computer
Ethernet
FirewallRouter
Router 3
Router 1
Router 2
W
W
W
Gateway
PC WPrinter
Ethernet
Ethernet
W
W
Internet
GATEWAY/
W
W W
LegendPC WNC
Site B
Site A
Site C
Ethernet
Printer
Printer
Wireless access
NC
W
workstation
Router
Switch
Server
computer
point
Figure 10-1 A slice of the Internet

Types of Networks and How They Work 361
and prevent anyone except users from selected domains from using FTP to retrieve datafrom the network. The implementations of firewalls vary widely—from Linux machineswith two interfaces (page 1042) running custom software to a router (preceding sec-tion) with simple access lists to esoteric, vendor-supplied firewall appliances. Mostlarger installations have at least one kind of firewall in place. A firewall is often accom-panied by a proxy server/gateway (page 387) that provides an intermediate pointbetween you and the host you are communicating with.
In addition to the firewalls found in multipurpose computers, firewalls are becom-ing increasingly common in consumer appliances. For example, they are built intocable modems, wireless gateways, routers, and stand-alone devices.
Typically a single Linux machine will include a minimal firewall. A small group ofLinux systems may have an inexpensive Linux machine with two network interfacesand packet-filtering software functioning as a dedicated firewall. One of the inter-faces connects to the Internet, modems, and other outside data sources. The otherconnects, normally through a hub or switch, to the local network. Refer toChapter 26 for information on firestarter, iptables, and setting up a firewall and toAppendix C for a discussion of security.
Network Protocols
To exchange information over a network, computers must communicate using a com-mon language, or protocol (page 1054). The protocol determines the format of mes-sage packets. The predominant network protocols used by Linux systems are TCPand IP,3 collectively referred to as TCP/IP (Transmission Control Protocol and Inter-net Protocol). Network services that need highly reliable connections, such as ssh andscp, tend to use TCP/IP. Another protocol used for some system services is UDP (UserDatagram Protocol). Network services that do not require guaranteed delivery, suchas RealAudio and RealVideo, operate satisfactorily with the simpler UDP.4
IP: Internet Protocol
Layering was introduced to facilitate protocol design: Layers distinguish functionaldifferences between adjacent protocols. A grouping of layers can be standardizedinto a protocol model. IP has a model that distinguishes protocol layers. The IPmodel differs from the ISO seven-layer protocol model (also called the OSI model)that is often illustrated in networking textbooks. Specifically IP uses the followingsimplified five-layer model:
1. The first layer of the IP protocol, called the physical layer, describes the physical medium (copper, fiber, wireless) and the data encoding used to
3. All references to IP imply IPv4 (page 1043).
4. Voice and video protocols are delay sensitive, not integrity sensitive. The human ear and eye accept andinterpolate loss in an audio or video stream but cannot deal with variable delay. The guaranteed deliverythat TCP provides introduces a delay on a busy network when packets get retransmitted. This delay is notacceptable for video and audio transmissions, whereas less than 100 percent integrity is acceptable.

362 Chapter 10 Networking and the Internet
transmit signals on that medium (pulses of light, electrical waves, or radio waves, for instance).
2. The second layer, called the data link layer, covers media access by net-work devices and describes how to put data into packets, transmit the data, and check it for errors. Ethernet is found at this layer, as is 802.11(page 1022) wireless.
3. The third layer, called the network layer, frequently uses IP and addresses and routes packets.
4. The fourth layer, called the transport layer, is where TCP and UDP exist. This layer provides a means for applications to communicate with each other. Functions commonly performed by the transport layer include guar-anteed delivery, delivery of packets in the order of their transmission, flow control, error detection, and error correction. The transport layer is respon-sible for dividing data streams into packets. In addition, this layer performs port addressing, which allows it to distinguish among different services using the same transport protocol. Port addressing keeps the data from multiple applications using the same protocol (for example, TCP) separate.
5. Anything above the transport layer is the domain of the application and is part of the fifth layer. Unlike the ISO model, the Internet model does not distinguish among application, presentation, and session layers. All of the upper-layer characteristics, such as character encoding, encryption, and GUIs, are part of the application. Applications choose the transport char-acteristics they require as well as the corresponding transport layer proto-col with which to send and receive data.
TCP: Transmission Control Protocol
TCP is most frequently run on top of IP in a combination referred to as TCP/IP.This protocol provides error recovery and guaranteed delivery in packet transmis-sion order; it also works with multiple ports so that it can handle more than oneapplication. TCP is a connection-oriented protocol (page 1030), also known as astream-based protocol. Once established, a TCP connection looks like a stream ofdata, not individual IP packets. The connection is assumed to remain up and beuniquely addressable. Every piece of information you write to the connectionalways goes to the same destination and arrives in the order it was sent. BecauseTCP is connection oriented and establishes a virtual circuit between two systems,this protocol is not suitable for one-to-many transmissions (see the discussion ofUDP, following). TCP has builtin mechanisms for dealing with congestion (or flow)control over busy networks and throttles back (slows the speed of data flow) whenit has to retransmit dropped packets. TCP can also deal with acknowledgments,wide area links, high-delay links, and other situations.
UDP: User Datagram Protocol
UDP runs at layer 4 of the IP stack, just as TCP does, but is much simpler. Like TCP,UDP works with multiple ports and multiple applications. It has checksums for error

Types of Networks and How They Work 363
detection but does not automatically retransmit datagrams (page 1032) that fail thechecksum test. UDP is a datagram-oriented protocol: Each datagram must carry itsown address and port information. Each router along the way examines each data-gram to determine the destination, one hop at a time. You can broadcast or multicastUDP datagrams to many destinations at the same time by using special addresses.
PPP: Point-to-Point Protocol
PPP provides serial line point-to-point connections that support IP. This protocolcompresses data to make the most of the limited bandwidth available on serial con-nections. PPP, which replaces SLIP5 (Serial Line IP), acts as a point-to-point layer2/3 transport that many other types of protocols can ride on. It is used mostly forIP-based services and connections, such as TCP or UDP.
Xremote and LBX
Two protocols that speed up data transfer over serial lines are Xremote and LBX.Xremote compresses the X Window System protocol so that it is more efficient overslower serial lines. LBX (low-bandwidth X) is based on the Xremote technologyand is part of X Window System release X11R6 and higher.
Host Address
Each computer interface is identified by a unique address, or host number, on itsnetwork. A system attached to more than one network has multiple interfaces—onefor each network, each with a unique address.
Each packet of information that is broadcast over the network has a destinationaddress. All hosts on the network must process each broadcast packet to seewhether it is addressed to that host.6 If the packet is addressed to a given host, thathost continues to process it. If not, the host ignores the packet.
The network address of a machine is an IP address, which, under IPv4, is repre-sented as one number broken into four segments separated by periods (for example,192.168.184.5). Domain names and IP addresses are assigned through a highly dis-tributed system coordinated by ICANN (Internet Corporation for Assigned Namesand Numbers—www.icann.org) via many registrars (see www.internic.net). ICANNis funded by the various domain name registries and registrars and by IP addressregistries, which supply globally unique identifiers for hosts and services on theInternet. Although you may not deal with any of these agencies directly, your Inter-net service provider most assuredly does.
How a company uses IP addresses is determined by the system or network adminis-trator. For example, the leftmost two sets of numbers in an IP address might represent
5. SLIP was one of the first serial line implementations of IP and has slightly less overhead than PPP. PPPsupports multiple protocols (such as AppleTalk and IPX), whereas SLIP supports only IP.
6. Contrast broadcast packets with unicast packets: Ethernet hardware on a computer filters out unicast pack-ets that are not addressed to that machine; the operating system on that machine never sees these packets.

364 Chapter 10 Networking and the Internet
a large network (campuswide or companywide); the third set, a subnetwork (perhapsa department or a single floor in a building); and the rightmost number, an individualcomputer. The operating system uses the address in a different, lower-level form, con-verting it to its binary equivalent, a series of 1s and 0s. See the following optional sec-tion for more information. Refer to “Private address space” on page 697 forinformation about addresses you can use on a LAN without registering them.
Static Versus Dynamic IP Addresses
A static IP address is one that always remains the same. A dynamic IP address is onethat can change each time you connect to the network. A dynamic address remainsthe same during a single login session. Any server (mail, Web, and so on) must havea static address so clients can find the machine that is acting as the server. End-usersystems usually work well with dynamic addresses. During a given login session,they can function as a client (your Web browser, for example) because they main-tain a constant IP address. When you log out and log in again, it does not matterthat you have a different IP address because your computer, acting as a client, estab-lishes a new connection with a server. The advantage of dynamic addressing is thatit allows inactive addresses to be reused, reducing the total number of IP addressesneeded.
optional IP Classes
To facilitate routing on the Internet, IP addresses are divided into classes. Theseclasses, which are labeled class A through class E, allow the Internet address spaceto be broken into blocks of small, medium, and large networks that are designed tobe assigned based on the number of hosts within a network.
When you need to send a message to an address outside the local network, your sys-tem looks up the address block/class in its routing table and sends the message tothe next router on the way to the final destination. Every router along the way doesa similar lookup and forwards the message accordingly. At the destination, localrouters direct the message to the specific address. Without classes and blocks, yourhost would have to know every network and subnetwork address on the Internetbefore it could send a message. This setup would be impractical because of the hugenumber of addresses on the Internet.
Each of the four numbers in the IP address is in the range 0–255 because each seg-ment of the IP address is represented by 8 bits (an octet), with each bit being capa-ble of taking on two values; the total number of values is therefore 28 = 256. Whenyou start counting at 0, the range 1–256 becomes 0–255.7 Each IP address isdivided into a net address (netid) portion, which is part of the class, and a hostaddress (hostid) portion. See Table 10-2.
7. Internally, the IP address is represented as a set of four unsigned 8-bit fields or a 32-bit unsigned num-ber, depending on how programs are using it. The most common format in C is to represent it as a unionof an unsigned 32-bit long integer, four unsigned chars, and two unsigned short integers.

Types of Networks and How They Work 365
The first set of addresses, defining class A networks, is reserved for extremely largecorporations, such as General Electric (3.0.0.0) and Hewlett-Packard (15.0.0.0), andfor ISPs. One start bit (0) in the first position designates a class A network, 7 bitsholds the network portion of the address (netid), and 24 bits holds the host portionof the address (hostid; see Table 10-2). This setup means that GE can have 224, orapproximately 16 million, hosts on its network. Unused address space and subnets(page 1062) lower this number quite a bit. The 127.0.0.0 subnet (page 369) isreserved, as are several others (see private address space on page 1054).
Two start bits (10) in the first two positions designates a class B network, 14 bitsholds the network portion of the address (netid), and 16 bits holds the host portionof the address, for a potential total of 65,534 hosts.8 A class C network uses 3 startbits (100), 21 netid bits (2 million networks), and 8 hostid bits (254 hosts). Today anew large customer will not receive a class A or B network but is likely to receive aclass C or several (usually contiguous) class C networks, if merited.
Several other classes of networks exist. Class D networks are reserved for multicast(page 1049) networks. When you run netstat –nr on a Linux system, you can seewhether the machine is a member of a multicast network. A 224.0.0.0 in the Desti-nation column that netstat displays indicates a class D, multicast address(Table 10-2). A multicast is like a broadcast, but only hosts that subscribe to the
Table 10-2 IP classes
Class Start bits Address range All bits (including start bits)
0–7 8–15 16–23 24–31
Class A 0 001.000.000.000–126.000.000.000 0-netid ========hostid=========
Class B 10 129.000.000.000–191.255.000.000 10-----netid------ =====hostid=====
Class C 110 192.000.000.000–223.255.255.000 110----------netid----------- =hostid=
Class D (multicast) 1110 224.000.000.000–239.255.255.000 1110
Class E (reserved) 11110 240.000.000.000–255.255.255.000 11110
8. A 16-bit (class B) address can address 216 = 65,536 hosts, yet the potential number of hosts is two fewerthan that because the first and last addresses on any network are reserved. In a similar manner, an 8-bit(class C) address can address only 254 hosts (28 – 2 = 254). The 0 host address (for example, 194.16.100.0for a class C network or 131.204.0.0 for a class B network) is reserved as a designator for the networkitself. Several older operating systems use this as a broadcast address. The 255 host address (for example,194.16.100.255 for a class C network or 131.204.255.255 for a class B network) is reserved as the IPbroadcast address. An IP packet (datagram) that is sent to this address is broadcast to all hosts on thenetwork.
The netid portion of a subnet does not have the same limitations. Often you are given the choice of re-serving the first and last networks in a range as you would a hostid, but this is rarely done in practice.More often the first and last networks in the netid range provide more usable address space. Refer to“Subnets” on page 367.
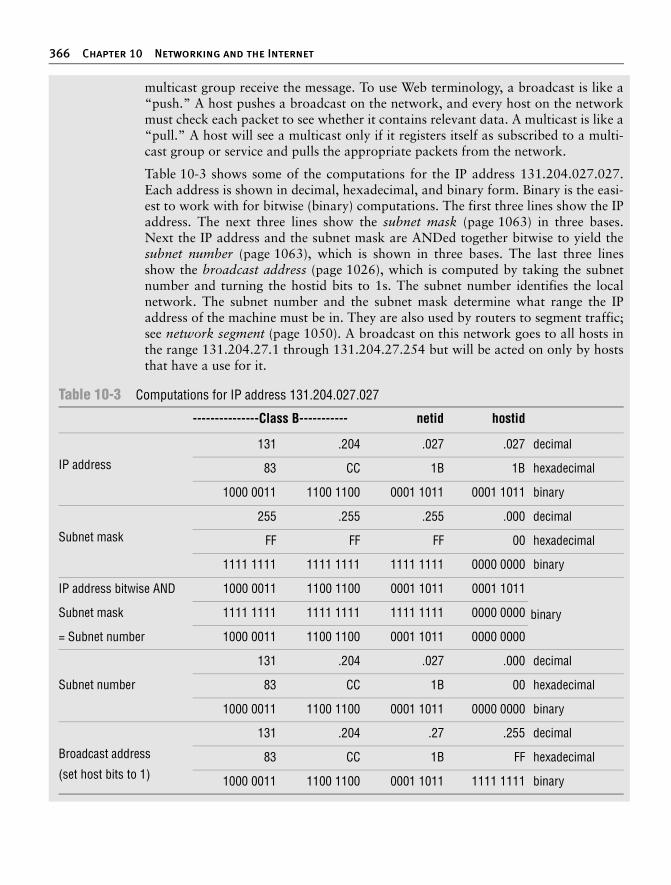
366 Chapter 10 Networking and the Internet
multicast group receive the message. To use Web terminology, a broadcast is like a“push.” A host pushes a broadcast on the network, and every host on the networkmust check each packet to see whether it contains relevant data. A multicast is like a“pull.” A host will see a multicast only if it registers itself as subscribed to a multi-cast group or service and pulls the appropriate packets from the network.
Table 10-3 shows some of the computations for the IP address 131.204.027.027.Each address is shown in decimal, hexadecimal, and binary form. Binary is the easi-est to work with for bitwise (binary) computations. The first three lines show the IPaddress. The next three lines show the subnet mask (page 1063) in three bases.Next the IP address and the subnet mask are ANDed together bitwise to yield thesubnet number (page 1063), which is shown in three bases. The last three linesshow the broadcast address (page 1026), which is computed by taking the subnetnumber and turning the hostid bits to 1s. The subnet number identifies the localnetwork. The subnet number and the subnet mask determine what range the IPaddress of the machine must be in. They are also used by routers to segment traffic;see network segment (page 1050). A broadcast on this network goes to all hosts inthe range 131.204.27.1 through 131.204.27.254 but will be acted on only by hoststhat have a use for it.
Table 10-3 Computations for IP address 131.204.027.027
---------------Class B----------- netid hostid
IP address
131 .204 .027 .027 decimal
83 CC 1B 1B hexadecimal
1000 0011 1100 1100 0001 1011 0001 1011 binary
Subnet mask
255 .255 .255 .000 decimal
FF FF FF 00 hexadecimal
1111 1111 1111 1111 1111 1111 0000 0000 binary
IP address bitwise AND 1000 0011 1100 1100 0001 1011 0001 1011
binarySubnet mask 1111 1111 1111 1111 1111 1111 0000 0000
= Subnet number 1000 0011 1100 1100 0001 1011 0000 0000
Subnet number
131 .204 .027 .000 decimal
83 CC 1B 00 hexadecimal
1000 0011 1100 1100 0001 1011 0000 0000 binary
Broadcast address
(set host bits to 1)
131 .204 .27 .255 decimal
83 CC 1B FF hexadecimal
1000 0011 1100 1100 0001 1011 1111 1111 binary

Types of Networks and How They Work 367
Subnets
Each host on a network must process each broadcast packet to determine whetherthe information in the packet is useful to that host. If the network includes numer-ous hosts, each host must process many packets. To maintain efficiency—most net-works, and particularly shared media networks such as Ethernet—need to be splitinto subnetworks, or subnets.9 The more hosts on a network, the more dramaticallynetwork performance is affected. Organizations use router and switch technologycalled VLANs (virtual local area networks) to group similar hosts into broadcastdomains (subnets) based on function. For example, it is not uncommon to see aswitch with different ports being part of different subnets. See page 529 for infor-mation on how to specify a subnet.
Subnet mask A subnet mask (or address mask) is a bit mask that identifies which parts of an IPaddress correspond to the network address and the subnet portion of the address.This mask has 1s in positions corresponding to the network and subnet numbersand 0s in the host number positions. When you perform a bitwise AND on an IPaddress and a subnet mask (Table 10-3), the resulting address contains everythingexcept the host address (hostid) portion.
There are several ways to represent a subnet mask: A network could have a subnetmask of 255.255.255.0 (decimal), FFFFFF00 (hexadecimal), or /24 (the number ofbits used for the subnet mask). If it were a class B network (of which 16 bits arealready fixed), this yields 28 (24 total bits – 16 fixed bits = 8 bits, 28 = 256) net-works10 with 28 – 2 (256 – 2 = 254) hosts11 on each network.
For example, when you divide the class C address 192.25.4.0 into eight subnets,you get a subnet mask of 255.255.255.224, FFFFFFE0, or /27 (27 1s). The eightresultant networks are 192.25.4.0, 192.25.4.32, 192.25.4.64, 192.25.4.96,192.25.4.128, 192.25.4.160, 192.25.4.192, and 192.25.4.224. You can use a Web-based subnet mask calculator to calculate subnet masks (refer to “Network Calcu-lators” on page 987). To use this calculator to determine the preceding subnetmask, start with an IP host address of 192.25.4.0.
For more information refer to “Specifying a Subnet” on page 529.
CIDR: Classless Inter-Domain Routing
CIDR (pronounced “cider”) allows groups of addresses that are smaller than a classC block to be assigned to an organization or ISP and then further subdivided andparceled out. In addition, it helps to alleviate the potential problem of routing tableson major Internet backbone and peering devices becoming too large to manage.
9. Splitting a network is also an issue with other protocols, particularly AppleTalk.
10. The first and last networks are reserved in a manner similar to the first and last hosts, although thestandard is flexible. You can configure routers to reclaim the first and last networks in a subnet. Differentrouters have different techniques for reclaiming these networks.
11. Subtract 2 because the first and last host addresses on every network are reserved.
368 Chapter 10 Networking and the Internet
The pool of available IPv4 addresses has been depleted to the point that no one getsa class A address anymore. The trend is to reclaim these huge address blocks, if pos-sible, and recycle them into groups of smaller addresses. Also, as more class Caddresses are assigned, routing tables on the Internet are filling up and causingmemory overflows. The solution is to aggregate12 groups of addresses into blocksand allocate them to ISPs, which in turn subdivide these blocks and allocate them totheir customers. The address class designations (A, B, and C) described in the previ-ous section are used less often today, although you may still encounter subnets.When you request an address block, your ISP usually gives you as many addressesas you need—and no more. The ISP aggregates several contiguous smaller blocksand routes them to your location. This aggregation is CIDR. Without CIDR, theInternet as we know it would not function.
For example, you might be allocated the 192.168.5.0/22 IP address block, whichcould support 210 hosts (32 – 22 = 10). Your ISP would set its routers so that anypackets going to an address in that block would be sent to your network. Internally,your own routers might further subdivide this block of 1,024 potential hosts intosubnets, perhaps into four networks. Four networks require an additional two bitsof addressing (22 = 4). You could therefore set up your router to support four net-works with this allocation: 192.168.5.0/24, 192.168.6.0/24, 192.168.7.0/24, and192.168.8.0/24. Each of these networks could then have 254 hosts. CIDR lets youarbitrarily divide networks and subnetworks into increasingly smaller blocks alongthe way. Each router has enough memory to keep track of the addresses it needs todirect and aggregates the rest.
This scheme uses memory and address space efficiently. For example, you could take192.168.8.0/24 and further divide it into 16 networks with 14 hosts each. The 16 net-works require four more bits (24 = 16), so you would have 192.168.8.0/28,192.168.8.16/28, 192.168.8.32/28, and so on, up through the last subnet of192.168.8.240/16, which would have the hosts 192.168.8.241 through 192.168.8.254.
Hostnames
People generally find it easier to work with names than with numbers, so Linuxprovides several ways to associate hostnames with IP addresses. The oldest methodis to consult a list of names and addresses that are stored in the /etc/hosts file:
$ cat /etc/hosts127.0.0.1 localhost130.128.52.1 gw–example.example.com gw–example130.128.52.2 bravo.example.com bravo130.128.52.3 hurrah.example.com hurrah130.128.52.4 kudos.example.com kudos
12. Aggregate means to join. In CIDR, the aggregate of 208.178.99.124 and 208.178.99.125 is208.178.99.124/23 (the aggregation of two class C blocks).
Types of Networks and How They Work 369
localhost =127.0.0.1
The address 127.0.0.1 is reserved for the special hostname localhost, which servesas a hook for the system’s networking software to operate on the local machinewithout going onto a physical network. The names of the other systems are shownin two forms: in a fully qualified domain name (FQDN) format that is unique onthe Internet and as a nickname that is locally unique.
NIS As more hosts joined networks, storing these name-to-address mappings in a textfile proved to be inefficient and inconvenient. The hosts file grew increasingly largerand became impossible to keep up-to-date. To solve this problem Linux supportsNIS (Network Information Service, page 383), which was developed for use on Suncomputers. NIS stores information in a database, making it easier to find a specificaddress, but it is useful only for host information within a single administrativedomain. Hosts outside the domain cannot access the information.
DNS The solution to this dilemma is DNS (Domain Name Service, page 381). DNS effec-tively addresses the efficiency and update issues by arranging the entire networknamespace (page 1049) as a hierarchy. Each domain in the DNS manages its ownnamespace (addressing and name resolution), and each domain can easily query forany host or IP address by following the tree up or down the namespace until it findsthe appropriate domain. By providing a hierarchical naming structure, DNS distrib-utes name administration across the entire Internet.
IPv6
The explosive growth of the Internet has uncovered deficiencies in the design of thecurrent address plan—most notably the shortage of addresses. Over the next fewyears, a revised protocol, named IPng (IP Next Generation), also known as IPv6 (IPversion 6),13 will be phased in. (It may take longer—the phase-in is going quiteslowly.) This new scheme is designed to overcome the major limitations of the cur-rent approach and can be implemented gradually because it is compatible with theexisting address usage. IPv6 makes it possible to assign many more unique Internetaddresses (2128, or 340 undecillion [1036]). It also supports more advanced securityand performance control features:
• IPv6 enables autoconfiguration. With IPv4, autoconfiguration is available using optional DHCP (page 538). With IPv6, autoconfiguration is manda-tory, making it easy for hosts to configure their IP addresses automatically.
• IPv6 reserves 24 bits in the header for advanced services, such as resource reservation protocols, better backbone routing, and improved traffic engineering.
• IPv6 makes multicast protocols mandatory and uses them extensively. In IPv4, multicast, which improves scalability, is optional.
13. IPv5 referred to an experimental real-time stream protocol named ST—thus the jump from IPv4 to IPv6.

370 Chapter 10 Networking and the Internet
• IPv6 aggregates address blocks more efficiently because of the huge address space. This aggregation makes obsolete NAT (page 1049), which decreased scalability and introduced protocol issues.
• IPv6 provides a simplified packet header that allows hardware accelerators to work better.
A sample IPv6 address is fe80::a00:20ff:feff:5be2/10. Each group of four hexadeci-mal digits is equivalent to a number between 0 and 65,536 (164). A pair of adjacentcolons indicates a hex value of 0x0000; leading 0s need not be shown. With eightsets of hexadecimal groupings, 65,5368 = 2128 addresses are possible. In an IPv6address on a host with the default autoconfiguration, the first characters in theaddress are always fe80. The last 64 bits hold an interface ID designation, which isoften the MAC address (page 1046) of the system’s Ethernet controller.
Communicate Over a Network
Many commands that you can use to communicate with other users on a singlecomputer system have been extended to work over a network. Examples ofextended utilities include electronic mail programs, information-gathering utilities(such as finger, page 167), and communications utilities (such as talk). These utilitiesare examples of the UNIX philosophy: Instead of creating a new, special-purposetool, modify an existing one.
Many utilities understand a convention for the format of network addresses:user@host (spoken as “user at host”). When you use an @ sign in an argument toone of these utilities, the utility interprets the text that follows as the name of aremote host. When you omit the @ sign, a utility assumes that you are requestinginformation from or corresponding with someone on the local system.
The prompts shown in the examples in this chapter include the hostname of the sys-tem you are using. If you frequently use more than one system over a network, youmay find it difficult to keep track of which system you are interacting with at anyparticular moment. If you set your prompt to include the hostname of the currentsystem, it will always be clear which system you are using. To identify the computeryou are using, run hostname or uname –n:
$ hostnamekudos
See page 303 for information on how you can change the prompt.
finger: Displays Information About Remote Users
The finger utility displays information about one or more users on a system. Thisutility was designed for local use, but when networks became popular, it was obvi-ous that finger should be enhanced to reach out and collect information remotely. Inthe following examples, finger displays information about all users logged in on thesystem named bravo:

Communicate Over a Network 371
[kudos]$ finger @bravo[bravo.example.com]Login Name Tty Idle Login Time Office Office Phonesam Sam the Great *1 1:35 Oct 22 5:00 alex Alex Watson 4 Oct 22 12:23 (kudos)alex Alex Watson 5 19 Oct 22 12:33 (:0)jenny Jenny Chen 7 2:24 Oct 22 8:45 (:0)hls Helen Simpson 11 2d Oct 20 12:23 (:0)
A user’s username in front of the @ sign causes finger to display information fromthe remote system for the specified user only. If the remote system has multiplematches for that name, finger displays the results for all of them:
[kudos]$ finger alex@bravo[bravo.example.com]Login Name Tty Idle Login Time Office Office Phonealex Alex Watson 4 Oct 22 12:23 (kudos)alex Alex Watson 5 19 Oct 22 12:33 (:0)
The finger utility works by querying a standard network service, the in.fingerd dae-mon, that runs on the system being queried. Although this service is available in thefingerd package for Ubuntu Linux, some sites choose not to run it to minimize theload on their systems, reduce security risks, or maintain privacy. When you use fingerto obtain information about someone at such a site, you will see an error message ornothing at all. The remote in.fingerd daemon determines how much information toshare and in what format. As a result, the report displayed for any given system maydiffer from that shown in the preceding examples.
The information for remote finger looks much the same as it does when finger runs onthe local system, with one difference: Before displaying the results, finger reports thename of the remote system that answered the query (bravo, as shown in brackets inthe preceding example). The name of the host that answers may be different from thesystem name you specified on the command line, depending on how the finger dae-mon service is configured on the remote system. In some cases, several hostnamesmay be listed if one finger daemon contacts another to retrieve the information.
Sending Mail to a Remote User
Given a user’s username on a remote system and the name of the remote system orits domain, you can use an email program to send a message over the network orthe Internet, using the @ form of an address:
jenny@bravo
or
The in.fingerd daemon
security The finger daemon (in.fingerd) gives away system account information that can aid a malicioususer. Some sites disable finger or randomize user account IDs to make a malicious user’s jobmore difficult. Do not install the fingerd package if you do not want to run the finger daemon.

372 Chapter 10 Networking and the Internet
Although many Linux utilities recognize the @ form of a network address, you mayfind that you can reach more remote computers with email than with the other net-working utilities described in this chapter. This disparity arises because the emailsystem can deliver a message to a host that does not run IP, even though it appearsto have an Internet address. The message may be routed over the network, forexample, until it reaches a remote system that has a point-to-point, dial-up connec-tion to the destination system. Other utilities, such as talk, rely on IP and operateonly between networked hosts.
Mailing List Servers
A mailing list server (listserv14) allows you to create and manage an email list. Anelectronic mailing list provides a means for people interested in a particular topic toparticipate in an electronic discussion and for a person to disseminate informationperiodically to a potentially large mailing list. One of the most powerful features ofmost list servers is their ability to archive email postings to the list, create an archiveindex, and allow users to retrieve postings from the archive based on keywords ordiscussion threads. Typically you can subscribe and unsubscribe from the list with orwithout human intervention. The owner of the list can restrict who can subscribe,unsubscribe, and post messages to the list. Popular list servers include LISTSERV(www.lsoft.com), Lyris (www.lyris.com), Majordomo (www.greatcircle.com/majordomo), Mailman (www.list.org, page 775), and ListProc (www.listproc.net).Ubuntu maintains quite a few mailing lists and list archives for those mailing lists atlists.ubuntu.com. Use Google to search on linux mailing list to find other lists.
Network Utilities
To realize the full benefits of a networked environment, it made sense to extendcertain tools, some of which have already been described. The advent of networksalso created a need for new utilities to control and monitor them, spurring thedevelopment of new tools that took advantage of network speed and connectivity.This section describes concepts and utilities for systems attached to a network.
Trusted Hosts
Some commands, such as rcp and rsh, work only if the remote system trusts yourlocal computer (that is, if the remote system knows your local computer andbelieves that it is not pretending to be another system). The /etc/hosts.equiv file liststrusted systems. For reasons of security, the root account does not rely on this file toidentify trusted privileged users from other systems.
14. Although the term listserv is sometimes used generically to include many different list server programs,it is a specific product and a registered trademark of L-soft International, Inc.: LISTSERV (for more infor-mation go to www.lsoft.com).

Network Utilities 373
Host-based trust is largely obsolete. Because there are many ways to circumventtrusted host security, including subverting DNS systems and IP spoofing(page 1043), authentication based on IP address is widely regarded as insecure andobsolete. In a small homogeneous network of machines with local DNS control, itcan be “good enough.” Its greater ease of use in these situations may outweigh thesecurity concerns.
OpenSSH Tools
The OpenSSH project provides a set of tools that replace rcp, rsh, and others withsecure equivalents. These tools are installed by default in Ubuntu Linux and can beused as drop-in replacements for their insecure counterparts. The OpenSSH toolsuite is covered in detail in Chapter 19.
telnet: Logs In on a Remote System
You can use the TELNET protocol to interact with a remote computer. The telnetutility, a user interface to this protocol, is older than ssh and is not secure. Never-theless, it may work where ssh (page 714) is not available (there is more non-UNIXsupport for TELNET access than for ssh access). In addition, many legacy devices,such as terminal servers and network devices, do not support ssh.
[bravo]$ telnet kudosTrying 172.19.52.2...Connected to kudos.example.comEscape character is '^]'.
Welcome to SuSE Linux 7.3 (i386) - Kernel 2.4.10-4GB (2).kudos login: watsonPassword:You have old mail in /var/mail/watson.Last login: Mon Feb 27 14:46:55 from bravo.example.comwatson@kudos:~>...watson@kudos:~> logoutConnection closed by foreign host.[bravo]$
telnet versus ssh When you connect to a remote UNIX or Linux system using telnet, you are pre-sented with a regular, textual login: prompt. Unless you specify differently, the sshutility assumes that your username on the remote system matches that on the localsystem. Because telnet is designed to work with non-UNIX and non-Linux systems,it makes no such assumptions.
Do not share your login accountsecurity You can use a .rhosts file to allow another user to log in as you from a remote system without
knowing your password. This setup is not recommended. Do not compromise the security of yourfiles or the entire system by sharing your login account. Use ssh and scp instead of rsh and rcpwhenever possible.

374 Chapter 10 Networking and the Internet
Another difference between these two utilities is that telnet allows you to configuremany special parameters, such as how RETURNs or interrupts are processed. When usingtelnet between UNIX and/or Linux systems, you rarely need to change any parameters.
When you do not specify the name of a remote host on the command line, telnet runsin an interactive mode. The following example is equivalent to the previous telnetexample:
[bravo]$ telnettelnet> open kudosTrying 172.19.52.2...Connected to kudos.example.comEscape character is '^]'....
Before connecting you to a remote system, telnet tells you what the escape characteris; in most cases, it is ^] (where ^ represents the CONTROL key). When you press CONTROL-],you escape to telnet’s interactive mode. Continuing the preceding example:
[kudos]$ CONTROL-]telnet> ?
(displays help information)
telnet> closeConnection closed.[bravo]$
When you enter a question mark in response to the telnet> prompt, telnet lists itscommands. The close command ends the current telnet session, returning you to thelocal system. To get out of telnet’s interactive mode and resume communication withthe remote system, press RETURN in response to a prompt.
You can use telnet to access special remote services at sites that have chosen to makesuch services available. However, many of these services, such as the U.S. Library ofCongress Information System (LOCIS), have moved to the Web. As a consequence,you can now obtain the same information using a Web browser.
Using telnet to Connect to Other Ports
By default telnet connects to port 23, which is used for remote logins. However, youcan use telnet to connect to other services by specifying a port number. In addition tostandard services, many of the special remote services available on the Internet useunallocated port numbers. For example, you can access some multiplayer text games,called MUDs (Multi-User Dungeons, or Dimensions), using telnet to connect to a spec-ified port, such as 4000 or 8888. Unlike the port numbers for standard protocols, theseport numbers can be picked arbitrarily by the administrator of the game.
telnet is not secure
security Whenever you enter sensitive information, such as your password, while you are using telnet, itis transmitted in cleartext and can be read by someone who is listening in on the session.

Network Utilities 375
While telnet is no longer commonly employed to log in on remote systems, it is stillused extensively as a debugging tool. This utility allows you to communicatedirectly with a TCP server. Some standard protocols are simple enough that anexperienced user can debug problems by connecting to a remote service directlyusing telnet. If you are having a problem with a network server, a good first step isto try to connect to it using telnet.
In the following example, a system administrator who is debugging a problem withemail delivery uses telnet to connect to the SMTP port (port 25) on a the server atexample.com to see why it is bouncing mail from the spammer.com domain. The firstline of output indicates which IP address telnet is trying to connect to. After telnet dis-plays the Connected to smtpsrv.example.com message, the user emulates an SMTPdialog, following the standard SMTP protocol. The first line, which starts with helo,begins the session and identifies the local system. After the SMTP server responds, theuser enters a line that identifies the mail sender as [email protected]. The SMTPserver’s response explains why the message is bouncing, so the user ends the sessionwith quit.
$ telnet smtpsrv 25Trying 192.168.1.1...Connected to smtpsrv.example.com.Escape character is '^]'.helo example.com220 smtpsrv.example.com ESMTP Sendmail 8.13.1/8.13.1; Wed, 4 May 2005 00:13:43 -0500 (CDT)250 smtpsrv.example.com Hello desktop.example.com [192.168.1.97], pleased to meet youmail from:[email protected] 5.0.0 Domain banned for spammingquit221 2.0.0 smtpsrv.example.com closing connection
The telnet utility allows you to use any protocol you want, as long as you know itwell enough to type commands manually.
ftp: Transfers Files Over a Network
The File Transfer Protocol (FTP) is a method of downloading files from and upload-ing files to another system using TCP/IP over a network. FTP is not a secure proto-col; use it only for downloading public information from a public server. Most Webbrowsers can download files from FTP servers. Chapter 20 covers FTP clients andservers.
ping: Tests a Network Connection
The ping15 utility (http://ftp.arl.mil/~mike/ping.html) sends an ECHO_REQUESTpacket to a remote computer. This packet causes the remote system to send back areply. This exchange is a quick way to verify that a remote system is available and
15. The name ping mimics the sound of a sonar burst used by submarines to identify and communicate with eachother. The word ping also expands to packet internet groper.

376 Chapter 10 Networking and the Internet
to check how well the network is operating, such as how fast it is or whether it isdropping data packets. The ping utility uses the ICMP (Internet Control MessageProtocol) protocol. Without any options, ping tests the connection once per seconduntil you abort execution with CONTROL-C.
$ ping tsx-11.mit.eduPING tsx-11.mit.edu (18.7.14.121) 56(84) bytes of data.64 bytes from TSX-11.MIT.EDU (18.7.14.121): icmp_seq=0 ttl=45 time=97.2 ms64 bytes from TSX-11.MIT.EDU (18.7.14.121): icmp_seq=1 ttl=45 time=96.1 ms64 bytes from TSX-11.MIT.EDU (18.7.14.121): icmp_seq=2 ttl=45 time=95.7 ms64 bytes from TSX-11.MIT.EDU (18.7.14.121): icmp_seq=3 ttl=45 time=96.3 msCONTROL-C
--- tsx-11.mit.edu ping statistics ---4 packets transmitted, 4 received, 0% packet loss, time 3001msrtt min/avg/max/mdev = 95.755/96.361/97.202/0.653 ms
This example shows that the remote system named tsx-11.mit.edu is up and avail-able over the network.
By default ping sends packets containing 64 bytes (56 data bytes and 8 bytes of pro-tocol header information). In the preceding example, four packets were sent to thesystem tsx-11.mit.edu before the user interrupted ping by pressing CONTROL-C. Thefour-part number in parentheses on each line is the remote system’s IP address. Apacket sequence number (called icmp_seq) is also given. If a packet is dropped, agap occurs in the sequence numbers. The round-trip time is listed last; it representsthe time (in milliseconds) that elapsed from when the packet was sent from the localsystem to the remote system until the reply from the remote system was received bythe local system. This time is affected by the distance between the two systems, net-work traffic, and the load on both computers. Before it terminates, ping summarizesthe results, indicating how many packets were sent and received as well as the mini-mum, average, maximum, and mean deviation round-trip times it measured. Useping6 to test IPv6 networks.
traceroute: Traces a Route Over the Internet
The traceroute utility traces the route that an IP packet follows, including all inter-mediary points traversed (called network hops), to its destination (the argument totraceroute—an Internet host). It displays a numbered list of hostnames, if avail-able, and IP addresses, together with the round-trip time it took for a packet toreach each router along the way and an acknowledgment to get back. You can put
When ping cannot connecttip If it is unable to contact the remote system, ping continues trying until you interrupt it with
CONTROL-C. A system may not answer for any of several reasons: The remote computer may bedown, the network interface or some part of the network between the systems may be broken,a software failure may have occurred, or the remote machine may be set up, for reasons ofsecurity, not to return pings (try pinging www.microsoft.com or www.ibm.com).
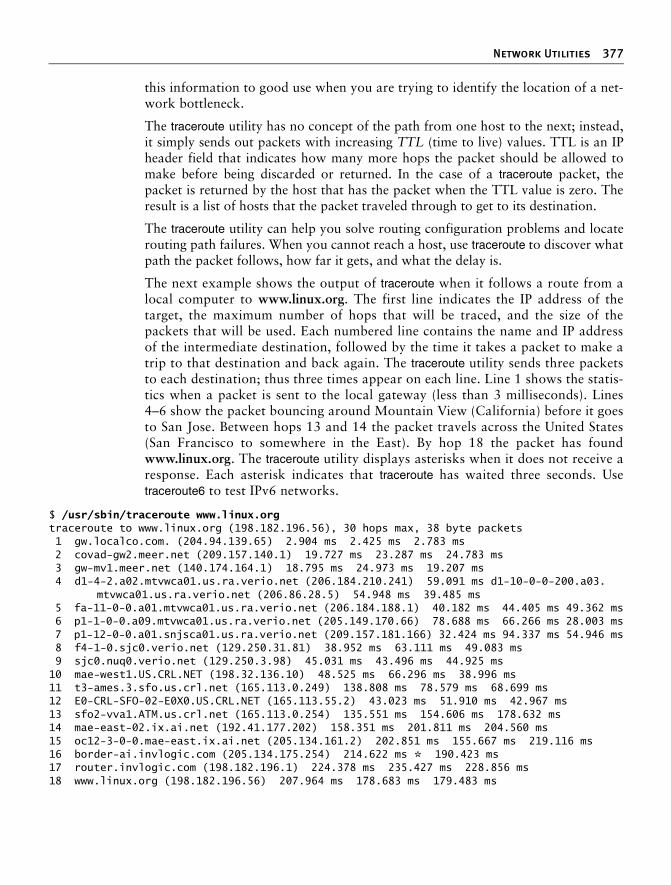
Network Utilities 377
this information to good use when you are trying to identify the location of a net-work bottleneck.
The traceroute utility has no concept of the path from one host to the next; instead,it simply sends out packets with increasing TTL (time to live) values. TTL is an IPheader field that indicates how many more hops the packet should be allowed tomake before being discarded or returned. In the case of a traceroute packet, thepacket is returned by the host that has the packet when the TTL value is zero. Theresult is a list of hosts that the packet traveled through to get to its destination.
The traceroute utility can help you solve routing configuration problems and locaterouting path failures. When you cannot reach a host, use traceroute to discover whatpath the packet follows, how far it gets, and what the delay is.
The next example shows the output of traceroute when it follows a route from alocal computer to www.linux.org. The first line indicates the IP address of thetarget, the maximum number of hops that will be traced, and the size of thepackets that will be used. Each numbered line contains the name and IP addressof the intermediate destination, followed by the time it takes a packet to make atrip to that destination and back again. The traceroute utility sends three packetsto each destination; thus three times appear on each line. Line 1 shows the statis-tics when a packet is sent to the local gateway (less than 3 milliseconds). Lines4–6 show the packet bouncing around Mountain View (California) before it goesto San Jose. Between hops 13 and 14 the packet travels across the United States(San Francisco to somewhere in the East). By hop 18 the packet has foundwww.linux.org. The traceroute utility displays asterisks when it does not receive aresponse. Each asterisk indicates that traceroute has waited three seconds. Usetraceroute6 to test IPv6 networks.
$ /usr/sbin/traceroute www.linux.orgtraceroute to www.linux.org (198.182.196.56), 30 hops max, 38 byte packets 1 gw.localco.com. (204.94.139.65) 2.904 ms 2.425 ms 2.783 ms 2 covad-gw2.meer.net (209.157.140.1) 19.727 ms 23.287 ms 24.783 ms 3 gw-mv1.meer.net (140.174.164.1) 18.795 ms 24.973 ms 19.207 ms 4 d1-4-2.a02.mtvwca01.us.ra.verio.net (206.184.210.241) 59.091 ms d1-10-0-0-200.a03.
mtvwca01.us.ra.verio.net (206.86.28.5) 54.948 ms 39.485 ms 5 fa-11-0-0.a01.mtvwca01.us.ra.verio.net (206.184.188.1) 40.182 ms 44.405 ms 49.362 ms 6 p1-1-0-0.a09.mtvwca01.us.ra.verio.net (205.149.170.66) 78.688 ms 66.266 ms 28.003 ms 7 p1-12-0-0.a01.snjsca01.us.ra.verio.net (209.157.181.166) 32.424 ms 94.337 ms 54.946 ms 8 f4-1-0.sjc0.verio.net (129.250.31.81) 38.952 ms 63.111 ms 49.083 ms 9 sjc0.nuq0.verio.net (129.250.3.98) 45.031 ms 43.496 ms 44.925 ms10 mae-west1.US.CRL.NET (198.32.136.10) 48.525 ms 66.296 ms 38.996 ms11 t3-ames.3.sfo.us.crl.net (165.113.0.249) 138.808 ms 78.579 ms 68.699 ms12 E0-CRL-SFO-02-E0X0.US.CRL.NET (165.113.55.2) 43.023 ms 51.910 ms 42.967 ms13 sfo2-vva1.ATM.us.crl.net (165.113.0.254) 135.551 ms 154.606 ms 178.632 ms14 mae-east-02.ix.ai.net (192.41.177.202) 158.351 ms 201.811 ms 204.560 ms15 oc12-3-0-0.mae-east.ix.ai.net (205.134.161.2) 202.851 ms 155.667 ms 219.116 ms16 border-ai.invlogic.com (205.134.175.254) 214.622 ms * 190.423 ms17 router.invlogic.com (198.182.196.1) 224.378 ms 235.427 ms 228.856 ms18 www.linux.org (198.182.196.56) 207.964 ms 178.683 ms 179.483 ms

378 Chapter 10 Networking and the Internet
host and dig: Query Internet Nameservers
The host utility looks up an IP address given a name, or vice versa. The followingexample shows how to use host to look up the domain name of a machine, given anIP address:
$ host 140.174.164.22.164.174.140.in-addr.arpa. domain name pointer ns.meer.net.
You can also use host to determine the IP address of a domain name:
$ host ns.meer.netns.meer.net. has address 140.174.164.2
The dig (domain information groper) utility queries DNS servers and individualmachines for information about a domain. A powerful utility, dig has many featuresthat you may never use. It is more complex than host.
Chapter 25 on DNS has many examples of the use of host and dig.
jwhois: Looks Up Information About an Internet Site
The jwhois utility (jwhois package) replaces whois and queries a whois server forinformation about an Internet site. This utility returns site contact and InterNIC orother registry information that can help you track down the person who is responsi-ble for a site: Perhaps that person is sending you or your company spam(page 1061). Many sites on the Internet are easier to use and faster than jwhois. Usea browser and search engine to search on whois or go to www.networksolu-tions.com/whois or www.ripe.net/perl/whois to get started.
When you do not specify a whois server, jwhois defaults to whois.internic.net. Usethe –h option to jwhois to specify a different whois server. See the jwhois info page formore options and setup information.
To obtain information on a domain name, specify the complete domain name, as inthe following example:
$ jwhois sobell.com[Querying whois.internic.net][Redirected to whois.godaddy.com][Querying whois.godaddy.com][whois.godaddy.com]The data contained in Go Daddy Software, Inc.'s WhoIs database,...Registrant: Sobell Associates Inc POBox 460068 San Francisco, California 94146-0068 United States
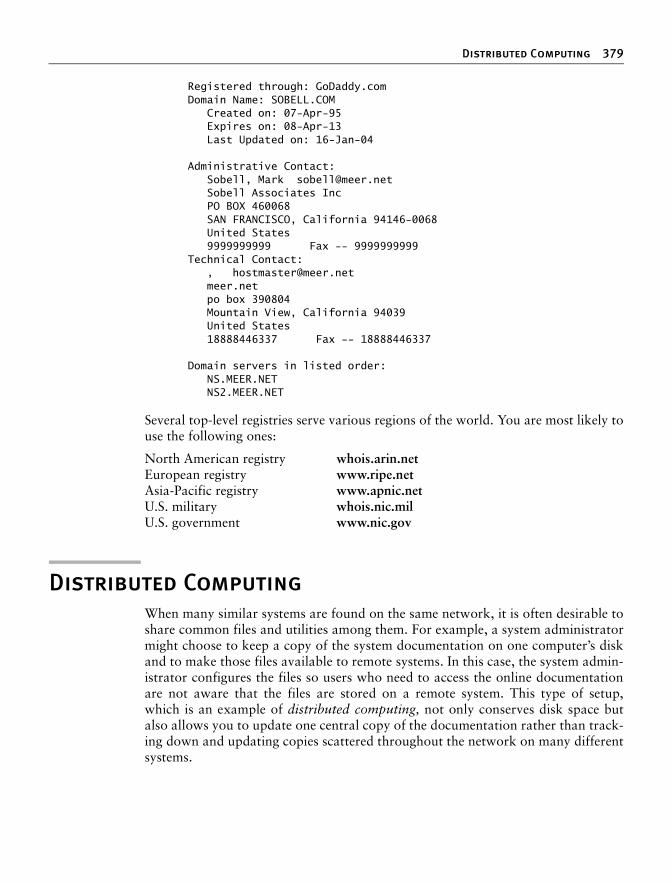
Distributed Computing 379
Registered through: GoDaddy.com Domain Name: SOBELL.COM Created on: 07-Apr-95 Expires on: 08-Apr-13 Last Updated on: 16-Jan-04
Administrative Contact: Sobell, Mark [email protected] Sobell Associates Inc PO BOX 460068 SAN FRANCISCO, California 94146-0068 United States 9999999999 Fax -- 9999999999 Technical Contact: , [email protected] meer.net po box 390804 Mountain View, California 94039 United States 18888446337 Fax -- 18888446337
Domain servers in listed order: NS.MEER.NET NS2.MEER.NET
Several top-level registries serve various regions of the world. You are most likely touse the following ones:
North American registry whois.arin.netEuropean registry www.ripe.netAsia-Pacific registry www.apnic.netU.S. military whois.nic.milU.S. government www.nic.gov
Distributed Computing
When many similar systems are found on the same network, it is often desirable toshare common files and utilities among them. For example, a system administratormight choose to keep a copy of the system documentation on one computer’s diskand to make those files available to remote systems. In this case, the system admin-istrator configures the files so users who need to access the online documentationare not aware that the files are stored on a remote system. This type of setup,which is an example of distributed computing, not only conserves disk space butalso allows you to update one central copy of the documentation rather than track-ing down and updating copies scattered throughout the network on many differentsystems.

380 Chapter 10 Networking and the Internet
Figure 10-2 illustrates a fileserver that stores the system manual pages and users’home directories. With this arrangement, a user’s files are always available to thatuser—no matter which system the user logs in on. Each system’s disk might containa directory to hold temporary files as well as a copy of the operating system.Chapter 23 contains instructions for setting up NFS clients and servers in net-worked configurations.
The Client/Server Model
Mainframe model The client/server model was not the first computational model. First came the main-frame, which follows a one-machine-does-it-all model. That is, all the intelligenceresides in one system, including the data and the program that manipulates andreports on the data. Users connect to a mainframe using terminals.
File-sharing model With the introduction of PCs, file-sharing networks became available. In thisscheme data is downloaded from a shared location to a user’s PC, where a programthen manipulates the data. The file-sharing model ran into problems as networksexpanded and more users needed access to the data.
Client/server model In the client/server model, a client uses a protocol, such as FTP, to request services,and a server provides the services that the client requests. Rather than providing datafiles as the file-sharing model does, the server in a client/server relationship is a data-base that provides only those pieces of information that the client needs or requests.
The client/server model dominates UNIX and Linux system networking and under-lies most of the network services described in this book. FTP, NFS, DNS, email, andHTTP (the Web browsing protocol) all rely on the client/server model. Some servers,such as Web servers and browser clients, are designed to interact with specific utili-ties. Other servers, such as those supporting DNS, communicate with one another, inaddition to answering queries from a variety of clients. Clients and servers can resideon the same or different systems running the same or different operating systems.The systems can be proximate or thousands of miles apart. A system that is a serverto one system can turn around and act as a client to another. A server can reside on asingle system or, as is the case with DNS, be distributed among thousands of geo-graphically separated systems running many different operating systems.
Peer-to-peer model The peer-to-peer (PTP) model, in which either program can initiate a transaction,stands in contrast to the client/server model. PTP protocols are common on small
Figure 10-2 A fileserver
/usr/man/home
Fileserver
Linux Linux

Distributed Computing 381
networks. For example, Microsoft’s Network Neighborhood and Apple’s AppleTalkboth rely on broadcast-based PTP protocols for browsing and automatic configura-tion. The Zeroconf multicast DNS protocol is a PTP alternative DNS for small net-works. The highest-profile PTP networks are those used for file sharing, such asKazaa and GNUtella. Many of these networks are not pure PTP topologies. PurePTP networks do not scale well, so networks such as Napster and Kazaa employ ahybrid approach.
DNS: Domain Name Service
DNS is a distributed service: Nameservers on thousands of machines around theworld cooperate to keep the database up-to-date. The database itself, whichmaps hundreds of thousands of alphanumeric hostnames to numeric IPaddresses, does not exist in one place. That is, no system has a complete copy ofthe database. Instead, each system that runs DNS knows which hosts are local tothat site and understands how to contact other nameservers to learn about other,nonlocal hosts.
Like the Linux filesystem, DNS is organized hierarchically. Each country has an ISO(International Organization for Standardization) country code designation as itsdomain name. (For example, AU represents Australia, IL is Israel, and JP is Japan;see www.iana.org/cctld/cctld.htm for a complete list.) Although the United States isrepresented in the same way (US) and uses the standard two-letter Postal Serviceabbreviations to identify the next level of the domain, only governments and a feworganizations use these codes. Schools in the US domain are represented by a third-(and sometimes second-) level domain: k12. For example, the domain name forMyschool in New York state could be www.myschool.k12.ny.us.
Following is a list of the six original top-level domains. These domains are usedextensively within the United States and, to a lesser degree, by users in othercountries:
COM Commercial enterprisesEDU Educational institutionsGOV Nonmilitary government agenciesMIL Military government agenciesNET Networking organizationsORG Other (often nonprofit) organizations
Recently, the following additional top-level domains have been approved for use:
AERO Air-transport industryBIZ BusinessCOOP CooperativesINFO Unrestricted useMUSEUM MuseumsNAME Name registries

382 Chapter 10 Networking and the Internet
Like Internet addresses, domain names were once assigned by the Network Infor-mation Center (NIC, page 363); now they are assigned by several companies. A sys-tem’s full name, referred to as its fully qualified domain name (FQDN), isunambiguous in the way that a simple hostname cannot be. The systemokeeffe.berkeley.edu at the University of California at Berkeley (Figure 10-3) is notthe same as one named okeeffe.moma.org, which might represent a host at theMuseum of Modern Art. The domain name not only tells you something aboutwhere the system is located but also adds enough diversity to the namespace toavoid confusion when different sites choose similar names for their systems.
Unlike the filesystem hierarchy, the top-level domain name appears last (readingfrom left to right). Also, domain names are not case sensitive, so the namesokeeffe.berkeley.edu, okeeffe.Berkeley.edu, and okeeffe.Berkeley.EDU refer to thesame computer. Once a domain has been assigned, the local site is free to extend thehierarchy to meet local needs.
With DNS, email addressed to [email protected] can be delivered to the com-puter named example.com that handles the corporate mail and knows how to for-ward messages to user mailboxes on individual machines. As the company grows,its site administrator might decide to create organizational or geographical subdo-mains. The name delta.ca.example.com might refer to a system that supports Cali-fornia offices, for example, while alpha.co.example.com is dedicated to Colorado.Functional subdomains might be another choice, with delta.sales.example.comand alpha.dev.example.com representing the sales and development divisions,respectively.
BIND On Linux systems, the most common interface to the DNS is BIND (Berkeley Inter-net Name Domain). BIND follows the client/server model. On any given local net-work, one or more systems may be running a nameserver, supporting all the localhosts as clients. When it wants to send a message to another host, a system queriesthe nearest nameserver to learn the remote host’s IP address. The client, called aresolver, may be a process running on the same computer as the nameserver, or itmay pass the request over the network to reach a server. To reduce network trafficand facilitate name lookups, the local nameserver maintains some knowledge of dis-tant hosts. If the local server must contact a remote server to pick up an address,when the answer comes back, the local server adds that address to its internal table
Figure 10-3 U.S. top-level domains
com edu org
bravo kudos okeeffe okeeffe
mil net
momaberkeley
gov
example

Distributed Computing 383
and reuses it for a while. The nameserver deletes the nonlocal information before itcan become outdated. Refer to “TTL” on page 1066.
The system’s translation of symbolic hostnames into addresses is transparent tomost users; only the system administrator of a networked system needs to be con-cerned with the details of name resolution. Systems that use DNS for name resolu-tion are generally capable of communicating with the greatest number ofhosts—more than would be practical to maintain in a /etc/hosts file or private NISdatabase. Chapter 25 covers setting up and running a DNS server.
Three common sources are referenced for hostname resolution: NIS, DNS, and sys-tem files (such as /etc/hosts). Linux does not ask you to choose among thesesources; rather, the nsswitch.conf file (page 542) allows you to choose any of thesesources, in any combination, and in any order.
Ports
Ports are logical channels on a network interface and are numbered from 1 to65,535. Each network connection is uniquely identified by the IP address and portnumber of each endpoint.
In a system that has many network connections open simultaneously, the use ofports keeps packets (page 1051) flowing to and from the appropriate programs. Aprogram that needs to receive data binds to a port and then uses that port for com-munication.
Privileged ports Services are associated with specific ports, generally with numbers less than 1024.These ports are called privileged (or reserved) ports. For security reasons, only aprocess running with root privileges can bind to privileged ports. A service run on aprivileged port provides assurance that the service is being provided by someonewith authority over the system, with the exception that any user on Windows 98 andearlier Windows systems can bind to any port. Commonly used ports include 22(SSH), 23 (TELNET), 80 (HTTP), 111 (Sun RPC), and 201–208 (AppleTalk).
NIS: Network Information Service
NIS (Network Information Service) simplifies the maintenance of frequently usedadministrative files by keeping them in a central database and having clients contactthe database server to retrieve information from the database. Just as DNSaddresses the problem of keeping multiple copies of hosts files up-to-date, NIS dealswith the issue of keeping system-independent configuration files (such as/etc/passwd) current. Refer to Chapter 22 for coverage of NIS.
NFS: Network Filesystem
The NFS (Network Filesystem) protocol allows a server to share selected localdirectory hierarchies with client systems on a heterogeneous network. Files on theremote fileserver appear as if they are present on the local system. NFS is covered inChapter 23.

384 Chapter 10 Networking and the Internet
optionalInternet Services
Linux Internet services are provided by daemons that run continuously or by a dae-mon that is started automatically by the inetd or xinetd daemon (page 531) when aservice request comes in. The /etc/services file lists network services (for example,telnet, ftp, and ssh) and their associated numbers. Any service that uses TCP/IP orUDP/IP has an entry in this file. IANA (Internet Assigned Numbers Authority)maintains a database of all permanent, registered services. The /etc/services file usu-ally lists a small, commonly used subset of services. Visit www.rfc.net/rfc1700.htmlfor more information and a complete list of registered services.
Most of the daemons (the executable files) are stored in /usr/sbin. By convention thenames of many daemons end with the letter d to distinguish them from utilities (onecommon daemon whose name does not end in d is sendmail). The prefix in. or rpc. isoften used for daemon names. Look at /usr/sbin/*d to see a list of many of the dae-mon programs on the local system. Refer to “SysVinit (rc) Scripts: Start and Stop Sys-tem Services” on page 507 for information about starting and stopping these daemons.
To see how a daemon works, consider what happens when you run ssh. The local sys-tem contacts the ssh daemon (sshd) on the remote system to establish a connection.The two systems negotiate the connection according to a fixed protocol. Each systemidentifies itself to the other, and then they take turns asking each other specific ques-tions and waiting for valid replies. Each network service follows its own protocol.
In addition to the daemons that support the utilities described up to this point,many other daemons support system-level network services that you will not typi-cally interact with. Table 10-4 lists some of these daemons.
Table 10-4 Common daemons
Daemon Used for or by Function
acpid Advanced configuration and power interface
Flexible daemon for delivering ACPI events. Replaces apmd.
anacron anacrontab Used for periodic execution of tasks. This daemon looks in the /etc/anacrontab file. When a task comes up for execution, anacronexecutes it as the user who owns the file that describes the task.
apache2 HTTP The Web server daemon (Apache, page 915).
apmd Advanced powermanagement
Reports and takes action on specified changes in system power, including shutdowns. Useful with machines, such as laptops, that run on batteries.
atd at Executes a command once at a specific time and date. See crond for periodic execution of a command.
automount Automatic mounting Automatically mounts filesystems when they are accessed. Auto-matic mounting is a way of demand-mounting remote directories without having to hard-configure them into /etc/fstab.
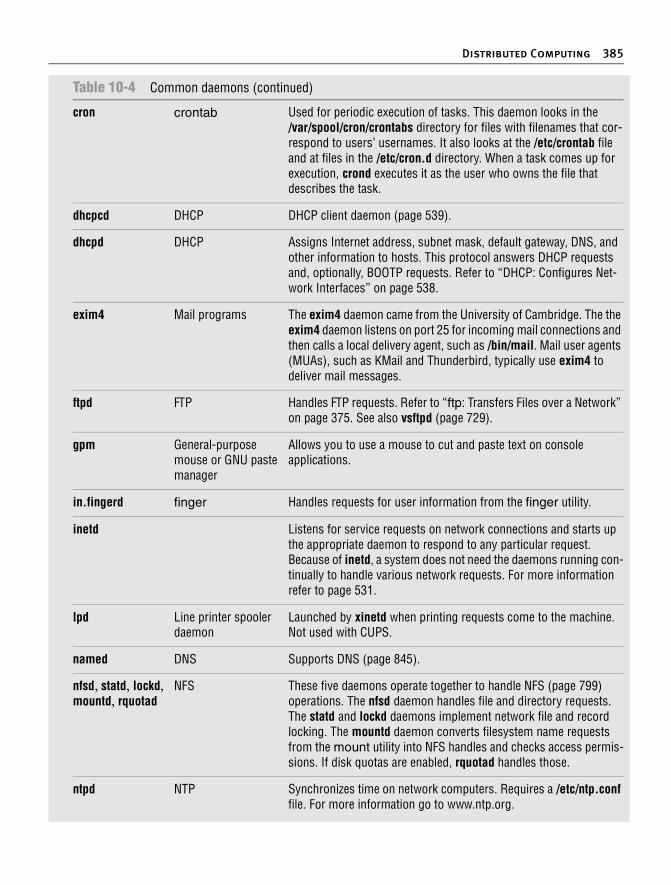
Distributed Computing 385
cron crontab Used for periodic execution of tasks. This daemon looks in the /var/spool/cron/crontabs directory for files with filenames that cor-respond to users’ usernames. It also looks at the /etc/crontab file and at files in the /etc/cron.d directory. When a task comes up for execution, crond executes it as the user who owns the file that describes the task.
dhcpcd DHCP DHCP client daemon (page 539).
dhcpd DHCP Assigns Internet address, subnet mask, default gateway, DNS, and other information to hosts. This protocol answers DHCP requests and, optionally, BOOTP requests. Refer to “DHCP: Configures Net-work Interfaces” on page 538.
exim4 Mail programs The exim4 daemon came from the University of Cambridge. The the exim4 daemon listens on port 25 for incoming mail connections and then calls a local delivery agent, such as /bin/mail. Mail user agents (MUAs), such as KMail and Thunderbird, typically use exim4 to deliver mail messages.
ftpd FTP Handles FTP requests. Refer to “ftp: Transfers Files over a Network” on page 375. See also vsftpd (page 729).
gpm General-purposemouse or GNU pastemanager
Allows you to use a mouse to cut and paste text on console applications.
in.fingerd finger Handles requests for user information from the finger utility.
inetd Listens for service requests on network connections and starts up the appropriate daemon to respond to any particular request. Because of inetd, a system does not need the daemons running con-tinually to handle various network requests. For more information refer to page 531.
lpd Line printer spoolerdaemon
Launched by xinetd when printing requests come to the machine. Not used with CUPS.
named DNS Supports DNS (page 845).
nfsd, statd, lockd,mountd, rquotad
NFS These five daemons operate together to handle NFS (page 799) operations. The nfsd daemon handles file and directory requests. The statd and lockd daemons implement network file and record locking. The mountd daemon converts filesystem name requests from the mount utility into NFS handles and checks access permis-sions. If disk quotas are enabled, rquotad handles those.
ntpd NTP Synchronizes time on network computers. Requires a /etc/ntp.conffile. For more information go to www.ntp.org.
Table 10-4 Common daemons (continued)

386 Chapter 10 Networking and the Internet
portmap RPC Maps incoming requests for RPC service numbers to TCP or UDP port numbers on the local system. Refer to “RPC Network Services” on page 387.
pppd PPP For a modem, this protocol controls the pseudointerface represented by the IP connection between the local computer and a remote com-puter. Refer to “PPP: Point-to-Point Protocol” on page 363.
rexecd rexec Allows a remote user with a valid username and password to run programs on a system. Its use is generally deprecated for security reasons; certain programs, such as PC-based X servers, may still have it as an option.
routed Routing tables Manages the routing tables so your system knows where to send messages that are destined for remote networks. If your system does not have a /etc/defaultrouter file, routed is started automatically to listen to incoming routing messages and to advertise outgoing routes to other systems on the local network. A newer daemon, the gateway daemon (gated), offers enhanced configurability and support for more routing protocols and is proportionally more complex.
sendmail Mail programs The sendmail daemon came from Berkeley UNIX and has been avail-able for a long time. The de facto mail transfer program on the Inter-net, the sendmail daemon always listens on port 25 for incoming mail connections and then calls a local delivery agent, such as /bin/mail. Mail user agents (MUAs), such as KMail and Thunderbird, typically use sendmail to deliver mail messages.
smbd, nmbd Samba Allow Windows PCs to share files and printers with UNIX and Linux computers (page 823).
sshd ssh, scp Enables secure logins between remote systems (page 720).
syslogd System log Transcribes important system events and stores them in files and/or forwards them to users or another host running the syslogd dae-mon. This daemon is configured with /etc/syslog.conf and used with the syslog utility. See page 688.
talkd talk Allows you to have a conversation with another user on the same or a remote machine. The talkd daemon handles the connections between the machines. The talk utility on each system contacts the talkd daemon on the other system for a bidirectional conversation.
telnetd TELNET One of the original Internet remote access protocols (page 373).
tftpd TFTP Used to boot a system or get information from a network. Examples include network computers, routers, and some printers.
timed Time server On a LAN synchronizes time with other computers that are also run-ning timed.
xinetd Internet superserver Listens for service requests on network connections and starts up the appropriate daemon to respond to any particular request. Because of xinetd, a system does not need the daemons running continually to handle various network requests. For more informa-tion refer to page 531.
Table 10-4 Common daemons (continued)

Distributed Computing 387
Proxy Servers
A proxy is a network service that is authorized to act for a system while not beingpart of that system. A proxy server or proxy gateway provides proxy services; it is atransparent intermediary, relaying communications back and forth between anapplication, such as a browser and a server, usually outside of a LAN and frequentlyon the Internet. When more than one process uses the proxy gateway/server, theproxy must keep track of which processes are connecting to which hosts/serversso that it can route the return messages to the proper process. The most commonlyencountered proxies are email and Web proxies.
A proxy server/gateway insulates the local computer from all other computers orfrom specified domains by using at least two IP addresses: one to communicate withthe local computer and one to communicate with a server. The proxy server/gatewayexamines and changes the header information on all packets it handles so that it canencode, route, and decode them properly. The difference between a proxy gatewayand a proxy server is that the proxy server usually includes cache (page 1027) tostore frequently used Web pages so that the next request for that page is availablelocally and quickly; a proxy gateway typically does not use cache. The terms “proxyserver” and “proxy gateway” are frequently used interchangeably.
Proxy servers/gateways are available for such common Internet services as HTTP,HTTPS, FTP, SMTP, and SNMP. When an HTTP proxy sends queries from localsystems, it presents a single organizationwide IP address (the external IP address ofthe proxy server/gateway) to all servers. It funnels all user requests to the appropri-ate servers and keeps track of them. When the responses come back, the HTTPproxy fans them out to the appropriate applications using each machine’s unique IPaddress, thereby protecting local addresses from remote/specified servers.
Proxy servers/gateways are generally just one part of an overall firewall strategy toprevent intruders from stealing information or damaging an internal network.Other functions, which can be either combined with or kept separate from theproxy server/gateway, include packet filtering, which blocks traffic based on originand type, and user activity reporting, which helps management learn how the Inter-net is being used.
RPC Network Services
Much of the client/server interaction over a network is implemented using the RPC(Remote Procedure Call) protocol, which is implemented as a set of library callsthat make network access transparent to the client and server. RPC specifies andinterprets messages but does not concern itself with transport protocols; it runs ontop of TCP/IP and UDP/IP. Services that use RPC include NFS and NIS. RPC wasdeveloped by Sun as ONC RPC (Open Network Computing Remote ProcedureCalls) and differs from Microsoft RPC.
In the client/server model, a client contacts a server on a specific port (page 383) toavoid any mixup between services, clients, and servers. To avoid maintaining a longlist of port numbers and to enable new clients/servers to start up without registeringa port number with a central registry, when a server that uses RPC starts, it specifies

388 Chapter 10 Networking and the Internet
the port it expects to be contacted on. RPC servers typically use port numbers thathave been defined by Sun. If a server does not use a predefined port number, it picksan arbitrary number.
portmap The server then registers this port with the RPC portmapper (the portmap daemon)on the local system. The server tells the daemon which port number it is listening onand which RPC program numbers it serves. Through these exchanges, the portmapdaemon learns the location of every registered port on the host and the programsthat are available on each port. The portmap daemon, which always listens on port111 for both TCP and UDP, must be running to make RPC calls.
Files The /etc/rpc file (page 562) maps RPC services to RPC numbers. The /etc/servicesfile (page 562) lists system services.
RPC client/servercommunication
The sequence of events for communication between an RPC client and server occursas follows:
1. The client program on the client system makes an RPC call to obtain data from a (remote) server system. (The client issues a “read record from a file” request.)
2. If RPC has not yet established a connection with the server system for the client program, it contacts portmap on port 111 of the server and asks which port the desired RPC server is listening on (for example, rpc.nfsd).
3. The portmap daemon on the remote server looks in its tables and returns a UDP or TCP port number to the local system, the client (typically 2049 for nfs).
4. The RPC libraries on the server system receive the call from the client and pass the request to the appropriate server program. The origin of the request is transparent to the server program. (The filesystem receives the “read record from file” request.)
5. The server responds to the request. (The filesystem reads the record.)
6. The RPC libraries on the remote server return the result over the network to the client program. (The read record is returned to the calling program.)
Under Ubuntu Linux most servers start and run their own daemons. When RPCservers are started by the xinetd daemon (page 531), the portmap daemon must bestarted before the xinetd daemon is invoked. The init scripts (page 507) make sureportmap starts before xinetd. You can confirm this sequence by looking at thenumbers associated with /etc/rc.d/*/S*portmap and /etc/rc.d/*/S*/xinetd. If theportmap daemon stops, you must restart all RPC servers on the local system.
Usenet
One of the earliest information services available on the Internet, Usenet is an elec-tronic bulletin board that allows users with common interests to exchange informa-tion. Usenet comprises an informal, loosely connected network of systems thatexchange email and news items (commonly referred to as netnews). It was formedin 1979 when a few sites decided to share some software and information on topics

Usenet 389
of common interest. They agreed to contact one another and to pass the informa-tion along over dial-up telephone lines (at that time running at 1,200 baud at best),using UNIX’s uucp utility (UNIX-to-UNIX copy program).
The popularity of Usenet led to major changes in uucp to handle the escalating vol-ume of messages and sites. Today much of the news flows over network links usinga sophisticated protocol designed especially for this purpose: NNTP (NetworkNews Transfer Protocol). The news messages are stored in a standard format, andthe many public domain programs available let you read them. An old, simple inter-face is named readnews. Other interfaces, such as rn, its X Window System cousinxrn, tin, nn, and xvnews, have many features that help you browse through and replyto the articles that are available or create articles of your own. In addition, Netscapeand Mozilla include an interface that you can use to read news (Netscape/MozillaNews) as part of their Web browsers. One of the easiest ways to read netnews is togo to groups.google.com. The program you select to read netnews is largely a mat-ter of personal taste.
As programs to read netnews articles have been ported to non-UNIX and non-Linux systems, the community of netnews users has become highly diversified. Inthe UNIX tradition, categories of netnews groups are structured hierarchically. Thetop level includes such designations as comp (computer-related), misc (miscella-neous), rec (recreation), sci (science), soc (social issues), and talk (ongoing discus-sions). Usually at least one regional category is at the top level, such as ba (SanFrancisco Bay Area), and includes information about local events. New categoriesare continually being added to the more than 30,000 newsgroups. The names ofnewsgroups resemble domain names but are read from left to right (like Linux file-names): comp.os.unix.misc, comp.lang.c, misc.jobs.offered, rec.skiing, sci.med,soc.singles, and talk.politics are but a few examples.
A great deal of useful information is available on Usenet, but you need patienceand perseverance to find what you are looking for. You can ask a question, andsomeone from halfway around the world might answer it. Before posing such asimple question and causing it to appear on thousands of systems around theworld, however, first ask yourself whether you can get help in a less invasive way.Try the following:
• Refer to the man pages and info.
• Look through the files in /usr/share/doc.
• Ask the system administrator or another user for help.
• All of the popular newsgroups have FAQs (lists of frequently asked ques-tions). Consult these lists and see whether your question has been answered. FAQs are periodically posted to the newsgroups; in addition, all the FAQs are archived at sites around the Internet, including Google groups (groups.google.com).
• Because someone has probably asked the same question earlier, search the netnews archives for an answer. Try looking at groups.google.com, which has a complete netnews archive.

390 Chapter 10 Networking and the Internet
• Use a search engine to find an answer. One good way to get help is to search on an error message.
• Review support documents at help.ubuntu.com.
• Contact a Ubuntu Linux users’ group.
Post a query to the worldwide Usenet community as a last resort. If you are stuckon a Linux question and cannot find any other help, try submitting it to one of thesenewsgroups:
• comp.os.linux.misc
• alt.os.linux
• comp.os.linux.networking
• comp.os.linux.security
• comp.os.linux.setup
One way to find out about new tools and services is to read Usenet news. Thecomp.os.linux hierarchy is of particular interest to Linux users; for example, newsabout newly released software for Linux is posted to comp.os.linux.announce. Peo-ple often announce the availability of free software there, along with instructions onhow to get a copy for your own use using anonymous FTP (page 735). Other toolsto help you find resources, both old and new, exist on the network; see Appendix B.
WWW: World Wide Web
The World Wide Web (WWW, W3, or the Web) provides a unified, interconnectedinterface to the vast amount of information stored on computers around the world.The idea that spawned the World Wide Web came from the mind of Tim Berners-Lee(www.w3.org/People/Berners-Lee) of the European Particle Physics Laboratory(CERN) in response to a need to improve communications throughout the high-energy physics community. The first-generation solution consisted of a notebook pro-gram named Enquire, short for Enquire Within Upon Everything (the name of abook from Berners-Lee’s childhood), which he created in 1980 on a NeXT computerand which supported links between named nodes. Not until 1989 was the conceptproposed as a global hypertext project to be known as the World Wide Web. In 1990,Berners-Lee wrote a proposal for a hypertext project, which eventually producedHTML (Hypertext Markup Language), the common language of the Web. The WorldWide Web program became available on the Internet in the summer of 1991. Bydesigning the tools to work with existing protocols, such as FTP and gopher, theresearchers who created the Web produced a system that is generally useful for manytypes of information and across many types of hardware and operating systems.
The WWW is another example of the client/server paradigm. You use a WWW clientapplication, or browser, to retrieve and display information stored on a server that maybe located anywhere on your local network or the Internet. WWW clients can interactwith many types of servers. For example, you can use a WWW client to contact a remote

WWW: World Wide Web 391
FTP server and display the list of files it offers for anonymous FTP. Most commonly youuse a WWW client to contact a WWW server, which offers support for the special fea-tures of the World Wide Web that are described in the remainder of this chapter.
The power of the Web derives from its use of hypertext, a way to navigate throughinformation by following cross-references (called links) from one piece of informa-tion to another. To use the Web effectively, you need to run interactive networkapplications. The first GUI for browsing the Web was a tool named Mosaic, whichwas released in February 1993. Designed at the National Center for SupercomputerApplications at the University of Illinois, its introduction sparked a dramaticincrease in the number of users of the World Wide Web. Marc Andreessen, whoparticipated in the Mosaic project at the University of Illinois, later cofoundedNetscape Communications with the founder of Silicon Graphics, Jim Clark. Thepair created Netscape Navigator, a Web client program that was designed to per-form better and support more features than the Mosaic browser. Netscape Naviga-tor has enjoyed immense success and has become a popular choice for exploring theWorld Wide Web. Important for Linux users is the fact that from its inceptionNetscape has provided versions of its tools that run on Linux. Also, Netscape cre-ated Mozilla (mozilla.org) as an open-source browser project.
These browsers provide GUIs that allow you to listen to sounds, watch Web eventsor live news reports, and display pictures as well as text, giving you access to hyper-media. A picture on your screen may be a link to more detailed, nonverbal informa-tion, such as a copy of the same picture at a higher resolution or a short animation.If your system can produce audio output, you can listen to audio clips that havebeen linked to a document.
URL: Uniform Resource Locator
Consider the URL http://www.w3.org/Consortium/siteindex. The first componentin the URL indicates the type of resource, in this case http (HTTP—HypertextTransfer Protocol). Other valid resource names, such as https (HTTPS—secureHTTP) and ftp (FTP—File Transfer Protocol), represent information available onthe Web using other protocols. Next come a colon and double slash (://). Fre-quently the http:// string is omitted from a URL in print, as you seldom need toenter it to reach the URL. The next element is the full name of the host that acts asthe server for the information (www.w3.org/). The rest of the URL consists of a rel-ative pathname to the file that contains the information (Consortium/siteindex). Ifyou enter a URL in the location bar of a Web browser, the Web server returns thepage, frequently an HTML (page 1040) file, pointed to by this URL.
By convention many sites identify their WWW servers by prefixing a host ordomain name with www. For example, you can reach the Web server at the NewJersey Institute of Technology at www.njit.edu. When you use a browser to explorethe World Wide Web, you may never need to enter a URL. However, as more infor-mation is published in hypertext form, you cannot help but find URLs every-where—not just online in email messages and Usenet articles, but also innewspapers, in advertisements, and on product labels.

392 Chapter 10 Networking and the Internet
Browsers
Mozilla (www.mozilla.org) is the open-source counterpart to Netscape. Mozilla,which was first released in March 1998, was based on Netscape 4 code. Since then,Mozilla has been under continuous development by employees of Netscape (now adivision of AOL) and other companies and by contributors from the community.Firefox is the Web browser component of Mozilla. KDE offers Konqueror, an all-purpose file manager and Web browser. Other browsers include Epiphany(www.gnome.org/projects/epiphany) and Opera (www.opera.com). Although eachWeb browser is unique, all of them allow you to move about the Internet, viewingHTML documents, listening to sounds, and retrieving files. If you do not use the XWindow System, try a text browser, such as lynx or links. The lynx browser workswell with Braille terminals.
Search Engines
Search engine is a name that applies to a group of hardware and software tools thathelp you search for World Wide Web sites that contain specific information. Asearch engine relies on a database of information collected by a Web crawler, a pro-gram that regularly looks through the millions of pages that make up the WorldWide Web. A search engine must also have a way of collating the information theWeb crawler collects so that you can access it quickly, easily, and in a manner thatmakes it most useful to you. This part of the search engine, called an index, allowsyou to search for a word, a group of words, or a concept; it returns the URLs ofWeb pages that pertain to what you are searching for. Many different types ofsearch engines are available on the Internet, each with its own set of strengths andweaknesses.
Chapter Summary
A Linux system attached to a network is probably communicating on an Ethernet,which may in turn be linked to other local area networks (LANs) and wide area net-works (WANs). Communication between LANs and WANs requires the use of gate-ways and routers. Gateways translate the local data into a format suitable for theWAN, and routers make decisions about the optimal routing of the data along theway. The most widely used network, by far, is the Internet.
Basic networking tools allow Linux users to log in and run commands on remotesystems (ssh, telnet) and copy files quickly from one system to another (scp, ftp/sftp).Many tools that were originally designed to support communication on a single-host computer (for example, finger and talk) have since been extended to recognizenetwork addresses, thus allowing users on different systems to interact with oneanother. Other features, such as the Network Filesystem (NFS), were created toextend the basic UNIX model and to simplify information sharing.

Exercises 393
Concern is growing about our ability to protect the security and privacy ofmachines connected to networks and of data transmitted over networks. Towardthis end, many new tools and protocols have been created: ssh, scp, HTTPS, IPv6,firewall hardware and software, VPN, and so on. Many of these tools take advan-tage of newer, more impenetrable encryption techniques. In addition, some weakerconcepts (such as that of trusted hosts) and some tools (such as finger and rwho) arebeing discarded in the name of security.
Computer networks offer two major advantages over other ways of connectingcomputers: They enable systems to communicate at high speeds and they requirefew physical interconnections (typically one per system, often on a shared cable).The Internet Protocol (IP), the universal language of the Internet, has made it possi-ble for dissimilar computer systems around the world to readily communicate withone another. Technological advances continue to improve the performance of com-puter systems and the networks that link them.
One way to gather information on the Internet is via Usenet. Many Linux users rou-tinely peruse Usenet news (netnews) to learn about the latest resources available fortheir systems. Usenet news is organized into newsgroups that cover a wide range oftopics, computer-related and otherwise. To read Usenet news, you need to haveaccess to a news server and the appropriate client software. Many modern emailprograms, such as Mozilla and Netscape, can display netnews.
The rapid increase of network communication speeds in recent years has encour-aged the development of many new applications and services. The World Wide Webprovides access to vast information stores on the Internet and makes extensive useof hypertext links to promote efficient searching through related documents. Itadheres to the client/server model that is so pervasive in networking. Typically theWWW client is local to a site or is made available through an Internet service pro-vider. WWW servers are responsible for providing the information requested bytheir many clients.
Mozilla/Firefox is a WWW client program that has enormous popular appeal. Fire-fox and other browsers use a GUI to give you access to text, picture, and audioinformation: Making extensive use of these hypermedia simplifies access to andenhances the presentation of information.
Exercises
1. Describe the similarities and differences between these utilities:
a. scp and ftp
b. ssh and telnet
c. rsh and ssh

394 Chapter 10 Networking and the Internet
2. Assuming rwho is disabled on the systems on your LAN, describe two ways to find out who is logged in on some of the other machines attached to your network.
3. Explain the client/server model. Give three examples of services on Linux systems that take advantage of this model.
4. A software implementation of chess was developed by GNU and is available for free. How can you use the Internet to find a copy and download it?
5. What is the difference between the World Wide Web and the Internet?
6. If you have access to the World Wide Web, answer the following questions.
a. Which browser do you use?
b. What is the URL of the author of this book’s home page? How many links does it have?
c. Does your browser allow you to create bookmarks? If so, how do you create a bookmark? How can you delete one?
7. Give one advantage and two disadvantages of using a wireless network.
Advanced Exercises
8. Suppose the link between routers 1 and 2 is down in the Internet shown in Figure 10-1 on page 360. What happens if someone at site C sends a mes-sage to a user on a workstation attached to the Ethernet cable at site A? What happens if the router at site A is down? What does this tell you about designing network configurations?
9. If you have a class B network and want to divide it into subnets, each with 126 hosts, which subnet mask should you use? How many networks will be available? What are the four addresses (broadcast and network num-ber) for the network starting at 131.204.18?
10. Suppose you have 300 hosts and want to have no more than 50 hosts per subnet. What size of address block should you request from your ISP? How many class C–equivalent addresses would you need? How many sub-nets would you have left over from your allocation?
11. a. On your system, find two daemons running that are not listed in this chapter and explain what purpose they serve.
a.b. Review which services/daemons are automatically started on your system, and consider which you might turn off. Are there any services/daemons in the list in Table 10-4 on page 384 that you would consider adding?

395395
11Chapter11Chapter 7 introduced the shells and Chapter 9 went into detailabout the Bourne Again Shell. This chapter introduces additionalBourne Again Shell commands, builtins, and concepts that carryshell programming to a point where it can be useful. The firstpart of this chapter covers programming control structures,which are also known as control flow constructs. These struc-tures allow you to write scripts that can loop over command linearguments, make decisions based on the value of a variable, setup menus, and more. The Bourne Again Shell uses the same con-structs found in such high-level programming languages as C.
Although you may make use of shell programming as a systemadministrator, reading this chapter is not required to performsystem administration tasks. Feel free to skip this chapter andcome back to it when you will find it most useful.
The next part of this chapter discusses parameters and vari-ables, going into detail about array variables, local versus glo-bal variables, special parameters, and positional parameters.The exploration of builtin commands covers type, which dis-plays information about a command, and read, which allows
In This Chapter
Control Structures . . . . . . . . . . . . . 396
File Descriptors . . . . . . . . . . . . . . . 429
Parameters and Variables . . . . . . 432
Array Variables . . . . . . . . . . . . . . . 432
Locality of Variables . . . . . . . . . . . 434
Special Parameters. . . . . . . . . . . . 436
Positional Parameters. . . . . . . . . . 438
Builtin Commands . . . . . . . . . . . . 444
Expressions . . . . . . . . . . . . . . . . . . 458
Shell Programs . . . . . . . . . . . . . . . 466
A Recursive Shell Script . . . . . . . . 467
The quiz Shell Script. . . . . . . . . . . 470
11
Programming the
Bourne Again Shell

396 Chapter 11 Programming the Bourne Again Shell
you to accept user input in a shell script. The section on the exec builtin demon-strates how exec provides an efficient way to execute a command by replacing aprocess and explains how you can use it to redirect input and output from within ascript. The next section covers the trap builtin, which provides a way to detect andrespond to operating system signals (such as that which is generated when you pressCONTROL-C). The discussion of builtins concludes with a discussion of kill, which canabort a process, and getopts, which makes it easy to parse options for a shell script.(Table 11-6 on page 457 lists some of the more commonly used builtins.)
Next the chapter examines arithmetic and logical expressions and the operatorsthat work with them. The final section walks through the design and implementa-tion of two major shell scripts.
This chapter contains many examples of shell programs. Although they illustratecertain concepts, most use information from earlier examples as well. This overlapnot only reinforces your overall knowledge of shell programming but also demon-strates how you can combine commands to solve complex tasks. Running, modify-ing, and experimenting with the examples in this book is a good way to becomecomfortable with the underlying concepts.
This chapter illustrates concepts with simple examples, which are followed by morecomplex ones in sections marked “Optional.” The more complex scripts illustrate tra-ditional shell programming practices and introduce some Linux utilities often used inscripts. You can skip these sections without loss of continuity the first time you readthe chapter. Return to them later when you feel comfortable with the basic concepts.
Control Structures
The control flow commands alter the order of execution of commands within a shellscript. Control structures include the if...then, for...in, while, until, and case state-ments. In addition, the break and continue statements work in conjunction with thecontrol structures to alter the order of execution of commands within a script.
if...then
The if...then control structure has the following syntax:
if test-commandthen
commandsfi
Do not name a shell script testtip You can unwittingly create a problem if you give a shell script the name test because a Linux utility
has the same name. Depending on how the PATH variable is set up and how you call the program,you may run your script or the utility, leading to confusing results.

Control Structures 397
The bold words in the syntax description are the items you supply to cause thestructure to have the desired effect. The nonbold words are the keywords the shelluses to identify the control structure.
test builtin Figure 11-1 shows that the if statement tests the status returned by the test-commandand transfers control based on this status. The end of the if structure is marked by afi statement, (if spelled backward). The following script prompts for two words,reads them, and then uses an if structure to execute commands based on the resultreturned by the test builtin when it compares the two words. (See the test info pagefor information on the test utility, which is similar to the test builtin.) The test buil-tin returns a status of true if the two words are the same and false if they are not.Double quotation marks around $word1 and $word2 make sure that test worksproperly if you enter a string that contains a SPACE or other special character:
$ cat if1echo -n "word 1: "read word1echo -n "word 2: "read word2
if test "$word1" = "$word2"then
echo "Match"fiecho "End of program."
Figure 11-1 An if...then flowchart
thencommands
fi
iftest-command
True
False

398 Chapter 11 Programming the Bourne Again Shell
$ if1word 1: peachword 2: peachMatchEnd of program.
In the preceding example the test-command is test "$word1" = "$word2". The testbuiltin returns a true status if its first and third arguments have the relationshipspecified by its second argument. If this command returns a true status (= 0), theshell executes the commands between the then and fi statements. If the commandreturns a false status (not = 0), the shell passes control to the statement following fiwithout executing the statements between then and fi. The effect of this if statementis to display Match if the two words are the same. The script always displays End ofprogram.
Builtins In the Bourne Again Shell, test is a builtin—part of the shell. It is also a stand-aloneutility kept in /usr/bin/test. This chapter discusses and demonstrates many BourneAgain Shell builtins. You usually use the builtin version if it is available and the util-ity if it is not. Each version of a command may vary slightly from one shell to thenext and from the utility to any of the shell builtins. See page 444 for more informa-tion on shell builtins.
Checking arguments The next program uses an if structure at the beginning of a script to check that youhave supplied at least one argument on the command line. The –eq test operator com-pares two integers, where the $# special parameter (page 439) takes on the value ofthe number of command line arguments. This structure displays a message and exitsfrom the script with an exit status of 1 if you do not supply at least one argument:
$ cat chkargsif test $# -eq 0
thenecho "You must supply at least one argument."exit 1
fiecho "Program running."$ chkargsYou must supply at least one argument.$ chkargs abcProgram running.
A test like the one shown in chkargs is a key component of any script thatrequires arguments. To prevent the user from receiving meaningless or confusinginformation from the script, the script needs to check whether the user has sup-plied the appropriate arguments. Sometimes the script simply tests whether argu-ments exist (as in chkargs). Other scripts test for a specific number or specifickinds of arguments.
You can use test to ask a question about the status of a file argument or the relation-ship between two file arguments. After verifying that at least one argument has beengiven on the command line, the following script tests whether the argument is the

Control Structures 399
name of an ordinary file (not a directory or other type of file) in the working direc-tory. The test builtin with the –f option and the first command line argument ($1)check the file:
$ cat is_ordfileif test $# -eq 0
thenecho "You must supply at least one argument."exit 1
fiif test -f "$1"
thenecho "$1 is an ordinary file in the working directory"
elseecho "$1 is NOT an ordinary file in the working directory"
fi
You can test many other characteristics of a file with test and various options.Table 11-1 lists some of these options.
Other test options provide ways to test relationships between two files, such aswhether one file is newer than another. Refer to later examples in this chapter formore detailed information.
[ ] is a synonymfor test
The following example—another version of chkargs—checks for arguments in away that is more traditional for Linux shell scripts. The example uses the bracket([]) synonym for test. Rather than using the word test in scripts, you can surroundthe arguments to test with brackets. The brackets must be surrounded by white-space (SPACEs or TABs).
Table 11-1 Options to the test builtin
Option Tests file to see if it
–d Exists and is a directory file
–e Exists
–f Exists and is an ordinary file (not a directory)
–r Exists and is readable
–s Exists and has a size greater than 0 bytes
–w Exists and is writable
–x Exists and is executable
Always test the argumentstip To keep the examples in this book short and focused on specific concepts, the code to verify argu-
ments is often omitted or abbreviated. It is a good practice to test arguments in shell programsthat other people will use. Doing so results in scripts that are easier to run and debug.

400 Chapter 11 Programming the Bourne Again Shell
$ cat chkargs2if [ $# -eq 0 ]
thenecho "Usage: chkargs2 argument..." 1>&2exit 1
fiecho "Program running."exit 0$ chkargs2Usage: chkargs2 arguments$ chkargs2 abcProgram running.
Usage message The error message that chkargs2 displays is called a usage message and uses the1>&2 notation to redirect its output to standard error (page 280). After issuing theusage message, chkargs2 exits with an exit status of 1, indicating that an error hasoccurred. The exit 0 command at the end of the script causes chkargs2 to exit witha 0 status after the program runs without an error. The Bourne Again Shell returns a0 status if you omit the status code.
The usage message is commonly employed to specify the type and number of argu-ments the script takes. Many Linux utilities provide usage messages similar to theone in chkargs2. If you call a utility or other program with the wrong number orkind of arguments, you will often see a usage message. Following is the usage mes-sage that cp displays when you call it without any arguments:
$ cpcp: missing file argumentTry 'cp --help' for more information.
if...then...else
The introduction of an else statement turns the if structure into the two-way branchshown in Figure 11-2. The if...then...else control structure has the following syntax:
if test-commandthen
commandselse
commandsfi
Because a semicolon (;) ends a command just as a NEWLINE does, you can place then onthe same line as if by preceding it with a semicolon. (Because if and then are sepa-rate builtins, they require a command separator between them; a semicolon and NEW-
LINE work equally well.) Some people prefer this notation for aesthetic reasons, whileothers like it because it saves space:
if test-command; thencommands
elsecommands
fi

Control Structures 401
If the test-command returns a true status, the if structure executes the commandsbetween the then and else statements and then diverts control to the statement fol-lowing fi. If the test-command returns a false status, the if structure executes thecommands following the else statement.
When you run the next script, named out, with arguments that are filenames, it dis-plays the files on the terminal. If the first argument is –v (called an option in thiscase), out uses less (page 148) to display the files one page at a time. After determin-ing that it was called with at least one argument, out tests its first argument to seewhether it is –v. If the result of the test is true (if the first argument is –v), out usesthe shift builtin to shift the arguments to get rid of the –v and displays the files usingless. If the result of the test is false (if the first argument is not –v), the script uses catto display the files:
$ cat outif [ $# -eq 0 ]
thenecho "Usage: out [-v] filenames..." 1>&2exit 1
fi
if [ "$1" = "-v" ]then
shiftless -- "$@"
elsecat -- "$@"
fi
Figure 11-2 An if ...then...else flowchart
fi
iftest-commandTrue False
elsecommands
thencommands

402 Chapter 11 Programming the Bourne Again Shell
optional In out the –– argument to cat and less tells these utilities that no more options fol-low on the command line and not to consider leading hyphens (–) in the followinglist as indicating options. Thus –– allows you to view a file with a name that startswith a hyphen. Although not common, filenames beginning with a hyphen do occa-sionally occur. (You can create such a file by using the command cat > –fname.) The–– argument works with all Linux utilities that use the getopts builtin (page 454) toparse their options; it does not work with more and a few other utilities. This argu-ment is particularly useful when used in conjunction with rm to remove a file whosename starts with a hyphen (rm –– –fname), including any that you create whileexperimenting with the –– argument.
Figure 11-3 An if ...then...elif flowchart
fi
iftest-command
True False
elsecommands
thencommands elif
test-commandTrue False
thencommands

Control Structures 403
if...then...elif The if...then...elif control structure (Figure 11-3) has the following syntax:
if test-commandthen
commandselif test-command
thencommands
. . .else
commandsfi
The elif statement combines the else statement and the if statement and allows youto construct a nested set of if...then...else structures (Figure 11-3). The differencebetween the else statement and the elif statement is that each else statement must bepaired with a fi statement, whereas multiple nested elif statements require only a sin-gle closing fi statement.
The following example shows an if...then...elif control structure. This shell script com-pares three words that the user enters. The first if statement uses the Boolean operatorAND (–a) as an argument to test. The test builtin returns a true status only if the firstand second logical comparisons are true (that is, if word1 matches word2 and word2matches word3). If test returns a true status, the script executes the command followingthe next then statement, passes control to the statement following fi, and terminates:
$ cat if3echo -n "word 1: "read word1echo -n "word 2: "read word2echo -n "word 3: "read word3
if [ "$word1" = "$word2" -a "$word2" = "$word3" ]then
echo "Match: words 1, 2, & 3"elif [ "$word1" = "$word2" ]then
echo "Match: words 1 & 2"elif [ "$word1" = "$word3" ]then
echo "Match: words 1 & 3"elif [ "$word2" = "$word3" ]then
echo "Match: words 2 & 3"else
echo "No match"fi

404 Chapter 11 Programming the Bourne Again Shell
$ if3word 1: appleword 2: orangeword 3: pearNo match$ if3word 1: appleword 2: orangeword 3: appleMatch: words 1 & 3$ if3word 1: appleword 2: appleword 3: appleMatch: words 1, 2, & 3
If the three words are not the same, the structure passes control to the first elif,which begins a series of tests to see if any pair of words is the same. As the nestingcontinues, if any one of the if statements is satisfied, the structure passes controlto the next then statement and subsequently to the statement following fi. Eachtime an elif statement is not satisfied, the structure passes control to the next elifstatement. The double quotation marks around the arguments to echo that con-tain ampersands (&) prevent the shell from interpreting the ampersands as specialcharacters.
optional The lnks Script
The following script, named lnks, demonstrates the if...then and if...then...elif con-trol structures. This script finds hard links to its first argument, a filename. If youprovide the name of a directory as the second argument, lnks searches for links inthat directory and all subdirectories. If you do not specify a directory, lnks searchesthe working directory and its subdirectories. This script does not locate symboliclinks.
$ cat lnks#!/bin/bash# Identify links to a file# Usage: lnks file [directory]
if [ $# -eq 0 -o $# -gt 2 ]; thenecho "Usage: lnks file [directory]" 1>&2exit 1
fiif [ -d "$1" ]; then
echo "First argument cannot be a directory." 1>&2echo "Usage: lnks file [directory]" 1>&2exit 1
elsefile="$1"
fi

Control Structures 405
if [ $# -eq 1 ]; thendirectory="."
elif [ -d "$2" ]; thendirectory="$2"
elseecho "Optional second argument must be a directory." 1>&2echo "Usage: lnks file [directory]" 1>&2exit 1
fi
# Check that file exists and is an ordinary file:if [ ! -f "$file" ]; then
echo "lnks: $file not found or special file" 1>&2exit 1
fi# Check link count on fileset -- $(ls -l "$file")linkcnt=$2if [ "$linkcnt" -eq 1 ]; then
echo "lnks: no other hard links to $file" 1>&2exit 0
fi
# Get the inode of the given fileset $(ls -i "$file")
inode=$1
# Find and print the files with that inode numberecho "lnks: using find to search for links..." 1>&2find "$directory" -xdev -inum $inode -print
Alex has a file named letter in his home directory. He wants to find links to this filein his and other users’ home directory file trees. In the following example, Alexcalls lnks from his home directory to perform the search. The second argument tolnks, /home, is the pathname of the directory he wants to start the search in. Thelnks script reports that /home/alex/letter and /home/jenny/draft are links to thesame file:
$ lnks letter /homelnks: using find to search for links.../home/alex/letter/home/jenny/draft
In addition to the if...then...elif control structure, lnks introduces other features thatare commonly used in shell programs. The following discussion describes lnks sec-tion by section.
Specify the shell The first line of the lnks script uses #! (page 284) to specify the shell that will exe-cute the script:
#!/bin/bash

406 Chapter 11 Programming the Bourne Again Shell
In this chapter the #! notation appears only in more complex examples. It ensuresthat the proper shell executes the script, even when the user is running a differentshell or the script is called from another shell script.
Comments The second and third lines of lnks are comments; the shell ignores the text that fol-lows a pound sign up to the next NEWLINE character. These comments in lnks brieflyidentify what the file does and how to use it:
# Identify links to a file# Usage: lnks file [directory]
Usage messages The first if statement tests whether lnks was called with zero arguments or morethan two arguments:
if [ $# -eq 0 -o $# -gt 2 ]; thenecho "Usage: lnks file [directory]" 1>&2exit 1
fi
If either of these conditions is true, lnks sends a usage message to standard errorand exits with a status of 1. The double quotation marks around the usage messageprevent the shell from interpreting the brackets as special characters. The bracketsin the usage message indicate that the directory argument is optional.
The second if statement tests whether the first command line argument ($1) is adirectory (the –d argument to test returns a true value if the file exists and is adirectory):
if [ -d "$1" ]; thenecho "First argument cannot be a directory." 1>&2echo "Usage: lnks file [directory]" 1>&2exit 1
elsefile="$1"
fi
If the first argument is a directory, lnks displays a usage message and exits. If it isnot a directory, lnks saves the value of $1 in the file variable because later in thescript set resets the command line arguments. If the value of $1 is not saved beforethe set command is issued, its value will be lost.
Test the arguments The next section of lnks is an if...then...elif statement:
if [ $# -eq 1 ]; thendirectory="."
elif [ -d "$2" ]; thendirectory="$2"
elseecho "Optional second argument must be a directory." 1>&2echo "Usage: lnks file [directory]" 1>&2exit 1
fi
Control Structures 407
The first test-command determines whether the user specified a single argumenton the command line. If the test-command returns 0 (true), the user-created vari-able named directory is assigned the value of the working directory (.). If the test-command returns false, the elif statement tests whether the second argument is adirectory. If it is a directory, the directory variable is set equal to the second com-mand line argument, $2. If $2 is not a directory, lnks sends a usage message tostandard error and exits with a status of 1.
The next if statement in lnks tests whether $file does not exist. This test keeps lnksfrom wasting time looking for links to a nonexistent file.
The test builtin with the three arguments !, –f, and $file evaluates to true if the file$file does not exist:
[ ! -f "$file" ]
The ! operator preceding the –f argument to test negates its result, yielding false ifthe file $file does exist and is an ordinary file.
Next lnks uses set and ls –l to check the number of links $file has:
# Check link count on fileset -- $(ls -l "$file")linkcnt=$2if [ "$linkcnt" -eq 1 ]; then
echo "lnks: no other hard links to $file" 1>&2exit 0
fi
The set builtin uses command substitution (page 344) to set the positional parame-ters to the output of ls –l. The second field in this output is the link count, so theuser-created variable linkcnt is set equal to $2. The –– used with set prevents setfrom interpreting as an option the first argument produced by ls –l (the first argu-ment is the access permissions for the file and typically begins with –). The if state-ment checks whether $linkcnt is equal to 1; if it is, lnks displays a message andexits. Although this message is not truly an error message, it is redirected to stan-dard error. The way lnks has been written, all informational messages are sent tostandard error. Only the final product of lnks—the pathnames of links to the speci-fied file—is sent to standard output, so you can redirect the output as you please.
If the link count is greater than one, lnks goes on to identify the inode (page 1041)for $file. As explained on page 212, comparing the inodes associated with filenamesis a good way to determine whether the filenames are links to the same file. The lnksscript uses set to set the positional parameters to the output of ls –i. The first argu-ment to set is the inode number for the file, so the user-created variable namedinode is assigned the value of $1:
# Get the inode of the given fileset $(ls -i "$file")
inode=$1

408 Chapter 11 Programming the Bourne Again Shell
Finally lnks uses the find utility to search for files having inode numbers that match$inode:
# Find and print the files with that inode numberecho "lnks: using find to search for links..." 1>&2find "$directory" -xdev -inum $inode -print
The find utility searches for files that meet the criteria specified by its arguments,beginning its search with the directory specified by its first argument ($directory)and searching all subdirectories. The remaining arguments specify that the file-names of files having inodes matching $inode should be sent to standard output.Because files in different filesystems can have the same inode number and not belinked, find must search only directories in the same filesystem as $directory. The–xdev argument prevents find from searching directories on other filesystems. Referto page 209 for more information about filesystems and links.
The echo command preceding the find command in lnks, which tells the user thatfind is running, is included because find frequently takes a long time to run. Becauselnks does not include a final exit statement, the exit status of lnks is that of the lastcommand it runs, find.
Debugging Shell Scripts
When you are writing a script such as lnks, it is easy to make mistakes. You can usethe shell’s –x option to help debug a script. This option causes the shell to displayeach command before it runs the command. Tracing a script’s execution in this waycan give you information about where a problem lies.
You can run lnks as in the previous example and cause the shell to display eachcommand before it is executed. Either set the –x option for the current shell (set –x)so that all scripts display commands as they are run or use the –x option to affectonly the shell that is running the script called by the command line.
$ bash -x lnks letter /home+ '[' 2 -eq 0 -o 2 -gt 2 ']'+ '[' -d letter ']'+ file=letter+ '[' 2 -eq 1 ']'+ '[' -d /home ']'+ directory=/home+ '[' '!' -f letter ']'...
PS4 Each command that the script executes is preceded by the value of the PS4 vari-able—a plus sign (+) by default, so you can distinguish debugging output fromscript-produced output. You must export PS4 if you set it in the shell that calls thescript. The next command sets PS4 to >>>> followed by a SPACE and exports it:
$ export PS4='>>>> '

Control Structures 409
You can also set the –x option of the shell running the script by putting the follow-ing set command at the top of the script:
set -x
Put set –x anywhere in the script you want to turn debugging on. Turn the debug-ging option off with a plus sign.
set +x
The set –o xtrace and set +o xtrace commands do the same things as set –x and set+x, respectively.
for...in
The for...in control structure has the following syntax:
for loop-index in argument-listdo
commandsdone
Figure 11-4 A for...in flowchart
Assign nextargument inargument-listto loop-index
do
commands
Anotherargument in argument-list
done
Yes
No
?

410 Chapter 11 Programming the Bourne Again Shell
The for...in structure (Figure 11-4, previous page) assigns the value of the first argu-ment in the argument-list to the loop-index and executes the commands betweenthe do and done statements. The do and done statements mark the beginning andend of the for loop.
After it passes control to the done statement, the structure assigns the value of thesecond argument in the argument-list to the loop-index and repeats the commands.The structure repeats the commands between the do and done statements one timefor each argument in the argument-list. When the structure exhausts the argument-list, it passes control to the statement following done.
The following for...in structure assigns apples to the user-created variable fruit andthen displays the value of fruit, which is apples. Next the structure assigns orangesto fruit and repeats the process. When it exhausts the argument list, the structuretransfers control to the statement following done, which displays a message.
$ cat fruitfor fruit in apples oranges pears bananasdo
echo "$fruit"doneecho "Task complete."
$ fruitapplesorangespearsbananasTask complete.
The next script lists the names of the directory files in the working directory bylooping over all the files, using test to determine which files are directories:
$ cat dirfilesfor i in *do
if [ -d "$i" ]then
echo "$i"fi
done
The ambiguous file reference character * matches the names of all files (except hid-den files) in the working directory. Prior to executing the for loop, the shell expandsthe * and uses the resulting list to assign successive values to the index variable i.
for The for control structure has the following syntax:
for loop-indexdo
commandsdone
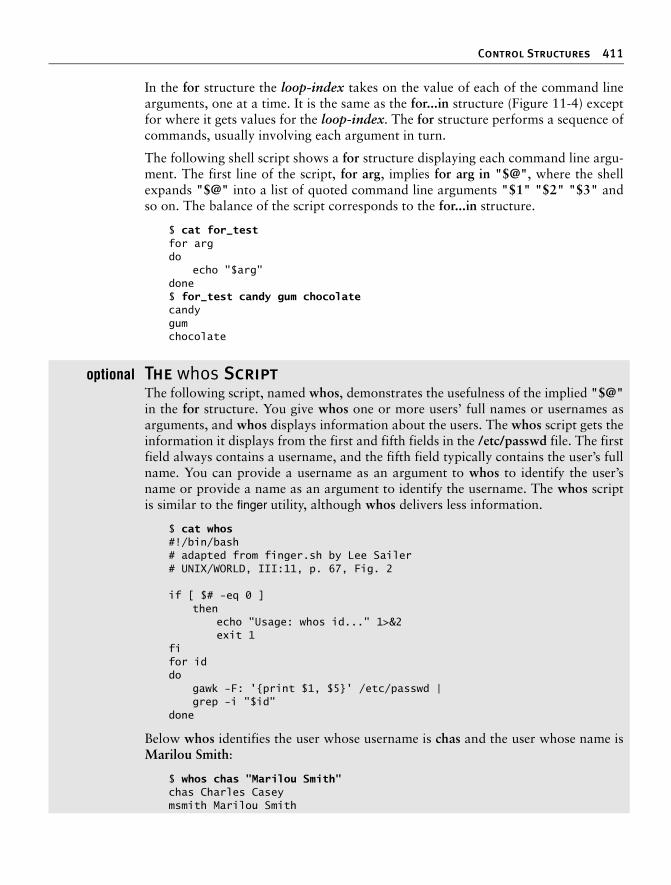
Control Structures 411
In the for structure the loop-index takes on the value of each of the command linearguments, one at a time. It is the same as the for...in structure (Figure 11-4) exceptfor where it gets values for the loop-index. The for structure performs a sequence ofcommands, usually involving each argument in turn.
The following shell script shows a for structure displaying each command line argu-ment. The first line of the script, for arg, implies for arg in "$@", where the shellexpands "$@" into a list of quoted command line arguments "$1" "$2" "$3" andso on. The balance of the script corresponds to the for...in structure.
$ cat for_testfor argdo
echo "$arg"done$ for_test candy gum chocolatecandygumchocolate
optional The whos Script
The following script, named whos, demonstrates the usefulness of the implied "$@"in the for structure. You give whos one or more users’ full names or usernames asarguments, and whos displays information about the users. The whos script gets theinformation it displays from the first and fifth fields in the /etc/passwd file. The firstfield always contains a username, and the fifth field typically contains the user’s fullname. You can provide a username as an argument to whos to identify the user’sname or provide a name as an argument to identify the username. The whos scriptis similar to the finger utility, although whos delivers less information.
$ cat whos#!/bin/bash# adapted from finger.sh by Lee Sailer# UNIX/WORLD, III:11, p. 67, Fig. 2
if [ $# -eq 0 ]then
echo "Usage: whos id..." 1>&2exit 1
fifor iddo
gawk -F: '{print $1, $5}' /etc/passwd |grep -i "$id"
done
Below whos identifies the user whose username is chas and the user whose name isMarilou Smith:
$ whos chas "Marilou Smith"chas Charles Caseymsmith Marilou Smith

412 Chapter 11 Programming the Bourne Again Shell
Use of "$@" The whos script uses a for statement to loop through the command line arguments.In this script the implied use of "$@" in the for loop is particularly beneficialbecause it causes the for loop to treat an argument that contains a SPACE as a singleargument. This example quotes Marilou Smith, which causes the shell to pass it tothe script as a single argument. Then the implied "$@" in the for statement causesthe shell to regenerate the quoted argument Marilou Smith so that it is again treatedas a single argument.
gawk For each command line argument, whos searches the /etc/passwd file. Inside the forloop the gawk utility extracts the first ($1) and fifth ($5) fields from the lines in/etc/passwd. The –F: option causes gawk to use a colon (:) as a field separator whenit reads /etc/passwd, allowing it to break each line into fields. The gawk commandsets and uses the $1 and $5 arguments; they are included within single quotationmarks and are not interpreted by the shell. Do not confuse these arguments withpositional parameters, which correspond to command line arguments. The first andfifth fields are sent to grep (page 151) via a pipe. The grep utility searches for $id(which has taken on the value of a command line argument) in its input. The –ioption causes grep to ignore case as it searches; grep displays each line in its inputthat contains $id.
| at the end of a line An interesting syntactical exception that bash gives the pipe symbol (|) appears onthe line with the gawk command: You do not have to quote a NEWLINE that immedi-ately follows a pipe symbol (that is, a pipe symbol that is the last thing on a line) tokeep the NEWLINE from executing a command. Try giving the command who | andpressing RETURN. The shell displays a secondary prompt. If you then enter sort fol-lowed by another RETURN, you see a sorted who list. The pipe works even though aNEWLINE follows the pipe symbol.
while
The while control structure has the following syntax:
while test-commanddo
commandsdone
As long as the test-command (Figure 11-5) returns a true exit status, the whilestructure continues to execute the series of commands delimited by the do and donestatements. Before each loop through the commands, the structure executes the test-command. When the exit status of the test-command is false, the structure passescontrol to the statement after the done statement.
test builtin The following shell script first initializes the number variable to zero. The test builtinthen determines whether number is less than 10. The script uses test with the –ltargument to perform a numerical test. For numerical comparisons, you must use –ne(not equal), –eq (equal), –gt (greater than), –ge (greater than or equal to), –lt (lessthan), or –le (less than or equal to). For string comparisons use = (equal) or != (notequal) when you are working with test. In this example, test has an exit status of 0(true) as long as number is less than 10. As long as test returns true, the structure

Control Structures 413
executes the commands between the do and done statements. See page 397 for infor-mation on the test utility, which is very similar to the test builtin.
$ cat count#!/bin/bashnumber=0while [ "$number" -lt 10 ]
doecho -n "$number"((number +=1))
doneecho$ count0123456789$
The echo command following do displays number. The –n prevents echo from issu-ing a NEWLINE following its output. The next command uses arithmetic evaluation[((...)); page 458] to increment the value of number by 1. The done statement termi-nates the loop and returns control to the while statement to start the loop overagain. The final echo causes count to send a NEWLINE character to standard output, sothat the next prompt occurs in the leftmost column on the display (rather thanimmediately following 9).
optional The spell_check Script
The aspell utility checks the words in a file against a dictionary of correctly spelledwords. With the –l option, aspell runs in list mode: Input comes from standard inputand aspell sends each potentially misspelled word to standard output. The followingcommand produces a list of possible misspellings in the file letter.txt:
$ aspell -l < letter.txtquiklyportiblefrendly
Figure 11-5 A while flowchart
whiletest-command
docommands
doneFalse
True

414 Chapter 11 Programming the Bourne Again Shell
The next shell script, named spell_check, shows another use of a while structure. Tofind the incorrect spellings in a file, you can use spell_check, which calls aspell tocheck a file against a system dictionary but goes a step further: It enables you tospecify a list of correctly spelled words and removes these words from the output ofaspell. This script is useful for removing words that you use frequently, such asnames and technical terms, that are not in a standard dictionary. Although you canduplicate the functionality of spell_check by using additional aspell dictionaries, thescript is included here for its instructive value.
The spell_check script requires two filename arguments: a file containing the list ofcorrectly spelled words and a file that you want to check. The first if statement ver-ifies that the user specified two arguments. The next two if statements verify thatboth arguments are readable files. (The exclamation point negates the sense of thefollowing operator; the –r operator causes test to determine whether a file is read-able. The result is a test that determines whether a file is not readable.)
$ cat spell_check#!/bin/bash# remove correct spellings from aspell outputif [ $# -ne 2 ]
thenecho "Usage: spell_check file1 file2" 1>&2echo "file1: list of correct spellings" 1>&2echo "file2: file to be checked" 1>&2exit 1
fi
if [ ! -r "$1" ]then
echo "spell_check: $1 is not readable" 1>&2exit 1
fi
if [ ! -r "$2" ]then
echo "spell_check: $2 is not readable" 1>&2exit 1
fi
aspell -l < "$2" |while read linedo
if ! grep "^$line$" "$1" > /dev/nullthen
echo $linefi
done
The spell_check script sends the output from aspell (with the –l option so that itproduces a list of misspelled words on standard output) through a pipe to standardinput of a while structure, which reads one line at a time (each line has one word on

Control Structures 415
it) from standard input. The test-command (that is, read line) returns a true exit sta-tus as long as it receives a line from standard input.
Inside the while loop an if statement1 monitors the return value of grep, which deter-mines whether the line that was read is in the user’s list of correctly spelled words.The pattern that grep searches for (the value of $line) is preceded and followed byspecial characters that specify the beginning and end of a line (^ and $, respectively).These special characters ensure that grep finds a match only if the $line variablematches an entire line in the file of correctly spelled words. (Otherwise, grep wouldmatch a string, such as paul, in the output of aspell if the file of correctly spelledwords contained the word paulson.) These special characters, together with thevalue of the $line variable, form a regular expression (Appendix A).
The output of grep is redirected to /dev/null (page 233) because the output is notneeded; only the exit code is important. The if statement checks the negated exit sta-tus of grep (the leading exclamation point negates or changes the sense of the exitstatus—true becomes false, and vice versa), which is 0 or true (false when negated)when a matching line is found. If the exit status is not 0 or false (true when negated),the word was not in the file of correctly spelled words. The echo builtin sends a listof words that are not in the file of correctly spelled words to standard output.
Once it detects the EOF (end of file), the read builtin returns a false exit status. Con-trol then passes out of the while structure, and the script terminates.
Before you use spell_check, create a file of correct spellings containing words thatyou use frequently but that are not in a standard dictionary. For example, if youwork for a company named Blinkenship and Klimowski, Attorneys, you would putBlinkenship and Klimowski into the file. The following example shows howspell_check checks the spelling in a file named memo and removes Blinkenship andKlimowski from the output list of incorrectly spelled words:
$ aspell -l < memoBlinkenshipKlimowskitargathte$ cat word_listBlinkenshipKlimowski$ spell_check word_list memotargathte
Refer to the aspell manual (in the /usr/share/doc/aspell directory or at aspell.net)for more information.
1. This if statement can also be written as
if ! grep -qw "$line" "$1"
The –q option suppresses the output from grep so that only an exit code is returned. The –w option causesgrep to match only a whole word.

416 Chapter 11 Programming the Bourne Again Shell
until The until and while structures are very similar, differing only in the sense of the testperformed at the top of the loop. Figure 11-6 shows that until continues to loopuntil the test-command returns a true exit status. The while structure loops whilethe test-command continues to return a true or nonerror condition. The until con-trol structure has the following syntax:
until test-commanddo
commandsdone
The following script demonstrates an until structure that includes read. When theuser enters the correct string of characters, the test-command is satisfied and thestructure passes control out of the loop.
$ cat until1secretname=jennyname=nonameecho "Try to guess the secret name!"echountil [ "$name" = "$secretname" ]do
echo -n "Your guess: "read name
doneecho "Very good."
$ until1Try to guess the secret name!
Your guess: helenYour guess: barbaraYour guess: rachaelYour guess: jennyVery good
Figure 11-6 An until flowchart
untiltest-command
docommands
done
False
True

Control Structures 417
The following locktty script is similar to the lock command on Berkeley UNIX andthe Lock Screen menu selection in GNOME. The script prompts you for a key(password) and uses an until control structure to lock the terminal. The until state-ment causes the system to ignore any characters typed at the keyboard until the usertypes in the key on a line by itself, which unlocks the terminal. The locktty scriptcan keep people from using your terminal while you are away from it for short peri-ods of time. It saves you from having to log out if you are concerned about otherusers using your login.
$ cat locktty#! /bin/bash# UNIX/WORLD, III:4
trap '' 1 2 3 18stty -echoecho -n "Key: "read key_1echoecho -n "Again: "read key_2echokey_3=if [ "$key_1" = "$key_2" ]
thentput clearuntil [ "$key_3" = "$key_2" ]do
read key_3done
elseecho "locktty: keys do not match" 1>&2
fistty echo
trap builtin The trap builtin (page 451) at the beginning of the locktty script stops a user frombeing able to terminate the script by sending it a signal (for example, by pressing theinterrupt key). Trapping signal 18 means that no one can use CONTROL-Z (job control, astop from a tty) to defeat the lock. (See Table 11-5 on page 451 for a list of signals.)The stty –echo command causes the terminal not to display characters typed at thekeyboard, thereby preventing the key that the user enters from appearing on thescreen. After turning off keyboard echo, the script prompts the user for a key, readsit into the user-created variable key_1, prompts the user to enter the same key again,and saves it in key_2. The statement key_3= creates a variable with a NULL value. Ifkey_1 and key_2 match, locktty clears the screen (with the tput command) andstarts an until loop. The until loop keeps attempting to read from the terminal and
Forget your password for locktty?
tip If you forget your key (password), you will need to log in from another (virtual) terminal and killthe process running locktty.

418 Chapter 11 Programming the Bourne Again Shell
assigning the input to the key_3 variable. Once the user types in a string thatmatches one of the original keys (key_2), the until loop terminates and keyboardecho is turned on again.
break and continueYou can interrupt a for, while, or until loop by using a break or continue statement.The break statement transfers control to the statement after the done statement,which terminates execution of the loop. The continue command transfers control tothe done statement, which continues execution of the loop.
The following script demonstrates the use of these two statements. The for...instructure loops through the values 1–10. The first if statement executes its com-mands when the value of the index is less than or equal to 3 ($index –le 3). Thesecond if statement executes its commands when the value of the index is greaterthan or equal to 8 ($index –ge 8). In between the two ifs, echo displays the valueof the index. For all values up to and including 3, the first if statement displayscontinue and executes a continue statement that skips echo $index and the secondif statement and continues with the next for statement. For the value of 8, the sec-ond if statement displays break and executes a break statement that exits from thefor loop:
$ cat brkfor index in 1 2 3 4 5 6 7 8 9 10
doif [ $index -le 3 ] ; then
echo "continue"continue
fi#
echo $index#
if [ $index -ge 8 ] ; thenecho "break"break
fidone
$ brkcontinuecontinuecontinue45678break

Control Structures 419
case
The case structure (Figure 11-7, page 420) is a multiple-branch decision mecha-nism. The path taken through the structure depends on a match or lack of a matchbetween the test-string and one of the patterns. The case control structure has thefollowing syntax:
case test-string inpattern-1)
commands-1;;
pattern-2)commands-2;;
pattern-3)commands-3;;
. . .esac
The following case structure examines the character that the user enters as the test-string. This value is held in the variable letter. If the test-string has a value of A, thestructure executes the command following the pattern A. The right parenthesis ispart of the case control structure, not part of the pattern. If the test-string has avalue of B or C, the structure executes the command following the matching pat-tern. The asterisk (*) indicates any string of characters and serves as a catchall incase there is no match. If no pattern matches the test-string and if there is no catch-all (*) pattern, control passes to the command following the esac statement, with-out the case structure taking any action.
$ cat case1echo -n "Enter A, B, or C: "read lettercase "$letter" in
A)echo "You entered A";;
B)echo "You entered B";;
C)echo "You entered C";;
*)echo "You did not enter A, B, or C";;
esac
$ case1Enter A, B, or C: BYou entered B

420 Chapter 11 Programming the Bourne Again Shell
The next execution of case1 shows the user entering a lowercase b. Because the test-string b does not match the uppercase B pattern (or any other pattern in the casestatement), the program executes the commands following the catchall pattern anddisplays a message:
$ case1Enter A, B, or C: bYou did not enter A, B, or C
The pattern in the case structure is analogous to an ambiguous file reference. It caninclude any of the special characters and strings shown in Table 11-2.
The next script accepts both uppercase and lowercase letters:
Figure 11-7 A case flowchart
case
esac
test-string=
pattern-1?
test-string=
pattern-2?
test-string=
pattern-3?
commands-1
commands-2
commands-3

Control Structures 421
$ cat case2echo -n "Enter A, B, or C: "read lettercase "$letter" in
a|A)echo "You entered A";;
b|B)echo "You entered B";;
c|C)echo "You entered C";;
*)echo "You did not enter A, B, or C";;
esac
$ case2Enter A, B, or C: bYou entered B
optional The following example shows how you can use the case structure to create a simplemenu. The command_menu script uses echo to present menu items and prompt theuser for a selection. (The select control structure [page 425] makes it much easier tocode a menu.) The case structure then executes the appropriate utility depending onthe user’s selection.
$ cat command_menu#!/bin/bash# menu interface to simple commands
echo -e "\n COMMAND MENU\n"echo " a. Current date and time"echo " b. Users currently logged in"echo " c. Name of the working directory"echo -e " d. Contents of the working directory\n"echo -n "Enter a, b, c, or d: "read answerecho
Table 11-2 Patterns
Pattern Function
* Matches any string of characters. Use for the default case.
? Matches any single character.
[...] Defines a character class. Any characters enclosed within brackets are tried, one at a time, in an attempt to match a single character. A hyphen between two characters specifies a range of characters.
| Separates alternative choices that satisfy a particular branch of the case structure.

422 Chapter 11 Programming the Bourne Again Shell
#case "$answer" in
a)date;;
b)who;;
c)pwd;;
d)ls;;
*)echo "There is no selection: $answer";;
esac
$ command_menu
COMMAND MENU
a. Current date and timeb. Users currently logged inc. Name of the working directoryd. Contents of the working directory
Enter a, b, c, or d: a
Wed Jan 2 12:31:12 PST 2008
echo –e The –e option causes echo to interpret \n as a NEWLINE character. If you do not includethis option, echo does not output the extra blank lines that make the menu easy toread but instead outputs the (literal) two-character sequence \n. The –e option causesecho to interpret several other backslash-quoted characters (Table 11-3). Rememberto quote (i.e., place double quotation marks around the string) the backslash-quotedcharacter so that the shell does not interpret it but passes the backslash and the char-acter to echo. See xpg_echo (page 337) for a way to avoid using the –e option.
Table 11-3 Special characters in echo (must use –e)
Quotedcharacter echo displays
\a Alert (bell)
\b BACKSPACE
\c Suppress trailing NEWLINE
\f FORMFEED
\n NEWLINE

Control Structures 423
You can also use the case control structure to take various actions in a script,depending on how many arguments the script is called with. The following script,named safedit, uses a case structure that branches based on the number of com-mand line arguments ($#). It saves a backup copy of a file you are editing with vim.
$ cat safedit#!/bin/bash# UNIX/WORLD, IV:11
PATH=/bin:/usr/binscript=$(basename $0)case $# in
0)vimexit 0;;
1)if [ ! -f "$1" ]
thenvim "$1"exit 0
fiif [ ! -r "$1" -o ! -w "$1" ]
thenecho "$script: check permissions on $1" 1>&2exit 1
elseeditfile=$1
fiif [ ! -w "." ]
thenecho "$script: backup cannot be " \
"created in the working directory" 1>&2exit 1
fi;;
*)echo "Usage: $script [file-to-edit]" 1>&2exit 1;;
esac
\r RETURN
\t Horizontal TAB
\v Vertical TAB
\\ Backslash
\nnn The character with the ASCII octal code nnn; if nnn is not valid, echo displays the string literally
Table 11-3 Special characters in echo (must use –e) (continued)

424 Chapter 11 Programming the Bourne Again Shell
tempfile=/tmp/$$.$scriptcp $editfile $tempfileif vim $editfile
thenmv $tempfile bak.$(basename $editfile)echo "$script: backup file created"
elsemv $tempfile editerrecho "$script: edit error--copy of " \
"original file is in editerr" 1>&2fi
If you call safedit without any arguments, the case structure executes its first branchand calls vim without a filename argument. Because an existing file is not beingedited, safedit does not create a backup file. If you call safedit with one argument, itruns the commands in the second branch of the case structure and verifies that thefile specified by $1 does not yet exist or is the name of a file for which the user hasread and write permission. The safedit script also verifies that the user has writepermission for the working directory. If the user calls safedit with more than oneargument, the third branch of the case structure presents a usage message and exitswith a status of 1.
Set PATH In addition to using a case structure for branching based on the number of com-mand line arguments, the safedit script introduces several other features. First, atthe beginning of the script, the PATH variable is set to search /bin and /usr/bin. Set-ting PATH in this way ensures that the commands executed by the script are stan-dard utilities, which are kept in those directories. By setting PATH inside a script,you can avoid the problems that might occur if users have set PATH to search theirown directories first and have scripts or programs with the same names as the utili-ties the script calls. You can also include absolute pathnames within a script toachieve this end, but this practice can make a script less portable.
Name of theprogram
In a second safedit feature, the following line creates a variable named script andassigns the simple filename of the script to it:
script=$(basename $0)
The basename utility sends the simple filename component of its argument to stan-dard output, which is assigned to the script variable, using command substitution.The $0 holds the command the script was called with (page 439). No matter whichof the following commands the user calls the script with, the output of basename isthe simple filename safedit:
$ /home/alex/bin/safedit memo$ ./safedit memo$ safedit memo
After the script variable is set, it replaces the filename of the script in usage anderror messages. By using a variable that is derived from the command that invokedthe script rather than a filename that is hardcoded into the script, you can create

Control Structures 425
links to the script or rename it, and the usage and error messages will still provideaccurate information.
Naming temporaryfiles
A third significant feature of safedit relates to the use of the $$ variable in the nameof a temporary file. The statement following the esac statement creates and assignsa value to the tempfile variable. This variable contains the name of a temporary filethat is stored in the /tmp directory, as are many temporary files. The temporary file-name begins with the PID number of the shell and ends with the name of the script.Use of the PID number ensures that the filename is unique, and safedit will notattempt to overwrite an existing file, as might happen if two people were usingsafedit at the same time. The name of the script is appended so that, should the filebe left in /tmp for some reason, you can figure out where it came from.
The PID number is used in front of—rather than after—$script in the filenamebecause of the 14-character limit placed on filenames by some older versions ofUNIX. Linux systems do not have this limitation. Because the PID number ensuresthe uniqueness of the filename, it is placed first so that it cannot be truncated. (If the$script component is truncated, the filename is still unique.) For the same reason,when a backup file is created inside the if control structure a few lines down in thescript, the filename is composed of the string bak. followed by the name of the filebeing edited. On an older system, if bak were used as a suffix rather than a prefixand the original filename were 14 characters long, .bak might be lost and the origi-nal file would be overwritten. The basename utility extracts the simple filename of$editfile before it is prefixed with bak.
Fourth, safedit uses an unusual test-command in the if structure: vim $editfile. Thetest-command calls vim to edit $editfile. When you finish editing the file and exitfrom vim, vim returns an exit code. The if control structure uses that exit code todetermine which branch to take. If the editing session completed successfully, vimreturns 0 and the statements following the then statement are executed. If vim doesnot terminate normally (as would occur if the user killed [page 522] the vim pro-cess), vim returns a nonzero exit status and the script executes the statements fol-lowing else.
select The select control structure is based on the one found in the Korn Shell. It displays amenu, assigns a value to a variable based on the user’s choice of items, and executesa series of commands. The select control structure has the following syntax:
select varname [in arg . . . ]do
commandsdone
The select structure displays a menu of the arg items. If you omit the keyword inand the list of arguments, select uses the positional parameters in place of the arg

426 Chapter 11 Programming the Bourne Again Shell
items. The menu is formatted with numbers before each item. For example, a selectstructure that begins with
select fruit in apple banana blueberry kiwi orange watermelon STOP
displays the following menu:
1) apple 3) blueberry 5) orange 7) STOP2) banana 4) kiwi 6) watermelon
The select structure uses the values of the LINES and COLUMNS variables todetermine the size of the display. (LINES has a default value of 24; COLUMNS hasa default value of 80.) With COLUMNS set to 20, the menu looks like this:
1) apple2) banana3) blueberry4) kiwi5) orange6) watermelon7) STOP
PS3 After displaying the menu select displays the value of PS3, the special select prompt.The default value of PS3 is ?# but you typically set PS3 to a more meaningful value.When you enter a valid number (one in the menu range) in response to the PS3prompt, select sets varname to the argument corresponding to the number youentered. If you make an invalid entry, varname is set to null. Either way select storesyour response in the keyword variable REPLY and then executes the commandsbetween do and done. If you press RETURN without entering a choice, the shell redis-plays the menu and the PS3 prompt.
The select structure continues to issue the PS3 prompt and execute the commandsuntil something causes it to exit—typically a break or exit statement. A break state-ment exits from the loop and an exit statement exits from the script.
The following script illustrates the use of select:
$ cat fruit2#!/bin/bashPS3="Choose your favorite fruit from these possibilities: "select FRUIT in apple banana blueberry kiwi orange watermelon STOPdo if [ "$FRUIT" == "" ]; then echo -e "Invalid entry.\n" continue elif [ $FRUIT = STOP ]; then echo "Thanks for playing!" break fiecho "You chose $FRUIT as your favorite."echo -e "That is choice number $REPLY.\n"done

Control Structures 427
$ fruit21) apple 3) blueberry 5) orange 7) STOP2) banana 4) kiwi 6) watermelonChoose your favorite fruit from these possibilities: 3You chose blueberry as your favorite.That is choice number 3.
Choose your favorite fruit from these possibilities: 99Invalid entry.
Choose your favorite fruit from these possibilities: 7Thanks for playing!
After setting the PS3 prompt and establishing the menu with the select statement,fruit2 executes the commands between do and done. If the user makes an invalidentry, the shell sets varname ($FRUIT) to a null value, so fruit2 first tests whether$FRUIT is null. If it is, echo displays an error and continue causes the shell to redis-play the PS3 prompt. If the entry is valid, the script tests whether the user wants tostop. If so, echo displays a message and break exits from the select structure (andfrom the script). If the user entered a valid response and does not want to stop, thescript displays the name and number of the user’s response. (See page 422 for infor-mation about the –e option to echo.)
Here Document
A Here document allows you to redirect input to a shell script from within the shellscript itself. A Here document is so called because it is here—immediately accessiblein the shell script—instead of there, perhaps in another file.
The following script, named birthday, contains a Here document. The two less than(<<) symbols in the first line indicate that a Here document follows. One or morecharacters that delimit the Here document follow the less than symbols—this exam-ple uses a plus sign. Whereas the opening delimiter must appear adjacent to the lessthan symbols, the closing delimiter must be on a line by itself. The shell sends every-thing between the two delimiters to the process as standard input. In the example itis as though you had redirected standard input to grep from a file, except that thefile is embedded in the shell script:
$ cat birthdaygrep -i "$1" <<+Alex June 22Barbara February 3Darlene May 8Helen March 13Jenny January 23Nancy June 26+$ birthday JennyJenny January 23$ birthday juneAlex June 22Nancy June 26

428 Chapter 11 Programming the Bourne Again Shell
When you run birthday, it lists all the Here document lines that contain the argu-ment you called it with. In this case the first time birthday is run, it displays Jenny’sbirthday because it is called with an argument of Jenny. The second run displays allthe birthdays in June. The –i argument causes grep’s search not to be case sensitive.
optional The next script, named bundle,2 includes a clever use of a Here document. Thebundle script is an elegant example of a script that creates a shell archive (shar) file.The script, shown following, creates a file that is itself a shell script containing sev-eral other files as well as the code to re-create the original files.
$ cat bundle#!/bin/bash# bundle: group files into distribution package
echo "# To unbundle, bash this file"for ido
echo "echo $i 1>&2"echo "cat >$i <<'End of $i'"cat $iecho "End of $i"
done
Just as the shell does not treat special characters that occur in standard input of ashell script as special, so the shell does not treat the special characters that occurbetween the delimiters in a Here document as special.
As the following example shows, the output of bundle is a shell script, which is redi-rected to a file named bothfiles. It contains the contents of each file given as anargument to bundle (file1 and file2 in this case) inside a Here document. To extractthe original files from bothfiles, you simply run it as an argument to a bash com-mand. Before each Here document is a cat command that causes the Here documentto be written to a new file when bothfiles is run:
$ cat file1This is a file.It contains two lines.$ cat file2This is another file.It containsthree lines.
$ bundle file1 file2 > bothfiles$ cat bothfiles# To unbundle, bash this fileecho file1 1>&2cat >file1 <<'End of file1'
2. Thanks to Brian W. Kernighan and Rob Pike, The Unix Programming Environment (Englewood Cliffs,N.J.: Prentice-Hall, 1984), 98. Reprinted with permission.

File Descriptors 429
This is a file.It contains two lines.End of file1echo file2 1>&2cat >file2 <<'End of file2'This is another file.It containsthree lines.End of file2
In the next example, file1 and file2 are removed before bothfiles is run. The both-files script echoes the names of the files it creates as it creates them. The ls commandthen shows that bothfiles has re-created file1 and file2:
$ rm file1 file2$ bash bothfilesfile1file2$ lsbothfilesfile1file2
File Descriptors
As discussed on page 280, before a process can read from or write to a file it mustopen that file. When a process opens a file, Linux associates a number (called a filedescriptor) with the file. Each process has its own set of open files and its own filedescriptors. After opening a file, a process reads from and writes to that file byreferring to its file descriptor. When it no longer needs the file, the process closes thefile, freeing the file descriptor.
A typical Linux process starts with three open files: standard input (file descriptor 0),standard output (file descriptor 1), and standard error (file descriptor 2). Often thoseare the only files the process needs. Recall that you redirect standard output with thesymbol > or the symbol 1> and that you redirect standard error with the symbol 2>.Although you can redirect other file descriptors, because file descriptors other than0, 1, and 2 do not have any special conventional meaning, it is rarely useful to do so.The exception is in programs that you write yourself, in which case you control themeaning of the file descriptors and can take advantage of redirection.
Opening a filedescriptor
The Bourne Again Shell opens files using the exec builtin as follows:
exec n> outfileexec m< infile
The first line opens outfile for output and holds it open, associating it with filedescriptor n. The second line opens infile for input and holds it open, associating itwith file descriptor m.
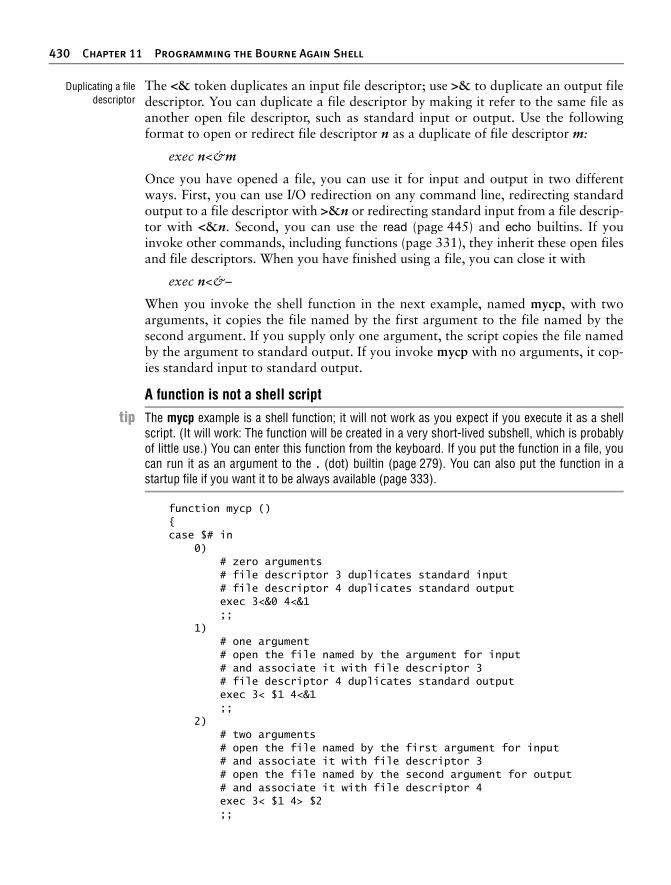
430 Chapter 11 Programming the Bourne Again Shell
Duplicating a filedescriptor
The <& token duplicates an input file descriptor; use >& to duplicate an output filedescriptor. You can duplicate a file descriptor by making it refer to the same file asanother open file descriptor, such as standard input or output. Use the followingformat to open or redirect file descriptor n as a duplicate of file descriptor m:
exec n<&m
Once you have opened a file, you can use it for input and output in two differentways. First, you can use I/O redirection on any command line, redirecting standardoutput to a file descriptor with >&n or redirecting standard input from a file descrip-tor with <&n. Second, you can use the read (page 445) and echo builtins. If youinvoke other commands, including functions (page 331), they inherit these open filesand file descriptors. When you have finished using a file, you can close it with
exec n<&–
When you invoke the shell function in the next example, named mycp, with twoarguments, it copies the file named by the first argument to the file named by thesecond argument. If you supply only one argument, the script copies the file namedby the argument to standard output. If you invoke mycp with no arguments, it cop-ies standard input to standard output.
function mycp (){case $# in 0) # zero arguments # file descriptor 3 duplicates standard input # file descriptor 4 duplicates standard output exec 3<&0 4<&1 ;; 1) # one argument # open the file named by the argument for input # and associate it with file descriptor 3 # file descriptor 4 duplicates standard output exec 3< $1 4<&1 ;; 2) # two arguments # open the file named by the first argument for input # and associate it with file descriptor 3 # open the file named by the second argument for output # and associate it with file descriptor 4 exec 3< $1 4> $2 ;;
A function is not a shell script
tip The mycp example is a shell function; it will not work as you expect if you execute it as a shellscript. (It will work: The function will be created in a very short-lived subshell, which is probablyof little use.) You can enter this function from the keyboard. If you put the function in a file, youcan run it as an argument to the . (dot) builtin (page 279). You can also put the function in astartup file if you want it to be always available (page 333).

File Descriptors 431
*) echo "Usage: mycp [source [dest]]" return 1 ;;esac
# call cat with input coming from file descriptor 3# and output going to file descriptor 4cat <&3 >&4
# close file descriptors 3 and 4exec 3<&- 4<&-}
The real work of this function is done in the line that begins with cat. The rest of thescript arranges for file descriptors 3 and 4, which are the input and output of the catcommand, to be associated with the appropriate files.
optional The next program takes two filenames on the command line, sorts both, and sendsthe output to temporary files. The program then merges the sorted files to standardoutput, preceding each line by a number that indicates which file it came from.
$ cat sortmerg#!/bin/bashusage (){if [ $# -ne 2 ]; then
echo "Usage: $0 file1 file2" 2>&1exit 1fi
}
# Default temporary directory: ${TEMPDIR:=/tmp}
# Check argument countusage "$@"
# Set up temporary files for sortingfile1=$TEMPDIR/$$.file1file2=$TEMPDIR/$$.file2
# Sortsort $1 > $file1sort $2 > $file2
# Open $file1 and $file2 for reading. Use file descriptors 3 and 4.exec 3<$file1exec 4<$file2
# Read the first line from each file to figure out how to start.read Line1 <&3status1=$?read Line2 <&4status2=$?

432 Chapter 11 Programming the Bourne Again Shell
# Strategy: while there is still input left in both files:# Output the line that should come first.# Read a new line from the file that line came from.while [ $status1 -eq 0 -a $status2 -eq 0 ]
doif [[ "$Line2" > "$Line1" ]]; then
echo -e "1.\t$Line1"read -u3 Line1status1=$?
elseecho -e "2.\t$Line2"read -u4 Line2status2=$?
fidone
# Now one of the files is at end-of-file.# Read from each file until the end.# First file1:while [ $status1 -eq 0 ]
doecho -e "1.\t$Line1"read Line1 <&3status1=$?
done# Next file2:while [[ $status2 -eq 0 ]]
doecho -e "2.\t$Line2"read Line2 <&4status2=$?
done
# Close and remove both input filesexec 3<&- 4<&-rm -f $file1 $file2exit 0
Parameters and Variables
Shell parameters and variables were introduced on page 295. This section adds tothe previous coverage with a discussion of array variables, global versus local vari-ables, special and positional parameters, and expanding null and unset variables.
Array Variables
The Bourne Again Shell supports one-dimensional array variables. The subscriptsare integers with zero-based indexing (i.e., the first element of the array has the sub-script 0). The following format declares and assigns values to an array:
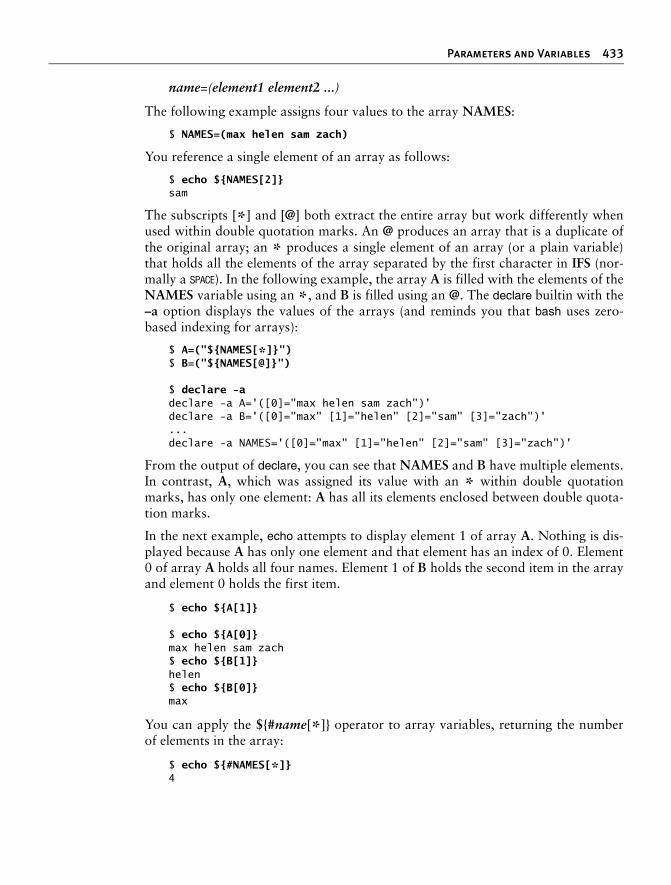
Parameters and Variables 433
name=(element1 element2 ...)
The following example assigns four values to the array NAMES:
$ NAMES=(max helen sam zach)
You reference a single element of an array as follows:
$ echo ${NAMES[2]}sam
The subscripts [*] and [@] both extract the entire array but work differently whenused within double quotation marks. An @ produces an array that is a duplicate ofthe original array; an * produces a single element of an array (or a plain variable)that holds all the elements of the array separated by the first character in IFS (nor-mally a SPACE). In the following example, the array A is filled with the elements of theNAMES variable using an *, and B is filled using an @. The declare builtin with the–a option displays the values of the arrays (and reminds you that bash uses zero-based indexing for arrays):
$ A=("${NAMES[*]}")$ B=("${NAMES[@]}")
$ declare -adeclare -a A='([0]="max helen sam zach")'declare -a B='([0]="max" [1]="helen" [2]="sam" [3]="zach")'...declare -a NAMES='([0]="max" [1]="helen" [2]="sam" [3]="zach")'
From the output of declare, you can see that NAMES and B have multiple elements.In contrast, A, which was assigned its value with an * within double quotationmarks, has only one element: A has all its elements enclosed between double quota-tion marks.
In the next example, echo attempts to display element 1 of array A. Nothing is dis-played because A has only one element and that element has an index of 0. Element0 of array A holds all four names. Element 1 of B holds the second item in the arrayand element 0 holds the first item.
$ echo ${A[1]}
$ echo ${A[0]}max helen sam zach$ echo ${B[1]}helen$ echo ${B[0]}max
You can apply the ${#name[*]} operator to array variables, returning the numberof elements in the array:
$ echo ${#NAMES[*]}4

434 Chapter 11 Programming the Bourne Again Shell
The same operator, when given the index of an element of an array in place of *,returns the length of the element:
$ echo ${#NAMES[1]}5
You can use subscripts on the left side of an assignment statement to replaceselected elements of the array:
$ NAMES[1]=alex$ echo ${NAMES[*]}max alex sam zach
Locality of Variables
By default variables are local to the process in which they are declared. Thus a shellscript does not have access to variables declared in your login shell unless youexplicitly make the variables available (global). Under bash, export makes a variableavailable to child processes.
Once you use the export builtin with a variable name as an argument, the shellplaces the value of the variable in the calling environment of child processes. Thiscall by value gives each child process a copy of the variable for its own use.
The following extest1 shell script assigns a value of american to the variable namedcheese and then displays its filename (extest1) and the value of cheese. The extest1script then calls subtest, which attempts to display the same information. Next sub-test declares a cheese variable and displays its value. When subtest finishes, itreturns control to the parent process, which is executing extest1. At this pointextest1 again displays the value of the original cheese variable.
$ cat extest1cheese=americanecho "extest1 1: $cheese"subtestecho "extest1 2: $cheese"$ cat subtestecho "subtest 1: $cheese"cheese=swissecho "subtest 2: $cheese"$ extest1extest1 1: americansubtest 1:subtest 2: swissextest1 2: american
The subtest script never receives the value of cheese from extest1, and extest1 neverloses the value. Unlike in the real world, a child can never affect its parent’sattributes. When a process attempts to display the value of a variable that has notbeen declared, as is the case with subtest, the process displays nothing; the value ofan undeclared variable is that of a null string.

Parameters and Variables 435
export The following extest2 script is the same as extest1 except that it uses export to makecheese available to the subtest script:
$ cat extest2export cheese=americanecho "extest2 1: $cheese"subtestecho "extest2 2: $cheese"$ extest2extest2 1: americansubtest 1: americansubtest 2: swissextest2 2: american
Here the child process inherits the value of cheese as american and, after displayingthis value, changes its copy to swiss. When control is returned to the parent, theparent’s copy of cheese retains its original value: american.
An export builtin can optionally include an assignment:
export cheese=american
The preceding statement is equivalent to the following two statements:
cheese=americanexport cheese
Although it is rarely done, you can export a variable before you assign a value to it.You do not need to export an already-exported variable a second time after youchange its value. For example, you do not usually need to export PATH when youassign a value to it in ~/.bash_profile because it is typically exported in the /etc/profileglobal startup file.
Functions
Because functions run in the same environment as the shell that calls them, variablesare implicitly shared by a shell and a function it calls.
$ function nam () {> echo $myname> myname=zach> }
$ myname=sam$ namsam$ echo $mynamezach
In the preceding example, the myname variable is set to sam in the interactive shell.Then the nam function is called. It displays the value of myname it has (sam) andsets myname to zach. The final echo shows that, in the interactive shell, the value ofmyname has been changed to zach.

436 Chapter 11 Programming the Bourne Again Shell
Function localvariables
Local variables are helpful in a function written for general use. Because the func-tion is called by many scripts that may be written by different programmers, youneed to make sure that the names of the variables used within the function do notinteract with variables of the same name in the programs that call the function.Local variables eliminate this problem. When used within a function, the typesetbuiltin declares a variable to be local to the function it is defined in.
The next example shows the use of a local variable in a function. It uses two vari-ables named count. The first is declared and assigned a value of 10 in the interactiveshell. Its value never changes, as echo verifies after count_down is run. The othercount is declared, using typeset, to be local to the function. Its value, which isunknown outside the function, ranges from 4 to 1, as the echo command within thefunction confirms.
The example shows the function being entered from the keyboard; it is not a shellscript. (See the tip “A function is not a shell script” on page 430).
$ function count_down () {> typeset count> count=$1> while [ $count -gt 0 ]> do> echo "$count..."> ((count=count-1))> sleep 1> done> echo "Blast Off."> }$ count=10$ count_down 44...3...2...1...Blast Off\!$ echo $count10
The ((count=count–1)) assignment is enclosed between double parentheses, whichcause the shell to perform an arithmetic evaluation (page 458). Within the doubleparentheses you can reference shell variables without the leading dollar sign ($).
Special Parameters
Special parameters enable you to access useful values pertaining to command linearguments and the execution of shell commands. You reference a shell specialparameter by preceding a special character with a dollar sign ($). As with posi-tional parameters, it is not possible to modify the value of a special parameter byassignment.

Parameters and Variables 437
$$: PID Number
The shell stores in the $$ parameter the PID number of the process that is execut-ing it. In the following interaction, echo displays the value of this variable and theps utility confirms its value. Both commands show that the shell has a PID numberof 5209:
$ echo $$5209$ ps PID TTY TIME CMD 5209 pts/1 00:00:00 bash 6015 pts/1 00:00:00 ps
Because echo is built into the shell, the shell does not have to create another processwhen you give an echo command. However, the results are the same whether echo isa builtin or not, because the shell substitutes the value of $$ before it forks a newprocess to run a command. Try using the echo utility (/bin/echo), which is run byanother process, and see what happens. In the following example, the shell substi-tutes the value of $$ and passes that value to cp as a prefix for a filename:
$ echo $$8232$ cp memo $$.memo$ ls8232.memo memo
Incorporating a PID number in a filename is useful for creating unique filenameswhen the meanings of the names do not matter; it is often used in shell scripts forcreating names of temporary files. When two people are running the same shellscript, these unique filenames keep them from inadvertently sharing the same tem-porary file.
The following example demonstrates that the shell creates a new shell process whenit runs a shell script. The id2 script displays the PID number of the process runningit (not the process that called it—the substitution for $$ is performed by the shellthat is forked to run id2):
$ cat id2echo "$0 PID= $$"$ echo $$8232$ id2./id2 PID= 8362 $ echo $$8232
The first echo displays the PID number of the interactive shell. Then id2 displays itsname ($0) and the PID of the subshell that it is running in. The last echo shows thatthe PID number of the interactive shell has not changed.

438 Chapter 11 Programming the Bourne Again Shell
$! The value of the PID number of the last process that you ran in the background isstored in $!. The following example executes sleep as a background task and usesecho to display the value of $! :
$ sleep 60 &[1] 8376$ echo $!8376
$?: Exit Status
When a process stops executing for any reason, it returns an exit status to the par-ent process. The exit status is also referred to as a condition code or a return code.The $? variable stores the exit status of the last command.
By convention a nonzero exit status represents a false value and means that thecommand failed. A zero is true and indicates that the command was successful. Inthe following example, the first ls command succeeds and the second fails:
$ ls eses$ echo $?0$ ls xxxls: xxx: No such file or directory$ echo $?1
You can specify the exit status that a shell script returns by using the exit builtin, followedby a number, to terminate the script. If you do not use exit with a number to terminate ascript, the exit status of the script is that of the last command the script ran.
$ cat esecho This program returns an exit status of 7.exit 7$ esThis program returns an exit status of 7.$ echo $?7$ echo $?0
The es shell script displays a message and terminates execution with an exit com-mand that returns an exit status of 7, the user-defined exit status in this script. Thefirst echo then displays the value of the exit status of es. The second echo displaysthe value of the exit status of the first echo. The value is 0 because the first echo wassuccessful.
Positional Parameters
The positional parameters comprise the command name and command line argu-ments. They are called positional because within a shell script, you refer to them by

Parameters and Variables 439
their position on the command line. Only the set builtin (page 442) allows you tochange the values of positional parameters with one exception: You cannot changethe value of the command name from within a script.
$#: Number of Command Line Arguments
The $# parameter holds the number of arguments on the command line (positionalparameters), not counting the command itself:
$ cat num_argsecho "This script was called with $# arguments."$ num_args sam max zachThis script was called with 3 arguments.
$0: Name of the Calling Program
The shell stores the name of the command you used to call a program in parameter$0. This parameter is numbered zero because it appears before the first argumenton the command line:
$ cat abcecho "The command used to run this script is $0"$ abcThe command used to run this script is ./abc$ /home/sam/abcThe command used to run this script is /home/sam/abc
The preceding shell script uses echo to verify the name of the script you are executing.You can use the basename utility and command substitution to extract and displaythe simple filename of the command:
$ cat abc2echo "The command used to run this script is $(basename $0)"$ /home/sam/abc2The command used to run this script is abc2
$1–$n: Command Line Arguments
The first argument on the command line is represented by parameter $1, the secondargument by $2, and so on up to $n. For values of n over 9, the number must beenclosed within braces. For example, the twelfth command line argument is repre-sented by ${12}. The following script displays positional parameters that hold com-mand line arguments:
$ cat display_5argsecho First 5 arguments are $1 $2 $3 $4 $5
$ display_5args jenny alex helenFirst 5 arguments are jenny alex helen
The display_5args script displays the first five command line arguments. The shellassigns a null value to each parameter that represents an argument that is not

440 Chapter 11 Programming the Bourne Again Shell
present on the command line. Thus the $4 and $5 variables have null values in thisexample.
$* The $* variable represents all the command line arguments, as the display_all pro-gram demonstrates:
$ cat display_allecho All arguments are $*
$ display_all a b c d e f g h i j k l m n o pAll arguments are a b c d e f g h i j k l m n o p
Enclose references to positional parameters between double quotation marks. Thequotation marks are particularly important when you are using positional parame-ters as arguments to commands. Without double quotation marks, a positionalparameter that is not set or that has a null value disappears:
$ cat showargsecho "$0 was called with $# arguments, the first is :$1:."
$ showargs a b c./showargs was called with 3 arguments, the first is :a:.$ echo $xx
$ showargs $xx a b c./showargs was called with 3 arguments, the first is :a:.$ showargs "$xx" a b c./showargs was called with 4 arguments, the first is ::.
The showargs script displays the number of arguments ($#) followed by the value ofthe first argument enclosed between colons. The preceding example first callsshowargs with three simple arguments. Next the echo command demonstrates thatthe $xx variable, which is not set, has a null value. In the final two calls toshowargs, the first argument is $xx. In the first case the command line becomesshowargs a b c; the shell passes showargs three arguments. In the second case thecommand line becomes showargs "" a b c, which results in calling showargs withfour arguments. The difference in the two calls to showargs illustrates a subtlepotential problem that you should keep in mind when using positional parametersthat may not be set or that may have a null value.
"$*" versus "$@" The $* and $@ parameters work the same way except when they are enclosedwithin double quotation marks. Using "$*" yields a single argument (with SPACEs orthe value of IFS [page 305] between the positional parameters), whereas "$@" pro-duces a list wherein each positional parameter is a separate argument. This differ-ence typically makes "$@" more useful than "$*" in shell scripts.
The following scripts help to explain the difference between these two specialparameters. In the second line of both scripts, the single quotation marks keep theshell from interpreting the enclosed special characters so they can be displayed asthemselves. The bb1 script shows that set "$*" assigns multiple arguments to thefirst command line parameter:

Parameters and Variables 441
$ cat bb1set "$*"echo $# parameters with '"$*"'echo 1: $1echo 2: $2echo 3: $3
$ bb1 a b c1 parameters with "$*"1: a b c2:3:
The bb2 script shows that set "$@" assigns each argument to a different commandline parameter:
$ cat bb2set "$@"echo $# parameters with '"$@"'echo 1: $1echo 2: $2echo 3: $3
$ bb2 a b c3 parameters with "$@"1: a2: b3: c
shift: Promotes Command Line Arguments
The shift builtin promotes each command line argument. The first argument (whichwas $1) is discarded. The second argument (which was $2) becomes the first argu-ment (now $1), the third becomes the second, and so on. Because no “unshift” com-mand exists, you cannot bring back arguments that have been discarded. Anoptional argument to shift specifies the number of positions to shift (and the numberof arguments to discard); the default is 1.
The following demo_shift script is called with three arguments. Double quotationmarks around the arguments to echo preserve the spacing of the output. The pro-gram displays the arguments and shifts them repeatedly until there are no morearguments left to shift:
$ cat demo_shiftecho "arg1= $1 arg2= $2 arg3= $3"shiftecho "arg1= $1 arg2= $2 arg3= $3"shiftecho "arg1= $1 arg2= $2 arg3= $3"shiftecho "arg1= $1 arg2= $2 arg3= $3"shift

442 Chapter 11 Programming the Bourne Again Shell
$ demo_shift alice helen jennyarg1= alice arg2= helen arg3= jennyarg1= helen arg2= jenny arg3=arg1= jenny arg2= arg3=arg1= arg2= arg3=
Repeatedly using shift is a convenient way to loop over all the command line argu-ments in shell scripts that expect an arbitrary number of arguments. See page 401for a shell script that uses shift.
set: Initializes Command Line Arguments
When you call the set builtin with one or more arguments, it assigns the values ofthe arguments to the positional parameters, starting with $1. The following scriptuses set to assign values to the positional parameters $1, $2, and $3:
$ cat set_itset this is itecho $3 $2 $1$ set_itit is this
Combining command substitution (page 344) with the set builtin is a convenientway to get standard output of a command in a form that can be easily manipulatedin a shell script. The following script shows how to use date and set to provide thedate in a useful format. The first command shows the output of date. Then cat dis-plays the contents of the dateset script. The first command in this script uses com-mand substitution to set the positional parameters to the output of the date utility.The next command, echo $*, displays all positional parameters resulting from theprevious set. Subsequent commands display the values of parameters $1, $2, $3, and$6. The final command displays the date in a format you can use in a letter or report:
$ dateWed Jan 2 23:39:18 PST 2008$ cat datesetset $(date)echo $*echoecho "Argument 1: $1"echo "Argument 2: $2"echo "Argument 3: $3"echo "Argument 6: $6"echoecho "$2 $3, $6"
$ datesetWed Jan 2 23:39:25 PST 2008
Argument 1: WedArgument 2: JanArgument 3: 2Argument 6: 2008
Jan 2, 2008

Parameters and Variables 443
You can also use the +format argument to date to modify the format of its output.
When used without any arguments, set displays a list of the shell variables that areset, including user-created variables and keyword variables. Under bash, this list isthe same as that displayed by declare and typeset when they are called without anyarguments.
The set builtin also accepts options that let you customize the behavior of the shell.For more information refer to “set ±o: Turns Shell Features On and Off” onpage 335.
Expanding Null and Unset Variables
The expression ${name} (or just $name if it is not ambiguous) expands to the valueof the name variable. If name is null or not set, bash expands ${name} to a nullstring. The Bourne Again Shell provides the following alternatives to accepting theexpanded null string as the value of the variable:
• Use a default value for the variable.
• Use a default value and assign that value to the variable.
• Display an error.
You can choose one of these alternatives by using a modifier with the variablename. In addition, you can use set –o nounset (page 337) to cause bash to displayan error and exit from a script whenever an unset variable is referenced.
:– Uses a Default Value
The :– modifier uses a default value in place of a null or unset variable while allow-ing a nonnull variable to represent itself:
${name:–default}
The shell interprets :– as “If name is null or unset, expand default and use theexpanded value in place of name; else use name.” The following command lists thecontents of the directory named by the LIT variable. If LIT is null or unset, it liststhe contents of /home/alex/literature:
$ ls ${LIT:-/home/alex/literature}
The default can itself have variable references that are expanded:
$ ls ${LIT:-$HOME/literature}
:= Assigns a Default Value
The :– modifier does not change the value of a variable. You may want to changethe value of a null or unset variable to its default in a script, however. You can do sowith the := modifier:
${name:=default}

444 Chapter 11 Programming the Bourne Again Shell
The shell expands the expression ${name:=default} in the same manner as itexpands ${name:–default} but also sets the value of name to the expanded valueof default. If a script contains a line such as the following and LIT is unset or null atthe time this line is executed, LIT is assigned the value /home/alex/literature:
$ ls ${LIT:=/home/alex/literature}
: builtin Shell scripts frequently start with the : (colon) builtin followed on the same line bythe := expansion modifier to set any variables that may be null or unset. The : buil-tin evaluates each token in the remainder of the command line but does not executeany commands. Without the leading colon (:), the shell evaluates and attempts toexecute the “command” that results from the evaluation.
Use the following syntax to set a default for a null or unset variable in a shell script(there is a SPACE following the first colon):
: ${name:=default}
When a script needs a directory for temporary files and uses the value of TEMPDIRfor the name of this directory, the following line makes TEMPDIR default to /tmp:
: ${TEMPDIR:=/tmp}
:? Displays an Error Message
Sometimes a script needs the value of a variable but you cannot supply a reasonabledefault at the time you write the script. If the variable is null or unset, the :? modi-fier causes the script to display an error message and terminate with an exit statusof 1:
${name:?message}
You must quote message if it contains SPACEs. If you omit message, the shell displaysthe default error message (parameter null or not set). Interactive shells do not exitwhen you use :? . In the following command, TESTDIR is not set so the shell dis-plays on standard error the expanded value of the string following :?. In this casethe string includes command substitution for date, with the %T format being fol-lowed by the string error, variable not set.
cd ${TESTDIR:?$(date +%T) error, variable not set.}bash: TESTDIR: 16:16:14 error, variable not set.
Builtin Commands
Builtin commands were introduced in Chapter 7. Commands that are built into ashell do not fork a new process when you execute them. This section discusses thetype, read, exec, trap, kill, and getopts builtins and concludes with Table 11-6 onpage 457, which lists many bash builtins.

Builtin Commands 445
type: Displays Information About a Command
The type builtin provides information about a command:
$ type cat echo who if ltcat is hashed (/bin/cat)echo is a shell builtinwho is /usr/bin/whoif is a shell keywordlt is aliased to 'ls -ltrh | tail'
The preceding output shows the files that would be executed if you gave cat or whoas a command. Because cat has already been called from the current shell, it is in thehash table (page 1039) and type reports that cat is hashed. The output also showsthat a call to echo runs the echo builtin, if is a keyword, and lt is an alias.
read: Accepts User Input
When you begin writing shell scripts, you soon realize that one of the most commontasks for user-created variables is storing information a user enters in response to aprompt. Using read, scripts can accept input from the user and store that input invariables. The read builtin reads one line from standard input and assigns the wordson the line to one or more variables:
$ cat read1echo -n "Go ahead: "read firstlineecho "You entered: $firstline"$ read1Go ahead: This is a line.You entered: This is a line.
The first line of the read1 script uses echo to prompt you to enter a line of text. The–n option suppresses the following NEWLINE, allowing you to enter a line of text on thesame line as the prompt. The second line reads the text into the variable firstline.The third line verifies the action of read by displaying the value of firstline. The vari-able is quoted (along with the text string) in this example because you, as the scriptwriter, cannot anticipate which characters the user might enter in response to theprompt. Consider what would happen if the variable were not quoted and the userentered * in response to the prompt:
$ cat read1_no_quoteecho -n "Go ahead: "read firstlineecho You entered: $firstline$ read1_no_quoteGo ahead: *You entered: read1 read1_no_quote script.1$ lsread1 read1_no_quote script.1

446 Chapter 11 Programming the Bourne Again Shell
The ls command lists the same words as the script, demonstrating that the shellexpands the asterisk into a list of files in the working directory. When the variable$firstline is surrounded by double quotation marks, the shell does not expand theasterisk. Thus the read1 script behaves correctly:
$ read1Go ahead: *You entered: *
If you want the shell to interpret the special meanings of special characters, do notuse quotation marks.
REPLY The read builtin has features that can make it easier to use. When you do notspecify a variable to receive read’s input, bash puts the input into the variablenamed REPLY. You can use the –p option to prompt the user instead of using aseparate echo command. The following read1a script performs exactly the sametask as read1:
$ cat read1aread -p "Go ahead: "echo "You entered: $REPLY"
The read2 script prompts for a command line and reads the user’s response into thevariable cmd. The script then attempts to execute the command line that resultsfrom the expansion of the cmd variable:
$ cat read2read -p "Enter a command: " cmd$cmdecho "Thanks"
In the following example, read2 reads a command line that calls the echo builtin.The shell executes the command and then displays Thanks. Next read2 reads acommand line that executes the who utility:
$ read2Enter a command: echo Please display this message.Please display this message.Thanks$ read2Enter a command: whoalex pts/4 Jun 17 07:50 (:0.0)scott pts/12 Jun 17 11:54 (bravo.example.com)Thanks
If cmd does not expand into a valid command line, the shell issues an error message:
$ read2Enter a command: xxx./read2: line 2: xxx: command not foundThanks
The read3 script reads values into three variables. The read builtin assigns one word(a sequence of nonblank characters) to each variable:

Builtin Commands 447
$ cat read3read -p "Enter something: " word1 word2 word3echo "Word 1 is: $word1"echo "Word 2 is: $word2"echo "Word 3 is: $word3"
$ read3Enter something: this is somethingWord 1 is: thisWord 2 is: isWord 3 is: something
When you enter more words than read has variables, read assigns one word to eachvariable, with all leftover words going to the last variable. Both read1 and read2assigned the first word and all leftover words to the one variable they each had towork with. In the following example, read accepts five words into three variables,assigning the first word to the first variable, the second word to the second variable,and the third through fifth words to the third variable:
$ read3Enter something: this is something else, really.Word 1 is: thisWord 2 is: isWord 3 is: something else, really.
Table 11-4 lists some of the options supported by the read builtin.
Table 11-4 read options
Option Function
–a aname (array) Assigns each word of input to an element of array aname.
–d delim (delimiter) Uses delim to terminate the input instead of NEWLINE.
–e (Readline) If input is coming from a keyboard, use the Readline Library (page 322) to get input.
–n num (number of characters) Reads num characters and returns. As soon as the user types num characters, read returns; there is no need to press RETURN.
–p prompt (prompt) Displays prompt on standard error without a terminating NEWLINEbefore reading input. Displays prompt only when input comes from the keyboard.
–s (silent) Does not echo characters.
–un (file descriptor) Uses the integer n as the file descriptor that read takes its input from.
read –u4 arg1 arg2
is equivalent toread arg1 arg2 <&4
See “File Descriptors” (page 429) for a discussion of redirec-tion and file descriptors.

448 Chapter 11 Programming the Bourne Again Shell
The read builtin returns an exit status of 0 if it successfully reads any data. It has anonzero exit status when it reaches the EOF (end of file). The following exampleruns a while loop from the command line. It takes its input from the names file andterminates after reading the last line from names.
$ cat namesAlice JonesRobert SmithAlice PaulsonJohn Q. Public
$ while read first rest> do> echo $rest, $first> done < namesJones, AliceSmith, RobertPaulson, AliceQ. Public, John$
The placement of the redirection symbol (<) for the while structure is critical. It isimportant that you place the redirection symbol at the done statement and not atthe call to read.
optional Each time you redirect input, the shell opens the input file and repositions the readpointer at the start of the file:
$ read line1 < names; echo $line1; read line2 < names; echo $line2Alice JonesAlice Jones
Here each read opens names and starts at the beginning of the names file. In the fol-lowing example, names is opened once, as standard input of the subshell created bythe parentheses. Each read then reads successive lines of standard input.
$ (read line1; echo $line1; read line2; echo $line2) < namesAlice JonesRobert Smith
Another way to get the same effect is to open the input file with exec and hold itopen (refer to “File Descriptors” on page 429):
$ exec 3< names$ read -u3 line1; echo $line1; read -u3 line2; echo $line2Alice JonesRobert Smith$ exec 3<&-
exec: Executes a Command
The exec builtin has two primary purposes: to run a command without creating anew process and to redirect a file descriptor—including standard input, output, orerror—of a shell script from within the script (page 429). When the shell executes a

Builtin Commands 449
command that is not built into the shell, it typically creates a new process. The newprocess inherits environment (global or exported) variables from its parent but doesnot inherit variables that are not exported by the parent. (For more informationrefer to “Locality of Variables” on page 434.) In contrast, exec executes a commandin place of (overlays) the current process.
exec versus . (dot) Insofar as exec runs a command in the environment of the original process, it is sim-ilar to the . (dot) command (page 279). However, unlike the . command, which canrun only shell scripts, exec can run both scripts and compiled programs. Also,whereas the . command returns control to the original script when it finishes run-ning, exec does not. Finally, the . command gives the new program access to localvariables, whereas exec does not.
exec runs acommand
The exec builtin used for running a command has the following syntax:
exec command arguments
exec does notreturn control
Because the shell does not create a new process when you use exec, the commandruns more quickly. However, because exec does not return control to the originalprogram, it can be used only as the last command that you want to run in a script.The following script shows that control is not returned to the script:
$ cat exec_demowhoexec dateecho "This line is never displayed."
$ exec_demojenny pts/7 May 30 7:05 (bravo.example.com)hls pts/1 May 30 6:59 (:0.0)Mon May 26 11:42:56 PDT 2007
The next example, a modified version of the out script (page 401), uses exec to exe-cute the final command the script runs. Because out runs either cat or less and thenterminates, the new version, named out2, uses exec with both cat and less:
$ cat out2if [ $# -eq 0 ]
thenecho "Usage: out2 [-v] filenames" 1>&2exit 1
fiif [ "$1" = "-v" ]
thenshiftexec less "$@"
elseexec cat -- "$@"
fi
exec redirectsinput and output
The second major use of exec is to redirect a file descriptor—including standardinput, output, or error—from within a script. The next command causes all subse-quent input to a script that would have come from standard input to come from thefile named infile:
exec < infile

450 Chapter 11 Programming the Bourne Again Shell
Similarly the following command redirects standard output and standard error tooutfile and errfile, respectively:
exec > outfile 2> errfile
When you use exec in this manner, the current process is not replaced with a newprocess, and exec can be followed by other commands in the script.
/dev/tty When you redirect the output from a script to a file, you must make sure that theuser sees any prompts the script displays. The /dev/tty device is a pseudonym forthe screen the user is working on; you can use this device to refer to the user’s screenwithout knowing which device it is. (The tty utility displays the name of the deviceyou are using.) By redirecting the output from a script to /dev/tty, you ensure thatprompts and messages go to the user’s terminal, regardless of which terminal theuser is logged in on. Messages sent to /dev/tty are also not diverted if standard out-put and standard error from the script are redirected.
The to_screen1 script sends output to three places: standard output, standard error,and the user’s screen. When it is run with standard output and standard error redi-rected, to_screen1 still displays the message sent to /dev/tty on the user’s screen.The out and err files hold the output sent to standard output and standard error.
$ cat to_screen1echo "message to standard output"echo "message to standard error" 1>&2echo "message to the user" > /dev/tty
$ to_screen1 > out 2> errmessage to the user$ cat outmessage to standard output$ cat errmessage to standard error
The following command redirects the output from a script to the user’s screen:
exec > /dev/tty
Putting this command at the beginning of the previous script changes where the out-put goes. In to_screen2, exec redirects standard output to the user’s screen so the >/dev/tty is superfluous. Following the exec command, all output sent to standardoutput goes to /dev/tty (the screen). Output to standard error is not affected.
$ cat to_screen2exec > /dev/ttyecho "message to standard output"echo "message to standard error" 1>&2echo "message to the user" > /dev/tty
$ to_screen2 > out 2> errmessage to standard outputmessage to the user
One disadvantage of using exec to redirect the output to /dev/tty is that all subse-quent output is redirected unless you use exec again in the script.

Builtin Commands 451
You can also redirect the input to read (standard input) so that it comes from/dev/tty (the keyboard):
read name < /dev/tty
or
exec < /dev/tty
trap: Catches a Signal
A signal is a report to a process about a condition. Linux uses signals to reportinterrupts generated by the user (for example, pressing the interrupt key) as well asbad system calls, broken pipes, illegal instructions, and other conditions. The trapbuiltin catches, or traps, one or more signals, allowing you to direct the actions ascript takes when it receives a specified signal.
This discussion covers six signals that are significant when you work with shellscripts. Table 11-5 lists these signals, the signal numbers that systems often ascribeto them, and the conditions that usually generate each signal. Give the commandkill –l, trap –l, or man 7 signal for a list of signal names.
Table 11-5 Signals
Type Name Number Generating condition
Not a real signal EXIT 0 Exit because of exit command or reaching the end of the program (not an actual signal but use-ful in trap)
Hang up SIGHUP or HUP
1 Disconnect the line
Terminalinterrupt
SIGINT or INT
2 Press the interrupt key (usually CONTROL-C)
Quit SIGQUIT or QUIT
3 Press the quit key (usually CONTROL-SHIFT-| or CONTROL-SHIFT-\)
Kill SIGKILL or KILL
9 The kill command with the –9 option (cannot be trapped; use only as a last resort)
Softwaretermination
SIGTERM or TERM
15 Default of the kill command
Stop SIGTSTP or TSTP
20 Press the suspend key (usually CONTROL-Z)
Debug DEBUG Executes commands specified in the trap state-ment after each command (not an actual signal but useful in trap)
Error ERR Executes commands specified in the trap state-ment after each command that returns a nonzero exit status (not an actual signal but useful in trap)

452 Chapter 11 Programming the Bourne Again Shell
When it traps a signal, a script takes whatever action you specify: It can remove filesor finish any other processing as needed, display a message, terminate executionimmediately, or ignore the signal. If you do not use trap in a script, any of the sixactual signals listed in Table 11-5 (not EXIT, DEBUG, or ERR) terminates thescript. Because a process cannot trap a KILL signal, you can use kill –KILL (or kill–9) as a last resort to terminate a script or any other process. (See page 454 formore information on kill.)
The trap command has the following syntax:
trap ['commands'] [signal]
The optional commands part specifies the commands that the shell executes when itcatches one of the signals specified by signal. The signal can be a signal name ornumber—for example, INT or 2. If commands is not present, trap resets the trap toits initial condition, which is usually to exit from the script.
The trap builtin does not require single quotation marks around commands asshown in the preceding syntax, but it is a good practice to use them. The singlequotation marks cause shell variables within the commands to be expanded whenthe signal occurs, not when the shell evaluates the arguments to trap. Even if youdo not use any shell variables in the commands, you need to enclose any commandthat takes arguments within either single or double quotation marks. Quoting thecommands causes the shell to pass to trap the entire command as a single argument.
After executing the commands, the shell resumes executing the script where it leftoff. If you want trap to prevent a script from exiting when it receives a signal but notto run any commands explicitly, you can specify a null (empty) commands string, asshown in the locktty script (page 417). The following command traps signal num-ber 15 after which the script continues.
trap '' 15
The following script demonstrates how the trap builtin can catch the terminal inter-rupt signal (2). You can use SIGINT, INT, or 2 to specify this signal. The scriptreturns an exit status of 1:
$ cat inter#!/bin/bashtrap 'echo PROGRAM INTERRUPTED; exit 1' INTwhile truedo
echo "Program running."sleep 1
done$ interProgram running.Program running.Program running.CONTROL-CPROGRAM INTERRUPTED$

Builtin Commands 453
: (null) builtin The second line of inter sets up a trap for the terminal interrupt signal using INT.When trap catches the signal, the shell executes the two commands between the sin-gle quotation marks in the trap command. The echo builtin displays the messagePROGRAM INTERRUPTED, exit terminates the shell running the script, and theparent shell displays a prompt. If exit were not there, the shell would return controlto the while loop after displaying the message. The while loop repeats continuouslyuntil the script receives a signal because the true utility always returns a true exit sta-tus. In place of true you can use the : (null) builtin, which is written as a colon andalways returns a 0 (true) status.
The trap builtin frequently removes temporary files when a script is terminated pre-maturely so that the files are not left to clutter the filesystem. The following shellscript, named addbanner, uses two traps to remove a temporary file when the scriptterminates normally or owing to a hangup, software interrupt, quit, or software ter-mination signal:
$ cat addbanner#!/bin/bashscript=$(basename $0)
if [ ! -r "$HOME/banner" ]then
echo "$script: need readable $HOME/banner file" 1>&2exit 1
fi
trap 'exit 1' 1 2 3 15trap 'rm /tmp/$$.$script 2> /dev/null' 0
for filedo
if [ -r "$file" -a -w "$file" ]then
cat $HOME/banner $file > /tmp/$$.$scriptcp /tmp/$$.$script $fileecho "$script: banner added to $file" 1>&2
elseecho "$script: need read and write permission for $file" 1>&2
fidone
When called with one or more filename arguments, addbanner loops through thefiles, adding a header to the top of each. This script is useful when you use a stan-dard format at the top of your documents, such as a standard layout for memos, orwhen you want to add a standard header to shell scripts. The header is kept in a filenamed ~/banner. Because addbanner uses the HOME variable, which contains thepathname of the user’s home directory, the script can be used by several users with-out modification. If Alex had written the script with /home/alex in place of$HOME and then given the script to Jenny, either she would have had to change itor addbanner would have used Alex’s banner file when Jenny ran it (assuming Jennyhad read permission for the file).
454 Chapter 11 Programming the Bourne Again Shell
The first trap in addbanner causes it to exit with a status of 1 when it receives ahangup, software interrupt (terminal interrupt or quit signal), or software termina-tion signal. The second trap uses a 0 in place of signal-number, which causes trap toexecute its command argument whenever the script exits because it receives an exitcommand or reaches its end. Together these traps remove a temporary file whetherthe script terminates normally or prematurely. Standard error of the second trap issent to /dev/null for cases in which trap attempts to remove a nonexistent temporaryfile. In those cases rm sends an error message to standard error; because standarderror is redirected, the user does not see this message.
See page 417 for another example that uses trap.
kill: Aborts a Process
The kill builtin sends a signal to a process or job. The kill command has the followingsyntax:
kill [–signal] PID
where signal is the signal name or number (for example, INT or 2) and PID is theprocess identification number of the process that is to receive the signal. You canspecify a job number (page 237) as %n in place of PID. If you omit signal, kill sendsa TERM (software termination, number 15) signal. For more information on signalnames and numbers see Table 11-5 on page 451.
The following command sends the TERM signal to job number 1:
$ kill -TERM %1
Because TERM is the default signal for kill, you can also give this command as kill%1. Give the command kill –l (lowercase “l”) to display a list of signal names.
A program that is interrupted often leaves matters in an unpredictable state: Tempo-rary files may be left behind (when they are normally removed), and permissions maybe changed. A well-written application traps, or detects, signals and cleans up beforeexiting. Most carefully written applications trap the INT, QUIT, and TERM signals.
To terminate a program, first try INT (press CONTROL-C, if the job is in the foreground).Because an application can be written to ignore these signals, you may need to usethe KILL signal, which cannot be trapped or ignored; it is a “sure kill.” For moreinformation refer to “kill: Sends a Signal to a Process” on page 522.
getopts: Parses Options
The getopts builtin parses command line arguments, thereby making it easier to writeprograms that follow the Linux argument conventions. The syntax for getopts is
getopts optstring varname [arg ...]
where optstring is a list of the valid option letters, varname is the variable thatreceives the options one at a time, and arg is the optional list of parameters to beprocessed. If arg is not present, getopts processes the command line arguments. Ifoptstring starts with a colon (:), the script takes care of generating error messages;otherwise, getopts generates error messages.

Builtin Commands 455
The getopts builtin uses the OPTIND (option index) and OPTARG (option argu-ment) variables to store option-related values. When a shell script starts, the valueof OPTIND is 1. Each time getopts locates an argument, it increments OPTIND tothe index of the next option to be processed. If the option takes an argument, bashassigns the value of the argument to OPTARG.
To indicate that an option takes an argument, follow the corresponding letter inoptstring with a colon (:). The option string dxo:lt:r indicates that getopts shouldsearch for –d, –x, –o, –l, –t, and –r options and that the –o and –t options takearguments.
Using getopts as the test-command in a while control structure allows you to loopover the options one at a time. The getopts builtin checks the option list for optionsthat are in optstring. Each time through the loop, getopts stores the option letter itfinds in varname.
Suppose that you want to write a program that can take three options:
1. A –b option indicates that the program should ignore whitespace at the start of input lines.
2. A –t option followed by the name of a directory indicates that the program should use that directory for temporary files. Otherwise, it should use /tmp.
3. A –u option indicates that the program should translate all its output to uppercase.
In addition, the program should ignore all other options and end option processingwhen it encounters two hyphens (––).
The problem is to write the portion of the program that determines which optionsthe user has supplied. The following solution does not use getopts:
SKIPBLANKS=TMPDIR=/tmpCASE=lowerwhile [[ "$1" = -* ]] # [[ = ]] does pattern matchdo
case $1 in-b) SKIPBLANKS=TRUE ;;-t) if [ -d "$2" ]
thenTMPDIR=$2shift
elseecho "$0: -t takes a directory argument." >&2exit 1
fi ;;-u) CASE=upper ;;--) break ;; # Stop processing options
*) echo "$0: Invalid option $1 ignored." >&2 ;;esac
shiftdone

456 Chapter 11 Programming the Bourne Again Shell
This program fragment uses a loop to check and shift arguments while the argumentis not ––. As long as the argument is not two hyphens, the program continues toloop through a case statement that checks for possible options. The –– case labelbreaks out of the while loop. The * case label recognizes any option; it appears asthe last case label to catch any unknown options, displays an error message, andallows processing to continue. On each pass through the loop, the program does ashift to get to the next argument. If an option takes an argument, the program doesan extra shift to get past that argument.
The following program fragment processes the same options, but uses getopts:
SKIPBLANKS=TMPDIR=/tmpCASE=lower
while getopts :bt:u argdo
case $arg inb) SKIPBLANKS=TRUE ;;t) if [ -d "$OPTARG" ]
thenTMPDIR=$OPTARG
elseecho "$0: $OPTARG is not a directory." >&2exit 1
fi ;;u) CASE=upper ;;:) echo "$0: Must supply an argument to -$OPTARG." >&2
exit 1 ;;\?) echo "Invalid option -$OPTARG ignored." >&2 ;;esac
done
In this version of the code, the while structure evaluates the getopts builtin each timeit comes to the top of the loop. The getopts builtin uses the OPTIND variable tokeep track of the index of the argument it is to process the next time it is called.There is no need to call shift in this example.
In the getopts version of the script the case patterns do not start with a hyphenbecause the value of arg is just the option letter (getopts strips off the hyphen). Also,getopts recognizes –– as the end of the options, so you do not have to specify itexplicitly as in the case statement in the first example.
Because you tell getopts which options are valid and which require arguments, itcan detect errors in the command line and handle them in two ways. This exampleuses a leading colon in optstring to specify that you check for and handle errors inyour code; when getopts finds an invalid option, it sets varname to ? and OPTARGto the option letter. When it finds an option that is missing an argument, getoptssets varname to : and OPTARG to the option lacking an argument.
The \? case pattern specifies the action to take when getopts detects an invalidoption. The : case pattern specifies the action to take when getopts detects a missing

Builtin Commands 457
option argument. In both cases getopts does not write any error message; it leavesthat task to you.
If you omit the leading colon from optstring, both an invalid option and a missingoption argument cause varname to be assigned the string ?. OPTARG is not set andgetopts writes its own diagnostic message to standard error. Generally this methodis less desirable because you have less control over what the user sees when anerror is made.
Using getopts will not necessarily make your programs shorter. Its principal advan-tages are that it provides a uniform programming interface and it enforces standardoption handling.
A Partial List of Builtins
Table 11-6 lists some of the bash builtins. See “Listing bash builtins” on page 243for instructions on how to display complete lists of builtins.
Table 11-6 bash builtins
Builtin Function
: Returns 0 or true (the null builtin; page 453)
. (dot) Executes a shell script as part of the current process (page 279)
bg Puts a suspended job in the background (page 291)
break Exits from a looping control structure (page 418)
cd Changes to another working directory (page 193)
continue Starts with the next iteration of a looping control structure (page 418)
echo Displays its arguments (page 157)
eval Scans and evaluates the command line (page 333)
exec Executes a shell script or program in place of the current process (page 448)
exit Exits from the current shell (usually the same as CONTROL-D from an interactive shell; page 438)
export Places the value of a variable in the calling environment (makes it global; page 434)
fg Brings a job from the background into the foreground (page 290)
getopts Parses arguments to a shell script (page 454)
jobs Displays list of background jobs (page 290)
kill Sends a signal to a process or job (page 522)
pwd Displays the name of the working directory (page 188)

458 Chapter 11 Programming the Bourne Again Shell
Expressions
An expression is composed of constants, variables, and operators that can be pro-cessed to return a value. This section covers arithmetic, logical, and conditionalexpressions as well as operators. Table 11-8 on page 461 lists the bash operators.
Arithmetic Evaluation
The Bourne Again Shell can perform arithmetic assignments and evaluate many dif-ferent types of arithmetic expressions, all using integers. The shell performs arith-metic assignments in a number of ways. One is with arguments to the let builtin:
$ let "VALUE=VALUE * 10 + NEW"
In the preceding example, the variables VALUE and NEW contain integer values.Within a let statement you do not need to use dollar signs ($) in front of variablenames. Double quotation marks must enclose a single argument, or expression, thatcontains SPACEs. Because most expressions contain SPACEs and need to be quoted, bashaccepts ((expression)) as a synonym for let "expression", obviating the need forboth quotation marks and dollar signs:
$ ((VALUE=VALUE * 10 + NEW))
You can use either form wherever a command is allowed and can remove the SPACEsif you like. In the following example, the asterisk (*) does not need to be quotedbecause the shell does not perform pathname expansion on the right side of anassignment (page 298):
$ let VALUE=VALUE*10+NEW
read Reads a line from standard input (page 445)
readonly Declares a variable to be readonly (page 299)
set Sets shell flags or command line argument variables; with no argument, lists all variables (pages 335 and 442)
shift Promotes each command line argument (page 441)
test Compares arguments (page 397)
times Displays total times for the current shell and its children
trap Traps a signal (page 451)
type Displays how each argument would be interpreted as a command (page 445)
umask Returns the value of the file-creation mask (page 526)
unset Removes a variable or function (page 299)
wait Waits for a background process to terminate
Table 11-6 bash builtins (continued)

Expressions 459
Because each argument to let is evaluated as a separate expression, you can assignvalues to more than one variable on a single line:
$ let "COUNT = COUNT + 1" VALUE=VALUE*10+NEW
You need to use commas to separate multiple assignments within a set of doubleparentheses:
$ ((COUNT = COUNT + 1, VALUE=VALUE*10+NEW))
Logical expressions You can use the ((expression)) syntax for logical expressions, although that task is fre-quently left to [[expression]]. The next example expands the age_check script(page 342) to include logical arithmetic evaluation in addition to arithmetic expansion:
$ cat age2#!/bin/bashecho -n "How old are you? "read ageif ((30 < age && age < 60)); then
echo "Wow, in $((60-age)) years, you'll be 60!"else
echo "You are too young or too old to play."fi
$ age2How old are you? 25You are too young or too old to play.
The test-statement for the if structure evaluates two logical comparisons joined by aBoolean AND and returns 0 (true) if they are both true or 1 (false) otherwise.
Logical Evaluation (Conditional Expressions)
The syntax of a conditional expression is
[[ expression ]]
where expression is a Boolean (logical) expression. You must precede a variablename with a dollar sign ($) within expression. The result of executing this builtin,like the test builtin, is a return status. The conditions allowed within the bracketsare almost a superset of those accepted by test (page 397). Where the test builtinuses –a as a Boolean AND operator, [[ expression ]] uses &&. Similarly, where testuses –o as a Boolean OR operator, [[ expression ]] uses ||.
Arithmetic evaluation versus arithmetic expansion
tip Arithmetic evaluation differs from arithmetic expansion. As explained on page 342, arithmeticexpansion uses the syntax $((expression)), evaluates expression, and replaces $((expression)) withthe result. You can use arithmetic expansion to display the value of an expression or to assign thatvalue to a variable.
Arithmetic evaluation uses the let expression or ((expression)) syntax, evaluates expression, andreturns a status code. You can use arithmetic evaluation to perform a logical comparison or anassignment.
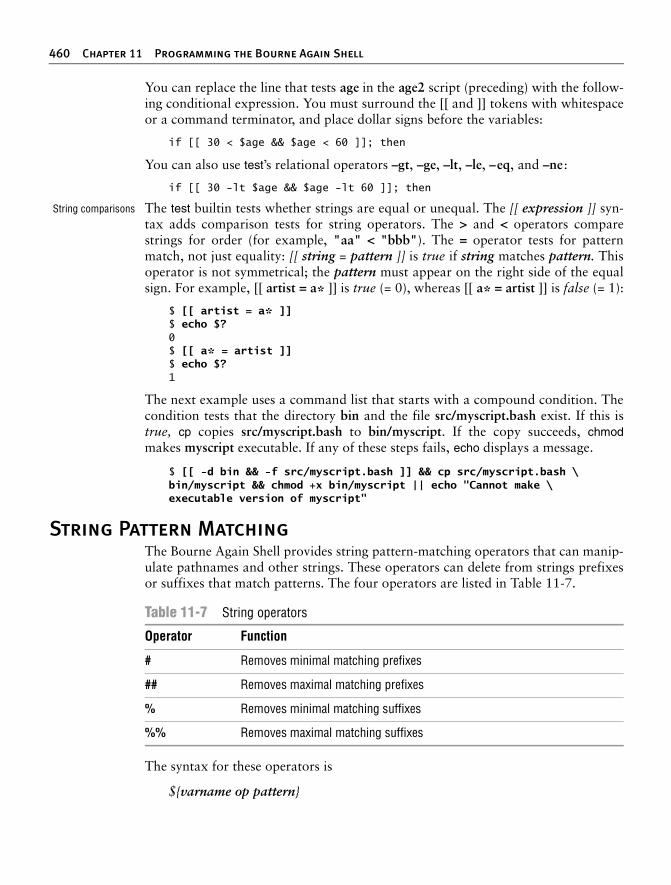
460 Chapter 11 Programming the Bourne Again Shell
You can replace the line that tests age in the age2 script (preceding) with the follow-ing conditional expression. You must surround the [[ and ]] tokens with whitespaceor a command terminator, and place dollar signs before the variables:
if [[ 30 < $age && $age < 60 ]]; then
You can also use test’s relational operators –gt, –ge, –lt, –le, –eq, and –ne :
if [[ 30 -lt $age && $age -lt 60 ]]; then
String comparisons The test builtin tests whether strings are equal or unequal. The [[ expression ]] syn-tax adds comparison tests for string operators. The > and < operators comparestrings for order (for example, "aa" < "bbb"). The = operator tests for patternmatch, not just equality: [[ string = pattern ]] is true if string matches pattern. Thisoperator is not symmetrical; the pattern must appear on the right side of the equalsign. For example, [[ artist = a* ]] is true (= 0), whereas [[ a* = artist ]] is false (= 1):
$ [[ artist = a* ]]$ echo $?0$ [[ a* = artist ]]$ echo $?1
The next example uses a command list that starts with a compound condition. Thecondition tests that the directory bin and the file src/myscript.bash exist. If this istrue, cp copies src/myscript.bash to bin/myscript. If the copy succeeds, chmodmakes myscript executable. If any of these steps fails, echo displays a message.
$ [[ -d bin && -f src/myscript.bash ]] && cp src/myscript.bash \bin/myscript && chmod +x bin/myscript || echo "Cannot make \ executable version of myscript"
String Pattern Matching
The Bourne Again Shell provides string pattern-matching operators that can manip-ulate pathnames and other strings. These operators can delete from strings prefixesor suffixes that match patterns. The four operators are listed in Table 11-7.
The syntax for these operators is
${varname op pattern}
Table 11-7 String operators
Operator Function
# Removes minimal matching prefixes
## Removes maximal matching prefixes
% Removes minimal matching suffixes
%% Removes maximal matching suffixes

Expressions 461
where op is one of the operators listed in Table 11-7 and pattern is a match patternsimilar to that used for filename generation. These operators are commonly used tomanipulate pathnames so as to extract or remove components or to change suffixes:
$ SOURCEFILE=/usr/local/src/prog.c$ echo ${SOURCEFILE#/*/}local/src/prog.c$ echo ${SOURCEFILE##/*/}prog.c$ echo ${SOURCEFILE%/*}/usr/local/src$ echo ${SOURCEFILE%%/*}
$ echo ${SOURCEFILE%.c}/usr/local/src/prog$ CHOPFIRST=${SOURCEFILE#/*/}$ echo $CHOPFIRSTlocal/src/prog.c$ NEXT=${CHOPFIRST%%/*}$ echo $NEXTlocal
Here the string-length operator, ${#name}, is replaced by the number of charactersin the value of name:
$ echo $SOURCEFILE/usr/local/src/prog.c$ echo ${#SOURCEFILE}21
Operators
Arithmetic expansion and arithmetic evaluation use the same syntax, precedence,and associativity of expressions as the C language. Table 11-8 lists operators inorder of decreasing precedence (priority of evaluation); each group of operators hasequal precedence. Within an expression you can use parentheses to change the orderof evaluation.
Table 11-8 Operators
Type of operator/operator Function
Post
var++
var––
Postincrement
Postdecrement
Pre
++var
––var
Preincrement
Predecrement

462 Chapter 11 Programming the Bourne Again Shell
Type of operator/operator Function
Unary
– Unary minus
+ Unary plus
Negation
! Boolean NOT (logical negation)
~ Complement (bitwise negation)
Exponentiation
** Exponent
Multiplication, division,remainder
* Multiplication
/ Division
% Remainder
Addition, subtraction
– Subtraction
+ Addition
Bitwise shifts
<< Left bitwise shift
>> Right bitwise shift
Comparison
<= Less than or equal
>= Greater than or equal
< Less than
> Greater than
Equality, inequality
== Equality
!= Inequality
Bitwise
& Bitwise AND
^ Bitwise XOR (exclusive OR)
| Bitwise OR
Table 11-8 Operators (continued)

Expressions 463
Pipe The pipe token has higher precedence than operators. You can use pipes anywherein a command that you can use simple commands. For example, the command line
$ cmd1 | cmd2 || cmd3 | cmd4 && cmd5 | cmd6
is interpreted as if you had typed
$ ((cmd1 | cmd2) || (cmd3 | cmd4)) && (cmd5 | cmd6)
Increment anddecrementoperators
The postincrement, postdecrement, preincrement, and predecrement operatorswork with variables. The pre- operators, which appear in front of the variable nameas in ++COUNT and ––VALUE, first change the value of the variable (++ adds 1;–– subtracts 1) and then provide the result for use in the expression. The post- oper-ators appear after the variable name as in COUNT++ and VALUE––; they first pro-vide the unchanged value of the variable for use in the expression and then changethe value of the variable.
$ N=10$ echo $N10$ echo $((--N+3))12$ echo $N9$ echo $((N++ - 3))6$ echo $N10
Boolean (logical)
&& Boolean AND
|| Boolean OR
Conditional evaluation
? : Ternary operator
Assignment
=, *=, /=, %=, +=, –=,<<=, >>=, &=, ^=, |=
Assignment
Comma
, Comma
Table 11-8 Operators (continued)
Do not rely on rules of precedence: use parentheses
tip Do not rely on the precedence rules when you use compound commands. Instead, use parenthe-ses to explicitly state the order in which you want the shell to interpret the commands.

464 Chapter 11 Programming the Bourne Again Shell
Remainder The remainder operator (%) gives the remainder when its first operand is dividedby its second. For example, the expression $((15%7)) has the value 1.
Boolean The result of a Boolean operation is either 0 (false) or 1 (true).
The && (AND) and || (OR) Boolean operators are called short-circuiting operators.If the result of using one of these operators can be decided by looking only at the leftoperand, the right operand is not evaluated. The && operator causes the shell to testthe exit status of the command preceding it. If the command succeeded, bash exe-cutes the next command; otherwise, it skips the remaining commands on the com-mand line. You can use this construct to execute commands conditionally:
$ mkdir bkup && cp -r src bkup
This compound command creates the directory bkup. If mkdir succeeds, the contentsof directory src is copied recursively to bkup.
The || separator also causes bash to test the exit status of the first command but hasthe opposite effect: The remaining command(s) are executed only if the first onefailed (that is, exited with nonzero status):
$ mkdir bkup || echo "mkdir of bkup failed" >> /tmp/log
The exit status of a command list is the exit status of the last command in the list.You can group lists with parentheses. For example, you could combine the previoustwo examples as
$ (mkdir bkup && cp -r src bkup) || echo "mkdir failed" >> /tmp/log
In the absence of parentheses, && and || have equal precedence and are groupedfrom left to right. The following examples use the true and false utilities. These util-ities do nothing and return true (0) and false (1) exit statuses, respectively:
$ false; echo $?1
The $? variable holds the exit status of the preceding command (page 438). Thenext two commands yield an exit status of 1 (false):
$ true || false && false$ echo $?1$ (true || false) && false$ echo $?1
Similarly the next two commands yield an exit status of 0 (true):
$ false && false || true$ echo $?0$ (false && false) || true$ echo $?0

Expressions 465
Because || and && have equal precedence, the parentheses in the two precedingpairs of examples do nothing to change the order of operations.
Because the expression on the right side of a short-circuiting operator may never getexecuted, you must be careful with assignment statements in that location. The fol-lowing example demonstrates what can happen:
$ ((N=10,Z=0))$ echo $((N || ((Z+=1)) ))1$ echo $Z0
Because the value of N is nonzero, the result of the || (OR) operation is 1 (true), nomatter what the value of the right side is. As a consequence ((Z+=1)) is never evalu-ated and Z is not incremented.
Ternary The ternary operator, ? :, decides which of two expressions should be evaluated,based on the value returned from a third expression:
expression1 ? expression2 : expression3
If expression1 produces a false (0) value, expression3 is evaluated; otherwise,expression2 is evaluated. The value of the entire expression is the value ofexpression2 or expression3, depending on which one is evaluated. If expression1is true, expression3 is not evaluated. If expression1 is false expression2 is notevaluated:
$ ((N=10,Z=0,COUNT=1))$ ((T=N>COUNT?++Z:--Z))$ echo $T1$ echo $Z1
Assignment The assignment operators, such as +=, are shorthand notations. For example, N+=3is the same as ((N=N+3)) .
Other bases The following commands use the syntax base#n to assign base 2 (binary) values.First v1 is assigned a value of 0101 (5 decimal) and v2 is assigned a value of 0110 (6decimal). The echo utility verifies the decimal values.
$ ((v1=2#0101))$ ((v2=2#0110))$ echo "$v1 and $v2"5 and 6
Next the bitwise AND operator (&) selects the bits that are on in both 5 (0101binary) and 6 (0110 binary). The result is binary 0100, which is 4 decimal.
$ echo $(( v1 & v2 ))4

466 Chapter 11 Programming the Bourne Again Shell
The Boolean AND operator (&&) produces a result of 1 if both of its operands arenonzero and a result of 0 otherwise. The bitwise inclusive OR operator (|) selectsthe bits that are on in either 0101 or 0110, resulting in 0111, which is 7 decimal.The Boolean OR operator (| |) produces a result of 1 if either of its operands is non-zero and a result of 0 otherwise.
$ echo $(( v1 && v2 ))1$ echo $(( v1 | v2 ))7$ echo $(( v1 || v2 ))1
Next the bitwise exclusive OR operator (^) selects the bits that are on in either, butnot both, of the operands 0101 and 0110, yielding 0011, which is 3 decimal. TheBoolean NOT operator (!) produces a result of 1 if its operand is 0 and a result of 0otherwise. Because the exclamation point in $(( ! v1 )) is enclosed within doubleparentheses, it does not need to be escaped to prevent the shell from interpreting theexclamation point as a history event. The comparison operators produce a result of1 if the comparison is true and a result of 0 otherwise.
$ echo $(( v1 ^ v2 ))3$ echo $(( ! v1 ))0$ echo $(( v1 < v2 ))1$ echo $(( v1 > v2 ))0
Shell Programs
The Bourne Again Shell has many features that make it a good programming lan-guage. The structures that bash provides are not a random assortment. Rather, theyhave been chosen to provide most of the structural features that are in other proce-dural languages, such as C or Pascal. A procedural language provides the ability to
• Declare, assign, and manipulate variables and constant data. The Bourne Again Shell provides string variables, together with powerful string operators, and integer variables, along with a complete set of arithmetic operators.
• Break large problems into small ones by creating subprograms. The Bourne Again Shell allows you to create functions and call scripts from other scripts. Shell functions can be called recursively; that is, a Bourne Again Shell function can call itself. You may not need to use recursion often, but it may allow you to solve some apparently difficult problems with ease.
• Execute statements conditionally, using statements such as if.

Shell Programs 467
• Execute statements iteratively, using statements such as while and for.
• Transfer data to and from the program, communicating with both data files and users.
Programming languages implement these capabilities in different ways but with thesame ideas in mind. When you want to solve a problem by writing a program, youmust first figure out a procedure that leads you to a solution—that is, an algorithm.Typically you can implement the same algorithm in roughly the same way in differ-ent programming languages, using the same kinds of constructs in each language.
Chapter 9 and this chapter have introduced numerous bash features, many of whichare useful for interactive use as well as for shell programming. This section developstwo complete shell programs, demonstrating how to combine some of these featureseffectively. The programs are presented as problems for you to solve along withsample solutions.
A Recursive Shell Script
A recursive construct is one that is defined in terms of itself. Alternatively, youmight say that a recursive program is one that can call itself. This may seem circular,but it need not be. To avoid circularity a recursive definition must have a specialcase that is not self-referential. Recursive ideas occur in everyday life. For example,you can define an ancestor as your mother, your father, or one of their ancestors.This definition is not circular; it specifies unambiguously who your ancestors are:your mother or your father, or your mother’s mother or father or your father’smother or father, and so on.
A number of Linux system utilities can operate recursively. See the –R option to thechmod, chown, and cp utilities for examples.
Solve the following problem by using a recursive shell function:
One algorithm for a recursive solution follows:
1. Examine the path argument. If it is a null string or if it names an existing directory, do nothing and return.
2. If it is a simple path component, create it (using mkdir) and return.
3. Otherwise, call makepath using the path prefix of the original argument. This step eventually creates all the directories up to the last component, which you can then create with mkdir.
In general, a recursive function must invoke itself with a simpler version of theproblem than it was given until it is finally called with a simple case that does notneed to call itself. Following is one possible solution based on this algorithm.
Write a shell function named makepath that, given a pathname, creates all compo-nents in that pathname as directories. For example, the command makepatha/b/c/d should create directories a, a/b, a/b/c, and a/b/c/d. (The mkdir utility sup-ports a –p option that does exactly this. Solve the problem without using mkdir –p.)

468 Chapter 11 Programming the Bourne Again Shell
makepath # this is a function# enter it at the keyboard, do not run it as a shell script#function makepath(){
if [[ ${#1} -eq 0 || -d "$1" ]]then
return 0 # Do nothingfiif [[ "${1%/*}" = "$1" ]]
thenmkdir $1return $?
fimakepath ${1%/*} || return 1mkdir $1return $?
}
In the test for a simple component (the if statement in the middle of the function),the left expression is the argument after the shortest suffix that starts with a / char-acter has been stripped away (page 460). If there is no such character (for example,if $1 is alex), nothing is stripped off and the two sides are equal. If the argument is asimple filename preceded by a slash, such as /usr, the expression ${1%/*} evaluatesto a null string. To make the function work in this case, you must take two precau-tions: Put the left expression within quotation marks and ensure that the recursivefunction behaves sensibly when it is passed a null string as an argument. In general,good programs are robust: They should be prepared for borderline, invalid, ormeaningless input and behave appropriately in such cases.
By giving the following command from the shell you are working in, you turn ondebugging tracing so that you can watch the recursion work:
$ set -o xtrace
(Give the same command, but replace the hyphen with a plus sign (+) to turn debug-ging off.) With debugging turned on, the shell displays each line in its expandedform as it executes the line. A + precedes each line of debugging output. In the fol-lowing example, the first line that starts with + shows the shell calling makepath.The makepath function is called from the command line with arguments of a/b/c.Subsequently it calls itself with arguments of a/b and finally a. All the work is done(using mkdir) as each call to makepath returns.
$ makepath a/b/c+ makepath a/b/c+ [[ 5 -eq 0 ]]+ [[ -d a/b/c ]]+ [[ a/b = \a\/\b\/\c ]]+ makepath a/b+ [[ 3 -eq 0 ]]+ [[ -d a/b ]]+ [[ a = \a\/\b ]]
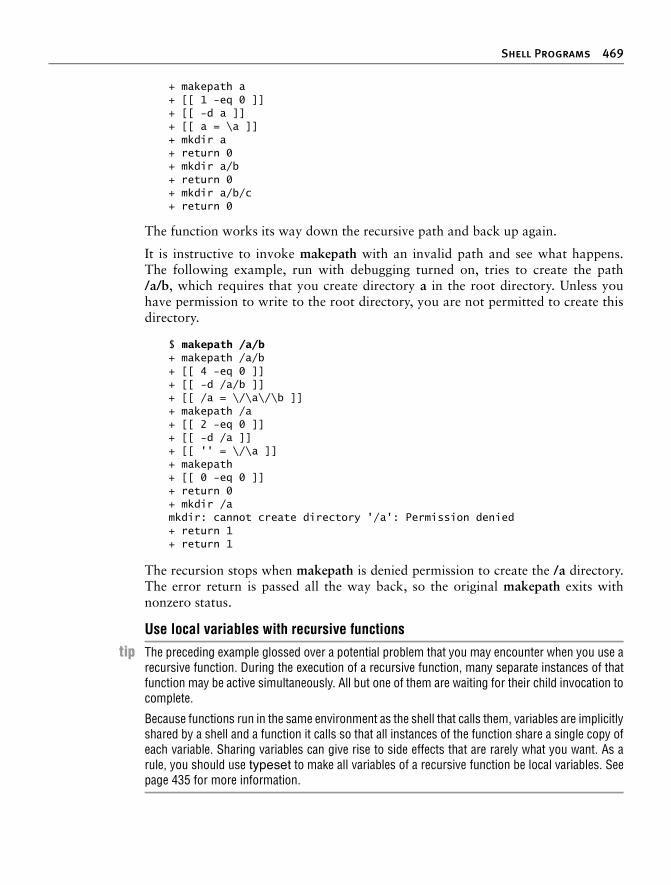
Shell Programs 469
+ makepath a+ [[ 1 -eq 0 ]]+ [[ -d a ]]+ [[ a = \a ]]+ mkdir a+ return 0+ mkdir a/b+ return 0+ mkdir a/b/c+ return 0
The function works its way down the recursive path and back up again.
It is instructive to invoke makepath with an invalid path and see what happens.The following example, run with debugging turned on, tries to create the path/a/b, which requires that you create directory a in the root directory. Unless youhave permission to write to the root directory, you are not permitted to create thisdirectory.
$ makepath /a/b+ makepath /a/b+ [[ 4 -eq 0 ]]+ [[ -d /a/b ]]+ [[ /a = \/\a\/\b ]]+ makepath /a+ [[ 2 -eq 0 ]]+ [[ -d /a ]]+ [[ '' = \/\a ]]+ makepath+ [[ 0 -eq 0 ]]+ return 0+ mkdir /amkdir: cannot create directory '/a': Permission denied+ return 1+ return 1
The recursion stops when makepath is denied permission to create the /a directory.The error return is passed all the way back, so the original makepath exits withnonzero status.
Use local variables with recursive functionstip The preceding example glossed over a potential problem that you may encounter when you use a
recursive function. During the execution of a recursive function, many separate instances of thatfunction may be active simultaneously. All but one of them are waiting for their child invocation tocomplete.
Because functions run in the same environment as the shell that calls them, variables are implicitlyshared by a shell and a function it calls so that all instances of the function share a single copy ofeach variable. Sharing variables can give rise to side effects that are rarely what you want. As arule, you should use typeset to make all variables of a recursive function be local variables. Seepage 435 for more information.

470 Chapter 11 Programming the Bourne Again Shell
The quiz Shell Script
Solve the following problem using a bash script:
The detailed design of this program and even the detailed description of the prob-lem depend on a number of choices: How will the program know which subjects areavailable for quizzes? How will the user choose a subject? How will the programknow when the quiz is over? Should the program present the same questions (for agiven subject) in the same order each time, or should it scramble them?
Of course, you can make many perfectly good choices that implement the specifica-tion of the problem. The following details narrow the problem specification:
• Each subject will correspond to a subdirectory of a master quiz directory. This directory will be named in the environment variable QUIZDIR, whose default will be ~/quiz. For example, you could have the following directories correspond to the subjects engineering, art, and politics: ~/quiz/engineering,~/quiz/art, and ~/quiz/politics. Put the quiz directory in /usr/games if you want all users to have access to it (requires root privileges).
• Each subject can have several questions. Each question is represented by a file in its subject’s directory.
• The first line of each file that represents a question is the text of the ques-tion. If it takes more than one line, you must escape the NEWLINE with a backslash. (This setup makes it easy to read a single question with the readbuiltin.) The second line of the file is an integer that specifies the number of choices. The next lines are the choices themselves. The last line is the correct answer. Following is a sample question file:
Who discovered the principle of the lever?4EuclidArchimedesThomas EdisonThe Lever BrothersArchimedes
• The program presents all the questions in a subject directory. At any point the user can interrupt the quiz with CONTROL-C, whereupon the program will summarize the results so far and exit. If the user does not interrupt, the program summarizes the results and exits when it has asked all questions for the chosen subject.
• The program scrambles the questions in a subject before presenting them.
Write a generic multiple-choice quiz program. The program should get its questionsfrom data files, present them to the user, and keep track of the number of correctand incorrect answers. The user must be able to exit from the program at any timewith a summary of results to that point.

Shell Programs 471
Following is a top-level design for this program:
1. Initialize. This involves a number of steps, such as setting the counts of the number of questions asked so far and the number of correct and wrong answers to zero. Sets up to trap CONTROL-C.
2. Present the user with a choice of subjects and get the user’s response.
3. Change to the corresponding subject directory.
4. Determine the questions to be asked (that is, the filenames in that direc-tory). Arrange them in random order.
5. Repeatedly present questions and ask for answers until the quiz is over or is interrupted by the user.
6. Present the results and exit.
Clearly some of these steps (such as step 3) are simple, whereas others (such as step4) are complex and worthy of analysis on their own. Use shell functions for anycomplex step, and use the trap builtin to handle a user interrupt.
Here is a skeleton version of the program with empty shell functions:
function initialize{# Initializes variables.}function choose_subj{# Writes choice to standard output.}
function scramble{# Stores names of question files, scrambled,# in an array variable named questions.}
function ask{# Reads a question file, asks the question, and checks the# answer. Returns 1 if the answer was correct, 0 otherwise. If it# encounters an invalid question file, exit with status 2.}
function summarize{# Presents the user's score.}
# Main programinitialize # Step 1 in top-level design
subject=$(choose_subj) # Step 2[[ $? -eq 0 ]] || exit 2 # If no valid choice, exit

472 Chapter 11 Programming the Bourne Again Shell
cd $subject || exit 2 # Step 3echo # Skip a linescramble # Step 4
for ques in ${questions[*]}; do # Step 5 ask $ques result=$? (( num_ques=num_ques+1 )) if [[ $result == 1 ]]; then (( num_correct += 1 )) fi echo # Skip a line between questions sleep ${QUIZDELAY:=1}done
summarize # Step 6exit 0
To make reading the results a bit easier for the user, a sleep call appears inside thequestion loop. It delays $QUIZDELAY seconds (default = 1) between questions.
Now the task is to fill in the missing pieces of the program. In a sense this programis being written backward. The details (the shell functions) come first in the file butcome last in the development process. This common programming practice is calledtop-down design. In top-down design you fill in the broad outline of the programfirst and supply the details later. In this way you break the problem up into smallerproblems, each of which you can work on independently. Shell functions are a greathelp in using the top-down approach.
One way to write the initialize function follows. The cd command causes QUIZDIRto be the working directory for the rest of the script and defaults to ~/quiz ifQUIZDIR is not set.
function initialize (){trap 'summarize ; exit 0' INT # Handle user interruptsnum_ques=0 # Number of questions asked so farnum_correct=0 # Number answered correctly so farfirst_time=true # true until first question is askedcd ${QUIZDIR:=~/quiz} || exit 2}
Be prepared for the cd command to fail. The directory may be unsearchable or con-ceivably another user may have removed it. The preceding function exits with a sta-tus code of 2 if cd fails.
The next function, choose_subj, is a bit more complicated. It displays a menu usinga select statement:

Shell Programs 473
function choose_subj (){subjects=($(ls))PS3="Choose a subject for the quiz from the preceding list: "select Subject in ${subjects[*]}; do if [[ -z "$Subject" ]]; then echo "No subject chosen. Bye." >&2 exit 1 fi echo $Subject return 0done}
The function first uses an ls command and command substitution to put a list ofsubject directories in the subjects array. Next the select structure (page 425) pre-sents the user with a list of subjects (the directories found by ls) and assigns the cho-sen directory name to the Subject variable. Finally the function writes the name ofthe subject directory to standard output. The main program uses command substi-tution to assign this value to the subject variable [subject=$(choose_subj)].
The scramble function presents a number of difficulties. In this solution it uses anarray variable (questions) to hold the names of the questions. It scrambles the entriesin an array using the RANDOM variable (each time you reference RANDOM it hasthe value of a [random] integer between 0 and 32767):
function scramble (){typeset -i index quescountquestions=($(ls))quescount=${#questions[*]} # Number of elements((index=quescount-1))while [[ $index > 0 ]]; do ((target=RANDOM % index)) exchange $target $index ((index -= 1))done}
This function initializes the array variable questions to the list of filenames (questions)in the working directory. The variable quescount is set to the number of such files. Thenthe following algorithm is used: Let the variable index count down from quescount – 1(the index of the last entry in the array variable). For each value of index, the functionchooses a random value target between 0 and index, inclusive. The command
((target=RANDOM % index))
produces a random value between 0 and index – 1 by taking the remainder (the %operator) when $RANDOM is divided by index. The function then exchanges theelements of questions at positions target and index. It is convenient to do this inanother function named exchange:

474 Chapter 11 Programming the Bourne Again Shell
function exchange (){temp_value=${questions[$1]}questions[$1]=${questions[$2]}questions[$2]=$temp_value}
The ask function also uses the select structure. It reads the question file named in itsargument and uses the contents of that file to present the question, accept theanswer, and determine whether the answer is correct. (See the code that follows.)
The ask function uses file descriptor 3 to read successive lines from the question file,whose name was passed as an argument and is represented by $1 in the function. Itreads the question into the ques variable and the number of questions intonum_opts. The function constructs the variable choices by initializing it to a nullstring and successively appending the next choice. Then it sets PS3 to the value ofques and uses a select structure to prompt the user with ques. The select structureplaces the user’s answer in answer, and the function then checks it against the cor-rect answer from the file.
The construction of the choices variable is done with an eye toward avoiding apotential problem. Suppose that one answer has some whitespace in it. Then itmight appear as two or more arguments in choices. To avoid this problem, makesure that choices is an array variable. The select statement does the rest of the work:
quiz $ cat quiz#!/bin/bash
# remove the # on the following line to turn on debugging# set -o xtrace
#==================function initialize (){trap 'summarize ; exit 0' INT # Handle user interruptsnum_ques=0 # Number of questions asked so farnum_correct=0 # Number answered correctly so farfirst_time=true # true until first question is askedcd ${QUIZDIR:=~/quiz} || exit 2}
#==================function choose_subj (){subjects=($(ls))PS3="Choose a subject for the quiz from the preceding list: "select Subject in ${subjects[*]}; do if [[ -z "$Subject" ]]; then echo "No subject chosen. Bye." >&2 exit 1 fi echo $Subject return 0done}

Shell Programs 475
#==================function exchange (){temp_value=${questions[$1]}questions[$1]=${questions[$2]}questions[$2]=$temp_value}
#==================function scramble (){typeset -i index quescountquestions=($(ls))quescount=${#questions[*]} # Number of elements((index=quescount-1))while [[ $index > 0 ]]; do ((target=RANDOM % index)) exchange $target $index ((index -= 1))done}
#==================function ask (){exec 3<$1read -u3 ques || exit 2read -u3 num_opts || exit 2
index=0choices=()while (( index < num_opts )) ; do read -u3 next_choice || exit 2 choices=("${choices[@]}" "$next_choice") ((index += 1))doneread -u3 correct_answer || exit 2exec 3<&-
if [[ $first_time = true ]]; then first_time=false echo -e "You may press the interrupt key at any time to quit.\n"fi
PS3=$ques" " # Make $ques the prompt for select # and add some spaces for legibility.select answer in "${choices[@]}"; do if [[ -z "$answer" ]]; then echo Not a valid choice. Please choose again. elif [[ "$answer" = "$correct_answer" ]]; then echo "Correct!" return 1 else echo "No, the answer is $correct_answer." return 0 fidone}

476 Chapter 11 Programming the Bourne Again Shell
#==================function summarize (){echo # Skip a lineif (( num_ques == 0 )); then echo "You did not answer any questions" exit 0fi
(( percent=num_correct*100/num_ques ))echo "You answered $num_correct questions correctly, out of \$num_ques total questions."echo "Your score is $percent percent."}
#==================# Main programinitialize # Step 1 in top-level design
subject=$(choose_subj) # Step 2[[ $? -eq 0 ]] || exit 2 # If no valid choice, exit
cd $subject || exit 2 # Step 3echo # Skip a linescramble # Step 4
for ques in ${questions[*]}; do # Step 5 ask $ques result=$? (( num_ques=num_ques+1 )) if [[ $result == 1 ]]; then (( num_correct += 1 )) fi echo # Skip a line between questions sleep ${QUIZDELAY:=1}done
summarize # Step 6 exit 0
Chapter Summary
The shell is a programming language. Programs written in this language are calledshell scripts, or simply scripts. Shell scripts provide the decision and looping controlstructures present in high-level programming languages while allowing easy accessto system utilities and user programs. Shell scripts can use functions to modularizeand simplify complex tasks.
Control structures The control structures that use decisions to select alternatives are if...then,if...then...else, and if...then...elif. The case control structure provides a multiwaybranch and can be used when you want to express alternatives using a simplepattern-matching syntax.
The looping control structures are for...in, for, until, and while. These structuresperform one or more tasks repetitively.

Chapter Summary 477
The break and continue control structures alter control within loops: break trans-fers control out of a loop, and continue transfers control immediately to the top ofa loop.
The Here document allows input to a command in a shell script to come fromwithin the script itself.
File descriptors The Bourne Again Shell provides the ability to manipulate file descriptors. Coupledwith the read and echo builtins, file descriptors allow shell scripts to have as muchcontrol over input and output as programs written in lower-level languages.
Variables You assign attributes, such as readonly, to bash variables using the typeset builtin.The Bourne Again Shell provides operators to perform pattern matching on vari-ables, provide default values for variables, and evaluate the length of variables. Thisshell also supports array variables and local variables for functions and providesbuilt-in integer arithmetic capability, using the let builtin and an expression syntaxsimilar to the C programming language.
Builtins Bourne Again Shell builtins include type, read, exec, trap, kill, and getopts. The typebuiltin displays information about a command, including its location; read allows ascript to accept user input.
The exec builtin executes a command without creating a new process. The newcommand overlays the current process, assuming the same environment and PIDnumber of that process. This builtin executes user programs and other Linux com-mands when it is not necessary to return control to the calling process.
The trap builtin catches a signal sent by Linux to the process running the script andallows you to specify actions to be taken upon receipt of one or more signals. Youcan use this builtin to cause a script to ignore the signal that is sent when the userpresses the interrupt key.
The kill builtin allows you to terminate a running program. The getopts builtinparses command line arguments, making it easier to write programs that followstandard Linux conventions for command line arguments and options.
Utilities in scripts In addition to using control structures, builtins, and functions, shell scripts gener-ally call Linux utilities. The find utility, for instance, is commonplace in shell scriptsthat search for files in the system hierarchy and can perform a vast range of tasks,from simple to complex.
A well-written shell script adheres to standard programming practices, such as spec-ifying the shell to execute the script on the first line of the script, verifying the num-ber and type of arguments that the script is called with, displaying a standard usagemessage to report command line errors, and redirecting all informational messagesto standard error.
Expressions There are two basic types of expressions: arithmetic and logical. Arithmetic expres-sions allow you to do arithmetic on constants and variables, yielding a numericresult. Logical (Boolean) expressions compare expressions or strings, or test condi-tions to yield a true or false result. As with all decisions within Linux shell scripts, atrue status is represented by the value zero; false, by any nonzero value.

478 Chapter 11 Programming the Bourne Again Shell
Exercises
1. Rewrite the journal script of Chapter 9 (question 5, page 350) by adding commands to verify that the user has write permission for a file named journal-file in the user’s home directory, if such a file exists. The script should take appropriate actions if journal-file exists and the user does not have write permission to the file. Verify that the modified script works.
2. The special parameter "$@" is referenced twice in the out script (page 401). Explain what would be different if the parameter "$*" were used in its place.
3. Write a filter that takes a list of files as input and outputs the basename (page 424) of each file in the list.
4. Write a function that takes a single filename as an argument and adds exe-cute permission to the file for the user.
a. When might such a function be useful?
b. Revise the script so that it takes one or more filenames as arguments and adds execute permission for the user for each file argument.
c. What can you do to make the function available every time you log in?
d. Suppose that, in addition to having the function available on subsequent login sessions, you want to make the function available now in your current shell. How would you do so?
5. When might it be necessary or advisable to write a shell script instead of a shell function? Give as many reasons as you can think of.
6. Write a shell script that displays the names of all directory files, but no other types of files, in the working directory.
7. Write a script to display the time every 15 seconds. Read the date man page and display the time, using the %r field descriptor. Clear the window (using the clear command) each time before you display the time.
8. Enter the following script named savefiles, and give yourself execute per-mission to the file:
$ cat savefiles#! /bin/bashecho "Saving files in current directory in file savethem."exec > savethemfor i in * do echo "===================================================" echo "File: $i" echo "===================================================" cat "$i" done

Exercises 479
a. What error message do you get when you execute this script? Rewrite the script so that the error does not occur, making sure the output still goes to savethem.
b. What might be a problem with running this script twice in the same directory? Discuss a solution to this problem.
9. Read the bash man or info page, try some experiments, and answer the fol-lowing questions:
a. How do you export a function?
b. What does the hash builtin do?
c. What happens if the argument to exec is not executable?
10. Using the find utility, perform the following tasks:
a. List all files in the working directory and all subdirectories that have been modified within the last day.
b. List all files that you have read access to on the system that are larger than 1 megabyte.
c. Remove all files named core from the directory structure rooted at your home directory.
d. List the inode numbers of all files in the working directory whose file-names end in .c.
e. List all files that you have read access to on the root filesystem that have been modified in the last 30 days.
11. Write a short script that tells you whether the permissions for two files, whose names are given as arguments to the script, are identical. If the per-missions for the two files are identical, output the common permission field. Otherwise, output each filename followed by its permission field. (Hint: Try using the cut utility.)
12. Write a script that takes the name of a directory as an argument and searches the file hierarchy rooted at that directory for zero-length files. Write the names of all zero-length files to standard output. If there is no option on the command line, have the script delete the file after displaying its name, asking the user for confirmation, and receiving positive confir-mation. A –f (force) option on the command line indicates that the script should display the filename but not ask for confirmation before deleting the file.

480 Chapter 11 Programming the Bourne Again Shell
Advanced Exercises
13. Write a script that takes a colon-separated list of items and outputs the items, one per line, to standard output (without the colons).
14. Generalize the script written in exercise 13 so that the character separating the list items is given as an argument to the function. If this argument is absent, the separator should default to a colon.
15. Write a function named funload that takes as its single argument the name of a file containing other functions. The purpose of funload is to make all functions in the named file available in the current shell; that is, funloadloads the functions from the named file. To locate the file, funloadsearches the colon-separated list of directories given by the environment variable FUNPATH. Assume that the format of FUNPATH is the same as PATH and that searching FUNPATH is similar to the shell’s search of the PATH variable.
16. Rewrite bundle (page 428) so that the script it creates takes an optional list of filenames as arguments. If one or more filenames are given on the command line, only those files should be re-created; otherwise, all files in the shell archive should be re-created. For example, suppose that all files with the filename extension .c are bundled into an archive named srcshell,and you want to unbundle just the files test1.c and test2.c. The following command will unbundle just these two files:
$ bash srcshell test1.c test2.c
17. What kind of links will the lnks script (page 404) not find? Why?
18. In principle, recursion is never necessary. It can always be replaced by an iterative construct, such as while or until. Rewrite makepath (page 468) as a nonrecursive function. Which version do you prefer? Why?
19. Lists are commonly stored in environment variables by putting a colon (:) between each of the list elements. (The value of the PATH variable is a good example.) You can add an element to such a list by catenating the new element to the front of the list, as in
PATH=/opt/bin:$PATH
If the element you add is already in the list, you now have two copies of it in the list. Write a shell function named addenv that takes two arguments:(1) the name of a shell variable and (2) a string to prepend to the list that is the value of the shell variable only if that string is not already an element of the list. For example, the call
addenv PATH /opt/bin

Advanced Exercises 481
would add /opt/bin to PATH only if that pathname is not already in PATH. Be sure that your solution works even if the shell variable starts out empty. Also make sure that you check the list elements carefully. If /usr/opt/bin is in PATH but /opt/bin is not, the example just given should still add /opt/bin to PATH. (Hint: You may find this exercise easier to complete if you first write a function locate_field that tells you whether a string is an element in the value of a variable.)
20. Write a function that takes a directory name as an argument and writes to standard output the maximum of the lengths of all filenames in that direc-tory. If the function’s argument is not a directory name, write an error message to standard output and exit with nonzero status.
21. Modify the function you wrote for exercise 20 to descend all subdirecto-ries of the named directory recursively and to find the maximum length of any filename in that hierarchy.
22. Write a function that lists the number of ordinary files, directories, block special files, character special files, FIFOs, and symbolic links in the work-ing directory. Do this in two different ways:
a. Use the first letter of the output of ls –l to determine a file’s type.
b. Use the file type condition tests of the [[ expression ]] syntax to deter-mine a file’s type.
23. Modify the quiz program (page 474) so that the choices for a question are randomly arranged.

This page intentionally left blank

483
I
PART IV
System Administration
CHAPTER 12
System Administration: Core Concepts 485
CHAPTER 13
Files, Directories, and Filesystems 553
CHAPTER 14
Downloading and Installing Software 583
CHAPTER 15
Printing with CUPS 611
CHAPTER 16
Building a Linux Kernel 635
CHAPTER 17
Administration Tasks 657
CHAPTER 18
Configuring a LAN 693

This page intentionally left blank

485485
12Chapter12The job of a system administrator is to keep one or more sys-tems in a useful and convenient state for users. On a Linuxsystem, the administrator and user may both be you, withyou and the computer being separated by only a few feet.Alternatively, the system administrator may be halfwayaround the world, supporting a network of systems, with youbeing one of thousands of users. On one hand, a systemadministrator can be one person who works part-time takingcare of a system and perhaps is also a user of the system. Onthe other hand, several administrators can work together full-time to keep many systems running.
In This Chapter
Running Commands with root Privileges . . . . . . . . . . . . . . . . . . 487
sudo: Running a Command with root Privileges . . . . . . . . . . . . . . 490
The Upstart Event-Based init Daemon . . . . . . . . . . . . . . . . . . . 500
SysVinit (rc) Scripts: Start and Stop System Services . . . . . . . . 507
Recovery (Single-User) Mode . . . . 512
rpcinfo: Displays Information About portmap . . . . . . . . . . . . . 530
TCP Wrappers: Secure a Server (hosts.allow and hosts.deny) . . 532
Setting Up a chroot Jail . . . . . . . . . 534
DHCP: Configures Network Interfaces . . . . . . . . . . . . . . . . . . 538
12
System
Administration:
Core Concepts

486 Chapter 12 System Administration: Core Concepts
A well-maintained system
• Runs quickly enough so users do not get frustrated waiting for the system to respond or complete a task.
• Has enough storage to accommodate users’ reasonable needs.
• Provides a working environment appropriate to each user’s abilities and requirements.
• Is secure from malicious and accidental acts altering its performance or compromising the security of the data it holds and exchanges with other systems.
• Is backed up regularly, with recently backed-up files being readily avail-able to users.
• Has recent copies of the software that users need to get their jobs done.
• Is easier to administer than a poorly maintained system.
In addition, a system administrator should be available to help users with all typesof system-related problems—from logging in to obtaining and installing softwareupdates to tracking down and fixing obscure network issues.
Part IV of this book breaks system administration into seven chapters:
• Chapter 12 covers the core concepts of system administration, including working with root (Superuser) privileges, system operation, the Ubuntu configuration tools and other useful utilities, general information about setting up and securing a server (including a section on DHCP), and PAM.
• Chapter 13 covers files, directories, and filesystems from an administra-tor’s point of view.
• Chapter 14 covers installing software on the system, including how to use APT (aptitude), the Debian package (dpkg) management system, BitTor-rent, and wget.
• Chapter 15 discusses how to set up local and remote printers that use the CUPS printing system.
• Chapter 16 explains how to rebuild the Linux kernel.
• Chapter 17 covers additional system administrator tasks and tools, includ-ing setting up users and groups, backing up files, scheduling tasks, printing system reports, and general problem solving.
• Chapter 18 goes into detail about how to set up a LAN, including setting up and configuring network hardware and configuring software.
Because Linux is readily configurable and runs on a wide variety of platforms (SunSPARC, DEC/Compaq Alpha, Intel x86, AMD, PowerPC, and more), this chaptercannot discuss every system configuration or every action you might potentially

Running Commands with root Privileges 487
have to take as a system administrator. Instead, this chapter seeks to familiarize youwith the concepts you need to understand and the tools you will use to maintain anUbuntu system. Where it is not possible to go into depth about a subject, the chap-ter provides references to other sources.
This chapter assumes that you are familiar with the following terms:
block device (page 1025) filesystem (page 1036) root filesystem (page 1058)daemon (page 1032) fork (page 1037) runlevel (page 1058)device (page 1033) kernel (page 1044) signal (page 1060)device filename (page 1033) login shell (page 1046) spawn (page 1061)disk partition (page 1033) mount (page 1048) system console (page 1064)environment (page 1035) process (page 1054) X server (page 1070)
Running Commands with root Privileges
Some commands can damage the filesystem or crash the operating system. Othercommands can invade users’ privacy or make the system less secure. To keep aLinux system up and running as well as secure, Ubuntu is configured not to permitordinary users to execute some commands and access certain files. Linux providesseveral ways for a trusted user to execute these commands and access these files.The default username of the trusted user with these systemwide powers is root; auser with these privileges is also sometimes referred to as Superuser. As this sectionexplains, Ubuntu enables specified ordinary users to run commands with root privi-leges while logged in as themselves.
A user running with root privileges has the following powers—and more:
• Some commands, such as those that add new users, partition hard drives, and change system configuration, can be executed only by a user with rootprivileges. Such a user can configure tools, such as sudo, to give specific users permission to perform tasks that are normally reserved for a user running with root privileges.
• Read, write, and execute file access and directory access permissions do not affect a user with root privileges. A user with root privileges can read from, write to, and execute all files, as well as examine and work in all directories.
Terminology: single-user mode is changing to recovery modetip Linux is in transition. With the advent of the Upstart init daemon (page 500), what was called
single-user mode Ubuntu now refers to as recovery mode. However, vestiges of the old terminol-ogy remain. For example, you type single at the end of the grub kernel line to bring a system upin recovery mode. This book uses these terms interchangeably.

488 Chapter 12 System Administration: Core Concepts
• Some restrictions and safeguards that are built in to some commands do not apply to a user with root privileges. For example, a user with root priv-ileges can change any user’s password without knowing the old password.
When you are running with root privileges in a command line environment, by con-vention the shell displays a special prompt to remind you of your status. By default,this prompt is (or ends with) a pound sign (#). You can gain or grant root privilegesin a number of ways:
• When you bring the system up in recovery mode (page 512), you are logged in as the user named root.
• The sudo utility allows specified users to run selected commands with rootprivileges while they are logged in as themselves. You can set up sudo to allow certain users to perform specific tasks that require root privileges without granting them systemwide root privileges. See page 490 for more information on sudo.
• Some programs ask for your password when they start. If sudo is set up to give you root privileges, when you provide your password, the program runs with root privileges. When a program requests a password when it starts, you stop running as a privileged user when you quit using the pro-gram. This setup keeps you from remaining logged in with root privileges when you do not need or intend to be.
• Any user can create a setuid (set user ID) file. Setuid programs run on behalf of the owner of the file and have all the access privileges that the owner has. While you are running as a user with root privileges, you can change the permissions of a file owned by root to setuid. When an ordi-nary user executes a file that is owned by root and has setuid permissions, the program has full root privileges. In other words, the program can do
System console security
security Ubuntu Linux is not secure from a user at the console. Additional security measures, such as set-ting bootloader and BIOS passwords, can help secure the console. However, when a user hasphysical access to the hardware, as console users typically do, it is very difficult to secure a sys-tem from that user.
Least privilegecaution When you are working on any computer system, but especially when you are working as the sys-
tem administrator (with root privileges), perform any task using the least privilege possible. Whenyou can perform a task logged in as an ordinary user, do so. When you must run a command withroot privileges, do as much as you can as an ordinary user, use sudo so that you have root priv-ileges, complete the part of the task that has to be done with root privileges, and revert to beingan ordinary user as soon as you can. Because you are more likely to make a mistake when youare rushing, this concept becomes more important when you have less time to apply it.

Running Commands with root Privileges 489
anything a user with root privileges can do that the program normally does. The user’s privileges do not change. Thus, when the program finishes running, all user privileges are as they were before the program started. Setuid programs owned by root are both extremely powerful and extremely dangerous to system security, which is why a system contains very few of them. Examples of setuid programs that are owned by rootinclude passwd, at, and crontab. For more information refer to “Setuid and Setgid Permissions” on page 201.
optional The following techniques for gaining root privileges depend on unlocking the rootaccount (setting up a root password) as explained on page 499.
• You can give an su (substitute user) command while you are logged in as yourself. When you then provide the root password, you will have rootprivileges. For more information refer to “su: Gives You Another User’s Privileges” on page 499.
• Once the system is up and running in multiuser mode (page 515), you can log in as root. When you then supply the root password, you will be run-ning with root privileges.
Some techniques limit how someone can log in as root. For example, PAM (page 545)controls the who, when, and how of logging in. The /etc/securetty file controls whichterminals (ttys) a user can log in on as root. The /etc/security/access.conf file addsanother dimension to login control (see the comments in the file for details).
root-owned setuid programs are extremely dangerous
security Because a root-owned setuid program allows someone who does not know the root password andcannot use sudo to gain root privileges, it is a tempting target for a malicious user. Also, program-ming errors that make normal programs crash can become root exploits in setuid programs. Asystem should have as few of these programs as necessary. You can disable setuid programs atthe filesystem level by mounting a filesystem with the nosuid option (page 573). See page 521 fora command that lists all setuid files on the local system.
Do not allow root access over the Internetsecurity Prohibiting root logins using login over a network is the default policy of Ubuntu and is imple-
mented by the PAM securetty module. The /etc/security/access.conf file must contain the namesof all users and terminals/workstations that you want a user to be able to log in as root. Initiallyevery line in access.conf is commented out.
You can, however, log in as root over a network using ssh (page 707). As shipped by Ubuntu, sshdoes not follow the instructions in securetty or access.conf. In addition, in /etc/ssh/sshd_config,Ubuntu sets PermitRootLogin to yes to permit root to log in using ssh (page 723).

490 Chapter 12 System Administration: Core Concepts
sudo: Running a Command with root Privileges
Classically a user gained root privileges by logging in as root or by giving an su(substitute user) command and providing the root password. When an ordinaryuser executed a privileged command in a graphical environment, the system wouldprompt for the root password. More recently the use of sudo (www.sudo.ws) hastaken over these classic techniques of gaining root privileges.
Ubuntu strongly encourages the use of sudo. In fact, as shipped, Ubuntu locks the rootaccount (there is no password) so you cannot use the classic techniques. There aremany advantages of using sudo over using the root account for system administration:
• When you run sudo, it requests your password—not the root password— so you have to remember only one password.
• The sudo utility logs all commands it executes. This log can be useful for retracing your steps if you make a mistake and for system auditing.
• The sudo utility allows implementation of a finer-grained security policy than does the use of su and the root account. Using sudo, you can enable specific users to execute specific commands—something you cannot do with the classic root account setup.
• Using sudo makes it harder for a malicious user to gain access to a system. When there is an unlocked root account, a malicious user knows the user-name of the account she wants to crack before she starts. When the rootaccount is locked, the user has to determine the username and the pass-word to break into a system.
Some users question whether sudo is less secure than su. Because both rely on pass-words, they share the same strengths and weaknesses. If the password is compro-mised, the system is compromised. However, if the password of a user who isallowed by sudo to do one task is compromised, the entire system may not be atrisk. Thus, if used properly, the finer granularity of sudo’s permissions structure canmake it a more secure tool than su. Also, when sudo is used to invoke a single com-mand, it is less likely that a user will be tempted to keep working with root privi-leges than if the user opens a root shell with su.
There is a root account, but no root password
tip As installed, Ubuntu locks the root account by not providing a root password. This setup preventsanyone from logging into the root account (except when you bring the system up in recoverymode [page 512]). There is, however, a root account (a user with the username root—look at thefirst line in /etc/passwd). This account/user owns files (give the command ls –l /bin) and runsprocesses (give the command ps –ef and look at the left column of the output). The root accountis critical to the functioning of an Ubuntu system.
The sudo utility enables you to run a command as though it had been run by a user logged in asroot. This book uses the phrase “working with root privileges” to emphasize that, although youare not logged in as root, when you use sudo you have the powers of the root user.
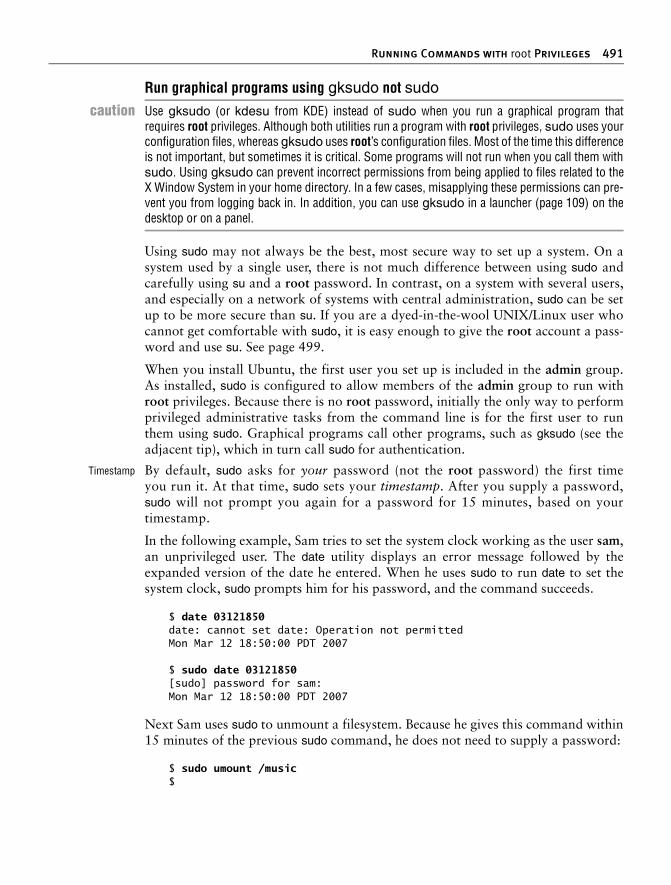
Running Commands with root Privileges 491
Using sudo may not always be the best, most secure way to set up a system. On asystem used by a single user, there is not much difference between using sudo andcarefully using su and a root password. In contrast, on a system with several users,and especially on a network of systems with central administration, sudo can be setup to be more secure than su. If you are a dyed-in-the-wool UNIX/Linux user whocannot get comfortable with sudo, it is easy enough to give the root account a pass-word and use su. See page 499.
When you install Ubuntu, the first user you set up is included in the admin group.As installed, sudo is configured to allow members of the admin group to run withroot privileges. Because there is no root password, initially the only way to performprivileged administrative tasks from the command line is for the first user to runthem using sudo. Graphical programs call other programs, such as gksudo (see theadjacent tip), which in turn call sudo for authentication.
Timestamp By default, sudo asks for your password (not the root password) the first timeyou run it. At that time, sudo sets your timestamp. After you supply a password,sudo will not prompt you again for a password for 15 minutes, based on yourtimestamp.
In the following example, Sam tries to set the system clock working as the user sam,an unprivileged user. The date utility displays an error message followed by theexpanded version of the date he entered. When he uses sudo to run date to set thesystem clock, sudo prompts him for his password, and the command succeeds.
$ date 03121850date: cannot set date: Operation not permittedMon Mar 12 18:50:00 PDT 2007
$ sudo date 03121850[sudo] password for sam:Mon Mar 12 18:50:00 PDT 2007
Next Sam uses sudo to unmount a filesystem. Because he gives this command within15 minutes of the previous sudo command, he does not need to supply a password:
$ sudo umount /music$
Run graphical programs using gksudo not sudo
caution Use gksudo (or kdesu from KDE) instead of sudo when you run a graphical program thatrequires root privileges. Although both utilities run a program with root privileges, sudo uses yourconfiguration files, whereas gksudo uses root’s configuration files. Most of the time this differenceis not important, but sometimes it is critical. Some programs will not run when you call them withsudo. Using gksudo can prevent incorrect permissions from being applied to files related to theX Window System in your home directory. In a few cases, misapplying these permissions can pre-vent you from logging back in. In addition, you can use gksudo in a launcher (page 109) on thedesktop or on a panel.

492 Chapter 12 System Administration: Core Concepts
Now Sam uses the –l option to check which commands sudo will allow him to run.Because he was the first user registered on the system (and is therefore a member ofthe admin group), he is allowed to run any command as any user.
$ sudo -lUser sam may run the following commands on this host: (ALL) ALL
Spawning a rootshell
When you have several commands you need to run with root privileges, it may beeasier to spawn a root shell, give the commands without having to type sudo infront of each one, and exit from the shell. This technique defeats some of the safe-guards built in to sudo, so use it carefully and remember to return to a nonroot shellas soon as possible. (See the tip on least privilege on page 488.) Use the sudo –ioption to spawn a root shell:
$ pwd/home/sam$ sudo -i# iduid=0(root) gid=0(root) groups=0(root)# pwd/root# exit$
In this example, sudo spawns a root shell, which displays a # prompt to remind youthat you are running with root privileges. The id utility displays the identity of theuser running the shell. The exit command (you can also use CONTROL-D) terminates theroot shell, returning the user to his normal status and his former shell and prompt.
sudo’s environment The pwd builtin in the preceding example shows one aspect of the modified environ-ment the –i option (page 493) creates. This option spawns a root login shell (a shellwith the same environment as a user logging in as root would have) and executesroot’s startup files (page 277). Before issuing the sudo –i command, the pwd builtinshows /home/sam as Sam’s working directory; after the command it shows /root,root’s home directory, as the working directory. Use the –s option (page 493) tospawn a root shell without modifying the environment. When you call sudo withoutan option, it runs the command you specify in an unmodified environment. To dem-onstrate, the following example has sudo run pwd without an option. The workingdirectory of a command run in this manner does not change.
$ pwd/home/sam$ sudo pwd/home/sam
Redirecting output The following command fails because, although the shell that sudo spawns executesls with root privileges, the nonprivileged shell that the user is running redirects theoutput. The user’s shell does not have permission to write to /root.
$ sudo ls > /root/ls.sam-bash: /root/ls.sam: Permission denied
There are several ways around this problem. The easiest is to pass the whole com-mand line to a shell running under sudo:

Running Commands with root Privileges 493
$ sudo bash -c 'ls > /root/ls.sam'
The bash –c option spawns a shell that executes the string following the option andthen terminates. The sudo utility runs the spawned shell with root privileges. Youcan quote the string to prevent the nonprivileged shell from interpreting specialcharacters. You can also spawn a root shell with sudo –i, execute the command, andexit from the privileged shell. (See the preceding section.)
optional Another way to deal with the problem of redirecting output of a command run bysudo is to use tee (page 236):
$ ls | sudo tee /root/ls.sam...
This command writes the output of ls to the file but also displays it. If you do not wantto display the output, you can have the nonprivileged shell redirect the output to/dev/null (page 555). The next example uses this technique to do away with the screenoutput and uses the –a option to tee to append to the file instead of overwriting it:
$ ls | sudo tee -a /root/ls.sam > /dev/null
Options
You can use command line options to control how sudo runs a command. Follow-ing is the syntax of an sudo command line:
sudo [options] [command]
where options is one or more options and command is the command you want toexecute. Without the –u option, sudo runs command with root privileges. Some ofthe more common options follow; see the sudo man page for a complete list.
–b (background) Runs command in the background.
–i (initial login environment) Spawns the shell that is specified for root (or anotheruser specified by –u) in /etc/passwd, running root’s (or the other user’s) startup files,with some exceptions (e.g., TERM is not changed). Does not take a command.
–k (kill) Resets the timestamp (page 491) of the user running the command, whichmeans the user must enter a password the next time she runs sudo.
–L (list defaults) Lists the parameters that you can set on a Defaults line (page 497) inthe sudoers file. Does not take a command.
–l (list commands) Lists the commands the user who is running sudo is allowed torun on the local system. Does not take a command.
–s (shell) Spawns a new root (or another user specified by –u) shell as specified in the/etc/passwd file. Similar to –i but does not change the environment. Does not take acommand.
–u user Runs command with the privileges of user. Without this option sudo runs commandwith root privileges.

494 Chapter 12 System Administration: Core Concepts
sudoers: Configuring sudoAs installed, sudo is not as secure and robust as it can be if you configure it care-fully. The sudo configuration file is /etc/sudoers. The best way to edit sudoers is touse visudo by giving this command: sudo visudo. The visudo utility locks, edits, andchecks the grammar of the sudoers file. By default, visudo calls the nano editor. Youcan set the VISUAL environment variable to cause visudo to call vi with the follow-ing command:
$ export VISUAL=vi
Replace vi with the textual editor of your choice. Put this command in a startup file(page 277) to set this variable each time you log in.
In the sudoers file, comments, which start with a pound sign (#), can appear any-where on a line. In addition to comments, this file holds two types of entries: aliasesand user privilege specifications. Each of these entries occupies a line, which can becontinued by terminating it with a backslash (\).
User Privilege Specifications
The format of a line that specifies user privileges is as follows (the whitespacearound the equal sign is optional)
user_list host_list = [(runas_list)] command_list
• The user_list specifies the user(s) this specification line applies to. This list can contain usernames, groups (prefixed with %), and user aliases (next section).
• The host_list specifies the host(s) this specification line applies to. This list can contain one or more hostnames, IP addresses, or host aliases (dis-cussed in the next section). You can use the builtin alias ALL to cause the line to apply to all systems that refer to this sudoers file.
• The runas_list specifies the user(s) the commands in the command_list can be run as when sudo is called with the –u option (page 493). This list can contain usernames, groups (prefixed with %), and runas aliases (discussed in the next section). Must be enclosed within parentheses. Without runas_list, sudo assumes root.
Always use visudo to edit the sudoers file
caution A syntax error in the sudoers file can prevent you from using sudo to gain root privileges. If youedit this file directly (without using visudo), you will not know that you introduced a syntax erroruntil you find you cannot use sudo. The visudo utility checks the syntax of sudoers before itallows you to exit. If it finds an error, it gives you the choice of fixing the error, exiting without sav-ing the changes to the file, or saving the changes and exiting. The last is usually a poor choice, sovisudo marks the last choice with (DANGER!).

Running Commands with root Privileges 495
• The command_list specifies the utilities this specification line applies to. This list can contain names of utilities, names of directories holding utili-ties, and command aliases (discussed in the next section). All names must be absolute pathnames; directory names must end with a slash (/).
If you follow a name with two adjacent double quotation marks (""), the user willnot be able to specify any command line arguments, including options. Alterna-tively, you can specify arguments, including wildcards, to limit the arguments a useris allowed to use.
Examples The following user privilege specification allows Sam to use sudo to mount andunmount filesystems (run mount and umount with root privileges) on all systems (asspecified by ALL) that refer to the sudoers file containing this specification:
sam ALL=(root) /bin/mount, /bin/umount
The (root) runas_list is optional. If you omit it, sudo allows the user to run the com-mands in the command_list with root privileges. In the following example, Samtakes advantage of these permissions. He cannot run umount directly; instead, hemust call sudo to run it.
$ whoamisam$ umount /musicumount: only root can unmount /dev/sdb7 from /music$ sudo umount /music[sudo] password for sam:$
If you replace the line in sudoers described above with the following line, Sam is notallowed to unmount /p03, although he can still unmount any other filesystem andcan mount any filesystem:
sam ALL=(root) /bin/mount, /bin/umount, !/bin/umount /p03
The result of the preceding line in sudoers is shown below. The sudo utility does notprompt for a password because Sam has entered his password within the last 15minutes.
$ sudo umount /p03Sorry, user sam is not allowed to execute '/bin/umount /p03' as root on localhost.
The following line limits Sam to mounting and unmounting filesystems mounted on/p01, /p02, /p03, and /p04:
sam ALL= /bin/mount /p0[1-4], /bin/umount /p0[1-4]
The following commands show the result:
$ sudo umount /musicSorry, user sam is not allowed to execute '/bin/umount /music' as root on localhost.$ sudo umount /p03$

496 Chapter 12 System Administration: Core Concepts
Default privilegesfor admin group
As shipped, the sudoers file contains the following lines:
# Members of the admin group may gain root privileges%admin ALL=(ALL) ALL
This user privilege specification applies to all systems (as indicated by the ALL to theleft of the equal sign). As the comment says, this line allows members of the admingroup (specified by preceding the name of the group with a percent sign: %admin) torun any command (the rightmost ALL) as any user (the ALL within parentheses).When you call it without the –u option, the sudo utility runs the command you spec-ify with root privileges, which is what sudo is used for most of the time.
If the following line were in sudoers, it would allow members of the wheel group torun any command as any user with one exception: They would not be allowed to runpasswd to change the root password.
%wheel ALL=(ALL) ALL, !/usr/bin/passwd root
optional In the %admin ALL=(ALL) ALL line, if you replaced (ALL) with (root), or if youomitted (ALL), you would still be able to run any command with root privileges.You would not, however, be able to use the –u option to run a command as anotheruser. Typically, when you can have root privileges, this limitation is not an issue.Working as a user other than yourself or root allows you to use the least privilegepossible to accomplish a task, which is a good idea.
For example, if you are in the admin group, the default entry in the sudoers fileallows you to give the following command to create and edit a file in Sam’s homedirectory. Because you are working as Sam, he will own the file and be able to readfrom and write to it.
$ sudo -u sam vi ~sam/reminder$ ls -l ~sam/reminder-rw-r--r-- 1 sam sam 15 Mar 9 15:29 /home/sam/reminder
Aliases
An alias enables you to rename and/or group users, hosts, or commands. Followingis the format of an alias definition:
alias_type alias_name = alias_list
where alias_type is the type of alias (User_Alias, Runas_Alias, Host_Alias,Cmnd_Alias), alias_name is the name of the alias (by convention in all uppercase let-ters), and alias_list is a comma-separated list of one or more elements that make upthe alias. Preceding an element of an alias with an exclamation point (!) negates it.
User_Alias The alias_list for a user alias is the same as the user_list for a user privilege specifi-cation (discussed in the previous section). The following lines from a sudoers filedefine three user aliases: OFFICE, ADMIN, and ADMIN2. The alias_list thatdefines the first alias includes the usernames mark, sam, and sls; the second includes

Running Commands with root Privileges 497
two usernames and members of the admin group; and the third includes all mem-bers of the admin group except Max.
User_Alias OFFICE = mark, sam, slsUser_Alias ADMIN = max, zach, %adminUser_Alias ADMIN2 = %admin, !max
Runas_Alias The alias_list for a runas alias is the same as the runas_list for a user privilege spec-ification (discussed in the previous section). The following SM runas alias includesthe usernames sam and sls:
Runas_Alias SM = sam, sls
Host_Alias Host aliases are meaningful only when the sudoers file is referenced by sudo runningon more than one system. The alias_list for a host alias is the same as the host_listfor a user privilege specification (discussed in the previous section). The followingline defines the LCL alias to include the systems named dog and plum:
Host_Alias LCL = dog, plum
If you want to use fully qualified hostnames (hosta.example.com instead of justhosta) in this list, you must set the fqdn flag (discussed in the next section), whichcan slow the performance of sudo.
Cmnd_Alias The alias_list for a command alias is the same as the command_list for a user priv-ilege specification (discussed in the previous section). The following command aliasincludes three files and, by including a directory (denoted by its trailing /), incorpo-rates all the files in that directory:
Cmnd_Alias BASIC = /bin/cat, /usr/bin/vi, /bin/df, /usr/local/safe/
Defaults (Options)
You can change configuration options from their default values by using theDefaults keyword. Most values in this list are flags that are implicitly Boolean (caneither be on or off) or strings. You turn on a flag by naming it on a Defaults line,and you turn it off by preceding it with a !. The following line from the installedsudoers file turns off the lecture and fqdn flags and turns on tty_tickets:
Defaults !lecture,tty_tickets,!fqdn
This section lists some common flags; see the sudoers man page for a complete list.
fqdn (fully qualified domain name) Performs DNS lookups on FQDNs (page 1037) inthe sudoers file. When this flag is set, you can use FQDNs in the sudoers file, butdoing so may negatively affect sudo’s performance, especially if DNS is not work-ing. When this flag is set, you must use the local host’s official DNS name, not analias. If hostname returns an FQDN, you do not need to set this flag. By default, thisflag is on; it is off in the sudoers file distributed by Ubuntu.
insults Displays mild, humorous insults when a user enters a wrong password. The defaultis off. See also passwd_tries.

498 Chapter 12 System Administration: Core Concepts
lecture=freq Controls when sudo displays a reminder message before the password prompt. Pos-sible values of freq are never (default), once, and always. Specifying !lecture is thesame as specifying a freq of never.
mailsub=subj (mail subject) Changes the default email subject for warning and error messagesfrom the default *** SECURITY information for %h *** to subj. The sudo util-ity expands %h within subj to the local system’s hostname. Place subj between quo-tation marks if it contains shell special characters (page 146).
mailto=eadd Sends sudo warning and error messages to eadd (an email address; the default is root).Place eadd between quotation marks if it contains shell special characters (page 146).
mail_always Sends email to the mailto user each time a user runs sudo. The default is off.
mail_badpass Sends email to the mailto user when a user enters an incorrect password while run-ning sudo. The default is off.
mail_no_host Sends email to the mailto user when a user whose username is in the sudoers file butwho does not have permission to run commands on the local host runs sudo. Thedefault is off.
mail_no_perms Sends email to the mailto user when a user whose username is in the sudoers file butwho does not have permission to run the requested command runs sudo. Thedefault is off.
mail_no_user Sends email to the mailto user when a user whose username is not in the sudoers fileruns sudo. The default is on.
passwd_tries=numThe num is the number of times the user can enter an incorrect password inresponse to the sudo password prompt before sudo quits. The default is 3. See alsoinsults and lecture.
rootpw Causes sudo to accept only the root password in response to its prompt. Becausesudo issues the same prompt whether it is asking for your password or the rootpassword, turning this flag on may confuse users. Do not turn on this flag if youhave not unlocked the root account (page 499) as you will not be able to use sudo.To fix this problem, bring the system up in recovery mode (page 512) and turn off(remove) this flag. The default is off, causing sudo to prompt for the password ofthe user running sudo. See the adjacent tip.
shell_noargs Causes sudo, when called without any arguments, to spawn a root shell withoutchanging the environment. The default is off. This option is the same as the sudo –soption.
Using the root password in place of your password
tip If you have set up a root password (page 499), you can cause graphical programs that require apassword to require the root password in place of the password of the user who is running theprogram by turning on rootpw. The programs will continue to ask for your password, but willaccept only the root password. Making this change causes an Ubuntu system to use the root pass-word in a manner similar to the way some other distributions use this password.

Running Commands with root Privileges 499
timestamp_timeout=minsThe mins is the number of minutes that the sudo timestamp (page 491) is valid. Thedefault is 15; set mins to –1 to cause the timestamp to be valid forever.
umask=val The val is the umask (page 526) that sudo uses to run the command that the userspecifies. Set val to 0777 to preserve the user’s umask value. The default is 0022.
Unlocking the root Account (Assigning a Password to root)Except for a few instances, there is no need to unlock the root account on anUbuntu system and Ubuntu suggests that you do not do so. The following com-mand unlocks the root account by assigning a password to it:
$ sudo passwd rootEnter new UNIX password:Retype new UNIX password:passwd: password updated successfully
Relocking the rootaccount
If you decide you want to lock the root account after unlocking it, give the com-mand sudo passwd –l root. You can unlock it again with the preceding command.
su: Gives You Another User’s Privileges
To use su to gain root privileges, you must unlock the root account (as discussed inthe preceding section).
The su (substitute user) utility can spawn a shell or execute a program with theidentity and privileges of a specified user. Follow su on the command line with thename of a user; if you are working with root privileges or if you know the user’spassword, you will then take on the identity of that user. When you give an su com-mand without an argument, su defaults to spawning a shell with root privileges(you have to know the root password).
When you give an su command to work as root, su spawns a new shell, which dis-plays the # prompt. You can return to your normal status (and your former shelland prompt) by terminating this shell: Press CONTROL-D or give an exit command. Giv-ing an su command by itself changes your user and group IDs but makes minimalchanges to the environment. For example, PATH has the same value as it did beforeyou gave the su command. When you give the command su – (you can use –l or––login in place of the hyphen), you get a root login shell: It is as though youlogged in as root. Not only do the shell’s user and group IDs match those of root,but the environment is identical to that of root. The login shell executes the appro-priate startup files (page 277) before displaying a prompt.
The id utility displays the changes in your user and group IDs and in the groups youare associated with:
$ iduid=1002(sam) gid=1002(sam) groups=117(admin),1002(sam)$ suPassword:# iduid=0(root) gid=0(root) groups=0(root)

500 Chapter 12 System Administration: Core Concepts
You can use su with the –c option to run a command line with root privileges,returning to the original shell when the command finishes executing. The followingexample first shows that a user is not permitted to kill (page 522) a process. With theuse of su –c and the root password, however, the user is permitted to kill the process.The quotation marks are necessary because su –c takes its command as a singleargument.
$ kill -15 4982-bash: kill: (4982) - Operation not permitted$ su -c "kill -15 4982"Password:$
The Upstart Event-Based init Daemon
Because the traditional System V init daemon (SysVinit) does not deal well withmodern hardware, including hotplug (page 568) devices, USB hard and flash drives,and network-mounted filesystems, Ubuntu replaced it with the Upstart init daemon(upstart.ubuntu.com and upstart.ubuntu.com/wiki).
Several other replacements for SysVinit are also available. One of the most promi-nent, initng (www.initng.org), is available for Debian and runs on Ubuntu. In addi-tion, Solaris uses SMF (Service Management Facility) and MacOS uses launchd.Over time, Ubuntu will likely come to incorporate features of each of these systemsinto Upstart.
The runlevel-based SysVinit daemon (sysvinit package) uses runlevels (single-user,multiuser, and more) and links from the /etc/rc?.d directories to the init scripts in/etc/init.d to start and stop system services. The event-based Upstart init daemon(upstart package) uses events to start and stop system services. With the Feistyrelease, Ubuntu switched to the Upstart init daemon and began the transition fromthe SysVinit setup to the Upstart setup. This section discusses Upstart and the partsof SysVinit that remain: the /etc/rc?.d and /etc/init.d directories and the concept ofrunlevels. See the tip about terminology on page 487.
The Upstart init daemon is event-based and runs specified programs when somethingon the system changes. These programs, which are frequently scripts, start and stopservices. This setup is similar in concept to the links to init scripts that SysVinit callsas a system enters runlevels, except Upstart is more flexible. Instead of starting andstopping services only when the runlevel changes, Upstart can start and stop servicesupon receiving information that something on the system has changed. Such a
Superuser, PATH, and securitysecurity The fewer directories you keep in PATH when you are working as root, the less likely you will be
to execute an untrusted program as root. Never include the working directory (as . or : : anywherein PATH, or : as the last element of PATH). For more information refer to “PATH: Where the ShellLooks for Programs” on page 302.

The Upstart Event-Based init Daemon 501
change is called an event. For example, Upstart can take action when it learns fromudev (page 568) that a filesystem, printer, or other device has been added or removedfrom the running system. It can also start and stop services when the system isbrought up, when the system is shut down, or when a job changes state.
Future of Upstart Changing from Sysvinit to Upstart involves many parts of the Linux system. Tomake the switch smoothly and to introduce as few errors as possible, the Upstartteam elected to make the transition over several releases.
Ubuntu started using the Upstart init daemon in Feisty. Between the Feisty andGutsy+2 releases, Ubuntu will move away from the SysVinit setup and toward thecleaner, more flexible Upstart setup. As more system services are put under the con-trol of Upstart, entries in the /etc/event.d directory (see the tip on page 507) willreplace the contents of the /etc/init.d and /etc/rc?.d directories. Runlevels will nolonger be a formal feature of Ubuntu, although they will be maintained for compat-ibility with third-party software. Eventually Upstart will also replace crond.
Software Packages
The Upstart system comprises five packages, all of which are installed by default:
• upstart Provides the Upstart init daemon and initctl utility.
• upstart-logd Provides the logd daemon and the job definition file for the logd service.
• upstart-compat-sysv Provides job definition files for the rc* tasks as well as the reboot, runlevel, shutdown, and telinit utilities that provide compatibil-ity with SysVinit.
• startup-tasks Provides job definition files for system startup tasks.
• system-services Provides job definition files for tty services.
Definitions
Events An event is a change in state that init can be informed of. Almost any change instate—either internal or external to the system—can trigger an event. For example,the boot loader triggers the startup event, the system entering runlevel 2 triggers therunlevel 2 event, and a filesystem being mounted triggers the path-mounted event.Removing and installing a hotplug (page 568) or USB device (such as a printer) cantrigger an event. You can also trigger an event manually by using the initctl emitcommand (page 504).
Jobs A job is a series of instructions that init reads. The instructions typically include aprogram (binary file or shell script) and the name of an event. The Upstart init dae-mon runs the program when the event is triggered. You can run and stop a job man-ually using the initctl start and stop commands, respectively (page 504). Jobs aredivided into tasks and services.
Tasks A task is a job that performs its work and returns to a waiting state when it is done.
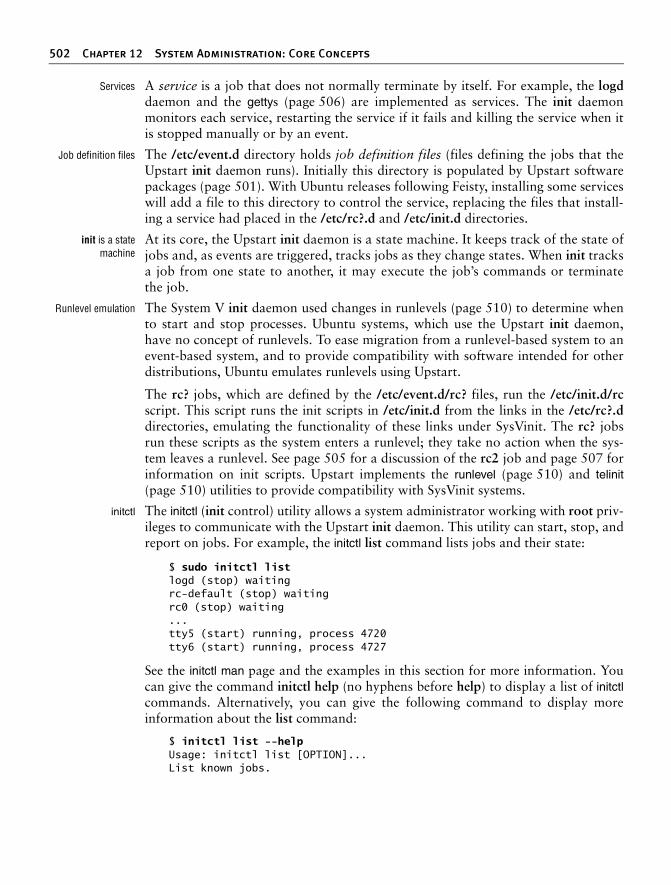
502 Chapter 12 System Administration: Core Concepts
Services A service is a job that does not normally terminate by itself. For example, the logddaemon and the gettys (page 506) are implemented as services. The init daemonmonitors each service, restarting the service if it fails and killing the service when itis stopped manually or by an event.
Job definition files The /etc/event.d directory holds job definition files (files defining the jobs that theUpstart init daemon runs). Initially this directory is populated by Upstart softwarepackages (page 501). With Ubuntu releases following Feisty, installing some serviceswill add a file to this directory to control the service, replacing the files that install-ing a service had placed in the /etc/rc?.d and /etc/init.d directories.
init is a statemachine
At its core, the Upstart init daemon is a state machine. It keeps track of the state ofjobs and, as events are triggered, tracks jobs as they change states. When init tracksa job from one state to another, it may execute the job’s commands or terminatethe job.
Runlevel emulation The System V init daemon used changes in runlevels (page 510) to determine whento start and stop processes. Ubuntu systems, which use the Upstart init daemon,have no concept of runlevels. To ease migration from a runlevel-based system to anevent-based system, and to provide compatibility with software intended for otherdistributions, Ubuntu emulates runlevels using Upstart.
The rc? jobs, which are defined by the /etc/event.d/rc? files, run the /etc/init.d/rcscript. This script runs the init scripts in /etc/init.d from the links in the /etc/rc?.ddirectories, emulating the functionality of these links under SysVinit. The rc? jobsrun these scripts as the system enters a runlevel; they take no action when the sys-tem leaves a runlevel. See page 505 for a discussion of the rc2 job and page 507 forinformation on init scripts. Upstart implements the runlevel (page 510) and telinit(page 510) utilities to provide compatibility with SysVinit systems.
initctl The initctl (init control) utility allows a system administrator working with root priv-ileges to communicate with the Upstart init daemon. This utility can start, stop, andreport on jobs. For example, the initctl list command lists jobs and their state:
$ sudo initctl listlogd (stop) waitingrc-default (stop) waitingrc0 (stop) waiting...tty5 (start) running, process 4720tty6 (start) running, process 4727
See the initctl man page and the examples in this section for more information. Youcan give the command initctl help (no hyphens before help) to display a list of initctlcommands. Alternatively, you can give the following command to display moreinformation about the list command:
$ initctl list --helpUsage: initctl list [OPTION]...List known jobs.

The Upstart Event-Based init Daemon 503
Options: --show-ids show job ids, as well as names -p, --pid=PID destination process -q, --quiet reduce output to errors only -v, --verbose increase output to include informationalmessages --help display this help and exit --version output version information and exit
Replace list with the initctl command you want more information about. The start,stop, and status utilities are links to initctl that run the initctl commands they arenamed for.
Jobs
Each file in the /etc/event.d directory defines a job and usually has at least an eventand a command. When the event is triggered, init executes the command. This sec-tion describes examples of both administrator-defined jobs and jobs installed withthe Upstart packages.
Administrator-Defined Jobs
mudat example The following administrator-defined job uses the exec keyword to execute a shellcommand. You can also use this keyword to execute a shell script stored in a file ora binary executable file.
$ cat /etc/event.d/mudatstart on runlevel 2exec echo "Entering multiuser mode on " $(date) > /tmp/mudat.out
This file defines a task: It runs the echo shell command when the system entersmultiuser mode (runlevel 2). This command writes a message that includes the timeand date to /tmp/mudat.out. The shell uses command substitution (page 344) toexecute the date utility. After this job runs to completion, the mudat task stops andenters a wait state. In the next example, the cat utility shows the contents of the/tmp/mudat.out file and the initctl list command reports on this task (the status util-ity displays the same information):
$ cat /tmp/mudat.outEntering multiuser mode on Tue Jul 10 17:34:39 PDT 2007
$ sudo initctl list mudatmudat (stop) waiting
If the exec command line contains shell special characters (page 146), init executes/bin/sh (a link to dash [page 276]) and passes the command line to the shell. Other-wise, exec executes the command line directly. To run multiple shell commands,either use exec to run a shell script stored in a file or use script...end script (dis-cussed next).

504 Chapter 12 System Administration: Core Concepts
The Upstart init daemon can monitor only jobs (services) whose programs are exe-cuted using exec. It cannot monitor jobs run using script...end script. Put another way,services require the use of exec while tasks can use either method to run a program.
myjob example You can also define an event and set up a job that is triggered by that event. Themyjob job definition file defines a job that is triggered by the hithere event:
$ cat /etc/event.d/myjobstart on hitherescript
echo "Hi there, here I am!" > /tmp/myjob.outdate >> /tmp/myjob.outend script
The myjob file shows another way of executing commands: It includes two com-mand lines between the script and end script keywords. These keywords alwayscause init to execute /bin/sh. These commands write a message and the date to the/tmp/myjob.out file. You can use the emit initctl command to trigger the job. Fol-lowing, init displays the stages myjob goes through when you trigger it:
initctl emit $ sudo initctl emit hitherehitheremyjob (start) waitingmyjob (start) startingmyjob (start) pre-startmyjob (start) spawned, process 6064myjob (start) post-start, (main) process 6064myjob (start) running, process 6064myjob (stop) runningmyjob (stop) stoppingmyjob (stop) killedmyjob (stop) post-stopmyjob (stop) waiting
$ cat /tmp/myjob.outHi there, here I am!Sat Jul 7 20:19:13 PDT 2007
$ sudo initctl list myjobmyjob (stop) waiting
initctl start and stop In the preceding example, cat shows the output that myjob generates and initctl dis-plays the status of the job. You can run the same job with the command initctl startmyjob (or just start myjob). The initctl start command is useful when you want torun a job without triggering an event. For example, you can use the commandinitctl start mudat to run the mudat job from the previous example without trigger-ing the runlevel 2 event.
Job Definition Files in /etc/event.d
As Ubuntu transitions from SysVinit to Upstart init, more jobs will be defined in the/etc/event.d directory. This section describes some of the jobs that the Upstart pack-ages (page 501) put in this directory.

The Upstart Event-Based init Daemon 505
optional Specifying Events with Arguments
The telinit and shutdown utilities emit runlevel events that include arguments. Forexample, shutdown emits runlevel 0, and telinit 2 emits runlevel 2. You can matchthese events within a job definition using the following syntax:
start|stop on event [arg]
where event is an event such as runlevel and arg is an optional argument. To stop ajob when the system enters runlevel 2, specify stop on runlevel 2. You can also spec-ify runlevel [235] to match runlevels 2, 3, and 5 or runlevel [!2] to match any run-level except 2.
Event arguments Although Upstart ignores additional arguments in an event, additional arguments inan event name within a job definition file must exist in the event. For example, run-level (no argument) in a job definition file matches all runlevel events (regardless ofarguments) whereas runlevel S arg2 does not match any runlevel event because therunlevel event takes only one argument.
rc2 task The /etc/event.d/rc2 job definition file defines the rc2 task, which is similar to theother rc? tasks. The rc2 task is started when the system enters multiuser mode (theevent is named runlevel 2); it is stopped when the system enters any runlevel otherthan runlevel 2 (runlevel [!2]). The first part of the script calls the runlevel utility(page 510), which makes the system appear to be in runlevel 2 (there are no realrunlevels) and assigns values to two variables. The real work is done by the execcommand, which runs the /etc/init.d/rc script with an argument of 2. This scriptcalls the links in the /etc/rc?.d directory that correspond to its argument. Thus therc2 task runs the init scripts that the links in the /etc/rc2.d directory point to.
$ cat /etc/event.d/rc2# rc2 - runlevel 2 compatibility## This task runs the old sysv-rc runlevel 2 ("multi-user") scripts. It# is usually started by the telinit compatibility wrapper.
start on runlevel 2
stop on runlevel [!2]
console outputscript
set $(runlevel --set 2 || true)if [ "$1" != "unknown" ]; then
PREVLEVEL=$1RUNLEVEL=$2export PREVLEVEL RUNLEVEL
fi
exec /etc/init.d/rc 2end script

506 Chapter 12 System Administration: Core Concepts
tty services Following is the job definition file for the service that starts and monitors the gettyprocess on tty1:
$ cat /etc/event.d/tty1# tty1 - getty## This service maintains a getty on tty1 from the point when# the system is started until it is shut down again.
start on runlevel 2start on runlevel 3start on runlevel 4start on runlevel 5
stop on runlevel 0stop on runlevel 1stop on runlevel 6
respawnexec /sbin/getty 38400 tty1
This service starts the getty process when any of the events runlevel 2 through run-level 5 are triggered (i.e., when the system enters multiuser mode) and stops whenany of the events runlevel 0, runlevel 1, or runlevel 6 is triggered (i.e., when the sys-tem is shut down, enters single-user mode, or is rebooted). The respawn keywordtells init to restart the job if it terminates, and exec runs a getty process on tty1 at38,400 baud. The initctl utility reports that the tty1 service has started and is runningas process 4747; ps reports on the process:
$ sudo initctl list tty1tty1 (start) running, process 4747$ ps -ef | grep 4747root 4747 1 0 Jul02 tty1 00:00:00 /sbin/getty 38400 tty1
control-alt-del task See page 518 for a discussion of the control-alt-del task that you can use to bringthe system down.
rc-default task andinittab
Under SysVinit, the initdefault entry in the /etc/inittab file tells init which runlevel(page 510) to bring the system to when it comes up. Ubuntu does not include aninittab file and, by default, the Upstart init daemon (using the rc-default task) bootsthe system to multiuser mode (runlevel 2, the default runlevel). If you want the sys-tem to boot to a different runlevel, create an inittab file. The following file causesthe system to boot to single-user mode (runlevel S; see the tip on page 511):
$ cat /etc/inittab:id:S:initdefault:
When the system comes up in single-user (recovery) mode, if the root account onthe system is unlocked (page 499), init requests the root password before display-ing the root prompt. Otherwise it displays the root prompt without requesting apassword.

The Upstart Event-Based init Daemon 507
Never set the system to boot to runlevel 0 or 6, as it will not come up properly. Toboot to multiuser mode (runlevel 2), remove the inittab file if it exists or create theinittab file shown in the example and replace the S with a 2.
SysVinit (rc) Scripts: Start and Stop System Services
rc scripts The init (initialization) scripts, also called rc (run command) scripts, are shell scriptslocated in the /etc/init.d directory. They are run via symbolic links in the /etc/rcn.ddirectories, where n is the runlevel the system is entering.
The /etc/rcn.d directories contain scripts whose names begin with K (K19cupsys,K20dhcp, K74bluetooth, and so on) and scripts whose names begin with S(S15bind9, S18nis, S65firestarter, and so on). When entering a new runlevel, each K(kill) script is executed with an argument of stop, and then each S (start) script isexecuted with an argument of start. Each of the K files is run in numerical order.The S files are run in similar fashion. This setup allows the person who sets up thesefiles to control which services are stopped and which are started, and in what order,whenever the system enters a given runlevel. Using scripts with start and stop argu-ments promotes flexibility because it allows one script to both start and kill a pro-cess, depending on which argument it is called with.
To customize system initialization, you can add shell scripts to the /etc/init.d direc-tory and place links to these files in the /etc/rcn.d directories (although in practice itis best to use sysv-rc-conf [discussed next] to create the links). The following exam-ple shows several links to the samba init script. These links are called to run thesamba init script to start or stop the nmbd and smbd daemons at various runlevels:
$ ls -l /etc/rc?.d/*samba*lrwxrwxrwx 1 root root 15 May 17 10:51 /etc/rc0.d/K19samba -> ../init.d/sambalrwxrwxrwx 1 root root 15 May 17 10:51 /etc/rc1.d/K19samba -> ../init.d/sambalrwxrwxrwx 1 root root 15 May 17 10:51 /etc/rc2.d/S20samba -> ../init.d/sambalrwxrwxrwx 1 root root 15 May 17 10:51 /etc/rc3.d/S20samba -> ../init.d/sambalrwxrwxrwx 1 root root 15 May 17 10:51 /etc/rc4.d/S20samba -> ../init.d/sambalrwxrwxrwx 1 root root 15 May 17 10:51 /etc/rc5.d/S20samba -> ../init.d/sambalrwxrwxrwx 1 root root 15 May 17 10:51 /etc/rc6.d/K19samba -> ../init.d/samba
Each link in /etc/rcn.d points to a file in /etc/init.d. For example, the file/etc/rc2.d/S20samba is a link to the file named samba in /etc/init.d. (The numbersin the filenames of the links in the /etc/rcn.d directories may change from onerelease of Ubuntu to the next, but the scripts in /etc/init.d always have the same
Most of the files in the /etc/rcn.d and /etc/init.d directories will go away
tip As explained on page 502, Ubuntu emulates runlevels using Upstart to aid migration and providecompatibility with software for other distributions. This section explains how init scripts work with(emulated) runlevels to control system services. The /etc/rcn.d and the /etc/init.d directoriesdescribed in this section will largely be empty by the release of Ubuntu Gutsy+2 (the secondUbuntu release following Gutsy), the links in these directories having been replaced by job controlfiles in /etc/event.d (page 502).

508 Chapter 12 System Administration: Core Concepts
names.) The names of files in the init.d directory are functional. Thus, when youwant to turn NFS services on or off, you use the nfs-kernel-server script. When youwant to turn basic network services on or off, you run the networking script. Thecupsys script controls the printer daemon. Each script takes an argument of stop orstart, depending on what you want to do. Some scripts also take other arguments,such as restart, reload, and status. Run a script without an argument to display ausage message indicating which arguments it accepts.
Following are three examples of calls to init scripts:
$ sudo /etc/init.d/nfs-kernel-server stop$ sudo /etc/init.d/networking start$ sudo /etc/init.d/networking restart
The first example stops all NFS server processes (processes related to serving filesys-tems over the network). The second example starts all processes related to basic net-work services. The third example stops and then restarts these same processes.
/etc/rc.local The /etc/rc.local file is executed after the other init scripts when the system boots.Put commands that customize the system in rc.local. Although you can add anycommands you like to rc.local, it is best to run them in the background; that way ifthey hang, they will not stop the boot process.
sysv-rc-conf: Configures Services
The sysv-rc-conf utility (sysv-rc-conf package) makes it easier for a system adminis-trator to maintain the /etc/rc?.d directory hierarchy. This utility can add, remove,and list startup information for system services. You might also want to try thegraphical boot-up manager, bum (bum package), which this book does not cover.
You can run sysv-rc-conf in pseudographical or textual mode. In pseudographicalmode, it makes changes to configuration files as you enter the changes and can alsostart and stop services. For more information on this mode, see the sysv-rc-conf manpage or run sysv-rc-conf without any arguments and give the command h. This sec-tion discusses using sysv-rc-conf in textual mode in which it changes the configura-tion only—it does not change the current state of any service. Give the followingcommand to see a the list of services:
$ sudo sysv-rc-conf --listacpi-support 1:off 2:on 3:on 4:on 5:onacpid 1:off 2:on 3:on 4:on 5:onalsa-utils 0:off 6:offanacron 1:off 2:on 3:on 4:on 5:onapmd 1:off 2:on 3:on 4:on 5:onapport 0:off 1:off 2:on 3:on 4:on 5:on 6:offatd 1:off 2:on 3:on 4:on 5:onavahi-daemonbinfmt-suppo 2:on 3:on 4:on 5:on...
All services that run their own daemons are listed, one to a line, followed by their con-figured state for each runlevel. If a runlevel is missing, it means that there is no entry

The Upstart Event-Based init Daemon 509
for that service in the corresponding file in the /etc/rc?.d directory. You can check howa specific daemon is configured by adding its name to the previous command:
$ sudo sysv-rc-conf --list sshssh 1:off 2:on 3:on 4:on 5:on
In the next example, sysv-rc-conf configures the /etc/rc?.d directories so that sshd(the OpenSSH daemon) is off in runlevels 2, 3, 4, and 5 and then confirms thechange. To make changes, you must work with root privileges:
$ sudo sysv-rc-conf --level 2345 ssh off$ sudo sysv-rc-conf --list sshssh 1:off 2:off 3:off 4:off 5:off
For convenience, you can omit the ––level 2345 arguments. When you specify aninit script and on or off, sysv-rc-conf defaults to runlevels 2, 3, 4, and 5. The follow-ing command is equivalent to the first of the preceding commands:
$ sudo sysv-rc-conf ssh off
The ps utility confirms that even though sysv-rc-conf set things up so sshd would beoff in all runlevels, it is still running. The sysv-rc-conf utility did not shut down sshd.
$ ps -ef | grep sshdroot 5169 1 0 Mar12 ? 00:00:00 /usr/sbin/sshdzach 11545 5749 0 19:30 pts/2 00:00:00 grep sshd
With the preceding changes, when you reboot the system, sshd will not start. Youcan stop it more easily using the ssh init script:
$ sudo /etc/init.d/ssh stop * Stopping OpenBSD Secure Shell server... [ OK ]$ ps -ef | grep sshdroot 11740 8840 0 19:33 pts/1 00:00:00 grep sshd
The name of the init script is not always the same as name of the daemon it runs
tip The adjacent examples show that the ssh init script controls the sshd daemon. You can find thename of the script that controls a daemon by listing the contents of the /etc/init.d directory andsearching for a filename that is similar to the name or function of the daemon you want to workwith. For example, the /etc/init.d/networking script controls the networking daemons.
Frequently, the first few lines of a script identify the daemon it controls. In the following example,a comment explains what the ssh init script does and the line that starts with test checks whetherthe sshd file, which runs the sshd daemon, exists on the system:
$ cat /etc/init.d/ssh#! /bin/shset -e
# /etc/init.d/ssh: start and stop the OpenBSD "secure shell(tm)" daemon
test -x /usr/sbin/sshd || exit 0...

510 Chapter 12 System Administration: Core Concepts
System Operation
This section covers the basics of how the system functions and can help you makeintelligent decisions as a system administrator. It does not examine every aspect ofsystem administration in the depth necessary to set up or modify all system func-tions. Instead, it provides a guide to bringing a system up and keeping it runningfrom day to day.
Runlevels
With the introduction of Upstart in the Feisty release of Ubuntu, true runlevels dis-appeared from the system. As a transitional tool, runlevels were replaced with astructure that runs under Upstart and emulates runlevels (page 502). Table 12-1lists these pseudorunlevels as they exist under Upstart.
Default runlevel By default, Ubuntu systems boot to multiuser mode (runlevel 2). See “rc-defaulttask and inittab” on page 506 for instructions on how to change this default.
runlevel The runlevel utility displays the previous and current runlevels. This utility is a tran-sitional tool; it provides compatibility with SysVinit. In the following example, theN indicates that the system does not know what the previous runlevel was and the 2indicates that the system is in multiuser mode.
$ runlevelN 2
telinit The telinit utility allows a user with root privileges to bring the system down, rebootthe system, or change between recovery (single-user) and multiuser modes. Thetelinit utility is a transitional tool; it provides compatibility with SysVinit. On a sys-tem running Upstart, this utility emits a runlevel event based on its argument. Theformat of a telinit command is
telinit runlevel
where runlevel is one of the pseudorunlevels described in Table 12-1.
Table 12-1 Pseudorunlevels
Number Name/function
0 Brings the system down
1 Brings the system to single-user (S, recovery) mode
S Single-user (recovery) mode, textual login, few system services running
2 Multiuser mode, graphical login, all scheduled system services running
3, 4, 5 Multiuser mode, graphical login, all scheduled system services running (for system customization, runlevels 2–5 are identical)
6 Reboots the system

System Operation 511
Recovery mode andthe root password
When the system enters recovery (single-user) mode, if the root account is unlocked(page 499), init requests the root password before displaying the root prompt. Oth-erwise it displays the root prompt without requesting a password. When the systementers multiuser mode, it displays a graphical login screen.
Booting the System
Booting a system is the process of reading the Linux kernel (page 1044) into systemmemory and starting it running. Refer to “grub: The Linux Boot Loader” onpage 647 for more information on the initial steps of bringing a system up.
init daemon As the last step of the boot procedure, Linux starts the Upstart init daemon(page 500) as PID number 1. The init daemon is the first genuine process to runafter booting and is the parent of all system processes. (That is why when you killprocess 1 while you are working with root privileges, the system dies.)
Once init is running, the startup event triggers the rcS task, which stops when thesystem enters any runlevel. The rc-default task starts when rcS stops. Based on thecontents of /etc/inittab (page 506) or the absence of this file, rc-default either
• Executes telinit with an argument of S, which triggers rcS-sulogin and brings the system to recovery (single-user) mode, or
• Executes telinit with an argument of 2, which triggers rc2 (page 505) and brings the system to multiuser mode.
Reinstalling theMBR
If the Master Boot Record (MBR) gets overwritten, the system will not boot intoLinux and you need to rewrite the MBR. See page 653 for details.
Do not change runlevels directly into runlevel Scaution Using telinit to request the system change to runlevel 1 brings the system first to runlevel 1,
where appropriate system processes (running system services) are killed, and then automati-cally to runlevel S. Changing directly to runlevel S puts the system into runlevel S but does notkill any processes first; it is usually a poor idea.
The Upstart init daemon consults /etc/inittab (page 506) only when the system is booting. At thattime there are no processes left running from a previous runlevel, so there is no issue with goingdirectly to runlevel S.
List the kernel boot messages
tip To save a list of kernel boot messages, give the following command immediately after booting thesystem and logging in:
$ dmesg > dmesg.boot
This command saves the kernel messages in a file named dmesg.boot. This list can be educational.It can also be useful when you are having a problem with the boot process. For more informationsee page 654.

512 Chapter 12 System Administration: Core Concepts
Recovery (Single-User) Mode
When the system is in recovery (single-user) mode, only the system console isenabled. You can run programs from the console in single-user mode as you wouldfrom any terminal in multiuser mode. The differences are twofold: You are workingin textual mode so you cannot run graphical programs and few of the system dae-mons are running. All filesystems are mounted per /etc/fstab (page 576).
When you boot the system to recovery mode, the init daemon runs the init scripts in/etc/rcS.d as part of single-user initialization (see the tip on page 511). See the nextsections for instructions on booting a system to recovery mode. When you bring arunning system down to recovery mode (page 519), the init daemon runs the initscripts in /etc/rc1.d and /etc/rcS.d.
With the system in recovery mode, you can perform system maintenance thatrequires filesystems to be unmounted or that requires just a quiet system—no oneexcept you using it, so that no user programs interfere with disk maintenance andbackup programs. The classical UNIX term for this state is quiescent. You can oftenboot to recovery mode when the system will not boot normally, allowing you tochange or replace configuration files, check and repair partitions using fsck(page 577), rewrite boot information (page 653), and more.
Booting the System into Recovery (Single-User) Mode
You can bring a system up in recovery mode by booting from the hard drive or froman installation CD/DVD. The Alternate and Server CDs make this task easy. Eitherway, you must instruct grub to bring the system to single-user mode.
Booting to Recovery Mode from a Hard Drive
Displaying thegrub menu
The first step in bringing a system up in single-user mode from the hard disk is todisplay the grub menu. Boot the system normally (turn on the power or reboot it).The grub menu will be hidden or displayed.
Hidden menu If the grub menu is hidden, grub displays
GRUB loading, please wait...press 'ESC' to enter the menu... 10
You must press ESCAPE before the 10 counts down to 0 to display the grub menu. Oth-erwise grub boots the default operating system, which typically brings the system tomultiuser mode.
Displayed menu If grub displays its menu, you must press ESCAPE before the 10 counts down to 0. Oth-erwise grub boots the default operating system.
Selecting recoverymode
Unless you have modified menu.lst (page 648), the grub menu starts with a few pairsof lines similar to the following:
Ubuntu, kernel 2.6.22-10-genericUbuntu, kernel 2.6.22-10-generic (recovery mode)

System Operation 513
Typically the first line is highlighted. Press the DOWN ARROW key to highlight the secondline, which includes the words recovery mode. Press RETURN to boot the system torecovery (single-user) mode.
Editing the grubmenu
If there is no line with recovery mode in the menu, follow these instructions:
1. Highlight the kernel you want to boot—grub highlights the default kernel when grub displays its menu.
2. Press e to edit the grub boot command lines (from menu.lst) for the kernel you selected. The lines look similar to the following:
root (hd0,0)kernel /boot/vmlinuz-2.6.22-10-generic root=UUID=9e467f91-5240-4472-8193-1954dd1be37b ro quiet splashinitrd /boot/initrd.img-2.6.22-10-generic
3. Press the UP or DOWN ARROW key to highlight the line that begins with kernel.
4. Press e to edit the highlighted line; grub displays the line in a simple editor with the cursor at the end of the line. In this editor, grub displays only part of the line. You can use the RIGHT and LEFT ARROW keys to display other parts of the line.
5. With the cursor positioned at the right end of the line (where it is if you have not moved it), enter SPACE single (following splash in the preceding example) and press RETURN to display the previous screen.
6. Press b to boot the system using the modified kernel line. The system comes up in recovery (single-user) mode.
root password If the root account on the system is unlocked (page 499), the system requests theroot password before displaying the root prompt. Otherwise it displays the rootprompt without requesting a password.
Booting to Recovery Mode from an Installation CD
If you are booting Ubuntu from the Alternate CD or the Server CD, select Rescue abroken system from the initial install screen. Follow the instructions on page 65,select one of the Execute a shell... selections, and continue with the “Which is theboot disk and partition?” section below.
If you are booting from the live/install Desktop CD/DVD, when Ubuntu displaysthe Ubuntu logo and the startup menu, press F6 (Other options—see Figure 3-16 onpage 64). Ubuntu stops its countdown and displays the boot options line, whichlooks similar to the following:
Boot Options :casper initrd=/casper/initrd.gz quiet splash --
Boot options Ubuntu displays only the end of the boot options line. You can use the RIGHT and LEFT
ARROW keys to display other parts of the line. With the cursor positioned to the rightof the SPACE following the two hyphens at the right end of the line (where it is if youhave not moved it), type single and press RETURN. Ubuntu boots to recovery modefrom the CD/DVD; it will not request a password. At this point, you are working

514 Chapter 12 System Administration: Core Concepts
with root privileges (the system displays a # prompt) and none of the hard disk par-titions are mounted. If you want to make changes to the system that resides on thehard drive, you must mount the partition(s) you want to change.
Which is the bootdisk and partition?
The most common reason for booting to recovery mode from a CD/DVD on aninstalled Ubuntu system is to repair the system when it cannot boot from the harddisk. To fix this problem, you need to make changes to the bootable partition. Onceyou can boot the system from the hard drive, you can boot to recovery mode fromthe hard disk as explained earlier and make other changes as needed.
A system typically boots from the hard disk at /dev/hda, /dev/sda, /dev/hdb, or/dev/sdb. Give the following command, substituting each of the device names untilparted displays a list of partitions that includes one with a boot flag:
# parted /dev/hda printError: Error opening /dev/hda: No medium foundRetry/Cancel? c
# parted /dev/sda print
Disk /dev/sda: 150GBSector size (logical/physical): 512B/512BPartition Table: msdos
Number Start End Size Type File system Flags 1 32.3kB 1003MB 1003MB primary ext2 boot 2 1003MB 5001MB 3997MB primary ext3 3 5001MB 25.0GB 20.0GB primary ext3...
The preceding example shows that parted cannot read /dev/hda and that partition 1of /dev/sda has the boot flag set (it is a bootable partition). The device name for thispartition is the catenation of the device name and the partition number: /dev/sda1.Typically the boot directory is mounted on an ext2 or ext3 filesystem.
Dual-boot systems The /boot directory does not have to be on a partition with the boot flag. On adual-boot system, the partition with the boot flag may not be the partition thatholds the /boot directory. Or, on a system that can boot more than one version ofLinux, the partition with the boot flag may not hold the boot directory you need tofix. Following is the line that parted displays for the primary partition of a dual-boot system that boots both Windows and Ubuntu:
1 32.3kB 42.2GB 42.2GB primary ntfs boot
The first clue that this is not the partition you want to work with is that it is anNTFS filesystem, which is unlikely to hold a Linux boot partition.
The second clue will come after you mount the partition and look at its contents(next step). If you find filenames such as WINDOWS, DRIVERS, and ProgramFiles, it is likely the C drive of a Windows system. Unmount this partition andmount another one as explained next.

System Operation 515
Mounting the bootpartition
Once you determine the device name of the boot partition, mount that partition soyou can edit files on it. Frequently you will need to edit /boot/grub/menu.lst. If youmade a change to this file and you (or the system) made a backup of the file beforemaking the change, you may only need to copy the backup over menu.lst.
Continuing with the preceding example, mount /dev/sda1 on /mnt. A listing of/mnt will look similar to the following. Use cd to make grub the working directoryand see which menu files are available to work with.
# ls /mntbin dev initrd lib mnt root sys varboot etc initrd.img lost+found opt sbin tmp vmlinuzcdrom home initrd.img.old media proc srv usr vmlinuz.old
# cd /mnt/boot/grub# ls -ltr menu.*-rw-r--r-- 1 root root 4649 2007-06-25 17:59 menu.lst~-rw-r--r-- 1 root root 5097 2007-07-02 08:59 menu.lst
If you have mounted the wrong partition, unmount it as described below; thenmount another partition and see whether it contains a /boot/grub directory. Thepreceding listing shows a backup copy of the menu file (menu.lst~; the dpkgpostinst script makes a backup file with this name when it installs a new, precom-piled kernel). Before preceding, make a backup of menu.lst by copying it to a filenamed menu.list.00 or something similar. You can now copy a known-good backupover menu.lst or edit menu.lst using a text editor such as nano or vi.
When you are done making changes, give the following commands to unmount thedevice mounted on /mnt (you cannot unmount a filesystem while one of its directo-ries is the working directory):
# cd# umount /mnt
After unmounting /mnt, give the command reboot. Ubuntu asks you to remove theCD and press ENTER (RETURN) to boot the system. If you have fixed the problem, thesystem will boot normally.
Going to Multiuser Mode
Multiuser/graphical mode (runlevel 2) is the default state for an Ubuntu Linux sys-tem. In this mode all appropriate filesystems are mounted, and users can log in fromall connected terminals, dial-up lines, and network connections. All support servicesand daemons are enabled and running. With the system in multiuser mode, Ubuntudisplays a graphical login screen on the console.
If you booted to recovery mode to fix something, give a reboot command and allowthe system to come up in multiuser mode. If the system entered recovery mode auto-matically to allow you to repair the filesystem, when you exit from the recoveryshell, init brings the system to the default mode—usually multiuser. Alternatively,

516 Chapter 12 System Administration: Core Concepts
you can give the following command in response to the root prompt to bring thesystem to multiuser mode:
# telinit 2
The telinit utility (page 510) tells init which runlevel to change to.
When it goes from single-user to multiuser mode, the system executes the K (kill orstop) scripts and then the S (start) scripts in /etc/rc.d/rc2.d. For more informationrefer to “SysVinit (rc) Scripts: Start and Stop System Services” on page 507. Usesysv-rc-conf (page 508) to stop any of these scripts from running when the systementers the new runlevel.
Logging In
Textual login With a textual login, the system uses init, getty, and login to allow a user to log in;login uses PAM modules (page 545) to authenticate a user. Once the system is inmultiuser mode, init is responsible for spawning a getty process on each of the linesa user can log in on.
When you enter your username, getty establishes the characteristics of the terminal.It then overlays itself with a login process and passes to the login process whateveryou entered in response to the login: prompt. The login process uses PAM to consultthe /etc/passwd file to see whether any username there matches the username youentered. PAM then consults the /etc/shadow file to see whether a password is asso-ciated with the username. If it is, login prompts you for a password; if not, it contin-ues without requiring a password. When your username requires a password, loginverifies the password you enter by checking the /etc/shadow file again. If eitheryour username or your password is not correct, login displays Login incorrect andprompts you to log in again.
All passwords in the /etc/shadow file are hashed using MD5 (page 1047). It is notfeasible to recover a hashed password. When you log in, the login process hashes thepassword you type at the prompt and compares it to the hashed password in/etc/shadow. If the two passwords match, you are authenticated.
Graphical login With a graphical login, the init process spawns gdm (the GNOME display manager)on the first free virtual terminal, providing features similar to getty and login. Thegdm utility starts an X server and presents a login window. The gdm display man-ager then uses PAM to authenticate the user and runs the scripts in the/etc/gdm/PreSession directory. These scripts inspect the user’s ~/.dmrc file, whichstores the user’s default session and language, and launch the user’s session. TheGNOME desktop environment stores the state of the last saved session andattempts to restore it when the user logs in again.
With NIS, login compares your username and password with the information inthe appropriate naming service instead of (or in addition to) the passwd andshadow files. If the system is configured to use both methods (/etc/passwd and

System Operation 517
NIS), it checks the /etc/nsswitch.conf file (page 542) to see in which order itshould consult them.
PAM (page 545), the Pluggable Authentication Module facility, gives you greatercontrol over user logins than the /etc/passwd and /etc/shadow files do. Using PAM,you can specify multiple levels of authentication, mutually exclusive authenticationmethods, or parallel methods, each of which is by itself sufficient to grant access tothe system. For example, you can have different authentication methods for consolelogins and for ssh logins. Similarly, you can require modem users to authenticatethemselves using two or more methods (such as a smartcard or badge reader and apassword). PAM modules also provide security technology vendors with a conve-nient way to interface their hardware or software products with a system.
Initializing thesession
When the username and password are correct, login or the scripts in PreSession con-sult the appropriate services to initialize the user and group IDs, establish the homedirectory, and determine which shell or desktop manager the user works with.
The login utility/PreSession scripts assign values to variables and look in the/etc/group file (page 558) to identify the groups the user belongs to. When login hasfinished its work, it overlays itself with the login shell, which inherits the variablesset by login. In a graphical environment, the PreSession scripts start the desktopmanager.
During a textual login, the login shell assigns values to additional shell variablesand executes the commands in the system startup files /etc/profile and /etc/bashrc.Some systems have additional system startup files. The actions performed by thesescripts are system dependent. In most cases they display the contents of the/etc/motd (message of the day) and /etc/issue files, let you know if you have mail,and set umask (page 526), the file-creation mask.
After executing the system startup commands, the shell executes the commandsfrom the personal startup files in the user’s home directory. These scripts aredescribed on page 277. Because the shell executes the personal startup files after thesystem startup files, a sophisticated user can override any variables or conventionsthat were established by the system. A new user, by contrast, can remain uninvolvedin these matters.
Logging Out
With a shell prompt displayed, you can either execute a program or exit from theshell. If you exit from the shell, the process running the shell dies and the parentprocess wakes up. When the shell is a child of another shell, the parent shell wakesup and displays a prompt. Exiting from a login shell causes the operating system tosend init a signal that one of its children has died. Upon receiving this signal, inittakes action based on the appropriate job (page 501). In the case of a process con-trolling a line for a terminal, init calls the appropriate tty service (page 506), whichthen respawns getty so another user can log in.

518 Chapter 12 System Administration: Core Concepts
Bringing the System Down
The shutdown and reboot utilities perform the tasks needed to bring the system downsafely. These utilities can restart the system, prepare the system to be turned off,and, on most hardware, power down the system. The poweroff and halt utilities arelinks to reboot.
You must tell shutdown when you want to bring the system down. This time can beexpressed as an absolute time of day, as in 19:15, which causes the shutdown tooccur at 7:15 PM. Alternatively, you can give this time as the number of minutesfrom the present time, as in +15, which means 15 minutes from now. To bring thesystem down immediately (recommended for emergency shutdowns only or whenyou are the only user logged in), you can give the argument +0 or its synonym, now.When the shutdown time exceeds 5 minutes, all nonroot logins are disabled for thelast 5 minutes before shutdown.
Calling shutdown with the –r option causes the system to reboot (same as reboot,except reboot implies now). Using –h instead of –r forces the system to halt (same ashalt, except halt implies now). A message appears once the system has been safelyhalted: System halted. Most ATX systems power off automatically after shutdown,in which case you will not see this message.
Because Linux is a multiuser system, shutdown warns all users before taking action.This warning gives users a chance to prepare for the shutdown, perhaps by writingout editor files or exiting from applications. You can replace the default shutdownmessage with one of your own by following the time specification on the commandline with a message:
$ sudo shutdown -h 09:30 Going down 9:30 to install disk, up by 10am.
CONTROL-ALT-DEL: Reboots the System
In a textual environment, pressing the key sequence CONTROL-ALT-DEL (also referred to asthe three-finger salute or the Vulcan death grip) on the console causes the kernel totrigger a control-alt-delete event that causes init to run the commands in/etc/event.d/control-alt-delete. See page 501 for more information on Upstartevents. These commands safely reboot the system by issuing a shutdown command.You can disable CONTROL-ALT-DEL by removing the /etc/event.d/control-alt-delete file (orby moving it to another directory for safe keeping).
Do not turn the power off before bringing the system downcaution Do not turn the power off on a Linux system without first bringing it down as described in this sec-
tion. Linux speeds disk access by keeping buffers in memory that it writes out to disk periodicallyor when system use is momentarily low. When you turn off or reset the computer without writingthe contents of these buffers to the disk, you lose any information in the buffers. Running shut-down forces these buffers to be written. You can force the buffers to be written at any time byissuing a sync command. However, sync does not unmount filesystems, nor does it bring thesystem down. Also, turning off or resetting a system in this manner can destroy filesystems onIDE and SATA hard disks.

System Operation 519
In a graphical environment, the X Window System traps this key sequence but thewindow manager does not pass it to the kernel. As a result, CONTROL-ALT-DEL does notwork in a graphical environment.
Going to Recovery (Single-User) Mode
The following steps describe a method of manually bringing the system down torecovery mode—the point where it is safe to turn the power off. Make sure you giveother users enough warning before switching to recovery mode; otherwise they maylose the data they are working on. Because going from multiuser to recovery modecan affect other users, you must work with root privileges to perform all of thesetasks except the first.
1. Use wall (page 677) to warn everyone who is using the system to log out.
2. If you are sharing files via NFS, use exportfs –ua to disable network access to the shared filesystems. (Use exportfs without an argument to see which filesystems are being shared.)
3. Confirm no critical processes are running in the background (e.g., an unat-tended compile).
4. Give the command telinit 1 (page 510) to bring the system down to recov-ery mode. The system displays messages about the services it is shutting down followed by a root shell prompt (#). In runlevel 1, the system kills many system services and then brings the system to runlevel S. The runlevelutility confirms the system was at runlevel 1 and is now at runlevel S. See the tip about changing runlevels on page 511.
$ sudo telinit 1...# runlevel1 S
5. Use umount –a to unmount all mounted devices that are not in use. Use mount without an argument to make sure that no devices other than root (/) are mounted before continuing.
Turning the Power Off
Once the system is in recovery mode, give the command telinit 0 (page 510) or haltto bring the system down. You can build a kernel with apm so it turns the machineoff at the appropriate time. If the system is not set up this way, turn the power offwhen prompted to do so or when the system starts rebooting.
Crash
A crash occurs when the system suddenly stops or fails when you do not intend itto. A crash may result from software or hardware problems or from a loss of power.As a running system loses power, it may behave in erratic or unpredictable ways. Ina fraction of a second, some components are supplied with enough voltage; others

520 Chapter 12 System Administration: Core Concepts
are not. Buffers are not flushed, corrupt data may be written to hard disks, and soon. IDE and SATA drives do not behave as predictably as SCSI drives under thesecircumstances. After a crash, you must bring the operating system up carefully tominimize possible damage to the filesystems. Frequently little or no damage willhave occurred.
Repairing a Filesystem
Although the filesystems are checked automatically during the boot process ifneeded, you will have to check them manually if a problem cannot be repaired auto-matically. By default, when fsck cannot repair a filesystem automatically at boottime, Linux enters recovery mode so you can run fsck manually. If necessary, youcan boot the system to recovery mode (page 512).
With the system in recovery mode, use umount to unmount local filesystems youwant to check. Then run fsck (page 577) on these filesystems, repairing them asneeded. Make note of any ordinary files or directories that you repair (and can iden-tify), and inform their owners that these files may not be complete or correct. Lookin the lost+found directory in each filesystem for missing files. After successfullyrunning fsck, if the system entered recovery mode automatically, type exit to exitfrom the recovery shell and resume booting; otherwise give a reboot command.
If files are not correct or are missing altogether, you may have to recreate them froma backup copy of the filesystem. For more information refer to “Backing Up Files”on page 662.
When the System Does Not Boot
When a system will not boot from the hard disk, boot the system to recovery modefrom an installation CD/DVD (page 513). If the system comes up, run fsck on theroot filesystem on the hard disk and try booting from the hard disk again. If the sys-tem still does not boot, you may have to reinstall the master boot record (page 653).
Avoiding a Trojan Horse
A Trojan horse is a program that does something destructive or disruptive to a sys-tem while appearing to be benign. As an example, you could store the followingscript in an executable file named mkfs:
while truedoecho 'Good Morning Mr. Jones. How are you? Ha Ha Ha.' > /dev/consoledone
If you are working with root privileges when you run this command, it will contin-uously write a message to the console. If the programmer were malicious, it coulddo something worse. The only thing missing in this plot is access permissions.

Avoiding a Trojan Horse 521
A malicious user could implement this Trojan horse by changing root’s PATH vari-able to include a publicly writable directory at the start of the PATH string. (Thecatch is that you need to be able to write to /etc/profile—where the PATH variableis set for root—and only a user with root privileges can do that.) Then you wouldneed to put the bogus mkfs program file in that directory. Because the fraudulentversion appears in a directory mentioned earlier than the real one in PATH, the shellwill run it. Thus, the next time a user working with root privileges tries to run mkfs,the fraudulent version would run.
Trojan horses that lie in wait for and take advantage of the misspellings that mostpeople make are among the most insidious types. For example, you might type slinstead of ls. Because you do not regularly execute a utility named sl and you maynot remember typing the command sl, it is more difficult to track down this type ofTrojan horse than one that takes the name of a more familiar utility.
A good way to help prevent the execution of a Trojan horse is to make sure yourPATH variable does not contain a single colon (:) at the beginning or end of the PATHstring or a period (.) or double colon (::) anywhere in the PATH string. This precautionensures that you will not execute a file in the working directory by accident.
To check for a possible Trojan horse, examine the filesystem periodically for fileswith setuid (page 488) permission. The following command lists these files:
Listing setuid files $ sudo find / -perm -4000 -exec ls -lh {} \; 2> /dev/null-rwsr-xr-x 1 root root 25K Oct 19 15:52 /usr/bin/newgrp-rwsr-xr-x 1 root root 35K Oct 19 15:52 /usr/bin/chfn-rwsr-xr-x 1 root root 29K Oct 19 15:52 /usr/bin/chsh-rwsr-xr-x 1 root root 38K Oct 19 15:52 /usr/bin/gpasswd-rwsr-xr-x 1 root root 35K Oct 19 15:52 /usr/bin/passwd-rwsr-sr-x 1 root root 21K Dec 6 22:11 /usr/bin/X-rwsr-xr-x 2 root root 104K Oct 9 04:39 /usr/bin/sudoedit-rwsr-xr-x 2 root root 104K Oct 9 04:39 /usr/bin/sudo-rwsr-sr-x 1 daemon daemon 44K Jul 20 2007 /usr/bin/at-rwsr-xr-x 1 root root 14K Oct 16 10:33 /usr/bin/arping...
This command uses find to locate all files that have their setuid bit set (mode 4000).The hyphen preceding the mode causes find to report on any file that has this bit set,regardless of how the other bits are set. The output sent to standard error is redi-rected to /dev/null so it does not clutter the screen.
Run software onlyfrom sources
you trust
Another way a Trojan horse can enter a system is via a tainted ~/.bashrc (page 554)file. A bogus sudo command or alias in this file can capture a user’s password,which may then be used to gain root privileges. Because a user has write permissionto this file, any program the user executes can easily modify it. The best way to pre-vent this type of Trojan horse from entering a system is to run software only fromsources you trust.
You can set up a program, such as AIDE (Advanced Intrusion Detection Environ-ment), that will take a snapshot of the system and check it periodically. For moreinformation see sourceforge.net/projects/aide.
522 Chapter 12 System Administration: Core Concepts
Getting Help
The Ubuntu Linux distribution comes with extensive documentation (page 124). Forexample, the Support tab on the Ubuntu home page (www.ubuntu.com/support)and the Ubuntu wiki (wiki.ubuntu.com) point to many useful sources of supportthat can help answer many questions. You can also find help on the System Adminis-trators Guild site (www.sage.org). The Internet is another rich source of informationon managing a Linux system; refer to Appendix B (page 981) and to the author’shome page (www.sobell.com) for pointers to useful sites.
You need not act as an Ubuntu system administrator in isolation; a large communityof Linux/Ubuntu experts is willing to assist you in getting the most out of your sys-tem. Of course, you will get better help if you have already tried to solve a problemyourself by reading the available documentation. If you are unable to solve a prob-lem by consulting the documentation, a well-thought-out question to the appropriatenewsgroup, such as comp.os.linux.misc, or mailing list can often generate usefulinformation. Be sure to describe the problem accurately and identify the system care-fully. Include information about the version of Ubuntu running on the system andany software packages and hardware that you think relate to the problem. The news-group comp.os.linux.answers contains postings of solutions to common problemsand periodic postings of the most up-to-date versions of FAQs and HOWTO docu-ments. See www.catb.org/~esr/faqs/smart-questions.html for a good paper by Eric S.Raymond and Rick Moen titled “How to Ask Questions the Smart Way.”
Textual System Administration Utilities
Many tools can help you be an efficient and thorough system administrator. Thissection describes a few textual (command line) tools and utilities; others aredescribed throughout Part IV of this book.
kill: Sends a Signal to a Process
The kill builtin sends a signal to a process. This signal may or may not terminate(kill) the process, depending on which signal it is and how the process is designed.Refer to “trap: Catches a Signal” on page 451 for a discussion of the various signalsand their interaction with a process. Running kill is definitely not the first method totry when a process needs to be aborted.
Usually a user can kill a process by working in another window or by logging in onanother terminal. Sometimes, however, you may have to use sudo to kill a processfor a user. To kill a process, you need to know its PID. The ps utility can providethis information once you determine the name of the program the user is runningand/or the username of the user. The top utility (page 672) can also be helpful infinding and killing a runaway process (use the top k command).

Textual System Administration Utilities 523
In the following example, Sam complains that xeyes is stuck and that he cannot doanything from the xeyes window—not even close it. A more experienced user couldopen another window and kill the process, but in this case you kill it for Sam. Firstyou use ps with the –u option, followed by the name of the user and the –f(full/wide) option to view all processes associated with that user:
$ ps -u sam -fUID PID PPID C STIME TTY TIME CMDsam 2294 2259 0 09:31 ? 00:00:00 /bin/sh /usr/bin/startkdesam 2339 2294 0 09:31 ? 00:00:00 /usr/bin/ssh-agent /usr/bin/dbus-launchsam 2342 1 0 09:31 ? 00:00:00 dbus-daemon --fork --print-pid 8 --prinsam 2343 1 0 09:31 ? 00:00:00 /usr/bin/dbus-launch --exit-with-sessiosam 2396 1 0 09:31 ? 00:00:00 kdeinit Running...sam 2399 1 0 09:31 ? 00:00:00 dcopserver [kdeinit] --nosidsam 2401 2396 0 09:31 ? 00:00:00 klauncher [kdeinit]sam 2403 1 0 09:31 ? 00:00:00 kded [kdeinit]sam 2405 1 0 09:31 ? 00:00:00 /usr/libexec/gam_serversam 2413 2396 0 09:31 ? 00:00:00 /usr/bin/artsd -F 10 -S 4096 -s 60 -m asam 2415 1 0 09:31 ? 00:00:00 kaccess [kdeinit]sam 2416 2294 0 09:31 ? 00:00:00 kwrapper ksmserversam 2418 1 0 09:31 ? 00:00:00 ksmserver [kdeinit]sam 2421 2396 0 09:31 ? 00:00:00 kwin [kdeinit] -session 1070626e6a00011sam 2424 1 0 09:31 ? 00:00:01 kdesktop [kdeinit]sam 2426 1 0 09:31 ? 00:00:01 kicker [kdeinit]sam 2429 2396 0 09:31 ? 00:00:00 kio_file [kdeinit] file /tmp/ksocket-masam 2434 2396 0 09:31 ? 00:00:00 konsole [kdeinit] -session 1070626e6a00sam 2435 2396 0 09:31 ? 00:00:00 /bin/sh /usr/lib/firefox-1.5/firefox -Usam 2446 2435 0 09:31 ? 00:00:00 /bin/sh /usr/lib/firefox-1.5/run-mozillsam 2451 2446 0 09:31 ? 00:00:01 /usr/lib/firefox-1.5/firefox-bin -UILocsam 2453 2434 0 09:31 pts/2 00:00:00 /bin/bashsam 2474 1 0 09:31 ? 00:00:00 /usr/libexec/gconfd-2 10sam 3568 3567 0 13:55 pts/3 00:00:00 -bashsam 3726 1 0 14:07 ? 00:00:00 knotify [kdeinit]sam 3728 1 0 14:07 ? 00:00:00 /usr/bin/artsd -F 10 -S 4096 -s 60 -m asam 3730 2424 0 14:07 ? 00:00:00 xeyessam 3731 3568 0 14:07 pts/3 00:00:00 ps -u sam -f
This list is fairly short, and the process running xeyes is easy to find. Another way tosearch for this process is to use ps to produce a long list of all processes and then usegrep to find which one is running xeyes.
$ ps -ef | grep xeyessam 3730 2424 0 14:07 ? 00:00:00 xeyessam 3766 3568 0 14:14 pts/3 00:00:00 grep xeyes
kill: Use the kill signal (–KILL or –9) as a method of last resort
caution When you do need to use kill, send the termination signal (kill –TERM or kill –15) first. Only ifthat tactic does not work should you attempt to use the kill signal (kill –KILL or kill – 9).
Because of its inherent dangers, using a kill signal is a method of last resort, especially when youare working with root privileges. One kill command issued while working with root privileges canbring the system down without warning.

524 Chapter 12 System Administration: Core Concepts
If several people are running xeyes, look in the left column to find the correctusername so you can kill the right process. You can combine the two commandsas ps –u sam –f | grep xeyes.
Now that you know Sam’s process running xeyes has a PID of 3730, you can use killto terminate it. The safest way to do so is to log in as Sam (perhaps allow him to login for you) and give any of the following commands (they all send a termination sig-nal to process 3730):
$ kill 3730
or
$ kill -15 3730
or
$ kill –TERM 3730
Only if this command fails should you send the kill signal:
$ kill –KILL 3730
The –KILL option instructs kill to send a SIGKILL signal, which the process cannotignore. Although you can give the same command while you are working with rootprivileges, a typing mistake in this situation can have much more far-reaching con-sequences than when you make the mistake while you are working as a nonprivi-leged user. A nonprivileged user can kill only her own processes, whereas a userwith root privileges can kill any process, including system processes.
As a compromise between speed and safety, you can combine the sudo and kill util-ities by using the sudo –u option. The following command runs the part of thecommand line following the –u sam with the identity of Sam (Sam’s privileges):
$ sudo -u sam kill -TERM 3730
killall Two useful utilities related to kill are killall and pidof. The killall utility is very similarto kill but uses a command name instead of a PID number. Give the following com-mand to kill all your processes that are running xeyes or vi:
$ killall xeyes vi
Running this command while working with root privileges kills all processes run-ning xeyes or vi.
pidof The pidof utility displays the PID number of each process running the command youspecify:
$ pidof apache2567 566 565 564 563 562 561 560 553
If it is difficult to find the right process, try using top. Refer to the man pages forthese utilities for more information, including lists of options.

Textual System Administration Utilities 525
Other Textual Utilities
This section describes a few textual (command line) system administration toolsyou may find useful. To learn more about most of these utilities, read the man pages.For umask and uname, see the info pages.
chsh Changes the login shell for a user. When you call chsh without an argument, youchange your login shell. When an ordinary user changes his login shell with chsh, hemust specify an installed shell that is listed in the file /etc/shells, exactly as it is listedthere; chsh rejects other entries. When working with root privileges, you can changeany user’s shell to any value by calling chsh with the username as an argument. In thefollowing example, a user working with root privileges changes Sam’s shell to tcsh:
$ sudo chsh samPassword:Changing the login shell for samEnter the new value, or press ENTER for the default Login Shell [/bin/bash]: /bin/tcsh
clear Clears the screen. You can also use CONTROL-L from the bash shell to clear the screen.The value of the environment variable TERM (page 988) determines how to clearthe screen.
dmesg Displays recent system log messages (page 654).
e2label Displays or creates a volume label on an ext2 or ext3 disk partition. You must runthis utility with root privileges. An e2label command has the following format:
e2label device [newlabel]
where device is the name of the device (/dev/hda2, /dev/sdb1, /dev/fd0, and so on)you want to work with. When you include the optional newlabel parameter, e2labelchanges the label on device to newlabel. Without this parameter, e2label displaysthe label. You can also create a volume label with the –L option of tune2fs(page 578).
lshw Lists hardware. This utility provides complete information only when run with rootprivileges. Use the –short option to display a brief listing.
mkfs Creates a new filesystem on a device, destroying all data on the device as it does so.This utility is a front-end for many utilities, each of which builds a different type offilesystem. By default, mkfs builds an ext2 filesystem and works on either a harddisk partition or a floppy diskette. Although it can take many options and argu-ments, you can use mkfs simply as
$ sudo mkfs device
where device is the name of the device (/dev/hda2, /dev/sdb1, /dev/fd0, and so on)you want to make a filesystem on. Use the –t option to specify a type of filesystem.As an example, the following command creates an ext3 filesystem on /dev/hda2:
$ sudo mkfs -t ext3 /dev/hda2
Page 574 has an example of using mkfs to create a filesystem on a floppy diskette.

526 Chapter 12 System Administration: Core Concepts
ping Sends packets to a remote system. This utility determines whether you can reach aremote system through the network and determines how long it takes to exchangemessages with the remote system. Refer to “ping: Tests a Network Connection” onpage 375.
reset (linkto tset)
Resets terminal characteristics. The value of the TERM environment variable(page 988) determines how to reset the screen. The screen is cleared, the kill andinterrupt characters are set to their default values, and character echo is turned on.From a graphical terminal emulator, this command also changes the size of the win-dow to its default. The reset utility is useful for restoring the screen to a sane stateafter it has been corrupted. In this sense, it is similar to an stty sane command.
setserial Gets and sets serial port information. When run with root privileges, this utility canconfigure a serial port. The following command sets the input address of /dev/ttys0to 0x100, the interrupt (IRQ) to 5, and the baud rate to 115,000 baud:
$ sudo setserial /dev/ttys0 port 0x100 irq 5 spd_vhi
You can also check the configuration of a serial port with setserial:
$ sudo setserial /dev/ttys0/dev/ttyS0, UART: 16550A, Port: 0x0100, IRQ: 5, Flags: spd_vhi
Normally the system calls setserial as it is booting if a serial port needs custom con-figuration. This utility is part of the setserial package.
stat Displays information about a file or filesystem. Use the –f (filesystem) option fol-lowed by the device name or mount point of a filesystem to display informationabout the filesystem, including the maximum length of filenames (Namelen in thefollowing example). See the stat man page for more information.
$ stat -f /dev/hda File: "/dev/hda" ID: 0 Namelen: 255 Type: tmpfsBlock size: 4096 Fundamental block size: 4096Blocks: Total: 121237 Free: 121206 Available: 121206Inodes: Total: 121237 Free: 120932
umask A shell builtin that specifies the mask the system uses to set up access permissionswhen you create a file. A umask command has the following format:
umask [mask]
where mask is a three-digit octal number or a symbolic value such as you would usewith chmod (page 200). The mask specifies the permissions that are not allowed.When mask is an octal number, the digits correspond to the permissions for theowner of the file, members of the group the file is associated with, and everyoneelse. Because mask specifies the permissions that are not allowed, the system sub-tracts each of the three digits from 7 when you create a file. The result is three octalnumbers that specify the access permissions for the file (the numbers you would use

Setting Up a Server 527
with chmod). A mask that you specify using symbolic values specifies the permis-sions that are allowed.
Most utilities and applications do not attempt to create files with execute permis-sions, regardless of the value of mask; they assume you do not want an executablefile. As a result, when a utility or application (such as touch) creates a file, the sys-tem subtracts each of the three digits in mask from 6. An exception is mkdir, whichassumes you want the execute (access in the case of a directory) bit set.
The following commands set the file-creation mask and display the mask and itseffect when you create a file and a directory. The mask of 022, when subtractedfrom 666 or 777, gives permissions of 644 (rw–r––r––) for a file and 755(rwxr–xr–x) for a directory.
$ umask 022$ umask0022$ touch afile$ mkdir adirectory$ ls -ld afile adirectorydrwxr-xr-x 2 sam sam 4096 May 2 23:57 adirectory-rw-r--r-- 1 sam sam 0 May 2 23:57 afile
The next example sets the same mask using symbolic values. The –S option displaysthe mask symbolically:
$ umask u=rwx,g=rx,o=rx$ umask0022$ umask -Su=rwx,g=rx,o=rx
uname Displays information about the system. Without arguments, this utility displays thename of the operating system (Linux). With the –a (all) option, it displays the oper-ating system name, hostname, version number and release date of the operating sys-tem, and type of hardware you are using:
$ uname –aLinux dog 2.6.22-10-generic #2 SMP Thu Jun 7 20:19:32 UTC 2007 i686 GNU/Linux
Setting Up a Server
This section discusses issues that you may need to address when setting up a server:how to write configuration files; how to specify hosts and subnets; how to use port-map, rpcinfo, and TCP wrappers (hosts.allow and hosts.deny); and how to set up achroot jail. Chapters 15 and 19–27 cover setting up specific servers; Chapter 18 dis-cusses setting up a LAN.

528 Chapter 12 System Administration: Core Concepts
Standard Rules in Configuration Files
Most configuration files, which are typically named *.conf, rely on the followingconventions:
• Blank lines are ignored.
• A # anywhere on a line starts a comment that continues to the end of the line. Comments are ignored.
• When a name contains a SPACE, you must quote the SPACE by preceding it with a backslash (\) or by enclosing the entire name within single or dou-ble quotation marks.
• To make long lines easier to read and edit, you can break them into several shorter lines. To break a line, insert a backslash (\) immediately followed by a NEWLINE (press RETURN in a text editor). When you insert the NEWLINE before or after a SPACE, you can indent the following line to make it easier to read. Do not break lines in this manner while editing on a Windows machine, as the NEWLINEs may not be properly escaped (Windows uses a RETURN-LINEFEED
combination to end lines).
Configuration files that do not follow these conventions are noted in the text.
Specifying Clients
Table 12-2 shows some common ways to specify a host or a subnet. Most of thetime you can specify multiple hosts or subnets by separating their specificationswith SPACEs.
Table 12-2 Specifying a client
Client name pattern Matches
n.n.n.n One IP address.
name One hostname, either local or remote.
Name that starts with . Matches a hostname that ends with the specified string. For example, .example.com matches the systems named kudos.example.com and speedy.example.com, among others.
IP address that ends with . Matches a host address that starts with the specified numbers. For example, 192.168.0. matches 192.168.0.0–192.168.0.255. If you omit the trailing period, this format does not work.
n.n.n.n/m.m.m.m orn.n.n.n/mm
An IP address and subnet mask specifying a subnet.
Starts with / An absolute pathname of a file containing one or more names or addresses as specified in this table.

Setting Up a Server 529
Examples Each of the following examples specifies one or more systems:
10.10. Matches all systems with IP addresses that start with 10.10..ubuntu.com Matches all named hosts on the Ubuntu networklocalhost Matches the local system127.0.0.1 The loopback address; always resolves to localhost192.168.*.1 Could match all routers on a network of /24 subnets
Specifying a Subnet
When you set up a server, you frequently need to specify which clients are allowedto connect to it. Sometimes it is convenient to specify a range of IP addresses, calleda subnet. The discussion on page 367 explains what a subnet is and how to use asubnet mask to specify a subnet. Usually you can specify a subnet as
n.n.n.n/m.m.m.m
or
n.n.n.n/maskbits
where n.n.n.n is the base IP address and the subnet is represented by m.m.m.m (thesubnet mask) or maskbits (the number of bits used for the subnet mask). For exam-ple, 192.168.0.1/255.255.255.0 represents the same subnet as 192.168.0.1/24. Inbinary, decimal 255.255.255.0 is represented by 24 ones followed by 8 zeros. The/24 is shorthand for a subnet mask with 24 ones. Each line in Table 12-3 (on thenext page) presents two notations for the same subnet, followed by the range of IPaddresses that the subnet includes.
Wildcard Matches
* and ? Matches one (?) or more (*) characters in a simple hostname or IP address. These wildcards do not match periods in a domain name.
ALL Always matches.
LOCAL Matches any hostname that does not contain a period.
Operator
EXCEPT Matches anything in the preceding list that is not in the follow-ing list. For example, a b c d EXCEPT c matches a, b, and d.Thus you could use 192.168. EXCEPT 192.168.0.1 to match all IP addresses that start with 192.168. except 192.168.0.1.
Table 12-2 Specifying a client (continued)

530 Chapter 12 System Administration: Core Concepts
rpcinfo: Displays Information About portmapThe rpcinfo utility displays information about programs registered with portmapand makes RPC calls to programs to see if they are alive. For more information onportmap, refer to “RPC Network Services” on page 387. The rpcinfo utility takesthe following options and arguments:
rpcinfo –p [host]rpcinfo [–n port] –u | –t host program [version]rpcinfo –b | –d program version
–p (probe) Lists all RPC programs registered with portmap on host or on the localsystem when you do not specify host.
–n (port number) With –t or –u, uses the port numbered port instead of the portnumber specified by portmap.
–u (UDP) Makes a UDP RPC call to version (if specified) of program on host andreports whether it receives a response.
–t (TCP) Makes a TCP RPC call to version (if specified) of program on host andreports whether it receives a response.
–b (broadcast) Makes an RPC broadcast to version of program and lists those hoststhat respond.
–d (delete) Removes local RPC registration for version of program. Available to auser running with root privileges only.
Give the following command to see which RPC programs are registered with theportmap daemon on the system named plum:
$ rpcinfo -p plum program vers proto port 100000 2 tcp 111 portmapper 100000 2 udp 111 portmapper 100003 2 udp 2049 nfs 100003 3 udp 2049 nfs 100003 4 udp 2049 nfs 100021 1 udp 32768 nlockmgr...
Use the –u option to display a list of versions of a daemon, such as ypserv, registeredon a remote system (plum):
Table 12-3 Different ways to represent a subnet
Bits Mask Range
10.0.0.0/8 10.0.0.0/255.0.0.0 10.0.0.0–10.255.255.255
172.16.0.0/12 172.16.0.0/255.240.0.0 172.16.0.0–172.31.255.255
192.168.0.0/16 192.168.0.0/255.255.0.0 192.168.0.0–192.168.255.255

Setting Up a Server 531
$ rpcinfo -u plum nfsprogram 100003 version 2 ready and waitingprogram 100003 version 3 ready and waitingprogram 100003 version 4 ready and waiting
Specify localhost to display a list of versions of a daemon registered on the local system:
$ rpcinfo -u localhost ypbindprogram 100007 version 1 ready and waitingprogram 100007 version 2 ready and waiting
Locking downportmap
Because the portmap daemon holds information about which servers are runningon the local system and which port each server is running on, only trusted systemsshould have access to this information. One way to ensure that only selected sys-tems have access to portmap is to lock it down in the /etc/hosts.allow and/etc/hosts.deny files (page 532). Put the following line in hosts.deny to prevent allsystems from using portmap on the local (server) system:
portmap: ALL
You can test this setup from a remote system with the following command:
$ rpcinfo -p hostname No remote programs registered.
Replace hostname with the name of the remote system that you changed thehosts.deny file on. The change is immediate; you do not need to kill/restart a daemon.
Next add the following line to the hosts.allow file on the server system:
portmap: host-IP
where host-IP is the IP address of the trusted, remote system that you gave the pre-ceding rpcinfo command from. Use only IP addresses with portmap in hosts.allow;do not use system names that portmap could get stuck trying to resolve. If you givethe same command, rpcinfo should display a list of the servers that RPC knowsabout, including portmap. See page 787 for more examples.
The inetd and xinetd Superservers
The inetd (Internet daemon) daemon, and its replacement xinetd (extended Internetdaemon; xinetd.org), are called superservers or service dispatchers because theystart other daemons, such as smbd (Samba) and vsftpd (FTP), as necessary. Thesesuperservers listen for network connections. When one is made, they identify aserver daemon based on the port the connection comes in on, set the daemon’s stan-dard input and standard output file descriptors to the socket (page 569), and startthe daemon.
Set the clocks
tip The portmap daemon relies on the client’s and the server’s clocks being synchronized. A simpleDoS attack (page 1034) can be initiated by setting the server’s clock to the wrong time.

532 Chapter 12 System Administration: Core Concepts
Using these superservers offers two advantages over having several servers con-stantly running daemons that monitor ports. First, the superservers avoid the needfor daemons to be running when not in use. Second, they allow developers to writeservers that read from standard input and write to standard output; they handle allsocket communication.
The inetd superserver, which originally shipped with 4.3BSD, was not particularlyinsecure. However, it typically opened a lot of ports and ran many servers, increas-ing the possibility that exploitable software would be exposed to the Internet. Itssuccessor, xinetd, introduced access control and logging. This daemon allowed anadministrator to limit the hours a service was available and the origin and numberof incoming connections. When compiled with libwrap, xinetd can take advantageof TCP wrappers (discussed in the next section).
At a time when CPU power was more limited than it is today and RAM was moreexpensive, these superservers offered the advantage of efficient memory and CPUusage. Systems have slowly moved away from using these superservers over the pastfew years. Today a system can easily spare the few megabytes of memory and theminimal CPU time it takes to keep a daemon running to monitor a port: It takesfewer resources to keep a process in RAM (or swap space) than it does to restart itperiodically. Also, a developer can now handle socket communications more easilyusing various toolkits.
Securing a Server
Two ways you can secure a server are by using TCP wrappers and by setting up achroot jail. This section describes both techniques.
TCP Wrappers: Secure a Server (hosts.allow
and hosts.deny)
Follow these guidelines when you open a local system to access from remote systems:
• Open the local system only to systems you want to allow to access it.
• Allow each remote system to access only the data you want it to access.
• Allow each remote system to access data only in the appropriate manner (readonly, read/write, write only).
libwrap As part of the client/server model, TCP wrappers, which can be used for any dae-mon that is linked against libwrap, rely on the /etc/hosts.allow and /etc/hosts.denyfiles as the basis of a simple access control language (ACL). This access control lan-guage defines rules that selectively allow clients to access server daemons on a localsystem based on the client’s address and the daemon the client tries to access. Theoutput of ldd shows that one of the shared library dependencies of sshd is libwrap:
$ ldd /usr/sbin/sshd | grep libwraplibwrap.so.0 => /lib/libwrap.so.0 (0xb7f56000)
Setting Up a Server 533
hosts.allow andhosts.deny
Each line in the hosts.allow and hosts.deny files has the following format:
daemon_list : client_list [: command]
where daemon_list is a comma-separated list of one or more server daemons (suchas portmap, vsftpd, or sshd), client_list is a comma-separated list of one or more cli-ents (see Table 12-2, “Specifying a client,” on page 528), and the optional commandis the command that is executed when a client from client_list tries to access a serverdaemon from daemon_list.
When a client requests a connection to a server, the hosts.allow and hosts.deny fileson the server system are consulted as follows until a match is found:
1. If the daemon/client pair matches a line in hosts.allow, access is granted.
2. If the daemon/client pair matches a line in hosts.deny, access is denied.
3. If there is no match in the hosts.allow or hosts.deny file, access is granted.
The first match determines whether the client is allowed to access the server. Wheneither hosts.allow or hosts.deny does not exist, it is as though that file was empty.Although it is not recommended, you can allow access to all daemons for all clientsby removing both files.
Examples For a more secure system, put the following line in hosts.deny to block all access:
$ cat /etc/hosts.deny...ALL : ALL : echo '%c tried to connect to %d and was blocked' >> /var/log/tcpwrappers.log
This line prevents any client from connecting to any service, unless specifically per-mitted to do so in hosts.allow. When this rule is matched, it adds a line to the filenamed /var/log/tcpwrappers.log. The %c expands to client information and the%d expands to the name of the daemon the client attempted to connect to.
With the preceding hosts.deny file in place, you can include lines in hosts.allow thatexplicitly allow access to certain services and systems. For example, the followinghosts.allow file allows anyone to connect to the OpenSSH daemon (ssh, scp, sftp)but allows telnet connections only from the same network as the local system andusers on the 192.168. subnet:
$ cat /etc/hosts.allowsshd: ALLin.telnet: LOCALin.telnet: 192.168.* 127.0.0.1...
The first line allows connection from any system (ALL) to sshd. The second lineallows connection from any system in the same domain as the server (LOCAL).The third line matches any system whose IP address starts 192.168. and the localsystem.

534 Chapter 12 System Administration: Core Concepts
Setting Up a chroot Jail
On early UNIX systems, the root directory was a fixed point in the filesystem. On mod-ern UNIX variants, including Linux, you can define the root directory on a per-processbasis. The chroot utility allows you to run a process with a root directory other than /.
The root directory appears at the top of the directory hierarchy and has no parent.Thus a process cannot access files above the root directory because none exists. If,for example, you run a program (process) and specify its root directory as /tmp/jail,the program would have no concept of any files in /tmp or above: jail is the pro-gram’s root directory and is labeled / (not jail).
By creating an artificial root directory, frequently called a (chroot) jail, you prevent aprogram from accessing, executing, or modifying—possibly maliciously—files out-side the directory hierarchy starting at its root. You must set up a chroot jail prop-erly to increase security: If you do not set up a chroot jail correctly, you can make iteasier for a malicious user to gain access to a system than if there were no chroot jail.
Using chrootCreating a chroot jail is simple: Working with root privileges, give the command/usr/sbin/chroot directory. The directory becomes the root directory and the pro-cess attempts to run the default shell. The following command sets up a chroot jail inthe (existing) /tmp/jail directory:
$ sudo /usr/sbin/chroot /tmp/jail/usr/sbin/chroot: cannot run command '/bin/bash': No such file or directory
This example sets up a chroot jail, but when it attempts to run the bash shell, it fails.Once the jail is set up, the directory that was named jail takes on the name of theroot directory, /. As a consequence, chroot cannot find the file identified by the path-name /bin/bash. In this situation the chroot jail works correctly but is not useful.
Getting a chroot jail to work the way you want is more complicated. To have thepreceding example run bash in a chroot jail, create a bin directory in jail(/tmp/jail/bin) and copy /bin/bash to this directory. Because the bash binary isdynamically linked to shared libraries, you need to copy these libraries into jail aswell. The libraries go in lib.
The next example creates the necessary directories, copies bash, uses ldd to displaythe shared library dependencies of bash, and copies the necessary libraries to lib.The linux-gate.so.1 file is a dynamically shared object (DSO) provided by the kernelto speed system calls; you do not need to copy it.
$ pwd/tmp/jail$ mkdir bin lib$ cp /bin/bash bin$ ldd bin/bash
linux-gate.so.1 => (0xffffe000)libncurses.so.5 => /lib/libncurses.so.5 (0xb7f44000)libdl.so.2 => /lib/tls/i686/cmov/libdl.so.2 (0xb7f40000)libc.so.6 => /lib/tls/i686/cmov/libc.so.6 (0xb7dff000)/lib/ld-linux.so.2 (0xb7f96000)

Setting Up a Server 535
$ cp /lib/{libncurses.so.5,ld-linux.so.2} lib$ cp /lib/tls/i686/cmov/{libdl.so.2,libc.so.6} lib
Now start the chroot jail again. Although all the setup can be done by an ordinaryuser, you must be working with root privileges to run chroot:
$ sudo /usr/sbin/chroot /tmp/jailbash-3.2# pwd/bash-3.2# lsbash: ls: command not foundbash-3.2# exitexit$
This time chroot finds and starts bash, which displays its default prompt (bash-3.2#).The pwd command works because it is a shell builtin (page 243). However, bash can-not find the ls utility because it is not in the chroot jail. You can copy /bin/ls and itslibraries into the jail if you want users in the jail to be able to use ls. An exit com-mand allows you to escape from the jail.
If you provide chroot with a second argument, it takes that argument as the name ofthe program to run inside the jail. The following command is equivalent to the pre-ceding one:
$ sudo /usr/sbin/chroot /home/sam/jail /bin/bash
To set up a useful chroot jail, first determine which utilities the users of the chroot jailneed. Then copy the appropriate binaries and their libraries into the jail. Alterna-tively, you can build static copies of the binaries and put them in the jail withoutinstalling separate libraries. (The statically linked binaries are considerably largerthan their dynamic counterparts. The base system with bash and the core utilitiesexceeds 50 megabytes.) You can find the source code for most common utilities inthe bash and coreutils source packages.
The chroot utility fails unless you run it with root privileges. The preceding examplesused sudo to gain these privileges. The result of running chroot with root privileges is aroot shell (a shell with root privileges) running inside a chroot jail. Because a user withroot privileges can break out of a chroot jail, it is imperative that you run a program inthe chroot jail with reduced privileges (i.e., privileges other than those of root).
There are several ways to reduce the privileges of a user. For example, you can putsu or sudo in the jail and then start a shell or a daemon inside the jail, using one ofthese programs to reduce the privileges of the user working in the jail. A commandsuch as the following starts a shell with reduced privileges inside the jail:
$ sudo /usr/sbin/chroot jailpath /usr/bin/sudo -u user /bin/bash &
where jailpath is the pathname of the jail directory, and user is the usernameunder whose privileges the shell runs. The problem with this scenario is that sudoand su as compiled for Ubuntu, call PAM. To run one of these utilities you need toput all of PAM, including its libraries and configuration files, in the jail, along withsudo (or su) and the /etc/passwd file. Alternatively, you can recompile su or sudo.

536 Chapter 12 System Administration: Core Concepts
The source code calls PAM, however, so you would need to modify the source so itdoes not call PAM. Either one of these techniques is time-consuming and introducescomplexities that can lead to an insecure jail.
The following C program1 runs a program with reduced privileges in a chroot jail.Because this program obtains the UID and GID of the user you specify on the com-mand line before calling chroot(), you do not need to put /etc/passwd in the jail.The program reduces the privileges of the specified program to those of the speci-fied user. This program is presented as a simple solution to the preceding issues soyou can experiment with a chroot jail and better understand how it works.
$ cat uchroot.c
/* See svn.gna.org/viewcvs/etoile/trunk/Etoile/LiveCD/uchroot.c for terms of use. */
#include <stdio.h>#include <stdlib.h>#include <pwd.h>
int main(int argc, char * argv[]){
if(argc < 4){
printf("Usage: %s {username} {directory} {program} [arguments]\n", argv[0]);return 1;
}/* Parse arguments */struct passwd * pass = getpwnam(argv[1]);if(pass == NULL){
printf("Unknown user %s\n", argv[1]);return 2;
}/* Set the required UID */chdir(argv[2]);if(chroot(argv[2])
||setgid(pass->pw_gid)||setuid(pass->pw_uid))
{printf("%s must be run as root. Current uid=%d, euid=%d\n",
argv[0],(int)getuid(),(int)geteuid());
return 3;}char buf[100];return execv(argv[3], argv + 3);
}
1. Thanks to David Chisnall and the Étoilé Project (etoile-project.org) for the uchroot.c program.

Setting Up a Server 537
The first of the following commands compiles uchroot.c, creating an executable filenamed uchroot. Subsequent commands move uchroot to /usr/local/bin and give itappropriate ownership.
$ cc -o uchroot uchroot.c$ sudo mv uchroot /usr/local/bin$ sudo chown root:root /usr/local/bin/uchroot$ ls -l /usr/local/bin/uchroot-rwxr-xr-x 1 root root 7922 Jul 17 08:26 /usr/local/bin/uchroot
Using the setup from earlier in this section, give the following command to run ashell with the privileges of the user sam inside a chroot jail:
$ sudo /usr/local/bin/uchroot sam /tmp/jail /bin/bash
Running a Service in a chroot Jail
Running a shell inside a jail has limited usefulness. Instead, you are more likely towant to run a specific service inside the jail. To run a service inside a jail, make sureall files needed by that service are inside the jail. Using uchroot, the format of a com-mand to start a service in a chroot jail is
$ sudo /usr/local/bin/uchroot user jailpath daemonname
where jailpath is the pathname of the jail directory, user is the username that runsthe daemon, and daemonname is the pathname (inside the jail) of the daemon thatprovides the service.
Some servers are already set up to take advantage of chroot jails. You can set upDNS so that named runs in a jail (page 870), for example, and the vsftpd FTP servercan automatically start chroot jails for clients (page 744).
Security Considerations
Some services need to be run by a user/process with root privileges but releasetheir root privileges once started (Apache, Procmail, and vsftpd are examples). Ifyou are running such a service, you do not need to use uchroot or put su or sudoinside the jail.
A process run with root privileges can potentially escape from a chroot jail. For thisreason, always reduce privileges before starting a program running inside the jail.Also, be careful about which setuid (page 201) binaries you allow inside a jail—asecurity hole in one of them could compromise the security of the jail. In addition,make sure the user cannot access executable files that he uploads to the jail.
Keeping multiple chroot jails
tip If you plan to deploy multiple chroot jails, it is a good idea to keep a clean copy of the bin and libdirectories somewhere other than one of the active jails.

538 Chapter 12 System Administration: Core Concepts
DHCP: Configures Network Interfaces
Instead of storing network configuration information in local files on each system,DHCP (Dynamic Host Configuration Protocol) enables client systems to retrievenetwork configuration information from a DHCP server each time they connect tothe network. A DHCP server assigns IP addresses from a pool of addresses to clientsas needed. Assigned addresses are typically temporary but need not be.
This technique has several advantages over storing network configuration informa-tion in local files:
• A new user can set up an Internet connection without having to deal with IP addresses, netmasks, DNS addresses, and other technical details. An experienced user can set up a connection more quickly.
• DHCP facilitates assignment and management of IP addresses and related network information by centralizing the process on a server. A system administrator can configure new systems, including laptops that connect to the network from different locations, to use DHCP; DHCP then assigns IP addresses only when each system connects to the network. The pool of IP addresses is managed as a group on the DHCP server.
• IP addresses can be used by more than one system, reducing the total num-ber of IP addresses needed. This conservation of addresses is important because the Internet is quickly running out of IPv4 addresses. Although a particular IP address can be used by only one system at a time, many end-user systems require addresses only occasionally, when they connect to the Internet. By reusing IP addresses, DHCP has lengthened the life of the IPv4 protocol. DHCP applies to IPv4 only, as IPv6 (page 369) forces systems to configure their IP addresses automatically (called autoconfiguration) when they connect to a network.
DHCP is particularly useful for an administrator who is responsible for maintaininga large number of systems because individual systems no longer need to storeunique configuration information. With DHCP, the administrator can set up a mas-ter system and deploy new systems with a copy of the master’s hard disk. In educa-tional establishments and other open-access facilities, the hard disk image may bestored on a shared drive, with each workstation automatically restoring itself topristine condition at the end of each day.
More Information
Web www.dhcp.org www.dhcp-handbook.com/dhcp_faq.html DHCP FAQ
HOWTO DHCP Mini HOWTO
How DHCP Works
Using dhclient, the client contacts the server daemon, dhcpd, to obtain the IPaddress, netmask, broadcast address, nameserver address, and other networking

Setting Up a Server 539
parameters. In turn, the server provides a lease on the IP address to the client. Theclient can request the specific terms of the lease, including its duration; the servercan limit these terms. While connected to the network, a client typically requestsextensions of its lease as necessary so its IP address remains the same. This leasemay expire once the client is disconnected from the network, with the server givingthe client a new IP address when it requests a new lease. You can also set up aDHCP server to provide static IP addresses for specific clients (refer to “Static Ver-sus Dynamic IP Addresses” on page 364). DHCP is broadcast based, so both clientand server must be on the same subnet (page 367).
When you install Ubuntu, the system runs a DHCP client, connects to a DHCPserver if it can find one, and configures its network interface. You can use firestarter(page 886) to configure and run a DHCP server.
DHCP Client
A DHCP client requests network configuration parameters from the DHCP serverand uses those parameters to configure its network interface.
Prerequisites
Make sure the following package is installed:
• dhcp3-client
dhclient: The DHCP Client
When a DHCP client system connects to the network, dhclient requests a lease fromthe DHCP server and configures the client’s network interface(s). Once a DHCP cli-ent has requested and established a lease, it stores the lease information in a filenamed dhclient.interface.leases, which is stored in /var/lib/dhcp3. The interface isthe name of the interface that the client uses, such as eth0. The system uses thisinformation to reestablish a lease when either the server or the client needs toreboot. You need to change the default DHCP client configuration file,/etc/dhcp3/dhclient.conf, only for custom configurations.
The following dhclient.conf file specifies a single interface, eth0:
$ cat /etc/dhclient.confinterface "eth0"{send dhcp-client-identifier 1:xx:xx:xx:xx:xx:xx;send dhcp-lease-time 86400;}
In the preceding file, the 1 in the dhcp-client-identifier specifies an Ethernet net-work and xx:xx:xx:xx:xx:xx is the MAC address (page 1046) of the device control-ling that interface. See page 541 for instructions on how to determine the MACaddress of a device. The dhcp-lease-time is the duration, in seconds, of the lease onthe IP address. While the client is connected to the network, dhclient automaticallyrenews the lease each time half of the lease time is up. The lease time of 86,400 sec-onds (or one day) is a reasonable choice for a workstation.

540 Chapter 12 System Administration: Core Concepts
DHCP Server
A DHCP server maintains a list of IP addresses and other configuration parameters.Clients request network configuration parameters from the server.
Prerequisites
Install the following package:
• dhcp3-server
dhcp3-server initscript
When you install the dhcpd3-server package, the dpkg postinst script starts thedhcpd3 daemon. After you configure dhcpd3, call the dhcp3-server init script torestart the dhcpd3 daemon:
$ sudo /etc/init.d/dhcp3-server restart
dhcpd: The DHCP Daemon
A simple DCHP server (dhcpd) allows you to add clients to a network withoutmaintaining a list of assigned IP addresses. A simple network, such as a home LANsharing an Internet connection, can use DHCP to assign a dynamic IP address toalmost all nodes. The exceptions are servers and routers, which must be at knownnetwork locations to be able to receive connections. If servers and routers are con-figured without DHCP, you can specify a simple DHCP server configuration in/etc/dhcp3/dhcpd.conf:
$ cat /etc/dhcp3/dhcpd.confdefault-lease-time 600;max-lease-time 86400;
option subnet-mask 255.255.255.0;option broadcast-address 192.168.1.255;option routers 192.168.1.1;option domain-name-servers 192.168.1.1;option domain-name "example.com";
subnet 192.168.1.0 netmask 255.255.255.0 { range 192.168.1.2 192.168.1.200;}
The /etc/default/dhcp3-server file specifies the interfaces that dhcpd serves requestson. By default, dhcpd uses eth0. To use another interface or to use more than oneinterface, set the INTERFACES variable in this file to a SPACE-separated list of theinterfaces you want to use; enclose the list within quotation marks.
The preceding configuration file specifies a LAN where both the router and DNSserver are located on 192.168.1.1. The default-lease-time specifies the number ofseconds the dynamic IP lease will remain valid if the client does not specify a dura-tion. The max-lease-time is the maximum time allowed for a lease.
The information in the option lines is sent to each client when it connects. Thenames following the word option specify what the following argument represents.For example, the option broadcast-address line specifies the broadcast address ofthe network. The routers and domain-name-servers options allow multiple valuesseparated by commas.

Setting Up a Server 541
The subnet section includes a range line that specifies the range of IP addresses theDHCP server can assign. If case of multiple subnets, you can define options, such assubnet-mask, inside the subnet section. Options defined outside all subnet sectionsare global and apply to all subnets.
The preceding configuration file assigns addresses in the range from 192.168.1.2 to192.168.1.200. The DHCP server starts at the bottom of this range and attempts toassign a new IP address to each new client. Once the DHCP server reaches the topof the range, it starts reassigning IP addresses that have been used in the past but arenot currently in use. If you have fewer systems than IP addresses, the IP address ofeach system should remain fairly constant. Two systems cannot use the same IPaddress at the same time.
Once you have configured a DHCP server, restart it using the dhcpd init script(page 540). With the server is running, clients configured to obtain an IP addressfrom the server using DHCP should be able to do so.
Static IP Addresses
As mentioned earlier, routers and servers typically require static IP addresses.Although you can manually configure IP addresses for these systems, it may bemore convenient to have the DHCP server provide them with static IP addresses.
When a system that requires a specific static IP address connects to the network andcontacts the DHCP server, the server needs a way to identify the system so it can assignthe proper IP address to that system. The DHCP server uses the MAC address(page 1046) of the system’s Ethernet card (NIC) as an identifier. When you set up theserver, you must know the MAC address of each system that requires a static IP address.
Determining a MACaddress
The ifconfig utility displays the MAC addresses of the Ethernet cards in a system. Inthe following example, the MAC addresses are the colon-separated series of hexa-decimal number pairs following HWaddr:
$ ifconfig | grep -i hwaddreth0 Link encap:Ethernet HWaddr BA:DF:00:DF:C0:FFeth1 Link encap:Ethernet HWaddr 00:02:B3:41:35:98
Run ifconfig on each system that requires a static IP address. Once you have deter-mined the MAC addresses of these systems, you can add a host section to the/etc/dhcpd.conf file for each one, instructing the DHCP server to assign a specificaddress to that system. The following host section assigns the address 192.168.1.1to the system with the MAC address of BA:DF:00:DF:C0:FF:
$ cat /etc/dhcp3/dhcpd.conf...host router { hardware ethernet BA:DF:00:DF:C0:FF; fixed-address 192.168.1.1; option host-name router;}
The name following host is used internally by dhcpd. The name specified afteroption host-name is passed to the client and can be a hostname or an FQDN. Aftermaking changes to dhcpd.conf, restart dhcpd using the dhcpd init script (page 540).

542 Chapter 12 System Administration: Core Concepts
nsswitch.conf: Which Service to Look at First
With the advent of NIS and DNS, finding user and system information was nolonger a simple matter of searching a local file. Where once you looked in/etc/passwd to get user information and in /etc/hosts to find system address infor-mation, you can now use several methods to obtain this type of information. The/etc/nsswitch.conf (name service switch configuration) file specifies which methodsto use and the order in which to use them when looking for a certain type of infor-mation. You can also specify which action the system should take based on whethera method succeeds or fails.
Format Each line in nsswitch.conf specifies how to search for a piece of information, suchas a user’s password. A line in nsswitch.conf has the following format:
info: method [[action]] [method [[action]]...]
where info specifies the type of information the line describes, method is the methodused to find the information, and action is the response to the return status of thepreceding method. The action is enclosed within square brackets.
How nsswitch.conf Works
When called upon to supply information that nsswitch.conf describes, the systemexamines the line with the appropriate info field. It uses the methods specified onthe line, starting with the method on the left. By default, when it finds the desiredinformation, the system stops searching. Without an action specification, when amethod fails to return a result, the system tries the next action. It is possible for thesearch to end without finding the requested information.
Information
The nsswitch.conf file commonly controls searches for usernames, passwords, host IPaddresses, and group information. The following list describes most of the types ofinformation (info in the syntax given earlier) that nsswitch.conf controls searches for.
automount Automount (/etc/auto.master and /etc/auto.misc, page 818)bootparams Diskless and other booting options (See the bootparam man page.)ethers MAC address (page 1046)group Groups of users (/etc/group, page 558)hosts System information (/etc/hosts, page 559)networks Network information (/etc/networks)passwd User information (/etc/passwd, page 560)protocols Protocol information (/etc/protocols, page 561)publickey Used for NFS running in secure moderpc RPC names and numbers (/etc/rpc, page 562)services Services information (/etc/services, page 562)shadow Shadow password information (/etc/shadow, page 562)

nsswitch.conf: Which Service to Look at First 543
Methods
Following is a list of the types of information that nsswitch.conf controls searchesfor (method in the format above). For each type of information, you can specify oneor more of the following methods:2
files Searches local files such as /etc/passwd and /etc/hostsnis Searches the NIS database; yp is an alias for nisdns Queries the DNS (hosts queries only)compat ± syntax in passwd, group, and shadow files (page 544)
Search Order
The information provided by two or more methods may overlap: For example, bothfiles and nis may provide password information for the same user. With overlappinginformation, you need to consider which method you want to be authoritative (takeprecedence); place that method at the left of the list of methods.
The default nsswitch.conf file lists methods without actions, assuming no overlap(which is normal). In this case, the order is not critical: When one method fails, thesystem goes to the next one and all that is lost is a little time. Order becomes criticalwhen you use actions between methods or when overlapping entries differ.
The first of the following lines from nsswitch.conf causes the system to search forpassword information in /etc/passwd and, if that fails, to use NIS to find the infor-mation. If the user you are looking for is listed in both places, the information in thelocal file is used and is considered authoritative. The second line uses NIS to find anIP address given a hostname; if that fails, it searches /etc/hosts; if that fails, it checkswith DNS to find the information.
passwd files nishosts nis files dns
Action Items
Each method can optionally be followed by an action item that specifies what to doif the method succeeds or fails. An action item has the following format:
[[!]STATUS=action]
where the opening and closing square brackets are part of the format and do notindicate that the contents are optional; STATUS (uppercase by convention) is thestatus being tested for; and action is the action to be taken if STATUS matches thestatus returned by the preceding method. The leading exclamation point (!) isoptional and negates the status.
2. There are other, less commonly used methods. See the default /etc/nsswitch.conf file and thensswitch.conf man page for more information. Although NIS+ belongs in this list, it is not implemented asa Linux server and is not discussed in this book.

544 Chapter 12 System Administration: Core Concepts
STATUS Values for STATUS are
NOTFOUND The method worked but the value being searched for was notfound. The default action is continue.
SUCCESS The method worked and the value being searched for was found; noerror was returned.The default action is return.
UNAVAIL The method failed because it is permanently unavailable. For example,the required file may not be accessible or the required server may be down. Thedefault action is continue.
TRYAGAIN The method failed because it was temporarily unavailable. Forexample, a file may be locked or a server overloaded. The default action is continue.
action Values for action are
return Returns to the calling routine with or without a value.
continue Continues with the next method. Any returned value is overwritten by avalue found by a subsequent method.
Example The following line from nsswitch.conf causes the system first to use DNS to searchfor the IP address of a given host. The action item following the DNS method testswhether the status returned by the method is not (!) UNAVAIL.
hosts dns [!UNAVAIL=return] files
The system takes the action associated with the STATUS (return) if the DNSmethod does not return UNAVAIL (!UNAVAIL)—that is, if DNS returns SUCCESS,NOTFOUND, or TRYAGAIN. The result is that the following method (files) isused only when the DNS server is unavailable. If the DNS server is not unavailable(read the two negatives as “is available”), the search returns the domain name orreports that the domain name was not found. The search uses the files method(checks the local /etc/hosts file) only if the server is not available.
compat Method: ± in passwd, group, and shadow Files
You can put special codes in the /etc/passwd, /etc/group, and /etc/shadow files thatcause the system, when you specify the compat method in nsswitch.conf, to com-bine and modify entries in the local files and the NIS maps.
A plus sign (+) at the beginning of a line in one of these files adds NIS information;a minus sign (–) removes information. For example, to use these codes in thepasswd file, specify passwd: compat in nsswitch.conf. The system then goes throughthe passwd file in order, adding or removing the appropriate NIS entries when itreaches each line that starts with a + or –.
Although you can put a plus sign at the end of the passwd file, specify passwd: compatin nsswitch.conf to search the local passwd file, and then go through the NIS map,it is more efficient to put passwd: file nis in nsswitch.conf and not modify thepasswd file.
PAM 545
PAM
PAM (Linux-PAM, or Linux Pluggable Authentication Modules) allows a systemadministrator to determine how applications use authentication (page 1024) toverify the identity of a user. PAM provides shared libraries of modules (located in/lib/security) that, when called by an application, authenticate a user. The configu-ration files kept in the /etc/pam.d directory determine the method of authentica-tion and contain a list, or stack, of calls to the modules. PAM may also use otherfiles, such as /etc/passwd, when necessary. The term “Pluggable” in PAM’s namerefers to the ease with which you can add and remove modules from an authentica-tion stack.
Instead of building the authentication code into each application, PAM providesshared libraries that keep the authentication code separate from the applicationcode. The techniques of authenticating users stay the same from application toapplication. PAM enables a system administrator to change the authenticationmechanism for a given application without modifying the application.
PAM provides authentication for a variety of system-entry services (such as login,ftp, su, and sudo). You can take advantage of its ability to stack authentication mod-ules to integrate system-entry services with different authentication mechanisms,such as RSA, DCE, Kerberos, and smartcards.
From login through using sudo to shutting the system down, whenever you areasked for a password (or not asked for a password because the system trusts youare who you say you are), PAM makes it possible for system administrators to con-figure the authentication process. It also makes the configuration process essentiallythe same for all applications that use PAM for authentication.
The configuration files stored in /etc/pam.d describe the authentication procedurefor each application. These files usually have names that are the same as or similarto the name of the application that they authenticate for. For example, authentica-tion for the login utility is configured in /etc/pam.d/login. The name of the file is thename of the PAM service3 that the file configures. Occasionally one file may servetwo programs. PAM accepts only lowercase letters in the names of files in the/etc/pam.d directory.
PAM warns you about errors it encounters, logging them to /var/log/messages or/var/log/secure. Review these files if you are trying to figure out why a changedPAM file is not working properly. To prevent a malicious user from seeing informa-tion about PAM, PAM sends error messages to a file rather than to the screen.
3. There is no relationship between PAM services and the /etc/services file. The name of the PAM serviceis an arbitrary string that each application gives to PAM; PAM then looks up the configuration file withthat name and uses it to control authentication. There is no central registry of PAM service names.

546 Chapter 12 System Administration: Core Concepts
More Information
Local /usr/share/doc/libpam*pam man page
Web Linux-PAM System Administrators’ Guidewww.kernel.org/pub/linux/libs/pam/Linux-PAM-html/Linux-PAM_SAG.html
HOWTO User Authentication HOWTO
Configuration Files, Module Types, and Control Flags
Following is an example of a PAM configuration file. Comment lines, which havebeen omitted, begin with a pound sign (#).
Login module $ grep '^[^#]' /etc/pam.d/loginauth requisite pam_securetty.soauth requisite pam_nologin.sosession required pam_env.so readenv=1session required pam_env.so readenv=1 envfile=/etc/default/locale@include common-authauth optional pam_group.sosession required pam_limits.sosession optional pam_lastlog.sosession optional pam_motd.sosession optional pam_mail.so standard@include common-account@include common-session@include common-password
Each line tells PAM to do something as part of the authentication process. The firstword on each line is a module type indicator: account, auth, password, or session(Table 12-4). The second is a control flag (Table 12-5) that indicates the actionPAM should take if authentication fails. The rest of the line contains the name of aPAM module (located in /lib/security) and any arguments for that module. ThePAM library itself uses the /etc/pam.d files to determine which modules to delegatework to. Lines that begin with @include include the named file.
Do not lock yourself out of the system
caution Editing PAM configuration files correctly requires paying careful attention. It is easy to lock yourselfout of the system with a single mistake. To avoid this problem, keep backup copies of the PAM con-figuration files you edit, test every change thoroughly, and make sure you can still log in once thechange is installed. Keep a root shell open (use sudo –i) until you have finished testing. If a changefails and you cannot log in, use the root shell to replace the newly edited files with the backup copies.
Table 12-4 Module type indicators
Module type Description Controls
account Accountmanagement
Determining whether an already authenticated user is allowed to use the service she is trying to use. (That is, has the account expired? Is the user allowed to use this service at this time of day?)

PAM 547
You can use one of the control flag keywords listed in Table 12-5 to set the control flags.
PAM uses each of the module types as requested by the application. That is, the appli-cation asks PAM separately to authenticate, check account status, manage sessions,and change the password. PAM uses one or more modules from the /lib/securitydirectory to accomplish each of these tasks.
auth Authentication Proving that the user is authorized to use the service; uses passwords or another mechanism.
password Passwordmodification
Updating authentication mechanisms such as user passwords.
session Sessionmanagement
Setting things up when the service is started (as when a user logs in) and breaking them down when the service is terminated (as when a user logs out).
Table 12-5 Control flag keywords
Keyword Flag function
required Success is required for authentication to succeed. Control and a failure resultare returned after all modules in the stack have been executed. The techniqueof delaying the report to the calling program until all modules have been exe-cuted may keep attackers from knowing precisely what caused their authenti-cation attempts to fail and tell them less about the system, making it moredifficult for them to break in.
requisite Success is required for authentication to succeed. Further module processingis aborted, and control is returned immediately after a module fails. This tech-nique may expose information about the system to an attacker. However, if itprevents a user from giving a password over an insecure connection, it mightkeep information out of the hands of an attacker.
sufficient Success indicates that this module type has succeeded, and no subsequentrequired modules of this type are executed. Failure is not fatal to the stack ofthis module type. This technique is generally used when one form of authen-tication or another is good enough: If one fails, PAM tries the other. For exam-ple, when you use rsh to connect to another computer, pam_rhosts_auth firstchecks whether your connection can be trusted without a password. If theconnection can be trusted, the pam_rhosts_auth module reports success, andPAM immediately reports success to the rsh daemon that called it. You will notbe asked for a password. If your connection is not considered trustworthy,PAM starts the authentication over and asks for a password. If this secondauthentication succeeds, PAM ignores the fact that the pam_rhosts_authmodule reported failure. If both modules fail, you will not be able to log in.
optional Result is generally ignored. An optional module is relevant only when it is theonly module on the stack for a particular service.
Table 12-4 Module type indicators (continued)

548 Chapter 12 System Administration: Core Concepts
The configuration files in /etc/pam.d list the set of modules to be used for eachapplication to perform each task. Each such set of the same module types is called astack. PAM calls the modules one at a time in order, going from the top of the stack(the first module listed in the configuration file) to the bottom. Each module reportssuccess or failure back to PAM. When all stacks of modules (with some exceptions)within a configuration file have been called, the PAM library reports success or fail-ure back to the application.
Example
Part of a sample login service’s authentication stack follows:
$ cat /etc/pam.d/loginauth requsite pam_securetty.so@include common-authaccount required pam_nologin.so...
The login utility first asks for a username and then asks PAM to run this stack toauthenticate the user. Refer to Table 12-4 on page 546 and Table 12-5 on page 547.
1. PAM first calls the pam_securetty (secure tty) module to make sure the root user logs in only from an allowed terminal. (By default, root is not allowed to run login over the network; this policy helps prevent security breaches.) The pam_securetty module is required to succeed if the authen-tication stack is to succeed. The pam_securetty module reports failure only if someone is trying to log in as root from an unauthorized terminal. Oth-erwise (if the username being authenticated is not root or if the username is root and the login attempt is being made from a secure terminal), the pam_securetty module reports success.
Success and failure within PAM are opaque concepts that apply only to PAM. They do not equate to true and false as used elsewhere in the operat-ing system.
2. The included common-auth file holds modules that check whether the user who is logging in is authorized to do so. As part of completing this task, they verify the username and password.
3. The pam_nologin module makes sure that if the /etc/nologin.txt file exists, only the root user is allowed to log in. (That is, the pam_nologin module reports success only if /etc/nologin.txt does not exist or if the root user is logging in.) Thus, when a shutdown has been scheduled to occur in the near future, the system keeps users from logging in only to have the system shut down moments later.
The account module type works like the auth module type but is called after theuser has been authenticated; it acts as an additional security check or requirementfor a user to gain access to the system. For example, account modules might enforcea policy that a user can log in only during business hours.

PAM 549
The session module type sets up and tears down the session (perhaps mounting andunmounting the user’s home directory). One common session module on an Ubuntusystem is pam_mail, which announces you have new mail when a user logs in to atextual environment.
The password module type is a bit unusual: All modules in the stack are called onceand told to get all information they need to store the password to persistent mem-ory, such as a disk, but not actually to store it. If it determines that it cannot orshould not store the password, a module reports failure. If all password modules inthe stack report success, they are called a second time and told to store to persistentmemory the password they obtained on the first pass. The password module isresponsible for updating the authentication information (that is, changing the user’spassword).
Any one module can act as more than one module type; many modules can act as allfour module types.
Modifying the PAM Configuration
Some UNIX systems require that a user be a member of the wheel group to use thesu command. Although Ubuntu Linux is not configured this way by default, PAMallows you to change this behavior by editing the /etc/pam.d/su file:
$ cat /etc/pam.d/su...# Uncomment this to force users to be a member of group root before they can use 'su' # auth required pam_wheel.so
# Uncomment this if you want wheel members to be able to su without a password.# auth sufficient pam_wheel.so trust...
The lines of this su module contain comments that include the lines necessary to per-mit only users who are in the wheel group to use su (required) and to permit membersof the wheel group to run su without supplying a password (sufficient). Uncommentone of these lines when you want the system to follow one of these rules.
Be cautious when changing PAM filescaution Unless you understand how to configure PAM, do not change the files in /etc/pam.d. Mistakes in
the configuration of PAM can make the system unusable.
Brackets ([ ]) in the control flags fieldcaution You can set the control flags in a more complex way than described in this section. When you see
brackets ([ ]) in the control flags position in a PAM configuration file, the newer, more complex methodis in use. Each comma-delimited argument is a value=action pair. When the result returned by the func-tion matches value, action is evaluated. For more information refer to the PAM System Administrator’sGuide (www.kernel.org/pub/linux/libs/pam/Linux-PAM-html/Linux-PAM_SAG.html).

550 Chapter 12 System Administration: Core Concepts
Chapter Summary
A system administrator is someone who keeps the system useful and convenient forits users. Much of the work you do as the system administrator will require you towork with root privileges. A user with these privileges (sometimes referred to asSuperuser) has extensive systemwide powers that normal users do not have. A userwith root privileges can read from and write to any file and can execute programsthat ordinary users are not permitted to execute.
The system administrator controls system operation, which includes many tasks:configuring the system; booting up; running init scripts; setting up servers; workingin recovery (single-user) and multiuser modes; bringing the system down; and han-dling system crashes. Ubuntu Linux provides both graphical and textual configura-tion tools.
When you bring up the system in recovery (single-user) mode, only the system con-sole is functional. When the system is in recovery mode, you can back up files anduse fsck to check the integrity of filesystems before you mount them. The telinit util-ity can bring the system to its default multiuser state. With the system running inmultiuser mode, you can still perform many administration tasks, such as addingusers and printers.
As installed, the root account on an Ubuntu system is locked: It has no password.Ubuntu recommends you use sudo when you need to perform a task with root priv-ileges. The sudo utility grants root privileges based on your password. A system thatdoes not have a root password and that relies on sudo to escalate permissions can bemore secure than one with a root password.
The Upstart init daemon, which replaces the traditional System V init daemon(SysVinit), is event-based and can start and stop services upon receiving informa-tion that something on the system has changed. This kind of change is called anevent. Events include adding devices to and removing them from the system as wellas bringing the system up and shutting it down.
You can use TCP wrappers to control who can use which system services by editingthe hosts.allow and hosts.deny files in the /etc directory. Setting up a chroot jail lim-its the portion of the filesystem a user sees, so it can help control the damage a mali-cious user can do.
You can set up a DHCP server so you do not have to configure each system on anetwork manually. DHCP can provide both static and dynamic IP addresses.Whether a system uses NIS, DNS, local files, or a combination (and in what order)as a source of information is determined by /etc/nsswitch.conf. Linux-PAM enablesyou to maintain fine-grained control over who can access the system, how they canaccess it, and what they can do.

Advanced Exercises 551
Exercises
1. How does recovery (single-user) mode differ from multiuser mode?
2. How would you communicate each of the following messages?
a. The system is coming down tomorrow at 6:00 in the evening for peri-odic maintenance.
b. The system is coming down in 5 minutes.
c. Jenny’s jobs are slowing the system down drastically, and she should postpone them.
d. Zach’s wife just had a baby girl.
3. How would you run a program with Sam’s privileges if you did not know his password but had permission to use sudo to run a command with rootprivileges? How would you spawn a shell with the same environment that Sam has when he first logs in?
4. How would you allow a user to execute a specific, privileged command without giving the user the root password or permission to use sudo to run any command with root privileges?
5. How do you kill process 1648? How do you kill all processes running kmail? In which instances do you need to work with root privileges?
6. What does the /etc/event.d/logd file do and what starts it? What does the respawn keyword in this file mean?
7. Develop a strategy for coming up with a password that an intruder would not be likely to guess but that you will be able to remember.
Advanced Exercises
8. Give the command
$ /sbin/fuser -uv /
What does the output list? Why is it so long? Give the same command while working with root privileges (or ask the system administrator to do so and email you the results). How does this list differ from the first? Why is it different?

552 Chapter 12 System Administration: Core Concepts
9. When it puts files in a lost+found directory, fsck has lost the directory information for the files and thus has lost the names of the files. Each file is given a new name, which is the same as the inode number for the file:
$ ls –l lost+found–rw–r––r–– 1 alex pubs 110 Jun 10 10:55 51262
How can you identify these files and restore them?
10. Take a look at /usr/bin/lesspipe. Explain its purpose and give six ways it works.
11. Why are setuid shell scripts inherently unsafe?
12. When a user logs in, you would like the system to first check the local /etc/passwd file for a username and then check NIS. How do you imple-ment this strategy?
13. Some older kernels contain a vulnerability that allows a local user to gain root privileges. Explain how this kind of vulnerability negates the value of a chroot jail.

553553
13Chapter13Filesystems hold directories of files. These structures store userdata and system data that are the basis of users’ work on thesystem and the system’s existence. This chapter discusses impor-tant files and directories, various types of files and ways towork with them, and the use and maintenance of filesystems.
In This Chapter
Important Files and Directories . . 554
Special Files . . . . . . . . . . . . . . . . . 567
Filesystems . . . . . . . . . . . . . . . . . . 570
mount: Mounts a Filesystem . . . . 572
fstab: Keeps Track of Filesystems . . . . . . . . . . . . . . . . 576
fsck: Checks Filesystem Integrity . . . . . . . . . . . . . . . . . . . 577
13
Files, Directories,
and Filesystems

554 Chapter 13 Files, Directories, and Filesystems
Important Files and Directories
This section details the files most commonly used to administer the system. For moreinformation, refer to “Important Standard Directories and Files” on page 194.
~/.bash_profile Contains an individual user’s login shell initialization script. By default, Ubuntudoes not create this file when it adds a user. The shell executes the commands in thisfile in the same environment as the shell each time a user logs in. (For informationon executing a shell script in this manner, refer to the discussion of the . [dot] com-mand on page 279.) The file must be located in a user’s home directory. It is not runfrom terminal emulator windows because you do not log in in those windows.
You can use .bash_profile to specify a terminal type (for vi, terminal emulators, andother programs), run stty to establish the terminal characteristics, set up aliases, andperform other housekeeping functions when a user logs in.
A simple .bash_profile file specifying a vt100 terminal and CONTROL-H as the erase keyfollows:
$ cat .bash_profileexport TERM=vt100stty erase '^h'
For more information refer to “Startup Files” on page 277.
~/.bashrc Contains an individual user’s interactive, nonlogin shell initialization script. Theshell executes the commands in this file in the same environment as the (new) shelleach time a user creates a new interactive shell, including when a user opens a ter-minal emulator window. (For information on executing a shell script in this manner,refer to the discussion of the . [dot] command on page 279.) The .bashrc script dif-fers from .bash_profile in that it is executed each time a new shell is spawned, notjust when a user logs in. For more information refer to “Startup Files” on page 277.
/dev Contains files representing pseudodevices and physical devices that may be attached tothe system. The following list explains the naming conventions for some physical devices:
• /dev/fd0 The first floppy disk. The second floppy disk is named /dev/fd1.
• /dev/hda The master disk on the primary IDE controller. The slave disk on the primary IDE controller is named /dev/hdb. This disk may be a CD-ROM drive.
• /dev/hdc The master disk on the secondary IDE controller. The slave disk on the secondary IDE controller is named /dev/hdd. This disk may be a CD-ROM drive.
• /dev/sda Traditionally the first SCSI disk; now the first non-IDE drive, including SATA and USB drives. Other, similar drives are named /dev/sdb,/dev/sdc, etc.

Important Files and Directories 555
/dev/disk/by-id Holds symbolic links to local devices. The names of the devices in this directoryidentify the devices. Each entry points to the device in /dev that it refers to.
$ ls -l /dev/disk/by-idlrwxrwxrwx 1 root root 9 Sep 9 08:32 ata-CR-48XGTE_3E30053332_0175 -> ../../hdblrwxrwxrwx 1 root root 9 Sep 9 08:32 ata-WDC_WD1600JB-00GVA0_WD-WCAL95325197 -> ../../hda
/dev/disk/by-uuid Holds symbolic links to local devices. The names of the devices in this directoryconsist of the UUID (page 1067) numbers of the devices. Each entry points to thedevice in /dev that it refers to.
$ ls -l /dev/disk/by-uuidlrwxrwxrwx 1 root root 10 Jun 4 11:41 39fc600f-91d5-4c9f-8559-727050b27645 -> ../../hda2lrwxrwxrwx 1 root root 10 Jun 4 11:41 7eb0ba40-d48d-4ded-b4e4-7027cc93629f -> ../../hda5lrwxrwxrwx 1 root root 10 Jun 4 11:41 8c2e5007-9cea-4bfb-8d26-82f8b376949b -> ../../hda6...
/dev/null Also called a bit bucket. Output sent to this file disappears. The /dev/null file is adevice file. Input that you redirect to come from this file appears as null values, cre-ating an empty file. You can create an empty file named nothing by giving one ofthe following commands:
$ cat /dev/null > nothing$ cp /dev/null nothing
or, without explicitly using /dev/null,
$ > nothing
The last command redirects the output of a null command to the file with the sameresult as the previous commands. You can use any of these commands to truncatean existing file to zero length without changing its permissions. You can also use/dev/null to get rid of output that you do not want:
$ grep portable * 2> /dev/null
This command displays all lines in all files in the working directory that contain thestring portable. Any output to standard error (page 280), such as a permission ordirectory error, is discarded, while output to standard output appears on the screen.
/dev/pts A hook into the Linux kernel. This pseudofilesystem is part of the pseudoterminalsupport. Pseudoterminals are used by remote login programs, such as ssh and telnet,as well as xterm and other graphical terminal emulators. The following sequence ofcommands demonstrates that Sam is logged in on /dev/pts/2. After using who am ito verify the pseudoterminal he is logged in on and using ls to show that thispseudoterminal exists, Sam redirects the output of an echo command to /dev/pts/2,whereupon the output appears on his screen:
$ who am isam pts/2 2007-05-31 17:37 (dog.bogus.com)$ ls /dev/pts0 1 2$ echo Hi there > /dev/pts/2Hi there
556 Chapter 13 Files, Directories, and Filesystems
/dev/randomand
/dev/urandom
Interfaces to the kernel’s random number generator. You can use either file with ddto create a file filled with pseudorandom bytes.
$ dd if=/dev/urandom of=randfile2 bs=1 count=100100+0 records in100+0 records out100 bytes (100 B) copied, 0.000884387 seconds, 113 kB/s
The preceding command reads from /dev/urandom and writes to the file namedrandfile. The block size is 1 and the count is 100; thus randfile is 100 bytes long.For bytes that are more random, you can read from /dev/random. See the urandomand random man pages for more information.
optionalWiping a file You can use a similar technique to wipe data from a file before deleting it, making it
almost impossible to recover data from the deleted file. You might want to wipe afile for security reasons.
In the following example, ls shows the size of the file named secret. Using a blocksize of 1 and a count corresponding to the number of bytes in secret, dd wipes thefile. The conv=notrunc argument ensures that dd writes over the data in the file andnot another (erroneous) place on the disk.
$ ls -l secret-rw-r--r-- 1 sam sam 5733 2007-05-31 17:43 secret$ dd if=/dev/urandom of=secret bs=1 count=5733 conv=notrunc5733+0 records in5733+0 records out5733 bytes (5.7 kB) copied, 0.0358146 seconds, 160 kB/s$ rm secret
For added security, run sync to flush the disk buffers after running dd, and repeatthe two commands several times before deleting the file. See wipe.sourceforge.netfor more information about wiping files.
/dev/zero Input you take from this file contains an infinite string of zeros (numerical zeros,not ASCII zeros). You can fill a file (such as a swap file, page 564) or overwrite afile with zeros with a command such as the following:
$ dd if=/dev/zero of=zeros bs=1024 count=1010+0 records in10+0 records out10240 bytes (10 kB) copied, 0.000160263 seconds, 63.9 MB/s
$ od -c zeros0000000 \0 \0 \0 \0 \0 \0 \0 \0 \0 \0 \0 \0 \0 \0 \0 \0*0024000
The od utility shows the contents of the new file.

Important Files and Directories 557
When you try to do with /dev/zero what you can do with /dev/null, you fill the par-tition in which you are working:
$ cp /dev/zero bigzerocp: writing 'bigzero': No space left on device$ rm bigzero
/etc/aliases Used by the mail delivery system to hold aliases for users. Edit this file to suit localneeds. For more information refer to /etc/aliases on page 763.
/etc/alternatives Holds symbolic links so that you can call a utility by a name other than that of thefile that holds the utility. For example, when you give the command btdownload-curses, the shell calls btdownloadcurses.bittorrent using the following links:
$ ls -l /usr/bin/btdownloadcurseslrwxrwxrwx ... /usr/bin/btdownloadcurses -> /etc/alternatives/btdownloadcurses$ ls -l /etc/alternatives/btdownloadcurseslrwxrwxrwx ... /etc/alternatives/btdownloadcurses -> /usr/bin/btdownloadcurses.bittorrent
The alternatives directory also allows a utility to appear in more than one directory:
$ ls -l /usr/X11R6/bin/btdownloadcurses /usr/bin/X11/btdownloadcurseslrwxrwxrwx ... /usr/X11R6/bin/btdownloadcurses -> /etc/alternatives/btdownloadcurseslrwxrwxrwx ... /usr/bin/X11/btdownloadcurses -> /etc/alternatives/btdownloadcurses
In addition, this directory allows you to call one utility by several names. Althoughthe alternatives directory does not allow developers to do anything they could notdo without it, it provides an orderly way to keep and update these links. Use whereis(page 164) to find all links to a utility.
/etc/at.allow,/etc/at.deny,
/etc/cron.allow,and
/etc/cron.deny
By default, users can use the at and crontab utilities. The at.allow and cron.allowfiles list the users who are allowed to use at and crontab, respectively. The at.denyand cron.deny files specify users who are not permitted to use the correspondingutilities. As Ubuntu Linux is configured, the at.deny file holds a list of some systemaccounts and there is no at.allow file, allowing nonsystem accounts to use at; theabsence of cron.allow and cron.deny files allows anyone to use crontab. To preventanyone except a user running with root privileges from using at, remove theat.allow and at.deny files. To prevent anyone except a user running with root privi-leges from using crontab, create a cron.allow file with the single entry root. For moreinformation on crontab, refer to “Scheduling Tasks” on page 668.
/etc/bash.bashrc Contains the global interactive, nonlogin shell initialization script. A user can over-ride settings made in this file in her ~/.bashrc (page 554) file.
/etc/default Holds files that set default values for system services and utilities such as NFS anduseradd. Look at the files in this directory for more information.
/etc/dumpdates Contains information about the last execution of dump (part of the dump softwarepackage). For each filesystem, it stores the time of the last dump at a given dumplevel. The dump utility uses this information to determine which files to back upwhen executing at a particular dump level. Refer to “Backing Up Files” on page 662and the dump man page for more information.

558 Chapter 13 Files, Directories, and Filesystems
Following is a sample /etc/dumpdates file from a system with four filesystems and abackup schedule that uses three dump levels:
/dev/hda1 5 Thu Apr 19 03:53:55 2007/dev/hda8 2 Sun Apr 15 08:25:24 2007/dev/hda9 2 Sun Apr 15 08:57:32 2007/dev/hda10 2 Sun Apr 15 08:58:06 2007/dev/hda1 2 Sun Apr 15 09:02:27 2007/dev/hda1 0 Sun Mar 18 22:08:35 2007/dev/hda8 0 Sun Mar 18 22:33:40 2007/dev/hda9 0 Sun Mar 18 22:35:22 2007/dev/hda10 0 Sun Mar 18 22:43:45 2007
The first column contains the device name of the dumped filesystem. The secondcolumn contains the dump level and the date of the dump.
/etc/event.d Holds files that define Upstart init jobs. See page 502 for more information.
/etc/fstab filesystem (mount) table Contains a list of all mountable devices as specified bythe system administrator. Programs do not write to this file; they only read from it.Refer to “fstab: Keeps Track of Filesystems” on page 576.
/etc/group Groups allow users to share files or programs without giving all system users accessto those files or programs. This scheme is useful when several users are workingwith files that are not public. The /etc/group file associates one or more usernameswith each group (number). Refer to “ACLs: Access Control Lists” on page 203 fora finer-grained way to control file access.
Each entry in the /etc/group file has four colon-separated fields that describe onegroup:
group-name:password:group-ID:login-name-list
The group-name is the name of the group. The password is an optional hashed(page 1039) password. This field frequently contains an x, indicating that grouppasswords are not used. The group-ID is a number, with 1–999 reserved for systemaccounts. The login-name-list is a comma-separated list of users who belong to thegroup. If an entry is too long to fit on one line, end the line with a backslash (\),which quotes the following RETURN, and continue the entry on the next line. A sampleentry from a group file follows. The group is named pubs, has no password, andhas a group ID of 1103:
pubs:x:1103:max,sam,zach,mark
You can use the groups utility to display the groups to which a user belongs:
$ groups samsam : sam pubs
Each user has a primary group, which is the group that user is assigned in the/etc/passwd file. By default, Ubuntu Linux has user private groups: Each user’s pri-mary group has the same name as the user. In addition, a user can belong to othergroups, depending on which login-name-lists the user appears on in the /etc/group

Important Files and Directories 559
file. In effect, you simultaneously belong both to your primary group and to anygroups you are assigned to in /etc/group. When you attempt to access a file you donot own, Linux checks whether you are a member of the group that has access tothe file. If you are, you are subject to the group access permissions for the file. If youare not a member of the group that has access to the file and you do not own thefile, you are subject to the public access permissions for the file.
When you create a new file, Linux assigns it to the group associated with the direc-tory the file is being written into, assuming that you belong to that group. If you donot belong to the group that has access to the directory, the file is assigned to yourprimary group.
Refer to page 660 for information on using users-admin to work with groups.
/etc/hosts Stores the names, IP addresses, and optionally aliases of other systems. At the veryleast, this file must have the hostname and IP address that you have chosen for thelocal system and a special entry for localhost. This entry supports the loopback ser-vice, which allows the local system to talk to itself (for example, for RPC services).The IP address of the loopback service is always 127.0.0.1, while 127.0.1.1 namesthe local system. Following is a simple /etc/hosts file:
$ cat /etc/hosts127.0.0.1 localhost127.0.1.1 tiny192.168.0.9 jam192.168.0.10 plum192.168.0.12 dog...
If you are not using NIS or DNS to look up hostnames (called hostname resolution),you must include in /etc/hosts all systems that the local system should be able tocontact by hostname. (A system can always contact another system by using the IPaddress of the system.) The hosts entry in the /etc/nsswitch.conf file (page 542) con-trols the order in which hostname resolution services are checked.
/etc/inittab initialization table Some distributions use this file to control the behavior of theinit process. It is not present on Ubuntu systems. See rc-default on page 506 formore information.
/etc/motd Contains the message of the day, which can be displayed each time someone logs inusing a textual login. This file typically contains site policy and legal information.Keep this file short because users tend to see the message many times.
/etc/mtab When you call mount without any arguments, it consults this file and displays a listof mounted devices. Each time you (or an init script) call mount or umount, theseutilities make the necessary changes to mtab. Although this is an ASCII text file, youshould not edit it. See also /etc/fstab.
/etc/nsswitch.confSpecifies whether a system uses NIS, DNS, local files, or a combination as the sourceof certain information, and in what order it consults these services (page 542).

560 Chapter 13 Files, Directories, and Filesystems
/etc/pam.d Files in this directory specify the authentication methods used by PAM (page 545)applications.
/etc/passwd Describes users to the system. Do not edit this file directly; instead, use one of theutilities discussed in “Configuring User and Group Accounts” on page 658. Eachline in passwd has seven colon-separated fields that describe one user:
login-name:password:user-ID:group-ID:info:directory:program
The login-name is the user’s username—the name you enter in response to thelogin: prompt or on a GUI login screen. The value of the password is the characterx. The /etc/shadow file (page 562) stores the real password, which is hashed(page 1039). For security reasons, every account should have a password. By con-vention, disabled accounts have an asterisk (*) in this field.
The user-ID is a number, with 0 indicating the root account and 1–999 beingreserved for system accounts. The group-ID identifies the user as a member of agroup. It is a number, with 0–999 being reserved for system accounts; see/etc/group (page 558). You can change these values and set maximum values in/etc/login.defs.
The info is information that various programs, such as accounting and email pro-grams, use to identify the user further. Normally it contains at least the first and lastnames of the user. It is referred to as the GECOS (page 1038) field.
The directory is the absolute pathname of the user’s home directory. The program isthe program that runs once the user logs in to a textual session. If program is notpresent, a value of /bin/bash is assumed. You can put /bin/tcsh here to log in usingthe TC Shell or /bin/zsh to log in using the Z Shell, assuming the shell you specify isinstalled. The chsh utility (page 525) changes this value.
The program is usually a shell, but it can be any program. The following line in thepasswd file creates a “user” whose only purpose is to execute the who utility:
who:x:1000:1000:execute who:/usr:/usr/bin/who
Logging in with who as a username causes the system to log you in, execute the who util-ity, and log you out. The output of who flashes by quickly because the new login promptclears the screen immediately after who finishes running. This entry in the passwd filedoes not provide a shell, so you cannot stay logged in after who finishes executing.
This technique is useful for providing special accounts that may do only one thing. Theftp account, for example, enables anonymous FTP (page 729) access to an FTP server.
Fixing mtabtip The kernel maintains its own internal mount table. You can display this table with the command
cat /proc/mounts. Sometimes the list of files in /etc/mtab may not be synchronized with the par-titions in this table. To bring the mtab file in line with the operating system’s mount table, you caneither reboot the system or replace /etc/mtab with a symbolic link to /proc/mounts (althoughsome information may be lost).
$ sudo rm /etc/mtab$ sudo ln -s /proc/mounts /etc/mtab

Important Files and Directories 561
Because no one logs in on this account, the shell is set to /bin/false (which returns afalse exit status) or to /sbin/nologin (which does not permit the user to log in). Whenyou put a message in /etc/nologin.txt, nologin displays that message (except it has thesame problem as the output of who: It is removed so quickly that it is hard to see).
/etc/printcap The printer capability database for LPD/LPR (page 612). It is not used with CUPS(Chapter 15), Ubuntu’s default printing system. This file describes system printersand is derived from 4.3BSD UNIX.
/etc/profile Contains a systemwide interactive shell initialization script for environment andstartup programs. When you log in, the shell immediately executes the commandsin this file in the same environment as the shell. (For information on executing ashell script in this manner, refer to the discussion of the . [dot] command onpage 279.) This file allows the system administrator to establish systemwide envi-ronment parameters that individual users can override in their ~/.bash_profile(page 554) files. For example, this file can set shell variables, execute utilities, set upaliases, and take care of other housekeeping tasks.
The default Ubuntu /etc/profile file sets the shell prompt and executes the com-mands in /etc/bash.bashrc (page 557).
Following is an example of a /etc/profile file that displays the message of the day(the /etc/motd file), sets the file-creation mask (umask, page 526), and sets the inter-rupt character to CONTROL-C:
# cat /etc/profilecat /etc/motdumask 022stty intr '^c'
/etc/protocols Provides protocol numbers, aliases, and brief definitions for DARPA InternetTCP/IP protocols. Do not modify this file.
/etc/init.d Holds SysVinit initialization scripts. See page 507 for more information.
/etc/resolv.conf The resolver (page 848) configuration file, which is used to provide access to DNS.By default, this file is rebuilt by resolvconf when you run the bind9 init script. See“named options” on page 858, “resolvconf and resolv.conf” on page 859, and theresolver and resolv.conf man pages for more information.
The following example shows the resolv.conf file for the example.com domain. Aresolv.conf file usually contains at least two lines—a search line (optional) and anameserver line:
# cat /etc/resolv.confsearch example.comnameserver 10.0.0.50nameserver 10.0.0.51
Do not replace a login shell with a shell scriptsecurity Do not use shell scripts as replacements for shells in /etc/passwd. A user may be able to interrupt
a shell script, giving him full shell access when you did not intend to do so. When installing adummy shell, use a compiled program, not a shell script.

562 Chapter 13 Files, Directories, and Filesystems
The search keyword may be followed by a maximum of six domain names. The firstdomain is interpreted as the host’s local domain. These names are appended one ata time to all DNS queries, shortening the time needed to query local hosts. Thedomains are searched in order in the process of resolving hostnames that are notfully qualified. See FQDN on page 1037.
When you put search example.com in resolv.conf, any reference to a host within theexample.com domain or a subdomain (such as marketing.example.com) can use theabbreviated form of the host. For example, instead of issuing the command pingspeedy.marketing.example.com, you can use ping speedy.marketing. The followingline in resolv.conf causes the marketing subdomain to be searched first, followed bysales, and finally the entire example.com domain:
search marketing.example.com sales.example.com example.com
It is a good idea to put the most frequently used domain names first to try to outguesspossible conflicts. If both speedy.marketing.example.com and speedy.example.comexist, for example, the order of the search determines which one is selected when youinvoke DNS. Do not overuse this feature: The longer the search path, the more net-work DNS requests generated, and the slower the response. Three or four names aretypically sufficient.
The nameserver line(s) indicate which systems the local system should query toresolve hostnames to IP addresses, and vice versa. These machines are consulted inthe order they appear, with a timeout between queries. The first timeout is a fewseconds; each subsequent timeout is twice as long as the previous one. The preced-ing file causes this system to query 10.0.0.50, followed by 10.0.0.51 when the firstsystem does not answer within a few seconds. The resolv.conf file may be automati-cally updated when a PPP- (Point-to-Point Protocol) or DHCP- (Dynamic HostConfiguration Protocol) controlled interface is activated. Refer to the resolv.confand resolver man pages for more information.
/etc/rpc Maps RPC services to RPC numbers. The three columns in this file show the nameof the server for the RPC program, the RPC program number, and any aliases.
/etc/services Lists system services. The three columns in this file show the informal name of theservice, the port number/protocol the service uses most frequently, and any aliasesfor the service. This file does not specify which services are running on the local sys-tem, nor does it map services to port numbers. The services file is used internally tomap port numbers to services for display purposes.
/etc/shadow Contains MD5 (page 1047) hashed user passwords. Each entry occupies one linecomposed of nine fields, separated by colons:
login-name:password:last-mod:min:max:warn:inactive:expire:flag
The login-name is the user’s username—the name that the user enters in response tothe login: prompt or on a GUI login screen. The password is a hashed passwordthat passwd puts in this file. New accounts that are not set up with a password are

Important Files and Directories 563
given a value of ! or * in this field to prevent the user from logging in until youassign a password to that user (page 658).
The last-mod field indicates when the password was last modified. The min is theminimum number of days that must elapse before the password can be changed; themax is the maximum number of days before the password must be changed. Thewarn field specifies how much advance warning (in days) will be given to the userbefore the password expires. The account will be closed if the number of daysbetween login sessions exceeds the number of days specified in the inactive field. Theaccount will also be closed as of the date in the expire field. The last field in an entry,flag, is reserved for future use. You can use usermod (page 661) to modify these fields.
The shadow password file must be owned by root and must not be publicly read-able or writable. Setting ownership and permissions in this way makes it more diffi-cult for someone to break into the system by identifying accounts withoutpasswords or by using specialized programs that try to match hashed passwords.
A number of conventions exist for creating special shadow entries. An entry of*LK* or NP in the password field indicates locked or no password, respectively. Nopassword is different from an empty password; no password implies that this is anadministrative account that no one ever logs in on directly. Occasionally programswill run with the privileges of this account for system maintenance functions. Theseaccounts are set up under the principle of least privilege (page 488).
Entries in the shadow file must appear in the same order as in the passwd file. Theremust be exactly one shadow entry for each passwd entry.
hosts.deny andhosts.allow
As part of the client/server model, TCP wrappers rely on these files as the basis of asimple access control language. See page 532 for more information.
/proc Provides a window into the Linux kernel. Through the /proc pseudofilesystem youcan obtain information on any process running on the system, including its currentstate, memory usage, CPU usage, terminal association, parent, and group. You canextract information directly from the files in /proc. An example follows:
$ sleep 1000 &[1] 22756$ cd /proc/22756$ ls -ltotal 0dr-xr-xr-x 2 sam sam 0 2007-06-01 15:24 attr-r-------- 1 sam sam 0 2007-06-01 15:24 auxv-r--r--r-- 1 sam sam 0 2007-06-01 15:24 cmdline-r--r--r-- 1 sam sam 0 2007-06-01 15:24 cpusetlrwxrwxrwx 1 sam sam 0 2007-06-01 15:24 cwd -> /home/sam-r-------- 1 sam sam 0 2007-06-01 15:24 environlrwxrwxrwx 1 sam sam 0 2007-06-01 15:24 exe -> /bin/sleepdr-x------ 2 sam sam 0 2007-06-01 15:24 fd-r--r--r-- 1 sam sam 0 2007-06-01 15:24 maps-rw------- 1 sam sam 0 2007-06-01 15:24 mem...

564 Chapter 13 Files, Directories, and Filesystems
$ cat statusName: sleepState: S (sleeping)SleepAVG: 88%Tgid: 22756Pid: 22756PPid: 22723TracerPid: 0Uid: 1002 1002 1002 1002Gid: 1002 1002 1002 1002FDSize: 256Groups: 1002VmPeak: 2800 kBVmSize: 2800 kB...
In this example, bash creates a background process (PID 22756) for sleep. Next theuser changes directories to the directory in /proc that has the same name as the PIDof the background process (cd /proc/22756). This directory holds informationabout the process it is named for—the sleep process in the example. The ls –l com-mand shows that some entries in this directory are links (cwd is a link to the direc-tory the process was started from, and exe is a link to the executable file that thisprocess is running) and some appear to be ordinary files. All appear to be empty.However, when you use cat to display one of these pseudofiles (status in the exam-ple), cat displays output. Obviously it is not an ordinary file.
/sbin/shutdown A utility that brings the system down (see page 518).
swap Even though swap is not normally a file, swap space can be added and deleted fromthe system dynamically. Swap space is used by the virtual memory subsystem of thekernel. When it runs low on real memory (RAM), the kernel writes memory pagesfrom RAM to the swap space on the disk. Which pages are written and when theyare written are controlled by finely tuned algorithms in the Linux kernel. Whenneeded by running programs, the kernel brings these pages back into RAM—a tech-nique called paging (page 1052). When a system is running very short on memory,an entire process may be paged out to disk.
Running an application that requires a large amount of virtual memory may resultin the need for additional swap space. If you run out of swap space, you can usemkswap to create a swap file and swapon to enable it. Normally you use a disk parti-tion as swap space, but you can also use a file for this purpose. A disk partition pro-vides much better performance than a file.
If you are creating a file as swap space, first use df to ensure that the partition you arecreating it in has adequate space for the file. In the following sequence of commands,the administrator first uses dd and /dev/zero (page 556) to create an empty file (do notuse cp because you may create a file with holes, which may not work) in the workingdirectory. Next mkswap takes as an argument the name of the file created in the firststep to set up the swap space. For security reasons, change the file so that it cannot beread from or written to by anyone except a user with root privileges. Use swapon with

Important Files and Directories 565
the same argument to turn the swap file on; then use swapon –s to confirm the swapspace is available. The final two commands turn off the swap file and remove it.Because many of the commands in this sequence must be executed with root privileges,and because typing sudo in front of each command would be tedious, the administra-tor spawns a shell with root privileges by giving the command sudo –i before starting.The exit command at the end of the sequence closes the privileged shell:
$ sudo -i# dd if=/dev/zero of=swapfile bs=1024 count=6553665536+0 records in65536+0 records out67108864 bytes (67 MB) copied, 0.631809 seconds, 106 MB/s# mkswap swapfileSetting up swapspace version 1, size = 67104 kBno label, UUID=e2e4ec08-77a4-47b1-bca1-59dd9a59dbf7# chmod 600 swapfile# swapon swapfile# swapon -sFilename Type Size Used Priority/dev/hda3 partition 1951888 33796 -1/root/swapfile file 65528 0 -2# swapoff swapfile# rm swapfile# exit$
/sys A pseudofilesystem that was added in the Linux 2.6 kernel to make it easy for pro-grams running in kernelspace, such as device drivers, to exchange information withprograms running in userspace. Refer to udev on page 568.
/usr/share/file/magicMost files begin with a unique identifier called a magic number. This file is a textdatabase listing all known magic numbers on the system. When you use the file util-ity, it consults /usr/share/file/magic to determine the type of a file. Occasionally youmay acquire a new tool that creates a new type of file that is unrecognized by the fileutility. In this situation you can add entries to the /etc/magic file. Refer to the magicand file man pages for more details. See also “magic number” on page 1046.
/var/log Holds system log files, many of which are generated by syslogd (page 688). You canuse a text display program such as less, tail, or cat, or the graphical program gnome-system-log to view the files in this directory. To run gnome-system-log, select System:Administration System Log or enter gnome-system-log (use gksudo if you are nota member of the adm group) from a terminal emulator or in a Run Application win-dow (ALT-F2).
/var/log/messagesContains messages from daemons, the Linux kernel, and security programs. Forexample, you will find filesystem full warning messages, error messages from sys-tem daemons (NFS, exim4, printer daemons), SCSI and IDE disk error messages,and more in messages. Check /var/log/messages periodically to keep informed

566 Chapter 13 Files, Directories, and Filesystems
about important system events. Much of the information displayed on the systemconsole is also sent to messages. If the system experiences a problem and you cannotaccess the console, check this file for messages about the problem. See page 688 forinformation on syslogd, which generates many of these messages.
/var/log/auth.log Holds messages from security-related programs such as sudo and the sshd daemon.
File Types
Linux supports many types of files. This section discusses the following types offiles:
• Ordinary files, directories, links, and inodes (next)
• Symbolic links (page 567)
• Special files (page 567)
• FIFO special files (named pipes) (page 568)
• Sockets (page 569)
• Block and character devices (page 569)
• Raw devices (page 570)
Ordinary Files, Directories, Links, and Inodes
Ordinary anddirectory files
An ordinary file stores user data, such as textual information, programs, or images,such as a jpeg or tiff file. A directory is a standard-format disk file that stores infor-mation, including names, about ordinary files and other directory files.
Inodes An inode is a data structure (page 1032), stored on disk, that defines a file’s exist-ence and is identified by an inode number. An inode contains critical informationabout a file, such as the name of the owner, where it is physically located on thedisk, and how many hard links point to it. Except for directory inodes, inodes donot contain filenames. An inode that describes a directory file relates each of thefilenames stored in the directory to the inode that describes that file. This setupallows an inode to be associated with more than one filename and to be pointed tofrom more than one directory.
When you move (mv) a file, including a directory file, within a filesystem, youchange the filename portion of the directory entry associated with the inode thatdescribes the file. You do not create a new inode. If you move a file to another file-system, mv first creates a new inode on the destination filesystem and then deletesthe original inode. You can also use mv to move a directory recursively from onefilesystem to another. In this case mv copies the directory and all the files in it, anddeletes the original directory and its contents.
When you make an additional hard link (ln, page 210) to a file, you add a directoryentry that points to the inode that describes the file. You do not create a new inode.

File Types 567
When you remove (rm) a file, you delete the directory entry that describes the file.When you remove the last hard link to a file, the operating system puts all blocksthe inode pointed to back in the free list (the list of blocks that are available for useon the disk) and frees the inode to be used again.
The . and ..directory entries
Every directory contains at least two entries (. and . .). The . entry is a link to thedirectory itself. The . . entry is a link to the parent directory. In the case of the rootdirectory, there is no parent and the . . entry is a link to the root directory itself. It isnot possible to create hard links to directories.
Symbolic links Because each filesystem has a separate set of inodes, you can create hard links to afile only from within the filesystem that holds that file. To get around this limita-tion, Linux provides symbolic links, which are files that point to other files. Filesthat are linked by a symbolic link do not share an inode. As a consequence, you cancreate a symbolic link to a file from any filesystem. You can also create a symboliclink to a directory, device, or other special file. For more information refer to “Sym-bolic Links” on page 212.
Special Files
Special files represent Linux kernel routines that provide access to an operating sys-tem feature. FIFO (first in, first out) special files allow unrelated programs toexchange information. Sockets allow unrelated processes on the same or differentsystems to exchange information. One type of socket, the UNIX domain socket, is aspecial file. Symbolic links are another type of special file.
Device files Device files include both block and character special files and represent device driv-ers that allow the system to communicate with peripheral devices, such as terminals,printers, and hard disks. By convention, device files appear in the /dev directory andits subdirectories. Each device file represents a device; hence, the system reads fromand writes to the file to read from and write to the device it represents. The follow-ing example shows part of the output that an ls –l command produces for the /devdirectory:
$ ls -l /devtotal 0lrwxrwxrwx 1 root root 13 May 24 16:08 MAKEDEV -> /sbin/MAKEDEVcrw-rw---- 1 root root 10, 63 May 24 16:08 acpicrw-rw---- 1 root audio 14, 12 May 24 16:08 adspcrw-rw---- 1 root video 10, 175 May 24 16:08 agpgartcrw-rw---- 1 root audio 14, 4 May 24 16:08 audiodrwxr-xr-x 3 root root 60 May 24 16:08 buslrwxrwxrwx 1 root root 3 May 24 16:08 cdrom -> hdblrwxrwxrwx 1 root root 3 May 24 16:08 cdrw -> hdbcrw------- 1 root root 5, 1 Jun 1 07:36 console...brw-rw---- 1 root disk 3, 0 Jun 6 13:49 hdabrw-rw---- 1 root disk 3, 1 Jun 6 13:50 hda1brw-rw---- 1 root cdrom 3, 64 Jun 6 13:49 hd...

568 Chapter 13 Files, Directories, and Filesystems
The first character of each line is always –, b, c, d, l, or p, representing the filetype—ordinary (plain), block, character, directory, symbolic link, or named pipe(see the following section), respectively. The next nine characters identify the per-missions for the file, followed by the number of hard links and the names of theowner and the group. Where the number of bytes in a file would appear for an ordi-nary or directory file, a device file shows major and minor device numbers(page 569) separated by a comma. The rest of the line is the same as for any other ls–l listing (page 199).
udev The udev utility manages device naming dynamically. It replaces the earlier devfsand moves the device-naming functionality from the kernel to userspace. Becausedevices are added to and removed from a system infrequently, the performance pen-alty associated with this change is minimal. The benefit of the move is that a bug inudev cannot compromise or crash the kernel.
The udev utility is part of the hotplug system (next). When a device is added to orremoved from the system, the kernel creates a device name in the /sys pseudofile-system and notifies hotplug of the event, which is received by udev. The udev utilitythen creates the device file, usually in the /dev directory, or removes the device filefrom the system. The udev utility can also rename network interfaces. Seewww.kernel.org/pub/linux/utils/kernel/hotplug/udev.html for more information.
Hotplug The hotplug system allows you to plug a device into a running system and use itimmediately. Although hotplug was available in the Linux 2.4 kernel, the 2.6 kernelintegrates hotplug with the unified device driver model framework (the drivermodel core) so that any bus can report an event when a device is added to orremoved from the system. User software can be notified of the event so it can takeappropriate action. See linux-hotplug.sourceforge.net for more information.
FIFO Special File (Named Pipe)
A FIFO special file, also called a named pipe, represents a pipe: You read from andwrite to the file to read from and write to the pipe. The term FIFO stands for first in,first out—the way any pipe works. In other words, the first information you put inone end is the first information that comes out the other end. When you use a pipe ona command line to send the output of a program to the printer, the printer outputs theinformation in the same order that the program produced it and sent it to the pipe.
Unless you are writing sophisticated programs, you will not be working with FIFOspecial files. However, programs that you use on Linux use named pipes for inter-process communication. You can create a pipe using mkfifo:
$ mkfifo AA$ ls -l AAprw-rw-r-- 1 zach zach 0 Apr 26 13:11 AA
The p at the left end of the output of ls –l indicates the file is a pipe.
Both UNIX and Linux systems have included pipes for many generations. Withoutnamed pipes, only processes that were children of the same ancestor could use pipes to
File Types 569
exchange information. Using named pipes, any two processes on a single system canexchange information. When one program writes to a FIFO special file, another pro-gram can read from the same file. The programs do not have to run at the same time orbe aware of each other’s activity. The operating system handles all buffering and infor-mation storage. This type of communication is termed asynchronous (async) becausethe programs on the opposite ends of the pipe do not have to be synchronized.
Sockets
Like a FIFO special file, a socket allows asynchronous processes that are not chil-dren of the same ancestor to exchange information. Sockets are the central mecha-nism of the interprocess communication that forms the basis of the networkingfacility. When you use networking utilities, pairs of cooperating sockets manage thecommunication between the processes on the local system and the remote system.Sockets form the basis of such utilities as ssh and scp.
Major and Minor Device Numbers
A major device number points to a driver in the kernel that works with a class ofhardware devices: terminal, printer, tape drive, hard disk, and so on. In the listing ofthe /dev directory on page 567, all the hard disk partitions have a major devicenumber of 3.
A minor device number identifies a particular piece of hardware within a class.Although all hard disk partitions are grouped together by their major device num-ber, each has a different minor device number (hda1 is 1, hda2 is 2, and so on). Thissetup allows one piece of software (the device driver) to service all similar hard-ware, yet still be able to distinguish among different physical units.
Block and Character Devices
This section describes typical device drivers. Because device drivers can be changed tosuit a particular purpose, the descriptions in this section do not pertain to every system.
Block device A block device is an I/O (input/output) device that has the following characteristics:
• Able to perform random access reads
• Has a specific block size
• Handles only single blocks of data at a time
• Accepts only transactions that involve whole blocks of data
• Able to have a filesystem mounted on it
• Has the Linux kernel buffer its input and output
• Appears to the operating system as a series of blocks numbered from 0 through n – 1, where n is the number of blocks on the device
Block devices commonly found on a Linux system include hard disks, floppy disk-ettes, and CDs.

570 Chapter 13 Files, Directories, and Filesystems
Character device A character device is any device that is not a block device. Examples of characterdevices include printers, terminals, tape drives, and modems.
The device driver for a character device determines how a program reads from andwrites to that device. For example, the device driver for a terminal allows a programto read the information you type on the terminal in two ways. First, a program canread single characters from a terminal in raw mode—that is, without the driverdoing any interpretation of the characters. (This mode has nothing to do with theraw device described in the following section.) Alternatively, a program can readone line at a time. When a program reads one line at a time, the driver handles theerase and kill characters so the program never sees typing mistakes that have beencorrected. In this case, the program reads everything from the beginning of a line tothe RETURN that ends a line; the number of characters in a line can vary.
Raw Devices
Device driver programs for block devices usually have two entry points so they canbe used in two ways: as block devices or as character devices. The character deviceform of a block device is called a raw device. A raw device is characterized by
• Direct I/O (no buffering through the Linux kernel).
• One-to-one correspondence between system calls and hardware requests.
• Device-dependent restrictions on I/O.
fsck An example of a utility that uses a raw device is fsck. It is more efficient for fsck tooperate on the disk as a raw device rather than being restricted by the fixed size ofblocks in the block device interface. Because it has full knowledge of the underlyingfilesystem structure, fsck can operate on the raw device using the largest possibleunits. When a filesystem is mounted, processes normally access the disk through theblock device interface, which explains why it is important to allow fsck to modifyonly unmounted filesystems. On a mounted filesystem, there is the danger that, whilefsck is rearranging the underlying structure through the raw device, another processcould change a disk block using the block device, resulting in a corrupted filesystem.
Filesystems
Table 13-1 lists some types of filesystems available under Linux.
Table 13-1 Filesystems
Filesystem Features
adfs Advanced Disc Filing System. Used on Acorn computers. The word Advanceddifferentiated this filesystem from its predecessor DFS, which did not support advanced features such as hierarchical filesystems.
affs Amiga Fast Filesystem (FFS).

Filesystems 571
autofs Automounting filesystem (page 818).
cifs Common Internet Filesystem (page 823). Formerly the Samba Filesystem (smbfs).
coda CODA distributed filesystem (developed at Carnegie Mellon).
devpts A pseudofilesystem for pseudoterminals (page 555).
ext2 A standard filesystem for Ubuntu systems, usually with the ext3 extension.
ext3 A journaling (page 1043) extension to the ext2 filesystem. It greatly improves recovery time from crashes (it takes a lot less time to run fsck), promoting increased availability. As with any filesystem, a journaling filesystem can lose data during a system crash or hardware failure.
GFS Global Filesystem. GFS is a journaling, clustering filesystem. It enables a clus-ter of Linux servers to share a common storage pool.
hfs Hierarchical Filesystem. Used by older Macintosh systems. Newer Macintosh systems use hfs+.
hpfs High-Performance Filesystem. The native filesystem for IBM’s OS/2.
jffs2 Journaling Flash Filesystem (jffs). A filesystem for flash memory.
iso9660 The standard filesystem for CDs.
minix Very similar to Linux. The filesystem of a small operating system that was writ-ten for educational purposes by Andrew S. Tanenbaum (www.minix3.org).
msdos Filesystem used by DOS and subsequent Microsoft operating systems. Do not use msdos for mounting Windows filesystems; it does not read VFAT attributes.
ncpfs Novell NetWare NCP Protocol Filesystem. Used to mount remote filesystems under NetWare.
nfs Network Filesystem. Developed by Sun Microsystems, this protocol allows a com-puter to access remote files over a network as if the files were local (page 799).
ntfs NT Filesystem. The native filesystem of Windows NT. See www.linux-ntfs.org.
proc An interface to several Linux kernel data structures (page 1032) that behaves like a filesystem (page 563).
qnx4 QNX 4 operating system filesystem.
reiserfs A journaling (page 1043) filesystem, based on balanced-tree algorithms. See ext3 for more on journaling filesystems.
romfs A dumb, readonly filesystem used mainly for RAM disks (page 1056) during installation.
smbfs Samba Filesystem (deprecated). See cifs.
Table 13-1 Filesystems (continued)

572 Chapter 13 Files, Directories, and Filesystems
mount: Mounts a Filesystem
The mount utility connects directory hierarchies—typically filesystems—to theLinux directory hierarchy. These directory hierarchies can be on remote and localdisks, CDs, DVDs, and floppy diskettes. Linux can also mount virtual filesystemsthat have been built inside ordinary files, filesystems built for other operating sys-tems, and the special /proc filesystem (page 563), which maps useful Linux kernelinformation to a pseudodirectory. This section covers mounting local filesystems;refer to page 799 for information on using NFS to mount remote directory hierar-chies. See /dev on page 554 for information on device names.
Mount point The mount point for the filesystem/directory hierarchy that you are mounting is adirectory in the local filesystem. This directory must exist before you can mount afilesystem; its contents disappear as long as a filesystem is mounted on it and reap-pear when you unmount the filesystem.
Without any arguments, mount lists the currently mounted filesystems, showing thephysical device holding each filesystem, the mount point, the type of filesystem, andany options set when each filesystem was mounted. The mount utility gets this infor-mation from the /etc/mtab file (page 559).
$ mount/dev/hda1 on / type ext3 (rw,errors=remount-ro)proc on /proc type proc (rw,noexec,nosuid,nodev).../dev/hda2 on /home type ext3 (rw)/dev/hda5 on /pl5 type ext3 (rw)/dev/hda6 on /pl6 type ext3 (rw)/dev/sda1 on /p01 type ext3 (rw)//jam/C on /jam/c type cifs (rw,mand)dog:/p04 on /p04 type nfs (rw,addr=192.168.0.12)/dev/hdb on /media/cdrom0 type iso9660 (ro,noexec,nosuid,nodev,user=sam)
The first entry in the preceding example shows the root filesystem, which ismounted on /. The second entry shows the /proc pseudofilesystem (page 563). The
Filesystem Features
software RAID RAID implemented in software. Refer to “RAID” on page 34.
sysv System V UNIX filesystem.
ufs Default filesystem under Sun’s Solaris operating system and other UNIXs.
umsdos A full-feature UNIX-like filesystem that runs on top of a DOS FAT filesystem.
vfat Developed by Microsoft, a standard that allows long filenames on FAT partitions.
VxFS Veritas Extended Filesystem. The first commercial journaling (page 1043) file-system, popular under HP-UX and Solaris.
xfs SGI’s journaling filesystem (ported from Irix).
Table 13-1 Filesystems (continued)

Filesystems 573
next four entries identify disk partitions holding standard Linux ext3 filesystems.The directory /jam/c has a cifs (Windows) filesystem mounted on it using Samba.You can use Linux utilities and applications to access the Windows files and direc-tories on this partition as if they were Linux files and directories. The line startingwith dog shows a mounted, remote NFS filesystem. The last line shows the CD at/dev/hdb mounted on /media/cdrom0.
If the list of filesystems in /etc/mtab is not correct, see the tip on page 560.
When you add a line for a filesystem to the /etc/fstab file (page 558), you canmount that filesystem by giving the associated mount point or device name as theargument to mount. For example, the CD listed earlier was mounted using the fol-lowing command:
$ mount /media/cdrom0
This command worked because /etc/fstab contains the additional informationneeded to mount the file. An ordinary user was able to mount the file because of theuser option:
/dev/hdb /media/cdrom0 udf,iso9660 user,nosuid,noauto 0 0
You can also mount filesystems that do not appear in /etc/fstab. For example, whenyou insert a floppy diskette that holds a DOS filesystem into the floppy diskettedrive, you can mount that filesystem using the following command:
$ sudo mount –t msdos /dev/fd0 /media/floppy0
The –t msdos option specifies a filesystem type of msdos. You can mount DOS file-systems only if you have configured the Linux kernel (page 635) to accept DOSfilesystems. You do not need to mount a DOS filesystem to read from and write toit, such as when you use mcopy (page 159). However, you do need to mount a DOSfilesystem to use Linux commands (other than Mtools commands) on files on thefilesystem (which may be on a diskette).
Mount Options
The mount utility takes many options, which you can specify either on the command lineor in the /etc/fstab file (page 576). For a complete list of mount options for local filesys-tems, see the mount man page; for remote directory hierarchies, see the nfs man page.
The noauto option causes Linux not to mount the filesystem automatically. Thenosuid option forces mounted setuid executables to run with regular permissions
Do not mount anything on root ( / )
caution Always mount network directory hierarchies and removable devices at least one level below the rootlevel of the filesystem. The root filesystem is mounted on / ; you cannot mount two filesystems inthe same place. If you were to try to mount something on /, all files, directories, and filesystemsthat were under the root directory would no longer be available, and the system would crash.

574 Chapter 13 Files, Directories, and Filesystems
(no effective user ID change) on the local system (the system that mounted thefilesystem).
Unless you specify the user, users, or owner option, only a user running with rootprivileges can mount and unmount a filesystem. The user option allows any user tomount the filesystem, but the filesystem can be unmounted only by the user whomounted it; the users option allows any user to mount and unmount the filesystem.These options are frequently specified for CD, DVD, and floppy drives. The owneroption, which is used only under special circumstances, is similar to the user optionexcept that the user mounting the device must own the device.
Mounting a Linux Floppy Diskette
Mounting a Linux floppy diskette is similar to mounting a partition of a hard disk.If it does not already exist, put an entry similar to the following in /etc/fstab for adiskette in the first floppy drive:
/dev/fd0 /media/floppy0 auto rw,user,nosuid,noauto 0 0
Specifying a filesystem type of auto causes the system to probe the filesystem todetermine its type and allows users to mount a variety of diskettes. Create the/media/floppy0 directory if necessary. Insert a diskette and try to mount it. The dis-kette must be formatted (use fdformat, which deletes all data on a diskette). In the fol-lowing example, the error message following the first command usually indicatesthere is no filesystem on the diskette. In some cases, the mount command may hang.If this problem occurs, pop the diskette out to display a prompt. Use mkfs (page 525)to create a filesystem—but be careful, because mkfs destroys all data on the diskette.
$ mount /dev/fd0mount: I could not determine the filesystem type, and none was specified
$ mkfs /dev/fd0mke2fs 1.40-WIP (14-Nov-2006)Filesystem label=OS type: LinuxBlock size=1024 (log=0)Fragment size=1024 (log=0)184 inodes, 1440 blocks72 blocks (5.00%) reserved for the super userFirst data block=1Maximum filesystem blocks=15728641 block group8192 blocks per group, 8192 fragments per group184 inodes per group
Mount removable devices with the nosuid option
security Always mount removable devices with the nosuid option so that a malicious user cannot, forexample, put a setuid copy of bash on a disk and have a shell with root privileges. By default,Ubuntu uses the nosuid option when mounting removable media.

Filesystems 575
Writing inode tables: doneWriting superblocks and filesystem accounting information: done
This filesystem will be automatically checked every 36 mounts or180 days, whichever comes first. Use tune2fs -c or -i to override.
Now try the mount command again:
$ mount /dev/fd0$ mount.../dev/fd0 on /media/floppy0 type ext2 (rw,noexec,nosuid,nodev,user=sam)
$ df -h /dev/fd0Filesystem Size Used Avail Use% Mounted on/dev/fd0 1.4M 19K 1.3M 2% /media/floppy0
The mount command without any arguments and df –h /dev/fd0 show that thefloppy diskette is mounted and ready for use.
umount: Unmounts a Filesystem
The umount utility unmounts a filesystem as long as it does not contain any files ordirectories that are in use (open). For example, a logged-in user’s working directorycannot be on the filesystem you want to unmount. The next command unmountsthe CD mounted earlier:
$ umount /media/cdrom0
Unmount a floppy or a remote (NFS) directory hierarchy the same way you wouldunmount a partition of a hard drive.
The umount utility consults /etc/fstab to get the necessary information and thenunmounts the appropriate filesystem from its server. When a process has a file openon the filesystem that you are trying to unmount, umount displays a message similarto the following:
umount: /home: device is busy
Use the –a option to umount to unmount all mounted filesystems that are not in use.You can never unmount the filesystem mounted at /. You can combine –a with the –toption to unmount filesystems of a given type (ext3, nfs, or others). For example, thefollowing command unmounts all mounted nfs directory hierarchies that are not in use:
$ sudo umount -at nfs
When you cannot unmount a device because it is in use
tip When a process has a file open on a device you need to unmount, use fuser to determine whichprocess has the file open and to kill it. For example, when you want to unmount a floppy diskette,give the command fuser –ki /media/floppy0 (substitute the mount point for the diskette on thelocal system for /media/floppy0). After checking with you, this command kills the process(es)using the diskette.

576 Chapter 13 Files, Directories, and Filesystems
fstab: Keeps Track of Filesystems
The system administrator maintains the /etc/fstab file, which lists local and remotedirectory hierarchies, most of which the system mounts automatically when itboots. The fstab file has six columns, where a hyphen is a placeholder for a columnthat has no value:
1. Name The name, label, or UUID number of a local block device (page 569) or a pointer to a remote directory hierarchy. When you install the system, Ubuntu uses UUID numbers for fixed devices. It prefaces each line in fstab that specifies a UUID with a comment that specifies the device name. Using UUID numbers in fstab during installation circumvents the need for consistent device naming. Because udev (page 568) manages device naming dynamically, the installer may not be aware, for example, that the first disk is not named /dev/hda1 but rather /dev/sda1, but it always knows the UUID number of a device. See /dev/disk/by-uuid(page 555) for more information on UUID numbers. You can use the vol-ume label of a local filesystem by using the form LABEL=xx, where xx is the volume label. Refer to e2label on page 525.
A remote directory hierarchy appears as hostname:pathname, where hostname is the name of the remote system that houses the filesystem, and pathname is the absolute pathname (on the remote system) of the directory that is to be mounted.
2. Mount point The name of the directory file that the filesystem/directory hierarchy is to be mounted on. If it does not already exist, create this direc-tory using mkdir. See page 572.
3. Type The type of filesystem/directory hierarchy that is to be mounted. Local filesystems are generally of type ext2, ext3, or iso9660, and remote directory hierarchies are of type nfs or cifs. Table 13-1 on page 570 lists filesystem types.
4. Mount options A comma-separated list of mount options, such as whether the filesystem is mounted for reading and writing (rw, the default) or readonly (ro). See pages 573 and 804, and refer to the mount and nfs man pages for lists of options.
5. Dump Used by dump (page 666) to determine when to back up the filesystem.
6. Fsck Specifies the order in which fsck checks filesystems. Root (/) should have a 1 in this column. Filesystems that are mounted to a directory just below the root directory should have a 2. Filesystems that are mounted on another mounted filesystem (other than root) should have a 3. For exam-ple, if local is a separate filesystem from /usr and is mounted on /usr (as /usr/local), then local should have a 3. Filesystems and directory hierar-chies that do not need to be checked (for example, remotely mounted directory hierarchies and CDs/DVDs) should have a 0.
The following example shows a typical fstab file:

Filesystems 577
$ cat /etc/fstab# /etc/fstab: static file system information.## <file system> <mount point> <type> <options> <dump> <pass>proc /proc proc defaults 0 0# /dev/hda1UUID=8f3c51c2-a42c-49b1-9f03-db2140cb7eb5 / ext3 defaults,errors=remount-ro 0 1# /dev/hda2UUID=39fc600f-91d5-4c9f-8559-727050b27645 /home ext3 defaults 0 2# /dev/hda3UUID=a68fb957-2ae7-4ae5-8656-23a1cf8fcd14 none swap sw 0 0/dev/hda5 /pl5 ext3 defaults 0 2/dev/hda6 /pl6 ext3 defaults 0 2/dev/hdb /media/cdrom0 udf,iso9660 user,nosuid,noauto 0 0/dev/fd0 /media/floppy0 auto rw,user,nosuid,noauto 0 0dog:/p04 /p04 nfs defaults 0 0
In the preceding example, /pl5 and /pl6 do not use UUID numbers because thesedevices were added to fstab by the administrator after the system was installed.
fsck: Checks Filesystem Integrity
The fsck (filesystem check) utility verifies the integrity of filesystems and, if possible,repairs problems it finds. Because many filesystem repairs can destroy data, particu-larly on nonjournaling filesystems (page 1043), such as ext2, by default fsck asksyou for confirmation before making each repair.
The following command checks all unmounted filesystems that are marked to bechecked in /etc/fstab (page 576) except for the root filesystem:
$ sudo fsck -AR
The –A option causes fsck to check filesystems listed in fstab. When used with the–A option, the –R option causes fsck not to check the root filesystem. You can checka specific filesystem with a command similar to one of the following:
$ sudo fsck /home
or
$ sudo fsck /dev/hda2
Crash flag When the system boots, it runs the /etc/init.d/checkroot.sh and/etc/init.d/checkfs.sh init scripts. With some exceptions, these scripts run fsck on thefilesystems as specified by the sixth column in /etc/fstab (page 576). The root file-system is checked first, as long as it is mounted readonly. All checking is skipped ifthe system is running on batteries.
Do not run fsck on a mounted filesystem
caution Do not run fsck on a mounted filesystem. When you attempt to check a mounted filesystem, fsckwarns you and asks whether you want to continue. Reply no. You can run fsck with the –N optionon a mounted filesystem because it will not write to the filesystem; as a result, no harm can comeof running it. See page 570 for more information

578 Chapter 13 Files, Directories, and Filesystems
Certain filesystem parameters (discussed in the next section) determine whether fsckreports the filesystem as clean or checks it. If the file /forcefsck is present on theroot filesystem, fsck ignores the filesystem parameters and checks filesystems asspecified by fstab. The /forcefsck file exists if filesystems were not properlyunmounted, such as when the system has crashed.
tune2fs: Changes Filesystem Parameters
The tune2fs utility displays and modifies filesystem parameters on ext2 filesystemsand on ext3 filesystems, which are modified ext2 filesystems. This utility can alsoset up journaling on an ext2 filesystem, turning it into an ext3 filesystem. With theintroduction of increasingly more reliable hardware and software, systems tend tobe rebooted less frequently, so it is important to check filesystems regularly. Bydefault, fsck is run on each partition while the system is brought up, before the par-tition is mounted. (The checks scheduled by tune2fs are separate and scheduled dif-ferently from the checks that are done following a system crash or hard disk error[see the previous section].)
Depending on the flags, fsck may do nothing more than display a message sayingthe filesystem is clean. The larger the partition, the more time it takes to check it,assuming a nonjournaling filesystem. These checks are often unnecessary. Thetune2fs utility helps you to find a happy medium between checking filesystems eachtime you reboot the system and never checking them. It does so by scheduling whenfsck checks a filesystem (these checks occur only when the system is booted).1 Youcan use two scheduling patterns: time elapsed since the last check and number ofmounts since the last check. The following command causes fsck to check/dev/hda5 after it has been mounted eight times or after 15 days have elapsed sinceits last check, whichever happens first:
$ sudo tune2fs -c 8 -i 15 /dev/hda5tune2fs 1.40-WIP (14-Nov-2006)Setting maximal mount count to 8Setting interval between checks to 1296000 seconds
The next tune2fs command is similar but works on a different partition and sets the cur-rent mount count to 4. When you do not specify a current mount count, it is set to zero:
$ sudo tune2fs -c 8 -i 15 -C 4 /dev/hda6tune2fs 1.40-WIP (14-Nov-2006)Setting maximal mount count to 8Setting current mount count to 4Setting interval between checks to 1296000 seconds
The –l option lists a variety of information about the partition. You can combinethis option with others. A maximum mount count of –1 or 0 means fsck and thekernel will ignore the mount count information.
1. For systems whose purpose in life is to run continuously, this kind of scheduling does not work. Youmust develop a schedule that is not based on system reboots but rather on a clock. Each filesystem mustbe unmounted periodically, checked with fsck (preceding section), and then remounted.

Filesystems 579
$ sudo tune2fs -l /dev/hda6tune2fs 1.40-WIP (14-Nov-2006)Filesystem volume name: <none>Last mounted on: <not available>Filesystem UUID: 8c2e5007-9cea-4bfb-8d26-82f8b376949bFilesystem magic number: 0xEF53Filesystem revision #: 1 (dynamic)Filesystem features: has_journal resize_inode dir_index filetype
needs_recovery sparse_super large_fileFilesystem flags: signed directory hashDefault mount options: (none)Filesystem state: cleanErrors behavior: ContinueFilesystem OS type: LinuxInode count: 183936Block count: 367479...Last mount time: Mon Jun 4 15:02:43 2007Last write time: Mon Jun 4 15:25:54 2007Mount count: 4Maximum mount count: 8Last checked: Mon Jun 4 15:02:42 2007Check interval: 1296000 (2 weeks, 1 day)...
Set the filesystem parameters on the local system so they are appropriate to the wayyou use it. When using the mount count to control when fsck checks filesystems, usethe –C option to stagger the checks to ensure all checks do not occur at the sametime. Always make sure new and upgraded filesystems have checks scheduled asyou desire.
To change an ext2 filesystem to an ext3 filesystem, you must put a journal(page 1043) on the filesystem, and the kernel must support ext3 filesystems. Use the–j option to set up a journal on an unmounted filesystem:
$ sudo tune2fs -j /dev/hda5tune2fs 1.40-WIP (14-Nov-2006)Creating journal inode: doneThis filesystem will be automatically checked every 8 mounts or15 days, whichever comes first. Use tune2fs -c or -i to override.
Before you can use fstab (page 558) to mount the changed filesystem, you mustmodify its entry in the fstab file to reflect its new type. To do so, change the thirdcolumn to ext3.
The following command changes an unmounted or readonly ext3 filesystem to anext2 filesystem:
$ sudo tune2fs -O ^has_journal /dev/hda5tune2fs 1.40-WIP (14-Nov-2006)
Refer to the tune2fs man page for more details.

580 Chapter 13 Files, Directories, and Filesystems
RAID Filesystem
RAID (Redundant Arrays of Inexpensive/Independent Disks) spreads informationacross several disks so as to combine several physical disks into one larger virtualdevice. RAID improves performance and may create redundancy. For more infor-mation see page 34.
Chapter Summary
Filesystems hold directories of files. These structures store user data and systemdata that are the basis of users’ work on the system and the system’s existence.Linux supports many types of files, including ordinary files, directories, links, andspecial files. Special files provide access to operating system features. The kerneluses major and minor device numbers to identify classes of devices and specificdevices within each class. Character and block devices represent I/O devices such ashard disks and printers. Inodes, which are identified by inode numbers, are storedon disk and define a file’s existence.
When the system comes up, the /etc/fstab file controls which filesystems aremounted and how they are mounted (readonly, read-write, and so on). After a sys-tem crash, filesystems are automatically verified and repaired if necessary by fsck.You can use tune2fs to force the system to cause fsck to verify a filesystem periodi-cally when the system boots.
Exercises
1. What is the function of the /etc/hosts file? Which services can you use in place of, or to supplement, the hosts file?
2. What does the /etc/resolv.conf file do? What do the nameserver lines in this file do?
3. What is an inode? What happens to the inode when you move a file within a filesystem?
4. What does the . . entry in a directory point to? What does this entry point to in the root (/) directory?
5. What is a device file? Where are device files located?
6. What is a FIFO? What does FIFO stand for? What is another name for a FIFO? How does a FIFO work?

Advanced Exercises 581
Advanced Exercises
7. Write a line for the /etc/fstab file that mounts the /dev/hdb1 ext3 file-system on /extra with the following characteristics: The filesystem will not be mounted automatically when the system boots, and anyone can mount and unmount the filesystem.
8. Without using rm, how can you delete a file? (Hint: How do you rename a file?)
9. After burning an ISO image file named image.iso to a CD on /dev/hdc,how can you can verify the copy from the command line?
10. Why should /var reside on a separate partition from /usr?
11. Create a FIFO. Using the shell, demonstrate that two users can use this FIFO to communicate asynchronously.
12. How would you mount an ISO image so you could copy files from it with-out burning it to a CD?

This page intentionally left blank

583583
14Chapter14A software package is the collection of scripts, programs, files,and directories required to install and run applications, utilities,servers, and system software. A package also includes a list ofother packages that the package depends on (dependencies).Using software packages makes it easier to transfer, install, anduninstall software. A package contains either executable files orsource code files. Executable files are precompiled for a specificprocessor architecture and operating system, whereas sourcefiles need to be compiled but will run on a wide range ofmachines and operating systems.
In This Chapter
JumpStart: Installing and Removing Packages Using aptitude. . . . . . 585
Finding the Package That Holds a File You Need . . . . . . . . . . . . . . . 587
APT: Keeps the System Up-to-Date . . . . . . . . . . . . . . . . . 588
The apt cron Script and APT Configuration Files. . . . . . . . . . . 590
aptitude: Works with Packages and the Local Package Index . . 592
dpkg: The Debian Package Management System. . . . . . . . . 598
BitTorrent. . . . . . . . . . . . . . . . . . . . 604
Installing Non-dpkg Software. . . . 607
wget: Downloads Files Noninteractively . . . . . . . . . . . . 609
14
Downloading and
Installing Software
584 Chapter 14 Downloading and Installing Software
Software packageformats
Software packages come in different formats. Ubuntu uses dpkg (page 598), whichwas the first Linux packaging system to incorporate dependency information; it getsits name from the Linux distribution it was developed on (Debian). Other formatsinclude rpm (used on Red Hat, SuSE, and other systems), yum, the GNU Configureand Build System (page 607), and compressed tar. Formats such as compressed tar,which were popular before the introduction of dpkg, are used less often todaybecause they require more work on the part of the installer (you) and do not pro-vide the dependency and compatibility checking that dpkg offers.
dpkg The Debian package management system is referred to as the dpkg managementsystem, or just dpkg. This system is a collection of more than 20 utilities that man-age and report on dpkg packages, both those installed on the system and thoseavailable from online repositories. Give the command dpkgTABTAB (press TAB twice) orapropos dpkg to display a list of dpkg utilities.
deb files The dpkg utilities work with files whose names end in .deb and are referred to asdeb files (page 599) or (software) packages.
APT APT (Advanced Package Tool) is a collection of utilities that, together with dpkg,work with software packages. APT downloads software packages, while dpkginstalls, removes, maintains, manages dependencies of, and reports on softwarepackages. Give the command aptTABTAB or apropos apt to display a list of APT utili-ties (and a few other things).
Kernel source code See Chapter 16 for information on downloading, compiling, and installing kernelsource code.
Graphical interfaces Several pseudographical and graphical interfaces to dpkg and APT are available.Among the most popular are Synaptic (page 121), aptitude, and dselect.
Repositories APT downloads package headers and packages from servers called repositoriesthat can reside on the Internet, a CD, or a local network. See page 588 for moreinformation.
Bug tracking Ubuntu uses Launchpad, which belongs to a class of programs formally known asdefect tracking systems, to track bugs (launchpad.net/+about for information aboutLaunchpad and launchpad.net/ubuntu to use it). You can use Launchpad to readabout existing bugs and to report new ones. Ubuntu uses Bazaar for source codeversion control (bazaar-vcs.org and wiki.ubuntu.com/Bzr). Launchpad allows youto track any project that uses Bazaar version control.
Keeping softwareup-to-date
Of the many reasons to keep software up-to-date, one of the most important issecurity. Although you may hear about software-based security breaches after thefact, you rarely hear about the fixes that were available but never installed beforethe breach occurred. Timely installation of software updates is critical to systemsecurity. Linux open-source software is the ideal environment to find and fix bugsand make repaired software available quickly. When you keep the system and appli-cation software up-to-date, you keep abreast of bug fixes, new features, support fornew hardware, speed enhancements, and more.

JumpStart: Installing and Removing Packages Using aptitude 585
As shipped, most versions of Ubuntu check for updates daily and advise you whenupdates are available (page 100). Use the Software Sources window (page 119),Updates tab to change these options.
JumpStart: Installing and Removing Packages
Using aptitudeThis section explains how to install packages on and remove packages from a sys-tem using aptitude, a versatile tool that is part of APT. The aptitude utility has twointerfaces: pseudographical and textual. This chapter covers the textual interface.Give the command aptitude without arguments to display the pseudographicalinterface. Information on this interface is available in the aptitude user’s manual(people.debian.org/~dburrows/aptitude-doc/en).
If you do not know the name of the package you want to install, see page 587. Ifyou want aptitude to download packages that are not supported by Ubuntu, youmust add the repositories that hold those packages to the sources.list file; seepage 589.
Before using aptitude to install a package, give the command sudo aptitude updateto update the local list of packages (more about this process on page 594). Bydefault, the apt cron script (page 590) updates this list daily. Even so, it is a goodidea to give this command periodically until you are sure the script is updatingthe list.
aptitude install The following example calls aptitude to install the tcsh shell, which is part of the tcshpackage:
$ sudo aptitude install tcshReading package lists... DoneBuilding dependency treeReading state information... DoneReading extended state informationInitializing package states... DoneBuilding tag database... DoneThe following NEW packages will be installed: tcsh0 packages upgraded, 1 newly installed, 0 to remove and 0 not upgraded.Need to get 0B/338kB of archives. After unpacking 709kB will be used.Writing extended state information... DoneSelecting previously deselected package tcsh.(Reading database ... 119619 files and directories currently installed.)Unpacking tcsh (from .../tcsh_6.14.00-7_i386.deb) ...Setting up tcsh (6.14.00-7) ......
586 Chapter 14 Downloading and Installing Software
The next command installs the apache2.2-common package. Because this packagedepends on other packages, and because these packages are not installed, aptitudelists the packages it will automatically install in addition to the one you asked it toinstall. When aptitude is going to install more packages than you requested, it asks ifyou want to continue. Reply y if you want to continue or n if you want to quit.
$ sudo aptitude install apache2.2-common...The following NEW packages will be automatically installed: apache2-utils libapr1 libaprutil1 libpq5The following NEW packages will be installed: apache2-utils apache2.2-common libapr1 libaprutil1 libpq50 packages upgraded, 5 newly installed, 0 to remove and 0 not upgraded.Need to get 0B/1698kB of archives. After unpacking 5407kB will be used.Do you want to continue? [Y/n/?] y...
aptitude remove The aptitude remove command removes a package, but leaves its configuration files inplace, allowing you to reinstall the package without having to reconfigure it. Use purge(discussed next) in place of remove to remove a package and its configuration files.
$ sudo aptitude remove tcsh...The following packages will be REMOVED: tcsh0 packages upgraded, 0 newly installed, 1 to remove and 0 not upgraded.Need to get 0B of archives. After unpacking 709kB will be freed.Writing extended state information... Done(Reading database ... 120025 files and directories currently installed.)Removing tcsh ......
Automaticallyremoves
dependencies
When aptitude removes a package, it also removes the dependent packages it auto-matically installed when it installed the original package. The following exampleremoves apache2-common and its dependencies:
$ sudo aptitude remove apache2.2-common...The following packages are unused and will be REMOVED: apache2-utils libapr1 libaprutil1 libpq5...The following packages will be REMOVED: apache2.2-common0 packages upgraded, 0 newly installed, 5 to remove and 0 not upgraded.Need to get 0B of archives. After unpacking 5407kB will be freed.Do you want to continue? [Y/n/?] y...
aptitude purge The next example uses an alternative approach—the aptitude purge command—toremove apache2-common, its dependencies, and all configuration files. The {p} fol-lowing apache2.2-common indicates that aptitude is removing (purging) apache2.2-common’s configuration files, as does the last line of the example.

Finding the Package That Holds a File You Need 587
$ sudo aptitude purge apache2.2-common...The following packages are unused and will be REMOVED: apache2-utils libapr1 libaprutil1 libpq5...The following packages will be REMOVED: apache2.2-common{p}0 packages upgraded, 0 newly installed, 5 to remove and 0 not upgraded.Need to get 0B of archives. After unpacking 5407kB will be freed.Do you want to continue? [Y/n/?] y...Purging configuration files for apache2.2-common ......
Finding the Package That Holds a File You Need
You may know the name of a file or utility you need but not know the name of thepackage that holds the file. There are several ways that you can locate a packagethat holds a file. The Ubuntu Web page, packages.ubuntu.com, allows you to searchfor packages based on several criteria. Partway down the page is a section titledSearch that gives you two ways to search for packages. You can use the second,Search the contents of packages, to search for a package that holds a specific file.Enter the name of the file in the text box labeled Keyword, click the radio buttonlabeled packages that contain files named like this, select Case sensitive (no), selectthe distribution and architecture you are working with, and click Search. Thebrowser displays a list of packages that hold the file you are looking for. For exam-ple, suppose you are compiling a program and get the following error message:
xv.h:174:22: error: X11/Xlib.h: No such file or directory
You are working on an Intel x86-compatible system running Gutsy and need the fileXlib.h located in the X11 directory. When you enter X11/Xlib.h in the text boxlabeled Keyword (on packages.ubuntu.com), the browser displays the following list:
usr/include/X11/Xlib.h libdevel/libx11-devusr/lib/TenDRA/lib/include/x5/lib.api/X11/Xlib.h devel/tendra [universe]
The [universe] on the second line indicates that the package comes from the uni-verse repository (page 588). The most likely candidate is the first entry, which issupported by Ubuntu and is the most generic. The libdevel/libx11-dev on the rightindicates that the libx11-dev package is part of the libdevel section of packages. Youcan install this package using the following command:
$ sudo aptitude install libx11-dev
apt-file You can also use the apt-file utility to search for a package containing a specified file.Before you can use this utility, you must install it and update the package list on thelocal system. Updating the package list takes a few minutes. Because apt-file displays

588 Chapter 14 Downloading and Installing Software
multiple, sequential, identical lines, you can pipe its output through uniq (page 154)to make the job of finding the right package easier:
$ sudo aptitude install apt-file...$ sudo apt-file update...$ apt-file search X11/Xlib.h | uniqivtools-dev: usr/include/IV-X11/Xlib.hlibghc6-x11-dev: usr/lib/X11-1.2.1/ghc-6.6.1/Graphics/X11/Xlib.hilibhugs-x11-bundled: usr/lib/hugs/packages/X11/Graphics/X11/Xlib.hslibx11-dev: usr/include/X11/Xlib.htendra: usr/lib/TenDRA/lib/include/x5/lib.api/X11/Xlib.h
Again, the most generic package (the next-to-last one listed) is probably the one youwant. While the aptitude search command (page 595) and apt-cache (page 596)search installed packages only, apt-file searches all packages from the repositorieslisted in /etc/apt/sources.list, including packages that have not been downloaded.See also dpkg ––search (page 604) and dpkg ––listfiles (page 604) for other ways ofsearching for files.
APT: Keeps the System Up-to-Date
APT (Advanced Package Tool) is a collection of utilities that download, install,remove, upgrade, and report on software packages. APT utilities download packagesand call dpkg (page 598) utilities to manipulate the packages once they are on the localsystem. For more information refer to www.debian.org/doc/manuals/apt-howto.
Repositories
Repositories hold collections of software packages and related information, includ-ing headers that describe each package and provide information on other packagesthe package depends on. Ubuntu maintains repositories for each of its releases.
Software packagecategories
Software packages from Ubuntu repositories are divided into several categories,including the following:
• main Ubuntu-supported open-source software
• universe Community-maintained open-source software
• multiverse Software restricted by copyright or legal issues
• restricted Proprietary device drivers
• backports Packages from later releases of Ubuntu that are not available for an earlier release.
APT selects packages from repositories it searches based on the categories speci-fied in the sources.list file (next). You do not need to reconfigure APT to install

APT: Keeps the System Up-to-Date 589
supported software. You may get the following error message when you try toinstall a package:
$ sudo aptitude install xxx...Couldn't find package "xxx". However, the followingpackages contain "xxx" in their name: mixxx mixxx-dataNo packages will be installed, upgraded, or removed....
This message means that the package you requested does not exist in the reposito-ries that APT is searching (as specified in sources.list). It may also mean that thepackage does not exist; check the spelling. If you are not running the latest versionof Ubuntu, it may be available on a later version; try enabling the backports reposi-tory in sources.list (discussed next).
sources.list: Specifies Repositories for APT to Search
The /etc/apt/sources.list file specifies the repositories APT searches when you ask itto find or install a package. You must modify sources.list file to enable APT todownload software from nondefault repositories. You can use software-properties-gtkto display the Software Sources window to modify sources.list (as explained onpage 119) or you can use an editor to modify it (as explained in this section).
Each line in sources.list describes one repository and has the following format:
type URI repository category-list
where type is deb (page 599) for packages of executable files and deb-src for pack-ages of source files; URI is the location of the repository, usually cdrom or an Inter-net address that starts with http://; repository is the name of the repository thatAPT is to search; and category-list is a SPACE-separated list of categories (see “Soft-ware package categories” in the preceding section) that APT selects packages from.When a line specifies a non-Ubuntu repository, the repository and category-list mayhave other values. Comments begin with a pound sign (#) anywhere on a line andend at the end of the line. The comment #Added by software-properties indicatesthat software-properties-gtk added the line to sources.list.
The following line from sources.list causes APT to search the Gutsy archive locatedat us.archive.ubuntu.com/ubuntu for deb packages that contain executable files. Itaccepts packages that are categorized as main, restricted, universe, or multiverse:
deb http://us.archive.ubuntu.com/ubuntu/ gutsy main restricted universe multiverse
Replacing deb with deb-src causes APT to search in the same manner for packagesof source files. Use the apt-get source command to download source packages(page 598).
deb-src http://us.archive.ubuntu.com/ubuntu/ gutsy main restricted universe multiverse
590 Chapter 14 Downloading and Installing Software
Default repositories The default sources.list file includes repositories such as gutsy (Gutsy as originallyreleased), gutsy-updates (major bug fixes after the release of Gutsy), gutsy-security(critical security-related updates), and backports (newer, less-tested software that isnot reviewed by the Ubuntu security team). Separating security updates from otherupdates enables you to set up a system to automatically install security updateswhile allowing you to review other updates before installing them. As installed, thesources.list file allows you to search for and retrieve packages from the main, uni-verse, multiverse, and restricted categories (page 588) of the gutsy, gutsy-updates,and gutsy-security repositories. Some repositories in sources.list are commentedout. Remove the leading pound sign (#) on the lines of the repositories you want toenable. After you modify sources.list, give the command aptitude update (page 594)to update the local package indexes.
The next line, which was added to sources.list, enables APT to search a third-partyrepository (but see the following security tip):
deb http://download.skype.com/linux/repos/debian/ stable non-free
In this case, the repository is named stable and the category is non-free. Althoughthe code is compiled for Debian, it runs on Ubuntu, as is frequently the case.
The APT Local Package Indexes and the APT Cache
APT local packageindexes
The /var/lib/apt/lists directory holds the local package index and associated files.For each repository listed in /etc/apt/sources.list (page 589), this directory holds afile that lists information about the most recent version of each package in thatrepository. APT uses these files to determine whether the packages on the system,and those in its cache, are the most recent versions.
APT cache The /var/cache/apt/archives directory holds recently downloaded deb files(page 599). By default, the apt cron script (next) limits the size of this directory andthe age of the files in it.
The apt cron Script and APT Configuration Files
Traditionally, APT configuration instructions are kept in a single file:/etc/apt/apt.conf; Ubuntu breaks this file into smaller files that it keeps in the/etc/apt/apt.conf.d directory. The apt cron script, kept in /etc/cron.daily so it is rundaily, reads the configuration files in apt.conf.d and maintains the APT local pack-age indexes and the APT cache based on the instructions in those files. APT tools,such as aptitude, also read these files as they start. This section explains a few of the
Use repositories you trust
security There are many repositories of software packages. Search the Internet for ubuntu repositories todisplay a sampling of them. Be selective in which repositories you add to sources.list, however:When you add a repository, you are trusting the person who runs the repository not to put mali-cious software in packages you may download. In addition, packages that are not supported byUbuntu can conflict with other packages and/or cause upgrades to fail.

APT: Keeps the System Up-to-Date 591
many directives you can use to control APT tools. See the apt.conf man page anduse zless to view the /usr/share/doc/apt/examples/configure-index.gz file for moreinformation.
The software-properties-gtk utility, which is part of the software package with thesame name, opens the Software Sources window (page 119), which allows you toset some APT configuration directives using a graphical interface (Updates tab,Automatic updates).
The following files, which are part of the update-notifier package, control how theapt cron script maintains the APT local package indexes and the APT cache:
$ cat /etc/apt/apt.conf.d/10periodicAPT::Periodic::Update-Package-Lists "1";APT::Periodic::Download-Upgradeable-Packages "1";APT::Periodic::AutocleanInterval "0";APT::Periodic::Unattended-Upgrade "0";
$ cat /etc/apt/apt.conf.d/20archiveAPT::Archives::MaxAge "30";APT::Archives::MinAge "2";APT::Archives::MaxSize "500";
Working with root privileges, you can edit these files and change the values withinthe quotation marks to change what the apt cron script does. Each line must endwith a semicolon. The following list explains each of the directives in these files.
APT::Periodic::Update-Package-Lists "days";Synchronizes local package indexes with their corresponding repositories(page 594) every days days. Set days to 0 to disable this directive.
APT::Periodic::Download-Upgradeable-Packages "days";Downloads (but does not install) the packages necessary to upgrade all packages onthe system (page 594) every days days. Set days to 0 to disable this directive.
APT::Periodic::AutocleanInterval "days";Clears the APT cache (page 590) of packages that can no longer be downloadedevery days days. Set days to 0 to disable this directive.
APT::Periodic::Unattended-Upgrade "days";Installs upgrades that relate to system security every days days and writes a log to/var/log/unattended-upgrades. Make sure the unattended-upgrades package is installed;for more information see /usr/share/doc/unattended-upgrades/README. Set daysto 0 to disable this directive.
APT::Archives::MaxAge "days";Deletes files from the APT cache (page 590) older than days days. Set days to 0 todisable this directive.
APT::Archives::MinAge "days";Causes files younger than days days not to be deleted from the APT (page 590). Setdays to 0 to disable this directive.

592 Chapter 14 Downloading and Installing Software
APT::Archives::MaxSize "MB";Establishes the maximum size of the APT cache (page 590). When the cache growslarger than MB megabytes, the apt cron script deletes files until the cache is smallerthan this size. It deletes the largest files first. Set MB to 0 to disable this directive.
KDE and Adept If you are running KDE, the apt.conf.d directory holds two files that work with theAdept package manager (which is not covered in this book): 15adept-periodic-update and 25adept-archive-limits. These files should be the same as their GNOMEcounterparts: 10periodic and 20archive. If the Adept files exist on the local systemand you modify their GNOME counterparts, copy 10periodic to 15adept-periodic-update and 20archive to 25adept-archive-limits.
aptitude: Works with Packages and the Local Package Index
One of the most commonly used APT utilities is aptitude. The JumpStart onpage 585 explains how to use the aptitude install and remove commands to add andremove packages from the local system. This section describes aptitude in moredetail and explains how to use other of its commands and options.
Logs The aptitude utility keeps very readable logs in /var/log/aptitude.
Virtual package When you install certain packages, aptitude queries you and, if you agree, installsmore than one package. You are either installing a package with dependencies or avirtual package, also called a metapackage. A virtual package is not a softwarepackage, but rather a metapackage that depends on other packages. Virtual pack-ages facilitate the installation of software that requires multiple packages.
The format of an aptitude command is
aptitude options command [package-list]
where options is one or more options from the list of options that begins onpage 593, command is a command from the list of commands in the next section,and package-list is a SPACE-separated list of the names of one or more packages youwant to work with. With the search command, package-list is a list of search pat-terns (page 595). With other commands, an element of package-list that contains atilde (~) is treated as a search pattern. Except when aptitude is only displaying pack-age information, you must work with root privileges. If you call aptitude withoutarguments, it displays its pseudographical interface. This section lists more commoncommands and options; see the aptitude man page for a complete list.
See page 587 if you need to determine the name of the package that holds a file youwant to install.
aptitude Commands
This section describes the more common aptitude commands. You must run all thesecommands, except search and show, while working with root privileges.

APT: Keeps the System Up-to-Date 593
autoclean Clears the APT cache (page 590) of packages that can no longer be downloaded.Run this command periodically to keep the local cache from becoming clutteredwith useless files.
clean Deletes all packages from the APT cache (page 590).
download Downloads the deb file (page 599) for a package.
full-upgrade Performs the tasks safe-upgrade does and also works with newer packages that havedifferent dependencies than the ones they are replacing. This command installs newpackages if necessary. It does not upgrade from one release of Ubuntu to another;see page 59 for information on upgrading Ubuntu to another release.
install Downloads, unpacks, and installs all packages in the package-list as well as allpackages those packages depend on. See page 585 for an example.
purge Removes all packages in the package-list, including their configuration files. Seepage 586 for an example of the remove command.
reinstall Downloads, unpacks, and reinstalls an already installed package, upgrading to thelatest version if necessary.
remove Removes all packages in the package-list. This command does not remove configu-ration files. See page 586 for an example.
safe-upgrade Installs the latest versions of most packages on the system. This command will notinstall a package that is not already on the system, nor will it remove an installedpackage. It will not install a newer version of a package that cannot be installedwithout changing the install status of another package. To make sure the local APTcache is up-to-date, run aptitude update before giving this command. See page 594for an example. See also full-upgrade.
search Searches the repositories specified by sources.list for packages whose names arematched by any element of package-list. For example, a search for apache2 willyield apache2-dev, apache2-doc, apache2, apache2-mpm, and so on. See page 595for an example.
show Displays detailed information about package-list. See page 595 for an example.
update Synchronizes the local APT package index files with those in the repositories. Seepage 594 for an example.
aptitude Options
This section describes some of the options you can use with aptitude commands.Each description advises you whether the option works with only certain commands.
––show-deps –D Displays information about packages a command would automatically installor remove.
––download-only –d Does not unpack or install a package after downloading it.
–f Attempts to fix broken dependencies.

594 Chapter 14 Downloading and Installing Software
––purge-unused Removes packages that are no longer needed because they were automaticallyinstalled to satisfy a dependency of a package that has been removed.
––help –h Displays a summary of usage, commands, and options.
––simulate –s Displays what command would do, without taking any action.
––assume-yes –y Assumes a yes response to most prompts so aptitude runs noninteractively. Theaptitude utility still prompts for an extraordinary event, such as removing anessential package or attempting to install an unauthenticated package.
aptitude update: Synchronizes Local Package Indexes
with Repositories
The aptitude update command synchronizes local package indexes with their corre-sponding repositories:
$ sudo aptitude updateGet:1 http://security.ubuntu.com gutsy-security Release.gpg [191B]Get:2 http://us.archive.ubuntu.com gutsy Release.gpg [191B]Get:3 http://us.archive.ubuntu.com gutsy-updates Release.gpg [191B]Hit http://security.ubuntu.com gutsy-security ReleaseGet:4 http://us.archive.ubuntu.com gutsy Release [65.9kB]Hit http://security.ubuntu.com gutsy-security/main Packages...Fetched 6941kB in 37s (187kB/s)Reading package lists... Done
After running this command, APT can determine, without accessing repositories,whether installed packages and those in its cache are the most recent versionsavailable.
By default, the apt cron script (page 590) synchronizes local package indexes nightly.If this script is running and set to update the package index, you need not run theupdate command. However, you must run this command after you add repositoriesto /etc/apt/sources.list before APT can retrieve files from new repositories.
aptitude safe-upgrade and aptitude full-upgrade: Upgrade
the System
There are two aptitude commands that upgrade all packages on the system: safe-upgrade, which upgrades all packages on the system that do not require new pack-ages to be installed, and full-upgrade, which upgrades all packages on the system,installing new packages as needed.
aptitudesafe-upgrade
The following example uses the aptitude safe-upgrade command to upgrade allpackages on the system that depend only on packages that are already installed.This command will not install new packages (packages that are not already on thesystem). Before running this command, run aptitude update (page 594) to makesure the local package indexes are up-to-date.

APT: Keeps the System Up-to-Date 595
$ sudo aptitude update...$ sudo aptitude safe-upgrade...The following packages will be upgraded: belocs-locales-bin libpam-modules libpam-runtime libpam0g4 packages upgraded, 0 newly installed, 0 to remove and 0 not upgraded.Need to get 571kB of archives. After unpacking 0B will be used.Do you want to continue? [Y/n/?] y...
The aptitude utility lists the changes it will make and asks you whether you want to con-tinue. Enter y to upgrade the listed packages or n to quit. Packages that are notupgraded because they depend on packages that are not installed are listed as kept back.
aptitudefull-upgrade
Use the aptitude full-upgrade command to upgrade all packages, including packagesthat are dependent on packages that are not installed. This command installs newpackages as needed to satisfy dependencies.
aptitude search: Searches the Repositories for Packages
The search command interprets the package-list on the command line as a list ofpatterns; all other aptitude commands normally interpret it as a list of packagenames. This command displays one line about each package whose name matchesone of the elements of package-list:
$ aptitude search vimv gvim -p jvim-canna - Japanized VIM (Canna version)p jvim-doc - Documentation for jvim (Japanized VIM)i vim - Vi IMproved - enhanced vi editori vim-common - Vi IMproved - Common filesp vim-doc - Vi IMproved - HTML documentationp vim-full - Vi IMproved - enhanced vi editor - full fledged versionp vim-gnome - Vi IMproved - enhanced vi editor - with GNOME2 GUI...
The letter in the first column of each entry indicates the status of the package on thesystem: i for installed, c for removed except for configuration files, p for purged(package and configuration files removed), and v for a virtual package (page 592).A second letter in the first column indicates a stored action that will be performedon the package. An A appearing as the third letter means the package was automat-ically installed.
aptitude show: Displays Package Information
The aptitude show command displays information about packages in the reposito-ries, including dependency information. See also the apt-cache show command,which displays more information (page 597), and the dpkg status command(page 603). On the next page is an example.

596 Chapter 14 Downloading and Installing Software
$ aptitude show nfs-commonPackage: nfs-commonState: installedAutomatically installed: yesVersion: 1:1.1.1~git-20070709-3ubuntu1Priority: optionalSection: netMaintainer: Ubuntu Core Developers <[email protected]>Uncompressed Size: 504kDepends: portmap | rpcbind, adduser, ucf, lsb-base (>= 1.3-9ubuntu3), netbase (>= 4.24), initscripts (>= 2.86.ds1-14.1ubuntu1), libc6 (>= 2.6-1), libcomerr2 (>= 1.33-3), libevent1 (>= 1.3b), libgssapi2, libkrb53 (>= 1.6.dfsg.1), libnfsidmap2, librpcsecgss3, libwrap0Conflicts: nfs-clientReplaces: nfs-client, nfs-kernel-server (< 1:1.0.7-5), mount (< 2.13~)Provides: nfs-clientDescription: NFS support files common to client and server. Use this package on any machine that uses NFS, either as client or server. Programs included: lockd, statd, showmount, nfsstat, gssd and idmapd.
Upstream: SourceForge project "nfs", CVS module nfs-utils.
Homepage: http://nfs.sourceforge.net/
apt-cache: Displays Package Information
The apt-cache utility has many commands—some that manipulate the APT packagecache and others that display information about packages in the cache. This sectioncontains examples of some of the simpler commands that display information. Useapt-file (page 587) to display information about packages that are not installed onthe system.
Displaying packagedependencies
The apt-cache depends command displays the list of packages that a packagedepends on. These are forward (normal) dependencies. Use the ––recurse option todisplay the packages that the dependencies are dependent on (the dependencies’dependencies).
$ apt-cache depends nfs-commonnfs-common |Depends: portmap Depends: <rpcbind> Depends: adduser ... Depends: libwrap0 Conflicts: <nfs-client> Replaces: <nfs-client> nfs-common Replaces: nfs-kernel-server
Use the rdepends apt-cache command to display the list of packages that are depen-dent on a specified package. These are reverse dependencies. Use the ––recurseoption to display the packages that are dependent on the dependent packages.

APT: Keeps the System Up-to-Date 597
$ apt-cache rdepends nfs-commonnfs-commonReverse Depends: sfs-common gconf education-networked rgmanager openoffice.org-core nfs-kernel-server netbase autofs
Displaying packagerecords
The apt-cache show command displays package records from the files in the APTlocal package indexes. See also the aptitude show command, which displays lessinformation (page 595), and the dpkg status command (page 603). Following is anexample:
$ apt-cache show nfs-commonPackage: nfs-commonPriority: optionalSection: netInstalled-Size: 392Maintainer: Ubuntu Core Developers <[email protected]>Original-Maintainer: Anibal Monsalve Salazar <[email protected]>Architecture: i386Source: nfs-utilsVersion: 1:1.0.12-4Replaces: nfs-client, nfs-kernel-server (<< 1:1.0.7-5)Provides: nfs-clientDepends: portmap | rpcbind, adduser, ucf, lsb-base (>= 1.3-9ubuntu3),netbase (>= 4.24), libc6 (>= 2.5-0ubuntu1), libcomerr2 (>= 1.33-3),libevent1 (>= 1.1a), libgssapi2, libkrb53 (>= 1.4.2), libnfsidmap2,librpcsecgss3, libwrap0Conflicts: nfs-clientFilename: pool/main/n/nfs-utils/nfs-common_1.0.12-4_i386.debSize: 132236MD5sum: c381f4f9383b6e0993daff25ba463e83SHA1: 77654317983629d331244c39ed42a0afba859802SHA256: d1bc0e8cc4080af90148b4bf91a178c6c74ec542677738eb8a990be3ba0fe44fDescription: NFS support files common to client and server Use this package on any machine that uses NFS, either as client or server. Programs included: lockd, statd, showmount, nfsstat, gssd and idmapd. . Upstream: SourceForge project "nfs", CVS module nfs-utils. . Homepage: http://nfs.sourceforge.net/Bugs: mailto:[email protected]: UbuntuTask: edubuntu-server
The apt-cache showpkg command displays package version and location informa-tion as well as dependency lists.

598 Chapter 14 Downloading and Installing Software
apt-get source: Downloads Source Files
The apt-get source command downloads and unpacks in the working directorysource code files from repositories specified with deb-src lines in sources.list(page 589). APT does not keep index and cache files for source files as it does forbinary files. With the ––download-only option, this command does not unpack thesource code. With the ––compile option, it unpacks and compiles the source code.You do not have to run this command with root privileges; it requires only writeaccess to the working directory. Following is an example:
$ apt-get source adduser...dpkg-source: extracting adduser in adduser-3.103ubuntu1dpkg-source: unpacking adduser_3.103ubuntu1.tar.gz
$ ls -ld adduser*drwxr-xr-x 7 zach zach 4096 Jul 10 08:12 adduser-3.103ubuntu1-rw-r--r-- 1 zach zach 708 Jul 10 09:03 adduser_3.103ubuntu1.dsc-rw-r--r-- 1 zach zach 246211 Jul 10 09:03 adduser_3.103ubuntu1.tar.gz
dpkg: The Debian Package Management System
The Debian package (dpkg) management system database tracks which softwarepackages are installed on a system, where each is installed, which version isinstalled, and which packages each depends on.
The dpkg management system comprises many utilities. These utilities install, unin-stall, upgrade, query, and verify software packages. The original and primary utilityis dpkg (page 600). Although you can use dpkg for most tasks involving the dpkgmanagement system, other tools can make your job easier. Some of the most com-monly used of these tools are described here:
• apt-cache Displays information about and manipulates the APT cache (page 596).
• apt-file Similar to apt-cache except that it works with packages that have not been installed and packages that have not been downloaded, in addi-tion to those that are installed on the local system (page 587).
• aptitude Retrieves software packages and calls dpkg to install and remove them (pages 585 and 592).
• apt-get A textual interface to APT; similar to aptitude.
• dpkg The primary dpkg management system utility (page 600).
• dselect A pseudographical front-end for dpkg.
• Synaptic A graphical interface to APT (page 121).

dpkg: The Debian Package Management System 599
deb Files
The dpkg management system works with .deb format files, frequently referred toas deb files. Because dpkg cannot download deb files from repositories, aptitude(page 592) typically performs this task. By default, aptitude stores downloaded debfiles in /var/cache/apt/archives. The dpkg management system stores availablepackage information in /var/lib/dpkg/available and package installation informa-tion in /var/lib/dpkg/status.
You can manually locate, download, and install deb files. However, doing so can betedious, especially when you find that a package is dependent on several other pack-ages and that some of those packages are dependent on yet other packages.
You can create deb files, as when you build a kernel. Page 643 has an example ofbuilding a kernel deb file; pages 602 and 646 show dpkg installing deb files.
Binary files A binary deb file can contain the following components, which are packed andunpacked using the ar (archive) utility. All packages contain an executable file; theother components are optional.
• binary Binary executable files.
• control Package information including lists of dependent, recommended, and suggested packages.
• conffiles Package configuration files.
• preinst Preinstall script.
• postinst Postinstall script.
• prerm Preremove script.
• postrm Postremove script.
Source files A source file package contains a description file, a source code file, and a diff filethat contains Ubuntu-specific changes to the source file.
Installing a deb file When dpkg installs a binary package (page 602), it takes the following steps:
1. Extracts control files.
2. If another version of the same package is installed on the system, executes the prerm script of the old package.
3. Runs the preinst script.
4. Backs up the old binary files and unpacks the new binary files, allowing dpkg to revert to the existing setup if installation fails.
5. If another version of the same package is installed on the system, executes the postrm script of the old package.
6. Backs up the old configuration files and unpacks the new configuration files, allowing dpkg to revert to the existing setup if installation fails.
7. Runs the postinst script.

600 Chapter 14 Downloading and Installing Software
Removing a deb file When dpkg removes a binary package (page 602), it runs the prerm script, removesthe files, and runs the postrm script.
dpkg: The Foundation of the Debian Package
Management System
The dpkg (Debian package) utility installs (unpacks and configures), queries, andremoves deb packages. Before querying the software package database, give theupdate-avail command (discussed next) to update the list of available packages.
Typically you will use one of the tools that acts as a front-end for dpkg and not workwith dpkg itself. In some cases you may find the following dpkg commands useful.View the dpkg man page or use the ––help option for a complete list of commands.
dpkg ––update-avail: Updates the List of
Available Packages
The list of available packages is kept in the /var/lib/dpkg/available file. The––update-avail dpkg command updates this list from files that the APT local pack-age indexes (page 590).
$ sudo dpkg --update-avail /var/lib/dpkg/availableReplacing available packages info, using /var/lib/dpkg/available.Information about 1868 package(s) was updated.
dpkg ––list: Displays Information About a Package
The dpkg ––list (or –l) command displays a line of information about packages youname as an argument. Package names can include wildcards as described in “File-name Generation/Pathname Expansion” on page 239. You must quote wildcards onthe command line.
The following command lists all packages whose names begin with apache2. Thefirst two lines of the header are keys for the first two letters on each line thatdescribes a package. The first line of the header, labeled Desired, lists the possibledesired package selection states (Table 14-1). The second line, labeled Status, listspossible package statuses (Table 14-1). The Name column lists the name of thepackage, while the Version and Description columns describe the package.
$ sudo dpkg --list "apache2*"Desired=Unknown/Install/Remove/Purge/Hold| Status=Not/Installed/Config-files/Unpacked/Failed-config/Half-installed|/ Err?=(none)/Hold/Reinst-required/X=both-problems (Status,Err: uppercase=bad)||/ Name Version Description
dpkg commands and options both start with hyphens
tip Although command line arguments that start with one or two hyphens are generally calledoptions, the dpkg documentation divides these arguments into commands and options. Forexample, ––purge is a command and ––simulate is an option.

dpkg: The Debian Package Management System 601
+++-===================-==================-===========================================pn apache2 <none> (no description available)rc apache2-common 2.0.55-4ubuntu4 next generation, scalable, extendable web serverii apache2-doc 2.0.55-4ubuntu4 documentation for apache2un apache2-modules <none> (no description available)un apache2-mpm-perchil <none> (no description available)un apache2-mpm-prefork <none> (no description available)un apache2-mpm-threadp <none> (no description available)pn apache2-mpm-worker <none> (no description available)pn apache2-utils <none> (no description available)
In the preceding example, the apache2 package has a desired state of purged (p)and a status of not installed (n), meaning the package is not installed and has noconfiguration files on the system. The apache2-common package has a desiredstate of removed (r) and currently has only its configuration files installed (c). Forapache2-doc, the first i indicates that the desired state of the package is installedand the second i indicates that the current state of the package is installed (thepackage is installed on the system). For apache2-modules, the desired state of thepackage is unknown (u) and it is not installed (n). See page 602 for more examplesof the ––list command.
Table 14-1 dpkg letter codes
Letter Means that the package is
Desired (selection state)
u (unknown) Unknown to dpkg
i (install) To be installed
r (remove) To be removed (uninstalled), except for configuration files
p (purge) To be removed, including configuration files
h (hold) Not handled by dpkg
Status (package state)
n (not installed) Not installed
i (installed) Installed
c (config-files) Not installed; only the configuration files exist on the system
u (unpacked) Unpacked, but not configured
f (failed-config) Unpacked, but not configured; configuration failed
h (half-installed) Partially installed; installation is not complete

602 Chapter 14 Downloading and Installing Software
dpkg ––install: Installs a Package
The dpkg ––install (–i) command installs (unpacks and sets up; see page 599) apackage stored in a deb file. It does not search for and download a package fromthe Internet. Use aptitude (page 592) for that purpose. The following example showsdpkg installing the ftp package:
$ sudo dpkg --install /var/cache/apt/archives/ftp_0.17-16_i386.debSelecting previously deselected package ftp.(Reading database ... 173635 files and directories currently installed.)Unpacking ftp (from .../archives/ftp_0.17-16_i386.deb) ...Setting up ftp (0.17-16) ...
dpkg ––remove and dpkg ––purge: Remove an
Installed Package
The dpkg ––remove (–r) command removes an installed package except for its con-figuration files. Leaving these files can be useful if you decide to reinstall the pack-age. Use ––purge (–P) to completely remove a package, including configurationfiles. The following command displays the status of the ftpd package (it is installed).
$ dpkg --list ftpdDesired=Unknown/Install/Remove/Purge/Hold| Status=Not/Installed/Config-files/Unpacked/Failed-config/Half-installed|/ Err?=(none)/Hold/Reinst-required/X=both-problems (Status,Err: uppercase=bad)||/ Name Version Description+++-=================-==================-========================================ii ftpd 0.17-24 FTP server
The next command removes the ftpd package except for its configuration files:
$ sudo dpkg --remove ftpd(Reading database ... 113335 files and directories currently installed.)Removing ftpd ...
Next the dpkg ––list command shows a status of rc for the ftpd package, indicatingthat it has been removed (r) but the configuration files (c) remain.
$ dpkg --list ftpd...rc ftpd 0.17-24 FTP server
Finally dpkg purges the ftpd package and shows a state of pn (purged, not installed).
$ sudo dpkg --purge ftpd(Reading database ... 113325 files and directories currently installed.)Removing ftpd ...Purging configuration files for ftpd ...
$ dpkg --list ftpd...pn ftpd <none> (no description available)
If there are packages dependent on the package you are removing, the command fails.In the next example, dpkg attempts to remove the apache2.2-common package butfails because the apache2-mpm-worker package depends on apache2.2-common:
dpkg: The Debian Package Management System 603
$ sudo dpkg --remove apache2.2-commondpkg: dependency problems prevent removal of apache2.2-common: apache2-mpm-worker depends on apache2.2-common (= 2.2.3-3.2build1).dpkg: error processing apache2.2-common (--remove): dependency problems - not removingErrors were encountered while processing: apache2.2-common
You can remove the dependent package and then remove apache2.2-common. It isfrequently easier to use aptitude to remove a package and its dependencies becauseyou can do so with a single aptitude remove command (page 586).
When dpkg removes a package, the prerm script stops any running daemons associ-ated with the package. In the case of Apache, it stops the apache2 server.
$ sudo dpkg --remove apache2-mpm-worker(Reading database ... 113816 files and directories currently installed.)Removing apache2-mpm-worker ... * Stopping web server (apache2)... [ OK ]
dpkg ––status: Displays Information About a Package
The ––status (–s) dpkg command displays lengthy information about the installedpackage you specify as an argument. This information includes package status,installed size, architecture it is compiled for, conflicting packages, a description, andthe name of the package maintainer. See also the aptitude show command(page 595) and the apt-cache show command (page 597).
$ dpkg --status apache2-mpm-workerPackage: apache2-mpm-workerStatus: install ok installedPriority: optionalSection: webInstalled-Size: 684Maintainer: Ubuntu Core Developers <[email protected]>Architecture: i386Source: apache2Version: 2.2.3-3.2build1Replaces: apache2-mpm-threadpool (<< 2.0.53), apache2-mpm-perchild (<< 2.2.0)Provides: apache2-modules, apache2, httpd, httpd-cgiDepends: libapr1, libaprutil1, libc6 (>= 2.5-0ubuntu1), libdb4.4, libexpat1 (>= 1.95.8),libldap2 (>= 2.1.17-1), libpcre3 (>= 4.5), libpq5, libsqlite3-0 (>= 3.3.10), libuuid1,apache2.2-common (= 2.2.3-3.2build1)Conflicts: apache2-mpm-prefork, apache2-mpm-event, apache2-commonDescription: High speed threaded model for Apache HTTPD 2.1 The worker MPM provides a threaded implementation for Apache HTTPD 2.1. It is considerably faster than the traditional model, and is the recommended MPM. . Worker generally is a good choice for high-traffic servers because it has a smaller memory footprint than the prefork MPM.Original-Maintainer: Debian Apache Maintainers <[email protected]>

604 Chapter 14 Downloading and Installing Software
Use the dpkg ––info command to display information about a deb file that is on thesystem (for example, in the APT cache) but is not installed. The following commanddisplays information about the ftpd deb file in the archives directory:
$ dpkg --info /var/cache/apt/archives/ftpd_0.17-24_i386.deb
dpkg ––search: Displays the Name of the Package That
Contains a Specified File
The ––search (or –S) option to dpkg displays the name of the package that includesthe file you specify as an argument:
$ dpkg --search /etc/sshopenssh-client: /etc/ssh
dpkg ––listfiles: Lists Files Within a Package
The dpkg ––listfiles (or –L) command lists the files that are part of the package youspecify as an argument. The following example lists the files in the openssh-serverpackage:
$ dpkg --listfiles openssh-server/./etc/etc/init.d/etc/init.d/ssh/etc/default/etc/default/ssh...
Use the dpkg ––contents command to list the files contained in a package that is onthe system but not installed. The following command lists the files in the dump debfile in the archives directory:
$ dpkg --contents /var/cache/apt/archives/dump_0.4b41-4_i386.deb
BitTorrent
The easiest way to download a BitTorrent file is to click the torrent file object in aWeb browser or in the Nautilus File Browser. This section describes how BitTorrentworks and explains how to download a BitTorrent file from the command line.
The BitTorrent protocol implements a hybrid client/server and P2P (page 1051) filetransfer mechanism. BitTorrent efficiently distributes large amounts of static data,such as the Ubuntu installation ISO images. It can replace protocols such as anony-mous FTP, where client authentication is not required. Each BitTorrent client thatdownloads a file provides additional bandwidth for uploading the file, therebyreducing the load on the initial source. In general, BitTorrent downloads proceedfaster than FTP downloads. Unlike protocols such as FTP, BitTorrent groups multi-ple files into a single package: a BitTorrent file.

BitTorrent 605
Tracker, peer, seed,and swarm
BitTorrent, like other P2P systems, does not use a dedicated server. Instead, thefunctions of a server are performed by the tracker, peers, and seeds. The tracker is aserver that allows clients to communicate with each other. Each client—called apeer when it has downloaded part of the BitTorrent file and a seed once it hasdownloaded the entire BitTorrent file—acts as an additional source for the BitTor-rent file. Peers and seeds are collectively called a swarm. As with a P2P network, amember of a swarm uploads to other clients the sections of the BitTorrent file it hasalready downloaded. There is nothing special about a seed: It can be removed atany time once the torrent is available for download from other seeds.
The torrent The first step in downloading a BitTorrent file is to locate or acquire the torrent, afile with the filename extension of .torrent. A torrent contains pertinent information(metadata) about the BitTorrent file to be downloaded, such as its size and the loca-tion of the tracker. You can obtain a torrent by accessing its URI, or you can acquireit via the Web, an email attachment, or other means. The BitTorrent client can thenconnect to the tracker to learn the locations of other members of the swarm that itcan download the BitTorrent file from.
Manners Once you have downloaded a BitTorrent file (the local system has become a seed), itis good manners to allow the local BitTorrent client to continue to run so peers (cli-ents that have not downloaded the entire BitTorrent file) can upload at least asmuch information as you have downloaded.
Prerequisites
If necessary, use aptitude (pages 585 and 592) to install the bittorrent package. Withthis package installed, the command apropos bittorrent displays a list of BitTorrentutilities. See /usr/share/doc/bittorrent for more information. You may want to tryBitTornado, an experimental BitTorrent client with additional features (bittornadopackage; see bittornado.com)
Because the BitTorrent utilities are written in Python and run on any platform witha Python interpreter, they are not dependent on system architecture. Python isinstalled in /usr/bin/python and is available in the python package.
Using BitTorrent
The btdownloadcurses utility is a textual BitTorrent client that provides a pseudo-graphical interface. Once you have a torrent, give a command such as the following,substituting the name of the torrent you want to download for the Ubuntu torrentin the example:
$ btdownloadcurses gutsy-desktop-i386.iso.torrent
In the preceding command, the torrent specifies that the BitTorrent file be saved asgutsy-desktop-i386.iso in the working directory. The name of the BitTorrent file is notalways the same as the name of the torrent. In the case of a multifile torrent, the Bit-Torrent files may be stored in a directory, also named by the torrent. Figure 14-1 showsbtdownloadcurses running. Depending on the speed of the Internet connection and thenumber of seeds, downloading a large BitTorrent file can take from hours to days.

606 Chapter 14 Downloading and Installing Software
You can abort the download by pressing q or CONTROL-C. The download will automati-cally resume from where it left off when you download the same torrent to the samelocation again.
See the btdownloadcurses man page for a list of options. One of the most usefuloptions is ––max_upload_rate, which limits how much bandwidth the swarm canuse while downloading the torrent from you. The default is 0, meaning there is nolimit to the upload bandwidth. The following command prevents BitTorrent fromusing more than 10 kilobytes per second of upstream bandwidth:
$ btdownloadcurses --max_upload_rate 10 gutsy-desktop-i386.iso.torrent
BitTorrent usually allows higher download rates for members of the swarm thatupload more data, so it is to your advantage to increase this value if you have sparebandwidth. You need to leave enough free upstream bandwidth for the acknowledg-ment packets from your download to get through or else the download will be veryslow. By default, btdownloadcurses uploads to a maximum of seven other clients atonce. You can change this number by using the ––max_uploads argument, followedby the number of concurrent uploads you wish to permit. If you are downloadingover a modem, try setting ––max_upload_rate to 3 and ––max_uploads to 2.
The name of the file or directory that BitTorrent saves a file or files in is specified bythe torrent. You can specify a different file or directory name by using the ––saveasoption. The btshowmetainfo utility displays the name the BitTorrent file will be savedas, the size of the file, the name of the torrent (metainfo file), and other information:
$ btshowmetainfo gutsy-desktop-i386.iso.torrentbtshowmetainfo 20021207 - decode BitTorrent metainfo filesmetainfo file.: gutsy-desktop-i386.iso.torrentinfo hash.....: 5457398c658984f7b6d54f3f7ebf9a06f3999796file name.....: gutsy-desktop-i386.isofile size.....: 728713216 (1389 * 524288 + 477184)announce url..: http://torrent.ubuntu.com:6969/announce
Figure 14-1 btdownloadcurses working with the Ubuntu desktop torrent
Make sure you have enough room to download the torrentcaution Some torrents are huge. Make sure the partition you are working in has enough room to hold the
BitTorrent file you are downloading.

Installing Non-dpkg Software 607
Installing Non-dpkg Software
Most software that is not in dpkg format comes with detailed instructions on howto configure, build (if necessary), and install it. Some binary distributions (thosecontaining prebuilt executables) require you to unpack the software from the rootdirectory.
The /opt and /usr/local Directories
Some newer application packages include scripts to install themselves automaticallyinto a directory hierarchy under /opt, with files in a /opt subdirectory that is namedafter the package and executables in /opt/bin or /opt/package/bin.
Other software packages allow you to choose where you unpack them. Becausemany different people develop software for Linux, there is no consistent methodfor installing it. As you acquire software, install it on the local system in as consis-tent and predictable a manner as possible. The standard Linux file structure has adirectory hierarchy under /usr/local for binaries (/usr/local/bin), manual pages(/usr/local/man), and so forth. Because many GNU buildtools search the /usr/localhierarchy by default and may find the wrong version of a utility if you install devel-oper tools there, putting these tools in /opt is a good idea.
To prevent confusion later and to avoid overwriting or losing the software whenyou install standard software upgrades, avoid installing nonstandard software instandard system directories (such as /usr/bin). On a multiuser system, make sureusers know where to find the local software and advise them whenever you install,change, or remove local tools.
GNU Configure and Build System
The GNU Configure and Build System makes it easy to build a program that is dis-tributed as source code (see autoconf at developer.gnome.org/tools/build.html). Thisprocess requires a shell, make, and gcc (the GNU C compiler). You do not need towork with root privileges except to install the program.
The following example assumes you have downloaded the GNU chess program(www.gnu.org/software/chess/chess.html) to the working directory. First unpackand decompress the file and cd to the new directory:
$ tar -xvzf gnuchess-5.05.tar.gzchess/chess/CVS/chess/CVS/Root...chess/src/util.cchess/src/version.cchess/src/version.h$ cd chess
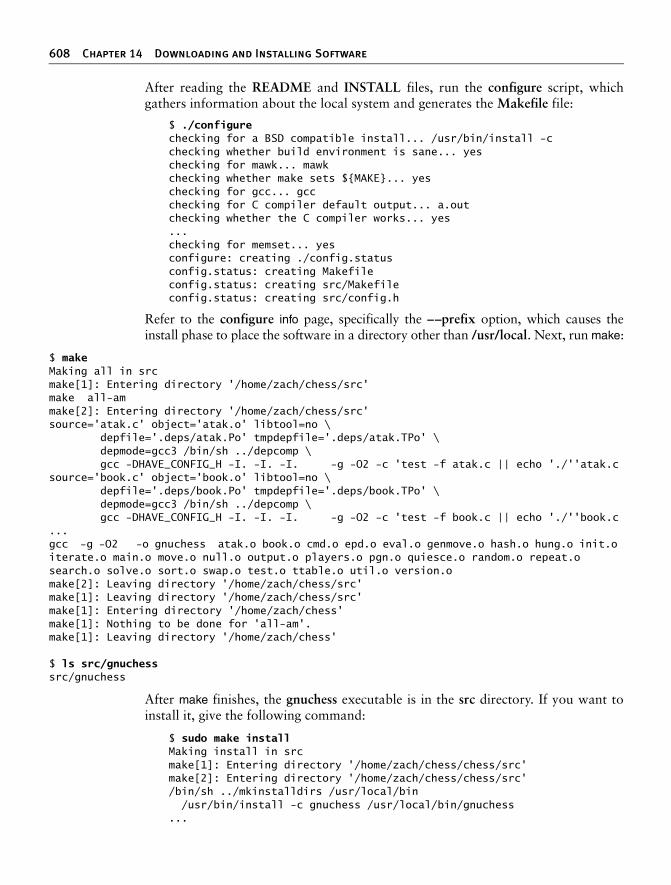
608 Chapter 14 Downloading and Installing Software
After reading the README and INSTALL files, run the configure script, whichgathers information about the local system and generates the Makefile file:
$ ./configurechecking for a BSD compatible install... /usr/bin/install -cchecking whether build environment is sane... yeschecking for mawk... mawkchecking whether make sets ${MAKE}... yeschecking for gcc... gccchecking for C compiler default output... a.outchecking whether the C compiler works... yes...checking for memset... yesconfigure: creating ./config.statusconfig.status: creating Makefileconfig.status: creating src/Makefileconfig.status: creating src/config.h
Refer to the configure info page, specifically the ––prefix option, which causes theinstall phase to place the software in a directory other than /usr/local. Next, run make:
$ makeMaking all in srcmake[1]: Entering directory '/home/zach/chess/src'make all-ammake[2]: Entering directory '/home/zach/chess/src'source='atak.c' object='atak.o' libtool=no \ depfile='.deps/atak.Po' tmpdepfile='.deps/atak.TPo' \ depmode=gcc3 /bin/sh ../depcomp \ gcc -DHAVE_CONFIG_H -I. -I. -I. -g -O2 -c 'test -f atak.c || echo './''atak.csource='book.c' object='book.o' libtool=no \ depfile='.deps/book.Po' tmpdepfile='.deps/book.TPo' \ depmode=gcc3 /bin/sh ../depcomp \ gcc -DHAVE_CONFIG_H -I. -I. -I. -g -O2 -c 'test -f book.c || echo './''book.c...gcc -g -O2 -o gnuchess atak.o book.o cmd.o epd.o eval.o genmove.o hash.o hung.o init.o iterate.o main.o move.o null.o output.o players.o pgn.o quiesce.o random.o repeat.o search.o solve.o sort.o swap.o test.o ttable.o util.o version.omake[2]: Leaving directory '/home/zach/chess/src'make[1]: Leaving directory '/home/zach/chess/src'make[1]: Entering directory '/home/zach/chess'make[1]: Nothing to be done for 'all-am'.make[1]: Leaving directory '/home/zach/chess'
$ ls src/gnuchesssrc/gnuchess
After make finishes, the gnuchess executable is in the src directory. If you want toinstall it, give the following command:
$ sudo make installMaking install in srcmake[1]: Entering directory '/home/zach/chess/chess/src'make[2]: Entering directory '/home/zach/chess/chess/src'/bin/sh ../mkinstalldirs /usr/local/bin /usr/bin/install -c gnuchess /usr/local/bin/gnuchess...

wget: Downloads Files Noninteractively 609
You can complete the entire task with the following command line:
$ sudo ./configure && make && make install
The Boolean AND operator (&&) allows the execution of a subsequent commandonly if the previous step returned a successful exit status.
wget: Downloads Files Noninteractively
The wget utility is a noninteractive, command line utility that retrieves files from theWeb using HTTP, HTTPS, or FTP. In the following example, wget downloads theUbuntu home page, named index.html, to a file in the working directory with thesame name:
$ wget http://www.ubuntu.com--14:58:48-- http://www.ubuntu.com/=> 'index.html'Resolving www.ubuntu.com... 82.211.81.158Connecting to www.ubuntu.com|82.211.81.158|:80... connected.HTTP request sent, awaiting response... 200 OKLength: 13,112 (13K) [text/html]
100%[==========================================================>] 13,112 40.60K/s
14:58:49 (40.40 KB/s) - 'index.html' saved [13112/13112]
$
With the ––recursive (–r) option, wget downloads the directory hierarchy under theURI you specify. Be careful with this option because it can download a lot of data(which may completely fill the partition you are working in). The ––background(–b) option runs wget in the background and redirects its standard error to a filenamed wget-log:
$ wget --recursive --background http://www.ubuntu.comContinuing in background, pid 28839.Output will be written to 'wget-log'.$
The wget utility does not overwrite log files. When wget-log exists, wget writes sub-sequent logs to wget-log.1, wget-log.2, and so on.
Running wget in the background is useful when you need to download a large file toa remote system. You can start it running from an ssh (page 714) session and thendisconnect, allowing the download to complete without any interaction.
The wget ––continue (–c) option continues an interrupted download. For example,if you decide to stop a download so you can run it in the background, you can con-tinue it from where it left off with this option.

610 Chapter 14 Downloading and Installing Software
Chapter Summary
As a system administrator, you need to keep applications and system software cur-rent. Of the many reasons to keep the software on a system up-to-date, one of themost important is system security. The Debian package (dpkg) management systemmakes the process of adding and removing deb format software packages quite easy.
APT utilities, such as aptitude, download software packages and dependencies andthen work with dpkg to install, remove, or update packages. In addition, you canuse the apt-cache and dpkg utilities to query and verify dpkg packages. For packagesdistributed as source code, the GNU Configure and Build System enables you tobuild executable files.
BitTorrent is a handy tool for downloading large static data files such as the Ubuntuinstallation ISO images. It can replace protocols such as anonymous FTP, where cli-ent authentication is not required.
Exercises
1. Why would you use HTTP or FTP instead of BitTorrent for downloading large files?
2. Which command would you give to perform a complete upgrade?
3. Why would you build a package from its source code when a (binary) debfile is available?
4. Suggest two advantages that deb files have over source distributions.
Advanced Exercises
5. When you compile a package yourself, rather than from a deb file, which directory hierarchy should you put it in?
6. Which steps should you take before performing an upgrade on a mission-critical server?

611611
15Chapter15A printing system handles the tasks involved in first getting aprint job from an application (or the command line) throughthe appropriate filters (page 1036) and into a queue for a suit-able printer and then getting it printed. While handling a job,a printing system can keep track of billing information so theproper accounts can be charged for printer use. When aprinter fails, the printing system can redirect jobs to other,similar printers.
In This Chapter
JumpStart I: Configuring a Local Printer . . . . . . . . . . . . . . 614
system-config-printer: Configuring a Printer . . . . . . . . . 614
JumpStart II: Configuring a Remote Printer Using the CUPS Web Interface. . . . . . . . . . 618
Traditional UNIX Printing . . . . . . . 622
The CUPS Web Interface . . . . . . . . 624
CUPS on the Command Line. . . . . 626
Printing from Windows . . . . . . . . . 630
Printing to Windows . . . . . . . . . . . 632
15
Printing with CUPS

612 Chapter 15 Printing with CUPS
Introduction
LPD and LPR Traditionally, UNIX had two printing systems: the BSD Line Printer Daemon (LPD)and the System V Line Printer system (LPR). Linux adopted those systems at first,and both UNIX and Linux have seen modifications to and replacements for thesesystems. Today CUPS is the default printing system under Ubuntu Linux.
CUPS CUPS (Common UNIX Printing System) is a cross-platform print server builtaround IPP (Internet Printing Protocol), which is itself based on HTTP. CUPS pro-vides a number of printer drivers and can print different types of files, includingPostScript. Because it is built on IPP and written to be portable, CUPS runs undermany operating systems, including Linux and Windows. Other UNIX variants,including Mac OS X, use CUPS, and recent versions of Windows include the abilityto print to IPP printers, making CUPS an ideal solution for printing in a heteroge-neous environment. CUPS provides System V and BSD command line interfacesand, in addition to IPP, supports LPD/LPR, HTTP, SMB, and JetDirect (socket) pro-tocols, among others.
IPP The IPP project (www.pwg.org/ipp) began in 1996, when Novell and several othercompanies designed a protocol for printing over the Internet. IPP enables users to
• Determine the capabilities of a printer.
• Submit jobs to a printer.
• Determine the status of a printer.
• Determine the status of a print job.
• Cancel a print job.
IPP is a client/server protocol in which the server side can be a print server or anetwork-capable stand-alone printer.
Printers and queues On a modern computing system, when you “send a job to the printer,” you actuallyadd the job to the list of jobs waiting their turn to be printed on a printer. The list iscalled a print queue or simply a queue. The phrase configuring (or setting up) aprinter is often used to mean configuring a (print) queue. This chapter uses thesephrases interchangeably.
Prerequisites
Installation Install the following packages (installed with the base system):
• cupsys
• cupsys-bsd (optional; BSD printing commands)

Introduction 613
• cupsys-client (optional; System V printing commands)
• openprinting-ppds (PPD files)
• openprinting-ppds-extra (optional; more PPD files)
• system-config-printer (optional; graphical printer tool)
To use the Web interface to CUPS, you need an X server and a Web browser. Youalso need to add the name of the administrator working with the Web interface tothe shadow group (page 660).
cupsys init script When you install the cupsys package, the dpkg postinst script starts the cupsddaemon. After you configure CUPS, call the cupsys init script to restart the cupsddaemon:
$ sudo /etc/init.d/cupsys restart * Restarting Common Unix Printing System: cupsd [ OK ]$
More Information
Local CUPS Documentation With the CUPS Web interface up (page 624), point a local browser at localhost:631/help.
Web www.linux-foundation.org/en/OpenPrinting Information on printers and printing under Linux. Hosts a support database with details about many printers, including notes and driver information; also offers forums, articles, and a HOWTO document on printing.
CUPS home page www.cups.orgIPP information www.pwg.org/ipp
HOWTO SMB HOWTO has a section titled “Sharing a Windows Printer with Linux Machines.”
Notes
Firewall A CUPS server normally uses TCP port 631 for an IPP connection and port 80 foran LPR/LPD connection. If the CUPS server system is running a firewall, you needto open one or both of these ports. Using firestarter (page 886), open one or both ofthese ports by adding a rule that allows service for port 631 and/or port 80 from theclients you want to be able to access the server.
PDF printer Ubuntu automatically creates a virtual PDF printer. You can use this printer to gen-erate PDF output from applications that are not otherwise able to generate PDFoutput, such as GIMP and Firefox.

614 Chapter 15 Printing with CUPS
JumpStart I: Configuring a Local Printer
In most cases, when you connect a printer to the local system and turn it on, after amoment Ubuntu displays a Printer Added message (Figure 15-1). If you want tomodify the new printer’s configuration, click Configure (in the message window) todisplay the Printer Configuration window (Figure 15-2). See the next section forinformation on using this window.
system-config-printer: Configuring a Printer
The Printer Configuration window (Figure 15-2) enables you to add, remove, andconfigure local and remote printers. To display this window, select Main menu:Administration Printing or give the command gksudo system-config-printer froma terminal emulator or Run Application window (ALT-F2).
Using system-config-printer is very similar to using the CUPS Web interface, which isdiscussed on page 618. However, system-config-printer is a native application, not aWeb interface.
The frame on the left side of the Printer Configuration window lists the configuredprinters. Ubuntu configures a PDF printer by default. On the right side of the win-dow you can configure the printer highlighted on the left.
Server Settings Click Server Settings at the top of the frame on the left to display Basic Server Set-tings on the right side of the window. The top two check boxes under Basic ServerSettings specify whether system-config-printer displays printers that are shared byother systems and whether the local system publishes printers it shares. You controlwhether a given printer is shared from the Settings tab (discussed next).
Configuration Tabs
This section describes the six tabs on the right side of the Printer Configuration win-dow. You can use these tabs to configure the printer highlighted in the frame on theleft side of the window.
Figure 15-1 Printer added message
You must be a member of the lpadmin group
tip To modify a printer using the Printer Configuration window (system-config-printer), you mustbe a member of the lpadmin group (the first user is a member of this group). See page 660 forinstructions on how to add a user to a group.

system-config-printer: Configuring a Printer 615
The right side of the Printer Configuration window holds six tabs you can use toconfigure the printer highlighted on the left side.
Settings Figure 15-2 shows the Settings tab for an HP printer. The text boxes labeledDescription and Location hold information for your use; the system does not usethis information. The text boxes labeled Device URI and Make and Model specifythe location and type of the printer. At the lower left, under State, are check boxeslabeled Enabled, Accepting jobs, and Shared. Table 15-1 describes the effects of put-ting ticks in the first two check boxes. Putting a tick in the check box labeled Sharedshares the printer with other systems if the local system publishes shared printers(see “Server settings,” above). Click the buttons below Default Printer to make thehighlighted printer the default printer (if it is not already) and print a test page.
Policies The Policies tab controls whether the printer prints banners before and after jobsand what CUPS does when it encounters an error.
Access Control The access Control tab allows you to set policy for printer access. By default, any-one can use the printer. You can create a blacklist of users who are not allowed touse it, however. Alternatively, you can prohibit anyone from using the printer andcreate a whitelist of users who are allowed to use it.
Figure 15-2 The Printer Configuration window
Table 15-1 Printer status
Enabled Disabled
Accepting jobs Accepts new jobs into the queue.Prints jobs from the queue.
Accepts new jobs into the queue.Does not print jobs from the queue until the printer is enabled.
Rejecting jobs Rejects new jobs.Prints jobs from the queue.
Rejects new jobs.Does not print jobs from the queue until the printer is enabled.

616 Chapter 15 Printing with CUPS
Installed Options The Installed Options tab controls printer-specific options.
Printer Options The Printer Options tab sets up a watermark or overlay that the printer prints onevery page, and controls image quality as well as paper size and source (tray).
Job Options The Job Options tab controls the number of copies, orientation (portrait or land-scape), scaling, margins, and more. Options specified by an application sending ajob to the printer override options you set in this tab.
Setting Up a Remote Printer
As explained earlier, system-config-printer recognizes and sets up a printer when youconnect it to the local system and turn it on. Specifying a remote printer takes a lit-tle more work. This section describes setting up an IPP printer on another Linuxsystem. For more information on setting up a remote printer, refer to “JumpStart II:Configuring a Remote Printer Using the CUPS Web Interface” on page 618. Becauseof the similarity between system-config-printer and the CUPS Web interface, many ofthe explanations in that section apply here.
To add a remote IPP printer to the local system, click New Printer on the toolbar inthe Printer Configuration window. The system-config-printer utility displays Search-ing as it looks for printers attached to the system and then displays the New Printerwindow (Figure 15-3).
To configure a remote IPP printer, highlight Internet Printing Protocol (ipp) in theframe labeled Select Connection. Enter the name of the system the printer is con-nected to (Hostname) and the name of the print queue on the remote system(Printername). Click Forward.
In the second screen of the New Printer window (Figure 15-4), you specify a printermanufacturer (such as HP) or provide a PPD file (page 626). To select a manufac-turer, click within the list box labeled Makes and start typing the name of the man-ufacturer. As you type, system-config-printer opens a small window (shown inFigure 15-4) that displays what you type and tries to match a name in the list box towhat you have typed. When the correct name appears in the list box, press RETURN (orjust stop typing). Click Forward.
The next screen (Figure 15-5) allows you to specify the model of the printer andselect which driver you want to use (if there is more than one). When you highlight
Figure 15-3 The New Printer window

system-config-printer: Configuring a Printer 617
an entry in the list box labeled Models, you can type to specify a model just as youtyped to specify a manufacturer in the previous screen.
If the model of the printer you are configuring is not listed, check whether theprinter can emulate another printer (if it has an emulation mode). If it can, checkwhether the manufacturer and model of the printer it can emulate are listed and setit up that way. If all else fails, click Back and select Generic as the manufacturer.Then click Forward and choose a type of generic printer from the list box labeledModels. Choose PostScript Printer if the printer is PostScript capable. If there is nomatch, select Text-only Printer; you will not be able to print graphics, but youshould be able to print text. If you are using a winprinter, select GDI Printer fromthe list of generic printers. Click Forward.
On the next screen, you must specify a name for the printer; the description andlocation are optional. The name of the printer must start with a letter and cannotcontain SPACEs. If you use only one printer, the name you choose is not important. Ifyou use two or more printers, the name should help you distinguish between them.The printer name is the name of the print queue on the local system. Click Forward.
Figure 15-4 Selecting a printer manufacturer
Figure 15-5 Selecting a printer model and driver

618 Chapter 15 Printing with CUPS
The system-config-printer utility closes the New Printer window and the new printerappears in the list at the left of the Printer Configuration window. If you have morethan one print queue and want to set up the new print queue as the default, high-light the print queue and click Make Default Printer.
JumpStart II: Configuring a Remote Printer Using
the CUPS Web Interface
This JumpStart explains how to use the CUPS Web interface to configure either (1)a printer connected to a different UNIX/Linux system that provides IPP support oran LPD/LPR queue or (2) a printer that is connected directly to the network.
If the printer you are configuring is on an older Linux system or another UNIX-likeoperating system that does not run CUPS, the system is probably running LPD/LPR.Newer versions of Linux and UNIX variants that support CUPS (including Mac OSX) support IPP. Most devices that connect printers directly to a network supportLPR/LPD and may support IPP.
Printers connected directly to a network are functionally equivalent to printers con-nected to a system running a print server: They listen on the same ports as systemsrunning print servers and queue jobs.
shadow group At some point the CUPS Web interface will ask you for a username and password.Supply your username and password. (You must be a member of the shadow group[page 660] to change the printer configuration using the CUPS Web interface.)
Display the CUPS Web interface by pointing Firefox, or another browser, at localhost:631on the system on which you are configuring the printer (Figure 15-6).
Figure 15-6 CUPS home page

JumpStart II: Configuring a Remote Printer Using the CUPS Web Interface 619
Clicking Add Printer on the row of buttons near the top of the page displays theAdd New Printer page (Figure 15-7). Enter the name of the printer in the Namefield; this name must start with a letter and not contain any SPACEs. You must supplya name—supply any name you like. Optionally, you can fill in the Location andDescription fields with text that will help users identify the printer. Click Continue.
Specifying aprotocol
The next page asks you to select the device that the printer is attached to(Figure 15-8). Click the down arrow at the right of the list box labeled Device todisplay a list of printer devices. Select Internet Printing Protocol (ipp) or LPD/LPRHost or Printer, depending on what the printer is attached to. Select AppSocket/HPJetDirect for an HP JetDirect-compatible network printer. Click Continue.
Figure 15-7 Add New Printer page
Figure 15-8 Device page

620 Chapter 15 Printing with CUPS
Specifying the URI Next the Device URI page (Figure 15-9) asks for the URI (location on the network)of the printer. For an LPD/LPR printer, use the form lpd://hostname/printer-name;for an IPP printer, use ipp://hostname/printers/printer-name; for an HP JetDirect-compatible network printer, use socket://hostname. Replace hostname with thename of the host the printer is attached to (the server) or, for a network printer, thename of the printer. You can specify an IP address instead of hostname. Replaceprinter-name with the name of the printer on the server. Give the command lpstat–p on the server to display the names of all printers on that system. Enter the appro-priate URI in the text box labeled Device URI. Click Continue.
Next is the Make/Manufacturer page (Figure 15-10). Select and highlight the brandof printer from the list. Click Continue.
Next the Model/Driver page (Figure 15-11) allows you to choose the model andspecify a driver for the printer. If the printer is PostScript capable but is not listed,
Figure 15-9 Device URI page
Figure 15-10 Make/Manufacturer page

JumpStart II: Configuring a Remote Printer Using the CUPS Web Interface 621
select a PostScript printer such as the Apple LaserWriter 12/640ps. If the printer isnot PostScript capable and is not listed, check whether the printer supports PCL; ifit does, select another, similar PCL printer. If all else fails, determine which listedprinter is most similar to the one you are configuring and specify that printer. Youcan also try configuring the printer using system-config-printer (page 614), whichoffers a different choice of models.
After you click Add Printer, CUPS briefly displays a message saying that theprinter has been successfully added and then displays the Set Printer Optionspage (Figure 15-12). This page allows you to set printer options and configura-tion information. Browse through the page and make any changes you like,although frequently you need change nothing. Click one of the Set PrinterOptions buttons.
Figure 15-11 Model/Driver page
Figure 15-12 Set Printer Options page

622 Chapter 15 Printing with CUPS
After another brief message, CUPS displays the Printers page (Figure 15-13) show-ing the new printer. Click Print Test Page to confirm that the new setup works. Ifyou want to make this printer the default printer, click Set As Default.
The bottom of the Printers page allows you to cancel or move jobs in the print queue.Figure 15-14 shows this page displaying information about a job the printer is print-ing. In addition to these tasks, the CUPS Jobs page enables you to reprint jobs.
Traditional UNIX Printing
Before the advent of GUIs and WYSIWYG (page 1069) word processors, UNIX userswould create documents using an editor such as vi and a typesetting markup languagesuch as TeX or nroff/troff, convert the resulting files to PostScript using an interpreter,and send the PostScript files to the printer using lpr (BSD) or lp (System V). UbuntuLinux implements both BSD and System V command line printing utilities for com-patibility. However, these utilities are now wrappers around the equivalent functional-ity in CUPS rather than core components of the printing system. The correspondingutilities are functionally equivalent; use whichever you prefer (Table 15-2).
The cupsys-bsd package holds the BSD utilities; the cupsys-client package holds theSystem V utilities. From the command line, you can print a text, PostScript, or PDFfile using lp:
$ lp memo.txtrequest id is MainPrinter-25 (1 file(s))
The preceding command adds memo.txt to the print queue of the default printer asjob 25. When this printer is available, it prints the file. You can specify a printerusing the –d option:
$ lp -d ColorPtr graph.psrequest id is ColorPtr-26 (1 file(s))
Figure 15-13 Printers page

Traditional UNIX Printing 623
The lpr –P option is equivalent to the lp –d option.
Without an argument, lp and lpr send their standard input to the printer:
$ cat memo2.txt | lprequest id is MainPrinter-27 (1 file(s))
The lpq and lpstat commands display information about the print queue:
$ lpstatMainPrinter-25 zach 13312 Sun Feb 24 18:28:38 2008ColorPtr-26 zach 75776 Sun Feb 24 18:28:48 2008MainPrinter-27 zach 8192 Sun Feb 24 18:28:57 2008
Use cancel or lprm to remove jobs from the print queue. Only the owner of a printjob or a user working with root privileges can remove a job.
$ cancel 27$ lpstatMainPrinter-25 zach 13312 Sun Feb 24 18:28:38 2008ColorPtr-26 zach 75776 Sun Feb 24 18:28:48 2008
Give the command sudo cancel –a or sudo lprm – to remove all jobs from the printqueues.
Figure 15-14 Job information in the Printers page
Table 15-2 BSD and System V command line utilities
BSD/SysV Purpose
lpr/lp Sends job(s) to the printer.
lpq/lpstat Displays the status of the print queue.
lprm/cancel Removes job(s) from the print queue.

624 Chapter 15 Printing with CUPS
Configuring Printers
You can use the Web interface or the command line interface to CUPS to manageprinters and queues.
The CUPS Web Interface
CUPS, which was designed for Internet printing, provides a Web interface to config-ure printers. To connect to this interface, point a Web browser running on the localsystem at localhost:631. You must be a member of the shadow group (page 660) tochange the printer configuration using the CUPS Web interface.
Setting Up and Modifying a Printer
“JumpStart II: Configuring a Remote Printer Using the CUPS Web Interface”(page 618) discusses how to set up a remote printer using CUPS. The procedure for set-ting up a local printer is similar. The major difference is the second step: specifying thedevice that the printer is connected to. Refer to “Specifying a protocol” on page 619.
With the printer attached to the local system and turned on, CUPS generally identifiesthe printer, protocol, and device and places the printer in the list of choices in the Devicelist on the Device page (Figure 15-15). When you select the identified printer and clickContinue, CUPS skips the Make/Manufacturer page and highlights the model anddriver on the Model/Driver page (Figure 15-11, page 621). Click Add Printer.
If CUPS does not identify the printer, select the port/device it is attached to from theDevice list. After you specify one of these ports/devices, the Web interface fre-quently skips the Device URI page and displays the Make/Manufacturer page(Figure 15-10, page 620). If you are setting up a serial printer, you need to specifycharacteristics of the printer, including its baud rate. After these steps, the procedureis the same as explained in JumpStart II.
Figure 15-15 CUPS Device page showing an identified printer in the Device list

Configuring Printers 625
To modify a printer, click the Printers tab near the top of the page and then click theModify Printer button adjacent to the printer you want to modify. The Web inter-face takes you through the same steps as when you are setting up a new printer.
Click the Stop Printer button to pause the printer. Click the Reject Jobs button toprevent jobs from being added to the print queue.
Jobs
Click the Jobs tab near the top of the page to display the Jobs page (Figure 15-16),which lists jobs in the print queues. From this page you can hold (pause), release(unpause), and cancel print jobs. Click Show Complete Jobs to display a list ofrecently completed jobs. In some cases, you can reprint completed jobs from this page.
Classes
CUPS allows you to put similar printers into a group called a class. To clients, aclass of printers appears as a single printer. For each class, you must specify a name;optionally, you can specify a location and description. A printer can belong to morethan one class. CUPS prints jobs sent to a class on the first available printer in theclass. For example, you may be able to divide your print jobs into black-and-whitejobs and color jobs. If more than one printer can fulfill each of these roles, you canallow users to select a printer manually, or you can define two printer classes(black-and-white and color) and have users send their jobs to a certain class ofprinters.
Figure 15-16 CUPS Jobs page
Plan for the futuretip If you expect to add printers to the network, you may want to configure classes containing the
existing printers when you set up the network. You can then add printers later without having tochange printer configurations on client systems.

626 Chapter 15 Printing with CUPS
To define a class, first click the Administration tab near the top of the page and thenclick Add Class. At a minimum, you must enter a name for the class. You may alsoenter a location and description. The Members list displays the names of all CUPSprinters and classes. Highlight the printers you want to be members of the class youare defining; hold SHIFT and click on another printer to highlight more than oneprinter. To define a class that includes printers that are not adjacent in the list,define the class to have a single printer and then modify the class after you create itto add other printers. To modify existing classes, click Manage Classes in theAdministration tab.
CUPS on the Command Line
In addition to using the Web interface, you can control CUPS and manage printqueues from the command line. This section describes the utilities that enable youto manage printers and print queues and establish printing quotas.
lpinfo: Displays Available Drivers
PPD files The lpinfo utility provides information about the printer drivers and interfacesavailable to CUPS. The –m option displays the list of available PostScript PrinterDefinition (PPD) files/drivers.
$ lpinfo -m | headfoomatic:Alps-MD-1000-md2k.ppd Alps MD-1000 Foomatic/md2kfoomatic:Alps-MD-1000-ppmtomd.ppd Alps MD-1000 Foomatic/ppmtomd (recommended)foomatic:Alps-MD-1300-md1xMono.ppd Alps MD-1300 Foomatic/md1xMonofoomatic:Alps-MD-1300-md2k.ppd Alps MD-1300 Foomatic/md2kfoomatic:Alps-MD-1300-ppmtomd.ppd Alps MD-1300 Foomatic/ppmtomd (recommended)foomatic:Alps-MD-1500-md1xMono.ppd Alps MD-1500 Foomatic/md1xMonofoomatic:Alps-MD-1500-md2k.ppd Alps MD-1500 Foomatic/md2kfoomatic:Alps-MD-1500-ppmtomd.ppd Alps MD-1500 Foomatic/ppmtomd (recommended)foomatic:Alps-MD-2000-md2k.ppd Alps MD-2000 Foomatic/md2kfoomatic:Alps-MD-2000-ppmtomd.ppd Alps MD-2000 Foomatic/ppmtomd (recommended)
CUPS uses URIs (page 1067) to identify printer ports by type and location, justas a Web browser identifies documents by protocol and location. A parallel porthas a URI with the format parallel:/dev/lp0; a remote LPD printer uses the for-mat lpd://192.168.0.101. With the –v option, lpinfo provides a list of availableconnections:
$ lpinfo -vnetwork socketnetwork behnetwork httpnetwork ippnetwork lpddirect parallel:/dev/lp0direct scsiserial serial:/dev/ttyS0?baud=115200serial serial:/dev/ttyS1?baud=115200

Configuring Printers 627
The –v option to lpinfo does not display every possible network address for thesocket, HTTP, IPP, LPD, and SMB protocols because there are more than 4 billionof these addresses in the IPv4 address space.
lpadmin: Configures Printers
The lpadmin utility can add and remove printers from the system, modify printerconfigurations, and manage printer classes. It has three major options: –d (set thedefault printer), –x (remove a printer), and –p (add or modify a printer). The firsttwo options are simple; examples follow the next section. Each of these threeoptions takes an argument that is the name of a printer. The name of the printermust start with a letter and cannot contain SPACEs.
Adding or Modifying a Printer
Add a printer or modify an existing printer by giving a command in the followingformat:
$ lpadmin –p printer-name options
where printer-name is the name of the printer and options is a combination ofoptions from the following list:
–c class Adds the printer to the class class, creating the class if necessary.
–D info The info is a string that describes the printer for users. This string has no meaningto the system. Enclose info within quotation marks if it contains SPACEs.
–E Enables the printer instructing CUPS to accept jobs into its print queue.
–L loc The loc is a string that physically locates the printer for users (office, building, floor,and so on). This string has no meaning to the system. Enclose loc within quotationmarks if it contains SPACEs.
–P file The file is the absolute pathname of the PPD file (page 626) that describes the printer.Use lpinfo –m to display a list of installed PPD files. If you have a manufacturer-provided PPD file, copy it to /usr/share/ppd/custom.
–r class Removes the printer from the class class. This option removes the class if, afterremoving the printer, the class would be empty.
–v URI The URI is the device to which the printer is attached. Use lpinfo –v to list possibledevices.
Example lpadmin Commands
At a minimum, you need to provide a device and a model when you add a printer tothe system. The following command adds an Epson Stylus Color printer to the sys-tem and enables it for use. This printer is connected locally to the first parallel portand is named ColorPtr.
$ lpadmin -p ColorPtr -E -v parallel:/dev/lp0 -P /usr/share/ppd/custom/stcolor.ppd.gz

628 Chapter 15 Printing with CUPS
The printer information generated by the preceding command is stored in the/etc/cups/printers.conf file:
$ sudo cat /etc/cups/printers.conf# Printer configuration file for CUPS v1.2.8# Written by cupsd on 2007-05-29 20:32<Printer ColorPtr>Info ColorPtrDeviceURI parallel:/dev/lp0State IdleStateTime 1180495957Accepting YesShared YesJobSheets none noneQuotaPeriod 0PageLimit 0KLimit 0OpPolicy defaultErrorPolicy retry-job</Printer>
The lpadmin command decompresses and copies the printer driver information fromthe /usr/share/ppd/custom/stcolor.ppd.gz file to /etc/cups/ppd. The resulting file isgiven the printer’s name: /etc/cups/ppd/ColorPtr.ppd.
You can modify a printer configuration with lpadmin using the same options thatyou used to add it. When you specify the name of an existing printer, lpadmin modi-fies the printer rather than creating a new one.
The next command configures an HP LaserJet-compatible printer with a JetDirectinterface that is connected directly to the LAN at 192.168.1.103 and names thisprinter HPLJ. Specifying socket in the protocol part of the URI instructs CUPS touse the JetDirect protocol, a proprietary protocol developed by Hewlett-Packard forprinters connected directly to a network.
$ lpadmin -p HPLJ -E -v socket://192.168.1.103 -P /usr/share/ppd/custom/laserjet.ppd.gz
The lpstat utility with the –d option displays the name of the default printer:
$ lpstat -dsystem default destination: MainPrinter
CUPS automatically makes the first printer you define the default printer. The fol-lowing command makes HPLJ the default printer:
$ lpadmin -d HPLJ
The following command removes the configuration for the ColorPtr printer:
$ lpadmin -x ColorPtr
Printing Quotas
CUPS provides rudimentary printing quotas. You can define two forms of quotas:page count and file size. File size quotas are almost meaningless because a small

Configuring Printers 629
PostScript file can take a long time to interpret and can require a lot more ink toprint than a large one. Page quotas are more useful, although their implementationis flawed. To determine the number of pages in a document, CUPS examines thePostScript input. If a job is submitted in the printer’s native language, such as PCL,CUPS bypasses this accounting mechanism. Also, if mpage is used to create a Post-Script file with multiple pages printed on each sheet, CUPS counts each page in theoriginal document, rather than each sheet of paper it prints on.
Use the job-quota-period and either job-page-limit or job-k-limit to establish aquota for each user on a given printer. The job-quota-period option specifies thenumber of seconds that the quota remains valid. The following command estab-lishes a quota of 20 pages per day per user for the printer named HPLJ:
$ lpadmin -p HPLJ -o job-quota-period=86400 -o job-page-limit=20
The job-k-limit option works similarly but defines a file size limit in kilobytes. Thelimit is the total number of kilobytes that each user can print during the quotaperiod. Once a user has exceeded her quota, she will not be allowed to print untilthe next quota period.
Managing Print Queues
When a printer is operating normally, it accepts jobs into its print queue and prints themin the order they are received. You can give the command reject followed by the nameof a printer to cause a printer to not accept jobs into its print queue; give the commandaccept to reenable it. You can also use system-config-printer to control the print queue;refer to “Settings” on page 615.
Sharing CUPS Printers
IPP facilitates remote printing. The Listen directive in the CUPS configuration file,/etc/cups/cupsd.conf, specifies which IP address and port or which domain socket pathCUPS binds to and accepts requests on. The Listen directive has the following format:
Listen IP:port | path
where IP is the IP address that CUPS accepts connections on, port is the port num-ber that CUPS listens on for connections on IP, and path is the pathname of thedomain socket CUPS uses to communicate with printers. CUPS typically uses port631. By default, it binds to localhost so it accepts connections from the loopbackservice of the local system only. CUPS uses /var/run/cups/cups.sock, a local domainsocket, to communicate with local printers. It can also use a Port directive to specifythe port number it listens to for HTTP requests.
$ cat /etc/cups/cupsd.conf...# Only listen for connections from the local machine.Listen localhost:631Listen /var/run/cups/cups.sock...

630 Chapter 15 Printing with CUPS
To allow other systems to connect to the CUPS server on the local system, you mustinstruct CUPS to bind to an IP address that the other systems can reach. The follow-ing directive would be appropriate on a CUPS server running on 192.168.0.12:
Listen 192.168.0.12:631
This directive, when placed after the other Listen directives, would cause CUPS tolisten on IP address 192.168.0.12, port 631. When you change cupsd.conf, youneed to call the cupsys init script to restart the cupsd daemon (page 613).
Some directives in cupsd.conf use the @LOCAL macro, which is internal to CUPSand specifies the local system: It accepts communication from any address thatresolves to the local system.
Once you restart cupsd, remote systems can print on the local system’s printers usingthe IP address and port number specified by the Listen directive. If the server is run-ning a firewall, you need to allow remote systems to connect through it; see page 613.
Alternatively, you can use CUPS’s access control list to permit only selectedmachines to connect to local printers. An access control list is defined inside a<Location> container (see page 934 for the Apache equivalent). The followingexample allows only the system at IP 192.168.1.101 and the local system to print tothe specified printer:
<Location /printers>Order Allow,DenyAllow from localhostAllow from 192.168.1.101</Location>
The /printers indicates that this container refers to all local printers. Alternatively,you can control access on a per-printer basis by specifying /printers/printer-name,where printer-name is the printer name, or by specifying /printers/path.ppd, wherepath.ppd is the full pathname of the PPD file (page 626) used by the printer.
The Order Deny,Allow directive allows access by default and denies access only toclients specified in Deny from directives. Specifying Order Allow,Deny denies printrequests by default and allows requests from specified addresses. You can usedomain names, including wildcards, and IP ranges with either wildcards or net-masks in Allow from and Deny from directives. These directives work the same waythey do in Apache. For more information refer to “Order” on page 948.
With the Order Deny,Allow directive, Deny from specifies the only IP addressesCUPS does not accept connections from. When you use the Order Allow,Deny direc-tive, Allow from specifies the only IP addresses CUPS accepts connections from.
Printing from Windows
This section explains how to use printers on Linux CUPS servers from Windowsmachines. CUPS is easier to manage and can be made more secure than usingSamba to print from Windows.

Printing from Windows 631
Printing Using CUPS
Modern versions of Windows (2000 and later) support IPP and, as a result, cancommunicate directly with CUPS. To use this feature, you must have CUPS config-ured on the Linux print server to allow remote IPP printing; you also need to createa new printer on the Windows system that points to the IP address of the Linuxprint server.
First, set up the /etc/cups/cupsd.conf file to allow network printing from a client asexplained under “Sharing CUPS Printers” on page 629. Setting up CUPS to allowprinting from a Windows machine is exactly the same as setting it up to allow printingfrom a Linux client system. If necessary, open the firewall as explained on page 613.
From Windows XP, go to Control Panel Printers and Faxes and click Add Printer.Click Next from the introductory window and select A network printer or a printerattached to another computer. Click Next. Select Connect to a printer on the Inter-net or on a home or office network and enter the following information in the textbox labeled URL:
http://hostname:631/printers/printer-name
where hostname is the name or IP address of the Linux CUPS server system andprinter-name is the name of the printer on that system. For example, for the printernamed dog88 on the system named dog at IP address 192.168.0.12, you could enterhttp://dog:631/printers/dog88 or http://192.168.0.12:631/printers/dog88. If youuse a hostname, it must be defined in the hosts file on the Windows machine. Win-dows requests that you specify the manufacturer and model of printer or provide adriver for the printer. If you supply a printer driver, use the Windows version of thedriver. After Windows copies some files, the printer appears in the Printers andFaxes window. Right-click the printer and select Set as Default Printer to make itthe default printer. You can specify comments, a location, and other attributes ofthe printer by right-clicking the printer and selecting Properties.
Printing Using Samba
This section assumes that Samba (page 823) is installed and working on the Linuxsystem that controls the printer you want to use from Windows. Samba must be setup so that the Windows user who will be printing is mapped to a Linux user(including mapping the Windows guest user to the Linux user nobody). Make surethese users have Samba passwords. Refer to “Samba Users, User Maps, and Pass-words” on page 826.
Windows supports printer sharing via SMB, allowing a printer to be shared trans-parently between Windows systems using the same mechanism as file sharing.Samba allows Windows users to use printers connected to Linux systems just asthey would use any other shared printers. Because all Linux printers traditionallyappear to be PostScript printers, the Linux print server appears to share a PostScriptprinter. Windows does not include a generic PostScript printer driver. Instead, Win-dows users must select a printer driver for a PostScript printer. The Apple Laser-Writer 12/640ps driver is a good choice.

When you install Samba, the dpkg postinst script creates a directory named/var/spool/samba that is owned by the root account and that anyone can read fromand write to. The sticky bit (page 1062) is set for this directory, allowing a Win-dows user who starts a print job as a Linux user to be able to delete that job, butdenying users the ability to delete the print jobs of other users. Make sure this direc-tory is in place and has the proper ownership and permissions:
$ ls -ld /var/spool/sambadrwxrwxrwt 2 root root 4096 May 15 12:29 /var/spool/samba
Put the following two lines in the [global] section of the /etc/samba/smb.conf file:
[global]...printing = cupsprintcap name = cups
The printer’s share is listed in the [printers] section in smb.conf. In the followingexample, the path is the path Samba uses as a spool directory and is not a normalshare path. The settings allow anyone, including guest, to use the printer. Setting useclient driver to yes causes Windows systems to use their own drivers. Not setting thisoption, or setting it to no, can cause printing from Windows to fail. The [printers]section in the default smb.conf file has the following entries, which are appropriatefor most setups:
[printers] comment = All Printers browseable = no path = /var/spool/samba printable = yes public = no writable = no create mode = 0700
Ideally each user who plans to print should have an account because when multipleusers share the same account (for example, the nobody account), these users candelete one another’s print jobs.
Printing to Windows
CUPS views a printer on a Windows machine exactly the same way it views anyother printer. The only difference is the URI you need to specify when connecting it.To configure a printer connected to a Windows machine, go to the Printers page inthe CUPS Web interface and select Add Printer, as you would for a local printer.
When you are asked to select the device, choose Windows Printer via SAMBA.Enter the URI of the printer in the following format:
smb://windows_system/printer_name

Advanced Exercises 633
where the windows_system can be an IP address or a hostname. Once you haveadded the printer, you can use it as you would any other printer.
Chapter Summary
A printing system such as CUPS sets up printers. It also moves print jobs from anapplication or the command line through the appropriate filters and into a queuefor a suitable printer and then prints those jobs.
CUPS is a cross-platform print server built around IPP, the Internet Printing Proto-col. CUPS handles setting up and sending jobs through print queues. The easiestway to configure printers is via the Printer Configuration window (system-config-printer). You can also configure CUPS using the Web interface, which you can accessby pointing a Web browser at localhost:631 on the system the printer is connectedto. From the Web interface, you can configure print queues and modify print jobs inthe queues.
You can use the traditional UNIX commands from a command line to send jobs toa printer (lpr/lp), display a print queue (lpq/lpstat), and remove jobs from a printqueue (lprm/cancel). In addition, CUPS provides the lpinfo and lpadmin utilities sothat you can configure printers from the command line.
CUPS and Samba enable you to print on a Linux printer from a Windows machine,and vice versa.
Exercises
1. Which commands can you use from the command line to send a file to the default printer?
2. Which command would you give to cancel all print jobs on the system?
3. Which commands list your outstanding print jobs?
4. What is the purpose of sharing a Linux printer using Samba?
5. Name three printing protocols that CUPS supports. Which is the CUPS native protocol?
Advanced Exercises
6. Which command lists the installed printer drivers available to CUPS?
7. How would you send a text file to a printer connected to the first parallel port without using a print queue? Why is doing so not a good idea?

634 Chapter 15 Printing with CUPS
8. Assume you have a USB printer with a manufacturer-supplied PostScript printer definition file named newprinter.ppd. Which command would you use to add this printer to the system on the first USB port with the name USBPrinter?
9. /usr/share/ppd/custom/How would you define a quota that allows each user to print up to 50 pages per week to the printer named LaserJet?
10. Define a set of access control rules for a <Location> container inside /etc/cups/cupsd.conf that would allow anyone to print to all printers as long as they were either on the local system or in the mydomain.comdomain.

635635
16Chapter16Once you have installed Ubuntu Linux, you may want to recon-figure and build a new Linux kernel. Ubuntu Linux comes witha prebuilt kernel that simplifies the installation process. How-ever, this kernel may not be properly configured for all systemfeatures. By configuring and building a new kernel, you can cre-ate one that is customized for a system and its unique needs. Acustomized kernel is typically smaller than a generic one.
Sometimes you do not need to build a new kernel. Instead,you can dynamically change many things that used to requirebuilding a new kernel. Two ways to make these changes are byusing boot command line parameters (page 63) or by modify-ing /etc/sysctl.conf, which sysctl uses when the system boots(page 636).
You can add the same parameters as you use on the boot com-mand line to a kernel command in /boot/grub/menu.lst. Forexample, acpi=off prevents acpid (the advanced configurationand power interface daemon) from starting.
In This Chapter
Downloading the Kernel Source Code. . . . . . . . . . . . . . . . 637
Configuring and Compiling the Linux Kernel . . . . . . . . . . . . . . . . 639
Installing the Kernel, Modules, and Associated Files . . . . . . . . . 646
grub: The Linux Boot Loader . . . . 647
dmesg: Displays Kernel Messages . . . . . . . . . . . . . . . . . . 654
16
Building a Linux
Kernel

636 Chapter 16 Building a Linux Kernel
sysctl The sysctl utility modifies kernel parameters while the system is running. This utilitytakes advantage of the facilities of /proc/sys, which defines the parameters thatsysctl can modify.
The command sysctl –a displays a complete list of sysctl parameters. An example ofdisplaying and changing the domainname kernel parameter follows. The quotationmarks are not required in this example, but you must quote any characters thatwould otherwise be interpreted by the shell.
$ sudo /sbin/sysctl kernel.domainnamekernel.domainname = tcorp.com$ sudo /sbin/sysctl -w kernel.domainname="testing.com"kernel.domainname = testing.com$ sudo /sbin/sysctl kernel.domainnamekernel.domainname = testing.com
Before you can start building a new kernel, you must download, install, and cleanthe source code. You also need to build a configuration file that describes the newkernel you want to build. This chapter describes the steps involved in completingthese tasks.
Prerequisites
Install the following packages:
• linux-source (the latest released Ubuntu kernel source code; not needed if you use git to download the code)
• build-essential (metapackage; includes the packages required to compile the code)
• fakeroot, kernel-package (kernel-specific)
• git-core (to use git to download the kernel source code)
• ncurses-dev (to configure the kernel using make menuconfig)
• libglade2-dev (to configure the kernel using make gconfig)
• module-assistant, debhelper (to create modules)
Have the installation CD/DVD handy when you build a new kernelcaution When you build a new Linux kernel to install a new version or to change the configuration of the
existing version, make sure you have the installation CD/DVD handy. This disk allows you toreboot the system, even when you have destroyed the system software completely. Having thisCD/DVD available can mean the difference between momentary panic and a full-scale nervousbreakdown.

Downloading the Kernel Source Code 637
Downloading the Kernel Source Code
This section describes two ways to download kernel source code on the local sys-tem: aptitude (or Synaptic, page 121) and git. If you want to download code that hasnot been customized (patched) by Ubuntu, visit kernel.org or see the section on git.
aptitude: Downloading and Installing the
Kernel Source Code
The easiest way to download and install the updated kernel source code for themost recently released version of the Ubuntu kernel is to use aptitude. The followingcommands make sure that the package index is up-to-date and download the linux-source package. The dpkg postinst script puts the compressed source code in/usr/src/linux-source*:
$ sudo aptitude update...$ sudo aptitude install linux-source...$ ls -l /usr/src/linux-source*-rw-r--r-- 1 root root 45202339 Sep 7 00:37 /usr/src/linux-source-2.6.22.tar.bz2
Because /usr/src is associated with the src group, if you are a member of this group(page 558), you can extract and build kernels in the /usr/src directory. Otherwise,you can unpack the kernel in any directory you have write access to.
git: Obtaining the Latest Kernel Source Code
The git utility (GNU interactive tools, git.or.cz) can download the latest versions ofthe source code for several different kernels and can keep that source code up-to-date. Give the following command to install git:
$ sudo aptitude install git-core
Do not work with root privileges
caution You do not need to—nor should you—work as a user with root privileges for any portion of con-figuring or building the kernel except for installation (the last step). The kernel README file says,“Don’t take the name of root in vain.” As long as you are a member of the group src, you can down-load, configure, and compile the kernel in a directory under /usr/src without working with rootprivileges.
Install the git-core Package, Not the git Package
tip Make sure to install the git-core package and not the git package. The git package is not usefulfor downloading kernel source code.

638 Chapter 16 Building a Linux Kernel
The following command uses git to download a copy of the development (not thereleased) kernel into the ubuntu-2.6 subdirectory of the working directory. As amember of the src group, you can work in the /usr/src directory. Otherwise, youcan work in any directory you have write access to. You can and should work as anonprivileged user.
$ git-clone git://kernel.ubuntu.com/ubuntu/ubuntu-gutsy.git ubuntu-2.6Initialized empty Git repository in /usr/src/ubuntu-2.6/.git/remote: Generating pack...remote: Done counting 509670 objects.remote: Deltifying 509670 objects.remote: 100% (509670/509670) doneIndexing 509670 objects...remote: Total 509670, written 509670 (delta 401907), reused 492656 (delta 385717) 100% (509670/509670) doneResolving 401907 deltas... 100% (401907/401907) doneChecking 22623 files out... 100% (22623/22623) done
See kernel.ubuntu.com/git and kernel.org/git for a list of Ubuntu kernels you candownload. Substitute the URL of the kernel you want to download for the URL inthe preceding command and specify the name of an appropriate directory to holdthe files you download. For example, the following command downloads the latestFeisty kernel into the feisty directory in the working directory:
$ git-clone git://kernel.ubuntu.com/ubuntu/ubuntu-feisty.git feisty
Once you have downloaded the kernel, cd to the directory that holds the code andgive the following command to update the source code to match that available atthe URL you specified in the git-clone command:
$ git pullAlready up-to-date.
The files you just downloaded should be up-to-date, as shown in the example. Givethis command anytime you want to synchronize the code in the working directorywith the latest source code at the URL.
Read the Documentation
The kernel package includes the latest documentation, some of which may not beavailable in other documents. You may wish to review the README file in the toplevel of the kernel source directory and the relevant files in the Documentation subdi-rectory. In addition, there is a lot of information in the /usr/share/doc/kernel-packagedirectory. Read the Linux Kernel-HOWTO for a detailed, somewhat dated, genericguide to installing and configuring the Linux kernel.

Configuring and Compiling the Linux Kernel 639
Configuring and Compiling the Linux Kernel
This section describes how to configure the kernel, how to compile it, and how todownload and compile kernel modules.
.config: Configures the Kernel
Before you can compile the code and create a Linux kernel, you must decide andspecify which features you want the kernel to support. You can configure the ker-nel to support most features in one of two ways: by building the feature into thekernel or by specifying the feature as a loadable kernel module (page 643), whichis loaded into the kernel only as needed. In deciding which method to use, youmust weigh the size of the kernel against the time it takes to load a module. Makethe kernel as small as possible while minimizing how often modules have to beloaded. Do not make the SCSI driver modular unless you have a reason to do so.
The .config file in the directory you downloaded the source code in controls whichfeatures the new kernel will support and how it will support them. “Customizing aKernel” (page 640) explains how to create a default version of this file if it does notexist and how to edit the file if it does exist.
Replacing a Custom Kernel
If you have already configured a custom kernel, you may want to replace it with asimilarly configured newer kernel. However, each kernel potentially has new config-uration options, so it is poor practice to use an old .config file for compiling a newkernel. This section explains how to upgrade an existing .config file so it includesoptions that are new to the new kernel and maintains the existing configuration forthe old options.
Work in the directory you downloaded or extracted the source code to. The systemkeeps a copy of the configuration file for the kernel the local system is running in/boot. The following command copies this file to .config in the working directory:
$ cp /boot/config-$(uname -r) .config
In this command, the shell executes uname –r and replaces $(uname –r) with theoutput of the command, which is the name of the release of the kernel running onthe local system. For more information refer to “Command Substitution” onpage 344.
Next give the command make oldconfig to patch the .config file with options fromthe new kernel that are not in the old kernel. This command displays each kerneloption that is the same in the new and old kernels and automatically sets the state ofthe option in the new kernel the same way it was set in the old kernel. It stops whenit gets to an option that is in the new kernel but not in the old kernel. It then displays

640 Chapter 16 Building a Linux Kernel
a prompt, which is similar to [N/y/?] (NEW), showing possible responses and indi-cating this option is new. The prompt shows the default response as an uppercase let-ter; you can type this letter (uppercase or lowercase) and press RETURN, or just pressRETURN to select this response. In the example, the Tickless System option is new andthe default response is Y for yes, include the option in the new kernel. To select anondefault response (n means no, do not include the option and m means includethe option as a module), you must type the letter and press RETURN. Enter ? followedby RETURN to display more information about the option.
$ make oldconfigscripts/kconfig/conf -o arch/i386/Kconfig** Linux Kernel Configuration*** Code maturity level options*Prompt for development and/or incomplete code/drivers (EXPERIMENTAL) [Y/n/?] y** General setup*Local version - append to kernel release (LOCALVERSION) []Automatically append version information to version string (LOCALVERSION_AUTO) [N/y/?] n...** Processor type and features*Tickless System (Dynamic Ticks) (NO_HZ) [Y/n/?] (NEW) ? ?
This option enables a tickless system: timer interrupts willonly trigger on an as-needed basis both when the system isbusy and when the system is idle.
Tickless System (Dynamic Ticks) (NO_HZ) [Y/n/?] (NEW) ? RETURNHigh Resolution Timer Support (HIGH_RES_TIMERS) [Y/n/?] ySymmetric multi-processing support (SMP) [Y/n/?] ySubarchitecture Type> 1. PC-compatible (X86_PC) 2. AMD Elan (X86_ELAN)...## configuration written to .config#
Customizing a Kernel
You can use one of three standard commands to build the .config file that config-ures a Linux kernel:
$ make config$ make menuconfig$ make gconfig

Configuring and Compiling the Linux Kernel 641
See “Prerequisites” on page 636 for a list of packages required to run all but thefirst of these commands.
If a .config file does not exist in the working directory, each of these commandsexcept the first sets up a .config file that matches the kernel the local system is run-ning and then allows you to modify that configuration. The commands can set upthis .config file only if the configuration file for the locally running kernel is in/boot/config-$(uname –r). See the preceding section if you want to build a new ker-nel with a configuration similar to that of an existing kernel.
The make config command is the simplest of the three commands, uses a textualinterface, and does not require any additional software. It is, however, the mostunforgiving and hardest to use of the configuration interfaces. The make menuconfigcommand uses a pseudographical interface and also displays a textual interface. Themake gconfig command uses GTK+ (www.gtk.org) and uses a graphical interface.
Each command asks the same questions and produces the same result, given thesame responses. The first and second commands work in character-based environ-ments; the third command works in graphical environments. For many administra-tors working with a GUI, the third method is the easiest to use.
The make gconfig command displays the Linux Kernel Configuration window,which you can view in three configurations: single, split, or full view. Choose a viewby clicking one of the three icons to the right of the floppy diskette on the toolbar.Figure 16-1 shows the split view. In this view, the left frame shows the options andthe top-right view lists the features for each option. The bottom-right view describesthe highlighted option or feature. Figure 16-2 on the next page shows the full view.
In any view, you can click the boxes and circles next to the choices and subchoices. Anempty box/circle indicates the feature is disabled, a tick indicates it is to be included inthe kernel, and a dot means it is to be compiled as a module. With a choice or sub-choice highlighted, you can also press M for module, N for not included, and Y for
Figure 16-1 The Linux Kernel Configuration window, split view

642 Chapter 16 Building a Linux Kernel
compiled into the kernel. Select Menubar: Options Show All Options to display alloptions and features.
Go through the options and mark the features as you would like them to be config-ured in the new kernel. At any time during the configuration process, you can storethe currently defined configuration to a file, load a configuration from a file, or exitwith or without saving your changes. See the selections in Menubar: File. When youare done, select Menubar: File Save and close the window.
Cleaning the Source Tree
After generating a .config file, but before compiling or recompiling the kernel, makea copy of the .config file (perhaps copy it to your home directory) and then purgethe source tree of all potentially stale *.o files by giving the following command:
$ make-kpkg cleanexec make -f /usr/share/kernel-package/ruleset/minimal.mk clean====== making target minimal_clean [new prereqs: ]======Cleaning.test ! -f .config || cp -pf .config config.precioustest ! -e stamp-building || rm -f stamp-buildingtest ! -f Makefile || \ make ARCH=i386 distcleanmake[1]: Entering directory `/usr/src/ubuntu-2.6' CLEAN scripts/basic CLEAN scripts/kconfig CLEAN /usr/src/ubuntu-2.6/debian/ CLEAN include/config CLEAN .config .config.old include/linux/autoconf.hmake[1]: Leaving directory `/usr/src/ubuntu-2.6'test ! -f config.precious || mv -f config.precious .configrm -f modules/modversions.h modules/ksyms.ver conf.vars scripts/cramfs/cramfsck scripts/cramfs/mkcramfs applied_patches stamp-build stamp-configure stamp-image stamp-headers stamp-src stamp-diff stamp-doc stamp-manual stamp-patch stamp-buildpackage stamp-debian
Figure 16-2 The Linux Kernel Configuration window, full view

Configuring and Compiling the Linux Kernel 643
This command ensures that make correctly applies any numbering scheme you usewhen you compile the kernel. Continue to work as a nonprivileged user.
Compiling a Kernel Image File and Loadable Modules
See “Prerequisites” on page 636 for a list of packages that must be installed to com-pile the source code. Give the following command to compile the kernel and modules.This command generates a .deb file in the parent of the working directory.
$ make-kpkg --initrd --rootcmd fakeroot --append-to-version $(date +%s) kernel_imageexec make -f /usr/share/kernel-package/ruleset/minimal.mk debianAPPEND_TO_VERSION=1189554076 INITRD=YES ROOT_CMD=fakeroot====== making target minimal_debian [new prereqs: ]======This is kernel package version .test -d debian || mkdir debiantest ! -e stamp-building || rm -f stamp-building...This is kernel package version 11.001.
$ ls ../*deb../linux-image-2.6.22.61189554076_2.6.22.61189554076-10.00.Custom_i386.deb
The ––append-to-version option allows you to specify a string that uniquely identi-fies the kernel you are building. This string also helps prevent overwriting existingkernels. You can specify any string you like following this option, using charactersfrom the set of lowercase letters, numbers, – (minus), + (plus), and . (period). Thevalue you specify is placed at the end of the kernel name and release number. Youcan make note of patches applied to the kernel in this string to help developers trackbugs. The preceding example uses command substitution (page 344) to place thenumber of seconds since the UNIX epoch in the name of the kernel, making easy totell which of several kernels is newest.
Using Loadable Kernel Modules
A loadable kernel module (page 1045) (sometimes called a module or loadable mod-ule) is an object file—part of the kernel—that is linked into the kernel at runtime.Modules can be inserted into and removed from a running kernel at almost any time(except when a module is being used). This ability gives the kernel the flexibility tobe as small as possible at any given time. Modules are a good way to code some ker-nel features, including drivers that are not used continually (such as a tape driver).Module filenames end in .ko and are stored in subdirectories in /lib/modules. UnderUbuntu, kernel modules are compiled along with the kernel as explained in the pre-ceding section.
Finding Nonstandard Modules
Many drivers that are not in the main source tree or not free are supplied as
*-source packages. You can use aptitude to display a list of available *-source pack-ages. The following example first updates APT’s cache, then displays a list of
*-source packages, and finally displays a list of packages that pertain to NVIDIA.

644 Chapter 16 Building a Linux Kernel
The dollar sign at the end of the search string (source$) ensures that the stringmatches only the last part of a package name.
$ sudo aptitude update$ aptitude search source$p acl2-books-source - A Computational Logic for Applicative Commp acl2-infix-source - A Computational Logic for Applicative Commp acl2-source - A Computational Logic for Applicative Commp alsa-source - ALSA driver sourcesp apparmor-modules-source - Source for the AppArmor LSM modules...$ aptitude search source$ | grep -i nvidiap nvidia-kernel-source - NVIDIA binary kernel module sourcep nvidia-legacy-kernel-source - NVIDIA binary 'legacy' kernel module sourcp nvidia-new-kernel-source - NVIDIA binary 'new' kernel module source
module-assistant: Downloading, Compiling, and
Installing Nonstandard Modules
Once you determine its name, you need to download and install the module sourcepackage. Then you need to compile, build, and install the Debian module packagethat corresponds to the source package. Check the prerequisites listed on page 636before starting this process. The following command uses module-assistant to per-form these steps with the nvidia-kernel-source package:
$ module-assistant --text-mode auto-install nvidia-kernel
The module-assistant utility calls sudo to run apt-get and dpkg and will fail if you donot have write permission to /usr/src (i.e., if you are not in the src group); sudo mayprompt you for your password. You must be a member of the admin group somodule-assistant can call sudo successfully. If you do not use the ––text-modeoption, module-assistant presents a pseudographical interface that requires input.
If you run into problems, you may want to call module-assistant to perform each ofthe steps in turn. You must run the module-assistant prepare command once beforerunning other module-assistant commands (except auto-install). The following com-mands use m-a, a link to module-assistant, and –t in place of ––text-mode:
$ m-a -t prepare$ m-a -t get nvidia-kernel$ m-a -t build nvidia-kernel$ m-a -t install nvidia-kernel
The format of a module-assistant command is as follows:
module-assistant command [pkg-list]
where command is a command from the following list and pkg-list is a list of one ormore SPACE-separated module source packages. You do not need to include the

Configuring and Compiling the Linux Kernel 645
–source part of the package name when working with module-assistant. The preparecommand does not accept a pkg-list; all other commands require it. See the module-assistant man page for a list of options, more commands, and more information.
auto-install pkg-listCombines the prepare, get, build, and install commands and processes pkg-list.Abbreviate this command as a-i.
build pkg-list Builds pkg-list. Error messages go to /var/cache/modass.
get pkg-list Downloads and installs the source code for pkg-list.
install pkg-list Installs pkg-list. Without pkg-list, installs the last package you built for the kernelrunning on the local system.
list pkg-list With arguments, lists details about pkg-list. Without arguments, lists all knownpackages. Abbreviate this command as la (list available).
list-installed Lists details about installed packages. Abbreviate this command as li.
prepare Determines the name of the kernel-header package, installs it and the build-essentialpackage as needed, and creates the /usr/src/linux symbolic link. With the –l option,this command uses the kernel version you specify. Without this option, it uses theversion of the kernel running on the local system. You must run this commandbefore you run any other module-assistant commands.
Loading a Module
After you install a module with module-assistant, you must load it to make it avail-able to the running kernel. Table 16-1 lists some of the tools available to help youwork with modules. Refer to the corresponding man pages for options and moreinformation.
Table 16-1 Tools for working with modules
Tool/utility Function
depmod Works with dependencies for modules.
insmod Loads modules in a running kernel.
lsmod Lists information about all loaded modules.
modinfo Lists information about a module.
modprobe Loads, unloads, and reports on modules. When it loads a module, it also loads dependencies.
rmmod Unloads modules from a running kernel.

646 Chapter 16 Building a Linux Kernel
Installing the Kernel, Modules, and
Associated Files
The next step is to copy the compiled kernel, modules, and associated files to theappropriate directories, usually /boot and a subdirectory of /lib/modules. Whenyou have a partition mounted at /boot, the files are kept in the root of this partition(/boot). Because you have created a deb package, installing these files is quite easy.
The following message may be displayed during the execution of dpkg as describedbelow:
find: /lib/firmware/2.6.22.61189554076: No such file or directory
If this message appears, change directories to /lib/firmware and create a symboliclink between the latest 2.6.*-generic directory and the directory listed in the errormessage. For example:
$ cd /lib/firmware$ ls -ldrwxr-xr-x 4 root root 4096 Sep 3 15:23 2.6.22-10-genericdrwxr-xr-x 4 root root 4096 Sep 8 20:14 2.6.22-11-generic$ sudo ln -s 2.6.22-11-generic 2.6.22.61189554076
When you repeat the dpkg command (below), it displays a warning message endingwith Stop install since the kernel-image is already installed? Respond with No andthe installation should continue without a problem.
The following commands show how to install the new kernel files in the properdirectories:
$ cd ..$ sudo dpkg -i linux-image-2.6.22.61189554076_2.6.22.61189554076-10.00.Custom_i386.deb(Reading database ... 120137 files and directories currently installed.)Done.Unpacking replacement linux-image-2.6.22.61189554076 ...Running postrm hook script /sbin/update-grub.Searching for GRUB installation directory ... found: /boot/grubSearching for default file ... found: /boot/grub/defaultTesting for an existing GRUB menu.lst file ... found: /boot/grub/menu.lstSearching for splash image ... none found, skipping ...Found kernel: /boot/vmlinuz-2.6.22.61189554076Found kernel: /boot/vmlinuz-2.6.22-11-genericFound kernel: /boot/vmlinuz-2.6.22-10-genericFound kernel: /boot/memtest86+.binUpdating /boot/grub/menu.lst ... done
Setting up linux-image-2.6.22.61189554076 (2.6.22.61189554076-10.00.Custom) ...Running depmod.Finding valid ramdisk creators.Using mkinitramfs-kpkg to build the ramdisk.Running postinst hook script update-grub.
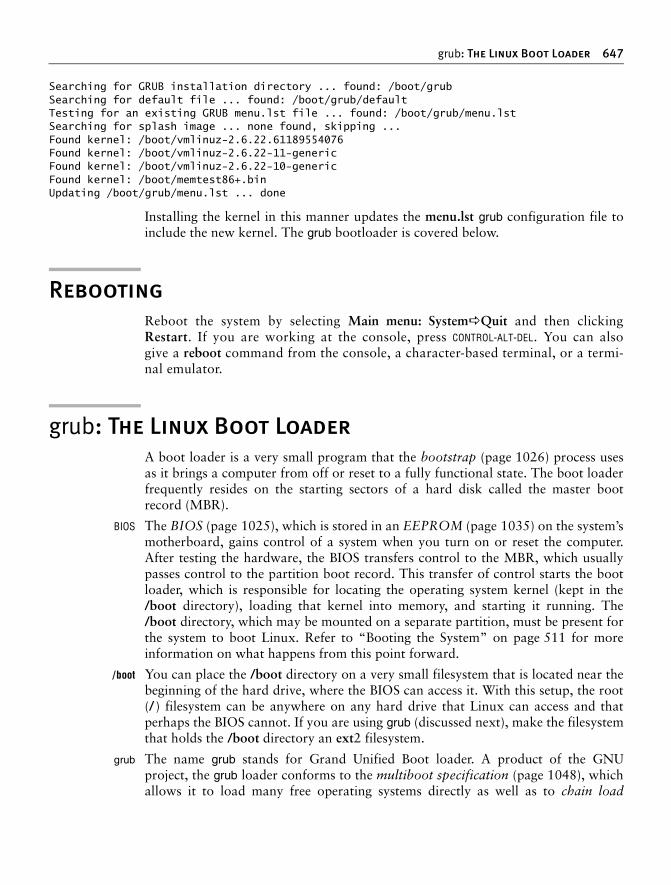
grub: The Linux Boot Loader 647
Searching for GRUB installation directory ... found: /boot/grubSearching for default file ... found: /boot/grub/defaultTesting for an existing GRUB menu.lst file ... found: /boot/grub/menu.lstSearching for splash image ... none found, skipping ...Found kernel: /boot/vmlinuz-2.6.22.61189554076Found kernel: /boot/vmlinuz-2.6.22-11-genericFound kernel: /boot/vmlinuz-2.6.22-10-genericFound kernel: /boot/memtest86+.binUpdating /boot/grub/menu.lst ... done
Installing the kernel in this manner updates the menu.lst grub configuration file toinclude the new kernel. The grub bootloader is covered below.
Rebooting
Reboot the system by selecting Main menu: System Quit and then clickingRestart. If you are working at the console, press CONTROL-ALT-DEL. You can alsogive a reboot command from the console, a character-based terminal, or a termi-nal emulator.
grub: The Linux Boot Loader
A boot loader is a very small program that the bootstrap (page 1026) process usesas it brings a computer from off or reset to a fully functional state. The boot loaderfrequently resides on the starting sectors of a hard disk called the master bootrecord (MBR).
BIOS The BIOS (page 1025), which is stored in an EEPROM (page 1035) on the system’smotherboard, gains control of a system when you turn on or reset the computer.After testing the hardware, the BIOS transfers control to the MBR, which usuallypasses control to the partition boot record. This transfer of control starts the bootloader, which is responsible for locating the operating system kernel (kept in the/boot directory), loading that kernel into memory, and starting it running. The/boot directory, which may be mounted on a separate partition, must be present forthe system to boot Linux. Refer to “Booting the System” on page 511 for moreinformation on what happens from this point forward.
/boot You can place the /boot directory on a very small filesystem that is located near thebeginning of the hard drive, where the BIOS can access it. With this setup, the root(/) filesystem can be anywhere on any hard drive that Linux can access and thatperhaps the BIOS cannot. If you are using grub (discussed next), make the filesystemthat holds the /boot directory an ext2 filesystem.
grub The name grub stands for Grand Unified Boot loader. A product of the GNUproject, the grub loader conforms to the multiboot specification (page 1048), whichallows it to load many free operating systems directly as well as to chain load

648 Chapter 16 Building a Linux Kernel
(page 1028) proprietary operating systems. The grub loader can recognize varioustypes of filesystems and kernel executable formats, allowing it to load an arbitraryoperating system. You must specify the kernel’s filename and location (drive andpartition) so grub knows where to find the kernel. You can pass this information togrub via either the command line or the menu. When you boot the system, grub candisplay a menu of choices that is generated by the /boot/grub/menu.lst file (next).At this point you can modify a menu selection, choose which operating system orkernel to boot, or do nothing and allow grub to boot the default system.
When you install grub at the time you install Linux, the installation program config-ures grub automatically. See the grub info page, www.gnu.org/software/grub, andwww.gnu.org/software/grub/manual/grub.html for more information on grub.
menu.lst: Configures grub
The /boot/grub/menu.lst file is the default grub configuration file. This file is a grubshell script that holds grub commands that tell grub which kernel and associated filesand which options to use when it boots the system. It can display a menu of kernelsfor you to chose from when the system boots.
As generated by update-grub (which is run when you install Ubuntu or install orupgrade a kernel using APT; see page 651), menu.lst comprises three sections:
• The file starts with many comments and a few interspersed global com-mands such as timeout, which controls how long grub waits for you to respond to its prompt before automatically booting the default kernel.
• It continues with the Automagic Kernels List, which is divided into two sections. The first section holds default options (directives) that update-grub uses to configure menu.lst (page 651). (The menu.lst file holds direc-tives that control the generation of a replacement menu.lst file.)
• The second part of the Automagic Kernels List holds update-grub-generated specifications for the grub boot-time menu (page 512). Each boot-time menu entry (boot specification) starts with a title keyword, which is followed by several lines that instruct grub which files to load and which options to use when you choose that menu entry to boot the system.
Following is a single menu entry from a menu.lst file. Following the title, the rootcommand tells grub which device the /boot directory is located on (hd0,0 meanshard disk drive 0, partition 0, typically hda1). Next the kernel command specifiesthe name of the file that holds the kernel that grub is to boot. The grub loader passesthe arguments following this filename to the kernel. The root= argument tells thekernel which partition the root filesystem (/) is mounted on. This partition is usu-ally initially mounted in readonly (ro) mode and is remounted in read-write modelater, after being checked. The noapic option, which turns off the advanced pro-grammable interrupt controllers, is required by the system this kernel is running on(you may not need to use this option). The initrd (initial RAM disk; page 1056)

grub: The Linux Boot Loader 649
command specifies the name of the file that holds the initial RAM disk image. Thegrub boot loader loads this image and mounts it as the root filesystem as the firststep in booting Linux. The savedefault command comes into play when the systemboots and you choose a grub menu entry other than the default. If that entryincludes a savedefault command, the menu entry becomes the default entry the nexttime the system boots. The boot command tells grub to boot the system and is notnormally required.
title Ubuntu, kernel 2.6.17.14-ubuntu13.00root (hd0,0)kernel /vmlinuz-2.6.17.14-ubuntu13.00 root=/dev/sda2 ro noapicinitrd /initrd.img-2.6.17.14-ubuntu13.00savedefaultboot
The menu.lst file in the next example is from a system that had its kernel replaced(there are two versions of vmlinuz and initrd). This system has a separate boot parti-tion or directory, as do most systems, so all kernel and initrd image paths are relativeto /boot.
The menu.lst file that update-grub configures when you install Ubuntu Linux startswith comments that explain many of the commands you can use in the file. Most ofthe comments have been removed from the following file. The first of the globalcommands, default, specifies the ordinal number of the default menu entry. Menuentries are numbered starting with 0. Although this number does not change, thedefault boot specification changes when you select a boot specification that includesa savedefault command (as explained earlier). The timeout command specifies thenumber of seconds that grub waits after it has prompted you for a boot specificationbefore it automatically boots the system using the default boot specification. Whenyou specify hiddenmenu, grub boots the default entry and does not display its menuunless you press ESCAPE while the timeout counter is ticking down. This option iscommented out in the following listing, which causes grub to display its menu. Thecolor command causes grub to display its menu in color.
$ cat /boot/grub/menu.lstdefault 0timeout 6#hiddenmenucolor cyan/blue white/blue
### BEGIN AUTOMAGIC KERNELS LIST
title Ubuntu, kernel 2.6.17.14-ubuntu13.00root (hd0,0)kernel /vmlinuz-2.6.17.14-ubuntu13.00 root=/dev/sda2 ro noapicinitrd /initrd.img-2.6.17.14-ubuntu13.00savedefaultboot

650 Chapter 16 Building a Linux Kernel
title Ubuntu, kernel 2.6.17.14-ubuntu13.00 (recovery mode)root (hd0,0)kernel /vmlinuz-2.6.17.14-ubuntu13.00 root=/dev/sda2 ro noapic singleinitrd /initrd.img-2.6.17.14-ubuntu13.00boot
title Ubuntu, kernel 2.6.17-10-genericroot (hd0,0)kernel /vmlinuz-2.6.17-10-generic root=/dev/sda2 ro quiet splash noapicinitrd /initrd.img-2.6.17-10-genericquietsavedefaultboot
title Ubuntu, kernel 2.6.17-10-generic (recovery mode)root (hd0,0)kernel /vmlinuz-2.6.17-10-generic root=/dev/sda2 ro singleinitrd /initrd.img-2.6.17-10-genericboot
title Ubuntu, memtest86+root (hd0,0)kernel /memtest86+.binquietboot
### END DEBIAN AUTOMAGIC KERNELS LIST
Each menu entry/boot specification in the menu.lst file, called a stanza, starts with atitle command. If you do not specify hiddenmenu, or if you press ESCAPE while thetimeout counter is ticking down, grub displays a menu of these title strings andallows you to a select one.
The preceding menu.lst file includes five boot specifications: The first, numbered 0,is for the 2.6.17.14-ubuntu13.00 kernel; the second, numbered 1, is for the samekernel brought up in recovery (single-user) mode. The next two entries are forgeneric kernels—those installed when Ubuntu was installed. The final entry is formemtest86 (page 62) and allows you to run this memory test utility directly fromthe grub menu.
The menu entries that bring the system up in multiuser mode have a few moreentries than those that bring the system up in recovery mode. The quiet option fol-lowing the kernel command causes the kernel to produce less output so the user canmore easily tell what is happening. The splash option causes grub to display theUbuntu logo as it boots the system. The single option in the recovery mode entriesbrings the system up in recovery (single-user) mode.
Make sure that when you install a new kernel manually, its title line is differentfrom the other title lines in menu.lst.
You must add a kernel that is not managed by update-grub before or after theAutomagic Kernels List section of menu.lst or update-grub will replace it next time

grub: The Linux Boot Loader 651
update-grub runs. The Automagic Kernels List section is delimited with the follow-ing comments: BEGIN AUTOMAGIC KERNELS LIST and END DEBIANAUTOMAGIC KERNELS LIST.
update-grub: Updates the menu.lst file
The update-grub utility updates the /boot/grub/menu.lst file if the file exists; other-wise, update-grub creates this file. This utility first looks for all files in the /bootdirectory whose names start with the string vmlinuz– and assumes that each of thesefiles holds a kernel. If the memtest86 directive (page 653) is set to true, it also looksfor a file that holds that utility. It creates a menu entry (boot specification) inmenu.lst for each kernel it finds (and optionally for memtest86). It also adds an initrd(initial RAM disk) line to menu.lst for each file in /boot whose name starts with thestring initrd– and whose version number matches one of the kernel files it found. Forexample, if update-grub finds the kernel file named vmlinuz-2.6.17-11-generic in/boot and then finds initrd.img-2.6.17-11-generic, it creates an initrd line inmenu.lst for that RAM disk image file.
After update-grub runs for the first time, such as when you install Ubuntu, and cre-ates a menu.lst file, you can edit menu.lst. The previous section discussed some ofthe options, located near the beginning of menu.lst, that you can edit. This sectiondiscusses the portion of this file that starts and ends with the following comments:
### BEGIN AUTOMAGIC KERNELS LIST## lines between the AUTOMAGIC KERNELS LIST markers will be modified## by the debian update-grub script except for the default options below...## ## End Default Options ##
The update-grub utility uses the directives in this part of menu.lst to configuremenu.lst when it updates this file. This part of the file is well commented; commentsbegin with two pound signs (##). Directives begin with one pound sign (#). This sec-tion of the chapter discusses the directives you are most likely to want to change.Following is an example of three comments followed by one directive:
## should update-grub create memtest86 boot option## e.g. memtest86=true## memtest86=false# memtest86=true
The directive memtest86=true tells update-grub to include in menu.lst an entry torun a memory test (memtest86) instead of booting a kernel. If you do not wantupdate-grub to include a memory test entry, change the true in the last line to false:
# memtest86=false
Do not remove the pound sign from the beginning of the line because a singlepound sign indicates a line that holds a directive. (As mentioned earlier, commentlines start with two pound signs.)

652 Chapter 16 Building a Linux Kernel
When you run update-grub, it updates the menu.lst file based on the kernels in the/boot directory and the directives in the Automagic Kernels List. In the followingexample, update-grub finds three kernels and the memtest86 utility in /boot:
$ sudo update-grubSearching for GRUB installation directory ... found: /boot/grubTesting for an existing GRUB menu.lst file ... found: /boot/grub/menu.lstSearching for splash image ... none found, skipping ...Found kernel: /boot/vmlinuz-2.6.20-15-genericFound kernel: /boot/vmlinuz-2.6.20-13-genericFound kernel: /boot/vmlinuz-2.6.20-12-genericFound kernel: /boot/memtest86+.binUpdating /boot/grub/menu.lst ... done
List of Directives
The following directives can appear within the Automagic Kernels List section ofmenu.lst.
alternative=true|falseWhen set to true (default), causes update-grub to create alternative stanzas for eachkernel. This option works in conjunction with altoption.
altoption=(string) optionsSpecifies information that update-grub provides in alternative stanzas: string, whichmust be enclosed within parentheses, is appended to the title line, and options is aSPACE-separated list of options that are appended to the kernel line. This option hasmeaning only if alternatives is set to true. The default value of (recovery mode) sin-gle provides recovery mode menu entries for each kernel. See kopt and defoptionsfor more information on options.
defoptions=optionsThe options is a string that update-grub appends to the kernel line in the defaultstanzas but not in the alternative stanzas. See kopt and altoption for more informa-tion on options.
groot=(devX,Y) Specifies the default device that update-grub places in the root command of eachstanza. This device holds the /boot directory that contains the kernel file. Thisdirective starts numbering partitions at 0, while in most other situations partitionsare numbered starting at 1. For example, groot=(hd0,0) would generate the lineroot (hd0,0), specifying that the /boot directory is located on first hard disk, firstpartition (hard disk drive 0, partition 1)—typically sda1. The string (hd1,4) refersto the second hard disk, first logical partition (logical partitions usually start at 5,even if there are fewer than four primary partitions; see page 31).
howmany=num |allThe num specifies the maximum number of kernels update-grub creates stanzas for.Does not count alternative stanzas. Setting howmany to all includes all kernels.
kopt=root=dev optionsSpecifies the part of the kernel command of each stanza that tells the kernel thelocation of the root device (/). The dev can be the device name of a partition or a

grub: The Linux Boot Loader 653
UUID (page 576), which the following example uses. The comments in the exampleexplain how to specify kernel-specific devices and options. The options, such as ro(readonly) or acip=off (disables ACIP), is a SPACE-separated list that grub passes tothe kernel in all stanzas. The options are the same as the parameters you can specifyon the boot command line (page 63). See also defoptions and altoption.
## default kernel options for automagic boot options## If you want special options for specific kernels use kopt_x_y_z## where x.y.z is kernel version. Minor versions can be omitted.## e.g. kopt=root=/dev/hda1 ro## kopt_2_6_8=root=/dev/hdc1 ro## kopt_2_6_8_2_686=root=/dev/hdc2 ro# kopt=root=UUID=46f9dd87-4a2c-45f5-9177-3327567da56e ro
memtest86=true |falseWhen set to true (default), creates a stanza that calls the memory testing programmemtest86, instead of booting a kernel.
updatedefaultentry=true|falseWhen set to false (default), update-grub sets the default line in menu.lst so that italways specifies the newest kernel. As a result, grub automatically boots the newestkernel by default. When set to true, update-grub sets the default line in menu.lst sothat it always specifies the same kernel, even when it adds newer kernels to menu.lst.
grub-install: Installs the MBR and grub Files
The grub-install utility installs the MBR and the files, such as the *stage* files (thegrub images), that grub needs to boot the system. This utility takes a single argu-ment, the name of the device that is to hold the MBR. You can specify the devicename as a grub device name (e.g., hd0) or a device filename (e.g., /dev/hda). The/boot/grub/device.map lists both forms of the name of the device that holds theMBR. The following example shows grub-install installing files in the default loca-tion (/boot/grub) and the MBR on device /dev/hda:
$ sudo grub-install /dev/hdaInstallation finished. No error reported.This is the contents of the device map /boot/grub/device.map.Check if this is correct or not. If any of the lines is incorrect,fix it and re-run the script 'grub-install'.
$ cat /boot/grub/device.map(hd0) /dev/hda
Reinstalling the MBR
The following procedure reinstalls the MBR, as is necessary when it gets overwrit-ten by a Windows installation:
1. Boot the system using an Ubuntu live (installation) CD/DVD.
2. Open a terminal emulator window (Menubar: Applications AccessoriesTerminal).

654 Chapter 16 Building a Linux Kernel
3. Give the following commands, substituting the name of the device that holds the root partition (e.g., /dev/sda2) for /dev/xxx. Substitute the name of the drive that you want to install the MBR on (e.g., /dev/sda) for /dev/yyy. Do not forget to unmount /mnt when you are done.
a. If the system does not have a separate boot partition, use these commands:
$ sudo mount /dev/xxx /mnt$ sudo grub-install --root-directory=/mnt /dev/yyyInstallation finished. No error reported.This is the contents of the device map /mnt/boot/grub/device.map.Check if this is correct or not. If any of the lines is incorrect,fix it and re-run the script 'grub-install'.$ cat /boot/grub/device.map(hd0) /dev/hda$ sudo umount /mnt
b. If the system does have a separate boot partition, use these commands, substituting the name of the device that holds the boot partition (e.g., /dev/hda1) for /dev/zzz:
$ sudo mount /dev/xxx /mnt$ sudo mount /dev/zzz /mnt/boot$ sudo grub-install --root-directory=/mnt /dev/yyyInstallation finished. No error reported.This is the contents of the device map /mnt/boot/grub/device.map.Check if this is correct or not. If any of the lines is incorrect,fix it and re-run the script 'grub-install'.$ cat /boot/grub/device.map(hd0) /dev/hda$ sudo umount /mnt
4. Reboot the system. Remove the CD/DVD when the system asks you to.
5. Continue to reboot the system from the hard drive you specified in place of /dev/xxx.
dmesg: Displays Kernel Messages
The dmesg utility displays the kernel-ring buffer, where the kernel stores messages.When the system boots, the kernel fills this buffer with messages related to hard-ware and module initialization. Messages in the kernel-ring buffer are often usefulfor diagnosing system problems.
When you run dmesg, it displays a lot of information. It is frequently easier to pipethe output of dmesg through less or grep to find what you are looking for. Forexample, if you find that your hard disks are performing poorly, you can use dmesgto check whether they are running in DMA mode:

Chapter Summary 655
$ dmesg | grep DMA...[ 23.259422] ata1: SATA max UDMA/133 cmd 0x9F0 ctl 0xBF2 bmdma 0xE000 irq 5[ 23.259478] ata2: SATA max UDMA/133 cmd 0x970 ctl 0xB72 bmdma 0xE008 irq 5...
The preceding lines tell you which mode each SATA device is operating in. If youare having problems with the Ethernet connection, search the dmesg log for eth:
$ dmesg | grep ethforcedeth.c: Reverse Engineered nForce ethernet driver. Version 0.54.eth0: forcedeth.c: subsystem: 0147b:1c00 bound to 0000:00:04.0eth0: no IPv6 routers present
If everything is working properly, dmesg displays the hardware configurationinformation for each network interface.
Another common source of problems is the Direct Rendering Infrastructure (DRI),which allows graphics drivers direct access to the kernel. The corresponding kernelcomponent is the Direct Rendering Module (DRM—not to be confused with DigitalRights Management).
$ dmesg | grep drm[drm] AGP 0.99 Aperture @ 0xd8000000 64MB[drm] Initialized radeon 1.7.0 20020828 on minor 0[drm] Loading R200 Microcode
This output tells you that an ATi Radeon graphics card is configured correctly:Any configuration problems must be in the /etc/X11/xorg.conf file. The nVidiabinary drivers do not use DRI. The dmesg log is a good place to start when diag-nosing faults. If you have configured a system service incorrectly, this log quicklyfills up with errors.
Chapter Summary
You can build a Linux kernel from the source code. Sometimes you do not need tobuild a kernel; instead, you can change many aspects of the kernel by using bootoptions in /boot/grub/menu.lst. You can dynamically change options by modifying/etc/sysctl.conf.
Before you can build a Linux kernel, you must have the kernel source files on thesystem. These files are frequently located in /usr/src/linux*. Once you have thesource files, you need to configure the kernel, clean the source tree, compile the ker-nel and the loadable modules, and install the kernel and loadable modules.
The grub boot loader is a small program that controls the process of bringing thesystem up. The update-grub utility updates the menu.lst file so you can boot thenew kernel.

656 Chapter 16 Building a Linux Kernel
The dmesg utility displays the kernel-ring buffer, where the kernel stores messages.You can use this utility to help diagnose boot-time problems.
Exercises
1. What is the purpose of the kernel?
2. How would you display a list of all loaded modules in the current kernel?
3. How would you use aptitude to download the source code for the most recently released version of the Ubuntu kernel? Where and in what form does the source code exist after you download it? How and where would you unpack the source code so that you could work with it?
4. How would you display information from the kernel about the hard disk on the first IDE channel?
5. The acpi=off kernel argument prevents acpid from starting. How would you use this argument?
6. What is a boot loader?
Advanced Exercises
7. Why would you use the ––append-to-version option to the make-kpkg util-ity when compiling a kernel?
8. You have just installed an Adaptec SCSI card. How can you find out whether it has been recognized and which entry in /dev represents it?
9. When you install an experimental kernel for testing purposes, how do you instruct grub not to load it by default?
10. How would you obtain a list of all network-related kernel parameters?

657657
17Chapter17The system administrator has many responsibilities. Thischapter discusses tasks not covered in Chapter 12, includingconfiguring user and group accounts, backing up files, sched-uling tasks, general problem solving, and using the system logdaemon, syslogd.
In This Chapter
Configuring User and Group Accounts . . . . . . . . . . . . . . . . . . 658
Backing Up Files . . . . . . . . . . . . . . 662
System Reports . . . . . . . . . . . . . . . 671
Keeping Users Informed . . . . . . . . 677
Solving Problems . . . . . . . . . . . . . 679
Speeding Up the System . . . . . . . 680
Keeping the System Secure . . . . . 682
logrotate: Manages Log Files . . . . 684
Disk Quota System . . . . . . . . . . . . 687
syslogd: Logs System Messages . . . . . . . . . . . . . . . . . . 688
17
Administration Tasks

658 Chapter 17 Administration Tasks
Configuring User and Group Accounts
More than a username is required for a user to be able to log in and use a system.That is, a user must have the necessary files, directories, permissions, and usually apassword to log in. At a minimum a user must have an entry in the /etc/passwd and/etc/shadow files and a home directory. This section describes several ways you canwork with user accounts. Refer to Chapter 22 if you want to run NIS to manage thepasswd database.
users-admin: Manages User Accounts
The Users Settings window (Figure 17-1) enables you to add, delete, and modifysystem users and groups. To display this window, select Main menu: SystemAdministration Users and Groups or give the command gksudo users-admin froma terminal emulator or Run Application window (ALT-F2).
Modifying or addinga user
To modify the properties of an existing user, highlight the user you want to workwith in the User Settings window and click Properties. To create a new user, clickAdd User in the Users Settings window. The users-admin utility displays the Accounttab of the Account Properties window (Figure 17-3) or New User Account window.The two windows are similar.
Account tab Modify or enter information for the user. At a minimum you must enter a usernameand password. Click the User Privileges tab.
User Privileges tab The User Privileges tab (Figure 17-2) enables you to add and remove privileges for auser. Place a tick in the check box next to each of the privileges you want to grant auser; remove the tick from those privileges you do not want to grant. The mostimportant of these privileges is Administer the system. Putting a tick in this boxadds the user to the admin group, which in turn allows the user to use sudo(page 490) to gain root privileges. Click OK.
Advanced tab The Advanced tab allows you to modify the home directory, shell, group, and ID ofthe user (UID). The users-admin utility fills in these values for a new user. Typicallyyou do not need to modify these entries.
Figure 17-1 The Users Settings window

Configuring User and Group Accounts 659
When you are finished entering information under each of the tabs for the user,click OK. At this point users-admin adds the user to or modifies the user on the sys-tem and closes the window, leaving the Users Settings window visible.
Figure 17-2 The Account Properties window, User Privileges tab
Figure 17-3 The Account Properties window, Account tab

660 Chapter 17 Administration Tasks
Working withgroups
Click Manage Groups in the Users Settings window to work with groups; users-admin displays the Groups Settings window (Figure 17-4). To create a group, clickAdd Group and specify the name and number (GID) of the group. Put a tick in thecheck box next to each user who you want to be a member of the group and clickOK. To change the name or number of a group or to add or remove users from agroup, highlight the group in the Groups Settings window and click Properties.Make the changes you want, and then click OK. To remove a group, highlight thegroup and click Delete. See page 558 for more information on groups.
When you are finished adding and modifying users and groups, click Close.
useradd: Adds a User Account
The useradd utility adds a new user account to the system. By default, useraddassigns the next highest unused user ID to a new account and specifies bash asthe user’s login shell. The following example adds entries to the /etc/passwd and/etc/shadow files, creates the user’s home directory (in /home), specifies theuser’s group ID, and puts the user’s full name in the comment field. The groupID you specify must exist in /etc/group or the command will fail. Use groupadd toadd a group.
$ sudo useradd -g 1105 -c "Max R." max
The useradd utility puts a ! in the password field of the shadow file (page 562) toprevent the user from logging in until you use passwd to assign a password to thatuser. Based on the /etc/login.defs file, useradd creates a home directory for the newuser. When doing so, it copies the contents of /etc/skel, which contains bash andother startup files, to that directory. For more information on adding user informa-tion, see the useradd man page.
Under some distributions, adduser is a link to useradd. Under Ubuntu, it is a differ-ent program. See the adduser man page for more information.
Figure 17-4 The Groups Settings window

Configuring User and Group Accounts 661
userdel: Removes a User Account
The userdel utility deletes a user’s account. If appropriate, back up the files belong-ing to the user before deleting them. The following command removes Max’saccount. The ––remove (–r) option causes the command to remove his home direc-tory hierarchy:
$ sudo userdel --remove max
See the userdel man page for more information.
usermod: Modifies a User Account
To turn off a user’s account temporarily, you can use usermod to change the expira-tion date for the account. Because it specifies that his account expired in the past(December 31, 2007), the following command line prevents Max from logging in:
$ sudo usermod -e "12/31/07" max
See the usermod man page for more information.
groupadd: Adds a Group
Just as useradd adds a new user to the system, so groupadd adds a new group byadding an entry to /etc/group (page 558). The following example creates a groupnamed pubs:
$ sudo groupadd -g 1024 pubs
Unless you use the –g option to assign a group ID, the system picks the next avail-able sequential number greater than 1000. The –o option allows the group ID to benonunique, which allows you to assign multiple names to a group ID.
groupdel: Removes a Group
The analogue of userdel for groups is groupdel, which takes a group name as anargument. You can also use groupmod to change the name or group ID of a group,as in the following examples:
$ sudo groupmod -g 1025 pubs$ sudo groupmod -n manuals pubs
The first example gives the previously created pubs group a new group ID number.The second example renames the pubs group to manuals.
Changing group ID numberscaution The groupmod utility does not change group numbers in /etc/passwd when you renumber a
group. Instead, you must edit /etc/passwd and change the entries manually. If you change the num-ber of a group, files that are associated with the group will no longer be associated with the group.Rather, they may be associated with no group or with another group with the old group ID number.

662 Chapter 17 Administration Tasks
Backing Up Files
One of the most oft-neglected tasks of system administration is making backup cop-ies of files on a regular basis. The backup copies are vital in three instances: whenthe system malfunctions and files are lost, when a catastrophic disaster (fire, earth-quake, and so on) occurs, and when a user or the system administrator deletes orcorrupts a file by accident. Even when you set up RAID (page 34), you still need toback up files. Although RAID can provide fault tolerance (helpful in the event ofdisk failure), it does not help when a catastrophic disaster occurs or when a file iscorrupted or removed accidentally. It is a good idea to have a written backup policyand to keep copies of backups offsite (in another building, at home, or at a differentfacility or campus) in a fireproof vault or safe.
The time to start thinking about backups is when you partition the disk. Refer to “Par-titioning a Disk” on page 31. Make sure the capacity of the backup device and yourpartition sizes are comparable. Although you can back up a partition onto multiplevolumes, it is easier not to—and it is much easier to restore data from a single volume.
You must back up filesystems regularly. Backup files are usually kept on magnetictape, external hard disk, or another removable medium. Alternatively, you can keepbackup files on a remote system. How often and which files you back up depend onthe system and your needs. Use this criterion when determining a backup schedule:If the system crashes, how much work are you willing to lose? Ideally you wouldback up all files on the system every few minutes so you would never lose more thana few minutes of work.
Of course, there is a tradeoff: How often are you willing to back up the files? Thebackup procedure typically slows the system for users, takes a certain amount ofyour time, and requires that you have and store the media holding the backup.Avoid backing up an active filesystem; the results may be inconsistent, and restoringfrom the backup may be impossible. This requirement is a function of the backupprogram and the filesystem you are backing up.
Another question is when to run the backup. Unless you plan to kick users off andbring the system down to single-user mode (not a user-friendly practice), you willwant to perform this task when the machine is at its quietest. Depending on the useof the system, sometime in the middle of the night can work well. Then the backupis least likely to affect users, and the files are not likely to change as they are beingread for backup.
A full backup makes copies of all files, regardless of when they were created oraccessed. An incremental backup makes copies of those files that have been createdor modified since the last (usually full) backup.
The more people using the system, the more often you should back up the filesys-tems. One popular schedule is to perform an incremental backup one or two times aday and a full backup one or two times a week.

Backing Up Files 663
Choosing a Backup Medium
If the local system is connected to a network, you can write backups to a drive onanother system. This technique is often used with networked computers to avoidthe cost of having a backup drive on each computer in the network and to simplifymanagement of backing up many computers in a network. Although tapes are stillused for backups, system administrators are using hard disks for this purpose morefrequently. Backing up to a hard disk on a remote system is cost-effective, reliable,and practical. Because hard disks hold many gigabytes of data, using them simpli-fies the task of backing up the system, making it more likely that you will take careof this important task regularly. Other options for holding backups are writableCDs and DVDs. These devices, although not as cost-effective or able to store asmuch information as hard disk or tape systems, offer the benefit of convenience.
Backup Utilities
A number of utilities are available to help you back up a system, and most workwith any media. Most Linux backup utilities are based on one of the archive pro-grams—tar or cpio—and augment these basic programs with bookkeeping supportfor managing backups conveniently.
You can use any of the tar, cpio, or dump/restore utilities to construct full or partialbackups of a system. Each utility constructs a large file that contains, or archives,other files. In addition to file contents, an archive includes header information foreach file it holds. This header information can be used when extracting files from thearchive to restore file permissions and modification dates. An archive file can besaved to disk, written to tape, or shipped across the network while it is being created.
In addition to helping you back up the system, these programs offer a convenientway to bundle files for distribution to other sites. The tar program is often used forthis purpose, and some software packages available on the Internet are bundled as tararchive files. A deb file (page 599) is an archive bundled using the ar archive utility.
amanda The amanda (Advanced Maryland Automatic Network Disk Archiver) utility(www.amanda.org), which is one of the more popular backup systems, uses dump ortar and takes advantage of Samba to back up Windows systems. The amanda utilitybacks up a LAN of heterogeneous hosts to a hard disk or tape. Relevant softwarepackages are amanda-common, amanda-client, and amanda-server.
tar: Archives Files
The tar (tape archive) utility writes files to and retrieves files from an archive; it can com-press this archive to conserve space. If you do not specify an archive device, tar writes tostandard output and reads from standard input. With the –f (––file) option, tar uses theargument to –f as the name of the archive device. You can use this option to refer to adevice on another system on the network. Although tar has many options, you need onlya few in most situations. The following command displays a complete list of options:
$ tar ––help | less

664 Chapter 17 Administration Tasks
Most options for tar can be given either in a short form (a single letter) or as adescriptive word. Descriptive-word options are preceded by two hyphens, as in––help. Single-letter options can be combined into a single command line argumentand need not be preceded by a hyphen (for consistency with other utilities, it is goodpractice to use the hyphen anyway).
Although the following two commands look quite different, they specify the sametar options in the same order. The first version combines single-letter options into asingle command line argument; the second version uses descriptive words for thesame options:
$ sudo tar –ztvf /dev/st0$ sudo tar ––gzip ––list ––verbose ––file /dev/st0
Both commands tell tar to generate a (v, verbose) table of contents (t, list) from thetape on /dev/st0 (f, file), using gzip (z, gzip) to decompress the files. Unlike the orig-inal UNIX tar utility, the GNU version strips the leading / from absolute pathnames.
The options in Table 17-1 tell the tar program what to do. You must include exactlyone of these options in a tar command.
The –c, –t, and –x options are used most frequently. You can use many otheroptions to change how tar operates. The –j option, for example, compresses ordecompresses the file by filtering it through bzip2 (page 160).
cpio: Archives Files
The cpio (copy in/out) program is similar to tar but can read and write archive filesin various formats, including the one used by tar. Normally cpio reads the names ofthe files to add to the archive from standard input and produces the archive file as
Table 17-1 tar options
Option Effect
––append (–r) Appends files to an archive
––catenate (–A) Adds one or more archives to the end of an existing archive
––create (–c) Creates a new archive
––delete Deletes files in an archive (not on tapes)
––dereference (–h) Follows symbolic links
––diff (–d) Compares files in an archive with disk files
––extract (–x) Extracts files from an archive
––help Displays a help list of tar options
––list (–t) Lists the files in an archive
––update (–u) Like the –r option, but the file is not appended if a newer version is already in the archive

Backing Up Files 665
standard output. When extracting files from an archive, it reads the archive as stan-dard input.
As with tar, some options can be given in both a short, single-letter form and a moredescriptive word form. However, unlike with tar, the syntax of the two forms in cpiodiffers when the option must be followed by additional information. In the shortform, you must include a SPACE between the option and the additional information;with the word form, you must separate the two with an equal sign and no SPACEs.
Running cpio with the ––help option displays a complete list of options.
Performing a Simple Backup
When you prepare to make a major change to a system, such as replacing a diskdrive, upgrading to a new release, or updating the Linux kernel, it is a good idea toarchive some or all of the files so you can restore any that become damaged if some-thing goes wrong. For this type of backup, tar or cpio works well. For example, ifyou have a SCSI tape drive as device /dev/st0 (or it could be a hard disk at/dev/hdb) that is capable of holding all the files on a single tape, you can use the fol-lowing commands to construct a backup tape of the entire system:
$ cd /$ sudo tar –cf /dev/st0 .
All the commands in this section start by using cd to change to the root directory soyou are sure to back up the entire system. The tar command then creates an archive(c) on the device /dev/st0 (f). To compress the archive, replace the preceding tarcommand with the following command, which uses j to call bzip2:
$ sudo tar –cjf /dev/st0 .
You can back up a system with a combination of find and cpio. The following com-mands create an output file and set the I/O block size to 5120 bytes (the default is512 bytes):
$ cd /$ sudo find . –depth | cpio –oB > /dev/st0
The next command restores the files in the /home directory from the precedingbackup. The options extract files from an archive (–i) in verbose mode, keeping themodification times and creating directories as needed.
$ cd /$ sudo cpio –ivmd /home/\* < /dev/st0
Although all the archive programs work well for simple backups, utilities such asamanda (page 663) provide more sophisticated backup and restore systems. Forexample, to determine whether a file is in an archive, you must read the entirearchive. If the archive is split across several tapes, this process is particularly tire-some. More sophisticated utilities, including amanda, assist you in several ways,including keeping a table of contents of the files in a backup.

666 Chapter 17 Administration Tasks
dump, restore: Back Up and Restore Filesystems
The dump utility (part of the dump package) first appeared in UNIX version 6. Itbacks up either an entire ext2 or ext3 filesystem or only those files that havechanged since a recent dump. The restore utility can then restore an entire filesystem,a directory hierarchy, or an individual file. You will get the best results if you per-form a backup on a quiescent system so that the files are not changing as you makethe backup.
The next command backs up all files (including directories and special files) on theroot (/) partition to SCSI tape 0. Frequently there is a link to the active tape drive,named /dev/tape, which you can use in place of the actual entry in the /dev directory.
$ sudo dump -0uf /dev/st0 /
The –0 option specifies that the entire filesystem is to be backed up (a full backup).There are ten dump levels: 0–9. Zero is the highest (most complete) level and alwaysbacks up the entire filesystem. Each additional level is incremental with respect tothe level above it. For example, 1 is incremental to 0 and backs up only those filesthat have changed since the last level 0 dump; 2 is incremental to 1 and backs uponly those files that have changed since the last level 1 dump; and so on. You canconstruct a flexible schedule using this scheme. You do not need to use sequentialnumbers for backup levels, however. For example, you can perform a level 0 dump,followed by level 2 and 5 dumps.
The –u option updates the /etc/dumpdates file (page 557) with filesystem, date, anddump level information for use by the next incremental dump. The –f option and itsargument write the backup to the device named /dev/st0.
The next command makes a partial backup containing all files that have changedsince the last level 0 dump. The first argument (1) specifies a level 1 dump:
$ sudo dump -1uf /dev/st0 /
To restore an entire filesystem from a dump backup, first restore the most recentcomplete (level 0) backup. Perform this operation carefully because restore can over-write the existing filesystem. Change directories to the directory the filesystem ismounted on (/xxx in the example) and give a restore command as shown following:
$ cd /xxx$ sudo restore -if /dev/st0
Exclude some directories from a backup
tip In practice, you will likely want to exclude some directories from the backup process. For example,not backing up /tmp or /var/tmp can save room in the archive. Also, do not back up the files in/proc. Because the /proc pseudofilesystem is not a true disk filesystem but rather a way for theLinux kernel to provide information about the operating system and system memory, you need notback up /proc; you cannot restore it later. Similarly, you do not need to back up filesystems thatare mounted from disks on other systems on the network. Do not back up FIFOs; the results areunpredictable. If you plan on using a simple backup method, similar to those just discussed, cre-ate a file naming the directories to exclude from the backup, and use the appropriate option withthe archive program to read the file.

Backing Up Files 667
The –i option invokes an interactive mode that allows you to choose which files anddirectories to restore. As with dump, the –f option specifies the name of the devicethat the backup medium is mounted on. When restore finishes, load the next lower-level (higher-number) dump tape and issue the same restore command. If multipleincremental dumps have been made at a particular level, always restore with themost recent one. You do not need to invoke restore with special arguments torestore an incremental dump; it will restore whatever appears on the tape.
You can also use restore to extract individual files from a tape by using the –xoption and specifying the filenames on the command line. Whenever you restore afile, the restored file appears in the working directory. Before restoring files, makesure you are working in the correct directory.
The following commands restore the etc/fstab file from the tape on /dev/st0. Thefilename of the dumped file does not begin with / because all dumped pathnamesare relative to the filesystem that you dumped—in this case /. Because the restorecommand is given from the / directory, the file will be restored to its original loca-tion of /etc/fstab:
$ cd /$ sudo restore -xf /dev/st0 etc/fstab
If you use the –x option without specifying a file or directory name to extract, restoreextracts the entire dumped filesystem. Use the –r option to restore an entire filesys-tem without using the interactive interface. The following command restores the file-system from the tape on /dev/st0 to the working directory without interaction:
$ sudo restore -rf /dev/st0
You can also use dump and restore to access a tape drive or hard disk on anothersystem. Specify the file/directory as host:file, where host is the hostname of the sys-tem the tape or disk is on and file is the file or directory you want to dump/restore.
Occasionally, restore may prompt you with the following message:
You have not read any volumes yet.Unless you know which volume your file(s) are on you should startwith the last volume and work towards the first.Specify next volume #:
Enter 1 (one) in response to this prompt. If the filesystem spans more than one tapeor disk, this prompt allows you to switch tapes.
At the end of the dump, you will receive another prompt:
set owner/mode for '.'? [yn]
Answer y to this prompt when you are restoring entire filesystems or files thathave been accidentally removed. Doing so will restore the appropriate permis-sions to the files and directories being restored. Answer n if you are restoring adump to a directory other than the one it was dumped from. The working direc-tory permissions and owner will then be set to those of the user doing the restore(typically root).

668 Chapter 17 Administration Tasks
A variety of device names can access the /dev/st0 device. Each name accesses a dif-ferent minor device number that controls some aspect of how the tape drive is used.After you complete a dump using /dev/st0, the tape drive automatically rewinds thetape. Use the nonrewinding SCSI tape device (/dev/nst0) to keep the tape fromrewinding on completion. This feature allows you to back up multiple filesystems tothe same volume.
Following is an example of backing up a system where the /home, /usr, and /vardirectories reside on different filesystems:
$ sudo dump -0uf /dev/nst0 /home$ sudo dump -0uf /dev/nst0 /usr$ sudo dump -0uf /dev/st0 /var
The preceding example uses the nonrewinding device for the first two dumps. If youuse the rewinding device, the tape rewinds after each dump, and you are left withonly the last dump on the tape.
You can use mt (magnetic tape), which is part of the cpio package, to manipulatefiles on a multivolume dump tape. The following mt command positions the tape(fsf 2 instructs mt to skip forward past two files, leaving the tape at the start of thethird file). The restore command restores the /var filesystem from the previousexample:
$ sudo mt -f /dev/st0 fsf 2$ sudo restore rf /dev/st0
Scheduling Tasks
It is a good practice to schedule certain routine tasks to run automatically. Forexample, you may want to remove old core files once a week, summarize account-ing data daily, and rotate system log files monthly.
cron and anacron: Schedule Routine Tasks
The cron daemon executes scheduled commands periodically. This daemon can exe-cute commands at specific times on systems that are always running. The anacronutility executes scheduled commands when it is called. It works well on laptops andother systems that are not on all the time. The anacron init scrip, which calls ana-cron, will not run commands when a system is running on batteries (i.e., not on AC).
Crontab Files
The cron daemon reads the commands it is to execute from crontab files. Users can usethe crontab utility to set up personal crontab files in /var/spool/cron/crontabs. Systemcrontab files are kept in the /etc/cron.d directory and in the /etc/crontab file. (Theterm crontab has three meanings: It refers to a text file in a specific format [a crontabfile], it is the name of a utility [crontab], and it is the name of a file [/etc/crontab].)

Scheduling Tasks 669
By default, Ubuntu is set up with no restrictions on who can have cron run com-mands in their personal crontab files. See cron.allow and cron.deny on page 557 forways of restricting this access.
System crontab files Crontab files specify how often cron is to run a command. A line in a systemcrontab file, such as /etc/crontab, has the following format:
minute hour day-of-month month day-of-week user command
The first five fields indicate when cron will execute the command. The minute is thenumber of minutes after the start of the hour, the hour is the hour of the day basedon a 24-hour clock, the day-of-month is a number from 1 to 31, and the day-of-week is a number from 0 to 7, with 0 and 7 indicating Sunday. An asterisk (*) sub-stitutes for any value in a field. The user is the username or user ID of the user thatthe command will run as. Following are some examples:
20 1 * * * root /usr/local/bin/checkit25 9 17 * * root /usr/local/bin/monthly.check40 23 * * 7 root /usr/local/bin/sunday.check
All three lines run as their commands with root privileges. The first line runs checkitevery day at 1:20 AM. The second line runs monthly.check at 9:25 AM on day 17 ofevery month. The third line runs sunday.check at 11:40 PM every Sunday. Give thecommand man 5 crontab to obtain more information on crontab files.
User crontab files A user crontab file has the same format as a system crontab file except that it doesnot include the user field because it always runs as the user who created it. Users canwork with their own crontab files by giving the command crontab followed by –l tolist the file, –r to remove the file, or –e to edit the file. This command uses the nanoeditor by default; if you prefer, export (page 435) and set the VISUAL or EDITORenvironment variable to the textual editor of your choice. See the crontab man pagefor more information.
/etc/crontab Following is the default /etc/crontab file. Comments begin with a pound sign (#).The file sets the SHELL and PATH (page 302) environment variables.
$ cat /etc/crontab# /etc/crontab: system-wide crontab# Unlike any other crontab you don't have to run the 'crontab'# command to install the new version when you edit this file# and files in /etc/cron.d. These files also have username fields,# that none of the other crontabs do.
SHELL=/bin/shPATH=/usr/local/sbin:/usr/local/bin:/sbin:/bin:/usr/sbin:/usr/bin
# m h dom mon dow user command17 * * * * root cd / && run-parts --report /etc/cron.hourly25 6 * * * root test -x /usr/sbin/anacron || ( cd / && run-parts --report /etc/cron.daily )47 6 * * 7 root test -x /usr/sbin/anacron || ( cd / && run-parts --report /etc/cron.weekly )52 6 1 * * root test -x /usr/sbin/anacron || ( cd / && run-parts --report /etc/cron.monthly )#
run-parts The run-parts utility runs all the executable files in the directory named as its argu-ment. The ––report option affects commands that produce output. It sends thename of the command to standard output or standard error—whichever the com-mand sends its first output to.

670 Chapter 17 Administration Tasks
The cron daemon runs the line that begins with 17 at 17 minutes past every hour.First the command cds to root (/). The AND Boolean operator (&&) then executesrun-parts, which executes all files in the /etc/cron.hourly directory.
The next three lines first test whether the /usr/sbin/anacron file is executable. If thefile is executable, the OR Boolean operator (| |) causes the shell to ignore the rest ofthe line. Thus, if anacron is installed and executable, this file executes only the filesin the cron.hourly directory. If anacron is not installed or is not executable, each ofthese three lines cds to root (/) and executes the files in the specified directory.
/etc/cron.d/anacron In addition to the /etc/crontab file, cron reads the files in /etc/cron.d for commands toexecute. The following file causes cron to run the anacron init script once a day at7:30 AM. This init script runs anacron if the system is up and not running on batteries):
$ cat /etc/cron.d/anacron# /etc/cron.d/anacron: crontab entries for the anacron package
SHELL=/bin/shPATH=/usr/local/sbin:/usr/local/bin:/sbin:/bin:/usr/sbin:/usr/bin
30 7 * * * root test -x /etc/init.d/anacron && /usr/sbin/invoke-rc.d anacron start >/dev/null
/etc/anacrontab When anacron is run, it reads the commands it is to execute from the /etc/anacrontabfile. The anacron utility keeps track of the last time it ran each of its jobs so when it iscalled, it can tell which jobs need to be run. This file is where the files in thecron.daily, cron.weekly, and cron.monthly directories get executed on a system run-ning anacron.
$ cat /etc/anacrontab# /etc/anacrontab: configuration file for anacron
# See anacron(8) and anacrontab(5) for details.
SHELL=/bin/shPATH=/usr/local/sbin:/usr/local/bin:/sbin:/bin:/usr/sbin:/usr/bin
# These replace cron's entries1 5 cron.daily nice run-parts --report /etc/cron.daily7 10 cron.weekly nice run-parts --report /etc/cron.weekly@monthly 15 cron.monthly nice run-parts --report /etc/cron.monthly
An entry in the anacrontab file has the following format:
period delay identifier command
where the period is the frequency in days (how often) that anacron executes thecommand, the delay is the number of minutes after anacron starts that it executesthe command, and the identifier is the name of the file in /var/spool/anacron thatanacron uses to keep track of when it last executed the command.
The cron.daily job in anacrontab runs the executable files in /etc/cron.daily everyday, five minutes after anacron starts. If the system is running at 7:30 AM,/etc/cron.d/anacron calls the anacron init script, and this job runs at 7:35 AM.When Ubuntu boots, the rc scripts call the anacron init script. If the system is notrunning at 7:30 AM, the cron.daily job has not been run for at least a day, and thesystem is not running on batteries, the job runs five minutes after the system boots.

System Reports 671
at: Runs Occasional Tasks
Like the cron utility, at runs a job sometime in the future. Unlike cron, at runs a jobonly once. For instance, you can schedule an at job that will reboot the system at3:00 AM (when all users are probably logged off):
$ sudo at 3amwarning: commands will be executed using /bin/shat> rebootat> CONTROL-D <EOT>job 1 at 2008-02-01 03:00
It is also possible to run an at job from within an at job. For instance, an at jobmight check for new patches every 18 days—something that would be more diffi-cult with cron. See the at man page for more information.
By default, Ubuntu is set up with restrictions that prevent some system accountsfrom running at. See at.allow and at.deny on page 557 for more information.
System Reports
Many utilities report on one thing or another. The who, finger, ls, ps, and other utili-ties, for example, generate simple end-user reports. In some cases, these reports canhelp with system administration. This section describes utilities that generate morein-depth reports that can provide greater assistance with system administrationtasks. Linux has many other report utilities, including (from the sysstat package) sar(system activity report), iostat (input/output and CPU statistics), and mpstat (proces-sor statistics); (from the net-tools package) netstat (network report); and (from thenfs-common package) nfsstat (NFS statistics).
vmstat: Reports Virtual Memory Statistics
The vmstat utility (procps package) generates virtual memory information alongwith (limited) disk and CPU activity data. The following example shows virtualmemory statistics at three-second intervals for seven iterations (from the arguments3 7). The first line covers the time since the system was last booted; each subsequentline covers the period since the previous line.
Running cron jobs at the right time
tip As installed, if the /usr/sbin/anacron file is present and executable, cron uses anacron to rundaily, weekly, and monthly cron jobs. The anacron utility always runs the jobs at 7:35 in the morn-ing, or as soon as possible after that. Refer to “run-parts” on page 669 and the section on/etc/anacrontab. An easy way to get cron to run these jobs as scheduled in /etc/crontab is tochange permissions on the anacron file so it is not executable:
$ sudo chmod 644 /usr/sbin/anacron
If you want to reenable anacron, change its permissions back to 755.

672 Chapter 17 Administration Tasks
$ vmstat 3 7procs -----------memory---------- ---swap-- -----io---- --system-- ----cpu---- r b swpd free buff cache si so bi bo in cs us sy id wa 0 2 0 684328 33924 219916 0 0 430 105 1052 134 2 4 86 8 0 2 0 654632 34160 248840 0 0 4897 7683 1142 237 0 5 0 95 0 3 0 623528 34224 279080 0 0 5056 8237 1094 178 0 4 0 95 0 2 0 603176 34576 298936 0 0 3416 141 1161 255 0 4 0 96 0 2 0 575912 34792 325616 0 0 4516 7267 1147 231 0 4 0 96 1 2 0 549032 35164 351464 0 0 4429 77 1120 210 0 4 0 96 0 2 0 523432 35448 376376 0 0 4173 6577 1135 234 0 4 0 95
The following list explains the column heads displayed by vmstat:
• procs Process information◆ r Number of waiting, runnable processes◆ b Number of blocked processes (in uninterruptable sleep)
• memory Memory information (in kilobytes)◆ swpd Used virtual memory◆ free Idle memory◆ buff Memory used as buffers◆ cache Memory used as cache
• swap System paging activity (in kilobytes per second)◆ si Memory swapped in from disk◆ so Memory swapped out to disk
• io System I/O activity (in blocks per second)◆ bi Blocks received from a block device◆ bo Blocks sent to a block device
• system (Values are per second)◆ in Interrupts (including the clock)◆ cs Context switches
• cpu Percentage of total CPU time spent in each of these states◆ us User (nonkernel)◆ sy System (kernel)◆ id Idle◆ wa Waiting for I/O
top: Lists Processes Using the Most Resources
The top utility is a useful supplement to ps. At its simplest, top displays system infor-mation at the top and the most CPU-intensive processes below the system informa-tion. The top utility updates itself periodically; type q to quit. Although you can usecommand line options, the interactive commands are often more helpful. Refer toTable 17-2 and to the top man page for more information.
Table 17-2 top: interactive commands
Command Function
A Sorts processes by age (newest first).
h or ? Displays a Help screen.

parted: Reports on and Partitions a Hard Disk 673
$ toptop - 17:58:53 up 3 days, 4:20, 1 user, load average: 2.16, 1.61, 0.83Tasks: 167 total, 5 running, 162 sleeping, 0 stopped, 0 zombieCpu(s): 1.5%us, 0.5%sy, 1.3%ni, 96.0%id, 0.2%wa, 0.6%hi, 0.0%si, 0.0%stMem: 2076092k total, 1990652k used, 85440k free, 18416k buffersSwap: 7815580k total, 34908k used, 7780672k free, 1330008k cached
PID USER PR NI VIRT RES SHR S %CPU %MEM TIME+ COMMAND31323 zach 25 0 9020 6960 396 R 63 0.3 0:17.58 bzip231327 zach 18 0 2092 596 492 R 57 0.0 0:00.92 cp31311 root 15 0 0 0 0 S 16 0.0 0:00.38 pdflush 6870 zach 27 12 331m 190m 37m R 2 9.4 198:42.98 firefox-bin31303 root 15 0 0 0 0 S 2 0.0 0:00.42 pdflush 1 root 15 0 2912 1808 488 S 0 0.1 0:01.55 init...
parted: Reports on and Partitions a Hard Disk
The parted (partition editor) utility reports on and manipulates hard disk partitions.The following example shows how to use parted from the command line. It uses theprint command to display information about the partitions on the /dev/hda drive:
$ sudo parted /dev/hda printDisk geometry for /dev/hda: 0kB - 165GBDisk label type: msdosNumber Start End Size Type File system Flags1 32kB 1045MB 1045MB primary ext3 boot2 1045MB 12GB 10GB primary ext33 12GB 22GB 10GB primary ext34 22GB 165GB 143GB extended5 22GB 23GB 1045MB logical linux-swap6 23GB 41GB 18GB logical ext37 41GB 82GB 41GB logical ext3Information: Don't forget to update /etc/fstab, if necessary.
k (kill) Prompts for a PID number and type of signal and sends the process that signal. Defaults to signal 15 (SIGTERM); specify 9 (SIGKILL) only when 15 does not work.
M Sorts processes by memory usage.
P (processor) Sorts processes by CPU usage (default).
q Quits top.
s Prompts for time between updates in seconds. Use 0 (zero) for continuous updates; such updates can slow the system by consuming a lot of resources.
SPACE Updates the display immediately.
T Sorts tasks by time.
W Writes a startup file named ~/.toprc so that the next time you start top, it uses the same parameters it is currently using.
Table 17-2 top: interactive commands (continued)

674 Chapter 17 Administration Tasks
Figure 17-5 graphically depicts the partitions shown in this example. The first linethat parted displays specifies the device being reported on (/dev/hda) and its size(165 gigabytes). The print command displays the following columns:
• Number The minor device number (page 569) of the device holding the partition. This number is the same as the last number in the device name. In the example, 5 corresponds to /dev/hda5.
• Start The location on the disk where the partition starts. The parted util-ity specifies a location on the disk as the distance (in bytes) from the start of the disk. Thus partition 3 starts 12 gigabytes from the start of the disk.
• End The location on the disk where the partition stops. Although parti-tion 2 ends 12 gigabytes from the start of the disk and partition 3 starts at the same location, parted takes care that the partitions do not overlap at this single byte.
• Size The size of the partition in kilobytes (kB), megabytes (MB), or gigabytes (GB).
• Type The partition type: primary, extended, or logical. See Figure 17-5 (next page) and page 31 for information on partitions.
• File system The filesystem type: ext2, ext3, fat32, linux-swap, and so on. See Table 13-1 on page 570 for a list of filesystem types.
• Flags The flags that are turned on for the partition, including boot, raid,and lvm. In the example, partition 1 is bootable.
In the preceding example, partition 4 defines an extended partition that includes143 gigabytes of the 165-gigabyte disk (Figure 17-5). You cannot make changes toan extended partition without affecting all logical partitions within it.
Figure 17-5 The primary and extended partitions from the example
/dev/hda /dev/hda4
Primary 2/dev/hda2
Primary 3
Primary 4(Extended)
/dev/hda3
Logical 5/dev/hda5
Logical 6/dev/hda6
Logical 7/dev/hda7
Primary 1/dev/hda1
.
.
.

parted: Reports on and Partitions a Hard Disk 675
In addition to reporting on the layout and size of a hard disk, you can use parted inter-actively to modify the disk layout. Be extremely careful when using parted in this man-ner, and always back up the system before starting to work with this utility. Changingthe partition information (the partition table) on a disk can destroy the information onthe disk. Read the parted info page before you attempt to modify a partition table.
To partition a disk, give the command parted followed by the name of the deviceyou want to work with. In the following example, after starting parted, the usergives a help (or just h) command, which displays a list of parted commands:
$ sudo parted /dev/hdbGNU Parted 1.7.1Using /dev/hdaWelcome to GNU Parted! Type 'help' to view a list of commands.(parted) help check NUMBER do a simple check on the file system cp [FROM-DEVICE] FROM-NUMBER TO-NUMBER copy file system to another partition help [COMMAND] prints general help, or help on COMMAND mklabel LABEL-TYPE create a new disklabel (partition table) mkfs NUMBER FS-TYPE make a FS-TYPE file system on partititon NUMBER mkpart PART-TYPE [FS-TYPE] START END make a partition mkpartfs PART-TYPE FS-TYPE START END make a partition with a file system move NUMBER START END move partition NUMBER name NUMBER NAME name partition NUMBER as NAME print [NUMBER] display the partition table, or a partition quit exit program rescue START END rescue a lost partition near START and END resize NUMBER START END resize partition NUMBER and its file system rm NUMBER delete partition NUMBER select DEVICE choose the device to edit set NUMBER FLAG STATE change a flag on partition NUMBER toggle [NUMBER [FLAG]] toggle the state of FLAG on partition NUMBER unit UNIT set the default unit to UNIT version displays the version of GNU Parted and copyright information(parted)
In response to the (parted) prompt, you can give the command help followed by thename of the command you want more information about. When you give a print (orjust p) command, parted displays current partition information, just as a print com-mand on the command line does.
The parted utility will not allow you to set up overlapping partitions (except for log-ical partitions overlapping their containing extended partition). Similarly, it will notallow you to create a partition that starts at the very beginning of the disk (cylinder0). Both of these situations can cause loss of data.
parted can destroy everythingcaution Be as careful with parted as you would be with a utility that formats a hard disk. Changes you
make with parted can easily result in the loss of large amounts of data. If you are using partedand have any question about what you are doing, quit with a q command before making anychanges. Once you give parted a command, it immediately makes the change you requested.

676 Chapter 17 Administration Tasks
Following are guidelines to remember when defining a partition table for a disk. Formore information refer to “Partitioning a Disk” on page 31.
• Do not delete or modify the partition that defines the extended partition unless you are willing to lose all data on all the logical partitions within the extended partition.
• If you put /boot on a separate partition, it is a good idea to put it at the beginning of the drive (partition 1) so there is no issue of Linux having to boot from a partition located too far into the drive. When you can afford the disk space, it is desirable to put each major filesystem on a separate partition. Many people choose to combine / (root), /var, and /usr into a single partition, which generally results in less wasted space but can, on rare occasions, cause problems.
• Although parted can create some types of filesystems, it is typically easiest to use parted to create partitions and then use mkfs and mkswap to create filesystems on the partitions.
The following sequence of commands defines a 300-megabyte, bootable, Linux par-tition as partition 1 on a clean disk:
# /sbin/parted /dev/hdb...Using /dev/hdb(parted) mkpart (create new partition)Partition type? primary/extended? primary (select primary partition)File system type? [ext2]? (default to an ext2 filesystem)Start? 1 (start at the beginning of the disk)End? 300m (specify a 300-megabyte partition)(parted) help set (use help to check the syntax of the set command) set NUMBER FLAG STATE change a flag on partition NUMBER
NUMBER is the partition number used by Linux. On msdos disk labels, the primary partitions number from 1 to 4, logical partitions from 5 onwards. FLAG is one of: boot, root, swap, hidden, raid, lvm, lba, hp-service, palo, prep, msftres STATE is one of: on, off(parted) set 1 boot on (turn on the boot flag on partition 1)(parted) print (verify that the partition is correct)Disk geometry for /dev/hdb: 0kB - 250GBDisk label type: msdosNumber Start End Size Type File system Flags1 1kB 300MB 300MB primary ext2 boot(parted) quitInformation: Don't forget to update /etc/fstab, if necessary.
When you specify a size within parted, you can use a suffix of k (kilobytes), m(megabytes), or g (gigabytes). After creating a partition, give a print command tosee where the partition ends. Perform this task before defining the next contiguouspartition so you do not waste space. After setting up all the partitions, exit fromparted with a quit command.

Keeping Users Informed 677
Next make a filesystem (mkfs, page 525) on each partition that is to hold a file-system (not swap). Make all partitions, except swap and /boot, of type ext3, unlessyou have a reason to do otherwise. Make the /boot partition of type ext2. Usemkswap (page 564) to set up a swap area on a partition. You can use e2label(page 525) to label a partition.
Keeping Users Informed
One of your primary responsibilities as a system administrator is communicatingwith system users. You need to make announcements, such as when the system willbe down for maintenance, when a class on some new software will be held, andhow users can access the new system printer. You can even start to fill the role of asmall local newspaper, letting users know about new employees, RIFs, births, thecompany picnic, and so on.
Different communications have different priorities. For example, information aboutthe company picnic in two months is not as time sensitive as the fact that you arebringing the system down in five minutes. To meet these differing needs, Linux pro-vides different ways of communicating. The most common methods are describedand contrasted in the following list. All of these methods are generally available toeveryone, except for the message of the day, which is typically reserved for a userwith root privileges.
write Use the write utility (page 170) to communicate with a user who is logged in on thelocal system. You might use it, for example, to ask a user to stop running a programthat is slowing the system; the user might reply that he will be done in three min-utes. Users can also use write to ask the system administrator to mount a tape orrestore a file. Messages sent from write may not appear in a graphical environment.
wall The wall (write all) utility effectively communicates immediately with all users whoare logged in. This utility takes its input from standard input and works much likewrite, except that users cannot use wall to write back to only you. Use wall when youare about to bring the system down or are in another crisis situation. Users who arenot logged in will not get the message.
Run wall as a user with root privileges only in a crisis situation; it interrupts anythinganyone is doing. Messages sent from wall may not appear in a graphical environment.
Email Email is useful for communicating less urgent information to one or more systemsand/or remote users. When you send mail, you have to be willing to wait for eachuser to read it. Email is useful for reminding users that they are forgetting to logout, their bills are past due, or they are using too much disk space.
Users can easily make permanent records of messages they receive via email, asopposed to messages received via write, so they can keep track of important details.For instance, it would be appropriate to use email to inform users about a new,complex procedure, so each user could keep a copy of the information for reference.

678 Chapter 17 Administration Tasks
Message of the day Users see the message of the day each time they log in in a textual environment, butnot when they open a terminal emulator window. You can edit the /etc/motd file tochange this message as necessary. The message of the day can alert users to upcom-ing periodic maintenance, new system features, or a change in procedures.
Creating Problems
Even experienced system administrators make mistakes; new system administratorsjust make more mistakes. Although you can improve your odds of avoiding prob-lems by carefully reading and following the documentation provided with software,many things can still go wrong. A comprehensive list, no matter how long, is notpossible because new and exciting ways to create problems are discovered everyday. This section describes a few of the more common techniques.
Failing to performregular backups
Few feelings are more painful to a system administrator than realizing that impor-tant information is lost forever. If the local system supports multiple users, having arecent backup may be your only protection from a public lynching. If it is a single-user system, having a recent backup certainly keeps you happier when you lose ahard disk or erase a file by mistake.
Not reading andfollowing
instructions
Software developers provide documentation for a reason. Even when you haveinstalled a software package before, carefully read the instructions again. They mayhave changed, or you may simply remember them incorrectly. Software changesmore quickly than books are revised, so no book should be taken as offering fool-proof advice. Instead, look for the latest documentation online. The /usr/share/docdirectory has information on many utilities, libraries, and software packages.
Failing to ask forhelp when
instructions are notclear
If something does not seem to make sense, try to find out what does make sense—do not attempt to guess. See Appendix B for a list of places you may be able tofind help.
Deleting ormistyping
information in acritical file
One sure way to give yourself nightmares is to execute the command
$ sudo rm –rf /etc ← do not do this
Perhaps no other command renders a Linux system useless so quickly. The onlyrecourse is to reboot into recovery mode using an installation CD/DVD (page 513)and restore the missing files from a recent backup. Although this example depictsan extreme case, many files are critical to proper operation of a system. Deletingone of these files or mistyping information in one of them is almost certain to causeproblems. If you directly edit /etc/passwd, for example, entering the wrong infor-mation in a field can make it impossible for one or more users to log in. Do not userm –rf with an argument that includes wildcard characters; do pause after typingthe command, and read it before you press RETURN. Check everything you do care-fully, and make a copy of a critical file before you edit it.

Solving Problems 679
Solving Problems
As the system administrator, it is your responsibility to keep the system secure andrunning smoothly. When a user is having a problem, it usually falls to the adminis-trator to help the user get back on track. This section suggests ways to keep usershappy and the system functioning at peak performance.
Helping When a User Cannot Log In
When a user has trouble logging in on the system, the source may be a user error ora problem with the system software or hardware. The following steps can helpdetermine where the problem is:
• Check the log files in /var/log. The /var/log/messages file accumulates system errors, messages from daemon processes, and other important information. It may indicate the cause or more symptoms of a problem. Also, check the system console. Occasionally messages about system problems that are not written to /var/log/messages (for instance, a full disk) are displayed on the system console.
• Determine whether only that one user or only that one user’s terminal/ workstation has a problem or whether the problem is more widespread.
• Check that the user’s Caps Lock key is not on.
• Make sure the user’s home directory exists and corresponds to that user’s entry in the /etc/passwd file. Verify that the user owns her home directory and startup files and that they are readable (and, in the case of the home directory, executable). Confirm that the entry for the user’s login shell in the /etc/passwd file is accurate and the shell exists as specified.
• Change the user’s password if there is a chance that he has forgotten the correct password.
• Check the user’s startup files (.profile, .login, .bashrc, and so on). The user may have edited one of these files and introduced a syntax error that pre-vents login.
• Check the terminal or monitor data cable from where it plugs into the ter-minal to where it plugs into the computer (or as far as you can follow it). Try turning the terminal or monitor off and then turning it back on.
Be careful when using a wildcard character with rm
caution When you must use a wildcard character, such as *, in an argument to an rm command, first useecho with the same argument to see exactly which files you will be deleting. This check is espe-cially important when you are working with root privileges.

680 Chapter 17 Administration Tasks
• When the problem appears to be widespread, check whether you can log in from the system console. Make sure the system is not in recovery mode. If you cannot log in, the system may have crashed; reboot it and perform any necessary recovery steps (the system usually does quite a bit automatically).
• If the user is logging in over a network connection, run the appropriate init script (page 507) to restart the service the user is trying to use (e.g., ssh).
• Use df to check for full filesystems. If the /tmp filesystem or the user’s home directory is full, login sometimes fails in unexpected ways. In some cases you may be able to log in to a textual environment but not a graphi-cal one. When applications that start when the user logs in cannot create temporary files or cannot update files in the user’s home directory, the login process itself may terminate.
Speeding Up the System
When the system is running slowly for no apparent reason, perhaps a process didnot exit when a user logged out. Symptoms of this problem include poor responsetime and a system load, as shown by w or uptime, that is greater than 1.0. Runningtop (page 672) is an excellent way to find rogue processes quickly. Use ps –ef to listall processes. One thing to look for in ps –ef output is a large number in the TIMEcolumn. For example, if a Firefox process has a TIME field greater than 100.0, thisprocess has likely run amok. However, if the user is doing a lot of Java work andhas not logged out for a long time, this value may be normal. Look at the STIMEfield to see when the process was started. If the process has been running for longerthan the user has been logged in, it is a good candidate to be killed.
When a user gets stuck and leaves her terminal unattended without notifying any-one, it is convenient to kill (page 522) all processes owned by that user. If the user isrunning a window system, such as GNOME or KDE on the console, kill the win-dow manager process. Manager processes to look for include startkde, x-session-manager, or another process name that ends in wm. Usually the window manager iseither the first or last thing to be run, and exiting from the window manager logsthe user out. If killing the window manager does not work, try killing the X serverprocess. This process is typically listed as /usr/bin/X or /usr/X11R6/bin/X. If thatfails, you can kill all processes owned by a user by giving the command kill –15 –1or, equivalently, kill –TERM –1 while you are logged in as that user. Using –1 (one)in place of the process ID tells kill to send the signal to all processes that are ownedby that user. For example, you could give the following command:
$ sudo -u zach kill -TERM -1
If this does not kill all processes (sometimes TERM does not kill a process), you canuse the KILL signal (–9). The following line will definitely kill all processes owned byZach and will not be friendly about it:
$ sudo -u zach kill -KILL -1
If you do not include –u zach, this command brings the system down.

Solving Problems 681
lsof: Finds Open Files
The lsof (list open files) utility displays the names of open files. Its options display onlycertain processes, only certain file descriptors of a process, or only certain networkconnections (network connections use file descriptors just as normal files do and lsofcan show these as well). Once you have identified a suspect process using ps –ef, givethe following command:
$ sudo lsof -sp pid
Replace pid with the process ID of the suspect process; lsof displays a list of filedescriptors that process pid has open. The –s option displays the sizes of all openfiles and the –p option allows you to specify the PID number of the process of inter-est. This size information is helpful in determining whether the process has a verylarge file open. If it does, contact the owner of the process or, if necessary, kill theprocess. The –rn option redisplays the output of lsof every n seconds.
Keeping a Machine Log
A machine log that includes the information shown in Table 17-3 can help you findand fix system problems. Note the time and date for each entry in the log. Avoid thetemptation to keep the log only on the computer—it will be most useful to youwhen the system is down. Another good idea is to keep a record of all email dealingwith user problems. One strategy is to save this mail to a separate file or folder asyou read it. Another approach is to set up a mail alias that users can send mail towhen they have problems. This alias can then forward mail to you and also store acopy in an archive file. Following is an example of an entry in the /etc/aliases file(page 763) that sets up this type of alias:
trouble: admin,/var/mail/admin.archive
Email sent to the trouble alias will be forwarded to the admin user as well as storedin the file /var/mail/admin.archive.
Table 17-3 Machine log
Entry Function
Hardwaremodifications
Keep track of the system hardware configuration: which devices hold which partitions, the model of the new NIC you added, and so on.
System softwaremodifications
Keep track of the options used when building Linux. Print such files as /usr/src/linux/.config (Linux kernel configuration) and the X11 configuration file /etc/X11/xorg.conf. The file hierarchy under /etc/default contains valuable information about the network configuration, among other things.
Hardwaremalfunctions
Keep as accurate a list as possible of any problems with the system. Make note of any error messages or numbers that the system displays on the system console and identify what users were doing when the problem occurred.
User complaints Make a list of all reasonable complaints made by knowledgeable users (for example, “Machine is abnormally slow”).

682 Chapter 17 Administration Tasks
Keeping the System Secure
No system with dial-in lines or public access to terminals is absolutely secure. Nev-ertheless, you can make a system as secure as possible by changing the passwords ofusers who are members of the admin group (these users can use sudo to gain rootprivileges) and the root password (if there is one) frequently and by choosing pass-words that are difficult to guess. Do not tell anyone who does not absolutely needto know any of these passwords. You can also encourage system users to choose dif-ficult passwords and to change them periodically.
Passwords By default, passwords on Ubuntu Linux use MD5 (page 1047) hashing, whichmakes them more difficult to break than passwords encrypted with DES (page 994).Of course, it makes little difference how well encrypted your password is if youmake it easy for someone to find out or guess what the password is.
A password that is difficult to guess is one that someone else would not be likely tothink you would have chosen. Do not use words from the dictionary (spelled for-ward or backward); names of relatives, pets, or friends; or words from a foreignlanguage. A good strategy is to choose a couple of short words, include some punc-tuation (for example, put a ^ between them), mix the case, and replace some of theletters in the words with numbers. If it were not printed in this book, an example ofa good password would be C&yGram5 (candygrams). Ideally you would use a ran-dom combination of ASCII characters, but that would be difficult to remember.
You can use one of several password-cracking programs to find users who havechosen poor passwords. These programs work by repeatedly hashing words fromdictionaries, phrases, names, and other sources. If the hashed password matches theoutput of the program, then the program has found the password of the user. Oneprogram that cracks passwords is crack (part of the crack software package). It andmany other programs and security tips are available from CERT (www.cert.org),which was originally called the Computer Emergency Response Team. Specifically,look at www.cert.org/tech_tips.
Setuid files Make sure no one except a user with root privileges can write to files containingprograms that are owned by root and run in setuid mode (for example, passwdand sudo). Also make sure users do not transfer programs that run in setuid modeand are owned by root onto the system by means of mounting tapes or disks.These programs can be used to circumvent system security. One technique thatprevents users from having setuid files is to use the –nosuid flag to mount, whichyou can set in the flags section in the fstab file. Refer to “fstab: Keeps Track ofFilesystems” on page 576.
BIOS The BIOS in many machines gives you some degree of protection from an unautho-rized person who tries to modify the BIOS or reboot the system. When you set upthe BIOS, look for a section named Security. You can probably add a BIOS pass-word. If you depend on the BIOS password, lock the computer case—it is usually asimple matter to reset the BIOS password by using a jumper on the motherboard.

Solving Problems 683
Log Files and Mail for rootUsers frequently email root and postmaster to communicate with the system admin-istrator. If you do not forward root’s mail to yourself (/etc/aliases on page 763),remember to check root’s mail periodically. You will not receive reminders aboutmail that arrives for root when you use sudo to perform system administrationtasks. However, you can give the command sudo mail –u root to look at root’s mail.
Review the system log files regularly for evidence of problems. Some important filesare /var/log/messages, where the operating system and some applications recorderrors; /var/log/mail.err (or /var/log/exmi4/mainlog if you are running exim4),which contains errors from the mail system; and /var/log/syslog, which containsmessages from the system, including messages from cron.
Monitoring Disk Usage
Sooner or later you will probably start to run out of disk space. Do not fill up a par-tition; Linux can write to files significantly faster if at least 5 to 30 percent of thespace in a partition remains free. Using more than the maximum optimal disk spacein a partition can degrade system performance.
Fragmentation As a filesystem becomes full, it can become fragmented. This is similar to the DOSconcept of fragmentation but is not nearly as pronounced and is typically rare onmodern Linux filesystems; by design Linux filesystems are resistant to fragmentation.If you keep filesystems from running near full capacity, you may never need to worryabout fragmentation. If there is no space on a filesystem, you cannot write to it at all.
To check for filesystem fragmentation, unmount the filesystem and run fsck(page 577) (with the –f option on ext2 and ext3 filesystems) on it. The output offsck includes a percent fragmentation figure for the filesystem. You can defragmenta filesystem by backing it up; using mkfs (page 525) to make a clean, empty image;and then restoring the filesystem. Which utility you use to perform the backup andrestore—dump/restore, tar, cpio, or a third-party backup program—is not important.
Reports Linux provides several programs that report on who is using how much disk spaceon which filesystems. Refer to the du, quota, and df man pages and the –size optionin the find utility man page. In addition to these utilities, you can use the disk quotasystem (page 687) to manage disk space.
Four strategies to increase the amount of free space on a filesystem are to compressfiles, delete files, grow LVM-based filesystems, and condense directories. This sec-tion contains some ideas on ways to maintain a filesystem so that it does notbecome overloaded.
Files thatgrow quickly
Some files, such as log files and temporary files, inevitably grow over time. Coredump files, for example, take up substantial space and are rarely needed. Also, usersoccasionally run programs that accidentally generate huge files. As the system admin-istrator, you must review these files periodically so they do not get out of hand.

684 Chapter 17 Administration Tasks
If a filesystem is running out of space quickly (that is, over a period of an hourrather than weeks or months), first figure out why it is running out of space. Use aps –ef command to determine whether a user has created a runaway process that iscreating a huge file. When evaluating the output of ps, look for a process that hasconsumed a large amount of CPU time. If such a process is running and creating alarge file, the file will continue to grow as you free up space. If you remove the hugefile, the space it occupied will not be freed until the process terminates, so you needto kill the process. Try to contact the user running the process, and ask the user tokill it. If you cannot contact the user, use sudo to kill the process yourself. Refer tokill on page 522 for more information.
You can also truncate a large log file rather than removing it, although you can bet-ter deal with this recurring situation with logrotate (discussed next). For example, ifthe /var/log/messages file has become very large because a system daemon is mis-configured, you can use /dev/null to truncate it:
$ sudo cp /dev/null /var/log/messages
or
$ sudo cat /dev/null > /var/log/messages
or, without spawning a new process,
$ sudo : > /var/log/messages
If you remove /var/log/messages, you have to restart the syslogd daemon. If you donot restart syslogd, the space on the filesystem will not be released.
When no single process is consuming the disk space but capacity has instead been usedup gradually, locate unneeded files and delete them. You can archive these files by usingcpio, dump, or tar before you delete them. You can safely remove most files named corethat have not been accessed for several days. The following command line performs thisfunction without removing necessary files named core (such as /dev/core):
$ sudo find / -type f -name core | xargs file | grep 'B core file' | sed 's/:ELF.*//g' | xargs rm -f
The find command lists all ordinary files named core and sends its output to xargs,which runs file on each of the files in the list. The file utility displays a string thatincludes B core file for files created as the result of a core dump. These files need tobe removed. The grep command filters out from file any lines that do not containthis string. Finally sed removes everything following the colon so that all that is lefton the line is the pathname of the core file; xargs then removes the file.
To free up more disk space, look through the /tmp and /var/tmp directories for oldtemporary files and remove them. Keep track of disk usage in /var/mail, /var/spool,and /var/log.
logrotate: Manages Log Files
Rather than deleting or truncating log files, you may want to keep these files for awhile in case you need to refer to them. The logrotate utility manages system log (and

Solving Problems 685
other) files automatically by rotating (page 1058), compressing, mailing, and remov-ing each file as you specify. The logrotate utility is controlled by the /etc/logrotate.conffile, which sets default values and can optionally specify files to be rotated. Typicallylogrotate.conf has an include statement that points to utility-specific specification filesin /etc/logrotate.d. Following is the default logrotate.conf file:
$ cat /etc/logrotate.conf# see "man logrotate" for details# rotate log files weeklyweekly
# keep 4 weeks worth of backlogsrotate 4
# create new (empty) log files after rotating old onescreate
# uncomment this if you want your log files compressed#compress
# packages drop log rotation information into this directoryinclude /etc/logrotate.d
# no packages own wtmp -- we'll rotate them here/var/log/wtmp { missingok monthly create 0664 root utmp rotate 1}
/var/log/btmp { missingok monthly create 0664 root utmp rotate 1}
# system-specific logs may be also be configured here.
The logrotate.conf file sets default values for common parameters. Whenever logrotatereads another value for one of these parameters, it resets the default value. Youhave a choice of rotating files daily, weekly, or monthly. The number followingthe rotate keyword specifies the number of rotated log files you want to keep.The create keyword causes logrotate to create a new log file with the same nameand attributes as the newly rotated log file. The compress keyword (commentedout in the default file) causes log files to be compressed using gzip. The includekeyword specifies the standard /etc/logrotate.d directory for program-specificlogrotate specification files. When you install a program using dpkg (page 598) ora dpkg-based utility such as aptitude (page 592), the installation script puts thelogrotate specification file in this directory.

686 Chapter 17 Administration Tasks
The last sets of instructions in logrotate.conf takes care of the /var/log/wtmp and/var/log/btmp log files (wtmp holds login records; you can view this file with the com-mand who /var/log/wtmp). The keyword missingok overrides the implicit defaultvalue of nomissingok for this utility only (because the value is within brackets). Thiskeyword causes logrotate to continue without issuing an error message if the log file ismissing. The keyword monthly overrides the default value of weekly. The create key-word is followed by the arguments establishing the permissions, owner, and group forthe new file. Finally rotate establishes that one rotated log file should be kept.
The /etc/logrotate.d/cupsys file is an example of a utility-specific logrotate specifica-tion file:
$ cat cupsys/var/log/cups/*log { daily missingok rotate 7 sharedscripts postrotate if [ -e /var/run/cups/cupsd.pid ]; then invoke-rc.d --quiet cupsys force-reload > /dev/null sleep 10 fi endscript compress notifempty create 640 cupsys lpadmin}
This file, which is installed by the cupsys package install script and incorporated in/etc/logrotate.d because of the include statement in logrotate.conf, works with eachof the files in /var/log/cups that has a filename ending in log (*log). The sharedscriptskeyword causes logrotate to execute the command(s) in the prerotate and postrotatesections one time only—not one time for each log that is rotated. Although it does notappear in this example, the copytruncate keyword causes logrotate to truncate theoriginal log file immediately after it copies it. This keyword is useful for programs thatcannot be instructed to close and reopen their log files because they might continuewriting to the original file even after it has been moved. The logrotate utility executesthe commands between prerotate and endscript before the rotation begins. Similarly,commands between postrotate and endscript are executed after the rotation is com-plete. The notifempty keyword causes logrotate not to rotate the log file if it is empty,overriding the default action of rotating empty log files.
The logrotate utility works with a variety of keywords, many of which take argu-ments and have side effects. Refer to the logrotate man page for details.
Removing Unused Space from Directories
A directory that contains too many filenames is inefficient. The point at which adirectory on an ext2 or ext3 filesystem becomes inefficient varies, depending partly

Solving Problems 687
on the length of the filenames it contains. Best practice is to keep directories rela-tively small. Having fewer than several hundred files (or directories) in a directory isgenerally a good idea, and having more than several thousand is generally a badidea. Additionally, Linux uses a caching mechanism for frequently accessed filesthat speeds the process of locating an inode from a filename. This caching mecha-nism works only on filenames of up to 30 characters in length, so avoid giving fre-quently accessed files extremely long filenames.
When a directory becomes too large, you can usually break it into several smallerdirectories by moving its contents to those new directories. Make sure you removethe original directory once you have moved all of its contents.
Because Linux directories do not shrink automatically, removing a file from a direc-tory does not shrink the directory, even though it frees up space on the disk. Toremove unused space and make a directory smaller, you must copy or move all thefiles to a new directory and remove the original directory.
The following procedure removes unused directory space. First remove all unneededfiles from the large directory. Then create a new, empty directory. Next move or copyall remaining files from the old large directory to the new empty directory. Rememberto copy hidden files. Finally delete the old directory and rename the new directory.
$ sudo mkdir /home/max/new$ sudo mv /home/max/large/* /home/max/large/.[A-z]* /home/max/new$ sudo rmdir /home/max/large$ sudo mv /home/max/new /home/max/large
optionalDisk Quota System
The disk quota system (supplied by the quota software package) limits the diskspace and number of files owned by individual users. You can choose to limit eachuser’s disk space, the number of files each user can own, or both. Each resource thatis limited has two limits: a lower limit and an upper limit. The user can exceed thelower limit, or quota, although a warning is given each time the user logs in whenhe is above the quota. After a certain number of warnings (set by the system admin-istrator), the system behaves as if the user had reached the upper limit. Once theupper limit is reached or the user has received the specified number of warnings, theuser will not be allowed to create any more files or use any more disk space. Theuser’s only recourse at that point is to remove some files.
Users can review their usage and limits with the quota utility. Using sudo, you canuse quota to obtain information about any user.
First you must decide which filesystems to limit and how to allocate space amongusers. Typically only filesystems that contain users’ home directories, such as/home, are limited. Use the edquota utility to set the quotas, and then use quotaon tostart the quota system. Unmounting a filesystem automatically disables the quotasystem for that filesystem.

688 Chapter 17 Administration Tasks
syslogd: Logs System Messages
Traditionally UNIX programs sent log messages to standard error. If a more perma-nent log was required, the output was redirected to a file. Because of the limitationsof this approach, 4.3BSD introduced the system log daemon (syslogd) now used byLinux. This daemon listens for log messages and stores them in the /var/log hierar-chy. In addition to providing logging facilities, syslogd allows a single machine toserve as a log repository for a network and allows arbitrary programs to processspecific log messages.
syslog.conf The /etc/syslog.conf file stores configuration information for syslogd. Each line in thisfile contains one or more selectors and an action, separated by whitespace. The selec-tors define the origin and type of the messages; the action specifies how syslogd pro-cesses the message. Sample lines from syslog.conf follow (a # indicates a comment):
# First some standard logfiles. Log by facility.kern.* -/var/log/kern.loglpr.* -/var/log/lpr.logmail.* -/var/log/mail.log## Some 'catch-all' logfiles.*.=debug;\ auth,authpriv.none;\ news.none;mail.none -/var/log/debug*.=info;*.=notice;*.=warn;\ auth,authpriv.none;\ cron,daemon.none;\ mail,news.none -/var/log/messages## Emergencies are sent to everybody logged in.*.emerg *
Selectors A selector is split into two parts, a facility and a priority, which are separated by aperiod. The facility indicates the origin of the message. For example, kern messagescome from the kernel and mail messages come from the mail subsystem. Following isa list of facility names used by syslogd and the systems that generate these messages:
Facilities auth Authorization and security systems including loginauthpriv Same as auth, but should be logged to a secure locationcron crondaemon System and network daemons without their own categorieskern Kernellpr Printing subsystemmail Mail subsystemnews Network news subsystemuser Default facility; all user programs use this facilityuucp The UNIX-to-UNIX copy protocol subsystemlocal0 to local7 Reserved for local use
The priority indicates the severity of the message. The following list of the prioritynames and the conditions they represent appears in priority order:

Solving Problems 689
Priorities debug Debugging informationinfo Information that does not require interventionnotice Conditions that may require interventionwarning Warningserr Errorscrit Critical conditions such as hardware failuresalert Conditions that require immediate attentionemerg Emergency conditions
A selector consisting of a single facility and priority, such as kern.info, causes thecorresponding action to be applied to every message from that facility with that pri-ority or higher (more urgent). Use .= to specify a single priority; for example,kern.=info applies the action to kernel messages of info priority. An exclamationpoint specifies that a priority is not matched. Thus kern.!info matches kernel mes-sages with a priority lower than info and kern.!=info matches kernel messages witha priority other than info.
A line with multiple selectors, separated by semicolons, applies the action if any ofthe selectors is matched. Each of the selectors on a line with multiple selectors con-strains the match, with subsequent selectors frequently tightening the constraints.For example, the selectors mail.info;mail.!err match mail subsystem messages withdebug, info, notice, or warning priorities.
You can replace either part of the selector with an asterisk to match anything. Thekeyword none in either part of the selector indicates no match is possible. The selec-tor *.crit;kern.none matches all critical or higher-priority messages, except thosefrom the kernel.
Actions The action specifies how syslogd processes a message that matches the selector. Thesimplest actions are ordinary files, which are specified by their absolute pathnames;syslogd appends messages to these files. Specify /dev/console to send messages to thesystem console. If you want a hardcopy record of messages, specify a device file thatrepresents a dedicated printer. Precede a filename with a hyphen (–) to keep syslogdfrom writing each message to the file as it is generated (syncing). Doing so mayimprove performance, but you may lose data if the system crashes after the messageis generated but before it gets written to a file.
You can write important messages to users’ terminals by specifying one or moreusernames separated by commas. Very important messages can be written to everylogged-in terminal by using an asterisk.
To forward messages to syslogd on a remote system, specify the name of the systempreceded by @. It is a good idea to forward critical messages from the kernel toanother system because these messages often precede a system crash and may not besaved to the local disk. The following line from syslog.conf sends critical kernelmessages to plum:
kern.crit @plum

690 Chapter 17 Administration Tasks
Because syslogd is not configured by default to enable logging over the network,you must edit the /etc/default/syslogd file on the remote system (plum in this case)so that syslogd is started with the –r option. After you modify the syslog.conf file,restart syslogd using the sysklogd init script.
Chapter Summary
The users-admin utility adds new users and groups to the system and modifies exist-ing users’ accounts. You can also use the equivalent command line tools (useradd,usermod, userdel, groupadd, and groupmod) to work with user accounts.
Backing up files on the system is a critical but often-overlooked part of systemadministration. Linux includes the tar, cpio, dump, and restore utilities to back upand restore files. You can also use more sophisticated packages such as amanda andvarious commercial products.
The system scheduling daemon, cron, periodically executes scheduled tasks. Youcan schedule tasks using crontab and at.
System reports present information on the health of the system. Two useful toolsthat generate these reports are vmstat, which details virtual memory, I/O, and CPUusage, and top, which reports on how the system is performing from moment tomoment and can help you figure out what might be slowing it down.
Another aspect of system administration is solving problems. Linux includes severaltools that can help track down system problems. One of the most important ofthese tools is syslogd, the system log daemon. Using /etc/syslogd.conf, you can con-trol which error messages appear on the console, which are sent as email, and whichgo to one of several log files.
Exercises
1. How would you list all the processes running vi?
2. How would you use kill to cause a server process to reread its configura-tion files?
3. From the command line, how would you create a user named John Doe who has the username jd and who belongs to group 65535?
4. How would you notify users that you are going to reboot the system in ten minutes?
5. Give a command that creates a level 0 dump of the /usr filesystem on the first tape device on the system. Which command would you use to take advantage of a drive that supports compression? Which command would place a level 3 dump of the /var filesystem immediately after the level 0 dump on the tape?

Advanced Exercises 691
Advanced Exercises
6. If the system is less responsive than normal, what is a good first step in fig-uring out where the problem is?
7. A process stores its PID number in a file named process.pid. Write a com-mand line that terminates this process.
8. Working with root privileges, you are planning to delete some files but want to make sure that the wildcard expression you use is correct. Suggest two ways you could make sure you delete the correct files.
9. Create a crontab file that will regularly perform the following backups:
a. Perform a level 0 backup once per month.
b. Perform a level 2 dump one day per week.
c. Perform a level 5 dump every day on which neither a level 0 nor a level 2 dump is performed.
In the worst-case scenario, how many restore commands would you have to give to recover a file that was dumped using this schedule?

This page intentionally left blank

693693
18Chapter18Networks allow computers to communicate and shareresources. A local area network (LAN) connects computers atone site, such as an office, home, or library, and can allow theconnected computers to share an Internet connection, files, anda printer. Of course, one of the most important reasons to setup a LAN is to allow systems to communicate while users enjoymultiplayer games.
This chapter covers the two aspects of configuring a LAN: set-ting up the hardware and configuring the software. It is notnecessarily organized in the order you will perform the tasksinvolved in setting up a particular LAN. Instead, read thechapter through, figure out how you will set up your LAN,and then read the parts of the chapter in the order appropriateto your setup.
In This Chapter
Setting Up the Hardware . . . . . . . 694
Routers . . . . . . . . . . . . . . . . . . . . . 695
NIC: Network Interface Card . . . . . 695
Configuring the Systems . . . . . . . 697
network-admin: Configures Network Connections . . . . . . . . 698
iwconfig: Configures a Wireless NIC. . . . . . . . . . . . . . . . 700
Setting Up Servers . . . . . . . . . . . . 702
18
Configuring a LAN

694 Chapter 18 Configuring a LAN
Setting Up the Hardware
Each system, or node, on a LAN must have a network interface card (NIC). Eachsystem must connect to a central hub or switch. If the LAN is connected to anothernetwork, such as the Internet, it must also have a router.
Connecting the Computers
Computers are connected to a network using cables (wired; page 357) or radiowaves (wireless or Wi-Fi, page 358). The cables can connect to a variety of devices,some of which are described in this section. See “LAN: Local Area Network” onpage 357 for an explanation of cables and definitions of hub, switch, and router.
In the simple network shown in Figure 18-1, four computers are connected to a sin-gle hub or switch. Assume computers 1 and 2 are communicating at the same timeas computers 3 and 4. With a hub (page 357), each conversation is limited to amaximum of half the network bandwidth. With a switch (page 357), each conversa-tion can theoretically use the full network bandwidth.
Hubs are usually less expensive than switches, although switches are getting cheaperall the time and hubs are becoming less available. If you plan to use the network forsharing an Internet connection and light file sharing, a hub is likely to be fast enough.If systems on the network will exchange files regularly, a switch may be a better choice.
Wireless accesspoint (WAP)
A wireless access point (WAP) connects a wireless network to a wired one. Typicallya WAP acts as a transparent bridge, forwarding packets between the two networksas if they were one. If you connect multiple WAPs in different locations to the samewired network, wireless clients can roam transparently between the WAPs.
Wireless networks do not require a hub or switch, although a WAP can optionallyfill the role of a hub. In a wireless network, the bandwidth is shared among all nodeswithin range of one another; the maximum speed is limited by the slowest node.
Figure 18-1 A simple network
Computer 1
Computer 2Computer 4
Computer 3
Hubor
switch

Setting Up the Hardware 695
Routers
A router (page 359) connects a LAN to another network, such as the Internet. Arouter can perform several functions, the most common of which is allowing severalsystems to share a single Internet connection and IP address (NAT, page 897). Whena router uses NAT, the packets from each system on the LAN appear to come froma single IP address; the router passes return packets to the correct system. A routercan also act as a firewall.
You have several choices for routers:
• A simple hardware router is relatively cheap and does most of the things required by a small network.
• You can set up an Ubuntu Linux system as a router. The Linux kernel can use firestarter (page 886) or iptables (page 896) to implement a firewall to help protect a system.
• You can use a Linux distribution tailored for use as a router. For example, SmoothWall (www.smoothwall.org) provides a browser-based configura-tion in the style of a hardware router.
NIC: Network Interface Card
Each system’s NIC may be a separate Ethernet card (wired or wireless) or it may bebuilt into the motherboard.
Supported NICs Linux supports most wired and many wireless Ethernet NICs.
Unsupportedwireless NICs
If a wireless network card is not supported under Linux directly, you may be able to getit to work with NdisWrapper (ndiswrapper.sourceforge.net; ndiswrapper-common,ndiswrapper-utils-1.9, and ndisgtk packages), which uses Win32 drivers. NdisWrapperis a kernel module that provides a subset of the Windows network driver API. Seehelp.ubuntu.com/community/WifiDocs/Driver/Ndiswrapper for instructions on install-ing a Windows driver.
Wireless bridge An alternative to a wireless NIC is a wireless bridge. A wireless bridge forwardspackets between wired and wireless interfaces, eliminating the need for wirelessdrivers. This simple device has an Ethernet port that plugs into a NIC and an802.11 (wireless) controller. While carrying a bridge around is usually not feasiblefor mobile users, a wireless bridge is an easy way to migrate a desktop computer toa wireless configuration.
Ad hoc andinfrastructure
modes
Wireless networks operate in either ad hoc or infrastructure mode. In ad hoc mode,individual nodes in the network communicate directly with each other. In infra-structure mode, nodes communicate via a WAP (page 694). Infrastructure mode isgenerally more reliable if the wireless LAN must communicate with a wired LAN.
If you do not want to use a WAP, it may be possible to set up a WLAN card so itacts as a WAP. Consult the NIC/driver documentation for more information.
Tools
This section describes two of the tools you can use to examine system hardware.

696 Chapter 18 Configuring a LAN
lspci: Lists PCI Information
The lspci utility lists PCI device information:
$ lspci00:00.0 Host bridge: nVidia Corporation nForce2 AGP (different version?) (rev c1)00:00.1 RAM memory: nVidia Corporation nForce2 Memory Controller 1 (rev c1)00:00.2 RAM memory: nVidia Corporation nForce2 Memory Controller 4 (rev c1)00:00.3 RAM memory: nVidia Corporation nForce2 Memory Controller 3 (rev c1)00:00.4 RAM memory: nVidia Corporation nForce2 Memory Controller 2 (rev c1)00:00.5 RAM memory: nVidia Corporation nForce2 Memory Controller 5 (rev c1)00:01.0 ISA bridge: nVidia Corporation nForce2 ISA Bridge (rev a4)00:01.1 SMBus: nVidia Corporation nForce2 SMBus (MCP) (rev a2)00:02.0 USB Controller: nVidia Corporation nForce2 USB Controller (rev a4)...
With the –v option, lspci is more verbose. You can use the –vv option to displayeven more information.
$ lspci -v00:00.0 Host bridge: nVidia Corporation nForce2 AGP (different version?) (rev c1) Subsystem: ABIT Computer Corp. Unknown device 1c00 Flags: bus master, 66MHz, fast devsel, latency 0 Memory at e0000000 (32-bit, prefetchable) [size=64M] Capabilities: <access denied>
00:00.1 RAM memory: nVidia Corporation nForce2 Memory Controller 1 (rev c1) Subsystem: nVidia Corporation Unknown device 0c17 Flags: 66MHz, fast devsel
00:00.2 RAM memory: nVidia Corporation nForce2 Memory Controller 4 (rev c1) Subsystem: nVidia Corporation Unknown device 0c17 Flags: 66MHz, fast devsel...
lshw: Lists Hardware Information
The lshw utility lists information about the hardware configuration of the local sys-tem. Run this utility with root privileges to display a more detailed report. The–short option displays a brief report. Without this option lshw displays much moreinformation.
$ sudo lshw -shortH/W path Device Class Description================================================== system Desktop Computer/0 bus NF7-S/NF7 (nVidia-nForce2)/0/0 memory 128KB BIOS/0/4 processor AMD Athlon(tm) XP 2600+/0/4/9 memory 128KB L1 cache/0/4/a memory 512KB L2 cache/0/1b memory 1GB System Memory/0/1b/0 memory DIMM [empty].../0/100/9/0/0 /dev/hda disk 149GB WDC WD1600JB-00GVA0/0/100/9/0/0/1 /dev/hda1 volume 74GB Linux filesystem partition

Configuring the Systems 697
/0/100/9/0/0/2 /dev/hda2 volume 3812MB Linux swap / Solaris partition/0/100/9/0/1 /dev/hdb disk CR-48XGTE/0/100/1e bridge nForce2 AGP/0/100/1e/0 display NV17 [GeForce4 MX 420]
You can also use lshal to display hardware information. This utility displays areport based on the HAL (hardware abstraction layer) device database. Seewww.freedesktop.org/wiki/Software/hal.
Configuring the Systems
Once the hardware is in place, you need to configure each system so it knows aboutthe NIC that connects it to the network. Normally Ubuntu detects and configuresnew hardware automatically when you install Ubuntu or the first time you boot thesystem after you install a NIC.
You can use network-admin (discussed in the next section) to augment the informa-tion Ubuntu collects and to activate the NIC.
System information In addition to information about the NIC, each system needs the following data:
• The system’s IP address
• The netmask (subnet mask) for the system’s address (page 529)
• The IP address of the gateway (page 695)
• The IP addresses of the nameservers (DNS addresses—specify two or three)
• The system’s hostname (set when you install Ubuntu Linux)
If you set up a DHCP server (page 538) to distribute network configuration infor-mation to systems on the LAN, you do not need to specify the preceding informa-tion on each system. Instead, you just specify that the system is using DHCP toobtain this information (which Ubuntu does by default). You must specify thisinformation when you set up the DHCP server.
Private addressspace
When you set up a LAN, the IP addresses of the systems on the LAN are generally notmade public on the Internet. Special IP addresses, which are part of the private addressspace defined by IANA (page 1041), are reserved for private use and are appropriateto use on a LAN (Table 18-1). Unless you have been assigned IP addresses for the sys-tems on the LAN, choose addresses from the private address space.
Table 18-1 Private IP ranges (defined in RFC 1918)
Range of IP addresses From IP address To IP address
10.0.0.0/8 10.0.0.1 10.255.255.254
172.16.0.0/12 172.16.0.1 172.31.255.254
192.168.0.0/16 192.168.0.1 192.168.255.254

698 Chapter 18 Configuring a LAN
network-admin: Configures Network Connections
The Network Settings window (Figure 18-2) enables you to modify the configura-tion of the NICs (wired or wireless). To display this window, select Main menu:Administration Network or give the command gksudo network-admin from a ter-minal emulator or Run Application window (ALT-F2).
The Network Settings window has tabs to specify hosts and DNS servers as well asto configure information about the local host and network connections. AfterUbuntu identifies and configures new network hardware, you can use network-adminto modify the configuration.
The Network Settings window has four tabs, one of which pertains to hardwaredevices and three of which relate to the system. The Hosts tab modifies the/etc/hosts file (page 559), the DNS tab modifies the /etc/resolv.conf file (page 561),and the General tab modifies the hostname and the domain name (page 1034) ofthe local system. Make changes in these tabs as necessary.
To modify the configuration of a NIC, select the Connections tab, highlight thedescription of the connection you want to configure, and click Properties; network-admin displays the Properties window (Figure 18-3).
Roaming mode A check box labeled Enable roaming mode appears in the upper-left corner of thewired and wireless Properties windows. When you put a tick in this check box,network-admin grays out the rest of the window and the nm-applet (next) takes overconfiguring the device. The modem Properties window has a check box labeledEnable this connection. Put a tick in this box to enable the modem connection;continue configuring it from the Properties window.
Figure 18-2 The Network Settings window

Configuring the Systems 699
If you do not enable roaming mode, you can use the Properties window to configurea device. The Configuration Settings portion of the wired and wireless Propertieswindows is the same, but the wireless Properties window has a Wireless Settingsportion that is not present on the wired Properties window.
Wireless Settings It is usually easier to configure a wireless connection using the nm-applet (put a tickin the box labeled Enable roaming mode, click OK, click Close in the Network Set-tings window, and see the next section). To use the Properties window to configurewireless settings, click the triangle at the right end of the combo box labeled Net-work name (ESDID) and select the network you want to connect to. Alternatively,you can enter the name of the network in the combo box. Select the password typefrom, and enter the network password in, the next two boxes. Continue with Con-nection Settings.
Connection Settings In the Configuration combo box you can select from Static IP address, Automaticconfiguration (DHCP), and Local Zeroconf network. By default, Ubuntu attemptsto set up network devices automatically, using DHCP (page 538). Select Static IPaddress and enter the information in the IP address (page 1042), Subnet mask(page 529), and Gateway (page 695) text boxes if the local system has beenassigned a fixed IP address. Typically the ISP provides this information. Zeroconf(www.zeroconf.org and zeroconf.sourceforge.net) allows networks to configurethemselves. Mac OS X, which calls Zeroconf Bonjour, uses this scheme exten-sively. Select Local Zeroconf network if appropriate. Click OK. When you are fin-ished entering information in the other tabs of the Network Settings window,click Close.
Figure 18-3 The Properties window (wireless connection)

700 Chapter 18 Configuring a LAN
nm-applet: Configures Network
Connections Automatically
The nm-applet (network manager applet) object appears toward the right end of theTop panel. Its icon appears as a double monitor when the system is using a wiredconnection and as a series of vertical bars when the system is using a wireless con-nection (Figure 18-4). The nm-applet package is a virtual package (page 592) thatinstalls the network-manager-gnome package. This applet works in conjunctionwith network-admin. As explained in the previous section, when you put a tick in thecheck box labeled Enable roaming mode in the Properties window for a wired orwireless connection, nm-applet attempts to configure that connection automatically.Exactly what clicking nm-applet displays depends on what is set up in network-admin.
Left-click nm-applet to display a menu that allows you to turn on/off networkingand, if available, wireless (networking). Click either selection to place or remove atick next to the entry. A tick indicates the service is enabled. You can also selectConnection Information to display a window showing information about the activeconnection.
Right-clicking nm-applet displays a menu that lists the available wireless networksand selections labeled Connect to Other Wireless Network and Create New Wire-less Network (if the system has a wireless connection), Wired Network, and Man-ual Configuration. In Figure 18-5 Wired Networks is selected (the adjacent radiobutton has a dot in it), meaning that the system is using a wired connection and isnot using a wireless connection.
Click one of the wireless networks to disable the wired connection and connect tothe selected wireless network. Alternatively, if the system is connected to a wirelessnetwork, click Wired Network to connect to the wired network. The nm-appletchanges to two dots with a tail going around them in circles while it connects to thenew network. It then displays the wireless or wired object, as is appropriate(Figure 18-4). Clicking Manual Configuration displays the Network Settings win-dow (discussed in the previous section).
iwconfig: Configures a Wireless NIC
You can configure a wireless NIC using either network-admin, nm-applet, or iwconfig.As a last resort, you can use NdisWrapper to install a Windows driver under Ubuntu
Figure 18-4 The nm-applet
nm-applet (wired)nm-applet (wireless)

Configuring the Systems 701
(see help.ubuntu.com/community/WifiDocs/Driver/Ndiswrapper). The iwconfig util-ity is based on ifconfig and configures elements of a wireless NIC not supported byifconfig, such as setting up Master mode and binding a card to a WAP.
When you call iwconfig without any arguments, it reports on the status of the wirelessinterfaces:
$ iwconfig eth1lo no wireless extensions.
eth0 no wireless extensions.
eth1 unassociated ESSID:off/anyMode:Managed Frequency=nan kHz Access Point: Not-AssociatedBit Rate:0 kb/s Tx-Power:16 dBmRetry limit:15 RTS thr:off Fragment thr:offPower Management:offLink Quality:0 Signal level:0 Noise level:0Rx invalid nwid:0 Rx invalid crypt:0 Rx invalid frag:0Tx excessive retries:0 Invalid misc:55 Missed beacon:0
The most common parameters you will change with iwconfig are the encryption key,the mode, and the name of the network. Most devices support a minimum of 40-bitWired Equivalent Privacy (WEP) encryption. The encryption key is defined by astring of 10 hexadecimal digits. The contents of the string is arbitrary, but must bethe same on all nodes:
$ sudo iwconfig eth1 key 19FEB47A5B
Figure 18-5 The nm-applet window

702 Chapter 18 Configuring a LAN
The algorithm used by WEP is known to be flawed; using it does not give much pro-tection. If you require privacy, use an encrypted protocol, such as SSH or HTTPS. Ifyou have difficulty connecting, disable encryption on all nodes:
$ sudo iwconfig eth1 key off
The mode defines whether you are connecting to an ad hoc or infrastructure network.Normally you can set mode to Auto, which selects the correct mode automatically:
$ sudo iwconfig eth1 mode Auto
The exception is if you want to use the NIC as a WAP, in which case you need to setmode to Master:
$ sudo iwconfig eth1 mode Master
Not all wireless NICs are capable of acting as masters.
The network name is defined by the ESSID (Extended Service Set ID), an arbitrarystring. With the ESSID set (it must be the same on every node, including the WAP),you should be able to roam between any set of nodes with the same network name:
$ sudo iwconfig eth1 essid "My Wireless Network"
See the iwconfig man page for more information.
Setting Up Servers
Setting up local clients and servers can make a LAN both easier to use and moreuseful. The following list briefly describes some of these tools and references thepages that describe them in detail.
Firewall Although not a server, a firewall—which is typically installed on the router—is animportant part of a LAN. See firestarter (page 886) or iptables (page 896) for moreinformation.
NIS NIS can provide a uniform login regardless of which system you log in on. The NISauthentication server is covered on page 790 and the client on page 784. NIS isoften combined with home directories that are mounted using NFS.
NFS NFS allows you to share directory hierarchies. Sharing directories using NFSrequires that the server export the directory hierarchy (page 811) and that clientsmount the hierarchy (page 803).
Using NFS, you can store all home directories on one system and mount them fromother systems as needed. This configuration works well with NIS login authentica-tion. With this setup, it can be convenient to create a world-writable directory—forexample, /home/shared—which users can use to exchange files. If you set the stickybit (page 1062) on this directory (chmod 1777 /home/shared), users can delete onlyfiles they created. If you do not set the sticky bit, any user can delete any file.
OpenSSH OpenSSH tools include ssh (logs in on a remote system; page 714) and scp (copiesfiles to and from a remote system; page 716). You can also set up automatic loginswith OpenSSH: If you set up a shared home directory with NFS, each user’s ~/.ssh

Chapter Summary 703
directory (page 709) is the same on each system; a user who sets up a personalauthentication key (page 721) will be able to use OpenSSH tools between systemswithout entering a password. See page 720 for information on how to set up anOpenSSH server. You can just use the ssh and scp clients—you do not have to setthem up.
DNS cache Setting up a local cache can reduce the traffic between the LAN and the Internetand can improve response times. For more information refer to “JumpStart I: Set-ting Up a DNS Cache” on page 858.
DHCP DHCP enables a client system to retrieve network configuration information from aserver each time it connects to a network. See page 538 for more information.
Samba Samba allows Linux systems to participate in a Windows network, sharing directo-ries and printers, and accessing those directories and printers shared by Windowssystems. Samba includes a special share for accessing users’ home directories. Formore information refer to “The [homes] Share: Sharing Users’ Home Directories”on page 838.
You can also use Samba to set up a shared directory similar to the one describedunder “NFS.” To share a Linux directory with Windows computers, the value ofWorkgroup in /etc/samba/smb.conf must be the same as the Windows workgroup(frequently MSHOME or WORKGROUP by default). Place the following code insmb.conf (page 832):
[public] comment = Public file space path = /home/shared read only = no public = yes browseable = yes
Any Windows user can access this share, which can be used to exchange filesbetween users and between Linux and Windows systems.
More Information
Web SmoothWall Linux distribution www.smoothwall.orghelp.ubuntu.com/community/WifiDocs/Driver/NdiswrapperNdisWrapper ndiswrapper.sourceforge.net
HOWTOs Linux Wireless Lan HOWTO www.hpl.hp.com/personal/Jean_Tourrilhes/LinuxWireless HOWTOLinux Hardware Compatibility HOWTO
Chapter Summary
A local area network (LAN) connects computers at one site and can allow the con-nected computers to share an Internet connection, files, and a printer. Each system,

704 Chapter 18 Configuring a LAN
or node, on a LAN must have a network interface card (NIC). NICs can be con-nected to the network via cables (wired) or radio waves (wireless).
An Ethernet-based LAN has a connection between each computer and a central hubor switch. Hubs are generally slower than switches, but either is usually satisfactoryfor a small LAN. A wireless access point (WAP) connects a wireless network to awired one. If the LAN you are setting up is connected to another network, such asthe Internet, the LAN requires a router. A router can perform several functions, themost common of which is allowing several systems to share a single Internet con-nection and IP address; this function is called NAT.
Several tools are useful when you are setting up a LAN. The Network Settings win-dow (network-admin) and the nm-applet enable you to configure NICs (wired or wire-less). The iwconfig utility configures elements of a wireless NIC.
You can configure the systems on the LAN to use NIS as a login server so you donot have to set up accounts on each system. You can use NFS, which allows you tomount remote directory hierarchies, to set up a universal home directory. Samba isan important part of many LANs: It allows Linux systems to participate in a Win-dows network, sharing directories and printers, and accessing those directories andprinters shared by Windows systems.
Exercises
1. What advantage does a switch have over a hub?
2. Which server would you set up to allow users to log in with the same user-name and password on all computers on a LAN?
3. Name two servers that allow you to share directories between systems.
4. What is a WAP and what does it do?
5. What is a common function of a router? What is this function called?
6. What does a wireless bridge do?
7. Name two tools you can use to configure a wireless NIC (rather than hav-ing it be configured automatically). What is the difference between the two?
8. What is the private address space? When would you use a private address?
Advanced Exercises
9. If you set a system’s subnet mask to 255.255.255.0, how many computers can you put on the network without using a router?
10. Which file stores information about which DNS servers the system uses?

705
I
PART V
Using Clients and Setting
Up Servers
CHAPTER 19
OpenSSH: Secure Network Communication 707
CHAPTER 20
FTP: Transferring Files Across a Network 729
CHAPTER 21
exim4: Setting Up Mail Servers, Clients, and More 755
CHAPTER 22
NIS: Network Information Service 781
CHAPTER 23
NFS: Sharing Filesystems 799
CHAPTER 24
Samba: Linux and Windows File and Printer Sharing 823
CHAPTER 25
DNS/BIND: Tracking Domain Names and Addresses 845
CHAPTER 26
firestarter and iptables: Setting Up a Firewall 885
CHAPTER 27
Apache: Setting Up a Web Server 915

This page intentionally left blank

707707
19Chapter19OpenSSH is a suite of secure network connectivity tools thatreplaces telnet/telnetd, rcp, rsh/rshd, rlogin/rlogind, and ftp/ftpd.Unlike the tools they replace, OpenSSH tools encrypt all traf-fic, including passwords. In this way they thwart malicioususers who attempt to eavesdrop, hijack connections, and stealpasswords.
This chapter covers the following OpenSSH tools:
• scp Copies files to and from another system
• sftp Copies files to and from other systems (a secure replacement for ftp)
• ssh Runs a command on or logs in on another system
• sshd The OpenSSH daemon (runs on the server)
• ssh-keygen Creates, manages, and converts RSA or DSA host/user authentication keys
In This Chapter
About OpenSSH . . . . . . . . . . . . . . 708
OpenSSH Clients. . . . . . . . . . . . . . 711
JumpStart: Using ssh and scp . . . 711
sshd: OpenSSH Server . . . . . . . . . 720
JumpStart: Starting the sshd Daemon. . . . . . . . . . . . . . . 720
Troubleshooting . . . . . . . . . . . . . . 724
Tunneling/Port Forwarding. . . . . . 725
19
OpenSSH: Secure
Network
Communication

708 Chapter 19 OpenSSH: Secure Network Communication
Introduction
Using public key encryption (page 993), OpenSSH provides two levels of authenti-cation: server and client/user. First the client verifies that it is connected to the cor-rect server. Then OpenSSH encrypts communication between the systems. Once asecure, encrypted connection has been established, OpenSSH makes sure the user isauthorized to log in on or copy files to and from the server. After verifying the sys-tem and user, OpenSSH allows different services to be passed through the connec-tion. These services include interactive shell sessions (ssh), remote commandexecution (ssh), file copying (scp), FTP services (sftp), X11 client/server connec-tions, and TCP/IP port tunneling.
SSH1 versus SSH2 SSH protocol version 2 (SSH2) is a complete rewrite of SSH protocol version 1(SSH1) that offers improved security, performance, and portability. The two proto-cols are not compatible. Because SSH1 is being rapidly supplanted by SSH2 andbecause SSH1 is vulnerable to a man-in-the-middle attack (footnote 3 on page 996),this chapter does not discuss SSH1. Because version 2 is floating-point intensive,version 1 does have a place on systems without FPUs (floating-point units or accel-erators), such as old 486SX systems. As installed, the OpenSSH tools supplied withUbuntu Linux support SSH2 only.
ssh The ssh utility allows you to log in on a remote system over a network. You mightchoose to use a remote system to access a special-purpose application or to takeadvantage of a device that is available only on that system, or you might use aremote system because you know it is faster or less busy than the local system.While traveling, many businesspeople use ssh on a laptop to log in on a system atcompany headquarters. From a GUI you can use several systems simultaneously bylogging in on each one from a different terminal emulator window.
X11 forwarding Once you turn on trusted X11 forwarding, it is a simple matter to run an X11 pro-gram over an ssh connection: Run ssh from a terminal emulator running on an X11server and give an X11 command such as xclock; the graphical output appears onthe local display. For more information refer to “Forwarding X11” on page 725.
About OpenSSH
This section discusses configuration files used by OpenSSH clients and servers,describes how OpenSSH works, and highlights additional OpenSSH resources.
Files
OpenSSH clients and servers rely on many files. Global files are kept in /etc/ssh anduser files in ~/.ssh. In this section, the first word in the description of each file indi-cates whether the client or the server uses the file.

About OpenSSH 709
/etc/ssh: Global Files
Global files listed in this section affect all users but can be overridden by files in auser’s ~/.ssh directory.
moduli client and server Contains key exchange information that OpenSSH uses to estab-lish a secure connection. Do not modify this file.
ssh_config client The global OpenSSH configuration file (page 718). Entries here can be over-ridden by entries in a user’s ~/.ssh/config file.
sshd_config server The configuration file for sshd (page 722).
ssh_host_dsa_key, ssh_host_dsa_key.pub
server SSH protocol version 2 DSA host keys. Both files should be owned by root.The ssh_host_dsa_key.pub public file should be readable by anyone but writableonly by its owner (644 permissions). The ssh_host_dsa_key private file should notbe readable or writable by anyone except its owner (600 permissions).
ssh_host_rsa_key, ssh_host_rsa_key.pub
server SSH protocol version 2 RSA host keys. Both files should be owned by root.The ssh_host_rsa_key.pub public file should be readable by anyone but writableonly by its owner (644 permissions). The ssh_host_rsa_key private file should notbe readable or writable by anyone except its owner (600 permissions).
ssh_known_hosts client Contains public RSA (by default) keys of hosts that users on the local sys-tem can connect to. This file contains information similar to that found in~/.ssh/known_hosts, but is set up by the administrator and is available to all users.This file should be owned by root and should be readable by anyone but writableonly by its owner (644 permissions).
sshrc server Contains initialization routines. When a user on a client connects to aserver, if ~/.ssh/rc is not present, OpenSSH runs this script on the server after~/.ssh/environment and before the user’s shell starts.
~/.ssh: User Files
OpenSSH creates the ~/.ssh directory and the known_hosts file therein automati-cally when a user connects to a remote system.
authorized_keys server Enables a user to log in on or copy files to and from another system with-out supplying a user login password (page 721). However, the user may need tosupply a passphrase, depending on how the key was set up. No one except theowner should be able to write to this file.
rhost authentication is a security risk
caution Although OpenSSH can get authentication information from /etc/hosts.equiv, /etc/shosts.equiv,~/.rhosts, and ~/.shosts, this chapter does not cover the use of these files because they are secu-rity risks. The default settings in the /etc/ssh/sshd_config configuration file prevent their use.

710 Chapter 19 OpenSSH: Secure Network Communication
config client A user’s private OpenSSH configuration file (page 718). Entries here over-ride those in /etc/ssh/ssh_config.
environment server Contains assignment statements that define environment variables on aserver when a user logs in using ssh.
id_dsa,id_dsa.pub
client User authentication DSA keys generated by ssh-keygen (page 721). Bothfiles should be owned by the user in whose home directory they appear. Theid_dsa.pub public file should be readable by anyone but writable only by its owner(644 permissions). The id_dsa private file should not be readable or writable byanyone except its owner (600 permissions).
id_rsa,id_rsa.pub
client User authentication RSA keys generated by ssh-keygen (page 721). Bothfiles should be owned by the user in whose home directory they appear. Theid_rsa.pub public file should be readable by anyone but writable only by its owner(644 permissions). The id_rsa private file should not be readable or writable by any-one except its owner (600 permissions).
known_hosts client Contains public RSA keys (by default) of hosts the user has connected to.OpenSSH automatically adds entries each time the user connects to a new server(page 712). Refer to “HostKeyAlgorithms” (page 719) for information on usingDSA keys. If HashKnownHosts (page 719) is set to yes, the hostnames andaddresses in this file are hashed to improve security.
rc server Contains initialization routines. When a user on a client connects to aserver, OpenSSH runs this script on the server after environment and before theuser’s shell starts. If this file is not present, OpenSSH runs /etc/ssh/sshrc; if that filedoes not exist, OpenSSH runs xauth.
How OpenSSH Works
When OpenSSH starts, it first establishes an encrypted connection and then authen-ticates the user. Once these two tasks are completed, OpenSSH allows the two sys-tems to send information back and forth.
OpenSSH uses two key pairs to negotiate an encrypted session: a host key pair anda session key pair. The host key pair is a set of public/private keys that is establishedwhen you install the openssh-server package (page 720). The session key pair is aset of public/private keys that changes hourly.
The first time an OpenSSH client connects with an OpenSSH server, you are asked toverify that it is connected to the correct server (see “First-time authentication” onpage 712). After verification, the client makes a copy of the server’s public host key. Onsubsequent connections, the client compares the key provided by the server with theoriginal key it stored. Although this test is not foolproof, the next one is quite secure.
The client then generates a random key, which it encrypts with both the server’spublic host key and the session key. The client sends this encrypted key to the server.The server, in turn, uses its private keys to decrypt the encrypted key. This processcreates a key that is known only to the client and the server and is used to encryptthe rest of the session.

OpenSSH Clients 711
More Information
Local man pages ssh, scp, sftp, ssh-keygen, ssh_config, sshd, sshd_config
Web OpenSSH home page www.openssh.comSearch on ssh to find various HOWTOs and other documents tldp.org
Books Implementing SSH: Strategies for Optimizing the Secure Shellby Dwivedi; John Wiley & Sons (October 2003)
SSH, The Secure Shell: The Definitive Guide by Barrett, Silverman, & Byrnes; O’Reilly Media (May 2005)
OpenSSH Clients
This section covers setting up and using the ssh, scp, and sftp clients.
Prerequisites
The openssh-client package is installed by default. You do not need to install anypackages to run an OpenSSH client. There is no init script for OpenSSH clients.
JumpStart: Using ssh and scpThe ssh and scp clients do not require setup beyond installing the requisite package,although you can create and edit files that facilitate their use. To run a secure shell on orsecurely copy a file to and from a remote system, the following criteria must be met:The remote system must be running the OpenSSH daemon (sshd), you must have anaccount on the remote system, and the server must positively identify itself to the client.
The following example shows Zach logging in on the remote host named plum andgiving an exit command to return to the shell on the local system:
$ ssh zach@plumzach@plum's password:Linux plum 2.6.17-10-generic #2 SMP Tue Dec 5 22:28:26 UTC 2006 i686...Last login: Mon Jan 22 21:58:22 2007 from 192.168.0.12zach@plum:~$ exitlogoutConnection to plum closed.
You can omit user@ (zach@ in the preceding example) from the command line if youwant to log in as yourself and you have the same username on both systems. The firsttime you connect to a remote OpenSSH server, ssh or scp asks you to confirm that youare connected to the right system. Refer to “First-time authentication” on page 712.
The following example copies ty1 from the working directory on the local system toZach’s home directory on plum:
$ scp ty1 zach@plum:zach@plum's password:ty1 100% 162 0.2KB/s 00:00

712 Chapter 19 OpenSSH: Secure Network Communication
Setup
This section describes how to set up OpenSSH on the client side.
Recommended Settings
X11 forwarding The configuration files provided by Ubuntu establish a mostly secure system andmay or may not meet your needs. One OpenSSH parameter you may want tochange is ForwardX11Trusted, which is set to yes by default. To increase security,and in some cases reduce usability, set ForwardX11Trusted (page 719) to no in theUbuntu /etc/ssh/ssh_config configuration file. See page 725 for more informationabout X11 forwarding.
Server Authentication/Known Hosts
known_hosts,ssh_known_hosts
Two files list the hosts the local system has connected to and positively identified:~/.ssh/known_hosts (user) and /etc/ssh/ssh_known_hosts (global). No one exceptthe owner (root in the case of the second file) should be able to write to either ofthese files. No one except the owner should have any access to a ~/.ssh directory.
First-timeauthentication
When you connect to an OpenSSH server for the first time, the OpenSSH clientprompts you to confirm that you are connected to the right system. This check canhelp prevent a man-in-the-middle attack (footnote 3 on page 996):
The authenticity of host 'plum (192.168.0.10)' can't be established.RSA key fingerprint is d1:9d:1b:5b:97:5c:80:e9:4b:41:9a:b7:bc:1a:ea:a1.Are you sure you want to continue connecting (yes/no)? yesWarning: Permanently added 'plum,192.168.0.10' (RSA) to the list of known hosts.
Before you respond to the preceding query, make sure you are logging in on thecorrect system and not on an imposter. If you are not sure, a telephone call tosomeone who logs in on that system locally can help verify that you are on theintended system. When you answer yes (you must spell it out), the client appendsthe server’s public host key (the single line in the /etc/ssh/ssh_host_rsa_key.pub or/etc/ssh/ssh_host_dsa_key.pub file on the server) to the user’s ~/.ssh/known_hostsfile on the local system, creating the ~/.ssh directory if necessary. So that it cankeep track of which line in known_hosts applies to which server, OpenSSHprepends the name of the server and the server’s IP address to the line.
When you subsequently use OpenSSH to connect to that server, the client verifiesthat it is connected to the correct server by comparing this key to the one suppliedby the server. You can display the local system’s RSA key fingerprint with the fol-lowing command:
$ ssh-keygen -lf /etc/ssh/ssh_host_rsa_key.pub2048 d1:9d:1b:5b:97:5c:80:e9:4b:41:9a:b7:bc:1a:ea:a1 /etc/ssh/ssh_host_rsa_key.pub
known_hosts file The known_hosts file uses one or two very long lines to identify each host it keepstrack of. Each line starts with the hostname and IP address of the system the line cor-responds to, followed by the type of encryption being used and the server’s public
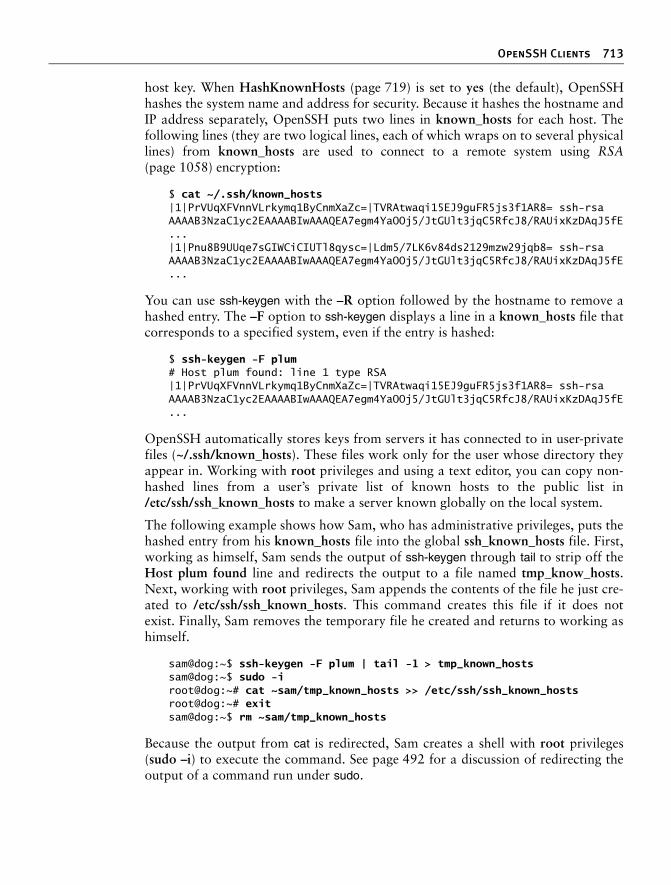
OpenSSH Clients 713
host key. When HashKnownHosts (page 719) is set to yes (the default), OpenSSHhashes the system name and address for security. Because it hashes the hostname andIP address separately, OpenSSH puts two lines in known_hosts for each host. Thefollowing lines (they are two logical lines, each of which wraps on to several physicallines) from known_hosts are used to connect to a remote system using RSA(page 1058) encryption:
$ cat ~/.ssh/known_hosts|1|PrVUqXFVnnVLrkymq1ByCnmXaZc=|TVRAtwaqi15EJ9guFR5js3f1AR8= ssh-rsa AAAAB3NzaC1yc2EAAAABIwAAAQEA7egm4YaOOj5/JtGUlt3jqC5RfcJ8/RAUixKzDAqJ5fE...|1|Pnu8B9UUqe7sGIWCiCIUTl8qysc=|Ldm5/7LK6v84ds2129mzw29jqb8= ssh-rsa AAAAB3NzaC1yc2EAAAABIwAAAQEA7egm4YaOOj5/JtGUlt3jqC5RfcJ8/RAUixKzDAqJ5fE...
You can use ssh-keygen with the –R option followed by the hostname to remove ahashed entry. The –F option to ssh-keygen displays a line in a known_hosts file thatcorresponds to a specified system, even if the entry is hashed:
$ ssh-keygen -F plum# Host plum found: line 1 type RSA|1|PrVUqXFVnnVLrkymq1ByCnmXaZc=|TVRAtwaqi15EJ9guFR5js3f1AR8= ssh-rsa AAAAB3NzaC1yc2EAAAABIwAAAQEA7egm4YaOOj5/JtGUlt3jqC5RfcJ8/RAUixKzDAqJ5fE...
OpenSSH automatically stores keys from servers it has connected to in user-privatefiles (~/.ssh/known_hosts). These files work only for the user whose directory theyappear in. Working with root privileges and using a text editor, you can copy non-hashed lines from a user’s private list of known hosts to the public list in/etc/ssh/ssh_known_hosts to make a server known globally on the local system.
The following example shows how Sam, who has administrative privileges, puts thehashed entry from his known_hosts file into the global ssh_known_hosts file. First,working as himself, Sam sends the output of ssh-keygen through tail to strip off theHost plum found line and redirects the output to a file named tmp_know_hosts.Next, working with root privileges, Sam appends the contents of the file he just cre-ated to /etc/ssh/ssh_known_hosts. This command creates this file if it does notexist. Finally, Sam removes the temporary file he created and returns to working ashimself.
sam@dog:~$ ssh-keygen -F plum | tail -1 > tmp_known_hostssam@dog:~$ sudo -iroot@dog:~# cat ~sam/tmp_known_hosts >> /etc/ssh/ssh_known_hostsroot@dog:~# exitsam@dog:~$ rm ~sam/tmp_known_hosts
Because the output from cat is redirected, Sam creates a shell with root privileges(sudo –i) to execute the command. See page 492 for a discussion of redirecting theoutput of a command run under sudo.

714 Chapter 19 OpenSSH: Secure Network Communication
If, after a remote system’s public key is stored in one of the known-hosts files, theremote system supplies a different fingerprint when the systems connect, OpenSSHdisplays the following message and does not complete the connection:
@@@@@@@@@@@@@@@@@@@@@@@@@@@@@@@@@@@@@@@@@@@@@@@@@@@@@@@@@@@@ WARNING: REMOTE HOST IDENTIFICATION HAS CHANGED! @@@@@@@@@@@@@@@@@@@@@@@@@@@@@@@@@@@@@@@@@@@@@@@@@@@@@@@@@@@@IT IS POSSIBLE THAT SOMEONE IS DOING SOMETHING NASTY!Someone could be eavesdropping on you right now (man-in-the-middle attack)!It is also possible that the RSA host key has just been changed.The fingerprint for the RSA key sent by the remote host isf1:6f:ea:87:bb:1b:df:cd:e3:45:24:60:d3:25:b1:0a.Please contact your system administrator.Add correct host key in /home/sam/.ssh/known_hosts to get rid of this message.Offending key in /home/sam/.ssh/known_hosts:1RSA host key for plum has changed and you have requested strict checking.Host key verification failed.
If you see this message, you may be the subject of a man-in-the-middle attack. Morelikely, however, something on the remote system has changed, causing it to supply anew fingerprint. Check with the remote system’s administrator. If all is well, removethe offending key from the specified file (the third line from the bottom in the pre-ceding example points to the line you need to remove) and try connecting again.You can use ssh-keygen with the –R option followed by the name of a host toremove a hashed entry. You will be subject to first-time authentication (page 712)again as OpenSSH verifies that you are connecting to the correct system. Follow thesame steps as when you initially connected to the remote host.
ssh: Connects to or Executes Commands on a
Remote System
The format of an ssh command line is
ssh [options] [user@]host [command]
where host, the name of the OpenSSH server (the remote system) you want to con-nect to, is the only required argument. The host can be a local system name, theFQDN (page 1037) of a system on the Internet, or an IP address. Give the com-mand ssh host to log in on the remote system host with the same username you areusing on the local system. Include user@ when you want to log in with a usernameother than the one you are using on the local system. Depending on how the serveris set up, you may need to supply your password.
Opening aremote shell
Without command, ssh logs you in on host. The remote system displays a shellprompt and you can run commands on host. Give the command exit to close theconnection to host and return to the local system’s prompt.
In the following example, Sam, who is logged in on dog, uses ssh to log in onplum, gives a who am i command that shows the IP address of the system he is

OpenSSH Clients 715
logged in from, and uses exit to close the connection to plum and return to thelocal system’s prompt:
sam@dog:~$ ssh plumsam@plum's password:Linux plum 2.6.17-10-generic #2 SMP Tue Dec 5 22:28:26 UTC 2006 i686...Last login: Mon Jan 22 22:00:13 2007 from 192.168.0.12sam@plum:~$ who am isam pts/0 2007-01-23 14:19 (192.168.0.12)sam@plum:~$ exitlogoutConnection to plum closed.sam@dog:~$
Running a remotecommand
When you include command, ssh logs in on host, executes command, closes theconnection to host, and returns control to the local system. The remote systemnever displays a shell prompt.
The following example runs ls in the memos directory on the remote system plum.The example assumes that the user running the command (Sam) has a login onplum and that the memos directory is in Sam’s home directory on plum:
sam@dog:~$ ssh plum ls memossam@plum's password:memo.0921memo.draftsam@dog:~$
For the next example, assume the working directory on the local system (dog) holdsfile named memo.new. You cannot remember whether this file contains certainchanges or whether you made these changes to the file named memo.draft on plum.You could copy memo.draft to the local system and run diff (page 154) on the twofiles, but then you would have three similar copies of the file spread across two sys-tems. If you are not careful about removing the old copies when you are done, youmay just become confused again in a few days. Instead of copying the file, you canuse ssh:
sam@dog:~$ ssh plum cat memos/memo.draft | diff memos.new –
When you run ssh, standard output of the command run on the remote system ispassed to the local shell as though the command had been run in place on the localsystem. As with all shell commands, you must quote special characters you do notwant the local system to interpret. In the preceding example, the output of the catcommand on plum is sent through a pipe on dog to diff (running on dog), whichcompares the local file memos.new to standard input (–). The following commandline has the same effect but causes diff to run on the remote system:
sam@dog:~$ cat memos.new | ssh plum diff – memos/memo.draft
Standard output from diff on the remote system is sent to the local shell, which dis-plays it on the screen (because it is not redirected).

716 Chapter 19 OpenSSH: Secure Network Communication
Options
This section describes some of the options you can use with ssh.
–C (compression) Enables compression. (In the commercial version of ssh, –C disablescompression and +C enables compression.)
–f (not foreground) Sends ssh to the background after asking for a password andbefore executing the command. Useful when you want to run the command in thebackground but must supply a password. Implies –n.
–L Forwards a port on the local system to a remote system. For more information referto “Tunneling/Port Forwarding” on page 725.
–l user (login) Attempts to log in as user.
–n (null) Redirects standard input to ssh to come from /dev/null. Required when run-ning ssh in the background (–f option).
–o option (option) Specifies option in the format used in configuration files (page 718).
–p (port) Specifies the port on the remote host that the connection is made to. Usingthe host declaration (page 719) in the configuration file, you can specify a differentport for each system you connect to.
–R Forwards a port on the remote system to the local client. For more informationrefer to “Tunneling/Port Forwarding” on page 725.
–t (tty) Allocates a pseudo-tty (terminal) to the ssh process on the remote system.Without this option, when you run a command on a remote system, ssh does notallocate a tty (terminal) to the process. Instead, it attaches standard input and stan-dard output of the remote process to the ssh session—which is normally, but notalways, what you want. This option forces ssh to allocate a tty on the remote sys-tem so programs that require a tty will work.
–v (verbose) Displays debugging messages about the connection and transfer. Useful ifthings are not going as expected.
–X (X11) Turns on nontrusted X11 forwarding. This option is not necessary if you turnon X11 nontrusted forwarding in the configuration file. For more information referto “Forwarding X11” on page 725.
–x (X11) Turns off X11 forwarding.
–Y (X11trusted) Turns on trusted X11 forwarding. This option is not necessary if youturn on trusted X11 forwarding in the configuration file. For more informationrefer to “Forwarding X11” on page 725.
scp: Copies Files to and from a Remote System
The scp (secure copy) utility copies an ordinary or directory file from one system toanother (including two remote systems) over a network. This utility uses ssh totransfer files and employs the same authentication mechanism as ssh; thus it pro-vides the same security as ssh. The scp utility asks for a password when one isrequired. The format of an scp command is

OpenSSH Clients 717
scp [[user@]from-host:]source-file [[user@]to-host:][destination-file]
where from-host is the name of the system you are copying files from and to-host isthe system you are copying to. The from-host and to-host arguments can be localsystem names, FQDNs (page 1037) of systems on the Internet, or IP addresses.When you do not specify a host, scp assumes the local system. The user on eithersystem defaults to the user on the local system who is giving the command; you canspecify a different user with user@.
The source-file is the file you are copying, and the destination-file is the resultingcopy. Make sure you have read permission for the file you are copying and writepermission for the directory you are copying it into. You can specify plain or direc-tory files as relative or absolute pathnames. (A relative pathname is relative to thespecified or implicit user’s home directory.) When the source-file is a directory, youmust use the –r option to copy its contents. When the destination-file is a directory,each of the source files maintains its simple filename. When the destination-file ismissing, scp assumes the user’s home directory.
Suppose Sam has an alternate username, sls, on plum. In the following example, Samuses scp to copy memo.txt from the home directory of his sls account on plum to theallmemos directory in the working directory on the local system. If allmemos wasnot the name of a directory, memo.txt would be copied to a file named allmemos inthe working directory.
sam@dog:~$ scp sls@plum:memo.txt allmemossls@plum's password:memo.txt 100% 4084KB 4.0MB/s 00:01
As the transfer progresses, the percentage and number of bytes transferred increaseand the time remaining decreases.
In the next example, Sam, while working from peach, copies the same file as in theprevious example to the directory named old in his home directory on speedy. Forthis example to work, Sam must be able to use ssh to log in on speedy from plumwithout using a password. For more information refer to “Authorized Keys: Auto-matic Login” on page 721.
sam@peach:~$ scp sls@plum:memo.txt speedy:oldsam@plum's password:
Options
This section describes some of the options you can use with scp.
–C (compression) Enables compression.
–o option (option) Specifies option in the format used in configuration files (discussed shortly).
–P port (port) Connects to port port on the remote host. This option is given in uppercasefor scp and in lowercase for ssh.
–p (preserve) Preserves the modification and access times as well as the modes of theoriginal file.

718 Chapter 19 OpenSSH: Secure Network Communication
–q (quiet) Does not display the progress information as scp copies a file.
–r (recursive) Recursively copies a directory hierarchy.
–v (verbose) Displays debugging messages about the connection and transfer. Useful ifthings are not going as expected.
sftp: A Secure FTP Client
As part of OpenSSH, Ubuntu Linux provides sftp, a secure alternative to ftp(page 729). Functionally the same as ftp, sftp maps ftp commands to OpenSSH com-mands. You can replace ftp with sftp when you are logging in on a server that isrunning the OpenSSH daemon, sshd. Once you are connected to a system with sftp,give the command ? to display a list of commands. For secure communication, usesftp or scp to perform all file transfers requiring authentication. Refer to the sftpman page for more information.
lftp Ubuntu also offers lftp, which is more sophisticated than sftp and supports sftp. Thelftp utility provides a shell-like command syntax that has many features, includingsupport for tab completion and the ability to run jobs in the background. Use/etc/lftp.conf to configure lftp and see the lftp man page for more information.
~/.ssh/config and /etc/ssh/ssh_config Configuration Files
It is rarely necessary to modify OpenSSH client configuration files. For a given userthere may be two configuration files: ~/.ssh/config (user) and /etc/ssh/ssh_config(global). These files are read in this order and, for a given parameter, the first onefound is the one that is used. A user can override a global parameter setting by set-ting the same parameter in her user configuration file. Parameters given on the sshor scp command line take precedence over parameters set in either of these files.
A user’s ~/.ssh/config file must be owned by the user (the owner of the ~/ directory)and must not be writable by anyone except the owner; if it is, the client will exitwith an error message. This file is typically set to mode 600 as there is no reason foranyone except its owner to be able to read it.
Lines in the configuration files contain declarations. Each of these declarations starts witha keyword that is not case sensitive, followed by whitespace, followed by case-sensitivearguments. You can use the Host keyword to cause declarations to apply to a specific sys-tem. A Host declaration applies to all the lines between it and the next Host declaration.
CheckHostIP yes | noIdentifies a remote system using the IP address in addition to a hostname from theknown_hosts file when set to yes (default). Set it to no to use a hostname only. Set-ting CheckHostIP to yes can improve system security.
ForwardX11 yes | noWhen set to yes, automatically forwards X11 connections over a secure channelin nontrusted mode but does not set the DISPLAY shell variable. IfForwardX11Trusted is also set to yes, the connections are made in trusted mode.Alternatively, you can use –X on the command line to redirect X11 connections in

OpenSSH Clients 719
nontrusted mode. The default value for this parameter is yes. For X11 forwardingto work, X11Forwarding must also be set to yes in the /etc/sshd_config file on theserver (page 724). For more information refer to “Forwarding X11” on page 725.
ForwardX11Trusted yes | noWorks in conjunction with ForwardX11, which must be set to yes (default) for thisdeclaration to have any effect. When this declaration is set to yes (default) andForwardX11 is set to yes, this declaration sets the DISPLAY shell variable and givesremote X11 clients full access to the original (server) X11 display. Alternatively, youcan use –Y on the command line to redirect X11 connections in trusted mode. Thedefault value for this declaration is no. For X11 forwarding to work, X11Forwardingmust also be set to yes in the /etc/sshd_config file on the server (page 724). For moreinformation refer to “Forwarding X11” on page 725.
HashKnownHostsCauses OpenSSH to hash hostnames and addresses in the ~/.ssh/known_hosts filewhen set to yes. The hostnames and addresses are written in cleartext when it is setto no. Ubuntu Linux sets this declaration to yes to improve system security. Seepage 712 for more information on the known_hosts file.
Host hostnames Specifies that the following declarations, until the next Host declaration, apply onlyto hosts that hostnames matches. The hostnames can include ? and * wildcards. Asingle * specifies all hosts. Without this keyword, all declarations apply to all hosts.
HostbasedAuthentication yes | noTries rhosts authentication when set to yes. For a more secure system, set to no(default).
HostKeyAlgorithms algorithmsThe algorithms is a comma-separated list of algorithms the client uses in order ofpreference. Choose algorithms from ssh-rsa or ssh-dss. The default is ssh-rsa,ssh-dss.
Port num Causes OpenSSH to connect to the remote system on port num. The default is 22.
StrictHostKeyChecking yes | no | askDetermines whether and how OpenSSH adds host keys to a user’s known_hosts file.Set this option to ask to ask whether to add a host key when connecting to a newsystem, set it to no to add a host key automatically, and set it to yes to require thathost keys be added manually. The yes and ask arguments cause OpenSSH to refuseto connect to a system whose host key has changed. For a more secure system, setthis option to yes or ask. The default is ask.
TCPKeepAlive yes | noPeriodically checks whether a connection is alive when set to yes (default). Checkingcauses the ssh or scp connection to be dropped when the server crashes or the con-nection dies for another reason, even if it is only temporary. This option tests theconnection at the transport (TCP) layer (page 362). Setting this parameter to nocauses the client not to check whether the connection is alive.
This declaration uses the TCP keepalive option, which is not encrypted and is sus-ceptible to IP spoofing (page 1043). Refer to “ClientAliveInterval” on page 723 fora server-based nonspoofable alternative.

720 Chapter 19 OpenSSH: Secure Network Communication
User name Specifies a username to use when logging in on a system. You can specify a systemwith the Host declaration. This option means that you do not have to enter a user-name on the command line when you are using a username that differs from yourusername on the local system.
sshd: OpenSSH Server
This section discusses how to set up an OpenSSH server.
Prerequisites
Installation Install the following package:
• openssh-server
When you install the openssh-server package, the dpkg postinst script creates thehost key files in /etc/ssh (OpenSSH uses these files to identify the server; page 709)and starts the sshd daemon:
...Unpacking openssh-server (from .../openssh-server_1%3a4.3p2-5ubuntu1_i386.deb) ...Setting up openssh-server (4.3p2-5ubuntu1) ...Creating SSH2 RSA key; this may take some time ...Creating SSH2 DSA key; this may take some time ... * Restarting OpenBSD Secure Shell server...
ssh init script After you configure the OpenSSH server, call the ssh init script to restart the sshddaemon:
$ sudo /etc/init.d/ssh reload * Reloading OpenBSD Secure Shell server's configuration [ OK ]
Note
Firewall An OpenSSH server normally uses TCP port 22. If the OpenSSH server system isrunning a firewall, you need to open this port. To do so, use firestarter (page 886) toset a policy that allows the SSH service.
JumpStart: Starting the sshd Daemon
Installing the requisite package starts the sshd daemon. Look in /var/log/auth.log tomake sure everything is working properly.
Recommended Settings
The configuration files provided by Ubuntu establish a mostly secure system andmay or may not meet your needs. The Ubuntu /etc/ssh/sshd_config file turns onX11 forwarding (page 725). It is important to set PermitRootLogin (page 723) tono, which prevents a known-name, privileged account from being exposed to theoutside world with only password protection. If the root account is locked, the set-ting of this declaration is not an issue.

sshd: OpenSSH Server 721
Authorized Keys: Automatic Login
You can configure OpenSSH so you do not have to enter a password each time youconnect to a server (remote system). To set up this feature, you need to generate apersonal authentication key on the client (local system), place the public part of thekey on the server, and keep the private part of the key on the client. When you con-nect to the server, it issues a challenge based on the public part of the key. The privatepart of the key must then respond properly to this challenge. If the client provides theappropriate response, the server logs you in.
The first step in setting up an automatic login is to generate your personal authenti-cation keys. First check whether these authentication keys already exist on the localsystem (client) by looking in ~/.ssh for either id_dsa and id_dsa.pub or id_rsa andid_rsa.pub. If one of these pairs of files is present, skip the next step (do not create anew key).
On the client, the ssh-keygen utility creates the public and private parts of an RSA key:
ssh-keygen $ ssh-keygen -t rsaGenerating public/private rsa key pair.Enter file in which to save the key (/home/sam/.ssh/id_rsa):RETURNCreated directory '/home/sam/.ssh'.Enter passphrase (empty for no passphrase):RETURNEnter same passphrase again:RETURNYour identification has been saved in /home/sam/.ssh/id_rsa.Your public key has been saved in /home/sam/.ssh/id_rsa.pub.The key fingerprint is:f2:eb:c8:fe:ed:fd:32:98:e8:24:5a:76:1d:0e:fd:1d sam@peach
Replace rsa with dsa to generate DSA keys. In this example, the user pressed RETURN
in response to each query. You have the option of specifying a passphrase (10–30characters is a good length) to encrypt the private part of the key. There is no wayto recover a lost passphrase. See the following security tip for more informationabout the passphrase.
When you encrypt your personal keysecurity The private part of the key is kept in a file that only you can read. If a malicious user compromises
your account, an account that can use sudo to gain root privileges, or the root account on thelocal system, that user then has access to your account on the remote system because she canread the private part of your personal key.
Encrypting the private part of your personal key protects the key and, therefore, restricts access to theremote system should someone compromise your local account. However, if you encrypt your per-sonal key, you must supply the passphrase you used to encrypt the key each time you use the key,negating the benefit of not having to type a password when logging in on the remote system. Also,most passphrases that you can remember can be cracked quite quickly by a powerful computer.
A better idea is to store the private keys on a removable medium, such as a USB flash drive, anduse your ~/.ssh directory as the mount point for the filesystem stored on this drive. You may wantto encrypt these keys with a passphrase in case you lose the flash drive.
722 Chapter 19 OpenSSH: Secure Network Communication
The ssh-keygen utility generates two keys: a private key or identification in~/.ssh/id_rsa and a public key in ~/.ssh/id_rsa.pub. No one except the ownershould be able to write to either of these files, and only the owner should be able toread from the private key file.
authorized_keys To enable you to log in on or copy files to and from another system without supplyinga password, first create a ~/.ssh directory with permissions set to 700 on the server(remote system). Next copy ~/.ssh/id_rsa.pub from the client (local system) to a filenamed ~/.ssh/authorized_keys on the server (remote system). Set its permissions to600 so that no one except the owner can read from or write to this file. Now whenyou run ssh or scp to access the server, you do not have to supply a password. Tomake the server even more secure, you can disable password authentication by settingPasswordAuthentication to no in /etc/ssh/sshd_config (remove the # from the begin-ning of the PasswordAuthentication line and change the yes to no; page 723).
Command Line Options
Command line options override declarations in the configuration files. Followingare descriptions of some of the more useful sshd options.
–d (debug) Sets debug mode so that sshd sends debugging messages to the system logand the server stays in the foreground (implies –D). You can specify this option amaximum of three times to increase the verbosity of the output. See also –e. (Thessh client uses –v for debugging; see page 716.)
–e (error) Sends output to standard error, not to the system log. Useful with –d.
–f file Specifies file as the default configuration file instead of /etc/ssh/sshd_config.
–t (test) Checks the configuration file syntax and the sanity of the key files.
–D (noDetach) Keeps sshd in the foreground. Useful for debugging; implied by –d.
/etc/ssh/sshd_config Configuration File
The /etc/ssh/sshd_config configuration file contains one-line declarations. Each ofthese declarations starts with a keyword that is not case sensitive, followed by whitespace,followed by case-sensitive arguments. You must reload the sshd server before thesechanges will take effect.
AllowUsers userlistThe userlist is a SPACE-separated list of usernames that specifies which users areallowed to log in using sshd. This list can include * and ? wildcards. You can spec-ify a user as user or user@host. If you use the second format, make sure you specifythe host as returned by hostname. Without this declaration, any user who can log inlocally can log in using an OpenSSH client.
ClientAliveCountMax nThe n specifies the number of client-alive messages that can be sent without receiv-ing a response before sshd disconnects from the client. See ClientAliveInterval. Thedefault is 3.

sshd: OpenSSH Server 723
ClientAliveInterval nSends a message through the encrypted channel after n seconds of not receiving amessage from the client. See ClientAliveCountMax. The default is 0, meaning thatno messages are sent.
This declaration passes messages over the encrypted channel (application layer;page 362) and is not susceptible to IP spoofing (page 1043). It differs fromTCPKeepAlive, which uses the TCP keepalive option (transport layer; page 362)and is susceptible to IP spoofing.
DenyUsers userlistThe userlist is a SPACE-separated list of usernames that specifies users who are notallowed to log in using sshd. This list can include * and ? wildcards. You can spec-ify a user as user or user@host. If you use the second format, make sure you specifythe host as returned by hostname.
HostbasedAuthentication yes | noTries rhosts and /etc/hosts.equiv authentication when set to yes. For a more securesystem, set this declaration to no (default).
IgnoreRhosts yes | noIgnores .rhosts and .shosts files for authentication. Does not affect the use of/etc/hosts.equiv and /etc/ssh/shosts.equiv files for authentication. For a moresecure system, set this declaration to yes (default).
LoginGraceTime nWaits n seconds for a user to log in on the server before disconnecting. A value of 0means there is no time limit. The default is 120 seconds.
LogLevel val Specifies how detailed the log messages are. Choose val from QUIET, FATAL,ERROR, INFO (default), and VERBOSE.
PasswordAuthenticationPermits a user to use a password for authentication. For a more secure system, setup automatic login (page 721) and set this declaration to no. The default is yes.
PermitEmptyPasswordsPermits a user to log in on an account that has an empty password. The default is no.
PermitRootLogin Permits root to log in using an OpenSSH client. Given the number of brute-forceattacks on a typical system connected to the Internet, it is important to set this dec-laration to no. (How you set this declaration is not an issue if the root account islocked.) The default is yes.
Port num Specifies that the sshd server listen on port num. It may improve security to changenum to a nonstandard port. The default is port 22.
StrictModes yes | noChecks modes and ownership of the user’s home directory and files. Login fails forusers other than the owner if the directories and/or files can be written to by anyoneother than the owner. For a more secure system, set this declaration to yes (default).

724 Chapter 19 OpenSSH: Secure Network Communication
TCPKeepAlive yes | noPeriodically checks whether a connection is alive when set to yes (default). Checkingcauses the ssh or scp connection to be dropped when the client crashes or the con-nection dies for another reason, even if it is only temporary. This option tests theconnection at the transport (TCP) layer (page 362). Setting this parameter to nocauses the server not to check whether the connection is alive.
This declaration uses the TCP keepalive option, which is not encrypted and is sus-ceptible to IP spoofing (page 1043). Refer to ClientAliveInterval (page 723) for anonspoofable alternative.
X11Forwarding yes | noAllows X11 forwarding when set to yes. The default is no, but Ubuntu Linux setsX11Forwarding to yes. For trusted X11 forwarding to work, the ForwardX11 andthe ForwardX11Trusted declarations must also be set to yes in either the~/.ssh/config or /etc/ssh/ssh_config client configuration file (page 718). For moreinformation refer to “Forwarding X11” on page 725.
Troubleshooting
Log files There are several places to look for clues when you have a problem connecting withssh or scp. First look for sshd entries in /var/log/auth.log on the server. Followingare messages you may see when you are using an AllowUsers declaration but havenot included the user who is trying to log in (page 722). The messages that aremarked (pam_unix) originate with PAM (page 545).
$ sudo grep sshd /var/log/auth.logplum sshd[6927]: Invalid user sam from 192.168.0.12plum sshd[6927]: Failed none for invalid user sam from 192.168.0.12 port 37134 ssh2plum sshd[6927]: (pam_unix) check pass; user unknownplum sshd[6927]: (pam_unix) authentication failure; logname= uid=0 euid=0 tty=ssh ruser= rhost=192.168.0.12plum sshd[6927]: Failed password for invalid user sam from 192.168.0.12 port 37134 ssh2
Debug the client If entries in these files do not help solve the problem, try connecting with the –voption (either ssh or scp—the results should be the same). OpenSSH displays a lotof debugging messages, one of which may help you figure out what the problem is.You can use a maximum of three –v options to increase the number of messagesthat OpenSSH displays.
$ ssh -v plumOpenSSH_4.3p2 Debian-5ubuntu1, OpenSSL 0.9.8b 04 May 2006debug1: Reading configuration data /etc/ssh/ssh_configdebug1: Applying options for *debug1: Connecting to plum [192.168.0.10] port 22.debug1: Connection established.debug1: identity file /home/sam/.ssh/identity type -1debug1: identity file /home/sam/.ssh/id_rsa type 1...

Tunneling/Port Forwarding 725
debug1: Host 'plum' is known and matches the RSA host key.debug1: Found key in /home/sam/.ssh/known_hosts:1debug1: ssh_rsa_verify: signature correct...debug1: Authentications that can continue: publickey,passworddebug1: Next authentication method: publickeydebug1: Trying private key: /home/sam/.ssh/identitydebug1: Offering public key: /home/sam/.ssh/id_rsadebug1: Authentications that can continue: publickey,passworddebug1: Trying private key: /home/sam/.ssh/id_dsadebug1: Next authentication method: passwordsam@plum's password:
Debug the server You can debug from the server side by running sshd with the –de options. Theserver will run in the foreground and its display may help you solve the problem.
Tunneling/Port Forwarding
The ssh utility can forward a port (port forwarding; page 1053) through theencrypted connection it establishes. Because the data sent across the forwarded portuses the encrypted ssh connection as its data link layer (page 362), the term tunneling(page 1066) is applied to this type of connection: “The connection is tunneledthrough ssh.” You can secure protocols—including POP, X, IMAP, VNC, andWWW—by tunneling them through ssh.
Forwarding X11 The ssh utility makes it easy to tunnel the X11 protocol. For X11 tunneling towork, you must enable it on both the server and the client, and the client must berunning the X Window System. On the ssh server, enable X11 forwarding by settingthe X11Forwarding declaration (page 724) to yes (the default) in the/etc/ssh/sshd_config file.
Trusted clients On a client, enable trusted X11 forwarding by setting the ForwardX11 (default isno; see page 718) and ForwardX11Trusted (default is no, but set to yes as installed;see page 719) declarations to yes in the /etc/ssh/ssh_config or ~/.ssh/ssh_config file.
When you enable trusted X11 forwarding on a client, the client connects as atrusted client, which means that the client trusts the server and is given full access tothe X11 display. With full access to the X11 display, in some situations a client maybe able to modify other clients of the X11 display. Make a trusted connection onlywhen you trust the remote system. (You do not want someone tampering with yourclient.) If this concept is confusing, see the tip “The roles of X client and server maybe counterintuitive” on page 253.
Nontrusted clients An ssh client can connect to an ssh server as a trusted client or as a nontrusted cli-ent. A nontrusted client is given limited access to the X11 display and cannot mod-ify other clients of the X11 display.
Few clients work properly when they are run in nontrusted mode. If you are run-ning an X11 client in nontrusted mode and encounter problems, try running in

726 Chapter 19 OpenSSH: Secure Network Communication
trusted mode (assuming you trust the remote system). Ubuntu Linux sets up ssh cli-ents to run in nontrusted mode by default.
Running ssh When you start an ssh client, you can use the –Y option (page 716) on the com-mand line to start the client in trusted mode. Alternatively, you can set theForwardX11 and ForwardX11trusted declarations to yes in a user’s ~/.ssh/configconfiguration file (page 719) or, working with root privileges, in the global/etc/ssh/ssh_config file (page 719) on the client to enable trusted X11 tunneling.
To use nontrusted tunneling, you can use the –X option (page 716) or set theForwardX11 declaration to yes and set the ForwardX11trusted declaration to no inone of the configuration files (page 718) on the server.
With trusted X11 forwarding turned on, ssh tunnels the X11 protocol, setting theDISPLAY environment variable on the system it connects to and forwarding therequired port. Typically you will be running from a GUI, which usually means thatyou are using ssh on a terminal emulator to connect to a remote system. When yougive an X11 command from an ssh prompt, OpenSSH creates a new secure channelthat carries the X11 data and the graphical output from the X11 program appearson the screen. Typically you will need to start the client in trusted mode.
sam@dog:~$ ssh plumsam@plum's password:...sam@plum:~$ echo $DISPLAYlocalhost:10.0
By default, ssh uses X Window System display numbers 10 and higher (port numbers6010 and higher) for forwarded X sessions. Once you connect to a remote systemusing ssh, you can give a command to run an X application. The application will thenrun on the remote system with its display appearing on the local system, such that itappears to run locally.
Port forwarding You can forward arbitrary ports using the –L and –R options. The –L option forwardsa local port to a remote system, so a program that tries to connect to the forwardedport on the local system transparently connects to the remote system. The –R optiondoes the reverse: It forwards remote ports to the local system. The –N option, whichprevents ssh from executing remote commands, is generally used with –L and –R.When you specify –N, ssh works only as a private network to forward ports. An sshcommand line using the –L or –R option has the following format:
$ ssh –N –L | –R local-port:remote-host:remote-port target
where local-port is the number of the local port that is being forwarded to or fromremote-host, remote-host is the name or IP address of the system that local-portgets forwarded to or from, remote-port is the number of the port on remote-hostthat is being forwarded from or to the local system, and target is the name or IPaddress of the system ssh connects to.

Chapter Summary 727
As an example, assume that there is a POP mail client on the local system and thatthe POP server is on a remote network, on a system named pophost. POP is not asecure protocol; passwords are sent in cleartext each time the client connects to theserver. You can make it more secure by tunneling POP through ssh (POP-3 connectson port 110; port 1550 is an arbitrary port on the local system):
$ ssh -N -L 1550:pophost:110 pophost
After giving the preceding command, you can point the POP client at local-host:1550. The connection between the client and the server will then be encrypted.(When you set up an account on the POP client, specify the location of the server aslocalhost, port 1550; details vary with different mail clients.)
Firewalls In the preceding example, remote-host and target were the same system. However,the system specified for port forwarding (remote-host) does not have to be the sameas the destination of the ssh connection (target). As an example, assume the POPserver is behind a firewall and you cannot connect to it via ssh. If you can connectto the firewall via the Internet using ssh, you can encrypt the part of the connectionover the Internet:
$ ssh -N -L 1550:pophost:110 firewall
Here remote-host (the system receiving the port forwarding) is pophost, and target(the system that ssh connects to) is firewall.
You can also use ssh when you are behind a firewall (that is running sshd) and wantto forward a port into your system without modifying the firewall settings:
$ ssh -R 1678:localhost:80 firewall
The preceding command forwards connections from the outside to port 1678 onthe firewall to the local Web server. Forwarding connections in this manner allowsyou to use a Web browser to connect to port 1678 on the firewall when you connectto the Web server on the local system. This setup would be useful if you ran a Web-mail program (page 772) on the local system because it would allow you to checkyour mail from anywhere using an Internet connection.
Compression Compression, which is enabled with the –C option, can speed up communicationover a low-bandwidth connection. This option is commonly used with port for-warding. Compression can increase latency to an extent that may not be desirablefor an X session forwarded over a high-bandwidth connection.
Chapter Summary
OpenSSH is a suite of secure network connectivity tools that encrypts all traffic,including passwords, thereby helping to thwart malicious users who might other-wise eavesdrop, hijack connections, and steal passwords. The components discussed

728 Chapter 19 OpenSSH: Secure Network Communication
in this chapter were sshd (the server daemon), ssh (runs a command on or logs in onanother system), scp (copies files to and from another system), sftp (securelyreplaces ftp), and ssh-keygen (creates, manages, and converts authentication keys).
To ensure secure communications, when an OpenSSH client opens a connection, itverifies that it is connected to the correct server. Then OpenSSH encrypts communi-cation between the systems. Finally OpenSSH makes sure that the user is authorizedto log in on or copy files to and from the server. You can secure many protocols—including POP, X, IMAP, VNC, and WWW—by tunneling them through ssh.
OpenSSH also enables secure X11 forwarding. With this feature, you can runsecurely a graphical program on a remote system and have the display appear onthe local system.
Exercises
1. What is the difference between the scp and sftp utilities?
2. How can you use ssh to find out who is logged in on a remote system?
3. How would you use scp to copy your ~/.bashrc file from the system named plum to the local system?
4. How would you use ssh to run xterm on plum and show the display on the local system?
5. What problem can enabling compression present when you are using sshto run remote X applications on a local display?
6. When you try to connect to another system using an OpenSSH client and you see a message warning you that the remote host identification has changed, what has happened? What should you do?
Advanced Exercises
7. Which scp command would you use to copy your home directory from plum to the local system?
8. Which single command could you give to log in as root on the remote sys-tem named plum, if plum has the root account unlocked and remote rootlogins disabled?
9. How could you use ssh to compare the contents of the ~/memos directo-ries on plum and the local system?

729729
20Chapter20File Transfer Protocol is a method of downloading files fromand uploading files to another system using TCP/IP over anetwork. File Transfer Protocol is the name of a client/serverprotocol (FTP) and a client utility (ftp) that invokes the pro-tocol. In addition to the original ftp utility, there are manytextual and graphical FTP client programs, including mostbrowsers, that run under many different operating systems.There are also many FTP server programs.
In This Chapter
FTP Client. . . . . . . . . . . . . . . . . . . . 731
JumpStart I: Downloading Files Using ftp. . . . . . . . . . . . . . . . . . . 732
Anonymous FTP . . . . . . . . . . . . . . 735
Automatic Login . . . . . . . . . . . . . . 735
Binary Versus ASCII Transfer Mode . . . . . . . . . . . . . . . . . . . . . 736
FTP Server (vsftpd) . . . . . . . . . . . . 740
JumpStart II: Starting a vsftpd Server . . . . . . . . . . . . . . . . . . . . . 741
vsftpd.conf: The vsftpd Configuration File . . . . . . . . . . . 742
20
FTP: Transferring
Files Across a
Network

730 Chapter 20 FTP: Transferring Files Across a Network
Introduction
First implemented under 4.2BSD, FTP has played an essential role in the propaga-tion of Linux; this protocol/program is frequently used to distribute free software.The term FTP site refers to an FTP server that is connected to a network, usually theInternet. FTP sites can be public, allowing anonymous users to log in and downloadsoftware and documentation. In contrast, private FTP sites require you to log inwith a username and password. Some sites allow you to upload programs.
ftp and vsftpd Although most FTP clients are similar, the servers differ quite a bit. This chapterdescribes the ftp client with references to sftp, a secure FTP client. It also covers theFTP server available under Ubuntu, which is named vsftpd (very secure FTP daemon).
Security FTP is not a secure protocol: All usernames and passwords exchanged in setting upan FTP connection are sent in cleartext, data exchanged over an FTP connection isnot encrypted, and the connection is subject to hijacking. Given these facts, FTP isbest used for downloading public files. In most cases, the OpenSSH clients, ssh(page 714), scp (page 716), and sftp (page 718), offer secure alternatives to FTP.
The vsftpd server does not make usernames, passwords, data, and connectionsmore secure. However, it is secure in that a malicious user finds it more difficult tocompromise directly the system running it, even if vsftpd is poorly implemented.One feature that makes vsftpd more secure than ftpd is the fact that it does not runwith root privileges. See also “Security” on page 741.
ftp utility The ftp utility is a user interface to FTP, the standard protocol used to transfer filesbetween systems that communicate over a network.
FTP connections FTP uses two connections: one for control (you establish this connection when youlog in on an FTP server) and one for data transfer (FTP sets up this connection whenyou ask it to transfer a file). An FTP server listens for incoming connections on port21 by default and handles user authentication and file exchange.
Passive versusactive connections
A client can ask an FTP server to establish either a PASV (passive—give the commandftp –p or pftp) or a PORT (active—the default when you use ftp) connection for datatransfer. Some servers are limited to one type of connection. The difference between apassive and an active FTP connection lies in whether the client or the server initiates thedata connection. In passive mode, the client initiates the connection to the server (onport 20 by default); in active mode, the server initiates the connection (there is nodefault port; see “Connection Parameters” on page 750 for the parameters that deter-mine which ports a server uses). Neither approach is inherently more secure than theother. Passive connections are more common because a client behind a NAT (page 897)can connect to a passive server and it is simpler to program a scalable passive server.
Use FTP only to download public informationsecurity FTP is not secure. The sftp utility provides better security for all FTP functions other than allowing anon-
ymous users to download information. Because sftp uses an encrypted connection, user passwordsand data cannot be sniffed when you use this utility. You can replace all instances of ftp in this chapterwith sftp because sftp uses the same commands as ftp. See page 718 for more information on sftp.

FTP Client 731
More Information
Local Type help or ? at an ftp> prompt to display a list of commands. Follow the ? with aSPACE and an ftp command to display information about that command.Files /usr/share/doc/vsftpd/*man pages ftp, sftp, lftp, netrc, vsftpd.conf
Web vsftpd home page vsftpd.beasts.org
HOWTO FTP mini-HOWTO
FTP Client
ftp Ubuntu supplies several FTP clients, including ftp (an older version of the BSD ftputility). This section discusses ftp because most other FTP clients, including sftp andlftp, provide a superset of ftp commands.
sftp Part of the OpenSSH suite, sftp (openssh-client package) is a secure and functionallyequivalent alternative to ftp. The sftp utility is not an FTP client—it does not under-stand the FTP protocol. It maps ftp commands to OpenSSH commands. See page 718for more information.
lftp The lftp utility (lftp package) provides the same security as sftp but offers more fea-tures. See the lftp man page for more information.
gFTP The gftp utility (gftp package) is a graphical client that works with FTP, SSH, andHTTP servers. This client has many useful features, including the ability to resumean interrupted file transfer. See www.gftp.org and freshmeat.net/projects/gftp formore information.
NcFTP The ncftp utility (ncftp package) is a textual client that offers many more features thanftp, including filename completion and command line editing. See www.ncftp.comand freshmeat.net/projects/ncftp for details.
Prerequisites
The ftp and sftp utilities are installed on most Ubuntu systems. You can check fortheir presence by giving either of these utilities’ names as commands:
$ ftpftp> quit
$ sftpusage: sftp [-1Cv] [-B buffer_size] [-b batchfile] [-F ssh_config] [-o ssh_option] [-P sftp_server_path] [-R num_requests] [-S program] [-s subsystem | sftp_server] host sftp [[user@]host[:file [file]]] sftp [[user@]host[:dir[/]]] sftp -b batchfile [user@]host
Install the ftp (contains ftp and pftp) or openssh-client (contains sftp) package ifneeded.
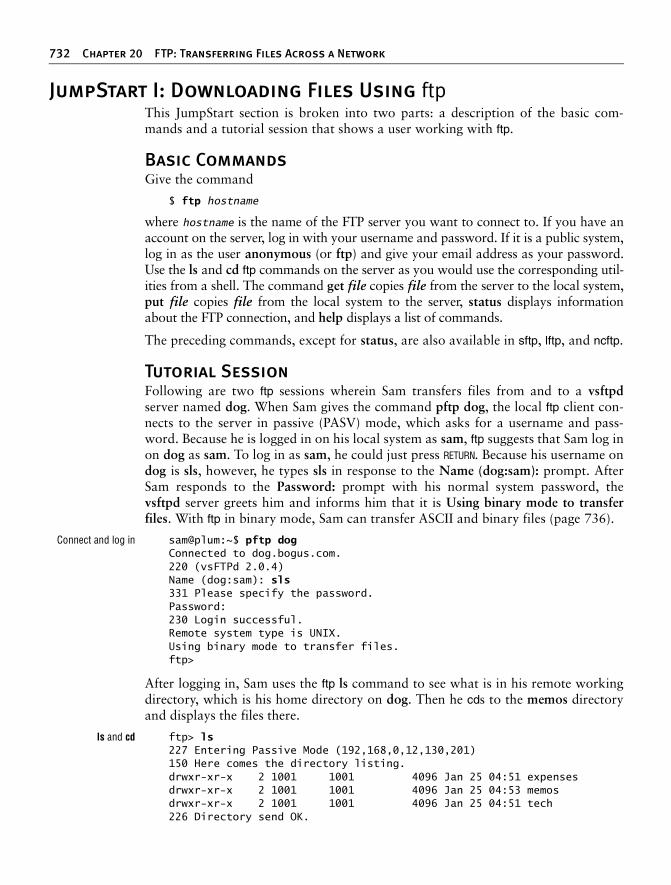
732 Chapter 20 FTP: Transferring Files Across a Network
JumpStart I: Downloading Files Using ftpThis JumpStart section is broken into two parts: a description of the basic com-mands and a tutorial session that shows a user working with ftp.
Basic Commands
Give the command
$ ftp hostname
where hostname is the name of the FTP server you want to connect to. If you have anaccount on the server, log in with your username and password. If it is a public system,log in as the user anonymous (or ftp) and give your email address as your password.Use the ls and cd ftp commands on the server as you would use the corresponding util-ities from a shell. The command get file copies file from the server to the local system,put file copies file from the local system to the server, status displays informationabout the FTP connection, and help displays a list of commands.
The preceding commands, except for status, are also available in sftp, lftp, and ncftp.
Tutorial Session
Following are two ftp sessions wherein Sam transfers files from and to a vsftpdserver named dog. When Sam gives the command pftp dog, the local ftp client con-nects to the server in passive (PASV) mode, which asks for a username and pass-word. Because he is logged in on his local system as sam, ftp suggests that Sam log inon dog as sam. To log in as sam, he could just press RETURN. Because his username ondog is sls, however, he types sls in response to the Name (dog:sam): prompt. AfterSam responds to the Password: prompt with his normal system password, thevsftpd server greets him and informs him that it is Using binary mode to transferfiles. With ftp in binary mode, Sam can transfer ASCII and binary files (page 736).
Connect and log in sam@plum:~$ pftp dogConnected to dog.bogus.com.220 (vsFTPd 2.0.4)Name (dog:sam): sls331 Please specify the password.Password:230 Login successful.Remote system type is UNIX.Using binary mode to transfer files.ftp>
After logging in, Sam uses the ftp ls command to see what is in his remote workingdirectory, which is his home directory on dog. Then he cds to the memos directoryand displays the files there.
ls and cd ftp> ls227 Entering Passive Mode (192,168,0,12,130,201)150 Here comes the directory listing.drwxr-xr-x 2 1001 1001 4096 Jan 25 04:51 expensesdrwxr-xr-x 2 1001 1001 4096 Jan 25 04:53 memosdrwxr-xr-x 2 1001 1001 4096 Jan 25 04:51 tech226 Directory send OK.

FTP Client 733
ftp> cd memos250 Directory successfully changed.
ftp> ls227 Entering Passive Mode (192,168,0,12,48,84)150 Here comes the directory listing.-rw-r--r-- 1 1001 1001 3430 Jan 25 04:52 memo.0514-rw-r--r-- 1 1001 1001 6581 Jan 25 04:52 memo.0628-rw-r--r-- 1 1001 1001 2801 Jan 25 04:52 memo.0905-rw-r--r-- 1 1001 1001 7351 Jan 25 04:53 memo.0921-rw-r--r-- 1 1001 1001 14703 Jan 25 04:53 memo.1102226 Directory send OK.ftp>
Next Sam uses the ftp get command to copy memo.1102 from the server to the localsystem. His use of binary mode ensures that he will get a good copy of the fileregardless of whether it is binary or ASCII. The server confirms that the file wascopied successfully and reports on its size and the time required to copy it. Sam thencopies the local file memo.1114 to the remote system. This file is copied into hisremote working directory, memos.
get and put ftp> get memo.1102local: memo.1102 remote: memo.1102227 Entering Passive Mode (192,168,0,12,53,74)150 Opening BINARY mode data connection for memo.1102 (14703 bytes).226 File send OK.14703 bytes received in 0.00 secs (11692.5 kB/s)
ftp> put memo.1114local: memo.1114 remote: memo.1114227 Entering Passive Mode (192,168,0,12,182,124)150 Ok to send data.226 File receive OK.11903 bytes sent in 0.00 secs (23294.6 kB/s)ftp>
Now Sam decides he wants to copy all the files in the memo directory on dog to anew directory on his local system. He gives an ls command to make sure he willcopy the right files, but ftp has timed out. Instead of exiting from ftp and givinganother ftp command from the shell, he gives ftp an open dog command to reconnectto the server. After logging in, he uses the ftp cd command to change directories tomemos on the server.
Timeout and open ftp> lsNo control connection for command: SuccessPassive mode refused.
ftp> open dogConnected to dog.bogus.com.220 (vsFTPd 2.0.4)Name (dog:sam): sls...ftp> cd memos250 Directory successfully changed.ftp>

734 Chapter 20 FTP: Transferring Files Across a Network
Local cd (lcd) At this point, Sam realizes he has not created the new directory to hold the files hewants to download. Giving an ftp mkdir command would create a new directory onthe server, but Sam wants a new directory on his local system. He uses an exclama-tion point (!) followed by a mkdir memos.hold command to invoke a shell and runmkdir on the local system, thereby creating a directory named memos.hold in hisworking directory on the local system. (You can display the name of your workingdirectory on the local system with !pwd.) Next, because Sam wants to copy filesfrom the server to the memos.hold directory on his local system, he has to changehis working directory on the local system. Giving the command !cd memos.holdwill not accomplish what Sam wants to do because the exclamation point willspawn a new shell on the local system and the cd command would be effective onlyin the new shell, which is not the shell that ftp is running under. For this situation, ftpprovides the lcd (local cd) command, which changes the working directory for ftpand reports on the new local working directory:
ftp> !mkdir memos.holdftp> lcd memos.holdLocal directory now /home/sam/memos.holdftp>
Sam uses the ftp mget (multiple get) command followed by the asterisk (*) wildcardto copy all files from the remote memos directory to the memos.hold directory onthe local system. When ftp prompts him for the first file, Sam realizes that he forgotto turn off the prompts, so he responds with n and presses CONTROL-C to stop copyingfiles in response to the second prompt. The server checks whether he wants to con-tinue with his mget command.
Next Sam gives the ftp prompt command, which toggles the prompt action (turns itoff if it is on and turns it on if it is off). Now when he gives a mget * command, ftpcopies the files without prompting him. After getting the desired files, Sam gives aquit command to close the connection with the server, exit from ftp, and return tothe local shell prompt.
mget and prompt ftp> mget *mget memo.0514? nmget memo.0628?CONTROL-CContinue with mget? nftp>ftp> promptInteractive mode off.ftp> mget *local: memo.0514 remote: memo.0514227 Entering Passive Mode (192,168,0,12,216,239)150 Opening BINARY mode data connection for memo.0514 (3430 bytes).226 File send OK.3430 bytes received in 0.00 secs (9409.0 kB/s)local: memo.0628 remote: memo.0628227 Entering Passive Mode (192,168,0,12,134,149)150 Opening BINARY mode data connection for memo.0628 (6581 bytes).226 File send OK....

FTP Client 735
150 Opening BINARY mode data connection for memo.1114 (11903 bytes).226 File send OK.11903 bytes received in 0.00 secs (11296.4 kB/s)ftp> quit221 Goodbye.sam@plum:~$
Notes
A Linux system running ftp can exchange files with any of the many operating sys-tems that support FTP. Many sites offer archives of free information on an FTPserver, although for many it is just an alternative to an easier-to-access Web site (see,for example, ftp://ftp.ibiblio.org/pub/Linux and http://www.ibiblio.org/pub/Linux).Most browsers can connect to and download files from FTP servers.
The ftp utility makes no assumptions about filesystem nomenclature or structurebecause you can use ftp to exchange files with non-UNIX/Linux systems (which mayuse different filenaming conventions).
Anonymous FTP
Many systems—most notably those from which you can download free software—allow you to log in as anonymous. Most systems that support anonymous loginsaccept the name ftp as an easier-to-spell and quicker-to-enter synonym for anony-mous. An anonymous user is usually restricted to a portion of a filesystem set aside tohold files that are to be shared with remote users. When you log in as an anonymoususer, the server prompts you to enter a password. Although any password may beaccepted, by convention you are expected to supply your email address.
Many systems that permit anonymous access store interesting files in the pub direc-tory. Most browsers, such as Firefox, log in on an anonymous FTP site and transfera file when you click on the filename.
Automatic Login
You can store server-specific FTP username and password information so you donot have to enter it each time you visit an FTP site. Each line of ~/.netrc identifies aserver. When you connect to an FTP server, ftp reads the ~/.netrc file to determinewhether you have an automatic login set up for that server. The format of a line in~/.netrc is
machine server login username password passwd
where server is the name of the server, username is your username, and passwd isyour password on server. Replace machine with default on the last line of the file tospecify a username and password for systems not listed in ~/.netrc. The default lineis useful for logging in on anonymous servers. A sample ~/.netrc file follows:
$ cat ~/.netrcmachine dog login sam password mypassworddefault login anonymous password [email protected]

736 Chapter 20 FTP: Transferring Files Across a Network
To protect the account information in .netrc, make it readable only by the user whosehome directory it appears in. Refer to the netrc man page for more information.
Binary Versus ASCII Transfer Mode
The vsftpd FTP server can—but does not always—provide two modes to transferfiles. Binary mode transfers always copy an exact, byte-for-byte image of a file andnever change line endings. Transfer all binary files using binary mode. Unless youneed to convert line endings, use binary mode to transfer ASCII files as well.
ASCII files, such as text or program source code, when created under Linux with atext editor such as vi, use a single NEWLINE character (CONTROL-J, written as \n) to markthe end of each line. Other operating systems mark the ends of lines differently.Windows marks the end of each such line with a RETURN (CONTROL-M, written as \r) fol-lowed by a NEWLINE (two characters). Macintosh uses a RETURN by itself. These descrip-tions do not apply to files created by word processors such as Word or OpenOfficebecause those programs generate binary files. The vsftpd server can map Linux lineendings to Windows line endings as you upload files and Windows line endings toLinux line endings as you download files.
To use ASCII mode on an FTP server that allows it, give an ascii command(page 738) after you log in and set cr to ON (the default; page 738). If the serverdoes not allow you to change line endings as you transfer a file, you can use theunix2dos (page 159) or dos2unix (page 159) utility before or after you transfer a filein binary mode.
Security When run against a very large file, the ftp size command, which displays the size of afile, consumes a lot of server resources and can be used to initiate a DoS attack(page 1034). To enhance security, by default vsftpd transfers every file in binarymode, even when it appears to be using ASCII mode. On the server side, you canenable real ASCII mode transfers by setting the ascii_upload_enable andascii_download_enable parameters (page 747) to YES. With the server set to allowASCII transfers, the client controls whether line endings are mapped by using theascii, binary, and cr commands (page 738).
ftp Specifics
This section covers the details of using ftp.
Format
An ftp command line has the following format:
ftp [options] [ftp-server]
where options is one or more options from the list in the next section and ftp-serveris the name or network address of the FTP server you want to exchange files with. Ifyou do not specify an ftp-server, you will need to use the ftp open command to con-nect to a server once ftp is running.

FTP Client 737
Command Line Options
–g (globbing) Turns off globbing. See glob (page 738).
–i (interactive) Turns off prompts during file transfers with mget (page 737) and mput(page 738). See also prompt (page 739).
–n (no automatic login) Disables automatic logins (page 735).
–v (verbose) Tells you more about how ftp is working. Responses from the remote com-puter are displayed, and ftp reports information on how quickly files are transferred.See also verbose (page 740).
ftp Commands
The ftp utility is interactive: After you start ftp, it prompts you to enter commands toset parameters or transfer files. You can abbreviate commands as long as the abbre-viations are unique. Enter a question mark (?) in response to the ftp> prompt to dis-play a list of commands. Follow the question mark by a SPACE and a command todisplay a brief description of what the command does:
ftp> ? mgetmget get multiple files
Shell Command
![command] Without command, escapes to (spawns) a shell on the local system. Use CONTROL-D orexit to return to ftp when you are finished using the local shell. Follow the exclama-tion point with command to execute that command only; ftp will display an ftp>prompt when execution of the command finishes. Because the shell that ftp spawnswith this command is a child of the shell that is running ftp, no changes you make inthis shell are preserved when you return to ftp. Specifically, when you want to copyfiles to a local directory other than the directory that you started ftp from, you needto use the ftp lcd command to change the local working directory: Issuing a cd com-mand in the spawned shell will not make the change you desire. See “Local cd (lcd)”on page 734 for an example.
Transfer Files
In the following descriptions, remote-file and local-file can be pathnames.
append local-file [remote-file]Appends local-file to the file with the same name on the remote system or toremote-file if specified.
get remote-file [local-file]Copies remote-file to the local system under the name local-file. Without local-file,ftp uses remote-file as the filename on the local system.
mget remote-file-list(multiple get) Copies several files to the local system, with each file maintaining itsoriginal filename. You can name the remote files literally or use wildcards (seeglob). Use prompt (page 739) to turn off the prompts during transfers.

738 Chapter 20 FTP: Transferring Files Across a Network
mput local-file-list(multiple put) Copies several files to the server, with each file maintaining its origi-nal filename. You can name the local files literally or use wildcards (see glob). Useprompt (page 739) to turn off the prompts during transfers.
newer remote-file [local-file]If the modification time of remote-file is more recent than that of local-file or iflocal-file does not exist, copies remote-file to the local system under the name local-file. Without local-file, ftp uses remote-file as the filename on the local system. Thiscommand is similar to get, but will not overwrite a newer file with an older one.
put local-file [remote-file]Copies local-file to the remote system under the name remote-file. Without remote-file, ftp uses local-file as the filename on the remote system.
reget remote-file [local-file]If local-file exists and is smaller than remote-file, assumes that a previous get oflocal-file was interrupted and continues from where the previous get left off. With-out local-file, ftp uses remote-file as the filename on the local system. This com-mand can save time when a get of a large file fails partway through the transfer.
Status
ascii Sets the file transfer type to ASCII. The cr command must be ON for ascii to work(page 736).
binary Sets the file transfer type to binary (page 736).
bye Closes the connection to the server and terminates ftp. Same as quit.
case Toggles and displays the case mapping status. The default is OFF. When it is ON,for get and mget commands, this command maps filenames that are all uppercaseon the server to all lowercase on the local system.
close Closes the connection to the server without exiting from ftp.
cr (carriage RETURN) Toggles and displays the (carriage) RETURN stripping status. Effectiveonly when the file transfer type is ascii. Set cr to ON (default) to remove RETURN char-acters from RETURN/LINEFEED line termination sequences used by Windows, yielding thestandard Linux line termination of LINEFEED. Set cr to OFF to leave line endingsunmapped (page 736).
debug [n] Toggles/sets and displays the debugging status/level, where n is the debugging level.OFF or 0 (zero) is the default. When n > 0, this command displays each commandftp sends to the server.
glob Toggles and displays the filename expansion (page 239) status for mdelete (page 739),mget (page 737), and mput (page 738) commands.
hash Toggles and displays the pound sign (#, also called a hash mark) display status. Whenit is ON, ftp displays one pound sign for each 1024-byte data block it transfers.

FTP Client 739
open [hostname]Specifies hostname as the name of the server to connect to. Without hostname,prompts for the name of the server. This command is useful when a connectiontimes out or otherwise fails.
passive Toggles between active (PORT—the default) and passive (PASV) transfer modesand displays the transfer mode. For more information refer to “Passive versus activeconnections” on page 730.
prompt Toggles and displays the prompt status. When it is ON (default), mdelete(page 739), mget (page 737), and mput (page 738) ask for verification before trans-ferring each file. Set prompt to OFF to turn off these prompts.
quit Closes the connection to the server and terminates ftp. Same as bye.
umask [nnn] Changes the umask (page 526) applied to files created on the server to nnn. Withoutnnn, displays the umask.
user [username] [password]Prompts for or accepts the username and password that enable you to log in on theserver. When you call it with the –n option, ftp prompts you for a username and pass-word automatically. For more information refer to “Automatic Login” on page 735.
Directories
cd remote-directoryChanges the working directory on the server to remote-directory.
cdup Changes the working directory on the server to the parent of the working directory.
lcd [local_directory](local change directory) Changes the working directory on the local system tolocal_directory. Without an argument, this command changes the working direc-tory on the local system to your home directory (just as the cd shell builtin doeswithout an argument). See “Local cd (lcd)” on page 734 for an example.
Files
chmod mode remote-fileChanges the access permissions of remote-file on the server to mode. See chmod onpage 200 for more information on how to specify the mode.
delete remote-file Removes remote-file from the server.
mdelete remote-file-list(multiple delete) Deletes the files specified by remote-file-list from the server.
Display Information
dir [remote-directory] [file]Displays a listing of remote-directory from the server. When you do not specifyremote-directory, displays the working directory. When you specify file, the listingis saved on the local system in a file named file.

740 Chapter 20 FTP: Transferring Files Across a Network
help [command] Displays information about command. Without command, displays a list of localftp commands.
ls [remote-directory] [file]Similar to dir but produces a more concise listing from some servers. When youspecify file, the listing is saved on the local system in a file named file.
pwd Displays the pathname of the working directory on the server. Use !pwd to displaythe pathname of the local working directory.
status Displays ftp connection and status information.
verbose Toggles and displays verbose mode, which displays responses from the server andreports how quickly files are transferred. The effect of this command is the same asspecifying the –v option on the command line.
FTP Server (vsftpd)
This section discusses the vsftpd server as supplied by Ubuntu.
Prerequisites
Install the following package:
• vsftpd
.vsftpd init script When you install the vsftpd package, the dpkg postinst script starts the vsftpd dae-mon. After you configure vsftpd, call the vsftpd init script to restart the vsftpddaemon:
$ sudo /etc/init.d/vsftpd restart * Stopping FTP server: vsftpd [ OK ] * Starting FTP server: vsftpd [ OK ]
After changing the vsftpd configuration on an active server, use reload in place ofrestart to reload the vsftpd configuration files without disturbing clients that areconnected to the server.
Notes
The vsftpd server can run in normal mode (the xinetd daemon, which is notinstalled by default, calls vsftpd each time a client tries to make a connection) or itcan run in stand-alone mode (vsftpd runs as a daemon and handles connectionsdirectly).
Stand-alone mode Although by default vsftpd runs in normal mode, Ubuntu sets it up to run in stand-alone mode by setting the listen parameter (page 743) to YES in the vsftpd.conf file.Under Ubuntu Linux, with vsftpd running in stand-alone mode, you start and stopthe server using the vsftpd init script.

FTP Server (vsftpd) 741
Normal mode The xinetd superserver must be installed and running and you must install an xinetdcontrol file to run vsftpd in normal mode. A sample control file is located at/usr/share/doc/vsftpd/EXAMPLE/INTERNET_SITE/vsftpd.xinetd. Copy the sam-ple file to the /etc/xinetd.d directory, rename it vsftpd, edit the file to change theno_access and banner_fail parameters as appropriate, and restart xinetd. With thelisten parameter in vsftpd.conf set to NO, xinetd starts vsftpd as needed.
Security The safest policy is not to allow users to authenticate against FTP: Instead, use FTPfor anonymous access only. If you do allow local users to authenticate and uploadfiles to the server, be sure to put local users in a chroot jail (page 744). Because FTPsends usernames and passwords in cleartext, a malicious user can easily sniff(page 1060) them. Armed with a username and password, the same user can imper-sonate a local user, upload a Trojan horse (page 1065), and compromise the system.
Firewall An FTP server normally uses TCP port 21. If the FTP server system is running a fire-wall, you need to open this port. To do so, use firestarter (page 886) to set a policythat allows FTP service.
JumpStart II: Starting a vsftpd Server
By default, under Ubuntu Linux vsftpd allows anonymous users only to log in onthe server; it does not set up a guest account. When someone logs in as an anon-ymous user, that person works in the /home/ftp directory. You do not have toconfigure anything.
Testing the Setup
Make sure vsftpd is working by logging in from the system running the server. Youcan refer to the server as localhost or by using its hostname on the command line.Log in as anonymous; use any password.
$ ftp localhostConnected to localhost.220 (vsFTPd 2.0.4)Name (localhost:sam): anonymous331 Please specify the password.Password:230 Login successful.Remote system type is UNIX.Using binary mode to transfer files.ftp> quit221 Goodbye.
If you are not able to connect to the server, first make sure the server is running:
$ ps -ef | grep vsftpdroot 5681 1 0 12:22 ? 00:00:00 /usr/sbin/vsftpdsam 6629 6596 0 14:49 pts/2 00:00:00 grep vsftpd

742 Chapter 20 FTP: Transferring Files Across a Network
Next check that permissions on /home/ftp, or the home directory of ftp as specifiedin /etc/passwd, are set to 755 and that the directory is not owned by ftp. If the ftpuser can write to /var/ftp, connections will fail.
$ ls -ld /home/ftpdrwxr-xr-x 2 root nogroup 4096 2007-01-24 08:45 /home/ftp
Once you are able to log in from the local system, log in from another system—either one on the LAN or another system with access to the server. On the com-mand line, use the hostname from within the LAN or the FQDN (page 1037) fromoutside the LAN. The dialog should appear the same as in the previous example. Ifyou cannot log in from a system that is not on the LAN, use ping (page 375) to testthe connection and make sure the firewall is set up to allow FTP access. See “FTPconnections” on page 730 for a discussion of active and passive modes and theports that each mode uses.
vsftpd.conf: The vsftpd Configuration File
The configuration file for vsftpd, /etc/vsftpd.conf, lists Boolean, numeric, and stringname-value pairs of configuration parameters, called directives. Each name-valuepair is joined by an equal sign with no SPACEs on either side. Ubuntu Linux providesa well-commented vsftpd.conf file that changes many of the compiled-in defaults.This section covers most of the options, noting their default values and their valuesas specified in the vsftpd.conf file supplied with Ubuntu Linux.
Set Boolean options to YES or NO and numeric options to a nonnegative integer.Octal numbers, which are useful for setting umask options, must have a leading 0(zero). Numbers without a leading zero are treated as base 10 numbers. Followingare examples from vsftpd.conf of setting each type of option:
anonymous_enable=YESlocal_umask=022xferlog_file=/var/log/vsftpd.log
Descriptions of the directives are broken into the following groups:
• Stand-alone mode (page 743)
• Logging in (page 743)
• Working directory and the chroot jail (page 744)
• Downloading and uploading files (page 746)
• Messages (page 748)
• Display (page 748)
• Logs (page 749)
• Connection parameters (page 750)

FTP Server (vsftpd) 743
Stand-Alone Mode
Refer to “Notes” on page 735 for a discussion of normal and stand-alone modes.This section describes the parameters that affect stand-alone mode.
listen YES runs vsftpd in stand-alone mode; NO runs it in normal mode.
Default: NOUbuntu: YES
listen_address In stand-alone mode, specifies the IP address of the local interface that vsftpd listenson for incoming connections. When this parameter is not set, vsftpd uses the defaultnetwork interface.
Default: none
listen_port In stand-alone mode, specifies the port that vsftpd listens on for incoming connections.
Default: 21
max_clients In stand-alone mode, specifies the maximum number of clients. Zero (0) indicatesunlimited clients.
Default: 0
max_per_ip In stand-alone mode, specifies the maximum number of clients from the same IPaddress. Zero (0) indicates unlimited clients from the same IP address.
Default: 0
Logging In
Three classes of users can log in on a vsftpd server: anonymous, local, and guest.The guest user is rarely used and is not covered in this chapter. Local users log inwith their system username and password. Anonymous users log in with anony-mous or ftp, using their email address as a password. You can control whether eachof these classes of users can log in on the server and what they can do once they login. You can also specify what a local user can do on a per-user basis; for more infor-mation refer to user_config_dir on page 752.
Local Users
userlist_enable The /etc/vsftpd.user_list file (page 752), or another file specified by userlist_file,contains a list of zero or more users. YES consults this list and takes action based onuserlist_deny, either granting or denying users in the list permission to log in on theserver. To prevent the transmission of cleartext passwords, access is denied immedi-ately after the user enters her username. NO does not consult the list. For a moresecure system, set this parameter to NO.
Default: NOUbuntu: YES

744 Chapter 20 FTP: Transferring Files Across a Network
userlist_deny YES prevents users listed in /etc/vsftpd.user_list (page 752) from logging in on theserver. NO allows only users listed in /etc/vsftpd.user_list to log in on the server.Use userlist_file to change the name of the file that this parameter consults. Thisparameter is checked only when userlist_enable is set to YES.
Default: YES
userlist_file The name of the file consulted when userlist_enable is set to YES.
Default: /etc/vsftpd.user_list
local_enable YES permits local users (users listed in /etc/passwd) to log in on the server.
Default: NO
Anonymous Users
anonymous_enableYES allows anonymous logins. NO disables anonymous logins.
Default: YES
no_anon_passwordYES skips asking anonymous users for passwords.
Default: NO
deny_email_enableYES checks whether the password (email address) that an anonymous user enters islisted in /etc/vsftpd/banned_emails or another file specified by banned_email_file. Ifit is, the user is not allowed to log in on the system. NO does not perform thischeck. Using firestarter (page 886) or iptables (page 885) to block specific hosts isgenerally more productive than using this parameter.
Default: NO
banned_email_fileThe name of the file consulted when deny_email_enable is set to YES.
Default: /etc/vsftpd.banned_emails
The Working Directory and the chroot Jail
When a user logs in on a vsftpd server, standard filesystem access permissions con-trol which directories and files the user can access and how the user can accessthem. Three basic parameters control a user who is logged in on a vsftpd server:
• The user ID (UID)
• The initial working directory
• The root directory
By default, the vsftpd server sets the user ID of a local user to that user’s usernameand sets the user ID of an anonymous user to ftp. A local user starts in her homedirectory and an anonymous user starts in /home/ftp.

FTP Server (vsftpd) 745
By default, anonymous users are placed in a chroot jail for security; local users arenot. For example, when an anonymous user logs in on a vsftpd server, his homedirectory is /home/ftp. All that user sees, however, is that his home directory is /.The user sees the directory at /home/ftp/upload as /upload. The user cannot see, orwork with, for example, the /home, /usr/local, or /tmp directory because the user isin a chroot jail. For more information refer to “Setting Up a chroot Jail” onpage 534.
You can use the chroot_local_user option to put each local user in a chroot jailwhose root is the user’s home directory. You can use chroot_list_enable to putselected local users in chroot jails.
chroot_list_enableUpon login, YES checks whether a local user is listed in /etc/vsftpd.chroot_list(page 752) or another file specified by chroot_list_file.
When a user is in the list and chroot_local_user is set to NO, the user is put in achroot jail in his home directory. Only users listed in /etc/vsftpd.chroot_list are putin chroot jails.
When a user is in the list and chroot_local_user is set to YES, that user is not put ina chroot jail. Users not listed in /etc/vsftpd.chroot_list are put in chroot jails.
Default: NO
chroot_local_userSee chroot_list_enable. Set to NO for a more open system, but remember to addnew users to the chroot_list_file as needed when you add users to the system. Set toYES for a more secure system. New users are automatically restricted unless youadd them to chroot_list_file.
Default: NO
chroot_list_file The name of the file consulted when chroot_list_enable is set to YES.
Default: /etc/vsftpd.chroot_list
passwd_chroot_enableYES enables you to change the location of the chroot jail that the chroot_list_enableand chroot_local_user settings impose on a local user.
The location of the chroot jail can be moved up the directory structure by includinga /./ within the home directory string for that user in /etc/passwd. This change hasno effect on the standard system login, just as a cd . command has no effect on theworking directory.
For example, changing the home directory field in /etc/passwd (page 560) for Samfrom /home/sam to /home/./sam allows Sam to cd to /home after logging in usingvsftpd. Given the proper permissions, Sam can now view files and collaborate withanother user.
Default: NO

746 Chapter 20 FTP: Transferring Files Across a Network
secure_chroot_dir The name of an empty directory that is not writable by the user ftp. The vsftpdserver uses this directory as a secure chroot jail when the user does not need access tothe filesystem.
Default: /var/run/vsftpd
local_root After a local user logs in on the server, this directory becomes the user’s workingdirectory. No error results if the specified directory does not exist.
Default: none
Downloading and Uploading Files
By default, any user—whether local or anonymous—can download files from thevsftpd server, assuming proper filesystem access and permissions. You must changewrite_enable from NO (default) to YES to permit local users to upload files. Bydefault, local_umask is set to 077, giving uploaded files 600 permissions(page 199). These permissions allow only the user who created a file to downloadand overwrite it. Change local_umask to 022 to allow users to download otherusers’ files.
Security Refer to “Security” on page 741 for information on the security hole that is createdwhen you allow local users to upload files.
The following actions set up vsftpd to allow anonymous users to upload files:
1. Set write_enable (page 747) to YES.
2. Create a directory under /home/ftp that an anonymous user can write to but not read from (mode 333). You do not want a malicious user to be able to see, download, modify, and upload a file that another user origi-nally uploaded. The following commands create a /home/ftp/uploadsdirectory that anyone can write to but no one can read from:
$ sudo mkdir /home/ftp/uploads$ sudo chmod 333 /home/ftp/uploads
Because of the security risk, vsftpd prevents anonymous connections when an anonymous user (ftp) can write to /home/ftp.
3. Set anon_upload_enable (page 747) to YES.
4. See the other options in this section.
Download/Upload for Local Users
local_umask The umask (page 526) setting for local users.
Default: 077
file_open_mode Uploaded file permissions for local users. The umask (page 526) is applied to thisvalue. Change to 0777 to make uploaded files executable.
Default: 0666

FTP Server (vsftpd) 747
write_enable YES permits users to create and delete files and directories (assuming appropriatefilesystem permissions). NO prevents users from making changes to the filesystem.
Default: NO
Anonymous Users
anon_mkdir_write_enableYES permits an anonymous user to create new directories when write_enable=YESand the anonymous user has permission to write to the parent directory.
Default: NO
anon_other_write_enableYES grants an anonymous user write permission in addition to the permissionsgranted by anon_mkdir_write_enable and anon_upload_enable. For example, YESallows an anonymous user to delete and rename files, assuming she has permis-sion to write to the parent directory. For a more secure site, do not set this param-eter to YES.
Default: NO
anon_root After an anonymous user logs in on the server, this directory becomes the user’sworking directory. No error results if the specified directory does not exist.
Default: none
anon_umask The umask (page 526) setting for anonymous users. The default setting gives onlyanonymous users access to files uploaded by anonymous users; set this parameter to022 to give everyone read access to these files.
Default: 077
anon_upload_enableYES allows anonymous users to upload files when write_enable=YES and the anon-ymous user has permission to write to the directory.
Default: NO
anon_world_readable_onlyYES limits the files that a user can download to those that are readable by theowner of the file, members of the group the file is associated with, and others. Itmay not be desirable to allow one anonymous user to download a file that anotheranonymous user uploaded. Setting this parameter to YES can avoid this scenario.
Default: YES
ascii_download_enableYES allows a user to download files using ASCII mode. Setting this parameter toYES can create a security risk (page 736).
Default: NO
ascii_upload_enableYES allows a user to upload files using ASCII mode (page 736).
Default: NO

748 Chapter 20 FTP: Transferring Files Across a Network
chown_uploads YES causes files uploaded by anonymous users to be owned by root (or anotheruser specified by chown_username).
Default: NO
chown_username See chown_uploads.
Default: root
ftp_username The username of anonymous users.
Default: ftp
nopriv_user The name of the user with minimal privileges, as used by vsftpd. Because other pro-grams use nobody, to enhance security you can replace nobody with the name of adedicated user such as ftp.
Default: nobody
Messages
You can replace the standard greeting banner that vsftpd displays when a user logs inon the system (banner_file and ftpd_banner). You can also display a message eachtime a user enters a directory (dirmessage_enable and message_file). When you setdirmessage_enable=YES, each time a user enters a directory using cd, vsftpd displaysthe contents of the file in that directory named .message (or another file specified bymessage_file).
dirmessage_enableYES displays .message or another file specified by message_file as an ftp user entersa new directory by giving a cd command.
Default: NOUbuntu: YES
message_file See dirmessage_enable.
Default: .message
banner_file The absolute pathname of the file that is displayed when a user connects to theserver. Overrides ftpd_banner.
Default: none
ftpd_banner Overrides the standard vsftpd greeting banner displayed when a user connects tothe server.
Default: none; uses standard vsftpd banner
Display
This section describes parameters that can improve security and performance bycontrolling how vsftpd displays information.
hide_ids YES lists all users and groups in directory listings as ftp. NO lists the real owners.
Default: NO
FTP Server (vsftpd) 749
setproctitle_enableNO causes ps to display the process running vsftpd as vsftpd. YES causes ps to dis-play what vsftpd is currently doing (uploading and so on). Set this parameter to NOfor a more secure system.
Default: NO
text_userdb_namesNO improves performance by displaying numeric UIDs and GIDs in directory list-ings. YES displays names.
Default: NO
use_localtime NO causes the ls, mls, and modtime FTP commands to display UTC (page 1067).YES causes these commands to display the local time.
Default: NO
ls_recurse_enable YES permits users to give ls –R commands. Setting this parameter to YES may posea security risk because giving an ls –R command at the top of a large directory hier-archy can consume a lot of system resources.
Default: NO
Logs
By default, logging is turned off. However, the vsftpd.conf file distributed withUbuntu Linux turns it on. This section describes parameters that control the detailsand locations of logs.
log_ftp_protocol YES logs FTP requests and responses, provided that xferlog_std_format is set to NO.
Default: NO
xferlog_enable YES maintains a transfer log in /var/log/vsftpd.log (or another file specified byxferlog_file). NO does not create a log.
Default: NOUbuntu: YES
xferlog_std_formatYES causes a transfer log (not covering connections) to be written in standardxferlog format, as used by wu-ftpd, as long as xferlog_file is explicitly set. Ifxferlog_std_format is set to YES and xferlog_file is not explicitly set, logging isturned off. The default vsftpd log format is more readable than xferlog format,but it cannot be processed by programs that generate statistical summaries ofxferlog files. Search for xferlog on the Internet to obtain more information on thiscommand.
Default: NO
xferlog_file See xferlog_enable and xferlog_std_format.
Default: /var/log/xferlog
750 Chapter 20 FTP: Transferring Files Across a Network
Connection Parameters
You can allow clients to establish passive and/or active connections (page 730).Setting timeouts and maximum transfer rates can improve server security and per-formance. This section describes parameters that control the types of connectionsthat a client can establish, the length of time vsftpd will wait while establishing aconnection, and the speeds of connections for different types of users.
Passive (PASV) Connections
pasv_enable NO prevents the use of PASV connections.
Default: YES
pasv_promiscuousNO causes PASV to perform a security check that ensures that the data and controlconnections originate from a single IP address. YES disables this check; it is not rec-ommended for a secure system.
Default: NO
pasv_max_port The highest port number that vsftpd will allocate for a PASV data connection; use-ful in setting up a firewall.
Default: 0 (use any port)
pasv_min_port The lowest port number that vsftpd will allocate for a PASV data connection; usefulin setting up a firewall.
Default: 0 (use any port)
pasv_address Specifies an IP address other than the one used by the client to contact the server.
Default: none; the address is the one used by the client
Active (PORT) Connections
port_enable NO prevents the use of PORT connections.
Default: YES
port_promiscuousNO causes PORT to perform a security check that ensures that outgoing data con-nections connect only to the client. YES disables this check; it is not recommendedfor a secure system.
Default: NO
connect_from_port_20YES specifies port 20 (ftp-data, a privileged port) on the server for PORT connec-tions, as required by some clients. NO allows vsftpd to run with fewer privileges (ona nonprivileged port).
Default: NOUbuntu: YES

FTP Server (vsftpd) 751
ftp_data_port With connect_from_port_20 set to NO, specifies the port that vsftpd uses for PORTconnections.
Default: 20
Timeouts
accept_timeout The number of seconds the server waits for a client to establish a PASV data connection.
Default: 60
connect_timeout The number of seconds the server waits for a client to respond to a PORT dataconnection.
Default: 60
data_connection_timeoutThe number of seconds the server waits for a stalled data transfer to resume beforedisconnecting.
Default: 300
idle_session_timeoutThe number of seconds the server waits between FTP commands before disconnecting.
Default: 300
local_max_rate For local users, the maximum data transfer rate in bytes per second. Zero (0) indi-cates no limit.
Default: 0
anon_max_rate For anonymous users, the maximum data transfer rate in bytes per second. Zero (0)indicates no limit.
Default: 0
one_process_modelYES establishes one process per connection, which improves performance butdegrades security. NO allows multiple processes per connection. NO is recom-mended to maintain a more secure system.
Default: NO
Miscellaneous
This section describes parameters not discussed elsewhere.
pam_service_nameThe name of the PAM service used by vsftpd.
Default: vsftpd
rsa_cert_file Specifies where the RSA certificate for SSL-encrypted connections is kept.
Default: /usr/share/ssl/certs/vsftpd.pemUbuntu: /etc/ssl/certs/ssl-cert-snakeoil.pem

752 Chapter 20 FTP: Transferring Files Across a Network
rsa_private_key_fileSpecifies where the RSA key for SSL-encrypted connections is kept.
Default: noneUbuntu: /etc/ssl/private/ssl-cert-snakeoil.key
tcp_wrappers YES causes incoming connections to use tcp_wrappers (page 532) if vsftpd wascompiled with tcp_wrappers support. When tcp_wrappers sets the environmentvariable VSFTPD_LOAD_CONF, vsftpd loads the configuration file specified bythis variable, allowing per-IP configuration.
Default: NO
user_config_dir Specifies a directory that contains files named for local users. Each of these files,which mimic vsftpd.conf, contains parameters that override, on a per-user basis,default parameters and parameters specified in vsftpd.conf. For example, assume thatuser_config_dir is set to /etc/vsftpd/user_conf. Further suppose that the default con-figuration file, /etc/vsftpd/vsftpd.conf, sets idlesession_timeout=300 and Sam’s indi-vidual configuration file, /etc/vsftpd/user_conf/sam, sets idlesession_timeout=1200.Then all users’ sessions except for Sam’s will time out after 300 seconds of inactivity.Sam’s sessions will time out after 1,200 seconds.
Default: none
Files
In addition to /etc/vsftpd.conf, the following files control the functioning of vsftpd.The directory hierarchy that user_config_dir points to is not included in this listbecause it has no default name.
/etc/ftpusersLists users, one per line, who are never allowed to log in on the FTP server, regard-less of how userlist_enable (page 743) is set and regardless of the users listed in theuser_list file. The default file lists root, bin, daemon, and others.
/etc/vsftpd.user_listLists either the only users who can log in on the server or the only users who are notallowed to log in on the server. The userlist_enable (page 743) option must be set toYES for vsftpd to examine the list of users in this file. Setting userlist_enable to YESand userlist_deny (page 744) to YES (or not setting it) prevents listed users fromlogging in on the server. Setting userlist_enable to YES and userlist_deny to NO per-mits only the listed users to log in on the server.
/etc/vsftpd.chroot_listDepending on the chroot_list_enable (page 745) and chroot_local_user (page 745)settings, lists either users who are forced into a chroot jail in their home directoriesor users who are not placed in a chroot jail.
/var/log/vsftpd.logLog file. For more information refer to “Logs” on page 749.
Exercises 753
Chapter Summary
File Transfer Protocol is a protocol for downloading files from and uploading filesto another system over a network. FTP is the name of both a client/server protocol(FTP) and a client utility (ftp) that invokes this protocol. Because FTP is not a secureprotocol, it should be used only to download public information. You can run thevsftpd FTP server in the restricted environment of a chroot jail to make it signifi-cantly less likely that a malicious user can compromise the system.
Many servers and clients implement the FTP protocol. The ftp utility is the originalclient implementation; sftp and lftp are secure implementations that use OpenSSHfacilities to encrypt the connection. Although they do not understand the FTP pro-tocol, they map ftp commands to OpenSSH commands. The vsftpd daemon is asecure FTP server; it better protects the server from malicious users than do otherFTP servers.
Public FTP servers allow you to log in as anonymous or ftp. By convention, yousupply your email address as a password when you log in as an anonymous user.Public servers frequently have interesting files in the pub directory.
FTP provides two modes of transferring files: binary and ASCII. It is safe to usebinary mode to transfer all types of files, including ASCII files. If you transfer abinary file using ASCII mode, the transfer will fail.
Exercises
1. What changes does FTP make to an ASCII file when you download it in ASCII mode to a Windows machine from a Linux server? What changes are made when you download the file to a Mac?
2. What happens if you transfer an executable program file in ASCII mode?
3. When would ftp be a better choice than sftp?
4. How would you prevent local users from logging in on a vsftpd server using their system username and password?
5. What advantage does sftp have over ftp?
6. What is the difference between cd and lcd in ftp?

754 Chapter 20 FTP: Transferring Files Across a Network
Advanced Exercises
7. Why might you have problems connecting to an FTP server in PORT mode?
8. Why is it advantageous to run vsftpd in a chroot jail?
9. After downloading a file, you find that it does not match the MD5 checksum provided. Downloading the file again gives the same incorrect checksum. What have you done wrong and how would you fix it?
10. How would you configure vsftpd to run through xinetd, and what would be the main advantage of this approach?

755755
21Chapter21Sending and receiving email require three pieces of software. Ateach end, there is a client, called an MUA (mail user agent),which is a bridge between a user and the mail system. CommonMUAs are mutt, Evolution, KMail, Thunderbird, and Outlook.When you send an email, the MUA hands it to an MTA (a mailtransfer agent, such as exmi4 or sendmail), which transfers it tothe destination server. At the destination, an MDA (a maildelivery agent, such as procmail) puts the mail in the recipient’smailbox file. On Linux systems, the MUA on the receiving sys-tem either reads the mailbox file or retrieves mail from a remoteMUA or MTA, such as an ISP’s SMTP (Simple Mail TransferProtocol) server, using POP (Post Office Protocol) or IMAP(Internet Message Access Protocol).
Most Linux MUAs expect a local MTA such as exim4 to deliveroutgoing email. On some systems, including those with a dial-up connection to the Internet, the MTA sends email to an ISP’smail server. Because most MTAs use SMTP to deliver email,they are often referred to as SMTP servers. By default, whenyou install exim4 on an Ubuntu system, exim4 uses its ownbuiltin MDA to deliver email to the recipient’s mailbox file.
In This Chapter
Introduction to exim4 . . . . . . . . . . 756
JumpStart I: Configuring exim4 to Use a Smarthost . . . . . . . . . . 758
JumpStart II: Configuring exim4 to Send and Receive Email . . . . 760
Configuring exim4. . . . . . . . . . . . . 765
SpamAssassin. . . . . . . . . . . . . . . . 768
Webmail . . . . . . . . . . . . . . . . . . . . 772
Mailing Lists . . . . . . . . . . . . . . . . . 775
Setting Up an IMAP or POP3 Server . . . . . . . . . . . . . . . . . . . . . 776
Authenticated Relaying . . . . . . . . 777
21
exim4: Setting Up
Mail Servers,
Clients, and More

756 Chapter 21 exim4: Setting Up Mail Servers, Clients, and More
Introduction to exim4When the network that was to evolve into the Internet was first set up, it connecteda few computers, each serving a large number of users and running several services.Each computer was capable of sending and receiving email and had a unique host-name, which was used as a destination for email.
Today the Internet has a large number of transient clients. Because these clients donot have fixed IP addresses or hostnames, they cannot receive email directly. Userson these systems usually maintain an account on an email server run by theiremployer or an ISP, and they collect email from this account using POP or IMAP.Unless you own a domain where you want to receive email, you will not need to setup exim4 to receive mail from nonlocal systems.
Smarthost You can set up exim4 on a client system so it sends mail bound for nonlocal sys-tems to an SMTP server that relays the mail to its destination. This type of serveris called a smarthost. Such a configuration is required by organizations that usefirewalls to prevent email from being sent out on the Internet from any systemother than the company’s official mail servers. As a partial defense against spread-ing viruses, some ISPs block outbound port 25 to prevent their customers fromsending email directly to a remote computer. This configuration is required bythese ISPs.
You can also set up exim4 as a server that sends mail to nonlocal systems and doesnot use an ISP as a relay. In this configuration, exim4 connects directly to the SMTPservers for the domains receiving the email. An ISP set up as a smarthost is config-ured this way.
You can set up exim4 to accept email for a registered domain name as specified inthe domain’s DNS MX record (page 852). However, most mail clients (MUAs) donot interact directly with exim4 to receive email. Instead, they use POP or IMAP—protocols that include features for managing mail folders, leaving messages on theserver, and reading only the subject of an email without downloading the entiremessage. If you want to collect your email from a system other than the one runningthe incoming mail server, you may need to set up a POP or IMAP server, as dis-cussed on page 776.
You do not need to set up exim4 to send and receive email
tip Most MUAs can use POP or IMAP to receive email from an ISP’s server. These protocols do notrequire an MTA such as exim4. As a consequence, you do not need to install or configure exim4(or another MTA) to receive email. Although you still need SMTP to send email, the SMTP servercan be at a remote location, such as your ISP. Thus you may not need to concern yourself withit, either.

Introduction to exim4 757
Prerequisites
Install the following packages:
• exim4 (a virtual package)
• eximon4 (optional; monitors exim4)
• mailx (optional; installs mail, which is handy for testing exim4 from the command line)
• exim4-doc-html (optional; exim4 documentation in HTML format)
• exim4-doc-info (optional; exim4 documentation in info format)
exim4 init script When you install the exim4 package, the dpkg postinst script minimally configuresexim4 and starts the exim4 daemon. After you configure exim4, call the exim4 initscript to restart exim4:
$ sudo /etc/init.d/exim4 restart
After changing the exim4 configuration on an active server, use reload in place ofrestart to reload exim4 configuration files without interrupting the work exim4 isdoing. The exim4 init script accepts several nonstandard arguments:
$ /etc/init.d/exim4Usage: /etc/init.d/exim4 {start|stop|restart|reload|status|what|force-stop}
The status and what arguments display information about exim4. The force-stopargument immediately kills all exim4 processes.
Notes
Firewall An SMTP server normally uses TCP port 25. If an SMTP server system thatreceives nonlocal mail is running a firewall, you need to open this port. To do so,use firestarter (page 886) to set a policy that allows SMTP service.
Log files You must be a member of the adm group or work with root privileges to view thelog files in /var/log/exim4.
sendmail andexim4
Although it does not work the same way sendmail does, Ubuntu configures exim4as a drop-in replacement for sendmail. The exim4-daemon-light package, which ispart of the exim4 virtual package, includes /usr/sbin/sendmail, which is a link toexim4. Because the exim4 daemon accepts many of sendmail’s options, programsthat depend on sendmail will work with exim4 installed in place of sendmail.
Local and nonlocalsystems
The exim4 daemon sends and receives email. A piece of email that exim4 receivescan originate on a local system or on a nonlocal system. Similarly, email that exim4sends can be destined for a local or a nonlocal system. The exim4 daemon processeseach piece of email based on its origin and destination.
The local systemversus
local systems
The local system is the one exim4 is running on. Local systems are systems that areon the same LAN as the local system.
As it is installed, exim4 delivers mail to the local system only.

758 Chapter 21 exim4: Setting Up Mail Servers, Clients, and More
More Information
Web exim4 www.exim.org (includes the complete exim4 specification), www.exim-new-users.co.uk, wiki.debian.org/PkgExim4SpamAssassin spamassassin.apache.org, wiki.apache.org/spamassassinSpam database razor.sourceforge.netMailman www.list.orgprocmail www.procmail.orgSquirrelMail www.squirrelmail.orgIMAP www.imap.orgDovecot www.dovecot.orgPostfix www.postfix.org/docs.html (alternative MTA; page 779)Qmail www.qmail.org/top.html
Local exim4 /usr/share/doc/exim4*/*SpamAssassin /usr/share/doc/spam*Dovecot /usr/share/doc/dovecot*man pages exim4 exim4_files update-exim4.conf update-exim4defaults spamassassin
spamc spamdSpamAssassin Install the perl-doc package and give the following command:
$ perldoc Mail::SpamAssassin::Conf
JumpStart I: Configuring exim4 to Use a Smarthost
This JumpStart configures an exim4 server that sends mail from users on local sys-tems to local and nonlocal destinations and does not accept mail from nonlocalsystems. This server
• Accepts email originating on local systems for delivery to local systems.
• Accepts email originating on local systems for delivery to nonlocal sys-tems, delivering it using an SMTP server (a smarthost)—typically an ISP— to relay email to its destination.
• Does not deliver email originating on nonlocal systems. As is frequently the case, you need to use POP or IMAP to receive email.
• Does not forward email originating on nonlocal systems to other nonlocal systems (does not relay email).
To set up this server, you need to change the values of a few configuration variablesin /etc/exim4/update-exim4.conf.conf (page 766) and restart exim4. The dpkg-reconfigure utility (page 768) guides you in editing this file; this JumpStart uses atext editor. Working with root privileges, use a text editor to make the followingchanges to update-exim4.conf.conf:
dc_eximconfig_configtype='smarthost'smarthost='mail.example.net'

JumpStart I: Configuring exim4 to Use a Smarthost 759
Configuration type Set the dc_eximconfig_configtype configuration variable to smarthost to cause exim4to send mail bound for nonlocal systems to the system that the smarthost configura-tion variable specifies. This line should appear exactly as shown on the previous page.
Smarthost With dc_eximconfig_configtype set to smarthost, set smarthost to the FQDN or IPaddress (preferred) of the remote SMTP server (the smarthost) that exim4 uses torelay email to nonlocal systems. Replace mail.example.net with this FQDN or IPaddress. For Boolean variables in update-exim4.conf.conf, exim4 interprets the nullvalue (specified by ' ') as a value of false. With these changes, the file should looksimilar to this:
$ cat /etc/exim4/update-exim4.conf.conf...dc_eximconfig_configtype='smarthost'dc_other_hostnames=''dc_local_interfaces='127.0.0.1'dc_readhost=''dc_relay_domains=''dc_minimaldns='false'dc_relay_nets=''dc_smarthost='mail.example.net'CFILEMODE='644'dc_use_split_config='false'dc_hide_mailname='false'dc_mailname_in_oh='true'dc_localdelivery='mail_spool'
The exim4 server does not use the value of the dc_local_interfaces variable in asmarthost configuration, so you can leave it blank. However, in other configura-tions, the value of 127.0.0.1 prevents exim4 from accepting email from nonlocalsystems. It is a good idea to configure exim4 this way and change this variable onlywhen you are ready to accept mail from other systems.
To minimize network accesses for DNS lookups, which can be helpful if you are usinga dial-up line, change the value of the dc_minimaldns configuration variable to true.
/etc/mailname The /etc/mailname file initially holds the node name (uname –n) of the server. Thestring stored in /etc/mailname appears as the name of the sending system on theenvelope-from and From lines of email that originates on the local system. If youwant email to appear to come from a different system, change the contents of thisfile. You can modify this file using a text editor; the dpkg-reconfigure utility can alsochange it.
The following file causes mail sent from the local system to appear to come [email protected], where username is the username of the user who is send-ing the email:
$ cat /etc/mailnameexample.com
See page 766 for more information on exim4 configuration variables. After makingthese changes, restart exim4 (page 757).

760 Chapter 21 exim4: Setting Up Mail Servers, Clients, and More
Test Test exim4 with the following command:
$ echo "my exim4 test" | exim4 [email protected]
Replace [email protected] with an email address on another system where youreceive email. You need to send email to a remote system to make sure that exim4 issending email to the remote SMTP server (the smarthost). If the mail is not deliv-ered, check the email of the user who sent the email (on the local system) for errors.Also check the log file(s) in the /var/log/exim4 directory.
JumpStart II: Configuring exim4 to Send
and Receive Email
To receive email sent from a nonlocal system to a registered domain (that you con-trol), you need to configure exim4 to accept email from nonlocal systems. ThisJumpStart describes how to set up a server that
• Accepts email from local and nonlocal systems.
• Delivers email that originates on local systems to a local system or directly to a nonlocal system, without using a relay.
• Delivers email that originates on nonlocal systems to a local system only.
• Does not forward email originating on nonlocal systems to other nonlocal systems (does not relay email).
This server does not relay email originating on nonlocal systems. (You must set thedc_relay_domains variable [page 767] for the local system to act as a relay.) For thisconfiguration to work, you must be able to make outbound connections and receiveinbound connections on port 25 (see “Firewall” on page 757).
Working with root privileges, use a text editor to set the following configurationvariables in /etc/exim4/update-exim4.conf.conf:
dc_eximconfig_configtype='internet'dc_other_hostnames='mydom.example.com'dc_local_interfaces=''
Configuration type Set dc_eximconfig_configtype to internet to cause exim4 to send mail directly to non-local systems as specified by the DNS MX record (page 852) for the domain the mail isaddressed to and to accept email on the interfaces specified by dc_local_interfaces(next page). This line should appear exactly as shown above.
Other hostnames The dc_other_hostnames configuration variable specifies the FQDNs or IP addressesthat the local server receives mail addressed to. Replace mydom.example.com withthese FQDN or IP addresses. You must separate multiple entries with semicolons.These values do not necessarily include the FQDN or the IP address of the localserver.

How exim4 Works 761
Local interfaces Set dc_local_interfaces to the interface you want exim4 to listen on. Set it to the nullvalue ('') to listen on all interfaces.
As in JumpStart I, you may need to change the value of /etc/mailname (page 759).For Boolean variables in this file, exim4 interprets the null value (specified by '') asfalse. The file should look similar to this:
$ cat /etc/exim4/update-exim4.conf.conf...dc_eximconfig_configtype='internet'dc_other_hostnames='mydom.example.com'dc_local_interfaces=''dc_readhost=''dc_relay_domains=''dc_minimaldns='false'dc_relay_nets=''dc_smarthost=''CFILEMODE='644'dc_use_split_config='false'dc_hide_mailname=''dc_mailname_in_oh='true'dc_localdelivery='mail_spool'
See page 766 for more information on exim4 configuration variables. Once youhave restarted exim4, it will accept mail addressed to the local system. To receiveemail addressed to a domain, the DNS MX record (page 852) for that domain mustpoint to the IP address of the local system. If you are not running a DNS server, youmust ask your ISP to set up an MX record or else receive mail at the IP address ofthe server. If you receive email addressed to an IP address, set dc_other_hostnamesto that IP address.
How exim4 Works
When exim4 receives email, from both local and nonlocal systems, it creates in the/var/spool/exim4/input directory two files that hold the message while exim4 pro-cesses it. To identify a particular message, exim4 generates a 16-character messageID and uses that string in filenames pertaining to the email. The exim4 daemonstores the body of the message in a file named by the message ID followed by –D(data). It stores the headers and envelope information in a file named by the mes-sage ID followed by –H (header).
If exim4 cannot deliver a message, it marks the message as frozen and makes no fur-ther attempt to deliver it. Once it has successfully delivered an email, exim4removes all files pertaining to that email from /var/spool/exim4/input.
Mail addressed tothe local system
By default, exim4 delivers email addressed to the local system to users’ files in themail spool directory, /var/mail, in mbox format. Within this directory, each user hasa mail file named with the user’s username. Mail remains in these files until it is col-lected, typically by an MUA. Once an MUA collects the mail from the mail spool,the MUA stores the mail as directed by the user, usually in the user’s home directory.

762 Chapter 21 exim4: Setting Up Mail Servers, Clients, and More
Mail addressed tononlocal systems
The scheme that exim4 uses to process email addressed to a nonlocal systemdepends on how it is configured: It can send the email to a smarthost, it can sendthe email to the system pointed to by the DNS MX record of the domain the emailis addressed to, or it can refuse to send the email.
mbox versusmaildir
The mbox format holds all messages for a user in a single file. To prevent corruption,a process must lock this file while it is adding messages to or deleting messages fromthe file; thus the MUA cannot delete a message at the same time the MTA is addingmessages. A competing format, maildir, holds each message in a separate file. Thisformat does not use locks, allowing an MUA to delete messages from a user at thesame time as mail is delivered to the same user. In addition, the maildir format is bet-ter able to handle larger mailboxes. The downside is that the maildir format addsoverhead when you are using a protocol such as IMAP to check messages. Theexim4 daemon supports both mbox and maildir formats (see dc_localdelivery onpage 767). Qmail (page 779), which is an alternative to sendmail and exim4, usesmaildir-format mailboxes.
Mail Logs
By default, exim4 sends normal log messages to /var/exim4/mainlog, with othermessages going to other files in the same directory. The following lines in a mainlogfile describe an email message sent directly to a remote system’s SMTP server. Theexim4 daemon writes one line each time it receives a message and one line each timeit attempts to deliver a message. The Completed line indicates that exim4 has com-pleted its part in delivering the message. Each line starts with the date and time ofthe entry followed by the message ID.
$ tail -3 /var/log/exim4/mainlog2007-07-19 23:13:12 1IBljk-0000t8-1Z <= [email protected] U=sam P=local S=3042007-07-19 23:13:17 1IBljk-0000t8-1Z => [email protected] R=dnslookup T=remote_smtp
H=filter.mx.meer.net [64.13.141.12]2007-07-19 23:13:17 1IBljk-0000t8-1Z Completed
The next entry on each line except the Completed line is a two-character status flagthat tells you which kind of event the line describes:
<= Received a message=> Delivered a message normally–> Delivered a message normally to an additional address (same delivery)
*> Did not deliver because of a –N command line option
** Did not deliver because the address bounced== Did not deliver because of a temporary problem
Information following the flag is preceded by one of the following letters, whichindicates the type of the information, and an equal sign:
H Name of remote system (host)U Username of the user who sent the messageP Protocol used to receive the messageR Router used to process the messageT Transport used to process the messageS Size of the message in bytes

How exim4 Works 763
The first line in the preceding example indicates that exim4 received a 304-bytemessage to be delivered to [email protected] from sam on the local system. Thenext line indicates that exim4 looked up the address using DNS (dnslookup) anddelivered it to the remote SMTP server (remote_smtp) at filter.mx.meer.net, whichhas an IP address of 64.13.141.12.
The following log entries describe a message that exim4 received from a remote sys-tem and delivered to the local system:
2007-07-19 23:13:32 1IBlk4-0000tL-8L <= [email protected] H=wx-out-0506.google.com[66.249.82.229] P=esmtp S=1913 [email protected]
2007-07-19 23:13:32 1IBlk4-0000tL-8L => sam <[email protected]> R=local_user T=mail_spool2007-07-19 23:13:32 1IBlk4-0000tL-8L Completed
See the exim4 specification for more information on log files. If you send andreceive a lot of email, the mail logs can grow quite large. The logrotate (page 684)exim4-base file archives and rotates these files regularly.
Working with Messages
You can call exim4 with many different options to work with email that is on thesystem and to generate records of email that has passed through the system. Most ofthese options begin with –M and require the message ID (see the preceding section)of the piece of email you want to work with. The following command removes amessage from the queue:
$ sudo exim4 -Mrm 1IEKKj-0006CQ-LMMessage 1IEKKj-0006CQ-LM has been removed
Following are some of the exim4 options you can use to work with a message. Eachof these options must be followed by a message ID. See the exim4 man page for acomplete list.
–Mf Mark message as frozen–Mrm Remove message–Mt Thaw message–Mvb Display message body–Mvh Display message header
Aliases and Forwarding
You can use the aliases and .forward (page 764) files to forward email.
/etc/aliases Most of the time when you send email, it goes to a specific person; the recipient,user@system, maps to a real user on the specified system. Sometimes, however, youmay want email to go to a class of users and not to a specific recipient. Examples ofclasses of users include postmaster, webmaster, root, and tech_support. Differentusers may receive this email at different times or the email may go to a group of users.You can use the /etc/aliases file to map local addresses and classes to local users, files,commands, and local as well as to nonlocal addresses.
Each line in /etc/aliases contains the name of a local (pseudo)user, followed by acolon, whitespace, and a comma-separated list of destinations. Because email sent

764 Chapter 21 exim4: Setting Up Mail Servers, Clients, and More
to the root account is rarely checked, the default installation includes an entry simi-lar to the following that redirects email sent to root to the initial user:
root: sam
You can set up an alias to forward email to more than one user. The following lineforwards mail sent to abuse on the local system to sam and max:
abuse: sam, max
You can create simple mailing lists with this type of alias. For example, the follow-ing alias sends copies of all email sent to admin on the local system to several users,including Zach, who is on a different system:
admin: sam, helen, max, [email protected]
You can direct email to a file by specifying an absolute pathname in place of a desti-nation address. The following alias, which is quite popular among less conscientioussystem administrators, redirects email sent to complaints to /dev/null (page 555),where it disappears:
complaints: /dev/null
You can also send email to standard input of a command by preceding the com-mand with the pipe character (|). This technique is commonly used by mailing listsoftware such as Mailman (page 774). For each list it maintains, Mailman hasentries, such as the following one for painting_class, in the aliases file:
painting_class: "|/var/lib/mailman/mail/mailman post painting_class"
See the exim4_files man page for information on exim4 files, including aliases.
newaliases After you edit /etc/aliases, you must run newaliases while you are working withroot privileges. The /usr/bin/newaliases file is a symbolic link to exim4. Runningnewaliases calls exim4, which rebuilds the exim4 alias database.
~/.forward Systemwide aliases are useful in many cases, but nonroot users cannot make orchange them. Sometimes you may want to forward your own mail: Maybe youwant mail from several systems to go to one address or perhaps you want to for-ward your mail while you are working at another office. The ~/.forward file allowsordinary users to forward their email.
Lines in a .forward file are the same as the right column of the aliases file explainedearlier in this section: Destinations are listed one per line and can be a local user, aremote email address, a filename, or a command preceded by the pipe character (|).
Mail that you forward does not go to your local mailbox. If you want to forwardmail and keep a copy in your local mailbox, you must specify your local usernamepreceded by a backslash to prevent an infinite loop. The following example sendsSam’s email to himself on the local system and on the system at example.com:
$cat ~sam/[email protected]\sam

Configuring exim4 765
Related Programs
exim4 The exim4 packages include several programs. The primary program, exim4, readsfrom standard input and sends an email to the recipient specified by its argument.You can use exim4 from the command line to check that the mail delivery system isworking and to email the output of scripts. See “Test” on page 760 for an example.The command apropos exim4 displays a list of exim4-related files and utilities. Inaddition, you can call exim4 with options (page 763) or through links to cause it toperform various tasks.
exim4 –bp When you call exim4 with the –bp option, or when you call the mailq utility (whichis a symbolic link to exim4), it displays the status of the outgoing mail queue. Whenthere are no messages in the queue, it displays nothing. Unless they are transient,messages in the queue usually indicate a problem with the local or remote MTAconfiguration or a network problem.
$ sudo exim4 -bp24h 262 1IBhYI-0006iT-7Q <sam@> *** frozen *** [email protected]
eximstats The eximstats utility displays statistics based on exim4 log files. Call this utility with anargument of the name of a log file, such as /var/log/mainlog or /var/log/mainlog2.gz.Without any options, eximstats sends information based on the log file in text formatto standard output. When you include the –html option, eximstats generates output inHTML format, suitable for viewing with a browser:
$ eximstats -html /var/log/exim4/mainlog.2.gz > exim.0720.html
If you are not a member of the adm group, you must run the preceding commandwith root privileges. See the eximstats man page for more information.
eximon Part of the eximon4 package, eximon displays a simple graphical representation ofthe exim4 queue and log files.
Configuring exim4
The exim4 daemon is a complex and capable MTA that is configured by/etc/default/exim4 and the files in the /etc/exim4 directory hierarchy. The formerallows you to specify how the daemon is to be run; the latter configures all otheraspects of exim4. You can configure exim4 by editing its configuration files witha text editor (discussed in the next section) or by using dpkg-reconfigure(page 768).
/etc/default/exim4 The default /etc/default/exim4 file sets QUEUERUNNER to combined, whichstarts one daemon that both runs the queue and listens for incoming email. It setsQUEUEINTERVAL to 30m, which causes the daemon to run the queue (that is,check whether the queue contains mail to be delivered) every 30 minutes. See thecomments in the file for more information.

766 Chapter 21 exim4: Setting Up Mail Servers, Clients, and More
Using a Text Editor to Configure exim4
The files in the /etc/exim4 directory hierarchy control how exim4 works—whichinterfaces it listens on, whether it uses a smarthost or sends email directly to its des-tination, whether and for which systems it relays email, and so on. You can also cre-ate an exim4.conf.localmacros file to turn on/off exim4 functions (see page 778 foran example). Because of its flexibility, exim4 uses many configuration variables.You can establish the values of these variables in one of two ways: You can edit asingle file, as the JumpStart sections of this chapter explain, or you can work withthe approximately 40 files in the /etc/exim4/conf.d directory hierarchy. For manyconfigurations, working with the single file update-exim4.conf.conf is sufficient.This section describes the variables in that file but does not discuss working withthe files in conf.d. Refer to the exim4 specification if you need to set up a morecomplex mail server.
The update-exim4.conf.conf Configuration File
update-exim4.conf
The update-exim4.conf utility reads the exim4 configuration files in /etc/exim4, includ-ing update-exim4.conf.conf, and generates the /var/lib/exim4/config.autogeneratedfile. When exim4 starts, it reads this file for configuration information. Typically you donot need to run update-exim4.conf manually because the exim4 init script (page 757)runs this utility before it starts, restarts, or reloads exim4.
Split configuration Setting the dc_use_split_config variable in update-exim4.conf.conf to false speci-fies an unsplit configuration, wherein update-exim4.conf merges the data fromexim4.conf.localmacros, update-exim4.conf.conf, and exim4.conf.template to cre-ate config.autogenerated. Setting this variable to true specifies a split configura-tion, wherein update-exim4.conf merges the data from exim4.conf.localmacros,update-exim4.conf.conf, and all the files in the conf.d directory hierarchy to createconfig.autogenerated.
Following is the list of configuration variables you can set in update-exim4.conf.conf. Enclose all values within single quotation marks. For Booleanvariables, exim4 interprets the null value (specified by ' ') as false.
CFILEMODE='perms'Sets the permissions of config.autogenerated to the octal value perms, typically 644.
dc_eximconfig_configtype='type'Specifies the type of configuration that exim4 will run, where type is one of the following:
internet Sends and receives email locally and remotely. See “JumpStart II” onpage 760 for an example.
smarthost Sends and receives email locally and remotely, using a smarthost torelay messages to nonlocal systems. See “JumpStart I” on page 758 for an example.
satellite Sends email remotely, using a smarthost to relay messages; does notreceive mail locally.
local Sends and receives local messages only.
none No configuration; exim4 will not work.
Configuring exim4 767
dc_hide_mailname='bool'Controls whether exim4 displays the local mailname (from /etc/mailname,page 759) in the headers of email originating on local systems. Set bool to true tohide (not display) the local mailname or false to display it. When you set this vari-able to true, exim4 uses the value of dc_readhost in headers.
dc_local_interfaces='interface-list'The interface-list is a semicolon-separated list of interfaces that exim4 listens on.Set interface-list to the null value ('') to cause exim4 to listen on all interfaces. Set itto 127.0.0.1 to prevent exim4 from accepting email from other systems.
dc_localdelivery='lcl-transport'Set lcl-transport to mail_spool to cause exim4 to store email in mbox format; set itto maildir_home for maildir format. See page 762 for more information.
dc_mailname_in_oh='bool'Used internally by exim4. Do not change this value.
dc_minimaldns='bool'Set bool to true to minimize DNS lookups (useful for dial-up connections) or tofalse to perform DNS lookups as needed.
dc_other_hostnames='host-list'The host-list is a semicolon-separated list of IP addresses and/or FQDNs the localsystem accepts (but does not relay) email for; localhost (127.0.0.1) is assumed to bein this list.
dc_readhost='hostname'The hostname replaces the local mailname in the headers of email originating onlocal systems. This setting is effective only if dc_hide_mailname is set to true anddc_eximconfig_configtype is set to smarthost or satellite.
dc_relay_domains='host-list'The host-list is a semicolon-separated list of IP addresses and/or FQDNs the localsystem accepts mail for, but does not deliver to local systems. The local systemrelays mail to these systems. For example, the local system may be a secondaryserver for these systems.
dc_relay_nets='host-list'The host-list is a semicolon-separated list of IP addresses and/or FQDNs of systemsthat the local system relays mail for. The local system is a smarthost (page 759) forthese systems.
dc_smarthost='host-list'The host-list is a semicolon-separated list of IP addresses (preferred) and/or FQDNsthe local system sends email to for relaying to nonlocal systems (a smarthost;page 759). See “JumpStart I” on page 758 for an example.
dc_use_split_config='bool'Controls which files update-exim4.conf uses to generate the configuration file forexim4. See “Split configuration” (page 766) for more information.

768 Chapter 21 exim4: Setting Up Mail Servers, Clients, and More
dpkg-reconfigure: Configures exim4
The dpkg-reconfigure utility reconfigures the installed copy of a software package. Itdisplays a pseudographical window that can be used from any character-baseddevice, including a terminal emulator. The following command enables you toreconfigure exim4 interactively:
$ sudo dpkg-reconfigure exim4-config
The first window this command displays briefly explains the differences betweenthe split and unsplit configurations (page 766), tells you where you can find moreinformation on this topic, and asks if you want to set up the split configuration(Figure 21-1). If you choose to set up a split configuration, dpkg-reconfigure assignsa value of true to dc_use_split_config (see “Split configuration” on page 766) andcontinues as though you had chosen to use an unsplit configuration: It does notmodify files in the /etc/exim4/conf.d directory hierarchy. This setup causes update-exim4.conf to read the files in the /etc/exim4/conf.d directory hierarchy, incorporat-ing any changes you make to those files.
The dpkg-reconfigure utility continues providing information, asking questions, andassigning values to the variables in /etc/exim4/update-exim4.conf.conf (page 766).It may also change the string in /etc/mailname (page 759). When it is finished, itrestarts exim4, running update-exim4.conf in the process.
SpamAssassin
Spam—or more correctly UCE (unsolicited commercial email)—accounts for morethan three-fourths of all email. SpamAssassin evaluates each piece of incomingemail and assigns it a number that indicates the likelihood that the email is spam.
Figure 21-1 Using dpkg-reconfigure on exim4-config

SpamAssassin 769
The higher the number, the more likely that the email is spam.You can filter emailbased on its rating. SpamAssassin is effective as installed, but you can modify itsconfiguration files to make it better fit your needs. See page 758 for sources of moreinformation on SpamAssassin.
Prerequisites
Packages Install the following packages:
• spamassassin
• spamc
• procmail (needed to run SpamAssassin on a mail server; page 772)
When you install the spamassassin package, the dpkg postinst script does not startthe spamd daemon. Before you can start spamd, you must change the valueassigned to ENABLED to 1 in /etc/default/spamassassin. Typically you do not needto make other changes to this file.
$ cat /etc/default/spamassassin...# Change to one to enable spamdENABLED=1...
spamassassin initscript
After making this change, start the spamd daemon with the following command:
$ sudo /etc/init.d/spamassassin startStarting SpamAssassin Mail Filter Daemon: spamd.
After modifying any system SpamAssassin configuration files, give the same command,but replacing start with reload, to cause spamd to reread its configuration files.
How SpamAssassin Works
spamc and spamd SpamAssassin comprises the spamd daemon and the spamc client. Although itincludes the spamassassin utility, the SpamAssassin documentation suggests usingspamc and not spamassassin to filter email because spamc is much quicker to load thanspamassassin. While spamassassin works alone, spamc calls spamd. The spamd dae-mon spawns children; when spamd is running, ps displays several spamd child pro-cesses in addition to the parent spamd process:
$ ps -ef | grep spamroot 5073 1 0 10:53 ? 00:00:00 /usr/sbin/spamd --create-prefs ...root 5106 5073 0 10:53 ? 00:00:00 spamd childroot 5107 5073 0 10:53 ? 00:00:00 spamd childzach 16080 6225 0 12:58 pts/0 00:00:00 grep spam
The spamc utility is a filter. That is, it reads each piece of email from standard input,sends the email to spamd for processing, and writes the modified email to standardoutput. The spamd daemon uses several techniques to identify spam:
• Header analysis Checks for tricks that people who send spam use to make you think email is legitimate.
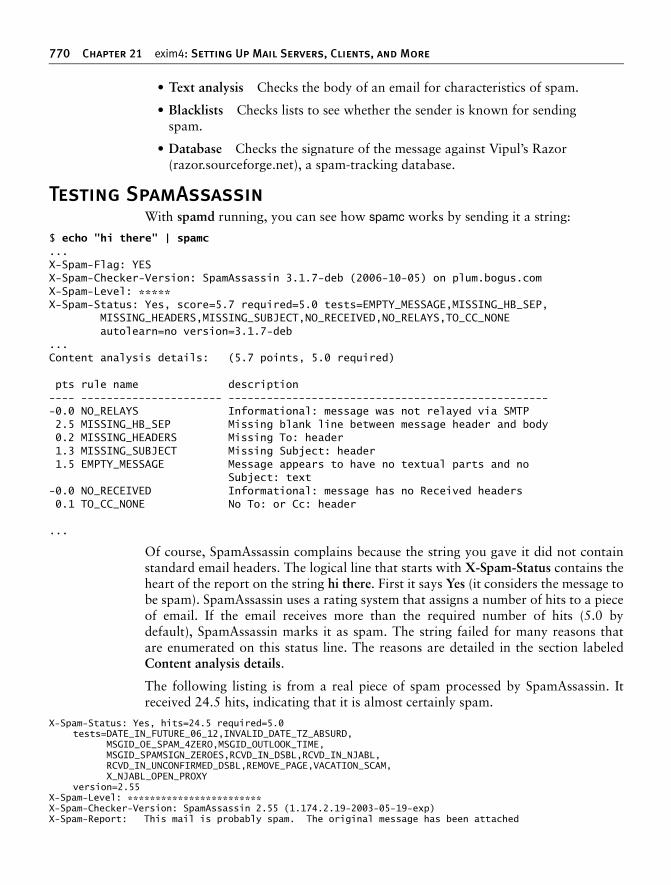
770 Chapter 21 exim4: Setting Up Mail Servers, Clients, and More
• Text analysis Checks the body of an email for characteristics of spam.
• Blacklists Checks lists to see whether the sender is known for sending spam.
• Database Checks the signature of the message against Vipul’s Razor (razor.sourceforge.net), a spam-tracking database.
Testing SpamAssassin
With spamd running, you can see how spamc works by sending it a string:
$ echo "hi there" | spamc...X-Spam-Flag: YESX-Spam-Checker-Version: SpamAssassin 3.1.7-deb (2006-10-05) on plum.bogus.comX-Spam-Level: *****X-Spam-Status: Yes, score=5.7 required=5.0 tests=EMPTY_MESSAGE,MISSING_HB_SEP, MISSING_HEADERS,MISSING_SUBJECT,NO_RECEIVED,NO_RELAYS,TO_CC_NONE autolearn=no version=3.1.7-deb...Content analysis details: (5.7 points, 5.0 required)
pts rule name description---- ---------------------- ---------------------------------------------------0.0 NO_RELAYS Informational: message was not relayed via SMTP 2.5 MISSING_HB_SEP Missing blank line between message header and body 0.2 MISSING_HEADERS Missing To: header 1.3 MISSING_SUBJECT Missing Subject: header 1.5 EMPTY_MESSAGE Message appears to have no textual parts and no Subject: text-0.0 NO_RECEIVED Informational: message has no Received headers 0.1 TO_CC_NONE No To: or Cc: header
...
Of course, SpamAssassin complains because the string you gave it did not containstandard email headers. The logical line that starts with X-Spam-Status contains theheart of the report on the string hi there. First it says Yes (it considers the message tobe spam). SpamAssassin uses a rating system that assigns a number of hits to a pieceof email. If the email receives more than the required number of hits (5.0 bydefault), SpamAssassin marks it as spam. The string failed for many reasons thatare enumerated on this status line. The reasons are detailed in the section labeledContent analysis details.
The following listing is from a real piece of spam processed by SpamAssassin. Itreceived 24.5 hits, indicating that it is almost certainly spam.
X-Spam-Status: Yes, hits=24.5 required=5.0tests=DATE_IN_FUTURE_06_12,INVALID_DATE_TZ_ABSURD, MSGID_OE_SPAM_4ZERO,MSGID_OUTLOOK_TIME, MSGID_SPAMSIGN_ZEROES,RCVD_IN_DSBL,RCVD_IN_NJABL, RCVD_IN_UNCONFIRMED_DSBL,REMOVE_PAGE,VACATION_SCAM, X_NJABL_OPEN_PROXYversion=2.55
X-Spam-Level: ************************X-Spam-Checker-Version: SpamAssassin 2.55 (1.174.2.19-2003-05-19-exp)X-Spam-Report: This mail is probably spam. The original message has been attached

SpamAssassin 771
along with this report, so you can recognize or block similar unwanted mail in future. See http://spamassassin.org/tag/ for more details. Content preview: Paradise SEX Island Awaits! Tropical 1 week vacations where anything goes! We have lots of WOMEN, SEX, ALCOHOL, ETC! Every man’s dream awaits on this island of pleasure. [...] Content analysis details: (24.50 points, 5 required) MSGID_SPAMSIGN_ZEROES (4.3 points) Message-Id generated by spam tool (zeroes variant) INVALID_DATE_TZ_ABSURD (4.3 points) Invalid Date: header (timezone does not exist) MSGID_OE_SPAM_4ZERO (3.5 points) Message-Id generated by spam tool (4-zeroes variant) VACATION_SCAM (1.9 points) BODY: Vacation Offers REMOVE_PAGE (0.3 points) URI: URL of page called “remove” MSGID_OUTLOOK_TIME (4.4 points) Message-Id is fake (in Outlook Express format) DATE_IN_FUTURE_06_12 (1.3 points) Date: is 6 to 12 hours after Received: date RCVD_IN_NJABL (0.9 points) RBL: Received via a relay in dnsbl.njabl.org [RBL check: found 94.99.190.200.dnsbl.njabl.org.] RCVD_IN_UNCONFIRMED_DSBL (0.5 points) RBL: Received via a relay in unconfirmed.dsbl.org [RBL check: found 94.99.190.200.unconfirmed.dsbl.org.] X_NJABL_OPEN_PROXY (0.5 points) RBL: NJABL: sender is proxy/relay/formmail/spam-source RCVD_IN_DSBL (2.6 points) RBL: Received via a relay in list.dsbl.org [RBL check: found 211.157.63.200.list.dsbl.org.]X-Spam-Flag: YESSubject: [SPAM] re: statement
Configuring SpamAssassin
SpamAssassin looks in many locations for configuration files; refer to the spam-assassin man page for details. The easiest configuration file to work with is/etc/mail/spamassassin/local.cf. You can edit this file to configure SpamAssassinglobally. Users can override these global options and add their own options in the~/.spamassassin/user_prefs file. You can put the options discussed in this section ineither of these files.
For example, you can configure SpamAssassin to rewrite the Subject line of emailthat it rates as spam. The rewrite_header keyword in the configuration files controlsthis behavior. The word Subject following this keyword tells SpamAssassin torewrite Subject lines. Remove the # from the following line to turn on this behavior:
# rewrite_header Subject *****SPAM*****
The required_score keyword specifies the minimum score a piece of email mustreceive before SpamAssassin considers it to be spam. The default is 5.00. Set thevalue of this keyword to a higher number to cause SpamAssassin to mark fewerpieces of email as spam.
required_score 5.00
Sometimes mail from addresses that should be marked as spam is not, or mail fromaddresses that should not be marked as spam is. Use the whitelist_from keyword tospecify addresses that should never be marked as spam and blacklist_from to spec-ify addresses that should always be marked as spam:
whitelist_from [email protected]_from *@spammer.net
You can specify multiple addresses, separated by SPACEs, on the whitelist_from andblacklist_from lines. Each address can include wildcards. To whitelist everyonesending email from the example.com domain, use whitelist_from *@example.com.You can use multiple whitelist_from and blacklist_from lines.

772 Chapter 21 exim4: Setting Up Mail Servers, Clients, and More
Running SpamAssassin on a Mail Server
This section explains how to set up SpamAssassin on a mail server so that it willprocess all email being delivered to local systems before it is sent to users. It showshow to use procmail as the MDA and have procmail send email through spamc.
First make sure the procmail package is installed on the server system. Next, if the/etc/procmailrc configuration file does not exist, create it so that this file is ownedby root and has 644 permissions and the following contents. If it does exist, appendthe last two lines from the following file to it:
$ cat /etc/procmailrcDROPPRIVS=yes:0 fw| /usr/bin/spamc
The first line of this file ensures that procmail runs with the least possible privileges.The next two lines implement a rule that pipes each user’s incoming email throughspamc. The :0 tells procmail that a rule follows. The f flag indicates a filter; the wflag causes procmail to wait for the filter to complete and check the exit code. Thelast line specifies that the /usr/bin/spamc utility will be used as the filter.
With this file in place, all email that the server system receives for local deliverypasses through SpamAssassin, which rates it according to the options in the globalconfiguration file. Users with accounts on the server system can override the globalSpamAssassin configuration settings in their ~/.spamassassin/user_prefs files.
When you run SpamAssassin on a server, you typically want to rate the email con-servatively so that fewer pieces of good email are marked as spam. Settingrequired_hits in the range of 6–10 is generally appropriate. Also, you do not wantto remove any email automatically because you could prevent a user from getting apiece of nonspam email. When the server marks email as possibly being spam, userscan manually or automatically filter the spam and decide what to do with it.
Additional Email Tools
This section covers Webmail and mailing lists. In addition, it discusses how to set upIMAP and POP3 servers.
Webmail
Traditionally you read email using a dedicated email client such as mail or Evolu-tion. Recently it has become more common to use a Web application to read email.If you have an email account with a commercial provider such as Gmail, HotMail,or Yahoo! Mail, you use a Web browser to read email. Email read in this manner iscalled Webmail. Unlike email you read on a dedicated client, you can read Webmailfrom anywhere you can open a browser on the Internet: You can check your emailfrom an Internet cafe or a friend’s computer, for example.
SquirrelMail SquirrelMail provides Webmail services. It is written in PHP and supports the IMAPand SMTP protocols. For maximum compatibility across browsers, SquirrelMailrenders pages in HTML 4.0 without the use of JavaScript.

Additional Email Tools 773
SquirrelMail is modular, meaning that you can easily add functionality using plug-ins. Plugins can allow you to share a calendar, for example, or give you the ability tochange passwords using the Webmail interface. See the plugins section of theSquirrelMail Web site (www.squirrelmail.org) for more information.
To use SquirrelMail, you must run IMAP (page 776) because SquirrelMail usesIMAP to receive and authenticate email. You must also run Apache (Chapter 27) soa user can use a browser to connect to SquirrelMail. Because the squirrelmail pack-age depends on several Apache packages, APT installs apache2 when it installssquirrelmail. You need to install an IMAP package manually.
Installation Install the following packages:
• squirrelmail
• apache2 (page 917; installed as a dependency when you install squirrelmail)
• exim4 (page 756) or sendmail
• dovecot-imapd (page 776) or another IMAP server
Startup You do not need to start SquirrelMail, nor do you have to open any ports for it.However, you need to configure, start, and open ports (if the server is running on asystem with a firewall) for exim4 (page 760), IMAP (page 776), and Apache(page 919).
Configuration The SquirrelMail files reside in /usr/share/squirrelmail. Create the following link tomake SquirrelMail accessible from the Web:
$ sudo ln -s /usr/share/squirrelmail /var/www/mail
Give the following command to configure SquirrelMail:
$ sudo squirrelmail-configureSquirrelMail Configuration : Read: config.php (1.4.0)---------------------------------------------------------Main Menu --1. Organization Preferences2. Server Settings3. Folder Defaults4. General Options5. Themes6. Address Books7. Message of the Day (MOTD)8. Plugins9. Database10. Languages
D. Set pre-defined settings for specific IMAP servers
C Turn color onS Save dataQ Quit
Command >>

774 Chapter 21 exim4: Setting Up Mail Servers, Clients, and More
This menu has multiple levels. When you select a setting (and not a submenu),squirrelmail-configure displays information that can help you decide how to answerthe question it poses. Set the server’s domain name (number 1 on the Server Settingspage) and the name of the IMAP server you are using (D on the main menu).SquirrelMail provides several themes; if you do not like the way SquirrelMail looks,choose another theme from Themes (number 5). When you are finished makingchanges, exit from squirrelmail-configure. Run squirrelmail-configure whenever youwant to change the configuration of SquirrelMail.
SquirrelMail provides a Web page that tests its configuration. Point a browser on theserver at localhost/mail/src/configtest.php. Replace localhost with the IP address orFQDN of the server to view the page from another system. SquirrelMail checks itsconfiguration and displays the results on this page. Figure 21-2 shows that Squirrel-Mail cannot connect to the IMAP server on the local system, probably becauseIMAP has not been installed.
Logging in Point a Web browser at localhost/mail or localhost/mail/src/login.php to displaythe SquirrelMail login page (Figure 21-3). Replace localhost with the IP address orFQDN of the server to view the page from another system. Enter the username andpassword of a user who has an account on the server system.
Figure 21-2 SquirrelMail running a configuration test
Figure 21-3 SquirrelMail login page

Additional Email Tools 775
Mailing Lists
A mailing list can be an asset if you regularly send email to the same large group ofpeople. It offers several advantages over listing numerous recipients in the To or Ccfield of an email or sending the same email individually to many people:
• Anonymity None of the recipients of the email can see the addresses of the other recipients.
• Archiving Email sent to the list is stored in a central location where list mem-bers or the public, as specified by the list administrator, can browse through it.
• Access control You can specify who can send email to the list.
• Consistency When you send mail to a group of people using To or Cc, it is easy to forget people who want to be on the list and to erroneously include people who want to be off the list.
• Efficiency A mailing list application spreads email transmissions over time so it does not overload the mail server.
Mailman Mailman, the GNU list manager, is written mostly in Python and manages emaildiscussions and email newsletter lists. Because it is integrated with the Web, Mail-man makes it easy for users to manage their accounts and for administrators tomanage lists. See the Mailman home page (www.list.org) and the files in the/usr/share/doc/mailman directory for more information.
Prerequisites Install the mailman package and an MTA such as exim4 (page 757). To use the Webinterface you must install Apache (page 917).
Installing Mailman When you install the mailman package, the dpkg postinst script displays a pseudo-graphical interface that asks you to specify the language you want Mailman to displayand tells you that you must create a site list. Give the following newlist command tocreate a site list, substituting the name of your mailing site for painting_class:
$ sudo newlist painting_classEnter the email of the person running the list: [email protected] painting_class password:To finish creating your mailing list, you must edit your /etc/aliases (orequivalent) file by adding the following lines, and possibly running the'newaliases' program:
## painting_class mailing listpainting_class: "|/var/lib/mailman/mail/mailman post painting_class"painting_class-admin: "|/var/lib/mailman/mail/mailman admin painting_class"painting_class-bounces: "|/var/lib/mailman/mail/mailman bounces painting_class"painting_class-confirm: "|/var/lib/mailman/mail/mailman confirm painting_class"painting_class-join: "|/var/lib/mailman/mail/mailman join painting_class"painting_class-leave: "|/var/lib/mailman/mail/mailman leave painting_class"painting_class-owner: "|/var/lib/mailman/mail/mailman owner painting_class"painting_class-request: "|/var/lib/mailman/mail/mailman request painting_class"painting_class-subscribe: "|/var/lib/mailman/mail/mailman subscribe painting_class"painting_class-unsubscribe: "|/var/lib/mailman/mail/mailman unsubscribe painting_class"
Hit enter to notify painting_class owner...

776 Chapter 21 exim4: Setting Up Mail Servers, Clients, and More
Before users on the list can receive email, you need to copy the lines generated bynewlist (the ones that start with the name of your mailing site) to the end of/etc/aliases (page 763) and run newaliases (page 764).
mailman site list Before you can start Mailman, you must create a site list named mailman. Give thecommand sudo newlist mailman, copy the lines to the aliases file, and run newaliases.
mailman init script After setting up the mailman site list and a site list of your choice, start the Mailmanqrunner daemon with the following command:
$ sudo /etc/init.d/mailman start * Starting Mailman master qrunner mailmanctl [ OK ]
After modifying any Mailman configuration files or adding a new site list, give thesame command, but replacing start with reload, to cause Mailman to reread its con-figuration files.
mm_cfg.py The main Mailman configuration file is /etc/mailman/mm_cfg.py. When you installMailman, it automatically assigns values to DEFAULT_EMAIL_HOST (the defaultdomain for mailing lists) and DEFAULT_URL_HOST (the default Web server forMailman). Change the value of these variables as needed and restart Mailman.
$ cat /etc/mailman/mm_cfg.py...# Default domain for email addresses of newly created MLsDEFAULT_EMAIL_HOST = 'example.com'
# Default host for web interface of newly created MLsDEFAULT_URL_HOST = 'example.com'...
Web interface Assuming the host for the Web interface is example.com, anyone can point abrowser at example.com/cgi-bin/mailman/listinfo to display a list of available mail-ing lists. Click the name of a mailing list to display a page that allows you to viewthe list’s archives, send a message, or subscribe to the list. At the bottom of the pageis a link to the administrative interface for the list.
Setting Up an IMAP or POP3 Server
Dovecot IMAP (Internet Message Access Protocol) and POP (Post Office Protocol) allowusers to retrieve and manipulate email remotely. This section explains how to set upservers for these protocols. Dovecot (www.dovecot.org and wiki.dovecot.org) pro-vides the imap-login and pop3-login daemons that implement these protocols.
Prerequisites Install the dovecot-pop3d (for a POP3 server) and/or dovecot-imapd (for an IMAPserver) packages. APT installs the dovecot-common package automatically whenyou install one of these packages. When you install either package, the dpkgpostinst script for the dovecot-common package generates self-signed SSL certifi-cates if they do not already exist.
Configuration Dovecot will not start until you specify in the /etc/dovecot/dovecot.conf configura-tion file which servers you want to run. Near the beginning of this long file is a line

Authenticated Relaying 777
that starts with protocols =. Put the names of the servers you want to run at the endof this line. Possible servers, depending on which packages you have installed, areimap (IMAP on port 143), imaps (IMAP over SSL on port 993), pop3 (POP3 onport 110), and pop3s (POP3 over SSL on port 995). See /usr/share/doc/dovecot*for more information.
dovecot init script After configuring Dovecot, start the Dovecot daemon(s) with the followingcommand:
$ sudo /etc/init.d/dovecot startStarting mail server: dovecot.
After modifying a Dovecot configuration file, give the same command, but replac-ing start with restart, to cause Dovecot to reread its configuration files.
Authenticated Relaying
If you travel with a portable computer such as a laptop, you may connect to theInternet through a different connection at each location where you work. Perhapsyou travel for work, or maybe you just bring your laptop home at night.
This section does not apply if you always dial in to the network through your ISP. Inthat case, you are always connected to your ISP’s network and it is as though younever moved your computer.
On a laptop you do not use a local instance of exim4 to send email. Instead, you useSMTP to connect to an ISP or to a company’s SMTP server (a smarthost), whichthen relays your outgoing mail. To avoid relaying email for anyone, including mali-cious users who would send spam, SMTP servers restrict who they relay email for,based on IP address. By implementing authenticated relaying, you can cause theSMTP server to authenticate, based on user identification. In addition, SMTP canencrypt communication when you send mail from your email client and use anSMTP server.
An authenticated relay provides several advantages over a plain connection:
• You can send email from any Internet connection.
• The secure connection makes it more difficult to intercept email as it traverses the Internet.
• The outgoing mail server requires authentication, preventing it from being used for spam.
You set up authenticated relaying by creating an SSL certificate or using an existingone, enabling SSL in exim4, and telling your email client to connect to the SMTPserver using SSL. If you have an SSL certificate from a company such as VeriSign,you can skip the next section, in which you create a self-signed certificate.

778 Chapter 21 exim4: Setting Up Mail Servers, Clients, and More
Creating a Self-Signed Certificate for exim4Give the following command to create SSL certificates for exim4. The keys arestored in exim.key and exim.crt in the /etc/exim4 directory. Apache uses a similarprocedure for creating a certificate (page 959).
$ sudo /usr/share/doc/exim4-base/examples/exim-gencert[*] Creating a self signed SSL certificate for Exim! This may be sufficient to establish encrypted connections but for secure identification you need to buy a real certificate!
Please enter the hostname of your MTA at the Common Name (CN) prompt!
Generating a 1024 bit RSA private key...........................................................++++++writing new private key to '/etc/exim4/exim.key'-----You are about to be asked to enter information that will be incorporatedinto your certificate request.What you are about to enter is what is called a Distinguished Name or a DN.There are quite a few fields but you can leave some blankFor some fields there will be a default value,If you enter '.', the field will be left blank.-----Country Code (2 letters) [US]:State or Province Name (full name) []:CaliforniaLocality Name (eg, city) []:San FranciscoOrganization Name (eg, company; recommended) []:Sobell Associates Inc.Organizational Unit Name (eg, section) []:Server name (eg. ssl.domain.tld; required!!!) []:sobell.comEmail Address []:[email protected][*] Done generating self signed certificates for exim! Refer to the documentation and example configuration files over at /usr/share/doc/exim4-base/ for an idea on how to enable TLS support in your mail transfer agent.
You can enter any information you wish in the certificate.
Enabling SSL in exim4Once you have a certificate, create a file named exim4.conf.localmacros in the/etc/exim4 directory (you have to work with root privileges). With the followingcontents, this file instructs exim4 to use SSL certificates:
$ cat /etc/exim4/exim4.conf.localmacrosMAIN_TLS_ENABLE = 1
Because exim4 will be relaying email, you need to add the name of the system you will besending email from to the dc_relay_nets variable (page 767). Restart exim4 (page 757).
Enabling SSL in the Mail Client
Enabling SSL in a mail client is usually quite simple. For example, Evolution pro-vides the Edit Preferences Mail Accounts Sending Email Security Use Secure

Chapter Summary 779
Connection combo box that allows you to choose the type of encryption you wantto use: No encryption, SSL encryption, or TLS encryption. Clicking the Check forSupported Types button (found just below this combo box) queries the server andsets Evolution to use the type of security and authentication the server supports.
Alternatives to exim4
sendmail The most popular MTA today, sendmail (sendmail package) first appeared in4.1BSD. The sendmail system is complex, but its complexity allows sendmail to beflexible and to scale well. On the downside, because of its complexity, configuringsendmail can be a daunting task. See www.sendmail.org for more information.
Postfix Postfix (postfix package) is an alternative MTA. Postfix is fast and easy to adminis-ter, but is compatible enough with sendmail/exim4 to not upset sendmail/exim4users. Postfix has a good reputation for ease of use and security and is a drop-inreplacement for sendmail. Point a browser at www.postfix.org/docs.html for PostfixDocumentation.
Qmail Qmail is a direct competitor of Postfix and has the same objectives. By default,Qmail stores email using the maildir format as opposed to the mbox format thatother MTAs use (page 762). The Qmail Web site is www.qmail.org.
Chapter Summary
The exim4 daemon is an MTA (mail transfer agent). When you send a message,exim4 works with other software to get the email to the proper recipients. You canset up exim4 to send email to an SMTP server that then relays the email to its desti-nation or you can have exim4 send email directly to the SMTP servers for thedomains receiving the email. By default, exim4 stores incoming messages in the mailspool directory, /var/mail.
The /etc/exim4/update-exim4.conf.conf file controls many aspects of how exim4works. After you edit this file, you must use the exim4 init script to restart exim4 soit rereads its configuration files. The system administrator can use the /etc/aliasesfile and ordinary users can use ~/.forward files to reroute email to one or more localor remote addresses, to files, or as input to programs.
You can use a program such as SpamAssassin to grade and mark email as to thelikelihood of it being spam. You can then decide what to do with the marked email:You can look at each piece of potential spam and decide where to put it, or you canhave your MUA automatically put potential spam in a special mailbox for spam.
Other programs that can help with email include SquirrelMail, which provides Web-mail services, and Mailman, which provides mailing list support. IMAP (InternetMessage Access Protocol) and POP (Post Office Protocol) allow users to retrieve andmanipulate email remotely. The Dovecot system provides IMAP and POP servers.

780 Chapter 21 exim4: Setting Up Mail Servers, Clients, and More
Exercises
1. By default, email addressed to system goes to root. How would you also save a copy in /var/logs/systemmail?
2. How would Max store a copy of his email in ~/mbox and send a copy to [email protected]?
3. If your firewall allowed only the machine with the IP address 192.168.1.1 to send email outside the network, how would you instruct the local copy of exim4 to use this server as a relay?
4. Describe how setting the dc_eximconfig_configtype variable in /etc/exim4/update-exim4.conf.conf to smarthost affects exim4 behavior. What happens when you set this variable to internet?
5. SpamAssassin is installed on your mail server, with the threshold set to an unusually low value of 3, resulting in a lot of false positives. What rule could you give to your mail client to allow it to identify spam with a score of 5 or higher?
6. Describe the software and protocols used when Max sends an email to Sam on a remote Linux system.
Advanced Exercises
7. Explain the differences between configuring exim4 to use a split configura-tion and configuring it to use an unsplit configuration. Which files would you modify to set up each type of configuration? Name two files that are read by both configurations.
8. Assume a script stores certain information in a variable named RESULT.What line could you put in the script that would send the contents of RESULT to the email address specified by the first argument on the com-mand line?
9. Give a simple way of reading your email that does not involve the use of an MUA.
10. Describe the relationship between spamassassin, spamd, and spamc. How does each work? Why not use the spamassassin utility by itself?

781781
22Chapter22NIS (Network Information Service) simplifies the maintenance ofcommon administrative files by keeping them in a central data-base and having clients contact the database server to retrieveinformation from the database. Developed by Sun Microsystems,NIS is an example of the client/server paradigm.
Just as DNS addresses the problem of keeping multiple copies of/etc/hosts files up-to-date, so NIS deals with the issue of keepingsystem-independent configuration files (such as /etc/passwd)current. Most networks today are heterogeneous (page 1039);even though they run different varieties of UNIX or Linux, theyhave certain common attributes, such as a passwd file.
In This Chapter
How NIS Works . . . . . . . . . . . . . . . 782
Setting Up an NIS Client . . . . . . . . 784
yppasswd: Changes NIS Passwords . . . . . . . . . . . . . . . . . 788
Setting Up an NIS Server . . . . . . . 790
yppasswdd: The NIS Password Update Daemon. . . . . . . . . . . . . 797
22
NIS: Network
Information Service

782 Chapter 22 NIS: Network Information Service
Introduction to NIS
A primary goal of a LAN administrator is to make the network transparent tousers. One aspect of this transparency is presenting users with similar environments,including usernames and passwords, when they log in on different machines. Fromthe administrator’s perspective, the information that supports a user’s environmentshould not be replicated but rather should be kept in a central location and distrib-uted as required. NIS simplifies this task.
As with DNS, users need not be aware that NIS is managing system configuration files.Setting up and maintaining NIS databases are tasks for the system administrator; individ-ual users and users on single-user Linux systems rarely need to work directly with NIS.
Yellow Pages NIS used to be called the Yellow Pages, and some people still refer to it by thisname. Sun renamed the service because another corporation holds the trademark tothe Yellow Pages name. The names of NIS utilities and files, however, are reminis-cent of the old name: ypcat displays and ypmatch searches an NIS file, and the serverdaemon is named ypserv.
How NIS Works
No encryption NIS does not encrypt data it transfers over the network—it transfers data as plain text.
NIS domain NIS makes a common set of information available to systems on a network. Thenetwork, referred to as an NIS domain, is characterized by each system having thesame NIS domain name (different than a DNS domain name [page 1034]). Techni-cally an NIS domain is a set of NIS maps (database files).
Master and slaveservers
Each NIS domain must have exactly one master server; larger networks may haveslave servers. Each slave server holds a copy of the NIS database from the master.The need for slave servers is based on the size of the NIS domain and the reliabilityof the systems and network. A system can belong to only one NIS domain at a time.
nsswitch.conf Whether a system uses NIS, DNS, local files, or a combination of these as the sourceof certain information, and in what order, is determined by the /etc/nsswitch.conffile (page 542). When it needs information from the NIS database, a client requeststhe information from the NIS server. For example, when a user attempts to log in,the client system may authenticate the user with username and password informa-tion from the NIS server.
You can configure nsswitch.conf to cause /etc/passwd to override NIS passwordinformation for the local system. When you do not export the root account to NIS(and you should not), this setup allows you to have a unique root password (or noroot password, if the root account is locked) for each system.
Source files Under Ubuntu Linux, NIS derives the information it offers—such as usernames,passwords, and local system names and IP addresses—from local ASCII configura-tion files such as /etc/passwd and /etc/hosts. These files are called source files ormaster files. (Some administrators avoid confusion by using different files to hold

How NIS Works 783
local configuration information and NIS source information.) An NIS server caninclude information from as many of the following source files as is appropriate:
/etc/group Defines groups and their members/etc/gshadow Provides shadow passwords for groups/etc/hosts Maps local systems and IP addresses/etc/passwd Lists user information/etc/printcap Lists printer information/etc/rpc Maps RPC program names and numbers/etc/services Maps system service names and port numbers/etc/shadow Provides shadow passwords for users
The information that NIS offers is based on files that change from time to time. NISis responsible for making the updated information available in a timely manner toall systems in the NIS domain.
NIS maps Before NIS can store the information contained in a source file, it must be converted to adbm (page 1032) format file called a map. Each map is indexed on one field (column).Records (rows) from a map can be retrieved by specifying a value from the indexed field.Some files generate two maps, each indexed on a different field. For example, the/etc/passwd file generates two maps: one indexed by username, the other indexed byUID. These maps are named passwd.byname and passwd.byuid, respectively.
optional NIS maps correspond to C library functions. The getpwnam() and getpwuid() func-tions obtain username and UID information from /etc/passwd on non-NIS systems.On NIS systems, these functions place RPC calls to the NIS server in a process thatis transparent to the application calling the function.
Map names The names of the maps NIS uses correspond to the files in the /var/yp/nisdomainnamedirectory on the master server, where nisdomainname is the name of the NIS domain.The examples in this chapter use the NIS domain named mgs:
$ ls /var/yp/mgsgroup.bygid netgroup.byhost protocols.byname services.byservicenamegroup.byname netgroup.byuser protocols.bynumber shadow.bynamehosts.byaddr netid.byname rpc.byname ypservershosts.byname passwd.byname rpc.bynumbernetgroup passwd.byuid services.byname
Map nicknames To make it easier to refer to NIS maps, you can assign nicknames to them. The/var/yp/nicknames file on both clients and servers holds a list of commonly usednicknames:
$ cat /var/yp/nicknamespasswd passwd.bynamegroup group.bynamenetworks networks.byaddrhosts hosts.bynameprotocols protocols.bynumberservices services.bynamealiases mail.aliasesethers ethers.byname

784 Chapter 22 NIS: Network Information Service
You can also use the command ypcat –x to display the list of nicknames. Each linein nicknames contains a nickname followed by whitespace and the name of the mapcorresponding to the nickname. You can add, remove, or modify nicknames bychanging the nicknames file.
Displaying maps The ypcat and ypmatch utilities display information from the NIS maps on theserver. Using the nickname passwd, the following command, which you can run onany NIS client in the local domain, displays the information contained in thepasswd.byname map:
$ ypcat passwdsam:x:1000:1000:Sam,,,,:/home/sam:/bin/bashsls:x:1001:1001:Sam the Great,,,,:/home/sls:/bin/bash...
By default, NIS stores passwords only for users with UIDs less than 1000 (seeMINUID on page 793). Thus ypcat does not display lines for root, bin, and othersystem entries. You can display password information for a single user withypmatch:
$ ypmatch sam passwdsam:x:1000:1000:Sam,,,,:/home/sam:/bin/bash
You can retrieve the same information by filtering the output of ypcat through grep,but ypmatch is more efficient because it searches the map directly, using a single pro-cess. The ypmatch utility works on the key for the map only. To match members ofthe group or other fields not in a map, such as the GECOS (page 1038) field inpasswd, you need to use ypcat and grep:
$ ypcat passwd | grep -i greatsls:x:1001:1001:Sam the Great,,,,:/home/sls:/bin/bash
Terminology This chapter uses the following definitions:
NIS source files The ASCII files that NIS obtains information fromNIS maps The dbm-format files created from NIS source filesNIS database The collection of NIS maps
More Information
Local man pages domainname, makedbm, netgroup, revnetgroup, ypbind, ypcat, ypinit,ypmatch, yppasswd, yppoll, yppush, ypset, ypserv, ypserv.conf, ypwhich, ypxfr,ypxfrd
Web www.linux-nis.orgNIS-HOWTO
Setting Up an NIS Client
This section explains how to set up an NIS client on the local system.

Setting Up an NIS Client 785
Prerequisites
Install Install the following package:
• nis
When you install the nis package, the dpkg postinst script starts an NIS client. Seethe “nis init script” section below if you want to start an NIS server or do not wantto start an NIS client. The dpkg postinst script asks you to specify the NIS domainname of the local system if it does not find one in /etc/defaultdomain. If necessary,the script creates this file and stores the NIS domain name in that file. If this filedoes not exist, the NIS client (ypbind) will not start. If there is a server for thedomain you specify, the client quickly binds to that server.
No server If there is no NIS server for the NIS client to bind to when you install or start anNIS client or boot the system, the client spends several minutes trying to find aserver, displaying the following message while doing so:
...Setting up nis (3.17-2ubuntu2) ... * Setting NIS domainname to: mgs * Starting NIS services * binding to YP server... * .... * .......
Broadcast mode Finally the client (ypbind) gives up on finding a server and runs in the backgroundin broadcast mode:
$ ps -ef | grep yproot 16832 1 0 19:33 ? 00:00:00 /usr/sbin/ypbind -broadcastsam 17390 5839 0 19:38 pts/0 00:00:00 grep yp
Broadcast mode is less secure than other modes because it exposes the system torogue servers by broadcasting a request for a server to identify itself. If ypbind startsin this mode, it is a good idea to restart it after you set up an NIS server (page 790)and configure an NIS client as explained in the next section.
nis init script After you configure nis, call the nis init script to restart nis. However, as explainedearlier, starting nis takes a while if it cannot connect to a server. The /etc/default/nisfile specifies whether this script starts an NIS client, server, or both:
$ sudo /etc/init.d/nis restart
After changing the nis configuration on an active server, use reload in place ofrestart to reload nis configuration files without disturbing clients connected to theserver.
Notes
If there is no NIS server for the local system’s NIS domain, you need to set one up(page 790). If there is an NIS server, you need to know the name of the NIS domain
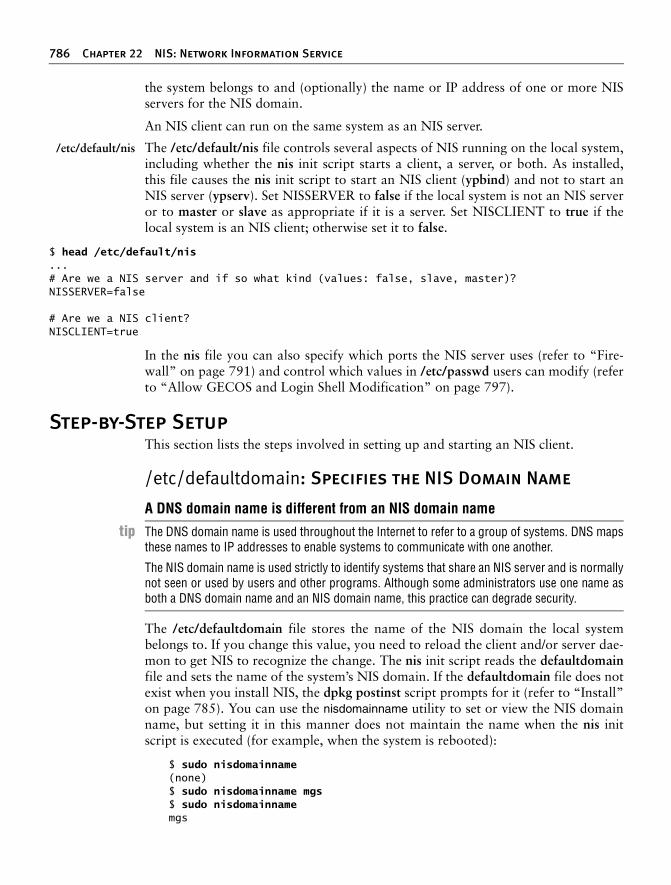
786 Chapter 22 NIS: Network Information Service
the system belongs to and (optionally) the name or IP address of one or more NISservers for the NIS domain.
An NIS client can run on the same system as an NIS server.
/etc/default/nis The /etc/default/nis file controls several aspects of NIS running on the local system,including whether the nis init script starts a client, a server, or both. As installed,this file causes the nis init script to start an NIS client (ypbind) and not to start anNIS server (ypserv). Set NISSERVER to false if the local system is not an NIS serveror to master or slave as appropriate if it is a server. Set NISCLIENT to true if thelocal system is an NIS client; otherwise set it to false.
$ head /etc/default/nis...# Are we a NIS server and if so what kind (values: false, slave, master)?NISSERVER=false
# Are we a NIS client?NISCLIENT=true
In the nis file you can also specify which ports the NIS server uses (refer to “Fire-wall” on page 791) and control which values in /etc/passwd users can modify (referto “Allow GECOS and Login Shell Modification” on page 797).
Step-by-Step Setup
This section lists the steps involved in setting up and starting an NIS client.
/etc/defaultdomain: Specifies the NIS Domain Name
The /etc/defaultdomain file stores the name of the NIS domain the local systembelongs to. If you change this value, you need to reload the client and/or server dae-mon to get NIS to recognize the change. The nis init script reads the defaultdomainfile and sets the name of the system’s NIS domain. If the defaultdomain file does notexist when you install NIS, the dpkg postinst script prompts for it (refer to “Install”on page 785). You can use the nisdomainname utility to set or view the NIS domainname, but setting it in this manner does not maintain the name when the nis initscript is executed (for example, when the system is rebooted):
$ sudo nisdomainname(none)$ sudo nisdomainname mgs$ sudo nisdomainnamemgs
A DNS domain name is different from an NIS domain name
tip The DNS domain name is used throughout the Internet to refer to a group of systems. DNS mapsthese names to IP addresses to enable systems to communicate with one another.
The NIS domain name is used strictly to identify systems that share an NIS server and is normallynot seen or used by users and other programs. Although some administrators use one name asboth a DNS domain name and an NIS domain name, this practice can degrade security.
Setting Up an NIS Client 787
/etc/yp.conf: Specifies an NIS Server
Edit /etc/yp.conf to specify one or more NIS servers (masters and/or slaves). Youcan use one of three formats to specify each server:
domain nisdomain server server_name
domain nisdomain broadcast (do not use)
ypserver server_name
where nisdomain is the name of the NIS domain that the local (client) system belongsto and server_name is the hostname of the NIS server that the local system queries. Itis best to specify server_name as an IP address or a hostname from /etc/hosts. If youspecify a hostname that requires a DNS lookup and DNS is down, NIS will not findthe server. The second format puts ypbind in broadcast mode and is less secure thanthe first and third formats because it exposes the system to rogue servers by broad-casting a request for a server to identify itself. Under Ubuntu Linux, if you do notspecify an NIS server, or if the server you specify is not available, an NIS client runs inbroadcast mode.
Following is a simple yp.conf file for a client in the mgs domain with a server at192.168.0.10:
$ cat /etc/yp.confdomain mgs server 192.168.0.10
You can use multiple lines to specify multiple servers for one or more domains.Specifying multiple servers for a single domain allows the system to change toanother server when its current server is slow or down.
When you specify more than one NIS domain, you must set the system’s NISdomain name before starting ypbind so the client queries the proper server. Specify-ing the NIS domain name in /etc/defaultdomain before running the ypbind initscript takes care of this issue (page 786).
Testing the Setup
After starting ypbind, use nisdomainname to make sure the correct NIS domain nameis set. Refer to “/etc/defaultdomain: Specifies the NIS Domain Name” on page 786if you need to set the NIS domain name. Next check whether the system is set up toconnect to the proper server; the name of this server is set in /etc/yp.conf (page 787):
$ ypwhichplum
To avoid confusion, use nisdomainname, not domainnametip The domainname and nisdomainname utilities do the same thing: They display or set the sys-
tem’s NIS domain name. Use nisdomainname to avoid confusion when you are also workingwith DNS domain names.
You must set the local system’s NIS domain nametip If the /etc/defaultdomain file is not present, the NIS server and client will not start.

788 Chapter 22 NIS: Network Information Service
Make sure the NIS server is up and running (replace plum with the name of theserver that ypwhich returned):
$ rpcinfo -u plum ypservprogram 100004 version 1 ready and waitingprogram 100004 version 2 ready and waiting
After starting ypbind, check that it is registered with portmap:
$ rpcinfo -u localhost ypbindprogram 100007 version 1 ready and waitingprogram 100007 version 2 ready and waiting
If rpcinfo does not report that ypbind is ready and waiting, check that ypbind is running:
$ ps -ef | grep ypbindroot 23144 1 0 18:10 ? 00:00:00 /usr/sbin/ypbindsam 23670 5553 0 18:31 pts/2 00:00:00 grep ypbind
If NIS still does not work properly, stop the NIS server and start ypbind with debug-ging turned on:
$ sudo /etc/init.d/nis stop
$ sudo /usr/sbin/ypbind -debug7607: parsing config file7607: Trying entry: domain mgs server 192.168.0.107607: parsed domain 'mgs' server '192.168.0.10'7607: add_server() domain: mgs, host: 192.168.0.10, slot: 07607: [Welcome to ypbind-mt, version 1.20.1]
7607: ping interval is 20 seconds
7609: NetworkManager is running.
7609: Are already online7609: interface: org.freedesktop.DBus, object path: /org/freedesktop/DBus, method: NameAcquired7610: ping host '192.168.0.10', domain 'mgs'7610: Answer for domain 'mgs' from server '192.168.0.10'7610: Pinging all active servers.7610: Pinging all active servers....
The –debug option keeps ypbind in the foreground and causes it to send error mes-sages and debugging output to standard error. Use CONTROL-C to stop ypbind when it isrunning in the foreground.
yppasswd: Changes NIS Passwords
The yppasswd utility—not to be confused with the yppasswdd daemon (two d’s; seepage 797) that runs on the NIS server—replaces the functionality of passwd on cli-ents when you use NIS for passwords. Where passwd changes password informa-tion in the /etc/shadow file on the local system, yppasswd changes password
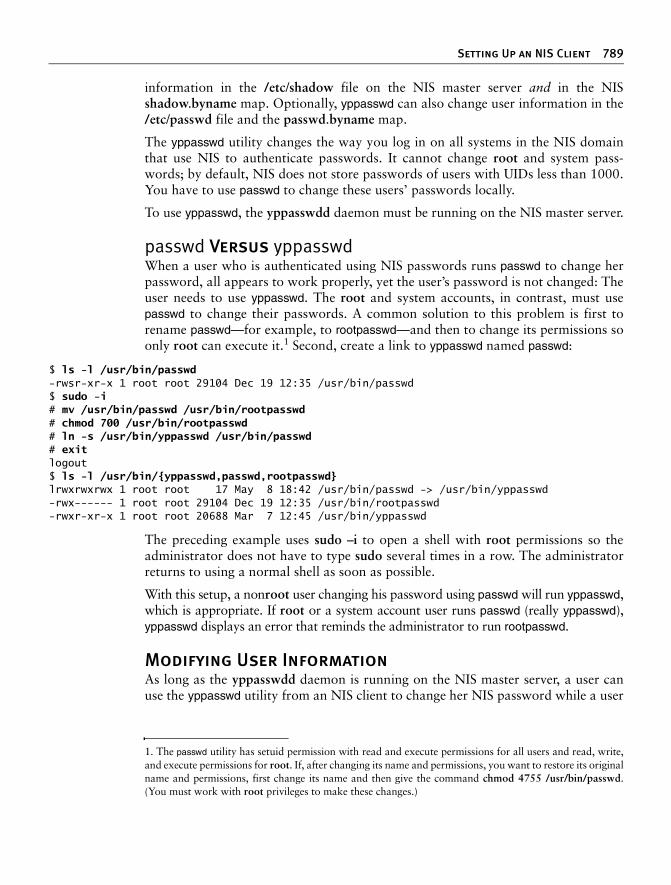
Setting Up an NIS Client 789
information in the /etc/shadow file on the NIS master server and in the NISshadow.byname map. Optionally, yppasswd can also change user information in the/etc/passwd file and the passwd.byname map.
The yppasswd utility changes the way you log in on all systems in the NIS domainthat use NIS to authenticate passwords. It cannot change root and system pass-words; by default, NIS does not store passwords of users with UIDs less than 1000.You have to use passwd to change these users’ passwords locally.
To use yppasswd, the yppasswdd daemon must be running on the NIS master server.
passwd Versus yppasswdWhen a user who is authenticated using NIS passwords runs passwd to change herpassword, all appears to work properly, yet the user’s password is not changed: Theuser needs to use yppasswd. The root and system accounts, in contrast, must usepasswd to change their passwords. A common solution to this problem is first torename passwd—for example, to rootpasswd—and then to change its permissions soonly root can execute it.1 Second, create a link to yppasswd named passwd:
$ ls -l /usr/bin/passwd-rwsr-xr-x 1 root root 29104 Dec 19 12:35 /usr/bin/passwd$ sudo -i# mv /usr/bin/passwd /usr/bin/rootpasswd# chmod 700 /usr/bin/rootpasswd# ln -s /usr/bin/yppasswd /usr/bin/passwd# exitlogout$ ls -l /usr/bin/{yppasswd,passwd,rootpasswd}lrwxrwxrwx 1 root root 17 May 8 18:42 /usr/bin/passwd -> /usr/bin/yppasswd-rwx------ 1 root root 29104 Dec 19 12:35 /usr/bin/rootpasswd-rwxr-xr-x 1 root root 20688 Mar 7 12:45 /usr/bin/yppasswd
The preceding example uses sudo –i to open a shell with root permissions so theadministrator does not have to type sudo several times in a row. The administratorreturns to using a normal shell as soon as possible.
With this setup, a nonroot user changing his password using passwd will run yppasswd,which is appropriate. If root or a system account user runs passwd (really yppasswd),yppasswd displays an error that reminds the administrator to run rootpasswd.
Modifying User Information
As long as the yppasswdd daemon is running on the NIS master server, a user canuse the yppasswd utility from an NIS client to change her NIS password while a user
1. The passwd utility has setuid permission with read and execute permissions for all users and read, write,and execute permissions for root. If, after changing its name and permissions, you want to restore its originalname and permissions, first change its name and then give the command chmod 4755 /usr/bin/passwd.(You must work with root privileges to make these changes.)

790 Chapter 22 NIS: Network Information Service
running with root privileges can change any user’s password (except that of root ora system account). A user can also use yppasswd to change his login shell andGECOS (page 1038) information if the yppasswdd daemon is set up to permit thesechanges. Refer to “yppasswdd: The NIS Password Update Daemon” on page 797for information on how to configure yppasswdd to permit users to change these val-ues. Use the –p option with yppasswd to change the password, –f to change GECOSinformation, and –l to change the login shell:
$ yppasswd -lChanging NIS account information for sam on plum.Please enter password:
To accept the default, simply press return. To use thesystem's default shell, type the word "none".Login shell [/bin/bash]: /bin/sh
The login shell has been changed on plum.
$ ypmatch sam passwdsam:x:1000:1000:Sam,,,,:/home/sam:/bin/sh
If yppasswd does not work and the server system is running a firewall, refer to “Fire-wall” on page 791.
Adding and Removing Users
There are several ways to add and remove users from the NIS passwd map. Thesimplest approach is to keep the /etc/passwd file on the NIS master server synchro-nized with the passwd map. You can keep these files synchronized by first makingchanges to the passwd file using standard tools such as adduser and deluser, or theirgraphical counterparts, and then running ypinit (page 795) to update the map.
Setting Up an NIS Server
This section explains how to set up an NIS server.
Prerequisites
Installation Decide on an NIS domain name (page 786) and install the following package:
• nis
nis init script When you install the nis package, the dpkg postinst script starts an NIS client. See“Install” on page 785 for information on how to start a server, a client, or both.The /etc/default/nis configuration file controls whether an NIS server starts as amaster or a slave (page 786). You may also want to specify the ports for the NISserver and yppasswdd to run on (see “Firewall,” below). After you configure theserver you can start, restart, or reload it with the nis init script:
$ sudo /etc/init.d/nis restart

Setting Up an NIS Server 791
Notes
An NIS client can run on the same system as an NIS server.
There must be only one master server for each domain.
You can run multiple NIS domain servers (for different domains) on a single system.
An NIS server serves the NIS domains listed in /var/yp. For a more secure system,remove the maps directories from /var/yp when disabling an NIS server.
Firewall The NIS server (ypserv) and the NIS password daemon (yppasswdd) use portmap(page 530) to choose which ports they accept queries on. The portmap serverhands out a random unused port below 1024 when a service, such as ypserv,requests a port. Having ypserv and yppasswdd use random port numbers makes itdifficult to set up a firewall on an NIS server. You can specify ports by editing theypserv and yppasswdd option lines in /etc/default/nis (choose any unused ports lessthan 1024):
YPSERVARGS='--port 114'...YPPASSWDDARGS='--port 112'
If the NIS server system is running a firewall, open the ports you specify. Using fire-starter (page 886), open these ports by setting two policies: one that allows serviceon each of these ports. If you follow the preceding example, allow service on ports114 and 112.
Step-by-Step Setup
This section lists the steps involved in setting up and starting an NIS server.
/etc/default/nis: Allows the NIS Server to Start
Edit the /etc/default/nis file as described on page 786 so that the nis init script startsthe NIS server. You can also specify ports for the NIS server and yppaswswdd to lis-ten on in this file; refer to “Firewall” on page 791.
Specify the System’s NIS Domain Name
Specify the system’s NIS domain name as explained on page 786. This step is takencare of when you install the nis package.
/etc/ypserv.conf: Configures the NIS Server
The /etc/ypserv.conf file, which holds NIS server configuration information, specifiesoptions and access rules. Option rules specify server options and have the followingformat:
option: value

792 Chapter 22 NIS: Network Information Service
Options
Following is a list of options and their default values:
files Specifies the maximum number of map files that ypserv caches. Set to 0 to turn offcaching. The default is 30.
trusted_master On a slave server, the name/IP address of the master server from which the slaveaccepts new maps. The default is no master server, meaning no new maps areaccepted.
xfer_check_port YES (default) requires the master server to run on a privileged port (page 1054).NO allows it to run on any port.
Access Rules
Access rules, which specify which hosts and domains can access which maps, havethe following format:
host:domain:map:security
where host and domain specify the IP address and NIS domain this rule applies to;map is the name of the map this rule applies to; and security is either none (alwaysallow access), port (allow access from a privileged port), or deny (never allow access).
The following lines appear in the ypserv.conf file supplied with Ubuntu Linux:
$ cat /etc/ypserv.conf...# This is the default - restrict access to the shadow password file,# allow access to all others.* : * : shadow.byname : port* : * : passwd.adjunct.byname : port* : * : * : none
These lines restrict the shadow.byname and passwd.adjunct.byname (the passwdmap with shadow [asterisk] entries) maps to access from ports numbered less than1024. However, anyone using a DOS or early Windows system on the network canread the maps because they can access ports numbered less than 1024. The last lineallows access to the other maps from any port on any host.
The following example describes a LAN with some addresses you want to grantNIS access from and some that you do not; perhaps you have a wireless segment orsome public network connections you do not want to expose to NIS. You can listthe systems or an IP subnet that you want to grant access to in ypserv.conf. Anyonelogging in on another IP address will then be denied NIS services. The following linefrom ypserv.conf grants access to anyone logging in from an IP address in the rangeof 192.168.0.1 to 192.168.0.255 (specified as 192.168.0.1 with a subnet mask[page 529] of /24):
$ cat /etc/ypserv.conf... 192.168.0.1/24 : * : * : none

Setting Up an NIS Server 793
/var/yp/securenets: Enhances Security
To enhance system security, you can create the /var/yp/securenets file, which pre-vents unauthorized systems from sending RPC requests to the NIS server andretrieving NIS maps. Notably securenets prevents unauthorized users from retriev-ing the shadow map, which contains encrypted passwords. When securenets doesnot exist or is empty, an NIS server accepts requests from any system.
Each line of securenets lists a netmask and IP address. NIS accepts requests fromsystems whose IP addresses are specified in securenets; it ignores and logs requestsfrom other addresses. You must include the (local) server system as localhost(127.0.0.1) in securenets. A simple securenets file follows:
$ cat /var/yp/securenets# you must accept requests from localhost255.255.255.255 127.0.0.1## accept requests from IP addresses 192.168.0.1 - 192.168.0.62255.255.255.192 192.168.0.0## accept requests from IP addresses starting with 192.168.14255.255.255.0 192.168.14.0
/var/yp/Makefile: Specifies Maps
The make utility, which is controlled by /var/yp/Makefile, uses makedbm to create theNIS maps that hold the information distributed by NIS. When you run ypinit (page 795)on the master server, ypinit calls make: You do not need to run make manually.
Edit /var/yp/Makefile to set options and specify which maps to create. The follow-ing sections discuss /var/yp/Makefile in more detail.
Variables
Following is a list of variables you can set in /var/yp/Makefile. The values followingUbuntu are the values set in the file distributed by Ubuntu.
B Do not change.
Ubuntu: not set
NOPUSH Specifies that ypserv is not to copy (push) maps to slave servers. Set to TRUE if youdo not have any slave NIS servers; set to FALSE to cause NIS to copy maps to slaveservers.
Ubuntu: TRUE
YPPUSHARGS Specifies arguments for yppush. See the yppush man page for more information.
Ubuntu: not set
MINUID,MINGID Specify the lowest UID and GID numbers, respectively, to include in NIS maps. In the
/etc/passwd and /etc/group files, lower ID numbers belong to root and systemaccounts and groups. To enhance security, NIS does not distribute password and group

794 Chapter 22 NIS: Network Information Service
information about these users and groups. Set MINUID to the lowest UID numberyou want to include in the NIS maps and set MINGID to the lowest GID number youwant to include.
Ubuntu: 1000/1000
NFSNOBODYUID,NFSNOBODYGID
Specify the UID and GID, respectively, of the user named nfsnobody. NIS does notexport values for this user. Set to 0 to export maps for nfsnobody.
Ubuntu: 65534/65534
MERGE_PASSWD,MERGE_GROUP
When set to TRUE, merge the /etc/shadow and /etc/passwd files and the/etc/gshadow and /etc/group files in the passwd and group maps, respectively,enabling shadow user passwords and group passwords.
Ubuntu: FALSE/FALSE
File Locations
The next sections of /var/yp/Makefile specify standard file locations; you do notnormally need to change these entries. This part of the makefile is broken into thefollowing groups:
Commands Locates awk (mawk) and make and sets a value for umask (page 526)Source directories Locates directories that contain NIS source filesNIS source files Locates NIS source files used to build the NIS databaseServers Locates the file that lists NIS servers
The ALL Target
The ALL target in /var/yp/Makefile specifies the maps that make is to build for NIS:
ALL = passwd group hosts rpc services netid protocols netgrp#ALL += publickey mail ethers bootparams printcap#ALL += amd.home auto.master auto.home auto.local#ALL += timezone locale networks netmasks
The first line of the ALL target lists the maps that make builds by default. This linestarts with the word ALL, followed by an equal sign and a TAB. The last three linesare commented out. Uncomment lines and delete or move map names until the listmatches your needs.
As your needs change, you can edit the ALL target in Makefile and run make in the/var/yp directory to modify the list of maps distributed by NIS.
Start the Servers
Restart the master server (page 785) and then the slave servers after completing thepreceding steps. On a master server, the nis init script starts the ypserv, yppasswdd,

Setting Up an NIS Server 795
and ypxfrd daemons. If you are running an NIS client on the local system, it alsostarts ypbind. On a slave server, the nis init script starts only the ypserv daemonand, optionally, the ypbind daemon.
When you start the master server before running ypinit (discussed in the next sec-tion), as you must do to avoid getting errors, it takes a long time to start asexplained in “No server” on page 785. After running ypinit, you must restart theserver (page 785).
ypxfrd: the mapserver
The ypxfrd daemon speeds up the process of copying large NIS databases from themaster server to slaves. It allows slaves to copy the maps, thereby avoiding the needfor each slave to copy the raw data and then compile the maps. When an NIS slavereceives a message from the server saying there is a new map, it starts ypxfr, whichreads the map from the server.
The ypxfrd daemon runs on the master server only; it is not necessary to run it onslave servers. For more information refer to “Prerequisites” on page 790.
ypinit: Builds or Imports the Maps
The ypinit utility builds or imports and then installs the NIS database. On the masterserver, ypinit gathers information from the passwd, group, hosts, networks, services,protocols, netgroup, and rpc files in /etc and builds the database. On a slave server,ypinit copies the database from the master server.
You must run ypinit by giving its absolute pathname (/usr/lib/yp/ypinit). Use the –moption to create the domain subdirectory under /var/yp and build the maps that goin it on the master server; use the –s master option on slave servers to import mapsfrom the master server named master. In the following example, ypinit asks for thename of each of the slave servers; it already has the name of the master serverbecause this command is run on the system running the master server (plum in theexample). Terminate the list with CONTROL-D on a line by itself. After you respond tothe query about the list of servers being correct, ypinit builds the ypservers map andcalls make with /var/yp/Makefile, which builds the maps specified in Makefile.
$ sudo /usr/lib/yp/ypinit -m
At this point, we have to construct a list of the hosts which will run NISservers. dog is in the list of NIS server hosts. Please continue to addthe names for the other hosts, one per line. When you are done with thelist, type a <control D>.next host to add: plumnext host to add:CONTROL-DThe current list of NIS servers looks like this:
plum
Is this correct? [y/n: y] yWe need a few minutes to build the databases...Building /var/yp/mgs/ypservers...Running /var/yp/Makefile...

796 Chapter 22 NIS: Network Information Service
make[1]: Entering directory '/var/yp/mgs'Updating passwd.byname...Updating passwd.byuid...Updating group.byname...Updating group.bygid...Updating hosts.byname...Updating hosts.byaddr...Updating rpc.byname...Updating rpc.bynumber...Updating services.byname...Updating services.byservicename...Updating netid.byname...Updating protocols.bynumber...Updating protocols.byname...Updating netgroup...Updating netgroup.byhost...Updating netgroup.byuser...Updating shadow.byname...make[1]: Leaving directory '/var/yp/mgs'
plum has been set up as a NIS master server.
Now you can run ypinit -s plum on all slave server.
After running ypinit, you must restart the server (page 785).
Testing
From the server, check that ypserv is connected to portmap:
$ rpcinfo -p | grep ypserv100004 2 udp 114 ypserv100004 1 udp 114 ypserv100004 2 tcp 114 ypserv100004 1 tcp 114 ypserv
Again from the server system, make sure the NIS server is up and running:
$ rpcinfo -u localhost ypservprogram 100004 version 1 ready and waitingprogram 100004 version 2 ready and waiting
If the server is not working properly, use the nis init script to stop the NIS server.Then start ypserv in the foreground with debugging turned on:
$ sudo /etc/init.d/nis stop
$ sudo /usr/sbin/ypserv --debug[ypserv (ypserv) 2.19]
If you are starting an NIS client, be sure to edit yp.conftip If you are starting ypbind (the NIS client) on the same system on which you are running ypserv
(the NIS server), you must edit /etc/yp.conf to specify a server as explained on page 787. If youdo not do so, the server will start properly but the client will take a long time to come up and willstart in broadcast mode. For more information refer to “No server” on page 785.
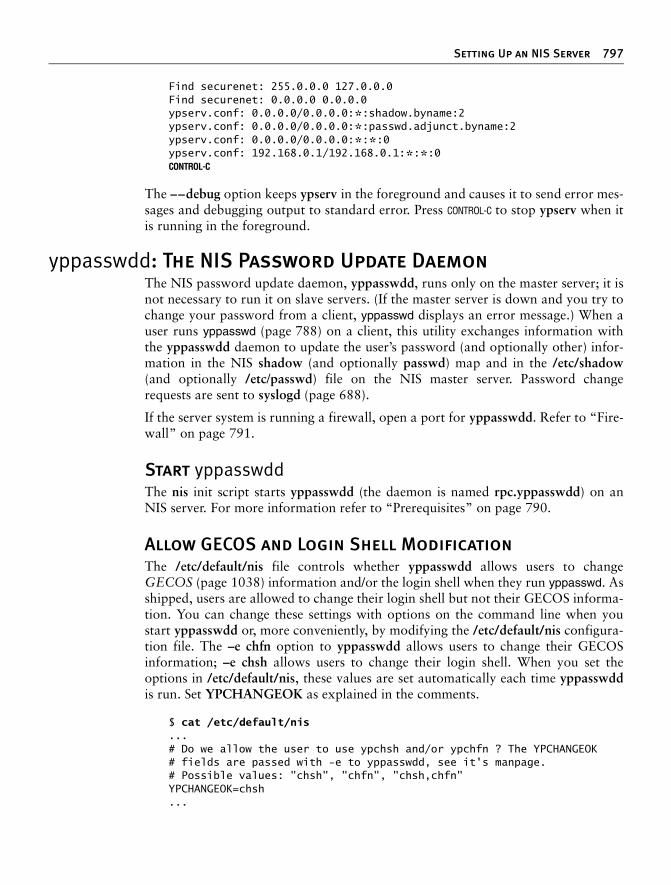
Setting Up an NIS Server 797
Find securenet: 255.0.0.0 127.0.0.0Find securenet: 0.0.0.0 0.0.0.0ypserv.conf: 0.0.0.0/0.0.0.0:*:shadow.byname:2ypserv.conf: 0.0.0.0/0.0.0.0:*:passwd.adjunct.byname:2ypserv.conf: 0.0.0.0/0.0.0.0:*:*:0ypserv.conf: 192.168.0.1/192.168.0.1:*:*:0CONTROL-C
The ––debug option keeps ypserv in the foreground and causes it to send error mes-sages and debugging output to standard error. Press CONTROL-C to stop ypserv when itis running in the foreground.
yppasswdd: The NIS Password Update Daemon
The NIS password update daemon, yppasswdd, runs only on the master server; it isnot necessary to run it on slave servers. (If the master server is down and you try tochange your password from a client, yppasswd displays an error message.) When auser runs yppasswd (page 788) on a client, this utility exchanges information withthe yppasswdd daemon to update the user’s password (and optionally other) infor-mation in the NIS shadow (and optionally passwd) map and in the /etc/shadow(and optionally /etc/passwd) file on the NIS master server. Password changerequests are sent to syslogd (page 688).
If the server system is running a firewall, open a port for yppasswdd. Refer to “Fire-wall” on page 791.
Start yppasswddThe nis init script starts yppasswdd (the daemon is named rpc.yppasswdd) on anNIS server. For more information refer to “Prerequisites” on page 790.
Allow GECOS and Login Shell Modification
The /etc/default/nis file controls whether yppasswdd allows users to changeGECOS (page 1038) information and/or the login shell when they run yppasswd. Asshipped, users are allowed to change their login shell but not their GECOS informa-tion. You can change these settings with options on the command line when youstart yppasswdd or, more conveniently, by modifying the /etc/default/nis configura-tion file. The –e chfn option to yppasswdd allows users to change their GECOSinformation; –e chsh allows users to change their login shell. When you set theoptions in /etc/default/nis, these values are set automatically each time yppasswddis run. Set YPCHANGEOK as explained in the comments.
$ cat /etc/default/nis...# Do we allow the user to use ypchsh and/or ypchfn ? The YPCHANGEOK# fields are passed with -e to yppasswdd, see it's manpage.# Possible values: "chsh", "chfn", "chsh,chfn"YPCHANGEOK=chsh...

798 Chapter 22 NIS: Network Information Service
Chapter Summary
NIS (Network Information Service) simplifies the management of common adminis-trative files by maintaining them in a central database and having clients contact thedatabase server to retrieve information from the database. The network that NISserves is called an NIS domain. Each NIS domain has one master server; larger net-works may have slave servers.
NIS derives the information it offers from local configuration files, such as/etc/passwd and /etc/hosts. These files are called source files or master files. BeforeNIS can store the information contained in a source file, it must be converted todbm-format files, called maps. The ypcat and ypmatch utilities display informationfrom NIS maps.
The yppasswd utility replaces the functionality of passwd on clients when you useNIS to authenticate passwords. The /etc/ypserv.conf file, which holds NIS serverconfiguration information, specifies options and access rules for the NIS server. Toenhance system security, you can create a /var/yp/securenets file, which preventsunauthorized systems from retrieving NIS maps.
Exercises
1. What is the difference between the passwd and yppasswd utilities?
2. How would you prevent NIS from exporting the root user and other sys-tem users to clients?
3. How would you make NIS user information override local user informa-tion on client systems?
4. Why does the /etc/passwd file need two NIS maps?
Advanced Exercises
5. How can you use NIS to mirror the functionality of a private DNS server for a small network? Why should NIS not be used this way on a large network?
6. How can you find out if the working directory is the home directory of an NIS user?
7. What advantage does NIS provide when you use it with NFS?
8. Suggest a way to implement NIS maps so they can be indexed on more than one field.

799799
23Chapter23The NFS (Network Filesystem) protocol, a UNIX de facto stan-dard developed by Sun Microsystems, allows a server to shareselected local directory hierarchies with client systems on a heter-ogeneous network. NFS runs on UNIX, DOS, Windows, VMS,Linux, and more. Files on the remote computer (the fileserver)appear as if they are present on the local system (the client). Mostof the time, the physical location of a file is irrelevant to an NFSuser; all standard Linux utilities work with NFS remote files thesame way as they operate with local files.
NFS reduces storage needs and system administration workload.As an example, each system in a company traditionally holds itsown copy of an application program. To upgrade the program, theadministrator needs to upgrade it on each system. NFS allows youto store a copy of a program on a single system and give other usersaccess to it over the network. This scenario minimizes storagerequirements by reducing the number of locations that need tomaintain the same data. In addition to boosting efficiency, NFSgives users on the network access to the same data (not just applica-tion programs), thereby improving data consistency and reliability.By consolidating data, it reduces administrative overhead and pro-vides a convenience to users. This chapter covers NFSv3.
In This Chapter
Setting Up an NFS Client . . . . . . . 802
JumpStart I: Mounting a Remote Directory Hierarchy . . . . . . . . . . 803
Improving Performance . . . . . . . . 806
Setting Up an NFS Server . . . . . . . 808
JumpStart II: Configuring an NFS Server Using shares-admin. . . . 809
Manually Exporting a Directory Hierarchy . . . . . . . . . . . . . . . . . . 811
automount: Mounts Directory Hierarchies on Demand. . . . . . . 818
23
NFS: Sharing
Filesystems

800 Chapter 23 NFS: Sharing Filesystems
Introduction
Figure 23-1 shows the flow of data in a typical NFS client/server setup. An NFSdirectory hierarchy appears to users and application programs as just another direc-tory hierarchy. By looking at it, you cannot tell that a given directory holds aremotely mounted NFS directory hierarchy and not a local filesystem. The NFSserver translates commands from the client into operations on the server’s filesystem.
Diskless systems In many computer facilities, user files are stored on a central fileserver equippedwith many large-capacity disk drives and devices that quickly and easily makebackup copies of the data. A diskless system boots from a fileserver (netboots—discussed next) or a CD/DVD and loads system software from a fileserver. TheLinux Terminal Server Project (LTSP.org) Web site says it all: “Linux makes a greatplatform for deploying diskless workstations that boot from a network server. TheLTSP is all about running thin client computers in a Linux environment.” Becausea diskless workstation does not require a lot of computing power, you can giveolder, retired computers a second life by using them as diskless systems.
Netboot/PXE You can netboot (page 1049) systems that are appropriately set up. Ubuntu Linuxincludes the PXE (Preboot Execution Environment; pxe package) server package fornetbooting Intel systems. Older systems sometimes use tftp (Trivial File Transfer Pro-tocol; tftp and tftpd packages) for netbooting. Non-Intel architectures have histori-cally included netboot capabilities, which Ubuntu Linux also supports. In addition,you can build the Linux kernel so it mounts root (/) using NFS. Given the manyways to set up a system, the one you choose depends on what you want to do. Seethe Remote-Boot mini-HOWTO for more information.
Dataless systems Another type of Linux system is a dataless system, in which the client has a disk butstores no user data (only Linux and the applications are kept on the disk). Settingup this type of system is a matter of choosing which directory hierarchies aremounted remotely.
df: shows wheredirectory hierarchies
are mounted
The df utility displays a list of the directory hierarchies available on the system,along with the amount of disk space, free and used, on each. The –h (human)option makes the output more intelligible. Directory hierarchy names in the left col-umn that are prepended with hostname: are available through NFS.
zach@plum:~$ cd;pwd/dog.home/zachzach@plum:~$ df -hFilesystem Size Used Avail Use% Mounted on/dev/hda1 28G 8.9G 18G 35% /.../dev/hda2 28G 220M 26G 1% /home/dev/hda5 9.2G 150M 8.6G 2% /pl5/dev/hda6 1.4G 35M 1.3G 3% /pl6dog:/home/zach 19G 6.7G 11G 39% /dog.home/zachgrape:/gc1 985M 92M 844M 10% /grape.gc1grape:/gc5 3.9G 3.0G 738M 81% /grape.gc5

Introduction 801
In the preceding example, Zach’s home directory, /home/zach, is on the remote sys-tem dog. Using NFS, the /home/zach directory hierarchy on dog is mounted on plum;to make it easy to recognize, it is mounted as /dog.home/zach. The /gc1 and /gc5filesystems on grape are mounted on plum as /grape.gc1 and /grape.gc5, respectively.
You can use the –T option to df to add a Type column to the display. The followingcommand uses –t nfs to display NFS filesystems only:
zach@plum:~$ df -ht nfsFilesystem Size Used Avail Use% Mounted ondog:/home/zach 19G 6.7G 11G 39% /dog.home/zachgrape:/gc1 985M 92M 844M 10% /grape.gc1grape:/gc5 3.9G 3.0G 738M 81% /grape.gc5
Errors Sometimes a client may lose access to files on an NFS server. For example, a networkproblem or a remote system crash may make these files temporarily unavailable. If youtry to access a remote file in these circumstances, you will get an error message, such as
Figure 23-1 Flow of data in a typical NFS client/server setup
Other FSNFS client
Network
types (devfs,procfs, ...)
Disk FS(ext3, ...)
User
NFS serverDisk FS(ext3, ...)
Filesysteminterface
Other FStypes (devfs,
procfs, ...)
Client Server
Disk Disk
Filesysteminterface

802 Chapter 23 NFS: Sharing Filesystems
NFS server dog not responding. When the local system can contact the remote serveragain, NFS will display another message, such as NFS server dog OK. A stable net-work and server (or not using NFS) is the best defense against this problem.
Security NFS is based on the trusted-host paradigm (page 372), so it has all the securityshortcomings that plague other services based on this paradigm. In addition, NFS isnot encrypted. Because of these issues, you should implement NFS on a single LANsegment only, where you can be (reasonably) sure systems on the LAN segment arewhat they claim to be. Make sure a firewall blocks NFS traffic from outside theLAN and never use NFS over the Internet. To improve security, make sure UIDs andGIDs are the same on the server and clients (page 814).
NFSv4 NFSv4 addresses many of these security issues, including the problem of users hav-ing different UIDs on different systems (NFSv4 uses usernames, not UID numbers).The new version of NFS adds Kerberos authentication, provides for encrypted filetransfers, and increases WAN performance.
More Information
Web Good information on NFS, including the Linux NFS-HOWTO nfs.sourceforge.netRunning NFS behind a firewall wiki.debian.org/?SecuringNFS
Local exportfs, exports, nfs (provides fstab information), rpc.idmapd, rpc.mountd,rpc.nfsd, and showmount man pages
HOWTO Linux NFS-HOWTO nfs.sourceforge.netNetboot and PXE Remote-Boot mini-HOWTO
Book NFS Illustrated by Callaghan, Addison-Wesley (December 1999)
Setting Up an NFS Client
This section describes how to set up an NFS client, mount remote directory hierar-chies, and improve NFS performance.
Prerequisites
Installation Install the following package:
• nfs-common
portmap The portmap utility (which is part of the portmap package and is installed as adependency when you install nfs-common; page 388) must be running to enablereliable file locking.
nfs-common initscript
When you install the nfs-common package, the dpkg postinst script starts the dae-mons that an NFS client requires (not all daemons are always required): rpc.statd,

Setting Up an NFS Client 803
rpc.lockd (does not run but starts the NFS lock manager if necessary), rpc.idmapd,and rpc.gssd. You do not normally need to restart any of these daemons.
JumpStart I: Mounting a Remote Directory Hierarchy
To set up an NFS client, mount the remote directory hierarchy the same way you mounta local directory hierarchy (page 572). The following sections explain this process.
mount: Mounts a Remote Directory Hierarchy
The following examples show two ways to mount a remote directory hierarchy,assuming dog is on the same network as the local system and is sharing /home and/export with the local system. The /export directory on dog holds two directoryhierarchies you want to mount: /export/progs and /export/oracle. The examplemounts dog’s /home directory on /dog.home on the local system, /export/progs on/apps, and /export/oracle on /oracle.
First run mkdir on the local (client) system to create the directories that are themount points for the remote directory hierarchies:
$ sudo mkdir /dog.home /apps /oracle
You can mount any directory hierarchy from an exported directory hierarchy. Inthis example, dog exports /export and the local system mounts /export/progs and/export/oracle. The following commands manually mount the directory hierarchiesone time:
$ sudo mount dog:/home /dog.home$ sudo mount -o ro,nosuid dog:/export/progs /apps$ sudo mount -o ro dog:/export/oracle /oracle
If you receive the error mount: RPC: Program not registered, it may mean NFS isnot running on the server.
By default, directory hierarchies are mounted read-write, assuming the NFS serveris exporting them with read-write permissions. The first of the preceding commandsmounts the /home directory hierarchy from dog on the local directory /dog.home.The second and third commands use the –o ro option to force a readonly mount.The second command adds the nosuid option, which forces setuid (page 201) exe-cutables in the mounted directory hierarchy to run with regular permissions on thelocal system.
nosuid option If a user has the ability to run a setuid program, that user has the power of a userwith root privileges. This ability should be limited. Unless you know a user willneed to run a program with setuid permissions from a mounted directory hierarchy,always mount a directory hierarchy with the nosuid option. For example, youwould need to mount a directory hierarchy with setuid privileges when the root par-tition of a diskless workstation is mounted using NFS.
nodev option Mounting a device file creates another potential security hole. Although the bestpolicy is not to mount untrustworthy directory hierarchies, it is not always possible

804 Chapter 23 NFS: Sharing Filesystems
to implement this policy. Unless a user needs to use a device on a mounted directoryhierarchy, mount directory hierarchies with the nodev option, which prevents char-acter and block special files (page 569) on the mounted directory hierarchy frombeing used as devices.
fstab file If you mount directory hierarchies frequently, you can add entries for the directoryhierarchies to the /etc/fstab file (page 807). (Alternatively, you can use automount;see page 818.) The following /etc/fstab entries automatically mount the same direc-tory hierarchies as in the previous example at the same time that the system mountsthe local filesystems:
$ cat /etc/fstab...dog:/home /dog.home nfs rw 0 0dog:/export/progs /apps nfs ro,nosuid 0 0dog:/export/oracle /oracle nfs ro 0 0
A file mounted using NFS is always of type nfs on the local system, regardless ofwhat type it is on the remote system. Typically you do not run fsck on or back up anNFS directory hierarchy. The entries in the third, fifth, and sixth columns of fstabare usually nfs (filesystem type), 0 (do not back up this directory hierarchy withdump [page 666]), and 0 (do not run fsck [page 577] on this directory hierarchy).The options for mounting an NFS directory hierarchy differ from those for mount-ing an ext3 or other type of filesystem. See the section on mount (below) for details.
umount: Unmounts a Remote Directory Hierarchy
Use umount to unmount a remote directory hierarchy the same way you unmount alocal filesystem (page 575).
mount: Mounts a Directory Hierarchy
The mount utility (page 572) associates a directory hierarchy with a mount point (adirectory). You can use mount to mount an NFS (remote) directory hierarchy. Thissection describes some mount options. It lists default options first, followed by non-default options (enclosed in parentheses). You can use these options on the commandline or set them in /etc/fstab (page 807). For a complete list of options, refer to themount and nfs man pages.
Attribute Caching
A file’s inode (page 566) stores file attributes that provide information about a file,such as file modification time, size, links, and owner. File attributes do not includethe data stored in a file. Typically file attributes do not change very often for anordinary file; they change even less often for a directory file. Even the size attributedoes not change with every write instruction: When a client is writing to an NFS-mounted file, several write instructions may be given before the data is transferredto the server. In addition, many file accesses, such as that performed by ls, are read-only operations and, therefore, do not change the file’s attributes or its contents.Thus a client can cache attributes and avoid costly network reads.

Setting Up an NFS Client 805
The kernel uses the modification time of the file to determine when its cache is out-of-date. If the time the attribute cache was saved is later than the modification timeof the file itself, the data in the cache is current. The server must periodically refreshthe attribute cache of an NFS-mounted file to determine whether another processhas modified the file. This period is specified as a minimum and maximum numberof seconds for ordinary and directory files. Following is a list of options that affectattribute caching:
ac (noac) (attribute cache) Permits attribute caching (default). The noac option disablesattribute caching. Although noac slows the server, it avoids stale attributes whentwo NFS clients actively write to a common directory hierarchy.
acdirmax=n (attribute cache directory file maximum) The n is the number of seconds, at a maxi-mum, that NFS waits before refreshing directory file attributes (default is 60 seconds).
acdirmin=n (attribute cache directory file minimum) The n is the number of seconds, at a mini-mum, that NFS waits before refreshing directory file attributes (default is 30 seconds).
acregmax=n (attribute cache regular file maximum) The n is the number of seconds, at a maxi-mum, that NFS waits before refreshing regular file attributes (default is 60 seconds).
acregmin=n (attribute cache regular file minimum) The n is the number of seconds, at a mini-mum, that NFS waits before refreshing regular file attributes (default is 3 seconds).
actimeo=n (attribute cache timeout) Sets acregmin, acregmax, acdirmin, and acdirmax to n sec-onds (without this option, each individual option takes on its assigned or default value).
Error Handling
The following options control what NFS does when the server does not respond orwhen an I/O error occurs. To allow for a mount point located on a mounted device,a missing mount point is treated as a timeout.
fg (bg) (foreground) Retries failed NFS mount attempts in the foreground (default). The bg(background) option retries failed NFS mount attempts in the background.
hard (soft) Displays server not responding on the console on a major timeout and keeps retry-ing (default). The soft option reports an I/O error to the calling program on a majortimeout. In general, it is not advisable to use soft. As the mount man page says ofsoft, “Usually it just causes lots of trouble.” For more information refer to“Improving Performance” on page 806.
nointr (intr) (no interrupt) Does not allow a signal to interrupt a file operation on a hard-mounted directory hierarchy when a major timeout (see retrans) occurs (default).The intr option allows this type of interrupt.
retrans=n (retransmission value) After n minor timeouts, NFS generates a major timeout(default is 3). A major timeout aborts the operation or displays server not respond-ing on the console, depending on whether hard or soft is set.
retry=n (retry value) The number of minutes that NFS retries a mount operation before giv-ing up (default is 10,000).

806 Chapter 23 NFS: Sharing Filesystems
timeo=n (timeout value) The n is the number of tenths of a second that NFS waits beforeretransmitting following an RPC, or minor, timeout (default is 7). The value isincreased at each timeout to a maximum of 60 seconds or until a major timeoutoccurs (see retrans). On a busy network, in case of a slow server, or when therequest passes through multiple routers, increasing this value may improve perfor-mance. See “Timeouts” on page 806 for more information.
Miscellaneous Options
Following are additional useful options:
lock (nolock) Permits NFS locking (default). The nolock option disables NFS locking (does not startthe lockd daemon) and is useful with older servers that do not support NFS locking.
nodev (no device) Causes mounted device files not to function as devices (page 803).
port=n The port used to connect to the NFS server (defaults to 2049 if the NFS daemon isnot registered with portmap). When n is set to 0 (default), NFS queries portmap onthe server to determine the port.
rsize=n (read block size) The number of bytes read at one time from an NFS server. Thedefault block size is 4096. Refer to “Improving Performance.”
wsize=n (write block size) The number of bytes written at one time to an NFS server. Thedefault block size is 4096. Refer to “Improving Performance.”
tcp Uses TCP in place of the default UDP protocol for an NFS mount. This option mayimprove performance on a congested network; however, some NFS servers supportUDP only.
udp Uses the default UDP protocol for an NFS mount.
Improving Performance
hard/soft Several parameters can affect the performance of NFS, especially over slow connec-tions such as a line with a lot of traffic or a line controlled by a modem. If you havea slow connection, make sure hard (page 805) is set (this setting is the default) sothat timeouts do not abort program execution.
Block size One of the easiest ways to improve NFS performance is to increase the blocksize—that is, the number of bytes NFS transfers at a time. The default of 4096 islow for a fast connection using modern hardware. Try increasing rsize and wsize to8192 or higher. Experiment until you find the optimal block size. Unmount andmount the directory hierarchy each time you change an option. See the Linux NFS-HOWTO for more information on testing different block sizes.
Timeouts NFS waits the amount of time specified by the timeo (timeout, page 806) option fora response to a transmission. If it does not receive a response in this amount of time,NFS sends another transmission. The second transmission uses bandwidth that,over a slow connection, may slow things down even more. You may be able toincrease performance by increasing timeo.

Setting Up an NFS Client 807
The default value of timeo is seven-tenths of a second (700 milliseconds). After atimeout, NFS doubles the time it waits to 1400 milliseconds. On each timeout itdoubles the amount of time it waits to a maximum of 60 seconds. You can test thespeed of a connection with the size of packets you are sending (rsize and wsize) byusing ping with the –s (size) option:
$ ping -s 4096 dogPING dog (192.168.0.12) 4096(4124) bytes of data.4104 bytes from dog (192.168.0.12): icmp_seq=1 ttl=64 time=0.823 ms4104 bytes from dog (192.168.0.12): icmp_seq=2 ttl=64 time=0.814 ms4104 bytes from dog (192.168.0.12): icmp_seq=3 ttl=64 time=0.810 ms...4104 bytes from dog (192.168.0.12): icmp_seq=28 ttl=64 time=0.802 ms4104 bytes from dog (192.168.0.12): icmp_seq=29 ttl=64 time=0.802 ms4104 bytes from dog (192.168.0.12): icmp_seq=30 ttl=64 time=0.801 ms
--- dog.bogus.com ping statistics ---30 packets transmitted, 30 received, 0% packet loss, time 28999msrtt min/avg/max/mdev = 0.797/0.803/0.823/0.020 ms
The preceding example uses Ubuntu Linux’s default packet size of 4096 bytes andshows a fast average packet round-trip time of slightly less than 1 millisecond. Overa modem line, you can expect times of several seconds. If the connection is dealingwith other traffic, the time will be even longer. Run the test during a period of heavytraffic. Try increasing timeo to three or four times the average round-trip time (toallow for unusually bad network conditions, such as when the connection is made)and see whether performance improves. Remember that the timeo value is given intenths of a second (100 milliseconds = one-tenth of a second).
/etc/fstab: Mounts Directory Hierarchies Automatically
The /etc/fstab file (page 576) lists directory hierarchies that the system mountsautomatically as it comes up. You can use the options discussed in the precedingsections on the command line or in the fstab file.
The following line from fstab mounts grape’s /gc1 filesystem on the /grape.gc1mount point:
grape:/gc1 /grape.gc1 nfs rsize=8192,wsize=8192 0 0
A mount point should be an empty, local directory. (Files in a mount point are hid-den when a directory hierarchy is mounted on it.) The type of a filesystem mountedusing NFS is always nfs, regardless of its type on its local system. You can increasethe rsize and wsize options to improve performance. Refer to “Improving Perfor-mance” on page 806.
The next example from fstab mounts a filesystem from dog:
dog:/export /dog.export nfs timeo=50,hard 0 0
808 Chapter 23 NFS: Sharing Filesystems
Because the local system connects to dog over a slow connection, timeo is increasedto 5 seconds (50-tenths of a second). Refer to “Timeouts” on page 806. In addition,hard is set to make sure NFS keeps trying to communicate with the server after amajor timeout. Refer to “hard/soft” on page 806.
The final example from fstab shows a remote-mounted home directory. Because dog isa local server and is connected via a reliable, high-speed connection, timeo is decreasedand rsize and wsize are increased substantially:
dog:/home /dog.home nfs timeo=4,rsize=16384,wsize=16384 0 0
Setting Up an NFS Server
Prerequisites
Installation Install the following package:
• nfs-kernel-server
portmap The portmap utility (which is part of the portmap package and is installed as adependency when you install nfs-kernel-server; page 388) must be running to enablereliable file locking.
nfs-kernel-serverinit script
When you install the nfs-kernel-server package, the dpkg postinst script starts thenfsd (the NFS kernel) daemon. After you configure NFS, call the nfs-kernel-serverinit script to reexport directory hierarchies and restart the nfsd daemon:
$ sudo /etc/init.d/nfs-kernel-server restart * Stopping NFS kernel daemon [ OK ] * Unexporting directories for NFS kernel daemon... [ OK ] * Exporting directories for NFS kernel daemon... [ OK ] * Starting NFS kernel daemon [ OK ]
After changing the NFS configuration on an active server, use reload in place of restartto reexport directory hierarchies without disturbing clients connected to the server.
Notes
Firewall An NFS server normally uses TCP port 111 for portmap and TCP port 2049 fornfsd. In addition, unless you instruct it otherwise, the NFS server uses portmap toassign (almost) random ports for the services it provides: rpc.statd, rpc.mountd,and (optionally) rpc.quotad. It is difficult to set up a firewall to protect a serverfrom queries from random ports; it is much easier to specify which port each ofthese services uses. To specify the ports that NFS services use, modify the lines inthe following files as shown:
$ grep STATD /etc/default/nfs-commonSTATDOPTS="--port 32765 --outgoing-port 32766"
$ grep MOUNTD /etc/default/nfs-kernel-serverRPCMOUNTDOPTS="-p 32767"

Setting Up an NFS Server 809
$ grep QUOTAD /etc/default/quotaRPCQUOTADOPTS="-p 32769"
If you are not running rpc.quotad, you do not need to create or modify the quota file.The ports used in the example are the ones suggested in the Linux NFS-HOWTO,but you can use any unused ports you like. See wiki.debian.org/?SecuringNFS formore information.
If the NFS server system is running a firewall, you need to open ports 111 and2049. To do so, use firestarter (page 886) to set a policy that allows NFS service. Inaddition, open the ports you specified in the files in /etc/default, as explained ear-lier. Because firestarter has no defined policy for these ports, you need to specify theports manually when you add a rule in firestarter.
Security The rpc.mountd daemon uses TCP wrappers to control client access to the server.As explained on page 532, you can set up /etc/hosts.allow and /etc/hosts.deny filesto specify which clients can contact rpc.mountd on the server and thereby use NFS.The name of the daemon to use in these files is mountd.
JumpStart II: Configuring an NFS Server
Using shares-adminThe Shared Folders window (Figure 23-2) enables the local system to share direc-tory hierarchies using Samba (Chapter 24) and/or NFS. To display this window,select Main menu: System Administration Shared Folders or give the commandgksudo shares-admin from a terminal emulator or Run Application window (ALT-F2).
As part of the process of setting up an NFS server, the Shared Folders window mod-ifies the /etc/exports file. If the system is running a firewall, see “Firewall” onpage 808. The shares-admin utility allows you to specify which directory hierarchiesyou want to share and how they are shared using NFS. Each exported hierarchy iscalled a share—terminology that is borrowed from Samba.
Figure 23-2 Shared Folders window

810 Chapter 23 NFS: Sharing Filesystems
To add a share, click Add, which displays the Share Folder window (Figure 23-3).This window has two sections: Shared Folder and Allowed Hosts. In the first section,choose the pathname of the directory hierarchy you want to share from the list boxlabeled Path. If the directory you want is not listed, click Other; then double-clickFile System in the Places column and double-click the directory you want in theName column. Continue selecting directories in the Name column until the buttonsat the top of the window display the pathname of the directory hierarchy you wantto share. Click Open to select the directory hierarchy. Then select Unix networks(NFS) from the list box labeled Share through.
In the Allowed Hosts section of the Share Folder window, click Add to display theAdd Allowed Hosts window (Figure 23-4). Select Specify hostname, Specify IPaddress, or Specify network from the list box labeled Allowed hosts and specify thesystem in the text box labeled IP address. Put a tick in the check box labeled Readonly if you do not want users on the remote system to be able to write to themounted directory hierarchy. Click OK. The shares-admin utility stores this infor-mation in /etc/exports. Click Add and repeat this process for each system you wantto be able to access the directory hierarchy specified in the list box labeled Path.Click OK.
To modify a share, highlight the object representing the share in the Shared Folderswindow and click Properties, or double-click the object. The shares-admin utilitydisplays the Settings for Folder share-name window. To modify an existing host,you must delete it from the Allowed Hosts list and then add it again. Make thechanges you want and click OK.
To remove a share, highlight the object representing the share in the Shared Folderswindow and click Delete.
Click Close when you are finished setting up shares. There is no need to restart anydaemons. After running shares-admin, give the following command from a terminalemulator:
$ sudo exportfs -r
Figure 23-3 The Share Folder window

Setting Up an NFS Server 811
You can ignore error messages that refer to subtree_check. For more information onthis parameter, see page 813.
Give the command exportfs without any options to display a list of exported direc-tory hierarchies and the systems each is exported to:
$ exportfs/pl6 192.168.0.12
See page 817 for more information on exportfs.
Manually Exporting a Directory Hierarchy
Exporting a directory hierarchy makes the directory hierarchy available for mountingby designated systems via a network. “Exported” does not mean “mounted”: When adirectory hierarchy is exported, it is placed in the list of directory hierarchies that canbe mounted by other systems. An exported directory hierarchy may be mounted (ornot) at any given time.
A mounted directory hierarchy whose mount point is within an exported partitionis not exported with the exported partition. You need to explicitly export eachdirectory hierarchy you want exported, even if it resides within an already exporteddirectory hierarchy. For example, assume two directory hierarchies, /opt/apps and/opt/apps/oracle, reside on two partitions. You must export each directory hierar-chy explicitly, even though oracle is a subdirectory of apps. Most other subdirecto-ries and files are exported automatically.
Figure 23-4 The Add Allowed Hosts window
Exporting symbolic links and device filestip When you export a directory hierarchy that contains a symbolic link, make sure the object of the
link is available on the client (remote) system. If the object of the link does not exist on a clientsystem, you must export and mount it along with the exported link. Otherwise, the link will notpoint to the same file it points to on the server.
A device file refers to a Linux kernel interface. When you export a device file, you export that inter-face. If the client system does not have the same type of device available, the exported device willnot work. To improve security on a client, you can use mount’s nodev option (page 803) to pre-vent device files on mounted directory hierarchies from being used as devices.

812 Chapter 23 NFS: Sharing Filesystems
/etc/exports: Holds a List of Exported
Directory Hierarchies
The /etc/exports file is the access control list for exported directory hierarchies thatNFS clients can mount; it is the only file you need to edit to set up an NFS server.The exportfs utility (page 817) reads this file when it updates the files in /var/lib/nfs(page 815), which the kernel uses to keep its mount table current. The exports filecontrols the following NFS characteristics:
• Which clients can access the server (see also “Security” on page 802)
• Which directory hierarchies on the server each client can access
• How each client can access each directory hierarchy
• How client usernames are mapped to server usernames
• Various NFS parameters
Each line in the exports file has the following format:
export-point client1(option-list) [client2(option-list) ... ]
where export-point is the absolute pathname of the root directory of the directoryhierarchy to be exported. The client1-n are the names or IP addresses of one ormore clients, separated by SPACEs, that are allowed to mount the export-point. Theoption-list, described in the next section, is a comma-separated list of options thatapplies to the preceding client; it must not contain any SPACEs. There must not be anySPACE between each client name and the open parenthesis that starts the option-list.
You can either use shares-admin (page 809) to make changes to exports or edit thisfile manually. The following exports file gives grape read and write access to /home,and jam and the system at 192.168.0.12 read and write access to /pl6:
$ cat /etc/exports/home grape(rw,no_subtree_check) /pl6 192.168.0.12(rw,no_subtree_check) jam(rw,no_subtree_check)
The specified directories are on the local server. In each case, access is implicitlygranted for the directory hierarchy rooted at the exported directory. You can specifyIP addresses or hostnames and you can specify more than one client system on aline. By default, directory hierarchies are exported in readonly mode. The currentversion of exportfs complains when you do not specify either subtree_check orno_subtree_check (page 813).
General Options
The left column of this section lists default options, followed by nondefault optionsenclosed in parentheses. Refer to the exports man page for more information.
auth_nlm (no_auth_nlm) or secure_locks (insecure_locks)Causes the server to require authentication of lock requests (using the NLM [NFSLock Manager] protocol). Use no_auth_nlm for older clients when you find thatonly files that anyone can read can be locked.

Setting Up an NFS Server 813
mountpoint[=path]Allows a directory to be exported only if it has been mounted. This option preventsa mount point that does not have a directory hierarchy mounted on it from beingexported and prevents the underlying mount point from being exported. Also mp.
nohide (hide) When a server exports two directory hierarchies, one of which is mounted on theother, a client has to mount both directory hierarchies explicitly to access both.When the second (child) directory hierarchy is not explicitly mounted, its mountpoint appears as an empty directory and the directory hierarchy is hidden. Thenohide option causes the underlying second directory hierarchy to appear when it isnot explicitly mounted, but this option does not work in all cases.
ro (rw) (readonly) Permits only read requests on an NFS directory hierarchy. Use rw to per-mit read and write requests.
secure (insecure) Requires NFS requests to originate on a privileged port (page 1054) so a programrunning without root privileges cannot mount a directory hierarchy. This optiondoes not guarantee a secure connection.
no_subtree_check (subtree_check)Checks subtrees for valid files. Assume you have an exported directory hierarchythat has its root below the root of the filesystem that holds it (that is, an exportedsubdirectory of a filesystem). When the NFS server receives a request for a file inthat directory hierarchy, it performs a subtree check to confirm the file is in theexported directory hierarchy.
Subtree checking can cause problems with files that are renamed while opened and,when no_root_squash is used, files that only a process running with root privilegescan access. The no_subtree_check option disables subtree checking and can improvereliability in some cases.
For example, you may need to disable subtree checking for home directories. Homedirectories are frequently subtrees (of /home), are written to often, and can have fileswithin them frequently renamed. You would probably not need to disable subtreechecking for directory hierarchies that contain files that are mostly read, such as /usr.
Because the default has changed (it is now no_subtree_check), exportfs displays awarning when you do not specify either subtree_check or no_subtree_check.
sync (async) (synchronize) Specifies that the server should reply to requests only after diskchanges made by the request are written to disk. The async option specifies that theserver does not have to wait for information to be written to disk and can improveperformance, albeit at the cost of possible data corruption if the server crashes orthe connection is interrupted.
wdelay(no_wdelay)
(write delay) Causes the server to delay committing write requests when it antici-pates that another, related request will follow, thereby improving performance bycommitting multiple write requests within a single operation. The no_wdelayoption does not delay committing write requests and can improve performancewhen the server receives multiple, small, unrelated requests.

814 Chapter 23 NFS: Sharing Filesystems
User ID Mapping Options
Each user has a UID number and a primary GID number on the local system. Thelocal /etc/passwd and /etc/group files may map these numbers to names. When auser makes a request of an NFS server, the server uses these numbers to identify theuser on the remote system, raising several issues:
• The user may not have the same ID numbers on both systems. As a conse-quence, the user may have owner access to files of another user and not have owner access to his own files (see “NIS and NFS” for a solution).
• You may not want a user with root privileges on the client system to have owner access to root-owned files on the server.
• You may not want a remote user to have owner access to some important system files that are not owned by root (such as those owned by bin).
Owner access to a file means that the remote user can execute or—worse—modifythe file. NFS gives you two ways to deal with these cases:
• You can use the root_squash option to map the ID number of the rootaccount on a client to UID 65534 on the server.
• You can use the all-squash option to map all NFS users on the client to UID 65534 on the server.
Use the anonuid and anongid options to override these values.
NIS and NFS When you use NIS (page 781) for user authorization, users automatically have thesame UIDs on both systems. If you are using NFS on a large network, it is a goodidea to use a directory service such as LDAP (page 1044) or NIS for authorization.Without such a service, you must synchronize the passwd files on all the systemsmanually.
root_squash (no_root_squash)Maps requests from root on a remote system so they appear to come from the UID65534, an unprivileged user on the local system, or as specified by anonuid. Thisoption does not affect other sensitive UIDs such as bin. The no_root_squash optionturns off this mapping so that requests from root appear to come from root.
Critical files in NFS-mounted directories should be owned by rootsecurity Despite the mapping done by the root-squash option, a user with root privileges on a client system
can use sudo or su to assume the identity of any user on the system and then access that user’sfiles on the server. Thus, without resorting to all-squash, you can protect only files owned by rooton an NFS server. Make sure that root—and not bin or another user—owns and is the only userwho can modify or delete critical files within any NFS-mounted directory hierarchy.
Taking this precaution does not completely protect the system against an attacker with root priv-ileges, but it can help thwart an attack from a less experienced malicious user.

Setting Up an NFS Server 815
no_all_squash(all_squash)
Does not change the mapping of users making requests of the NFS server. Theall_squash option maps requests from all users—not just root—on remote systemsto appear to come from the UID 65534, an unprivileged user on the local system, oras specified by anonuid. This option is useful for controlling access to exportedpublic FTP, news, and other directories.
anonuid=un andanongid=gn
Set the UID or the GID of the anonymous account to un or gn, respectively. NFSuses these accounts when it does not recognize an incoming UID or GID and whenit is instructed to do so by root_squash or all_squash.
Where the System Keeps NFS Mount Information
A server holds several lists of directory hierarchies it can export. The list that you asa system administrator work with is /etc/exports. The following discussion assumesthat the local server, plum, is exporting these directory hierarchies:
$ cat /etc/exports/home grape(rw,no_subtree_check) /pl6 192.168.0.12(rw,no_subtree_check) jam(rw,no_subtree_check)
As explained in more detail on page 817, exportfs displays the list of exported direc-tory hierarchies:
$ exportfs/home grape/pl6 jam/pl6 192.168.0.12
The important files and pseudofiles that NFS works with are described next.
/var/lib/nfs/etab (export table) On the server, lists the directory hierarchies that are exported (can bemounted, but are not necessarily mounted at the moment) and the options they areexported with:
$ cat /var/lib/nfs/etab/home grape(rw,sync,wdelay,hide,nocrossmnt,secure,root_squash,no_all_squash,no_subtree_check,secure_locks,acl,mapping=identity,anonuid=65534,anongid=65534)/pl6 jam(rw,sync,wdelay,hide,nocrossmnt,secure,root_squash,no_all_squash,no_subtree_check,secure_locks,acl,mapping=identity,anonuid=65534,anongid=65534)/pl6 192.168.0.12(rw,sync,wdelay,hide,nocrossmnt,secure,root_squash,no_all_squash,no_subtree_check,secure_locks,acl,mapping=identity,anonuid=65534,anongid=65534)
The preceding output shows that grape can mount /home and that jam and192.168.0.12 can mount /pl6. The etab file is initialized from /etc/exports when thesystem is brought up, read by mountd when a client asks to mount a directory hierar-chy, and modified by exportfs (page 817) as the list of exported directory hierarchieschanges.

816 Chapter 23 NFS: Sharing Filesystems
/var/lib/nfs/rmtab(remote mount table) On the server, lists the directory hierarchies that are mountedby client systems:
$ cat /var/lib/nfs/rmtab192.168.0.12:/pl6:0x00000002
The preceding output shows /pl6 is mounted by 192.168.0.12. The rmtab file isupdated by mountd as it mounts and unmounts directory hierarchies. This file is“mostly ornamental” (from the mountd man page) and may not be accurate.
/proc/mounts On the client, this pseudofile displays the kernel mount table, which lists filesystemsmounted by the local system. In the following example, grep displays lines that con-tain the string nfs followed by a SPACE. The SPACE, which you must quote, eliminateslines with the string nfs that do not pertain to mounted filesystems.
$ grep nfs\ /proc/mountsplum:/pl6 /mnt nfs rw,vers=3,rsize=131072,wsize=131072,hard,intr,proto=tcp,timeo=600,retrans=2,sec=sys,addr=plum 0 0
showmount: Displays NFS Status Information
Without any options, the showmount utility displays a list of systems that are allowedto mount local directories. You typically use showmount to display a list of directoryhierarchies that a server is exporting. To display information for a remote system,give the name of the remote system as an argument. The information showmount pro-vides may not be complete, however, because it depends on mountd and trusts thatremote servers are reporting accurately.
In the following example, 192.168.0.12 is allowed to mount local directories, butyou do not know which ones:
$ showmountHosts on plum:192.168.0.12
If showmount displays an error such as RPC: Program not registered, NFS is not run-ning on the server. Start NFS on the server with the nfs-kernel-server init script(page 808).
–a (all) Displays a list of client systems and indicates which directories each client sys-tem can mount. This information is stored in /etc/exports. In the following example,showmount lists the directories that 192.168.0.12 can mount from the local system:
$ /sbin/showmount -aAll mount points on plum:192.168.0.12:/pl6
–e (exports) Displays a list of exported directories and the systems that each directoryis exported to.
$ showmount -eExport list for plum:/pl6 192.168.0.12

Setting Up an NFS Server 817
exportfs: Maintains the List of Exported
Directory Hierarchies
The exportfs utility maintains the /var/lib/nfs/etab file (page 815). When mountd iscalled, it checks this file to see if it is allowed to mount the requested directory hier-archy. Typically exportfs is called with simple options and modifies the etab filebased on changes in /etc/exports. When called with client and directory arguments,it can add to or remove the directory hierarchies specified by those arguments fromthe list kept in etab, without reference to the exports file. An exportfs command hasthe following format:
/usr/sbin/exportfs [options] [client:dir ...]
where options is one or more options (as discussed in the next section), client is thename of the system that dir is exported to, and dir is the absolute pathname of thedirectory at the root of the directory hierarchy being exported. Without any argu-ments, exportfs reports which directory hierarchies are exported to which systems:
$ exportfs/home grape/pl6 jam/pl6 192.168.0.12
The system executes the following command when it comes up (it is in the nfs-kernel-server init script). This command reexports the entries in /etc/exports and removesinvalid entries from /var/lib/nfs/etab so etab is synchronized with /etc/exports:
$ sudo exportfs -r
Options
–a (all) Exports directory hierarchies specified in /etc/exports. This option does notunexport entries you have removed from exports (that is, it does not remove invalidentries from /var/lib/nfs/etab); use –r to perform this task.
–f (flush) Removes everything from the kernel’s export table.
–i (ignore) Ignores /etc/exports; uses what is specified on the command line only.
–o (options) Specifies options. You can specify options following –o the same way youdo in the exports file. For example, exportfs –i –o ro dog:/home/sam exports/home/sam on the local system to dog for readonly access.
–r (reexport) Reexports the entries in /etc/exports and removes invalid entries from/var/lib/nfs/etab so /var/lib/nfs/etab is synchronized with /etc/exports.
–u (unexport) Makes an exported directory hierarchy no longer exported. If a direc-tory hierarchy is mounted when you unexport it, users see the message Stale NFSfile handle when they try to access the directory hierarchy from a remote system.
–v (verbose) Provides more information. Displays export options when you use exportfsto display export information.

818 Chapter 23 NFS: Sharing Filesystems
Testing the Server Setup
From the server, run the nfs-kernel-server init script with an argument of status. Ifall is well, the system displays the following:
$ /etc/init.d/nfs-kernel-server statusnfsd running
Also check that mountd is running:
$ ps -e | grep mountd29609 ? 00:00:00 rpc.mountd
Next, from the server, use rpcinfo to make sure NFS is registered with portmap:
$ rpcinfo -p localhost | grep nfs 100003 2 udp 2049 nfs 100003 3 udp 2049 nfs 100003 4 udp 2049 nfs 100003 2 tcp 2049 nfs 100003 3 tcp 2049 nfs 100003 4 tcp 2049 nfs
Repeat the preceding command from the client, replacing localhost with the nameof the server. The results should be the same.
Finally, try mounting directory hierarchies from remote systems and verify access.
automount: Mounts Directory Hierarchies
on Demand
In a distributed computing environment, when you log in on any system on the net-work, all your files—including startup scripts—are available. All systems are alsocommonly able to mount all directory hierarchies on all servers: Whichever systemyou log in on, your home directory is waiting for you.
As an example, assume /home/zach is a remote directory hierarchy that ismounted on demand. When you issue the command ls /home/zach, autofs goes towork: It looks in the /etc/auto.home map, finds zach is a key that says to mountplum:/export/home/zach, and mounts the remote directory hierarchy. Once thedirectory hierarchy is mounted, ls displays the list of files in that directory. If yougive the command ls /home after this mounting sequence, ls shows that zach ispresent within the /home directory. The df utility shows that zach is mountedfrom plum.
Prerequisites
Installation Install the following package:
• autofs

automount: Mounts Directory Hierarchies on Demand 819
autofs init script When you install the autofs package, the dpkg postinst script starts the automountdaemon. After you configure automount, call the autofs init script to restart theautomount daemon:
$ sudo /etc/init.d/autofs restart
After changing the automount configuration on an active server, use reload in placeof restart to reload automount configuration files without disturbing automaticallymounted filesystems. With an argument of status, autofs displays information aboutconfigured and active autofs mount points. See the example on page 821.
More Information
Local man pages autofs, automount, auto.master
Web tutorial www.linuxhq.com/lg/issue24/nielsen.html
HOWTO Automount mini-HOWTO
autofs: Automatically Mounted Directory Hierarchies
An autofs directory hierarchy is like any other directory hierarchy but remainsunmounted until it is needed, at which time the system mounts it automatically(demand mounting). The system unmounts an autofs directory hierarchy when it isno longer needed—by default, after 5 minutes of inactivity. Automatically mounteddirectory hierarchies are an important part of managing a large collection of sys-tems in a consistent way. The automount daemon is particularly useful when aninstallation includes a large number of servers or a large number of directory hierar-chies. It also helps to remove server–server dependencies (discussed next).
When you boot a system that uses traditional fstab-based mounts and an NFS serveris down, the system can take a long time to come up as it waits for the server to timeout. Similarly, when you have two servers, each mounting directory hierarchies fromthe other, and both systems are down, both may hang as they are brought up whileeach tries to mount a directory hierarchy from the other. This situation is called aserver–server dependency. The automount facility gets around these issues by mount-ing a directory hierarchy from another system only when a process tries to access it.
When a process attempts to access one of the directories within an unmountedautofs directory hierarchy, the kernel notifies the automount daemon, whichmounts the directory hierarchy. You must give a command, such as cd /home/zach,that accesses the autofs mount point (in this case /home/zach) to create the demandthat causes automount to mount the autofs directory hierarchy; only then can thesystem display or use the autofs directory hierarchy. Before you issue this cd com-mand, zach does not appear in /home.
The main file that controls the behavior of automount is /etc/auto.master. A simpleexample follows:
$ cat /etc/auto.master/free1 /etc/auto.misc --timeout=60/plum /etc/auto.plum

820 Chapter 23 NFS: Sharing Filesystems
The auto.master file has three columns. The first column names the parent of theautofs mount point—the location where the autofs directory hierarchy is to bemounted. (/free1 and /plum in the example are not mount points but will hold themount points when the directory hierarchies are mounted). The second columnnames the files, called map files, that store supplemental configuration information.The optional third column holds mount options for map entries. In the precedingexample, the first line sets the timeout (the length of time a directory stays mountedwhen it is not in use) to 60 seconds; the default timeout value is 300 seconds. Youcan change autofs default values in /etc/default/autofs.
Although the map files can have any names, one is traditionally named auto.misc.Following are the two map files specified in auto.master:
$ cat /etc/auto.miscmusic -fstype=ext3 :/dev/sdb7
$ cat /etc/auto.plumpl6 -fstype=nfs plum:/pl6
The first column of a map file holds the relative autofs mount point (music and pl6in the preceding files). This mount point is appended to the corresponding autofsmount point from column 1 of the auto.master file to create the absolute autofsmount point. In this example, music (from auto.misc) is appended to /free1 (fromauto.master) to make /free1/music; pl6 is appended to /plum to make /plum/pl6.The second column holds options, and the third column shows the server anddirectory hierarchy to be mounted. The first example shows a local drive(/dev/sdb7). You can tell it is local because its filesystem type is specified as ext3and no system name appears before the colon. The second example shows a file-system on a remote system. It has a filesystem type of nfs and specifies the name ofthe remote system, a colon, and the name the filesystem is mounted under on theremote system.
Before the new setup can work, you must reload the automount daemon using theautofs init script (page 819). This script creates the directories that hold the mountpoints (/free1 and /plum in the example) when you start, restart, or reload autofsand removes those directories when you stop it.
In the following example, the first ls command shows that the /free1 and /plumdirectories do not exist. The next command, running with root privileges, runs theautofs init script to reload autofs. Now the directories exist but do not hold anyfiles. When the user lists the contents of /plum/pl6, autofs mounts pl6 and ls dis-plays its contents:
$ ls /free1 /plumls: /free1: No such file or directoryls: /plum: No such file or directory
$ sudo /etc/init.d/autofs reloadReloading automounter: checking for changes ...

Chapter Summary 821
Reloading automounter map for: /free1Reloading automounter map for: /plum
$ ls /free1 /plum/free1:/plum:
$ ls /plum/pl6lost+found memo
The following command displays information about configured and active autofsmount points:
$ /etc/init.d/autofs statusConfigured Mount Points:------------------------/usr/sbin/automount --timeout=60 /free1 file /etc/auto.misc/usr/sbin/automount --timeout=300 /plum file /etc/auto.plum
Active Mount Points:--------------------/usr/sbin/automount --pid-file=/var/run/autofs/_free1.pid --timeout=60 /free1 file /etc/auto.misc/usr/sbin/automount --pid-file=/var/run/autofs/_plum.pid --timeout=300 /plum file /etc/auto.plum
Chapter Summary
NFS allows a server to share selected local directory hierarchies with client systemson a heterogeneous network, thereby reducing storage needs and administrativeoverhead. NFS defines a client/server relationship in which a server provides direc-tory hierarchies that clients can mount.
On the server, the /etc/exports file typically lists the directory hierarchies thatthe system exports. Each line in exports specifies a directory hierarchy and theclient systems that are allowed to mount it, including options for each client(readonly, read-write, and so on). An exportfs –r command causes NFS to rereadthis file.
From a client, a mount command mounts an exported NFS directory hierarchy.Alternatively, you can put an entry in /etc/fstab to have the system automaticallymount the directory hierarchy when it boots.
Automatically mounted directory hierarchies help manage large groups of systemscontaining many servers and filesystems in a consistent way and can help removeserver–server dependencies. The automount daemon automatically mounts autofsdirectory hierarchies when they are needed and unmounts them when they are nolonger needed.

822 Chapter 23 NFS: Sharing Filesystems
Exercises
1. What are three reasons to use NFS?
2. Which command would you give to mount on the local system the /homedirectory hierarchy that resides on the file server named plum? Assume the mounted directory hierarchy will appear as /plum.home on the local sys-tem. How would you mount the same directory hierarchy if it resided on the fileserver at 192.168.1.1? How would you unmount /home?
3. How would you list the mount points on the remote system named plumthat the local system named grape can mount?
4. Which command line lists the currently mounted NFS directory hierarchies?
5. What does the /etc/fstab file do?
6. From a server, how would you allow readonly access to /opt for any sys-tem in example.com?
Advanced Exercises
7. When is it a good idea to disable attribute caching?
8. Describe the difference between the root_squash and all_squash options in /etc/exports.
9. Why does the secure option in /etc/exports not really provide any security?
10. Some diskless workstations use NFS as swap space. Why is this approach useful? What is the downside?
11. NFS maps users on the client to users on the server. Explain why this map-ping is a security risk.
12. What does the mount nosuid option do? Why would you want to use this option?

823823
24Chapter24Samba is a suite of programs that enables UNIX-like operatingsystems, including Linux, Solaris, FreeBSD, and Mac OS X, towork with other operating systems, such as OS/2 and Windows,as both a server and a client.
As a server, Samba shares Linux files and printers with Windowssystems. As a client, Samba gives Linux users access to files onWindows systems. Its ability to share files across operating sys-tems makes Samba an ideal tool in a heterogeneous computingenvironment.
Refer to pages 630 and 632 for information about printingusing Samba.
In This Chapter
About Samba . . . . . . . . . . . . . . . . 825
JumpStart: Configuring a Samba Server Using shares-admin. . . . 826
smb.conf: Manually Configuring a Samba Server . . . . . . . . . . . . . 832
Accessing Linux Shares from Windows . . . . . . . . . . . . . . . . . . 838
Accessing Windows Shares from Linux. . . . . . . . . . . . . . . . . . . . . . 839
Troubleshooting . . . . . . . . . . . . . . 841
24
Samba: Linux and
Windows File and
Printer Sharing

824 Chapter 24 Samba: Linux and Windows File and Printer Sharing
Introduction
This chapter starts by providing a list of Samba tools followed by some basic infor-mation. The JumpStart section discusses how to set up a simple Samba server usingthe Shared Folders window. The section following that covers how to use swat, aWeb-based advanced configuration tool, to set up a Samba server. The final serversection discusses how to set up a Samba server by using a text editor to manuallyedit the files that control Samba. The next two sections of this chapter, “AccessingLinux Shares from Windows” (page 838) and “Accessing Windows Shares fromLinux” (page 839), explain how to work with Linux and Windows files and print-ers. The final section, “Troubleshooting” (page 841), offers tips on what to dowhen Samba does not work properly.
Table 24-1 lists some of the utilities and daemons that make up the Samba suite ofprograms. See the samba man page for a complete list.
Table 24-1 Samba utilities and daemons
Utility or daemon Function
net This utility has the same syntax as the DOS net command and, over time, will eventually replace other Samba utilities such as smbpasswd.
nmbd The NetBIOS (page 1049) nameserver program, run as a daemon by default. Provides NetBIOS over IP naming services for Samba cli-ents. Also provides browsing support (as in the Windows Network Neighborhood or My Network Places view).
nmblookup Queries the NetBIOS (page 1049) name; see page 842.
pdbedit Maintains Samba user database.
smbclient Displays shares on a Samba server such as a Windows machine; uses ftp-like commands (page 840).
smbd The Samba program, run as a daemon by default. Provides file and print services for Samba clients.
smbpasswd Changes Windows NT password hashes on Samba and Windows NT servers (page 828).
smbstatus Displays information about current smbd connections.
smbtar Backs up and restores data from Samba servers; similar to tar.
smbtree Displays a hierarchical diagram of available shares (page 839).
swat Samba Web Administration Tool. A browser-based editor for the smb.conf file (page 828).
testparm Checks syntax of the smb.conf file (page 842).

About Samba 825
About Samba
This section covers the packages you need to install to run Samba, sources of moreinformation on Samba, and users and passwords under Samba.
Prerequisites
Installation Install the following packages:
• samba
• smbclient
• smbfs (the only package needed to mount a Windows share)
• swat (optional, but useful)
• openbsd-inetd (needed to run swat; installed as a swat dependency)
• samba-doc (optional documentation; installed with swat)
• samba-doc-pdf (optional; documentation in PDF format)
samba init script When you install the samba package, the dpkg postinst script configures Samba to runas a normal daemon (not from inetd), copies all Linux users to the list of Samba users,sets up Samba to use encrypted passwords, and starts the smbd and nmbd daemons.After you configure samba, call the samba init script to restart smbd and nmbd:
$ sudo /etc/init.d/samba restart
After changing the samba configuration on an active server, use reload in place ofrestart to reload samba configuration files without disturbing clients connected tothe server.
More Information
Local Samba/swat home page has links to local Samba documentation (page 828)Documentation /usr/share/doc/samba-*
Web Samba www.samba.org (mailing lists, documentation, downloads, and more)CIFS www.samba.org/cifs
HOWTO Unofficial Samba HOWTO hr.uoregon.edu/davidrl/samba.htmlSamba Documentation Collection Point a browser at
/usr/share/doc/samba-doc/htmldocs/index.html; if you have installed the samba-doc-pdf package, look in /usr/share/doc/samba-doc-pdf.
Notes
Firewall The Samba server normally uses UDP ports 137 and 138 and TCP ports 139 and 445.If the Samba server system is running a firewall, you need to open these ports. Usingfirestarter (page 886), open these ports by setting a policy that allows service for Samba.
Share Under Samba, an exported directory hierarchy is called a share.

826 Chapter 24 Samba: Linux and Windows File and Printer Sharing
Mapping a share The Samba term mapping a share is equivalent to the Linux term mounting a direc-tory hierarchy.
Samba The name Samba is derived from SMB (page 1060), the protocol that is the nativemethod of file and printer sharing for Windows.
swat You must set up a root password to use swat to change the Samba configuration; seepage 499 for instructions.
Samba Users, User Maps, and Passwords
For a Windows user to access Samba services on a Linux system, the user must pro-vide a Windows username and a Samba password. In some cases, Windows suppliesthe username and password for you. It is also possible to authenticate using othermethods. For example, Samba can use LDAP (page 1044) or PAM (page 545)instead of the default password file. Refer to the Samba documentation for moreinformation on authentication methods.
Usernames The username supplied by Windows must be the same as a Linux username or mustmap to a Linux username.
User maps You can create a file, typically named /etc/samba/smbusers, to map Windows user-names to Linux usernames. For more information see username map on page 835.
Passwords By default, Samba uses Linux passwords to authenticate users. However, Ubuntusets passdb backend (page 834) to tdbsam, causing Samba to use trivial databasepasswords. Change this parameter to smbpasswd in smb.conf (page 832) to causeSamba to use Linux passwords.
JumpStart: Configuring a Samba Server
Using shares-adminThe shares-admin utility can set up only basic features of a Samba server. It is, how-ever, the best tool to use if you are not familiar with Samba and you want to set up
Figure 24-1 Shared Folders window

JumpStart: Configuring a Samba Server Using shares-admin 827
a simple Samba server quickly. The shares-admin utility exports shares (directoryhierarchies) to Windows machines.
The Shared Folders window (Figure 24-1) enables you to share directory hierarchiesusing NFS (Chapter 23) and/or Samba. To display this window, select Main menu:System Administration Shared Folders or give the command gksudo shares-admin from a terminal emulator or Run Application window (ALT-F2).
The Shared Folders window allows you to modify the /etc/samba/smb.conf file,which is a large part of setting up a Samba server. (If the system is running a fire-wall, see “Firewall” on page 825.) In this window you can specify which directoryhierarchies you want to share and how they are shared.
Click the Shared Folders tab in the Shared Folders window and click Add to displaythe Share Folder window (Figure 24-2). Then select Windows networks (SMB)from the list box labeled Share through. Now the Share Folder window has two sec-tions: Shared Folder and Share Properties. In the first section, choose the pathnameof the directory hierarchy you want to share from the list box labeled Path. If thedirectory you want is not listed, click Other; then double-click File System in thePlaces column and double-click the directory you want in the Name column. Con-tinue selecting directories in the Name column until the buttons at the top of thewindow display the pathname of the directory hierarchy you want to share. ClickOpen to select the directory hierarchy.
Under Share Properties, shares-admin names the share with the simple filename ofthe directory you selected to share. This name is the one you will use from Windowswhen you map (mount) the share. For example, if you select /pl5/documents on thehost named plum as the directory to share, shares-admin names the share documents.From Windows, you would map the share as the folder named //plum/documents.For more information refer to “Mapping a Share” on page 839. You can change thename of the share; doing so changes the name you use to map the share from Win-dows. Add a comment if you like.
The General Properties tab of the Shared Folders window allows you to change thename of the workgroup the server belongs to and to declare the server to be a WINSserver. If necessary, change the workgroup name so it is the same as the workgroup
Figure 24-2 The Share Folder window

828 Chapter 24 Samba: Linux and Windows File and Printer Sharing
name on the Windows machine. In most cases you do not need to make the systema WINS server. Add more shares if you like. When you are done adding shares, clickClose to close the Shared Folders window.
smbpasswd Working with root privileges, you can use smbpasswd to change a Linux user’s Sambapassword.
$ sudo smbpasswd samNew SMB password:Retype new SMB password:
This example assumes Sam was a user on the Linux system before Samba wasinstalled. When you install Samba, it copies all Linux users to the list of Sambausers. If you add a user after you install Samba, you need to use the –a option toinstruct smbpasswd to add the user to the list of Samba users. The following com-mand adds a new Linux user, Max, to the list of Samba users and assigns a Sambapassword to Max:
$ sudo smbpasswd -a maxNew SMB password:Retype new SMB password:Added user max.
Once a user has a Samba password, he can use smbpasswd without any argumentsto change his password.
If a user has different usernames on the Linux and Windows systems, you must mapthe Windows username to a Linux username (see username map on page 835).Make sure all Linux users who will log in using Samba have Samba passwords.
You should now be able to access the new shares from a Windows machine(page 838). There is no need to restart the Samba server.
swat: Configures a Samba Server
The swat (Samba Web Administration Tool, swat package) utility is a browser-basedgraphical editor for the smb.conf file. For each of the configurable parameters, itprovides Help links, default values, and a text box to change the value. The swatutility is a well-designed tool in that it remains true to the lines in the smb.conf fileyou edit: You can use and learn from swat, so that, if you want to use a text editorto modify smb.conf, the transition will be straightforward.
The swat utility is run from inetd (openbsd-inetd package). When you install theswat package, it installs openbsd-inetd as a dependency and places the followingline in /etc/inetd.conf:
swat stream tcp nowait.400 root /usr/sbin/tcpd /usr/sbin/swat
Make a copy of smb.conftip As installed, the /etc/samba/smb.conf file contains extensive comments (page 832). The swat
utility overwrites this file, removing the comments. Make a copy of smb.conf for safekeepingbefore you run this utility for the first time.

swat: Configures a Samba Server 829
This line enables swat when inetd is running. If necessary, give the following com-mand to restart inetd so that it rereads its configuration file:
$ sudo /etc/init.d/openbsd-inetd restart
Now you should be able to run swat: From the local system, open a browser andenter either http://127.0.0.1:901 or http://localhost:901 in the location bar. Whenprompted, enter the username root and the password for root. (You must set up aroot password to use swat to change the Samba configuration; see page 499 forinstructions.) If you provide a username other than root, you will be able to viewsome configuration information but will not be able to make changes. From aremote system, replace 127.0.0.1 with the IP address of the server (but see the adja-cent security tip). If a firewall is running on the local system and you want to accessswat from a remote system, open TCP port 901 using firestarter (page 894).
The browser displays the local Samba/swat home page (Figure 24-3). This page includeslinks to local Samba documentation and the following buttons:
HOME Links to local Samba documentation. When you click the word Samba (not thelogo, but the one just before the word Documentation in the Samba/swat homepage), swat displays the Samba man page, which defines each Samba program.
GLOBALS Edits global parameters (variables) in smb.conf.
SHARES Edits share information in smb.conf.
PRINTERS Edits printer information in smb.conf.
Figure 24-3 The local swat home page
Do not allow unencrypted remote access to swat
security Do not allow access to swat from a remote system on an insecure network. When you do so and login, the root password is sent in cleartext over whatever connection you are using and can easily besniffed. If you want to access swat over an insecure network, use ssh to forward port 901 (page 725).

830 Chapter 24 Samba: Linux and Windows File and Printer Sharing
WIZARD Rewrites the smb.conf file, removing all comment lines and lines that specify defaultvalues.
STATUS Shows the active connections, active shares, and open files. Stops and restarts thesmbd and nmbd daemons.
VIEW Displays a subset (click Full View) or all of the configuration parameters as deter-mined by the default values and settings in smb.conf (click Normal View).
PASSWORD Manages Samba passwords.
It is quite easy to establish a basic Samba setup so you can work with a Linux direc-tory hierarchy from a Windows system. More work is required to set up a secureconnection or one with special features. The following example creates a basic setupbased on the sample smb.conf file included with Ubuntu Linux.
swat Help anddefaults
Each of the parameters swat displays has a button labeled Help next to it. ClickHelp to open a new browser window containing an explanation of that parameter.Each parameter also has a Set Default button that sets the parameter to its defaultvalue (not necessarily the initial value as supplied by Ubuntu).
For this example, do not click any of the Set Default buttons. Make sure to clickCommit Changes at the top of each page after you finish making changes on a pagebut before you click a menu button at the top of the page. Otherwise, swat will dis-card your changes.
GLOBALS page To follow this example, first click GLOBALS at the top of the Samba/swat homepage. Leave everything at its current setting with two exceptions: hosts allow andhosts deny. Setting these parameters makes the server more secure by limiting theclients that Samba responds to. Scroll to the bottom of the Security Options and sethosts allow to the names or IP addresses of systems you want to allow to access thelocal system’s shares and printers. If there are any addresses in hosts allow or if youset hosts deny to ALL, you must also add 0.0.0.0 to hosts allow to be able to useswat. Separate the entries with SPACEs or commas. See page 833 for more informationon the various ways you can set hosts allow. Set hosts deny to ALL. Click CommitChanges (near the top of the page) when you are done with the GLOBALS page.
If you can no longer use swat
tip If you can no longer use swat, you probably changed the hosts allow setting incorrectly. In thiscase you need to edit /etc/samba/smb.conf manually and fix the line with the words hosts allowin it:
# grep hosts smb.conf hosts allow = 0.0.0.0, 192.168.0.8 hosts deny = ALL
The preceding entries allow access from 192.168.0.8 only. They also allow swat to work. You donot need to restart Samba after changing smb.conf.

swat: Configures a Samba Server 831
SHARES page Next click SHARES at the top of the page. Three buttons and two text boxesappear near the bottom of the page (Figure 24-4). In the text box adjacent to theCreate Share button, enter the name you want to assign to the share you are set-ting up. You will use this share name from Windows when you map (mount) theshare. Click Create Share. To modify an existing share, bring up the name of theshare in the list box adjacent to Choose Share, and click Choose Share. Either ofthese actions expands the Share Parameters page so it displays information aboutthe selected share.
Set path to the absolute pathname on the Linux server of the share and, if you like,set comment to a string that will help you remember where the share is located. Thevalues for hosts allow and hosts deny, if any, are taken from the global parameters.Make sure read only, guest ok, and browseable are set as you desire. Set available toYES or you will not have access to the share. Click Commit Changes when you aredone with the SHARES page. If you want to see how many parameters there reallyare, click Advanced near the top of the page. Switching between the Basic andAdvanced views removes any changes you have not committed.
From a Windows machine, you should now be able to access the share you just cre-ated (page 838).
Figure 24-4 Share Parameters page
You do not need to restart Samba when you change smb.conftip Samba rereads its configuration files each time a client connects. Unless you change the security
parameter (page 834), you do not need to restart Samba when you change smb.conf.

832 Chapter 24 Samba: Linux and Windows File and Printer Sharing
smb.conf: Manually Configuring a Samba Server
The /etc/samba/smb.conf file controls most aspects of how Samba works and isdivided into sections. Each section begins with a line that holds some text betweenbrackets ([...]). The text within the brackets identifies the section. Typical sections are
[globals] Defines global parameters[printers] Defines printers[homes] Defines shares in the homes directory[share name] Defines a share (you can have more than one of these sections)
smb.confcomments
As installed on an Ubuntu Linux system, the smb.conf sample configuration filecontains extensive comments and commented-out examples. Comment lines startwith either a pound sign (#) or a semicolon (;). The sample file uses pound signs tobegin lines that are intended to remain as comments. Semicolons begin lines thatyou may want to mimic or use as is by removing the semicolons. The following seg-ment of smb.conf contains three lines of true comments and three lines beginningwith semicolons that you may want to uncomment and change:
# Un-comment the following (and tweak the other settings below to suit)# to enable the default home directory shares. This will share each# user's home directory as \\server\username;[homes]; comment = Home Directories; browseable = no
As Ubuntu sets the global parameters in smb.conf, you need simply add a share fora Windows system to be able to access a directory on the Linux server. Add the fol-lowing simple share to the end of the smb.conf file to enable a user on a Windowssystem to be able to read from and write to the local /tmp directory:
[tmp] comment = temporary directory path = /tmp writable = YES guest ok = YES
The name of the share under Windows is tmp; the path under Linux is /tmp. AnyWindows user who can log in on Samba, including guest, can read from and writeto this directory, assuming the user’s Linux permissions allow it. To allow a user tolog in on Samba, you must run smbpasswd (page 828). Because browseable defaultsto YES, unless you specify browseable = NO, the share appears as a share on theserver without explicitly being declared browseable. The Linux permissions thatapply to a Windows user using Samba are the same permissions that apply to theLinux user that the Windows user maps to.
Parameters in the smbd.conf File
The smb.conf man page and the Help feature of swat list all the parameters you canset in smb.conf. The following sections identify some of the parameters you are likelyto want to change.

smb.conf: Manually Configuring a Samba Server 833
Global Parameters
interfaces A SPACE-separated list of networks Samba uses. Specify as interface names (such aseth0) or as IP address/net mask pairs (page 529).
Default: all active interfaces except 127.0.0.1
server string The string that the Windows machine displays in various places. Within the string,Samba replaces %v with the Samba version number and %h with the hostname.
Default: Samba %vUbuntu: %h server (Samba, Ubuntu)
workgroup The workgroup the server belongs to. Set to the same workgroup as the Windowsclients that use the server. This parameter controls the domain name that Sambauses when security (page 834) is set to DOMAIN.
Default: WORKGROUPUbuntu: MSHOME
Security Parameters
encryptpasswords
YES accepts only encrypted passwords from clients. Windows 98 and Windows NT4.0 Service Pack 3 and later use encrypted passwords by default. This parameteruses smbpasswd to authenticate passwords unless you set security to SERVER orDOMAIN, in which case Samba authenticates using another server.
Default: YES
guest account The username that is assigned to users logging in as guest or mapped to guest; appli-cable only when guest ok (page 838) is set to YES. This username should be presentin /etc/passwd but should not be able to log in on the system. Typically guestaccount is assigned a value of nobody because the user nobody can access only filesthat any user can access. If you are using the nobody account for other purposes onthe Linux system, set this parameter to a name other than nobody.
Default: nobody
hosts allow Analogous to the /etc/hosts.allow file (page 532); specifies hosts that are allowedto connect to the server. Overrides hosts specified in hosts deny. A good strategy isto specify ALL in hosts deny and to specify the hosts you want to grant access to inthis file. Specify hosts in the same manner as in hosts.allow.
Default: none (all hosts permitted access)
hosts deny Analogous to the /etc/hosts.deny file (page 532); specifies hosts that are notallowed to connect to the server. Overridden by hosts specified in hosts allow. If youspecify ALL in this file, remember to include the local system (127.0.0.1) in hostsallow. Specify hosts in the same manner as in hosts.deny.
Default: none (no hosts excluded)
invalid users Lists users who are not allowed to log in using Samba.
Default: none (all users are permitted to log in)Ubuntu: root
834 Chapter 24 Samba: Linux and Windows File and Printer Sharing
map to guest Defines when a failed login is mapped to the guest account. Useful only when secu-rity (page 834) is not set to SHARE.
Never: Allows guest to log in only when the user explicitly provides guest as theusername and a blank password.
Bad User: Treats any attempt to log in as a user who does not exist as a guest login.This parameter is a security risk because it allows a malicious user to retrieve a listof users on the system quickly.
Bad Password: Silently logs in as guest any user who incorrectly enters her pass-word. This parameter may confuse a user when she mistypes her password and isunknowingly logged in as guest because she will suddenly see fewer shares than sheis used to.
Default: Never
passdb backend Specifies how Samba stores passwords. Set to ldapsam for LDAP, smbpasswd forSamba, or tdbsam for TDB (trivial database) password storage. See page 828 forinstructions on using smbpasswd to change Samba passwords.
Default: smbpasswdUbuntu: tdbsam
passwd chat The chat script Samba uses to converse with the passwd program. If this script is notfollowed, Samba does not change the password. Used only when unix passwordsync (page 835) is set to YES.
Default: *new*password* %n\n*new*password* %n\n *changed*Ubuntu: *Enter\snew\sUNIX\spassword:* %n\n *Retype\snew\sUNIX\spass-word:* %n\n *password\supdated\ssuccessfully* .
passwd program The program Samba uses to set Linux passwords. Samba replaces %u with theuser’s username.
Default: noneUbuntu: /usr/bin/passwd %u
security Specifies if and how clients transfer user and password information to the server.Choose one of the following:
USER: Causes Samba to require a username and password from Windows userswhen logging in on the Samba server. With this setting you can use
• username map (page 835) to map Samba usernames to Linux usernames
• encrypt passwords (page 833) to encrypt passwords (recommended)
• guest account (page 833) to map users to the guest account
SHARE: Causes Samba not to authenticate clients on a per-user basis. Instead,Samba uses the Windows 9x setup, in which each share can have an individual pass-word for either read or full access. This option is not compatible with more recentversions of Windows.

smb.conf: Manually Configuring a Samba Server 835
SERVER: Causes Samba to use another SMB server to validate usernames andpasswords. If the remote validation fails, the local Samba server tries to validateusernames and passwords as though security were set to USER.
DOMAIN: Samba passes an encrypted password to a Windows NT domain con-troller for validation. The workgroup parameter (page 833) must be properly set insmb.conf for DOMAIN to work.
ADS: Instructs Samba to use an Active Directory server for authentication, allowinga Samba server to participate as a native Active Directory member. (Active Directoryis the centralized information system that Windows 2000 and later use. It replacesWindows Domains, which was used by Windows NT and earlier.)
Default: USER
unix passwordsync
YES causes Samba to change a user’s Linux password when the associated userchanges the encrypted Samba password.
Default: NO
updateencrypted
YES allows users to migrate from cleartext passwords to encrypted passwords with-out logging in on the server and using smbpasswd. To migrate users, set to YES andset encrypt passwords to NO. As each user logs in on the server with a cleartextLinux password, smbpasswd encrypts and stores the password. Set to NO and setencrypt passwords to YES after all users have been converted.
Default: NO
username map The name of the file, typically /etc/samba/smbusers, that maps usernames from aWindows client to usernames on the Linux server. This parameter is effective onlywhen security (page 834) is set to USER. Each line of the map file starts with aserver (Linux) username, followed by a SPACE, an equal sign, another SPACE, and oneor more SPACE-separated client (Windows) usernames. An asterisk (*) on the clientside matches any client username.
This file frequently maps Windows usernames to Linux usernames and/or mapsmultiple Windows usernames to a single Linux username to facilitate file sharing.Following is a sample map file:
$ cat /etc/samba/smbusers# Unix_name = SMB_name1 SMB_name2 ...root = administrator adminnobody = guest pcguest smbguest
The first entry maps the two Windows usernames (administrator and admin) to theLinux username root (you must change the Ubuntu value for invalid users[page 833] to be able to log in as root). The second entry maps three Windowsusernames, including guest, to the Linux username nobody: When a Windows userattempts to log in on the Samba server as guest, Samba authenticates the Linuxuser named nobody. Each user, including nobody, must have a Samba password(refer to smbpasswd on page 828), even if it is blank.
836 Chapter 24 Samba: Linux and Windows File and Printer Sharing
Add the following line to the file this parameter points to, creating the file if neces-sary, to map the Windows username sam to the Linux username sls:
sls = sam
After you add a user to this file, you must give the user a password using smbpasswd.When Sam logs in as sam, Samba now maps sam to sls and looks up sls in the Sambapassword database. Assuming Sam provides the correct password, he logs in on theSamba server as sls.
Default: no map
Logging Parameters
log file The name of the Samba log file. Samba replaces %m with the name of the client sys-tem, allowing you to generate a separate log file for each client.
Default: noneUbuntu: /var/log/samba/log.%m
log level Sets the log level, with 0 (zero) being off and higher numbers being more verbose.
Default: 0 (off)
max log size An integer specifying the maximum size of the log file in kilobytes. A 0 (zero) speci-fies no limit. When a file reaches this size, Samba appends .old to the filename andstarts a new log, deleting any old log file.
Default: 5000Ubuntu: 1000
Browser Parameters
The domain master browser is the system responsible for maintaining the list ofmachines on a network used when browsing a Windows Network Neighborhood orMy Network Places. SMB (page 1060) uses weighted elections every 11–15 minutesto determine which machine is the domain master browser.
Whether a Samba server wins this election depends on two parameters:
• Setting domain master to YES instructs the Samba server to enter the election.
• The os level determines how much weight the Samba server’s vote receives.
Setting os level to 2 should cause the Samba server to win against any Windows 9xmachines. NT Server series domain controllers—including Windows 2000, XP, and2003—use an os level of 32. The maximum setting for os level is 255, although set-ting it to 65 should ensure that the Samba server wins.
domain master YES causes nmbd to attempt to be the domain master browser. If a domain masterbrowser exists, then local master browsers will forward copies of their browse liststo it. If there is no domain master browser, then browse queries may not be able to
smb.conf: Manually Configuring a Samba Server 837
cross subnet boundaries. A Windows PDC (primary domain controller) will alwaystry to become the domain master and may behave in unexpected ways if it fails.Refer to the preceding discussion for more information.
Default: AUTO
local master YES causes nmbd to enter elections for the local master browser on a subnet. Alocal master browser stores a cache of the NetBIOS (page 1049) names of entitieson the local subnet, allowing browsing. Windows machines automatically enterelections; for browsing to work, the network must have at least one Windowsmachine or one Samba server with local master set to YES. It is poor practice to setlocal master to NO. If you do not want a computer to act as a local master, set its oslevel to a lower number, allowing it to be used as the local master if all else fails.
Default: YES
os level An integer that controls how much Samba advertises itself for browser elections andhow likely nmbd is to become the local master browser for its workgroup. A highernumber increases the chances of the local server becoming the local master browser.Refer to the discussion at the beginning of this section for more information.
Default: 20
preferred master YES forces nmbd to hold an election for local master and enters the local systemwith a slight advantage. With domain master set to YES, this parameter helpsensure the local Samba server becomes the domain master. Setting this parameter toYES on more than one server causes the servers to compete to become master, gen-erating a lot of network traffic and sometimes leading to unpredictable results. AWindows PDC automatically acts as if this parameter is set.
Default: AUTO
Communication Parameters
dns proxy When acting as a WINS server (page 1069), YES causes nmbd to use DNS if NetBIOS(page 1049) resolution fails.
Default: YESUbuntu: NO
socket options Tunes the network parameters used when exchanging data with a client. AddingSO_RCVBUF=8192 SO_SNDBUF=8192 to this parameter may improve networkperformance.
Default: TCP_NODELAY
wins server The IP address of the WINS server nmbd should register with.
Default: not enabled
wins support YES specifies nmbd is to act as a WINS server.
Default: NO

838 Chapter 24 Samba: Linux and Windows File and Printer Sharing
Share Parameters
Each of the following parameters can appear many times in smb.conf, once in eachshare definition.
available YES specifies the share as active. Set this parameter to NO to disable the share butcontinue logging requests for it.
Default: YES
browseable Determines whether the share can be browsed, for example, in Windows My Net-work Places.
Default: YESUbuntu: YES, except for printers
comment A description of the share, shown when browsing the network from Windows.
Default: noneUbuntu: varies
guest ok Allows a user who logs in as guest to access this share.
Default: NO
path The path of the directory being shared.
Default: noneUbuntu: various
read only Does not allow write access.
Default: YES
The [homes] Share: Sharing Users’ Home Directories
Frequently users want to share their Linux home directories with a Windowsmachine. To make this task easier, Samba provides the [homes] share. When youdefine this share, each user’s home directory is shared with the specified parameters.In most cases, the following parameters are adequate:
[homes] comment = Home Directories browseable = NO writable = YES
These settings prevent users other than the owners from browsing home directorieswhile allowing logged-in owners full access.
Accessing Linux Shares from Windows
Browsing Shares
To access a share on a Samba server from Windows, open My Computer or Exploreron the Windows system and, in the text box labeled Address, enter \\ followed by theNetBIOS name (or just the hostname if you have not assigned a different NetBIOS

Accessing Windows Shares from Linux 839
name) of the Samba server. Windows then displays the directories the Linux system issharing. To view the shares on the Linux system named dog, for example, enter \\dog.From this window, you can view and, if permitted, browse the shares available on theLinux system. If you set a share so it is not browseable, you need to enter the path ofthe share using the format \\servername\sharename to display the share.
Mapping a Share
Another way to access a share on a Samba server is by mapping (mounting) a share.Open My Computer or Explorer on the Windows system and click Map NetworkDrive from one of the drop-down menus on the menubar (found on the Tools menuon Windows XP). Windows displays the Map Network Drive window. Select anunused Windows drive letter from the list box labeled Drive and enter the Windowspath to the share you want to map in the text box labeled Folder. The format of thewindows path is \\hostname\sharename. For example, to map /tmp on dog toWindows drive J, assuming the share is named tmp on the Linux system, select J inthe list box labeled Drive, enter \\dog\tmp in the text box labeled Folder, and clickFinish. After supplying a username and password, you should be able to access the/tmp directory from dog as J (tmp) on the Windows machine. If you cannot map thedrive, refer to “Troubleshooting” on page 841.
Accessing Windows Shares from Linux
Samba enables you to view and work with files on a Windows system (client) froma Linux system (server). This section discusses several ways of accessing Windowsfiles from Linux.
smbtree: Displays Windows Shares
The smbtree utility displays a hierarchical diagram of available shares. When yourun smbtree, it prompts you for a password; do not enter a password if you want tobrowse shares that are visible to the guest user. The password allows you to viewrestricted shares, such as a user’s home directory in the [homes] share. Following issample output from smbtree:
$ smbtreePassword: RETURN (do not enter a password)MGS \\JAM \\JAM\C$ Default share \\JAM\ADMIN$ Remote Admin \\JAM\F \\JAM\E ... \\DOG Samba 3.0.22 \\DOG\dogprinter HP LaserJet 1320 \\DOG\print$ Printer Drivers \\DOG\home \\DOG\p01 common backed-up directory \\DOG\p02 common backed-up directory

840 Chapter 24 Samba: Linux and Windows File and Printer Sharing
In the preceding output, MGS is the name of the workgroup, JAM is the name ofthe Windows machine, and DOG is the name of the Samba server that the smbtreeutility is run from. Workgroup and machine names are always shown in uppercaseletters. If smbtree does not display output, set the workgroup (page 833) and winsserver (page 837) parameters in smb.conf. Refer to the smbtree man page for moreinformation.
smbclient: Connects to Windows Shares
The smbclient utility functions similarly to ftp (page 729) and connects to a Windowsshare. However, smbclient uses Linux-style forward slashes (/) as path separatorsrather than Windows-style backslashes (\). The next example connects to one of theshares displayed in the preceding example:
$ smbclient //JAM/DPassword: RETURN (do not enter a password)Domain=[JAM] OS=[Windows 5.1] Server=[Windows 2000 LAN Manager]smb: \> ls audit D 0 Tue May 1 18:46:33 2007 data D 0 Tue May 1 18:47:09 2007 laptop.data D 0 Tue May 1 19:12:16 2007 Linux D 0 Tue May 1 18:57:49 2007 oldfonts D 0 Wed May 2 00:02:17 2007 PSFONTS D 0 Tue May 1 18:45:36 2007 RECYCLER DHS 0 Thu May 3 20:05:21 2007 System Volume Information DHS 0 Tue May 1 18:45:32 2007
46547 blocks of size 1048576. 42136 blocks availablesmb: \>
You can use most ftp commands from smbclient. Refer to “Tutorial Session” onpage 732 for some examples. Alternatively, give the command help to display alist of commands or help followed by a command for information on a specificcommand:
smb: \> help historyHELP history: displays the command history
Browsing Windows Networks
Browsing Windows shares using smbtree and smbclient is quite awkward comparedwith the ease of browsing a network from Windows; GNOME provides a moreuser-friendly alternative. From Nautilus, enter smb:/// in the location bar to browsethe Windows shares on the network.
Nautilus uses virtual filesystem add-ons, which are part of the desktop environmentand not part of the native Linux system. As a consequence, only native GNOMEapplications can open files on remote shares; normal Linux programs cannot. Forexample, gedit can open files on remote shares, while OpenOffice, mplayer, and xeditcannot.

Troubleshooting 841
Mounting Windows Shares
The mount utility (page 572) with a –t cifs option mounts a Windows share as if itwere a Linux directory hierarchy. See page 1029 for more information on the CIFSprotocol. When you mount a Windows share, you can write to the files on theshare; you cannot write to files on a share using smbclient.
A mount command that mounts a Windows share has the following syntax (youmust run this command with root privileges):
mount -t cifs //host/share dir
where host is the name of the system the share is on, share is the name of the Win-dows share that you want to mount, and dir is the absolute pathname of the Linuxdirectory that you are mounting the share on (the mount point).
The following command, when run with root privileges, mounts on the /sharedirectory the share used in the preceding example:
$ sudo mount -t cifs //jam/d /share -o username=samPassword:$ ls /shareLinux RECYCLER audit laptop.dataPSFONTS System Volume Information data oldfonts
You can omit the username argument and provide a blank password to mountshares that are visible to the guest user. Use the uid, file_mode, and dir_mode mountoptions with type cifs filesystems to establish ownership and permissions ofmounted files.
$ sudo mount -t cifs //jam/d /share -o username=sam,uid=sam,file_mode=0644,dir_mode=0755
Permissions must be expressed as octal numbers preceded by a zero. For more infor-mation refer to the mount.cifs man page.
Troubleshooting
Samba provides two utilities that can help troubleshoot a connection: testparmchecks the syntax of /etc/samba/smb.conf and displays its contents; smbstatus dis-plays a report on open Samba connections.
The following steps can help you narrow down the problem when you cannot getSamba to work.
1. Restart the Samba daemons. Make sure the last line of output ends with OK.
$ sudo /etc/init.d/samba restart * Stopping Samba daemons... [ OK ] * Starting Samba daemons... [ OK ]

842 Chapter 24 Samba: Linux and Windows File and Printer Sharing
testparm 2. Run testparm to confirm that the smb.conf file is syntactically correct:
$ testparmLoad smb config files from /etc/samba/smb.confProcessing section "[printers]"Processing section "[print$]"Processing section "[pl5]"Loaded services file OK.Server role: ROLE_STANDALONEPress enter to see a dump of your service definitions...
If you misspell a keyword in smb.conf, you get an error such as the following:
$ testparmLoad smb config files from /etc/samba/smb.confUnknown parameter encountered: "workgruop"Ignoring unknown parameter "workgruop"...
ping 3. Use ping (page 375) from both sides of the connection to make sure the network is up.
Firewall 4. Confirm the firewall on the server is not blocking the Samba connection (page 825).
Password 5. Make sure you have set up a password for the Samba user you are trying to log in as.
net view 6. From a Windows command prompt, use net view to display a list of shares available from the server (dog in this example):
C:>net view \\dogShared resources at \\dog
Samba 3.0.24
Share name Type Used as Comment
--------------------------------------------------------------------backup Disk The backup partitiondogprinter Print HP Laserjet 1320homes Disk Home Directoriesp04 Disk O: common backed-up directory...The command completed successfully.
net use 7. Try to map (mount) the drive from a Windows command prompt. The fol-lowing command attempts to mount the share named p04 on dog as drive X:
C:>net use x: \\dog\p04The command completed successfully.
nmblookup 8. From the Samba server, query the nmbd server, using the special name __SAMBA__ for the server’s NetBIOS name. The –d 2 option turns the debugger on at level 2, which generates a moderate amount of output. The –B option specifies the server you are querying.

Troubleshooting 843
$ nmblookup -d 2 -B localhost __SAMBA__added interface ip=192.168.0.10 bcast=192.168.0.127 nmask=255.255.255.128querying __SAMBA__ on 127.0.0.1Got a positive name query response from 127.0.0.1 ( 192.168.0.10 )192.168.0.10 __SAMBA__<00>
The next example uses nmblookup, without setting the debug level, to query the local system for all NetBIOS names.
$ nmblookup -B localhost \*querying * on 127.0.0.1192.168.0.10 *<00>
To query for the master browser from the local server, run nmblookup with the –A option followed localhost or the name of the server:
$ nmblookup -A localhostLooking up status of 127.0.0.1 PLUM <00> - H <ACTIVE> PLUM <03> - H <ACTIVE> PLUM <20> - H <ACTIVE> ..__MSBROWSE__. <01> - <GROUP> H <ACTIVE> MGS <1d> - H <ACTIVE> MGS <1e> - <GROUP> H <ACTIVE> MGS <00> - <GROUP> H <ACTIVE>
MAC Address = 00-00-00-00-00-00
smbclient 9. From the Samba server, use smbclient with the –L option followed by the name of the server to generate a list of shares offered by the server:
$ smbclient -L localhostPassword: RETURN (do not enter a password)Anonymous login successfulDomain=[MGS] OS=[Unix] Server=[Samba 3.0.24]
Sharename Type Comment --------- ---- ------- IPC$ IPC IPC Service (plum server (Samba, Ubuntu)) tmp Disk mgs comment tmp pl5 Disk print$ Disk Printer DriversAnonymous login successfulDomain=[MGS] OS=[Unix] Server=[Samba 3.0.24]
Server Comment --------- ------- PLUM plum server (Samba, Ubuntu)
Workgroup Master --------- ------- MGS PLUM

844 Chapter 24 Samba: Linux and Windows File and Printer Sharing
Chapter Summary
Samba is a suite of programs that enables Linux and Windows to share directoryhierarchies and printers. A directory hierarchy or printer that is shared betweenLinux and Windows systems is called a share. To access a share on a Linux system,a Windows user must supply a username and password. Usernames must corre-spond to Linux usernames either directly or as mapped by the file that is pointed toby the username map parameter in smb.conf, often /etc/samba/smbusers. Sambapasswords are generated by smbpasswd.
The main Samba configuration file is /etc/samba/smb.conf, which you can editusing the Shared Folders window, swat (a Web-based administration utility), or atext editor. The swat utility is a powerful configuration tool that provides integratedonline documentation and clickable default values to help you set up Samba.
From a Windows machine, you can access a share on a Linux Samba server byopening My Computer or Explorer and, in the text box labeled Address, entering \\followed by the name of the server. In response, Windows displays the shares on theserver. You can work with these shares as though they were Windows files.
From a Linux system, you can use any of several Samba tools to access Windowsshares. These tools include smbtree (displays shares), smbclient (similar to ftp), andmount with the –t cifs option (mounts shares). In addition, you can enter smb:/// inthe Nautilus location bar and browse the shares.
Exercises
1. Which two daemons are part of the Samba suite? What does each do?
2. What steps are required for mapping a Windows user to a Linux user?
3. How can a system administrator add a Samba password for a new user?
4. What is the purpose of the [homes] share?
Advanced Exercises
5. Describe how Samba’s handling of users differs from that of NFS.
6. Which configuration changes would you need to apply to routers if you wanted to allow SMB/CIFS browsing across multiple subnets without con-figuring master browsers?
7. How could you use swat securely from a remote location?
8. $ sudo WINS resolution allows hosts to define their own names. Suggest a way to use Samba to assign names from a centralized list.

845845
25Chapter25DNS (Domain Name System) maps domain names to IPaddresses, and vice versa. It reduces the need for humans towork with IP addresses, which, with the introduction of IPv6,are complex. The DNS specification defines a secure, general-purpose database that holds Internet host information. It alsospecifies a protocol that is used to exchange this information.Further, DNS defines library routines that implement the pro-tocol. Finally, DNS provides a means for routing email.Under DNS, nameservers work with clients, called resolvers,to distribute host information in the form of resource recordsin a timely manner as needed.
This chapter describes BIND (Berkeley Internet Name Domain)version 9, a popular open-source implementation of DNS. Partof the Ubuntu Linux distribution, BIND includes the DNSserver daemon (named), a DNS resolver library, and tools forworking with DNS. Although DNS can be used for private net-works, this chapter covers DNS as used by the Internet.
In This Chapter
Introduction to DNS . . . . . . . . . . . 846
JumpStart I: Setting Up a DNS Cache . . . . . . . . . . . . . . . . . . . . . 858
Setting Up BIND . . . . . . . . . . . . . . 860
Troubleshooting . . . . . . . . . . . . . . 872
A Full-Functioned Nameserver . . . 873
A Slave Server . . . . . . . . . . . . . . . . 877
A Split Horizon Server. . . . . . . . . . 878
25
DNS/BIND: Tracking
Domain Names and
Addresses

846 Chapter 25 DNS/BIND: Tracking Domain Names and Addresses
Introduction to DNS
You typically use DNS when you display a Web page. For example, to displayUbuntu’s home page, you enter its name, www.ubuntu.com, in a browser; thebrowser then displays the page you want. You never enter or see the IP address forthe displayed page. However, without the IP address, the browser could not displaythe page. DNS works behind the scenes to find the IP address when you enter thename in the browser. The DNS database is
• Hierarchical, so it provides quick responses to queries. DNS has a root, branches, and nodes.
• Distributed, so it offers fast access to servers. The DNS database is spread across thousands of systems worldwide; each system is referred to as a DNS server (or a domain server or nameserver).
• Replicated, to enhance reliability. Because many systems hold the same information, when some systems fail, DNS does not stop functioning.
As implemented, DNS is
• Secure, so your browser or email is directed to the correct location.
• Flexible, so it can adapt to new names, deleted names, and names whose information changes.
• Fast, so Internet connections are not delayed by slow DNS lookups.
History The mapping that DNS does was originally handled statically in a /etc/hosts file(page 559) on each system on a network. Small LANs still make use of this file. Asnetworks—specifically the Internet—grew, a dynamic mapping system was required.DNS was specified in 1983 and BIND became part of BSD in 1985. Today BIND isby far the most popular implementation of DNS.
Security Historically BIND has not been very secure. Recently, however, developers have focusedon improving the security of BIND. You may want to run BIND inside a chroot jail(page 870) and use transaction signatures (TSIG, page 868) to improve security.
host and dig The host and dig utilities (page 378) query DNS servers. The host utility is simpler, iseasier to use, and returns less information than dig. This chapter uses both tools toexplore DNS.
Nodes, Domains, and Subdomains
Node Each node in the hierarchical DNS database is called a domain and is labeled with a(domain) name. As with the Linux file structure, the node at the top of the DNShierarchy is called the root node or root domain. While the Linux file structure sep-arates the nodes (directory and ordinary files) with slashes (/) and labels the rootnode (directory) with a slash, the DNS structure uses periods in place of the filestructure’s slashes (Figure 25-1).
You read an absolute pathname in a Linux filesystem from left to right: It startswith the root directory (/) at the left and, as you read to the right, describes the path

Introduction to DNS 847
to the file being identified (for example, /var/spool/cups). Unlike a Linux path-name, you read a DNS domain name from right to left: It starts with the rootdomain at the right (represented by a period [.]) and, as you read to the left, worksits way down through the top-level and second-level domains to a subdomain orhost. Frequently the name of the root domain (the period at the right) is omittedfrom a domain name.
Domain The term domain refers both to a single node in the DNS domain structure and to acatenated, period-separated list (path) of domain names that describes the locationof a domain.
FQDN A fully qualified domain name (FQDN) is the DNS equivalent of a filesystem’sabsolute pathname: It is a pointer that positively locates a domain on the Internet.Just as you (and Linux) can identify an absolute pathname by its leading slash (/)that names the root directory, so an FQDN can be identified by its trailing period (.)that names the root domain (Figure 25-2).
Figure 25-1 The DNS domain structure (FQDNs are shown below hostnames.)
ubuntuubuntu.com
berkeleyberkeley.edu
sobellsobell.com
netcom edu
wikiwiki.ubuntu.com
releasesreleases.ubuntu.com
liblib.berkeley.edu
hrwebhrweb.berkeley.edu
. (root)Rootdomain
Top-leveldomains
Second-leveldomains
Subdomains or hosts
Figure 25-2 A fully qualified domain name (FQDN)
wiki.ubuntu.com.
Root domainTop-level domain
Second-level domainSubdomain or hostname
Period separating parts of an FQDN

848 Chapter 25 DNS/BIND: Tracking Domain Names and Addresses
Resolver The resolver comprises the routines that turn an unqualified domain name into anFQDN that is passed to DNS to be mapped to an IP address. The resolver canappend several domains, one at a time, to an unqualified domain name, producingseveral FQDNs that it then passes, one at a time, to DNS. For each FQDN, DNSreports success (it found the FQDN and is returning the corresponding IP address)or failure (the FQDN does not exist).
The resolver always appends the root domain (.) to an unqualified domain name first,thereby allowing you to type www.sobell.com instead of www.sobell.com. (includingthe trailing period) in a browser. You can specify other domains for the resolver to tryif the root domain fails. Put the domain names, in the order you want them tried,after the search keyword in /etc/resolv.conf (page 561). For example, if your searchdomains include ubuntu.com., then the domains wiki and wiki.ubuntu.com. willresolve to the same address.
Subdomains Each node in the domain hierarchy is a domain. Each domain that has a parent (thatis, every domain except the root domain) is also a subdomain, regardless of whetherit has children. All subdomains can resolve to hosts—even those with children. Forexample, the ubuntu.com. domain resolves to the host that serves the Ubuntu Website, without preventing its children—domains such as wiki.ubuntu.com—fromresolving. The leftmost part of an FQDN is often called the hostname.
Hostnames In the past, hostnames could contain only characters from the set a–z, A–Z, 0–9,and –. As of March 2004, however, hostnames can include various accents,umlauts, and so on (www.switch.ch/id/idn). DNS considers uppercase and lower-case letters to be the same (it is not case sensitive), so www.sobell.com is the same asWWW.sObEll.coM.
Zones
For administrative purposes, domains are grouped into zones that extend down-ward from a domain (Figure 25-3). A single DNS server is responsible for (holds theinformation required to resolve) all domains within a zone. The DNS server for azone also holds pointers to DNS servers that are responsible for the zones immedi-ately below the zone it is responsible for. Information about zones originates in zonefiles, one zone per file.
Root domain The highest zone—the one containing the root domain—does not contain anyhosts. Instead, this domain delegates to the DNS servers for the top-level domains(Figure 25-1, page 847).
Authority Each zone has at least one authoritative DNS server. This server holds all informa-tion about the zone. A DNS query returns information about a domain and speci-fies which DNS server is authoritative for that domain.
DNS employs a hierarchical structure to keep track of names and authority. At the topor root of the structure is the root domain, which employs 13 authoritative nameserv-ers. These are the only servers that are authoritative for the root and top-level domains.

Introduction to DNS 849
Delegation ofauthority
When referring to DNS, the term delegation means delegation of authority. ICANN(Internet Corporation for Assigned Names and Numbers, www.icann.org) delegatesauthority to the root and top-level domains. In other words, ICANN says whichservers are authoritative for these domains. Authority is delegated to each domainbelow the top-level domains by the authoritative server at the next-higher-leveldomain. ICANN is not authoritative for most second-level domains. For example,Ubuntu is authoritative for the ubuntu.com domain. This scheme of delegatingauthority allows for local control over segments of the DNS database while makingall segments available to the public.
Queries
There are two types of DNS queries: iterative and recursive.1
Iterative query An iterative query sends a domain name to a DNS server and asks the server toreturn either the IP address of the domain or the name of the DNS server that isauthoritative for the domain or one of its parents: The server does not query otherservers when seeking an answer. Nameservers typically send each other iterativequeries.
Recursive query A recursive query sends a domain name to a DNS server and asks the server toreturn the IP address of the domain. The server may need to query other servers toget the answer.
Both iterative and recursive queries can fail. In this case, the server returns a mes-sage saying it is unable to locate the domain.
Figure 25-3 DNS structure showing zones
org comedu gov
. (root)
ubuntu
smtp
example
ftp
site2www site1
1. A third type of query is not covered in this book: inverse. An inverse query provides a domain namegiven a resource record. Reverse name resolution (page 855), not an inverse query, is used to query for adomain name given an IP address.

850 Chapter 25 DNS/BIND: Tracking Domain Names and Addresses
When a client, such as a browser, needs the IP address that corresponds to a domainname, the client queries a resolver. Most resolvers are quite simple and require aDNS server to do most of the work—that is, they send recursive queries. Theresolver communicates with a single DNS server, which can perform multiple itera-tive queries in response to the resolver’s recursive query.
All DNS servers must answer iterative queries. DNS servers can also be set up toanswer recursive queries. A DNS server that is not set up to answer recursive que-ries treats a recursive query as though it is an iterative query.
In Figure 25-4, the resolver on a client system is trying to discover the IP address ofthe server ftp.site1.example.com. on the network with the DNS layout shown inFigure 25-3 on page 849. The resolver on the client sends a recursive query to itsprimary DNS server. This server interrogates the root server and one additionalserver for each zone until it receives an answer, which it returns to the resolver onthe client. In practice, the query would not start with the root server because mostservers have the location of the authoritative nameserver for the com. domainstored in cache (memory).
Servers
There are three main types of DNS servers: primary (master), secondary (slave), andcaching-only.
• A primary master server, also called a primary server or master server, is the authoritative server that holds the master copy of zone data. It copies information from the zone or master file, a local file that the server admin-istrator maintains. For security and efficiency, a primary master server should provide iterative answers only. A primary master server that pro-vides recursive answers is more easily subverted by a DoS attack(page 1034) than one that provides iterative answers only.
Figure 25-4 A recursive query that starts several iterative queries to find the answer
2. Do you know the addressof ftp.site1.example.com.?
3. No, but DNS server 1 should.
4. Do you know the addressof ftp.site1.example.com.?
5. No, but DNS server 2 should.
6. Do you know the addressof ftp.site1.example.com.?
7. No, but DNS server 3 should.
8. Do you know the addressof ftp.site1.example.com.?
9. Yes, here it is.
Root DNSserver
Authoritativeserver for
Authoritativeserver for
Authoritativeserver for
Client’sprimaryDNSserver
1. Do you knowthe addressof ftp.site1.-example.com.?
10. Yes,here it is.
Resolver
example.com
com
site1.example.com

Introduction to DNS 851
• Slave servers, also called secondary servers, are authoritative and copy zone information from the primary master server or another slave server. On some systems, when information on the primary master server changes, the primary master server notifies the slave servers. When a slave receives such a message, it uses a process called zone transfer to copy the new zone information from the master server to itself.
• DNS caches, also called caching-only servers, are not authoritative. These servers store answers to previous queries in cache (memory). When a DNS cache receives a query, it answers it from cache if it can. If the DNS cache does not have the answer in cache, it forwards the query to an authoritative server.
It is possible—but for reasons of security not recommended—for the same server tobe the primary master server (authoritative) for some zones and a DNS cache forothers. When the same server acts as both a DNS cache and a master server, if amalicious local user or malfunctioning resolver on the local network floods theDNS cache with more traffic than it can handle (a DoS attack), users may be pre-vented from accessing the public servers handled by the primary master server. Con-versely, if the authoritative server is compromised, the attacker can subvert alltraffic leaving the network.
Resource Records
Resource records store information about nodes (domains) in the DNS databaseand are kept in zone files (page 863). The zone that a resource record pertains to isdefined by the zone file that contains the resource record. The zone is named in thenamed.conf file (page 860) that references the zone file.
A resource record has the following fields:
• Name The domain name or IP address
• TTL Time to live (not in all resource records; see page 1066)
• Class Always IN for Internet (the only class supported by DNS)
• Type Record type (discussed in the next section)
• Data Varies with record type
If the Name field is missing, the resource record inherits the name from the previousresource record in the same file. Cached resource records become out-of-date whenthe information in the record changes on the authoritative server. The TTL fieldindicates the maximum amount of time a server may keep a record in cache beforechecking whether a newer one is available. Typically the TTL is on the order ofdays. A TTL of 0 (zero) means that the resource record should not be cached.
More than 30 types of resource records exist, ranging from common types, such asaddress records that store the address of a host, to those that contain geographicalinformation. The following paragraphs describe the types of resource records youare most likely to encounter.

852 Chapter 25 DNS/BIND: Tracking Domain Names and Addresses
A IPv4 Address Maps a domain name to the IPv4 address of a host. There must beat least one address record for each domain; multiple address records can point tothe same IP address. The Name field holds the domain name, which is assumed tobe in the same zone as the domain. The Data field holds the IP address associatedwith the name. The following address resource record maps the ns domain in thezone to 192.168.0.1:
ns IN A 192.168.0.1
AAAA IPv6 Address Maps a domain name to the IPv6 address of a host. The followingaddress resource record maps the ns domain in the zone to an IPv6 address:
ns IN AAAA 2001:630:d0:131:a00:20ff:feb5:ef1e
CNAME Canonical Name Maps an alias or nickname to a domain name. The Name fieldholds the alias or nickname; the Data field holds the official or canonical name.CNAME is useful for specifying an easy-to-remember name or multiple names forthe same domain. It is also useful when a system changes names or IP addresses. Inthis case the alias can point to the real name that must resolve to an IP address.
When a query returns a CNAME, a client or DNS tool performs a DNS lookup on thedomain name returned with the CNAME. It is acceptable to provide multiple levels ofCNAME records. The following resource record maps ftp in the zone to www.sam.net.:
ftp IN CNAME www.sam.net.
MX Mail Exchange Specifies a destination for mail addressed to the domain. MXrecords must always point to A (or AAAA) records. The Name field holds thedomain name, which is assumed to be in the zone; the Data field holds the name ofa mail server preceded by its priority. Unlike A records, MX records contain a prior-ity number that allows mail delivery agents to fall back to a backup server if the pri-mary server is down. Several mail servers can be ranked in priority order, where thelowest number has the highest priority. DNS selects randomly from among mailservers with the same priority. The following resource records forward mail sent tospeedy in the zone first to mail in the zone and then, if that attempt fails, tomail.sam.net. . The value of speedy in the Name field on the second line is implicit.
speedy IN MX 10 mailIN MX 20 mail.sam.net.
NS Nameserver Specifies the name of the system that provides domain service (DNSrecords) for the domain. The Name field holds the domain name; the Data fieldholds the name of the DNS server. Each domain must have at least one NS record.DNS servers do not need to reside in the domain and, in fact, it is better if at leastone does not. The system name ns is frequently used to specify a nameserver, but thisname is not required and does not have any significance beyond assisting humans inidentifying a nameserver. The following resource record specifies ns.max.net. as anameserver for peach in the zone:
peach IN NS ns.max.net.
PTR Pointer Maps an IP address to a domain name and is used for reverse name resolu-tion. The Name field holds the IP address; the Data field holds the domain name.Do not use PTR resource records with aliases. The following resource record maps

Introduction to DNS 853
3 in a reverse zone (for example, 3 in the 0.168.192.in-addr.arpa zone is192.168.0.3) to peach in the zone:
3 IN PTR peach
For more information refer to “Reverse Name Resolution” on page 855.
SOA Start of Authority Designates the start of a zone. Each zone must have exactly oneSOA record. An authoritative server maintains the SOA record for the zone it isauthoritative for.
All zone files must have one SOA resource record, which must be the first resourcerecord in the file. The Name field holds the name of the domain at the start of thezone. The Data field holds the name of the host the data was created on, the emailaddress of the person responsible for the zone, and the following information,which must be enclosed within parentheses if the record does not fit on one line. Ifthis information is enclosed within parentheses (and it usually is), the openingparenthesis must appear on the first physical line of the SOA record:
serial A value in the range 1 to 2,147,483,647. A change in this number indicatesthe zone data has changed. By convention, this field is set to the string yyyymmddnn(year, month, day, change number). Along with the date, the final two digits—that is,the change number—should be incremented each time you change the SOA record.
refresh The elapsed time after which the primary master server notifies slave (sec-ondary) servers to refresh the record; the amount of time between updates.
retry The time to wait after a refresh fails before trying to refresh again.
expiry The elapsed time after which the zone is no longer authoritative and theroot servers must be queried. The expiry applies to slave servers only.
minimum The negative caching (page 1049) TTL, which is the amount of timethat a nonexistent domain error (NXDOMAIN) can be held in a slave server’scache. A negative caching TTL is the same as a normal TTL except that it applies todomains that do not exist rather than to domains that do exist.
The $TTL directive (page 863) specifies the default zone TTL (the maximumamount of time data stays in a slave server’s cache). Jointly, the default zone TTLand the negative caching TTL encompass all types of replies the server can generate.If you will be adding subdomains or modifying existing domains frequently, set thenegative caching TTL to a low number. A short TTL increases traffic to DNS for cli-ents requesting domains that do not exist, but allows new domains to propagatequickly, albeit at the expense of increased traffic.
The following two SOA resource records are equivalent (the parentheses in the firstrecord are optional because the record fits on one physical line):
@ IN SOA ns.zach.net. [email protected]. ( 2007111247 8H 2H 4W 1D )
@ IN SOA ns.zach.net. [email protected]. (2007111247 ; serial8H ; refresh2H ; retry4W ; expire1D ) ; minimum

854 Chapter 25 DNS/BIND: Tracking Domain Names and Addresses
The second format is more readable because of its layout and the comments. The atsymbol (@) at the start of the SOA resource record stands for the zone name (alsocalled the origin) as specified in the named.conf file. Because the named.conf filespecifies the zone name to be zach.net, you could rewrite the first line as follows:
zach.net. IN SOA ns.zach.net. [email protected]. (
The host utility returns something closer to the first format with each of the timesspecified in seconds:
$ host -t soa zach.netzach.net. SOA ns.zach.net. mgs\@sobell.com. 03111 28800 7200 2419200 86400
TXT Text Associates a character string with a domain. The Name field holds thedomain name. The data field can contain up to 256 characters and must be enclosedwithin quotation marks. TXT records can contain any arbitrary text value. As wellas general information, they can be used for things such as public key distribution.Following is a TXT resource record that specifies a company name:
zach.net IN TXT "Sobell Associates Inc."
DNS Query and Response
Query A DNS query has three parts:
1. Name Domain name, FQDN, or IP address for reverse name resolution
2. Type Type of record requested (page 851)
3. Class Always IN for Internet class
Cache Most DNS servers store in cache memory the query responses from other DNSservers. When a DNS server receives a query, it first tries to resolve the queryfrom its cache. If that attempt fails, the server may query other servers to get ananswer. Because DNS uses cache, when you make a change to a DNS record, thechange takes time—sometimes a matter of days—to propagate throughout theDNS hierarchy.
Response A DNS message sent in response to a query has the following structure:
• Header record Information about this message
• Query record Repeats the query
• Answer records Resource records that answer the query
• Authority records Resource records for servers that have authority for the answers
• Additional records Additional resource records, such as NS records
The dig utility does not consult /etc/nsswitch.conf (page 542) to determine whichserver to query. The following example uses dig to query a DNS server:

Introduction to DNS 855
$ dig ubuntu.com
; <<>> DiG 9.3.2 <<>> ubuntu.com;; global options: printcmd;; Got answer:;; ->>HEADER<<- opcode: QUERY, status: NOERROR, id: 61389;; flags: qr rd ra; QUERY: 1, ANSWER: 1, AUTHORITY: 3, ADDITIONAL: 4
;; QUESTION SECTION:;ubuntu.com. IN A
;; ANSWER SECTION:ubuntu.com. 600 IN A 82.211.81.166
;; AUTHORITY SECTION:ubuntu.com. 2823 IN NS ns.ubuntu.com.ubuntu.com. 2823 IN NS ns0.blackcatnetworks.co.uk.ubuntu.com. 2823 IN NS ns1.blackcatnetworks.co.uk.
;; ADDITIONAL SECTION:ns.ubuntu.com. 77912 IN A 82.211.81.173ns0.blackcatnetworks.co.uk. 39247 IN A 193.201.200.34ns0.blackcatnetworks.co.uk. 39247 IN AAAA 2001:1b40:0:20::34ns1.blackcatnetworks.co.uk. 39247 IN A 69.55.225.40...
Reverse Name Resolution
In addition to normal or forward name resolution, DNS provides reverse name res-olution (also referred to as inverse mapping or reverse mapping) so you can look updomain names given an IP address. Because resource records in the forward DNSdatabase are indexed hierarchically by domain name, DNS cannot perform an effi-cient search by IP address on this database.
DNS implements reverse name resolution by means of special domains namedin-addr.arpa (IPv4) and ip6.int (IPv6). Resource records in these domains haveName fields that hold IP addresses; the records are indexed hierarchically by IPaddress. The Data fields hold the FQDNs that correspond to these IP addresses.
Reverse name resolution can verify that someone is who he says he is or at least isfrom the domain he says he is from. In general, it allows a server to retrieve andrecord the domain names of the clients it provides services to. For example, legiti-mate mail contains the domain of the sender and the IP address of the sendingmachine. A mail server can verify the stated domain of a sender by checking thedomain associated with the IP address. Reverse name resolution can also be used byanonymous FTP servers to verify that a domain specified in an email address used asa password is legitimate.
For example, to determine the domain name that corresponds to the IP address82.211.81.150 in Figure 25-5, a resolver would query DNS for information aboutthe domain named 150.81.211.82.in-addr.arpa.

856 Chapter 25 DNS/BIND: Tracking Domain Names and Addresses
The following example uses dig to query DNS for the IP address that corresponds towww.sobell.com, which is 209.157.128.22. The second command line uses the digutility to query the same IP address, reversed and appended with .in-addr.arpa(22.128.157.209.in-addr.arpa) to display a PTR resource record (page 852). Thedata portion of the resultant resource record is the domain name from the originalquery: www.sobell.com.
$ dig www.sobell.com...;; QUESTION SECTION:;www.sobell.com. IN A
;; ANSWER SECTION:www.sobell.com. 2274 IN A 209.157.128.22...
$ dig 22.128.157.209.in-addr.arpa PTR...;; QUESTION SECTION:;22.128.157.209.in-addr.arpa. IN PTR
;; ANSWER SECTION:22.128.157.209.in-addr.arpa. 2244 IN PTR www.sobell.com....
Instead of reformatting the IP address as in the preceding example, you can use the–x option to dig to perform a reverse query:
Figure 25-5 Reverse name resolution and the in-addr.arpa domain
.
com arpanet
in-addr
11182
sobell ubuntu
help wiki
233211
81 229
150PTR

About DNS 857
$ dig -x 209.157.128.22...;; QUESTION SECTION:;22.128.157.209.in-addr.arpa. IN PTR
;; ANSWER SECTION:22.128.157.209.in-addr.arpa. 2204 IN PTR www.sobell.com....
Alternatively, you can just use host:
$ host 209.157.128.2222.128.157.209.in-addr.arpa domain name pointer www.sobell.com.
About DNS
This section discusses how DNS works and identifies resources you can consult foradditional information on DNS.
How DNS Works
Application programs do not issue DNS queries directly but rather use thegethostbyname() system call. How the system comes up with the corresponding IPaddress is transparent to the calling program. The gethostbyname() call examinesthe hosts line in /etc/nsswitch.conf file (page 542) to determine which files it shouldexamine and/or which services it should query and in what order to obtain the IPaddress corresponding to a domain name. When it needs to query DNS, the localsystem (i.e., the DNS client) queries the DNS database by calling the resolver libraryon the local system. This call returns the required information to the applicationprogram.
Prerequisites
Installation Install the following packages:
• bind9
• bind9-doc (optional; installs bind documentation)
• dnsutils (optional; installs dig, nslookup, and nsupdate)
bind9 init script When you install the bind9 package, the dpkg postinst script starts the named daemon.After you configure BIND, call the bind9 init script to restart the named daemon:
$ sudo /etc/init.d/named restart
After changing the BIND configuration on an active server, use reload in place ofrestart to reload named configuration files without disturbing clients connected to theserver. By default, starting or restarting—but not reloading—named runs resolvconf,which rebuilds the /etc/resolv.conf file. See “named options” on page 858 for moreinformation.

858 Chapter 25 DNS/BIND: Tracking Domain Names and Addresses
More Information
DNS for Rocket Scientists is an excellent site that makes good use of links topresent information on DNS in a very digestible form. The same information isavailable in the Pro DNS and BIND book.
Local Bind Administrator Reference Manual/usr/share/doc/bind9-doc/arm/Bv9ARM.html.
Web DNS for Rocket Scientists www.zytrax.com/books/dnsBIND www.isc.org/products/BINDDNS security www.sans.org/reading_room/whitepapers/dns/1069.php
(downloadable PDF file)
HOWTO DNS HOWTO
Book DNS & BIND, fifth edition, by Albitz & Liu, O’Reilly & Associates (May 2006)Pro DNS and BIND, first edition, by Ron Aitchison, Apress (August 2005)
Notes
Terms:DNS and named
The name of the DNS server is named. This chapter uses “DNS” and “named”interchangeably.
Firewall The named server normally accepts queries on TCP and UDP port 53. If the serversystem is running a firewall, you need to open these ports. Using firestarter(page 886), open this port by setting a policy that allows service for DNS.
chroot jail The bind-chroot.sh script sets up named to run in a chroot jail. After you run thisscript, all files that control BIND are located within this jail. In this case the file-names used in this chapter are symbolic links to the files in the chroot jail. Seepage 870 for more information.
named options When the bind9 init script starts or restarts the named server, but not when it justreloads the configuration files, it reads the options in the /etc/default/bind9 file. If theRESOLVCONF variable is set to yes (as it is by default), the script runs resolvconf,which rebuilds /etc/resolv.conf. You can cause the script not to run resolvconf by set-ting RESOLVCONF to no.
$ cat /etc/default/bind9OPTIONS="-u bind"# Set RESOLVCONF=no to not run resolvconfRESOLVCONF=yes
JumpStart: Setting Up a DNS Cache
As explained earlier, a DNS cache is a bridge between a resolver and authoritativeDNS servers: It is not authoritative, but simply stores the results of its queries inmemory. Most ISPs provide a DNS cache for the use of their customers. Setting up alocal cache can reduce the traffic between the LAN and the outside world, therebyimproving response times. While it is possible to set up a DNS cache on each systemon a LAN, setting up a single DNS cache on a LAN prevents multiple systems onthe LAN from having to query a remote server for the same information.

JumpStart: Setting Up a DNS Cache 859
After installing BIND, you have most of a caching-only nameserver ready to run.Refer to “A DNS Cache” (page 864) for an explanation of which files this name-server uses and how it works.
resolvconf andresolv.conf
Before you start the DNS cache, you need to modify the /etc/resolv.conf file(page 561). How you go about modifying this file depends on whether the resolvconfpackage is installed and set up to run on the local system. When you give the commandresolvconf, a usage message tells you the package is installed, whereas a command notfound message tells you it is not installed.
If resolvconf is not installed or you have turned it off as explained in “namedoptions,” put the following line in /etc/resolv.conf, before other nameserver lines:
nameserver 127.0.0.1
If resolvconf is installed and is set up to rebuild resolv.conf when you run the bind9init script (page 857), put the preceding line in /etc/resolvconf/resolv.conf.d/head,following the comments and before any other nameserver lines. You can ignore thecomment telling you not to edit the file: This comment is intended for someone who istrying to edit /etc/resolv.conf. You must put this line in the head file so resolvconf putsit in resolv.conf before any other nameserver lines; otherwise the local DNS cache willnever be used. Put other nameserver lines in base in the same directory as needed.
The nameserver line tells the resolver to use the local system (localhost or127.0.0.1) as the primary nameserver. To experiment with using the local system asthe only nameserver, comment out other nameserver lines in resolv.conf or base bypreceding each with a pound sign (#).
Finally, run the bind9 init script to restart the named daemon (page 857). When you doso, if resolvconf is installed and set up to run, the bind9 init script will rebuild resolv.conf.See the resolver and resolv.conf man pages for more information on resolv.conf.
Refer to “Troubleshooting” on page 872 for ways to confirm that the DNS cache isworking. Once you have restarted named, you can see the effect of the cache byusing dig to look up the IP address of www.ubuntu.com, a remote system:
$ dig www.ubuntu.com
; <<>> DiG 9.3.4 <<>> www.ubuntu.com;; global options: printcmd;; Got answer:;; ->>HEADER<<- opcode: QUERY, status: NOERROR, id: 59184;; flags: qr rd ra; QUERY: 1, ANSWER: 1, AUTHORITY: 3, ADDITIONAL: 3
;; QUESTION SECTION:;www.ubuntu.com. IN A
;; ANSWER SECTION:www.ubuntu.com. 60 IN A 82.211.81.199...;; Query time: 496 msec;; SERVER: 127.0.0.1#53(127.0.0.1);; WHEN: Wed Apr 25 16:08:17 2007;; MSG SIZE rcvd: 183
860 Chapter 25 DNS/BIND: Tracking Domain Names and Addresses
The fourth line from the bottom of the example on the preceding page shows thatthis query took 496 milliseconds (about one-half of a second). When you run thesame query again, it runs more quickly because the DNS cache has saved the infor-mation locally in memory:
$ dig www.ubuntu.com...;; Query time: 1 msec;; SERVER: 127.0.0.1#53(127.0.0.1);; WHEN: Wed Apr 25 16:08:23 2007;; MSG SIZE rcvd: 183
Setting Up BIND
This section discusses the /etc/named.conf file, zone files, implementation of a DNScache, and running DNS inside a chroot jail.
named.conf: The named Configuration File
Configuration information for named, including zone names and the names andlocations of zone files, is kept in /etc/bind/named.conf. By default, the zone filesreside in /etc/bind. If you are running named in a chroot jail, these files are kept in/var/lib/named/etc/bind, with a link in /etc/bind (page 870).
IP-list
In the descriptions in this section, IP-list is a semicolon-separated list of IPaddresses, where each IP address is optionally followed by a slash and a subnetmask length (page 529). Prefix an IP-list with an exclamation point (!) to negate it.Builtin names you can use in IP-list include any, none, and localhost. You mustenclose these builtin names within double quotation marks.
Comments
Within named.conf, specify a comment by preceding it with a pound sign (#) as in aPerl or shell program, preceding it with a double slash (//) as in a C++ program, or
Try not to modify named.conftip The Ubuntu bind9 package breaks the named.conf file distributed with BIND into three files:
named.conf, named.conf.options, and named.conf.local. There are two motivations for breakingthis file apart. First, it makes the configuration files easier to understand. Second, it enables you toconfigure named without modifying named.conf. This setup allows the bind9 package to beupgraded, including changes to named.conf, without requiring you to modify the local configuration.
When you configure named, try to put your changes in the named.conf.options andnamed.conf.local files. For more complex setups it may be easier to modify named.conf andcarry those changes forward when bind9 is upgraded.

Setting Up BIND 861
enclosing it between /* and */ as in a C program. Within a DNS db.* file, a com-ment starts with a semicolon (;).
Included Files
An include statement within the named.conf file includes the file named as its argu-ment as though its contents appeared inline in the named.conf file. The defaultUbuntu named.conf file includes both the /etc/bind/named.conf.options and/etc/bind/named.conf.local files. The named.conf.options file holds the Optionsclause of named.conf. The named.conf.local file gives you a place to put local con-figuration information.
Options clause
Options statements can appear in two places: in the Options clause found innamed.conf.options and in the Zone clauses found in named.conf. Option state-ments within the Options clause apply globally. When an option statement appearsin a Zone clause, the option applies to the zone, and within that zone, overrides acorresponding global option.
An Options clause starts with the keyword options and continues with braces sur-rounding the statements. Following is a list of some option statements. Statementsthat can appear only in an Options clause and statements that cannot appear in aView clause (page 878) are so noted.
allow-query {IP-list}Allows queries from IP-list only. Without this option, the server responds to all queries.
allow-recursion {IP-list}Specifies systems for which this server will perform recursive queries (page 849).For systems not in IP-list, the server performs iterative queries only. Without thisoption, the server performs recursive queries for any system. This statement may beoverridden by the recursion statement.
allow-transfer {IP-list}Specifies systems that are allowed to perform zone transfers from this server. Specifyan IP-list of "none" (include the quotation marks) to prevent zone transfers. For amore secure network, include only trusted systems in IP-list because systems on thelist can obtain a list of all systems on the network.
directory path Specifies the absolute pathname of the directory containing the zone files. UnderUbuntu Linux, this directory is initially /var/cache/bind. Relative pathnamesspecified in named.conf are relative to this directory. Options clause only; not inView clause.
forward ONLY|FIRSTONLY forwards all queries and fails if it does not receive an answer. FIRST for-wards all queries and, if a query does not receive an answer, attempts to find ananswer using additional queries. Valid with the forwarders statement only.
862 Chapter 25 DNS/BIND: Tracking Domain Names and Addresses
forwarders {IP [port] [; ...]}Specifies IP addresses and optionally port numbers that queries are forwarded to.See the forward statement.
notify YES|NO YES sends a message to slave servers for the zone when zone information changes.Master servers only. See page 878.
recursion YES|NOYES (default) provides recursive queries (page 849) if the client requests. NO pro-vides iterative queries only (page 849). An answer is always returned if it appears inthe server’s cache. This statement overrides allow-recursion statements. Optionsclause only.
Zone Clause
A Zone clause defines a zone and can include any of the statements listed for theOptions clause except as noted. A Zone clause is introduced by the keyword zone,the name of the zone enclosed within double quotation marks, and the class (alwaysIN). The body of the Zone clause consists of a pair of braces surrounding one ormore zone statements. See the listing of named.conf on page 864 for examples ofZone clauses. Following is a list of some zone statements:
allow-update {IP-list}Specifies systems that are allowed to update this zone dynamically. This statementmay be useful when hosting a master DNS server for a domain owned by someoneother than the local administrator because it allows a remote user to update theDNS entry without granting the user access to the server.
file filename Specifies the zone file—the file that specifies the characteristics of the zone. Thefilename is relative to the directory specified by the directory statement in theOptions clause. The file statement is mandatory for master and hint zones. Includ-ing it for slave zones is a good idea (see type).
masters (IP-list) Specifies systems that a slave zone can use to update zone files. Slave zones only.
type ztype Specifies the type of zone defined by this clause. Choose ztype from the following list:
• forward Specifies a forward zone, which forwards queries directed to this zone. See the forward and/or forwarders statements in the Options clause.
• hint Specifies a hint zone. A hint zone lists root servers that the local server queries when it starts and when it cannot find an answer in its cache.
• master Specifies the local system as a primary master server (page 850) for this zone.
• slave Specifies the local system as a slave server (page 850) for this zone.

Setting Up BIND 863
Zone Files
Zone files define zone characteristics. The name of the zone is typically specified innamed.conf. In contrast to named.conf, zone files use periods at the ends of domainnames. See page 866 for example zone files.
Time Formats
All times in BIND files are given in seconds, unless they are followed by one ofthese letters (uppercase or lowercase): S (seconds), M (minutes), H (hours), D(days), or W (weeks). You can combine formats. For example, the time 2h25m30smeans 2 hours, 25 minutes, and 30 seconds and is the same as 8,730 seconds.
Domain Qualification
An unqualified domain in a zone file is assumed to be in the current zone (the zonedefined by the zone file and named by the named.conf file that refers to the zonefile). The name zach in the zone file for myzone.com, for example, would beexpanded to the FQDN zach.myzone.com. . Use an FQDN (include the trailingperiod) to specify a domain that is not in the current zone. Any name that does notend with a period is regarded as a subdomain of the current zone.
Zone Name
Within a zone file, an at sign (@) is replaced with the zone name as specified by thenamed.conf file that refers to the zone file. The zone name is also referred to as theorigin. See “$ORIGIN” in the next section.
Zone File Directives
The following directives can appear within a zone file. Each directive is identified bya leading dollar sign. The $TTL directive is mandatory and must be the first entry ina zone file.
$TTL Defines the default time to live for all resource records in the zone. This directivemust appear in a zone file before any resource records that it applies to. Anyresource record can include a TTL value that overrides this value, except for theresource record in the root zone (.).
$ORIGIN Changes the zone name from that specified in the named.conf file. This name, or thezone name if this directive does not appear in the zone file, replaces an @ sign in theName field of a resource record.
$INCLUDE Includes a file as though it were part of the zone file. The scope of an $ORIGINdirective within an included file is the included file. That is, an $ORIGIN direc-tive within an included file does not affect the file that holds the $INCLUDEdirective.

864 Chapter 25 DNS/BIND: Tracking Domain Names and Addresses
A DNS Cache
You install a DNS cache (also called a resolving, caching nameserver) when youinstall the bind9 package. The section “JumpStart I: Setting Up a DNS Cache”(page 858) explains how to run this server. This section describes how the files pro-vided by Ubuntu Linux implement this server.
named.conf: The named Configuration File
The default named.conf file is shown following:
$ cat /etc/bind/named.conf// This is the primary configuration file for the BIND DNS server named.//// Please read /usr/share/doc/bind9/README.Debian.gz for information on the// structure of BIND configuration files in Debian, *BEFORE* you customize// this configuration file.//// If you are just adding zones, please do that in /etc/bind/named.conf.local
include "/etc/bind/named.conf.options";
// prime the server with knowledge of the root serverszone "." { type hint; file "/etc/bind/db.root";};
// be authoritative for the localhost forward and reverse zones, and for// broadcast zones as per RFC 1912
zone "localhost" { type master; file "/etc/bind/db.local";};
zone "127.in-addr.arpa" { type master; file "/etc/bind/db.127";};
zone "0.in-addr.arpa" { type master; file "/etc/bind/db.0";};
zone "255.in-addr.arpa" { type master; file "/etc/bind/db.255";};
// zone "com" { type delegation-only; };// zone "net" { type delegation-only; };// From the release notes:// Because many of our users are uncomfortable receiving undelegated answers// from root or top level domains, other than a few for whom that behaviour

Setting Up BIND 865
// has been trusted and expected for quite some length of time, we have now// introduced the "root-delegations-only" feature which applies delegation-only// logic to all top level domains, and to the root domain. An exception list// should be specified, including "MUSEUM" and "DE", and any other top level// domains from whom undelegated responses are expected and trusted.// root-delegation-only exclude { "DE"; "MUSEUM"; };
include "/etc/bind/named.conf.local";
Options clause The Options clause is in named.conf.options; named.conf incorporates it with aninclude statement.
Zone clauses The named.conf file holds five Zone clauses, each of which uses an absolute filenameto locate its zone file. Any relative filenames appearing in this file would be relativeto /var/cache/bind, which the directory statement in named.conf.options points to.
• . (The name of the zone is a period.) The hint zone. Specifies that when the server starts or does not know which server to query, it should look in the /etc/bind/db.root file to find the addresses of authoritative servers for the root domain.
• localhost Sets up the normal server on the local system.
• 127.in-addr.arpa Sets up IPv4 reverse name resolution.
• 0.in-addr.arpa Specifies that the local server handle reverse lookup for IP addresses starting with 0, thereby preventing the local server from looking upstream for this information.
• 255.in-addr.arpa Specifies that the local server handle reverse lookup for IP addresses starting with 255, preventing the local server from looking upstream for this information.
named.conf.options: Options File
The named.conf.options file, which named.conf incorporates with an include state-ment, holds mostly comments with the following uncommented statements:
directory "/var/cache/bind";
auth-nxdomain no; # conform to RFC1035
listen-on-v6 { any; };
allow-recursion { localnets; };
The directory statement specifies the directory that all relative pathnames in thisfile, named.conf, and all other files incorporated in named.conf are relative to. If youare running named in a chroot jail, this directory is located under /var/lib/named(page 870). The auth-nxdomain no statement does not allow the server to answerauthoritatively on NXDOMAIN (nonexistent domain error; see negative caching[page 1049]) answers. The listen-on-v6 { any } statement enables the server to listenfor IPv6 queries on any address. The allow-recursion { localnets } statement specifiesthat the server perform recursive queries for systems on the local network (page 861).

866 Chapter 25 DNS/BIND: Tracking Domain Names and Addresses
Zone Files
There are five zone files in /etc/bind, each of which corresponds to one of the Zoneclauses in named.conf. This section describes three of these zone files.
The root zone:db.root
The hint zone file, db.root, is similar to the output of a dig @a.root-servers.net.command, which does not change frequently (check the date on the next-to-lastline). It specifies authoritative servers for the root domain. The DNS server initial-izes its cache from this file and can determine an authoritative server for anydomain from this information.
The root zone is required only for servers that answer recursive queries: If a serverresponds to recursive queries, it needs to perform a series of iterative queries start-ing at the root domain. Without the root domain hint file, it would not know whereto find the root domain servers.
$ cat /etc/bind/db.root; <<>> DiG 9.2.3 <<>> ns . @a.root-servers.net.;; global options: printcmd;; Got answer:;; ->>HEADER<<- opcode: QUERY, status: NOERROR, id: 18944;; flags: qr aa rd; QUERY: 1, ANSWER: 13, AUTHORITY: 0, ADDITIONAL: 13
;; QUESTION SECTION:;. IN NS
;; ANSWER SECTION:. 518400 IN NS A.ROOT-SERVERS.NET.. 518400 IN NS B.ROOT-SERVERS.NET.. 518400 IN NS C.ROOT-SERVERS.NET.. 518400 IN NS D.ROOT-SERVERS.NET.. 518400 IN NS E.ROOT-SERVERS.NET.. 518400 IN NS F.ROOT-SERVERS.NET.. 518400 IN NS G.ROOT-SERVERS.NET.. 518400 IN NS H.ROOT-SERVERS.NET.. 518400 IN NS I.ROOT-SERVERS.NET.. 518400 IN NS J.ROOT-SERVERS.NET.. 518400 IN NS K.ROOT-SERVERS.NET.. 518400 IN NS L.ROOT-SERVERS.NET.. 518400 IN NS M.ROOT-SERVERS.NET.
;; ADDITIONAL SECTION:A.ROOT-SERVERS.NET. 3600000 IN A 198.41.0.4B.ROOT-SERVERS.NET. 3600000 IN A 192.228.79.201C.ROOT-SERVERS.NET. 3600000 IN A 192.33.4.12D.ROOT-SERVERS.NET. 3600000 IN A 128.8.10.90E.ROOT-SERVERS.NET. 3600000 IN A 192.203.230.10F.ROOT-SERVERS.NET. 3600000 IN A 192.5.5.241G.ROOT-SERVERS.NET. 3600000 IN A 192.112.36.4H.ROOT-SERVERS.NET. 3600000 IN A 128.63.2.53I.ROOT-SERVERS.NET. 3600000 IN A 192.36.148.17J.ROOT-SERVERS.NET. 3600000 IN A 192.58.128.30K.ROOT-SERVERS.NET. 3600000 IN A 193.0.14.129L.ROOT-SERVERS.NET. 3600000 IN A 198.32.64.12M.ROOT-SERVERS.NET. 3600000 IN A 202.12.27.33

Setting Up BIND 867
;; Query time: 81 msec;; SERVER: 198.41.0.4#53(a.root-servers.net.);; WHEN: Sun Feb 1 11:27:14 2004;; MSG SIZE rcvd: 436
db.local The db.local zone file defines the localhost zone, the normal server on the local sys-tem. It starts with a $TTL directive and holds three resource records: SOA, NS, andA. The $TTL directive in the following file specifies that the default time to live forthe resource records specified in this file is 604,800 seconds (one week):
$ cat /etc/bind/db.local;; BIND data file for local loopback interface;$TTL 604800@ IN SOA localhost. root.localhost. ( 1 ; Serial 604800 ; Refresh 86400 ; Retry 2419200 ; Expire 604800 ) ; Negative Cache TTL;@ IN NS localhost.@ IN A 127.0.0.1
As explained earlier, the @ stands for the origin (the name of the zone), which islocalhost, as specified in named.conf. The last two lines are the NS resource recordthat specifies the nameserver for the zone as localhost and the A resource record thatspecifies the IPv4 address of the host as 127.0.0.1
db.127 The db.127 zone file provides information about the 127.in-addr.arpa reverselookup zone. It follows the same pattern as the localhost zone file, with one excep-tion: Instead of the A resource record, this file has a PTR record that provides thename the zone associates with the IP address. The PTR resource record specifies thename 1.0.0, which equates the system at address 1.0.0 in the zone (127.in-addr.arpa)with the name localhost, which has an IP address of 127.0.0.1:
$ cat /etc/bind/db.127;; BIND reverse data file for local loopback interface;$TTL 604800@ IN SOA localhost. root.localhost. ( 1 ; Serial 604800 ; Refresh 86400 ; Retry 2419200 ; Expire 604800 ) ; Negative Cache TTL;@ IN NS localhost.1.0.0 IN PTR localhost.
The other zone files perform similar functions as described under “Zone clauses”on page 865. Once named is started (page 857), you can use the tests describedunder “Troubleshooting” on page 872 to make sure the server is working.
868 Chapter 25 DNS/BIND: Tracking Domain Names and Addresses
DNS Glue Records
It is common practice to put the nameserver for a zone inside the zone it serves. Forexample, you might put the nameserver for the zone starting at site1.example.com(Figure 25-3, page 849) in ns.site1.example.com. When a DNS cache tries to resolvewww.site1.example.com, the authoritative server for example.com gives it the NSrecord pointing to ns.site1.example.com. In an attempt to resolve ns.site1.example.com,the DNS cache again queries the authoritative server for example.com, which pointsback to ns.site1.example.com. This loop does not allow ns.site1.example.com to beresolved.
The simplest solution to this problem is to prohibit any nameserver from residinginside the zone it points to. Because every zone is a child of the root zone, this solutionmeans every domain would be served by the root server and would not scale at all.
A better solution is to use glue records. A glue record is an A record for a name-server that is returned in addition to the NS record when an NS query is performed.Because the A record provides an IP address for the nameserver, it does not need tobe resolved and does not create the problematic loop.
The nameserver setup for ubuntu.com illustrates the use of glue records. When youquery for NS records for ubuntu.com, DNS returns three NS records. In addition, itreturns three A records that provide the IP addresses for two of the hosts that theNS records point to (the AAAA record provides an IPv6 address):
$ dig -t NS ubuntu.com...;; QUESTION SECTION:;ubuntu.com. IN NS
;; ANSWER SECTION:ubuntu.com. 10800 IN NS ns.ubuntu.com.ubuntu.com. 10800 IN NS ns0.blackcatnetworks.co.uk.ubuntu.com. 10800 IN NS ns1.blackcatnetworks.co.uk.
;; ADDITIONAL SECTION:ns0.blackcatnetworks.co.uk. 160011 IN A 193.201.200.34ns0.blackcatnetworks.co.uk. 160011 IN AAAA 2001:1b40:0:20::34ns1.blackcatnetworks.co.uk. 160011 IN A 69.55.225.40
You can create a glue record by providing an A record for the nameserver inside thedelegating domain’s zone file:
site1.example.com IN NS ns.site1.example.comns.site1.example.com IN A 1.2.3.4
TSIGs: Transaction Signatures
Interaction between DNS components is based on the query–response model: Onepart queries another and receives a reply. Traditionally a server determines whetherand how to reply to a query based on the client’s IP address. IP spoofing

Setting Up BIND 869
(page 1043) is relatively easy to carry out, making this situation less than ideal.Recent versions of BIND support transaction signatures (TSIGs), which allow twosystems to establish a trust relationship by using a shared secret key.
TSIGs provide an additional layer of authentication between master and slave serv-ers for a zone. When a slave server is located at a different site than the masterserver (as it should be), a malicious person operating a router between the sites canspoof the IP address of the master server and change the DNS data on the slave (aman-in-the-middle scenario). With TSIGs, this person would need to know thesecret key to change the DNS data on the slave.
Creating a Secret Key
A secret key is an encoded string of up to 512 bits. The dnssec-keygen utility, which isincluded with BIND, generates this key. The following command generates a 512-bitrandom key using MD5, a one-way hash function (page 1051):
$ /usr/sbin/dnssec-keygen -a hmac-md5 -b 512 -n HOST keynameKkeyname.+157+47586
In the preceding command, replace keyname with a string that is unique yet mean-ingful. This command creates a key in a file whose name is similar to the stringKkeyname.+157+47586.private, where keyname is replaced by the name of the key,+157 indicates the algorithm used, and +47586 is a hash of the key. If you run thesame command again, the hash part will be different.
The key file is not used directly. Use cat with an argument of the private filename todisplay the algorithm and key information you will need in the next step:
$ cat Kkeyname.+157+47586.privatePrivate-key-format: v1.2Algorithm: 157 (HMAC_MD5)Key: uNPDouqVwR7fvo/zFyjkqKbQhcTd6Prm...
Using the Shared Secret
The next step is to tell the nameservers about the shared secret by inserting the fol-lowing code in the /etc/named.conf file on both servers. This code is a top-levelclause; insert it at the end of the named.conf.local file (which is included innamed.conf):
key keyname {algorithm "hmac-md5";secret "uNPDouqVwR7fvo/zFyjkqKbQhcTd6Prm...";
};
The keyname is the name of the key you created. The algorithm is the string thatfollows algorithm in the output of cat, above. The secret is the string that followssecret in the output of cat. You must enclose each string within double quotationmarks. Be careful when you copy the key; although it is long, you must not break itinto multiple lines.

870 Chapter 25 DNS/BIND: Tracking Domain Names and Addresses
Because key names are unique, you can insert any number of Keys clauses intonamed.conf. To keep the key a secret, make sure users other than bind cannot readit: Either give named.conf.local permissions such that no one except bind has accessto it or put the key in a file that only bind can read and incorporate it innamed.conf.local using an include statement.
Once both servers know about the key, use a server statement in named.conf.localto tell them when to use it:
server 1.2.3.4 {# 1.2.3.4 is the IP address of the other server using this key
keys {"keyname";
};};
Each server must have a Server clause, each containing the IP address of the otherserver. The servers will now communicate with each other only if they first authen-ticate each other using the secret key.
Running BIND in a chroot Jail
To increase security, you can run BIND in a chroot jail. See page 534 for informationabout the security advantages of, and ways to set up, a chroot jail. The bind-chroot.shshell script (below), which sets up BIND to run in a chroot jail, creates a directorynamed /var/lib/named that takes the place of the root directory (/) for all BINDfiles. The bind-chroot.sh shell installs the bind9 package if it is not already installedand then runs the bind9 init script to stop named. It then adds the –t option to thenamed options in /etc/default/bind9 so named chroots to the /var/lib/named direc-tory before it reads its configuration files. The named daemon is already set up torun as the user bind (–u bind).
After creating the necessary directories in /var/lib/named, the script moves the filesfrom /etc/bind to /var/lib/named, creates a symbolic link from /var/lib/named backto /etc/bind, and creates and sets permissions on devices BIND may need. Next,bind-chroot.sh adds a line to the syslogd configuration file so messages from namedthat are not sent elsewhere go to the socket that named uses to send messages to sys-logd. Finally, the script restarts syslogd, starts named, and displays the end of thesyslog file.
$ cat bind-chroot.sh#!/bin/bash
# install and stop bindapt-get -y install bind9/etc/init.d/bind9 stop
# add -t /var/lib/named to OPTIONS in /etc/default/bind9sed -i 's:OPTIONS="\(.*\)":OPTIONS="\1\ -t /var/lib/named":' /etc/default/bind9

Setting Up BIND 871
# make the chroot directoriesmkdir -p /var/lib/named/{etc,dev,var/cache/bind,var/run/bind/run}
# move the configuration to the chroot and link back to /etcmv /etc/bind /var/lib/named/etcln -s /var/lib/named/etc/bind /etc/bind
# create devices and set permissionsmknod /var/lib/named/dev/null c 1 3mknod /var/lib/named/dev/random c 1 8chmod 666 /var/lib/named/dev/{null,random}chown -R bind:bind /var/lib/named/var/*chown -R bind:bind /var/lib/named/etc/bind
# add -a /var/lib/named/dev/log to SYSLOGD in /etc/default/syslogd# so messages go to the socket that named uses to send messages to syslogdsed -i 's:^SYSLOGD="\(.*\)":SYSLOGD="\1\ -a /var/lib/named/dev/log":' /etc/default/syslogd
# restart syslogd and start bind/etc/init.d/sysklogd restart/etc/init.d/bind9 start
# check that everything started finetail /var/log/syslog
Following is the output of the execution of bind-chroot.sh. You must run this scriptwhile working with root privileges. You must also have execute permission to runthe script. In the example, the bind-chroot.sh file is in the working directory.
$ sudo ./bind-chroot.shReading package lists... DoneBuilding dependency treeReading state information... Donebind9 is already the newest version.0 upgraded, 0 newly installed, 0 to remove and 0 not upgraded. * Stopping domain name service... bind [ OK ] * Restarting system log daemon... [ OK ] * Starting domain name service... bind [ OK ]Apr 26 11:00:02 plum named[9301]: listening on IPv6 interfaces, port 53Apr 26 11:00:02 plum named[9301]: listening on IPv4 interface lo, 127.0.0.1#53Apr 26 11:00:02 plum named[9301]: listening on IPv4 interface eth0, 192.168.0.10#53Apr 26 11:00:02 plum named[9301]: command channel listening on 127.0.0.1#953Apr 26 11:00:02 plum named[9301]: command channel listening on ::1#953Apr 26 11:00:02 plum named[9301]: zone 0.in-addr.arpa/IN: loaded serial 1Apr 26 11:00:02 plum named[9301]: zone 127.in-addr.arpa/IN: loaded serial 1Apr 26 11:00:02 plum named[9301]: zone 255.in-addr.arpa/IN: loaded serial 1Apr 26 11:00:02 plum named[9301]: zone localhost/IN: loaded serial 1Apr 26 11:00:02 plum named[9301]: running
After you run this script, all files that control BIND are located within this chrootjail and the filenames used in this chapter are symbolic links to the files in thechroot jail. See the command and output on the next page.

872 Chapter 25 DNS/BIND: Tracking Domain Names and Addresses
$ ls -l /etc/bind /var/lib/named/etc/bindlrwxrwxrwx 1 root root 23 Apr 26 11:00 /etc/bind -> /var/lib/named/etc/bind
/var/lib/named/etc/bind:total 44-rw-r--r-- 1 bind bind 237 Feb 20 05:40 db.0-rw-r--r-- 1 bind bind 271 Feb 20 05:40 db.127-rw-r--r-- 1 bind bind 237 Feb 20 05:40 db.255-rw-r--r-- 1 bind bind 353 Feb 20 05:40 db.empty-rw-r--r-- 1 bind bind 256 Feb 20 05:40 db.local-rw-r--r-- 1 bind bind 1507 Feb 20 05:40 db.root-rw-r--r-- 1 bind bind 1611 Feb 20 05:40 named.conf-rw-r--r-- 1 bind bind 165 Feb 20 05:40 named.conf.local-rw-r--r-- 1 bind bind 1458 Feb 20 05:40 named.conf.options-rw-r----- 1 bind bind 77 Apr 25 15:42 rndc.key-rw-r--r-- 1 bind bind 1317 Feb 20 05:40 zones.rfc1918
BIND is running in a chroot jail in /var/lib/named. Because the /etc/bind directory isnow a link to /var/lib/named, you can make changes to BIND from either location.
Troubleshooting
When you start a DNS cache, the /var/log/syslog file contains lines similar to thefollowing. Other types of DNS servers display similar messages.
$ cat /var/log/syslog...Apr 26 11:00:02 plum named[9301]: starting BIND 9.3.4 -u bindApr 26 11:00:02 plum named[9301]: found 1 CPU, using 1 worker threadApr 26 11:00:02 plum named[9301]: loading configuration from '/etc/bind/named.conf'Apr 26 11:00:02 plum named[9301]: listening on IPv6 interfaces, port 53Apr 26 11:00:02 plum named[9301]: listening on IPv4 interface lo, 127.0.0.1#53Apr 26 11:00:02 plum named[9301]: listening on IPv4 interface eth0, 192.168.0.10#53Apr 26 11:00:02 plum named[9301]: command channel listening on 127.0.0.1#953Apr 26 11:00:02 plum named[9301]: command channel listening on ::1#953Apr 26 11:00:02 plum named[9301]: zone 0.in-addr.arpa/IN: loaded serial 1Apr 26 11:00:02 plum named[9301]: zone 127.in-addr.arpa/IN: loaded serial 1Apr 26 11:00:02 plum named[9301]: zone 255.in-addr.arpa/IN: loaded serial 1Apr 26 11:00:02 plum named[9301]: zone localhost/IN: loaded serial 1Apr 26 11:00:02 plum named[9301]: running
When you create or update DNS information, you can use dig or host to testwhether the server works as planned. The most useful part of the output from dig isusually the answer section, which gives the nameserver’s reply to your query:

A Full-Functioned Nameserver 873
$ dig example.com...;; ANSWER SECTION:example.com. 72683 IN A 192.0.34.166...
The preceding output shows that the example.com. domain has a single A recordthat points to 192.0.34.166. The TTL of this record, which tells you how long therecord can be held in cache, is 72,683 seconds (slightly less than one day). You canalso use dig to query other record types by using the –t option followed by the typeof record you want to query for (–t works with host, too):
$ dig -t MX ubuntu.com...;; ANSWER SECTION:ubuntu.com. 3600 IN MX 10 fiordland.ubuntu.com....
If you query for a domain that does not exist, dig returns the SOA record for theauthority section of the highest-level domain in your query that does exist:
$ dig domaindoesnotexist.info...;; AUTHORITY SECTION:info. 7200 IN SOA a9.info.afilias-nst.info. dns.afilias.info. ......
Because it tells you the last zone that was queried correctly, this information can beuseful in tracing faults.
TSIGs If two servers using TSIGs (page 868) fail to communicate, confirm that the time isthe same on both servers. The TSIG authentication mechanism is dependent on thecurrent time. If the clocks on the two servers are not synchronized, TSIG will fail.Consider setting up NTP (page 1051) on the servers to prevent this problem.
A Full-Functioned Nameserver
Because the IP addresses used in this example are part of the private address space(page 1054), you can copy the example and run the server without affecting globalDNS. Also, to prevent contamination of the global DNS, each zone has the notifyoption set to NO. When you build a nameserver that is integrated with the Internet,you will want to use IP addresses that are unique to your installation. You maywant to change the settings of the notify statements.

874 Chapter 25 DNS/BIND: Tracking Domain Names and Addresses
named.conf The named.conf file in this example limits the IP addresses that named answers que-ries from and sets up logging:
$ cat /etc/bind/named.confoptions {
directory "/etc/bind";// recursion NO;
allow-query {127.0.0.1; 192.168.0.0/24;};};
zone "." IN {type hint;file "db.root";
};
zone "0.168.192.in-addr.arpa" IN {type master;file "named.conf.local";notify NO;
};
zone "sam.net" IN {type master;file "sam.net";notify NO;
};
logging{channel "misc" {
file "/var/log/bind/misc.log" versions 4 size 4m;print-time YES;print-severity YES;print-category YES;
};channel "query" {
file "/var/log/bind/query.log" versions 4 size 4m;print-time YES;print-severity NO;print-category NO;
};category default {
"misc";};category queries {
"query";};
};
The allow-query statement in the Options clause specifies the IP addresses of sys-tems the server answers queries from. You must include the local system as127.0.0.1 if it will be querying the server. The server is authoritative for the zonesam.net; the zone file for sam.net is /etc/bind/sam.net.

A Full-Functioned Nameserver 875
Logging Logging is turned on by the Logging clause. Logging is separate from named mes-sages, which go to syslogd. The Logging clause in the preceding example openstwo logging channels: one that logs information to /var/log/bind/misc.log and onethat logs information to /var/log/bind/query.log. When either of these logs growsto 4 megabytes (size 4m in the file statement), it is renamed by appending .1 to itsfilename and a new log is started. The numbers at the ends of other, similarlynamed logs are incremented. Any log that would have a larger number than thatspecified by the versions keyword (4 in the example) is removed. See logrotate(page 684) for another way to maintain log files.
The print statements determine whether the time, severity, and category of the infor-mation are sent to the log; specify each as YES or NO. The category determines whatinformation is logged to the channel. In the previous example, default information issent to the misc channel and queries are sent to the query channel. Refer to thenamed.conf man page for more choices.
named.conf.local The origin for the reverse zone file (named.conf.local) is 0.168.192.in-addr.arpa (asspecified in the Zone clause that refers to this file in named.conf). Following theSOA and NS resource records, the first three PTR resource records equate address 1in the subnet 0.168.192.in-addr.arpa (192.168.0.1) with the names gw.sam.net.,www.sam.net. , and ftp.sam.net., respectively. The next three PTR records equate192.168.0.3 with mark.sam.net., 192.168.0.4 with mail.sam.net. , and 192.168.0.6with ns.sam.net..
$ cat /etc/bind/named.conf.local$TTL 3D@ IN SOA ns.sam.net. [email protected]. (
2007110501 ; serial8H ; refresh2H ; retry4W ; expire1D) ; minimum
IN NS ns.sam.net.1 IN PTR gw.sam.net.1 IN PTR www.sam.net.1 IN PTR ftp.sam.net.3 IN PTR mark.sam.net.4 IN PTR mail.sam.net.6 IN PTR ns.sam.net.
sam.net The zone file for sam.net takes advantage of many BIND features and includes TXT(page 854), CNAME (page 852), and MX (page 852) resource records. When you queryfor resource records, named returns the TXT resource record along with the records yourequested. The first of the two NS records specifies an unqualified name (ns) to whichBIND appends the zone name (sam.net), yielding an FQDN of ns.sam.net. The secondnameserver is specified with an FQDN name that BIND does not alter. The MX recordsspecify mail servers in a similar manner and include a priority number at the start of thedata field, where lower numbers indicate preferred servers.

876 Chapter 25 DNS/BIND: Tracking Domain Names and Addresses
$ cat sam.net; zone "sam.net";$TTL 3D@ IN SOA ns.sam.net. [email protected]. (
200711051 ; serial8H ; refresh2H ; retry4W ; expire1D ) ; minimum
TXT "Sobell Associates Inc."NS ns ; Nameserver address (unqualified)NS ns.max.net.; Nameserver address (qualified)MX 10 mail ; Mail exchange (primary/unqualified)MX 20 mail.max.net.; Mail exchange (2nd/qualified)
localhost IN A 127.0.0.1
www IN CNAME nsftp IN CNAME ns
gw IN A 192.168.0.1TXT "Router"
ns IN A 192.168.0.6MX 10 mailMX 20 mail.max.net.
mark IN A 192.168.0.3MX 10 mailMX 20 mail.max.net.TXT "MGS"
mail IN A 192.168.0.4MX 10 mailMX 20 mail.max.net.
Some resource records have a value in the Name field; those without a name inheritthe name from the previous resource record. In a similar manner, the previousresource record may have an inherited name value, and so on. The five resourcerecords following the SOA resource record inherit the @, or zone name, from theSOA resource record. These resource records pertain to the zone as a whole. In thepreceding example, the first TXT resource record inherits its name from the SOAresource record; it is the TXT resource record for the sam.net zone (give the com-mand host –t TXT sam.net to display the TXT resource record).
Following these five resource records are resource records that pertain to a domainwithin the zone. For example, the MX resource records that follow the A resourcerecord with the Name field set to mark are resource records for the mark.sam.net.domain.

A Slave Server 877
The A resource record for localhost is followed by two CNAME resource records thatspecify www(.sam.net.) and ftp(.sam.net.) as aliases for the nameserver ns.sam.net..For example, a user connecting to ftp.sam.net will connect to 192.168.0.6. Theresource records named gw, ns, mark, and mail are resource records for domainswithin the sam.net zone.
Log files Before restarting named, create the directory for the log files and give it permissionsand ownership as shown below. If you are running named in a chroot jail, create thebind directory in /var/lib/named/var/log.
$ sudo mkdir /var/log/bind$ sudo chown bind:bind /var/log/bind$ ls -ld /var/log/binddrwxr-xr-x 2 bind bind 4096 Apr 26 17:43 /var/log/bind
With the log directory in place, and the named.conf, db.root, named.conf.local, andsam.net zone files in /etc/bind (or in /var/lib/named/etc/bind if you are runningnamed in a chroot jail), restart named and check the log files. The file /var/log/syslogshould show something like the following (the example shows named started in achroot jail):
# cat /var/log/syslog...Apr 26 18:05:19 plum named[22119]: starting BIND 9.3.4 -u bind -t /var/lib/namedApr 26 18:05:19 plum named[22119]: found 1 CPU, using 1 worker threadApr 26 18:05:19 plum named[22119]: loading configuration from '/etc/bind/named.conf'Apr 26 18:05:19 plum named[22119]: listening on IPv4 interface lo, 127.0.0.1#53Apr 26 18:05:19 plum named[22119]: listening on IPv4 interface eth0, 192.168.0.10#53Apr 26 18:05:19 plum named[22119]: command channel listening on 127.0.0.1#953Apr 26 18:05:19 plum named[22119]: command channel listening on ::1#953...
The misc.log file may show errors that do not appear in the syslog file:
# cat /var/log/bind/misc.log... 01:05:19.932 general: info: zone 0.168.192.in-addr.arpa/IN: loaded serial 2007110501... 01:05:19.933 general: info: zone sam.net/IN: loaded serial 200711051... 01:05:19.933 general: notice: running
A Slave Server
To set up a slave server, copy the /etc/bind/named.conf file from the master serverto the slave server, replacing the type master statement with type slave and adding amasters { 1.2.3.4; }; directive. Remove any zones the slave server will not be actingas a slave for, including the root (.) zone, if the slave server will not respond torecursive queries. If necessary, create the /var/log/bind directory for log files asexplained at the end of the previous section.

878 Chapter 25 DNS/BIND: Tracking Domain Names and Addresses
notify statement Slave servers copy zone information from the primary master server or anotherslave server. The notify statement specifies whether you want a master server tonotify slave servers when information on the master server changes. Set the (global)value of notify in the Options clause or set it within a Zone clause, which overridesa global setting for a given zone. The format is
notify YES | NO | EXPLICIT
YES causes the master server to notify all slaves listed in NS resource records for thezone as well as servers at IP addresses listed in an also-notify statement. When youset notify to EXPLICIT, the server notifies servers listed in the also-notify statementonly. NO turns off notification.
If you specify notify YES on the master server, the zone files on the slave server will beupdated each time you change the serial field of the SOA resource record in a zone.You must manually distribute changes to /etc/bind/named.conf and included files.
A Split Horizon Server
Assume you want to set up a LAN that provides all of its systems and services to localusers on internal systems, which may be behind a firewall, but only certain public ser-vices—such as Web, FTP, and mail—to Internet (public) users. A split horizon (alsocalled DMZ) DNS server takes care of this situation by treating queries from internalsystems differently from queries from public systems (systems on the Internet).
View clauses BIND 9 introduced View clauses in named.conf. View clauses facilitate the implemen-tation of a split DNS server. Each view provides a different perspective of the DNSnamespace to a group of clients. When there is no View clause, all zones specified innamed.conf are part of the implicit default view.
Assume that an office has several systems on a LAN and public Web, FTP, DNS, andmail servers. The single connection to the Internet is NATed (page 1049) so it isshared by the local systems and the servers. The system connected directly to theInternet is a router, firewall, and server. This scenario takes advantage of the Viewclauses in named.conf and supports separate secondary nameservers for local andpublic users. Although public users need access to the DNS server as the authorityon the domain that supports the servers, they do not require the DNS server to sup-port recursive queries. Not supporting recursion for public users limits the load onthe DNS server and the Internet connection. For security reasons, public users mustnot have access to information about local systems other than the servers. Localusers should have access to information about local systems and should be able touse the DNS server recursively.
Figure 25-6 shows that the server responds differently to queries from the LAN andfrom the Internet.
The firestarter (page 886) or iptables utility (page 896) controls which ports onwhich systems users on internal and external systems can access. DNS controlswhich systems are advertised to which users.

A Split Horizon Server 879
The named.conf file has four clauses: an Options clause, two View clauses, and aLogging clause. The Options clause specifies that the zone files be located in the/etc/bind directory. The View clauses specify the characteristics and zones that aresolver is given access to, which depend on the resolver’s address. One zone is foruse by the LAN/local users; the other is used by Internet/public users. The Loggingclause sets up the misc2.log file for default messages.
There are several ways to specify which clients see a view. The following named.conffile uses match-clients statements:
$ cat /etc/bind/named.confoptions {
directory "/etc/bind";}; //end options
view "local" IN { // start local viewmatch-clients { 127.0.0.1; 192.168.0.0/24;};recursion YES;
zone"zach.net" IN {type master;file "local.net";notify YES;
};
zone "0.168.192.in-addr.arpa" IN {type master;file "named.local";notify YES;
};
zone "." IN {type hint;file "named.ca";
};
}; // end local view
Figure 25-6 A split horizon DNS server
Internet LAN
Do you know the addressof grape.zach.net?
No, it does not exist.
Do you know the addressof www.zach.net?
Yes, it is 66.187.232.50
Do you know the addressof grape.zach.net?
Yes, it is 192.168.0.3.
Do you know the addressof www.zach.net?
Yes, it is 66.187.232.50

880 Chapter 25 DNS/BIND: Tracking Domain Names and Addresses
view "public" IN { // start public viewmatch-clients { "all";};recursion NO;
zone"zach.net" IN {type master;file "public.net";notify YES;
};
zone "0.168.192.in-addr.arpa" IN {type master;file "named.public";notify YES;
};zone "." IN {
type hint;file "named.ca";
};
}; // end public view
logging{channel "misc" {
file "/var/log/bind/misc2.log" versions 2 size 1m;print-time YES;print-severity YES;print-category YES;
};category default {
"misc";};
}; //end logging
The ordering of View clauses within named.conf is critical because the view that ispresented to a client is the first view that the client matches. The precedingnamed.conf file holds two View clauses: one for local users and one for public users,in that order. Local users are defined to be those on the 192.168.0.0/24 subnet orlocalhost (127.0.0.1); public users are defined to be any users. If you reversed theorder of the View clauses, all users—including local users—would get the viewintended for the public and no users would see the local view.
Many statements from the Options clause can be used within View clauses, wherethey override statements in the (global) Options clause. The recursion statement,which can appear within an Options clause, appears in each View clause. Thisnamed.conf file sets up a server that provides recursive answers to queries that orig-inate locally and iterative answers to queries from the public. This setup providesquick, complete answers to local users, limiting the network and processor band-width that is devoted to other users while continuing to provide authoritative nameservice for the local servers.

A Split Horizon Server 881
To make named.conf easier to understand and maintain, zones in different Viewclauses can have the same name but different zone files. Both the local and publicView clauses in the example have zones named zach.net: The public zach.net zonefile is named public.net and the local one is named local.net.
The Logging clause is described on page 875.
The zone files defining zach.net are similar to the ones in the previous examples; thepublic file is a subset of the local one. Following the SOA resource record in bothfiles is a TXT, two NS, and two MX resource records. Next are three CNAMEresource records that direct queries addressed to www.zach.net, ftp.zach.net, andmail.zach.net to the system named ns.zach.net. The next four resource records spec-ify two nameserver addresses and two mail servers for the ns.zach.net domain.
The final four resource records appear in the local zach.net zone file and not inthe public zone file; they are address (A) resource records for local systems.Instead of keeping this information in /etc/hosts files on each system, you cankeep it on the DNS server, where it can be updated easily. When you use DNSinstead of /etc/hosts, you must change the hosts line in /etc/nsswitch.conf(page 542) accordingly.
$ cat local.net; zach.net local zone file;$TTL 3D@ IN SOA ns.zach.net. [email protected]. (
200711118 ; serial8H ; refresh2H ; retry4W ; expire1D ) ; minimum
IN TXT "Sobell Associates Inc."IN NS ns ; Nameserver address (unqualified)IN NS ns.speedy.net.; Nameserver address (qualified)IN MX 10 mail ; Mail exchange (primary/unqualified)IN MX 20 mail.max.net.; Mail exchange (2nd/qualified)
www IN CNAME nsftp IN CNAME nsmail IN CNAME ns
ns IN A 192.168.0.1IN A 192.168.0.6IN MX 10 mailIN MX 20 mail.max.net.
speedy IN A 192.168.0.1grape IN A 192.168.0.3potato IN A 192.168.0.4peach IN A 192.168.0.6

882 Chapter 25 DNS/BIND: Tracking Domain Names and Addresses
The public version of the zach.net zone file follows:
$ cat public.net; zach.net public zone file;$TTL 3D@ IN SOA ns.zach.net. [email protected]. (
200711118 ; serial8H ; refresh2H ; retry4W ; expire1D ) ; minimum
IN TXT "Sobell Associates Inc."IN NS ns ; Nameserver address (unqualified)IN NS ns.speedy.net.; Nameserver address (qualified)
IN MX 10 mail ; Mail exchange (primary/unqualified)IN MX 20 mail.max.net.; Mail exchange (2nd/qualified)
www IN CNAME nsftp IN CNAME nsmail IN CNAME ns
ns IN A 192.168.0.1IN A 192.168.0.6IN MX 10 mailIN MX 20 mail.max.net.
Here there are two reverse zone files, each of which starts with SOA and NSresource records, followed by PTR resource records for each of the names of theservers. The local version of this file also lists the names of the local systems:
$ cat named.local;"0.168.192.in-addr.arpa" reverse zone file;$TTL 3D@ IN SOA ns.zach.net. [email protected]. (
2007110501 ; serial8H ; refresh2H ; retry4W ; expire1D) ; minimum
IN NS ns.zach.net.IN NS ns.speedy.net.
1 IN PTR gw.zach.net.1 IN PTR www.zach.net.1 IN PTR ftp.zach.net.1 IN PTR mail.zach.net.1 IN PTR speedy.zach.net.3 IN PTR grape.zach.net.4 IN PTR potato.zach.net.6 IN PTR peach.zach.net.

Exercises 883
Chapter Summary
DNS maps domain names to IP addresses, and vice versa. It is implemented as ahierarchical, distributed, and replicated database on the Internet. You can improvethe security of BIND, which implements DNS, by running it inside a chroot jail andusing transaction signatures (TSIGs).
When a program on the local system needs to look up an IP address that corre-sponds to a domain name, it calls the resolver. The resolver queries the local DNScache, if available, and then queries DNS servers on the LAN or Internet. There aretwo types of queries: iterative and recursive. When a server responds to an iterativequery, it returns whatever information it has at hand; it does not query other serv-ers. Recursive queries cause a server to query other servers if necessary to respondwith an answer.
There are three types of servers. Master servers, which hold the master copy of zonedata, are authoritative for a zone. Slave servers are also authoritative and copy theirdata from a master server or other slave servers. DNS caches are not authoritativeand either answer queries from cache or forward queries to another server.
The DNS database holds resource records for domains. Many types of resourcerecords exist, including A (address), MX (mail exchange), NS (nameserver), PTR(pointer for performing reverse name resolution), and SOA (start of authority,which describes the zone) records.
Exercises
1. What kind of server responds to recursive queries? How does this server work?
2. What kind of DNS record is likely to be returned when a Web browser tries to resolve the domain part of a URI?
3. What are MX resource records for?
4. How would you find the IP address of example.com from the com-mand line?
5. How would you instruct a Linux system to use the local network’s DNS cache, located at 192.168.1.254, or the ISP’s DNS cache, located at 1.2.3.4, if the LAN nameserver is unavailable?
6. How would you instruct a DNS server to respond only to queries from the 137.44.* IP range?
7. How might a resolver attempt to find the IP address of the example domain?
884 Chapter 25 DNS/BIND: Tracking Domain Names and Addresses
Advanced Exercises
8. How would you set up a private domain name hierarchy that does not include any of the official InterNIC-assigned domain names?
9. Which part of DNS is most vulnerable to an attack from a malicious user and why?
10. It is often irritating to have to wait for DNS records to update around the world when you change DNS entries. You could prevent this delay by set-ting the TTL to a small number. Why is setting the TTL to a small number a bad idea?
11. Outline a method by which DNS could be used to support encryption.

885885
26Chapter26The firestarter utility is a user-friendly, graphical front-end foriptables; iptables builds and manipulates network packet filter-ing (page 1052) rules in the Linux kernel. You can use firestarter,or iptables directly, to create a firewall that protects a systemfrom malicious users and to set up NAT (Network AddressTranslation, page 1049), which can allow several systems toshare a single Internet connection. In addition, firestarter cancontrol a DHCP server.
The iptables utility is flexible and extensible, allowing you toset up both simple and complex network packet filteringsolutions. It provides connection tracking (stateful packet fil-tering), allowing you to handle packets (page 1051) based onthe state of their connection. For example, you can set uprules that reject inbound packets trying to open a new con-nection and accept inbound packets that are responses tolocally initiated connections. Many features not included inthe base iptables package are available as patches via thepatch-o-matic program.
In This Chapter
JumpStart: Building a Firewall Using the firestarter Firewall Wizard . . . . . . . . . . . . . . . . . . . . 888
firestarter: Maintains a Firewall . . 890
How iptables Works . . . . . . . . . . . 896
Rules, Matches, Targets, and Chains . . . . . . . . . . . . . . . . . . . . 896
Anatomy of an iptables Command. . . . . . . . . . . . . . . . . . 900
Building a Set of Rules . . . . . . . . . 901
Copying Rules to and from the Kernel . . . . . . . . . . . . . . . . . . . . . 907
Sharing an Internet Connection Using NAT . . . . . . . . . . . . . . . . . . 908
26
firestarter and iptables:
Setting Up a Firewall
886 Chapter 26 firestarter and iptables: Setting Up a Firewall
The firestarter utility is frequently sufficient to protect a single system or a small LANbut, because of its user-friendly nature, it does not provide access to the full com-plexity and power of iptables. Most of the concepts involving firestarter will prob-ably be familiar, or easy to learn, for someone who is familiar with basicnetworking. Some of the concepts required to fully understand iptables arebeyond the scope of this book. Although you can use iptables at different levels,this chapter presents only the fundamentals. There are, however, some sections ofthis chapter that delve into areas that may require additional understanding orexplanation. If a concept is not clear, refer to one of the resources in “MoreInformation” on page 899.
About firestarterThe firestarter utility is a sophisticated, graphical tool for building and maintaining afirewall. Although it works with GTK and is designed to run under GNOME, it isequally at home under KDE. This utility enables a system to share an Internet con-nection with other systems on a LAN. It can also set up and control a DHCP(page 538) server. It provides a real-time view of intrusion and other events andallows you to tune ICMP (page 1041) parameters to help stop DoS attacks(page 1034). As installed, firestarter allows outbound connections and blocks anddisplays information about inbound connections that originate outside the system orLAN it is protecting (that is, connections that originate on the Internet). As you viewthese events, you can set up rules to allow them, facilitating firewall customization.
The firestarter utility can protect the single system it runs on (the firewall host) or itcan protect the system it runs on as well as other client systems on a LAN that con-nect to the Internet through the firewall host. Figure 26-1 shows a typical setupwhere all network traffic to and from a LAN must pass through the firewall,enabling the firewall to control access between the Internet and the LAN (includingthe firewall host). In this setup the firewall host acts as a router (page 359).
Prerequisites
Install the following package:
• firestarter
• dhcp3-server (needed only if you want firestarter to run DHCP)
When you install the firestarter package, you must run the Firewall Wizard beforefirestarter will start (see the JumpStart section on page 888). After you configure it,firestarter starts running each time you boot the system. Although there is a firestarterinit file, you never need to run it manually; use the firestarter GUI to turn the firewallon or off or to lock the system so no network traffic can enter or leave it. When you

About firestarter 887
bring the system up, firestarter comes up in the state it was in when you shut the sys-tem down. The firestarter utility runs regardless of whether its GUI is displayed.
Notes
Terminology This section explains what some of the words used to explain firestarter mean in thiscontext. The terms firewall and firestarter are used interchangeably.
• (Firewall) host (system) The system the firewall is running on.
• Client systems Systems that are on the same LAN as the firewall host and whose packets to and from systems outside the LAN (specifically the Inter-net) pass through the firewall host.
• Policy The set of rules that the firewall applies.
• Rule A statement that specifies what the firewall does with specific types of packets it receives from specific systems on its network interface(s).
• Connection Under TCP, the path through which two systems exchange data. A client system opens a connection with a server system by sending it a SYN (synchronization) packet. The server sends an ACK (acknowledge) packet back to the client and the two systems exchange data. The client closes the connection with a SYN packet. Although UDP works differently because it has no concept of a connection, for the purposes of this discus-sion the concept of a UDP connection is appropriate.
• Inbound connections Include connections that originate from the Internet and client systems with the firewall host as the destination.
• Outbound connections Include connections that originate from the firewall host and client systems with the Internet as the destination.
Figure 26-1 A typical firewall setup
Internet Firewall host LAN(client systems)(router)
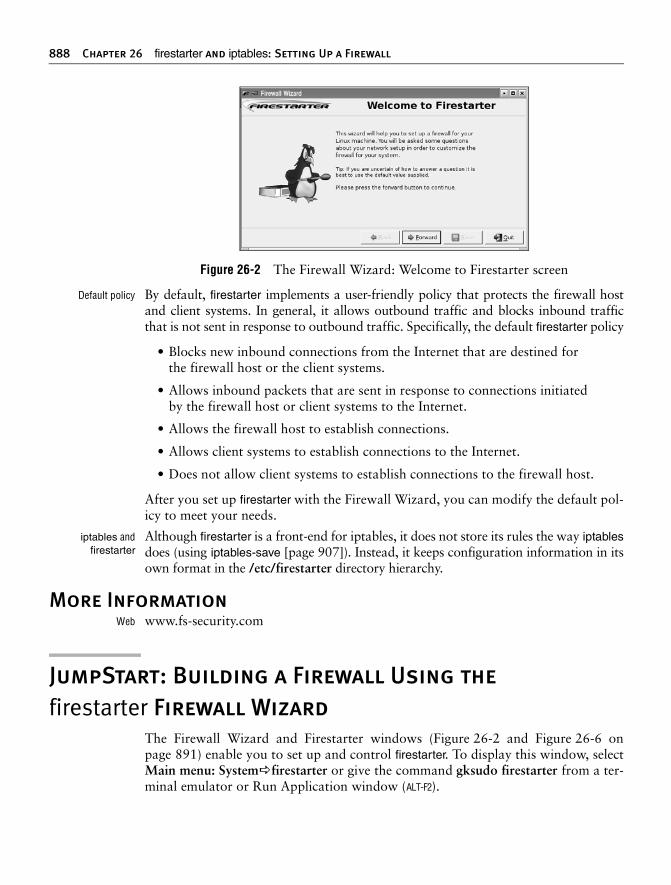
888 Chapter 26 firestarter and iptables: Setting Up a Firewall
Default policy By default, firestarter implements a user-friendly policy that protects the firewall hostand client systems. In general, it allows outbound traffic and blocks inbound trafficthat is not sent in response to outbound traffic. Specifically, the default firestarter policy
• Blocks new inbound connections from the Internet that are destined for the firewall host or the client systems.
• Allows inbound packets that are sent in response to connections initiated by the firewall host or client systems to the Internet.
• Allows the firewall host to establish connections.
• Allows client systems to establish connections to the Internet.
• Does not allow client systems to establish connections to the firewall host.
After you set up firestarter with the Firewall Wizard, you can modify the default pol-icy to meet your needs.
iptables andfirestarter
Although firestarter is a front-end for iptables, it does not store its rules the way iptablesdoes (using iptables-save [page 907]). Instead, it keeps configuration information in itsown format in the /etc/firestarter directory hierarchy.
More Information
Web www.fs-security.com
JumpStart: Building a Firewall Using the
firestarter Firewall Wizard
The Firewall Wizard and Firestarter windows (Figure 26-2 and Figure 26-6 onpage 891) enable you to set up and control firestarter. To display this window, selectMain menu: System firestarter or give the command gksudo firestarter from a ter-minal emulator or Run Application window (ALT-F2).
Figure 26-2 The Firewall Wizard: Welcome to Firestarter screen

JumpStart: Building a Firewall Using the firestarter Firewall Wizard 889
When you run firestarter for the first time, it opens the Firewall Wizard (Figure 26-2),which helps you configure firestarter. You can rerun this wizard at any time by select-ing Firestarter menu: Firewall Run Wizard. The last step of the wizard allows youto start the firewall and display the Firestarter window.
Device setup The first Firewall Wizard screen welcomes you to firestarter; click Forward to getstarted. The Firewall Wizard displays the Network device setup screen (Figure 26-3).In this screen you select the device that is connected to the Internet. You can alsospecify that you want the firewall to start when you dial out from the system (if youare using a modem to connect to the Internet) and/or that you want firestarter to useDHCP (page 538) to assign IP addresses and provide other network configurationinformation to the client systems.
From the drop-down list labeled Detected device(s), select the device that is con-nected to the Internet. If the local system is functioning as a router, make sure toselect the device that is connected to the Internet, not the device that is connected tothe LAN. If the local system connects to the Internet using a modem only, put a tickin the check box labeled Start the firewall on dial-out.
DHCP If you want to run DHCP, put a tick in the check box labeled IP address is assigned viaDHCP. (You can also configure DHCP using Firestarter menu: Edit Preferences.) Iffirestarter is going to control DHCP, you must install the DHCP package (page 886).Click Forward.
NAT (connectionsharing)
The Internet connection sharing setup screen (Figure 26-4, next page) allows you to setup NAT (page 1049) so systems on the LAN can share a single Internet connection.This window appears only if the system you are installing the firewall on has at leasttwo network connections. Put a tick in the check box labeled Enable Internet connec-tion sharing if the firewall host is to function as a router (Figure 26-1, page 887) andshare an Internet connection; otherwise skip this screen. When you put a tick in thischeck box, firestarter enables you to select the device that is connected to the LAN (notthe one that is connected to the Internet). Put a tick in the check box labeled EnableDHCP for local network to cause firestarter to run DHCP. When you put a tick in thischeck box, click the triangle adjacent to DHCP server details to choose whether to
Figure 26-3 The Network device setup screen

890 Chapter 26 firestarter and iptables: Setting Up a Firewall
keep an existing DHCP configuration or create a new one. The Server name can be theIP address or name of the DHCP server. If you set the name to <dynamic>, firestarterdetermines the IP address of the DHCP server at runtime, which can be useful if theserver is assigned an IP address using DHCP. Click Forward.
Starting the firewall In the Ready to start your firewall screen (Figure 26-5), you can choose to start the fire-wall. The firewall starts in secure mode, which protects the LAN but may cause prob-lems for some users and does not allow systems on the Internet to access servers behindthe firewall. If you are configuring the firewall from a remote system, you will not beable to work with firestarter once you start the firewall. Put a tick in the check boxlabeled Start firewall now if you want to start the firewall immediately. Click Save.
firestarter: Maintains a Firewall
After you configure firestarter, you can make changes to the policy from the Firestarterwindow. After you run the Firewall Wizard, firestarter displays this window. Youcan display this window at any time by following the instruction at the start of theJumpStart section on page 888. The firewall runs regardless of whether the Fire-starter window is displayed. When you bring the system up, the firewall resumes thestatus it had (running, stopped, or locked) when you brought the system down.
The Status Tab
The Firestarter window Status tab (Figure 26-6) displays an overview of the fire-wall. This tab can display active connections to the firewall. The toolbar allows youto change the state of the firewall and specify preferences. The large round icon inthe Firewall frame of the window indicates the status of the firewall:
• Disabled The firewall is turned off—it is as though firestarter was not installed.
• Active The firewall is up and running and implementing the policy you have set up (or the default policy).
Figure 26-4 The Internet connection sharing setup screen

firestarter: Maintains a Firewall 891
• Locked The firewall is up and running and blocking all packets. Noth-ing can get in or out of the firewall host over the network interfaces that firestarter controls.
Click the appropriate icon on the toolbar to change the state of the firewall.
Events An event occurs when the firewall blocks a packet based on a rule. The Events columnsin the Firewall frame list the number of inbound and outbound events the firewallhas blocked and indicate how many of those were of a serious nature. Events are
Figure 26-5 The Ready to start your firewall screen
Figure 26-6 The Status tab with Active connections expanded

892 Chapter 26 firestarter and iptables: Setting Up a Firewall
considered serious if they could have been attempts by malicious users to gain accessto the system. For example, a blocked attempt to log in using ssh is a serious event; ablocked ping is not.
The Network frame shows the activity on each of the system’s network connections.
When you click the small triangle to the left of Active connections, firestarter dis-plays a scrollable list of active connections; lengthen the window to display moreconnections. Click on a line in this list to select it and then right-click and selectLookup hostnames to change the value in the Source and Destination columns fromIP addresses to hostnames. The Port column lists the port on the target host that theconnection uses. The Service column indicates the service that is associated with thespecified port. The Program column shows the name the program running the ser-vice if it is local and known to firestarter.
The Events Tab
The Firestarter window Events tab (Figure 26-7) is the key to modifying the defaultfirewall policy. It displays a list of blocked connections. Each line in this list speci-fies an event that the firewall blocked based on a rule. Events displayed in black areattempts to connect to a random port and are typically not of concern. Events ingray are harmless, consisting mostly of broadcast traffic. Events in red are attemptsto access a service that is not provided to the public and may indicate that a mali-cious user is attempting to gain access to the firewall host or a client system.
You can modify this list in several ways.
• To display a hostname in place of an IP address, highlight the entry you want to change, right-click, and select Lookup Hostnames (Figure 26-7).
• By default, the Blocked Connections list does not include redundant entries. To display redundant entries, remove the tick from the check box at Firestarter menu: Edit Preferences Events Skip redundant entries.
Figure 26-7 Events tab, right-click menu

firestarter: Maintains a Firewall 893
• You can specify the columns that firestarter includes in the Blocked Con-nections list by selecting from the menu displayed by Firestarter menu: Events Show Column (Figure 26-8).
As Figure 26-7 shows, the right-click menu also allows you to change the rule forthe highlighted system and port (service). Inbound and outbound connectionspresent different menus. The inbound menu includes the following selections:
• Allow Connections from Source Enables the originating system on the Internet that the highlighted event blocked to make any type of connection to client systems or the firewall host. Set this rule only if you completely trust the source system.
• Allow Inbound Service for Everyone Enables any system on the Internet to connect to the service (port) that the highlighted event blocked. Set this rule to allow the public to access servers behind the firewall.
• Allow Inbound Service for Source Enables the originating system on the Internet to connect to the service (port) that the highlighted event blocked. The port protected by this rule is called a stealth port because it is invisible to all systems on the Internet except the specified system.
The outbound menu includes the following selections:
• Allow Connections to Destination Enables the firewall host and client systems to establish a connection with the destination system that the highlighted event blocked.
Figure 26-8 Selecting columns for the Blocked Connections list

894 Chapter 26 firestarter and iptables: Setting Up a Firewall
• Allow Outbound Service for Everyone Enables the firewall host and client systems to establish a connection to the service (port) that the highlighted event blocked.
• Allow Outbound Service for Source Enables the firewall host or a spe-cific client that the event blocked to establish a connection to the service that the highlighted event blocked.
In addition, both menus include these two selections:
• Disable Events from Source Prevents the highlighted originating system on the Internet from connecting to client systems or the firewall host.
• Disable Events on Port Prevents any system on the Internet from con-necting to the service (port) that the highlighted event blocked.
The Policy Tab
The Policy tab (Figure 26-9) displays the firewall rules and allows you to add,remove, and edit rules. The drop-down list labeled Editing allows you to selectwhether firestarter displays (and you can edit) inbound or outbound rules.
The Policy tab displays three frames each for inbound and outbound groups ofrules. Right-click with the mouse pointer in a frame to display a context menu withthese selections: Add Rule, Remove Rule, and Edit Rule. To use the last two selec-tions, you must highlight a rule before right-clicking.
Applying changes By default, firestarter does not apply changes you make in this tab until you clickApply Policy at the top of the window. You can cause firestarter to apply changes
Figure 26-9 The Policy tab
Events tab: ease of use
tip It is easiest to set up rules from the Events tab and view them in the Policy tab. However, you can-not set up certain rules, such as forwarding rules, from the Events tab. Also, you cannot edit rulesfrom the Events tab.

firestarter: Maintains a Firewall 895
immediately by selecting Firestarter menu: Edit Preferences Policy and putting atick in the check box labeled Apply policy changes immediately.
Inbound Policy
The default inbound policy is to block all inbound connections except connectionsthat are responding to outbound connections. When you select Inbound traffic pol-icy, firestarter displays three frames that enable you to work with rules that areexceptions to the default policy:
• Allow connections from host Specifies a host or network that firestarteraccepts any incoming connection from. Make sure you trust this system or network completely.
• Allow service Specifies a service (port) that firestarter accepts inbound connections on. You can specify that firestarter accept inbound connections on the specified port from anyone, all clients, or a specific host or network on the Internet.
• Forward service Specifies a service (port) that firestarter will accept inbound connections on. The firestarter firewall forwards these connections to the client you specify on the port you specify. Forwarding a service is appropriate if you are running a server on a client system and want systems on the Internet to be able to connect to the server.
Outbound Policy
When you select Outbound traffic policy, firestarter displays two radio buttons thatenable you to set the default outbound policy:
• Permissive by default, blacklist traffic The default outbound policy. Allows all outbound connections that originate from the firewall host or clients. You must set up specific policies (a blacklist) to block outbound requests for specific services and/or requests from specific systems.
• Restrictive by default, whitelist traffic Blocks all outbound traffic except connections that you set up rules to allow (a whitelist).
Permissive bydefault
With the default policy of Permissive by default, firestarter displays three frames thatenable you to deny connections and/or services:
• Deny connections to host Specifies systems on the Internet that the fire-wall host and all client systems are not allowed to connect to.
• Deny connections from LAN host Specifies client systems that are not allowed to connect to any system on the Internet.
• Deny service Specifies a service and/or port that firestarter blocks outbound connections on. You can specify that firestarter block outbound connections on the specified port from anyone, clients, the firewall host, or a specific host or network on the Internet.

896 Chapter 26 firestarter and iptables: Setting Up a Firewall
Restrictive bydefault
With the Restrictive by default policy, firestarter displays three frames that enableyou to allow connections and/or services:
• Allow connections to host Specifies systems on the Internet that the fire-wall host and all client systems are allowed to connect to.
• Allow connections from LAN host Specifies client systems that are allowed to connect to any system on the Internet.
• Allow service Specifies a service and/or port that firestarter allows outbound connections on. You can specify that firestarter allow outbound connections on the specified port from anyone, clients, the firewall host, or a specific host or network on the Internet.
How iptables Works
netfilter andiptables
The functionality referred to as iptables is composed of two components: netfilterand iptables. Running in kernelspace (page 1044), the netfilter component is a set oftables that hold rules that the kernel uses to control network packet filtering. Run-ning in userspace (page 1067), the iptables utility sets up, maintains, and displaysthe rules stored by netfilter.
Rules, matches,targets, and chains
A rule comprises one or more criteria (matches or classifiers) and a single action (atarget). If, when a rule is applied to a network packet, the packet matches all the cri-teria, the action is applied to the packet. Rules are stored in chains. Each rule in achain is applied, in order, to a packet until a match is found. If there is no match,the chain’s policy, or default action, is applied to the packet (page 902).
History In the kernel, iptables replaces the earlier ipchains as a method of filtering networkpackets. It provides multiple chains for increased filtration flexibility. The iptablesutility also provides stateful packet inspection (page 898).
Example rules As an example of how rules work, assume a chain has two rules (Figure 26-10). Thefirst rule tests whether a packet’s destination is port 23 (FTP) and drops the packet if itis. The second rule tests whether a packet was received from the IP address192.168.1.1 and alters the packet’s destination if it was. When a packet is processed bythe example chain, the kernel applies the first rule in the chain to see whether thepacket arrived on port 23. If the answer is yes, the packet is dropped and that is theend of processing for that packet. If the answer is no, the kernel applies the second rulein the chain to see whether the packet came from the specified IP address. If the answeris yes, the destination in the packet’s header is changed and the modified packet is senton its way. If the answer is no, the packet is sent on without being changed.
Chains are collected in three tables: Filter, NAT, and Mangle. Each of these tableshas builtin chains (described next). You can create additional, user-defined chains inFilter, the default table.

How iptables Works 897
Filter table The default table. This table is mostly used to DROP or ACCEPT packets based ontheir content; it does not alter packets. Builtin chains are INPUT, FORWARD, andOUTPUT. All user-defined chains go in this table.
NAT table The Network Address Translation table. Packets that create new connectionsare routed through this table, which is used exclusively to translate the source ordestination fields of packets. Builtin chains are PREROUTING, OUTPUT, andPOSTROUTING. Use this table with DNAT, SNAT, and MASQUERADE tar-gets only.
• DNAT (destination NAT) alters the destination IP address of the first inbound packet in a connection so it is rerouted to another host. Subsequent packets in the connection are automatically DNATed. DNAT is useful for redirecting packets from the Internet that are bound for a firewall or a NATed server (page 912).
• SNAT (source NAT) alters the source IP address of the first outbound packet in a connection so it appears to come from a fixed IP address— for example, a firewall or router. Subsequent packets in the connection are automatically SNATed. Replies to SNATed packets are automatically de-SNATed so they go back to the original sender. SNAT is useful for hiding LAN addresses from systems outside the LAN and using a single IP address to serve multiple local hosts.
• MASQUERADE differs from SNAT only in that it checks for an IP address to apply to each outbound packet, making it suitable for use with dynamic IP addresses such as those provided by DHCP (page 538). MAS-QUERADE is slightly slower than SNAT.
Mangle table Used exclusively to alter the TOS (type of service), TTL (time to live), and MARKfields in a packet. Builtin chains are PREROUTING and OUTPUT.
Network packet When a packet from the network enters the kernel’s network protocol stack, it isgiven some basic sanity tests, including checksum verification. After passing these
Figure 26-10 Example of how rules in a chain work
Destination=
Port 23?
Source=
192.168.1.1?Packet TCP stack
Alterdestination
Yes
No
Drop
No
Yes

898 Chapter 26 firestarter and iptables: Setting Up a Firewall
tests, the packet goes through the PREROUTING chain, where its destinationaddress may be changed (Figure 26-11).
Next the packet is routed based on its destination address. If it is bound for the localsystem, it first goes through the INPUT chain, where it can be filtered (accepted,dropped, or sent to another chain) or altered. If the packet is not addressed to thelocal system (the local system is forwarding the packet), it goes through the FOR-WARD and POSTROUTING chains, where it can again be filtered or altered.
Packets created locally pass through the OUTPUT and POSTROUTING chains,where they can be filtered or altered before being sent to the network.
State The connection tracking machine (also called the state machine) provides informa-tion on the state of a packet, allowing you to define rules that match criteria basedon the state of the connection the packet is part of. For example, when a connectionis opened, the first packet is part of a NEW connection, whereas subsequent packetsare part of an ESTABLISHED connection. Connection tracking is handled by theconntrack module.
The OUTPUT chain handles connection tracking for locally generated packets. ThePREROUTING chain handles connection tracking for all other packets. For moreinformation refer to “State” on page 905.
Before the advent of connection tracking, it was sometimes necessary to open manyor all nonprivileged ports to make sure that the system accepted all RETURN andRELATED traffic. Because connection tracking allows you to identify these kinds oftraffic, you can keep many more ports closed to general traffic, thereby increasingsystem security.
Jumps and targets A jump or target (page 906) specifies the action the kernel takes if a network packetmatches all the match criteria (page 900) for the rule being processed.
Figure 26-11 Filtering a packet in the kernel
(Routing)
INPUT
POSTROUTINGFORWARDPREROUTING
OUTPUT
Filter, Mangle
Mangle, Filter Mangle, (S)NAT
Mangle, NAT, Filter
(Routing)
Mangle, (D)NAT
Local system
Network

About iptables 899
About iptablesThis section contains information about iptables: resources to consult for more infor-mation, prerequisites, and notes.
More Information
Web Documentation, HOWTOs, FAQs, patch-o-matic,security information www.netfilter.org
Tutorial www.faqs.org/docs/iptablesMulticast DNS www.multicastdns.orgScripts and more www.linuxguruz.com/iptables
HOWTO KernelAnalysis-HOWTOIP-Masquerade-HOWTO (contains useful scripts)Netfilter Extensions HOWTO www.netfilter.orgNetfilter Hacking-HOWTO www.netfilter.org
Book TCP Illustrated by W. Richard Stevens, Addison-Wesley, January 2002
Prerequisites
Installation Install the following package:
• iptables
iptables init script The iptables package does not include an init script because, under Ubuntu, it is gener-ally called from firestarter. This chapter includes instructions for configuring and runningiptables. You can save and reload iptables rules as explained in “Saving rules” below.
Notes
Startup The iptables utility is a tool that manipulates rules in the kernel. It differs from dae-mons (servers) in its setup and use. Whereas Linux daemons such as Apache, vsftpd,and sshd read the data that controls their operation from a configuration file, youmust provide iptables with a series of commands that build a set of packet filteringrules that are kept in the kernel.
Saving rules You can save and reload iptables rules as explained on page 907. Run iptables withthe –L option to display the packet filtering rules the kernel is using. You can put acommand to load iptables rules in /etc/rc.local. Or, if you want to start iptables ear-lier in the boot process, you can write a simple init script, put it in /etc/init.d, anduse sysv-rc-conf (page 508) to tell init when to run it.
Resetting iptables If you encounter problems related to the firewall rules, you can return the packetprocessing rules in the kernel to their default state without rebooting by giving thefollowing commands:
$ sudo iptables --flush && iptables --delete-chain
These commands flush all chains and delete any user-defined chains, leaving the sys-tem without a firewall.

900 Chapter 26 firestarter and iptables: Setting Up a Firewall
Anatomy of an iptables Command
Command line This section lists the components of an iptables command line that follow the nameof the utility, iptables. Except as noted, the iptables utility is not sensitive to the posi-tions of arguments on the command line. The examples in this chapter reflect a gen-erally accepted syntax that allows commands to be easily read, understood, andmaintained. Not all commands have all components.
Many tokens on an iptables command line have two forms: a short form, consistingof a single letter preceded by a single hyphen, and a long form, consisting of a wordpreceded by two hyphens. Most scripts use the short forms for brevity; lines usingthe long forms can get unwieldy. The following iptables command lines are equiva-lent and are used as examples in this section:
$ sudo iptables --append FORWARD --in-interface eth1 --out-interface eth0 --jump ACCEPT$ sudo iptables -A FORWARD -i eth1 -o eth0 -j ACCEPT
Table Specifies the name of the table the command operates on: Filter, NAT, or Mangle.You can specify a table name in any iptables command. When you do not specify atable name, the command operates on the Filter table. Most examples in this chap-ter do not specify table names and, therefore, work on the Filter table. Specify atable as –t tablename or ––table tablename.
Command Tells iptables what to do with the rest of the command line—for example, add ordelete a rule, display rules, or add a chain. The example commands, –A and––append, append the rule specified by the command line to the specified table(defaults to Filter table) and chain. See page 901 for a list of commands.
Chain Specifies the name of the chain that this rule belongs to or that this command works on.The chain is INPUT, OUTPUT, FORWARD, PREROUTING, POSTROUTING, or thename of a user-defined chain. Specify a chain by putting the name of the chain on thecommand line without any preceding hyphens. The examples at the beginning of thissection work with the FORWARD chain.
Match criteria There are two kinds of match criteria: packet match criteria, which match a net-work packet, and rule match criteria, which match an existing rule.
Packet matchcriteria/rule
specifications
Packet match criteria identify network packets and implement rules that take actionon packets that match the criteria. The combination of packet match criteria and anaction is called a rule specification. Rule specifications form the basis for packet fil-tering. The first example at the beginning of this section uses the ––in-interface eth1––out-interface eth0 rule match criteria. The second example uses the short form ofthe same criteria: –i eth1 –o eth0. Both of these rules forward packets that come inon device eth1 and go out on device eth0.
Rule match criteria Rule match criteria identify existing rules. An iptables command can modify,remove, or position a new rule adjacent to a rule specified by a rule match criterion.There are two ways to identify an existing rule: You can use the same rule specifica-tion that was used to create the rule or you can use the rule’s ordinal number, calleda rule number. Rule numbers begin with 1, signifying the first rule in a chain, and

Building a Set of Rules 901
can be displayed with iptables –L (or ––line-numbers). The first command belowdeletes the rule listed at the beginning of this section; the second command replacesrule number 3 in the INPUT chain with a rule that rejects all packets from IPaddress 192.168.0.10:
$ sudo iptables --delete -A FORWARD -i eth1 -o eth0 -j ACCEPT$ sudo iptables -R INPUT 3 --source 192.168.0.10 --jump REJECT
A jump or target specifies what action the kernel takes on packets that match allmatch criteria for a rule. Specify a jump or target as –j target or ––jump target. Theexamples at the beginning of this section specify the ACCEPT target using the fol-lowing commands: ––jump ACCEPT and –j ACCEPT.
Jumps A jump transfers control to a different chain within the same table. The followingcommand adds (––append) a rule to the INPUT chain that transfers packets thatuse the TCP protocol (––protocol tcp) to a user-defined chain named tcp_rules(––jump tcp_rules):
$ sudo iptables --append INPUT --protocol tcp --jump tcp_rules
When the packet finishes traversing the tcp_rules chain, assuming it has not beendropped or rejected, it continues traversing the INPUT chain from the rule follow-ing the one it jumped from.
Targets A target specifies an action the kernel takes on the packet; the simplest actions areACCEPT, DROP, and REJECT. The following command adds a rule to the FOR-WARD chain that rejects packets coming from the FTP port (/etc/services, the fileiptables consults to determine which port to use, shows that FTP uses port 21):
$ sudo iptables --append FORWARD --sport ftp --jump REJECT
Some targets, such as LOG, are nonterminating: Control passes to the next ruleafter the target is executed. See page 906 for information on how to use targets.
Building a Set of Rules
To specify a table, it is common practice to put the table declaration on the com-mand line immediately following iptables. For example, the following commandflushes (deletes all the rules from) the NAT table:
$ sudo iptables -t NAT -F
Commands
Following is a list of iptables commands:
––append –A Adds rule(s) specified by rule-specifications to the end of chain. When a packetmatches all of the rule-specifications, target processes it.
iptables –A chain rule-specifications ––jump target

902 Chapter 26 firestarter and iptables: Setting Up a Firewall
––delete –D Removes one or more rules from chain, as specified by the rule-numbers orrule-specifications.
iptables –D chain rule-numbers | rule-specifications
––insert –I Adds rule(s) specified by rule-specifications and target to the location in chainspecified by rule-number. If you do not specify rule-number, it defaults to 1, thehead of the chain.
iptables –I chain rule-number rule-specifications ––jump target
––replace –R Replaces rule number rule-number in chain with rule-specification and target.The command fails if rule-number or rule-specification resolves to more than oneaddress.
iptables –R chain rule-number rule-specification ––jump target
––list –L Displays the rules in chain. Omit chain to display the rules for all chains. Use––line-numbers to display rule numbers or select other display criteria from the liston page 903.
iptables –L [chain] display-criteria
––flush –F Deletes all rules from chain. Omit chain to delete all rules from all chains.
iptables –F [chain]
––zero –Z Changes to zero the value of all packet and byte counters in chain or in allchains when you do not specify chain. Use with –L to display the counters beforeclearing them.
iptables –Z [–L] [chain]
––delete-chain –X Removes the user-defined chain named chain. If you do not specify chain,removes all user-defined chains. You cannot delete a chain that a target points to.
iptables –X chain
––policy –P Sets the default target or policy builtin-target for the builtin chain builtin-chain. This policy is applied to packets that do not match any rule in the chain. If achain does not have a policy, unmatched packets are ACCEPTed.
iptables –P builtin-chain builtin-target
––rename-chain –E Changes the name of the chain old to new.
iptables –E old new
––help –h Displays a summary of the iptables command syntax.
iptables –h
Follow a match extension protocol with –h to display options you can use with thatprotocol. For more information refer to “Help with extensions” on page 904.

Building a Set of Rules 903
Packet Match Criteria
The following criteria match network packets. When you precede a criterion withan exclamation point (!), the rule matches packets that do not match the criterion.
––protocol [!] proto–p Matches if the packet uses the proto protocol. This criterion is a match exten-sion (page 903).
––source [!] address[/mask]–s or ––src Matches if the packet came from address. The address can be a nameor IP address. See page 529 for formats of the optional mask (only with an IPaddress).
––destination [!] address[/mask]–d or ––dst Matches if the packet is going to address. The address can be a nameor IP address. See page 529 for formats of the optional mask (only with an IPaddress).
––in-interface [!] iface[+]–i For the INPUT, FORWARD, and PREROUTING chains, matches if iface is thename of the interface the packet was received from. Append a plus sign (+) to ifaceto match any interface whose name begins with iface. When you do not specify in-interface, the rule matches packets coming from any interface.
––out-interface [!] iface[+]–o For the OUTPUT, FORWARD, and POSTROUTING chains, matches if ifaceis the interface the packet will be sent to. Append a plus sign (+) to iface to matchany interface whose name begins with iface. When you do not specify out-interface,the rule matches packets going to any interface.
[!] –fragment –f Matches the second and subsequent fragments of fragmented packets. Becausethese packets do not contain source or destination information, they do not matchany other rules.
Display Criteria
The following criteria display information. All packets match these criteria.
––verbose –v Displays additional output.
––numeric –n Displays IP addresses and port numbers as numbers, not names.
––exact –x Use with –L to display exact packet and byte counts instead of rounded values.
––line-numbers Displays line numbers when listing rules. These line numbers are also the rule num-bers that you can use in rule match criteria (page 900).
Match Extensions
Rule specification (packet match criteria) extensions, called match extensions, addmatches based on protocols and state to the matches described previously. Each ofthe protocol extensions is kept in a module that must be loaded before that match

904 Chapter 26 firestarter and iptables: Setting Up a Firewall
extension can be used. The command that loads the module must appear in thesame rule specification as, and to the left of, the command that uses the module.There are two types of match extensions: implicit and explicit.
Implicit Match Extensions
Help withextensions
Implicit extensions are loaded (somewhat) automatically when you use a ––protocolcommand (described below). Each protocol has its own extensions. Follow the pro-tocol with –h to display extensions you can use with that protocol. For example, thefollowing command displays TCP extensions at the end of the Help output:
$ iptables -p tcp -h...TCP v1.3.6 options: --tcp-flags [!] mask comp match when TCP flags & mask == comp (Flags: SYN ACK FIN RST URG PSH ALL NONE)[!] --syn match when only SYN flag set (equivalent to --tcp-flags SYN,RST,ACK SYN) --source-port [!] port[:port] --sport ... match source port(s) --destination-port [!] port[:port] --dport ... match destination port(s) --tcp-option [!] number match if TCP option set
This section does not describe all extensions. Use –h, as in the preceding example, todisplay a complete list.
––protocol [!] proto–p Loads the proto module and matches if the packet uses the proto protocol. Theproto can be a name or number from /etc/protocols, including tcp, udp, and icmp(page 1041). Specifying all or 0 (zero) matches all protocols and is the same as notincluding this match in a rule.
The following criteria load the TCP module and match TCP protocol packets com-ing from port 22 (ssh packets):
--protocol tcp --source-port 22
The following command expands the preceding match to cause the kernel to drop allincoming ssh packets. This command uses ssh, which iptables looks up in /etc/services,in place of 22:
$ sudo iptables --protocol tcp --source-port ssh --jump DROP
TCP
The extensions in this section are loaded when you specify ––protocol tcp.
––destination-port [!] [port][:port]]––dport Matches a destination port number or service name (see /etc/services).You can also specify a range of port numbers. Specifically, :port specifies ports 0through port, and port: specifies ports port through 65535.

Building a Set of Rules 905
––source-port [!] [port][:port]]––sport Matches a source port number or service name (see /etc/services). You canalso specify a range of port numbers. Specifically, :port specifies ports 0 throughport, and port: specifies ports port through 65535.
[!] ––syn Matches packets with the SYN bit set and the ACK and FIN bits cleared. Thismatch extension is shorthand for ––tcp-flags SYN,RST,ACK SYN.
––tcp-flags [!] mask compDefines which TCP flag settings constitute a match. Valid flags are SYN, ACK, FIN,RST, URG, PSH, ALL, and NONE. The mask is a comma-separated list of flags tobe examined; comp is a comma-separated subset of mask that specifies the flags thatmust be set for a match to occur. Flags not specified in mask must be unset.
––tcp-option [!] n Matches a TCP option with a decimal value of n.
UDP
When you specify ––protocol udp, you can specify a source and/or destination portin the same manner as described under “TCP” on the preceding page.
ICMP
The extension in this section is loaded when you specify ––protocol icmp. ICMP(page 1041) packets carry messages only.
––icmp-type [!] nameMatches when the packet is an ICMP packet of type name. The name can be anumeric ICMP type or one of the names returned by
$ iptables -p icmp -h
Explicit Match Extensions
Explicit match extensions differ from implicit match extensions in that you mustuse a –m or ––match option to specify a module before you can use the extension.Many explicit match extension modules are available; this section covers state, oneof the most important.
State
The state extension matches criteria based on the state of the connection the packetis part of (page 898).
––state state Matches a packet whose state is defined by state, a comma-separated list of statesfrom the following list:
• ESTABLISHED Any packet, within a specific connection, following the exchange of packets in both directions for that connection.
• INVALID A stateless or unidentifiable packet.
• NEW The first packet within a specific connection, typically a SYN packet.

906 Chapter 26 firestarter and iptables: Setting Up a Firewall
• RELATED Any packets exchanged in a connection spawned from an ESTABLISHED connection. For example, an FTP data connection might be related to the FTP control connection. (You need the ip_conntrack_ftpmodule for FTP connection tracking.)
The following command loads the state extension and establishes a rule that matchesand drops both invalid packets and packets from new connections:
$ sudo iptables --match state --state INVALID,NEW --jump DROP
Targets
All targets are built in; there are no user-defined targets. This section lists some ofthe targets available with iptables. Applicable target options are listed followingeach target.
ACCEPT Continues processing the packet.
DNAT Destination Network Address Translation Rewrites the destination address of thepacket (page 897).
––to-destination ip[-ip][:port-port]Same as SNAT with to-source, except that it changes the destination addresses ofpackets to the specified addresses and ports and is valid only in the PREROUTINGor OUTPUT chains of the NAT table and any user-defined chains called from thosechains. The following command adds to the PREROUTING chain of the NAT tablea rule that changes the destination in the headers of TCP packets with a destinationof 66.187.232.50 to 192.168.0.10:
$ sudo iptables -t NAT -A PREROUTING -p tcp -d 66.187.232.50 -j DNAT --to-destination 192.168.0.10
DROP Ends the packet’s life without notice.
LOG Turns on logging for the packet being processed. The kernel uses syslogd (page 688)to process output generated by this target. LOG is a nonterminating target, so pro-cessing continues with the next rule. Use two rules to LOG packets that youREJECT or DROP, one each with the targets LOG and REJECT or DROP, with thesame matching criteria.
––log-level n Specifies logging level n as per syslog.conf (page 688).
––log-prefix stringPrefixes log entries with string, which can be a maximum of 14 characters long.
––log-tcp-options Logs options from the TCP packet header.
––log-ip-options Logs options from the IP packet header.
MASQUERADE Similar to SNAT with ––to-source, except that it grabs the IP information from theinterface on the specified port. For use on systems with dynamically assigned IPaddresses, such as those using DHCP, including most dial-up lines. Valid only inrules in the POSTROUTING chain of the NAT table.

Copying Rules to and from the Kernel 907
––to-ports port[-port]Specifies the port for the interface you want to masquerade. Forgets connectionswhen the interface goes down, as is appropriate for dial-up lines. You must specifythe TCP or UDP protocol (––protocol tcp or udp) with this target.
REJECT Similar to DROP, except that it notifies the sending system that the packet wasblocked.
––reject-with type Returns the error type to the originating system. The type can be any of the following,all of which return the appropriate ICMP (page 1041) error: icmp-net-unreachable,icmp-host-unreachable, icmp-port-unreachable, icmp-proto-unreachable, icmp-net-prohibited, or icmp-host-prohibited. You can specify type as echo-reply from rulesthat require an ICMP ping (page 375) packet to return a ping reply. You can specifytcp-reset from rules in or called from the INPUT chain to return a TCP RST packet.This parameter is valid in the INPUT, FORWARD, and OUTPUT chains and user-defined chains called from these chains.
RETURN Stops traversing this chain and returns the packet to the calling chain.
SNAT Source Network Address Translation Rewrites the source address of the packet.Appropriate for hosts on a LAN that share an Internet connection.
––to-source ip[-ip][:port-port]Alters the source IP address of an outbound packet, and the source IP addresses ofall future packets in this connection, to ip. Skips additional rules, if any exist.Returning packets are automatically de-SNATed so they return to the originatinghost. Valid only in the POSTROUTING chain of the NAT table.
When you specify a range of IP addresses (ip-ip) or use multiple to-source targets,iptables assigns the addresses in a round-robin fashion, cycling through theaddresses, one for each new connection.
When the rule specifies the TCP or UDP protocol (–p tcp or –p udp), you can spec-ify a range of ports. When you do not specify a range of ports, the rule matches allports. Every connection on a NATed subnet must have a unique IP address and portcombination. If two systems on a NATed subnet try to use the same port, the kernelmaps one of the ports to another (unused) port. Ports less than 512 are mapped toother ports less than 512, ports from 512 to 1024 are mapped to other ports from512 to 1024, and ports above 1024 are mapped to other ports above 1024.
Copying Rules to and from the Kernel
The iptables-save utility copies packet filtering rules from the kernel to standard outputso you can save them in a file. The iptables-restore utility copies rules from standardinput, as written by iptables-save, to the kernel. Sample output from iptables-saveappears on the next page.

908 Chapter 26 firestarter and iptables: Setting Up a Firewall
$ sudo iptables-save# Generated by iptables-save v1.3.6 on Sat Jul 14 21:13:29 2007*mangle:PREROUTING ACCEPT [1720:889840]:INPUT ACCEPT [1720:889840]:FORWARD ACCEPT [0:0]:OUTPUT ACCEPT [1391:111855]:POSTROUTING ACCEPT [1391:111855]COMMIT# Completed on Sat Jul 14 21:13:29 2007# Generated by iptables-save v1.3.6 on Sat Jul 14 21:13:29 2007*filter:INPUT DROP [1:44]:FORWARD DROP [0:0]:OUTPUT DROP [0:0]:INBOUND - [0:0]:LOG_FILTER - [0:0]:LSI - [0:0]:LSO - [0:0]:OUTBOUND - [0:0]-A INPUT -s 198.144.192.2 -p tcp -m tcp ! --tcp-flags FIN,SYN,RST,ACK SYN -j ACCEPT-A INPUT -s 198.144.192.2 -p udp -j ACCEPT-A INPUT -s 209.157.152.23 -p tcp -m tcp ! --tcp-flags FIN,SYN,RST,ACK SYN -j ACCEPT-A INPUT -s 209.157.152.23 -p udp -j ACCEPT-A INPUT -i lo -j ACCEPT...
Most lines that iptables-save writes are iptables command lines without the iptablesat the beginning. Lines that begin with a pound sign (#) are comments. Lines thatbegin with an asterisk (*) are names of tables that the following commands workon; the first few commands in the preceding example work on the Mangle table, therest work on the Filter table. The COMMIT line must appear at the end of all com-mands for a table; it executes the preceding commands. Lines that begin with colonsspecify chains in the following format:
:chain policy [packets:bytes]
where chain is the name of the chain, policy is the policy (default target) for thechain, and packets and bytes are the packet and byte counters, respectively. Thesquare brackets must appear in the line; they do not indicate optional parameters.Visit www.faqs.org/docs/iptables/iptables-save.html for more information.
Sharing an Internet Connection Using NAT
Many scripts that set up Internet connection sharing using iptables are available onthe Internet. Each of these scripts boils down to the same few basic iptables com-mands, albeit with minor differences. This section discusses those few statements toexplain how a connection can be shared. You can use the statements presented inthis section or refer to the Linux IP Masquerade HOWTO for complete scripts.

Sharing an Internet Connection Using NAT 909
The tldp.org/HOWTO/IP-Masquerade-HOWTO/firewall-examples.html Web pageholds the simplest of these scripts.
There are two ways you can share a single connection to the Internet (one IPaddress), both of which involve setting up NAT to alter addresses in packets andthen forward them. The first allows clients (browsers, mail readers, and so on) onseveral systems on a LAN to share a single IP address to connect to servers on theInternet. The second allows servers (mail, Web, FTP, and so on) on different systemson a LAN to provide their services over a single connection to the Internet. You canuse iptables to set up one or both of these configurations. In both cases, you need toset up a system that is a router: It must have two network connections—one con-nected to the Internet and the other to the LAN.
For optimal security, use a dedicated system as a router. Because data transmissionover a connection to the Internet—even over a broadband connection—is relativelyslow, using a slower, older system as a router does not generally slow down a LAN.This setup also offers some defense against intrusion from the Internet. A worksta-tion on the LAN can function as a router as well, but this setup means that youmaintain data on a system that is directly connected to the Internet. The followingsections discuss the security of each setup.
The examples in this section assume that the device named eth0 connects to theInternet on 10.255.255.255 and that eth1 connects to the LAN on 192.168.0.1.Substitute the devices and IP addresses that the local systems use. If you use amodem to connect to the Internet, you need to substitute ppp0 (or another device)for eth0 in the examples.
For the examples in this section to work, you must turn on IP forwarding. First givethe following command and make sure everything is working:
$ sudo sysctl -w net.ipv4.conf.default.forwarding=1net.ipv4.conf.default.forwarding = 1
If you want to forward IPv6 packets, give this command instead:
$ sudo sysctl -w net.ipv6.conf.default.forwarding=1net.ipv6.conf.default.forwarding = 1
Once you know that iptables is working correctly, follow the instructions in/etc/sysctl.conf and uncomment one or both of the following assignments to makethe kernel always perform IP forwarding for IPv4 and/or IPv6:
# Uncomment the next line to enable packet forwarding for IPv4#net.ipv4.conf.default.forwarding=1
# Uncomment the next line to enable packet forwarding for IPv6#net.ipv6.conf.default.forwarding=1
After making this change, give the command /sbin/sysctl –p to apply the changeand to make sure that there are no typographical errors in the configuration file.

910 Chapter 26 firestarter and iptables: Setting Up a Firewall
Connecting Several Clients to a Single
Internet Connection
Configuring the kernel of the router system to allow clients on multiple local sys-tems on the LAN to connect to the Internet requires you to set up IP masquerading,or SNAT (source NAT). IP masquerading translates the source and destinationaddresses in the headers of network packets that originate on local systems and thepackets that remote servers send in response to those packets. These packets arepart of connections that originate on a local system. The example in this sectiondoes nothing to packets that are part of connections that originate on the remotesystems (on the Internet): These packets cannot get past the router system, whichprovides some degree of security.
The point of rewriting the packet headers is to allow systems with different local IPaddresses to share a single IP address on the Internet. The router system translates thesource or origin address of packets from the local systems to that of the Internet con-nection, so that all packets passing from the router to the Internet appear to comefrom a single system—10.255.255.255 in the example. All packets sent in response byremote systems on the Internet to the router system have the address of the Internetconnection—10.255.255.255 in the example—as their destination address. Therouter system remembers each connection and alters the destination address of eachresponse packet to that of the local, originating system.
The router system is established by four iptables commands, one of which sets up alog of masqueraded connections. The first command puts the first rule in the FOR-WARD chain of the Filter (default) table (–A FORWARD):
$ sudo iptables -A FORWARD -i eth0 -o eth1 -m state --state ESTABLISHED,RELATED -j ACCEPT
To match this rule, a packet must be
1. Received on eth0 (coming in from the Internet): –i eth0.
2. Going to be sent out on eth1 (going out to the LAN): –o eth1.
3. Part of an established connection or a connection that is related to an established connection: ––state ESTABLISHED,RELATED.
The kernel accepts (–j ACCEPT) packets that meet these three criteria. Acceptedpackets pass to the next appropriate chain or table. Packets from the Internet thatattempt to create a new connection are not matched and, therefore, are notaccepted by this rule. Packets that are not accepted pass to the next rule in the FOR-WARD chain.
The second command puts the second rule in the FORWARD chain of the Filtertable:
$ sudo iptables -A FORWARD -i eth1 -o eth0 -j ACCEPT
To match this rule, a packet must be
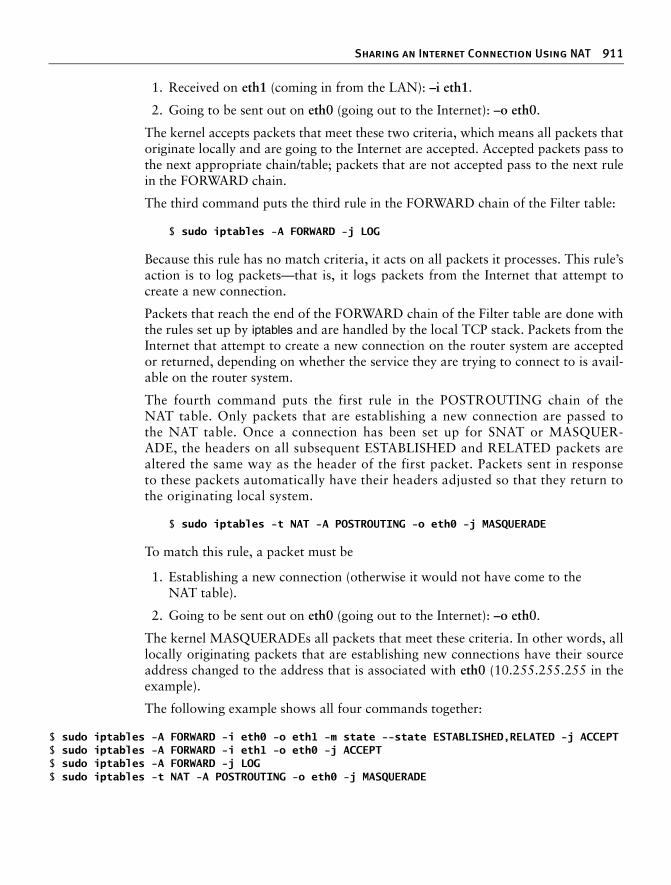
Sharing an Internet Connection Using NAT 911
1. Received on eth1 (coming in from the LAN): –i eth1.
2. Going to be sent out on eth0 (going out to the Internet): –o eth0.
The kernel accepts packets that meet these two criteria, which means all packets thatoriginate locally and are going to the Internet are accepted. Accepted packets pass tothe next appropriate chain/table; packets that are not accepted pass to the next rulein the FORWARD chain.
The third command puts the third rule in the FORWARD chain of the Filter table:
$ sudo iptables -A FORWARD -j LOG
Because this rule has no match criteria, it acts on all packets it processes. This rule’saction is to log packets—that is, it logs packets from the Internet that attempt tocreate a new connection.
Packets that reach the end of the FORWARD chain of the Filter table are done withthe rules set up by iptables and are handled by the local TCP stack. Packets from theInternet that attempt to create a new connection on the router system are acceptedor returned, depending on whether the service they are trying to connect to is avail-able on the router system.
The fourth command puts the first rule in the POSTROUTING chain of theNAT table. Only packets that are establishing a new connection are passed tothe NAT table. Once a connection has been set up for SNAT or MASQUER-ADE, the headers on all subsequent ESTABLISHED and RELATED packets arealtered the same way as the header of the first packet. Packets sent in responseto these packets automatically have their headers adjusted so that they return tothe originating local system.
$ sudo iptables -t NAT -A POSTROUTING -o eth0 -j MASQUERADE
To match this rule, a packet must be
1. Establishing a new connection (otherwise it would not have come to the NAT table).
2. Going to be sent out on eth0 (going out to the Internet): –o eth0.
The kernel MASQUERADEs all packets that meet these criteria. In other words, alllocally originating packets that are establishing new connections have their sourceaddress changed to the address that is associated with eth0 (10.255.255.255 in theexample).
The following example shows all four commands together:
$ sudo iptables -A FORWARD -i eth0 -o eth1 -m state --state ESTABLISHED,RELATED -j ACCEPT$ sudo iptables -A FORWARD -i eth1 -o eth0 -j ACCEPT$ sudo iptables -A FORWARD -j LOG$ sudo iptables -t NAT -A POSTROUTING -o eth0 -j MASQUERADE

912 Chapter 26 firestarter and iptables: Setting Up a Firewall
See page 899 for instructions on how to save these rules so that the firewall comesup each time the system boots. To limit the local systems that can connect to theInternet, you can add a –s (source) match criterion to the last command:
$ sudo iptables -t NAT -A POSTROUTING -o eth0 -s 192.168.0.0-192.168.0.32 -j MASQUERADE
In the preceding command, –s 192.168.0.0-192.168.0.32 causes only packets froman IP address in the specified range to be MASQUERADEd.
Connecting Several Servers to a Single
Internet Connection
DNAT (destination NAT) can set up rules that allow clients from the Internet tosend packets to servers on the LAN. This example sets up an SMTP mail server on192.168.1.33 and an Apache (Web) server on 192.168.1.34. Both protocols useTCP. SMTP uses port 25 and Apache uses port 80, so the rules match TCP packetswith destination ports of 25 and 80. The example assumes that the mail server doesnot make outgoing connections and uses another server on the LAN for DNS andmail relaying. Both commands put rules in the PREROUTING chain of the NATtable (–A PREROUTING –t NAT):
$ sudo iptables -A PREROUTING -t NAT -p tcp --dport 25 --to-source 192.168.0.33:25 -j DNAT$ sudo iptables -A PREROUTING -t NAT -p tcp --dport 80 --to-source 192.168.0.34:80 -j DNAT
To match these rules, the packet must use the TCP protocol (–p tcp) and have a des-tination port of either 25 (first rule, ––dport 25) or 80 (second rule, ––dport 80).
The ––to-source is a target specific to the PREROUTING and OUTPUT chains ofthe NAT table; it alters the destination address and port of matched packets as spec-ified. As with MASQUERADE and SNAT, subsequent packets in the same andrelated connections are altered the same way.
The fact that the servers cannot originate connections means that neither server can beexploited to participate in a DDoS attack (page 1032) on systems on the Internet, norcan they send private data from the local system back to a malicious user’s system.
Chapter Summary
A firewall, such as iptables or firestarter, is designed to prevent unauthorized accessto a system or network. The firestarter utility is a sophisticated, graphical tool forbuilding and maintaining a firewall. It can protect just the single system it runs onor it can protect the system it runs on plus other systems on a LAN that connect tothe Internet through the system running firestarter.
An iptables command sets up or maintains in the kernel rules that control the flowof network packets; rules are stored in chains. Each rule includes a criteria part andan action part, called a target. When the criteria part matches a network packet, thekernel applies the action from the rule to the packet.

Advanced Exercises 913
Chains are collected in three tables: Filter, NAT, and Mangle. Filter (the defaulttable) DROPs or ACCEPTs packets based on their content. NAT (the NetworkAddress Translation table) translates the source or destination field of packets.Mangle is used exclusively to alter the TOS (type of service), TTL (time to live), andMARK fields in a packet. The connection tracking machine, which is handled bythe conntrack module, defines rules that match criteria based on the state of theconnection a packet is part of.
Exercises
1. How would you remove all iptables rules and chains?
2. What is firestarter? How is it related to iptables?
3. What is the easiest way to set up a rule using firestarter?
4. How would you list all current iptables rules?
5. How is configuring iptables different from configuring most Linux services?
6. Define an iptables rule that will reject incoming connections on the TELNET port.
7. What does NAT stand for? What does the NAT table do?
Advanced Exercises
8. What does the conntrack module do?
9. What do rule match criteria do? What are they used for?
10. What do packet match criteria do? What are they used for?
11. Which utilities copy packet filtering rules to and from the kernel? How do they work?
12. Define a rule that will silently block incoming SMTP connections from spmr.com.

This page intentionally left blank

915915
27Chapter27The World Wide Web (WWW or Web for short), is a collection ofservers that hold material, called content, that Web browsers (orjust browsers) can display. Each of the servers on the Web is con-nected to the Internet, a network of networks (an internetwork).Much of the content on the Web is coded in HTML (HypertextMarkup Language, page 1040). Hypertext, the links you click ona Web page, allows browsers to display and react to links thatpoint to other Web pages on the Internet.
Apache is the most popular Web server on the Internet. It isboth robust and extensible. The ease with which you caninstall, configure, and run it in the Linux environment makes itan obvious choice for publishing content on the World WideWeb. The Apache server and related projects are developed andmaintained by the Apache Software Foundation (ASF), a not-for-profit corporation formed in June 1999. The ASF grew outof the Apache Group, which was established in 1995 to developthe Apache server.
This chapter starts by providing introductory information aboutApache. Following this information is the JumpStart section,
In This Chapter
JumpStart: Getting Apache Up and Running. . . . . . . . . . . . . . . . 919
Configuring Apache . . . . . . . . . . . 921
Configuration Directives . . . . . . . . 925
Contexts and Containers . . . . . . . 931
The Ubuntu apache2.conf File . . . 948
Redirects . . . . . . . . . . . . . . . . . . . . 951
Content Negotiation . . . . . . . . . . . 951
Type Maps . . . . . . . . . . . . . . . . . . . 951
MultiViews. . . . . . . . . . . . . . . . . . . 952
Virtual Hosts . . . . . . . . . . . . . . . . . 953
Troubleshooting . . . . . . . . . . . . . . 956
27
Apache: Setting Up a
Web Server

916 Chapter 27 Apache: Setting Up a Web Server
which describes the minimal steps needed to get Apache up and running. Next is“Filesystem Layout,” which tells you where the various Apache files are located.
Configuration directives (referred to simply as directives) are a key part of Apacheand are discussed starting on page 925. This section includes coverage of contextsand containers, two features/concepts that are critical to understanding Apache.The next section, which starts on page 948, explains the main Apache configurationfile, apache2.conf, as distributed by Ubuntu. The final pages of the chapter covervirtual hosts, troubleshooting, and modules you can use with Apache, includingCGI and SSL.
Introduction
Apache is a server that responds to requests from Web browsers, or clients, such asFirefox, Netscape, lynx, and Internet Explorer. When you enter the address of a Webpage (a URI, page 1067) in a Web browser’s location bar, the browser sends a requestover the Internet to the (Apache) server at that address. In response, the server sends(serves) the requested content back to the browser. The browser then displays or playsthe content, which might be a song, picture, video clip, or other information.
Content Aside from add-on modules that can interact with the content, Apache looks only atthe type of data it is sending so that it can specify the correct MIME (page 1048)type; otherwise it remains oblivious to the content itself. Server administration andcontent creation are two different aspects of bringing up a Web site. This chapterconcentrates on setting up and running an Apache server; it spends little time dis-cussing content creation.
Modules Apache, like the Linux kernel, uses external modules to increase load-time flexibil-ity and allow parts of its code to be recompiled without recompiling the whole pro-gram. Rather than being part of the Apache binary, modules are stored as separatefiles that can be loaded when Apache is started.
Apache uses external modules, called dynamic shared objects (DSOs), for basic andadvanced functions; there is not much to Apache without these modules. Apache alsouses modules to extend its functionality. For example, modules can process scriptswritten in Perl, PHP, Python, and other languages; use several different methods toauthenticate users; facilitate publishing content; and process nontextual content, suchas audio. The list of modules written by the ASF and third-party developers is con-stantly growing. For more information refer to “Modules” on page 957.
Setup The Debian/Ubuntu Apache team provides one of the easiest-to-use Apache setupsof any distribution. Most packages that provide a Web interface and that depend onApache run as installed; typically you do not need to modify the configuration files.For example, installing phpmyadmin (sourceforge.net/projects/phpmyadmin) makesit available to a browser as /phpmyadmin.

About Apache 917
About Apache
This section describes the packages you need to install and provides references forthe programs covered in this chapter. The “Notes” section on page 918 introducesterminology and other topics that may help you make better sense of this chapter.“JumpStart I” (page 919) gets Apache up and running as quickly as possible.
Prerequisites
Minimal installation Install the following package:
• apache2
apache2 init script When you install the apache2 package, the dpkg postinst script starts the apache2daemon. After you configure Apache, call the apache2 init script to restart theapache2 daemon:
$ sudo /etc/init.d/apache2 restart
After changing the Apache configuration on an active server, use reload in place ofrestart to reload Apache configuration files without disturbing clients connected tothe server.
Optional packages The mod_ssl package is installed as part of the apache2 package—you do not needto install it separately. You may want to install the following optional packages:
• apache2-doc The Apache manual
• webalizer Web server log analyzer (page 964)
• awstats Web server log analyzer
• libapache2-mod-perl2 Embedded Perl scripting language (mod_perl)
• libapache2-mod-python Metapackage that installs the embedded Python scripting language (mod_python)
• libapache2-mod-php5 Embedded PHP scripting language, including IMAP and LDAP support (mod_php)
• mrtg MRTG traffic monitor (page 964)
The apache2ctl utility and restarting Apache gracefully
tip The apache2 init script calls apache2ctl to start and stop Apache. The reload argument calls thisutility with an argument of graceful, which does not disturb clients that are connected to theserver. The restart and force-reload arguments call it with arguments of stop and then start; thispair of commands shuts down the server completely before restarting it.

918 Chapter 27 Apache: Setting Up a Web Server
More Information
Local Apache HTTP Server Version 2.2 Documentation. With Apache runningand apache2-doc installed, point a browser at server/manual, where serveris localhost or the name or IP address of the Apache server.
Apache directives server/manual/mod/directives.htmlSSI directives server/manual/howto/ssi.html
Web Apache documentation httpd.apache.org/docs/2.2 Apache directives httpd.apache.org/docs/2.2/mod/directives.htmlApache Software Foundation (newsletters, mailing lists, projects, module registry, and more) www.apache.orgwebalizer www.mrunix.net/webalizer awstats awstats.sourceforge.net libapache2-mod-perl2 perl.apache.org (mod_perl)libapache2-mod-php5 www.php.net (mod_php)libapache2-mod-python www.modpython.org (mod_python)SSL www.modssl.org (mod_ssl)MRTG mrtg.hdl.com/mrtg SNMP net-snmp.sourceforge.net SSI directives httpd.apache.org/docs/2.2/howto/ssi.html
Notes
Terms:Apache and
apache2
Apache is the name of a server that serves HTTP and other content. The name of theApache 2 daemon is apache2. This chapter uses Apache and apache2 interchangeably.
Terms: server andprocess
An Apache server is the same thing as an Apache process. An Apache child processexists to handle incoming client requests; hence it is referred to as a server.
Firewall An Apache server normally uses TCP port 80; a secure server uses TCP port 443. Ifthe Apache server system is running or behind a firewall, you must open one or bothof these ports. To get started, open port 80 (HTTP). Using firestarter (page 886),open these ports by setting a policy that allows service for HTTP and/or HTTPS.
Running with rootprivileges
Because Apache serves content on privileged ports, you must start it running withroot privileges. For security reasons, Ubuntu sets up Apache to spawn processesthat run as the user and group www-data.
Locale The apache2 daemon starts using the C locale by default. You can modify thisbehavior—for example, to use the configured system locale—by setting theLANG variable (in the line that starts with ENV="env -i LANG=C ...) in the/etc/init.d/apache2 file.
Document root The root of the directory hierarchy that Apache serves content from is called thedocument root and is controlled by the DocumentRoot directive (page 929). Thisdirective defines a directory on the server that maps to /. This directory appears tousers who are browsing a Web site as the root directory. As distributed by Ubuntu,the document root is /var/www.
Modifying content With the default Ubuntu configuration of Apache, only a user working with rootprivileges (using sudo) can add or modify content in /var/www. To avoid having

JumpStart: Getting Apache Up and Running 919
people work as root when they are manipulating content, create a group (webwork,for example), put people who need to work with Web content in this group, andmake the directory hierarchy starting at /var/www (or another document root)writable by that group. In addition, if you give the directory hierarchy setgid per-mission, all new files created within this hierarchy will belong to the group, whichfacilitates sharing files. The first three commands below add the new group, changethe mode of the document root to setgid, and change the group that the documentroot belongs to. The last command adds username to the webwork group; you mustrepeat this command for each user you want to add to the group.
$ sudo addgroup webwork$ sudo chmod g+s /var/www$ sudo chown :webwork /var/www
$ sudo usermod -aG webwork username
See page 660 for more information about working with groups.
Versions Ubuntu runs Apache version 2.2.
JumpStart: Getting Apache Up and Running
To get Apache up and running, modify the /etc/apache2/sites-available/default con-figuration file as described in this section. “Directives I: Directives You May Wantto Modify as You Get Started” on page 926 explains more about this file andexplores other changes you may want to make to it.
Modifying the Configuration Files
Apache runs as installed, but it is a good idea to add the three lines described in thissection to the /etc/apache2/sites-available/default configuration file. If you do notadd these lines, Apache will assign values that may not work for you. After youmodify this file, you must restart Apache (page 917).
The ServerName line establishes a name for the server. Add one of the followinglines to /etc/apache2/sites-available/default to set the name of the server to thedomain name of the server or, if you do not have a domain name, to the IP addressof the server. Add the line just below the ServerAdmin line near the top of the file.
ServerName example.com
or
ServerName IP_address
where example.com is the domain name of the server and IP_address is the IPaddress of the server. If you are not connected to a network, you can use the localhostaddress, 127.0.0.1, so you can start the server and experiment with it. See (page 950)for more information on the ServerName directive.

920 Chapter 27 Apache: Setting Up a Web Server
When a client has trouble getting information from a server, the server typically dis-plays an error page that identifies the problem. For example, when Apache cannotfind a requested page, it displays a page that says Error 404: Not Found. Each errorpage can include a mailto: link that the user can click to send mail to the server’sadministrator. The ServerSignature directive can specify that you want an email linkon error pages. This link appears as the domain name the user called in the Browser.The ServerAdmin directive specifies the email address that the server sends mail towhen a user clicks the link on an error page. Add these two lines to the file nameddefault, each following the location at which the same directive is already defined(ServerSignature is near the end of the file):
ServerAdmin email_address
ServerSignature EMail
where email_address is the email address of the person who needs to know whenpeople are having trouble using the server. Make sure that someone checks thisemail account frequently. But see the tip “ServerAdmin attracts spam” on page 928.
It can make system administration much easier if you use a role alias (for example,[email protected]) instead of a specific username (e.g., [email protected])as an email_address. See the discussion of email aliases on page 763.
After making the changes to the file named default, restart apache2 as explained onpage 917.
Testing Apache
Once you restart the apache2 daemon, you can confirm that Apache is working cor-rectly by pointing a browser on the local (server) system to http://localhost/. Froma remote system, point a browser to http:// followed by the ServerName you speci-fied in the previous section. If you are displaying a page from a system other thanthe local one, the local system must know how to resolve the domain name youenter (e.g., by using DNS or the /etc/hosts file). For example, you might use eitherof these URI formats: http://192.168.0.16 or http://example.org.
In response to your request, the browser should display the Index of / page, which liststhe apache2-default directory (stored at /var/www/apache2-default on the server).Click this directory name to display the contents of the directory. This directory holdsa file named index.html. When you point a browser at a directory that holds a filenamed index.html, Apache causes the browser to display the contents of that file inplace of a directory listing. In this case, the browser should display It works!
If the server is behind a firewall, open TCP port 80 (page 918). If you are havingproblems getting Apache to work, see “Troubleshooting” on page 956.
Putting Your Content in Place
Place the content you want Apache to serve in /var/www. Apache automaticallydisplays the file named index.html in this directory. Give the following command tocreate such a page:

Configuring Apache 921
$ sudo tee /var/www/index.html<html><body><p>This is <i>my</i> test page.</p></body></html><html><body><p>This is <i>my</i> test page.</p></body></html>CONTROL-D
The tee utility (page 236) copies standard input (page 226) to the file you give as itsargument and to standard output (page 226). Because of this redirection, tee repeatseach line you type after you press RETURN. After you create this file, either refresh thepage on the browser (if it is still running) or start it again and point it at the server.The browser should display the page you just created.
See apache2-default on page 927 if you want Apache to redirect the browser to the/var/www/apache2-default directory so that it displays the index.html file in thatdirectory.
Configuring Apache
This section describes configuration tools you can use to make your job easier. Italso tells you where you can find many of the files you may need to work with asyou set up and modify an Apache server. Most of the configuration files are in the/etc/apache2 hierarchy.
Configuration Tools
This section describes the utilities that manage some of the files in the /etc/apache2hierarchy. These utilities are part of the apache2.2-common package, which isinstalled as a dependency when you install apache2.
a2enmod anda2dismod
The a2enmod (Apache 2 enable module) and a2dismod (Apache 2 disable module)utilities enable and disable an Apache module. The /etc/apache2/mods-availabledirectory holds files that contain LoadModule directives (page 944) and options formodules that are installed on the local system. The /etc/apache2/mods-enableddirectory holds symbolic links to the files in mods-available. Apache incorporatesthese links into its configuration files by using Include directives (next section). Thea2enmod utility creates symbolic links in the mods-enabled directory from configu-ration files in the mods-available directory. It works on files whose basename isgiven as its argument.
$ sudo -i# cd /etc/apache2# ls mods-available/userdir*mods-available/userdir.conf mods-available/userdir.load# ls mods-enabled/userdir*ls: mods-enabled/userdir*: No such file or directory# a2enmod userdirModule userdir installed; run /etc/init.d/apache2 force-reload to enable.# ls mods-enabled/userdir*mods-enabled/userdir.conf mods-enabled/userdir.load# exit$

922 Chapter 27 Apache: Setting Up a Web Server
The a2dismod utility removes the symbolic links that a2enmod creates. You mustreload Apache (page 917) after you give one or more of these commands beforethey will take effect.
The a2enmod and a2dismod utilities simplify Apache administration. Instead of add-ing or commenting out a LoadModule directive in the httpd.conf or apache2.conffile, you can use these programs to enable or disable a module. This setupenables APT or Synaptic, after it installs a package, to call a2enmod via a dpkgpostinst script and then reload Apache so that the package is functional uponinstallation.
a2ensite anda2dissite
The a2ensite (Apache 2 enable site) and a2dissite (Apache 2 disable site) utilitiesenable and disable an Apache virtual host (page 953). These commands work simi-larly to the module commands described earlier. First you design a virtual host in a filein the /etc/apache2/sites-available directory. Then you call a2ensite with the name ofthe site as an argument to create a symbolic link in the /etc/apache2/sites-enableddirectory. The a2dissite utility removes the symbolic link, disabling the virtual host.
Include Directives
Under Ubuntu, the primary configuration file is /etc/apache2/apache2.conf. Thisfile incorporates other files using Include directives (page 944):
$ grep '^Include' /etc/apache2/apache2.confInclude /etc/apache2/mods-enabled/*.loadInclude /etc/apache2/mods-enabled/*.confInclude /etc/apache2/httpd.confInclude /etc/apache2/ports.confInclude /etc/apache2/conf.d/Include /etc/apache2/sites-enabled/
apache2.conf Typically, when you configure Apache, you do not make changes to apache2.conf;instead, you modify files that are specified in Include directives. You can also usethe configuration tools described in the previous section. This setup allows updatesto Apache to change apache2.conf without affecting the server.
When Apache reads its configuration files, if it finds more than one occurrence ofthe same directive, even in an Include file, it uses the value assigned by the last direc-tive it encounters.
In the apache2.conf file, the Include directive for the httpd.conf file occurs afterdirectives that set up the global environment, which includes various timeouts andlimits as shown in Table 27-1. To change any of these directives, copy them tohttpd.conf and make the changes there. You must change directives that appearafter the Include httpd.conf directive in other included files as explained in thissection.

Configuring Apache 923
The Include directive for /etc/apache2/conf.d (it includes all files in this directory)appears after the Include directive for httpd.conf, with only the Include directive for/etc/apache2/ports.conf separating them. This directory is a good place to put smallconfiguration snippets, or break out parts of httpd.conf if it is growing too large.
Directives that control log formats, indexing options, MIME handling, and browserbug handling appear after the Include directive for httpd.conf, but before the Includedirective for /etc/apache2/sites-enabled, which is the last line in apache2.conf. Youcan override these directives on a per-site basis by copying them to individual sitefiles in the sites-enabled directory and modifying them there.
If you manage more than one Ubuntu Web server, it is nice to keep all the custom-ized configuration code separate from the main configuration. That way you canuse scp to copy the files to each new server. Or you can keep the custom code undera version control system and check it out to configure a new system. This techniqueis much easier than using diff to find out what you changed from system to system.
Filesystem Layout
This section lists the locations and uses of files you will work with to configureApache and serve Web pages.
Binaries, scripts,and modules
The Apache server and related binary files are kept in several directories:
/usr/sbin/apache2 The Apache server (daemon).
/usr/sbin/apache2ctl Starts and stops Apache. The apache2 init script calls apachectl.
Table 27-1 Directives that you can override in httpd.conf
AccessFileName MaxRequestsPerChild
DefaultType MaxSpareThreads
ErrorLog MinSpareThreads
Group PidFile
HostnameLookups ServerRoot
KeepAlive StartServers
KeepAliveTimeout ThreadsPerChild
LockFile Timeout
LogLevel TypesConfig
MaxClients User
MaxKeepAliveRequests

924 Chapter 27 Apache: Setting Up a Web Server
/usr/bin/htpasswd Creates and maintains the password files used by the Apacheauthentication module (page 961).
/usr/sbin/rotatelogs Rotates Apache log files so that these files do not get toolarge. See logrotate (page 684) for information about rotating log files.
/etc/apache2/mods-available Holds files containing LoadModule directives(page 944) for their respective modules. The alias.conf file is kept in this directoryand is enabled by default. Two of the most frequently used module binary files aremod_perl (part of the libapache2-mod-perl2 package) and mod_python (part of thelibapache2-mod-python metapackage). The *.load files in this directory load mod-ules from the /usr/lib/apache2/modules directory (page 957). The *.conf files con-figure the modules for use. See page 921 for information on using a2enmod toenable a module.
/etc/apache2/mods-enabled Holds links to files in mods-available. Use a2enmodto create links and a2dismod to remove links (page 921).
Configuration files Apache configuration files are kept in the /etc/apache2 hierarchy:
/etc/apache2/apache2.conf Holds configuration directives. This file is the mainApache configuration file. You do not typically make changes to this file, but ratherput any configuration directives in httpd.conf and other files.
/etc/apache2/envvars Holds variables that modify the environment in whichApache runs.
/etc/apache2/ports.conf Holds the Listen directive (page 926), which controlswhich IP address(es) and port(s) Apache listens on.
/etc/apache2/sites-available Holds files containing the code that describes virtualhosts. See page 922 for information on using a2ensite to enable a site.
/etc/apache2/sites-enabled Holds links to files in sites-available. Use a2ensite tocreate links and a2dissite to remove links (page 922).
/etc/apache2/httpd.conf Holds local configuration directives. This file augmentsthe apache2.conf file in the same directory. The discussion of configuration direc-tives starts on page 925.
/etc/apache2/conf.d Holds configuration files.
Logs Logs are kept in /var/log/apache2:
/var/log/apache2/access_log Logs requests made to the server.
/var/log/apache2/error_log Logs request and runtime server errors.
Web documents Web documents (including the Web pages displayed by client browsers), customerror messages, and CGI scripts are kept in /var/www by default:
/usr/lib/cgi-bin Holds CGI scripts (page 958). This directory is aliased to /cgi-bin/.
/usr/share/apache2/error Holds default error documents. You can modify thesedocuments to conform to the style of your Web site. This directory is aliased to/error/. See ErrorDocument (page 940).

Configuration Directives 925
/usr/share/apache2/icons Holds icons used to display directory entries. This direc-tory is aliased to /icons/.
/usr/share/doc/apache2-doc/manual/index.html.* Apache HTTP Server Version2.2 Documentation. With Apache running and apache2-doc installed, point abrowser at server/manual, where server is localhost or the name or IP address of theApache server.
Document root By default, the document root (page 918) is /var/www. You can change this loca-tion with the DocumentRoot directive (page 929). In addition to content for theWeb pages that Apache serves, this directory can house the webalizer directory,which holds webalizer (page 964) output.
.htaccess files A .htaccess file contains configuration directives and can appear in any directory inthe document root hierarchy. The location of a .htaccess file is critical: The direc-tives in a .htaccess file apply to all files in the hierarchy rooted at the directory thatholds the .htaccess file. The AllowOverride directive (page 946) controls whetherApache examines .htaccess files. Because the default site contains AllowOverrideNone directives, you must use an AllowOverride directive to cause Apache to exam-ine .htaccess files and process directives in those files. This protection is duplicatedand enhanced in the apache2.conf file distributed by Ubuntu, where a directiveinstructs Apache not to serve files whose names start with .ht. Because of this direc-tive, Apache does not serve .htaccess files (nor does it serve .htpassword files).
Configuration Directives
Configuration directives, or simply directives, are lines in a configuration file thatcontrol some aspect of how Apache functions. A configuration directive is com-posed of a keyword followed by one or more arguments (values) separated by SPACEs.For example, the following configuration directive sets Timeout to 300 (seconds):
Timeout 300
You must enclose arguments that contain SPACEs within double quotation marks.Keywords are not case sensitive, but arguments (pathnames, filenames, and so on)often are.
apache2.conf The main file that holds Apache configuration directives is, by default,/etc/apache2/apache2.conf. This file holds global directives that affect all contentserved by Apache. Include directives (pages 922 and 944) within apache2.confincorporate the contents of other files as though they were part of apache2.conf.
.htaccess Local directives can appear in .htaccess files. A .htaccess file can appear in anydirectory within the document root hierarchy; it affects files in the directory hierar-chy rooted at the directory it appears in.
Pathnames When you specify an absolute pathname in a configuration directive, the directiveuses that pathname without modifying it. When you specify a relative pathname,such as a simple filename or the name of a directory, Apache prepends to that namethe value specified by the ServerRoot (page 942) directive (/etc/apache2 by default).

926 Chapter 27 Apache: Setting Up a Web Server
Directives I: Directives You May Want to Modify as
You Get Started
When it starts, Apache reads the /etc/apache2/apache2.conf configuration file (bydefault) for instructions governing every aspect of how Apache runs and serves content.The apache2.conf file shipped by Ubuntu is more than 600 lines long. As explainedunder apache2.conf on page 922, you do not normally make changes to this file.
This section details some directives you may want to add to /etc/apache2/httpd.conf,or change in one of the other configuration files, as you are getting started withApache. You can use each of the following directives in httpd.conf to override thecorresponding directive in apache2.conf. Or you can change the directive if it appearsin another configuration file. In this chapter, the Specify in line near the end of eachexplanation tells you in which configuration file in the /etc/apache2 hierarchy youtypically specify that directive. If the directive already appears in a file, you must spec-ify the new directive after the one you want to override. See apache2.conf (page 922)for more information. The Context line in each explanation tells you which locationsthe directives can appear in; contexts are explained on page 931. The section titled“Directives II: Advanced Directives” on page 935 describes more directives.
Listen Specifies the port(s) that Apache listens for requests on.
Listen [IP-address:]portnumber
where IP-address is the IP address that Apache listens on and portnumber is thenumber of the port that Apache listens on for the given IP-address. When IP-addressis absent or is set to 0.0.0.0, Apache listens on all network interfaces. At least oneListen directive must appear in the configuration files or Apache will not work.
The following minimal directive from the ports.conf file listens for requests on allinterfaces on port 80:
Listen 80
The next directive changes the port from the default value of 80 to 8080:
Listen 8080
When you specify a port other than 80, each request to the server must include aport number (as in www.example.org:8080) or the kernel will return a ConnectionRefused message. Use multiple Listen directives to have Apache listen on multiple IPaddresses and ports. For example,
Listen 80Listen 192.168.1.1:8080Listen 192.168.1.2:443
accepts connections on all network interfaces on port 80, on 192.168.1.1 on port8080, and on 192.168.1.2 on port 443.

Configuration Directives 927
Context: server configSpecify in ports.confDefault: none (Apache will not start without this directive)Ubuntu: Listen 80
Redirect Tells the client to fetch a requested resource from a different, specified location.
Redirect [status] requested-path [new-URI]
where status is the status that Apache returns along with the redirect. If you omitstatus, Apache assumes temp. The status can be an Apache error code in the range300–399 or one of the following:
permanent Returns status 301 (the resource has moved permanently)temp Returns status 302 (the resource has moved temporarily)seeother Returns status 303 (the resource has been replaced)gone Returns status 410 (the resource has been removed—does not
take a new-URI argument
The requested-path is the absolute pathname of the ordinary file or directory thatApache is to redirect requests for. Apache redirects all requests that start with the abso-lute pathname specified by requested-path. (See the example below.) Use RedirectMatch(discussed next) if you want to use a regular expression in this argument.
The new-URI is the URI that Apache redirects requests to. If the new-URI startswith a slash (/) and not http://, ftp://, or a similar prefix, Apache uses the same pre-fix that it was called with. Most Redirect directives require a new-URI argument.
A request must match all segments of the requested-path argument. Assume the fol-lowing directive:
Redirect /www.example.com/pictures http://pictures.example.com/
Apache will redirect a request for http://www.example.com/pictures/mom.jpg tohttp://pictures.example.com/mom.jpg but, because the final segment does not match,it will not redirect a request for http://www.example.com/pictures_mom.jpg.
Contexts: server config, virtual host, directory, .htaccessSpecify in sites-available/*Default: noneUbuntu: none
RedirectMatch Tells the client to fetch a requested resource from a different location specified by aregular expression.
Redirect [status] requested-path-re [new-URI]
This directive is the same as Redirect (discussed above), except that you can use aregular expression (Appendix A) in requested-path-re.
apache2-default The file installed at /etc/apache2/sites-available/default includes the following comment:
#RedirectMatch ^/$ /apache2-default/
928 Chapter 27 Apache: Setting Up a Web Server
If you remove the leading pound sign (i.e., uncomment the line), this directive redi-rects all requests to / (root) to /apache2-default on the same server. The regularexpression ^/$ matches all URIs that start with a / (the ^ matches the beginning ofthe string and the $ matches the end. Because the requested-path-re specifies thestart of the requested URI, this regular expression matches all requests for the rootdirectory. When a user points a browser at the root of the server (as described onpage 920) Apache redirects the user’s request to the apache2-default directory anddisplays It works! immediately.
Contexts: server config, virtual host, directory, .htaccessSpecify in sites-available/*Default: noneUbuntu: none, but see above
ServerAdmin Sets the email address used in mailto: links on error pages.
ServerAdmin email-address
where email-address is the email address of the person who is responsible for man-aging the Web content. Apache includes this address as a link on Apache-generatederror pages. However, Ubuntu Linux sets ServerSignature (page 943) to On, whichcauses Apache to display information about the server—rather than a link to anemail address—on error pages. If you want to display the link on error pages, setServerSignature to EMail. Make sure email-address points to an email account thatsomeone checks frequently. Users can use this address to get help with the Web siteor to inform the administrator of problems. There is no default value for Server-Admin; if you do not use this directive and ServerSignature is set to EMail, themailto: link on error pages points to [no address given].
You can use a role alias such as webmaster at your domain and use a mail alias toforward mail that is sent to webmaster to the person who is responsible for main-taining the Web site. See the discussion of mail aliases on page 763.
Contexts: server config, virtual hostSpecify in sites-available/*Default: noneUbuntu: webmaster@localhost
ServerName Specifies the server’s name and the port it listens on.
ServerName FQDN [:port]
where FQDN is the fully qualified domain name or IP address of the server and portis the optional port number Apache listens on. The domain name of the server must
ServerAdmin attracts spamsecurity The email address you put in ServerAdmin often attracts spam. Use a spam-guarded address such
as "mgs at sobell dot com" (you must use the quotation marks) or use a custom error page topoint to a Web page with a form for sending mail to the right person.

Configuration Directives 929
be able to be resolved (by DNS or /etc/hosts) and may differ from the hostname ofthe system running the server. If you do not specify a ServerName, Apache performsa DNS reverse name resolution (page 855) on the system’s IP address and assignsthat value to ServerName. If the reverse lookup fails, Apache assigns the system’s IPaddress to ServerName.
In the following example, substitute the FQDN or IP address of the server forwww.example.com. Change the 80 to the port number Apache listens on (if it is notport 80).
ServerName www.example.com:80
The ports specified by ServerName and Listen (page 926) must be the same if youwant the FQDN specified by ServerName to be tied to the IP address specified bythe Listen directive.
Apache uses ServerName to construct a URI when it redirects a client (page 951).See also UseCanonicalName (page 938).
Contexts: server config, virtual hostSpecify in sites-available/*Default: noneUbuntu: none
DocumentRoot Points to the root of the directory hierarchy that holds the server’s content.
DocumentRoot dirname
where dirname is the absolute pathname of the directory at the root of the directoryhierarchy that holds the content Apache serves. Do not use a trailing slash. You canput the document root wherever you like, as long as the user www-data has readaccess to the ordinary files and execute access to the directory files in the directoryhierarchy. The FHS (page 194) specifies /srv as the top-level directory for this pur-pose. The following directive puts the document root at /srv/www:
DocumentRoot /srv/www
Contexts: server config, virtual hostSpecify in sites-available/*Default: /usr/local/apache/htdocsUbuntu: /var/www
UserDir Allows users to publish content from their home directories.
UserDir dirname | disabled | enabled user-list
where dirname is the name of a directory that, if it appears in a local user’s homedirectory, Apache publishes to the Web. The disabled keyword prevents contentfrom being published from users’ home directories; enabled causes content to bepublished from the home directories of users specified in the SPACE-separated user-list.When you do not specify a dirname, Apache publishes content to ~/public_html.

930 Chapter 27 Apache: Setting Up a Web Server
Apache can combine the effects of multiple UserDir directives. Suppose you havethe following directives:
UserDir disabledUserDir enabled user1 user2 user3UserDir web
The first directive turns off user publishing for all users. The second directiveenables user publishing for three users. The third directive makes web the name ofthe directory that, if it appears in one of the specified users’ home directories,Apache publishes to the Web.
To cause a browser to display the content published by a user, specify in the loca-tion bar the name of the Web site followed by a /~ and the user’s username. Forexample, if Sam published content in the public_html directory in his home direc-tory and the URI of the Web site was www.example.com, you would enterhttp://www.example.com/~sam to display Sam’s Web page. To display a user’sWeb page, Apache must have execute permission (as user www-data) for theuser’s home directory and the directory holding the content, and read permissionfor the content files.
Ubuntu Linux provides the following configuration for user directories in/etc/apache2/mods-available/userdir.conf, which is disabled by default:
UserDir public_htmlUserDir disabled root
Give the command a2enmod userdir to enable user directories.
Contexts: server config, virtual hostSpecify in mods-available/userdir.confDefault: noneUbuntu: public_html, disabled root
DirectoryIndex Specifies which file Apache serves when a user requests a directory.
DirectoryIndex filename [filename ...]
where filename is the name of the file that Apache serves.
This directive specifies a list of filenames. When a client requests a directory,Apache attempts to find a file in the specified directory whose name matches a filein the list. When Apache finds a match, it returns that file. When this directive isabsent or when none of the files specified by this directive exists in the specifieddirectory, Apache displays a directory listing as specified by the IndexOptions direc-tive (page 940).
The following DirectoryIndex directive, which Ubuntu Linux provides in themods-enabled/dir.conf file, is enabled by default:
DirectoryIndex index.html index.cgi index.pl index.php index.xhtml
Configuration Directives 931
This directive causes Apache to search the specified directory and return the filenamed index.html, index.cgi, index.pl, index.php, or index.xhtml, where index.htmland index.xhtml are the names of the standard, default HTML and XHTML docu-ments; index.cgi is a CGI document; index.pl is a Perl document; and index.php is aPHP document. The name index is standard but arbitrary.
Using headers, a client can communicate a language preference to a server. If the servercan handle the preference, it determines the best response from among its resources.The .var is an Ubuntu addition (a line in apache2.conf, AddHandler type-map var,makes the .var extension a type map, one of the forms of content negotiation; Multi-Views is the other form). For more information refer to “Content Negotiation” onpage 951.
Contexts: server config, virtual hostSpecify in mods-available/dir.confDefault: index.htmlUbuntu: index.html index.cgi index.pl index.php index.xhtml
Contexts and Containers
To make it flexible and easy to customize, Apache uses configuration directives,contexts, and containers. Configuration directives were covered in the previous sec-tion. This section discusses contexts and containers, which are critical to managingan Apache server.
Contexts
Four locations, called contexts, define where configuration directives can appear.This chapter marks each configuration directive to indicate which context(s) it canappear in. Table 27-2 describes each of these contexts.
Directives in files incorporated by means of an Include directive (page 944) are partof the context they are included in and must be allowed in that context.
Putting a directive in the wrong context generates a configuration error and cancause Apache not to serve content correctly or not to start.
Table 27-2 Contexts
Context Location(s) directives can appear in
server config In apache2.conf or included files only, but not inside <VirtualHost> or <Directory> containers (next section) unless so marked
virtual host Inside <VirtualHost> containers in apache2.conf or included files only
directory Inside <Directory>, <Location>, and <Files> containers in apache2.conf or included files only
.htaccess In .htaccess files (page 925) only

932 Chapter 27 Apache: Setting Up a Web Server
Containers
Containers, or special directives, are directives that group other directives. Contain-ers are delimited by XML-style tags. Three examples are shown here:
<Directory> ... </Directory>
<Location> ... </Location>
<VirtualHost> ... </VirtualHost>
Look in apache2.conf and sites-available/default for examples of containers. Likeother directives, containers are limited to use within specified contexts. This sectiondescribes some of the more frequently used containers.
<Directory> Applies directives to all directories within the specified directory hierarchies.
<Directory directory> ... </Directory>
where directory is an absolute pathname specifying the root of the directory hierar-chy that holds the directories the directives in the container apply to. The directorycan include wildcards; a * does not match a /.
A <Directory> container provides the same functionality as a .htaccess file. Whilean administrator can use a <Directory> container in Apache configuration files, reg-ular users cannot. Regular users can use .htaccess files to control access to their owndirectories.
The directives in the <Directory> container shown in the following example applyto the /var/www/html/corp directory hierarchy. The Deny directive denies access toall clients, the Allow directive grants clients from the 192.168.10. subnet access,and the AllowOverride directive (page 946) enables Apache to process directives in.htaccess files in the hierarchy:
<Directory /var/www/html/corp> Deny from all Allow from 192.168.10. AllowOverride All</Directory>
Contexts: server config, virtual host
<Files> Applies directives to specified ordinary files.
<Files directory> ... </Files>
where directory is an absolute pathname specifying the root of the directory hierar-chy that holds the ordinary files the directives in the container apply to. The direc-tory can include wildcards; a * does not match a /. This container is similar to<Directory> but applies to ordinary files rather than to directories.
The following directive, from the Ubuntu apache2.conf file, denies access to all fileswhose filenames start with .ht , meaning that Apache will not serve these files. Thetilde (~) changes how Apache interprets the following string. Without a tilde, thestring is a simple shell match that interprets shell special characters (page 239).With a tilde, Apache interprets the string as a regular expression (page 971):

Configuration Directives 933
<Files ~ "^\.ht"> Order allow,deny Deny from all</Files>
Contexts: server config, virtual host, directory, .htaccess
<IfModule> Applies directives if a specified module is loaded.
<IfModule [!]module-name> ... </IfModule>
where module-name is the name of the module (page 957) that is tested for. Apacheexecutes the directives in this container if module-name is loaded or with ! ifmodule-name is not loaded.
Apache will not start if you specify a configuration directive that is specific to amodule that is not loaded.
The following <IfModule> container, which is located in the Ubuntu file namedmods-available/mime_magic.conf, depends on the mod_mime_magic.c module beingloaded. If this module is loaded, Apache runs the MIMEMagicFile directive, whichtells the mod_mime_magic.c module where its hints file is located.
<IfModule mod_mime_magic.c>MIMEMagicFile /usr/share/file/magic.mime
</IfModule>
See page 949 for another example of an <IfModule> container.
Contexts: server config, virtual host, directory, .htaccess
<Limit> Limits access-control directives to specified HTTP methods.
<Limit method [method] ... > ... </Limit>
where method is an HTTP method. An HTTP method specifies which action is tobe performed on a URI. The most frequently used methods are GET, PUT, POST,and OPTIONS; method names are case sensitive. GET (the default method) sendsany data indicated by the URI. PUT stores data from the body section of the com-munication at the specified URI. POST creates a new document containing the bodyof the request at the specified URI. OPTIONS requests information about the capa-bilities of the server.
The <Limit> container binds a group of access-control directives to specified HTTPmethods: Only methods named by this container are affected by this group of directives.
The following example disables HTTP uploads (PUTs) from systems that are not ina subdomain of example.com:
<Limit PUT>order deny,allowdeny from allallow from .example.com</Limit>
Contexts: server config, virtual host, directory, .htaccess

934 Chapter 27 Apache: Setting Up a Web Server
<LimitExcept> Limits access-control directives to all except specified HTTP methods.
<LimitExcept method [method] ... > ... </LimitExcept>
where method is an HTTP method. See <Limit> for a discussion of methods.
This container causes a group of access-control directives not to be bound to speci-fied HTTP methods. Thus methods not named in <LimitExcept> are affected by thisgroup of directives.
The access-control directives within the following <LimitExcept> container affectHTTP methods other than GET, POST, and OPTIONS. You could put this con-tainer in a <Directory> container to limit its scope:
<LimitExcept GET POST OPTIONS> Order deny,allow Deny from all </LimitExcept>
Contexts: server config, virtual host, directory, .htaccess
<Location> Applies directives to specified URIs.
<Location URI> ... </Location>
where URI points to content; it specifies a file or the root of the directory hierarchythat the directives in the container apply to. While the <Directory> container pointswithin the local filesystem, <Location> points outside the local filesystem. The URIcan include wildcards; a * does not match a /.
The following <Location> container limits access to http://server/pop to clientsfrom the example.net domain, where server is the FQDN of the server:
<Location /pop> Order deny,allow Deny from all Allow from .example.net</Location>
Contexts: server config, virtual host
Use <LimitExcept> instead of <Limit>
caution It is safer to use the <LimitExcept> container than to use the <Limit> container, as the former pro-tects against arbitrary methods. When you use <Limit>, you must be careful to name explicitly allpossible methods that the group of directives could affect.
It is safer still not to put access-control directives in any container.
Use <Location> with care
caution Use this powerful container with care. Do not use it to replace the <Directory> container: Whenseveral URIs point to the same location in a filesystem, a client may be able to circumvent thedesired access control by using a URI not specified by this container.

Configuration Directives 935
<LocationMatch> Applies directives to URIs specified by a regular expression.
<LocationMatch regexp> ... </LocationMatch>
where regexp is a regular expression that matches one or more URIs. This containerworks the same way as <Location>, except that it applies to any URIs that regexpmatches.
Contexts: server config, virtual host
<VirtualHost> Applies directives to a specified virtual host.
<VirtualHost addr[:port] [addr[:port]] ... > ... </VirtualHost>
where addr is the IP address (or FQDN, although it is not recommended) of the vir-tual host (or * to represent all addresses) and port is the port that Apache listens onfor the virtual host. This directive does not control which addresses and portsApache listens on; use a Listen directive (page 926) for that purpose. This containerholds commands that Apache applies to a virtual host. For more information see“NameVirtualHost” on page 936 and “Virtual Hosts” on page 953.
Context: server config
Directives II: Advanced Directives
This section discusses configuration directives that you may want to use after youhave gained some experience with Apache.
Directives That Control Processes
MaxClients Specifies the maximum number of child processes.
MaxClients num
where num is the maximum number of child processes (servers) Apache runs at onetime, including idle processes and processes that are serving requests. When Apacheis running num processes and there are no idle processes, Apache issues Server toobusy errors to new connections; it does not start new child processes. A value of150 is usually sufficient, even for moderately busy sites.
Context: server configChange in httpd.confDefault: 256Ubuntu: 150
MaxRequestsPerChild
Specifies the maximum number of requests a child process can serve.
MaxRequestsPerChild num
where num is the maximum number of requests a child process (server) can serveduring its lifetime. After a child process serves num requests, it does not process any

936 Chapter 27 Apache: Setting Up a Web Server
more requests but dies after it finishes processing its current requests. Apache canstart another child process to replace the one that dies. Additional requests are pro-cessed by other processes from the server pool.
Set num to 0 to not set a limit on the number of requests a child can process, exceptfor the effects of MinSpareServers. By limiting the lives of processes, this directivecan prevent memory leaks from consuming too much system memory. However,setting MaxRequestsPerChild to a too-small value can hurt performance by causingApache to create new child servers constantly.
Context: server configSpecify in httpd.confDefault: 10000Ubuntu: 0
MaxSpareServers Specifies the maximum number of idle processes.
MaxSpareServers num
where num is the maximum number of idle processes (servers) Apache keeps runningto serve requests as they come in. Do not set this number too high, as each processconsumes system resources.
Context: server configSpecify in httpd.confDefault: 10Ubuntu: 10
MinSpareServers Specifies the minimum number of idle processes.
MinSpareServers num
where num is the minimum number of idle processes (servers) Apache keeps run-ning to serve requests as they come in. More idle processes occupy more computerresources; increase this value for busy sites only.
Context: server configSpecify in httpd.confDefault: 5Ubuntu: 5
NameVirtualHost
Specifies the address and port for a name-based (host-by-name) virtual host.
NameVirtualHost addr[:port]
where addr is the IP address (or FQDN, although it is not recommended) thatApache will use for serving a name-based virtual host and port is the port that

Configuration Directives 937
Apache listens on for that virtual host. Specify addr as * to cause the server to pro-cess requests on all interfaces as name-based virtual hosts.
This directive does not control which addresses and ports Apache listens on; use a Lis-ten directive (page 926) for that purpose. For more information see “<VirtualHost>”on page 935 and “Virtual Hosts” on page 953.
Context: server configSpecify in sites-available/*Default: noneUbuntu: *
StartServers Specifies the number of child processes that Apache starts with.
StartServers num
where num is the number of child processes (servers) that Apache starts when it isbrought up. This value is significant only when Apache starts; MinSpareServers andMaxSpareServers control the number of idle processes once Apache is up and run-ning. Starting Apache with multiple servers ensures that a pool of servers is waitingto serve requests immediately.
Context: server configSpecify in httpd.confDefault: 5Ubuntu: 5 (prefork MPM) or 2 (worker MPM)
Networking Directives
HostnameLookups
Specifies whether Apache puts a client’s hostname or its IP address in the logs.
HostnameLookups On | Off | Double
On: Performs DNS reverse name resolution (page 855) to determine the hostnameof each client for logging purposes.
Off: Logs each client’s IP address.
Double: To provide greater security, performs DNS reverse name resolution(page 855) to determine the hostname of each client, performs a forward DNSlookup to verify the original IP address, and logs the hostname. Denies access if itcannot verify the original IP address.
Contexts: server config, virtual host, directorySpecify in httpd.confDefault: OffUbuntu: Off

938 Chapter 27 Apache: Setting Up a Web Server
Timeout Specifies the amount of time Apache waits for network operations to complete.
Timeout num
where num is the number of seconds that Apache waits for network operations tofinish. You can usually set this directive to a lower value; five minutes is a long timeto wait on a busy server. The Apache documentation says that the default is notlower “because there may still be odd places in the code where the timer is not resetwhen a packet is sent.”
Context: server configSpecify in httpd.confDefault: 300Ubuntu: 300
UseCanonicalName
Specifies the method the server uses to identify itself.
UseCanonicalName On | Off | DNS
On: Apache uses the value of the ServerName directive (page 928) as its identity.
Off: Apache uses the name and port from the incoming request as its identity.
DNS: Apache performs a DNS reverse name resolution (page 855) on the IP addressfrom the incoming request and uses the result as its identity. Rarely used.
This directive is important when a server has more than one name and needs to performa redirect. Ubuntu does not set this directive because it does not set the ServerNamedirective (page 928). Once you set ServerName, change UseCanonicalName to On. Seepage 951 for a discussion of redirects and this directive.
Contexts: server config, virtual host, directorySpecify in sites-available/*Default: OffUbuntu: none
Logging Directives
ErrorLog Specifies where Apache sends error messages.
ErrorLog filename | syslog[:facility]
where filename specifies the name of the file, relative to ServerRoot (page 942), thatApache sends error messages to. The syslog keyword specifies that Apache send
Lookups can consume a lot of system resources
tip Use the On and Double options with caution: They can consume a lot of resources on a busy system.You can use a program such as logresolve to perform reverse name resolution offline for statisticalpurposes.
If you perform hostname resolution offline, you run the risk that the name may have changed;you usually want the name that was current at the time of the request. To minimize this problem,perform the hostname resolution as soon as possible after writing the log.

Configuration Directives 939
errors to syslogd (page 688); facility specifies which syslogd facility to use. Thedefault facility is local7.
Contexts: server config, virtual hostSpecify in httpd.conf or sites-available/*Default: logs/error_logUbuntu: /var/log/apache2/error.log
LogLevel Specifies the level of error messages that Apache logs.
LogLevel level
where level specifies that Apache log errors of that level and higher (more urgent).Choose level from the following list, which is presented here in order of decreasingurgency and increasing verbosity:
emerg System unusable messagesalert Need for immediate action messagescrit Critical condition messageserror Error condition messageswarn Nonfatal warning messagesnotice Normal but significant messagesinfo Operational messages and recommendationsdebug Messages for finding and solving problems
Contexts: server config, virtual hostSpecify in httpd.conf or sites-available/*Default: warnUbuntu: warn
Directives That Control Content
AddHandler Creates a mapping between filename extensions and a builtin Apache handler.
AddHandler handler extension [extension] ...
where handler is the name of a builtin handler and extension is a filename exten-sion that maps to the handler. Handlers are actions that are built into Apache andare directly related to loaded modules. Apache uses a handler when a client requestsa file with a specified filename extension.
For example, the following AddHandler directive causes Apache to process filesthat have a filename extension of .cgi with the cgi-script handler:
AddHandler cgi-script .cgi
See “Type Maps” on page 951 for another example of an AddHandler directive.
Contexts: server config, virtual host, directory, .htaccessSpecify in httpd.confDefault: noneUbuntu: type-map var

940 Chapter 27 Apache: Setting Up a Web Server
Alias Maps a URI to a directory or file.
Alias alias pathname
where alias must match part of the URI that the client requested to invoke the alias.The pathname is the absolute pathname of the target of the alias, usually a directory.
For example, the following alias causes Apache to serve /usr/local/pix/milk.jpgwhen a client requests http://www.example.com/pix/milk.jpg:
Alias /pix /usr/local/pix
In some cases, you need to use a <Directory> container (page 932) to grant access toaliased content.
Contexts: server config, virtual hostSpecify in httpd.conf, sites-available/*, or mods-available/alias.confDefault: NoneUbuntu: /icons/ /usr/share/apache2/icons/ and /doc/ /usr/share/doc/
ErrorDocument Specifies the action Apache takes when the specified error occurs.
ErrorDocument code action
where code is the error code (page 964) that this directive defines a response for andaction is one of the following:
string: Defines the message that Apache returns to the client.
absolute pathname: Points to a local script or other content that Apache redirectsthe client to.
URI: Points to an external script or other content that Apache redirects the client to.
When you do not specify this directive for a given error code, Apache returns ahardcoded error message when that error occurs.
Some examples of ErrorDocument directives follow:
ErrorDocument 403 "Sorry, access is forbidden."ErrorDocument 403 /cgi-bin/uh-uh.plErrorDocument 403 http://errors.example.com/not_allowed.html
Contexts: server config, virtual host, directory, .htaccessSpecify in httpd.confDefault: none; Apache returns hardcoded error messagesUbuntu: none (but see the comments in apache2.conf)
IndexOptions Specifies how Apache displays directory listings.
IndexOptions [±]option [[±]option] ...
where option can be any combination of the following:
DescriptionWidth=n: Sets the width of the description column to n characters. Use
* in place of n to accommodate the widest description.

Configuration Directives 941
FancyIndexing: In directory listings, displays column headers that are links. Whenyou click one of these links, Apache sorts the display based on the content of thecolumn. Clicking the link a second time reverses the order.
FoldersFirst: Sorts the listing so that directories come before plain files. Use onlywith FancyIndexing.
HTMLTable: Displays a directory listing in a table.
IconsAreLinks: Makes the icons clickable. Use only with FancyIndexing.
IconHeight=n: Sets the height of icons to n pixels. Use only with IconWidth.
IconWidth=n: Sets the width of icons to n pixels. Use only with IconHeight.
IgnoreCase: Ignores case when sorting names.
IgnoreClient: Ignores options the client supplied in the URI.
NameWidth=n: Sets the width of the filename column to n characters. Use * inplace of n to accommodate the widest filename.
ScanHTMLTitles: Extracts and displays titles from HTML documents. Use onlywith FancyIndexing. Not normally used because it is CPU and disk intensive.
SuppressColumnSorting: Suppresses clickable column headings that can be used forsorting columns. Use only with FancyIndexing.
SuppressDescription: Suppresses file descriptions. Use only with FancyIndexing.
SuppressHTMLPreamble: Suppresses the contents of the file specified by the Header-Name directive, even if that file exists.
SuppressIcon: Suppresses icons. Use only with FancyIndexing.
SuppressLastModified: Suppresses the modification date. Use only with Fancy-Indexing.
SuppressRules: Suppresses horizontal lines. Use only with FancyIndexing.
SuppressSize: Suppresses file sizes. Use only with FancyIndexing.
VersionSort: Sorts version numbers (in filenames) in a natural way; characterstrings, except for substrings of digits, are not affected.
As an example, suppose a client requests a URI that points to a directory (such ashttp://www.example.com/support/) and none of the files specified by the Directory-Index directive (page 930) is present in that directory. If the directory hierarchy iscontrolled by a .htaccess file and AllowOverride (page 946) has been set to allowindexes, then Apache displays a directory listing according to the options specifiedby this directive.
When this directive appears more than once within a directory, Apache merges theoptions from the directives. Use + and – to merge IndexOptions options with optionsfrom higher-level directories. (Unless you use + or – with all options, Apache discardsany options set in higher-level directories.) For example, the following directives and

942 Chapter 27 Apache: Setting Up a Web Server
containers set the options for /custsup/download to VersionSort; Apache discardsFancyIndexing and IgnoreCase in the download directory because there is no + or –before VersionSort in the second <Directory> container:
<Directory /custsup> IndexOptions FancyIndexing IndexOptions IgnoreCase</Directory
<Directory /custsup/download> IndexOptions VersionSort</Directory>
Because + appears before VersionSort, the next directives and containers set theoptions for /custsup/download to FancyIndexing, IgnoreCase, and VersionSort:
<Directory /custsup> IndexOptions FancyIndexing IndexOptions IgnoreCase</Directory
<Directory /custsup/download> IndexOptions +VersionSort</Directory>
Contexts: server config, virtual host, directory, .htaccessSpecify in httpd.confDefault: none; lists only filenamesUbuntu: FancyIndexing VersionSort HTMLTable NameWidth=*
ServerRoot Specifies the root directory for server files (not content).
ServerRoot directory
where directory specifies the pathname of the root directory for the files that make upthe server. Apache prepends directory to relative pathnames in httpd.conf. This direc-tive does not specify the location of the content that Apache serves; the Document-Root directive (page 929) performs that function. Do not change this value unless youmove the server files.
Context: server configSpecify in httpd.confDefault: /usr/local/apacheUbuntu: /etc/apache2
ServerTokens Specifies the server information that Apache returns to a client.
ServerTokens Prod | Major | Minor | Min | OS | Full
Prod: Returns the product name: Apache. Also ProductOnly.
Major: Returns the major release number of the server: Apache/2.

Configuration Directives 943
Minor: Returns the major and minor release numbers of the server: Apache/2.2.
Min: Returns the complete version: Apache/2.2.4. Also Minimal.
OS: Returns the name of the operating system and the complete version:Apache/2.2.4 (Ubuntu). Provides less information that might help a malicious userthan Full does.
Full: Same as OS, plus sends the names and versions of non-ASF modules:Apache/2.2.4 (Ubuntu) PHP/5.1.2.
Unless you want clients to know the details of the software you are running, setServerTokens to reveal as little as possible.
Context: server configSpecify in httpd.confDefault: FullUbuntu: Full
ServerSignature Adds a line to server-generated pages.
ServerSignature On | Off | EMail
On: Turns the signature line on. The signature line contains the server version asspecified by the ServerTokens directive (discussed above) and the name specified bythe <VirtualHost> container (page 935).
Off: Turns the signature line off.
EMail: To the signature line, adds a mailto: link to the server email address. Thisoption produces output that can attract spam. See ServerAdmin (page 928) forinformation on specifying an email address.
Contexts: server config, virtual host, directory, .htaccessSpecify in httpd.conf or sites-available/*Default: OffUbuntu: On
Configuration Directives
Group Sets the GID of the processes that run the servers.
Group #groupid | groupname
where groupid is a GID value, preceded by #, and groupname is the name of agroup. The processes (servers) that Apache spawns are run as the group specified bythis directive. See the User directive (page 946) for more information.
Context: server configSpecify in httpd.confDefault: #–1Ubuntu: www-data
944 Chapter 27 Apache: Setting Up a Web Server
Include Loads directives from files.
Include filename | directory
where filename is the relative pathname of a file that contains directives. Apacheprepends ServerRoot (page 942) to filename. The directives in filename areincluded in the file holding this directive at the location of the directive. Becausefilename can include wildcards, it can specify more than one file.
The directory is the relative pathname that specifies the root of a directory hierar-chy that holds files containing directives. Apache prepends ServerRoot to directory.The directives in ordinary files in this hierarchy are included in the file holding thisdirective at the location of the directive. The directory can include wildcards.
Ubuntu Linux categorizes and splits Apache configuration information into filesand directories related to virtual hosts, server configuration, ports, modules, andmiscellaneous configuration options. These files are incorporated into the mainapache2.conf file using Include directives; see page 922 for more information.
Contexts: server config, virtual host, directorySpecify anywhereDefault: noneUbuntu: /etc/apache2/mods-enabled/*.load
/etc/apache2/mods-enabled/*.conf/etc/apache2/httpd.conf/etc/apache2/ports.conf/etc/apache2/conf.d//etc/apache2/sites-enabled/
LoadModule Loads a module.
LoadModule module filename
where module is the name of an external DSO module and filename is the relativepathname of the named module. Apache prepends ServerRoot (page 942) to filenameand loads the external module specified by this directive. Use a2enmod (page 921) toenable modules. For more information refer to “Modules” on page 957.
Context: server configSpecify in mods-available/*.loadDefault: none; nothing is loaded by default if this directive is omittedUbuntu: see the *.load files in the mods-enabled directory
Options Controls server features by directory.
Options [±]option [[±]option ...]
This directive controls which server features are enabled for a directory hierarchy.The directory hierarchy is specified by the container this directive appears in. A + orthe absence of a – turns an option on, and a – turns it off.
The option may be one of the following:

Configuration Directives 945
None None of the features this directive can control are enabled.
All All of the features this directive can control are enabled, except for Multi-Views, which you must explicitly enable.
ExecCGI Apache can execute CGI scripts (page 958).
FollowSymLinks Apache follows symbolic links.
Includes Permits SSIs (server-side includes, page 959). SSIs are containers embed-ded in HTML pages that are evaluated on the server before the content is passed tothe client.
IncludesNOEXEC The same as Includes but disables the #exec and #exec cgicommands that are part of SSIs. Does not prevent the #include command from ref-erencing CGI scripts.
Indexes Generates a directory listing if DirectoryIndex (page 930) is not set.
MultiViews Allows MultiViews (page 952).
SymLinksIfOwnerMatch The same as FollowSymLinks but follows the link onlyif the file or directory being pointed to has the same owner as the link.
The following Options directive from the Ubuntu sites-available/default file sets theIndexes, FollowSymLinks, and MultiViews options and, because the <Directory> con-tainer specifies the /var/www directory hierarchy (the document root), affects all content:
<Directory /var/www/>Options Indexes FollowSymLinks MultiViews
...
Context: directorySpecify in httpd.conf or sites-available/*Default: AllUbuntu: various
ScriptAlias Maps a URI to a directory or file and declares the target to be a server (CGI) script.
ScriptAlias alias pathname
where alias must match part of the URI the client requested to invoke the Script-Alias. The pathname is the absolute pathname of the target of the alias, usually adirectory. Similar to the Alias directive, this directive specifies the target is a CGIscript (page 958).
The following ScriptAlias directive from the Ubuntu default file maps clientrequests that include /cgi-bin/ to the /var/lib/cgi-bin directory (and indicates thatthese requests will be treated as CGI requests):
ScriptAlias /cgi-bin/ "/usr/lib/cgi-bin/"
Contexts: server config, virtual hostSpecify in sites-available/*Default: noneUbuntu: /cgi-bin/ /usr/lib/cgi-bin/

946 Chapter 27 Apache: Setting Up a Web Server
User Sets the UID of the processes that run the servers.
User #userid | username
where userid is a UID value, preceded by #, and username is the name of a local user.The processes that Apache spawns are run as the user specified by this directive.
Apache must start with root privileges to listen on a privileged port. For reasons ofsecurity, Apache’s child processes (servers) run as nonprivileged users. The defaultUID of –1 does not map to a user under Ubuntu Linux. Instead, Ubuntu’s apache2package creates a user named www-data during installation and sets User to that user.
Context: server configSpecify in httpd.confDefault: #–1Ubuntu: www-data
Security Directives
Allow Specifies which clients can access specified content.
Allow from All | host [host ...] | env=var [env=var ...]
This directive, which must be written as Allow from, grants access to a directoryhierarchy to the specified clients. The directory hierarchy is specified by the con-tainer or .htaccess file this directive appears in.
All: Serves content to any client.
host: Serves content to the client(s) specified by host, which can take several forms:an FQDN, a partial domain name (such as example.com), an IP address, a partial IPaddress, or a network/netmask pair.
var: Serves content when the environment variable named var is set. You can set avariable with the SetEnvIf directive. See the Order directive (page 948) for an example.
Contexts: directory, .htaccessSpecify in httpd.conf or sites-available/*Default: none; default behavior depends on the Order directiveUbuntu: various
AllowOverride Specifies whether Apache examines .htaccess files and which classes of directives inthose files it processes.
AllowOverride All | None | directive-class [directive-class ...]
This directive specifies whether Apache examines .htaccess files in the directoryhierarchy specified by its container. If Apache does examine .htaccess files, thisdirective specifies which classes of directives within .htaccess files Apache processes.
Do not set User to root or 0security For a more secure system, do not set User to root or 0 (zero) and do not allow the www-data user
to have write access to the DocumentRoot directory hierarchy (except as needed for storing data),especially not to configuration files.

Configuration Directives 947
All: Processes all classes of directives in .htaccess files.
None: Ignores directives in .htaccess files. However, Apache will still serve the con-tent of .htaccess files, possibly exposing sensitive information. This choice does notaffect .htpasswrd files. The example in the description of the <Files> container(page 932) shows how to prevent Apache from serving the content of files whosenames begin with .ht.
The directive-class is one of the following directive class identifiers:
AuthConfig: Class of directives that control authorization (AuthName, AuthType,Require, and so on). This class is used mostly in .htaccess files to require a usernameand password to access the content. For more information refer to “AuthenticationModules and .htaccess” on page 961.
FileInfo: Class of directives that controls document types (DefaultType, Error-Document, SetHandler, and so on).
Indexes: Class of directives relating to directory indexing (DirectoryIndex, Fancy-Indexing, IndexOptions, and so on).
Limit: Class of client-access directives (Allow, Deny, and Order).
Options: Class of directives controlling directory features.
Context: directorySpecify in httpd.conf or sites-available/*Default: AllUbuntu: various
Deny Specifies which clients are not allowed to access specified content.
Deny from All | host [host ...] | env=var [env=var ...]
This directive, which must be written as Deny from, denies access to a directoryhierarchy to the specified clients. The directory hierarchy is specified by the con-tainer or .htaccess file this directive appears in. See the Order directive (next) for anexample.
All: Denies content to all clients.
host: Denies content to the client(s) specified by host, which can take several forms:an FQDN, a partial domain name (such as example.com), an IP address, a partial IPaddress, or a network/netmask pair.
var: Denies content when the environment variable named var is set. You can set avariable with the SetEnvIf directive.
Contexts: directory, .htaccessSpecify in mods-available/proxy.conf, httpd.conf, and sites-available/*Default: noneUbuntu: All

948 Chapter 27 Apache: Setting Up a Web Server
Order Specifies the default access and the order in which Allow and Deny directives areevaluated.
Order Deny,Allow | Allow,Deny
Deny,Allow: Allows access by default; denies access only to clients specified in Denydirectives. (First evaluates Deny directives, then evaluates Allow directives.)
Allow,Deny: Denies access by default; allows access only to clients specified in Allowdirectives. (First evaluates Allow directives, then evaluates Deny directives.)
There must not be SPACEs on either side of the comma. Access defaults to the secondentry in the pair (Deny,Allow defaults to Allow) if there is no Allow from or Denyfrom directive that matches the client. If a single Allow from or Deny from directivematches the client, that directive overrides the default. If multiple Allow from andDeny from directives match the client, Apache evaluates the directives in the orderspecified by the Order directive; the last match takes precedence.
Access granted or denied by this directive applies to the directory hierarchy speci-fied by the container or .htaccess file this directive appears in. Although UbuntuLinux has a default of Allow,Deny, which denies access to all clients not specified byAllow directives, the next directive in sites-available/default, Allow from all, grantsaccess to all clients:
Order allow,denyAllow from all
You can restrict access by specifying Deny,Allow to deny all access and then specifyingonly those clients you want to grant access to in an Allow directive. The followingdirectives grant access to clients from the example.net domain only and would typi-cally appear within a <Directory> container (page 932):
Order deny,allowDeny from allAllow from .example.net
Contexts: directory, .htaccessSpecify in httpd.conf or sites-available/*Default: Deny,AllowUbuntu: Allow,Deny (for /var/www)
The Ubuntu apache2.conf File
This section highlights some of the important features of the Ubuntu apache2.conffile, which is based on the httpd.conf file distributed by Apache. The version of thisheavily commented file that is distributed by Apache is broken into three parts, ofwhich Ubuntu uses the first (Section 1: Global Environment) as apache2.conf.Ubuntu distributes the contents of the other two sections among other configura-tion files, including the sites-available/default configuration file, which is describedin the next section.
The Ubuntu apache2.conf File 949
Include directives See page 922 for information on Include directives in the apache2.conf file.
ServerRoot The ServerRoot directive (page 942) is set to /etc/apache2, which is the pathnamethat Apache prepends to relative pathnames in the configuration files:
ServerRoot "/etc/apache2"
<IfModule> The <IfModule> containers (page 933) allow you to use the same apache2.conf filewith different multiprocessing modules (MPMs, page 963). Apache executes thedirectives in an <IfModule> container only if the specified module is loaded. Theapache2.conf file holds two <IfModule> containers that configure Apache differ-ently, depending on which module—prefork or worker—is loaded. Ubuntu shipswith the more efficient worker MPM loaded.
## Server-Pool Size Regulation (MPM specific)...<IfModule mpm_prefork_module>
StartServers 5MinSpareServers 5MaxSpareServers 10MaxClients 150MaxRequestsPerChild 0
</IfModule>
<IfModule mpm_worker_module>StartServers 2MaxClients 150MinSpareThreads 25MaxSpareThreads 75ThreadsPerChild 25MaxRequestsPerChild 0
</IfModule>
For more information refer to “Multiprocessing Modules (MPMs)” on page 963.
User The User directive causes Apache to run as the user www-data.
User www-data
TypesConfig The TypesConfig directive specifies the file that defines the MIME (page 1048)types that Apache uses for content negotiation (page 951). It is used to match file-name extensions with MIME types (e.g., .png with image/png).
TypesConfig /etc/mime.types
DefaultType Defines the content-type Apache sends if it cannot determine a type.
DefaultType text/plain
Do not modify apache2.conftip Typically, when you configure Apache, you do not make changes to apache2.conf; instead, you
modify files that are specified in Include directives (page 922). You can also use the configurationtools described on page 921. This setup allows updates to Apache to change apache2.conf with-out affecting the server.

950 Chapter 27 Apache: Setting Up a Web Server
Modules Instead of having a lot of LoadModule directives (page 944) in the apache2.conffile, Ubuntu puts the following Include directives in that file:
Include /etc/apache2/mods-enabled/*.loadInclude /etc/apache2/mods-enabled/*.conf
These directives include all the *.load and *.conf files in the mods-enabled direc-tory. For more information on how to enable modules, see the discussion of a2enmodon page 921.
There are many more directives in the apache2.conf file; the comments in the fileprovide a guide as to what they do. There is nothing here you need to change as youget started using Apache.
The Ubuntu default Configuration File
This section highlights some of the important features of the Ubuntu default config-uration file, which is located in the /etc/apache2/sites-available directory.
ServerAdmin andServerName
As Ubuntu Linux is shipped, the ServerAdmin directive is set to [email protected] a ServerName directive and change ServerAdmin to a useful value as suggestedunder ServerAdmin (page 928) and ServerName (page 928).
DocumentRoot The DocumentRoot directive (page 929) appears as follows:
DocumentRoot /var/www/
Modify this directive only if you want to put content somewhere other than in the/var/www directory.
<Directory> The following <Directory> container (page 932) sets up a restrictive environmentfor the entire local filesystem (specified by /):
<Directory /> Options FollowSymLinks AllowOverride None</Directory>
The Options directive (page 944) allows Apache to follow symbolic links but disal-lows many options. The AllowOverride directive (page 946) causes Apache not toprocess directives in .htaccess files. You must explicitly enable less restrictiveoptions if you want them, but be aware that doing so can expose the root filesystemand compromise system security.
Next, another <Directory> container sets up less restrictive options for the Document-Root (/var/www). The code in default is interspersed with many comments. Withoutthe comments it looks like this:
<Directory /var/www/>Options Indexes FollowSymLinks MultiViewsAllowOverride None

Content Negotiation 951
Order allow,denyallow from all
</Directory>
The Indexes option in the Options directive allows Apache to display directory list-ings. The Order (page 948) and Allow (page 946) directives combine to allowrequests from all clients. This container is slightly less restrictive than the precedingone, although it still does not allow Apache to follow directives in .htaccess files.
Redirects
Apache can respond to a request for a URI by asking the client to request a differentURI. This response is called a redirect. A redirect works because redirection is partof the HTTP implementation: Apache sends the appropriate response code and thenew URI, and a compliant browser requests the new location.
The Redirect directive can establish an explicit redirect that sends a client to a dif-ferent page when a Web site is moved. Or, when a user enters the URI of a directoryin a browser but leaves off the trailing slash, Apache can automatically redirect theclient to the same URI terminated with a slash.
UseCanonicalName The ServerName directive (page 928), which establishes the name of the server, andthe UseCanonicalName directive (page 938) are both important when a server hasmore than one name and needs to perform an automatic redirect. For example,assume the server with the name zach.example.com and the alias www.example.comhas ServerName set to www.example.com. When a client specifies a URI of a direc-tory but leaves off the trailing slash (zach.example.com/dir), Apache has to per-form a redirect to determine the URI of the requested directory. WhenUseCanonicalName is set to On, Apache uses the value of ServerName and returnswww.example.com/dir/. With UseCanonicalName set to Off, Apache uses the namefrom the incoming request and returns zach.example.com/dir/.
Content Negotiation
Apache can serve multiple versions of the same page, using a client’s preference todetermine which version to send. The process Apache uses to determine which versionof a page (file) to send is called content negotiation. Apache supports two methods ofcontent negotiation: MultiViews search and type maps, which can work together.
Type Maps
The following directive from apache2.conf tells Apache to use any filename endingin .var as a type map:
AddHandler type-map var

952 Chapter 27 Apache: Setting Up a Web Server
To see how type maps work, create the following files in /var/www:
$ cat /var/www/index.html.en<html><body><h1>Hello</h1></body></html>
$ cat /var/www/index.html.fr<html><body><h1>Bonjour</h1><body></html>
$ cat /var/www/index.html.varURI: index.html.enContent-Language: enContent-type: text/html; charset=ISO-8859-1
URI: index.html.frContent-Language: frContent-type: text/html; charset=ISO-8859-1
If your browser’s preferred language is set to English (en), it will display the Hellopage when you browse to http://localhost/index.html.var. If your browser’s pre-ferred language is set to French (fr), it will display the Bonjour page. (With theMultiViews option turned on, as it is by default, the browser displays the correctpage when you browse to http://localhost. See the next section.) You can change thedefault language in Firefox by selecting Edit Preferences from the menubar, clickingthe Advanced icon and then the General tab, and finally clicking Choose from theLanguages frame. Select a language from the Select a language to add combo box, ifnecessary, and then move the preferred language to the top of the list. In the exam-ple, the charset assignments are not necessary. However, they would be helpful if youwere sending pages using different encodings such as English, Russian, and Korean.
Type maps are used for more than selecting among different languages. Instead ofmatching Content-Language as in the preceding example, the map could matchContent-type and send jpeg or png images depending on how the browser’s prefer-ences are set.
MultiViews
When you set the MultiViews option on a directory, Apache attempts to deliver thecorrect page when a requested resource does not exist. The following lines in thesites-available/default file set MultiViews for the document root (/):
<Directory /var/www/>Options Indexes FollowSymLinks MultiViews
...
To see how MultiViews work, remove the /var/www/index.html.var type map filethat you created in the preceding section. Now browse to http://localhost. Theproper language page is displayed, but why?
When a browser sends Apache a request for a directory, Apache looks for a filenamed index.html in that directory. In the example, Apache does not find the file. If

Virtual Hosts 953
MultiViews is enabled, as it is by default, Apache looks for files named index.html.*.In the example it finds index.html.en and index.html.fr. Apache effectively creates atype map on the fly, mapping the index.html.* files to various languages, and sendsits best guess as to the page you want.
MultiViews provides an easy way to serve multiple versions of the same file withouthaving to create a type map. However if you require finer-grained control overwhich version of a resource should be sent, type maps are a better solution.
Server-Generated Directory Listings (Indexing)
When a client requests a directory, the Apache configuration determines what isreturned to the client. Apache can return a file as specified by the DirectoryIndex direc-tive (page 930), a directory listing if no file matches DirectoryIndex and the OptionsIndexes directive (page 944) is set, or an error message if no file matches Directory-Index and Options Indexes is not set. Figure 27-1 shows the server-generated directorylisting that results from pointing a local browser at http://localhost/doc/ (you mustinclude the trailing slash) on the server system (assuming the default configuration).
Virtual Hosts
Apache supports virtual hosts, which means that one instance of Apache canrespond to requests directed to multiple IP addresses or hostnames as though itwere multiple servers. Each IP address or hostname can then provide different con-tent and be configured differently.
Figure 27-1 A server-generated directory listing

954 Chapter 27 Apache: Setting Up a Web Server
Setting Up a Virtual Host
To improve portability and make software upgrades easier, Ubuntu provides two direc-tories that can hold the code to support virtual hosts. The apache2.conf file has anInclude directive (page 922) that incorporates the files in the /etc/apache2/sites-enableddirectory.
To create a new virtual host, you can create a file that defines the virtual host in/etc/apache2/sites-available. Then run a2ensite (page 922) with the name of the fileyou created as an argument and reload Apache. Running a2ensite enables the vir-tual host by creating a link in /etc/apache2/sites-enabled.
Types of Virtual Hosts
There are two types of virtual hosts: host-by-name (also called host-based) andhost-by-IP. Host-by-name relies on the FQDN the client uses in its request toApache—for example, www.example.com versus www2.example.com. Host-by-IPexamines the IP address the host resolves as and responds according to that match.
Host-by-name is handy if there is only one IP address, but Apache must supportmultiple FQDNs. Although you can use host-by-IP if a given Web server has aliases,Apache should serve the same content regardless of which name is used.
The VirtualHost container and the ServerName directive control which kind of vir-tual host you are running. The NameVirtualHost directive specifies which IPaddress supports host-by-name virtual hosting. You can specify many virtual hostsfor a single instance of Apache.
The default Virtual Host
Ubuntu ships with the host-by-name virtual host named default defined in/etc/apache2/sites-available/default. This virtual host displays a server-generateddirectory listing (page 953) of /var/www. This directory includes the apache2-default directory. When you click this directory, Apache serves the index.html file,which displays It works! If you uncomment the RewriteMatch directive in thedefault file, Apache serves the apache2-default directory in response to a request for/ and automatically displays It works! Alternatively, if you put your content in/var/www, the default configuration will serve your site as you would expect. It issafe to remove the apache2-default directory.
Examples
The following examples of host-by-name virtual hosting use wildcards (*) to remainas flexible as possible. You may want to replace the wildcards with the IP address ofthe server for more precise control when Apache is serving multiple virtual hosts.
The first <VirtualHost> container sets up host-by-name for the site named example.com.This virtual host handles requests that are directed to example.com. The ServerAliasdirective allows it to also process requests directed to www.example.com.

Virtual Hosts 955
<VirtualHost *>ServerName example.comServerAlias www.example.comServerAdmin [email protected] /var/www/example.comCustomLog /var/log/apache2/example.com.log combinedErrorLog /var/log/apache2/example.com.err
</VirtualHost>
The next example is similar to the previous one. It adds a Directory directive thatprevents remote users (users not coming from the 192.168. subnet) from accessingthe Web site.
<VirtualHost *>ServerName intranet.example.comServerAdmin [email protected] /var/wwwErrorLog /var/log/apache2/intra.error_logCustomLog /var/log/apache2/example.com.log combined<Directory /var/www>
Order deny,allowDeny from allAllow from 192.168. # allow from private subnet only
</Directory></VirtualHost>
The next example sets up two virtual hosts. The VirtualHost containers accept alltraffic directed to the server by specifying *. The ServerName directives accept trafficfor sam.example.com (or the alias www.example.com/sam) and mail.example.com.The first virtual host serves documents from Sam’s public_html directory; the secondis a Webmail server with its content at /var/www/squirrelmail. This example worksbecause all three addresses resolve to the IP address of the server.
NameVirtualHost *:<VirtualHost *>
ServerName sam.example.comServerAdmin [email protected] /home/sam/public_html
</VirtualHost>
<VirtualHost *:>ServerName mail.example.comServerAdmin [email protected] /var/www/squirrelmail
</VirtualHost>
If the user specifies an IP address and not a URI, that address may match more thanone of the virtual hosts, as in the example. In this case, Apache serves the virtual hostthat best matches. If none of the virtual host addresses matches the IP address betterthan another, Apache serves the first virtual host. In the preceding example, both vir-tual hosts match an IP address the same way; neither is a better match, so Apache

956 Chapter 27 Apache: Setting Up a Web Server
serves the first virtual host (sam.example.com). If mail.example.com was defined as<VirtualHost 192.168.1.102> and a user specified that IP address, Apache would servemail.example.com because it is a better match for the IP address than the wildcardthat the other virtual host specifies.
The next example shows VirtualHost containers for a host-by-IP server. The exam-ple assumes that 111.111.0.0 and 111.111.0.1 point to the local server. Here eachvirtual host has its own IP/port combination. The third virtual host is distinguishedfrom the first by the port that a request comes in on.
<VirtualHost 111.111.0.0:80>DocumentRoot /var/www/www0
</VirtualHost>
<VirtualHost 111.111.0.1:80>DocumentRoot /var/www/www1
</VirtualHost>
<VirtualHost 111.111.0.0:8080>DocumentRoot /var/www/www2Listen 8080 # this directive should go in ports.conf
</VirtualHost>
The final example sets up a virtual server for Webmail that can be accessed onlyover SSL. It would be appropriate to put this code in a file named/etc/apache2/sites-available/mail.example.com. To use this example you must cre-ate an SSL certificate (page 959), enable the ssl module (included in the defaultApache installation) with a2enmod (page 921), and enable the virtual domain usinga2ensite (page 922).
<VirtualHost mail.example.com:80> Redirect permanent / https://mail.example.com/</VirtualHost><VirtualHost mail.example.com:443>
ServerName mail.example.comServerAdmin [email protected] /var/www/mail.example.comErrorLog /var/log/apache2/mail.example.com.errCustomLog /var/log/apache2/mail.example.com.log combinedSSLEngine OnSSLCertificateFile /etc/apache2/ssl/apache.pem
</VirtualHost>
Troubleshooting
The apache2 init script checks the syntax of the Apache configuration files and logs anerror if there is a problem. You can also call apache2ctl directly to check the syntax:
$ apache2ctl configtestSyntax OK

Modules 957
Once you start the apache2 daemon, you can confirm that Apache is working cor-rectly by pointing a browser on the local system at http://localhost/. From a remotesystem, use http://server/, substituting the hostname of the server for server. Inresponse, Apache displays a directory listing for /var/www unless you have addedan index file or changed the default virtual host.
If the browser does not display the directory listing, it will display one of twoerrors: Connection refused or an error page. If you get a Connection refused error,make sure that port 80 is not blocked by a firewall (page 918) and check that theserver is running:
$ ps -ef | grep apache2max 3479 12869 0 16:55 pts/1 00:00:00 grep apache2root 5031 1 0 Mar26 ? 00:00:00 /usr/sbin/apache2 -k startwww-data 5032 5031 0 Mar26 ? 00:00:00 /usr/sbin/apache2 -k startwww-data 5088 5031 0 Mar26 ? 00:00:00 /usr/sbin/apache2 -k startwww-data 5092 5031 0 Mar26 ? 00:00:00 /usr/sbin/apache2 -k start
If the server is running, confirm that you did not specify a port other than 80 in aListen directive. If you did, the URI you specify in the browser must reflect this portnumber (http://localhost:port specifies port port). Otherwise, check the error log(/var/log/httpd/error_log) for information about what is not working.
To verify that the browser is not at fault, use telnet to try to connect to port 80 ofthe server:
$ telnet www.example.com 80Trying 192.0.34.166...Connected to www.example.com.Escape character is '^]'.CONTROL-]telnet> quitConnection closed.
If telnet displays Connection refused, it means that the local system cannot connectto the server.
Modules
Apache is a skeletal program that relies on external modules, called dynamic sharedobjects (DSOs), to provide most of its functionality. In addition to the modules includedwith Ubuntu Linux, many other modules are available. See httpd.apache.org/modulesfor more information. See a2enmod on page 921 for information on enabling modules.
Configuring modulestip You can configure some modules by editing their corresponding *.conf file in the mods-available
directory.

958 Chapter 27 Apache: Setting Up a Web Server
The names of the files that hold modules start with the prefix libapache2-mod-. Thefollowing command displays a complete list of modules. You can pipe the list throughgrep to find the module you want. See page 596 for information on apt-cache.
$ apt-cache search libapache2-modlibapache2-mod-auth-mysql - Apache 2 module for MySQL authenticationlibapache2-mod-auth-pam - module for Apache2 which authenticate using PAMlibapache2-mod-auth-pgsql - Module for Apache2 which provides pgsql authenticationlibapache2-mod-auth-plain - Module for Apache2 which provides plaintext authenticationlibapache2-mod-auth-sys-group - Module for Apache2 which checks user against system grouplibapache2-mod-macro - Create macros inside apache2 config fileslibapache2-mod-perl2 - Integration of perl with the Apache2 web serverlibapache2-mod-perl2-dev - Integration of perl with the Apache2 server - development fileslibapache2-mod-perl2-doc - Integration of perl with the Apache2 web server - documentationlibapache2-mod-php5 - server-side, HTML-embedded scripting language (apache 2 module)libapache2-mod-python - Apache 2 module that embeds Python within the server...
$ apt-cache search libapache2-mod | grep rubylibapache2-mod-ruby - Embedding Ruby in the Apache2 web server
mod_cgi and CGI Scripts
The CGI (Common Gateway Interface) allows external application programs tointerface with Web servers. Any program can be a CGI program if it runs in realtime (at the time of the request) and relays its output to the requesting client. Vari-ous kinds of scripts, including shell, Perl, Python, and PHP, are the most commonlyencountered CGI programs because a script can call a program and reformat itsoutput in HTML for a client.
Apache can handle requests for CGI programs in several different ways. The mostcommon method is to put a CGI program in the cgi-bin directory and then enableits execution from that directory only. The location of the cgi-bin directory, as spec-ified by the ScriptAlias directive (page 945), is /usr/lib/cgi-bin. Alternatively, anAddHandler directive (page 939) can identify the filename extensions of scripts,such as .cgi or .pl, within the regular content (for example, AddHandler cgi-script.cgi). If you use AddHandler, you must also specify the ExecCGI option in anOptions directive within the appropriate <Directory> container. The mod_cgi mod-ule must be loaded to access and execute CGI scripts.
The following Perl CGI script displays the Apache environment. This script shouldbe used for debugging only because it presents a security risk if remote clients canaccess it:
#!/usr/bin/perl#### printenv -- demo CGI program that prints its environment##
print "Content-type: text/plain\n\n";

Modules 959
foreach $var (sort(keys(%ENV))) { $val = $ENV{$var}; $val =~ s|\n|\\n|g; $val =~ s|"|\\"|g; print "${var}=\"${val}\"\n";}
mod_ssl SSL (Secure Sockets Layer), which is implemented by the mod_ssl module, has twofunctions: It allows a client to verify the identity of a server and it enables securetwo-way communication between a client and a server. SSL is used on Web pages inconjunction with forms that require passwords, credit card numbers, or other sensi-tive data.
Apache uses the HTTPS protocol—not HTTP—for SSL communication. WhenApache uses SSL, it listens on a second port (443 by default) for a connection andperforms a handshaking sequence before sending the requested content to the client.
Server verification is critical for financial transactions. After all, you do not want togive your credit card number to a fraudulent Web site posing as a known company.SSL uses a certificate to positively identify a server. Over a public network such asthe Internet, the identification is reliable only if the certificate contains a digital sig-nature from an authoritative source such as VeriSign or Thawte. SSL Web pages aredenoted by a URI beginning with https://.
Data encryption prevents malicious users from eavesdropping on Internet connec-tions and copying personal information. To encrypt communication, SSL sitsbetween the network and an application and encrypts communication between theserver and the client.
Setting Up mod_sslThe mod_ssl package is installed as part of the apache2 package—you do not needto install it separately. The /etc/apache2/mods-available/ssl.conf file configuresmod_ssl; ssl.load, which is in the same directory, loads it. You must enable the mod-ule with the command a2enmod ssl. The first few directives in this file set variousparameters for SSL operation.
You can set up a virtual host for SSL in the sites-available directory and enable itusing a2ensite (page 922). As with any virtual host, a virtual host for SSL holdsdirectives such as ServerName and ServerAdmin that need to be configured. In addi-tion, it holds some SSL-related directives. See the example on page 956.
Using a Self-Signed Certificate for Encryption
If you require SSL for encryption and not verification—that is, if the client alreadytrusts the server—you can generate and use a self-signed certificate, bypassing thetime and expense involved in obtaining a digitally signed certificate. Self-signedcertificates generate a warning when you connect to the server: Most browsers
960 Chapter 27 Apache: Setting Up a Web Server
display a dialog box that allows you to examine and accept the certificate. Theexim4 daemon also uses certificates (page 778).
The following example creates a self-signed certificate. (See the procedure atwww.modssl.org/docs/2.8/ssl_faq.html#ToC28 if apache2-ssl-certificate is missing fromthe system. You do not need to send in the CSR for a self-signed certificate.)
$ sudo apache2-ssl-certificatecreating selfsigned certificatereplace it with one signed by a certification authority (CA)
enter your ServerName at the Common Name prompt
If you want your certificate to expire after x days call this programmwith -days xGenerating a 1024 bit RSA private key..................................................++++++........++++++writing new private key to ‘/etc/apache2/ssl/apache.pem’-----You are about to be asked to enter information that will be incorporatedinto your certificate request.What you are about to enter is what is called a Distinguished Name or a DN.There are quite a few fields but you can leave some blankFor some fields there will be a default value,If you enter ‘.’, the field will be left blank.-----Country Name (2 letter code) [GB]:USState or Province Name (full name) [Some-State]:California Locality Name (eg, city) []:San FranciscoOrganization Name (eg, company; recommended) []:Sobell Associates Inc.Organizational Unit Name (eg, section) []:server name (eg. ssl.domain.tld; required!!!) []:www.sobell.comEmail Address []:[email protected]
The answers to the first five questions are arbitrary: They can help clients identify asite when they examine the certificate. The answer to the sixth question (servername) is critical. Because certificates are tied to the name of the server, you mustenter the server’s FQDN accurately. If you mistype this information, the servername and the name of the certificate will not match. A browser will then generate awarning message each time a connection is made.
Now you must create an SSL-enabled virtual host in /etc/apache2/sites-available.Host-by-name virtual hosting will not work with SSL because the HTTP Hostheader sent by the client that Apache uses to differentiate between host-by-namevirtual hosts is encrypted. You can use only one SSL certificate, matching onedomain per IP address. You can have multiple virtual hosts on that IP address, but ifthey are accessed over HTTPS, the client will receive an error saying that the certifi-cate does not match the domain name. After you enable the new virtual host andrestart Apache, the new certificate will be in use.

Modules 961
Following is an example wildcard setup for /etc/apache2/sites-available/ssl. Enableit with sudo a2ensite ssl:
<VirtualHost *:80>Redirect permanent / https://www.sobell.com/
</VirtualHost>
<VirtualHost *:443>ServerName www.sobell.comSSLEngine OnSSLCertificateFile /etc/apache2/ssl/apache.pemDocumentRoot /var/www
</VirtualHost>
This example directs all non-SSL traffic to the SSL site. You must add a Listen 443directive to /etc/apache2/ports.conf if you want Apache to listen on the defaultHTTPS port.
Notes on Certificates
• Although the server name is part of the certificate, the SSL connection is tied to the IP address of the server: You can have only one certificate per IP address. For multiple virtual hosts to have separate certificates, you must specify host-by-IP rather than host-by-name virtual hosts (page 953).
• As long as the server is identified by the name for which the certificate was issued, you can use the certificate on another server or IP address.
• A root certificate (root CA) is the certificate that signs the server certificate. Every browser contains a database of the public keys for the root certificates of the major signing authorities, including VeriSign and Thawte.
• It is possible to generate a root certificate (root CA) and sign all your server certificates with this root CA. Regular clients can import the public key of the root CA so that they recognize every certificate signed by that root CA. This setup is convenient for a server with multiple SSL-enabled virtual hosts and no commercial certificates. For more information see www.modssl.org/docs/2.8/ssl_faq.html#ToC29.
• A self-signed certificate does not enable clients to verify the identity of the server.
Authentication Modules and .htaccessTo restrict access to a Web page, Apache and third parties provide authenticationmodules and methods that can verify a user’s credentials, such as a username andpassword. Some modules support authentication against various databases includ-ing LDAP (page 1044) and NIS (page 781).

962 Chapter 27 Apache: Setting Up a Web Server
User authentication directives are commonly placed in a .htaccess file. A basic .htaccessfile that uses the Apache default authentication module (mod_auth) follows. Substituteappropriate values for the local server.
$ sudo cat .htaccessAuthUserFile /var/www/.htpasswdAuthGroupFile /dev/nullAuthName "Browser dialog box query"AuthType Basicrequire valid-user
The /var/www/.htpasswd is a typical absolute pathname of a .htpasswd file andBrowser dialog box query is the string that the user will see as part of the dialogbox that requests a username and password.
The second line of the preceding .htaccess file turns off the group function. Thefourth line specifies the user authentication type Basic, which is implemented by thedefault mod_auth module. The last line tells Apache which users can access the pro-tected directory. The entry valid-user grants access to the directory to any userwhose username appears in the Apache password file and who enters the correctpassword. You can also specify Apache usernames separated by SPACEs.
You can put the Apache password file anywhere on the system, as long as Apachecan read it. It is safe to put this file in the same directory as the .htaccess filebecause, by default, Apache will not answer any requests for files whose names startwith .ht.
The following command creates a .htpasswd file in the working directory for Sam:
$ htpasswd -c .htpasswd samNew password:Re-type new password:Adding password for user sam
The default virtual host includes an AllowOverride None directive (page 946) for/var/www. You must change this directive to at least AllowOverride AuthConfig insites-available/default or remove it to enable Apache to process user authenticationdirectives.
Scripting Modules
Apache can process content before serving it to a client. In earlier versions ofApache, only CGI scripts could process content. In the current version, scriptingmodules can work with scripts embedded in HTML documents.
Scripting modules manipulate content before Apache serves it to a client. Becausethey are built into Apache, scripting modules are fast. Scripting modules are espe-cially efficient at working with external data sources such as relational databases.Clients can pass data to a scripting module that modifies the information thatApache serves.

Modules 963
Scripting modules stand in contrast to CGI scripts that are run externally toApache. In particular, CGI scripts do not allow client interaction and are slowbecause they must make external calls.
Ubuntu provides packages that allow you to embed Perl (mod_perl), Python(mod_python), and PHP (mod_php) code in HTML content. Perl and Python,which are general-purpose scripting languages, are encapsulated for use directly inApache and are available in the libapache2-mod-perl2 and libapache2-mod-pythonpackages, respectively.
PHP, which was developed for manipulating Web content, outputs HTML bydefault. Implemented in the mod_php module and available in libapache2-mod-php5, this language is easy to set up, has a syntax similar to that of Perl and C, andcomes with a large number of Web-related functions.
Multiprocessing Modules (MPMs)
If Apache were to execute in only one process, every time a client requested a page,Apache would have to ignore other requests while it read that page from disk (orwaited for a CGI script to generate it). After it read the page, it could send the pageto the client and respond to the next request. With this setup, Apache could serveonly one client at a time.
prefork MPM Apache 1.3 and earlier forked servers to respond to multiple clients. Apache 2moved the forking behavior to the prefork multiprocessing module (MPM). MPMsintroduced the ability to switch between various multiprocessing techniques.
The prefork MPM uses the fork() system call to create an exact copy of the runningApache process to serve each request. The MaxServers, MaxSpareServers, and simi-lar directives control how many copies of Apache run at the same time. Because theoperating system has to spend time context switching between Apache processes,and because each process has its own memory, the prefork MPM generates consid-erable overhead on a busy server.
worker MPM The worker MPM reduces this overhead by using threads. A thread is similar to aprocess in that it can execute independently of other threads or processes. Waitingfor a read to complete in one thread does not stop (block) other threads from exe-cuting. The difference between threads and processes is that all the threads runningunder one process share the same memory, and the program—rather than the oper-ating system—is responsible for managing the threads. The worker MPM maintainsa pool of threads it can use to serve each request. Instead of the parent Apache pro-cess forking a child to serve each request for content as in prefork, the workerMPM uses threads to serve requests for content.
Threads Because all these threads run under the same process, they share the same memory. Codethat is not thread safe (see reentrant on page 1056) can return inconsistent results. Forexample, some PHP library functions use the strtok() C function to convert a string totokens. This function maintains internal variables. If it is called by multiple threads shar-ing the same memory, strtok()’s internal variables are put in an inconsistent state.

964 Chapter 27 Apache: Setting Up a Web Server
PHP If you want to use PHP, either you must use the prefork MPM or, if you want to usethe worker MPM and PHP, you must remove libapache2-mod-php5 and run PHPas a CGI script (page 958).
MPMs Available MPMs include
• apache2-mpm-prefork Traditional MPM.
• apache2-mpm-worker High speed threaded MPM.
• apache2-mpm-event Event driven MPM.
The apache2-mpm-worker, apache2-mpm-event, and apache2-mpm-prefork pack-ages each supply the apache2 binary and conflict with one another. You cannot havemore than one of these modules installed at the same time. When you install one ofthese packages, the installer automatically removes the existing MPM.
webalizer: Analyzes Web Traffic
The webalizer package creates a directory at /var/www/webalizer and a cron file(page 668) at /etc/cron.daily/webalizer. Once a day, the cron file generates usagedata and puts it in the webalizer directory; you can view this data by pointing abrowser at http://server/webalizer/, where server is the hostname of the server.
The /etc/webalizer/webalizer.conf file controls the behavior of the webalizer utility.If you change the location of the DocumentRoot or log files, you must edit this fileto reflect those changes. For more information on webalizer, refer to the webalizerman page and the sites listed under “More Information” on page 918.
MRTG: Monitors Traffic Loads
Multi Router Traffic Grapher (MRTG; mrtg package) is an open-source applicationthat graphs statistics available through SNMP (Simple Network Management Pro-tocol). SNMP information is available on all high-end routers and switches as wellas on some other networked equipment, such as printers and wireless access points.
Once MRTG is installed and running, you can view the reports athttp://server/mrtg, where server is the hostname of the server. For more informa-tion see the mrtg man page and the sites listed under “More Information” onpage 918.
Error Codes
Following is a list of Apache error codes:

Chapter Summary 965
100 Continue 404 Not Found101 Switching Protocols 405 Method Not Allowed200 OK 406 Not Acceptable201 Created 407 Proxy Authentication Required202 Accepted 408 Request Timed out203 Non-Authoritative Information 409 Conflict204 No Content 410 Gone205 Reset Content 411 Length Required206 Partial Content 412 Precondition Failed300 Multiple Choices 413 Request Entity Too Large301 Moved Permanently 414 Request-URI Too Large302 Moved Temporarily 415 Unsupported Media Type303 See Other 500 Internal Server Error304 Not Modified 501 Not Implemented305 Use Proxy 502 Bad Gateway400 Bad Request 503 Service Unavailable401 Unauthorized 504 Gateway Time-out402 Payment Required 505 HTTP Version Not Supported403 Forbidden
Chapter Summary
Apache is the most popular Web server on the Internet today. It is both robust andextensible. The /etc/apache2/apache2.conf configuration file controls many aspectsof how Apache runs. This file, which is based on the first part of the httpd.conf filedistributed by Apache, is heavily commented. Ubuntu also puts some configurationdirectives in the /etc/apache2/sites-available/default file.
Content to be served is typically placed in /var/www, called the document root.Apache automatically displays the file named index.html in this directory.
Configuration directives, or simply directives, are lines in a configuration file thatcontrol some aspect of how Apache functions. Four locations, called contexts,define where a configuration directive can appear: server config, virtual host, direc-tory, and .htaccess. Containers, or special directives, are directives that group otherdirectives.
To restrict access to a Web page, Apache and third parties provide authenticationmodules and methods that can verify a user’s credentials, such as a username andpassword. Some modules enable authentication against various databases, includingLDAP and NIS.
Apache can respond to a request for a URI by asking the client to request a differentURI. This response is called a redirect. Apache can also process content before serv-ing it to a client using scripting modules that work with scripts embedded in HTMLdocuments.

966 Chapter 27 Apache: Setting Up a Web Server
Apache supports virtual hosts, which means that one instance of Apache canrespond to requests directed to multiple IP addresses or hostnames as though itwere multiple servers. Each IP address or hostname can provide different contentand be configured differently.
The CGI (Common Gateway Interface) allows external application programs tointerface with Web servers. Any program can be a CGI program if it runs in realtime and relays its output to the requesting client.
SSL (Secure Sockets Layer) has two functions: It allows a client to verify the identityof a server and it enables secure two-way communication between a client and server.
Exercises
1. How would you tell Apache that your content is in /usr/local/www?
2. How would you instruct an Apache server to listen on port 81 instead of port 80?
3. How would you enable Sam to publish Web pages from his ~/websitedirectory but not allow anyone else to publish to the Web?
4. Apache must be started with root privileges. Why? Why does this action not present a security risk?
Advanced Exercises
5. If you are running Apache on a firewall system, perhaps to display a Web front-end for firewall configuration, how would you make sure that it is accessible only from inside the local network?
6. Why is it more efficient to run scripts using mod_php or mod_perl than to run them through CGI?
7. What two things does SSL provide and how does this situation differ if the certificate is self-signed?
8. Some Web sites generate content by retrieving data from a database and inserting it into a template using PHP or CGI each time the site is accessed. Why is this practice often a poor idea?
9. Assume you want to provide Webmail access for employees on the same server that hosts the corporate Web site. The Web site address is exam-ple.com, you want to use mail.example.com for Webmail, and the Web-mail application is located in /var/www/webmail. Describe two ways you can set this up this configuration.

Advanced Exercises 967
10. Part of a Web site is a private intranet. Describe how you would prevent people outside the company’s internal 192.168.0.0/16 network from accessing this site. The site is defined as follows:
<VirtualHost *>ServerName example.comDocumentRoot /var/www<Directory /var/www/intranet>
AllowOverride AuthConfig</Directory>
</VirtualHost>

This page intentionally left blank

969
I
PART VI
Appendixes
APPENDIX A
Regular Expressions 971
APPENDIX B
Help 981
APPENDIX C
Security 991
APPENDIX D
The Free Software Definition 1011
APPENDIX E
The Linux 2.6 Kernel 1015

This page intentionally left blank

971971
AAppendixAA regular expression defines a set of one or more strings ofcharacters. A simple string of characters is a regular expressionthat defines one string of characters: itself. A more complexregular expression uses letters, numbers, and special charactersto define many different strings of characters. A regular expres-sion is said to match any string it defines.
This appendix describes the regular expressions used by ed, vim,emacs, grep, gawk, sed, and other utilities. The regular expres-sions used in shell ambiguous file references are different andare described in “Filename Generation/Pathname Expansion”on page 239.
In This Appendix
Characters . . . . . . . . . . . . . . . . . . . 972
Delimiters . . . . . . . . . . . . . . . . . . . 972
Simple Strings. . . . . . . . . . . . . . . . 972
Special Characters . . . . . . . . . . . . 972
Rules . . . . . . . . . . . . . . . . . . . . . . . 975
Bracketing Expressions . . . . . . . . 976
The Replacement String . . . . . . . . 976
Extended Regular Expressions. . . 977
A
Regular Expressions

972 Appendix A Regular Expressions
Characters
As used in this appendix, a character is any character except a NEWLINE. Most charac-ters represent themselves within a regular expression. A special character is one thatdoes not represent itself. If you need to use a special character to represent itself,you must quote it as explained on page 975.
Delimiters
A character called a delimiter usually marks the beginning and end of a regularexpression. The delimiter is always a special character for the regular expression itdelimits (that is, it does not represent itself but marks the beginning and end of theexpression). Although vim permits the use of other characters as a delimiter and grepdoes not use delimiters at all, the regular expressions in this appendix use a forwardslash (/) as a delimiter. In some unambiguous cases, the second delimiter is notrequired. For example, you can sometimes omit the second delimiter when it wouldbe followed immediately by RETURN.
Simple Strings
The most basic regular expression is a simple string that contains no special charac-ters except the delimiters. A simple string matches only itself (Table A-1). In theexamples in this appendix, the strings that are matched are underlined and look likethis.
Special Characters
You can use special characters within a regular expression to cause the regularexpression to match more than one string. A regular expression that includes a
Table A-1 Simple strings
Regular expression Matches Examples
/ring/ ring ring, spring, ringing,stringing
/Thursday/ Thursday Thursday, Thursday’s
/or not/ or not or not, poor nothing
Special Characters 973
special character always matches the longest possible string, starting as far towardthe beginning (left) of the line as possible.
Periods
A period ( .) matches any character (Table A-2).
Brackets
Brackets ( []) define a character class1 that matches any single character withinthe brackets (Table A-3). If the first character following the left bracket is a caret(^), the brackets define a character class that matches any single character notwithin the brackets. You can use a hyphen to indicate a range of characters. Withina character-class definition, backslashes and asterisks (described in the followingsections) lose their special meanings. A right bracket (appearing as a member of thecharacter class) can appear only as the first character following the left bracket. Acaret is special only if it is the first character following the left bracket. A dollar signis special only if it is followed immediately by the right bracket.
Table A-2 Period
Regular expression Matches Examples
/ .alk/ All strings consisting of a SPACE followed by any character followed by alk
will talk, may balk
/.ing/ All strings consisting of any character pre-ceding ing
sing song, ping,before inglenook
1. GNU documentation calls these List Operators and defines Character Class operators as expressionsthat match a predefined group of characters, such as all numbers (page 1028).
Table A-3 Brackets
Regular expression Matches Examples
/[bB]ill/ Member of the character class b and B fol-lowed by ill
bill, Bill, billed
/t[aeiou].k/ t followed by a lowercase vowel, any char-acter, and a k
talkative, stink, teak, tanker
/# [6–9]/ # followed by a SPACE and a member of the character class 6 through 9
# 60, # 8:, get # 9
/[^a–zA–Z]/ Any character that is not a letter (ASCII character set only)
1, 7, @, ., }, Stop!

974 Appendix A Regular Expressions
Asterisks
An asterisk can follow a regular expression that represents a single character(Table A-4). The asterisk represents zero or more occurrences of a match of the reg-ular expression. An asterisk following a period matches any string of characters. (Aperiod matches any character, and an asterisk matches zero or more occurrences ofthe preceding regular expression.) A character-class definition followed by an aster-isk matches any string of characters that are members of the character class.
Carets and Dollar Signs
A regular expression that begins with a caret (^) can match a string only at thebeginning of a line. In a similar manner, a dollar sign ($) at the end of a regularexpression matches the end of a line. The caret and dollar sign are called anchorsbecause they force (anchor) a match to the beginning or end of a line (Table A-5).
Table A-4 Asterisks
Regular expression Matches Examples
/ab*c/ a followed by zero or more b’s followed by a c
ac, abc, abbc, debbcaabbbc
/ab.*c/ ab followed by zero or more characters fol-lowed by c
abc, abxc, ab45c,xab 756.345 x cat
/t.*ing/ t followed by zero or more characters fol-lowed by ing
thing, ting, I thought of going
/[a–zA–Z ]*/ A string composed only of letters and SPACEs
1. any string withoutnumbers or punctuation!
/(.*)/ As long a string as possible between ( and ) Get (this) and (that);
/([^)]*)/ The shortest string possible that starts with ( and ends with )
(this), Get (this and that)
Table A-5 Carets and dollar signs
Regular expression Matches Examples
/^T/ A T at the beginning of a line This line...,That Time...,In Time
/^+[0–9]/ A plus sign followed by a digit at the begin-ning of a line
+5 +45.72,+759 Keep this...
/:$/ A colon that ends a line ...below:

Rules 975
Quoting Special Characters
You can quote any special character (but not a digit or a parenthesis) by preceding itwith a backslash (Table A-6). Quoting a special character makes it represent itself.
Rules
The following rules govern the application of regular expressions.
Longest Match Possible
A regular expression always matches the longest possible string, starting as fartoward the beginning of the line as possible. For example, given the string
This (rug) is not what it once was (a long time ago), is it?
the expression /Th.*is/ matches
This (rug) is not what it once was (a long time ago), is
and /(.*)/ matches
(rug) is not what it once was (a long time ago)
However, /([^)]*)/ matches
(rug)
Given the string
singing songs, singing more and more
the expression /s.*ing/ matches
singing songs, singing
and /s.*ing song/ matches
singing song
Table A-6 Quoted special characters
Regular expression Matches Examples
/end\./ All strings that contain end followed by a period
The end., send., pretend.mail
/ \\ / A single backslash \
/ \*/ An asterisk *.c, an asterisk (*)
/ \[5\]/ [5] it was five [5]
/and\/or/ and/or and/or

976 Appendix A Regular Expressions
Empty Regular Expressions
Within some utilities, such as vim and less (but not grep), an empty regular expres-sion represents the last regular expression that you used. For example, suppose yougive vim the following Substitute command:
:s/mike/robert/
If you then want to make the same substitution again, you can use the followingcommand:
:s//robert/
Alternatively, you can use the following commands to search for the string mike andthen make the substitution
/mike/:s//robert/
The empty regular expression ( // ) represents the last regular expression youused ( /mike/ ).
Bracketing Expressions
You can use quoted parentheses, \( and \), to bracket a regular expression. Thestring that the bracketed regular expression matches can be recalled, as explained in“Quoted Digit.” A regular expression does not attempt to match quoted parenthe-ses. Thus a regular expression enclosed within quoted parentheses matches what thesame regular expression without the parentheses would match. The expression/\(rexp\)/ matches what /rexp/ would match; /a\(b*\)c/ matches what /ab*c/would match.
You can nest quoted parentheses. The bracketed expressions are identified only bythe opening \( , so no ambiguity arises in identifying them. The expression/\([a–z]\([A–Z]*\)x\)/ consists of two bracketed expressions, one nested within theother. In the string 3 t dMNORx7 l u, the preceding regular expression matchesdMNORx, with the first bracketed expression matching dMNORx and the secondmatching MNOR.
The Replacement String
The vim and sed editors use regular expressions as search strings within Substitutecommands. You can use the ampersand (&) and quoted digits (\n) special charac-ters to represent the matched strings within the corresponding replacement string.

Extended Regular Expressions 977
Ampersand
Within a replacement string, an ampersand (&) takes on the value of the string thatthe search string (regular expression) matched. For example, the following vim Sub-stitute command surrounds a string of one or more digits with NN. The ampersandin the replacement string matches whatever string of digits the regular expression(search string) matched:
:s/[0-9][0-9]*/NN&NN/
Two character-class definitions are required because the regular expression [0–9]*matches zero or more occurrences of a digit, and any character string constituteszero or more occurrences of a digit.
Quoted Digit
Within the search string, a bracketed regular expression, \(xxx\), matches what theregular expression would have matched without the quoted parentheses, xxx.Within the replacement string, a quoted digit, \n, represents the string that thebracketed regular expression (portion of the search string) beginning with the nth \(matched. For example, you can take a list of people in the form
last-name, first-name initial
and put it in the form
first-name initial last-name
with the following vim command:
:1,$s/\([^,]*\), \(.*\)/\2 \1/
This command addresses all the lines in the file (1,$). The Substitute command (s)uses a search string and a replacement string delimited by forward slashes. The firstbracketed regular expression within the search string, \([^,]*\), matches what thesame unbracketed regular expression, [^,]*, would match: zero or more charactersnot containing a comma (the last-name). Following the first bracketed regularexpression are a comma and a SPACE that match themselves. The second bracketedexpression, \(.*\), matches any string of characters (the first-name and initial).
The replacement string consists of what the second bracketed regular expressionmatched (\2), followed by a SPACE and what the first bracketed regular expressionmatched ( \1).
Extended Regular Expressions
The three utilities egrep, grep when run with the –E option (similar to egrep), and gawkprovide all the special characters that are included in ordinary regular expressions,

978 Appendix A Regular Expressions
except for \( and \), as well as several others. The vim editor includes the additionalcharacters as well as \( and \). Patterns using the extended set of special characters arecalled full regular expressions or extended regular expressions.
Two of the additional special characters are the plus sign (+) and the question mark(?). They are similar to *, which matches zero or more occurrences of the previouscharacter. The plus sign matches one or more occurrences of the previous character,whereas the question mark matches zero or one occurrence. You can use any one ofthe special characters *, +, and ? following parentheses, causing the special charac-ter to apply to the string surrounded by the parentheses. Unlike the parentheses inbracketed regular expressions, these parentheses are not quoted (Table A-7).
In full regular expressions, the vertical bar ( |) special character is a Boolean ORoperator. Within vim, you must quote the vertical bar by preceding it with a back-slash to make it special (\|). A vertical bar between two regular expressions causes amatch with strings that match the first expression, the second expression, or both.You can use the vertical bar with parentheses to separate from the rest of the regularexpression the two expressions that are being ORed (Table A-8).
Table A-7 Extended regular expressions
Regular expression Matches Examples
/ab+c/ a followed by one or more b’s followed by a c
yabcw, abbc57
/ab?c/ a followed by zero or one b followed by c back, abcdef
/(ab)+c/ One or more occurrences of the string abfollowed by c
zabcd, ababc!
/(ab)?c/ Zero or one occurrence of the string ab fol-lowed by c
xc, abcc
Table A-8 Full regular expressions
Regular expression Meaning Examples
/ab|ac/ Either ab or ac ab, ac, abac (abac is two matches of the regular expression)
/^Exit|^Quit/ Lines that begin with Exit or Quit Exit,Quit,No Exit
/(D|N)\. Jones/ D. Jones or N. Jones P.D. Jones, N. Jones

Appendix Summary 979
Appendix Summary
A regular expression defines a set of one or more strings of characters. A regularexpression is said to match any string it defines.
In a regular expression, a special character is one that does not represent itself.Table A-9 lists special characters.
Table A-10 lists ways of representing character classes and bracketed regularexpressions.
In addition to the preceding special characters and strings (excluding quoted paren-theses, except in vim), the characters in Table A-11 are special within full, orextended, regular expressions.
Table A-9 Special characters
Character Meaning
. Matches any single character
* Matches zero or more occurrences of a match of the preceding character
^ Forces a match to the beginning of a line
$ A match to the end of a line
\ Quotes special characters
\< Forces a match to the beginning of a word
\> Forces a match to the end of a word
Table A-10 Character classes and bracketed regular expressions
Class Defines
[xyz] Defines a character class that matches x, y, or z
[^xyz] Defines a character class that matches any character except x, y, or z
[x–z] Defines a character class that matches any character x through z inclusive
\(xyz \) Matches what xyz matches (a bracketed regular expression)
Table A-11 Extended regular expressions
Expression Matches
+ Matches one or more occurrences of the preceding character
? Matches zero or one occurrence of the preceding character

980 Appendix A Regular Expressions
Table A-12 lists characters that are special within a replacement string in sed and vim.
Expression Matches
(xyz)+ Matches one or more occurrences of what xyz matches
(xyz)? Matches zero or one occurrence of what xyz matches
(xyz)* Matches zero or more occurrences of what xyz matches
xyz |abc Matches either what xyz or what abc matches (use \| in vim)
(xy|ab)c Matches either what xyc or what abc matches (use \| in vim)
Table A-12 Replacement strings
String Represents
& Represents what the regular expression (search string) matched
\n A quoted number, n, represents what the nth bracketed regular expression in the search string matched
Table A-11 Extended regular expressions (continued)
981981
BAppendixBYou need not be a user or system administrator in isolation. Alarge community of Linux experts is willing to assist you inlearning about, helping you solve problems with, and gettingthe most out of a Linux system. Before you ask for help, how-ever, make sure you have done everything you can to solve theproblem yourself. No doubt, someone has experienced thesame problem before you and the answer to your questionexists somewhere on the Internet. Your job is to find it. Thisappendix lists resources and describes methods that can helpyou in that task.
In This Appendix
Solving a Problem . . . . . . . . . . . . . 982
Finding Linux-Related Information . . . . . . . . . . . . . . . . 983
Documentation . . . . . . . . . . . . . . . 983
Useful Linux Sites . . . . . . . . . . . . . 984
Linux Newsgroups. . . . . . . . . . . . . 985
Mailing Lists . . . . . . . . . . . . . . . . . 985
Words. . . . . . . . . . . . . . . . . . . . . . . 986
Software . . . . . . . . . . . . . . . . . . . . 986
Office Suites and WordProcessors . . . . . . . . . . . . . . . . . 988
Specifying a Terminal . . . . . . . . . . 988
B
Help
982 Appendix B Help
Solving a Problem
Following is a list of steps that can help you solve a problem without asking someonefor help. Depending on your understanding of and experience with the hardware andsoftware involved, these steps may lead to a solution.
1. Ubuntu Linux comes with extensive documentation. Read the documenta-tion on the specific hardware or software you are having a problem with. If it is a GNU product, use info; otherwise, use man to find local information. Also look in /usr/share/doc for documentation on specific tools. For more information refer to “Where to Find Documentation” on page 124.
2. When the problem involves some type of error or other message, use a search engine, such as Google (www.google.com/linux) or Google Groups (groups.google.com), to look up the message on the Internet. If the message is long, pick a unique part of the message to search for; 10 to 20 characters should be enough. Enclose the search string within double quotation marks. See “Using the Internet to Get Help” on page 130 for an example of this kind of search.
3. Check whether the Linux Documentation Project (www.tldp.org) has a HOWTO or mini-HOWTO on the subject in question. Search its site for keywords that relate directly to the product and problem. Read the FAQs.
4. See Table B-1 for other sources of documentation.
5. Use Google or Google Groups to search on keywords that relate directly to the product and problem.
6. When all else fails (or perhaps before you try anything else), examine the system logs in /var/log. First look at the end of the messages file using the following command:
$ sudo tail -20 /var/log/messages
If messages contains nothing useful, run the following command. It dis-plays the names of the log files in chronological order, with the most recently modified files appearing at the bottom of the list:
$ ls -ltr /var/log
Look at the files at the bottom of the list first. If the problem involves a network connection, review the auth.log file on the local and remote sys-tems. Also look at messages on the remote system.
7. The /var/spool directory contains subdirectories with useful informa-tion: cups holds the print queues, mail or exim4 holds the user’s mail files, and so on.

Finding Linux-Related Information 983
If you are unable to solve a problem yourself, a thoughtful question to an appropriatenewsgroup (page 985) or mailing list (page 985) can elicit useful information. Whenyou send or post a question, make sure you describe the problem and identify the localsystem carefully. Include the version numbers of Ubuntu Linux and any software pack-ages that relate to the problem. Describe the hardware, if appropriate. There is an eti-quette to posting questions—see www.catb.org/~esr/faqs/smart-questions.html for agood paper by Eric S. Raymond and Rick Moen titled “How To Ask Questions theSmart Way.”
The author’s home page (www.sobell.com) contains corrections to this book,answers to selected chapter exercises, and pointers to other Linux sites.
Finding Linux-Related Information
Ubuntu Linux comes with reference pages stored online. You can read these docu-ments by using the man or info (page 126) utility. You can read man and info pages toget more information about specific topics while reading this book or to determinewhich features are available with Linux. To search for topics, use apropos (seepage 165 or give the command man apropos).
Documentation
Good books are available on various aspects of using and managing UNIX systemsin general and Linux systems in particular. In addition, you may find the sites listedin Table B-1 useful.1
1. The right-hand columns of most of the tables in this appendix show Internet addresses (URLs). All siteshave an implicit http:// prefix unless ftp:// or https:// is shown. Refer to “URLs (Web addresses)” on page 19.
Table B-1 Documentation
Site About the site URL
freedesktop.org Creates standards for interoperability between open-source desktop environments.
freedesktop.org
GNOME GNOME home page. www.gnome.org
GNU Manuals GNU manuals. www.gnu.org/manual
info Instructions for using the info utility. www.gnu.org/software/texinfo/manual/info
Internet FAQ Archives
Searchable FAQ archives. www.faqs.org

984 Appendix B Help
Useful Linux Sites
Sometimes the sites listed in Table B-2 are so busy that you cannot connect to them.In this case, you are usually given a list of alternative, or mirror, sites to try.
Site About the site URL
KDEDocumentation
KDE documentation. kde.org/documentation
KDE News KDE news. dot.kde.org
LinuxDocumentation Project
All things related to Linux documenta-tion (in many languages): HOWTOs, guides, FAQs, man pages, and maga-zines. This is the best overall source for Linux documentation. Make sure to visit the Links page.
www.tldp.org
UbuntuDocumentation and Support
These URIs have links to many pages that provide documentation and support.
www.ubuntu.com/support
help.ubuntu.com/community
RFCs Requests for comments; see RFC(page 1057).
www.rfc-editor.org
SystemAdministrators Guild (SAGE)
SAGE is a group for systemadministrators.
www.sage.org
Table B-1 Documentation (continued)
Table B-2 Useful Linux sites
Site About the site URL
DistroWatch A survey of many Linux distributions, including news, reviews, and articles.
distrowatch.com
GNU GNU Project Web server. www.gnu.org
Hardware compatibility
User-written hardware reviews for Ubuntu Linux.
www.ubuntuhcl.org
ibiblio A large library and digital archive. For-merly Metalab; formerly Sunsite.
www.ibiblio.orgwww.ibiblio.org/pub/linuxwww.ibiblio.org/pub/historic-linux
Linux Standard Base (LSB)
A group dedicated to standardizing Linux.
www.linuxbase.org

Finding Linux-Related Information 985
Linux Newsgroups
One of the best ways of getting specific information is through a newsgroup (referto “Usenet” on page 388). You can often find the answer to a question by readingpostings to the newsgroup. Try using Google Groups (groups.google.com) to searchthrough newsgroups to see whether the question has already been asked andanswered. Or open a newsreader program and subscribe to appropriate news-groups. If necessary, you can post a question for someone to answer. Before you doso, make sure you are posting to the correct group and that your question has notalready been answered.
The newsgroup comp.os.linux.answers provides postings of solutions to commonproblems and periodic postings of the most up-to-date versions of FAQ and HOWTOdocuments. The comp.os.linux.misc newsgroup has answers to miscellaneous Linux-related questions.
Mailing Lists
Subscribing to a mailing list (page 775) allows you to participate in an electronicdiscussion. With most lists, you can send and receive email dedicated to a specifictopic to and from a group of users. Moderated lists do not tend to stray as muchas unmoderated lists, assuming the list has a good moderator. The disadvantageof a moderated list is that some discussions may be cut off when they get interest-ing if the moderator deems that the discussion has gone on for too long. Mailinglists described as bulletins are strictly unidirectional: You cannot post informa-tion to these lists but can only receive periodic bulletins. If you have the subscrip-tion address for a mailing list but are not sure how to subscribe, put the wordhelp in the body and/or header of email you send to the address. You will usuallyreceive instructions via return email. Ubuntu hosts several mailing lists; go tolists.ubuntu.com for more information. You can also use a search engine tosearch for mailing list linux.
Sobell The author’s home page contains use-ful links, errata for this book, code for many of the examples in this book, and answers to selected exercises.
www.sobell.com
USENIX A large, well-established UNIX group. This site has many links, including a list of conferences.
www.usenix.org
X.Org The X Window System home. www.x.org
Table B-2 Useful Linux sites (continued)

986 Appendix B Help
Words
Many dictionaries, thesauruses, and glossaries are available online. Table B-3 lists afew of them.
Software
There are many ways to learn about interesting software packages and their avail-ability on the Internet. Table B-4 lists sites you can download software from. Forsecurity-related programs, refer to Table C-1 on page 1006. Another way to learnabout software packages is through a newsgroup (page 985).
Table B-3 Looking up words
Site About the site URL
DICT.org Multiple-database search for words www.dict.org
Dictionary.com Everything related to words dictionary.reference.com
DNS Glossary DNS glossary www.menandmice.com/online_docs_and_faq/glossary/glossarytoc.htm
FOLDOC The Free On-Line Dictionary of Computing
www.foldoc.org
GNOME Controls Defines many GUI controls (widgets) developer.gnome.org/projects/gup/hig/2.0/controls.html
The Jargon File An online version of The New Hacker’s Dictionary
www.catb.org/~esr/jargon
Merriam-Webster English language www.m-w.com
OneLook Multiple-site word search with a single query
www.onelook.com
Roget’s Thesaurus
Thesaurus humanities.uchicago.edu/forms_unrest/ROGET.html
Webopedia Commercial technical dictionary www.webopedia.com
Wikipedia An open-source (user-contributed) encyclopedia project
wikipedia.org
Wordsmyth Dictionary and thesaurus www.wordsmyth.net
Yahoo Reference Search multiple sources at the same time
education.yahoo.com/reference

Finding Linux-Related Information 987
Table B-4 Software
Site About the site URL
BitTorrent BitTorrent efficiently distributes large amounts of static data
azureus.sourceforge.nethelp.ubuntu.com/community/BitTorrent
CVS CVS (Concurrent Versions System) is a version control system
www.nongnu.org/cvs
ddd The ddd utility is a graphical front-end for command line debuggers such as gdb
www.gnu.org/software/ddd
Firefox Web browser www.mozilla.com/firefox
Free Software Directory
Categorized, searchable lists of free software
directory.fsf.org
Freshmeat A large index of UNIX and cross-platform software and themes
freshmeat.net
gdb The gdb utility is a command line debugger
www.gnu.org/software/gdb
GNOME Project Links to all GNOME projects www.gnome.org/projects
IceWALKERS Categorized, searchable lists of free software
www.icewalkers.com
kdbg The kdbg utility is a graphical user interface to gdb
freshmeat.net/projects/kdbg
Linux Software Map
A database of packages written for, ported to, or compiled for Linux
www.boutell.com/lsm
Mtools A collection of utilities to access DOS floppy diskettes from Linux without mounting the diskettes
mtools.linux.lu
Network Calculators
Subnet mask calculator www.subnetmask.info
NTFS driver Driver that enables Linux to read from and write to Windows NTFS filesystems (available in the ntfs-3gpackage)
http://www.ntfs-3g.org
Savannah Central point for development, dis-tribution, and maintenance of free software
savannah.gnu.org
988 Appendix B Help
Office Suites and Word Processors
Several office suites and many word processors are available for Linux. Table B-5lists a few of them. If you are exchanging documents with people using Windows,make sure the import from/export to MS Word functionality covers your needs.
Specifying a Terminal
Because vim, emacs, and other textual and pseudographical programs take advan-tage of features specific to various kinds of terminals and terminal emulators, youmust tell these programs the name of the terminal you are using or the terminalyour terminal emulator is emulating. Most of the time the terminal name is set foryou. If the terminal name is not specified or is not specified correctly, the characterson the screen will be garbled or, when you start a program, the program will askwhich type of terminal you are using.
Terminal names describe the functional characteristics of a terminal or terminalemulator to programs that require this information. Although terminal names arereferred to as either Terminfo or Termcap names, the difference relates to themethod each system uses to store the terminal characteristics internally—not to the
Site About the site URL
SourceForge A development Web site with a large repository of open-source code and applications
sourceforge.net
strace The strace utility is a system call trace debugging tool
http://sourceforge.net/
Thunderbird Mail application www.mozilla.com/thunderbird
ups The ups utility is a graphical source-level debugger
ups.sourceforge.net
Table B-4 Software (continued)
Table B-5 Office suites and word processors
Product name What it does URL
AbiWord Word processor www.abisource.com
KOffice Integrated suite of office applications, including the KWord word processing program
www.koffice.org
OpenOffice A multiplatform and multilingual office suite
www.openoffice.orgwww.gnome.org/projects/ooo

Specifying a Terminal 989
manner in which you specify the name of a terminal. Terminal names that are oftenused with Linux terminal emulators and with graphical monitors while they are runin textual mode include ansi, linux, vt100, vt102, vt220, and xterm.
When you are running a terminal emulator, you can specify the type of terminal youwant to emulate. Set the emulator to either vt100 or vt220, and set TERM to thesame value.
When you log in, you may be prompted to identify the type of terminal you are using:
TERM = (vt100)
You can respond to this prompt in one of two ways. First you can press RETURN to setyour terminal type to the name in parentheses. If that name does not describe theterminal you are using, you can enter the correct name and then press RETURN.
TERM = (vt100) ansi
You may also receive the following prompt:
TERM = (unknown)
This prompt indicates that the system does not know which type of terminal youare using. If you plan to run programs that require this information, enter the nameof the terminal or terminal emulator you are using before you press RETURN.
TERM If you do not receive a prompt, you can give the following command to display thevalue of the TERM variable and check whether the terminal type has been set:
$ echo $TERM
If the system responds with the wrong name, a blank line, or an error message, setor change the terminal name. From the Bourne Again Shell (bash), enter a commandsimilar to the following to set the TERM variable so the system knows which typeof terminal you are using:
export TERM=name
Replace name with the terminal name for the terminal you are using, making sureyou do not put a SPACE before or after the equal sign. If you always use the same typeof terminal, you can place this command in your ~/.bashrc file (page 277), causingthe shell to set the terminal type each time you log in. For example, give the follow-ing command to set your terminal name to vt100:
$ export TERM=vt100
LANG For some programs to display information correctly, you may need to set the LANGvariable (page 308). Frequently you can set this variable to C. Under bash use thecommand
$ export LANG=C

This page intentionally left blank

991991
CAppendixCSecurity is a major part of the foundation of any system that isnot totally cut off from other machines and users. Some aspectsof security have a place even on isolated machines. Examples ofthese measures include periodic system backups, BIOS or power-on passwords, and self-locking screensavers.
A system that is connected to the outside world requires othermechanisms to secure it: tools to check files (tripwire), audit tools(tiger/cops), secure access methods (kerberos/ssh), services thatmonitor logs and machine states (swatch/watcher), packet-filteringand routing tools (ipfwadm/iptables/firestarter), and more.
System security has many dimensions. The security of a system asa whole depends on the security of individual components, suchas email, files, network, login, and remote access policies, as wellas the physical security of the host itself. These dimensions fre-quently overlap, and their borders are not always static or clear.For instance, email security is affected by the security of bothfiles and the network. If the medium (the network) over whichyou send and receive your email is not secure, then you must takeextra steps to ensure the security of your messages. If you save
In This Appendix
Encryption . . . . . . . . . . . . . . . . . . . 992
File Security . . . . . . . . . . . . . . . . . . 997
Email Security . . . . . . . . . . . . . . . . 997
Network Security. . . . . . . . . . . . . . 998
Host Security . . . . . . . . . . . . . . . . 1001
Login Security . . . . . . . . . . . . . . . 1002
Remote Access Security . . . . . . . 1003
Viruses and Worms. . . . . . . . . . . 1004
Physical Security . . . . . . . . . . . . . 1004
Security Resources . . . . . . . . . . . 1006
C
Security

992 Appendix C Security
your secure email in a file on the local system, then you rely on the filesystem and hostaccess policies for file security. A failure in any one of these areas can start a dominoeffect, diminishing reliability and integrity in other areas and potentially compromis-ing system security as a whole.
This short appendix cannot cover all facets of system security in depth, but providesan overview of the complexity of setting up and maintaining a secure system. Thisappendix offers some specifics, concepts, guidelines to consider, and many pointersto security resources (Table C-1 on page 1006).
Encryption
One of the building blocks of security is encryption, which provides a means ofscrambling data for secure transmission to other parties. In cryptographic terms, thedata or message to be encrypted is referred to as plaintext, and the resultingencrypted block of text as ciphertext. Processes exist for converting plaintext intociphertext through the use of keys, which are essentially random numbers of a spec-ified length used to lock and unlock data. This conversion is achieved by applyingthe keys to the plaintext according to a set of mathematical instructions, referred toas the encryption algorithm.
Developing and analyzing strong encryption software is extremely difficult. Manynuances exist, many standards govern encryption algorithms, and a background inmathematics is requisite. Also, unless an algorithm has undergone public scrutinyfor a significant period of time, it is generally not considered secure; it is oftenimpossible to know that an algorithm is completely secure but possible to knowthat one is not secure. Ultimately time is the best test of any algorithm. Also, a solidalgorithm does not guarantee an effective encryption mechanism because the falli-bility of an encryption scheme frequently arises from problems with its implementa-tion and distribution.
An encryption algorithm uses a key that is a certain number of bits long. Each bitadded to the length of a key effectively doubles the key space (the number of combi-nations allowed by the number of bits in the key—2 to the power of the length ofthe key in bits1) and means it will take twice as long for an attacker to decrypt amessage (assuming the scheme lacks any inherent weaknesses or vulnerabilities to
Other sources of system security information
security Depending on how important system security is to you, you may want to purchase one or morebooks dedicated to system security, visit some of the Internet sites that are dedicated to security,or hire someone who is an expert in the field.
Do not rely on this appendix as your sole source of information on system security.
1. A 2-bit key would have a key space of 4 (22), a 3-bit key would have a key space of 8 (23), and so on.

Encryption 993
exploit). However, it is a mistake to compare algorithms based only on the numberof bits used. In some cases an algorithm that uses a 64-bit key can be more securethan an algorithm that uses a 128-bit key.
The two primary classifications of encryption schemes are public key encryptionand symmetric key encryption. Public key encryption, also called asymmetricencryption, uses two keys: a public key and a private key. These keys are uniquelyassociated with a specific user. Public key encryption schemes are used mostly toexchange keys and signatures. Symmetric key encryption, also called symmetricencryption or secret key encryption, uses one key that you and the person you arecommunicating with (hereafter referred to as your friend) share as a secret. Sym-metric key encryption is typically used to encrypt large amounts of data. Public keyalgorithm keys typically have a length of 512 bits to 2,048 bits, whereas symmetrickey algorithms use keys in the range of 64 bits to 512 bits.
When you are choosing an encryption scheme, realize that security comes at a price.There is usually a tradeoff between resilience of the cryptosystem and ease ofadministration.
The practicality of a security solution is a far greater factor in encryption, and insecurity in general, than most people realize. With enough time and effort, nearlyevery algorithm can be broken. In fact, you can often unearth the mathematicalinstructions for a widely used algorithm by flipping through a cryptography book,reviewing a vendor’s product specifications, or performing a quick search on theInternet. The challenge is to ensure the effort required to follow the twists and turnstaken by an encryption algorithm and its resulting encryption solution outweighsthe worth of the information it is protecting.
Public Key Encryption
To use public key encryption, you must generate two keys: a public key and a pri-vate key. You keep the private key for yourself and give the public key to the world.In a similar manner, each of your friends will generate a pair of keys and give youtheir public keys. Public key encryption is marked by two distinct features:
1. When you encrypt data with someone’s public key, only that person’s pri-vate key can decrypt it.
2. When you encrypt data with your private key, anyone can decrypt it with your public key.
You may wonder why the second point is useful: Why would you want everyoneelse to be able to decrypt something you just encrypted? The answer lies in the pur-pose of the encryption. Although encryption changes the original message intounreadable ciphertext, its purpose is to provide a digital signature. If the message
How much time and money should you spend on encryption?
tip When the cost of obtaining the information exceeds the value realized by its possession, the solu-tion is an effective one.

994 Appendix C Security
can be properly decrypted with your public key, only you could have encrypted itwith your private key, proving the message is authentic. Combining these twomodes of operation yields privacy and authenticity. You can sign a message withyour private key so it can be verified as authentic, and then you can encrypt it withyour friend’s public key so that only your friend can decrypt it.
Public key encryption has three major shortcomings:
1. Public key encryption algorithms are generally much slower than symmet-ric key algorithms and usually require a much larger key size and a way to generate large prime numbers to use as components of the key, making them more resource intensive.
2. The private key must be stored securely and its integrity safeguarded. If a person’s private key is obtained by another party, that party can encrypt, decrypt, and sign messages while impersonating the original owner of the key. If the private key is lost or becomes corrupted, any messages previ-ously encrypted with it are also lost, and a new keypair must be generated.
3. It is difficult to authenticate the origin of a key—that is, to prove whom it originally came from. This so-called key-distribution problem is the raison d’être for such companies as VeriSign (www.verisign.com).
Algorithms such as RSA, Diffie-Hellman, and El-Gamal implement public key encryp-tion methodology. Today a 512-bit key is considered barely adequate for RSA encryptionand offers marginal protection; 1,024-bit keys are expected to hold off determinedattackers for several more years. Keys that are 2,048 bits long are now becoming com-monplace and are rated as espionage strength. A mathematical paper published in late2001 and reexamined in spring 2002 describes how a machine can be built—for a verylarge sum of money—that could break 1,024-bit RSA encryption in seconds to minutes(this point is debated in an article at www.schneier.com/crypto-gram-0203.html#6).Although the cost of such a machine exceeds the resources available to most indi-viduals and smaller corporations, it is well within the reach of large corporationsand governments.
Symmetric Key Encryption
Symmetric key encryption is generally fast and simple to deploy. First you and yourfriend agree on which algorithm to use and a key that you will share. Then either ofyou can decrypt or encrypt a file with the same key. Behind the scenes, symmetric keyencryption algorithms are most often implemented as a network of black boxes,which can involve hardware components, software, or a combination of the two.Each box imposes a reversible transformation on the plaintext and passes it to thenext box, where another reversible transformation further alters the data. The secu-rity of a symmetric key algorithm relies on the difficulty of determining which boxeswere used and the number of times the data was fed through the set of boxes. A goodalgorithm will cycle the plaintext through a given set of boxes many times beforeyielding the result, and there will be no obvious mapping from plaintext to ciphertext.

Encryption 995
The disadvantage of symmetric key encryption is that it depends heavily on theavailability of a secure channel through which to send the key to your friend. Forexample, you would not use email to send your key; if your email is intercepted, athird party is in possession of your secret key, and your encryption is useless. Youcould relay the key over the phone, but your call could be intercepted if your phonewere tapped or someone overheard your conversation.
Common implementations of symmetric key algorithms include DES (Data Encryp-tion Standard), 3-DES (triple DES), IDEA, RC5, Blowfish, and AES (AdvancedEncryption Standard). AES is the new Federal Information Processing Standard(FIPS-197) algorithm endorsed for governmental use and has been selected toreplace DES as the de facto encryption algorithm. AES uses the Rijndael algorithm,chosen after a thorough evaluation of 15 candidate algorithms by the cryptographicresearch community.
None of the aforementioned algorithms has undergone more scrutiny than DES,which has been in use since the late 1970s. However, the use of DES has drawbacksand it is no longer considered secure because the weakness of its 56-bit key makes itunreasonably easy to break. Given the advances in computing power and speedsince DES was developed, the small size of this algorithm’s key renders it inadequatefor operations requiring more than basic security for a relatively short period oftime. For a few thousand dollars, you can link off-the-shelf computer systems sothey can crack DES keys in a few hours.
The 3-DES application of DES is intended to combat its degenerating resilience byrunning the encryption three times; it is projected to be secure for years to come.DES is probably sufficient for such tasks as sending email to a friend when you needit to be confidential or secure for only a few days (for example, to send a notice of ameeting that will take place in a few hours). It is unlikely anyone is sufficiently inter-ested in your email to invest the time and money to decrypt it. Because of 3-DES’swide availability and ease of use, it is advisable to use it instead of DES.
Encryption Implementation
Most of today’s commercial software packages use both public and symmetric keyencryption algorithms, taking advantage of the strengths of each and avoiding theirweaknesses. The public key algorithm is used first, as a means of negotiating a ran-domly generated secret key and providing for message authenticity. Then a secretkey algorithm, such as 3-DES, IDEA, AES, or Blowfish, encrypts and decrypts thedata on both ends for speed. Finally a hash algorithm, such as DSA (Digital Signa-ture Algorithm), generates a message digest that provides a signature that can alertyou to tampering. The digest is digitally signed with the sender’s private key.
GnuPG/PGP
The most popular personal encryption packages available today are GnuPG (GNUPrivacy Guard, also called GPG; www.gnupg.org) and PGP (Pretty Good Privacy;www.pgp.com). GNU Privacy Guard was designed as a free replacement for PGP, a

996 Appendix C Security
security tool that made its debut during the early 1990s. Phil Zimmerman devel-oped PGP as a Public Key Infrastructure (PKI), featuring a convenient interface,ease of use and management, and the security of digital certificates. One criticalcharacteristic set PGP apart from the majority of cryptosystems then available: PGPfunctions entirely without certification authorities (CAs). Until the introduction ofPGP, PKI implementations were built around the concept of CAs and centralizedkey management controls.
Both PGP and GnuPG rely on the notion of a web of trust:2 If you trust someoneand that person trusts someone else, the person you trust can provide an introduc-tion to the third party. When you trust someone, you perform an operation calledkey signing. By signing someone else’s key, you verify that the person’s public key isauthentic and safe for you to use to send email. When you sign a key, you are askedwhether you trust this person to introduce other keys to you. It is common practiceto assign this trust based on several criteria, including your knowledge of a person’scharacter or a lasting professional relationship with the person. The best practice isto sign someone’s key only after you have met face to face to avert any chance of aman-in-the-middle3 scenario. The disadvantage of this scheme is the lack of a cen-tral registry for associating with people you do not already know.
PGP is available without cost for personal use but its deployment in a commercialenvironment requires the purchase of a license. This was not always the case: Soonafter its introduction, PGP was available on many bulletin board systems, and userscould implement it in any manner they chose. PGP rapidly gained popularity in thenetworking community, which capitalized on its encryption and key managementcapabilities for secure transmission of email.
After a time, attention turned to RSA and IDEA, the two robust cryptographic algo-rithms that form an integral part of PGP’s code. These algorithms are privatelyowned. The wide distribution of and growing user base for PGP sparked battlesover patent violation and licenses, resulting in the eventual restriction of PGP’s use.
Enter GnuPG, which supports most of the features and implementations made avail-able by PGP and complies with the OpenPGP Message Format standard. BecauseGnuPG does not use the patented IDEA algorithm but rather relies on BUGS (Big andUseful Great Security; www.gnu.org/directory/bugs.html), you can use it almostwithout restriction: It is released under the GNU GPL (refer to “The Code Is Free” on
2. For more information, see the section of The GNU Privacy Handbook (www.gnupg.org/documentation)titled “Validating Other Keys on Your Public Keyring.”
3. Man-in-the-middle: If Alex and Jenny try to carry on a secure email exchange over a network, Alex firstsends Jenny his public key. However, suppose Mr. X sits between Alex and Jenny on the network and inter-cepts Alex’s public key. Mr. X then sends his public key to Jenny. Jenny then sends her public key to Alex,but once again Mr. X intercepts it and substitutes his public key and sends that to Alex. Without somekind of active protection (a piece of shared information), Mr. X, the man-in-the-middle, can decrypt alltraffic between Alex and Jenny, reencrypt it, and send it on to the other party.

Email Security 997
page 4). PGP and GnuPG are considered to be interchangeable and interoperable. Thecommand sequences for and internal workings of these two tools are very similar.
GNU offers a good introduction to privacy, The GNU Privacy Handbook, which isavailable in several languages and listed at www.gnupg.org (click DocumentationGuides). Click Documentation HOWTOs on the same Web page to view theGNU Privacy Guard (GnuPG) Mini Howto, which steps through the setup and useof gpg. And, of course, there is a gpg info page.
In addition to providing encryption, gpg is useful for authentication. For example, youcan use it to verify the person who signed a piece of email is the person who sent it.
File Security
From an end user’s perspective, file security is one of the most critical areas of secu-rity. Some file security is built into Linux: chmod (page 200) gives you basic securitycontrol. ACLs (Access Control Lists) allow more fine-grained control of file accesspermissions. ACLs are part of Solaris, Windows NT/2000/XP, VAX/VMS, andmainframe operating systems. Ubuntu Linux supports ACLs (page 203). Even thesetools are insufficient, however, when your account is compromised (for example, bysomeone watching your fingers on the keyboard as you type your password). Toprovide maximum file security, you must encrypt your files. Then even someonewho knows your password cannot read your files. (Of course, if someone knowsyour key, that person can decrypt your files if she can get to them.)
Email Security
Email security overlaps file security and, as discussed later, network security. GnuPGis the tool most frequently used for email security, although you can also use PGP.PEM (Privacy Enhanced Mail) is a standard rather than an algorithm and is used lessfrequently.
MTAs (Mail Transfer Agents)
An increasingly commonplace MTA is STARTTLS (Start Transport Layer Security;www.sendmail.org/~ca/email/starttls.html). TLS itself usually refers to SSL (SecureSockets Layer) and has become the de facto method for encrypting TCP/IP traffic onthe Internet. The sendmail and exim4 daemons can be built to support STARTTLS,
The GnuPG system includes the gpg programtip GnuPG is frequently referred to as gpg, but gpg is actually the main program for the GnuPG system.

998 Appendix C Security
and much documentation exists on how to do so. STARTTLS enhancements are alsoavailable for qmail and postfix and other popular MTAs. It is important to recognizethat this capability provides encryption between two mail servers but not necessarilybetween your machine and the mail server. Also, the advantages of using TLS arenegated if the email must pass through a relay that does not support TLS.
MUAs (Mail User Agents)
Many popular mail user agents, such as mutt, elm, Thunderbird, and emacs, includethe ability to use PGP or GnuPG for encryption. Evolution, the default UbuntuLinux MUA, has built-in GnuPG support. This approach has become the defaultway to exchange email securely.
Network Security
Network security is a vital component for ensuring the security of a computing site.However, without the right infrastructure, providing network security is difficult, ifnot impossible. For example, if you run a shared network topology,4 such as Ether-net, and have in public locations jacks that allow anyone to plug in to the networkat will, how can you prevent someone from plugging in a machine and capturing allthe packets (page 1051) that traverse the network?5 You cannot—so you have apotential security hole. Another common security hole relates to the use of telnet forlogins. Because telnet sends and receives cleartext, anyone “listening in” on the linecan easily capture usernames and passwords, compromising security.
Do not allow any unauthenticated PC (any PC that does not require users to supplya local name and password) on a network. With a Windows 9x PC, any user on thenetwork is effectively working with root privileges for the following reasons:
• A PC does not recognize the concept of root privileges. All users, by default, have access to and can watch the network, capture packets, and send packets.
• On UNIX/Linux, only a user working with root privileges can put the net-work interface in promiscuous mode and collect packets. On UNIX and Linux, ports numbered less than 10246 are privileged—that is, normal user protocols cannot bind to these ports. This is an important but regret-table means of security for some protocols, such as NIS, NFS, RSH, and
4. Shared network topology: A network in which each packet may be seen by machines other than its des-tination. “Shared” means that the 100 megabits per second bandwidth is shared by all users.
5. Do not make the mistake of assuming that you have security just because you have a switch. Switchesare designed to allocate bandwidth, not to guarantee security.
6. The term port has many meanings; here it is a number assigned to a program. This number links incom-ing data with a specific service. For example, port 21 is used by FTP traffic, and port 23 is used by TELNET.

Network Security 999
LPD. Normally a data switch on a LAN automatically protects machines from people snooping on the network for data. In high-load situations, switches have been known to behave unpredictably, directing packets to the wrong ports. Certain programs can overload the switch tables that hold information about which machine is on which port. When these tables are overloaded, the switch becomes a repeater and broadcasts all packets to all ports. The attacker on the same switch as you can poten-tially see the traffic your system sends and receives.
Network Security Solutions
One solution to shared-network problems is to encrypt messages that travelbetween machines. IPSec (Internet Protocol Security Protocol) provides an appro-priate technology. IPSec is commonly used to establish a secure point-to-point vir-tual network (VPN, page 1068) that allows two hosts to communicate securelyover an unsecure channel, such as the Internet. This protocol provides integrity,confidentiality, authenticity, and flexibility of implementation that supports multi-ple vendors.
IPSec is an amalgamation of protocols (IPSec = AH + ESP + IPComp + IKE):
• Authentication Header (AH) A cryptographically secure, irreversible checksum (page 1028) for an entire packet. AH guarantees that the packet is authentic.
• Encapsulating Security Payload (ESP) Encrypts a packet to make the data unreadable.
• IP Payload Compression (IPComp) Compresses a packet. Encryption can increase the size of a packet, and IPComp counteracts this increase in size.
• Internet Key Exchange (IKE) Provides a way for the endpoints to negoti-ate a common key securely. For AH to work, both ends of the exchange must use the same key to prevent a “man-in-the-middle” (see footnote 3 on page 996) from spoofing the connection.
While IPSec is an optional part of IPv4, IPv6 (page 369) mandates its use. It may bequite some time before IPv6 is widely implemented, however. See page 1016 forinformation about the implementation of IPSec in the Linux 2.6 kernel.
Network Security Guidelines
Some general guidelines for establishing and maintaining a secure system follow.This list is not complete but rather is meant as a guide.
• Fiberoptic cable is more secure than copper cable. Copper is subject to both active and passive eavesdropping. With access to copper cable, all a data thief needs to monitor your network traffic is a passive device for measuring magnetic fields. In contrast, it is much more difficult to tap a

1000 Appendix C Security
fiberoptic cable without interrupting the signal. Sites requiring top security keep fiberoptic cable in pressurized conduits, where a change in pressure signals that the physical security of the cable has been breached.
• Avoid leaving unused ports available in public areas. If a malicious user can plug a laptop into the network without being detected, you are at risk of a serious security problem. Network drops that will remain unused for extended periods should be disabled at the switch, preventing them from accepting or passing network traffic.
• Many network switches have provisions for binding a hardware address to a port for enhanced security. If someone unplugs one machine and plugs in another machine to capture traffic, chances are that the second machine will have a different hardware address. When it detects a device with a dif-ferent hardware address, the switch can disable the port. Even this solu-tion is no guarantee, however, as some programs enable you to change or mask the hardware address of a network interface.
• Do not allow NFS or NIS access outside the local network. Otherwise, it is a simple matter for a malicious user to steal the password map. Default NFS security is marginal to nonexistent (a common joke is that NFS stands for No File Security) so such access should not be allowed outside your network to machines that you do not trust. Experimental versions of NFS for Linux that support much better authentication algorithms are now becoming available. Use IPSec, NFSv4 (which includes improved authentication), or firewalls to provide access outside of your domain.
• Support for VPN configuration is often built into new firewalls or pro-vided as a separate product, enabling your system to join securely with the systems of your customers or partners. If you must allow business part-ners, contractors, or other outside parties to access local files, consider using a secure filesystem, such as NFS with Kerberos (page 1044), secure NFS (encrypts authentication, not traffic), NFS over a VPN such as IPSec, or cfs (cryptographic filesystem).
• Specify /usr as readonly (ro) in /etc/fstab. Following is an example of such a configuration:
/dev/hda6 /usr ext2 ro 0 0
This approach may make your machine difficult to update, so use this tac-tic with care.
Install a small kernel and run only the programs you need
security Linux systems contain a huge number of programs that, although useful, significantly reduce thesecurity of the host. Install the smallest operating system kernel that meets your needs. For Weband FTP servers, install only the needed components and do not install a graphical interface. Usersmay require additional packages.

Host Security 1001
• Mount filesystems other than / and /usr nosuid to prevent setuid programs from executing on this filesystem. For example:
/dev/hda4 /var ext3 nosuid 0 0/dev/hda5 /usr/local ext3 nosuid 0 0
• Use a barrier or firewall product between the local network and the Internet. Several valuable mailing lists cover firewalls, including the comp.security.firewalls newsgroup and the free firewalls Web site (www.freefire.org). Ubuntu Linux includes firestarter (page 886) and iptables (page 896), which allow you to implement a firewall.
Host Security
Your host must be secure. Simple security steps include preventing remote logins andleaving the /etc/hosts.equiv and individual users’ ~/.rhosts files empty (or not havingthem at all). Complex security steps include installing IPSec for VPNs between hosts.Many other security measures, some of which are discussed in this section, fall some-where between these extremes. See Table C-1 on page 1006 for relevant URLs.
• Although potentially tricky to implement and manage, intrusion detection systems (IDSs) are an excellent way to keep an eye on the integrity of a device. An IDS can warn of possible attempts to subvert security on the host on which it runs. The great-granddaddy of intrusion detection sys-tems is tripwire. This host-based system checks modification times and integrity of files by using strong algorithms (cryptographic checksums or signatures) that can detect even the most minor modifications. A commer-cial version of tripwire is also available. Another commercial IDS is DragonSquire. Other free, popular, and flexible IDSs include samhain and AIDE. The last two IDSs offer even more features and means of remaining invisible to users than tripwire does. Commercial IDSs that are popular in enterprise environments include Cisco Secure IDS (formerly NetRanger), Enterasys Dragon, and ISS RealSecure.
• Keep Ubuntu systems up-to-date by downloading and installing the latest updates. Use the Update Notifier to update the system regularly (page 100). You can set the system up to automatically install security updates using the Software Sources window, Updates tab (page 119).
• Complementing host-based IDSs are network-based IDSs. The latter pro-grams monitor the network and nodes on the network and report suspi-cious occurrences (attack signatures) via user-defined alerts. These signatures can be matched based on known worms, overflow attacks against programs, or unauthorized scans of network ports. Such programs as snort, klaxon, and NFR are used in this capacity. Commercial programs, such as DragonSentry, also fill this role.

1002 Appendix C Security
• Provided with Ubuntu Linux is PAM, which allows you to set up different methods and levels of authentication in many ways (page 545).
• Process accounting—a good supplement to system security—can provide a continuous record of user actions on your system. See the accton man page (part of the acct package) for more information.
• Emerging standards for such things as Role-Based Access Control (RBAC) allow tighter delegation of privileges along defined organizational bound-aries. You can delegate a role or roles to each user as appropriate to the access required.
• General mailing lists and archives are useful repositories of security infor-mation, statistics, and papers. The most useful are the bugtraq mailing list and CERT.7 The bugtraq site and email service offer immediate notifica-tions about specific vulnerabilities, whereas CERT provides notice of widespread vulnerabilities and useful techniques to fix them, plus links to vendor patches.
• The syslogd facility can direct messages from system daemons to specific files such as those in /var/log. On larger groups of systems, you can send all important syslogd information to a secure host, where that host’s only function is to store syslogd data so it cannot be tampered with. See page 386 and the syslogd man page for more information.
Login Security
Without a secure host, good login security cannot add much protection. Table C-1on page 1006 lists some of the best login security tools, including replacement dae-mons for telnetd, rlogind, and rshd. Many sites use ssh, which comes as both free-ware and a commercially supported package that works on UNIX/Linux, Windows,and Macintosh platforms.
The PAM facility (page 545) allows you to set up multiple authentication methodsfor users in series or in parallel. In-series PAM requires multiple methods of authen-tication for a user. In-parallel PAM uses any one of a number of methods forauthentication.
Although not the most popular choice, you can configure a system to take advan-tage of one-time passwords. S/Key is the original implementation of one-time pass-words by Bellcore. OPIE (one-time passwords in everything), which was developedby the U.S. Naval Research Labs, is an improvement over the original Bellcore sys-tem. In one permutation of one-time passwords, the user gets a piece of paper listinga set of one-time passwords. Each time a user logs in, she enters a password fromthe piece of paper. Once used, a password becomes obsolete, and the next password
7. CERT is slow but useful as a medium for coordination between sites. It acts as a tracking agency todocument the spread of security problems.

Host Security 1003
in the list is the only one that will work. Even if a malicious user compromises thenetwork and sees your password, this information will be of no use because thepassword can be used only once. This setup makes it very difficult for someone tolog in as you but does nothing to protect the data you type at the keyboard. One-time passwords is a good solution if you are at a site where no encrypted login isavailable. A truly secure (or paranoid) site will combine one-time passwords andencrypted logins.
Another type of secure login that is becoming more common is facilitated by a tokenor a smartcard. Smartcards are credit-card-like devices that use a challenge–responsemethod of authentication. Smartcard and token authentication rely on somethingyou have (the card) and something you know (a pass phrase, user ID, or PIN). Forexample, you might enter your username in response to the login prompt and get apassword prompt. You would then enter your PIN and the number displayed on theaccess token. The token has a unique serial number that is stored in a database onthe authentication server. The token and the authentication server use this serialnumber as a means of computing a challenge every 30 to 60 seconds. If the PIN andtoken number you enter match what they should be as computed by the accessserver, you are granted access to the system.
Remote Access Security
Issues and solutions surrounding remote access security overlap with those pertain-ing to login and host security. Local logins may be secure with simply a usernameand password, whereas remote logins (and all remote access) should be made moresecure. Many break-ins can be traced back to reusable passwords. It is a good ideato use an encrypted authentication client, such as ssh or kerberos. You can also usesmartcards for remote access authentication.
Modem pools can also be an entry point into a system. Most people are aware ofhow easy it is to monitor a network line but they may take for granted the securityof the public switched telephone network (PSTN, also known as POTS—plain oldtelephone service). You may want to set up an encrypted channel after dialing in toa modem pool. One way to do so is by running ssh over PPP.
There are ways to implement stringent modem authentication policies so unautho-rized users cannot use local modems. The most common techniques are PAP (Pass-word Authentication Protocol), CHAP (Challenge Handshake AuthenticationProtocol), and Radius. PAP and CHAP are relatively weak as compared to Radius,so the latter has rapidly gained in popularity. Cisco also provides a method ofauthentication called TACACS/TACACS+ (Terminal Access Controller Access Con-trol System).
One or more of these authentication techniques are available in a RAS (remoteaccess server—in a network, a computer that provides network access to remoteusers via modem). Before purchasing a RAS, check what kind of security it providesand decide whether that level of security meets your needs.

1004 Appendix C Security
Two other techniques for remote access security can be built into a modem (or RASif it has integrated modems). One is callback: After you dial in, you get a passwordprompt. Once you type your password, the modem hangs up and calls you back ata phone number it has stored internally. Unfortunately this technique is not fool-proof. Some modems have a built-in callback table that holds about ten entries, sothis strategy works for small sites with only a few modems. If you use moremodems, the RAS software must provide the callback.
The second technique is to use CLID (caller line ID) or ANI (automatic numberidentification) to decide whether to answer the call. Depending on your wiring andthe local phone company, you may or may not be able to use ANI. ANI informationis provided before the call, whereas CLID information is provided in tandem withthe call.
Viruses and Worms
Examples of UNIX/Linux viruses include the Bliss virus/worm released in 1997 andthe RST.b virus discovered in December 2001. Both are discussed in detail in arti-cles on the Web. Viruses spread through systems by infecting executable files. In thecases of Bliss and RST.b, the Linux native executable format, ELF, was used as apropagation vector.
Just after 5 PM on November 2, 1988, Robert T. Morris, Jr., a graduate student atCornell University, released the first big virus onto the Internet. Called an Internetworm, this virus was designed to propagate copies of itself over many machines onthe Internet. The worm was a piece of code that exploited four vulnerabilities,including one in finger, to force a buffer to overflow on a system. Once the bufferoverflowed, the code was able to get a shell and then recompile itself on the remotemachine. The worm spread around the Internet very quickly and was not disabled,despite many people’s efforts, for 36 hours.
The chief characteristic of any worm is propagation over a public network, such asthe Internet. A virus propagates by infecting executables on the machine, whereas aworm tends to prefer exploiting known security holes in network servers to gainroot access and then tries to infect other machines in the same way.
UNIX/Linux file permissions help to inoculate systems against many viruses. Win-dows NT is resistant for similar reasons. You can easily protect the local systemagainst many viruses and worms by keeping its system patches up-to-date, not exe-cuting untrusted binaries from the Internet, limiting PATH (page 302) to includeonly necessary system directories, and doing as little as possible while working withroot privileges. You can prevent a disaster in case a virus strikes by backing up yoursystem frequently.
Physical Security
Often overlooked as a defense against intrusion, physical security covers access tothe computer itself and to the console or terminal attached to the machine. If the

Host Security 1005
machine is unprotected in an unlocked room, there is very little hope for physicalsecurity. (A simple example of physical vulnerability is someone walking into theroom where the computer is, removing the hard drive from the computer, taking ithome, and analyzing it.) You can take certain steps to improve the physical securityof a computer.
• Keep servers in a locked room with limited access. A key, a combination, or a swipe card should be required to gain access. Protect windows as well as doors. Maintain a single point of entry. (Safety codes may require multi-ple exits, but only one must be an entry.)
• For public machines, use a security system, such as a fiberoptic security system, that can secure a lab full of machines. With such a system, you run a fiberoptic cable through each machine such that the machine cannot be removed (or opened) without cutting the cable. When the cable is cut, an alarm goes off. Some machines—for example, PCs with plastic cases—are much more difficult to secure than others. Although it is not a perfect solu-tion, a fiberoptic security system may improve local security enough to persuade a would-be thief to go somewhere else.
• Most modern PCs have a BIOS password. You can set the order in which a PC searches for a boot device, preventing the PC from being booted from a floppy disk or CD/DVD. Some BIOSs can prevent the machine from boot-ing altogether without a proper password. The password protects the BIOS from unauthorized modification. Beware, however: Many BIOSs have well-known back doors (page 1024). Research this issue if the BIOS password is an important feature for you. In addition, you can blank the BIOS password by setting the clear-CMOS jumper on a PC motherboard; if you are relying on a BIOS password, lock the case.
• Run only fiberoptic cable between buildings. This strategy is not only more secure but also safer in the event of lightning strikes and is required by many commercial building codes.
• Maintain logs of who goes in and out of secure areas. Sign-in/out sheets are useful only if everyone uses them. Sometimes a guard is warranted. Often a simple proximity badge or smartcard can tell when anyone has entered or left an area and keep logs of these events, although these can be expensive to procure and install.
• Anyone who has access to the physical hardware has the keys to the pal-ace. Someone with direct access to a computer system can do such things as swap components and insert boot media, all of which are security threats.
• Avoid having activated, unused network jacks in public places. Such jacks provide unnecessary risk.

1006 Appendix C Security
• Many modern switches can lock a particular switch port so it accepts only traffic from an NIC (network interface card) with a particular hardware address and shuts down the port if another address is seen. However, com-monly available programs can enable someone to reset this address.
• Make periodic security sweeps. Check doors for proper locking. If you must have windows, make sure they are locked or are permanently sealed.
• Waste receptacles are often a source of information for intruders. Have policies for containment and disposal of sensitive documents.
• Use a UPS (uninterruptable power supply). Without a clean source of power, your system is vulnerable to corruption.
Security Resources
Many free and commercial programs can enhance system security. Some of these arelisted in Table C-1. Many of these sites have links to other, interesting sites that areworth looking at.
Table C-1 Security resources
Tool What it does Where to get it
AIDE Advanced Intrusion Detection Environment. Similar to trip-wire with extensible verification algorithms.
sourceforge.net/projects/aide
bugtraq A moderated mailing list for the announcement and detailed dis-cussion of all aspects of com-puter security vulnerabilities.
www.securityfocus.com/archive/1
CERT Computer Emergency Response Team. A repository of papers and data about major security events and a list of security tools.
www.cert.org
chkrootkit Checks for signs of a rootkit indicating that the machine has been compromised.
www.chkrootkit.org
dsniff Sniffing and network audit tool suite. Free.
naughty.monkey.org/~dugsong/dsniff/
freefire Supplies free security solutions and supports developers of free security solutions.
www.freefire.org
Security Resources 1007
fwtk Firewall toolkit. A set of proxies that can be used to construct a firewall.
www.fwtk.org
GIAC A security certification and training Web site.
www.giac.org
hping Multipurpose network auditing and packet analysis tool. Free.
www.hping.org
ISC2 Educates and certifies industry professionals and practitioners under an international standard.
www.isc2.org
John John the Ripper: a fast, flexible, weak password detector.
www.openwall.com/john
Kerberos Complete, secure network authentication system.
web.mit.edu/kerberos/www
L6 Verifies file integrity; similar to tripwire (French and English).
www.pgci.ca/l6.html
Launchpad Tracks Ubuntu Linux bugs. bugs.launchpad.net/ubuntu
LIDS Intrusion detection and active defense system.
www.lids.org
LinuxSecurity.com A solid news site dedicated to Linux security issues.
www.linuxsecurity.com
LWN.net Security alert database for all major Linux distributions.
lwn.net/Alerts
Microsoft Security Microsoft security information. www.microsoft.com/security
nessus A plugin-based remote security scanner that can perform more than 370 security checks. Free.
www.nessus.org
netcat Explores, tests, and diagnoses networks.
freshmeat.net/projects/netcat
nmap Scans hosts to see which ports are available. It can perform stealth scans, determine operat-ing system type, find open ports, and more.
www.insecure.org/nmap
OPIE Provides one-time passwords for system access.
inner.net/opie
Table C-1 Security resources (continued)

1008 Appendix C Security
Tool What it does Where to get it
RBAC Role-Based Access Control. Assigns roles and privileges associated with the roles.
csrc.nist.gov/rbac
SAINT Security Administrator’s Inte-grated Network Tool. Assesses and analyzes network vulnera-bilities. This tool follows satan.
www.saintcorporation.com
samhain A file integrity checker. Has a GUI configurator, client/server capability, and real-time report-ing capability.
www.la-samhna.de
SANS Security training and certification.
www.sans.org
SARA The Security Auditor’s Research Assistant security analysis tool.
www-arc.com/sara
Schneier, Bruce Security visionary. www.schneier.com
Secunia Monitors a broad spectrum of vulnerabilities.
secunia.com
SecurityFocus Home for security tools, mail lists, libraries, and cogent analysis.
www.securityfocus.com
snort A flexible IDS. www.snort.org
srp Secure Remote Password. Upgrades common protocols, such as TELNET and FTP, to use secure password exchange.
srp.stanford.edu
ssh A secure rsh, ftp, and rloginreplacement with encrypted sessions and other options. Supplied with Ubuntu Linux.
openssh.org
www.ssh.com
swatch A Perl-based log parser and analyzer.
swatch.sourceforge.net
Treachery A collection of tools for security and auditing.
www.treachery.net/tools
tripwire Checks for possible signs of intruder activity. Supplied with Ubuntu Linux.
www.tripwire.com
wireshark Network protocol analyzer. Free. www.wireshark.org
Table C-1 Security resources (continued)

Appendix Summary 1009
Appendix Summary
Security is inversely proportional to usability. There must be a balance betweenusers’ requirements to get their work done and the amount of security that is imple-mented. It is often unnecessary to provide top security for a small business withonly a few employees. By contrast, if you work for a government military contrac-tor, you are bound to have extreme security constraints and an official audit policyto determine whether security policies are being implemented correctly.
Review your own security requirements periodically. Several of the tools mentionedin this appendix can help you monitor a system’s security measures. Tools such asnessus, samhain, and SAINT, for example, provide auditing mechanisms.
Some companies specialize in security and auditing. Hiring one of them to examineyour site can be costly but may yield specific recommendations for areas you mayhave overlooked in your initial setup. When you hire someone to audit your secu-rity, recognize you may be providing both physical and root access to local systems.Make sure the company that you hire has a good history, has been in business forseveral years, and has impeccable references. Check up on the company periodi-cally: Things change over time. Avoid the temptation to hire former system crackersas consultants. Security consultants should have an irreproachable ethical back-ground or you will always have doubts about their intentions.
Your total security package is based on your risk assessment of local vulnerabilities.Strengthen those areas that are most important for your business. For example,many sites rely on a firewall to protect them from the Internet, whereas internalhosts may receive little or no security attention. Crackers refer to this setup as “thecrunchy outside surrounding the soft chewy middle.” Yet this setup is entirely suffi-cient to protect some sites. Perform your own risk assessment and address yourneeds accordingly. If need be, hire a full-time security administrator whose job it isto design and audit local security policies.

This page intentionally left blank

10111011
DAppendixDThe Free Software Definition1
We maintain this free software definition to show clearly whatmust be true about a particular software program for it to beconsidered free software.
‘‘Free software’’ is a matter of liberty, not price. To understandthe concept, you should think of ‘‘free’’ as in ‘‘free speech,’’ notas in ‘‘free beer.’’
Free software is a matter of the users’ freedom to run, copy, dis-tribute, study, change and improve the software. More pre-cisely, it refers to four kinds of freedom, for the users of thesoftware:
• The freedom to run the program, for any purpose (freedom 0).
1. This material is at www.gnu.org/philosophy/free-sw.html on the GNU Website. Because GNU requests a verbatim copy, links remain in place (underlined).View the document on the Web to ensure you are reading the latest copy and tofollow the links.
D
The Free Software
Definition1

1012 Appendix D The Free Software Definition
• The freedom to study how the program works, and adapt it to your needs (freedom 1). Access to the source code is a precondition for this.
• The freedom to redistribute copies so you can help your neighbor (free-dom 2).
• The freedom to improve the program, and release your improvements to the public, so that the whole community benefits (freedom 3). Access to the source code is a precondition for this.
A program is free software if users have all of these freedoms. Thus, you should befree to redistribute copies, either with or without modifications, either gratis orcharging a fee for distribution, to anyone anywhere. Being free to do these thingsmeans (among other things) that you do not have to ask or pay for permission.
You should also have the freedom to make modifications and use them privately inyour own work or play, without even mentioning that they exist. If you do publishyour changes, you should not be required to notify anyone in particular, or in anyparticular way.
The freedom to use a program means the freedom for any kind of person or organi-zation to use it on any kind of computer system, for any kind of overall job, andwithout being required to communicate subsequently with the developer or anyother specific entity.
The freedom to redistribute copies must include binary or executable forms of theprogram, as well as source code, for both modified and unmodified versions. (Dis-tributing programs in runnable form is necessary for conveniently installable freeoperating systems.) It is ok if there is no way to produce a binary or executableform for a certain program (since some languages don’t support that feature), butyou must have the freedom to redistribute such forms should you find or develop away to make them.
In order for the freedoms to make changes, and to publish improved versions, to bemeaningful, you must have access to the source code of the program. Therefore,accessibility of source code is a necessary condition for free software.
One important way to modify a program is by merging in available free subroutinesand modules. If the program’s license says that you cannot merge in an existingmodule, such as if it requires you to be the copyright holder of any code you add,then the license is too restrictive to qualify as free.
In order for these freedoms to be real, they must be irrevocable as long as you donothing wrong; if the developer of the software has the power to revoke the license,without your doing anything to give cause, the software is not free.
However, certain kinds of rules about the manner of distributing free software areacceptable, when they don’t conflict with the central freedoms. For example, copy-left (very simply stated) is the rule that when redistributing the program, you cannotadd restrictions to deny other people the central freedoms. This rule does not con-flict with the central freedoms; rather it protects them.

The Free Software Definition 1013
You may have paid money to get copies of free software, or you may have obtainedcopies at no charge. But regardless of how you got your copies, you always have thefreedom to copy and change the software, even to sell copies.
‘‘Free software’’ does not mean ‘‘non-commercial’’. A free program must be avail-able for commercial use, commercial development, and commercial distribution.Commercial development of free software is no longer unusual; such free commer-cial software is very important.
Rules about how to package a modified version are acceptable, if they don’t sub-stantively block your freedom to release modified versions, or your freedom tomake and use modified versions privately. Rules that ‘‘if you make your versionavailable in this way, you must make it available in that way also’’ can be acceptabletoo, on the same condition. (Note that such a rule still leaves you the choice ofwhether to publish your version at all.) Rules that require release of source code tothe users for versions that you put into public use are also acceptable. It is alsoacceptable for the license to require that, if you have distributed a modified versionand a previous developer asks for a copy of it, you must send one, or that you iden-tify yourself on your modifications.
In the GNU project, we use ‘‘copyleft’’ to protect these freedoms legally for every-one. But non-copylefted free software also exists. We believe there are importantreasons why it is better to use copyleft, but if your program is non-copylefted freesoftware, we can still use it.
See Categories of Free Software for a description of how ‘‘free software,’’ ‘‘copy-lefted software’’ and other categories of software relate to each other.
Sometimes government export control regulations and trade sanctions can con-strain your freedom to distribute copies of programs internationally. Softwaredevelopers do not have the power to eliminate or override these restrictions, butwhat they can and must do is refuse to impose them as conditions of use of the pro-gram. In this way, the restrictions will not affect activities and people outside thejurisdictions of these governments.
Most free software licenses are based on copyright, and there are limits on whatkinds of requirements can be imposed through copyright. If a copyright-basedlicense respects freedom in the ways described above, it is unlikely to have someother sort of problem that we never anticipated (though this does happen occasion-ally). However, some free software licenses are based on contracts, and contractscan impose a much larger range of possible restrictions. That means there are manypossible ways such a license could be unacceptably restrictive and non-free.
We can’t possibly list all the ways that might happen. If a contract-based licenserestricts the user in an unusual way that copyright-based licenses cannot, and whichisn’t mentioned here as legitimate, we will have to think about it, and we will prob-ably conclude it is non-free.
When talking about free software, it is best to avoid using terms like ‘‘give away’’ or‘‘for free’’, because those terms imply that the issue is about price, not freedom. Somecommon terms such as ‘‘piracy’’ embody opinions we hope you won’t endorse. SeeConfusing Words and Phrases that are Worth Avoiding for a discussion of theseterms. We also have a list of translations of “free software” into various languages.

1014 Appendix D The Free Software Definition
Finally, note that criteria such as those stated in this free software definition requirecareful thought for their interpretation. To decide whether a specific softwarelicense qualifies as a free software license, we judge it based on these criteria todetermine whether it fits their spirit as well as the precise words. If a license includesunconscionable restrictions, we reject it, even if we did not anticipate the issue inthese criteria. Sometimes a license requirement raises an issue that calls for extensivethought, including discussions with a lawyer, before we can decide if the require-ment is acceptable. When we reach a conclusion about a new issue, we often updatethese criteria to make it easier to see why certain licenses do or don’t qualify.
If you are interested in whether a specific license qualifies as a free software license,see our list of licenses. If the license you are concerned with is not listed there, youcan ask us about it by sending us email at [email protected].
If you are contemplating writing a new license, please contact the FSF by writing tothat address. The proliferation of different free software licenses means increasedwork for users in understanding the licenses; we may be able to help you find anexisting Free Software license that meets your needs.
If that isn’t possible, if you really need a new license, with our help you can ensurethat the license really is a Free Software license and avoid various practical problems.______________________________________________________________________
Another group has started using the term “open source” to mean something close(but not identical) to “free software”. We prefer the term “free software” because,once you have heard it refers to freedom rather than price, it calls to mind freedom.The word “open” never does that.______________________________________________________________________
Other Texts to Read
Translations of this page:
[ Català | Chinese (Simplified) | Chinese (Traditional) | Czech | Dansk | Deutsch |English | Español | Persian/Farsi | Français | Galego | Hebrew | Hrvatski | BahasaIndonesia | Italiano | Japanese | Korean | Magyar | Nederlands | Norsk | Polski | Por-tuguês | Româna | Russian | Slovinsko | Serbian | Tagalog | Türkçe ]
Return to the GNU Project home page.
Please send FSF & GNU inquiries to [email protected]. There are also other ways tocontact the FSF.
Please send broken links and other corrections (or suggestions) to [email protected]
Please see the Translations README for information on coordinating and submit-ting translations of this article.
Copyright (C) 1996, 1997, 1998, 1999, 2000, 2001, 2002, 2003, 2004 Free Soft-ware Foundation, Inc., 51 Franklin St, Fifth Floor, Boston, MA 02110, USA
Verbatim copying and distribution of this entire article is permitted in any mediumwithout royalty provided this notice is preserved.
• Updated: $Date: 2005/11/26 13:16:40 $ $Author: rms $

10151015
EAppendixEThe Linux 2.6 kernel was released on December 17, 2003. Amajor release of a Linux kernel is not an everyday occurrence:The last kernel, Linux 2.4, was released in January 2001. Thisappendix lists features that are new to the 2.6 kernel.
Linux kernel revisions alternate between stable and unstable ver-sions: 2.4 was the previous stable version, so 2.5 was the devel-opment branch, which later became 2.6. For each of the majorrevisions, there is a series of minor revisions. Usually, minor revi-sions do not contain major changes, although one minor revisionto the 2.4 kernel replaced the entire virtual memory subsystem, amajor part of the kernel.
See www.kniggit.net/wwol26.html if you want more informa-tion on the Linux 2.6 kernel than this appendix provides.
E
The Linux 2.6 Kernel

1016 Appendix E The Linux 2.6 Kernel
Native Posix Thread Library (NPTL)
Classically programs start execution at the beginning of a series of instructions andexecute them in sequence. While this technique works well for simple programsrunning on single CPU systems, it is often better to allow a program to execute dif-ferent parts of itself simultaneously in parallel. Most programs with a GUI benefitfrom this functionality as it can prevent the user interface from freezing while theprogram performs computations.
The traditional way of writing parallel code under UNIX is to execute a fork() systemcall, which creates a copy of the running program in memory and starts it executing atthe same point as the original. At the point fork() is called, the two copies of the pro-gram are indistinguishable, except for the fact that they receive different return valuesfrom their fork() call. One disadvantage of this approach is that each time fork() iscalled, the system must create a complete copy of the process. This copying takes arelatively long time and causes parallel applications to use a lot of memory. (Thisdescription is not quite accurate: Copy-on-write functionality in a modern operatingsystem copies only those parts of memory that would be different.)
A more efficient solution to this problem is to allow a single process to run multiplethreads. A thread exists in the same memory space as other threads and so has amuch smaller overhead than a single program running multiple processes. The dis-advantage of this strategy is that multithreaded applications must be designed morecarefully and thus take more time to write than multiprocessor ones. Operating sys-tems, such as Solaris, rely heavily on threads to provide scalability to very largeSMP (symmetric multiprocessing) systems. The new threading support in the Linux2.6 kernel uses the same industry standard POSIX APIs as Solaris for implementingthreads and provides high-performance processing.
IPSecurity (IPSec)
IPSec is a network layer protocol suite that secures Internet connections by encrypt-ing IP packets. IPSec is an optional part of IPv4 (page 1043) and a required part ofIPv6 (page 1043). See page 999 for more information on IPSec.
Kernel integration of IPSec means that any kernel module or application can useIPSec in the same way that it would use unsecured IP.
Asynchronous I/O (AIO)
Without AIO, when an application needs to get data from a hardware device or anetwork connection, it can either poll the connection until the data becomes avail-able or spawn a thread for the connection that waits for the data. Neither of thesetechniques is particularly efficient.
Reverse Map Virtual Memory (rmap VM) 1017
Asynchronous I/O allows the kernel to notify an application when it has data readyto be read. This feature is most useful to large servers but can provide moderate per-formance gains in almost any application.
O(1) Scheduler
One of the responsibilities of the kernel is to make sure that each execution threadgets a reasonable amount of time on the CPU(s). The scheduling algorithm used inthe Linux 2.4 kernel gradually decreased performance as more processes wereadded and additional CPUs were brought online, making it hard to use Linux onlarge SMP systems. The 2.6 scheduling algorithm runs in O(1) time, a term thatindicates that a process takes the same time to run under all conditions, makingLinux better able to run large numbers of processes and scale to large systems.
OProfile
It is often said that a program spends 90 percent of its time executing 10 percent ofthe code. Programmers use profiling tools to identify bottlenecks in code and targetthis 10 percent for optimization. OProfile is an advanced profiling tool that identi-fies common programming inefficiencies. Thanks to its close relationship with thekernel, OProfile is able to identify hardware-specific efficiency problems, such ascache misses, which are often not possible to identify from source code.
kksymoops
When something goes wrong in the kernel, it generates an error message called anOOPS. This message is an in-joke from the Linux Kernel Mailing List, where devel-opers would start bug reports with “Oops, we’ve found a bug in the kernel.” AnOOPS provides debugging information that can help kernel developers track downthe offending code or indicate that the OOPS was caused by hardware failure.
The kksymoops functionality provides detailed debugging information, allowing adeveloper to determine the line of code in the kernel that caused the OOPS. Whilethis feature does not directly benefit the end user, it allows developers to find kernelbugs more quickly, resulting in a more stable kernel.
Reverse Map Virtual Memory (rmap VM)
Virtual memory (VM) allows each process to exist in its own memory space. Everytime a process attempts to access a portion of memory, the kernel translates thememory location from an address in the process’s own address space to one in real

1018 Appendix E The Linux 2.6 Kernel
memory. The reverse map enables the kernel to perform this process in reverse:Given a location in physical memory, the kernel can determine which process ownsit. The reverse map allows pages to be unallocated quickly, giving the system morefree memory, fewer page faults, and less overhead when quitting a program.
HugeTLBFS: Translation Look-Aside Buffer
Filesystem
The kernel allocates memory in units of pages. Virtual memory uses these pages tomap between the virtual and real memory address spaces. Older versions of theLinux kernel set the size of these pages to 4 kilobytes. In cases where a lot of virtualmemory is used, such as in large database servers, this small size can place a heavyload on the VM subsystem. HugeTLBFS allows for much larger pages, which signif-icantly improves performance under heavy VM load conditions.
remap_file_pages
When retrieving data from or writing data to a file, it is common practice to mapthe file on disk to an area of memory. The system then translates accesses to thatarea of memory directly into accesses to disk.
For additional flexibility, large database systems map different parts of a file to dif-ferent parts of memory. Each mapping results in an additional load on the kerneland VM subsystems. The remap_file_pages() system call can perform a nonuniformmapping, meaning that a file needs to be mapped only once, which significantlyimproves the performance of large database servers.
2.6 Network Stack Features (IGMPv3, IPv6,
and Others)
The Linux 2.6 kernel includes a large number of improvements in the area of net-working, including support for IPv6 (page 1043) and enhanced multicast(page 1049) support. Although these features do not immediately benefit end users,they do permit the development and deployment of network services that will notrequire significant modification for integration with future technologies.

Block I/O (BIO) Block Layer 1019
Internet Protocol Virtual Server (IPVS)
IPVS implements transport layer switching inside the kernel for load balancing.This feature enables a single machine to distribute connections to a server farm,allowing transparent load balancing.
Access Control Lists (ACLs)
The traditional UNIX permission system allows three permissions to be assigned toeach file: controlling access by the owner, by a single group, and by everyone else.ACLs provide much finer-grained access control. In theory, ACLs can increase secu-rity. However, they make setting correct permissions more complicated, which mayencourage administrators to establish weaker controls than they should.
4GB-4GB Memory Split: Physical Address
Extension (PAE)
The 32-bit CPUs are limited in that they can address only 232 bytes (4 gigabytes) ofmemory. With the Pentium Pro, Intel introduced a work-around to this limitationcalled Physical Address Extension (PAE), which permits the operating system toaddress up to 64 gigabytes of memory. Because they are limited to addressing 4gigabytes each, 32-bit programs cannot access this much memory. A Linux kernelfrom the main tree is able to allocate up to 1 gigabyte for the kernel and 3 gigabytesfor each userspace (page 1067) process.
Scheduler Support for HyperThreaded CPUs
The Linux 2.6 kernel supports Intel’s HyperThreading. The 2.6 kernel treats eachvirtual CPU as the equivalent of a physical CPU.
Block I/O (BIO) Block Layer
The 2.6 kernel includes a completely redesigned interface to drivers for blockdevices (page 569). While this conveys a number of benefits, it also means that thesedevice drivers need to be rewritten and tested.

1020 Appendix E The Linux 2.6 Kernel
Support for Filesystems Larger Than 2 Terabytes
The Linux 2.6 kernel includes SGI’s XFS journaling filesystem, which supports file-systems of up to 9 exabytes (9 × 260 bytes).
New I/O Elevators
I/O elevators control how long I/O requests can be queued to allow them to be re-ordered for optimal device performance. The Linux 2.6 kernel includes some additionalsettings that allow I/O elevators to be tuned for specific high-device-load situations.
Interactive Scheduler Response Tuning
The new scheduler in the Linux 2.6 kernel prioritizes I/O bound processes. Becausemost user interface processes spend most of their time waiting for input from theuser, this tuning should result in a more responsive system under high system load.

10211021
GGlossaryAll entries marked with FOLDOC are based on definitions in the FreeOnline Dictionary of Computing (www.foldoc.org), Denis Howe,editor. Used with permission.
Glossary
Glossary

1022 Glossary
10.0.0.0 See private address space on page 1054.
172.16.0.0 See private address space on page 1054.
192.168.0.0 See private address space on page 1054.
802.11 A family of specifications developed by IEEE for wireless LAN technology, includ-ing 802.11 (1–2 megabits per second), 802.11a (54 megabits per second), 802.11b(11 megabits per second), and 802.11g (54 megabits per second).
absolute pathname
A pathname that starts with the root directory (/). An absolute pathname locates afile without regard to the working directory.
access In computer jargon, a verb meaning to use, read from, or write to. To access a filemeans to read from or write to the file.
Access Control List
See ACL.
access permission
Permission to read from, write to, or execute a file. If you have write access permis-sion to a file, you can write to the file. Also access privilege.
ACL Access Control List. A system that performs a function similar to file permissionsbut with much finer-grain control.
active window On a desktop, the window that receives the characters you type on the keyboard.Same as focus, desktop (page 1037).
address mask See subnet mask on page 1063.
alias A mechanism of a shell that enables you to define new commands.
alphanumeric character
One of the characters, either uppercase or lowercase, from A to Z and 0 to 9, inclusive.
ambiguous file reference
A reference to a file that does not necessarily specify any one file but can be used tospecify a group of files. The shell expands an ambiguous file reference into a list offilenames. Special characters represent single characters (?), strings of zero or morecharacters (*), and character classes ([]) within ambiguous file references. Anambiguous file reference is a type of regular expression (page 1056).
angle bracket A left angle bracket (<) and a right angle bracket (>). The shell uses < to redirect acommand’s standard input to come from a file and > to redirect the standard out-put. The shell uses the characters << to signify the start of a Here document and >>to append output to a file.
animate When referring to a window action, means that the action is slowed down so theuser can view it. For example, when you minimize a window, it can disappear all atonce (not animated) or it can slowly telescope into the panel so you can get a visualfeel for what is happening (animated).

Glossary 1023
anti-aliasing Adding gray pixels at the edge of a diagonal line to get rid of the jagged appearanceand thereby make the line look smoother. Anti-aliasing sometimes makes type on ascreen look better and sometimes worse; it works best on small and large fonts andis less effective on fonts from 8 to 15 points. See also subpixel hinting (page 1063).
API Application program interface. The interface (calling conventions) by which anapplication program accesses an operating system and other services. An API isdefined at the source code level and provides a level of abstraction between theapplication and the kernel (or other privileged utilities) to ensure the portability ofthe code.FOLDOC
append To add something to the end of something else. To append text to a file means toadd the text to the end of the file. The shell uses >> to append a command’s outputto a file.
applet A small program that runs within a larger program. Examples are Java applets thatrun in a browser and panel applets that run from a desktop panel.
archive A file that contains a group of smaller, typically related, files. Also, to create such afile. The tar and cpio utilities can create and read archives.
argument A number, letter, filename, or another string that gives some information to a com-mand and is passed to the command when it is called. A command line argument isanything on a command line following the command name that is passed to thecommand. An option is a kind of argument.
arithmetic expression
A group of numbers, operators, and parentheses that can be evaluated. When youevaluate an arithmetic expression, you end up with a number. The Bourne AgainShell uses the expr command to evaluate arithmetic expressions; the TC Shell uses@, and the Z Shell uses let.
array An arrangement of elements (numbers or strings of characters) in one or moredimensions. The Bourne Again, TC, and Z Shells and gawk can store and processarrays.
ASCII American Standard Code for Information Interchange. A code that uses seven bitsto represent both graphic (letters, numbers, and punctuation) and CONTROL characters.You can represent textual information, including program source code and Englishtext, in ASCII code. Because ASCII is a standard, it is frequently used whenexchanging information between computers. See the file /usr/pub/ascii or give thecommand man ascii to see a list of ASCII codes.
Extensions of the ASCII character set use eight bits. The seven-bit set is common;the eight-bit extensions are still coming into popular use. The eighth bit is some-times referred to as the metabit.
ASCII terminal A textual terminal. Contrast with graphical display (page 1038).

1024 Glossary
ASP Application service provider. A company that provides applications over the Internet.
asynchronous event
An event that does not occur regularly or synchronously with another event. Linuxsystem signals are asynchronous; they can occur at any time because they can be ini-tiated by any number of nonregular events.
attachment A file that is attached to, but is not part of, a piece of email. Attachments are fre-quently opened by programs (including your Internet browser) that are called byyour mail program so you may not be aware that they are not an integral part of anemail message.
authentication The verification of the identity of a person or process. In a communication system,authentication verifies that a message comes from its stated source. Methods ofauthentication on a Linux system include the /etc/passwd and /etc/shadow files,LDAP, Kerberos 5, and SMB authentication.FOLDOC
automatic mounting
A way of demand mounting directories from remote hosts without having themhard configured into /etc/fstab. Also called automounting.
avoided An object, such as a panel, that should not normally be covered by another object,such as a window.
back door A security hole deliberately left in place by the designers or maintainers of a system.The motivation for creating such holes is not always sinister; some operating sys-tems, for example, come out of the box with privileged accounts intended for use byfield service technicians or the vendor’s maintenance programmers.
Ken Thompson’s 1983 Turing Award lecture to the ACM revealed the existence, inearly UNIX versions, of a back door that may be the most fiendishly clever securityhack of all time. The C compiler contained code that would recognize when thelogin command was being recompiled and would insert some code recognizing apassword chosen by Thompson, giving him entry to the system whether or not anaccount had been created for him.
Normally such a back door could be removed by removing it from the source codefor the compiler and recompiling the compiler. But to recompile the compiler, youhave to use the compiler, so Thompson arranged that the compiler would recognizewhen it was compiling a version of itself. It would insert into the recompiled com-piler the code to insert into the recompiled login the code to allow Thompson entry,and, of course, the code to recognize itself and do the whole thing again the nexttime around. Having done this once, he was then able to recompile the compilerfrom the original sources; the hack perpetuated itself invisibly, leaving the backdoor in place and active but with no trace in the sources.
Sometimes called a wormhole. Also trap door.FOLDOC
background process
A process that is not run in the foreground. Also called a detached process, a back-ground process is initiated by a command line that ends with an ampersand (&).You do not have to wait for a background process to run to completion before giving

Glossary 1025
the shell additional commands. If you have job control, you can move backgroundprocesses to the foreground, and vice versa.
basename The name of a file that, in contrast with a pathname, does not mention any of thedirectories containing the file (and therefore does not contain any slashes [/]). Forexample, hosts is the basename of /etc/hosts.FOLDOC
baud The maximum information-carrying capacity of a communication channel in sym-bols (state transitions or level transitions) per second. It coincides with bits per sec-ond only for two-level modulation with no framing or stop bits. A symbol is aunique state of the communication channel, distinguishable by the receiver from allother possible states. For example, it may be one of two voltage levels on a wire fora direct digital connection, or it might be the phase or frequency of a carrier.FOLDOC
Baud is often mistakenly used as a synonym for bits per second.
baud rate Transmission speed. Usually used to measure terminal or modem speed. Commonbaud rates range from 110 to 38,400 baud. See baud.
Berkeley UNIX
One of the two major versions of the UNIX operating system. Berkeley UNIX wasdeveloped at the University of California at Berkeley by the Computer SystemsResearch Group and is often referred to as BSD (Berkeley Software Distribution).
BIND Berkeley Internet Name Domain. An implementation of a DNS (page 1034) serverdeveloped and distributed by the University of California at Berkeley
BIOS Basic Input/Output System. On PCs, EEPROM-based (page 1035) system softwarethat provides the lowest-level interface to peripheral devices and controls the first stageof the bootstrap (page 1026) process, which loads the operating system. The BIOS canbe stored in different types of memory. The memory must be nonvolatile so that itremembers the system settings even when the system is turned off. Also BIOS ROM.Refer to page 26 for instructions on how to open the BIOS screens for maintenance.
bit The smallest piece of information a computer can handle. A bit is a binary digit:either 1 or 0 (on or off ).
bit depth Same as color depth (page 1029).
bit-mapped display
A graphical display device in which each pixel on the screen is controlled by anunderlying representation of zeros and ones.
blank character
Either a SPACE or a TAB character, also called whitespace (page 1068). In some con-texts, NEWLINEs are considered blank characters.
block A section of a disk or tape (usually 1,024 bytes long but shorter or longer on somesystems) that is written at one time.
block device A disk or tape drive. A block device stores information in blocks of characters. Ablock device is represented by a block device (block special) file. Contrast withcharacter device (page 1028).

1026 Glossary
block number Disk and tape blocks are numbered so that Linux can keep track of the data on thedevice.
blocking factor
The number of logical blocks that make up a physical block on a tape or disk.When you write 1K logical blocks to a tape with a physical block size of 30K, theblocking factor is 30.
Boolean The type of an expression with two possible values: true and false. Also, a variableof Boolean type or a function with Boolean arguments or result. The most commonBoolean functions are AND, OR, and NOT.FOLDOC
boot See bootstrap.
boot loader A very small program that takes its place in the bootstrap process that brings acomputer from off or reset to a fully functional state. See “grub: The Linux BootLoader” on page 647.
bootstrap Derived from “Pull oneself up by one’s own bootstraps,” the incremental process ofloading an operating system kernel into memory and starting it running withoutany outside assistance. Frequently shortened to boot.
Bourne Again Shell
bash. GNU’s command interpreter for UNIX, bash is a POSIX-compliant shellwith full Bourne Shell syntax and some C Shell commands built in. The BourneAgain Shell supports emacs-style command line editing, job control, functions,and online help.FOLDOC
Bourne Shell sh. This UNIX command processor was developed by Steve Bourne at AT&T BellLaboratories.
brace A left brace ( {) and a right brace (}). Braces have special meanings to the shell.
bracket A square bracket (page 1061) or an angle bracket (page 1022).
branch In a tree structure, a branch connects nodes, leaves, and the root. The Linux file-system hierarchy is often conceptualized as an upside-down tree. The branches con-nect files and directories. In a source code control system, such as SCCS or RCS, abranch occurs when a revision is made to a file and is not included in subsequentrevisions to the file.
bridge Typically a two-port device originally used for extending networks at layer 2 (datalink) of the Internet Protocol model.
broadcast A transmission to multiple, unspecified recipients. On Ethernet a broadcast packetis a special type of multicast packet that has a special address indicating that alldevices that receive it should process it. Broadcast traffic exists at several layers ofthe network stack, including Ethernet and IP. Broadcast traffic has one source butindeterminate destinations (all hosts on the local network).
broadcast address
The last address on a subnet (usually 255), reserved as shorthand to mean all hosts.

Glossary 1027
broadcast network
A type of network, such as Ethernet, in which any system can transmit informationat any time, and all systems receive every message.
BSD See Berkeley UNIX on page 1025.
buffer An area of memory that stores data until it can be used. When you write informa-tion to a file on a disk, Linux stores the information in a disk buffer until there isenough to write to the disk or until the disk is ready to receive the information.
bug An unwanted and unintended program property, especially one that causes the pro-gram to malfunction.FOLDOC
builtin (command)
A command that is built into a shell. Each of the three major shells—the BourneAgain, TC, and Z Shells—has its own set of builtins. Refer to “Builtins” on page 243.
byte A component in the machine data hierarchy, usually larger than a bit and smallerthan a word; now most often eight bits and the smallest addressable unit of storage.A byte typically holds one character.FOLDOC
Cprogramming language
A modern systems language that has high-level features for efficient, modular pro-gramming as well as lower-level features that make it suitable for use as a systemsprogramming language. It is machine independent so that carefully written C pro-grams can be easily transported to run on different machines. Most of the Linuxoperating system is written in C, and Linux provides an ideal environment for pro-gramming in C.
C Shell csh. The C Shell command processor was developed by Bill Joy for BSD UNIX. Itwas named for the C programming language because its programming constructsare similar to those of C. See shell on page 1059.
cable modem A type of modem that allows you to access the Internet by using your cable televi-sion connection.
cache Holding recently accessed data, a small, fast memory designed to speed up subse-quent access to the same data. Most often applied to processor-memory access butalso used for a local copy of data accessible over a network, from a hard disk, andso on.FOLDOC
calling environment
A list of variables and their values that is made available to a called program. Referto “Executing a Command” on page 312.
cascading stylesheet
See CSS on page 1031.
cascading windows
An arrangement of windows such that they overlap, generally with at least part ofthe title bar visible. Opposite of tiled windows (page 1065).
case sensitive Able to distinguish between uppercase and lowercase characters. Unless you set theignorecase parameter, vim performs case-sensitive searches. The grep utility per-forms case-sensitive searches unless you use the –i option.

1028 Glossary
catenate To join sequentially, or end to end. The Linux cat utility catenates files: It displaysthem one after the other. Also concatenate.
chain loading The technique used by a boot loader to load unsupported operating systems. Usedfor loading such operating systems as DOS or Windows, it works by loadinganother boot loader.
character-based
A program, utility, or interface that works only with ASCII (page 1023) characters.This set of characters includes some simple graphics, such as lines and corners, andcan display colored characters. It cannot display true graphics. Contrast with GUI(page 1038).
character-based terminal
A terminal that displays only characters and very limited graphics. See character-based.
character class In a regular expression, a group of characters that defines which characters canoccupy a single character position. A character-class definition is usually sur-rounded by square brackets. The character class defined by [abcr] represents a char-acter position that can be occupied by a, b, c, or r. Also list operator.
In POSIX, used to refer to sets of characters with a common characteristic, denotedby the notation [:class:]; for example, [:upper:] denotes the set of uppercase letters.
This book uses the term character class as explained under “Brackets” on page 973.
character device
A terminal, printer, or modem. A character device stores or displays characters oneat a time. A character device is represented by a character device (character special)file. Contrast with block device (page 1025).
check box A GUI widget, usually the outline of a square box with an adjacent caption, that auser can click to display or remove a tick (page 1065). When the box holds a tick,the option described by the caption is on or true. Also tick box.
checksum A computed value that depends on the contents of a block of data and is transmit-ted or stored along with the data to detect corruption of the data. The receiving sys-tem recomputes the checksum based on the received data and compares this valuewith the one sent with the data. If the two values are the same, the receiver hassome confidence that the data was received correctly.
The checksum may be 8, 16, or 32 bits, or some other size. It is computed by sum-ming the bytes or words of the data block, ignoring overflow. The checksum may benegated so that the total of the data words plus the checksum is zero.
Internet packets use a 32-bit checksum.FOLDOC
child process A process that is created by another process, the parent process. Every process is achild process except for the first process, which is started when Linux begins execu-tion. When you run a command from the shell, the shell spawns a child process torun the command. See process on page 1054.

Glossary 1029
CIDR Classless Inter-Domain Routing. A scheme that allocates blocks of Internetaddresses in a way that allows summarization into a smaller number of routingtable entries. A CIDR block is a block of Internet addresses assigned to an ISP bythe Internic. Refer to “CIDR: Classless Inter-Domain Routing” on page 367.FOLDOC
CIFS Common Internet File System. An Internet filesystem protocol based on SMB(page 1060). CIFS runs on top of TCP/IP, uses DNS, and is optimized to supportslower dial-up Internet connections. SMB and CIFS are used interchangeably.FOLDOC
CIPE Crypto IP Encapsulation (page 1035). This protocol (page 1054) tunnels(page 1066) IP packets within encrypted UDP (page 1066) packets, is lightweightand simple, and works over dynamic addresses, NAT (page 1049), and SOCKS(page 1061) proxies (page 1055).
cipher (cypher) A cryptographic system that uses a key to transpose/substitute characters within amessage, the key itself, or the message.
ciphertext Text that is encrypted. Contrast with plaintext (page 1053). See also “Encryption”on page 992.
Classless Inter-Domain Routing
See CIDR on page 1029.
cleartext Text that is not encrypted. Also plaintext. Contrast with ciphertext. See also“Encryption” on page 992.
CLI Command line interface. See also character-based (page 1028). Also textual interface.
client A computer or program that requests one or more services from a server.
CODEC Coder/decoder or compressor/decompressor. A hardware and/or software technol-ogy that codes and decodes data. MPEG is a popular CODEC for computer video.
color depth The number of bits used to generate a pixel—usually 8, 16, 24, or 32. The colordepth is directly related to the number of colors that can be generated. The numberof colors that can be generated is 2 raised to the color-depth power. Thus a 24-bitvideo adapter can generate about 16.7 million colors.
color quality See color depth.
combo box A combination of a drop-down list (page 1035) and text box (page 1064). You canenter text in a combo box. Or, you can click a combo box, cause it to expand anddisplay a static list of selections for you to choose from.
command What you give the shell in response to a prompt. When you give the shell a com-mand, it executes a utility, another program, a builtin command, or a shell script.Utilities are often referred to as commands. When you are using an interactive util-ity, such as vim or mail, you use commands that are appropriate to that utility.

1030 Glossary
command line A line containing instructions and arguments that executes a command. This termusually refers to a line that you enter in response to a shell prompt on a character-based terminal or terminal emulator (page 114).
command substitution
Replacing a command with its output. The shells perform command substitutionwhen you enclose a command between $( and ) or between a pair of back ticks(‘‘), also called grave accent marks.
component architecture
A notion in object-oriented programming where “components” of a program arecompletely generic. Instead of having a specialized set of methods and fields, theyhave generic methods through which the component can advertise the functional-ity it supports to the system into which it is loaded. This strategy enables com-pletely dynamic loading of objects. JavaBeans is an example of a componentarchitecture.FOLDOC
concatenate See catenate on page 1028.
condition code See exit status on page 1036.
connection-oriented protocol
A type of transport layer data communication service that allows a host to senddata in a continuous stream to another host. The transport service guarantees thatall data will be delivered to the other end in the same order as sent and withoutduplication. Communication proceeds through three well-defined phases: connec-tion establishment, data transfer, and connection release. The most common exam-ple is TCP (page 1064).
Also called connection-based protocol and stream-oriented protocol. Contrast withconnectionless protocol and datagram (page 1032).FOLDOC
connectionless protocol
The data communication method in which communication occurs between hostswith no previous setup. Packets sent between two hosts may take different routes.There is no guarantee that packets will arrive as transmitted or even that they willarrive at the destination at all. UDP (page 1066) is a connectionless protocol. Alsocalled packet switching. Contrast with circuit switching and connection-orientedprotocol.FOLDOC
console See system console on page 1064.
console terminal
See system console on page 1064.
control character
A character that is not a graphic character, such as a letter, number, or punctuationmark. Such characters are called control characters because they frequently act tocontrol a peripheral device. RETURN and FORMFEED are control characters that control aterminal or printer.
The word CONTROL is shown in this book in THIS FONT because it is a key that appears onmost terminal keyboards. Control characters are represented by ASCII codes lessthan 32 (decimal). See also nonprinting character on page 1051.

Glossary 1031
control structure
A statement used to change the order of execution of commands in a shell script orother program. Each shell provides control structures (for example, if and while) aswell as other commands that alter the order of execution (for example, exec). Alsocontrol flow commands.
cookie Data stored on a client system by a server. The client system browser sends thecookie back to the server each time it accesses that server. For example, a catalogshopping service may store a cookie on your system when you place your firstorder. When you return to the site, it knows who you are and can supply yourname and address for subsequent orders. You may consider cookies to be an inva-sion of privacy.
CPU Central processing unit. The part of a computer that controls all the other parts.The CPU includes the control unit and the arithmetic and logic unit (ALU). Thecontrol unit fetches instructions from memory and decodes them to produce signalsthat control the other parts of the computer. These signals can cause data to betransferred between memory and ALU or peripherals to perform input or output. ACPU that is housed on a single chip is called a microprocessor. Also processor andcentral processor.
cracker An individual who attempts to gain unauthorized access to a computer system.These individuals are often malicious and have many means at their disposal forbreaking into a system. Contrast with hacker (page 1039).FOLDOC
crash The system suddenly and unexpectedly stops or fails. Derived from the action ofthe hard disk heads on the surface of the disk when the air gap between the twocollapses.
cryptography The practice and study of encryption and decryption—encoding data so that only aspecific individual or machine can decode it. A system for encrypting and decrypt-ing data is a cryptosystem. Such systems usually rely on an algorithm for combiningthe original data (plaintext) with one or more keys—numbers or strings of charac-ters known only to the sender and/or recipient. The resulting output is called cipher-text (page 1029).
The security of a cryptosystem usually depends on the secrecy of keys rather thanon the supposed secrecy of an algorithm. Because a strong cryptosystem has a largerange of keys, it is not possible to try all of them. Ciphertext appears random tostandard statistical tests and resists known methods for breaking codes.FOLDOC
.cshrc file In your home directory, a file that the TC Shell executes each time you invoke a newTC Shell. You can use this file to establish variables and aliases.
CSS Cascading stylesheet. Describes how documents are presented on screen and inprint. Attaching a stylesheet to a structured document can affect the way it lookswithout adding new HTML (or other) tags and without giving up device indepen-dence. Also stylesheet.

1032 Glossary
current (process, line, character, directory, event, etc.)
The item that is immediately available, working, or being used. The current processis the program you are running, the current line or character is the one the cursor ison, and the current directory is the working directory.
cursor A small lighted rectangle, underscore, or vertical bar that appears on a terminalscreen and indicates where the next character will appear. Differs from the mousepointer (page 1048).
daemon A program that is not invoked explicitly but lies dormant, waiting for some condi-tion(s) to occur. The perpetrator of the condition need not be aware that a daemonis lurking (although often a program will commit an action only because it knowsthat it will implicitly invoke a daemon). From the mythological meaning, later ratio-nalized as the acronym Disk And Execution MONitor. See Table 10-4 on page 384for a list of daemons.FOLDOC
data structure A particular format for storing, organizing, working with, and retrieving data. Fre-quently, data structures are designed to work with specific algorithms that facilitatethese tasks. Common data structures include trees, files, records, tables, arrays, etc.
datagram A self-contained, independent entity of data carrying sufficient information to berouted from the source to the destination computer without reliance on earlierexchanges between this source and destination computer and the transporting net-work. UDP (page 1066) uses datagrams; IP (page 1042) uses packets (page 1051).Packets are indivisible at the network layer; datagrams are not.FOLDOC See also frame(page 1037).
dataless A computer, usually a workstation, that uses a local disk to boot a copy of the oper-ating system and access system files but does not use a local disk to store user files.
dbm A standard, simple database manager. Implemented as gdbm (GNU database man-ager), it uses hashes to speed searching. The most common versions of the dbmdatabase are dbm, ndbm, and gdbm.
DDoS attack Distributed denial of service attack. A DoS attack (page 1034) from many systemsthat do not belong to the perpetrator of the attack.
debug To correct a program by removing its bugs (that is, errors).
default Something that is selected without being explicitly specified. For example, whenused without an argument, ls displays a list of the files in the working directory bydefault.
delta A set of changes made to a file that has been encoded by the Source Code ControlSystem (SCCS).
denial of service
See DoS attack on page 1034.

Glossary 1033
dereference When speaking of symbolic links, follow the link rather than working with the refer-ence to the link. For example, the –L or ––dereference option causes ls to list theentry that a symbolic link points to rather than the symbolic link (the reference) itself.
desktop A collection of windows, toolbars, icons, and buttons, some or all of which appearon your display. A desktop comprises one or more workspaces (page 1069). Referto “A Tour of the Ubuntu Linux Desktop” on page 89.
desktop manager
An icon- and menu-based user interface to system services that allows you to runapplications and use the filesystem without using the system’s command line interface.
detached process
See background process on page 1024.
device A disk drive, printer, terminal, plotter, or other input/output unit that can beattached to the computer. Short for peripheral device.
device driver Part of the Linux kernel that controls a device, such as a terminal, disk drive, orprinter.
device file A file that represents a device. Also special file.
devicefilename
The pathname of a device file. All Linux systems have two kinds of device files:block and character device files. Linux also has FIFOs (named pipes) and sockets.Device files are traditionally located in the /dev directory.
device number See major device number (page 1046) and minor device number (page 1048).
DHCP Dynamic Host Configuration Protocol. A protocol that dynamically allocates IPaddresses to computers on a LAN. Refer to “DHCP: Configures Network Inter-faces” on page 538.FOLDOC
dialog box In a GUI, a special window, usually without a titlebar, that displays information.Some dialog boxes accept a response from the user
directory Short for directory file. A file that contains a list of other files.
directory hierarchy
A directory, called the root of the directory hierarchy, and all the directory and ordi-nary files below it (its children).
directory service
A structured repository of information on people and resources within an organiza-tion, facilitating management and communication.FOLDOC
disk partition See partition on page 1052.
diskless A computer, usually a workstation, that has no disk and must contact another com-puter (a server) to boot a copy of the operating system and access the necessary sys-tem files.
distributed computing
A style of computing in which tasks or services are performed by a network ofcooperating systems, some of which may be specialized.

1034 Glossary
DMZ Demilitarized zone. A host or small network that is a neutral zone between a LANand the Internet. It can serve Web pages and other data to the Internet and allowlocal systems access to the Internet while preventing LAN access to unauthorizedInternet users. Even if a DMZ is compromised, it holds no data that is private andnone that cannot be easily reproduced.
DNS Domain Name Service. A distributed service that manages the correspondence offull hostnames (those that include a domain name) to IP addresses and other systemcharacteristics.
DNS domain name
See domain name.
document object model
See DOM.
DOM Document Object Model. A platform-/language-independent interface that enablesa program to update the content, structure, and style of a document dynamically.The changes can then be made part of the displayed document. Go towww.w3.org/DOM for more information.
domain name A name associated with an organization, or part of an organization, to help identifysystems uniquely. Technically, the part of the FQDN (page 1037) to the right of theleftmost period. Domain names are assigned hierarchically. The domain berkeley.edurefers to the University of California at Berkeley, for example; it is part of the top-level edu (education) domain. Also DNS domain name. Different than NIS domainname (page 1050).
Domain Name Service
See DNS.
door An evolving filesystem-based RPC (page 1058) mechanism.
DoS attack Denial of service attack. An attack that attempts to make the target host or networkunusable by flooding it with spurious traffic.
DPMS Display Power Management Signaling. A standard that can extend the life of CRTmonitors and conserve energy. DPMS supports four modes for a monitor: Normal,Standby (power supply on, monitor ready to come to display images almostinstantly), Suspend (power supply off, monitor takes up to ten seconds to display animage), and Off.
drag The motion part of drag-and-drop.
drag-and-drop To move an object from one position or application to another within a GUI. Todrag an object, the user clicks a mouse button (typically the left one) while themouse pointer hovers (page 1040) over the object. Then, without releasing themouse button, the user drags the object, which stays attached to the mouse pointer,to a different location. The user can then drop the object at the new location byreleasing the mouse button.

Glossary 1035
drop-down list A widget (page 1068) that displays a static list for a user to choose from. When thelist is not active, it appears as text in a box, displaying the single selected entry.When a user clicks the box, a list appears; the user can move the mouse cursor toselect an entry from the list. Different from a list box (page 1045).
druid In role-playing games, a character that represents a magical user. Red Hat uses theterm druid at the ends of names of programs that guide you through a task-drivenchain of steps. Other operating systems call these types of programs wizards.
DSA Digital Signature Algorithm. A public key cipher used to generate digital signatures.
DSL Digital Subscriber Line/Loop. Provides high-speed digital communication over aspecialized, conditioned telephone line. See also xDSL (page 1070).
Dynamic Host Configuration Protocol
See DHCP on page 1033.
editor A utility, such as vim or emacs, that creates and modifies text files.
EEPROM Electrically erasable, programmable, readonly memory. A PROM (page 1054) thatcan be written to.
effective user ID
The user ID that a process appears to have; usually the same as the user ID. Forexample, while you are running a setuid program, the effective user ID of the pro-cess running the program is that of the owner of the program.
element One thing; usually a basic part of a group of things. An element of a numeric arrayis one of the numbers stored in the array.
emoticon See smiley on page 1060.
encapsulation See tunneling on page 1066.
environment See calling environment on page 1027.
EOF End of file.
EPROM Erasable programmable readonly memory. A PROM (page 1054) that can be writ-ten to by applying a higher than normal voltage.
escape See quote on page 1055.
Ethernet A type of LAN (page 1044) capable of transfer rates as high as 1,000 megabits persecond. Refer to “Ethernet” on page 357.
event An occurrence, or happening, of significance to a task or program—for example,the completion of an asynchronous input/output operation, such as a keypress ormouse click.FOLDOC
exabyte 260 bytes or about 1018 bytes. See also large number (page 1044).

1036 Glossary
exit status The status returned by a process; either successful (usually 0) or unsuccessful(usually 1).
exploit A security hole or an instance of taking advantage of a security hole.FOLDOC
expression See logical expression (page 1046) and arithmetic expression (page 1023).
extranet A network extension for a subset of users (such as students at a particular school orengineers working for the same company). An extranet limits access to privateinformation even though it travels on the public Internet.
failsafe session A session that allows you to log in on a minimal desktop in case your standard logindoes not work well enough to allow you to log in to fix a login problem.
FDDI Fiber Distributed Data Interface. A type of LAN (page 1044) designed to transportdata at the rate of 100 million bits per second over fiberoptic cable.
file A collection of related information referred to with a filename and frequently storedon a disk. Text files typically contain memos, reports, messages, program sourcecode, lists, or manuscripts. Binary or executable files contain utilities or programsthat you can run. Refer to “Directory Files and Ordinary Files” on page 184.
filename The name of a file. A filename refers to a file.
filename completion
Automatic completion of a filename after you specify a unique prefix.
filename extension
The part of a filename following a period.
filename generation
What occurs when the shell expands ambiguous file references. See ambiguous filereference on page 1022.
filesystem A data structure (page 1032) that usually resides on part of a disk. All Linux sys-tems have a root filesystem, and many have other filesystems. Each filesystem iscomposed of some number of blocks, depending on the size of the disk partitionthat has been assigned to the filesystem. Each filesystem has a control block, namedthe superblock, that contains information about the filesystem. The other blocks ina filesystem are inodes, which contain control information about individual files,and data blocks, which contain the information in the files.
filling A variant of maximizing in which window edges are pushed out as far as they cango without overlapping another window.
filter A command that can take its input from standard input and send its output to stan-dard output. A filter transforms the input stream of data and sends it to standardoutput. A pipe usually connects a filter’s input to standard output of one command,and a second pipe connects the filter’s output to standard input of another com-mand. The grep and sort utilities are commonly used as filters.

Glossary 1037
firewall A device for policy-based traffic management used to keep a network secure. A fire-wall can be implemented in a single router that filters out unwanted packets, or itcan rely on a combination of routers, proxy servers, and other devices. Firewalls arewidely used to give users access to the Internet in a secure fashion and to separate acompany’s public WWW server from its internal network. They are also employedto keep internal network segments more secure.
Recently the term has come to be defined more loosely to include a simple packetfilter running on an endpoint machine.
See also proxy server on page 1055.
firmware Software built into a computer, often in ROM (page 1057). May be used as part ofthe bootstrap (page 1026) procedure.
focus, desktop On a desktop, the window that is active. The window with the desktop focusreceives the characters you type on the keyboard. Same as active window(page 1022).
footer The part of a format that goes at the bottom (or foot) of a page. Contrast withheader (page 1039).
foreground process
When you run a command in the foreground, the shell waits for the command tofinish before giving you another prompt. You must wait for a foreground process torun to completion before you can give the shell another command. If you have jobcontrol, you can move background processes to the foreground, and vice versa. Seejob control on page 1043. Contrast with background process (page 1024).
fork To create a process. When one process creates another process, it forks a process.Also spawn.
FQDN Fully qualified domain name. The full name of a system, consisting of its hostnameand its domain name, including the top-level domain. Technically the name thatgethostbyname(2) returns for the host named by gethostname(2). For example,speedy is a hostname and speedy.example.com is an FQDN. An FQDN is sufficientto determine a unique Internet address for a machine on the Internet.FOLDOC
frame A data link layer packet that contains, in addition to data, the header and trailerinformation required by the physical medium. Network layer packets are encapsu-lated to become frames.FOLDOC See also datagram (page 1032) and packet(page 1051).
free list In a filesystem, the list of blocks that are available for use. Information about thefree list is kept in the superblock of the filesystem.
free software Refer to Appendix D, “The Free Software Definition.”
free space The portion of a hard disk that is not within a partition. A new hard disk has nopartitions and contains all free space.

1038 Glossary
full duplex The ability to receive and transmit data simultaneously. A network switch(page 1050) is typically a full-duplex device. Contrast with half-duplex (page 1039).
fully qualified domain name
See FQDN on page 1037.
function See shell function on page 1059.
gateway A generic term for a computer or a special device connected to more than one dis-similar type of network to pass data between them. Unlike a router, a gateway oftenmust convert the information into a different format before passing it on. The his-torical usage of gateway to designate a router is deprecated.
GCOS See GECOS.
GECOS General Electric Comprehensive Operating System. For historical reasons, the userinformation field in the /etc/passwd file is called the GECOS field. Also GCOS.
giga- In the binary system, the prefix giga- multiplies by 230 (i.e., 1,073,741,824). Gigabitand gigabyte are common uses of this prefix. Abbreviated as G. See also large num-ber on page 1044.
glyph A symbol that communicates a specific piece of information nonverbally. A smiley(page 1060) is a glyph.
GMT Greenwich Mean Time. See UTC on page 1067.
graphical display
A bitmapped monitor that can display graphical images. Contrast with ASCII ter-minal (page 1023).
graphical user interface
See GUI on page 1038.
group (of users)
A collection of users. Groups are used as a basis for determining file access permis-sions. If you are not the owner of a file and you belong to the group the file isassigned to, you are subject to the group access permissions for the file. A user cansimultaneously belong to several groups.
group (of windows)
A way to identify similar windows so they can be displayed and acted on similarly.Typically windows started by a given application belong to the same group.
group ID A unique number that identifies a set of users. It is stored in the password andgroup databases (/etc/passwd and /etc/group files or their NIS equivalents). Thegroup database associates group IDs with group names. Also GID.
GUI Graphical user interface. A GUI provides a way to interact with a computer systemby choosing items from menus or manipulating pictures drawn on a display screeninstead of by typing command lines. Under Linux, the X Window System provides agraphical display and mouse/keyboard input. GNOME and KDE are two populardesktop managers that run under X. Contrast with character-based (page 1028).

Glossary 1039
hacker A person who enjoys exploring the details of programmable systems and learninghow to stretch their capabilities, as opposed to users, who prefer to learn only theminimum necessary. One who programs enthusiastically (even obsessively) or whoenjoys programming rather than just theorizing about programming.FOLDOC Contrastwith cracker (page 1031).
half-duplex A half-duplex device can only receive or transmit at a given moment; it cannot do both. Ahub (page 1041) is typically a half-duplex device. Contrast with full duplex (page 1038).
hard link A directory entry that contains the filename and inode number for a file. The inodenumber identifies the location of control information for the file on the disk, whichin turn identifies the location of the file’s contents on the disk. Every file has at leastone hard link, which locates the file in a directory. When you remove the last hardlink to a file, you can no longer access the file. See link (page 1045) and symboliclink (page 1064).
hash A string that is generated from another string. See one-way hash function onpage 1051. When used for security, a hash can prove, almost to a certainty, that amessage has not been tampered with during transmission: The sender generates ahash of a message, encrypts the message and hash, and sends the encrypted messageand hash to the recipient. The recipient decrypts the message and hash, generates asecond hash from the message, and compares the hash that the sender generated tothe new hash. When they are the same, the message has probably not been tam-pered with. Hashed versions of passwords can be used to authenticate users. A hashcan also be used to create an index called a hash table. Also hash value.
hash table An index created from hashes of the items to be indexed. The hash function makesit highly unlikely that two items will create the same hash. To look up an item in theindex, create a hash of the item and search for the hash. Because the hash is typi-cally shorter than the item, the search is more efficient.
header When you are formatting a document, the header goes at the top, or head, of apage. In electronic mail the header identifies who sent the message, when it wassent, what the subject of the message is, and so forth.
Here document
A shell script that takes its input from the file that contains the script.
hesiod The nameserver of project Athena. Hesiod is a name service library that is derivedfrom BIND (page 1025) and leverages a DNS infrastructure.
heterogeneous Consisting of different parts. A heterogeneous network includes systems producedby different manufacturers and/or running different operating systems.
hexadecimal number
A base 16 number. Hexadecimal (or hex) numbers are composed of the hexadeci-mal digits 0–9 and A–F. See Table G-1, next page.

1040 Glossary
hidden file A file whose filename starts with a period. These files are called hidden because thels utility does not normally list them. Use the –a option of ls to list all files, includinghidden ones. The shell does not expand a leading asterisk (*) in an ambiguous filereference to match the filename of a hidden file. Also invisible file.
hierarchy An organization with a few things, or thing—one at the top—and with severalthings below each other thing. An inverted tree structure. Examples in computinginclude a file tree where each directory may contain files or other directories, a hier-archical network, and a class hierarchy in object-oriented programming.FOLDOC Referto “The Hierarchical Filesystem” on page 184.
history A shell mechanism that enables you to modify and reexecute recent commands.
home directory
The directory that is your working directory when you first log in. The pathname ofthis directory is stored in the HOME shell variable.
hover To leave the mouse pointer stationary for a moment over an object. In many caseshovering displays a tooltip (page 1065).
HTML Hypertext Markup Language. A hypertext document format used on the WorldWide Web. Tags, which are embedded in the text, consist of a less than sign (<), adirective, zero or more parameters, and a greater than sign (>). Matched pairs ofdirectives, such as <TITLE> and </TITLE>, delimit text that is to appear in a specialplace or style.FOLDOC For more information on HTML, go to www.htmlhelp.com/faq/html/all.html.
Table G-1 Decimal, octal, and hexadecimal numbers
Decimal Octal Hex Decimal Octal Hex
1 1 1 17 21 11
2 2 2 18 22 12
3 3 3 19 23 13
4 4 4 20 24 14
5 5 5 21 25 15
6 6 6 31 37 1F
7 7 7 32 40 20
8 10 8 33 41 21
9 11 9 64 100 40
10 12 A 96 140 60
11 13 B 100 144 64
12 14 C 128 200 80
13 15 D 254 376 FE
14 16 E 255 377 FF
15 17 F 256 400 100
16 20 10 257 401 101

Glossary 1041
HTTP Hypertext Transfer Protocol. The client/server TCP/IP protocol used on the WorldWide Web for the exchange of HTML documents.
hub A multiport repeater. A hub rebroadcasts all packets it receives on all ports. Thisterm is frequently used to refer to small hubs and switches, regardless of the device’sintelligence. It is a generic term for a layer 2 shared-media networking device.Today the term hub is sometimes used to refer to small intelligent devices, althoughthat was not its original meaning. Contrast with network switch (page 1050).
hypertext A collection of documents/nodes containing (usually highlighted or underlined)cross-references or links, which, with the aid of an interactive browser program,allow the reader to move easily from one document to another.FOLDOC
Hypertext Markup Language
See HTML.
Hypertext Transfer Protocol
See HTTP.
i/o device Input/output device. See device on page 1033.
IANA Internet Assigned Numbers Authority. A group that maintains a database of all per-manent, registered system services (www.iana.org).
ICMP Internet Control Message Protocol. A type of network packet that carries only mes-sages, no data.
icon In a GUI, a small picture representing a file, directory, action, program, and so on.When you click an icon, an action, such as opening a window and starting a programor displaying a directory or Web site, takes place. From miniature religious statues.FOLDOC
iconify The process of changing a window into an icon. Contrast with restore (page 1057).
ignored window
A state in which a window has no decoration and therefore no buttons or titlebar tocontrol it with.
indentation See indention.
indention The blank space between the margin and the beginning of a line that is set in fromthe margin.
inode A data structure (page 1032) that contains information about a file. An inode for afile contains the file’s length, the times the file was last accessed and modified, thetime the inode was last modified, owner and group IDs, access privileges, number oflinks, and pointers to the data blocks that contain the file itself. Each directory entryassociates a filename with an inode. Although a single file may have several file-names (one for each link), it has only one inode.
input Information that is fed to a program from a terminal or other file. See standardinput on page 1062.

1042 Glossary
installation A computer at a specific location. Some aspects of the Linux system are installationdependent. Also site.
interactive A program that allows ongoing dialog with the user. When you give commands inresponse to shell prompts, you are using the shell interactively. Also, when you givecommands to utilities, such as vim and mail, you are using the utilities interactively.
interface The meeting point of two subsystems. When two programs work together, theirinterface includes every aspect of either program that the other deals with. The userinterface (page 1067) of a program includes every program aspect the user comesinto contact with: the syntax and semantics involved in invoking the program, theinput and output of the program, and its error and informational messages. Theshell and each of the utilities and built-in commands have a user interface.
International Organization for Standardization
See ISO on page 1043.
internet A large network that encompasses other, smaller networks.
Internet The largest internet in the world. The Internet (uppercase “I”) is a multilevel hierar-chy composed of backbone networks (ARPANET, NSFNET, MILNET, and others),midlevel networks, and stub networks. These include commercial (.com or .co), uni-versity (.ac or .edu), research (.org or .net), and military (.mil) networks and spanmany different physical networks around the world with various protocols, includ-ing the Internet Protocol (IP). Outside the United States, country code domains arepopular (.us, .es, .mx, .de, and so forth), although you will see them used within theUnited States as well.
Internet Protocol
See IP.
Internet service provider
See ISP.
intranet An inhouse network designed to serve a group of people such as a corporation or school.The general public on the Internet does not have access to the intranet. See page 354.
invisible file See hidden file on page 1040.
IP Internet Protocol. The network layer for TCP/IP. IP is a best-effort, packet-switching, connectionless protocol (page 1030) that provides packet routing,fragmentation, and reassembly through the data link layer. IPv4 is slowly givingway to IPv6.FOLDOC
IP address Internet Protocol address. A four-part address associated with a particular network con-nection for a system using the Internet Protocol (IP). A system that is attached to multi-ple networks that use the IP will have a different IP address for each network interface.
Glossary 1043
IP multicast See multicast on page 1049.
IP spoofing A technique used to gain unauthorized access to a computer. The would-be intrudersends messages to the target machine. These messages contain an IP address indicat-ing that the messages are coming from a trusted host (page 372). The target machineresponds to the messages, giving the intruder (privileged) access to the target.
IPC Interprocess communication. A method to communicate specific informationbetween programs.
IPv4 IP version 4. See IP and IPv6.
IPv6 IP version 6. The next generation of Internet Protocol, which provides a muchlarger address space (2128 bits versus 232 bits for IPv4) that is designed to accommo-date the rapidly growing number of Internet addressable devices. IPv6 also hasbuilt-in autoconfiguration, enhanced security, better multicast support, and manyother features.
ISDN Integrated Services Digital Network. A set of communications standards that allowsa single pair of digital or standard telephone wires to carry voice, data, and video ata rate of 64 kilobits per second.
ISO International Organization for Standardization. A voluntary, nontreaty organiza-tion founded in 1946. It is responsible for creating international standards in manyareas, including computers and communications. Its members are the national stan-dards organizations of 89 countries, including the American National StandardsInstitute.FOLDOC
ISO9660 The ISO standard defining a filesystem for CD-ROMs.
ISP Internet service provider. Provides Internet access to its customers.
job control A facility that enables you to move commands from the foreground to the back-ground and vice versa. Job control enables you to stop commands temporarily.
journaling filesystem
A filesystem that maintains a noncached log file, or journal, which records all trans-actions involving the filesystem. When a transaction is complete, it is marked ascomplete in the log file.
The log file results in greatly reduced time spent recovering a filesystem after acrash, making it particularly valuable in systems where high availability is an issue.
JPEG Joint Photographic Experts Group. This committee designed the standard image-compression algorithm. JPEG is intended for compressing either full-color or gray-scaledigital images of natural, real-world scenes and does not work as well on nonrealisticimages, such as cartoons or line drawings. Filename extensions: .jpg, .jpeg.FOLDOC
justify To expand a line of type in the process of formatting text. A justified line has evenmargins. A line is justified by increasing the space between words and sometimesbetween letters on the line.

1044 Glossary
Kerberos An MIT-developed security system that authenticates users and machines. It doesnot provide authorization to services or databases; it establishes identity at logon,which is used throughout the session. Once you are authenticated, you can open asmany terminals, windows, services, or other network accesses as you like until yoursession expires.
kernel The part of the operating system that allocates machine resources, including mem-ory, disk space, and CPU (page 1031) cycles, to all other programs that run on acomputer. The kernel includes the low-level hardware interfaces (drivers) and man-ages processes (page 1054), the means by which Linux executes programs. The ker-nel is the part of the Linux system that Linus Torvalds originally wrote (see thebeginning of Chapter 1).
kernelspace The part of memory (RAM) where the kernel resides. Code running in kernelspacehas full access to hardware and all other processes in memory. See theKernelAnalysis-HOWTO.
key binding A keyboard key is said to be bound to the action that results from pressing it. Typi-cally keys are bound to the letters that appear on the keycaps: When you press A, anA appears on the screen. Key binding usually refers to what happens when youpress a combination of keys, one of which is CONTROL, ALT, META, or SHIFT, or when youpress a series of keys, the first of which is typically ESCAPE.
keyboard A hardware input device consisting of a number of mechanical buttons (keys) thatthe user presses to input characters to a computer. By default a keyboard is con-nected to standard input of a shell.FOLDOC
kilo- In the binary system, the prefix kilo- multiplies by 210 (i.e., 1,024). Kilobit and kilo-byte are common uses of this prefix. Abbreviated as k.
Korn Shell ksh. A command processor, developed by David Korn at AT&T Bell Laboratories,that is compatible with the Bourne Shell but includes many extensions. See alsoshell on page 1059.
LAN Local area network. A network that connects computers within a localized area(such as a single site, building, or department).
large number Go to mathworld.wolfram.com/LargeNumber.html for a comprehensive list.
LDAP Lightweight Directory Access Protocol. A simple protocol for accessing onlinedirectory services. LDAP is a lightweight alternative to the X.500 Directory AccessProtocol (DAP). It can be used to access information about people, system users,network devices, email directories, and systems. In some cases, it can be used as analternative for services such as NIS. Given a name, many mail clients can use LDAPto discover the corresponding email address. See directory service on page 1033.
leaf In a tree structure, the end of a branch that cannot support other branches. Whenthe Linux filesystem hierarchy is conceptualized as a tree, files that are not directo-ries are leaves. See node on page 1050.

Glossary 1045
least privilege, concept of
Mistakes made by a user working with root privileges can be much more devastat-ing than those made by an ordinary user. When you are working on the computer,especially when you are working as the system administrator, always perform anytask using the least privilege possible. If you can perform a task logged in as an ordi-nary user, do so. If you must work with root privileges, do as much as you can as anordinary user, log in as root or give an su or sudo command so you are workingwith root privileges, do as much of the task that has to be done with root privileges,and revert to being an ordinary user as soon as you can.
Because you are more likely to make a mistake when you are rushing, this conceptbecomes more important when you have less time to apply it.
Lightweight Directory Access Protocol
See LDAP.
link A pointer to a file. Two kinds of links exist: hard links and symbolic (soft) links. Ahard link associates a filename with a place on the disk where the contents of thefile is located. A symbolic link associates a filename with the pathname of a hardlink to a file. See hard link (page 1039) and symbolic link (page 1064).
Linux-PAM See PAM on page 1052.
Linux-Pluggable Authentication Modules
See PAM on page 1052.
list box A widget (page 1068) that displays a static list for a user to choose from. The listappears as multiple lines with a scrollbar (page 1059) if needed. The user can scrollthe list and select an entry. Different from a drop-down list (page 1035).
loadable kernel module
See loadable module.
loadable module
A portion of the operating system that controls a special device and that can beloaded automatically into a running kernel as needed to access that device. See“Using Loadable Kernel Modules” on page 643.
local area network
See LAN on page 1044.
locale The language; date, time, and currency formats; character sets; and so forth thatpertain to a geopolitical place or area. For example, en_US specifies English as spo-ken in the United States and dollars; en_UK specifies English as spoken in theUnited Kingdom and pounds. See the locale man page in section 5 of the systemmanual for more information. Also the locale utility.

1046 Glossary
log in To gain access to a computer system by responding correctly to the login: and Pass-word: prompts. Also log on, login.
log out To end your session by exiting from your login shell. Also log off.
logical expression
A collection of strings separated by logical operators (>, >=, =, !=, <=, and <) thatcan be evaluated as true or false. Also Boolean (page 1026) expression.
.login file A file in a user’s home directory that the TC Shell executes when you log in. Youcan use this file to set environment variables and to run commands that you wantexecuted at the beginning of each session.
login name See username on page 1067.
login shell The shell that you are using when you log in. The login shell can fork other pro-cesses that can run other shells, utilities, and programs.
.logout file A file in a user’s home directory that the TC Shell executes when you log out,assuming that the TC Shell is your login shell. You can put in the .logout file com-mands that you want run each time you log out.
MAC address Media Access Control address. The unique hardware address of a device connectedto a shared network medium. Each Ethernet adapter has a globally unique MACaddress in ROM. MAC addresses are 6 bytes long, enabling 2566 (about 300 tril-lion) possible addresses or 65,536 addresses for each possible IPv4 address.
A MAC address performs the same role for Ethernet that an IP address performs forTCP/IP: It provides a unique way to identify a host.
machine collating sequence
The sequence in which the computer orders characters. The machine collatingsequence affects the outcome of sorts and other procedures that put lists in alpha-betical order. Many computers use ASCII codes so their machine collatingsequences correspond to the ordering of the ASCII codes for characters.
macro A single instruction that a program replaces by several (usually more complex)instructions. The C compiler recognizes macros, which are defined using a #defineinstruction to the preprocessor.
magic number A magic number, which occurs in the first 512 bytes of a binary file, is a 1-, 2-, or 4-byte numeric value or character string that uniquely identifies the type of file (muchlike a DOS 3-character filename extension). See /usr/share/magic and the magicman page for more information.
main memory Random access memory (RAM), an integral part of the computer. Although diskstorage is sometimes referred to as memory, it is never referred to as main memory.
major device number
A number assigned to a class of devices, such as terminals, printers, or disk drives.Using the ls utility with the –l option to list the contents of the /dev directory dis-plays the major and minor device numbers of many devices (as major, minor).

Glossary 1047
MAN Metropolitan area network. A network that connects computers and LANs(page 1044) at multiple sites in a small regional area, such as a city.
masquerade To appear to come from one domain or IP address when actually coming fromanother. Said of a packet (iptables) or message (exim4). See also NAT on page 1049.
MD5 Message Digest 5. A one-way hash function (page 1051). The SHA1 (page 1059)algorithm has supplanted MD5 in many applications.
MDA Mail delivery agent. One of the three components of a mail system; the other twoare the MTA (page 1048) and MUA (page 1048). An MDA accepts inbound mailfrom an MTA and delivers it to a local user.
mega- In the binary system, the prefix mega- multiplies by 220 (i.e., 1,048,576). Megabitand megabyte are common uses of this prefix. Abbreviated as M.
memory See RAM on page 1055.
menu A list from which the user may select an operation to be performed. This selection isoften made with a mouse or other pointing device under a GUI but may also be con-trolled from the keyboard. Very convenient for beginners, menus show which com-mands are available and facilitate experimenting with a new program, oftenreducing the need for user documentation. Experienced users usually prefer key-board commands, especially for frequently used operations, because they are fasterto use.FOLDOC
merge To combine two ordered lists so that the resulting list is still in order. The sort utilitycan merge files.
META key On the keyboard, a key that is labeled META or ALT. Use this key as you would the SHIFT
key. While holding it down, press another key. The emacs editor makes extensiveuse of the META key.
metacharacter A character that has a special meaning to the shell or another program in a particu-lar context. Metacharacters are used in the ambiguous file references recognized bythe shell and in the regular expressions recognized by several utilities. You mustquote a metacharacter if you want to use it without invoking its special meaning.See regular character (page 1056) and special character (page 1061).
metadata Data about data. In data processing, metadata is definitional data that providesinformation about, or documentation of, other data managed within an applicationor environment.
For example, metadata can document data about data elements or attributes (name,size, data type, and so on), records or data structures (page 1032) (length, fields,columns, and so on), and data itself (where it is located, how it is associated, whoowns it, and so on). Metadata can include descriptive information about the con-text, quality and condition, or characteristics of the data.FOLDOC

1048 Glossary
metropolitan area network
See MAN on page 1047.
MIME Multipurpose Internet Mail Extension. Originally used to describe how specifictypes of files that were attached to email were to be handled. Today MIME typesdescribe how a file is to be opened or worked with, based on its contents, deter-mined by its magic number (page 1046), and filename extension. An example of aMIME type is image/jpeg: The MIME group is image and the MIME subtype isjpeg. Many MIME groups exist, including application, audio, image, inode, mes-sage, text, and video.
minimize See iconify on page 1041.
minor device number
A number assigned to a specific device within a class of devices. See major devicenumber on page 1046.
modem Modulator/demodulator. A peripheral device that modulates digital data into ana-log data for transmission over a voice-grade telephone line. Another modemdemodulates the data at the other end.
module See loadable module on page 1045.
mount To make a filesystem accessible to system users. When a filesystem is not mounted,you cannot read from or write to files it contains.
mount point A directory that you mount a local or remote filesystem (page 572) on.
mouse A device you use to point to a particular location on a display screen, typically soyou can choose a menu item, draw a line, or highlight some text. You control apointer on the screen by sliding a mouse around on a flat surface; the position of thepointer moves relative to the movement of the mouse. You select items by pressingone or more buttons on the mouse.
mouse pointer In a GUI, a marker that moves in correspondence with the mouse. It is usually asmall black x with a white border or an arrow. Differs from the cursor (page 1032).
mouseover The action of passing the mouse pointer over an object on the screen.
MTA Mail transfer agent. One of the three components of a mail system; the other two are theMDA (page 1047) and MUA (page 1048). An MTA accepts mail from users and MTAs.
MUA Mail user agent. One of the three components of a mail system; the other two arethe MDA (page 1047) and MTA (page 1048). An MUA is an end-user mail pro-gram such as KMail, mutt, or Outlook.
multiboot specification
Specifies an interface between a boot loader and an operating system. With compli-ant boot loaders and operating systems, any boot loader should be able to load anyoperating system. The object of this specification is to ensure that different operat-ing systems will work on a single machine. For more information, go toodin-os.sourceforge.net/guides/multiboot.html.

Glossary 1049
multicast A multicast packet has one source and multiple destinations. In multicast, sourcehosts register at a special address to transmit data. Destination hosts register at thesame address to receive data. In contrast to broadcast (page 1026), which is LAN-based, multicast traffic is designed to work across routed networks on a subscrip-tion basis. Multicast reduces network traffic by transmitting a packet one time, withthe router at the end of the path breaking it apart as needed for multiple recipients.
multitasking A computer system that allows a user to run more than one job at a time. A multi-tasking system, such as Linux, allows you to run a job in the background while run-ning a job in the foreground.
multiuser system
A computer system that can be used by more than one person at a time. Linux is amultiuser operating system. Contrast with single-user system (page 1060).
namespace A set of names in which all names are unique.FOLDOC
NAT Network Address Translation. A scheme that enables a LAN to use one set of IPaddresses internally and a different set externally. The internal set is for LAN (pri-vate) use. The external set is typically used on the Internet and is Internet unique.NAT provides some privacy by hiding internal IP addresses and allows multipleinternal addresses to connect to the Internet through a single external IP address.See also masquerade on page 1047.
NBT NetBIOS over TCP/IP. A protocol that supports NetBIOS services in a TCP/IP envi-ronment. Also NetBT.
negative caching
Storing the knowledge that something does not exist. A cache normally stores infor-mation about something that exists. A negative cache stores the information thatsomething, such as a record, does not exist.
NetBIOS Network Basic Input/Output System. An API (page 1023) for writing network-aware applications.
netboot To boot a computer over the network (as opposed to booting from a local disk).
netiquette The conventions of etiquette—that is, polite behavior—recognized on Usenet and inmailing lists, such as not (cross-)posting to inappropriate groups and refrainingfrom commercial advertising outside the business groups.
The most important rule of netiquette is “Think before you post.” If what youintend to post will not make a positive contribution to the newsgroup and be ofinterest to several readers, do not post it. Personal messages to one or two individu-als should not be posted to newsgroups; use private email instead.FOLDOC
netmask A 32-bit mask (for IPv4), that shows how an Internet address is to be divided into net-work, subnet, and host parts. The netmask has ones in the bit positions in the 32-bitaddress that are to be used for the network and subnet parts and zeros for the host part.The mask should contain at least the standard network portion (as determined by theaddress class). The subnet field should be contiguous with the network portion.FOLDOC

1050 Glossary
network address
The network portion (netid) of an IP address. For a class A network, it is the firstbyte, or segment, of the IP address; for a class B network, it is the first two bytes; andfor a class C network, it is the first three bytes. In each case the balance of the IPaddress is the host address (hostid). Assigned network addresses are globally uniquewithin the Internet. Also network number. See also “Host Address” on page 363.
Network Filesystem
See NFS.
Network Information Service
See NIS.
network number
See network address.
network segment
A part of an Ethernet or other network on which all message traffic is common toall nodes; that is, it is broadcast from one node on the segment and received by allothers. This commonality normally occurs because the segment is a single continu-ous conductor. Communication between nodes on different segments is via one ormore routers.FOLDOC
network switch
A connecting device in networks. Switches are increasingly replacing shared mediahubs in an effort to increase bandwidth. For example, a 16-port 10BaseT hubshares the total 10 megabits per second bandwidth with all 16 attached nodes. Byreplacing the hub with a switch, both sender and receiver can take advantage of thefull 10 megabits per second capacity. Each port on the switch can give full band-width to a single server or client station or to a hub with several stations. Networkswitch refers to a device with intelligence. Contrast with hub (page 1041).
Network Time Protocol
See NTP on page 1051.
NFS Network Filesystem. A remote filesystem designed by Sun Microsystems, availableon computers from most UNIX system vendors.
NIC Network interface card (or controller). An adapter circuit board installed in a com-puter to provide a physical connection to a network.FOLDOC
NIS Network Information Service. A distributed service built on a shared database tomanage system-independent information (such as usernames and passwords).
NIS domain name
A name that describes a group of systems that share a set of NIS files. Differentfrom domain name (page 1034).
NNTP Network News Transfer Protocol. Refer to “Usenet” on page 388.
node In a tree structure, the end of a branch that can support other branches. When theLinux filesystem hierarchy is conceptualized as a tree, directories are nodes. See leafon page 1044.

Glossary 1051
nonprinting character
See control character on page 1030. Also nonprintable character.
nonvolatile storage
A storage device whose contents are preserved when its power is off. Also NVS andpersistent storage. Some examples are CD-ROM, paper punch tape, hard disk,ROM (page 1057), PROM (page 1054), EPROM (page 1035), and EEPROM(page 1035). Contrast with RAM (page 1055).
NTP Network Time Protocol. Built on top of TCP/IP, NTP maintains accurate local timeby referring to known accurate clocks on the Internet.
null string A string that could contain characters but does not. A string of zero length.
octal number A base 8 number. Octal numbers are composed of the digits 0–7, inclusive. Refer toTable G-1 on page 1040.
one-way hash function
A one-way function that takes a variable-length message and produces a fixed-length hash. Given the hash, it is computationally infeasible to find a message withthat hash; in fact, you cannot determine any usable information about a messagewith that hash. Also message digest function. See also hash (page 1039).
OpenSSH A free version of the SSH (secure shell) protocol suite that replaces TELNET, rlogin, andmore with secure programs that encrypt all communication—even passwords—over anetwork. Refer to “OpenSSH: Secure Network Communication” on page 707.
operating system
A control program for a computer that allocates computer resources, schedulestasks, and provides the user with a way to access resources.
option A command line argument that modifies the effects of a command. Options are usu-ally preceded by hyphens on the command line and traditionally have single-charac-ter names (such as –h or –n). Some commands allow you to group options followinga single hyphen (for example, –hn). GNU utilities frequently have two argumentsthat do the same thing: a single-character argument and a longer, more descriptiveargument that is preceded by two hyphens (such as ––show-all and ––invert-match).
ordinary file A file that is used to store a program, text, or other user data. See directory(page 1033) and device file (page 1033).
output Information that a program sends to the terminal or another file. See standard out-put on page 1062.
P2P Peer-to-Peer. A network that does not divide nodes into clients and servers. Eachcomputer on a P2P network can fulfill the roles of client and server. In the contextof a file-sharing network, this ability means that once a node has downloaded (partof) a file, it can act as a server. BitTorrent implements a P2P network.
packet A unit of data sent across a network. Packet is a generic term used to describe a unitof data at any layer of the OSI protocol stack, but it is most correctly used todescribe network or application layer (page 362) data units (“application protocoldata unit,” APDU).FOLDOC See also frame (page 1037) and datagram (page 1032).

1052 Glossary
packet filtering A technique used to block network traffic based on specified criteria, such as theorigin, destination, or type of each packet. See also firewall (page 1037).
packet sniffer A program or device that monitors packets on a network. See sniff on page 1060.
pager A utility that allows you to view a file one screen at a time (for example, less and more).
paging The process by which virtual memory is maintained by the operating system. Thecontents of process memory is moved (paged out) to the swap space (page 1063) asneeded to make room for other processes.
PAM Linux-PAM or Linux-Pluggable Authentication Modules. These modules allow asystem administrator to determine how various applications authenticate users.Refer to “PAM” on page 545.
parent process A process that forks other processes. See process (page 1054) and child process(page 1028).
partition A section of a (hard) disk that has a name so you can address it separately fromother sections. A disk partition can hold a filesystem or another structure, such asthe swap area. Under DOS and Windows, partitions (and sometimes whole disks)are labeled C:, D:, and so on. Also disk partition and slice.
passive FTP Allows FTP to work through a firewall by allowing the flow of data to be initiatedand controlled by the client FTP program instead of the server. Also called PASVFTP because it uses the FTP PASV command.
passphrase A string of words and characters that you type in to authenticate yourself. A pass-phrase differs from a password only in length. A password is usually short—6 to 10characters. A passphrase is usually much longer—up to 100 characters or more.The greater length makes a passphrase harder to guess or reproduce than a pass-word and therefore more secure.FOLDOC
password To prevent unauthorized access to a user’s account, an arbitrary string of characterschosen by the user or system administrator and used to authenticate the user whenattempting to log in.FOLDOC See also passphrase.
PASV FTP See passive FTP.
pathname A list of directories separated by slashes (/) and ending with the name of a file,which can be a directory. A pathname is used to trace a path through the file struc-ture to locate or identify a file.
pathname, last element of a
The part of a pathname following the final /, or the whole filename if there is no /.A simple filename. Also basename.
pathname element
One of the filenames that forms a pathname.
peripheral device
See device on page 1033.

Glossary 1053
persistent Data that is stored on nonvolatile media, such as a hard disk.
phish An attempt to trick users into revealing or sharing private information, especiallypasswords or financial information. The most common form is email purporting tobe from a bank or vendor that requests that a user fill out a form to “update” anaccount on a phoney Web site disguised to appear legitimate. Generally sent asspam (page 1061).
physical device A tangible device, such as a disk drive, that is physically separate from other, similardevices.
PID Process identification, usually followed by the word number. Linux assigns a uniquePID number as each process is initiated.
pipe A connection between programs such that standard output of one program is con-nected to standard input of the next. Also pipeline.
pixel The smallest element of a picture, typically a single dot on a display screen.
plaintext Text that is not encrypted. Also cleartext. Contrast with ciphertext (page 1029). Seealso “Encryption” on page 992.
Pluggable Authentication Modules
See PAM on page 1052.
point-to-point link
A connection limited to two endpoints, such as the connection between a pair ofmodems.
port A logical channel or channel endpoint in a communications system. The TCP(page 1064) and UDP (page 1066) transport layer protocols used on Ethernet useport numbers to distinguish between different logical channels on the same networkinterface on the same computer.
The /etc/services file (see the beginning of this file for more information) or theNIS (page 1050) services database specifies a unique port number for each applica-tion program. The number links incoming data to the correct service (program).Standard, well-known ports are used by everyone: Port 80 is used for HTTP (Web)traffic. Some protocols, such as TELNET and HTTP (which is a special form ofTELNET), have default ports specified as mentioned earlier but can use other portsas well.FOLDOC
port forwarding
The process by which a network port on one computer is transparently connectedto a port on another computer. If port X is forwarded from system A to system B,any data sent to port X on system A is sent to system B automatically. The connec-tion can be between different ports on the two systems. See also tunneling(page 1066).
portmapper A server that converts TCP/IP port numbers into RPC (page 1058) program num-bers. See “RPC Network Services” on page 387.

1054 Glossary
printable character
One of the graphic characters: a letter, number, or punctuation mark. Contrast witha nonprintable, or CONTROL, character. Also printing character.
private address space
IANA (page 1041) has reserved three blocks of IP addresses for private internetsor LANs:
10.0.0.0 - 10.255.255.255172.16.0.0 - 172.31.255.255192.168.0.0 - 192.168.255.255
You can use these addresses without coordinating with anyone outside of your LAN(you do not have to register the system name or address). Systems using these IPaddresses cannot communicate directly with hosts using the global address spacebut must go through a gateway. Because private addresses have no global meaning,routing information is not stored by DNSs and most ISPs reject privately addressedpackets. Make sure that your router is set up not to forward these packets onto theInternet.
privileged port A port (page 1053) with a number less than 1024. On Linux and other UNIX-likesystems, only a process running with root privileges can bind to a privileged port.Any user on Windows 98 and earlier Windows systems can bind to any port. Alsoreserved port.
procedure A sequence of instructions for performing a particular task. Most programming lan-guages, including machine languages, enable a programmer to define procedures thatallow the procedure code to be called from multiple places. Also subroutine.FOLDOC
process The execution of a command by Linux. See “Processes” on page 310.
.profile file A startup file in a user’s home directory that the Bourne Again or Z Shell executeswhen you log in. The TC Shell executes .login instead. You can use the .profile fileto run commands, set variables, and define functions.
program A sequence of executable computer instructions contained in a file. Linux utilities,applications, and shell scripts are all programs. Whenever you run a command thatis not built into a shell, you are executing a program.
PROM Programmable readonly memory. A kind of nonvolatile storage. ROM (page 1057)that can be written to using a PROM programmer.
prompt A cue from a program, usually displayed on the screen, indicating that it is waitingfor input. The shell displays a prompt, as do some of the interactive utilities, such asmail. By default the Bourne Again and Z Shells use a dollar sign ($) as a prompt, andthe TC Shell uses a percent sign (%).
protocol A set of formal rules describing how to transmit data, especially across a network.Low-level protocols define the electrical and physical standards, bit and byte order-ing, and transmission, error detection, and correction of the bit stream. High-levelprotocols deal with data formatting, including message syntax, terminal-to-computerdialog, character sets, and sequencing of messages.FOLDOC

Glossary 1055
proxy A service that is authorized to act for a system while not being part of that system.See also proxy gateway and proxy server.
proxy gateway A computer that separates clients (such as browsers) from the Internet, working as atrusted agent that accesses the Internet on their behalf. A proxy gateway passes arequest for data from an Internet service, such as HTTP from a browser/client, to aremote server. The data that the server returns goes back through the proxy gate-way to the requesting service. A proxy gateway should be transparent to the user.
A proxy gateway often runs on a firewall (page 1037) system and acts as a barrierto malicious users. It hides the IP addresses of the local computers inside the firewallfrom Internet users outside the firewall.
You can configure browsers, such as Mozilla/Firefox and Netscape, to use a differ-ent proxy gateway or to use no proxy for each URL access method including FTP,netnews, SNMP, HTTPS, and HTTP. See also proxy.
proxy server A proxy gateway that usually includes a cache (page 1027) that holds frequentlyused Web pages so that the next request for that page is available locally (and there-fore more quickly). The terms proxy server and proxy gateway are frequently inter-changed so that the use of cache does not rest exclusively with the proxy server. Seealso proxy.
Python A simple, high-level, interpreted, object-oriented, interactive language that bridgesthe gap between C and shell programming. Suitable for rapid prototyping or as anextension language for C applications, Python supports packages, modules, classes,user-defined exceptions, a good C interface, and dynamic loading of C modules. Ithas no arbitrary restrictions. For more information, see www.python.orgFOLDOC
quote When you quote a character, you take away any special meaning that it has in thecurrent context. You can quote a character by preceding it with a backslash. Whenyou are interacting with the shell, you can also quote a character by surrounding itwith single quotation marks. For example, the command echo \* or echo '*' dis-plays *. The command echo * displays a list of the files in the working directory.See ambiguous file reference (page 1022), metacharacter (page 1047), regular char-acter (page 1056), regular expression (page 1056), and special character(page 1061). See also escape on page 1035.
radio button In a GUI, a one of a group of buttons similar to those used to select the station on acar radio. Radio buttons within a group are mutually exclusive; only one buttoncan be selected at a time.
RAID Redundant array of inexpensive/independent disks. Two or more (hard) disk drivesused in combination to improve fault tolerance and performance. RAID can beimplemented in hardware or software.
RAM Random access memory. A kind of volatile storage. A data storage device for whichthe order of access to different locations does not affect the speed of access. Con-trast with a hard disk or tape drive, which provides quicker access to sequential

1056 Glossary
data because accessing a nonsequential location requires physical movement of thestorage medium and/or read/write head rather than just electronic switching. Con-trast with nonvolatile storage (page 1051). Also memory.FOLDOC
RAM disk RAM that is made to look like a floppy diskette or hard disk. A RAM disk is fre-quently used as part of the boot (page 1026) process.
RAS Remote access server. In a network, a computer that provides access to remote usersvia analog modem or ISDN connections. RAS includes the dial-up protocols andaccess control (authentication). It may be a regular fileserver with remote accesssoftware or a proprietary system, such as Shiva’s LANRover. The modems may beinternal or external to the device.
RDF Resource Description Framework. Being developed by W3C (the main standardsbody for the World Wide Web), a standard that specifies a mechanism for encodingand transferring metadata (page 1047). RDF does not specify what the metadatashould or can be. It can integrate many kinds of applications and data, using XMLas an interchange syntax. Examples of the data that can be integrated includelibrary catalogs and worldwide directories; syndication and aggregation of news,software, and content; and collections of music and photographs. Go towww.w3.org/RDF for more information.
redirection The process of directing standard input for a program to come from a file ratherthan from the keyboard. Also, directing standard output or standard error to go toa file rather than to the screen.
reentrant Code that can have multiple simultaneous, interleaved, or nested invocations thatdo not interfere with one another. Noninterference is important for parallel process-ing, recursive programming, and interrupt handling.
It is usually easy to arrange for multiple invocations (that is, calls to a subroutine)to share one copy of the code and any readonly data. For the code to be reentrant,however, each invocation must use its own copy of any modifiable data (or synchro-nized access to shared data). This goal is most often achieved by using a stack andallocating local variables in a new stack frame for each invocation. Alternatively,the caller may pass in a pointer to a block of memory that that invocation can use(usually for output), or the code may allocate some memory on a heap, especially ifthe data must survive after the routine returns.
Reentrant code is often found in system software, such as operating systems andteleprocessing monitors. It is also a crucial component of multithreaded programs,where the term thread-safe is often used instead of reentrant.FOLDOC
regular character
A character that always represents itself in an ambiguous file reference or anothertype of regular expression. Contrast with special character.
regular expression
A string—composed of letters, numbers, and special symbols—that defines one ormore strings. See Appendix A.

Glossary 1057
relative pathname
A pathname that starts from the working directory. Contrast with absolute path-name (page 1022).
remote access server
See RAS on page 1056.
remote filesystem
A filesystem on a remote computer that has been set up so that you can access (usu-ally over a network) its files as though they were stored on your local computer’sdisks. An example of a remote filesystem is NFS.
remote procedure call
See RPC on page 1058.
resolver The TCP/IP library software that formats requests to be sent to the DNS(page 1034) for hostname-to-Internet address conversion.FOLDOC
Resource Description Framework
See RDF on page 1056.
restore The process of turning an icon into a window. Contrast with iconify (page 1041)
return code See exit status on page 1036.
RFC Request for comments. Begun in 1969, one of a series of numbered Internet infor-mational documents and standards widely followed by commercial software andfreeware in the Internet and UNIX/Linux communities. Few RFCs are standardsbut all Internet standards are recorded in RFCs. Perhaps the single most influentialRFC has been RFC 822, the Internet electronic mail format standard.
The RFCs are unusual in that they are floated by technical experts acting on theirown initiative and reviewed by the Internet at large rather than being formallypromulgated through an institution such as ANSI. For this reason they remainknown as RFCs, even after they are adopted as standards. The RFC tradition ofpragmatic, experience-driven, after-the-fact standard writing done by individualsor small working groups has important advantages over the more formal, committee-driven process typical of ANSI or ISO. For a complete list of RFCs, go towww.rfc-editor.org.FOLDOC
roam To move a computer between wireless access points (page 1069) on a wireless net-work without the user or applications being aware of the transition. Movingbetween access points typically results in some packet loss, although this loss istransparent to programs that use TCP.
ROM Readonly memory. A kind of nonvolatile storage. A data storage device that is man-ufactured with fixed contents. In general, ROM describes any storage system whosecontents cannot be altered, such as a phonograph record or printed book. Whenused in reference to electronics and computers, ROM describes semiconductor inte-grated circuit memories, of which several types exist, and CD-ROM.

1058 Glossary
ROM is nonvolatile storage—it retains its contents even after power has beenremoved. ROM is often used to hold programs for embedded systems, as these usu-ally have a fixed purpose. ROM is also used for storage of the BIOS (page 1025) ina computer. Contrast with RAM (page 1055).FOLDOC
root directory The ancestor of all directories and the start of all absolute pathnames. The name ofthe root directory is /.
root filesystem The filesystem that is available when the system is brought up in recovery mode.The name of this filesystem is always /. You cannot unmount or mount the root file-system. You can remount root to change its mount options.
root login Usually the username of Superuser (page 1063).
root (user) Another name for Superuser (page 1063).
root window Any place on the desktop not covered by a window, object, or panel.
rotate When a file, such as a log file, gets indefinitely larger, you must keep it from takingup too much space on the disk. Because you may need to refer to the informationin the log files in the near future, it is generally not a good idea to delete the con-tents of the file until it has aged. Instead you can periodically save the current logfile under a new name and create a new, empty file as the current log file. You cankeep a series of these files, renaming each as a new one is saved. You will thenrotate the files. For example, you might remove xyzlog.4, xyzlog.3→xyzlog.4,xyzlog.2→xyzlog.3, xyzlog.1→xyzlog.2, xyzlog→xyzlog.1, and create a newxyzlog file. By the time you remove xyzlog.4, it will not contain any informationmore recent than you want to remove.
router A device (often a computer) that is connected to more than one similar type of net-work to pass data between them. See gateway on page 1038.
RPC Remote procedure call. A call to a procedure (page 1054) that acts transparentlyacross a network. The procedure itself is responsible for accessing and using the net-work. The RPC libraries make sure that network access is transparent to the appli-cation. RPC runs on top of TCP/IP or UDP/IP.
RSA A public key encryption (page 993) technology that is based on the lack of an effi-cient way to factor very large numbers. Because of this lack, it takes an extraordi-nary amount of computer processing time and power to deduce an RSA key. TheRSA algorithm is the de facto standard for data sent over the Internet.
run To execute a program.
runlevel Before the introduction of Upstart daemon, runlevels specified the state of the sys-tem, including single-user and multiuser. For more information refer to “Runlevelemulation” on page 502.
Samba A free suite of programs that implement the Server Message Block (SMB) protocol.See SMB (page 1060).

Glossary 1059
schema Within a GUI, a pattern that helps you see and interpret the information that is pre-sented in a window, making it easier to understand new information that is pre-sented using the same schema.
scroll To move lines on a terminal or window up and down or left and right.
scrollbar A widget (page 1068) found in graphical user interfaces that controls (scrolls)which part of a document is visible in the window. A window can have a horizontalscrollbar, a vertical scrollbar (more common), or both.FOLDOC
server A powerful centralized computer (or program) designed to provide information toclients (smaller computers or programs) on request.
session The lifetime of a process. For a desktop, it is the desktop session manager. For acharacter-based terminal, it is the user’s login shell process. In KDE, it is launchedby kdeinit. A session may also be the sequence of events between when you startusing a program, such as an editor, and when you finish.
setgid When you execute a file that has setgid (set group ID) permission, the process exe-cuting the file takes on the privileges of the group the file belongs to. The ls utilityshows setgid permission as an s in the group’s executable position. See also setuid.
setuid When you execute a file that has setuid (set user ID) permission, the process execut-ing the file takes on the privileges of the owner of the file. As an example, if you runa setuid program that removes all the files in a directory, you can remove files in anyof the file owner’s directories, even if you do not normally have permission to do so.When the program is owned by root, you can remove files in any directory that auser working with root privileges can remove files from. The ls utility shows setuidpermission as an s in the owner’s executable position. See also setgid.
sexillion In the British system, 1036. In the American system, this number is named undecil-lion. See also large number (page 1044).
SHA1 Secure Hash Algorithm 1. The SHA family is a set of cryptographic hash(page 1039) algorithms that were designed by the National Security Agency (NSA).The second member of this family is SHA1, a successor to MD5 (page 1047). Seealso cryptography on page 1031.
share A filesystem hierarchy that is shared with another system using SMB (page 1060).Also Windows share (page 1069).
shared network topology
A network, such as Ethernet, in which each packet may be seen by systems otherthan its destination system. Shared means that the network bandwidth is shared byall users.
shell A Linux system command processor. The three major shells are the Bourne AgainShell (page 1026), the TC Shell (page 1064), and the Z Shell (page 1070).
shell function A series of commands that the shell stores for execution at a later time. Shell func-tions are like shell scripts but run more quickly because they are stored in the

1060 Glossary
computer’s main memory rather than in files. Also, a shell function is run in theenvironment of the shell that calls it (unlike a shell script, which is typically run ina subshell).
shell script An ASCII file containing shell commands. Also shell program.
signal A very brief message that the UNIX system can send to a process, apart from theprocess’s standard input. Refer to “trap: Catches a Signal” on page 451.
simple filename
A single filename containing no slashes (/). A simple filename is the simplest formof pathname. Also the last element of a pathname. Also basename (page 1025).
single-user system
A computer system that only one person can use at a time. Contrast with multiusersystem (page 1049).
slider A widget (page 1068) that allows a user to set a value by dragging an indicatoralong a line. Many sliders allow the user also to click on the line to move the indica-tor. Differs from a scrollbar (page 1059) in that moving the indicator does notchange other parts of the display.
SMB Server Message Block. Developed in the early 1980s by Intel, Microsoft, and IBM,SMB is a client/server protocol that is the native method of file and printer sharingfor Windows. In addition, SMB can share serial ports and communications abstrac-tions, such as named pipes and mail slots. SMB is similar to a remote procedure call(RPC, page 1058) that has been customized for filesystem access. Also MicrosoftNetworking.FOLDOC
smiley A character-based glyph (page 1038), typically used in email, that conveys an emo-tion. The characters :-) in a message portray a smiley face (look at it sideways).Because it can be difficult to tell when the writer of an electronic message is sayingsomething in jest or in seriousness, email users often use :-) to indicate humor. Thetwo original smileys, designed by Scott Fahlman, were :-) and :-(. Also emoticon,smileys, and smilies. For more information search on smiley on the Internet.
smilies See smiley.
SMTP Simple Mail Transfer Protocol. A protocol used to transfer electronic mail betweencomputers. It is a server-to-server protocol, so other protocols are used to access themessages. The SMTP dialog usually happens in the background under the control ofa message transport system such as exim4.FOLDOC
snap (windows)
As you drag a window toward another window or edge of the workspace, it canmove suddenly so that it is adjacent to the other window/edge. Thus the windowsnaps into position.
sneakernet Using hand-carried magnetic media to transfer files between machines.
sniff To monitor packets on a network. A system administrator can legitimately sniffpackets and a malicious user can sniff packets to obtain information such as user-names and passwords. See also packet sniffer (page 1052).
Glossary 1061
SOCKS A networking proxy protocol embodied in a SOCKS server, which performs thesame functions as a proxy gateway (page 1055) or proxy server (page 1055).SOCKS works at the application level, requiring that an application be modified towork with the SOCKS protocol, whereas a proxy (page 1055) makes no demandson the application.
SOCKSv4 does not support authentication or UDP proxy. SOCKSv5 supports avariety of authentication methods and UDP proxy.
sort To put in a specified order, usually alphabetic or numeric.
SPACE character A character that appears as the absence of a visible character. Even though you can-not see it, a SPACE is a printable character. It is represented by the ASCII code 32 (dec-imal). A SPACE character is considered a blank or whitespace (page 1068).
spam Posting irrelevant or inappropriate messages to one or more Usenet newsgroups ormailing lists in deliberate or accidental violation of netiquette (page 1049). Also,sending large amounts of unsolicited email indiscriminately. This email usuallypromotes a product or service. Another common purpose of spam is to phish(page 1053). Spam is the electronic equivalent of junk mail. From the MontyPython “Spam” song.FOLDOC
sparse file A file that is large but takes up little disk space. The data in a sparse file is not dense(thus its name). Examples of sparse files are core files and dbm files.
spawn See fork on page 1037.
special character
A character that has a special meaning when it occurs in an ambiguous file referenceor another type of regular expression, unless it is quoted. The special charactersmost commonly used with the shell are * and ?. Also metacharacter (page 1047)and wildcard.
special file See device file on page 1033.
spin box In a GUI, a type of text box (page 1064) that holds a number you can change bytyping over it or using the up and down arrows at the end of the box. Also spinner.
spinner See spin box.
spoofing See IP spoofing on page 1043.
spool To place items in a queue, each waiting its turn for some action. Often used whenspeaking about printers. Also used to describe the queue.
SQL Structured Query Language. A language that provides a user interface to relationaldatabase management systems (RDBMS). SQL, the de facto standard, is also an ISOand ANSI standard and is often embedded in other programming languages.FOLDOC
square bracket A left square bracket ( [) or a right square bracket (]). These special charactersdefine character classes in ambiguous file references and other regular expressions.

1062 Glossary
SSH Communica-tions Security
The company that created the original SSH (secure shell) protocol suite(www.ssh.com). Linux uses OpenSSH (page 1051).
standard error A file to which a program can send output. Usually only error messages are sent tothis file. Unless you instruct the shell otherwise, it directs this output to the screen(that is, to the device file that represents the screen).
standard input A file from which a program can receive input. Unless you instruct the shell other-wise, it directs this input so that it comes from the keyboard (that is, from the devicefile that represents the keyboard).
standard output
A file to which a program can send output. Unless you instruct the shell otherwise,it directs this output to the screen (that is, to the device file that represents thescreen).
startup file A file that the login shell runs when you log in. The Bourne Again and Z Shells run.profile, and the TC Shell runs .login. The TC Shell also runs .cshrc whenever a newTC Shell or a subshell is invoked. The Z Shell runs an analogous file whose name isidentified by the ENV variable.
status line The bottom (usually the twenty-fourth) line of the terminal. The vim editor usesthe status line to display information about what is happening during an editingsession.
sticky bit An access permission bit that causes an executable program to remain on the swaparea of the disk. It takes less time to load a program that has its sticky bit set thanone that does not. Only a user with root privileges can set the sticky bit. If the stickybit is set on a directory that is publicly writable, only the owner of a file in thatdirectory can remove the file.
streaming tape A tape that moves at a constant speed past the read/write heads rather than speed-ing up and slowing down, which can slow the process of writing to or reading fromthe tape. A proper blocking factor helps ensure that the tape device will be keptstreaming.
streams See connection-oriented protocol on page 1030.
string A sequence of characters.
stylesheet See CSS on page 1031.
subdirectory A directory that is located within another directory. Every directory except the rootdirectory is a subdirectory.
subnet Subnetwork. A portion of a network, which may be a physically independent net-work segment, that shares a network address with other portions of the networkand is distinguished by a subnet number. A subnet is to a network as a network is toan internet.FOLDOC

Glossary 1063
subnet address The subnet portion of an IP address. In a subnetted network, the host portion of anIP address is split into a subnet portion and a host portion using a subnet mask (alsoaddress mask). See also subnet number.
subnet mask A bit mask used to identify which bits in an IP address correspond to the networkaddress and subnet portions of the address. Called a subnet mask because the net-work portion of the address is determined by the number of bits that are set in themask. The subnet mask has ones in positions corresponding to the network andsubnet numbers and zeros in the host number positions. Also address mask.
subnet number The subnet portion of an IP address. In a subnetted network, the host portion of anIP address is split into a subnet portion and a host portion using a subnet mask.Also address mask. See also subnet address.
subpixel hinting
Similar to anti-aliasing (page 1023) but takes advantage of colors to do the anti-aliasing. Particularly useful on LCD screens.
subroutine See procedure on page 1054.
subshell A shell that is forked as a duplicate of its parent shell. When you run an executablefile that contains a shell script by using its filename on the command line, the shellforks a subshell to run the script. Also, commands surrounded with parentheses arerun in a subshell.
superblock A block that contains control information for a filesystem. The superblock containshousekeeping information, such as the number of inodes in the filesystem and freelist information.
superserver The extended Internet services daemon. Refer to xinetd on page 386.
Superuser A user working with root privileges. This user has access to anything any other sys-tem user has access to and more. The system administrator must be able to becomeSuperuser (work with root privileges) to establish new accounts, change passwords,and perform other administrative tasks. The username of Superuser is usually root.Also root or root user.
swap The operating system moving a process from main memory to a disk, or vice versa.Swapping a process to the disk allows another process to begin or continue execu-tion. Refer to “swap” on page 564.
swap space An area of a disk (that is, a swap file) used to store the portion of a process’s mem-ory that has been paged out. Under a virtual memory system, the amount of swapspace—rather than the amount of physical memory—determines the maximum sizeof a single process and the maximum total size of all active processes. Also swaparea or swapping area.FOLDOC
switch See network switch on page 1050.

1064 Glossary
symbolic link A directory entry that points to the pathname of another file. In most cases a sym-bolic link to a file can be used in the same ways a hard link can be used. Unlike ahard link, a symbolic link can span filesystems and can connect to a directory.
system administrator
The person responsible for the upkeep of the system. The system administrator has theability to log in as root or use sudo to work with root privileges. See also Superuser.
system console The main system terminal, usually directly connected to the computer and the onethat receives system error messages. Also console and console terminal.
system mode The designation for the state of the system while it is doing system work. Someexamples are making system calls, running NFS and autofs, processing networktraffic, and performing kernel operations on behalf of the system. Contrast withuser mode (page 1067).
System V One of the two major versions of the UNIX system.
TC Shell tcsh. An enhanced but completely compatible version of the BSD UNIX C shell, csh.
TCP Transmission Control Protocol. The most common transport layer protocol used onthe Internet. This connection-oriented protocol is built on top of IP (page 1042) andis nearly always seen in the combination TCP/IP (TCP over IP). TCP adds reliablecommunication, sequencing, and flow control and provides full-duplex, process-to-process connections. UDP (page 1066), although connectionless, is the other proto-col that runs on top of IP.FOLDOC
tera- In the binary system, the prefix tera- multiplies by 240 (1,099,511,627,776). Ter-abyte is a common use of this prefix. Abbreviated as T. See also large number onpage 1044.
termcap Terminal capability. The /etc/termcap file contains a list of various types of termi-nals and their characteristics. System V replaced the function of this file with theterminfo system.
terminal Differentiated from a workstation (page 1069) by its lack of intelligence, a terminalconnects to a computer that runs Linux. A workstation runs Linux on itself.
terminfo Terminal information. The /usr/lib/terminfo directory contains many subdirecto-ries, each containing several files. Each of those files is named for and holds a sum-mary of the functional characteristics of a particular terminal. Visually orientedtextual programs, such as vim, use these files. An alternative to the termcap file.
text box A GUI widget (page 1068) that allows a user to enter text.
theme Defined as an implicit or recurrent idea, theme is used in a GUI to describe a lookthat is consistent for all elements of a desktop. Go to themes.freshmeat.net forexamples.
thicknet A type of coaxial cable (thick) used for an Ethernet network. Devices are attachedto thicknet by tapping the cable at fixed points.

Glossary 1065
thinnet A type of coaxial cable (thin) used for an Ethernet network. Thinnet cable is smallerin diameter and more flexible than thicknet cable. Each device is typically attachedto two separate cable segments by using a T-shaped connector; one segment leads tothe device ahead of it on the network and one to the device that follows it.
thread-safe See reentrant on page 1056.
thumb The movable button in the scrollbar (page 1059) that positions the image in thewindow. The size of the thumb reflects the amount of information in the buffer.Also bubble.
tick A mark, usually in a check box (page 1028), that indicates a positive response. Themark can be a checkmark (✔) or an x. Also checkmark or check.
TIFF Tagged Image File Format. A file format used for still-image bitmaps, stored intagged fields. Application programs can use the tags to accept or ignore fields,depending on their capabilities.FOLDOC
tiled windows An arrangement of windows such that no window overlaps another. The oppositeof cascading windows (page 1027).
time to live See TTL.
toggle To switch between one of two positions. For example, the ftp glob command togglesthe glob feature: Give the command once, and it turns the feature on or off; give thecommand again, and it sets the feature back to its original state.
token A basic, grammatically indivisible unit of a language, such as a keyword, operator,or identifier.FOLDOC
token ring A type of LAN (page 1044) in which computers are attached to a ring of cable. Atoken packet circulates continuously around the ring. A computer can transmitinformation only when it holds the token.
tooltip A minicontext help system that a user activates by allowing the mouse pointer tohover (page 1040) over an object (such as those on a panel).
transient window
A dialog or other window that is displayed for only a short time.
Transmission Control Protocol
See TCP on page 1064.
Trojan horse A program that does something destructive or disruptive to your system. Its actionis not documented, and the system administrator would not approve of it if shewere aware of it. See “Avoiding a Trojan Horse” on page 520.
The term Trojan horse was coined by MIT-hacker-turned-NSA-spook Dan Edwards. Itrefers to a malicious security-breaking program that is disguised as something benign,such as a directory lister, archive utility, game, or (in one notorious 1990 case on theMac) a program to find and destroy viruses. Similar to back door (page 1024).FOLDOC

1066 Glossary
TTL Time to live.
1. All DNS records specify how long they are good for—usually up to a week at most. This time is called the record’s time to live. When a DNS server or an application stores this record in cache (page 1027), it decrements the TTL value and removes the record from cache when the value reaches zero. A DNS server passes a cached record to another server with the cur-rent (decremented) TTL guaranteeing the proper TTL, no matter how many servers the record passes through.
2. In the IP header, a field that indicates how many more hops the packet should be allowed to make before being discarded or returned.
TTY Teletypewriter. The terminal device that UNIX was first run from. Today TTYrefers to the screen (or window, in the case of a terminal emulator), keyboard, andmouse that are connected to a computer. This term appears in UNIX, and Linux haskept the term for the sake of consistency and tradition.
tunneling Encapsulation of protocol A within packets carried by protocol B, such that Atreats B as though it were a data link layer. Tunneling is used to transfer databetween administrative domains that use a protocol not supported by the internetconnecting those domains. It can also be used to encrypt data sent over a publicinternet, as when you use ssh to tunnel a protocol over the Internet.FOLDOC See alsoVPN (page 1068) and port forwarding (page 1053).
UDP User Datagram Protocol. The Internet standard transport layer protocol that pro-vides simple but unreliable datagram services. UDP is a connectionless protocol(page 1030) that, like TCP (page 1064), is layered on top of IP (page 1042).
Unlike TCP, UDP neither guarantees delivery nor requires a connection. As a resultit is lightweight and efficient, but the application program must handle all errorprocessing and retransmission. UDP is often used for sending time-sensitive datathat is not particularly sensitive to minor loss, such as audio and video data.FOLDOC
UID User ID. A number that the passwd database associates with a username.
undecillion In the American system, 1036. In the British system, this number is named sexillion.See also large number (page 1044).
unicast A packet sent from one host to another host. Unicast means one source and onedestination.
Unicode A character encoding standard that was designed to cover all major modern writtenlanguages with each character having exactly one encoding and being representedby a fixed number of bits.
unmanaged window
See ignored window on page 1041.

Glossary 1067
URI Universal Resource Identifier. The generic set of all names and addresses that areshort strings referring to objects (typically on the Internet). The most common kindsof URIs are URLs.FOLDOC
URL Uniform (was Universal) Resource Locator. A standard way of specifying the loca-tion of an object, typically a Web page, on the Internet. URLs are a subset of URIs.
usage message A message displayed by a command when you call the command using incorrectcommand line arguments.
User Datagram Protocol
See UDP.
User ID See UID.
user interface See interface on page 1042.
user mode The designation for the state of the system while it is doing user work, such as run-ning a user program (but not the system calls made by the program). Contrast withsystem mode (page 1064).
username The name you enter in response to the login: prompt. Other users use your user-name when they send you mail or write to you. Each username has a correspondinguser ID, which is the numeric identifier for the user. Both the username and the userID are stored in the passwd database (/etc/passwd or the NIS equivalent). Alsologin name.
userspace The part of memory (RAM) where applications reside. Code running in userspacecannot access hardware directly and cannot access memory allocated to other appli-cations. Also userland. See the KernelAnalysis-HOWTO.
UTC Coordinated Universal Time. UTC is the equivalent to the mean solar time at theprime meridian (0 degrees longitude). Also called Zulu time (Z stands for longitudezero) and GMT (Greenwich Mean Time).
UTF-8 An encoding that allows Unicode (page 1066) characters to be represented usingsequences of 8-bit bytes.
utility A program included as a standard part of Linux. You typically invoke a utilityeither by giving a command in response to a shell prompt or by calling it fromwithin a shell script. Utilities are often referred to as commands. Contrast with buil-tin (command) (page 1027).
UUID Universally Unique Identifier. A 128-bit number that uniquely identifies an objecton the Internet. Frequently used on Linux systems to identify an ext2 or ext3 diskpartition.
variable A name and an associated value. The shell allows you to create variables and usethem in shell scripts. Also, the shell inherits several variables when it is invoked, and

1068 Glossary
it maintains those and other variables while it is running. Some shell variablesestablish characteristics of the shell environment; others have values that reflect dif-ferent aspects of your ongoing interaction with the shell.
viewport Same as workspace (page 1069).
virtual console Additional consoles, or displays, that you can view on the system, or physical, con-sole. See page 136 for more information.
virus A cracker (page 1031) program that searches out other programs and “infects”them by embedding a copy of itself in them, so that they become Trojan horses(page 1065). When these programs are executed, the embedded virus is executed aswell, propagating the “infection,” usually without the user’s knowledge. By analogywith biological viruses.FOLDOC
VLAN Virtual LAN. A logical grouping of two or more nodes that are not necessarily onthe same physical network segment but that share the same network number. AVLAN is often associated with switched Ethernet.FOLDOC
VPN Virtual private network. A private network that exists on a public network, such asthe Internet. A VPN is a less expensive substitute for company-owned/leased linesand uses encryption (page 992) to ensure privacy. A nice side effect is that you cansend non-Internet protocols, such as AppleTalk, IPX, or NetBIOS (page 1049),over the VPN connection by tunneling (page 1066) them through the VPN IPstream.
W2K Windows 2000 Professional or Server.
W3C World Wide Web Consortium (www.w3.org).
WAN Wide area network. A network that interconnects LANs (page 1044) and MANs(page 1047), spanning a large geographic area (typically states or countries).
WAP Wireless access point. A bridge or router between wired and wireless networks.WAPs typically support some form of access control to prevent unauthorized clientsfrom connecting to the network.
Web ring A collection of Web sites that provide information on a single topic or group ofrelated topics. Each home page that is part of the Web ring has a series of links thatlet you go from site to site.
whitespace A collective name for SPACEs and/or TABs and occasionally NEWLINEs. Also white space.
wide area network
See WAN.
widget The basic objects of a graphical user interface. A button, combo box (page 1029),and scrollbar (page 1059) are examples of widgets.
wildcard See metacharacter on page 1047.

Glossary 1069
Wi-Fi Wireless Fidelity. A generic term that refers to any type of 802.11 (page 1022) wire-less network.
window On a display screen, a region that runs or is controlled by a particular program.
window manager
A program that controls how windows appear on a display screen and how youmanipulate them.
Windows share
See share on page 1059.
WINS Windows Internet Naming Service. The service responsible for mapping NetBIOSnames to IP addresses. WINS has the same relationship to NetBIOS names thatDNS has to Internet domain names.
WINS server The program responsible for handling WINS requests. This program caches nameinformation about hosts on a local network and resolves them to IP addresses.
wireless access point
See WAP.
word A sequence of one or more nonblank characters separated from other words by TABs,SPACEs, or NEWLINEs. Used to refer to individual command line arguments. In vim, aword is similar to a word in the English language—a string of one or more charac-ters bounded by a punctuation mark, a numeral, a TAB, a SPACE, or a NEWLINE.
Work buffer A location where vim stores text while it is being edited. The information in theWork buffer is not written to the file on the disk until you give the editor a com-mand to write it.
working directory
The directory that you are associated with at any given time. The relative path-names you use are relative to the working directory. Also current directory.
workspace A subdivision of a desktop (page 1033) that occupies the entire display. Seepage 106.
workstation A small computer, typically designed to fit in an office and be used by one personand usually equipped with a bit-mapped graphical display, keyboard, and mouse.Differentiated from a terminal (page 1064) by its intelligence. A workstation runsLinux on itself while a terminal connects to a computer that runs Linux.
worm A program that propagates itself over a network, reproducing itself as it goes. Todaythe term has negative connotations, as it is assumed that only crackers (page 1031)write worms. Compare to virus (page 1068) and Trojan horse (page 1065). FromTapeworm in John Brunner’s novel, The Shockwave Rider, Ballantine Books, 1990(via XEROX PARC).FOLDOC
WYSIWYG What You See Is What You Get. A graphical application, such as a word processor,whose display is similar to its printed output.

1070 Glossary
X server The X server is the part of the X Window System that runs the mouse, keyboard,and display. (The application program is the client.)
X terminal A graphics terminal designed to run the X Window System.
X Window System
A design and set of tools for writing flexible, portable windowing applications, cre-ated jointly by researchers at MIT and several leading computer manufacturers.
XDMCP X Display Manager Control Protocol. XDMCP allows the login server to acceptrequests from network displays. XDMCP is built into many X terminals.
xDSL Different types of DSL (page 1035) are identified by a prefix, for example, ADSL,HDSL, SDSL, and VDSL.
Xinerama An extension to X.org. Xinerama allows window managers and applications to usethe two or more physical displays as one large virtual display. Refer to the Xin-erama-HOWTO.
XML Extensible Markup Language. A universal format for structured documents anddata on the Web. Developed by W3C (page 1068), XML is a pared-down version ofSGML. See www.w3.org/XML and www.w3.org/XML/1999/XML-in-10-points.
XSM X Session Manager. This program allows you to create a session that includes cer-tain applications. While the session is running, you can perform a checkpoint (savesthe application state) or a shutdown (saves the state and exits from the session).When you log back in, you can load your session so that everything in your sessionis running just as it was when you logged off.
Z Shell zsh. A shell (page 1059) that incorporates many of the features of the Bourne AgainShell (page 1026), Korn Shell (page 1044), and TC Shell (page 1064), as well asmany original features.
Zulu time See UTC on page 1067.
10711071
Index
Only variables that must always appear with a leading dollar sign are indexed with a leading dollarsign. Other variables are indexed without a leading dollar sign.
Symbols
! Boolean operator, 309, 462, 466! variable, 317!! to reexecute the previous event, 317!$ last word of the previous event, 319# comment, 285# prompt, 488# variable, 439#! to choose a script shell, 284$ in regular expressions, 974$ in variable name, 297$! variable, 438$# variable, 423$$ variable, 425, 437$(...). See Command, substitution$* variable, 440$? variable, 438$@ variable, 411, 440${}, expand variable, 443$0 variable, 439% job number, 238, 291& background, 237, 288, 289, 290, 312, 438, 1024& bitwise operator, 462, 465& in replacement string, 977, 980&& Boolean operator, 459, 463, 464, 466((...)). See Arithmetic evaluation
() command grouping, 289() in shell functions, 332
* in regular expressions, 974
* special character, 240+ in full regular expressions, 978. (dot) builtin, 279, 333, 449, 457. directory, 193, 240, 567. in regular expressions, 973./ to execute a file in the working directory, 283, 303.. directory, 193, 240, 567.bash_history file, 312.bash_login file, 277.bash_logout file, 277.bash_profile file, 277, 313, 554.bashrc file, 190, 277, 554.bmp filename extension, 188.bz2 filename extension, 160, 188.c filename extension, 187.cgi filename extension, 931.conf filename extension, 528.cshrc file, 1031.deb filename extension, 599.forward file, 764.gif filename extension, 188.gz filename extension, 161, 188.htaccess file, 925, 962.html filename extension, 188, 931

1072 Index
.htpasswd file, 962
.inputrc file, 325
.jpeg filename extension, 188, 1043
.jpg filename extension, 188, 1043
.login file, 1046
.logout file, 1046
.netrc file, 735
.o filename extension, 187
.pdf filename extension, 187
.pgpkey file, 168
.php filename extension, 931
.pl filename extension, 931
.plan file, 168
.ppd filename extension, 626
.profile file, 277, 554, 1054
.project file, 168
.ps filename extension, 187
.rhosts file, 373, 1001
.ssh directory, 709
.tar.bz2 filename extension, 162
.tar.gz filename extension, 162
.tar.Z filename extension, 162, 187
.tbz filename extension, 162
.tgz filename extension, 187
.tif filename extension, 188, 1065
.tiff filename extension, 188, 1065
.toprc file, 673
.torrent filename extension, 40
.Trash directory, 100
.txt filename extension, 187, 241
.tz filename extension, 162
.var filename extension, 951
.xhtml filename extension, 931
.Z filename extension, 161, 187/ (root) directory, 33, 186, 194/bin directory, 194/bin/false file, 561/boot
grub/menu.lst file, 648, 651location, 676partition, 32, 646
/boot directory, 194/dev, 194, 226, 1046
fd0 file, 554hda file, 554hdc file, 554nst0 file, 668null file, 233, 415, 454, 555, 557, 684pts file, 555random file, 556
rmt/0 file, 666sda file, 554special files, 567st0 file, 668tty file, 450urandom file, 556zero file, 556
/etc, 195aliases file, 557, 681, 763alternatives directory, 557anacrontab file, 384, 670apache2 directory, 924apt
apt.conf file, 590apt.conf.d directory, 590sources.list file, 589
at.allow file, 557at.deny file, 557auto_master file, 819bashrc file, 277bind directory, 866cron.allow file, 557cron.d directory, 385, 668cron.deny file, 557crontab file, 385, 669cups directory, 629default, 557
autofs file, 820exim4 file, 765nis file, 786, 791, 797syslogd file, 690
defaultdomain file, 785, 786defaultrouter file, 386dhcp3
dhclient.conf file, 539dhcpd.conf file, 540
dumpdates file, 557, 666event.d directory, 502, 504event.d/control-alt-delete file, 518exim4 directory, 766exports file, 809, 812firestarter directory, 888fstab file, 384, 558, 576, 804, 807ftpusers file, 752group file, 558, 661, 1038hosts file, 368, 383, 559, 781hosts.allow file, 531, 532hosts.deny file, 531, 532hosts.equiv file, 372, 1001init.d directory, 507, 561

Index 1073
init.d/apache2 file, 918inittab file, 506, 559issue file, 134lftp.conf file, 718login.defs file, 560, 660logrotate.conf file, 685logrotate.d directory, 685magic file, 565mailname file, 759motd file, 134, 559, 561, 678mtab file, 559named.conf file, 860, 874, 879nologin.txt file, 548, 561nsswitch.conf file, 542, 559, 782ntp.conf file, 385opt directory, 195pam.d directory, 545, 548, 560passwd file, 412, 516, 560printcap file, 561profile file, 277, 561protocols file, 561, 904rc.local file, 508rc?.d directory, 507, 508resolv.conf file, 561, 859rpc file, 388, 562securetty file, 489security/access.conf file, 489services file, 384, 388, 562shadow file, 516, 562shells file, 525skel directory, 660ssh directory, 709sudoers file, 494syslog.conf file, 386, 688termcap file, 1064vsftpd.chroot_list file, 752vsftpd.user_list file, 752X11, 74X11/xorg.conf file, 74yp.conf file, 787ypserv.conf file, 791
/home directory, 195/home partition, 33/lib, 195
modules directory, 195modules file, 643security directory, 545, 547
/lost+found directory, 520/mnt directory, 195/opt directory, 33, 195, 607
/proccontents, 195filesystem, 563, 572mounts file, 560sys file, 636
/root, 195/sbin, 195/sys directory, 195, 565/tmp directory, 195, 425, 684/usr, 195
bin directory, 195doc directory, 196games directory, 196include, 196info directory, 196lib directory, 196lib/terminfo directory, 1064local directory, 196, 607localpartition, 33man directory, 196partition, 33pub/ascii file, 1023sbin daemons, 384sbin directory, 196share, 196
doc directory, 678magic file, 1046
src directory, 196/var, 196
ftp directory, 741lib/nfs/etab file, 815lib/nfs/rmtab file, 816log, 196, 565, 982
auth.log file, 566disk usage, 684lastlog file, 196messages file, 196, 545, 565, 679, 684,
982secure file, 545, 982syslog file, 872vsftpd.log file, 752wtmp file, 196, 686
mail directory, 684, 761partition, 33spool, 982
disk usage, 684mail directory, 303
tmp directory, 684www directory, 918, 924, 925www file, 920

1074 Index
: (null) builtin, 444, 453, 457:– substitute default value, 443:= assign default value, 443:? display error message, 444; command separator, 286< redirect standard input, 230, 280, 1022<& duplicate input file descriptor, 430<< Here document, 427, 1022> redirect standard output, 228, 231, 280, 281, 1022>& duplicate output file descriptor, 281, 430>> append standard output, 232, 1022? in full regular expressions, 978? special character, 239@ in a network address, 370, 371@ in an email address, 371@ variable, 411[] character class, 241, 973, 1028[[...]] builtin, 460. See also Conditional expression\ escape character, 146, 287, 297\( in regular expressions, 976\) in regular expressions, 976\n in replacement strings, 980^ bitwise operator, 462^ in regular expressions, 974^ quick substitution character, 320{ expansion, 340{ in a shell function, 332| bitwise operator, 462| Boolean operator, 978| in full regular expressions, 978| pipe, 234, 281, 288|| Boolean operator, 309, 459, 463, 464, 465} expansion, 340} in a shell function, 332~ (tilde) expansion, 190, 301, 341~ home directory, 301. See also Home directory~ in pathnames, 190‘ ...‘. See Command, substitution
Numerics
0< redirect standard input, 2801> redirect standard output, 280100BaseT cable, 35710Base2 cable, 35710BaseT cable, 3572> redirect standard error, 2803-DES encryption, 99564-bit PC processor architecture, 27802.11, 1022
A
–a Boolean operator, 403, 459Aborting execution, 138Absolute pathname, 189, 224, 307, 1022accept utility, 629Access, 1022Access Control List. See ACLAccess permission, 199, 200, 284, 1022
change using chmod, 200directory, 202display using ls, 199execute, 199, 283group, 199other, 199owner, 199read, 199write, 199
access.conf file, 489accton utility, 1002ACL, 203, 997, 1019, 1022
access rules, 204default rules, 207effective rights mask, 206enabling, 204exports file, 812
acpi boot parameter, 64acpid daemon, 384Actions menu, 132Active window, 139, 1022Ad hoc mode, wireless, 695Add/Remove Applications window, 120addbanner shell script, 453Adding a user, 658, 660Address
IP, 1042class, 364representation, 363
MAC, 541, 1046mask, 367, 1022network, 370, 1050space, private, 697, 1054
adduser utility, 660Adept package manager, 592adfs filesystem, 570Administration submenu, 111Advanced Encryption Standard, 995AES encryption, 995affs filesystem, 570

Index 1075
AIDE utility, 521, 1001, 1006AIM, 354Algorithm, 467Alias, 1022
bash, 328double versus single quotation marks, 329email, 763quotation marks, 329recursion, 328recursive plunge, 331
alias builtin, 328alias.conf file, 924aliases file, 557, 681, 763Alphanumeric character, 1022Alternate CD, 28
See also Installationchecking for defects, 47function keys, 62installing software from, 119ISO image, 37menu, 65recovery mode, 65
alternatives directory, 557amanda utility, 663Ambiguous file reference, 239, 1022AMD64 processor architecture, 27American National Standards Institute, 9anacron daemon, 384anacron file, 670anacron init script, 668, 670anacrontab file, 384, 670anacrontab utility, 384AND bitwise operator, 366, 367AND Boolean operator, 403, 459Andreessen, Marc, 391Angle bracket, 1022ANI, 1004Animate, 1022Anonymous FTP, 390, 735ANSI, 9ANSI C, 9ansi terminal name, 989Answers to questions, finding, 389Antialiasing, 1023, 1063Apache, 915
.htaccess context, 931
.htaccess file, 925, 962
.htpasswd file, 962AddHandler directive, 939
Alias directive, 940alias.conf file, 924Allow directive, 946AllowOverride directive, 946apache2 daemon, 384, 917, 918apache2 directory, 924apache2ctl utility, 917, 956authentication modules, 961CGI, 958, 962Common Gateway Interface. See Apache, CGIconfiguration directives. See Apache, directivescontainers, 932content, 916, 918, 920content negotiation, 951contexts, 931Deny directive, 947directives, 925
control content, 939control processes, 935security, 946
<Directory> container, 932, 950directory context, 931directory listings, 953DirectoryIndex directive, 930document root, 918DocumentRoot directive, 929, 950DSO, 916, 957dynamic shared objects, 916, 957error codes, 964ErrorDocument directive, 940ErrorLog directive, 938<Files> container, 932files, where to find, 921filesystem layout, 921group apache, 918Group directive, 943group www-data, 918HostnameLookups directive, 937httpd daemon and, 918HTTPS protocol, 959<IfModule> container, 933, 949Include directive, 944index.cgi file, 931index.html file, 931index.php file, 931index.pl file, 931index.xhtml file, 931indexing, 953IndexOptions directive, 940

1076 Index
Apache, continuedJumpStart, getting Apache up and running, 919<Limit> container, 933<LimitExcept> container, 934Listen directive, 926LoadModule directive, 944, 950<Location> container, 934<LocationMatch> container, 935log, 924LogLevel directive, 939logresolve utility, 938MaxClients directive, 935MaxRequestsPerChild directive, 935MaxSpareServers directive, 936MinSpareServers directive, 936mod_ssl module, 959modules, 916, 957MRTG, 964multiviews, 952NameVirtualHost directive, 936Options directive, 944Order directive, 948pathname, 925Perl, 963PHP, 963prerequisites, 917privileged port, 918process, defined, 918public_html directory, 930Python, 963redirect, 951role alias, 928root permission, 918ScriptAlias directive, 945scripting modules, 962self-signed certificate, 959server config context, 931server, defined, 918ServerAdmin directive, 920, 928, 950ServerName directive, 919, 928, 950ServerRoot directive, 942, 949ServerSignature directive, 943ServerTokens directive, 942Software Foundation, 915special directives. See Apache, containersSSL, 959StartServers directive, 937terminology, 918Testing, 920
Timeout directive, 938troubleshooting, 956type maps, 951UseCanonicalName directive, 938, 951User directive, 946UserDir directive, 929users publishing content, 929virtual host context, 931virtual hosts, 953<VirtualHost> container, 935webalizer utility, 964www directory, 924
apache2 daemon. See Apache, apache2 daemonapache2 directory, 924apache2 file, 918apache2 init script, 917apache2ctl utility, 917, 956API, 1023apic boot parameter, 64apm boot parameter, 64apmd daemon, 384Appearance Preferences window, 102Appearance, desktop, 102Append, 1023Append standard output, 231, 232Applet, 109, 1023
clock, 95Deskbar, 266
AppleTalk, 367Application, Run window, 269Application, terminating, 96Applications menu, 110apropos utility, 126, 165APT, 584, 588
See also aptitude utility; Software packageapt cron script, 590apt.conf file, 590apt.conf.d directory, 590apt-cache utility, 596apt-file utility, 587apt-get, downloading source code, 598cache, 590configuration files, 590dependencies. See Software package,
dependenciesJumpStart, using aptitude, to install and remove
packages, 585local package indexes, 590repositories. See Repositories

Index 1077
source code, downloading, 598sources.list file, 589update-notifier, 591
apt cron script, 590apt.conf file, 590apt.conf.d directory, 590apt-cache utility, 596apt-file utility, 587apt-get, downloading source code, 598aptitude utility, 592
commands, 592full-upgrade command, 595install command, 585install error, 589options, 593purge command, 586remove command, 586safe-upgrade command, 594show command, 595update command, 594
Architecture, processor, 26Archive, 1023
pack and unpack using tar, 161shell, 428
Argument, 191, 220, 1023command line, 440display, 440testing, 398
Arithmeticbash, 458expansion, 342expression, 1023
Arithmetic evaluation, 458Arithmetic evaluation, example, 413, 436, 459Array, 1023ASCII, 1023ascii file, 1023ASCII terminal, 1023ASP, 1024aspell utility, 413, 415Assembly language, 9Asterisk special character, 974Asymmetric encryption. See Public key encryptionAsynchronous communication, 569Asynchronous event, 1024at utility, 384, 557, 671AT&T Bell Laboratories, 5, 276at.allow file, 557at.deny file, 557
atd daemon, 384Athena, Project, 252ATM link, 356Attachment, 1024auth.log file, 566Authenticated relaying, email, 777Authentication, 1024
Apache, 961database, 1003OpenSSH, 708, 710, 712user, 516
authorized_keys file, 709auto_master file, 819autofs directory hierarchy, 819autofs file, 820autofs filesystem, 571autofs init script, 819Automatic mounting, 384, 1024Automatic number identification, telephone, 1004automount daemon, 384, 819, 820automount utility, 818available file (dpkg), 599Avoided, 1024
B
B language, 9Back door, 1024Back tick, 345, 1030Background, 237
command grouping, 289foreground versus, 237job control, 14, 290PID stored in $!, 438process, 312, 1024running a command in, 237symbol (&), 288
backports software package category, 588BACKSLASH escape character, 146, 287, 297BACKSLASH in replacement strings, 977BACKSPACE key, 137Backup
active filesystem, 662amanda, 663cpio utility, 664dump level, 666failing to perform, 678file, 662, 666full, 662

1078 Index
Backup, continuedincremental, 662media, 663offsite, 662policy, 662simple, 665using tar, 663utilities, 663
Basename, 189, 1025basename utility, 423, 424, 453bash, 1026
<& duplicate input file descriptor, 430>& duplicate output file descriptor, 430alias, 328arguments, 440arithmetic evaluation, 458
example, 413, 436, 459operators, 461
arithmetic expansion, 342arithmetic expansion operators, 461array variables, 432attribute
array, 300export, 300function, 300integer, 300, 301readonly, 299, 300
background, 276builtin. See Builtinclosing a file, 430command line, order of expansion, 297command substitution, 344command, processing, 338conditional expression, 459conditional expression, example, 431, 455control structure. See Control, structuredirectory stack manipulation, 292editing previous commands, 314, 315emacs command line editor, 323event number, 313expanding a null variable, 443expanding an unset variable, 443expression, 461features, 334file descriptor, 429globbing, 345history mechanism, 312, 316makepath shell script, 467menu, 425
open file, 429operator, 461
bitwise, 465remainder, 464short-circuiting, 464ternary, 465
options. See bash, featuresoverlay, 286pathname completion, 324process substitution, 347program structures, 466programming, 466prompt, 303PS3 prompt, 426quick substitution, 321quiz shell script, 470quotation mark removal, 339recursion, 467redirection operators, 282reexecuting events, 314, 315REPLY keyword variable, 426signal names, 451, 454special characters, 146standard error. See Standard, errorstandard input. See Standard, inputstandard output. See Standard, outputstartup files, 277string pattern matching, 460substitution, quick, 321symbolic link, 213ternary operator, 463tilde substitution, 341variable
See also Variablearray, 432assign default value, 443BASH_ENV, 278COLUMNS, 426display error message, 444expansion, 443LINES, 426modifier, 443OPTARG, 455OPTIND, 455PS3, 426REPLY, 426, 446substitute default value, 443
vi command line editor, 322vim command line editor, 322–x option, 408

Index 1079
BASH_ENV variable, 278Baud, 1025Baud rate, 1025Bazaar version control, 584BCPL language, 9Bell Laboratories. See AT&T Bell LaboratoriesBerkeley Internet Name Domain. See DNSBerkeley UNIX, 6, 14, 1025Berners-Lee, Tim, 390bg builtin, 237, 291, 457bin directory, 302Binary file, 283bind builtin, 326bind directory, 866BIND. See DNSbind9 init script, 857Binding, key, 1044BIOS, 647, 1025
boot from CD/DVD, 26security, 682setup, 26
birthday shell script, 427bison utility, 17Bit, 1025
bucket, 233, 555depth, 1025
Bit-mapped display, 1025BitTornado, 605BitTorrent, 604
BitTornado, 605btdownloadcurses utility, 605btshowmetainfo utility, 606downloading from the command line, 605manners, 605obtaining Ubuntu using, 37, 39peer, 605prerequisites, 605seed, 605swarm, 605torrent, 605torrent information, displaying, 606tracker, 605
Bitwise operator&, 462, 465^, 462|, 462AND, 366, 367
Blank character, 146, 297, 1025, 1061
Block, 1025device, 569, 1025number, 1026special file, 1025
Blocking factor, 1026Blowfish encryption, 995bmp filename extension, 188Bonjour, 699Boolean, 1026Boolean operator, 464
!, 309, 462, 466&&, 459, 463, 464, 466|, 978||, 309, 459, 463, 464, 465–a, 403, 459NOT, 466–o, 459
Boot, 1026bootstrap, 1026disk, finding, 514display problems, 62dual, system, 514failure, 520flag, 72Linux, 647loader, 1026loader, grub, 647loader, reinstall, 66, 653netboot, 1049options, 63parameter
quiet, 48specifying, 63splash, 48xforcevesa, 62
partition, mounting, 515recovery mode, 512safe graphics mode, 62system, the, 46, 511
boot partition, 32, 646Bootable flag, 72Bootstrap, 1026Bottleneck, network, 377Bourne, Steve, 276, 1026Bourne Shell (original), 276, 278, 1026Brace, 1026
around a variable, 298expansion, 340shell functions, 332

1080 Index
Bracket, 1026character class, 973filename expansion, 241
Branch, 1026break control structure, 418, 457Bridge, network, 1026Broadcast, 1026
about, 366address, 1026network, 356, 1027packet, 363unicast, versus, 363
Browse window, 99Browser, 390
File. See NautilusFirefox, 105Lynx (text only), 392Mosaic, 391Mozilla, 389, 391, 392, 1055
BSD. See Berkeley, UNIXbtdownloadcurses utility, 605btshowmetainfo utility, 606Buffer, 1027
disk, 518primary, 113selection, 113
Bug, 1027bugtraq, 1002, 1006defect tracking system, 584Launchpad, 584tracking, 584
bugtraq, 1006Builtin, 243, 398, 444, 1027
. (dot), 279, 449, 457: (null), 444, 453, 457[[...]], 460alias, 328bash, list of, 457bg, 237, 291, 457bind, 326cd, 193, 213, 289, 301, 307, 457command, 1027command editing using fc, 316declare, 299, 300dirs, 292echo, 157, 240, 297, 422, 437, 445eval, 333, 457exec, 429, 448, 457execution of, 312exit, 105, 438, 453, 457
export, 300, 301, 434, 457, 561fc, 314fg, 238, 291, 457getopts, 454, 457history, 312, 313jobs, 138, 238, 290, 292, 457kill, 138, 238, 452, 454, 522, 524, 680let, 343, 458locale, 308null, 453, 457popd, 294pushd, 293pwd, 188, 193, 457read, 415, 416, 421, 445, 446, 458readonly, 299, 300, 301, 458set, 300, 405, 407, 408, 442, 443, 458shift, 441, 456, 458source, 279test, 397, 398, 399, 403, 407, 410, 412times, 458tput, 417trap, 417, 451, 458type, 445, 458typeset, 436umask, 526unalias, 328, 331unset, 299, 332, 458utility versus, 398wait, 458
bundle shell script, 428bunzip2 utility, 160, 164Button, 110Button, Logout, 105by-id directory, 555Byte, 1027by-uuid directory, 555bz2 filename extension, 160, 188bzcat utility, 161bzip2 utility, 160, 164, 665bzip2recover utility, 161
C
c filename extension, 187C programming language, 1027
about, 8, 9library
getpwnam() function, 783getpwuid() function, 783libwrap, 532
portability, 9

Index 1081
C++ programming language, 10C89 programming language, 9Cable
10Base2, 35710BaseT, 357Category 5, 357Category 5e, 357Category 6, 355, 357Category 7, 355coaxial, 357fiberoptic, 357glass, 357modem, 1027thicknet, 357thinnet, 357twisted pair, 357unshielded twisted pair, 357UTP, 357
Cache, 1027Cache, APT, 590Cache, APT, fixing broken dependencies, 593Cache, DNS. See DNS, cacheCaching-only server. See DNS, cacheCall by value, 434Caller ID, 1004Calling environment, 1027Calling program, name of, 439cancel utility, 623Caret in regular expressions, 974Cascading windows, 1027case control structure, 419Case-sensitive, 1027
domain name, not, 382filename, 187
cat utility, 147, 227, 229, 230, 280, 402Category 5 cable, 357Category 5e cable, 357Category 6 cable, 355, 357Category 7 cable, 355Category, software package, 119Catenate, 147, 230, 1028cd builtin, 193, 213, 289, 301, 307, 457CD. See Alternate CD; Desktop CD; Server CDCDPATH variable, 307CERN, 390CERT, 1002, 1006CGI, 958cgi filename extension, 931Chain loading, 1028
Changeaccess permission using chmod, 200directories using cd, 193filename using mv, 150password, 135
Characteralphanumeric, 1022class, 241, 1028device, 570, 1028escaping, 287list. See Character, classquoting, 287special file, 1028typeface, 18
Character-based, 1028Character-based interface. See Command line;
Textual, interfaceCharacter-based terminal, 1028Check box, 1028Check. See tickcheckfs.sh init script, 577Checkmark. See tickcheckroot.sh init script, 577Checksum, 1028Child directory, 185, 186Child process, 310, 312, 1028chkargs shell script, 398, 400chkrootkit utility, 1006chmod utility, 200, 284chroot jail
BIND, 870DNS, 870FTP, 744named daemon, 870running a service in, 537security considerations, 537setting up, 534uchroot.c, 536using, 534vsftpd, 744
chsh utility, 525CIDR, 367, 1029CIFS, 1029cifs filesystem, 571CIPE, 1029Cipher, 1029Ciphertext, 992, 1029Clark, Jim, 391Class, character, 1028Class, IP address, 364

1082 Index
Classless Inter-Domain Routing. See CIDRClear screen, 171clear utility, 525Cleartext, 1029CLI, 1029. See also Command line; Textual,
interfaceClick and right-click, 91Click object, 91Click-to-focus, 139CLID, 1004Client, 1029Client, specifying, 528Client/server model, 253, 380, 382, 390, 532, 729,
781, 799Clock applet, 95Close files, bash, 430CMOS setup, 26Coaxial cable, 357coda filesystem, 571Code, reentrant, 1056CODEC, 1029Collating sequence, machine, 1046Colon (:) builtin, 444Color
depth, 257, 1029Pick a Color window, 268quality, 1029
COLUMNS variable, 426Combo box, 1029Comer, Doug, 4Command, 220, 1029
; separator, 286argument, 220builtin, 243, 312, 1027completion, 324control flow. See Control, structurecontrol structure. See Control, structureediting previous, 315executing, 312export, 554grouping, 286, 289interpreter, shell, 114line. See Command linemode, vim, 174name, 220NEWLINE separator, 286option, 221process, 338reexecuting previous, 315
repeating, 139running remotely, ssh, 715separation, 286separator, 287, 400substitution, 344, 407, 424, 1030summary, 457syntax, 220terminator, 287usage message, 220, 400, 406
Command line, 136, 220, 1030advantages of, 137argument, 220, 439editing, 322executing, 225expansion, 297, 339interface, 1029. See also Textual, interfaceoption, 221parse, 223, 338processing, 223, 297syntax, 220token, 220, 338whitespace, 287word, 220, 338
command_menu shell script, 421Comments, shell scripts, 285Common UNIX Printing System. See CUPSCommunication
interprocess, 156, 568, 569network, 370write, 170
comp.lang.c newsgroup, 389comp.os.linux.announce newsgroup, 390comp.os.linux.answers newsgroup, 522, 985comp.os.linux.misc newsgroup, 389, 390, 522, 985comp.os.linux.networking newsgroup, 390comp.os.linux.security newsgroup, 390comp.os.linux.setup newsgroup, 390comp.security.firewalls newsgroup, 1001Compare files using diff, 154Compiz window manager, 103, 141Completion
command, 324pathname, 324Readline Library, 324variable, 325
Component architecture, 1030Compress
bunzip2, 164bzip2, 160, 164, 665

Index 1083
bzip2recover, 161compress, 161, 187gzip, 161OpenSSH, 727uncompress, 187unzip, 161zip, 161
compress utility, 161, 187Computer Systems Research Group, 6Computer, diskless, 1033Computing, distributed, 379, 1033Concatenate. See CatenateCondition code. See Exit statusConditional expression, 459
example, 431, 455conf filename extension, 528config file, 718Configuration file rules, 528Configure
and Build System, 607monitor, 75video card, 76
configure shell script, 608Connectionless, protocol, 1030Connection-oriented protocol, 362, 1030Console, 1064
recovery mode, 512security, 488system, 136virtual, 64, 136, 1068
Content negotiation, 951Content, Apache, 916Context menu, 94Context menu, object, 115continue control structure, 418, 457Control
bars, Nautilus, 262character, 1030characters, printer, 422flow. See Control, structurejob, 237structure, 396, 1031
break, 418, 457case, 419continue, 418, 457do, 409, 410, 412, 416done, 409, 410, 412, 416elif, 403elif versus fi, 403
else, 400esac, 419fi, 396, 400, 403fi versus elif, 403for, 409, 410, 453for...in, 409, 410if, 396, 400, 403if...then, 396if...then...elif, 403if...then...else, 400in, 409select, 425shell scripts, 283then, 396, 400, 403two-way branch, 400until, 416while, 412, 448, 453
CONTROL key, 18control-alt-delete file, 518CONTROL-C key, 113, 138CONTROL-D key, 105, 228, 292CONTROL-H key, 137, 146, 176, 223CONTROL-L key, 171, 178CONTROL-M key, 146CONTROL-Q key, 134CONTROL-R key, 171CONTROL-U key, 138, 146, 176, 223CONTROL-V key, 113, 146CONTROL-W key, 137, 176, 223CONTROL-X key, 113, 138CONTROL-Z key, 138, 237, 291Conventions
end line key, 18file naming, 241used in this book, 17
Convert file to/from Windows format, 159Cookie, 1031Coordinated Universal Time. See UTCCopy
buffer, 113directory, shell script, 289file using cp, 149, 198launcher, 111object, 100
Copyleft, 5core file, 684Correcting typing mistakes, 137count shell script, 413cp utility, 149, 198, 289

1084 Index
cp versus ln, 210cpdir shell script, 289cpio utility, 664, 665CPU, 1031
intensive processes, report, 672required for installation, 26
crack utility, 682Cracker, 1031Crash, 519, 1031Create
directory using mkdir, 191file using vim, 172null file, 555
Creation date, file, display using ls, 200cron daemon, 385, 668cron script, apt, 590cron.allow file, 557cron.d directory, 385, 668cron.deny file, 557crontab file, 385, 669Crontab file, system, 669Crontab file, user, 669crontab utility, 385, 557crontabs directory, 385crontabs file, 668Cryptography, 1031. See also Encryptioncsh, 1027CSRG, 6CSS, 1027, 1031CUPS, 612
adding a printer, 627command line interface, 626configuring a printer, 624JumpStart, configuring a local printer, 614JumpStart, configuring a remote printer, 618lpadmin utility, 627lpinfo utility, 626modifying a printer, 627more information, 613PPD files, 626prerequisites, 612print queue, 629printing from Windows, 631printing quotas, 628printing to Windows, 632sharing printers, 629Web interface, 624winprinter, 617
cups directory, 629
cupsd.conf file, 629Current, 1032Current directory. See Working directoryCursor, 1032Cut and paste, 113cut utility, 343Cycling, window, 112Cypher, 1029
D
Daemon, 1032acpid, 384anacron, 384apache2, 384apmd, 384atd, 384automount, 384, 819, 820cron, 385, 668dhcpcd, 385dhcpd, 385, 538, 540exim4, 385ftpd, 385gated, 386gpm, 385imapd, 776imap-login, 776in.fingerd, 371, 385inetd, 385, 531init. See Upstartinitng, 500ipop3d, 776launchd, 500lockd, 385lpd, 385, 612messages, 565, 679, 684, 688mountd, 385named, 385, 859, 860names, 384network, 354, 384nfsd, 385nmbd, 386, 824, 842ntpd, 385pop3-login, 776portmap, 386, 388, 530postfix, 998pppd, 386prefix in., 384prefix rpc., 384

Index 1085
printer, 385procmail, 772protocol, 384qrunner, 776rexecd, 386rlogind, 1002routed, 386rpc.yppasswdd, 797rquotad, 385rshd, 1002sendmail, 386services, providing, 384smbd, 386, 824spamd, 769sshd, 384, 386, 720starting, 508statd, 385stopping, 508Superserver. See inetd daemon; xinetd daemonsyslogd, 386, 688talkd, 386telnetd, 386, 1002tftpd, 386timed, 386xinetd, 386, 531, 741ypbind, 788yppasswdd, 797ypxfrd, 795
dash Shell, 276Data
Encryption Standard. See DES encryptionsink, 233structure, 1032
Databaseauthentication, 1003dbm, 1032DNS, 381gdbm, 1032group, 1038hosts, 383Linux Software Map, 987magic number, 565ndbm, 1032NIS, 369, 383, 781, 1050passwd, 658, 1038, 1066, 1067printcap, 561search engine, 392services, 1053SQL, 1061
system services, 1041terminfo, 172whatis, 165
Datagram, network, 355, 1032Dataless system, 800, 1032Date, displaying, 157date utility, 157, 233dbm database, 1032DDoS attack, 1032deb filename extension, 599deb files, 599Debian package management system. See dpkgDebug, 1032Debugging a shell script, 408declare builtin, 299, 300Decorations, window, 141Decrement operator, 463Default, 1032default directory, 557Default runlevel, 506defaultdomain file, 785, 786defaultrouter file, 386Defect tracking system, 584Delete
directory using rmdir, 196file using rm, 148key, 137line, 138link using rm, 214word, 137
Delete key, 137Delimiter, regular expression, 972Delta, SCCS, 1032Demand mounting, filesystem, 819Denial of Service. See DOS; DDoSDependencies. See Software package, dependenciesdepmod utility, 645Dereference, 1033DES encryption, 995Descriptor, file, 280Descriptor, file, duplicate, 430Design, top-down, 472Deskbar applet, 266Desktop, 91, 106, 1033
See also GNOME; Desktop CDappearance, 102directory, 97manager, 1033panel. See Panel

1086 Index
Desktop, continuedresolution, changing the, 140theme, 102visual effects, 103window. See Windowworkspace, 91Xfce, 10
Desktop CD, 24, 28See also Installationbasic installation, 46checking for defects, 47function keys, 62installing software from, 119ISO image, 37menu, 62
Detached process. See Background, processdev directory, 567, 1046devfs filesystem, 568Device, 1033
block, 569, 1025character, 570, 1028driver, 567, 569, 1033file, 226, 1033. See also /devfile, exporting, 811filename, 1033hotplug, 568independence, 14independent input and output, 13MD, 74multidisk, 74name, 668names, dynamic (udev), 568nonrewinding, 668null, 233number, major, 569, 1046number, minor, 569, 1048physical, 1053raw, 570tape, 666tape, nonrewinding, 668
devpts filesystem, 571df utility, 800dhclient utility, 539dhclient.conf file, 539dhclient.interface.leases file, 539DHCP, 538, 1033
client, 539firestarter and, 889MAC addresses, 541
more information, 538packages, 540prerequisites, client, 539prerequisites, server, 540resolv.conf file, and, 562server, 540static IP addresses, 541
dhcpcd daemon, 385dhcpd daemon, 385, 538, 540dhcpd.conf file, 540dhcpd3-server init script, 540Dialog box, 1033Dial-up connection, 133Die, process, 312diff utility, 154, 715Diffie-Hellman encryption, 994dig utility, 378, 856, 859, 872Digital signature, 993Digital Signature Algorithm. See DSADirect Rendering Infrastructure (DRI), 655Direct Rendering Module (DRM), 655Directory, 12, 147, 185, 568, 1033
., 193, 567
.., 193, 567
.ssh, 709
.Trash, 100/ (root), 33, 186, 194/bin, 194/boot, 32, 194/dev, 194, 226, 1046
special files, 567/etc, 195
alternatives, 557apache2, 924apt.conf.d, 590bind, 866cron.d, 385, 668cups, 629default, 557event.d, 502, 504exim4, 766firestarter, 888init.d, 507logrotate.d, 685opt, 195pam.d, 545, 548, 560rc.d, 508rc?.d, 507skel, 660

Index 1087
ssh, 709X11, 74, 195X11/xorg.conf, 77
/home, 33, 195/init.d, 561/lib, 195
modules, 195security, 545, 547
/lost+found, 520/mnt, 195/opt, 33, 195, 607/proc, 195/root, 195/sbin, 195/sys, 195, 565/tmp, 195, 425, 684/usr, 33, 195
bin, 195doc, 196games, 196include, 196info, 196lib, 196lib/terminfo, 1064local, 33man, 196sbin, 384share, 196share/doc, 678src, 196
/var, 33, 196ftp, 741log, 196, 565, 684, 982mail, 684, 761spool, disk usage, 684spool, problem solving, 982tmp, 684www, 918, 924, 925
~ (home). See Home directoryaccess permission, 202alternatives, 557apache2, 924apt.conf.d, 590bin, 195, 302bind, 866boot, 32, 646by-id, 555by-uuid, 555change using cd, 193
child, 185, 186compact, 686copy, shell script, 289create using mkdir, 191cron.d, 385, 668crontabs, 385cups, 629current. See Directory, workingdefault, 557delete using rmdir, 196Desktop, 97dev, 226, 567, 1046doc, 130, 196, 678empty, 185event.d, 502, 504exim4, 766file, 185, 1033firestarter, 888folder and, 96ftp, 741games, 196hierarchy, 1033home, 147, 188, 301, 1040home, 33, 560home versus working, 193important, 554include, 196info, 196init.d, 507lib, 196link, 209list using ls, 147local, 33, 196log, 196, 565, 684, 982logrotate.d, 685mail, 684, 761make using mkdir, 191man, 196modules, 195move using mv, 198moving, 566opt, 33, 195, 607pam.d, 545, 548, 560parent, 185, 186pathname, 185, 197proc, 195public_html, 930rc?.d, 507, 508remove using rmdir, 196

1088 Index
Directory, continuedremoving unused space, 686rename using mv, 198root, 184, 186, 194, 1058sbin, 195, 196, 384security, 545, 547service, 1033share, 196skel, 660spool, disk usage, 684spool, problem solving, 982src, 196ssh, 709stack manipulation, 292standard, 194terminfo, 1064tmp, 425, 684Trash, 100usr, 33var, 33working, 188
change using cd, 193home, versus, 193relative pathnames, 190significance of, 190with, 196
www, 918, 924, 925X11, 74, 195
dirs builtin, 292Disk
buffer, 518capacity planning, 31extended partition, 31filesystem, 30formatting, 30fragmentation, 683free space, 30, 683logical partition, 31partition, 30, 1052partition table, 30, 675partitioning, 31primary partition, 31quota system, 687RAM, 36space, required for installation, 26usage, 683volume label, 525, 576
Diskette, floppy. See Floppy disketteDiskless, 800, 1033
Displaybeginning of a file using head, 152color depth, 257, 1029configuring, 75date using date, 157end of a file using tail, 152file using cat, 147graphical, 1038hidden filename, 240machine name, 149problems when booting, 62resolution, changing the, 140sorted file using sort, 153system load using w, 169text using echo, 157uptime using w, 169user using finger, 167user using w, 169user using who, 167
DISPLAY variable, 256displayconfig-gtk utility, 75Distributed computing, 379, 818, 1033Distribution, Linux, 4dmesg utility, 511, 654DMZ, 1034DNS, 369, 381, 1034
$INCLUDE, 863$ORIGIN, 863$TTL, 863A (address) record, 852AAAA (address) record, IPv6, 852authority, 848cache, 851, 854, 864caching-only server. See DNS, cachechroot jail, 870CNAME record, 852database, 381, 851db.root file, 866delegation, 849dig utility, 378, 856, 859, 872domain, 846domain qualification, 863domain, root, 848FQDN, 847full-functioned nameserver, 873glue, 868hints zone, 866host utility, 378, 857

Index 1089
how it works, 857in-addr.arpa domain, 855inverse mapping. See DNS, reverse name
resolutionip6.int domain, 855iterative query, 849JumpStart, setting up a DNS cache, 858log, 872, 875, 877master server, 850more information, 858MX record, 852named daemon, 385, 858, 859, 860named.conf file, 860, 874, 879nameserver, full-functioned, 873node. See DNS, domainNS record, 852nsswitch.conf file, 857origin. See DNS, zone nameoverview, 845prerequisites, 857primary master server, 850PTR record, 852query, 849, 854recursive query, 849resolver, 848resource record, 851response, 854reverse mapping. See DNS, reverse name
resolutionreverse name resolution, 855root domain, 847, 848root zone, 866secondary server, 851security, 846server
caching, 864master, 850primary master, 850secondary, 851slave, 851, 877split horizon, 878types of, 850
setting up, 860slave server, 851, 877SOA record, 853split horizon server, 878subdomain, 848terminology, 858
time format, 863transactions signatures. See DNS, TSIGtroubleshooting, 872TSIG, 868, 873TTL value, 853TXT record, 854zone, 848
file, 863, 866hint, 866name, 863root, 866section, named.conf, 862
do control structure, 409, 410, 412, 416doc directory, 130, 196, 678Document Object Model. See DOMDocument root, Apache, 918Documentation
finding, 983online, 379system, 124
Dollar sign in regular expressions, 974Dollar sign, use with variables, 297DOM, 1034Domain
See also DNSDNS, defined, 846in-addr.arpa, 855ip6.int, 855name, 381, 1034Name Service. See DNSname, not case-sensitive, 382NIS, 782root, 848
done control structure, 409, 410, 412, 416Door, 1034DOS
convert files, 159filename, 186filename extension, 186mounting filesystems, 573
DoS attack, 1034dos2unix utility, 159, 736Double versus single quotation marks, 329Double-click timeout, mouse, 96Dovecot, 776dovecot.conf file, 776Downloading files using wget, 609Downloading source code useing apt-get, 598

1090 Index
Downloading Ubuntu, 37BitTorrent, 37, 39ISO image, 38locations, 24mirrors, 38verifying an ISO image, 40
dpkg, 584See also dpkg utilityavailable file, 599database, 598deb file
binary, 599installing, 599removing, 600
init script, 613package information, 599postinst script, 599preinst script, 599source files, 599status file, 599
dpkg utility, 600. See also dpkgdpkg-reconfigure utility, 768DPMS, 1034Drag, 1034Drag-and-drop, 1034DragonSquire utility, 1001Drawer, 110DRI (Direct Rendering Infrastructure), 655Driver, device, 567, 1033Driver, NTFS, 987DRM (Direct Rendering Module), 655Drop-down list, 1035Druid, 1035DSA, 995, 1035DSL, 356, 1035dsniff utility, 1006DSO, Apache, 916Dual monitors, specifying, 75Dual-boot system, 61, 514Dump level, 666dump utility, 666dumpdates file, 557, 666Duplex network, 357Duplicate lines, getting rid of using uniq, 154DVD, live/install, 24, 29, 46, 67
See also Installationchecking for defects, 47installing software from, 119ISO image, 37
Dynamicdevice names (udev), 568Host Configuration Protocol. See DHCPIP address, 364shared objects, Apache, 916
E
e2label utility, 525echo builtin, 157, 240, 297, 422, 437, 445ed editor, 151Editions, Ubuntu, 28Editor, 1035
command line, 322ed, 151ex, 306Readline Library, 322vim, 172
edquota utility, 687Edubuntu, 10Edwards, Dan, 1065EEPROM, 1035Effective user ID, 1035egrep utility, 977Electronic message, write, 170Element, 1035El-Gamal encryption, 994elif control structure, 403else control structure, 400emacs mail, 171Email. See MailEmblems, Nautilus, 117, 262Emoticon, 1035Empty regular expression, 976Emulator, operating system, 7Emulator, terminal, 114, 133, 270Encryption, 992
3-DES, 995AES, 995algorithm, 992asymmetric. See Encryption, public keyBlowfish, 995DES, 995Diffie-Hellman, 994digital signature, 993DSA, 995El-Gamal, 994GnuPG, 995host key, 710IDEA, 995

Index 1091
implementation, 995key, 992man-in-the-middle, 869, 996, 999MD5, 562OpenSSH, 710PEM, 997PGP, 995private key, 993public key, 993RC5, 995RSA, 994, 1058scheme, weaknesses of, 993secret key, 993session key, 710symmetric key, 994web of trust, 996
End line key, 18End of file. See EOFEnquire program, 390Enter-only input focus, 139ENV variable, 278Environment, 1035
calling, 1027establishing, 561exec, 449export, 301, 312, 434variable, 295
EOF, 170, 228, 1035EPROM, 1035Erase key, 137, 223, 554Erase word key, 223Error
codes, Apache, 964correcting typos, 137message
cannot execute, 225conditional, 444mount: RPC: Program not registered,
803, 816name of calling script, 424NFS server not responding, 802, 805not found, 225redirecting to standard error, 282Stale NFS file handle, 817standard error. See Standard, errorsystem, 565usage, 220, 400, 406
shell script, 407standard. See Standard, errorusage message, 220, 400, 406
esac control structure, 419Escape a character, 146, 287Escape an end of line, 287etab file, 815Ethernet network, 353, 356, 357, 358, 1035eval builtin, 333, 457Event, 1035
asynchronous, 1024control-alt-delete, 518firestarter, 891history, 312modifying previous, 320number, 313, 317reexecuting, 314text, 317Upstart, 501words within, 318X Window System, 253
event.d directory, 502, 504Evolution utility, 109, 171ex editor, 306Exabyte, 1035Exclamation point, 317exec builtin, 429, 448, 457exec() system call, 285Execute
access, 199, 283, 284command, 225, 312permission, 284shell script, 285
exim.crt file, 778exim.key file, 778exim4, 756, 761
See also Mail.forward file, 764aliases, 763–bp option, 765configuration type, 759, 760configuration variables, 766configuring, 765daemon, 385directory, 766dpkg-reconfigure utility, 768exim4.conf.localmacros file, 766, 778eximon utility, 765eximstats utility, 765file, 765frozen message, removing, 763init script, 757

1092 Index
exim4, continuedJumpStart, configuring exim4 to send and
receive email, 760JumpStart, configuring exim4 to use a
smarthost, 758local and nonlocal systems, 757log files, 762mainlog file, 762masquerade, 1047message ID, 761, 762message, removing, 763messages, working with, 763packages, 757prerequisites, 757self-signed certificate, 778sendmail and, 757smarthost, 756, 759split configuration, 766SSL, 778testing, 760update-exim4.conf file, 766variables, configuration, 766
exim4.conf.localmacros file, 766, 778eximon utility, 765eximstats utility, 765exit builtin, 105, 438, 453, 457Exit from a shell, 292Exit status, 438, 1036Expansion
arithmetic, 342brace, 298, 340command line, 339filename, 346null variable, 443order of, 297, 339parameter, 342pathname, 239, 298, 345, 346quotation marks, double, 346tilde, 190, 341unset variable, 443variable, 342
Explicit input focus, 139Exploit, 1036Export
device file, 811link, 811variable, 449
export builtin, 300, 301, 434, 457, 561
exportfs utility, 817exports file, 809, 812Expression, 1036
arithmetic, 1023logical, 1046
ext2 filesystem, 571, 578ext3 filesystem, 571, 578Extended partition, 31Extended regular expression, 978Extensible Markup Language. See XMLExtension, filename. See Filename, extensionExtranet, 355, 1036
F
Fahlman, Scott, 1060Failsafe GNOME login, 132Failsafe session, 1036Failsafe terminal, 132Fake RAID, 35false file, 561Family tree, 184fc builtin, 314FCEDIT variable, 316fd0 file, 554FDDI network, 1036fdformat utility, 574fdisk utility. See partedfg builtin, 238, 291, 457FHS (Linux Filesystem Hierarchy Standard), 12, 194fi control structure, 396, 400, 403Fiber Distributed Data Interface. See FDDIFiberoptic cable, 357FIFO special file, 347, 567, 568File, 12, 1036
.bash_history, 312
.bash_login, 277
.bash_logout, 277
.bash_profile, 277, 313, 554
.bashrc, 190, 277, 554
.cshrc, 1031
.forward, 764
.htaccess, 925, 962
.htpasswd, 962
.inputrc, 325
.login, 1046
.logout, 1046
.netrc, 735

Index 1093
.pgpkey, 168
.plan, 168
.profile, 277, 554, 1054
.project, 168
.rhosts, 373, 1001
.toprc, 673/bin/false, 561/boot/grub/menu.lst, 648, 651/dev
fd0, 554hda, 554hdc, 554nst0, 668null, 233, 415, 454, 555, 557, 684pts, 555random, 556rmt/0, 666sda, 554st0, 668tty, 450urandom, 556zero, 556
/etcaliases, 557, 681, 763anacrontab, 384, 670apt/apt.conf, 590apt/sources.list, 589at.allow, 557at.deny, 557auto_master, 819cron.allow, 557cron.deny, 557crontab, 385, 669default
autofs, 820exim4, 765nis, 786, 791, 797syslogd, 690
defaultdomain, 785, 786defaultrouter, 386dhcp3/dhclient.conf, 539dhcp3/dhcpd.conf, 540dumpdates, 557, 666event.d/control-alt-delete, 518exports, 809, 812fstab, 384, 558, 576, 804, 807ftpusers, 752group, 558, 661
hosts, 368, 383, 559, 781hosts.allow, 531, 532hosts.deny, 531, 532hosts.equiv, 372, 1001init.d/apache2, 918inittab, 506, 559issue, 134lftp.conf, 718login.defs, 560, 660logrotate.conf, 685magic, 565mailname, 759motd, 134, 559, 561, 678mtab, 559named.conf, 860, 874, 879nologin.txt, 548, 561nsswitch.conf, 542, 559, 782ntp.conf, 385pam.d, 545passwd, 412, 516, 560printcap, 561profile, 277, 561protocols, 561, 904rc.local, 508resolv.conf, 561, 859rpc, 388, 562securetty, 489security/access.conf, 489services, 384, 388, 562shadow, 516, 562shells, 525sudoers, 494syslog.conf, 386, 688termcap, 1064vsftpd.chroot_list, 752vsftpd.user_list, 752X11/xorg, 74yp.conf, 787ypserv.conf, 791
/lib/modules, 643/proc/mounts, 560/proc/sys, 636/usr
local, 196pub/ascii, 1023sbin, 196share/magic, 1046

1094 Index
File, continued/var
lib/nfs/etab, 815lib/nfs/rmtab, 816log
auth.log, 566lastlog, 196messages, 196, 545, 565, 679, 684,
982secure, 545, 982syslog, 872vsftpd.log, 752wtmp, 196, 686
www, 920access permission, 199, 201access.conf, 489alias.conf, 924aliases, 557, 681, 763ambiguous reference, 239anacron, 670anacrontab, 384, 670apache2, 918apt.conf, 590archive using tar, 161ascii, 1023at.allow, 557at.deny, 557auth.log, 566authorized_keys, 709auto_master, 819autofs, 820available (dpkg), 599backup. See Backupbashrc, 277block special, 1025Browser. See Nautiluscharacter special, 1028close (bash), 430config, 718configuration, rules, 528control-alt-delete, 518copy using cp, 198core, 684create using cat, 229creation date, display using ls, 200cron.allow, 557cron.deny, 557crontab, 669crontab, 385, 669
crontabs, 668cupsd.conf, 629deb, 599defaultdomain, 785, 786defaultrouter, 386delete vs. move to trash, 265descriptor, 280, 429descriptor, duplicate, 430device, 226, 567, 1033. See also /devdhclient.conf, 539dhclient.iinterface.leases, 539dhcpd.conf, 540directory, 185, 1033directory vs. ordinary, 566display
beginning of using head, 152end of using tail, 152using cat, 147
dovecot.conf, 776dumpdates, 557, 666empty, creating an, 197etab, 815execute permission, 284exim.crt, 778exim.key, 778exim4, 765exim4.conf.localmacros, 766, 778exports, 809, 812false, 561fd0, 554FIFO special, 347, 567, 568finding the package containing a, 587fstab, 384, 558, 576, 804, 807ftpusers (vsftpd), 752gdm.conf, 83gdm.conf-custom, 83group, 558, 661group assignment, 559group, display using ls, 199growing, 683hda, 554hdc, 554hierarchical structure, 184hosts, 368, 383, 559, 781hosts.allow, 531, 532hosts.deny, 531, 532hosts.equiv, 372, 1001identifying using file, 155important, 554

Index 1095
index.cgi, 931index.html, 931index.php, 931index.pl, 931index.xhtml, 931inittab, 506, 559issue, 134job definition (Upstart), 502known_hosts, 710, 712, 713large, rotate, 684lastlog, 196lftp.conf, 718link, 209linux-gate.so.1, 534list, 147log, 196, 683, 684login.defs, 560, 660logrotate.conf, 685magic, 565, 1046mailname, 759mainlog, 762Manager. See NautilusMD5SUMS.htm, 40menu.lst, 648, 651messages, 196, 545, 565, 679, 684, 982modules, 643motd, 134, 559, 561, 678mounts, 560move using mv, 197mtab, 559name. See Filenamenamed pipe, 347, 567, 568named.conf, 860, 874, 879nicknames, 783nis, 786, 791, 797nologin.txt, 548, 561nsswitch.conf, 542, 559, 782nst0, 668ntp.conf, 385null, 233, 415, 454, 555, 557, 684open, bash, 429open, finding, 681opening using Nautilus, 106order using sort, 153ordinary, 185, 1051ordinary vs. directory, 566owner, 284owner, display using ls, 199package, finding in a, 604
package, listing, 604pam.d, 545passwd, 412, 516, 560pathname, 185, 197permission, 117, 201, 284, 559pointer to, 209PPD, 626printcap, 561profile, 277, 561protocols, 561, 904pts, 555random, 556rc.local, 508rc2, 505reference, ambiguous, 239, 1022remove using rm, 148rename using mv, 197resolv.conf, 561, 859rmt/0, 666rmtab, 816rotate, 684, 1058rpc, 388, 562sda, 554search for a, 266, 269secure, 545, 982securenets, 793securetty, 489security, 997services, 384, 388, 562shadow, 516, 562shells, 525size, display using ls, 199smb.conf, 832smbusers, 826sort using sort, 153sources.list, 589sparse, 1061special, 567, 1028, 1033, 1061ssh_config, 718ssh_known_hosts, 709, 712, 713sshd_config, 722st0, 668standard, 194startup, 188, 277, 554, 679, 1062status (dpkg), 599structure, 184sudoers, 494symbolic link, 567sys, 636

1096 Index
File, continuedsyslog, 872syslog.conf, 386, 688syslogd, 690tar, 161temporary, name of, 425termcap, 1064terminal, 226text, 172trash, moving to, 100truncate, 555, 684tty, 450tty?, 506type of, discover using ls, 200types, GNOME, 118typescript, 158update-exim4.conf, 766urandom, 556user crontab, 669vsftpd
ftpusers, 752vsftpd.chroot_list, 752vsftpd.user_list, 752
vsftpd.log, 752vsftpd.user_list, 752window, 226wtmp, 196, 686www, 920xorg.conf, 74, 77yp.conf, 787ypserv.conf, 791zero, 556
file utility, 155, 565, 684Filename, 185, 1036
/, 186absolute, 307ambiguous reference. See File, ambiguous
referencebasename, 189, 1025case, 18case-sensitive, 187change using mv, 150characters in, 186choice of, 186completion, 1036conventions, 241defined, 189device, 1033
DOS, 186extension, 187, 1036
bmp, 188bz2, 160, 188c, 187cgi, 931conf, 528deb, 599DOS, 186gif, 188gz, 161, 188html, 188, 931jpeg, 188, 1043jpg, 188, 1043MIME and, 106o, 187pdf, 187php, 931pl, 931ppd, 626ps, 187remove a, 321tar.bz2, 162tar.gz, 162tar.Z, 162, 187tbz, 162tgz, 187tif, 188, 1065tiff, 188, 1065torrent, 40, 605txt, 187, 241tz, 162var, 951xhtml, 931Z, 161, 187
generation, 13, 239, 1036hidden, 188, 240, 1040length, 185, 186, 425, 526period, leading, 240quoting, 346reference, ambiguous. See File, ambiguous
referenceroot directory, 186simple, 189, 190, 224, 1060temporary file, 425typeface, 18unique, 425, 437Windows, 186

Index 1097
Fileserver, 380, 799Filesystem, 1036
/proc, 563, 572active, 662adfs, 570affs, 570autofs, 571, 819bootable flag, 72check integrity of, 577cifs, 571coda, 571creating, 525defined, 183demand mounting, 819devfs, 568devpts, 571disk, 30ext2, 571, 578ext3, 571, 578filename length, 185, 526free list, 567, 1037GFS, 571hfs, 571Hierarchy Standard, Linux, 12hpfs, 571independence, 31iso9660, 571jffs2, 571journaling, 571, 578, 1043minix, 571mount
automatically, 819demand, 819point, 30, 820, 1048remote, 803
mount point, 71, 572, 576msdos, 571ncpfs, 571NFS, 571, 804ntfs, 571organize, 184proc, 563, 571, 572, 666qnx4, 571RAID, 34, 73, 572reiserfs, 571remote, 354, 1057repair, 520romfs, 571
root, 1058smbfs, 571Standard, Linux (FSSTND), 12, 194structure, 12, 183swap, 32, 564sysv, 572types, list of, 570ufs, 572umsdos, 572use, 184vfat, 572virtual, 572VxFS, 572xfs, 572
Filling, 1036Filter, 14, 236, 1036Find
command name using apropos, 165inode using find utility, 405, 408string using grep, 151
find utility, 521, 684finger utility, 167, 370, 371, 385, 411fingerd daemon. See in.fingerdFirefox, starting, 105firestarter
and iptables, 888default policy, 888firewall wizard, 889JumpStart, building a firewall using firestarter,
888NAT, 889terminology, 887
firestarter directory, 888Firewall toolkit, 1007Firewall, 359, 1037. See also firestarter; iptablesFirmware, 1037flex utility, 17Floppy diskette, mount, 573, 574Focus, desktop, 1037Focus, input, 112, 139Folder. See DirectoryFont
antialiasing, 1023, 1063Pick a Font window, 268preferences, GNOME, 267
Footer, 1037for control structure, 409, 410, 453for...in control structure, 409, 410

1098 Index
Foreground, 14, 237background versus, 237process, 1037
Fork, 310, 1037fork() system call, 285, 310, 312, 963Formatting a hard disk, low-level, 30FQDN, 369, 382, 847, 1037Fragmentation, disk, 683Frame, network, 355, 1037Free
list, filesystem, 567, 1037software, definition, 1011space, disk, 30, 683, 1037Standards Group (FSG), 194
freedesktop.org group, 260Freefire, security solutions, 1006fsck utility, 570, 577FSG (Free Standards Group), 194FSSTND (Linux Filesystem Standard), 12, 194fstab file, 384, 558, 576, 804, 807FTP
about, 730active, 730anonymous, 735ASCII transfer mode, 736automatic login, 735basic commands, 732binary transfer mode, 736chroot jail, 744client, 731ftp utility, 730, 736JumpStart, starting a vsftpd server, 741JumpStart, using ftp to download files, 732lftp client, 718more information, 731passive, 730, 1052PASV connection, 730PORT connection, 730prerequisites, 731pub directory, 735security, 730, 736, 741server, 740sftp client, 718tutorial, 732vsftpd server, 740
ftp directory, 741ftp utility, 354, 730, 736ftpd daemon, 385
ftpusers file, 752Full
backup, 662duplex, 1038functioned nameserver, DNS, 873regular expressions, 977
pipe, 978plus sign, 978question mark, 978summary, 979
Fully qualified domain name. See FQDNFunction, 1038Function keys, initial install screen, 62Function, shell, 331, 1059fuser utility, 575fwtk utility, 1007
G
Gaim. See Pidgin IM clientgames directory, 196gated daemon, 386Gateway, 1038
network, 358proxy, 387
gawk, 411, 412gcc, 9. See also C programming languagegdbm database, 1032gdm utility, 82gdm.conf file, 83gdm.conf-custom file, 83gdmsetup utility, 83GECOS, 1038GECOS and NIS, 797Generate filenames, 239Generic operating system, 8getfacl utility, 204gethostbyname() system call, 857getopts builtin, 454, 457getty utility, 310, 516GFS filesystem, 571GIAC, security certification and training, 1007GID, 1038
displaying, 499in /etc/group, 558in /etc/passwd, 560
gif filename extension, 188Giga-, 1038gksudo utility, 491

Index 1099
Global Filesystem, 571Global variable, 295, 449Globbing, 239, 345Glue, DNS, 868Glyph, 1038GMT, 1038GNOME, 89, 259
Applet, 109Browse window, 99button, 110Compiz window manager, 103desktop, 15, 106desktop and workspaces, 91Drawer, 110file types, 118focus, input, 112, 139font preferences, 267gdm utility, 82gdm.conf file, 83gdm.conf-custom file, 83gdmsetup utility, 83gparted utility, 53GTK, 259input focus, 112, 139KDE, compared, 259Launcher, 109Menu, 110Metacity window manager, 103, 141MIME types, 118Nautilus. See Nautilusobject. See Objectpanel. See Panelpartition editor, 53root window, 106, 113session manager, 104, 141Switcher, 93, 94terminal emulator, 270terminology, 105tooltips, 106window. See Windowworkspace, 16, 91, 106Workspace Switcher, 93, 94
gnome-search-tool utility, 269gnome-terminal utility, 270GNU
Configure and Build System, 607General Public License, 4
GnuPG encryption, 995GNUStep window manager, 260manuals, 983usage message, 221
GnuPG encryption, 995GNUStep window manager, 260gopher utility, 390gparted utility, 53GPG. See GnuPG encryptionGPL. See GNU, General Public Licensegpm daemon, 385gprof utility, 17Grand Unified Boot Loader. See grubGraphical display, 1038Graphical user interface. See GUIGraphics card, specifying, 75Grave accent, 1030grep utility, 151, 235, 427Group
about, 558access, 199adding, 661admin and sudo, 496commands, 286, 289file assigned to, 559ID. See GIDname of, display using ls, 199password, 558user private, 558users, 1038wheel, 549windows, 1038www-data, 918
group database, 1038group file, 558, 661groupadd utility, 661groupdel utility, 661groupmod utility, 661groups utility, 558grub, 647
grub-install utility, 653menu, 512menu.lst file, 651reinstalling the boot loader, 66, 653update-grub utility, 651
grub-install utility, 653GTK, 259

1100 Index
GUI, 27, 1038check box, 1028check. See GUI, tickcheckmark. See GUI, tickcombo box, 1029dialog box, 1033drag, 1034drag-and-drop, 1034drop-down list, 1035list box. See GUI, drop-down listradio button, 1055root privileges and, 491scrollbar, 1059slider, 1060spin box, 1061spinner. See GUI, spin boxtext box, 1064thumb, 1065tick, 1065tick box. See GUI, check boxWYSIWYG, 1069X Window System, 15, 74
Guided partitioning, 31, 50, 56gunzip utility, 161gz filename extension, 161, 188gzip utility, 161
H
–h option, 129Hacker, 1039Half duplex, 1039Half-duplex network, 357halt utility, 518, 519Hard disk. See DiskHard link, 1039, 1045
create using ln, 566remove using rm, 214versus symbolic link, 567
Hardcoded filename in shell scripts, 424Hardware required for installation, 25Hardware required for visual effects, 25Hardware, listing, 525Hardware, listing PCI information, 696Hash, 1039
one-way, 1051SHA1 algorithm, 1059table, 1039
hda file, 554hdc file, 554head utility, 152Header, document, 1039Help
apropos utility, 126Center, Ubuntu, 104documentation, 124error messages, 130finding answers, 389from the Internet, 130getting, 983GNU manuals, 131HOWTOs, 129info pages, 126Linux Documentation Project, 129, 131local, 130man pages, 124netnews, 389option, 129Ubuntu Help Center, 124Ubuntu Web site, 130window (Ubuntu), 124
––help option, 129–help option, 129Here document, 427, 428, 1039Hesiod, 1039Heterogeneous, 1039Heterogeneous network, 781Hexadecimal number, 1039hfs filesystem, 571Hidden filename, 188, 1040
display, 240not displayed with ?, 240
Hierarchical file structure, 184Hierarchy, 1040HISTFILESIZE variable, 312History, 1040
C Shell mechanism, classic, 316event
editing, 315number, 317previous, !$ last word of, 319previous, modifying, 320reexecuting, 315text, 317words within, 318
mechanism, 312

Index 1101
viewing, 314word designator, 318
history builtin, 312, 313HISTSIZE variable, 312Home directory, 188, 301, 1040
.bash_history file, 312
.bash_login file, 277
.bash_logout file, 277
.bash_profile file, 277, 313
.bashrc file, 190, 277
.forward file, 764
.inputrc file, 325
.netrc, 735
.profile file, 277
.rhosts, 1001
.ssh, 709~, shorthand for, 190, 301automount, 818defined, 147hidden file, 188passwd and, 560startup file, 188working directory, versus, 193
home partition, 33HOME variable, 296, 301, 453Host
address, 363key, OpenSSH, 710security, 1001specifying, 528trusted, 372
host utility, 378, 857Hostname
about, 848resolution, 559symbolic, 383
hostname utility, 149, 370hosts database, 383hosts file, 368, 383, 559, 781hosts.allow file, 531, 532hosts.deny file, 531, 532hosts.equiv file, 372, 1001Hotplug system, 568Hover, 1040HOWTO documents, finding, 129hpfs filesystem, 571hping utility, 1007HTML, 390, 1040
html filename extension, 188, 931HTML suffix, 391HTTP protocol, 391, 1041HTTPS protocol, 391, 959Hub, 357, 1041Humor, 5, 1000, 1060hunk (diff), 154HUP signal, 680Hypermedia, 391Hypertext, 391, 1041
link, 391Markup Language. See HTMLTransfer Protocol. See HTTPWorld Wide Web, 391
I
I/O device. See DeviceIANA, 384, 1041ICMP packet, 376, 1041icmp_seq, 376Icon, 1041Iconify, 1041ICQ, 354id utility, 492, 499IDEA encryption, 995IDS
about, 1001AIDE, 1001DragonSquire, 1001samhain, 1001tripwire, 1001
if control structure, 396, 400, 403if...then control structure, 396if...then...elif control structure, 403if...then...else control structure, 400ifconfig utility, 541IFS variable, 305Ignored window, 1041IMAP, 776imapd daemon, 776imap-login daemon, 776in control structure, 409in.fingerd daemon, 371, 385in-addr.arpa domain, 855include directory, 196Increment operator, 463Incremental backup, 662

1102 Index
Indentation. See IndentionIndention, 1041index.cgi file, 931index.html file, 931index.php file, 931index.pl file, 931index.xhtml file, 931Indirect pointer, 212inetd daemon, 385, 531Infinite recursion, alias, 328info directory, 196info utility, 126, 243, 983Information. See More informationInfrastructure mode, wireless, 695init daemon. See UpstartInit script, 507
anacron, 668, 670apache2, 917autofs, 819bind9, 857checkfs.sh, 577checkroot.sh, 577dhcpd3-server, 540dpkg, 613exim4, 757mailman, 776nfs-common, 802nfs-kernel-server, 808nis, 785samba, 825spamassassin, 769ssh, 720sysklogd, 690vsftpd, 740
init utility, 310, 559init.d directory, 507initctl utility, 502initng daemon, 500inittab file, 506, 559Inode, 212, 566, 1041
altering using mv, 566create another reference using ln, 566file, 566filesystem, 212links shell script, 404number, 566
Input, 1041focus, 112, 139mode, vim, 174standard. See Standard, input
Input/Output device. See DeviceINPUTRC variable, 325insmod utility, 645Installation, 23, 36
See also Desktop CD; Alternate CD; Server CD; DVD live/install
BIOS setup, 26boot parameters, 63CD/DVD, burning, 40CD/DVD, checking for defects, 47clean install, 29CMOS setup, 26computer, 1042CPU, 26disk setup, 50, 53, 56disk space, 26display, configuring, 75dual monitors, 75dual-boot system, 61formatting, low-level, 30free space, 30function keys, 62graphical
final step, 52guided partitioning, 50, 56installer, 48keyboard, 50language, 48migrating documents and settings, 51partitioning, 50, 53, 56partitioning, manual, 57Ready to install screen, 52system, 48time zone, 50user, first, 51
guided partitioning, 31hardware requirements, 25installer interface, 28low-level formatting, 30MD5SUMS.htm file, 40minimal RAM, 25monitor, configuring, 75partition, 30partition planning, 31planning, 25processor architecture, 26RAID, 73RAM, 26starting, 46

Index 1103
textual installer, 67textual system, 65upgrading versus installing, 29video card, configuring, 76virtual console, 64X Window System, configuring, 75
Installing KDE, 60Installing software packages, 585Installing Ubuntu. See InstallationInstant messenger, 105Integrated Services Digital Network. See ISDNIntegrity, filesystem, 577Interactive, 1042Interface, 1042
character-based. See Command line; Textual, interface
command line. See Command line; Textual, interface
graphical user, see GUIpseudographical, 27, 137textual. See Command line; Textual, interfaceuser, 1042, 1067
Internal Field Separator. See IFS variableInternational Organization for Standardization. See
ISOInternet, 17, 1042
Assigned Numbers Authority. See IANAbrowser, 390connection sharing, 908Control Message Protocol. See ICMPlooking up a user, 378multiple clients on a single connection, 910multiple servers on a single connection, 912netiquette, 1049netnews. See Netnewsnetwork, 354Printing Protocol. See IPPProtocol Security. See IPSecProtocol. See IP; TCP/IPRelay Chat, 354search engine, 392service provider. See ISPservices, 388sharing a connection, 908speed, 355URI, 1067URL, 391, 1067Usenet, 391
internet (small i), 1042
Internetwork, 354InterNIC, 378Interprocess communication, 14, 156, 568, 569Interrupt key, 138, 451Intranet, 354, 1042Intrusion detection system. See IDSInvisible file. See Hidden filenameIP, 1042
address, 363, 382, 1042address, static, 541class, address, 364IPng, 369IPv6, 369, 999, 1018masquerading, 897, 906, 910multicast. See MulticastNext Generation, 369spoofing, 1043version 6. See IP, IPv6
ip6.int domain, 855IPC, 1043ipchains utility, 896ipop3d daemon, 776IPP protocol, 612IPSec, 999, 1016iptables, 885
ACCEPT target, 906building a set of rules, 901chain policy, 902chain, about, 896classifiers. See iptables, matchcommand line, 900commands, 901connection tracking, 898, 905conntrack module, 898display criteria, 903DNAT target, 897, 906DROP target, 906Filter table, 897firestarter and, 888how it works, 896Internet connection sharing, 908IP masquerading, 910iptables-restore utility, 907iptables-save utility, 907jump, 901LOG target, 906Mangle table, 897masquerade, 1047MASQUERADE target, 897, 906

1104 Index
iptables, continuedmatch, 896
criteria, 900extension, 903
explicit, 905implicit, 904
more information, 899NAT table, 897netfilter, 896network packet, 897non-terminating target, 901packet match criteria, 900, 903patch-o-matic, 885policy, 902prerequisites, 899protocols file, 904REJECT target, 907resetting rules, 899RETURN target, 907router, 908rule
about, 896defined, 896match criteria, 900number, 900saving, 907specification, 900
sharing an Internet connection, 908SNAT target, 897, 907, 910state machine, 898, 905target, 896, 901, 906
iptables-restore utility, 907iptables-save utility, 907IPv6, 369, 1043
address record, DNS, 852in 2.6 kernel, 1018ping6, 376traceroute6, 377
IRC, 354IRC, Ubuntu channels, 131is_regfile shell script, 399ISC2 security certification, 1007ISDN, 356, 1043ISO, 1043
image, 37ISO9660 filesystem, 571, 1043protocol model, 361
ISP, 1043issue file, 134iwconfig utility, 700
J
jffs2 filesystem, 571Job, 237
control, 14, 290, 1043bg builtin, 291fg builtin, 291how to use, 237jobs builtin, 290
number, 237, 238stop foreground, 237Upstart, 501, 503Upstart, definition files, 502, 504
jobs builtin, 138, 238, 290, 292, 457John the Ripper utility, 1007Journaling filesystem, 571, 578, 1043Joy, Bill, 1027JPEG, 1043jpeg filename extension, 188, 1043jpg filename extension, 188, 1043JumpStart
Apache, getting up and running, 919aptitude, installing and removing packages, 585DNS, setting up a cache, 858exim4, configuring to send and receive email,
760exim4, configuring to use a smarthost, 758firestarter, building a firewall, 888ftp, downloading files, 732NFS server, configuring using shares-admin,
809NFS, mounting a remote directory, 803OpenSSH, starting the sshd daemon, 720OpenSSH, using ssh and scp, 711printer, configuring a local, 614printer, configuring a remote, 618shares-admin, configuring a Samba server, 826vsftpd, starting a server, 741
Justify, 1043jwhois utility, 378
K
K&R, 9KDE, 89, 259
Adept package manager, 592compated to GNOME, 259desktop, 15installing, 60

Index 1105
kdesu utility, 491Kubuntu, 10portability, 259Qt toolkit, 259
kdesu utility, 491Kerberos, 1003, 1007, 1044Kernel, 6, 1044
/proc filesystem, 5632.4, 10152.6 features
2TB filesystem, 10204GB-4GB memory split, 1019ACL, 1019AIO, 1016asynchronous I/O, 1016BIO, 1019block I/O, 1019hugeTLBFS, 1018HyperThreaded CPUs, 1019I/O elevators, 1020IGMPv3, 1018interactive scheduler response tuning,
1020Internet Protocol virtual server, 1019IPSec, 1016IPv6, 1018IPVS, 1019kksymoops, 1017native Posix thread library, 1016network stack features, 1018NPTL, 1016O(1) scheduler, 1017OOPS, 1017OProfile, 1017PAE, 1019physical address extension, 1019remap_file_pages, 1018reverse map virtual memory, 1017rmap VM, 1017TLBFS, 1018translation look-aside buffer file system,
1018XFS journaling filesystem, 1020
2.6 release, 1015booting, 511building, 635configuring, 639dmesg utility, 654installing compiled, 646
messages, 654messages, saving, 511module. See Loadable modulenetwork packet filtering. See iptables;
firestarterpacket filtering. See iptables; firestarterparameter, 636programming interface, 10raw device, 570source code, installing, 637special files, 567
kernelspace, 1044Kernighan & Ritchie, 9Key
BACKSPACE, 137binding, 1044CONTROL, 18CONTROL-C, 113, 138CONTROL-D, 105, 228, 292CONTROL-H, 137, 146, 176, 223CONTROL-L, 171, 178CONTROL-M, 146CONTROL-Q, 134CONTROL-R, 171CONTROL-U, 138, 146, 176, 223CONTROL-V, 113, 146CONTROL-W, 137, 176, 223CONTROL-X, 113, 138CONTROL-Z, 138, 237, 291Delete, 137encryption, 992end line, 18ENTER, 18erase, 137, 223, 554interrupt, 138kill, 138, 223line kill, 138, 223META, 1047NEWLINE, 18, 286, 287RETURN, 18, 19, 137, 223, 286SPACE bar, 146suspend, 138, 178, 237, 291, 451TAB, 146typeface, 18word erase, 223
Keyboard, 1044graphical installation, 50move cursor to the next line, 18
Keyword variable, 296, 301

1106 Index
Keyword, searching for using apropos, 165Kill (line) key, 138, 223kill builtin, 138, 238, 452, 454, 522, 524, 680Kill process, 522, 523, 524KILL signal, 680killall utility, 524kilo-, 1044known_hosts file, 710, 712, 713Korn, David, 276, 1044Korn Shell, 276, 1044ksh, 276, 1044Kubuntu, 10, 60, 89KVM, 7
L
L6 utility, 1007LAN, 17, 357, 1044
compared to an intranet, 354configuring, 693example, 359more information, 703setting up, 694
Language, graphical installation, 48Language, procedural, 466Language, used by the system, 132Large number, 1044Last in first out stack, 292Last Line mode, vim, 175lastlog file, 196launchd daemon, 500Launcher, 109, 111Launching applications, 92Launchpad, 584LBX, 363LCD monitor, subpixel smoothing, 268LDAP, 1044ldd utility, 532Leaf, 1044Least privilege, 488, 1045Left-click, 91Left-handed mouse, 95, 258Length of filename, 186, 526less utility, 125, 148, 236, 288, 402let builtin, 343, 458lftp utility, 718lftp.conf file, 718lib directory, 196Library, libwrap, 532
Library, listing with ldd, 532libwrap library, 532lids utility, 1007LIFO stack, 292Lightweight Directory Access Protocol. See LDAPLine kill key, 138, 223Line Printer Daemon. See lpd daemonLINES variable, 426Link, 12, 209, 1045
alternatives directory, 557create using ln, 210delete using rm, 214, 567exporting, 811hard, 566, 567, 1039, 1045hard versus symbolic, 210, 212hypertext, 391inode, 566number of, display using ls, 199point-to-point, 1053remove using rm, 214, 567soft. See Link, symbolicsymbolic, 567, 1045
bash and, 213create using ln, 213versus hard, 210, 212
symlink. See Link, symbolicutility naming, 557
links utility, 392Linux
2.6 kernel. See Kernelboot, 647distribution, 4documentation, 124Documentation Project, 129, 131FHS (Filesystem Hierarchy Standard), 12, 194FSSTND (Filesystem Standard), 12, 194kernel. See KernelLSB (Standard Base), 194manual, 126newsgroup, 522, 985PAM. See PAMPluggable Authentication Modules. See PAMSoftware Map database, 987Terminal Server Project, 800
linux terminal name, 989linux-gate.so.1 file, 534LinuxSecurity.com security news, 1007List box. See drop-down listList server, 372, 985

Index 1107
Listserv, 372, 985Live session, 47Live/install CD. See Desktop CDLive/install DVD. See DVD, live/installln utility, 210, 213, 566ln utility versus cp, 210lnks shell script, 404Load average, display using w, 169Loadable module, 643, 1045Loader, boot. See grubLocal area network. See LANlocal directory, 33, 607local file, 196Local variable, 312, 434, 449Locale, 1045locale builtin, 308localhost, 369, 559Location bar, Nautilus, 263lock utility, 417lockd daemon, 385locktty shell script, 417Log
Apache, 924DNS, 872, 875, 877email, 762exim4, 762file, check, 683file, rotate, 684files, 196in. See Loginmachine, 681OpenSSH, 724out, 517, 1046syslogd daemon, 386system, 386vsftpd, 749
log directory, 196, 565, 684, 982Logical
expression, 1046partition, 31Volume Manager. See LVM
Login, 516, 1046failsafe GNOME, 132failsafe terminal, 132name. See Usernameoptions, 89, 132problems, 133, 679prompt, 134, 516remote, 133, 134
root, 1058screen, 89, 132security, 1002shell, 310, 517, 561, 1046Window Preferences window, 82
login utility, 310, 516login.defs file, 560, 660Logout button, 105logresolve utility, 938logrotate utility, 684logrotate.conf file, 685logrotate.d directory, 685Loopback service, 559lost+found directory, 520lp utility, 623lpadmin utility, 627lpd daemon, 385, 612lpinfo utility, 626lpq utility, 151, 623LPR line printer system, 612lpr utility, 151, 235, 237, 623lprm utility, 151, 623lpstat utility, 151, 623ls utility, 147, 192, 199, 202, 211, 240, 284LSB (Linux Standard Base), 194lshal utility, 697lshw utility, 525, 696lsmod utility, 645lsof utility, 681lspci utility, 696LTS release, 28LVM, 35
LV, 35PV, 35VG, 35
LWN.net security alerts, 1007lynx text browser, 392
M
MAC address, 541, 1046Machine
collating sequence, 1046independence, 9log, 681name, display using hostname, 149
Macro, 1046magic file, 565, 1046Magic number, 565, 1046

1108 Index
magic number database, 565Mail
.forward file, 764aliases, 557, 763authenticated relaying, 777checking root’s, 683communicating with users, 677delivery agent, 385, 386Dovecot, 776IMAP, 776JumpStart, configuring exim4 to send and
receive email, 760JumpStart, configuring exim4 to use a
smarthost, 758list server, 372, 985log, 762mailbox, 303maildir format, 762mailing list, 774Mailman, 775mailq utility, 765mbox format, 761MDA, 755, 1047more information, 758MTA, 755, 997, 1048MUA, 385, 386, 755, 998, 1048network addresses, 172newaliases utility, 764POP3, 776Postfix, 779postmaster, 683prerequisites, 757Qmail, 779security, 997
GnuPG, 997MTA, 997MUA, 998PEM encryption, 997
self-signed certificate, 778sending to a remote user, 371SMTP, 755spam, 378SpamAssassin. See SpamAssassinSquirrelMail, 772SSL, 778Webmail, 772
mail directory, 684, 761mail utility, 171
MAIL variable, 303Mailbox, 303MAILCHECK variable, 303maildir format, 762Mailing list, 774Mailman, 775mailman init script, 776mailname file, 759MAILPATH variable, 303mailq utility, 765Main memory, 1046Main menu, 92, 110main software package category, 588Main toolbar, Nautilus, 263Mainframe computer, 7mainlog file, 762Maintenance. See System administrationMajor device number, 569, 1046make utility, 162makedbm utility, 793MAN, 358, 1047man directory, 196man utility, 14, 124, 128Manager
File. See Nautilussession, 104, 141window, 141
mandb utility, 165Man-in-the-middle, 869, 996, 999Manuals
finding reference, 983GNU, 131, 983HOWTO, 129man, 124system, 124
Map file, 820Masquerading, IP, 897, 906, 910, 1047Massachusetts Institute of Technology. See MITMaster Boot Record (MBR), 511, 647, 653Master server, DNS, 850mbox format, 761MBR, 511, 647, 653MD device, 74MD5 encryption, 562, 1047md5sum utility, 40MD5SUMS.htm file, 40MDA, 755, 1047Mega-, 1047

Index 1109
MemorySee also RAMmain, 1046paging, 564testing, 62virtual, 564
memtest86+ utility, 62Menu, 110, 1047
Actions, 132context, 94, 115grub, 512Main, 110Object Context, 115Panel Object Context, 110panel. See Panelshell script, 421
menu.lst file, 648, 651Menubar, Nautilus, 262, 263Merge, 1047mesg utility, 171Message
daemon, 565, 688deny using mesg, 171Digest 5. See MD5ID, exim, 761, 762of the day. See motd filesecurity, 566sending
email, 677wall, 677write, 170, 677
system, 565, 679truncating, 684usage, 220, 400, 406, 424, 1067
messages file, 196, 545, 565, 679, 684, 982META key, 1047Metabit, 1023Metacharacter, 239, 1047Metacity window manager, 103, 141Metadata, 1047Metapackage, 592Method of last resort, kill, 523Metropolitan area network, 358, 1047Microprocessor, 8Middle mouse button, 113MIME, 106, 118, 1048mingetty utility, 310Minicomputer, 7mini-HOWTO documents, finding, 129
Minimize window, 1048MINIX, 4minix filesystem, 571Minor device number, 569, 1048misc.jobs.offered newsgroup, 389Mistake, correct typing, 137MIT, 15
Project Athena, 252X Consortium, 252
MITM. See Man-in-the-middlemkdir utility, 191, 192, 193, 803mkfifo utility, 568mkfs utility, 525, 574mkswap utility, 564Modem, 1048Modem, cable, 1027modinfo utility, 645modprobe utility, 645Module. See Loadable modulemodules directory, 195modules file, 643Monitor
configuring, 75dual, 75LCD, subpixel smoothing, 268
More informationDHCP, 538DNS, 858email, 758FTP, 731iptables, 899LAN, setting up a, 703NFS, 802NIS, 784OpenSSH, 711PAM, 546Samba, 825security, 1006system administration, 522
more utility, 148, 236, 402Morris, Robert T. Jr., 1004Mosaic Web browser, 391motd file, 134, 559, 561, 678Mount, 1048
automatic, 384, 819, 1024floppy diskette, 573point, 30, 71, 572, 576, 820, 1048remote filesystem, 803table, 558

1110 Index
mount utility, 559, 572, 573, 803, 841mountd daemon, 385mounts file, 560Mouse, 1048
click, 91double-click timeout, 96left-handed, 95, 258middle button, 113mouseover, 1048pointer, 1048pointer, hover, 1040preferences, setting, 95remap buttons, 258right-click, 94right-handed, 258wheel, 258
Mouseover, 1048Move
directory using mv, 198file using mv, 197window, 96
Mozillahistory of, 391, 392netnews, 389proxy, 1055
MS Windows. See Windowsmsdos filesystem, 571mt utility, 668MTA, 755, 997, 1048mtab file, 559MUA, 755, 998, 1048Multiboot specification, 1048Multicast, 365, 1049multidisk device, 74Multipurpose Internet Mail Extension. See MIMEMultitasking, 11, 237, 1049Multiuser, 11, 515, 1049multiverse software package category, 588Multiviews, 952mv utility, 150, 197, 566MX record, DNS, 852
N
Namecommand, 220daemons, 384domain. See Domain, namelogin. See Username
server, 381, 382variable, 295
named.conf file, 860, 874, 879named daemon, 385, 859, 860Named pipe, 347, 567, 568Namespace, 1049NAT, 889, 897, 1049National Center for Supercomputer Applications,
391Nautilus, 96
control bars, 262emblems, 117, 262file permissions, 117file, open with, 106history, 262location bar, 263Main toolbar, 263menubar, 262, 263open file with, 106Open With selection, 118places, 262Side pane, 261Status bar, 263toolbar, Main, 263Vew pane, 261
NBT, 1049ncpfs filesystem, 571ndbm database, 1032nessus utility, 1007net use utility (Windows), 842net utility, 824net view utility (Windows), 842NetBIOS, 1049Netboot, 800, 1049netcat utility, 1007Netiquette, 1049Netmask, 1049Netnews, 388
See also Newsgroupanswers, finding, 389Mozilla News, 389Netscape News, 389nn utility, 389readnews utility, 389rn utility, 389tin utility, 389xrn utility, 389xvnews utility, 389

Index 1111
Netscape, 391Navigator, 391netnews, 389
netstat utility, 365Network
@ in an address, 370, 371@ with email, 371100BaseT cable, 35710Base2 cable, 35710BaseT cable, 357address, 1050
@ in, 370, 371@ sign in, 371email, 172mask, 367space, private, 697, 1054
Address Translation. See NATBonjour, 699boot, 1049bottleneck, 377broadcast, 356, 1026, 1027
address, 1026multicast, compared, 366packet, 363unicast, compared, 363
browser, 390Category 5 cable, 357Category 5e cable, 357Category 6 cable, 355, 357Category 7 cable, 355class, IP address, 364coaxial cable, 357configuring, 700connection, test using ping, 375daemon, 354, 384datagram, 355, 1032DNS. See DNSdomain name, 381duplex, 357dynamic IP address, 364Ethernet, 353, 356, 357, 358, 1035extranet, 355, 1036FDDI, 1036fiberoptic cable, 357fileserver, 799Filesystem. See NFSfirewall. See Firewallframe, 355, 1037gateway, 358, 1038
half-duplex, 357heterogeneous, 781hops, 376host address, 363hostname, FQDN. See FQDNhostname, nickname, 369hub, 357, 1041ICMP packet, 1041Information Service. See NISinterface card. See Network, NICInternet, 354intranet, 354IP
address, 363address class, 364Next Generation, 369
local area. See LANmanager applet, 700metropolitan area, 358, 1047multicast, 365, 1049nameserver, 381, 382netmask, 1049netnews. See Netnewsnewsgroup, 389NIC, 694, 695number. See Network, addresspacket, 355, 376, 1051packet filtering, 1052. See also iptablespacket sniffer, 1052partner net, 355ping to test, 375point-to-point link, 356port forwarding, 1053PPP protocol, 363private address space, 697, 1054privileged port, 1054protocol, 361remote filesystem, 354resolver, 382route trace, 376router, 358, 359, 695, 1058router, SmoothWall Linux distribution, 695security, 998, 999segment, 357, 1050services, 354, 384setting up, 694SLIP protocol, 363sniff, 1060socket, 569

1112 Index
Network, continuedstatic IP address, 364subnet, 367, 1062
about, 367address, 1063mask, 367, 1063number, 1063specifying, 529
switch, 356, 357, 1050TCP/IP protocol, 361thicknet cable, 357thinnet cable, 357Time Protocol. See NTPtoken ring, 1065topology, shared, 1059trace route, 376transfer rate, 357trusted hosts, 372tunneling, 1066, 1068twisted pair cable, 357UDP, 361, 1066unicast, 363, 1066unicast vs. broadcast, 363unshielded twisted pair cable, 357user communication, 370utilities, 354, 372UTP cable, 357virtual private, 355VPN, 355, 1068WAN. See WANWAP, 694wide area. See WANWi-Fi, 1069. See also Wirelesswireless. See WirelessZeroconf, 699
newaliases utility, 764NEWLINE key, 18, 286, 287newlist utility, 775News, Internet. See NetnewsNewsgroup
See also Netnewsarchive, groups.google.com, 389comp.lang.c, 389comp.os.linux.announce, 390comp.os.linux.answers, 522, 985comp.os.linux.misc, 389, 390, 522, 985comp.os.linux.networking, 390comp.os.linux.security, 390comp.os.linux.setup, 390
comp.security.firewalls, 1001hierarchical structure of, 389list of, 985misc.jobs.offered, 389names of, 389rec.skiing, 389sci.med, 389soc.singles, 389talk.politics, 389
NFS, 799, 800, 1050all_squash option, 815attribute caching options, 804block size, 806client, setting up, 802daemons, 385data flow, 801error handling options, 805error message
mount: RPC: Program not registered,803, 816
NFS server not responding, 802, 805Stale NFS file handle, 817
etab file, 815exchanging files, 702exportfs utility, 817exporting device files, 811exporting directory hierarchies, 811exports file, 812filesystem, 571fstab file, 804, 807home directories, 702init script, 808JumpStart, configuring an NFS server using
shares-admin, 809JumpStart, mounting a remote directory, 803line speed, testing, 807miscellaneous options, 806more information, 802mount utility, 803mounting a filesystem, 803NIS and, 814options
all_squash, 815attribute caching, 804error handling, 805miscellaneous, 806root_squash, 814
performance, improving, 806portmap utility, 802, 808, 818

Index 1113
prerequisites, 802, 808rmtab file, 816root_squash option, 814security, 802server–server dependency, 819setuid, 803showmount utility, 816testing, 818timeout, 806umount utility, 804user ID mapping, 814version 4, 802
nfs-common init script, 802nfsd daemon, 385nfs-kernel-server init script, 808NIC, 382, 694, 695, 1050Nickname, host, 369nicknames file, 783NIS, 369, 781, 782, 1050
adding users, 790client setup, 784client, test, 787database, 369, 383, 1050domain, 782domain name, 786, 1050GECOS, 797login, 516makedbm utility, 793Makefile, 793map, 783master server, 782more information, 784NFS and, 814nicknames file, 783nisdomainname utility, 786passwd utility, 789prerequisites, client, 785prerequisites, server, 790removing users, 790rpcinfo utility, 788securenets file, 793server setup, 790server specify, 787slave server, 782source files, 782testing, 796Yellow Pages, 782yp.conf file, 787ypinit utility, 795
yppasswd utility, 788yppasswdd daemon, 797ypserv.conf file, 791ypwhich utility, 787ypxfr utility, 795ypxfrd daemon, 795
nis file, 786, 791, 797nis init script, 785nisdomainname utility, 786nmap utility, 1007nm-applet utility, 700nmbd daemon, 386, 824, 842nmblookup utility, 842, 843nn utility, 389NNTP, 389, 1050noacpi boot parameter, 64noapic boot parameter, 64noapm boot parameter, 64noclobber variable, 231Node, 694, 1050nologin utility, 561nologin.txt file, 548, 561Nonprinting character, 1051Nonrewinding tape device, 668Nonvolatile storage, 1051Normal mode, vim. See vim, Command modeNOT Boolean operator, 466nsswitch.conf file, 542, 559, 782nst0 file, 668NTFS driver, 987ntfs filesystem, 571NTP, 1051ntp.conf file, 385ntpd daemon, 385Null
builtin (:), 453, 457device, 233string, 434, 1051
null file, 233, 415, 454, 555, 557, 684Number
block, 1026device
major, 1046minor, 1048
giga-, 1038hexadecimal, 1039job, 237kilo-, 1044large, 1044

1114 Index
Number, continuedmagic, 1046mega-, 1047octal, 1051sexillion, 1059tera-, 1064undecillion, 1066
O
–o Boolean operator, 459o filename extension, 187Object, 90
applet, 109button, 110click, 91Clock, 95Context menu, 94, 115copying, 100, 113cut and paste, 113Deskbar, 266dragging, 96drawer, 110launcher, 109menu, 110panel. See Panelpreferences, setting, 94Properties window, 116question mark, 104right-click, 94selecting, 100trash, moving to, 100Update Notifier, 100
Octal number, 1051od utility, 556OLDPWD variable, 342One-time password, 1002Online documentation, 124, 379Open Group, 252Opening a file using exec, 429OpenOffice.org, 98, 105OpenPGP Message Format, 996OpenSSH, 1051
.ssh directory, 709authentication, 708, 710authorized keys, 721authorized_keys file, 709automatic login, 721clients, 711
compression, 727config file, 718configuration files, 718, 722debugging, 724diff utility, 715encryption, 710files, 708firewall, 727global files, 709host key, 710how it works, 710JumpStart
starting the sshd daemon, 720using ssh and scp, 711
known hosts, 712known_hosts file, 710, 712, 713log file, 724more information, 711NFS shared home directories, and, 702port forwarding, 725prerequisites, 711, 720protocol versions 1 and 2, 708public key encryption, 708recommended settings, 712, 720remote commands, 715rhost authentication, 709scp utility, 711security, 707server authentication, 712session key, 710setup, 712sftp utility, 718shell, remote, 714ssh directory, 709ssh utility, 708, 711, 714, 715ssh_config file, 718ssh_known_hosts file, 709, 712, 713sshd daemon, 720sshd_config file, 722ssh-keygen utility, 712, 713, 721troubleshooting, 724tunneling, 725user files, 709X11 forwarding, 712, 718, 719, 724, 725
Operating system, 1051generic, 8proprietary, 8
Operations menu, window, 112Operator

Index 1115
bash, 461in expressions, 461redirection, 282
bitwise&, 462, 465^, 462|, 462AND, 366, 367
Boolean, 464!, 309, 462, 466&&, 459, 463, 464, 466|, 978||, 309, 459, 463, 464, 465–a, 403, 459NOT, 466–o, 459
decrement, 463increment, 463postdecrement, 463postincrement, 463predecrement, 463preincrement, 463relational, 460short-circuiting, 464table of, 461
OPIE utility, 1002, 1007opt directory, 33, 195, 607OPTARG variable, 455OPTIND variable, 455Option, 221, 1051
bash. See bash, featuresboot, 63combining, 221
OR operator, 459Order of expansion, command line, 297Ordering a file using sort, 153Ordinary file, 185, 1051Organizing a filesystem, 184Other access, 199out shell script, 401Output, 1051
append. See Append, standard outputredirect, 156standard. See Standard, output
Overlay a shell, 286Owner file access, 199Owner, file, display the name of using ls, 199, 284
P
P2P, 1051Package. See Software packagePacket, 1051
broadcast, 363filtering, 1052. See also iptablesnetwork, 355, 376sniffer, 1052unicast, 363
Page break, 178Pager, 125, 148, 1052Paging, 564, 1052PAM, 545, 1052
features, 517more information, 546security, login, 1002stack, 548
pam.d directory, 545, 548, 560Panel, 90, 106
adding objects to a, 107menu, 107moving a, 109moving objects on a, 110object, 106, 109Object Context menu, 110orientation, 108Properties window, 108
Parameterexpansion, 342positional, 438shell, 295special, 436substitution, 297
Parentdirectory, 185, 186of all processes, 511process, 310, 449, 1052
Parentheses in shell functions, 332Parentheses, using to group commands, 289Parse, 223, 338parted utility, 514, 673Partition
/boot, 32, 646, 676/home, 33/usr, 33/var, 33creating graphically, 50, 53, 56creating manually, 70

1116 Index
Partition, continueddeleting, 55disk, 30, 1052Editor, GNOME, 53guided creation, 31, 50, 56LVM, 35parted editor, 514, 673planning, 31RAID, 34, 73resizing, 55size, table of minimum, 34sizes, 31table, 30type, 70
Partitioning a disk, 31Partner net, 355PASC, 276Passive FTP. See FTP, passivePassphrase, 1052passwd database, 658, 1038, 1066, 1067passwd file, 412, 516, 560passwd utility, 562, 789Password, 135, 1052
assigning root a, 499breaking, 682group, 558hashed, 562one-time, 1002root account, 490Samba, 826
PASV FTP. See FTP, passivePath, search, 164PATH variable, 302
inherited, 296root privileges and, 521usage, 423
Pathname, 185, 1052~ (tilde) in a, 190absolute, 189, 224, 1022completion, 324element, 1052expansion, 239, 298, 345, 346last element of, 1052relative, 190, 224, 1057using, 197
PC processor architecture, 27PCI device, information about, 696pdbedit utility, 824pdf filename extension, 187
Peer, BitTorrent, 605Period, leading in a filename, 240Peripheral device. See DevicePermission
access, 1022change using chmod, 200control of, 200directory, 202display using ls, 199execute, 284read, 284types of, 201
execute, 284file access, 201, 559read, 284setgid, 201setuid, 201, 488
Persistent, 1053PGP encryption, 995.pgpkey file, 168Philosophy, UNIX, 370Phish, 1053php filename extension, 931Physical
device, 1053security, 1004volume. See LVM, PV
Pick a Color window, 268Pick a Font window, 268PID, 310, 1053
$! variable, and, 438$$ variable, 437background process and, 237, 288fg, 290number 1, 310, 511temporary file, use in the name of, 425
Pidgin IM client, 105pidgin utility, 105pidof utility, 524pinfo utility, 128ping utility, 375, 526, 562, 842ping6 utility, 376Pipe, 156, 234, 1053
command separator, 288end of line, at the, 412filter, 14, 236named, 347, 567, 568noclobber and, 231standard error, and, 281

Index 1117
symbol, 978syntax exception, 412
Pipeline. See PipePixel, 1053pl filename extension, 931Places menu, 110Plaintext, 992, 1053.plan file, 168Pluggable Authentication Module. See PAMPlus sign, 978Pointer to a file, 209Point-to-point link, 356, 1053Point-to-Point Protocol. See PPP protocolPOP3, 776pop3-login daemon, 776popd builtin, 294Port, 383, 1053
forwarding, 725, 1053privileged, 383, 998stealth, 893
Portability, 8, 9portmap daemon, 386, 388, 530portmap utility, 802, 808, 818Portmapper, 1053Positional parameter, 296, 438POSIX, 9, 276Postdecrement operator, 463Postfix, 779postfix daemon, 998Postincrement operator, 463postinst script, dpkg, 599Postmaster, 683PostScript Printer Definition files, 626Postscript, brace expansion, 340Power management, 384Power, turn off, 519poweroff utility, 518ppd filename extension, 626PPD files, 626PPID. See Parent, processPPP protocol, 363, 562pppd daemon, 386Preamble, brace expansion, 340Preboot Execution Environment. See PXEPredecrement operator, 463Preferences submenu, 111Preferences, setting, 94Preincrement operator, 463preinst script, 599
PrerequisitesApache, 917automount, 818BitTorrent, 605CUPS, 612DHCP client, 539DHCP server, 540DNS, 857exim4, 757ftp, 731iptables, 899NFS, 802, 808NIS client, 785NIS server, 790Samba, 825SpamAssassin, 769vsftpd, 740
Pretty Good Privacy. See PGPPrimary
buffer, 113master server, DNS, 850partition, 31
Printfile, 151IPP protocol, 612queue, 629
Printable character, 1054printcap file, 561Printer
See also Printingcapability database, 561configuring with CUPS, 624control characters, 422daemon, 385lpr and, 151page break, 178sharing, 629skip to top of page, 178using, 151
PrintingSee also PrinterCUPS, 612quotas, 628system, about, 611UNIX traditional, 622Windows, from, 630Windows, to, 632
Privacy Enhanced Mail. See PEM encryptionPrivate address space, 697, 1054

1118 Index
Private key, 993Privilege, least, 488, 1045Privileged port, 383, 998, 1054Privileges, root. See root privilegesProblem solving, 982Problems, hung program, 523Problems, login, 133proc filesystem, 195, 563, 571, 572, 666Procedural language, 466Procedure, 1054Process, 1054
background, 310, 312, 1024child, 310, 312, 1028defined, 225, 310die, 310, 312displaying the number of a, 524first, 511foreground, 1037fork, 310ID. See PIDinit, 511kill, 522, 523, 524parent, 310, 1052parent of all, 511parent-child relationship, 310search for using ps and grep, 523sleep, 225, 312spawn. See Process, forkspontaneous, 310start, 225structure, 310substitution, 347wake up, 225, 310, 312
Processing a command line, 223Processor architecture, 26procmail daemon, 772procmail utility, 171profile file, 277, 561Program, 1054
See also Builtin; Utilitystopping a, 138structures, 466terminating, 96, 138
Project Athena, 252.project file, 168PROM, 1054Prompt, 1054
#, 488$, 19
%, 19bash, 303job control and, 290login, 134, 516PS2, 332PS3, 426representation, 19root account, 488secondary, 412shell, 134, 220
Proprietary operating system, 8Protocol, 1054
connectionless, 1030connection-oriented, 362, 1030datagram-oriented, 363defined, 361DHCP, 538HTTP, 391HTTPS, 391, 959ICMP, 376IPP, 612IPSec, 999, 1016ISO model, 361network, 361NNTP, 389PPP, 363SLIP, 363TCP/IP, 361TELNET, 386UDP, 361
protocols file, 561, 904Proxy, 387, 1055
gateway, 387, 1055server, 387, 1055
ps filename extension, 187ps utility, 238, 310, 437, 680, 684PS1 variable, 279, 303PS2 variable, 305, 332PS3 variable, 426PS4 variable, 408Pseudographical interface, 27, 137Pseudoterminal, 555pstree utility, 311pts file, 555pub directory, 735Public key encryption, 708, 993public_html directory, 930pushd builtin, 293pwd builtin, 188, 193, 457

Index 1119
pwd utility, 192, 213PWD variable, 342PXE, 800Python, 1055
Q
Qmail, 779, 998qnx4 filesystem, 571qrunner daemon, 776Qt toolkit, 259Question mark, 978Questions, finding answers to, 389Quick substitution, 321Quiescent, 512quiet boot parameter, 48quota utility, 687quotaon utility, 687Quotation mark
double, 297, 344, 397, 441removal, 339single, 146, 297, 412single versus double, 329, 346usage message, 406
Quoting, 1055characters, 146, 287shell variables, 297special characters, 298whitespace, 297
R
Radio button, 1055RAID, 34, 73, 580, 1055
backups, does not replace, 662fake, 35
RAM, 1055disk, 36, 1056required for installation, 26swap and, 32, 564testing, 62
Random access memory. See RAMRandom bytes, generating, 556random file, 556Random number generator, 556RANDOM variable, 473RAS, 1003, 1056, 1057Raw device, 570
Raw mode, 570rbac utility, 1008rc script. See init scriptrc.local file, 508rc?.d directory, 507, 508rc2 file, 505RC5 encryption, 995rcp utility, 372RDF, 1056Read access, 199, 284read builtin, 415, 416, 421, 445, 446, 458Reading user input, 445Readline Library, 314, 322, 324readnews utility, 389readonly builtin, 299, 300, 301, 458Readonly memory. See ROMReadonly variable, 295reboot utility, 518Reboot, system, 133, 518Rebuilding Linux, 635rec.skiing newsgroup, 389Recovery mode, 512
from multiuser mode, 519from the Alternate CD, 65maintenance, 512root password, 511root privileges, 488
Recursion, example of, 467Recursion, infinite, alias, 328, 331Recursive plunge. See Recursion, infinite, aliasRedirect
operators, bash, 282output, 156standard
error, 449, 454input, 230, 449output, 228, 231, 449output and append, 232output and error, 281output of background job, 238output using tee, 236
sudo output, 492Redirection, 13, 228, 1056Redundant array of inexpensive disks. See RAIDReentrant code, 1056Reexecuting commands, 314Refresh screen, 171Regular character, 1056

1120 Index
Regular expression, 971, 1056\(...\) bracket expression, 976ampersand, 977, 980anchor, 974asterisk, 974bracket, 973bracketing, 976caret, 974delimiter, 972dollar sign, 974empty, 976extended, 978full, 977longest match, 975period, 973quoted digit, 977quoting parentheses, 976quoting special characters, 975replacement string, 976rules of use, 975simple string, 972special character, 972special character, quoting, 975square bracket, 1028summary, 979
reiserfs filesystem, 571reject utility, 629Relational operator, 460Relative pathname, 190, 224, 1057Relaying, authenticated email, 777Release, upgrading, 59Releases, Ubuntu, 28Religious statue, miniature. See IconRemainder operator, 464Remapping mouse buttons, 258Remote
access security, 1003access server. See RAScomputing and local displays, 254filesystem, 354, 1057login, 134procedure call. See RPC
Removedirectory using rmdir, 196file using rm, 148link using rm, 214user, 661variable, 299
Rename a directory using mv, 198
Rename a file using mv, 150, 197Repairing a broken system using recovery mode, 65Repairing a filesystem, 520Repeating a command, 139Replacement string, 976, 977, 980REPLY variable, 426, 446Reports, system, 671Repositories, 119, 588, 590Request for comments. See RFCReserved port. See Privileged portreset utility, 526Resizing a window, 96Resolution, changing the display, 140resolv.conf file, 561, 859resolvconf utility, 858Resolver, 382, 561, 848, 1057Resource Description Framework, 1056Resource record, DNS, 851Restore, 1057restore utility, 666restricted software package category, 588Return code. See Exit, statusRETURN key, 18, 19, 137, 223, 286Reverse name resolution, DNS, 855rexecd daemon, 386RFC, 1057rhost Authentication, OpenSSH, 709Right-click, mouse, 94Right-handed mouse, 258Ritchie, Dennis, 9rlogin utility, 354rlogind daemon, 1002rm utility, 148, 214, 330, 402, 567rmdir utility, 196rmmod utility, 645rmt/0 file, 666rmtab file, 816rn utility, 389Roam, 1057Role alias, 928ROM, 1057romfs filesystem, 571Root
directory, 184, 186, 194, 1058domain, DNS, 848filesystem, 1058login, 1058user. See root accountwindow, 106, 113, 1058

Index 1121
root account, 490password, 490password and recovery mode, 511password and sudo, 498privileges. See root privilegesprompt, 488unlocking, 499
root privileges, 88, 487gaining, 488gksudo utility, 491graphical programs and, 491kdesu utility, 491PATH, and security, 500recovery mode, 488setuid file, 488shell with, 492su utility, 489, 499sudo utility, 490
root user. See root accountRotate file, 684, 1058routed daemon, 386Router, 695, 1058
network, 358, 359setting up with iptables, 908SmoothWall Linux distribution, 695
RPC, 387, 783, 1058rpc file, 388, 562rpc.yppasswdd daemon, 797rpcinfo utility, 530, 788rquotad daemon, 385RSA encryption, 994, 1058rsh utility, 354, 372rshd daemon, 1002Run, 1058
Application window, 92, 269background command, 237command scripts. See rc scriptsshell script, 285
Runlevel, 510, 1058emulation in Upstart, 502initdefault, and, 506table of, 510
runlevel utility, 510, 519Running applications, 92run-parts utility, 669ruptime utility, 680
S
S/Key utility, 1002safedit shell script, 423saint utility, 1008Samba, 823, 1058
browser parameters, 836browsing Linux shares from Windows, 838communication parameters, 837daemons, 824global parameters, 833home directories, sharing, 838[homes] share, 838JumpStart, configuring a Samba server using
shares-admin, 826Linux shares, accessing from Windows, 838logging parameters, 836manual configuration, 832mapping a share, 839more information, 825NBT, 1049net use utility (Windows), 842net utility, 824net view utility (Windows), 842NetBIOS, 1049nmbd daemon, 824, 842nmblookup utility, 842, 843password, 826pdbedit utility, 824ping utility, 842prerequisites, 825printing from Windows, 631printing to Windows, 632security parameters, 833share, 1059share parameters, 838shared directory, 703shares-admin utility, 826SMB, 1060smb.conf file, 832smbclient utility, 824, 840, 843smbd daemon, 824smbpasswd utility, 828smbstatus utility, 824smbtar utility, 824smbtree utility, 824, 839smbusers file, 826suite of programs, 824swat utility, 828

1122 Index
Samba, continuedtestparm utility, 842troubleshooting, 841user map, 826user name, 826utilities, 824Web Administration Tool. See Samba, swat
utilityWindows
networks, browsing, 840share, 1059shares from Linux, accessing, 839shares, connecting to, 840shares, displaying, 839shares, mounting, 841
WINS, 1069samba init script, 825samhain utility, 1001, 1008SANS security training and education, 1008sara utility, 1008Save window, 99sbin directory, 196Scheduling jobs, 10Scheduling routine tasks, 668Schema, 1059Schneier, Bruce, 1008sci.med newsgroup, 389scp utility, 354, 569, 711. See also OpenSSHScreen and Graphics Preferences window, 75Screen, login, 132Screen, refresh, 171Script
postinst, 599preinst, 599rc. See init scriptshell. See Shell script
script utility, 158Scroll, 1059Scrollbar, 1059sda file, 554Search
engine, 392for a file, 266, 269for a keyword using apropos, 165for a string using grep, 151for Files window, 269path, 164
Secondary prompt, 412Secondary server, DNS, 851
Secret key encryption. See Symmetric key encryptionSecunia vulernability monitoring, 1008secure file, 545, 982Secure Sockets Layer. See SSLsecurenets file, 793securetty file, 489Security
access permission, 199, 201accton utility, 1002ACL, 1019, 1022admin group, user passwords, 682AIDE utility, 521, 1001, 1006ANI, 1004Apache security directives, 946authentication, 1024automatic number identification, telephone,
1004back door, 1024BIND. See Security, DNSBIOS, 682Bugtraq, 1002caller ID, 1004CERT, 682, 1002, 1006checksum, 1028chkrootkit utility, 1006chroot jail. See chroot jailcipher, 1029ciphertext, 992, 1029cleartext, 1029CLID, 1004cookie, 1031crack utility, 682cracker, 1031cryptography, 1031cypher, 1029DDoS attack, 1032digital signature, 993DNS, 846, 870DoS attack, 1034DragonSquire IDS, 1001dsniff utility, 1006email, 997encryption. See Encryptionfile, 997finger utility, 371firewall, 359Firewall toolkit, 1007Freefire solutions, 1006FTP, 736, 741fwtk utility, 1007

Index 1123
GIAC certification and training, 1007host, 1001host based trust, 373host, trusted, 372hosts.equiv file, 372hping utility, 1007in.rexecd daemon, 386Internet, root access, 489IP spoofing, 1043IPng, 369IPSec, 999, 1016IPv6, 369ISC2, 1007John the Ripper utility, 1007keeping a system secure, 682Kerberos, 1007, 1044kill, 523L6 utility, 1007lids utility, 1007Linux features, 12LinuxSecurity.com, 1007locktty script, 417login, 1002
account, 373shell, 561
LWN.net, 1007mailing list, bugtraq, 1006man-in-the-middle, 869, 996, 999messages, 566MITM. See Man-in-the-middlemore information, 1006MTA, 997MUA, 998nessus utility, 1007netcat utility, 1007network, 998NFS, 802nmap utility, 1007one-time password, 1002OpenSSH. See OpenSSHOPIE utility, 1002, 1007PAM, 517, 1002password, 135, 560PATH and root privileges, 500PATH variable, 303physical, 1004plaintext, 992RAS, 1003rbac utility, 1008remote access, 1003
resources, 1006rlogind daemon, 1002root access, Internet, 489root password, 682root privileges and PATH, 500RSA, 1058rshd daemon, 1002saint utility, 1008samhain utility, 1001, 1008SANS training and certification, 1008sara utility, 1008Schneier, Bruce, 1008Secunia vulnerability monitoring, 1008SecurityFocus tools and lists, 1008server, securing a, 532setgid, 201setuid, 201, 202, 488, 682setuid file, 488SHA1 hash algorithm, 1059shadow file, 562smartcard, 1003snort utility, 1008software, keeping up-to-date, 584spoofing, 1043srp utility, 1008ssh. See sshSSL, 997STARTTLS, 997sudo utility, 490swatch utility, 1008syslogd daemon, 688TCP wrappers, 532telnet, 374telnetd daemon, 1002TLS, 997Treachery, tools, 1008tripwire utility, 1001, 1008Trojan horse, 520, 1065trust, 373trusted host, 372up-to-date software, 584virtual private network, 355virus, 1004, 1068VPN, 355vsftpd, 746web of trust, 996wiping a file, 556wireshark utility, 1008worm, 1004, 1068, 1069xhost, 255

1124 Index
security directory, 545, 547SecurityFocus, security tools and lists, 1008sed utility, 684Seed, BitTorrent, 605Segment, network, 357, 1050select control structure, 425Selecting objects, 100Selection buffer, 113Self-signed certificate, 776, 778, 959sendmail and exim4, 757sendmail daemon, 386sendmail utility, 779Separating commands, 286Server, 1059
DNScache, 864full-functioned, 873master, 850primary master, 850secondary, 851slave, 877split horizon, 878types of, 850
file, 799FTP, 740mail list, 372, 985Message Block protocol. See Samba, SMBname, 381, 382process, 380proxy, 387securing, 532setting up, 527, 702superserver. See inetd daemon; xinetd daemonvsftpd, 740X, 253, 1070
Server CD, 29See also Installationchecking for defects, 47function keys, 62installing software from, 119ISO image, 37menu, 66
Service dispatcher, 531Service, directory, 1033Services
configuring, 508daemons providing, 384Internet, 388network, 384
nsswitch.conf file, 542Upstart, 502
services database, 1053services file, 384, 388, 562Session, 1059
failsafe, 1036initialize, 517key, OpenSSH, 710manager, 104, 141
set builtin, 300, 405, 407, 408, 442, 443, 458Set group ID. See SetgidSet user ID. See Setuidsetfacl utility, 205Setgid, 201, 1059setserial utility, 526Setuid, 201, 488, 1059
files, find using find, 521grant privileges, 202mount, 573, 803NFS, 803nosuid option to mount, 573, 803security, 682
Sexillion, 1059sftp utility, 718sh Shell, 276, 278, 1026SHA1 hash algorithm, 1059shadow file, 516, 562shar shell script, 428Share, 1059share directory, 196Shared network topology, 1059shares-admin utility, 658, 809, 812, 827Sharing an Internet connection, 908Shell, 219, 1059
See also Shell script; Shell variablearchive, 428arithmetic (bash), 458calling program, name of, 439changing default, 525command
grouping, 286, 289interpreter, 114separation, 286substitution, 407, 424
comment, 406comparing strings, 460control structure
break, 418case, 419

Index 1125
continue, 418do, 409, 410, 412, 416done, 409, 410, 412, 416elif, 403else, 400esac, 419fi, 396, 403for, 409, 410, 453for...in, 409, 410if, 396, 400, 403if...then, 396if...then...elif, 403if...then...else, 400in, 409then, 396, 400, 403until, 416while, 412, 453
dash, 276environment variable, 295, 434exit from, 292features, 334function, 331, 1059job control, 290keyword variable, 296login, 310, 517, 561, 1046name of the calling program, 439options. See Shell, featuresparameter, 295
positional, 296special, 296
prompt, 19, 134, 220, 303readonly variable, 295root privileges, 492sh, 276, 278sleep, 225strings, comparing, 460user-created variable, 295variable. See Shell variable
Shell script, 275, 282, 1060# comment, 285#! specifies which shell to use, 284/dev/tty for a terminal, 450addbanner, 453bash, 466birthday, 427bundle, 428chkargs, 398, 400command_menu, 421comment, 285
configure, 608count, 413cpdir, 289creating, 282debugging, 408double quotation marks, 441, 446error message, 407, 424executing, 283, 285Here document, 427infinite loop, 452invocation, 285is_regfile, 399lnks, 404locktty, 417makepath, 467menu, 421out, 401PATH usage, 424quiz, 470quote in, 397, 406, 412, 441read user input, 445recursion, 467running, 285safedit, 423shar, 428specifying a shell, 284spell_check, 414temporary filename, 425, 437usage message, 400, 406, 424user input, 445whos, 411whoson, 283
Shell variable$!, 438$#, 423, 439$$, 425, 437$*, 440$?, 438$@, 411, 440$0, 439BASH_ENV, 278CDPATH, 307COLUMNS, 426DISPLAY, 256ENV, 278FCEDIT, 316HISTFILESIZE, 312HISTSIZE, 312HOME, 296, 301, 453

1126 Index
Shell variable, continuedIFS, 305INPUTRC, 325keyword, 301LINES, 426MAIL, 303MAILCHECK, 303MAILPATH, 303naming, 295noclobber, 231OLDPWD, 342OPTARG, 455OPTIND, 455PATH, 302
example, 423keyword shell variable, 296security, 521
PS1, 279, 303PS2, 305, 332PS3, 426PS4, 408PWD, 342quoting, 297RANDOM, 473readonly, 295REPLY, 426, 446TERM, 134, 554
shells file, 525shift builtin, 441, 456, 458Short-circuiting operator, 464Shortcut. See Linkshowmount utility, 816Shutdown system, 133shutdown utility, 518, 564Side pane, Nautilus, 261Signal, 1060
defined, 451hang up, 452HUP, 680KILL, 680kill, 452list of, 451names, 451, 454quit, 452software termination, 452TERM, 138terminal interrupt, 452
Signature, digital, 993Silicon Graphics, 391
Simple filename, 189, 190, 224, 1060Single quotation mark, 146, 412Single versus double quotation marks, 329Single-user mode. See Recovery modeSingle-user system, 1060Size of file, display using ls, 199skel directory, 660Skip to top of page, 178Slave server, DNS, 851, 877Sleep, shell, 225sleep system call, 312Slice. See PartitionSlider, 1060SLIP protocol, 363slocate utility, 166Sloppy input focus, 139Slow system, 680Smartcard, 1003Smarthost, 756, 759SMB. See Samba, SMBsmb.conf file, 832smbclient utility, 824, 840, 843smbd daemon, 386, 824smbfs filesystem, 571smbpasswd utility, 828smbstatus utility, 824smbtar utility, 824smbtree utility, 824, 839smbusers file, 826SMF, 500Smiley, 1060Smilies, plural of smileySmoothWall, Linux router distribution, 695SMTP, 375, 755, 1060Snap, window, 1060SNAT, 910Sneakernet, 1060Sniff, 1060snort utility, 1008SOA record, DNS, 853soc.singles newsgroup, 389Socket, 569SOCKS, 1061Soft link. See Symbolic, linkSoftware
bug tracking, 584free, definition, 1011keep up-to-date, 584Sources window, 119

Index 1127
termination signal, 452Update Notifier, 100updating, 100
Software package, 583See also APT; apt-cache; apt-file; aptitude;
dpkgadding, 119, 120binary, 599category, 119, 588CD/DVD, installing from, 119dependencies, 586, 596dependencies, fixing broken, 593file, searching for a, 604files, listing, 604finding, 587formats, 584information, 595, 596, 597, 599, 600, 603installing, 585, 602metapackage, 592removing, 119, 120, 586, 602removing configuration files, 586repositories. See Repositoriessource code, 598, 599updating, 119updating index, 594updating list of available, 600upgrading, 594virtual, 592
Solving a problem, 982Sort, 1061sort utility, 14, 153, 235, 236source builtin, 279Source code, downloading, 598sources.list file, 589SPACE, 146, 1061Spam, 1061
See also SpamAssassinwhois and, 378
SpamAssassin, 768, 769See also Spamconfiguring, 771mail server, on a, 772prerequisites, 769spamassassin init script, 769spamc utility, 769spamd daemon, 769testing, 770
spamassassin init script, 769spamc utility, 769
spamd daemon, 769SPARC processor architecture, 27Sparse file, 1061Spawn. See ForkSpecial
character, 146, 239, 1061
*, 240?, 239[], 241filename generation, 239Here document, 428pathname expansion, 239quoting, 297, 298regular expressions, 971standard input, 428
file, 567about, 567block, 568character, 568device file, 1033
parameters, shell, 296, 436Speed, Internet, 355spell_check shell script, 414Spin box, 1061Spinner. See spin boxsplash boot parameter, 48Split horizon server, DNS, 878Splitting, word, 305Spontaneous process, 310Spoofing, IP, 1043Spool, 1061spool directory, 684, 982SQL, 1061Square bracket, 1061Square bracket in place of test, 399SquirrelMail, 772squirrelmail-configure utility, 774src directory, 196srp utility, 1008ssh directory, 709ssh init script, 720ssh utility, 134, 354, 384, 569, 708, 711, 714, 715,
1003, 1008. See also OpenSSHssh_config file, 718ssh_known_hosts file, 709, 712, 713sshd daemon, 384, 386sshd_config file, 722ssh-keygen utility, 712, 713, 721

1128 Index
SSLApache, 959email, 778security, 997
st0 file, 668Stack, 292
directory, manipulation, 292LIFO, 292PAM, 548
Stallman, Richard, 2Stand-alone computer, 353Standard
directories and files, 194error, 226, 280, 407, 429, 1062
file descriptor, 280, 429redirecting with exec, 449shell script, 406trap, 454
input, 226, 1062file descriptor, 280, 429pipe (|), 288redirect, 230redirecting with exec, 449special character, 428
output, 226, 1062append, 232file descriptor, 280, 429pipe (|), 288redirect, 228, 236redirecting with exec, 449
StandardsFHS (Linux Filesystem Hierarchy Standard),
194FSG (Free Standards Group), 194FSSTND (Linux Filesystem Standard), 194LSB (Linux Standard Base), 194OpenPGP Message Format, 996option handling, 457
STARTTLS MTA, 997Startup file, 188, 1062
.bash_login file, 277
.bash_logout file, 277
.bash_profile, 277, 554
.bashrc, 190, 277, 554
.cshrc, 1031
.inputrc, 325
.login, 1046
.logout, 1046
.profile, 277, 554, 1054
.toprc, 673/etc
bashrc, 277profile, 277, 561
bash, 277BASH_ENV variable, 278check for problems, 679ENV variable, 278
startx utility, 254stat utility, 526statd daemon, 385Static IP address, 364Status
bar, Nautilus, 263exit, 1036line, 1062
status file (dpkg), 599status utility, 503Stealth port, 893Sticky bit, 1062Stopping a job using the suspend key, 237Stopping a program, 96, 138Streaming tape, 1062Streams. See Connection-oriented protocolString, 1062
comparing, 460finding using grep, 151pattern matching (bash), 460within double quotation marks, 297
Stroustrup, Bjarne, 10strtok() system call, 963Structure, data, 1032Structured Query Language. See SQLstty utility, 417, 554Stylesheet. See CSSsu utility, 489, 499Subdirectory, 184, 1062Subdomain, 848Subnet, 367, 1062
address, 1063mask, 367, 1063number, 1063specifying, 529
Subpixel hinting, 1063Subpixel smoothing, 268Subroutine. See ProcedureSubshell, 285, 289, 1063Substitution
command, 344

Index 1129
parameter, 297sudo utility, 88, 490
See also root privilegesadmin group, 496configuring, 494defaults (options), 497environment, 492redirect output, 492root account password and, 498root shell, spawning, 492sudoers file, 494tee utility and, 493timestamp, 491
sudoers file, 494Sun Microsystems, 369, 781, 799Superblock, 1063Supercomputers, 8Superserver. See inetd daemon; xinetd daemonSuperuser, 1063. See also root privileges; System
administrationSuspend key, 138, 178, 237, 291, 451SVID. See System, V Interface DefinitionSwap, 564, 1063
filesystem, 32, 564RAM, and, 32, 564space, 1063
swapon utility, 564Swarm, BitTorrent, 605swat utility, 828swatch utility, 1008Switch, network, 356, 357, 1050Switcher, Workspace, 93, 94sylpheed utility, 171Symbolic
hostname, 383link, 212, 567, 1045, 1064
creating using ln, 213deleting using rm, 214
symlink. See Symbolic, linkSymmetric key encryption, 994Synaptic utility, 121Syntax, command line, 220sys file, 636sysctl utility, 636sysklogd init script, 690syslog file, 872syslog utility, 386syslog.conf file, 386, 688syslogd daemon, 386, 688
syslogd file, 690System
administration. See System administrationadministrator. See System administrationbooting, 511bringing down, 518call, 10
bad, trapping, 451exec(), 285fork(), 285, 310, 312, 963gethostbyname(), 857raw device and, 570sleep(), 312strtok(), 963
console. See Consolecrash, 519dataless, 800, 1032diskless, 800does not boot, 520error messages, 565initialization, customize, 507logging in, 89logs, 688menu, 111messages, 565, 688mode, 1064operation, 510powering down, 519rebooting, 133, 518reports, 671security, 682shutting down, 133, 518single-user, 1060upgrading, 59V. See System Vwell-maintained, 486
System administrationaccept utility, 629adduser utility, 660aptitude utility. See aptitude utilityat utility, 671back up files, 662, 666backup, amanda, 663client, specifying, 528communicate with users, 677configuration file rules, 528dmesg utility, 511, 654dump utility, 666e2label utility, 525

1130 Index
System administration, continuededquota utility, 687files, growing, 683filesystem
integrity, 577mounting remote, 803repairing, 520
firestarter utility, 888free space, disk, 683fsck utility, 577gdmsetup utility, 83getty utility, 516group, adding, 661groupadd utility, 661groupdel utility, 661groupmod utility, 661halt utility, 518, 519host, specifying, 528hosts.allow file, 531hosts.deny file, 531kill builtin, 524log in problem, 679log, machine, 681login utility, 516lpadmin utility, 627lpinfo utility, 626lshal utility, 697lshw utility, 696lsof utility, 681lspci utility, 696maintenance, 512memtest86+ utility, 62mkfs utility, 525more information, 522mounting a remote filesystem, 803multiuser mode, 515parted utility, 514, 673password, modifying, 661poweroff utility, 518powers of the administrator, 485problem solving, 982problems, 679ps utility, 238, 310, 680, 684quota utility, 687quotaon utility, 687reboot utility, 518recovery mode, 512reject utility, 629reports, 671
restore utility, 666rpcinfo utility, 530runlevels, 510scheduling tasks, 668setuid files, finding, 521shares-admin utility, 658, 809, 827shutdown utility, 518single-user mode. See Recovery modeslow system, 680su utility, 499subnet, specifying, 529sudo, users who are allowed to run, 88sudoers file, 494syslogd daemon, 688system does not boot, 520telinit utility, 516, 519top utility, 672Trojan horse, 520trouble alias, 681tune2fs utility, 525, 578umask builtin, 526umount utility, 575uname utility, 527updating software packages, 119user
adding, 658, 660cannot log in, 679getting information to, 677modifying, 661removing, 661
useradd utility, 660userdel utility, 661usermod utility, 661vmstat utility, 671wget utility, 609
system services database, 1041System V, 1064
init daemon, 500init script. See Init scriptInterface Definition, 9
sysv filesystem, 572SysVinit, 500SysVinit scripts. See Init scriptsysv-rc-conf utility, 508
T
T-1 line, 356T-3 line, 356

Index 1131
TAB key, 146Table, hash, 1039tail utility, 152, 238talk utility, 372, 386talk.politics newsgroup, 389talkd daemon, 386Tanenbaum, Andrew, 4, 571Tape
archive. See tar utilitydevice, 666, 668mt utility, 668nonrewinding, 668streaming, 1062
tar file, 161tar utility, 161, 289, 663, 665tar.bz2 filename extension, 162tar.gz filename extension, 162tar.Z filename extension, 162, 187Tarball, 161Task, Upstart, 501tbz filename extension, 162TC Shell, 1064TCP, 1064TCP wrappers, 532TCP/IP, 361, 387tcsh, 1064tee utility, 236, 493Teletypewriter, 1066telinit utility, 510, 516, 519telnet utility, 134, 354, 373, 374, 957, 998telnetd daemon, 386, 1002Temporary file, 425Tera-, 1064TERM signal, 138TERM variable, 134, 554Termcap, 988termcap file, 1064Terminal, 1064
ASCII, 1023character-based, 1028emulator, 114, 133, 270failsafe, 132file, 226interrupt signal, 452name
ansi, 989linux, 989vt100, 989vt102, 989
vt220, 989xterm, 989
pseudo, 555resetting, 526Server Project, Linux, 800specifying, 988standard input, 227standard output, 227virtual, 64X, 1070
Terminating a program, 96, 138Terminfo, 988terminfo database, 172terminfo directory, 1064Terminology
Apache, 918DNS, 858firestarter, 887folder and directory, 96GNOME, 105Nautilus and File Browser, 96Upstart, 501
Ternary operator, 463, 465test builtin, 397, 398, 399, 403, 407, 410, 412test utility, 398testparm utility, 842Text
box, 1064echo, 157file, 172
Textualinstaller, 67interface, 27partitioning, manual, 70system, installing, 65
tftp utility, 800tftpd daemon, 386tgz filename extension, 187Theme, 102, 1064then control structure, 396, 400, 403Thicknet, 357, 1064Thinnet, 357, 1065Thompson, Ken, 9, 1024Thread safe. See Reentrant codeThree-finger salute, 518Thumb, 1065Tick, 1065Tick box. See check boxtif filename extension, 188, 1065

1132 Index
tiff filename extension, 188, 1065Tilde expansion, 190, 301, 341Tiled windows, 1065time builtin, 458Time to live. See TTLTime zone, graphical installation, 50timed daemon, 386tin utility, 389Titlebar, 96, 112TLS, security, 997tmp directory, 425, 684Toggle, 1065Token, 220, 338Token ring network, 1065Toolbar, 112Toolbar, Nautilus, 263Tooltip, 106, 1065Top of form, 178top utility, 672, 680Top-down design, 472torrent filename extension, 40, 605Torrent, BitTorrent, 605Torvalds, Linus, 1, 2, 3, 6, 1044touch utility, 197tput builtin, 417tr utility, 159, 234, 281traceroute utility, 376traceroute6 utility, 377Tracker, BitTorrent, 605Transactions signatures, DNS. See DNS, TSIGTransfer rate, network, 357Transient window, 1065Transmission Control Protocol. See TCPTransmission Control Protocol/Internet Protocol. See
TCP/IPTransport Layer Security. See TLStrap builtin, 417, 451, 458Trash directory, 100Trash vs. deleting a file, 265Trash, emptying, 100Treachery, security tools, 1008Tree structure, 184tripwire utility, 1001, 1008Trojan horse, 520, 1065Trolltech, 259Troubleshooting, DNS, 872true utility, 453Trusted host, 372tset utility, 526
TTL, 1066TTL, DNS, 853tty file, 450tty utility, 226TTY. See Teletypewritertty? file, 506tune2fs utility, 525, 578Tunneling, 1066Tunneling, OpenSSH, 725Tutorial, ftp, 732Tutorial, vim, 172Twisted pair cable, 357txt filename extension, 187, 241type builtin, 445, 458Type maps, 951Type of file, display using ls, 200Typeface conventions, 18typescript file, 158typeset builtin, 299, 436Typo, correcting, 137tz filename extension, 162
U
U.S. Library of Congress, 374ubiquity. See Installation, graphicalUbuntu
Alternate CD. See Alternate CDbooting, 46burning a CD/DVD, 40Desktop CD. See Desktop CDdocumentation, 124download locations, 24downloading. See Downloading UbuntuDVD. See DVD, live/installeditions, 28Help Center window, 104Help window, 124history, 10IRC channels, 131live/install Desktop CD. See Desktop CDLTS release, 28recovery mode, 65releases, 28Server CD. See Server CDupgrading, 59X.org, 74
UCE. See Spamuchroot.c program, 536

Index 1133
udev utility, 568UDP, 361, 1066UDP/IP, 387ufs filesystem, 572ufsdump utility, 557UID, 1066
displaying, 499effective, 1035passwd file, in, 560
umask builtin, 458, 526umount utility, 559, 575, 804umsdos filesystem, 572unalias builtin, 328, 331uname utility, 527uncompress utility, 187Undecillion, 1066Undeclared variable, 434Unicast packet, 363, 1066Unicast vs. broadcast, 363Unicode, 1066uniq utility, 154Unique filename, 425, 437universe software package category, 588University of Illinois, 391UNIX
Bourne Shell, 276philosophy, 370printing, traditional, 622System V, 6, 1064
unix2dos utility, 159, 736Unlocking the root account, 499Unmanaged window, 1066Unmounting a busy filesystem, 575Unpacking an archive file using tar, 161unset builtin, 299, 332, 458Unshielded twisted pair. See UTPuntil control structure, 416unzip utility, 161Update Manager window, 101Update Notifier, 100updatedb utility, 166update-exim4.conf file, 766update-grub utility, 651Updating software package index, 594Updating software packages, 100, 119Upgrading software packages, 594Upgrading Ubuntu, 59Upstart, 500
event, 501
future of, 501init daemon, 502, 511initctl utility, 502job, 501, 503job definition file, 504rc2 task, 505runlevel emulation, 502service, 502status utility, 503task, 501terminology, 501tty? tasks, 506
Uptime, display using w, 169uptime utility, 169urandom file, 556URI, 1067URL, 391, 1067Usage message, 220, 400, 406, 424, 1067Usenet, 388, 391User
accounts, manage, 658adding, 658, 660authentication, 516cannot log in, 679communication, network, 370created variable, 295, 296Datagram Protocol. See UDPfinger, 167graphical installation, 51ID. See UIDinterface, 1042, 1067map, Samba, 826mode, 1067modifying, 661name, Samba, 826name. See Usernameprivate groups, 558removing, 661Superuser. See root accountw, 169who, 167
useradd utility, 660userdel utility, 661usermod utility, 661Username, 560, 562, 1067Userspace, 1067usr partition, 33UTC, 1067

1134 Index
Utility, 1067accept, 629accton, 1002adduser, 660AIDE, 521, 1001, 1006amanda, 663anacrontab, 384apache2ctl, 917, 956apropos, 126, 165apt-cache, 596aptitude. See aptitude utilityaspell, 413, 415at, 384, 557, 671automount, 818basename, 423, 424, 453bison, 17BitTorrent. See BitTorrentbtdownloadcurses, 605btshowmetainfo, 606builtin versus, 398bunzip2, 160, 164bzcat, 161bzip2, 160, 164, 665bzip2recover, 161cancel, 623cat, 147, 227, 229, 230, 280, 402chkrootkit, 1006chmod, 200, 284chsh, 525clear, 525compress, 161, 187cp, 149, 198, 289cpio, 664, 665crack, 682crontab, 385, 557cut, 343date, 157, 233depmod, 645df, 800dhclient, 539diff, 154, 715dig, 378, 856, 859, 872displayconfig-gtk, 75dmesg, 511, 654dos2unix, 159, 736dpkg, 600dpkg-reconfigure, 768DragonSquire, 1001dsniff, 1006
dump, 666e2label, 525edquota, 687egrep, 977emacs, 171Evolution, 109, 171eximon, 765eximstats, 765exportfs, 817fdformat, 574fdisk. See partedfile, 155, 565, 684find, 405, 408, 521, 684find using whereis, 164find using which, 164finger, 167, 370, 371, 385, 411flex, 17fsck, 570, 577ftp, 354, 730, 736fuser, 575fwtk, 1007gawk, 411, 412gcc, 9gdm (GNOME), 82gdmsetup, 83getfacl, 204getty, 310, 516gksudo, 491gnome-search-tool, 269gnome-terminal, 270gopher, 390gparted, 53gprof, 17grep, 151, 235, 427groupadd, 661groupdel, 661groupmod, 661groups, 558grub, 647grub-install, 653gunzip, 161gzip, 161halt, 518, 519head, 152host, 378, 857hostname, 149, 370hping, 1007id, 492, 499ifconfig, 541

Index 1135
info, 126, 243, 983init, 310, 559initctl, 502insmod, 645ipchains, 896iptables, 885iptables-restore, 907iptables-save, 907iwconfig, 700John the Ripper, 1007jwhois, 378kdesu, 491kerberos, 1003, 1007killall, 524L6, 1007ldd, 532less, 125, 148, 236, 288, 402lftp, 718lids, 1007links, 392ln, 210, 213, 566lock, 417login, 310, 516logresolve, 938logrotate, 684lp, 623lpadmin, 627lpinfo, 626lpq, 151, 623lpr, 151, 235, 237, 623lprm, 151, 623lpstat, 151, 623ls, 147, 192, 199, 202, 211, 240, 284lshal, 697lshw, 525, 696lsmod, 645lsof, 681lspci, 696lynx, 392mail, 171mailq, 765make, 162makedbm, 793man, 14, 124, 128mandb, 165md5sum, 40memtest86+, 62mesg, 171mingetty, 310
mkdir, 191, 192, 193, 803mkfifo, 568mkfs, 525, 574mkswap, 564modinfo, 645modprobe, 645more, 148, 236, 402mount, 559, 572, 573, 803, 841mt, 668mv, 150, 197, 566names, typeface, 18nessus, 1007net, 824net use (Windows), 842net view (Windows), 842netcat, 1007netstat, 365network, 354, 372newaliases, 764newlist, 775nisdomainname, 786nmap, 1007nm-applet, 700nmblookup, 842, 843nn, 389nologin, 561od, 556OPIE, 1002, 1007option, 221parted, 514, 673passwd, 562, 789pdbedit, 824pidgin, 105pidof, 524pinfo, 128ping, 375, 526, 562, 842ping6, 376portmap, 802, 808, 818poweroff, 518procmail, 171ps, 238, 310, 437, 680, 684pstree, 311pwd, 192, 213qmail, 998quota, 687quotaon, 687rbac, 1008rcp, 372readnews, 389

1136 Index
Utility, continuedreboot, 518reject, 629reset, 526resolvconf, 858restore, 666rlogin, 354rm, 148, 214, 330, 402, 567rmdir, 196rmmod, 645rn, 389rpcinfo, 530, 788rsh, 354, 372runlevel, 510, 519run-parts, 669ruptime, 680S/Key, 1002saint, 1008samhain, 1001, 1008sara, 1008scp, 354, 569, 711. See also OpenSSHscript, 158sed, 684sendmail, 779setfacl, 205setserial, 526sftp, 718shares-admin, 658, 809, 812, 827showmount, 816shutdown, 518, 564slocate, 166smbclient, 824, 840, 843smbpasswd, 828smbstatus, 824smbtar, 824smbtree, 824, 839snort, 1008sort, 14, 153, 235, 236spamc, 769squirrelmail-configure, 774srp, 1008ssh, 134, 354, 384, 569, 708, 711, 714, 715,
1003, 1008. See also OpenSSHssh-keygen, 712, 713, 721startx, 254stat, 526status, 503stty, 417, 554su, 489, 499
sudo, 88swapon, 564swat, 828swatch, 1008sylpheed, 171Synaptic, 121sysctl, 636syslog, 386sysv-rc-conf, 508tail, 152, 238talk, 372, 386tar, 161, 289, 663, 665tee, 236, 493telinit, 510, 516, 519telnet, 134, 354, 373, 374, 957, 998test, 397, 398, 403, 407testparm, 842tftp, 800tin, 389top, 672, 680touch, 197tr, 159, 234, 281traceroute, 376traceroute6, 377tripwire, 1001, 1008true, 453tset, 526tty, 226tune2fs, 525, 578typeset, 299ubiquity. See Installation, graphicaludev, 568ufsdump, 557umount, 559, 575, 804uname, 527uncompress, 187uniq, 154unix2dos, 159, 736unzip, 161updatedb, 166update-grub, 651uptime, 169useradd, 660userdel, 661usermod, 661uucp, 389vimtutor, 172vmstat, 671w, 169, 680

Index 1137
wall, 677wc, 343webalizer, 964wget, 609whatis, 166whereis, 164which, 164who, 167, 226, 233, 235, 560, 686whois. See Utility, jwhoiswireshark, 1008write, 167, 170, 677X server, 252xargs, 684xev, 254xhost, 255Xinerama, 1070xmodmap, 258xrn, 389xvnews, 389ypinit, 795yppasswd, 788yppush, 793ypwhich, 787ypxfr, 795zcat, 161zip, 161
UTP cable, 357uucp utility, 389UUID, 576, 1067
V
var filename extension, 951var partition, 33Variable, 295, 1067
braces, 298completion, 325default value, assigning, 443displaying an error message, 444environment, 295expansion, 342, 443exported, 449global, 295, 449keyword, 296local, 312, 449modifiers, 443naming, 295readonly, 295
removing, 299shell, 295substitute default value, 443substitution, 297undeclared, 434unsetting, 299user created, 295, 296
VeriSign, 994Version control, Bazaar, 584vfat filesystem, 572vi bash command line editor, 322Video card, configure, 76View pane, Nautilus, 261Viewport. See Workspacevim
bash command line editor, 322case sensitivity, 1027Command mode, 174correcting a mistake, 176, 178creating a file, 172d command, 177dd command, 177deleting text, 177editing a file, 172end a session, 178enter text, 175exit from, 178exit, emergency, 172getting started, 172Input mode, 174, 175inserting text, 178Last Line mode, 175moving the cursor, 177Normal mode. See vim, Command modepage break, 178quitting, 178replacement string, 980safedit script, 423special characters, 980starting, 172terminal specification, 988u command, 177undoing changes, 177vimtutor utility, 172Work buffer, 178x command, 177ZZ command, 178
vimtutor utility, 172

1138 Index
Virtualconsole, 64, 136, 1068filesystem, 572memory, 564package, software, 592private network. See VPNsoftware package, 592terminal. See Virtual, console
Virtual machineKVM, 7VirtualBox, 7Xen, 7
VirtualBox, 7Virus, 1004, 1068Visual effects, 103Visual effects, required hardware, 25VLAN, 1068vmstat utility, 671Volume label, 525, 576VPN, 355, 1068vsftpd
See also FTPchroot jail, 744configuration file, 742connection parameters, 750display, 748downloading files, 746files, 752init script, 740log, 749logging in (users), 743messages, 748PASV connections, 750PORT connections, 750prerequisites, 740security, 746server, 740stand-alone mode, 740, 743starting, 741testing, 741uploading files, 746
vsftpd.chroot_list file, 752vsftpd.log file, 752vsftpd.user_list file, 752vt100 terminal, 989vt102 terminal, 989
vt220 terminal, 989Vulcan death grip, 518VxFS filesystem, 572
W
w utility, 169, 680W2K, 1068W3. See World Wide WebW3C, 1068wait builtin, 458Wake up a process, 312wall utility, 677WAN, 17, 356, 358, 359, 1068WAP, 694, 1068wc utility, 343Web
See also World Wide Webcrawler, 392of trust, 996ring, 1068
webalizer utility, 964Webmail, 772wget utility, 609whatis database, 165whatis utility, 166wheel group, 549whereis utility, 164which utility, 164while control structure, 412, 448, 453, 456Whitespace, 146, 1068
command line, 287quoting, 297
who am i, 167who utility, 167, 226, 233, 235, 560, 686whois utility. See jwhois utilitywhos shell script, 411whoson shell script, 283Wide area network. See WANWidget, 1068. See also GUIWi-Fi, 1069. See also WirelessWiggly windows, 103Wildcard, 239, 1068. See also MetacharacterWindow, 106, 111, 1069
active, 139Add/Remove Applications, 120

Index 1139
Appearance Preferences, 102Browse, 99cascading, 1027clipboard, 113cut and paste, 113cycling, 112decorations, 141file, 226File Browser. See Nautilusfocus, input, 112, 139ignored, 1041input focus, 112, 139List applet, 109Login Window Preferences, 82manager, 16, 141, 259, 1069
Compiz, 103, 141GNUStep, 260Metacity, 103, 141WindowMaker, 260
minimize, 1048mouse buttons, remap, 258Object Properties, 116Operations menu, 112Panel Properties, 108Pick a Color, 268Pick a Font, 268Preferences window, 140root, 106, 113, 1058Run Application, 92, 269Save, 99Screen and Graphics Preferences, 75scrollbar, 1059Search for Files, 269share. See Samba, shareslider, 1060snap, 1060Software Sources, 119thumb, 1065tiled, 1065titlebar, 96, 112toolbar, 112transient, 1065Ubuntu Help Center, 104unmanaged, 1066Update Manager, 101wiggly, 103
Window Preferences, 140working with, 96
WindowMaker window manager, 260Windows
convert Linux files to, 159dual-boot system, 61filename limitation, 186integration. See Sambanet use utility (Samba), 842net view utility (Samba), 842networks, browsing using Samba, 840NTFS driver, 987privileged port, 1054Samba. See Sambashares from Linux, accessing using Samba, 839shares, connecting to using Samba, 840shares, displaying using Samba, 839shares, mounting, 841
winprinter, 617WINS, 1069Wiping a file, 556Wire. See CableWireless
access point, 694, 1069ad hoc mode, 695bridge, 695configuring, 700infrastructure mode, 695iwconfig utility, 700NIC, 700
wireshark utility, 1008Word, 137, 1069
defined, 220, 446deleting, 137designator, 318erase key, 223parse a command line, 338splitting (bash), 305
Work buffer, 1069Work buffer, vim, 178Working directory, 188, 1069
change using cd, 193execute a file in, 303PATH, 283relative pathnames and, 190significance of, 190versus home directory, 193

1140 Index
Working with root privileges, 88Workspace, 106, 1069
desktop, and the, 91GNOME, 16Switcher, 93, 94
Workstation, 7, 1069World Wide Web, 390
Berners-Lee, Tim, 390CERN, 390Consortium, 1068Enquire, 390HTML, 390hypermedia, 391hypertext, 391link, hypertext, 391Mosaic browser, 391search engine, 392URL, 391Web crawler, 392
Worm, 1004, 1068, 1069Write access, 199write utility, 167, 170, 677wtmp file, 196, 686www directory, 918, 924, 925www file, 920WWW. See World Wide WebWYSIWYG, 1069
X
XConsortium, 252server, 1070terminal, 1070utility, 252
X Window System, 15, 74, 252, 1070client and server, 253color depth, 257configuring, 75display number, 256DISPLAY variable, 256display, access to, 255emergency exit, 257event, 253exiting from, 257freedesktop.org group, 260
ID string, 256library, 141Mouse. See Mousemultiple X servers, 257remote computing and local displays, 254resolution, changing, 140screen number, 256server, 253server process, 680stack, 252starting, 254X stack, 252X.org versus XFree86, 252X11 forwarding, OpenSSH, 712, 718, 719,
724, 725X11R6.6, 252X11R7.2, 74XFree86 versus X.org, 252Xinerama, 1070Xlib, 252xorg.conf file, 77
X.org, 74X11 directory, 74, 195X11R6.6, 252X11R7.2, 74x86 processor architecture, 27xargs utility, 684XDMCP, 1070xDSL, 1070Xen, 7xev utility, 254Xfce desktop, 10xforcevesa boot parameter, 62xfs filesystem, 572xhost utility, 255xhtml filename extension, 931Xinerama, 1070xinetd daemon, 386, 531, 741XINU, 4Xlib, 252XML, 1070xmodmap utility, 258xorg.conf file, 74, 77Xremote, 363xrn utility, 389XSM, 1070

Index 1141
xterm terminal name, 989Xubuntu, 10, 26xvnews utility, 389
Y
Yellow Pages, 782yp.conf file, 787ypbind daemon, 788ypinit utility, 795yppasswd utility, 788yppasswdd daemon, 797yppush utility, 793ypserv.conf file, 791ypwhich utility, 787
ypxfr utility, 795ypxfrd daemon, 795
Z
Z filename extension, 161, 187Z Shell, 1070zcat utility, 161zero file, 556Zeroconf, 699Zimmerman, Phil, 996zip utility, 161Zone, DNS, 848zsh shell, 1070Zulu time. See UTC

This page intentionally left blank
Visit us online for more information about this book and to read sample chapters.www.informit.com/ph
The Most Useful Linux Tutorial and Reference Ever, with Hundredsof High-Quality Examples Covering Every Linux Distribution!
To be truly productive with Linux, you need tothoroughly master the shells and the command line.Until now, you had to buy two books to gain thatmastery: a tutorial on fundamental Linux conceptsand techniques, plus a separate reference. Worse,most Linux references offer little more than prettied-up man pages. Now, there’s a far better solution.Renowned Linux expert Mark G. Sobell has broughttogether comprehensive, insightful guidance on thetools system administrators, developers, and powerusers need most, and an outstanding day-to-dayreference, both in the same book.
This book is 100 percent distribution and releaseagnostic: You can use it on any Linux system, nowand for years to come. What’s more, it’s packed with hundreds of high-qualityexamples: better examples than you’ll find in any other Linux guidebook. This isLinux from the ground up—the clearest explanations and most useful knowledgeabout everything from filesystems to shells, editors to utilities, and programmingtools to regular expressions. And when you need instant answers, you’llconstantly turn to Sobell’s comprehensive command reference section—organizedand tabbed for easy, fast access!
Don’t settle for yesterday’s Linux guidebook. Get the one book that meetstoday’s challenges—and tomorrow’s!
A Practical Guide to Linux® Commands, Editors, and Shell Programming isthe most useful, most comprehensive Linux tutorial and reference you can find.
ALSO AVAILABLE FROM MARK G. SOBELLAND PRENTICE HALL
ISBN-13: 978-0-13-147823-7©2006 · 1,008 pages