PHP & PYTHON - Introduction - APSA COLLEGE
165
PHP AND PYTHON: Department of Information Technology - APSAC Page | 1 PHP & PYTHON - Introduction PHP started out as a small open source project that evolved as more and more people found out how useful it was. Rasmus Lerdorf unleashed the first version of PHP way back in 1994. PHP is a recursive acronym for "PHP: Hypertext Preprocessor". PHP is a server side scripting language that is embedded in HTML. It is used to manage dynamic content, databases, session tracking, even build entire e-commerce sites. It is integrated with a number of popular databases, including MySQL, PostgreSQL, Oracle, Sybase, Informix, and Microsoft SQL Server. PHP is pleasingly zippy in its execution, especially when compiled as an Apache module on the Unix side. The MySQL server, once started, executes even very complex queries with huge result sets in record-setting time. PHP supports a large number of major protocols such as POP3, IMAP, and LDAP. PHP4 added support for Java and distributed object architectures (COM and CORBA), making n-tier development a possibility for the first time. PHP is forgiving: PHP language tries to be as forgiving as possible. PHP Syntax is C-Like. Common uses of PHP PHP performs system functions, i.e. from files on a system it can create, open, read, write, and close them. PHP can handle forms, i.e. gather data from files, save data to a file, through email you can send data, return data to the user. You add, delete, modify elements within your database through PHP. Access cookies variables and set cookies. Using PHP, you can restrict users to access some pages of your website. It can encrypt data.
-
Upload
khangminh22 -
Category
Documents
-
view
10 -
download
0
Transcript of PHP & PYTHON - Introduction - APSA COLLEGE

P H P A N D P Y T H O N : Department of Information Technology - APSAC P a g e | 1
PHP & PYTHON
- Introduction
PHP started out as a small open source project that evolved as more and more people found out
how useful it was. Rasmus Lerdorf unleashed the first version of PHP way back in 1994.
PHP is a recursive acronym for "PHP: Hypertext Preprocessor".
PHP is a server side scripting language that is embedded in HTML. It is used to manage
dynamic content, databases, session tracking, even build entire e-commerce sites.
It is integrated with a number of popular databases, including MySQL, PostgreSQL,
Oracle, Sybase, Informix, and Microsoft SQL Server.
PHP is pleasingly zippy in its execution, especially when compiled as an Apache module
on the Unix side. The MySQL server, once started, executes even very complex queries
with huge result sets in record-setting time.
PHP supports a large number of major protocols such as POP3, IMAP, and LDAP. PHP4
added support for Java and distributed object architectures (COM and CORBA), making
n-tier development a possibility for the first time.
PHP is forgiving: PHP language tries to be as forgiving as possible.
PHP Syntax is C-Like.
Common uses of PHP
PHP performs system functions, i.e. from files on a system it can create, open, read, write,
and close them.
PHP can handle forms, i.e. gather data from files, save data to a file, through email you
can send data, return data to the user.
You add, delete, modify elements within your database through PHP.
Access cookies variables and set cookies.
Using PHP, you can restrict users to access some pages of your website.
It can encrypt data.

P H P A N D P Y T H O N : Department of Information Technology - APSAC P a g e | 2
Characteristics of PHP
Five important characteristics make PHP's practical nature possible −
Simplicity
Efficiency
Security
Flexibility
Familiarity
"Hello World" Script in PHP
To get a feel for PHP, first start with simple PHP scripts. Since "Hello, World!" is an essential
example, first we will create a friendly little "Hello, World!" script.
As mentioned earlier, PHP is embedded in HTML. That means that in amongst your normal
HTML (or XHTML if you're cutting-edge) you'll have PHP statements like this −
<html>
<head>
<title>Hello World</title>
</head>
<body>
<?php echo "Hello, World!";?>
</body>
</html>
It will produce following result −
Hello, World!
If you examine the HTML output of the above example, you'll notice that the PHP code is not
present in the file sent from the server to your Web browser. All of the PHP present in the Web
page is processed and stripped from the page; the only thing returned to the client from the Web
server is pure HTML output.

P H P A N D P Y T H O N : Department of Information Technology - APSAC P a g e | 3
All PHP code must be included inside one of the three special markup tags ate are recognised by
the PHP Parser.
<?php PHP code goes here ?>
<? PHP code goes here ?>
<script language="php"> PHP code goes here </script>
A most common tag is the <?php...?> and we will also use the same tag in our tutorial.
ENVIRONMENT SETUP
In order to develop and run PHP Web pages three vital components need to be installed on your
computer system.
Web Server − PHP will work with virtually all Web Server software, including
Microsoft's Internet Information Server (IIS) but then most often used is freely available
Apache Server. Download Apache for free here − https://httpd.apache.org/download.cgi
Database − PHP will work with virtually all database software, including Oracle and
Sybase but most commonly used is freely available MySQL database. Download MySQL
for free here − https://www.mysql.com/downloads/
PHP Parser − In order to process PHP script instructions a parser must be installed to
generate HTML output that can be sent to the Web Browser. This tutorial will guide you
how to install PHP parser on your computer.
PHP Parser Installation
Before you proceed it is important to make sure that you have proper environment setup on your
machine to develop your web programs using PHP.
Type the following address into your browser's address box.
http://127.0.0.1/info.php
If this displays a page showing your PHP installation related information then it means you have
PHP and Webserver installed properly. Otherwise you have to follow given procedure to install
PHP on your computer.
P H P A N D P Y T H O N : Department of Information Technology - APSAC P a g e | 4
This section will guide you to install and configure PHP over the following four platforms −
PHP Installation on Linux or Unix with Apache
PHP Installation on Mac OS X with Apache
PHP Installation on Windows NT/2000/XP with IIS
PHP Installation on Windows NT/2000/XP with Apache
Apache Configuration
If you are using Apache as a Web Server then this section will guide you to edit Apache
Configuration Files.
Just Check it here − PHP Configuration in Apache Server
PHP.INI File Configuration
The PHP configuration file, php.ini, is the final and most immediate way to affect PHP's
functionality.
Just Check it here − PHP.INI File Configuration
Windows IIS Configuration
To configure IIS on your Windows machine you can refer your IIS Reference Manual shipped
along with IIS.

P H P A N D P Y T H O N : Department of Information Technology - APSAC P a g e | 5
PHP - Syntax Overview
Canonical PHP tags
The most universally effective PHP tag style is −
<?php...?>
Commenting PHP Code
A comment is the portion of a program that exists only for the human reader and stripped out
before displaying the programs result. There are two commenting formats in PHP −
Single-line comments − They are generally used for short explanations or notes relevant to the
local code. Here are the examples of single line comments.
<?
# This is a comment, and
# This is the second line of the comment
// This is a comment too. Each style comments only
print "An example with single line comments";
?>
Multi-lines printing − Here are the examples to print multiple lines in a single print statement −
<?
# First Example
print <<<END
This uses the "here document" syntax to output
multiple lines with $variable interpolation. Note
that the here document terminator must appear on a
line with just a semicolon no extra whitespace!
END;
# Second Example
print "This spans
multiple lines. The newlines will be
output as well"; ?>

P H P A N D P Y T H O N : Department of Information Technology - APSAC P a g e | 6
Multi-lines comments − They are generally used to provide pseudocode algorithms and more
detailed explanations when necessary. The multiline style of commenting is the same as in C.
Here are the example of multi lines comments.
<?
/* This is a comment with multiline
Author : Mohammad Mohtashim
Purpose: Multiline Comments Demo
Subject: PHP
*/
print "An example with multi line comments";
?>
PHP is whitespace insensitive
Whitespace is the stuff you type that is typically invisible on the screen, including spaces, tabs,
and carriage returns (end-of-line characters).
PHP whitespace insensitive means that it almost never matters how many whitespace characters
you have in a row.one whitespace character is the same as many such characters.
For example, each of the following PHP statements that assigns the sum of 2 + 2 to the variable
$four is equivalent −
$four = 2 + 2; // single spaces
$four <tab>=<tab2<tab>+<tab>2 ; // spaces and tabs
$four =
2+
2; // multiple lines
PHP is case sensitive
Yeah it is true that PHP is a case sensitive language. Try out following example −
<html>
<body>

P H P A N D P Y T H O N : Department of Information Technology - APSAC P a g e | 7
<?php
$capital = 67;
print("Variable capital is $capital<br>");
print("Variable CaPiTaL is $CaPiTaL<br>");
?>
</body>
</html>
This will produce the following result −
Variable capital is 67
Variable CaPiTaL is
Statements are expressions terminated by semicolons
A statement in PHP is any expression that is followed by a semicolon (;).Any sequence of valid
PHP statements that is enclosed by the PHP tags is a valid PHP program. Here is a typical
statement in PHP, which in this case assigns a string of characters to a variable called $greeting
−
$greeting = "Welcome to PHP!";
Expressions are combinations of tokens
The smallest building blocks of PHP are the indivisible tokens, such as numbers (3.14159), strings
(.two.), variables ($two), constants (TRUE), and the special words that make up the syntax of
PHP itself like if, else, while, for and so forth
Braces make blocks
Although statements cannot be combined like expressions, you can always put a sequence of
statements anywhere a statement can go by enclosing them in a set of curly braces.
Here both statements are equivalent −
if (3 == 2 + 1)
print("Good - I haven't totally lost my mind.<br>");
if (3 == 2 + 1) {

P H P A N D P Y T H O N : Department of Information Technology - APSAC P a g e | 8
print("Good - I haven't totally");
print("lost my mind.<br>");
}
Running PHP Script from Command Prompt
Yes you can run your PHP script on your command prompt. Assuming you have following
content in test.php file
<?php
echo "Hello PHP!!!!!";
?>
Now run this script as command prompt as follows −
$ php test.php
It will produce the following result −
Hello PHP!!!!!

P H P A N D P Y T H O N : Department of Information Technology - APSAC P a g e | 9
VARIABLE / DATA TYPES
The main way to store information in the middle of a PHP program is by using a variable.
Here are the most important things to know about variables in PHP.
All variables in PHP are denoted with a leading dollar sign ($).
The value of a variable is the value of its most recent assignment.
Variables are assigned with the = operator, with the variable on the left-hand side and the
expression to be evaluated on the right.
Variables can, but do not need, to be declared before assignment.
Variables in PHP do not have intrinsic types - a variable does not know in advance whether
it will be used to store a number or a string of characters.
Variables used before they are assigned have default values.
PHP does a good job of automatically converting types from one to another when
necessary.
PHP variables are Perl-like.
Variable Scope
Scope can be defined as the range of availability a variable has to the program in which it is
declared. PHP variables can be one of four scope types −
Local variables
Function parameters
Global variables
Static variables
Variable Naming
Rules for naming a variable is −
Variable names must begin with a letter or underscore character.

P H P A N D P Y T H O N : Department of Information Technology - APSAC P a g e | 10
A variable name can consist of numbers, letters, underscores but you cannot use characters
like + , - , % , ( , ) . & , etc
There is no size limit for variables.
PHP has a total of eight data types which we use to construct our variables −
Integers − are whole numbers, without a decimal point, like 4195.
Doubles − are floating-point numbers, like 3.14159 or 49.1.
Booleans − have only two possible values either true or false.
NULL − is a special type that only has one value: NULL.
Strings − are sequences of characters, like 'PHP supports string operations.'
Arrays − are named and indexed collections of other values.
Objects − are instances of programmer-defined classes, which can package up both other
kinds of values and functions that are specific to the class.
Resources − are special variables that hold references to resources external to PHP (such
as database connections).
The first five are simple types, and the next two (arrays and objects) are compound - the compound
types can package up other arbitrary values of arbitrary type, whereas the simple types cannot.
We will explain only simple data type in this chapters. Array and Objects will be explained
separately.
Integers
They are whole numbers, without a decimal point, like 4195. They are the simplest type .they
correspond to simple whole numbers, both positive and negative. Integers can be assigned to
variables, or they can be used in expressions, like so −
$int_var = 12345;
$another_int = -12345 + 12345;

P H P A N D P Y T H O N : Department of Information Technology - APSAC P a g e | 11
Integer can be in decimal (base 10), octal (base 8), and hexadecimal (base 16) format. Decimal
format is the default, octal integers are specified with a leading 0, and hexadecimals have a leading
0x.
For most common platforms, the largest integer is (2**31 . 1) (or 2,147,483,647), and the smallest
(most negative) integer is . (2**31 . 1) (or .2,147,483,647).
Doubles
They like 3.14159 or 49.1. By default, doubles print with the minimum number of decimal places
needed. For example, the code −
<?php
$many = 2.2888800;
$many_2 = 2.2111200;
$few = $many + $many_2;
print("$many + $many_2 = $few <br>");
?>
It produces the following browser output −
2.28888 + 2.21112 = 4.5
Boolean
They have only two possible values either true or false. PHP provides a couple of constants
especially for use as Booleans: TRUE and FALSE, which can be used like so −
if (TRUE)
print("This will always print<br>");
else
print("This will never print<br>");
Interpreting other types as Booleans
Here are the rules for determine the "truth" of any value not already of the Boolean type −

P H P A N D P Y T H O N : Department of Information Technology - APSAC P a g e | 12
If the value is a number, it is false if exactly equal to zero and true otherwise.
If the value is a string, it is false if the string is empty (has zero characters) or is the string
"0", and is true otherwise.
Values of type NULL are always false.
If the value is an array, it is false if it contains no other values, and it is true otherwise. For
an object, containing a value means having a member variable that has been assigned a
value.
Valid resources are true (although some functions that return resources when they are
successful will return FALSE when unsuccessful).
Don't use double as Booleans.
Each of the following variables has the truth value embedded in its name when it is used in a
Boolean context.
$true_num = 3 + 0.14159;
$true_str = "Tried and true"
$true_array[49] = "An array element";
$false_array = array();
$false_null = NULL;
$false_num = 999 - 999;
$false_str = "";
NULL
NULL is a special type that only has one value: NULL. To give a variable the NULL value,
simply assign it like this −
$my_var = NULL;
The special constant NULL is capitalized by convention, but actually it is case insensitive; you
could just as well have typed −
$my_var = null;

P H P A N D P Y T H O N : Department of Information Technology - APSAC P a g e | 13
A variable that has been assigned NULL has the following properties −
It evaluates to FALSE in a Boolean context.
It returns FALSE when tested with IsSet() function.
STRINGS
They are sequences of characters, like "PHP supports string operations". Following are valid
examples of string
$string_1 = "This is a string in double quotes";
$string_2 = 'This is a somewhat longer, singly quoted string';
$string_39 = "This string has thirty-nine characters";
$string_0 = ""; // a string with zero characters
Singly quoted strings are treated almost literally, whereas doubly quoted strings replace variables
with their values as well as specially interpreting certain character sequences.
<?php
$variable = "name";
$literally = 'My $variable will not print!';
print($literally);
print "<br>";
$literally = "My $variable will print!";
print($literally);
?>
This will produce following result −
My $variable will not print!\n
My name will print
There are no artificial limits on string length - within the bounds of available memory, you ought
to be able to make arbitrarily long strings.

P H P A N D P Y T H O N : Department of Information Technology - APSAC P a g e | 14
Strings that are delimited by double quotes (as in "this") are preprocessed in both the following
two ways by PHP −
Certain character sequences beginning with backslash (\) are replaced with special
characters
Variable names (starting with $) are replaced with string representations of their values.
The escape-sequence replacements are −
\n is replaced by the newline character
\r is replaced by the carriage-return character
\t is replaced by the tab character
\$ is replaced by the dollar sign itself ($)
\" is replaced by a single double-quote (")
\\ is replaced by a single backslash (\)
CONSTANTS TYPES
A constant is a name or an identifier for a simple value. A constant value cannot change during
the execution of the script. By default, a constant is case-sensitive. By convention, constant
identifiers are always uppercase. A constant name starts with a letter or underscore, followed by
any number of letters, numbers, or underscores. If you have defined a constant, it can never be
changed or undefined.
To define a constant you have to use define() function and to retrieve the value of a constant, you
have to simply specifying its name. Unlike with variables, you do not need to have a constant
with a $. You can also use the function constant() to read a constant's value if you wish to obtain
the constant's name dynamically.
constant() function
As indicated by the name, this function will return the value of the constant.
This is useful when you want to retrieve value of a constant, but you do not know its name, i.e. It
is stored in a variable or returned by a function.
constant() example
<?php

P H P A N D P Y T H O N : Department of Information Technology - APSAC P a g e | 15
define("MINSIZE", 50);
echo MINSIZE;
echo constant("MINSIZE"); // same thing as the previous line
?>
Only scalar data (boolean, integer, float and string) can be contained in constants.
Differences between constants and variables are
There is no need to write a dollar sign ($) before a constant, where as in Variable one has
to write a dollar sign.
Constants cannot be defined by simple assignment, they may only be defined using the
define() function.
Constants may be defined and accessed anywhere without regard to variable scoping rules.
Once the Constants have been set, may not be redefined or undefined.
Valid and invalid constant names
// Valid constant names
define("ONE", "first thing");
define("TWO2", "second thing");
define("THREE_3", "third thing");
// Invalid constant names
define("2TWO", "second thing");
define("__THREE__", "third value");
PHP Magic constants
PHP provides a large number of predefined constants to any script which it runs.
There are five magical constants that change depending on where they are used. For example, the
value of __LINE__ depends on the line that it's used on in your script. These special constants
are case-insensitive and are as follows −
A few "magical" PHP constants ate given below −

P H P A N D P Y T H O N : Department of Information Technology - APSAC P a g e | 16
Sr.No Name & Description
1 __LINE__
The current line number of the file.
2 __FILE__
The full path and filename of the file. If used inside an include,the name of the
included file is returned. Since PHP 4.0.2, __FILE__ always contains an absolute
path whereas in older versions it contained relative path under some circumstances.
3 __FUNCTION__
The function name. (Added in PHP 4.3.0) As of PHP 5 this constant returns the
function name as it was declared (case-sensitive). In PHP 4 its value is always
lowercased.
4 __CLASS__
The class name. (Added in PHP 4.3.0) As of PHP 5 this constant returns the class
name as it was declared (case-sensitive). In PHP 4 its value is always lowercased.
5 __METHOD__
The class method name. (Added in PHP 5.0.0) The method name is returned as it
was declared (case-sensitive).
P H P A N D P Y T H O N : Department of Information Technology - APSAC P a g e | 17
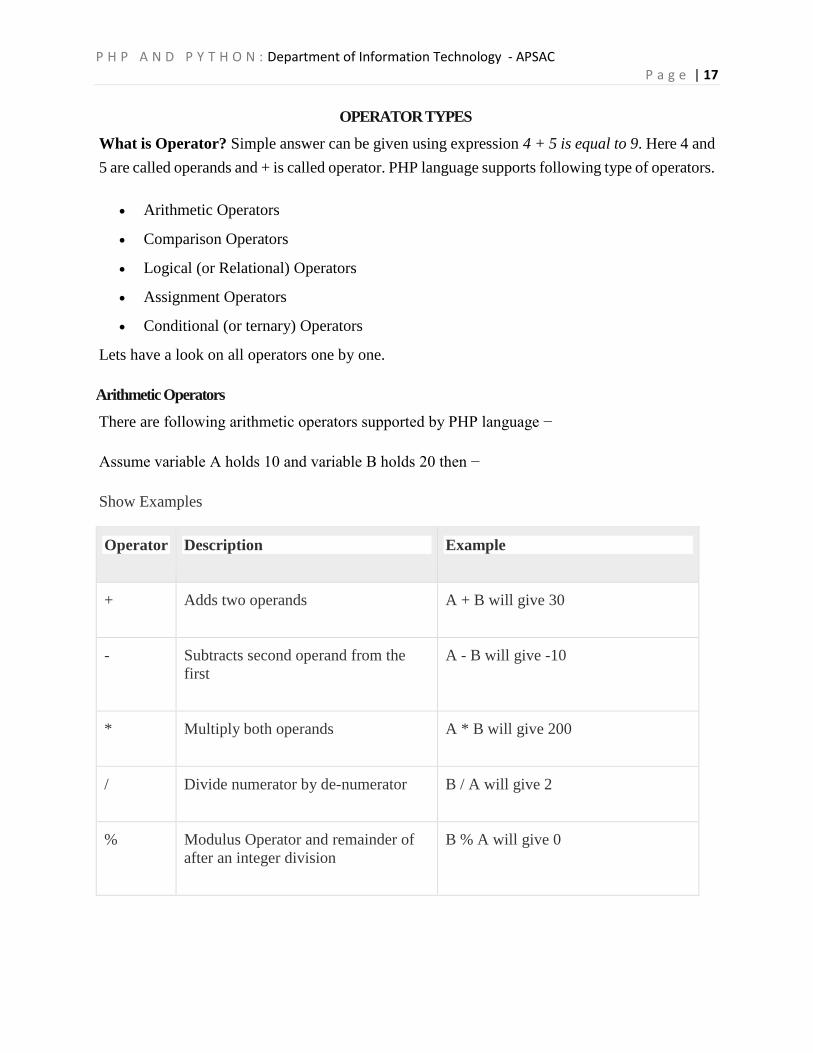
OPERATOR TYPES
What is Operator? Simple answer can be given using expression 4 + 5 is equal to 9. Here 4 and
5 are called operands and + is called operator. PHP language supports following type of operators.
Arithmetic Operators
Comparison Operators
Logical (or Relational) Operators
Assignment Operators
Conditional (or ternary) Operators
Lets have a look on all operators one by one.
Arithmetic Operators
There are following arithmetic operators supported by PHP language −
Assume variable A holds 10 and variable B holds 20 then −
Show Examples
Operator Description Example
+ Adds two operands A + B will give 30
- Subtracts second operand from the
first
A - B will give -10
* Multiply both operands A * B will give 200
/ Divide numerator by de-numerator B / A will give 2
% Modulus Operator and remainder of
after an integer division
B % A will give 0

P H P A N D P Y T H O N : Department of Information Technology - APSAC P a g e | 18
++ Increment operator, increases integer
value by one
A++ will give 11
-- Decrement operator, decreases integer
value by one
A-- will give 9
Comparison Operators
There are following comparison operators supported by PHP language
Assume variable A holds 10 and variable B holds 20 then −
Show Examples
Operator Description Example
== Checks if the value of two operands are equal or not, if
yes then condition becomes true.
(A == B) is not true.
!= Checks if the value of two operands are equal or not, if
values are not equal then condition becomes true.
(A != B) is true.
> Checks if the value of left operand is greater than the
value of right operand, if yes then condition becomes
true.
(A > B) is not true.
< Checks if the value of left operand is less than the value
of right operand, if yes then condition becomes true.
(A < B) is true.
>= Checks if the value of left operand is greater than or
equal to the value of right operand, if yes then condition
becomes true.
(A >= B) is not true.
<= Checks if the value of left operand is less than or equal to
the value of right operand, if yes then condition becomes
true.
(A <= B) is true.

P H P A N D P Y T H O N : Department of Information Technology - APSAC P a g e | 19
Logical Operators
There are following logical operators supported by PHP language
Assume variable A holds 10 and variable B holds 20 then −
Show Examples
Operator Description Example
and Called Logical AND operator. If both
the operands are true then condition
becomes true.
(A and B) is true.
or Called Logical OR Operator. If any of
the two operands are non zero then
condition becomes true.
(A or B) is true.
&& Called Logical AND operator. If both
the operands are non zero then
condition becomes true.
(A && B) is true.
|| Called Logical OR Operator. If any of
the two operands are non zero then
condition becomes true.
(A || B) is true.
! Called Logical NOT Operator. Use to
reverses the logical state of its
operand. If a condition is true then
Logical NOT operator will make
false.
!(A && B) is false.

P H P A N D P Y T H O N : Department of Information Technology - APSAC P a g e | 20
Assignment Operators
There are following assignment operators supported by PHP language −
Show Examples
Operator Description Example
= Simple assignment operator,
Assigns values from right side
operands to left side operand
C = A + B will assign value of A + B into
C
+= Add AND assignment operator,
It adds right operand to the left
operand and assign the result to
left operand
C += A is equivalent to C = C + A
-= Subtract AND assignment
operator, It subtracts right
operand from the left operand
and assign the result to left
operand
C -= A is equivalent to C = C - A
*= Multiply AND assignment
operator, It multiplies right
operand with the left operand and
assign the result to left operand
C *= A is equivalent to C = C * A
/= Divide AND assignment
operator, It divides left operand
with the right operand and assign
the result to left operand
C /= A is equivalent to C = C / A
%= Modulus AND assignment
operator, It takes modulus using
two operands and assign the
result to left operand
C %= A is equivalent to C = C % A

P H P A N D P Y T H O N : Department of Information Technology - APSAC P a g e | 21
Conditional Operator
There is one more operator called conditional operator. This first evaluates an expression for a
true or false value and then execute one of the two given statements depending upon the result of
the evaluation. The conditional operator has this syntax −
Show Examples
Operator Description Example
? : Conditional Expression If Condition is true ? Then value X :
Otherwise value Y
Operators Categories
All the operators we have discussed above can be categorised into following categories −
Unary prefix operators, which precede a single operand.
Binary operators, which take two operands and perform a variety of arithmetic and logical
operations.
The conditional operator (a ternary operator), which takes three operands and evaluates
either the second or third expression, depending on the evaluation of the first expression.
Assignment operators, which assign a value to a variable.
Precedence of PHP Operators
Operator precedence determines the grouping of terms in an expression. This affects how an
expression is evaluated. Certain operators have higher precedence than others; for example, the
multiplication operator has higher precedence than the addition operator −
For example x = 7 + 3 * 2; Here x is assigned 13, not 20 because operator * has higher precedence
than + so it first get multiplied with 3*2 and then adds into 7.
Here operators with the highest precedence appear at the top of the table, those with the lowest
appear at the bottom. Within an expression, higher precedence operators will be evaluated first.

P H P A N D P Y T H O N : Department of Information Technology - APSAC P a g e | 22
Category Operator Associativity
Unary ! ++ -- Right to left
Multiplicative * / % Left to right
Additive + - Left to right
Relational < <= > >= Left to right
Equality == != Left to right
Logical AND && Left to right
Logical OR || Left to right
Conditional ?: Right to left
Assignment = += -= *= /= %= Right to left

P H P A N D P Y T H O N : Department of Information Technology - APSAC P a g e | 23
DECISION MAKING
The if, elseif ...else and switch statements are used to take decision based on the different
condition.
You can use conditional statements in your code to make your decisions. PHP supports following
three decision making statements −
if...else statement − use this statement if you want to execute a set of code when a
condition is true and another if the condition is not true
elseif statement − is used with the if...else statement to execute a set of code if one of the
several condition is true
switch statement − is used if you want to select one of many blocks of code to be
executed, use the Switch statement. The switch statement is used to avoid long blocks of
if..elseif..else code.
The If...Else Statement
If you want to execute some code if a condition is true and another code if a condition is false,
use the if....else statement.
Syntax
if (condition)
code to be executed if condition is true;
else
code to be executed if condition is false;

P H P A N D P Y T H O N : Department of Information Technology - APSAC P a g e | 24
Example
The following example will output "Have a nice weekend!" if the current day is Friday,
Otherwise, it will output "Have a nice day!":
<html>
<body>
<?php
$d = date("D");
if ($d == "Fri")
echo "Have a nice weekend!";
else
echo "Have a nice day!";
?>
</body>
</html>
It will produce the following result −
Have a nice day!
The ElseIf Statement
If you want to execute some code if one of the several conditions are true use the elseif statement
Syntax
if (condition)
code to be executed if condition is true;
elseif (condition)
code to be executed if condition is true;
else
code to be executed if condition is false;

P H P A N D P Y T H O N : Department of Information Technology - APSAC P a g e | 25
Example
The following example will output "Have a nice weekend!" if the current day is Friday, and "Have
a nice Sunday!" if the current day is Sunday. Otherwise, it will output "Have a nice day!" −
<html>
<body>
<?php
$d = date("D");
if ($d == "Fri")
echo "Have a nice weekend!";
elseif ($d == "Sun")
echo "Have a nice Sunday!";
else
echo "Have a nice day!";
?>
</body>
</html>
It will produce the following result −
Have a nice day!

P H P A N D P Y T H O N : Department of Information Technology - APSAC P a g e | 26
The Switch Statement
If you want to select one of many blocks of code to be executed, use the Switch statement.
The switch statement is used to avoid long blocks of if..elseif..else code.
Syntax
switch (expression){
case label1:
code to be executed if expression = label1;
break;
case label2:
code to be executed if expression = label2;
break;
default:
code to be executed
if expression is different
from both label1 and label2;
}
Example
The switch statement works in an unusual way. First it evaluates given expression then seeks a
lable to match the resulting value. If a matching value is found then the code associated with the
matching label will be executed or if none of the lable matches then statement will execute any
specified default code.
<html>
<body>
<?php
$d = date("D");
switch ($d){
case "Mon":
echo "Today is Monday";
break;

P H P A N D P Y T H O N : Department of Information Technology - APSAC P a g e | 27
case "Tue":
echo "Today is Tuesday";
break;
case "Wed":
echo "Today is Wednesday";
break;
case "Thu":
echo "Today is Thursday";
break;
case "Fri":
echo "Today is Friday";
break;
case "Sat":
echo "Today is Saturday";
break;
case "Sun":
echo "Today is Sunday";
break;
default:
echo "Wonder which day is this ?";
}
?>
</body>
</html>
It will produce the following result −
Today is Monday

P H P A N D P Y T H O N : Department of Information Technology - APSAC P a g e | 28
LOOP TYPES
Loops in PHP are used to execute the same block of code a specified number of times. PHP
supports following four loop types.
for − loops through a block of code a specified number of times.
while − loops through a block of code if and as long as a specified condition is true.
do...while − loops through a block of code once, and then repeats the loop as long as a
special condition is true.
foreach − loops through a block of code for each element in an array.
We will discuss about continue and break keywords used to control the loops execution.
The for loop statement
The for statement is used when you know how many times you want to execute a statement or a
block of statements.
Syntax
for (initialization; condition; increment){
code to be executed;
}

P H P A N D P Y T H O N : Department of Information Technology - APSAC P a g e | 29
The initializer is used to set the start value for the counter of the number of loop iterations. A
variable may be declared here for this purpose and it is traditional to name it $i.
Example
The following example makes five iterations and changes the assigned value of two variables on
each pass of the loop −
<html>
<body>
<?php
$a = 0;
$b = 0;
for( $i = 0; $i<5; $i++ ) {
$a += 10;
$b += 5;
}
echo ("At the end of the loop a = $a and b = $b" );
?>
</body>
</html>
This will produce the following result −
At the end of the loop a = 50 and b = 25

P H P A N D P Y T H O N : Department of Information Technology - APSAC P a g e | 30
The while loop statement
The while statement will execute a block of code if and as long as a test expression is true.
If the test expression is true then the code block will be executed. After the code has executed the
test expression will again be evaluated and the loop will continue until the test expression is found
to be false.
Syntax
while (condition) {
code to be executed;
}
Example
This example decrements a variable value on each iteration of the loop and the counter increments
until it reaches 10 when the evaluation is false and the loop ends.
<html>
<body>
<?php

P H P A N D P Y T H O N : Department of Information Technology - APSAC P a g e | 31
$i = 0;
$num = 50;
while( $i < 10) {
$num--;
$i++;
}
echo ("Loop stopped at i = $i and num = $num" );
?>
</body>
</html>
This will produce the following result −
Loop stopped at i = 10 and num = 40
The do...while loop statement
The do...while statement will execute a block of code at least once - it then will repeat the loop
as long as a condition is true.
Syntax
do {
code to be executed;
}
while (condition);
Example
The following example will increment the value of i at least once, and it will continue
incrementing the variable i as long as it has a value of less than 10 −
<html>
<body>

P H P A N D P Y T H O N : Department of Information Technology - APSAC P a g e | 32
<?php
$i = 0;
$num = 0;
do {
$i++;
}
while( $i < 10 );
echo ("Loop stopped at i = $i" );
?>
</body>
</html>
This will produce the following result −
Loop stopped at i = 10
The foreach loop statement
The foreach statement is used to loop through arrays. For each pass the value of the current array
element is assigned to $value and the array pointer is moved by one and in the next pass next
element will be processed.
Syntax
foreach (array as value) {
code to be executed;
}
Example
Try out following example to list out the values of an array.
<html>
<body>

P H P A N D P Y T H O N : Department of Information Technology - APSAC P a g e | 33
<?php
$array = array( 1, 2, 3, 4, 5);
foreach( $array as $value ) {
echo "Value is $value <br />";
}
?>
</body>
</html>
This will produce the following result −
Value is 1
Value is 2
Value is 3
Value is 4
Value is 5
The break statement
The PHP break keyword is used to terminate the execution of a loop prematurely.
The break statement is situated inside the statement block. If gives you full control and whenever
you want to exit from the loop you can come out. After coming out of a loop immediate statement
to the loop will be executed.
P H P A N D P Y T H O N : Department of Information Technology - APSAC P a g e | 34
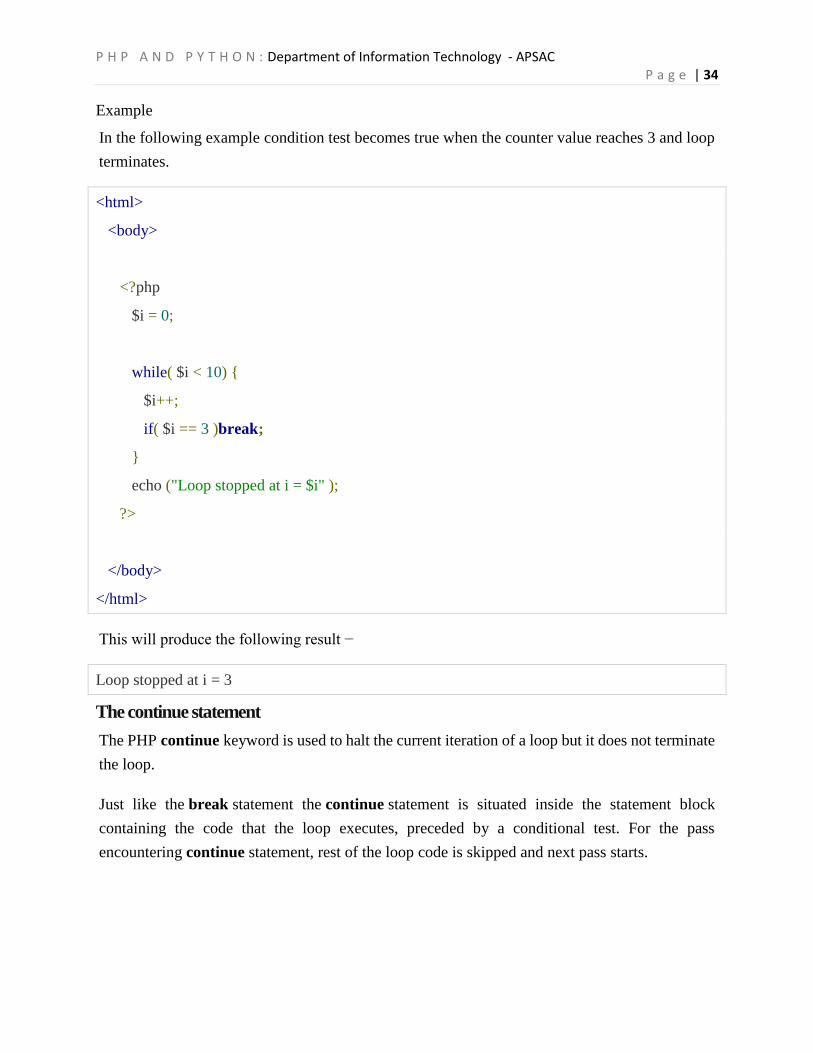
Example
In the following example condition test becomes true when the counter value reaches 3 and loop
terminates.
<html>
<body>
<?php
$i = 0;
while( $i < 10) {
$i++;
if( $i == 3 )break;
}
echo ("Loop stopped at i = $i" );
?>
</body>
</html>
This will produce the following result −
Loop stopped at i = 3
The continue statement
The PHP continue keyword is used to halt the current iteration of a loop but it does not terminate
the loop.
Just like the break statement the continue statement is situated inside the statement block
containing the code that the loop executes, preceded by a conditional test. For the pass
encountering continue statement, rest of the loop code is skipped and next pass starts.

P H P A N D P Y T H O N : Department of Information Technology - APSAC P a g e | 35
Example
In the following example loop prints the value of array but for which condition becomes true it
just skip the code and next value is printed.
<html>
<body>
<?php
$array = array( 1, 2, 3, 4, 5);
foreach( $array as $value ) {
if( $value == 3 )continue;
echo "Value is $value <br />";
}
?>
</body>
</html>
This will produce the following result −
Value is 1
Value is 2
Value is 4
Value is 5

P H P A N D P Y T H O N : Department of Information Technology - APSAC P a g e | 36
Functions
PHP functions are similar to other programming languages. A function is a piece of code which
takes one more input in the form of parameter and does some processing and returns a value.
There are two parts which should be clear to you −
Creating a PHP Function
Calling a PHP Function
In fact you hardly need to create your own PHP function because there are already more than
1000 of built-in library functions created for different area and you just need to call them
according to your requirement.
Please refer to PHP Function Reference for a complete set of useful functions.
Creating PHP Function
Its very easy to create your own PHP function. Suppose you want to create a PHP function which
will simply write a simple message on your browser when you will call it. Following example
creates a function called writeMessage() and then calls it just after creating it.
Note that while creating a function its name should start with keyword function and all the PHP
code should be put inside { and } braces as shown in the following example below −
<html>
<head>
<title>Writing PHP Function</title>
</head>
<body>
<?php
/* Defining a PHP Function */
function writeMessage() {
echo "You are really a nice person, Have a nice time!";
}

P H P A N D P Y T H O N : Department of Information Technology - APSAC P a g e | 37
/* Calling a PHP Function */
writeMessage();
?>
</body>
</html>
This will display following result −
You are really a nice person, Have a nice time!
PHP Functions with Parameters
PHP gives you option to pass your parameters inside a function. You can pass as many as
parameters your like. These parameters work like variables inside your function. Following
example takes two integer parameters and add them together and then print them.
<html>
<head>
<title>Writing PHP Function with Parameters</title>
</head>
<body>
<?php
function addFunction($num1, $num2) {
$sum = $num1 + $num2;
echo "Sum of the two numbers is : $sum";
}
addFunction(10, 20);
?>
</body>
</html>
This will display following result −
Sum of the two numbers is : 30

P H P A N D P Y T H O N : Department of Information Technology - APSAC P a g e | 38
Passing Arguments by Reference
It is possible to pass arguments to functions by reference. This means that a reference to the
variable is manipulated by the function rather than a copy of the variable's value.
Any changes made to an argument in these cases will change the value of the original variable.
You can pass an argument by reference by adding an ampersand to the variable name in either
the function call or the function definition.
Following example depicts both the cases.
<html>
<head>
<title>Passing Argument by Reference</title>
</head>
<body>
<?php
function addFive($num) {
$num += 5;
}
function addSix(&$num) {
$num += 6;
}
$orignum = 10;
addFive( $orignum );
echo "Original Value is $orignum<br />";

P H P A N D P Y T H O N : Department of Information Technology - APSAC P a g e | 39
addSix( $orignum );
echo "Original Value is $orignum<br />";
?>
</body>
</html>
This will display following result −
Original Value is 10
Original Value is 16
PHP Functions returning value
A function can return a value using the return statement in conjunction with a value or object.
return stops the execution of the function and sends the value back to the calling code.
You can return more than one value from a function using return array(1,2,3,4).
Following example takes two integer parameters and add them together and then returns their
sum to the calling program. Note that return keyword is used to return a value from a function.
<html>
<head>
<title>Writing PHP Function which returns value</title>
</head>
<body>
<?php
function addFunction($num1, $num2) {
$sum = $num1 + $num2;
return $sum;
}

P H P A N D P Y T H O N : Department of Information Technology - APSAC P a g e | 40
$return_value = addFunction(10, 20);
echo "Returned value from the function : $return_value";
?>
</body>
</html>
This will display following result −
Returned value from the function : 30
Setting Default Values for Function Parameters
You can set a parameter to have a default value if the function's caller doesn't pass it.
Following function prints NULL in case use does not pass any value to this function.
<html>
<head>
<title>Writing PHP Function which returns value</title>
</head>
<body>
<?php
function printMe($param = NULL) {
print $param;
}
printMe("This is test");
printMe();
?>
</body>
</html>
This will produce following result −
This is test

P H P A N D P Y T H O N : Department of Information Technology - APSAC P a g e | 41
Dynamic Function Calls
It is possible to assign function names as strings to variables and then treat these variables exactly
as you would the function name itself. Following example depicts this behaviour.
<html>
<head>
<title>Dynamic Function Calls</title>
</head>
<body>
<?php
function sayHello() {
echo "Hello<br />";
}
$function_holder = "sayHello";
$function_holder();
?>
</body>
</html>
This will display following result −
Hello
P H P A N D P Y T H O N : Department of Information Technology - APSAC P a g e | 42
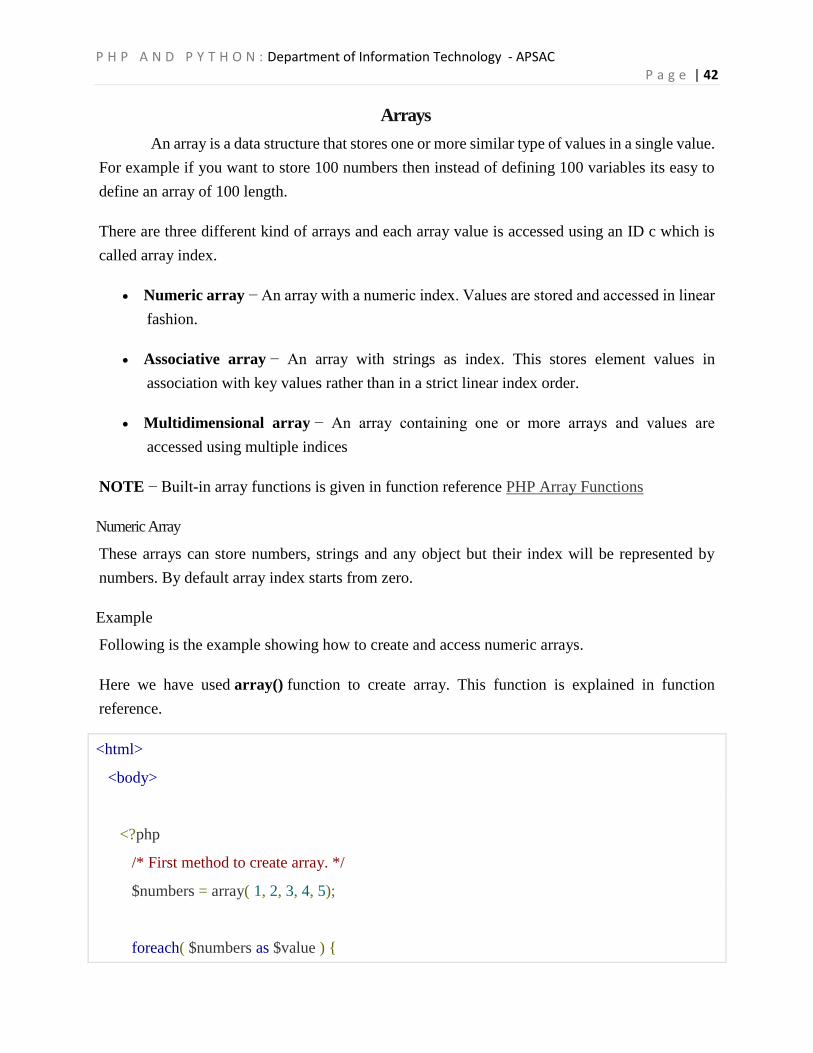
Arrays
An array is a data structure that stores one or more similar type of values in a single value.
For example if you want to store 100 numbers then instead of defining 100 variables its easy to
define an array of 100 length.
There are three different kind of arrays and each array value is accessed using an ID c which is
called array index.
Numeric array − An array with a numeric index. Values are stored and accessed in linear
fashion.
Associative array − An array with strings as index. This stores element values in
association with key values rather than in a strict linear index order.
Multidimensional array − An array containing one or more arrays and values are
accessed using multiple indices
NOTE − Built-in array functions is given in function reference PHP Array Functions
Numeric Array
These arrays can store numbers, strings and any object but their index will be represented by
numbers. By default array index starts from zero.
Example
Following is the example showing how to create and access numeric arrays.
Here we have used array() function to create array. This function is explained in function
reference.
<html>
<body>
<?php
/* First method to create array. */
$numbers = array( 1, 2, 3, 4, 5);
foreach( $numbers as $value ) {

P H P A N D P Y T H O N : Department of Information Technology - APSAC P a g e | 43
echo "Value is $value <br />";
}
/* Second method to create array. */
$numbers[0] = "one";
$numbers[1] = "two";
$numbers[2] = "three";
$numbers[3] = "four";
$numbers[4] = "five";
foreach( $numbers as $value ) {
echo "Value is $value <br />";
}
?>
</body>
</html>
This will produce the following result −
Value is 1
Value is 2
Value is 3
Value is 4
Value is 5
Value is one
Value is two
Value is three
Value is four
Value is five
Associative Arrays
The associative arrays are very similar to numeric arrays in term of functionality but they are
different in terms of their index. Associative array will have their index as string so that you can
establish a strong association between key and values.

P H P A N D P Y T H O N : Department of Information Technology - APSAC P a g e | 44
To store the salaries of employees in an array, a numerically indexed array would not be the best
choice. Instead, we could use the employees names as the keys in our associative array, and the
value would be their respective salary.
NOTE − Don't keep associative array inside double quote while printing otherwise it would not
return any value.
Example
<html>
<body>
<?php
/* First method to associate create array. */
$salaries = array("mohammad" => 2000, "qadir" => 1000, "zara" => 500);
echo "Salary of mohammad is ". $salaries['mohammad'] . "<br />";
echo "Salary of qadir is ". $salaries['qadir']. "<br />";
echo "Salary of zara is ". $salaries['zara']. "<br />";
/* Second method to create array. */
$salaries['mohammad'] = "high";
$salaries['qadir'] = "medium";
$salaries['zara'] = "low";
echo "Salary of mohammad is ". $salaries['mohammad'] . "<br />";
echo "Salary of qadir is ". $salaries['qadir']. "<br />";
echo "Salary of zara is ". $salaries['zara']. "<br />";
?>
</body>
</html>

P H P A N D P Y T H O N : Department of Information Technology - APSAC P a g e | 45
This will produce the following result −
Salary of mohammad is 2000
Salary of qadir is 1000
Salary of zara is 500
Salary of mohammad is high
Salary of qadir is medium
Salary of zara is low
Multidimensional Arrays
A multi-dimensional array each element in the main array can also be an array. And each element
in the sub-array can be an array, and so on. Values in the multi-dimensional array are accessed
using multiple index.
Example
In this example we create a two dimensional array to store marks of three students in three subjects
−
This example is an associative array, you can create numeric array in the same fashion.
<html>
<body>
<?php
$marks = array(
"mohammad" => array (
"physics" => 35,
"maths" => 30,
"chemistry" => 39
),
"qadir" => array (
"physics" => 30,
"maths" => 32,
"chemistry" => 29
),

P H P A N D P Y T H O N : Department of Information Technology - APSAC P a g e | 46
"zara" => array (
"physics" => 31,
"maths" => 22,
"chemistry" => 39
)
);
/* Accessing multi-dimensional array values */
echo "Marks for mohammad in physics : " ;
echo $marks['mohammad']['physics'] . "<br />";
echo "Marks for qadir in maths : ";
echo $marks['qadir']['maths'] . "<br />";
echo "Marks for zara in chemistry : " ;
echo $marks['zara']['chemistry'] . "<br />";
?>
</body>
</html>
This will produce the following result −
Marks for mohammad in physics : 35
Marks for qadir in maths : 32
Marks for zara in chemistry : 39
Strings
They are sequences of characters, like "PHP supports string operations".
NOTE − Built-in string functions is given in function reference PHP String Functions
Following are valid examples of string
$string_1 = "This is a string in double quotes";
$string_2 = "This is a somewhat longer, singly quoted string";

P H P A N D P Y T H O N : Department of Information Technology - APSAC P a g e | 47
$string_39 = "This string has thirty-nine characters";
$string_0 = ""; // a string with zero characters
Singly quoted strings are treated almost literally, whereas doubly quoted strings replace variables
with their values as well as specially interpreting certain character sequences.
<?php
$variable = "name";
$literally = 'My $variable will not print!\\n';
print($literally);
print "<br />";
$literally = "My $variable will print!\\n";
print($literally);
?>
This will produce the following result −
My $variable will not print!\n
My name will print
There are no artificial limits on string length - within the bounds of available memory, you ought
to be able to make arbitrarily long strings.
Strings that are delimited by double quotes (as in "this") are preprocessed in both the following
two ways by PHP −
Certain character sequences beginning with backslash (\) are replaced with special
characters
Variable names (starting with $) are replaced with string representations of their values.
The escape-sequence replacements are −
\n is replaced by the newline character
\r is replaced by the carriage-return character

P H P A N D P Y T H O N : Department of Information Technology - APSAC P a g e | 48
\t is replaced by the tab character
\$ is replaced by the dollar sign itself ($)
\" is replaced by a single double-quote (")
\\ is replaced by a single backslash (\)
String Concatenation Operator
To concatenate two string variables together, use the dot (.) operator −
<?php
$string1="Hello World";
$string2="1234";
echo $string1 . " " . $string2;
?>
This will produce the following result −
Hello World 1234
If we look at the code above you see that we used the concatenation operator two times. This is
because we had to insert a third string.
Between the two string variables we added a string with a single character, an empty space, to
separate the two variables.
Using the strlen() function
The strlen() function is used to find the length of a string.
Let's find the length of our string "Hello world!":
<?php
echo strlen("Hello world!");
?>
This will produce the following result −
12

P H P A N D P Y T H O N : Department of Information Technology - APSAC P a g e | 49
The length of a string is often used in loops or other functions, when it is important to know when
the string ends. (i.e. in a loop, we would want to stop the loop after the last character in the string)
Using the strpos() function
The strpos() function is used to search for a string or character within a string.
If a match is found in the string, this function will return the position of the first match. If no
match is found, it will return FALSE.
Let's see if we can find the string "world" in our string −
<?php
echo strpos("Hello world!","world");
?>
This will produce the following result −
6
As you see the position of the string "world" in our string is position 6. The reason that it is 6, and
not 7, is that the first position in the string is 0, and not 1.
Regular Expressions
Regular expressions are nothing more than a sequence or pattern of characters itself. They provide
the foundation for pattern-matching functionality.
Using regular expression you can search a particular string inside a another string, you can replace
one string by another string and you can split a string into many chunks.
PHP offers functions specific to two sets of regular expression functions, each corresponding to
a certain type of regular expression. You can use any of them based on your comfort.
POSIX Regular Expressions
PERL Style Regular Expressions
POSIX Regular Expressions
The structure of a POSIX regular expression is not dissimilar to that of a typical arithmetic
expression: various elements (operators) are combined to form more complex expressions.

P H P A N D P Y T H O N : Department of Information Technology - APSAC P a g e | 50
The simplest regular expression is one that matches a single character, such as g, inside strings
such as g, haggle, or bag.
Lets give explanation for few concepts being used in POSIX regular expression. After that we
will introduce you with regular expression related functions.
Brackets
Brackets ([]) have a special meaning when used in the context of regular expressions. They are
used to find a range of characters.
Sr.No Expression & Description
1 [0-9]
It matches any decimal digit from 0 through 9.
2 [a-z]
It matches any character from lower-case a through lowercase z.
3 [A-Z]
It matches any character from uppercase A through uppercase Z.
4 [a-Z]
It matches any character from lowercase a through uppercase Z.
The ranges shown above are general; you could also use the range [0-3] to match any decimal
digit ranging from 0 through 3, or the range [b-v] to match any lowercase character ranging from
b through v.
Quantifiers
The frequency or position of bracketed character sequences and single characters can be denoted
by a special character. Each special character having a specific connotation. The +, *, ?, {int.
range}, and $ flags all follow a character sequence.

P H P A N D P Y T H O N : Department of Information Technology - APSAC P a g e | 51
Sr.No Expression & Description
1 p+
It matches any string containing at least one p.
2 p*
It matches any string containing zero or more p's.
3 p?
It matches any string containing zero or more p's. This is just an alternative way
to use p*.
4 p{N}
It matches any string containing a sequence of N p's
5 p{2,3}
It matches any string containing a sequence of two or three p's.
6 p{2, }
It matches any string containing a sequence of at least two p's.
7 p$
It matches any string with p at the end of it.
8 ^p
It matches any string with p at the beginning of it.

P H P A N D P Y T H O N : Department of Information Technology - APSAC P a g e | 52
Examples
Following examples will clear your concepts about matching characters.
Sr.No Expression & Description
1 [^a-zA-Z]
It matches any string not containing any of the characters ranging from a through
z and A through Z.
2 p.p -It matches any string containing p, followed by any character, in turn followed
by another p.
3 ^.{2}$ -It matches any string containing exactly two characters.
4 <b>(.*)</b> -It matches any string enclosed within <b> and </b>.
5 p(hp)*
It matches any string containing a p followed by zero or more instances of the
sequence php.
Predefined Character Ranges
For your programming convenience several predefined character ranges, also known as character
classes, are available. Character classes specify an entire range of characters, for example, the
alphabet or an integer set −
Sr.No Expression & Description
1 [[:alpha:]]
It matches any string containing alphabetic characters aA through zZ.

P H P A N D P Y T H O N : Department of Information Technology - APSAC P a g e | 53
2 [[:digit:]]
It matches any string containing numerical digits 0 through 9.
3 [[:alnum:]]
It matches any string containing alphanumeric characters aA through zZ and 0
through 9.
4 [[:space:]]
It matches any string containing a space.
PHP's Regexp POSIX Functions
PHP currently offers seven functions for searching strings using POSIX-style regular expressions
Sr.No Function & Description
1 ereg() The ereg() function searches a string specified by string for a string
specified by pattern, returning true if the pattern is found, and false otherwise.
2 ereg_replace() The ereg_replace() function searches for string specified by
pattern and replaces pattern with replacement if found.
3 eregi() The eregi() function searches throughout a string specified by pattern for
a string specified by string. The search is not case sensitive.
4 eregi_replace() The eregi_replace() function operates exactly like ereg_replace(),
except that the search for pattern in string is not case sensitive.
5 split() The split() function will divide a string into various elements, the
boundaries of each element based on the occurrence of pattern in string.
6 spliti()
The spliti() function operates exactly in the same manner as its sibling split(),
except that it is not case sensitive.

P H P A N D P Y T H O N : Department of Information Technology - APSAC P a g e | 54
7 sql_regcase()
The sql_regcase() function can be thought of as a utility function, converting each
character in the input parameter string into a bracketed expression containing two
characters.
PERL Style Regular Expressions
Perl-style regular expressions are similar to their POSIX counterparts. The POSIX syntax can be
used almost interchangeably with the Perl-style regular expression functions. In fact, you can use
any of the quantifiers introduced in the previous POSIX section. Lets give explanation for few
concepts being used in PERL regular expressions. After that we will introduce you wih regular
expression related functions.
Meta characters
A meta character is simply an alphabetical character preceded by a backslash that acts to give the
combination a special meaning.
For instance, you can search for large money sums using the '\d' meta character: /([\d]+)000/,
Here \d will search for any string of numerical character.Following is the list of meta characters
which can be used in PERL Style Regular Expressions.
Character Description . a single character
\s a whitespace character (space, tab, newline)
\S non-whitespace character
\d a digit (0-9)
\D a non-digit
\w a word character (a-z, A-Z, 0-9, _)
\W a non-word character
[aeiou] matches a single character in the given set
[^aeiou] matches a single character outside the given set
(foo|bar|baz) matches any of the alternatives specified
Modifiers
Several modifiers are available that can make your work with regexps much easier, like case
sensitivity, searching in multiple lines etc.

P H P A N D P Y T H O N : Department of Information Technology - APSAC P a g e | 55
Modifier Description i Makes the match case insensitive
m Specifies that if the string has newline or carriage return characters, the ^ and $
operators will now
match against a newline boundary, instead of a string boundary
o Evaluates the expression only once
s Allows use of . to match a newline character
x Allows you to use white space in the expression for clarity
g Globally finds all matches
cg Allows a search to continue even after a global match fails
PHP's Regexp PERL Compatible Functions
PHP offers following functions for searching strings using Perl-compatible regular expressions −
Sr.No Function & Description
1 preg_match() This function searches string for pattern, returning true if pattern
exists, and false otherwise.
2 preg_match_all()
The preg_match_all() function matches all occurrences of pattern in string.
3 preg_replace()
The preg_replace() function operates just like ereg_replace(), except that regular
expressions can be used in the pattern and replacement input parameters.
4 preg_split()
The preg_split() function operates exactly like split(), except that regular
expressions are accepted as input parameters for pattern.
5 preg_grep()
The preg_grep() function searches all elements of input_array, returning all
elements matching the regexp pattern.
6 preg_ quote()
Quote regular expression characters

P H P A N D P Y T H O N : Department of Information Technology - APSAC P a g e | 56
Object Oriented Programming in PHP
We can imagine our universe made of different objects like sun, earth, moon etc. Similarly we
can imagine our car made of different objects like wheel, steering, gear etc. Same way there is
object oriented programming concepts which assume everything as an object and implement a
software using different objects.
Object Oriented Concepts
Before we go in detail, lets define important terms related to Object Oriented Programming.
Class − This is a programmer-defined data type, which includes local functions as well as
local data. You can think of a class as a template for making many instances of the same
kind (or class) of object.
Object − An individual instance of the data structure defined by a class. You define a class
once and then make many objects that belong to it. Objects are also known as instance.
Member Variable − These are the variables defined inside a class. This data will be
invisible to the outside of the class and can be accessed via member functions. These
variables are called attribute of the object once an object is created.
Member function − These are the function defined inside a class and are used to access
object data.
Inheritance − When a class is defined by inheriting existing function of a parent class
then it is called inheritance. Here child class will inherit all or few member functions and
variables of a parent class.
Parent class − A class that is inherited from by another class. This is also called a base
class or super class.
Child Class − A class that inherits from another class. This is also called a subclass or
derived class.
Polymorphism − This is an object oriented concept where same function can be used for
different purposes. For example function name will remain same but it make take different
number of arguments and can do different task.

P H P A N D P Y T H O N : Department of Information Technology - APSAC P a g e | 57
Overloading − a type of polymorphism in which some or all of operators have different
implementations depending on the types of their arguments. Similarly functions can also
be overloaded with different implementation.
Data Abstraction − Any representation of data in which the implementation details are
hidden (abstracted).
Encapsulation − refers to a concept where we encapsulate all the data and member
functions together to form an object.
Constructor − refers to a special type of function which will be called automatically
whenever there is an object formation from a class.
Destructor − refers to a special type of function which will be called automatically
whenever an object is deleted or goes out of scope.
Defining PHP Classes
The general form for defining a new class in PHP is as follows −
<?php
class phpClass {
var $var1;
var $var2 = "constant string";
function myfunc ($arg1, $arg2) {
[..]
}
[..]
}
?>
Here is the description of each line −
The special form class, followed by the name of the class that you want to define.
A set of braces enclosing any number of variable declarations and function definitions.

P H P A N D P Y T H O N : Department of Information Technology - APSAC P a g e | 58
Variable declarations start with the special form var, which is followed by a conventional
$ variable name; they may also have an initial assignment to a constant value.
Function definitions look much like standalone PHP functions but are local to the class
and will be used to set and access object data.
Example
Here is an example which defines a class of Books type −
<?php
class Books {
/* Member variables */
var $price;
var $title;
/* Member functions */
function setPrice($par){
$this->price = $par;
}
function getPrice(){
echo $this->price ."<br/>";
}
function setTitle($par){
$this->title = $par;
}
function getTitle(){
echo $this->title ." <br/>";
}
}
?>
The variable $this is a special variable and it refers to the same object ie. itself.

P H P A N D P Y T H O N : Department of Information Technology - APSAC P a g e | 59
Creating Objects in PHP
Once you defined your class, then you can create as many objects as you like of that class type.
Following is an example of how to create object using new operator.
$physics = new Books;
$maths = new Books;
$chemistry = new Books;
Here we have created three objects and these objects are independent of each other and they will
have their existence separately. Next we will see how to access member function and process
member variables.
Calling Member Functions
After creating your objects, you will be able to call member functions related to that object. One
member function will be able to process member variable of related object only.
Following example shows how to set title and prices for the three books by calling member
functions.
$physics->setTitle( "Physics for High School" );
$chemistry->setTitle( "Advanced Chemistry" );
$maths->setTitle( "Algebra" );
$physics->setPrice( 10 );
$chemistry->setPrice( 15 );
$maths->setPrice( 7 );
Now you call another member functions to get the values set by in above example −
$physics->getTitle();
$chemistry->getTitle();
$maths->getTitle();
$physics->getPrice();
$chemistry->getPrice();
$maths->getPrice();
This will produce the following result −

P H P A N D P Y T H O N : Department of Information Technology - APSAC P a g e | 60
Physics for High School
Advanced Chemistry
Algebra
10
15
7
Constructor Functions
Constructor Functions are special type of functions which are called automatically whenever an
object is created. So we take full advantage of this behaviour, by initializing many things through
constructor functions.
PHP provides a special function called __construct() to define a constructor. You can pass as
many as arguments you like into the constructor function.
Following example will create one constructor for Books class and it will initialize price and title
for the book at the time of object creation.
function __construct( $par1, $par2 ) {
$this->title = $par1;
$this->price = $par2;
}
Now we don't need to call set function separately to set price and title. We can initialize these two
member variables at the time of object creation only. Check following example below −
$physics = new Books( "Physics for High School", 10 );
$maths = new Books ( "Advanced Chemistry", 15 );
$chemistry = new Books ("Algebra", 7 );
/* Get those set values */
$physics->getTitle();
$chemistry->getTitle();
$maths->getTitle();
$physics->getPrice();
$chemistry->getPrice();
$maths->getPrice();

P H P A N D P Y T H O N : Department of Information Technology - APSAC P a g e | 61
This will produce the following result −
Physics for High School
Advanced Chemistry
Algebra
10
15
7
Destructor
Like a constructor function you can define a destructor function using function __destruct(). You
can release all the resources with-in a destructor.
Inheritance
PHP class definitions can optionally inherit from a parent class definition by using the extends
clause. The syntax is as follows −
class Child extends Parent {
<definition body>
}
The effect of inheritance is that the child class (or subclass or derived class) has the following
characteristics −
Automatically has all the member variable declarations of the parent class.
Automatically has all the same member functions as the parent, which (by default) will
work the same way as those functions do in the parent.
Following example inherit Books class and adds more functionality based on the requirement.
class Novel extends Books {
var $publisher;
function setPublisher($par){
$this->publisher = $par;
}
function getPublisher(){

P H P A N D P Y T H O N : Department of Information Technology - APSAC P a g e | 62
echo $this->publisher. "<br />";
}
}
Now apart from inherited functions, class Novel keeps two additional member functions.
Function Overriding
Function definitions in child classes override definitions with the same name in parent classes. In
a child class, we can modify the definition of a function inherited from parent class.
In the following example getPrice and getTitle functions are overridden to return some values.
function getPrice() {
echo $this->price . "<br/>";
return $this->price;
}
function getTitle(){
echo $this->title . "<br/>";
return $this->title;
}
Public Members
Unless you specify otherwise, properties and methods of a class are public. That is to say, they
may be accessed in three possible situations −
From outside the class in which it is declared
From within the class in which it is declared
From within another class that implements the class in which it is declared
Till now we have seen all members as public members. If you wish to limit the accessibility of
the members of a class then you define class members as private or protected.

P H P A N D P Y T H O N : Department of Information Technology - APSAC P a g e | 63
Private members
By designating a member private, you limit its accessibility to the class in which it is declared.
The private member cannot be referred to from classes that inherit the class in which it is declared
and cannot be accessed from outside the class.
A class member can be made private by using private keyword infront of the member.
class MyClass {
private $car = "skoda";
$driver = "SRK";
function __construct($par) {
// Statements here run every time
// an instance of the class
// is created.
}
function myPublicFunction() {
return("I'm visible!");
}
private function myPrivateFunction() {
return("I'm not visible outside!");
}
}
When MyClass class is inherited by another class using extends, myPublicFunction() will be
visible, as will $driver. The extending class will not have any awareness of or access to
myPrivateFunction and $car, because they are declared private.
Protected members
A protected property or method is accessible in the class in which it is declared, as well as in
classes that extend that class. Protected members are not available outside of those two kinds of

P H P A N D P Y T H O N : Department of Information Technology - APSAC P a g e | 64
classes. A class member can be made protected by using protected keyword in front of the
member.Here is different version of MyClass −
class MyClass {
protected $car = "skoda";
$driver = "SRK";
function __construct($par) {
// Statements here run every time
// an instance of the class
// is created.
}
function myPublicFunction() {
return("I'm visible!");
}
protected function myPrivateFunction() {
return("I'm visible in child class!");
}
}
Interfaces
Interfaces are defined to provide a common function names to the implementers. Different
implementors can implement those interfaces according to their requirements. You can say,
interfaces are skeletons which are implemented by developers.
As of PHP5, it is possible to define an interface, like this −
interface Mail {
public function sendMail();
}
Then, if another class implemented that interface, like this −
class Report implements Mail {
// sendMail() Definition goes here }

P H P A N D P Y T H O N : Department of Information Technology - APSAC P a g e | 65
Constants
A constant is somewhat like a variable, in that it holds a value, but is really more like a function
because a constant is immutable. Once you declare a constant, it does not change.
Declaring one constant is easy, as is done in this version of MyClass −
class MyClass {
const requiredMargin = 1.7;
function __construct($incomingValue) {
// Statements here run every time
// an instance of the class
// is created.
}
}
In this class, requiredMargin is a constant. It is declared with the keyword const, and under no
circumstances can it be changed to anything other than 1.7. Note that the constant's name does
not have a leading $, as variable names do.
Abstract Classes
An abstract class is one that cannot be instantiated, only inherited. You declare an abstract class
with the keyword abstract, like this −
When inheriting from an abstract class, all methods marked abstract in the parent's class
declaration must be defined by the child; additionally, these methods must be defined with the
same visibility.
abstract class MyAbstractClass {
abstract function myAbstractFunction() {
}
}
Note that function definitions inside an abstract class must also be preceded by the keyword
abstract. It is not legal to have abstract function definitions inside a non-abstract class.

P H P A N D P Y T H O N : Department of Information Technology - APSAC P a g e | 66
Static Keyword
Declaring class members or methods as static makes them accessible without needing an
instantiation of the class. A member declared as static can not be accessed with an instantiated
class object (though a static method can).
Try out following example −
<?php
class Foo {
public static $my_static = 'foo';
public function staticValue() {
return self::$my_static;
}
}
print Foo::$my_static . "\n";
$foo = new Foo();
print $foo->staticValue() . "\n";
?>
Final Keyword
PHP 5 introduces the final keyword, which prevents child classes from overriding a method by
prefixing the definition with final. If the class itself is being defined final then it cannot be
extended.
Following example results in Fatal error: Cannot override final method BaseClass::moreTesting()
<?php
class BaseClass {
public function test() {
echo "BaseClass::test() called<br>";
}

P H P A N D P Y T H O N : Department of Information Technology - APSAC P a g e | 67
final public function moreTesting() {
echo "BaseClass::moreTesting() called<br>";
}
}
class ChildClass extends BaseClass {
public function moreTesting() {
echo "ChildClass::moreTesting() called<br>";
}
}
?>
Calling parent constructors
Instead of writing an entirely new constructor for the subclass, let's write it by calling the parent's
constructor explicitly and then doing whatever is necessary in addition for instantiation of the
subclass. Here's a simple example −
class Name {
var $_firstName;
var $_lastName;
function Name($first_name, $last_name) {
$this->_firstName = $first_name;
$this->_lastName = $last_name;
}
function toString() {
return($this->_lastName .", " .$this->_firstName);
}
}
class NameSub1 extends Name {

P H P A N D P Y T H O N : Department of Information Technology - APSAC P a g e | 68
var $_middleInitial;
function NameSub1($first_name, $middle_initial, $last_name) {
Name::Name($first_name, $last_name);
$this->_middleInitial = $middle_initial;
}
function toString() {
return(Name::toString() . " " . $this->_middleInitial);
}
}
In this example, we have a parent class (Name), which has a two-argument constructor, and a
subclass (NameSub1), which has a three-argument constructor. The constructor of NameSub1
functions by calling its parent constructor explicitly using the :: syntax (passing two of its
arguments along) and then setting an additional field. Similarly, NameSub1 defines its non
constructor toString() function in terms of the parent function that it overrides.
NOTE − A constructor can be defined with the same name as the name of a class. It is defined in
above example.

P H P A N D P Y T H O N : Department of Information Technology - APSAC P a g e | 69
File Handling
PHP readfile() Function
The readfile() function reads a file and writes it to the output buffer.
Assume we have a text file called "webdictionary.txt", stored on the server, that looks like this:
AJAX = Asynchronous JavaScript and XML
CSS = Cascading Style Sheets
HTML = Hyper Text Markup Language
PHP = PHP Hypertext Preprocessor
SQL = Structured Query Language
SVG = Scalable Vector Graphics
XML = EXtensible Markup Language
The PHP code to read the file and write it to the output buffer is as follows (the readfile()
function returns the number of bytes read on success):
Example
<?php
echo readfile("webdictionary.txt");
?>
following functions related to files −
Opening a file
Reading a file
Writing a file
Closing a file
Opening and Closing Files
The PHP fopen() function is used to open a file. It requires two arguments stating first the file
name and then mode in which to operate.
Files modes can be specified as one of the six options in this table.
Mode Purpose
r Opens the file for reading only.

P H P A N D P Y T H O N : Department of Information Technology - APSAC P a g e | 70
Places the file pointer at the beginning of the file.
r+ Opens the file for reading and writing.
Places the file pointer at the beginning of the file.
w Opens the file for writing only.
Places the file pointer at the beginning of the file.
and truncates the file to zero length. If files does not
exist then it attempts to create a file.
w+ Opens the file for reading and writing only.
Places the file pointer at the beginning of the file.
and truncates the file to zero length. If files does not
exist then it attempts to create a file.
a Opens the file for writing only.
Places the file pointer at the end of the file.
If files does not exist then it attempts to create a file.
a+ Opens the file for reading and writing only.
Places the file pointer at the end of the file.
If files does not exist then it attempts to create a file.
If an attempt to open a file fails then fopen returns a value of false otherwise it returns a file
pointer which is used for further reading or writing to that file.

P H P A N D P Y T H O N : Department of Information Technology - APSAC P a g e | 71
After making a changes to the opened file it is important to close it with the fclose() function.
The fclose() function requires a file pointer as its argument and then returns true when the closure
succeeds or false if it fails.
Reading a file
Once a file is opened using fopen() function it can be read with a function called fread(). This
function requires two arguments. These must be the file pointer and the length of the file
expressed in bytes.
The files length can be found using the filesize() function which takes the file name as its
argument and returns the size of the file expressed in bytes.
So here are the steps required to read a file with PHP.
Open a file using fopen() function.
Get the file's length using filesize() function.
Read the file's content using fread() function.
Close the file with fclose() function.
The following example assigns the content of a text file to a variable then displays those contents
on the web page.
<html>
<head>
<title>Reading a file using PHP</title>
</head>
<body>
<?php
$filename = "tmp.txt";
$file = fopen( $filename, "r" );

P H P A N D P Y T H O N : Department of Information Technology - APSAC P a g e | 72
if( $file == false ) {
echo ( "Error in opening file" );
exit();
}
$filesize = filesize( $filename );
$filetext = fread( $file, $filesize );
fclose( $file );
echo ( "File size : $filesize bytes" );
echo ( "<pre>$filetext</pre>" );
?>
</body>
</html>
It will produce the following result −
Writing a file
A new file can be written or text can be appended to an existing file using the
PHP fwrite() function. This function requires two arguments specifying a file pointer and the
string of data that is to be written. Optionally a third integer argument can be included to specify
the length of the data to write. If the third argument is included, writing would will stop after the
specified length has been reached.

P H P A N D P Y T H O N : Department of Information Technology - APSAC P a g e | 73
The following example creates a new text file then writes a short text heading inside it. After
closing this file its existence is confirmed using file_exist() function which takes file name as an
argument
<?php
$filename = "/home/user/guest/newfile.txt";
$file = fopen( $filename, "w" );
if( $file == false ) {
echo ( "Error in opening new file" );
exit();
}
fwrite( $file, "This is a simple test\n" );
fclose( $file );
?>
<html>
<head>
<title>Writing a file using PHP</title>
</head>
<body>
<?php
$filename = "newfile.txt";
$file = fopen( $filename, "r" );
if( $file == false ) {
echo ( "Error in opening file" );
exit();
}

P H P A N D P Y T H O N : Department of Information Technology - APSAC P a g e | 74
$filesize = filesize( $filename );
$filetext = fread( $file, $filesize );
fclose( $file );
echo ( "File size : $filesize bytes" );
echo ( "$filetext" );
echo("file name: $filename");
?>
</body>
</html>
It will produce the following result −
Sending Emails using PHP
PHP must be configured correctly in the php.ini file with the details of how your system sends
email. Open php.ini file available in /etc/ directory and find the section headed [mail function].
Windows users should ensure that two directives are supplied. The first is called SMTP that
defines your email server address. The second is called sendmail_from which defines your own
email address.
The configuration for Windows should look something like this −
[mail function]
; For Win32 only.
SMTP = smtp.secureserver.net
; For win32 only
sendmail_from = [email protected]
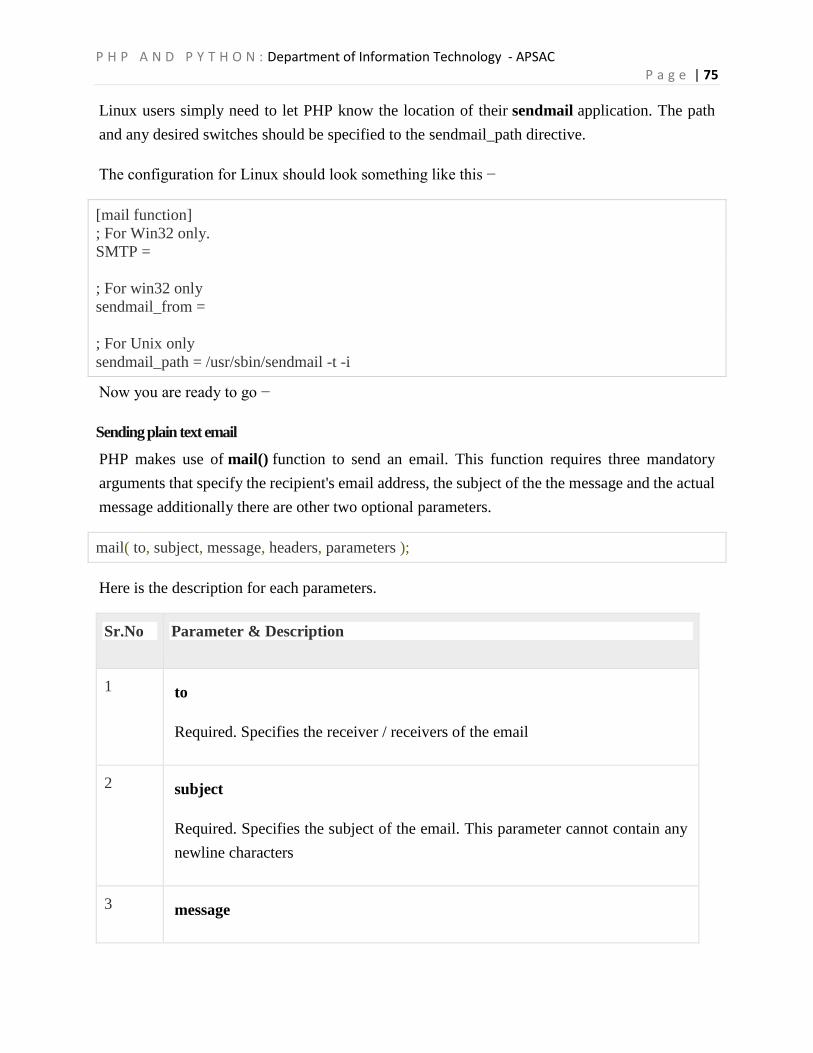
P H P A N D P Y T H O N : Department of Information Technology - APSAC P a g e | 75
Linux users simply need to let PHP know the location of their sendmail application. The path
and any desired switches should be specified to the sendmail_path directive.
The configuration for Linux should look something like this −
[mail function]
; For Win32 only.
SMTP =
; For win32 only
sendmail_from =
; For Unix only
sendmail_path = /usr/sbin/sendmail -t -i
Now you are ready to go −
Sending plain text email
PHP makes use of mail() function to send an email. This function requires three mandatory
arguments that specify the recipient's email address, the subject of the the message and the actual
message additionally there are other two optional parameters.
mail( to, subject, message, headers, parameters );
Here is the description for each parameters.
Sr.No Parameter & Description
1 to
Required. Specifies the receiver / receivers of the email
2 subject
Required. Specifies the subject of the email. This parameter cannot contain any
newline characters
3 message

P H P A N D P Y T H O N : Department of Information Technology - APSAC P a g e | 76
Required. Defines the message to be sent. Each line should be separated with a
LF (\n). Lines should not exceed 70 characters
4 headers
Optional. Specifies additional headers, like From, Cc, and Bcc. The additional
headers should be separated with a CRLF (\r\n)
5 parameters
Optional. Specifies an additional parameter to the send mail program
As soon as the mail function is called PHP will attempt to send the email then it will return true
if successful or false if it is failed.
Multiple recipients can be specified as the first argument to the mail() function in a comma
separated list.
Sending HTML email
When you send a text message using PHP then all the content will be treated as simple text. Even
if you will include HTML tags in a text message, it will be displayed as simple text and HTML
tags will not be formatted according to HTML syntax. But PHP provides option to send an HTML
message as actual HTML message.
While sending an email message you can specify a Mime version, content type and character set
to send an HTML email.
Example
Following example will send an HTML email message to [email protected] copying it to
[email protected]. You can code this program in such a way that it should receive all
content from the user and then it should send an email.
<html>
<head>
<title>Sending HTML email using PHP</title>

P H P A N D P Y T H O N : Department of Information Technology - APSAC P a g e | 77
</head>
<body>
<?php
$to = "[email protected]";
$subject = "This is subject";
$message = "<b>This is HTML message.</b>";
$message .= "<h1>This is headline.</h1>";
$header = "From:[email protected] \r\n";
$header .= "Cc:[email protected] \r\n";
$header .= "MIME-Version: 1.0\r\n";
$header .= "Content-type: text/html\r\n";
$retval = mail ($to,$subject,$message,$header);
if( $retval == true ) {
echo "Message sent successfully...";
}else {
echo "Message could not be sent...";
}
?>
</body>
</html>
Sending attachments with email
To send an email with mixed content requires to set Content-type header to multipart/mixed.
Then text and attachment sections can be specified within boundaries.

P H P A N D P Y T H O N : Department of Information Technology - APSAC P a g e | 78
A boundary is started with two hyphens followed by a unique number which can not appear in
the message part of the email. A PHP function md5() is used to create a 32 digit hexadecimal
number to create unique number. A final boundary denoting the email's final section must also
end with two hyphens.
<?php
// request variables // important
$from = $_REQUEST["from"];
$emaila = $_REQUEST["emaila"];
$filea = $_REQUEST["filea"];
if ($filea) {
function mail_attachment ($from , $to, $subject, $message, $attachment){
$fileatt = $attachment; // Path to the file
$fileatt_type = "application/octet-stream"; // File Type
$start = strrpos($attachment, '/') == -1 ?
strrpos($attachment, '//') : strrpos($attachment, '/')+1;
$fileatt_name = substr($attachment, $start,
strlen($attachment)); // Filename that will be used for the
file as the attachment
$email_from = $from; // Who the email is from
$subject = "New Attachment Message";
$email_subject = $subject; // The Subject of the email
$email_txt = $message; // Message that the email has in it
$email_to = $to; // Who the email is to
$headers = "From: ".$email_from;

P H P A N D P Y T H O N : Department of Information Technology - APSAC P a g e | 79
$file = fopen($fileatt,'rb');
$data = fread($file,filesize($fileatt));
fclose($file);
$msg_txt="\n\n You have recieved a new attachment message from $from";
$semi_rand = md5(time());
$mime_boundary = "==Multipart_Boundary_x{$semi_rand}x";
$headers .= "\nMIME-Version: 1.0\n" . "Content-Type: multipart/mixed;\n" . "
boundary=\"{$mime_boundary}\"";
$email_txt .= $msg_txt;
$email_message .= "This is a multi-part message in MIME format.\n\n" .
"--{$mime_boundary}\n" . "Content-Type:text/html;
charset = \"iso-8859-1\"\n" . "Content-Transfer-Encoding: 7bit\n\n" .
$email_txt . "\n\n";
$data = chunk_split(base64_encode($data));
$email_message .= "--{$mime_boundary}\n" . "Content-Type: {$fileatt_type};\n" .
" name = \"{$fileatt_name}\"\n" . //"Content-Disposition: attachment;\n" .
//" filename = \"{$fileatt_name}\"\n" . "Content-Transfer-Encoding:
base64\n\n" . $data . "\n\n" . "--{$mime_boundary}--\n";
$ok = mail($email_to, $email_subject, $email_message, $headers);
if($ok) {
echo "File Sent Successfully.";
unlink($attachment); // delete a file after attachment sent.
}else {

P H P A N D P Y T H O N : Department of Information Technology - APSAC P a g e | 80
die("Sorry but the email could not be sent. Please go back and try again!");
}
}
move_uploaded_file($_FILES["filea"]["tmp_name"],
'temp/'.basename($_FILES['filea']['name']));
mail_attachment("$from", "[email protected]",
"subject", "message", ("temp/".$_FILES["filea"]["name"]));
}
?>
<html>
<head>
<script language = "javascript" type = "text/javascript">
function CheckData45() {
with(document.filepost) {
if(filea.value ! = "") {
document.getElementById('one').innerText =
"Attaching File ... Please Wait";
}
}
}
</script>
</head>
<body>
<table width = "100%" height = "100%" border = "0"
cellpadding = "0" cellspacing = "0">

P H P A N D P Y T H O N : Department of Information Technology - APSAC P a g e | 81
<tr>
<td align = "center">
<form name = "filepost" method = "post"
action = "file.php" enctype = "multipart/form-data" id = "file">
<table width = "300" border = "0" cellspacing = "0"
cellpadding = "0">
<tr valign = "bottom">
<td height = "20">Your Name:</td>
</tr>
<tr>
<td><input name = "from" type = "text"
id = "from" size = "30"></td>
</tr>
<tr valign = "bottom">
<td height = "20">Your Email Address:</td>
</tr>
<tr>
<td class = "frmtxt2"><input name = "emaila"
type = "text" id = "emaila" size = "30"></td>
</tr>
<tr>
<td height = "20" valign = "bottom">Attach File:</td>
</tr>

P H P A N D P Y T H O N : Department of Information Technology - APSAC P a g e | 82
<tr valign = "bottom">
<td valign = "bottom"><input name = "filea"
type = "file" id = "filea" size = "16"></td>
</tr>
<tr>
<td height = "40" valign = "middle"><input
name = "Reset2" type = "reset" id = "Reset2" value = "Reset">
<input name = "Submit2" type = "submit"
value = "Submit" onClick = "return CheckData45()"></td>
</tr>
</table>
</form>
<center>
<table width = "400">
<tr>
<td id = "one">
</td>
</tr>
</table>
</center>
</td>
</tr>
</table>
</body>
</html>

P H P A N D P Y T H O N : Department of Information Technology - APSAC P a g e | 83
Error handling is the process of catching errors raised by your program and then taking
appropriate action. If you would handle errors properly then it may lead to many unforeseen
consequences.
Its very simple in PHP to handle an errors.
Using die() function
While writing your PHP program you should check all possible error condition before going
ahead and take appropriate action when required.
Try following example without having /tmp/test.xt file and with this file.
<?php
if(!file_exists("/tmp/test.txt")) {
die("File not found");
}else {
$file = fopen("/tmp/test.txt","r");
print "Opend file sucessfully";
}
// Test of the code here.
?>
This way you can write an efficient code. Using above technique you can stop your program
whenever it errors out and display more meaningful and user friendly message.
Defining Custom Error Handling Function
You can write your own function to handling any error. PHP provides you a framework to define
error handling function.
This function must be able to handle a minimum of two parameters (error level and error message)
but can accept up to five parameters (optionally: file, line-number, and the error context) −
Syntax
error_function(error_level,error_message, error_file,error_line,error_context);

P H P A N D P Y T H O N : Department of Information Technology - APSAC P a g e | 84
Sr.No Parameter & Description
1 error_level
Required - Specifies the error report level for the user-defined error. Must be a
value number.
2 error_message
Required - Specifies the error message for the user-defined error
3 error_file :
Optional - Specifies the file name in which the error occurred
4 error_line :Optional - Specifies the line number in which the error occurred
5 error_context :Optional - Specifies an array containing every variable and their
values in use when the error occurred
Possible Error levels
These error report levels are the different types of error the user-defined error handler can be used
for. These values cab used in combination using | operator
Sr.No Constant & Description Value
1 .E_ERROR
Fatal run-time errors. Execution of the script is halted
1
2 E_WARNING
Non-fatal run-time errors. Execution of the script is not halted
2

P H P A N D P Y T H O N : Department of Information Technology - APSAC P a g e | 85
3 E_PARSE
Compile-time parse errors. Parse errors should only be generated by
the parser.
4
4 E_NOTICE
Run-time notices. The script found something that might be an error,
but could also happen when running a script normally
8
5 E_CORE_ERROR
Fatal errors that occur during PHP's initial start-up.
16
6 E_CORE_WARNING
Non-fatal run-time errors. This occurs during PHP's initial start-up.
32
7 E_USER_ERROR
Fatal user-generated error. This is like an E_ERROR set by the
programmer using the PHP function trigger_error()
256
8 E_USER_WARNING
Non-fatal user-generated warning. This is like an E_WARNING set
by the programmer using the PHP function trigger_error()
512
9 E_USER_NOTICE
User-generated notice. This is like an E_NOTICE set by the
programmer using the PHP function trigger_error()
1024

P H P A N D P Y T H O N : Department of Information Technology - APSAC P a g e | 86
10 E_STRICT
Run-time notices. Enable to have PHP suggest changes to your code
which will ensure the best interoperability and forward compatibility
of your code.
2048
11 E_RECOVERABLE_ERROR
Catchable fatal error. This is like an E_ERROR but can be caught by
a user defined handle (see also set_error_handler())
4096
12 E_ALL
All errors and warnings, except level E_STRICT (E_STRICT will be
part of E_ALL as of PHP 6.0)
8191
All the above error level can be set using following PHP built-in library function where level cab
be any of the value defined in above table.
int error_reporting ( [int $level] )
Following is the way you can create one error handling function −
<?php
function handleError($errno, $errstr,$error_file,$error_line) {
echo "<b>Error:</b> [$errno] $errstr - $error_file:$error_line";
echo "<br />";
echo "Terminating PHP Script";
die();
}
?>
Once you define your custom error handler you need to set it using PHP built-in
library set_error_handler function. Now lets examine our example by calling a function which
does not exist.

P H P A N D P Y T H O N : Department of Information Technology - APSAC P a g e | 87
<?php
error_reporting( E_ERROR );
function handleError($errno, $errstr,$error_file,$error_line) {
echo "<b>Error:</b> [$errno] $errstr - $error_file:$error_line";
echo "<br />";
echo "Terminating PHP Script";
die();
}
//set error handler
set_error_handler("handleError");
//trigger error
myFunction();
?>
Exceptions Handling
PHP 5 has an exception model similar to that of other programming languages. Exceptions are
important and provides a better control over error handling.
Lets explain there new keyword related to exceptions.
Try − A function using an exception should be in a "try" block. If the exception does not
trigger, the code will continue as normal. However if the exception triggers, an exception
is "thrown".
Throw − This is how you trigger an exception. Each "throw" must have at least one
"catch".
Catch − A "catch" block retrieves an exception and creates an object containing the
exception information.

P H P A N D P Y T H O N : Department of Information Technology - APSAC P a g e | 88
When an exception is thrown, code following the statement will not be executed, and PHP will
attempt to find the first matching catch block. If an exception is not caught, a PHP Fatal Error
will be issued with an "Uncaught Exception ...
An exception can be thrown, and caught ("catched") within PHP. Code may be surrounded
in a try block.
Each try must have at least one corresponding catch block. Multiple catch blocks can be
used to catch different classes of exceptions.
Exceptions can be thrown (or re-thrown) within a catch block.
Example
Following is the piece of code, copy and paste this code into a file and verify the result.
<?php
try {
$error = 'Always throw this error';
throw new Exception($error);
// Code following an exception is not executed.
echo 'Never executed';
}catch (Exception $e) {
echo 'Caught exception: ', $e->getMessage(), "\n";
}
// Continue execution
echo 'Hello World';
?>
In the above example $e->getMessage function is used to get error message. There are following
functions which can be used from Exception class.
getMessage() − message of exception
getCode() − code of exception

P H P A N D P Y T H O N : Department of Information Technology - APSAC P a g e | 89
getFile() − source filename
getLine() − source line
getTrace() − n array of the backtrace()
getTraceAsString() − formated string of trace
Creating Custom Exception Handler
You can define your own custom exception handler. Use following function to set a user-defined
exception handler function.
string set_exception_handler ( callback $exception_handler )
Here exception_handler is the name of the function to be called when an uncaught exception
occurs. This function must be defined before calling set_exception_handler().
Example
<?php
function exception_handler($exception) {
echo "Uncaught exception: " , $exception->getMessage(), "\n";
}
set_exception_handler('exception_handler');
throw new Exception('Uncaught Exception');
echo "Not Executed\n";
?>

P H P A N D P Y T H O N : Department of Information Technology - APSAC P a g e | 90
Create MySQL Database Using PHP
Creating a Database
To create and delete a database you should have admin privilege. Its very easy to create a new
MySQL database. PHP uses mysql_query function to create a MySQL database. This function
takes two parameters and returns TRUE on success or FALSE on failure.
Syntax
bool mysql_query( sql, connection );
Sr.No Parameter & Description
1 sql
Required - SQL query to create a database
2 connection
Optional - if not specified then last opend connection by mysql_connect will be
used.
Example
Try out following example to create a database −
<?php
$dbhost = 'localhost:3036';
$dbuser = 'root';
$dbpass = 'rootpassword';
$conn = mysql_connect($dbhost, $dbuser, $dbpass);
if(! $conn ) {
die('Could not connect: ' . mysql_error());
}
echo 'Connected successfully';

P H P A N D P Y T H O N : Department of Information Technology - APSAC P a g e | 91
$sql = 'CREATE Database test_db';
$retval = mysql_query( $sql, $conn );
if(! $retval ) {
die('Could not create database: ' . mysql_error());
}
echo "Database test_db created successfully\n";
mysql_close($conn);
?>
Selecting a Database
Once you establish a connection with a database server then it is required to select a particular
database where your all the tables are associated.
This is required because there may be multiple databases residing on a single server and you can
do work with a single database at a time.
PHP provides function mysql_select_db to select a database.It returns TRUE on success or
FALSE on failure.
Syntax
bool mysql_select_db( db_name, connection );
Sr.No Parameter & Description
1 db_name : Required - Database name to be selected
2 Connection :Optional - if not specified then last opend connection by
mysql_connect will be used.

P H P A N D P Y T H O N : Department of Information Technology - APSAC P a g e | 92
Example
Here is the example showing you how to select a database.
<?php
$dbhost = 'localhost:3036';
$dbuser = 'guest';
$dbpass = 'guest123';
$conn = mysql_connect($dbhost, $dbuser, $dbpass);
if(! $conn ) {
die('Could not connect: ' . mysql_error());
}
echo 'Connected successfully';
mysql_select_db( 'test_db' );
mysql_close($conn);
?>
Creating Database Tables
To create tables in the new database you need to do the same thing as creating the database. First
create the SQL query to create the tables then execute the query using mysql_query() function.
Example
Try out following example to create a table −
<?php
$dbhost = 'localhost:3036';
$dbuser = 'root';
$dbpass = 'rootpassword';
$conn = mysql_connect($dbhost, $dbuser, $dbpass);

P H P A N D P Y T H O N : Department of Information Technology - APSAC P a g e | 93
if(! $conn ) {
die('Could not connect: ' . mysql_error());
}
echo 'Connected successfully';
$sql = 'CREATE TABLE employee( '.
'emp_id INT NOT NULL AUTO_INCREMENT, '.
'emp_name VARCHAR(20) NOT NULL, '.
'emp_address VARCHAR(20) NOT NULL, '.
'emp_salary INT NOT NULL, '.
'join_date timestamp(14) NOT NULL, '.
'primary key ( emp_id ))';
mysql_select_db('test_db');
$retval = mysql_query( $sql, $conn );
if(! $retval ) {
die('Could not create table: ' . mysql_error());
}
echo "Table employee created successfully\n";
mysql_close($conn);
?>
In case you need to create many tables then its better to create a text file first and put all the SQL
commands in that text file and then load that file into $sql variable and excute those commands.

P H P A N D P Y T H O N : Department of Information Technology - APSAC P a g e | 94
Consider the following content in sql_query.txt file
CREATE TABLE employee(
emp_id INT NOT NULL AUTO_INCREMENT,
emp_name VARCHAR(20) NOT NULL,
emp_address VARCHAR(20) NOT NULL,
emp_salary INT NOT NULL,
join_date timestamp(14) NOT NULL,
primary key ( emp_id ));
<?php
$dbhost = 'localhost:3036';
$dbuser = 'root';
$dbpass = 'rootpassword';
$conn = mysql_connect($dbhost, $dbuser, $dbpass);
if(! $conn ) {
die('Could not connect: ' . mysql_error());
}
$query_file = 'sql_query.txt';
$fp = fopen($query_file, 'r');
$sql = fread($fp, filesize($query_file));
fclose($fp);
mysql_select_db('test_db');
$retval = mysql_query( $sql, $conn );
if(! $retval ) {
die('Could not create table: ' . mysql_error());
}
echo "Table employee created successfully\n";
mysql_close($conn);
?>

P H P A N D P Y T H O N : Department of Information Technology - APSAC P a g e | 95
PHP AND LDAP
LDAP is the Lightweight Directory Access Protocol, and is a protocol used to access "Directory
Servers". The Directory is a special kind of database that holds information in a tree structure.
The concept is similar to your hard disk directory structure, except that in this context, the root
directory is "The world" and the first level subdirectories are "countries". Lower levels of the
directory structure contain entries for companies, organisations or places, while yet lower still we
find directory entries for people, and perhaps equipment or documents.
To refer to a file in a subdirectory on your hard disk, you might use something like:
/usr/local/myapp/docs
The forwards slash marks each division in the reference, and the sequence is read from left to right.
The equivalent to the fully qualified file reference in LDAP is the "distinguished name", referred
to simply as "dn". An example dn might be:
cn=John Smith,ou=Accounts,o=My Company,c=US
The comma marks each division in the reference, and the sequence is read from right to left. You
would read this dn as:
country = US
organization = My Company
organizationalUnit = Accounts
commonName = John Smith
In the same way as there are no hard rules about how you organise the directory structure of a hard
disk, a directory server manager can set up any structure that is meaningful for the purpose.
However, there are some conventions that are used. The message is that you can not write code to
access a directory server unless you know something about its structure, any more than you can
use a database without some knowledge of what is available.

P H P A N D P Y T H O N : Department of Information Technology - APSAC P a g e | 96
PHP Security Function
What is a Security?
Security is a measure put in place that protects an application from accidental or deliberate
attacks.
The attacks can;
Corrupt data
Allow unauthorized users gain access to sensitive data
Lead to loss of important data
Posting of unauthorized transactions i.e. in an accounting system
Websites and web applications are hosted on public servers that are accessible from the internet.
Potential security threats
They are basically two groups of people that can attack your system
Hackers – with the intent to gain access to unauthorized data or disrupt the application
Users – they may innocently enter wrong parameters in forms which can have negative
effects on a website or web application.
The following are the kinds of attacks that we need to look out for.
SQL Injection – This type of attack appends harmful code to SQL statements.
This is done using either user input forms or URLs that use variables.
The appended code comments the condition in the WHERE clause of an SQL statement. The
appended code can also;
o insert a condition that will always be true

P H P A N D P Y T H O N : Department of Information Technology - APSAC P a g e | 97
o delete data from a table
o update data in a table
o This type of attack is usually used to gain unauthorized access to an application.
o Cross-site scripting – this type of attack inserts harmful code usually JavaScript. This is
done using user input forms such as contact us and comments forms. This is done to;
Retrieve sensitive information such as cookies data
Redirect the user to a different URL.
Other threats can include – PHP code injection, Shell Injection, Email Injection,
Script Source Code Disclosure etc.
PHP Application Security Best Practices
Let’s now look at some of the PHP Security best practices that we must consider when
developing our applications.
PHP strip_tags
The strip_tags functions removes HTML, JavaScript or PHP tags from a string.
This function is useful when we have to protect our application against attacks such as cross site
scripting.
Let’s consider an application that accepts comments from users.
<?php
$user_input = "Your site rocks";
echo "<h4>My Commenting System</h4>";
echo $user_input;
?>
Assuming you have saved comments.php in the phptuts folder, browse to the
URLhttp://localhost/phptuts/comments.php

P H P A N D P Y T H O N : Department of Information Technology - APSAC P a g e | 98
Let’s assume you receive the following as the user input <script>alert('Your site
sucks!');</script>
<?php
$user_input = "<script>alert('Your site sucks!');</script>";
echo "<h4>My Commenting System</h4>";
echo $user_input;
?>
Browse to the URL http://localhost/phptuts/comments.php
Let’s now secure our application from such attacks using strip_tags function.
<?php
$user_input = "<script>alert('Your site sucks!');</script>";
echo strip_tags($user_input);
?>
Browse to the URL http://localhost/phptuts/comments.php

P H P A N D P Y T H O N : Department of Information Technology - APSAC P a g e | 99
PHP filter_var function
The filter_var function is used to validate and sanitize data.
Validation checks if the data is of the right type. A numeric validation check on a string returns a
false result.
Sanitization is removing illegal characters from a string.
The code is for the commenting system.
It uses the filter_var function and FILTER_SANITIZE_STRIPPED constant to strip tags.
<?php
$user_input = "<script>alert('Your site sucks!');</script>";
echo filter_var($user_input, FILTER_SANITIZE_STRIPPED); ?>
Mysql_real_escape_string function This function is used to protect an application against SQL
injection.
Let’s suppose that we have the following SQL statement for validating the user id and password.
<?php
SELECT uid,pwd,role FROM users WHERE uid = 'admin' AND password = 'pass'; ?>
A malicious user can enter the following code in the user id text box. ' OR 1 = 1 -- And 1234 in
the password text box Let’s code the authentication module
<?php
$uid = "' OR 1 = 1 -- ";
$pwd = "1234";
$sql = "SELECT uid,pwd,role FROM users WHERE uid = '$uid' AND password = '$pwd';";
P H P A N D P Y T H O N : Department of Information Technology - APSAC P a g e | 100
echo $sql;
?>
The end result will be
<?php
SELECT uid,pwd,role FROM users WHERE uid = '' OR 1 = 1 -- ' AND password = '1234';
?>
HERE,
“SELECT * FROM users WHERE user_id = ''” tests for an empty user id
“' OR 1 = 1 “ is a condition that will always be true
“--" comments that part that tests for the password.
The above query will return all the users Let’s now use mysql_real_escape_string function to
secure our login module.
<?php
$uid = mysql_real_escape_string("' OR 1 = 1 -- ");
$pwd = mysql_real_escape_string("1234");
$sql = "SELECT uid,pwd,role FROM users WHERE uid = '$uid' AND password = '$pwd';";
echo $sql;
?>
The above code will output
<?php
SELECT uid,pwd,role FROM users WHERE uid = '\' OR 1 = 1 -- ' AND password = '1234';
?>
Note the second single quote has been escaped for us, it will be treated as part of the user id
and the password won’t be commented.
PHP Md5 and PHP sha1
Md5 is the acronym for Message Digest 5 and sha1 is the acronym for Secure Hash Algorithm 1.
They are both used to encrypt strings.
Once a string has been encrypted, it is tedious to decrypt it.

P H P A N D P Y T H O N : Department of Information Technology - APSAC P a g e | 101
Md5 and sha1 are very useful when storing passwords in the database.
The code below shows the implementation of md5 and sha1
<?php
echo "MD5 Hash: " . md5("password");
echo "SHA1 Hash: " . sha1("password");
?>
Assuming you have saved the file hashes.php in phptuts folder, browse to the URL
As you can see from the above hashes, if an attacker gained access to your database, they still
wouldn’t know the passwords for them to login.
Summary
Security refers to measures put in place to protect an application from accidental and
malicious attacks.
strip_tags function is used to remove tags such as <script></script> from input data
filter_var function validates and php sanitize input data
mysql_real_escape_string is used to sanitize SQL statement. It removes malicious
characters from the statements
both MD5 and SHA1 are used to encrypt password.
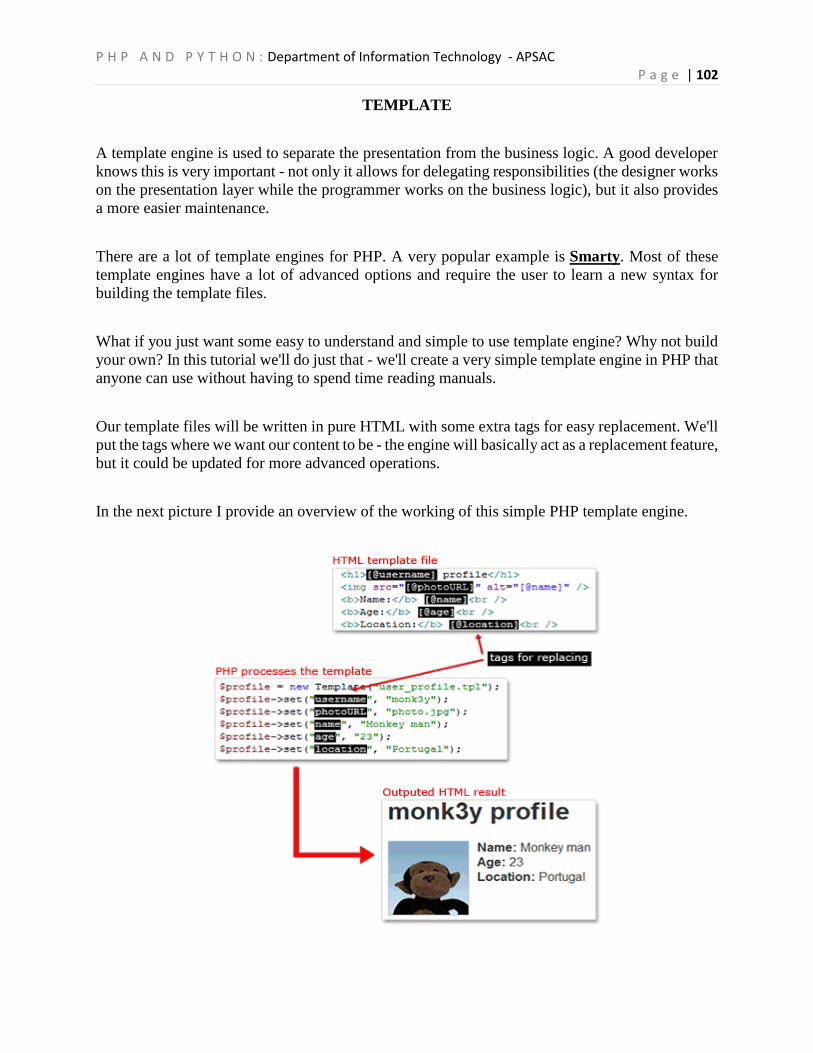
P H P A N D P Y T H O N : Department of Information Technology - APSAC P a g e | 102
TEMPLATE
A template engine is used to separate the presentation from the business logic. A good developer
knows this is very important - not only it allows for delegating responsibilities (the designer works
on the presentation layer while the programmer works on the business logic), but it also provides
a more easier maintenance.
There are a lot of template engines for PHP. A very popular example is Smarty. Most of these
template engines have a lot of advanced options and require the user to learn a new syntax for
building the template files.
What if you just want some easy to understand and simple to use template engine? Why not build
your own? In this tutorial we'll do just that - we'll create a very simple template engine in PHP that
anyone can use without having to spend time reading manuals.
Our template files will be written in pure HTML with some extra tags for easy replacement. We'll
put the tags where we want our content to be - the engine will basically act as a replacement feature,
but it could be updated for more advanced operations.
In the next picture I provide an overview of the working of this simple PHP template engine.

P H P A N D P Y T H O N : Department of Information Technology - APSAC P a g e | 103
A simple HTML template
First, let's start with our HTML template file. We must define the tags' format we're going to use.
Most templates use curly brackets surrounding the tags, e.g. {tag}, but I like to use a different
syntax: [@tag]. Feel free to define your own conventions.
Imagine a typical case of building a user's profile page. Let's assume we need to display the user's
photo, username, real name, age and location. An example HTML is provided below.
<h1>[@username] profile</h1>
<img src="[@photoURL]" class="photo" alt="[@name]" />
<b>Name:</b> [@name]<br />
<b>Age:</b> [@age]<br />
<b>Location:</b> [@location]<br />
Create your template file and save it. I like to use the tpl extension. In this case, let's call this
template file user_profile.tpl.
Now we just need to load it in our PHP script and replace those tags with real values.
Template engine class
For easier use and portability we'll need a class - it will be called Template. This class will only
need two member variables - one for storing the filename of the template and the other to store the
values that will be used for replacing the tags in the template.
Let's start with this. We'll define our class and its constructor. I provide the code for this bellow.
class Template {
protected $file;

P H P A N D P Y T H O N : Department of Information Technology - APSAC P a g e | 104
protected $values = array();
public function __construct($file) {
$this->file = $file;
}}
Putting the engine to use
Now we can finally test our first iteration of the template engine. We'll create a simple PHP file
(named user_profile.php) which loads the template with test data and outputs its result.
We'll start by including the file with the definition for our Template class (I called mine
template.class.php). We then make a new Template object and we define each value in the
template. In the end we want to write its output.
include("template.class.php");
$profile = new Template("user_profile.tpl");
$profile->set("username", "monk3y");
$profile->set("photoURL", "photo.jpg");
$profile->set("name", "Monkey man");
$profile->set("age", "23");
$profile->set("location", "Portugal");
echo $profile->output();
<tr>
<td>[@username]</td>

P H P A N D P Y T H O N : Department of Information Technology - APSAC P a g e | 105
<td>[@location]</td>
</tr>
Now we'll combine these two into one. Because each user/row will be represented by a different
template we'll make a function that will allow us to merge these different templates. This is needed
because this merged value will then be used to replace the users tag on the main template
(list_users.tpl).
static public function merge($templates, $separator = "n") {
$output = "";
foreach ($templates as $template) {
$content = (get_class($template) !== "Template")
? "Error, incorrect type - expected Template."
: $template->output();
$output .= $content . $separator;
}
return $output;
}

P H P A N D P Y T H O N : Department of Information Technology - APSAC P a g e | 106
Python Python is a high-level, interpreted, interactive and object-oriented scripting language. Python is
designed to be highly readable. It uses English keywords frequently where as other languages use
punctuation, and it has fewer syntactical constructions than other languages.
Python is Interpreted: Python is processed at runtime by the interpreter. You do not need
to compile your program before executing it. This is similar to PERL and PHP.
Python is Interactive: You can actually sit at a Python prompt and interact with the
interpreter directly to write your programs.
Python is Object-Oriented: Python supports Object-Oriented style or technique of
programming that encapsulates code within objects.
Python is a Beginner's Language: Python is a great language for the beginner-level
programmers and supports the development of a wide range of applications from simple
text processing to WWW browsers to games.
History of Python
Python was developed by Guido van Rossum in the late eighties and early nineties at the National
Research Institute for Mathematics and Computer Science in the Netherlands.
Python is derived from many other languages, including ABC, Modula-3, C, C++, Algol-68,
SmallTalk, and Unix shell and other scripting languages.
Python is copyrighted. Like Perl, Python source code is now available under the GNU General
Public License (GPL).
Python Features
Python's features include:
Easy-to-learn: Python has few keywords, simple structure, and a clearly defined syntax.
This allows the student to pick up the language quickly.
Easy-to-read: Python code is more clearly defined and visible to the eyes.
Easy-to-maintain: Python's source code is fairly easy-to-maintain.

P H P A N D P Y T H O N : Department of Information Technology - APSAC P a g e | 107
A broad standard library: Python's bulk of the library is very portable and cross-
platform compatible on UNIX, Windows, and Macintosh.
Interactive Mode :Python has support for an interactive mode which allows interactive
testing and debugging of snippets of code.
Portable: Python can run on a wide variety of hardware platforms and has the same
interface on all platforms.
Extendable: You can add low-level modules to the Python interpreter. These modules
enable programmers to add to or customize their tools to be more efficient.
Databases: Python provides interfaces to all major commercial databases.
GUI Programming: Python supports GUI applications that can be created and ported to
many system calls, libraries and windows systems, such as Windows MFC, Macintosh,
and the X Window system of Unix.
Scalable: Python provides a better structure and support for large programs than shell
scripting.
Installing Python
Python distribution is available for a wide variety of platforms. You need to download only the
binary code applicable for your platform and install Python.
If the binary code for your platform is not available, you need a C compiler to compile the source
code manually. Compiling the source code offers more flexibility in terms of choice of features
that you require in your installation.
Here is a quick overview of installing Python on various platforms −
Unix and Linux Installation
Here are the simple steps to install Python on Unix/Linux machine.
Open a Web browser and go to https://www.python.org/downloads/.
Follow the link to download zipped source code available for Unix/Linux.
Download and extract files.

P H P A N D P Y T H O N : Department of Information Technology - APSAC P a g e | 108
Editing the Modules/Setup file if you want to customize some options.
run ./configure script
make
make install
This installs Python at standard location /usr/local/bin and its libraries
at/usr/local/lib/pythonXX where XX is the version of Python.
Windows Installation
Here are the steps to install Python on Windows machine.
Open a Web browser and go to https://www.python.org/downloads/.
Follow the link for the Windows installer python-XYZ.msi file where XYZ is the version
you need to install.
To use this installer python-XYZ.msi, the Windows system must support Microsoft
Installer 2.0. Save the installer file to your local machine and then run it to find out if your
machine supports MSI.
Run the downloaded file. This brings up the Python install wizard, which is really easy to
use. Just accept the default settings, wait until the install is finished, and you are done.
Setting up PATH
Programs and other executable files can be in many directories, so operating systems provide a
search path that lists the directories that the OS searches for executables.
The path is stored in an environment variable, which is a named string maintained by the operating
system. This variable contains information available to the command shell and other programs.
The path variable is named as PATH in Unix or Path in Windows (Unix is casesensitive;
Windows is not).
In Mac OS, the installer handles the path details. To invoke the Python interpreter from any
particular directory, you must add the Python directory to your path.

P H P A N D P Y T H O N : Department of Information Technology - APSAC P a g e | 109
Integrated Development Environment
You can run Python from a Graphical User Interface (GUI) environment as well, if you have a
GUI application on your system that supports Python.
Unix − IDLE is the very first Unix IDE for Python.
Windows − PythonWin is the first Windows interface for Python and is an IDE with a
GUI.
Macintosh − The Macintosh version of Python along with the IDLE IDE is available from
the main website, downloadable as either MacBinary or BinHex'd files.
If you are not able to set up the environment properly, then you can take help from your system
admin. Make sure the Python environment is properly set up and working perfectly fine.
The Python language has many similarities to Perl, C, and Java. However, there are some definite
differences between the languages.
First Python Program
Let us execute programs in different modes of programming.
Interactive Mode Programming
Invoking the interpreter without passing a script file as a parameter brings up the following
prompt −
$ python
Python 2.4.3 (#1, Nov 11 2010, 13:34:43)
[GCC 4.1.2 20080704 (Red Hat 4.1.2-48)] on linux2
Type "help", "copyright", "credits" or "license" for more information.
>>>
Type the following text at the Python prompt and press the Enter:
>>> print "Hello, Python!"
If you are running new version of Python, then you would need to use print statement with
parenthesis as in print ("Hello, Python!");. However in Python version 2.4.3, this produces the
following result:
Hello, Python!

P H P A N D P Y T H O N : Department of Information Technology - APSAC P a g e | 110
Script Mode Programming
Invoking the interpreter with a script parameter begins execution of the script and continues until
the script is finished. When the script is finished, the interpreter is no longer active.
Let us write a simple Python program in a script. Python files have extension .py. Type the
following source code in a test.py file:
print "Hello, Python!"
We assume that you have Python interpreter set in PATH variable. Now, try to run this program
as follows −
$ python test.py
This produces the following result:
Hello, Python!
Let us try another way to execute a Python script. Here is the modified test.py file −
#!/usr/bin/python
print "Hello, Python!"
We assume that you have Python interpreter available in /usr/bin directory. Now, try to run this
program as follows −
$ chmod +x test.py # This is to make file executable
$./test.py
This produces the following result −
Hello, Python!
Python Identifiers
A Python identifier is a name used to identify a variable, function, class, module or other object.
An identifier starts with a letter A to Z or a to z or an underscore (_) followed by zero or more
letters, underscores and digits (0 to 9).

P H P A N D P Y T H O N : Department of Information Technology - APSAC P a g e | 111
Python does not allow punctuation characters such as @, $, and % within identifiers. Python is a
case sensitive programming language. Thus, Manpower and manpower are two different
identifiers in Python.
Here are naming conventions for Python identifiers −
Class names start with an uppercase letter. All other identifiers start with a lowercase letter.
Starting an identifier with a single leading underscore indicates that the identifier is private.
Starting an identifier with two leading underscores indicates a strongly private identifier.
If the identifier also ends with two trailing underscores, the identifier is a language-defined
special name.
Reserved Words
The following list shows the Python keywords. These are reserved words and you cannot use
them as constant or variable or any other identifier names. All the Python keywords contain
lowercase letters only.
and exec not
assert finally or
break for pass
class from print
continue global raise
def if return
del import try

P H P A N D P Y T H O N : Department of Information Technology - APSAC P a g e | 112
elif in while
else is with
except lambda yield
Lines and Indentation
Python provides no braces to indicate blocks of code for class and function definitions or flow
control. Blocks of code are denoted by line indentation, which is rigidly enforced.
The number of spaces in the indentation is variable, but all statements within the block must be
indented the same amount. For example −
if True:
print "True"
else:
print "False"
However, the following block generates an error −
if True:
print "Answer"
print "True"
else:
print "Answer"
print "False"
Thus, in Python all the continuous lines indented with same number of spaces would form a block.
The following example has various statement blocks −
Note: Do not try to understand the logic at this point of time. Just make sure you understood
various blocks even if they are without braces.

P H P A N D P Y T H O N : Department of Information Technology - APSAC P a g e | 113
#!/usr/bin/python
import sys
try:
# open file stream
file = open(file_name, "w")
except IOError:
print "There was an error writing to", file_name
sys.exit()
print "Enter '", file_finish,
print "' When finished"
while file_text != file_finish:
file_text = raw_input("Enter text: ")
if file_text == file_finish:
# close the file
file.close
break
file.write(file_text)
file.write("\n")
file.close()
file_name = raw_input("Enter filename: ")
if len(file_name) == 0:
print "Next time please enter something"
sys.exit()
try:
file = open(file_name, "r")
except IOError:
print "There was an error reading file"
sys.exit()

P H P A N D P Y T H O N : Department of Information Technology - APSAC P a g e | 114
file_text = file.read()
file.close()
print file_text
Multi-Line Statements
Statements in Python typically end with a new line. Python does, however, allow the use of the
line continuation character (\) to denote that the line should continue. For example −
total = item_one + \
item_two + \
item_three
Statements contained within the [], {}, or () brackets do not need to use the line continuation
character. For example −
days = ['Monday', 'Tuesday', 'Wednesday',
'Thursday', 'Friday']
Quotation in Python
Python accepts single ('), double (") and triple (''' or """) quotes to denote string literals, as long
as the same type of quote starts and ends the string.
The triple quotes are used to span the string across multiple lines. For example, all the following
are legal −
word = 'word'
sentence = "This is a sentence."
paragraph = """This is a paragraph. It is
made up of multiple lines and sentences."""
Comments in Python
A hash sign (#) that is not inside a string literal begins a comment. All characters after the # and
up to the end of the physical line are part of the comment and the Python interpreter ignores them.
#!/usr/bin/python

P H P A N D P Y T H O N : Department of Information Technology - APSAC P a g e | 115
# First comment
print "Hello, Python!" # second comment
This produces the following result −
Hello, Python!
You can type a comment on the same line after a statement or expression −
name = "Madisetti" # This is again comment
You can comment multiple lines as follows −
# This is a comment.
# This is a comment, too.
# This is a comment, too.
# I said that already.
Using Blank Lines
A line containing only whitespace, possibly with a comment, is known as a blank line and Python
totally ignores it.
In an interactive interpreter session, you must enter an empty physical line to terminate a multiline
statement.
Waiting for the User
The following line of the program displays the prompt, the statement saying “Press the enter key
to exit”, and waits for the user to take action −
#!/usr/bin/python
raw_input("\n\nPress the enter key to exit.")
Here, "\n\n" is used to create two new lines before displaying the actual line. Once the user presses
the key, the program ends. This is a nice trick to keep a console window open until the user is
done with an application.
P H P A N D P Y T H O N : Department of Information Technology - APSAC P a g e | 116
Multiple Statements on a Single Line
The semicolon ( ; ) allows multiple statements on the single line given that neither statement starts
a new code block. Here is a sample snip using the semicolon −
import sys; x = 'foo'; sys.stdout.write(x + '\n')
Multiple Statement Groups as Suites
A group of individual statements, which make a single code block are called suites in Python.
Compound or complex statements, such as if, while, def, and class require a header line and a
suite.
Header lines begin the statement (with the keyword) and terminate with a colon ( : ) and are
followed by one or more lines which make up the suite. For example −
if expression :
suite
elif expression :
suite
else :
suite
Command Line Arguments
Many programs can be run to provide you with some basic information about how they should
be run. Python enables you to do this with -h −
$ python -h
usage: python [option] ... [-c cmd | -m mod | file | -] [arg] ...
Options and arguments (and corresponding environment variables):
-c cmd : program passed in as string (terminates option list)
-d : debug output from parser (also PYTHONDEBUG=x)
-E : ignore environment variables (such as PYTHONPATH)
-h : print this help message and exit
[ etc. ]

P H P A N D P Y T H O N : Department of Information Technology - APSAC P a g e | 117
Standard Data Types
The data stored in memory can be of many types. For example, a person's age is stored as a
numeric value and his or her address is stored as alphanumeric characters. Python has various
standard data types that are used to define the operations possible on them and the storage method
for each of them.
Python has five standard data types −
Numbers
String
List
Tuple
Dictionary
Python Numbers
Number data types store numeric values. Number objects are created when you assign a value to
them. For example −
var1 = 1
var2 = 10
You can also delete the reference to a number object by using the del statement. The syntax of
the del statement is −
del var1[,var2[,var3[....,varN]]]]
You can delete a single object or multiple objects by using the del statement. For example −
del var
del var_a, var_b
Python supports four different numerical types −
int (signed integers)
long (long integers, they can also be represented in octal and hexadecimal)

P H P A N D P Y T H O N : Department of Information Technology - APSAC P a g e | 118
float (floating point real values)
complex (complex numbers)
Examples
Here are some examples of numbers −
int long float complex
10 51924361L 0.0 3.14j
100 -0x19323L 15.20 45.j
-786 0122L -21.9 9.322e-36j
080 0xDEFABCECBDAECBFBAEl 32.3+e18 .876j
-0490 535633629843L -90. -.6545+0J
-0x260 -052318172735L -32.54e100 3e+26J
0x69 -4721885298529L 70.2-E12 4.53e-7j
Python allows you to use a lowercase l with long, but it is recommended that you use only
an uppercase L to avoid confusion with the number 1. Python displays long integers with
an uppercase L.
A complex number consists of an ordered pair of real floating-point numbers denoted by
x + yj, where x and y are the real numbers and j is the imaginary unit.

P H P A N D P Y T H O N : Department of Information Technology - APSAC P a g e | 119
Python Strings
Strings in Python are identified as a contiguous set of characters represented in the quotation
marks. Python allows for either pairs of single or double quotes. Subsets of strings can be taken
using the slice operator ([ ] and [:] ) with indexes starting at 0 in the beginning of the string and
working their way from -1 at the end.
The plus (+) sign is the string concatenation operator and the asterisk (*) is the repetition operator.
For example −
#!/usr/bin/python
str = 'Hello World!'
print str # Prints complete string
print str[0] # Prints first character of the string
print str[2:5] # Prints characters starting from 3rd to 5th
print str[2:] # Prints string starting from 3rd character
print str * 2 # Prints string two times
print str + "TEST" # Prints concatenated string
This will produce the following result −
Hello World!
H
llo
llo World!
Hello World!Hello World!
Hello World!TEST
Python Lists
Lists are the most versatile of Python's compound data types. A list contains items separated by
commas and enclosed within square brackets ([]). To some extent, lists are similar to arrays in C.
One difference between them is that all the items belonging to a list can be of different data type.
The values stored in a list can be accessed using the slice operator ([ ] and [:]) with indexes starting
at 0 in the beginning of the list and working their way to end -1. The plus (+) sign is the list
concatenation operator, and the asterisk (*) is the repetition operator. For example −

P H P A N D P Y T H O N : Department of Information Technology - APSAC P a g e | 120
#!/usr/bin/python
list = [ 'abcd', 786 , 2.23, 'john', 70.2 ]
tinylist = [123, 'john']
print list # Prints complete list
print list[0] # Prints first element of the list
print list[1:3] # Prints elements starting from 2nd till 3rd
print list[2:] # Prints elements starting from 3rd element
print tinylist * 2 # Prints list two times
print list + tinylist # Prints concatenated lists
This produce the following result −
['abcd', 786, 2.23, 'john', 70.200000000000003]
abcd
[786, 2.23]
[2.23, 'john', 70.200000000000003]
[123, 'john', 123, 'john']
['abcd', 786, 2.23, 'john', 70.200000000000003, 123, 'john']
Python Tuples
A tuple is another sequence data type that is similar to the list. A tuple consists of a number of
values separated by commas. Unlike lists, however, tuples are enclosed within parentheses.
The main differences between lists and tuples are: Lists are enclosed in brackets ( [ ] ) and their
elements and size can be changed, while tuples are enclosed in parentheses ( ( ) ) and cannot be
updated. Tuples can be thought of as read-only lists. For example −
#!/usr/bin/python
tuple = ( 'abcd', 786 , 2.23, 'john', 70.2 )
tinytuple = (123, 'john')
print tuple # Prints complete list
print tuple[0] # Prints first element of the list

P H P A N D P Y T H O N : Department of Information Technology - APSAC P a g e | 121
print tuple[1:3] # Prints elements starting from 2nd till 3rd
print tuple[2:] # Prints elements starting from 3rd element
print tinytuple * 2 # Prints list two times
print tuple + tinytuple # Prints concatenated lists
This produce the following result −
('abcd', 786, 2.23, 'john', 70.200000000000003)
abcd
(786, 2.23)
(2.23, 'john', 70.200000000000003)
(123, 'john', 123, 'john')
('abcd', 786, 2.23, 'john', 70.200000000000003, 123, 'john')
The following code is invalid with tuple, because we attempted to update a tuple, which is not
allowed. Similar case is possible with lists −
#!/usr/bin/python
tuple = ( 'abcd', 786 , 2.23, 'john', 70.2 )
list = [ 'abcd', 786 , 2.23, 'john', 70.2 ]
tuple[2] = 1000 # Invalid syntax with tuple
list[2] = 1000 # Valid syntax with list
Python Dictionary
Python's dictionaries are kind of hash table type. They work like associative arrays or hashes
found in Perl and consist of key-value pairs. A dictionary key can be almost any Python type, but
are usually numbers or strings. Values, on the other hand, can be any arbitrary Python object.
Dictionaries are enclosed by curly braces ({ }) and values can be assigned and accessed using
square braces ([]). For example −
#!/usr/bin/python
dict = {}
dict['one'] = "This is one"
dict[2] = "This is two"

P H P A N D P Y T H O N : Department of Information Technology - APSAC P a g e | 122
tinydict = {'name': 'john','code':6734, 'dept': 'sales'}
print dict['one'] # Prints value for 'one' key
print dict[2] # Prints value for 2 key
print tinydict # Prints complete dictionary
print tinydict.keys() # Prints all the keys
print tinydict.values() # Prints all the values
This produce the following result −
This is one
This is two
{'dept': 'sales', 'code': 6734, 'name': 'john'}
['dept', 'code', 'name']
['sales', 6734, 'john']
Dictionaries have no concept of order among elements. It is incorrect to say that the elements are
"out of order"; they are simply unordered.
Data Type Conversion
Sometimes, you may need to perform conversions between the built-in types. To convert between
types, you simply use the type name as a function.
There are several built-in functions to perform conversion from one data type to another. These
functions return a new object representing the converted value.
Function Description
int(x [,base]) Converts x to an integer. base specifies the base if x is a string.
long(x [,base] ) Converts x to a long integer. base specifies the base if x is a string.
float(x) Converts x to a floating-point number.
complex(real
[,imag])
Creates a complex number.

P H P A N D P Y T H O N : Department of Information Technology - APSAC P a g e | 123
str(x) Converts object x to a string representation.
repr(x) Converts object x to an expression string.
eval(str) Evaluates a string and returns an object.
tuple(s) Converts s to a tuple.
list(s) Converts s to a list.
set(s) Converts s to a set.
dict(d) Creates a dictionary. d must be a sequence of (key,value) tuples.
frozenset(s) Converts s to a frozen set.
chr(x) Converts an integer to a character.
unichr(x) Converts an integer to a Unicode character.
ord(x) Converts a single character to its integer value.
hex(x) Converts an integer to a hexadecimal string.
oct(x) Converts an integer to an octal string.

P H P A N D P Y T H O N : Department of Information Technology - APSAC P a g e | 124
Conditional Loops
A loop statement allows us to execute a statement or group of statements multiple times. The
following diagram illustrates a loop statement −
Python programming language provides following types of loops to handle looping requirements.
Loop Type Description
while loop
Repeats a statement or group of statements while a given
condition is TRUE. It tests the condition before executing the
loop body.
for loop
Executes a sequence of statements multiple times and
abbreviates the code that manages the loop variable.
nested loops
You can use one or more loop inside any another while, for or
do..while loop.
while loop
A while loop statement in Python programming language repeatedly executes a target statement
as long as a given condition is true.
Syntax
The syntax of a while loop in Python programming language is −
while expression:
statement(s)

P H P A N D P Y T H O N : Department of Information Technology - APSAC P a g e | 125
Here, statement(s) may be a single statement or a block of statements. The condition may be
any expression, and true is any non-zero value. The loop iterates while the condition is true.
When the condition becomes false, program control passes to the line immediately following the
loop.
In Python, all the statements indented by the same number of character spaces after a
programming construct are considered to be part of a single block of code. Python uses
indentation as its method of grouping statements.
Flow Diagram
Here, key point of the while loop is that the loop might not ever run. When the condition is tested
and the result is false, the loop body will be skipped and the first statement after the while loop
will be executed.
Example
#!/usr/bin/python
count = 0
while (count < 9):
print 'The count is:', count
count = count + 1
print "Good bye!"

P H P A N D P Y T H O N : Department of Information Technology - APSAC P a g e | 126
When the above code is executed, it produces the following result −
The count is: 0
The count is: 1
The count is: 2
The count is: 3
The count is: 4
The count is: 5
The count is: 6
The count is: 7
The count is: 8
Good bye!
The block here, consisting of the print and increment statements, is executed repeatedly until
count is no longer less than 9. With each iteration, the current value of the index count is displayed
and then increased by 1.
FOR LOOP
It has the ability to iterate over the items of any sequence, such as a list or a string.
Syntax
for iterating_var in sequence:
statements(s)
If a sequence contains an expression list, it is evaluated first. Then, the first item in the sequence
is assigned to the iterating variable iterating_var. Next, the statements block is executed. Each
item in the list is assigned to iterating_var, and the statement(s) block is executed until the entire
sequence is exhausted.Flow Diagram

P H P A N D P Y T H O N : Department of Information Technology - APSAC P a g e | 127
Example
#!/usr/bin/python
for letter in 'Python': # First Example
print 'Current Letter :', letter
fruits = ['banana', 'apple', 'mango']
for fruit in fruits: # Second Example
print 'Current fruit :', fruit
print "Good bye!"
When the above code is executed, it produces the following result −
Current Letter : P
Current Letter : y
Current Letter : t
Current Letter : h
Current Letter : o
Current Letter : n
Current fruit : banana
Current fruit : apple
Current fruit : mango
Good bye!
NESTED LOOPS
Python programming language allows to use one loop inside another loop. Following section
shows few examples to illustrate the concept.
Syntax
for iterating_var in sequence:
for iterating_var in sequence:
statements(s)
statements(s)
The syntax for a nested while loop statement in Python programming language is as follows −

P H P A N D P Y T H O N : Department of Information Technology - APSAC P a g e | 128
while expression:
while expression:
statement(s)
statement(s)
A final note on loop nesting is that you can put any type of loop inside of any other type of loop.
For example a for loop can be inside a while loop or vice versa.
Files I/O
Printing to the Screen
The simplest way to produce output is using the print statement where you can pass zero or more
expressions separated by commas. This function converts the expressions you pass into a string
and writes the result to standard output as follows −
#!/usr/bin/python
print "Python is really a great language,", "isn't it?"
This produces the following result on your standard screen −
Python is really a great language, isn't it?
Reading Keyboard Input
Python provides two built-in functions to read a line of text from standard input, which by default
comes from the keyboard. These functions are −
raw_input
input
The raw_input Function
The raw_input([prompt]) function reads one line from standard input and returns it as a string
(removing the trailing newline).
#!/usr/bin/python
str = raw_input("Enter your input: ");
print "Received input is : ", str

P H P A N D P Y T H O N : Department of Information Technology - APSAC P a g e | 129
This prompts you to enter any string and it would display same string on the screen. When I typed
"Hello Python!", its output is like this −
Enter your input: Hello Python
Received input is : Hello Python
The input Function
The input([prompt]) function is equivalent to raw_input, except that it assumes the input is a valid
Python expression and returns the evaluated result to you.
#!/usr/bin/python
str = input("Enter your input: ");
print "Received input is : ", str
This would produce the following result against the entered input −
Enter your input: [x*5 for x in range(2,10,2)]
Recieved input is : [10, 20, 30, 40]
Opening and Closing Files
Until now, you have been reading and writing to the standard input and output. Now, we will see
how to use actual data files.
Python provides basic functions and methods necessary to manipulate files by default. You can
do most of the file manipulation using a file object.
The open Function
Before you can read or write a file, you have to open it using Python's built-in open() function.
This function creates a file object, which would be utilized to call other support methods
associated with it.
Syntax
file object = open(file_name [, access_mode][, buffering])
Here are parameter details:

P H P A N D P Y T H O N : Department of Information Technology - APSAC P a g e | 130
file_name: The file_name argument is a string value that contains the name of the file that
you want to access.
access_mode: The access_mode determines the mode in which the file has to be opened,
i.e., read, write, append, etc. A complete list of possible values is given below in the table.
This is optional parameter and the default file access mode is read (r).
buffering: If the buffering value is set to 0, no buffering takes place. If the buffering value
is 1, line buffering is performed while accessing a file. If you specify the buffering value
as an integer greater than 1, then buffering action is performed with the indicated buffer
size. If negative, the buffer size is the system default(default behavior).
Here is a list of the different modes of opening a file −
Modes Description
r Opens a file for reading only. The file pointer is placed at the beginning of the
file. This is the default mode.
rb Opens a file for reading only in binary format. The file pointer is placed at the
beginning of the file. This is the default mode.
r+ Opens a file for both reading and writing. The file pointer placed at the
beginning of the file.
rb+ Opens a file for both reading and writing in binary format. The file pointer
placed at the beginning of the file.
w Opens a file for writing only. Overwrites the file if the file exists. If the file does
not exist, creates a new file for writing.
wb Opens a file for writing only in binary format. Overwrites the file if the file
exists. If the file does not exist, creates a new file for writing.

P H P A N D P Y T H O N : Department of Information Technology - APSAC P a g e | 131
w+ Opens a file for both writing and reading. Overwrites the existing file if the file
exists. If the file does not exist, creates a new file for reading and writing.
wb+ Opens a file for both writing and reading in binary format. Overwrites the
existing file if the file exists. If the file does not exist, creates a new file for
reading and writing.
a Opens a file for appending. The file pointer is at the end of the file if the file
exists. That is, the file is in the append mode. If the file does not exist, it creates
a new file for writing.
ab Opens a file for appending in binary format. The file pointer is at the end of the
file if the file exists. That is, the file is in the append mode. If the file does not
exist, it creates a new file for writing.
a+ Opens a file for both appending and reading. The file pointer is at the end of the
file if the file exists. The file opens in the append mode. If the file does not exist,
it creates a new file for reading and writing.
ab+ Opens a file for both appending and reading in binary format. The file pointer is
at the end of the file if the file exists. The file opens in the append mode. If the
file does not exist, it creates a new file for reading and writing.
The file Object Attributes
Once a file is opened and you have one file object, you can get various information related to that
file.
Here is a list of all attributes related to file object:
Attribute Description
file.closed Returns true if file is closed, false otherwise.
file.mode Returns access mode with which file was opened.

P H P A N D P Y T H O N : Department of Information Technology - APSAC P a g e | 132
file.name Returns name of the file.
file.softspace Returns false if space explicitly required with print, true otherwise.
Example
#!/usr/bin/python
# Open a file
fo = open("foo.txt", "wb")
print "Name of the file: ", fo.name
print "Closed or not : ", fo.closed
print "Opening mode : ", fo.mode
print "Softspace flag : ", fo.softspace
This produces the following result −
Name of the file: foo.txt
Closed or not : False
Opening mode : wb
Softspace flag : 0
The close() Method
The close() method of a file object flushes any unwritten information and closes the file object,
after which no more writing can be done.
Python automatically closes a file when the reference object of a file is reassigned to another file.
It is a good practice to use the close() method to close a file.
Syntax
fileObject.close();
Example
#!/usr/bin/python
# Open a file

P H P A N D P Y T H O N : Department of Information Technology - APSAC P a g e | 133
fo = open("foo.txt", "wb")
print "Name of the file: ", fo.name
# Close opend file
fo.close()
This produces the following result −
Name of the file: foo.txt
Reading and Writing Files
The file object provides a set of access methods to make our lives easier. We would see how to
use read() and write() methods to read and write files.
The write() Method
The write() method writes any string to an open file. It is important to note that Python strings
can have binary data and not just text.
The write() method does not add a newline character ('\n') to the end of the string −
Syntax
fileObject.write(string);
Here, passed parameter is the content to be written into the opened file.
Example
#!/usr/bin/python
# Open a file
fo = open("foo.txt", "wb")
fo.write( "Python is a great language.\nYeah its great!!\n");
# Close opend file
fo.close()
P H P A N D P Y T H O N : Department of Information Technology - APSAC P a g e | 134
The above method would create foo.txt file and would write given content in that file and finally
it would close that file. If you would open this file, it would have following content.
Python is a great language.
Yeah its great!!
The read() Method
The read() method reads a string from an open file. It is important to note that Python strings can
have binary data. apart from text data.
Syntax
fileObject.read([count]);
Here, passed parameter is the number of bytes to be read from the opened file. This method starts
reading from the beginning of the file and if count is missing, then it tries to read as much as
possible, maybe until the end of file.
Example
Let's take a file foo.txt, which we created above.
#!/usr/bin/python
# Open a file
fo = open("foo.txt", "r+")
str = fo.read(10);
print "Read String is : ", str
# Close opend file
fo.close()
This produces the following result −
Read String is : Python is

P H P A N D P Y T H O N : Department of Information Technology - APSAC P a g e | 135
File Positions
The tell() method tells you the current position within the file; in other words, the next read or
write will occur at that many bytes from the beginning of the file.
The seek(offset[, from]) method changes the current file position. The offset argument indicates
the number of bytes to be moved. The from argument specifies the reference position from where
the bytes are to be moved.
If from is set to 0, it means use the beginning of the file as the reference position and 1 means use
the current position as the reference position and if it is set to 2 then the end of the file would be
taken as the reference position.
Example
Let us take a file foo.txt, which we created above.
#!/usr/bin/python
# Open a file
fo = open("foo.txt", "r+")
str = fo.read(10);
print "Read String is : ", str
# Check current position
position = fo.tell();
print "Current file position : ", position
# Reposition pointer at the beginning once again
position = fo.seek(0, 0);
str = fo.read(10);
print "Again read String is : ", str
# Close opend file
fo.close()
This produces the following result −
Read String is : Python is
Current file position : 10
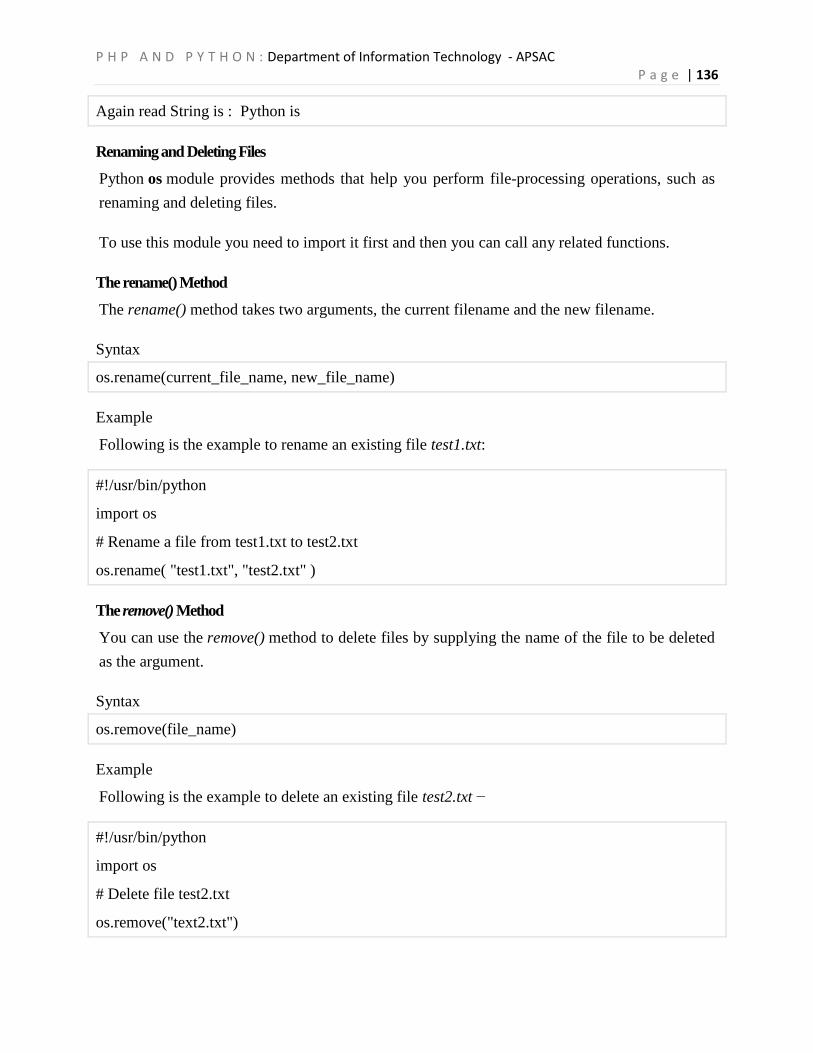
P H P A N D P Y T H O N : Department of Information Technology - APSAC P a g e | 136
Again read String is : Python is
Renaming and Deleting Files
Python os module provides methods that help you perform file-processing operations, such as
renaming and deleting files.
To use this module you need to import it first and then you can call any related functions.
The rename() Method
The rename() method takes two arguments, the current filename and the new filename.
Syntax
os.rename(current_file_name, new_file_name)
Example
Following is the example to rename an existing file test1.txt:
#!/usr/bin/python
import os
# Rename a file from test1.txt to test2.txt
os.rename( "test1.txt", "test2.txt" )
The remove() Method
You can use the remove() method to delete files by supplying the name of the file to be deleted
as the argument.
Syntax
os.remove(file_name)
Example
Following is the example to delete an existing file test2.txt −
#!/usr/bin/python
import os
# Delete file test2.txt
os.remove("text2.txt")

P H P A N D P Y T H O N : Department of Information Technology - APSAC P a g e | 137
Directories in Python
All files are contained within various directories, and Python has no problem handling these too.
The os module has several methods that help you create, remove, and change directories.
The mkdir() Method
You can use the mkdir() method of the os module to create directories in the current directory.
You need to supply an argument to this method which contains the name of the directory to be
created.
Syntax
os.mkdir("newdir")
Example
Following is the example to create a directory test in the current directory −
#!/usr/bin/python
import os
# Create a directory "test"
os.mkdir("test")
The chdir() Method
You can use the chdir() method to change the current directory. The chdir() method takes an
argument, which is the name of the directory that you want to make the current directory.
Syntax
os.chdir("newdir")
Example
Following is the example to go into "/home/newdir" directory −
#!/usr/bin/python
import os
# Changing a directory to "/home/newdir"
os.chdir("/home/newdir")

P H P A N D P Y T H O N : Department of Information Technology - APSAC P a g e | 138
Errors - Exceptions Handling
Python provides two very important features to handle any unexpected error in your Python
programs and to add debugging capabilities in them −
Exception Handling: This would be covered in this tutorial. Here is a list standard
Exceptions available in Python: Standard Exceptions.
Assertions: This would be covered in Assertions in Python tutorial.
List of Standard Exceptions −
EXCEPTION
NAME
DESCRIPTION
Exception Base class for all exceptions
StopIteration Raised when the next() method of an iterator does not point to any
object.
SystemExit Raised by the sys.exit() function.
StandardError Base class for all built-in exceptions except StopIteration and
SystemExit.
ArithmeticError Base class for all errors that occur for numeric calculation.
OverflowError Raised when a calculation exceeds maximum limit for a numeric
type.
FloatingPointError Raised when a floating point calculation fails.
ZeroDivisonError Raised when division or modulo by zero takes place for all
numeric types.

P H P A N D P Y T H O N : Department of Information Technology - APSAC P a g e | 139
What is Exception?
An exception is an event, which occurs during the execution of a program that disrupts the normal
flow of the program's instructions. In general, when a Python script encounters a situation that it
cannot cope with, it raises an exception. An exception is a Python object that represents an error.
When a Python script raises an exception, it must either handle the exception immediately
otherwise it terminates and quits.
Handling an exception
If you have some suspicious code that may raise an exception, you can defend your program by
placing the suspicious code in a try: block. After the try: block, include an except: statement,
followed by a block of code which handles the problem as elegantly as possible.
Syntax
Here is simple syntax of try....except...else blocks −
try:
You do your operations here;
......................
except ExceptionI:
If there is ExceptionI, then execute this block.
except ExceptionII:
If there is ExceptionII, then execute this block.
......................
else:
If there is no exception then execute this block.
Here are few important points about the above-mentioned syntax −
A single try statement can have multiple except statements. This is useful when the try
block contains statements that may throw different types of exceptions.
You can also provide a generic except clause, which handles any exception.
After the except clause(s), you can include an else-clause. The code in the else-block
executes if the code in the try: block does not raise an exception.

P H P A N D P Y T H O N : Department of Information Technology - APSAC P a g e | 140
The else-block is a good place for code that does not need the try: block's protection.
Example
This example opens a file, writes content in the, file and comes out gracefully because there is no
problem at all −
#!/usr/bin/python
try:
fh = open("testfile", "w")
fh.write("This is my test file for exception handling!!")
except IOError:
print "Error: can\'t find file or read data"
else:
print "Written content in the file successfully"
fh.close()
This produces the following result −
Written content in the file successfully
The except Clause with No Exceptions
You can also use the except statement with no exceptions defined as follows −
try:
You do your operations here;
......................
except:
If there is any exception, then execute this block.
......................
else:
If there is no exception then execute this block.
This kind of a try-except statement catches all the exceptions that occur. Using this kind of try-
except statement is not considered a good programming practice though, because it catches all

P H P A N D P Y T H O N : Department of Information Technology - APSAC P a g e | 141
exceptions but does not make the programmer identify the root cause of the problem that may
occur.
The except Clause with Multiple Exceptions
You can also use the same except statement to handle multiple exceptions as follows −
try:
You do your operations here;
......................
except(Exception1[, Exception2[,...ExceptionN]]]):
If there is any exception from the given exception list,
then execute this block.
......................
else:
If there is no exception then execute this block.
The try-finally Clause
You can use a finally: block along with a try: block. The finally block is a place to put any code
that must execute, whether the try-block raised an exception or not. The syntax of the try-finally
statement is this −
try:
You do your operations here;
......................
Due to any exception, this may be skipped.
finally:
This would always be executed.
......................
You cannot use else clause as well along with a finally clause.
Example
#!/usr/bin/python

P H P A N D P Y T H O N : Department of Information Technology - APSAC P a g e | 142
try:
fh = open("testfile", "w")
fh.write("This is my test file for exception handling!!")
finally:
print "Error: can\'t find file or read data"
If you do not have permission to open the file in writing mode, then this will produce the following
result:
Error: can't find file or read data
Same example can be written more cleanly as follows −
#!/usr/bin/python
try:
fh = open("testfile", "w")
try:
fh.write("This is my test file for exception handling!!")
finally:
print "Going to close the file"
fh.close()
except IOError:
print "Error: can\'t find file or read data"
When an exception is thrown in the try block, the execution immediately passes to
the finally block.
Raising an Exceptions
You can raise exceptions in several ways by using the raise statement. The general syntax for
the raise statement is as follows.
Syntax
raise [Exception [, args [, traceback]]]

P H P A N D P Y T H O N : Department of Information Technology - APSAC P a g e | 143
Here, Exception is the type of exception (for example, NameError) and argument is a value for
the exception argument. The argument is optional; if not supplied, the exception argument is
None.
The final argument, traceback, is also optional (and rarely used in practice), and if present, is the
traceback object used for the exception.
Example
An exception can be a string, a class or an object. Most of the exceptions that the Python core
raises are classes, with an argument that is an instance of the class. Defining new exceptions is
quite easy and can be done as follows −
def functionName( level ):
if level < 1:
raise "Invalid level!", level
# The code below to this would not be executed
# if we raise the exception
Note: In order to catch an exception, an "except" clause must refer to the same exception thrown
either class object or simple string. For example, to capture above exception, we must write the
except clause as follows −
try:
Business Logic here...
except "Invalid level!":
Exception handling here...
else:
Rest of the code here...
User-Defined Exceptions
Python also allows you to create your own exceptions by deriving classes from the standard built-
in exceptions.
Here is an example related to RuntimeError. Here, a class is created that is subclassed
from RuntimeError. This is useful when you need to display more specific information when an
exception is caught.

P H P A N D P Y T H O N : Department of Information Technology - APSAC P a g e | 144
In the try block, the user-defined exception is raised and caught in the except block. The variable
e is used to create an instance of the class Networkerror.
class Networkerror(RuntimeError):
def __init__(self, arg):
self.args = arg
So once you defined above class, you can raise the exception as follows −
try:
raise Networkerror("Bad hostname")
except Networkerror,e:
print e.args
Functions
A function is a block of organized, reusable code that is used to perform a single, related action.
Functions provide better modularity for your application and a high degree of code reusing.
As you already know, Python gives you many built-in functions like print(), etc. but you can also
create your own functions. These functions are called user-defined functions.
Defining a Function
You can define functions to provide the required functionality. Here are simple rules to define a
function in Python.
Function blocks begin with the keyword def followed by the function name and
parentheses ( ( ) ).
Any input parameters or arguments should be placed within these parentheses. You can
also define parameters inside these parentheses.
The first statement of a function can be an optional statement - the documentation string
of the function or docstring.
The code block within every function starts with a colon (:) and is indented.
The statement return [expression] exits a function, optionally passing back an expression
to the caller. A return statement with no arguments is the same as return None.

P H P A N D P Y T H O N : Department of Information Technology - APSAC P a g e | 145
Syntax
def functionname( parameters ):
"function_docstring"
function_suite
return [expression]
By default, parameters have a positional behavior and you need to inform them in the same order
that they were defined.
Example
The following function takes a string as input parameter and prints it on standard screen.
def printme( str ):
"This prints a passed string into this function"
print str
return
Calling a Function
Defining a function only gives it a name, specifies the parameters that are to be included in the
function and structures the blocks of code.
Once the basic structure of a function is finalized, you can execute it by calling it from another
function or directly from the Python prompt. Following is the example to call printme() function
−
#!/usr/bin/python
# Function definition is here
def printme( str ):
"This prints a passed string into this function"
print str
return;
# Now you can call printme function

P H P A N D P Y T H O N : Department of Information Technology - APSAC P a g e | 146
printme("I'm first call to user defined function!")
printme("Again second call to the same function")
When the above code is executed, it produces the following result −
I'm first call to user defined function!
Again second call to the same function
Pass by reference vs value
All parameters (arguments) in the Python language are passed by reference. It means if you
change what a parameter refers to within a function, the change also reflects back in the calling
function. For example −
#!/usr/bin/python
# Function definition is here
def changeme( mylist ):
"This changes a passed list into this function"
mylist.append([1,2,3,4]);
print "Values inside the function: ", mylist
return
# Now you can call changeme function
mylist = [10,20,30];
changeme( mylist );
print "Values outside the function: ", mylist
Here, we are maintaining reference of the passed object and appending values in the same object.
So, this would produce the following result −
Values inside the function: [10, 20, 30, [1, 2, 3, 4]]
Values outside the function: [10, 20, 30, [1, 2, 3, 4]]
Values inside the function: [1, 2, 3, 4]

P H P A N D P Y T H O N : Department of Information Technology - APSAC P a g e | 147
Function Arguments
You can call a function by using the following types of formal arguments:
Required arguments
Keyword arguments
Default arguments
Variable-length arguments
Required arguments
Required arguments are the arguments passed to a function in correct positional order. Here, the
number of arguments in the function call should match exactly with the function definition.
To call the function printme(), you definitely need to pass one argument, otherwise it gives a
syntax error as follows −
#!/usr/bin/python
# Function definition is here
def printme( str ):
"This prints a passed string into this function"
print str
return;
# Now you can call printme function
printme()
When the above code is executed, it produces the following result:
Traceback (most recent call last):
File "test.py", line 11, in <module>
printme();
TypeError: printme() takes exactly 1 argument (0 given)

P H P A N D P Y T H O N : Department of Information Technology - APSAC P a g e | 148
Keyword arguments
Keyword arguments are related to the function calls. When you use keyword arguments in a
function call, the caller identifies the arguments by the parameter name.
This allows you to skip arguments or place them out of order because the Python interpreter is
able to use the keywords provided to match the values with parameters. You can also make
keyword calls to the printme() function in the following ways −
#!/usr/bin/python
# Function definition is here
def printme( str ):
"This prints a passed string into this function"
print str
return;
# Now you can call printme function
printme( str = "My string")
When the above code is executed, it produces the following result −
My string
The following example gives more clear picture. Note that the order of parameters does not
matter.
#!/usr/bin/python
# Function definition is here
def printinfo( name, age ):
"This prints a passed info into this function"
print "Name: ", name
print "Age ", age
return;

P H P A N D P Y T H O N : Department of Information Technology - APSAC P a g e | 149
# Now you can call printinfo function
printinfo( age=50, name="miki" )
When the above code is executed, it produces the following result −
Name: miki
Age 50
Default arguments
A default argument is an argument that assumes a default value if a value is not provided in the
function call for that argument. The following example gives an idea on default arguments, it
prints default age if it is not passed −
#!/usr/bin/python
# Function definition is here
def printinfo( name, age = 35 ):
"This prints a passed info into this function"
print "Name: ", name
print "Age ", age
return;
# Now you can call printinfo function
printinfo( age=50, name="miki" )
printinfo( name="miki" )
When the above code is executed, it produces the following result −
Name: miki
Age 50
Name: miki
Age 35

P H P A N D P Y T H O N : Department of Information Technology - APSAC P a g e | 150
Variable-length arguments
You may need to process a function for more arguments than you specified while defining the
function. These arguments are called variable-length arguments and are not named in the function
definition, unlike required and default arguments.
Syntax for a function with non-keyword variable arguments is this −
def functionname([formal_args,] *var_args_tuple ):
"function_docstring"
function_suite
return [expression]
An asterisk (*) is placed before the variable name that holds the values of all nonkeyword variable
arguments. This tuple remains empty if no additional arguments are specified during the function
call. Following is a simple example −
#!/usr/bin/python
# Function definition is here
def printinfo( arg1, *vartuple ):
"This prints a variable passed arguments"
print "Output is: "
print arg1
for var in vartuple:
print var
return;
# Now you can call printinfo function
printinfo( 10 )
printinfo( 70, 60, 50 )
When the above code is executed, it produces the following result −
Output is:

P H P A N D P Y T H O N : Department of Information Technology - APSAC P a g e | 151
10
Output is:
70
60
50
The Anonymous Functions
These functions are called anonymous because they are not declared in the standard manner by
using the def keyword. You can use the lambda keyword to create small anonymous functions.
Lambda forms can take any number of arguments but return just one value in the form of
an expression. They cannot contain commands or multiple expressions.
An anonymous function cannot be a direct call to print because lambda requires an
expression
Lambda functions have their own local namespace and cannot access variables other than
those in their parameter list and those in the global namespace.
Although it appears that lambda's are a one-line version of a function, they are not
equivalent to inline statements in C or C++, whose purpose is by passing function stack
allocation during invocation for performance reasons.
Syntax
The syntax of lambda functions contains only a single statement, which is as follows −
lambda [arg1 [,arg2,.....argn]]:expression
Following is the example to show how lambda form of function works −
#!/usr/bin/python
# Function definition is here
sum = lambda arg1, arg2: arg1 + arg2;
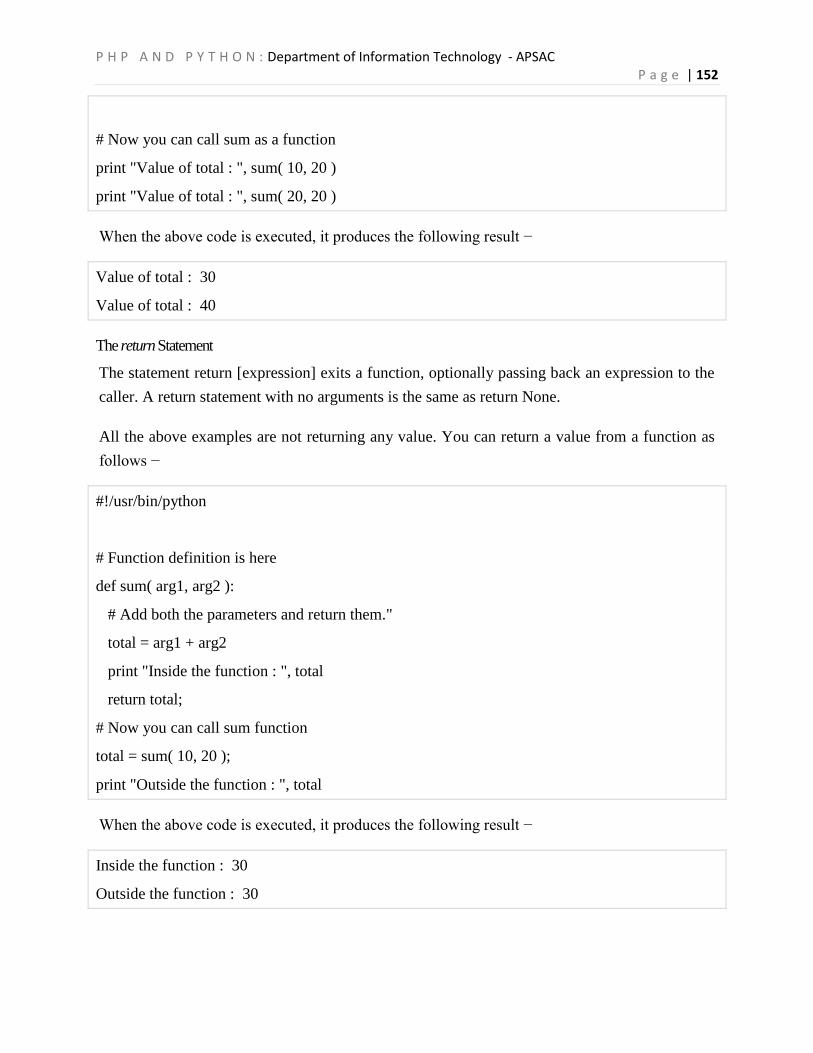
P H P A N D P Y T H O N : Department of Information Technology - APSAC P a g e | 152
# Now you can call sum as a function
print "Value of total : ", sum( 10, 20 )
print "Value of total : ", sum( 20, 20 )
When the above code is executed, it produces the following result −
Value of total : 30
Value of total : 40
The return Statement
The statement return [expression] exits a function, optionally passing back an expression to the
caller. A return statement with no arguments is the same as return None.
All the above examples are not returning any value. You can return a value from a function as
follows −
#!/usr/bin/python
# Function definition is here
def sum( arg1, arg2 ):
# Add both the parameters and return them."
total = arg1 + arg2
print "Inside the function : ", total
return total;
# Now you can call sum function
total = sum( 10, 20 );
print "Outside the function : ", total
When the above code is executed, it produces the following result −
Inside the function : 30
Outside the function : 30

P H P A N D P Y T H O N : Department of Information Technology - APSAC P a g e | 153
Scope of Variables
All variables in a program may not be accessible at all locations in that program. This depends
on where you have declared a variable.
The scope of a variable determines the portion of the program where you can access a particular
identifier. There are two basic scopes of variables in Python −
Global variables
Local variables
Global vs. Local variables
Variables that are defined inside a function body have a local scope, and those defined outside
have a global scope.
Modules
A module allows you to logically organize your Python code. Grouping related code into a
module makes the code easier to understand and use. A module is a Python object with arbitrarily
named attributes that you can bind and reference.
Simply, a module is a file consisting of Python code. A module can define functions, classes and
variables. A module can also include runnable code.
Example
The Python code for a module named aname normally resides in a file named aname.py. Here's
an example of a simple module, support.py
def print_func( par ):
print "Hello : ", par
return
The import Statement
You can use any Python source file as a module by executing an import statement in some other
Python source file. The import has the following syntax:
import module1[, module2[,... moduleN]

P H P A N D P Y T H O N : Department of Information Technology - APSAC P a g e | 154
When the interpreter encounters an import statement, it imports the module if the module is
present in the search path. A search path is a list of directories that the interpreter searches before
importing a module. For example, to import the module hello.py, you need to put the following
command at the top of the script −
#!/usr/bin/python
# Import module support
import support
# Now you can call defined function that module as follows
support.print_func("Zara")
When the above code is executed, it produces the following result −
Hello : Zara
A module is loaded only once, regardless of the number of times it is imported. This prevents the
module execution from happening over and over again if multiple imports occur.
The from...import Statement
Python's from statement lets you import specific attributes from a module into the current
namespace. The from...import has the following syntax −
from modname import name1[, name2[, ... nameN]]
For example, to import the function fibonacci from the module fib, use the following statement −
from fib import fibonacci
This statement does not import the entire module fib into the current namespace; it just introduces
the item fibonacci from the module fib into the global symbol table of the importing module.
The from...import * Statement:
It is also possible to import all names from a module into the current namespace by using the
following import statement −
from modname import *

P H P A N D P Y T H O N : Department of Information Technology - APSAC P a g e | 155
This provides an easy way to import all the items from a module into the current namespace;
however, this statement should be used sparingly.
Locating Modules
When you import a module, the Python interpreter searches for the module in the following
sequences −
The current directory.
If the module isn't found, Python then searches each directory in the shell variable
PYTHONPATH.
If all else fails, Python checks the default path. On UNIX, this default path is normally
/usr/local/lib/python/.
Namespaces and Scoping
Variables are names (identifiers) that map to objects. A namespace is a dictionary of variable
names (keys) and their corresponding objects (values).
A Python statement can access variables in a local namespace and in the global namespace. If a
local and a global variable have the same name, the local variable shadows the global variable.
The dir( ) Function
The dir() built-in function returns a sorted list of strings containing the names defined by a
module.
The list contains the names of all the modules, variables and functions that are defined in a
module. Following is a simple example −
#!/usr/bin/python
# Import built-in module math
import math
content = dir(math)
print content

P H P A N D P Y T H O N : Department of Information Technology - APSAC P a g e | 156
When the above code is executed, it produces the following result −
['__doc__', '__file__', '__name__', 'acos', 'asin', 'atan',
'atan2', 'ceil', 'cos', 'cosh', 'degrees', 'e', 'exp',
'fabs', 'floor', 'fmod', 'frexp', 'hypot', 'ldexp', 'log',
'log10', 'modf', 'pi', 'pow', 'radians', 'sin', 'sinh',
'sqrt', 'tan', 'tanh']
Here, the special string variable __name__ is the module's name, and __file__ is the filename
from which the module was loaded.
The globals() and locals() Functions −
The globals() and locals() functions can be used to return the names in the global and local
namespaces depending on the location from where they are called.
If locals() is called from within a function, it will return all the names that can be accessed locally
from that function.
If globals() is called from within a function, it will return all the names that can be accessed
globally from that function.
The return type of both these functions is dictionary. Therefore, names can be extracted using the
keys() function.
The reload() Function
When the module is imported into a script, the code in the top-level portion of a module is
executed only once.
Therefore, if you want to reexecute the top-level code in a module, you can use
the reload() function. The reload() function imports a previously imported module again. The
syntax of the reload() function is this −
reload(module_name)
Here, module_name is the name of the module you want to reload and not the string containing
the module name. For example, to reload hello module, do the following −
reload(hello)

P H P A N D P Y T H O N : Department of Information Technology - APSAC P a g e | 157
CLASSES AND OOP
Python has been an object-oriented language since it existed. Because of this, creating and using
classes and objects are downright easy. However, here is small introduction of Object-Oriented
Programming (OOP) to bring you at speed −
Overview of OOP Terminology
Class: A user-defined prototype for an object that defines a set of attributes that
characterize any object of the class. The attributes are data members (class variables and
instance variables) and methods, accessed via dot notation.
Class variable: A variable that is shared by all instances of a class. Class variables are
defined within a class but outside any of the class's methods. Class variables are not used
as frequently as instance variables are.
Data member: A class variable or instance variable that holds data associated with a class
and its objects.
Function overloading: The assignment of more than one behavior to a particular function.
The operation performed varies by the types of objects or arguments involved.
Instance variable: A variable that is defined inside a method and belongs only to the
current instance of a class.
Inheritance: The transfer of the characteristics of a class to other classes that are derived
from it.
Instance: An individual object of a certain class. An object obj that belongs to a class
Circle, for example, is an instance of the class Circle.
Instantiation: The creation of an instance of a class.
Method : A special kind of function that is defined in a class definition.
Object: A unique instance of a data structure that's defined by its class. An object
comprises both data members (class variables and instance variables) and methods.
Operator overloading: The assignment of more than one function to a particular operator.
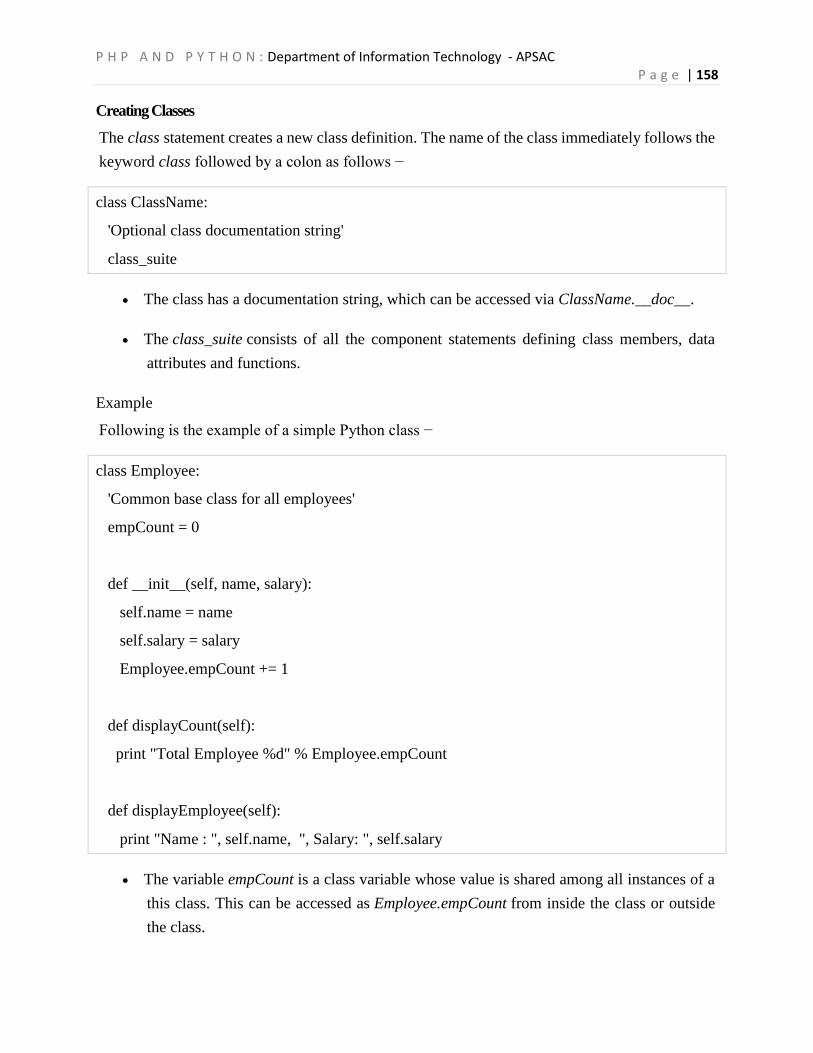
P H P A N D P Y T H O N : Department of Information Technology - APSAC P a g e | 158
Creating Classes
The class statement creates a new class definition. The name of the class immediately follows the
keyword class followed by a colon as follows −
class ClassName:
'Optional class documentation string'
class_suite
The class has a documentation string, which can be accessed via ClassName.__doc__.
The class_suite consists of all the component statements defining class members, data
attributes and functions.
Example
Following is the example of a simple Python class −
class Employee:
'Common base class for all employees'
empCount = 0
def __init__(self, name, salary):
self.name = name
self.salary = salary
Employee.empCount += 1
def displayCount(self):
print "Total Employee %d" % Employee.empCount
def displayEmployee(self):
print "Name : ", self.name, ", Salary: ", self.salary
The variable empCount is a class variable whose value is shared among all instances of a
this class. This can be accessed as Employee.empCount from inside the class or outside
the class.
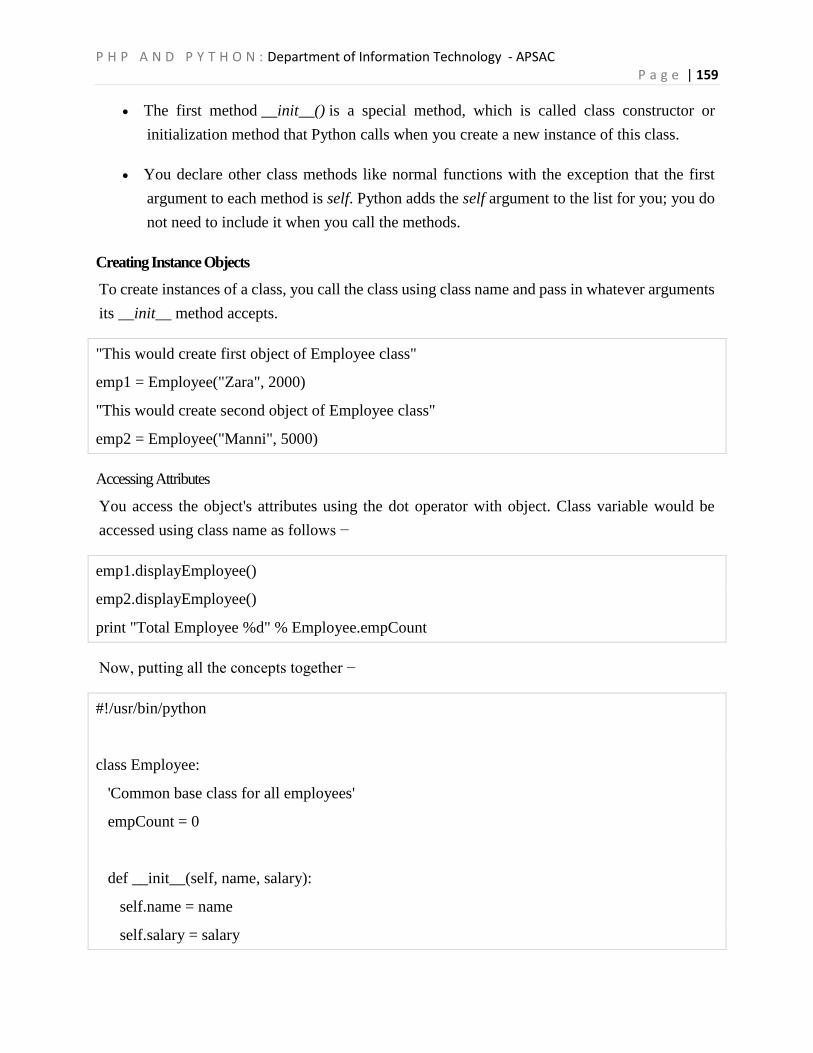
P H P A N D P Y T H O N : Department of Information Technology - APSAC P a g e | 159
The first method __init__() is a special method, which is called class constructor or
initialization method that Python calls when you create a new instance of this class.
You declare other class methods like normal functions with the exception that the first
argument to each method is self. Python adds the self argument to the list for you; you do
not need to include it when you call the methods.
Creating Instance Objects
To create instances of a class, you call the class using class name and pass in whatever arguments
its __init__ method accepts.
"This would create first object of Employee class"
emp1 = Employee("Zara", 2000)
"This would create second object of Employee class"
emp2 = Employee("Manni", 5000)
Accessing Attributes
You access the object's attributes using the dot operator with object. Class variable would be
accessed using class name as follows −
emp1.displayEmployee()
emp2.displayEmployee()
print "Total Employee %d" % Employee.empCount
Now, putting all the concepts together −
#!/usr/bin/python
class Employee:
'Common base class for all employees'
empCount = 0
def __init__(self, name, salary):
self.name = name
self.salary = salary

P H P A N D P Y T H O N : Department of Information Technology - APSAC P a g e | 160
Employee.empCount += 1
def displayCount(self):
print "Total Employee %d" % Employee.empCount
def displayEmployee(self):
print "Name : ", self.name, ", Salary: ", self.salary
"This would create first object of Employee class"
emp1 = Employee("Zara", 2000)
"This would create second object of Employee class"
emp2 = Employee("Manni", 5000)
emp1.displayEmployee()
emp2.displayEmployee()
print "Total Employee %d" % Employee.empCount
When the above code is executed, it produces the following result −
Name : Zara ,Salary: 2000
Name : Manni ,Salary: 5000
Total Employee 2
You can add, remove, or modify attributes of classes and objects at any time −
emp1.age = 7 # Add an 'age' attribute.
emp1.age = 8 # Modify 'age' attribute.
del emp1.age # Delete 'age' attribute.
Instead of using the normal statements to access attributes, you can use the following functions −
The getattr(obj, name[, default]) : to access the attribute of object.
The hasattr(obj,name) : to check if an attribute exists or not.

P H P A N D P Y T H O N : Department of Information Technology - APSAC P a g e | 161
The setattr(obj,name,value) : to set an attribute. If attribute does not exist, then it would
be created.
The delattr(obj, name) : to delete an attribute.
hasattr(emp1, 'age') # Returns true if 'age' attribute exists
getattr(emp1, 'age') # Returns value of 'age' attribute
setattr(emp1, 'age', 8) # Set attribute 'age' at 8
delattr(empl, 'age') # Delete attribute 'age'
Built-In Class Attributes
Every Python class keeps following built-in attributes and they can be accessed using dot operator
like any other attribute −
__dict__: Dictionary containing the class's namespace.
__doc__: Class documentation string or none, if undefined.
__name__: Class name.
__module__: Module name in which the class is defined. This attribute is "__main__" in
interactive mode.
__bases__: A possibly empty tuple containing the base classes, in the order of their
occurrence in the base class list.
For the above class let us try to access all these attributes −
#!/usr/bin/python
class Employee:
'Common base class for all employees'
empCount = 0
def __init__(self, name, salary):
self.name = name
self.salary = salary

P H P A N D P Y T H O N : Department of Information Technology - APSAC P a g e | 162
Employee.empCount += 1
def displayCount(self):
print "Total Employee %d" % Employee.empCount
def displayEmployee(self):
print "Name : ", self.name, ", Salary: ", self.salary
print "Employee.__doc__:", Employee.__doc__
print "Employee.__name__:", Employee.__name__
print "Employee.__module__:", Employee.__module__
print "Employee.__bases__:", Employee.__bases__
print "Employee.__dict__:", Employee.__dict__
When the above code is executed, it produces the following result −
Employee.__doc__: Common base class for all employees
Employee.__name__: Employee
Employee.__module__: __main__
Employee.__bases__: ()
Employee.__dict__: {'__module__': '__main__', 'displayCount':
<function displayCount at 0xb7c84994>, 'empCount': 2,
'displayEmployee': <function displayEmployee at 0xb7c8441c>,
'__doc__': 'Common base class for all employees',
'__init__': <function __init__ at 0xb7c846bc>}
Destroying Objects (Garbage Collection)
Python deletes unneeded objects (built-in types or class instances) automatically to free the
memory space. The process by which Python periodically reclaims blocks of memory that no
longer are in use is termed Garbage Collection.
Python's garbage collector runs during program execution and is triggered when an object's
reference count reaches zero. An object's reference count changes as the number of aliases that
point to it changes.

P H P A N D P Y T H O N : Department of Information Technology - APSAC P a g e | 163
Class Inheritance
Instead of starting from scratch, you can create a class by deriving it from a preexisting class by
listing the parent class in parentheses after the new class name.
The child class inherits the attributes of its parent class, and you can use those attributes as if they
were defined in the child class. A child class can also override data members and methods from
the parent.
Syntax
Derived classes are declared much like their parent class; however, a list of base classes to inherit
from is given after the class name −
class SubClassName (ParentClass1[, ParentClass2, ...]):
'Optional class documentation string'
class_suite
Example
#!/usr/bin/python
class Parent: # define parent class
parentAttr = 100
def __init__(self):
print "Calling parent constructor"
def parentMethod(self):
print 'Calling parent method'
def setAttr(self, attr):
Parent.parentAttr = attr
def getAttr(self):
print "Parent attribute :", Parent.parentAttr

P H P A N D P Y T H O N : Department of Information Technology - APSAC P a g e | 164
class Child(Parent): # define child class
def __init__(self):
print "Calling child constructor"
def childMethod(self):
print 'Calling child method'
c = Child() # instance of child
c.childMethod() # child calls its method
c.parentMethod() # calls parent's method
c.setAttr(200) # again call parent's method
c.getAttr() # again call parent's method
When the above code is executed, it produces the following result −
Calling child constructor
Calling child method
Calling parent method
Parent attribute : 200
Similar way, you can drive a class from multiple parent classes as follows −
class A: # define your class A
.....
class B: # define your class B
.....
class C(A, B): # subclass of A and B
.....
You can use issubclass() or isinstance() functions to check a relationships of two classes and
instances.

P H P A N D P Y T H O N : Department of Information Technology - APSAC P a g e | 165
The issubclass(sub, sup) boolean function returns true if the given subclass sub is indeed
a subclass of the superclass sup.
The isinstance(obj, Class) boolean function returns true if obj is an instance of
class Class or is an instance of a subclass of Class
Overriding Methods
You can always override your parent class methods. One reason for overriding parent's methods
is because you may want special or different functionality in your subclass.
Example
#!/usr/bin/python
class Parent: # define parent class
def myMethod(self):
print 'Calling parent method'
class Child(Parent): # define child class
def myMethod(self):
print 'Calling child method'
c = Child() # instance of child
c.myMethod() # child calls overridden method
When the above code is executed, it produces the following result −
Calling child method
Data Hiding
An object's attributes may or may not be visible outside the class definition. You need to name
attributes with a double underscore prefix, and those attributes then are not be directly visible to
outsiders.