pfaff 71 instructions
40
-
Upload
khangminh22 -
Category
Documents
-
view
0 -
download
0
Transcript of pfaff 71 instructions


\
PFAFF 71INSTRUCTIONS
Foreword
Your dream has come true. You are now the proud owner of a Pfaff 71, the sewingmachine which will enable you to master all ordinary sewing, embroidering and darningjobs that may come up in a home.
This instruction book will help you understand the machine and familiarize you with anumber of important sewing jobs. Keep it handy as a reference book in case you shouldhave forgotten some details.
Follow these simple instructions and sewing with your Plaff will become a lastingpleasure.
If you have any sewing problems, please contact your Pfaff dealer. He will be gladto help you at any time.
G.M.PFAFF AGKarisruhe-Durlach Branch
Western Germany


Essential Parts1. Face cover2. Take-up lever3. Thread retainer4 Spool pins5. Bobbrn winder& Balance wheel7. Stop motion knob8. Motor disengaging mechanism9, Bobbin winder thread retainer
10. Reverse feed control
Ii. Stitch length control12. Bed slide13. PlaIt rotary sewing hook14. Needle plate15. Sewing toot thumb screw18. Light switch17. Needle thread tension18. Presser bar lifter19. Needle set screw20. Sewing foot
The fo(Iowing feet are standard with this machine:
93-838 950-00 Presser loot,(attached to machine)
93-847551-00 Hemmer foot 93-847630-on Edge Stitcher,with guide
3
Engaging the Sewing Mechanism
Hold balance wheel and turn stop motion knob clockwise (as indicated byblack arrow).
Disengaging the Sewing MechanismHold balance wheel and turn stop motion knob counter-clockwise (towardyou). The sewing mechanism is disengaged for bobbin winding.
Foot DrivePush sewlight plug into wall outlet.Mount driving belt. To switch on sew-light, push button on face cover.
ImportantAlways turn balance wheel toward youi
For sewing, pull the spool pins outpartway. Push them down into the machine before you place it into the carrying case.
DR 506DR 507
4

Electrical InformationOFt 861
Power Drive
Push plug 1 into receptacle 2 on backof machine, and plug 3 at other end ofcord into the wall outlet. Cord 4 leadsto the foot control.
Foot Control
Place the foot control under the cabinet within easy reach of your foot.Rest the right foot on the control pedaland press. The harder you press, thefaster the machine will run.(Foot-driven machines have only a sew-light cord).
Motor Disengaging Mechanism
Power-driven machines feature a leverunderneath the balance wheel whichserves to swing the motor to its operative position. To do this, flick the leverdown. After you have completed sewing, flick the leverto its top position in order to return the motor to theinoperative position.With the motor swung out of engagement, all machinesset up on treadle stands can be driven by foot power.
5

Removing the Bobbin Case
Raise needle to its highest point. Liftfront end of bed slide and pull.
Lift latch k with the thumb ol your lefthand arid pull out bobbin case withbobbin. When you release the latch, theempty bobbin drops out.
DR 862DR 850
6

\
Winding the Bobbin
Disengage the sewing mechanism andraise the spool pins to the vertical position.
Place a spool of thread on one of thespooi pins and a bobbin on the bobbinwinder spindle, making sure that the keyat its base enters the slot in the bobbin.Pass the thread through the rightharidthread guide, down and around the threadretainer stud, and up to the bobbin. Winda few turns of thread on the bobbin inclockwise direction. Push the bobbin tothe right and start the machine. Thebobbin winder will stop automatically when the bobbin isfull. Press the bobbin to the left and remove it from thespindle. Then tighten the stop motion knob again.
The amount of thread to be wound on the bobbin is regulated by turning the adjusting button accordingly. Set thebutton at position A for the minimum amount of thread,or at position B for the maximum. The button can be turnedto the desired position after loosening its set screw witha screwdriver.
7

Inserting a Full Bobbin
Hold bobbin so that the thread endfalls from the top down toward you andinsert bobbin into bobbin case.
Hold the bobbin firmly in the bobbincase and pull the thread into the caseslot.
R 5867R 5869
8

Pull the thread under the tension springuntil it emerges from the opening at itsend. Leave about 3” of thread hangingfrom the bobbin case.
Hold the case by its open latch so thatthe bobbin cannot fall out.
R 5870Ft 5868
9

Inserting the flobbin Case
Raise needle to its highest point and
lilt latch k (see ilL at bottom of page 6)
with the thumb and forefinger of your
right hand. Turn bobbin case until slot
points up (see arrow). Place bobbin
case on center stud S of hook. In re
placing the bobbin case, it is best to
hold the loose end of thread so that It
will not get jammed between bobbin
case and hook.
Release latch k and press against bob
bin case until you hear it snap into
place.
DR 857
10

The Needle
Pfaff 71 machines use System 130 Rneedles. Genuine Plaff needles of thissystem are available from every Pfaffdealer. The needle size should be chosen from the Needle and Thread Charton page 12.
Changing the Needle
Bring needle bar to Its highest pointand lower sewing foot. Loosen needleset screw a half a turn and pull oldneedle out of needle clamp. Push newneedle up as far as it will go. Makesure that flat side of shank faces towardthe back and long groove toward you.Tighten needle set screw a.
I
11DR 863

Nee
dle
and
Thr
ead
Cha
rt
Mer
ceri
zed
Silk
Nee
dle
Typ
esof
Fab
rics
Cot
ton
Siz
e
Fine
Fab
rics
800
to60
such
asge
orge
tte,
chif
fon,
to00
0or
bati
ste,
voil
e,la
wn,
silk
.10
0tw
ist
70
Lig
htw
eigh
tF
abri
cs70
such
asdr
ess
silk
san
dco
t-A
&B
to80
tons
,sh
eer
woo
lens
,sh
irt-
twis
t80
ing,
dra
per
ies.
Med
ium
Fab
rics
such
asli
ghtw
eigh
tw
ool-
508
&c
ens,
mad
ras,
mus
lin,
bro-
to90
twis
tca
des,
heav
ysi
lks,
rayo
n,70
and
gaba
rdin
e.
Hea
vyF
abri
cssu
chas
coat
ing,
deni
m,
40C
&D
cord
uroy
,sl
ipco
ver
fab-
to10
0tw
ist
rics
,be
dti
ckin
gs,
light
-50
wei
ght
canv
as.
Deter
min
edS
ynth
etic
s,R
ayon
,A
ceta
teD
eter
min
edby
byth
read
incl
udin
gny
lon,
orio
n,w
eigh
tof
fabr
icsiz
eda
cron
,pl
asti
cs,
etc.
40to
5060
to80

Upper ThreadingRaise the presser bar lifter and swing thespool pins up to the vertical position.Place spool 1 on one of the spool pinsand lead the thread behind both scrollsof thread retainer 2 (see ill.). Seize thethread on the right and left of the threadretainer and pull it toward you until itsnaps into the eyelets. It suffices to drawthe thread into the left eyelet.Pull the thread between any two of tension discs 3 (see ill, at bottom) and jerkit far to the right so that it slips properlyinto the slot and under the thread checkspring. As you do this, press the threadagainst the casting between spool andtension.Bring take-up lever 4 as high as it willgo and pass the thread from right to leftthrough the hole at its end Lead thethread down and into slot 5. Then threadthe needle from front to back.
dz13 ,

Drawing Up the Bobbin Thread
Hold needle thread lightly in your lefthand. Turn balance wheel toward youuntil the needle moves down and upagain. Lightly pull needle thread todraw bobbin thread up through theneedle hole. Place both threads backunder the sewing foot.
R 8213
14

Correct Tension Regulation
The tensions are properly balanced ifboth threads interlock in the center ofthe material. When stitching sheer fabrics, set both tensions a little lighter to Both tensions properly balanced
prevent puckering.
Upper tension too tight or lowertension too loose
Upper tension too loose or lowertension too tight.
15

Regulating the Upper Tension
Turn tension knob right to increasetension on heavier materials. Turn itleft to ease tension on lighter fabrics.The numbers on the tension dial indicate different degrees of tension.
Regulating the Lower Tension
The bobbin tension rarely needs adjusting, except for special sewing jobs. Adjustment is made by a small knurledscrew on the bobbin case.
Turn it right for tighter tensionor left for looser tension.
DR 580H 8029 16
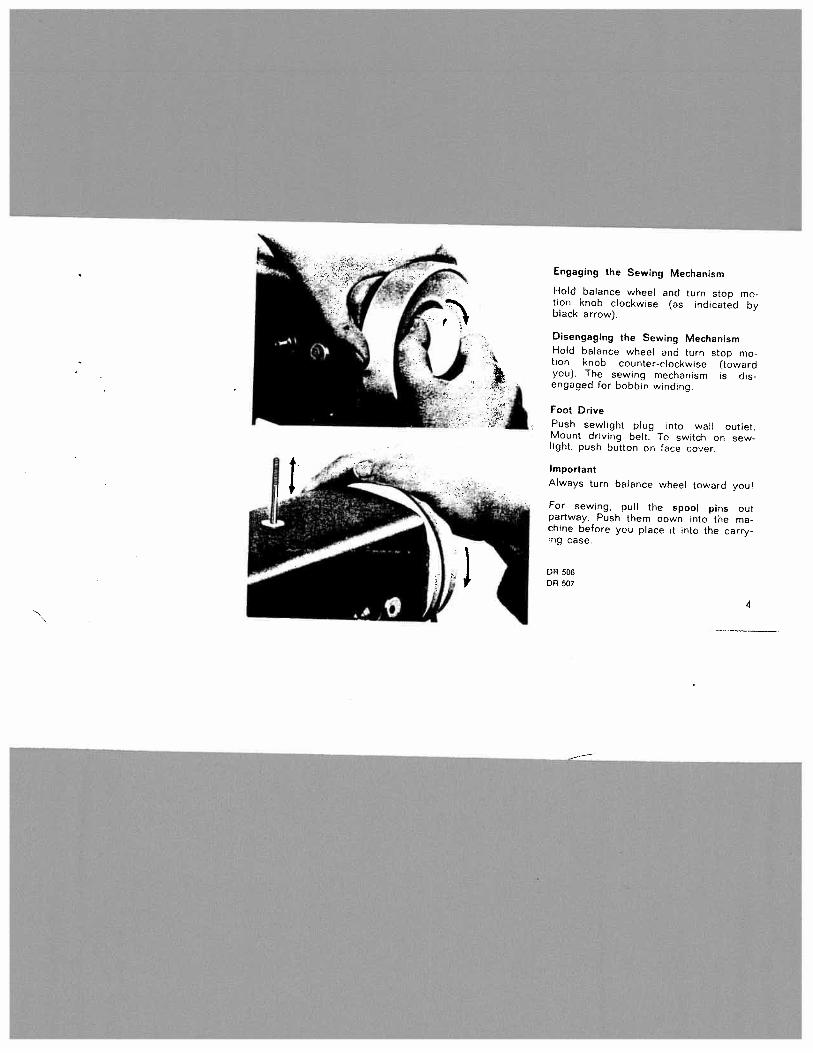
Stitch Length Regulation
The stitch length control serves to regulate the stitch length and to limit it insewing backwards.
The numbers on the control indicate thestitch length (the higher the number.the longer the stitch). When the control is set on O’, the machine ceasesFeeding; maximum stitch length is 6 tothe inch (4 mm). To regulate the stitchlength, turn the control until the desired number is fully visible at the top ofthe slot (see arrow).
Reverse Sewing
To sew in reverse, simply press thefinger-tip control down. When thecontrol is released, the machine resumes forward sewing.
This feature is ideal for backtacking thebeginning or end of a seam and fordarning rips.
17OR 008DR 009

Fundamentals of Machine Operation
• Never run a threaded machine unless you have fabric under the sewing foot.• Place both threads back under the sewing foot before you put fabric into the machine.• Always bring the take-up lever to its highest position before you begin rind after youhave completed a seam.
• The machine will feed the material under the sewing foot automatically. All you haveto do is guide the work. Never try to hasten feeding by pushing or pulling the fabric
With presser foot No. 93-838 95OQO attached to your machine, you can start sewingnow.
Enjoy creative sewing with your Pfaff.
To exchange the sewing foot loosen thumb screw 14 (page 3). Make sure, you tightenthis thumb screw securely again.
18

_‘%_
R 8228 Z.._, ..,
—— .,
Inserting Patches
Large holes can be patched quickly. Trim away ragged edges around the hole, cutting
a square opening exactly on the fabric threads. Cut the patch slightly larger and sew
it down (inner seam). Cut into corners, fold down raw edges and stitch along folded
edges (outer seam).
19

Zipper Insertion
R 8226
Attach edge stitcher No. 93-847 600-00 without guide. Pm or baste closed zipper on
wrong side of fabric. Position of zipper depends on whether or not you want the edge
of the fabric to overlap the zipper, Turn fabric to right side. Flun a straight seam close
to left edge of zipper, stitch across end and up the other side in one continuous operation
Use right edge of foot as a guide.
20
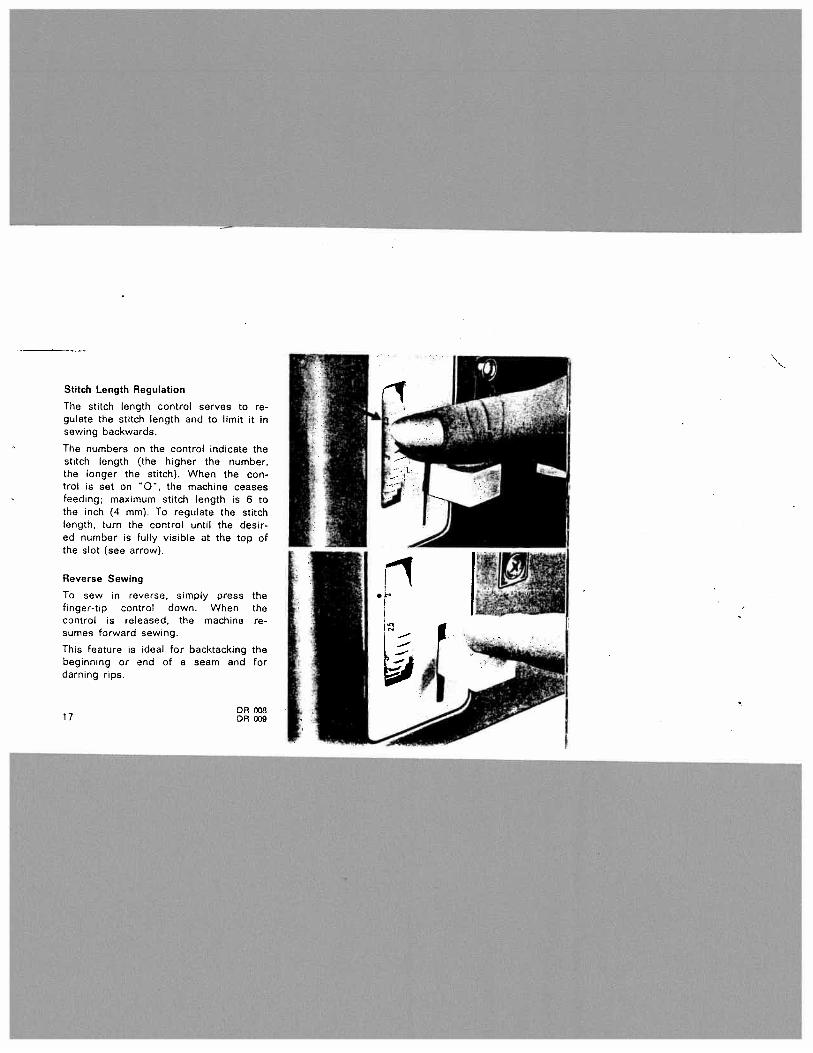
Hemming
Hemmer foot No. 93-847 551-00 is in
dispensable if you want to sew a uniform hem. Clip off the corner of the
fabric to facilitate insertion into the
hemmer foot. Feed fabric so that the
raw edge is in line with the left edge
of the hemmer foot opening.
Avoid ugly ends by slowing down feed
ing. To do this, press the fabric against
the needle plate on the left side of the
foot before you come to the end of the
hem.
DR 870DR 509
JL4
21
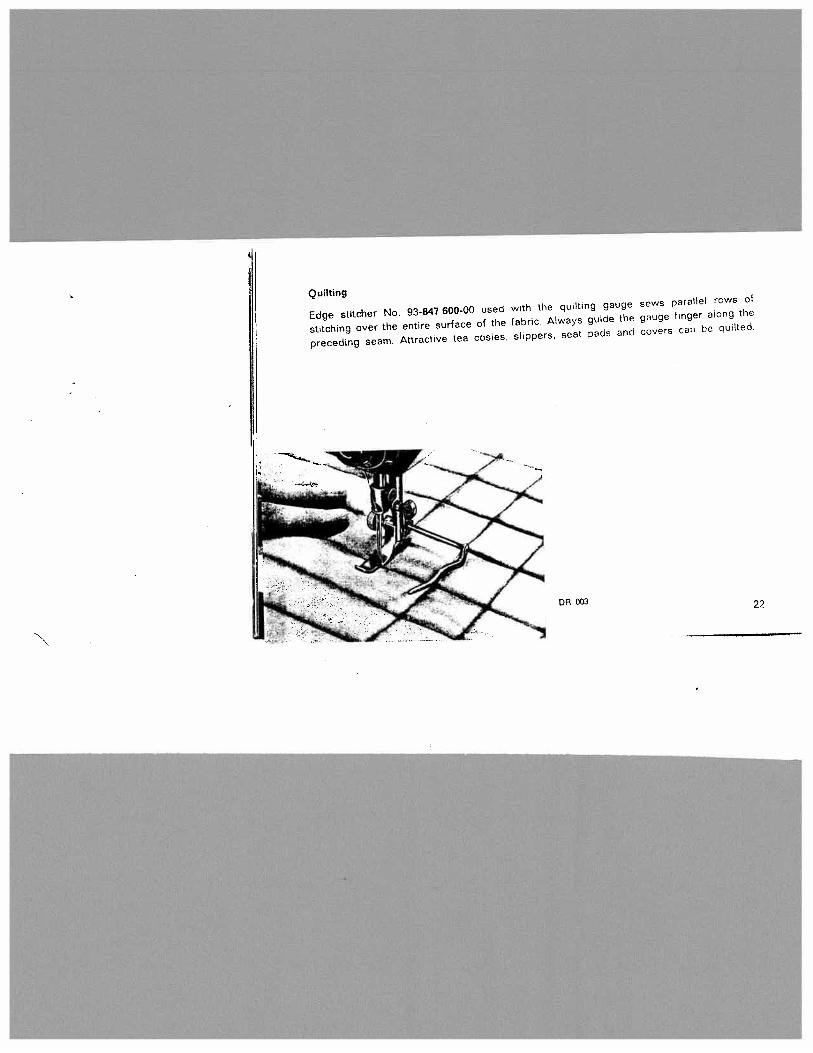
Quilting
Edge stitcher No. 93-647 600-00 used with the quilting gauge sews parallel rows of
stitching over the entire surface of the fabric. Always guide the gauge finger along the
preceding seam. Attractive tea cosies, slippers, seat pads and covers can be quilted
OR 003 22

Dropping the Machine Feed
Remove the bed cover and press thedrop feed ever down slantwise, then tothe rear and up (as indicated by the whitearrow). The lever wilt be retained in thisposition and the fabric will cease feeding.
The machine feed is dropped for darning.hoop embroidery and button sewing.
To raise the machine feed, press the leverdown and let it return to its originalposition.
I
23OR 855

Darning with Darning Hoops
(See page 23 for preparing your machine
for darning.)
Clamp fabric into darning hoops, cut
out small arid mediumsized holes
following the fabric grain. First stitch
back and forth across the hole with the
machine running at high speed. Then
turn the fabric at right angles and sew
back and forth over preceding work
with short stitches. This anchors threads
in the unworn area around the hole.
R 828824

Darning with Sewing FootNo. 93-839 950-00
Triangular tears, small rips or thinspots are best darned by making closestitches back and forth over the area tobe darned. To do this, attach the sewing foot and set the needle plate in thenormal position. While darning, guidethe material with your left hand and
operate the reverse feed control inrhythm with your right hand.
25 OR 559

CordingTo cord on your PlaIt 71, use a cording foot, a twin needle, and a needle p’ate with
needle plate slot.
Twin needles are available for needle distances of 1.2 (3/64”). 1.6 (1/16”), 1 8, 2.0 (5/64”).
2.5 (3/32”), 3.0, and 4.0 (5/32”) millimeters.
Cording feet are available in three varieties, as follows:
Pin tucks are made with cording foot No. 93-847 680-00 (7 grooves. 3/64” wide each)
and a 1.2-mm twin needle.
For narrow cording use cording foot No. 93-847 675-00 (5 grooves. 1/16” wide each;
see ill.) and a 1.6-mm twin needle.
Wider cording is made with cording foot No. 93-847 671-00 (3 grooves. 5/64” wide
each) and a twin needle with a needle distance of 2.0 or 2.5 millimeters.
The above-mentioned System 130 twin needles, the cording teet, and needle plate No93-113 592-00 with needle plate slot are suppliedon speciai request and at extra cost.
Changing the Needle and the Sewing
FootBring take-up lever to highest point,
loosen needle set screw a, and pull
ordinary needle out of reedle clamp.
Insert twin needle into opening of
needle clamp and push it up as far as
it will go. Make sure that the flat side
of the shank faces toward the back.
Tighten needle set screw a securely.
26
I, —.
OP 865
N

Turn sewing foot thumb screw b to the left and take out the sewing foot. Slip on cordingfoot and tighten screw b securely.It is best to turn out screw b completely if you want to slip on a cording foot with theguide attached.
Thread SizePin tucks and narrow cording are made with a No. 50 embroidery thread, wider cordingwith sewing silk in the needle and on the bobbin.Set the machine for medium stitch length.
Upper ThreadPlace a spool of thread on each of the two spool pins. Pass both thread ends throughboth thread retainer openings 2, as illustrated on page 13. Lead one thread betweenthe rear and center tension discs, and the other between the center and front tensiondiscs of upper tension 3. Raise take-up lever 4 to its highest position and pass boththreads through the hole at its end. Pull threads into slot 5, and thread each needle fromfront to back.
The bobbin thread is drawn up as instructed on page 14. To do this, hold both needlethreads in your left hand.
Thread TensionSlightly increase the bobbin thread tension, and increase or decrease the needlethread tension depending on the type of fabric used. If the tension has been Setcorrectly, the bobbin thread should appear as a faint zigzag line on the other side.
27

Filled Cording
If you want to make cording in filmy fabrics or render your cording more prominent
Pfaff recommends that you insert a filler cord. Its thickness depends on the cording
size you want.
Remove the bed slide and pass the filler cord from below through hole g located in
front of needle plate slot I (see ill, on page 26). Lay the end of the filler cord back
under the cording foot (together with
the needle and bobbin thread ends).
Pull a filler cord forward under the bed
slide and place the ball in your ap
Spacing Between Tucks
To ensure uniform spacing between
parallel tucks, place the preceding
seam into one of the grooves of the
foot and use it as a guide. For a larger
spacing between tucks, use the adjust
able guide (see ill, opposite) which is
part of every cording fot.
28
F.
OR 521

Various Cording Effects
Attractive cording effects may be obtained by combining horizontal, vertical and diagonal tucks or stitchingcurved tucks (see adjoining ill), If youwant to turn a corner, leave needle infabric (up to needle eye only), lift foot,turn fabric, lower foot, and continuesewing. To stitch an acute angle, turnfabric halfway, let needle make onestitch, turn fabric all the way, and resume stitching.
To produce a corduroy effect, sewtucks close together, placing rightseam of new tuck extremely close toleft seam of preceding tuck.
DR 473DR 474DR 475
29

Ornamental Sewing
Two-Needle Decorative Effects
Two-needle effects can be obtained by using presser foot No, 93-838 954-00 with needleslot and a NE 1.6 twin needle. The stitch length can be set as desired. Particularly nice
effects can be obtained by using varicolored thread.
Straight-Stitch HemstitchingPresser toot No.93-838954-00 Stitch Length: Medium.with needle slot
Attach presser foot No. 93-838 954-00, and insert twinhemstitching needle, System 130 Zwi-Ho, as instructedon page 11. Turn out needle set screw a little furtherthan for ordinary needles.
The thread size, threading procedure and threadtension are the same as for cording work (seepage 27).
Beautiful hemstitching effects on blouses, dresses.handkerchiefs, doilies and so forth, can be obtainedwith Pfaff’s System 130 twin needle. The harder thefabric yarn, the more pronounced the hemstitchingwill be. Fcr this reason, batiste, organdy, georgette,etc. are best suited to hemstitching, while woollyfabrics are not recommended.
available at your Ptatt dealer)
30

Procedure
Fold fabric to mark seamline or trace seamline on fabric. Sew first row. Guide fabricso that wing needle stitches along trccad in. At the end of U seam, turn fabric halfa turn and sew second row. Guide fabric in such a way that wing needle penetratesthe needle holes it has made and enlarged previously.
Imitation hemstitching thus requires ateast two operations, If desired addi
tional straight or curved ornamentalseams may be stitched parallel to thefirst one. Exciting decorative effectsmay be obtained by using varicoloredembroidery and darning threads.
31DROOl .,
1

Your Pfaff can be used for many additional sewing operations. See your Pfaf[ dealerwho will be glad to offer you various sewIng feet and attachments which will considerably enlarge the range of applications of your machine.
Such additional applications include felling, granite stitching, embroidering monograms, sewing on wool, and straight-stitch embroidery with four-ply thread. Interesting effects can also be obtained with the multi-stitch ruffler and the bias binder.
32

Care and Maintenance
Regular cleaning and oiling will increase the service life of your machine. Use sewingmachine oil only, All moving and rotating parts unde the bed plate and in the annrequire regular lubrication.
If your machine is a Portable Electric, remove the machine base first. To do this, loosenscrew on underside of base.
____e --
, :11
i1t33
DA 852

The raceway in the sewing hook is themost important oiling point. Put onedrop of oil into the raceway each dayyou sew.
Do not lubricate the bobbin winder.
From time to time, remove the needleplate and clean the machine feed witha soft brush. Take a toothpick and remove accumulations of packed lint.Take out the bobbin case with the bobbin and clean the vicinity of the sewing hook.
DR 886DR 887
34

Removing the Face CoverTo change the hght bulb or oil the partsat the needle bar end, remove the facecover by pulling ft upwards
Replacing the Face CoverSlip tip d into slot e and push face coverup until it snaps into place.
DR 024DR 51235

Changing the Light Bulb
The built-in 15-watt sewing light illuminates the area of stitching perfectly.
To change the light bulb, remove theface cover, push the bulb into its socket.turn left, and pull out.
When inserting a new light bulb, makesure its voltage agrees with the linevoltage. Slide bulb pins into socket slots,press bulb in, and turn right. Replaceface cover.
OR 505
36

Tro u ble Shooti 119
1. Machine Skips Stitches
Cause:Remedy:
Needle ncorrectly inserted.Push needle up as far as it will go andbe sure that long groove faces towardyou.
Wrong needle Always use System 130 A needles.
Needle bent Insert new needle.
Machrne threaded improperly Check and correct threading as instructed on page 13.
Needle too fine or too thick for the Select proper needle from Chart onthread.
page 12.
37

2. Needle Thread Breaks Remedy:Cause:
See remedies listed under 1. above.The above-mentioned may causethread breakage.
Adjust tensions as instructed.Thread tension too tight.Use good-quality threads only.Poor, knotty or rotten thread used.Clean and oil hook raceway.Hook raceway is jammed with thread
or needs oiling.
3. Needle Breaks
Cause:Remedy:
Bent needle strikes point of sewing Replace needle at once to preventhook,further damage.
Use correct needle and thread sizesNeedle too thin or thread too heavy.
(see page 14).Fabric pulls needle so it bends and Don’t force the feeding motion. Guidestrikes needle plate.
the material lightly.
38N

Bobbin case inserted incorrectly. Press against bobbin case until you hearit snap into place.4. Machine Feeds Improperly
Cause:Remedy:
Feed dog dropped. Raise feed dog (see page 23).Machine does not Feed because stitch Regulate stitch length, as desired.length control set on “O’.
Accumulations of lint packed between Take off needle plate and remove lintfeed teeth,with a stiff brush.
5. Motor Idles
Cause:Remedy:
Motor disengaging lever raised. Flick lever down (see page 5).
Thread Jamming
The Pfaff lotary hook will not normally jam, even if the machine should be handledimproperly. If thread should happen to jam in the hook raceway, the power of themotor in most instances will be sufficient to overcome hard working of the mechanism.If this action should net free the jammed thread, put a dvop of kerosene into the hookraceway, jerk the balance wheel back, then rock it back and forth.
39