
PRPC V5.3 Installation Guide WebLogic 9.2 (Full ... - Pega Community
Upload
khangminh22Category
view
2download
0
PeopleSoft 9.2: EnterpriseComponents
July 2020
PeopleSoft 9.2: Enterprise ComponentsCopyright © 1988, 2020, Oracle and/or its affiliates.
This software and related documentation are provided under a license agreement containing restrictions on use anddisclosure and are protected by intellectual property laws. Except as expressly permitted in your license agreementor allowed by law, you may not use, copy, reproduce, translate, broadcast, modify, license, transmit, distribute,exhibit, perform, publish, or display any part, in any form, or by any means. Reverse engineering, disassembly, ordecompilation of this software, unless required by law for interoperability, is prohibited.
The information contained herein is subject to change without notice and is not warranted to be error-free. If youfind any errors, please report them to us in writing.
If this is software or related documentation that is delivered to the U.S. Government or anyone licensing it on behalfof the U.S. Government, then the following notice is applicable:
U.S. GOVERNMENT END USERS: Oracle programs (including any operating system, integrated software,any programs embedded, installed or activated on delivered hardware, and modifications of such programs) andOracle computer documentation or other Oracle data delivered to or accessed by U.S. Government end users are"commercial computer software" or “commercial computer software documentation” pursuant to the applicableFederal Acquisition Regulation and agency-specific supplemental regulations. As such, the use, reproduction,duplication, release, display, disclosure, modification, preparation of derivative works, and/or adaptation of i) Oracleprograms (including any operating system, integrated software, any programs embedded, installed or activatedon delivered hardware, and modifications of such programs), ii) Oracle computer documentation and/or iii) otherOracle data, is subject to the rights and limitations specified in the license contained in the applicable contract. Theterms governing the U.S. Government’s use of Oracle cloud services are defined by the applicable contract for suchservices. No other rights are granted to the U.S. Government.
This software or hardware is developed for general use in a variety of information management applications. It isnot developed or intended for use in any inherently dangerous applications, including applications that may create arisk of personal injury. If you use this software or hardware in dangerous applications, then you shall be responsibleto take all appropriate fail-safe, backup, redundancy, and other measures to ensure its safe use. Oracle Corporationand its affiliates disclaim any liability for any damages caused by use of this software or hardware in dangerousapplications.
Oracle and Java are registered trademarks of Oracle and/or its affiliates. Other names may be trademarks of theirrespective owners.
Intel and Intel Inside are trademarks or registered trademarks of Intel Corporation. All SPARC trademarks are usedunder license and are trademarks or registered trademarks of SPARC International, Inc. AMD, Epyc, and the AMDlogo are trademarks or registered trademarks of Advanced Micro Devices. UNIX is a registered trademark of TheOpen Group.
This software or hardware and documentation may provide access to or information about content, products, andservices from third parties. Oracle Corporation and its affiliates are not responsible for and expressly disclaim allwarranties of any kind with respect to third-party content, products, and services unless otherwise set forth in anapplicable agreement between you and Oracle. Oracle Corporation and its affiliates will not be responsible for anyloss, costs, or damages incurred due to your access to or use of third-party content, products, or services, except asset forth in an applicable agreement between you and Oracle.
The business names used in this documentation are fictitious, and are not intended to identify any real companiescurrently or previously in existence.
Documentation Accessibility
For information about Oracle's commitment to accessibility, visit the Oracle Accessibility Program website at http://www.oracle.com/pls/topic/lookup?ctx=acc&id=docacc.
Access to Oracle Support
Oracle customers that have purchased support have access to electronic support through My Oracle Support. Forinformation, visit http://www.oracle.com/pls/topic/lookup?ctx=acc&id=info or visit http://www.oracle.com/pls/topic/lookup?ctx=acc&id=trs if you are hearing impaired.

Contents
Chapter 1: Setting Up Pagelets for WorkCenters and Dashboards as a System Administrator........13Understanding WorkCenters and Dashboards...................................................................................... 13
Adding a User-Defined Link to the My Work Pagelet for PeopleSoft Classic User Interface....... 13Configuring Filter Definitions and Values........................................................................................... 14
Pages Used to Configure Filter Definitions and Values................................................................ 14Configure Filter Definition Page....................................................................................................14Configure Filter Values Page......................................................................................................... 16Filter Values Inquiry Page..............................................................................................................18Validate Filters Page.......................................................................................................................18Delete Filter Values Page............................................................................................................... 19Using the Filter Value Copy Wizard..............................................................................................20Select Filters Page.......................................................................................................................... 21Select Roles/Users Page................................................................................................................. 21Create Filter Values Page............................................................................................................... 22
Configuring Pagelets.............................................................................................................................23Page Used to Configure Pagelets...................................................................................................23Configure Pagelets – WorkCenter/Dashboard Page.......................................................................24Configure Pagelets - My Work Page............................................................................................. 25Set Up Scope Security Page.......................................................................................................... 28Define My Work Link Page...........................................................................................................29Import My Work Link Page...........................................................................................................32Configure Pagelets - Links Page....................................................................................................33Define Link/Security Page............................................................................................................. 35Configure Pagelets – Queries Page................................................................................................37Define Link Page............................................................................................................................39Configure Pagelets – Reports/Processes Page............................................................................... 40
Chapter 2: Using Datasets.........................................................................................................................45Understanding Datasets.........................................................................................................................45Defining Dataset Rules......................................................................................................................... 45
Page Used to Define Dataset Rules............................................................................................... 45Understanding Dataset Rules......................................................................................................... 45Dataset Rules Page.........................................................................................................................46
Defining Dataset Roles......................................................................................................................... 48Page Used to Define Dataset Roles............................................................................................... 48Dataset Roles Page.........................................................................................................................48
Defining Mobile Data Distribution.......................................................................................................49Pages Used to Define Mobile Data Distribution........................................................................... 49Understanding Mobile Data Distribution.......................................................................................49Mobile Data Distribution Page...................................................................................................... 50Mobile User Rules Page.................................................................................................................51
Chapter 3: Formatting Addresses............................................................................................................ 53Understanding Address Formats...........................................................................................................53Specifying Address Formats.................................................................................................................53
Pages Used to Specify Address Formats....................................................................................... 53Country Description Page.............................................................................................................. 54Address Format Page..................................................................................................................... 54
Copyright © 1988, 2020, Oracle and/or its affiliates. iii

Contents
Valid Address Page........................................................................................................................ 56State/Province Page........................................................................................................................ 57
Chapter 4: Using the Find Object Navigation Utility............................................................................59Understanding the Find Object Navigation Utility.............................................................................. 59Specifying Navigation Path Search Criteria.........................................................................................59
Page Used to Specify Navigation Path Search Criteria.................................................................59Understanding Navigation Path Search Criteria............................................................................ 59Find Object Navigation Page......................................................................................................... 59
Chapter 5: Working With Currencies and Market Rates.....................................................................65Understanding Currencies and Market Rates....................................................................................... 65
Understanding Currency and Market Rate Tables......................................................................... 65Understanding Triangulation.......................................................................................................... 65Understanding Conversion Factor Fields and the Visual Rate...................................................... 67Understanding Application-Specific Requirements for Currency Conversion.............................. 68
Defining Currencies.............................................................................................................................. 68Page Used to Define Currency Codes........................................................................................... 68Currency Code Page.......................................................................................................................68
Defining Currency Quotation Methods................................................................................................ 70Page Used to Define Currency Quotation Methods...................................................................... 70Currency Quotation Method Page..................................................................................................70
Defining Market Rates..........................................................................................................................73Pages Used to Define Market Rates.............................................................................................. 73Market Rate Index Page.................................................................................................................74Market Rate Type Page..................................................................................................................75Market Rate Definition Page......................................................................................................... 76Market Rate Page........................................................................................................................... 78Rate Definition Page...................................................................................................................... 80Exchange Rate Detail Page............................................................................................................80
Calculating Cross, Triangulated, and Reciprocal Rates....................................................................... 83Page Used to Run the EOP_RATECALC Process........................................................................ 83Understanding the EOP_RATECALC Process.............................................................................. 83Calculate Cross/Reciprocal Rate - Parameters Page......................................................................83
Using the Currency Exchange Calculator............................................................................................ 86Page Used to Convert Amounts Using the Currency Exchange Calculator.................................. 86Currency Exchange Calculator Page..............................................................................................86
Chapter 6: Working With PeopleSoft Forms and Approval Builder...................................................89Understanding PeopleSoft Forms and Approval Builder.....................................................................89Designing Forms................................................................................................................................... 92
Pages Used to Design Forms......................................................................................................... 92Design Form - Step 1: Basic Information Page.............................................................................92Design Form - Step 2: Instructions Page.......................................................................................94Design Form - Step 3: Form Fields Page......................................................................................94Form Field Edits Page....................................................................................................................96Design Form - Step 4: Attachment Templates Page......................................................................99Design Form - Step 5: Publish to Menu Page.............................................................................100Design Form - Step 6: Approval Process Page........................................................................... 102Design Form: Complete Page...................................................................................................... 103
Defining Prompt Records................................................................................................................... 104Page Used to Specify Prompt Records........................................................................................ 104Define Prompt Records Page....................................................................................................... 104
Managing Forms................................................................................................................................. 104
iv Copyright © 1988, 2020, Oracle and/or its affiliates.

Contents
Page Used to Manage Forms....................................................................................................... 105Understanding Form Management...............................................................................................105Manage Forms Page.....................................................................................................................105
Working with Forms........................................................................................................................... 107Pages Used to Work with Forms................................................................................................. 107Search/Fill a Form Page...............................................................................................................107Form Page.....................................................................................................................................109<Portal label (approval preview)> Page...................................................................................... 111Form Approval Page.................................................................................................................... 112
Integrating Forms with PeopleSoft Applications............................................................................... 112Pages Used to Integrate Forms with PeopleSoft Applications.................................................... 112Understanding Form Integration.................................................................................................. 112Form to CI Collection Mapping Page......................................................................................... 115Document Form References Page................................................................................................118
Using Forms in PeopleSoft Fluid User Interface............................................................................... 118Pages Used to Manage Forms......................................................................................................119Design Forms Page...................................................................................................................... 119Form Designer Page.....................................................................................................................120My Forms Page............................................................................................................................ 123Approve Form...............................................................................................................................124
Chapter 7: Configuring Toolbars........................................................................................................... 125Understanding Toolbars...................................................................................................................... 125
Toolbar Elements..........................................................................................................................125Delivered Toolbars........................................................................................................................126Delivered Toolbar Buttons........................................................................................................... 126
Defining Toolbar Buttons................................................................................................................... 127Page Used to Define Toolbar Buttons......................................................................................... 127Toolbar Button Definition Page................................................................................................... 127
Configuring Toolbars.......................................................................................................................... 128Pages Used to Configure Toolbars...............................................................................................129Toolbar Definition - Description Page.........................................................................................129Toolbar Definition - Button Page.................................................................................................132Toolbar Definition - Content Page...............................................................................................134Toolbar Definition - Focus Fields Page.......................................................................................135Viewing the Toolbar at Runtime..................................................................................................136
Personalizing Toolbars........................................................................................................................ 137Page Used to Personalize Toolbars..............................................................................................137Personalize Toolbar Page............................................................................................................. 137
Chapter 8: Working with the PeopleSoft Fluid User Interface.......................................................... 139Understanding the PeopleSoft Fluid User Interface...........................................................................139
The PeopleSoft Fluid User Interface........................................................................................... 139Fluid Transactions and Conditional Navigation...........................................................................139
Understanding Banners in PeopleSoft Fluid User Interface...............................................................139Using the PeopleSoft Fluid User Interface to Work with Approvals................................................. 141
Understanding PeopleSoft Fluid User Interface to Work with Approvals...................................141Pages Used to Configure the Mobile Approval Options............................................................. 141Mobile Approval Options - General Settings Page..................................................................... 141Mobile Approval Options - Transactions Page............................................................................143Pages Used for PeopleSoft Fluid User Interface Mobile Approvals........................................... 147Approvals Tile.............................................................................................................................. 147Pending Approvals Page.............................................................................................................. 148
Copyright © 1988, 2020, Oracle and/or its affiliates. v

Contents
Pending Approvals - <Transaction Details> Page....................................................................... 151Actions for Pending Approvals....................................................................................................151Approvals History Page............................................................................................................... 152Administer Approvals Page......................................................................................................... 154
Chapter 9: Setting Up and Working with Fluid Delegation............................................................... 159Understanding Delegation...................................................................................................................159Registering Workflow Transactions....................................................................................................164
Page Used to Register Workflow Transactions............................................................................164Workflow Transactions Page........................................................................................................164
Setting Up Permission Lists and Roles for Delegation......................................................................166Understanding Permission Lists and Roles for Delegation......................................................... 167Setting Up Permission Lists and Roles........................................................................................168
Defining Delegation Installation Settings...........................................................................................168Pages Used to Define Delegation Installation Settings............................................................... 168Installation Settings Page............................................................................................................. 168Delegation Installation Settings Page...........................................................................................170
Configuring Delegation Transactions................................................................................................. 173Page Used To Configure Delegation Transactions...................................................................... 174Configure Delegation Transaction Page.......................................................................................174
Adding Delegation Requests by Administrator..................................................................................182Page Used to Add Delegation Requests by Administrator..........................................................182Administer Create Delegation Page............................................................................................182
Administering Delegations..................................................................................................................183Page Used to Administer Delegations......................................................................................... 184Administer Delegation Page.........................................................................................................184
Processing Batch Delegation Requests...............................................................................................186Page Used to Process Batch Delegation Requests.......................................................................186Maintain Delegated Authorities Page.......................................................................................... 186
Working with Self-Service Delegation............................................................................................... 187Pages Used to Work With Self-Service Delegation.....................................................................187Manage Delegation Page..............................................................................................................188Manage Delegation - Learn More about Delegation Page.......................................................... 189Create Delegation Request - Delegation Dates Page...................................................................189Create Delegation Request - Delegates Page...............................................................................190Create Delegation Request - Transactions Page.......................................................................... 191Create Delegation Request - Review and Submit Page...............................................................192My Delegates Page.......................................................................................................................194
Reviewing Delivered Notification Templates for Delegation............................................................ 195Chapter 10: Using the Comments and Attachments View Framework.............................................197
Understanding Comments and Attachments View Framework..........................................................197Configuring and Implementing the Comments and Attachments View Framework..........................198
Pages Used to Configure and Implement the Comments and Attachments View Framework.....198CAVF Configuration Setup Page................................................................................................. 198CAVF Configuration ID Component Mapping Page...................................................................202CAVF Configuration ID Page Composer Mapping Page............................................................ 204
Chapter 11: Page Composer................................................................................................................... 207Understanding Page Composer...........................................................................................................207Using Page Composer.........................................................................................................................208
Pages Used to Configure Pages Using Page Composer.............................................................. 209Page Composer Page....................................................................................................................209
Registering Components in Page Composer...................................................................................... 212
vi Copyright © 1988, 2020, Oracle and/or its affiliates.

Contents
Pages Used to Register Components in Page Composer.............................................................213Registration Page..........................................................................................................................213
Chapter 12: Page and Field Configurator............................................................................................ 219Understanding Page and Field Configurator...................................................................................... 219Using Page and Field Configurator....................................................................................................219
Pages Used to Configure Pages Using Page and Field Configurator.......................................... 219Page Configuration Page..............................................................................................................221User List Page.............................................................................................................................. 228Map to Portal Registry Page........................................................................................................229Validate Page Configurations Page.............................................................................................. 231Moving Configuration from One Database to Another............................................................... 231Configuring the Event Mapping Manually.................................................................................. 232
Masking Data in Page and Field Configurator...................................................................................233Defining the Mask Profile in Page and Field Configurator............................................................... 234
Pages Used to Define the Mask Profile.......................................................................................234Define Mask Profile Page............................................................................................................ 235Pages Used to Define Field Groups for Masking........................................................................238Define Field Group Page............................................................................................................. 239
Configuring Data Masking in Page and Field Configurator.............................................................. 239Pages Used to Configure Masking using Page and Field Configurator.......................................239Masking Page............................................................................................................................... 240User List Page.............................................................................................................................. 244Map to Portal Registry.................................................................................................................244
Chapter 13: Data Privacy Framework.................................................................................................. 245Understanding Data Privacy............................................................................................................... 245Maintaining Data Privacy Attributes..................................................................................................245
Pages Used in Data Privacy Framework..................................................................................... 246Maintain Category Page............................................................................................................... 247Maintain Classification Page........................................................................................................249Maintain Data Privacy Settings Page...........................................................................................250Select Reference Type Page.........................................................................................................253References Last Run Page........................................................................................................... 254Comments Modal Window...........................................................................................................255View References Page..................................................................................................................256View Reference Page — Component/Page Tab...........................................................................257Component Page Details for Standard page................................................................................ 258View Reference Page — Query Tab............................................................................................259Query Details Page.......................................................................................................................262View Reference Page — Reports Tab......................................................................................... 263BIP Report Details Modal............................................................................................................266SQR Report Details Modal.......................................................................................................... 266View Reference Page — Search Tab...........................................................................................267Search Details Modal................................................................................................................... 269View Reference Page — Analytics Tab.......................................................................................269Pivot Grid Details Modal............................................................................................................. 271View Reference Page — Integration Tab.................................................................................... 271Integration Details Modal.............................................................................................................273
Enabling Query Data Masking........................................................................................................... 273Pages Used to Enable Query Data Masking................................................................................274Authorized Roles Page................................................................................................................. 274Synchronize Data Page.................................................................................................................276
Copyright © 1988, 2020, Oracle and/or its affiliates. vii

Contents
Exclude Fields Page..................................................................................................................... 278System Settings Page................................................................................................................... 278Query Masking Utility Page........................................................................................................ 279Query Masking Examples............................................................................................................ 281
Chapter 14: Security Automation.......................................................................................................... 285Understanding Security Automation...................................................................................................285Configuring Metadata for Security Automation.................................................................................285
Pages Used to Configure Metadata for Security Automation......................................................285Manage Permissions Page............................................................................................................286Manage Roles Page...................................................................................................................... 287Manage Menus Page.................................................................................................................... 288
Chapter 15: Supplemental Data............................................................................................................. 291Understanding Supplemental Data..................................................................................................... 291Establishing Supplemental Data......................................................................................................... 295
Pages Used to Set Up Supplemental Data...................................................................................295Define Record - Record Page...................................................................................................... 296Define Record - Fields Summary Page....................................................................................... 297Define Record - Fields Detail Page............................................................................................. 298Define Display Group Page......................................................................................................... 299Assign Display Group Page........................................................................................................301Assign Display Group - Conditions Page....................................................................................302
Chapter 16: Using the Configurable Analysis Framework................................................................. 305Understanding Configurable Analysis Framework............................................................................ 305Understanding Technical Elements of Configurable Analysis Framework........................................306
Factor Types................................................................................................................................. 306Handler Types...............................................................................................................................308Related Action Levels.................................................................................................................. 309Security......................................................................................................................................... 310
Setting Up Configurable Analysis Framework.................................................................................. 311Pages Used to Set Up Configurable Analysis Framework.......................................................... 311Analysis Handler Registry Page.................................................................................................. 311Analysis Configuration Page........................................................................................................314Entity Configuration Page............................................................................................................316Factor Configuration Page........................................................................................................... 317Define Factor Page.......................................................................................................................318Factor List Configuration Page.................................................................................................... 323Copy Factor Lists Page................................................................................................................ 324Related Action Configuration Page............................................................................................. 325Define Related Action Page.........................................................................................................325Miscellaneous Page...................................................................................................................... 328Analysis Access Control Page..................................................................................................... 329
Using Configurable Analysis Framework.......................................................................................... 330Pages Used to Utilize Configurable Analysis Framework.......................................................... 330Understanding Configurable Analysis Framework......................................................................330Common Elements on the Display Analysis Page...................................................................... 331Analysis Display Page (Comparison Mode)................................................................................332Analysis Display Page (Analysis Mode)..................................................................................... 335Understanding Configurable Analysis Framework for Fluid Implementations........................... 337Common Elements for Comparison and Analysis Modes in Fluid Implementations.................. 338Fluid Analysis Display Page (Comparison Mode)...................................................................... 339Fluid Analysis Display Page (Analysis Mode)............................................................................339
viii Copyright © 1988, 2020, Oracle and/or its affiliates.

Contents
Chapter 17: Fluid Discussion Service.................................................................................................... 341Understanding Fluid Discussion Service............................................................................................341
Security Access.............................................................................................................................341Fluid Discussion Service Implementation Options......................................................................341
Understanding Default Discussion Type............................................................................................ 343Assigning Default Discussion as a Related Content Tile...................................................................343Assigning Default Discussion as a Related Action with Context...................................................... 344Implementing Discussion Service with a New Discussion Type....................................................... 346
Configuring Discussion Service...................................................................................................346Pages Used to Configure Discussion Service..............................................................................346Discussion User Group Page....................................................................................................... 346Discussion Type Page...................................................................................................................347Assigning New Discussion Type as a Related Action with Context........................................... 349
Scheduling Notifications.....................................................................................................................351Pages Used to Schedule Notifications......................................................................................... 352Discussion Notification Page....................................................................................................... 352
Viewing All Discussions.....................................................................................................................353Pages Used to View Discussions................................................................................................. 353Discussions Tile............................................................................................................................353Discussions Page.......................................................................................................................... 354
Chapter 18: Run Control Management.................................................................................................361Understanding the Run Control Date Update Framework................................................................. 361Updating Dates on Run Controls....................................................................................................... 363
Pages Used to Register the Run Controls for Date Update.........................................................363Run Control Update Registry Page..............................................................................................363Pages Used to Create a Run Control Date Update task...............................................................365Run Control Date Update Page....................................................................................................366Create A Task Page......................................................................................................................367Select Run Controls Page.............................................................................................................368Define New Values Page..............................................................................................................369
Chapter 19: Working with the Acknowledgement Framework..........................................................371Understanding the Acknowledgement Framework............................................................................ 371Setting Up the Acknowledgement Framework.................................................................................. 371
Pages Used to Set Up Acknowledgement Framework................................................................ 371Acknowledgement Category Page............................................................................................... 371Acknowledgement Configuration Page........................................................................................374Review Acknowledgements Page................................................................................................ 378
Adding Acknowledgement Page as a Step in an Activity Guide.......................................................380Pages Used to Add Acknowledgement Page as a Step in an Activity Guide.............................. 380Categories - Steps Page................................................................................................................380Activity Guide Templates Page....................................................................................................382Activity Guide Composer - General Information Page............................................................... 383Activity Guide Composer - Select Steps Page............................................................................ 384Activity Guide Composer - Organize and Configure Steps Page................................................385Best Practices While Using the Acknowledgement Step in Activity Guides.............................. 386Acknowledgement Step as Displayed in an Activity Guide........................................................389
Chapter 20: Questionnaire Framework.................................................................................................391Understanding Questionnaire Framework.......................................................................................... 391Understanding Security in Questionnaire Framework....................................................................... 392Configuring and Creating Questionnaires Using the Questionnaire Framework............................... 393
Pages Used to Configure Questionnaire Framework...................................................................393
Copyright © 1988, 2020, Oracle and/or its affiliates. ix

Contents
Questionnaire Category Page....................................................................................................... 394Question Pool Page...................................................................................................................... 396Answer Pool Page........................................................................................................................ 398Smart Answers Page.....................................................................................................................400Manage Questionnaires Page....................................................................................................... 402Define Questionnaire Page...........................................................................................................404User Instructions Page..................................................................................................................406Add Question Page.......................................................................................................................406Format Questionnaire - Organize Question Page........................................................................ 411Format Questionnaire - Organize Question Groups Page............................................................414Preview Questionnaire Page.........................................................................................................415Questionnaire Options Page......................................................................................................... 416Update Question Answer Pool Page............................................................................................416Activate Questionnaire Page........................................................................................................ 417
Adding Questionnaire as a Step in an Activity Guide....................................................................... 418Pages Used to Add the Questionnaire as a Step in an Activity Guide........................................ 418Categories - Steps Page................................................................................................................419Activity Guide Templates Page....................................................................................................420Activity Guide Composer - General Information Page............................................................... 421Activity Guide Composer - Select Steps Page............................................................................ 422Activity Guide Composer - Organize and Configure Steps Page................................................423
Chapter 21: Working with the Activity Guide Composer...................................................................425Understanding the Activity Guide Composer.................................................................................... 425
Setting Up Activity Guides..........................................................................................................427Using Activity Guides..................................................................................................................429
Setting Up Activity Guide Categories................................................................................................429Pages Used to Set Up Activity Guide Contextual Data and Categories...................................... 430Understanding Categories.............................................................................................................430Categories - Category Page..........................................................................................................431Categories - Security Page........................................................................................................... 432Categories - Context Page............................................................................................................433Categories - Actions Page............................................................................................................437Categories - Images Page.............................................................................................................439Categories - Assignees Page........................................................................................................ 441Categories - Steps Page................................................................................................................443Categories - Notifications Page....................................................................................................449Preview Notification Page............................................................................................................452
Cloning Activity Guide Categories.................................................................................................... 452Pages Used to Clone Activity Guide Categories......................................................................... 453Clone Category Page....................................................................................................................453
Managing Activity Guide Templates..................................................................................................454Pages Used to Manage Activity Guide Templates...................................................................... 455Activity Guide Templates Page....................................................................................................457Add Activity Guide Template Page............................................................................................. 458Update Template Page..................................................................................................................459Clone Template Page....................................................................................................................460The Activity Guide Composer Guided Template Process........................................................... 461Activity Guide Composer - Introduction Page............................................................................ 463Activity Guide Composer - General Information Page............................................................... 464Activity Guide Composer - Activity Guide Type Page............................................................... 466View Example (Activity Guide Types) Page...............................................................................469
x Copyright © 1988, 2020, Oracle and/or its affiliates.

Contents
Activity Guide Composer - Security Page...................................................................................470Activity Guide Composer - Additional Actions Page................................................................. 472Activity Guide Composer - Sub Banner Page.............................................................................473Configure Sub Banner Page.........................................................................................................475View Example (Sub Banner) Page...............................................................................................477Activity Guide Composer - Select Steps Page............................................................................ 478Activity Guide Composer - Organize and Configure Steps Page................................................480Add Group Step Page.................................................................................................................. 483Configure Group Step Page......................................................................................................... 483Configure Attributes Page............................................................................................................484Configure Dependencies Page......................................................................................................488Configure Page Text Page............................................................................................................488Step Details Page..........................................................................................................................489Activity Guide Composer - Display and Processing Page.......................................................... 490Activity Guide Composer - Notifications Page........................................................................... 492Preview <Notification Type> Notifications Page........................................................................ 494Activity Guide Composer - Review and Activate Page.............................................................. 495
Working with Activity Guide Notifications....................................................................................... 496Pages Used to Work with Activity Guide Notifications..............................................................496Understanding Notifications for Activity Guide Instance Steps..................................................496Define Notifications Page............................................................................................................ 499Process Notifications Page........................................................................................................... 501
Setting Up Activity Guide Utilities for Template Assignment.......................................................... 502Pages Used to Set Up Activity Guide Utilities for Auto Template Assignment..........................502Search Key Source Tables Page...................................................................................................502Search Keys Page.........................................................................................................................503Template Assignment - General Page..........................................................................................504Template Assignment - Template Assignment Page....................................................................505Edit Search Key Values Page.......................................................................................................506Test Template Assignment Page.................................................................................................. 507
Setting Up Activity Guide Utilities for Contextual Data................................................................... 508Pages Used to Set Up Activity Guide Utilities for Contextual Data........................................... 508Contextual Data - Definition Page...............................................................................................509Contextual Data - Test Page........................................................................................................ 510
Deploying and Managing Activity Guide Processes..........................................................................511Pages Used to Deploy and Manage Activity Guides...................................................................512My Processes Page.......................................................................................................................512Start Process Page........................................................................................................................ 514Start Process - Questionnaire Page.............................................................................................. 514Activity Guide Tiles Page............................................................................................................ 515<Activity Guide Tile Review> Page............................................................................................518
Chapter 22: Chatbot Integration Framework...................................................................................... 521Understanding Chatbots...................................................................................................................... 521Understanding the Chatbot Architecture............................................................................................ 525Understanding Security for the Chatbot Integration Framework....................................................... 529Understanding Application Service for Chatbot Integration Framework...........................................530Installing and Setting Up a Delivered Skill....................................................................................... 531Installing and Setting Up the Skill Template..................................................................................... 534Creating the Channel.......................................................................................................................... 536
Creating the Web Channel........................................................................................................... 536Creating the Twilio Channel........................................................................................................ 537
Copyright © 1988, 2020, Oracle and/or its affiliates. xi

Contents
Creating Bot Definitions.....................................................................................................................537Pages Used to Create Bot Definition...........................................................................................537Bot Definition Page......................................................................................................................537Add Bot Definition Page..............................................................................................................538Maintain Bot Definition Page...................................................................................................... 539Maintain Branding Template Page...............................................................................................540
Adding Chatbot to Application pages................................................................................................ 541Adding the Chatbot for a delivered skill to a PeopleSoft Page as a Tile.....................................541Adding the Chatbot for a new skill to a PeopleSoft Page as a Tile.............................................541Adding the Chatbot to a PeopleSoft Page as a Widget............................................................... 544
xii Copyright © 1988, 2020, Oracle and/or its affiliates.

Chapter 1
Setting Up Pagelets for WorkCenters andDashboards as a System Administrator
Understanding WorkCenters and Dashboards
WorkCenters are designed for specific roles and provide a central area for users to access keycomponents. They enable users to access various pages and perform daily tasks without leaving theWorkCenter, which reduces the time used to navigate through menus.
WorkCenters are delivered as empty components. The system administrator from your organization isresponsible for designing and creating links so that users can view and access specific links and pages.
WorkCenters that are accessed using a mobile device are similar to Classic WorkCenters but are designedusing the PeopleSoft Fluid User Interface. Some setup is performed using PeopleSoft Classic pages.
Click to watch a short video about PeopleSoft WorkCenters, for PeopleSoft Classic UserInterface.
Click to watch a short video about Configuring WorkCenters: Application Framework, forPeopleSoft Classic User Interface.
Adding a User-Defined Link to the My Work Pagelet for PeopleSoft ClassicUser Interface
To add a user-defined link to the My Work pagelet in Classic WorkCenters, first create a new filterdefinition, then create a new Application Class, and finally, add the link to the pagelet.
A series of online help videos demonstrates how to do this by providing an example: how to add a link tothe My Work pagelet in the General Ledger WorkCenter.
Step 1: Creating a New Filter Definition
Step 2: Creating a New Application Class for the Criteria
Step 3: Adding the Link to the My Work Pagelet
If your business requires a custom link, contact Oracle technical support for your product.
Copyright © 1988, 2020, Oracle and/or its affiliates. 13

Setting Up Pagelets for WorkCenters and Dashboards as a System Administrator Chapter 1
Configuring Filter Definitions and Values
This topic discusses how to configure filter definitions and values as a System Administrator.
Pages Used to Configure Filter Definitions and ValuesPage Name Definition Name Usage
Configure Filter Definition Page FSFB_FILTER_FIELDS Set up filter definitions.
Configure Filter Values Page FSFB_FILTER_VALUES Set up filter values.
Filter Values Inquiry Page EOWC_FLTRVALS_INQ Understand the correlation between filterfields and its corresponding filter values.
Validate Filters Page RUN_FSFB_VALCLN Validate filters.
Delete Filter Values Page FSFB_DEL_FLTRVALS Delete Filter values.
Select Filters Page FSFB_COPY_WIZARD1 Select filter values of a particular userfor copying them to one or more users.
Select Roles/Users Page FSFB_COPY_WIZARD2 Select a role and the correspondingusers.
Create Filter Values Page FSFB_COPY_WIZARD3 Review the selected filters and users, andto create the filter values.
Configure Filter Definition PageUse the Configure Filter Definition page (FSFB_FILTER_FIELDS) to set up filter definitions as a systemadministrator.
Navigation
Enterprise Components >WorkCenter/Dashboards >Configure Filter Definitions
14 Copyright © 1988, 2020, Oracle and/or its affiliates.

Chapter 1 Setting Up Pagelets for WorkCenters and Dashboards as a System Administrator
Image: Configure Filter Definition page
This example illustrates the fields and controls on the Configure Filter Definition page.
Note: The data that is entered using this page can also be loaded as an Application Data Set using theData Migration Workbench. For more information about ADS and the Data Migration Workbenchfor FSCM applications, see PeopleSoft Application Fundamentals documentation, Working with andPersonalizing WorkCenters, using the Data Migration Workbench for PeopleSoft WorkCetners.
Use this page to define the filter data that is displayed in the My Work pagelet. Filters are used to specifythe data that a user views when accessing a My Work pagelet.
Model Rec (model record) Select a record name that provides the fields to which you willuse to filter data.
Public Select to indicate that the criteria for the filter can be added ormodified by end users
Test Click to view the Test Filter Criteria window. This windowdisplays how the filter option appears to the end user.
Configure Filter FieldsWhen you select a value in the Model Rec field, the record fields are displayed in this grid.
Status Select a status for the field. Options are Active and Inactive.
Active fields are available for editing on the Configure FilterValues page and are available to end users when filtering data.
Field Label ID Select an option that corresponds the field label.
Prompt Table Displays the prompt table that controls the valid values that canbe entered on the Configure Filter Values page.
For translate and yes or no fields, this value defaults from theprompt table that is defined on the record. You can choose tokeep the default value or change it.
Copyright © 1988, 2020, Oracle and/or its affiliates. 15

Setting Up Pagelets for WorkCenters and Dashboards as a System Administrator Chapter 1
For translate tables, this field is not available and can’t bechanges.
Required Flag Select to indicate that this field must have a value on theConfigure Filter Values page.
Restrict Operands if Required Select to indicate that you want to restrict the operands to “=” (equals) and “in”, on the Configure Filter Values page.
Note: If a security controlled view is used, and security by user, role, and permission list are implemented, then you shouldselect Restrict Operands if Required along with RequiredFlag fields. This enforces that only those values that are in thesecured prompt view will be displayed.
Exclude Operator IN Select to remove the “IN” operator only from the operator drop-down list when setting up filter values on the Configure FilterValues page.
Display Order Enter a value that indicates the order in which the filter fieldsare displayed on the Configure Filter Values page.
Filter SecurityThis section displays only when the Public check box is not selected.
Permission Type Select an option that indicates whether user IDs, role names, andpermission lists are used to restrict access to the filter criteria.
User/Role/Permission List Depending on the option selected in the Permission Type field, select user IDs, role names, or permission lists. Individual usersthat are associated to the option selected have access to edit thefilter criteria.
IN Select Properties TabThe “IN” Select Properties tab enables you to select search field names and search field descriptions.
Search Field Name Select a field that determines the name of the field that thesystem uses to retrieve field values.
Search Field Description Select the name of the field that the system uses to retrieve thevalue descriptions.
Configure Filter Values PageUse the Configure Filter Values page (FSFB_FILTER_VALUES) to set up filter values as a systemadministrator.
Navigation
Enterprise Components >WorkCenter/Dashboards >Configure Filter Values
16 Copyright © 1988, 2020, Oracle and/or its affiliates.

Chapter 1 Setting Up Pagelets for WorkCenters and Dashboards as a System Administrator
Image: Configure Filter Values page
This example illustrates the fields and controls on the Configure Filter Values page.
Note: The data that is entered using this page can also be loaded as an Application Data Set using theData Migration Workbench. For more information about ADS and the Data Migration Workbenchfor FSCM applications, see PeopleSoft Application Fundamentals documentation, Working with andPersonalizing WorkCenters, using the Data Migration Workbench for PeopleSoft WorkCetners.
Use this page to select specific values that the system uses when displaying the My Work pagelet. Thefields that appear on this page are the fields that have an active status on the Configure Filter Definitionpage.
Copyright © 1988, 2020, Oracle and/or its affiliates. 17

Setting Up Pagelets for WorkCenters and Dashboards as a System Administrator Chapter 1
Filter Values Inquiry PageUse the Filter Values Inquiry page (EOWC_FLTRVALS_INQ) to understand the correlation between filterfields and its corresponding filter values for a particular Filter ID.
Navigation
Enterprise Components >WorkCenter/Dashboards >Filter Values Inquiry
Image: Filter Values Inquiry page
This example illustrates the fields and controls on the Filter Values Inquiry page. You can find definitionsfor the fields and controls later on this page.
Validate Filters PageUse the Validate Filters page (RUN_FSFB_VALCLN) to validate filters as a system administrator
Navigation
Enterprise Components >WorkCenter/Dashboards >Validate Filters
18 Copyright © 1988, 2020, Oracle and/or its affiliates.

Chapter 1 Setting Up Pagelets for WorkCenters and Dashboards as a System Administrator
Image: Validate Filters page
This example illustrates the fields and controls on the Validate Filters page.
Use this page to validate specific filters. If the Filter ID field is blank, then the system tests all filters.
Filter ID Select a filter ID to test. If you leave this field blank, the systemtests all filters.
Use Only Required Fields Select to indicate that only the fields that are defined as requiredon the Configure Filter Definition page, are validated by thesystem.
If this check box is not selected, then the system validates allapplicable fields.
Delete Filter Values PageUse the Delete Filter Values page (FSFB_DEL_FLTRVALS) to select and delete filter values for a user.
Navigation
Enterprise Components >WorkCenter/Dashboards >Delete Filter Values.
Copyright © 1988, 2020, Oracle and/or its affiliates. 19

Setting Up Pagelets for WorkCenters and Dashboards as a System Administrator Chapter 1
Image: Delete Filter Values page
This example illustrates the fields and controls on the Delete Filter Values page.
User ID Select the user for which filter values are to be deleted. Thepage displays a list of filter values the user has.
Filters Select one or more filter values to be deleted. Selected filtervalues are displayed in a grid on the right.
Delete Filter Values Click the button to delete the selected filter values for theuser. After deleting, a confirmation page appears displayingsuccessful deletion of filter values. You can click the DeleteMore Filter values link to go back to Delete Filter values anddelete more filter values.
Using the Filter Value Copy WizardThe Filter Value Copy Wizard allows the administrator to set filter values to users by role. Administratorscan copy one user’s filter values to one or more users. The wizard follows three steps to accomplish this:
1. Select User/Filters to copy, using the Select Filters page
2. Select Role/Users who will be assigned to the filter values, using the Select Role/Users page.
3. Create filter values by reviewing and creating filters, using the Create Filter Values Page
20 Copyright © 1988, 2020, Oracle and/or its affiliates.

Chapter 1 Setting Up Pagelets for WorkCenters and Dashboards as a System Administrator
Select Filters PageUse the Select Filters page (FSFB_COPY_WIZARD1) to select filter values of a particular user forcopying them to one or more users.
Navigation
Enterprise Components >WorkCenter/Dashboards >Filter Value Copy Wizard
Image: Select Filters page
This example illustrates the fields and controls on the Select Filters page.
User ID Select a user id to display available filter values for the user.
Filters Select one or more filter values to be copied to the user(s).
Selected Filters Displays the list of filter values selected.
Select Roles/Users PageUse the Select Roles/Users page (FSFB_COPY_WIZARD2) to select a role and the corresponding users.
Navigation
Enterprise Components >WorkCenter/Dashboards >Filter Value Copy Wizard. Select the desired filterson the Select Filters page and click Next.
Copyright © 1988, 2020, Oracle and/or its affiliates. 21

Setting Up Pagelets for WorkCenters and Dashboards as a System Administrator Chapter 1
Image: Select Roles/Users page
This example illustrates the fields and controls on the Select Filters page.
Role Select a role to display a list of users in that role.
User ID Select one or more user IDs that will be assigned the filtervalues selected in the Select Filters step. Selected user IDs aredisplayed in a grid on the right.
Filter Values Exist The system selects the field to indicate that the user ID hasvalues for one or more of the filters selected in the previousstep, Select Filters.
Override Existing Values Select to override one or more existing filter values for the userIDs that have values for the filters selected in the previous step. This field is disabled for the user IDs that do not have any filtervalues.
Create Filter Values PageUse the Create Filter Values page (FSFB_COPY_WIZARD3) to review the selected filters and users, andto create the filter values.
Navigation
Enterprise Components >WorkCenter/Dashboards >Filter Value Copy Wizard. Select the desired userson the Select Roles/Users page and click Next.
22 Copyright © 1988, 2020, Oracle and/or its affiliates.

Chapter 1 Setting Up Pagelets for WorkCenters and Dashboards as a System Administrator
Image: Create Filter Values page
This example illustrates the fields and controls on the Select Filters page.
Create Filters Click the button to copy filter values for the selected users. After creating, a confirmation page appears displayingsuccessful creation of filter values. You can click the Copy MoreFilter Values link to go back to Filter Value Copy Wizard andcopy more filter values.
Configuring Pagelets
This topic discusses how to set up pagelets and group boxes as a System Administrator.
Note: In PeopleSoft Classic, My Work and Links are considered pagelets. In PeopleSoft Fluid, My Workand Links are considered group boxes. Within pagelets and group boxes are collapsible sections, suchas Current Work and Exceptions. The name of a page may not follow this standard, because PeopleSoftClassic WorkCenters were created before PeopleSoft Fluid WorkCenters.
Page Used to Configure PageletsPage Name Definition Name Usage
Configure Pagelets – WorkCenter/Dashboard Page
FSPC_ADMIN_MAIN Define configuration IDs for ClassicWorkCenters and Dashboards, and FluidWorkCenters.
Configure Pagelets - My Work Page FSPC_ADMIN_MYWORK Set up My Work links for end users.
Set Up Scope Security Page EOWC_VIEWBY_SEC Determine the users who can accessthe Scope field on the Fluid & Classic<Application> WorkCenter – My Workgroup box and pagelet.
Copyright © 1988, 2020, Oracle and/or its affiliates. 23

Setting Up Pagelets for WorkCenters and Dashboards as a System Administrator Chapter 1
Page Name Definition Name Usage
Define My Work Link Page FSPC_ADM_WRK_SEC Define the type of link that appears onthe My Work pagelet.
Import My Work Link Page FSPC_MYWORK_PROMPT Import system defined My Work links.
Configure Pagelets - Links Page FSPC_ADMIN_LINK Determine how links appear in a pagelet.
Define Link/Security Page FSPC_ADMIN_LINK_SEC Define links and security.
Select a Content Reference Page FSPC_CRFURL_SELECT Select a menu item from a tree structureview.
Configure Pagelets – Queries Page FSPC_ADMIN_QUERY Determine how query links appear in agroup boxpagelet.
Define Link Page FSPC_ADM_QRY_SEC Define access to query links.
Configure Pagelets – Reports/ProcessesPage
FSPC_ADMIN_REPORT Determine how reports and process linksappear on pagelets.
Configure Pagelets – WorkCenter/Dashboard PageUse the Configure Pagelets – WorkCenter/Dashboard page (FSPC_ADMIN_MAIN) to defineconfiguration IDs for Classic WorkCenters, Fluid WorkCenters, and Dashboards
Navigation
Enterprise Components >WorkCenter/Dashboards >Configure Pagelets
Image: Configure Pagelets – WorkCenter/Dashboard Page
This example illustrates the fields and controls on the Configure Pagelets – WorkCenter/Dashboard Page.
24 Copyright © 1988, 2020, Oracle and/or its affiliates.

Chapter 1 Setting Up Pagelets for WorkCenters and Dashboards as a System Administrator
Use this page to add or maintain the configuration of Classic pagelets, Fluid group boxes, or both. Youcan determine if the configuration is to be used in a Classic WorkCenter, Fluid WorkCenter, or ClassicDashboard, by entering the menu item in which the WorkCenter or Dashboard should appear.
Create one configuration ID for each combination of Classic WorkCenter, Fluid WorkCenter, andDashboard for your organization.
Each menu item cannot be associated with more than one configuration ID:
• Classic WorkCenter menu items are defined in the Manage WorkCenter Pages component.
• Fluid WorkCenter menu items are defined using the PeopleTools Structure and Content page.
• Classic Dashboard menu items are defined in the Portal as Homepage tabs.
Note: The data that is entered using this page can also be loaded as an Application Data Set using theData Migration Workbench. For more information about ADS and the Data Migration Workbenchfor FSCM applications, see PeopleSoft Application Fundamentals documentation, Working with andPersonalizing WorkCenters, Using the Data Migration Workbench for PeopleSoft WorkCetners.
Fluid WorkCenter Grouplet Display OrderDisplay Order Enter the order in which you want the Fluid WorkCenter group
boxes to appear in the Fluid WorkCenter. LFF only. Youradministrator is the only person who can change the order of thegroup boxe, and it must be performed using this field.
Show Grouplet Choose to show or hide the Grouplet.
Start Grouplet Collapsed Choose to start the Grouplet in collapsed or open mode.
Configure Pagelets - My Work PageUse the Configure Pagelets – My Work page (FSPC_ADMIN_MYWORK) to set up My Work links forend users.
Navigation
Enterprise Components >WorkCenter/Dashboards >Configure Pagelets
Click the My Work tab.
Copyright © 1988, 2020, Oracle and/or its affiliates. 25

Setting Up Pagelets for WorkCenters and Dashboards as a System Administrator Chapter 1
Image: Configure Pagelets - My Work Page
This example illustrates the fields and controls on the Configure Pagelets - My Work Page.
A system administrator can determine whether an end user can personalize their display options.
Allow User to Personalize the DisplayOptions
Select to indicate that end users who have access to this pageletor group box, can personalize their display options.
If this option is selected, an end user has access to thePersonalize page for the pagelet.
If this option is not selected, an end user does not have accessto the Personalize page for the pagelet. If an end user tries toaccess the Personalize page, they receive a message that the userpersonalization is not enabled for the pagelet.
Enable Scope Select to indicate that certain users have access to the Scopefield on the PeopleSoft Classic page let and Fluid <Application>WorkCenter – My Work group box.
When this check box is selected, the Set Up Scope Security linkappears.
Set Up Scope Security Click this link to access the Set Up Scope Security Page .
26 Copyright © 1988, 2020, Oracle and/or its affiliates.

Chapter 1 Setting Up Pagelets for WorkCenters and Dashboards as a System Administrator
Note: If you access the Set Up Scope Security page, butdon’t set up parameters on that page, when you return to theConfigure Pagelets – My Work page, the system displays amessage in red text saying, “Please set up Scope security”.
Update User Personalization SettingsActivate My Work Settings Click to run the Application Engine process that adds and
deletes changes to the user personalization records. This processmoves the new configuration to the master record. The lastmodified and the last run dates and times are displayed so thatyou know that the process has run after changes have beenmade.
My Work GroupsGroup Label Enter a label heading for the group of links that appear in the
grid. Multiple group labels can be added to organize pageletlinks into logical groups.
This is not a required field, but should be used if more than fivelinks are listed, and the links can be grouped.
Start Group Collapsed Select to indicate that this particular group of links shoulddisplay as collapsed when users access this pagelet. The grouplabel displays, and the user must click the group label to expandthe group and access the links.
If the Allow User to Personalize the Display Options checkbox is selected, this check box is also displayed on thePersonalization page for the end user.
Display Order Enter an order in which this group of links should display withinthe <pagelet> section.
If the Allow User to Personalize the Display Options checkbox is selected, this check box is also displayed on thePersonalization page for the end user.
Hide Group Select to indicate that this group label, and associated links, should not display for an end user.
If selected, the end user does not have access to the grouplabel, and associated links, even if they have authorization topersonalize their display options.
My Work LinksDefine Link/Security Select to access the Define Link/Security Page.
Display Order Enter the order in which you want the links to appear within thegroup.
Copyright © 1988, 2020, Oracle and/or its affiliates. 27

Setting Up Pagelets for WorkCenters and Dashboards as a System Administrator Chapter 1
If the Allow User to Personalize the Display Options checkbox is selected, this check box is also displayed on thePersonalization page for the end user.
Classic/Fluid Displays whether the link is available in Classic, Fluid, or Both.
Filter ID Select a filter ID for PeopleSoft WorkCenters.
Show Count Select to display a number in parenthesis at the end of the link. The value of the number indicates how many transactions applyto the link in which the user needs to act upon.
Administrators should use caution when selecting this optionbecause it could slow system performance.
You should evaluate the show count option on a link by linkbasis. If you find that one link encounters a performanceproblem, then you should consider deselecting the Show Countcheck box for that link. You do not have to be consistent withthe Show Count check box from link to link. If you deselect theShow Count check box for a link, then the link remains active ifthere are transactions to review.
If the Allow User to Personalize the Display Options checkbox is selected, this check box is also displayed on thePersonalization page for the end user.
Show Link Select to indicate that the link is displayed on the pagelet.
PeopleSoft delivers some links that a system administrator maychoose to hide from end users. If this is the case, then select thischeck box. This allows system administrators to preserve thelink definition, if they decide to display the link at a later time.
If the Allow User to Personalize the Display Options checkbox is selected, this check box is also displayed on thePersonalization page for the end user.
Starting Page If the Allow User to Personalize the Display Options checkbox is selected, this check box is also displayed on thePersonalization page for the end user.
Set Up Scope Security PageUse the Set Up Scope Security page (EOWC_VIEWBY_SEC) to determine the users who can access theScope field on the WorkCenter – My Work pagelet.
Navigation
Enterprise Components >WorkCenter/Dashboards >Configure Pagelets. Click the My Work tab. Clickthe Set Up Scope Security link.
28 Copyright © 1988, 2020, Oracle and/or its affiliates.

Chapter 1 Setting Up Pagelets for WorkCenters and Dashboards as a System Administrator
Image: Set Up Scope Security Page
This example illustrates the fields and controls on the Set Up Scope Security Page .
Enable Scope for All Select this check box to indicate that all users have access to theScope field on the WorkCenter – My Work page.
When you select this check box, the Security section is hidden.
SecurityThis section displays when the Enable Scope For All check box is not selected.
Permission Type Select the type of permission. Options include:
• Permission List
• Role
• User
Use this option when you want to restrict access to the Scopefield to certain permission lists, roles, or user IDs.
User/Role/Permission List Select a particular user ID, role, or permission list that hasaccess to the Scope field on the WorkCenter – My Work pagelet.
The options available in this field are determined by yourselection in the Permission Type field.
Define My Work Link PageUse the Define My Work Link page (FSPC_ADM_WRK_SEC) to define link types and security for MyWork Pagelets as a system administrator.
Navigation
Enterprise Components >WorkCenter/Dashboards >Configure Pagelets
Click the My Work tab and then click the Define link in the Define Link/Security column.
Copyright © 1988, 2020, Oracle and/or its affiliates. 29

Setting Up Pagelets for WorkCenters and Dashboards as a System Administrator Chapter 1
Image: Define My Work Link Page
This example illustrates the Define My Work Link Page.
Use this page to define the type of link that appears on the My Work pagelet.
Link Type Select the type of link. The fields in this window changedepending on the option selected in this field. Options include:
• Events and Notifications Alert
• System-Defined
• User-Defined
• Worklist
Link Type is Events and Notifications AlertProcess Name Select a process name that the system must run to display the
results of an event or notification alert.
30 Copyright © 1988, 2020, Oracle and/or its affiliates.

Chapter 1 Setting Up Pagelets for WorkCenters and Dashboards as a System Administrator
Process Category Select a process category within the process name selected inthe previous field.
Link Label Displays from the alert and cannot be changed.
Public Select to indicate that this is a public link.
Link Type is System-DefinedImport Link Click to access the Import My Work Link page where you can
import system-defined links. This button is displayed only whenSystem-Defined is selected in the Link Type field.
Filter ID Select the Filter ID that will be used to filter the data for thislink.
Add Filter Select to add filters if you don’t want to use what is alreadydefined.
Public Displays whether the filter is public. This option is display only.
Public Select to indicate that this is a public link.
Link Type is User-DefinedLink Label Enter a label for the link, which appears on the My Work
pagelet. (User defined only)
Record Based On Enter the view name that will be used for defining filter fieldsfor this link.
Filter ID Select the Filter ID that will be used to filter the data for thislink.
Add Filter Select to add filters if you don’t want to use what is alreadydefined.
Public Displays whether the filter is public. This option is display only.
Public Select to indicate that this is a public link.
Link Type is WorklistWorklist Name Select the Worklist to be displayed when the link is selected.
Link Label Enter a label for the link, which appears on the My Workpagelet.
Public Select to indicate that this is a public link.
Copyright © 1988, 2020, Oracle and/or its affiliates. 31

Setting Up Pagelets for WorkCenters and Dashboards as a System Administrator Chapter 1
Import My Work Link PageUse the Import My Work Link page (FSPC_MYWORK_PROMPT) to import system defined My Worklinks as a system administrator.
Navigation
Enterprise Components >WorkCenter/Dashboards >Configure Pagelets
Click the My Work tab and then click the Define link in the Define Link/Security column. Click theImport Link button.
Image: Import My Work Link page
This example illustrates the fields and controls on the Import My Work Link page.
Use this page to select an Appclass link that is predefined by a source product (object owner ID).
When the user is importing a link, they can narrow their search by entering a part of the link label name,the Object Owner ID, and the record based on field, or all. Or, they don’t have to enter any search criteria.
Link Label Enter a label for the link, which appears on the My Workpagelet.
Object Owner ID Select the application owner of the object. For example: Billing, Contracts, General Ledger, and so on.
Record Based On Select a table that is used for the link.
Search Click to search the PeopleSoft database for results based onyour selection criteria.
(radio button) Select one radio button to indicate that you want the system touse that record for the My Work link.
32 Copyright © 1988, 2020, Oracle and/or its affiliates.

Chapter 1 Setting Up Pagelets for WorkCenters and Dashboards as a System Administrator
Configure Pagelets - Links PageUse the Configure Pagelets – Links page (FSPC_ADMIN_LINK) to determine how links appear on theLinks Pagelets as a system administrator.
Navigation
Enterprise Components >WorkCenter/Dashboards >Configure Pagelets
Click the Links tab.
Image: Configure Pagelets – Links page
This example illustrates the fields and controls on the Configure Pagelets – Links page.
Use this page to set up links for end users. A system administrator can determine whether an end user canpersonalize their display options, as well as define group labels and links.
Allow User to Personalize the DisplayOptions
Select to indicate that end users who have access to this pageletcan personalize their display options.
If this option is selected, an end user has access to thePersonalize page for the pagelet.
If this option is not selected, an end user does not have accessto the Personalize page for the pagelet. If an end user tries toaccess the Personalize page, they receive a message that the userpersonalization is not enabled for the pagelet.
Allow User to Add Additional Links Select to indicate that an end user can add groups and links tothe pagelet.
Copyright © 1988, 2020, Oracle and/or its affiliates. 33

Setting Up Pagelets for WorkCenters and Dashboards as a System Administrator Chapter 1
Update User Personalization SettingsActivate Links Settings Click to run the Application Engine process that adds and
deletes changes to the user personalization records. This processmoves the new configuration to the master record. The lastmodified and the last run dates and times are displayed so thatyou know that the process has run after changes have beenmade.
Link GroupsGroup Label Enter a label heading for the group of links that appear in the
<pagelet> Links grid. Multiple group labels can be added toorganize <pagelet> links into logical groups.
This is not a required field, but should be used if more than fivelinks are listed, and the links can be grouped.
Start Group Collapsed Select to indicate that this particular group of links shoulddisplay as collapsed when users access this pagelet. The grouplabel displays, and the user must click the group label to expandthe group and access the links.
If the Allow User to Personalize the Display Options checkbox is selected, this check box is also displayed on thePersonalization page for the end user.
Display Order Enter an order in which this group of links should display withinthe <pagelet> section.
Hide Group Select to indicate that this group label, and associated links, should not display for an end user.
If selected, the end user does not have access to the grouplabel, and associated links, even if they have authorization topersonalize their display options.
Link ListDefine Link/Security Click to access the Define Link/Security window where you can
define the type of link as well as additional information relatedto the link type.
Display Order Enter the order in which you want the links to appear within thegroup.
If the Allow User to Personalize the Display Options checkbox is selected, this check box is also displayed on thePersonalization page for the end user.
Show Link Select to indicate that the link is displayed on the pagelet.
PeopleSoft delivers some links that a system administrator maychoose to hide from end users. If this is the case, then select this
34 Copyright © 1988, 2020, Oracle and/or its affiliates.

Chapter 1 Setting Up Pagelets for WorkCenters and Dashboards as a System Administrator
check box. This allows system administrators to preserve thelink definition, if they decide to display the link at a later time.
If the Allow User to Personalize the Display Options checkbox is selected, this check box is also displayed on thePersonalization page for the end user.
Starting Page If the Allow User to Personalize the Display Options checkbox is selected, this check box is also displayed on thePersonalization page for the end user.
Open in New Window If the Allow User to Personalize the Display Options checkbox is selected, this check box is also displayed on thePersonalization page for the end user.
Define Link/Security PageUse the Define Link/Security page (FSPC_ADMIN_LINK_SEC) to define links and external linksecurity as a system administrator.
Navigation
Enterprise Components >WorkCenter/Dashboards >Configure Pagelets
Click the Links tab. Click the Define link.
Copyright © 1988, 2020, Oracle and/or its affiliates. 35

Setting Up Pagelets for WorkCenters and Dashboards as a System Administrator Chapter 1
Image: Define Link/Security page
This example illustrates the fields and controls on the Define Link/Security page.
Use this page to define a link, whether the link is public, and if the link is not public to set up security forthe link. The fields on this page change depending on the option selected in the Link Type field.
Link Type Select Menu Item or URL.
Select Menu Item Click to access the Select a Content Reference window whereadministrators can select menu items from a tree structure to useas a link. Only links to which the end user has permission aredisplayed.
This option appears when Menu Item is selected in the LinkType field.
URL and Label Enter the URL address and label description.
This option appears when URL is selected in the Link Typefield.
Public Select to indicate that end users, who have access to this pageletin the WorkCenter, have access to this URL.
Deselect to define specific users, roles, and permission lists thathave access to this URL. The URL Security section displayswhen this check box is not selected.
36 Copyright © 1988, 2020, Oracle and/or its affiliates.

Chapter 1 Setting Up Pagelets for WorkCenters and Dashboards as a System Administrator
This option appears when URL is selected in the Link Typefield.
URL SecurityPermission Type Select an option that indicates whether user IDs, role names, and
permission lists are used to restrict access to the link.
User/Role/Permission List Depending on the option selected in the Permission Type field, select user IDs, role names, or permission lists. Individual usersthat are associated to the option selected have access to the link.
Configure Pagelets – Queries PageUse the Configure Pagelets – Queries page (FSPC_ADMIN_QUERY) to determine how queries appearon pagelets.
Navigation
Enterprise Components >WorkCenter/Dashboards >Configure Pagelets
Click the Queries tab.
Image: Configure Pagelets – Queries page
This example illustrates the fields and controls on the Configure Pagelets – Queries page.
Use this page to set up query links for end users. A system administrator can determine whether an enduser can personalize their display options, add additional links to queries, as well as define group labelsand links.
Copyright © 1988, 2020, Oracle and/or its affiliates. 37

Setting Up Pagelets for WorkCenters and Dashboards as a System Administrator Chapter 1
Allow User to Personalize the DisplayOptions
Select to indicate that end users who have access to this pageletcan personalize their display options.
If this option is selected, an end user has access to thePersonalize page for the pagelet.
If this option is not selected, an end user does not have accessto the Personalize page for the pagelet. If an end user tries toaccess the Personalize page, they receive a message that the userpersonalization is not enabled for the pagelet.
Allow User to Add Additional Links Select to indicate that an end user can add groups and links tothe pagelet.
Display the Query Manager/ViewerLink
The end user can see the link to the Query Manager.
Update User Personalization SettingsActivate Query Settings Click to run the Application Engine process that adds and
deletes changes to the user personalization records. This processmoves the new configuration to the master record. The lastmodified and the last run dates and times are displayed so thatyou know that the process has run after changes have beenmade.
Query GroupsGroup Label Enter a label heading for the group of links that appear in the
<pagelet> Links grid. Multiple group labels can be added toorganize <pagelet> links into logical groups.
This is not a required field, but should be used if more than fivelinks are listed, and the links can be grouped.
Start Group Collapsed Select to indicate that this particular group of links shoulddisplay as collapsed when users access this pagelet. The grouplabel displays, and the user must click the group label to expandthe group and access the links.
If the Allow User to Personalize the Display Options checkbox is selected, this check box is also displayed on thePersonalization page for the end user.
Display Order Enter an order in which this group of links should display withinthe <pagelet> section.
Hide Group Select to indicate that this group label, and associated links, should not display for an end user.
38 Copyright © 1988, 2020, Oracle and/or its affiliates.

Chapter 1 Setting Up Pagelets for WorkCenters and Dashboards as a System Administrator
If selected, the end user does not have access to the grouplabel, and associated links, even if they have authorization topersonalize their display options.
Query DefinitionDisplay Order Enter the order in which you want the links to appear within the
group.
Type Select and option that includes: Query and Pivot Grid.
Depending on the option selected in this field, the other fields inthis section vary.
Override Description/Title Select to override the query description, the pivot grid title, andthe query label for the user added queries and pivot grids.
Pivot Grid Name Select the name of a pivot grid. Queries can optionally bedisplayed as a pivot grid.
These columns display only when Pivot Grid is selected in theType field.
For more information about setting up Pivot Grids, seePeopleTools: Pivot Grid
Query Name Select from a list of public queries.
System administrators can only add public queries.
Access Click the Access link to access the Define Link window whereyou can define security access to the query or pivot grid.
Show Link Select to indicate that the link is displayed on the pagelet.
PeopleSoft delivers some links that a system administrator maychoose to hide from end users. If this is the case, then select thischeck box. This allows system administrators to preserve thelink definition, if they decide to display the link at a later time.
If the Allow User to Personalize the Display Options checkbox is selected, this check box is also displayed on thePersonalization page for the end user.
Starting Page If the Allow User to Personalize the Display Options checkbox is selected, this check box is also displayed on thePersonalization page for the end user.
Define Link PageUse the Define Link page (FSPC_ADM_QRY_SEC) to define query access as a system administrator.
Copyright © 1988, 2020, Oracle and/or its affiliates. 39

Setting Up Pagelets for WorkCenters and Dashboards as a System Administrator Chapter 1
Navigation
Enterprise Components >WorkCenter/Dashboards >Configure Pagelets
Click the Queries tab. Click the Access link.
Image: Define Link page
This example illustrates the fields and controls on the Define Link page.
Use this page to define access to query links on the Query pagelet.
Public Select to indicate that end users, who have access to this pageletin the WorkCenter, have access to this query or pivot grid.
Deselect to define specific users, roles, and permission lists thathave access to this link. The Security section displays when thischeck box is not selected.
SecurityType Select an option that indicates whether user IDs, role names, and
permission lists are used to restrict access to the link.
User/Role/Permission List Depending on the option selected in the Permission Type field, select user IDs, role names, or permission lists. Individual usersthat are associated to the option selected have access to the link.
Configure Pagelets – Reports/Processes PageUse the Configure Pagelets – Reports/Processes page (FSPC_ADMIN_REPORT) to determine howreports and process links appear on pagelets as a system administrator.
Navigation
Enterprise Components >WorkCenter/Dashboards >Configure Pagelets
Select the Reports/Processes tab.
40 Copyright © 1988, 2020, Oracle and/or its affiliates.

Chapter 1 Setting Up Pagelets for WorkCenters and Dashboards as a System Administrator
Image: Configure Pagelets – Reports/Processes page
This example illustrates the fields and controls on the Configure Pagelets – Reports/Processes page.
Use this page to set up reports and process links for end users. A system administrator can determinewhether an end user can personalize their display options, add additional links to reports and processes, aswell as define group labels and links.
Allow User to Personalize the DisplayOptions
Select to indicate that end users who have access to this pageletcan personalize their display options.
If this option is selected, an end user has access to thePersonalize page for the pagelet.
If this option is not selected, an end user does not have accessto the Personalize page for the pagelet. If an end user tries toaccess the Personalize page, they receive a message that the userpersonalization is not enabled for the pagelet.
Allow User to Add Additional Links Select to indicate that an end user can add groups and links tothe pagelet.
Update User Personalization SettingsActivate Reports/Processes Settings Click to run the Application Engine process that adds and
deletes changes to the user personalization records. This processmoves the new configuration to the master record. The lastmodified and the last run dates and times are displayed so thatyou know that the process has run after changes have beenmade.
Copyright © 1988, 2020, Oracle and/or its affiliates. 41

Setting Up Pagelets for WorkCenters and Dashboards as a System Administrator Chapter 1
Link GroupsGroup Label Enter a label heading for the group of links that appear in the
<pagelet> Links grid. Multiple group labels can be added toorganize <pagelet> links into logical groups.
This is not a required field, but should be used if more than fivelinks are listed, and the links can be grouped.
Start Group Collapsed Select to indicate that this particular group of links shoulddisplay as collapsed when users access this pagelet. The grouplabel displays, and the user must click the group label to expandthe group and access the links.
If the Allow User to Personalize the Display Options checkbox is selected, this check box is also displayed on thePersonalization page for the end user.
Display Order Enter an order in which this group of links should display withinthe <pagelet> section.
Hide Group Select to indicate that this group label, and associated links, should not display for an end user.
If selected, the end user does not have access to the grouplabel, and associated links, even if they have authorization topersonalize their display options.
Link ListDefine Link/Security Click to access the Define Link/Security Page where you can
define the type of link as well as additional information relatedto the link type.
Display Order Enter the order in which you want the links to appear within thegroup.
Show Link Select to indicate that the link is displayed on the pagelet.
PeopleSoft delivers some links that a system administrator maychoose to hide from end users. If this is the case, then select thischeck box. This allows system administrators to preserve thelink definition, if they decide to display the link at a later time.
If the Allow User to Personalize the Display Options checkbox is selected, this check box is also displayed on thePersonalization page for the end user.
Starting Page If the Allow User to Personalize the Display Options checkbox is selected, this check box is also displayed on thePersonalization page for the end user.
42 Copyright © 1988, 2020, Oracle and/or its affiliates.

Chapter 1 Setting Up Pagelets for WorkCenters and Dashboards as a System Administrator
Open in New Window If the Allow User to Personalize the Display Options checkbox is selected, this check box is also displayed on thePersonalization page for the end user.
Copyright © 1988, 2020, Oracle and/or its affiliates. 43

Setting Up Pagelets for WorkCenters and Dashboards as a System Administrator Chapter 1
44 Copyright © 1988, 2020, Oracle and/or its affiliates.

Chapter 2
Using Datasets
Understanding Datasets
Datasets enable role-based filtering and distribution of data. You can limit the range and quantity of datadisplayed for a user by associating dataset rules with a user's dataset roles. The resulting dataset rules area set of data appropriate to the user’s dataset roles.
You can also limit the range and quantity of data passed to a mobile device by defining data distributionrules based on datasets. Data distribution rules define the selection of data downloaded to a mobiledevice. The dataset may differ depending on the mobile device.
Note: If you are using PeopleCode to control data distribution, consider using datasets instead.
Defining Dataset Rules
This section provides an overview of dataset rules and discusses how to create dataset rules.
Page Used to Define Dataset RulesPage Name Definition Name Usage
Dataset Rules Page EOEC_DATASET Define the rules that make up a dataset.
Understanding Dataset RulesDataset rules define datasets for use in conjunction with each dataset role’s security rules. Definingdataset rules creates Structured Query Language (SQL) statements that select the dataset displayed foreach rule.
To use dataset rules and roles:
1. Define dataset rules, which are based on a synchronized record.
You define a dataset rule to return a subset of rows from the selected synchronized record based onthe dataset role to which you will link the rule.
These dataset rules are based on views that can join to any record in your PeopleSoft system.
For each rule condition, the user specifies a field that comes from the search record name defined inthe dataset rule. When the specified field has neither a prompt or translate table edit, the followingsystem variables, which are delivered as system data to all applications, can be used to filter thecondition:
Copyright © 1988, 2020, Oracle and/or its affiliates. 45

Using Datasets Chapter 2
• %Blank
• %Date
• %EmployeeID
• %PersonID
• %Time
• %UserID
2. Assign the dataset rules to dataset roles, according to role security and data requirements.
Each dataset role can have multiple dataset rules. You can use existing dataset roles, or create newdataset roles by selecting from existing PeopleTools security-based user roles.
See PeopleTools: Security Administration, “Understanding Roles”.
3. Ensure that the original user roles on which dataset roles were based are associated with appropriateuser IDs.
Each user ID can have multiple user roles.
See PeopleTools: Security Administration, “User Profiles - Roles Page”
Dataset Rules PageUse the Dataset Rules page (EOEC_DATASET) to define the rules that make up a dataset.
Navigation
Enterprise Components > Component Configurations > Datasets > Dataset Rules
46 Copyright © 1988, 2020, Oracle and/or its affiliates.
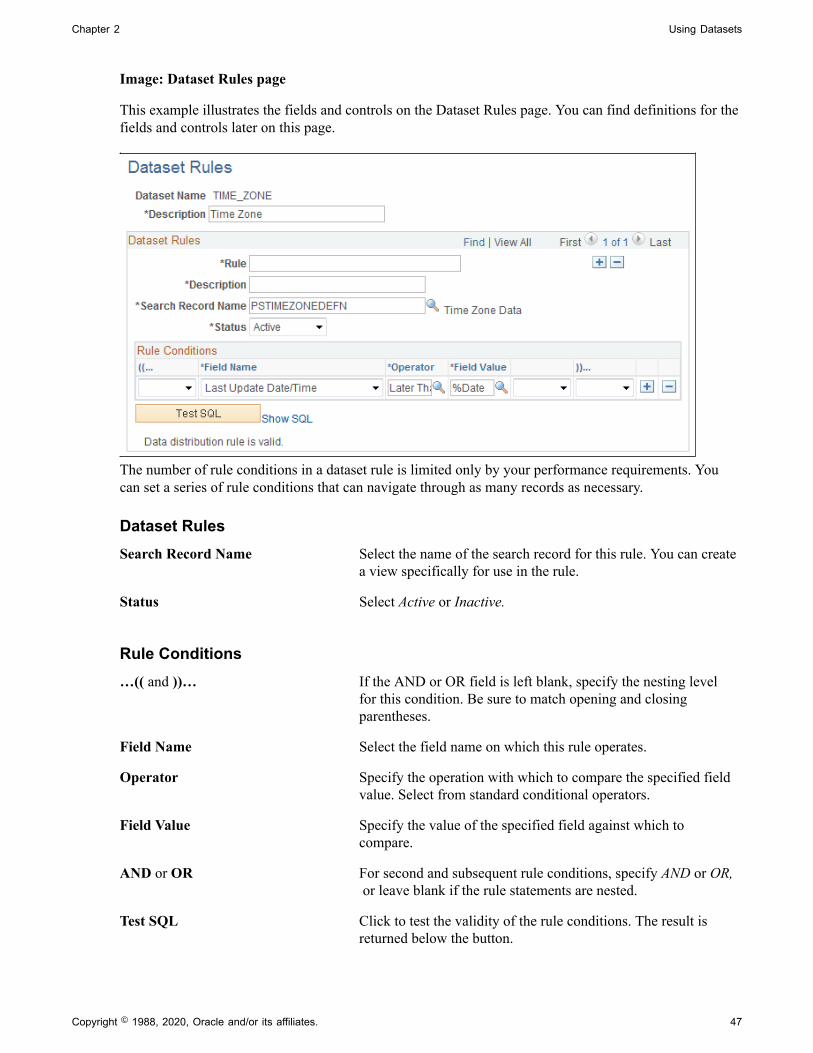
Chapter 2 Using Datasets
Image: Dataset Rules page
This example illustrates the fields and controls on the Dataset Rules page. You can find definitions for thefields and controls later on this page.
The number of rule conditions in a dataset rule is limited only by your performance requirements. Youcan set a series of rule conditions that can navigate through as many records as necessary.
Dataset RulesSearch Record Name Select the name of the search record for this rule. You can create
a view specifically for use in the rule.
Status Select Active or Inactive.
Rule Conditions…(( and ))… If the AND or OR field is left blank, specify the nesting level
for this condition. Be sure to match opening and closingparentheses.
Field Name Select the field name on which this rule operates.
Operator Specify the operation with which to compare the specified fieldvalue. Select from standard conditional operators.
Field Value Specify the value of the specified field against which tocompare.
AND or OR For second and subsequent rule conditions, specify AND or OR, or leave blank if the rule statements are nested.
Test SQL Click to test the validity of the rule conditions. The result isreturned below the button.
Copyright © 1988, 2020, Oracle and/or its affiliates. 47

Using Datasets Chapter 2
Show SQL Click to view the SQL statement generated by the rule.
Defining Dataset Roles
This section discusses how to define dataset roles.
Set up user roles by associating dataset rules with user roles.
Page Used to Define Dataset RolesPage Name Definition Name Usage
Dataset Roles Page EOEC_MP_ROLE Define dataset roles that associateexisting PeopleTools user roles withdataset rules.
Dataset Roles PageUse the Dataset Roles page (EOEC_MP_ROLE) to define dataset roles that associate existingPeopleTools user roles with dataset rules.
Navigation
Enterprise Components > Component Configurations > Datasets > Dataset Roles
Image: Dataset Roles page
This example illustrates the fields and controls on the Dataset Roles page. You can find definitions for thefields and controls later on this page.
Select an existing dataset role for editing, or create a new dataset role by selecting from existingPeopleTools security-based user roles.
See PeopleTools: Security Administration, “Setting Up Roles”
Dataset Name Select the dataset with which the component rule is associated.
Rule Select the component rule.
Laptop and PDA Select to display the resulting data on a laptop computer orPDA.
48 Copyright © 1988, 2020, Oracle and/or its affiliates.

Chapter 2 Using Datasets
Note: If you do not select Laptop or PDA, no data from this ruleis displayed.
Defining Mobile Data Distribution
Use datasets to define the data distributed to mobile devices running the PeopleTools Mobile Agent.
Important! PeopleSoft Mobile Agent is a deprecated product. The information in this section exists forbackward compatibility only.
This section provides an overview of mobile data distribution.
Pages Used to Define Mobile Data DistributionPage Name Definition Name Usage
Mobile Data Distribution Page EOEC_MP_RULE Define data distribution rules for mobiledevices based on datasets.
Mobile User Rules Page EOEC_MP_USRRULE Preview the effect of mobile datadistribution.
Understanding Mobile Data DistributionMobile devices can have limited processing power, storage capacity, and display space. You can limit therange and quantity of data passed to the mobile device by associating dataset rules with synchronizablecomponent interfaces. Mobile data distribution rules define the selection of data from network servers fordownload to a mobile device. The result of data distribution rules is a set of data appropriate to the user’sroles. The set of data may differ depending on the mobile device.
Data distribution for mobile applications implements security and filters the data downloaded to themobile device. You define data distribution for mobile devices based on datasets by selecting dataset rulesassigned to the mobile device user’s dataset roles.
Implementing Mobile Data DistributionTo filter data defined by dataset rules to mobile devices, developers must include the functionDistributeDataByRules() in the synchronizable component interface's OnSelect PeopleCode method.
For example:
Declare Function DistributeDataByRules PeopleCodeFUNCLIB_ECMOBIL.EOEC_ONSELECT FieldFormula;DistributeDataByRules();
See Also
Enterprise PeopleTools 8.49 PeopleBook: Mobile Agent
PeopleTools: PeopleCode Language Reference
Copyright © 1988, 2020, Oracle and/or its affiliates. 49

Using Datasets Chapter 2
Mobile Data Distribution PageUse the Mobile Data Distribution page (EOEC_MP_RULE) to define data distribution rules for mobiledevices based on datasets.
Navigation
Enterprise Components > Component Configurations > Mobile > Mobile Data Distribution
Image: Mobile Data Distribution page
This example illustrates the fields and controls on the Mobile Data Distribution page. You can finddefinitions for the fields and controls later on this page.
Note: Component interfaces selected for mobile data distribution must be synchronizable; onlysynchronizable component interfaces are available from the prompt.
Laptop Limit Select the limiting factor for data instances to be downloaded toa laptop computer during synchronization. Select from:
All Data: Select to download all data matching the rule’sconditions.
Limit By Count: Select to download only data matching therule’s conditions up to the specified count. The count is basedon the number of rows returned. Referenced data is alsoincluded.
Referenced Data Only: Select to download only data only if it isreferenced by another component. You would be more likely toselect this option for setup data than for transaction data.
For example, if you have 50,000 products, but the leads youdownload are related to only 2,000 of the products, selectReferenced Data Only so that you only download the 2,000products, instead of the entire set.
50 Copyright © 1988, 2020, Oracle and/or its affiliates.

Chapter 2 Using Datasets
If Reference Data Only is selected for products, downloadsdo not include products unless other objects such as leads andopportunities that reference products are downloaded.
PDA Limit Select the limiting factor for data instances to be downloaded toa PDA during synchronization. Select from:
All Data: All data matching the rule’s conditions is downloaded.
Limit By Count: Only data matching the rule’s conditions upto the specified count is downloaded. Referenced data is alsoincluded.
Referenced Data Only: Only data referenced by the componentinterface is downloaded.
Laptop Count and PDA Count If you select Limit By Count in the Laptop Limit field orthe PDA Limit field, specify the maximum number of datainstances to be downloaded.
Dataset Name Select the dataset to apply to this mobile data distribution rule.
Dataset Details Click to access the Dataset Rules page, where you can view andmodify the selected dataset definition.
See Dataset Rules Page.
The Dataset Rules grid lists rules for the specified dataset.
Mobile User Rules PageUse the Mobile User Rules page (EOEC_MP_USRRULE) to preview the effect of mobile datadistribution.
Navigation
Enterprise Components > Component Configurations > Mobile > Mobile User Rules
A mobile user can specify whether a selected data distribution rule returns data to a selected mobiledevice. The user must be signed in with a user ID, not as an administrator, to define mobile user rules.
Show Rule Count Click to view the number of results the mobile data distributionrule returns.
Show Laptop Count and Show PDACount
Click to view the number of results the mobile data distributionrule returns to a laptop computer or PDA based on any limits setfor the mobile device on the Mobile Data Distribution page.
Laptop and PDA Select to display the results of this mobile data distribution ruleon a laptop computer or on a PDA, or both.
Note: If neither Laptop nor PDA is selected, no data from thismobile data distribution rule is displayed.
Copyright © 1988, 2020, Oracle and/or its affiliates. 51

Using Datasets Chapter 2
Preview Laptop Results and PreviewPDA Results
Click to preview the data that will be downloaded to a laptopor PDA as a result of this mobile data distribution rule and anylimits set for the mobile device on the Mobile Data Distributionpage.
52 Copyright © 1988, 2020, Oracle and/or its affiliates.

Chapter 3
Formatting Addresses
Understanding Address Formats
You can use addresses throughout PeopleSoft applications for customer, vendor, and student locations.The address format pages are used to specify the details and defaults for the way address fields displayand how they prompt users.
You can format addresses for any country in the world. You can create country and state descriptions andstreet, suite, building, and postal zone formats to meet the needs of any country format. For example, thestate description can be changed to county, province, district, or other geopolitical designation in use bythe country in question. In addition, PeopleSoft applications contain fully populated country code andstate code tables that Oracle updates for each major release, according to current changes in nationalboundaries and designations.
Specifying Address Formats
This section discusses how to specify address formats.
Important! This task, Specifying Address Formats, does not apply to the PeopleSoft CustomerRelationship Management application nor the PeopleSoft Financials/Supply Change Managementapplication, because these applications do not use the common address objects.
Pages Used to Specify Address FormatsPage Name Definition Name Usage
Country Description Page COUNTRY_DEFN Define countries to be used throughoutthe system. This is used mainly forcurrencies and addresses.
Address Format Page ADDR_FORMAT_TABLE Customize fields and field descriptions, so addresses conform to the customaryaddress format of the specified country. Once set, the format appears everywherethe system uses the address subrecord.
Valid Address Page EO_ADDR_VALIDAT Add valid combinations of addressfields.
State/Province Page STATE_DEFN Add or review a state, province, county, or other geopolitical region within acountry.
Copyright © 1988, 2020, Oracle and/or its affiliates. 53

Formatting Addresses Chapter 3
Country Description PageUse the Country Description page (COUNTRY_DEFN) to define countries to be used throughout thesystem.
This is used mainly for currencies and addresses.
Navigation
• Set Up <Product Line> > Install > Country Table
• Enterprise Components > Component Configurations > Address - Hidden > Country - Hidden
Image: Country Description page
This example illustrates the fields and controls on the Country Description page. You can find definitionsfor the fields and controls later on this page.
Use this page to define the prompts and fields that display throughout the system.
2-Char Country Code (two-charactercountry code)
Enter the Value Added Tax (VAT) registration ID for thecountry.
EU Member State (European Unionmember state)
Select if the country is a member of the European Union. Selectto include the country in prompts for intrastate reporting.
Address Format PageUse the Address Format page (ADDR_FORMAT_TABLE) to customize fields and field descriptions, soaddresses conform to the customary address format of the specified country.
Once set, the format appears everywhere the system uses the address subrecord.
Note: The navigation, page shot, and field definitions are from a HCM database. See the FSCMApplication Fundamentals documentation for navigation and field definitions from a FSCM database.
Navigation
• Set Up <Product Line> > Install > Country Table > Address Format
• Enterprise Components > Component Configurations > Address - Hidden > Country - Hidden
54 Copyright © 1988, 2020, Oracle and/or its affiliates.

Chapter 3 Formatting Addresses
Image: Address Format page
This example illustrates the fields and controls on the Address Format page. You can find definitions forthe fields and controls later on this page.
Use this page to set up the three main aspects of the address: editing, displaying, and printing.
Address Edit Page Displays the secondary page used for editing the address. Youcan create a new secondary page using Application Designer. On the new address secondary page you create, use page fieldsfrom the DERIVED_ADDRESS record definition. You thenneed to add a secondary page control to ADDRESS_SBPpointing to your new secondary page. Once you complete thesesteps, the secondary page is accessible in this field.
Enable Address Search Select to enable users to search for a valid value. Selecting thischeck box enables the Used in Search column and the ValidAddress page.
The system default is to leave this check box clear.
Enable Address Validation Available only when Enable Address Search is selected. Selectto ensure validation of all values selected. When selected, usersmust select a value from the search list. If this check box isclear, users can select from the search list or enter a new value.
The system default is to leave this check box clear.
Search Limit Enter a numeric value to limit the number of search results.
This option enables you to limit the search results retrievedduring Address Search.
Field Name Displays the field options available for the address page.
Edit Label Override (Optional) Enter an alternative label for the field. The new labelis used when prompting for the field. You can customize addressformats so that they conform to the address requirements ofeach location. For instance, for a U.S. address, you wouldchange the Postal field to read ZIP Code.
Keep in mind the distinctions between county and state:
• County: The tertiary geopolitical region within a state; thelevel after country and state. In the UK, the level of state is
Copyright © 1988, 2020, Oracle and/or its affiliates. 55

Formatting Addresses Chapter 3
called a county; you would enter such counties in the Statefield.
• State: The secondary geopolitical region within a country; astate in the U.S., a province in Canada, a county in the UK, and a department in France.
Used in Search Available only when you select the Enable Address Searchcheck box. Select the fields you want users to be able to searchon.
Include in Display Select to have the PeopleSoft system include this field whenan address appears in read-only mode. Clear this check box forspecific fields if your organization wants to display addressesin a format that is different than the appearance of the addressduring data entry.
Include in Print Select to print the field when printing.
Line Number and Position Number Enter the physical location of the fields for displaying andprinting. The line number and position number control the fieldorder in the Address Edit page.
The Line Number field specifies the line in which the addressfield should appear on the page. If there are more than twofields on the same line, then the Position Number field is used toresolve the conflict.
Use Description Select to display the description for the field value. Forexample, for addresses in Japan, select this option to display thedescription of the state rather than the state code, since the codeis numeric.
Pre Separator and Post Separator Enter characters to be used surrounding the address field. Forexample, in the United States, a comma generally follows thecity name, such as in San Francisco, CA. In India, there areparentheses around the postal code, for example (123).
Valid Address PageUse the Valid Address page (EO_ADDR_VALIDAT) to add valid combinations of address fields.
Navigation
• Set Up <Product Line> > Install > Country Table > Valid Address
• Enterprise Components > Component Configurations > Address - Hidden > Country - Hidden
56 Copyright © 1988, 2020, Oracle and/or its affiliates.

Chapter 3 Formatting Addresses
Image: Valid Address page
This example illustrates the fields and controls on the Valid Address page. You can find definitions for thefields and controls later on this page.
To enable this page, select the Enable Address Search check box on the Address Format page. Thisenables the Used in Search column. The fields that you select to be used in the search appear on the ValidAddress page as columns. Enter the valid postal code and state combinations that the user can search forand select.
State/Province PageUse the State/Province page (STATE_DEFN) to add or review a state, province, county, or othergeopolitical region within a country.
Navigation
• Set Up <Product Line> > Install > State/Province
• Enterprise Components > Component Configurations > Address - Hidden > State - Hidden
Image: State/ Province page
This example illustrates the fields and controls on the State/Province page. You can find definitions forthe fields and controls later on this page.
This table provides states, provinces, and equivalent geopolitical entities for all supported countries, suchas Dutch communities and French departments. The codes are based on standard postal codes.
Numeric Code Enter a two digit numeric code for statistical and reportingpurposes.
Copyright © 1988, 2020, Oracle and/or its affiliates. 57

Formatting Addresses Chapter 3
Province The second enterable field, Province in the preceding example, changes depending on the country.
This field has a maximum limitation of 30 characters. Otherexamples for this field include:
• State—if the country is USA, the field label appears asState.
• Department—if the country is France, the field label appearsas Department.
• Community—if the country is Holland, the field labelappears as Community.
58 Copyright © 1988, 2020, Oracle and/or its affiliates.

Chapter 4
Using the Find Object Navigation Utility
Understanding the Find Object Navigation Utility
You can use this utility with any PeopleSoft Pure Internet Architecture page to locate the navigation pathfor a component, page, content reference, or portal. Select your search criteria and click the Search button.The resulting navigation paths appear with links that enable you to navigate directly to the page that youspecified in your search. Frequently, several ways are available to access a page. Reviewing all of thenavigation paths may help you find the page in a more intuitive way.
For example, an administrator wants to apply security to all references to Monitor Approvals. Thiscomponent resides in Enterprise Components, Approvals, Approvals. Some applications can choose tocreate static reference or links to a page. With this utility, the administrator can find both references andconfirm that the appropriate security is applied.
Additionally, when used as an internal tool, this utility can be very helpful during PeopleTools andapplication upgrades.
Specifying Navigation Path Search Criteria
This section provides an overview of the navigation path search criteria.
Page Used to Specify Navigation Path Search CriteriaPage Name Definition Name Usage
Find Object Navigation Page EOEC_FIND_NAV Specify navigation path search criteria.
Understanding Navigation Path Search CriteriaThis utility uses the object ID and portal tables to locate the target objects, allowing you to enter acomponent name, page name, or content reference (CREF) name and portal name to locate all of thenavigation paths. Select your search criteria to populate and display a grid with the navigation for yoursearch parameters. The full navigation path is given along with URL links that take you to a new browserfor the navigation that you specified.
Find Object Navigation PageUse the Find Object Navigation page (EOEC_FIND_NAV) to specify navigation path search criteria.
Copyright © 1988, 2020, Oracle and/or its affiliates. 59

Using the Find Object Navigation Utility Chapter 4
Navigation
• Enterprise Components > Find Object Navigation
• Set Up <Product Line> > System Administration > Utilities > Find Object Navigation
Image: Find Object Navigation page showing search criteria of component name
This example illustrates the fields and controls on the Find Object Navigation page with the navigationgrid displaying the path and URL for search parameters of component name. You can find definitions forthe fields and controls later on this page.
A component is a set of pages that are grouped for a business purpose. Component Interfaces exposecomponents for synchronous access from another application, such as PeopleCode, Java, C/C++, orComponent Object Model (COM).
Component Name Select to search by component name.
The system default is Component Name.
*Component Name This is a required field. Enter the name of the component forthe search, or click the prompt to display available componentnames.
Search Click to display a grid that is populated with all of thecorresponding navigation paths for your search parameters.
URL Click to open a browser window that directly accesses thenavigation that you select in the grid.
60 Copyright © 1988, 2020, Oracle and/or its affiliates.

Chapter 4 Using the Find Object Navigation Utility
Image: Find Object Navigation page showing search criteria of page name
This example illustrates the fields and controls on the Find Object Navigation page with the navigationgrid displaying path and URL for search parameters of the page name. You can find definitions for thefields and controls later on this page.
Page Name Select to search by page name.
*Page Name This is a required field. Enter the name of the page for thesearch, or click the prompt to display available page names.
Search Click to display a grid that is populated with all of thecorresponding navigation paths for your search parameters.
URL Click to open a browser window that directly accesses thenavigation that you select in the grid.
Copyright © 1988, 2020, Oracle and/or its affiliates. 61

Using the Find Object Navigation Utility Chapter 4
Image: Find Object Navigation page showing search criteria of secondary page name
This example illustrates the fields and controls on the Find Object Navigation page showing searchcriteria of the secondary page name. You can find definitions for the fields and controls later on this page.
Secondary Page Name Select to search by secondary page name.
*Secondary Page Name This is a required field. Enter the name of the secondary pagefor the search, or click the prompt to display available secondarypage names.
Search Click to display a grid that is populated with all of thecorresponding navigation paths for your search parameters.
URL Click to open a browser window that directly accesses thenavigation that you select in the grid.
62 Copyright © 1988, 2020, Oracle and/or its affiliates.

Chapter 4 Using the Find Object Navigation Utility
Image: Find Object Navigation page showing search criteria of CREF name and portal name
This example illustrates the fields and controls on the Find Object Navigation page showing searchcriteria of content reference name and portal name. You can find definitions for the fields and controlslater on this page.
CREFs are pointers to content that is registered in the portal registry. These are typically URLs oriScripts. CREFs fall into three categories: target content, templates, and template pagelets.
Content Reference Name Select to search by CREF name for the portal that you specify.
When you select Content Reference Name, the Portal Namefield becomes available to search for CREF names within aspecific portal.
*Portal Name This is a required field. Enter the name of the portal for thesearch, or click the prompt to display available portal names.
The default for this field is Employee.
*Content Reference This is a required field. Enter the name of the CREF for thesearch, or click the prompt to display available CREF names.
Search Click to display a grid that is populated with all of thecorresponding navigation paths for your search parameters.
URL Click to open a browser window that directly accesses thenavigation that you select in the grid.
Copyright © 1988, 2020, Oracle and/or its affiliates. 63

Using the Find Object Navigation Utility Chapter 4
64 Copyright © 1988, 2020, Oracle and/or its affiliates.
Chapter 5
Working With Currencies and Market Rates
Understanding Currencies and Market Rates
PeopleSoft applications offer a core set of objects (fields, tables, work records, pages, and PeopleCodefunctions), as well as a recommended set of standard techniques and formulas to support a commonapproach to converting currency throughout PeopleSoft applications and to define and store market rates.Market rate is a generic term for a currency exchange rate, an interest rate, or a future rate.
This section provides overviews of:
• Currency and market rate tables.
• Triangulation.
• Conversion factor fields and the visual rate.
• Application-specific requirements for currency conversion.
Understanding Currency and Market Rate TablesThe following tables store currency and market rate data:
• CURRENCY_CD_TBL
Stores currency code data.
• CURR_QUOTE_PNL
Stores currency quotation method data.
• RT_INDEX_TBL
Stores market rate index data.
• RT_TYPE_TBL
Stores rate type data.
• RT_RATE_TBL
Stores market rate data.
Understanding TriangulationTriangulation is the process by which a conversion between two currencies takes place by way of a thirdreference currency. This process may be used in hyperinflationary environments, where all conversions
Copyright © 1988, 2020, Oracle and/or its affiliates. 65

Working With Currencies and Market Rates Chapter 5
to the local currency are done by way of a stronger, more stable currency. This process may also be usedwhen a country is undergoing a currency revaluation.
To support triangulation, the PeopleSoft system provides a means to define that you want a currency pairto triangulate through a fixed reference currency. The actual conversion process is done in a two-stepprocedure in which the from-currency amount is first converted to the reference currency and then to thedestination currency, using the appropriate exchange rates. Supporting triangulation also affects the userinterface, as there are now two or possibly three exchange rates that are relevant to the conversion. Whenviewing a triangulated conversion at a detailed level, users access three visual rates:
• A rate for converting the from-currency to the reference currency.
• A rate for converting the reference currency to the to-currency.
• A cross rate indicating the rate that would be required to convert the from-currency directly into theto-currency.
The cross rate in a triangulated conversion is not typically maintained directly. The system enables you tomaintain those non-triangulated rates that are components of the triangulated rate, then run a process togenerate the triangulated exchange rate. However, you can override the cross rate, which causes one of theother exchange rate values to be recalculated to synchronize it with the overridden cross rate.
For example, suppose an implementation was using triangulation to convert from USD to FRF. Youwould directly maintain the visual rate from the USD to euros (1.25 in the example table) and rate fromeuros to FRF (6.8 in the example table). You could then run the EOP_RATECALC application engineprocess to derive the triangulated rate for converting from USD to FRF. The results are shown in thefollowing table:
Currency Pair Quote Method Quote Units Primary VisualRate
RATE_MULT RATE_DIV
USD to Euro Indirect 1 1.25 1 1.25
Euro to FRF Direct 1 6.8 6.8 1
USD to FRF Direct/Triangulate/Euro
1 5.44 6.8 1.25
When performing the actual conversion, applications interpret the visual rates into RATE_MULT andRATE_DIV values based on the quotation method for the exchange, then use the RATE_MULT andRATE_DIV values stored in the Market Rates Data table in the currency conversion formula, either byaccessing the values directly or by calling the ConvertCurrency PeopleCode function.
Note: For information on how a specific application supports maintenance of triangulated exchange rates,see the documentation for that application.
Related LinksCalculating Cross, Triangulated, and Reciprocal Rates
66 Copyright © 1988, 2020, Oracle and/or its affiliates.

Chapter 5 Working With Currencies and Market Rates
Understanding Conversion Factor Fields and the Visual RateSupport for both direct and indirect currency quotations creates a potential for complex currencyconversion formulas in applications. To avoid excess conditional logic in the conversion formula, thePeopleSoft system provides two fields to store the conversion factor, RATE_MULT and RATE_DIV. Therate that you enter is called the visual rate. This visual rate is generally stored in either RATE_MULT orRATE_DIV, based on the quote method. The quote units are stored in whichever field does not contain thevisual rate. As a result, the formula for currency conversion remains consistent:
(from-currency / RATE_DIV) × RATE_MULT = to-currency
This formula is also used for currency conversion in PeopleCode programs for online processing, as wellas in SQR and COBOL processes.
The following table shows a few basic examples of how visual rates are transformed into RATE_MULTand RATE_DIV, according to the quote method and quote units for the currency pair:
Currency Pair Quote Method Quote Units Primary VisualRate
RATE_MULT RATE_DIV
USD to GBP Indirect 1 1.6 1 1.6
GBP to USD Direct 1 1.6 1.6 1
DEM to CHF Indirect 100 119.335 100 119.335
CHF to DEM Direct 100 119.335 119.335 100
USD to Euro Indirect 1 1.25 1 1.25
Euro to FRF Direct 1 6.8 6.8 1
USD to FRF Direct/Triangulate/Euro
1 5.44 6.8 1.25
FRF to Euro Indirect 1 6.8 1 6.8
Euro to USD Direct 1 1.25 1.25 1
FRF to USD Indirect/Triangulate/Euro
1 5.44 1.25 6.8
In all cases, the visual rate for a currency pair remains the same, regardless of the direction. This isconsistent with business standards. For a direct quoted rate, you multiply by the visual rate; thereforethe visual rate goes into RATE_MULT and 1 (or the quote units) goes into RATE_DIV. For an indirectquoted rate, you divide by the visual rate; therefore the visual rate goes into RATE_DIV and 1 (or thequote units) goes into RATE_MULT.
The following examples show indirect quotation, direct quotation with quote units, and triangulation:
100 USD to GBP (indirect) = (100 USD / 1.6) × 1 = 62.50 GBP
1000 CHF to DEM (direct with units) = (1000 CHF / 100) × 119.335 = 1193.35 DEM
100 USD to FRF (triangulate) = (100 USD / 1.25) × 6.8 = 544 FRF
Copyright © 1988, 2020, Oracle and/or its affiliates. 67

Working With Currencies and Market Rates Chapter 5
Related LinksDefining Currency Quotation Methods
Understanding Application-Specific Requirements for Currency ConversionEach application that shows a visual rate on a page must have an application-specific work record to holdthe visual rate and the associated PeopleCode; this can be an existing work record. The suggested namefor the field is VISUAL_RATE. The work record should also have a field to store the original rate forpurposes of tolerance checking.
The application also typically provides an application-specific table to store RATE_MULT andRATE_DIV values that are stored on the database.
Application-specific PeopleCode needs to format work record fields and call the common functions invarious circumstances, such as RowInit or FieldChange on the currency or visual rate.
See Also
PeopleTools: Global Technology
PeopleTools: PeopleCode Developer's Guide
Defining Currencies
This section discusses how to define currency codes.
Page Used to Define Currency CodesPage Name Definition Name Usage
Currency Code Page CURRENCY_CD_TABLE Define currency codes.
Currency Code PageUse the Currency Code page (CURRENCY_CD_TABLE) to define currency codes.
Navigation
• Set Up <Product Line> > Common Definitions > Currency > Currency Code
• Set Up <Product Line> > Foundation Tables > Currency and Market Rates > Currency Code
• Portal Objects > Navigation Collections > General Ledger Center > Definition and Administration >Currency
68 Copyright © 1988, 2020, Oracle and/or its affiliates.

Chapter 5 Working With Currencies and Market Rates
Image: Currency Code page
This example illustrates the fields and controls on the Currency Code page. You can find definitions forthe fields and controls later on this page.
Note: PeopleTools provides the system data in the currency table, CURRENCY_CD_TBL, and Oracleupdates this data during major releases. You are also expected to update or adjust the system data in thecurrency table for your own needs. Enterprise Components maintains the system data in the country tableand defines a default currency for each country definition. The currency table has a default country code,but that does not apply in the case of a multi-country currency like the Euro.
Use this page to add and maintain currency codes. These currency codes are used to designate currenciesthroughout your PeopleSoft system.
Status Indicate whether the currency code is active or inactive. If youinactivate a currency code that is in use, existing transactions areunaffected. However, the currency code is unavailable for futureselections.
Some PeopleSoft applications do not allow you to inactivate acurrency code that is in use.
Currency Symbol PeopleSoft applications deliver many currencies with a currencysymbol such as $ for Australian dollar (AUD) or £ for Britishpound (GBP). You can enter new symbols for deliveredcurrencies or for currencies that you might add.
Country Select the code for the country from which the currencyoriginates.
Copyright © 1988, 2020, Oracle and/or its affiliates. 69

Working With Currencies and Market Rates Chapter 5
Note: PeopleSoft applications deliver fully populated country, state, and province code tables and update these tables asnational boundaries and designations change.
Decimal Positions Enter the number of decimal positions that should appear in thenotation for the currency. For example, there are two decimalpositions for Australian dollars (500.00 AUD), but no decimalpositions for Japanese yen (500 JPY).
Scale Positions Enter the scale positions you want to round for this currency. This controls how many numbers appear to the left of thedecimal when displayed. The data is actually stored with fullprecision in the database itself.
For example, if you want all million-dollar amounts displayedas the number of millions without the zeros, enter 6 as yourscale position. In this case, 24,000,000 is displayed as 24, but isstored in the database as 24,000,000.
Defining Currency Quotation Methods
This section discusses how to define currency quotation methods.
Page Used to Define Currency Quotation MethodsPage Name Definition Name Usage
Currency Quotation Method Page CURR_QUOTE_PNL Set up and maintain a currency quotationmethod for each from-currency and to-currency pair.
Currency Quotation Method PageUse the Currency Quotation Method page (CURR_QUOTE_PNL) to set up and maintain a currencyquotation method for each from-currency and to-currency pair.
Navigation
Set Up <Product Line> > Foundation Tables > Currency and Market Rates > Currency QuotationMethod
70 Copyright © 1988, 2020, Oracle and/or its affiliates.

Chapter 5 Working With Currencies and Market Rates
Image: Currency Quotation Method page
This example illustrates the fields and controls on the Currency Quotation Method page. You can finddefinitions for the fields and controls later on this page.
A currency quotation method, defined for an exchange rate, stores data that determines how theapplication interprets a visual rate entered by a user (or multiple visual rates, in the case of triangulatedexchange rates) into the RATE_MULT and RATE_DIV values stored on the Market Rate Data table.Conversely, a currency quotation method also determines how the stored RATE_MULT and RATE_DIVvalues are interpreted into the visual rate displayed to the user.
The quotation method can be direct or indirect, and it can be non-triangulated or a triangulated conversionusing a third reference currency. The currency quotation method also determines the quotation units of thefrom-currency.
See Understanding Conversion Factor Fields and the Visual Rate.
It is not necessary to define a currency quotation method for every exchange rate. If, during maintenanceof market rates, no quotation method is found for an exchange rate, the page logic assumes the followingdefaults:
• The exchange rate is direct.
• The quotation units are equal to 1.
• The exchange rate is not triangulated.
Note: This use of default values supports backward compatibility with previous exchange rate data,including calculated reciprocal rates, if your implementation requires them.
Copyright © 1988, 2020, Oracle and/or its affiliates. 71

Working With Currencies and Market Rates Chapter 5
See Understanding Conversion Factor Fields and the Visual Rate.
Note: You can view the currency quotation method for an exchange rate on the Exchange Rate Detailpage while working on the Market Rate page.
See Defining Market Rates.
Direct and Indirect In the Rate Quotation Basis section, indicate whether the ratesfor this currency pair are quoted directly or indirectly. Forexample, when defining a currency quotation method for USDand FRF:
• Select Direct if you want one USD to equal x.xxxx FRF.
• Select Indirect if you want x.xxxx USD to equal one FRF.
Even currency quotation methods for currency pairs thattriangulate must be classified as either direct or indirect. In thiscase, the value is used to display the calculated cross rate.
Support for indirect and direct quotation methods allowsapplications to eliminate use of calculated reciprocal ratesby using a single rate by which you either divide or multiply, depending on whether the conversion method is direct orindirect.
Quote Units Enter a quote unit for the exchange rate, as is common businesspractice for some currencies. This field can have any value, butis usually a power of 10.
Sometimes called scaling factors, quote units are often used topreserve more decimal precision. For example, the exchangerate between Swiss francs (CHF) and Deutsche marks (DEM)may be stated as 100 CHF = 119.335 DEM instead of 1 CHF =1.19335 DEM.
Auto Reciprocate Select to automatically create or update the rate for thereciprocal currency pair on the Market Rate page whenever anexchange rate is added or updated.
For example, if you create a currency quotation method for USDto EUR. The reciprocal currency quotation method for EUR toUSD is automatically created, regardless of this setting.
When you create a rate for USD to EUR on the Market Ratepage, the EUR to USD reciprocal rate is automatically created ifthis Auto Reciprocate option is selected for the currency pair.
If the either rate for the currency pair is updated on the MarketRate page, the reciprocal rate is updated as long as the AutoReciprocate option is selected for one of the currencies in thepair.
72 Copyright © 1988, 2020, Oracle and/or its affiliates.

Chapter 5 Working With Currencies and Market Rates
Triangulate Select to triangulate conversions between this currency pairusing a reference currency.
Reference Currency Enter the reference currency for a triangulated conversion.
Primary Visual Rate With triangulated currency pairs, there are three exchange ratesto consider:
• The rate between the from-currency and the referencecurrency.
• The rate between the reference currency and the to-currency.
• The calculated cross rate between the from-currency and theto-currency.
Select which of these three rates you want as the primary visualrate. This is the rate that displays on the primary pages andreports. For online applications, other components of the ratecan be viewed and modified on the Exchange Rate Detail page.
Allow Override For triangulated currency pairs, select to enable users tooverride the cross rates on the Market Rate page and ExchangeRate Detail page.
Recalculate If the Allow Override option is selected, select to indicate whichof the two other rates should be recalculated to bring the triangleback into balance. Because the triangulated rate is initially acalculated rate, if you allow it to be overridden, the rates that areused to initially calculate this rate must be recalculated.
Defining Market Rates
This section discusses how to define market rates.
Pages Used to Define Market RatesPage Name Definition Name Usage
Market Rate Index Page RT_INDEX_TBL Create market rate indexes, whichprovide a means of organizing marketrates in the PeopleSoft system.
Market Rate Type Page RT_TYPE_TBL Define rate types that further categorizemarket rates. Examples of rate typesinclude current, commercial, floating, average, and historical.
Copyright © 1988, 2020, Oracle and/or its affiliates. 73

Working With Currencies and Market Rates Chapter 5
Page Name Definition Name Usage
Market Rate Page RT_RATE_PNL Maintain and view market rates. Thefields available on the page varydepending on the rate category. Thispage shows the rate definition for anytwo currencies.
Market Rate Definition Page RT_RATE_DEF_TBL Define tolerance limits for rates anddetermine what action occurs if a newrate falls outside the tolerance limit. TheMarket Rate Definition (RT_RATE_DEF_TBL) page shows all of the ratedefinitions for a rate index.
Rate Definition Page RT_RATE_DEF_SEC View market rate definition details, including the maximum variance anderror handling definitions specified forthe currency pair on the Rate Definitionpage.
Exchange Rate Detail Page EXCH_RT_DTL Access exchange rate detail information.
Market Rate Index PageUse the Market Rate Index page (RT_INDEX_TBL) to create market rate indexes, which provide a meansof organizing market rates in the PeopleSoft system.
Navigation
Set Up <Product Line> > Foundation Tables > Currency and Market Rates > Market Rate Index
Image: Market Rate Index page
This example illustrates the fields and controls on the Market Rate Index page. You can find definitionsfor the fields and controls later on this page.
Market rate indexes are stored in the RT_INDEX_TBL table.
74 Copyright © 1988, 2020, Oracle and/or its affiliates.

Chapter 5 Working With Currencies and Market Rates
Index Displays the key term for the highest level of organization formarket rates in the application.
Rate Category Select a general category for the market rate index, such asExchange Rate, Commodity Price, or Interest Rate.
Default Exchange Rate Index Select to indicate that the selected market rate index is thedefault exchange rate index. This field is available only if:
• The Rate Category field is set to Exchange Rate.
• No other index is currently defined as the default exchangerate index.
The Market Rates Index page does not ensure that a defaultmarket rate index has been defined. However, if no default hasbeen defined, the Market Rate Default view does not return anydata.
The Market Rate Definition Default view (RT_DEF_DFLT_VW) selects rows from the Market Rate Definition tablethat have a term of zero and an index defined as the defaultexchange rate index.
Market Rate Type PageUse the Market Rate Type page (RT_TYPE_TBL) to define rate types that further categorize market rates.
Examples of rate types include current, commercial, floating, average, and historical.
Navigation
• Set Up <Product Line> > Foundation Tables > Currency and Market Rates > Currency ExchangeRate Type
• Set Up <Product Line> > Common Definitions > Market Rates > Market Rate Type
Image: Market Rate Type page
This example illustrates the fields and controls on the Market Rate Type page. You can find definitions forthe fields and controls later on this page.
Rate types are stored in the RT_TYPE_TBL edit table. Rate types serve as categories within a market rateindex. For example, some common types of exchange rates are official rate, spot rate, and free marketrate.
Copyright © 1988, 2020, Oracle and/or its affiliates. 75

Working With Currencies and Market Rates Chapter 5
Enter a description and short description to define each market rate type that you use.
Market Rate Definition PageUse the Market Rate Definition page (RT_RATE_DEF_TBL) to define tolerance limits for rates anddetermine what action occurs if a new rate falls outside the tolerance limit.
Navigation
• Set Up <Product Line> > Foundation Tables > Currency and Market Rates > Market Rate Definition
• Set Up <Product Line> > Common Definitions > Market Rates > Market Rate Definition
Image: Market Rate Definition page
This example illustrates the fields and controls on the Market Rate Definition page. You can finddefinitions for the fields and controls later on this page.
This page shows all of the rate definitions for a rate index.
Market rate definitions specify the valid term, currency, and other appropriate field combinations formarket rates. For example, if you have a market rate definition for an exchange rate with a term of 30,a from-currency of CHF, and a to-currency of USD, you can enter a rate using this combination on theMarket Rate page.
If you have not created a market rate definition on this page when you create the a market rate on theMarket Rate page, the system automatically creates one for you using the default values of 2.5 percentmaximum variance and warning message processing.
It is common for applications to support tolerance checking (against user-specified tolerances) in allplaces where exchange rates can be entered or overridden. With the introduction of indirect quotationmethods and quote units, tolerance checking is even more critical to ensure data entry accuracy.
76 Copyright © 1988, 2020, Oracle and/or its affiliates.

Chapter 5 Working With Currencies and Market Rates
Note: The information you see on this page depends on the selected market rate index. For example, ifyou select an index associated with a rate category of Interest Rate, fields on this page display interest-related data.
From Currency Code Enter the from-currency code with which you want to populateall From Currency fields on the page.
Refresh Click to populate the From Currency field with the currency youselected in the From Currency Code field.
Rate DefinitionTerm Enter the desired term expressed in days. A zero term indicates
that the spot rate = zero term. Only PeopleSoft Treasury usesnon-zero terms; all other applications must use a zero term forspot rate.
From Currency In addition to using the From Currency Code field to populateall From Currency field on this page, you can also manuallyenter the appropriate from-currency. This value is used with itsassociated To Currency field value as part of an exchange ratepair. When you use triangulation, include a definition row foreach of the currency pairs involved in the triangulation.
To Currency Enter the appropriate to-currency. This value is used with itsassociated From Currency field value as part of an exchangerate pair.
Maximum Variance Enter the percentage of variance that is allowed when a usermaintains or overrides a market rate. If the change exceeds thetolerance, an error results. The default value is 2.50 (2.5%).
Error Type Select the type of error that results when the defined maximumvariance is exceeded during data entry.
None: No error processing occurs and the new rate is used, evenif it exceeds the maximum variance.
Stop: Processing halts and the system prevents you from savingthe new rate.
Warning: This is the default value. A warning appears that youcan ignore and proceed to save the new rate.
Administrator Max Variance This field is relevant only when Error Type is Stop. The defaultAdministrator Max Variance is 5%.
Note: Administrators can change the market rates greater than2.5%. No user is allowed to update rate changes greater than theAdministrator Max Variance value.
Role Name Name of the role,
Copyright © 1988, 2020, Oracle and/or its affiliates. 77

Working With Currencies and Market Rates Chapter 5
Market Rate PageUse the Market Rate page (RT_RATE_PNL) to maintain and view market rates.
The fields available on the page vary depending on the rate category. This page shows the rate definitionfor any two currencies.
Navigation
• Set Up <Product Line> > Foundation Tables > Currency and Market Rates > Market Rates
• Set Up <Product Line> > Common Definitions > Market Rates > Market Rates
Image: Market Rate page
This example illustrates the fields and controls on the Market Rate page. You can find definitions for thefields and controls later on this page.
Note: The Market Rate page provides the details about the exchange rate between two currencies. TheExchange Rate Detail page is a secondary page of the Market Rate (RT_RATE_PNL) page. After youaccess the Market Rate page, you must click the Exchange Rate Detail icon beside the Rate field on theMarket Rate page to access the Exchange Rate Details page.
The data you enter on this page is stored in the RT_RATE_TBL table that is the common repository for alltypes of market rates including exchange rates and interest rates.
You cannot edit this page if all of the following are true:
78 Copyright © 1988, 2020, Oracle and/or its affiliates.

Chapter 5 Working With Currencies and Market Rates
• The rate is triangulated.
• The primary visual rate is the cross rate.
• The Allow Override option is clear for the exchange rate’s quotation method on the CurrencyQuotation Method page.
Note: When working with interest rates, the From Currency Code and To Currency Code fields maycontain the same field value.
Index Displays the key term for the highest level of organization formarket rates in the application.
Rate Category Displays the general category for the market rate, such asExchange Rate, Commodity Price, or Interest Rate.
Rate Type Displays the selected rate type for this market rate.
Some examples of rate types are commercial, average, floatingand historical.
Term Displays the entered term.
From Currency Code Displays the selected currency that you are converting from.
To Currency Code Displays the selected currency that you are converting to.
Rate Definition Click to access the Rate Definition page and view market ratedefinition details, including the maximum variance and errorhandling definitions specified for the currency pair.
RateEffective Date Enter the date that you are initiating the currency exchange.
Rate Displays the visual rate. If you are working with a triangulatedexchange rate, this field displays the primary visual rate, whichis typically the cross rate, but can also be one of the othercomponent rates of the triangle.
During online maintenance of market rates, you don’t viewor change RATE_MULT and RATE_DIV values directly, butinstead access this visual rate, which is calculated by page logicbased on RATE_MULT, RATE_DIV, and the currency quotationmethod defined for the currency pair on the Currency QuotationMethod page. The visual rate is stored temporarily on a pagework record.
Click the Exchange Rate Detail icon to the right of the Ratefield to access the Exchange Rate Detail (EXCH_RT_DTL)page, where you can view all three visual rates of a triangulatedexchange rate.
Copyright © 1988, 2020, Oracle and/or its affiliates. 79

Working With Currencies and Market Rates Chapter 5
If a quotation method has been defined for the currency pair and the Auto Reciprocate option for thecurrency quotation method is selected, then creating or maintaining a rate for a currency pair on this pageautomatically creates or updates the rate for the reciprocal currency pair. For example, if you change theUSD-to-GBP rate, the GBP-to-USD rate is automatically updated. You can only auto-reciprocate currencypairs for which currency quotation methods have been defined on the Currency Quotation Method page.
See Currency Quotation Method Page.
Note: The results of updating the rate definition do not take effect until you save, close, and reopen theMarket Rate page.
Rate Definition PageUse the Rate Definition page (RT_RATE_DEF_SEC) to view market rate definition details, including themaximum variance and error handling definitions specified for the currency pair on the Rate Definitionpage.
Navigation
Click the Rate Definition link on the Market Rate page.
Image: Rate Definition page
This example illustrates the fields and controls on the Rate Definition page. You can find definitions forthe fields and controls later on this page.
Exchange Rate Detail PageUse the Exchange Rate Detail page (EXCH_RT_DTL) to access exchange rate detail information.
Navigation
Click the Exchange Rate Detail icon on the Market Rate page.
80 Copyright © 1988, 2020, Oracle and/or its affiliates.

Chapter 5 Working With Currencies and Market Rates
Image: Exchange Rate Detail page
This example illustrates the fields and controls on the Exchange Rate Detail page. You can finddefinitions for the fields and controls later on this page.
The primary record for this page is the Exchange Rate work record. For triangulated rates, you can updaterate values for all three components of the triangulated rate.
Rate Quotation Basis Displays the quotation basis for the exchange rate as defined inthe Currency Quotation Method page.
Quote Units Displays the quote units for the exchange rate as defined in theCurrency Quotation Method page.
Triangulate Displays the triangulation setting for the exchange rate asdefined in the Currency Quotation Method page.
Reference Currency For triangulated exchange rates, displays the reference currencyused in the triangulated exchange.
Current Quote Displays the current exchange rate used to convert the from-currency to the to-currency.
For a direct, non-triangulated rate, this field displays quoteunits (or 1) to the left side of the equal sign and the visual rateon the right. For example:
1 USD = 1.40000000 CAD
Copyright © 1988, 2020, Oracle and/or its affiliates. 81

Working With Currencies and Market Rates Chapter 5
For an indirect, non-triangulated rate, this field displays thevisual rate to the left of the equal sign and quote units (or 1) onthe right. For example:
1.400000000 CAD = 1 USD
For a triangulated rate, this field displays the two componentrates of the triangle: the rate for converting the from-currencyto the reference currency (USD to EUR) and the rate forconverting the reference currency to the to-currency (FRF toEUR). For example:
1.25 USD = 1 EUR = 6.8 FRF
Historic Quote If page logic determines that the exchange rate, as stored in thedatabase, is inconsistent with the current quotation method, thisfield displays a quote based on the current quotation method, instead of the quotation method active on the rate effective date.
Data provided in the historic quote field allows you to see howthe exchange rate has changed over time, using a consistentquotation method, even if the quotation method has actuallychanged.
For example, if you are viewing a historical rate where FRFwas converted to USD directly using a calculated reciprocalrate of 1 FRF = 0.1470588 USD and the current quotationmethod for this currency pair is indirect, the conversion functionrecalculates the visual rate based on indirect quotation, that is 6.8000001 FRF = 1 USD.
This field also displays a quote if the historic quote method wasnon-triangulated and the current quote method is triangulated.
A historic quote is also displayed if you override a cross rateand bypass triangulation, because the exchange rate being usedis inconsistent with the current quotation method.
If the system determines that the exchange rate is consistentwith the current quotation method, the field displays NotApplicable.
Exchange Rate Displays a single visual rate for non-triangulated exchange rates, or all three component visual rates for triangulated exchangerates. You can edit the cross rate for triangulated exchangerates only if the Allow Override option box is selected for theexchange rate on the Currency Quotation Method page.
82 Copyright © 1988, 2020, Oracle and/or its affiliates.

Chapter 5 Working With Currencies and Market Rates
Calculating Cross, Triangulated, and Reciprocal Rates
This section discusses how to run the EOP_RATECALC Application Engine process to calculate cross,triangulated, and reciprocal rates.
Page Used to Run the EOP_RATECALC ProcessPage Name Definition Name Usage
Calculate Cross/Reciprocal Rate -Parameters Page
RUN_EO9030 Set run control parameters and runthe EOP_RATECALC ApplicationEngine process that calculates cross, triangulated, and reciprocal rates.
Understanding the EOP_RATECALC ProcessRun the EOP_RATECALC process to calculate rates and update the market rates table.
The process performs three functions:
• Generates cross rates for non-triangulated currency pairs.
For example, an organization subscribes to a rate service that provides all rates respective to USD.Starting with a USD to Canadian dollar rate and a USD to Mexican peso rate, the system can calculatea new Canadian dollar to Mexican peso cross rate.
• Generates triangulated rates for triangulated currency pairs.
For example, the EUR to an EPC (euro participating currency) fixed rate has been established onthe market rate table and a new EUR to USD rate has just been entered. Using this information, theprocess can create a new USD to EPC triangulated rate. The difference between triangulated rates andcross rates affects how the data is stored in the database. When calculating a cross rate, you actuallycreate a new rate. When calculating a triangulated rate, the individual components of the source ratesare stored on the target.
• Generates reciprocal rates for those currency pairs that are not automatically reciprocated.
For example, using a USD to CAD rate as the source, the process calculates the CAD to USDreciprocal. If currency quote methods are in place, the visual rate remains the same and there is adifference in how the data is stored in the database (RATE_MULT and RATE_DIV are inverse). Ifcurrency quote methods are not used, the process actually calculates an inverse rate, meaning that thevisual rates will differ.
Calculate Cross/Reciprocal Rate - Parameters PageUse the Calculate Cross/Reciprocal Rate - Parameters page (RUN_EO9030) to set run control parametersand run the EOP_RATECALC Application Engine process that calculates cross, triangulated, andreciprocal rates.
Copyright © 1988, 2020, Oracle and/or its affiliates. 83
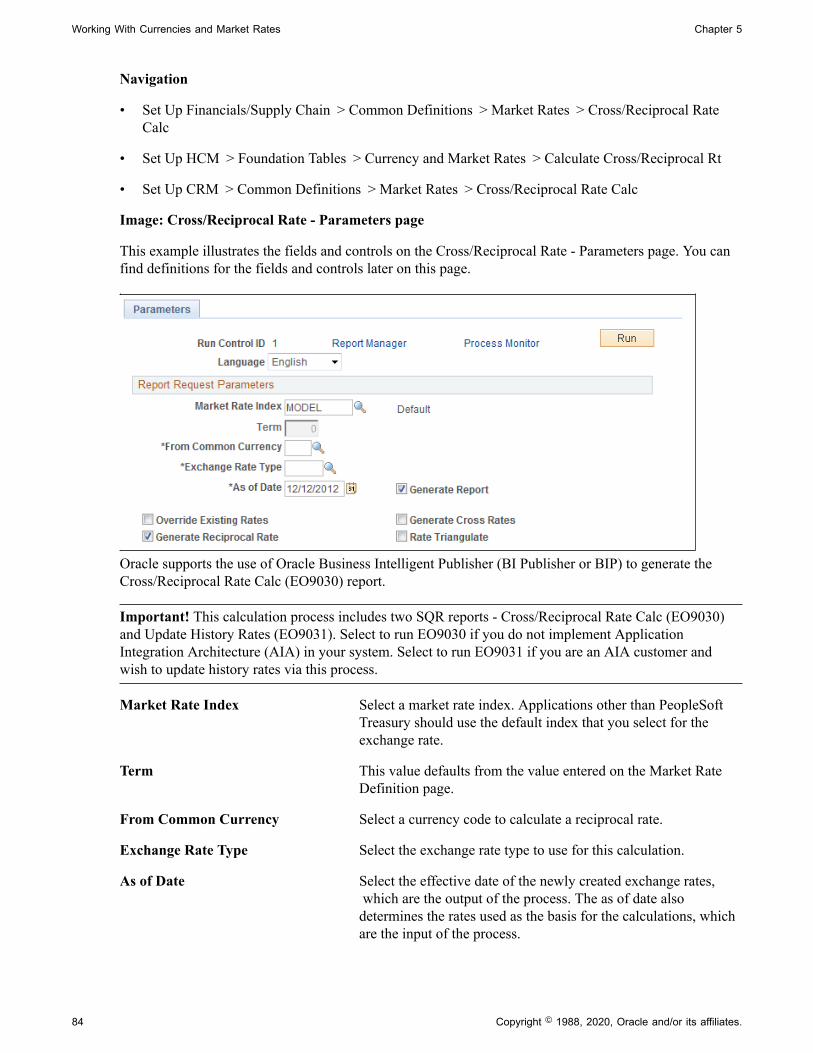
Working With Currencies and Market Rates Chapter 5
Navigation
• Set Up Financials/Supply Chain > Common Definitions > Market Rates > Cross/Reciprocal RateCalc
• Set Up HCM > Foundation Tables > Currency and Market Rates > Calculate Cross/Reciprocal Rt
• Set Up CRM > Common Definitions > Market Rates > Cross/Reciprocal Rate Calc
Image: Cross/Reciprocal Rate - Parameters page
This example illustrates the fields and controls on the Cross/Reciprocal Rate - Parameters page. You canfind definitions for the fields and controls later on this page.
Oracle supports the use of Oracle Business Intelligent Publisher (BI Publisher or BIP) to generate theCross/Reciprocal Rate Calc (EO9030) report.
Important! This calculation process includes two SQR reports - Cross/Reciprocal Rate Calc (EO9030)and Update History Rates (EO9031). Select to run EO9030 if you do not implement ApplicationIntegration Architecture (AIA) in your system. Select to run EO9031 if you are an AIA customer andwish to update history rates via this process.
Market Rate Index Select a market rate index. Applications other than PeopleSoftTreasury should use the default index that you select for theexchange rate.
Term This value defaults from the value entered on the Market RateDefinition page.
From Common Currency Select a currency code to calculate a reciprocal rate.
Exchange Rate Type Select the exchange rate type to use for this calculation.
As of Date Select the effective date of the newly created exchange rates, which are the output of the process. The as of date alsodetermines the rates used as the basis for the calculations, whichare the input of the process.
84 Copyright © 1988, 2020, Oracle and/or its affiliates.

Chapter 5 Working With Currencies and Market Rates
The report uses the most current currency quotation method forthe currency pair as the input to the process. If the as of dateis the current effective rate on the specified date, it can affecttriangulation. For example, a USD to EPC (euro participatingcurrency) triangulated rate effective April 1, 2004 might becomprised of the EUR to USD rate also effective April 1, 2004and the fixed EUR to an EPC rate effective on the date thenewly participating EPC officially becomes a euro participatingcurrency.
Generate Report Select to generate a report that displays the cross, triangulated, and reciprocal rate calculations performed by the process.
Override Existing Rates Select to have the calculated rates override rates for theexchange rate type, regardless of the as of date.
Generate Reciprocal Rate Select to calculates reciprocal rates for currency pairs that donot have the Auto Reciprocate option select on the CurrencyQuotation Method page.
You can select this option alone, or in combination with theGenerate Cross Rates and Rate Triangulate options.
This process does not directly manipulate the exchange rates. The system uses numerator and denominator values instead, such that the following is true:
(from-currency / RATE_DIV) × RATE_MULT = to-currency
Fro example, suppose you want a reciprocal rate between USDand CHF and assume a two-to-one ratio. If the exchange ratefor USD to CHF is quoted directly (either using a direct quotemethod that you selected or using the system default), this rateis stored as RATE_MULT = 2 and RATE_DIV = 1. The rate isrepresented as 1 USD = 2 CHF, with a visual rate of 2.
In turn, the CHF to USD rate must be indirect. The reciprocalis a simple exchange, storing the rate as RATE_MULT = 1 andRATE_DIV = 2. The visual rate remains 2.
If quote methods are not being used, the CHF to USD rate mustbe quoted directly (the default), so the reciprocal rate is actuallya calculated inverse. This rate is stored as RATE_MULT = 0.5and RATE_DIV = 1, with a visual rate of 0.5.
In this example between USD and CHF, using a quote methodand using a calculated inverse produced the same end result, 1/2equals 0.5. But in actual practice, the manipulation of exchangerates is a major task and is one of the reasons for establishingthe currency quote method.
Generate Cross Rates Select to automatically generate cross rates. For example, togenerate cross currency rates for USD, CAD, and MXP, youenter USD to CAD = 1.473 and USD to MXP = 9.8793. The
Copyright © 1988, 2020, Oracle and/or its affiliates. 85

Working With Currencies and Market Rates Chapter 5
system automatically generates CAD to MXP = 9.8793/1.473 =6.7069246.
If you choose to generate cross rates, the From Cur (from-currency) and To Cur (to-currency) fields display and you mustselect a from-currency and a to-currency. You can enter a wildcard of % in either or both fields to indicate from all or to allcurrencies.
Rate Triangulate Select to convert two currencies through a third currency.
Select to convert two currencies through a third currency. If youselect Rate Triangulate, the From Cur (from-currency) and ToCur (to-currency) fields display and you must select a from-currency and a to-currency. You can enter a wild card of % ineither or both fields to indicate from all or to all currencies.
Quote Method Required Select to indicate that you want the process to perform selectedcalculations only if the currency pairs have an existing currencyquotation method definition.
Using the Currency Exchange Calculator
This section discusses how to convert amounts using the currency exchange calculator.
Page Used to Convert Amounts Using the Currency Exchange CalculatorPage Name Definition Name Usage
Currency Exchange Calculator Page CURRENCY_EXCHNG_PN Calculate currency exchange betweencurrencies.
This tool enables you to select a rate typeother than the base currency, but does notenable you to override the exchange rate.
Currency Exchange Calculator PageUse the Currency Exchange Calculator page (CURRENCY_EXCHNG_PN) to calculate currencyexchange between currencies.
This tool enables you to select a rate type other than the base currency, but does not enable you tooverride the exchange rate.
Navigation
• Set Up <Product Line> > Foundation Tables > Currency and Market Rates > Currency ExchangeCalculator
• Set Up <Product Line> > Common Definitions > Currency > Currency Exchange Calculator
86 Copyright © 1988, 2020, Oracle and/or its affiliates.

Chapter 5 Working With Currencies and Market Rates
Image: Currency Exchange Calculator page
This example illustrates the fields and controls on the Currency Exchange Calculator page. You can finddefinitions for the fields and controls later on this page.
From Amount The currency exchange is based on the from amount that youenter and the current exchange rate set up on the Market Ratepage.
See Defining Market Rates.
From Currency Code Select the currency code from which to calculate the exchangeamount.
To Currency Code Select the currency code to which to calculate the exchangeamount.
Exchange Rate Type Select the type of exchange rate to use for this calculation.
Converted Amount Click the Calculate button to calculate the amount and display itin this field.
Copyright © 1988, 2020, Oracle and/or its affiliates. 87

Working With Currencies and Market Rates Chapter 5
88 Copyright © 1988, 2020, Oracle and/or its affiliates.

Chapter 6
Working With PeopleSoft Forms andApproval Builder
Understanding PeopleSoft Forms and Approval Builder
The Forms and Approval Builder enables you to design online forms, specify the approval process theyrequire, and deploy them to users within your organization. Use this feature to convert manual procedureswithin your organization to paperless processes that include workflow-based approvals and an audit trailfor tracking progress. No coding is required on your part, and future upgrades to your PeopleSoft systemwill not require you to update these forms, since the forms you create are not customizations.
Once a form is published, users navigate to the form using the main menu, complete the fields and submitit for approval. Each published form includes three tabs: Form, Instructions, and Attachments. An audittrail of the approval history and comments is automatically generated as the form goes through theapproval process. You can review the audit trail to see the history for each step of the approval chain.
Form DesignTo create forms, you use the Design Form Wizard component (FORM_DESIGN_WIZARD), whichguides you through the following steps of the form creation process:
• Defining the basic information for a form, including the form ID and form owner.
• Providing instructions that describe how to use the form.
• Specifying the fields that appear on the form.
• Attaching files to the form (optional).
• Defining the menu item that is used to access the form.
• Specifying the approval workflow that is required for the form.
• Previewing, testing, and activating the form.
Forms can contain fields arranged into one or two columns. You can specify which fields are required,and define the edits that a field must pass in order for the completed form to be saved. As you design theform, you can use the following field types:
• Numeric
• Text
• Date
• Time
• Yes/No
Copyright © 1988, 2020, Oracle and/or its affiliates. 89

Working With PeopleSoft Forms and Approval Builder Chapter 6
• Prompt
Enables form users to select values from existing PeopleSoft records to complete the field.
• Code
Enables you to build a list of values that appear in a drop-down list. Form users can select a valuefrom the list to complete the field.
• Section
Enables you to organize the form into multiple sections.
Form StatusIt is important to understand the distinction between a form and a form instance. For the purposes of thisdocumentation, when we use the term form, we are referring to the “master” form, or template, that formdesigners create using the Form Design Wizard component. A form instance is a deployed form that hasbeen completed by a form user. Each form instance is automatically assigned a unique sequence number,so all completed forms can be tracked and managed independently.
The possible status values for a form are:
In Design Indicates a form that is being designed, and is not active.
Activated Indicates a form that is active and available for form users tocomplete.
Depending on your user role, you can activate a form using thefollowing pages:
• Design Form: Complete page of the Form Design Wizardcomponent.
• Manage Forms page.
Note: Only the owner of a form or a form administrator canactivate/inactivate a form or reassign a form to a new owner.
Inactive Indicates a form that has been inactivated by either the form'sowner or a form administrator. Form administrators or formowners can inactivate forms by using the Manage Formspage. When a form is inactive, form users are not permitted tocomplete the form.
The possible status values for a form instance are:
Initial When a form user accesses an activated form and begins tocomplete it, the status of the form instance is set to Initial.
Pending When the form user finalizes the form instance and submits itfor approval, the status changes to Pending.
On Hold When an approver or reviewer requests more information abouta submitted form, the status changes to On Hold.
90 Copyright © 1988, 2020, Oracle and/or its affiliates.

Chapter 6 Working With PeopleSoft Forms and Approval Builder
Approved, Denied, or Cancelled As the form instance flows through the required approvalchain, the status subsequently updates to approved, denied, orcancelled.
Security and Delivered RolesUser roles determine who has permission to access, design, and administer forms. The following tablelists the delivered roles and associated permission lists for Form and Approval Builder.
Role Name Description Permission Lists Access Rights
FORM_USER Form user:
Can complete and submit forms.
EOFM1000 The form user has add/update/displayaccess to forms that have been createdwith the Form Design Wizard (forminstances).
FORM_DESIGNER Form designer:
Can complete and submit forms, design forms, and manage formsthat they are assigned to as theowner.
EOFM1000
EOFM2000
The form designer has add/update/display access to forms that have beencreated with the Form Design Wizard,and has add/update/display access to theForm Design Wizard component.
Form designers have update/displayaccess to only their forms when usingthe Manage Forms (FORM_RPT)component.
FORM_ADMIN Form administrator:
Can complete and submit forms, design forms, and manage allforms.
EOFM1000
EOFM2000
EOFM3000
EOSD2000
The form administrator has the sameaccess as the form designer, andadditionally, has update/display accessto all forms when using the ManageForms (FORM_RPT) component.
FORM_CI_DEVELOPERS
Form to component interface (CI) developer:
Can complete and submit forms, design forms, manage all forms, and map forms to componentinterfaces (integrate forms).
EOFM1000
EOFM2000
EOFM3000
EOFM4000
EOSD2000
The form to CI developer has the sameaccess as the form administrator, and inaddition can set up form integration bymapping forms to component interfacesusing the Forms to CI Mapping page.
Row level security is enforced on the completed forms; only the form's owner or approver/reviewer canaccess the form instance.
Note: A security administrator will need to update existing User IDs and/or create new User IDs toinclude the appropriate roles before those users begin working with Form and Approval Builder.
See PeopleTools: Security Administration, “Administering User Profiles”.
Copyright © 1988, 2020, Oracle and/or its affiliates. 91

Working With PeopleSoft Forms and Approval Builder Chapter 6
RequirementsForm and Approval Builder is available only on the Employee portal.
Related Links"Understanding Approval Features" (PeopleSoft 9.2: Approval Framework)
Designing Forms
This section describes designing forms using the Form Design Wizard component(FORM_DESIGN_WIZARD).
Note: Access to the Form Design Wizard component is limited to form designers and formadministrators. In addition, only form owners can modify existing forms.
Pages Used to Design FormsPage Name Definition Name Usage
Design Form - Step 1: Basic InformationPage
FORM_DSN_WZR_MAIN Define a form's basic information.
Design Form - Step 2: Instructions Page FORM_DSN_WZR_INST Provide instructions for users thatdescribe how to complete and submit aform.
Design Form - Step 3: Form Fields Page FORM_DSN_WZR_FLDS Define the fields that appear on the form.
Form Field Edits Page FORM_L_FLD_SEC Define additional requirements for fields.
Design Form - Step 4: AttachmentTemplates Page
FORM_DSN_WZR_ATCH Associate file attachments with a form.
Design Form - Step 5: Publish to MenuPage
FORM_DSN_WZR_PRTL Specify the menu location for a form.
Design Form - Step 6: Approval ProcessPage
FORM_DSN_WZR_AW Assign the approval workflow requiredfor a form.
Design Form: Complete Page FORM_DSN_WZR_DONE Preview and activate or redesign a form.
Design Form - Step 1: Basic Information PageUse the Design Form - Step 1: Basic Information page (FORM_DSN_WZR_MAIN) to define a form'sbasic information.
Navigation
Enterprise Components > Forms > Design a Form
92 Copyright © 1988, 2020, Oracle and/or its affiliates.

Chapter 6 Working With PeopleSoft Forms and Approval Builder
Image: Design Form - Step 1: Basic Information page
This example illustrates the fields and controls on the Design Form - Step 1: Basic Information page. Youcan find definitions for the fields and controls later on this page.
Form The unique identifier for the form. You specify this ID whenyou add a new form.
Status Lists the current status of the form. The value for this field isautomatically assigned. Values are:
• In Design: Indicates the form is being designed and has notyet been published.
• Activated: Indicates the form's design is complete, and theform has been published.
• Inactive: Indicates a form that has been inactivated by eitherthe form's owner or a form administrator.
Form administrators or form owners can inactivate formsby using the Manage Forms page. When a form is inactive, form users are not permitted to complete the form.
Effective Date From Enter the date the form is first available for use.
Effective Date To Enter the date the form expires. Leave this field blank if youintend to use the form indefinitely.
Label Enter a label for the menu item that users will select to accessthe form.
Names can contain only alphanumeric and underscorecharacters.
Long Description Enter a description for the form. The description appears belowthe form's label when users access the published form.
Owner Id Enter the User ID of the person who is the responsible for theform. Only this person can modify the form design.
Copyright © 1988, 2020, Oracle and/or its affiliates. 93

Working With PeopleSoft Forms and Approval Builder Chapter 6
Design Form - Step 2: Instructions PageUse the Design Form - Step 2: Instructions page (FORM_DSN_WZR_INST) to provide instructions forusers that describe how to complete and submit a form.
Navigation
Click Next on the Design Form - Step 1: Basic Information page of the Forms Design Wizard.
Image: Design Form - Step 2: Instructions page
This example illustrates the fields and controls on the Design Form - Step 2: Instructions page. You canfind definitions for the fields and controls later on this page.
Enter instructions for completing the form using the HTML editor. Use the toolbar buttons to copy andpaste, format text, and insert graphics or links.
Design Form - Step 3: Form Fields PageUse the Design Form - Step 3: Form Fields page (FORM_DSN_WZR_FLDS) to define the fields thatappear on the form.
Navigation
Click Next on the Design Form - Step 2: Instructions page of the Forms Design Wizard.
94 Copyright © 1988, 2020, Oracle and/or its affiliates.

Chapter 6 Working With PeopleSoft Forms and Approval Builder
Image: Design Form - Step 3: Form Fields page
This example illustrates the fields and controls on the Design Form - Step 3: Form Fields page. You canfind definitions for the fields and controls later on this page.
Insert rows within the Left Column and Right Column grids to define the fields that appear on the left andright columns of the form.
For each row, specify values for the following parameters to define the requirements for that field.
Label Enter the label to use for this field.
Use Type Select the field type, and field length, if required (depends onthe Use Type). Values are:
Code: Use to define a code field that allows the form user toselect a response from a list of codes.
Date: Use for dates.
Number: Use for numeric entries (only positive values areallowed).
Prompt: Defines a prompt field that allows the user to selectdata from existing PeopleSoft database tables.
Section: Use to separate a form into sections. The section caninclude a header with instructive text, and an HTML editor isprovided for you to define the section.
Signed: Use for signed numeric entries (values can be positiveor negative).
Text: Use for text entries.
Copyright © 1988, 2020, Oracle and/or its affiliates. 95

Working With PeopleSoft Forms and Approval Builder Chapter 6
Time: Use for time entries.
Y/N: Use for yes/no responses.
Length Select the field length. You can modify this field only forNumber, Prompt, Signed, and Text fields; the remaining fieldtypes use a preset length.
The syntax for numeric fields is X.Y, where the value before thedecimal (X) is the number of integer digits allowed, the valueafter the decimal (Y) is the number of decimal places allowed.
Field Status Indicates the status of the field, either Activated or In Design.
Details Click to access the Form Fields Details page, where you defineadditional requirements for the field, including whether the fieldis required, and edits for the field when a user completes theform.
See Form Field Edits Page.
and Click the arrow icons to reposition a field.
Move to Right Column Click to move selected fields to the right column.
Move to Left Column Click to move selected fields to the left column.
Single column style Select to create a form that contains a single column. Any fieldsthat are defined in the right column will appear under the leftcolumn fields when you view the form.
Form Field Edits PageUse the Form Field Edits page (FORM_L_FLD_SEC) to define additional requirements for fields.
Navigation
Click the Details link for a field on the Design Form - Step 3: Form Fields page.
96 Copyright © 1988, 2020, Oracle and/or its affiliates.

Chapter 6 Working With PeopleSoft Forms and Approval Builder
Image: Form Field Edits page displaying an example for a prompt field
This example illustrates the fields and controls on the Form Field Edits page example for a prompt field.You can find definitions for the fields and controls later on this page.
Copyright © 1988, 2020, Oracle and/or its affiliates. 97

Working With PeopleSoft Forms and Approval Builder Chapter 6
Image: Form Field Edits page displaying an example for a code field
This example illustrates the fields and controls on the Form Field Edits page example for a code field.You can find definitions for the fields and controls later on this page.
The fields that appear on this page differ depending on the field's Use Type. The examples providedshow how the page appears for a Prompt field and a Code field. The following information lists all of thepossible fields that can appear on this page.
Required Select to require that a user enter a value in this field in order tosave the form.
Uppercase (available only when theUse Type is set to Prompt or Text).
Select to have the system convert the field value to uppercasewhen the form is saved. Available for only Prompt and Textfields. Use this option for code values, such as department ID, for which it does not matter whether the user enters the value inuppercase or lowercase.
Long Label Enter up to 100 characters as an alternate label for this field. Ifyou enter a long label, then it will be appear on the form insteadof the short label (the value specified in the Label field on theDesign Form - Step 3: Form Fields page).
98 Copyright © 1988, 2020, Oracle and/or its affiliates.

Chapter 6 Working With PeopleSoft Forms and Approval Builder
Prompt Record and SetID (availableonly when the Use Type is set toPrompt)
Select the record that contains the values to use for this field.For SetID based tables, specify the SetID from which to retrievethe values. To complete this field type, a form user can selectone of the values from the prompt list, or they can enter a valueby typing it into the field.
The records that are available for selection are established byform administrators using the Define Prompt Records page.
See Defining Prompt Records.
Prompt Control (available for all UseTypes except Section)
To use the value that a form user enters for this field as the keyby which to filter the list of available values in one or moreprompt fields elsewhere on this form, insert rows in the PromptControl grid, and select the Record Name and Field Name foreach of the form fields that will reference this field.
For example, to limit the Project IDs available in a prompt fieldto only those that are associated with the business unit that theuser has already selected while completing the form, whendesigning the form you would:
• Add a row to the Business Unit field’s Prompt Controlgrid and specify the record name that equates to the projectrecord, and the field name in that record that equates tobusiness unit.
• Define the Project ID field as a Prompt field, and specifythe same record name that was used for the business unitPrompt Control record name as the prompt record forProject ID. Note: leave the Prompt Control grid empty.
The records that are available for selection are established byform administrators using the Define Prompt Records page.
See Defining Prompt Records.
Field Value and Translate Long Name(appear only when the Use Type is setto Code)
Use to define the codes and their associated translate values thatare valid for this field. The translate values appear in the drop-down list when the user completes the field.
Design Form - Step 4: Attachment Templates PageUse the Design Form - Step 4: Attachment Templates page (FORM_DSN_WZR_ATCH) to associate fileattachments with a form.
Navigation
Click Next on the Design Form - Step 3: Form Fields page of the Forms Design Wizard.
Copyright © 1988, 2020, Oracle and/or its affiliates. 99

Working With PeopleSoft Forms and Approval Builder Chapter 6
Image: Design Form - Step 4: Attachment Templates page
This example illustrates the fields and controls on the Design Form - Step 4: Attachment Templates page.You can find definitions for the fields and controls later on this page.
Attach Click to attach a file. In the window that appears, click theBrowse button to navigate to and select the file, then click theUpload button.
Description Enter a description for the file. If you leave this blank, the filename is used.
Attached File Displays the file name of the attached file.
Open Click to open the attached file.
Design Form - Step 5: Publish to Menu PageUse the Design Form - Step 5: Publish to Menu page (FORM_DSN_WZR_PRTL) to specify the menulocation for a form.
Navigation
Click Next on the Design Form - Step 4: Attachment Templates page of the Forms Design Wizard.
100 Copyright © 1988, 2020, Oracle and/or its affiliates.

Chapter 6 Working With PeopleSoft Forms and Approval Builder
Image: Design Form - Step 5: Publish to Menu page (1 of 2)
This example illustrates the fields and controls on the Design Form - Step 5: Publish to Menu page (1 of2). You can find definitions for the fields and controls later on this page.
Image: Design Form - Step 5: Publish to Menu page (2 of 2)
This example illustrates the fields and controls on the Design Form - Step 5: Publish to Menu page (2 of2). You can find definitions for the fields and controls later on this page.
The menu hierarchy appears near the top of the page, below the form name; the highest level, Root,is equivalent to Main Menu in the menu hierarchy. Click the links to navigate to the level of the menuhierarchy in which you want the form to appear. Then, enter a value in the Sequence number to controlthe order in which it appears in the menu. In the example shown, the form will appear as the last itemunder Main Menu, Manager Self-Service, along with Review Forecasted Time and Travel and ExpenseCenter.
Sequence number Enter a value to specify the order within the menu that the formwill appear. Items appear in ascending order.
Copyright © 1988, 2020, Oracle and/or its affiliates. 101

Working With PeopleSoft Forms and Approval Builder Chapter 6
Folders This grid lists the folders at the currently selected menu level,and their associated sequence number. Click a folder to navigateto that folder level of the menu hierarchy.
Content References This grid lists the available components at the selected level ofthe menu hierarchy and their associated sequence number. Thisis the level at which the form will appear in the menu.
Note: Only the components that your assigned role permits youto access appear in the grid.
Design Form - Step 6: Approval Process PageUse the Design Form - Step 6: Approval Process page (FORM_DSN_WZR_AW) to assign the approvalworkflow required for a form.
Navigation
Click Next on the Design Form - Step 5: Publish to Menu page of the Forms Design Wizard.
Image: Design Form - Step 6: Approval Process page
This example illustrates the fields and controls on the Design Form - Step 6: Approval Process page. Youcan find definitions for the fields and controls later on this page.
Lockdown Options Specify if a form instance can be modified after it has beensubmitted, and under what conditions. Values are:
• Do not Lockdown: Select this option to allow changes to bemade to the form instance at any time. This option enablesusers to update a form even after it has been submitted andapproved.
• Lockdown after submit: Select this option to prevent anychanges to the form instance after it has been submitted (theapproval status is Pending, or Approved.)
• Lockdown after approval: Select this option to prevent anychanges to the form instance after it has been approved (theapproval status is Approved). Changes can still be madeafter it has been submitted, up until the time it is approved.
102 Copyright © 1988, 2020, Oracle and/or its affiliates.

Chapter 6 Working With PeopleSoft Forms and Approval Builder
Note: If a form is integrated with PeopleSoft applications, theform cannot be modified after it has been posted to PeopleSofttransactional tables.
Approver User List Insert rows and select the Approver User Lists required forthis form. Approver paths must be sequential, branching is notsupported.
Approver user lists are established using the User List Definition page (EnterpriseComponents >Approvals > Approvals > User List Setup).
See "Defining Users for Approval Framework" (PeopleSoft 9.2: Approval Framework)
After you have specified all the required Approver User Lists, click OK. The system automatically createsthe approval Process Definition ID using the same name as the form name.
The predefined form approval configuration supports the following notification events: Route forApproval, Route for Review, On Final Approval and On Final Denial.
Design Form: Complete PageUse the Design Form: Complete page (FORM_DSN_WZR_DONE) to preview and activate or redesign aform.
Navigation
Click OK on the Design Form - Step 6: Approval Process page.
Image: Design Form: Complete page
This example illustrates the fields and controls on the Design Form: Complete page. You can finddefinitions for the fields and controls later on this page.
This page enables you to preview your form, modify it, if needed, and activate it when you've finalizedthe design by using the following links:
Preview the form Click to preview the form. A preview of the designed formappears, as the user would see it when they complete the form. Navigate within the form to preview each page, and interactwith the form fields to test them.
Note: Enable Runtime" is necessary for ‘Preview the form’.
Copyright © 1988, 2020, Oracle and/or its affiliates. 103

Working With PeopleSoft Forms and Approval Builder Chapter 6
Redesign the form Click to return to the Form Design Wizard component, whereyou can continue designing the form.
Activate the form Click to activate and publish the form. A confirmation messageappears. The form status updates to Activated.
Defining Prompt Records
This section discusses how to specify which PeopleSoft database records can be used as prompt fields inForm and Approval Builder. Access to this page is limited to form administrators.
Page Used to Specify Prompt RecordsPage Name Definition Name Usage
Define Prompt Records Page FS_SD_PROMPTREC Specify records for prompt fields.
Define Prompt Records PageUse the Define Prompt Records page (FS_SD_PROMPTREC) to specify records for prompt fields.
Navigation
Enterprise Components > Forms > Define Prompt Records
Image: Define Prompt Records page
This example illustrates the fields and controls on the Define Prompt Records page. You can finddefinitions for the fields and controls later on this page.
Prompt Record Insert rows and select a database record. Only the recordsspecified on this page are available for selection as prompt fieldsand prompt control fields in the form designer.
Managing Forms
This section provides an overview of form management and discusses how to manage forms.
104 Copyright © 1988, 2020, Oracle and/or its affiliates.

Chapter 6 Working With PeopleSoft Forms and Approval Builder
Page Used to Manage FormsPage Name Definition Name Usage
Manage Forms Page FORM_RPT Manage forms.
Understanding Form ManagementForm designers and form administrators can review and manage forms using the Form Managementcomponent. Use this page to review how many of each form are in the system, see the current approvalstatus, and activate/inactivate forms. This component works like most inquiry pages; first specify thesearch criteria, then click the Search button to retrieve the forms that meet the criteria. Data is categorizedinto the following tabs: Action, Counting, and Owner.
Form designers can access only forms that they are assigned to as owner, form administrators can accessall forms.
Manage Forms PageUse the Manage Forms page (FORM_RPT) to manage forms.
Navigation
Enterprise Components > Forms > Manage Forms
Image: Manage Forms page
This example illustrates the fields and controls on the Manage Forms page. You can find definitions forthe fields and controls later on this page.
Search CriteriaEnter values in the following fields, then click Search to retrieve form information:
Portal Label Enter the form's label (the menu item name under which it ispublished) to view only the subset of forms that have beenpublished to that menu. This is equivalent to the field “Label”when you design a form. Leave this blank to review informationfor all of your forms.
Time Period Select the time period to use for determining form instancecount totals.
Copyright © 1988, 2020, Oracle and/or its affiliates. 105

Working With PeopleSoft Forms and Approval Builder Chapter 6
Values are:
• Custom Time Period
Select this option to review forms within a specific daterange. Specify the dates by completing the From Date andTo Date fields.
• Last 30 Days
• Last 60 Days
• Last 90 Days
Form FieldsThese form fields appear on each tab:
Form The Form ID that was defined in the Form Design Wizardcomponent when the form was created.
Portal Label The menu item used for the form. This is the value of the Labelfield that was specified on the Form Design Wizard: BasicInformation page during form design.
Portal Folder The name of the folder the form is published under.
Status The form's current activation status, either Activated or InDesign.
Activating/Inactivating FormsSelect the Action tab to activate or inactivate forms.
Activate Click this button to activate an inactive form. If the form'scurrent status is In Design, the system transfers you to the FormDesign Wizard component, where you can complete the formdesign and then activate it.
Inactivate Click this button to inactivate an active form.
Reviewing Form CountsSelect the Counting tab to review form counts for the specified time period.
Total Lists the total number of form instances (forms that have beencompleted by form users).
Initial Lists the number of form instances that have been completed byform users, but have not yet been submitted for approval.
Pending Lists the number of form instances that have been submitted forapproval but have not yet been approved, denied, or cancelled.
106 Copyright © 1988, 2020, Oracle and/or its affiliates.

Chapter 6 Working With PeopleSoft Forms and Approval Builder
Cancelled Lists the number of form instances that have been cancelled.
Approved Lists the number of form instances that have been approved.
Denied Lists the number of form instances that have been denied.
Reassigning Form OwnershipSelect the Ownership tab to reassign a form to a new owner.
Owner ID Lists the current owner. To change ownership, select a newowner from the prompt list.
Change Ownership Click to assign the user listed in Owner ID as the new owner ofthe form.
Working with Forms
This section describes how to work with forms.
Pages Used to Work with FormsPage Name Definition Name Usage
Search/Fill a Form Page FORM_ADD Search for an existing form instance toupdate, or complete a new form instance.
Form Page FORM
FORM2
Complete a form instance and submit itfor approval.
<Portal label (approval preview)> Page FORM_APPR_MAP Preview the approval path for a form.
Instructions Page FORM_INSTR Review form instructions if needed.
Attachments Page FORM_ATCH Download and upload attachments to theform if needed.
Form Approval Page FORM_APPR_ACTION Approve or deny a form.
Search/Fill a Form PageUse the Search/Fill a Form page (FORM_ADD) to search for an existing form instance to update, orcomplete a new form instance.
Copyright © 1988, 2020, Oracle and/or its affiliates. 107

Working With PeopleSoft Forms and Approval Builder Chapter 6
Navigation
The menu navigation to access the form depends on the menu under which it was published. You canaccess the form by selecting one of these paths:
• Enterprise Components > Forms > Search/Fill in a form
• <Menu Path> > <Form Label>
Image: Search/Fill a Form page
This example illustrates the fields and controls on the Search/Fill a Form page. You can find definitionsfor the fields and controls later on this page.
To find an existing form instance:
1. Select the Find an Existing Value tab.
2. Enter values in the fields to find the form instances that meet the criteria and click Search.
3. Click the form to view, you will transfer to the Form page where you can review the form.
The Document Key String is a concatenation of a form's key field values separated by the slash character(/).
To add a new form instance, navigate to the Form component pages using the menu under which the formwas published.
108 Copyright © 1988, 2020, Oracle and/or its affiliates.

Chapter 6 Working With PeopleSoft Forms and Approval Builder
Form PageUse the Form page (FORM or FORM2) to complete a form instance and submit it for approval.
Navigation
Access the form using the menu under which it was published.
Image: Form page showing a new form instance that has not been completed
This example illustrates the Form page when a new form instance is added, but has not been completed.You can find definitions for the fields and controls later on this page.
Image: Form page showing a saved form instance that is ready to submit for approval
This example illustrates the Form page when it is saved and ready to submit for approval.
Copyright © 1988, 2020, Oracle and/or its affiliates. 109

Working With PeopleSoft Forms and Approval Builder Chapter 6
Image: Form page showing a posted integrated form instance
This example illustrates the Form page showing a posted integrated form instance.
Users can complete the fields, review the instructions, and download and upload attachments as required.Each form instance will have the following fields, in addition to the fields defined by the form designer.
Seq. Nbr (sequence number) The system assigns a unique sequence number to identify eachcompleted form when the form instance is saved.
Subject Enter a subject. Form users can search for form instances usingthe subject field.
Priority Select a priority for the form. This field is for informationalpurposes only.
Status Lists the status of the form. This value is automaticallyassigned.
Due Date Specify the date the form is required to be approved or denied. This date is for informational purposes only.
More Information Enter additional information for the form.
The following action buttons appear depending on the form's current status.
Approver Status Click to view the current approval flow for the form.
Available for forms in Pending status.
Submit Click to submit the form for approval.
Available for forms in Initial or Cancelled status.
Cancel Approval Click to cancel the form.
Available for forms in Pending status. Any pending approvalsare canceled.
Preview Approval Click to view the approval workflow.
110 Copyright © 1988, 2020, Oracle and/or its affiliates.

Chapter 6 Working With PeopleSoft Forms and Approval Builder
Available for forms in Initial or Cancelled status.
Save & Post Form Click this button to post the data to the transactional tables ofthe component the form instance is associated with. A messageappears to confirm that the form has been successfully posted tothe transactional tables.
This button is available only for form instances in Approvedstatus that have a defined component interface mapping, andonly to users that have access to the application component thatis associated with the component interface to which the formis mapped. For example, if a user has access to the Departmentcomponent then they will have access to this button if the forminstance has been approved and the form is set up to integratewith the Department component interface.
Related Documents Click the document key string link within this grid to accessthe data within the related component. Available only forsuccessfully posted forms.
AttachmentsThe attachments page enables form users to download any attachments that were defined as part of theform, as well as upload any documents that are required for the form to be approved.
<Portal label (approval preview)> PageUse the <portal label (approval preview)> page (FORM_APPR_MAP) to preview the approval path for aform.
Navigation
Click the Preview Approval button on the Form page.
Image: <portal label (approval preview)> page
This example illustrates the fields and controls on the <portal label (approval preview)> page. You canfind definitions for the fields and controls later on this page.
Copyright © 1988, 2020, Oracle and/or its affiliates. 111

Working With PeopleSoft Forms and Approval Builder Chapter 6
Click the Submit button to submit the form for approval, or click the OK button to return to the formpage.
Click to insert additional approvers after the form has beensubmitted.
Note: You can only insert ad-hoc approvers.
Related Links"Understanding Approval Features" (PeopleSoft 9.2: Approval Framework)
Form Approval PageUse the Form Approval page (FORM_APPR_ACTION) to approve or deny a form.
Navigation
Enterprise Components > Forms > Approve/Review a Form
Approvers can also access pending forms from their worklist.
Enter any comments, then click Approve or Deny to update the form.
Related Links"Understanding Approval Features" (PeopleSoft 9.2: Approval Framework)
Integrating Forms with PeopleSoft Applications
This section provides an overview of form integration.
Pages Used to Integrate Forms with PeopleSoft ApplicationsPage Name Definition Name Usage
Form to CI Collection Mapping Page EODC_CI_MAP Map form fields to component interfaces.
Document Form References Page EODC_FORM_XREF View the form instances that updated acomponent.
Understanding Form IntegrationForms and approval builder includes a framework that enables you to integrate forms with PeopleSoftapplication components. Using this integration is optional, and involves creating component interfacesfor the components you want the form to integrate with, then mapping the form fields to their associatedcomponent interface fields. Only those with PeopleTools expertise should be involved with setting up theintegration. The integration can be used only to add new records, not to update existing data.
112 Copyright © 1988, 2020, Oracle and/or its affiliates.

Chapter 6 Working With PeopleSoft Forms and Approval Builder
Integration is limited to simple transactions; only one row per component level can be mapped. Forexample, you can create a new department with only one effective dated row (Level 1) and one chartfieldattribute/value pair (Level 2). You cannot insert multiple rows per level using this feature.
Note: This documentation assumes you have experience with component interfaces, security, andApplication Designer. This framework is designed to help implement form integration with thetransactional PeopleSoft system; it is not designed for end users. When implementing this feature, careshould be taken to follow the standard methodology required for all software development, especiallytesting the form integration before deploying it to a production environment.
For more information, please refer to the following product documentation:
See PeopleTools: Application Designer Developer's Guide and PeopleTools: Component Interfaces
Integration FrameworkThe forms integration framework includes the following objects:
Form to CI Collection MappingComponent (EODC_CI_MAP) (Formto Component Interface CollectionMapping Component)
The pages within this component enable you to:
• Associate a form with one or more PeopleSoft applicationcomponent interfaces.
• Map form fields to the component interface properties.
These mappings serve as input to the forms integrationframework, which is used to post the form data to thePeopleSoft transactional tables, and also provides a link fromthe form to the transactional components.
See Form to CI Collection Mapping Page.
Forms Integration FrameworkApplication Classes
These application classes use the form to CI mappings to postform instance data to the PeopleSoft application through thecomponent interface.
Approval Framework Used to provide notifications and worklist entries for forms.
Security Once a form is approved, form users with add/update accessto the application component that the form is associated with (specified by the component interface it is mapped to) are ableto post the form to the PeopleSoft application, using the Save &Post button that is available on the Forms page.
After the form has been successfully submitted to thePeopleSoft application, no additional changes to the form areallowed.
Form Integration Implementation StepsIntegrating forms involves the following steps:
1. Determine the component in the PeopleSoft application that you want the form to integrate with.
Copyright © 1988, 2020, Oracle and/or its affiliates. 113

Working With PeopleSoft Forms and Approval Builder Chapter 6
2. Create a component interface to use for the integration, following the guidelines provided in theComponent Interface Guidelines section that follows.
See the Component Interface Guidelines section in this topic.
3. Design the form using the Form Design Wizard, following the guidelines provided in Form DesignGuidelines section that follows.
Keep in mind the structure of the CI you wish to map to. You must ensure the fields of your form areof the correct data type to map to the CI fields, and that you have all of the fields listed on your formthat the CI is going to require.
See the Form Design Guidelines section in this topic.
4. Map the form to the component interface properties, using the Form to CI Collection Mapping page.
See Form to CI Collection Mapping Page.
5. Once the Form Design and Form To CI Mappings have been properly tested, copy them to theproduction database.
You need to copy the required integration objects (for example, new component interfaces thatyou created for the Form to CI Integration, new prompt records, and so on), the form design, andform to CI mappings. The Form To CI Mappings are located in these records: EODC_DOC_HDR,EODC_DOC_LN, and EODC_CI_MAP.
If the underlying CI or form design changes after being released to the production database, you mustreview the mappings and ensure that they are still valid.
Component Interface GuidelinesBecause forms generally do not contain a large number of fields, to simplify the form to CI collectionmapping, we recommend that you create separate component interfaces when you implement the formintegration. Consider the following recommendations when creating these component interfaces:
• Make the CI Collection Name for all levels the same as the Component Level Main Record. Thisshould be the default when creating the Component Interface.
• Make sure that the Read Only attribute of the CI Properties is not set to Y.
Integration may fail if the CI property is set to Read Only
• Remove all unwanted CI Properties so that you expose only those needed for the integration.
• Update the appropriate permission lists (EOFM2000 and EOFM4000, for example) to grant access tothe newly created component interfaces.
Form approvers must have access to the related component interface to be able to post integratedforms.
Form Design GuidelinesKeep the following considerations in mind when designing integrated forms:
• For every form field that will map to a CI property, both the CI property and the corresponding formfield must have the same field type and field length.
114 Copyright © 1988, 2020, Oracle and/or its affiliates.

Chapter 6 Working With PeopleSoft Forms and Approval Builder
Note: If the required field length is not available in the form designer, then choose either a shorter orlonger field length. If you choose a longer field length, the value will be truncated before it is postedto its associated transaction table.
• For prompt fields, the prompt values must match those in the prompt list of the CI property they mapto; this may require you to create a new prompt.
• For code fields, you must ensure that the codes are the same as those of the CI Property being mappedto.
• Set all the required fields according to the base component associated with the CI, otherwise an errormessage that a required field has not been completed will appear when a form user attempts to saveand post the form data.
Form to CI Collection Mapping PageUse the Form to CI Collection Mapping page (EODC_CI_MAP) to map form fields to componentinterfaces.
Navigation
Enterprise Components > Forms > Form to CI Mapping
Image: Form to CI Collection Mapping page
This example illustrates the fields and controls on the Form to CI Collection Mapping page. You can finddefinitions for the fields and controls later on this page.
Document Category Indicates the type of document. Currently, Form is the onlyvalid value.
Document Name Select the form to map.
Description Enter a description for the mapping.
Form Type Automatically populates to the same value as Document Name. You cannot edit this field.
Copyright © 1988, 2020, Oracle and/or its affiliates. 115

Working With PeopleSoft Forms and Approval Builder Chapter 6
Mode Select the action allowed to the component when a forminstance is saved. For this release, Add is the only permittedoption.
Document Component InterfacesInsert a row for each component interface to associate with the form and complete the following fields:
Component Interface Name Select the component interface to associate with the form.
Menu Name Select the name of the registered menu item of the componentinterface. The value for this field is automatically populatedwhen you specify the component interface name, but if there ismore than one menu associated with the CI, then you can selectthe required one.
When a form user completes an instance of the form, thesystem transfers them to this menu item when they click Link toRelated Component on the form instance.
Level0 Record Name Select the Level0 record of the component interface to associatewith the form.
Sequence Enter a number to specify the order in which to execute thecomponent interface. When mapping multiple componentinterfaces to a form, this is especially important if there are datadependencies.
Get CI Properties Click to populate the CI Collection property Mappings gridwith the values for the specified component interface. You canthen remove or update any fields as required. Alternatively, youcan manually add each row within the CI Collection propertyMappings grid.
CI Collection Property MappingsDefine the mapping for each form field in this grid. You can either add rows individually for each formfield you want to map (recommended when there are only a few fields to map), or you can click Get CIProperty Mapping to populate the grid with all the CI properties, select the form field that maps to eachproperty, specify field defaults, then delete any rows you do not need.
Seq (sequence) Enter a number to specify the order in which to process the fieldmapping. Processing order is important because any data in aform that depends on other data must be processed after the dataon which it depends is entered.
Form Field Name Select the name of the form field to map. Only form fields withActive status appear in the selection list.
CI Scroll Level Select the CI component buffer level to map the field to. Threelevels are supported.
116 Copyright © 1988, 2020, Oracle and/or its affiliates.

Chapter 6 Working With PeopleSoft Forms and Approval Builder
CI Key Field Select to specify the field is a key field. You must specify allthe key fields associated to the Level0 main record. For lowerlevels, you specify only any additional keys; you do not need torepeat the Level 0 keys.
For example, if Level0 keys are SETID and DEPTID, andLevel1 keys are SETID, DEPTID, and EFFDT, then select theCI Key Field check box for SETID and DEPTID for Level 0, forlevel1 select the CIKey Field check box for EFFDT.
The CI Key Field check box is selected initially, so you mustreview and adjust these for each field.
CI Collection Select the name of the CI Collection to map to this form field.
CI Collection Property Name Select the name of the CI Collection property to map to thisform field.
CI Property Default Enter a value in this field to define a default value to assign tothis field when the form is used. For example, you could mapthe SETID form field to the CI Property of SETID and set thedefault value to SHARE. When a form user creates a new forminstance, the SETID field on the form will be initially set toSHARE, but the form user can override the default value asneeded.
Default values are currently limited to number, text, and date. Date values must be entered in YYYYMMDD format.
Active Flag Select to activate the field mapping, deselect to inactivate thefield mapping. Inactive mappings are ignored by the Form to CIFramework when posting data to the transactional tables.
CI Level Main Record Select the component level main record that is associatedwith the CI Collection. This information is required since aCI property can potentially be associated with a work record, and the system needs to know the CI Level Main Recordinformation in the mapping so that the framework can identifyit.
CI Parent Collection Name Lists the parent collection associated with the corresponding CICollection. For example, for a Level 1 CI Collection, the parentcollection will always be PS_ROOT. This value is automaticallypopulated.
CI Record Name Lists the component record name associated with thecorresponding CI Property. This value is automaticallypopulated based on the CI Collection and CI CollectionProperty.
CI FieldName Lists the component field name associated with thecorresponding CI Property. This value is automaticallypopulated based on the CI Collection and CI CollectionProperty. The system uses both CI Record Name and CI FieldName to perform the default value validation and conversion
Copyright © 1988, 2020, Oracle and/or its affiliates. 117

Working With PeopleSoft Forms and Approval Builder Chapter 6
(the default value currently supports only string values, therefore, it needs to be converted to the appropriate field type (Number or Date)).
Document Form References PageUse the Document Form References page (EODC_FORM_XREF) to view the form instances thatupdated a component.
Navigation
Enterprise Components > Forms > Document Form References
For each form instance that integrated with the specified component interface, the following informationis provided:
Document Key String Displays the concatenation of the values of all the form'skey fields separated by the slash character (/), for example, SHARE/0000000065.
Form Lists the name of the form.
Form Instance Lists the unique form instance.
Subject Lists the form's subject. Click to access the Form page.
Action Lists the mode by which the component was modified. Currently, only Add mode is supported.
Last Updated By and Last UpdateDate/Time
Lists the user that most recently updated the form, and the dateand time it was modified.
Using Forms in PeopleSoft Fluid User Interface
Use forms to automate processes that include workflow-based approvals. Forms also provide an audit trailfor tracking progress. You can design forms based on your business requirements.
Note: Forms designed in the Fluid forms and approval builder are not accessible in the classic version,and vice versa. For more information on classic forms and approval builder, please refer UnderstandingPeopleSoft Forms and Approval Builder
For more information on Fluid Forms, refer the Video Feature Overview on PeopleSoft Fluid Forms andApproval Builder.
PeopleSoft Fluid Forms and Approval Builder
118 Copyright © 1988, 2020, Oracle and/or its affiliates.

Chapter 6 Working With PeopleSoft Forms and Approval Builder
Pages Used to Manage FormsPage Name Definition Name Usage
Design Forms EOFM_DSN_SRCH_FL To add a form or view the forms alreadycreated
Form Designer EOFM_DSN_FORM_FL To create a form or edit an existing form.
My Forms EOFM_CONTAINER_FL To view the forms created and fill out anew form.
Add Form EOFM_FORM_FL To fill out a new form; or update/view aform already filled out.
Approve/Review Form EOFM_FORM_FL To approve or review a form submitted.
Design Forms PageUse the Design Forms page (EOFM_DSN_SRCH_FL) to create a form or view the forms already created.You can only view forms in Activated or In Design status.
Note: User should have Form Designer role assigned to view the design forms in the Employee SelfService home page.
Navigation
Select the Design Forms tile on the home page.
This tile can be placed on any PeopleSoft Fluid Home page. For additional information about how toadd a tile to a PeopleSoft Fluid Home page, see PeopleTools: Application User’s Guide, Working WithPeopleSoft Fluid User Interface, Working With Fluid Homepages, Managing Tiles, Adding Tiles to aFluid Homepage documentation.
Image: Design Forms Page
This example illustrates the fields and controls on the Design Forms page. You can find definitions for thefields and controls later on this page.
Form Enter a unique value. The form name can contain letters, digitsor underscore. System checks if the value is used by an existingform, or any other supplemental data record.
Add and Edit Click to display the Form Designer component.
Copyright © 1988, 2020, Oracle and/or its affiliates. 119

Working With PeopleSoft Forms and Approval Builder Chapter 6
Add To Homepage Click to add the selected form to the home page as a tile. Youcannot have multiple tiles of the same form on the home page.
Transfer Click to transfer the ownership of the form to another user.
Note: You can view inactive forms on the designer forms page by selecting Show Inactive Forms optionin the Actions list menu.
Form Designer PageUse the Form Designer page (EOFM_DSN_SRCH_FL) to create a form or edit an existing form.
Navigation
Click Add or Edit button on the Design Forms page.
Image: Form Designer - Form Page
This example illustrates the fields and controls on the Form Designer - Form page. You can finddefinitions for the fields and controls later on this page.
Label Enter a name for the design.
Status The available status options are
• In Design
• Inactivated
120 Copyright © 1988, 2020, Oracle and/or its affiliates.

Chapter 6 Working With PeopleSoft Forms and Approval Builder
Image: Form Designer - Layout Page
This example illustrates the fields and controls on the Form Designer - Layout page. You can finddefinitions for the fields and controls later on this page.
Select the desired form factor from the available options. Theoptions are: Laptop/ Desktop, Phone, Tablet Portrait and TabletLandscape.
Select to zoom in or zoom out the design form.
Widgets Drag and drop the desired widget to the design form field.
The widgets available are the following:
• Text
• Prompt: Allows users to select values from existingPeopleSoft records to complete the field.
• Yes/No
• Code: Allows users to build a list of values that appear in adrop-down list. Form users can select a value from the list tocomplete the field.
• Date
• Number
• Signed Number
• Divider: Allows users to organize the form into multiplesections.
Copyright © 1988, 2020, Oracle and/or its affiliates. 121

Working With PeopleSoft Forms and Approval Builder Chapter 6
Image: Form Designer - Instructions Page
This example illustrates the fields and controls on the Form Designer - Instructions page.
Image: Form Designer - Approval Page
This example illustrates the fields and controls on the Form Designer - Approval page. You can finddefinitions for the fields and controls later on this page.
Lockdown Options Select the lockdown option. The available options are:
• Do Not Lockdown
• Lockdown After Approval
• Lockdown After Submit
Approver User List Add an approver. The approver added will be synchronized withthe Approval Workflow Engine (AWE) setup.
Image: Form Designer - Security Page
This example illustrates the fields and controls on the Form Designer - Security page. You can finddefinitions for the fields and controls later on this page.
Role Name Add a role. The Role added here will be synchronized with thecontent reference defined in Portal Registry. The form controllerwill also check this configuration to enforce form level security.
Click to activate the form and the Design Forms page isdisplayed.
122 Copyright © 1988, 2020, Oracle and/or its affiliates.

Chapter 6 Working With PeopleSoft Forms and Approval Builder
Related LinksDefining Prompt Records
My Forms PageUse the My Forms page (EOFM_CONTAINER_FL) to view the forms created.
Navigation
Select the My Forms tile on the home page.
Image: My Forms Page
This example illustrates the fields and controls on the My Forms page. You can find definitions for thefields and controls later on this page.
View By Select to sort the forms by the Approval status or Form names. The available options are: Form and Status.
Fill out a new form Click to select and fill a form. You can view all the forms youare allowed to access.
Image: Form Page
This example illustrates the fields and controls on the Form page. You can find definitions for the fieldsand controls later on this page.
Add Attachment Click to add an attachment to the form.
Preview Approval Click to view the approval hierarchy. The Preview Approvalbutton appears only when you save the form.
Submit Click to submit the form. The Submit button appears only whenyou save the form.
Copyright © 1988, 2020, Oracle and/or its affiliates. 123

Working With PeopleSoft Forms and Approval Builder Chapter 6
Approve FormUse the Approve form page (EOFM_FORM_FL) to approve or review a form submitted.
Navigation
Select the Approvals tile on the home page.
Approvers can login and click the Approvals tile on the home page to access the form to be approved.Click the Forms link on the Fluid Approvals page to list the forms to be approved or reviewed.
Image: Fluid Approvals Page
This example illustrates the fields and controls on the Fluid Approvals page.
Click the required form link on the Fluid Approvals page to access the form to be approved or reviewed.Click the Approve or Deny button and enter any comments if required to submit the form and completethe approval process.
Note: Only Fluid forms are supported for fluid approvals.
Image: Approval Page
This example illustrates the fields and controls on the Approval page.
124 Copyright © 1988, 2020, Oracle and/or its affiliates.

Chapter 7
Configuring Toolbars
Understanding Toolbars
This section discusses:
• Toolbar elements.
• Delivered toolbars.
• Delivered toolbar buttons.
Toolbar ElementsA toolbar contains these parts:
• Title area.
• Button bar.
• Component-specific data.
• Toolbar footer.
Title AreaBased on the configuration, the title area includes one or more of these controls:
• Page title, if enabled, is shown left-aligned on top of the toolbar buttons.
• Date and time, if enabled, is shown right aligned on top of the toolbar buttons.
See Toolbar Definition - Description Page.
Button BarThe button bar is similar to a browser's toolbar. It can include the following elements:
• PeopleTools actions
This includes buttons such as Save, Refresh, Add, Next in List, Previous in List, Return to Search, andUpdate/Display, which map to the corresponding buttons (which are available at the bottom of a page)that are defined in PeopleTools.
• Custom actions
This includes buttons that perform application-specific actions, such as cloning a case. Often, clickinga custom button displays a page on which you complete the action.
Copyright © 1988, 2020, Oracle and/or its affiliates. 125

Configuring Toolbars Chapter 7
• The Personalize action
This enables users to reconfigure the buttons on the button bar.
You can choose which toolbar elements to display and, for PeopleTools and custom actions, you candefine their appearance sequence. There are two kinds of toolbar buttons: primary and secondary. Primarytoolbar buttons are orange-colored, rectangular buttons with text label on them. They always appear onthe left of the toolbar, and cannot be hidden through user personalizations. Secondary toolbar buttons,on the other hand, can be configured to show only the button icon, the text label, or both. End users canhide secondary toolbar buttons through personalizations, if the buttons are configured to support thisfunctionality in the toolbar definition.
Also, you can modify the delivered toolbar buttons' definitions, or you can create new toolbar buttonsusing application classes.
See Toolbar Definition - Button Page.
Component-Specific DataUnder the button bar, the toolbar displays summary information about the object that you are viewing. Forexample, the Manage Job Opening toolbar shows summary information about the current job opening.PeopleCode in the underlying component makes this information available.
When you configure a toolbar, you choose which and how summary data appear.
See Toolbar Definition - Content Page
Toolbar FooterIf a page is too long to be displayed in a single browser window and you need to scroll to see the entirepage, you can add a toolbar footer so that toolbar buttons are also available when users are at the bottomof the page. The toolbar footer is the same as the toolbar button area at the top of the page. One exceptionis that the footer has the Top of Page link instead of a Personalize link as you see in the header. When youclick the right or left arrow for more buttons in either direction, the other toolbar shifts at the same time.
Delivered ToolbarsTo obtain a list of system-delivered toolbars, and to identify the components and pages thatuse them, go to the Toolbar Definition component (Enterprise Components >ComponentConfigurations >Toolbar >Toolbar Definition) and click Search without entering search criteria. Thesystem displays all delivered toolbars on the Search Results list.
To review the buttons and display items that are available for use in toolbars, access the ToolbarDefinition - Button Page and the Toolbar Definition - Content Page of the selected toolbar definition.
Delivered Toolbar ButtonsTo obtain a list of system-delivered toolbar buttons, go to the Toolbar Button Definition component(Enterprise Components >Component Configurations >Toolbar >Toolbar Button Definition) and clickSearch without entering search criteria. The system displays all delivered buttons on the Search Resultslist.
126 Copyright © 1988, 2020, Oracle and/or its affiliates.

Chapter 7 Configuring Toolbars
Note that before you add a custom button to the toolbar of a component, confirm that the component hasthe PeopleCode to support the action that the button performs. For instance, do not include the Clonebutton in the toolbar of a component that does not have the code needed to support cloning.
Defining Toolbar Buttons
To define toolbar buttons, use the Toolbar Button Definition (EOTL_TB_BUTTON) component
Page Used to Define Toolbar ButtonsPage Name Definition Name Usage
Toolbar Button Definition Page EOTL_TB_BUTTON Define buttons for a toolbar.
Toolbar Button Definition PageUse the Toolbar Button Definition page (EOTL_TB_BUTTON) to define buttons for a toolbar.
Navigation
Enterprise Components > Component Configurations > Toolbar > Toolbar Button Definition >ToolbarButton Definition
Image: Toolbar Button Definition page
This example illustrates the fields and controls on the Toolbar Button Definition page. You can finddefinitions for the fields and controls later on this page.
Copyright © 1988, 2020, Oracle and/or its affiliates. 127

Configuring Toolbars Chapter 7
Toolbar Button ID Displays the unique identifier of the toolbar button. This ID isreferenced in PeopleCode to manipulate button properties.
Class Method Enter the method name of the extended application class, whichcontains the PeopleCode that executes when a user clicks thebutton.
This value does not contain spaces or special characters.
Note: If you specify a value in this field, leave the DefinedButton field blank.
Defined Button Select a button value if the button is mapped to a PeopleTools-delivered action. Values are Add, CTI Phone Launch, Correction, Next Page In Component, Next in List, PreviousPage In Component, Previous in List, Refresh, Related Links, Return to List, Save, Spell Check, Update/Display, and Update/Display All. These actions are the same as the similarly namedPeopleTools buttons that normally appear at the bottom of apage.
Note: If you specify a value in this field, leave the Class Fieldfield blank.
Toolbar Label Enter the default button label, which is used as a tool tip for thebutton at runtime.
Content Name Select the default icon that appears when the toolbar buttonis active. Select image definitions from the PeopleSoft imagecatalog. To use a custom graphic, you must add it to the catalogfirst.
Disabled Originally used to specify the default icon that appeared whenthe toolbar button is inactive. Note that inactive toolbar buttonsare now hidden rather than displayed: therefore the Disabledimage is not used.
Description Enter a detailed description, such as usage and comments, aboutthe button.
Configuring Toolbars
To configure toolbars, use the Toolbar Definition (EOTL_TOOLBAR) component.
This section discusses how to configure toolbars.
128 Copyright © 1988, 2020, Oracle and/or its affiliates.

Chapter 7 Configuring Toolbars
Pages Used to Configure ToolbarsPage Name Definition Name Usage
Toolbar Definition - Description Page EOTL_TOOLBAR_DEFN Define general toolbar attributes.
Toolbar Definition - Button Page EOTL_TOOLBAR_BTNS Configure toolbar buttons.
Toolbar Definition - Content Page EOTL_TOOLBAR_DISP Configure component-specific toolbarcontent.
Toolbar Definition - Focus Fields Page EOTL_TOOLBAR_FFLD Specify the default cursor position forpages.
Toolbar Definition - Description PageUse the Toolbar Definition - Description page (EOTL_TOOLBAR_DEFN) to define general toolbarattributes.
Navigation
Enterprise Components > Component Configurations > Toolbar > Toolbar Definition >ToolbarDefinition - Description
Copyright © 1988, 2020, Oracle and/or its affiliates. 129

Configuring Toolbars Chapter 7
Image: Toolbar Definition - Description page
This example illustrates the fields and controls on the Toolbar Definition - Description page. You can finddefinitions for the fields and controls later on this page.
Toolbar ID Displays the toolbar's unique identifier. This ID is referenced inPeopleCode to manipulate toolbar properties.
Toolbar Details Toolbar Page Title Enter a page title that is displayed on the left side of the page
above the toolbar buttons. A page title is not a required toolbarelement, but it is recommended.
Display Page Title Select to have the page title displayed. The default state forpage title is set to On. Page title can be set dynamically throughPeopleCode.
130 Copyright © 1988, 2020, Oracle and/or its affiliates.

Chapter 7 Configuring Toolbars
Description Enter a description of the toolbar (for example, the name).
This is a required field that is used to help users identify thetoolbar on the Toolbar Definition component.
Show Date and Time Select to have the date and time (in the user's time zone) appearon the toolbar when the user accessed the component associatedwith the toolbar.
Display Option Select Icon Only, Icon and Text Label, or Text Only. You can seeabout seven buttons on the toolbar at a time, if both the buttonand text are displayed. This number varies depending on thelength of text and language used in the application. Grey verticalseparators appear between each button.
Text links are active links all the time, not just on the roll overstate. Buttons are clickable as well as any space between thebutton and the text. Any remaining buttons can be accessedby using the << or >> button on the left and right side of thebuttons. Only secondary buttons are scrollable; primary buttonsalways appear. When you scroll to the right, the last button tothe right becomes the first button on the next scroll set. Thesame is true when you scroll to the left.
Width (in pixels) Enter the width of the toolbar in pixels. The default toolbarwidth is set to 745 pixels.
Clone To Enter the ID of the new toolbar that the system clones fromthe current toolbar when a user clicks the clone button on thetoolbar of this page.
Toolbar Personalizations Allow Toolbar Personalization Select to allow toolbar personalization.
Personalizations Displays the number of user personalizations that the toolbarcurrently has.
This information helps administrators to evaluate the usabilityof the current toolbar settings and to determine the impact thatupdating a toolbar has on users.
Reset Toolbar Personalizations Click to delete any toolbar personalizations that usersperformed.
When changes to the toolbar functionality occur, administratorscan use this button to refresh users' toolbar settings.
Toolbar Summary Area Layout Summary Layout Select Column or Row. The summary information area will
be displayed under the button bar only after a customer orcontact has been selected. Depending on the application, the
Copyright © 1988, 2020, Oracle and/or its affiliates. 131

Configuring Toolbars Chapter 7
summary area may contain other information besides customerinformation. The information in the content area is displayedin a two-column format, with the number of fields beingconfigurable.
# of Columns (number of columns) You can select a one or two column display if you selectcolumns for the summary layout. The recommended number ofcolumns is 2.
Width Type Define the width of the columns using either a pixel orpercentage amount.
Column 1 Width and Column 2Width
Enter the width of the item display area in pixels or as apercentage of the total toolbar width.
If pixel is used, be sure that the sum of width of the columnsdoes not equal or exceed the toolbar width value (some borderand spacing values make the total width less than the toolbarwidth specified).
If percentage is used, be sure that the width of all columns doesnot exceed 100%.
Toolbar Control PropertiesSelect to have the toolbar footer, PeopleTools buttons, and PeopleTools links displayed. It is suggestedthat you disable the PeopleTools buttons and links from being displayed because it may cause confusionto users if the button used for the same function appears twice on a page. When using a new toolbar, itis recommended that you disable the PeopleTools generated folder tabs from the component propertysettings.
Toolbar Definition - Button PageUse the Toolbar Definition - Button page (EOTL_TOOLBAR_BTNS) to configure toolbar buttons.
Enterprise Components > Component Configurations > Toolbar > Toolbar Definition > ToolbarDefinition - Buttons
132 Copyright © 1988, 2020, Oracle and/or its affiliates.

Chapter 7 Configuring Toolbars
Image: Toolbar Button Definition - Buttons page
This example illustrates the fields and controls on the Toolbar Button Definition - Buttons page. You canfind definitions for the fields and controls later on this page.
Seq (sequence) Enter sequence numbers to determine the order of the toolbarbuttons.
Button Name Select the button to place on the toolbar. Buttons thatperform custom actions cannot necessarily be shared betweencomponents because these actions can be component-specific.
Use the separator image (a vertical line) as needed to groupbuttons.
User Can Hide Select to allow users to show or hide the button from the toolbaron the Personalize Toolbar page.
You may not want to give users the ability to manipulate thevisibility of some basic yet important toolbar functions, such asSave or Add. In this case, clear the check box of these buttons.
Copyright © 1988, 2020, Oracle and/or its affiliates. 133

Configuring Toolbars Chapter 7
These buttons become required buttons that users cannotmanipulate on the Personalize Toolbar page. They always showup in the toolbar.
Text Label Specify the text that is displayed on the button (for primarytoolbar buttons) or next to the button (for secondary toolbarbuttons) if the toolbar is configured to show both button iconand text.
Alt. Label (alternate label) Enter the text that users can see if they put the mouse over thebutton.
Access Key If you enter an access key, the keyboard shortcut Alt + accesskey brings the system focus to the associated button.
You must terminate the access key with the enter key to executethe toolbar button function associated with the hotkey. Accesskey is disabled in toolbar footers.
Toolbar Definition - Content PageUse the Toolbar Definition - Content page (EOTL_TOOLBAR_DISP) to configure component-specifictoolbar content.
Navigation
Enterprise Components Component Configurations > Toolbar > Toolbar Definition > Toolbar Definition- Content
Image: Toolbar Definition - Content page
This example illustrates the fields and controls on the Toolbar Definition - Content page. You can finddefinitions for the fields and controls later on this page.
Display Item ID Enter the ID of the data to appear on the toolbar. The ID andthe data that it references come from an array that componentPeopleCode populates.
134 Copyright © 1988, 2020, Oracle and/or its affiliates.

Chapter 7 Configuring Toolbars
Row Enter the toolbar row in which the content appears. Row 1appears under the button bar. If you define display items foradditional rows, those rows appear in order under row 1.
Item Enter the position of the item in the row. Enter 1 for the itemthat appears in the leftmost position in the row, 2 for the nextlabel to the right, and so forth.
Title Enter a label for the item.
Width Pixels, Width %, LabelPixels and Label %
Enter the width of the display item label and data in pixels oras a percentage of the total toolbar width. If the latter, be surethat the total percentage for all fields on the same row does notexceed 100%. It is recommended that you indicate widths inpercentage because the toolbar layout is adjusted automatically. The general guideline is 20% for the display item label, and30% for the display item data. If pixel is used (for advancedHTML usage), the total width of all display columns on thesame row should not equal or exceed the width of the toolbar asdefined.
Length of text Enter the maximum number of characters of data (not labeltext) that can appear in this row. The text is truncated with thespecified truncation token if it exceeds the length of text value, and is wrapped if it is too long for the width that you specify.
Truncation Token Enter the characters that indicate truncated data. This appearswhen the data is longer than the value that you entered in theLength of text field.
Wrap Data Select to wrap data if its length exceeds what is specified for thetext length.
Start New Row Select if the display item should start on the next new row.
Span Data Select to let the display item span across horizontally to usethe other column to display its long item value. This option isenabled only when Start New Row field is selected.
Toolbar Definition - Focus Fields PageUse the Toolbar Definition - Focus Fields page (EOTL_TOOLBAR_FFLD) to specify the default cursorposition for pages.
Navigation
Enterprise Components > Component Configurations > Toolbar > Toolbar Definition > ToolbarDefinition - Focus Fields
Copyright © 1988, 2020, Oracle and/or its affiliates. 135
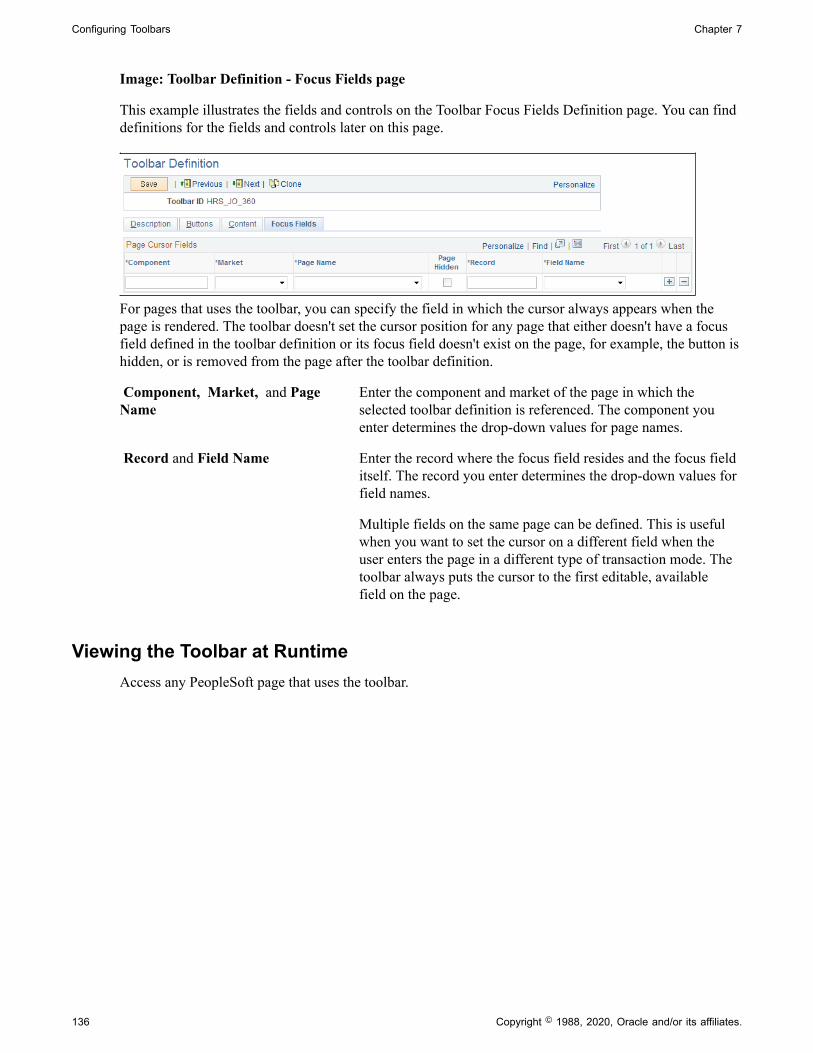
Configuring Toolbars Chapter 7
Image: Toolbar Definition - Focus Fields page
This example illustrates the fields and controls on the Toolbar Focus Fields Definition page. You can finddefinitions for the fields and controls later on this page.
For pages that uses the toolbar, you can specify the field in which the cursor always appears when thepage is rendered. The toolbar doesn't set the cursor position for any page that either doesn't have a focusfield defined in the toolbar definition or its focus field doesn't exist on the page, for example, the button ishidden, or is removed from the page after the toolbar definition.
Component, Market, and PageName
Enter the component and market of the page in which theselected toolbar definition is referenced. The component youenter determines the drop-down values for page names.
Record and Field Name Enter the record where the focus field resides and the focus fielditself. The record you enter determines the drop-down values forfield names.
Multiple fields on the same page can be defined. This is usefulwhen you want to set the cursor on a different field when theuser enters the page in a different type of transaction mode. Thetoolbar always puts the cursor to the first editable, availablefield on the page.
Viewing the Toolbar at RuntimeAccess any PeopleSoft page that uses the toolbar.
136 Copyright © 1988, 2020, Oracle and/or its affiliates.

Chapter 7 Configuring Toolbars
Image: Toolbar used on the Manage Job Opening page (HRS_JO_360)
This example illustrates the toolbar used on the Manage Job Opening page (HRS_JO_360).
Confirm that the toolbar buttons, content, and other controls work and are displayed as intended.
At runtime, you can find out which toolbar that a page is using (for debugging purposes). To do so, rightclick on the toolbar area of the page to view the HTML source code, and look for keywords TOOLBARID If the page uses the toolbar, a comment appears in the source code that indicate the actual toolbarbeing used, for example:
<!-- TOOLBAR ID: [HRS_JO_360] -->
Personalizing Toolbars
End users can personalize which buttons appear on the toolbar. Personalized configurations are associatedwith user IDs and do not affect the base toolbar definition. As an administrator, you can decide (duringsetup) whether users can personalize toolbars, and specify which buttons in the toolbar can be hidden byusers in the personalization process.
This section discusses how to set toolbar preferences.
Page Used to Personalize ToolbarsPage Name Definition Name Usage
Personalize Toolbar Page EOTL_TB_USER_PRSN Set toolbar preferences.
Personalize Toolbar PageUse the Personalize Toolbar page (EOTL_TB_USER_PRSN) to set toolbar preferences.
Copyright © 1988, 2020, Oracle and/or its affiliates. 137

Configuring Toolbars Chapter 7
Navigation
Click the toolbar's Personalize link on the page whose toolbar you want to personalize.
Image: Personalize Toolbar age
This example illustrates the fields and controls on the Personalize Toolbar age. You can find definitionsfor the fields and controls later on this page.
Note: If the Personalize link is not present on a toolbar, then that toolbar is not user-configurable.
Select ControlsUsers can move buttons from Available Controls to Selected Controls for them to be displayed on thetoolbar. In addition, the user can choose to view icons or text or both. Buttons with an asterisk are notsubject to user personalization. They always show up in the toolbar.
After making some changes, click the Preview button to view the toolbar updated in real time.
Upon return from the page, the Personalized setting is automatically saved.
138 Copyright © 1988, 2020, Oracle and/or its affiliates.

Chapter 8
Working with the PeopleSoft Fluid UserInterface
Understanding the PeopleSoft Fluid User Interface
This overview discusses the PeopleSoft Fluid User Interface.
The PeopleSoft Fluid User InterfaceOracle’s PeopleSoft has two user interfaces
• PeopleSoft Classic User Interface, which was designed to be used on a laptop and desktop. Thisinterface was previously know as PIA (PeopleSoft Internet Architecture).
• PeopleSoft Fluid User Interface, which was designed to be used on mobile devices, but can also beused on a laptop and desktop. Oracle delivers fluid pages for a variety of PeopleSoft self-servicetransactions across its various modules.
PeopleTools documentation regarding the PeopleSoft Fluid User Interface includes:
• PeopleTools: Applications User's Guide, Working With PeopleSoft Fluid User Interface.
• PeopleTools: Fluid User Interface Developer’s Guide
Fluid Transactions and Conditional NavigationIf a user on a mobile device navigates to a transaction for which a fluid page exists, the fluid pageappears regardless of whether the user navigated using a home page tile or the classic menu structure.For example, when users on mobile devices use the classic menu to view their paychecks, the systemautomatically displays the Pay fluid page rather than the View Self-Service Paycheck classic page. Thelogic that displays a fluid page when a user navigates from the classic menu is known as conditionalnavigation. Conditional navigation is also the mechanism that displays the fluid home when users initiallyaccess the system on a mobile device.
Note: The user needs to have the appropriate Fluid role to be transferred to the Fluid page. If a user on adesktop or laptop accesses a fluid home page and taps a tile, conditional navigation logic does not redirectthe users to a classic page.
Understanding Banners in PeopleSoft Fluid User Interface
A standard banner appears at the top of every fluid page. The banner includes the page title and somestandard buttons. They appear differently for phone and tablet devices.
Copyright © 1988, 2020, Oracle and/or its affiliates. 139

Working with the PeopleSoft Fluid User Interface Chapter 8
PeopleSoft Fluid User Interface Banner for TabletsImage: Example of the page banner for the tablet
This example illustrates the fluid page banner for the tablet.
The banner on the tablet will display the following for all pages:
Back Button The Back button with text indicates the last page the user wason.
Page Title This displays the name of the current Fluid User page.
Home Icon Takes you to your home page.
Search Icon Enables you to search.
Alerts Icon Tap to view actions and alerts in a notifications window.
Actions Icon Tap to see a list of available actions for the current window. Access pages to personalize home page content or sign out.
NavBar Icon Tap to expand the NavBar window, where you can selectwindow content from options, such as Recent Places, MyFavorites, Navigator, My Preferences, and Fluid Home. Tapagain to collapse the NavBar window.
PeopleSoft Fluid User Interface Banner for SmartphonesImage: Example of the page banner for the smartphone
This example illustrates the fluid page banner for the smartphone.
The typical banner on a phone displays the following:
Back Button This is a icon with only an image and takes you to the last pagethat you were on.
Page Title This displays the name of the current Fluid User page.
Alerts Icon Tap to view actions and alerts in a notifications window.
Menu Icon Tap to access Pending Approvals, History and other Fluid UserInterface menu items like Home, About, Sign Out.
140 Copyright © 1988, 2020, Oracle and/or its affiliates.

Chapter 8 Working with the PeopleSoft Fluid User Interface
Using the PeopleSoft Fluid User Interface to Work with Approvals
This topic discusses the various mobile approval options in the PeopleSoft Fluid User Interface. TheMobile approval options are displayed as per the configurations set in the Mobile Approval Optionscomponent.
Note: To enable a user to receive PeopleSoft Fluid User Interface for approvals, the user should be amember of the Approvals Fluid role. See Mobile Approval Installation document on My Oracle Support(support.oracle.com), note number 1990593.1.
Understanding PeopleSoft Fluid User Interface to Work with ApprovalsPeopleSoft Fluid User Interface is designed for users to access PeopleSoft pages using multiple formfactors:
• SFF: Small Form Factor, such as smart phones.
• MFF: Medium Form Factor, such as tablets.
• LFF: Large Form Factor, such as some tablets, laptops, and desktops.
Note: PeopleSoft Mobile Approvals uses the Approval Workflow Framework as configured for thespecific application. Make sure that the Approval Workflow Framework has been enabled and configuredproperly for each application before implementing Mobile Approvals for the transactions.
Pages Used to Configure the Mobile Approval OptionsPage Name Definition Name Usage
Mobile Approval Options - GeneralSettings Page
HMAP_MBL_TYPE_SET Configure the general settings for MobileApprovals.
Mobile Approval Options - TransactionsPage
HMAP_MBL_TYPE_SET2 Configure the transaction settings forMobile Approvals.
Mobile Approval Options - General Settings PageUse the Mobile Approval Options page (HMAP_MBL_TYPE_SET) to set the general options for mobileapprovals.
Navigation
Enterprise Components >Approvals >Approvals >Mobile Approval Options
Copyright © 1988, 2020, Oracle and/or its affiliates. 141

Working with the PeopleSoft Fluid User Interface Chapter 8
Image: Mobile Approval Options - General Settings page
This example illustrates the fields and controls on the Mobile Approval Options - General Settings page.
Display Attachments Select to allow, at the enterprise level, approvers to viewattachments. If you select this option, you must also select aprocess scheduler server for the Process Server field with properdistribution node setup.
Note: Attachments are not available for all transactions.
Maximum Approvals Displayed The maximum number of approvals to be displayed in MobileApprovals for each transaction type that is activated in theTransactions tab.
Maximum Lines Displayed The maximum number of approval lines to be displayed foreach transaction that contains approvals at the line level.
Age of Approvals History in Days The number of days prior to today’s date to include whendisplaying approval history.
Actionable Approvals Only Select to view only those transactions that require your approvalaction.
142 Copyright © 1988, 2020, Oracle and/or its affiliates.

Chapter 8 Working with the PeopleSoft Fluid User Interface
Note: These three approval options (Maximum Approvals Displayed, Maximum Lines Displayed, andAge of Approvals History in Days) can be synchronised between multiple pillars. For example, If youhave configured multiple systems, such as HCM and FSCM for mobile approvals, changes made to theseoptions from any one system are propagated to other systems when the Mobile Approval Options pageis saved. To do this, enable the service operation HMAP_GEN_OPTIONS in PeopleTools, IntegrationBroker, Integration Setup, Service Operations.
Group ID Unique ID for the Transaction group.
Description Name for the group which is displayed in Mobile Approvals
Image The image associated with the group to display in MobileApprovals.
Mobile Approval Options - Transactions PageUse the Mobile Approval Options — Transactions page (HMAP_MBL_TYPE_SET2) to set thetransaction options for mobile approvals.
Navigation
Enterprise Components >Approvals >Approvals >Mobile Approval Options >Transactions
Image: Mobile Approval Options - Transactions page: Actions tab
This example illustrates the fields and controls on the Mobile Approval Options - Transactions page:Transaction tab
Order Enter a display order for each transaction ID.
Copyright © 1988, 2020, Oracle and/or its affiliates. 143

Working with the PeopleSoft Fluid User Interface Chapter 8
Transaction ID Select the Transaction ID(s) to enable for the Mobile Approvalsapplication.
Allow Mass Approvals Indicates whether or not users can select multiple transactionsin the list when viewing by type and perform approval actionagainst all of them. Users can allow mass approvals for all oronly for some of the transactions in the same transaction group.
Transaction Group This is an optional field. It allows user to add multipletransactions into a group (as defined on General Settings tab) todisplay them together in the transaction list.
Image: Mobile Approval Options - Transactions page: Handlers tab
This example illustrates the fields and controls on the Mobile Approval Options - Transactions page:Handlers tab.
Root Package ID The application package that holds the DataHandler, DetailDocument and SubPage classes for the transaction.
144 Copyright © 1988, 2020, Oracle and/or its affiliates.

Chapter 8 Working with the PeopleSoft Fluid User Interface
Image: Mobile Approval Options - Transactions page: Actions tab
This example illustrates the fields and controls on the Mobile Approval Options - Transactions page:Actions tab.
Select the approval Actions that are visible as push buttons in mobile approvals in PeopleSoft Fluid UserInterface.
Note: The approval transaction handler must support the transaction.
Copyright © 1988, 2020, Oracle and/or its affiliates. 145

Working with the PeopleSoft Fluid User Interface Chapter 8
Image: Mobile Approval Options - Transactions page: Options tab
This example illustrates the fields and controls on the Mobile Approval Options - Transactions page:Options tab.
Require Comments for Deny Make it mandatory to enter comments if the action is Deny.
Show Terminated Transactions Include terminated transactions in the Transaction History.
Image: Mobile Approval Options - Transactions page: Images tab
This example illustrates the fields and controls on the Mobile Approval Options - Transactions page:Images tab.
146 Copyright © 1988, 2020, Oracle and/or its affiliates.

Chapter 8 Working with the PeopleSoft Fluid User Interface
Small Image field is required by Approvals in PeopleSoft Fluid User Interface. This is the imagedisplayed in the transaction list for the associated transaction.
Pages Used for PeopleSoft Fluid User Interface Mobile ApprovalsPage Name Usage
Approvals Tile Review pending and historical approval requests that areassociated with the logged-in manager.
Pending Approvals Page Lists pending approval requests requiring the attention of thelogged-in manager.
Pending Approvals - <Transaction Details> Page Review the approval request details, enter a comment, andapprove, deny, or push back the request.
Approvals History Page Lists approvals you have worked on in the past.
Administer Approvals Page Approval Administrators can view Approvals and take actionon pending approvals.
Approvals TileUse the Approvals tile (HMAP_APPR_TILE_FL) to review pending and historical approval requests thatare associated with the logged-in manager.
Navigation
Select Fluid Home under the main menu. On the page that appears, select Manager Self Service. TheApprovals tile is available on the Manager Self Service landing page. As a manager, you can add the tile,through personalization, to a system-delivered homepage or a homepage that you create.
Image: Approvals Tile
This is an example of the Approvals tile that appears on the Manager Self-Service home page.
The tile shows the total number of pending approvals. If no pending approvals are available, the tile doesnot display a number count.
Copyright © 1988, 2020, Oracle and/or its affiliates. 147

Working with the PeopleSoft Fluid User Interface Chapter 8
Pending Approvals PageClick the Approvals tile to access the Pending Approvals page without using traditional menu navigationto review and approve different transactions.
Navigation
Click the Approvals tile on the Manager Self Service home page.
Image: (Tablet) Pending Approvals page
This example illustrates the fields and controls on the Pending Approvals page for the tablet.
148 Copyright © 1988, 2020, Oracle and/or its affiliates.

Chapter 8 Working with the PeopleSoft Fluid User Interface
Image: (Smartphone) List of transaction categories on the Pending Approvals page
This example illustrates the list of transaction categories on the Pending Approvals page for thesmartphone.
Both Landscape and Portrait views are supported on a tablet. The approvals landing page has two panelsin landscape mode and the left panel is locked in place and is not collapsible. The left panel defaults tothe Type grouping with the All category selected and the right panel displays all pending approvals in theuser’s queue sorted by the date/time on which they were received with the oldest one displayed first. Theright panel title displays the name of the selected category. The number of rows are displayed at the top-right of the list and a filter button is displayed to the top-left of the list.
In Portrait mode, the left panel is hidden and only the right panel is displayed as a full page. The left panelcan be invoked as an overlay. Even though the left panel is hidden, the All category of the Type groupingwill be defaulted. The page in portrait mode displays all pending approvals in the approver’s queue.
Viewing Pending Approvals SummaryOn a Phone, when a user launches Approvals, the user is presented with list of pending approvals groupedby transaction type. The page title will be Pending Approvals. The user can view approvals that are in aPending status for them.
Pending Approvals can be categorized in 5 views:
1. Type (default view)
Copyright © 1988, 2020, Oracle and/or its affiliates. 149

Working with the PeopleSoft Fluid User Interface Chapter 8
2. Date Received
3. Priority (not available in HCM)
4. Person (not available in FSCM)
5. From
The user can switch between the different groupings by selecting a grouping from the grouping drop-down. Priority and Person grouping are not applicable to all transactions. If none of the transactionsin an approver’s pending approvals queue has a priority or person associated, the grouping will not bedisplayed in the drop-down.
When the user clicks on any category on the left panel, the right panel is refreshed with pending approvalsfor the selected category. The panel title on the right panel reflects the selected category. A user canfilter the list of approvals by clicking on the grid filter icon. The Filter window gives the following filteroptions:
Type Drop-down displaying transaction types that the user haspending approvals for.
Priority Drop-down displaying priorities that the user has pendingapprovals for. One of the values will also be “No PriorityAssociated”. Priority is not available in HCM.
Received Drop-down displaying the date groupings that the user haspending approvals for – applicable values from This Week, LastWeek, 2 Weeks Ago, Older.
From Drop-down displaying the last sender for each approval. Thelast sender could be either the last approver in the approvalchain or the requestor of the transaction if the current approveris the first approver in the chain.
Person Drop-down displaying a list of persons that the user has pendingapprovals for. One of the values may be "No Person Associated"if there are approvals that are not related to a person (example, Job Opening).
Each Pending Approvals row on the right panel will display the information about the approval request in3 columns.
Column 1 This column displays the Transaction Name and the ObjectName for this transaction (Person, Position etc.)
Column 2 This column displays the Transaction Summary and Priority (ifapplicable).
Column 3 This column displays the date on with the approval wasreceived.
150 Copyright © 1988, 2020, Oracle and/or its affiliates.

Chapter 8 Working with the PeopleSoft Fluid User Interface
Pending Approvals - <Transaction Details> PageUse the Pending Approval - <Transaction Details> page to review the approval request details, make acomment, and approve, deny or pushback the request.
Navigation
Click an individual approval request transaction from the Pending Approvals page.
Image: Approval Details - <Transaction Details> page
This example illustrates the fields and controls on the Pending Approvals - <Transaction Details> page.
Actions for Pending ApprovalsIn PeopleSoft Fluid User Interface, you can take five actions on any approvals based on how thetransaction has been configured.
1. Approve
2. Deny
3. Pushback
4. Hold
5. Request Information
The applicable action buttons are displayed on the sub-banner to the right.
Copyright © 1988, 2020, Oracle and/or its affiliates. 151

Working with the PeopleSoft Fluid User Interface Chapter 8
Mass Action for Pending ApprovalsImage: Mass action on the Pending Approvals page
This example illustrates the fields and controls on the Pending Approvals page when Mass Approvals isenabled for a transaction category.
Mass approval is available for the following approvals:
• When the user has Type selected in the View By drop-down.
• When the particular transaction has been configured for mass approval.
• When an individual transaction or transaction group has been selected.
When a transaction type that is enabled for mass approvals is selected in the left panel, the approvalrequests in the right panel is displayed with check boxes in each row. Applicable action buttons aredisplayed on the top-right of the grid. The approval requests are deselected by default and the approvalaction buttons are disabled. The action buttons will be enabled only if at least one row is selected. ASelect All check box is available above the grid to select all approvals in the grid. The approver can entercomments before taking an approval action. The comments will be applied to all selected requests.
Approvals History PageA user can view approvals requests that they already worked on by going to Approvals History. The menuicon in the banner displays a list of options which includes Pending Approvals and Approvals History.These serve as a toggle between the Pending Approvals and Approvals History views.
152 Copyright © 1988, 2020, Oracle and/or its affiliates.

Chapter 8 Working with the PeopleSoft Fluid User Interface
Image: Approvals History Menu
Menu option to view Approvals History.
Image: Approvals History page
This example illustrates the fields and controls on the Approvals History page.
When the user switches to History, the title in the banner changes to Approvals History. Landscape andPortrait behavior will be the same as Pending Approvals. The History view is also displayed using a two-panel layout, similar to Pending Approvals. There are five views by which a user can view historicalapprovals.
• Type
Copyright © 1988, 2020, Oracle and/or its affiliates. 153

Working with the PeopleSoft Fluid User Interface Chapter 8
• Status
• Priority (not available for HCM)
• Person (not available for FSCM)
• From
Priority and Person grouping are not applicable to all transactions. If none of the transactions in anapprover’s approval history have a priority associated, the Priority grouping will not be displayed in thedropdown. The same holds true for the Person grouping. A configuration is available to administratorsto define how far back in time should the history be displayed. The left panel displays a message at theend of the last category indicating the time period for which the history is displayed, example, “Historydisplays approvals for last 90 days.” If this configuration has not been set, no such message will bedisplayed. For more details on the settings, see Mobile Approval Options - Transactions Page
Users can also change the view and design of the Approvals page with the Page Composer Feature. Formore details, see Understanding Page Composer
Administer Approvals PageApprovals administrators can use Administer Approvals to view all approvals to which they have access,as well as the ability to take necessary actions on pending approvals.
Access the Administer Approvals page from the menu icon in the banner.
154 Copyright © 1988, 2020, Oracle and/or its affiliates.

Chapter 8 Working with the PeopleSoft Fluid User Interface
Image: Administer Approvals Menu Option
Administer Approvals menu option.
Image: Administer Approvals page
Administer Approvals page
Copyright © 1988, 2020, Oracle and/or its affiliates. 155

Working with the PeopleSoft Fluid User Interface Chapter 8
You can view the approvals based on the specified search criteria in the left panel. The search criteria are:
Process ID Choose the process type of the approval transactions.
Header Status Current status of the approval transaction.
Last Modified Last modified date of the approval transaction.
Approver Choose current approver.
Approver Status Choose the approval status of the current approver.
Originator Choose based on the originator of the approval transaction
Requestor Choose approval transactions from a requestor.
From Date Choose approvals from a certain date.
The three approval administration options available for the transactions are:
Approve Approve the transaction.
Deny Deny the transaction.
Reassign Re-assign the transaction.
Click on an individual approval transaction to view the details for that transaction.
Image: Administer Approvals Transaction Details page
Administer Approvals Transaction Details page
For example the Delegation of Authority transaction details page shows the details such as the DelegatedAuthority, period of delegation, the Requestor and the Approval Chain for this transaction. Approval
156 Copyright © 1988, 2020, Oracle and/or its affiliates.

Chapter 8 Working with the PeopleSoft Fluid User Interface
administrators can approve, deny or perform more actions on the approval transaction. The More optionincludes Reassign, Pushback and Resubmit actions.
Copyright © 1988, 2020, Oracle and/or its affiliates. 157

Working with the PeopleSoft Fluid User Interface Chapter 8
158 Copyright © 1988, 2020, Oracle and/or its affiliates.

Chapter 9
Setting Up and Working with FluidDelegation
Understanding Delegation
Delegation is when a person authorizes another to serve as a his or her representative for a particular taskof responsibility. With the Delegation feature, users can authorize other users to perform managerial taskson their behalf by delegating authority to initiate or approve managerial transactions.
Delegation of authority to perform managerial transactions is usually prompted by one of these scenarios:
• A manager takes leave and wants to delegate authority of managerial transactions to another personwhile away from the office.
• A senior executive does not have the time to process transactions and wants to delegate this authorityto another person, such as an assistant.
For more information, see the video feature overview on PeopleSoft Fluid Delegation
https://www.youtube.com/watch?v=-qkD6LgOGP8
Note: By default, Fluid Delegation is enabled for all PeopleSoft applications. However, HCMapplications can still choose to implement classic delegation. If classic Delegation Framework is enabledfor your PeopleSoft HCM application, then refer the classic Delegation Framework documentation in theHCM Application Fundamentals book.
Delegation TerminologyThe following terms are important to the understanding of Delegation feature and are used throughoutthese topics:
Delegation The act of delegating one's authority to another user.
Delegator A person that delegates authority to another user.
Proxy A person granted authority to act on behalf of another user.
Delegate Initiation The Delegation Framework allows you to separate the task ofinitiating a transaction from approving the same transaction onsomeone's behalf. Delegator may delegate authority for a proxyto only initiate or submit a transaction on the delegator's behalf.
Delegate Approvals The Delegation framework allows you to separate the task ofinitiating a transaction from approving the same transaction on
Copyright © 1988, 2020, Oracle and/or its affiliates. 159

Setting Up and Working with Fluid Delegation Chapter 9
someone's behalf. Delegator may delegate authority for a proxyto only approve or deny a transaction on the delegator's behalf.
Delegated Authority The rights and privileges that are delegated from the delegator tothe proxy.
Delegation Request A request from the delegator to the proxy to take on delegatedauthority.
Delegation Period The time range in which the delegated authority is in effect.
Delegation Administrator The system administrator who is responsible for configuring, managing, and maintaining delegated authorities.
Revoke When a delegator or delegation administrator withdrawsdelegated authority.
Delegation FrameworkThe core of the Delegation feature is the Delegation framework. The Delegation framework managesa proxy's authority over a delegated transaction. When a proxy has delegated authority, the Delegationframework temporarily assigns the proxy a unique role that is specific to the delegated transaction. Therole enables the proxy to access the components and pages associated with the delegated transaction.When the proxy no longer has delegated authority, the Delegation framework removes that role and thusprevents the proxy from performing the transaction.
The Delegation framework supports the following types of delegation:
• Downward delegation of authority to a direct report or another person lower down in the reportinghierarchy.
• Upward delegation of authority to a manager or another person higher up in the reporting hierarchy.
• Lateral delegation of authority to a peer either within the same division or in a different divisionwithin the reporting hierarchy
Integration with the Approval FrameworkThe Delegation framework integrates with the Approval Framework. This integration provides severalbenefits. First, the integration between the Delegation framework and Approval Framework makes theApproval Framework aware of delegated authorities in the system. Second, the Delegation frameworkuses the Approval Framework to manage the acceptance and rejection of delegation requests.
Delegation Request Creation Through Self-ServiceThe Delegation framework is a component of the PeopleSoft self-service solution. Users can createdelegation requests for selected transactions through self-services pages.
When creating a delegation request, the delegator can:
• Delegate only the transactions to which they have access.
For example, an employee who is not a manager does not have access to manager self-servicetransactions and, therefore, cannot delegate manager-specific transactions.
160 Copyright © 1988, 2020, Oracle and/or its affiliates.

Chapter 9 Setting Up and Working with Fluid Delegation
• Delegate to only one proxy per delegation period per transaction.
• Delegate all transactions to a single proxy, or delegate different transactions to different proxies.
Delegation AdministrationDelegation administrators can use the administrative components for delegation to perform several usefultasks. They can:
• Create delegation requests on behalf of delegators through the Adding Delegation Requests byAdministrator component.
• Review delegation requests and, if necessary, revoke them on behalf of delegators through theAdminister Delegation Page
• Process all delegation transactions in batch daily through the Maintain Delegated Authorities Page.
NotificationsThe system uses email and worklist notifications to notify managers and proxies of new delegationrequests and transactions pending approval. The system creates a worklist item only on the proxy'sworklist, not on the delegator's worklist (provided that you have set up worklist items as a preference forreceiving notifications). The system sends email notifications for approval to the proxy and, if approvalframework is configured correctly, the system also sends the delegator a courtesy email notification.Delegation administrators can use the Generic Templates component to configure different emailtemplates for the proxy and delegator.
See Reviewing Delivered Notification Templates for Delegation.
Requests Statuses and Delegation StatusesThe Delegation framework manages delegation requests through request statuses and delegation statuses.A request status defines the status of the delegation request. A delegation status defines whether a proxy'sdelegation authority is active or inactive. The combination of these two statuses determines how theDelegation framework handles delegations.
This table lists request statuses for delegation and describes how the Delegation framework handles adelegation depending on the delegation status associated with each request status:
Request Status Delegation Status Description
Submitted Inactive When a delegator creates a newdelegation request the system setsthe request status to Submitted anddelegation status to Inactive.
Copyright © 1988, 2020, Oracle and/or its affiliates. 161

Setting Up and Working with Fluid Delegation Chapter 9
Request Status Delegation Status Description
Accepted Active When a proxy accepts a delegationrequest, the system sets the request statusto Accepted.
The delegation status becomes Activeonly when the following two conditionsoccur:
• The proxy accepts the delegationrequest.
• The system date is greater than orequal to the From Date and lessthan or equal to the To Date of thedelegation period.
Once the delegation status becomesActive, the system reassigns all pendingtransactions from the delegator to theproxy. The system also assigns the proxya temporary permission list and rolefor the transaction, which grants theproxy navigation access to the onlinetransaction.
If the To Date of the delegation requestis blank, the request status remainsActive until revoked by delegator oradministrator.
Accepted Inactive If the proxy accepts the delegationrequest but the delegation request isfuture-dated, the delegation statusremains Inactive until the system date isgreater than or equal to the From Date.
Rejected Inactive When a proxy rejects a delegationrequest, the system sets the requeststatus to Rejected. The delegation statusremains Inactive.
162 Copyright © 1988, 2020, Oracle and/or its affiliates.

Chapter 9 Setting Up and Working with Fluid Delegation
Request Status Delegation Status Description
Ended Inactive When the delegation authority periodfor the proxy expires, the system setsthe request status to Ended and changesthe delegation status to Inactive. Thischange occurs when the system date isgreater than the To Date of the delegationauthority period.
The system reassigns all pendingtransactions from the proxy to thedelegator. The system also removesthe proxy's temporary permissionlist and role, which removes theproxy's navigation access to the onlinetransaction.
Revoked Inactive When the delegator revokes a delegationrequest or the delegation administratorrevokes the delegation request on behalfof the delegator, the system sets therequest status to Revoked and changesthe delegation status to Inactive.
The system reassigns all pendingtransactions from the proxy to thedelegator. The system also removesthe proxy's temporary permissionlist and role, which removes theproxy's navigation access to the onlinetransaction.
Implementation Considerations for DelegationWhen implementing Delegation functionality, you should consider the following:
The important considerations are:
• Should you enable delegation functionality?
• What transactions should you enable for delegation?
• What hierarchy should you enable for delegation?
You should also analyze the following security needs and create a plan that covers these needs:
• Analyze delivered permission lists and roles for delegation components to decide if theimplementation will use the delivered objects or create new objects.
• Decide how to define a standard user profile for the delegation administrator that contains the relevantroles.
Copyright © 1988, 2020, Oracle and/or its affiliates. 163

Setting Up and Working with Fluid Delegation Chapter 9
• Decide how to define a standard user profile for the delegator that contains the relevant roles.
• Decide how to define a standard user profile for the proxy that contains the relevant roles.
• Decide if the delegator and proxy should have the same or different profiles.
Steps to Set Up DelegationTo implement transactions in the delegation framework:
1. Register delegation transactions for workflow on the Workflow Transactions Page.
2. Set up delegation permission lists and roles through PeopleTools Security components.
3. Define installation settings for delegation on the Installation Settings Page.
4. Configure transactions for delegation on the Configure Delegation Transaction Page.
Registering Workflow Transactions
This topic discusses how to register workflow transactions.
Page Used to Register Workflow TransactionsPage Name Definition Name Usage
Workflow Transactions Page EO_TRANSACTIONS Register workflow transactions forself-service transactions by associatingthem with the appropriate workflowfunctionality and assigning a workflowtransaction category. For transactionsthat use the Approval Framework, you must additionally specify theapproval process ID associated withthe transaction. You can also enabledelegation of transaction initiation andapproval.
Workflow Transactions PageUse the Workflow Transactions page (EO_TRANSACTIONS) to register workflow transactions for self-service transactions by associating them with the appropriate workflow functionality and assigning aworkflow transaction category.
For transactions that use the Approval Framework, you must additionally specify the approval process IDassociated with the transaction. You can also enable delegation of transaction initiation and approval.
Navigation
Enterprise Components > Delegation > Workflow Transactions
164 Copyright © 1988, 2020, Oracle and/or its affiliates.

Chapter 9 Setting Up and Working with Fluid Delegation
Image: Workflow Transactions page: Details1 tab
This example illustrates the fields and controls on the Workflow Transactions page: Details1 tab.
Image: Workflow Transactions page: Details2 tab
This example illustrates the fields and controls on the Workflow Transactions page: Details2 tab.
Transaction name Enter the name of the self-service transaction in either one tab orthe other, not both.
Category Assign the self-service transaction to a category. You can set upcategories in the Workflow Transaction Categories page.
Copyright © 1988, 2020, Oracle and/or its affiliates. 165

Setting Up and Working with Fluid Delegation Chapter 9
Description Enter a description of the self-service transaction.
Approval Process ID When implementing the Approval Framework, you define aunique transaction registry ID, called a process ID, for eachof your self-service transactions on the Register Transactionspage. Select the approval process ID that you have definedfor this self-service transaction. By creating this link betweenthe self-service transactions and the Approval Framework, theself-service transactions can dynamically retrieve this approvalprocess ID by transaction name and thus invoke the ApprovalFramework. The Approval Framework requires this parameterduring processing.
Delegate Initiation Select to enable delegation of transaction initiation for thecorresponding self-service transaction that uses the ApprovalFramework. The transaction then becomes available forconfiguration as an initiate-type delegation transaction. Configure delegation transactions on the Configure DelegationTransaction page.
Delegate Approvals Select to enable delegation of transaction approval for thecorresponding self-service transaction. The transaction thenbecomes available for configuration as an approval-typedelegation transaction. This functionality is available only fortransactions that you register with the Approval Framework..
Note: If you select both the Delegation Initiation andthe Delegate Approvals check boxes, you can configurethe transaction for delegation of initiations and approvals. Configure delegation transactions on the Configure DelegationTransaction page.
Combine Partial Select to have the system continue searching for a departmentmanager even after it has found a partial position reports tomanager. Deselect to have the system stop searching for themanager ID once it is found by one of the access types.
Limit Drill Up Select to enable the system to continue to drill up an access typeuntil a manager is found. Deselect this check box to allow thesystem to go up to the next level only.
Note: When implementing the Delegation framework, you must register all self-service transactions.Only the registered workflow transactions that you enable for delegation initiation or approval areavailable for subsequent delegation transaction setup.
Setting Up Permission Lists and Roles for Delegation
These topics provide an overview of permission lists and roles for delegation and discuss how to set uppermission lists and roles.
166 Copyright © 1988, 2020, Oracle and/or its affiliates.

Chapter 9 Setting Up and Working with Fluid Delegation
Understanding Permission Lists and Roles for DelegationBefore configuring delegation transactions, you must set up permission list and role security for yourdelegation transactions. The PeopleSoft HCM application delivers as system data several permission liststhat are required for use of the Delegation framework. You can attach these permission lists to roles whereneeded to enable users access to delegation functionality.
This table describes the delivered permission lists for the Delegation framework:
Permission List Name Description Roles Assigned to Permission List
HCCPDL1000 Enables HCM users to access thedelegation setup components that arepart of the Delegation Setup Centerpage and the delegation administrativecomponents that are part of theApprovals and Delegation page.
HCM Delegation Admin (administrator)
HCCPDL1100 Enables HCM users to access theManage Delegation page, which is thehome page for self-service transactions.
Manager
Employee
EODL1000 Enables Enterprise Objects users toaccess the delegation setup componentsthat are part of the Delegation SetupCenter page and the delegationadministrative components that are partof the Approvals and Delegation page.
EODL_Administrator
EODL1100 Enables Enterprise Objects users toaccess the Manage Delegation page, which is the home page for self-servicetransactions.
Manager
Employee
In addition to permission lists, you need to define the delegation administrator role and assign theHCCPDL1000 permission list to it. Once assigned to a user, this role enables that designated delegationadministrator access to the delegation setup and administrative components. The PeopleSoft HCM systemdelivers the HCM Delegation Admin role as system data for this purpose. This role already has theHCCPDL1000 permission list assigned to it.
PeopleSoft HCM applications that use delegation functionality deliver many transactions that arepreconfigured for the Delegation framework. These transactions are preconfigured with a uniquepermission list and role for each component where the proxy can perform the delivered delegatedtransaction. When a proxy status becomes active, the system inserts the unique role for that delegationtransaction into the proxy's user profile. The role contains the permission list that enables the proxy accessto the component for performing the delegated transaction. When the proxy status becomes inactive,the system removes that role from the proxy's user profile. To configure delegation transactions, use theConfigure Delegation Transaction page to associate to the transaction the unique role and the componentwhere the transaction is performed. The unique permission list is associated with the role in PeopleToolssecurity.
See Configuring Delegation Transactions.
When configuring transactions for delegation you must use a unique role and permission list for eachcomponent that you associate with a delegated transaction. You must attach the permission list to portal
Copyright © 1988, 2020, Oracle and/or its affiliates. 167

Setting Up and Working with Fluid Delegation Chapter 9
security for the component and associate the unique role with the unique permission list. You might alsoneed to run the Portal Security Sync process (PeopleTools > Portal > Portal Security Sync) to ensure thatthe permission list is associated with the portal navigation.
Warning! Do not use an existing role to configure a delegation transaction because the delegationframework grants and revokes the role from the proxy's security profile according to the proxy's delegatedauthority over a transaction. This will cause a proxy who already has access to the specified component tolose access to that component entirely when the delegation framework revokes the delegated authority.
Related LinksConfiguring Delegation Transactions
Setting Up Permission Lists and RolesSet up permission list and role security for your delegation transactions.
See PeopleTools: Security Administration.
Defining Delegation Installation Settings
This topic discusses how to define delegation installation settings.
Pages Used to Define Delegation Installation SettingsPage Name Definition Name Usage
Installation Settings Page EODL_INSTALL_PG Define delegation installation settings. This task is typically performed by thedelegation administrator after someonehas set up permission lists and roles fordelegation.
Delegation Installation Settings Page HCDL_SYS_SETUP Configure the Delegation Installationsettings for the HCM application.
Installation Settings PageUse the Installation Settings page (EODL_INSTALL_PG) to define delegation installation settings.
This task is typically performed by the delegation administrator after someone has set up permission listsand roles for delegation.
Navigation
Enterprise Components > Delegation > Installation Settings
168 Copyright © 1988, 2020, Oracle and/or its affiliates.
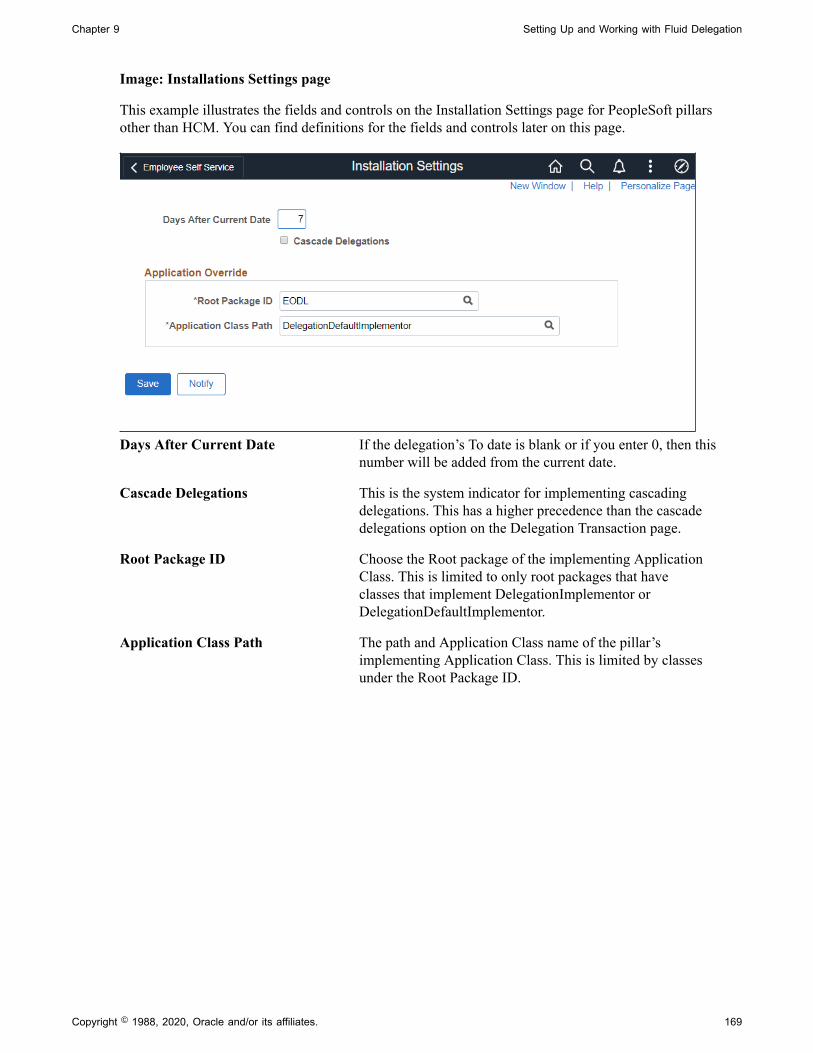
Chapter 9 Setting Up and Working with Fluid Delegation
Image: Installations Settings page
This example illustrates the fields and controls on the Installation Settings page for PeopleSoft pillarsother than HCM. You can find definitions for the fields and controls later on this page.
Days After Current Date If the delegation’s To date is blank or if you enter 0, then thisnumber will be added from the current date.
Cascade Delegations This is the system indicator for implementing cascadingdelegations. This has a higher precedence than the cascadedelegations option on the Delegation Transaction page.
Root Package ID Choose the Root package of the implementing ApplicationClass. This is limited to only root packages that haveclasses that implement DelegationImplementor orDelegationDefaultImplementor.
Application Class Path The path and Application Class name of the pillar’simplementing Application Class. This is limited by classesunder the Root Package ID.
Copyright © 1988, 2020, Oracle and/or its affiliates. 169

Setting Up and Working with Fluid Delegation Chapter 9
Image: Installation Settings page for HCM
This example illustrates the fields and controls on the Installation Settings page for HCM. You can finddefinitions for the fields and controls later on this page.
Days After Current Date If the delegation’s To date is blank or if you enter 0, then thisnumber will be added from the current date.
Cascade Delegations This is the system indicator for implementing cascadingdelegations. This has a higher precedence than the cascadedelegations option on the Delegation Transaction page.
Root Package ID Choose the Root package of the implementing ApplicationClass. This is limited to only root packages that haveclasses that implement DelegationImplementor orDelegationDefaultImplementor.
Application Class Path The path and Application Class name of the pillar’simplementing Application Class. This is limited by classesunder the Root Package ID.
Configure Application Click this button to go to the Configure Application page toconfigure the delegation installation settings for the application.
Delegation Installation Settings PageUse the Delegation Installation Settings page (HCDL_SYS_SETUP) to configure the delegationinstallation settings for the HCM application. Other areas of PeopleSoft does not have this setting.
170 Copyright © 1988, 2020, Oracle and/or its affiliates.

Chapter 9 Setting Up and Working with Fluid Delegation
Navigation
Click the Configure button on the Installation Settings page.
Image: Delegation Installation Settings Page
This example illustrates the fields and controls on the Delegation Installation Settings Page. You can finddefinitions for the fields and controls later on this page.
Use Fluid Delegation Enables Fluid delegation in the application. By default thischeck-box is selected.
Administrator Role Select the role that you want to designate as the delegationadministrator. The delegation framework routes errors to thisrole. The PeopleSoft system delivers the HCM DelegationAdmin role as system data for this purpose. You can select thatrole or any other role.
Enabled HierarchiesUse this group box to define options for how self-service users can select a proxy when delegating atransaction. Your selections here determine the available proxies that the system displays on the SelectProxy By Hierarchy page when users create delegation requests. These settings apply to all transactionsthat are using the Delegation framework. For example, you cannot specify that the system display
Copyright © 1988, 2020, Oracle and/or its affiliates. 171

Setting Up and Working with Fluid Delegation Chapter 9
available proxies for time-off requests by supervisor ID and available proxies for promotions by ReportsTo Position.
All Persons Select this check box to enable open selection of the proxy whenusers are creating a delegation request. The system displaysthe Search by Name link on the Select Proxy By Hierarchypage. When users click this link, the system displays the SelectProxy By Name page, where users can search for and select asproxy any active person in the system with a Job Data record. By default, the system selects this check box.
Specific Hierarchies Click this check box to require delegators to select a proxybased on a specific hierarchy. You can only select one hierarchy. The hierarchy that you select applies to all delegation requestsacross the system regardless of the transaction type. When self-service users search for a proxy by hierarchy, they can search upthe hierarchy as well as down the hierarchy.
Your choices are:
• By Dept Security Tree: Determines person data access usinginformation from the security tree. The system presents theuser with a list of people whose data the user has access to, based on the security tree.
• By Supervisor ID: Defines the reporting relationship basedon information in the Supervisor ID field on the WorkLocation page. The system presents the user with a list ofpeople whose job records indicate that they are supervisedby the user.
• By Supervisor ID: Defines the reporting relationship basedon information in the Supervisor ID field on the WorkLocation page. The system presents the user with a list ofpeople whose job records indicate that they are supervisedby the user.
• By Reports To Position: Defines the reporting relationshipbased on information in the Reports To field on the WorkLocation page. The system presents the user with a list ofpeople whose job record indicates that they report to thatuser's position.
This option is available only if you have enabled theManage Positions business process on the Installation Table- HCM Options page.
• By Part Posn Mgmt Supervisor: Defines the reportingrelationship by both the Reports To and the SupervisorID fields on the Work Location page. This is designed forthe organizations that use partial position management. Thesystem searches for reporting relationship based on ReportTo values first, and then for Supervisor ID values.
172 Copyright © 1988, 2020, Oracle and/or its affiliates.

Chapter 9 Setting Up and Working with Fluid Delegation
This option is available only if you have enabled theManage Positions business process on the Installation Table- HCM Options page.
• By Part Posn Mgmt Dept Mgr ID: Defines the reportingrelationship by the Reports To field on the Work Locationpage (JOB_DATA1) and the information in the ManagerID field on the Department Profile page. This is designed forthe organizations that use partial position management. Thesystem searches for reporting relationship based on ReportTo values first, and then for Department Manager ID values.
• By Group ID: Determines data access using the group ID setup in the Group Build feature.
f you select this option, you must select a valid groupID in the field that the system displays to the right. Youdefine group IDs using the Group Build - Group Definitioncomponent.
These hierarchies relate to direct reports functionality and arethe same as those found in the Access Type field on the TargetInformation page of the Direct Reports Setup component.
If you select the Specific Hierarchies check box and the AllPersons check box, then this hierarchical selection of proxybecomes a preference rather than a requirement because thedelegator has the option to either select from the list or searchfor any active proxy in the system.
IncludeSelect the organizational relationships that should be included in the list of current people whenperforming a delegation. Persons with the relationship of Employee are automatically included in the list,however you can also choose to include the following people when they are active with a Job Data record.
• Contingent Workers
• Persons of Interest
Configuring Delegation Transactions
These topics provide an overview of delivered delegation transactions and discuss how to configuredelegation transactions.
Copyright © 1988, 2020, Oracle and/or its affiliates. 173

Setting Up and Working with Fluid Delegation Chapter 9
Page Used To Configure Delegation TransactionsPage Name Definition Name Usage
Configure Delegation Transaction Page EODL_TXN_SETUP Configure transactions for delegation. This task is performed by delegationadministrators after setting up delegationinstallation settings so that thetransaction becomes available fordelegation configuration.
Configure Delegation Transaction PageUse the Configure Delegation Transaction page (EODL_TXN_SETUP) to configure transactions fordelegation.
This task is performed by delegation administrators after setting up delegation installation settings so thatthe transaction becomes available for delegation configuration.
Navigation
Enterprise Components > Delegation > Delegation Transaction
174 Copyright © 1988, 2020, Oracle and/or its affiliates.

Chapter 9 Setting Up and Working with Fluid Delegation
Image: Configure Delegation Transaction page
This example illustrates the fields and controls on the Configure Delegation Transaction page. You canfind definitions for the fields and controls later on this page.
Transaction Name Displays the name of the transaction. If you are adding a newvalue, the system prompts you to select a value from the listof transactions that have been configured for workflow andselected for delegation initiation or approval on the WorkflowTransactions page. Transactions that do not meet these criteriaare not available for delegation configuration.
Transaction Type Displays whether the configuration of the transaction is fordelegation initiation or approval. The Delegation frameworkallows you to separate the task of initiating a transaction fromapproving the same transaction on someone's behalf. If you areadding a new value, the system prompts you to select either:
• Initiate: Delegator may delegate authority for a proxyto only initiate or submit a transaction on the delegator'sbehalf.
Copyright © 1988, 2020, Oracle and/or its affiliates. 175

Setting Up and Working with Fluid Delegation Chapter 9
• Approve: Delegator may delegate authority for a proxy toonly approve or deny a transaction on the delegator's behalf.
Although both options are available for the selected transaction, the value that you select is valid only if you have selected thecorresponding Delegate Initiation or Delegate Approvals checkbox on the Workflow Transactions page.
Description Enter the description of the delegation transaction configuration. The system uses this description throughout the delegationpages when displaying related transactions. As a default, thesystem uses the concatenation of the transaction type andtransaction name. We strongly recommend that you alwaysassign a meaningful description.
Effective Date and Status Enter the effective date of the transaction and whether itis active or inactive within the Delegation framework. Byentering new effective-dated rows, you can enable or disable thetransaction, as necessary. When entering a new row, the systemuses the system date for the effective date by default.
SecurityUse this group box to establish security access for proxies that are delegated authority to the giventransaction. While a delegation transaction is active, the Delegation framework temporarily assigns thespecified role to the proxy and grants the proxy access to the specified component.
Role Name Select the role that contains the permission list for the relevantcomponent where one processes the given transaction. Eachtransaction that you enable for delegation must have a uniquerole and associated permission list that are solely for delegationpurposes.
When a proxy's delegated authority becomes active, the systemtemporarily assigns this role to the proxy's user profile sothat the proxy can access the transaction component whilehaving delegation authority. When the proxy's delegationauthority ends, the system deletes this role from the proxy's userprofile. Thus, the proxy no longer has access to the transactioncomponent.
If an approval transaction requires that the approver be ina particular role, then the proxy who is delegated authorityover that transaction must have the same role to approve thetransaction. For example, if promotion approval requires thatthe approver be a manager, then the proxy who is delegatedauthority to approve promotions must also be a manager tosuccessfully approve a promotion request.
This field prompts from roles set up in the Roles component.
Warning! You must use a unique role for each component thatyou associate with a delegated transaction.
176 Copyright © 1988, 2020, Oracle and/or its affiliates.

Chapter 9 Setting Up and Working with Fluid Delegation
See Understanding Permission Lists and Roles for Delegation.
Component Name Select the object name of the component where users canprocess requests for the given transaction. When a user createsa delegation request, the system checks the delegator's userprofile to determine if the delegator has the authority to accessthis component. The system permits the creation of a delegationrequest for the transaction only if the delegator has securityaccess. Refer the Delivered Delegation Transactions tablesbelow to determine the components to be used for the relatedtransactions to be enabled for delegation.
Optional ParametersUse this group box when you need to create a link on the Delegation pages that will take the user to aproduct specific page to complete the delegation process.
Use the Display Link Label fields for retrieving the link labels from the message catalog.
Message Set Number and MessageNumber
Enter the number that will identify the label that should be usedfor the link that will appear on the Delegation Detail page. Thislabel is maintained at the product specific
Note: For more information about application-specific messagenumbers, refer to the application-specific documentation.
Use Delegation Event Handler Class fields to identify the product specific application classes.
Root Package ID Select the application package that owns the component towhich the person will be directed when he or she clicks the linkin the Delegation pages.
Path Enter the class that will take the user to the product specificcomponent to finished the delegation process.
Use Delegation Options fields to configure additional parameters in delegation.
Cascade Delegation Choose if the delegated transactions can be cascaded.
Include Delegator Choose if the delegator should also be included as an approverfor the transaction.
Delivered Delegation Transactions for HCMThis table lists the delivered delegation transactions for PeopleSoft HCM
Transaction Name Unique Role / PermissionList
Component Name Delegation TransactionDescription
Delegate_ePerformance_Dev delegate_ePerformaceDevDoc_Upd
EP_CURRENT_MY_DVL Delegate the ability to updatedevelopment documents.
Copyright © 1988, 2020, Oracle and/or its affiliates. 177

Setting Up and Working with Fluid Delegation Chapter 9
Transaction Name Unique Role / PermissionList
Component Name Delegation TransactionDescription
Delegate_ePerformance_Doc delegate_ePerformaceDoc_Update
EP_CURRENT_MY_PRF Delegate the ability to updateperformance documents.
EP_APPRAISAL Delegate_PerformancDoc_Approve
EP_APPRAISAL_APPR Delegate the approval ofperformance documents.
GP_ABS_EESS_BAL Delegate Employee AbsenceBal
GP_ABS_EESS_BAL Delegate the initiation ofemployee absence balanceinquiries.
GP_ABS_EESS_HIST Delegate Employee AbsenceHist
GP_ABS_EESS_HIST Delegate the initiation ofemployee absence historyinquiries.
GP_ABS_EESS_REQ Delegate Employee AbsenceRqst
GP_ABS_EESS_REQ Delegate the initiation ofemployee absence requests.
GP_ABS_MGRSS_BAL Delegate Manager AbsenceBal
GP_ABS_MGRSS_BAL Delegate the initiation ofmanager absence balanceinquiries.
GP_ABS_MGRSS_HIST Delegate Manager AbsenceHist
GP_ABS_MGRSS_HIST Delegate the initiation ofmanager absence historyinquiries.
GP_ABS_MGRSS_REQ Delegate Manager AbsenceRqst
GP_ABS_MGRSS_REQ Delegate the initiation ofmanager absence requests.
GP_SS_ABS_APPR_L Delegate Manager AbsenceAppr
GP_SS_ABS_APPR_L Delegate the approval ofmanager absence requests.
HGA_ESS_ABS_BALANCE_FLU
Delegate Empl Abs Bal Fluid HGA_SS_BAL_FLU Delegate the initiation ofemployee absence balanceinquiries in fluid.
HGA_ESS_ABS_CANCEL_FLU
Delegate Empl Abs CancelFluid
HGA_SS_REQCAN_FLU Delegate the initiationof employee absencecancellations in fluid.
HGA_ESS_ABS_HISTORY_FLU
Delegate Empl Abs Hist Fluid HGA_SS_REQHIST_FLU Delegate the initiation ofemployee absence historyinquiries in fluid.
HGA_ESS_ABS_REQUEST_FLU
Delegate Empl Abs Req Fluid HGA_SS_REQ_FLU Delegate the initiation ofemployee absence requests influid.
178 Copyright © 1988, 2020, Oracle and/or its affiliates.

Chapter 9 Setting Up and Working with Fluid Delegation
Transaction Name Unique Role / PermissionList
Component Name Delegation TransactionDescription
HGA_SS_MBAL_FLU Delegate Manager Abs BalFluid
HGA_SS_BAL_FLU Delegate the initiation ofmanager absence balanceinquires in fluid.
HGA_SS_MREQCAN_FLU Delegate Mrg Cancel AbsFluid
HGA_SS_REQCAN_FLU Delegate the initiationof manager absencecancellations in fluid.
HGA_SS_MREQHIST_FLU Delegate Mrg Abs Hist Fluid HGA_SS_REQHIST_FLU Delegate the initiation ofmanager absence historyinquiries in fluid.
HGA_SS_MREQ_FLU Delegate Manager Abs ReqFluid
HGA_SS_REQ_FLU Delegate the approval ofmanager absence requests influid.
HR_CP_CAREERPLAN Delegate Manage Career Plan HR_CP_REDIRECT Delegate the initiation ofmanager career plans.
HR_CP_MGR_PRO_CHART Delegate Career Prog Chart HR_CP_REDIRECT_CHA Delegate the initiation ofemployee career progressioncharts.
HR_EE_INF_MGR Delegate_View_Employee_Info
HR_EE_INF_MGR Delegate the initiationof employee informationinquiries.
HR_FULL_PART_CHG (Approve)
Delegate_FullPart_Approve HR_FULLPART_APPR Delegate the approval ofchanges in full-time and part-time status.
HR_FULL_PART_CHG (Initiate)
Delegate_FullPartStat_Initiate HR_MGR_FULL_PART Delegate the initiation ofchanges in full-time and part-time status.
HR_LOCATION_CHANGE (Approve)
Delegate_GSS_Approve HR_MSS_CT_APPR Delegate the approval oflocation changes in GuidedSelf Service.
HR_LOCATION_CHANGE (Initiate)
Delegeate_GSS_Initiate HR_MSS_CT_FL Delegate the initiation oflocation changes in GuidedSelf Service.
HR_LOCATION_CHG (Approve)
Delegate_Location_Approval HR_MGR_LOC_APPR Delegate the approval oflocation changes.
HR_LOCATION_CHG (Initiate)
Delegate_LocChange_Initiate HR_MGR_LOCATION Delegate the initiation oflocation changes.
Copyright © 1988, 2020, Oracle and/or its affiliates. 179

Setting Up and Working with Fluid Delegation Chapter 9
Transaction Name Unique Role / PermissionList
Component Name Delegation TransactionDescription
HR_PROMOTION (Approve) Delegate_Promotion_Approve HR_PROMOTE_APPR Delegate the approval ofpromotions.
HR_PROMOTION (Initiate) Delegate_Promotion_Initiate HR_PROMOTE_MGR Delegate the initiation ofpromotions.
HR_REPORT_CHG (Approve)
Delegate_ReportingChg_Approve
HR_MGR_REPORT_APPR Delegate the approval ofreporting changes.
HR_REPORT_CHG (Initiate) Delegate_ReportingChg_Initiate
HR_MGR_REPORT_CHNG Delegate the initiation ofreporting changes.
HR_RETIRE (Approve) Delegate_Retire_Approve HR_RETIRE_APPR Delegate the approval ofemployee retirements.
HR_RETIRE (Initiate) Delegate_Retire_Initiate HR_RETIRE_EE Delegate the initiation ofemployee retirements.
HR_TBH_JOB Delegate Add TBH HR_TBH_JOB Delegate the initiation of atemplate-based hire for anend-user.
HR_TBH_STATUS Delegate TBH Status HR_TBH_STATUS Delegate the initiation oftemplate-based hire statuses.
HR_TERM (Approve) Delegate_Terminate_Approve HR_EE_TERM_APPR Delegate the approval ofemployee terminations.
HR_TERM (Initiate) Delegate_Terminate_Initiate HR_EE_TERMINATE Delegate the initiation ofemployee terminations.
HR_TRANSFER (Approve) Delegate_Transfer_Approve HR_TRANSFER_APPR Delegate the approval oftransfers.
HR_TRANSFER (Initiate) Delegate_Transfer_Initiate HR_TRANSFER_MGR Delegate the initiation oftransfers.
JobOffer Delegate_JobOffer_Approve HRS_RECRUIT_CONSOL Delegate the approval of joboffers.
JobOpening Delegate_JobOpening_Approve
HRS_RECRUIT_CONSOL Delegate the approval of jobopenings.
TL_MSS_EE_SECH_PRD (Approve)
Delegate Manage AppRptTime
TL_MSS_EE_SRCH_PRD Delegate the approval ofmanaging reported time.
180 Copyright © 1988, 2020, Oracle and/or its affiliates.

Chapter 9 Setting Up and Working with Fluid Delegation
Transaction Name Unique Role / PermissionList
Component Name Delegation TransactionDescription
TL_MSS_EE_SECH_PRD (Initiate)
Delegate Manage ReportTime
TL_MSS_EE_SRCH_PRD Delegate the initiation ofmanaging reported time.
TL_OT_MNGR_LIST (Approve)
Delegate Approve Overtime TL_OT_HISTORY_LIST Delegate the approval ofovertime.
TL_OT_MNGR_LIST (Initiate)
Delegate Manage OvertimeReq
TL_OT_MNGR_LIST Delegate the initiation ofovertime requests.
TL_SRCH_APPRV_GRP Delegate Manage App PayTime
TL_SRCH_APPRV_GRP Delegate the approval ofpayable time.
WCSCompConfirmer Delegate UpdateCompensation
WCS_ECM_MSS_HOME Delegate the initiation ofconfirming compensationproposals.
WCSCompReviewer Delegate UpdateCompensation
WCS_ECM_MSS_HOME Delegate the initiation ofreviewing compensationproposals.
WCSCompSubmitter Delegate UpdateCompensation
WCS_ECM_MSS_HOME Delegate the initiation ofsubmitting compensationproposals.
WCS_ECM_AWE_HOME Delegate ApproveCompensation
WCS_ECM_AWE_HOME Delegate the approval ofcompensation.
W3EB_APPR_SUMMARY Delegate Manage ApprDocument
W3EB_APPR_SUMMARY Delegate the approval of lifeevent documents.
Delivered Delegation Transactions for PeopleSoft Financials and Supply ChainManagementThis table lists the delivered delegation transactions for PeopleSoft Financials and Supply Chain and theirconfiguration
Transaction Name Component Name Delegation TransactionDescription
Payment Request PR_APPROVAL Delegate the approval of paymentrequests.
Requisition PV_REQ_APPROVAL Delegate the approval of Requisitions.
Structure Request EOAWMA_MAIN_FL Delegate the approval of fluid financialstructure request.
Copyright © 1988, 2020, Oracle and/or its affiliates. 181

Setting Up and Working with Fluid Delegation Chapter 9
Transaction Name Component Name Delegation TransactionDescription
Cash Advances EX_ADV_APPR Delegate approval of cash advances.
Expense Reports EX_SHEET_APPR Delegate approval of expense reports.
Time Adjustments EX_TADJ_APPR Delegate approval of time adjustments.
Time Reports EX_TIME_APPR Delegate approval of time reports.
Travel Authorizations EX_TAUTH_APPR Delegate approval of travelauthorizations.
Vendor Approval APPROVE_VENDOR Delegate the approval of vendor.
Adding Delegation Requests by Administrator
This topic discusses how to add delegation requests by administrator.
Page Used to Add Delegation Requests by AdministratorPage Name Definition Name Usage
Administer Create Delegation Page EODL_ADMIN_SEL_FL Add delegation requests thatadministrators create on behalf ofdelegators.
Administer Create Delegation PageUse the Administer Create Delegation page (EODL_ADMIN_SEL_FL) to add delegation requests thatadministrators create on behalf of delegators.
Navigation
Enterprise Components > Delegation > Administer Create Delegation
182 Copyright © 1988, 2020, Oracle and/or its affiliates.

Chapter 9 Setting Up and Working with Fluid Delegation
Image: Administer Create Delegation page
This example illustrates the fields and controls on the Administer Create Delegation page. You can finddefinitions for the fields and controls later on this page.
Note: To prevent situations of cascading or circular delegation chains, after the Delegation frameworkpasses delegated authority over a transaction to a proxy, the proxy cannot delegate authority over thattransaction to another user. The Delegation framework only passes authority over transactions from initialdelegator to initial proxy.
Note: When a user adds a delegation request, the system checks for an Alternate User ID field value onthe User Profile - Workflow page. The delegation request overrides the alternate user ID for transactionsin the delegation request. If an alternate user ID exists and the dates of the delegation and alternate IDoverlap, the system issues a warning message.
User ID Choose the User on behalf of whom the delegation requestneeds to be created by the administrator.
Create Delegation Request Click this button to initiate the delegation guided process. Formore details on the guided process, see Create DelegationRequest - Delegation Dates Page.
Administering Delegations
This topic discusses how to administer delegations.
Copyright © 1988, 2020, Oracle and/or its affiliates. 183
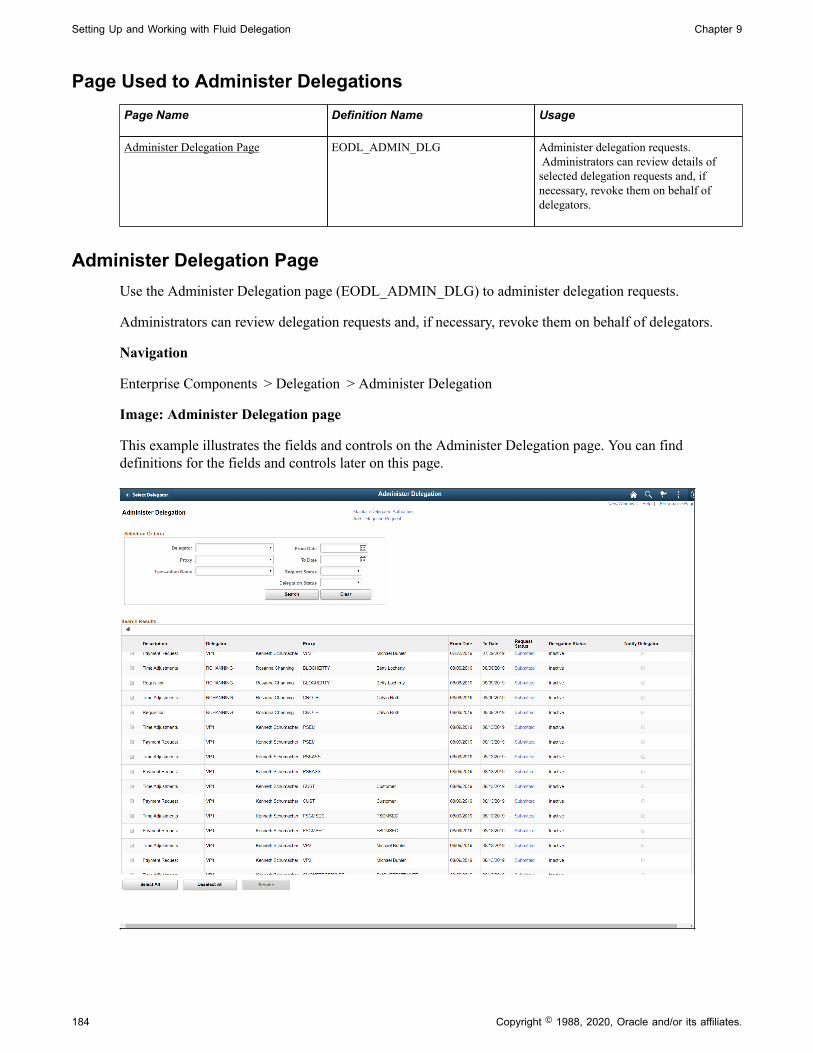
Setting Up and Working with Fluid Delegation Chapter 9
Page Used to Administer DelegationsPage Name Definition Name Usage
Administer Delegation Page EODL_ADMIN_DLG Administer delegation requests. Administrators can review details ofselected delegation requests and, ifnecessary, revoke them on behalf ofdelegators.
Administer Delegation PageUse the Administer Delegation page (EODL_ADMIN_DLG) to administer delegation requests.
Administrators can review delegation requests and, if necessary, revoke them on behalf of delegators.
Navigation
Enterprise Components > Delegation > Administer Delegation
Image: Administer Delegation page
This example illustrates the fields and controls on the Administer Delegation page. You can finddefinitions for the fields and controls later on this page.
184 Copyright © 1988, 2020, Oracle and/or its affiliates.

Chapter 9 Setting Up and Working with Fluid Delegation
Note: If the delegator and proxy initiate duplicate transactions, then either the proxy, delegator, ordelegation administrator can cancel the duplicate transaction or approvers can deny the duplicatetransaction while approving the original transaction.
Maintain Delegated Authorities Click this link to access the Maintain Delegated Authoritypage, where you can run a batch job to process delegationtransactions.
Add Delegation Request Click this link to access the Add Delegation Request page, where you can create delegation requests on behalf ondelegators.
Selection CriteriaUse this group box to specify criteria for the delegation requests that you want to retrieve. To retrieve alldelegation requests, click the Search button without specifying criteria. To narrow your search results,enter one or more criteria.
Delegator Enter the delegator for whom you want to retrieve delegationrequests. The system prompts you to select from delegators withexisting requests.
Proxy Enter the proxy for whom you want to retrieve delegationrequests. The system prompts you to select from proxies withexisting requests.
Transaction Name Enter the transaction for which you want to retrieve delegationrequests. The system prompts you to select from transactionsthat are part of existing requests.
From Date and To Date Specify the specific from or to date for which you want toreview delegation requests.
Request Status Select the status of the requests that you want to retrieve.Request statuses are Accepted, Ended, Rejected, Revoked, andSubmitted.
See Understanding Delegation.
Delegation Status Select the delegation status of the requests that you want toretrieve, either Active or Inactive.
See Understanding Delegation.
Search Click this button to retrieve delegation requests based on yourselection criteria.
Clear Click this button to deselect all selection criteria fields.
Search ResultsThe system displays delegation requests and details based on your search criteria.
Copyright © 1988, 2020, Oracle and/or its affiliates. 185

Setting Up and Working with Fluid Delegation Chapter 9
Request Status The system displays the status of the request : Accepted, Ended, Rejected, Revoked, and Submitted. Click this link to reviewfurther details of a delegation request.
Select All Click this button to select the check boxes for all delegationrequests in the search results.
Deselect All Click this button to deselect all check boxes for the selecteddelegation requests in the search results.
Revoke Click this button to revoke a delegation request on behalf ofthe delegator. The system revokes delegations for all requeststhat are selected in the search results. The system sends anotification to the proxy who is affected by the change andautomatically reassigns all pending transactions back to thedelegator.
Processing Batch Delegation Requests
This topic discusses how to process batch delegation requests.
Page Used to Process Batch Delegation RequestsPage Name Definition Name Usage
Maintain Delegated Authorities Page EODL_BATCH Process batch delegation requests in adaily batch.
Maintain Delegated Authorities PageUse the Maintain Delegated Authorities page (EODL_BATCH) to process batch delegation requests in adaily batch.
Navigation
Enterprise Components > Delegation > Maintain Delegated Authorities
186 Copyright © 1988, 2020, Oracle and/or its affiliates.

Chapter 9 Setting Up and Working with Fluid Delegation
Image: Maintain Delegated Authority page
This example illustrates the fields and controls on the Maintain Delegated Authority page. You can finddefinitions for the fields and controls later on this page.
Click the Process Request button to run the Maintain Delegated Authority (EODL_BATCH)) ApplicationEngine process. This batch program processes all delegation transactions as of the system date thatappears on the run control page. The process activates all delegation transactions that were future-datedto become active on today's date, revokes all delegation requests that have expired as of today's date, andsearches for inactive proxies. For all affected delegation transactions, the process updates the requeststatus and delegation status as appropriate. The process also updates proxy navigation security, as needed.
Important! Run this process daily to maintain delegations and update invalid rows.
Working with Self-Service Delegation
These topics discuss working with self-service delegation.
Pages Used to Work With Self-Service DelegationPage Name Definition Name Usage
Manage Delegation Page EODL_LANDING_FL View delegation activity associated witha user.
Manage Delegation - Learn More aboutDelegation Page
EODL_DLGT_INSTR_FL View help for delegation. Users can viewan instructive description of delegationfunctionality.
Create Delegation Request - DelegationDates Page
EODL_DLGRQST_DT_FL Enter delegation dates by specifying theFrom Date and To Date, which definesthe delegation authority period for atransaction. By not specifying a To Date,users specify an open-ended delegation.
Copyright © 1988, 2020, Oracle and/or its affiliates. 187

Setting Up and Working with Fluid Delegation Chapter 9
Page Name Definition Name Usage
Create Delegation Request - DelegatesPage
EODL_PROXY_SEL_FL Select a delegate/proxy.
Create Delegation Request - TransactionsPage
EODL_TRANS_SEL_FL Select transactions for delegation. Userscan select one or more transactions todelegate.
Create Delegation Request - Review andSubmit Page
EODL_DLGRQST_SM_FL Submit a delegation request. Users canreview the details of a delegation requestand then submit the delegation request.
Manage Delegation PageUse the Manage Delegation page (EODL_LANDING_FL) to view delegation activity associated with auser.
Navigation
Enterprise Components > Delegation > Manage Delegation
Image: Manage Delegation page
This example illustrates the fields and controls on the Manage Delegation page.
Users can view all delegation activity associated with themselves. They can create a delegation request,revoke delegation requests for which they have delegated transaction initiation or approval to a delegate/proxy, and accept or reject the delegation requests for which they are selected to serve as delegate/proxy.The system displays only the content and associated links that are applicable to the user at the time thatuser accesses the page. Specifically, the system displays:
• The Learn More about Delegation link and associated content for learning more about delegation,which is accessible to all users at all times provided that the system is using the Delegationframework.
• The Create Delegation Request link and associated content for creating delegation requests only ifthe user has navigation security access to transactions that are enabled for delegation through thedelegation setup pages.
• The Review My Proxies link and associated content for reviewing delegates/proxies only if the userhas active or inactive delegation requests.
188 Copyright © 1988, 2020, Oracle and/or its affiliates.

Chapter 9 Setting Up and Working with Fluid Delegation
• The Review My Delegated Authorities link and associated content for reviewing delegated authoritiesonly if the user has been delegated authority to serve as a delegate/proxy.
Manage Delegation - Learn More about Delegation PageUse the Manage Delegation - Learn More about Delegation page (EODL_DLGT_INSTR_FL) to viewhelp for delegation.
Users can view an instructive description of delegation functionality.
Navigation
Click the Learn More about Delegation link on the Manage Delegation page.
Image: Manage Delegation - Learn More about Delegation page
This example illustrates the fields and controls on the Manage Delegation - Learn More about Delegationpage.
You can configure this page by accessing it through PeopleTools Application Designer.
Create Delegation Request - Delegation Dates PageUse the Create Delegation Request - Delegation Dates page (EODL_DLGRQST_DT_FL) to enterdelegation dates by specifying the From Date and To Date, which defines the delegation authority periodfor a transaction.
By not specifying a To Date, users specify an open-ended delegation.
Navigation
Click the Create Delegation Request link on the Manage Delegation page.
Copyright © 1988, 2020, Oracle and/or its affiliates. 189
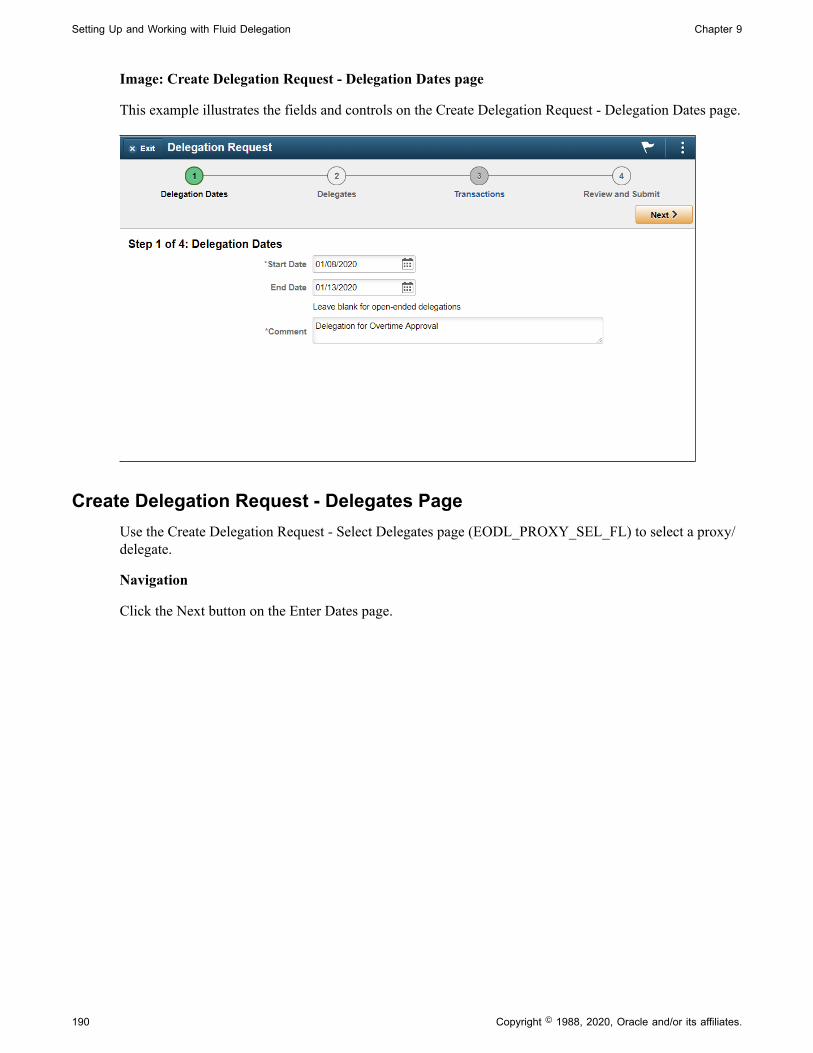
Setting Up and Working with Fluid Delegation Chapter 9
Image: Create Delegation Request - Delegation Dates page
This example illustrates the fields and controls on the Create Delegation Request - Delegation Dates page.
Create Delegation Request - Delegates PageUse the Create Delegation Request - Select Delegates page (EODL_PROXY_SEL_FL) to select a proxy/delegate.
Navigation
Click the Next button on the Enter Dates page.
190 Copyright © 1988, 2020, Oracle and/or its affiliates.

Chapter 9 Setting Up and Working with Fluid Delegation
Image: Create Delegation Request - Select Delegates page
This example illustrates the fields and controls on the Create Delegation Request - Select Delegates page.
Users can select a delegate/proxy for transactions they are delegating. If the delegation administratorselects a specific hierarchy for the transaction on the Delegation Installation Settings page, the systemdisplays valid delegates/proxies based on that selection, and users can select from this list. Validdelegates/proxies include persons who report directly or indirectly to the delegator, as well as all personsin the upward hierarchy—starting with the delegator's manager. If the delegation administrator selects theAll Persons check box on the installation page, then the system displays the Search by Name link so thatusers can search for and select from any person in the system.
Create Delegation Request - Transactions PageUse the Create Delegation Request - Transactions page (EODL_TRANS_SEL_FL) to select transactionsfor delegation.
Users can select one or more transactions to delegate.
Navigation
Click the Next button on the Delegates page.
Copyright © 1988, 2020, Oracle and/or its affiliates. 191

Setting Up and Working with Fluid Delegation Chapter 9
Image: Create Delegation Request - Transactions page
This example illustrates the fields and controls on the Create Delegation Request - Transactions page.
The system displays only the transactions that are configured for delegation initiation or approval on theConfigure Delegation Transactions page and for which the delegator has component access.
Users can delegate one or multiple transactions to another person in a single delegation request. When adelegate/proxy receives a delegation request for multiple transactions, he or she must accept or reject theentire request. The delegator, however, can revoke single transactions from a multiple transaction request.When a delegator revokes one or more transactions from a multiple transaction request, the system pullsthe revoked transactions out of the multiple transaction request and creates individual revoked entries inthe Approval Framework. The remaining transactions stay in the multiple transaction request. If only onetransaction remains after revoking, the system disbands the group and displays an individual rather thanmultiple delegation request. This functionality preserves the accuracy of the multiple transaction status.
Create Delegation Request - Review and Submit PageUse the Create Delegation Request - Review and Submit page (EODL_DLGRQST_SM_FL) to reviewand submit a delegation request.
Users can review the details of a delegation request and then submit the delegation request.
Navigation
Click the Next button on the Select Transactions page.
192 Copyright © 1988, 2020, Oracle and/or its affiliates.

Chapter 9 Setting Up and Working with Fluid Delegation
Image: Create Delegation Request - Review and Submit page
This example illustrates the fields and controls on the Create Delegation Request - Review and Submitpage.
The system displays the delegation period, the selected delegate/proxy, and the selected transactions.When a transaction is set up with product specific delegation requirements on the Configure DelegationTransaction page, a link will appear after the transaction. When no information is entered in the OptionalParameters section of the Configure Delegation Transaction page, the link is not available. Select theproduct specific link for a transaction to have the system open the product specific component to continuethe delegation request.
When users click the Submit button, the system automatically sends an email notification to the delegate/proxy to either accept or reject the delegation request if Approval Framework is set up.
To prevent situations of cascading or circular delegation chains, after the Delegation framework passesdelegated authority over a transaction to a delegate/proxy, the delegate/proxy cannot delegate authorityover that transaction to another user. The Delegation framework only passes authority over transactionsfrom initial delegator to initial delegate/proxy.
Copyright © 1988, 2020, Oracle and/or its affiliates. 193

Setting Up and Working with Fluid Delegation Chapter 9
Image: Create Delegation Request — Confirmation page
This example illustrates the fields and controls on the Create Delegation Request — Confirmation page.
Note: When a user adds a delegation request, the system checks for an Alternate User ID field value onthe User Profile - Workflow page. The delegation request overrides the alternate user ID for transactionsin the delegation request. If an alternate user ID exists and the dates of the delegation and alternate IDoverlap, the system issues a warning message.
My Delegates PageUse the My Delegates page (EODL_MY_PROXIES_PG) to manage delegates/proxies for delegation.
Users can manage their delegates/proxies by search for and updating the status of their delegationrequests.
Navigation
Click the Review My Proxies link on the Manage Delegation page.
194 Copyright © 1988, 2020, Oracle and/or its affiliates.

Chapter 9 Setting Up and Working with Fluid Delegation
Image: Review My Proxies — My Delegates page
This example illustrates the fields and controls on the Review My Proxies — My Delegates page.
Users can change their mind by revoking delegation requests for which they have delegated transactioninitiation or approval to a delegate/proxy. To revoke the delegation request, users must select the checkbox for the delegation request and then click the Revoke button. The system changes the request statusto Revoked and automatically sends an email notification to the delegate/proxy about the status of thedelegation request.
Reviewing Delivered Notification Templates for Delegation
This table lists the delivered delegation notifications, describes each notification, describes the trigger foreach notification, and lists the recipients:
Template Name Notification Description Trigger Recipients
DelegationAccept States that the proxy hasaccepted the delegationrequest submitted by thedelegator.
Proxy accepts delegationrequest.
To: Delegator
CC: Proxy
DelegationAdminAdd States that the administrator, on behalf of delegator, hassubmitted a delegation requestto the proxy.
Delegation administratoradds and submits delegationrequest.
To: Proxy
CC: Delegator
DelegationAdminRevoke States that the administrator, on behalf of delegator, hasrevoked a delegation requestthat was assigned to the proxy.
Delegation administratorrevokes delegation request.
To: Proxy
CC: Delegator
Copyright © 1988, 2020, Oracle and/or its affiliates. 195

Setting Up and Working with Fluid Delegation Chapter 9
Template Name Notification Description Trigger Recipients
DelegationBatch States that delegationauthority has been madeactive or inactive for thedelegator and transactionslisted. Also states that securityhas been updated to allowthe proxy access to thetransactions.
Delegation administratorruns the Maintain DelegatedAuthorities batch process.
To: Proxy
CC: Delegator
DelegationError States that a submitteddelegation request hasencountered an error.
Delegator submits adelegation request but an erroroccurs.
To: Delegator
DelegationNotifyAdmin States that the system hasidentified that a proxy isinactive for at least one dayfor a delegation request thathas been accepted.
Delegation administratorruns the Maintain DelegatedAuthorities batch process.
To: Delegator
CC: Delegation Administrator
DelegationReject States that a proxy hasrejected a delegation requestsubmitted by a delegator.
Proxy rejects delegationrequest.
To: Delegator
CC: Proxy
DelegationRequest States that a delegator or anadministrator on behalf ofthe delegator has submitteda delegation request to theproxy.
Delegator creates and submitsa delegation request.
To: Proxy
CC: Delegator
DelegationRevoke States that a delegator or anadministrator on behalf ofthe delegator has revoked adelegation request that wasassigned to the proxy.
Delegator revokes adelegation request.
To: Proxy
CC: Delegator
196 Copyright © 1988, 2020, Oracle and/or its affiliates.

Chapter 10
Using the Comments and Attachments ViewFramework
Understanding Comments and Attachments View Framework
The Comments and Attachments View Framework enables users to view comments and attachmentsat a common location or page. This can be configured in PeopleSoft components where comments orattachments or both need to be displayed.
The steps involved in the configuration, setup and registration of the Comments and Attachments Viewframework are:
1. DataSource View
2. Configuration Setup
3. Configuration ID Mapping
4. Implementation
DataSource ViewThe DataSource View should be an SQL query to fetch Comments (or) Attachments (or) both for atransaction. The Query/View has to be with proper keys on each level (Transaction, Comments andAttachments)
Configuration SetupConfiguration ID needs to be setup to use the framework. Based on the Query/View created, appropriatefields appear in the configuration setup. For details on Configuration Setup, see CAVF ConfigurationSetup Page
Configuration ID MappingConfiguration ID Mapping setup used for calling Configuration ID dynamically in PeopleCode event. Formore details, see CAVF Configuration ID Component Mapping Page
Copyright © 1988, 2020, Oracle and/or its affiliates. 197

Using the Comments and Attachments View Framework Chapter 10
Implementation
Configuring and Implementing the Comments and AttachmentsView Framework
Pages Used to Configure and Implement the Comments and AttachmentsView Framework
Page Name Definition Name Usage
CAVF Configuration Setup Page EOATT_CONFIG_DTLS Set up the Comments and AttachmentsView configuration.
CAVF Configuration ID ComponentMapping Page
EOATT_MAPCO_PG Configure the transaction page and tospecify where to display the commentsand attachments.
CAVF Configuration ID Page ComposerMapping Page
EOATT_MAPPC_PG Configure the Page Composer pagewhere the Comments and AttachmentsView framework is to be used
CAVF Configuration Setup PageUse the CAVF Configuration Setup page (EOATT_CONFIG_DTLS) to create a unique Configuration IDand to configure the comments and attachments.
Navigation
Enterprise Components >CA View Framework > CAVF Configuration Setup
198 Copyright © 1988, 2020, Oracle and/or its affiliates.

Chapter 10 Using the Comments and Attachments View Framework
Image: CAVF Configuration Setup screenshot 1 of 2
CAVF Configuration Setup screenshot 1 of 2
Image: CAVF Configuration Setup screenshot 2 of 2
CAVF Configuration Setup screenshot 2 of 2
The fields and description are mentioned below in this page.
Configuration ID Unique ID for the configuration.
Description Description of the configuration.
Copyright © 1988, 2020, Oracle and/or its affiliates. 199

Using the Comments and Attachments View Framework Chapter 10
Product Product Information.
Data Source View The query that drives the framework.
Default Attributes Set up the UI related defaults. If this is left blank, the values willbe picked up from the framework defaults.
File Attachment Server Details Enter the details of the file server for the attachments for aconfiguration ID. For more details see the section on FileAttachment Server Details in this page.
File Attachment Server DetailsImage: File Attachment Server Details
File Attachment Server Details
Configuration ID CAVF Configuration Setup ID.
Default Server For PeopleSoft FSCM, this check box needs to be ticked for thesystem to take in the default server and path.
If this is unchecked, provide the details in the below fields.
Attachment Server Type Choose the type of file server. Available types are DB, FTP andURL.
Server/Record Name/Url Id specify the server name or record name or URL.
PATHNAME specify the path details from where to pick the attachments.
Administer File Attachments Use this link to manage the file servers. Users can add or makechanges to existing file servers.
Data Set 1Field Name Field names for the attachment.
200 Copyright © 1988, 2020, Oracle and/or its affiliates.
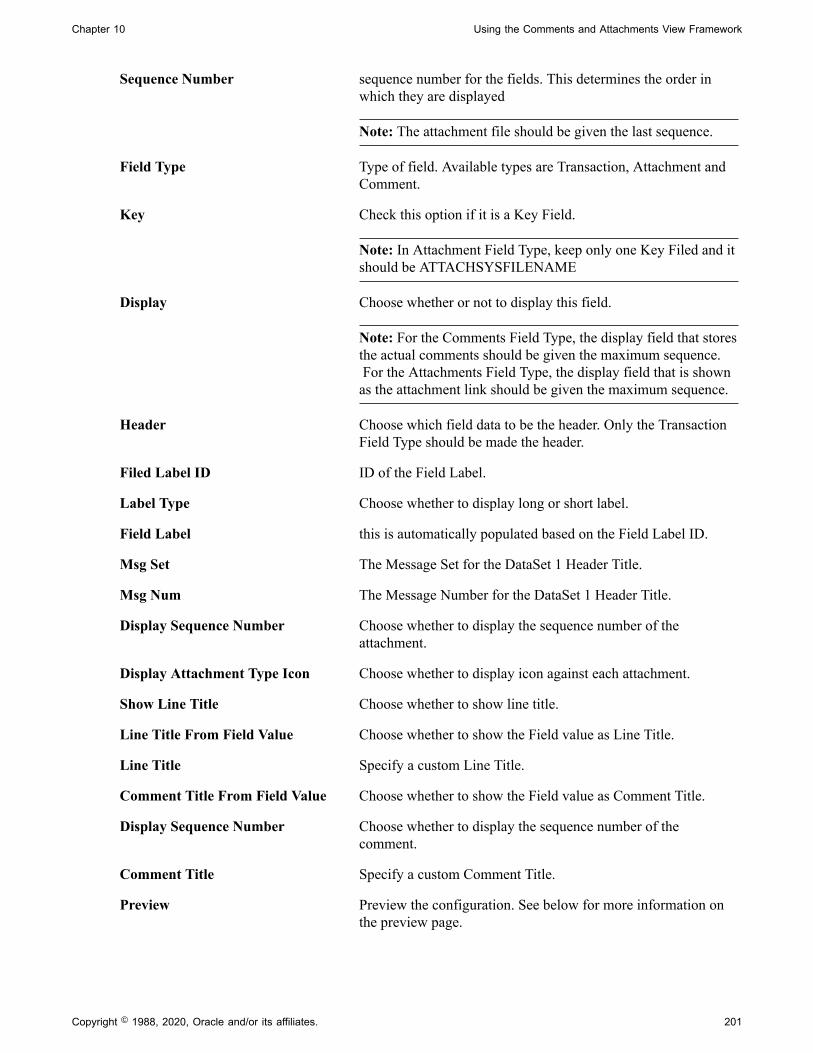
Chapter 10 Using the Comments and Attachments View Framework
Sequence Number sequence number for the fields. This determines the order inwhich they are displayed
Note: The attachment file should be given the last sequence.
Field Type Type of field. Available types are Transaction, Attachment andComment.
Key Check this option if it is a Key Field.
Note: In Attachment Field Type, keep only one Key Filed and itshould be ATTACHSYSFILENAME
Display Choose whether or not to display this field.
Note: For the Comments Field Type, the display field that storesthe actual comments should be given the maximum sequence. For the Attachments Field Type, the display field that is shownas the attachment link should be given the maximum sequence.
Header Choose which field data to be the header. Only the TransactionField Type should be made the header.
Filed Label ID ID of the Field Label.
Label Type Choose whether to display long or short label.
Field Label this is automatically populated based on the Field Label ID.
Msg Set The Message Set for the DataSet 1 Header Title.
Msg Num The Message Number for the DataSet 1 Header Title.
Display Sequence Number Choose whether to display the sequence number of theattachment.
Display Attachment Type Icon Choose whether to display icon against each attachment.
Show Line Title Choose whether to show line title.
Line Title From Field Value Choose whether to show the Field value as Line Title.
Line Title Specify a custom Line Title.
Comment Title From Field Value Choose whether to show the Field value as Comment Title.
Display Sequence Number Choose whether to display the sequence number of thecomment.
Comment Title Specify a custom Comment Title.
Preview Preview the configuration. See below for more information onthe preview page.
Copyright © 1988, 2020, Oracle and/or its affiliates. 201
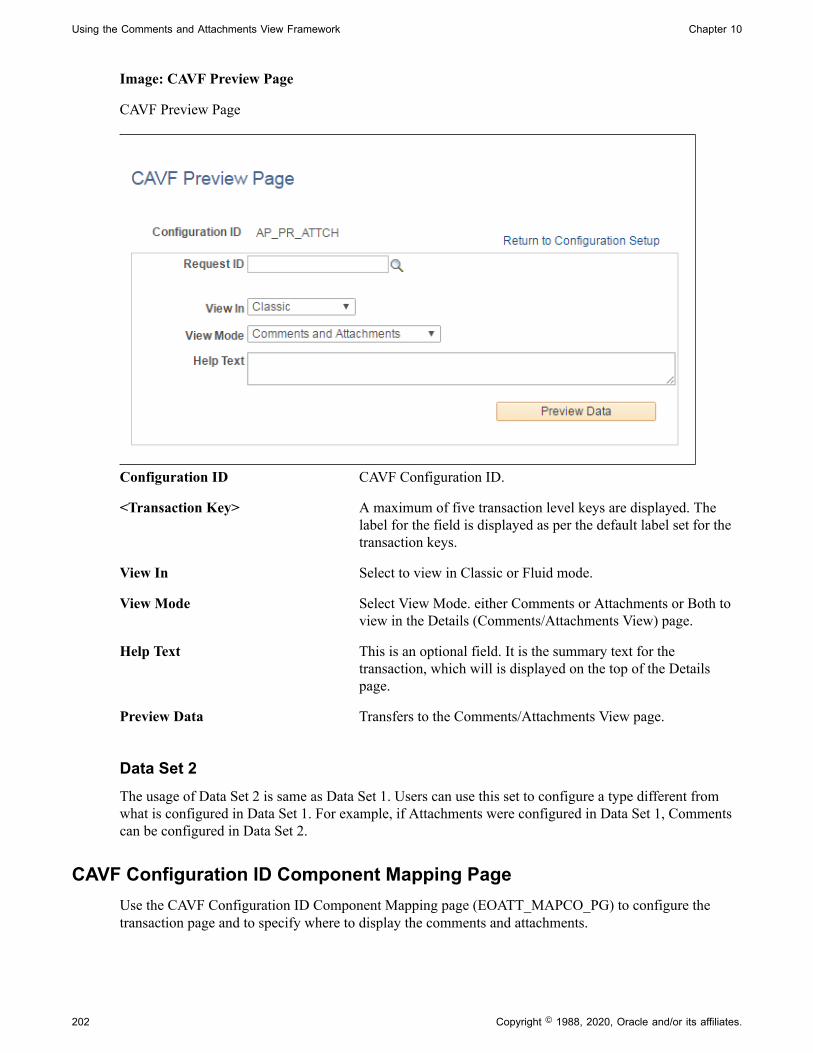
Using the Comments and Attachments View Framework Chapter 10
Image: CAVF Preview Page
CAVF Preview Page
Configuration ID CAVF Configuration ID.
<Transaction Key> A maximum of five transaction level keys are displayed. Thelabel for the field is displayed as per the default label set for thetransaction keys.
View In Select to view in Classic or Fluid mode.
View Mode Select View Mode. either Comments or Attachments or Both toview in the Details (Comments/Attachments View) page.
Help Text This is an optional field. It is the summary text for thetransaction, which will is displayed on the top of the Detailspage.
Preview Data Transfers to the Comments/Attachments View page.
Data Set 2The usage of Data Set 2 is same as Data Set 1. Users can use this set to configure a type different fromwhat is configured in Data Set 1. For example, if Attachments were configured in Data Set 1, Commentscan be configured in Data Set 2.
CAVF Configuration ID Component Mapping PageUse the CAVF Configuration ID Component Mapping page (EOATT_MAPCO_PG) to configure thetransaction page and to specify where to display the comments and attachments.
202 Copyright © 1988, 2020, Oracle and/or its affiliates.

Chapter 10 Using the Comments and Attachments View Framework
Navigation
Enterprise Components >CA View Framework > CAVF Configuration ID Mapping
(choose the Component tab).
Image: CAVF Configuration ID Mapping of Component.
CAVF Configuration ID Mapping of Component.
Product Area Select the Product Area.
Component Select the Component within the selected Product Area.
Page Select the Page associated with the Component.
Record Select the record in the Page.
Field Select the Field in the Record.
Configuration ID 1 Select the Configuration ID of Data Set 1.
View Mode 1 Select the Data Set 1 View Mode.
Configuration ID 2 Select the Configuration ID of Data Set 2.
View Mode 2 Select the Data Set 2 View Mode.
Image: CAVF Component Mapping Authorization
CAVF Component Mapping Authorization
Component Select the Component.
Copyright © 1988, 2020, Oracle and/or its affiliates. 203

Using the Comments and Attachments View Framework Chapter 10
User List Source Select the User List Source. Available options are ApplicationClass, Query, Role, SQL Definition.
Application Class/Query/Role/SQLDefinition
Select the appropriate Class/Query/Role or Definition.
Access type Select the Attachment Type. Available types are Attachments, Comments, Comments and Attachments.
Image: CAVF Mapping File Securing
CAVF Mapping File Securing
Component Name of the Component.
Extension List Name File extension list name.
Display Option Choose to display or hide.
CAVF Configuration ID Page Composer Mapping PageUse the CAVF Configuration ID Page Composer Mapping page (EOATT_MAPPC_PG ) to configure thePage Composer page where the Comments and Attachments View framework is to be used.
Navigation
Enterprise Components >CA View Framework > CAVF Configuration ID Mapping
(choose the Page Composer tab).
204 Copyright © 1988, 2020, Oracle and/or its affiliates.
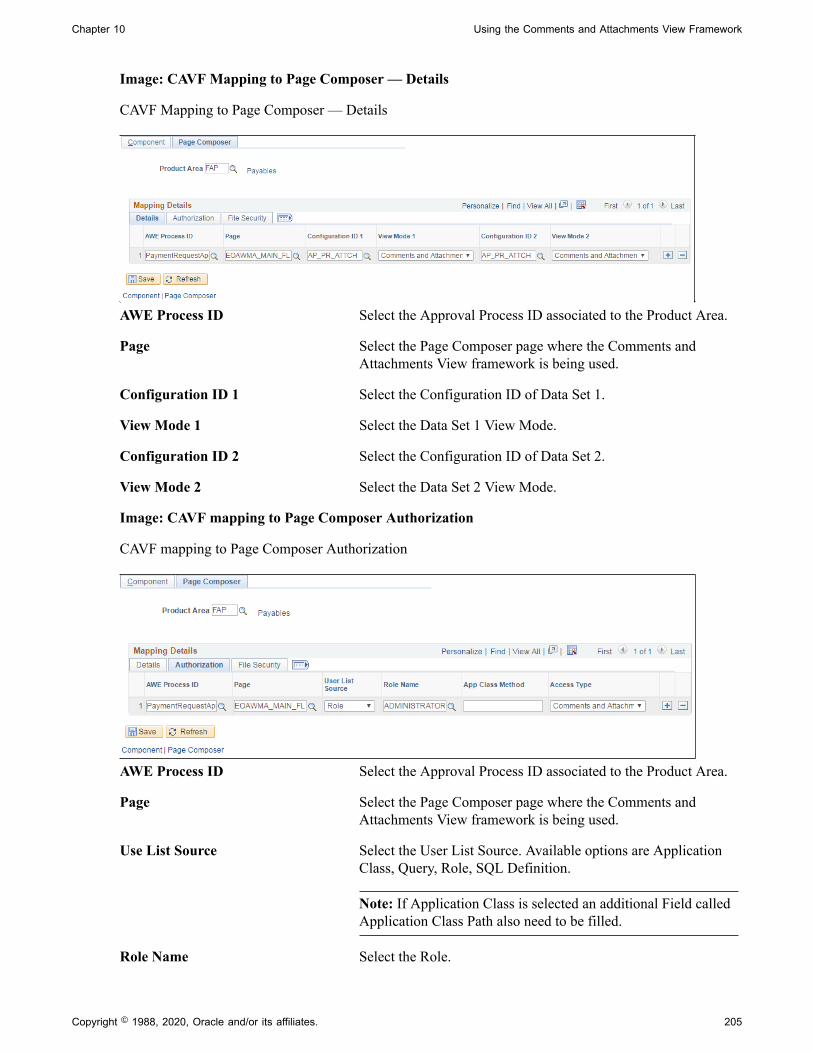
Chapter 10 Using the Comments and Attachments View Framework
Image: CAVF Mapping to Page Composer — Details
CAVF Mapping to Page Composer — Details
AWE Process ID Select the Approval Process ID associated to the Product Area.
Page Select the Page Composer page where the Comments andAttachments View framework is being used.
Configuration ID 1 Select the Configuration ID of Data Set 1.
View Mode 1 Select the Data Set 1 View Mode.
Configuration ID 2 Select the Configuration ID of Data Set 2.
View Mode 2 Select the Data Set 2 View Mode.
Image: CAVF mapping to Page Composer Authorization
CAVF mapping to Page Composer Authorization
AWE Process ID Select the Approval Process ID associated to the Product Area.
Page Select the Page Composer page where the Comments andAttachments View framework is being used.
Use List Source Select the User List Source. Available options are ApplicationClass, Query, Role, SQL Definition.
Note: If Application Class is selected an additional Field calledApplication Class Path also need to be filled.
Role Name Select the Role.
Copyright © 1988, 2020, Oracle and/or its affiliates. 205

Using the Comments and Attachments View Framework Chapter 10
App Class method Select the Application Class method.
Access Type Select the Attachment Type. Available types are Attachments, Comments, Comments and Attachments.
Image: CAVF Mapping to Page Composer File Security
CAVF Mapping to Page Composer File Security.
AWE Process ID Select the Approval Process ID associated to the Product Area.
Page Select the Page Composer page where the Comments andAttachments View framework is being used.
Extension List name Select the file extension list name. The File Extensions List IDis defined at PeopleTools, Utilities, Administration, AdministerFile Processing, File Extension List.
Display Option Choose to display or hide.
206 Copyright © 1988, 2020, Oracle and/or its affiliates.

Chapter 11
Page Composer
Understanding Page Composer
The Page Composer feature enables users to design their own Fluid Application Pages to make it morein line with the business needs. The feature allows users to design pages for different form factors and toinclude fields and tabs using the registered components delivered with the feature. It is metadata driven sothe users can modify the styling and layout of select areas on component pages without having to code orcustomize delivered PeopleSoft application pages
Copyright © 1988, 2020, Oracle and/or its affiliates. 207

Page Composer Chapter 11
Image: Page Composer
Page Composer design
Using Page Composer
Page Composer gives users the flexibility to edit the design of the Fluid Approval pages based on theavailable page components that are already registered for Page Composer. Users can design the existingplacement of the fields in the fluid approval pages and can also add buttons and links in line with specificbusiness requirements.
208 Copyright © 1988, 2020, Oracle and/or its affiliates.

Chapter 11 Page Composer
Pages Used to Configure Pages Using Page ComposerPage Name Definition Name Usage
Page Composer Page EOPC_MAIN_FL Create page compositions.
Page Composer PageUse the Page Composer page (EOPC_MAIN_FL) to create page compositions..
Navigation
Enterprise Components >Page Composer > Page Composer
Image: Page Composer Main Page
Page Composer Main Page
The Page Composer main page consists of the left and right panel. Use the Search field in the left panel tosearch for the definitions.
Note: Only Fluid Approvals definition is available in Page Composer.
Copyright © 1988, 2020, Oracle and/or its affiliates. 209

Page Composer Chapter 11
SearchImage: Search panel
Search panel
Definition Search from the list of available definitions. Currently, only theApprovals definition is available.
Object Type Search based on the Object Type from the list. Listed objecttypes are Component, Email HTML Page, Email Rich TextHTML, Stand-Alone HTML Area. Currently users can composeonly Component.
System Source Search based on the system source.
210 Copyright © 1988, 2020, Oracle and/or its affiliates.

Chapter 11 Page Composer
PagesImage: Pages panel
Pages panel
The Page Composer allows users to compose and configure the view of three sections in the Fluidapproval pages.
• Approval Summary
• Header Detail
• Line Detail
ToolboxImage: Toolbox panel
Toolbox panel
Use the Toolbox panel to configure the different sections in the Fluid Approval page.
Copyright © 1988, 2020, Oracle and/or its affiliates. 211

Page Composer Chapter 11
Change Form Factor Change the form factor. Available form factors are Large, Medium , Small and X-Large.
Change Composition Change the composition of the form. The Change Compositiontool allows users to access the records already registered in PageComposer and to view the fields available under each record. Users can then simply drag and drop the relevant Fields to theSummary, Header or Line details area of the form to composethe particular fluid approval page.
Image: Drag and Drop Fields
Drag and Drop the fields to page sections.
Registering Components in Page Composer
The Developer Registration page of Page Composer has a list of registered components. Users cannotadd new components for registration. Existing components can be edited for your business needs. thecomponents registered and the changes made to them are then available in the Toolbox panel in PageComposer.
212 Copyright © 1988, 2020, Oracle and/or its affiliates.

Chapter 11 Page Composer
Pages Used to Register Components in Page ComposerPage Name Definition Name Usage
Registration Page EOPC_DEVREG_FL Use and edit the components availablein the Registration page for PageComposer.
Registration PageUse the Registration page (EOPC_DEVREG_FL) to view and edit the records available for PageComposer.
Navigation
Enterprise Components > Page Composer Administrator > Developer Registration.
Image: Page Composer Registration page
Page used to Register Page Composer transactions.
The Approvals definition the only definition currently registered for Page Composer. Use the Search paneto search for the Approval transactions that are registered to AWE
Copyright © 1988, 2020, Oracle and/or its affiliates. 213

Page Composer Chapter 11
Definition Name of the definition.
Detail Description of the definition.
Type Object type of the definition.
Object Name Name of the object.
Multiple Composition Whether it is multiple composition. A multiple composition is adefinition that allows multiple types of data compositions in thebase object (e.g. component).
Add View Record This record is used as the prompt view to add new compositionsto the definition.
Search View Record This view is used when searching for compositions in PageComposition registration and Page Composer.
Composition Key Fields This is the Field Name of the cross reference record and isrequired only in case of multiple compositions.
Note: For Approvals, the value is taken from the cross referencetable from AWE Transaction Registry.
Description Name of the page.
Edit Edit the page name.
Display Type Display Type. Currently only the display type Page is available.
Page Name Content reference of the page.
Form Factor The form factor for the page to support different devices. Available form factors are Small, Medium, Large and X-Large. A page needs to be registered for each form factor.
Sequence Enter the sequence in which this section should be displayed onthe Page Composer Composition page.
214 Copyright © 1988, 2020, Oracle and/or its affiliates.

Chapter 11 Page Composer
Image: Page Composer Registration Reserved Field
Page Composer Registration Reserved Field.
Page Reserved Field
Object Name PeopleTools Component name.
Long Description
Copyright © 1988, 2020, Oracle and/or its affiliates. 215

Page Composer Chapter 11
Image: Page Composer Registration Labels
Page Composer Registration Labels.
Short Page Description Short Page Description.
Long Page Description Long Page Description.
216 Copyright © 1988, 2020, Oracle and/or its affiliates.

Chapter 11 Page Composer
Image: Page Composer Registration Keys/Source Records/Field Events
Page Composer Registration Keys/Source Records/Field Events.
Composition Key Fields Enter Composition Key Field.
Application Source Records Add an Application Source Record for the Approval page inPage Composer.
Field Events Field Events for the desired page section and form factor.
Application Source RecordsApplication Source Records are displayed in the left-hand panel on the Page Composer page. The fieldsdefined in these record are the list available to the users to drag and drop to the page.
For Approvals, use the AWE Transaction Registry records to determine the required key structure of theapplication source records.
Copyright © 1988, 2020, Oracle and/or its affiliates. 217

Page Composer Chapter 11
Image: Application Source Records
Application Source Records.
Record This record is used to display the drag-from fields in the left-hand panel of the Page Composer page.
Record Alias Enter a 1 to 4 character alias name for the record.
Buffer Level The Buffer Level of the Page Composer reserved filed basecomponent.
Message Set Number Enter the Message Set Number for the Record Label.
Message Number Enter the Message Number for the Record Label.
Field Name The Field Name in the Record
Key Sequence Search Key Field sequence.
App Class Path Enter the full path name of the application class method. This isused only for the app class reserved field.
218 Copyright © 1988, 2020, Oracle and/or its affiliates.

Chapter 12
Page and Field Configurator
Understanding Page and Field Configurator
PeopleSoft Page and Field Configurator feature enables the users to configure certain properties ofpages and fields of Classic and Fluid pages based on their business requirements. It allows the users todefine multiple configuration for a component based on different user roles or user list. User can definemultiple criteria based on the component fields and selectively apply the configuration at run time if thecriteria is satisfied based on the run time values. The Page and Field Configurator supports two type ofConfigurations: Standard and Masking.
In Standard configuration, a user can hide a field/page, change label of a field, add default value toa field, make the field/page read only, or mark the field as mandatory without having to customizedelivered application pages. It also permits the user to verify the configuration against the underlyingpage metadata.
In Masking configuration, a user can mask page fields and search fields based on a chosen Mask profile.
Note: The configuration can be applied only to a registered component in the system.
Using Page and Field Configurator
Page and Field Configurator gives users the flexibility to configure fields and pages in any componentwithout having to customize delivered application pages or fields.
To configure any component using Page and Field Configurator, use the Page Configuration(EOCC_CONFIGURE), User Lists (EOCC_CONFIG_USER) and Map to Portal registry(EOCC_MAP_EVENT) pages.
Pages Used to Configure Pages Using Page and Field ConfiguratorPage Name Definition Name Usage
Page Configuration Page EOCC_CONFIGURE Use this page to capture the page andfield configuration and criteria.
User List Page EOCC_CONFIG_USER Use this page to capture the list of usersand/or roles to which the configurationdefined in the Page Configuration pageshould be applied to.
Map to Portal Registry Page EOCC_MAP_EVENT Use this page to map the configuration tothe Portal Registry.
Copyright © 1988, 2020, Oracle and/or its affiliates. 219

Page and Field Configurator Chapter 12
Page Name Definition Name Usage
Validate Page Configurations Page EOCC_CONFIG Use this page to verify the validity of theconfigurations defined using the PageConfiguration page.
Understanding How to Configure a Page using Page and Field ConfiguratorAs a user, there are three steps to be completed to configure a page using Page and Field Configurator:
1. Define the page and field changes to be made in the selected component using the DefineConfiguration page.
2. Define the list of users and/or roles to whom the configuration needs to be applied using the User Listpage.
3. Map the configurations to the corresponding portal registry entries using the Map Configuration toPortal Registry page.
First step is to select the page to be configured, identify the specific field and capture the criteria. Next isto define the user list which identifies the users to which the new configuration is applicable. The finalstep is to map the configuration to the portal registry. The configuration defined in this component willbecome effective only if the services defined by the utility are mapped to the corresponding portal registryentries.
Define the Page and Field ConfigurationTo define the page and field configuration, from the Page and Field Configuration search page, choose theAdd New Value tab.
Navigation
Enterprise Components >Page and Field Configuration > Add New value
220 Copyright © 1988, 2020, Oracle and/or its affiliates.

Chapter 12 Page and Field Configurator
Image: Add New Value for Page and Field Configuration
Add New Value for Page and Field Configuration
Component Name Choose the component for which a new configuration needs tobe done.
Market Choose the component market.
Configuration Type Choose the configuration type for the component. Availablevalues are Standard and Masking
Note: Only users with the role PFC Data Masking Admin cansee the configuration type. The PeopleTools version needs to be8.57.11 or higher.
To configure the component for Standard Configuration Type, see Page Configuration Page
To configure the component for Masking Configuration Type, see Masking Data in Page and FieldConfigurator
Page Configuration PageUse the Page Configuration page (EOCC_CONFIGURE) to define the changes needed for thecomponent.
Navigation
Enterprise Components >Page and Field Configuration > Page and Field Configurator >PageConfiguration
Copyright © 1988, 2020, Oracle and/or its affiliates. 221

Page and Field Configurator Chapter 12
Image: Page Configuration page
This example illustrates the fields and controls on the Page Configuration page.
Component Name Displays the name of the component as selected by the user.
Description Enter an appropriate description.
Market Displays the market for which the configuration is defined asselected by the user.
Status Select the status of the configuration.
Configuration Type Displays whether this is a Standard or Masking configuration.
Validate Configuration You can use the Validate Configuration button to verify theconfiguration against the underlying page metadata and identifyif any errors exist. For more details, see
CriteriaYou can associate criteria with each configuration. In this section, you can capture the criteria for thecomponent with sequence number.
Sequence Number Enter the Sequence number for the configuration.
Multiple configurations can be defined for same componentand the sequence number is given to distinguish theseconfigurations.
222 Copyright © 1988, 2020, Oracle and/or its affiliates.

Chapter 12 Page and Field Configurator
Note: At the application run time, if the transactions satisfiesmore than one criteria defined in the configuration, then thecriteria with lowest sequence number is selected for executionand the rest of the criteria and related configuration are ignored. However it works differently if Apply Additively check boxis selected. For more information, see the Apply Additivelysection in this page. Please do not use sequence numbers from81 to 99. These are reserved by Oracle.
Description Enter an appropriate description.
Status Select the Status of the Sequence.
Criteria Displays the criteria defined by the user using the DefineCriteria or Edit Criteria hyperlink in a readable format.
When you create a new configuration, Define Criteria link will be displayed on the page. On clicking thelink you can select the fields available on the level zero of the component, an operator, and enter a valueto be compared at the run time, per Sequence Number.
Image: Define Criteria page
This example illustrates the Define Criteria page.
For existing record, Edit Criteria link will appear where you can edit the criteria details. You can add anew row to add more than one condition (Field, Criteria and Value combination) for the same sequencelevel using the Select Fields button.
You can define criteria based on page name and field name. Once you select the page field, select thecondition and enter the required value.
Note: While defining the criteria, the selected field should contain a value either from defaults orfrom existing transaction data. If criteria is configured on work record fields where data is populateddynamically, then at the time of criteria evaluation (Post Build event) if the system does not finds a valuefor the field, the criteria would fail and the configuration will not get applied.At the run time of the component, the criteria will be evaluated only once at the time of component load.Any change in the field values selected for criteria evaluation thereafter will not result in re-evaluation ofcriteria.
Copyright © 1988, 2020, Oracle and/or its affiliates. 223

Page and Field Configurator Chapter 12
Copy Criteria From You can use this link and select a sequence number from whichyou can copy the criteria.
User List Click the link to open the User List page. Use this page toquickly create corresponding sequence level user list for theconfiguration. For more information see,User List Page.
Apply AdditivelyUse the Apply Additively check box when you want to apply multiple sequences. When the ApplyAdditively check box is selected the component configuration is evaluated as follows:
The system evaluates sequences in ascending order starting with sequence 1. Once the criteria for a non-additive sequence (e.g. apply additively is not selected), the system proceeds to evaluate only the latersequences marked as Apply Additively.
As an example, assume sequences 1 through 4 are not applied additively, but sequences 5 through 10are selected to apply additively. The system starts evaluation with sequence 1 and proceeds in ascendingorder. Assume sequence 1 and 2 criteria are not met, but sequence 3 criteria is met. The system wouldapply sequence 3 configuration then move to evaluating any subsequent sequences marked as ApplyAdditively. Sequence 5 would be evaluated next and if criteria is met, would be applied in addition tosequence 3. Sequence 4 would not be evaluated. Sequences 6-10 would also be evaluated for criteria sinceall are marked as Apply Additively. The display shown to the user would include all the sequences wherecriteria was satisfied.
If the same field is being modified in multiple sequences then both sequences will be applied. Forexample if a field in a sequence is marked as Disable Entry in one sequence and in another sequencewhich is applied additively it is marked as Modify label, then on applying the configuration that field willhave the label modified as well as its text area disabled.
If a property of a field is modified on multiple sequences, then the property in the highest sequence getsapplied. For example if for a field in sequence 1 you modify the label as abc and for the same field insequence 6 you modify the label as xyz, then on applying the configuration, the label xyz will take effect.
Note: once a field has been set as disabled for entry, required for entry or hidden, then it cannot beundone in a subsequent sequence. Only labels and default values can be changed in subsequent sequences.
Masking configurations are applied after standard configurations. Masking configurations are appliedadditively.
Configure Field PropertiesThe Configure Field Properties section is used to capture the field level changes that need to be made fora component.
Select Fields Click the Select Fields button to open Select Field page. Youcan use this page to select an existing field from the component.
Note: Radio buttons and non-data entry fields will not beavailable for selection in the list.Be cautious while selecting fields on a grid or scroll areawhich can contain large volume of data as it could result in theperformance degradation of the component.
224 Copyright © 1988, 2020, Oracle and/or its affiliates.

Chapter 12 Page and Field Configurator
You can select multiple fields from a primary page or from thesecondary page of a primary page.
Image: Select Field page
Select Field page
Field Name Based on the selected field, name of field is displayed.
Label Text Label of the field is displayed based on your selection.
Note: This field is enabled only if ‘Modify Label’ check box isselected.
Modify Label Select the check box if you need to modify the label.
Hide Field Select the check box if you need to hide the field.
Copyright © 1988, 2020, Oracle and/or its affiliates. 225

Page and Field Configurator Chapter 12
Note: You can only hide the fields which are made visible in theapplication designer. The fields made invisible in applicationdesigner cannot be made visible via configuration.
Disable Entry Select the check box if you need to make the field as read-only.
Note: You can disable a field only if it is by default editable inthe application designer. The field which is already disabled inapplication designer or people code could not be made editableusing the configuration.
Required Field Select the check box if you need to make the field as mandatory.
Note: You can make a field mandatory which is not configuredas required in the application designer. The field which is madeas required in application designer or people code could not bemade Not-Required by using the configuration.
Default Value Enter a value if you need to add a default value for the field.
Note: The default value will be applied only when thecomponent is open in Add mode or when a new row is inserted. The system will not do any check on the value entered on thisfield except for the basic format check.Be cautious while entering the default value as a non-acceptablevalue throws an error at run time of the selected component. You should not default a value for a field that already hasadditional processing associated it such as field change.
Copy Field Properties From You can use this link and select a sequence number from whichyou can copy the field properties.
Configure Secondary PageUse the Select link under Configure Field Properties to configure fields in secondary pages.
226 Copyright © 1988, 2020, Oracle and/or its affiliates.

Chapter 12 Page and Field Configurator
Image: Configure Secondary Page
Configure Secondary Page.
Primary Page Choose the main page.
Secondary page Choose the secondary page listed under the selected primarypage.
Choose the field to be configured from the list of page field results.
Configure Page VisibilityThe Configure Page Visibility section is used to hide or show the page as a whole in the component. Italso has the capability to make a page as display only.
Page Name Select the page that needs to be configured.
Visible Select from the following options:
• Yes – Select Yes to configure the page as visible. You canoverride the page visibility defined in the component.
• No – Select No to hide the page. If a page is selected asinvisible then in run time, the hyperlink at the bottom andpage tab at the top of the component will not display thatpage.
Note: If all the pages of a component are selected as invisibleeither via the configuration or via the Application Designer orthrough a combination of both, then the system may behaveunexpectedly as there should be at least one page visible for thecomponent.
Display Only Select the check box to make the selected page as read only atthe component run time.
Copyright © 1988, 2020, Oracle and/or its affiliates. 227

Page and Field Configurator Chapter 12
Note: A page which is already Display Only in ApplicationDesigner or PeopleCode could not be made editable by usingthe configuration.
System prompts you with a warning, if you have made any fieldas Required Field in the configuration and if the page where thefield appears is configured as Display Only or Invisible.
Page Visibility feature is supported for all classic components and selected fluid components. Only thefluid components with left panel and side page with group box of type” Page Tab” are supported. Formore information on side pages, refer the product information PeopleTools: Providing Left NavigationUsing PT_SIDE_PAGETABS
User List PageUse the User List page (EOCC_CONFIG_USER) to define the list of users to whom the configurationneeds to be applied. You can create user list at Header Level where one user list covers the entirecomponent or, at Sequence Level, where separate user list is defined for each sequence number.
Navigation
Enterprise Components, Page and Field Configuration, Page and Field Configurator, User List
Image: User List page
This example illustrates the fields and controls on the User List page.
Level The user list can be applied either on the Header Level or on theSequence Level.
• Header Level - Select this option if you need to define onlyone user list for the entire component (for all the SequenceNumbers).
228 Copyright © 1988, 2020, Oracle and/or its affiliates.

Chapter 12 Page and Field Configurator
• Sequence Level - Select this option if you need to defineseparate user list for each sequence number. On selectingthis option “Criteria’ section appears on the page to capturesequence level user list criteria.
Applies To Select from the following options:
• All with Excluded Roles/Users – Select this option if youwant to make the configuration applicable to all the usersand roles in the system. On selecting this option, ‘ExcludeRoles’ and ‘Excluded Users’ sections appear where you canadd any exception User ID or Role.
• Single Role with Exceptions – Select this option if you wantto make the configuration applicable to all the users havingthe role defined on the field Role. On selecting this option, ‘Excluded Users’ section appears where you can add anyexception User ID.
• Selected Users – Select this option if you want to makethe configuration applicable only to specific User IDs. Onselecting this option, ‘Included Users ’ section appearswhere you can add the User IDs to which the configurationneeds to be applied.
• Specific Role with Exceptions — Select this option tomake the Configuration applicable to specific roles andto exclude specific users in that role. Select this option tomake the configuration applicable to one specific role and toexclude specific users in that role. On selection this option, Included Roles section appears where you select the rolesand Excluded Users section appears where you can excludespecific users.
Role Select the role to which the configuration needs to be applied.
User ID Select the User ID of the users to which the configuration needsto be applied if ‘Applies To’ is selected as ‘Selected Users’.
When the ‘Applies To’ is selected as ‘All Users with Exception’or ‘Selected Role with Exception’, the User ID will correspondto the User to which this configuration need not be applied to.
Note: When the ‘Applies To’ is selected as ‘Selected Users’, thegrid Excluded Users will be replaced with User List grid.
Map to Portal Registry PageUse the Map to Portal Registry page (EOCC_MAP_EVENT) to map the configurations to Portal Registry.The defined configuration will be effective only when the Services defined by the utility is mapped to thecorresponding portal registry entries.
Copyright © 1988, 2020, Oracle and/or its affiliates. 229

Page and Field Configurator Chapter 12
Note: Access to this page is restricted based on the access to People Tools Events Mapping component.
Navigation
Enterprise Components, Page and Field Configuration, Page and Field Configurator, Map to PortalRegistry
Image: Map to Portal Registry
This example illustrates the fields and controls on the Map to Portal Registry page.
Select Select the required portal registry entries to map theconfiguration.
Enable Page Level Events Select this checkbox to enable mapping of Page and FieldConfigurator to Page Activate people code events. Once thepage level events are enabled, the field configurations definedin the Page Configuration tab will preside over any applicationdelivered Page Activate event people code.
Note: By default this will be enabled for fluid components.
Apply Configuration Once you have selected the portal registry for mapping, clickApply Configuration button.
If it is an existing configuration, system re- creates theconfiguration after removing the existing one. The system issuesappropriate warning message to notify the user about the same.
Remove Mapping Use this button to clear the Event Mapping configurationsdefined earlier.
Review/Editing Mapping Click this link to review/edit the mappings generated by thePage and Field Configurator in the Event Mapping pagedelivered by People Tools. For more information on Editing theEvent Mapping, see Configuring the Event Mapping Manually
230 Copyright © 1988, 2020, Oracle and/or its affiliates.

Chapter 12 Page and Field Configurator
Note: The Review/Editing Mapping link will be visible onlyif the Page and Field Configurator services are mapped to thecorresponding portal entry.
At the time of page save, if any potential errors in configurations are detected, the system will issue awarning message to the user stating the reason. However it is left to the user to take the final action toproceed with the configuration.
Note: During the process of mapping the configurations, if the system faces any exceptions, the systemprompts the user to generate the Event Mapping manually.If any changes are made to the configuration, the Page and Field Configurator services need to be mappedagain to the portal entry using the Apply Configuration push button.
Validate Page Configurations PageUse the Validate Page Configurations page (EOCC_CONFIG) to verify the validity of the configurationsdefined using the Page Configuration page. This component can be used to verify the validity of theconfigurations after any system update or application of fix or patch. Any changes to the page or pagefield meta data of the fields and pages selected in Page and Field Configuration will be reported asvalidation error.
Navigation
Enterprise Components, Page and Field Configuration, Validate Page Configurations
Image: Validate Page Configurations page
This example illustrates the Validate Page Configurations page.
The Component listed in the Invalid Configuration section is a hyper link. Click the link to directly openthe corresponding configuration.
Moving Configuration from One Database to AnotherThe page and field configuration can be exported as ADS (Application Data Set) zip files and can beimported back to the desired database. The data set definition EOCC_CONFIGURATION can be used toexport the configuration defined in one environment to another.
Copyright © 1988, 2020, Oracle and/or its affiliates. 231

Page and Field Configurator Chapter 12
Note: The Data Set EOCC_CONFIGURATION will contain only the Page and Field relatedconfigurations. Any Event Mapping related configurations needs to be exported/imported separatelyusing the corresponding ADS definitions. Alternatively, users can use the Apply Configuration pushbutton on the "Map to Portal Registry" page to generate the Event Mapping configuration on the targetenvironment."
See the product documentation for:
• PeopleTools: Copying and Comparing ADS Projects
• PeopleTools: Upgrading or Copying Related Content Data Using ADS Definitions
Configuring the Event Mapping ManuallyThis topic discuss on configuring the event mapping manually if the Apply Configuration push button onthe Map to Portal Registry fails to map the events automatically.
The configuration can be mapped to each of the registered entity of the component using the “Eventmapping” page (Main Menu> PeopleTools> Portal> Related Content Service> Manage Related ContentService). For more information on the fields and controls on the Event Mapping page, see MappingApplication Class PeopleCode to Component Events in PeopleTools documentation.
Note: You may need to map the services manually only if you have other Services already mapped to theComponent or if the system prompts you to do so. In all other cases you could map the services for theconfiguration using the “Apply Configuration” push button.
To map the events manually, follow the below guidelines:
• Map the service EOCC_POSTBUILD to the PostBuild event (Component Level Event Mapping grid)of the component.
• Map the service EOCC_SAVEPRECHANGE to the SavePreChange event (Component Level EventMapping grid) of the component.
• For all the fields selected in the configuration residing on a scroll level greater than zero of thecomponent ( the fields on the grids and scroll areas), map the services EOCC_ROWINIT andEOCC_ROWINSERT to the Component Records (Component Record Level Event Mapping grid)RowInt and RowInsert events respectively.
• For fields residing on scroll levels greater than 1 of the component, map the serviceEOCC_ROWINIT to the RowInit event on the Component Record (Component Record Level EventMapping grid) for the primary records of its parent level up to level 1.
For example, if there is a component with four levels having primary records Record0, Record1,Record2, and Record3 respectively. For a configuration of any field on the Level 3, the RowInitevents of its parent record Record2 and Record1 needs to be configured in addition to the RowInit andRowInsert events of the Record3.
• The RowInit and RowInsert events should be mapped to the primary record of the scroll area. Forexample if the related display field in a grid is configured in the utility, the services need to be mappedto the grid’s primary record. It should not be mapped to the related field’s record.
232 Copyright © 1988, 2020, Oracle and/or its affiliates.

Chapter 12 Page and Field Configurator
• If the PeopleTools version is 8.55 instead of using the services EOCC_ROWINIT andEOCC_ROWINSERT directly, the services should be cloned for each instance and the cloned instanceshould be used. The services can be cloned from the Define Related Content Service (Main Menu>PeopleTools> Portal> Related Content Service). The services can be cloned to any new names such asEOCC_ROWINIT_1, EOCC_ROWINIT_2 etc.
• To override the page level PeopleCode, map the service EOCC_PAGEACTIVATE to the PageActivate Event (Component Page Level Event Mapping grid) for the required pages.
• Select the Processing Sequence as “Post Process” for all the service configurations.
Masking Data in Page and Field Configurator
To comply with Data Privacy regulations, organizations may mask personally identifiable and/or sensitivecontent in PeopleSoft, and expose them only to authorized persons. Page and Field Configurator usesConfiguration Type value of Masking to allow masking of page fields and search fields.
Note: The PeopleTools version should be 8.57.11 or higher.
Note: For HCM systems, it is recommended that HCM specific data masking is disabled in theinstallation options and the Page and Field Configurator masking is used instead.
Understanding How to Mask the Fields in a Page using Page and FieldConfiguratorAs a user, there are five steps to be completed to configure data masking in a page using Page and FieldConfigurator:
Define the mask profiles and apply the profile to the fields in the selected component using the DefineMask Profile page. This involves:
1. Define Mask Profile based on needs of the organization.
2. Define Field Groups to group fields with similar masking requirements.
3. In Page and Field Configurator, configure the fields to be masked using Mask Profiles defined in step1.
4. Define the list of users to whom the configuration needs to be applied using the User List page.
5. Map the configurations to the corresponding portal registry entries using the Map Configuration toPortal Registry page.
Note: The configuration defined in a component will become effective only if the services defined by theutility are mapped to the corresponding portal registry entries.
For more details, see the image highlight video on Data Masking:
https://www.youtube.com/watch?v=buFycBauNHE&t=364s
Copyright © 1988, 2020, Oracle and/or its affiliates. 233

Page and Field Configurator Chapter 12
Image: Example of component masking
The image depicts masking of sensitive fields for the Modify a Person component.
Defining the Mask Profile in Page and Field Configurator
Pages Used to Define the Mask ProfilePage Name Definition Name Usage
Define Mask Profile Page EOCC_MASK_PROFILE Use this page to define Mask profiles.
234 Copyright © 1988, 2020, Oracle and/or its affiliates.

Chapter 12 Page and Field Configurator
Define Mask Profile PageUse the Define Mask Profile page (EOCC_MASK_PROFILE) to set up data masking profiles which canbe applied to the fields that are selected for masking in Page and Field Configurator.
Navigation
Enterprise Components > Page and Field Configuration > Define Mask Profile
Page and Field Configurator supports four types of masking configuration:
• Complete Masking.
• Trailing Character Type Masking (Partial Masking).
• Date Type Masking.
• Setup Table Based Masking.
To create a new Mask Profile, add a new value the Define Mask Profile search page
Oracle delivers one mask profile of each type as system data. Any new mask profile that you createshould be migrated using data mover scripts before any masking configurations from Page and FieldConfigurator are migrated.
Image: Define a new Mask Profile
Define a new Mask Profile
Complete MaskingThis type of masking masks all the characters of the field.
Copyright © 1988, 2020, Oracle and/or its affiliates. 235
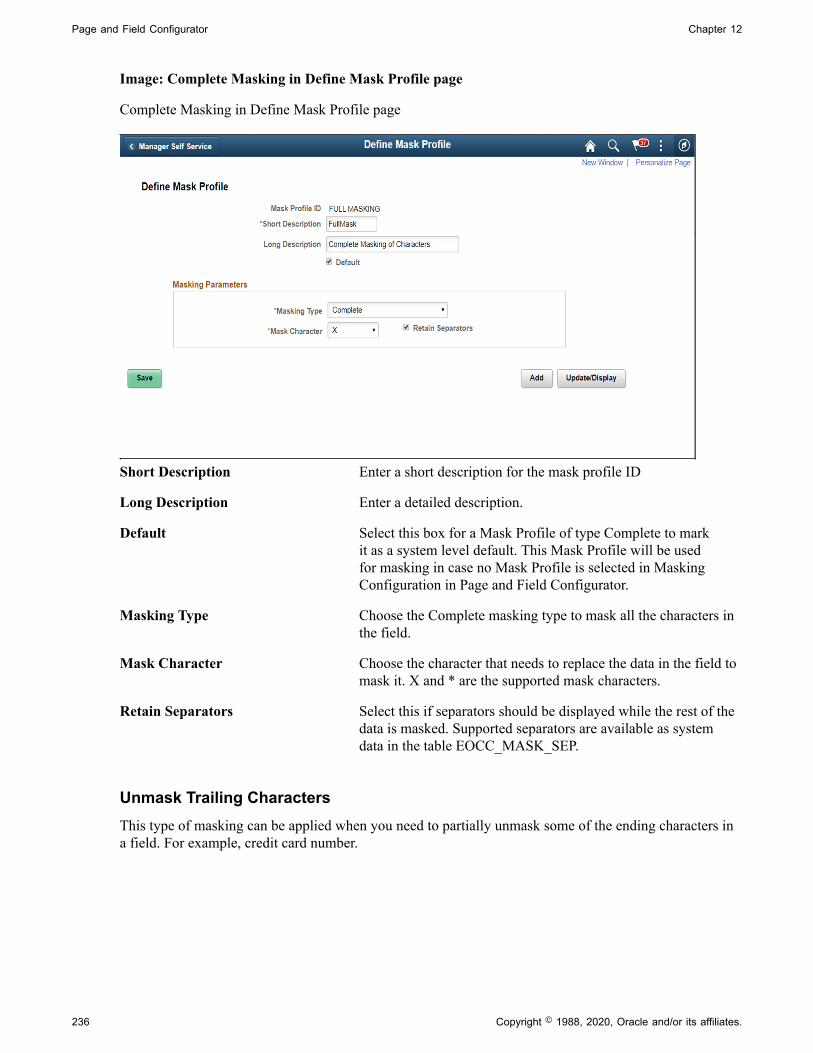
Page and Field Configurator Chapter 12
Image: Complete Masking in Define Mask Profile page
Complete Masking in Define Mask Profile page
Short Description Enter a short description for the mask profile ID
Long Description Enter a detailed description.
Default Select this box for a Mask Profile of type Complete to markit as a system level default. This Mask Profile will be usedfor masking in case no Mask Profile is selected in MaskingConfiguration in Page and Field Configurator.
Masking Type Choose the Complete masking type to mask all the characters inthe field.
Mask Character Choose the character that needs to replace the data in the field tomask it. X and * are the supported mask characters.
Retain Separators Select this if separators should be displayed while the rest of thedata is masked. Supported separators are available as systemdata in the table EOCC_MASK_SEP.
Unmask Trailing CharactersThis type of masking can be applied when you need to partially unmask some of the ending characters ina field. For example, credit card number.
236 Copyright © 1988, 2020, Oracle and/or its affiliates.

Chapter 12 Page and Field Configurator
Image: Unmask trailing characters
Unmask trailing characters
Length Choose the length or number of trailing characters that needs tobe kept unmasked.
Date MaskingThis type of masking can be applied for date fields and you can choose the parts of the date field that canbe masked or left unmasked.
Image: Date type masking
Date type masking
Copyright © 1988, 2020, Oracle and/or its affiliates. 237

Page and Field Configurator Chapter 12
Date Masking Options Select which part of the date (Day, Month or Year) needs to bemasked.
Setup Table Based MaskingUse this masking profile to mask data from a defined setup table that has the masking format defined in it.
Image: Setup table based masking
Setup table based masking
Setup Table Choose the Setup table that has the masking definition.
Mask Format Field Choose the field that has the mask format in the setup table.
Control Fields These fields in the Setup table determine the right mask formatfor a transaction.
Default Record The default record to be displayed in Page and FieldConfigurator when a field is selected for masking. The DefaultRecord can be overridden.
Default Field The default field to be displayed in Page and Field Configuratorwhen a field is selected for masking. The Default Field can beoverridden.
Pages Used to Define Field Groups for MaskingPage Name Definition Name Usage
Define Field Group Page EOCC_FIELD_GRP Use this page to assign a default maskprofile for a similar set of fields.
238 Copyright © 1988, 2020, Oracle and/or its affiliates.

Chapter 12 Page and Field Configurator
Define Field Group PageUse the Define Field Group page (EOCC_FIELD_GRP) to assign a default Mask Profile to a similar setof fields.
Navigation
Enterprise Components > Page and Field Configuration > Define Field Group
Image: Define Field Group
Define Field Group
Default Mask Profile ID Replace with the default Mask Profile. The default mask profilewill be defaulted in Page and Field Configurator if any fieldfrom the field group is chosen for masking. The same fieldcannot be used in multiple field groups
Field name Choose the similar fields that are to be grouped under this fieldgroup.
Configuring Data Masking in Page and Field Configurator
Pages Used to Configure Masking using Page and Field ConfiguratorPage Name Definition Name Usage
Masking Page EOCC_CONFIG_MASK Use this page to configure masking forPage fields and Search Fields.
User List Page EOCC_CONFIG_USER Use this page to capture the list of usersto which the configuration defined inthe Page Configuration page should beapplied to.
Copyright © 1988, 2020, Oracle and/or its affiliates. 239
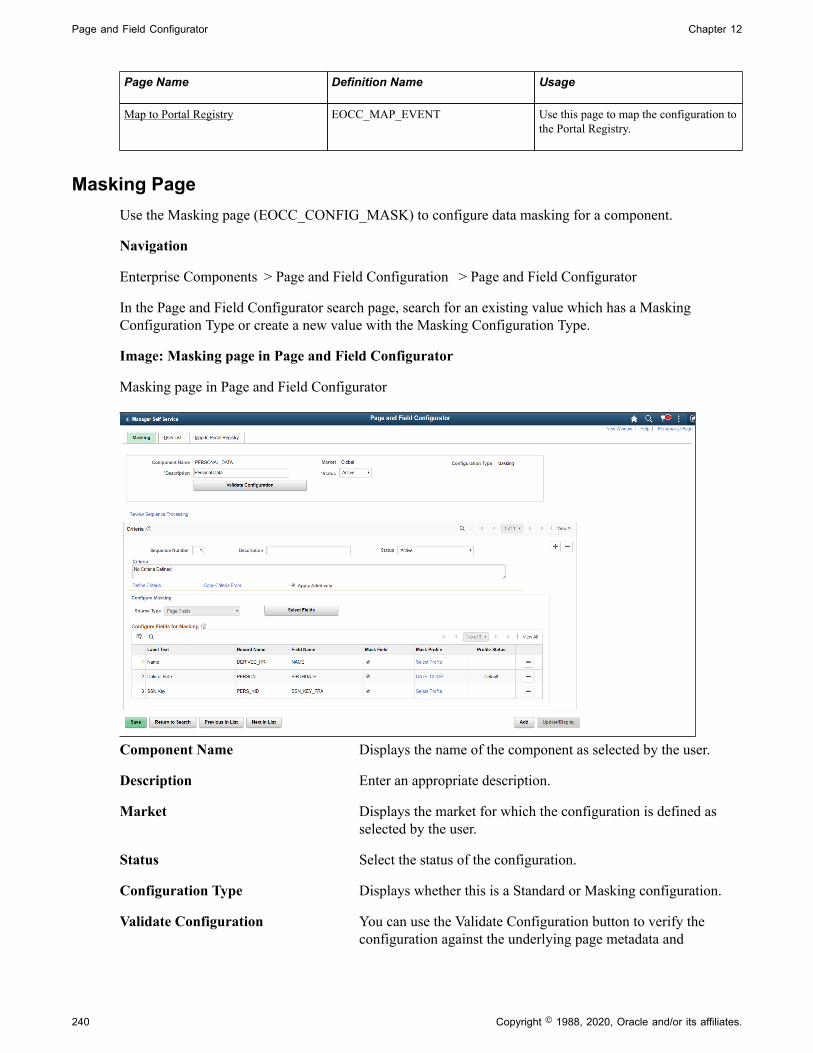
Page and Field Configurator Chapter 12
Page Name Definition Name Usage
Map to Portal Registry EOCC_MAP_EVENT Use this page to map the configuration tothe Portal Registry.
Masking PageUse the Masking page (EOCC_CONFIG_MASK) to configure data masking for a component.
Navigation
Enterprise Components > Page and Field Configuration > Page and Field Configurator
In the Page and Field Configurator search page, search for an existing value which has a MaskingConfiguration Type or create a new value with the Masking Configuration Type.
Image: Masking page in Page and Field Configurator
Masking page in Page and Field Configurator
Component Name Displays the name of the component as selected by the user.
Description Enter an appropriate description.
Market Displays the market for which the configuration is defined asselected by the user.
Status Select the status of the configuration.
Configuration Type Displays whether this is a Standard or Masking configuration.
Validate Configuration You can use the Validate Configuration button to verify theconfiguration against the underlying page metadata and
240 Copyright © 1988, 2020, Oracle and/or its affiliates.

Chapter 12 Page and Field Configurator
identify if any errors exist. For more details, see Validate PageConfigurations Page
CriteriaThis functionality is the same as the Criteria for a Standard Page Configuration. For details, refer theCriteria Section in Page Configuration Page
Configure MaskingThe Configure Masking section is used to configure page fields, search fields and prompt record fields formasking. Masking is supported for:
• Primary Page fields
• Secondary Page fields
• Search Record fields
• Prompt Record fields
Any drop-down field selected for masking will be fully masked with * character.
Choose the Select Fields button to list out all the available fields in that component. Masking is notsupported for long fields.
Image: Select Fields for masking
Select Fields for masking
Source Type Indicates the source of the fields that are available for masking. Source Type can be Page Fields or Search and Prompt Fields.
Copyright © 1988, 2020, Oracle and/or its affiliates. 241

Page and Field Configurator Chapter 12
Field Source Indicates the selected record type for masking. Based on theselected field source, all the field records will be listed forselection.
Page Type Indicates whether the fields listed are from a primary page orfrom a secondary field.
Primary Page Choose the main page to which the fields belong.
Secondary Page Choose the secondary page from the main page.
Note: In addition to secondary pages which are part of thecomponent structure, masking is also supported for secondarypages called from PeopleCode. To select fields from secondarypages called via PeopleCode for masking, the secondary pagefields should be manually added to the Page Fields grid. Forsecondary pages called via PeopleCode, masking is supportedonly if the secondary page field is marked as Personal Identifier/Sensitive in Data Privacy Framework.
Restrict to Personal Identifier/Sensitive Fields
Choose this option if you want to list only the fields that havebeen classified as Personal Identifier or Sensitive in DataPrivacy Framework. For more details, see Understanding DataPrivacy
Choose the required field names and click OK.
In Add mode, the page fields chosen for masking will be enabled for data entry. In other modes, fieldschosen for masking will be enabled only if they are blank..
Review Sequence ProcessingUse the Review Sequence Processing link at the beginning of the Criteria section to review the list ofsequences. Here you can see the sequences which are applied additionally.
242 Copyright © 1988, 2020, Oracle and/or its affiliates.
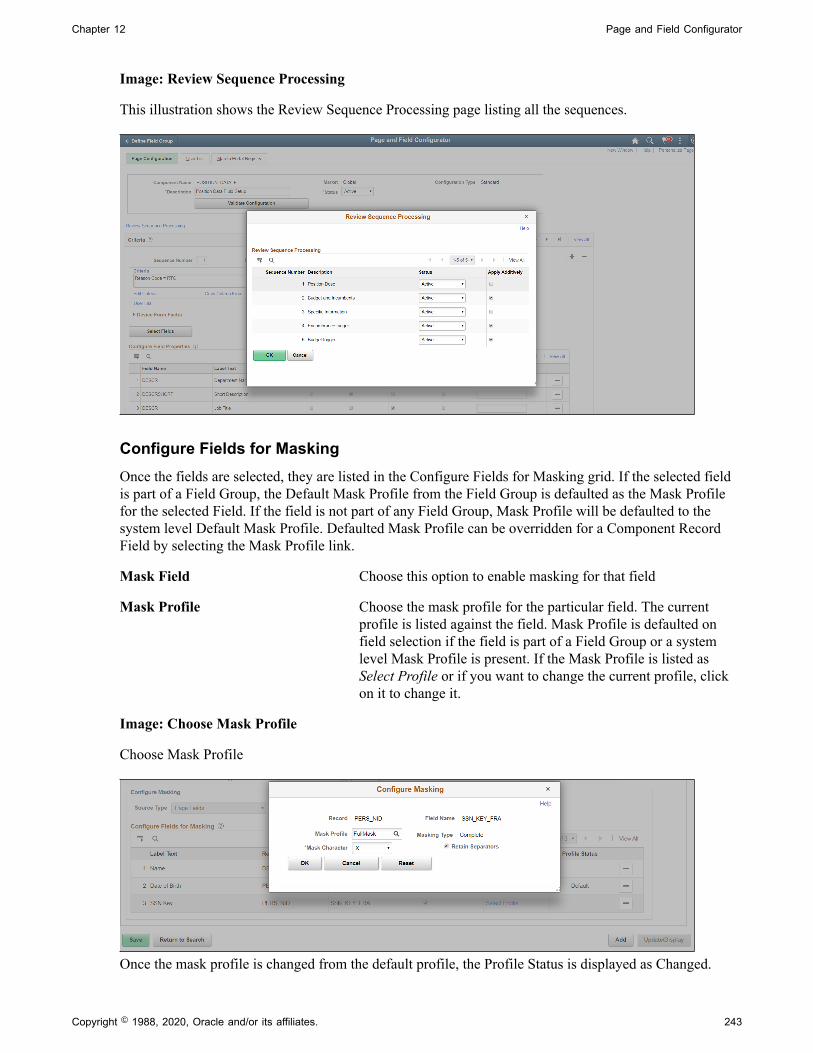
Chapter 12 Page and Field Configurator
Image: Review Sequence Processing
This illustration shows the Review Sequence Processing page listing all the sequences.
Configure Fields for MaskingOnce the fields are selected, they are listed in the Configure Fields for Masking grid. If the selected fieldis part of a Field Group, the Default Mask Profile from the Field Group is defaulted as the Mask Profilefor the selected Field. If the field is not part of any Field Group, Mask Profile will be defaulted to thesystem level Default Mask Profile. Defaulted Mask Profile can be overridden for a Component RecordField by selecting the Mask Profile link.
Mask Field Choose this option to enable masking for that field
Mask Profile Choose the mask profile for the particular field. The currentprofile is listed against the field. Mask Profile is defaulted onfield selection if the field is part of a Field Group or a systemlevel Mask Profile is present. If the Mask Profile is listed asSelect Profile or if you want to change the current profile, clickon it to change it.
Image: Choose Mask Profile
Choose Mask Profile
Once the mask profile is changed from the default profile, the Profile Status is displayed as Changed.
Copyright © 1988, 2020, Oracle and/or its affiliates. 243

Page and Field Configurator Chapter 12
For more details on Mask Profile, see Define Mask Profile Page
Search Field MaskingSearch fields are configured for masking in the same way as the page fields are configured as explainedabove. However, there are some differences with page field masking:
• Only the Mask profiles of Complete, Unmask Trailing Character and Date masking are supported forSearch Fields masking.
• If a component uses pivot grid based search and the masked field is also a part of facet search, thenthe facet will be hidden.
• When a search field is chosen to be masked, then the List view will be hidden from ComponentKeyword search and Pivot Grid based search.
• A search field selected for masking will be masked in the search result and will be disabled as asearch field.
• For Search fields, separators are supported only for non-date type masking.
Prompt MaskingPrompt masking provides a configurable option for masking sensitive/PII fields in Prompt records.Prompt record fields are configured for masking in the same way as the page fields are configured.
When you apply the configuration using the Map to Portal Registry Page , the record-field property“Allow Search events for Prompt dialogs" is automatically selected. This is necessary to trigger the searchevent programs generated by Page and Field Configurator. If the masking configurations for the promptrecord field is removed, the mentioned record-field property will be de-selected.
Once prompt masking is enabled and an unauthorized user clicks on the prompt lookup the prompt dialogshows the masked data in the column(s) identified for masking in the result grid. After the user selects avalue from the prompt and the page is loaded, the field value on the page will be masked if the page fieldis also defined in Page and Field Configurator masking configuration.
User List PageUse the User List page (EOCC_CONFIG_USER) to define the list of users to whom the configurationneeds to be applied. You can create user list at Header Level where one user list covers the entirecomponent or, at Sequence Level, where separate user list is defined for each sequence number.
The functionality is the same for Standard and Masking configurations. For details on the User List page,see User List Page
Map to Portal RegistryUse the Map to Portal Registry page (EOCC_MAP_EVENT) to map the configurations to Portal Registry.The defined configuration will be effective only when the Services defined by the utility is mapped to thecorresponding portal registry entries.
For more details refer the Map to Portal Registry Page
244 Copyright © 1988, 2020, Oracle and/or its affiliates.

Chapter 13
Data Privacy Framework
Understanding Data Privacy
PeopleSoft Data Privacy Framework provide pages for identifying and maintaining PersonallyIdentifiable and sensitive information. Personally Identifiable Information (PII) is any information thatdirectly or indirectly helps to determine the identity of an individual. A common example for PII is aperson's name. Examples for sensitive information include Ethnicity or Compensation Rate. PeopleSoftcaptures many data elements that can be considered PII, Sensitive, or both.
The framework helps in the following ways:
• Maintain Category/Classification setup data and their Data Privacy attributes.
• Maintain Data Privacy Attributes for PeopleSoft Application Record Fields that store Sensitive andPersonally Identifiable data.
• Generate and View references for Components at Record Field Level and Component Record Fieldlevel.
Click to view a video about PeopleSoft Data Privacy
Maintaining Data Privacy Attributes
Data Privacy Attributes are parameters used to group records and fields storing Personally Identifiableand Sensitive Information. Data Privacy Attributes used in PeopleSoft System are:
• Category
• Classification
• Personal Identifier
• Sensitive
The following video provides an overview of Data Privacy Framework:
Image Highlights, PeopleSoft HCM Update Image 27: Data Privacy Enhancements — SensitiveData Setup
Copyright © 1988, 2020, Oracle and/or its affiliates. 245
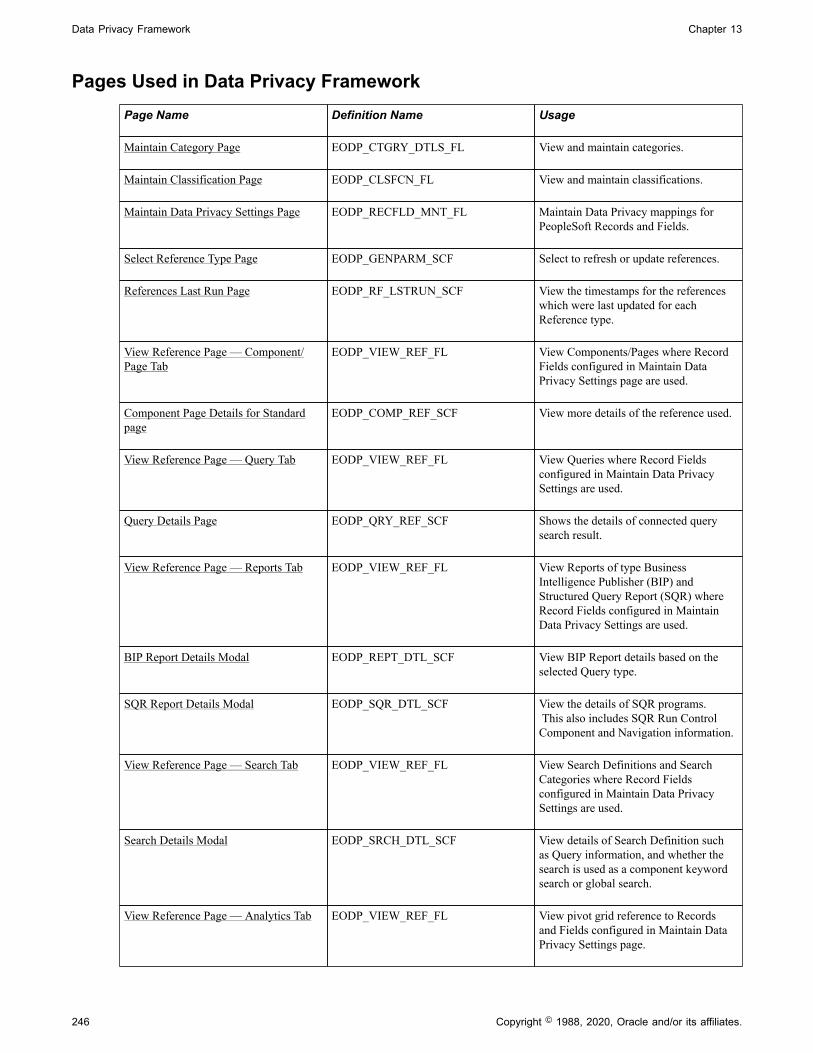
Data Privacy Framework Chapter 13
Pages Used in Data Privacy FrameworkPage Name Definition Name Usage
Maintain Category Page EODP_CTGRY_DTLS_FL View and maintain categories.
Maintain Classification Page EODP_CLSFCN_FL View and maintain classifications.
Maintain Data Privacy Settings Page EODP_RECFLD_MNT_FL Maintain Data Privacy mappings forPeopleSoft Records and Fields.
Select Reference Type Page EODP_GENPARM_SCF Select to refresh or update references.
References Last Run Page EODP_RF_LSTRUN_SCF View the timestamps for the referenceswhich were last updated for eachReference type.
View Reference Page — Component/Page Tab
EODP_VIEW_REF_FL View Components/Pages where RecordFields configured in Maintain DataPrivacy Settings page are used.
Component Page Details for Standardpage
EODP_COMP_REF_SCF View more details of the reference used.
View Reference Page — Query Tab EODP_VIEW_REF_FL View Queries where Record Fieldsconfigured in Maintain Data PrivacySettings are used.
Query Details Page EODP_QRY_REF_SCF Shows the details of connected querysearch result.
View Reference Page — Reports Tab EODP_VIEW_REF_FL View Reports of type BusinessIntelligence Publisher (BIP) andStructured Query Report (SQR) whereRecord Fields configured in MaintainData Privacy Settings are used.
BIP Report Details Modal EODP_REPT_DTL_SCF View BIP Report details based on theselected Query type.
SQR Report Details Modal EODP_SQR_DTL_SCF View the details of SQR programs. This also includes SQR Run ControlComponent and Navigation information.
View Reference Page — Search Tab EODP_VIEW_REF_FL View Search Definitions and SearchCategories where Record Fieldsconfigured in Maintain Data PrivacySettings are used.
Search Details Modal EODP_SRCH_DTL_SCF View details of Search Definition suchas Query information, and whether thesearch is used as a component keywordsearch or global search.
View Reference Page — Analytics Tab EODP_VIEW_REF_FL View pivot grid reference to Recordsand Fields configured in Maintain DataPrivacy Settings page.
246 Copyright © 1988, 2020, Oracle and/or its affiliates.

Chapter 13 Data Privacy Framework
Page Name Definition Name Usage
Pivot Grid Details Modal EODP_PIVOT_DTL_SCF View pivot grid details such as Queryinformation and publish options for pivotgrids.
View Reference Page — Integration Tab EODP_VIEW_REF_FL Lists the Services and ServiceOperations using messages that referenceRecord Fields configured in MaintainData Privacy Settings page.
Integration Details Modal EODP_IB_REF_SCF View the details of Integration Brokermessages.
These are details such as messageInformation and Integration groupreferences.
Maintain Category PageUse the Maintain Category page (EODP_CTGRY_DTLS_FL) to view, modify or add a new categoryvalue.
Navigation
Enterprise Components >Data Privacy Framework > Maintain Category
Using the search page on the left panel, you can search for Categories or add new Categories. Additionalfacets and filters are provided to refine search results.
Categories are used to functionally group information captured in PeopleSoft System. For example,Category- Contact Details is used to identify all Record Fields storing Contact information such as PhoneNumber, Email ID or Fax. Classifications are used to sub-categorize this information into more specificgroups. Classifications for Category- Contact Details include Business Email, Personal Phone and InstantMessaging Address.
Copyright © 1988, 2020, Oracle and/or its affiliates. 247
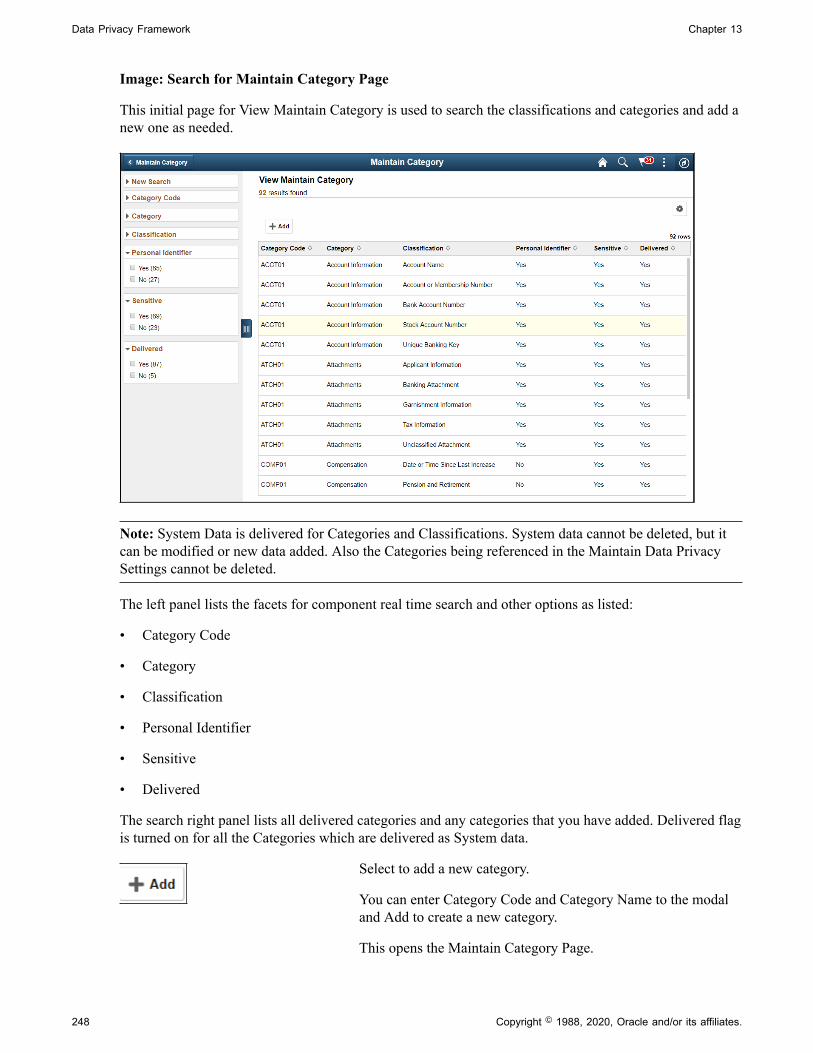
Data Privacy Framework Chapter 13
Image: Search for Maintain Category Page
This initial page for View Maintain Category is used to search the classifications and categories and add anew one as needed.
Note: System Data is delivered for Categories and Classifications. System data cannot be deleted, but itcan be modified or new data added. Also the Categories being referenced in the Maintain Data PrivacySettings cannot be deleted.
The left panel lists the facets for component real time search and other options as listed:
• Category Code
• Category
• Classification
• Personal Identifier
• Sensitive
• Delivered
The search right panel lists all delivered categories and any categories that you have added. Delivered flagis turned on for all the Categories which are delivered as System data.
Select to add a new category.
You can enter Category Code and Category Name to the modaland Add to create a new category.
This opens the Maintain Category Page.
248 Copyright © 1988, 2020, Oracle and/or its affiliates.

Chapter 13 Data Privacy Framework
Image: Maintain Category Page
The Maintain Categories page lists Classifications mapped to a Category. System data and Classificationsbeing used in Maintain Data Privacy Settings cannot be deleted from this page.
This example illustrates the fields and controls of Maintain Category page.
Select to add a new classification to the category list.
Here you can mark the classification specified as PersonalIdentifier or/and Sensitive accordingly.
Select to open Maintain Classification Page.
Maintain Classification PageUse the Maintain Classification (EODP_CLSFCN_FL) page to define new classifications or viewavailable classifications.
Navigation
Enterprise Components >Data Privacy Framework > Maintain Category
Select the Maintain Classification button.
Copyright © 1988, 2020, Oracle and/or its affiliates. 249

Data Privacy Framework Chapter 13
Image: Maintain Classification page
This example illustrates the fields and controls on the Maintain Classification page.
Select to add a new classification.
Maintain Data Privacy Settings PageUse the Maintain Data Privacy Settings (EODP_RECFLD_MNT_FL) page to:
• View delivered Record Fields and their Data Privacy Attributes.
• Modify Data Privacy Attributes for existing Record Field information.
• Add new Record Field Information and map Data Privacy Attributes.
Data Privacy Attributes are mapped to Records and Fields in Maintain Data Privacy Settings Page.System data is delivered for Record Fields and their Data Privacy Attributes. You can modifyDelivered information, but delete is disabled for such rows. You can add new Records and Fields to theconfiguration, and map data privacy attributes to it.
You can delete rows which are not System data.
250 Copyright © 1988, 2020, Oracle and/or its affiliates.

Chapter 13 Data Privacy Framework
Navigation
Enterprise Components >Data Privacy Framework > Maintain Data Privacy Settings
Image: Maintain Data Privacy Settings page
This example illustrates the fields and controls on the Maintain Data Privacy Settings page.
The left pane lists different filters available for Data Privacy Settings maintenance page. Available filtersare:
• Product
• Record
• Field
• Category
• Classification
• Personal Identifier
• Sensitive
• Delivered
• Installed Products Only
Note: By default, all Record Fields and their references are displayed in Data Privacy framework. A filterInstalled Products Only is added to Maintain Data Privacy settings page and View References pages alltabs to display information on installed products alone. The products to be displayed are selected fromthe Products page (Set Up HCM, Install, Installation Table, Products). By default the option for InstalledProducts Only will be selected as No.
Copyright © 1988, 2020, Oracle and/or its affiliates. 251

Data Privacy Framework Chapter 13
Image: Maintain Data Privacy_References_Actions
This example illustrates the references actions from Maintain Data Privacy Settings page.
The search results based on the filtered criteria are displayed on the right pane.
Add Record Fields and map Data Privacy Attributes to it.
Note: The Personal Identifier and Sensitive flags will bedefaulted depending on the category and classification.
Select to view the options of View References, UpdateReferences and Process Monitor.
On selecting View References, you can navigate to other pageslisted below:
• View Reference Page — Component/Page Tab
• View Reference Page — Query Tab
• View Reference Page — Reports Tab
• View Reference Page — Search Tab
• View Reference Page — Analytics Tab
• View Reference Page — Integration Tab
Select Reference Type Page to update or refresh a referencetype.
References Last Run Details View last run times of each reference type. This References LastRun Page also displays when Record Field information was lastupdated.
252 Copyright © 1988, 2020, Oracle and/or its affiliates.

Chapter 13 Data Privacy Framework
Select to download the filtered Record Field Information.
Select to view reference for the Record Field combination.
Select to open Comments Modal Window to enter, review orupdate the comments for a Record.
Note: To view the status of the process run for the selected references, see Viewing the Status of Processunder Process Scheduler.
Select Reference Type PageUse the Select Reference Type (EODP_GENPARM_SCF) page to open the Select Reference Type modal.In this modal, you can select the reference type which need an update or refresh.
The Component / Page and Query should be selected to generate Report References. Select RefreshReferences to delete and reload all references except for the system data.
Navigation
Enterprise Components >Data Privacy Framework > Maintain Data Privacy Settings
Select Update References from the Actions menu of the Manage References button.
Copyright © 1988, 2020, Oracle and/or its affiliates. 253

Data Privacy Framework Chapter 13
Image: Select References Page
This example illustrates the Select References page.
References Last Run PageUse the Reference Last Run (EODP_RF_LSTRUN_SCF) page to view last run times of each referencetype. The page also displays when Record Field information was last updated.
Navigation
Enterprise Components >Data Privacy Framework > Maintain Data Privacy Settings
Select Reference Last Run Details link.
254 Copyright © 1988, 2020, Oracle and/or its affiliates.

Chapter 13 Data Privacy Framework
Image: Reference Last Run Details Page
This example illustrates the Reference Last Run Details page.
Comments Modal WindowUse Comments Modal (EODP_RF_CMNT_SCF) to enter, review and update the comments for a RecordField Combination.
Copyright © 1988, 2020, Oracle and/or its affiliates. 255

Data Privacy Framework Chapter 13
Image: Comments Modal Window
This illustration represents the comments modal for Record field.
View References PageThe View References page displays References to Record Fields configured in Maintain Data PrivacySettings page. These pages can be accessed in the following ways:
Navigation
Direct Navigation: Enterprise Components >Data Privacy Framework >View References
Row Level Action
Select from Maintain Data Privacy Settings page. This is amodal window.
Select to get the option of:
• View References: to directly navigate to the correspondingtab in View References page.
• Update References: to access
This page uses a tabbed interface to display different types of references. Different Reference Typesdisplayed are:
• Components/Page
• Query
• Reports
256 Copyright © 1988, 2020, Oracle and/or its affiliates.

Chapter 13 Data Privacy Framework
• Search
• Analytics
• Integration
Note: Data Privacy Attributes in Component / Page References gets defaulted from Data PrivacyAttributes at Record Field level, but this can be overridden. Data Privacy Attributes for Reference Typesare read-only, and are displayed based on the Data Privacy Attributes configured at the Record Fieldlevel.System data is delivered just for Component/Page References.Some Component/Page References are delivered as System data. New Component/Page references getgenerated for newly added Record Fields when Update References or Refresh References are run.
View Reference Page — Component/Page TabUse the Component/Page (EODP_VIEW_REF_FL) tab to view the references on Record FieldReferences in Components and Pages.
Note: Update References and Refresh References don't overwrite Data Privacy Attributes set inComponent / Page References.
Navigation
Enterprise Components >Data Privacy Framework > View References >Component/Page tab
Image: Component/Page
This example illustrates the fields and controls on the Component/Page tab.
The left panel have Filters listed as follows:
• Product
Copyright © 1988, 2020, Oracle and/or its affiliates. 257

Data Privacy Framework Chapter 13
• Component
• Page
• Page Type
• Record
• Field
• Category
• Classification
• Personal Identifier
• Sensitive
• Installed Products Only
Page Type has three options:
• Search: Show references of Record Fields in Component Search Records. This reference is displayedonly if the Record field is a Key / Search Key / Alternate Search Key / List Box Item in the SearchRecord for the Component.
• Secondary/ Popup: Show references in Secondary Page or Popup page. Component Name is blank forthis Page type.
• Standard: Show references in Standard pages.
Select to open the Component Page Details for Standard page.
Component Page Details for Standard pageUse the Component/Page Details (EODP_COMP_REF_SCF) modal to view more details of the referenceused.
The details display portal navigation and any component interface references.
Navigation
Enterprise Components >Data Privacy Framework > View References
Select the chevron in the Component/Page tab.
258 Copyright © 1988, 2020, Oracle and/or its affiliates.

Chapter 13 Data Privacy Framework
Image: Component/Page Details
This example illustrates the fields and controls on the Component/Page Details.
Select the navigation link to open a new window for the particular component. For a user who do not haveaccess to the components, the navigation link is disabled. If there is no Navigation to a Component, thenavigation column shows N/A.
View Reference Page — Query TabUse the View References (EODP_VIEW_REF_FL) Query tab to view references for Record Fields inQueries, Connected Queries and Composite Queries.
Navigation
Enterprise Components >Data Privacy Framework >View References >Query tab
Copyright © 1988, 2020, Oracle and/or its affiliates. 259

Data Privacy Framework Chapter 13
Image: Query Page with query type as Connected
This example illustrates the fields and controls on the Query tab listing standard query results.
The left panel have Filters listed as follows:
• Query name
• Query Type
Query Type has three options: Composite, Connected and Standard.
• Owner
• Record
• Field
• Category
• Classification
• Personal Identifier
• Sensitive
Select to view the usage of Record Field in the Query.
Select to open the Query Details page.
Note: The chevron is enabled for Composite Query andConnected Query.
260 Copyright © 1988, 2020, Oracle and/or its affiliates.

Chapter 13 Data Privacy Framework
Image: Query Details Page
This example illustrates the fields and controls in Query Details (EODP_QRY_REF_SCF) page.
Note: For connected and composite queries, the chevron is enabled, and selecting this opens the QueryDetails modal which displays the child queries that uses the Record Field.
Copyright © 1988, 2020, Oracle and/or its affiliates. 261

Data Privacy Framework Chapter 13
Image: Query tab with connected query search results
This example illustrates the search result for a type of connected query.
Query Details PageThe Connected Query Details (EODP_QRY_REF_SCF) modal displays details of connected queries.
Navigation
Enterprise Components >Data Privacy Framework > View References >Query tab
Select the Query Type as Connected Queries and select the chevron for details.
262 Copyright © 1988, 2020, Oracle and/or its affiliates.

Chapter 13 Data Privacy Framework
Image: Query Details Page
This example illustrates the fields and controls in Query Details (EODP_QRY_REF_SCF) page.
View Reference Page — Reports TabUse the View References (EODP_VIEW_REF_FL) page Reports tab to view the Report References inBusiness Intelligence Publisher Reports (BIP) and Structured Query Reports (SQR).
Navigation
Enterprise Components >Data Privacy Framework > View References >Reports tab
Select Report Type as BIP to view references in BI Publisher Reports.
Copyright © 1988, 2020, Oracle and/or its affiliates. 263

Data Privacy Framework Chapter 13
Image: View References — Reports Tab for BIP
This example illustrates the fields and controls on the View References — Reports Tab for Report TypeBIP.
Select Report Type as SQR to view references in SQR Reports.
264 Copyright © 1988, 2020, Oracle and/or its affiliates.

Chapter 13 Data Privacy Framework
Image: View References — Reports Tab for SQR
This example illustrates the fields and controls on the View References — Reports Tab for Report TypeSQR.
Note: Data Privacy Framework uses File Pre-Processor to load Record Field references in SQR files. Thisutility is bundled with PeopleSoft Change Impact Analyzer. For details, refer to File Pre-Processor topicsin the PeopleSoft Change Impact Analyzer product documentation.System data for Oracle delivered SQRs is pre-delivered. This data gets loaded when Update References isrun for Reference type - Reports. Customers on PeopleTools patches 8.55.26/8.56.12 or higher have theability to generate references for Record Fields used in all the SQR files they maintain. To do this, FilePre-Processor should be run in your environment prior to running Update References with the Refreshoption selected.
Warning! File Pre-processor is process intensive and may continue to run for some time.
The left panel have Filters listed as follows:
• Product
• Report Name
• Report Type:
Report Type has two options: SQR and BIP .
• Record
• Field
• Category
• Classification
• Personal Identifier
Copyright © 1988, 2020, Oracle and/or its affiliates. 265

Data Privacy Framework Chapter 13
• Sensitive
• Installed Products Only
Select to open the report details of BIP Report Details Modal orSQR Report Details Modal.
BIP Report Details ModalThe BIP Report Details Modal (EODP_REPT_DTL_SCF) display Query Details. If Connected Query isused, Child Query details are displayed.
Image: BIP Report Details Modal
This example illustrates the BIP Report Details Modal.
SQR Report Details ModalThe SQR Report Details Modal (EODP_SQR_DTL_SCF) displays details of Run Control componentsfrom which SQR Reports are run.
266 Copyright © 1988, 2020, Oracle and/or its affiliates.

Chapter 13 Data Privacy Framework
Image: SQR Report Details Modal
This example illustrates the SQR Report Details Modal.
View Reference Page — Search TabUse the View References Search (EODP_VIEW_REF_FL) tab to view references in Search Definitionsand Search Categories.
Navigation
Enterprise Components >Data Privacy Framework > View References >Search tab
Note: Query Expressions used in Search Definitions are excluded from Search References.
Copyright © 1988, 2020, Oracle and/or its affiliates. 267

Data Privacy Framework Chapter 13
Image: View References-Search tab
This example illustrates the fields and controls on the View References-Search tab.
The left panel have Filters listed as follows:
• Product
• Search Category
• Search Definition
• Query
• Record
• Field
• Category
• Classification
• Personal Identifier
• Sensitive
• Installed Products Only
Select to open the Search Details Modal.
268 Copyright © 1988, 2020, Oracle and/or its affiliates.

Chapter 13 Data Privacy Framework
Search Details ModalThe Search Details (EODP_SRCH_DTL_SCF) modal displays details of queries in each searchdefinition.
Navigation
Enterprise Components >Data Privacy Framework > View References >Search tab
Select the chevron in the Search Results.
Image: Search Details Modal
This example illustrates the Search Details Modal.
This modal shows the information on the query name and whether it is a global search or componentsearch.
View Reference Page — Analytics TabThe Analytics (EODP_VIEW_REF_FL) tab list references in Pivot Grids.
Navigation
Enterprise Components >Data Privacy Framework > View References >Analytics tab
Copyright © 1988, 2020, Oracle and/or its affiliates. 269

Data Privacy Framework Chapter 13
Image: Component/Page
This example illustrates the fields and controls on the Analytics tab.
The left panel have Filters listed as follows:
• Product
• Pivot Grid Name
• Data Source Type
Data Source Type has three options: COMPONENT, PSCOMPQUERY and PSQUERY.
• Data Source Value
• Record
• Field
• Category
• Classification
• Personal Identifier
• Sensitive
• Installed Products Only
Select to open the Pivot Grid Details Modal.
270 Copyright © 1988, 2020, Oracle and/or its affiliates.

Chapter 13 Data Privacy Framework
Pivot Grid Details ModalThe Pivot Grid Details (EODP_PIVOT_DTL_SCF) modal displays Query details and publish options forthe Pivot Grid.
The modal also lists the tile details. You can view the Pivot Grid in Pivot Grid Viewer.
Navigation
Enterprise Components >Data Privacy Framework > View References >Analytics tab
Select the chevron in the Search Results.
Image: Pivot Grid Details Modal
This example illustrates the Pivot Grid Details Modal.
View Reference Page — Integration TabUse the Integration (EODP_VIEW_REF_FL) tab to view references to Integration Broker related objects.
Navigation
Enterprise Components >Data Privacy Framework > View References >Integration tab
Copyright © 1988, 2020, Oracle and/or its affiliates. 271

Data Privacy Framework Chapter 13
Image: Component/Page
This example illustrates the fields and controls on the Integration tab.
The left panel have Filters listed as follows:
• Product
• Service
• Service Operation
• Record
• Field
• Category
• Classification
• Personal Identifier
• Sensitive
• Installed Products Only
Select to open the Integration Details Modal.
272 Copyright © 1988, 2020, Oracle and/or its affiliates.

Chapter 13 Data Privacy Framework
Integration Details ModalThe Integration Details (EODP_IB_REF_SCF) modal displays details of Integration Broker Objects.Some details displayed are the Default Service Operation Version, Queue Name, Type and MessageInformation. This modal also displays the Integration Group References, if any.
Navigation
Enterprise Components >Data Privacy Framework > View References >Integration tab
Select the Action icon in the Search Results.
Image: Integration Details Modal
This example illustrates the Integration Details Modal.
Enabling Query Data Masking
PeopleSoft provides ability for data protection in PS Query and ensures that only authorized users haveaccess to sensitive data used in the query.
Understanding Query MaskingQuery Masking provides a configurable option for masking sensitive fields used in the PS Queries. Onlyauthorized users will have the access to view and/or run the PS Query using sensitive data.
When a user runs a query, the system checks:
• If the Query Masking feature is enabled in the system.
Copyright © 1988, 2020, Oracle and/or its affiliates. 273

Data Privacy Framework Chapter 13
• If the fields used in the query are identified as Personally Identifiable Information (PII) or Sensitive inthe Data Privacy Framework.
• If the current user is authorized to view the PII and/or Sensitive fields.
Note: Data Privacy Framework maintains all the sensitive record fields in the product and the rolesthat have access to these fields. You can mark a field as sensitive using Maintain Data Privacy SettingsPage and define the roles that have access to specific fields using Authorized Roles Page. For moreinformation, see Understanding Data Privacy.You can enable the query masking feature using System Settings Page. If the Query Masking feature isnot enabled, then there is no change in the PS Query behavior.This does not impact or change the Query Security requirements for a user to access a PS Query.
In a query, the sensitive field could be part of the query SELECT, WHERE or ORDER BY clause. For anunauthorized user:
• If a sensitive field is in the SELECT statement of the PS Query, then the sensitive column output willbe masked.
• If a sensitive field is in the WHERE or ORDER BY clause, then PS Query will stop query executionand will NOT return any output.
Pages Used to Enable Query Data MaskingPage Name Definition Name Usage
Authorized Roles Page HCSCM_AUTHROLE Identify PeopleSoft Roles and defineaccess to sensitive record fields.
Synchronize Data Page EODP_QRYMSK_RUN_FL Synchronize data privacy mappingsdefined in Data Privacy Framework withthe Query system and the authorizedroles.
Exclude Fields Page EODP_QMSK_EXCLU_FL Identify fields that should be excludedfrom the Data Sync process.
System Settings Page EODP_QRYSWITCH_FL Enable/disable Query Masking systemsetting.
Query Masking Utility Page EODP_QRMSK_UTILITY Generate User Access reports.
Authorized Roles PageUse the Authorized Roles page (HCSCM_AUTHROLE) to identify PeopleSoft Roles and their access tosensitive record fields.
Navigation
Enterprise Components >Data Privacy Framework >Query Masking >Authorized Roles
274 Copyright © 1988, 2020, Oracle and/or its affiliates.

Chapter 13 Data Privacy Framework
Image: Authorized Roles Page
This example illustrates the Authorized Roles page.
To newly configure a role, click the Add button.
Image: Authorized Roles Page – Add (1)
This example illustrates the Authorized Roles page when you click the Add button.
Role Name Select the role to be authorized.
To enter further details, select the role and click Add.
Image: Authorized Roles Page – Add (2)
This example illustrates the Authorized Roles page to enter more details.
Record Name Search and select the record name of the field that displays anysensitive information.
Field Name Search and enter the field name from the lookup that displaysany sensitive information.
Copyright © 1988, 2020, Oracle and/or its affiliates. 275

Data Privacy Framework Chapter 13
Access Code Select to indicate if the role has access to this field.
• Authorized: Only the identified PeopleSoft role isauthorized to view the information in the specified recordfield.
• Not Authorized: PeopleSoft roles set to ‘Not Authorized’are restricted from viewing that information in the specifiedrecord field.
Note: If a sensitive record field is not defined here for any PeopleSoft role, then none of the users willhave access to view the information in PS Query.
For more information, refer Query Masking Examples that illustrate the PS Query behavior.
Synchronize Data PageUse the Synchronize Data page (EODP_QRYMSK_RUN_FL) to synchronize:
• Data privacy mappings in Data Privacy Framework with the Query system.
• Authorized roles and their access to sensitive record fields.
Navigation
Enterprise Components >Data Privacy Framework >Query Masking >Run Data Sync >SynchronizeData
Image: Synchronize Data Page
This example illustrates the Synchronize Data page.
276 Copyright © 1988, 2020, Oracle and/or its affiliates.
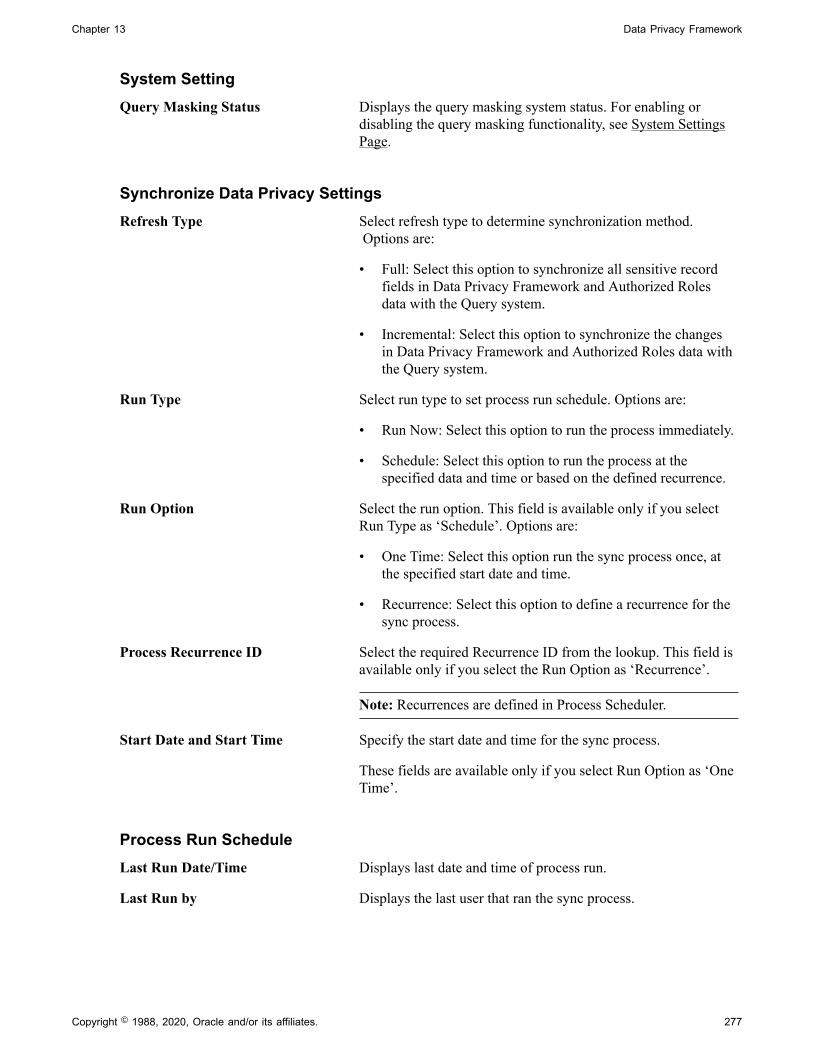
Chapter 13 Data Privacy Framework
System SettingQuery Masking Status Displays the query masking system status. For enabling or
disabling the query masking functionality, see System SettingsPage.
Synchronize Data Privacy SettingsRefresh Type Select refresh type to determine synchronization method.
Options are:
• Full: Select this option to synchronize all sensitive recordfields in Data Privacy Framework and Authorized Rolesdata with the Query system.
• Incremental: Select this option to synchronize the changesin Data Privacy Framework and Authorized Roles data withthe Query system.
Run Type Select run type to set process run schedule. Options are:
• Run Now: Select this option to run the process immediately.
• Schedule: Select this option to run the process at thespecified data and time or based on the defined recurrence.
Run Option Select the run option. This field is available only if you selectRun Type as ‘Schedule’. Options are:
• One Time: Select this option run the sync process once, atthe specified start date and time.
• Recurrence: Select this option to define a recurrence for thesync process.
Process Recurrence ID Select the required Recurrence ID from the lookup. This field isavailable only if you select the Run Option as ‘Recurrence’.
Note: Recurrences are defined in Process Scheduler.
Start Date and Start Time Specify the start date and time for the sync process.
These fields are available only if you select Run Option as ‘OneTime’.
Process Run ScheduleLast Run Date/Time Displays last date and time of process run.
Last Run by Displays the last user that ran the sync process.
Copyright © 1988, 2020, Oracle and/or its affiliates. 277

Data Privacy Framework Chapter 13
Queued ProcessesLists the process runs that are scheduled with date and time. A request can be cancelled.
Note: PeopleSoft recommends to schedule the sync process during low system usage hours. This isbecause the process updates internal tables and may sometimes result in data sync problems due to onlinetransactions.
Exclude Fields PageUse the Exclude Fields page (EODP_QMSK_EXCLU_FL) to identify the fields that should be excludedfrom the Data Sync process.
Note: All the record fields in the Data Privacy Mappings for the identified fields will not be part of thesync process.
Navigation
Enterprise Components >Data Privacy Framework >Query Masking >Run Data Sync >Exclude Fields
Image: Exclude Fields Page
This example illustrates the Exclude Fields page.
Field Name Select the field name from the lookup.
System Settings PageUse the System Settings page (EODP_QRYSWITCH_FL) to enable or disable Query Masking feature.
Navigation
Enterprise Components >Data Privacy Framework >Query Masking >System Settings
278 Copyright © 1988, 2020, Oracle and/or its affiliates.

Chapter 13 Data Privacy Framework
Image: System Settings Page
This example illustrates the System Settings page.
Enable Query Masking Use this option to enable or disable Query Masking feature inthe system.
Query Masking Utility PageUse the Query Masking Utility page (EODP_QRMSK_UTILITY) to identify the sensitive data accessdetails by users and record fields.
Navigation
Enterprise Components >Data Privacy Framework >Query Masking >Query Masking Utility
Image: Query Masking Utility Page
This example illustrates the Query Masking Utility page.
Access by User IDUser ID Select the User ID(s) to generate the access details report.
Display Name Displays the name of the user based on the selected user ID.
Copyright © 1988, 2020, Oracle and/or its affiliates. 279

Data Privacy Framework Chapter 13
Generate Report By Users Click the button to generate sensitive data access details for theselected user.
Image: Sample Output Report
Report by User Access
Access by Record FieldRecord Name Select record name of the field that displays any sensitive
information.
Field Name Select the field name from the lookup that displays any sensitiveinformation.
Generate Report By Record Fields Click the button to generate list of authorized user and roles thathave access to the selected record fields.
Image: Sample Report Output
Report by User Record Fields
Note: In the generated report, the ‘Authorized’ column indicates the access of a user to a record-field.
• Authorized: User is authorized by Role Authorization configuration to view sensitive data.
• Not Authorized: User is not authorized by Role Authorization configuration to view sensitive data.
280 Copyright © 1988, 2020, Oracle and/or its affiliates.

Chapter 13 Data Privacy Framework
• Un-Authorized: Role Authorization is not configured for the User and/or Record fields.
Query Masking ExamplesThis section discusses a few examples to illustrate Query Masking behavior.
Example: 1Consider three PeopleSoft users: User A, User B and User C.
The table given below lists the PeopleSoft roles assigned to each user.
User A User B User C
HR Administrator HR Administrator Payroll Administrator
Payroll Administrator Benefits Administrator Benefits Administrator
For the HR Administrator role, the Role Authorization configuration is as given below.
Image: Role Authorization Page
Role Authorization configuration for HR Administrator
Now, when User A, User B and User C run the following query.
Image: Query
Query
For User A and User B, the PS Query output will be as shown below.
Copyright © 1988, 2020, Oracle and/or its affiliates. 281

Data Privacy Framework Chapter 13
Image: Query Output Page
Query Output for User A and User B
As Birthdate and Marital Status access codes are defined as “Authorized” for HR Administrator role, UserA and User B can view those values in the output.
As User C does not have HR Administrator role, the Birthdate and Marital Status column values aremasked.
Note: The Birth Country and Gender column values are also masked as these fields are not defined in therole authorization set up for HR administrator role.
Image: Query Output Page
Query Output for User C
Example 2Consider that the same users run another Query.
282 Copyright © 1988, 2020, Oracle and/or its affiliates.

Chapter 13 Data Privacy Framework
Image: Query
Query
Here, the PS Query uses a Sensitive field ETHNIC_GRP_CD in the WHERE-Clause.
User A, User B and User C do not have any role that authorizes them to access the ETHNIC_GRP_CDinformation. Unlike the first query, PS Query stops execution and returns an error stating ‘ You haveinsufficient access to retrieve this data’.
This PS Query behavior protects sensitive information from access through data inference.
Example 3Consider the same users from the previous example.
In this example, for the HR Administrator role, the Role Authorization configuration is as given below.
Image: Role Authorization Page
Role Authorization configuration for HR Administrator role.
Here, the PERSON.BIRTHCOUNTRY is set to access code “Not Authorized”. This explicit specificationof Not Authorized access to a record field would restrict any user with HR Administrator role fromaccessing the record field information.
Note: All other users in the system without the HR Administrator role will now be able to access theinformation.
When User A, User B and User C run the query, as per the “Not Authorized” access behavior explainedpreviously, both User A and User B will not have access to PERSON.BIRTHCOUNTRY field.
Copyright © 1988, 2020, Oracle and/or its affiliates. 283

Data Privacy Framework Chapter 13
Image: Query Output Page
Query Output for User A and User B
However, for User C who does not have the HR Administrator role, the Birth Country will be displayed.
Image: Query Output Page
Query Output for User C
Note: A detailed review of all users and the associated roles is necessary before setting a “NotAuthorized” access.
284 Copyright © 1988, 2020, Oracle and/or its affiliates.

Chapter 14
Security Automation
Understanding Security Automation
The PeopleSoft Security Automation tool allows users to automate the customization of pre-existingpermission lists, roles and menus. It allows setting the permission list security for:
• Pages
• Component Interfaces
• Query Trees (Access Groups)
• ADS (Access Groups and general settings)
• Process Groups (Process Groups and general settings)
• Web Services
It allows adding or removing permission lists from roles, adding or removing items to, or from a menuthat points to new or deprecated components. The required changes are put together by user and is storedin a table as metadata. This is then run by the Security Update Automation Engine process. There arethree AE processes to be run for security updates for Permission Lists, Roles and Menus.
Configuring Metadata for Security Automation
There are three metadata pages that users can use to set security for Permissions, Roles and Menus.
Pages Used to Configure Metadata for Security AutomationPage Name Definition Name Usage
Manage Permissions Page EOPM_SUPD_PERM Set security metadata for newpermissions or change the security forexisting permissions.
Manage Roles Page EOPM_SUPD_ROLE Set security metadata for new roles orchange the security for existing roles.
Manage Menus Page EOPM_SUPD_MENU Set security metadata for new menus orchange the security for existing menus.
Copyright © 1988, 2020, Oracle and/or its affiliates. 285

Security Automation Chapter 14
Manage Permissions PageUse the Manage Permissions page (EOPM_SUPD_PERM) to set security for new permissions or tochange the security for existing permissions.
Navigation
Enterprise Components >Security Deployment > Update Permission Lists
Image: Manage Permissions page
This example illustrates the fields and controls on the Manage Permissions page.
Users can filter on existing rows of the metadata. Filtering can be done based on:
• Status (whether = or <>)
• Permission List
• Bug Number
• Update Flag
The following are the field definitions for the permission lists:
Select for Update Select the check box to run the AE update for the permissionlist.
Permission List Enter the permission List that is used to update.
Status New — When new data is entered.
286 Copyright © 1988, 2020, Oracle and/or its affiliates.

Chapter 14 Security Automation
Changed — When an existing data is changed.
Delivered — When the Permission update project is exported tothe DAT file.
Applied — When an AE change is successfully applied.
Tested — When the AE was started in Test mode.
Error — When the applied change is not successful.
Permission Type The user can define the type of permission they want to definemetadata for. Available values are:
• Page
• Component Interfaces
• Query Trees
• Access Group Permission
• Search Groups
• Process Groups and Process Profile Permissions
• Web services
Menu/CI/Tree/Search The name for the corresponding Menu/CI/Query Tree/SESpermission type.
Component Name This is available if the Permission Type is Page.
Bug Number This is populated by the developer delivering the fix but it is notmandatory.
Set Permissions Depending on the Permission type, different modal windows areopened to set permissions.
+/- Add or remove rows from the grid.
Manage Roles PageUse the Manage Roles page (EOPM_SUPD_ROLE) to set security for new permissions or to change thesecurity for existing permissions.
Navigation
Enterprise Components >Security Deployment > Update Roles
Copyright © 1988, 2020, Oracle and/or its affiliates. 287

Security Automation Chapter 14
Image: Manage Roles page
This example illustrates the fields and controls on the Manage Permissions page.
Select for Update Select the check box to select the role for AE execution.
Status Displays the description for Status for the Manage Permissionspage.
Role Name Name of the role.
Permissions List Permission List for that role.
Action Action to be taken for the permission for that role.
Bug Number Bug number delivered by the developer. This is not mandatory.
Date Processed Date processed.
Process Instance Process Instance.
Description Description for the role.
Last Updated Date/Time Last updated date and time.
Updated by user User name that ran the update.
Manage Menus PageUse the Manage Menus page (EOPM_SUPD_MENU) to set security for new menu or to change thesecurity for existing menu.
Navigation
Enterprise Components >Security Deployment > Update Menus
288 Copyright © 1988, 2020, Oracle and/or its affiliates.

Chapter 14 Security Automation
Image: Manage Menus Page
This example illustrates the fields and controls on the Manage Menus page.
Select for Update Select the check box to select the role for AE execution.
Status Displays the description for Status for the Manage Permissionspage.
Menu Name Select the Menu name.
Menu Bar Name Select the Menu Bar name.
Item Name Select the Menu Item.
Action Select the action to be performed on the Menu.
Bug Number This is delivered by developer. This is optional.
Details This is a modal window that shows the Menu Item details.
Date Processed Date of processing.
Process Instance Processing instance.
Description Menu Item description.
Last Updated Date/Time Last updated date and time.
Updated by User User name that ran the update.
+/- Add or remove rows from the grid.
Copyright © 1988, 2020, Oracle and/or its affiliates. 289

Security Automation Chapter 14
290 Copyright © 1988, 2020, Oracle and/or its affiliates.

Chapter 15
Supplemental Data
Understanding Supplemental Data
Because every organization has different data requirements for work orders based upon unique businessprocesses and regulatory issues, PeopleSoft Maintenance Management includes the Supplemental Datacomponent to provide a way to define additional work-order related data. This component enables systemadministrators to extend the information that is stored for an object without requiring modifications to theobject's base table (record) and without requiring additional PeopleCode or PeopleTools customizations.The supplemental data framework uses the PeopleSoft Common Components Active Analytic Framework(AAF) to define the business rules for the additional data.
Supplemental data is valuable when you want to capture information about a subset of object instanceswith fields that are relevant only to these particular object instances. Objects include records, pagesand components, which you must configure specifically to accept supplemental data. For example,PeopleSoft defines and enables the Service Request, Work Order Header, and Work Order Task toinclude supplemental data for PeopleSoft Maintenance Management. Supplemental data may be afield that is embedded in the page or displays on a secondary page. PeopleSoft defines and registersboth the supplemental data store records associated with a base record and the components to be usedfor supplemental data. Be aware that adding any additional objects is regarded as a customization andrequires familiarity with PeopleTools.
When you set up supplemental data, you define records and fields and map them to a data storage record.These definitions are not stored in the PeopleTools metadata tables but in the supplemental data's ownmetadata tables. You define supplemental data page elements to display on the page in two columns.You must also group supplemental data fields within a display group for display purposes. You assigndisplay groups to pages that are enabled for supplemental data. Once you have made this designation,you can define the conditions under which the application should use the supplemental data. You mayperform a search on one display group. The pages within the Supplemental Data component enable you toaccomplish these tasks.
Considerations and LimitationsThe decision to add supplemental data to your application should be based on how applicable the dataobjects are to instances of the object. If the data objects apply to a significant number of instances ofthe object, then it may be better to add a field to the table using Application Designer instead of usingattributes to capture the data. If the data elements apply to a much smaller percentage of the objects, thenattributes may be the solution. While supplemental data provides a large amount of flexibility in termsof adding data elements without changing the underlying data model, you should consider the followinglimitations when you are evaluating whether to implement supplemental data:
• Supplemental data does not fall under the normal upgrade capabilities that are provided withPeopleTools.
Because supplemental data records are not a type of PeopleTools object, you cannot use the standardupgrade facilities that are provided by PeopleTools, such as the Upgrade Copy or Upgrade Compare
Copyright © 1988, 2020, Oracle and/or its affiliates. 291

Supplemental Data Chapter 15
process, to upgrade supplemental data from one database to another. The mechanism for migratingsupplemental data is to extract the data from the source database and move the data to the targetdatabase, which can be accomplished, for example, by using Data Mover or a similar tool. PeopleSoftdoes not deliver any utilities, such as data mover scripts, for migrating supplemental data.
• Because supplemental data records are stored in separate tables (distinct from the base table), it can bedifficult to incorporate supplemental information into reports.
• Supplemental data can only be displayed in a two-column format.
• Performance issues can occur if you have too many supplemental data records in the system.
Use supplemental data only if the data elements are truly dynamic in nature or if they apply to certaininstances of an object. Never use supplemental data simply because it is easier to create than standardPeopleTools fields.
TermsThe following terms are used when discussing supplemental data:
Supplemental Data Field Defined in the Supplemental Data Record, mapped to fields ofthe data store record. Also referred to as "Field" in the contextof supplemental data setup.
Display Group Grouping of supplemental data fields, for display purpose.
Supplemental Data Page The page where supplemental data will be displayed orentered in runtime. Also referred to as Page in the context ofsupplemental data setup.
Supplemental Data Record Logical data model for supplemental data. Also referred to asRecord in the context of supplemental data setup.
Supplemental Data Store The physical table where supplemental data is stored. Alsoreferred to as Data Store or Data Store Record.
Search Record Record that saves search criteria for the base record.
Supplemental Search Record Record that saves search criteria for the base record. The criteriaare based on the supplemental data defined for the base record.
Supplemental Data Record DetailsThe Supplemental Data components, Register Record and Register Component are system-defined byPeopleSoft. The purpose of these options is to associate the supplemental data storage and optionalsearch records with a PeopleSoft Maintenance Management base record and a PeopleSoft MaintenanceManagement component.
For each base PeopleSoft Maintenance Management record, there is an associated supplemental datastorage record:
Base Record Supplemental Data Storage Record
WM_WO_HDR WM_WO_HDR_SD
292 Copyright © 1988, 2020, Oracle and/or its affiliates.
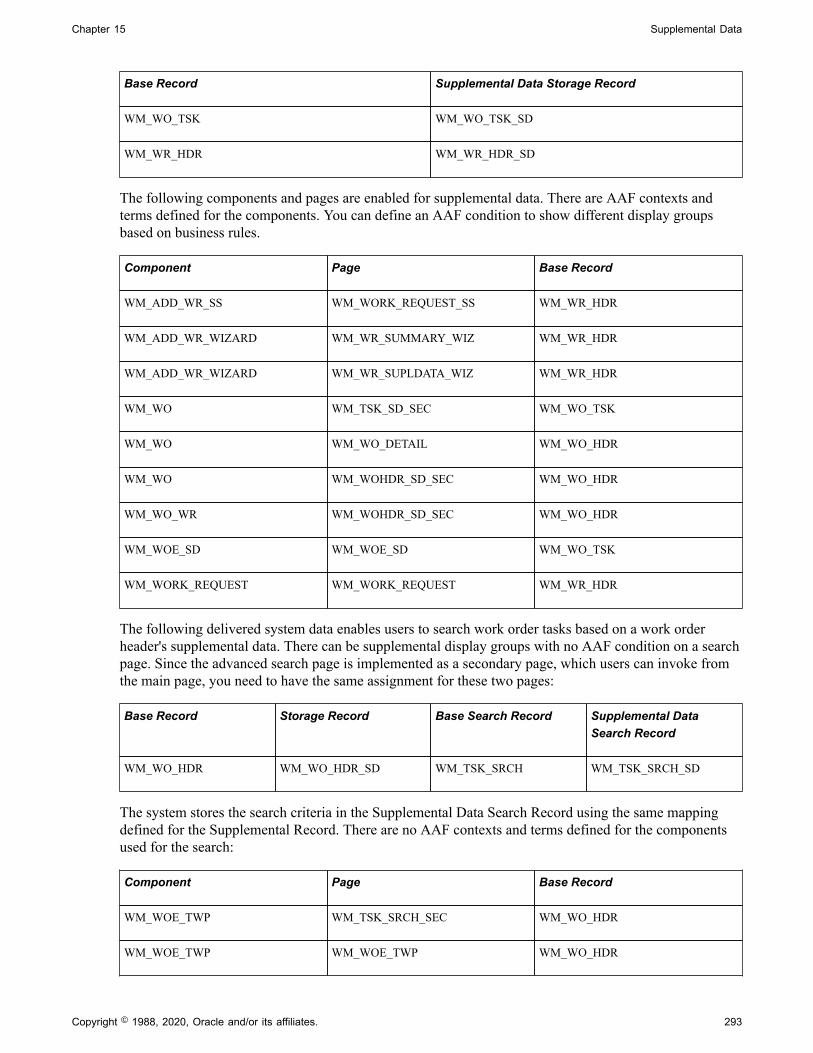
Chapter 15 Supplemental Data
Base Record Supplemental Data Storage Record
WM_WO_TSK WM_WO_TSK_SD
WM_WR_HDR WM_WR_HDR_SD
The following components and pages are enabled for supplemental data. There are AAF contexts andterms defined for the components. You can define an AAF condition to show different display groupsbased on business rules.
Component Page Base Record
WM_ADD_WR_SS WM_WORK_REQUEST_SS WM_WR_HDR
WM_ADD_WR_WIZARD WM_WR_SUMMARY_WIZ WM_WR_HDR
WM_ADD_WR_WIZARD WM_WR_SUPLDATA_WIZ WM_WR_HDR
WM_WO WM_TSK_SD_SEC WM_WO_TSK
WM_WO WM_WO_DETAIL WM_WO_HDR
WM_WO WM_WOHDR_SD_SEC WM_WO_HDR
WM_WO_WR WM_WOHDR_SD_SEC WM_WO_HDR
WM_WOE_SD WM_WOE_SD WM_WO_TSK
WM_WORK_REQUEST WM_WORK_REQUEST WM_WR_HDR
The following delivered system data enables users to search work order tasks based on a work orderheader's supplemental data. There can be supplemental display groups with no AAF condition on a searchpage. Since the advanced search page is implemented as a secondary page, which users can invoke fromthe main page, you need to have the same assignment for these two pages:
Base Record Storage Record Base Search Record Supplemental DataSearch Record
WM_WO_HDR WM_WO_HDR_SD WM_TSK_SRCH WM_TSK_SRCH_SD
The system stores the search criteria in the Supplemental Data Search Record using the same mappingdefined for the Supplemental Record. There are no AAF contexts and terms defined for the componentsused for the search:
Component Page Base Record
WM_WOE_TWP WM_TSK_SRCH_SEC WM_WO_HDR
WM_WOE_TWP WM_WOE_TWP WM_WO_HDR
Copyright © 1988, 2020, Oracle and/or its affiliates. 293

Supplemental Data Chapter 15
Component Page Base Record
WM_WOE_WB1 WM_TSK_SRCH_SEC WM_WO_HDR
WM_WOE_WB1 WM_WOE_WB WM_WO_HDR
WM_WOTSK_WORKBENCH WM_TSK_SRCH_SEC WM_WO_HDR
WM_WOTSK_WORKBENCH WM_WOTSK_WORKBENCH WM_WO_HDR
ExamplePeopleSoft Maintenance Management serves as an excellent example of how supplemental data is set upand used in an application. For example, an organization may need to create work orders to assign andschedule resources to repair vehicles and uses PeopleSoft Maintenance Management. Part of this repairprocess includes the requirement to track any hazardous waste that was created while performing thiswork. This organization wants a Hazardous Waste group box to display, which contains the fields labeledas Date Generated (DATE), Description (DESCR), Notes (NOTES), Quantity (QTY), Unit of Measure(UOM), and Waste Code (WASTE_CD) when you create or update a work order task for this type ofwork.
Based on the registered records and components, you access the Define Record component and defineeach supplemental data record such as PS_HAZARD_WASTE, associate it with a supplemental datastored record, such as WM_WO_TSK_SD, and add all the field names and their associated details thatyou want to include in this record. Based on the hazardous waste example, you would add the fields:DATE, DESCR, NOTES, QTY, UOM, and WASTE_CD. You create a field name (WASTE_CD), a fieldlabel (Waste Code), select how the field will be used (code), the field length displays based on the field'suse type (4 displays for code), and select a supplemental database field (SD_TEXT_4_1) in which tostore each field's data. Since the use type for the field in this example is code, an additional group boxdisplays where you can define all the field values and the order in which you want each value to displayon the drop-down list For example, the WASTE_CD values might be D001, D002, D003, D004, D005,D006. Initially the status in the Record page is In Design. You must change the status in the Record pageto Activated before saving the data and exiting this option.
Note: If you access the Define Record component for an existing record, you must change the status fieldto In Design before making any changes. After you add the new field, you must change the status fieldback to Activated before saving and exiting the component.
Once you have defined and activated all of your fields, you must access the Define Display Groupcomponent and create a display group, such as PS_HAZARD_WASTE, and associate it with a baserecord, such as WM_WO_TSK. You then must identify the fields and their associated records that youwant to appear in either the left or the right column of the page. If a label is not associated with thefield name, you may enter a label here. For example, for the PS_HAZARD_WASTE record, you mightwant to put the fields DATE, DESCR, and NOTES fields in the right column, and the QTY, UOM, andWASTE_CD fields in the left column.
Once you create a display group, you associate one or more of the display groups that you created to acomponent, such as the WM_WO component. This is also where you identify whether the condition iseditable or read-only. If the condition is editable, you may access the condition term page where you mayedit and add conditions for this display group. When you access the Work Order component in PeopleSoft
294 Copyright © 1988, 2020, Oracle and/or its affiliates.

Chapter 15 Supplemental Data
Maintenance Management and access the WM_WO_DETAIL page, the supplemental data group boxcontaining the supplemental data fields appear on the page.
Establishing Supplemental Data
To establish supplemental data, use the following components:
• Register Record (FS_SD_REG_REC) component.
• Register Component (FS_SD_REG_COMP) component.
• Define Record (FS_SD_RECDEFN) component.
• Define Display Group (FS_SD_GRPDEFN) component.
• Assign Display Group (FS_SD_PAGE_GRP) component.
This section discusses how to define a supplemental data record, define and map supplemental data recordfields to data store records, specify details for supplemental data record files, define a supplemental datadisplay group, assign a supplemental data display group, and define conditions for display groups.
Pages Used to Set Up Supplemental DataPage Name Definition Name Usage
Register Record Page SD_REG_REC Registers the supplemental data baserecord and optionally registers the recordthat saves the search criteria for the baserecord.
This is PeopleSoft system-defined dataand is not set up by users. It should notbe modified.
Register Component Page SD_REG_COMP Registers and enables the component andthe pages for supplemental data.
This is PeopleSoft system-defined dataand is not set up by users. It should notbe modified.
Define Record - Record Page SD_RECDEFN Defines the supplemental data recordassociated with the base record andidentifies where to store this record.
Define Record - Fields Summary Page SD_RECFLD Maps fields to the data storage fields.
Define Record - Fields Detail Page SD_RECFLD_DTL Defines a field's detail information.
Define Display Group Page SD_GRPDEFN Defines a display group and associatesany records and fields, as well asidentifies the order in which the fieldsappear on the page.
Copyright © 1988, 2020, Oracle and/or its affiliates. 295

Supplemental Data Chapter 15
Page Name Definition Name Usage
Assign Display Group Page SD_PAGE_GRP Assigns one or more display groups toa supplemental data-enabled componentand page.
Assign Display Group - Conditions Page SD_PHRASE_SEC
SD_TERM_SEC
Specify conditions that control when adisplay group appears.
Define Record - Record PageUse the Define Record - Record page (SD_RECDEFN) to defines the supplemental data record associatedwith the base record and identifies where to store this record.
Navigation
Enterprise Components > Supplemental Data > Define Record > Record
Image: Define Record - Record page
This example illustrates the fields and controls on the Define Record - Record page. You can finddefinitions for the fields and controls later on this page.
Record Enter a name for a supplemental data record. For example apossible supplemental data record name used for PeopleSoftMaintenance Management may be PS_WASTE.
Base Record Select a base record on the Define Record page to associatewith this supplemental data record. For example, a PeopleSoftMaintenance Management base record is WM_WO_TSK.
Status Select a status of In Design during the time that you are definingthis record. Change the status to Activated to indicate that youcompleted mapping the supplemental data fields.
296 Copyright © 1988, 2020, Oracle and/or its affiliates.

Chapter 15 Supplemental Data
Note: If you update a record, before you add a field or makechanges to a record, you must change this status back to InDesign. When you have completed the modification, you mustchange the status back to Activated before saving and exiting thecomponent.
Data Store Record Select one of the data store records that you previouslyregistered that you want to use to store this supplemental datarecord. For example, the data store record for this supplementaldata record in PeopleSoft Maintenance Management is WM_WO_TSK_SD.
Recycle Cache Clears the cache for the Supplemental Data.
Define Record - Fields Summary PageUse the Define Record - Fields Summary page (SD_RECFLD) to maps fields to the data storage fields.
Navigation
Enterprise Components > Supplemental Data > Define Record > and select the Fields Summary tab.
Image: Define Record - Fields Summary page
This example illustrates the fields and controls on the Define Record - Fields Summary page. You canfind definitions for the fields and controls later on this page.
Field Name, Use Type, Length, Mapped to and Field Status
Click the Field Name link to access the Fields Detail page. The remaining fields on this page are all defined in the FieldsDetail page. Once you finish adding all the fields and theirdescriptions on the Field Details page, and change the Statusvalue in the Record page to Activated, each new field nameand its characteristics appear on this summary page. You may
Copyright © 1988, 2020, Oracle and/or its affiliates. 297
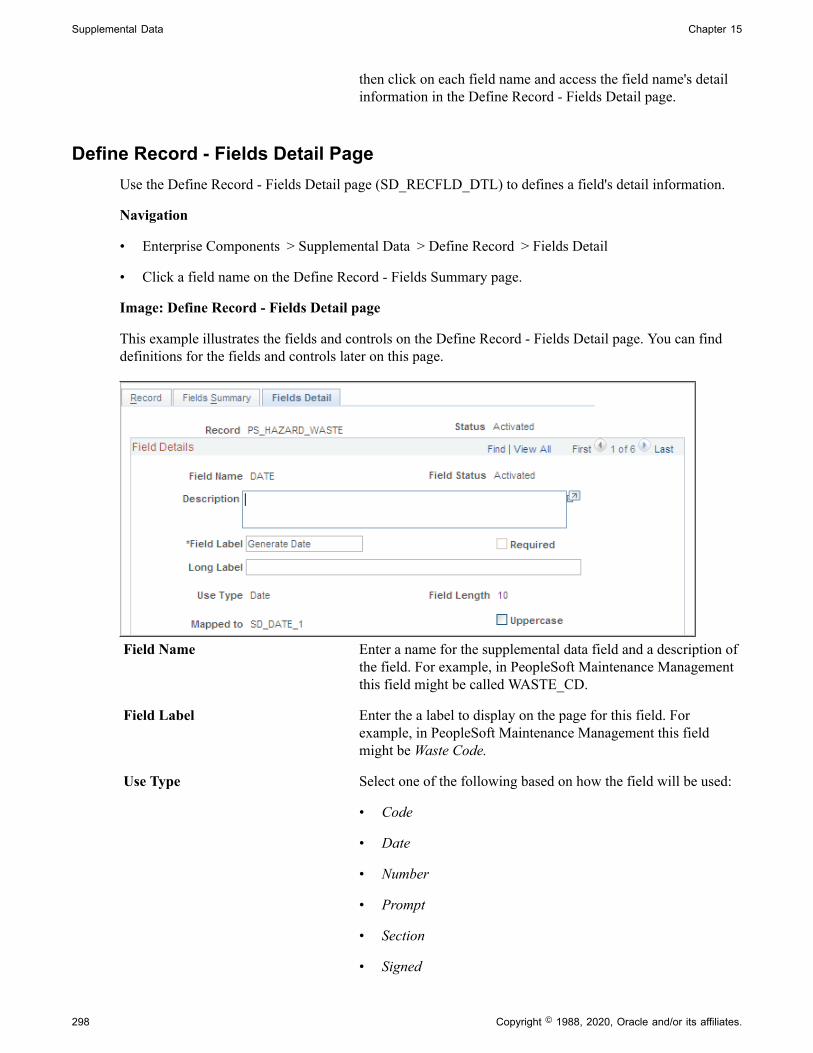
Supplemental Data Chapter 15
then click on each field name and access the field name's detailinformation in the Define Record - Fields Detail page.
Define Record - Fields Detail PageUse the Define Record - Fields Detail page (SD_RECFLD_DTL) to defines a field's detail information.
Navigation
• Enterprise Components > Supplemental Data > Define Record > Fields Detail
• Click a field name on the Define Record - Fields Summary page.
Image: Define Record - Fields Detail page
This example illustrates the fields and controls on the Define Record - Fields Detail page. You can finddefinitions for the fields and controls later on this page.
Field Name Enter a name for the supplemental data field and a description ofthe field. For example, in PeopleSoft Maintenance Managementthis field might be called WASTE_CD.
Field Label Enter the a label to display on the page for this field. Forexample, in PeopleSoft Maintenance Management this fieldmight be Waste Code.
Use Type Select one of the following based on how the field will be used:
• Code
• Date
• Number
• Prompt
• Section
• Signed
298 Copyright © 1988, 2020, Oracle and/or its affiliates.

Chapter 15 Supplemental Data
• Text
• Time
• Yes/No
Field Length Select a length based on the selected Use Type:
• If the use type is a number or signed number consisting ofan integer or decimal position, the field lengths may only be:9.0, 7.2, and 15.4.
• If the use type is text, the field length may be 4, 20, 50, or100.
• If you select any of the remaining use types, each type'sfield length is dictated by the specific length of the selecteduse type.
Mapped To Select the data store field to which you want to map this field.
Note: Once you change the status to Activated on the Record page, the information listed above, with theexception of the description and field label, becomes read-only and cannot be modified.
CodesThis group box displays if you selected code as a Use Type and identifies a list of code values for a drop-down list.
Sequence Enter a number to represent the order in which you want to seethese codes listed in a drop-down list or lookup page.
Field Value and Translate LongName
Enter each valid code in this list along with the text that youwant to appear on the list when the drop-down list displays.
Field Status Displays the current status of the field. Initially this value willbe In Design. The value changes to Activated after you changethe record status to Activated on the Define Record - Recordpage.
Reorder Click this button to assign each code a unique sequentialnumber and reorganize the sequence numbers in top-downnumerical order.
Define Display Group PageUse the Define Display Group page (SD_GRPDEFN) to defines a display group and associates anyrecords and fields, as well as identifies the order in which the fields appear on the page.
Navigation
Enterprise Components, Supplemental Data, Define Display Group
Copyright © 1988, 2020, Oracle and/or its affiliates. 299

Supplemental Data Chapter 15
Image: Define Display Group page
This example illustrates the fields and controls on the Define Display Group page. You can finddefinitions for the fields and controls later on this page
Display Group Select a base record to associate this new display group with andenter a name for this display group in the Define Display GroupAdd page.
Label Enter a label for the display group data group box.
Occurs Enter the number of rows of data to display in the group box.
Left and Right ColumnsThe supplemental fields that you want to appear on a page are defined in left and right columns.
Sequence, Record, Field Name, andLabel
Select the record and field name, enter a label that you want todisplay on the page for the field name for each supplementaldata field. Enter a sequence number to determine the order inwhich the fields should display on the page for each column.
Reorder Reorders the group as per the sequence entered by the user inthe Sequence column.
Recycle Cache Clears the cache for the Supplemental Data.
300 Copyright © 1988, 2020, Oracle and/or its affiliates.

Chapter 15 Supplemental Data
Assign Display Group PageUse the Assign Display Group page (SD_PAGE_GRP) to assigns one or more display groups to asupplemental data-enabled component and page.
Navigation
Enterprise Components, Supplemental Data, Assign Display Group
Image: Assign Display Group page
Use the Assign Display Group page (SD_PAGE_GRP) to assigns one or more display groups to asupplemental data-enabled component and page
Component Name and Market Select the component that is enabled for supplemental data andwith which you want to associate a supplemental data displaygroup in the Assign Display Group Search page. The Market forwhich this component was defined displays as read-only alongwith the Component Name.
Enabled Pages and Display GroupsThis group box displays the name of the pages within the component that are enabled for supplementaldata, their associated base record, and any associated display groups. You may also add the display groupsthat you want to appear in this component and page.
Sequence, Display Group, Use Add a supplemental data display group that you want toassociate with this component and this page, and select whetheryou want the text associated with the display group to beEditable or Read-only.
User Friendly Text Describes the condition associated with this display group ineasy to understand terminology.
Click the Edit icon to access the Assign Display Group -Conditions page where you can establish conditions that controlwhen a display group appears. For example, you could set acondition so that a display group appears only when there is a
Copyright © 1988, 2020, Oracle and/or its affiliates. 301

Supplemental Data Chapter 15
hazardous asset associated with a work order task, or when thework order is of the type CM (corrective maintenance).
Click the Clear icon to remove the condition that is associatedwith this display group.
Reorder Reorders the group as per the sequence entered by the user inthe Sequence column.
Recycle Cache Clears the cache for the Supplemental Data.
Note: If the supplemental data page is registered as a search page, then you may add only one displaygroup to the page; you must select 1 as the value in the Occurs field for the selected display group; youmust define all fields for this display group for the same record definition; and you must map this recordto a data store record defined with a Search Supplemental Search record. With PeopleSoft MaintenanceManagement, you can only search based on supplemental data for the Work Order Header.
Assign Display Group - Conditions PageUse the Assign Display Group - Conditions page (SD_PHRASE_SEC) to specify conditions that controlwhen a display group appears.
Navigation
Click the Edit icon on the Assign Display Group page.
Image: Assign Display Group - Conditions page
Use the Assign Display Group - Conditions page (SD_PHRASE_SEC) to specify conditions that controlwhen a display group appears
Supplemental data depends on the Active Analytics Framework (AAF) to define and resolve theconditions for a supplemental data display group. AAF is a PeopleSoft Enterprise Component thatincludes the following components:
• Data Library Framework.
• Rule Evaluation Engine.
• Rule Builder Framework.
• Action Framework.
302 Copyright © 1988, 2020, Oracle and/or its affiliates.

Chapter 15 Supplemental Data
PeopleSoft Maintenance Management utilizes all of these AAF components with the exception of theAction Framework.
You define a condition using a combination of a term, an operator, and a value or term. A term is anontechnical name that refers to the information (data) that can be retrieved or computed and is the objectevaluated within a condition. This page enables you to build conditions by viewing and selecting theterms, operators, and value/term that define the condition.
To add a condition:
1. Select a term.
2. Select an operator.
3. Enter or select values or terms to define the right side of the condition equation, if required by theselected operator.
Note: To add conditions for values derived from control tables that are keyed by SetID (for example,Work Type, Service Group ID), you must use one of the "in list" operators (is in list, or is not in list).
There are two modes that you can use to specify conditions:
• Basic.
This is the default mode. When you select this option, the Select Subject Area group box appears,with a folder hierarchy of subjects. Navigate through the subjects and select one to view the termsavailable in an adjacent group box. Click a term to select it and insert it into the condition.
If the criteria you define includes more than one condition row, the system uses AND logic for theconditions, therefore all of the conditions must be met for the criteria to evaluate as true.
• Advanced.
This mode enables you to group condition rows using parenthesis, specify the logical operator foreach condition row (AND, OR), and specify terms as values in the right-hand side of the conditionequation.
Switch to Advanced Mode Click to activate advanced mode.
Switch to Basic Mode Click to activate basic mode.
Switch to Search Mode Click to activate search mode, where you can execute a searchfor defined terms.
Switch to Browse Mode Click to activate browse mode, where you can browse definedterms.
Select Term Click to insert the term into the condition.
Term Displays the term name used in the condition that is evaluatedagainst the Value.
Operator Select the operator to use for the condition. The list of availableoperators depends on the term upon which the condition isbased.
Copyright © 1988, 2020, Oracle and/or its affiliates. 303

Supplemental Data Chapter 15
Value Displays the value to which the Term is compared.
Done Click to create the condition and return to the Assign DisplayGroup page.
Cancel Click to cancel building the condition.
304 Copyright © 1988, 2020, Oracle and/or its affiliates.

Chapter 16
Using the Configurable Analysis Framework
Understanding Configurable Analysis Framework
Oracle’s PeopleSoft Configurable Analysis Framework (CAF) allows administrators to use a commonframework to design end-user pages. These pages are intended to be used to compare or analyzePeopleSoft data. The CAF allows administrators to determine what factors (data) to display for an entitysuch as customers, suppliers.
There are two display layouts:
• Comparison - Displays multiple entities and factors in a column and row layout.
This option allows users to compare the same factor for multiple entities, side-by-side.
• Analysis - displays multiple factors for one entity in any layout that the user chooses.
This option allows users to focus on one entity at a time and both display layouts can be saved andshared with other users.
High level feature functionality includes:
• It is generic so that it can be used to display data for different types of entities and factors withoutmodifying the framework.
• It is configurable so that the types of the factors and entities can be defined by administrators.
• It is extensible so that application developers can extend it to provide additional functionality that isnot available from the framework.
• It supports comparison and analysis modes so that it can be used to compare entities or to focus onone entity at a time.
• It provides an intuitive user interface so that users can easily select the entities and factors to displayand arrange them in the way that is most useful for them.
• It allows users to save a set of factors and entities, and recall it later or share it with other users.
• It has access control so that security can be applied to control the entities, factors, and actions that areaccessible for the users.
Third Party IntegrationThe Configurable Analysis Framework uses the following third party JavaScript libraries to implement itsuser interface. They are included as PeopleTools managed objects and don’t reference to external URLs:
• JQuery 1.8.2, which is used to help interact and manipulate the Html DOM objects.
Copyright © 1988, 2020, Oracle and/or its affiliates. 305

Using the Configurable Analysis Framework Chapter 16
• JQuery UI 1.9.0, which is used to implement the drag-drop and re-size capabilities in the userinterface
The Fluid Configuration Analysis Framework does not use JQuery.
PerformanceThe Configurable Analysis Framework is a framework that hosts contents. The contents are provided byvarious factor handlers. It is not expected that there will be large overhead by the framework. However,depending on the types of factors used, potential performance issues may need to be considered.
SecurityStandard PeopleTools security is used to secure the user login and access to the components. In addition,CAF provides access control to control user’s access to the factors and related actions.
To control the access to entities, uptake can add OPRID to the entity record to filter the entities byOPRID, extend the built-in entity handler and override its logic to select the entities, or both. Since factordata is retrieved by factor handlers, it is expected that the factor handler will implement the necessarysecurity (such as row-level security) to control the data displayed.
Understanding Technical Elements of Configurable AnalysisFramework
Topics discussed in this section:
• Factor Types
• Handler Types
• Related Action Levels
• Security
Factor TypesFactor types are used in the Configurable Analysis Framework (CAF) when defining factors for ananalysis on the Define Factor Page. The factor type is used by the system to display data.
Factor type options are:
Application Class Select to indicate that the factor should use an application classto display the data.
Component Select to indicate that the factor should use a PeopleSoft Classiccomponent to display the data for classic pages and PeopleSoftFluid component and pages for Fluid CAF.
Field List Select to indicate that the factor should use a pre-formatted twocolumn display that lists each field to display the data.
306 Copyright © 1988, 2020, Oracle and/or its affiliates.

Chapter 16 Using the Configurable Analysis Framework
HTML Select to indicate that the factor should use HTML to display thedata.
PS Query Pagelet Select to indicate that the factor should use a PS Query Pageletto display the data.
Pivot Grid Pagelet Select to indicate that the factor should use a Pivot Grid Pageletto display the data.
URL Select to indicate that the factor should use a URL to display thedata.
This table lists the factor types that support a value expression in the format of #(type.value). CAF detectsthese factor types in the configuration and substitutes them with the proper value.
Factor Type Value Description Example
URL URL Object Name Returns the text from thespecified URL object.
#(URL.HOMEPAGE):returnsthe URL for the HOMEPAGEURL object.
IMG Image Object Name Returns the URL to the imageobject.
#{IMG.LOGO}: returns theURL to the LOGO image.
HTML HTML Object Name Returns the HTML content ortext of the HTML object.
#{HTML.COMMON_HEADER}: returns the HTMLfor the COMMON_HEADERHTML object.
MSG MESSAGE_SET, MESSAGE_NBR
Returns the message catalogtext. MESSAGE_SET andMESSAGE_NBR specify themessage set and number
#{MSG.6550,1}: returns thetext for message (6550,1).
MSGE MESSAGE_SET, MESSAGE_NBR
Similar to MSG but returnsthe explanation text.
All others specify recordname
Field Name Returns the values from thespecified record field. Thevalue is formatted:
• If it is currencycontrolled, the amount isformatted as a currency.
• If it is IMAGE orIMAGEREFERENCE, it returns the URL to theimage.
#{CUSTOMER.NAME1}returns the value of theNAME1 field in theCUSTOMER record (customer name).
#{CUST_DATA.BAL_AMT}returns the BAL_AMTamount formatted since theBAL_AMT field in the CUST_DATA record is currencycontrolled.
#{CUSTOMER.CUST_LOGO} returns the URL tothe CUST_LOGO image (given that CUST_LOGO isan image field and stores thecustomer’s logo).
Copyright © 1988, 2020, Oracle and/or its affiliates. 307

Using the Configurable Analysis Framework Chapter 16
Handler TypesConfigurable Analysis Framework (CAF) is an extendable framework using a plug-in architecture. Thefunctionality of CAF can be extended using various types of handlers to override default behavior orprovide additional functionality, such as additional type of data to display or related actions.
Handler types are set up using the Analysis Handler Registry Page. The purpose of this registry is to allowapplication developers to assign a single value to the application class. Therefore, users do not need toknow the full path to the application class when specifying it during analysis configuration.
Handler type options are:
Action Handler Handles configured related actions. Select to indicate that thehandler is used to implement related actions on the RelatedAction Configuration Page.
The application class must be a subclass of CAF_API:ActionHandler. The built-in action handlers are in the CAF_CORE:HANDLER:ActionHandler package.
For Fluid implementations, the application must be a subclass ofCAFNUI_API: ActionHandler or CAFNUI_CORE:HANDLER:ActionHandler.
Analysis Handler The application class for the component that displays theanalysis. It is used to provide functionality at the analysis level. For example, it handles rendering the html for the display, managing the user sessions, and responding to user actions tosave/edit the analysis views. It is also the handler that sendsnotifications. Select to indicate that the handler is used atthe analysis level to handle events or override functionalityprovided by CAF on the Analysis Configuration Page.
The application class must be a subclass of CAF_API:ComparisonHandler. For most implementations, it shouldbe a subclass of CAF_CORE:HANDLER:ComparisonHandlerso that most of the built-in functionality is used.
For Fluid implementations, the application must be asubclass of CAFNUI_API:ComparisonHandler or CAFNUI_CORE:HANDLER:ComparisonHandler.
Entity Handler The application class used to implement the functionalityof an entity, including selecting/managing the entities, andimplementing the entity related actions. Select to indicatethat the handler is used at the entity level to handle eventsor override functionality provided by CAF on the EntityConfiguration Page.
The application class must be a subclass of CAF_API:EntityHandler. For most of implementations, it should besubclass of CAF_CORE:HANDLER:EntityHandler so that mostof the built-in functionality is used.
308 Copyright © 1988, 2020, Oracle and/or its affiliates.

Chapter 16 Using the Configurable Analysis Framework
For Fluid implementations, the application must be a subclass ofCAFNUI_API: EntityHandler or CAFNUI_CORE:HANDLER:EntityHandler.
Factor Handler The application class used to implement the functionality ofa factor, including configuring and showing the factor data. It can also implement factor level related actions. Select toindicate that the handler is used at the factor level to handleevents or override functionality provided by CAF on the FactorConfiguration Page.
The application class must be a subclass of CAF_API:FactorHandler.
If the factor handler is extending built-in factor types, it shouldbe a subclass of the corresponding factor handlers in the CAF_CORE:HANDLER:FactorHandler package.
A CAF method is provided to enable the display of these iconsfor the factors that support them:
• Configure Factor: allows the user to configure the factordisplay, such as changing filter values.
• Show Combined: allows the user to show the data for allselected entities in a single report or chart.
This option is only available for comparison mode and is notavailable for Fluid CAF.
For Fluid implementations, the application must be a subclass ofCAFNUI_API: FactorHandler or CAFNUI_CORE:HANDLER:FactorHandler.
For each type of handlers, CAF provides built-in setup to implement the core functionality. Theinterface definitions of each handler is in the CAF_API application package. The core setup is in theCAF_CORE:HANDLER application package. In almost all cases, implementation of handlers should besubclassed from the corresponding application classes in CAF_CORE:HANDLER.
To add a handler:
1. Create an application class as a subclass of the proper type (handler type) and begin to override themethods as required.
2. Register the application class using the Analysis Handler Registry Page.
3. Use the appropriate handler on each of the Analysis Configuration pages for analysis, entities, factors,and related actions.
Related Action LevelsConfigurable Analysis Framework (CAF) is an actionable framework that allows related actions to beattached to many levels of the display so that users can take related/context sensitive actions.
Copyright © 1988, 2020, Oracle and/or its affiliates. 309

Using the Configurable Analysis Framework Chapter 16
Related action levels are:
Common Factor This option is a related action level for a factor, and is applicableto all factors.
Analysis This option is a related action level for the whole analysis.
Entity This option is a related action level for an entity and isapplicable to a single entity.
Factor This option is a related action level for a factor and is applicableto a single factor.
Factor Data This option is a related action level for a combination of entityand factor and is applicable to the data display.
Selected Entities This option is a related action level for an entity and isapplicable to a group of entities.
Related actions can be
• Configured, meaning that the related action is configured using the Analysis Configuration Page.Administrators can add or remove related actions using the Related Action Configuration Page anddetermine access using the Analysis Access Control Page.
• Dynamic, meaning that the related action is implemented using handlers. Administrators can add orremove handlers dynamically.
SecurityConfigurable Analysis Framework (CAF) provides secure access to entities, factors, and related actionsusing the Analysis Access Control Page: This ensures that proper data security is applied when selectingthe data to be displayed.
Entity If an entity provided has OPRID as a high order key, then whenentity data is selected from the database, row-level security (OPRID = %OperatorId) is applied to select only the entitiesthat the user has access to. If this does not provide the requiredsecurity to select the entities, the entity handler can implementor override the EntityHandler.GetAllEntities() method to selectthe entities.
Factor The framework allows an administrator to specify factors thatcan be used and viewed by users. The access control is by user,role, or both. This can limit access to factors with sensitive data.
Related Action Similar to factors, administrators can limit the related actions sowhich a user has access.
310 Copyright © 1988, 2020, Oracle and/or its affiliates.

Chapter 16 Using the Configurable Analysis Framework
Setting Up Configurable Analysis Framework
Pages Used to Set Up Configurable Analysis FrameworkPage Name Definition Name Usage
Analysis Handler Registry Page CAF_HANDLER_TBL Register application classes used ashandlers in Configurable AnalysisFramework (CAF).
Analysis Configuration Page CAF_CONFIG_TBL_GEN Define data analysis.
Entity Configuration Page CAF_CONFIG_TBL_ENT Define the entity for the analysis.
Factor Configuration Page CAF_CONFIG_TBL_FCT Define the factors for the analysis.
Define Factor Page CAF_FACTOR_SEC Add factors to the Factor Analysis page.
Factor List Configuration Page CAF_CONFIG_TBL_FLS Create a pre-selected list of factors thatare available to all users.
Copy Factor Lists Page CAF_CNF_FL_SEL_SEC Copy a factor list from other users.
Related Action Configuration Page CAF_CONFIG_TBL_ACT Define configured related actions fordifferent levels of data.
Define Related Action Page CAF_ACTION_SEC Add a related action to the RelatedAction Configuration page.
Miscellaneous Page CAF_CONFIG_TBL_MSC Perform administrative tasks.
Analysis Access Control Page CAF_ACC_CTL_TBL Set up access control for factors andrelated actions for an analysis.
Analysis Handler Registry PageUse the Analysis Handler Registry page (CAF_HANDLER_TBL) to register application classes used ashandlers in Configurable Analysis Framework (CAF).
Navigation
Enterprise Components > Configurable Analysis >Handler Registry
Copyright © 1988, 2020, Oracle and/or its affiliates. 311

Using the Configurable Analysis Framework Chapter 16
Image: Analysis Handler Registry Page (1 of 2)
This example illustrates the fields and controls on the Analysis Handler Registry page (1 of 2)
312 Copyright © 1988, 2020, Oracle and/or its affiliates.

Chapter 16 Using the Configurable Analysis Framework
Image: Analysis Handler Registry Page (2 of 2) (scroll to right)
This example illustrates the fields and controls on the Analysis Handler Registry page (2 of 2) afterscrolling to the right.
Application developers use this page to create user defined handler ID’s.
User DefinedSystem defined handlers are available for you to use. However, if you need to create your own handlers,use this section to create user defined handlers.
Handler ID Enter a unique Id that is used when referencing the applicationclass.
Note: System defined handlers should always begin with “PS_”. User defined handlers should NOT begin with “PS_”.
Handler Type Select the type of handler that is being registered. Optionsinclude:
• Action Handler
• Analysis Handler
• Entity Handler
• Factor Handler
Copyright © 1988, 2020, Oracle and/or its affiliates. 313

Using the Configurable Analysis Framework Chapter 16
For a description of each option and additional information, seeHandler Types.
Root Package ID, Qualified Package/Class Path, and Application Class ID
Select the full path to the application class. The system verifiesthat the application class is a valid subclass of the handler typewhen you save the page.
Owner Select a product or owner ID for the handler. This is an optionalfield.
Analysis Configuration PageUse the Analysis Configuration page (CAF_CONFIG_TBL_GEN) to define data analysis.
Navigation
Enterprise Components > Configurable Analysis >Analysis Configuration
Image: Analysis Configuration Page
This example illustrates the fields and controls on the Analysis Configuration page.
Use this page to set up general information about the analysis.
Analysis ID and Analysis Type Displays key fields for the analysis. The analysis type is SystemDefined or User Defined, which corresponds to the AnalysisHandler Registry Page.
Fluid Configuration Select to indicate if this is a Fluid configuration.
Active Select to indicate that the analysis can be used.
314 Copyright © 1988, 2020, Oracle and/or its affiliates.

Chapter 16 Using the Configurable Analysis Framework
Analysis ConfigurationAnalysis Title Enter a title that appears on the Analysis Display page for
Classic implementations. For more information about theAnalysis Display page, see Using Configurable AnalysisFramework.
Display Menu Name Select the name of the menu where the Display Analysis page isaccessed or the Tile in case of CAF Fluid implementation.
For Classic Implementations:
1. Register the CAF_DISPLAY component in an existingmenu or a new menu.
2. The search record should be INSTALLATION
For Fluid Implementations:
1. Register the CAFNUI_DISPLAY_FL component in a newmenu. Leave the search record as INSTALLATION.
2. Create a Content Reference in an existing or new Fluid Pagereferring to the Menu/Component pair mentioned in theprevious step.
3. Specify the menu in this field.
Analysis Handler and AnalysisHandler Parameter
(Optional) Select the handler and enter its parameter.
Owner ID (Optional) Select an owner for the analysis. This field isinformational only and is not used by the system.
Analysis OptionsSupport Analysis Mode Select to support analysis mode.
Support Entity Group Actions Select to support entity group actions. This is not allowed forFluid configurations.
Support Flagged Entity Select to allow users to flag one or more entities.
Analysis Access ControlAccess control must be set up for the analysis.
Set up Access Control Select this button to access the Analysis Access Control Page ina modal window.
Copyright © 1988, 2020, Oracle and/or its affiliates. 315

Using the Configurable Analysis Framework Chapter 16
Note: The current data for the analysis configuration mustbe saved before changes are reflected in the Analysis AccessControl component. For example, if a new factor is added on theFactor Configuration page, you must save the page before thefactor is reflected on the Analysis Access Control component.
Copy Configuration To ... Select this button to copy this configuration to a newconfiguration. This button accesses the Copy Configurationwindow where you can select an analysis type and enter a newanalysis ID.
Entity Configuration PageUse the Entity Configuration page (CAF_CONFIG_TBL_ENT) to define the entity for the analysis.
Navigation
Enterprise Components > Configurable Analysis >Analysis Configuration >Entity Configuration
Image: Entity Configuration Page
This example illustrates the fields and controls on the Entity Configuration page.
Entity Label and Entity Label(Plural)
Enter a singular and plural description for the entity label. The framework requires singular and plural forms so that itcan properly create labels. Examples include Customer andCustomers so that CAF can display messages such as “Flag thisCustomer” and “Select All Customers”.
Entity Record Name Select a record or view that indicates the structure of the entityand the record from which to retrieve the data.
If the keys of the record or view include OPRID (operatorID), then row-level security is used to select entities that areaccessible to the user when CAF selects the data,
For Fluid CAF, when the record has a field of type Image, theimage is displayed in Comparison Mode at the Header.
Key Separator Enter a value that is used to separate key values.
The session tracks the entity keys using a composite key Thiskey is obtained by concatenating the key fields of the entity. The key fields are separated by a key separator. If you leave
316 Copyright © 1988, 2020, Oracle and/or its affiliates.

Chapter 16 Using the Configurable Analysis Framework
the key separator blank, the system uses “~|~” as the defaultvalue. However, if you believe that “~|~” can be found in somekey values, then you should specify a different value as the keyseparator.
Note: Use caution when changing key separators or entity keysbecause any saved views or saved sessions will not be valid.
Description Field Select a field from the entity record that is used to retrieve thetitle or name for the entity. For example, NAME1 for customername.
Entity Handler and Entity HandlerParameter
Select the handler ID and the parameters if a handler isimplemented for the entity.
Factor Configuration PageUse the Factor Configuration page (CAF_CONFIG_TBL_FCT) to define the factors for the analysis.
Navigation
Common Definitions > Enterprise Components >Analysis Configuration >Factor Configuration
Image: Factor Configuration Page
This example illustrates the fields and controls on the Factor Configuration page.
Factor ConfigurationFactor Label and Factor Label(Plural)
Enter a singular and plural description for the factor label. Theframework requires singular and plural forms so that CAF canproperly display messages. Examples include Measure andMeasures.
FactorsUse this section to add factors that are to be used in the analysis.
Define Click this button to access the Define Factor Page.
Copyright © 1988, 2020, Oracle and/or its affiliates. 317

Using the Configurable Analysis Framework Chapter 16
Define Factor PageUse the Define Factor page (CAF_FACTOR_SEC) to add factors to the Factor Comparison page.
Navigation
Set Up Financials/Supply Chain > Common Definitions > Configurable Analysis >AnalysisConfiguration >Factor Configuration. Click the Define button in the Factors section of the page.
Image: Define Factor Page
This example illustrates the fields and controls on the Define Factor page.
Factor ID Enter an ID that identifies the factor.
Factor Type Select the type of factor you want to use to display the data..Depending on the option selected, additional fields are displayedto define the factor details.
Options include:
• Application Class
• Component
• Field List
• HTML
• PS Query Pagelet
• Pivot Grid Pagelet
• URL
318 Copyright © 1988, 2020, Oracle and/or its affiliates.

Chapter 16 Using the Configurable Analysis Framework
When an option other than Application Class is selected, a newsection with additional fields appears lower on the page.
For a description of each option and additional information, seeFactor Types.
Factor Name Enter a name for the factor, which is used when displaying it tothe user.
Factor OptionsUsed In Mode Select a mode for which this factor can be used. Options
include:
• Analysis: Select to indicate that the factor can only be use inAnalysis Mode.
• Comparison: Select to indicate that the factor can only beused in Comparison Mode.
• Both: Select to indicate that the factor can be use in Analysisand Comparison Mode.
Width and Height Enter a value that represents the size of the factor. The systemdefaults the size to 400 (width) and 300 (height).
Note: For fixed size factor types, such as Component, Chart, and pagelets, the size should be large enough to accommodatethe content and avoid scroll bars that the user would need toview the data.
Factor Handler and HandlerParameter
Select the factor handler and specify its parameters.
This is a required field when the Factor Type is ApplicationClass.
When the Factor Type is anything other than application class, then factor handler is already determined. However, if you needto extend, or override, the built-in handler, then you can specifya customized handler and its parameters. The custom handlershould extend or subclass from the built-in handler class.
Entity Key Map Enter a value that is used to map the key values when a therecord specified uses different key fields.
For example, the entity record for Customer can beCUSTOMER, which is keyed by SETID and CUST_ID. If thedata is retrieved from a view or record that is keyed by BILL_TO_SETID and BILL_TO_CUST_ID, then the Entity Key Mapthat can be used to specify the mapping could be BILL_TO_SETID=SETID,BILL_TO_CUST_ID=CUST_ID
For some factor types, CAF automatically passes the selectedentity keys to retrieve the data for display. For example, with
Copyright © 1988, 2020, Oracle and/or its affiliates. 319

Using the Configurable Analysis Framework Chapter 16
the HTML factor type, an administrator can use the expression#{RECORD.FIELD} to specify the record and the field toretrieve the data. In most cases, the record specified should bekeyed at the entity level and use the same key fields. However, it is possible that the record specified uses different key fields.
Component OptionsData is displayed by entity and the search record for the component should be keyed by entity. CAFautomatically passes the entity keys to the component to bypass the search dialog. The Entity Key Mapfield can be used if the key fields are different. However, this create a transaction to display the data.Therefore, it may be more efficient to use other factor types such as PS Query, Field List, and so on.
Menu Name, Component Name, PageName, and Menu Action
Enter the values for the target component.
Field List OptionsWhen this option is selected the left column is intended to display field labels and right justified. The rightcolumn is intended to display the field values and is left justified.
Label Column Width and ValueColumn Width
Enter the column width for field labels and field values.
The preferred method is to enter one column a percentage sothat the data display can automatically adjust based on the cellsize of the data. Then, enter the other column using “*”, whichindicates that it will use the remaining width.
Seq (sequence) Enter the sequence of each row. The rows are ordered in thissequence when viewed by a user.
HTML OptionsIf the HTML generated for each entity is the same except for the data, then this factor type can be used.The HTML can be coded to format the data and the value expressions can be used to substitute the data inthe HTML.
HTML Enter the HTML code. Value expressions should be used tosubstitute the data that is specific to each entity. You mayprovide formatting for this data.
PS Query Pagelet OptionsWhen this option is selected, you must perform theses steps:
1. Create a PS Query.
2. Use the Pagelet Wizard to create the Pagelet for the PS Query.
3. Create a factor that uses PS Query Pagelet as the factor type and complete the PS Query PageletOptions.
320 Copyright © 1988, 2020, Oracle and/or its affiliates.

Chapter 16 Using the Configurable Analysis Framework
The data that is generated for this option is a static HTML, image, or both, and the factor is notinteractive. However, this options provides the best performance when displaying the data. Therefore, ifyou want a simple chart, grid, or both, this option should be used instead of the Component option.
Maximum Rows Enter the maximum number of rows to display. This fieldoverrides the MAXROWS parameter in the pagelet.
Pagelet Width and Pagelet Height Enter the size of the container that holds the pagelet. This valueshould be slightly larger than the size of the pagelet specifiedin the Pagelet Wizard, and smaller than the size entered inthe Factor Options. This provides clean margins and reducesscrolling.
Pagelet ID Select the ID of the Pagelet that you created in the PageletWizard.
Pivot Grid Pagelet OptionsWhen this option is selected, you must perform theses steps:
1. Create a PS Query.
2. Use the Pivot Wizard to create the Pivot Grid.
3. Use the Pagelet Wizard to create the Pagelet for the Pivot Grid.
4. Create a factor that uses Pivot Grid Pagelet as the factor type and complete the Pivot Grid PageletOptions.
5. For Fluid, use Publish as a Grouplet found at the last page of the Pivot Grid Wizard to create thegrouplet. The new Pivot Grid Content Reference should have exactly the same name of the Pagelet.
The data that is generated for this option uses iframe and is interactive. Therefore a user can makechanges to the Pivot Grid view. Changes are independent for each view, therefore to apply changes to allviews, you must use the Configure Factor related action for the factor.
Pagelet Width and Pagelet Height Enter the size of the pagelet. these values override the valuesin the Pagelet Wizard. These values should be slightly smallerthan the size entered in the Factor Options. This provides cleanmargins and reduces scrolling.
Pagelet ID Select the ID of the Pivot Grid pagelet that you created in thePagelet Wizard.
URL OptionsURL Enter the URL for the factor. The URL should be based on the
entity, the installed system, or both.
Note: Due to security limitations, not all URLs are supported.
Copyright © 1988, 2020, Oracle and/or its affiliates. 321

Using the Configurable Analysis Framework Chapter 16
Pivot Grid Pagelet Options for FluidThe Fluid Configurable Analysis Framework allows users to setup how each prompt field of their PivotGrids should be populated. Handlers are not needed in most cases. Use the Pivot Grid Prompt Fields topopulate the prompt fields.
Image: Pivot Grid Prompt Fields for Fluid CAF (1 of 2).
Pivot Grid Prompt Fields for Fluid CAF.
Image: Pivot Grid Prompt Fields for Fluid CAF (2 of 2).
Pivot Grid Prompt Fields for Fluid CAF (2 of 2).
Unique Prompt Name The Pivot Grid prompt fields defined in Pivot Grid Wizard.
322 Copyright © 1988, 2020, Oracle and/or its affiliates.

Chapter 16 Using the Configurable Analysis Framework
Value Type The options users can use to populate the prompt fields. Available options are:
• Constant
• Global Date
• My Personalization
Record (Table) Name This field is enabled only when the Value Type is MyPersonalization. The personalization can be changeddynamically if the Action Level is set to Analysis. For moredetails, see Related Action Configuration Page
Field Name This field is enabled only when the Value Type is MyPersonalization. Specify a field of the My Personalizationrecord.
Global Date Operation This field is enabled only when the Value Type is Global Date. The options available are:
• Global Date from
• Global Date to
• Day of Global Date from
• Day of Global Date to
• Month of Global Date from
• Month of Global Date to
• Year of Global Date from
• Year of Global Date to
• Day Difference
• Month Difference
• Year Difference
Constant This field is enabled only when the Value Type is Constant. Specify a constant value for this field.
Factor List Configuration PageUse the Factor List Configuration Page (CAF_CONFIG_TBL_FLS) to create a pre-selected list of factorsthat are available to all users.
Navigation
Common Definitions > Enterprise Components >Factor List Configuration.
Copyright © 1988, 2020, Oracle and/or its affiliates. 323

Using the Configurable Analysis Framework Chapter 16
Image: Factor List Configuration Page
This example illustrates the fields and controls on the Factor List Configuration page..
Depending on the needs of your users, this page allows them to switch between different sets of factorswithout having to select individual factors, or without having to create their own factor lists. The listincludes the position and size of the factor for the administrator to create the list using the CAF Displaypage (for the classic CAF implementations) or the Fluid CAF for Fluid implementation as opposed toentering the data in this page. Therefore, to set up a factor list, create it using the CAF Display page or theFluid CAF page and then use this page to copy the factor lists as part of your configuration. Alternatively,the administrator can copy public factor lists from other users and make them part of the configuration.
Factor ListsThis section displays all the factor lists that have been configured for the analysis. Each row representsone factor list.
Default Select to indicate that this row is the default factor list for eachdisplay mode. Therefore, only one row can be selected for anAnalysis mode row and a second row can be selected as long asit is for a Comparison mode row.
The select factor list is used the first time a user accesses theanalysis without specifying any factors.
Analysis Mode Displays the mode to which the factor list belongs.
Factor List Name Displays the name of the factor list. This value is copied fromthe source factor list and can be changed.
Factors Displays the list of factors of the factor list.
Status Select Active or Inactive. Active factor lists are available tousers.
Copy Factor Lists Click this button to access the Copy Factor Lists page whereyou can copy factor lists from users.
Copy Factor Lists PageUse the Copy Factor Lists page (CAF_CNF_FL_SEL_SEC) to copy a factor list from other users.
Navigation
Enterprise Components > Configurable Analysis >Analysis Configuration >Factor List Configuration.Click the Copy Factor Lists button.
324 Copyright © 1988, 2020, Oracle and/or its affiliates.
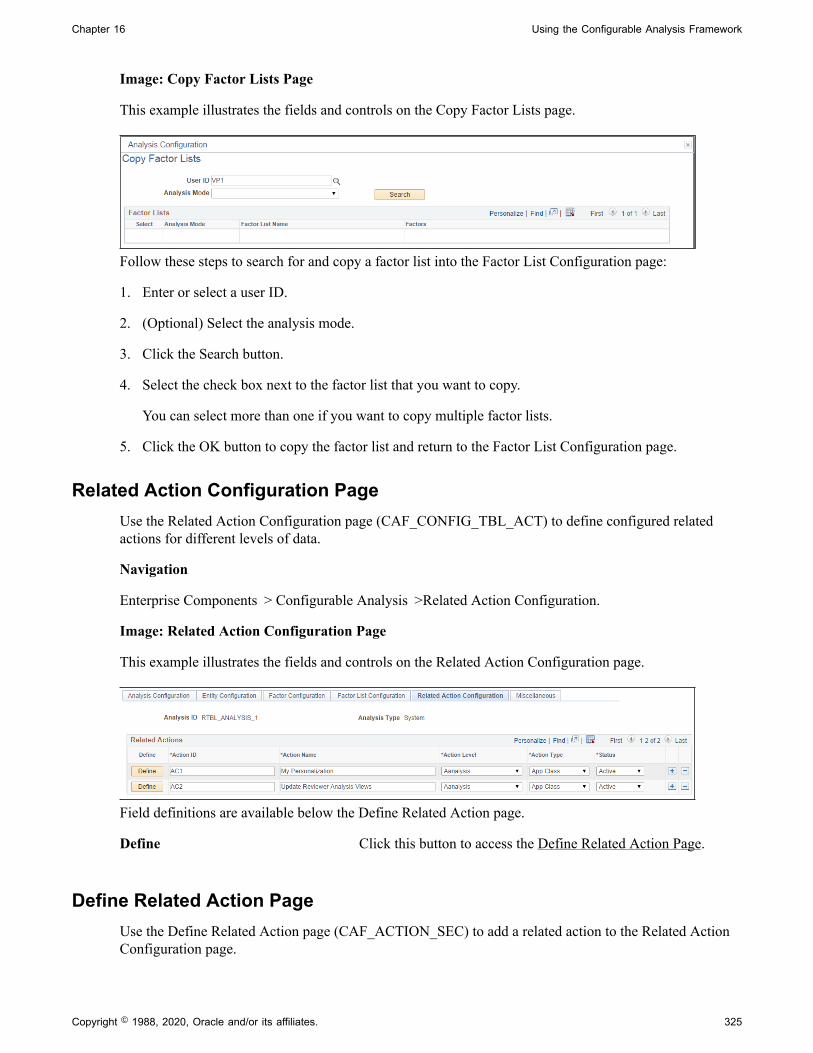
Chapter 16 Using the Configurable Analysis Framework
Image: Copy Factor Lists Page
This example illustrates the fields and controls on the Copy Factor Lists page.
Follow these steps to search for and copy a factor list into the Factor List Configuration page:
1. Enter or select a user ID.
2. (Optional) Select the analysis mode.
3. Click the Search button.
4. Select the check box next to the factor list that you want to copy.
You can select more than one if you want to copy multiple factor lists.
5. Click the OK button to copy the factor list and return to the Factor List Configuration page.
Related Action Configuration PageUse the Related Action Configuration page (CAF_CONFIG_TBL_ACT) to define configured relatedactions for different levels of data.
Navigation
Enterprise Components > Configurable Analysis >Related Action Configuration.
Image: Related Action Configuration Page
This example illustrates the fields and controls on the Related Action Configuration page.
Field definitions are available below the Define Related Action page.
Define Click this button to access the Define Related Action Page.
Define Related Action PageUse the Define Related Action page (CAF_ACTION_SEC) to add a related action to the Related ActionConfiguration page.
Copyright © 1988, 2020, Oracle and/or its affiliates. 325

Using the Configurable Analysis Framework Chapter 16
Navigation
Enterprise Components > Configurable Analysis >Related Action Configuration. Click the Definebutton.
Image: Define Related Action Page
This example illustrates the fields and controls on the Define Related Action page.
Action ID and Action Name Enter a unique action ID and a name for the related action. Thename appears for users.
Active Select the check box to indicate that the action is active. Onlyactive related actions are displayed to users.
Action Level Select the level to which the related action is associated. Optionsare:
• Analysis
• Common Factor
• Entity
• Factor
• Factor Data
• Selected Entities
Factor ID Select the factor to which this action is associated. Or, you canleave this field is blank and it will be applicable to all factors inthe analysis.
This option is only available when the action level is Factor andFactor Data.
Configure Action Select to indicate that this is the configuration action for thefactor. It is the action that is associated with the ConfigurationFactor button for the factor. Only one related action can have thethis check box selected and it overrides any dynamic configureaction from the faction handler.
This check box is only available when the action level is Factor.
326 Copyright © 1988, 2020, Oracle and/or its affiliates.

Chapter 16 Using the Configurable Analysis Framework
Action Type Select the type of related action. Options include:
• App Class (application class): the related action is handledthrough an application class.
• Component: the related action is intended to open acomponent.
Action Handler and HandlerParameter
Select the action handler for the related action. This field isrequired for the application class action type, and is optional forthe component action type.
When the action handler is selected, it overrides the built-inhandler and you can enter the parameter of the handler.
To create an Analysis Related Action My Personalization:
1. Create an action with Action Level = Analysis, and Action Type: App Class.
2. Create a handler to display a page where the user can maintain the fields for My Personalizationrecord.
3. Enter Handler Parameter = refreshall=y.
A value is changed by doing this action every time. The Pivot Grids using Value Type = MyPersonalization will be automatically refreshed to reflect this change.
Image: My Personalization in Related Actions for an analysis
My Personalization in Related Actions for an analysis
Component OptionsThis section appears when Component is selected as the action type.
Key Map Enter the map, which is similar to the entity key map.
Copyright © 1988, 2020, Oracle and/or its affiliates. 327

Using the Configurable Analysis Framework Chapter 16
This option maps the key differences between the data fromCAF and the data in the search record of the target component. The key fields and values that are passed from CAF whenopening the component are defined in record CAF_XFRSRCH_WRK.
Navigation Type Select to indicate how the component is to be opened. Optionsinclude:
• Modal: indicates that the component is opened as a modalpage.
• New Page: indicates that the component is opened in a newbrowser page or tab.
• Replace Page: indicates that the component is openedin place of the current page, which would be the CAFDISPLAY page.
Menu Name, Bar Name, Item Name,Panel Name, and Menu Action
Select the path and action of the component.
Miscellaneous PageUse the Miscellaneous page (CAF_CONFIG_TBL_MSC) to perform administrative tasks.
Navigation
Enterprise Components > Configurable Analysis >Miscellaneous.
Image: Miscellaneous Page
This example illustrates the fields and controls on the Miscellaneous page.
Use this page to reset the last session for a specific user or for all users.
Every time a user accesses the CAF_DISPLAY page (for Classic CAF implementations) or the FluidCAF, a new session is created. When a user makes changes on the page, such as adding, deleting, orrearranging the entities, factors, or both the session data is saved. When the user comes back to theCAF_DISPLAY page for the same analysis, the last session that the user accessed is loaded, unless aspecific session is entered by the user. If there is problem with the factors, entities, or both from the lastsession, during configuration or factor development, the session may not load and the page may not bedisplayed properly. The Reset Last Session button is provided for an administrator or developer to resetthe last session, which loads a blank session instead of the last session that had the issue.
328 Copyright © 1988, 2020, Oracle and/or its affiliates.

Chapter 16 Using the Configurable Analysis Framework
User Id Select a user ID to reset the last session for a specific user. Leave this field blank to reset the last session for all users.
Reset Last Session Click to reset the last session to a blank session for the specifieduser, or for all users, if a User ID is not specified in the User Idfield.
Analysis Access Control PageUse the Analysis Access Control page (CAF_ACC_CTL_TBL) to set up access control for factors andrelated actions for an analysis.
Navigation
• Enterprise Components > Configurable Analysis >Analysis Access Control.
• Enterprise Components > Analysis Configuration. Click the Set Up Access Control button on theAnalysis Configuration page.
Image: Analysis Access Control Page
This example illustrates the fields and controls on the Analysis Access Control page. This setup page isused by both Classic CAF and Fluid CAF
Use this page to grant access to each analysis.
Enabled Select to allow access control.
Access Level Select the level of access. Options include:
• Public: Select to indicate that access is available for allusers.
When this option is selected, the Access Level Value field isnot available for entry.
• Role: Select to indicate that access is defined by role.
When this options is selected, indicate the role in the AccessLevel Value field.
• User: Select to indicate that access is defined by User ID.
When this option is selected, indicate the user ID in theAccess Level Value field.
All Factors Select to indicate that access is granted to all factors. When thisoption is selected, Factors and Select Factors are not displayed.
Copyright © 1988, 2020, Oracle and/or its affiliates. 329

Using the Configurable Analysis Framework Chapter 16
Select Factors Select to access the Select Factors page, where you can selectwhich factors of the analysis are available for the access level. This option is available when the All Factors check box is notselected.
All Actions Select to indicate that access is granted to all related actions. When this option is selected, Related Actions and SelectActions are not displayed.
Select Actions Select to access the Select Related Actions page where you canselect which related actions are available for the access level. This option is available when the All Actions check box is notselected.
Using Configurable Analysis Framework
Pages Used to Utilize Configurable Analysis FrameworkPage Name Definition Name Usage
Analysis Display Page (ComparisonMode)
CAF_DISPLAY Compare data for multiple entities in atabular or grid format.
Analysis Display Page (Analysis Mode) CAF_DISPLAY Analyze data for one entity.
Fluid Analysis Display Page(Comparison Mode)
CAFNUI_DISPLAY_FL Compare data for multiple entities inFluid.
Fluid Analysis Display Page (AnalysisMode)
CAFNUI_360_FL Analyze data for one entity in Fluid.
Understanding Configurable Analysis FrameworkThe CAF_DISPLAY page is the page that is used to view and interact with comparison and analysis data.This page supports two modes: comparison mode and analysis mode. Each mode has some similaritiesand some differences.
When a PeopleSoft application uses CAF, component CAF_DISPLAY should be registered under its ownmenu. For example, a customer analysis might be accessed from the Customers menu. It is registeredunder the Analysis menu as Display Analysis, and Display Analysis Test for an administrator to test theconfiguration only.
The default search record for Component.CAF_DISPLAY is INSTALLATION. This bypasses the searchdialog and displays the default comparison associated with the menu. However, the search record can beoverridden for a menu to provide the search dialog to allow users to select from multiple comparisons, ifdesirable.
The CAF_DISPLAY page is automatically re-sized when the size of the browser window changes. Userscan add, remove, and rearrange entities and factors. There is no built-in limitation on the number ofentities and factors that a user can selected at the same time.
330 Copyright © 1988, 2020, Oracle and/or its affiliates.

Chapter 16 Using the Configurable Analysis Framework
Warning! Depending on your implementation, there may be performance issues if a user selects too manyentities, factors, or both.
Common Elements on the Display Analysis PageThe Display Analysis page is displayed in two modes. Each mode has similarities and differences. Thissection discusses the similarities.
Select Analysis View Select previously saved views that are available for a user.Saved views are created by the user who is signed on or by otherusers.
Analysis View Displays the last analysis view selected from the drop down listbox. This can be used as a reference if the factors, entities, orboth have been modified since the analysis view was selectedand the current display does not reflect that analysis view.
(Save As)Click the Save icon so that the current view can be accessedin the future. The user must enter text in the Name of AnalysisView to Save field, and click the OK button. The saved viewincludes the list of entities and factors, including the layoutinformation such as order and size. The system also saves thedata for both modes.
If the name entered in the Name of Analysis View to Save fieldexists, the view is replaced.
(Edit)Click the Edit icon to access the Edit Analysis View page andperform these tasks:
• Select the Public check box to make the view available toother users.
The system adds the owners user ID to the end of the viewname for other users to identify the modified view and whomodified it.
• Select the Delete check box to delete the view.
(Notify)Click the Notify icon to access the Email Notification page andsend an e-mail to other users. The field The e-mail includes alink to the current view.
• To: select the e-mail addresses icon if the analysis handlerincludes a list of e-mail addresses to choose from.
• BCC: is automatically populated with the user’s e-mailaddress so they have a copy of the message and can re-sendit if necessary.
• Subject: The system automatically populates this field withthe analysis title.
Copyright © 1988, 2020, Oracle and/or its affiliates. 331

Using the Configurable Analysis Framework Chapter 16
• Message: The system automatically populates this field withthe entities and factors selected.
In addition, a link is provided for the e-mail recipients toopen the current view.
(Refresh)Click the Refresh icon to refresh the data that is displayed on thepage.
(Analyze this Entity)Click the Analyze this <entity> icon to access the ComparisonAnalysis page in analysis mode.
This icon acts like a toggle between comparison mode andanalysis mode.
This option is only available if the Support Analysis Modecheck box is selected on the Analysis Configuration Page.
(Analysis related actions) Click the Analysis related actions icon to perform relatedactions. This icon is only available if related actions areavailable for the analysis.
Analysis Display Page (Comparison Mode)Use the Analysis Display page (Comparison Mode) (CAF_DISPLAY) to compare data for multipleentities in a tabular or grid format.
Image: Analysis Display Page (Comparison Mode) (1 of 2)
This example illustrates the fields and controls on the Analysis Display Page (Comparison Mode) (1 of 2).
332 Copyright © 1988, 2020, Oracle and/or its affiliates.
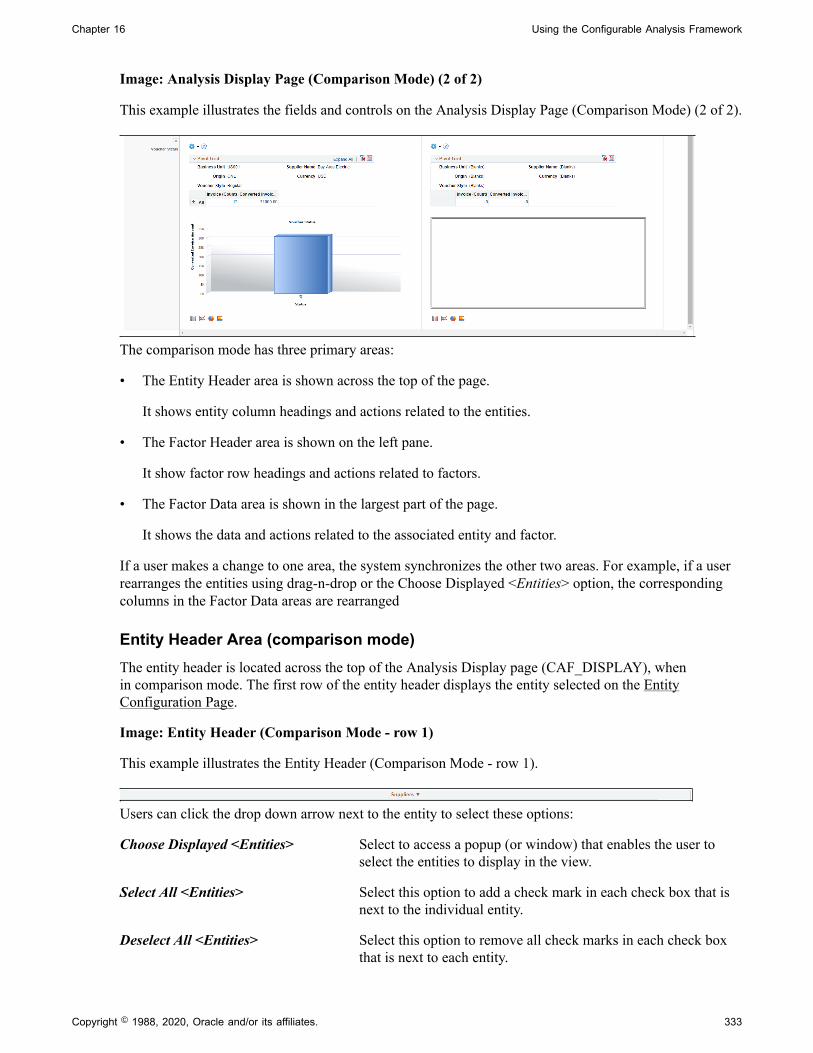
Chapter 16 Using the Configurable Analysis Framework
Image: Analysis Display Page (Comparison Mode) (2 of 2)
This example illustrates the fields and controls on the Analysis Display Page (Comparison Mode) (2 of 2).
The comparison mode has three primary areas:
• The Entity Header area is shown across the top of the page.
It shows entity column headings and actions related to the entities.
• The Factor Header area is shown on the left pane.
It show factor row headings and actions related to factors.
• The Factor Data area is shown in the largest part of the page.
It shows the data and actions related to the associated entity and factor.
If a user makes a change to one area, the system synchronizes the other two areas. For example, if a userrearranges the entities using drag-n-drop or the Choose Displayed <Entities> option, the correspondingcolumns in the Factor Data areas are rearranged
Entity Header Area (comparison mode)The entity header is located across the top of the Analysis Display page (CAF_DISPLAY), whenin comparison mode. The first row of the entity header displays the entity selected on the EntityConfiguration Page.
Image: Entity Header (Comparison Mode - row 1)
This example illustrates the Entity Header (Comparison Mode - row 1).
Users can click the drop down arrow next to the entity to select these options:
Choose Displayed <Entities> Select to access a popup (or window) that enables the user toselect the entities to display in the view.
Select All <Entities> Select this option to add a check mark in each check box that isnext to the individual entity.
Deselect All <Entities> Select this option to remove all check marks in each check boxthat is next to each entity.
Copyright © 1988, 2020, Oracle and/or its affiliates. 333

Using the Configurable Analysis Framework Chapter 16
The second row of the entity header displays each entity selected for the view. These tasks can beperformed:
Image: Entity Header (Comparison Mode - row 2)
This example illustrates the Entity Header (Comparison Mode - row 2).
(check box) Select the entity for the Selected Entities action options.
This option is only available if the Support Entity GroupActions check box is selected on the Analysis ConfigurationPage.
(Selected)This icon indicates that the entity is selected.
(entity name) Click the entity name to open related actions.
• Flag this <Entity> and Clear Flag for this <Entity>: Theseoption add or remove a check mark from the check box nextto the entity name.
This option is only available if the Support Flagged Entitycheck box is selected on the Analysis Configuration Page.
• Other actions: The actions that are displayed are dynamic, from the handler, or configured at the entity action level onthe Related Action Configuration Page.
(remove) Click the Remove icon to remove the entity from the view.
Users can re-position the entity name columns by using the Entity Chooser option or by dragging thecolumn to the new position.
Factor Header Area (comparison mode)The factor header is located on the left pane of the Comparison Analysis page (CAF_DISPLAY), when incomparison mode.
Image: Factor Header (comparison mode)
This example illustrates the Factor Header when in Comparison mode.
The top of the factor header displays the factor labels that are defined on the Factor Configuration Page.Users can select the label to access the related actions that are associated with each factor. This sectionalso provides the dynamic and configured related actions for each factor.
334 Copyright © 1988, 2020, Oracle and/or its affiliates.

Chapter 16 Using the Configurable Analysis Framework
Image: Factor Header Options (comparison mode)
This example illustrates the Factor Header Options when in comparison mode. The factor label Metric isdefined so that it appears wherever <Factor> is referenced.
Users can click the drop down arrow next to the factor to select these options:
Choose Displayed <Factor> Select to open the Factor Chooser where users can select, remove, and rearrange the factors in the view.
Switch to <Factor> List Select to open the factor list where users can switch to a pre-defined list of factors. The factor lists are defined by the user, by other users, and by an administrator using the Factor ListConfiguration Page.
Save to <Factor> List Select to open a window where the user can enter a list nameand save the factor list. If the name entered in the List Namefield already exists, the factor list is replaced with the currentfactors.
Edit <Factor> Lists Select to access the Edit <Factor Lists page that shows the factorlists that have been saved by the user. The user can make thefactor lists public, change the status to Active or Inactive, ordelete a factor list.
Factor Data Area (comparison mode)The factor data is located on the center of the Analysis Display page (CAF_DISPLAY), when incomparison mode. The factor data is displayed in a cell, which combines the entity in the Entity Headerand the factor in the Factor Header.
(More drop down) Click the More drop down to select related actions. Each factordata cell can have factor related actions, which are determinedfrom the factor handler or the Related Action ConfigurationPage.
(Action button) Click the Action button to access embedded related actions forthe factor data.
Analysis Display Page (Analysis Mode)Use the Analysis Display page (Analysis Mode) (CAF_DISPLAY) to analyze data for one entity.
Copyright © 1988, 2020, Oracle and/or its affiliates. 335

Using the Configurable Analysis Framework Chapter 16
Image: Analysis Display Page (Analysis Mode)
This example illustrates the fields and controls on the Analysis Display page (Analysis Mode).
The analysis mode has two primary areas:
• The Entity Header area is shown across the top of the page.
It shows the entity and related actions.
• The Factor Data area is shown in the largest part of the page.
It shows the factor data for the entity. Factors can be added, removed, resized, repositioned,minimized, and maximized by the user.
Entity Header Area (analysis mode)The Entity Header area displays entity information and actions that allow the user to access the factorrelated actions.
Image: Entity Header Options (analysis mode)
This example illustrates the Entity Header Options when in analysis mode.
Choose Displayed <Factors> Select to display a factor popup window that shows theavailable factors for the user. You can drag selected factorsfrom the list to any location in the Factor Data area. The system
336 Copyright © 1988, 2020, Oracle and/or its affiliates.

Chapter 16 Using the Configurable Analysis Framework
shows a frame for the size of the factor. When you drop thefactor, the factor data is retrieved and displayed.
(switch to Comparison Mode) Click this icon to switch to comparison mode.
Factor Data Area (analysis mode)The Factor Data area appears in the largest part of the page and shows the factors in a free-form format.Each factor is displayed in its own frame, with a header.
Image: Factor Header Options (analysis mode)
This example illustrates the Factor Header Options when in analysis mode.
The Factor Data area size is not limited to the size of your display. You can move the factor frame outsideof the current Factor Data area and the area is re-sized to accommodate it. Use the scroll bars at the rightand bottom of the Factor Data area to scroll through all factors
and (Collapse and expandicons)
Use the collapse and expand icons to collapse and expand eachframe. When you collapse a frame, only the factor header isshown.
You can also double-click on the factor header to maximize andconsolidate the factor frame.
(factor name) Click on a factor name to access the related actions for thefactor. These actions are the same as those in comparison modewith the exception of Show Combined and Configure.
(remove icon) Click the remove icon to remove the factor frame from theFactor Data Area.
Understanding Configurable Analysis Framework for Fluid ImplementationsUse the CAFNUI_DISPLAY_FL page to view and interact with comparison and analysis data in Fluidimplementations. This page supports only Comparison Mode. Comparison mode and analysis mode hassome similarities and some differences.
The following steps need to be followed while implementing Fluid Configurable Analysis Framework:
1. Register the CAFNUI_DISPLAY_FL component in a new menu. Leave the search record asInstallation.
Copyright © 1988, 2020, Oracle and/or its affiliates. 337

Using the Configurable Analysis Framework Chapter 16
2. Create a Content Reference in an existing or new Fluid Page referring to the Menu/Component pairmentioned in the previous step.
3. Specify the menu in this field.
The Fluid Analysis Display is resized automatically when the browser window size is changed. User canadd/remove/rearrange entities and factors in any way they desire. Please note that there might be potentialperformance issue if user selects too many entities and/or factors.
Common Elements for Comparison and Analysis Modes in FluidImplementations
These are the common elements that are available in both modes:
View This drop-down allows user to switch between saved views.
Choose Factors Allows adding and removing of factors for comparison oranalysis.
Choose Metrics The selector Individual Factor/Factor Group switches between:
• Individual Factor(select/remove factorindividually.
• Factor Group (replace all factors with a set of factor or afactor list.
Related Actions (In Entity) Lists all the actions defined in the Analysis configuration withAction level = Entity. It also lists:
• Flag this Entity. This is listed only when Support FlaggedEntity is flagged at Analysis Configuration and the entity isnot flagged.
• Clear Flag. This is listed only when only when SupportFlagged Entity is flagged at Analysis Configuration, and theentity is already flagged. It then clears the flag.
Related Actions (in Analysis) Lists all the actions defined in the Analysis configuration withAction level = Analyis. It also lists:
• Save to <Factor> List. This creates a new Factor List withall the metric currently displayed at the page. This factor listis accessible only to the user that created it.
• Edit <Factor> List. It allows to activate/inactivate, makepublic, delete or edit the user created Metric Lists
• Save View.
• Edit View List. Allows to make public or delete the createdViews.
• Global Date Filter. allows users to change the Global Daterange and refresh all factors.
338 Copyright © 1988, 2020, Oracle and/or its affiliates.

Chapter 16 Using the Configurable Analysis Framework
• Send View by eMail. Allows users to send an eMail to otherusers including the link to the current view display.
Fluid Analysis Display Page (Comparison Mode)Use the Analysis Display Page (CAFNUI_DISPLAY_FL) in Fluid implementations to compare differententities.
Image: Fluid Analysis Display Page (Comparison Mode)
Fluid Analysis Display Page (Comparison Mode)
The items specific to Comparison mode are:
Comparison Title Name of the comparison.
Add Entity Allows adding and removing entities to the comparison.
Analysis Mode Transfer to the Analysis mode, and the entity will be analyzed inAnalysis mode.
Remove Factor Allows removing the entire row of a factor or the entire column.
Flagged Entity Indicator If the entity has been flagged, this flag is placed before thisentity. If the user clicks at Analysis Mode icon for this Entity, this entity will show up as flagged in Analysis Mode. If theuser unflags this entity in Analysis Mode, and navigates toComparison Mode, it will show up unflagged in ComparisonMode.
Fluid Analysis Display Page (Analysis Mode)Use the Analysis Display Page (CAFNUI_360_FL) in Fluid implementations to Analyze an entity.
Copyright © 1988, 2020, Oracle and/or its affiliates. 339

Using the Configurable Analysis Framework Chapter 16
Image: Fluid Analysis Display Page (Analysis Mode)
Fluid Analysis Display Page (Analysis Mode)
The Analysis Mode allows user to concentrate on one entity by displaying factors for only one selectedentity. It is displayed in the Entity Header area. The Factor Data area displays factor data for the entity.The factors can be added, removed or moved, by the user
The items specific to Analysis mode are:
Analysis Title Name of the analysis.
Change Entity Allows changing the entity spotted in Analysis Mode.
Remove factor Allows removing a factor from the Analysis Mode page.
Comparison View Transfer to the Comparison mode. The Entity currentlydisplayed in Analysis Mode is not automatically added toComparison mode.
Flagged Entity Indicator If the entity has been flagged, this flag is placed before thisentity. If the user clicks on Comparison View and this entitywas already placed at Comparison Mode, this will show up asflagged in Comparison Mode. If the user unflags this entity inComparison Mode and navigates back to Analysis Mode, it willshow up unflagged in Analysis Mode.
Remove Entity Allows removing an entity from the Analysis mode page.
340 Copyright © 1988, 2020, Oracle and/or its affiliates.

Chapter 17
Fluid Discussion Service
Understanding Fluid Discussion Service
Fluid Discussion Service is a simple and easy to use discussion tool that enables you to link ContextSpecific Discussions to PeopleSoft pages.
Discussion Service enables you to:
• Initiate discussion from a page with the context of current transaction
• Send/Receive messages and attachments
• Easily identify when and who posted what to discussion
• Search within discussions
• Edit Subject, Add/Remove participants
• Close/Reopen Discussions
Security AccessTo access discussion components, users need to be assigned with the below roles:
• EOFD_USER: Discussions User, this role is required for accessing Discussions that the user is aparticipant of.
• EOFD_ADMIN: Discussion Service Administrator, user with this role will have access to configurenew Discussion Types and Discussion Groups.
• EOFD_SUPER_ADMIN: Discussion Service Super Administrator, user with this role will have fullaccess to all the Discussions in the system.
Note: In a cluster environment it is important that you assign the EOFD_USER role to the users in all thenodes.
Fluid Discussion Service Implementation OptionsThe fluid discussion service implementation options are listed in the below table.
Copyright © 1988, 2020, Oracle and/or its affiliates. 341

Fluid Discussion Service Chapter 17
Sl. No:
ImplementationOption
Description Steps Result
1 Assign DefaultDiscussion Service atcomponent level
The simplest wayto implement FluidDiscussions is to assign theDefault Discussion Serviceas a Related Content Tile ora Related Action
Assign the DefaultDiscussion Service: EOFD_DEFAULT_DSCN to thecomponent using RelatedContent framework.
For details, see AssigningDefault Discussion as aRelated Content Tile.
Users with access tocomponent can:
Add a new topic, addparticipants and startdiscussion.
View all discussions thatthey have been added to asparticipants.
The discussion list will onlyshow discussions created forthe current component
2 Assign DefaultDiscussion Service withcontext
Discussions can be madecontext specific by addingthe context parameters to theservice
Clone Default Service:EOFD_DEFAULT_DSCNand add context fields to theService.
Assign the cloned Service tothe component as a RelatedAction or Related Contenttile and map the page fieldsto the context fields so thatvalues are passed at run time.
For details, see AssigningDefault Discussion as aRelated Action with Context.
Users with access tocomponent can:
Add a new topic, addparticipants and startdiscussion.
View all discussions thatthey have been added to asparticipants.
The discussion list will onlyshow discussions createdfor the current context. (example: current Class, Current Employee, etc.).
3 Implement DiscussionService with additionalrules to auto-adddynamic participants andassign privileges.
Create Discussion Type andDiscussion User Groups.
Clone Default Service:EOFD_DEFAULT_DSCNand add context fields anddiscussion type field.
Assign the cloned Serviceto the relevant Componentsand map the page fields tothe context fields so thatvalues are sent at run time. Specify the new Discussiontype value for the Discussiontype parameter.
For details, see ImplementingDiscussion Service with aNew Discussion Type.
Dynamic users areautomatically added torelevant discussions withappropriate access basedon the Discussion Typeand Discussion User Groupconfigurations.
342 Copyright © 1988, 2020, Oracle and/or its affiliates.

Chapter 17 Fluid Discussion Service
Understanding Default Discussion Type
Oracle delivers a default Discussion Service definition that has predefined rules configured in theDEFAULT discussion type. In most cases, you will be able to use this Default service for enablingDiscussions on a component. Next few sections describe detailed steps for implementing the defaultdiscussion.
Note: DO NOT update the Default Discussion Configuration and Service.
Assigning Default Discussion as a Related Content Tile
To assign default discussion as a RC tile, perform the following:
1. Navigate to PeopleTools, Portal, Related Content, Manage Related Content.
2. Select the Cref to which you need to assign the discussion service.
3. Assign the Service ID: EOFD_DEFAULT_DSCN under Component Level Related Content.
4. Update the Service label.
5. Click on Configure button to configure the service. For parameters EOFD_COMPONENT &EOFD_MARKET, choose mapping type as System Variable and mapping data as %Component and%Market respectively.
6. Select Security options as Related Content Provider Security.
7. Click Ok. Save the configuration details.
Image: Class Page
This example illustrates the fields and controls on the Class page.
Copyright © 1988, 2020, Oracle and/or its affiliates. 343

Fluid Discussion Service Chapter 17
Assigning Default Discussion as a Related Action with Context
To assign default discussion as a related action with context, perform the following:
1. Navigate to PeopleTools, Portal, Related Content, Maintain Related Content.
2. Clone the Service: EOFD_DEFAULT_DSCN.
3. Add the context fields to the new service. Add below additional parameters to the service definition:
• EOFD_<Context Key Field 1>
• EOFD_<Context Key Field 2>
You can add as many key fields as per your requirement. These parameters will be used to determinethe context. If you want to use the same discussion type on multiple components then you can removethe Component parameter from the list. Save your changes.
4. Navigate to PeopleTools, Portal, Related Content, Manage Related Content.
5. Select the Cref to which you need to assign the default service.
6. Under Page-level Related Content, select the page in which Discussion Service link should be opened.
7. Select the new cloned service ID created in step 2.
8. Update the Service label.
Image: Assign Related Actions Page
Assign Related Actions Page
9. Click on Configure button to configure the service to pick the System variables.
344 Copyright © 1988, 2020, Oracle and/or its affiliates.

Chapter 17 Fluid Discussion Service
a. For parameters EOFD_COMPONENT & EOFD_MARKET, choose Mapping Type as SystemVariable and Mapping data as %Component and %Market respectively.
b. Assign fields from the page as values for the context field parameters.
10. Suppose the page in selected component reference is designed to have a Push button/Hyperlink foropening Discussion Service. Under Menu Options, select that field as Page Field Menu.
Image: Configure Service Modal Window
Configure Service Modal Window
11. Select Security Options and Click Ok.
12. Save the details configured in Assign Related Actions page. After performing all the above mentionedsteps, the default discussion services appear as a related action in the Discussion list.
Copyright © 1988, 2020, Oracle and/or its affiliates. 345

Fluid Discussion Service Chapter 17
Image: My Expense Reports Page
My Expense Reports Page
Clicking Discuss opens the Discussion list page.
Implementing Discussion Service with a New Discussion Type
Creating new Discussion type and Discussion User group enables you to implement additional rules toauto-add dynamic participants and assign privileges to specific roles.
Configuring Discussion ServiceThis topic provides an overview of discussion service configuration and describes how to:
• Define Discussion User Group •
• Define Discussion Type
Pages Used to Configure Discussion ServicePage Name Definition Name Usage
Discussion User Group Page EOFD_DSCN_GROUP To create a new discussion user group.
Discussion Type Page EOFD_DSCN_TYPE To create a new discussion type that canbe assigned to components.
Discussion User Group PageUse the Discussion User Group page (EOFD_DSCN_GROUP) to define discussion groups whichenable you to create dynamic list of participants for a discussion based on the context. For example allparticipants and the instructor of a course class can be added to a discussion attached to the Course classpage with a context of the course class id.
Navigation
Enterprise Components > Discussion Service > Discussion User Group
346 Copyright © 1988, 2020, Oracle and/or its affiliates.

Chapter 17 Fluid Discussion Service
Image: Discussion User Group page
Discussion User Group page
Defining Discussion User GroupTo create a new discussion user group:
1. Login as an administrator.
2. Enter the required discussion group ID.
3. Click Add.
4. Type a meaningful description in the Description field.
5. Select an appropriate value from the Group Source field. On selecting a value, corresponding field isdisplayed as shown:
Image: Discussion User Group Query Page
This example illustrates the fields and controls on the Discussion User Group Query Page
Discussion Type PageUse the Discussion Type page (EOFD_DSCN_TYPE) to define new discussion types. You can postattachments to the discussion, add default list of participant, define permissions for adding/removingparticipants, updating subject, and close or reopen discussion.
Enterprise Components >Discussion Service >Discussion Type
Copyright © 1988, 2020, Oracle and/or its affiliates. 347

Fluid Discussion Service Chapter 17
Image: Discussion Type Page
This example illustrates the fields and controls on the Discussion Type page.
Defining Discussion TypeTo create a new discussion type:
1. Login as an administrator.
2. Enter the discussion type and a meaningful description as per requirement.
3. To allow attachments, select the Allow Attachments check-box.
To configure the permissions for each type of user:
1. Select the Roles tab. The Discussion Type – Roles page appears as shown:
Image: Discussion Type — Roles page
This example illustrates the fields and controls on the Discussion Type — Roles page.
2. Select the Allow Create check-box, so that the user can create new discussions.
348 Copyright © 1988, 2020, Oracle and/or its affiliates.

Chapter 17 Fluid Discussion Service
Note: When ‘Allow Create’ is turned off, Creator role is removed and the users will not be allowed toadd new discussions. Add Discussion(+) Button on the Discussion List page will be hidden for users.
Add Custom Roles Click this button to add new roles.
To automatically add users while creating discussions:
1. Click the Participants tab. The Participants tab is displayed only when you saved the Roles pagedetails.
Image: Discussion Type – Participants Page
This example illustrates the fields and controls on the Discussion Type – Participants Page:
2. Include User/Group in Participants tab to automatically add users when discussion is created. AssignParticipant/Administrators role to user/group using this tab as shown.
Image: Default Participants page
Default Participants page
Assigning New Discussion Type as a Related Action with ContextTo assign a new discussion type as a related action with context, perform the following:
1. Navigate to PeopleTools, Portal, Related Content, Maintain Related Content.
2. Clone the Service: EOFD_DEFAULT_DSCN.
3. Add the context fields to the new service. Add below additional parameters to the service definition:
Copyright © 1988, 2020, Oracle and/or its affiliates. 349

Fluid Discussion Service Chapter 17
a. EOFD_DSCN_TYPE_ID
b. EOFD_<Context Key Field 1>
c. EOFD_<Context Key Field 2>
You can add as many key fields as per your requirement. These parameters will be used todetermine the context. If you want to use the same discussion type on multiple components thenyou can remove the Component parameter from the list. Save your changes.
4. Navigate to PeopleTools, Portal, Related Content, Manage Related Content.
5. Select the Cref to which you need to assign the default service.
6. Under Page-level Related Content, select the page in which Discussion Service link should be opened.
7. Select the new cloned service ID created in step 2.
8. Update the Service label.
Image: Assign Related Actions Page
Assign Related Actions Page
9. Click on Configure button to configure the service to pick the System variables.
a. For parameters EOFD_COMPONENT & EOFD_MARKET, choose Mapping Type as SystemVariable and Mapping data as %Component and %Market respectively.
b. Assign fields from the page as values for the context fields.
c. Specify the new Discussion Type ID as fixed value for the parameter: EOFD_DSCN_TYPE_ID.
350 Copyright © 1988, 2020, Oracle and/or its affiliates.

Chapter 17 Fluid Discussion Service
10. Suppose the page in selected component reference is designed to have a Push button/Hyperlink foropening Discussion Service. Under Menu Options, select that field as Page Field Menu.
Image: Configure Service Modal Window
Configure Service Modal Window
11. Select Security Options and Click Ok.
12. Save the details configured in Assign Related Actions page.
Scheduling Notifications
Certain actions in Fluid Discussion Service send users both an email message and a notification thatappears on the RC tile or Discussion List page. On the RC tile, you can view unread messages and activediscussions.
Notifications are triggered when the user initiate the following actions:
Copyright © 1988, 2020, Oracle and/or its affiliates. 351

Fluid Discussion Service Chapter 17
• User is added to a new/existing conversation.
• New message is posted in a conversation.
• When the subject is changed
• When discussion is closed/reopened
Pages Used to Schedule NotificationsPage Name Definition Name Usage
Discussion Notification Page EOFD_EML_RUN To run discussion notifications.
Discussion Notification PageUse the Discussion Notification page (EOFD_EML_RUN) to schedule notifications.
Navigation
Enterprise Components > Discussion Service > Run Discussion Notifications
Image: Discussion Notification Page
This example illustrates the fields and controls on the Discussion Notification Page.
To schedule discussion notifications, perform the following:
1. Login as an administrator.
2. Access Discussion Notification page.
3. Enter the Run Control ID.
4. Click Add. This displays the Discussion Notifications page.
5. Select an appropriate value from the Notification Type field.
6. Click Run to process the notification request. This displays the Process Scheduler Request modalwindow as shown.
352 Copyright © 1988, 2020, Oracle and/or its affiliates.

Chapter 17 Fluid Discussion Service
Image: Process Scheduler Request modal window
Process Scheduler Request modal window
Note: It is recommended to set different frequencies for email and push notifications. For instance,push notifications could be as frequent as every hour or every 5 minutes. Email notifications would beless frequent, say once a day or week.
Viewing All Discussions
This section details the pages used to view discussions.
Pages Used to View DiscussionsPage Name Definition Name Usage
Discussions Tile EOFD_DSCN_LIST_FL_GBL To view all discussions.
Discussions Page EOFD_DSCN_LIST_FL To access a list of discussion types whichare having active discussions.
Discussions TileUse the Discussion tile (EOFD_DSCN_LIST_FL_GBL) to view all the discussions.
Navigation
Select Fluid Home under the main menu. On the page that appears, select Employee Self Service. TheDiscussions tile is available on the Employee Self Service landing page.
Copyright © 1988, 2020, Oracle and/or its affiliates. 353

Fluid Discussion Service Chapter 17
Note: Discussion Tile is not available on the homepage by default. It can be added using PersonalizeHomepage option.
Image: Discussions Tile
Discussions Tile
The tile displays the cumulative count of Unread and Active discussions from all the nodes.
Click the tile to access the aggregated discussion list.
Discussions PageUse the Discussion page (EOFD_MAIN_LIST_FL) to access a list of discussion types which are havingactive discussions.
Navigation
Click the Discussion tile on the Employee Self Service homepage.
354 Copyright © 1988, 2020, Oracle and/or its affiliates.

Chapter 17 Fluid Discussion Service
Image: Discussions page
This example illustrates the fields and controls on the Discussions page.
Only top fifty discussions are displayed on selection of any discussion type. To view all the discussions,click the View More link.
Note: By Default, ‘All’ is selected and the list of all discussions, of all discussion types, from all thenodes is displayed. Discussion Type description is followed by Unread Messages count.
Click on a discussion to open up the conversation window corresponding to the selected discussion.
Copyright © 1988, 2020, Oracle and/or its affiliates. 355

Fluid Discussion Service Chapter 17
Image: Discussion Conversation page
Discussion Conversation page
You can enter your comments and attach supporting documents in this page.
Click Send to add your comments.
Actions on Discussions PageIn Discussions page, you can perform three actions on any discussions.
• Details
• View Attachements
• Notification Preferences
Click on the Related Action item. You can view the actions on Discussions page as shown.
356 Copyright © 1988, 2020, Oracle and/or its affiliates.

Chapter 17 Fluid Discussion Service
Image: Discussions – Actions Page
Discussions – Actions Page
Details OptionUse this option to access Discussion Details page which is used to update the discussion details and addor remove participants. Default Discussion grants full access to the creator of the discussion.
Copyright © 1988, 2020, Oracle and/or its affiliates. 357

Fluid Discussion Service Chapter 17
Image: Discussion Details Page
Discussion Details Page
View Attachments OptionUse this action to access Discussion Attachments page which can be used to view all the attachmentsposted in the Discussion Conversation.
Image: Discussion Attachments Page
Discussion Attachments Page
Notification Preferences PageUse this action to access User Notification Preferences page which can be used to enable or disablenotifications for the current discussion.
358 Copyright © 1988, 2020, Oracle and/or its affiliates.

Chapter 17 Fluid Discussion Service
Image: User Notification Preferences Page
User Notification Preferences Page
Copyright © 1988, 2020, Oracle and/or its affiliates. 359

Fluid Discussion Service Chapter 17
360 Copyright © 1988, 2020, Oracle and/or its affiliates.

Chapter 18
Run Control Management
Understanding the Run Control Date Update Framework
The Run Control Date Update Framework enables users to update the parameters for multiple run controlsin a single step instead of having to manually update the parameters by visiting the relevant pages foreach of the run controls. The framework enables the efficiency of organizations that have a big list ofrun controls that they need to update as and when the business need arises. The framework provides aregistry page that administrators can use to enable the processes that can have their run controls edited.Once this is set, regular users can group a set of run controls having common parameters, under a singletask. Updating the parameters of the task updates the parameters of all the run controls that are part of thattask.
Copyright © 1988, 2020, Oracle and/or its affiliates. 361

Run Control Management Chapter 18
Image: Run Control Date Update Framework — Process Flow
The diagram depicts the functional diagram of the Run Control Date Update Framework
362 Copyright © 1988, 2020, Oracle and/or its affiliates.

Chapter 18 Run Control Management
Updating Dates on Run Controls
Pages Used to Register the Run Controls for Date UpdatePage Name Definition Name Usage
Run Control Update Registry Page EORC_RCCMPS Register the Run Controls and fields forDate Update task.
Run Control Update Registry PageUse the Run Control Update Registry page (EORC_RCCMPS) for administrators to register the RunControls that can be updated by the users.
Navigation
Enterprise Components >Run Control Registry > Run Control Update Registry
Image: Run Control Update Registry Page
Run Control Update Registry Page
Search Filters
Use the search filters to find the required run controls that you want to register for the Run Control DateUpdate task.
Process Type Choose the relevant Process Type .
Owner Choose the Object Owner.
Process name Choose the Process name.
Copyright © 1988, 2020, Oracle and/or its affiliates. 363

Run Control Management Chapter 18
Click Search to list the relevant run controls based on the user’s search filters.
Select Processes and Run Controls
Select All Select all the search results.
Deselect All Deselect all the search results.
The Grid Action Menu provides three options that the user canperform on the search results:
• Personalize the column and sort order of the search resultgrid.
• Zoom or display in a popup page the selected processes andrun controls.
• Download the selected processes and run controls table toand Excel sheet.
Search Search a particular text in the search result.
Select Select the required Run Controls from the search result.
Process Type Displays the Process Type of the Run Controls.
Process Name Displays the Process Name of the Run Controls.
Component name Displays the Component Name of the Run Controls.
Registered Indicates whether the Run Control has been registered for thedate update task.
Edit Run Control Registry pageletUse the Edit Run Control Registry pagelet to include or specify the fields in the Run Control that isregistered for Run Control Date Update.
Navigation
On the Run Control Update Registry page, click the Edit Run Control Registry button.
364 Copyright © 1988, 2020, Oracle and/or its affiliates.

Chapter 18 Run Control Management
Image: Edit Run Control Registry pagelet
Edit Run Control Registry pagelet.
Registered Run Control Fields
Component Name Choose the Run Control Component Name from the parentpage.
Record (Table) Name Choose the table name with the fields to be updated .
Field Name Choose the field Name in the table that needs to be updated.
Field Used As The list of page fields that the field can be used as.
Use the + or - buttons to add or remove fields to be registered for the run control date update task.
Note: System data of registered run control fields cannot be edited.
Once done, Click Save on the Run Control Update Registry Page to register the Run Control.
Click the Notify Button to notify selected users about the registration.
Pages Used to Create a Run Control Date Update taskPage Name Definition Name Usage
Run Control Date Update Page EORC_TASKMAIN_FL View existing Run Control Date Updatetasks and take actions on them.
Create A Task Page EORC_UPD_STEP1_FL Define Run Control Date Update task.
Select Run Controls Page EORC_UPD_STEP2_FL Add Run Controls to the Date Updatetask.
Copyright © 1988, 2020, Oracle and/or its affiliates. 365

Run Control Management Chapter 18
Page Name Definition Name Usage
Define New Values Page EORC_UPD_STEP3_FL Update dates on the Run Control DateUpdate task.
Run Control Date Update PageUse the Run Control Date update page (EORC_TASKMAIN_FL) to view the existing list of Run ControlDate Update tasks or to create, edit and manage an existing task.
Navigation
The Run Control Date Update page is delivered as a tile on your home page or dashboard. To access thetile, browse to:
Personalize Homepage > Add Tile> Run Control management> Run Control Date Update.
Once the tile is available on the home page, click the tile to access the Run Control Date Update page.
Image: Run Control Date Update Page
Run Control Date Update Page.
Click the Add button to add a new Run Control Date Updatetask.
Click the filter button to filter the existing task list.
Click spreadsheet button to download the task list to aspreadsheet.
Click search to search for a particular text in the task list.
366 Copyright © 1988, 2020, Oracle and/or its affiliates.

Chapter 18 Run Control Management
Click the sort button to sort the list based on any of the existingcolumns.
Task ID List of Task IDs that are available.
Description Task Description
Run Control List Run Controls that are associated with the Task ID.
Task Status Status of the task.
Date Time updated Last updated date and time of the task.
Process Details The processing details of the task.
Update Target Field Values This link delivers a pop-up page where the run control dates forthe task can be updated.
Image: Update Target Field Values
Update Target Field Values
Copy Copy an existing Task ID to create a new task.
Submit Submit the task for processing.
Create A Task PageUse the Create A task page (EORC_UPD_STEP1_FL) to create a new Run Control Date Update task.
Navigation
Click the Add (+) button on the Run Control Date Update Task page. This starts a three-step activityguide to create the task.
Copyright © 1988, 2020, Oracle and/or its affiliates. 367

Run Control Management Chapter 18
Image: Create A task page
Create A task page
Task ID Enter a unique name for your task. Task ID should not containspaces.
Description Enter a short user-friendly description for the task.
Select Run Control IDs Select all the Run Control IDs that needsto be grouped underthis task. Use the + and – buttons to add more Run Control IDsor to remove any Run Control IDs. Only those run controls thatwere registered through the Run Control Update registry pagewill be available here.
Save For Later Save the task as draft. The user can revisit the Run Control DateUpdate Task page to access this task later and continue with thecreation of the task
Click the Next button to proceed to the next page in the activity guide.
Select Run Controls PageUse the Select Run Controls page (EORC_UPD_STEP2_FL) to update the Run Control components.
368 Copyright © 1988, 2020, Oracle and/or its affiliates.

Chapter 18 Run Control Management
Image: Select Run Controls page
Select Run Controls page
Select All Select all the components for the update task.
Deselect All Deselect all the components for the update task.
Select Select the required components from the list for the update task.
Save For Later Save the task as draft.
Click the Next button to proceed to the next page in the activity guide. Click Previous to go to theprevious step in the activity guide.
Define New Values PageUse the Define New values page (EORC_UPD_STEP3_FL) to define the new run control dates for thetask.
Copyright © 1988, 2020, Oracle and/or its affiliates. 369

Run Control Management Chapter 18
Image: Define New values page
Define New values page
Fiscal Year Choose from all Fiscal Year values available in the system.
From Year Choose all Fiscal Year values available in the system.
To Year Choose from all Fiscal Year values available in the system.
From Period Choose from all periods in the current fiscal year.
To Period Choose from all periods in the current fiscal year.
As Of Date Choose the date on which the run controls associated withthe task should run. As Of Date has the values Add Days andAbsolute Value. Select Add Days to specify the number ofdays from which the run control needs to run from the currentset date. Choose Absolute Value to run the run controls on aspecific date.
From Date Choose the From date for the run control period .
To Date Choose the To date for the run control period.
Tree Effective Date Choose the tree Effective Date.
Process Frequency Choose the process frequency.
Save for Later Save the changes as draft.
Use the Submit button to submit the task for processing.
370 Copyright © 1988, 2020, Oracle and/or its affiliates.

Chapter 19
Working with the AcknowledgementFramework
Understanding the Acknowledgement Framework
PeopleSoft Acknowledgement Framework
Several business processes require employers to capture the acknowledgement or acceptance ofcandidates and employees as they, agree to terms and conditions, and attest to the validity of informationprovided.
The Acknowledgement Framework gives customers the ability to create configurable acknowledgementsand agreements across PeopleSoft products. The flexibility of the setup allows customers to create textboxes, agreements or acknowledgment consents.
The feature also includes validation and automated audit trails. Digital signature is not a part of thisframework. The Acknowledgement page created using the Acknowledgement Framework can be addedas a step within fluid activity guides for the various business processes in an organization.
Setting Up the Acknowledgement Framework
This topic discusses how to set up the Acknowledgement Framework.
Pages Used to Set Up Acknowledgement FrameworkPage Name Definition Name Usage
Acknowledgement Category Page ESIGN_CATEGORY Create the Acknowledgement categoryand configure its user security.
Acknowledgement Configuration Page ESIGN_DTL Create an AcknowledgementConfiguration.
Review Acknowledgements Page ESIGN_ADMIN_SUM_FL Review the Acknowledgements.
Acknowledgement Category PageUse the Acknowledgement Category page (ESIGN_CATEGORY) to categorize acknowledgements as perbusiness requirement and to control the access rights of users for a category of acknowledgements.
Copyright © 1988, 2020, Oracle and/or its affiliates. 371

Working with the Acknowledgement Framework Chapter 19
Navigation
Enterprise Components >Acknowledgement >Acknowledgement Category
Image: Add Acknowledgement Category page
Add Acknowledgement Category page.
372 Copyright © 1988, 2020, Oracle and/or its affiliates.

Chapter 19 Working with the Acknowledgement Framework
Image: Acknowledgement Category page
Acknowledgement Category page
To add a new acknowledgement category, use the Add New value tab in the Acknowledgement Categorysearch page.
Category Add the Acknowledgement Category
Description Add the Acknowledgement Category description.
Use the Configure Security section to set the user security for the acknowledgement category.
Role Name Choose the user roles that need can access theacknowledgements in this acknowledgement category.
Can Edit Configuration Select the check-box to allow users in this user role to edit theacknowledgement configuration.
Can View Responses Select the check-box to allow users in this user role to view theacknowledgement responses.
Use the Review Acknowledgement Search Options section to configure the search options in the ReviewAcknowledgements page.
Acknowledgement ID Select the check-box if the Acknowledgement ID field needs tobe displayed in the Review Acknowledgements search page.
User ID Select the check-box if the User ID field needs to be displayedin the Review Acknowledgement search page.
Field label Enter the customized label for the User ID field.
Copyright © 1988, 2020, Oracle and/or its affiliates. 373

Working with the Acknowledgement Framework Chapter 19
Prompt Table Select the table that is used to provide a prompt list when auser enters a value into the User ID search field in the ReviewAcknowledgement page..
From/Through Date Select the check-box if the From and Through date needs to bedisplayed in the Review Acknowledgements search page.
Acknowledged By Select the check-box if the search filter for users whohave acknowledged needs to be displayed in the ReviewAcknowledgements search page.
Field Label Choose the custom field label for the Acknowledged by field.
Prompt Table Select the table that is used to provide a prompt list when a userenters a value into the Acknowledged By search field in theReview Acknowledgement page..
Acknowledgement Configuration PageUse the Acknowledgement Configuration page (ESIGN_DTL) to create an AcknowledgementConfiguration.
Navigation
Enterprise Components >Acknowledgement >Configure Acknowledgement
Note: Users with the ‘Acknowledgement Administrator’ role will have access to the AcknowledgmentConfiguration page.
374 Copyright © 1988, 2020, Oracle and/or its affiliates.

Chapter 19 Working with the Acknowledgement Framework
Image: Acknowledgement Configuration page
Acknowledgement Configuration page.
Acknowledgement DetailsAcknowledgement ID Displays the ID under which the configuration is saved. This
value is entered as the Parameter Value in the Categories - StepsPage during the activity guide creation.
Note: A configuration created under an AcknowledgementID can be updated only if it is not used in any activity guideinstance.
Effective Date Enter the effective date for this configuration.
Copyright © 1988, 2020, Oracle and/or its affiliates. 375

Working with the Acknowledgement Framework Chapter 19
Note: The Acknowledgment page, when used in an activityguide, is displayed based on the configuration effective as of theactivity guide instance creation date.If an Acknowledgement configuration is already in use in anactivity guide instance, then it is available only in the displaymode and cannot be edited.
Status Choose the appropriate value to indicate the status of theconfiguration. Available values are Active and Inactive.
Preview link Click this link to preview the Acknowledgement page createdbased on the saved configuration. The preview is displayed in anew browser tab.
(Long and Short) Description Enter descriptions to indicate the purpose of theAcknowledgement Configuration.
Category Choose the category for this acknowledgement.
Acknowledgement Fields - Field DetailsSequence Number Use the Sequence Number field to set the priority of the
Acknowledgement fields, i.e. the order in which the fields aredisplayed in the Acknowledgement page.
This field must contain a unique value and the lowest numberhas the highest priority.
Field Name Add fields to the configuration. The fields that can be added tothe configuration are:
• Agreement check box.
• Date of Birth.
• Check Box 1.
• Display Name.
• First Name.
• Last Name.
• National ID.
• Postal Code.
• Radio Button.
• Terms and Conditions hyperlink.
• Up to a maximum of three Text Box fields.
Field Label Displays the default label of the field. This label can be edited.
376 Copyright © 1988, 2020, Oracle and/or its affiliates.

Chapter 19 Working with the Acknowledgement Framework
Edit Text Click the Edit Text icon to open the contents of text fields forText Box, and Terms and Conditions link, in a Rich Text Editor. All changes to the content and formatting for these text fields, including text alignment, can be set from within the Rich TextEditor.
Field Alignment Use the Field Alignment drop down to set the field alignments. Available values are: Default, Left, Right and Center.
Note: The Default field alignment is set as per PeopleToolsstandards.
Required Select the Required check box to set a field as mandatory. Fieldsmarked as Required cannot be left blank by the user.
Acknowledgement Fields-Validation DetailsImage: Acknowledgement Fields Validation Details
Acknowledgement Fields Validation Details.
Root Package ID Enter the Root Package ID for the field.
Qualified Package/Class Path Enter the Class path for the field.
Application Class ID Enter the Application Class ID for the field.
Method Name Enter the Method Name for the field.
Audit Trail DetailsSection Header Use the Section Header field to enter a heading for the audit trail
details displayed at the bottom of the transactional page. Forexample: Updated By.
Note: This field is required only when the user chooses todisplay any of the audit trail fields on the transactional page.
Audit Trail FieldsField Name By default, the User ID and the Date/Time Stamp values are
stored in the database for all Acknowledgement transactions.Only the IP Address is optional.
Copyright © 1988, 2020, Oracle and/or its affiliates. 377

Working with the Acknowledgement Framework Chapter 19
Field Label Displays the default field labels. You can edit this label.
Enable Select the Enable check box to capture the corresponding fieldas part of audit trail.
Note: The Enable check box can be selected only for the IPAddress field. It will then capture the IP address of the devicefrom which a user saves the transaction.
The User ID and Date/Time Stamp fields are delivered asenabled and cannot be unchecked.
Display Select the check box to display the corresponding field as audittrail on the transactional page.
Note: Audit Trail fields are displayed only if the Enable checkbox is selected.
Enable Verify IdentityEnable Verify Identity Select this check box to enable user authentication when the
user saves the Acknowledgement page.
The system will prompt the user for their PeopleSoft passwordwhen they save the Acknowledgement page.
Review Acknowledgements PageUse the Review Acknowledgements page (ESIGN_ADMIN_SUM_FL) to search for and review theacknowledgements.
Navigation
Enterprise Components >Acknowledgement >Review Acknowledgements
378 Copyright © 1988, 2020, Oracle and/or its affiliates.

Chapter 19 Working with the Acknowledgement Framework
Image: Review Acknowledgements page for Admin user
Review Acknowledgements page for Admin user.
Category Filter the search based on the acknowledgment category.
Acknowledgement ID Filter the search based on an acknowledgment ID
Empl ID Filter the search based on an employee ID
From Filter the search based on a start date.
Through Enter the end date for the period between which theacknowledgements were done.
Click the More button to view the details of theacknowledgement.
For more information, see the image highlights video on Acknowledge Framework Summary page.
https://www.youtube.com/watch?v=buFycBauNHE&t=707s
My AcknowledgementsEmployees can use the My Acknowledgements tile in the Employe Self-Service home page to reviewacknowledgements that they did in the past.
Copyright © 1988, 2020, Oracle and/or its affiliates. 379
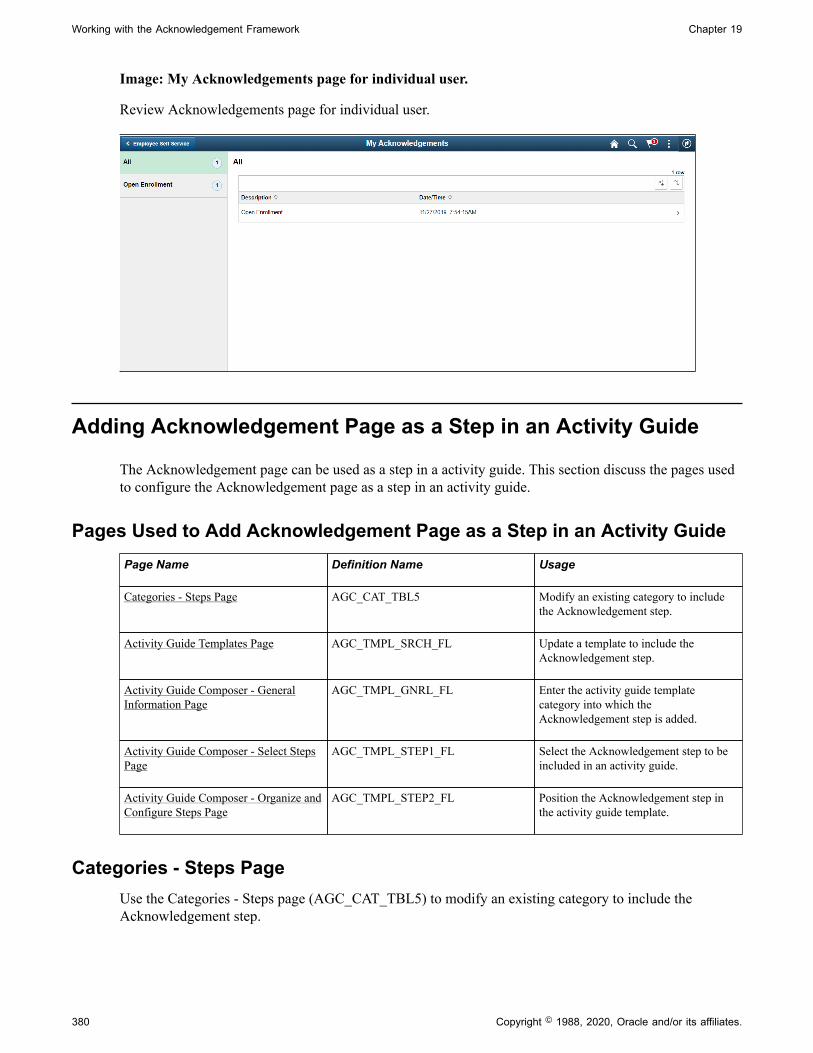
Working with the Acknowledgement Framework Chapter 19
Image: My Acknowledgements page for individual user.
Review Acknowledgements page for individual user.
Adding Acknowledgement Page as a Step in an Activity Guide
The Acknowledgement page can be used as a step in a activity guide. This section discuss the pages usedto configure the Acknowledgement page as a step in an activity guide.
Pages Used to Add Acknowledgement Page as a Step in an Activity GuidePage Name Definition Name Usage
Categories - Steps Page AGC_CAT_TBL5 Modify an existing category to includethe Acknowledgement step.
Activity Guide Templates Page AGC_TMPL_SRCH_FL Update a template to include theAcknowledgement step.
Activity Guide Composer - GeneralInformation Page
AGC_TMPL_GNRL_FL Enter the activity guide templatecategory into which theAcknowledgement step is added.
Activity Guide Composer - Select StepsPage
AGC_TMPL_STEP1_FL Select the Acknowledgement step to beincluded in an activity guide.
Activity Guide Composer - Organize andConfigure Steps Page
AGC_TMPL_STEP2_FL Position the Acknowledgement step inthe activity guide template.
Categories - Steps PageUse the Categories - Steps page (AGC_CAT_TBL5) to modify an existing category to include theAcknowledgement step.
380 Copyright © 1988, 2020, Oracle and/or its affiliates.

Chapter 19 Working with the Acknowledgement Framework
Navigation
Enterprise Components >Activity Guide Composer >Categories >Steps
Image: Categories - Steps Page
This example illustrates the fields and controls on the Categories - Steps page (1 of 2).
Service Type Select PS Component to associate with the Acknowledgementstep.
Service ID EC_ACKNOWLEDGEMENT_FL
Fluid Select the Fluid check box, to load the fluid page in the activityguide.
Post Processing PeopleCodeRoot Package Id Select ESIGN_AGPOSTPROCESS.
Path Select :
Application Class ID Select AGPostProcess..
Post Process Method Enter ItemPostProcess.
Copyright © 1988, 2020, Oracle and/or its affiliates. 381

Working with the Acknowledgement Framework Chapter 19
Image: Categories - Steps Page (2 of 2)
This example illustrates the fields and controls on the Categories - Steps Page (2 of 2).
Parameter Name Acknowledgement _ID
Service Parameter Name Acknowledgement _ID
Parameter Type Fixed Value
Parameter Value Enter the Acknowledgement ID created duringAcknowledgement configuration using the AcknowledgementConfiguration Page.
Note: You can add multiple Acknowledgement steps withinthe same activity guide category by using different parametervalues (i.e., Acknowledgement IDs) and by giving a differentstep name.
Related LinksSetting Up Activity Guide Categories
Activity Guide Templates PageUse the Activity Guide Templates page (AGC_TMPL_SRCH_FL) to create a new activity guide templateor update a template to include the Acknowledgement step.
Note: You will only see templates you have administrator access to or where no security has been definedfor the template.
Navigation
Enterprise Components >Activity Guide Composer >Templates >Activity Guide Templates
382 Copyright © 1988, 2020, Oracle and/or its affiliates.

Chapter 19 Working with the Acknowledgement Framework
Image: Activity Guide Templates Page
This example illustrates the fields and controls on the Activity Guide Templates Page.
The page displays all templates in template ID order to which you have administrator security access.Click the column headings to sort the template rows by that category.
Add Activity Guide Template button Click this button to access the Add Activity Guide TemplatePage to create a new activity guide template.
Update Template button Click the button for a template row to access the UpdateTemplate Page for the template you have chosen.
Activity Guide Composer - General Information PageUse the Activity Guide Composer - General Information page (AGC_TMPL_GNRL_FL) to enter theactivity guide template category into which the Acknowledgement step is added.
Navigation
Enterprise Components >Activity Guide Composer >Templates >Activity Guide Template
• Click the Add Activity Guide Template button from the Activity Guide Templates Page, enter thetemplate ID and effective date on the Add Activity Guide Template Page, and click Continue.
• Click the Update Template button from the Update Template Page.
From within the Activity Guide Composer, select the General Information tab from the left panel categorylist, or click the Next or Previous buttons to navigate to the page.
Copyright © 1988, 2020, Oracle and/or its affiliates. 383

Working with the Acknowledgement Framework Chapter 19
Image: Activity Guide Composer - General Information page
This example illustrates the fields and controls on the Activity Guide Composer - General Informationpage.
Note: This example shows a template cloned from a delivered template with a new effective dated rowinserted. The fields for the original effective dated row of a delivered template are not available for edit.You must insert a new row or clone a delivered template to make changes to the description, but youcannot change the Activity Guide Category value.
Activity Guide Category Select the category that contains the record structure, actions, and step that apply to this template. Delivered options includeLife Events and OnBoarding, however you can create newcategories using the Activity Guide Composer - Categoriescomponent (see Setting Up Activity Guide Categories).
Note: You cannot change the category for this template afteryou have saved this page. If you have cloned or inserted a newrow for an existing template, you cannot change the category.
Activity Guide Composer - Select Steps PageUse the Activity Guide Composer - Select Steps page (AGC_TMPL_STEP1_FL) to select theAcknowledgement step to be included in this activity guide.
384 Copyright © 1988, 2020, Oracle and/or its affiliates.

Chapter 19 Working with the Acknowledgement Framework
Navigation
Enterprise Components >Activity Guide Composer >Templates >Activity Guide Template
• Click the Add Activity Guide Template button from the Activity Guide Templates Page, enter thetemplate ID and effective date on the Add Activity Guide Template Page, and click Continue.
• Click the Update Template button from the Update Template Page.
From within the Activity Guide Composer, select the Select Steps tab from the left panel category list, orclick the Next or Previous buttons to navigate to the page.
Image: Activity Guide Composer - Select Steps page
This example illustrates the fields and controls on the Activity Guide Composer - Select Steps page.
Note: You must first identify the security roles for this template before you can select steps.
The top of this page displays the category associated with this template. The activity guide categorydefines the valid steps that are available for the activity guide template. To manage steps for a category,use the Categories - Steps Page.
Add Step Click this button to add the Acknowledgement step to thisActivity Guide template.
Added Step Count The Added Step Count field identifies if you have already addedthis step to your template and how many times it will be listedas a step.
Activity Guide Composer - Organize and Configure Steps PageUse the Activity Guide Composer - Organize and Configure Steps page (AGC_TMPL_STEP2_FL) toposition the Acknowledgement step in the activity guide template.
Copyright © 1988, 2020, Oracle and/or its affiliates. 385

Working with the Acknowledgement Framework Chapter 19
Navigation
Enterprise Components >Activity Guide Composer >Templates >Activity Guide Template
• Click the Add Activity Guide Template button from the Activity Guide Templates Page, enter thetemplate ID and effective date on the Add Activity Guide Template Page, and click Continue.
• Click the Update Template button from the Update Template Page.
From within the Activity Guide Composer, select the Organize and Configure Steps tab from the leftpanel category list, or click the Next or Previous buttons to navigate to the page.
Image: Activity Guide Composer - Organize and Configure Steps Page
This example illustrates the fields and controls on the Activity Guide Composer - Organize and ConfigureSteps page.
Note: You must first identify the security roles and select step for this template before you can configuresteps.
You can determine the step order by moving the steps up and down in the list. Here, we position theAcknowledgement step right after the Welcome Video.
Best Practices While Using the Acknowledgement Step in Activity GuidesHere are a few best practices you can adopt while adding the Acknowledgement step in your activityguides. You can use any one of the options listed below to ensure that the activity guide user completesthe Acknowledgement step.
• Suppressing the Mark Complete action: If your activity guide has a Mark Complete action, thensuppressing that action for the Acknowledgement step ensures that the Mark Complete button is
386 Copyright © 1988, 2020, Oracle and/or its affiliates.
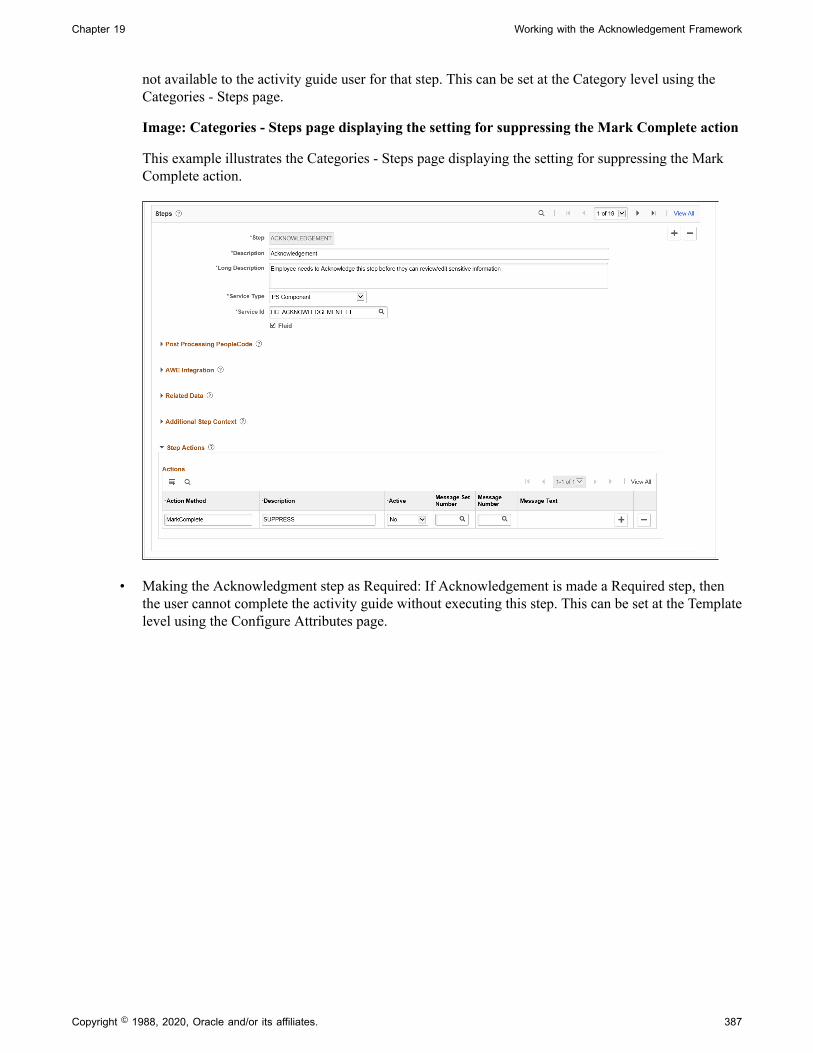
Chapter 19 Working with the Acknowledgement Framework
not available to the activity guide user for that step. This can be set at the Category level using theCategories - Steps page.
Image: Categories - Steps page displaying the setting for suppressing the Mark Complete action
This example illustrates the Categories - Steps page displaying the setting for suppressing the MarkComplete action.
• Making the Acknowledgment step as Required: If Acknowledgement is made a Required step, thenthe user cannot complete the activity guide without executing this step. This can be set at the Templatelevel using the Configure Attributes page.
Copyright © 1988, 2020, Oracle and/or its affiliates. 387

Working with the Acknowledgement Framework Chapter 19
Image: Configure Attributes page displaying the setting to make the Acknowledgement step asRequired
This example illustrates the Configure Attributes page displaying the setting to make theAcknowledgement step as Required.
• Making the subsequent steps as Dependent: If subsequent steps are made dependent on theAcknowledgement step, then the activity guide user cannot move to the next step without completingthe Acknowledgement step.This can be set at the Template level using the Configure Dependenciespage.
388 Copyright © 1988, 2020, Oracle and/or its affiliates.

Chapter 19 Working with the Acknowledgement Framework
Image: Configure Dependencies page displaying the setting to make a subsequent stepdependent on the Acknowledgement step
This example illustrates the Configure Dependencies page displaying the setting to make a subsequentstep dependent on the Acknowledgement step.
Acknowledgement Step as Displayed in an Activity GuideImage: Acknowledgement step as displayed in an Activity Guide
This example illustrates the Acknowledgement step as displayed in an Activity Guide.
Copyright © 1988, 2020, Oracle and/or its affiliates. 389

Working with the Acknowledgement Framework Chapter 19
390 Copyright © 1988, 2020, Oracle and/or its affiliates.

Chapter 20
Questionnaire Framework
Understanding Questionnaire Framework
PeopleSoft Questionnaire Framework enables users in an organization to design and create questionnairesbased on a set of questions and plug it into activity guides. The framework allows users to categorizethe questionnaire and control the security and permissions regarding who can create or deploy thequestionnaires.
The following is the brief process flow of the questionnaire framework:
Copyright © 1988, 2020, Oracle and/or its affiliates. 391

Questionnaire Framework Chapter 20
Image: Questionnaire Framework Process Flow
Questionnaire Framework Process Flow
Understanding Security in Questionnaire Framework
RolesThe Questionnaire Framework delivers the following Roles:
392 Copyright © 1988, 2020, Oracle and/or its affiliates.

Chapter 20 Questionnaire Framework
1. Questionnaire Administrator. A Questionnaire Administrator role is a super user and has full access tothe data in the Questionnaire Framework. The Questionnaire Administrator:
• Has read and write access to setup pages like Questionnaire Category, Question Pool, AnswerPool, Smart Answers, Questionnaire Templates
• Can access the Manage Questionnaires page and the COMMON category which is systemdelivered.
• Can create New Question and Answer, Use Existing Question and Answer, add Question andAnswer to the Pool.
• Can edit the Access field in the Define Questionnaire page.
• The Questionnaire Administrator role needs to be assigned to the user designated to manage andadminister the Questionnaire Framework.
2. Questionnaire Composer. A Questionnaire Composer role can only access the Manage Questionnairespage and the COMMON category which is system delivered.
User roles that need specific access rights to manage the questionnaires can be assigned in theQuestionnaire Category Page
Permission listThe permission list EOQF3000 is system delivered to the Employee and Manager roles to viewand answer questionnaires. If there are any custom roles created for employees and managers in anorganization, this permission list should be added to those roles as well to enable them to view and answerquestionnaires.
Configuring and Creating Questionnaires Using the QuestionnaireFramework
These topics discuss configuring and creating questionnaires using the Questionnaire Framework.
Pages Used to Configure Questionnaire FrameworkPage Name Definition Name Usage
Questionnaire Category Page EOQF_CATEGORY_FL Create Questionnaire Category and setpermissions to provide access to theusers to be able to create questionnairesusing existing question/answer or able tocreate new question and answers and beable to add them to the pool.
Question Pool Page EOQF_QUESTION_FL Create or Update questions. Whilecreating a questionnaire, you can addexisting questions that were created aspart of the question pool.
Copyright © 1988, 2020, Oracle and/or its affiliates. 393

Questionnaire Framework Chapter 20
Page Name Definition Name Usage
Answer Pool Page EOQF_ANSWER_FL Create or Update answers. Whilecreating a questionnaire, you can addexisting answers that were created as partof the answer pool.
Smart Answers Page EOQF_SANS_FL Group of pre-defined answers formSmart Answer. While creating aquestionnaire, use Smart Answer to pre-fill the answers in the questionnaire.
Manage Questionnaires Page EOQF_TMPL_SRCH_FL Manage the list of existingquestionnaires like update, delete, clone, preview or create new questionnaires.
Define Questionnaire Page EOQF_QSTNR_DEFN_FL Define a new questionnaire and provideaccess level to it.
User Instructions Page EOQF_INSTRUCTN_FL Set instructions for the audience of thequestionnaire.
Add Question Page EOQF_ADD_QSTN_FL Ability to add a question and link ananswer based on permissions set at thequestionnaire category level.
Format Questionnaire - OrganizeQuestion Page
EOQF_QSTNGRPDEF_FL Organize and group the questions.
Format Questionnaire - OrganizeQuestion Groups Page
EOQF_QSTNGRPSEQ_FL Organize the question groups.
Preview Questionnaire Page EOQF_QSTNR_PRVW_FL Preview the Questionnaire.
Questionnaire Options Page EOQF_QSTNR_OPTN_FL Set the questionnaire options.
Update Question Answer Pool Page EOQF_QSTNR_POOL_FL Based on permission set at thequestionnaire category level, user willbe able to add any new question andanswers to the pool that was created aspart of this questionnaire.
Activate Questionnaire Page EOQF_QSTNR_STS_FL Activate the Questionnaire.
Questionnaire Category PageUse the Questionnaire Category page (EOQF_CATEGORY_FL) to create questionnaire categories.
Navigation
Enterprise Components > Questionnaire Framework > Questionnaire Category
394 Copyright © 1988, 2020, Oracle and/or its affiliates.

Chapter 20 Questionnaire Framework
Image: Questionnaire Category page
Questionnaire Category page.
Category Enter a meaningful name as the category name and click add.
Note: Once a category is created, it cannot be deleted.
Image: Create Questionnaire Category page
Create Questionnaire Category page.
Description Provide a description for the category.
Status Specify whether the category should remain active or inactive inthe system.
Assign Questionnaire Template Specify the questionnaire template assigned to the category. This is the template available in Activity Guide Composerspecific to Questionnaire Framework. The steps in theQuestionnaire template are configured as per this template.
Copyright © 1988, 2020, Oracle and/or its affiliates. 395

Questionnaire Framework Chapter 20
QST0000 is the system delivered Activity Guide Templatefor Questionnaire Framework. For more details, see ManagingActivity Guide Templates
System Data This indicates that the questionnaire category is systemdelivered.
Rolename Select a rolename to provide access to the users to be able tocreate questionnaires using existing question/answer or able tocreate new question and answers and be able to add them to thepool.
Use Existing Question and Answer Enable this check box if you want to give Role Users access toexisting questions and answers from the question and answerpool while creating a questionnaire.
Create New Question Enable this check box if you want Role users to be able to createnew questions while creating a questionnaire.
Create New Answer Enable this check box if you want Role users to be able to createnew answers while creating a questionnaire.
Add Question and Answer to Pool Enable the check box if you want to the Role user to addnewly created question/answer to the pool while creating thequestionnaire.
Question Pool PageUse the Question Pool page (EOQF_QUESTION_FL) to add questions to a pool which can later be usedwhen creating a questionnaire.
Navigation
Enterprise Components > Questionnaire Framework > Question Pool
396 Copyright © 1988, 2020, Oracle and/or its affiliates.

Chapter 20 Questionnaire Framework
Image: Question Pool page
Question Pool page.
The Question Pool page lists the questions that have been created and added to the pool.
Users can use the filter options on the left pane to search for questions.
Use the left search filter panel of the page to enter search or filter criteria to find a question. To enterpartial searches, use the % wildcard character.
Click the Hide Filters or Show Filters tab to close or open the filter panel. After you have entered filtercriteria, click Search. The right panel will display the results of the search and the left search filter panelwill display additional criteria that you can use to continue filtering your search by facets
Category Category of the particular question
Question Question
Status Displays whether the question is active or inactive.
Question Usage Click the Question Usage icon to see the list of questionnaireswhere the question is currently in use.
Click the more button to open the question in Update Questionpage and make changes to it if necessary.
To add a new question to the question pool, click the Add (+) button. This launches the page to add newquestion.
Copyright © 1988, 2020, Oracle and/or its affiliates. 397

Questionnaire Framework Chapter 20
Image: Add Question Page
Add Question page.
Category Category of the particular question
Question Question
Status Choose whether to keep the question Active or Inactive. Thequestion will be available for use in a questionnaire only if thestatus is Active
Select Save and Add New to save a question and add a new question belonging to the same category.
Click Save to save the question.
Answer Pool PageUse the Answer Pool page (EOQF_ANSWER_FL) to add answers which can be later added to thequestionnaire.
Navigation
Enterprise Components > Questionnaire Framework > Answer Pool
398 Copyright © 1988, 2020, Oracle and/or its affiliates.

Chapter 20 Questionnaire Framework
Image: Answer Pool page
Answer Pool page.
The Answer Pool page lists the answers that have been created and added to the pool.
Users can use the filter options on the left pane to search for answers.
Use the left search filter panel of the page to enter search or filter criteria to find an answer. To enterpartial searches, use the % wildcard character.
Click the Hide Filters or Show Filters tab to close or open the filter panel. After you have entered filtercriteria, click Search. The right panel will display the results of the search and the left search filter panelwill display additional criteria that you can use to continue filtering your search by facets.
Category Displays the category of the particular answer.
Answer Shows the answer.
Status Displays whether the answer is active or inactive.
Answer Usage Click the Answer Usage icon to see the list of questionnaireswhere the answer is currently in use.
Click the more button to open the answer in Update Answerpage and make changes to it if necessary.
To add a new answer to the answer pool, click the add (+) button. This launches the page to add newanswer.
Copyright © 1988, 2020, Oracle and/or its affiliates. 399

Questionnaire Framework Chapter 20
Image: Create Answer page
Create Answer page.
Category Category of the particular Answer.
Question Enter your answer.
Status Choose whether to keep the answer Active or Inactive. Theanswer will be available for use in a questionnaire only if thestatus is Active.
System Data Indicates whether the answer is system delivered data.
Smart Answers PageUse the Smart Answers page (EOQF_SANS_FL) to create a group of answers that may be usedrepeatedly in the questionnaire.
Navigation
Enterprise Components > Questionnaire Framework > Smart Answers
400 Copyright © 1988, 2020, Oracle and/or its affiliates.

Chapter 20 Questionnaire Framework
Image: Smart Answers page
Smart Answers page.
Users can use the filter options on the left pane to search for smart answers.
Use the left search filter panel of the page to enter search or filter criteria to find a smart answer. To enterpartial searches, use the % wildcard character.
Click the Hide Filters or Show Filters tab to close or open the filter panel. After you have entered filtercriteria, click Search. The right panel will display the results of the search and the left search filter panelwill display additional criteria that you can use to continue filtering your search by facets.
Category Shows the category of the particular smart answer.
Smart Answer Displays the smart answer.
Status Displays whether the smart answer is active or inactive.
Smart Answer Usage Click the Smart Answer Usage icon to see the list ofquestionnaires where the smart answer is currently in use.
Click the more button to open the smart answer in Update SmartAnswer page and make changes to it if necessary.
To add a new smart answer, click the add (+) button. This launches the page to add new smart answer.
Copyright © 1988, 2020, Oracle and/or its affiliates. 401

Questionnaire Framework Chapter 20
Image: Create Smart Answer page
Create Smart Answer page.
Category Choose the Category for the smart answer.
Smart Answer Description Choose a description for the smart answer. This descriptionwill appear in the Smart Answer field in the Add New Questionpage.
Status Choose whether to keep the smart answer Active or Inactive.
System Data Indicates whether the smart answer is system delivered.
Add Answers You will be able to add answers from the answer pool thatbelongs to the same category as smart answer or the commoncategory. Use the + button to add a new row. Use the - button toremove a row.
Select Save and Add New to save a smart answer and add a new smart answer belonging to the samecategory.
Click Save to save the smart answer.
Manage Questionnaires PageUse the Manage Questionnaires page (EOQF_TMPL_SRCH_FL) to search and manage existingquestionnaires and to create new questionnaires.
Navigation
Enterprise Components > Questionnaire Framework > Questionnaires
402 Copyright © 1988, 2020, Oracle and/or its affiliates.

Chapter 20 Questionnaire Framework
Image: Manage Questionnaires page
Manage Questionnaires page.
The manage Questionnaires page lists all the questionnaires created by users based on your security. Youcan use the filter option on this page to filter your search for a specific questionnaire.
Category Associate the category to the questionnaire.
Questionnaire Code Questionnaire code.
Questionnaire Name Name of the Questionnaire.
Description Description of the Questionnaire.
Active If the questionnaire is active in the system it will be available forincluding in activity guides that uses Activity Guide Composer.
Update Questionnaire Edit the questionnaire. If the questionnaire is in use in anyactivity guide, a warning message is displayed about the impactof editing the questionnaire. Updates to the questionnaire willimmediately reflect in all questionnaires in progress.
Delete Questionnaire Delete the Questionnaire. If the Questionnaire is in use in anActivity Guide, a warning message is displayed about theimpact of deleting the questionnaire.
Questionnaire Usage Shows the Activity Guides where the Questionnaire is currentlyin use.
Clone Questionnaire Copy the questionnaire to create a new one.
Preview Questionnaire Preview the questionnaire.
Click the Create Questionnaire button to create a new questionnaire.
Copyright © 1988, 2020, Oracle and/or its affiliates. 403

Questionnaire Framework Chapter 20
Image: Create Questionnaire page
Create Questionnaire page
Questionnaire Name Enter the name of the questionnaire in the Create Questionnairepage.
Questionnaire Code Enter the value for this questionnaire.
Category Choose the category for the questionnaire.
Click the Done button to create the questionnaire and to start the activity guide for adding rest of thedetails for the questionnaire.
Define Questionnaire PageUse the Define Questionnaire page (EOQF_QSTNR_DEFN_FL) in the Questionnaire Framework guidedprocess (Activity Guide) to add a description to questionnaire.
Navigation
Enterprise Components > Questionnaire Framework > Questionnaires, then, click the UpdateQuestionnaire option for the relevant Questionnaire Name or click Create Questionnaire button.
404 Copyright © 1988, 2020, Oracle and/or its affiliates.
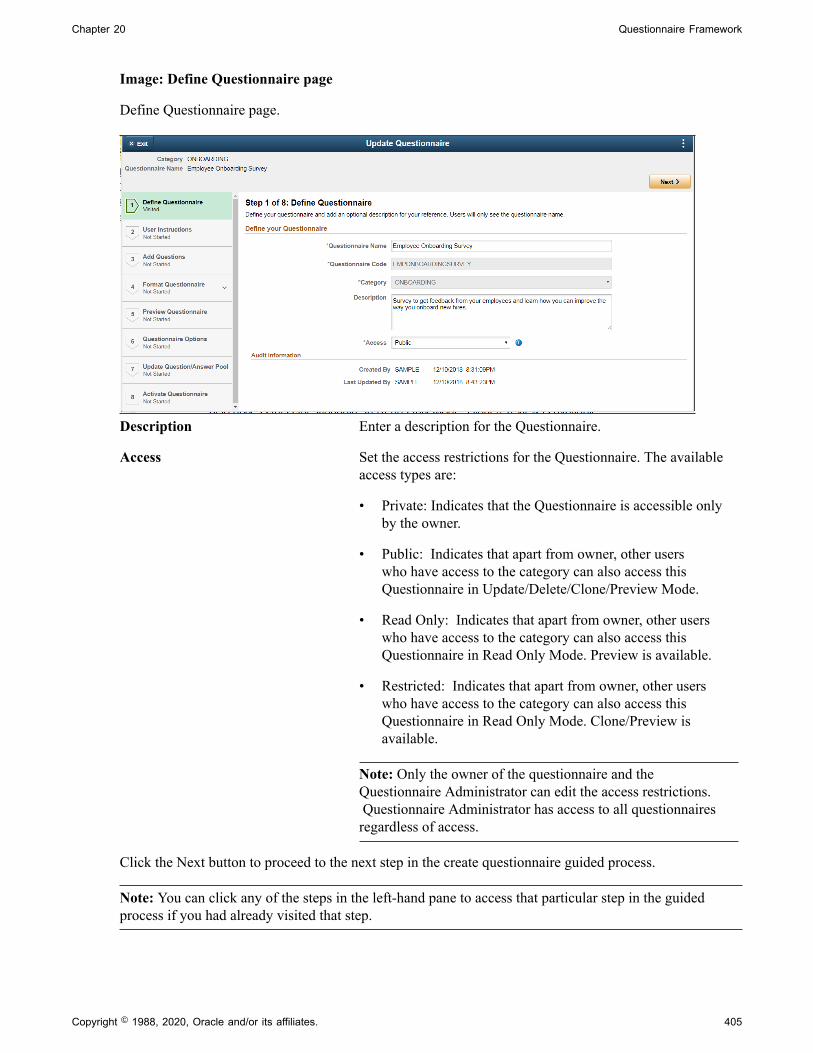
Chapter 20 Questionnaire Framework
Image: Define Questionnaire page
Define Questionnaire page.
Description Enter a description for the Questionnaire.
Access Set the access restrictions for the Questionnaire. The availableaccess types are:
• Private: Indicates that the Questionnaire is accessible onlyby the owner.
• Public: Indicates that apart from owner, other userswho have access to the category can also access thisQuestionnaire in Update/Delete/Clone/Preview Mode.
• Read Only: Indicates that apart from owner, other userswho have access to the category can also access thisQuestionnaire in Read Only Mode. Preview is available.
• Restricted: Indicates that apart from owner, other userswho have access to the category can also access thisQuestionnaire in Read Only Mode. Clone/Preview isavailable.
Note: Only the owner of the questionnaire and theQuestionnaire Administrator can edit the access restrictions. Questionnaire Administrator has access to all questionnairesregardless of access.
Click the Next button to proceed to the next step in the create questionnaire guided process.
Note: You can click any of the steps in the left-hand pane to access that particular step in the guidedprocess if you had already visited that step.
Copyright © 1988, 2020, Oracle and/or its affiliates. 405

Questionnaire Framework Chapter 20
User Instructions PageThe User Instructions page (EOQF_INSTRUCTN_FL) provides specify instructions to the personsanswering the questionnaire.
Image: User Instructions page
User Instructions page.
Start Instructions The instructions or message entered here will be displayed tothe users at the start of the questionnaire.
Completed Instructions The instructions or message displayed here will be visible atthe end of the questionnaire as a pop up screen once the userfinishes answering the questionnaire.
Add Question PageUse the Add Questions page (EOQF_ADD_QSTN_FL) to add questions to a questionnaire and associateanswers with it.
406 Copyright © 1988, 2020, Oracle and/or its affiliates.

Chapter 20 Questionnaire Framework
Image: Add Questions page
Add Questions page.
Click the Use Existing Question button to add questions that exist in the question pool.
In the Use Existing Questions page, enter search keywords in the Search Questions field, choose therelevant category and click Search. From the list of search results, choose the appropriate question to addit to the questionnaire.
Copyright © 1988, 2020, Oracle and/or its affiliates. 407

Questionnaire Framework Chapter 20
Image: Use Existing Question page
Use Existing Question page
Click the Create New Question button to add a new question to the questionnaire. This opens up the AddNew Question page.
408 Copyright © 1988, 2020, Oracle and/or its affiliates.

Chapter 20 Questionnaire Framework
Image: Add New Question page
Add new Question page.
Question Enter the question that you want to add.
Question Type Select the question type. Available options are:
• Multiple choice
• Single choice
• Drop Down
• Number
• Date
• Open Ended
• Ranking
Required Question Choose this option if you want to make this questioncompulsory and do not want the user to skip this question. Note:for Single choice option where the question is not marked asrequired, if the user selects an answer, it cannot be deselected. However user can switch between the answers.
Once done, users can define the answers associated with that question.
Use the Smart Answers option to add an already defined group of answer to the question. If you want tocreate a new smart answer, see Smart Answers Page
Copyright © 1988, 2020, Oracle and/or its affiliates. 409

Questionnaire Framework Chapter 20
Use the Use Existing Answer button to add an answer from the Answer pool.
Image: Use Existing Answer page
Use Existing Answer page.
Use the Edit icon to edit a particular question in the Add Questions page.
Use the Delete icon to remove a question from the Add Questions page. The question will be removedfrom that questionnaire.
410 Copyright © 1988, 2020, Oracle and/or its affiliates.

Chapter 20 Questionnaire Framework
Image: Edit and Delete options for each Question
Edit and Delete options for each question.
Format Questionnaire - Organize Question PageUse the Format Questionnaire – Organize Questions page (EOQF_QSTNGRPDEF_FL) to set the order ofthe questions for your questionnaire and create question groups.
Copyright © 1988, 2020, Oracle and/or its affiliates. 411

Questionnaire Framework Chapter 20
Image: Organize Questions page
Organize Questions page.
Use the Order column to specify the order in which you want the questions to appear within the questiongroup. Once done, use the Refresh icon to arrange the questions in the order specified.
To create section or group of questions, use the Group Your Questions button. This is optional.
Use the Edit button to edit the questions in a question group.
412 Copyright © 1988, 2020, Oracle and/or its affiliates.

Chapter 20 Questionnaire Framework
Image: Edit Question Group page
Edit Question Group page.
If some of the questions are left ungrouped, then the ungrouped questions are displayed at the start of thequestionnaire followed by the grouped questions.
Use the Move button to move a question from one group to another group or to ungroup the question
Copyright © 1988, 2020, Oracle and/or its affiliates. 413

Questionnaire Framework Chapter 20
Image: Move Question page
Move Question page.
Format Questionnaire - Organize Question Groups PageUse the Format Questionnaire – Organize Question Groups page (EOQF_QSTNGRPSEQ_FL) to set theorder of the question groups
414 Copyright © 1988, 2020, Oracle and/or its affiliates.

Chapter 20 Questionnaire Framework
Image: Organize Question Groups page
Organize Question Groups page.
Preview Questionnaire PageUse the Preview Questionnaire page (EOQF_QSTNR_PRVW_FL) to see how the questions appear to theusers. Use the Previous button to go back to previous steps to make any changes to the questionnaire.
Image: Preview Questionnaire page
Preview Questionnaire page.
Copyright © 1988, 2020, Oracle and/or its affiliates. 415

Questionnaire Framework Chapter 20
Questionnaire Options PageUse the Questionnaire Options page (EOQF_QSTNR_OPTN_FL) to set additional options for thequestionnaire.
Image: Questionnaire Options page
Questionnaire Options page.
Randomize Question Randomize the order of the questions within any questiongroup in the questionnaire.If there is no question group , thenrandomize the questions within the questionnaire.
Randomize Answer Randomize the order of answers within a question.
Anonymous Questionnaire Allows users to answer the questionnaire anonymously. If usedwithin an activity guide, the activity guide instance should bedeleted for the questionnaire to be truly anonymous.
Allow User Updates After Save Users can change their response even after saving the answersof the questions.
Update Question Answer Pool PageUse the Update Question/Answer Pool page (EOQF_QSTNR_POOL_FL) to add new questions andanswers to the question and answer pool.
416 Copyright © 1988, 2020, Oracle and/or its affiliates.
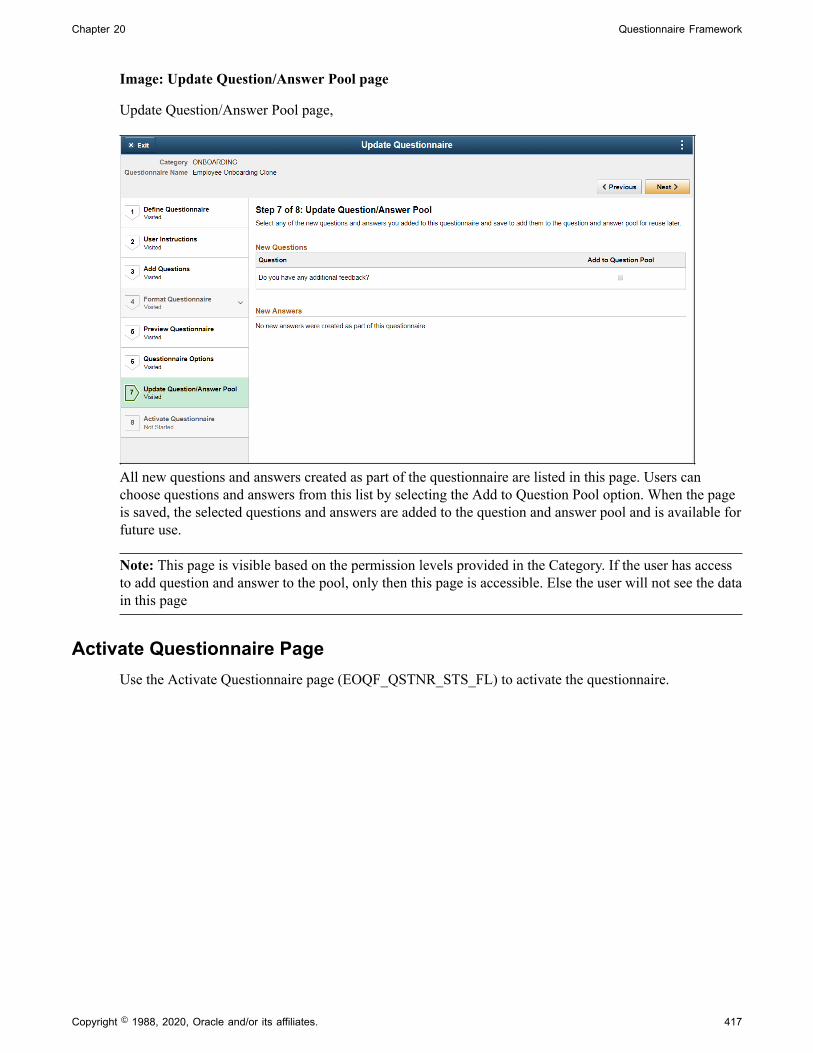
Chapter 20 Questionnaire Framework
Image: Update Question/Answer Pool page
Update Question/Answer Pool page,
All new questions and answers created as part of the questionnaire are listed in this page. Users canchoose questions and answers from this list by selecting the Add to Question Pool option. When the pageis saved, the selected questions and answers are added to the question and answer pool and is available forfuture use.
Note: This page is visible based on the permission levels provided in the Category. If the user has accessto add question and answer to the pool, only then this page is accessible. Else the user will not see the datain this page
Activate Questionnaire PageUse the Activate Questionnaire page (EOQF_QSTNR_STS_FL) to activate the questionnaire.
Copyright © 1988, 2020, Oracle and/or its affiliates. 417

Questionnaire Framework Chapter 20
Image: Activate Questionnaire page
Activate Questionnaire page
Choose the Activate Questionnaire button to activate the questionnaire. The questionnaire then becomesavailable for users to add to activity guides.
Adding Questionnaire as a Step in an Activity Guide
The questionnaire can be used as a step in a activity guide. This section discuss the pages used toconfigure the questionnaire as a step in an activity guide.
Pages Used to Add the Questionnaire as a Step in an Activity GuidePage Name Definition Name Usage
Categories - Steps Page AGC_CAT_TBL5 Modify an existing category to includethe Questionnaire step.
Activity Guide Templates Page AGC_TMPL_SRCH_FL Update a template to include theQuestionnaire step.
Activity Guide Composer - GeneralInformation Page
AGC_TMPL_GNRL_FL Enter the activity guide templatecategory into which the Questionnairestep is added.
Activity Guide Composer - Select StepsPage
AGC_TMPL_STEP1_FL Select the Questionnaire step to beincluded in an activity guide.
418 Copyright © 1988, 2020, Oracle and/or its affiliates.

Chapter 20 Questionnaire Framework
Page Name Definition Name Usage
Activity Guide Composer - Organize andConfigure Steps Page
AGC_TMPL_STEP2_FL Position the Questionnaire step in theactivity guide template.
Categories - Steps PageUse the Categories - Steps page (AGC_CAT_TBL5) to modify an existing category to include theQuestionnaire step.
Navigation
Enterprise Components >Activity Guide Composer >Categories >Steps
Image: Categories - Steps page
This example illustrates the fields and controls on the Categories - Steps page.
Service Type Select PS Component to associate with the Questionnaire step.
Service ID Select EOQF_QSTNR_FL.
Fluid Select the Fluid check box, to load the fluid page in the activityguide.
Post Processing PeopleCodeRoot Package Id Select EOQF_AGPOSTPROCESS.
Copyright © 1988, 2020, Oracle and/or its affiliates. 419

Questionnaire Framework Chapter 20
Path Select :.
Application Class ID Select AGPostProcess.
Post Process Method Enter ItemPostProcess.
Image: Additional Step Context section of the Categories - Steps page
This example illustrates the fields and controls in the Additional Step Context section of the Categories -Steps page.
Parameter Name Select EOQF_CATEGORY.
Service Parameter Name Select EOQF_CATEGORY.
Parameter Type Select Fixed Value.
Parameter Value Enter the Questionnaire Category created for this Questionnaire.
Note: You can add multiple Questionnaire steps within the sameactivity guide category by using different parameter values (i.e. Questionnaire categories) and by giving a different step name.
Activity Guide Templates PageUse the Activity Guide Templates page (AGC_TMPL_SRCH_FL) to create a new activity guide templateor update a template to include the step.
Note: You will only see templates you have administrator access to or where no security has been definedfor the template.
Navigation
Enterprise Components >Activity Guide Composer >Templates >Activity Guide Templates
420 Copyright © 1988, 2020, Oracle and/or its affiliates.

Chapter 20 Questionnaire Framework
Image: Activity Guide Templates Page
This example illustrates the fields and controls on the Activity Guide Templates Page.
The page displays all templates in template ID order to which you have administrator security access.Click the column headings to sort the template rows by that category.
Add Activity Guide Template Click this button to access the Activity Guide Templates page tocreate a new activity guide template.
Update Template Click this button for a template row to access the UpdateTemplate page for the template you have chosen.
Activity Guide Composer - General Information PageUse the Activity Guide Composer - General Information page (AGC_TMPL_GNRL_FL) to enter theactivity guide template category into which the Questionnaire step is added.
Navigation
Enterprise Components >Activity Guide Composer >Templates >Activity Guide Templates
• Click the Add Activity Guide Template button from the Activity Guide Templates page, enter thetemplate ID and effective date on the Add Activity Guide Template page, and click Continue.
• Click the Update Template button from the Update Template page.
From within the Activity Guide Composer, select the General Information tab from the left panel categorylist, or click the Next or Previous buttons to navigate to the page.
Copyright © 1988, 2020, Oracle and/or its affiliates. 421

Questionnaire Framework Chapter 20
Image: Activity Guide Composer - General Information page
This example illustrates the fields and controls on the Activity Guide Composer - General Informationpage.
Note: This example shows a template cloned from a delivered template with a new effective dated rowinserted. The fields for the original effective dated row of a delivered template are not available for edit.You must insert a new row or clone a delivered template to make changes to the description, but youcannot change the Activity Guide Category value.
Activity Guide Category Select the category that contains the record structure, actions, and step that apply to this template. Delivered options includeLife Events and OnBoarding, however you can create newcategories using the Activity Guide Composer - Categoriescomponent.
Note: You cannot change the category for this template afteryou have saved this page. If you have cloned or inserted a newrow for an existing template, you cannot change the category.
Activity Guide Composer - Select Steps PageUse the Activity Guide Composer - Select Steps page (AGC_TMPL_STEP1_FL) to select theQuestionnaire step to be included in this activity guide.
422 Copyright © 1988, 2020, Oracle and/or its affiliates.

Chapter 20 Questionnaire Framework
Navigation
Enterprise Components >Activity Guide Composer >Templates >Activity Guide Templates
• Click the Add Activity Guide Template button from the Activity Guide Templates page, enter thetemplate ID and effective date on the Add Activity Guide Template page, and click Continue.
• Click the Update Template button from the Update Template page.
From within the Activity Guide Composer, select the Select Steps tab from the left panel category list, orclick the Next or Previous buttons to navigate to the page.
Image: Activity Guide Composer - Select Steps page
This example illustrates the fields and controls on the Activity Guide Composer - Select Steps page.
Note: You must first identify the security roles for this template before you can select steps.
The top of this page displays the category associated with this template. The activity guide categorydefines the valid steps that are available for the activity guide template. To manage steps for a category,use the Categories - Steps page.
Add Step Click this button to add the Questionnaire step to this ActivityGuide template.
Added Step Count The Added Step Count field identifies if you have already addedthis step to your template and how many times it will be listedas a step.
Activity Guide Composer - Organize and Configure Steps PageUse the Activity Guide Composer - Organize and Configure Steps page (AGC_TMPL_STEP2_FL) toposition the Questionnaire step in the activity guide template.
Copyright © 1988, 2020, Oracle and/or its affiliates. 423

Questionnaire Framework Chapter 20
Navigation
Enterprise Components >Activity Guide Composer >Templates >Activity Guide Templates
• Click the Add Activity Guide Template button from the Activity Guide Templates page, enter thetemplate ID and effective date on the Add Activity Guide Template page, and click Continue.
• Click the Update Template button from the Update Template page.
From within the Activity Guide Composer, select the Organize and Configure Steps tab from the leftpanel category list, or click the Next or Previous buttons to navigate to the page
Image: Activity Guide Composer - Organize and Configure Steps page
This example illustrates the fields and controls on the Activity Guide Composer - Organize and ConfigureSteps page.
Note: You must first identify the security roles and select step for this template before you can configuresteps.
You can determine the step order by moving the steps up and down in the list. Here, we position thequestionnaire step right after the Welcome Video.
424 Copyright © 1988, 2020, Oracle and/or its affiliates.

Chapter 21
Working with the Activity Guide Composer
Understanding the Activity Guide Composer
PeopleTools Fluid Activity Guides provide your workers with a simplified and streamlined approach tocompleting a business process, such as an employee's OnBoarding process or life event change. Activityguides allow you to define guided procedures for a user or group of users to complete and will track andmaintain the user's progress as he or she completes the steps.
Defining a fluid activity guide requires a number of components that need to be configured by a technicalresource who becomes responsible for managing and maintaining the activity guide configuration. TheActivity Guide Composer framework is designed to improve the deployment and management of fluidactivity guides by separating the technical and functional configuration. The benefits of this is a reductionin technical resources and enabling your functional process owners to manage and maintain their activityguides. In addition, the Activity Guide Composer framework also provides utilities and configurable stepsthat are commonly utilized in activity guides.
The following videos provide demonstrations of features and how to use the Activity Guide Composer:
Image Highlights, PeopleSoft HCM Update Image 23: Activity Guide Composer
PeopleSoft Activity Guide Composer
Image Highlights, PeopleSoft HCM Update Image 31: Activity Guide Composer-Multi UserGuides
Copyright © 1988, 2020, Oracle and/or its affiliates. 425

Working with the Activity Guide Composer Chapter 21
Image: Example of the OnBoarding feature Using an Activity Guide
This example illustrates one of the layouts of an activity guide using the OnBoarding feature.
426 Copyright © 1988, 2020, Oracle and/or its affiliates.
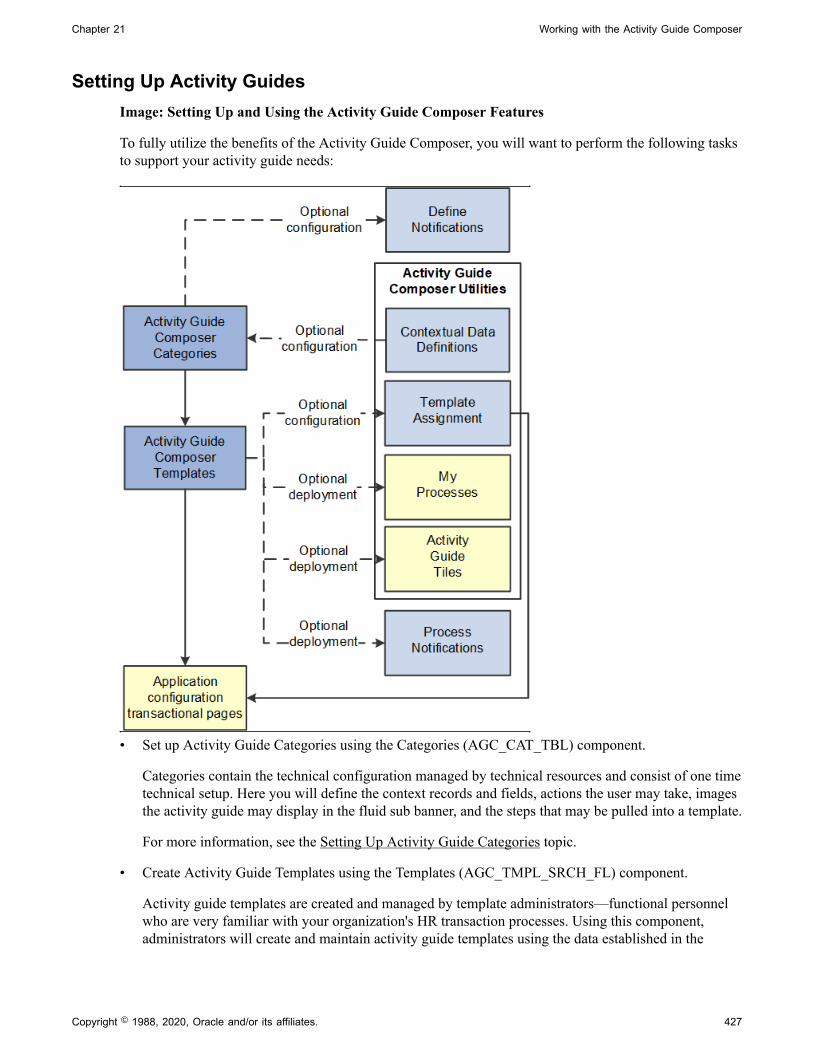
Chapter 21 Working with the Activity Guide Composer
Setting Up Activity GuidesImage: Setting Up and Using the Activity Guide Composer Features
To fully utilize the benefits of the Activity Guide Composer, you will want to perform the following tasksto support your activity guide needs:
• Set up Activity Guide Categories using the Categories (AGC_CAT_TBL) component.
Categories contain the technical configuration managed by technical resources and consist of one timetechnical setup. Here you will define the context records and fields, actions the user may take, imagesthe activity guide may display in the fluid sub banner, and the steps that may be pulled into a template.
For more information, see the Setting Up Activity Guide Categories topic.
• Create Activity Guide Templates using the Templates (AGC_TMPL_SRCH_FL) component.
Activity guide templates are created and managed by template administrators—functional personnelwho are very familiar with your organization's HR transaction processes. Using this component,administrators will create and maintain activity guide templates using the data established in the
Copyright © 1988, 2020, Oracle and/or its affiliates. 427

Working with the Activity Guide Composer Chapter 21
activity guide category. They can also clone existing activity guided templates that can then bereconfigured for a different business process.
For more information, see the Managing Activity Guide Templates topic.
• (Optional) Define notifications using the Define Notifications (AGC_CAT_NOTIF_TBL) component.
Notifications define push or email content that is sent to assignees when a template is configured tonotify participants that an activity guide process needs their attention. If you enable notifications foryour templates, use Process Notifications to sent activity guide notifications to your assignees.
For more information, see the Working with Activity Guide Notifications topic.
• (Optional) Define Contextual Data for a Category using the Contextual Data (AGC_CTXDTA_TBL)component.
Contextual data is data that can be derived from the context data defined for an activity guidecategory. The derived contextual data can be utilized in the sub banner of the fluid activity guide, inpage text, or in a date field to configure the start and due date for a step.
Note: This setup is optional. However, if you choose to use contextual data in your categories andtemplates, this step should be completed prior to setting up your categories.
For more information, see the Setting Up Activity Guide Utilities for Contextual Data topic.
• (Optional) Configure the following Activity Guide Utilities tables and define rules to assign templatesto your workers using Template Assignment:
• Search Key Source Tables (AGC_SRCHREC_TBL):
View the criteria fields that retrieve data from the source table.
• Search Key (AGC_SRCHKEY_TBL)
Identity source tables and fields to be used in the search keys prompt configuration when youdefine a Template Assignment definition.
• Template Assignment (AGC_TMA_TBL)
Determine the search keys and values that will be used to determine which template the systemshould assign to a worker.
• Test Template Assignment (AGC_TMA_TEST)
Test to validate that a template assignment is set up correctly.
The PeopleSoft features, such as HCM OnBoarding, take advantage of this functionality by enablingyou to select to have the system assign templates to individuals based on the rules you configuredusing these Template Assignment tables.
For more information on setting up template assignment rules, see the Setting Up Activity GuideUtilities for Template Assignment topic.
• (Optional) Deploy activity guides or create tiles from which individuals can access activity guidesusing the My Processes (AGC_MYAG_FL) or Activity Guide Tiles (AGC_TILE_TBL) components.
428 Copyright © 1988, 2020, Oracle and/or its affiliates.

Chapter 21 Working with the Activity Guide Composer
For more information, see the Deploying and Managing Activity Guide Processes topic.
Using Activity GuidesPeopleSoft Enterprise Components provides your organization with various means to deploy activityguides to your workers. The following are examples of end user transactional pages or utilities that usethe Activity Guide Composer templates as their structure:
• Customize tiles using the Activity Guide Tiles page (AGC_TILE_TBL1) — Allows administratorsto create tiles where users or assignees can work on activity guide processes. See also Activity GuideTiles Page
• My Processes (AGC_MYAG_FL) — Provides a component where users can initiate activity guideprocesses, outside of the delivered pages, which guide the users through business transactions whiledisplaying contextual information. See also Deploying and Managing Activity Guide Processes.
• Product transactional pages — Depending on the PeopleSoft application, some business processdeliver pages from which users can access activity guides. For instance, some examples available inHCM include:
• OnBoarding — Grants new workers a central location to provide personal information needed tocomplete the employment process. .
• Fluid Life Events — Enables employees to quickly enter life event changes that may impact theirbenefits offerings.
• Open Enrollment — Enables employees to enroll or review their benefit plans annually during theOpen Enrollment period.
• Position Management — Allows administrators access to view, update, and create positions usingthe fluid pages.
Setting Up Activity Guide Categories
Categories contain the technical components that are utilized to define an activity guide template. Forexample, categories contain the technical definition of one or more steps that can be included in anactivity guide.
To create and update activity guide categories, use the Categories (AGC_CAT_TBL) component. Toclone an activity guide category, see Cloning Activity Guide Categories.
These topics provide an overview of categories and discuss setting up activity guide categories.
Copyright © 1988, 2020, Oracle and/or its affiliates. 429

Working with the Activity Guide Composer Chapter 21
Pages Used to Set Up Activity Guide Contextual Data and CategoriesPage Name Definition Name Usage
Categories - Category Page AGC_CAT_TBL1 Create an activity guide category andenter an effective date, description, andlong description.
Categories - Security Page AGC_CAT_TBL6 Determine who has access to maintainand use the activity guide category.
Categories - Context Page AGC_CAT_TBL2 Define the context for the activity guidecategory.
Categories - Actions Page AGC_CAT_TBL3 Define action items that would enablethe user to perform additional actions, such as exit an activity guide or mark astep complete
Categories - Images Page AGC_CAT_TBL4 Identify images that can be displayed inthe sub banner of the fluid activity guide.
Categories - Assignees Page AGC_CAT_TBL7 Identify assignees that will be assignedto the steps.
Categories - Steps Page AGC_CAT_TBL5 Associate steps to a related contentservice that navigates the user to anapplication transaction page to performa specific task or review instructions toperform a manual task.
Categories - Notifications Page AGC_CAT_TBL8 Configure the notification settings for thecategory
Preview Notification Page AGC_CAT_NOTIF_SEC View the notification text or messagethat will be sent to an assignee.
Understanding CategoriesA Category definition contains the properties, contextual data, steps, and other options that can beincluded in an activity guide template. You will use the Categories - Category Page to associate thesesteps to a related content service that navigates the user to an application transaction page to performa specific task. Not all steps need be included in a template, but all possible steps must be included inthe category to be considered for a template. For example, you may have a step for workers to add theiraddress, another to enter dependent data, one for US worker to grant W-2 and W-2c consent, and a stepfor Canadian workers to grant T4/T4 slip consent. The template administrator will then determine whichsteps to include in a template. In this scenario, the template administrator would create two templates, onefor the US workers and one for the Canadian workers, and only include the steps relevant to workers inthat country.
The PeopleSoft applications may deliver some Activity Guide categories. Delivered categories can bemodified to suit your organization's needs; however, to include more steps to the delivered categories,insert a new effective dated row or use the Clone Category Page to clone a category to add the steps.
430 Copyright © 1988, 2020, Oracle and/or its affiliates.

Chapter 21 Working with the Activity Guide Composer
Note: When you include additional steps in a category, you will need to clone or insert a new effectivedated row in the templates that use this category with an effective date equal to or greater thanthe effective date of the category to see the category change in the template. The system will notautomatically insert the step into the template, but you can now opt to include this new step into thetemplate.
Categories - Category PageUse the Categories - Category page (AGC_CAT_TBL1) to create an activity guide category and enter aneffective date, description, and long description.
Navigation
Enterprise Components >Activity Guide Composer >Categories >Category
Image: Categories - Category Page
This example illustrates the fields and controls on the Categories - Category page.
Note: The PeopleSoft applications may deliver several activity guide categories as system data. Inthese cases, the fields for these categories are display only. To update a delivered category, insert a neweffective dated row or use the Clone Category Page to clone the category. Alternatively, you can createyour own categories.
Effective Date Enter an effective date that is earlier than or equal to theeffective date of the activity guide templates you plan to create. The effective date of the activity guide template will determinewhat effective dated category configuration will be availablewhen defining a template.
Root Package ID Enter the ID of the application package that contains theinstance creation and action class to be invoked at instancecreation.
The activity guide composer framework delivers the AGC_PROCESS_AG instance creation method.
Copyright © 1988, 2020, Oracle and/or its affiliates. 431

Working with the Activity Guide Composer Chapter 21
Path Enter a path that uses a specific class within the root package.
Instance Creation Class Id Enter the name of the application class that contains the methodto be invoked at instance creation.
The activity guide composer framework delivers theActivityGuideCreation instance creation method that you canutilize and extend for your category.
Instance Create Method Enter the name of the method to be invoked to initialize theactivity guide instance.
The activity guide composer framework delivers theInstanceCreation instance creation method that you can utilizeand extend for your category.
The system executes the instance creation class and method when a new instance of an activity guidetemplate is generated by the user. This application class and method can contain specific business logic tomodify the newly created activity guide instance. For example, it can contain logic to set the start and duedate for each step in the activity guide.
See also, PeopleTools: Portal Technology, “Developing and Deploying Activity Guides”.
Object Owner ID Select the application owner of the object. The owner ID helpsdetermine the team that created or modified the object. Youcan define unique owner IDs for your organization by enteringfield translate values for the OBJECTOWNERID field usingPeopleSoft Application Designer.
For more information about object owner IDs, see the productdocumentation for PeopleTools: Application DesignerDeveloper's Guide.
Data Type Code Displays that this is either delivered System Data or your ownCustomer Data.
Categories - Security PageUse the Categories - Security page (AGC_CAT_TBL6) to determine who has access to maintain and usethe activity guide category.
Navigation
Enterprise Components >Activity Guide Composer >Categories >Security
432 Copyright © 1988, 2020, Oracle and/or its affiliates.

Chapter 21 Working with the Activity Guide Composer
Image: Categories - Security Page
This example illustrates the fields and controls on the Categories - Security page.
Define your category security by associating security access to a security role.
Security Access Select a security access type. Options include:
• Administer Category: Provides access to update andmaintain the activity guide category.
• Add Templates: Provides access to add new templates for theactivity guide category.
Note: The ability to update and maintain a template iscontrolled by the Administrator security access type on thetemplate Activity Guide Composer - Security Page.
Role Name Identify the role or roles that should be associated with theaccess type.
Note: This security role must be defined in the user’s profile (PeopleTools >Security >User Profiles >Roles) to gainappropriate access to the activity guide category.
Categories - Context PageUse the Categories - Context page (AGC_CAT_TBL2) to define the context for the activity guidecategory.
Navigation
Enterprise Components >Activity Guide Composer >Categories >Context
Copyright © 1988, 2020, Oracle and/or its affiliates. 433

Working with the Activity Guide Composer Chapter 21
Image: Categories - Context Page (1 of 2)
This example illustrates the fields and controls on the Categories - Context page showing the ContextRecord and Fields tab.
Image: Categories - Context Page: Prompt Edit and Display tab
This example illustrates the fields and controls showing the Prompt Edit and Display tab on theCategories - Context page.
434 Copyright © 1988, 2020, Oracle and/or its affiliates.

Chapter 21 Working with the Activity Guide Composer
Image: Categories - Context Page (2 of 2)
This example illustrates the fields and controls on the Categories - Context page, Derived Contextual Dataand Context Display Page sections.
Context data consists of a record and field that are assigned values to provide context to your activityguide template. For example, an employee OnBoarding activity guide template is specific to an employeejoining the company. Context data key fields defined here are used to uniquely identify instances of theactivity guide template.
Note: The PeopleSoft applications may deliver several activity guide categories as system data. Inthese cases, the fields for these categories are display only. To update a delivered category, insert a neweffective dated row or use the Clone Category Page to clone the category. Alternatively, you can createyour own categories.
Context Data: Context Record and Fields TabUse the context fields defined for the activity guide category for the system to uniquely identify theinstances of an activity guide template. For example, an HR administrator activity guide requires theoperator ID, employee ID, and employee record number to uniquely identify an instance of that activityguide created by the administrator for a specific employee.
You can designate a maximum number of five key context fields, not including OPRID andSEQUENCENO, which can also be specified as keys.
Display Order Enter a sequence number when a user is expected to performdata entry of the context keys to start an activity guide. Thiswill assign each context field a display sequence and then youcan configure it with the Prompt Table edit type to control validvalues entered by the user.
Copyright © 1988, 2020, Oracle and/or its affiliates. 435
Working with the Activity Guide Composer Chapter 21
Key Field Indicate if this is a key field.
Context Data: Prompt Edit and Display TabEdit Type Select an edit type to ensure that the user enters a valid value.
For example, if the user is expected to perform data entry of thecontext keys to start an activity guide, then you can configure itwith the Prompt Table edit type to control valid values enteredby the user. Edit type options include:
• No Table Edit
• Prompt Table
• Translate Table
• Yes/No
Prompt Description Field Select the field name that should display for the prompt valueselected.
Derived Contextual DataContextual data is data that can be derived from the context data fields specified for the activity guidecategory. Valid Contextual Data and Field Ids are defined on the Contextual Data - Definition Page.
This data can be used in these areas when defining an activity guide template:
• Sub Banner of the fluid activity guide.
• Page text for the Information Only, Summary, or Video steps (for example, you can display theemployee’s name based on the context field EMPLID or job code description based on the EMPLIDand EMPL_RCD).
• A data field for the start and due date option of a step. (For example, the employee’s hire date is basedon the context fields EMPLID and EMPL_RCD and you can define the start date of the step to use adata field like hire date, or you can set the due date for the step to be a specific number of days afterthe data field hire date).
Use in Sub Banner, Use in Page Text, and Use in Start/Due Date Option
Select the check boxes to indicate the areas where you want tohave the option to use the contextual data field.
Context Display PageUse this section to configure context data that can display through a popup page link from the sub banner.When defining a fluid activity guide template, the Activity Guide Composer - Sub Banner Page providesa Popup Display Option. With this option, the sub banner displays one row of primary context data as alink and up to three rows of context data are displayed in a popup window.
436 Copyright © 1988, 2020, Oracle and/or its affiliates.

Chapter 21 Working with the Activity Guide Composer
Important! This popup page can display context data along with other non-editable data andinformational text. However, it cannot have links, buttons, or other controls that will take the user out ofthe fluid activity guide. The context display page needs to be a fluid page residing in a PeopleSoft fluidcomponent.
Context Display Enter a unique and descriptive name to identify the contextdisplay page.
Description and Long Description Enter an appropriate description and detailed descriptionidentifying the intent of this context data.
Root Package ID Select the ID of the application package that contains themethod to be invoked at instance creation. The context displaypage is defined by the application package PeopleCodethat generates a URL to a PeopleSoft fluid component. ThePeopleSoft fluid component referenced in the URL needs tobe defined in Application Designer with the appropriate logicto retrieve and display data. It is important that the PeopleSoftfluid component is accessible to the end users of the activityguide template.
Path Select the names of each subpackage in the application classhierarchy that defines the location of the application class. Separate subpackage names by a colon. If the class is defined inthe top-level application package, enter or select the colon.
Context Display Class Enter the name of the application class that contains the methodto be invoked at instance creation.
Context Display Method Enter the method name in the application class ID to be invokedto initialize the activity guide instance.
Related LinksView Example (Sub Banner) PageConfigure Sub Banner PageConfigure Attributes PageConfigure Page Text Page
Categories - Actions PageUse the Categories - Actions page (AGC_CAT_TBL3) to define action items that would enable the userto perform additional actions, such as exit an activity guide or mark a step complete.
Navigation
Enterprise Components >Activity Guide Composer >Categories >Actions
Copyright © 1988, 2020, Oracle and/or its affiliates. 437

Working with the Activity Guide Composer Chapter 21
Image: Categories - Actions Page
This example illustrates the fields and controls on the Categories - Actions page.
Note: The PeopleSoft applications may deliver several activity guide categories as system data. Inthese cases, the fields for these categories are display only. To update a delivered category, insert a neweffective dated row or use the Clone Category Page to clone the category. Alternatively, you can createyour own categories.
Use this page to identify all the possible actions that can be included in a template. Only those actionsdefined here will be available for selection for templates using this category. The template administratorchooses which actions are included in a template on the Activity Guide Composer - Additional ActionsPage step.
Action Class Select an action class for this category. The activity guidecomposer framework delivers the NavActionControls actionclass that contains examples of action methods that you can useor copy for your activity guide category. This is derived fromthe Root Package ID you select on the Categories - CategoryPage. The PeopleSoft application delivers the AGC_PROCESS_AG application package for the Activity Guide Composer.
Actions Identify the actions that can appear in the Actions List menu (prior to PeopleTools 8.57) or as a button in the sub banner (PeopleTools 8.57 or higher) of the fluid activity guide. Typically, there are three types of actions you configure for theactivity guide category: Mark Complete, Cancel, and ContinueLater.
Actions perform specific logic for your activity guide process. After you select the action and prior to the system performingthis logic, the application will display a Yes/No warningmessage that you specified for the action. The logic for this
438 Copyright © 1988, 2020, Oracle and/or its affiliates.

Chapter 21 Working with the Activity Guide Composer
action resides in specific methods that exist in the actionapplication class and method you have specified.
Action Method Enter a method name.
Note: The method name ExitAGProcess is reserved. If youdefine an action with method name ExitAGProcess, this actionwill not show in the Actions List menu. It is used to plug-in alogic to the Template Exit button.
Note: A single component activity guide requires methodSubmitAGProcess to save all the steps in the activity guide thatbelong to a single component. This reserved method is used torender a Submit button on the last step of a single componentactivity guide. By default, the method will save any data entryperformed on the step(s) in the activity guide. The method canalso contain additional application logic required when theactivity guide is submitted. To set up a category to use a singlecomponent, see the Categories - Steps Page.
Message Set Number and MessageNumber
Select a message set number and a message number that youwant to appear as the warning message when a user performsthis action. Message sets and number settings come from thePeopleTools message set catalog.
Categories - Images PageUse the Categories - Images page (AGC_CAT_TBL4) to identify images that can be displayed in the subbanner of the fluid activity guide.
Navigation
Enterprise Components >Activity Guide Composer >Categories >Images
Copyright © 1988, 2020, Oracle and/or its affiliates. 439

Working with the Activity Guide Composer Chapter 21
Image: Categories - Images Page
This example illustrates the fields and controls on the Categories - Images page.
Note: The PeopleSoft applications may deliver several activity guide categories as system data. Inthese cases, the fields for these categories are display only. To update a delivered category, insert a neweffective dated row or use the Clone Category Page to clone the category. Alternatively, you can createyour own categories.
Use this page to identify all the possible images that can be included in a template sub banner. Onlythose images defined here will be available for selection for templates using this category. The templateadministrator has the option of selecting one image to display in the fluid sub banner of a template on theActivity Guide Composer - Sub Banner step: Configure Sub Banner Page step.
Image Type Select an image type. Each type requires different information tobe specified for the image. Options include:
• Application Class: This image type requires the applicationpackage, path, class, and method that contains the logic todynamically return a URL to a image at runtime based onthe instance’s context data.
• Image Catalog: This image type requires an image name.
• Static URL: This image type requires a URL ID. URL IDsare defined in PeopleTools under Administration.
Application Class Field DefinitionsThese fields are available when you select Application Class as the image type:
440 Copyright © 1988, 2020, Oracle and/or its affiliates.

Chapter 21 Working with the Activity Guide Composer
Root Package ID Select the name of the application package that contains themethod to be invoked to dynamically return a URL to an image.
Path Select the path to the application class hierarchy that defines thelocation of the application class. If class is defined at the top-level of application package, select colon.
Image Class Select the name of the application class that contains the methodto be invoked to dynamically return a URL to an image.
Method Name Enter the method name in the application class ID thatdynamically returns a URL to an image based on the instance'scontext data.
Image Catalog Field DefinitionThis field is available when you select Image Catalog as the image type:
Image Name Select the name of the static image that the activity guide shoulddisplay for this step. After you enter the image name, the imagewill display below the field.
Static URL Field DefinitionThis field is available when you select Static URL as the image type:
URL Identifier Select the URL identifier that defines where you store theimage.
Categories - Assignees PageUse the Categories - Assignees page (AGC_CAT_TBL7) to identify assignees that will be assigned to thesteps.
Navigation
Enterprise Components >Activity Guide Composer >Categories >Assignees
Copyright © 1988, 2020, Oracle and/or its affiliates. 441

Working with the Activity Guide Composer Chapter 21
Image: Categories - Assignees Page
This example illustrates the fields and controls on the Categories - Assignees page.
Use this page to define assignees using an application package or role.
When you enter assignee information on this page, these page will display the following sections:
• Categories - Steps Page will display the Default Step Assignments collapsible section where you canidentify a default assignee value for individual steps.
• Configure Attributes Page within the Templates component for each step will display the Assigneesection to identify the assignees for individual steps.
Assignee Enter a unique identifier for the assignee ID.
Description and Long Description Enter an appropriate description and detailed descriptionidentifying the assignee type. The system uses the Descriptiontext to display valid options when associating an assignee to astep on the Configure Attributes Page.
Assignee Type Select an assignee type. Options include:
• Application Package: the application package specifiedneeds to derive a single user ID or security role thatidentifies the assignee.
• Role: the role must be associated with the user’s profile.
Root Package ID This field is available when you select Application Package inthe Assignee Type field.
Enter the ID of the application package that contains action classto be invoked.
Path This field is available when you select Application Package inthe Assignee Type field.
442 Copyright © 1988, 2020, Oracle and/or its affiliates.

Chapter 21 Working with the Activity Guide Composer
Select the path to the application class hierarchy that defines thelocation of the application class. If class is defined at the top-level of application package, select colon.
Application Class ID This field is available when you select Application Package inthe Assignee Type field.
Select the name of the application class that contains themethod.
Assignee Method This field is available when you select Application Package inthe Assignee Type field.
Enter the method name in the application class ID that containsthe method to return one user ID or security role that will beassigned a step of the activity guide.
Role Name This field is available when you select Role in the AssigneeType field.
Select a PeopleTools security role. All user’s that have thisrole associated with their user profile will be considered as theassignee.
The following video provides an overview of Activity Guide Composer - multi user guides:
Image Highlights, PeopleSoft HCM Update Image 31: Activity Guide Composer-Multi UserGuides
Categories - Steps PageUse the Categories - Steps page (AGC_CAT_TBL5) to associate steps to a related content service thatnavigates the user to an application transaction page to perform a specific task or review instructions toperform a manual task.
Navigation
Enterprise Components >Activity Guide Composer >Categories >Steps
Copyright © 1988, 2020, Oracle and/or its affiliates. 443

Working with the Activity Guide Composer Chapter 21
Image: Categories - Steps Page (1 of 3)
This example illustrates the fields and controls on the Categories - Steps page (1 of 3).
Image: Categories - Steps Page (2 of 3)
This example illustrates the fields and controls on the Categories - Steps page (2 of 3).
444 Copyright © 1988, 2020, Oracle and/or its affiliates.

Chapter 21 Working with the Activity Guide Composer
Image: Categories - Steps Page (3 of 3)
This example illustrates the fields and controls on the Categories - Steps page (3 of 3).
Note: The PeopleSoft applications may deliver several activity guide categories as system data. Inthese cases, the fields for these categories are display only. To update a delivered category, insert a neweffective dated row or use the Clone Category Page to clone the category. Alternatively, you can createyour own categories.
Use this page to identify all the possible steps that can be included in a template. Only those steps definedhere will be available for selection for templates using this category. The template administrator chooseswhich steps are included on a template on the Activity Guide Composer - Select Steps Page step.
Step Definition Rule This field will have two drop-down field values:
• Not Applicable (Default)
• Steps from single component saved as single transaction
When this option us selected, then the activity guidecategory will be defined to support single componentactivity guides. Single component activity guides functiondifferently than other types of activity guides. Each steprepresents a page from the same PeopleSoft component. Also all the data entered on the steps are saved when theuser submits the activity guide.
Single component activity guides have restrictions on howthey are defined. These restrictions are noted below forspecific step attributes.
Copyright © 1988, 2020, Oracle and/or its affiliates. 445

Working with the Activity Guide Composer Chapter 21
Note: If steps already exist for the activity guide categoryand this value is Step from single component save as singletransaction, then validations will be performed to ensure stepsare valid for a single component activity guide. This valuecannot be changed when invalid steps exist for the activity guidecategory.
Service Type Select the type of related content service you want to associatewith the step. Valid values are:
• Application Class
• Manual
• Non PeopleSoft URL
• PS Component
• PS Query
• PS Script
The Service Type is restricted to PeopleSoft Component andServices is restricted to related content services with the type ofPeopleSoft Component that are fluid only. If one step is definedwith a Service, then any new steps added will find the Servicefield restricted to only services with the same PeopleSoftcomponent.
Note: If the Step Definition Rule on the category is set to Stepsfrom a single component saved as single transaction, then theuser is expected to define at least one action that has the methoddefined as SubmitAGProcess.
For more information on related content services, see theproduct documentation for PeopleTools: Portal Technology.
Service Id Enter the ID of the related content service that you wantto associate with the step. For example, if you select PSComponent in the Service Type field, use this field to enter theobject ID of the component you want users to access for thestep.
Note: If set for single component, the this will be restricted toService Ids that have the service type of PS Component. If astep is already defined for the category, then the Service Id willbe restricted to Service Ids that reside in the same PeopleSoftcomponent.
Fluid Select to indicate that this is a fluid page.
Required Enabled if the Step Definition Rule is defined as Steps fromsingle component saved as single transaction.
446 Copyright © 1988, 2020, Oracle and/or its affiliates.

Chapter 21 Working with the Activity Guide Composer
Select to indicate the step is required. This will force the userdefining the activity guide template to include the step to savethe single component activity guide.
The following video provides an overview of Activity Guide Composer - Single Component:
Image Highlights, PeopleSoft HCM Update Image 29: Activity Guide Composer - SingleComponent
Depending on the requirements of the application transaction, there are a number of additionalconfiguration options that you can define for the step using these sections:
Post Processing PeopleCodePost processing PeopleCode is triggered after the application transaction component is saved in theactivity guide. This PeopleCode can contain additional logic that needs to be performed as a result of theapplication transaction saving. Typically, the logic updates the activity guide status of the step.
AWE IntegrationUse this section to configure AWE integration for application transactions that use the AWE Approvalprocess. Integration with AWE Approval enables you to control the status of the step when the approval iseither approved or denied.
When you configure this step in the activity guide category with AWE Integration, the Disable AWEStatus Update field is enabled on the Activity Guide Composer - Organize and Configure step: ConfigureAttributes Page for this step, allowing the template administrator to turn off the AWE Integration thatupdates the status of the step.
Understanding How AWE Works Within a Step when Using the Activity Guide Composer
The application utilizes the Activity Guide System Options page (PeopleTools >Portal >ActivityGuide >Activity Guide System Options) to render the approval chain that is available via a link on thefluid activity guide step.
Note: If you do not configure this information, the user cannot see the approval chain and status for theactivity guide step that AWE configured and triggered for the step.
PeopleTools delivers AWE step configuration examples that you can use in Application PackagePTAI_UTILITIES and Class AWEUtilities, which contain the following methods:
• AWEComplete
• AWEDenied
• AWEResubmit
• AGProcessTerminate
Each method uses the PeopleTools Activity Guide API to update the status of the step. You specify themethod called in the following fields located in this section of the Categories - Steps configuration:
• Approval Method Name
Copyright © 1988, 2020, Oracle and/or its affiliates. 447

Working with the Activity Guide Composer Chapter 21
• Denial Method Name
Typically, the Approval Method updates the status to Complete. The Denial Method may keep the statusof the step as In Progress for resubmitting, Denied, or may even terminate or cancel the activity guide alltogether.
See also PeopleTools documentation for Portal Technology, “Developing and Deploying ActivityGuides,” Enhancing Activity Guides, Defining Activity Guide system Options.
Related DataEnter specific data fields that you want to associate with a step. The related content service defined for thestep uses logic to retrieve and utilize the data that is stored at the step level.
Additional Step ContentUse this section to map additional non-key context data fields to related content service parameters, asneeded.
Step ActionsUse this section to define actions for the step.
If the method name of the action is the same as an action selected for the activity guide template, then theeffect is to override the action definition with the configuration specified here. For example, you can usethe Active status to make a specific action inactive for the step or display a different message.
If the method name of the action differs from action defined for the activity guide template, then theaction specified is available in addition to those defined for the activity guide template.
Default Step Assignments
Note: This section is available only when assignee data is specified on the Categories - Assignees Page.
Select default assignees for a step from the list of values defined on the Assignee page. The defaultassignees defined in the activity guide category step will automatically be assigned to the step whenadded to the activity guide template, Configure Attributes Page.
The following video provides an overview of Activity Guide Composer - multi user guides:
Image Highlights, PeopleSoft HCM Update Image 31: Activity Guide Composer-Multi UserGuides
Summary Page Options
Note: This section is available only when related content service HC_AGC_SUMMARY_FL is specified.
Select to enable the Summary button and define the label for the button on the standard summary page.
Note: If the Summary button is enabled, you will need to implement the button function in theApplication Class and define it in the Post Process PeopleCode section.
448 Copyright © 1988, 2020, Oracle and/or its affiliates.
Chapter 21 Working with the Activity Guide Composer
Video Page Options
Note: This section is available only when related content service is HC_AGC_VIDEO_FL.
Enter the video URL ID and text transcript for the video step. You will also need to define the URL ID inthe PeopleTools URL Maintenance page.
The Activity Guide Composer delivers the following content services, which can be used for templatesteps:
• HC_AGC_INFO_FL
• HC_AGC_VIDEO_FL
• HC_AGC_SUMMARY_FL
Categories - Notifications PageUse the Categories - Notifications page (AGC_CAT_TBL8) to configure the notification settings for thecategory.
Navigation
Enterprise Components >Activity Guide Composer >Categories >Notifications
Copyright © 1988, 2020, Oracle and/or its affiliates. 449

Working with the Activity Guide Composer Chapter 21
Image: Categories - Notifications Page
This example illustrates the fields and controls on the Categories - Notifications page.
Use this page to enable notifications for a category and define default notification settings. These settingscan be overridden in the activity guide template but only if notifications is enabled on this page.
Enable Notifications Select this check box to configure notifications for the category. When you select this option, the remaining fields on this pagebecome available
Note: When this option is deselected, then notifications cannotbe used in the activity guide template.
Notification OptionsWhen you have enabled notifications for this category, you must select one or both of the followingoptions:
Email Notification Select this option to have the system send an email message tothe assignee informing him or her that an activity guide processhas one or more steps that require attention.
Push Notification Select this option to have the system send an alert message tothe assignee via the Notifications functionality. Notificationswill appear on the banner once they have been processed.
450 Copyright © 1988, 2020, Oracle and/or its affiliates.

Chapter 21 Working with the Activity Guide Composer
Note: Push of email notification options must be set at the category level. You cannot override theseoptions at the template level.
Default NotificationsIdentify the default notification types for this category and enter the corresponding notification values.
Enable Select the default notification types for this category .
• Initial: Notification will be sent only once when the step(s) first become available to the assignee. The initialnotification will not be sent to the initiator of the activityguide process.
• Overdue: Notification will be sent when a step is incompleteand has become overdue.
• Reminder: Notification will be sent as a reminder when thestep is incomplete.
Notification Enter the notification values that corresponds to the notificationtype. Notifications are defined on the Define Notifications Page.Only those notifications associated with this category will beavailable for selection.
Note: Default notifications can be overridden at the template level on the Activity Guide Composer -Notifications Page.
Notification PrioritySpecify whether the Initial or Overdue notification should takes the highest priority.
When a user initiates and activity guide instance, the system checks to see if there are open steps in thatactivity guide instance. When there are open steps, the system will perform these actions when the followoption is selected as the priority notification:
Initial Sends the initial notification to the assignees, even if a step isoverdue.
Note: Initial notifications are not sent to the user who initiatedthe step.
Overdue When the step is overdue, the system sends the overduenotification to the assignees, even if the initial notification hasnot been sent. If the step is not overdue, the initial notificationwill be sent.
Note: Notification priority is set at the category level. You cannot override these options at the templatelevel.
Copyright © 1988, 2020, Oracle and/or its affiliates. 451

Working with the Activity Guide Composer Chapter 21
For more information on using notifications for activity guides, see Understanding Notifications forActivity Guide Instance Steps..
Preview Notification PageUse the Preview Notification page (AGC_CAT_NOTIF_SEC) to view the notification text or messagethat will be sent to an assignee.
Navigation
Select the Preview link for a notification type.
Image: Preview Notification Page
This example illustrates the fields and controls on the Preview Notification page.
Displays the push or email message text that will be sent via a notifications. Changes to the message textmust be done on the Define Notifications Page.
Cloning Activity Guide Categories
Use the Clone Category (AGC_CAT_CLONE_FL) component to clone a category for an activity guide.
452 Copyright © 1988, 2020, Oracle and/or its affiliates.

Chapter 21 Working with the Activity Guide Composer
Pages Used to Clone Activity Guide CategoriesPage Name Definition Name Usage
Clone Category Page AGC_CAT_CLONE_FL Clone an activity guide category.
Clone Category PageUse the Clone Category page (AGC_CAT_CLONE_FL) to clone an activity guide category.
Navigation
Enterprise Components >Activity Guide Composer >Activity Guide Utilities >Clone Category >CloneCategory
Image: Clone Category Page
This example illustrates the fields and controls on the Clone Category page.
Enter the category ID, effective date, short and long description.
The page sorts the Available Categories list by category and then by effective date within that category.Select the up and down arrows in the column heading to change the sort order.
Select the effective dated row you want to copy and click Clone Category. You will remain on this pagebut the Available Categories list will now include your newly cloned category.
Copyright © 1988, 2020, Oracle and/or its affiliates. 453

Working with the Activity Guide Composer Chapter 21
To make any changes or updates to this newly cloned category, navigate to the Activity Guide Composer -Categories component (Enterprise Components >Activity Guide Composer >Categories).
Filters icon or Filtericon with filters applied
Click to open the Filters page and select criteria to narrow thelist of activity guide categories. You can use that page to filterthe list by category, short description, or effective date,
When filters are in place, the icon displays as green. Click thefilter icon and click the Clear button to reset the filters.
Related LinksSetting Up Activity Guide Categories
Managing Activity Guide Templates
The Activity Guide Composer (AGC) feature enables you to use fluid to create activity guide templatesthat identify the steps a user should take to perform a transaction or process. You can use AGC templatesfor a variety of purposes, such as identifying the steps that a new employee would complete through theOnBoarding feature, or the items that should be updated in the system using the fluid pages when a personencounters a life event change.
You can even define an activity guide with multiple steps that supports a single component. The requiredpages are added to an activity guide template so that the PeopleSoft component can be saved. There areadditional instructions and validations for the functional analyst who defines the activity guide template.These validations ensure a Submit action for the activity guide category and template.
The following videos provide demonstrations of features and how to use the Activity Guide Composer:
Image Highlights, PeopleSoft HCM Update Image 23: Activity Guide Composer
PeopleSoft Activity Guide Composer
Image Highlights, PeopleSoft HCM Update Image 29: Activity Guide Composer - SingleComponent
The activity guide template administrator determines the following aspects of each transaction template:
• The type, or layout format of the template, where you determine if the steps should be presenting in avertical or horizontal layout.
• The activity guide category of the template, which determines available steps, assignees, images, andactions for the user.
• Administrator and end user security roles.
• Actions that should be available to the user from the Actions Menu list in the banner (pre PeopleTools8.57) and the sub-banner (PeopleTools 8.57 and higher).
454 Copyright © 1988, 2020, Oracle and/or its affiliates.

Chapter 21 Working with the Activity Guide Composer
• Content that should appear in the fluid sub banner of the activity guide.
• The steps, the order in which they appear in the activity guide, and configuration options and rules foreach step.
• Identify notification settings, if enabled.
• If a template should be available in the My Processes pages.
Note: When you create an activity guide template, the system also creates a PeopleTools activity guidetemplate using the PeopleTools Activity Guide application process integration (API). This combines thetechnical data from the activity guide category and the functional data from the activity guide template tosave a PeopleTools activity guide template.
To add, update, clone, or delete activity guide templates, use the Templates component(AGC_TMPL_SRCH_FL).
These topics discuss managing activity guide templates.
Pages Used to Manage Activity Guide TemplatesPage Name Definition Name Usage
Activity Guide Templates Page AGC_TMPL_SRCH_FL View a list of existing activity guidetemplates or initiate the action to add, update, delete, or clone a template.
Add Activity Guide Template Page AGC_TMPL_ADD_SCF Identify the template ID and effectivedate for a new template.
Update Template Page AGC_TMPL_UPDT_FL Manage effective dated rows for anactivity guide template.
Clone Template Page AGC_TMPL_CLONE_SCF Clone an activity guide template
The Activity Guide Composer GuidedTemplate Process
N/A The Activity Guide Composer guidedtemplate process is itself an activityguide process. It shows a list ofapplication steps in the left panel thattake you to pages displayed in thecontent area to define and configureyour activity guide template. TheActivity Guide Composer also providesnavigation buttons in the page subbanner for navigating through the steps.
Activity Guide Composer - IntroductionPage
AGC_TMPL_INTRO_FL Review an introduction to the ActivityGuide Composer.
Activity Guide Composer - GeneralInformation Page
AGC_TMPL_GNRL_FL Enter or view the template descriptionand category.
Copyright © 1988, 2020, Oracle and/or its affiliates. 455

Working with the Activity Guide Composer Chapter 21
Page Name Definition Name Usage
Activity Guide Composer - ActivityGuide Type Page
AGC_TMPL_TYPE_FL Select or view the activity guide type—either horizontal sequential, verticalnon sequential, or vertical sequential. Depending on the type, you can alsodetermine auto save, side panel display, translation, and hide step options.
View Example (Activity Guide Types)Page
AGC_TMPL_TYPE1_SCF View examples of the horizontal, verticalnon sequential, and vertical sequentialactivity guide types.
Activity Guide Composer - SecurityPage
AGC_TMPL_SCRTY_FL Identify the security roles foradministrator and end user.
Activity Guide Composer - AdditionalActions Page
AGC_TMPL_BTNS_FL Select which actions will be available inthe activity guide for a template
Activity Guide Composer - Sub BannerPage
AGC_TMPL_SBNR_FL Identify the type of sub banner you wishto display at the top of the activity guide, if any.
Configure Sub Banner Page AGC_TMPL_SBNR1_SCF Identify the image and fields that shouldappear in the sub banner
View Example (Sub Banner) Page AGC_TMPL_SBNR2_SCF View examples of sub banners.
Activity Guide Composer - Select StepsPage
AGC_TMPL_STEP1_FL Select the steps that should be part of thisactivity guide.
Activity Guide Composer - Organize andConfigure Steps Page
AGC_TMPL_STEP2_FL Organize, configure, or delete a stepfrom the activity guide template.
Add Group Step Page AGC_TMPL_STPAG_SCF Define the label for the group of steps.
Configure Group Step Page AGC_TMPL_STPEG_SCF Select which steps should be a sub stepwithin this group.
Configure Attributes Page AGC_TMPL_STPEA_SCF Configure the rules for a step.
Configure Dependencies Page AGC_TMPL_STPDP_SCF Identify steps that must be completedprior to completing this step.
Configure Page Text Page AGC_TMPL_PGTEXT Enter page text when a step is page textenabled.
Step Details Page AGC_TMPL_STPED_SCF View configuration details for a step.
Activity Guide Composer - Display andProcessing Page
AGC_TMPL_PRCS_FL Configure an activity guide template foruse in My Processes.
Activity Guide Composer - NotificationsPage
AGC_TMPL_NOTF_FL Configure notifications for a template
456 Copyright © 1988, 2020, Oracle and/or its affiliates.

Chapter 21 Working with the Activity Guide Composer
Page Name Definition Name Usage
Preview <Notification Type>Notifications Page
AGC_TMPL_NTPV_SCF View the notification text or messagethat will be sent to the users assigned tothe steps.
Activity Guide Composer - Review andActivate Page
AGC_TMPL_ACTIVE_FL Activate or deactivate an activity guidetemplate.
Activity Guide Templates PageUse the Activity Guide Templates page (AGC_TMPL_SRCH_FL) to view a list of existing activity guidetemplates or initiate the action to add, update, delete, or clone a template.
Note: You will only see templates you have administrator access to or where no security has been definedfor the template.
Navigation
Enterprise Components >Activity Guide Composer >Templates >Activity Guide Templates
Image: Activity Guide Templates Page
This example illustrates the fields and controls on the Activity Guide Templates page.
The page displays all templates in template ID order to which you have administrator security access.Click the column headings to sort the template rows by that category.
Note: Depending on the PeopleSoft application, you may already have several activity guides templatesavailable. For example, HCM delivers templates such as OnBoarding, Life Events, Open Enrollment,managing positions, an so forth. The administrator of these templates should be someone who is veryfamiliar with your organization's application transaction processes and can configure and maintainadditional activity guides and rules needed for users to complete personal and business transactions.
Copyright © 1988, 2020, Oracle and/or its affiliates. 457

Working with the Activity Guide Composer Chapter 21
Filter button
Click to open the Filter page and select criteria to narrow the listof activity guide templates.
Add Activity Guide Template button Click this button to access the Add Activity Guide TemplatePage and identify the name and effective date of a new activityguide template.
Note: In order to add a template, the user needs to have roleaccess to add a template for at least one category.
Active Indicates if the template is active (Yes) or inactive (No).
Update Template button
Click the button for a template row to access the UpdateTemplate Page for the template you have chosen.
Clone Template button
Click this button for a template row to access the CloneTemplate Page where you can initiate the process to clone thistemplate.
Delete Template button
Click this button to delete all effective dated versions of thistemplate. This button is not available for delivered templates. However, if an effective dated row has been inserted for adelivered template, the user can access Update Template Page todelete the specific effective dated row added for the template.
Note: If more than one effective dated row exists for thistemplate, the system will delete all rows. Use the UpdateTemplate button to access the Update Template Page to see alleffective dated rows and delete individual rows, if necessary.
Add Activity Guide Template PageUse the Add Activity Guide Template page (AGC_TMPL_ADD_SCF) to identify the template ID andeffective date for a new template.
Navigation
Click the Add Activity Guide Template button from the Activity Guide Templates Page.
458 Copyright © 1988, 2020, Oracle and/or its affiliates.

Chapter 21 Working with the Activity Guide Composer
Image: Add Activity Guide Template Page
This example illustrates the fields and controls on the Add Activity Guide Template page.
Enter the ID for the new template and an effective date. Template IDs must be seven characters in length.
Cancel button Click this button to exit the page and return the Activity GuideTemplates Page without saving the new template.
Continue button After entering a template ID and effective date, click this buttonto access the Activity Guide Composer - Introduction Page andstart the template creation process.
Template Enter a seven (7) character template code.
Important! Some applications may require a unique namingconvention. For example, the first four characters of a LifeEvents template must use a unique convention to ensure thatLife Event activity guides are processed correctly.
Update Template PageUse the Update Template page (AGC_TMPL_UPDT_FL) to manage effective dated rows for an activityguide template.
Navigation
Click the Update Template button from the Activity Guide Templates Page.
Image: Update Template Page
This example illustrates the fields and controls on the Update Activity Guide Template page.
Copyright © 1988, 2020, Oracle and/or its affiliates. 459

Working with the Activity Guide Composer Chapter 21
Use this page to view, select to update, insert a new row, or delete an effective dated rows for a template.
Cancel button Click this button to return to the Activity Guide Templates Page.If you have not clicked the Apply button, the data you enteredon the page will not be saved.
Apply or Done buttons Click either of these buttons to apply and save your changes.
Click the Apply button to save you data and remain on thispage. If you added a new row, the Update Template buttonbecomes active for that row and you can now update thetemplate as necessary.
Click the Done button to save your changes and return to theActivity Guide Composer - Activity Guide Templates Page.
Update Template button
Click this button to access the Activity Guide Template pages tomake updates to the template. The system will display the lastactivity guide step page you accessed in this component.
When you click this button for a delivered template, the systemwill issues a warning that it is delivered data and cannot bedeleted or modified. However, you can click OK to view thetemplate setup.
Add button
Click the Add a Row button to insert a new effective dated rowfor this template.
When you select the most current row, the system will inserta new row with today’s date. When you insert a row from anhistorical row, the template will copy over the same data fromthat row, including the effective date. Overwrite this date asneeded so the rows do not share the same effective date.
In order to proceed with updating a new row, click the Applybutton to save the row and activate the Update Template button, where you can access and update the setup parameters for thenew template row.
Delete button
Click this button to delete the row.
Important! You must click the Apply or Done button to savethis deletion. If you cancel out of the Update Template Pagewithout saving, the delete action will not take place and the rowwill remain.
Clone Template PageUse the Clone Template page (AGC_TMPL_CLONE_SCF) to clone an activity guide template.
Navigation
Click the Clone Template button on the Activity Guide Templates Page.
460 Copyright © 1988, 2020, Oracle and/or its affiliates.

Chapter 21 Working with the Activity Guide Composer
Image: Clone Template Page
This example illustrates the fields and controls on the Clone Template page.
Enter the seven character template ID, description, and effective date for the new template.
Note: Some delivered activity guide templates have specific naming conventions. For example, LifeEvent templates must begin with either EF_A (for Adoption) , EF_B (for Birth), EF_D (for Divorce), orEF_M (for Marriage) , to ensure correct processing of the Life Event transactions.
The page displays all effective dated rows for the template you are cloning, oldest to newest. Select theeffective dated row you want to copy and click Continue. The system will return you to the ActivityGuide Templates Page where you can click the Update Template button to make any changes to thisnewly cloned template.
The Activity Guide Composer Guided Template ProcessThe Activity Guide Composer guided template process is itself an activity guide process. It shows a listof application steps in the left panel that take you to pages displayed in the content area to define andconfigure your activity guide template. The Activity Guide Composer also provides navigation buttons inthe page sub banner for navigating through the steps.
Copyright © 1988, 2020, Oracle and/or its affiliates. 461
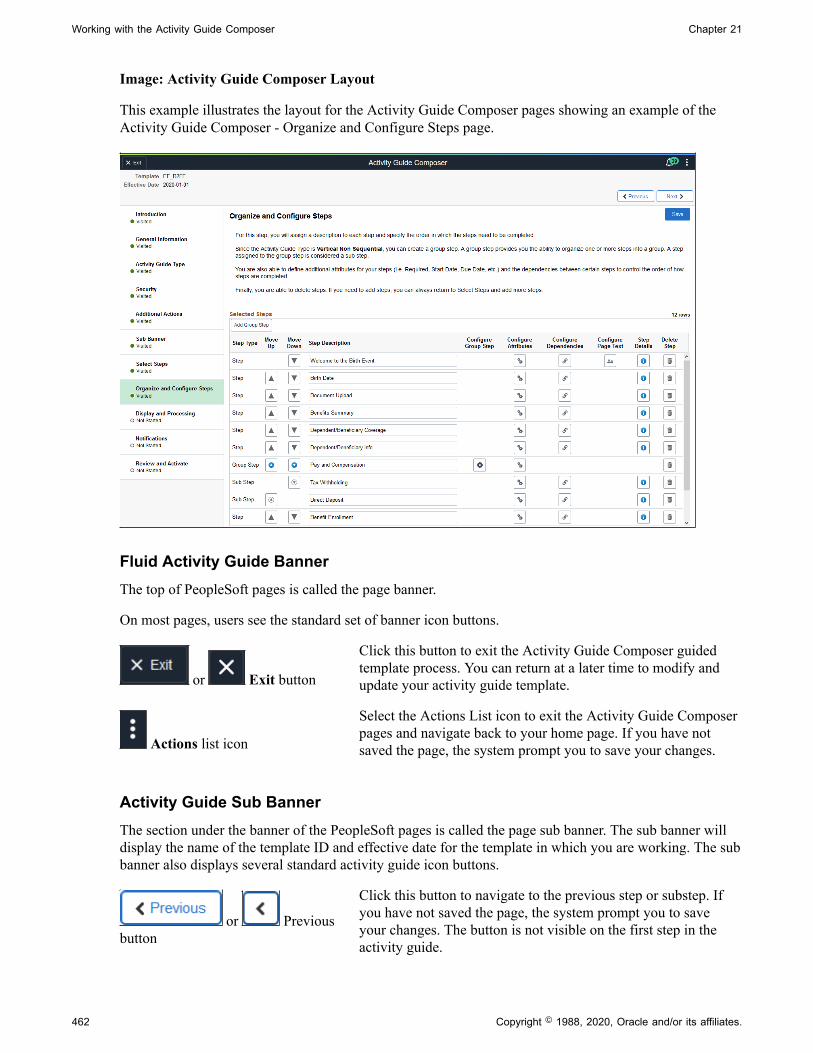
Working with the Activity Guide Composer Chapter 21
Image: Activity Guide Composer Layout
This example illustrates the layout for the Activity Guide Composer pages showing an example of theActivity Guide Composer - Organize and Configure Steps page.
Fluid Activity Guide BannerThe top of PeopleSoft pages is called the page banner.
On most pages, users see the standard set of banner icon buttons.
or Exit button
Click this button to exit the Activity Guide Composer guidedtemplate process. You can return at a later time to modify andupdate your activity guide template.
Actions list icon
Select the Actions List icon to exit the Activity Guide Composerpages and navigate back to your home page. If you have notsaved the page, the system prompt you to save your changes.
Activity Guide Sub BannerThe section under the banner of the PeopleSoft pages is called the page sub banner. The sub banner willdisplay the name of the template ID and effective date for the template in which you are working. The subbanner also displays several standard activity guide icon buttons.
or Previousbutton
Click this button to navigate to the previous step or substep. Ifyou have not saved the page, the system prompt you to saveyour changes. The button is not visible on the first step in theactivity guide.
462 Copyright © 1988, 2020, Oracle and/or its affiliates.

Chapter 21 Working with the Activity Guide Composer
or Next button
Click this button to navigate to the next step. If you have notsaved the page, the system prompt you to save your changes.
On the last step of the activity guide (the Review and Activatestep), the Next button does not appear. The page displays anActivate Activity Guide or Deactivate Activity Guide button onthe page to activity or inactivate this template.
Save button
Though this button does not appear in the sub banner, it doesappears on the page of each step, with the exception of the firstand last pages.
Click this button to save the changes to a specific stepconfiguration prior to navigating to another page.
Pages and Step List FormatThis Activity Guide Composer will display vertical steps. The steps will also display a status indicating ifyou have or have not visited the page.
<Step Status> Each page step has a status. These statuses include:
• Not Started: These are unvisited steps to completing yourtemplate.
• Visited: When you first access a step the status changes tothis.
You can return to steps by clicking the step or using thenavigation buttons in the banner.
The transaction content area displays the page for the current step you have selected for this templateconfiguration.
Activity Guide Composer - Introduction PageUse the Activity Guide Composer - Introduction page (AGC_TMPL_INTRO_FL) to review anintroduction to the Activity Guide Composer.
Navigation
Enterprise Components >Activity Guide Composer >Templates >Activity Guide Template
• Click the Add Activity Guide Template button from the Activity Guide Templates Page, enter thetemplate ID and effective date on the Add Activity Guide Template Page, and click Continue.
• Click the Update Template button from the Update Template Page.
From within the Activity Guide Composer, select the Introduction tab from the left panel list or click thePrevious button to navigate to the page.
Copyright © 1988, 2020, Oracle and/or its affiliates. 463

Working with the Activity Guide Composer Chapter 21
Image: Activity Guide Composer - Introduction Page
This example illustrates the fields and controls on the Activity Guide Composer - Introduction page.
Activity Guide Composer - General Information PageUse the Activity Guide Composer - General Information page (AGC_TMPL_GNRL_FL>) to enter orview the template description and category.
Navigation
Enterprise Components >Activity Guide Composer >Templates >Activity Guide Template
• Click the Add Activity Guide Template button from the Activity Guide Templates Page, enter thetemplate ID and effective date on the Add Activity Guide Template Page, and click Continue.
• Click the Update Template button from the Update Template Page.
From within the Activity Guide Composer, select the General Information tab from the left panel categorylist, or click the Next or Previous buttons to navigate to the page.
464 Copyright © 1988, 2020, Oracle and/or its affiliates.

Chapter 21 Working with the Activity Guide Composer
Image: Activity Guide Composer - General Information Page for a New Template
This example illustrates the fields and controls on the Activity Guide Composer - General Informationpage when creating a new template.
Image: Activity Guide Composer - General Information Page for an Existing Template
This example illustrates the fields and controls on the Activity Guide Composer - General Informationpage when updating or viewing an existing template.
Description Enter the description that should appear on the fluid activityguide banner.
The description is displayed in Activity Guide Templates. If theactivity guide template is configured for My Processes Page,
Copyright © 1988, 2020, Oracle and/or its affiliates. 465

Working with the Activity Guide Composer Chapter 21
then the template description is displayed in the left panel of theMy Processes page.
Long Description Enter a longer description that explains the purpose of thetemplate, if needed.
Available Categories or SelectedCategory
Select the category that contains the actions, images, assignees, and steps that apply to this template. Depending upon yourPeopleSoft application, you may have delivered options. Forexample, in HCM you will have Life Events and OnBoarding.Or, you can create new categories using the Activity GuideComposer - Categories component (see Setting Up ActivityGuide Categories).
Note: You cannot change the category for this template afteryou have saved this page. If you have cloned or inserted a newrow for an existing template, you cannot change the category.
Activity Guide Composer - Activity Guide Type PageUse the Activity Guide Composer - Activity Guide Type page (AGC_TMPL_TYPE_FL) to select orview the activity guide type—either horizontal sequential, vertical non sequential, or vertical sequential.Depending on the type, you can also determine auto save, side panel display, translation, and hide stepoptions.
Navigation
Enterprise Components >Activity Guide Composer >Templates >Activity Guide Template
• Click the Add Activity Guide Template button from the Activity Guide Templates Page, enter thetemplate ID and effective date on the Add Activity Guide Template Page, and click Continue.
• Click the Update Template button from the Update Template Page.
From within the Activity Guide Composer, select the Activity Guide Type tab from the left panel list, orclick the Next or Previous buttons to navigate to the page.
466 Copyright © 1988, 2020, Oracle and/or its affiliates.

Chapter 21 Working with the Activity Guide Composer
Image: Activity Guide Composer - Activity Guide Type Page for a New Template
This example illustrates the fields and controls on the Activity Guide Composer - Activity Guide Typepage for a new template.
Use this page to select an activity guide type or view the type that is selected for this template. You canview static examples of the different types by clicking the View Example button.
The delivered activity guide composer templates use the Vertical Non Sequential type with the left panelthat lists the steps in the process. For this configuration, the panel appears on the left of larger devices.On a small form factor such as phone, the panel is initially hidden. Users would click the left panel tab tomanually expand and view the steps.
Note: When you clone an existing template, the system copies the same activity guide type over and youcannot select a different activity guide type for the newly cloned template.
Activity Guide Type Select from one of the following activity guide types:
• Horizontal Sequential: Select this option to have the activityguide display the steps horizontally across the top of thepage.
• Vertical Non Sequential: Select this option to have theactivity guide display unnumbered steps vertically in the leftpanel of the page.
• Vertical Sequential: Select this option to have the activityguide display numbered steps vertically in the left panel ofthe page.
Note: You cannot change the activity guide type for thistemplate after you have saved this page. Or If you have clonedor inserted a new row for an existing template, you cannotchange the activity guide type.
View Example Click this button to access the View Example (Activity GuideTypes) Page and see examples of this type of activity guide.
Copyright © 1988, 2020, Oracle and/or its affiliates. 467

Working with the Activity Guide Composer Chapter 21
Note: These are examples only and do not reflect the templateyou are creating.
Image: Activity Guide Composer - Activity Guide Type Page for an Existing Template
This example illustrates the fields and controls on the Activity Guide Composer - Activity Guide Typepage after you have saved the type.
When you save the page, the activity guide type option you selected is now read-only. The page may alsodisplay other fields, which are based on the activity guide type you selected.
Auto Save This option is available for Vertical Non-Sequential types.
Click this check box to enable the auto save feature. Whenenabled, the system will automatically save the page whena user moves from one step to another. Deselect to have thesystem warn the user that unsaved data exist have allows theuser to determine whether to save the changes to the activityguide.
The system does not display this option for the sequentialactivity guide types because PeopleTools auto save isautomatically turned on for these types and cannot beoverridden.
Display Side Panel This option is available for Vertical Non-Sequential and VerticalSequential types.
468 Copyright © 1988, 2020, Oracle and/or its affiliates.

Chapter 21 Working with the Activity Guide Composer
Select this option to have the left panel expanded when the useraccesses a vertical activity guide on a large form factor device. The panel will always be hidden on small form factor devicesand the user will need to manually expand the panel to view thevertical activity steps.
Translation Option Select how you want the system to translate the language whena user accesses the activity guide process:
• Full Translation: Translates the activity guide for alllanguage translations defined for the template. This optionis beneficial when an activity guide has multiple users thatneed to access the process and have different languagepreferences.
• Partial Translation: Translates the activity guide to theuser’s preferred language. This is the default value.
Hide Steps This option is available for the Vertical Non Sequential type andorganizations on PeopleTools 8.58 or higher.
Select to hide steps for a user when not assigned to him or her. With this option selected, users will only see the steps for whichthey need to take action.
Deselect this option to display all step to users in the left panel. Although the step will appear in the left panel navigation, it willnot be available for selection. This is the default value.
View Example (Activity Guide Types) PageUse the View Example (Activity Guide Types) page (AGC_TMPL_TYPE1_SCF) to view examples ofthe horizontal, vertical non sequential, and vertical sequential activity guide types.
Navigation
Click a View Example button on the Activity Guide Composer - Activity Guide Type Page.
Copyright © 1988, 2020, Oracle and/or its affiliates. 469

Working with the Activity Guide Composer Chapter 21
Image: View Example Page: Showing an Example of the Horizontal Sequential Type
This example illustrates the View Example page showing a horizontal sequential example.
Note: These are static examples only and do not reflect the current template you are creating.
Activity Guide Composer - Security PageUse the Activity Guide Composer - Security page (AGC_TMPL_SCRTY_FL) to identify the securityroles for administrator and end user.
Navigation
Enterprise Components >Activity Guide Composer >Templates >Activity Guide Template
• Click the Add Activity Guide Template button from the Activity Guide Templates Page, enter thetemplate ID and effective date on the Add Activity Guide Template Page, and click Continue.
• Click the Update Template button from the Update Template Page.
From within the Activity Guide Composer, select the Security tab from the left panel category list, orclick the Next or Previous buttons to navigate to the page.
470 Copyright © 1988, 2020, Oracle and/or its affiliates.

Chapter 21 Working with the Activity Guide Composer
Image: Activity Guide Composer - Security Page
This example illustrates the fields and controls on the Activity Guide Composer - Security page.
Note: You must first enter an activity guide type and category in order to define the security for anactivity guide template. This step is also required before you can complete many of the other steps, orpages, for this template.
Add button
Click this button to insert an additional security row.
Security Type Select a security user type. Valid values are:
• Administrator for maintaining updates to the templateconfiguration.
• End User for user accessing the template to entertransactional data.
Note: You must enter at least one Administrator and one EndUser role.
Role Name Select the role that will either maintaining the templateconfiguration (Administrator) or that will be the user for thetemplate (End User).
Important! The role name that is assigned to the user profilemust match the role name that is specified for the security typesdefined here.
Delete button
Click to remove a security row from this template.
Copyright © 1988, 2020, Oracle and/or its affiliates. 471

Working with the Activity Guide Composer Chapter 21
Activity Guide Composer - Additional Actions PageUse the Activity Guide Composer - Additional Actions page (AGC_TMPL_BTNS_FL) to select whichactions will be available in the activity guide for a template.
Navigation
Enterprise Components >Activity Guide Composer >Templates >Activity Guide Template
• Click the Add Activity Guide Template button from the Activity Guide Templates Page, enter thetemplate ID and effective date on the Add Activity Guide Template Page, and click Continue.
• Click the Update Template button from the Update Template Page.
From within the Activity Guide Composer, select the Additional Actions tab from the left panel list, orclick the Next or Previous buttons to navigate to the page.
Note: If the activity guide category specified for the template has a Step Definition Rule of Steps fromsingle component saved as single transaction, then the user should select an Action that allows the user tosubmit or complete the activity guide.
Image: Activity Guide Composer - Additional Actions Page
This example illustrates the fields and controls on the Activity Guide Composer - Additional Actionspage.
Note: You must first identify the security roles for this template before you can configure actions.
Use this page to identify the actions a user can take when using this template. Actions are those list itemsor buttons that are available to the user from the Actions List menu (pre PeopleTools 8.57) or sub bannerbutton (PeopleTools 8.57 or higher) of the activity guide.
472 Copyright © 1988, 2020, Oracle and/or its affiliates.

Chapter 21 Working with the Activity Guide Composer
Image: Example of Actions in the Activity Guide Actions List Menu pre PeopleTools 8.75
This example illustrates the action items available from the activity guide Actions List menu prior toPeopleTools 8.75.
Image: Example of Actions item button using PeopleTools 8.57 or higher
This example illustrates the Mark Complete action item button available from the activity guide subbanner with PeopleTools 8.57 and higher.
(Check Box) Select those items you want to include in the Actions Listmenu (prior to PeopleTools 8.57) or as a sub banner button (PeopleTools 8.57 or higher).
To select all actions, select the check box next to the Descriptioncolumn in the header, or select action buttons individually.
Action Label Enter the text that should appear in the Actions List menu orbutton. If you save the page before entering a label, the pagewill automatically populate the fields you have selected with theDescription label. You can overwrite this value and save yourchanges. If you deselect an action type and save, the page willremove the label you have entered.
The activity guide category defines which actions are available on this page. To manage actions for acategory, use the Categories - Actions Page.
Activity Guide Composer - Sub Banner PageUse the Activity Guide Composer - Sub Banner page (AGC_TMPL_SBNR_FL) to identify the type ofsub banner you wish to display at the top of the activity guide, if any.
Copyright © 1988, 2020, Oracle and/or its affiliates. 473

Working with the Activity Guide Composer Chapter 21
Navigation
Enterprise Components >Activity Guide Composer >Templates >Activity Guide Template
• Click the Add Activity Guide Template button from the Activity Guide Templates Page, enter thetemplate ID and effective date on the Add Activity Guide Template Page, and click Continue.
• Click the Update Template button from the Update Template Page.
From within the Activity Guide Composer, select the Sub Banner tab from the left panel category list, orclick the Next or Previous buttons to navigate to the page.
Image: Activity Guide Composer - Sub Banner Page
This example illustrates the fields and controls on the Activity Guide Composer - Sub Banner page.
Note: You must first identify the security roles for this template before you can select a sub banner.
Configure Sub Banner Click this button to access the Configure Sub Banner Pageand identify which image and fields should display in the subbanner.
When No Sub Banner is selected, the system will not allow youto access the Configure Sub Banner page when you click thisbutton.
Sub Banner Type Select from one of the following sub banner types:
• No Sub Banner: This activity guide will display the bannerand the page directly below the banner.
474 Copyright © 1988, 2020, Oracle and/or its affiliates.
Chapter 21 Working with the Activity Guide Composer
• Image with 1 Primary Field: This activity guide will displaya sub banner where you can display one image, such as anemployee photo or company logo, and up to three fields, with one serving as the primary field in bold, such as theemployee’s name or the job title.
• Image, No Primary Field: This activity guide will displaya sub banner where you can display one image, such as anemployee photo or company logo, and up to three fields, although none serve as a primary field.
• No Image with 1 Primary Field: This activity guide willdisplay a sub banner where you can display up to threefields, with one serving as the primary field in bold, such asthe employee’s name or the job title.
• No Image, No Primary Field: This activity guide willdisplay a sub banner where you can display up to threefields, although none serve as a primary field.
• Display Page: This activity guide will display a sub bannerwith a link that will open a popup display page of non-editable data and informational text.
Popup Display Option Swipe this option to Yes to have a link appear in the sub bannerthat will open a popup display page. When you have this optionset to Yes, the View Example page will change dynamically toshow an example of the data in a popup page. Swipe this optionto No to keep the information viewable in the sub banner.
Popup pages can display non-editable data and informationaltext but cannot have links, buttons, and other controls that willtake the user out of the fluid activity guide. The primary fieldvalue will be displayed as a link to the display page.
View Example Click this button to access the View Example (Sub Banner)Page and view an example of the different sub banner types.
Note: These are examples only and do not reflect the currenttemplate you are creating.
Configure Sub Banner PageUse the Configure Sub Banner page (AGC_TMPL_SBNR1_SCF) to identify the image and fields thatshould appear in the sub banner.
Navigation
Click the Configure Sub Banner button from the Activity Guide Composer - Sub Banner Page.
Copyright © 1988, 2020, Oracle and/or its affiliates. 475
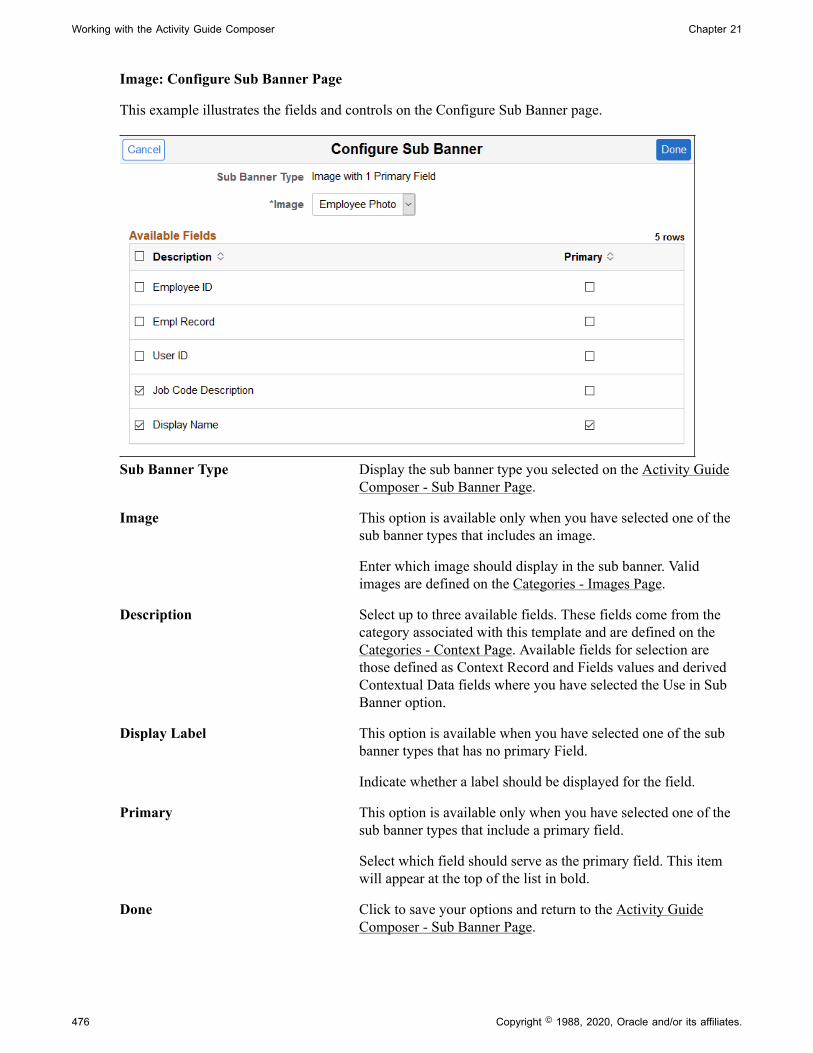
Working with the Activity Guide Composer Chapter 21
Image: Configure Sub Banner Page
This example illustrates the fields and controls on the Configure Sub Banner page.
Sub Banner Type Display the sub banner type you selected on the Activity GuideComposer - Sub Banner Page.
Image This option is available only when you have selected one of thesub banner types that includes an image.
Enter which image should display in the sub banner. Validimages are defined on the Categories - Images Page.
Description Select up to three available fields. These fields come from thecategory associated with this template and are defined on theCategories - Context Page. Available fields for selection arethose defined as Context Record and Fields values and derivedContextual Data fields where you have selected the Use in SubBanner option.
Display Label This option is available when you have selected one of the subbanner types that has no primary Field.
Indicate whether a label should be displayed for the field.
Primary This option is available only when you have selected one of thesub banner types that include a primary field.
Select which field should serve as the primary field. This itemwill appear at the top of the list in bold.
Done Click to save your options and return to the Activity GuideComposer - Sub Banner Page.
476 Copyright © 1988, 2020, Oracle and/or its affiliates.

Chapter 21 Working with the Activity Guide Composer
Cancel Click this button to return to the Activity Guide Composer - SubBanner Page without saving your changes.
Popup Display PagesPopup display pages can show non-editable data and informational text but cannot have links, buttons,and other controls that will take the user out of the fluid activity guide. Selected one field as primary,which will be used as the link to the popup display page.
The popup page configuration options are set up in the Content Display Page section of the Categories -Context Page.
View Example (Sub Banner) PageUse the View Example (Sub Banner page (AGC_TMPL_SBNR2_SCF) to view examples of sub banners.
Navigation
Click a View Example button on the Activity Guide Composer - Sub Banner Page.
Image: View Example (Sub Banner) Page
This example illustrates the View Example page showing a sub banner example.
Copyright © 1988, 2020, Oracle and/or its affiliates. 477

Working with the Activity Guide Composer Chapter 21
Image: View Example (Sub Banner) Page with the Popup Display Option Selected
This example illustrates the View Example page showing a sub banner example when you have swipedthe Popup Display Option to Yes.
Note: These are static examples only and do not reflect the template you are creating.
Activity Guide Composer - Select Steps PageUse the Activity Guide Composer - Select Steps page (AGC_TMPL_STEP1_FL) to select the steps thatshould be part of this activity guide.
Navigation
Enterprise Components >Activity Guide Composer >Templates >Activity Guide Template
• Click the Add Activity Guide Template button from the Activity Guide Templates Page, enter thetemplate ID and effective date on the Add Activity Guide Template Page, and click Continue.
• Click the Update Template button from the Update Template Page.
From within the Activity Guide Composer, select the Select Steps tab from the left panel category list, orclick the Next or Previous buttons to navigate to the page.
478 Copyright © 1988, 2020, Oracle and/or its affiliates.

Chapter 21 Working with the Activity Guide Composer
Image: Activity Guide Composer - Select Steps Page
This example illustrates the fields and controls on the Activity Guide Composer - Select Steps page.
Image: Activity Guide Composer - Select Steps Page for a Single Component
This example illustrates the fields and controls on the Activity Guide Composer - Select Steps page fora single component. Steps defined for this type of activity guide represent individual pages from a singlePeopleSoft component that will be saved as a single transaction. Single component functionality is setup on the category assigned to the template. See the Categories - Steps Page documentation for moreinformation on single component categories and templates.
Important! At minimum, the required steps need to be included in the activity guide template to ensurethe PeopleSoft component can be saved.
Copyright © 1988, 2020, Oracle and/or its affiliates. 479

Working with the Activity Guide Composer Chapter 21
The following video provides an overview of Activity Guide Composer - Single Component.
Image Highlights, PeopleSoft HCM Update Image 29: Activity Guide Composer - SingleComponent
Note: You must first identify the security roles for this template before you can select steps.
The top of this page displays the category associated with this template. The activity guide categorydefines the valid steps that are available for the activity guide template. To manage steps for a category,use the Categories - Steps Page.
Total Steps for Template Displays the number of steps that have been added to thistemplate.
Add Step Click this button to add the step to a template. The Added StepCount field identifies if you have already added this step toyour template and how many times it will be listed as a step. To organize, configure, or delete a step, use the Activity GuideComposer - Organize and Configure Steps Page.
Note: If Step Definition Rule on the category is defined asSteps from a single component saves as single transaction, thenthe user is only able to add the step once to the activity guidetemplate and Add Step will be disabled after the step is added.
Added Step Count Identifies how many times you have added this step to yourtemplate. If you have added a step by accident, you can deleteit from the Activity Guide Composer - Organize and ConfigureSteps Page.
Required This column is available when the Step Definition Rule on thecategory (see the Categories - Steps Page) is defined as Stepsfrom a single component saves as single transaction, and at leastone of the steps is selected as required. The field will display aYes or No value depending on what is defined on the category.
Note: This will generate an error if required steps are not addedand allow a step to be added once.
Activity Guide Composer - Organize and Configure Steps PageUse the Activity Guide Composer - Organize and Configure Steps page (AGC_TMPL_STEP2_FL) toorganize, configure, or delete a step from the activity guide template.
480 Copyright © 1988, 2020, Oracle and/or its affiliates.

Chapter 21 Working with the Activity Guide Composer
Navigation
Enterprise Components >Activity Guide Composer >Templates >Activity Guide Template
• Click the Add Activity Guide Template button from the Activity Guide Templates Page, enter thetemplate ID and effective date on the Add Activity Guide Template Page, and click Continue.
• Click the Update Template button from the Update Template Page.
From within the Activity Guide Composer, select the Organize and Configure Steps tab from the leftpanel category list, or click the Next or Previous buttons to navigate to the page.
Image: Activity Guide Composer - Organize and Configure Steps Page
This example illustrates the fields and controls on the Activity Guide Composer - Organize and ConfigureSteps page.
Note: You must first identify the security roles and select step for this template before you can configuresteps.
This page displays the steps you added on the Activity Guide Composer - Select Steps Page. Determinethe step order by moving them up and down in the list. If the activity guide type is vertical, you can groupsteps into like categories by adding group steps and selecting which steps should be a sub step within thegroup. For example, you can create a group called Payroll and select all those steps related to payroll assub steps to this group. This page also enables you to configure step attributes.
The following columns will display to manage your steps. If none of the steps are associated with thattype of configuration, that column will not display. For example, if none of your steps are page textenabled, that column and button will not be available.
Copyright © 1988, 2020, Oracle and/or its affiliates. 481

Working with the Activity Guide Composer Chapter 21
Add Group Stepbutton
Click this button to access the Add Group Step Page and enter agroup step description.
Note: This button is not available for templates made using theHorizontal activity guide types.
Step Type Displays if this is an individual Step, the Group Step label, or aSub Step that is part of a group step.
Move Step Up and Move Step Down icon buttons
Click the solid up arrow to move the step up one position in thelist or click the solid down arrow to move the step down oneposition in the list of steps. If the next step consists of a groupstep, then this step will be moved above or below the group stepwith all it’s sub steps.
Move Group Step Up and
Move Group Step Down iconbuttons
Click the solid circled up arrow to move the group step with allits sub steps up one position in the list or click the solid circleddown arrow to move the step and all it’s sub steps down oneposition in the list of steps.
Move Sub Step Up and Move Sub Step Down icon buttons
Click the open circled up arrow to move the sub step up oneposition within the group of steps or click the open circled downarrow to move the sub step down one position within the groupof steps. When you reach the top (or bottom) of the group step, you will no longer be given the option to move the sub step up (or down) in that group step.
Step Description The step description defaults from the Description field on theCategories - Steps Page. You can modify this description asneeded. This description will be the name of the step in the leftpanel, or horizontal step across the top for a horizontal activityguide type. It will also appear as the page name.
Configure Group Step button
This button is available for group steps. Click this button toaccess the Configure Group Step Page and select which stepsshould be a sub step within this group.
Configure Attributes button
Click this button to access the Configure Attributes Page todefine step attributes, such as whether the step is required or if itmust be completed by a specific due date.
Configure Dependencies iconbutton
Click this button to access the Configure Dependencies Page toidentify steps that must be completed prior to completing thisstep.
Configure Page Text iconbutton
This button is available when a step is page text enabled, such asthe Welcome or Summary page.
Click this button to access the Configure Page Text Page toenter any text that you want the page to display for this step.
482 Copyright © 1988, 2020, Oracle and/or its affiliates.

Chapter 21 Working with the Activity Guide Composer
Step Details icon button
Click this button to access the Step Details Page to view theconfiguration for this step. Step configuration is defined onthe Categories - Steps Page, with the exception of the StepDescription value, which comes from the Step Description valueyou entered on this page.
Delete Step icon button
Click this button to remove this step from the template. You canreturn to the Activity Guide Composer - Select Steps Page toadd the step back into this template.
Note: If the Step Definition Rule on the category is defined asSteps from a single component saves as single transaction, thenthat user will not be able to delete the step if it has been definedas a Required step in the activity guide category.
Add Group Step PageUse the Add Group Step page (AGC_TMPL_STPAG_SCF) to define the label for the group of steps.
Navigation
Click the Add Group Step button from the Activity Guide Composer - Organize and Configure StepsPage.
Image: Add Group Step Page
This example illustrates the fields and controls on the Add Group Step page.
A group step does not display a transactional page to the end user. Rather, it serves as a header for a groupof steps. For example, you can create a group step called Personal Data and then associate it to other stepsthat prompt the user to enter contact information, addresses, dependent data, and emergency contacts.When a user selects a group step from the left panel of the page, the panel will expand to show the substeps within that group.
Use the Configure Group Step Page to associate sub steps to a group.
Note: Group steps are not allowed for horizontal activity guides.
Configure Group Step PageUse the Configure Group Step page (AGC_TMPL_STPEG_SCF) to select which steps should be a substep within this group.
Copyright © 1988, 2020, Oracle and/or its affiliates. 483

Working with the Activity Guide Composer Chapter 21
Navigation
Click the Configure Group Step button from the Activity Guide Composer - Organize and ConfigureSteps Page.
Image: Configure Group Step Page
This example illustrates the fields and controls on the Configure Group Step page.
The page displays those steps that have been added to this template that have not already been associatedwith another group step. To add the same step to different groups, you will need to add the step multipletimes from the Activity Guide Composer - Select Steps Page.
Select those steps that should be part of this group. To remove a step from a group, deselect the check boxfor that step row.
Configure Attributes PageUse the Configure Attributes page (AGC_TMPL_STPEA_SCF) to configure the rules for a step.
Navigation
Click the Configure Attributes button from the Activity Guide Composer - Organize and Configure StepsPage.
484 Copyright © 1988, 2020, Oracle and/or its affiliates.

Chapter 21 Working with the Activity Guide Composer
Image: Configure Attributes Page (1 of 2)
This example illustrates the fields and controls on the Configure Attributes page (1 of 2).
Image: Configure Attributes Page (2 of 2)
This example illustrates the fields and controls on the Configure Attributes page (2 of 2).
Step ControlsRequired Swipe to Yes to make this a required step for the end user. When
required, the step tab in the left panel will display an asterisk tothe left to the step label.
Disable AWE Status Update This field is enabled when the AWE integration configuration isset up on the Categories - Steps Page for this step.
Swipe to Yes to override and turn off the AWE Integration thatupdates the status of this template step.
Lock Step After Complete Swipe to Yes to disable end user updates to this step after thestep has been completed. When step reaches a Complete status,
Copyright © 1988, 2020, Oracle and/or its affiliates. 485

Working with the Activity Guide Composer Chapter 21
the step is locked. Therefore, further updates or changes cannotbe made to this step once complete.
Step AssignmentsThis section is available when you have configured assignees on the Categories - Assignees Page.
Assignee Select one or more assignees that should be associated to thisstep. Assignees will still see all the steps listed in the activityguide process but they can access only those steps assigned tothem. To hide steps that are not assigned to a user, select theHide Steps option on the Activity Guide Composer - ActivityGuide Type Page. This option is available for the non sequentialvertical activity guide type only.
If you have set up default assignees in the Default StepAssignments section of the Categories - Steps Page, thosevalues will appear here, but you can override these values.
Leave this field blank to have the system automatically assignthis step to the user that created the activity guide instance.
Consider the following when you insert a new effective datedrow for a template after you have added or modified defaultassignee information on the category:
• The system will attempt to carry forward all configuration tothe new effective dated row.
• If you previously did not added assignee information forthis template, the page will take the new default assignees, ifany.
• If you previously added assignee information for thistemplate, the page will copy the previous assigneeinformation from the template and not take the defaultinformation from the category.
• When an assignee defined for a step no longer exists on thecategory, it will remove the assignee from the step.
• If you added a new step to the template, then the new stepwill have default assignees based on the maximum effectivedated category to the effective date of the template.
Note: When you click Done on this page or Save on theOrganize and Configure Steps page, the system will issue awarning if you left the Assignee field blank. Although you canleave this field blank, we recommend that you review all steps, especially those that should not be assigned to the user thatcreated the instance, to ensure the proper assignment.
486 Copyright © 1988, 2020, Oracle and/or its affiliates.

Chapter 21 Working with the Activity Guide Composer
When a person initiates an activity guide and assignees are associated with the template, only those stepsa user is assigned appear as available in the left navigation. The steps assigned to another person aregrayed out and unavailable. If notifications are enabled for the template, the assignees will be notifiedwhen their assigned steps become open. Therefore, if a dependency is set for a step, the assignee will benotified after the prerequisite step is marked complete.
The following video provides an overview of Activity Guide Composer - multi user guides:
Image Highlights, PeopleSoft HCM Update Image 31: Activity Guide Composer-Multi UserGuides
Start DateUse this section to identify the start date of a step.
Start Date Option Indicate the start date for this step, if any. Options include:Current Date, Date Field, and None.
Start Date Field This field becomes available when you select Date Field in theStart Date Option field.
Valid options for this field are defined on the Categories -Context Page when you select the Use in Start/Due Date Optioncheck box for a derived contextual date field.
Due DateUse this section to identify when a step must be completed.
Due Date Option Indicate a due date for this step, if any. Options include: DateField, None, and Start Date.
Due Date Field This field becomes available when you select Date Field in theDue Date Option field.
Valid options for this field are defined on the Categories -Context Page when you select the Use in Start/Due Date Optioncheck box for a contextual date field.
Add Days to Due Date Enter the number of days after the date you have entered (startdate or the date field) the user must be complete the step. Forexample, if proof of identification is due within three (3) days ofthe worker’s hire date, you would select Date Field in the DueDate Option field, EE Job Data : Hire Date in the Due DateField, and enter 3 in the Add Days to Due Date field.
Inactivate Step After Due Date Swipe to Yes if you want to inactivate and lock this step for theend user after the due date has passed.
Step QuestionEnter a simple yes or no question if you want the user to decide if the step should be included or excludedfrom the activity guide.
Copyright © 1988, 2020, Oracle and/or its affiliates. 487

Working with the Activity Guide Composer Chapter 21
If the user answers Yes to the question, then the step will appear in the activity guide.
If the user answers No to the question, then the step will be cancelled and not displayed to the user.
Configure Dependencies PageUse the Configure Dependencies page (AGC_TMPL_STPDP_SCF) to identify steps that must becompleted prior to completing this step.
Navigation
Click the Configure Dependencies button from the Activity Guide Composer - Organize and ConfigureSteps Page.
Image: Configure Dependencies Page
This example illustrates the fields and controls on the Configure Dependencies page.
Dependent Step Select a step or steps that must be completed before an end usercan perform this step. Valid values are all the steps that havebeen added to this template. Group steps are not part of the stepselection options: you would need to select each sub step withina group step if the entire group step should be completed priorto completing this step.
Note: You cannot make a step dependent upon itself.
Configure Page Text PageUse the Configure Page Text page (AGC_TMPL_PGTEXT) to enter page text when a step is page textenabled, such as the Welcome, Video, and Summary page steps.
As delivered, page text is only enabled for the following related content services: HC_AGC_INFO_FL,HC_AGC_VIDEO_FL, and HC_AGC_SUMMARY_FL.
Navigation
Click the Configure Page Text button from the Activity Guide Composer - Organize and Configure StepsPage.
488 Copyright © 1988, 2020, Oracle and/or its affiliates.
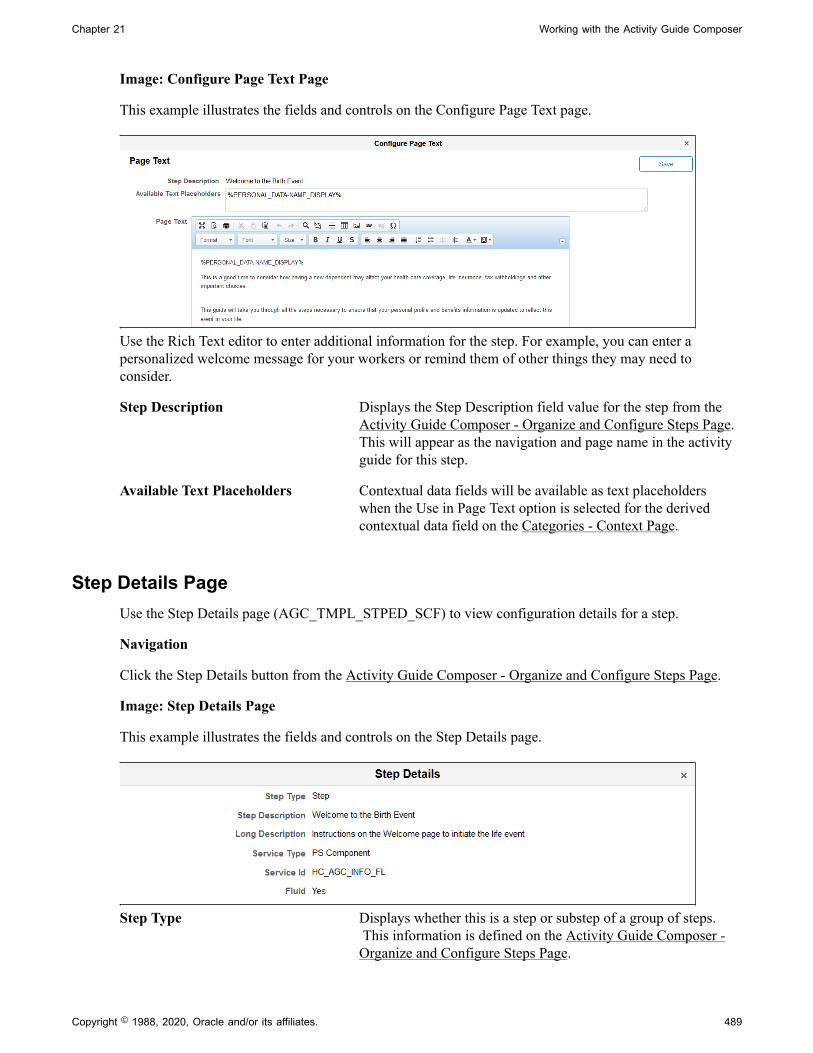
Chapter 21 Working with the Activity Guide Composer
Image: Configure Page Text Page
This example illustrates the fields and controls on the Configure Page Text page.
Use the Rich Text editor to enter additional information for the step. For example, you can enter apersonalized welcome message for your workers or remind them of other things they may need toconsider.
Step Description Displays the Step Description field value for the step from theActivity Guide Composer - Organize and Configure Steps Page.This will appear as the navigation and page name in the activityguide for this step.
Available Text Placeholders Contextual data fields will be available as text placeholderswhen the Use in Page Text option is selected for the derivedcontextual data field on the Categories - Context Page.
Step Details PageUse the Step Details page (AGC_TMPL_STPED_SCF) to view configuration details for a step.
Navigation
Click the Step Details button from the Activity Guide Composer - Organize and Configure Steps Page.
Image: Step Details Page
This example illustrates the fields and controls on the Step Details page.
Step Type Displays whether this is a step or substep of a group of steps. This information is defined on the Activity Guide Composer -Organize and Configure Steps Page.
Copyright © 1988, 2020, Oracle and/or its affiliates. 489

Working with the Activity Guide Composer Chapter 21
Step Description Displays the step description that will appear for the user as anavigation step and as the page name. This comes from the StepDescription field on the Activity Guide Composer - Organizeand Configure Steps Page.
Long Description, Service Type,Service Id, and Fluid
These values come from the configuration defined on theCategories - Steps Page for this step.
The service type and ID indicate the related content service thatis associated with the step.
The Fluid field will display a Yes value if this step is performedusing a fluid page.
Activity Guide Composer - Display and Processing PageUse the Activity Guide Composer - Display and Processing page (AGC_TMPL_PRCS_FL) to configurea template for use in My Processes.
Navigation
Enterprise Components >Activity Guide Composer >Templates >Activity Guide Template
• Click the Add Activity Guide Template button from the Activity Guide Templates Page, enter thetemplate ID and effective date on the Add Activity Guide Template Page, and click Continue.
• Click the Update Template button from the Update Template Page.
From within the Activity Guide Composer, select the Display and Processing tab from the left panelcategory list, or click the Next or Previous buttons to navigate to the page.
490 Copyright © 1988, 2020, Oracle and/or its affiliates.

Chapter 21 Working with the Activity Guide Composer
Image: Activity Guide Composer - Display and Processing Page
This example illustrates the fields and controls on the Activity Guide Composer - Display and Processingpage.
Use this page to identify which template activity guides should be available from the My Processes pageand the rules that apply for each activity guide.
Note: For users to access an activity guide from My Processes Page page, they must have a security roleequal to one of the end user security roles specified for the activity guide template.
Display in My Processes Select Yes to include this activity guide template in the MyProcesses pages. This will also open up the remaining fields onthis page.
Note: The template must also be active to be available from theMy Processes page.
My Processes Description Enter a long description that introduces the user to the activityguide template. This long description displays on the contentarea of My Processes after the user has selected an activityguide template from the left panel.
This will be defaulted to the long description of the activityguide, but it can be modified.
Template Icon (Optional) Select the icon, if any, that should appear next to thetemplate name in the left panel of the My Processes page. Theimage will display below the field after it is selected.
Copyright © 1988, 2020, Oracle and/or its affiliates. 491

Working with the Activity Guide Composer Chapter 21
Start in My Processes Select Yes to enable the user to initiate an activity guide instancefrom the My Processes page.
Delete in My Processes Select Yes to enable the user to delete an instance of an activityguide that is no longer needed.
Maximum Instances Indicate the maximum number of activity guide instances a usercan have in progress for this activity guide template. The pageprovides 0 as the default value, which is used to indicate thatthere is no limit on the number of instances the user can have inprogress for this activity guide.
Activity Guide Composer - Notifications PageUse the Activity Guide Composer - Notifications page (AGC_TMPL_NOTF_FL) to configurenotifications for a template.
Navigation
Enterprise Components >Activity Guide Composer >Templates >Activity Guide Template
• Click the Add Activity Guide Template button from the Activity Guide Templates Page, enter thetemplate ID and effective date on the Add Activity Guide Template Page, and click Continue.
• Click the Update Template button from the Update Template Page.
From within the Activity Guide Composer, select the Notifications tab from the left panel category list, orclick the Next or Previous buttons to navigate to the page.
492 Copyright © 1988, 2020, Oracle and/or its affiliates.

Chapter 21 Working with the Activity Guide Composer
Image: Activity Guide Composer - Notifications Page
This example illustrates the fields and controls on the Activity Guide Composer - Notifications page.
Use this page to manage notification settings for a template. Default values are provided from thecategory but can be overridden here.
Enable Notifications Swipe this option to Yes to enable notifications for this template.
Notifications must be enabled on the Categories - NotificationsPage in order to enable notifications for this template.
Enable Swipe to Yes for those notification types you want to send to theassignees of this template. Options include Initial, Overdue, andReminder.
Initial notifications will not be sent to the user that created theinstance of the activity guide process. For more informationon notifications, see Understanding Notifications for ActivityGuide Instance Steps.
Notification Select the notification that should be sent to the assignee. Notifications are configured on the Define Notifications Page.
Preview Notifications button
Click this button to access the Preview <Notification Type>Notifications Page and view the notification text or message thatwill be sent to an assignee.
Days Between Reminders Enter a positive number of days indicating when a remindernotification will be sent to an assignee.
Copyright © 1988, 2020, Oracle and/or its affiliates. 493

Working with the Activity Guide Composer Chapter 21
Preview <Notification Type> Notifications PageUse the Preview <Notification Type> Notification page (AGC_TMPL_NTPV_SCF) to view thenotification text or message that will be sent to the users assigned to the steps.
Note: The name of the page will vary based on which notification type preview you select.
Navigation
Select the Preview link for a notification type.
Image: Preview <Notification Type> Notification Page
This example illustrates the fields and controls on the Preview Initial Notification page.
Displays the push or email message text that will be sent via a notifications. Changes to the message textmust be done on the Define Notifications Page.
494 Copyright © 1988, 2020, Oracle and/or its affiliates.

Chapter 21 Working with the Activity Guide Composer
Activity Guide Composer - Review and Activate PageUse the Activity Guide Composer - Review and Activate page (AGC_TMPL_ACTIVE_FL) to activate ordeactivate an activity guide template.
Navigation
Enterprise Components >Activity Guide Composer >Templates >Activity Guide Template
• Click the Add Activity Guide Template button from the Activity Guide Templates Page, enter thetemplate ID and effective date on the Add Activity Guide Template Page, and click Continue.
• Click the Update Template button from the Update Template Page.
From within the Activity Guide Composer, select the Review and Activate tab from the left panelcategory list, or click the Next button to navigate to the page.
Image: Activity Guide Composer - Review and Activate Page
This example illustrates the fields and controls on the Activity Guide Composer - Review and Activatepage.
Activate Activity Guide or DeactivateActivity Guide buttons
These buttons are not active for the initial row of deliveredtemplates.
When an activity guide is Active, the text at the top of the pageinforms you that your activity guide is active and will displaythe Deactivate Activity Guide button.
If an activity guide is Inactive, the text at the top of the pagereminds you to activate your activity guide after you havecompleted all changes. It will also display the Activate ActivityGuide button for you to change the status.
Copyright © 1988, 2020, Oracle and/or its affiliates. 495

Working with the Activity Guide Composer Chapter 21
When you create a new activity guide template, the defaultvalue is inactive and the page will present you with the ActivateActivity Guide button.
If you insert a new effective dated row or clone an existingactivity guide template, the system will copy the same activestatus of that template. For example, if you insert a neweffective dated row or clone an activity guide template with astatus of Inactive (deactivated), the new row or cloned activityguide template will also be Inactive. However, if you inserta row or clone an activity guide template that has a status ofActive, the new row or cloned activity guide template will beActive.
Note: If Step Definition Rule on the category is defined as Stepsfrom a single component saves as single transaction, then theuser will not be able to activate the template until an Action hasbeen defined for the template that enables the end user to submitor complete the activity guide process.
Working with Activity Guide Notifications
Activity guide processes enable you to create and send notifications to the assignees associated with youractivity guide templates. The PeopleSoft application delivers several notifications, or you can create yourown.
To create message text for activity guides, use the Define Notifications (AGC_CAT_NOTIF_TBL)component.
To generate and review your notification processes, use the Process Notifications(AGC_PRCS_NOTIF_RC) component.
These topics provide an overview of activity guide notifications for activity guide instance steps anddiscusses working with activity guide notifications.
Pages Used to Work with Activity Guide NotificationsPage Name Definition Name Usage
Define Notifications Page AGC_CAT_NOTIF_DEF Create activity guide notifications.
Process Notifications Page AGC_PRCS_NOTIF_RC Process a batch or individual templatenotifications.
Understanding Notifications for Activity Guide Instance StepsYou can configure your activity guides to send notifications to those who are required to complete stepswithin a process. This is particularly beneficial when you are using a template that requires multiple usersto complete different steps within an instance. While a primary user will trigger and own the activity
496 Copyright © 1988, 2020, Oracle and/or its affiliates.

Chapter 21 Working with the Activity Guide Composer
guide instance, there may be other users, such as a manager or administrator, that may need to react to oneor more steps in an activity guide instance. These assignees are associated to steps and you can configurethe system to send a push or email notification to the appropriate users at the appropriate time to completetheir steps.
Notification Options and TypesYou will enable and set notification defaults when you configure your categories. Although notificationscan be overridden at the template level, notifications must be first enabled on the category. Templates thatare assigned to categories that do not have notifications enabled will not be able to use this feature.
The system provides three notification types:
• Initial
• Overdue
• Reminder
You will create your own notification messages and link these to the notification types you select on eitherthe Categories - Notifications Page or template Activity Guide Composer - Notifications Page. You canchoose one or all of these notification types, as well as select the options of whether you want to notifythe assignees through push notification, email, or both. When notifications are enabled, you must select atleast one notification type and option. Since notification types are provided by default from the category,you can override which types of notifications you want to use at the template level. A type does not needto be selected at the category level to be used in the template. However, options to use push or emailnotifications are determined at the category level.
When setting up notifications for your categories, you are required to select a notification priority oreither Initial or Overdue.
The system will send notifications based on the priority you select for the category and in this order.
Initial Notification Priority and ConsiderationsWhen you set the category to use Initial as the priority notification, the system will process notificationsin this order:
1. Initial
2. Overdue
3. Reminder
Copyright © 1988, 2020, Oracle and/or its affiliates. 497

Working with the Activity Guide Composer Chapter 21
Image: Process flow when Initial notifications are set as the priority
When an activity guide is initiated or a batch process for notification is run, the system will first evaluatethe steps to see which are open.
• When an activity guide is first initiated, the system checks to see if steps are open and, if so, sends theinitial notification.
• When a process notification is run, the system first checks for open steps and then checks to see if aninitial notification has been sent. If it has not been sent, the initial notification is sent to the assignee.If an initial notification has already been sent, then the system checks to see if there are overdue steps.If the step is overdue, the overdue notification is sent. If it is not overdue, then the system checks tosee if it is time to send a reminder notification, as specified on the template Activity Guide Composer- Notifications Page.
Keep the following in mind when setting up notifications when you select Initial as the first priority:
• The system will not send an initial notification to the initiator of the instance. Initial notifications aresent only to assignees who are not the initiators of the instance and sent when their step is open andready for them to complete.
• Initial notification is sent only once for each assignee.
• If the steps are overdue and the initial notification was not sent, the system will first send the initialnotification.
• If initial notification has been sent and the step is not overdue but is due for a reminder, the systemwill send a reminder notification.
• If the steps are overdue and initial notification was sent, then the system will send an overduenotification.
• The system will not send duplicate notifications to an assignee on the same day for the same instanceof an activity guide template.
Overdue Notification Priority and ConsiderationsWhen you set the category to use Overdue as the priority notification, the system will processnotifications in this order:
1. Overdue
2. Initial
498 Copyright © 1988, 2020, Oracle and/or its affiliates.

Chapter 21 Working with the Activity Guide Composer
3. Reminder
Image: Process flow when Overdue notifications are set as the priority
When an activity guide is initiated or a batch process for notification is run, the system will first evaluatethe steps to see which are open.
• When an activity guide is first initiated, the system checks to see if steps are open and, if so, thencheck to see if a step is overdue. If it’s not overdue, it sends the initial notification.
• When a notification process is run, the system first checks for open steps and then checks to see if anyare overdue. If the step is overdue, and the notification hasn’t been sent, the overdue notification issent at this time. If it is not overdue, the system will then check to see if the initial notification wassent to the assignee and sends it if it hasn’t already. If an initial notification has already been sent,then the system checks to see if it is time to send a reminder notification, as specified on the templateActivity Guide Composer - Notifications Page.
Keep the following in mind when setting up notifications when you select Overdue as the first priority:
• The system will not send an initial notification to the initiator of the instance. Initial notifications aresent only to assignees who are not the initiators of the instance and send when their step is ready forthem to complete.
• If no overdue steps are found the first time for an assignee, then the initial notification is sent. Initialnotification is sent only once for each assignee.
• If the steps are overdue when they become open, the system will send the overdue notification. Initialnotification only be sent if the step is not overdue.
• Once the overdue notification is sent, the system will check if the step is due for reminder.
• The system will not send duplicate notifications to an assignee on the same day for the same instanceof an activity guide template.
Define Notifications PageUse the Define Notifications page (AGC_CAT_NOTIF_DEF) to create activity guide notifications.
Navigation
Enterprise Components >Activity Guide Composer >Define Notifications
Copyright © 1988, 2020, Oracle and/or its affiliates. 499

Working with the Activity Guide Composer Chapter 21
Image: Define Notifications Page
This example illustrates the fields and controls on the Define Notifications page.
Push Notification Enter the text that should appear in the push notification alert. Alert messages are sent to the assignees via the Notificationsfunctionality and will appear on the banner once they have beenprocessed (see Process Notifications Page)..
Email Notification Enter the priority, subject, and message of the email that will besent to assignees.
The page displays the Available Text Placeholders section, which you can use to configure and derive your email text. These values come from the context fields defined in theDerived Contextual Data section on the Categories - ContextPage.
Use these reserved text placeholders for the following:
• %AG_DETAILS%: Display the steps in the activity guidethat are assigned to the user receiving the email. Details willalso identify if the step is overdue.
• %AG_URL%: Display a URL to access the fluid activityguide. The URL will appear as a hyperlink with thedescription of link.
500 Copyright © 1988, 2020, Oracle and/or its affiliates.

Chapter 21 Working with the Activity Guide Composer
%AG_USER%: Display the description of the operator idreceiving the email. Typically, the operator description is theusers name.
Related LinksCategories - Notifications PageActivity Guide Composer - Notifications Page
Process Notifications PageUse the Process Notifications page (AGC_PRCS_NOTIF_RC) to process a batch or individual templatenotifications.
Navigation
Enterprise Components >Activity Guide Composer >Process Notifications
Image: Process Notifications Page
This example illustrates the fields and controls on the Define Notifications page.
Processes should be run on a regular basis to capture any new or upcoming notifications that need to besent.
All Activity Guide Categories Select to indicate that the system should run and processnotifications for all templates. By selecting this check box, theremaining fields on the page become unavailable.
Activity Guide Category Select the categories for templates for which you want to runand process notifications.
Template Enter the templates for which you want to run and processnotifications. If you do not enter a template, notifications will begenerated for all templates within the category specified.
Copyright © 1988, 2020, Oracle and/or its affiliates. 501

Working with the Activity Guide Composer Chapter 21
Setting Up Activity Guide Utilities for Template Assignment
The Activity Guide Composer enables organizations to assign an activity guide template to a person basedon a set of rules you define using the Template Assignment feature.
For example, the OnBoarding feature enables the administrator to assign templates using a defaulttemplate or by using the Template Assignment feature, where the system will automatically assign theOnBoarding activity guide. The OnBoarding administrator determines which type of template assignmentfeature on the OnBoarding Installation page.
To set up Activity Guide Utilities for auto Template Assignment, use the Search Key SourceTables (AGC_SRCHREC_TBL), Search Keys (AGC_SRCHKEY_TBL), Template Assignment(AGC_TMA_TBL), and Test Template Assignment (AGC_TMA_TEST) components.
These topics discuss setting up Activity Guide Utilities for auto Template Assignment.
Pages Used to Set Up Activity Guide Utilities for Auto Template AssignmentPage Name Definition Name Usage
Search Key Source Tables Page AGC_SRCHREC_TBL Identify source criteria fields that arederived from the key structure of asource table.
Search Keys Page AGC_SRCHKEY_TBL Identify search key sourceconfigurations.
Template Assignment - General Page AGC_TMA_TBL1 Enter search keys for the templateassignment definition
Template Assignment - TemplateAssignment Page
AGC_TMA_TBL2 Enter template assignment definitions.
Edit Search Key Values Page AGC_TMA_TBL2_SEC Enter search key values for a template.
Test Template Assignment Page AGC_TMA_TEST Test and validate the templateassignment process.
Search Key Source Tables PageUse the Search Key Source Tables page (AGC_SRCHREC_TBL) to identify source criteria fields that arederived from the key structure of a source table.
Navigation
Enterprise Components >Activity Guide Composer >Activity Guide Utilities > Search Key SourceTables >Search Key Source Tables
502 Copyright © 1988, 2020, Oracle and/or its affiliates.

Chapter 21 Working with the Activity Guide Composer
Image: Search Key Source Tables Page
This example illustrates the fields and controls on the Search Key Source Tables page.
Identify source tables that you will use when creating auto template assignment search keys on the SearchKeys Page. When you add the source table to this page, the page displays the criteria fields associatedwith this source table.
Criteria Type The system uses the criteria fields to retrieve data from thesource table.
Criteria fields with the type of Required need to have valuesspecified in order to retrieve data.
Criteria fields with the type of Derived indicate that the systemwill derive the value based on common criteria utilized in thesystem. For example, EFFDT will be derived by retrievingthe maximum effective dated row as of the date specified orEFFSEQ will be derived by retrieving the maximum effectivesequence row as of the date specified.
Search Keys PageUse the Search Keys page (AGC_SRCHKEY_TBL) to identify search key source configurations.
Navigation
Enterprise Components >Activity Guide Composer >Activity Guide Utilities > Search Keys >SearchKeys
Copyright © 1988, 2020, Oracle and/or its affiliates. 503

Working with the Activity Guide Composer Chapter 21
Image: Search Keys Page
This example illustrates the fields and controls on the Search Keys page.
The system uses the search keys prompt configuration when you define a Template Assignment definition(see Template Assignment - General Page). This ensures that the user enters valid search key values.
Search Key SourceSource Table and Source Field Identify the search key source by entering a source table and
field that will be used to retrieve the search key value.
Valid source tables are defined using the Search Key SourceTables Page. They are defined with an edit table that controls thevalid values that can be selected for a field.
Field Edit Type Displays the field edit type after you enter the Source Fieldvalue. Values are Prompt Table,Translate Table Edit and Yes/No. When the source field is aPrompt Table, the page displays the Search Key Prompt sectionof the page.
Search Key PromptThis section becomes available when the Source Field value you entered on this page is a Prompt Tablefield edit type.
The search key prompt configuration is provided by default based on the source field you selected fromthe source table. The field edit type on the source table determines the values populated in the prompt andsource foreign key fields, if any.
The Prompt Table field edit type supports prompt tables that have no more than three keys defined,excluding the EFFDT field. If a prompt table has more than three keys, then you can specify a differentrecord view to retrieve valid values for the search key.
Template Assignment - General PageUse the Template Assignment - General page (AGC_TMA_TBL1) to enter search keys for the templateassignment definition.
504 Copyright © 1988, 2020, Oracle and/or its affiliates.

Chapter 21 Working with the Activity Guide Composer
Navigation
Enterprise Components >Activity Guide Composer >Activity Guide Utilities > TemplateAssignment >General
Image: Template Assignment - General Page
This example illustrates the fields and controls on the Template Assignment - General page.
Activity Guide Category Select the activity guide category for which you will beperforming auto template assignment. Valid values are definedusing the Categories - Category Page.
Search Keys Enter up to 15 search keys for your template assignmentdefinition. Valid values are defined on the Search Keys Page.
Each search key will display as columns in the order youindicate here on the Template Assignment - TemplateAssignment Page, which is where you will specify the criteriathat should be met to assign an activity guide template to anindividual.
Template Assignment - Template Assignment PageUse the Template Assignment - Template Assignment page (AGC_TMA_TBL2) to enter templateassignment definitions.
Navigation
Enterprise Components >Activity Guide Composer >Activity Guide Utilities > TemplateAssignment >Template Assignment
Copyright © 1988, 2020, Oracle and/or its affiliates. 505

Working with the Activity Guide Composer Chapter 21
Image: Template Assignment - Template Assignment Page
This example illustrates the fields and controls on the Template Assignment - Template Assignment page.
The template assignment definition is a look up table that associates activity guide templates to specificsearch key values. For example, a template assignment definition for employee OnBoarding will havesearch keys based on the job data related to the employee being hired. The system will retrieve the searchkey values for that employee and then find the highest priority (lowest number) template where all searchkey values match the employee's values to find the activity guide template that should be assigned to theemployee.
Important! It is recommended that a low order priority template be entered as a default template to getassigned in the event that no higher priority criteria matches. This default template should have no valuesassigned to the search keys.
Priority Organize and control the priority of certain search key valuecombinations that should take precedence over others. Thesystem will compare the search key values with those of theemployee’s in priority order and assign the template upon thefirst match. The lowest number represents the highest priority.
Edit icon Click this icon button to access the Edit Search Key Values Pageto enter the values for the search keys. These values will appearin the search key columns after you have added them on thesecondary page.
Edit Search Key Values PageUse the Edit Search Key Values page (AGC_TMA_TBL2_SEC) to enter search key values for a template.
Navigation
Click the Edit icon button on the Template Assignment - Template Assignment Page.
506 Copyright © 1988, 2020, Oracle and/or its affiliates.

Chapter 21 Working with the Activity Guide Composer
Image: Edit Search Key Values Page
This example illustrates the fields and controls on the Edit Search Key Values page.
For the template specified, enter the search key values that need to be satisfied to assign the template.
This page displays the search keys that you entered on the Template Assignment - General Page.
Test Template Assignment PageUse the Test Template Assignment page (AGC_TMA_TEST) to test and validate the template assignmentprocess.
Navigation
Enterprise Components >Activity Guide Composer >Activity Guide Utilities > Test TemplateAssignment >Test Template Assignment
Image: Test Template Assignment Page
This example illustrates the fields and controls on the Test Template Assignment page.
The template administrator can test a template by performing a mock transaction, like a hire, withoutactually applying the transaction to the system.
Copyright © 1988, 2020, Oracle and/or its affiliates. 507

Working with the Activity Guide Composer Chapter 21
When you perform a look up against the Template Assignment definition table, the system retrievesthe values of each search key based on the required criteria fields that you defined for the source tablespecified for the search key. The process then uses the values of the search keys to find a match in theTemplate Assignment definition table to assign the activity guide template.
Test Template AssignmentTemplate Assignment Enter a definition value to test a template assignment. Valid
value are created using the Template Assignment - GeneralPage.
Required Fields to Retrieve SearchAfter entering a template assignment value, the page will display the search keys and required fields forthis template assignment in this section. The system will use these to retrieve information for this templateassignment. The required fields are derived from the search key source table specified on the Search KeysPage.
Criteria Field Value Enter the values for the required fields to retrieve the searchkeys to test a template assignment.
Assign Template and Template Select the Assign Template button to see the template that isassigned based on your values.
Related LinksTemplate Assignment - Template Assignment Page
Setting Up Activity Guide Utilities for Contextual Data
The system uses contextual data and fields to retrieve and display data in an activity guide from aspecified source table. The PeopleSoft application delivers some contextual data but you can also addyour own.
To set up activity guide contextual data, use the Contextual Data (AGC_CTXDTA_TBL) component.
These topics discuss setting up activity guide context data.
Pages Used to Set Up Activity Guide Utilities for Contextual DataPage Name Definition Name Usage
Contextual Data - Definition Page AGC_CTXDTA_TBL1 Define definitions that will derive databased on the context fields defined foran activity guide category. The derivedcontextual data can be displayed in thefluid sub banner, page text, or, if its adate field, to configure the start and duedate of a step.
508 Copyright © 1988, 2020, Oracle and/or its affiliates.

Chapter 21 Working with the Activity Guide Composer
Page Name Definition Name Usage
Contextual Data - Test Page AGC_CTXDTA_TBL2 Test and validate contextual data.
Contextual Data - Definition PageUse the Contextual Data - Definition page (AGC_CTXDTA_TBL1) to define definitions that will deriveddata based on the context fields defined for an activity guide category. The derived contextual data can bedisplayed in the fluid sub banner, page text, or, if its a date field, to configure the start and due date of astep.
Navigation
Enterprise Components >Activity Guide Composer >Activity Guide Utilities > ContextualData >Definition
Image: Contextual Data - Definition Page
This example illustrates the fields and controls on the Contextual Data - Definition page.
The system uses the required context fields to retrieve data from the specified source table. Therefore, therequired context fields are typically the keys of the table that enable you to retrieve a row of data from thesource table.
Description Enter a description for the contextual data. This is the valuethat will appear in the Contextual Data field on the Categories -Context Page.
Source Table Identify the record source for the context fields.
Data Type Code Displays if it is System Data or Customer Data.
The PeopleSoft application delivers the following systemcontextual data values:
Copyright © 1988, 2020, Oracle and/or its affiliates. 509
Working with the Activity Guide Composer Chapter 21
• EE_JOB_DATA: Retrieves employee job data that haveEMPLID and EMPL_RCD as context keys.
• EE_PERSON_DATA: Retrieves employee person data.
Required Context FieldsUse this section to define the required context fields that need to exist in the activity guide category inorder to utilize the contextual data fields. This ensures that the contextual data fields can be retrievedbased on the values assigned to the context data fields.
Contextual Data FieldsContextual data fields are fields that can be retrieved from the source table based on the values of therequired context fields. They are defined by a field id, source field description, short description, andrelated data type.
Field Id and Source Field Enter a field and its position within the record.
Related Data Type, Related DataTable, and Related Data Field
Select either None or Table.
The related data type value of Table displays the fields RelatedData Table and Related Data Field, which enable you to retrieverelated data (e.g. Description) from another table based on thevalue of the source field. For example, a contextual data fieldcould have the source field of JOBCODE and related data typespecified as Table where the table is JOBCODE_TBL and therelated data field is DESCR.
To retrieve the related data for the value of the source field, allthe keys of the related data table need to exist on the sourcetable.
Contextual Data - Test PageUse the Contextual Data - Test page (AGC_CTXDTA_TBL2) to test and validate contextual data.
Navigation
Enterprise Components >Activity Guide Composer >Activity Guide Utilities > Contextual Data >Test
510 Copyright © 1988, 2020, Oracle and/or its affiliates.

Chapter 21 Working with the Activity Guide Composer
Image: Contextual Data - Test Page
This example illustrates the fields and controls on the Contextual Data - Test page.
Required Context Field Specify the required context fields to test and validatecontextual data. These fields will default from the requiredcontext fields you specified on the Categories - Category Page.
Value Enter the value the system should use to retrieve data for thecontextual data field you are testing.
As of Date Enter the date for when you want to view the data test results.
Contextual Data Field Id Select which field you want to search. Valid values come fromthe contextual data fields you defined on the Categories -Category Page.
Test Contextual Data and Test Results Click the Text Contextual Data button to have the system testthe retrieval of the contextual data you entered. Results areshown in the Test Results field.
Deploying and Managing Activity Guide Processes
The Activity Guide Composer provides your organization various means on how you can deploy andaccess activity guide processes. Many business processes deliver pages that workers access to completea transactional process. The Activity Guide Composer provides the My Processes page as a centralizedlocation where organizations can deploy their activity guide templates to their users without having tocreate a custom page. The Activity Guide Tiles page enables you to create custom tiles to grant assigneeseasy access to an activity guide. With these features, users can access activity guides to which they havebeen granted access to start new instances of activity guides, review and access activity guide instancesalready in progress, take action on individual steps to which they have been assigned, and, if given access,start or delete instances of a process.
Copyright © 1988, 2020, Oracle and/or its affiliates. 511

Working with the Activity Guide Composer Chapter 21
These topics discuss using the My Processes and Activity Guide Tile pages.
The following video provides an overview of Activity Guide Composer multi user guides and creatingtiles for the users:
Image Highlights, PeopleSoft HCM Update Image 31: Activity Guide Composer-Multi UserGuides
Pages Used to Deploy and Manage Activity GuidesPage Name Definition Name Usage
My Processes Page AGC_MYAG_DETAIL_FL View and manage activity guideprocesses.
Start Process Page AGC_START_AG_FL Deploy an activity guide processinstance.
Start Process - Questionnaire Page AGC_START_AG_FL Answer questions that determine ifcertain steps will appear in the activityguide transaction process.
Activity Guide Tiles Page AGC_TILE_TBL1 Create and publish activity guide tiles forassignees
<Activity Guide Tile Review> Page AGC_REVIEW_AG_FL Access activity guide instances through acustom tile.
My Processes PageUse the My Processes page (AGC_MYAG_DETAIL_FL) to view and manage activity guide processes.
Navigation
Enterprise Components >Activity Guide Composer >My Processes
Image: My Processes Page
This example illustrates the fields and controls on the My Processes page.
The My Processes fluid pages allow the user to start or access an in progress activity guide. When startingthe activity guide, the user will enter information and be transferred into a fluid activity guide.
512 Copyright © 1988, 2020, Oracle and/or its affiliates.

Chapter 21 Working with the Activity Guide Composer
My Processes Page LayoutThe My Processes page layout shows a list of activity guide process templates in the left pane towhich you have been granted access and that meet the following requirements set up by the templateadministrator:
1. You have been granted the security access role as defined for the End User security type for thistemplate on the Activity Guide Composer - Security Page.
2. The template is active and has been configured to display on the My Processes pages on the ActivityGuide Composer - Display and Processing Page.
Activity guide templates are listed in alphabetical order. Each time you return to the My Processes page,the system will select, by default, the first activity guide template in the list. Select an activity guidetemplate from the left pane and the main content page will be updated with details about the selectedtemplate. The left pane will also display the number of activity guide processes currently in progress for atemplate. The number of instances you can initiate per activity guide is set by the template administrator.
My Processes Page ElementsThe activity guide description, start, and delete options will vary by activity guide template and are set onthe Activity Guide Composer - Display and Processing Page of the template.
Start Process button Click this button to access the Start Process Page to initiate anew instance of the activity guide for a person.
The capability to initiate an activity guide from the MyProcesses page is determined on the Activity Guide Composer -Display and Processing Page. If the Start in My Processes is notset to Yes for an activity guide template, then this button will notbe available for this activity guide type.
Note: If you have met the maximum number of instances youcan have in progress for an activity guide, this button willstill display. However, when you click the button, the systemwill inform you that you cannot start another instance for thisactivity guide because the maximum number has been met. Administrators can set a different maximum instance numberof for each activity guide template. Hence, although you mayhave reached your maximum instances for one activity guide, you may not have met it for others.
In Progress This section displays a list of activity guide process instancesyou have started but not completed. The fields displayed are thecontext key fields specified for the category of the template (seeCategories - Context Page).
Delete icon button
Click this button to delete this activity guide process instance.
This button displays for activity guide templates where thetemplate administrator has granted the user deleting capabilitieson the My Processes page (see Activity Guide Composer -Display and Processing Page).
Copyright © 1988, 2020, Oracle and/or its affiliates. 513

Working with the Activity Guide Composer Chapter 21
Continue icon button
Click this button to access this activity guide process instanceand view or complete the activity guide.
Start Process PageUse the Start Process page (AGC_START_AG_FL) to deploy an activity guide process instance.
Navigation
Click the Start Process button from the My Processes Page.
Image: Start Process Page
This example illustrates the fields and controls on the Start Activity Guide page.
Note: Fields on this page vary based on the setup of the activity guide category associated with thisactivity guide template and are defined on the Categories - Context Page.Click the Next button to either access the Questionnaire page or start the activity guide.
Start Process - Questionnaire PageUse the Start Process – Questionnaire page (AGC_START_AG_FL) to answer questions that determine ifcertain page steps will appear in the activity guide transaction process.
Navigation
Click the Next button on the Start Process Page.
Note: Not all activity guide templates are set up to display the questionnaire. Some will take you directlyto the activity guide transaction process pages and steps.
Image: Start Process - Questionnaire Page
This example illustrates the fields and controls on the Start Process - Questionnaire page.
514 Copyright © 1988, 2020, Oracle and/or its affiliates.

Chapter 21 Working with the Activity Guide Composer
Questions on this page vary based on the setup of the template step configuration, which is defined on theConfigure Attributes Page.
Switch to Yes to have steps related to that question appear in the activity guide process. Select No to hidethe step within the activity guide process, since it is not needed.
Click Previous to return to the Start Process Page to update any parameters.
Click Next to access the activity guide transaction process pages. The My Processes fluid pages allow theuser to start or access an in progress activity guide. When starting the activity guide, the user will enterinformation and be transferred into a fluid activity guide. When a user accesses an activity guide that is inprogress, the user will be transferred into a fluid activity guide.
Related LinksManaging Activity Guide Templates
Activity Guide Tiles PageUse the Activity Guide Tiles page (AGC_TILE_TBL1) to create and publish activity guide tiles forassignees.
Navigation
Enterprise Components >Activity Guide Composer >Activity Guide Utilities >Activity Guide Tiles
Image: Activity Guide Tiles Page (1 of 2)
This example illustrates the fields and controls on the Activity Guide Tiles page (1 of 2).
Copyright © 1988, 2020, Oracle and/or its affiliates. 515

Working with the Activity Guide Composer Chapter 21
Image: Activity Guide Tiles Page (2 of 2)
This example illustrates the fields and controls on the Activity Guide Tiles page (2 of 2).
Use this page to configure a tile for easy access to activity guide instances. This is particularly usefulwhen there is not a delivered business process page from which to access an activity guide process, or youare using a template that allows multiple users to complete different steps within a process. For example,an employee may initiate a process from a delivered transactional page, such as the OnBoarding pages.However, if a manager or administrator is assigned to complete one of these steps, this tile provides ameans for them to take action on this activity guide process that he or she did not initiate.
Important! A user creating tiles needs to have access to create a new content reference for the tile andupdate the fluid homepage. Therefore, you must assign the Portal Administrator role to those userscreating tiles through this page.
Tile InformationTile Displays the unique code you entered to identify the tile.
Title Enter the title that should appear on the tile. Enter up to 30characters.
Category Select the category that should be associated with this tile. This will determine which template you can select later onthis page. Categories are defined using the Activity Guide
516 Copyright © 1988, 2020, Oracle and/or its affiliates.

Chapter 21 Working with the Activity Guide Composer
Composer - Categories component (see Setting Up ActivityGuide Categories)
Define Activity Guide Page ControlsView Activity Guides Displays Yes to indicate that the a tile will always allow a user to
view activity guides associated it. This is the default value.
Start Activity Guide Select Yes to enable the user to initiate an activity guide instancefrom the new tile. By selecting Yes, the package, path, class, method, and maximum fields become available.
Root Package Id Select the ID of the application package that contains themethod to be invoked at instance creation.
Path Select the names of each subpackage in the application classhierarchy that defines the location of the application class.
Start Class Id Enter the name of the application class that contains the methodto be invoked at instance creation.
Start Method Enter the method name in the application class ID to be invokedto initialize the activity guide instance.
Note: The logic in the start method can be designed to derive allthe necessary information to start an activity guide or generatea URL to a page that enables the user to enter the necessaryinformation to start an activity guide.If the tile is defined with template assignment, then thismethod needs to have the appropriate logic to call the TemplateAssignment API to identify the activity guide template that willbe use to start the activity guide.
Max Activity Guides (maximumactivity guides)
This option is available when Start Activity Guide is set to Yes.
Indicate the maximum number of activity guide instances auser can have in progress for this activity guide template. Forexample, if you enter 3 in this field and the user has three inprogress activity guides, then the user will not be able to starta fourth. However, if the user has access to delete an activityguide or if one of the activity guides reaches a completedstatus, then he or she will be able to start another activity guideinstances.
Delete Activity Guides Select Yes to enable the user to delete an instance of an activityguide that is no longer needed.
Identify Activity Guide TemplatesUse this section to select either the template assignment or templates to be used for this tile. Valid valuesare those that are associated with the Category value entered at the top of this page.
Copyright © 1988, 2020, Oracle and/or its affiliates. 517

Working with the Activity Guide Composer Chapter 21
Template Assignment Select an ID, which defines the rules for automatically assigningtemplates to workers. For more information on the TemplateAssignment process, see Setting Up Activity Guide Utilities forTemplate Assignment.
Template Select one of more template processes that are available throughthis tile.
Define Tile AttributesImage Name (Optional) Select the icon, if any, that should appear in the tile.
The image will display below the field after it is selected.
If nothing is selected, then the default black and white OraclePeopleSoft image is displayed in the tile.
Tile Security Roles Enter the security roles that should have access to this tile. Therole should be assigned to the user’s profile. If you are usingmultiple assignees for a template and want to use the ActivityGuide Tile feature, you will need to ensure that those who areidentified as assignees also have the security role entered here.
For information on where to identify assignees, see Categories -Assignees Page.
Publish to Fluid Homepages Select the homepages to which you want to add your tile.
Published and Publish Tile button The Published field displays whether you have published the tileto the homepage.
Click the Publish Tile button to add the tile to the homepage youindicated. If you do not publish a tile, it will not appear on thehomepage.
<Activity Guide Tile Review> PageUse the <Activity Guide Tile Review> page (AGC_REVIEW_AG_FL) to access activity guide instancesthrough a custom tile.
Note: The title of the tile and review page is based on the Title value you entered on the Activity GuideTiles Page.
Navigation
Access the homepage to which you published your custom activity guide tile, then click the tile.
518 Copyright © 1988, 2020, Oracle and/or its affiliates.

Chapter 21 Working with the Activity Guide Composer
Image: Example of a Custom Activity Guide Tile
This example illustrates an example of a custom tile created using the Activity Guide Tiles page.
The tile will display the number of activity guide processes in progress.
Image: <Activity Guide Tile Review> Page
This example illustrates the activity guide tile review page.
This page displays when the user has one or more activity guides in progress.
If the activity guide tile displays 0 and the user has access to start the activity guide, they will not seethis page. The Start method will be called. The start method may transfer the user to a page to enterinformation to start the activity guide or the method may have logic to transfer the user directly into thefluid activity guide.
Status Displays the progress status of the activity guide. If all the stepsare completed, the in progress activity guide instance will nolonger display on this page. However, the page will display acompleted activity guide instance if the tile is defined to allowthe user to delete the activity guide on the Activity Guide TilesPage.
Delete button
Click this button to delete this activity guide process instance.
This button displays for activity guide templates where thetemplate administrator has granted the user deleting capabilitieson the Activity Guide Tiles Page.
Continue icon button
Click this button to access this activity guide process instanceand view or complete the activity guide.
Copyright © 1988, 2020, Oracle and/or its affiliates. 519

Working with the Activity Guide Composer Chapter 21
520 Copyright © 1988, 2020, Oracle and/or its affiliates.

Chapter 22
Chatbot Integration Framework
Understanding Chatbots
A chatbot is a program, which simulates interaction with users like a real person via a chat interface.This is powered by certain rules which allows it to understand the requirement or data requested by therequester and then the program fetches the data or carries out a transaction. Chatbots are most useful formundane and repetitive business transactions that involves a predictable conversation path. For example,ordering a pizza or checking your leave balance.
It brings in efficiency and cost savings to the business as it can service multiple requests at the same timeon a large scale.
For more information on chatbots, see
https://www.oracle.com/solutions/chatbots/what-is-a-chatbot/
PeopleSoft delivers setup pages which can be used to develop and deploy chatbots on PeopleSoft systems.Oracle Digital Assistant (ODA) is leveraged to enable chatbots on PeopleSoft systems. For more detailson Oracle Digital Assistant please refer to:
https://cloud.oracle.com/digital-assistant
However, if your ODA instance version is below 19.10, then refer the documentation for PeopleSoftChatbot Integration Framework for ODA instance below 19.10 version.
Chatbots can be configured as Tiles or as a Widget to PeopleSoft Application pages. It can also beaccessed through external messaging client (like SMS client) buy sending a message directly to the Twilionumber of the skill.
Copyright © 1988, 2020, Oracle and/or its affiliates. 521
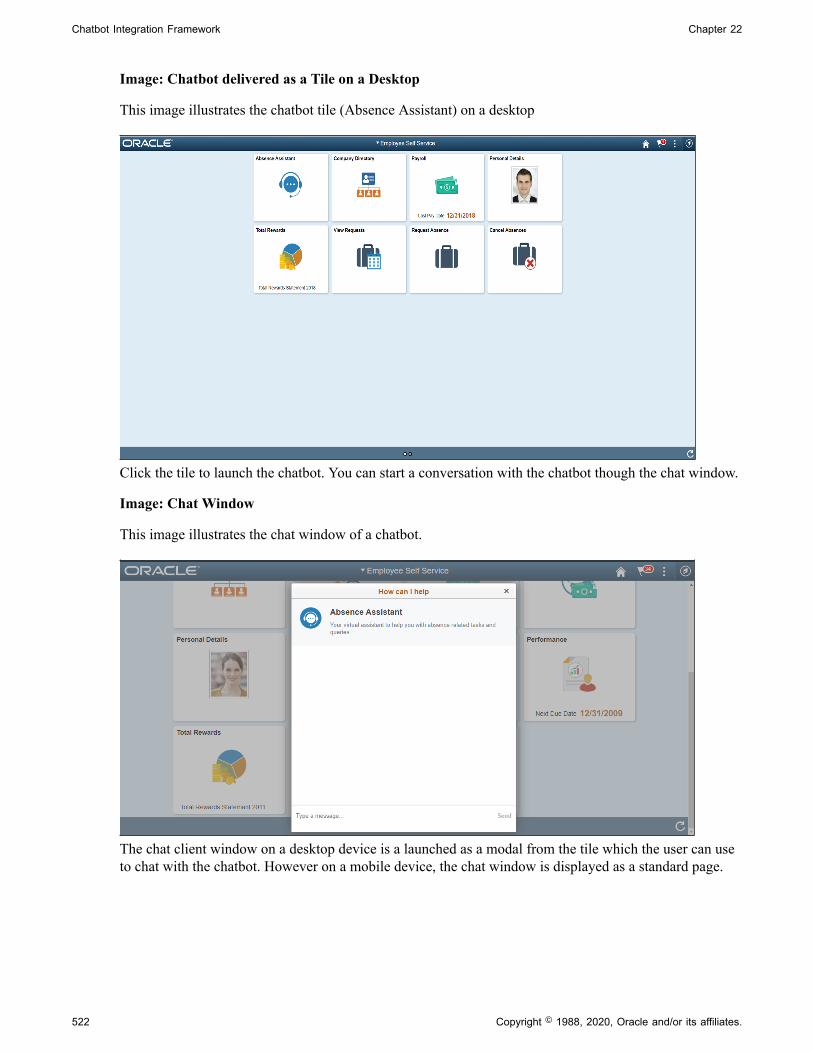
Chatbot Integration Framework Chapter 22
Image: Chatbot delivered as a Tile on a Desktop
This image illustrates the chatbot tile (Absence Assistant) on a desktop
Click the tile to launch the chatbot. You can start a conversation with the chatbot though the chat window.
Image: Chat Window
This image illustrates the chat window of a chatbot.
The chat client window on a desktop device is a launched as a modal from the tile which the user can useto chat with the chatbot. However on a mobile device, the chat window is displayed as a standard page.
522 Copyright © 1988, 2020, Oracle and/or its affiliates.

Chapter 22 Chatbot Integration Framework
Image: Chatbot tile on a mobile device
Chatbot tile on a mobile device
Copyright © 1988, 2020, Oracle and/or its affiliates. 523

Chatbot Integration Framework Chapter 22
Image: Chatbot client on a mobile device
Chatbot client on a mobile device.
524 Copyright © 1988, 2020, Oracle and/or its affiliates.

Chapter 22 Chatbot Integration Framework
Image: Chatbot through text messaging
Chatbot through text messaging
Understanding the Chatbot Architecture
The Chabot Integration Framework consists of components in PeopleSoft and in ODA. Refer the diagramto see how the different components are connected to each other.
The sequence of flow of data or information is represented by the sequential numbers.
Copyright © 1988, 2020, Oracle and/or its affiliates. 525

Chatbot Integration Framework Chapter 22
Image: Chatbot Architecture Diagram for Web Channel
Chatbot Architecture Diagram for Web Channel
526 Copyright © 1988, 2020, Oracle and/or its affiliates.

Chapter 22 Chatbot Integration Framework
Image: Chatbot Architecture Diagram for Twilio (text) Channel
Chatbot Architecture Diagram for Twilio (text) Channel
The different parts or components involved in the Chatbot Integration Framework are summarized below:
Component Description
Chat Client The chat client in PeopleSoft is a web based client that usersuse as the interface to converse with the chatbot. The chatclient is rendered with the help of the Web SDK whichcontains the JavaScript to embed the client to any web pageand to handle the communication with the chat server.
Chat client can be rendered as a a stand alone page or as anembedded widget within a component.
Web Channel The Web Channel (in ODA) works as the communication endpoint between the Digital Assistant and the chat client.
Twilio The Text Channel (in ODA) works as the communication endpoint between the Digital Assistant and the chat client.
Copyright © 1988, 2020, Oracle and/or its affiliates. 527

Chatbot Integration Framework Chapter 22
Component Description
Skill/Bot The skill governs the actual interaction between the user andODA. The skill has the natural language processing (NLP)capability that enables it to recognize the intent of a requestand route it accordingly to the appropriate dialogue flow.
NodeJS API The NodeJS API contains custom components for the ODA.They are hosted as a service in an embedded container in ODAand can be called from the different dialog flows.
It can be used to generate custom components by providing theApplication Service metadata.
The NodeJS API also contains the PeopleSoft Library which isa set of JavaScript for efficient connection and methods to thePeopleSoft Application Service.
PeopleSoft Application Service The PeopleSoft Application Service allows users to exposethe application logic in Application classes. They are exposedas REST services which have a structure very common tothe ODA custom component services. New service is createdand registered using the PeopleSoft Application ServiceFramework
Setup Information This is a set of PeopleSoft setup pages that control the chatbotdefinition in PeopleSoft.
Event Mapping Application Class/ Component PeopleCode ( for Web channel)
The chat client can be delivered as a stand-alone page or asa floating window (widget) in PeopleSoft Application pages. The Event Mapping configuration controls the applicationpages and the users that have access to the chat client andrenders the floating window (Widget).
Twilio (for Text channel) Chatbot User can also access the PeopleSoft Chatbots onSMS clients through the Twilio channel. In this method, the user sends messages directly to the skills’ designatedTwilio number. The authentication is handled through thePeopleSoft REST service. Apart from the client and explicitauthentication, the backend invocation flow is same for theWeb channel and Twilio channel.
Understanding the Chatbot Integration Framework Implementation Process flow.The Chatbot Integration Framework is used to deploy a delivered skill or users can decide to create a newskill. The process flow for the Chatbot Framework Implementation is illustrated below.
528 Copyright © 1988, 2020, Oracle and/or its affiliates.

Chapter 22 Chatbot Integration Framework
Image: PeopleSoft Chatbot Implementation Process Flow
PeopleSoft Chatbot Implementation Process Flow.
Understanding Security for the Chatbot Integration Framework
The access to the chatbot and the setup pages for chatbot is controlled by specific roles and permissions.Administrator can define and control the users who can have access to the chatbots and determine theapplication pages where it can be deployed.
Copyright © 1988, 2020, Oracle and/or its affiliates. 529

Chatbot Integration Framework Chapter 22
The below table describes the users associated with the Chatbot Integration Framework.
User Description Roles associated with the User
<Proxy User> A proxy user has to be created which isused for the integration of the chatbotwith the application services. It isrecommended not to give PIA access tothe proxy user.
PTCB_USER
EOCB Service User
Application Service Administrator This user manages the ApplicationService Framework.
PTCB_ADMINISTRATOR
Chatbot Configuration Administrator This user manages the chatbotconfiguration pages.
EOCB Admin User
Chatbot Client users All users who use the chatbot client. EOCB Client User
Note: Any additional role defined in theBot Definition page for a chatbot alsoneeds to be assigned to the client users ofthat particular chatbot.
The below table describes the Roles associated with Chatbot Integration Framework.
Role Description
PTCB_ADMINISTRATOR This role is given to the user who manages the ApplicationService Framework.
PTCB_USER This role is to be given to the proxy user to access theApplication Services Framework.
EOCB Admin User Users who need to use the Application Services Framework todevelop and register new application services should have theEOCB Admin User role.
EOCB Service User This role is used for access to the Chatbot IntegrationFramework.
EOCB Client User This permission is used for providing chat client access to thetile created for the chat client.
Understanding Application Service for Chatbot IntegrationFramework
The Application Services are application logic that are exposed as a service. These services can be usedto call relevant application functionality as part of a transaction or query. Chatbot Integration Frameworkdelivers some services that can be used to help the chatbot carry out various tasks that these servicesallow to perform. To integrate the chatbot with the application services, you need to create a proxy user.This proxy user is used for the chatbot to communicate with the application services.
530 Copyright © 1988, 2020, Oracle and/or its affiliates.

Chapter 22 Chatbot Integration Framework
1. Create a proxy user on the PeopleSoft system. It is recommended not to give PIA access to this user.
2. Assign the following roles to the proxy user:
a. PTCB_USER
b. EOCB_SERVICE_USER
Note: The PeopleSoft application service should be exposed to the open Web for the ODA to access thePeopleSoft REST services. PeopleSoft should have a certificate issued from a valid certifying authority.
The Chatbot Integration Framework delivers a set of application services. They are:
App ID ID for Service URL Description
EOCB_GETMSGCATLOG ps.GetMessageCatalogs Message Catalogs without parametersubstitution.
EOCB_GETSYSTEMVARIABLES ps.GetSystemVariables Get System Variables.
EOCB_GUID_TO_PSTOKEN ps.AuthenticateGUID Authenticate a user’s chatbot GUID.
EOCB_VERIFY_SERVICE_ACCESS ps.VerifyServiceAccess Verify current user’s access to a service
Note: It is recommended to use the EOCB_VERIFY_SERVICE_ACCESS (ps.VerifyServiceAccess) withApplication Service ID or its corresponding ID to handle authorization rejections early in the dialog flowof ODA.
If users need to create new service, then they can use the Application Service Framework to create customservices.
For more information please refer the documentation on Application Service Framework https://support.oracle.com/epmos/faces/DocumentDisplay?id=2557046.1
For more details on how to generate custom components for new services for your chatbot, pleaserefer the red paper on Chatbot Integration Framework. https://support.oracle.com/epmos/faces/DocumentDisplay?id=2558379.1
Installing and Setting Up a Delivered Skill
Once the site is setup and proxy user is available for communicating with the chatbot application services,install the skill in the ODA instance which is delivered by PeopleSoft from ODA skill store.
Extend it and configure the integration parameters. Whenever new skills are delivered or new servicesare introduced, the process of installation and configuring needs to be repeated. Here is the high levelillustration of the life cycle of a delivered skill.
Copyright © 1988, 2020, Oracle and/or its affiliates. 531

Chatbot Integration Framework Chapter 22
Image: Life Cycle management of a Delivered Skill
Life Cycle management of a Delivered Skill
532 Copyright © 1988, 2020, Oracle and/or its affiliates.

Chapter 22 Chatbot Integration Framework
Image: ODA Skill Store Page
A typical Skill Store page in ODA
Use the Pull/Install option to install the skill in your ODA instance.
Extend the Delivered SkillUse the extend functionality of ODA to extend the installed skill. For more information on extending askill, please refer the ODA Documentation on extending a skill. If customer uses the clone functionalityinstead of extend, they will not be able use the rebase feature to upgrade their cloned skill to latest versionof the skill.
Configure to Point To PeopleSoft ServiceThe extended version of the delivered skill now needs to be connected to the relevant service inPeopleSoft.
Access the configuration settings option of the cloned skill
Under Custom Parameters add the following parameters
Name Display Name Type Value
Add the Base URL namein the format PS <pillar>baseurl
For example the base URLname for the HCM area canbe PSHCMbaseurl.
Create a display namein accordance with thePeopleSoft application . Forexample, the display name forHCM area can be HCM BaseURL
Add type as String Enter the URL of theapplication service.
It is in the format https://<server>:<port>/PSIGW/RESTListeningConnector/<node>/PTCB_APPL_SVC.v1
Copyright © 1988, 2020, Oracle and/or its affiliates. 533

Chatbot Integration Framework Chapter 22
Name Display Name Type Value
Add the proxy user name inthe format
PS <pillar> userid
Add the display name for theproxy user
Add type as String Enter the proxy user name.
Add the proxy password namein the format
PS <pillar> password
Add the display name for theproxy user password
Add type as String Enter the password of theproxy user.
Note: Delivered skills have the names already configured. Users need to update the Value field for them.It is recommended to also add the custom parameter DebugLevel with Type as Integer and value as 3.
Image: Configure skill to point to PeopleSoft service
Configure skill to point to PeopleSoft service.
Customize and Train the SkillThough the skill is ready to be deployed as is, it needs to be trained with the delivered list of utterances.Additional changes can be done to build it into an effective skill for the required business needs. For moredetails on adding Intents and training the skill, please refer the Intents section in the ODA documentation.
Installing and Setting Up the Skill Template
The Chatbot Integration Framework allows users to create a skill from scratch. If users want to develop anew skill, they need to perform some additional steps.
This diagram illustrates the life cycle of a skill that is developed from scratch.
534 Copyright © 1988, 2020, Oracle and/or its affiliates.

Chapter 22 Chatbot Integration Framework
Image: Deploying a new skill or chatbot
Deploying a new skill or chatbot
Create and Grant Application ServicesThe Chatbot Integration Framework allows users to create new skills. However this will also requiresetting up of relevant application services in PeopleSoft which can be referenced by the skill to executethe requests.
Copyright © 1988, 2020, Oracle and/or its affiliates. 535

Chatbot Integration Framework Chapter 22
For information on using the Application Service Framework to create and register services, seethe documentation on Application Service Framework https://support.oracle.com/epmos/faces/DocumentDisplay?id=2557046.1
Install the skill templateThe Chatbot Integration Framework delivers a template file that contains the settings and configurationfor building a new skill in ODA. To install the skill template:
1. Login to your ODA instance.
2. Access the Skill Store.
3. Install the Skill Template.
Clone the Skill TemplateClone the skill to create a new skill which can then be modified as per your needs.
Configure to Point to PeopleSoft ServiceConfigure the skill to point to PeopleSoft Service in the same way as configuring a delivered skill.
Customize and Train the SkillThe Skill cloned from the skill template needs to be developed in order to create the conversation flow forthe new skill and to include the relevant Intents and utterances. Oracle Digital Assistant delivers an APIfor users to develop test and implement skills. For more information on developing a new skill, refer thered paper on Chatbot Integration Frameworkhttps://support.oracle.com/epmos/faces/DocumentDisplay?id=2558379.1.
Additional, refer the Oracle tutorial on developing an ODA skill https://fnimphiu.github.io/OracleTechExchange/.
Creating the Channel
Once a delivered skill or a new skill is ready, the next step is to create a channel for it.
Channels are used as communication end points for ODA skills or Digital Assistants.
Each channel can be routed to a particular skill and it can be updated.
Creating the Web ChannelTo create a new Web Channel for your skill, refer the ODA documentation on creating Web channels. Youneed to select the Channel Type as Oracle Web.
Configure the Oracle Web Channel
Note: While creating the Oracle Web Channel, note down the Channel Id value generated by the system.This value is added to the corresponding PeopleSoft Bot Definition of the chatbot in the Maintain BotDefinition Page. The Client Authentication Enabled option should be disabled.
536 Copyright © 1988, 2020, Oracle and/or its affiliates.

Chapter 22 Chatbot Integration Framework
Creating the Twilio ChannelTo create a new Twilio channel for your skill, refer the ODA documentation on creating Text-Onlychannels.
Configure the Oracle Web Channel
Refer the My Oracle Support document 2681215.1 to set up the Twilio channel for a PeopleSoft chatbot.
Creating Bot Definitions
Create Bot Definitions in PeopleSoft to create chatbot clients in PeopleSoft for the Skills created in ODA.
Pages Used to Create Bot DefinitionPage Name Definition Name Usage
Bot Definition Page EOCB_BOTSRCH_FL Search or view the list of available botdefinitions.
Add Bot Definition Page EOCB_ADDBOTDEFN_FL Add a Bot ID.
Maintain Bot Definition Page EOCB_BOTDEFN_FL Configure the Bot ID.
Maintain Branding Template Page EOCB_BRNDTMPL_FL Configure the branding for the Bot ID.
Bot Definition PageUse the Bot Definition page (EOCB_BOTSRCH_FL) to view, edit or add a new bot definition.
Navigation
Enterprise Components > Chatbot Configurations > Bot Definitions
Copyright © 1988, 2020, Oracle and/or its affiliates. 537

Chatbot Integration Framework Chapter 22
Image: Bot Definitions Page
Bot Definitions Page
Field Description
ODA Release Version Choose whether your ODA version is 19.10 and above or if it isbelow 19.10
Default Branding Template Choose the default branding template for the chatbots.
ODA Server URI Enter the Uniform Resource Identifier of your ODA instance.
The Bot Definitions page lists all the chatbots.
Use the Add button to add a new bot definition.
Use the Edit button corresponding to a bot to edit the bot definition.
Use the Delete button corresponding to a bot to delete the bot definition.
Add Bot Definition PageUse the Add Bot Definition page (EOCB_ADDBOTDEFN_FL) to add a new Bot Definition. To accessthis page, click the Add button on the Bot Definition page.
538 Copyright © 1988, 2020, Oracle and/or its affiliates.

Chapter 22 Chatbot Integration Framework
Image: Add Bot Definition page
Add Bot Definition page
Maintain Bot Definition PageOnce the Bot Definition name is added, use the maintain Bot Definition page (EOCB_BOTDEFN_FL) toconfigure the bot definition.
Image: Maintain Bot Definition page
Maintain Bot Definition page
Field Description
Bot name Name of the Bot
Copyright © 1988, 2020, Oracle and/or its affiliates. 539

Chatbot Integration Framework Chapter 22
Bot Channel ID Enter the Channel Id generated by the corresponding channel inODA. For more details, see Creating the Web Channel
Bot Type Chose how the bot client needs to be rendered. Available typesare:
• Web Based; This will render the chat client as a modalwindow
• Widget; This will render the chat client as a widget at thebottom of the screen
• Both; This enables the chat client to be rendered in bothWeb and Widget formats.
Branding Template Choose the Branding template for the bot.
Business Name Name of the Bot as it appears to users.
Business Icon Choose the icon for the bot
Role Name Add the user roles that should have access to the bot.
Maintain Branding Template PageUse the Maintain Branding Template page (EOCB_BRNDTMPL_FL) to control the branding aspects ofthe bot definition.
Image: Maintain Branding Template page
Maintain Branding Template page.
Field Description
Template Name Name of the template.
540 Copyright © 1988, 2020, Oracle and/or its affiliates.

Chapter 22 Chatbot Integration Framework
Custom Properties Choose the custom properties for the bot available from ODAto customize the bot layout, color and icons. In the Namefiled, enter the appropriate name reference listed in the ODAdocumentation to set the custom property.
Custom Text PeopleSoft provisions custom text to overwrite the custom textsprovided by default by ODA. The overriding text is created as amessage catalog entry. The message catalog entry is assigned tothe custom text key value.
Choose the appropriate Custom Text references available inthe ODA documentation to configure the default text that isdisplayed in the chat client.
Adding Chatbot to Application pages
Adding the Chatbot for a delivered skill to a PeopleSoft Page as a TileAfter Configuring the Bot ID, it can be rendered in the relevant application pages. based on the ChatbotType selected in the Bot Definition page, the chat client can be rendered as a tile or as a widget.PeopleSoft delivers the tile for the delivered skills. To enable the delivered skill as a tile in a page:
1. From the relevant Homepage, choose the Personalize Homepage option.
2. Choose the Add Tile button.
3. Add the delivered Chatbot Tile to the homepage.
Adding the Chatbot for a new skill to a PeopleSoft Page as a TileTo create and enable the tile for the chatbot for a new skill:
1. Create a new Content Reference to create the tile for the chatbot. See Administering ContentReferences section under Portal Technology in the PeopleTools Online Help.
2. In the General tab, Under URL Information section, choose URL Type as PeopleSoft Generic URL
3. At the end of the URL, enter the text BOTID=<BotID> where <BotID> is the ID of the Botdefinition.
4. In the Security tab, ensure that the permission list EOCB_CLIENT_USER is added. Also add theroles that were added to the Bot ID in the Maintain Bot Definition Page
5. In the Fluid Attributes tab, select the Display In field value as Modal.
Copyright © 1988, 2020, Oracle and/or its affiliates. 541

Chatbot Integration Framework Chapter 22
Image: Content Reference General tab
Content Reference General tab
Image: Content Reference Security tab
Content Reference Security tab
542 Copyright © 1988, 2020, Oracle and/or its affiliates.

Chapter 22 Chatbot Integration Framework
Image: Content Reference Fluid Attributes tab
Content Reference Fluid Attributes tab.
Once this is done, Add the tile to the relevant homepages.
Copyright © 1988, 2020, Oracle and/or its affiliates. 543
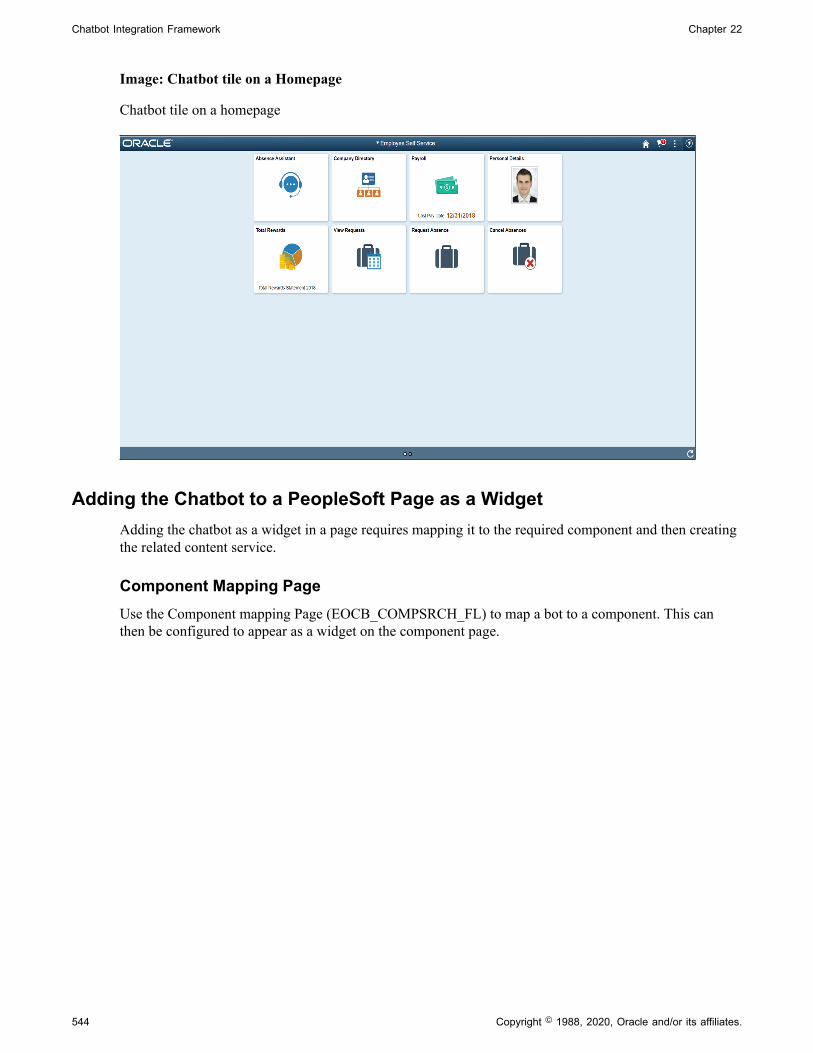
Chatbot Integration Framework Chapter 22
Image: Chatbot tile on a Homepage
Chatbot tile on a homepage
Adding the Chatbot to a PeopleSoft Page as a WidgetAdding the chatbot as a widget in a page requires mapping it to the required component and then creatingthe related content service.
Component Mapping PageUse the Component mapping Page (EOCB_COMPSRCH_FL) to map a bot to a component. This canthen be configured to appear as a widget on the component page.
544 Copyright © 1988, 2020, Oracle and/or its affiliates.

Chapter 22 Chatbot Integration Framework
Image: Component Mapping page
Component Mapping page
To add a new component, click the Add button
Maintain Component Mapping PageUse the maintain Component Mapping page(EOCB_COMP_ASSOC_FL) to associate Bot Ids to acomponent.
Image: Maintain Component Mapping page
Maintain Component Mapping page
Copyright © 1988, 2020, Oracle and/or its affiliates. 545

Chatbot Integration Framework Chapter 22
Component Choose the component in which the bot needs to be enabled.
Market Choose the market
Order Chatbot preference order for the user If multiple bots areassociated with a component..
Bot ID choose the Bot Id of the bot to be associated for the component.
Map Related Content ServiceMap the Related Content Service for chatbot to the widget in the required component page.
1. Refer the Mapping Application Class PeopleCode to Component Events section in the PeopleToolsOnline Help to select the application page in which the widget has to be rendered.
2. In the Event Mapping tab of the application page, choose add the following parameters
Field name Variable
Event Name PostBuild
Service ID EOCB_CHATCLIENT
Processing Sequence PostProcess
Image: Configure event mapping for the application page.
Configure event mapping for the application page.
The chatbot widget becomes available at the bottom right corner of the application page.
546 Copyright © 1988, 2020, Oracle and/or its affiliates.

Chapter 22 Chatbot Integration Framework
Image: Chatbot widget on the application page.
Chatbot widget on the application page.
Copyright © 1988, 2020, Oracle and/or its affiliates. 547

Chatbot Integration Framework Chapter 22
548 Copyright © 1988, 2020, Oracle and/or its affiliates.
Copyright © 2022 FDOKUMEN