Owner's manual - Mega Audio
12
PX-5 Professional monitor system Owner’s manual 8588121000 (568234) Thank you very much for purchasing the Fostex PX-5 professional monitor system. This manual provides the operating instructions for the PX-5. Read this before you use the unit for the first time. After reading, keep this manual in a convenient place so that you can consult it at any time.
-
Upload
khangminh22 -
Category
Documents
-
view
3 -
download
0
Transcript of Owner's manual - Mega Audio

PX-5Professional monitor system
Owner’s manual
8588121000(568234)
Thank you very much for purchasing the Fostex PX-5 professional monitor system.This manual provides the operating instructions for the PX-5. Read this before you use the unit for the first time. After reading, keep this manual in a convenient place so that you can consult it at any time.

E-2
avec la charrette, position, trépied, support ou table spécifiée par le fabri-cant, ou a vendu avec l’appareil . Lorsqu’une charrette est utilisée, utilise la prudence quand déplacer la combinaison de charrette / appareil pour éviter la blessure de pointe-sur.
13) Unplug this apparatus during lightning storms or when unused for long periods of time.
Débranchez cet appareil pendant les orages ou lorsqu’il n’est pas utilisé pendant de longues périodes de temps.
14) Refer all servicing to qualified service personnel. Servicing is required when the apparatus has been damaged in any way, such as power-supply cord or plug is damaged, liquid has been spilled or objects have fallen into the apparatus, the apparatus has been exposed to rain or moisture, does not operate normally, or has been dropped.
Confiez toute réparation à un personnel qualifié. Une réparation est néces-saire lorsque l’appareil a été endommagé de quelque façon que ce cordon d’alimentation ou la fiche est endommagé, liquide a été renversé ou des objets sont tombés dans l’appareil, a été exposé à la pluie ou à l’humidité, ne fonctionne pas normalement, ou s’il est tombé.
15) The apparatus shall be used in an open area. Cet appareil doit être utilisé dans un endroit a aire ouverte. 16) Apparatus shall not be exposed to dripping or splashing and that no ob-
jects filled with liquids, such as vases, shall be placed on apparatus. L’appareil ne doit pas êclaboussures et aucun objet ne contenant de liq-
uide, tel qu’un vase, ne doit être placé sur objet. 17) Mains plug is used as disconnect device. It shall remain readily operable
and should not be obstructed during intended use. To completely discon-nect the apparatus from supply mains, the main plug of the apparatus shall be disconnected from the mains socket outlet completely.
La prise du secteur et utilisé pou déconnecter le système. La prise du secteur ne doit pas être obstruée ou doit être facilement accessible pen-dant son utilisation. Pour être complètement déconnecté de l’alimentation d’entrée, la prise doit être débranchée du secteur.
18) An apparatus with CLASS I construction shall be connected to a MAINS socket outlet with a protective earthing connection.
Cet appareil est un équipement électronique de Classe I et doit être con-necté à une prise secteur avec terre.
• CAUTION: TO PREVENT ELECTRIC SHOCK, MATCH WIDE BLADE OF PLUG TO WIDE SLOT, FULLY INSERT.
ATTENTION: POUR PREVENIR LES CHOCS ELECTRIQUES, APAR DE LA FENTE LARGE, FOND.
• WARNING: To reduce the risk of fire or electric shock, do not expose this apparatus to rain or moisture.
AVIS: Pour réduire le risque d’incendie ou de choc électrique, ne pas ex-poser cet appareil sous la pluie et l’humidité.
• CAUTION: Use of any controls or adjustments or performance of proce-dures other than those herein specified may result in hazardous radiation exposure.
ATTENTION: L’utilisation de tout contrôle ou de réglages ou de procédures autres que celles indiquées ci-après peut entraîner une exposition à des ra-diations dangereuses.
• WARNING: Changes or modifications to this unit not expressly approved by the party responsible for compliance could void the user’s authority to operate the equipment.
AVIS: Les changements ou modifications à cette unité n’étant pas expres-sément approuvé par la partie responsable de la conformité pourrait annuler l’autorité de l’utilisateur de faire fonctionner l’équipement.
• WARNING: Do not place the unit on top of any soft, porous, or sensitive surfaces to avoid damaging the surface. Use a protective barrier between the unit and surface to protect the surface.
AVIS: Ne placez pas l’appareil au-dessus de toutes les surfaces souples, poreux, ou sensibles pour éviter d’endommager la surface. Utilisez une bar-rière de protection entre l’unité et la surface à protéger la surface.
• WARNING: Use of this unit near fluorescent lighting may cause interference regarding use of the remote. If the unit is displaying erratic behavior move away from any fluorescent lighting, as it may be the cause.
AVIS: L’utilisation de cet appareil à proximité d’éclairage fluorescent peut provoquer des interférences sur l’utilisation de la télécommande. Si l’appareil affiche un comportement erratique s’éloigner de tout éclairage fluorescent, telle qu’elle peut être la cause.
• CAUTION: Danger of explosion if battery is incorrectly replaced. Replace only with the same or equivalent type.
WARNING: TO REDUCE THE RISK OF ELECTRIC SHOCK, DO NOT REMOVE COVER (OR BACK). NO USER SERVICE-ABLE PARTS INSIDE. REFER SERVICING TO QUALIFIED SERVICE PERSONNEL.
AVERTISSEMENT: POUR RÉDUIRE LE RISQUE DE CHOC ÉLECTRIQUE, NE PAS ENLEVER LE COUVERCLE (NI LE DOS). AUCUNE PIÈCE À L’INTÉRIEUR. EN-TRETIEN DE PERSONNEL QUALIFIE.
The lightning flash with arrowhead symbol, within an equilateral trian-gle, is intended to alert the user to the presence of uninsulated “dan-gerous voltage” within the product’s enclosure that may be of sufficient magnitude to constitute a risk of electric shock to persons.Le symbole de l’éclair fléché dans un triangle équilatéral, est destiné à alerter l’utilisateur de la présence d’une “tension dangereuse” dans le boîtier du produit qui peuvent être des ampleur suffisante pour con-stituer un risque d’électrocution aux personnes.
The exclamation point within an equilateral triangle is intended to alert the user to the presence of important operating and maintenance (ser-vicing) instructions in the literature accompanying the appliance.Le point d’exclamation à l’intérieur d’un triangle équilatéral est destiné à attirer l’attention de l’utilisateur sur la présence d’instructions impor-tantes sur l’emploi ou de la maintenance (réparation) de l’appareil dans la documentation fournie.
WARNINGS and PRECAUTIONS
IMPORTANT SAFETY INSTRUCTIONS
ATTENTION: Danger d’explosion si les piles sont remplacées de façon incorrect. Remplacer les piles seulement par le même type de pile ou l’équivalent.
• WARNING: Do not install this equipment in a confined space such as a book case or similar unit.
AVIS: Ne pas installer cet équipement dans un espace confiné comme une bibliothèque ou une unité similaire.
• WARNING: Mains plug is used as disconnect device and it should remain readily operable during intended use. In order to disconnect the apparatus from the mains completely, the mains plug should be disconnected from the mains socket outlet completely.
AVIS: La prise du secteur est utilisé pour déconnecter le système. La prise du secteur ne doit pas être obstruée ou doit être facilement accessible pen-dant son utilisation. Pour être complètement déconnecté de l’alimentation d’entrée, la prise doit être débranchée du secteur.
ATTENTIONNES PAS OUVRIR
RISQUE Dʼ ÉLECTROCUTION
CAUTIONRISK OF ELECTRIC SHOCK
DO NOT OPEN
1) Read these instructions. Lisez ces instructions. 2) Keep these instructions. Conservez ces instructions. 3) Heed all warnings. Respectez tous les avertissements. 4) Follow all instructions. Suivez toutes les instructions. 5) Do not use this apparatus near water. Ne pas utiliser cet appareil près de l’eau. 6) Clean only with dry cloth. Nettoyer uniquement avec un chiffon sec. 7) Do not block any ventilation openings. Install in accordance with the man-
ufacturer’s instructions. Ne pas bloquer les ouvertures de ventilation. Installer conformément aux
instructions du fabricant. 8) Do not install near any heat sources such as radiators, heat registers,
stoves, or other apparatus (including amplifiers) that produce heat. Ne pas installer près de sources de chaleur telles que radiateurs, regis-
tres de chaleur, poêles ou autres appareils (y compris les amplificateurs) produisant de la chaleur.
9) Do not defeat the safety purpose of the polarized or grounding-type plug. A polarized plug has two blades with one wider than the other. A ground-ing type plug has two blades and a third grounding prong. The wide blade or the third prong are provided for your safety. If the provided plug does not fit into your outlet, consult an electrician for replacement of the obso-lete outlet.
Ne détruisez pas la sécurité de la terre ou polarisées - fiche. Une fiche polarisée possède deux lames dont une est plus large que l’autre. Une prise de terre possède deux lames et une broche de terre. La lame large ou la troisième broche sont prévues pour votre sécurité. Si la fiche fournie ne rentre pas dans votre prise, consultez un électricien pour remplacer la prise obsolète.
10) Protect the power cord from being walked on or pinched particularly at plugs, convenience receptacles, and the point where they exit from the apparatus.
Protégez le cordon d’alimentation d’être piétiné ou pincé, particulièrement au niveau des fiches, des prises, et le point où ils sortent de l’appareil.
11) Only use attachments/accessories specified by the manufacturer. N’utilisez que des accessoires spécifiés par le fabricant. 12) Use only with the cart, stand, tripod, bracket, or table spec-
ified by the manufacturer, or sold with the apparatus. When a cart is used, use caution when moving the cart/apparatus combination to avoid injury from tip-over.Utilisez seulement
In Finland: “Laite on liitettävä suojamaadoituskoskettimilla varustettuun pis-torasiaan”
In Norway: “Apparatet må tilkoples jordet stikkontakt”In Sweden: “Apparaten skall anslutas till jordat uttag’”

E-3
Table of contents Introduction
Supplied accessories
The PX-5 is a powered monitor speaker system that can connect to a professional or consumer audio device.
• A rotary encoder is used for adjusting the audio volume level as well as tone (bass and treble) controls, achieving precise digital processing.
• By using a linear phase filter for the network system, phase interference is minimized, result-ing natural sound that is comparable to a full-range speaker.
• Precise level adjustment in 440 steps is pos-sible.
• You can adjust the treble by changing the tweeter level within the +/- 3 dB range.
• You can change the low roll-off frequency. The subsonic filter that associates with the roll-off frequency eliminates unnecessary ultra-low fre-quency range.
• An 85 Hz high-pass filter with 36 dB/oct. slope is provided, so you can use the PX-5 with a subwoofer.
• When using the PX-5 with a subwoofer, you can adjust the phase within the range between 0 degree and 180 degrees (9 degree step) de-pending on the subwoofer position.
• When you turn on the power, the fade-in func-tion is automatically activated and the volume level gradually increases to the previously stored level.
• The parameter lock function prevents the set-tings from being changed inadvertently.
• High power 5.2-inch woofer featuring the dia-phragm that contains aramid fiber for reinforce-ment.
• 1-inch soft dome tweeter featuring UFLC dia-phragm for stable high-mid range sound.
• Rigid cabinet design eliminates unwanted vibra-tion.
• Standby mode saves electricity.• Three types of input connectors are provided
for input; XLR, phone and RCA.
The following accessories are supplied with the PX-5.
• Power cord x 1• Owner’s manual (this manual) x 1
After purchasing the PX-5, check that all the above items are included in the package.
WARNINGS and PRECAUTIONS . . . . . . . . . . . E-2IMPORTANT SAFETY INSTRUCTIONS . . . . . . E-2Table of contents . . . . . . . . . . . . . . . . . . . . . . . E-3FCC (U .S .A .) & ICES-003 (Canada) INFORMATION . . . . . . . . . . . . . . . . . . . . . . . E-3Introduction . . . . . . . . . . . . . . . . . . . . . . . . . . . E-3Supplied accessories . . . . . . . . . . . . . . . . . . . . E-3Features and functions . . . . . . . . . . . . . . . . . . E-4Volume level and tone controls . . . . . . . . . . . . E-6
Adjusting volume level . . . . . . . . . . . . . . . . . . E-6Adjusting the tone controls . . . . . . . . . . . . . . . E-7Standby function . . . . . . . . . . . . . . . . . . . . . . . E-8
Auto standby function . . . . . . . . . . . . . . . . . E-8Entering the standby mode manually . . . . . . E-8Releasing the standby mode manually . . . . . E-8
Parameter lock function . . . . . . . . . . . . . . . . . E-8Using the unit with a subwoofer . . . . . . . . . . . E-9
Preparing a subwoofer . . . . . . . . . . . . . . . . . E-9Enabling the high-pass filter . . . . . . . . . . . . . E-9Adjusting the phase of the high-pass filter . . E-9Subwoofer settings after adjusting the phase of the high-pass filter . . E-11Disabling the high-pass filter . . . . . . . . . . . . E-11
Specifications . . . . . . . . . . . . . . . . . . . . . . . . . E-11Speaker section . . . . . . . . . . . . . . . . . . . . . . E-11Amplifier section . . . . . . . . . . . . . . . . . . . . . E-11General . . . . . . . . . . . . . . . . . . . . . . . . . . . . E-11
Declaration of EC Directive . . . . . . . . . . . . . . E-12Fostex distributors list in Europe . . . . . . . . . . E-12
1. IMPORTANT NOTICEThis product, when installed as indicated in the instructions contained in this manual, meets FCC and ICES-003 requirements. Changes or modifications not expressly approved by Fostex Company for compliance could void the user’s authority to operate the equipment. DO NOT MODIFY THIS PRODUCT.
2. IMPORTANTIn order to comply with FCC and ICES-003 requirements, use high quality shielded cables for connection to accessories and / or another products. If any cables are supplied with this product, they MUST be used. Follow all in-stallation instructions. Failure to do so could void your FCC / ICES-003 autho-rization to use this product in the USA / Canada.
3. NOTEThis equipment has been tested and found to comply with the limits for a Class B digital device, pursuant to Part 15 of the FCC Rules. These limits are designed to provide reasonable protection against harmful interference in a residential installation. This equipment generates, uses and can radiate radio frequency energy and, if not installed and used in accordance with instruc-tions, may cause harmful interference to radio communications. However, there is no guarantee that interference will not occur in a particular installa-tion. If this equipment does cause harmful interference to radio or television reception, which can be determined by turning the equipment off and on, the user is encouraged to correct the interference by one or more of the following measures:• Reorient or relocate the receiving antenna.• Increase the separation between the equipment and receiver.• Connect the equipment into an outlet on a circuit different from that to which
the receiver is connected.• Consult the dealer or an experienced radio/TV technician for help.
4. Compliance with Part 15 of FCC Rules and Canadian ICES-003.This device complies with Part 15 of the FCC Rules. Operation is subject to the following two conditions: (1) This device may not cause harmful interfer-ence, and (2) this device must accept any interference received, including interference that many cause undesired operation.
This Class B digital apparatus complies with Canadian ICES-003.Cet appareil numérique de la classe B est conforme à la norme NMB-003 du Canada.
FCC (U.S.A.) & ICES-003 (Canada) INFORMATION

E-4
Features and functions
❶ [INPUT] jack (XLR-1/4” combo jack) You can connect an XLR male connector or 1/4” phone plug to this combo jack. The XLR input accepts a balanced line signal, while the 1/4” phone input accepts an unbal-anced line signal.The pin assignment of the XLR connector is as followings: pin 1: ground, pin 2: hot, pin 3: cold.
<Note>: You cannot use both the RCA and combo [INPUT] jacks simultaneously.When a plug is plugged into the RCA jack, the phone jack is disabled.When an RCA plug and an XLR connector are simul-taneously inserted to the RCA and XLR jacks respec-tively, both the input signals are mixed.
❷ [INPUT] jack (RCA jack) You can connect an RCA plug to this unbalanced line input jack.
<Note>: You cannot use both the RCA and combo [INPUT] jacks simultaneously.When a plug is plugged into the RCA jack, the phone jack is disabled.When an RCA plug and an XLR connector are simul-taneously inserted to the RCA and XLR jacks respec-tively, both the input signals are mixed.
❸ [CONTROL] knobUsed for controlling the volume level and the tone (bass and treble).By pressing this knob, you can change the con-trolling item in the current mode (LEVEL or TONE mode) selected by the mode select switch. By rotating this knob, you can adjust the value of the currently selected item.By pressing and holding down this knob for a few seconds, the settings of all items are saved to the unit. See “Level and tone controls” on pages 6-7 for details.This knob is also used when you make high-pass filter settings for using the unit with a subwoofer. See “Using the unit with a subwoofer” on pages 9-11 for details.
❹ Level indicatorsThe LED indicator corresponding to the current value of the controlling item is lit. When two ad-jacent indicators are lit, the value that is in the middle of the two is selected.
VOLUME
TRIM
LEVEL
❷
❼
❽
❸
❹
❻
❺
❶

E-5
Features and functions
VOLUME
TRIM
LEVEL
❷
❼
❽
❸
❹
❻
❺
❶
❺ Status indicatorsWhen the VOLUME item is selected in the LEVEL mode or the TREBLE item is selected in the TONE mode, the upper indicator lights or flashes.When the TRIM item is selected in the LEVEL mode or the BASS item is selected in the TONE mode, the lower indicator lights or flashes.If the current values of all items match the stored values, the indicator lights steadily. If you change any of the stored values, the indi-cator flashes.See “Level and tone controls” on pages 6-7 for details.For the details about how the indicator acts when the unit is used with a subwoofer and the high-pass filter is active, see “Using the unit with a subwoofer” on page 9-11.
❻Mode select switchYou can select the control mode: LEVEL or TONE. When the switch is set to LEVEL, you can control the volume level using the [CONTROL] knob.When the switch is set to TONE, you can control the bass and treble using the [CONTROL] knob.When the switch is set to the center position (OFF), you cannot change any value using the [CON-TROL] knob.See “Level and tone controls” on pages 6-7 for details.
❼ [POWER] buttonTurns on or off the power.
<Note>: When you turn on the power, the auto fade-in function is activated and the volume level gradually increases to the level you previously saved.
❽ [AC IN] connectorConnects to the supplied power cord.

E-6
Adjusting volume levelIn the LEVEL mode, you can adjust the volume level using the [CONTROL] knob.The VOLUME and TRIM items are available in the LEVEL mode. The VOLUME item coarsely adjusts the level, while the TRIM item fine-tune the level. By using a combination of these items, you can adjust the volume level precisely in 440 steps.
Volume level and tone controls
VOLUME
TRIM
LEVEL
You can adjust volume level as well as tone using the [CONTROL] knob.
1) Set the mode select switch to the LEVEL posi-tion.
LEVEL
The upper status indicator (beside VOLUME) lights steadily. In this condition, you can coarsely adjust the vol-ume level.
2) Adjust the volume level coarsely by rotating the [CONTROL] knob.
<Note>: If you change the stored value by rotating the [CONTROL] knob, the status indicator changes from lighting to flashing .
If necessary, fine-tune the volume level by follow-ing steps 3) and 4) below.
3) Press the [CONTROL] knob.The lower status indicator (beside TRIM) lights steadily or flashes. In this condition, you can fine-tune the volume level.
4) Fine-tune the volume level by rotating the [CONTROL] knob.
<Note>: TRIM reset functionWhen you change the stored VOLUME value in step 2) above, the TRIM value is automatically reset to the center position. This function allows you to make pre-cise volume level adjustment effectively.
5) After fine-tuning the volume level, long-press the [CONTROL] knob until the flashing upper status indicator turns on.
The adjusted value is saved to the unit.<Note>: Even if you perform step 5) above to save the value after you fine-tune the level (i.e. when the lower status indicator flashes), the upper status indi-cator lights steadily. Therefore, whenever you attempt to readjust LEVEL after you saved the LEVEL value, you can start with the VOLUME adjustment (coarse adjustment).
<Note>: By long-pressing the [CONTROL] knob, values of all items (both the volume and tone controls) are saved.

E-7
VOLUME
TRIM
LEVEL
Volume level and tone controls
Adjusting the tone controlsIn the TONE mode, you can adjust the tone con-trols using the [CONTROL] knob.The tone control function includes TREBLE and BASS. The former compensates the high fre-quency characteristics by adjusting the tweeter level, while the latter compensates the low fre-quency characteristics by adjusting the roll-off frequency.
1) Set the mode select switch to the TONE posi-tion.
LEVEL
The upper status indicator (beside TREBLE) lights steadily. In this condition, you can adjust the treble set-ting.
2) Adjust the treble by rotating the [CONTROL] knob.<Note>: You can adjust the treble by changing the tweeter level within the range of -3 dB to +3 dB.
<Note>: If you change the stored value by rotating the [CONTROL] knob, the status indicator changes from lighting to flashing .
3) Press the [CONTROL] knob.The lower status indicator (beside BASS) lights steadily. In this condition, you can adjust the bass setting.
4) Adjust the bass by rotating the [CONTROL] knob.<Note>: You can adjust the bass by changing the low frequency roll-off characteristics.
5) After fine-tuning the volume level, long-press the [CONTROL] knob until the flashing upper status indicator turns on.
The adjusted value is saved to the unit.
<Note>: By long-pressing the [CONTROL] knob, values of all items (both the volume and tone controls) are saved.

E-8
Auto standby functionWhen the mode select switch is set to VOLUME or TONE, the auto standby function is enabled.When the auto standby function is enabled, if there is no input signal for four hours, the unit au-tomatically enters the standby mode.
<Note>: Depending on the source noise level or the connection condition, the auto standby function may not correctly work.
When the unit is in the standby mode, the “FOSTEX” logo on the front panel flashes.
<Note>: When the mode select switch is set to OFF, the auto standby function is disabled.
Entering the standby mode manuallyBy long-pressing the [CONTROL] knob when the mode select switch is set to OFF, you can turn the unit to the standby mode.This feature would be useful when you go outside the studio for a while.
Releasing the standby modeWhen the unit is in the standby mode, pressing the [CONTROL] knob releases the standby mode and returns to the normal condition.
When the mode select switch is set to OFF, the parameter lock function is enabled and the unit is in the following conditions.• You cannot change the setting values. • The auto standby function is disabled.
Standby function Parameter lock function
E-9
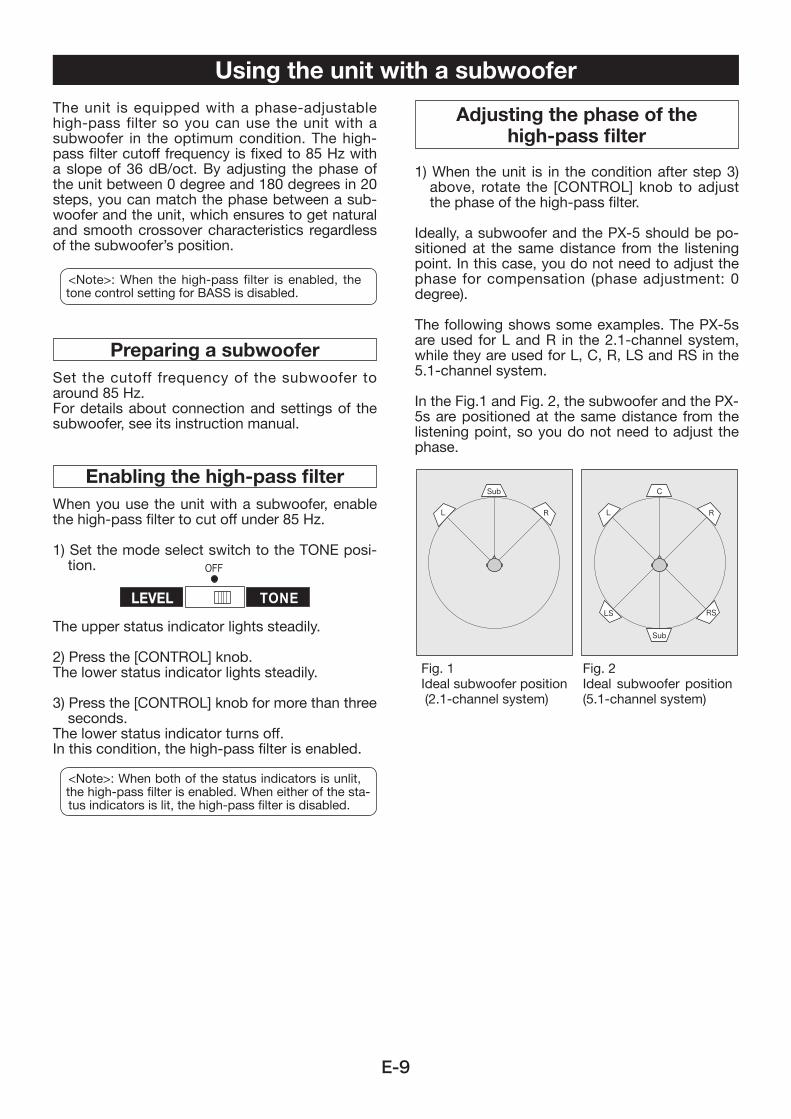
Using the unit with a subwooferThe unit is equipped with a phase-adjustable high-pass filter so you can use the unit with a subwoofer in the optimum condition. The high-pass filter cutoff frequency is fixed to 85 Hz with a slope of 36 dB/oct. By adjusting the phase of the unit between 0 degree and 180 degrees in 20 steps, you can match the phase between a sub-woofer and the unit, which ensures to get natural and smooth crossover characteristics regardless of the subwoofer’s position.
<Note>: When the high-pass filter is enabled, the tone control setting for BASS is disabled.
Preparing a subwooferSet the cutoff frequency of the subwoofer to around 85 Hz.For details about connection and settings of the subwoofer, see its instruction manual.
Enabling the high-pass filterWhen you use the unit with a subwoofer, enable the high-pass filter to cut off under 85 Hz.
1) Set the mode select switch to the TONE posi-tion.
LEVEL
The upper status indicator lights steadily.
2) Press the [CONTROL] knob.The lower status indicator lights steadily.
3) Press the [CONTROL] knob for more than three seconds.
The lower status indicator turns off.In this condition, the high-pass filter is enabled.
<Note>: When both of the status indicators is unlit, the high-pass filter is enabled. When either of the sta-tus indicators is lit, the high-pass filter is disabled.
Adjusting the phase of thehigh-pass filter
1) When the unit is in the condition after step 3) above, rotate the [CONTROL] knob to adjust the phase of the high-pass filter.
Ideally, a subwoofer and the PX-5 should be po-sitioned at the same distance from the listening point. In this case, you do not need to adjust the phase for compensation (phase adjustment: 0 degree).
The following shows some examples. The PX-5s are used for L and R in the 2.1-channel system, while they are used for L, C, R, LS and RS in the 5.1-channel system.
In the Fig.1 and Fig. 2, the subwoofer and the PX-5s are positioned at the same distance from the listening point, so you do not need to adjust the phase.
L R
Sub
L R
C
LS RS
Sub
Fig. 1Ideal subwoofer position (2.1-channel system)
Fig. 2Ideal subwoofer position (5.1-channel system)

E-10
When a subwoofer and the PX-5 are not posi-tioned at the same distance from the listening point, you need to adjust the phase to compen-sate.
In the example shown on Fig. 3, the distance difference is one meter (100 cm). According to Table 1 on the right, the phase adjustment is 90 degrees and the level indicator scale position is “10” when the distance difference is 100 cm. Therefore, rotate the [CONTROL] knob to turn on the level indicator at the top.If you position the subwoofer 10 cm nearer (i.e., the distance difference is 90 cm), the phase ad-justment is 81 degrees and the level indicator scale position is “9”, as you can see from Table 1 on the right. In this case, rotate the [CONTROL] knob to turn on the level indicators at the top and its immediate left.In the example shown on Fig. 4, you do not need to adjust the phase for the LS and RS becausethere is no distance difference. For the front speakers (L, C and R), the distance difference from the subwoofer is one meter, so the phase adjustment is 90 degrees and the level indicator scale position is “10”.
<Note>: If you change the stored value by rotating the [CONTROL] knob, the status indicator changes from lighting to flashing.
2) After adjusting the phase, long-press the [CONTROL] knob until the flashing status indica-tor turns off. The adjusted value is saved to the unit.
L RC
LS RSSub
L
1m 1m
R
Sub
01
2345678 9 10 1112
131415161718
1920
Using the unit with a subwoofer
Fig. 3Subwoofer is positioned away from the PX-5s.
Level indicator scale
Fig. 4Front and rear speakers are not positioned at the same distance from the listening point. The sub-woofer and LS and RS are arranged in a con-centric pattern.
Phase adjustment (degree)0918273645546372819099108117126135144153162171180
Distance difference(cm)0102030405060708090100110120130140150160170180190200
Table 1: Phase adjustment tableLevel indicatorscale position
01234567891011121314151617181920

E-11
Speaker sectionEnclosure type: 2 way bass reflexUnits: Tweeter: 1-inch soft dome tweeter Woofer: 5.2-inch, Aramid fiber diaphragmFrequency response: 50 Hz ~ 20 kHz
Amplifier sectionRated output power Low: 35 W High: 18 WInputs XLR-3-31 connector (balanced) Maximum input level: +24 dBu Input impedance: 20 kohms or more 1/4” phone jack (unbalanced) Maximum input level: +10 dBV Input impedance: 20 kohms or more RCA jack (unbalanced) Maximum input level: +10 dBV Input impedance: 20 kohms or more *The XLR-3-31 connector and the 1/4” phone jack are combined in the combo connector housing.
S/N ratio: 96 dBDistortion (THD): 0.02 %Crossover frequency: 2.5 kHzSubsonic filter: 50 Hz
GeneralDimensions: 280 (H) x 180 (W) x 210 (D) mmWeight: 5 kgPower requirement: US : 120 VAC, 60 Hz EUR/UK : 230 VAC, 50/60 HzPower consumption: 50 W (0.5 W or less in standby mode)
* Specifications and appearance are subject to change without notice for product improve-ment.
Specifications
0
10
2030
40
50
60
70
80
90100
110
120
100 1k 10k 20k20 50(Hz) 200 500 2k 5k
(dB)
BASS
TREBLE
MAX
MINCENTER
MAX
MIN
CENTER
Frequency response graph
Using the unit with a subwooferSubwoofer settings after adjusting
the phase of the high-pass filter• Input an 85-Hz sine wave to both the unit and
the subwoofer. If you find the phase is re-versed, flip the phase of the subwoofer 180 degrees.
• While monitoring music, adjust the level of the subwoofer appropriately so that you can get a flat sound pressure level at the low frequency range around 85-Hz.
<Note>: For the subwoofer settings, see its instruc-tion manual.
Disabling the high-pass filterThe unit that is set to be used with a subwoofer can be returned to the condition to be used alone (without a subwoofer) by disabling the high-pass filter and enabling the tone control function for BASS.
1) Set the mode select switch to the TONE posi-tion.
The upper status indicator lights steadily.
2) Press the [CONTROL] knob.Both the upper and lower status indicators are unlit.
3) Press the [CONTROL] knob for more than three seconds.
The lower status indicator lights steadily.In this condition, the high-pass filter is disabled while the tone control function for BASS is en-abled.

FOSTEX DISTRIBUTORS LIST IN EUROPE* Including non-EU countries (as of November 2013)
<AUSTRIA>NAME: Mega Audio GmbHADD: Stromberger Str. 32, D-55411 Bingen, GermanyTEL: (+49) 6721-94330, FAX: (+49) 6721-32046
<CZECHO>NAME: Praha Music Center spol s.r.o.ADD: Ocelarska 937/39, Praha 9, 190 00, CzechoTEL: (+420) 226-011-111, FAX: (+420) 226-011-112
<DENMARK>NAME: Benum Nordic A/SADD: Meterbuen 18, Skovlunde, 2740 DenmarkTEL: (+45) 4451-8900, FAX: (+45) 4451-8911
<FINLAND>NAME: Noretron Oy AudioADD: P. O. Box 22, FIN-02631 Espoo, FinlandTEL: (+358) 9-5259330, FAX: (+358) 9-52593352
<FRANCE>NAME: Sennheiser FranceADD: 128 bis, avenue Jean-Jaures, 94851 Ivry-sur-Seine Cedex, FranceTEL: (+33) 1 4987 0300, FAX: (+33) 1 4987 0324
<GERMANY>NAME: Mega Audio GmbHADD: Stromberger Str. 32, D-55411 Bingen, GermanyTEL: (+49) 6721-94330, FAX: (+49) 6721-32046
<GREECE>NAME: Bon Studio S. A.ADD: 6 Zaimi Street, Exarchia, 106.83 Athens, GreeceTEL: (+30) 210-3809-605, 606, 607, 608FAX: (+30) 210-3845-755, 210-3827-868
FOSTEX CO.1-1-109, Tsutsujigaoka, Akishima City, Tokyo, 196-8550, Japan
© PRINTED IN CHINA November 2013 8588121000 568234
<ITALY>NAME: Proel S. p. A.ADD: Zona Via Alla Ruenia, 37/43 64027 - Sant’Omero (Teramo), ItalyTEL: (+39) 0861-81241, FAX: (+39) 0861-887862
<THE NETHERLANDS>NAME: IEMKE ROOS AUDIO B. V.ADD: Kuiperbergweg 20, 1101 AG Amsterdam, The NetherlandsTEL: (+31) 20-697-2121, FAX: (+31) 20-697-4201
<NORWAY>NAME: Siv. Ing. Benum ASADD: P. O. Box 145, Vinderen, 0319 Oslo, NorwayTEL: (+47) 2213 9900, FAX: (+47) 2214 8259
<POLAND>NAME: Mega Music Spolka z o.oADD: Ul. Lesna 15, 81-876 Sopot, PolandTEL: (+48) 58-551-18-82, FAX: (+48) 58-551-18-72
<SPAIN>NAME: Letusa S. A.ADD: C/Laguna 10, 28923 Alcorcon, Madrid, SpainTEL: (+34) 91-4862800, 91-4470898, FAX: (+34) 91-6414597
<SWEDEN>NAME: Benum Nordic A/SADD: Aldermansvagen 17, 171 48 Solna, SwedenTEL: (+46) 8 207710
<SWITZERLAND>NAME: Audio Bauer Pro AGADD: Bernerstrasse-Nord 182, CH-8064 Zurich, SwitzerlandTEL: (+41) 1-4323230, FAX: (+41) 1-4326558
<UK>NAME: SCV LondonADD: 40 Chigwell Lane, Oakwood Hill Industrial Estate, Loughton, Essex IG10 3NY U. K.TEL: (+44) 20-8418-0778, FAX: (+44) 20-8418-0624
Declaration of EC DirectiveThis equipment is compatible with the EMC Directive (2004/108/EC) - Directive on approximation of member nation's ordinance concerning the electromagnetic compatibility and with the Low Voltage Directive (73/23/EEC) - Directive on approximation of member nation's ordinance concerning electric equipment designed to be used within the specified voltage range.
The Affect of Immunity on This EquipmentThe affect of the European Specification EN61000-6-1 (coexistence of electromagnetic waves - common immunity specification) on this equipment are as shown below.In the electrical fast transient/burst requirements, surge, conducted disturbances by radio-frequency fields, power frequency magnetic field, radiate electromagnetic field requirements and static electricity discharging environment, this could be affected by generation of noise in some cases.